Oracle® Transportation Management · APPLYING GC3 4.5 SERVICE RELEASES ... Added steps to migrate...
60
Oracle® Transportation Management Migration Guide Release 6.4.2 Part No. E81543-03 March 2017
Transcript of Oracle® Transportation Management · APPLYING GC3 4.5 SERVICE RELEASES ... Added steps to migrate...
Oracle® Transportation Management
Migration Guide
Release 6.4.2
Part No. E81543-03
March 2017

Copyright © 2001, 2016, Oracle and/or its affiliates. All rights reserved. iii
Copyright Notice
Oracle® Transportation Management Migration Guide, Release 6.4.2
Part No. E81543-03
Copyright © 2001, 2016, Oracle and/or its affiliates. All rights reserved.
This software and related documentation are provided under a license agreement containing restrictions on use and disclosure and are protected by intellectual property laws. Except as expressly permitted in your license agreement or allowed by law, you may not use, copy, reproduce, translate, broadcast, modify, license, transmit, distribute, exhibit, perform, publish, or display any part, in any form, or by any means. Reverse engineering, disassembly, or decompilation of this software, unless
required by law for interoperability, is prohibited.
The information contained herein is subject to change without notice and is not warranted to be error-free. If you find any errors, please report them to us in writing.
If this is software or related documentation that is delivered to the U.S. Government or anyone licensing it on behalf of the U.S. Government, then the following notice is applicable:
U.S. GOVERNMENT END USERS: Oracle programs, including any operating system, integrated software, any programs installed on the hardware, and/or documentation, delivered to U.S.
Government end users are "commercial computer software" pursuant to the applicable Federal Acquisition Regulation and agency-specific supplemental regulations. As such, use, duplication, disclosure, modification, and adaptation of the programs, including any operating system, integrated software, any programs installed on the hardware, and/or documentation, shall be subject to license terms and license restrictions applicable to the programs. No other rights are granted to the U.S. Government.
This software or hardware is developed for general use in a variety of information management
applications. It is not developed or intended for use in any inherently dangerous applications, including applications that may create a risk of personal injury. If you use this software or hardware in dangerous applications, then you shall be responsible to take all appropriate fail-safe, backup, redundancy, and other measures to ensure its safe use. Oracle Corporation and its affiliates disclaim any liability for any damages caused by use of this software or hardware in dangerous applications.
Oracle and Java are registered trademarks of Oracle and/or its affiliates. Other names may be
trademarks of their respective owners.
Intel and Intel Xeon are trademarks or registered trademarks of Intel Corporation. All SPARC trademarks are used under license and are trademarks or registered trademarks of SPARC International, Inc. AMD, Opteron, the AMD logo, and the AMD Opteron logo are trademarks or registered trademarks of Advanced Micro Devices. UNIX is a registered trademark of The Open Group.
This software or hardware and documentation may provide access to or information about content, products, and services from third parties. Oracle Corporation and its affiliates are not responsible for
and expressly disclaim all warranties of any kind with respect to third-party content, products, and services unless otherwise set forth in an applicable agreement between you and Oracle. Oracle Corporation and its affiliates will not be responsible for any loss, costs, or damages incurred due to your access to or use of third-party content, products, or services, except as set forth in an applicable agreement between you and Oracle.
Documentation Accessibility
For information about Oracle's commitment to accessibility, visit the Oracle Accessibility Program
website at http://www.oracle.com/pls/topic/lookup?ctx=acc&id=docacc.
Access to Oracle Support
Oracle customers that have purchased support have access to electronic support through My Oracle
Support. For information, visit http://www.oracle.com/pls/topic/lookup?ctx=acc&id=info or visit http://www.oracle.com/pls/topic/lookup?ctx=acc&id=trs if you are hearing impaired.
Copyright © 2001, 2016, Oracle and/or its affiliates. All rights reserved. iv
Contents
COPYRIGHT NOTICE ................................................................................. III
CONTENTS ................................................................................................. IV
SEND US YOUR COMMENTS ...................................................................... VII
PREFACE ................................................................................................ VIII
CHANGE HISTORY .................................................................................................. VIII
1. MIGRATING CREDENTIALS TO ORACLE WALLET ................................ 1-1
OVERVIEW ........................................................................................................... 1-1 VERSIONS AFFECTED .............................................................................................. 1-1 MIGRATION STEPS ................................................................................................. 1-1
2. MIGRATING THE DATABASE .............................................................. 2-1
GENERAL NOTE ON MIGRATIONS ............................................................................... 2-1 UPGRADING FROM VERSION 3.7 TO 4.0 ..................................................................... 2-1
APPLYING GC3 3.7 SERVICE RELEASES ....................................................................................... 2-2 UPDATING GLOGOWNER GRANTS ............................................................................................ 2-2 ADDING TABLESPACES FOR LOB COLUMNS ..................................................................................... 2-2 UPDATING THE STRUCTURE ...................................................................................................... 2-2 UPDATING DATA CONTENT ....................................................................................................... 2-2 RESETTING DB SEQUENCES ..................................................................................................... 2-3 REVIEWING OBSOLETE TABLES AND COLUMNS................................................................................. 2-3 VERIFYING SAVED QUERIES ...................................................................................................... 2-3
UPGRADING FROM VERSION 4.0 TO 4.5 ..................................................................... 2-3
APPLYING GC3 4.0 SERVICE RELEASES ....................................................................................... 2-4 IMPLEMENTING 4.5 COMPONENTS WITHIN 4.0 (OPTIONAL) .................................................................. 2-4 UPDATING GLOGOWNER GRANTS ............................................................................................ 2-5 UPDATING THE STRUCTURE ...................................................................................................... 2-5 UPDATING DATA CONTENT ....................................................................................................... 2-5 MIGRATING AUDIT TRAIL INFORMATION (OPTIONAL) ......................................................................... 2-6 REVIEWING OBSOLETE TABLES AND COLUMNS................................................................................. 2-6 VERIFYING SAVED QUERIES ...................................................................................................... 2-6 UPGRADING THE REPLICATED OPERATIONAL DATABASE (ROD) ............................................................. 2-6
UPGRADING FROM VERSION 4.5 TO 5.0 ..................................................................... 2-7
APPLYING GC3 4.5 SERVICE RELEASES ....................................................................................... 2-7 MIGRATING GC3 4.5 DATABASE TO 5.0 ...................................................................................... 2-8
UPGRADING FROM VERSION 5.0 TO 5.5 ................................................................... 2-11
CUSTOM HELP ................................................................................................................... 2-12 APPLYING ORACLE TRANSPORTATION MANAGEMENT 5.0 CONSOLIDATED UPDATES ..................................... 2-12 MIGRATING GC3 5.0 DATABASE TO 5.5 .................................................................................... 2-12
UPGRADING FROM VERSION 5.5 TO 6.3 ................................................................... 2-14
CUSTOM HELP ................................................................................................................... 2-15 APPLYING ORACLE TRANSPORTATION MANAGEMENT 5.5 CONSOLIDATED UPDATES ..................................... 2-15 MIGRATING ORACLE TRANSPORTATION MANAGEMENT 5.5 DATABASE TO 6.3 ........................................... 2-15
Copyright © 2001, 2016, Oracle and/or its affiliates. All rights reserved. v
MIGRATING ORACLE TRANSPORTATION MANAGEMENT 6.0 DATABASE TO 6.3 ................... 2-20 MIGRATING ORACLE TRANSPORTATION MANAGEMENT 6.1, 6.2 DATABASE TO 6.3 ............ 2-23 MIGRATING ORACLE TRANSPORTATION MANAGEMENT 5.5 DATABASE TO 6.4.2 ................ 2-23 MIGRATING ORACLE TRANSPORTATION MANAGEMENT 6.0, 6.1, 6.2 DATABASE TO 6.4.2 ... 2-24 MIGRATING ORACLE TRANSPORTATION MANAGEMENT 6.3 DATABASE TO 6.4.2 ................ 2-24 MIGRATING ORACLE TRANSPORTATION MANAGEMENT 6.4 DATABASE TO 6.4.2 ................ 2-28
3. MIGRATING WORKBENCH LAYOUTS .................................................. 3-1
OVERVIEW ........................................................................................................... 3-1 VERSIONS AFFECTED .............................................................................................. 3-1 UPGRADING WORKBENCH LAYOUTS ........................................................................... 3-1
4. MIGRATING CUSTOMIZATIONS ......................................................... 4-1
5. CONVERTING ORDER RELEASES TO A MULTI-TIER STRUCTURE FOR
CUSTOMERS WHO ARE MIGRATING FROM VERSION 5.5.CU6 OR EARLIER 5-1
6. MIGRATING FUSION TRANSPORTATION INTELLIGENCE ................... 6-1
MIGRATING FUSION TRANSPORTATION INTELLIGENCE HISTORICAL DATABASE (HD) ........... 6-1
PRE-REQUISITES: ................................................................................................................. 6-1 MIGRATION STEPS: ............................................................................................................... 6-1
UPGRADING TO ORACLE DATA INTEGRATOR 12C .......................................................... 6-1
PRE-REQUISITES: ................................................................................................................. 6-1 UPGRADE STEPS: ................................................................................................................. 6-1
MIGRATING FUSION TRANSPORTATION INTELLIGENCE ETL IN ORACLE DATA INTEGRATOR 12C 6-
2
PREREQUISITES: .................................................................................................................. 6-2 MIGRATION OF CUSTOM ETL: ................................................................................................... 6-2 POST MIGRATION STEPS: ........................................................................................................ 6-2 MIGRATING TARGETS ............................................................................................................. 6-3 INSERTING DEFAULT RECORDS FOR DIMENSIONS ............................................................................. 6-3
UPGRADING TO ORACLE BUSINESS INTELLIGENCE ENTERPRISE EDITION 11G ..................... 6-3
PREREQUISITES: .................................................................................................................. 6-3 UPGRADE STEPS: ................................................................................................................. 6-3
MIGRATING FUSION TRANSPORTATION INTELLIGENCE METADATA IN OBI EE 11G .............. 6-3
PREREQUISITES: .................................................................................................................. 6-3 MIGRATION OF STANDARD METADATA IN OBIEE 11G ....................................................................... 6-4 MIGRATION OF CUSTOM METADATA IN OBI EE 11G ......................................................................... 6-4
MIGRATING FUSION TRANSPORTATION INTELLIGENCE DASHBOARD REPORTS IN OBI EE 11G 6-5
PREREQUISITES .................................................................................................................... 6-5 MIGRATION OF STANDARD DASHBOARD REPORTS ............................................................................. 6-5 MIGRATION OF CUSTOM DASHBOARD REPORTS ............................................................................... 6-5 CONVERTING OBIEE GROUPS TO ROLES ...................................................................................... 6-9 REFERENCE ....................................................................................................................... 6-11
7. MIGRATING GLOBAL TRADE INTELLIGENCE ...................................... 7-1

Copyright © 2001, 2016, Oracle and/or its affiliates. All rights reserved. vi
Copyright © 2001, 2016, Oracle and/or its affiliates. All rights reserved. vii
Send Us Your Comments
Oracle® Transportation Management Migration Guide, Release 6.4.2
Part No. E81543-03
Oracle welcomes your comments and suggestions on the quality and usefulness of this publication. Your input is an important part of the information used for revision.
Did you find any errors?
Is the information clearly presented?
Do you need more information? If so, where?
Are the examples correct? Do you need more examples?
What features did you like most about this manual?
If you find any errors or have any other suggestions for improvement, please indicate the title and part number of the documentation and the chapter, section, and page number (if available). You can send comments to us in the following ways:
Electronic mail: [email protected]
If you have problems with the software, contact Support at https://support.oracle.com or find the
Support phone number for your region at http://www.oracle.com/support/contact.html.
Copyright © 2001, 2016, Oracle and/or its affiliates. All rights reserved. viii
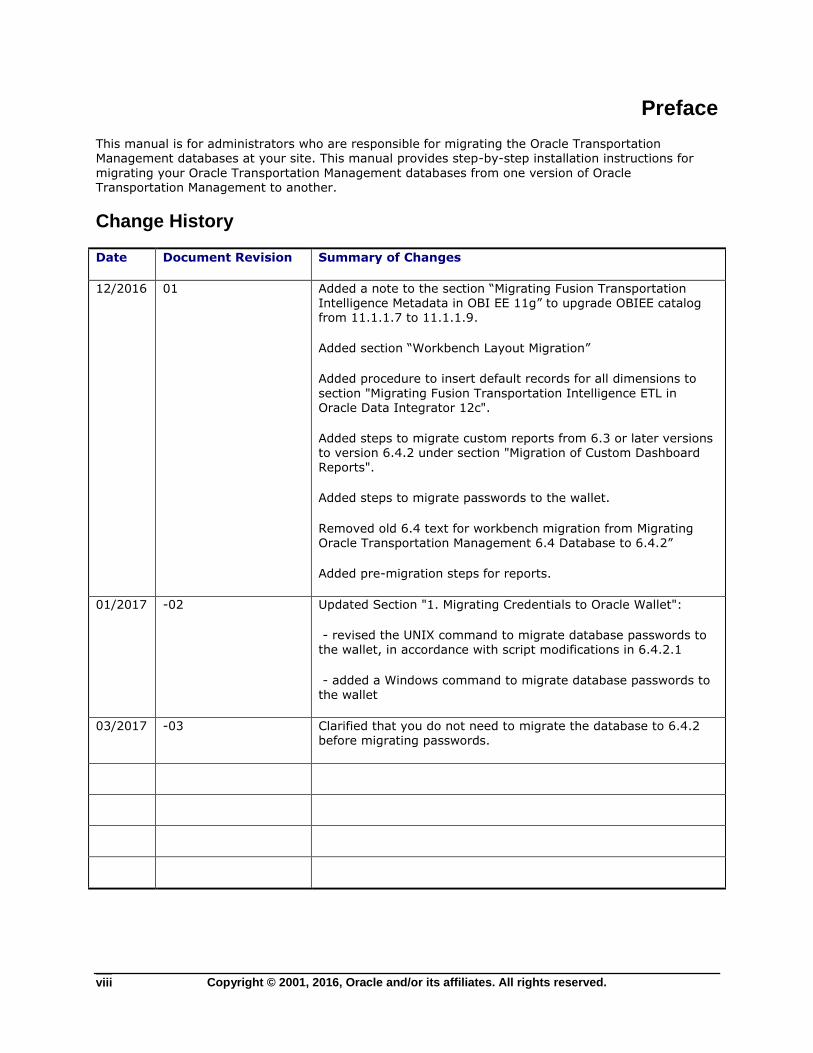
Preface
This manual is for administrators who are responsible for migrating the Oracle Transportation Management databases at your site. This manual provides step-by-step installation instructions for
migrating your Oracle Transportation Management databases from one version of Oracle Transportation Management to another.
Change History
Date Document Revision Summary of Changes
12/2016 01 Added a note to the section “Migrating Fusion Transportation
Intelligence Metadata in OBI EE 11g” to upgrade OBIEE catalog from 11.1.1.7 to 11.1.1.9.
Added section “Workbench Layout Migration”
Added procedure to insert default records for all dimensions to
section "Migrating Fusion Transportation Intelligence ETL in Oracle Data Integrator 12c".
Added steps to migrate custom reports from 6.3 or later versions to version 6.4.2 under section "Migration of Custom Dashboard Reports".
Added steps to migrate passwords to the wallet.
Removed old 6.4 text for workbench migration from Migrating Oracle Transportation Management 6.4 Database to 6.4.2”
Added pre-migration steps for reports.
01/2017 -02 Updated Section "1. Migrating Credentials to Oracle Wallet":
- revised the UNIX command to migrate database passwords to the wallet, in accordance with script modifications in 6.4.2.1
- added a Windows command to migrate database passwords to the wallet
03/2017 -03 Clarified that you do not need to migrate the database to 6.4.2 before migrating passwords.
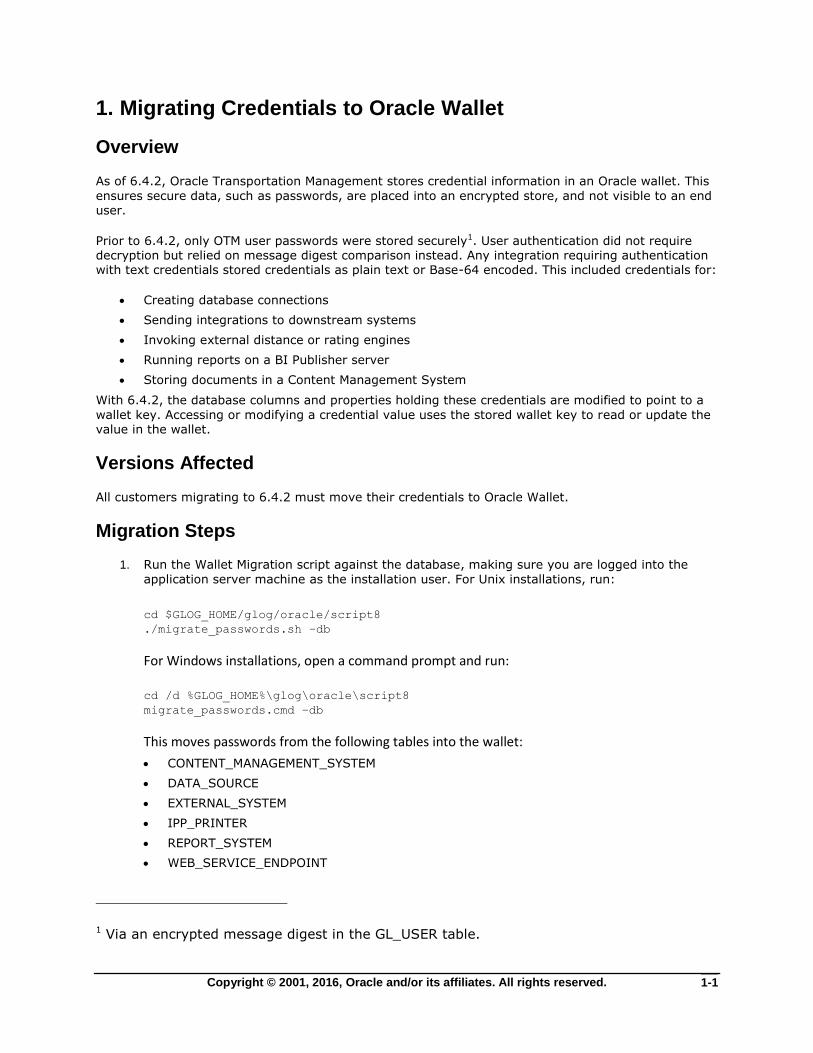
Copyright © 2001, 2016, Oracle and/or its affiliates. All rights reserved. 1-1
1. Migrating Credentials to Oracle Wallet
Overview
As of 6.4.2, Oracle Transportation Management stores credential information in an Oracle wallet. This
ensures secure data, such as passwords, are placed into an encrypted store, and not visible to an end user.
Prior to 6.4.2, only OTM user passwords were stored securely1. User authentication did not require decryption but relied on message digest comparison instead. Any integration requiring authentication with text credentials stored credentials as plain text or Base-64 encoded. This included credentials for:
Creating database connections
Sending integrations to downstream systems
Invoking external distance or rating engines
Running reports on a BI Publisher server
Storing documents in a Content Management System
With 6.4.2, the database columns and properties holding these credentials are modified to point to a
wallet key. Accessing or modifying a credential value uses the stored wallet key to read or update the value in the wallet.
Versions Affected
All customers migrating to 6.4.2 must move their credentials to Oracle Wallet.
Migration Steps
1. Run the Wallet Migration script against the database, making sure you are logged into the
application server machine as the installation user. For Unix installations, run:
cd $GLOG_HOME/glog/oracle/script8
./migrate_passwords.sh –db
For Windows installations, open a command prompt and run: cd /d %GLOG_HOME%\glog\oracle\script8
migrate_passwords.cmd –db
This moves passwords from the following tables into the wallet:
CONTENT_MANAGEMENT_SYSTEM
DATA_SOURCE
EXTERNAL_SYSTEM
IPP_PRINTER
REPORT_SYSTEM
WEB_SERVICE_ENDPOINT
1 Via an encrypted message digest in the GL_USER table.
Copyright © 2001, 2016, Oracle and/or its affiliates. All rights reserved. 1-2
2. Review the custom section of each glog.properties file. These are properties defined between
the # Custom Properties – Beginning and the # Custom Properties – End lines.
a. Any properties listed below should be removed from the property file. These reflect properties staged as part of the 6.4.2 installation. The installer prompted for these
values and wrote them to the wallet. There is no need to override them in a properties
file or properties set.
otm.db.password
glog.database.archive.password
glog.database.fti.password
glog.database.load.password
glog.signedServlet.password
glog.web.systemPassword
glog.appSystem.password
glog.appGuest.password
weblogic.system.password
b. Any properties listed below should be moved from the property file to a property set2.
For each property, append an instruction to the property set and set the property's
key and value. The Property Set screen automatically writes property values to the
wallet.
alk.api_key
glog.bip.externalFarm.password
glog.ExternalDistanceEngine.PCMilerWS.Account
glog.ExternalDistanceEngine.PCMilerWS.Password
glog.ExternalDistanceEngine.PCMilerWS.Username
glog.ExternalDistanceEngine.PCMilerWS.AuthorizationKey
glog.ExternalDistanceEngine.PCMilerRailWS.AuthorizationKey\
glog.odi.password
glog.RatingEngine.RatewareXL.License
glog.RatingEngine.RatewareXL.Password
glog.RatingEngine.RatewareXL.Username
glog.security.oam.password
here.app_code
here.app_id
intelliroute.password
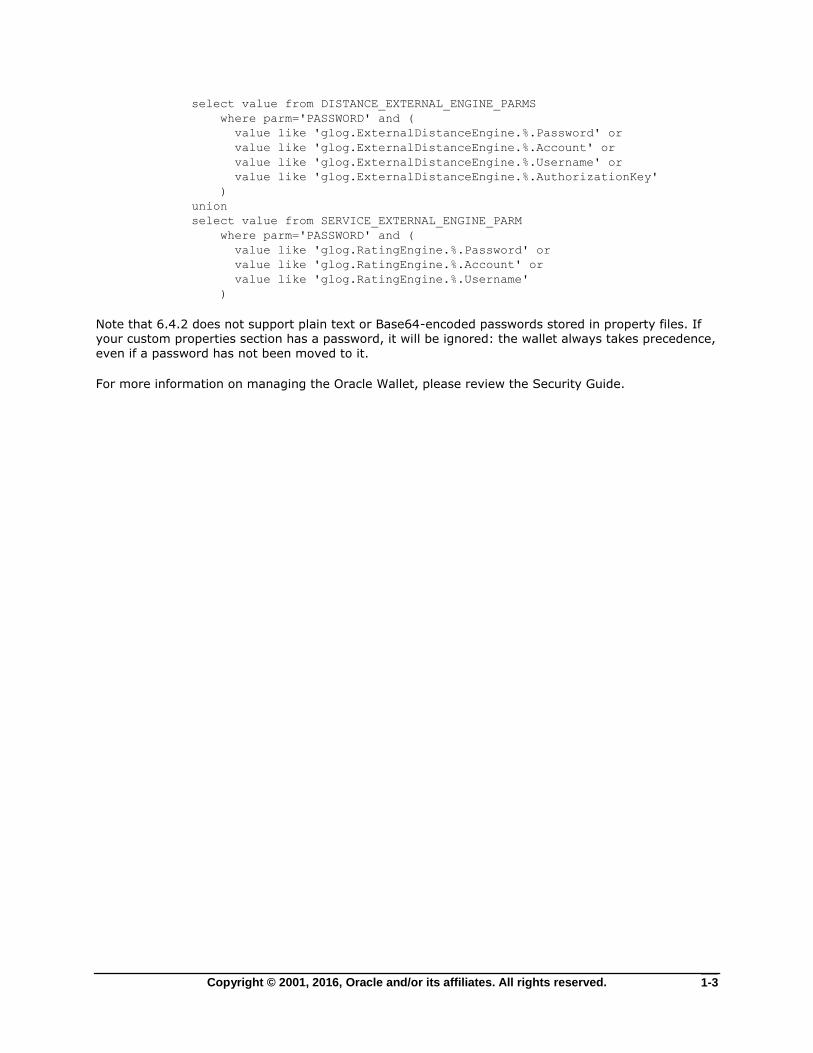
c. Any properties matching the following query should be moved to a property set as in
b).
2 For a property customized on both the web server and application server (or for a
combined web/application installation), modify the CUSTOM property set; for a property
customized on only the web server, modify the WEB_CUSTOM property set; for a property
customized on only the application server, modify the APP_CUSTOM property set.
Copyright © 2001, 2016, Oracle and/or its affiliates. All rights reserved. 1-3
select value from DISTANCE_EXTERNAL_ENGINE_PARMS
where parm='PASSWORD' and (
value like 'glog.ExternalDistanceEngine.%.Password' or
value like 'glog.ExternalDistanceEngine.%.Account' or
value like 'glog.ExternalDistanceEngine.%.Username' or
value like 'glog.ExternalDistanceEngine.%.AuthorizationKey'
)
union
select value from SERVICE_EXTERNAL_ENGINE_PARM
where parm='PASSWORD' and (
value like 'glog.RatingEngine.%.Password' or
value like 'glog.RatingEngine.%.Account' or
value like 'glog.RatingEngine.%.Username'
)
Note that 6.4.2 does not support plain text or Base64-encoded passwords stored in property files. If your custom properties section has a password, it will be ignored: the wallet always takes precedence,
even if a password has not been moved to it.
For more information on managing the Oracle Wallet, please review the Security Guide.

Copyright © 2001, 2016, Oracle and/or its affiliates. All rights reserved. 2-1
2. Migrating the Database
General Note on Migrations
Prior to migrating your data it is very important that you have the latest bug fixes in place. Please see
the section titled “General Instructions on Upgrading Oracle transportation Management from One Release to Another” in the Administration Guide.
Upgrading from Version 3.7 to 4.0
Note: Prior to its acquisition by Oracle, the Oracle Transportation Management product
(circa release 5.0) was known as the Global Command & Control Center, or GC3. The
migration instructions prior to release 5.0 of Oracle Transportation Management will refer
to the product by its old name of GC3.
Note: If you are migrating from a version prior to 3.7, refer to the GC3 4.5 Administration Manual.
Any new GC3 installation should be tested in a controlled environment before migrating your production database. This ensures that any potential problems or incompatibilities don’t affect your production GC3 instance(s).
Note: If you are migrating from a version earlier than 3.7, you must complete each previous version’s migration instructions. You cannot skip any migration steps. Please go
through all upgrade steps to 3.7 prior to starting the 3.7 to 4.0 migration.
IMPORTANT! GC3 4.0 relies on Oracle 9i, so this upgrade must occur prior to the upgrade
of GC3. If the Oracle database upgrade needs to be run at a separate time due to time
constraints, then we recommend upgrading to Oracle database 9i first, and then upgrading to GC3 version 4.0 during back-to-back weekends.
Follow the installation instructions and install the new 4.0 GC3 components into new directories. Once this is complete, you should compare your old glog.properties file with the new glog.properties file and migrate any customized settings. Finally, copy any customer-specific glog.properties files to the new GC3 instance and ensure that the new glog.properties file references these files. Customer-specific properties files usually follow the format glog.<company_name>.properties.
The following topics outline the procedures for migrating a GC3 3.7 database to 4.0. The structure of the database to be migrated should be consistent with the GC3 3.7 database specification; otherwise,
the migration will fail.
To complete these procedures you need the following DB passwords:
system password
glogowner password
reportowner password
In addition, you will be creating tablespaces for LOB columns. For this step, you will need to know the directory in which the datafiles will exist and a default initial size for the LOB tablespaces.
Before you begin the migration, shut down all processes running against the database and shut down the GC3 application. Always create a full backup of the database before beginning any GC3 migration.
Copyright © 2001, 2016, Oracle and/or its affiliates. All rights reserved. 2-2
Applying GC3 3.7 Service Releases
You must apply the latest GC3 3.7 Service Release before you continue with the 4.0 migration. You must also install the latest GC3 Service Release to your GC3 4.0 installation to ensure that any known migration issues have been patched and resolved.
3. Log in as GLOGOWNER and run dbpatch_37.sql (which resides in the 3.7 directory,
(<otm37_install_path>/glog/oracle/script8/).
Note: Do not continue with the upgrade until the dbpatch log is completely clean. Contact
Technical Support if you have any questions or concerns.
Important: Ensure that your environment is setup correctly by running:
On UNIX: “. <gc3_install_path>/install/gc3env.sh”
On Windows: “<gc3_install_path>\install\gc3env.cmd”
Updating GLOGOWNER Grants
1. Go to the script8 directory for 4.0 (<otm40_install_path>/glog/oracle/script8).
2. Log on as SYSTEM.
3. Run 40_mig_grants.sql, which directly grants GLOGOWNER the ability to create and drop
public synonyms (versus through a role).
Adding Tablespaces for LOB columns
1. As the SYSTEM user, run create_lob_tablespace.sql. You are prompted for the directory in
which to store the datafiles and the initial size for the tablespaces.
Updating the Structure
1. Run @dbupdate_40.sql to update the database with all the new tables and columns.
2. Enter the glogowner password, reportowner password, and database connection when
prompted.
3. After the process has run, verify in the dbupdate_40_<dbsid>_<timestamp>.log file (located
in the same directory as source) that there are no errors. If the solution to the error is
apparent, then you can fix the problem and then rerun the dbupdate_40 process again, without harm. Contact Technical Support if the problem is not resolvable, and send the entire
log file (along with any other logs you have from the day) to our Technical Support team. Do
not continue until the dbupdate_40 log is clean.
Updating Data Content
1. Update the PUBLIC data by running update_content. This process is run at the host command line, rather than from within SQL*Plus. Two command scripts have been provided; the script
you use is dependent on your operating system:
UNIX shell script: ./update_content.sh <otm_install_path>/glog/config
dbaglogowner dbareportowner V40
OR DOS command script:
update_content <otm_install_path>\glog\config dbaglogowner dbareportowner V40
2. Review the log file called update_content_v40_<timestamp>.log for errors (located in the
same directory as the SQL script). Search for errors beginning with “ORA-“ or “<Error>“ within
the log file.
This procedure migrates the data content into the table structures for the latest enhancements.
Copyright © 2001, 2016, Oracle and/or its affiliates. All rights reserved. 2-3
1. In SQL*Plus, as user GLOGOWNER run:
@dbmigrate_40.sql.
2. Enter the password and database connection string when prompted.
Note: The script might run for several hours depending on the amount of data to be processed.
3. After the process has run, verify in the dbmigrate_40_<dbsid>_<timestamp>.log file (located
in the same directory as the SQL script) that there are no errors.
4. If an error occurs while applying particular patch in the migration, the database rolls back changes made by that patch. It will, however, commit changes once a whole migration patch
has been successfully applied, and mark patch as “applied”. Migration will not reapply that
patch again in case of migration rerun. If an error occurs partway through the process, then you can fix the problem and rerun the process without harm. If you cannot resolve the error
yourself, contact Technical Support and send the entire log file (along with any other logs you
have from the day) to our Technical Support team.
Resetting DB Sequences
1. In SQL*Plus, as user SYS run:
exec domainman.reset_sequence
2. Go to the <otm_install_path>\glog\oracle directory on the GC3 application server. In
SQL*Plus, as user GLOGOWNER run:
@insert_security_roles.sql
The remaining topics are not critical to the upgrade but provide helpful information.
Reviewing Obsolete Tables and Columns
When a table or column becomes obsolete during an upgrade, the table/column is renamed with XX<version object became obsolete>_<original name of table/column>.
To generate SQL for dropping obsolete objects, run @gen_obsolete_objects.sql as GLOGOWNER.
Note: It will not include objects that just became obsolete in the current version, as a
safety precaution. This script will generate an SQL script called drop_obsolete_objects.sql,
which you can review and run at a convenient time.
Verifying Saved Queries
After the upgrade, some of your site’s saved queries may no longer be valid due to changes in table structure. Run the following to verify the saved queries: @validate_saved_query.sql
If there are invalid saved queries, you can decide what to do with them (remove the records or modify them to correct the syntax). Contact Technical Support if you need assistance.
Upgrading from Version 4.0 to 4.5
Note: Prior to its acquisition by Oracle, the Oracle Transportation Management product
(circa release 5.0) was known as the Global Command & Control Center, or GC3. The migration instructions prior to release 5.0 of Oracle Transportation Management will refer
to the product by its old name of GC3.
Copyright © 2001, 2016, Oracle and/or its affiliates. All rights reserved. 2-4
Any new GC3 installation should be tested in a controlled environment before migrating your production database. This ensures that any potential problems or incompatibilities don’t affect your production GC3 instance(s).
Note: If you are migrating from a version earlier than 4.0, you must complete each
previous version’s migration instructions. You cannot skip any migration steps. Please go
through all upgrade steps to 4.0 prior to starting the 4.0 to 4.5 migration.
Follow the installation instructions and install the new GC3 4.5 components into new directories. Once
this is complete, you should compare your old glog.properties file with the new glog.properties file and migrate any customized settings. Finally, copy any customer-specific glog.properties files to the new GC3 instance and ensure that the new glog.properties file references these files. Customer specific properties files usually follow the format glog.<company_name>.properties.
The following topics outline the procedures for migrating a GC3 4.0 database to 4.5. The structure of the database to be migrated should be consistent with the GC3 4.0 database specification; otherwise, the migration will fail.
Applying GC3 4.0 Service Releases
You must apply the latest GC3 4.0 Service Release before you continue with the 4.5 migration. You must also install the latest GC3 Consolidated Update to your GC3 4.5 installation to ensure that any known migration issues have been patched and resolved.
1. Log in as GLOGOWNER and run dbpatch_40.sql (which resides in the 4.0 directory,
(<gc3_40_install_path>/glog/oracle/script8/).
Note: Do not continue with the upgrade until the dbpatch log is completely clean. Contact
Technical Support if you have any questions or concerns.
Important: Ensure that your environment is setup correctly by running:
On UNIX: “. <gc3_install_path>/install/gc3env.sh”
On Windows: “<gc3_install_path>\install\gc3env.cmd”
Implementing 4.5 components within 4.0 (optional)
To reduce migration time, we have provided scripts that add new 4.5 tables and columns (and in some cases populate) to a 4.0 environment. We recommend testing the overall timeframe of the migration without the preupdate/premigrate steps. If you determine downtime is too long, then you can use
these scripts to reduce downtime.
Since these steps can be performed while 4.0 is running, the overall downtime of the 4.5 migration is reduced. However, this script should be run during off-peak hours, when heavy data loads are not running. You can also choose to run this script while the system is down in the 4.0 environment. If you plan to run these scripts, it is recommended to run these steps in the weekend prior to the 4.5 upgrade.
1. As GLOGOWNER, run:
@preupdate_45.sql
If the pre-update script cannot obtain access to a table for a new column, you may see a resource busy message within the preupdate_45 log file. You can either rerun pre-update at another time once
the table is available (which will only apply the failed procedure(s) ), or wait until migration down-
time. The step for running dbupdate_45.sql will automatically attempt to add the column at that time.
Copyright © 2001, 2016, Oracle and/or its affiliates. All rights reserved. 2-5
The ss_status_history and order_release tables have new columns that need to be populated as part of the migration. By running the following, three database triggers will be created to maintain the data within the 4.0 environment. Immediately following the creation of the triggers, the fields will be populated. These triggers will remain in place until your database has been fully upgraded to 4.5.
2. As GLOGOWNER, run:
@premigrate_45.sql
If your site chooses not to run these scripts in the 4.0 environment, the dbupdate_45 and dbmigrate scripts will automatically add these changes that were not implemented during the
preupdate/premigrate phase. The rest of the steps are all mandatory, and will be performed as part of the downtime 4.5 migration.
Updating GLOGOWNER Grants
1. Go to the script8 directory for 4.5 (<gc3_45_install_path>/glog/oracle/script8).
2. Log on as SYSTEM.
3. Run 45_mig_grants.sql.
Updating the Structure
1. Run @dbupdate_45.sql to update the database with all the new tables and columns.
2. Enter the glogowner password, reportowner password, and database connection when
prompted.
3. After the process has run, verify in the dbupdate_45_<dbsid>_<timestamp>.log file (located in the same directory as source) that there are no errors. If the solution to the error is
apparent, then you can fix the problem and then rerun the dbupdate_45 process again,
without harm (you may also want to rerun to see if it automatically resolves your problem). Contact Technical Support if the problem is not resolvable, and send the entire log file (along
with any other logs you have from the day) to our Technical Support team. Do not continue
until the dbupdate_45 log is clean.
Updating Data Content
1. Update the PUBLIC data by running update_content. This process is run at the host command line, rather than from within SQL*Plus. Two command scripts have been provided; the script
you use is dependent on your operating system:
UNIX shell script: ./update_content.sh <gc3_install_path>/glog/config V45
or
DOS command script:
update_content <gc3_install_path>\glog\config V45
2. Review the log file called update_content_v45_<timestamp>.log for errors (located in the
same directory as the SQL script). Search for errors beginning with “ORA-“ or “<Error>“ within
the log file.
This procedure migrates the data content into the table structures for the latest enhancements.
1. In SQL*Plus, as user GLOGOWNER run: @dbmigrate_45.sql.
2. Enter the password and database connection string when prompted.
Note: The script might run for several hours depending on the amount of data to be processed.
3. After the process has run, verify in the dbmigrate_45_<dbsid>_<timestamp>.log file (located
in the same directory as the SQL script) that there are no errors.
Copyright © 2001, 2016, Oracle and/or its affiliates. All rights reserved. 2-6
4. If an error occurs while applying particular patch in the migration, the database rolls back
changes made by that patch. It will, however, commit changes once a whole migration patch has been successfully applied, and mark patch as “applied”. Migration will not reapply that
patch again in case of migration rerun. If an error occurs partway through the process, then
you can fix the problem and rerun the process without harm. If you cannot resolve the error yourself, contact Technical Support and send the entire log file (along with any other logs you
have from the day) to our Technical Support team.
5. Go to the <gc3_install_path>\glog\oracle directory on the GC3 application server. In
SQL*Plus, as user GLOGOWNER run:
@insert_security_roles.sql
The remaining topics are not critical to the upgrade but provide helpful information.
Migrating Audit Trail Information (optional)
Audit trail information has been redesigned in 4.5. GC3 provides an optional migration script that can
be run if your site would like to keep its historical audit trail information. This can be run while 4.5 is up-and-running.
You will be prompted for the date range for the auditing information you would like to keep. The smaller the date range, the quicker the process will finish. You can run this process multiple times, if you would like to process sets of small ranges during off-peak hours, rather than processing all records at once.
1. As GLOGOWNER, run @45mig_audit_trail.sql
Reviewing Obsolete Tables and Columns
When a table or column becomes obsolete during an upgrade, the table/column is renamed with XX<version object became obsolete>_<original name of table/column>.
To generate SQL for dropping obsolete objects, run @gen_obsolete_objects.sql as GLOGOWNER.
Note: This will not include objects that just became obsolete in the current version, as a safety precaution. This script will generate a SQL script called drop_obsolete_objects.sql,
which you can review and run at a convenient time.
Verifying Saved Queries
After the upgrade, some of your saved queries may no longer be valid due to changes in table structure.
1. Run the following to verify the saved queries:
@validate_saved_query.sql
If there are invalid saved queries, you can decide what to do with them (remove the records or modify them to correct the syntax).
Upgrading the Replicated Operational Database (ROD)
After the 4.0 to 4.5 upgrade, the Replicated Operational Database (ROD) will not automatically be aware of new or changed GC3 tables. If structural changes occurred, the automatic refresh process will fail until the following steps have been completed.
Run the following command to create logs for new tables. It will skip tables that already have a log.
Copyright © 2001, 2016, Oracle and/or its affiliates. All rights reserved. 2-7
1. On the OLTP (Online Transactional Processing) database in SQL*Plus, as user GLOGOWNER
run:
@create_mview_logs
2. On the ROD database in SQL*Plus, as GLOGOWNER run:
@create_logon_triggers.sql
3. On the ROD database in SQL*Plus, as GLOGOWNER run:
@dbupdate_rod.sql
This will first identify broken views caused by columns becoming obsolete. It will then build (or rebuild) the materialized views for any new/modified tables.
Note: This will not automatically add columns that were added during an upgrade. This is
because the materialized view would need to be recreated from scratch again, and you may not even need those new columns. Therefore, views should only need to be completely
refreshed when a column has been removed, or modified in a way that Oracle Fusion
Transportation Intellitence needs a new copy of the data. Once the views are set, it refreshes the views and builds any new indexes.
Upgrading from Version 4.5 to 5.0
Any new Oracle Transportation Management installation should be tested in a controlled environment before migrating your production database. This ensures that any potential problems or incompatibilities don’t affect your production Oracle Transportation Management instance(s).
Note: Prior to its acquisition by Oracle, the Oracle Transportation Management product (before release 5.0) was known as the Global Command & Control Center, or GC3. The
migration instructions prior to release 5.0 of OTM will refer to the product by its old name
of GC3.
Note: If you are migrating from a version earlier than 4.5, you must complete each
previous version’s migration instructions. You cannot skip any migration steps. Please go
through all upgrade steps to 4.5 prior to starting the 4.5 to 5.0 migration.
The following topics outline the procedures for migrating a GC3 4.5 database to Oracle Transportation Management 5.0. The structure of the database to be migrated should be consistent with the GC3 4.5
database specification; otherwise, the migration will fail.
Applying GC3 4.5 Service Releases
Important: Ensure that your environment is setup correctly by running:
On UNIX: “. <gc3_install_path>/install/gc3env.sh”
On Windows: “<gc3_install_path>\install\gc3env.cmd”
You must apply GC3 4.5 Service Release dated February 2005 (SR-02.05) or later before you continue with the Oracle Transportation Management 5.0 migration. You must also install the latest Oracle
Transportation Management Service Release to your Oracle Transportation Management 5.0 installation to ensure that any known migration issues have been patched and resolved.
1. Log in as GLOGOWNER and run dbpatch_45.sql (which resides in the 4.5 directory,
(<gc3_45_install_path>/glog/oracle/script8/).
Note: Do not continue with the upgrade until the dbpatch log is completely clean. Contact Technical Support if you have any questions or concerns.
Copyright © 2001, 2016, Oracle and/or its affiliates. All rights reserved. 2-8
Migrating GC3 4.5 Database to 5.0
Oracle Transportation Management 5.0 had an interim release called 5.0 LA. To migrate a GC3 4.5 database to 5.0 GA, you must first migrate 5.0 LA. The following steps will guide you through the process.
Migrating to 5.0 LA: Updating the Structure
1. On the app server change to directory <otm_50_install_path>/glog/oracle/script8LA.
2. In SQL*Plus as user GLOGOWNER, run @dbupdate_50a.sql to update the database with all
the new tables and columns to 5.0LA.
3. Enter the glogowner password, reportowner password, archive password, and database
connection when prompted.
4. After the process has run, verify in the dbupdate_50a_<dbsid>_<timestamp>.log file (located in the same directory as source) that there are no errors. If the solution to the error is
apparent, then you can fix the problem and then rerun the dbupdate_50a.sql process again,
without harm (you may also want to rerun to see if it automatically resolves your problem). Contact Technical Support if the problem is not resolvable, and send the entire log file (along
with any other logs you have from the day) to our Technical Support team. Do not continue
until the dbupdate_50a log is clean.
Migrating to 5.0 LA: Updating Data Content
1. Update the PUBLIC data by running update_content. This process is run at the host command
line rather than from within SQL*Plus. Two command scripts are provided and the script you
use is dependent on your operating system: UNIX shell script:
./update_content.sh <otm_install_path>/glog/config V50A
or
DOS command script:
update_content <otm_install_path>\glog\config V50A
2. Review the log file called update_content_v50A_<timestamp>.log for errors (located in the same directory as the SQL script). Look for errors by searching key words like “ORA-“,
“Caught exception”,”SP2-“, or “<Error>“ within the log file.
3. Load the Oracle Transportation Sourcing (formerly Procurement) PUBLIC data by running
update_procure_content. This process is run at the host command line, rather than from
within SQL*Plus. Two command scripts have been provided; the script you use is dependent
on your operating system:
UNIX shell script:
./update_procure_content.sh <otm_install_path>/glog/config V50A
or
DOS command script:
update_procure_content <otm_install_path>\glog\config V50A
4. Review the log file called update_procure_content_v50A_<timestamp>.log for errors
(located in the same directory as the SQL script). Look for errors by searching key words like
“ORA-“, “Caught exception”,”SP2-“, within the log file.
Copyright © 2001, 2016, Oracle and/or its affiliates. All rights reserved. 2-9
Migrating to 5.0 LA: Data Migration
1. In SQL*Plus as GLOGOWNER, run:
@dbmigrate_50a.sql
2. Enter the password and database connection string when prompted.
Note: The script might run for several hours depending on the amount of data to process.
3. After the process has run, verify in the dbmigrate_50a_<dbsid>_<timestamp>.log file
(located in the same directory as the SQL script) that there are no errors.
4. If an error occurs while applying particular patch in the migration, the database rolls back changes made by that patch. It will, however, commit changes once a whole migration patch
has been successfully applied, and mark patch as “applied”. Migration will not reapply that
patch again in case of migration rerun. If an error occurs partway through the process, then
you can fix the problem and rerun the process without harm. If you cannot resolve the error
yourself, contact Technical Support and send the entire log file (along with any other logs you
have from the day) to our Technical Support team.
Migrating to 5.0 LA: Apply 5.0 LA Patch
1. In SQL*Plus as user GLOGOWNER, run:
@dbpatch_50a.sql
2. Enter the passwords and database connection strings when prompted.
3. Check the log files (dbpatch log and update_content log) to ensure they are error free before
proceeding to the next step.
Migrating to 5.0 GA: Updating the Structure
1. On the Application server change to directory
<otm50_install_path>/glog/oracle/script8.
2. In SQL*Plus as GLOGOWNER, run
@dbupdate_50b.sql to update the database with all the new 5.0 tables and columns.
3. Enter the glogowner password, reportowner password, and database connection when
prompted.
After the process has run, verify in the dbupdate_50b_<dbsid>_<timestamp>.log file (located in the
same directory as source) that there are no errors. If the solution to the error is apparent, then you can fix the problem and rerun the dbupdate_50b.sql process again, without harm (you may also want to rerun to see if it automatically resolves your problem). Contact Technical Support if the problem is not resolvable, and send the entire log file (along with any other logs you have from the day) to our Technical Support team. Do not continue until the dbupdate_50b log is clean.
Migrating to 5.0 GA: Updating Data Content
The Oracle Transportation Management 5.0 database includes Oracle Transportation Sourcing (formerly Procurement) structures and data contents even though you have not purchased the Oracle
Transportation Sourcing (formerly Procurement) component license. The database structure has been loaded in the previous step, while the content is loaded below after normal Oracle Transportation Management content loading.
Copyright © 2001, 2016, Oracle and/or its affiliates. All rights reserved. 2-10
1. Update the Oracle Transportation Management PUBLIC data by running update_content. This
process is run at the host command line, rather than from within SQL*Plus. Two command scripts have been provided; the script you use is dependent on your operating system:
UNIX shell script:
./update_content.sh <otm_install_path>/glog/config V50B
or
DOS command script:
update_content <otm_install_path>\glog\config V50B
2. Review the log file called update_content_v50B_<timestamp>.log for errors (located in the
same directory as the SQL script). Look for errors by searching key words like “ORA-“,
“Caught exception”,”SP2-“, or “<Error>“ within the log file.
3. Load the Oracle Transportation Sourcing (formerly Procurement) PUBLIC data by running
update_procure_content. This process is run at the host command line, rather than from
within SQL*Plus. Two command scripts have been provided; the script you use is dependent on your operating system:
UNIX shell script:
./update_procure_content.sh <otm_install_path>/glog/config V50B
or
DOS command script:
update_procure_content <otm_install_path>\glog\config V50B
4. Review the log file called update_procure_content_v50B_<timestamp>.log for errors
(located in the same directory as the SQL script). Look for errors by searching key words like
“ORA-“, “Caught exception”,”SP2-“, within the log file.
Migrating to 5.0 GA: Data Migration
1. In SQL*Plus as GLOGOWNER, run:
@dbmigrate_50b.sql
2. Enter the password and database connection string when prompted.
Note: The script might run for several hours depending on the amount of data to process.
3. After the process has run, verify in the dbmigrate_50b_<dbsid>_<timestamp>.log file
(located in the same directory as the SQL script) that there are no errors.
4. If an error occurs while applying particular patch in the migration, the database rolls back
changes made by that patch. It will, however, commit changes once a whole migration patch has been successfully applied, and mark patch as “applied”. Migration will not reapply that
patch again in case of migration rerun. If an error occurs partway through the process, then
you can fix the problem and rerun the process without harm. If you cannot resolve the error yourself, contact Technical Support and send the entire log file (along with any other logs you
have from the day) to our Technical Support team.
Running Security Role Script
1. Go to the <otm_install_path>\glog\oracle directory on the Oracle Transportation Management
application server. In SQL*Plus as GLOGOWNER, run:
@insert_security_roles.sql
Copyright © 2001, 2016, Oracle and/or its affiliates. All rights reserved. 2-11
The remaining steps are not critical to the upgrade but provide helpful information.
Reviewing Obsolete Tables and Columns
When a table or column becomes obsolete during an upgrade, the table/column is renamed with XX<version object became obsolete>_<original name of table/column>.
1. To generate SQL for dropping obsolete objects, run: @gen_obsolete_objects.sql as
GLOGOWNER.
Note: This will not include objects that just became obsolete in the current version, as a
safety precaution. This script will generate a SQL script called drop_obsolete_objects.sql, which you can review and run at a convenient time.
Verifying Saved Queries
After the upgrade, some of your saved queries may no longer be valid due to changes in table structure.
1. Run the following to verify the saved queries:
@validate_saved_query.sql
If there are invalid saved queries, you can decide what to do with them (remove the records or modify them to correct the syntax).
Upgrading the ROD
After the GC3 4.5 to Oracle Transportation Management 5.0 migration, the Oracle Fusion Transportation Intelligence Replicated Operational Database (ROD) will not automatically be aware of new or changed Oracle Transportation Management tables. If structural changes occurred, the automatic refresh process will fail until the following steps have been completed.
Run the following command to create logs for new tables. It will skip tables that already have a log.
1. On the OLTP database in SQL*Plus as GLOGOWNER, run:
@create_mview_logs
2. On the ROD database in SQL*Plus as GLOGOWNER, run:
@dbupdate_rod.sql
This will first identify broken views caused by obsolete columns. It will then build (or rebuild) the materialized views for any new/modified tables.
Note: This will not automatically add columns that were added during an upgrade. This is
because the materialized view would need to be recreated from scratch again, and you may
not even need those new columns. Therefore, views should only need to be completely refreshed when a column has been removed, or modified in a way that Oracle Fusion
Transportation Intelligence needs a new copy of the data. Once the views are set, it
refreshes the views and builds any new indexes.
Upgrading from Version 5.0 to 5.5
Any new Oracle Transportation Management installation should be tested in a controlled environment
before migrating your production database. This ensures that any potential problems or incompatibilities don’t affect your production Oracle Transportation Management instance(s).

Copyright © 2001, 2016, Oracle and/or its affiliates. All rights reserved. 2-12
Note: If you are migrating from a version earlier than 5.0 you must complete each
previous version’s migration instructions. You cannot skip any migration steps. Please go through all upgrade steps to 5.0 prior to starting the 5.0 to 5.5 migration.
The structure of the database to be migrated should be consistent with the Oracle Transportation Management 5.0 database specification; otherwise, the migration will fail.
Custom Help
If you have written custom documentation for Oracle Transportation Management, you can link it to the Oracle Transportation Management help. A file exists for you to customize. You must know some
elementary HTML in order to edit the file. By editing the HTML of the file general/custom_help.htm,
you can add links to any documents that you have written to supplement Oracle Transportation
Management's documentation. Alternatively, you can replace that topic with one of the same name that you have created.
Note: If you choose to edit that topic and add your own documentation or links to your
own documentation, be careful not to overwrite the file when you upgrade your software.
If you install a consolidated update, that help file will be overwritten when the new help is
installed. To avoid overwriting your edited help topic, make a backup of the file before
upgrading. Then, replace the newly installed file with the one from your backup.
Applying Oracle Transportation Management 5.0 Consolidated Updates
Important: Ensure that your environment is setup correctly by running:
On UNIX: “. <otm_install_path>/install/gc3env.sh”
On Windows: “<otm_install_path>\install\gc3env.cmd”
You must also install the latest Oracle Transportation Management 5.0 Service Release to your Oracle Transportation Management 5.0 installation and apply the Service Release script to your 5.0 database to ensure that any known migration issues have been patched and resolved.
1. Log in as GLOGOWNER and run dbpatch_50b.sql (which resides in the 5.0 directory,
(<otm_50_install_path>/glog/oracle/script8/).
Note: Do not continue with the upgrade until the dbpatch log is completely clean. Contact
Technical Support if you have any questions or concerns.
Migrating GC3 5.0 Database to 5.5
Updating the Structure
If 5.5 CUs are available, you should install the latest CU before running the following database migration steps. This is important since bugs, if any, in the database migration scripts would get fixed
in the Service Releases. Therefore, you will not run into any known issues.
1. On the app server, change to directory <otm_55_install_path>/glog/oracle/script8.
2. In SQL*Plus log in as GLOGOWNER
3. Run @dbupdate_55.sql to update the database with all the new tables and columns to 5.5.
4. Enter the glogowner password, reportowner password, archive password, and database
connection when prompted.
Copyright © 2001, 2016, Oracle and/or its affiliates. All rights reserved. 2-13
5. After the process has run, verify in the dbupdate_55_<dbsid>_<timestamp>.log file (located
in the same directory as source) that there are no errors. If the solution to the error is apparent, then you can fix the problem and then rerun the dbupdate_55.sql process again,
without harm (you may also want to rerun to see if it automatically resolves your problem).
Contact Technical Support if the problem is not resolvable, and send the entire log file (along with any other logs you have from the day) to our Technical Support team. Do not continue
until the dbupdate_55 log is clean.
Updating Data Content
1. Update the PUBLIC data by running update_content. This process is run at the host command line rather than from within SQL*Plus. Two command scripts are provided and the script you
use is dependent on your operating system:
UNIX shell script:
./update_content.sh <otm_install_path>/glog/config V55
or
Windows command line script:
update_content <otm_install_path>\glog\config V55
2. Review the log file called update_content_v55_<timestamp>.log for errors (located in the
same directory as the SQL script). Look for errors by searching key words like “ORA-“,
“Caught exception”,”SP2-“, or “<Error>“ within the log file. Do not continue until the
update_content log is clean.
Migrating Data
1. In SQL*Plus as GLOGOWNER, run:
@dbmigrate_55.sql.
2. Enter the password and database connection string when prompted.
3. After the process has run, verify in the dbmigrate_55_<dbsid>_<timestamp>.log file (located
in the same directory as the SQL script) that there are no errors.
4. If an error occurs while applying particular patch in the migration, the database rolls back changes made by that patch. It will, however, commit changes once a whole migration patch
has been successfully applied, and mark patch as “applied”. Migration will not reapply that
patch again in case of migration rerun. If an error occurs partway through the process, then you can fix the problem and rerun the process without harm. If you cannot resolve the error
yourself, contact Technical Support and send the entire log file (along with any other logs you
have from the day) to our Technical Support team.
Applying 5.5 Consolidated Update
If the 5.5 Consolidated Update is available, apply the latest CU to the database.
1. In SQL*Plus as user GLOGOWNER, run:
@dbpatch_55.sql
2. Enter the passwords and database connection strings when prompted.
3. Check the log files (dbpatch log and update_content log) to ensure they are error free before
proceeding to the next step.
Running Security Role Script
1. Go to the <otm_install_path>\glog\oracle directory on the Oracle Transportation
Management application server. In SQL*Plus as GLOGOWNER, run:
@insert_security_roles.sql
The remaining steps are not critical to the upgrade but provide helpful information.
Copyright © 2001, 2016, Oracle and/or its affiliates. All rights reserved. 2-14
Reviewing Obsolete Tables and Columns
When a table or column becomes obsolete during an upgrade, the table/column is renamed with XX<version object became obsolete>_<original name of table/column>.
1. To generate SQL for dropping obsolete objects, run: @gen_obsolete_objects.sql as
GLOGOWNER.
Note: This will not include objects that just became obsolete in the current version, as a safety precaution. This script will generate a SQL script called drop_obsolete_objects.sql,
which you can review and run at a convenient time. Do not run
drop_obsolete_objects.sql script right after the database migration to prevent accidental dropping newly obsolete objects.
Verifying Saved Queries
After the upgrade, some of your saved queries may no longer be valid due to changes in table structure.
1. Run the following to verify the saved queries:
@validate_saved_query.sql
If there are invalid saved queries, you can decide what to do with them (remove the records or modify them to correct the syntax).
Upgrading the Oracle Fusion Transportation Intelligence ROD
After the 5.0 to 5.5 migration, the Oracle Fusion Transportation Intelligence ROD will not automatically be aware of new or changed Oracle Transportation Management tables. If structural changes occurred, the automatic refresh process will fail until the following steps have been completed.
Run the following command to create logs for new tables. It will skip tables that already have a log.
1. On the OLTP database in SQL*Plus as GLOGOWNER, run:
@create_mview_logs
2. On the ROD database in SQL*Plus as GLOGOWNER, run:
@dbupdate_rod.sql
This will first identify broken views caused by obsolete columns. It will then build (or rebuild) the
materialized views for any new/modified tables.
Note: This will not automatically add columns that were added during an upgrade. This is
because the materialized view would need to be recreated from scratch again, and you may
not even need those new columns. Therefore, views should only need to be completely refreshed when a column has been removed, or modified in a way that Oracle Fusion
Transportation Intelligence needs a new copy of the data. Once the views are set, it
refreshes the views and builds any new indexes.
Upgrading from Version 5.5 to 6.3
Any new Oracle Transportation Management installation should be tested in a controlled environment
before migrating your production database. This ensures that any potential problems or
incompatibilities don’t affect your production Oracle Transportation Management instance(s).
Copyright © 2001, 2016, Oracle and/or its affiliates. All rights reserved. 2-15
Note: If you are migrating from a version earlier than 5.5 you must complete each
previous version’s migration instructions. You cannot skip any migration steps. Please go through all upgrade steps to 5.5 prior to starting the 5.5 to 6.3 migration.
The structure of the database to be migrated should be consistent with the Oracle Transportation Management 5.5 database specification; otherwise, the migration will fail.
Custom Help
If you have written custom documentation for Oracle Transportation Management, you can link it to the Oracle Transportation Management help. A file exists for you to customize. You must know some
elementary HTML in order to edit the file. By editing the HTML of the file general/custom_help.htm,
you can add links to any documents that you have written to supplement Oracle Transportation
Management's documentation. Alternatively, you can replace that topic with one of the same name that you have created.
Note: If you choose to edit that topic and add your own documentation or links to your
own documentation, be careful not to overwrite the file when you upgrade your software.
If you install a consolidated update, that help file will be overwritten when the new help is
installed. To avoid overwriting your edited help topic, make a backup of the file before
upgrading. Then, replace the newly installed file with the one from your backup.
Applying Oracle Transportation Management 5.5 Consolidated Updates
You must install the latest Oracle Transportation Management 5.5.06 to your Oracle Transportation
Management 5.5 installation. You must also apply all of the Roll Up (RU) patches available for the
5.5.06 to ensure that any known migration issues have been patched and resolved.
1. Log in as GLOGOWNER and run dbpatch_55.sql (which resides in the 5.5 directory,
<otm_55_install_path>/glog/oracle/script8/).
Note: Do not continue with the upgrade until the dbpatch_55 log is completely clean.
Contact Technical Support if you have any questions or concerns.
Migrating Oracle Transportation Management 5.5 Database to 6.3
You must install latest Roll Up release (6.3.x) of 6.3 as per Installation guide’s section “INSTALLING OTM” of Roll Up release. Proceed to below listed steps after successful installation of latest Roll Up release (6.3.x).
Following steps require database version 11g, do not upgrade database to version 12c until successful completion of these steps.
Running the Oracle Fusion Transportation Intelligence Data Cleanup Utility
Migration of the Oracle Fusion Transportation Intelligence solution from the version 5.5 to 6.3 will involve automatic clean-up of unsupported data in the TARGET_TYPE, TARGET_VALUE and
E_KPI_TARGET_VALUE_TYPE tables. To see the exact data that is cleaned up by the migration script, the aa_user_entered_cleanup.sql SQL script is provided. You should run this script before updating
structure of the OLTP database to the Oracle Transportation Management 6.0 version. Perform following steps to run this utility script.
1. On the app server, change to directory <otm_install_path>/glog/oracle/script8.
2. In SQL*Plus log in as GLOGOWNER and run @ aa_user_entered_cleanup.sql. Data will be
spooled into e_kpi*.csv files.
Copyright © 2001, 2016, Oracle and/or its affiliates. All rights reserved. 2-16
Pre-migration tasks
1. On the application server, change to directory <otm_install_path>/glog/oracle/script8.
2. In SQL*PLUS as the GLOGOWNER user, run the following script to check for missing data. The script will update data if default value exists or notifies the user if it does not exist. For the
reported columns, populate column data with the appropriate value prior to proceeding with
rest of the migration.
@pre_migrate_60.sql
3. Oracle Transportation Management database objects must be in VALID status prior to starting
the migration. Also, all Primary Key, Unique Key, Foreign key, and check constraints must be
in ENABLED and VALIDATED status prior to starting the migration.
Run the following query on the database to identify INVALID objects. If there are INVALID objects, take necessary action to make them VALID. select * from dba_objects where owner in ('GLOGOWNER','REPORTONWER',
'ARCHIVE') and status <> 'VALID' and object_name NOT IN
('CREATE_TABLE','PRIMARY_KEY','FOREIGN_KEY','CHECKC','CREATE_INDEX','CREATE_
SEQUENCE','ALTER_TABLE');
Run the following query on the database to identify DISABLED or NOT VALIDATED constraints. If there are DISABLED or NOT VALIDATED constraints, take necessary action to make them ENABLED and VALIDATED. select * from dba_constraints where ( status <> 'ENABLED' or validated <>
'VALIDATED' ) and owner in ('GLOGOWNER','REPORTOWNER','ARCHIVE') and
constraint_type in ('C','P','U','R');
validate_constraints.sql script is provided to enable constraints if it is
possible to enable constraints without changing any data. The script is
located in the <otm_install_path>/glog/oracle/script8 directory. Run this
script as the respective schema owner to enable constraint in the schema.
Note: This script does not fix data, Data modification may be require to enable constraints.
4. Migration requires all privileges and roles granted by Oracle Transportation Management. If
any privilege or role has been revoked from Oracle Transportation Management database users, restore it as provided by Oracle Transportation Management prior to starting the
migration.
5. Grant EXEMPT ACCESS POLICY privilege to database user GLOGOWNER. As SYSDBA, execute
grant exempt access policy to glogowner
6. A database backup or database level flashback restore point should be created prior to starting the migration. It may be required to restore the database to pre-migration state in case of a
problem during migration, depending on changes made on the database and errors.
Updating the Structure
1. On the app server, change to directory <otm_install_path>/glog/oracle/script8.
2. In SQL*PLUS as SYS user, run the following script to create new tablespaces required for Oracle Transportation Management 6.3:
@create_mobilcomm_tablespaces.sql
Note: This script creates two new tablespaces MSG_PART_TBS1 and MSG_LOB_TBS1. If this procedure has been already ran as part of previous migration then skip this step.
Check the log file (create_mobilcomm_tablespaces.log) to ensure they are error free
before proceeding to the next step.
Copyright © 2001, 2016, Oracle and/or its affiliates. All rights reserved. 2-17
3. Update the database with all the new tables and columns to 6.3 by running dbupdate_60
process. This process is run at the host command line; Two command scripts are provided and the script you use is dependent on your operating system:
UNIX shell script:
./dbupdate_60.sh
or
Windows command line script:
dbupdate_60.cmd
4. Enter the database connection, glogowner password, reportowner password, archive
password, archive database connection, archive database glogowner password, SYS user
password, DBA user name that can alter database users, and its password when prompted.
5. After the process has run, verify in the dbupdate_60_<dbsid>_<timestamp>.log file (located
in the same directory as source) that there are no errors. If the solution to the error is
apparent, then you can fix the problem and then rerun the dbupdate_60.sql process again, without harm (you may also want to rerun to see if it automatically resolves your problem).
Contact Technical Support if the problem is not resolvable, and send the entire log file (along
with any other logs you have from the day) to our Technical Support team. Do not continue
until the dbupdate_60 log is clean.
Updating Data Content
1. Update the PUBLIC data by running update_content. This process is run at the host command
line rather than from within SQL*Plus. Two command scripts are provided and the script you
use is dependent on your operating system: UNIX shell script:
./update_content.sh <otm_install_path>/glog/config V60 <Database TNS connection
id>
or
Windows command line script:
update_content.cmd <otm_install_path>\glog\config V60 <Database TNS connection
id>
2. Review the log file called update_content_<timestamp>.log for errors (located in the same
directory as the SQL script). Look for errors by searching key words like “ORA-“, “Caught
exception”,”SP2-“, or “<Error>“ within the log file.
Note: Do not continue until the update_content log is clean.
Migrating Data
1. Migrate data by running dbmigrate_60 process. This process is run at the host command line;
two command scripts are provided and the script you use is dependent on your operating system:
UNIX shell script:
./dbmigrate_60.sh
Copyright © 2001, 2016, Oracle and/or its affiliates. All rights reserved. 2-18
or
Windows command line script:
dbmigrate_60.cmd
2. Enter database connection ID, glogowner password, and property file location when prompted.
3. After the process has run, verify in the dbmigrate_60_<dbsid>_<timestamp>.log file (located
in the same directory as the SQL script) that there are no errors.
Patching the Database
1. Additionally, apply remaining database changes by running dbpatch_60 process. Successful
completion of this script will bring the database up to version 6.3.0. This process is run at the host command line; Two command scripts are provided and the script you use is dependent
on your operating system:
UNIX shell script:
./dbpatch_60.sh
or
Windows command line script:
dbpatch_60.cmd
2. Enter the database connection, glogowner password, reportowner password, archive password, archive database connection, archive database glogowner password, property file
location, SYS user password, DBA user name that can alter database users, and its password
when prompted.
3. Check the log files (dbpatch log, update_content log or any other generated log file) to ensure they are error free before proceeding to the next step. Look for errors by searching key words
like “ORA-“, “Caught exception”,”SP2-“, “PLS-“,”IMP-“,”Warning:”,” Caught exception”, “SQL*
Loader-” ,” SQLException”, “SQLRecoverableException” or “<Error>“ within the log file.
4. If an error occurs while applying particular patch in the migration, the database rolls back changes made by that patch. It will, however, commit changes once a whole migration patch
has been successfully applied, and mark patch as “applied”. Migration will not reapply that
patch again in case of migration rerun. If an error occurs partway through the process, then you can fix the problem and rerun the process without harm. If you cannot resolve the error
yourself, contact Technical Support and send the entire log file (along with any other logs you
have from the day) to our Technical Support team.
The remaining steps are not critical to the upgrade but provide helpful information.
Reviewing Obsolete Tables and Columns
When a table or column becomes obsolete during an upgrade, the table/column is renamed with XX<version object became obsolete>_<original name of table/column>.
1. To generate SQL for dropping obsolete objects, run: @gen_obsolete_objects.sql as
GLOGOWNER.
This script will generate a SQL script called drop_obsolete_objects.sql, which you can review and run at a convenient time. Do not run drop_obsolete_objects.sql script
right after the database migration to prevent accidental dropping newly obsolete
objects.

Copyright © 2001, 2016, Oracle and/or its affiliates. All rights reserved. 2-19
Verifying Saved Queries
After the upgrade, some of your saved queries may no longer be valid due to changes in table structure.
1. In SQL*Plus as user GLOGOWNER, run the following to verify the saved queries:
@validate_saved_query.sql
If there are invalid saved queries, you can decide what to do with them (remove the records or modify them to correct the syntax).
Upgrading the Oracle Fusion Transportation Intelligence (FTI) Database
1. If Oracle Fusion Transportation Intelligence Historical Database (HDOWNER schema) is
installed on Replicated Operational Database, make sure that the ROD database table structure also is upgraded to match with OLTP prior to proceeding. Change to directory
<otm_install_path>/glog/oracle/script8/advanced_analytics.
2. SQL*Plus log in as HDOWNER
3. Run @aa_dbupdate_60.sql to update the database with all the new tables and columns to 6.3.
4. Enter the hdowner password, SYS password, database connection for Oracle Fusion
Transportation Intelligence database, glogowner password for OLTP database and database connection for OLTP database, Y or N depending on the machine type, and glog property file
location when prompted.
5. After the process has run, verify in the aa_dbupdate_60_<dbsid>_<timestamp>.log file
(located in the same directory as source) that there are no errors. Also verify that
csvone_aa_W_LOCALIZED_STRING_G.log file does not have any errors like “ORA-“, “Caught
exception”,”SP2-“, or “<Error>”. If the solution to the error is apparent, then you can fix the
problem and then rerun the aa_dbupdate_60.sql process again, without harm (you may also want to rerun to see if it automatically resolves your problem). Contact Technical Support if
the problem is not resolvable, and send the entire log file (along with any other logs you have
from the day) to our Technical Support team. Do not continue until the aa_dbupdate_60
log is clean.
Updating Oracle Fusion Transportation Intelligence Data Content
The Oracle Fusion Transportation Intelligence data content in the Historical Database includes only the metadata translations.
1. On the OTM server go to the directory <otm_install_path>/glog/oracle/script8.
2. Update the data content by running update_content_aa. This process is run at the host command line rather than from within SQL*Plus. Two command scripts are provided and the
script you use is dependent on your operating system:
UNIX shell script:
./update_content_aa.sh <otm_install_path>/glog/config
or
Windows command line script:
update_content_aa.cmd <otm_install_path>\glog\config
3. Review the log file called update_content_<timestamp>.log for errors (located in the same
directory as the SQL script). Look for errors by searching key words like “ORA-“, “Caught
exception”,”SP2-“, or “<Error>“ within the log file.
Copyright © 2001, 2016, Oracle and/or its affiliates. All rights reserved. 2-20
Migrating Oracle Transportation Management 6.0 Database to 6.3
You must install latest Roll Up release (6.3.x) of 6.3 as per Installation guide’s section “INSTALLING OTM” of Roll Up release. Proceed to below listed steps after successful installation of latest Roll Up release (6.3.x).
Note: The following steps require database version 11g, do not upgrade database to version 12c until successful completion of these steps.
Pre-migration tasks
1. On the application server, change to directory <otm_install_path>/glog/oracle/script8.
2. In SQL*PLUS as the GLOGOWNER user, run the following script to check for missing data. The
script will update data if default value exists or notifies the user if it does not exist. For the
reported columns, populate column data with the appropriate value prior to proceeding with
rest of the migration.
@pre_migrate_60.sql
3. Oracle Transportation Management database objects must be in VALID status prior to starting
the migration. Also, all Primary Key, Unique Key, Foreign key, and check constraints must be
in ENABLED and VALIDATED status prior to starting the migration.
Run the following query on the database to identify INVALID objects. If there are INVALID
objects, take necessary action to make them VALID.
select * from dba_objects where owner in ('GLOGOWNER','REPORTONWER',
'ARCHIVE') and status <> 'VALID' and object_name NOT IN
('CREATE_TABLE','PRIMARY_KEY','FOREIGN_KEY','CHECKC','CREATE_INDEX','CREATE_
SEQUENCE','ALTER_TABLE');
Run the following query on the database to identify DISABLED or NOT VALIDATED constraints.
If there are DISABLED or NOT VALIDATED constraints, take necessary action to make them
ENABLED and VALIDATED.
select * from dba_constraints where ( status <> 'ENABLED' or validated <>
'VALIDATED' ) and owner in ('GLOGOWNER','REPORTOWNER','ARCHIVE') and
constraint_type in ('C','P','U','R');
validate_constraints.sql script is provided to enable constraints if it is
possible to enable constraints without changing any data. The script is
located in the <otm_install_path>/glog/oracle/script8 directory. Run this
script as the respective schema owner to enable constraint in the schema.
Note: This script does not fix data, Data modification may be require to enable constraints.
4. Migration requires all privileges and roles granted by Oracle Transportation Management. If
any privilege or role has been revoked from Oracle Transportation Management database
users, restore it as provided by Oracle Transportation Management prior to starting the
migration.
5. Grant EXEMPT ACCESS POLICY privilege to database user GLOGOWNER. As SYSDBA, execute
grant exempt access policy to glogowner.
6. A database backup or database level flashback restore point should be created prior to starting
the migration. It may be required to restore the database to pre-migration state in case of a
problem during migration, depending on changes made on the database and errors.
Upgrading 6.0 database to 6.3
1. On the app server, change to directory <otm_install_path>/glog/oracle/script8.
Copyright © 2001, 2016, Oracle and/or its affiliates. All rights reserved. 2-21
2. In SQL*PLUS as SYS user, run following script to create new tablespaces required for Oracle
Transportation Management version 6.3:
@create_mobilcomm_tablespaces.sql
Note: This script creates two new tablespaces MSG_PART_TBS1 and MSG_LOB_TBS1. If
this procedure has been already ran as part of previous migration then skip this step.
3. Apply database changes by running dbpatch_60 process. Successful completion of this script
will bring the database up to version 6.3.0. This process is run at the host command line. Two
command scripts are provided and the script you use is dependent on your operating system: UNIX shell script:
./dbpatch_60.sh
or
Windows command line script:
dbpatch_60.cmd
4. Enter the database connection, glogowner password, reportowner password, archive
password, archive database connection, archive database glogowner password, property file
location, SYS user password, DBA user name that can alter database users, and its password
when prompted.
5. Check the log files (dbpatch_<version>_<dbname>_<timestamp>. log ,
update_content_<version>_<dbname>_<timestamp>. log , or any other generated log file )
to ensure they are error free before proceeding to the next step. Look for errors by searching key words like “ORA-“, “Caught exception”,”SP2-“, “PLS-“,”IMP-“,”Warning:”,” Caught
exception”, “SQL* Loader-” ,” SQLException”, “SQLRecoverableException” or “<Error>“ within
the log file.
6. If an error occurs while applying particular patch in the migration, the database rolls back changes made by that patch. It will, however, commit changes once a whole migration patch
has been successfully applied, and mark patch as “applied”. Migration will not reapply that
patch again in case of migration rerun. If an error occurs partway through the process, then you can fix the problem and rerun the process without harm. If you cannot resolve the error
yourself, contact Technical Support and send the entire log file (along with any other logs you
have from the day) to our Technical Support team.
The remaining steps are not critical to the upgrade but provide helpful information.
Reviewing Obsolete Tables and Columns
When a table or column becomes obsolete during an upgrade, the table/column is renamed with
XX<version object became obsolete>_<original name of table/column>.
To generate SQL for dropping obsolete objects, run: @gen_obsolete_objects.sql as GLOGOWNER.
Note: This will not include objects that just became obsolete in the current version, as a
safety precaution. This script will generate a SQL script called drop_obsolete_objects.sql, which you can review and run at a convenient time. Do not
run drop_obsolete_objects.sql script right after the database migration to
prevent accidental dropping newly obsolete objects.
Verifying Saved Queries
After the upgrade, some of your saved queries may no longer be valid due to changes in table structure.
Run the following to verify the saved queries:
Copyright © 2001, 2016, Oracle and/or its affiliates. All rights reserved. 2-22
@validate_saved_query.sql
If there are invalid saved queries, you can decide what to do with them (remove the records or modify them to correct the syntax).
Changing Application Server Default Users Passwords
After the upgrade, the system and guest passwords should be changed using the instructions provided in the "Oracle Application Server Default Users" section of the Security Guide. This will allow utilization of more robust encryption logic provided in 6.3. If this step is not performed, then warning messages could be seen in application console logs.
If you have additional application users that do not actually manually log into the application, then the
passwords for these users should be changed for the utilization of the more robust encryption logic provided in 6.3. These application users could include users that are used in automated scripts, recurring process, or some kind of scheduled diagnostic collection.
Upgrading the Oracle Fusion Transportation Intelligence Database
If Oracle Fusion Transportation Intelligence Historical Database (HDOWNER schema) is installed on Replicated Operational Database, make sure that the ROD database table structure is also upgraded to match with OLTP prior to proceeding. Change to directory <otm_install_path>/glog/oracle/script8/advanced_analytics.
1. SQL*Plus log in as HDOWNER
2. Run @aa_dbupdate_60.sql to update the database with all the new tables and columns to 6.3.
3. Enter the hdowner password, system password, database connection for Oracle Fusion
Transportation Intelligence database, and glogowner password for OLTP database and
database connection for OLTP database when prompted.
After the process has run, verify in the aa_dbupdate_60_<dbsid>_<timestamp>.log file (located in
the same directory as source) that there are no errors. Look for errors by searching key words like
“ORA-“, “Caught exception”,”SP2-“, “PLS-“,”IMP-“,”Warning:”,” Caught exception”, “SQL* Loader-” ,” SQLException”, “SQLRecoverableException” or “<Error>“ within the log file. If the solution to the error is apparent, then you can fix the problem and then rerun the aa_dbupdate_60.sql process again,
without harm (you may also want to rerun to see if it automatically resolves your problem). Contact Technical Support if the problem is not resolvable, and send the entire log file (along with any other logs you have from the day) to our Technical Support team. Do not continue until the aa_dbupdate_60 log is clean.
Updating Fusion Transportation Intelligence Data Content
The Oracle Fusion Transportation Intelligence data content in the Historical Database includes only the metadata translations.
1. On the OTM server go to the directory <otm_install_path>/glog/oracle/script8.
2. Update the data content by running update_content_aa. This process is run at the host command line rather than from within SQL*Plus. Two command scripts are provided and the
script you use is dependent on your operating system:
UNIX shell script:
./update_content_aa.sh <otm_install_path>/glog/config
or
Windows command line script:
update_content_aa.cmd <otm_install_path>\glog\config
Copyright © 2001, 2016, Oracle and/or its affiliates. All rights reserved. 2-23
3. Review the log file called update_content_<timestamp>.log for errors (located in the same
directory as the SQL script). Look for errors by searching key words like “ORA-“, “Caught
exception”,”SP2-“, or “<Error>“ within the log file.
Creating Oracle Data Integrator Database Users
Now, you create the following Oracle Data Integrator users required for FTI. When you run the create_odi_users.sql script, you will be prompted for the password for each user listed below.
ftiodimaster
ftiodiwork
ftiodistage
To create these users, complete the following:
1. Log into the database (as per your deployment architecture discussed above) where you
want to create the ODI related repositories for Oracle FTI.
2. Using SQL*Plus, as user SYS, run the following script from the directory:
<otm_install_path>\glog\oracle\script8\advanced_analytics\create_odi_user
s.sql
3. You see an explanation of what the script will do followed by some questions:
a. Enter SYS password to login as SYSDBA.
b. Enter the Connection ID of the database to which you are logging in as SYSDBA.
This will typically be the same database on which you installed the HDOWNER
schema.
c. Enter password for user ftiodimaster.
Make note of this password because you will need it later in the FTI upgrade
process.
d. Enter password for user ftiodiwork.
Make note of this password because you will need it later in the FTI upgrade
process.
e. Enter password for user ftiodistage.
Make note of this password because you will need it later in the FTI upgrade
process.
Migrating Oracle Transportation Management 6.1, 6.2 Database to 6.3
Follow the instructions in the Migrating Oracle Transportation Management 6.0 Database to 6.3 section to migrate Oracle Transportation Management 6.1, 6.2 to 6.3.
Migrating Oracle Transportation Management 5.5 Database to 6.4.2
1. Migrate Oracle Transportation Management database to 6.3 by following instructions in the section Upgrading from Version 5.5 to 6.3.
2. Migrate Oracle Transportation Management database from 6.3 to 6.4.2 by following instructions in the section Migrating Oracle Transportation Management 6.3 Database to 6.4.2.
Copyright © 2001, 2016, Oracle and/or its affiliates. All rights reserved. 2-24
Migrating Oracle Transportation Management 6.0, 6.1, 6.2 Database to 6.4.2
1. Migrate Oracle Transportation Management database to 6.3 by following instructions in the
section Migrating Oracle Transportation Management 6.0 Database to 6.3.
2. Migrate Oracle Transportation Management database from 6.3 to 6.4.2 by following
instructions in the section Migrating Oracle Transportation Management 6.3 Database
to 6.4.2.
Migrating Oracle Transportation Management 6.3 Database to 6.4.2
Any Oracle Transportation Management migration should be tested in a controlled environment before
migrating your production database. This ensures that any potential problems or incompatibilities don’t affect your production Oracle Transportation Management instance(s).
Note: If you are migrating from a version earlier than 6.3 you must complete each previous version’s migration instructions. You cannot skip any migration steps. Please go
through all upgrade steps to 6.3 prior to starting the 6.3 to 6.4.2 migration.
The structure of the database to be migrated should be consistent with the Oracle Transportation Management version 6.3 database specification; otherwise, the migration will fail.
You must install Oracle Transportation Management 6.4.2 as per Installation Guide’s section “INSTALLING OTM” of 6.4.2 release. Proceed to below listed steps after successful installation of 6.4.2.
Note: Oracle Transportation Management 6.4.2 requires database version 12c. The
database must be version 12c with latest recommended database patches applied. Also the
database client must be version 12c (Administrator install) on all application servers.
Pre-migration tasks
1. Ensure that following database init parameters are set to sufficient values for Oracle
Transportation Management application. It is recommended that values are set to 3000 or
higher.
Open_cursors = 3000
Processes = 3000
Run following query on the database to find values.
select name, value from v$parameter where name in
('open_cursors','processes');
Check with the DBA if values are lower than 3000.
2. Review agents that had used PRINT DOCUMENT or GENERATE DOCUMENT. As PRINT
DOCUMENT worked on a Report Set, it should be replaced by a PREPARE REPORT action for
each report in the Report Set. GENERATE DOCUMENT was available only to DOCUMENT agents. It would generate a report for an existing document wrapper. This concept was
replaced by the GENERATE STANDARD DOCUMENT action on various business objects.
3. Review reports that specify "Both" for the Report Database field. You may want to copy these
reports before migration and explicitly set one to be "On-Line Database", and one to be "Off-
Line Database". This is not required, but may simplify the report upgrade process.
Copyright © 2001, 2016, Oracle and/or its affiliates. All rights reserved. 2-25
4. Run the following script to perform pre-migration checks. The script will check invalid objects,
disabled constraints, missing database roles, deprecated data or any other checks required prior to starting migration. Check log file pre_migration_check_<dbsid>_<timestamp>.log
and make sure that all checks are passed prior to starting migration.
Two command scripts are provided and the script you use is dependent on your operating
system.
On the application server, change to directory <otm_install_path>/glog/oracle/script8
UNIX shell script:
./pre_migration_check.sh
or
Windows command line script:
pre_migration_check.cmd
5. A database backup or database level flashback restore point should be created prior to starting
the migration. It may be required to restore the database to pre-migration state in case of a
problem during migration, depending on changes made on the database and errors.
Upgrading a 6.3 Database to 6.4.2
Migration to 6.4.2 requires a one-time setup of the new archive schemas. Run the following query to find out if new archive schemas have been set up. Log into database as SYSDBA and execute:
select username from dba_users where username in
('ARCHIVE_C','ARCHIVE_C_USER');
If it returns two rows as shown below, then the new archive schema is already set up and there's no need to execute the Archive Setup step.
USERNAME
------------------------------
ARCHIVE_C
ARCHIVE_C_USER
If it does not return any row as shown above then execute Archive setup step.
Archive Setup
This step creates two tablespaces (ARCH_C_TBS and ARCH_C_LOB_TBS) and two schemas ARCHIVE_C and ARCHIVE_C_USER.
1. On the application server, change to directory <otm_install_path>/glog/oracle/script8.
2. This process is run at the host command line. Two command scripts are provided and the
script you use is dependent on your operating system:
UNIX shell script:
./archive_c/setup_archive_c.sh
or
Windows command line script:
.\archive_c\setup_archive_c.cmd
3. Enter database connection id, SYSDBA user password, DBA user name who has
privilege to alter database users, and its password, ARCHIVE_C user password ,
ARCHIVE_C_USER password
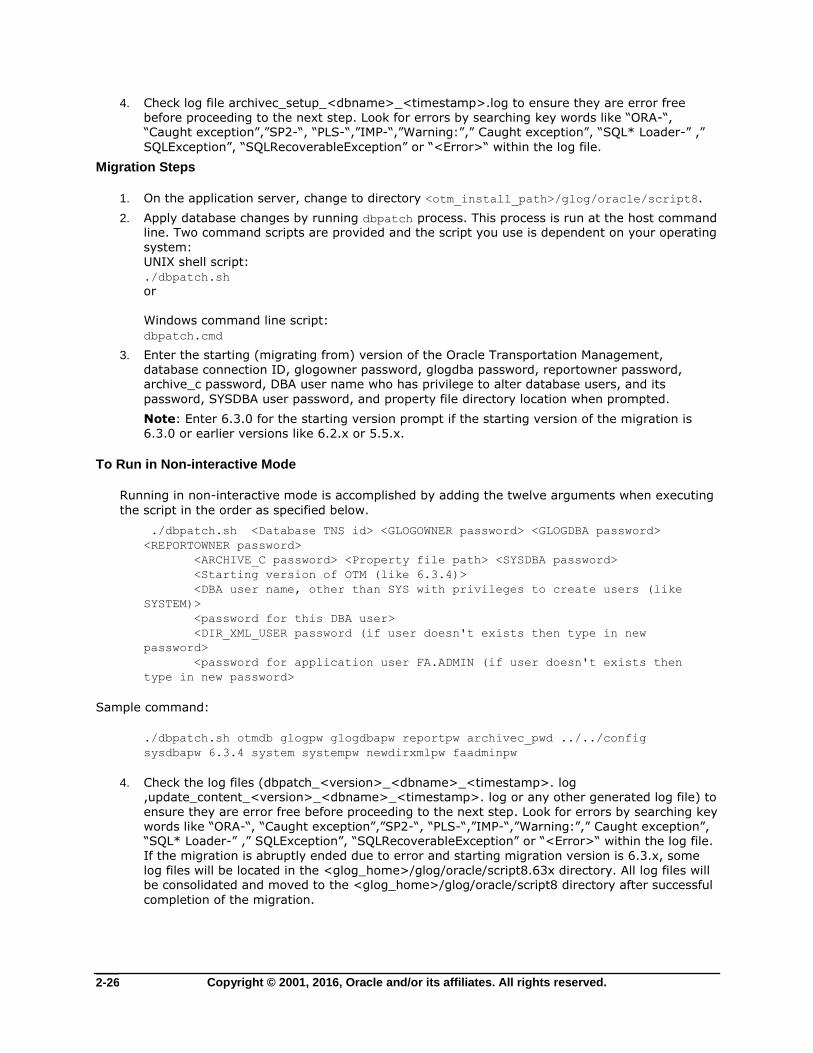
Copyright © 2001, 2016, Oracle and/or its affiliates. All rights reserved. 2-26
4. Check log file archivec_setup_<dbname>_<timestamp>.log to ensure they are error free
before proceeding to the next step. Look for errors by searching key words like “ORA-“, “Caught exception”,”SP2-“, “PLS-“,”IMP-“,”Warning:”,” Caught exception”, “SQL* Loader-” ,”
SQLException”, “SQLRecoverableException” or “<Error>“ within the log file.
Migration Steps
1. On the application server, change to directory <otm_install_path>/glog/oracle/script8.
2. Apply database changes by running dbpatch process. This process is run at the host command line. Two command scripts are provided and the script you use is dependent on your operating
system:
UNIX shell script: ./dbpatch.sh
or
Windows command line script:
dbpatch.cmd
3. Enter the starting (migrating from) version of the Oracle Transportation Management,
database connection ID, glogowner password, glogdba password, reportowner password, archive_c password, DBA user name who has privilege to alter database users, and its
password, SYSDBA user password, and property file directory location when prompted.
Note: Enter 6.3.0 for the starting version prompt if the starting version of the migration is
6.3.0 or earlier versions like 6.2.x or 5.5.x.
To Run in Non-interactive Mode
Running in non-interactive mode is accomplished by adding the twelve arguments when executing
the script in the order as specified below.
./dbpatch.sh <Database TNS id> <GLOGOWNER password> <GLOGDBA password>
<REPORTOWNER password>
<ARCHIVE_C password> <Property file path> <SYSDBA password>
<Starting version of OTM (like 6.3.4)>
<DBA user name, other than SYS with privileges to create users (like
SYSTEM)>
<password for this DBA user>
<DIR_XML_USER password (if user doesn't exists then type in new
password>
<password for application user FA.ADMIN (if user doesn't exists then
type in new password>
Sample command:
./dbpatch.sh otmdb glogpw glogdbapw reportpw archivec_pwd ../../config
sysdbapw 6.3.4 system systempw newdirxmlpw faadminpw
4. Check the log files (dbpatch_<version>_<dbname>_<timestamp>. log ,update_content_<version>_<dbname>_<timestamp>. log or any other generated log file) to
ensure they are error free before proceeding to the next step. Look for errors by searching key
words like “ORA-“, “Caught exception”,”SP2-“, “PLS-“,”IMP-“,”Warning:”,” Caught exception”, “SQL* Loader-” ,” SQLException”, “SQLRecoverableException” or “<Error>“ within the log file.
If the migration is abruptly ended due to error and starting migration version is 6.3.x, some
log files will be located in the <glog_home>/glog/oracle/script8.63x directory. All log files will be consolidated and moved to the <glog_home>/glog/oracle/script8 directory after successful
completion of the migration.
Copyright © 2001, 2016, Oracle and/or its affiliates. All rights reserved. 2-27
5. If an error occurs while applying particular patch in the migration, the database rolls back
changes made by that patch. It will, however, commit changes once a whole migration patch has been successfully applied, and mark patch as “applied”. Migration will not reapply that
patch again in case of migration rerun. If an error occurs partway through the process, then
you can fix the problem and rerun the process without harm. It may be required to restore the database to pre-migration state in case of a problem during migration, depending on changes
made on the database and errors. If you cannot resolve the error yourself, contact Technical
Support and send the entire log file (along with any other logs you have from the day) to our
Technical Support team.
6. Optional Step
Execute the following command to install database listener job which enables processing of XML
transmissions via OAQ.
Note: Do not install the database listener job if OAQ is not being use for processing of XML
transmissions.
Log into database as GLOGOWNER using SQL PLUS.
execute pkg_queue_management.install_queue_listener
Refer to the Integration Guide for details on the setup for use of Oracle Advanced Queuing.
The remaining steps are not critical to the upgrade but provide helpful information.
Reviewing Obsolete Tables and Columns
When a table or column becomes obsolete during an upgrade, the table/column is renamed with
XX<version object became obsolete>_<original name of table/column>.
To generate SQL for dropping obsolete objects, run: @gen_obsolete_objects.sql as GLOGOWNER.
Note: This will not include objects that just became obsolete in the current version, as a
safety precaution. This script will generate a SQL script called
drop_obsolete_objects.sql, which you can review and run at a convenient time. Do not run drop_obsolete_objects.sql script right after the database migration to
prevent accidental dropping newly obsolete objects.
Verifying Saved Queries
After the upgrade, some of your saved queries may no longer be valid due to changes in table
structure.
Run the following to verify the saved queries:
@validate_saved_query.sql
If there are invalid saved queries, you can decide what to do with them (remove the records or modify them to correct the syntax).
Upgrading the Oracle Fusion Transportation Intelligence Database
If Oracle Fusion Transportation Intelligence Historical Database (HDOWNER schema) is installed on Replicated Operational Database, make sure that the ROD database table structure is also upgraded to match with OLTP prior to proceeding. Change to directory
<otm_install_path>/glog/oracle/script8/advanced_analytics.
Copyright © 2001, 2016, Oracle and/or its affiliates. All rights reserved. 2-28
1. Run the following script to perform pre-migration checks. The script will check invalid objects,
disabled constraints, missing database roles, deprecated data or any other checks required prior to starting migration. Check log file
pre_migration_aa_check_<dbsid>_<timestamp>.log. and make sure that all checks are
passed prior to starting migration.
Two command scripts are provided and the script you use is dependent on your operating
system: UNIX shell script:
./pre_migration_aa_check.sh
or
Windows command line script:
pre_migration_aa_check.cmd
2. Apply database changes by running aa_dbpatch process. This process is run at the host
command line. Two command scripts are provided and the script you use is dependent on your operating system:
UNIX shell script:
./aa_dbpatch.sh
or
Windows command line script:
aa_dbpatch.cmd
3. Enter the starting (migrating from) version of the Oracle Transportation Management,
database connection, hdowner password, sys password, database connection for Oracle Fusion Transportation Intelligence database, and glogowner password for OLTP database and
database connection for OLTP database, and property file location when prompted. Note:
Enter 6.3.0 for the starting version prompt if starting version of the migration is 6.3.0 or
earlier versions like 6.2.x or 5.5.x.
4. After the process has run, verify in the aa_dbpatch_<version>_<dbsid>_<timestamp>.log,
aa_update_content_<dbsid>_<timestamp>.log files or any other generated log file (located in
the same directory as source) that there are no errors. Look for errors by searching key words like “ORA-“, “Caught exception”,”SP2-“, “PLS-“,”IMP-“,”Warning:”,” Caught exception”, “SQL*
Loader-” ,” SQLException”, “SQLRecoverableException” or “<Error>“ within the log file. If the
migration is abruptly ended due to error and starting migration version is 6.3.x, some log files will be located in the <glog_home>/glog/oracle/script8.63x/advanced_analytics
directory. All log files will be consolidated and moved to the
<glog_home>/glog/oracle/script8/advanced_analytics directory after successful
completion of the migration.
If the solution to the error is apparent, then you can fix the problem and then rerun the aa_dbpatch process again, without harm (you may also want to rerun to see if it automatically resolves your
problem). It may be required to restore the database to pre-migration state in case of a problem during migration, depending on changes made on the database and errors. Contact Technical Support if the problem is not resolvable, and send the entire log file (along with any other logs you have from the day) to our Technical Support team. Do not continue until the aa_dbpatch and aa_update_content logs are clean.
Migrating Oracle Transportation Management 6.4 Database to 6.4.2
Follow the instructions in the “Migrating Oracle Transportation Management 6.3 Database to 6.4.2”
section to migrate Oracle Transportation Management 6.4 database to 6.4.2.
Copyright © 2001, 2016, Oracle and/or its affiliates. All rights reserved. 3-1
3. Migrating Workbench Layouts
Overview
If you are using Workbench layouts created in either 6.4 or 6.4.1, you need to run the workbench
layout migration. The Workbench Layout migration upgrades workbench layouts to the 6.4.2 format and removes the limitation on the maximum number of layouts.
Versions Affected
The Workbench layout migration is required for installations running on version 6.4.0 and 6.4.1 only. Since Workbench layouts were introduced in version 6.4, no migration is needed for earlier versions of
Oracle Transportation Management.
Upgrading Workbench Layouts
After the OLTP database has been migrated to 6.4.2, complete the following:
1. Go to <GLOG_HOME>/glog/oracle/script8 on the app server directory from where the
database migration was run.
2. Copy the TRANSPORTATION_WORKBENCH.csv to the <GLOG_HOME>/temp directory on the web
server.
3. Go to the <GLOG_HOME>/install directory on the web server.
4. Copy two XML files (mdsParamsExport.xml and mdsParamsImport.xml) to the
<GLOG_HOME>/temp directory.
For both of these XML files, update the "jdbc-password" to access the Metadata repository (MDS repository) used by the application. All other properties are updated by the installer.
Note: The value of “jdbc-userid” and “jdbc-password” elements in
mdsParamsExport.xml should be the 6.4.1 MDS schema name and its password.
Check with the administrator to get credentials for the Metadata
repository.<GLOG_HOME>/temp directory. The directory should contain the following files:
TRANSPORTATION_WORKBENCH.csv
Modified version of mdsParamsExport.xml
Modified version of mdsParamsImport.xml
5. Run the workbench migration script from the <GLOG_HOME>/install directory on web
server.
Note: Navigate to the install directory on the web server when executing this script.
For UNIX:
./migrate_workbench.sh from641 ../temp/TRANSPORTATION_WORKBENCH.csv
../temp/mdsParamsExport.xml ../temp/mdsParamsImport.xml
For Windows:
migrate_workbench.bat from641 ..\temp\TRANSPORTATION_WORKBENCH.csv
..\temp\mdsParamsExport.xml ..\temp\mdsParamsImport.xml
When migrating directly from 6.4.0 to 6.4.2, change the argument in the above command to “from640” instead of “from641”.
Copyright © 2001, 2016, Oracle and/or its affiliates. All rights reserved. 3-2
Note:
At the end of the migration, input files located in the temp directory are deleted by the
script.
If there is an error, the script returns the value of 1 and generates a log file
(migrate_workbench.log) in the <GLOG_HOME>/install directory.
Copyright © 2001, 2016, Oracle and/or its affiliates. All rights reserved. 4-1
4. Migrating Customizations
If you are upgrading from a previous version of Oracle Transportation Management and have any customizations in the system other than custom properties in the glog.properties file or instructions in
a property set, you must copy those customizations from your old instance to your new instance. See the “Instructions on Upgrading” section in the Oracle Transportation Management Administration Guide for more details on what exactly needs to be copied. In order to facilitate this copying, a migration script can be generated based on your specific setup by following the directions below.
After the Oracle Transportation Management code has been installed and patched with the latest Roll-Up code and the database migrations have been completed, you will need to create the customization
migration script. This script is either a shell script or a batch file depending on which operating system you are installing on (UNIX or Windows, respectively). Once this script is created it should be reviewed
and adapted as needed for your specific setup, then it should be run. This must be done on every application and web server being upgraded.
In order to migrate customizations from a prior release, the following resources must be accessible from the new install:
the prior release’s database
the prior release’s code installation (or a copy of it) with the database connection information
properly configured
The following abbreviations will be used in the instructions below:
$NEWOTM: the directory where the new version of Oracle Transportation Management is
installed
$OLDOTM: the directory where the previous version of Oracle Transportation Management is
installed
To create and run the customizations migration script, do the following:
1. Log in as the user that the new version will use.
a. This user will need full read access to $OLDOTM directory structure.
2. Change directory to $NEWOTM/install
3. Create the migration script based on your specific setup.
a. Execute the following script (depending on operating system) to run a Java program to
create the customization script:
i. [Unix] ./create_migration_script.sh $OLDOTM [<script name>]
ii. [Windows] create_migration_script.cmd $OLDOTM [<script name>]
b. This Java program will read the database to determine potential locations of
customized files (see the “Instructions on Upgrading” section in the Oracle
Transportation Management Administration Guide for more details).
c. The script creation program takes one mandatory parameter and one optional parameter. The mandatory parameter is the value of $OLDOTM; the optional parameter
is the name of the script to be generated (default value is
migrate_customizations.sh or migrate_customizations.cmd, depending on the
operating system).
4. Carefully review the generated script to make sure it is appropriate for your specific setup (see
the “Instructions on Upgrading” section in the Oracle Transportation Management
Administration Guide for more details).
5. Once the script is reviewed, run the generated script while still in the $NEWOTM/install
directory.
Copyright © 2001, 2016, Oracle and/or its affiliates. All rights reserved. 4-2
a. Assuming the default script name was used, this would be one of the following,
depending on operating system:
i. [Unix] ./migrate_customizations.sh
ii. [Windows] migrate_customizations.cmd
6. Test the various customizations out thoroughly before rolling into production.
Copyright © 2001, 2016, Oracle and/or its affiliates. All rights reserved. 5-1
5. Converting Order Releases to a Multi-tier Structure for Customers Who Are Migrating from Version 5.5.CU6 or Earlier
Order releases that were planned prior to 6.0 must be converted into multi-tier database structures before they can be further processed by Oracle Transportation Management in 6.0. The primary purpose of conversion is to create order movements and separate shipment ship units from shipment to shipment in order to support the development of more complex planning and execution processes
in Oracle Transportation Management.
A new field was added to the ORDER_RELEASE table and is used to indicate if an order is converted or not. The OTM_VERSION is set to NULL for unconverted orders. When an order is converted, the
OTM_VERSION is set to ‘6.0’. If you try to invoke any action on an unconverted order in 6.0, directly on the order, such as unassigned order, or indirectly on any shipment related to the order, such as split/merge shipments or change stop times, you will get a warning and the action will be aborted.
The conversion of orders in 6.0 can be done only through a Java process. PL/SQL version was added
to convert orders planned on single leg shipments with significant performance improvement. Orders on multi-leg shipments will still need to be converted with the Java process.
You can run a validation script as @validate.sql to get a report of ill-structured orders, order
movements, and shipments in the database. This script will also report the number of orders that will be converted by the newly added PL/SQL conversion process that you will run next. For the poorly-structured data, Oracle Transportation Management does not provide any tool to fix them, but you can fix them manually. The validation script should be run right after the database migration process. This
process is optional.
The next step is to convert orders on single leg shipments using the PL/SQL script by running: @convert_orders.sql. This is a required script. It can be run right after the database migration
process or after running the validation script. After running the database script, verify in the convert_<dbname>_<timestamp>.log (located in the same directory as source) that there are no
errors.
Orders planned on multi-leg shipments need to be converted using a Java process after running the PL/SQL script convert_orders.sql. This process can be run interleaving with other Oracle
Transportation Management processes. However, we recommend it be run independently before any other Oracle Transportation Management processes. If there are a lot of multi-leg shipments left to convert after running the PL/SQL conversion script, it is not necessary to convert all of them at once. But orders which need to be further processed (order being unassigned, related shipments being split,
merged, etc.) by Oracle Transportation Management have to be converted. For better management and performance, you should consider converting orders for a short period of time, such as orders created within a quarter or half year at one time. Old orders that are no longer used will not need to be converted or can be converted at a later time.
Conversion process can be invoked at any time, but due to the performance impact, we recommend it to be run after normal business hours.
Converting Order Releases
1. Log in as DBA.ADMIN.
2. Turn on conversion-related logs. There are three log IDs related to conversion:
SSUConversion, SSUConversionDetails, and SSUConversionSummary. When you are testing
out the conversion process with a small number of orders, you can turn on all three. However, when you convert a large number of orders, we recommend only turn on
SSUConversionSummary due to performance concerns.
Copyright © 2001, 2016, Oracle and/or its affiliates. All rights reserved. 5-2
3. Navigate to Order Management > Process Management > Convert Order Releases.
4. Enter a starting date. All orders with insert_date later than the starting date will be converted.
5. Enter a batch size for converting. The default batch size is 150. It provides the best
performance based on testing experience.
6. Monitor your log file to see if there are any failed batches during conversion. Orders in failed batches will be re-attempted one by one once all batches are done and most likely they will be
converted successfully at this time. You only need to contact Oracle technical support for
further evaluation if any order failed to convert during the second attempt.
Copyright © 2001, 2016, Oracle and/or its affiliates. All rights reserved. 6-1
6. Migrating Fusion Transportation Intelligence
This chapter is applicable only for existing Oracle Fusion Transportation Intelligence (FTI) customers and it details the steps to migrate to the Oracle Fusion Transportation Intelligence version 6.3.
The migration process for Fusion Transportation Intelligence should follow this sequence:
1. Migrating Fusion Transportation Intelligence Historical Database (HD)
2. Upgrading to Oracle Data Integrator 12c
3. Migrating Fusion Transportation Intelligence ETL in Oracle Data Integrator 12c
4. Upgrading to Oracle Business Intelligence Enterprise Edition 11g
5. Migrating Fusion Transportation Intelligence Metadata in OBI EE 11g
6. Migrating Fusion Transportation Intelligence Dashboard Reports in OBI EE 11g
Migrating Fusion Transportation Intelligence Historical Database (HD)
Pre-Requisites:
Ensure the following steps were done successfully before attempting the migration of the FTI Historical database:
1. Successful migration of the Oracle Transportation Management database (glogowner schema).
2. If the ROD is in use, then the successful migration of the ROD database (glogowner schema).
Migration Steps:
Refer to the Upgrading the Oracle Fusion Transportation Intelligence Database section for your corresponding Fusion Transportation Intelligence version available under the Migrating the Database
chapter (above) for steps to migrate your existing Fusion Transportation Intelligence historical database and its data content.
Upgrading to Oracle Data Integrator 12c
Pre-Requisites:
1. Export the Master and Work repositories as .zip files. In other words, make a backup of the
following Fusion Transportation Intelligence 6.2 specific Oracle Data Integrator database
schemas:
ftimaster or ftiodi master
ftiwork or ftiodi master
Upgrade Steps:
The next step in the migration process is to upgrade Oracle Data Integrator (ODI) to 12c. Refer to the installation and migration documentation for Oracle Data Integrator before attempting to perform the
upgrade.
Copyright © 2001, 2016, Oracle and/or its affiliates. All rights reserved. 6-2
Migrating Fusion Transportation Intelligence ETL in Oracle Data Integrator 12c
Prerequisites:
Ensure the following steps were completed before attempting the migration of the Fusion Transportation Intelligence ETL in Oracle Data Integrator 12c:
1. The Fusion Transportation Intelligence Master and Work repositories are backed-up.
2. Export the master and work repositories.
Migration of Custom ETL:
1. Oracle Data Integrator 12c is installed. Please refer to the Installing Oracle Data
Integrator (ODI) section in the Install Guide to install ODI 12c.
2. Upgrade ODI repositories by running <ODI_12C_Home>\oracle_common\upgrade\bin\ua.bat.
3. Configure ODIC. Please refer to the Configuring ODI for Oracle FTI ETL section in the
Install Guide.
Note: Import master and work repositories using Synonym INSET_UPDATE mode.
4. If you have added custom ETL packages to the Fusion Transportation Intelligence Work repository in version 6.2 or 6.3, perform a manual merge of your custom ETL code into the
Fusion Transportation Intelligence 6.4 ETL package in ODI 12c.
Note: ODI does not provide an out-of-the box utility for merging the Work repository, so it
must be done manually.
5. If you have custom ETL code in a PL/SQL package then you can do one of the following:
Manually re-implement your custom ETL functionality in the Fusion Transportation
Intelligence Work repository in ODI.
Or
Plug in your custom PL/SQL package within the Fusion Transportation Intelligence Work
repository in ODI. Refer the FTI Reference Guide “Plugging in Custom PL/SQL Package to
Oracle Fusion Transportation Intelligence ETL” for more documentation.
Post Migration Steps:
1. Perform a thorough sanity test of the Fusion Transportation Intelligence 6.4 ETL on ODI 12c to
ensure stability of the ETL process.
a. Go to Operator.
b. Select Load Plan and Scenarios.
c. Select the FTI_LOAD Version-001 scenario.
d. Right click and select Execute.
e. Select Global context and click ok.
2. Once stable, you can drop the following backed-up Fusion Transportation Intelligence 6.2 ODI
schemas, if they exist:
ftimaster
ftiwork
ftistage
Copyright © 2001, 2016, Oracle and/or its affiliates. All rights reserved. 6-3
Migrating Targets
This has to be run immediately after the W_TARGETS_F table is created or when W_TARGETS_F table is empty. This is a one-time process to migrate the data from F_TARGETS to W_TARGETS_F. Execute the procedure in the following location in ODI:
3. Go to ODI Studio > Designer > FTI_ETL > FTI_ETL > Procedures >
64_DATA_MIGRATION_W_TARGETS_F.
4. Right click and execute the procedure by selecting the content parameter as ‘Global’.
Inserting Default Records for Dimensions
While migrating to 6.4.2 you need to run the following procedure in the ODI to insert the default
records into all dimensions. For fresh install this is run as part of initial ETL; but for migration it has to be done manually. This will load default records with UNKNOWN value. This was changed from UN-
KNOWN in 6.3.x versions.
1. Log on to ODI studio.
2. Go to the Designer tab.
3. Expand FTI_ETL Project > FTI_ETL folder > Procedures.
4. Select INSERT_DEFAULT_RECORDS procedure, right-click, and click Run.
5. Make sure to select the correct context (Global) and click OK.
6. Wait for the dialog box that indicates execution started to display, and then click OK.
Upgrading to Oracle Business Intelligence Enterprise Edition 11g
Prerequisites:
1. Create a backup of the following Fusion Transportation Intelligence version components in OBI
EE:
advanced_analytics.rpd (Fusion Transportation Intelligence metadata file)
Note: Rename it to advanced_analytics_bk_<Time Stamp>. The file is located in the path <OBIEE Root Dir>/server/Repository/.
aa Webcat folder (containing Fusion Transportation Intelligence dashboard reports,
prompts, etc.). This file is located in the path <OBIEE Root
Dir>/OracleBIData/web/catalog/.
Upgrade Steps:
Upgrade Oracle Business Intelligence Enterprise Edition (OBI EE) from version 10g to 11g. Refer the installation and migration documentation available for OBIEE 11g before upgrading.
Migrating Fusion Transportation Intelligence Metadata in OBI EE 11g
Follow these steps to migrate from an existing Oracle Fusion Transportation Intelligence metadata to the Oracle Fusion Transportation Intelligence version 6.4 metadata on an Oracle Business Intelligence Enterprise Edition server.
Prerequisites:
Ensure the following steps were completed before attempting the migration of the Fusion Transportation Intelligence ETL in ODI 12c:
Copyright © 2001, 2016, Oracle and/or its affiliates. All rights reserved. 6-4
Back up the Fusion Transportation Intelligence 6.2 version of metadata and aa Webcat folder
Migration of Standard Metadata in OBIEE 11g
If you have not customized the metadata, you can directly deploy the Fusion Transportation Intelligence 6.4 shipped standard metadata into OBI EE 11g.
Refer to the section “Copy RPD/Webcat/Images to OBIEE Server for Deployment” in the Install Guide for details on deploying the standard metadata.
Migration of Custom Metadata in OBI EE 11g
If you have customized the standard metadata, complete these steps:
1. Copy the Oracle Fusion Transportation Intelligence metadata file (advanced_analytics.rpd)
from the directory: <otm_install_path>/fti.
2. Upgrade the custom Fusion Transportation Intelligence metadata file
(advanced_analytics.rpd) and web catalog file (aa) which were originally compatible with
version OBI EE 10g to OBI EE 11g. To achieve this, use the OBI EE 11g Upgrade Assistant
available in the following paths:
o Windows: $OBIEE11G_HOME$\Oracle_BI1\bin\ua.bat
o Linux: $OBIEE11G_HOME$\Oracle_BI1\bin\ua
Note: Refer to the section “Upgrade the Oracle BI Repository and Catalog” in the OBI EE
11g documentation for using the Upgrade Assistant.
Note: For upgrading OBIEE catalog from 11.1.1.7 to 11.1.1.9, see the section “5.15.3
Upgrading Oracle BI Presentation Catalogs” in the Oracle Fusion Middleware Patching
Guide.
3. Merge all your custom metadata changes (from your backed up metadata file) to the new advanced_analytics.rpd file using the merge option available in the Administration tool.
For detailed steps, refer the section “Merging Repositories” -“Performing Full Repository Merges without a Common Parent” in the Oracle Business Intelligence Enterprise Edition 11g
documentation.
Merging basically requires three repository files:
o Current Repository: 6.3 Standard repository file,
o Modified Repository: Custom repository file, and
o Original Master Repository: Dummy, Blank repository file.
4. Add all custom columns to the new subject area Transportation Intelligence in order use them
in the reports. Refer the FTI Reference Guide for the detailed steps on how to add custom
columns into the new subject area.
5. Deploy the advanced_analytics.rpd in the OBI EE using Enterprise Manager (EM) console. Refer to the “Deploying RPD and Web Catalog” section in the Installation Guide for the specific
instructions.
6. Stop and re-start the Oracle Business Intelligence Server and Oracle Business Intelligence
Presentation Server services using Enterprise Manager (EM).
Note: While deploying the RPD, if you encounter an error, you can view the log messages in the Enterprise Manager (EM) under the Diagnostic tab.
Copyright © 2001, 2016, Oracle and/or its affiliates. All rights reserved. 6-5
Migrating Fusion Transportation Intelligence Dashboard Reports in OBI EE 11g
Prerequisites
Complete the following steps before attempting the migration of the Fusion Transportation Intelligence dashboard reports in OBI EE 11g:
1. Successfully upgrade OBI EE to version 11g.
2. Perform a sanity test to verify OBI EE’s stable operation.
3. Successfully migrate Fusion Transportation Intelligence metadata to version 6.4 on OBI EE
11g.
4. Back-up the Webcat folder aa (containing all Fusion Transportation Intelligence dashboard
reports). This file is available in the directory <OBIEE Root dir>/OracleBIData/web/catalog.
Note: The backup step is very important in case a roll-back is required if the report
migration fails.
5. Stop the Oracle Business Intelligence Server and Oracle Business Intelligence Presentation
Server services.
Migration of Standard Dashboard Reports
If you have not customized the webcatalog (dashboard reports, prompts etc), you can directly deploy the 6.4 shipped standard webcatalog into OBI EE 11g.
Refer to the section “Copy RPD/Webcat/Images to OBIEE Server for Deployment” in the Install
Guide for deploying the standard web catalog.
Migration of Custom Dashboard Reports
While migrating the Fusion Transportation Intelligence custom reports from 6.3 or later versions to version 6.4.2, complete the following steps:
1. Take a backup of webcatalog before migration.
2. Complete migration.
3. Copy the custom artifacts (reports and dashboards) to the new location.
In version 6.3 and later, Fusion Transportation Intelligence provides a reorganized metadata (subject
area). You must modify all Fusion Transportation Intelligence standard and custom dashboard reports that were used with versions 6.2 and earlier to use the new subject area. This section details the steps to migrate Fusion Transportation Intelligence dashboard reports from the deprecated 6.2 Fusion Transportation Intelligence subject area to the new Transportation Intelligence subject area (available
in the 6.3 and later releases).
Note: This documentation is only necessary if you are migrating from Fusion Transportation Intelligence release 6.2 or earlier to 6.4.
Note: The deprecated subject area of Fusion Transportation Intelligence is hidden by
default. To view this subject area, see the online help topic Report Common Properties and set the property SHOW_FTI_SUBJECT_AREA to true.
You can migrate the Fusion Transportation Intelligence Reports using the Catalog Manager utility
available within the OBI EE (metadata repository) Administration tool. To enable this migration, Fusion Transportation Intelligence ships a Subject Area Mapper XML file (explained in a later section below)
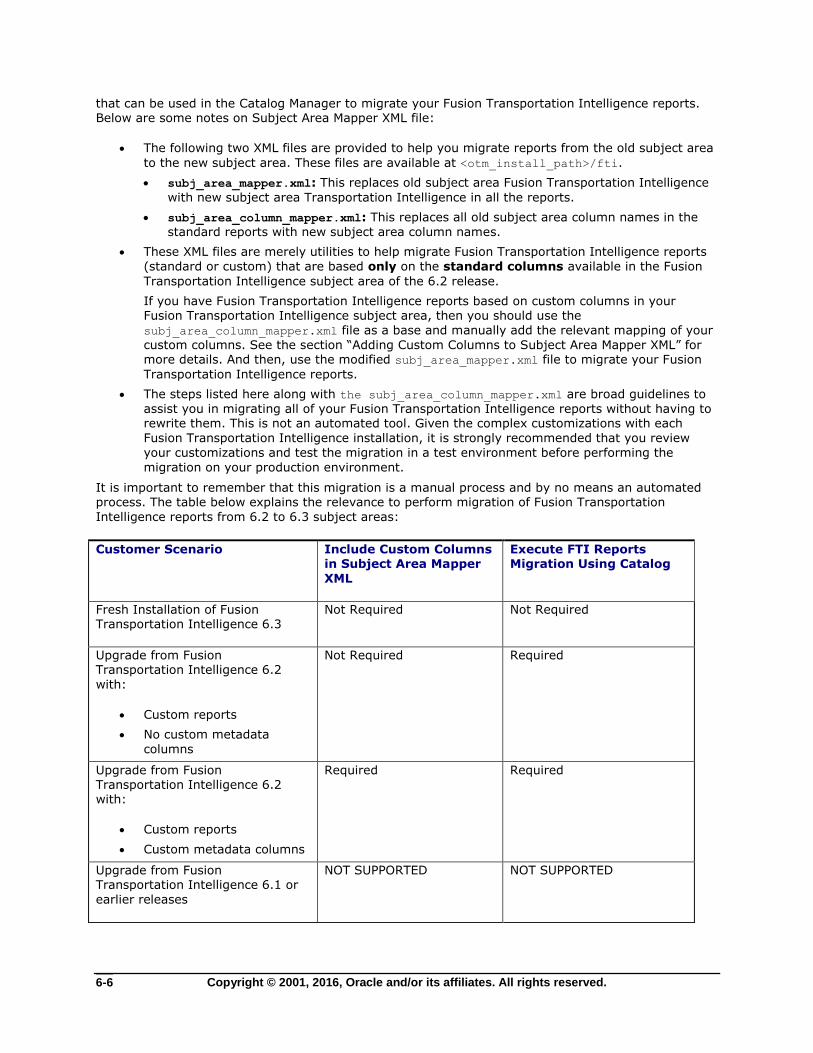
Copyright © 2001, 2016, Oracle and/or its affiliates. All rights reserved. 6-6
that can be used in the Catalog Manager to migrate your Fusion Transportation Intelligence reports. Below are some notes on Subject Area Mapper XML file:
The following two XML files are provided to help you migrate reports from the old subject area
to the new subject area. These files are available at <otm_install_path>/fti.
subj_area_mapper.xml: This replaces old subject area Fusion Transportation Intelligence
with new subject area Transportation Intelligence in all the reports.
subj_area_column_mapper.xml: This replaces all old subject area column names in the
standard reports with new subject area column names.
These XML files are merely utilities to help migrate Fusion Transportation Intelligence reports
(standard or custom) that are based only on the standard columns available in the Fusion
Transportation Intelligence subject area of the 6.2 release.
If you have Fusion Transportation Intelligence reports based on custom columns in your Fusion Transportation Intelligence subject area, then you should use the
subj_area_column_mapper.xml file as a base and manually add the relevant mapping of your
custom columns. See the section “Adding Custom Columns to Subject Area Mapper XML” for more details. And then, use the modified subj_area_mapper.xml file to migrate your Fusion
Transportation Intelligence reports.
The steps listed here along with the subj_area_column_mapper.xml are broad guidelines to
assist you in migrating all of your Fusion Transportation Intelligence reports without having to rewrite them. This is not an automated tool. Given the complex customizations with each
Fusion Transportation Intelligence installation, it is strongly recommended that you review
your customizations and test the migration in a test environment before performing the
migration on your production environment.
It is important to remember that this migration is a manual process and by no means an automated
process. The table below explains the relevance to perform migration of Fusion Transportation
Intelligence reports from 6.2 to 6.3 subject areas:
Customer Scenario Include Custom Columns in Subject Area Mapper
XML
Execute FTI Reports Migration Using Catalog
Fresh Installation of Fusion Transportation Intelligence 6.3
Not Required Not Required
Upgrade from Fusion Transportation Intelligence 6.2
with:
Custom reports
No custom metadata
columns
Not Required Required
Upgrade from Fusion Transportation Intelligence 6.2 with:
Custom reports
Custom metadata columns
Required Required
Upgrade from Fusion Transportation Intelligence 6.1 or
earlier releases
NOT SUPPORTED NOT SUPPORTED
Copyright © 2001, 2016, Oracle and/or its affiliates. All rights reserved. 6-7
Migrating the Fusion Transportation Intelligence Dashboard Reports Using Catalog Manager
To migrate the Fusion Transportation Intelligence dashboard report using the OBI EE Catalog Manager, complete the following:
1. Launch the OBI EE Catalog Manager.
2. Open the Fusion Transportation Intelligence webcat folder aa in offline mode.
3. In the Catalog Manager, in the tools menu, go to the XML Search and Replace.
4. Browse to and select your subj_area_mapper.xml file to change the subject area in the
Import from File text box.
5. Click OK to execute and complete the process.
6. Browse to and select your subj_area_column_mapper.xml file to change columns in the
Import from File text box.
7. Click OK to execute and complete the process.
8. Place the modified catalog aa in a specified path as provided in the OBI EE Enterprise
manager-Fusion Middleware control.
9. Start the OBI EE services.
10. Perform the post migration steps listed below to validate the migration.
11. Set the correct OBI EE privileges for the Transportation Intelligence subject area. This is
required so that FTI users can access the subject area.
a. In OBI EE, go to Administration > Manage Privileges.
b. For the entry of Subject Area: “Transportation Intelligence”, select Authenticated
User.
Post-migration Steps
The XML file that the Catalog Manager has processed might not have successfully migrated all report columns owing to incorrectly mapped custom columns in the Subject Area Mapper XML. You should complete the following steps to test for successful migration.
1. Test all Fusion Transportation Intelligence reports after migration and specifically identify the
report columns that failed the migration.
2. Once identified, correct the mapping in the Subject Area Mapper XML (as explained above)
and re-run the migration steps.
Adding Custom Columns to Subject Area Mapper XML
This section explains the steps to follow when the 6.2 version of the Fusion Transportation Intelligence subject area (metadata) has custom columns and custom reports were developed using these
columns.
Pre-requisites
Successful migration of all custom FTI metadata changes in version 6.2 to version 6.3.
Columns, which are included in your current reports but are not included in the 6.3 subject
area, cannot be automatically removed from your reports. You will have to find these reports during testing and manually remove any columns that are no longer supported in the 6.3
subject area. To determine if a column in your current report is not included in the 6.3 subject
area, use the Column Mapping tab of the spreadsheet referred to below.
Adding Custom Columns in Subject Area Mapper XML:
1. Take the custom columns from 6.2 metadata in the format “table”.”Column”.
Copyright © 2001, 2016, Oracle and/or its affiliates. All rights reserved. 6-8
2. Find the new corresponding custom columns in 6.3 metadata under the subject area
Transportation Intelligence.
3. Create xml line with xml tags with the old and the corresponding new custom columns as
shown in the example below:
<action command="textReplace" oldValue=""Period"."Day""
newValue=""- Shipment Period Dimensions"."Date""
ignoreCase="true"/>
In this example, the old column is
"Period"."Day"
And the new column is
"- Shipment Period Dimensions"."Date"
Various action commands can be used to migrate the reports. The action commands can be:
o textReplace
o renameColumn
o renameSubjectArea
The detailed descriptions for action commands can be found in “Oracle Business Intelligence Presentation Services Administration Guide” under the section “Managing Presentation Catalogs Using Oracle BI Catalog Manager” under the heading “Searching for and Replacing
Presentation Catalog Text Using Catalog Manager”.
In this example, the action command ‘textReplace’ is sufficient to migrate the reports from the old subject area to the new subject area.
4. After adding the XML lines for all the custom columns, add the XML lines to the Subject Area
Mapper XML to change columns.
5. Execute the Subject Area Mapper XML in the catalog manager as described in the Migration
Steps section.
Note: The Catalog Manager will replace column names exactly as given in these columns;
this includes the quotes. If your reports have variations on how the quotes are placed, the
replace will fail. For example, your report can have " Period". " Day", Period. " Day", " Period".Day, or Period.Day. While you can add all
permutations to the XML file, testing of all reports will be needed.
FTI Subject Areas Column Mapping Spreadsheet
Oracle provides the subject_area_column_reference.xls file as guide to assist you in the converting
your reports to the new subject area. This spreadsheet details the table and column information for
the 6.2 and 6.3 subject areas. Use this file as a guide.
Understanding the Column Mapping Spreadsheet
The spreadsheet consists of the following tabs:
Description tab: contains a list and description of all of the tabs in the spreadsheet.
Copyright © 2001, 2016, Oracle and/or its affiliates. All rights reserved. 6-9
FTI tab: contains the table and column information for the 6.2 subject area. By default, this
tab is populated with the information contained in the shipped version of Fusion Transportation Intelligence 6.2. Column A contains the subject area of Fusion Transportation Intelligence.
Column B contains the table name. Column C contains the column name. Column D contains a
concatenation of columns B and C (“table name”.”column name”).
You can replace the data in this tab with table and column information from your customized
version of 6.2.
TI tab: contains the table and column information for the 6.3 subject area. By default, this tab is populated with the information contained in the shipped version of Fusion Transportation
Intelligence 6.3. See column explanation for FTI tab. TI tab also contains a Tool Tips column,
but this is included for informational purposes only.
You can replace the data in this tab with table and column information from your customized
version of 6.2.
Column Mapping tab: lists the old (6.2.x) subject area, including presentation table, presentation column, and column formula and maps it to the new subject area (6.3) including
presentation table, presentation column and column formula.
The column labeled 6.3 Column helps to track any columns that were removed in 6.3. If this
column contains a value of No, then that column not longer exists in 6.3.
Formula Mapping tab: contains the formulas that are used to generate the final XML. The
Final XML is automatically populated as you customize columns A and C. You will customize
these fields as you use the tool.
XML tab: contains a place holder for the final XML. You will populate this tab when you use
the tool.
Converting OBIEE Groups to Roles
Note: This section should be completed only after you migrate your OBIEE metadata
(advanced_analytics.rpd) and OBIEE web catalog (aa) from an earlier version of Fusion Transportation Intelligence.
In previous versions of Fusion Transportation Intelligence, the Business Intelligence Roles or BI roles were mapped to groups in OBIEE. Since OBIEE no longer uses groups, the BI roles must be mapped to roles. Refer to the section Creating Business Intelligence Roles OBIEE, in the Oracle Transportation Management Installation Guide for Release 6.3.2 for complete details.
To convert the existing BI roles to OBIEE groups complete the step listed in this section. The steps listed here are required in addition to the steps listed in the Oracle Transportation Management
Installation Guide.
1. First, complete the section, Creating Business Intelligence Roles OBIEE, in the Oracle
Transportation Management Installation Guide for Release 6.3.2.
2. Add a new variable called ROLES in the metadata as follows:
a. Open metadata advanced_analytics.rpd in Administration tool.
b. Navigate to manage->Variables.
c. Create a new variable called ROLES in system session variable.
d. Add a new initialization block to the variable and name it as GET_USER_ROLE.
e. Add the following source query to the GET_USER_ROLE initialization block:
SELECT
NVL(LTRIM(MAX(SYS_CONNECT_BY_PATH(BI_ROLE_GID,';'))
KEEP(DENSE_RANK LAST ORDER BY curr),';'),'NO ACCESS')
FROM
Copyright © 2001, 2016, Oracle and/or its affiliates. All rights reserved. 6-10
(SELECT GL_USER_GID,
BI_ROLE_GID,
ROW_NUMBER() OVER (PARTITION BY GL_USER_GID ORDER BY BI_ROLE_GID) AS
curr,
ROW_NUMBER() OVER (PARTITION BY GL_USER_GID ORDER BY BI_ROLE_GID) -1
AS prev
FROM GL_USER_BI_ROLE
where GL_USER_GID=':USER')
CONNECT BY prev = PRIOR curr
AND GL_USER_GID = PRIOR GL_USER_GID
START WITH curr = 1
3. Locate the migrated catalog aa.
4. Get the catalog in a local folder which is mentioned as offline catalog path.
5. Execute the following commands to modify the permissions given to groups to assign it to
corresponding roles:
a. Go to the folder
OBIEE_HOME\instances\instance1\bifoundation\OracleBIPresentationServicesC
omponent\coreapplication_obips1\catalog\aa
b. Execute the commands:
i. runcat.cmd -cmd replaceAccountInPermissions -old "DEVELOPER" -
oldType group -new "BIAuthor" -newType role -offline <offline
catalog path>
ii. runcat.cmd -cmd replaceAccountInPermissions -old "EXECUTIVE" -
oldType group -new "BIConsumer" -newType role -offline <offline
catalog path>
iii. runcat.cmd -cmd replaceAccountInPermissions -old "LSP CUSTOMER" -
oldType group -new "LSP CUSTOMER" -newType role -offline <offline
catalog path>
iv. runcat.cmd -cmd replaceAccountInPermissions -old "LSP HOST" -
oldType group -new "LSP HOST" -newType role -offline <offline
catalog path>
v. runcat.cmd -cmd replaceAccountInPermissions -old "OPERATIONAL" -
oldType group -new "BIConsumer" -newType role -offline <offline
catalog path>
vi. runcat.cmd -cmd replaceAccountInPermissions -old "Presentation
Server Administrators" -oldType group -new "BIAdministrator" -
newType role -offline <offline catalog path>
vii. runcat.cmd -cmd replaceAccountInPermissions -old "SERVPROV" -
oldType group -new "SERVPROV" -newType role -offline <offline
catalog path>
viii. runcat.cmd -cmd replaceAccountInPermissions -old "NO ACCESS" -
oldType group -new "NO ACCESS" -newType role -offline <offline
catalog path>
6. Remove the deprecated Fusion Transportation Intelligence roles from the WebLogic Enterprise
Manager.
While migrating from OBIEE 10 g to OBIEE 11g, the groups are converted into roles and are saved in the WebLogic server. So you need to remove the following roles: DEVELOPER, EXECUTIVE, PRESENTATION SERVER ADMINISTRATOR, and OPERATIONAL from the WebLogic server.
a. To remove these roles, complete the following:
i. Go to http:<obiee_host>:<port>/em.
Copyright © 2001, 2016, Oracle and/or its affiliates. All rights reserved. 6-11
ii. Login with your WebLogic user name and password created during the OBIEE
installation.
iii. Go to Farm_bifoundation_domain > Business Intelligence > coreapplication.
iv. Go to Business Intelligence Instance > Security >Application Roles.
v. Delete the following roles:
DEVELOPER,
EXECUTIVE,
PRESENTATION SERVER ADMINISTRATOR, and
OPERATIONAL.
vi. Logout from the WebLogic Enterprise Manager.
Reference
For more information, refer to the following OBI EE documentation:
“Managing Objects in the Oracle BI Presentation Catalog" in Oracle Fusion Middleware User's
Guide for Oracle Business Intelligence Enterprise Edition.
"Working with Objects in Catalog Manager" in Oracle Fusion Middleware System
Administrator's Guide for Oracle Business Intelligence Enterprise Edition.
“Managing Presentation Catalogs Using Oracle BI Catalog Manager” in Oracle Fusion
Middleware Presentation Services Administration Guide for Oracle Business Intelligence
Enterprise Edition

Copyright © 2001, 2016, Oracle and/or its affiliates. All rights reserved. 7-1
7. Migrating Global Trade Intelligence
This chapter is applicable only for existing Oracle Global Trade Intelligence (GTI) customers and it details the steps to migrate to the Oracle Global Trade Intelligence version 6.4.
Please refer to the following sections in Migrating Fusion Transportation Intelligence :
Migrating Fusion Transportation Intelligence Historical Database (HD)
Upgrading to Oracle Data Integrator 12c
Migrating Fusion Transportation Intelligence ETL in Oracle Data Integrator 12c

Copyright © 2001, 2016, Oracle and/or its affiliates. All rights reserved. 7-2