Oracle Solaris Trusted Extensions Administrator's … · ... 243 TrustedExtensionsandAuditing ......
288
Oracle® Solaris Trusted Extensions Administrator's Procedures Part No: 819–0872–16 September 2010
Transcript of Oracle Solaris Trusted Extensions Administrator's … · ... 243 TrustedExtensionsandAuditing ......
Oracle® Solaris Trusted ExtensionsAdministrator's Procedures
Part No: 819–0872–16September 2010

Copyright © 1992, 2010, Oracle and/or its affiliates. All rights reserved.
This software and related documentation are provided under a license agreement containing restrictions on use and disclosure and are protected by intellectualproperty laws. Except as expressly permitted in your license agreement or allowed by law, you may not use, copy, reproduce, translate, broadcast, modify, license,transmit, distribute, exhibit, perform, publish, or display any part, in any form, or by any means. Reverse engineering, disassembly, or decompilation of this software,unless required by law for interoperability, is prohibited.
The information contained herein is subject to change without notice and is not warranted to be error-free. If you find any errors, please report them to us in writing.
If this is software or related software documentation that is delivered to the U.S. Government or anyone licensing it on behalf of the U.S. Government, the followingnotice is applicable:
U.S. GOVERNMENT RIGHTS Programs, software, databases, and related documentation and technical data delivered to U.S. Government customers are“commercial computer software” or “commercial technical data” pursuant to the applicable Federal Acquisition Regulation and agency-specific supplementalregulations. As such, the use, duplication, disclosure, modification, and adaptation shall be subject to the restrictions and license terms set forth in the applicableGovernment contract, and, to the extent applicable by the terms of the Government contract, the additional rights set forth in FAR 52.227-19, CommercialComputer Software License (December 2007). Oracle America, Inc., 500 Oracle Parkway, Redwood City, CA 94065.
This software or hardware is developed for general use in a variety of information management applications. It is not developed or intended for use in any inherentlydangerous applications, including applications which may create a risk of personal injury. If you use this software or hardware in dangerous applications, then youshall be responsible to take all appropriate fail-safe, backup, redundancy, and other measures to ensure its safe use. Oracle Corporation and its affiliates disclaim anyliability for any damages caused by use of this software or hardware in dangerous applications.
Oracle and Java are registered trademarks of Oracle and/or its affiliates. Other names may be trademarks of their respective owners.
AMD, Opteron, the AMD logo, and the AMD Opteron logo are trademarks or registered trademarks of Advanced Micro Devices. Intel and Intel Xeon aretrademarks or registered trademarks of Intel Corporation. All SPARC trademarks are used under license and are trademarks or registered trademarks of SPARCInternational, Inc. UNIX is a registered trademark licensed through X/Open Company, Ltd.
This software or hardware and documentation may provide access to or information on content, products, and services from third parties. Oracle Corporation andits affiliates are not responsible for and expressly disclaim all warranties of any kind with respect to third-party content, products, and services. Oracle Corporationand its affiliates will not be responsible for any loss, costs, or damages incurred due to your access to or use of third-party content, products, or services.
100707@24378

Contents
Preface ...................................................................................................................................................17
1 Trusted Extensions Administration Concepts ................................................................................23Trusted Extensions Software and the Solaris OS ............................................................................. 23
Similarities Between Trusted Extensions and the Solaris OS ................................................. 23Differences Between Trusted Extensions and the Solaris OS ................................................. 24Multiheaded Systems and the Trusted Extensions Desktop ................................................... 25
Basic Concepts of Trusted Extensions .............................................................................................. 26Trusted Extensions Protections ................................................................................................. 26Trusted Extensions and Access Control .................................................................................... 27Roles and Trusted Extensions .................................................................................................... 28Labels in Trusted Extensions Software ...................................................................................... 28
2 Trusted Extensions Administration Tools ........................................................................................33Administration Tools for Trusted Extensions ................................................................................. 33txzonemgr Script ................................................................................................................................. 35Trusted CDE Actions .......................................................................................................................... 35Device Allocation Manager ................................................................................................................ 36Solaris Management Console Tools .................................................................................................. 38
Trusted Extensions Tools in the Solaris Management Console ............................................. 39Client-Server Communication With the Solaris Management Console .............................. 41Solaris Management Console Documentation ........................................................................ 42
Label Builder in Trusted Extensions ................................................................................................. 43Command Line Tools in Trusted Extensions .................................................................................. 44Remote Administration in Trusted Extensions ............................................................................... 46
3

3 Getting Started as a Trusted Extensions Administrator (Tasks) .................................................. 47What's New in Trusted Extensions ................................................................................................... 47Security Requirements When Administering Trusted Extensions ............................................... 48
Role Creation in Trusted Extensions ......................................................................................... 48Role Assumption in Trusted Extensions ................................................................................... 49
Getting Started as a Trusted Extensions Administrator (Task Map) ............................................ 49▼ How to Enter the Global Zone in Trusted Extensions ............................................................. 50▼ How to Exit the Global Zone in Trusted Extensions ............................................................... 51▼ How to Administer the Local System With the Solaris Management Console .................... 52▼ How to Start CDE Administrative Actions in Trusted Extensions ........................................ 53▼ How to Edit Administrative Files in Trusted Extensions ........................................................ 54
4 Security Requirements on a Trusted Extensions System (Overview) ......................................... 57Configurable Solaris Security Features ............................................................................................. 57
Trusted Extensions Interfaces for Configuring Security Features ......................................... 57Extension of Solaris Security Mechanisms by Trusted Extensions ........................................ 58Trusted Extensions Security Features ........................................................................................ 58
Security Requirements Enforcement ................................................................................................ 58Users and Security Requirements .............................................................................................. 59Email Usage .................................................................................................................................. 59Password Enforcement ................................................................................................................ 59Information Protection ............................................................................................................... 60Password Protection .................................................................................................................... 61Group Administration ................................................................................................................ 61User Deletion Practices ............................................................................................................... 61
Rules When Changing the Level of Security for Data ..................................................................... 61sel_config File ............................................................................................................................ 63
Customization of Solaris Trusted Extensions (CDE) ..................................................................... 64Front Panel Customization ......................................................................................................... 64Workspace Menu Customization .............................................................................................. 64
5 Administering Security Requirements in Trusted Extensions (Tasks) ....................................... 67Common Tasks in Trusted Extensions (Task Map) ....................................................................... 67
▼ How to Assign the Editor of Your Choice as the Trusted Editor ............................................ 68▼ How to Change the Password for root ...................................................................................... 69
Contents
Oracle Solaris Trusted Extensions Administrator's Procedures • September 20104

▼ How to Regain Control of the Desktop's Current Focus ......................................................... 70▼ How to Obtain the Hexadecimal Equivalent for a Label ......................................................... 71▼ How to Obtain a Readable Label From Its Hexadecimal Form .............................................. 72▼ How to Change Security Defaults in System Files .................................................................... 73
6 Users, Rights, and Roles in Trusted Extensions (Overview) ......................................................... 75User Security Features in Trusted Extensions ................................................................................. 75Administrator Responsibilities for Users ......................................................................................... 76
System Administrator Responsibilities for Users .................................................................... 76Security Administrator Responsibilities for Users ................................................................... 76
Decisions to Make Before Creating Users in Trusted Extensions ................................................. 77Default User Security Attributes in Trusted Extensions ................................................................. 77
label_encodings File Defaults .................................................................................................. 77policy.conf File Defaults in Trusted Extensions ................................................................... 78
Configurable User Attributes in Trusted Extensions ...................................................................... 78Security Attributes That Must Be Assigned to Users ...................................................................... 79
Security Attribute Assignment to Users in Trusted Extensions ............................................. 79.copy_files and .link_files Files ......................................................................................... 81
7 Managing Users, Rights, and Roles in Trusted Extensions (Tasks) ..............................................83Customizing the User Environment for Security (Task Map) ....................................................... 83
▼ How to Modify Default User Label Attributes .......................................................................... 84▼ How to Modify policy.conf Defaults ...................................................................................... 84▼ How to Configure Startup Files for Users in Trusted Extensions .......................................... 86▼ How to Lengthen the Timeout When Relabeling Information .............................................. 88▼ How to Log In to a Failsafe Session in Trusted Extensions ..................................................... 90
Managing Users and Rights With the Solaris Management Console (Task Map) ...................... 90▼ How to Modify a User's Label Range in the Solaris Management Console ........................... 91▼ How to Create a Rights Profile for Convenient Authorizations ............................................. 92▼ How to Restrict a User's Set of Privileges .................................................................................. 94▼ How to Prevent Account Locking for Users ............................................................................. 96▼ How to Enable a User to Change the Security Level of Data ................................................... 96▼ How to Delete a User Account From a Trusted Extensions System ...................................... 97
Handling Other Tasks in the Solaris Management Console (Task Map) ..................................... 98
Contents
5
8 Remote Administration in Trusted Extensions (Tasks) ................................................................. 99Secure Remote Administration in Trusted Extensions .................................................................. 99Methods for Administering Remote Systems in Trusted Extensions ......................................... 100Remote Login by a Role in Trusted Extensions ............................................................................. 101
Remote Role-Based Administration From Unlabeled Hosts ................................................ 101Remote Login Management in Trusted Extensions .............................................................. 101
Administering Trusted Extensions Remotely (Task Map) ........................................................... 102▼ How to Log In Remotely From the Command Line in Trusted Extensions ....................... 103▼ How to Remotely Administer Trusted Extensions With dtappsession ............................ 103▼ How to Remotely Administer Systems by Using the Solaris Management Console From a
Trusted Extensions System ....................................................................................................... 105▼ How to Remotely Administer Systems by Using the Solaris Management Console From an
Unlabeled System ....................................................................................................................... 106▼ How to Enable Specific Users to Log In Remotely to the Global Zone in Trusted
Extensions ................................................................................................................................... 108▼ How to Use Xvnc to Remotely Access a Trusted Extensions System ................................... 109
9 Trusted Extensions and LDAP (Overview) ..................................................................................... 111Using a Naming Service in Trusted Extensions ............................................................................. 111
Non-Networked Trusted Extensions Systems ........................................................................ 112Trusted Extensions LDAP Databases ...................................................................................... 112
Using the LDAP Naming Service in Trusted Extensions .............................................................. 113
10 Managing Zones in Trusted Extensions (Tasks) ............................................................................ 115Zones in Trusted Extensions ............................................................................................................ 115
Zones and IP Addresses in Trusted Extensions ...................................................................... 116Zones and Multilevel Ports ....................................................................................................... 117Zones and ICMP in Trusted Extensions ................................................................................. 118
Global Zone Processes and Labeled Zones ..................................................................................... 118Zone Administration Utilities in Trusted Extensions .................................................................. 119Managing Zones (Task Map) ........................................................................................................... 120
▼ How to Display Ready or Running Zones ............................................................................... 121▼ How to Display the Labels of Mounted Files .......................................................................... 122▼ How to Loopback Mount a File That Is Usually Not Visible in a Labeled Zone ................. 124▼ How to Disable the Mounting of Lower-Level Files .............................................................. 125
Contents
Oracle Solaris Trusted Extensions Administrator's Procedures • September 20106

▼ How to Share a ZFS Dataset From a Labeled Zone ................................................................ 126▼ How to Enable Files to be Relabeled From a Labeled Zone ................................................... 128▼ How to Configure a Multilevel Port for NFSv3 Over udp ...................................................... 130▼ How to Create a Multilevel Port for a Zone ............................................................................. 131
11 Managing and Mounting Files in Trusted Extensions (Tasks) .................................................... 133Sharing and Mounting Files in Trusted Extensions ...................................................................... 133NFS Mounts in Trusted Extensions ................................................................................................ 133Sharing Files From a Labeled Zone ................................................................................................. 135Access to NFS Mounted Directories in Trusted Extensions ........................................................ 135
Home Directory Creation in Trusted Extensions .................................................................. 136Changes to the Automounter in Trusted Extensions ............................................................ 137
Trusted Extensions Software and NFS Protocol Versions ........................................................... 138Backing Up, Sharing, and Mounting Labeled Files (Task Map) .................................................. 139
▼ How to Back Up Files in Trusted Extensions .......................................................................... 139▼ How to Restore Files in Trusted Extensions ........................................................................... 140▼ How to Share Directories From a Labeled Zone .................................................................... 140▼ How to NFS Mount Files in a Labeled Zone ........................................................................... 142▼ How to Troubleshoot Mount Failures in Trusted Extensions .............................................. 147
12 Trusted Networking (Overview) ......................................................................................................149The Trusted Network ........................................................................................................................ 149
Trusted Extensions Data Packets ............................................................................................. 150Trusted Network Communications ........................................................................................ 150Network Configuration Databases in Trusted Extensions ................................................... 152Network Commands in Trusted Extensions .......................................................................... 152Trusted Network Security Attributes ...................................................................................... 153
Network Security Attributes in Trusted Extensions ..................................................................... 154Host Type and Template Name in Security Templates ......................................................... 155Default Label in Security Templates ........................................................................................ 155Domain of Interpretation in Security Templates ................................................................... 156Label Range in Security Templates .......................................................................................... 156Security Label Set in Security Templates ................................................................................. 156
Trusted Network Fallback Mechanism ........................................................................................... 157Overview of Routing in Trusted Extensions .................................................................................. 159
Contents
7

Background on Routing ............................................................................................................ 159Routing Table Entries in Trusted Extensions ......................................................................... 159Trusted Extensions Accreditation Checks .............................................................................. 160
Administration of Routing in Trusted Extensions ........................................................................ 161Choosing Routers in Trusted Extensions ............................................................................... 162Gateways in Trusted Extensions .............................................................................................. 163Routing Commands in Trusted Extensions ........................................................................... 163
13 Managing Networks in Trusted Extensions (Tasks) ..................................................................... 165Managing the Trusted Network (Task Map) ................................................................................. 165Configuring Trusted Network Databases (Task Map) ................................................................. 166
▼ How to Determine If You Need Site-Specific Security Templates ....................................... 167▼ How to Open the Trusted Networking Tools ......................................................................... 168▼ How to Construct a Remote Host Template ........................................................................... 168▼ How to Add Hosts to the System's Known Network .............................................................. 173▼ How to Assign a Security Template to a Host or a Group of Hosts ...................................... 174▼ How to Limit the Hosts That Can Be Contacted on the Trusted Network ......................... 175
Configuring Routes and Checking Network Information in Trusted Extensions (Task Map) 179▼ How to Configure Routes With Security Attributes .............................................................. 180▼ How to Check the Syntax of Trusted Network Databases ..................................................... 181▼ How to Compare Trusted Network Database Information With the Kernel Cache ......... 182▼ How to Synchronize the Kernel Cache With Trusted Network Databases ......................... 183
Troubleshooting the Trusted Network (Task Map) ...................................................................... 185▼ How to Verify That a Host's Interfaces Are Up ...................................................................... 186▼ How to Debug the Trusted Extensions Network ................................................................... 186▼ How to Debug a Client Connection to the LDAP Server ...................................................... 189
14 Multilevel Mail in Trusted Extensions (Overview) ....................................................................... 191Multilevel Mail Service ...................................................................................................................... 191Trusted Extensions Mail Features ................................................................................................... 191
15 Managing Labeled Printing (Tasks) ................................................................................................193Labels, Printers, and Printing ........................................................................................................... 193
Restricting Access to Printers and Print Job Information in Trusted Extensions .............. 194
Contents
Oracle Solaris Trusted Extensions Administrator's Procedures • September 20108

Labeled Printer Output ............................................................................................................. 194PostScript Printing of Security Information ........................................................................... 197Interoperability of Trusted Extensions With Trusted Solaris 8 Printing ............................ 198Trusted Extensions Print Interfaces (Reference) ................................................................... 199
Managing Printing in Trusted Extensions (Task Map) ................................................................ 200Configuring Labeled Printing (Task Map) ..................................................................................... 201
▼ How to Configure a Multilevel Print Server and Its Printers ................................................ 201▼ How to Configure a Network Printer for Sun Ray Clients .................................................... 203▼ How to Configure Cascade Printing on a Labeled System .................................................... 206▼ How to Configure a Zone for Single-Label Printing .............................................................. 209▼ How to Enable a Trusted Extensions Client to Access a Printer .......................................... 211▼ How to Configure a Restricted Label Range for a Printer ..................................................... 213
Reducing Printing Restrictions in Trusted Extensions (Task Map) ........................................... 214▼ How to Remove Labels From Printed Output ........................................................................ 214▼ How to Assign a Label to an Unlabeled Print Server ............................................................. 215▼ How to Remove Page Labels From All Print Jobs .................................................................. 216▼ How to Enable Specific Users to Suppress Page Labels ......................................................... 216▼ How to Suppress Banner and Trailer Pages for Specific Users ............................................. 217▼ How to Enable Users to Print PostScript Files in Trusted Extensions ................................. 217
16 Devices in Trusted Extensions (Overview) ..................................................................................... 219Device Protection With Trusted Extensions Software ................................................................. 219
Device Label Ranges .................................................................................................................. 220Effects of Label Range on a Device ........................................................................................... 220Device Access Policies ............................................................................................................... 221Device-Clean Scripts ................................................................................................................. 221
Device Allocation Manager GUI ..................................................................................................... 221Enforcement of Device Security in Trusted Extensions ............................................................... 223Devices in Trusted Extensions (Reference) .................................................................................... 223
17 Managing Devices for Trusted Extensions (Tasks) ....................................................................... 225Handling Devices in Trusted Extensions (Task Map) .................................................................. 225Using Devices in Trusted Extensions (Task Map) ........................................................................ 226Managing Devices in Trusted Extensions (Task Map) ................................................................. 226
▼ How to Configure a Device in Trusted Extensions ................................................................ 227
Contents
9

▼ How to Revoke or Reclaim a Device in Trusted Extensions ................................................. 230▼ How to Protect Nonallocatable Devices in Trusted Extensions ........................................... 231▼ How to Configure a Serial Line for Logins .............................................................................. 232▼ How to Configure an Audio Player Program for Use in Trusted CDE ................................ 233▼ How to Prevent the File Manager From Displaying After Device Allocation .................... 234▼ How to Add a Device_Clean Script in Trusted Extensions ................................................... 235
Customizing Device Authorizations in Trusted Extensions (Task Map) ................................... 236▼ How to Create New Device Authorizations ............................................................................ 236▼ How to Add Site-Specific Authorizations to a Device in Trusted Extensions .................... 239▼ How to Assign Device Authorizations .................................................................................... 240
18 Trusted Extensions Auditing (Overview) .......................................................................................243Trusted Extensions and Auditing .................................................................................................... 243Audit Management by Role in Trusted Extensions ....................................................................... 244
Role Setup for Audit Administration ....................................................................................... 244Audit Tasks in Trusted Extensions .......................................................................................... 244Audit Tasks of the Security Administrator ............................................................................. 245Audit Tasks of the System Administrator ............................................................................... 245
Trusted Extensions Audit Reference ............................................................................................... 246Trusted Extensions Audit Classes ............................................................................................ 246Trusted Extensions Audit Events ............................................................................................. 247Trusted Extensions Audit Tokens ............................................................................................ 247Trusted Extensions Audit Policy Options ............................................................................... 252Extensions to Auditing Commands in Trusted Extensions .................................................. 253
19 Software Management in Trusted Extensions (Tasks) ................................................................ 255Adding Software to Trusted Extensions ......................................................................................... 255
Solaris Security Mechanisms for Software .............................................................................. 256Evaluating Software for Security .............................................................................................. 257
Trusted Processes in the Window System ...................................................................................... 258Adding Trusted CDE Actions ................................................................................................... 259
Managing Software in Trusted Extensions (Tasks) ....................................................................... 260▼ How to Add a Software Package in Trusted Extensions ........................................................ 260▼ How to Install a Java Archive File in Trusted Extensions ...................................................... 261
Contents
Oracle Solaris Trusted Extensions Administrator's Procedures • September 201010

A Quick Reference to Trusted Extensions Administration ............................................................. 263Administrative Interfaces in Trusted Extensions .......................................................................... 263Solaris Interfaces Extended by Trusted Extensions ....................................................................... 264Tighter Security Defaults in Trusted Extensions ........................................................................... 265Limited Options in Trusted Extensions ......................................................................................... 266
B List of Trusted Extensions Man Pages ............................................................................................ 267Trusted Extensions Man Pages in Alphabetical Order ................................................................. 267Solaris Man Pages That Are Modified by Trusted Extensions ..................................................... 270
Index ................................................................................................................................................... 273
Contents
11

12

Figures
FIGURE 1–1 Trusted Extensions Multilevel CDE Desktop ........................................................ 27FIGURE 2–1 Device Allocation Manager Icon in Trusted CDE ................................................. 37FIGURE 2–2 Device Allocation Manager GUI ............................................................................. 37FIGURE 2–3 Typical Trusted Extensions Toolbox in the Solaris Management Console ........ 39FIGURE 2–4 Computers and Networks Tool Set in the Solaris Management Console ........... 40FIGURE 2–5 Solaris Management Console Client Using an LDAP Server to Administer the
Network ...................................................................................................................... 42FIGURE 2–6 Solaris Management Console Client Administering Individual Remote Systems
on a Network .............................................................................................................. 42FIGURE 12–1 Typical Trusted Extensions Routes and Routing Table Entries ........................ 163FIGURE 15–1 Job's Label Printed at the Top and Bottom of a Body Page ................................. 195FIGURE 15–2 Typical Banner Page of a Labeled Print Job .......................................................... 196FIGURE 15–3 Differences on a Trailer Page .................................................................................. 196FIGURE 16–1 Device Allocation Manager Opened by a User .................................................... 222FIGURE 17–1 Serial Ports Tool in the Solaris Management Console ........................................ 233FIGURE 18–1 Typical Audit Record on a Labeled System .......................................................... 246FIGURE 18–2 labelToken Format ............................................................................................... 248FIGURE 18–3 Format for xcolormap, xcursor, xfont, xgc, xpixmap, and xwindowTokens .249FIGURE 18–4 xpropertyToken Format ....................................................................................... 251FIGURE 18–5 xselectToken Format ........................................................................................... 252
13

14

Tables
TABLE 1–1 Examples of Label Relationships ............................................................................. 29TABLE 2–1 Trusted Extensions Administrative Tools .............................................................. 34TABLE 2–2 Administrative Actions in Trusted CDE, Their Purpose, and Associated Rights
Profiles ........................................................................................................................ 35TABLE 2–3 Installation Actions in Trusted CDE, Their Purpose, and Associated Rights
Profiles ........................................................................................................................ 36TABLE 2–4 User and Administrative Trusted Extensions Commands .................................. 44TABLE 2–5 User and Administrative Commands That Trusted Extensions Modifies ......... 45TABLE 4–1 Conditions for Moving Files to a New Label .......................................................... 62TABLE 4–2 Conditions for Moving Selections to a New Label ................................................. 62TABLE 6–1 Trusted Extensions Security Defaults in policy.conf File ................................. 78TABLE 6–2 Security Attributes That Are Assigned After User Creation ................................ 79TABLE 12–1 tnrhdbHost Address and Fallback Mechanism Entries ..................................... 158TABLE 15–1 Configurable Values in the tsol_separator.ps File ......................................... 197TABLE 18–1 X Server Audit Classes ............................................................................................ 246TABLE 18–2 Trusted Extensions Audit Tokens ......................................................................... 247TABLE 19–1 Constraints on CDE Actions in Trusted Extensions ........................................... 259
15

16
Preface
The Oracle Solaris Trusted Extensions Administrator's Procedures guide provides procedures forconfiguring Trusted Extensions on the Solaris Operating System. This guide also providesprocedures for managing users, zones, devices, and hosts that are labeled with TrustedExtensions software.
Note – This Solaris release supports systems that use the SPARC and x86 families of processorarchitectures. The supported systems appear in the Solaris OS: Hardware Compatibility Lists(http://www.sun.com/bigadmin/hcl). This document cites any implementation differencesbetween the platform types.
In this document these x86 related terms mean the following:
■ “x86” refers to the larger family of 64-bit and 32-bit x86 compatible products.■ “x64” relates specifically to 64-bit x86 compatible CPUs.■ “32-bit x86” points out specific 32-bit information about x86 based systems.
For supported systems, see the Solaris OS: Hardware Compatibility Lists.
Who Should Use This GuideThis guide is for knowledgeable system administrators and security administrators who areconfiguring and administering Trusted Extensions software. The level of trust that is requiredby your site security policy, and your level of expertise, determines who can perform theconfiguration tasks.
Administrators should be familiar with Solaris administration. In addition, administratorsshould understand the following:
■ The security features of Trusted Extensions and your site security policy■ Basic concepts and procedures for using a host that is configured with Trusted Extensions,
as described in the Oracle Solaris Trusted Extensions User’s Guide■ How administrative tasks are divided among roles at your site
17
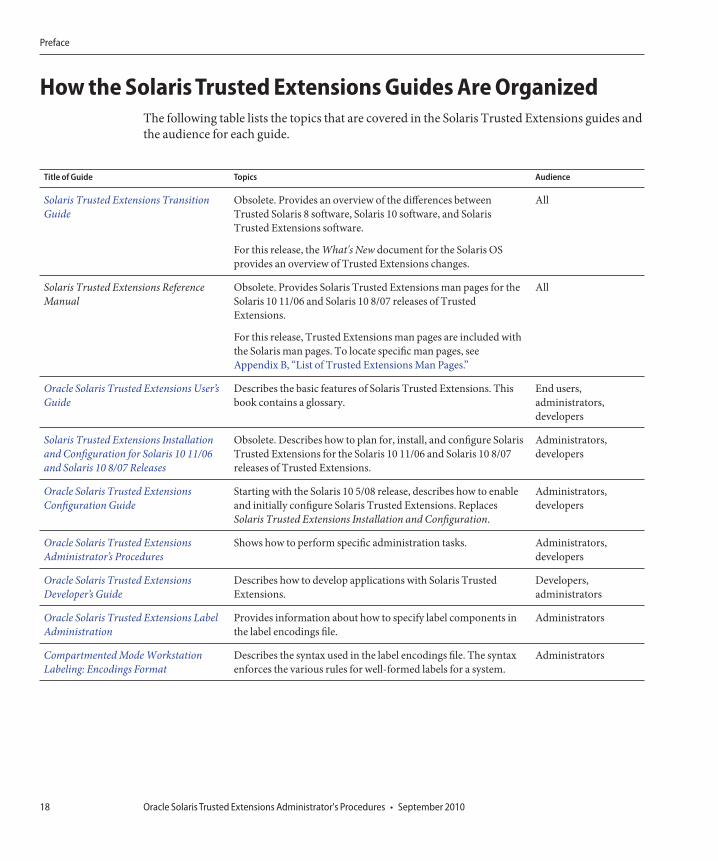
How the Solaris Trusted Extensions Guides Are OrganizedThe following table lists the topics that are covered in the Solaris Trusted Extensions guides andthe audience for each guide.
Title of Guide Topics Audience
Solaris Trusted Extensions TransitionGuide
Obsolete. Provides an overview of the differences betweenTrusted Solaris 8 software, Solaris 10 software, and SolarisTrusted Extensions software.
For this release, the What's New document for the Solaris OSprovides an overview of Trusted Extensions changes.
All
Solaris Trusted Extensions ReferenceManual
Obsolete. Provides Solaris Trusted Extensions man pages for theSolaris 10 11/06 and Solaris 10 8/07 releases of TrustedExtensions.
For this release, Trusted Extensions man pages are included withthe Solaris man pages. To locate specific man pages, seeAppendix B, “List of Trusted Extensions Man Pages.”
All
Oracle Solaris Trusted Extensions User’sGuide
Describes the basic features of Solaris Trusted Extensions. Thisbook contains a glossary.
End users,administrators,developers
Solaris Trusted Extensions Installationand Configuration for Solaris 10 11/06and Solaris 10 8/07 Releases
Obsolete. Describes how to plan for, install, and configure SolarisTrusted Extensions for the Solaris 10 11/06 and Solaris 10 8/07releases of Trusted Extensions.
Administrators,developers
Oracle Solaris Trusted ExtensionsConfiguration Guide
Starting with the Solaris 10 5/08 release, describes how to enableand initially configure Solaris Trusted Extensions. ReplacesSolaris Trusted Extensions Installation and Configuration.
Administrators,developers
Oracle Solaris Trusted ExtensionsAdministrator’s Procedures
Shows how to perform specific administration tasks. Administrators,developers
Oracle Solaris Trusted ExtensionsDeveloper’s Guide
Describes how to develop applications with Solaris TrustedExtensions.
Developers,administrators
Oracle Solaris Trusted Extensions LabelAdministration
Provides information about how to specify label components inthe label encodings file.
Administrators
Compartmented Mode WorkstationLabeling: Encodings Format
Describes the syntax used in the label encodings file. The syntaxenforces the various rules for well-formed labels for a system.
Administrators
Preface
Oracle Solaris Trusted Extensions Administrator's Procedures • September 201018
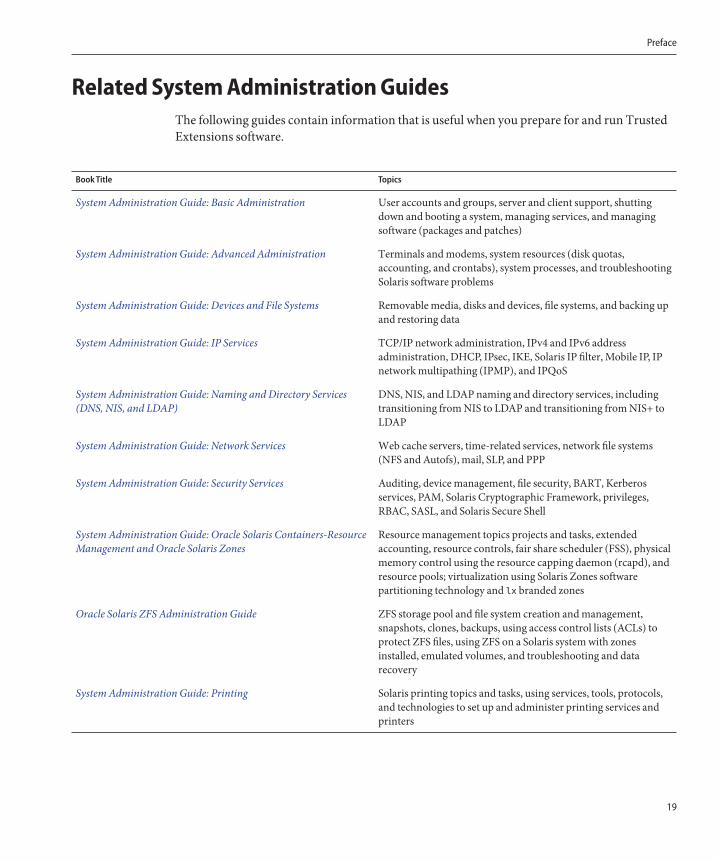
Related System Administration GuidesThe following guides contain information that is useful when you prepare for and run TrustedExtensions software.
Book Title Topics
System Administration Guide: Basic Administration User accounts and groups, server and client support, shuttingdown and booting a system, managing services, and managingsoftware (packages and patches)
System Administration Guide: Advanced Administration Terminals and modems, system resources (disk quotas,accounting, and crontabs), system processes, and troubleshootingSolaris software problems
System Administration Guide: Devices and File Systems Removable media, disks and devices, file systems, and backing upand restoring data
System Administration Guide: IP Services TCP/IP network administration, IPv4 and IPv6 addressadministration, DHCP, IPsec, IKE, Solaris IP filter, Mobile IP, IPnetwork multipathing (IPMP), and IPQoS
System Administration Guide: Naming and Directory Services(DNS, NIS, and LDAP)
DNS, NIS, and LDAP naming and directory services, includingtransitioning from NIS to LDAP and transitioning from NIS+ toLDAP
System Administration Guide: Network Services Web cache servers, time-related services, network file systems(NFS and Autofs), mail, SLP, and PPP
System Administration Guide: Security Services Auditing, device management, file security, BART, Kerberosservices, PAM, Solaris Cryptographic Framework, privileges,RBAC, SASL, and Solaris Secure Shell
System Administration Guide: Oracle Solaris Containers-ResourceManagement and Oracle Solaris Zones
Resource management topics projects and tasks, extendedaccounting, resource controls, fair share scheduler (FSS), physicalmemory control using the resource capping daemon (rcapd), andresource pools; virtualization using Solaris Zones softwarepartitioning technology and lx branded zones
Oracle Solaris ZFS Administration Guide ZFS storage pool and file system creation and management,snapshots, clones, backups, using access control lists (ACLs) toprotect ZFS files, using ZFS on a Solaris system with zonesinstalled, emulated volumes, and troubleshooting and datarecovery
System Administration Guide: Printing Solaris printing topics and tasks, using services, tools, protocols,and technologies to set up and administer printing services andprinters
Preface
19

Related ReferencesYour site security policy document – Describes the security policy and security procedures atyour site
Solaris Common Desktop Environment: Advanced User's and System Administrator's Guide –Describes the Common Desktop Environment (CDE)
The administrator guide for your currently installed operating system – Describes how to backup system files
Related Third-Party Web Site ReferencesThird-party URLs are referenced in this document and provide additional, related information.
Note – Oracle is not responsible for the availability of third-party web sites that are mentioned inthis document. Oracle does not endorse and is not responsible or liable for any content,advertising, products, or other materials that are available on or through such sites or resources.Oracle will not be responsible or liable for any actual or alleged damage or loss caused or allegedto be caused by or in connection with the use of or reliance on any such content, goods, orservices that are available on or through such sites or resources.
Documentation, Support, and TrainingSee the following web sites for additional resources:
■ Documentation (http://docs.sun.com)■ Support (http://www.oracle.com/us/support/systems/index.html)■ Training (http://education.oracle.com) – Click the Sun link in the left navigation bar.
Oracle Welcomes Your CommentsOracle welcomes your comments and suggestions on the quality and usefulness of itsdocumentation. If you find any errors or have any other suggestions for improvement, go tohttp://docs.sun.com and click Feedback. Indicate the title and part number of thedocumentation along with the chapter, section, and page number, if available. Please let usknow if you want a reply.
Preface
Oracle Solaris Trusted Extensions Administrator's Procedures • September 201020

Oracle Technology Network (http://www.oracle.com/technetwork/index.html) offers arange of resources related to Oracle software:
■ Discuss technical problems and solutions on the Discussion Forums(http://forums.oracle.com).
■ Get hands-on step-by-step tutorials with Oracle By Example (http://www.oracle.com/technology/obe/start/index.html).
■ Download Sample Code (http://www.oracle.com/technology/sample_code/index.html).
Typographic ConventionsThe following table describes the typographic conventions that are used in this book.
TABLE P–1 Typographic Conventions
Typeface Meaning Example
AaBbCc123 The names of commands, files, and directories,and onscreen computer output
Edit your .login file.
Use ls -a to list all files.
machine_name% you have mail.
AaBbCc123 What you type, contrasted with onscreencomputer output
machine_name% su
Password:
aabbcc123 Placeholder: replace with a real name or value The command to remove a file is rmfilename.
AaBbCc123 Book titles, new terms, and terms to beemphasized
Read Chapter 6 in the User's Guide.
A cache is a copy that is storedlocally.
Do not save the file.
Note: Some emphasized itemsappear bold online.
Shell Prompts in Command ExamplesThe following table shows the default UNIX system prompt and superuser prompt for shellsthat are included in the Oracle Solaris OS. Note that the default system prompt that is displayedin command examples varies, depending on the Oracle Solaris release.
Preface
21
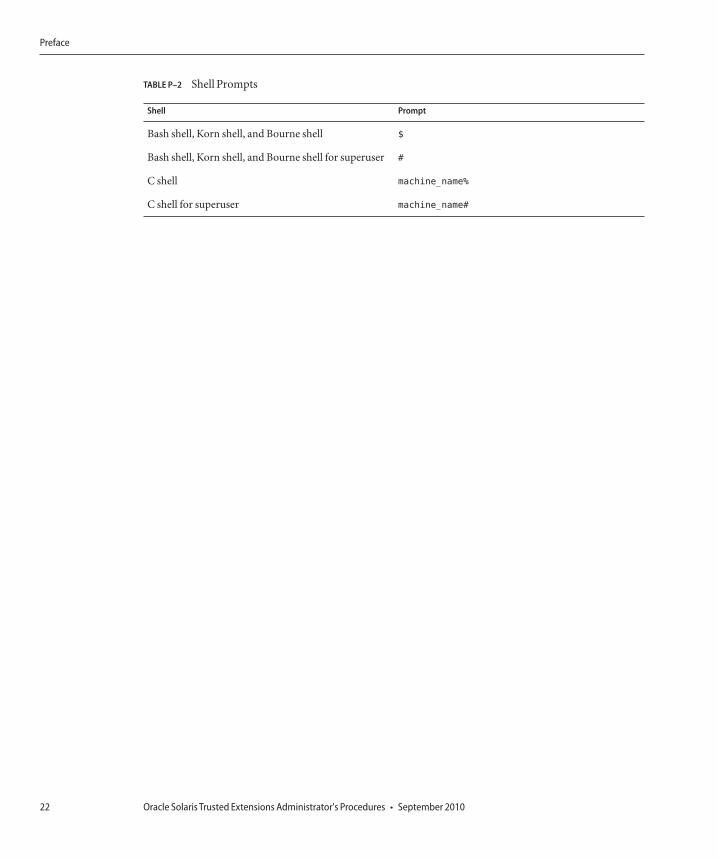
TABLE P–2 Shell Prompts
Shell Prompt
Bash shell, Korn shell, and Bourne shell $
Bash shell, Korn shell, and Bourne shell for superuser #
C shell machine_name%
C shell for superuser machine_name#
Preface
Oracle Solaris Trusted Extensions Administrator's Procedures • September 201022
Trusted Extensions Administration Concepts
This chapter introduces you to administering a system that is configured with Solaris TrustedExtensions software.
■ “Trusted Extensions Software and the Solaris OS” on page 23■ “Basic Concepts of Trusted Extensions” on page 26
Trusted Extensions Software and the Solaris OSTrusted Extensions software adds labels to a system that is running the Solaris OperatingSystem (Solaris OS). Labels implement mandatory access control (MAC). MAC, along withdiscretionary access control (DAC), protects system subjects (processes) and objects (data).Trusted Extensions software provides interfaces to handle label configuration, labelassignment, and label policy.
Similarities Between Trusted Extensions and theSolaris OSTrusted Extensions software uses rights profiles, roles, auditing, privileges, and other securityfeatures of the Solaris OS. You can use Solaris Secure Shell (SSH), BART, the Solariscryptographic framework, IPsec, and IPfilter with Trusted Extensions.
■ As in the Solaris OS, users can be limited to using applications that are necessary forperforming their jobs. Other users can be authorized to do more.
■ As in the Solaris OS, capabilities that were formerly assigned to superuser are assigned toseparate, discrete “roles.”
■ As in the Solaris OS, privileges protect processes. Zones are also used to separate processes.■ As in the Solaris OS, events on the system can be audited.
1C H A P T E R 1
23

■ Trusted Extensions uses the system configuration files of the Solaris OS, such aspolicy.conf and exec_attr.
Differences Between Trusted Extensions and theSolaris OSTrusted Extensions software extends the Solaris OS. The following list provides an overview.For a quick reference, see Appendix A, “Quick Reference to Trusted ExtensionsAdministration.”
■ Trusted Extensions controls access to data with special security tags that are called labels.Labels provide mandatory access control (MAC). MAC protection is in addition to UNIX filepermissions, or discretionary access control (DAC). Labels are directly assigned to users,zones, devices, windows, and network endpoints. Labels are implicitly assigned to processes,files, and other system objects.MAC cannot be overridden by regular users. Trusted Extensions requires regular users tooperate in labeled zones. By default, no users or processes in labeled zones can overrideMAC.As in the Solaris OS, the ability to override security policy can be assigned to specificprocesses or users when MAC can be overridden. For example, users can be authorized tochange the label of a file. Such an action upgrades or downgrades the sensitivity of theinformation in that file.
■ Trusted Extensions adds to existing configuration files and commands. For example,Trusted Extensions adds audit events, authorizations, privileges, and rights profiles.
■ Some features that are optional on a Solaris system are required on a Trusted Extensionssystem. For example, zones and roles are required on a system that is configured withTrusted Extensions.
■ Some features that are optional on a Solaris system are recommended on a TrustedExtensions system. For example, in Trusted Extensions the root user should be turned intothe root role.
■ Trusted Extensions can change the default behavior of the Solaris OS. For example, on asystem that is configured with Trusted Extensions, auditing is enabled by default. Inaddition, device allocation is required.
■ Trusted Extensions can narrow the options that are available in the Solaris OS. For example,on a system that is configured with Trusted Extensions, the NIS+ naming service is notsupported. Also, in Trusted Extensions, all zones are labeled zones. Unlike the Solaris OS,labeled zones must use the same pool of user IDs and group IDs. Additionally, in TrustedExtensions, labeled zones can share one IP address.
■ Trusted Extensions provides trusted versions of two desktops. To work in a labeledenvironment, desktop users of Trusted Extensions must use one of these desktops:
Trusted Extensions Software and the Solaris OS
Oracle Solaris Trusted Extensions Administrator's Procedures • September 201024

■ Solaris Trusted Extensions (CDE) – Is the trusted version of Common DesktopEnvironment (CDE). The name can be shortened to Trusted CDE.
■ Solaris Trusted Extensions (JDS) – Is the trusted version of Java Desktop System,Release number. The name can be shortened to Trusted JDS.
■ Trusted Extensions provides additional graphical user interfaces (GUIs) and command lineinterfaces (CLIs). For example, Trusted Extensions provides the Device Allocation Managerto administer devices. In addition, the updatehome command is used to place startup files inan regular user's home directory at every label.
■ Trusted Extensions requires the use of particular GUIs for administration. For example, ona system that is configured with Trusted Extensions, the Solaris Management Console isused to administer users, roles, and the network. Similarly, in Trusted CDE, the AdminEditor is used to edit system files.
■ Trusted Extensions limits what users can see. For example, a device that cannot be allocatedby a user cannot be seen by that user.
■ Trusted Extensions limits users' desktop options. For example, users are allowed a limitedtime of workstation inactivity before the screen locks.
Multiheaded Systems and the Trusted ExtensionsDesktopWhen the monitors of a multiheaded Trusted Extensions system are configured horizontally,the trusted stripe stretches across the monitors. When the monitors are configured vertically,the trusted stripe appears in the lowest monitor.
When different workspaces are displayed on the monitors of a multiheaded system, TrustedCDE and Trusted JDS render the trusted stripe differently.
■ On a Trusted JDS desktop, each monitor displays a trusted stripe.■ On a Trusted CDE desktop, one trusted stripe appears on the primary monitor.
Caution – If a second trusted stripe appears on a Trusted CDE multiheaded system, the stripeis not generated by the operating system. You might have an unauthorized program on yoursystem.
Contact your security administrator immediately. To determine the correct trusted stripe,see “How to Regain Control of the Desktop's Current Focus” on page 70.
Trusted Extensions Software and the Solaris OS
Chapter 1 • Trusted Extensions Administration Concepts 25

Basic Concepts of Trusted ExtensionsTrusted Extensions software adds labels to a Solaris system. Labeled desktops and trustedapplications, such as the Label Builder and the Device Allocation Manager, are also added. Theconcepts in this section are necessary to understand Trusted Extensions, both for users andadministrators. Users are introduced to these concepts in the Oracle Solaris Trusted ExtensionsUser’s Guide.
Trusted Extensions ProtectionsTrusted Extensions software enhances the protection of the Solaris OS. The Solaris OS protectsaccess to the system with user accounts that require passwords. You can require that passwordsbe changed regularly, be of a certain length, and so on. Roles require additional passwords toperform administrative tasks. Additional authentication limits the damage that can be done byan intruder who guesses the root password, because roles cannot be used as login accounts.Trusted Extensions software goes further by restricting users and roles to an approved labelrange. This label range limits the information that users and roles can access.
Trusted Extensions software displays the Trusted Path symbol, an unmistakable, tamper-proofemblem that appears at the left of the trusted stripe. In Trusted CDE, the stripe is at the bottomof the screen. In Trusted JDS, the stripe is at the top of the screen. The Trusted Path symbolindicates to users when they are using security-related parts of the system. If this symbol doesnot appear when the user is running a trusted application, that version of the application shouldbe checked immediately for authenticity. If the trusted stripe does not appear, the desktop is nottrustworthy. For a sample desktop display, see Figure 1–1.
Basic Concepts of Trusted Extensions
Oracle Solaris Trusted Extensions Administrator's Procedures • September 201026

Most security-related software, that is, the Trusted Computing Base (TCB), runs in the globalzone. Regular users cannot enter the global zone or view its resources. Users are able to interactwith TCB software, as in when they change passwords. The Trusted Path symbol is displayedwhenever the user interacts with the TCB.
Trusted Extensions and Access ControlTrusted Extensions software protects information and other resources through bothdiscretionary access control (DAC) and mandatory access control (MAC). DAC is thetraditional UNIX permission bits and access control lists that are set at the discretion of theowner. MAC is a mechanism that the system enforces automatically. MAC controls alltransactions by checking the labels of processes and data in the transaction.
A user's label represents the sensitivity level at which the user is permitted to operate andchooses to operate. Typical labels are Secret, or Public. The label determines the informationthat the user is allowed to access. Both MAC and DAC can be overridden by special permissionsthat are in the Solaris OS. Privileges are special permissions that can be granted to processes.Authorizations are special permissions that can be granted to users and roles by anadministrator.
FIGURE 1–1 Trusted Extensions Multilevel CDE Desktop
Trusted Path menu
Trusted symbol Workspace label
Windowlabel stripe
Front panel
Window iconlabel stripe
Trusted stripe
Basic Concepts of Trusted Extensions
Chapter 1 • Trusted Extensions Administration Concepts 27
As an administrator, you need to train users on the proper procedures for securing their filesand directories, according to your site's security policy. Furthermore, you need to instruct anyusers who are allowed to upgrade or downgrade labels as to when doing so is appropriate.
Roles and Trusted ExtensionsOn a system that is running Solaris software without Trusted Extensions, roles are optional. Ona system that is configured with Trusted Extensions, roles are required. The system isadministered by the System Administrator role and the Security Administrator role. In somecases, the root role is used.
As in the Solaris OS, rights profiles are the basis of a role's capabilities. Trusted Extensionsprovides two rights profiles, Information Security and User Security. These two profiles definethe Security Administrator role.
The programs that are available to a role in Trusted Extensions have a special property, thetrusted path attribute. This attribute indicates that the program is part of the TCB. The trustedpath attribute is available when a program is launched from the global zone.
For information about roles, see Part III, “Roles, Rights Profiles, and Privileges,” in SystemAdministration Guide: Security Services.
Labels in Trusted Extensions SoftwareLabels and clearances are at the center of mandatory access control (MAC) in TrustedExtensions. They determine which users can access which programs, files, and directories.Labels and clearances consist of one classification component and zero or more compartmentcomponents. The classification component indicates a hierarchical level of security such as TOPSECRET or CONFIDENTIAL. The compartment component represents a group of users who mightneed access to a common body of information. Some typical types of compartments areprojects, departments, or physical locations. Labels are readable by authorized users, butinternally, labels are manipulated as numbers. The numbers and their readable versions aredefined in the label_encodings file.
Trusted Extensions mediates all attempted security-related transactions. The softwarecompares the labels of the accessing entity, typically a process, and the entity being accessed,usually a filesystem object. The software then permits or disallows the transaction depending onwhich label is dominant. Labels are also used to determine access to other system resources,such as allocatable devices, networks, frame buffers, and other hosts.
Basic Concepts of Trusted Extensions
Oracle Solaris Trusted Extensions Administrator's Procedures • September 201028
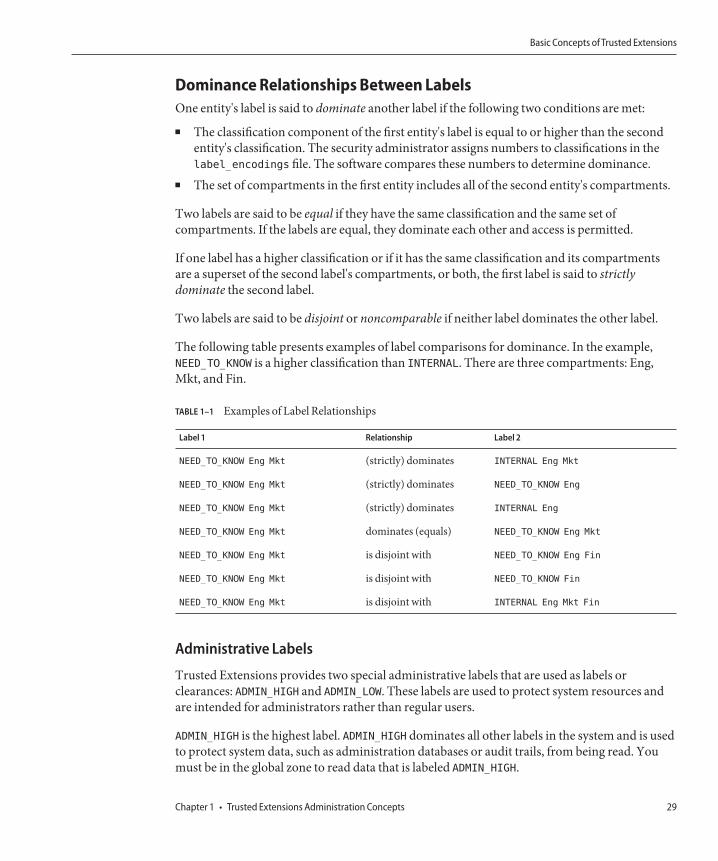
Dominance Relationships Between LabelsOne entity's label is said to dominate another label if the following two conditions are met:
■ The classification component of the first entity's label is equal to or higher than the secondentity's classification. The security administrator assigns numbers to classifications in thelabel_encodings file. The software compares these numbers to determine dominance.
■ The set of compartments in the first entity includes all of the second entity's compartments.
Two labels are said to be equal if they have the same classification and the same set ofcompartments. If the labels are equal, they dominate each other and access is permitted.
If one label has a higher classification or if it has the same classification and its compartmentsare a superset of the second label's compartments, or both, the first label is said to strictlydominate the second label.
Two labels are said to be disjoint or noncomparable if neither label dominates the other label.
The following table presents examples of label comparisons for dominance. In the example,NEED_TO_KNOW is a higher classification than INTERNAL. There are three compartments: Eng,Mkt, and Fin.
TABLE 1–1 Examples of Label Relationships
Label 1 Relationship Label 2
NEED_TO_KNOW Eng Mkt (strictly) dominates INTERNAL Eng Mkt
NEED_TO_KNOW Eng Mkt (strictly) dominates NEED_TO_KNOW Eng
NEED_TO_KNOW Eng Mkt (strictly) dominates INTERNAL Eng
NEED_TO_KNOW Eng Mkt dominates (equals) NEED_TO_KNOW Eng Mkt
NEED_TO_KNOW Eng Mkt is disjoint with NEED_TO_KNOW Eng Fin
NEED_TO_KNOW Eng Mkt is disjoint with NEED_TO_KNOW Fin
NEED_TO_KNOW Eng Mkt is disjoint with INTERNAL Eng Mkt Fin
Administrative Labels
Trusted Extensions provides two special administrative labels that are used as labels orclearances: ADMIN_HIGH and ADMIN_LOW. These labels are used to protect system resources andare intended for administrators rather than regular users.
ADMIN_HIGH is the highest label. ADMIN_HIGH dominates all other labels in the system and is usedto protect system data, such as administration databases or audit trails, from being read. Youmust be in the global zone to read data that is labeled ADMIN_HIGH.
Basic Concepts of Trusted Extensions
Chapter 1 • Trusted Extensions Administration Concepts 29

ADMIN_LOW is the lowest label. ADMIN_LOW is dominated by all other labels in a system, includinglabels for regular users. Mandatory access control does not permit users to write data to fileswith labels lower than the user's label. Thus, a file at the label ADMIN_LOW can be read by regularusers, but cannot be modified. ADMIN_LOW is typically used to protect public executables that areshared, such as files in /usr/bin.
Label Encodings FileAll label components for a system, that is, classifications, compartments, and the associatedrules, are stored in an ADMIN_HIGH file, the label_encodings file. This file is located in the/etc/security/tsol directory. The security administrator sets up the label_encodings filefor the site. A label encodings file contains:
■ Component definitions – Definitions of classifications, compartments, labels, andclearances, including rules for required combinations and constraints
■ Accreditation range definitions – Specification of the clearances and minimum labels thatdefine the sets of available labels for the entire system and for regular users
■ Printing specifications – Identification and handling information for print banners,trailers, headers, footers, and other security features on printer output
■ Customizations – Local definitions including label color codes, and other defaults
For more information, see the label_encodings(4) man page. Detailed information can also befound in Oracle Solaris Trusted Extensions Label Administration and Compartmented ModeWorkstation Labeling: Encodings Format.
Label RangesA label range is the set of potentially usable labels at which users can operate. Both users andresources both have label ranges. Resources that can be protected by label ranges include suchthings as allocatable devices, networks, interfaces, frame buffers, and commands or actions. Alabel range is defined by a clearance at the top of the range and a minimum label at the bottom.
A range does not necessarily include all combinations of labels that fall between a maximumand minimum label. Rules in the label_encodings file can disqualify certain combinations. Alabel must be well-formed, that is, permitted by all applicable rules in the label encodings file, inorder to be included in a range.
However, a clearance does not have to be well-formed. Suppose, for example, that alabel_encodings file prohibits any combination of compartments Eng, Mkt, and Fin in a label.INTERNAL Eng Mkt Fin would be a valid clearance but not a valid label. As a clearance, thiscombination would let a user access files that are labeled INTERNAL Eng, INTERNAL Mkt, andINTERNAL Fin.
Basic Concepts of Trusted Extensions
Oracle Solaris Trusted Extensions Administrator's Procedures • September 201030
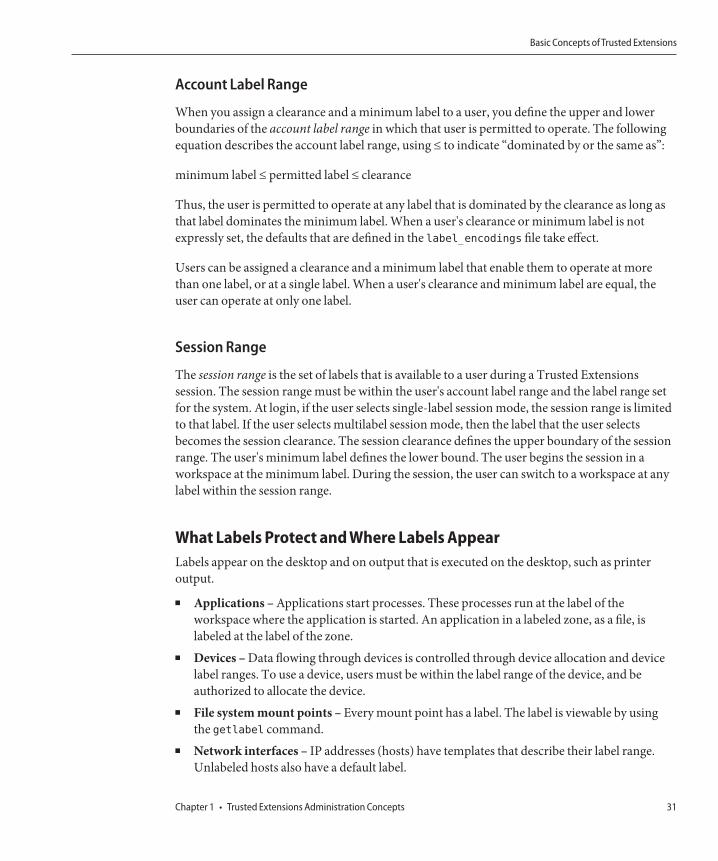
Account Label Range
When you assign a clearance and a minimum label to a user, you define the upper and lowerboundaries of the account label range in which that user is permitted to operate. The followingequation describes the account label range, using ≤ to indicate “dominated by or the same as”:
minimum label ≤ permitted label ≤ clearance
Thus, the user is permitted to operate at any label that is dominated by the clearance as long asthat label dominates the minimum label. When a user's clearance or minimum label is notexpressly set, the defaults that are defined in the label_encodings file take effect.
Users can be assigned a clearance and a minimum label that enable them to operate at morethan one label, or at a single label. When a user's clearance and minimum label are equal, theuser can operate at only one label.
Session Range
The session range is the set of labels that is available to a user during a Trusted Extensionssession. The session range must be within the user's account label range and the label range setfor the system. At login, if the user selects single-label session mode, the session range is limitedto that label. If the user selects multilabel session mode, then the label that the user selectsbecomes the session clearance. The session clearance defines the upper boundary of the sessionrange. The user's minimum label defines the lower bound. The user begins the session in aworkspace at the minimum label. During the session, the user can switch to a workspace at anylabel within the session range.
What Labels Protect and Where Labels AppearLabels appear on the desktop and on output that is executed on the desktop, such as printeroutput.
■ Applications – Applications start processes. These processes run at the label of theworkspace where the application is started. An application in a labeled zone, as a file, islabeled at the label of the zone.
■ Devices – Data flowing through devices is controlled through device allocation and devicelabel ranges. To use a device, users must be within the label range of the device, and beauthorized to allocate the device.
■ File system mount points – Every mount point has a label. The label is viewable by usingthe getlabel command.
■ Network interfaces – IP addresses (hosts) have templates that describe their label range.Unlabeled hosts also have a default label.
Basic Concepts of Trusted Extensions
Chapter 1 • Trusted Extensions Administration Concepts 31

■ Printers and printing – Printers have label ranges. Labels are printed on body pages. Labels,handling information, and other security information is printed on the banner and trailerpages. To configure printing in Trusted Extensions, see Chapter 15, “Managing LabeledPrinting (Tasks),” and “Labels on Printed Output” in Oracle Solaris Trusted Extensions LabelAdministration.
■ Processes – Processes are labeled. Processes run at the label of the workspace where theprocess originates. The label of a process is visible by using the plabel command.
■ Users – Users are assigned a default label and a label range. The label of the user's workspaceindicates the label of the user's processes.
■ Windows – Labels are visible at the top of desktop windows. The label of the desktop is alsoindicated by color. The color appears on the desktop switch and above window title bars.When a window is moved to a differently labeled workspace, the window maintains itsoriginal label.
■ Zones – Every zone has a unique label. The files and directories that are owned by a zone areat the zone's label. For more information, see the getzonepath(1) man page.
Basic Concepts of Trusted Extensions
Oracle Solaris Trusted Extensions Administrator's Procedures • September 201032
Trusted Extensions Administration Tools
This chapter describes the tools that are available in Solaris Trusted Extensions, the location ofthe tools, and the databases on which the tools operate.
■ “Administration Tools for Trusted Extensions” on page 33■ “Trusted CDE Actions” on page 35■ “Device Allocation Manager” on page 36■ “Solaris Management Console Tools” on page 38■ “Command Line Tools in Trusted Extensions” on page 44■ “Remote Administration in Trusted Extensions” on page 46
Administration Tools for Trusted ExtensionsAdministration on a system that is configured with Trusted Extensions uses many of the sametools that are available in the Solaris OS. Trusted Extensions offers security-enhanced tools aswell. Administration tools are available only to roles in a role workspace.
Within a role workspace, you can access commands, actions, applications, and scripts that aretrusted. The following table summarizes these administrative tools.
2C H A P T E R 2
33
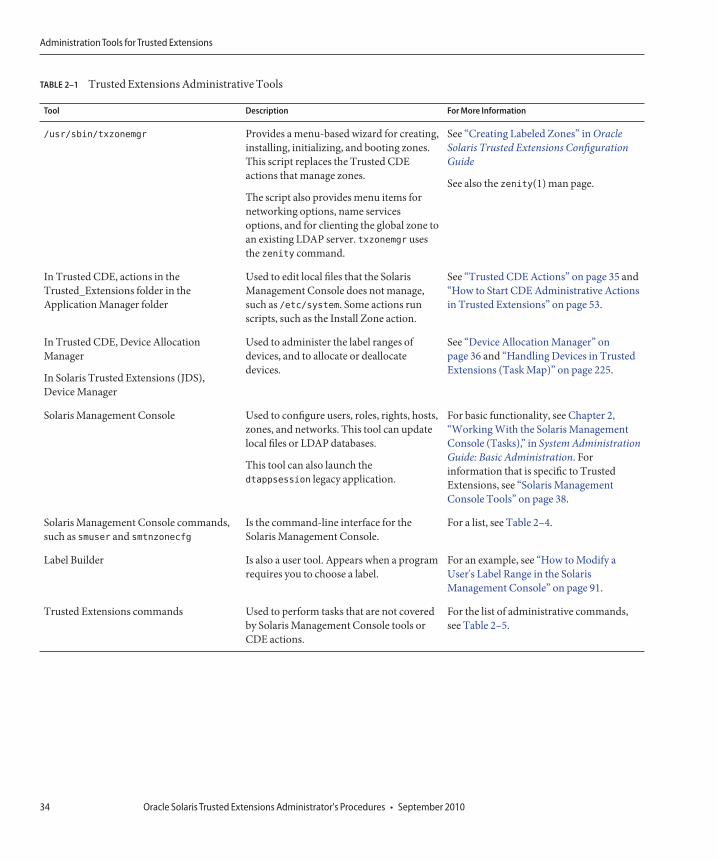
TABLE 2–1 Trusted Extensions Administrative Tools
Tool Description For More Information
/usr/sbin/txzonemgr Provides a menu-based wizard for creating,installing, initializing, and booting zones.This script replaces the Trusted CDEactions that manage zones.
The script also provides menu items fornetworking options, name servicesoptions, and for clienting the global zone toan existing LDAP server. txzonemgr usesthe zenity command.
See “Creating Labeled Zones” in OracleSolaris Trusted Extensions ConfigurationGuide
See also the zenity(1) man page.
In Trusted CDE, actions in theTrusted_Extensions folder in theApplication Manager folder
Used to edit local files that the SolarisManagement Console does not manage,such as /etc/system. Some actions runscripts, such as the Install Zone action.
See “Trusted CDE Actions” on page 35 and“How to Start CDE Administrative Actionsin Trusted Extensions” on page 53.
In Trusted CDE, Device AllocationManager
In Solaris Trusted Extensions (JDS),Device Manager
Used to administer the label ranges ofdevices, and to allocate or deallocatedevices.
See “Device Allocation Manager” onpage 36 and “Handling Devices in TrustedExtensions (Task Map)” on page 225.
Solaris Management Console Used to configure users, roles, rights, hosts,zones, and networks. This tool can updatelocal files or LDAP databases.
This tool can also launch thedtappsession legacy application.
For basic functionality, see Chapter 2,“Working With the Solaris ManagementConsole (Tasks),” in System AdministrationGuide: Basic Administration. Forinformation that is specific to TrustedExtensions, see “Solaris ManagementConsole Tools” on page 38.
Solaris Management Console commands,such as smuser and smtnzonecfg
Is the command-line interface for theSolaris Management Console.
For a list, see Table 2–4.
Label Builder Is also a user tool. Appears when a programrequires you to choose a label.
For an example, see “How to Modify aUser's Label Range in the SolarisManagement Console” on page 91.
Trusted Extensions commands Used to perform tasks that are not coveredby Solaris Management Console tools orCDE actions.
For the list of administrative commands,see Table 2–5.
Administration Tools for Trusted Extensions
Oracle Solaris Trusted Extensions Administrator's Procedures • September 201034

txzonemgr ScriptStarting in the Solaris 10 5/08 release, the txzonemgr script is used to configure labeled zones.This zenity(1) script displays a dialog box with the title Labeled Zone Manager. This GUIpresents a dynamically-determined menu that displays only valid choices for the currentconfiguration status of a labeled zone. For instance, if a zone is already labeled, the Label menuitem is not displayed.
Trusted CDE ActionsThe following tables list the CDE actions that roles in Trusted Extensions can run. These trustedCDE actions are available from the Trusted_Extensions folder. The Trusted_Extensions folderis available from the Application Manager folder on the CDE desktop.
TABLE 2–2 Administrative Actions in Trusted CDE, Their Purpose, and Associated Rights Profiles
Action Name Purpose of Action Default Rights Profile
Add Allocatable Device Creates devices by adding entries to device databases. Seeadd_allocatable(1M).
Device Security
Admin Editor Edits the specified file. See “How to Edit Administrative Files inTrusted Extensions” on page 54.
Object Access Management
Audit Classes Edits the audit_class file. See audit_class(4). Audit Control
Audit Control Edits the audit_control file. See audit_control(4). Audit Control
Audit Events Edits the audit_event file. See audit_event(4). Audit Control
Audit Startup Edits the audit_startup.sh script. See audit_startup(1M). Audit Control
Check Encodings Runs the chk_encodings command on specified encodings file.See chk_encodings(1M).
Object Label Management
Check TN Files Runs the tnchkdb command on tnrhdb, tnrhtp, and tnzonecfg
databases. See tnchkdb(1M).Network Management
Configure Selection
Confirmation
Edits /usr/dt/config/sel_config file. See sel_config(4). Object Label Management
Create LDAP Client Makes the global zone an LDAP client of an existing LDAPdirectory service.
Information Security
Edit Encodings Edits the specified label_encodings file and runs thechk_encodings command. See chk_encodings(1M).
Object Label Management
Name Service Switch Edits the nsswitch.conf file. See nsswitch.conf(4). Network Management
Set DNS Servers Edits the resolv.conf file. See resolv.conf(4). Network Management
Trusted CDE Actions
Chapter 2 • Trusted Extensions Administration Tools 35

TABLE 2–2 Administrative Actions in Trusted CDE, Their Purpose, and Associated Rights Profiles (Continued)Action Name Purpose of Action Default Rights Profile
Set Daily Message Edits the /etc/motd file. At login, the contents of this file displayin the Last Login dialog box.
Network Management
Set Default Routes Specifies default static routes. Network Management
Share Filesystem Edits the dfstab file. Does not run the share command. Seedfstab(4).
File System Management
The following actions are used by the initial setup team during zone creation. Some of theseactions can be used for maintenance and troubleshooting.
TABLE 2–3 Installation Actions in Trusted CDE, Their Purpose, and Associated Rights Profiles
Action Name Purpose of Action Default Rights Profile
Clone Zone Creates a labeled zone from a ZFS snapshot of an existing zone. Zone Management
Copy Zone Creates a labeled zone from an existing zone. Zone Management
Configure Zone Associates a label with a zone name. Zone Management
Initialize Zone for LDAP Initializes the zone for booting as an LDAP client. Zone Management
Install Zone Installs the system files that a labeled zone requires. Zone Management
Restart Zone Restarts a zone that has already been booted. Zone Management
Share Logical Interface Sets up one interface for the global zone and a separate interface for thelabeled zones to share.
Network Management
Share Physical Interface Sets up one interface that is shared by the global zone and the labeledzones.
Network Management
Shut Down Zone Shuts down an installed zone. Zone Management
Start Zone Boots an installed zone and starts the services for that zone. Zone Management
Zone Terminal Console Opens a console to view processes in an installed zone. Zone Management
Device Allocation ManagerA device is either a physical peripheral that is connected to a computer or a software-simulateddevice called a pseudo-device. Because devices provide a means for the import and export ofdata to and from a system, devices must be controlled to properly protect the data. TrustedExtensions uses device allocation and device label ranges to control data flowing throughdevices.
Device Allocation Manager
Oracle Solaris Trusted Extensions Administrator's Procedures • September 201036

Examples of devices that have label ranges are frame buffers, tape drives, diskette and CD-ROMdrives, printers, and USB devices.
Users allocate devices through the Device Allocation Manager. The Device Allocation Managermounts the device, runs a clean script to prepare the device, and performs the allocation. Whenfinished, the user deallocates the device through the Device Allocation Manager, which runsanother clean script, and unmounts and deallocates the device.
You can manage devices by using the Device Administration tool from the Device AllocationManager. Regular users cannot access the Device Administration tool.
Note – In Solaris Trusted Extensions (JDS), this GUI is named Device Manager, and the DeviceAdministration button is named Administration.
For more information about device protection in Trusted Extensions, see Chapter 17,“Managing Devices for Trusted Extensions (Tasks).”
FIGURE 2–1 Device Allocation Manager Icon in Trusted CDE
Device Allocation
FIGURE 2–2 Device Allocation Manager GUI
Device Allocation Manager
Chapter 2 • Trusted Extensions Administration Tools 37

Solaris Management Console ToolsThe Solaris Management Console provides access to toolboxes of GUI-based administrationtools. These tools enable you to edit items in various configuration databases. In TrustedExtensions, the Solaris Management Console is the administrative interface for users, roles, andthe trusted network databases.
Trusted Extensions extends the Solaris Management Console:
■ Trusted Extensions modifies the Solaris Management Console Users tool set. For anintroduction to the tool set, see Chapter 2, “Working With the Solaris Management Console(Tasks),” in System Administration Guide: Basic Administration.
■ Trusted Extensions adds the Security Templates tool and the Trusted Network Zones tool tothe Computers and Networks tool set.
Solaris Management Console tools are collected into toolboxes according to scope and securitypolicy. To administer Trusted Extensions, Trusted Extensions provides toolboxes whosePolicy=TSOL. You can access tools according to scope, that is, according to naming service. Theavailable scopes are local host and LDAP.
The Solaris Management Console is shown in the following figure. A Scope=Files TrustedExtensions toolbox is loaded, and the Users tool set is open.
Solaris Management Console Tools
Oracle Solaris Trusted Extensions Administrator's Procedures • September 201038
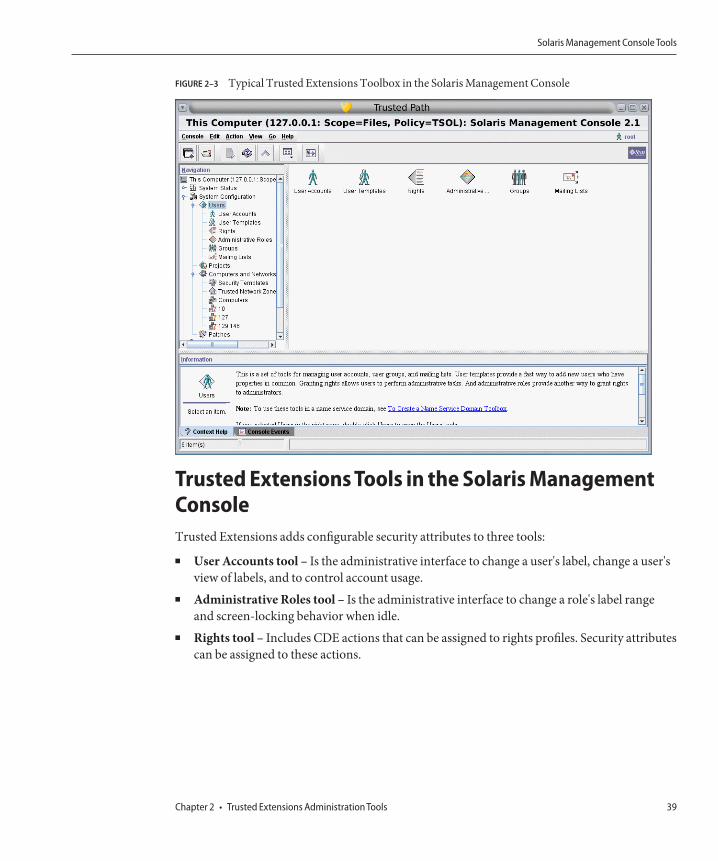
Trusted Extensions Tools in the Solaris ManagementConsoleTrusted Extensions adds configurable security attributes to three tools:
■ User Accounts tool – Is the administrative interface to change a user's label, change a user'sview of labels, and to control account usage.
■ Administrative Roles tool – Is the administrative interface to change a role's label rangeand screen-locking behavior when idle.
■ Rights tool – Includes CDE actions that can be assigned to rights profiles. Security attributescan be assigned to these actions.
FIGURE 2–3 Typical Trusted Extensions Toolbox in the Solaris Management Console
Solaris Management Console Tools
Chapter 2 • Trusted Extensions Administration Tools 39
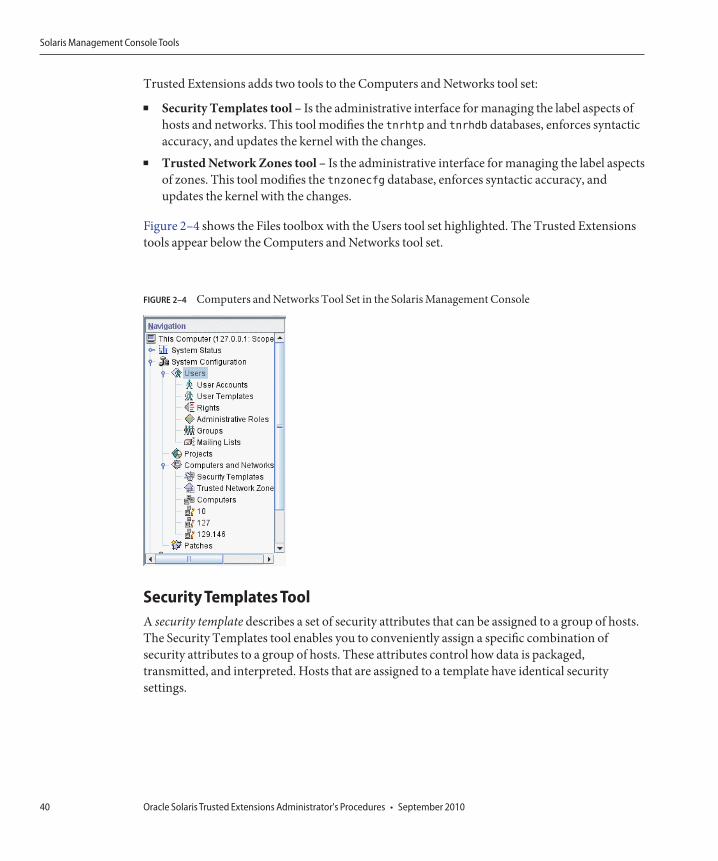
Trusted Extensions adds two tools to the Computers and Networks tool set:
■ Security Templates tool – Is the administrative interface for managing the label aspects ofhosts and networks. This tool modifies the tnrhtp and tnrhdb databases, enforces syntacticaccuracy, and updates the kernel with the changes.
■ Trusted Network Zones tool – Is the administrative interface for managing the label aspectsof zones. This tool modifies the tnzonecfg database, enforces syntactic accuracy, andupdates the kernel with the changes.
Figure 2–4 shows the Files toolbox with the Users tool set highlighted. The Trusted Extensionstools appear below the Computers and Networks tool set.
Security Templates ToolA security template describes a set of security attributes that can be assigned to a group of hosts.The Security Templates tool enables you to conveniently assign a specific combination ofsecurity attributes to a group of hosts. These attributes control how data is packaged,transmitted, and interpreted. Hosts that are assigned to a template have identical securitysettings.
FIGURE 2–4 Computers and Networks Tool Set in the Solaris Management Console
Solaris Management Console Tools
Oracle Solaris Trusted Extensions Administrator's Procedures • September 201040

The hosts are defined in the Computers tool. The security attributes of the hosts are assigned inthe Security Templates tool. The Modify Template dialog box contains two tabs:
■ General tab – Describes the template. Includes its name, host type, default label, domain ofinterpretation (DOI), accreditation range, and set of discrete sensitivity labels.
■ Hosts Assigned to Template tab – Lists all the hosts on the network that you have assignedto this template.
Trusted networking and security templates are explained in more detail in Chapter 12, “TrustedNetworking (Overview).”
Trusted Network Zones ToolThe Trusted Network Zones tool identifies the zones on your system. Initially, the global zone islisted. When you add zones and their labels, the zone names display in the pane. Zone creationusually occurs during system configuration. Label assignment, multilevel port configuration,and label policy is configured in this tool. For details, see Chapter 10, “Managing Zones inTrusted Extensions (Tasks).”
Client-Server Communication With the SolarisManagement ConsoleTypically, a Solaris Management Console client administers systems remotely. On a networkthat uses LDAP as a naming service, a Solaris Management Console client connects to theSolaris Management Console server that runs on the LDAP server. The following figure showsthis configuration.
Solaris Management Console Tools
Chapter 2 • Trusted Extensions Administration Tools 41

Figure 2–6 shows a network that is not configured with an LDAP server. The administratorconfigured each remote system with a Solaris Management Console server.
Solaris Management Console DocumentationThe main source of documentation for the Solaris Management Console is its online help.Context-sensitive help is tied to the currently selected feature and is displayed in theinformation pane. Expanded help topics are available from the Help menu or by clicking linksin the context-sensitive help. Further information is provided in Chapter 2, “Working With theSolaris Management Console (Tasks),” in System Administration Guide: Basic Administration.Also see “Using the Solaris Management Tools With RBAC (Task Map)” in SystemAdministration Guide: Basic Administration.
FIGURE 2–5 Solaris Management Console Client Using an LDAP Server to Administer the Network
LDAP Servertcp_listen = trueremote.connections = true
tsol_ldap.tbxScope = LDAPPolicy = TSOL
Solaris ManagementConsole client
remote.connections = true
remote.connections = true
FIGURE 2–6 Solaris Management Console Client Administering Individual Remote Systems on a Network
Solaris ManagementConsole client
tcp_listen = trueremote.connections = true
tcp_listen = trueremote.connections = true
tcp_listen = trueremote.connections = true
remote.connections = true
Solaris Management Console Tools
Oracle Solaris Trusted Extensions Administrator's Procedures • September 201042

Label Builder in Trusted ExtensionsThe label builder GUI enforces your choice of a valid label or clearance when a programrequires you to assign a label. For example, a label builder appears during login (see Chapter 2,“Logging In to Trusted Extensions (Tasks),” in Oracle Solaris Trusted Extensions User’s Guide).The label builder also appears when you change the label of a workspace, or when you assign alabel to a user, zone, or network interface in the Solaris Management Console. The followinglabel builder appears when you assign a label range to a new device.
In the label builder, component names in the Classification column correspond to theCLASSIFICATIONS section in the label_encodings file. The component names in the Sensitivitycolumn correspond to the WORDS section in the label_encodings file.
Label Builder in Trusted Extensions
Chapter 2 • Trusted Extensions Administration Tools 43

Command Line Tools in Trusted ExtensionsCommands that are unique to Trusted Extensions are contained in the Solaris TrustedExtensions Reference Manual. The Solaris commands that Trusted Extensions modifies arecontained in the Solaris Reference Manual. The man command finds all the commands.
The following table lists commands that are unique to Trusted Extensions. The commands arelisted in man page format.
TABLE 2–4 User and Administrative Trusted Extensions Commands
Man Page Trusted Extensions Modification For More Information
add_allocatable(1M) Enables a device to be allocated by adding the deviceto device allocation databases. By default, removabledevices are allocatable.
“How to Configure a Device in TrustedExtensions” on page 227
atohexlabel(1M) Translates a label into hexadecimal format. “How to Obtain the HexadecimalEquivalent for a Label” on page 71
chk_encodings(1M) Checks the integrity of the label_encodings file. “How to Debug a label_encodings File” inOracle Solaris Trusted Extensions LabelAdministration
dtappsession(1) Opens a remote Trusted CDE session by using theApplication Manager.
Chapter 8, “Remote Administration inTrusted Extensions (Tasks)”
getlabel(1) Displays the label of the selected files or directories. “How to Display the Labels of MountedFiles” on page 122
getzonepath(1) Displays the full pathname of a specific zone. “Acquiring a Sensitivity Label” in OracleSolaris Trusted Extensions Developer’sGuide
hextoalabel(1M) Translates a hexadecimal label into its readableequivalent.
“How to Obtain a Readable Label From ItsHexadecimal Form” on page 72
plabel(1) Displays the label of the current process. See the man page.
remove_allocatable(1M) Prevents allocation of a device by removing its entryfrom device allocation databases.
“How to Configure a Device in TrustedExtensions” on page 227
setlabel(1) Relabels the selected item. Requires thesolaris.label.file.downgrade orsolaris.label.file.upgrade authorization. Theseauthorizations are in the Object Label Managementrights profile.
For the equivalent GUI procedure, see“How to Move Files Between Labels inTrusted CDE” in Oracle Solaris TrustedExtensions User’s Guide.
smtnrhdb(1M) Manages entries in the tnrhdb database locally or in anaming service database.
For equivalent procedures that use theSolaris Management Console, see“Configuring Trusted Network Databases(Task Map)” on page 166.
Command Line Tools in Trusted Extensions
Oracle Solaris Trusted Extensions Administrator's Procedures • September 201044

TABLE 2–4 User and Administrative Trusted Extensions Commands (Continued)Man Page Trusted Extensions Modification For More Information
smtnrhtp(1M) Manages entries in the tnrhtp database locally or in anaming service database.
See the man page.
smtnzonecfg(1M) Manages entries in the local tnzonecfg database. For an equivalent procedure that uses theSolaris Management Console, see “How toCreate a Multilevel Port for a Zone” onpage 131.
tnchkdb(1M) Checks the integrity of the tnrhdb and tnrhtp
databases.“How to Check the Syntax of TrustedNetwork Databases” on page 181
tnctl(1M) Caches network information in the kernel. “How to Synchronize the Kernel CacheWith Trusted Network Databases” onpage 183
tnd(1M) Executes the trusted network daemon. “How to Synchronize the Kernel CacheWith Trusted Network Databases” onpage 183
tninfo(1M) Displays kernel-level network information andstatistics.
“How to Compare Trusted NetworkDatabase Information With the KernelCache” on page 182.
updatehome(1M) Updates .copy_files and .link_files for thecurrent label.
“How to Configure Startup Files for Usersin Trusted Extensions” on page 86
The following table lists Solaris commands that are modified or extended by TrustedExtensions. The commands are listed in man page format.
TABLE 2–5 User and Administrative Commands That Trusted Extensions Modifies
Man Page Purpose of Command For More Information
allocate(1) Adds options to clean the allocated device, and toallocate a device to a specific zone. In TrustedExtensions, regular users do not use this command.
“How to Allocate a Device in TrustedExtensions” in Oracle Solaris TrustedExtensions User’s Guide
deallocate(1) Adds options to clean the device, and to deallocate adevice from a specific zone. In Trusted Extensions,regular users do not use this command.
“How to Allocate a Device in TrustedExtensions” in Oracle Solaris TrustedExtensions User’s Guide
list_devices(1) Adds the -a option to display device attributes, suchas authorizations and labels. Adds the -d option todisplay the default attributes of an allocated devicetype. Adds the -z option to display available devicesthat can be allocated to a labeled zone.
See the man page.
Command Line Tools in Trusted Extensions
Chapter 2 • Trusted Extensions Administration Tools 45

TABLE 2–5 User and Administrative Commands That Trusted Extensions Modifies (Continued)Man Page Purpose of Command For More Information
tar(1) Adds the -T option to archive and extract files anddirectories that are labeled.
“How to Back Up Files in TrustedExtensions” on page 139 and “How toRestore Files in Trusted Extensions” onpage 140
auditconfig(1M) Adds the windata_down and windata_up audit policyoptions.
“How to Configure Audit Policy” in SystemAdministration Guide: Security Services
auditreduce(1M) Adds the -l option to select audit records by label. “How to Select Audit Events From theAudit Trail” in System AdministrationGuide: Security Services
automount(1M) Modifies the names and contents of auto_home mapsto account for zone names and zone visibility fromhigher labels.
“Changes to the Automounter in TrustedExtensions” on page 137
ifconfig(1M) Adds the all-zones option to make an interfaceavailable to every zone on the system.
“How to Verify That a Host's Interfaces AreUp” on page 186
netstat(1M) Adds the -R option to display extended securityattributes for sockets and routing table entries.
“How to Debug the Trusted ExtensionsNetwork” on page 186
route(1M) Adds the -secattr option to display the securityattributes of the route: cipso, doi, max_sl, andmin_sl.
“How to Configure Routes With SecurityAttributes” on page 180
Remote Administration in Trusted ExtensionsYou can remotely administer a system that is configured with Trusted Extensions by using thessh command, the dtappsession program, or the Solaris Management Console. If site securitypolicy permits, you can configure a Trusted Extensions host to enable login from a non-TrustedExtensions host, although this configuration is less secure. For more information, seeChapter 8, “Remote Administration in Trusted Extensions (Tasks).”
Remote Administration in Trusted Extensions
Oracle Solaris Trusted Extensions Administrator's Procedures • September 201046

Getting Started as a Trusted ExtensionsAdministrator (Tasks)
This chapter introduces you to administering a system that is configured with Solaris TrustedExtensions.■ “What's New in Trusted Extensions” on page 47■ “Security Requirements When Administering Trusted Extensions” on page 48■ “Getting Started as a Trusted Extensions Administrator (Task Map)” on page 49
What's New in Trusted ExtensionsSolaris 10 10/08 – In this release, Trusted Extensions provides the following features:■ The Trusted Extensions shared IP stack allows default routes to isolate labeled zones from
each other and from the global zone.■ The loopback interface, lo0, is an all-zones interface.■ Separation of duty can be enforced by role. The System Administrator role creates users, but
cannot assign passwords. The Security Administrator role assigns passwords, but cannotcreate users. For details, see “Create Rights Profiles That Enforce Separation of Duty” inOracle Solaris Trusted Extensions Configuration Guide.
■ This guide includes a list of Trusted Extensions man pages in Appendix B, “List of TrustedExtensions Man Pages.”
Solaris 10 5/08 – In this release, Trusted Extensions provides the following features:■ The service management facility (SMF) manages Trusted Extensions as the
svc:/system/labeld service. By default, the labeld service is disabled. When the service isenabled, the system must still be configured and rebooted to enforce Trusted Extensionssecurity policies.
■ The CIPSO Domain of Interpretation (DOI) number that your system uses is configurable.■ For information about the DOI, see “Network Security Attributes in Trusted
Extensions” on page 154.
3C H A P T E R 3
47

■ To specify a DOI that differs from the default, see “Configure the Domain ofInterpretation” in Oracle Solaris Trusted Extensions Configuration Guide.
■ Trusted Extensions recognizes CIPSO labels in NFS Version 3 (NFSv3) mounted filesystems, as well as in NFS Version 4 (NFSv4). Therefore, you can mount NFSv3 file systemson a Trusted Extensions system as a labeled file system. To use udp as an underlyingprotocol for multilevel mounts in NFSv3, see “How to Configure a Multilevel Port forNFSv3 Over udp” on page 130.
■ The name service cache daemon, nscd, can be configured to run in every labeled zone at thelabel of the zone.
Security Requirements When Administering TrustedExtensions
In Trusted Extensions, roles are the conventional way to administer the system. Typically,superuser is not used. Roles are created just as they are in the Solaris OS, and most tasks areperformed by roles. In Trusted Extensions, the root user is not used to perform administrativetasks.
The following roles are typical of a Trusted Extensions site:
■ root role – Created by the initial setup team■ Security Administrator role – Created during or after initial configuration by the initial
setup team■ System Administrator role – Created by the Security Administrator role
As in the Solaris OS, you might also create a Primary Administrator role, an Operator role, andso on. With the exception of the root role, the roles that you create can be administered in anaming service.
As in the Solaris OS, only users who have been assigned a role can assume that role. In SolarisTrusted Extensions (CDE), you can assume a role from a desktop menu called the Trusted Pathmenu. In Solaris Trusted Extensions (JDS), you can assume a role when your user name isdisplayed in the Trusted Stripe. The role choices appear when you click your user name.
Role Creation in Trusted ExtensionsTo administer Trusted Extensions, you create roles that divide system and security functions.The initial setup team created the Security Administrator role during configuration. For details,see “Create the Security Administrator Role in Trusted Extensions” in Oracle Solaris TrustedExtensions Configuration Guide.
Security Requirements When Administering Trusted Extensions
Oracle Solaris Trusted Extensions Administrator's Procedures • September 201048

The process of creating a role in Trusted Extensions is identical to the Solaris OS process. Asdescribed in Chapter 2, “Trusted Extensions Administration Tools,” the Solaris ManagementConsole is the GUI for managing roles in Trusted Extensions.
■ For an overview of role creation, see Chapter 10, “Role-Based Access Control (Reference),”in System Administration Guide: Security Services and “Using RBAC (Task Map)” in SystemAdministration Guide: Security Services.
■ To create a powerful role that is equivalent to superuser, see “Creating the PrimaryAdministrator Role” in System Administration Guide: Basic Administration. At sites that useTrusted Extensions, the Primary Administrator role might violate security policy. Thesesites would turn root into a role, and create a Security Administrator role.
■ To create the root role, see “How to Make root User Into a Role” in System AdministrationGuide: Security Services.
■ To create roles by using the Solaris Management Console, see “How to Create and Assign aRole by Using the GUI” in System Administration Guide: Security Services.
Role Assumption in Trusted ExtensionsUnlike the Solaris OS, Trusted Extensions provides an Assume Rolename Role menu item fromthe Trusted Path menu. After confirming the role password, the software activates a roleworkspace with the trusted path attribute. Role workspaces are administrative workspaces.Such workspaces are in the global zone.
Getting Started as a Trusted Extensions Administrator (TaskMap)
Familiarize yourself with the following procedures before administering Trusted Extensions.
Task Description For Instructions
Log in. Logs you in securely. “Logging In to Trusted Extensions” in OracleSolaris Trusted Extensions User’s Guide
Perform common user tasks on adesktop.
These tasks include:■ Configuring your workspaces■ Using workspaces at different labels■ Accessing Trusted Extensions man
pages■ Accessing Trusted Extensions online
help
“Working on a Labeled System” in Oracle SolarisTrusted Extensions User’s Guide
Getting Started as a Trusted Extensions Administrator (Task Map)
Chapter 3 • Getting Started as a Trusted Extensions Administrator (Tasks) 49

Task Description For Instructions
Perform tasks that require thetrusted path.
These tasks include:■ Allocating a device■ Changing your password■ Changing the label of a workspace
“Performing Trusted Actions” in Oracle SolarisTrusted Extensions User’s Guide
Create useful roles. Creates administrative roles for your site.Creating roles in LDAP is a one-time task.
The Security Administrator role is a usefulrole.
“Role Creation in Trusted Extensions” on page 48
“Create the Security Administrator Role inTrusted Extensions” in Oracle Solaris TrustedExtensions Configuration Guide
(Optional) Make root a role. Prevents anonymous login by root. Thistask is done once per system.
“How to Make root User Into a Role” in SystemAdministration Guide: Security Services
Assume a role. Enters the global zone in a role. Alladministrative tasks are performed in theglobal zone.
“How to Enter the Global Zone in TrustedExtensions” on page 50
Exit a role workspace and becomeregular user.
Leaves the global zone. “How to Exit the Global Zone in TrustedExtensions” on page 51
Locally administer users, roles,rights, zones, and networks.
Uses the Solaris Management Console tomanage the distributed system.
“How to Administer the Local System With theSolaris Management Console” on page 52
Administer the system by usingTrusted CDE actions.
Uses the administrative actions in theTrusted_Extensions folder.
“How to Start CDE Administrative Actions inTrusted Extensions” on page 53
Edit an administrative file. Edits files in a trusted editor. “How to Edit Administrative Files in TrustedExtensions” on page 54
Administer device allocation. Uses the Device Allocation Manager –Device Administration GUI.
“Managing Devices in Trusted Extensions (TaskMap)” on page 226
▼ How to Enter the Global Zone in Trusted ExtensionsBy assuming a role, you enter the global zone in Trusted Extensions. Administration of theentire system is possible only from the global zone. Only superuser or a role can enter the globalzone.
After assuming a role, the role can create a workspace at a user label to edit administration filesin a labeled zone.
For troubleshooting purposes, you can also enter the global zone by starting a Failsafe session.For details, see “How to Log In to a Failsafe Session in Trusted Extensions” on page 90.
You have created one or more roles, or you plan to enter the global zone as superuser. Forpointers, see “Role Creation in Trusted Extensions” on page 48.
Before You Begin
Getting Started as a Trusted Extensions Administrator (Task Map)
Oracle Solaris Trusted Extensions Administrator's Procedures • September 201050
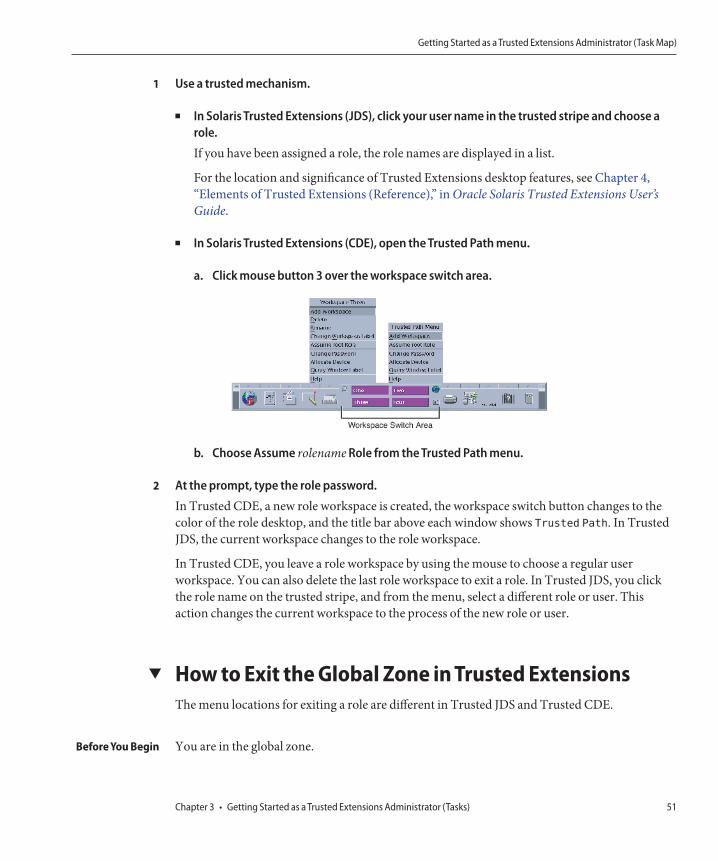
Use a trusted mechanism.
■ In Solaris Trusted Extensions (JDS), click your user name in the trusted stripe and choose arole.
If you have been assigned a role, the role names are displayed in a list.
For the location and significance of Trusted Extensions desktop features, see Chapter 4,“Elements of Trusted Extensions (Reference),” in Oracle Solaris Trusted Extensions User’sGuide.
■ In Solaris Trusted Extensions (CDE), open the Trusted Path menu.
a. Click mouse button 3 over the workspace switch area.
b. Choose Assume rolename Role from the Trusted Path menu.
At the prompt, type the role password.
In Trusted CDE, a new role workspace is created, the workspace switch button changes to thecolor of the role desktop, and the title bar above each window shows Trusted Path. In TrustedJDS, the current workspace changes to the role workspace.
In Trusted CDE, you leave a role workspace by using the mouse to choose a regular userworkspace. You can also delete the last role workspace to exit a role. In Trusted JDS, you clickthe role name on the trusted stripe, and from the menu, select a different role or user. Thisaction changes the current workspace to the process of the new role or user.
▼ How to Exit the Global Zone in Trusted ExtensionsThe menu locations for exiting a role are different in Trusted JDS and Trusted CDE.
You are in the global zone.
1
2
Before You Begin
Getting Started as a Trusted Extensions Administrator (Task Map)
Chapter 3 • Getting Started as a Trusted Extensions Administrator (Tasks) 51

On both desktops, you can click a user workspace in the Workspace Switch area.You can also exit the role workspace, and therefore the global zone, by doing one of thefollowing:
■ In Trusted JDS, click your role name in the trusted stripe.When you click the role name, your user name and a list of roles that you can assume isdisplayed. When you select your user name, all subsequent windows that you create in thatworkspace are created by the selected name. The windows that you previously created onthe current desktop continue to display at the name and label of the role.
If you choose a different role name, you remain in the global zone in a different role.
■ In Trusted CDE, delete the role workspace.Click mouse button 3 over the workspace button and select Delete. You are returned to thelast workspace you occupied.
▼ How to Administer the Local System With the SolarisManagement ConsoleThe first time that you launch the Solaris Management Console on a system, a delay occurswhile the tools are registered and various directories are created. This delay typically occursduring system configuration. For the procedure, see “Initialize the Solaris Management ConsoleServer in Trusted Extensions” in Oracle Solaris Trusted Extensions Configuration Guide.
To administer a remote system, see “Administering Trusted Extensions Remotely (Task Map)”on page 102.
You must have assumed a role. For details, see “How to Enter the Global Zone in TrustedExtensions” on page 50.
Start the Solaris Management Console.In Solaris Trusted Extensions (JDS), use the command line.$ /usr/sbin/smc &
In Trusted CDE, you have three choices.
■ Use the smc command in a terminal window.
■ From the Tools pull-up menu on the Front Panel, click the Solaris Management Console icon.
■ In the Trusted_Extensions folder, double-click the Solaris Management Console icon.
Choose Console -> Open Toolbox.
●
Before You Begin
1
2
Getting Started as a Trusted Extensions Administrator (Task Map)
Oracle Solaris Trusted Extensions Administrator's Procedures • September 201052

From the list, select a Trusted Extensions toolbox of the appropriate scope.
A Trusted Extensions toolbox has Policy=TSOL as part of its name. The Files scope updateslocal files on the current system. The LDAP scope updates LDAP directories on the Sun JavaSystem Directory Server. The toolbox names appear similar to the following:This Computer (this-host: Scope=Files, Policy=TSOL)
This Computer (ldap-server: Scope=LDAP, Policy=TSOL)
Navigate to the desired Solaris Management Console tool.
The password prompt is displayed.
For tools that Trusted Extensions has modified, click System Configuration.
Type the password.
Refer to the online help for additional information about Solaris Management Console tools.For an introduction to the tools that Trusted Extensions modifies, see “Solaris ManagementConsole Tools” on page 38.
To close the GUI, choose Exit from the Console menu.
▼ How to Start CDE Administrative Actions in TrustedExtensions
Assume a role.
For details, see “How to Enter the Global Zone in Trusted Extensions” on page 50.
In Trusted CDE, bring up the Application Manager.
a. Click mouse button 3 on the background to bring up the Workspace menu.
3
4
5
6
1
2
Getting Started as a Trusted Extensions Administrator (Task Map)
Chapter 3 • Getting Started as a Trusted Extensions Administrator (Tasks) 53
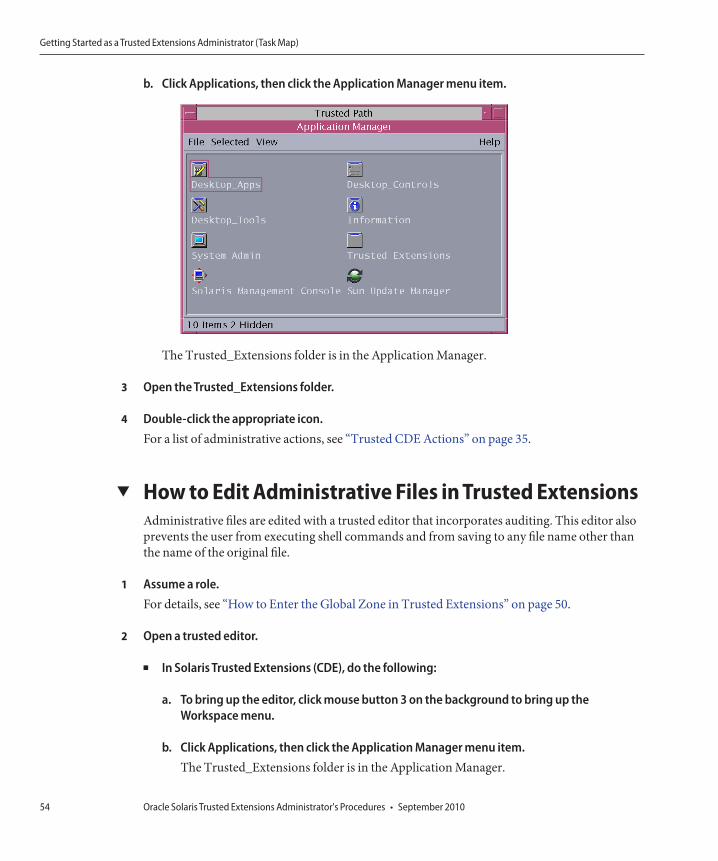
b. Click Applications, then click the Application Manager menu item.
The Trusted_Extensions folder is in the Application Manager.
Open the Trusted_Extensions folder.
Double-click the appropriate icon.For a list of administrative actions, see “Trusted CDE Actions” on page 35.
▼ How to Edit Administrative Files in Trusted ExtensionsAdministrative files are edited with a trusted editor that incorporates auditing. This editor alsoprevents the user from executing shell commands and from saving to any file name other thanthe name of the original file.
Assume a role.For details, see “How to Enter the Global Zone in Trusted Extensions” on page 50.
Open a trusted editor.
■ In Solaris Trusted Extensions (CDE), do the following:
a. To bring up the editor, click mouse button 3 on the background to bring up theWorkspace menu.
b. Click Applications, then click the Application Manager menu item.The Trusted_Extensions folder is in the Application Manager.
3
4
1
2
Getting Started as a Trusted Extensions Administrator (Task Map)
Oracle Solaris Trusted Extensions Administrator's Procedures • September 201054

c. Open the Trusted_Extensions folder.
d. Double-click the Admin Editor action.You are prompted to provide a file name. For the format, see Step 3 and Step 4.
■ In Solaris Trusted Extensions (JDS), do the following:
■ (Optional) To use gedit as the trusted editor, modify the EDITOR variable.For details, see “How to Assign the Editor of Your Choice as the Trusted Editor” onpage 68.
■ Use the command line to bring up the trusted editor.# /usr/dt/bin/trusted_edit filename
You must provide a filename argument.
To create a new file, type the full path name for the new file.When you save the file, the editor creates a temporary file.
To edit an existing file, type the full path name for the existing file.
Note – If your editor provides a Save As option, do not use it. Use the editor's Save option to savethe file.
To save the file to the specified path name, close the editor.
3
4
5
Getting Started as a Trusted Extensions Administrator (Task Map)
Chapter 3 • Getting Started as a Trusted Extensions Administrator (Tasks) 55

56
Security Requirements on a Trusted ExtensionsSystem (Overview)
This chapter describes configurable security features on a system that is configured with SolarisTrusted Extensions.
■ “Configurable Solaris Security Features” on page 57■ “Security Requirements Enforcement” on page 58■ “Rules When Changing the Level of Security for Data” on page 61■ “Customization of Solaris Trusted Extensions (CDE)” on page 64
Configurable Solaris Security FeaturesTrusted Extensions uses the same security features that the Solaris OS provides, and adds somefeatures. For example, the Solaris OS provides eeprom protection, password requirements andstrong password algorithms, system protection by locking out a user, and protection fromkeyboard shutdown.
Trusted Extensions differs from the Solaris OS in the actual procedures that are used to modifythese security defaults. In Trusted Extensions, you typically administer systems by assuming arole. Local settings are modified by using the trusted editor. Changes that affect the network ofusers, roles, and hosts are made in the Solaris Management Console.
Trusted Extensions Interfaces for Configuring SecurityFeaturesProcedures are provided in this book where Trusted Extensions requires a particular interfaceto modify security settings, and that interface is optional in the Solaris OS. Where TrustedExtensions requires the use of the trusted editor to edit local files, no separate procedures areprovided in this book. For example, the procedure “How to Prevent Account Locking for Users”on page 96 describes how to update a user's account by using the Solaris Management Consoleto prevent the account from being locked. However, the procedure for setting a system-wide
4C H A P T E R 4
57

password lock policy is not provided in this book. You follow the Solaris instructions, exceptthat in Trusted Extensions, you use the trusted editor to modify the system file.
Extension of Solaris Security Mechanisms by TrustedExtensionsThe following Solaris security mechanisms are extensible in Trusted Extensions as they are inthe Solaris OS:
■ Audit events and classes – Adding audit events and audit classes is described in Chapter 30,“Managing Solaris Auditing (Tasks),” in System Administration Guide: Security Services.
■ Rights profiles – Adding rights profiles is described in Part III, “Roles, Rights Profiles, andPrivileges,” in System Administration Guide: Security Services.
■ Roles – Adding roles is described in Part III, “Roles, Rights Profiles, and Privileges,” inSystem Administration Guide: Security Services.
■ Authorizations – For an example of adding a new authorization, see “Customizing DeviceAuthorizations in Trusted Extensions (Task Map)” on page 236.
As in the Solaris OS, privileges cannot be extended.
Trusted Extensions Security FeaturesTrusted Extensions provides the following unique security features:
■ Labels – Subjects and objects are labeled. Processes are labeled. Zones and the network arelabeled.
■ Device Allocation Manager – By default, devices are protected by allocation requirements.The Device Allocation Manager GUI is the interface for administrators and for regularusers.
■ Change Password menu item – The Trusted Path menu enables you to change your userpassword, and the password of the role that you have assumed.
Security Requirements EnforcementTo ensure that the security of the system is not compromised, administrators need to protectpasswords, files, and audit data. Users need to be trained to do their part. To be consistent withthe requirements for an evaluated configuration, follow the guidelines in this section.
Security Requirements Enforcement
Oracle Solaris Trusted Extensions Administrator's Procedures • September 201058

Users and Security RequirementsEach site's security administrator ensures that users are trained in security procedures. Thesecurity administrator needs to communicate the following rules to new employees and remindexisting employees of these rules on a regular basis:
■ Do not tell anyone your password.Anyone who knows your password can access the same information that you can withoutbeing identified and therefore without being accountable.
■ Do not write your password down or include it in an email message.■ Choose passwords that are hard to guess.■ Do not send your password to anyone by email.■ Do not leave your computer unattended without locking the screen or logging off.■ Remember that administrators do not rely on email to send instructions to users. Do not
ever follow emailed instructions from an administrator without first double-checking withthe administrator.Be aware that sender information in email can be forged.
■ Because you are responsible for the access permissions on files and directories that youcreate, make sure that the permissions on your files and directories are set appropriately. Donot allow unauthorized users to read a file, to change a file, to list the contents of a directory,or to add to a directory.
Your site might want to provide additional suggestions.
Email UsageIt is an unsafe practice to use email to instruct users to take an action.
Tell users not to trust email with instructions that purport to come from an administrator.Doing so prevents the possibility that spoofed email messages could be used to fool users intochanging a password to a certain value or divulging the password, which could subsequently beused to log in and compromise the system.
Password EnforcementThe System Administrator role must specify a unique user name and user ID when creating anew account. When choosing the name and ID for a new account, the administrator you mustensure that both the user name and associated ID are not duplicated anywhere on the networkand have not been previously used.
Security Requirements Enforcement
Chapter 4 • Security Requirements on a Trusted Extensions System (Overview) 59
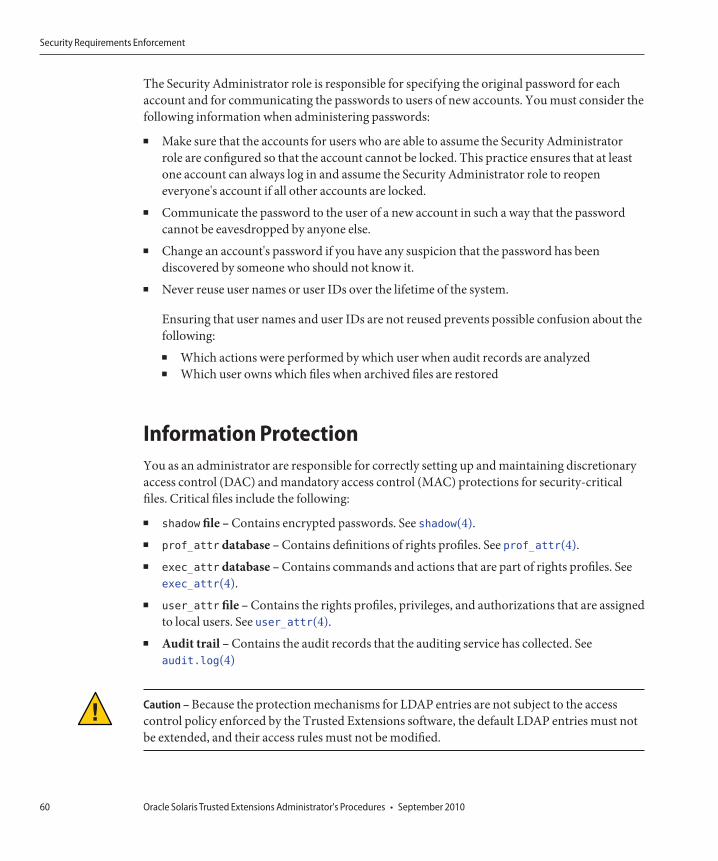
The Security Administrator role is responsible for specifying the original password for eachaccount and for communicating the passwords to users of new accounts. You must consider thefollowing information when administering passwords:
■ Make sure that the accounts for users who are able to assume the Security Administratorrole are configured so that the account cannot be locked. This practice ensures that at leastone account can always log in and assume the Security Administrator role to reopeneveryone's account if all other accounts are locked.
■ Communicate the password to the user of a new account in such a way that the passwordcannot be eavesdropped by anyone else.
■ Change an account's password if you have any suspicion that the password has beendiscovered by someone who should not know it.
■ Never reuse user names or user IDs over the lifetime of the system.
Ensuring that user names and user IDs are not reused prevents possible confusion about thefollowing:■ Which actions were performed by which user when audit records are analyzed■ Which user owns which files when archived files are restored
Information ProtectionYou as an administrator are responsible for correctly setting up and maintaining discretionaryaccess control (DAC) and mandatory access control (MAC) protections for security-criticalfiles. Critical files include the following:
■ shadow file – Contains encrypted passwords. See shadow(4).■ prof_attr database – Contains definitions of rights profiles. See prof_attr(4).■ exec_attr database – Contains commands and actions that are part of rights profiles. See
exec_attr(4).■ user_attr file – Contains the rights profiles, privileges, and authorizations that are assigned
to local users. See user_attr(4).■ Audit trail – Contains the audit records that the auditing service has collected. See
audit.log(4)
Caution – Because the protection mechanisms for LDAP entries are not subject to the accesscontrol policy enforced by the Trusted Extensions software, the default LDAP entries must notbe extended, and their access rules must not be modified.
Security Requirements Enforcement
Oracle Solaris Trusted Extensions Administrator's Procedures • September 201060

Password ProtectionIn local files, passwords are protected from viewing by DAC and from modifications by bothDAC and MAC. Passwords for local accounts are maintained in the /etc/shadow file, which isreadable only by superuser. For more information, see the shadow(4) man page.
Group AdministrationThe System Administrator role needs to verify on the local system and on the network that allgroups have a unique group ID (GID).
When a local group is deleted from the system, the System Administrator role must ensure thefollowing:
■ All objects with the GID of the deleted group must be deleted or assigned to another group.■ All users who have the deleted group as their primary group must be reassigned to another
primary group.
User Deletion PracticesWhen an account is deleted from the system, the System Administrator role and the SecurityAdministrator role must take the following actions:
■ Delete the account's home directories in every zone.■ Delete any processes or jobs that are owned by the deleted account:
■ Delete any objects that are owned by the account,or assign the ownership to anotheruser.
■ Delete any at or batch jobs that are scheduled on behalf of the user. For details, see theat(1) and crontab(1) man pages.
■ Never reuse the user (account) name or user ID.
Rules When Changing the Level of Security for DataBy default, regular users can perform cut-and-paste, copy-and-paste, and drag-and-dropoperations on both files and selections. The source and target must be at the same label.
To change the label of files, or the label of information within files requires authorization. Whenusers are authorized to change the security level of data, the Selection Manager applicationmediates the transfer. In Trusted CDE, the /usr/dt/config/sel_config file controls filerelabeling actions, and the cutting and copying of information to a different label. In TrustedJDS, the /usr/share/gnome/sel_config file controls these transfers. n Trusted CDE, the
Rules When Changing the Level of Security for Data
Chapter 4 • Security Requirements on a Trusted Extensions System (Overview) 61

/usr/dt/bin/sel_mgr application controls drag-and-drop operations between windows. Asthe following tables illustrate, the relabeling of a selection is more restrictive than the relabelingof a file.
The following table summarizes the rules for file relabeling. The rules cover cut-and-paste,copy-and-paste, and drag-and-drop operations.
TABLE 4–1 Conditions for Moving Files to a New Label
Transaction Description Label Relationship Owner Relationship Required Authorization
Copy and paste, cut and paste, or drag anddrop of files between File Managers
Same label Same UID None
Downgrade Same UID solaris.label.file.downgrade
Upgrade Same UID solaris.label.file.upgrade
Downgrade Different UIDs solaris.label.file.downgrade
Upgrade Different UIDs solaris.label.file.upgrade
Different rules apply to selections within a window or file. Drag-and-drop of selections alwaysrequires equality of labels and ownership. Drag-and-drop between windows is mediated by theSelection Manager application, not by the sel_config file.
The rules for changing the label of selections are summarized in the following table.
TABLE 4–2 Conditions for Moving Selections to a New Label
Transaction Description Label Relationship Owner Relationship Required Authorization
Copy and paste, or cut and paste ofselections between windows
Same label Same UID None
Downgrade Same UID solaris.label.win.downgrade
Upgrade Same UID solaris.label.win.upgrade
Downgrade Different UIDs solaris.label.win.downgrade
Upgrade Different UIDs solaris.label.win.upgrade
Drag and drop of selections betweenwindows
Same label Same UID None applicable
Trusted Extensions provides a selection confirmer to mediate label changes. This windowappears when an authorized user attempts to change the label of a file or selection. The user has120 seconds to confirm the operation. To change the security level of data without this windowrequires the solaris.label.win.noview authorization, in addition to the relabelingauthorizations. The following illustration shows a selection, zonename, in the window.
Rules When Changing the Level of Security for Data
Oracle Solaris Trusted Extensions Administrator's Procedures • September 201062

By default, the selection confirmer displays whenever data is being transferred to a differentlabel. If a selection requires several transfer decisions, the automatic reply mechanism providesa way to reply once to the several transfers. For more information, see the sel_config(4) manpage and the following section.
sel_config FileThe sel_config file is checked to determine the behavior of the selection confirmer when anoperation would upgrade or downgrade a label.
The sel_config file defines the following:
■ A list of selection types to which automatic replies are given■ Whether certain types of operations can be automatically confirmed■ Whether a selection confirmer dialog box is displayed
In Trusted CDE, the Security Administrator role can change the defaults by using the ConfigureSelection Confirmation action in the Trusted_Extensions folder. The new settings becomeeffective at the next login. In Solaris Trusted Extensions (JDS), the CDE action is not available.To change the defaults, modify the /usr/share/gnome/sel_config file in a text editor.
Rules When Changing the Level of Security for Data
Chapter 4 • Security Requirements on a Trusted Extensions System (Overview) 63
Customization of Solaris Trusted Extensions (CDE)In Solaris Trusted Extensions (CDE), users can add actions to the Front Panel and customizethe Workspace menu. Trusted Extensions software limits users' ability to add programs andcommands to CDE.
Front Panel CustomizationAnyone can drag and drop a pre-existing action from the Application Manager to the FrontPanel, as long as the account performing the modification has the action in its profile. Actions inthe /usr/dt/ or /etc/dt/ directories can be added to the Front Panel, but applications in the$HOME/.dt/appconfig directory cannot. While users can use the Create Action action, theycannot write into any of the directories where the system-wide actions are stored. Therefore,regular users cannot create actions that are usable.
In Trusted Extensions, the actions' search path has been changed. Actions in any individual'shome directory are processed last instead of first. Therefore, no one can customize existingactions.
The Security Administrator role is assigned the Admin Editor action, so can make any neededmodifications to the /usr/dt/appconfig/types/C/dtwm.fp file and the other configurationfiles for the Front Panel subpanels.
Workspace Menu CustomizationThe Workspace Menu is the menu that appears when you click mouse button 3 on thebackground of the workspace. Regular users can customize the menu, and add items to themenu.
The following conditions apply when a user is allowed to work at multiple labels:■ The user must have a home directory in the global zone.
To save the customizations, processes in the global zone must be able to write to the user'shome directory at the correct label. The zone path to a user home directory that is writableby global zone processes is similar to the following:
/zone/zone-name/home/username■ The user must use the Customize Menu and Add Item to Menu options in a regular user
workspace. The user can create a different customization for each label.■ When the user assumes a role, changes to the Workspace Menu persist.■ Changes that are made to the Workspace Menu are stored in the user's home directory at the
current label. The customized menu file is .dt/wsmenu.■ The user's rights profile must enable the user to run the desired action.
Customization of Solaris Trusted Extensions (CDE)
Oracle Solaris Trusted Extensions Administrator's Procedures • September 201064

Any action that is added to the Workspace Menu must be handled by one of the user's rightsprofiles. Otherwise, the action fails when invoked and an error message is displayed.For example, anyone with the Run action can double-click the icon for any executable andrun it, even if the action or any commands that the action invokes are not in one of theaccount's rights profiles. By default, roles are not assigned the Run action. Therefore, anymenu item that requires the Run action fails when executed by a role.
Customization of Solaris Trusted Extensions (CDE)
Chapter 4 • Security Requirements on a Trusted Extensions System (Overview) 65

66

Administering Security Requirements inTrusted Extensions (Tasks)
This chapter contains tasks that are commonly performed on a system that is configured withSolaris Trusted Extensions.
Common Tasks in Trusted Extensions (Task Map)The following task map describes procedures that set up a working environment foradministrators of Trusted Extensions.
Task Description For Instructions
Change the editor programfor the trusted editor.
Specify the editor for administrative files. “How to Assign the Editor of Your Choice as theTrusted Editor” on page 68
Change the password forroot.
Specify a new password for the root user, or forthe root role.
“How to Change the Password for root” onpage 69
Change the password for arole.
Specifies a new password for your current role. Example 5–2
Use the Secure Attention keycombination.
Gets control of the mouse or keyboard. Also, testswhether the mouse or keyboard is trusted.
“How to Regain Control of the Desktop's CurrentFocus” on page 70
Determine the hexadecimalnumber for a label.
Displays the internal representation for a textlabel.
“How to Obtain the Hexadecimal Equivalent for aLabel” on page 71
Determine the textrepresentation for a label.
Displays the text representation for a hexadecimallabel.
“How to Obtain a Readable Label From ItsHexadecimal Form” on page 72
Edit system files. Securely edits Solaris or Trusted Extensionssystem files.
“How to Change Security Defaults in SystemFiles” on page 73
Allocate a device. Uses a peripheral device to add information to orremove information from the system.
“How to Allocate a Device in Trusted Extensions”in Oracle Solaris Trusted Extensions User’s Guide
5C H A P T E R 5
67

Task Description For Instructions
Administer a host remotely. Administers Solaris or Trusted Extensions hostsfrom a remote host.
Chapter 8, “Remote Administration in TrustedExtensions (Tasks)”
▼ How to Assign the Editor of Your Choice as the TrustedEditorThe trusted editor uses the value of the $EDITOR environment variable as its editor.
You must be in a role in the global zone.
Determine the value of the $EDITOR variable.# echo $EDITOR
The following are editor possibilities. The $EDITOR variable might also not be set.
■ /usr/dt/bin/dtpad – Is the editor that CDE provides.■ /usr/bin/gedit – Is the editor that Java Desktop System, Release number provides. Solaris
Trusted Extensions (JDS) is the trusted version of that desktop.■ /usr/bin/vi – Is the visual editor.
Set the value of the $EDITOR variable.
■ To set the value permanently, modify the value in the shell initialization file for the role.
For example, in the role's home directory, modify the .kshrc file for a Korn shell, and the.cshrc file for a C shell.
■ To set the value for the current shell, set the value in the terminal window.
For example, in a Korn shell, use the following commands:# setenv EDITOR=pathname-of-editor# export $EDITOR
In a C shell, use the following command:
# setenv EDITOR=pathname-of-editor
In a Bourne shell, use the following commands:
# EDITOR=pathname-of-editor# export EDITOR
Before You Begin
1
2
Common Tasks in Trusted Extensions (Task Map)
Oracle Solaris Trusted Extensions Administrator's Procedures • September 201068
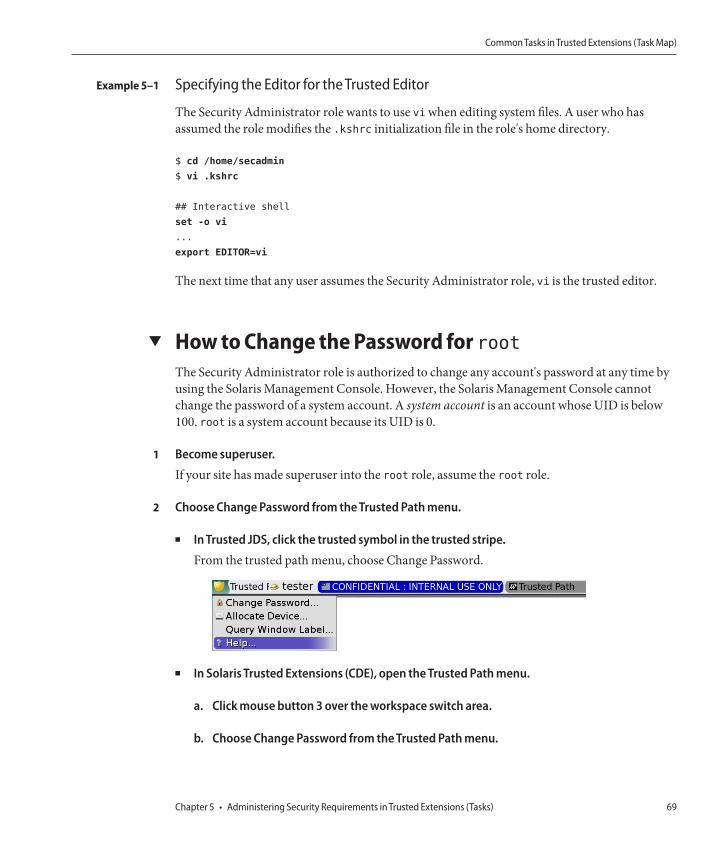
Specifying the Editor for the Trusted Editor
The Security Administrator role wants to use vi when editing system files. A user who hasassumed the role modifies the .kshrc initialization file in the role's home directory.
$ cd /home/secadmin
$ vi .kshrc
## Interactive shell
set -o vi
...
export EDITOR=vi
The next time that any user assumes the Security Administrator role, vi is the trusted editor.
▼ How to Change the Password for rootThe Security Administrator role is authorized to change any account's password at any time byusing the Solaris Management Console. However, the Solaris Management Console cannotchange the password of a system account. A system account is an account whose UID is below100. root is a system account because its UID is 0.
Become superuser.
If your site has made superuser into the root role, assume the root role.
Choose Change Password from the Trusted Path menu.
■ In Trusted JDS, click the trusted symbol in the trusted stripe.
From the trusted path menu, choose Change Password.
■ In Solaris Trusted Extensions (CDE), open the Trusted Path menu.
a. Click mouse button 3 over the workspace switch area.
b. Choose Change Password from the Trusted Path menu.
Example 5–1
1
2
Common Tasks in Trusted Extensions (Task Map)
Chapter 5 • Administering Security Requirements in Trusted Extensions (Tasks) 69
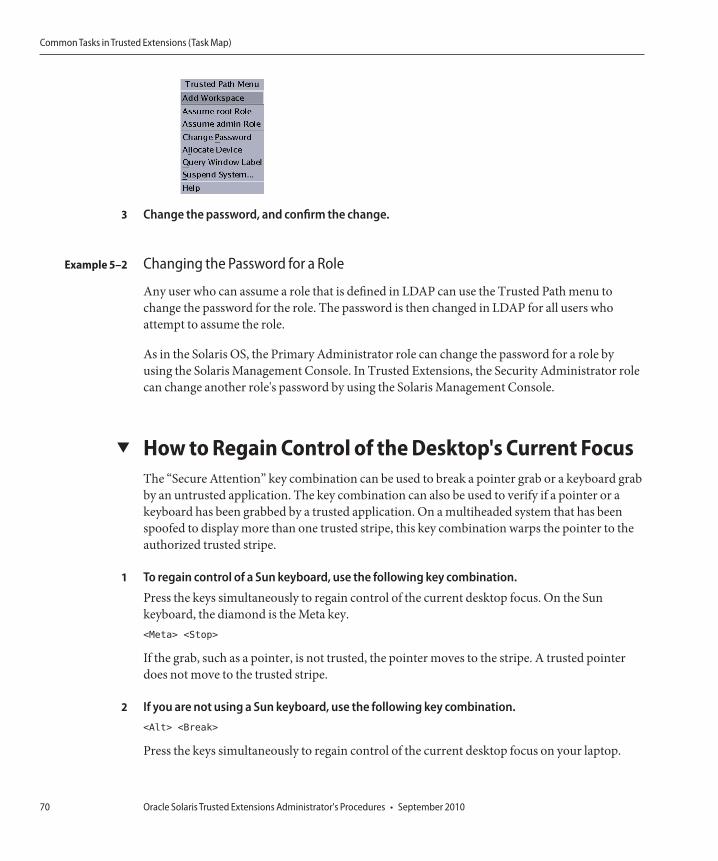
Change the password, and confirm the change.
Changing the Password for a Role
Any user who can assume a role that is defined in LDAP can use the Trusted Path menu tochange the password for the role. The password is then changed in LDAP for all users whoattempt to assume the role.
As in the Solaris OS, the Primary Administrator role can change the password for a role byusing the Solaris Management Console. In Trusted Extensions, the Security Administrator rolecan change another role's password by using the Solaris Management Console.
▼ How to Regain Control of the Desktop's Current FocusThe “Secure Attention” key combination can be used to break a pointer grab or a keyboard grabby an untrusted application. The key combination can also be used to verify if a pointer or akeyboard has been grabbed by a trusted application. On a multiheaded system that has beenspoofed to display more than one trusted stripe, this key combination warps the pointer to theauthorized trusted stripe.
To regain control of a Sun keyboard, use the following key combination.
Press the keys simultaneously to regain control of the current desktop focus. On the Sunkeyboard, the diamond is the Meta key.<Meta> <Stop>
If the grab, such as a pointer, is not trusted, the pointer moves to the stripe. A trusted pointerdoes not move to the trusted stripe.
If you are not using a Sun keyboard, use the following key combination.<Alt> <Break>
Press the keys simultaneously to regain control of the current desktop focus on your laptop.
3
Example 5–2
1
2
Common Tasks in Trusted Extensions (Task Map)
Oracle Solaris Trusted Extensions Administrator's Procedures • September 201070
Testing If the Password Prompt Can Be Trusted
On an x86 system that is using a Sun keyboard, the user has been prompted for a password. Thecursor has been grabbed, and is in the password dialog box. To check that the prompt is trusted,the user presses the <Meta> <Stop> keys simultaneously. When the pointer remains in thedialog box, the user knows that the password prompt is trusted.
If the pointer had moved to the trusted stripe, the user would know that the password promptcould not be trusted, and contact the administrator.
Forcing the Pointer to the Trusted Stripe
In this example, a user is not running any trusted processes but cannot see the mouse pointer.To bring the pointer to the center of the trusted stripe, the user presses the <Meta> <Stop> keyssimultaneously.
▼ How to Obtain the Hexadecimal Equivalent for a LabelThis procedure provides an internal hexadecimal representation of a label. This representationis safe for storing in a public directory. For more information, see the atohexlabel(1M) manpage.
You must be in the Security Administrator role in the global zone. For details, see “How to Enterthe Global Zone in Trusted Extensions” on page 50.
To obtain a hexadecimal value for a label, do one of the following.
■ To obtain the hexadecimal value for a sensitivity label, pass the label to the command.$ atohexlabel "CONFIDENTIAL : NEED TO KNOW"
0x0004-08-68
■ To obtain the hexadecimal value for a clearance, use the -coption.$ atohexlabel -c "CONFIDENTIAL NEED TO KNOW"
0x0004-08-68
Example 5–3
Example 5–4
Before You Begin
●
Common Tasks in Trusted Extensions (Task Map)
Chapter 5 • Administering Security Requirements in Trusted Extensions (Tasks) 71

Note – Human readable sensitivity labels and clearance labels are formed according to rulesin the label_encodings file. Each type of label uses rules from a separate section of this file.When a sensitivity label and a clearance label both express the same underlying level ofsensitivity, the labels have identical hexadecimal forms. However, the labels can havedifferent human readable forms. System interfaces that accept human readable labels asinput expect one type of label. If the text strings for the label types differ, these text stringscannot be used interchangeably.
In the default label_encodings file, the text equivalent of a clearance label does not includea colon (:).
Using the atohexlabel CommandWhen you pass a valid label in hexadecimal format, the command returns the argument.
$ atohexlabel 0x0004-08-68
0x0004-08-68
When you pass an administrative label, the command returns the argument.
$ atohexlabel admin_high
ADMIN_HIGH
atohexlabel admin_low
ADMIN_LOW
The error message atohexlabel parsing error found in <string> at position 0
indicates that the <string> argument that you passed to atohexlabel was not a valid label orclearance. Check your typing, and check that the label exists in your installed label_encodings
file.
▼ How to Obtain a Readable Label From Its HexadecimalFormThis procedure provides a way to repair labels that are stored in internal databases. For moreinformation, see the hextoalabel(1M) man page.
You must be in the Security Administrator role in the global zone.
To obtain the text equivalent for an internal representation of a label, do one of the following.
■ To obtain the text equivalent for a sensitivity label, pass the hexadecimal form of the label.$ hextoalabel 0x0004-08-68
CONFIDENTIAL : NEED TO KNOW
Example 5–5
Troubleshooting
Before You Begin
●
Common Tasks in Trusted Extensions (Task Map)
Oracle Solaris Trusted Extensions Administrator's Procedures • September 201072

■ To obtain the text equivalent for a clearance, use the -coption.$ hextoalabel -c 0x0004-08-68
CONFIDENTIAL NEED TO KNOW
▼ How to Change Security Defaults in System FilesIn Trusted Extensions, the security administrator changes or accesses default security settingson a system.
Files in the /etc/security and /etc/default directories contain security settings. On a Solarissystem, superuser can edit these files. For Solaris security information, see Chapter 3,“Controlling Access to Systems (Tasks),” in System Administration Guide: Security Services.
Caution – Relax system security defaults only if site security policy allows you to.
You must be in the Security Administrator role in the global zone.
Use the trusted editor to edit the system file.
For details, see “How to Edit Administrative Files in Trusted Extensions” on page 54.
The following table lists the security files and what security parameters to change in the files.
File Task For More Information
/etc/default/login Reduce the allowed number of passwordtries.
See the example under “How to Monitor All Failed LoginAttempts” in System Administration Guide: SecurityServices.
passwd(1) man page
/etc/default/kbd Disable keyboard shutdown. “How to Disable a System’s Abort Sequence” in SystemAdministration Guide: Security Services
Note – On hosts that are used by administrators fordebugging, the default setting for KEYBOARD_ABORTallows access to the kadb kernel debugger. For moreinformation about the debugger, see the kadb(1M) manpage.
Before You Begin
●
Common Tasks in Trusted Extensions (Task Map)
Chapter 5 • Administering Security Requirements in Trusted Extensions (Tasks) 73
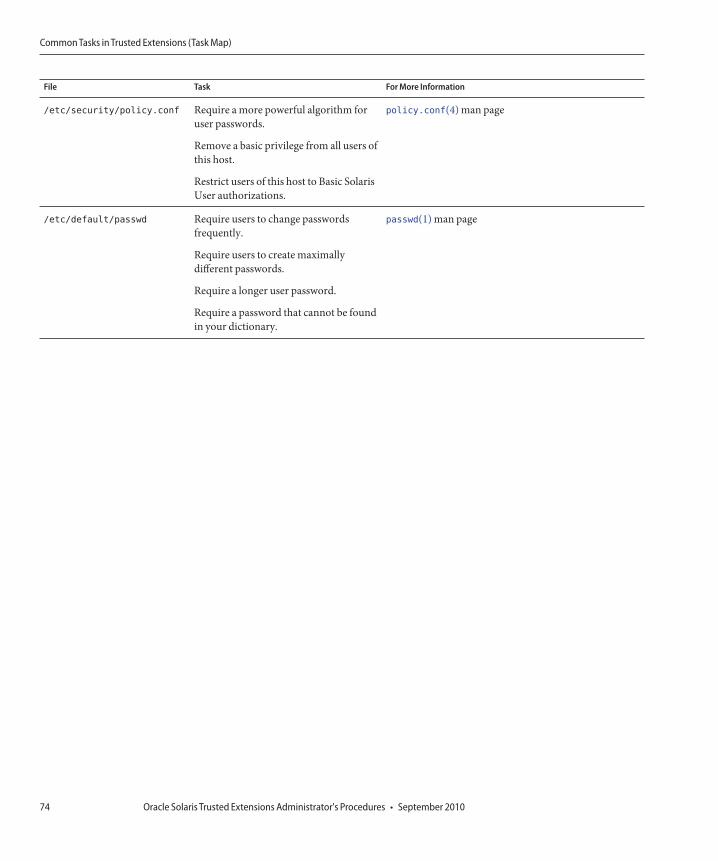
File Task For More Information
/etc/security/policy.conf Require a more powerful algorithm foruser passwords.
Remove a basic privilege from all users ofthis host.
Restrict users of this host to Basic SolarisUser authorizations.
policy.conf(4) man page
/etc/default/passwd Require users to change passwordsfrequently.
Require users to create maximallydifferent passwords.
Require a longer user password.
Require a password that cannot be foundin your dictionary.
passwd(1) man page
Common Tasks in Trusted Extensions (Task Map)
Oracle Solaris Trusted Extensions Administrator's Procedures • September 201074
Users, Rights, and Roles in Trusted Extensions(Overview)
This chapter describes essential decisions that you must make before creating regular users, andprovides additional background information for managing user accounts. The chapter assumesthat the initial setup team has set up roles and a limited number of user accounts. These userscan assume the roles that are used to configure and administer Solaris Trusted Extensions. Fordetails, see “Creating Roles and Users in Trusted Extensions” in Oracle Solaris TrustedExtensions Configuration Guide.
■ “User Security Features in Trusted Extensions” on page 75■ “Administrator Responsibilities for Users” on page 76■ “Decisions to Make Before Creating Users in Trusted Extensions” on page 77■ “Default User Security Attributes in Trusted Extensions” on page 77■ “Configurable User Attributes in Trusted Extensions” on page 78■ “Security Attributes That Must Be Assigned to Users” on page 79
User Security Features in Trusted ExtensionsTrusted Extensions software adds the following security features to users, roles, or rightsprofiles:
■ A user has a label range within which the user can use the system.■ A role has a label range within which the role can be used to perform administrative tasks.■ A Trusted Extensions rights profile can include CDE administrative actions. Like
commands, actions can have security attributes.■ Commands and actions in a Trusted Extensions rights profile have a label attribute. The
command or action must be performed within a label range, or at a particular label.■ Trusted Extensions software adds privileges and authorizations to the set of privileges and
authorizations that are defined by the Solaris OS.
6C H A P T E R 6
75
Administrator Responsibilities for UsersThe System Administrator role creates user accounts. The Security Administrator role sets upthe security aspects of an account.
If you are using the Sun Java System Directory Server for the LDAP naming service, check thatthe initial setup team configured the tsol_ldap.tbx toolbox. For the procedure, see“Configuring the Solaris Management Console for LDAP (Task Map)” in Oracle Solaris TrustedExtensions Configuration Guide.
For details on setting up users and roles, see the following:
■ “How to Create the First Role (Primary Administrator)” in System Administration Guide:Basic Administration
■ “Setting Up User Accounts (Task Map)” in System Administration Guide: BasicAdministration
■ Part III, “Roles, Rights Profiles, and Privileges,” in System Administration Guide: SecurityServices
System Administrator Responsibilities for UsersIn Trusted Extensions, the System Administrator role is responsible for determining who canaccess the system. The system administrator is responsible for the following tasks:
■ Adding and deleting users■ Adding and deleting roles■ Modifying user and role configurations, other than security attributes
Security Administrator Responsibilities for UsersIn Trusted Extensions, the Security Administrator role is responsible for all security attributesof a user or role. The security administrator is responsible for the following tasks:
■ Assigning and modifying the security attributes of a user, role, or rights profile■ Creating and modifying rights profiles■ Assigning rights profiles to a user or role■ Assigning privileges to a user, role, or rights profile■ Assigning authorizations to a user, a role, or rights profile■ Removing privileges from a user, role, or rights profile■ Removing authorizations from a user, role, or rights profile
Administrator Responsibilities for Users
Oracle Solaris Trusted Extensions Administrator's Procedures • September 201076
Typically, the Security Administrator role creates rights profiles. However, if a profile needscapabilities that the Security Administrator role cannot grant, then superuser or the PrimaryAdministrator role can create the profile.
Before creating a rights profile, the security administrator needs to analyze whether any of thecommands or actions in the new profile need privilege or authorization to be successful. Theman pages for individual commands list the privileges and authorizations that might be needed.For examples of actions that require privileges and authorizations, see the exec_attr database.
Decisions to Make Before Creating Users in Trusted ExtensionsThe following decisions affect what users are able to do in Trusted Extensions and how mucheffort is required. Some decisions are the same as the decisions that you would make wheninstalling the Solaris OS. However, decisions that are specific to Trusted Extensions can affectsite security and ease of use.■ Decide whether to change default user security attributes in the policy.conf file. User
defaults in the label_encodings file were configured by the initial setup team. For adescription of the defaults, see “Default User Security Attributes in Trusted Extensions” onpage 77.
■ Decide which startup files, if any, to copy or link from each user's minimum-label homedirectory to the user's higher-level home directories. For the procedure, see “How toConfigure Startup Files for Users in Trusted Extensions” on page 86.
■ Decide if users can access peripheral devices, such as the microphone, CD-ROM drive, andJAZ drive.If access is permitted to some users, decide if your site requires additional authorizations tosatisfy site security. For the default list of device-related authorizations, see “How to AssignDevice Authorizations” on page 240. For a finer-grained set of device authorizations, see“Customizing Device Authorizations in Trusted Extensions (Task Map)” on page 236.
Default User Security Attributes in Trusted ExtensionsSettings in the label_encodings and the policy.conf files together define default securityattributes for user accounts. The values that you explicitly set for a user override these systemvalues. Some values that are set in these files also apply to role accounts. For security attributesthat you can explicitly set, see “Configurable User Attributes in Trusted Extensions” onpage 78.
label_encodings File DefaultsThe label_encodings file defines a user's minimum label, clearance, and default label view. Fordetails about the file, see the label_encodings(4) man page. Your site's label_encodings file
Default User Security Attributes in Trusted Extensions
Chapter 6 • Users, Rights, and Roles in Trusted Extensions (Overview) 77
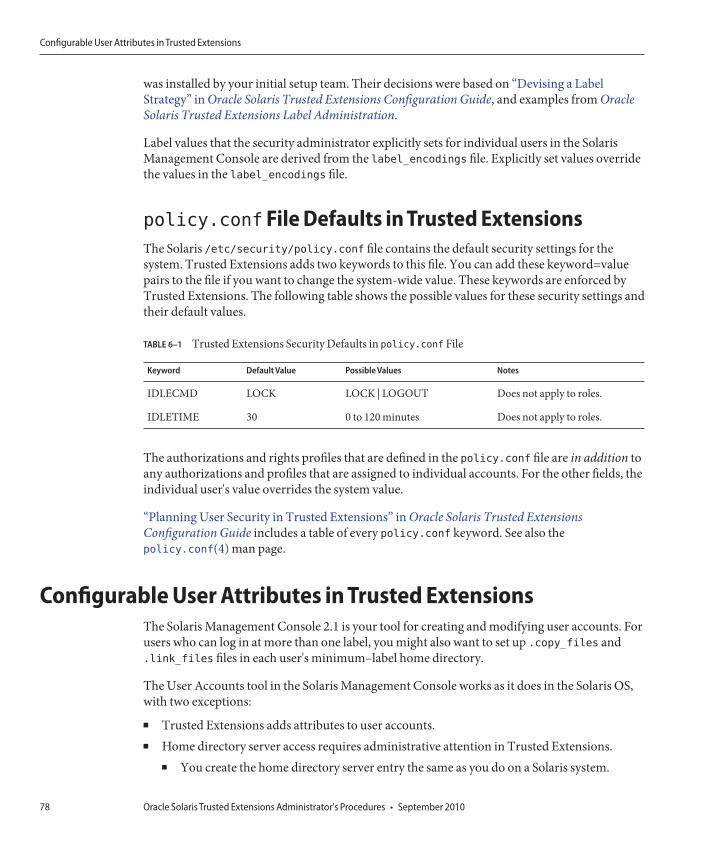
was installed by your initial setup team. Their decisions were based on “Devising a LabelStrategy” in Oracle Solaris Trusted Extensions Configuration Guide, and examples from OracleSolaris Trusted Extensions Label Administration.
Label values that the security administrator explicitly sets for individual users in the SolarisManagement Console are derived from the label_encodings file. Explicitly set values overridethe values in the label_encodings file.
policy.conf File Defaults in Trusted ExtensionsThe Solaris /etc/security/policy.conf file contains the default security settings for thesystem. Trusted Extensions adds two keywords to this file. You can add these keyword=valuepairs to the file if you want to change the system-wide value. These keywords are enforced byTrusted Extensions. The following table shows the possible values for these security settings andtheir default values.
TABLE 6–1 Trusted Extensions Security Defaults in policy.conf File
Keyword Default Value Possible Values Notes
IDLECMD LOCK LOCK | LOGOUT Does not apply to roles.
IDLETIME 30 0 to 120 minutes Does not apply to roles.
The authorizations and rights profiles that are defined in the policy.conf file are in addition toany authorizations and profiles that are assigned to individual accounts. For the other fields, theindividual user's value overrides the system value.
“Planning User Security in Trusted Extensions” in Oracle Solaris Trusted ExtensionsConfiguration Guide includes a table of every policy.conf keyword. See also thepolicy.conf(4) man page.
Configurable User Attributes in Trusted ExtensionsThe Solaris Management Console 2.1 is your tool for creating and modifying user accounts. Forusers who can log in at more than one label, you might also want to set up .copy_files and.link_files files in each user's minimum–label home directory.
The User Accounts tool in the Solaris Management Console works as it does in the Solaris OS,with two exceptions:
■ Trusted Extensions adds attributes to user accounts.■ Home directory server access requires administrative attention in Trusted Extensions.
■ You create the home directory server entry the same as you do on a Solaris system.
Configurable User Attributes in Trusted Extensions
Oracle Solaris Trusted Extensions Administrator's Procedures • September 201078

■ Then, you and the user perform additional steps to mount the home directory at everyuser label.
As described in “How to Add a User With the Solaris Management Console’s Users Tool” inSystem Administration Guide: Basic Administration, a wizard enables you to create useraccounts quickly. After using the wizard, you can modify the user's default Trusted Extensionsattributes.
For more information about the .copy_files and .link_files files, see “.copy_files and.link_files Files” on page 81.
Security Attributes That Must Be Assigned to UsersThe Security Administrator role must specify some security attributes for new users, as thefollowing table shows. For information about the files that contain default values, see “DefaultUser Security Attributes in Trusted Extensions” on page 77. The following table shows thesecurity attributes that can be assigned to users and the effects of each assignment.
TABLE 6–2 Security Attributes That Are Assigned After User Creation
User Attribute Location of Default Value Is Action Required Effect of Action
Password None Required User has password
Roles None Optional User can assume a role
Authorizations policy.conf file Optional User has additional authorizations
Rights Profiles policy.conf file Optional User has additional rights profiles
Labels label_encodings file Optional User has different default label or accreditationrange
Privileges policy.conf file Optional User has different set of privileges
Account Usage policy.conf file Optional User has different setting for computer when it isidle
Audit audit_control file Optional User is audited differently from the system auditsettings
Security Attribute Assignment to Users in TrustedExtensionsThe Security Administrator role assigns security attributes to users in the Solaris ManagementConsole after the user accounts are created. If you have set up correct defaults, your next step isto assign security attributes only for users who need exceptions to the defaults.
Security Attributes That Must Be Assigned to Users
Chapter 6 • Users, Rights, and Roles in Trusted Extensions (Overview) 79
When assigning security attributes to users, the security administrator considers the followinginformation:
Assigning PasswordsThe Security Administrator role assigns passwords to user accounts after the accounts havebeen created. After this initial assignment, users can change their passwords.
As in the Solaris OS, users can be forced to change their passwords at regular intervals. Thepassword aging options limit how long any intruder who is able to guess or steal a passwordcould potentially access the system. Also, establishing a minimum length of time to elapsebefore changing a password prevents a user with a new password from revertingimmediately to the old password. For details, see the passwd(1) man page.
Note – The passwords for users who can assume roles must not be subject to any passwordaging constraints.
Assigning RolesA user is not required to have a role. A single user can be assigned more than one role ifdoing so is consistent with your site's security policy.
Assigning AuthorizationsAs in the Solaris OS, assigning authorizations directly to a user adds those authorizations toexisting authorizations. In Trusted Extensions, you add the authorizations to a rights profile,then assign the profile to the user.
Assigning Rights ProfilesAs in the Solaris OS, the order of profiles is important. The profile mechanism uses the firstinstance of the command or action in an account's profile set.
You can use the sorting order of profiles to your advantage. If you want a command to runwith different security attributes from those attributes that are defined for the command inan existing profile, create a new profile with the preferred assignments for the command.Then, insert that new profile before the existing profile.
Note – Do not assign rights profiles that include administrative actions or administrativecommands to a regular user. The profile would not work because a regular user cannot enterthe global zone.
Changing Privilege DefaultThe default privilege set can be too liberal for many sites. To restrict the privilege set for anyregular user on a system, change the policy.conf file setting. To change the privilege set forindividual users, use the Solaris Management Console. For an example, see “How to Restricta User's Set of Privileges” on page 94.
Security Attributes That Must Be Assigned to Users
Oracle Solaris Trusted Extensions Administrator's Procedures • September 201080

Changing Label DefaultsChanging a user's label defaults creates an exception to the user defaults in thelabel_encodings file.
Changing Audit DefaultsAs in the Solaris OS, assigning audit classes to a user creates exceptions to the audit classesthat are assigned in the /etc/security/audit_control file on the system. For moreinformation about auditing, see Chapter 18, “Trusted Extensions Auditing (Overview).”
.copy_files and .link_files FilesIn Trusted Extensions, files are automatically copied from the skeleton directory only into thezone that contains the account's minimum label. To ensure that zones at higher labels can usestartup files, either the user or the administrator must create the files .copy_files and.link_files.
The Trusted Extensions files .copy_files and .link_files help to automate the copying orlinking of startup files into every label of an account's home directory. Whenever a user creates aworkspace at a new label, the updatehome command reads the contents of .copy_files and.link_files at the account's minimum label. The command then copies or links every listedfile into the higher-labeled workspace.
The .copy_files file is useful when a user wants a slightly different startup file at differentlabels. Copying is preferred, for example, when users use different mail aliases at differentlabels. The .link-files file is useful when a startup file should be identical at any label that it isinvoked. Linking is preferred, for example, when one printer is used for all labeled print jobs.For example files, see “How to Configure Startup Files for Users in Trusted Extensions” onpage 86.
The following lists some startup files that you might want users to be able to link to higher labelsor to copy to higher labels:
.acrorc
.aliases
.cshrc
.dtprofile
.emacs
.login
.mailrc
.mime_types
.newsrc
.profile
.signature
.soffice
.Xdefaults
.Xdefaults-hostname
Security Attributes That Must Be Assigned to Users
Chapter 6 • Users, Rights, and Roles in Trusted Extensions (Overview) 81

82

Managing Users, Rights, and Roles in TrustedExtensions (Tasks)
This chapter provides the Solaris Trusted Extensions procedures for configuring and managingusers, user accounts, and rights profiles.
■ “Customizing the User Environment for Security (Task Map)” on page 83■ “Managing Users and Rights With the Solaris Management Console (Task Map)” on page 90■ “Handling Other Tasks in the Solaris Management Console (Task Map)” on page 98
Customizing the User Environment for Security (Task Map)The following task map describes common tasks that you can perform when customizing asystem for all users, or when customizing an individual user's account.
Task Description For Instructions
Change label attributes. Modify label attributes, such as minimum label and defaultlabel view, for a user account.
“How to Modify Default UserLabel Attributes” on page 84
Change Trusted Extensionspolicy for all users of a system.
Changes the policy.conf file. “How to Modify policy.confDefaults” on page 84
Turns on the screensaver after a set amount of time.
Logs the user out after a set amount of time that the system isidle.
Example 7–1
Removes unnecessary privileges from all ordinary users of asystem.
Example 7–2
Removes labels from printed output at a public kiosk. Example 7–3
7C H A P T E R 7
83

Task Description For Instructions
Configure initialization files forusers.
Configures startup files, such as .cshrc, .copy_files, and.soffice for all users.
“How to Configure Startup Filesfor Users in Trusted Extensions”on page 86
Lengthen the timeout for filerelabeling.
Configures some applications to enable authorized users torelabel files.
“How to Lengthen the TimeoutWhen Relabeling Information” onpage 88
Log in to a failsafe session. Fixes faulty user initialization files. “How to Log In to a Failsafe Sessionin Trusted Extensions” on page 90
▼ How to Modify Default User Label AttributesYou can modify the default user label attributes during the configuration of the first system. Thechanges must be copied to every Trusted Extensions host.
You must be in the Security Administrator role in the global zone. For details, see “How to Enterthe Global Zone in Trusted Extensions” on page 50.
Review the default user attribute settings in the /etc/security/tsol/label_encodings file.For the defaults, see “label_encodings File Defaults” on page 77.
Modify the user attribute settings in the label_encodings file.Use the trusted editor. For details, see “How to Edit Administrative Files in Trusted Extensions”on page 54. In Trusted CDE, you can also use the Edit Label Encodings action. For details, see“How to Start CDE Administrative Actions in Trusted Extensions” on page 53.
The label_encodings file should be the same on all hosts.
Distribute a copy of the file to every Trusted Extensions host.
▼ How to Modify policy.confDefaultsChanging the policy.conf defaults in Trusted Extensions is similar to changing anysecurity-relevant system file in the Solaris OS. In Trusted Extensions, you use a trusted editor tomodify system files.
You must be in the Security Administrator role in the global zone. For details, see “How to Enterthe Global Zone in Trusted Extensions” on page 50.
Review the default settings in the /etc/security/policy.conf file.For Trusted Extensions keywords, see Table 6–1.
Before You Begin
1
2
3
Before You Begin
1
Customizing the User Environment for Security (Task Map)
Oracle Solaris Trusted Extensions Administrator's Procedures • September 201084
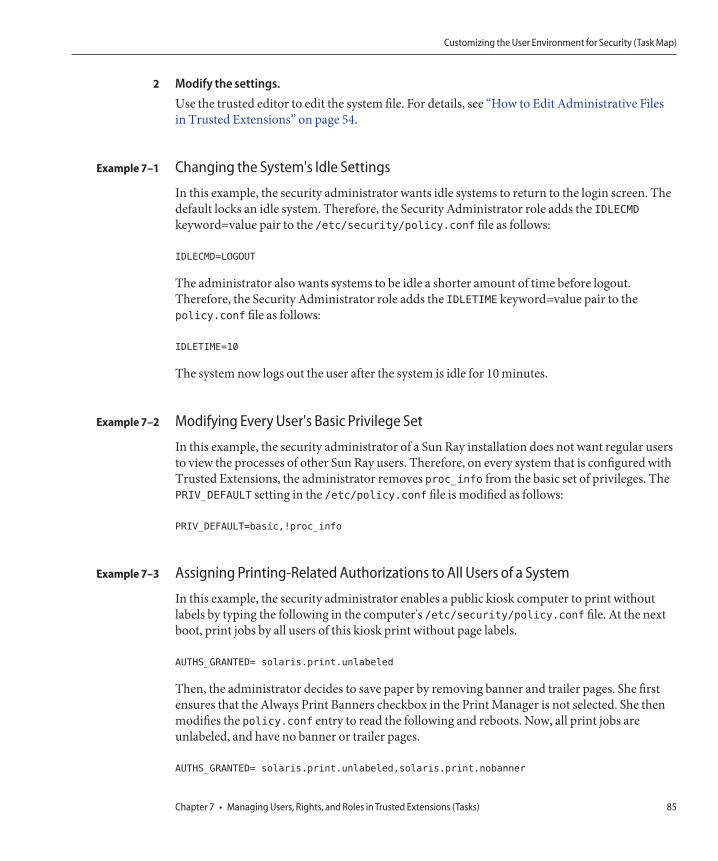
Modify the settings.Use the trusted editor to edit the system file. For details, see “How to Edit Administrative Filesin Trusted Extensions” on page 54.
Changing the System's Idle Settings
In this example, the security administrator wants idle systems to return to the login screen. Thedefault locks an idle system. Therefore, the Security Administrator role adds the IDLECMDkeyword=value pair to the /etc/security/policy.conf file as follows:
IDLECMD=LOGOUT
The administrator also wants systems to be idle a shorter amount of time before logout.Therefore, the Security Administrator role adds the IDLETIME keyword=value pair to thepolicy.conf file as follows:
IDLETIME=10
The system now logs out the user after the system is idle for 10 minutes.
Modifying Every User's Basic Privilege Set
In this example, the security administrator of a Sun Ray installation does not want regular usersto view the processes of other Sun Ray users. Therefore, on every system that is configured withTrusted Extensions, the administrator removes proc_info from the basic set of privileges. ThePRIV_DEFAULT setting in the /etc/policy.conf file is modified as follows:
PRIV_DEFAULT=basic,!proc_info
Assigning Printing-Related Authorizations to All Users of a System
In this example, the security administrator enables a public kiosk computer to print withoutlabels by typing the following in the computer's /etc/security/policy.conf file. At the nextboot, print jobs by all users of this kiosk print without page labels.
AUTHS_GRANTED= solaris.print.unlabeled
Then, the administrator decides to save paper by removing banner and trailer pages. She firstensures that the Always Print Banners checkbox in the Print Manager is not selected. She thenmodifies the policy.conf entry to read the following and reboots. Now, all print jobs areunlabeled, and have no banner or trailer pages.
AUTHS_GRANTED= solaris.print.unlabeled,solaris.print.nobanner
2
Example 7–1
Example 7–2
Example 7–3
Customizing the User Environment for Security (Task Map)
Chapter 7 • Managing Users, Rights, and Roles in Trusted Extensions (Tasks) 85

▼ How to Configure Startup Files for Users in TrustedExtensionsUsers can put a .copy_files file and .link_files file into their home directory at the labelthat corresponds to their minimum sensitivity label. Users can also modify the existing.copy_files and .link_files files at the users' minimum label. This procedure is for theadministrator role to automate the setup for a site.
You must be in the System Administrator role in the global zone. For details, see “How to Enterthe Global Zone in Trusted Extensions” on page 50.
Create two Trusted Extensions startup files.
You are going to add .copy_files and .link_files to your list of startup files.# cd /etc/skel
# touch .copy_files .link_files
Customize the .copy_files file.
a. Start the trusted editor.
For details, see “How to Edit Administrative Files in Trusted Extensions” on page 54.
b. Type the full pathname to the .copy_files file./etc/skel/.copy_files
c. Type into .copy_files, one file per line, the files to be copied into the user's home directoryat all labels.
Use “.copy_files and .link_files Files” on page 81 for ideas. For sample files, seeExample 7–4.
Customize the .link_files file.
a. Type the full pathname to the .link_files file in the trusted editor./etc/skel/.link_files
b. Type into .link_files, one file per line, the files to be linked into the user's home directoryat all labels.
Customize the other startup files for your users.
■ For a discussion of what to include in startup files, see “Customizing a User’s WorkEnvironment” in System Administration Guide: Basic Administration.
Before You Begin
1
2
3
4
Customizing the User Environment for Security (Task Map)
Oracle Solaris Trusted Extensions Administrator's Procedures • September 201086
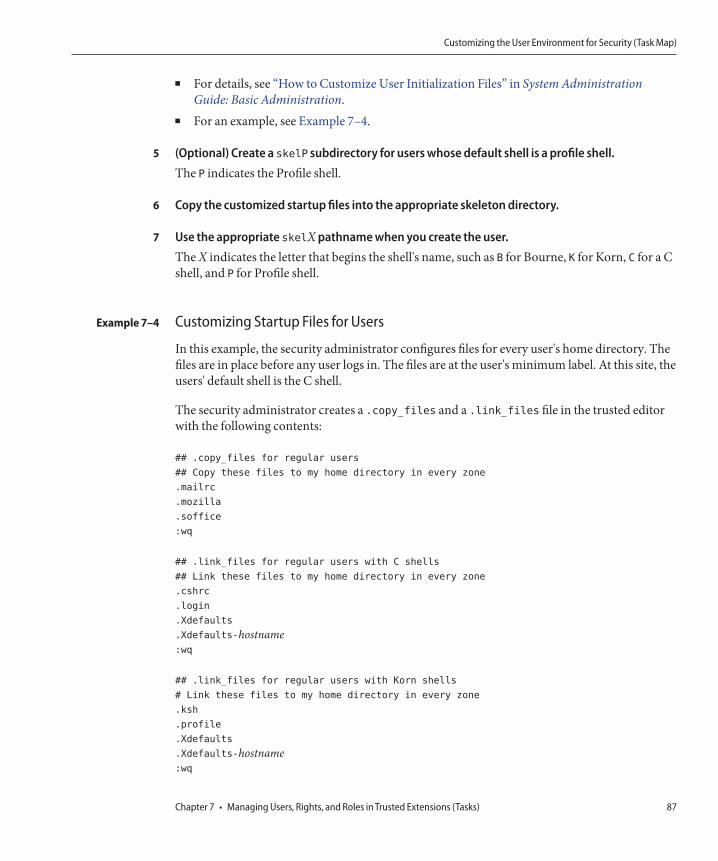
■ For details, see “How to Customize User Initialization Files” in System AdministrationGuide: Basic Administration.
■ For an example, see Example 7–4.
(Optional) Create a skelP subdirectory for users whose default shell is a profile shell.The P indicates the Profile shell.
Copy the customized startup files into the appropriate skeleton directory.
Use the appropriate skelX pathname when you create the user.The X indicates the letter that begins the shell's name, such as B for Bourne, K for Korn, C for a Cshell, and P for Profile shell.
Customizing Startup Files for Users
In this example, the security administrator configures files for every user's home directory. Thefiles are in place before any user logs in. The files are at the user's minimum label. At this site, theusers' default shell is the C shell.
The security administrator creates a .copy_files and a .link_files file in the trusted editorwith the following contents:
## .copy_files for regular users
## Copy these files to my home directory in every zone
.mailrc
.mozilla
.soffice
:wq
## .link_files for regular users with C shells
## Link these files to my home directory in every zone
.cshrc
.login
.Xdefaults
.Xdefaults-hostname:wq
## .link_files for regular users with Korn shells
# Link these files to my home directory in every zone
.ksh
.profile
.Xdefaults
.Xdefaults-hostname:wq
5
6
7
Example 7–4
Customizing the User Environment for Security (Task Map)
Chapter 7 • Managing Users, Rights, and Roles in Trusted Extensions (Tasks) 87

In the shell initialization files, the administrator ensures that the users' print jobs go to a labeledprinter.
## .cshrc file
setenv PRINTER conf-printer1
setenv LPDEST conf-printer1
## .ksh file
export PRINTER conf-printer1
export LPDEST conf-printer1
The administrator modifies the .Xdefaults-home-directory-server file to force the dttermcommand to source the .profile file for a new terminal.
## Xdefaults-HDserver
Dtterm*LoginShell: true
The customized files are copied to the appropriate skeleton directory.
$ cp .copy_files .link_files .cshrc .login .profile \
.mailrc .Xdefaults .Xdefaults-home-directory-server \
/etc/skelC
$ cp .copy_files .link_files .ksh .profile \
.mailrc .Xdefaults .Xdefaults-home-directory-server \
/etc/skelK
If you create a .copy_files files at your lowest label, then log in to a higher zone to run theupdatehome command and the command fails with an access error, try the following:■ Verify that from the higher-level zone you can view the lower-level directory.
higher-level zone# ls /zone/lower-level-zone/home/usernameACCESS ERROR: there are no files under that directory
■ If you cannot view the directory, then restart the automount service in the higher-level zone:
higher-level zone# svcadm restart autofs
Unless you are using NFS mounts for home directories, the automounter in the higher-levelzone should be loopback mounting from /zone/lower-level-zone/export/home/username to/zone/lower-level-zone/home/username.
▼ How to Lengthen the Timeout When RelabelingInformationIn Trusted Extensions, the Selection Manager mediates transfers of information between labels.The Selection Manager appears for drag-and-drop operations, and for cut-and-paste
Troubleshooting
Customizing the User Environment for Security (Task Map)
Oracle Solaris Trusted Extensions Administrator's Procedures • September 201088
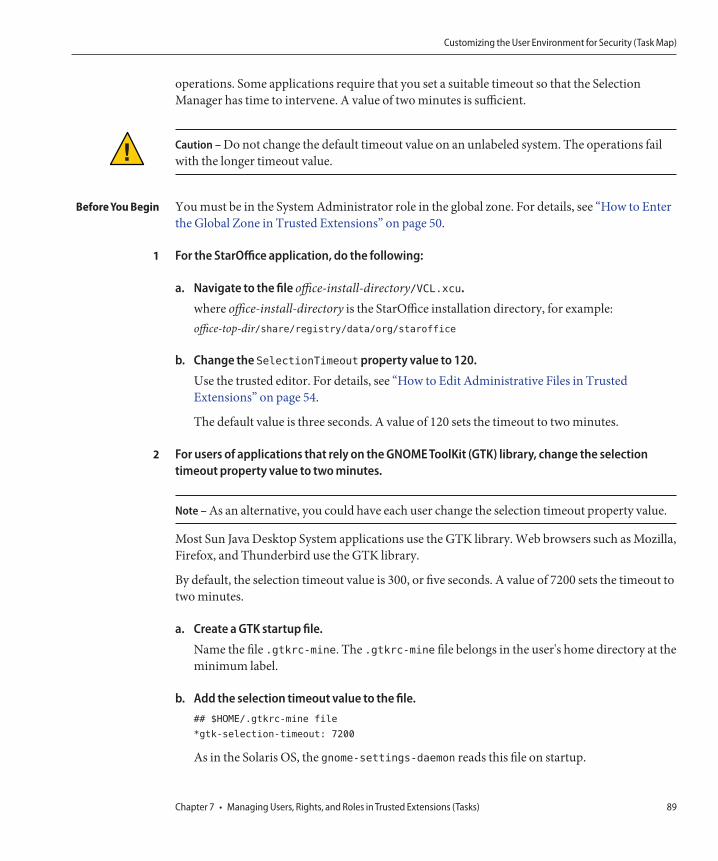
operations. Some applications require that you set a suitable timeout so that the SelectionManager has time to intervene. A value of two minutes is sufficient.
Caution – Do not change the default timeout value on an unlabeled system. The operations failwith the longer timeout value.
You must be in the System Administrator role in the global zone. For details, see “How to Enterthe Global Zone in Trusted Extensions” on page 50.
For the StarOffice application, do the following:
a. Navigate to the file office-install-directory/VCL.xcu.
where office-install-directory is the StarOffice installation directory, for example:office-top-dir/share/registry/data/org/staroffice
b. Change the SelectionTimeout property value to 120.
Use the trusted editor. For details, see “How to Edit Administrative Files in TrustedExtensions” on page 54.
The default value is three seconds. A value of 120 sets the timeout to two minutes.
For users of applications that rely on the GNOME ToolKit (GTK) library, change the selectiontimeout property value to two minutes.
Note – As an alternative, you could have each user change the selection timeout property value.
Most Sun Java Desktop System applications use the GTK library. Web browsers such as Mozilla,Firefox, and Thunderbird use the GTK library.
By default, the selection timeout value is 300, or five seconds. A value of 7200 sets the timeout totwo minutes.
a. Create a GTK startup file.
Name the file .gtkrc-mine. The .gtkrc-mine file belongs in the user's home directory at theminimum label.
b. Add the selection timeout value to the file.## $HOME/.gtkrc-mine file
*gtk-selection-timeout: 7200
As in the Solaris OS, the gnome-settings-daemon reads this file on startup.
Before You Begin
1
2
Customizing the User Environment for Security (Task Map)
Chapter 7 • Managing Users, Rights, and Roles in Trusted Extensions (Tasks) 89
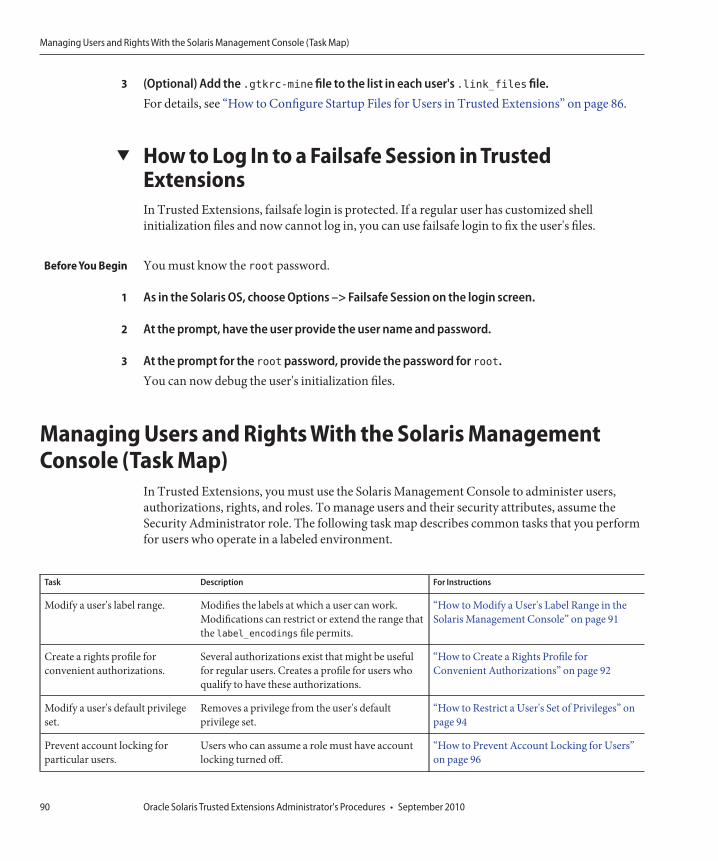
(Optional) Add the .gtkrc-mine file to the list in each user's .link_files file.For details, see “How to Configure Startup Files for Users in Trusted Extensions” on page 86.
▼ How to Log In to a Failsafe Session in TrustedExtensionsIn Trusted Extensions, failsafe login is protected. If a regular user has customized shellinitialization files and now cannot log in, you can use failsafe login to fix the user's files.
You must know the root password.
As in the Solaris OS, choose Options –> Failsafe Session on the login screen.
At the prompt, have the user provide the user name and password.
At the prompt for the rootpassword, provide the password for root.You can now debug the user's initialization files.
Managing Users and Rights With the Solaris ManagementConsole (Task Map)
In Trusted Extensions, you must use the Solaris Management Console to administer users,authorizations, rights, and roles. To manage users and their security attributes, assume theSecurity Administrator role. The following task map describes common tasks that you performfor users who operate in a labeled environment.
Task Description For Instructions
Modify a user's label range. Modifies the labels at which a user can work.Modifications can restrict or extend the range thatthe label_encodings file permits.
“How to Modify a User's Label Range in theSolaris Management Console” on page 91
Create a rights profile forconvenient authorizations.
Several authorizations exist that might be usefulfor regular users. Creates a profile for users whoqualify to have these authorizations.
“How to Create a Rights Profile forConvenient Authorizations” on page 92
Modify a user's default privilegeset.
Removes a privilege from the user's defaultprivilege set.
“How to Restrict a User's Set of Privileges” onpage 94
Prevent account locking forparticular users.
Users who can assume a role must have accountlocking turned off.
“How to Prevent Account Locking for Users”on page 96
3
Before You Begin
1
2
3
Managing Users and Rights With the Solaris Management Console (Task Map)
Oracle Solaris Trusted Extensions Administrator's Procedures • September 201090

Task Description For Instructions
Enable a user to relabel data. Authorizes a user to downgrade information orupgrade information.
“How to Enable a User to Change the SecurityLevel of Data” on page 96
Remove a user from the system. Completely removes a user and the user'sprocesses..
“How to Delete a User Account From aTrusted Extensions System” on page 97
Handle other tasks. Uses the Solaris Management Console to handletasks that are not specific to Trusted Extensions.
“Handling Other Tasks in the SolarisManagement Console (Task Map)” onpage 98
▼ How to Modify a User's Label Range in the SolarisManagement ConsoleYou might want to extend a user's label range to give the user read access to an administrativeapplication. For example, a user who can log in to the global zone could then run the SolarisManagement Console. The user could view, but not not change the contents.
Alternatively, you might want to restrict the user's label range. For example, a guest user mightbe limited to one label.
You must be in the Security Administrator role in the global zone.
Open a Trusted Extensions toolbox in the Solaris Management Console.
Use a toolbox of the appropriate scope. For details, see “Initialize the Solaris ManagementConsole Server in Trusted Extensions” in Oracle Solaris Trusted Extensions ConfigurationGuide.
Under System Configuration, navigate to User Accounts.
A password prompt might be displayed.
Type the role password.
Select the individual user from User Accounts.
Before You Begin
1
2
3
4
Managing Users and Rights With the Solaris Management Console (Task Map)
Chapter 7 • Managing Users, Rights, and Roles in Trusted Extensions (Tasks) 91
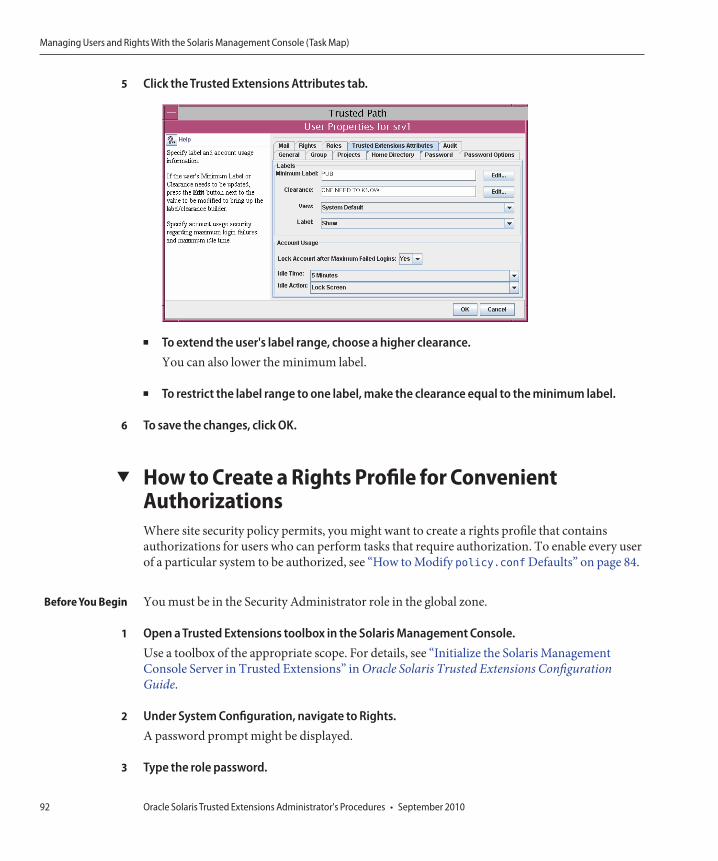
Click the Trusted Extensions Attributes tab.
■ To extend the user's label range, choose a higher clearance.You can also lower the minimum label.
■ To restrict the label range to one label, make the clearance equal to the minimum label.
To save the changes, click OK.
▼ How to Create a Rights Profile for ConvenientAuthorizationsWhere site security policy permits, you might want to create a rights profile that containsauthorizations for users who can perform tasks that require authorization. To enable every userof a particular system to be authorized, see “How to Modify policy.conf Defaults” on page 84.
You must be in the Security Administrator role in the global zone.
Open a Trusted Extensions toolbox in the Solaris Management Console.Use a toolbox of the appropriate scope. For details, see “Initialize the Solaris ManagementConsole Server in Trusted Extensions” in Oracle Solaris Trusted Extensions ConfigurationGuide.
Under System Configuration, navigate to Rights.A password prompt might be displayed.
Type the role password.
5
6
Before You Begin
1
2
3
Managing Users and Rights With the Solaris Management Console (Task Map)
Oracle Solaris Trusted Extensions Administrator's Procedures • September 201092

To add a rights profile, click Action –> Add Right.
Create a rights profile that contains one or more of the following authorizations.For the step-by-step procedure, see “How to Create or Change a Rights Profile” in SystemAdministration Guide: Security Services.
In the following figure, the Authorizations Included window shows the authorizations thatmight be convenient for users.
■ Allocate Device – Authorizes a user to allocate a peripheral device, such as a microphone.By default, Solaris users can read and write to a CD-ROM. However, in Trusted Extensions,only users who can allocate a device can access the CD-ROM drive. To allocate the drive foruse requires authorization. Therefore, to read and write to a CD-ROM in TrustedExtensions, a user needs the Allocate Device authorization.
■ Downgrade DragNDrop or CutPaste Info – Authorizes a user to select information from ahigher-level file and place that information in a lower-level file.
■ Downgrade File Label – Authorizes a user to lower the security level of a file■ DragNDrop or CutPaste without viewing contents – Authorizes a user to move information
without viewing the information that is being moved.■ Print Postscript – Authorizes a user to print PostScript files.■ Print without Banner - Authorizes a user to print hard copy without a banner page.■ Print without Label – Authorizes a user to print hard copy that does not display labels.■ Remote Login – Authorizes a user to remotely log in.■ Shutdown the System – Authorizes a user to shut down the system and to shut down a zone.■ Upgrade DragNDrop or CutPaste Info – Authorizes a user to select information from a
lower-level file and place that information in a higher-level file.
4
5
Managing Users and Rights With the Solaris Management Console (Task Map)
Chapter 7 • Managing Users, Rights, and Roles in Trusted Extensions (Tasks) 93

■ Upgrade File Label – Authorizes a user to heighten the security level of a file.
Assign the rights profile to a user or a role.
For assistance, see the online help. For the step-by-step procedure, see “How to Change theRBAC Properties of a User” in System Administration Guide: Security Services.
Assigning a Printing-Related Authorization to a Role
In the following example, the Security Administrator allows a role to print jobs without labelson body pages.
In the Solaris Management Console, the security administrator navigates to AdministrativeRoles. She views the rights profiles that are included in a particular role, then ensures that theprint-related authorizations are contained in one of the role's rights profiles.
▼ How to Restrict a User's Set of PrivilegesSite security might require that users be permitted fewer privileges than users are assigned bydefault. For example, at a site that uses Trusted Extensions on Sun Ray systems, you might wantto prevent users from viewing other users' processes on the Sun Ray server.
You must be in the Security Administrator role in the global zone.
Open a Trusted Extensions toolbox in the Solaris Management Console.
Use a toolbox of the appropriate scope. For details, see “Initialize the Solaris ManagementConsole Server in Trusted Extensions” in Oracle Solaris Trusted Extensions ConfigurationGuide.
Under System Configuration, navigate to User Accounts.
A password prompt might be displayed.
Type the role password.
Double–click the icon for the user.
Remove one or more of the privileges in the basic set.
a. Double-click the icon for the user.
6
Example 7–5
Before You Begin
1
2
3
4
5
Managing Users and Rights With the Solaris Management Console (Task Map)
Oracle Solaris Trusted Extensions Administrator's Procedures • September 201094
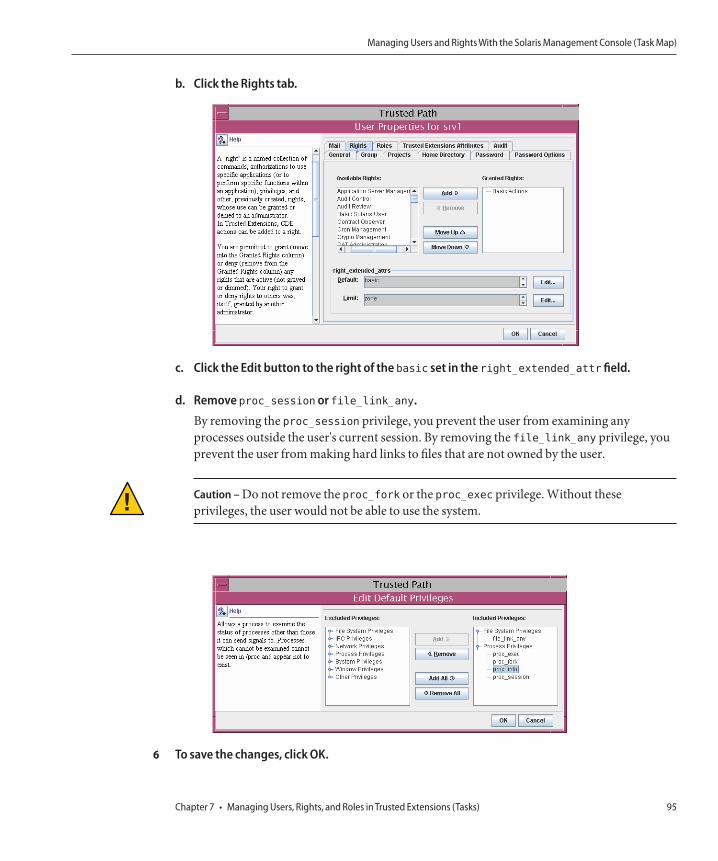
b. Click the Rights tab.
c. Click the Edit button to the right of the basic set in the right_extended_attr field.
d. Remove proc_session or file_link_any.
By removing the proc_session privilege, you prevent the user from examining anyprocesses outside the user's current session. By removing the file_link_any privilege, youprevent the user from making hard links to files that are not owned by the user.
Caution – Do not remove the proc_fork or the proc_exec privilege. Without theseprivileges, the user would not be able to use the system.
To save the changes, click OK.6
Managing Users and Rights With the Solaris Management Console (Task Map)
Chapter 7 • Managing Users, Rights, and Roles in Trusted Extensions (Tasks) 95
▼ How to Prevent Account Locking for UsersTrusted Extensions extends the user security features in the Solaris Management Console toinclude account locking. Turn off account locking for users who can assume a role.
You must be in the Security Administrator role in the global zone.
Start the Solaris Management Console.Use a toolbox of the appropriate scope. For details, see “Initialize the Solaris ManagementConsole Server in Trusted Extensions” in Oracle Solaris Trusted Extensions ConfigurationGuide.
Under System Configuration, navigate to User Accounts.A password prompt might be displayed.
Type the role password.
Double–click the icon for the user.
Click the Trusted Extensions Attributes tab.
In the Account Usage section, choose No from the pull-down menu next to Lock account after
maximum failed logins.
To save the changes, click OK.
▼ How to Enable a User to Change the Security Level ofDataA regular user or a role can be authorized to change the security level, or labels, of files anddirectories. The user or role, in addition to having the authorization, must be configured towork at more than one label. And, the labeled zones must be configured to permit relabeling.For the procedure, see “How to Enable Files to be Relabeled From a Labeled Zone” on page 128.
Caution – Changing the security level of data is a privileged operation. This task is fortrustworthy users only.
You must be in the Security Administrator role in the global zone.
Follow the procedure “How to Create a Rights Profile for Convenient Authorizations”on page 92to create a rights profile.
Before You Begin
1
2
3
4
5
6
7
Before You Begin
1
Managing Users and Rights With the Solaris Management Console (Task Map)
Oracle Solaris Trusted Extensions Administrator's Procedures • September 201096

The following authorizations enable a user to relabel a file:
■ Downgrade File Label■ Upgrade File Label
The following authorizations enable a user to relabel information within a file:
■ Downgrade DragNDrop or CutPaste Info■ DragNDrop or CutPaste Info Without Viewing■ Upgrade DragNDrop or CutPaste Info
Use the Solaris Management Console to assign the profile to the appropriate users and roles.For assistance, use the online help. For a step-by-step procedure, see “How to Change the RBACProperties of a User” in System Administration Guide: Security Services.
▼ How to Delete a User Account From a TrustedExtensions SystemWhen a user is removed from the system, you must ensure that the user's home directory andany objects that the user owns are also deleted. As an alternative to deleting objects that areowned by the user, you might change the ownership of these objects to a valid user.
You must also ensure that all batch jobs that are associated with the user are also deleted. Noobjects or processes belonging to a removed user can remain on the system.
You must be in the System Administrator role.
Archive the user's home directory at every label.
Archive the user's mail files at every label.
In the Solaris Management Console, delete the user account.
a. Open a Trusted Extensions toolbox in the Solaris Management Console.Use a toolbox of the appropriate scope. For details, see “Initialize the Solaris ManagementConsole Server in Trusted Extensions” in Oracle Solaris Trusted Extensions ConfigurationGuide.
b. Under System Configuration, navigate to User Accounts.A password prompt might be displayed.
c. Type the role password.
2
Before You Begin
1
2
3
Managing Users and Rights With the Solaris Management Console (Task Map)
Chapter 7 • Managing Users, Rights, and Roles in Trusted Extensions (Tasks) 97

d. Select the user account to be removed, and click the Delete button.You are prompted to delete the user's home directory and mail files. When you accept theprompt, the user's home directory and mail files are deleted in the global zone only.
In every labeled zone, manually delete the user's directories and mail files.
Note – You are responsible for finding and deleting the user's temporary files at all labels, such asfiles in /tmp directories.
Handling Other Tasks in the Solaris Management Console(Task Map)
Follow Solaris procedures to handle tasks in the Solaris Management Console. You must besuperuser, or in a role in the global zone. The following task map points to basic SolarisManagement Console tasks.
Task For Instructions
Perform administrative tasks by using the SolarisManagement Console.
Chapter 2, “Working With the Solaris ManagementConsole (Tasks),” in System Administration Guide: BasicAdministration
Create users. “Using the Solaris Management Tools With RBAC (TaskMap)” in System Administration Guide: BasicAdministration
Create roles. “How to Create and Assign a Role by Using the GUI” inSystem Administration Guide: Security Services
Modify roles. “How to Change the Properties of a Role” in SystemAdministration Guide: Security Services
Create or modify a rights profile. “How to Create or Change a Rights Profile” in SystemAdministration Guide: Security Services
Change other security attributes of a user. “How to Change the RBAC Properties of a User” in SystemAdministration Guide: Security Services
Audit the actions of a role. “How to Audit Roles” in System Administration Guide:Security Services
List the rights profiles by using smprofile list
-Dname-service-type:/server-name/domain-nameChapter 9, “Using Role-Based Access Control (Tasks),” inSystem Administration Guide: Security Services or thesmprofile(1M) man page
4
Handling Other Tasks in the Solaris Management Console (Task Map)
Oracle Solaris Trusted Extensions Administrator's Procedures • September 201098

Remote Administration in Trusted Extensions(Tasks)
This chapter describes how to use Trusted Extensions administrative tools to administer aremote system.
■ “Secure Remote Administration in Trusted Extensions” on page 99■ “Methods for Administering Remote Systems in Trusted Extensions” on page 100■ “Remote Login by a Role in Trusted Extensions” on page 101■ “Administering Trusted Extensions Remotely (Task Map)” on page 102
Secure Remote Administration in Trusted ExtensionsBy default, Trusted Extensions does not allow remote administration. Remote administrationwould present a significant security risk if users on remote untrusted systems could administersystems that are configured with Trusted Extensions. Therefore, systems are initially installedwithout the option of being remotely administered.
Until the network is configured, all remote hosts are assigned the admin_low security template.Therefore, the CIPSO protocol is not used or accepted for any connections. While in this initialstate, systems are protected from remote attacks by several mechanisms. Mechanisms includenetservices settings, default login policy, and PAM policy.
■ When the netservices Service Management Facility (SMF) profile is set to limited, noremote services except secure shell are enabled. However, the ssh service cannot be used forremote logins because of the login and PAM policies.
■ The root account cannot be used for remote logins because the default policy for CONSOLE inthe /etc/default/login file prevents remote logins by root.
■ Two PAM settings also affect remote logins.The pam_roles module always rejects local logins from accounts of type role. By default,this module also rejects remote logins. However, the system can be configured to acceptremote logins by specifying allow_remote in the system's pam.conf entry.
8C H A P T E R 8
99

Additionally, the pam_tsol_account module rejects remote logins into the global zoneunless the CIPSO protocol is used. The intent of this policy is for remote administration tobe performed by another Trusted Extensions system.
To enable remote login functionality, both systems must assign their peer to a CIPSO securitytemplate. If this approach is not practical, the network protocol policy can be relaxed byspecifying the allow_unlabeled option in the pam.conf file. If either policy is relaxed, thedefault network template must be changed so that arbitrary machines cannot access the globalzone. The admin_low template should be used sparingly, and the tnrhdb database should bemodified so that the wildcard address 0.0.0.0 does not default to the ADMIN_LOW label. Fordetails, see “Administering Trusted Extensions Remotely (Task Map)” on page 102 and “How toLimit the Hosts That Can Be Contacted on the Trusted Network” on page 175.
Methods for Administering Remote Systems in TrustedExtensions
Typically, administrators use the rlogin and ssh commands to administer remote systemsfrom the command line. The Solaris Management Console can also be used. In Trusted CDE,the dtappsession program can remotely launch Trusted CDE actions. Starting in the Solaris10 5/09 release, a virtual networking computer (vnc) can be used to remotely display amultilevel desktop.
The following methods of remote administration are possible in Trusted Extensions:
■ The root user can log in to a remote host from a terminal. See “How to Log In RemotelyFrom the Command Line in Trusted Extensions” on page 103. This method works as it doeson a Solaris system. This method is insecure.
■ A role can log in to a remote host from a terminal in the role workspace. See “How to Log InRemotely From the Command Line in Trusted Extensions” on page 103.
■ Administrators can start a Solaris Management Console server that is running on a remotesystem. See “How to Remotely Administer Systems by Using the Solaris ManagementConsole From a Trusted Extensions System” on page 105.
■ Actions in the Trusted_Extensions folder can be started remotely by using thedtappsession command. See “How to Remotely Administer Trusted Extensions Withdtappsession” on page 103.
■ A user can log in to a remote multilevel desktop by using a vnc client program to connect tothe Xvnc server on a Trusted Extensions system. See “How to Use Xvnc to Remotely Accessa Trusted Extensions System” on page 109.
Methods for Administering Remote Systems in Trusted Extensions
Oracle Solaris Trusted Extensions Administrator's Procedures • September 2010100

Remote Login by a Role in Trusted ExtensionsAs in the Solaris OS, a setting in the /etc/default/login file on each host must be changed toallow remote logins. Additionally, the pam.conf file might need to be modified. In TrustedExtensions, the security administrator is responsible for the change. For the procedures, see“Enable Remote Login by root User in Trusted Extensions” in Oracle Solaris Trusted ExtensionsConfiguration Guide and “Enable Remote Login by a Role in Trusted Extensions” in OracleSolaris Trusted Extensions Configuration Guide.
On both Trusted Extensions and Solaris hosts, remote logins might or might not requireauthorization. “Remote Login Management in Trusted Extensions” on page 101 describes theconditions and types of logins that require authorization. By default, roles have the RemoteLogin authorization.
Remote Role-Based Administration From UnlabeledHostsIn Trusted Extensions, users assume roles through the Trusted Path menu. The roles thenoperate in trusted workspaces. By default, roles cannot be assumed outside of the trusted path.If site policy permits, the security administrator can change the default policy. Administratorsof unlabeled hosts that are running Solaris Management Console 2.1 client software can thenadminister trusted hosts.
■ To change the default policy, see “Enable Remote Login by a Role in Trusted Extensions” inOracle Solaris Trusted Extensions Configuration Guide.
■ To administer systems remotely, see “How to Log In Remotely From the Command Line inTrusted Extensions” on page 103.
This policy change only applies when the user on the remote unlabeled system has a useraccount on the Trusted Extensions host. The Trusted Extensions user must have the ability toassume an administrative role. The role can then use the Solaris Management Console toadminister the remote system.
Caution – If remote administration from a non-Trusted Extensions host is enabled, theadministrative environment is less protected than a Trusted Extensions administrativeworkspace. Be cautious when typing passwords and other secure data. As a precaution, shutdown all untrusted applications before starting the Solaris Management Console.
Remote Login Management in Trusted ExtensionsA remote login between two Trusted Extensions hosts is considered to be an extension of thecurrent login session.
Remote Login by a Role in Trusted Extensions
Chapter 8 • Remote Administration in Trusted Extensions (Tasks) 101

An authorization is not required when the rlogin command does not prompt for a password. Ifan /etc/hosts.equiv file or a .rhosts file in the user's home directory on the remote host listseither the username or the host from which the remote login is being attempted, no password isrequired. For more information, see the rhosts(4) and rlogin(1) man pages.
For all other remote logins, including logins with the ftp command, the Remote Loginauthorization is required.
To create a rights profile that includes the Remote Login authorization, see “Managing Usersand Rights With the Solaris Management Console (Task Map)” on page 90.
Administering Trusted Extensions Remotely (Task Map)The following task map describes the tasks used to administer a remote Trusted Extensionssystem.
Task Description For Instructions
Enable root to remotely log in to aTrusted Extensions system.
Enables the root user to work remotely froma labeled system.
“Enable Remote Login by root User inTrusted Extensions” in Oracle SolarisTrusted Extensions Configuration Guide
Enable a role to remotely log in to aTrusted Extensions system.
Allows any role to work remotely from alabeled system.
“Enable Remote Login by a Role inTrusted Extensions” in Oracle SolarisTrusted Extensions Configuration Guide
Enable remote login from an unlabeledsystem to a Trusted Extensions system.
Allows any user or role to work remotelyfrom an unlabeled system.
“Enable Remote Login From anUnlabeled System” in Oracle SolarisTrusted Extensions Configuration Guide
Log in remotely to a Trusted Extensionssystem.
Logs in as a role to a Trusted Extensionssystem.
“How to Log In Remotely From theCommand Line in Trusted Extensions”on page 103
Administer a system remotely. Uses the dtappsession command toadminister the remote system withTrusted_Extensions actions.
“How to Remotely Administer TrustedExtensions With dtappsession” onpage 103
From a Trusted Extensions system, uses theSolaris Management Console to administerthe remote host.
“How to Remotely Administer Systems byUsing the Solaris Management ConsoleFrom a Trusted Extensions System” onpage 105
From an unlabeled system, uses the SolarisManagement Console to administer remoteTrusted Extensions hosts.
“How to Remotely Administer Systems byUsing the Solaris Management ConsoleFrom an Unlabeled System” on page 106
Administering Trusted Extensions Remotely (Task Map)
Oracle Solaris Trusted Extensions Administrator's Procedures • September 2010102
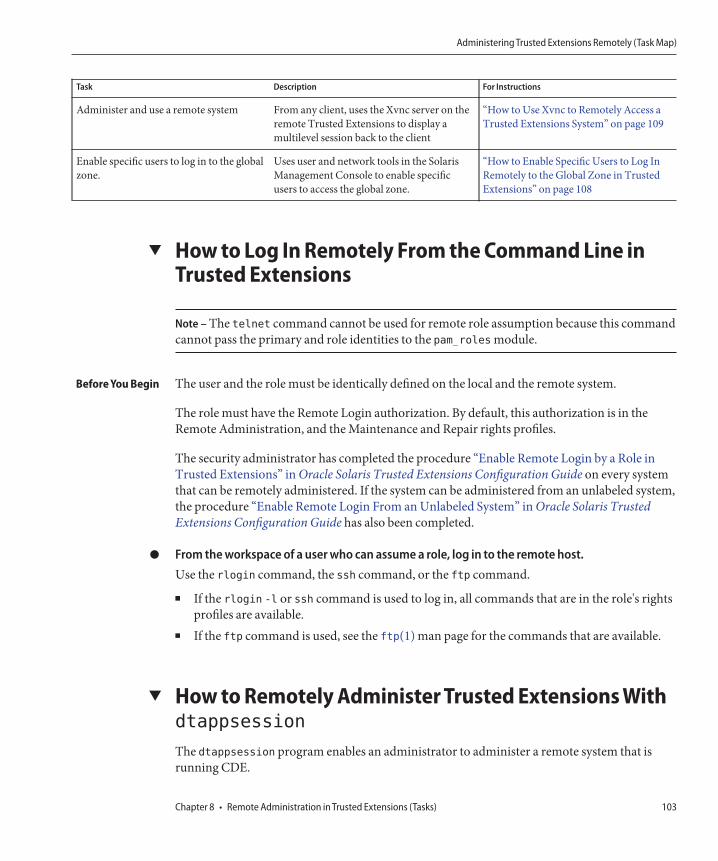
Task Description For Instructions
Administer and use a remote system From any client, uses the Xvnc server on theremote Trusted Extensions to display amultilevel session back to the client
“How to Use Xvnc to Remotely Access aTrusted Extensions System” on page 109
Enable specific users to log in to the globalzone.
Uses user and network tools in the SolarisManagement Console to enable specificusers to access the global zone.
“How to Enable Specific Users to Log InRemotely to the Global Zone in TrustedExtensions” on page 108
▼ How to Log In Remotely From the Command Line inTrusted Extensions
Note – The telnet command cannot be used for remote role assumption because this commandcannot pass the primary and role identities to the pam_roles module.
The user and the role must be identically defined on the local and the remote system.
The role must have the Remote Login authorization. By default, this authorization is in theRemote Administration, and the Maintenance and Repair rights profiles.
The security administrator has completed the procedure “Enable Remote Login by a Role inTrusted Extensions” in Oracle Solaris Trusted Extensions Configuration Guide on every systemthat can be remotely administered. If the system can be administered from an unlabeled system,the procedure “Enable Remote Login From an Unlabeled System” in Oracle Solaris TrustedExtensions Configuration Guide has also been completed.
From the workspace of a user who can assume a role, log in to the remote host.Use the rlogin command, the ssh command, or the ftp command.
■ If the rlogin -l or ssh command is used to log in, all commands that are in the role's rightsprofiles are available.
■ If the ftp command is used, see the ftp(1) man page for the commands that are available.
▼ How to Remotely Administer Trusted Extensions Withdtappsession
The dtappsession program enables an administrator to administer a remote system that isrunning CDE.
Before You Begin
●
Administering Trusted Extensions Remotely (Task Map)
Chapter 8 • Remote Administration in Trusted Extensions (Tasks) 103

dtappsession is useful when a remote system does not have a monitor. For example,dtappsession is often used to administer domains on large servers. For more information, seethe dtappsession(1) man page.
On a labeled system, you must be in an administrative role in the global zone. On an unlabeledsystem, you must assume a role that is defined on the remote system. You must then run theremote login from the role's profile shell.
(Optional) Create a workspace that is dedicated to the remote session.
To avoid confusion between the remote CDE applications and any local applications, dedicatean administrative role workspace to this procedure. For details, see “How to Add a Workspaceat a Particular Label” in Oracle Solaris Trusted Extensions User’s Guide.
Log in to the remote host.
You can use the rlogin command or the ssh command.$ ssh remote-host
Start remote administration.
In the terminal window, type the dtappsession command followed by the name of the localhost.$ /usr/dt/bin/dtappsession local-host
the Application Manager that is running on the remote host displays on the local host. Also, anExit dialog box appears.
Administer the remote host.
If you invoked the remote session from Trusted CDE, you can use actions in theTrusted_Extensions folder.
When finished, click the Exit button.
Caution – Closing the Application Manager does not end the login session and is notrecommended.
Before You Begin
1
2
3
4
5
Administering Trusted Extensions Remotely (Task Map)
Oracle Solaris Trusted Extensions Administrator's Procedures • September 2010104
In the terminal window, exit the remote login session.And use the hostname command to verify that you are on your local host.$ exit
$ hostname
local-host
▼ How to Remotely Administer Systems by Using theSolaris Management Console From a TrustedExtensions SystemThe Solaris Management Console provides a remote administration interface to manage users,rights, roles, and the network. You assume a role to use the Console. In this procedure, you runthe Console on the local system and specify the remote system as the server.
You have completed the following procedures:
■ On both systems – “Initialize the Solaris Management Console Server in TrustedExtensions” in Oracle Solaris Trusted Extensions Configuration Guide
■ On the remote system – “Enable Remote Login by a Role in Trusted Extensions” in OracleSolaris Trusted Extensions Configuration Guide and “Enable the Solaris ManagementConsole to Accept Network Communications” in Oracle Solaris Trusted ExtensionsConfiguration Guide
■ On the remote system that is the LDAP server – “Configuring the Solaris ManagementConsole for LDAP (Task Map)” in Oracle Solaris Trusted Extensions Configuration Guide
On the local system, log in as the user who is defined identically on the remote system.
Assume the role that you plan to use to administer the system.
In the role, start the Solaris Management Console.For details, see “Initialize the Solaris Management Console Server in Trusted Extensions” inOracle Solaris Trusted Extensions Configuration Guide.
a. In the Server dialog box, type the name of the remote server.
■ If you are using LDAP as a naming service, type the name of the LDAP server.Then, choose one of the following scopes.
■ To administer the databases in the naming service, choose the Scope=LDAP toolbox.This Computer (ldap-server: Scope=LDAP, Policy=TSOL)
6
Before You Begin
1
2
3
Administering Trusted Extensions Remotely (Task Map)
Chapter 8 • Remote Administration in Trusted Extensions (Tasks) 105
■ To administer the local files on the LDAP server, choose the Scope=Files toolbox.This Computer (ldap-server: Scope=Files, Policy=TSOL)
■ If you are not using LDAP as a naming service, type the name of the remote system thatyou want to administer.
Then, choose the Scope=Files toolbox.This Computer (remote-system: Scope=Files, Policy=TSOL)
Select a tool under System Configuration.When you select a tool such as User, a dialog box displays the Solaris Management Consoleserver name, your user name, your role name, and a place to type the role's password. Make surethat the entries are correct.
In the role that is defined identically on the local and the remote systems, log in to the SolarisManagement Console server.Type the role's password and press Login as Role. You can now use the Solaris ManagementConsole to manage the system.
Note – Although you can use the Solaris Management Console to run dtappsession, thesimplest way to use dtappsession is described in “How to Remotely Administer TrustedExtensions With dtappsession” on page 103.
▼ How to Remotely Administer Systems by Using theSolaris Management Console From an UnlabeledSystemIn this procedure, you run the Solaris Management Console client and server on the remotesystem, and display the Console on the local system.
The Trusted Extensions system must have assigned the label ADMIN_LOW to the local system.
Note – A system that is not running the CIPSO protocol, such as a Trusted Solaris system, is anunlabeled system from the viewpoint of a Trusted Extensions system.
The Solaris Management Console server on the remote system must be configured to accept theremote connection. For the procedure, see “Enable the Solaris Management Console to AcceptNetwork Communications” in Oracle Solaris Trusted Extensions Configuration Guide.
4
5
Before You Begin
Administering Trusted Extensions Remotely (Task Map)
Oracle Solaris Trusted Extensions Administrator's Procedures • September 2010106

Both systems must have the same user who is assigned the same role that can use the SolarisManagement Console. The user can have the normal user's label range, but the role must havethe range from ADMIN_LOW to ADMIN_HIGH.
You must be in an administrative role in the global zone.
Enable the local X server to display the remote Solaris Management Console.# xhost + TX-SMC-Server# echo $DISPLAY
:n.n
On the local system, become the user who can assume a role for the Solaris ManagementConsole.# su - same-username-on-both-systems
As that user, log in to the remote server as the role.$ rlogin -l same-rolename-on-both-systems TX-SMC-Server
Make sure that the environment variables that the Solaris Management Console uses have thecorrect values.
a. Set the value of the DISPLAY variable.$ DISPLAY=local:n.n$ export DISPLAY=local:n.n
b. Set the value of the LOGNAME variable to the user name.$ LOGNAME=same-username-on-both-systems$ export LOGNAME=same-username-on-both-systems
c. Set the value of the USER variable to the role name.$ USER=same-rolename-on-both-systems$ export USER=same-rolename-on-both-systems
In the role, start the Solaris Management Console from the command line.$ /usr/sbin/smc &
Select a tool under System Configuration.
When you select a tool such as User, a dialog box displays the Solaris Management Consoleserver name, your user name, your role name, and a place to type the role's password. Make surethat the entries are correct.
1
2
3
4
5
6
Administering Trusted Extensions Remotely (Task Map)
Chapter 8 • Remote Administration in Trusted Extensions (Tasks) 107

As the role, log in to the server.Type the role's password and press Login as Role. You can now use the Solaris ManagementConsole to manage the system.
Note – When you try to access network database information from a system that is not the LDAPserver, the operation fails. The Console allows you to log in to the remote host and open thetoolbox. However, when you try to access or change information, the following error messageindicates that you have selected Scope=LDAP on a system that is not the LDAP server:
Management server cannot perform the operation requested.
...
Error extracting the value-from-tool.The keys received from the client were machine, domain, Scope.
Problem with Scope.
▼ How to Enable Specific Users to Log In Remotely to theGlobal Zone in Trusted ExtensionsThe user's default label range and the zone's default behavior are changed to enable remotelogin by a non-role. You might want to complete this procedure for a tester who is using aremote labeled system. For security reasons, the tester's system should be running a disjointlabel from other users.
You must have a very good reason why this user can log in to the global zone.
You must be in the Security Administrator role in the global zone.
To enable specific users to log in to the global zone, assign them an administrative label range.Use the Solaris Management Console to assign a clearance of ADMIN_HIGH and a minimum labelof ADMIN_LOW to each user. For details, see “How to Modify a User's Label Range in the SolarisManagement Console” on page 91.
The user's labeled zones must also permit login.
To enable remote login from a labeled zone into the global zone, do the following.
a. Add a multilevel port for remote login to the global zone.Use the Solaris Management Console. Port 513 over the TCP protocol enables remote login.For an example, see “How to Create a Multilevel Port for a Zone” on page 131.
b. Read the tnzonecfg changes into the kernel.# tnctl -fz /etc/security/tsol/tnzonecfg
7
Before You Begin
1
2
Administering Trusted Extensions Remotely (Task Map)
Oracle Solaris Trusted Extensions Administrator's Procedures • September 2010108
c. Restart the remote login service.# svcadm restart svc:/network/login:rlogin
▼ How to Use Xvnc to Remotely Access a TrustedExtensions SystemVirtual Network Computing (vnc) technology connects a client to a remote server, thendisplays the desktop of the remote server in a window on the client. Xvnc is the UNIX version ofvnc, which is based on a standard X server. In Trusted Extensions, a client on any platform canconnect to an Xvnc that is running Trusted Extensions software, log in to the Xvnc server, thendisplay and work on a multilevel desktop.
You have installed and configured Trusted Extensions software on the system that is going to beused as the Xvnc server. You have created and booted the labeled zones. Your Xvnc serverrecognizes the vnc clients by hostname or IP address.
You are superuser in the global zone of the system that is going to be used as the Xvnc server.
Configure the Xvnc server.For more information, see the Xvnc(1) and vncconfig(1) man pages.
Caution – If you are running the Solaris 10 10/08 or the Solaris 10 5/08 release, you must patchyour system before configuring the server. For a SPARC system, install the latest version ofpatch 125719. For an x86 system, install the latest version of patch 125720.
a. Create the Xservers configuration directory.# mkdir -p /etc/dt/config
b. Copy the /usr/dt/config/Xservers file to the /etc/dt/configdirectory.# cp /usr/dt/config/Xservers /etc/dt/config/Xservers
c. Edit the /etc/dt/config/Xservers file to start up the Xvnc program instead of Xserver orXorg.In this example, the entry is configured to log in to the server without a password. Tosuccessfully log in the desktop, the local UID must be none instead of console.
The entry is split for display purposes. The entry must be on one line.# :0 Local local_uid@console root /usr/X11/bin/Xserver :0 -nobanner
:0 Local local_uid@none root /usr/X11/bin/Xvnc :0 -nobanner
-AlwaysShared -SecurityTypes None -geometry 1024x768x24 -depth 24
Before You Begin
1
Administering Trusted Extensions Remotely (Task Map)
Chapter 8 • Remote Administration in Trusted Extensions (Tasks) 109

Note – A safer configuration is to require a password by using the -SecurityTypes VncAuthparameter. The Xvnc(1) man page describes password requirements.
d. Reboot the server or start the Xvnc server.# reboot
After reboot, verify that the Xvnc program is running.
# ps -ef | grep Xvnc
root 2145 932 0 Jan 18 ? 6:15 /usr/X11/bin/Xvnc :0 -nobanner
-AlwaysShared -SecurityTypes None -geometry 1024
On every vnc client of the Trusted Extensions Xvnc server, install vnc client software.For the client system, you have a choice of software. This example uses the Sun vnc software.# cd SUNW-pkg-directory# pkgadd -d . SUNWvncviewer
In a terminal window on a vnc client, connect to the server.% /usr/bin/vncviewer Xvnc-server-hostname
In the window that displays, type your name and password.Continue with the login procedure. For a description of the remaining steps, see “Logging In toTrusted Extensions” in Oracle Solaris Trusted Extensions User’s Guide.
If you logged in to the server as superuser, you can administer the server immediately. If youlogged in to the server as a user, you must assume a role to administer the system.
2
3
4
Administering Trusted Extensions Remotely (Task Map)
Oracle Solaris Trusted Extensions Administrator's Procedures • September 2010110

Trusted Extensions and LDAP (Overview)
This chapter describes the use of the Sun Java System Directory Server (Directory Server) for asystem that is configured with Solaris Trusted Extensions.
■ “Using a Naming Service in Trusted Extensions” on page 111■ “Using the LDAP Naming Service in Trusted Extensions” on page 113
Using a Naming Service in Trusted ExtensionsTo achieve uniformity of user, host, and network attributes within a security domain withmultiple Trusted Extensions systems, a naming service is used for distributing mostconfiguration information. LDAP is an example of a naming service. The nsswitch.conf filedetermines which naming service is used. LDAP is the recommended naming service forTrusted Extensions.
The Directory Server can provide the LDAP naming service for Trusted Extensions and Solarisclients. The server must include Trusted Extensions network databases, and the TrustedExtensions clients must connect to the server over a multilevel port. The security administratorspecifies the multilevel port when configuring Trusted Extensions.
Trusted Extensions adds two trusted network databases to the LDAP server: tnrhdb andtnrhtp. These databases are administered by using the Security Templates tool in the SolarisManagement Console. A toolbox of Scope=LDAP, Policy=TSOL stores configuration changeson the Directory Server.
■ For information about the use of the LDAP naming service in the Solaris OS, see SystemAdministration Guide: Naming and Directory Services (DNS, NIS, and LDAP).
■ Setting up the Directory Server for Trusted Extensions clients is described in Oracle SolarisTrusted Extensions Configuration Guide. Trusted Extensions systems can be clients of aSolaris LDAP server by using an LDAP proxy server that is configured with TrustedExtensions.
9C H A P T E R 9
111
Note – Systems that are configured with Trusted Extensions cannot be clients of NIS or NIS+masters.
Non-Networked Trusted Extensions SystemsIf a naming service is not used at a site, administrators must ensure that configurationinformation for users, hosts, and networks is identical on all hosts. A change that is made onone host must be made on all hosts.
On a non-networked Trusted Extensions system, configuration information is maintained inthe /etc, /etc/security, and /etc/security/tsol directories. Actions in theTrusted_Extensions folder enable you to modify some configuration information. The SecurityTemplates tool in the Solaris Management Console enables you to modify network databaseparameters. Users, roles, and rights are modified in the User Accounts, Administrative Roles,and Rights tools. A toolbox on This Computer with Scope=Files, Policy=TSOL storesconfiguration changes locally.
Trusted Extensions LDAP DatabasesTrusted Extensions extends the Directory Server's schema to accommodate the tnrhdb andtnrhtp databases. Trusted Extensions defines two new attributes, ipTnetNumber andipTnetTemplateName, and two new object classes, ipTnetTemplate and ipTnetHost.
The attribute definitions are as follows:
ipTnetNumber
( 1.3.6.1.1.1.1.34 NAME ’ipTnetNumber’
DESC ’Trusted network host or subnet address’
EQUALITY caseExactIA5Match
SYNTAX 1.3.6.1.4.1.1466.115.121.1.26
SINGLE-VALUE )
ipTnetTemplateName
( 1.3.6.1.1.1.1.35 NAME ’ipTnetTemplateName’
DESC ’Trusted network template name’
EQUALITY caseExactIA5Match
SYNTAX 1.3.6.1.4.1.1466.115.121.1.26
SINGLE-VALUE )
The object class definitions are as follows:
ipTnetTemplate
( 1.3.6.1.1.1.2.18 NAME ’ipTnetTemplate’ SUP top STRUCTURAL
DESC ’Object class for Trusted network host templates’
Using a Naming Service in Trusted Extensions
Oracle Solaris Trusted Extensions Administrator's Procedures • September 2010112

MUST ( ipTnetTemplateName )
MAY ( SolarisAttrKeyValue ) )
ipTnetHost
( 1.3.6.1.1.1.2.19 NAME ’ipTnetHost’ SUP top AUXILIARY
DESC ’Object class for Trusted network host/subnet address
to template mapping’
MUST ( ipTnetNumber $ ipTnetTemplateName ) )
The cipso template definition in LDAP is similar to the following:
ou=ipTnet,dc=example,dc=example1,dc=exampleco,dc=com
objectClass=top
objectClass=organizationalUnit
ou=ipTnet
ipTnetTemplateName=cipso,ou=ipTnet,dc=example,dc=example1,dc=exampleco,dc=com
objectClass=top
objectClass=ipTnetTemplate
ipTnetTemplateName=cipso
SolarisAttrKeyValue=host_type=cipso;doi=1;min_sl=ADMIN_LOW;max_sl=ADMIN_HIGH;
ipTnetNumber=0.0.0.0,ou=ipTnet,dc=example,dc=example1,dc=exampleco,dc=com
objectClass=top
objectClass=ipTnetTemplate
objectClass=ipTnetHost
ipTnetNumber=0.0.0.0
ipTnetTemplateName=internal
Using the LDAP Naming Service in Trusted ExtensionsThe LDAP naming service is managed in Trusted Extensions as it is managed in the Solaris OS.The following is a sample of useful commands, and contains references to more detailedinformation:■ For strategies to solve LDAP configuration problems, see Chapter 13, “LDAP
Troubleshooting (Reference),” in System Administration Guide: Naming and DirectoryServices (DNS, NIS, and LDAP).
■ To troubleshoot client-to-server LDAP connection problems that are affected by labels, see“How to Debug a Client Connection to the LDAP Server” on page 189.
■ To troubleshoot other client-to-server LDAP connection problems, see Chapter 13, “LDAPTroubleshooting (Reference),” in System Administration Guide: Naming and DirectoryServices (DNS, NIS, and LDAP).
■ To display LDAP entries from an LDAP client, type:
$ ldaplist -l
$ ldap_cachemgr -g
Using the LDAP Naming Service in Trusted Extensions
Chapter 9 • Trusted Extensions and LDAP (Overview) 113

■ To display LDAP entries from an LDAP server, type:
$ ldap_cachemgr -g
$ idsconfig -v
■ To list the hosts that LDAP manages, type:
$ ldaplist -l hosts Long listing$ ldaplist hosts One-line listing
■ To list information in the Directory Information Tree (DIT) on LDAP, type:
$ ldaplist -l services | more
dn: cn=apocd+ipServiceProtocol=udp,ou=Services,dc=exampleco,dc=com
objectClass: ipService
objectClass: top
cn: apocd
ipServicePort: 38900
ipServiceProtocol: udp
...
$ ldaplist services name
dn=cn=name+ipServiceProtocol=udp,ou=Services,dc=exampleco,dc=com
■ To display the status of the LDAP service on the client, type:
# svcs -xv network/ldap/client
svc:/network/ldap/client:default (LDAP client)
State: online since dateSee: man -M /usr/share/man -s 1M ldap_cachemgr
See: /var/svc/log/network-ldap-client:default.log
Impact: None.
■ To start and stop the LDAP client, type:
# svcadm enable network/ldap/client
# svcadm disable network/ldap/client
■ To start and stop the LDAP server in version 5.2 of Sun Java System Directory Serversoftware, type:
# installation-directory/slap-LDAP-server-hostname/start-slapd# installation-directory/slap-LDAP-server-hostname/stop-slapd
■ To start and stop the LDAP server in version 6 of Sun Java System Directory Server software,type:
# dsadm start /export/home/ds/instances/your-instance# dsadm stop /export/home/ds/instances/your-instance
■ To start and stop a proxy LDAP server in version 6 of Sun Java System Directory Serversoftware, type:
# dpadm start /export/home/ds/instances/your-instance# dpadm stop /export/home/ds/instances/your-instance
Using the LDAP Naming Service in Trusted Extensions
Oracle Solaris Trusted Extensions Administrator's Procedures • September 2010114
Managing Zones in Trusted Extensions (Tasks)
This chapter describes how non-global zones work on a system that is configured with SolarisTrusted Extensions. Also included are procedures that are unique to zones in TrustedExtensions.
■ “Zones in Trusted Extensions” on page 115■ “Global Zone Processes and Labeled Zones” on page 118■ “Zone Administration Utilities in Trusted Extensions” on page 119■ “Managing Zones (Task Map)” on page 120
Zones in Trusted ExtensionsA properly configured Trusted Extensions system consists of a global zone, which is theoperating system instance, and one or more labeled non-global zones. During configuration,Trusted Extensions attaches a unique label to each zone, which creates labeled zones. The labelscome from the label_encodings file. The administrators can create a zone for each label, butare not required to. It is possible to have more labels than labeled zones on a system. It is notpossible to have more labeled zones than labels.
On a Trusted Extensions system, the file systems of a zone are usually mounted as a loopbackfile system (lofs). All writable files and directories in a labeled zone are at the label of the zone.By default, a user can view files that are in a zone at a lower label than the user's current label.This configuration enables users to view their home directories at lower labels than the label ofthe current workspace. Although users can view files at a lower label, they cannot modify them.Users can only modify files from a process that has the same label as the file.
In Trusted Extensions, the global zone is an administrative zone. The labeled zones are forregular users. Users can work in a zone whose label is within the user's accreditation range.
Every zone has an associated IP address and security attributes. A zone can be configured withmultilevel ports (MLPs). Also, a zone can be configured with a policy for Internet ControlMessage Protocol (ICMP) broadcasts, such as ping.
10C H A P T E R 1 0
115

For information about sharing directories from a labeled zone and about mounting directoriesfrom labeled zones remotely, see Chapter 11, “Managing and Mounting Files in TrustedExtensions (Tasks).”
Zones in Trusted Extensions are built on the Solaris zones product. For details, see Part II,“Zones,” in System Administration Guide: Oracle Solaris Containers-Resource Management andOracle Solaris Zones. In particular, patching and package installation issues affect TrustedExtensions. For details, see Chapter 25, “About Packages and Patches on a Solaris System WithZones Installed (Overview),” in System Administration Guide: Oracle SolarisContainers-Resource Management and Oracle Solaris Zones and Chapter 30, “TroubleshootingMiscellaneous Solaris Zones Problems,” in System Administration Guide: Oracle SolarisContainers-Resource Management and Oracle Solaris Zones.
Zones and IP Addresses in Trusted ExtensionsYour initial setup team assigned IP addresses to the global zone and the labeled zones. Threetypes of configurations are documented in “Creating Labeled Zones” in Oracle Solaris TrustedExtensions Configuration Guide:
■ The system has one IP address for the global zone and all labeled zones.This configuration is useful on a system that uses DHCP software to obtain its IP address. Ifno users are expected to log in, an LDAP server might have this configuration.
■ The system has one IP address for the global zone, and one IP address that is shared by allzones, including the global zone. Any zone can have a combination of a unique address anda shared address.This configuration is useful on a system that regular users are going to log in to. It can also beused for a printer or an NFS server. This configuration conserves IP addresses.
■ The system has one IP address for the global zone, and each labeled zone has a unique IPaddress.This configuration is useful for providing access to separate physical networks ofsingle-level systems. Typically, each zone would have an IP address on a different physicalnetwork from the other labeled zones. Because this configuration is implemented with asingle IP instance, the global zone controls the physical interfaces and manages globalresources, such as the route table.
With the introduction of exclusive IP instances for a non-global zone, a fourth type ofconfiguration is available in the Solaris OS. Starting in the Solaris 10 8/07 release, a non-globalzone can be assigned its own IP instance and manage its own physical interfaces. In thisconfiguration, each zone operates as if it is a distinct system. For a description, see “ZoneNetwork Interfaces” in System Administration Guide: Oracle Solaris Containers-ResourceManagement and Oracle Solaris Zones.
Zones in Trusted Extensions
Oracle Solaris Trusted Extensions Administrator's Procedures • September 2010116

However, in such a configuration, each labeled zone operates as if it is a distinct single-labeledsystem. The multilevel networking features of Trusted Extensions rely on features of a shared IPstack. Administration procedures in Trusted Extensions assume that networking is controlledentirely by the global zone. Therefore, if your initial setup team has installed labeled zones withexclusive IP instances, you must provide or refer to site-specific documentation.
Zones and Multilevel PortsBy default, a zone cannot send packets to and receive packets from any other zone. Multilevelports (MLPs) enable particular services on a port to accept requests within a range of labels orfrom a set of labels. These privileged services can reply at the label of the request. For example,you might want to create a privileged web browser port that can listen at all labels, but whosereplies are restricted by label. By default, labeled zones have no MLPs.
The range of labels or set of labels that constrains the packets that the MLP can accept is basedon the zone's IP address. The IP address is assigned a remote host template in the tnrhdbdatabase. The label range or set of labels in the remote host template constrains the packets thatthe MLP can accept.
■ The constraints on MLPs for different IP address configurations are as follows:■ On a system where the global zone has an IP address and each labeled zone has a unique IP
address, an MLP for a particular service can be added to every zone. For example, the systemcould be configured so that the ssh service, over TCP port 22, is an MLP in the global zoneand in every labeled zone.
■ In a typical configuration, the global zone is assigned one IP address and labeled zones sharea second IP address with the global zone. When an MLP is added to a shared interface, theservice packet is routed to the labeled zone where the MLP is defined. The packet is acceptedonly if the remote host template for the labeled zone includes the label of the packet. If therange is ADMIN_LOW to ADMIN_HIGH, then all packets are accepted. A narrower range woulddiscard packets that are not within the range.At most, one zone can define a particular port to be an MLP on a shared interface. In thepreceding scenario, where the ssh port is configured as a shared MLP in a non-global zone,no other zone can receive ssh connections on the shared address. However, the global zonecould define the ssh port as a private MLP for receipt of connections on its zone-specificaddress.
■ On a system where the global zone and the labeled zones share an IP address, an MLP for thessh service could be added to one zone. If the MLP for ssh is added to the global zone, thenno labeled zone can add an MLP for the ssh service. Similarly, if the MLP for the ssh serviceis added to a labeled zone, then the global zone cannot be configured with an ssh MLP.
For an example of adding MLPs to labeled zones, see Example 13–16.
Zones in Trusted Extensions
Chapter 10 • Managing Zones in Trusted Extensions (Tasks) 117

Zones and ICMP in Trusted ExtensionsNetworks transmit broadcast messages and send ICMP packets to systems on the network. On amultilevel system, these transmissions could flood the system at every label. By default, thenetwork policy for labeled zones requires that ICMP packets be received only at the matchinglabel.
Global Zone Processes and Labeled ZonesIn Trusted Extensions, MAC policy applies to all processes, including processes in the globalzone. Processes in the global zone run at the label ADMIN_HIGH. When files from a global zoneare shared, they are shared at the label ADMIN_LOW. Therefore, because MAC prevents ahigher-labeled process from modifying a lower-level object, the global zone usually cannotwrite to an NFS-mounted system.
However, in a limited number of cases, actions in a labeled zone can require that a global zoneprocess modify a file in that zone.
To enable a global zone process to mount a remote file system with read/write permissions, themount must be under the zone path of the zone whose label corresponds to that of the remotefile system. But it must not be mounted under that zone's root path.■ The mounting system must have a zone at the identical label as the remote file system.■ The system must mount the remote file system under the zone path of the identically labeled
zone.The system must not mount the remote file system under the zone root path of theidentically labeled zone
Consider a zone that is named public at the label PUBLIC. The zone path is /zone/public/. Alldirectories under the zone path are at the label PUBLIC, as in:
/zone/public/dev
/zone/public/etc
/zone/public/home/username/zone/public/root
/zone/public/usr
Of the directories under the zone path, only files under /zone/public/root are visible from thepublic zone. All other directories and files at the label PUBLIC are accessible only from the globalzone. The path /zone/public/root is the zone root path.
From the perspective of the public zone administrator, the zone root path is visible as /.Similarly, the public zone administrator cannot access a user's home directory in the zone path,/zone/public/home/username directory. That directory is visible only from the global zone.The public zone mounts that directory in the zone root path as /home/username. From theperspective of the global zone, that mount is visible as /zone/public/root/home/username.
Global Zone Processes and Labeled Zones
Oracle Solaris Trusted Extensions Administrator's Procedures • September 2010118

The public zone administrator can modify /home/username. A global zone process, when filesin a user's home directory need to be modified, does not use that path. The global zone uses theuser's home directory in the zone path, /zone/public/home/username.
■ Files and directories that are under the zone path, /zone/zonename/, but not under thezone root path, /zone/zonename/root directory, can be modified by a global zone processthat runs at the label ADMIN_HIGH.
■ Files and directories that are under the zone root path, /zone/public/root, can bemodified by the labeled zone administrator.
For example, when a user allocates a device in the public zone, a global zone process that runs atthe label ADMIN_HIGH modifies the dev directory in the zone path, /zone/public/dev. Similarly,when a user saves a desktop configuration, the desktop configuration file is modified by a globalzone process in the /zone/public/home/username. Finally, to share files from a labeled zone,the global zone administrator creates the configuration file, dfstab, in the zone path,/zone/public/etc/dfs/dfstab. A labeled zone administrator cannot access that file, andcannot share files from the labeled zone. To share a labeled directory, see “How to ShareDirectories From a Labeled Zone” on page 140.
Zone Administration Utilities in Trusted ExtensionsSome zone administration tasks can be performed from the command line. However, thesimplest way to administer zones is to use the GUIs that Trusted Extensions provides:
■ The configuration of zone security attributes is performed by using the Trusted NetworkZones tool in the Solaris Management Console. For a description of the tool, see “TrustedNetwork Zones Tool” on page 41. For examples of zone configuration and creation, seeChapter 4, “Configuring Trusted Extensions (Tasks),” in Oracle Solaris Trusted ExtensionsConfiguration Guide and “How to Create a Multilevel Port for a Zone” on page 131.
■ The shell script, /usr/sbin/txzonemgr, provides a menu-based wizard for creating,installing, initializing, and booting zones. If you are administering zones from SolarisTrusted Extensions (JDS), use the txzonemgr script rather than Trusted CDE actions.txzonemgr uses the zenity command. For details, see the zenity(1) man page.
■ In Trusted CDE, the configuration and creation of zones can be performed by using actionsin the Trusted_Extensions folder. For a description of the actions, see “Trusted CDEActions” on page 35. For procedures that use the actions, see “How to Start CDEAdministrative Actions in Trusted Extensions” on page 53.
Zone Administration Utilities in Trusted Extensions
Chapter 10 • Managing Zones in Trusted Extensions (Tasks) 119

Managing Zones (Task Map)The following task map describes zone management tasks that are specific to TrustedExtensions. The map also points to common procedures that are performed in TrustedExtensions just as they are performed on a Solaris system.
Task Description For Instructions
View all zones. At any label, views the zones that aredominated by the current zone.
“How to Display Ready or Running Zones”on page 121
View mounted directories. At any label, views the directories that aredominated by the current label.
“How to Display the Labels of MountedFiles” on page 122
Enable regular users to view an /etc file. Loopback mounts a directory or file fromthe global zone that is not visible by defaultin a labeled zone.
“How to Loopback Mount a File That IsUsually Not Visible in a Labeled Zone” onpage 124
Prevent regular users from viewing alower-level home directory from a higherlabel.
By default, lower-level directories arevisible from higher-level zones. When youdisable the mounting of one lower-levelzone, you disable all mounts of lower-levelzones.
“How to Disable the Mounting ofLower-Level Files” on page 125
Configure a zone to enable the changing ofthe labels on files.
Labeled zones have limited privileges. Bydefault, labeled zones do not have theprivilege that enables an authorized user torelabel a file. You modify the zoneconfiguration to add the privilege.
“How to Enable Files to be Relabeled Froma Labeled Zone” on page 128
Move a file or directory into or out of alabeled zone.
Changes a file or directory's level ofsecurity by changing its label.
“How to Move Files Between Labels inTrusted CDE” in Oracle Solaris TrustedExtensions User’s Guide
Attach a ZFS dataset to a labeled zone andshare it.
Mounts a ZFS dataset with read/writepermissions in a labeled zone and sharesthe dataset read-only with a higher zone.
“How to Share a ZFS Dataset From aLabeled Zone” on page 126.
Configure a new zone. Creates a zone at a label that is notcurrently being used to label a zone on thissystem.
See “Name and Label the Zone” in OracleSolaris Trusted Extensions ConfigurationGuide.
Then, follow the procedure that the initialsetup team used to create the other zones.For the steps, see “Creating Labeled Zones”in Oracle Solaris Trusted ExtensionsConfiguration Guide.
Managing Zones (Task Map)
Oracle Solaris Trusted Extensions Administrator's Procedures • September 2010120

Task Description For Instructions
Create a multilevel port for an application. Multilevel ports are useful for programsthat require a multilevel feed into a labeledzone.
“How to Configure a Multilevel Port forNFSv3 Over udp” on page 130
“How to Create a Multilevel Port for aZone” on page 131
Troubleshoot NFS mount and accessproblems.
Debugs general access issues for mountsand possibly for zones.
“How to Troubleshoot Mount Failures inTrusted Extensions” on page 147
Remove a labeled zone. Completely removes a labeled zone fromthe system.
“How to Remove a Non-Global Zone” inSystem Administration Guide: OracleSolaris Containers-Resource Managementand Oracle Solaris Zones
▼ How to Display Ready or Running ZonesThis procedure creates a shell script that displays the labels of the current zone and all zonesthat the current zone dominates.
You must be in the System Administrator role in the global zone.
Use the trusted editor to create the getzonelabels script.For details, see “How to Edit Administrative Files in Trusted Extensions” on page 54.
Provide the pathname to the script, such as /usr/local/scripts/getzonelabels.
Add the following content, and save the file:#!/bin/sh
#
echo "NAME\t\tSTATUS\t\tLABEL"echo "====\t\t======\t\t====="myzone=‘zonename‘for i in ‘/usr/sbin/zoneadm list -p‘ ; do
zone=‘echo $i | cut -d ":" -f2‘status=‘echo $i | cut -d ":" -f3‘path=‘echo $i | cut -d ":" -f4‘if [ $zone != global ]; then
if [ $myzone = global ]; then
path=$path/root/tmp
else
path=$path/export/home
fi
fi
label=‘/usr/bin/getlabel -s $path |cut -d ":" -f2-9‘if [ ‘echo $zone|wc -m‘ -lt 8 ]; then
Before You Begin
1
2
Managing Zones (Task Map)
Chapter 10 • Managing Zones in Trusted Extensions (Tasks) 121

echo "$zone\t\t$status\t$label"else
echo "$zone\t$status\t$label"fi
done
Test the script in the global zone.# getzonelabels
NAME STATUS LABEL
==== ====== =====
global running ADMIN_HIGH
needtoknow running CONFIDENTIAL : NEED TO KNOW
restricted ready CONFIDENTIAL : RESTRICTED
internal running CONFIDENTIAL : INTERNAL
public running PUBLIC
When run from the global zone, the script displays the labels of all ready or running zones. Hereis the global zone output for the zones that were created from the default label_encodings file:
Displaying the Labels of All Ready or Running Zones
In the following example, a user runs the getzonelabels script in the internal zone.
# getzonelabels
NAME STATUS LABEL
==== ====== =====
internal running CONFIDENTIAL : INTERNAL
public running PUBLIC
▼ How to Display the Labels of Mounted FilesThis procedure creates a shell script that displays the mounted file systems of the current zone.When run from the global zone, the script displays the labels of all mounted file systems in everyzone.
You must be in the System Administrator role in the global zone.
Use the trusted editor to create the getmounts script.For details, see “How to Edit Administrative Files in Trusted Extensions” on page 54.
Provide the pathname to the script, such as /usr/local/scripts/getmounts.
Add the following content and save the file:#!/bin/sh
#
3
Example 10–1
Before You Begin
1
2
Managing Zones (Task Map)
Oracle Solaris Trusted Extensions Administrator's Procedures • September 2010122

for i in ‘/usr/sbin/mount -p | cut -d " " -f3‘ ; do
/usr/bin/getlabel $i
done
Test the script in the global zone.# /usr/local/scripts/getmounts
/: ADMIN_LOW
/dev: ADMIN_LOW
/kernel: ADMIN_LOW
/lib: ADMIN_LOW
/opt: ADMIN_LOW
/platform: ADMIN_LOW
/sbin: ADMIN_LOW
/usr: ADMIN_LOW
/var/tsol/doors: ADMIN_LOW
/zone/needtoknow/export/home: CONFIDENTIAL : NEED TO KNOW
/zone/internal/export/home: CONFIDENTIAL : INTERNAL USE ONLY
/zone/restricted/export/home: CONFIDENTIAL : RESTRICTED
/proc: ADMIN_LOW
/system/contract: ADMIN_LOW
/etc/svc/volatile: ADMIN_LOW
/etc/mnttab: ADMIN_LOW
/dev/fd: ADMIN_LOW
/tmp: ADMIN_LOW
/var/run: ADMIN_LOW
/zone/public/export/home: PUBLIC
/root: ADMIN_LOW
Displaying the Labels of File Systems in the restricted Zone
When run from a labeled zone by a regular user, the getmounts script displays the labels of allthe mounted file systems in that zone. On a system where zones are created for every label in thedefault label_encodings file, the following is the output from the restricted zone:
# /usr/local/scripts/getmounts
/: CONFIDENTIAL : RESTRICTED
/dev: CONFIDENTIAL : RESTRICTED
/kernel: ADMIN_LOW
/lib: ADMIN_LOW
/opt: ADMIN_LOW
/platform: ADMIN_LOW
/sbin: ADMIN_LOW
/usr: ADMIN_LOW
/var/tsol/doors: ADMIN_LOW
/zone/needtoknow/export/home: CONFIDENTIAL : NEED TO KNOW
/zone/internal/export/home: CONFIDENTIAL : INTERNAL USE ONLY
/proc: CONFIDENTIAL : RESTRICTED
3
Example 10–2
Managing Zones (Task Map)
Chapter 10 • Managing Zones in Trusted Extensions (Tasks) 123

/system/contract: CONFIDENTIAL : RESTRICTED
/etc/svc/volatile: CONFIDENTIAL : RESTRICTED
/etc/mnttab: CONFIDENTIAL : RESTRICTED
/dev/fd: CONFIDENTIAL : RESTRICTED
/tmp: CONFIDENTIAL : RESTRICTED
/var/run: CONFIDENTIAL : RESTRICTED
/zone/public/export/home: PUBLIC
/home/gfaden: CONFIDENTIAL : RESTRICTED
▼ How to Loopback Mount a File That Is Usually NotVisible in a Labeled ZoneThis procedure enables a user in a specified labeled zone to view files that are not exported fromthe global zone by default.
You must be in the System Administrator role in the global zone.
Halt the zone whose configuration you want to change.# zoneadm -z zone-name halt
Loopback mount a file or directory.For example, enable ordinary users to view a file in the /etc directory.# zonecfg -z zone-nameadd filesystem
set special=/etc/filenameset directory=/etc/filenameset type=lofs
add options [ro,nodevices,nosetuid]
end
exit
Note – Certain files are not used by the system, so that loopback mounting them has no effect.For example, the /etc/dfs/dfstab file in a labeled zone is not checked by Trusted Extensionssoftware. For more information, see “Sharing Files From a Labeled Zone” on page 135.
Start the zone.# zoneadm -z zone-name boot
Loopback Mounting the /etc/passwd fileIn this example, the security administrator wants to enable testers and programmers to checkthat their local passwords are set. After the sandbox zone is halted, it is configured to loopbackmount the passwd file. Then, the zone is restarted.
Before You Begin
1
2
3
Example 10–3
Managing Zones (Task Map)
Oracle Solaris Trusted Extensions Administrator's Procedures • September 2010124

# zoneadm -z sandbox halt
# zonecfg -z sandbox
add filesystem
set special=/etc/passwd
set directory=/etc/passwd
set type=lofs
add options [ro,nodevices,nosetuid]
end
exit
# zoneadm -z sandbox boot
▼ How to Disable the Mounting of Lower-Level FilesBy default, users can view lower-level files. Remove the net_mac_aware privilege to prevent theviewing of all lower-level files from a particular zone. For a description of the net_mac_awareprivilege, see the privileges(5) man page.
You must be in the System Administrator role in the global zone.
Halt the zone whose configuration you want to change.# zoneadm -z zone-name halt
Configure the zone to prevent the viewing of lower-level files.Remove the net_mac_aware privilege from the zone.# zonecfg -z zone-nameset limitpriv=default,!net_mac_aware
exit
Restart the zone.# zoneadm -z zone-name boot
Preventing Users From Viewing Lower-Level Files
In this example, the security administrator wants to prevent users on one system from beingconfused. Therefore, users can only view files at the label at which the users are working. So, thesecurity administrator prevents the viewing of all lower-level files. On this system, users cannotsee publicly available files unless they are working at the PUBLIC label. Also, users can only NFSmount files at the label of the zones.
# zoneadm -z restricted halt
# zonecfg -z restricted
set limitpriv=default,!net_mac_aware
exit
# zoneadm -z restricted boot
Before You Begin
1
2
3
Example 10–4
Managing Zones (Task Map)
Chapter 10 • Managing Zones in Trusted Extensions (Tasks) 125

# zoneadm -z needtoknow halt
# zonecfg -z needtoknow
set limitpriv=default,!net_mac_aware
exit
# zoneadm -z needtoknow boot
# zoneadm -z internal halt
# zonecfg -z internal
set limitpriv=default,!net_mac_aware
exit
# zoneadm -z internal boot
Because PUBLIC is the lowest label, the security administrator does not run the commands forthe PUBLIC zone.
▼ How to Share a ZFS Dataset From a Labeled ZoneIn this procedure, you mount a ZFS dataset with read/write permissions in a labeled zone.Because all commands are executed in the global zone, the global zone administrator controlsthe addition of ZFS datasets to labeled zones.
At a minimum, the labeled zone must be in the ready state to share a dataset. The zone can be inthe running state.
To configure the zone with the dataset, you first halt the zone.
Create the ZFS dataset.# zfs create datasetdir/subdir
The name of the dataset can include a directory, such as zone/data.
In the global zone, halt the labeled zone.# zoneadm -z labeled-zone-name halt
Set the mount point of the dataset.# zfs set mountpoint=legacy datasetdir/subdir
Setting the ZFS mountpoint property sets the label of the mount point when the mount pointcorresponds to a labeled zone.
Add the dataset to the zone as a file system.# zonecfg -z labeled-zone-name# zonecfg:labeled-zone-name> add fs
# zonecfg:labeled-zone-name:dataset> set dir=/subdir# zonecfg:labeled-zone-name:dataset> set special=datasetdir/subdir
Before You Begin
1
2
3
4
Managing Zones (Task Map)
Oracle Solaris Trusted Extensions Administrator's Procedures • September 2010126
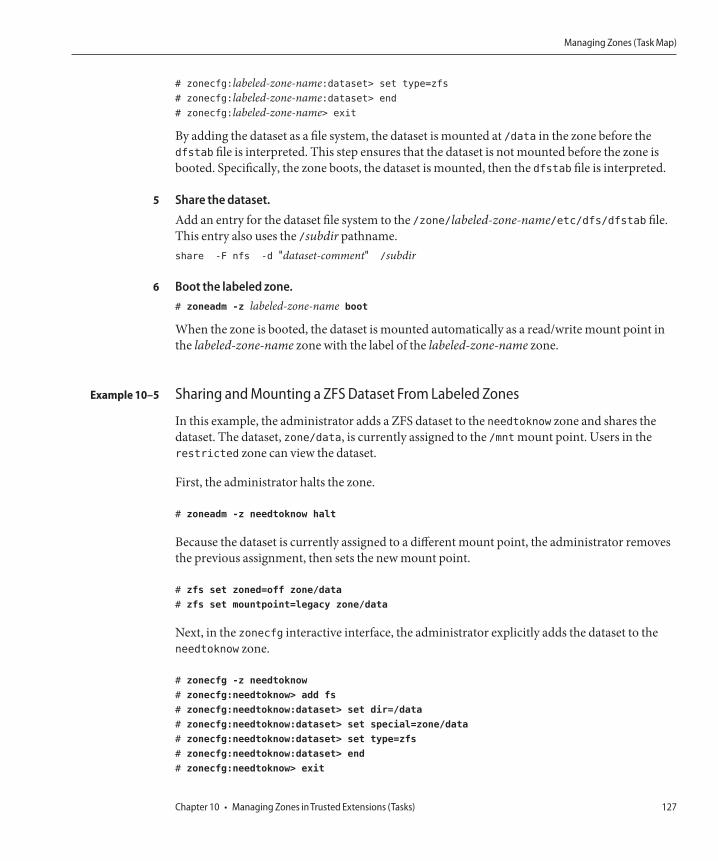
# zonecfg:labeled-zone-name:dataset> set type=zfs
# zonecfg:labeled-zone-name:dataset> end
# zonecfg:labeled-zone-name> exit
By adding the dataset as a file system, the dataset is mounted at /data in the zone before thedfstab file is interpreted. This step ensures that the dataset is not mounted before the zone isbooted. Specifically, the zone boots, the dataset is mounted, then the dfstab file is interpreted.
Share the dataset.Add an entry for the dataset file system to the /zone/labeled-zone-name/etc/dfs/dfstab file.This entry also uses the /subdir pathname.share -F nfs -d "dataset-comment" /subdir
Boot the labeled zone.# zoneadm -z labeled-zone-name boot
When the zone is booted, the dataset is mounted automatically as a read/write mount point inthe labeled-zone-name zone with the label of the labeled-zone-name zone.
Sharing and Mounting a ZFS Dataset From Labeled Zones
In this example, the administrator adds a ZFS dataset to the needtoknow zone and shares thedataset. The dataset, zone/data, is currently assigned to the /mnt mount point. Users in therestricted zone can view the dataset.
First, the administrator halts the zone.
# zoneadm -z needtoknow halt
Because the dataset is currently assigned to a different mount point, the administrator removesthe previous assignment, then sets the new mount point.
# zfs set zoned=off zone/data
# zfs set mountpoint=legacy zone/data
Next, in the zonecfg interactive interface, the administrator explicitly adds the dataset to theneedtoknow zone.
# zonecfg -z needtoknow
# zonecfg:needtoknow> add fs
# zonecfg:needtoknow:dataset> set dir=/data
# zonecfg:needtoknow:dataset> set special=zone/data
# zonecfg:needtoknow:dataset> set type=zfs
# zonecfg:needtoknow:dataset> end
# zonecfg:needtoknow> exit
5
6
Example 10–5
Managing Zones (Task Map)
Chapter 10 • Managing Zones in Trusted Extensions (Tasks) 127

Next, the administrator modifies the /zone/needtoknow/etc/dfs/dfstab file to share thedataset, then boots the needtoknow zone.
## Global zone dfstab file for needtoknow zone
share -F nfs -d "App Data on ZFS" /data
# zoneadm -z needtoknow boot
The dataset is now accessible.
Users in the the restricted zone, which dominates the needtoknow zone, can view themounted dataset by changing to the /data directory. They use the full path to the mounteddataset from the perspective of the global zone. In this example, machine1 is the host name ofthe system that includes the labeled zone. The administrator assigned this host name to anon-shared IP address.
# cd /net/machine1/zone/needtoknow/root/data
If the attempt to reach the dataset from the higher label returns the error not found or No suchfile or directory, the administrator must restart the automounter service by running thesvcadm restart autofs command.
▼ How to Enable Files to be Relabeled From a LabeledZoneThis procedure is a prerequisite for a user to be able to relabel files.
You must be in the Security Administrator role in the global zone.
Halt the zone whose configuration you want to change.# zoneadm -z zone-name halt
Configure the zone to enable relabeling.Add the appropriate privileges to the zone. The windows privileges enable users to usedrag-and-drop and cut-and-paste operations.
■ To enable downgrades, add the file_downgrade_sl privilege to the zone.# zonecfg -z zone-nameset limitpriv=default,win_dac_read,win_mac_read,win_dac_write,
win_mac_write,win_selection,file_downgrade_sl
exit
Troubleshooting
Before You Begin
1
2
Managing Zones (Task Map)
Oracle Solaris Trusted Extensions Administrator's Procedures • September 2010128

■ To enable upgrades, add the sys_trans_label and file_upgrade_slprivileges to thezone.# zonecfg -z zone-nameset limitpriv=default,win_dac_read,win_mac_read,win_dac_write,
win_mac_write,win_selection,sys_trans_label,file_upgrade_sl
exit
■ To enable both upgrades and downgrades, add all three privileges to the zone.# zonecfg -z zone-nameset limitpriv=default,win_dac_read,win_mac_read,win_dac_write,
win_mac_write,win_selection,sys_trans_label,file_downgrade_sl,
file_upgrade_sl
exit
Restart the zone.# zoneadm -z zone-name boot
For the user and process requirements that permit relabeling, see the setflabel(3TSOL) manpage. To authorize a user to relabel files, see “How to Enable a User to Change the Security Levelof Data” on page 96.
Enabling Upgrades From the internal Zone
In this example, the security administrator wants to enable authorized users on a system toupgrade files. By enabling users to upgrade information, the administrator enables them toprotect the information at a higher level of security. In the global zone, the administrator runsthe following zone administration commands.
# zoneadm -z internal halt
# zonecfg -z internal
set limitpriv=default,sys_trans_label,file_upgrade_sl
exit
# zoneadm -z internal boot
Authorized users can now upgrade internal information to restricted from the internalzone.
Enabling Downgrades From the restricted Zone
In this example, the security administrator wants to enable authorized users on a system todowngrade files. Because the administrator does not add windows privileges to the zone,authorized users cannot use the File Manager to relabel files. To relabel files, users use thesetlabel command.
3
Example 10–6
Example 10–7
Managing Zones (Task Map)
Chapter 10 • Managing Zones in Trusted Extensions (Tasks) 129

By enabling users to downgrade information, the administrator permits users at a lower level ofsecurity to access the files. In the global zone, the administrator runs the following zoneadministration commands.
# zoneadm -z restricted halt
# zonecfg -z restricted
set limitpriv=default,file_downgrade_sl
exit
# zoneadm -z restricted boot
Authorized users can now downgrade restricted information to internal or public from therestricted zone by using the setlabel command.
▼ How to Configure a Multilevel Port for NFSv3 Over udpThis procedure is used to enable NFSv3 read-down mounts over udp. The Solaris ManagementConsole is used to add the MLP.
You must be in the Security Administrator role in the global zone.
Start the Solaris Management Console.For details, see “How to Administer the Local System With the Solaris Management Console”on page 52.
Choose the Files toolbox.The title of the toolbox includes Scope=Files, Policy=TSOL.
Configure the zone and the MLP.
a. Navigate to the Trusted Network Zones tool.
b. Double-click the global zone.
c. Add a multilevel port for the UDP protocol:
i. Click Add for the Multilevel Ports for Zone's IP Addresses.
ii. Type 2049 for the port number, and click OK.
d. Click OK to save the settings.
Close the Solaris Management Console.
Before You Begin
1
2
3
4
Managing Zones (Task Map)
Oracle Solaris Trusted Extensions Administrator's Procedures • September 2010130

Update the kernel.# tnctl -fz /etc/security/tsol/tnzonecfg
▼ How to Create a Multilevel Port for a ZoneThis procedure is used when an application that runs in a labeled zone requires a multilevel port(MLP) to communicate with the zone. In this procedure, a web proxy communicates with thezone. The Solaris Management Console is used to add the MLP.
You must be in the Security Administrator role in the global zone. The labeled zone must exist.For details, see “Creating Labeled Zones” in Oracle Solaris Trusted Extensions ConfigurationGuide.
Start the Solaris Management Console.For details, see “How to Administer the Local System With the Solaris Management Console”on page 52.
Choose the Files toolbox.The title of the toolbox includes Scope=Files, Policy=TSOL.
Add the proxy host and the webservices host to the list of computers.
a. Under System Configuration, navigate to the Computers and Networks tool.
b. In the Computers tool, click the Action menu and choose Add Computer.
c. Add the host name and IP address for the proxy host.
d. Save the changes.
e. Add the host name and IP address for the webservice host.
f. Save the changes.
Configure the zone and the MLP.
a. Navigate to the Trusted Network Zones tool.
b. Select the labeled zone.
c. In the MLP Configuration for Local IP Addresses section, specify the appropriateport/protocol field.
5
Before You Begin
1
2
3
4
Managing Zones (Task Map)
Chapter 10 • Managing Zones in Trusted Extensions (Tasks) 131

d. Save the changes.
For the zone, customize a template by completing the following steps:
a. Navigate to the Security Templates tool.Click the Action menu and choose Add Template.
b. Use the host name for the template name.
c. Specify CIPSO for the Host Type.
d. Use the label of the zone for the Minimum Label and for the Maximum Label.
e. Assign the zone label to the Security Label Set.
f. Select the Hosts Explicitly Assigned tab.
g. In the Add an Entry section, add the IP address that is associated with the zone.
h. Save the changes.
Close the Solaris Management Console.
Start the zones.# zoneadm -z zone-name boot
In the global zone, add routes for the new addresses.For example, if the zones have a shared IP address, do the following:# route add proxy labeled-zones-IP-address# route add webservice labeled-zones-IP-address
5
6
7
8
Managing Zones (Task Map)
Oracle Solaris Trusted Extensions Administrator's Procedures • September 2010132

Managing and Mounting Files in TrustedExtensions (Tasks)
This chapter describes how LOFS and NFS mounts work on a system that is configured withTrusted Extensions. This chapter also covers how to back up and restore files.
■ “Sharing and Mounting Files in Trusted Extensions” on page 133■ “NFS Mounts in Trusted Extensions” on page 133■ “Sharing Files From a Labeled Zone” on page 135■ “Access to NFS Mounted Directories in Trusted Extensions” on page 135■ “Trusted Extensions Software and NFS Protocol Versions” on page 138■ “Backing Up, Sharing, and Mounting Labeled Files (Task Map)” on page 139
Sharing and Mounting Files in Trusted ExtensionsTrusted Extensions software supports the same file systems and file system managementcommands as the Solaris OS. Trusted Extensions adds the ability for a non-global zone to sharefiles. In addition, Trusted Extensions attaches a unique label to every non-global zone. All thefiles and directories that belong to that zone are mounted at the label of the zone. Any shared filesystems that belong to other zones or to NFS servers are mounted at the label of the owner.Trusted Extensions prevents any mounts that would violate the mandatory access control(MAC) policies for labeling. For example, a zone's label must dominate all of its mounted filesystem labels, and only equally labeled file systems can be mounted with read/writepermissions.
NFS Mounts in Trusted ExtensionsNFS mounts in Trusted Extensions are similar to Solaris mounts. The differences occur in theuse of zone root pathnames when mounting a labeled zone in Trusted Extensions, and in theenforcement of MAC policy.
11C H A P T E R 1 1
133

NFS shares in Trusted Extensions are similar to Solaris shares in a global zone. However, thesharing of files from a labeled zone on a multilevel system is unique to Trusted Extensions:
■ Shares and mounts in the global zone – Sharing and mounting files in the global zone of aTrusted Extensions system is almost identical to the procedure in the Solaris OS. Formounting files, the automounter, the vfstab file, and the mount command can be used. Forsharing files, the dfstab file is used.
■ Mounts in labeled zones – Mounting files in labeled zones in Trusted Extensions is almostidentical to mounting files in non-global zones in the Solaris OS. For mounting files, theautomounter, the vfstab file, and the mount command can be used. In Trusted Extensions, aunique automount_home_label configuration file exists for each labeled zone.
■ Shares in labeled zones – Files in a labeled zone can be shared at the label of the zone byusing a dfstab file that is at the label of the zone, but is visible to the global zone only. So,configuring a labeled zone to share files is performed by the global zone administrator in theglobal zone. This configuration file is not visible from its labeled zone. For more discussion,see “Global Zone Processes and Labeled Zones” on page 118.
Labels affect which files can be mounted. Files are shared and mounted at a particular label. Fora Trusted Extensions client to write to a file that is NFS-mounted, the file must be mounted withread/write permissions and be at the same label as the client. If you are mounting a file betweentwo Trusted Extensions hosts, the server and the client must have compatible remote hosttemplates of type cipso. If you are mounting a file between a Trusted Extensions host and anunlabeled host, files that are at the single label that is specified for the unlabeled host in thetnrhdb file can be mounted. Files that are mounted with LOFS can be viewed, but cannot bemodified. For details on NFS mounts, see “Access to NFS Mounted Directories in TrustedExtensions” on page 135.
Labels also affect which directories and files can be viewed. By default, lower-level objects areavailable in a user's environment. Therefore, in the default configuration, a regular user canview files that are in a zone at a lower level than the user's current level. For example, users cansee their lower-level home directories from a higher label. For details, see “Home DirectoryCreation in Trusted Extensions” on page 136.
If site security forbids the viewing of lower-level objects, you can make lower-level directoriesinvisible to the user. For details, see “How to Disable the Mounting of Lower-Level Files” onpage 125.
The mount policy in Trusted Extensions has no MAC overrides. Mounted files that are visible ata lower label can never be modified by a higher-label process. This MAC policy is also in effectin the global zone. A global zone ADMIN_HIGH process cannot modify an NFS-mounted file at alower label, such as a PUBLIC file or an ADMIN_LOW file. MAC policies enforce the defaultconfiguration and are invisible to regular users. Regular users cannot see objects unless theyhave MAC access to them.
NFS Mounts in Trusted Extensions
Oracle Solaris Trusted Extensions Administrator's Procedures • September 2010134

Sharing Files From a Labeled ZoneIn the Solaris OS, a non-global zone cannot share directories from its zone. However, in TrustedExtensions, a labeled zone can share directories. The specification of which directories in alabeled zone can be shared is performed in the global zone by using a directory that is outsidethe root path of the zone. For more discussion, see “Global Zone Processes and Labeled Zones”on page 118.
/zone/labeled-zone/directories Also called the zone path. Is the path from the globalzone to the labeled zone. Every directory underlabeled-zone is labeled the same as the zone.
/zone/labeled-zone/root/directories Also called the zone root path. Is the root path of alabeled zone from the perspective of the global zone.From the perspective of the labeled zone, this is thezone's root, the / directory. This path is not used bythe global zone to administer the zone.
To share directories from a labeled zone, the global zone administrator creates and modifies thedfstab file in the /etc directory of the zone path:
/zone/labeled-zone/etc/dfs/dfstab
This /etc directory is not visible from the labeled zone. This directory is distinct from the /etcdirectory that is visible from the zone:
Global zone view: /zone/labeled-zone/root/etcLabeled zone view of the same directory: /etc
A dfstab file in this path does not enable labeled directories to be shared.
When the status of the labeled zone is ready or running, the files that are listed in the/zone/labeled-zone/etc/dfs/dfstab file are shared at the label of the zone. For the procedure,see “How to Share Directories From a Labeled Zone” on page 140.
Access to NFS Mounted Directories in Trusted ExtensionsBy default, NFS-mounted file systems are visible at the label of the exported file system. If the filesystem is exported with read/write permissions, users at that label can write to the files. NFSmounts that are at a lower label than the user's current session are visible to the user, but cannotbe written to. Even if a file system is shared with read/write permissions, the mounting systemcan write to it only at the label of the mount.
To make lower-level directories that are NFS-mounted visible to users in a higher-level zone,the administrator of the global zone on the NFS server must export the parent directory. The
Access to NFS Mounted Directories in Trusted Extensions
Chapter 11 • Managing and Mounting Files in Trusted Extensions (Tasks) 135
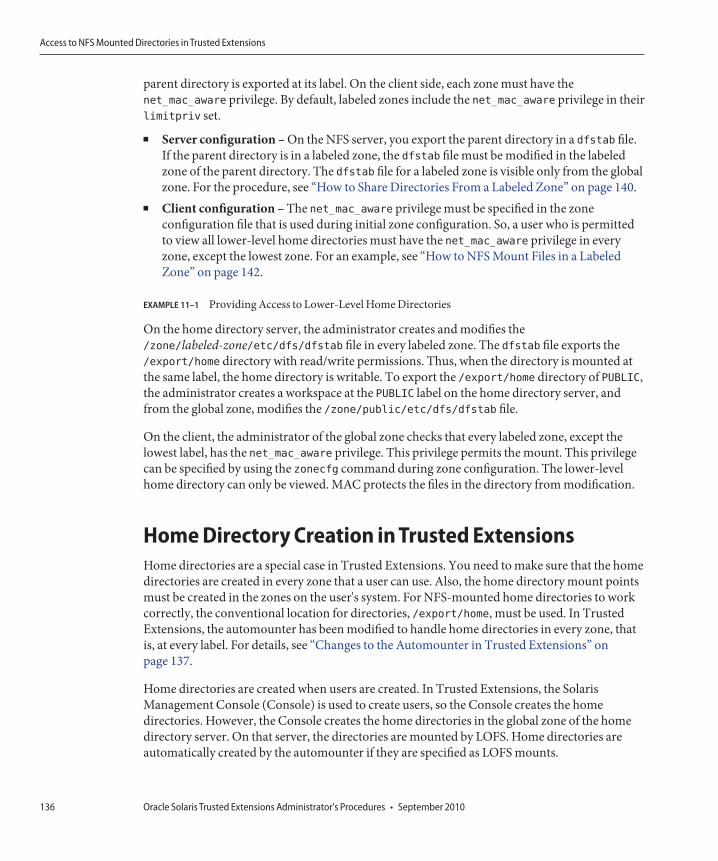
parent directory is exported at its label. On the client side, each zone must have thenet_mac_aware privilege. By default, labeled zones include the net_mac_aware privilege in theirlimitpriv set.
■ Server configuration – On the NFS server, you export the parent directory in a dfstab file.If the parent directory is in a labeled zone, the dfstab file must be modified in the labeledzone of the parent directory. The dfstab file for a labeled zone is visible only from the globalzone. For the procedure, see “How to Share Directories From a Labeled Zone” on page 140.
■ Client configuration – The net_mac_aware privilege must be specified in the zoneconfiguration file that is used during initial zone configuration. So, a user who is permittedto view all lower-level home directories must have the net_mac_aware privilege in everyzone, except the lowest zone. For an example, see “How to NFS Mount Files in a LabeledZone” on page 142.
EXAMPLE 11–1 Providing Access to Lower-Level Home Directories
On the home directory server, the administrator creates and modifies the/zone/labeled-zone/etc/dfs/dfstab file in every labeled zone. The dfstab file exports the/export/home directory with read/write permissions. Thus, when the directory is mounted atthe same label, the home directory is writable. To export the /export/home directory of PUBLIC,the administrator creates a workspace at the PUBLIC label on the home directory server, andfrom the global zone, modifies the /zone/public/etc/dfs/dfstab file.
On the client, the administrator of the global zone checks that every labeled zone, except thelowest label, has the net_mac_aware privilege. This privilege permits the mount. This privilegecan be specified by using the zonecfg command during zone configuration. The lower-levelhome directory can only be viewed. MAC protects the files in the directory from modification.
Home Directory Creation in Trusted ExtensionsHome directories are a special case in Trusted Extensions. You need to make sure that the homedirectories are created in every zone that a user can use. Also, the home directory mount pointsmust be created in the zones on the user's system. For NFS-mounted home directories to workcorrectly, the conventional location for directories, /export/home, must be used. In TrustedExtensions, the automounter has been modified to handle home directories in every zone, thatis, at every label. For details, see “Changes to the Automounter in Trusted Extensions” onpage 137.
Home directories are created when users are created. In Trusted Extensions, the SolarisManagement Console (Console) is used to create users, so the Console creates the homedirectories. However, the Console creates the home directories in the global zone of the homedirectory server. On that server, the directories are mounted by LOFS. Home directories areautomatically created by the automounter if they are specified as LOFS mounts.
Access to NFS Mounted Directories in Trusted Extensions
Oracle Solaris Trusted Extensions Administrator's Procedures • September 2010136

Note – When you delete a user by using the Console, only the user's home directory in the globalzone is deleted. The user's home directories in the labeled zones are not deleted. You areresponsible for archiving and deleting the home directories in the labeled zones. For theprocedure, see “How to Delete a User Account From a Trusted Extensions System” on page 97.
However, the automounter cannot automatically create home directories on remote NFSservers. Either the user must first log in to the NFS server or administrative intervention isrequired. To create home directories for users, see “Enable Users to Access Their HomeDirectories in Trusted Extensions” in Oracle Solaris Trusted Extensions Configuration Guide.
Changes to the Automounter in Trusted ExtensionsIn Trusted Extensions, each label requires a separate home directory mount. The automountcommand has been modified to handle these labeled automounts. For each zone, theautomounter, autofs, mounts an auto_home_zone-name file. For example, the following is theentry for the global zone in the auto_home_global file:
+auto_home_global
* -fstype=lofs :/export/home/&
When a zone that permits lower-level zones to be mounted is booted, the following occurs. Thehome directories of lower-level zones are mounted read only under/zone/<zone-name>/export/home. The auto_home_<zone-name> map specifies the /zone pathas the source directory for an lofs remount onto /zone/<zone-name>/home/<username>.
For example, the following is an auto_home_public entry in anauto_home_zone-at-higher-label map that is generated from a higher-level zone:
+auto_home_public
* -fstype=lofs :/zone/public/export/home/&
The following is the corresponding entry in the public zone:
auto_home_public
* -fstype=lofs :/export/home/&
Access to NFS Mounted Directories in Trusted Extensions
Chapter 11 • Managing and Mounting Files in Trusted Extensions (Tasks) 137

When a home directory is referenced and the name does not match any entries in theauto_home_<zone-name> map, the map tries to match this loopback mount specification. Thesoftware creates the home directory when the following two conditions are met:
1. The map finds the match of the loopback mount specification2. The home directory name matches a valid user whose home directory does not yet exist in
zone-name
For details on changes to the automounter, see the automount(1M) man page.
Trusted Extensions Software and NFS Protocol VersionsIn the Solaris 10 11/06 and Solaris 10 8/07 releases, Trusted Extensions recognizes multiplelabels on NFS Version 4 (NFSv4) only. Starting in the Solaris 10 5/08 release, TrustedExtensions software recognizes labels on NFS Version 3 (NFSv3) and NFSv4. You can use oneof the following sets of mount options:
vers=4 proto=tcp
vers=3 proto=tcp
vers=3 proto=udp
Trusted Extensions has no restrictions on mounts over the tcp protocol. In NFSv3 and NFSv4,the tcp protocol can be used for same-label mounts and for read-down mounts. Read-downmounts require a multilevel port (MLP).
For NFSv3, Trusted Extensions behaves like the Solaris OS. The udp protocol is the default forNFSv3, but udp is used only for the initial mount operation. For subsequent NFS operations, thesystem uses tcp. Therefore, read-down mounts work for NFSv3 in the default configuration.
In the rare case that you have restricted NFSv3 mounts to use the udp protocol for initial andsubsequent NFS operations, you must create an MLP for NFS operations that use the udpprotocol. For the procedure, see “How to Configure a Multilevel Port for NFSv3 Over udp” onpage 130.
A host that is configured with Trusted Extensions can also share its own file systems withunlabeled hosts. A file or directory that is exported to an unlabeled host is writable if its labelequals the label that is associated with the remote host in its trusted networking databaseentries. A file or directory that is exported to an unlabeled host is readable only if its label isdominated by the label that is associated with the remote host.
Communications with systems that are running a release of Trusted Solaris software is possibleonly at a single label. The Trusted Extensions system and the Trusted Solaris system must assign
Trusted Extensions Software and NFS Protocol Versions
Oracle Solaris Trusted Extensions Administrator's Procedures • September 2010138
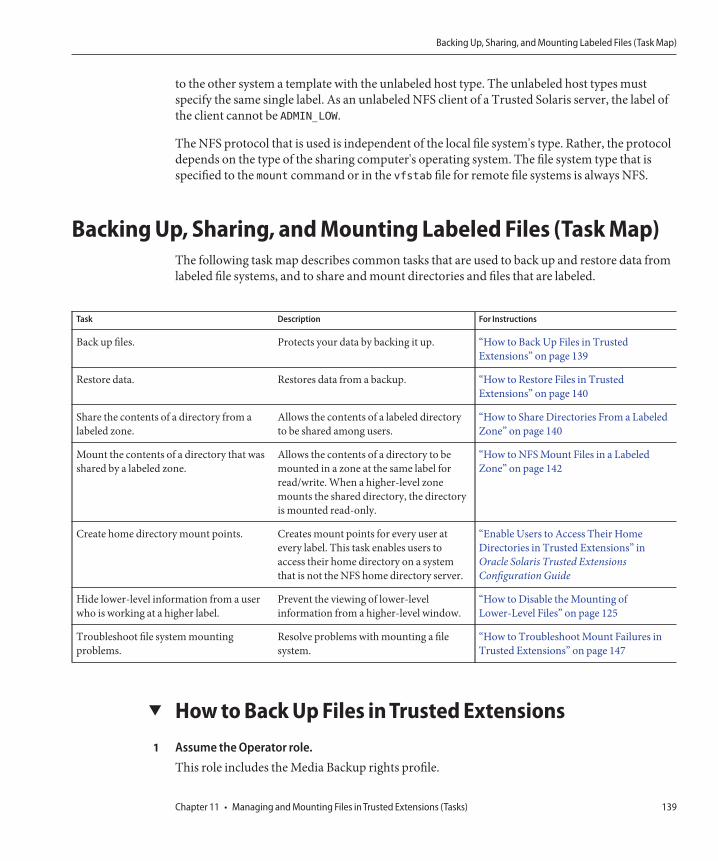
to the other system a template with the unlabeled host type. The unlabeled host types mustspecify the same single label. As an unlabeled NFS client of a Trusted Solaris server, the label ofthe client cannot be ADMIN_LOW.
The NFS protocol that is used is independent of the local file system's type. Rather, the protocoldepends on the type of the sharing computer's operating system. The file system type that isspecified to the mount command or in the vfstab file for remote file systems is always NFS.
Backing Up, Sharing, and Mounting Labeled Files (Task Map)The following task map describes common tasks that are used to back up and restore data fromlabeled file systems, and to share and mount directories and files that are labeled.
Task Description For Instructions
Back up files. Protects your data by backing it up. “How to Back Up Files in TrustedExtensions” on page 139
Restore data. Restores data from a backup. “How to Restore Files in TrustedExtensions” on page 140
Share the contents of a directory from alabeled zone.
Allows the contents of a labeled directoryto be shared among users.
“How to Share Directories From a LabeledZone” on page 140
Mount the contents of a directory that wasshared by a labeled zone.
Allows the contents of a directory to bemounted in a zone at the same label forread/write. When a higher-level zonemounts the shared directory, the directoryis mounted read-only.
“How to NFS Mount Files in a LabeledZone” on page 142
Create home directory mount points. Creates mount points for every user atevery label. This task enables users toaccess their home directory on a systemthat is not the NFS home directory server.
“Enable Users to Access Their HomeDirectories in Trusted Extensions” inOracle Solaris Trusted ExtensionsConfiguration Guide
Hide lower-level information from a userwho is working at a higher label.
Prevent the viewing of lower-levelinformation from a higher-level window.
“How to Disable the Mounting ofLower-Level Files” on page 125
Troubleshoot file system mountingproblems.
Resolve problems with mounting a filesystem.
“How to Troubleshoot Mount Failures inTrusted Extensions” on page 147
▼ How to Back Up Files in Trusted ExtensionsAssume the Operator role.This role includes the Media Backup rights profile.
1
Backing Up, Sharing, and Mounting Labeled Files (Task Map)
Chapter 11 • Managing and Mounting Files in Trusted Extensions (Tasks) 139
Use one of the following backup methods:
■ /usr/lib/fs/ufs/ufsdump for major backups■ /usr/sbin/tar cT for small backups■ A script calling either of these commands
For example, the Budtool backup application calls the ufsdump command. See theufsdump(1M) man page. For details on the T option to the tar command, see the tar(1) manpage.
▼ How to Restore Files in Trusted ExtensionsAssume the System Administrator role.This role includes the Media Restore rights profile.
Use one of the following methods:
■ /usr/lib/fs/ufs/ufsrestore for major restores■ /usr/sbin/tar xT for small restores■ A script calling either of these commands
For details on the T option to the tar command, see the tar(1) man page.
Caution – Only these commands preserve labels.
▼ How to Share Directories From a Labeled ZoneAs in the Solaris OS, the Mounts and Shares tool in the Solaris Management Console is used toshare and mount files from the global zone. The tool cannot be used to mount or sharedirectories that originate in labeled zones. Create a dfstab file at the label of the zone, and thenrestart the zone to share the labeled directories.
Caution – Do not use proprietary names for shared file systems. The names of shared file systemsare visible to every user.
You must be superuser, or in the System Administrator role in the global zone on the file server.
Create a workspace at the label of the directory that is going to be shared.For details, see “How to Add a Workspace at a Particular Label” in Oracle Solaris TrustedExtensions User’s Guide.
2
1
2
Before You Begin
1
Backing Up, Sharing, and Mounting Labeled Files (Task Map)
Oracle Solaris Trusted Extensions Administrator's Procedures • September 2010140

Create a dfstabfile in at the label of that zone.
For each zone that will share a directory, repeat the following steps:
a. Create the /etc/dfsdirectory in the zone.# mkdir -p /zone/zone-name/etc/dfs
b. Open the trusted editor.
For details, see “How to Edit Administrative Files in Trusted Extensions” on page 54.
c. Type the full pathname of the dfstabfile into the editor.# /zone/zone-name/etc/dfs/dfstab
d. Add an entry to share a directory from that zone.
The entry describes the directory from the perspective of the zone root path. For example,the following entry shares an application's files at the label of the containing zone:share -F nfs -o ro /viewdir/viewfiles
For each zone, share the directories by starting the zone.
In the global zone, run one of the following commands for each zone. Each zone can share itsdirectories in any of these ways. The actual sharing occurs when each zone is brought into theready or running state.
■ If the zone is not in the running state and you do not want users to log in to the server at thelabel of the zone, set the zone state to ready.# zoneadm -z zone-name ready
■ If the zone is not in the running state and users are allowed to log in to the server at the labelof the zone, boot the zone.# zoneadm -z zone-name boot
■ If the zone is already running, reboot the zone.# zoneadm -z zone-name reboot
Display the directories that are shared from your system.# showmount -e
To enable the client to mount the exported files, see “How to NFS Mount Files in a Labeled Zone”on page 142.
2
3
4
5
Backing Up, Sharing, and Mounting Labeled Files (Task Map)
Chapter 11 • Managing and Mounting Files in Trusted Extensions (Tasks) 141

Sharing the /export/shareDirectory at the PUBLIC Label
For applications that run at the label PUBLIC, the system administrator enables users to read thedocumentation in the /export/share directory of the public zone. The zone named public
runs at the label PUBLIC.
First, the administrator creates a public workspace and edits the dfstab file.
# mkdir -p /zone/public/etc/dfs
# /usr/dt/bin/trusted_edit /zone/public/etc/dfs/dfstab
In the file, the administrator adds the following entry:
## Sharing PUBLIC user manuals
share -F nfs -o ro /export/appdocs
The administrator leaves the public workspace and returns to the Trusted Path workspace.Because users are not allowed to log in to this system, the administrator shares the files byputting the zone in the ready state:
# zoneadm -z public ready
Users can access the shared directories once the directories are mounted on the users' systems.
▼ How to NFS Mount Files in a Labeled ZoneIn Trusted Extensions, a labeled zone manages the mounting of files in its zone.
Files from unlabeled and labeled hosts can be mounted on a Trusted Extensions labeled host.
■ To mount the files read/write from a single-label host, the assigned label of the remote hostmust be identical to the zone in which the file is being mounted.
■ Files that are mounted by a higher-level zone are read-only.■ In Trusted Extensions, the auto_home configuration file is customized per zone. The file is
named by zone name. For example, a system with a global zone and a public zone has twoauto_home files, auto_home_global and auto_home_public.
Trusted Extensions uses the same mounting interfaces as the Solaris OS:
■ To mount files at boot, use the /etc/vfstab file in the labeled zone.■ To mount files dynamically, use the mount command in the labeled zone.■ To automount home directories, use the auto_home_zone-name files.■ To automount other directories, use the standard automount maps. If the automount maps
are in LDAP, use LDAP commands to manage them.
Example 11–2
Backing Up, Sharing, and Mounting Labeled Files (Task Map)
Oracle Solaris Trusted Extensions Administrator's Procedures • September 2010142
You must be on the client system, in the zone at the label of the files that you want to mount.Unless you are using the automounter, you must be superuser, or be in the SystemAdministrator role. To mount from lower-level servers, the zone must be configured with thenet_mac_aware privilege.
To NFS mount files in a labeled zone, use the following procedures.Most procedures include creating a workspace at a particular label. To create a workspace, see“How to Add a Workspace at a Particular Label” in Oracle Solaris Trusted Extensions User’sGuide.
■ Mount files dynamically.In the labeled zone, use the mount command. For an example of mounting files dynamically,see Example 11–3.
■ Mount files when the zone bootsIn the labeled zone, add the mounts to the vfstab file.
For examples of mounting files when a labeled zone boots, see Example 11–4 andExample 11–5.
■ Mount home directories for systems that are administered with LDAP.
a. At every label, add the user specifications to the auto_home_zone-name files.
b. Then, use these files to populate the auto_home_zone-name database on the LDAPserver.
For an example, see Example 11–6.
■ Mount home directories for systems that are administered with files.
a. Create and populate an /export/home/auto_home_lowest-labeled-zone-name file.
b. Edit the /etc/auto_home_lowest-labeled-zone-name file to point to the newly populatedfile.
c. Modify the /etc/auto_home_lowest-labeled-zone-name file in every higher-level zone topoint to the file that you created in Step a.
For an example, see Example 11–7.
Mounting Files in a Labeled Zone by Using the mount Command
In this example, the system administrator mounts a remote file system from a public zone. Thepublic zone is on a multilevel server.
Before You Begin
●
Example 11–3
Backing Up, Sharing, and Mounting Labeled Files (Task Map)
Chapter 11 • Managing and Mounting Files in Trusted Extensions (Tasks) 143

After assuming the System Administrator role, the administrator creates a workspace at thelabel PUBLIC. In that workspace, the administrator runs the mount command.
# zonename
public
# mount -F nfs remote-sys:/zone/public/root/opt/docs /opt/docs
A single-label file server at the label PUBLIC also contains documents to be mounted:
# mount -F nfs public-sys:/publicdocs /opt/publicdocs
When the public zone of the remote-sys file server is in the ready or running state, theremote-sys files successfully mount on this system. When the public-sys file server isrunning, the files successfully mount.
Mounting Files Read/Write in a Labeled Zone by Modifying the vfstab File
In this example, the system administrator mounts two remote file systems at the label PUBLIC inthe local system's public zone when the public zone boots. One file system mount is from amultilevel system, and one file system mount is from a single-label system.
After assuming the System Administrator role, the administrator creates a workspace at thelabel PUBLIC. In that workspace, the administrator modifies the vfstab file in that zone.
## Writable books directories at PUBLIC
remote-sys:/zone/public/root/opt/docs - /opt/docs nfs no yes rw
public-sys:/publicdocs - /opt/publicdocs nfs no yes rw
To access the files in the remote labeled zone of the multilevel system, the vfstab entry uses thezone root path of the remote system's public zone, /zone/public/root, as the directorypathname to the directories to mount. The path to the single-label system is identical to the paththat would be used on a Solaris system.
In a terminal window at the label PUBLIC, the administrator mounts the files.
# mountall
Mounting Lower-Level Files in a Labeled Zone by Modifying the vfstab File
In this example, the system administrator mounts a remote file system from a public zone in thelocal system's internal zone. After assuming the System Administrator role, the administratorcreates a workspace at the label INTERNAL, then modifies the vfstab file in that zone.
## Readable books directory at PUBLIC
## ro entry indicates that PUBLIC docs can never be mounted rw in internal zone
remote-sys:/zone/public/root/opt/docs - /opt/docs nfs no yes ro
Example 11–4
Example 11–5
Backing Up, Sharing, and Mounting Labeled Files (Task Map)
Oracle Solaris Trusted Extensions Administrator's Procedures • September 2010144

To access the files in the remote labeled zone, the vfstab entry uses the zone root path of theremote system's public zone, /zone/public/root, as the directory pathname to the directoriesto mount.
From the perspective of a user in the internal zone, the files can be accessed at /opt/docs.
In a terminal window at the label INTERNAL, the administrator mounts the files.
# mountall
Mounting Labeled Home Directories in a Network That Is Administered by UsingLDAP
In this example, the system administrator enables a new user, ikuk, to access her homedirectory at every label. This site uses two home directory servers, and is administered by usingLDAP. The second server contains the home directories for the users jdoe and pkai. The newuser is added to this list.
First, after assuming the System Administrator role, the administrator modifies theauto_home_zone-name files in the /etc directory of the global zone to include the new user onthe second home directory server.
## auto_home_global file
jdoe homedir2-server:/export/home/jdoe
pkai homedir2-server:/export/home/pkai
ikuk homedir2-server:/export/home/ikuk
* homedir-server:/export/home/&
## auto_home_internal file
## Mount the home directory from the internal zone of the NFS server
jdoe homedir2-server:/export/home/jdoe
pkai homedir2-server:/export/home/pkai
ikuk homedir2-server:/export/home/ikuk
* homedir-server:/export/home/&
## auto_home_public
## Mount the home directory from the public zone of the NFS server
jdoe homedir2-server:/export/home/jdoe
pkai homedir2-server:/export/home/pkai
ikuk homedir2-server:/export/home/ikuk
* homedir-server:/export/home/&
Next, to enable the users to log in at all labels, the administrator repeats these edits for theauto_home_zone-name files at every label.
Finally, after modifying every auto_home_zone-name file on this system, the administrator usesthese files to add entries to the LDAP database.
Example 11–6
Backing Up, Sharing, and Mounting Labeled Files (Task Map)
Chapter 11 • Managing and Mounting Files in Trusted Extensions (Tasks) 145
Similar to the Solaris OS, the +auto_home_public entry in the /etc/auto_home_zone-namefiles directs the automounter to the LDAP entries. The auto_home_zone-name files on othersystems on the network are updated from the LDAP database.
Mounting a Lower-Level Home Directory on a System That Is Administered by UsingFiles
In this example, the system administrator enables users to access their home directories at everylabel. The labels at the site are PUBLIC, INTERNAL, and NEEDTOKNOW. This site uses two homedirectory servers, and is administered by using files. The second server contains the homedirectories for the users jdoe and pkai.
To accomplish this task, the system administrator defines the public zone NFS home directoriesin the public zone, and shares this configuration with the internal and needtoknow zones.
First, after assuming the System Administrator role, the administrator creates a workspace atthe label PUBLIC. In this workspace, the administrator creates a new file,/export/home/auto_home_public. This file contains all the customized per-user NFSspecification entries.
## /export/home/auto_home_public file at PUBLIC label
jdoe homedir2-server:/export/home/jdoe
pkai homedir2-server:/export/home/pkai
* homedir-server:/export/home/&
Second, the administrator modifies the /etc/auto_home_public file to point to this new file.
## /etc/auto_home_public file in the public zone
## Use /export/home/auto_home_public for the user entries
## +auto_home_public
+ /export/home/auto_home_public
This entry directs the automounter to use the contents of the local file.
Third, the administrator similarly modifies the /etc/auto_home_public file in the internal andneedtoknow zones. The administrator uses the pathname to the public zone that is visible to theinternal and needtoknow zones.
## /etc/auto_home_public file in the internal zone
## Use /zone/public/export/home/auto_home_public for PUBLIC user home dirs
## +auto_home_public
+ /zone/public/export/home/auto_home_public
## /etc/auto_home_public file in the needtoknow zone
## Use /zone/public/export/home/auto_home_public for PUBLIC user home dirs
## +auto_home_public
+ /zone/public/export/home/auto_home_public
Example 11–7
Backing Up, Sharing, and Mounting Labeled Files (Task Map)
Oracle Solaris Trusted Extensions Administrator's Procedures • September 2010146

When the administrator adds the new user ikuk, the addition is made to the/export/home/auto_home_public file at the PUBLIC label.
## /export/home/auto_home_public file at PUBLIC label
jdoe homedir2-server:/export/home/jdoe
pkai homedir2-server:/export/home/pkai
ikuk homedir2-server:/export/home/ikuk
* homedir-server:/export/home/&
The higher-level zones read down to obtain the per-user home directories from the lower-levelpublic zone.
▼ How to Troubleshoot Mount Failures in TrustedExtensionsYou must be in the zone at the label of the files that you want to mount. You must be thesuperuser, or in the System Administrator role.
Check the security attributes of the NFS server.Use the Security Templates tool in the Solaris Management Console at the appropriate scope.For details, see “Initialize the Solaris Management Console Server in Trusted Extensions” inOracle Solaris Trusted Extensions Configuration Guide.
a. Verify that the IP address of the NFS server is an assigned host in one of the securitytemplates.The address might be directly assigned, or indirectly assigned through a wildcardmechanism. The address can be in a labeled template, or in an unlabeled template.
b. Check the label that the template assigns to the NFS server.The label must be consistent with the label at which you are trying to mount the files.
Check the label of the current zone.If the label is higher than the label of the mounted file system, then you cannot write to themount even if the remote file system is exported with read/write permissions. You can onlywrite to the mounted file system at the label of the mount.
To mount file systems from an NFS server that is running earlier versions of Trusted Solarissoftware, do the following:
■ For a Trusted Solaris 1 NFS server, use the vers=2 and proto=udp options to the mountcommand.
Before You Begin
1
2
3
Backing Up, Sharing, and Mounting Labeled Files (Task Map)
Chapter 11 • Managing and Mounting Files in Trusted Extensions (Tasks) 147
■ For a Trusted Solaris 2.5.1 NFS server, use the vers=2 and proto=udp options to the mountcommand.
■ For a Trusted Solaris 8 NFS server, use the vers=3 and proto=udp options to the mountcommand.
To mount file systems from any of these servers, the server must be assigned to an unlabeledtemplate.
Backing Up, Sharing, and Mounting Labeled Files (Task Map)
Oracle Solaris Trusted Extensions Administrator's Procedures • September 2010148

Trusted Networking (Overview)
This chapter describes trusted networking concepts and mechanisms in Trusted Extensions.
■ “The Trusted Network” on page 149■ “Network Security Attributes in Trusted Extensions” on page 154■ “Trusted Network Fallback Mechanism” on page 157■ “Overview of Routing in Trusted Extensions” on page 159■ “Administration of Routing in Trusted Extensions” on page 161
The Trusted NetworkTrusted Extensions assigns security attributes to zones, hosts, and networks. These attributesensure that the following security features are enforced on the network:
■ Data is properly labeled in network communications.■ Mandatory access control (MAC) rules are enforced when data is sent or received across a
local network and when file systems are mounted.■ MAC rules are enforced when data is routed to distant networks.■ MAC rules are enforced when data is routed to zones.
In Trusted Extensions, network packets are protected by MAC. Labels are used for MACdecisions. Data is labeled explicitly or implicitly with a sensitivity label. A label has an ID field, aclassification or “level” field, and a compartment or “category” field. Data must pass anaccreditation check. This check determines if the label is well formed, and if the label lies withinthe accreditation range of the receiving host. Well-formed packets that are within the receivinghost's accreditation range are granted access.
IP packets that are exchanged between trusted systems can be labeled. Trusted Extensionssupports Commercial IP Security Option (CIPSO) labels. A CIPSO label on a packet serves toclassify, segregate, and route IP packets. Routing decisions compare the sensitivity label of thedata with the label of the destination.
12C H A P T E R 1 2
149
Typically on a trusted network, the label is generated by a sending host and processed by thereceiving host. However, a trusted router can also add or strip labels while forwarding packetsin a trusted network. A sensitivity label is mapped to a CIPSO label before transmission. TheCIPSO label is embedded in the IP packet. Typically, a packet sender and the packet's receiveroperate at the same label.
Trusted networking software ensures that the Trusted Extensions security policy is enforcedeven when the subjects (processes) and objects (data) are located on different hosts. TrustedExtensions networking preserves MAC across distributed applications.
Trusted Extensions Data PacketsTrusted Extensions data packets include a CIPSO label option. The data packets can be sentover IPv4 or IPv6 networks.
In the standard IPv4 format, the IPv4 header with options is followed by a TCP, UDP, or SCTPheader and then the actual data. The Trusted Extensions version of an IPv4 packet uses theCIPSO option in the IP header for the security attributes.
In the standard IPv6 format, an IPv6 header with extensions is followed by a TCP, UDP, orSCTP header and then the actual data. The Trusted Extensions IPv6 packet includes amultilevel security option in the header with extensions.
Trusted Network CommunicationsTrusted Extensions supports labeled and unlabeled hosts on a trusted network. LDAP is a fullysupported naming service. Various commands and GUIs enable the network to beadministered.
Systems that run Trusted Extensions software support network communications betweenTrusted Extensions hosts and any of the following types of systems:■ Other systems that are running Trusted Extensions■ Systems that are running operating systems that do not recognize security attributes, but do
support TCP/IP, such as Solaris systems, other UNIX systems, Microsoft Windows, andMacintosh OS systems
IPv4 Header With CIPSO Option TCP, UDP, or SCTP Data
IPv6 Header With Extensions TCP, UDP, or SCTP Data
The Trusted Network
Oracle Solaris Trusted Extensions Administrator's Procedures • September 2010150

■ Systems that are running other trusted operating systems that recognize CIPSO labels
As in the Solaris OS, Trusted Extensions network communications and services can bemanaged by a naming service. Trusted Extensions adds the following interfaces to Solarisnetwork interfaces:
■ Trusted Extensions adds three network configuration databases, tnzonecfg, tnrhdb, andtnrhtp. For details, see “Network Configuration Databases in Trusted Extensions” onpage 152.
■ The Trusted Extensions version of the naming service switch file, nsswitch.conf, includesentries for the tnrhtp and tnrhdb databases. These entries can be modified to suit each site'sconfiguration.
Trusted Extensions uses the LDAP naming service to centrally manage configuration filesthat define hosts, networks, and users. The default nsswitch.conf entries for the trustednetwork databases for the LDAP naming service follow:
# Trusted Extensions
tnrhtp: files ldap
tnrhdb: files ldap
The LDAP naming service on a Sun Java System Directory Server is the only fully supportednaming service in Trusted Extensions. For information about the use of LDAP on a systemthat is configured with Trusted Extensions, see Chapter 9, “Trusted Extensions and LDAP(Overview).”
■ Trusted Extensions adds tools to the Solaris Management Console. The console is used tocentrally manage zones, hosts, and networks. The network tools are described in “SolarisManagement Console Tools” on page 38.
The Oracle Solaris Trusted Extensions Configuration Guide describes how to define zonesand hosts when you configure the network. For additional details, see Chapter 13,“Managing Networks in Trusted Extensions (Tasks).”
■ Trusted Extensions adds commands to administer trusted networking. Trusted Extensionsalso adds options to the Solaris network commands. For a description of these commands,see “Network Commands in Trusted Extensions” on page 152.
The Trusted Network
Chapter 12 • Trusted Networking (Overview) 151

Network Configuration Databases in TrustedExtensionsTrusted Extensions loads three network configuration databases into the kernel. Thesedatabases are used in accreditation checks as data is transmitted from one host to another host.
■ tnzonecfg – This local database stores zone attributes that are security-related. Theattributes for each zone specify the zone label and the zone's access to single-level andmultilevel ports. Another attribute handles responses to control messages, such as ping. Thelabels for zones are defined in the label_encodings file. For more information, see thelabel_encodings(4) and smtnzonecfg(1M) man pages. For a discussion of multilevelports, see “Zones and Multilevel Ports” on page 117.
■ tnrhtp – This database stores templates that describe the security attributes of hosts andgateways. tnrhtp can be a local database or stored on the LDAP server. Hosts and gatewaysuse the attributes of the destination host and next-hop gateway to enforce MAC whensending traffic. When receiving traffic, hosts and gateways use the attributes of the sender.For details of the security attributes, see “Trusted Network Security Attributes” on page 153.For more information, see the smtnrhtp(1M) man page.
■ tnrhdb – This database holds the IP addresses and network prefixes (fallback mechanism)that correspond to all hosts that are allowed to communicate. tnrhdb can be a local databaseor stored on the LDAP server. Each host or network prefix is assigned a security templatefrom the tnrhtp database. The attributes in the template define the attributes of the assignedhost. For more information, see the smtnrhdb(1M) man page.
In Trusted Extensions, the Solaris Management Console has been extended to handle thesedatabases. For details, see “Solaris Management Console Tools” on page 38.
Network Commands in Trusted ExtensionsTrusted Extensions adds the following commands to administer trusted networking:
■ tnchkdb – This command is used to verify the correctness of the trusted network databases.The tnchkdb command is used whenever you change a security template (tnrhtp), asecurity template assignment (tnrhdb), or the configuration of a zone (tnzonecfg). TheSolaris Management Console tools run this command automatically when a database ismodified. For details, see the tnchkdb(1M) man page.
■ tnctl – This command can be used to update the trusted network information in thekernel. tnctl is also a system service. A restart with the command svcadm restart
/network/tnctl refreshes the kernel cache from the trusted network databases on the localsystem. The Solaris Management Console tools run this command automatically when adatabase is modified in the Files scope. For details, see the tnctl(1M) man page.
The Trusted Network
Oracle Solaris Trusted Extensions Administrator's Procedures • September 2010152

■ tnd – This daemon pulls tnrhdb and tnrhtp information from the LDAP directory andlocal files. The information from the naming services is loaded according to their order inthe nsswitch.conf file. The tnd daemon is started at boot time by the svc:/network/tndservice. This service is dependent on the svc:/network/ldap/client.The tnd command also can be used for debugging and for changing the polling interval. Fordetails, see the tnd(1M) man page.
■ tninfo – This command displays the details of the current state of the trusted networkkernel cache. The output can be filtered by host name, zone, or security template. For details,see the tninfo(1M) man page.
Trusted Extensions adds options to the following Solaris network commands:■ ifconfig – The all-zones interface flag for this command makes the specified interface
available to every zone on the system. The appropriate zone to deliver data to is determinedby the label that is associated with the data. For details, see the ifconfig(1M) man page.
■ netstat – The -R option extends Solaris netstat usage to display TrustedExtensions-specific information, such as security attributes for multilevel sockets androuting table entries. The extended security attributes include the label of the peer, andwhether the socket is specific to a zone, or available to several zones. For details, see thenetstat(1M) man page.
■ route – The -secattr option extends Solaris route usage to display the security attributesof the route. The value of the option has the following format:
min_sl=label,max_sl=label,doi=integer,cipso
The cipso keyword is optional and set by default. For details, see the route(1M) man page.■ snoop – As in the Solaris OS, the -v option to this command can be used to display the IP
headers in detail. In Trusted Extensions, the headers contain label information.
Trusted Network Security AttributesNetwork administration in Trusted Extensions is based on security templates. A securitytemplate describes a set of hosts that have common protocols and identical security attributes.
Security attributes are administratively assigned to systems, both hosts and routers, by means oftemplates. The security administrator administers templates and assigns them to systems. If asystem does not have an assigned template, no communications are allowed with that system.
Every template is named, and includes the following:■ A host type of either Unlabeled or CIPSO. The protocol that is used for network
communications is determined by the host type of the template.The host type is used to determine whether to use CIPSO options and affects MAC. See“Host Type and Template Name in Security Templates” on page 155.
The Trusted Network
Chapter 12 • Trusted Networking (Overview) 153

■ A set of security attributes that are applied to each host type.
For more detail about host types and security attributes, see “Network Security Attributes inTrusted Extensions” on page 154.
Network Security Attributes in Trusted ExtensionsTrusted Extensions is installed with a default set of security templates. When a template isassigned to a host, the security values in the template are applied to the host. In TrustedExtensions, both unlabeled hosts and labeled hosts on the network are assigned securityattributes by means of a template. Hosts that are not assigned a security template cannot bereached. The templates can be stored locally, or in the LDAP naming service on the Sun JavaSystem Directory Server.
Templates can be assigned directly or indirectly to a host. Direct assignment assigns a templateto a particular IP address. Indirect assignment assigns a template to a network address thatincludes the host. Hosts that do not have a security template cannot communicate with hoststhat are configured with Trusted Extensions. For an explanation of direct assignment andindirect assignment, see “Trusted Network Fallback Mechanism” on page 157.
Templates are modified or created by using the Security Templates tool in the SolarisManagement Console. The Security Templates tool enforces the completion of the requiredfields in the templates. Which fields are required is based on the host type.
Each host type has its own set of additional required and optional security attributes. Thefollowing security attributes are specified in security templates:■ Host type – Defines whether the packets are labeled with CIPSO security labels or not
labeled at all.■ Default label – Defines the level of trust of the unlabeled host. Packets that are sent by an
unlabeled host are read at this label by the receiving Trusted Extensions host or gateway.The Default label attribute is specific to the unlabeled host type. For details, see thesmtnrhtp(1M) man page and the following sections.
■ DOI – A positive, non-zero integer that identifies the domain of interpretation. The DOI isused to indicate which set of label encodings applies to a network communication ornetwork entity. Labels with different DOIs, even if otherwise identical, are disjoint. Forunlabeled hosts, the DOI applies to the default label. In Trusted Extensions, the default valueis 1.
■ Minimum label – Defines the bottom of the label accreditation range. Hosts and next-hopgateways do not receive packets that are below the minimum label that is specified in theirtemplate.
■ Maximum label – Defines the top of the label accreditation range. Hosts and next-hopgateways do not receive packets that are higher than the maximum label that is specified intheir template.
Network Security Attributes in Trusted Extensions
Oracle Solaris Trusted Extensions Administrator's Procedures • September 2010154

■ Security label set – Optional. Specifies a discrete set of security labels for a security template.In addition to their accreditation range that is determined by the maximum and minimumlabel, hosts that are assigned to a template with a security label set can send and receivepackets that match any one of the labels in the label set. The maximum number of labels thatcan be specified is four.
Host Type and Template Name in Security TemplatesTrusted Extensions supports two host types in the trusted network databases and provides twodefault templates:
■ CIPSO host type – Intended for hosts that run trusted operating systems. TrustedExtensions supplies the template named cipso for this host type.The Common IP Security Option (CIPSO) protocol is used to specify security labels that arepassed in the IP options field. CIPSO labels are derived automatically from the data's label.Tag type 1 is used to pass the CIPSO security label. This label is then used to make securitychecks at the IP level and to label the data in the network packet.
■ Unlabeled host type - Intended for hosts that use standard networking protocols but do notsupport CIPSO options. Trusted Extensions supplies the template named admin_low forthis host type.This host type is assigned to hosts that run the Solaris OS or other unlabeled operatingsystems. This host type gives provides a default label and a default clearance to apply tocommunications with the unlabeled host. Also, a label range or a set of discrete labels can bespecified to allow the sending of packets to an unlabeled gateway for forwarding.
Caution – The admin_low template provides an example for constructing unlabeled templateswith site-specific labels. While the admin_low template is required for the installation of TrustedExtensions, the security settings might not be appropriate for normal system operations. Retainthe provided templates without modification for system maintenance and support reasons.
Default Label in Security TemplatesTemplates for the unlabeled host type specify a default label. This label is used to controlcommunications with hosts whose operating systems are not aware of labels, such as Solarissystems. The default label that is assigned reflects the level of trust that is appropriate for thehost and its users.
Because communications with unlabeled hosts are essentially limited to the default label, thesehosts are also referred to as single-label hosts.
Network Security Attributes in Trusted Extensions
Chapter 12 • Trusted Networking (Overview) 155

Domain of Interpretation in Security TemplatesOrganizations that use the same Domain of Interpretation (DOI) agree among themselves tointerpret label information and other security attributes in the same way. When TrustedExtensions performs a label comparison, a check is made as to whether the DOI is equal.
A Trusted Extensions system enforces label policy on one DOI value. All zones on a TrustedExtensions system must operate at the same DOI. A Trusted Extensions system does notprovide exception handling on packets that are received from a system that uses a differentDOI.
If your site uses a DOI value that is different from the default value, you must add this value tothe /etc/system file, and change the value in every security template. For the initial procedure,see “Configure the Domain of Interpretation” in Oracle Solaris Trusted ExtensionsConfiguration Guide. To configure the DOI in every security template, see Example 13–1.
Label Range in Security TemplatesThe minimum label and maximum label attributes are used to establish the label range forlabeled and unlabeled hosts. These attributes are used to do the following:
■ To set the range of labels that can be used when communicating with a remote CIPSO hostIn order for a packet to be sent to a destination host, the label of the packet must be withinthe label range assigned to the destination host in the security template for that host.
■ To set a label range for packets that are being forwarded through a CIPSO gateway or anunlabeled gatewayThe label range can be specified in the template for an unlabeled host type. The label rangeenables the host to forward packets that are not necessarily at the label of the host, but arewithin a specified label range.
Security Label Set in Security TemplatesThe security label set defines at most four discrete labels at which packets can be accepted,forwarded, or sent by the remote host. This attribute is optional. By default, no security label setis defined.
Network Security Attributes in Trusted Extensions
Oracle Solaris Trusted Extensions Administrator's Procedures • September 2010156
Trusted Network Fallback MechanismThe tnrhdb database can assign a security template to a particular host either directly orindirectly. Direct assignment assigns a template to a host's IP address. Indirect assignment ishandled by a fallback mechanism. The trusted network software first looks for an entry thatspecifically assigns the host's IP address to a template. If the software does not find a specificentry for the host, it looks for the “longest prefix of matching bits”. You can indirectly assign ahost to a security template when the IP address of the host falls within the “longest prefix ofmatching bits” of an IP address with a fixed prefix length.
In IPv4, you can make an indirect assignment by subnet. When you make an indirectassignment by using 4, 3, 2, or 1 trailing zero (0) octets, the software calculates a prefix length of0, 8, 16, or 24, respectively. Entries 3 – 6 in Table 12–1 illustrate this fallback mechanism.
You can also set a fixed prefix length by adding a slash (/) followed by the number of fixed bits.IPv4 network addresses can have a prefix length between 1 – 32. IPv6 network addresses canhave a prefix length between 1 – 128.
The following table provides fallback address and host address examples. If an address withinthe set of fallback addresses is directly assigned, the fallback mechanism is not used for thataddress.
Trusted Network Fallback Mechanism
Chapter 12 • Trusted Networking (Overview) 157

TABLE 12–1 tnrhdbHost Address and Fallback Mechanism Entries
IP Version tnrhdb Entry Addresses Covered
IPv4 192.168.118.57:cipso
192.168.118.57/32:cipso
192.168.118.57
The /32 sets a prefix length of 32 fixed bits.
192.168.118.128/26:cipso From 192.168.118.0 through 192.168.118.63
192.168.118.0:cipso
192.168.118.0/24:cipso
All addresses on 192.168.118. network
192.168.0.0/24:cipso All addresses on 192.168.0. network.
192.168.0.0:cipso
192.168.0.0/16:cipso
All addresses on 192.168. network
192.0.0.0:cipso
192.0.0.0/8:cipso
All addresses on 192. network
192.168.0.0/32:cipso Network address 192.168.0.0. Not a wildcardaddress.
192.168.118.0/32:cipso Network address 192.168.118.0. Not a wildcardaddress.
192.0.0.0/32:cipso Network address 192.0.0.0. Not a wildcard address.
0.0.0.0/32:cipso Host address 0.0.0.0. Not a wildcard address.
0.0.0.0:cipso All addresses on all networks
IPv6 2001\:DB8\:22\:5000\:\:21f7:cipso 2001:DB8:22:5000::21f7
2001\:DB8\:22\:5000\:\:0/52:cipso From 2001:DB8:22:5000::0 through2001:DB8:22:5fff:ffff:ffff:ffff:ffff
0\:\:0/0:cipso All addresses on all networks
Note that the 0.0.0.0/32 address matches the specific address, 0.0.0.0. The tnrhdb entry0.0.0.0/32:admin_low is useful on a system where the literal address, 0.0.0.0, is used as asource IP address. For example, DHCP clients contact the DHCP server as 0.0.0.0 before theserver provides the clients with an IP address.
To create a tnrhdb entry on a Sun Ray server that serves DHCP clients, see Example 13–13.Because 0.0.0.0:admin_low is the default wildcard entry, see “How to Limit the Hosts ThatCan Be Contacted on the Trusted Network” on page 175 for issues to consider before removingor changing this default.
Trusted Network Fallback Mechanism
Oracle Solaris Trusted Extensions Administrator's Procedures • September 2010158

For more information about prefix lengths in IPv4 and IPv6 addresses, see “Designing YourCIDR IPv4 Addressing Scheme” in System Administration Guide: IP Services and “IPv6Addressing Overview” in System Administration Guide: IP Services.
Overview of Routing in Trusted ExtensionsIn Trusted Extensions, routes between hosts on different networks must maintain security ateach step in the transmission. Trusted Extensions adds extended security attributes to therouting protocols in the Solaris OS. Unlike the Solaris OS, this Trusted Extensions release doesnot support dynamic routing. For details about specifying static routing, see the -p option in theroute(1M) man page.
Gateways and routers route packets. In this discussion, the terms “gateway” and “router” areused interchangeably.
For communications between hosts on the same subnet, accreditation checks are performed atendpoints only because no routers are involved. Label range checks are performed at the source.If the receiving host is running Trusted Extensions software, label range checks are alsoperformed at the destination.
When the source and destination hosts are on different subnets, the packet is sent from thesource host to a gateway. The label range of the destination and the first-hop gateway is checkedat the source when a route is selected. The gateway forwards the packet to the network wherethe destination host is connected. A packet might go through several gateways before reachingthe destination.
Background on RoutingOn Trusted Extensions gateways, label range checks are performed in certain cases. A TrustedExtensions system that is routing a packet between two unlabeled hosts compares the defaultlabel of the source host to the default label of the destination host. When the unlabeled hostsshare a default label, the packet is routed.
Each gateway maintains a list of routes to all destinations. Standard Solaris routing makeschoices to optimize the route. Trusted Extensions provides additional software to checksecurity requirements that apply to the route choices. The Solaris choices that do not satisfysecurity requirements are skipped.
Routing Table Entries in Trusted ExtensionsThe routing table entries in Trusted Extensions can incorporate security attributes. Securityattributes can include a cipso keyword. Security attributes must include a maximum label, aminimum label, and a DOI.
Overview of Routing in Trusted Extensions
Chapter 12 • Trusted Networking (Overview) 159

For entries that do not provide security attributes, the attributes in the gateway's securitytemplate are used.
Trusted Extensions Accreditation ChecksTrusted Extensions software determines the suitability of a route for security purposes. Thesoftware runs a series of tests called accreditation checks on the source host, the destination host,and the intermediate gateways.
Note – In the following discussion, an accreditation check for a label range also means a checkfor a security label set.
The accreditation check verifies the label range and CIPSO label information. The securityattributes for a route are obtained from the routing table entry, or from the security template ofthe gateway if the entry has no security attributes.
For incoming communications, the Trusted Extensions software obtains labels from thepackets themselves, whenever possible. Obtaining labels from packets is only possible when themessages are sent from systems that support labels. When a label is not available from thepacket, a default label is assigned to the message from trusted networking database files. Theselabels are then used during accreditation checks. Trusted Extensions enforces several checks onoutgoing messages, forwarded messages, and incoming messages.
Source Accreditation ChecksThe following accreditation checks are performed on the sending process or sending zone:
■ For all destinations, the label of the data must be within the label range of the next hop in theroute, that is, the first hop. And, the label must be contained in the first-hop gateway'ssecurity attributes.
■ For all destinations, the DOI of an outgoing packet must match the DOI of the destinationhost. The DOI must also match the DOI of all hops along the route, including its first-hopgateway.
■ When the destination host is an unlabeled host, one of the following conditions must besatisfied:■ The sending host's label must match the destination host's default label.■ The sending host is privileged to perform cross-label communication, and the sender's
label dominates the destination's default label.■ The sending host is privileged to perform cross-label communication, and the sender's
label is ADMIN_LOW. That is, the sender is sending from the global zone.
Overview of Routing in Trusted Extensions
Oracle Solaris Trusted Extensions Administrator's Procedures • September 2010160

Note – A first-hop check occurs when a message is being sent through a gateway from a host onone network to a host on another network.
Gateway Accreditation ChecksOn a Trusted Extensions gateway system,the following accreditation checks are performed forthe next-hop gateway:
■ If the incoming packet is unlabeled, the packet inherits the source host's default label fromthe tnrhdb entry. Otherwise, the packet receives the indicated CIPSO label.
■ Checks for forwarding a packet proceed similar to source accreditation:■ For all destinations, the label of the data must be within the label range of the next hop.
And, the label must be contained in the security attributes of the next-hop host.■ For all destinations, the DOI of an outgoing packet must match the DOI of the
destination host. The DOI must also match the DOI of the next-hop host.■ The label of an unlabeled packet must match the destination host's default label.■ The label of a CIPSO packet must be within the destination host's label range.
Destination Accreditation ChecksWhen a Trusted Extensions host receives data, the software performs the following checks:
■ If the incoming packet is unlabeled, the packet inherits the source host's default label fromthe tnrhdb entry. Otherwise, the packet receives the indicated CIPSO label.
■ The label and DOI for the packet must be consistent with the destination zone ordestination process's label and DOI. The exception is when a process is listening on amultilevel port. The listening process can receive a packet if the process is privileged toperform cross-label communications, and the process is either in the global zone or has alabel that dominates the packet's label.
Administration of Routing in Trusted ExtensionsTrusted Extensions supports several methods for routing communications between networks.In the Security Administrator role, you can set up routes that enforce the degree of securityrequired by your site's security policy.
Administration of Routing in Trusted Extensions
Chapter 12 • Trusted Networking (Overview) 161

For example, sites can restrict communications outside the local network to a single label. Thislabel is applied to publicly available information. Labels such as UNCLASSIFIED or PUBLIC canindicate public information. To enforce the restriction, these sites assign a single-label templateto the network interface that is connected to the external network. For more details aboutTCP/IP and routing, see the following:■ “Planning for Routers on Your Network” in System Administration Guide: IP Services■ “Configuring Systems on the Local Network” in System Administration Guide: IP Services■ “Major TCP/IP Administrative Tasks (Task Map)” in System Administration Guide: IP
Services■ “Preparing Your Network for the DHCP Service (Task Map)” in System Administration
Guide: IP Services
Choosing Routers in Trusted ExtensionsTrusted Extensions hosts offer the highest degree of trust as routers. Other types of routersmight not recognize Trusted Extensions security attributes. Without administrative action,packets can be routed through routers that do not provide MAC security protection.■ CIPSO routers drop packets when they do not find the correct type of information in the IP
options section of the packet. For example, a CIPSO router drops a packet if it does not finda CIPSO option in the IP options when the option is required, or when the DOI in the IPoptions is not consistent with the destination's accreditation.
■ Other types of routers that are not running Trusted Extensions software can be configuredto either pass the packets or drop the packets that include the CIPSO option. OnlyCIPSO-aware gateways such as Trusted Extensions provides can use the contents of theCIPSO IP option to enforce MAC.
To support trusted routing, the Solaris 10 routing tables are extended to include TrustedExtensions security attributes. The attributes are described in “Routing Table Entries in TrustedExtensions” on page 159. Trusted Extensions supports static routing, in which theadministrator creates routing table entries manually. For details, see the -p option in theroute(1M) man page.
The routing software tries to find a route to the destination host in the routing tables. When thehost is not explicitly named, the routing software looks for an entry for the subnetwork wherethe host resides. When neither the host nor the network where the host resides is defined, thehost sends the packet to a default gateway, if defined. Multiple default gateways can be defined,and each is treated equally.
In this release of Trusted Extensions, the security administrator sets up routes manually, andthen manually changes the routing table when conditions change. For example, many sites havea single gateway that communicates with the outside world. In these cases, the single gatewaycan be statically defined as the default on each host on the network. Dynamic routing supportmight be available in future releases of Trusted Extensions.
Administration of Routing in Trusted Extensions
Oracle Solaris Trusted Extensions Administrator's Procedures • September 2010162

Gateways in Trusted ExtensionsAn example of routing in Trusted Extensions follows. The diagram and table show threepotential routes between Host 1 and Host 2.
Route First-Hop Gateway Minimum Label Maximum Label DOI
#1 Gateway 1 CONFIDENTIAL SECRET 1
#2 Gateway 3 ADMIN_LOW ADMIN_HIGH 1
#3 Gateway 5
■ Route #1 can transmit packets within the label range of CONFIDENTIAL to SECRET.■ Route #2 can transmit packets from ADMIN_LOW to ADMIN_HIGH.■ Route #3 does not specify routing information. Therefore, its security attributes are derived
from the template in the tnrhtp database for Gateway 5.
Routing Commands in Trusted ExtensionsTo show labels and extended security attributes for sockets, Trusted Extensions modifies thefollowing Solaris network commands:
■ The netstat -rR command displays the security attributes in routing table entries.■ The netstat -aR command displays the security attributes for sockets.■ The route -p command with the add or delete option changes the routing table entries.
For details, see the netstat(1M) and route(1M) man pages.
For examples, see “How to Configure Routes With Security Attributes” on page 180.
FIGURE 12–1 Typical Trusted Extensions Routes and Routing Table Entries
Host 1 Host 2
Gateway 1
Gateway 3
Gateway 5
Gateway 2
Gateway 4
Gateway 6
Route #1
Route #2
Route #3
Administration of Routing in Trusted Extensions
Chapter 12 • Trusted Networking (Overview) 163

164

Managing Networks in Trusted Extensions(Tasks)
This chapter provides implementation details and procedures for securing a Solaris TrustedExtensions network.
■ “Managing the Trusted Network (Task Map)” on page 165■ “Configuring Trusted Network Databases (Task Map)” on page 166■ “Configuring Routes and Checking Network Information in Trusted Extensions (Task
Map)” on page 179■ “Troubleshooting the Trusted Network (Task Map)” on page 185
Managing the Trusted Network (Task Map)The following table points to the task maps for common trusted networking procedures.
Task Description For Instructions
Configure network databases. Creates remote host templates,and assignshosts to the templates.
“Configuring Trusted Network Databases(Task Map)” on page 166
Configure routing, and check networkdatabases and network information in thekernel.
Configures static routes that enable labeledpackets to reach their destination throughlabeled and unlabeled gateways.
Also, displays the state of your network.
“Configuring Routes and CheckingNetwork Information in TrustedExtensions (Task Map)” on page 179
Troubleshoot networking problems. Steps to take when diagnosing networkproblems with labeled packets.
“Troubleshooting the Trusted Network(Task Map)” on page 185
13C H A P T E R 1 3
165
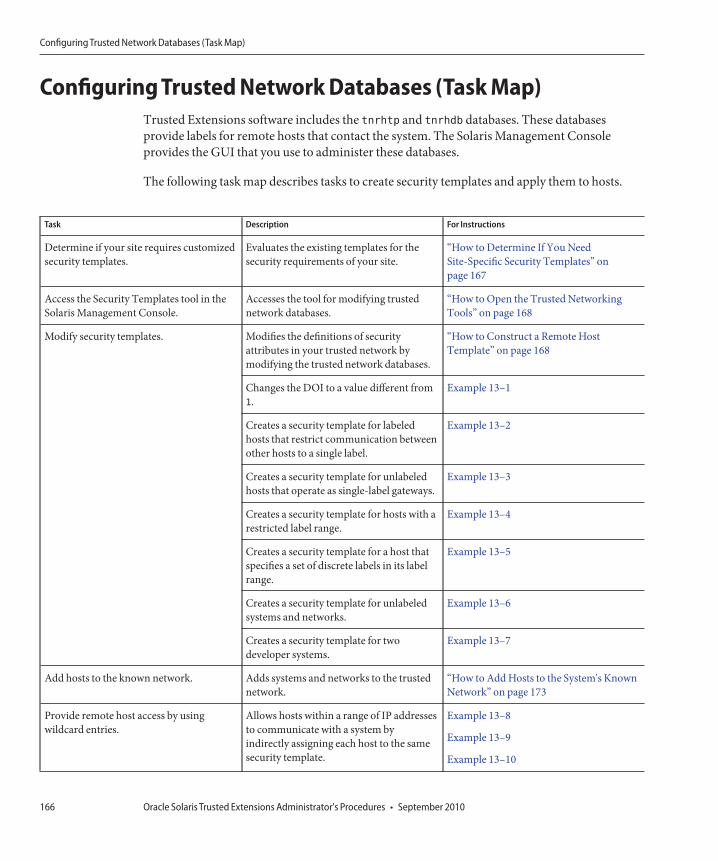
Configuring Trusted Network Databases (Task Map)Trusted Extensions software includes the tnrhtp and tnrhdb databases. These databasesprovide labels for remote hosts that contact the system. The Solaris Management Consoleprovides the GUI that you use to administer these databases.
The following task map describes tasks to create security templates and apply them to hosts.
Task Description For Instructions
Determine if your site requires customizedsecurity templates.
Evaluates the existing templates for thesecurity requirements of your site.
“How to Determine If You NeedSite-Specific Security Templates” onpage 167
Access the Security Templates tool in theSolaris Management Console.
Accesses the tool for modifying trustednetwork databases.
“How to Open the Trusted NetworkingTools” on page 168
Modify security templates. Modifies the definitions of securityattributes in your trusted network bymodifying the trusted network databases.
“How to Construct a Remote HostTemplate” on page 168
Changes the DOI to a value different from1.
Example 13–1
Creates a security template for labeledhosts that restrict communication betweenother hosts to a single label.
Example 13–2
Creates a security template for unlabeledhosts that operate as single-label gateways.
Example 13–3
Creates a security template for hosts with arestricted label range.
Example 13–4
Creates a security template for a host thatspecifies a set of discrete labels in its labelrange.
Example 13–5
Creates a security template for unlabeledsystems and networks.
Example 13–6
Creates a security template for twodeveloper systems.
Example 13–7
Add hosts to the known network. Adds systems and networks to the trustednetwork.
“How to Add Hosts to the System's KnownNetwork” on page 173
Provide remote host access by usingwildcard entries.
Allows hosts within a range of IP addressesto communicate with a system byindirectly assigning each host to the samesecurity template.
Example 13–8
Example 13–9
Example 13–10
Configuring Trusted Network Databases (Task Map)
Oracle Solaris Trusted Extensions Administrator's Procedures • September 2010166

Task Description For Instructions
Change the admin_low wildcard entry inthe tnrhdb file.
Increases security by replacing thewildcard entry with specific addresses forthe host to contact at boot time.
“How to Limit the Hosts That Can BeContacted on the Trusted Network” onpage 175
Increases security by replacing thewildcard entry with a network of labeledhosts as the default.
Example 13–11
Create an entry for the host address0.0.0.0
Configures a Sun Ray server to accept theinitial contact from a remote client
Example 13–13
Assign security templates. Associates a template with an IP address orlist of contiguous IP addresses.
“How to Assign a Security Template to aHost or a Group of Hosts” on page 174
▼ How to Determine If You Need Site-Specific SecurityTemplatesYou must be in the Security Administrator role in the global zone.
Familiarize yourself with the Trusted Extensions templates.Read the tnrhtp file on a local host. The comments in the file are helpful. You can also view thesecurity attribute values in the Security Templates tool in the Solaris Management Console.■ The default templates match any installation. The label range for each template is
ADMIN_LOW to ADMIN_HIGH.■ The cipso template defines a CIPSO host type whose DOI is 1. The label range for the
template is ADMIN_LOW to ADMIN_HIGH.■ The admin_low template defines an unlabeled host whose DOI is 1. The template's default
label is ADMIN_LOW. The label range for the template is ADMIN_LOW to ADMIN_HIGH. In thedefault configuration, the address 0.0.0.0 is assigned to this template. Therefore, allnon-CIPSO hosts are treated as hosts that operate at the ADMIN_LOW security label.
Keep the default templates.For support purposes, do not delete or modify the default templates. You can change the hostthat is assigned these default templates. For an example, see “How to Limit the Hosts That CanBe Contacted on the Trusted Network” on page 175.
Create new templates if you want to do any of the following:
■ Limit the label range of a host or a group of hosts.■ Create a single-label host.■ Create a host that recognizes a few discrete labels.■ Use a different DOI than 1.
Before You Begin
1
2
3
Configuring Trusted Network Databases (Task Map)
Chapter 13 • Managing Networks in Trusted Extensions (Tasks) 167
■ Require a default label for unlabeled hosts that is not ADMIN_LOW.
For details, see “How to Construct a Remote Host Template” on page 168.
▼ How to Open the Trusted Networking ToolsYou must be in the global zone in a role that can modify network security. For example, rolesthat are assigned the Information Security or Network Security rights profile can modifysecurity settings. The Security Administrator role includes these profiles.
To use the LDAP toolbox, you must have completed “Configuring the Solaris ManagementConsole for LDAP (Task Map)” in Oracle Solaris Trusted Extensions Configuration Guide.
Start the Solaris Management Console.For details, see “Initialize the Solaris Management Console Server in Trusted Extensions” inOracle Solaris Trusted Extensions Configuration Guide.
Use the appropriate tool.
■ To modify a template, use the Security Templates tool.All currently defined templates display in the right pane. When you select or create atemplate, online help is available in the left pane.
■ To assign a host to a template, use the Security Templates tool.■ To create a host that can be assigned to a template, use the Computers and Networks tool.■ To assign a label to a zone, use the Trusted Network Zones tool. For more information about
zones in Trusted Extensions, see Chapter 10, “Managing Zones in Trusted Extensions(Tasks).”
▼ How to Construct a Remote Host TemplateYou must be in the global zone in a role that can modify network security. For example, rolesthat are assigned the Information Security or Network Security rights profiles can modifysecurity settings. The Security Administrator role includes these profiles.
In the Solaris Management Console, navigate to the Security Templates tool.See “How to Open the Trusted Networking Tools” on page 168 for the steps.
Under Computers and Networks, double-click Security Templates.The existing templates are displayed in the View pane. These templates describe the securityattributes for hosts that this system can contact. These hosts include CIPSO hosts that arerunning Trusted Extensions and unlabeled hosts.
Before You Begin
1
2
Before You Begin
1
2
Configuring Trusted Network Databases (Task Map)
Oracle Solaris Trusted Extensions Administrator's Procedures • September 2010168

Examine the cipso template.View which hosts and which networks are already assigned this template.
Examine the admin_low template.View which hosts and which networks are already assigned this template.
Create a template.If the provided templates do not sufficiently describe the hosts that can be in communicationwith this system, choose Add Template from the Action menu.
Use the online help for assistance. Before assigning hosts to the templates, create all thetemplates that your site requires.
(Optional) Modify an existing template that is not a default template.Double-click the template, and use the online help for assistance. You can change the assignedhosts or the assigned networks.
Creating a Security Template With a Different DOI Value
In this example, the security administrator's network has a DOI whose value is different from 1.The team that initially configured the system has completed “Configure the Domain ofInterpretation” in Oracle Solaris Trusted Extensions Configuration Guide.
First, the security administrator confirms the value of the DOI in the /etc/system file:
# grep doi /etc/system
set default_doi = 4
Then, in the Security Templates tool, for every template that the administrator creates, the valueof doi is set to 4. For the single-label system that is described in Example 13–2, the securityadministrator creates the following template:
template: CIPSO_PUBLIC
host_type: CIPSO
doi: 4
min_sl: PUBLIC
max_sl: PUBLIC
Creating a Security Template That Has a Single Label
In this example, the security administrator wants to create a gateway that can only pass packetsat a single label, PUBLIC. Using the Security Templates tool in the Solaris Management Console,the administrator creates a template and assigns the gateway host to the template.
First, the gateway host and IP address are added to the Computers and Networks tool.
3
4
5
6
Example 13–1
Example 13–2
Configuring Trusted Network Databases (Task Map)
Chapter 13 • Managing Networks in Trusted Extensions (Tasks) 169
gateway-1
192.168.131.75
Then, the template is created in the Security Templates tool. The following are the values in thetemplate:
template: CIPSO_PUBLIC
host_type: CIPSO
doi: 1
min_sl: PUBLIC
max_sl: PUBLIC
The tool supplies the hexadecimal value for PUBLIC, 0X0002-08-08.
Finally, the gateway-1 host is assigned to the template by its name and IP address.
gateway-1
192.168.131.75
On a local host, the tnrhtp entry appears similar to the following:
cipso_public:host_type=cipso;doi=1;min_sl=0X0002-08-08;max_sl=0X0002-08-08;
On a local host, the tnrhdb entry appears similar to the following:
# gateway-1
192.168.131.75:cipso_public
Creating a Security Template for an Unlabeled Router
Any IP router can forward messages with CIPSO labels even though the router does notexplicitly support labels. Such an unlabeled router needs a default label to define the level atwhich connections to the router, perhaps for router management, need to be handled. In thisexample, the security administrator creates a router that can forward traffic at any label, but alldirect communication with the router is handled at the default label, PUBLIC.
In the Solaris Management Console, the administrator creates a template and assigns thegateway host to the template.
First, the router and its IP address are added to the Computers and Networks tool.
router-1
192.168.131.82
Then, the template is created in the Security Templates tool. The following values are in thetemplate:
Example 13–3
Configuring Trusted Network Databases (Task Map)
Oracle Solaris Trusted Extensions Administrator's Procedures • September 2010170

Template Name: UNL_PUBLIC
Host Type: UNLABELED
DOI: 1
Default Label: PUBLIC
Minimum Label: ADMIN_LOW
Maximum Label: ADMIN_HIGH
The tool supplies the hexadecimal value for the labels.
Finally, the router-1 router is assigned to the template by its name and IP address.
router-1
192.168.131.82
Creating a Security Template That Has a Limited Label RangeIn this example, the security administrator wants to create a gateway that restricts packets to anarrow label range. In the Solaris Management Console, the administrator creates a templateand assigns the gateway host to the template.
First, the host and its IP address are added to the Computers and Networks tool.
gateway-ir
192.168.131.78
Then, the template is created in the Security Templates tool. The following values are in thetemplate:
Template Name: CIPSO_IUO_RSTRCT
Host Type: CIPSO
DOI: 1
Minimum Label: CONFIDENTIAL : INTERNAL USE ONLY
Maximum Label: CONFIDENTIAL : RESTRICTED
The tool supplies the hexadecimal value for the labels.
Finally, the gateway-ir gateway is assigned to the template by its name and IP address.
gateway-ir
192.168.131.78
Creating a Security Template That Has a Security Label SetIn this example, the security administrator wants to create a security template that recognizestwo labels only. In the Solaris Management Console, the administrator creates a template andassigns the gateway host to the template.
First, each host and IP address that is going to use this template is added to the Computers andNetworks tool.
Example 13–4
Example 13–5
Configuring Trusted Network Databases (Task Map)
Chapter 13 • Managing Networks in Trusted Extensions (Tasks) 171

host-slset1
192.168.132.21
host-slset2
192.168.132.22
host-slset3
192.168.132.23
host-slset4
192.168.132.24
Then, the template is created in the Security Templates tool. The following values are in thetemplate:
Template Name: CIPSO_PUB_RSTRCT
Host Type: CIPSO
DOI: 1
Minimum Label: PUBLIC
Maximum Label: CONFIDENTIAL : RESTRICTED
SL Set: PUBLIC, CONFIDENTIAL : RESTRICTED
The tool supplies the hexadecimal value for the labels.
Finally, the range of IP addresses are assigned to the template by using the Wildcard button anda prefix.
192.168.132.0/17
Creating an Unlabeled Template at the Label PUBLIC
In this example, the security administrator allows a subnetwork of Solaris systems to have thePUBLIC label in the trusted network. The template has the following values:
Template Name: public
Host Type: Unlabeled
Default Label: Public
Minimum Label: Public
Maximum Label: Public
DOI: 1
Wildcard Entry: 10.10.0.0
Prefix: 16
All systems on the 10.10.0.0 subnetwork are handled at the label PUBLIC.
Example 13–6
Configuring Trusted Network Databases (Task Map)
Oracle Solaris Trusted Extensions Administrator's Procedures • September 2010172
Creating a Labeled Template for DevelopersIn this example, the security administrator creates a SANDBOX template. This template isassigned to systems that are used by developers of trusted software. The two systems that areassigned this template create and test labeled programs. However, their tests do not affect theother labeled systems, because the label SANDBOX is disjoint from the other labels on thenetwork.
Template Name: cipso_sandbox
Host Type: CIPSO
Minimum Label: SANDBOX
Maximum Label: SANDBOX
DOI: 1
Hostname: DevMachine1
IP Address: 196.168.129.129
Hostname: DevMachine2
IP Address: 196.168.129.102
The developers who use these systems can communicate with each other at the label SANDBOX.
▼ How to Add Hosts to the System's Known NetworkThe Computers tool in the Solaris Management Console is identical to the Computers tool inthe Solaris OS. This procedure is provided here for your convenience. After the hosts areknown, you then assign the hosts to a security template.
You must be in an administrator who can manage networks. For example, roles that include theNetwork Management or System Administrator rights profiles can manage networks.
In the Solaris Management Console, navigate to the Computers tool.For details, see “How to Open the Trusted Networking Tools” on page 168.
In the Computers tool, confirm that you want to view all computers on the network.
Add a host that this system can contact.You must add every host that this system might contact, including any static routers and anyaudit servers.
a. From the Action menu, choose Add Computer.
b. Identify the host by name and IP address.
c. (Optional) Provide additional information about the host.
Example 13–7
Before You Begin
1
2
3
Configuring Trusted Network Databases (Task Map)
Chapter 13 • Managing Networks in Trusted Extensions (Tasks) 173
d. To add the host, click Apply.
e. When the entries are complete, click OK.
Add a group of hosts that this system can contact.Use the online help to add groups of hosts by using a network IP address.
▼ How to Assign a Security Template to a Host or a Groupof HostsYou must be in the Security Administrator role in the global zone.
All hosts that you want to assign to a template must exist in the Computers and Networks tool.For details, see “How to Add Hosts to the System's Known Network” on page 173.
In the Solaris Management Console, navigate to the Security Templates tool.For details, see “How to Open the Trusted Networking Tools” on page 168.
Double-click the appropriate template name.
Click the Hosts Assigned to Template tab.
To assign the template to a single host, do the following:
a. In the Hostname field, type the host's name.
b. In the IP Address field, type the host's address.
c. Click the Add button.
d. To save your changes, click OK.
To assign a template to a group of hosts with contiguous addresses, do the following:
a. Click Wildcard.
b. In the IP Address field, type the IP address.
c. In the Prefix field, type the prefix that describes the group of contiguous addresses.
d. Click the Add button.
e. To save your changes, click OK.
4
Before You Begin
1
2
3
4
5
Configuring Trusted Network Databases (Task Map)
Oracle Solaris Trusted Extensions Administrator's Procedures • September 2010174
Adding an IPv4 Network as a Wildcard Entry
In the following example, a security administrator assigns several IPv4 subnetworks to the samesecurity template. In the Hosts Assigned to Template tab, the administrator adds the followingwildcard entries:
IP Address: 192.168.113.0
IP address: 192.168.75.0
Adding a List of IPv4 Hosts as a Wildcard Entry
In the following example, a security administrator assigns contiguous IPv4 addresses that arenot along octet boundaries to the same security template. In the Hosts Assigned to Templatetab, the administrator adds the following wildcard entries:
IP Address: 192.168.113.100
Prefix Length: 25
This wildcard entry covers the address range of 192.168.113.0 to 192.168.113.127. Theaddress includes 192.168.113.100.
Adding a List of IPv6 Hosts as a Wildcard Entry
In the following example, a security administrator assigns contiguous IPv6 addresses to thesame security template. In the Hosts Assigned to Template tab, the administrator adds thefollowing wildcard entries:
IP Address: 2001:a08:3903:200::0
Prefix Length: 56
This wildcard entry covers the address range of 2001:a08:3903:200::0 to2001:a08:3903:2ff:ffff:ffff:ffff:ffff. The address includes2001:a08:3903:201:20e:cff:fe08:58c.
▼ How to Limit the Hosts That Can Be Contacted on theTrusted NetworkThis procedure protects labeled hosts from being contacted by arbitrary unlabeled hosts. WhenTrusted Extensions is installed, this default template defines every host on the network. Use thisprocedure to enumerate specific unlabeled hosts.
The local tnrhdb file on each system is used to contact the network at boot time. By default,every host that is not provided with a CIPSO template is defined by the admin_low template.This template assigns every system that is not otherwise defined (0.0.0.0) to be an unlabeledsystem with the default label of admin_low.
Example 13–8
Example 13–9
Example 13–10
Configuring Trusted Network Databases (Task Map)
Chapter 13 • Managing Networks in Trusted Extensions (Tasks) 175

Caution – The default admin_low template can be a security risk on a Trusted Extensionsnetwork. If site security requires strong protection, the security administrator can remove the0.0.0.0 wildcard entry after the system is installed. The entry must be replaced with entries forevery host that the system contacts during boot.
For example, DNS servers, home directory servers, audit servers, broadcast and multicastaddresses, and routers must be in the local tnrhdb file after the 0.0.0.0 wildcard entry isremoved.
If an application initially recognizes clients at the host address 0.0.0.0, then you must add the0.0.0.0/32:admin_low host entry to the tnrhdb database. For example, to receive initialconnection requests from potential Sun Ray clients, Sun Ray servers must include this entry.Then, when the server recognizes the clients, the clients are provided an IP address andconnected as CIPSO clients.
You must be in the Security Administrator role in the global zone.
All hosts that are to be contacted at boot time must exist in the Computers and Networks tool.
In the Solaris Management Console, navigate to the Security Templates tool in the Files scope.
The Files scope protects the system during boot. To access the Security Templates tool, see“How to Open the Trusted Networking Tools” on page 168.
Modify the hosts that are assigned to the admin_low template.
a. Double-click the admin_low template.
Every host that is added can be contacted during boot at the label ADMIN_LOW.
b. Click the Hosts Assigned to Template tab.
Every host that is added can be contacted during boot at the label ADMIN_LOW.
c. Add each unlabeled host that must be contacted at boot time.
For details, see “How to Assign a Security Template to a Host or a Group of Hosts” onpage 174.
Include every on-link router that is not running Trusted Extensions, through which thishost must communicate.
d. Add the ranges of hosts that must be contacted at boot time.
e. Remove the 0.0.0.0 entry.
Before You Begin
1
2
Configuring Trusted Network Databases (Task Map)
Oracle Solaris Trusted Extensions Administrator's Procedures • September 2010176
Modify the hosts that are assigned to the cipso template.
a. Double-click the cipso template.Every host that is added can be contacted during boot.
b. Click the Hosts Assigned to Template tab.Every host that is added can be contacted during boot at the label ADMIN_LOW.
c. Add each labeled host that must be contacted at boot time.For details, see “How to Assign a Security Template to a Host or a Group of Hosts” onpage 174.
■ Include the LDAP server.■ Include every on-link router that is running Trusted Extensions, through which this host
must communicate■ Make sure that all network interfaces are assigned to the template.■ Include broadcast addresses.
d. Add the ranges of hosts that must be contacted at boot time.
Verify that the host assignments allow the system to boot.
Changing the Label of the 0.0.0.0 tnrhdb Entry
In this example, the security administrator creates a public gateway system. The administratorremoves the 0.0.0.0 entry from the admin_low template and assigns the entry to an unlabeledtemplate that is named public. The system then recognizes any system that is not listed in itstnrhdb file as an unlabeled system with the security attributes of the public security template.
The following describes an unlabeled template that was created specifically for public gateways.
Template Name: public
Host Type: Unlabeled
Default Label: Public
Minimum Label: Public
Maximum Label: Public
DOI: 1
Enumerating Computers to Contact During Boot in the tnrhdbDatabase
The following example shows the local tnrhdb database with entries for an LDAP client withtwo network interfaces. The client communicates with another network and with routers.
3
4
Example 13–11
Example 13–12
Configuring Trusted Network Databases (Task Map)
Chapter 13 • Managing Networks in Trusted Extensions (Tasks) 177

127.0.0.1:cipso Loopback address192.168.112.111:cipso Interface 1 of this host192.168.113.111:cipso Interface 2 of this host10.6.6.2:cipso LDAP server192.168.113.6:cipso Audit server192.168.112.255:cipso Subnet broadcast address192.168.113.255:cipso Subnet broadcast address192.168.113.1:cipso Router192.168.117.0:cipso Another Trusted Extensions network192.168.112.12:public Specific network router192.168.113.12:public Specific network router224.0.0.2:public Multicast address255.255.255.255:admin_low Broadcast address
Making the Host Address 0.0.0.0 a Valid tnrhdb Entry
In this example, the security administrator configures a Sun Ray server to accept initialconnection requests from potential clients. The server is using a private topology and is usingthe defaults:
# utadm -a bge0
First, the administrator determines the Solaris Management Console domain name:
SMCserver # /usr/sadm/bin/dtsetup scopes
Getting list of managable scopes...
Scope 1 file:/machine1.ExampleCo.COM/machine1.ExampleCo.COM
Then, the administrator adds the entry for client initial connection to the Sun Ray server'stnrhdb database. Because the administrator is testing, the default wildcard address is still usedfor all unknown addresses:
SunRayServer # /usr/sadm/bin/smtnrhdb \
add -D file:/machine1.ExampleCo.COM/machine1.ExampleCo.COM \
-- -w 0.0.0.0 -p 32 -n admin_low
Authenticating as user: root
Please enter a string value for: password ::
... from machine1.ExampleCo.COM was successful.
After this command, the tnhrdb database appears similar to the following. The result of thesmtnrhdb command is highlighted:
## tnrhdb database
## Sun Ray server address
192.168.128.1:cipso
## Sun Ray client addresses on 192.168.128 network
Example 13–13
Configuring Trusted Network Databases (Task Map)
Oracle Solaris Trusted Extensions Administrator's Procedures • September 2010178

192.168.128.0/24:admin_low
## Initial address for new clients
0.0.0.0/32:admin_low
## Default wildcard address
0.0.0.0:admin_low
Other addresses to be contacted at boot
# tnchkdb -h /etc/security/tsol/tnrhdb
After this phase of testing succeeds, the administrator makes the configuration more secure byremoving the default wildcard address, checks the syntax of the tnrhdb database, and testsagain. The final tnhrdb database appears similar to the following:
## tnrhdb database
## Sun Ray server address
192.168.128.1:cipso
## Sun Ray client addresses on 192.168.128 network
192.168.128.0/24:admin_low
## Initial address for new clients
0.0.0.0/32:admin_low
## 0.0.0.0:admin_low - no other systems can enter network at admin_low
Other addresses to be contacted at boot
Configuring Routes and Checking Network Information inTrusted Extensions (Task Map)
The following task map describes tasks to configure the network and to verify the configuration.
Task Description For Instructions
Configure static routes. Manually describes the best route from onehost to another host.
“How to Configure Routes With SecurityAttributes” on page 180
Check the accuracy of the local networkdatabases.
Uses the tnchkdb command to check thesyntactic validity of the local networkdatabases.
“How to Check the Syntax of TrustedNetwork Databases” on page 181
Compare the network database entrieswith the entries in the kernel cache.
Uses the tninfo command to determine ifthe kernel cache has been updated with thelatest database information.
“How to Compare Trusted NetworkDatabase Information With the KernelCache” on page 182
Synchronize the kernel cache with thenetwork databases.
Uses the tnctl command to update thekernel cache with up-to-date networkdatabase information on a running system.
“How to Synchronize the Kernel CacheWith Trusted Network Databases” onpage 183
Configuring Routes and Checking Network Information in Trusted Extensions (Task Map)
Chapter 13 • Managing Networks in Trusted Extensions (Tasks) 179

▼ How to Configure Routes With Security AttributesYou must be in the Security Administrator role in the global zone.
Add every destination host and gateway that you are using to route packets over the trustednetwork.The addresses are added to the local /etc/hosts file, or to its equivalent on the LDAP server.Use the Computers and Networks tool in the Solaris Management Console. The Files scopemodifies the /etc/hosts file. The LDAP scope modifies the entries on the LDAP server. Fordetails, see “How to Add Hosts to the System's Known Network” on page 173.
Assign each destination host, network, and gateway to a security template.The addresses are added to the local /etc/security/tsol/tnrhdb file, or to its equivalent onthe LDAP server. Use the Security Templates tool in the Solaris Management Console. Fordetails, see “How to Assign a Security Template to a Host or a Group of Hosts” on page 174.
Set up the routes.In a terminal window, use the route add command to specify routes.
The first entry sets up a default route. The entry specifies a gateway's address, 192.168.113.1,to use when no specific route is defined for either the host or the packet's destination.# route add default 192.168.113.1 -static
For details, see the route(1M) man page.
Set up one or more network entries.Use the -secattr flag to specify security attributes.
In the following list of commands, the second line shows a network entry. The third line shows anetwork entry with a label range of PUBLIC to CONFIDENTIAL : INTERNAL USE ONLY.# route add default 192.168.113.36
# route add -net 192.168.102.0 gateway-101
# route add -net 192.168.101.0 gateway-102 \
-secattr min_sl=“PUBLIC”,max_sl=”CONFIDENTIAL : INTERNAL USE ONLY”,doi=1
Set up one or more host entries.The new fourth line shows a host entry for the single-label host, gateway-pub. gateway-pub hasa label range of PUBLIC to PUBLIC.# route add default 192.168.113.36
# route add -net 192.168.102.0 gateway-101
# route add -net 192.168.101.0 gateway-102 \
-secattr min_sl="PUBLIC",max_sl="CONFIDENTIAL : INTERNAL USE ONLY",doi=1# route add -host 192.168.101.3 gateway-pub \
-secattr min_sl="PUBLIC",max_sl="PUBLIC",doi=1
Before You Begin
1
2
3
4
5
Configuring Routes and Checking Network Information in Trusted Extensions (Task Map)
Oracle Solaris Trusted Extensions Administrator's Procedures • September 2010180
Adding a Route With a Label Range of CONFIDENTIAL : INTERNAL USE ONLY toCONFIDENTIAL : RESTRICTED
The following route command adds to the routing table the hosts at 192.168.115.0 with192.168.118.39 as its gateway. The label range is from CONFIDENTIAL : INTERNAL USE ONLY
to CONFIDENTIAL : RESTRICTED, and the DOI is 1.
$ route add -net 192.168.115.0 192.168.118.39 \
-secattr min_sl="CONFIDENTIAL : INTERNAL USE ONLY",max_sl="CONFIDENTIAL : RESTRICTED",doi=1
The result of the added hosts is shown with the netstat -rR command. In the followingexcerpt, the other routes are replaced by ellipses (...).
$ netstat -rRn
...
192.168.115.0 192.168.118.39 UG 0 0
min_sl=CNF : INTERNAL USE ONLY,max_sl=CNF : RESTRICTED,DOI=1,CIPSO
...
▼ How to Check the Syntax of Trusted NetworkDatabasesThe tnchkdb command checks that the syntax of each network database is accurate. The SolarisManagement Console runs this command automatically when you use the Security Templatestool or the Trusted Network Zones tool. Typically, you run this command to check the syntax ofdatabase files that you are configuring for future use.
You must be in the global zone in a role that can check network settings. The SecurityAdministrator role and the System Administrator role can check these settings.
In a terminal window, run the tnchkdb command.$ tnchkdb [-h tnrhdb-path] [-t tnrhtp-path] [-z tnzonecfg-path]checking /etc/security/tsol/tnrhtp ...
checking /etc/security/tsol/tnrhdb ...
checking /etc/security/tsol/tnzonecfg ...
Testing the Syntax of a Trial Network DatabaseIn this example, the security administrator is testing a network database file for possible use.Initially, the administrator uses the wrong option. The results of the check are printed on theline for the tnrhdb file:
$ tnchkdb -h /opt/secfiles/trial.tnrhtp
checking /etc/security/tsol/tnrhtp ...
checking /opt/secfiles/trial.tnrhtp ...
Example 13–14
Before You Begin
●
Example 13–15
Configuring Routes and Checking Network Information in Trusted Extensions (Task Map)
Chapter 13 • Managing Networks in Trusted Extensions (Tasks) 181
line 12: Illegal name: min_sl=ADMIN_LOW;max_sl=ADMIN_HIGH
line 14: Illegal name: min_sl=ADMIN_LOW;max_sl=ADMIN_HIGH
checking /etc/security/tsol/tnzonecfg ...
When the security administrator checks the file by using the -t option, the command confirmsthat the syntax of the trial tnrhtp database is accurate:
$ tnchkdb -t /opt/secfiles/trial.tnrhtp
checking /opt/secfiles/trial.tnrhtp ...
checking /etc/security/tsol/tnrhdb ...
checking /etc/security/tsol/tnzonecfg ...
▼ How to Compare Trusted Network DatabaseInformation With the Kernel CacheThe network databases might contain information that is not cached in the kernel. Thisprocedure checks that the information is identical. When you use the Solaris ManagementConsole to update the network, the kernel cache is updated with network database information.The tninfo command is useful during testing and for debugging.
You must be in the global zone in a role that can check network settings. The SecurityAdministrator role and the System Administrator role can check these settings.
In a terminal window, run the tninfo command.
■ tninfo -h hostname displays the IP address and template for the specified host.■ tninfo -t templatename displays the following information:
template: template-namehost_type: either CIPSO or UNLABELED
doi: 1
min_sl: minimum-labelhex: minimum-hex-labelmax_sl: maximum-labelhex:maximum-hex-label
■ tninfo -m zone-name displays the multilevel port (MLP) configuration of a zone.
Displaying Multilevel Ports on a HostIn this example, a system is configured with several labeled zones. All zones share the same IPaddress. Some zones are also configured with zone-specific addresses. In this configuration, theTCP port for web browsing, port 8080, is an MLP on a shared interface in the public zone. Theadministrator has also set up telnet, TCP port 23, to be an MLP in the public zone. Becausethese two MLPs are on a shared interface, no other zone, including the global zone, can receivepackets on the shared interface on ports 8080 and 23.
Before You Begin
●
Example 13–16
Configuring Routes and Checking Network Information in Trusted Extensions (Task Map)
Oracle Solaris Trusted Extensions Administrator's Procedures • September 2010182

In addition, the TCP port for ssh, port 22, is a per-zone MLP in the public zone. The publiczone's ssh service can receive any packets on its zone-specific address within the address's labelrange.
The following command shows the MLPs for the public zone:
$ tninfo -m public
private: 22/tcp
shared: 23/tcp;8080/tcp
The following command shows the MLPs for the global zone. Note that ports 23 and 8080
cannot be MLPs in the global zone because the global zone shares the same address with thepublic zone:
$ tninfo -m global
private: 111/tcp;111/udp;514/tcp;515/tcp;631/tcp;2049/tcp;
6000-6003/tcp;38672/tcp;60770/tcp;
shared: 6000-6003/tcp
▼ How to Synchronize the Kernel Cache With TrustedNetwork DatabasesWhen the kernel has not been updated with trusted network database information, you haveseveral ways to update the kernel cache. The Solaris Management Console runs this commandautomatically when you use the Security Templates tool or the Trusted Network Zones tool.
You must be in the Security Administrator role in the global zone.
To synchronize the kernel cache with network databases, run one of the following commands:
■ Restart the tnctl service.
Caution – Do not use this method on systems that obtain their trusted network databaseinformation from an LDAP server. The local database information would overwrite theinformation that is obtained from the LDAP server.
$ svcadm restart svc:/network/tnctl
This command reads all information from the local trusted network databases into thekernel.
■ Update the kernel cache for your recently added entries.$ tnctl -h hostname
Before You Begin
●
Configuring Routes and Checking Network Information in Trusted Extensions (Task Map)
Chapter 13 • Managing Networks in Trusted Extensions (Tasks) 183

This command reads only the information from the chosen option into the kernel. Fordetails about the options, see Example 13–17 and the tnctl(1M) man page.
■ Modify the tnd service.
Note – The tnd service is running only if the ldap service running.
■ Change the tndpolling interval.This does not update the kernel cache. However, you can shorten the polling interval toupdate the kernel cache more frequently. For details, see the example in the tnd(1M)man page.
■ Refresh the tnd.This Service Management Facility (SMF) command triggers an immediate update of thekernel with recent changes to trusted network databases.$ svcadm refresh svc:/network/tnd
■ Restart the tndby using SMF.$ svcadm restart svc:/network/tnd
Caution – Avoid running the tnd command to restart the tnd. This command caninterrupt communications that are currently succeeding.
Updating the Kernel With Your Latest tnrhdb Entries
In this example, the administrator has added three addresses to the local tnrhdb database. First,the administrator removed the 0.0.0.0 wildcard entry.
$ tnctl -d -h 0.0.0.0:admin_low
Then, the administrator views the format of the final three entries in the/etc/security/tsol/tnrhdb database:
$ tail /etc/security/tsol/tnrhdb
#\:\:0:admin_low
127.0.0.1:cipso
#\:\:1:cipso
192.168.103.5:admin_low
192.168.103.0:cipso
0.0.0.0/32:admin_low
Then, the administrator updates the kernel cache:
Example 13–17
Configuring Routes and Checking Network Information in Trusted Extensions (Task Map)
Oracle Solaris Trusted Extensions Administrator's Procedures • September 2010184

$ tnctl -h 192.168.103.5
tnctl -h 192.168.103.0
tnctl -h 0.0.0.0/32
Finally, the administrator verifies that the kernel cache is updated. The output for the first entryis similar to the following:
$ tninfo -h 192.168.103.5
IP Address: 192.168.103.5
Template: admin_low
Updating Network Information in the Kernel
In this example, the administrator updates the trusted network with a public print server, andthen checks that the kernel settings are correct.
$ tnctl -h public-print-server
$ tninfo -h public-print-server
IP Address: 192.168.103.55
Template: PublicOnly
$ tninfo -t PublicOnly
==================================
Remote Host Template Table Entries
----------------------------------
template: PublicOnly
host_type: CIPSO
doi: 1
min_sl: PUBLIC
hex: 0x0002-08-08
max_sl: PUBLIC
hex: 0x0002-08-08
Troubleshooting the Trusted Network (Task Map)The following task map describes tasks to debug your network.
Task Description For Instructions
Determine why two hosts cannotcommunicate.
Checks that the interfaces on a singlesystem are up.
“How to Verify That a Host's Interfaces AreUp” on page 186
Uses debugging tools when two hostscannot communicate with each other.
“How to Debug the Trusted ExtensionsNetwork” on page 186
Determine why an LDAP client cannotreach the LDAP server.
Troubleshoots the loss of connectionbetween an LDAP server and a client.
“How to Debug a Client Connection to theLDAP Server” on page 189
Example 13–18
Troubleshooting the Trusted Network (Task Map)
Chapter 13 • Managing Networks in Trusted Extensions (Tasks) 185

▼ How to Verify That a Host's Interfaces Are UpUse this procedure if your system does not communicate with other hosts as expected.
You must be in the global zone in a role that can check network settings. The SecurityAdministrator role and the System Administrator role can check these settings.
Verify that the system's network interface is up.The following output shows that the system has two network interfaces, hme0 and hme0:3.Neither interface is up.# ifconfig -a
...
hme0: flags=1000843<BROADCAST,RUNNING,MULTICAST,IPv4> mtu 1500 index 2
inet 192.168.0.11 netmask ffffff00 broadcast 192.168.0.255
hme0:3 flags=1000843<BROADCAST,RUNNING,MULTICAST,IPv4> mtu 1500 index 2
inet 192.168.0.12 netmask ffffff00 broadcast 192.168.0.255
If the interface is not up, bring it up and then verify that it is up.The following output shows that both interfaces are up.# ifconfig hme0 up
# ifconfig -a
...
hme0: flags=1000843<UP,BROADCAST,RUNNING,MULTICAST,...
hme0:3 flags=1000843<UP,BROADCAST,RUNNING,MULTICAST,..
▼ How to Debug the Trusted Extensions NetworkTo debug two hosts that should be communicating but are not, you can use Trusted Extensionsand Solaris debugging tools. For example, Solaris network debugging commands such as snoopand netstat are available. For details, see the snoop(1M) and netstat(1M) man pages. Forcommands that are specific to Trusted Extensions, see Table 2–4.■ For problems with contacting labeled zones, see “Managing Zones (Task Map)” on
page 120.■ For debugging NFS mounts, see “How to Troubleshoot Mount Failures in Trusted
Extensions” on page 147.■ For debugging LDAP communications, see “How to Debug a Client Connection to the
LDAP Server” on page 189.
You must be in the global zone in a role that can check network settings. The SecurityAdministrator role or the System Administrator role can check these settings.
To troubleshoot the tnddaemon, change the polling interval and collect debugginginformation.
Before You Begin
1
2
Before You Begin
1
Troubleshooting the Trusted Network (Task Map)
Oracle Solaris Trusted Extensions Administrator's Procedures • September 2010186

Note – The tnd service is running only if the ldap service running.
For details, see the tnd(1M) man page.
Check that the hosts that cannot communicate are using the same naming service.
a. On each host, check the nsswitch.conf file.
i. Check the values for the Trusted Extensions databases in the nsswitch.conf file.
For example, at a site that uses LDAP to administer the network, the entries are similar tothe following:# Trusted Extensions
tnrhtp: files ldap
tnrhdb: files ldap
ii. If the values are different, correct the nsswitch.conf file.
To modify these entries, the system administrator uses the Name Service Switch action.For details, see “How to Start CDE Administrative Actions in Trusted Extensions” onpage 53. This action preserves the required DAC and MAC file permissions.
b. Check that the LDAP naming service is configured.$ ldaplist -l
c. Check that both hosts are in the LDAP naming service.$ ldaplist -l hosts | grep hostname
Check that each host is defined correctly.
a. Use the Solaris Management Console to verify the definitions.
■ In the Security Templates tool, check that each host is assigned to a security templatethat is compatible with the security template of the other host.
■ For an an unlabeled system, check that the default label assignment is correct.■ In the Trusted Network Zones tool, check that the multilevel ports (MLPs) are correctly
configured.
b. Use the command line to check that the network information in the kernel is current.
Check that the assignment in each host's kernel cache matches the assignment on thenetwork, and on the other host.
2
3
Troubleshooting the Trusted Network (Task Map)
Chapter 13 • Managing Networks in Trusted Extensions (Tasks) 187
To get security information for the source, destination, and gateway hosts in thetransmission, use the tninfo command.
■ Display the IP address and the assigned security template for a given host.$ tninfo -h hostnameIP Address: IP-addressTemplate: template-name
■ Display a template definition.$ tninfo -t template-nametemplate: template-namehost_type: one of CIPSO or UNLABELED
doi: 1
min_sl: minimum-labelhex: minimum-hex-labelmax_sl: maximum-labelhex: maximum-hex-label
■ Display the MLPs for a zone.$ tninfo -m zone-nameprivate: ports-that-are-specific-to-this-zone-onlyshared: ports-that-the-zone-shares-with-other-zones
Fix any incorrect information.
■ To change or check network security information, use the Solaris Management Consoletools. For details, see “How to Open the Trusted Networking Tools” on page 168
■ To update the kernel cache, restart the tnctl service on the host whose information is out ofdate. Allow some time for this process to complete. Then, refresh the tnd service. If therefresh fails, try restarting the tnd service. For details, see “How to Synchronize the KernelCache With Trusted Network Databases” on page 183.
Note – The tnd service is running only if the ldap service running.
Rebooting clears the kernel cache. At boot time, the cache is populated with databaseinformation. The nsswitch.conf file determines whether local databases or LDAPdatabases are used to populate the kernel.
Collect transmission information to help you in debugging.
■ Verify your routing configuration.Use the get subcommand to the route command.$ route get [ip] -secattr sl=label,doi=integer
4
5
Troubleshooting the Trusted Network (Task Map)
Oracle Solaris Trusted Extensions Administrator's Procedures • September 2010188

For details, see the route(1M) man page.
■ View the label information in packets.Use the snoop -v command.
The -v option displays the details of packet headers, including label information. Thiscommand provides a lot of detail, so you might want to restrict the packets that thecommand examines. For details, see the snoop(1M) man page.
■ View the routing table entries and the security attributes on sockets.Use the -R option with the netstat -a|-r command.
The -aR option displays extended security attributes for sockets. The -rR option displaysrouting table entries. For details, see the netstat(1M) man page.
▼ How to Debug a Client Connection to the LDAP ServerMisconfiguration of the client entry on the LDAP server can prevent the client fromcommunicating with the server. Similarly, misconfiguration of files on the client can preventcommunication. Check the following entries and files when attempting to debug a client-servercommunication problem.
You must be in the Security Administrator role in the global zone on the LDAP client.
Check that the remote host template for the LDAP server and for the gateway to the LDAP serverare correct.# tninfo -h LDAP-server# route get LDAP-server# tninfo -h gateway-to-LDAP-server
If a remote host template assignment is incorrect, assign the host to the correct template byusing the Security Templates tool in the Solaris Management Console.
Check and correct the /etc/hostsfile.Your system, the interfaces for the labeled zones on your system, the gateway to the LDAPserver, and the LDAP server must be listed in the file. You might have more entries.
Look for duplicate entries. Remove any entries that are labeled zones on other systems. Forexample, if Lserver is the name of your LDAP server, and LServer-zones is the sharedinterface for the labeled zones, remove LServer-zones from /etc/hosts.
If you are using DNS, check and correct the entries in the resolv.conf file.# more resolv.conf
search list of domainsdomain domain-name
Before You Begin
1
2
3
Troubleshooting the Trusted Network (Task Map)
Chapter 13 • Managing Networks in Trusted Extensions (Tasks) 189
nameserver IP-address
...
nameserver IP-address
Check that the tnrhdb and tnrhtp entries in the nsswitch.conf file are accurate.
Check that the client is correctly configured on the server.# ldaplist -l tnrhdb client-IP-address
Check that the interfaces for your labeled zones are correctly configured on the LDAP server.# ldaplist -l tnrhdb client-zone-IP-address
Verify that you can ping the LDAP server from all currently running zones.# ldapclient list
...
NS_LDAP_SERVERS= LDAP-server-address# zlogin zone-name1 ping LDAP-server-addressLDAP-server-address is alive
# zlogin zone-name2 ping LDAP-server-addressLDAP-server-address is alive
...
Configure LDAP and reboot.
a. For the procedure, see “Make the Global Zone an LDAP Client in Trusted Extensions”inOracle Solaris Trusted Extensions Configuration Guide.
b. In every labeled zone, re-establish the zone as a client of the LDAP server.# zlogin zone-name1# ldapclient init \
-a profileName=profileName \
-a domainName=domain \
-a proxyDN=proxyDN \
-a proxyPassword=password LDAP-Server-IP-Address# exit
# zlogin zone-name2 ...
c. Halt all zones, lock the file systems, and reboot.If you are using Solaris ZFS, halt the zones and lock the file systems before rebooting. If youare not using ZFS, you can reboot without halting the zones and locking the file systems.# zoneadm list
# zoneadm -z zone-name halt
# lockfs -fa
# reboot
4
5
6
7
8
Troubleshooting the Trusted Network (Task Map)
Oracle Solaris Trusted Extensions Administrator's Procedures • September 2010190

Multilevel Mail in Trusted Extensions(Overview)
This chapter covers security and multilevel mailers on systems that are configured with SolarisTrusted Extensions.
■ “Multilevel Mail Service” on page 191■ “Trusted Extensions Mail Features” on page 191
Multilevel Mail ServiceTrusted Extensions provides multilevel mail for any mail application. When regular users starttheir mailer, the application opens at the user's current label. If users are operating in amultilevel system, they might want to link or copy their mailer initialization files. For details, see“How to Configure Startup Files for Users in Trusted Extensions” on page 86.
Trusted Extensions Mail FeaturesIn Trusted Extensions, the System Administrator role sets up and administers mail serversaccording to instructions in the Solaris System Administration Guide: Advanced Administrationand System Administration Guide: IP Services. In addition, the security administratordetermines how Trusted Extensions mail features need to be configured.
The following aspects of managing mail are specific to Trusted Extensions:
■ The .mailrc file is at a user's minimum label.Therefore, users who work at multiple labels do not have a .mailrc file at the higher labels,unless they copy or link the .mailrc file in their minimum-label directory to each higherdirectory.The Security Administrator role or the individual user can add the .mailrc file to either.copy_files or .link_files. For a description of these files, see the updatehome(1M) manpage. For configuration suggestions, see “.copy_files and .link_files Files” on page 81.
14C H A P T E R 1 4
191

■ Your mail reader can run at every label on a system. Some configuration is required toconnect a mail client to the server.For example, to use Mozilla mail for multilevel mail requires that you configure a Mozillamail client at each label to specify the mail server. The mail server could be the same ordifferent for each label, but the server must be specified.
■ The Mailing Lists tool in the Solaris Management Console manages mail aliases.Depending on the scope of the selected Solaris Management Console toolbox, you canupdate the local /etc/aliases file or the LDAP entry on the Sun Java System DirectoryServer.
■ Trusted Extensions software checks host and user labels before sending or forwarding mail.■ The software checks that the mail is within the accreditation range of the host. The
checks are described in this list and in Chapter 13, “Managing Networks in TrustedExtensions (Tasks).”
■ The software checks that the mail is between the account's clearance and minimum label.■ Users can read email that is received within their accreditation range. During a session,
users can read mail only at their current label.To contact regular user by email, an administrative role must send mail from aworkspace that is at a label that the user can read. The user's default label is usually agood choice.
Trusted Extensions Mail Features
Oracle Solaris Trusted Extensions Administrator's Procedures • September 2010192

Managing Labeled Printing (Tasks)
This chapter describes how to use Solaris Trusted Extensions software to configure labeledprinting. It also describes how to configure print jobs without the labeling options.
■ “Labels, Printers, and Printing” on page 193■ “Managing Printing in Trusted Extensions (Task Map)” on page 200■ “Configuring Labeled Printing (Task Map)” on page 201■ “Reducing Printing Restrictions in Trusted Extensions (Task Map)” on page 214
Labels, Printers, and PrintingTrusted Extensions software uses labels to control printer access. Labels are used to controlaccess to printers and to information about queued print jobs. The software also labels printedoutput. Body pages are labeled, and mandatory banner and trailer pages are labeled. Banner andtrailer pages can also include handling instructions.
The system administrator handles basic printer administration. The security administrator rolemanages printer security, which includes labels and how the labeled output is handled. Theadministrators follow basic Solaris printer administration procedures, then they assign labels tothe print servers and printers.
Trusted Extensions software supports both single-level and multilevel printing. Multilevelprinting is implemented in the global zone only. To use the global zone's print server, a labeledzone must have a host name that is different from the global zone. One way to obtain a distincthost name is to assign an IP address to the labeled zone. The address would be distinct from theglobal zone's IP address.
15C H A P T E R 1 5
193

Restricting Access to Printers and Print JobInformation in Trusted ExtensionsUsers and roles on a system that is configured with Trusted Extensions software create printjobs at the label of their session. The print jobs can print only on printers that recognize thatlabel. The label must be in the printer's label range.
Users and roles can view print jobs whose label is the same as the label of the session. In theglobal zone, a role can view jobs whose labels are dominated by the label of the zone.
Printers that are configured with Trusted Extensions software print labels on the printer output.Printers that are managed by unlabeled print servers do not print labels on the printer output.Such printers have the same label as their unlabeled server. For example, a Solaris print servercan be assigned an arbitrary label in the tnrhdb database of the LDAP naming service. Users canthen print jobs at that arbitrary label on the Solaris printer. As with Trusted Extensions printers,those Solaris printers can only accept print jobs from users who are working at the label that hasbeen assigned to the print server.
Labeled Printer OutputTrusted Extensions prints security information on body pages and banner and trailer pages.The information comes from the label_encodings file and from the tsol_separator.ps file.
The security administrator can do the following to modify defaults that set labels and addhandling instructions to printer output:
■ Localize or customize the text on the banner and trailer pages■ Specify alternate labels to be printed on body pages or in the various fields of the banner and
trailer pages■ Change or omit any of the text or labels
The security administrator can also configure user accounts to use printers that do not printlabels on the output. Users can also be authorized to selectively not print banners or labels onprinter output.
Labeled Body PagesBy default, the “Protect As” classification is printed at the top and bottom of every body page.The “Protect As” classification is the dominant classification when the classification from thejob's label is compared to the minimum protect as classification. The minimum protect as
classification is defined in the label_encodings file.
For example, if the user is logged in to an Internal Use Only session, then the user's print jobsare at that label. If the minimum protect as classification in the label_encodings file isPublic, then the Internal Use Only label is printed on the body pages.
Labels, Printers, and Printing
Oracle Solaris Trusted Extensions Administrator's Procedures • September 2010194

Labeled Banner and Trailer PagesThe following figures show a default banner page and how the default trailer page differs.Callouts identify the various sections. Note that the trailer page uses a different outer line.
The text, labels, and warnings that appear on print jobs are configurable. The text can also bereplaced with text in another language for localization.
FIGURE 15–1 Job's Label Printed at the Top and Bottom of a Body Page
[INTERNAL_USE_ONLY]
[INTERNAL_USE_ONLY]
Labels, Printers, and Printing
Chapter 15 • Managing Labeled Printing (Tasks) 195
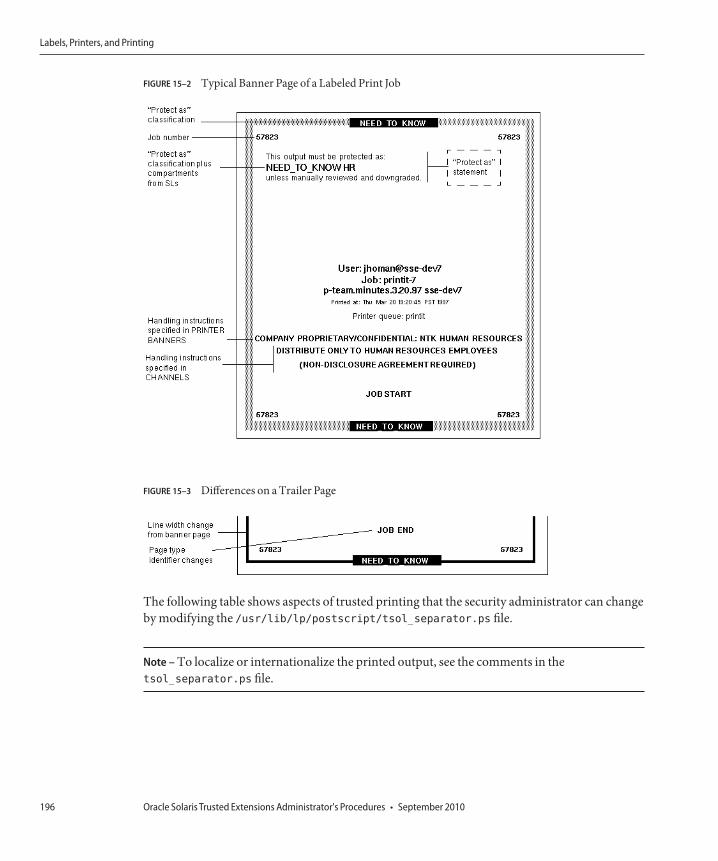
The following table shows aspects of trusted printing that the security administrator can changeby modifying the /usr/lib/lp/postscript/tsol_separator.ps file.
Note – To localize or internationalize the printed output, see the comments in thetsol_separator.ps file.
FIGURE 15–2 Typical Banner Page of a Labeled Print Job
FIGURE 15–3 Differences on a Trailer Page
Labels, Printers, and Printing
Oracle Solaris Trusted Extensions Administrator's Procedures • September 2010196
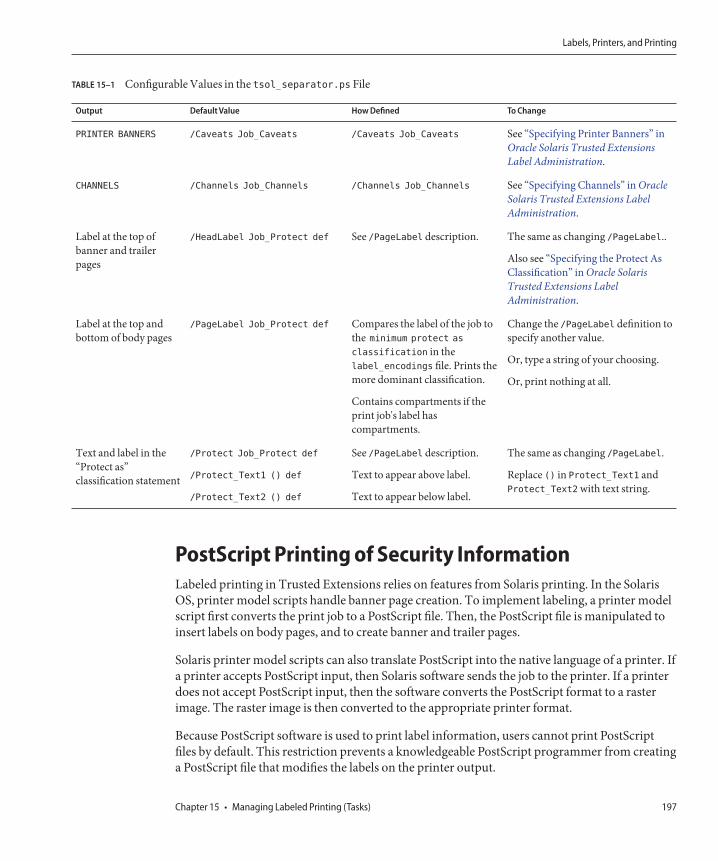
TABLE 15–1 Configurable Values in the tsol_separator.ps File
Output Default Value How Defined To Change
PRINTER BANNERS /Caveats Job_Caveats /Caveats Job_Caveats See “Specifying Printer Banners” inOracle Solaris Trusted ExtensionsLabel Administration.
CHANNELS /Channels Job_Channels /Channels Job_Channels See “Specifying Channels” in OracleSolaris Trusted Extensions LabelAdministration.
Label at the top ofbanner and trailerpages
/HeadLabel Job_Protect def See /PageLabel description. The same as changing /PageLabel..
Also see “Specifying the Protect AsClassification” in Oracle SolarisTrusted Extensions LabelAdministration.
Label at the top andbottom of body pages
/PageLabel Job_Protect def Compares the label of the job tothe minimum protect as
classification in thelabel_encodings file. Prints themore dominant classification.
Contains compartments if theprint job's label hascompartments.
Change the /PageLabel definition tospecify another value.
Or, type a string of your choosing.
Or, print nothing at all.
Text and label in the“Protect as”classification statement
/Protect Job_Protect def
/Protect_Text1 () def
/Protect_Text2 () def
See /PageLabel description.
Text to appear above label.
Text to appear below label.
The same as changing /PageLabel.
Replace () in Protect_Text1 andProtect_Text2 with text string.
PostScript Printing of Security InformationLabeled printing in Trusted Extensions relies on features from Solaris printing. In the SolarisOS, printer model scripts handle banner page creation. To implement labeling, a printer modelscript first converts the print job to a PostScript file. Then, the PostScript file is manipulated toinsert labels on body pages, and to create banner and trailer pages.
Solaris printer model scripts can also translate PostScript into the native language of a printer. Ifa printer accepts PostScript input, then Solaris software sends the job to the printer. If a printerdoes not accept PostScript input, then the software converts the PostScript format to a rasterimage. The raster image is then converted to the appropriate printer format.
Because PostScript software is used to print label information, users cannot print PostScriptfiles by default. This restriction prevents a knowledgeable PostScript programmer from creatinga PostScript file that modifies the labels on the printer output.
Labels, Printers, and Printing
Chapter 15 • Managing Labeled Printing (Tasks) 197
The Security Administrator role can override this restriction by assigning the PrintPostscript authorization to role accounts and to trustworthy users. The authorization isassigned only if the account can be trusted not to spoof the labels on printer output. Also,allowing a user to print PostScript files must be consistent with the site's security policy.
Printer Model ScriptsA printer model script enables a particular model of printer to provide banner and trailer pages.Trusted Extensions provides four scripts:
■ tsol_standard - For directly attached PostScript printers, for example, printers attached bya parallel port
■ tsol_netstandard - For network–accessible PostScript printers■ tsol_standard_foomatic - For directly attached printers that do not print PostScript
format■ tsol_netstandard_foomatic - For network–accessible printers that do not print
PostScript format
The foomatic scripts are used when a printer driver name begins with Foomatic. Foomaticdrivers are PostScript Printer Drivers (PPD).
Note – When you add a printer to a labeled zone, “Use PPD” is specified by default in the PrintManager. A PPD is then used to translate banner and trailer pages into the language of theprinter.
Additional Conversion FiltersA conversion filter converts text files to PostScript format. The filter's programs are trustedprograms that are run by the printer daemon. Files that are converted to PostScript format byany installed filter program can be trusted to have authentic labels and banner and trailer pagetext.
Solaris software provides most conversion filters that a site needs. A site's System Administratorrole can install additional filters. These filters can then be trusted to have authentic labels, andbanner and trailer pages. To add conversion filters, see Chapter 7, “Customizing LP PrintingServices and Printers (Tasks),” in System Administration Guide: Printing.
Interoperability of Trusted Extensions With TrustedSolaris 8 PrintingTrusted Solaris 8 and Trusted Extensions systems that have compatible label_encodings filesand that identify each other as using a CIPSO template can use each other for remote printing.
Labels, Printers, and Printing
Oracle Solaris Trusted Extensions Administrator's Procedures • September 2010198

The following table describes how to set up the systems to enable printing. By default, userscannot list or cancel print jobs on a remote print server of the other OS. Optionally, you canauthorize users to do so.
Originating System Print Server System Action Results
Trusted Extensions Trusted Solaris 8 Configure printing – In theTrusted Extensions tnrhdb,assign a template with theappropriate label range to theTrusted Solaris 8 print server.The label could be CIPSO orunlabeled.
Trusted Solaris 8 printer canprint jobs from a TrustedExtensions system within theprinter's label range.
Trusted Extensions Trusted Solaris 8 Authorize users – On theTrusted Extensions system,create a profile that adds theneeded authorizations.Assign the profile to users.
Trusted Extensions users canlist or cancel print jobs thatthey send to a Trusted Solaris8 printer.
Users cannot view or removejobs at a different label.
Trusted Solaris 8 Trusted Extensions Configure printing – In theTrusted Solaris 8 tnrhdb,assign a template with theappropriate label range to theTrusted Extensions printserver. The label could beCIPSO or unlabeled.
Trusted Extensions printercan print jobs from a TrustedSolaris 8 system within theprinter's label range.
Trusted Solaris 8 Trusted Extensions Authorize users – On theTrusted Solaris 8 system,create a profile that adds theneeded authorizations.Assign the profile to users.
Trusted Solaris 8 users can listor cancel print jobs that theysend to a Trusted Extensionsprinter.
Users cannot view or removejobs at a different label.
Trusted Extensions Print Interfaces (Reference)The following user commands are extended to conform with Trusted Extensions securitypolicy:
■ cancel – The caller must be equal to the label of the print job to cancel a job. By default,regular users can cancel only their own jobs.
■ lp – Trusted Extensions adds the -o nolabels option. Users must be authorized to printwith no labels. Similarly, users must be authorized to use the -o nobanner option.
Labels, Printers, and Printing
Chapter 15 • Managing Labeled Printing (Tasks) 199

■ lpstat – The caller must be equal to the label of the print job to obtain the status of a job. Bydefault, regular users can view only their own print jobs.
The following administrative commands are extended to conform with Trusted Extensionssecurity policy. As in the Solaris OS, these commands can only be run by a role that includes thePrinter Management rights profile.
■ lpmove – The caller must be equal to the label of the print job to move a job. By default,regular users can move only their own print jobs.
■ lpadmin – In the global zone, this command works for all jobs. In a labeled zone, the callermust dominate the print job's label to view a job, and be equal to change a job.Trusted Extensions adds printer model scripts to the -m option. Trusted Extensions adds the-o nolabels option.
■ lpsched – In the global zone, this command is always successful. As in the Solaris OS, usethe svcadm command to enable, disable, start, or restart the print service. In a labeled zone,the caller must be equal to the label of the print service to change the print service. Fordetails about the service management facility, see the smf(5), svcadm(1M), and svcs(1) manpages.
Trusted Extensions adds the solaris.label.print authorization to the Printer Managementrights profile. The solaris.print.unlabeled authorization is required to print body pageswithout labels.
Managing Printing in Trusted Extensions (Task Map)Trusted Extensions procedures for configuring printing are performed after completing Solarisprinter setup. The following task map points to the major tasks that manage labeled printing.
Task Description For Instructions
Configure printers for labeledoutput.
Enables users to print to a Trusted Extensions printer.The print jobs are marked with labels.
“Configuring Labeled Printing (TaskMap)” on page 201
Remove visible labels fromprinter output.
Enables users to print at a specific label to a Solarisprinter. The print jobs are not marked with labels.
Or, prevents labels from printing on a TrustedExtensions printer.
“Reducing Printing Restrictions inTrusted Extensions (Task Map)” onpage 214
Managing Printing in Trusted Extensions (Task Map)
Oracle Solaris Trusted Extensions Administrator's Procedures • September 2010200
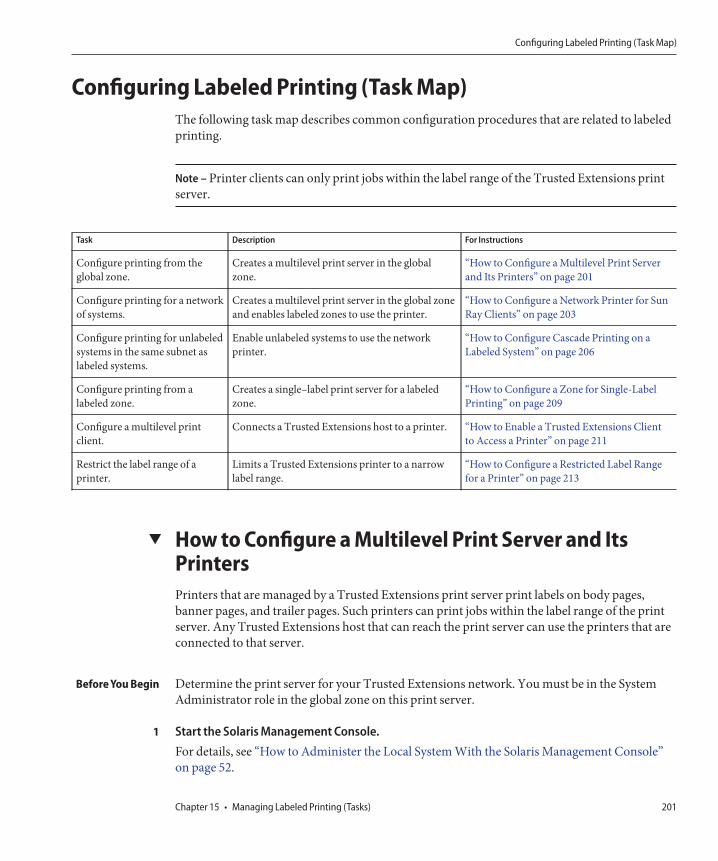
Configuring Labeled Printing (Task Map)The following task map describes common configuration procedures that are related to labeledprinting.
Note – Printer clients can only print jobs within the label range of the Trusted Extensions printserver.
Task Description For Instructions
Configure printing from theglobal zone.
Creates a multilevel print server in the globalzone.
“How to Configure a Multilevel Print Serverand Its Printers” on page 201
Configure printing for a networkof systems.
Creates a multilevel print server in the global zoneand enables labeled zones to use the printer.
“How to Configure a Network Printer for SunRay Clients” on page 203
Configure printing for unlabeledsystems in the same subnet aslabeled systems.
Enable unlabeled systems to use the networkprinter.
“How to Configure Cascade Printing on aLabeled System” on page 206
Configure printing from alabeled zone.
Creates a single–label print server for a labeledzone.
“How to Configure a Zone for Single-LabelPrinting” on page 209
Configure a multilevel printclient.
Connects a Trusted Extensions host to a printer. “How to Enable a Trusted Extensions Clientto Access a Printer” on page 211
Restrict the label range of aprinter.
Limits a Trusted Extensions printer to a narrowlabel range.
“How to Configure a Restricted Label Rangefor a Printer” on page 213
▼ How to Configure a Multilevel Print Server and ItsPrintersPrinters that are managed by a Trusted Extensions print server print labels on body pages,banner pages, and trailer pages. Such printers can print jobs within the label range of the printserver. Any Trusted Extensions host that can reach the print server can use the printers that areconnected to that server.
Determine the print server for your Trusted Extensions network. You must be in the SystemAdministrator role in the global zone on this print server.
Start the Solaris Management Console.For details, see “How to Administer the Local System With the Solaris Management Console”on page 52.
Before You Begin
1
Configuring Labeled Printing (Task Map)
Chapter 15 • Managing Labeled Printing (Tasks) 201
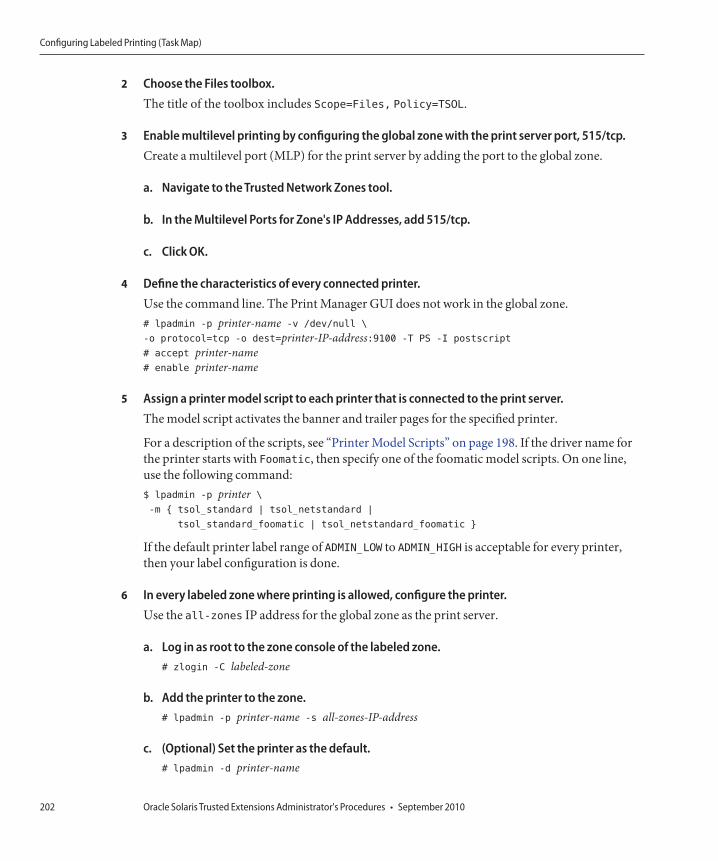
Choose the Files toolbox.The title of the toolbox includes Scope=Files, Policy=TSOL.
Enable multilevel printing by configuring the global zone with the print server port, 515/tcp.Create a multilevel port (MLP) for the print server by adding the port to the global zone.
a. Navigate to the Trusted Network Zones tool.
b. In the Multilevel Ports for Zone's IP Addresses, add 515/tcp.
c. Click OK.
Define the characteristics of every connected printer.Use the command line. The Print Manager GUI does not work in the global zone.# lpadmin -p printer-name -v /dev/null \
-o protocol=tcp -o dest=printer-IP-address:9100 -T PS -I postscript
# accept printer-name# enable printer-name
Assign a printer model script to each printer that is connected to the print server.The model script activates the banner and trailer pages for the specified printer.
For a description of the scripts, see “Printer Model Scripts” on page 198. If the driver name forthe printer starts with Foomatic, then specify one of the foomatic model scripts. On one line,use the following command:$ lpadmin -p printer \
-m { tsol_standard | tsol_netstandard |
tsol_standard_foomatic | tsol_netstandard_foomatic }
If the default printer label range of ADMIN_LOW to ADMIN_HIGH is acceptable for every printer,then your label configuration is done.
In every labeled zone where printing is allowed, configure the printer.Use the all-zones IP address for the global zone as the print server.
a. Log in as root to the zone console of the labeled zone.# zlogin -C labeled-zone
b. Add the printer to the zone.# lpadmin -p printer-name -s all-zones-IP-address
c. (Optional) Set the printer as the default.# lpadmin -d printer-name
2
3
4
5
6
Configuring Labeled Printing (Task Map)
Oracle Solaris Trusted Extensions Administrator's Procedures • September 2010202

In every zone, test the printer.
Note – Starting in the Solaris 10 7/10 release, files with an administrative label, eitherADMIN_HIGH or ADMIN_LOW, print ADMIN_HIGH on the body of the printout. The banner andtrailer pages are labeled with the highest label and compartments in the label_encodings file.
As root and as a regular user, perform the following steps:
a. Print plain files from the command line.
b. Print files from your applications, such as StarOffice, your browser, and your editor.
c. Verify that banner pages, trailer pages, and security banners print correctly.
■ Limit printer label range – “How to Configure a Restricted Label Range for a Printer” onpage 213
■ Prevent labeled output – “Reducing Printing Restrictions in Trusted Extensions (TaskMap)” on page 214
■ Use this zone as a print server – “How to Enable a Trusted Extensions Client to Access aPrinter” on page 211
▼ How to Configure a Network Printer for Sun RayClientsThis procedure configures a PostScript printer on a Sun Ray server that has a single all-zonesinterface. The printer is made available to all users of Sun Ray clients of this server. Initialconfiguration happens in the global zone. After the global zone is configured, each labeled zoneis configured to use the printer.
You must be logged in to a multilevel session in Trusted CDE.
In the global zone, assign an IP address to the network printer.For instructions, see Chapter 5, “Setting Up Printers by Using LP Print Commands (Tasks),” inSystem Administration Guide: Printing.
Start the Solaris Management Console.
■ For instructions, see “Initialize the Solaris Management Console Server in TrustedExtensions” in Oracle Solaris Trusted Extensions Configuration Guide.
■ Select the Scope=Files, Policy=TSOL toolbox and log in.
7
See Also
Before You Begin
1
2
Configuring Labeled Printing (Task Map)
Chapter 15 • Managing Labeled Printing (Tasks) 203

Assign the printer to the admin_low template.
a. In the Computers and Networks tool, double-click Security Templates.
b. Double-click admin_low.
c. In the Hosts Assigned to Template tab, add the printer's IP address.
For more information, read the online help in the left pane.
Add the printer port to the shared interface of the global zone.
a. In the Computers and Networks tool, double-click Trusted Network Zones.
b. Double-click global.
c. To the Multilevel Ports for Shared IP Addresses list, add port 515, protocol tcp.
Verify that the Solaris Management Console assignments are in the kernel.# tninfo -h printer-IP-address
IP address= printer-IP-addressTemplate = admin_low
# tninfo -m global
private: 111/tcp;111/udp;513/tcp;515/tcp;631/tcp;2049/tcp;6000-6050/tcp;
7007/tcp;7010/tcp;7014/tcp;7015/tcp;32771/tcp;32776/ip
shared: 515/tcp;6000-6050/tcp;7007/tcp;7010/tcp;7014/tcp;7015/tcp
Note – The additional private and shared multilevel ports (MLPs) such as 6055 and 7007 supportSun Ray requirements.
Ensure that printing services are enabled in the global zone.# svcadm enable print/server
# svcadm enable rfc1179
If your system was installed with netservices limited, enable the printer to reach thenetwork.
The rfc1179 service must listen on addresses other than localhost. The LP service listens onlyon a named pipe.# inetadm -m svc:/application/print/rfc1179:default bind_addr=’’
# svcadm refresh rfc1179
3
4
5
6
7
Configuring Labeled Printing (Task Map)
Oracle Solaris Trusted Extensions Administrator's Procedures • September 2010204
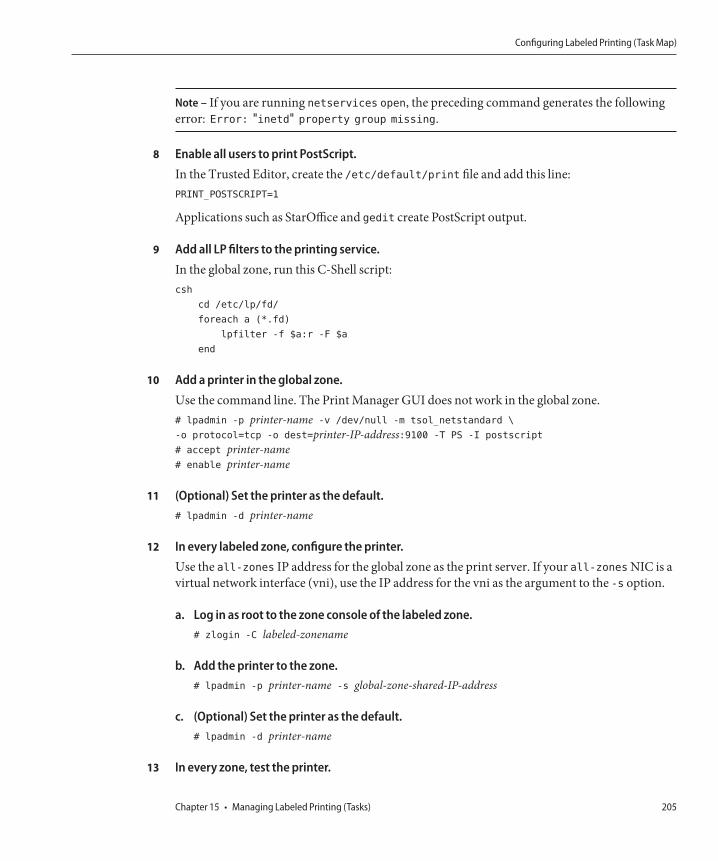
Note – If you are running netservices open, the preceding command generates the followingerror: Error: "inetd" property group missing.
Enable all users to print PostScript.
In the Trusted Editor, create the /etc/default/print file and add this line:PRINT_POSTSCRIPT=1
Applications such as StarOffice and gedit create PostScript output.
Add all LP filters to the printing service.
In the global zone, run this C-Shell script:csh
cd /etc/lp/fd/
foreach a (*.fd)
lpfilter -f $a:r -F $a
end
Add a printer in the global zone.
Use the command line. The Print Manager GUI does not work in the global zone.# lpadmin -p printer-name -v /dev/null -m tsol_netstandard \
-o protocol=tcp -o dest=printer-IP-address:9100 -T PS -I postscript
# accept printer-name# enable printer-name
(Optional) Set the printer as the default.# lpadmin -d printer-name
In every labeled zone, configure the printer.Use the all-zones IP address for the global zone as the print server. If your all-zones NIC is avirtual network interface (vni), use the IP address for the vni as the argument to the -s option.
a. Log in as root to the zone console of the labeled zone.# zlogin -C labeled-zonename
b. Add the printer to the zone.# lpadmin -p printer-name -s global-zone-shared-IP-address
c. (Optional) Set the printer as the default.# lpadmin -d printer-name
In every zone, test the printer.
8
9
10
11
12
13
Configuring Labeled Printing (Task Map)
Chapter 15 • Managing Labeled Printing (Tasks) 205

Note – Starting in the Solaris 10 7/10 release, files with an administrative label, eitherADMIN_HIGH or ADMIN_LOW, print ADMIN_HIGH on the body of the printout. The banner andtrailer pages are labeled with the highest label and compartments in the label_encodings file.
As root and as a regular user, perform the following steps:
a. Print plain files from the command line.
b. Print files from your applications, such as StarOffice, your browser, and your editor.
c. Verify that banner pages, trailer pages, and security banners print correctly.
Determining Printer Status for a Network Printer
In this example, the administrator verifies the network printer's status from the global zone andfrom a labeled zone.
global # lpstat -t
scheduler is running
system default destination: math-printer
system for _default: trusted1 (as printer math-printer)
device for math-printer: /dev/null
character set
default accepting requests since Feb 28 00:00 2008
lex accepting requests since Feb 28 00:00 2008
printer math-printer is idle. enabled since Feb 28 00:00 2008. available.
Solaris1# lpstat -t
scheduler is not running
system default destination: math-printer
system for _default: 192.168.4.17 (as printer math-printer)
system for math-printer: 192.168.4.17
default accepting requests since Feb 28 00:00 2008
math-printer accepting requests since Feb 28 00:00 2008
printer _default is idle. enabled since Feb 28 00:00 2008. available.
printer math-printer is idle. enabled since Feb 28 00:00 2008. available.
▼ How to Configure Cascade Printing on a LabeledSystemCascade printing provides the ability to print from a Windows desktop session to a TrustedExtensions labeled zone interface, where the zone IP address of the physical interface acts as the
Example 15–1
Configuring Labeled Printing (Task Map)
Oracle Solaris Trusted Extensions Administrator's Procedures • September 2010206

print spooler. The multilevel port (MLP) listener that is on the zone IP address of the physicalinterface talks to the Trusted Extensions printing subsystem and prints the file with theappropriate labeled header and trailer sheets.
This procedure enables unlabeled systems that are in the same subnet as labeled systems to usethe labeled network printer. The rfc1179 service handles cascade printing. You must performthis procedure in every labeled zone from which you permit cascade printing.
You have completed “How to Configure a Network Printer for Sun Ray Clients” on page 203.
Log in as root to the zone console of the labeled zone.# zlogin -C labeled-zonename
Remove the rfc1179 service's dependency on the print/server service.labeled-zone # cat <<EOF | svccfg
select application/print/rfc1179
delpg lpsched
end
EOF
labeled-zone # svcadm refresh application/print/rfc1179
Ensure that the rfc1179 service is enabled.labeled-zone # svcadm enable rfc1179
If the labeled zone was installed with netservices limited, enable the printer to reach thenetwork.
The rfc1179 service must listen on addresses other than localhost. The LP service listens onlyon a named pipe.# inetadm -m svc:/application/print/rfc1179:default bind_addr=’’
# svcadm refresh rfc1179
Note – If you are running netservices open, the preceding command generates the followingmessage: Error: "inetd" property group missing.
Configure cascade printing from the labeled zone.labeled-zone # lpset -n system -a spooling-type=cascade printer-name
This command updates the zone's /etc/printers.conf file.
Test a Solaris system that is on the same subnet as this labeled zone.
Before You Begin
1
2
3
4
5
6
Configuring Labeled Printing (Task Map)
Chapter 15 • Managing Labeled Printing (Tasks) 207

For example, test the Solaris1 system. This system is on the same subnet as the internal zone.The configuration parameters are the following:■ math-printer IP address is 192.168.4.6■ Solaris1 IP address is 192.168.4.12■ internal zone IP address is 192.168.4.17
Solaris1# uname -a
SunOS Solaris1 Generic_120011-11 sun4u sparc SUNW,Sun-Blade-1000
Solaris1# lpadmin -p math-printer -s 192.168.4.17
Solaris1# lpadmin -d math-printer
Solaris1# lpstat -t
scheduler is not running
system default destination: math-printer
system for _default: 192.168.4.17 (as printer math-printer)
system for math-printer: 192.168.4.17
default accepting requests since Feb 28 00:00 2008
math-printer accepting requests since Feb 28 00:00 2008
printer _default is idle. enabled since Feb 28 00:00 2008. available.
printer math-printer is idle. enabled since Feb 28 00:00 2008. available.
■ Test the lp command.Solaris1# lp /etc/hosts
request id is math-printer-1 (1 file)
■ Test printing from applications such as StarOffice and the browser.
Test a Windows 2003 server that is on the same subnet as this labeled zone.
a. Set up the printer on the Windows server.Use the Start Menu->Settings->Printers & Faxes GUI.Specify the following printer configuration:■ Add A Printer■ Local Printer attached to this computer■ Create a new port – Standard TCP/IP Port■ Printer Name or IP Address – 192.168.4.17, that is, the IP address of the labeled zone■ Port Name – Accept default■ Additional Port Information Required – Accept default
■ Device Type = Custom■ Settings – Protocol = LPR■ LPR Settings – Queue Name = math-printer, that is, the UNIX Queue Name■ LPR Byte Counting Enabled
7
Configuring Labeled Printing (Task Map)
Oracle Solaris Trusted Extensions Administrator's Procedures • September 2010208

Finish the printer prompts by specifying the manufacturer, model, driver and other printerparameters.
Test the printer by selecting the printer from an application.For example, test the winserver system that is on the same subnet as the internal zone. Theconfiguration parameters are the following:
■ math-printer IP address is 192.168.4.6■ winserver IP address is 192.168.4.200■ internal zone IP address is 192.168.4.17
winserver C:/> ipconfig
Windows IP Configuration
Ethernet adapter TP-NIC:
Connection-specific DNS Suffix . :
IP Address. . . . . . . . . . . . : 192.168.4.200
Subnet Mask . . . . . . . . . . . : 255.255.255.0
Default Gateway . . . . . . . . . : 192.168.4.17
▼ How to Configure a Zone for Single-Label PrintingThe zone must not be sharing an IP address with the global zone. You must be in the SystemAdministrator role in the global zone.
Add a workspace.For details, see “How to Add a Workspace at a Particular Label” in Oracle Solaris TrustedExtensions User’s Guide.
Change the label of the new workspace to the label of the zone that will be the print server forthat label.For details, see “How to Change the Label of a Workspace” in Oracle Solaris Trusted ExtensionsUser’s Guide.
Define the characteristics of the connected printers.
a. At the label of zone, start the Print Manager.By default, the “Use PPD” checkbox is selected. The system finds the appropriate driver forthe printer.
b. (Optional) To specify a different printer driver, do the following:
i. Remove the check from“Use PPD”.
8
Before You Begin
1
2
3
Configuring Labeled Printing (Task Map)
Chapter 15 • Managing Labeled Printing (Tasks) 209
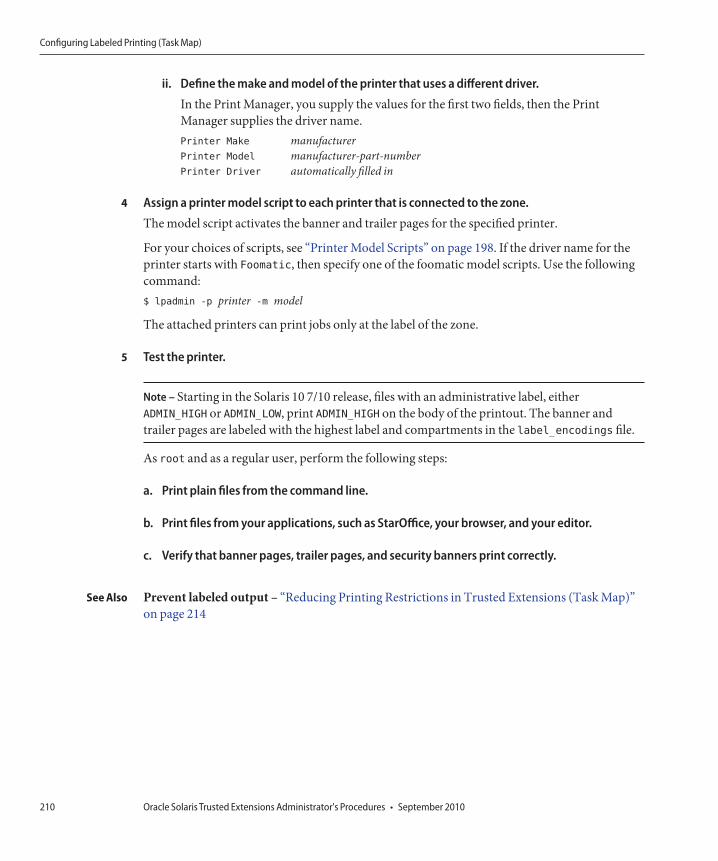
ii. Define the make and model of the printer that uses a different driver.
In the Print Manager, you supply the values for the first two fields, then the PrintManager supplies the driver name.Printer Make manufacturerPrinter Model manufacturer-part-numberPrinter Driver automatically filled in
Assign a printer model script to each printer that is connected to the zone.
The model script activates the banner and trailer pages for the specified printer.
For your choices of scripts, see “Printer Model Scripts” on page 198. If the driver name for theprinter starts with Foomatic, then specify one of the foomatic model scripts. Use the followingcommand:$ lpadmin -p printer -m model
The attached printers can print jobs only at the label of the zone.
Test the printer.
Note – Starting in the Solaris 10 7/10 release, files with an administrative label, eitherADMIN_HIGH or ADMIN_LOW, print ADMIN_HIGH on the body of the printout. The banner andtrailer pages are labeled with the highest label and compartments in the label_encodings file.
As root and as a regular user, perform the following steps:
a. Print plain files from the command line.
b. Print files from your applications, such as StarOffice, your browser, and your editor.
c. Verify that banner pages, trailer pages, and security banners print correctly.
Prevent labeled output – “Reducing Printing Restrictions in Trusted Extensions (Task Map)”on page 214
4
5
See Also
Configuring Labeled Printing (Task Map)
Oracle Solaris Trusted Extensions Administrator's Procedures • September 2010210
▼ How to Enable a Trusted Extensions Client to Access aPrinterInitially, only the zone in which a print server was configured can print to the printers of thatprint server. The system administrator must explicitly add access to those printers for otherzones and systems. The possibilities are as follows:■ For a global zone, add access to the printers that are connected to a global zone on a different
system.■ For a labeled zone, add access to the printers that are connected to the global zone of its
system.■ For a labeled zone, add access to a printer that a remote zone at the same label is configured
for.■ For a labeled zone, add access to the printers that are connected to a global zone on a
different system.
A print server has been configured with a label range or a single label, and the printers that areconnected to it have been configured. For details, see the following:■ “How to Configure a Multilevel Print Server and Its Printers” on page 201■ “How to Configure a Zone for Single-Label Printing” on page 209■ “How to Assign a Label to an Unlabeled Print Server” on page 215
You must be in the System Administrator role in the global zone, or be able to assume the role.
Complete the procedures that enable your systems to access a printer.
■ Configure the global zone on a system that is not a print server to use another system'sglobal zone for printer access.
a. On the system that does not have printer access, assume the System Administrator role.
b. Add access to the printer that is connected to the Trusted Extensions print server.$ lpadmin -s printer
■ Configure a labeled zone to use its global zone for printer access.
a. Change the label of the role workspace to the label of the labeled zone.For details, see “How to Change the Label of a Workspace” in Oracle Solaris TrustedExtensions User’s Guide.
b. Add access to the printer.$ lpadmin -s printer
Before You Begin
1
Configuring Labeled Printing (Task Map)
Chapter 15 • Managing Labeled Printing (Tasks) 211

■ Configure a labeled zone to use another system's labeled zone for printer access.
The labels of the zones must be identical.
a. On the system that does not have printer access, assume the System Administrator role.
b. Change the label of the role workspace to the label of the labeled zone.
For details, see “How to Change the Label of a Workspace” in Oracle Solaris TrustedExtensions User’s Guide.
c. Add access to the printer that is connected to the print server of the remote labeled zone.$ lpadmin -s printer
■ Configure a labeled zone to use an unlabeled print server for printer access.
The label of the zone must be identical to the label of the print server.
a. On the system that does not have printer access, assume the System Administrator role.
b. Change the label of the role workspace to the label of the labeled zone.
For details, see “How to Change the Label of a Workspace” in Oracle Solaris TrustedExtensions User’s Guide.
c. Add access to the printer that is connected to the arbitrarily labeled print server.$ lpadmin -s printer
Test the printers.
Starting in the Solaris 10 7/10 release, files with an administrative label, either ADMIN_HIGH orADMIN_LOW, print ADMIN_HIGH on the body of the printout. The banner and trailer pages arelabeled with the highest label and compartments in the label_encodings file.
On every client, test that printing works for root and roles in the global zone and for root,roles, and regular users in labeled zones.
a. Print plain files from the command line.
b. Print files from your applications, such as StarOffice, your browser, and your editor.
c. Verify that banner pages, trailer pages, and security banners print correctly.
2
Configuring Labeled Printing (Task Map)
Oracle Solaris Trusted Extensions Administrator's Procedures • September 2010212

▼ How to Configure a Restricted Label Range for aPrinterThe default printer label range is ADMIN_LOW to ADMIN_HIGH. This procedure narrows the labelrange for a printer that is controlled by a Trusted Extensions print server.
You must be in the Security Administrator role in the global zone.
Start the Device Allocation Manager.
■ Choose the Allocate Device option from the Trusted Path menu.
■ In Trusted CDE, launch the Device Allocation Manager action from the Tools subpanel on theFront Panel.
Click the Device Administration button to display the Device Allocation: Administration dialogbox.
Type a name for the new printer.If the printer is attached to your system, find the name of the printer.
Click the Configure button to display the Device Allocation: Configuration dialog box.
Change the printer's label range.
a. Click the Min Label button to change the minimum label.Choose a label from the label builder. For information about the label builder, see “LabelBuilder in Trusted Extensions” on page 43.
b. Click the Max Label button to change the maximum label.
Save the changes.
a. Click OK in the Configuration dialog box.
b. Click OK in the Administration dialog box.
Close the Device Allocation Manager.
Before You Begin
1
2
3
4
5
6
7
Configuring Labeled Printing (Task Map)
Chapter 15 • Managing Labeled Printing (Tasks) 213

Reducing Printing Restrictions in Trusted Extensions (TaskMap)
The following tasks are optional. They reduce the printing security that Trusted Extensionsprovides by default when the software is installed.
Task Description For Instructions
Configure a printer to not labeloutput.
Prevents security information from printing on bodypages, and removes banner and trailer pages.
“How to Remove Labels From PrintedOutput” on page 214
Configure printers at a singlelabel without labeled output.
Enables users to print at a specific label to a Solarisprinter. The print jobs are not marked with labels.
“How to Assign a Label to an UnlabeledPrint Server” on page 215
Remove visible labeling of bodypages.
Modifies the tsol_separator.ps file to preventlabeled body pages on all print jobs that are sent froma Trusted Extensions host.
“How to Remove Page Labels From AllPrint Jobs” on page 216
Suppress banner and trailerpages.
Authorizes specific users to print jobs without bannerand trailer pages.
“How to Suppress Banner and TrailerPages for Specific Users” on page 217
Enable trusted users to printjobs without labels.
Authorizes specific users or all users of a particularsystem to print jobs without labels.
“How to Enable Specific Users to SuppressPage Labels” on page 216
Enable the printing of PostScriptfiles.
Authorizes specific users or all users of a particularsystem to print PostScript files.
“How to Enable Users to Print PostScriptFiles in Trusted Extensions” on page 217
Assign printing authorizations. Enables users to bypass default printing restrictions. “How to Create a Rights Profile forConvenient Authorizations” on page 92
“How to Modify policy.conf Defaults” onpage 84
▼ How to Remove Labels From Printed OutputPrinters that do not have a Trusted Extensions printer model script do not print labeled banneror trailer pages. The body pages also do not include labels.
You must be in the Security Administrator role in the global zone.
At the appropriate label, do one of the following:
■ From the print server, stop banner printing altogether.$ lpadmin -p printer -o nobanner=never
Body pages are still labeled.
Before You Begin
●
Reducing Printing Restrictions in Trusted Extensions (Task Map)
Oracle Solaris Trusted Extensions Administrator's Procedures • September 2010214

■ Set the printer model script to a Solaris script.$ lpadmin -p printer \
-m { standard | netstandard | standard_foomatic | netstandard_foomatic }
No labels appear on printed output.
▼ How to Assign a Label to an Unlabeled Print ServerA Solaris print server is an unlabeled print server that can be assigned a label for TrustedExtensions access to the printer at that label. Printers that are connected to an unlabeled printserver can print jobs only at the label that has been assigned to the print server. Jobs printwithout labels or trailer pages and might print without banner pages. If a job prints with abanner page, the page does not contain any security information.
A Trusted Extensions system can be configured to submit jobs to a printer that is managed byan unlabeled print server. Users can print jobs on the unlabeled printer at the label that thesecurity administrator assigns to the print server.
You must be in the Security Administrator role in the global zone.
Open the Solaris Management Console in the appropriate scope.For details, see “Initialize the Solaris Management Console Server in Trusted Extensions” inOracle Solaris Trusted Extensions Configuration Guide.
Under System Configuration, navigate to the Computers and Networks tool.Provide a password when prompted.
Assign an unlabeled template to the print server.For details, see “How to Assign a Security Template to a Host or a Group of Hosts” on page 174.
Choose a label. Users who are working at that label can send print jobs to the Solaris printer atthe label of the print server. Pages do not print with labels, and banner and trailer pages are alsonot part of the print job.
Sending Public Print Jobs to an Unlabeled Printer
Files that are available to the general public are suitable for printing to an unlabeled printer. Inthis example, marketing writers need to produce documents that do not have labels printed onthe top and bottom of the pages.
The security administrator assigns an unlabeled host type template to the Solaris print server.The template is described in Example 13–6. The arbitrary label of the template is PUBLIC. Theprinter pr-nolabel1 is connected to this print server. Print jobs from users in a PUBLIC zone
Before You Begin
1
2
3
Example 15–2
Reducing Printing Restrictions in Trusted Extensions (Task Map)
Chapter 15 • Managing Labeled Printing (Tasks) 215
print on the pr-nolabel1 printer with no labels. Depending on the settings for the printer, thejobs might or might not have banner pages. The banner pages do not contain securityinformation.
▼ How to Remove Page Labels From All Print JobsThis procedure prevents all print jobs on a Trusted Extensions printer from including visiblelabels on the body pages of the print job.
You must be in the Security Administrator role in the global zone.
Edit the /usr/lib/lp/postscript/tsol_separator.ps file.Use the trusted editor. For details, see “How to Edit Administrative Files in Trusted Extensions”on page 54.
Find the definition of /PageLabel.Find the following lines:%% To eliminate page labels completely, change this line to
%% set the page label to an empty string: /PageLabel () def
/PageLabel Job_PageLabel def
Note – The value Job_PageLabel might be different at your site.
Replace the value of /PageLabelwith a set of empty parentheses./PageLabel () def
▼ How to Enable Specific Users to Suppress Page LabelsThis procedure enables an authorized user or role to print jobs on a Trusted Extensions printerwithout labels on the top and bottom of each body page. Page labels are suppressed for all labelsat which the user can work.
You must be in the Security Administrator role in the global zone.
Determine who is permitted to print jobs without page labels.
Authorize those users and roles to print jobs without page labels.Assign a rights profile that includes the Print without Label authorization to those users androles. For details, see “How to Create a Rights Profile for Convenient Authorizations” onpage 92.
Before You Begin
1
2
3
Before You Begin
1
2
Reducing Printing Restrictions in Trusted Extensions (Task Map)
Oracle Solaris Trusted Extensions Administrator's Procedures • September 2010216

Instruct the user or role to use the lp command to submit print jobs:% lp -o nolabels staff.mtg.notes
▼ How to Suppress Banner and Trailer Pages for SpecificUsersYou must be in the Security Administrator role in the global zone.
Create a rights profile that includes the Print without Banner authorization.Assign the profile to each user or role that is allowed to print without banner and trailer pages.
For details, see “How to Create a Rights Profile for Convenient Authorizations” on page 92.
Instruct the user or role to use the lp command to submit print jobs:% lp -o nobanner staff.mtg.notes
▼ How to Enable Users to Print PostScript Files in TrustedExtensionsYou must be in the Security Administrator role in the global zone.
Use one of the following three methods to enable users to print PostScript files:
■ To enable PostScript printing on a system, modify the /etc/default/print file.
a. Create or modify the /etc/default/print file.Use the trusted editor. For details, see “How to Edit Administrative Files in TrustedExtensions” on page 54.
b. Type the following entry:PRINT_POSTSCRIPT=1
c. Save the file and close the editor.
■ To authorize all users to print PostScript files from a system, modify the/etc/security/policy.conf file.
a. Modify the policy.conf file.Use the trusted editor. For details, see “How to Edit Administrative Files in TrustedExtensions” on page 54.
3
Before You Begin
1
2
Before You Begin
●
Reducing Printing Restrictions in Trusted Extensions (Task Map)
Chapter 15 • Managing Labeled Printing (Tasks) 217

b. Add the solaris.print.ps authorization.AUTHS_GRANTED=other-authorizations,solaris.print.ps
c. Save the file and close the editor.
■ To enable a user or role to print PostScript files from any system, give just those users androles the appropriate authorization.Assign a profile that includes the Print Postscript authorization to those users and roles.For details, see “How to Create a Rights Profile for Convenient Authorizations” on page 92.
Enabling PostScript Printing From a Public System
In the following example, the security administrator has constrained a public kiosk to operate atthe PUBLIC label. The system also has a few icons that open topics of interest. These topics canbe printed.
The security administrator creates an /etc/default/print file on the system. The file has oneentry to enable the printing of PostScript files. No user needs a Print Postscriptauthorization.
# vi /etc/default/print
# PRINT_POSTSCRIPT=0
PRINT_POSTSCRIPT=1
Example 15–3
Reducing Printing Restrictions in Trusted Extensions (Task Map)
Oracle Solaris Trusted Extensions Administrator's Procedures • September 2010218

Devices in Trusted Extensions (Overview)
This chapter describes the extensions that Solaris Trusted Extensions provides to Solaris deviceprotection.
■ “Device Protection With Trusted Extensions Software” on page 219■ “Device Allocation Manager GUI” on page 221■ “Enforcement of Device Security in Trusted Extensions” on page 223■ “Devices in Trusted Extensions (Reference)” on page 223
Device Protection With Trusted Extensions SoftwareOn a Solaris system, devices can be protected by allocation and by authorization. By default,devices are available to regular users without an authorization. A system that is configured withTrusted Extensions software uses the device protection mechanisms of the Solaris OS.
However, by default, Trusted Extensions requires that a device be allocated for use, and that theuser be authorized to use the device. In addition, devices are protected by labels. TrustedExtensions provides a graphical user interface (GUI) for administrators to manage devices. Thesame interface is used by users to allocate devices.
Note – In Trusted Extensions, users cannot use the allocate and deallocate commands. Usersmust use the Device Allocation Manager. In Solaris Trusted Extensions (JDS), the title of theGUI is Device Manager.
For information about device protection in the Solaris OS, see Chapter 4, “Controlling Accessto Devices (Tasks),” in System Administration Guide: Security Services.
16C H A P T E R 1 6
219

On a system that is configured with Trusted Extensions, two roles protect devices.
■ The System Administrator role controls access to peripheral devices.The system administrator makes a device allocatable. Devices that the system administratormakes nonallocatable cannot be used by anyone. Allocatable devices can be allocated onlyby authorized users.
■ The Security Administrator role restricts the labels at which a device can be accessed andsets device policy. The security administrator decides who is authorized to allocate a device.
The following are the main features of device control with Trusted Extensions software:
■ By default, an unauthorized user on a Trusted Extensions system cannot allocate devicessuch as tape drives, CD-ROM drives, or diskette drives.A regular user with the Allocate Device authorization can import or export information atthe label at which the user allocates the device.
■ Users invoke the Device Allocation Manager to allocate devices when they are logged indirectly. To allocate a device remotely, users must have access to the global zone. Typically,only roles have access to the global zone.
■ The label range of each device can be restricted by the security administrator. Regular usersare limited to accessing devices whose label range includes the labels at which the users areallowed to work. The default label range of a device is ADMIN_LOW to ADMIN_HIGH.
■ Label ranges can be restricted for both allocatable and nonallocatable devices.Nonallocatable devices are devices such as frame buffers and printers.
Device Label RangesTo prevent users from copying sensitive information, each allocatable device has a label range.To use an allocatable device, the user must be currently operating at a label within the device'slabel range. If the user is not, allocation is denied. The user's current label is applied to data thatis imported or exported while the device is allocated to the user. The label of exported data isdisplayed when the device is deallocated. The user must physically label the medium thatcontains the exported data.
Effects of Label Range on a DeviceTo restrict direct login access through the console, the security administrator can set a restrictedlabel range on the frame buffer.
For example, a restricted label range might be specified to limit access to a publicly accessiblesystem. The label range enables users to access the system only at a label within the framebuffer's label range.
Device Protection With Trusted Extensions Software
Oracle Solaris Trusted Extensions Administrator's Procedures • September 2010220

When a host has a local printer, a restricted label range on the printer limits the jobs that can beprinted on the printer.
Device Access PoliciesTrusted Extensions follows the same device policies as the Solaris OS. The securityadministrator can change default policies and define new policies. The getdevpolicycommand retrieves information about device policy, and the update_drv command changesdevice policy. For more information, see “Configuring Device Policy (Task Map)” in SystemAdministration Guide: Security Services. See also the getdevpolicy(1M) and update_drv(1M)man pages.
Device-Clean ScriptsA device-clean script is run when a device is allocated or deallocated. The Solaris OS providesscripts for tape drives, CD-ROM drives, and diskette drives. If your site adds allocatable devicetypes to the system, the added devices might need scripts. To see existing scripts, go to the/etc/security/lib directory. For more information, see “Device-Clean Scripts” in SystemAdministration Guide: Security Services.
For Trusted Extensions software, device-clean scripts must satisfy certain requirements. Theserequirements are described in the device_clean(5) man page.
Device Allocation Manager GUIThe Device Allocation Manager is used by administrators to administer allocatable andnonallocatable devices. The Device Allocation Manager is also used by regular users to allocateand deallocate devices. The users must have the Allocate Device authorization. In a SolarisTrusted Extensions (CDE) workspace, the Device Allocation Manager is opened from the FrontPanel. The icon appears as follows:
In a Solaris Trusted Extensions (JDS) workspace, the GUI is called the Device Manager. ThisGUI is started from the Trusted Path menu by selecting Allocate Device. In Trusted CDE, youcan also start the GUI from the Trusted Path menu. The following figure shows a DeviceAllocation Manager that was opened by a user who can allocate the audio device.
Device Allocation
Device Allocation Manager GUI
Chapter 16 • Devices in Trusted Extensions (Overview) 221

Users see an empty list when they are not authorized to allocate devices. Or, an empty list mightindicate that the allocatable devices are currently allocated by another user or are in an errorstate. If a user cannot see a device in the Available Devices list, the user needs to contact theresponsible administrator.
The Device Administration feature is available to roles that have either one or both of theauthorizations that are needed to administer devices. The administration authorizations areConfigure Device Attributes, and Revoke or Reclaim Device. The following figure shows aDevice Allocation Administration dialog box.
FIGURE 16–1 Device Allocation Manager Opened by a User
Device Allocation Manager GUI
Oracle Solaris Trusted Extensions Administrator's Procedures • September 2010222

In a Solaris Trusted Extensions (JDS), the Device Administration button is calledAdministration.
Enforcement of Device Security in Trusted ExtensionsThe security administrator decides who can allocate devices and makes sure that any user whois authorized to use devices is trained. The user is trusted to do the following:
■ Properly label and handle any media containing exported sensitive information so that theinformation does not become available to anyone who should not see it.For example, if information at a label of NEED TO KNOW ENGINEERING is stored on a diskette,the person who exports the information must physically label the disk with the NEED TOKNOW ENGINEERING label. The diskette must be stored where it is accessible only to membersof the engineering group with a need to know.
■ Ensure that labels are properly maintained on any information being imported (read) frommedia on these devices.An authorized user must allocate the device at the label that matches the label of theinformation that is being imported. For example, if a user allocates a diskette drive atPUBLIC, the user must only import information labeled PUBLIC.
The security administrator is also responsible for enforcing proper compliance with thesesecurity requirements.
Devices in Trusted Extensions (Reference)Trusted Extensions device protection uses Solaris interfaces and Trusted Extensions interfaces.
For Solaris command-line interfaces, see “Device Protection (Reference)” in SystemAdministration Guide: Security Services.
Administrators who do not have access to the Device Allocation Manager can administerallocatable devices by using the command line. The allocate and deallocate commands haveadministrative options. For examples, see “Forcibly Allocating a Device” in SystemAdministration Guide: Security Services and “Forcibly Deallocating a Device” in SystemAdministration Guide: Security Services.
For Trusted Extensions command-line interfaces, see the add_allocatable(1M) andremove_allocatable(1M) man pages.
Devices in Trusted Extensions (Reference)
Chapter 16 • Devices in Trusted Extensions (Overview) 223

224

Managing Devices for Trusted Extensions(Tasks)
This chapter describes how to administer and use devices on a system that is configured withSolaris Trusted Extensions.
■ “Handling Devices in Trusted Extensions (Task Map)” on page 225■ “Using Devices in Trusted Extensions (Task Map)” on page 226■ “Managing Devices in Trusted Extensions (Task Map)” on page 226■ “Customizing Device Authorizations in Trusted Extensions (Task Map)” on page 236
Handling Devices in Trusted Extensions (Task Map)The following task map points to task maps for administrators and users for handlingperipheral devices.
Task Description For Instructions
Use devices. Uses a device as a role or as a regular user. “Using Devices in Trusted Extensions (Task Map)”on page 226
Administer devices. Configures devices for ordinary users. “Managing Devices in Trusted Extensions (TaskMap)” on page 226
Customize deviceauthorizations.
The Security Administrator role creates newauthorizations, adds them to the device, places them ina rights profile and assigns this profile to the user.
“Customizing Device Authorizations in TrustedExtensions (Task Map)” on page 236
17C H A P T E R 1 7
225

Using Devices in Trusted Extensions (Task Map)In Trusted Extensions, all roles are authorized to allocate a device. Like users, roles must use theDevice Allocation Manager. The Solaris allocate command does not work in TrustedExtensions. The following task map points to user procedures that include using devices toperform administrative tasks.
Task For Instructions
Allocate and deallocate a device. “How to Allocate a Device in Trusted Extensions” in Oracle Solaris TrustedExtensions User’s Guide
“Workspace Switch Area” in Oracle Solaris Trusted Extensions User’s Guide
Use portable media to transfer files. “How to Copy Files From Portable Media in Trusted Extensions” in OracleSolaris Trusted Extensions Configuration Guide
“How to Copy Files to Portable Media in Trusted Extensions” in Oracle SolarisTrusted Extensions Configuration Guide
Managing Devices in Trusted Extensions (Task Map)The following task map describes procedures to protect devices at your site.
Task Description For Instructions
Set or modify device policy. Changes the privileges that are required to accessa device.
“Configuring Device Policy (Task Map)” inSystem Administration Guide: SecurityServices
Authorize users to allocate a device. The Security Administrator role assigns a profilewith the Allocate Device authorization to the user.
“How to Authorize Users to Allocate aDevice” in System Administration Guide:Security Services
The Security Administrator role assigns a profilewith the site-specific authorizations to the user.
“Customizing Device Authorizations inTrusted Extensions (Task Map)” onpage 236
Configure a device. Chooses security features to protect the device. “How to Configure a Device in TrustedExtensions” on page 227
Revoke or reclaim a device. Uses the Device Allocation Manager to make adevice available for use.
“How to Revoke or Reclaim a Device inTrusted Extensions” on page 230
Uses Solaris commands to make a device availableor unavailable for use.
“Forcibly Allocating a Device” in SystemAdministration Guide: Security Services
“Forcibly Deallocating a Device” in SystemAdministration Guide: Security Services
Using Devices in Trusted Extensions (Task Map)
Oracle Solaris Trusted Extensions Administrator's Procedures • September 2010226

Task Description For Instructions
Prevent access to an allocatabledevice.
Provides fine–grained access control to a device. Example 17–4
Denies everyone access to an allocatable device. Example 17–1
Protect printers and frame buffers. Ensures that nonallocatable devices are notallocatable.
“How to Protect Nonallocatable Devices inTrusted Extensions” on page 231
Configure serial login devices. Enables logins by serial port. “How to Configure a Serial Line for Logins”on page 232
Enable a CD player program to beused.
Enables an audio player program to openautomatically when a music CD is inserted.
“How to Configure an Audio PlayerProgram for Use in Trusted CDE” onpage 233
Prevent the File Manager fromdisplaying.
Prevents the File Manager from displaying after adevice has been allocated.
“How to Prevent the File Manager FromDisplaying After Device Allocation” onpage 234
Use a new device-clean script. Places a new script in the appropriate places. “How to Add a Device_Clean Script inTrusted Extensions” on page 235
▼ How to Configure a Device in Trusted ExtensionsBy default, an allocatable device has a label range from ADMIN_LOW to ADMIN_HIGH and must beallocated for use. Also, users must be authorized to allocate the device. These defaults can bechanged.
You must be in the Security Administrator role in the global zone.Before You Begin
Managing Devices in Trusted Extensions (Task Map)
Chapter 17 • Managing Devices for Trusted Extensions (Tasks) 227

From the Trusted Path menu, select Allocate Device.
The Device Allocation Manager appears.
View the default security settings.
Click Device Administration, then highlight the device. The following figure shows a CD-ROMdrive with default security settings.
1
2
Managing Devices in Trusted Extensions (Task Map)
Oracle Solaris Trusted Extensions Administrator's Procedures • September 2010228
(Optional) Restrict the label range on the device.
a. Set the minimum label.
Click the Min Label... button. Choose a minimum label from the label builder. Forinformation about the label builder, see “Label Builder in Trusted Extensions” on page 43.
b. Set the maximum label.
Click the Max Label... button. Choose a maximum label from the label builder.
Specify if the device can be allocated locally.
In the Device Allocation Configuration dialog box, under For Allocations From Trusted Path,select an option from the Allocatable By list. By default, the Authorized Users option is checked.Therefore, the device is allocatable and users must be authorized.
■ To make the device nonallocatable, click No Users.
When configuring a printer, frame buffer, or other device that must not be allocatable, selectNo Users.
■ To make the device allocatable, but to not require authorization, click All Users.
Specify if the device can be allocated remotely.
In the For Allocations From Non-Trusted Path section, select an option from the Allocatable Bylist. By default, the Same As Trusted Path option is checked.
■ To require user authorization, select Allocatable by Authorized Users.
■ To make the device nonallocatable by remote users, select No Users.
■ To make the device allocatable by anyone, select All Users.
3
4
5
Managing Devices in Trusted Extensions (Task Map)
Chapter 17 • Managing Devices for Trusted Extensions (Tasks) 229

If the device is allocatable, and your site has created new device authorizations, select theappropriate authorization.
The following dialog box shows the solaris.device.allocate authorization is required toallocate the cdrom0 device.
To create and use site-specific device authorizations, see “Customizing Device Authorizationsin Trusted Extensions (Task Map)” on page 236.
To save your changes, click OK.
▼ How to Revoke or Reclaim a Device in TrustedExtensionsIf a device is not listed in the Device Allocation Manager, it might already be allocated or itmight be in an allocate error state. The system administrator can recover the device for use.
You must be in the System Administrator role in the global zone. This role includes thesolaris.device.revoke authorization.
6
7
Before You Begin
Managing Devices in Trusted Extensions (Task Map)
Oracle Solaris Trusted Extensions Administrator's Procedures • September 2010230

From the Trusted Path menu, select Allocate Device.In the following figure, the audio device is already allocated to a user.
Click the Device Administration button.
Check the status of a device.Select the device name and check the State field.
■ If the State field is Allocate Error State, click the Reclaim button.
■ If the State field is Allocated, do one of the following:
■ Ask the user in the Owner field to deallocate the device.
■ Force deallocation of the device by clicking the Revoke button.
Close the Device Allocation Manager.
▼ How to Protect Nonallocatable Devices in TrustedExtensionsThe No Users option in the Allocatable By section of the Device Configuration dialog box isused most often for the frame buffer and printer, which do not have to be allocated to be used.
You must be in the Security Administrator role in the global zone.
From the Trusted Path menu, select Allocate Device.
In the Device Allocation Manager, click the Device Administration button.
1
2
3
4
Before You Begin
1
2
Managing Devices in Trusted Extensions (Task Map)
Chapter 17 • Managing Devices for Trusted Extensions (Tasks) 231

Select the new printer or frame buffer.
a. To make the device nonallocatable, click No Users.
b. (Optional) Restrict the label range on the device.
i. Set the minimum label.
Click the Min Label... button. Choose a minimum label from the label builder. Forinformation about the label builder, see “Label Builder in Trusted Extensions” onpage 43.
ii. Set the maximum label.
Click the Max Label... button. Choose a maximum label from the label builder.
Preventing Remote Allocation of the Audio Device
The No Users option in the Allocatable By section prevents remote users from hearingconversations around a remote system.
The security administrator configures the audio device in the Device Allocation Manager asfollows:
Device Name: audio
For Allocations From: Trusted Path
Allocatable By: Authorized Users
Authorizations: solaris.device.allocate
Device Name: audio
For Allocations From: Non-Trusted Pathh
Allocatable By: No Users
▼ How to Configure a Serial Line for LoginsYou must be in the Security Administrator role in the global zone.
Open the Solaris Management Console in the Files scope.
3
Example 17–1
Before You Begin
1
Managing Devices in Trusted Extensions (Task Map)
Oracle Solaris Trusted Extensions Administrator's Procedures • September 2010232

Under Devices and Hardware, navigate to Serial Ports.
Provide a password when prompted. Follow the online help to configure the serial port.
To change the default label range, open the Device Allocation Manager.
The default label range is ADMIN_LOW to ADMIN_HIGH.
Restricting the Label Range of a Serial Port
After creating a serial login device, the security administrator restricts the label range of theserial port to a single label, Public. The administrator sets the following values in the DeviceAdministration dialog boxes.
Device Name: /dev/term/[a|b]
Device Type: tty
Clean Program: /bin/true
Device Map: /dev/term/[a|b]
Minimum Label: Public
Maximum Label: Public
Allocatable By: No Users
▼ How to Configure an Audio Player Program for Use inTrusted CDEThe following procedure enables an audio player to open automatically in a Trusted CDEworkspace when a user inserts a music CD. For the user's procedure, see the example in “How toAllocate a Device in Trusted Extensions” in Oracle Solaris Trusted Extensions User’s Guide.
FIGURE 17–1 Serial Ports Tool in the Solaris Management Console
2
3
Example 17–2
Managing Devices in Trusted Extensions (Task Map)
Chapter 17 • Managing Devices for Trusted Extensions (Tasks) 233
Note – In a Trusted JDS workspace, users specify the behavior of removable media just as theyspecify it in a non-trusted workspace.
You must be in the System Administrator role in the global zone.
Edit the /etc/rmmount.conf file.
Use the trusted editor. For details, see “How to Edit Administrative Files in Trusted Extensions”on page 54.
Add your site's CD player program to the cdrom action in the file.action media action_program.so path-to-program
Configuring an Audio Player Program for Use
In the following example, the system administrator makes the workman program available to allusers of a system. The workman program is an audio player program.
# /etc/rmmount.conf file
action cdrom action_workman.so /usr/local/bin/workman
▼ How to Prevent the File Manager From DisplayingAfter Device AllocationBy default, the File Manager displays when a device is mounted. If you are not mounting devicesthat have file systems, you might want to prevent the File Manager from displaying.
You must be in the System Administrator role in the global zone.
Edit the /etc/rmmount.conf file.
Use the trusted editor. For details, see “How to Edit Administrative Files in Trusted Extensions”on page 54.
Find the following filemgr actions:action cdrom action_filemgr.so
action floppy action_filemgr.so
Before You Begin
1
2
Example 17–3
Before You Begin
1
2
Managing Devices in Trusted Extensions (Task Map)
Oracle Solaris Trusted Extensions Administrator's Procedures • September 2010234

Comment out the appropriate action.The following example shows the action_filemgr.so actions commented out for both thecdrom and diskette devices.# action cdrom action_filemgr.so
# action floppy action_filemgr.so
When a CDROM or diskette is allocated, the File Manager does not display.
▼ How to Add a Device_Clean Script in TrustedExtensionsIf no device_clean script is specified at the time a device is created, the default script,/bin/true, is used.
Have ready a script that purges all usable data from the physical device and that returns 0 forsuccess. For devices with removable media, the script attempts to eject the media if the user doesnot do so. The script puts the device into the allocate error state if the medium is not ejected. Fordetails about the requirements, see the device_clean(5) man page.
You must be in the System Administrator role in the global zone.
Copy the script into the /etc/security/lib directory.
In the Device Administration dialog box, specify the full path to the script.
a. Open the Device Allocation Manager.
b. Click the Device Administration button.
c. Select the name of the device, and click the Configure button.
d. In the Clean Program field, type the full path to the script.
Save your changes.
3
Before You Begin
1
2
3
Managing Devices in Trusted Extensions (Task Map)
Chapter 17 • Managing Devices for Trusted Extensions (Tasks) 235

Customizing Device Authorizations in Trusted Extensions(Task Map)
The following task map describes procedures to change device authorizations at your site.
Task Description For Instructions
Create new device authorizations. Creates site-specific authorizations. “How to Create New DeviceAuthorizations” on page 236
Add authorizations to a device. Adds site-specific authorizations to selecteddevices.
“How to Add Site-Specific Authorizationsto a Device in Trusted Extensions” onpage 239
Assign device authorizations tousers and roles.
Enables users and roles to use the newauthorizations.
“How to Assign Device Authorizations” onpage 240
▼ How to Create New Device AuthorizationsIf no authorization is specified at the time a device is created, by default, all users can use thedevice. If an authorization is specified, then, by default, only authorized users can use thedevice.
To prevent all access to an allocatable device without using authorizations, see Example 17–1.
You must be in the Security Administrator role in the global zone.
Edit the auth_attrfile.
Use the trusted editor. For details, see “How to Edit Administrative Files in Trusted Extensions”on page 54.
Create a heading for the new authorizations.
Use the reverse-order Internet domain name of your organization followed by optionaladditional arbitrary components, such as the name of your company. Separate components bydots. End heading names with a dot.domain-suffix.domain-prefix.optional.:::Company Header::help=Company.html
Before You Begin
1
2
Customizing Device Authorizations in Trusted Extensions (Task Map)
Oracle Solaris Trusted Extensions Administrator's Procedures • September 2010236
Add new authorization entries.Add the authorizations, one authorization per line. The lines are split for display purposes. Theauthorizations include grant authorizations that enable administrators to assign the newauthorizations.domain-suffix.domain-prefix.grant:::Grant All Company Authorizations::
help=CompanyGrant.htmldomain-suffix.domain-prefix.grant.device:::Grant Company Device Authorizations::
help=CompanyGrantDevice.htmldomain-suffix.domain-prefix.device.allocate.tape:::Allocate Tape Device::
help=CompanyTapeAllocate.htmldomain-suffix.domain-prefix.device.allocate.floppy:::Allocate Floppy Device::
help=CompanyFloppyAllocate.html
Save the file and close the editor.
If you are using LDAP as your naming service, update the auth_attr entries on the Sun JavaSystem Directory Server (LDAP server).For information, see the ldapaddent(1M) man page.
Add the new authorizations to the appropriate rights profiles. Then assign the profiles to usersand roles.Use the Solaris Management Console. Assume the Security Administrator role, then follow theSolaris procedure “How to Create or Change a Rights Profile” in System Administration Guide:Security Services.
Use the authorization to restrict access to tape and diskette drives.Add the new authorizations to the list of required authorizations in the Device AllocationManager. For the procedure, see “How to Add Site-Specific Authorizations to a Device inTrusted Extensions” on page 239.
Creating Fine-Grained Device Authorizations
A security administrator for NewCo needs to construct fine-grained device authorizations forthe company.
First, the administrator writes the following help files, and places the files in the/usr/lib/help/auths/locale/C directory:
Newco.html
NewcoGrant.html
NewcoGrantDevice.html
NewcoTapeAllocate.html
NewcoFloppyAllocate.html
3
4
5
6
7
Example 17–4
Customizing Device Authorizations in Trusted Extensions (Task Map)
Chapter 17 • Managing Devices for Trusted Extensions (Tasks) 237
Next, the administrator adds a header for all of the authorizations for newco.com in theauth_attr file.
# auth_attr file
com.newco.:::NewCo Header::help=Newco.html
Next, the administrator adds authorization entries to the file:
com.newco.grant:::Grant All NewCo Authorizations::
help=NewcoGrant.html
com.newco.grant.device:::Grant NewCo Device Authorizations::
help=NewcoGrantDevice.html
com.newco.device.allocate.tape:::Allocate Tape Device::
help=NewcoTapeAllocate.html
com.newco.device.allocate.floppy:::Allocate Floppy Device::
help=NewcoFloppyAllocate.html
The lines are split for display purposes.
The auth_attr entries create the following authorizations:
■ An authorization to grant all NewCo's authorizations■ An authorization to grant NewCo's device authorizations■ An authorization to allocate a tape drive■ An authorization to allocate a diskette drive
Creating Trusted Path and Non-Trusted Path Authorizations
By default, the Allocate Devices authorization enables allocation from the trusted path andfrom outside the trusted path.
In the following example, site security policy requires restricting remote CD-ROM allocation.The security administrator creates the com.someco.device.cdrom.local authorization. Thisauthorization is for CD-ROM drives that are allocated with the trusted path. Thecom.someco.device.cdrom.remote authorization is for those few users who are allowed toallocate a CD-ROM drive outside the trusted path.
The security administrator creates the help files, adds the authorizations to the auth_attrdatabase, adds the authorizations to the devices, and then places the authorizations in rightsprofiles. The profiles are assigned to users who are allowed to allocate devices.
■ The following are the auth_attr database entries:
com.someco.:::SomeCo Header::help=Someco.html
com.someco.grant:::Grant All SomeCo Authorizations::
help=SomecoGrant.html
com.someco.grant.device:::Grant SomeCo Device Authorizations::
help=SomecoGrantDevice.html
Example 17–5
Customizing Device Authorizations in Trusted Extensions (Task Map)
Oracle Solaris Trusted Extensions Administrator's Procedures • September 2010238
com.someco.device.cdrom.local:::Allocate Local CD-ROM Device::
help=SomecoCDAllocateLocal.html
com.someco.device.cdrom.remote:::Allocate Remote CD-ROM Device::
help=SomecoCDAllocateRemote.html
■ The following is the Device Allocation Manager assignment:
The Trusted Path enables authorized users to use the Device Allocation Manager whenallocating the local CD-ROM drive.
Device Name: cdrom_0
For Allocations From: Trusted Path
Allocatable By: Authorized Users
Authorizations: com.someco.device.cdrom.local
The Non-Trusted Path enables users to allocate a device remotely by using the allocatecommand.
Device Name: cdrom_0
For Allocations From: Non-Trusted Path
Allocatable By: Authorized Users
Authorizations: com.someco.device.cdrom.remote
■ The following are the rights profile entries:
# Local Allocator profile
com.someco.device.cdrom.local
# Remote Allocator profile
com.someco.device.cdrom.remote
■ The following are the rights profiles for authorized users:
# List of profiles for regular authorized user
Local Allocator Profile
...
# List of profiles for role or authorized user
Remote Allocator Profile
...
▼ How to Add Site-Specific Authorizations to a Device inTrusted ExtensionsYou must be in the Security Administrator role, or in a role that includes the Configure DeviceAttributes authorization. You must have already created site-specific authorizations, asdescribed in “How to Create New Device Authorizations” on page 236.
Before You Begin
Customizing Device Authorizations in Trusted Extensions (Task Map)
Chapter 17 • Managing Devices for Trusted Extensions (Tasks) 239
Follow the “How to Configure a Device in Trusted Extensions”on page 227 procedure.
a. Select a device that needs to be protected with your new authorizations.
b. Open the Device Administration dialog box.
c. In the Device Configuration dialog box, click the Authorizations button.
The new authorizations are displayed in the Not Required list.
d. Add the new authorizations to the Required list of authorizations.
To save your changes, click OK.
▼ How to Assign Device AuthorizationsThe Allocate Device authorization enables users to allocate a device. The Allocate Deviceauthorization, and the Revoke or Reclaim Device authorization, are appropriate foradministrative roles.
You must be in the Security Administrator role in the global zone.
If the existing profiles are not appropriate, the security administrator can create a new profile.For an example, see “How to Create a Rights Profile for Convenient Authorizations” on page 92.
Assign to the user a rights profile that contains the Allocate Device authorization.
For assistance, see the online help. For the step-by-step procedure, see “How to Change theRBAC Properties of a User” in System Administration Guide: Security Services.
The following rights profiles enable a role to allocate devices:
■ All Authorizations■ Device Management■ Media Backup■ Media Restore■ Object Label Management■ Software Installation
The following rights profiles enable a role to revoke or reclaim devices:
■ All Authorizations■ Device Management
1
2
Before You Begin
●
Customizing Device Authorizations in Trusted Extensions (Task Map)
Oracle Solaris Trusted Extensions Administrator's Procedures • September 2010240

The following rights profiles enable a role to create or configure devices:
■ All Authorizations■ Device Security
Assigning New Device Authorizations
In this example, the security administrator configures the new device authorizations for thesystem and assigns the rights profile with the new authorizations to trustworthy users. Thesecurity administrator does the following:
1. Creates new device authorizations, as in “How to Create New Device Authorizations” onpage 236
2. In the Device Allocation Manager, adds the new device authorizations to the tape anddiskette drives
3. Places the new authorizations in the rights profile, NewCo Allocation4. Adds the NewCo Allocation rights profile to the profiles of users and roles who are
authorized to allocate tape and diskette drives
Authorized users and roles can now use the tape drives and diskette drives on this system.
Example 17–6
Customizing Device Authorizations in Trusted Extensions (Task Map)
Chapter 17 • Managing Devices for Trusted Extensions (Tasks) 241

242

Trusted Extensions Auditing (Overview)
This chapter describes the additions to auditing that Solaris Trusted Extensions provides.
■ “Trusted Extensions and Auditing” on page 243■ “Audit Management by Role in Trusted Extensions” on page 244■ “Trusted Extensions Audit Reference” on page 246
Trusted Extensions and AuditingOn a system that is configured with Trusted Extensions software, auditing is configured and isadministered similarly to auditing on a Solaris system. However, the following are somedifferences.
■ Trusted Extensions software adds audit classes, audit events, audit tokens, and audit policyoptions to the system.
■ By default, auditing is enabled in Trusted Extensions software.■ Solaris per-zone auditing is not supported. In Trusted Extensions, all zones are audited
identically.■ Trusted Extensions provides administrative tools to administer the users' audit
characteristics and to edit audit files.■ Two roles, System Administrator and Security Administrator, are used to configure and
administer auditing in Trusted Extensions.The security administrator plans what to audit and any site-specific, event-to-classmappings. As in the Solaris OS, the system administrator plans disk space requirements forthe audit files, creates an audit administration server, and installs audit configuration files.
18C H A P T E R 1 8
243

Audit Management by Role in Trusted ExtensionsAuditing in Trusted Extensions requires the same planning as in the Solaris OS. For detailsabout planning, see Chapter 29, “Planning for Solaris Auditing,” in System AdministrationGuide: Security Services.
Role Setup for Audit AdministrationIn Trusted Extensions, auditing is the responsibility of two roles. The System Administratorrole sets up the disks and the network of audit storage. The Security Administrator role decideswhat is to be audited, and specifies the information in the audit configuration files. As in theSolaris OS, you create the roles in software. The rights profiles for these two roles are provided.The initial setup team created the Security Administrator role during initial configuration. Fordetails, see “Create the Security Administrator Role in Trusted Extensions” in Oracle SolarisTrusted Extensions Configuration Guide.
Note – A system only records the security-relevant events that the audit configuration filesconfigure the system to record (that is, by preselection). Therefore, any subsequent audit reviewcan only consider the events that have been recorded. As a result of misconfiguration, attemptsto breach the security of the system can go undetected, or the administrator is unable to detectthe user who is responsible for an attempted breach of security. Administrators must regularlyanalyze audit trails to check for breaches of security.
Audit Tasks in Trusted ExtensionsThe procedures to configure and manage auditing in Trusted Extensions differ slightly fromSolaris procedures:■ Audit configuration is performed in the global zone by one of two administrative roles.
Then, the system administrator copies specific customized audit files from the global zone toevery labeled zone. By following this procedure, user actions are audited identically in theglobal zone and in labeled zones.For details, see “Audit Tasks of the Security Administrator” on page 245 and “Audit Tasks ofthe System Administrator” on page 245
■ Trusted Extensions administrators use a trusted editor to edit audit configuration files. InTrusted CDE, Trusted Extensions administrators use CDE actions to invoke the trustededitor. For the list of actions, see “Trusted CDE Actions” on page 35.
■ Trusted Extensions administrators use the Solaris Management Console to configurespecific users. User-specific audit characteristics can be specified in this tool. Specifying usercharacteristics is only required when the user's audit characteristics differ from the auditcharacteristics of the systems on which the user works. For an introduction to the tool, see“Solaris Management Console Tools” on page 38.
Audit Management by Role in Trusted Extensions
Oracle Solaris Trusted Extensions Administrator's Procedures • September 2010244
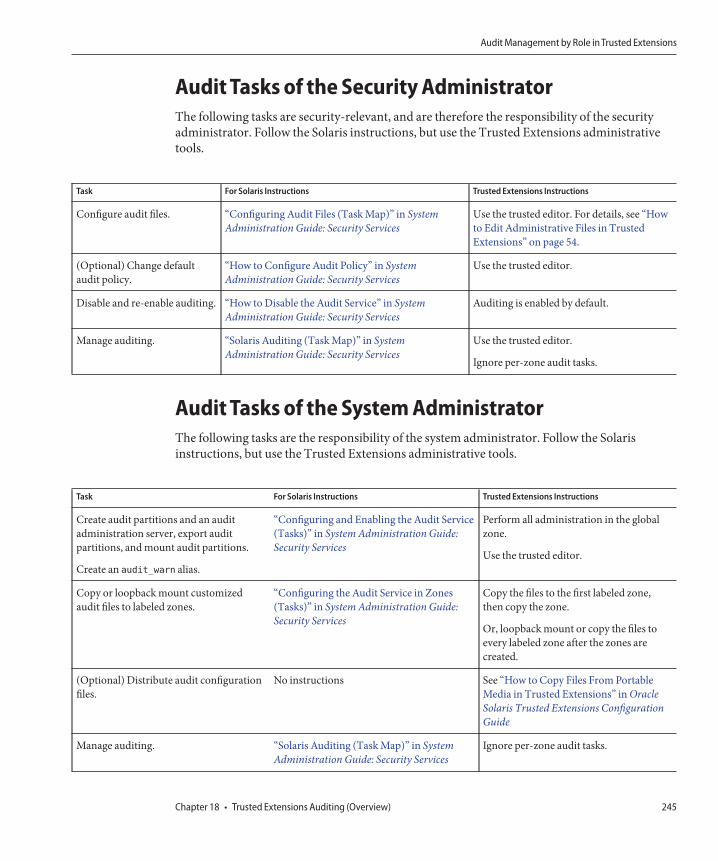
Audit Tasks of the Security AdministratorThe following tasks are security-relevant, and are therefore the responsibility of the securityadministrator. Follow the Solaris instructions, but use the Trusted Extensions administrativetools.
Task For Solaris Instructions Trusted Extensions Instructions
Configure audit files. “Configuring Audit Files (Task Map)” in SystemAdministration Guide: Security Services
Use the trusted editor. For details, see “Howto Edit Administrative Files in TrustedExtensions” on page 54.
(Optional) Change defaultaudit policy.
“How to Configure Audit Policy” in SystemAdministration Guide: Security Services
Use the trusted editor.
Disable and re-enable auditing. “How to Disable the Audit Service” in SystemAdministration Guide: Security Services
Auditing is enabled by default.
Manage auditing. “Solaris Auditing (Task Map)” in SystemAdministration Guide: Security Services
Use the trusted editor.
Ignore per-zone audit tasks.
Audit Tasks of the System AdministratorThe following tasks are the responsibility of the system administrator. Follow the Solarisinstructions, but use the Trusted Extensions administrative tools.
Task For Solaris Instructions Trusted Extensions Instructions
Create audit partitions and an auditadministration server, export auditpartitions, and mount audit partitions.
Create an audit_warn alias.
“Configuring and Enabling the Audit Service(Tasks)” in System Administration Guide:Security Services
Perform all administration in the globalzone.
Use the trusted editor.
Copy or loopback mount customizedaudit files to labeled zones.
“Configuring the Audit Service in Zones(Tasks)” in System Administration Guide:Security Services
Copy the files to the first labeled zone,then copy the zone.
Or, loopback mount or copy the files toevery labeled zone after the zones arecreated.
(Optional) Distribute audit configurationfiles.
No instructions See “How to Copy Files From PortableMedia in Trusted Extensions” in OracleSolaris Trusted Extensions ConfigurationGuide
Manage auditing. “Solaris Auditing (Task Map)” in SystemAdministration Guide: Security Services
Ignore per-zone audit tasks.
Audit Management by Role in Trusted Extensions
Chapter 18 • Trusted Extensions Auditing (Overview) 245
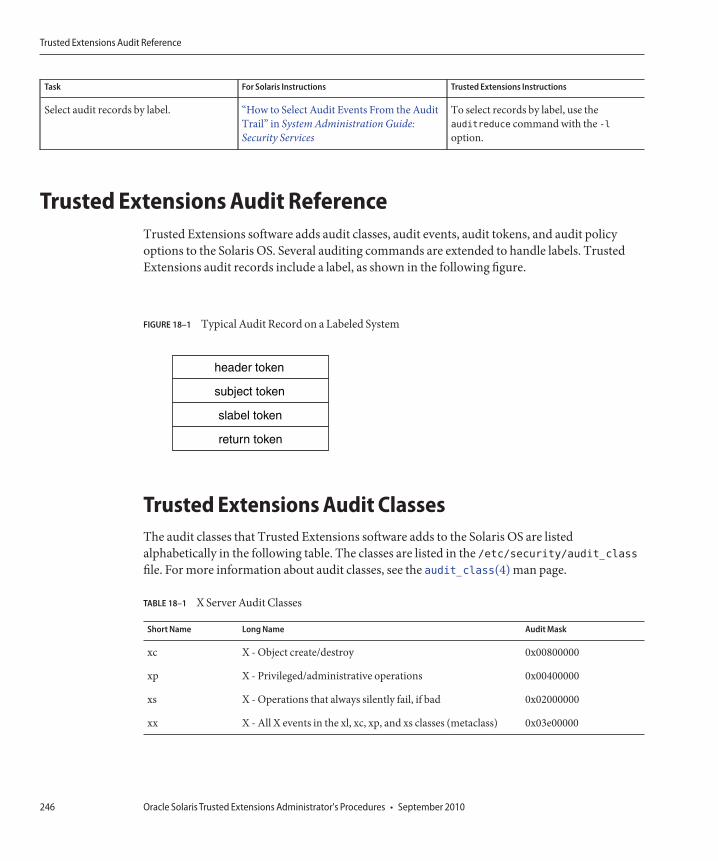
Task For Solaris Instructions Trusted Extensions Instructions
Select audit records by label. “How to Select Audit Events From the AuditTrail” in System Administration Guide:Security Services
To select records by label, use theauditreduce command with the -loption.
Trusted Extensions Audit ReferenceTrusted Extensions software adds audit classes, audit events, audit tokens, and audit policyoptions to the Solaris OS. Several auditing commands are extended to handle labels. TrustedExtensions audit records include a label, as shown in the following figure.
Trusted Extensions Audit ClassesThe audit classes that Trusted Extensions software adds to the Solaris OS are listedalphabetically in the following table. The classes are listed in the /etc/security/audit_classfile. For more information about audit classes, see the audit_class(4) man page.
TABLE 18–1 X Server Audit Classes
Short Name Long Name Audit Mask
xc X - Object create/destroy 0x00800000
xp X - Privileged/administrative operations 0x00400000
xs X - Operations that always silently fail, if bad 0x02000000
xx X - All X events in the xl, xc, xp, and xs classes (metaclass) 0x03e00000
FIGURE 18–1 Typical Audit Record on a Labeled System
header token
subject token
slabel token
return token
Trusted Extensions Audit Reference
Oracle Solaris Trusted Extensions Administrator's Procedures • September 2010246

The X server audit events are mapped to these classes according to the following criteria:■ xc – This class audits server objects for creation or for destruction. For example, this class
audits CreateWindow().■ xp – This class audits for use of privilege. Privilege use can be successful or unsuccessful. For
example, ChangeWindowAttributes() is audited when a client attempts to change theattributes of another client's window. This class also includes administrative routines suchas SetAccessControl().
■ xs – This class audits routines that do not return X error messages to clients on failure whensecurity attributes cause the failure. For example, GetImage() does not return a BadWindowerror if it cannot read from a window for lack of privilege.These events should be selected for audit on success only. When xs events are selected forfailure, the audit trail fills with irrelevant records.
■ xx – This class includes all of the X audit classes.
Trusted Extensions Audit EventsTrusted Extensions software adds audit events to the system. The new audit events and theaudit classes to which the events belong are listed in the /etc/security/audit_event file. Theaudit event numbers for Trusted Extensions are between 9000 and 10000. For moreinformation about audit events, see the audit_event(4) man page.
Trusted Extensions Audit TokensThe audit tokens that Trusted Extensions software adds to the Solaris OS are listedalphabetically in the following table. The tokens are also listed in the audit.log(4) man page.
TABLE 18–2 Trusted Extensions Audit Tokens
Token Name Description
“label Token” on page 248 Sensitivity label
“xatom Token” on page 248 X window atom identification
“xclient Token” on page 249 X client identification
“xcolormap Token” on page 249 X window color information
“xcursor Token” on page 249 X window cursor information
“xfont Token” on page 250 X window font information
“xgc Token” on page 250 X window graphical context information
“xpixmap Token” on page 250 Xwindow pixel mapping information
Trusted Extensions Audit Reference
Chapter 18 • Trusted Extensions Auditing (Overview) 247

TABLE 18–2 Trusted Extensions Audit Tokens (Continued)Token Name Description
“xproperty Token” on page 251 X window property information
“xselect Token” on page 251 X window data information
“xwindow Token” on page 252 X window window information
label TokenThe label token contains a sensitivity label. This token contains the following fields:
■ A token ID■ A sensitivity label
The following figure shows the token format.
A label token is displayed by the praudit command as follows:
sensitivity label,ADMIN_LOW
xatom TokenThe xatom token contains information concerning an X atom. This token contains thefollowing fields:
■ A token ID■ The string length■ A text string that identifies the atom
An xatom token is displayed by praudit as follows:
FIGURE 18–2 labelToken Format
token ID sensitivity label
1 byte
label ID pad classification compartments
1 byte 2 bytes 32 bytes1 byte
36 bytes
Trusted Extensions Audit Reference
Oracle Solaris Trusted Extensions Administrator's Procedures • September 2010248
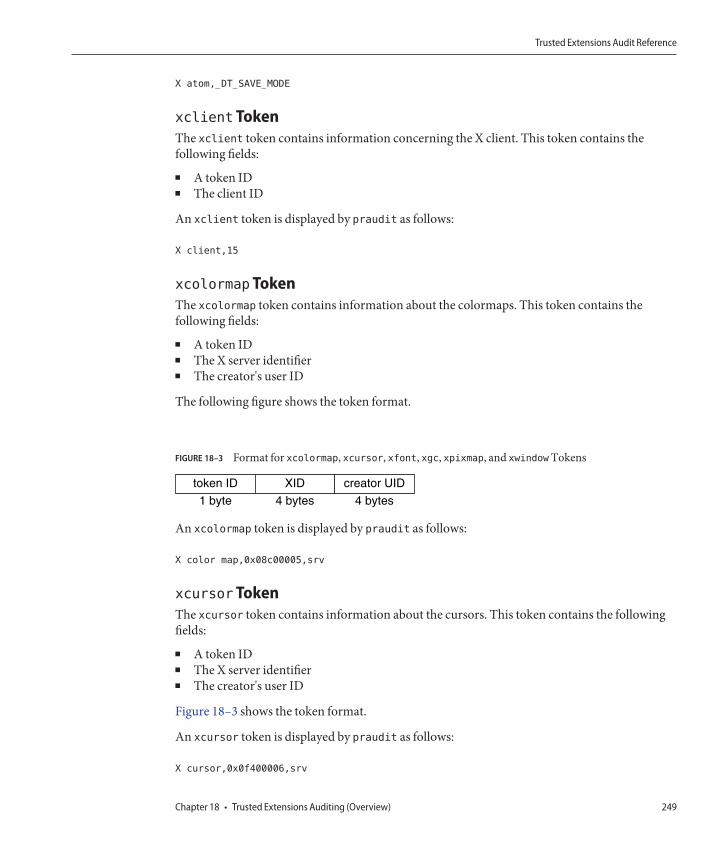
X atom,_DT_SAVE_MODE
xclient TokenThe xclient token contains information concerning the X client. This token contains thefollowing fields:
■ A token ID■ The client ID
An xclient token is displayed by praudit as follows:
X client,15
xcolormap TokenThe xcolormap token contains information about the colormaps. This token contains thefollowing fields:
■ A token ID■ The X server identifier■ The creator's user ID
The following figure shows the token format.
An xcolormap token is displayed by praudit as follows:
X color map,0x08c00005,srv
xcursor TokenThe xcursor token contains information about the cursors. This token contains the followingfields:
■ A token ID■ The X server identifier■ The creator's user ID
Figure 18–3 shows the token format.
An xcursor token is displayed by praudit as follows:
X cursor,0x0f400006,srv
FIGURE 18–3 Format for xcolormap, xcursor, xfont, xgc, xpixmap, and xwindowTokens
token ID XID creator UID
1 byte 4 bytes 4 bytes
Trusted Extensions Audit Reference
Chapter 18 • Trusted Extensions Auditing (Overview) 249

xfont TokenThe xfont token contains information about the fonts. This token contains the following fields:
■ A token ID■ The X server identifier■ The creator's user ID
Figure 18–3 shows the token format.
An xfont token is displayed by praudit as follows:
X font,0x08c00001,srv
xgc TokenThe xgc token contains information about the xgc. This token contains the following fields:
■ A token ID■ The X server identifier■ The creator's user ID
Figure 18–3 shows the token format.
An xgc token is displayed by praudit as follows:
Xgraphic context,0x002f2ca0,srv
xpixmap TokenThe xpixmap token contains information about the pixel mappings. This token contains thefollowing fields:
■ A token ID■ The X server identifier■ The creator's user ID
Figure 18–3 shows the token format.
An xpixmap token is displayed by praudit as follows:
X pixmap,0x08c00005,srv
Trusted Extensions Audit Reference
Oracle Solaris Trusted Extensions Administrator's Procedures • September 2010250

xproperty TokenThe xproperty token contains information about various properties of a window. This tokencontains the following fields:
■ A token ID■ The X server identifier■ The creator's user ID■ A string length■ A text string that identifies the atom
The following figure shows an xproperty token format.
An xproperty token is displayed by praudit as follows:
X property,0x000075d5,root,_MOTIF_DEFAULT_BINDINGS
xselect TokenThe xselect token contains the data that is moved between windows. This data is a byte streamwith no assumed internal structure and a property string. This token contains the followingfields:
■ A token ID■ The length of the property string■ The property string■ The length of the property type■ The property type string■ A length field that gives the number of bytes of data■ A byte string that contains the data
The following figure shows the token format.
FIGURE 18–4 xpropertyToken Format
1 byte 4 bytes 4 bytes 2 bytes N bytes
token ID XID creator UID strlen string (atom name)
Trusted Extensions Audit Reference
Chapter 18 • Trusted Extensions Auditing (Overview) 251

An xselect token is displayed by praudit as follows:
X selection,entryfield,halogen
xwindow TokenThe xwindow token contains information about a window. This token contains the followingfields:
■ A token ID■ The X server identifier■ The creator's user ID
Figure 18–3 shows the token format.
An xwindow token is displayed by praudit as follows:
X window,0x07400001,srv
Trusted Extensions Audit Policy OptionsTrusted Extensions adds two audit policy options to existing Solaris auditing policy options.List the policies to see the additions:
$ auditconfig -lspolicy
...
windata_down Include downgraded window information in audit records
windata_up Include upgraded window information in audit records
FIGURE 18–5 xselectToken Format
token ID property length prop string prop type len prop type data length window data
1 byte 2 bytes N bytes 2 bytes N bytes 2 bytes N bytes
Trusted Extensions Audit Reference
Oracle Solaris Trusted Extensions Administrator's Procedures • September 2010252

Extensions to Auditing Commands in TrustedExtensionsThe auditconfig, auditreduce, and bsmrecord commands are extended to handle TrustedExtensions information:
■ The auditconfig command includes the Trusted Extensions audit policies. For details, seethe auditconfig(1M) man page.
■ The auditreduce command adds the -l option for filtering records according to the label.For details, see the auditreduce(1M) man page.
■ The bsmrecord command includes the Trusted Extensions audit events. For details, see thebsmrecord(1M) man page.
Trusted Extensions Audit Reference
Chapter 18 • Trusted Extensions Auditing (Overview) 253

254

Software Management in Trusted Extensions(Tasks)
This chapter contains information about ensuring that third-party software runs in atrustworthy manner on a system that is configured with Solaris Trusted Extensions.
■ “Adding Software to Trusted Extensions” on page 255■ “Trusted Processes in the Window System” on page 258■ “Managing Software in Trusted Extensions (Tasks)” on page 260
Adding Software to Trusted ExtensionsAny software that can be added to a Solaris system can be added to a system that is configuredwith Trusted Extensions. Additionally, programs that use Trusted Extensions APIs can beadded. Adding software to a Trusted Extensions system is similar to adding software to a Solarissystem that is running non-global zones.
For example, packaging issues affect systems that have installed non-global zones. Packageparameters define the following:
■ The zone scope of the package – The scope determines the type of zone in which a specificpackage can be installed.
■ The visibility of the package – Visibility determines whether a package must be installedand be identical in all zones.
■ The limitation of the package – One limitation is whether a package must be installed inthe current zone only.
In Trusted Extensions, programs are typically installed in the global zone for use by regularusers in labeled zones. For details about installing packages in zones, see Chapter 25, “AboutPackages and Patches on a Solaris System With Zones Installed (Overview),” in SystemAdministration Guide: Oracle Solaris Containers-Resource Management and Oracle SolarisZones. Also, see the pkgadd(1M) man page.
19C H A P T E R 1 9
255

At a Trusted Extensions site, the system administrator and the security administrator worktogether to install software. The security administrator evaluates software additions foradherence to security policy. When the software requires privileges or authorizations tosucceed, the Security Administrator role assigns an appropriate rights profile to the users of thatsoftware.
To import software from removable media requires authorization. An account with theAllocate Device authorization can import or export data from removable media. Data caninclude executable code. A regular user can only import data at a label within that user'sclearance.
The System Administrator role is responsible for adding the programs that the securityadministrator approves.
Solaris Security Mechanisms for SoftwareTrusted Extensions uses the same security mechanisms as the Solaris OS. The mechanismsinclude the following:
■ Authorizations – Users of a program can be required to have a particular authorization. Forinformation about authorizations, see “Solaris RBAC Elements and Basic Concepts” inSystem Administration Guide: Security Services. Also, see the auth_attr(4) andgetauthattr(3SECDB) man pages.
■ Privileges – Programs and processes can be assigned privileges. For information aboutprivileges, see Chapter 8, “Using Roles and Privileges (Overview),” in System AdministrationGuide: Security Services. Also, see the privileges(5) man page.
The ppriv command provides a debugging utility. For details, see the ppriv(1) man page.For instructions on using this utility with programs that work in non-global zones, see“Using the ppriv Utility” in System Administration Guide: Oracle SolarisContainers-Resource Management and Oracle Solaris Zones.
■ Right Profiles – Rights profiles collect security attributes in one place for assignment tousers or roles. For information about rights profiles, see “RBAC Rights Profiles” in SystemAdministration Guide: Security Services. Trusted Extensions adds CDE actions to the type ofexecutables that can be assigned security attributes.
■ Trusted libraries – Dynamically shared libraries that are used by setuid, setgid, andprivileged programs can be loaded only from trusted directories. As in the Solaris OS, thecrle command is used to add a privileged program's shared library directories to the list oftrusted directories. For details, see the crle(1) man page.
Adding Software to Trusted Extensions
Oracle Solaris Trusted Extensions Administrator's Procedures • September 2010256
Evaluating Software for SecurityWhen software has been assigned privileges or when it runs with an alternate user ID or groupID, the software becomes trusted. Trusted software can bypass aspects of the Trusted Extensionssecurity policy. Be aware that you can make software trusted even though it might not beworthy of trust. The security administrator must wait to give privileges to software until carefulscrutiny has revealed that the software uses the privileges in a trustworthy manner.
Programs fall into three categories on a trusted system:
■ Programs that require no security attributes – Some programs run at a single level andrequire no privileges. These programs can be installed in a public directory, such as/usr/local. For access, assign the programs as commands in the rights profiles of users androles.
■ Programs that run as root – Some programs execute with setuid 0. Such programs can beassigned an effective UID of 0 in a rights profile. The security administrator then assigns theprofile to an administrative role.
Tip – If the application can use privileges in a trustworthy manner, assign the neededprivileges to the application, and do not execute the program as root.
■ Programs that require privileges – Some programs might need privileges for reasons thatare not obvious. Even if a program is not performing any function that seems to violatesystem security policy, the program might be doing something internally that violatessecurity. For example, the program could be using a shared log file, or the program could bereading from /dev/kmem. For security concerns, see the mem(7D) man page.Sometimes, an internal policy override is not particularly important to the application'scorrect operation. Rather, the override provides a convenient feature for users.If your organization has access to the source code, check if you can remove the operationsthat require policy overrides without affecting the application's performance.
Developer Responsibilities When Creating Trusted ProgramsEven though a program's developer can manipulate privilege sets in the source code, if thesecurity administrator does not assign the required privileges to the program, the program willfail. The developer and security administrator need to cooperate when creating trustedprograms.
A developer who writes a trusted program must do the following:
1. Understand where the program requires privileges to do its work.2. Know and follow techniques, such as privilege bracketing, for safely using privileges in
programs.
Adding Software to Trusted Extensions
Chapter 19 • Software Management in Trusted Extensions (Tasks) 257

3. Be aware of the security implications when assigning privileges to a program. The programmust not violate security policy.
4. Compile the program by using shared libraries that are linked to the program from a trusteddirectory.For additional information, see Oracle Solaris Security for Developers Guide. For examples ofcode for Trusted Extensions, see Oracle Solaris Trusted Extensions Developer’s Guide.
Security Administrator Responsibilities for Trusted ProgramsThe security administrator is responsible for testing and evaluating new software. Afterdetermining that the software is trustworthy, the security administrator configures rightsprofiles and other security-relevant attributes for the program.
The security administrator responsibilities include the following:
1. Make sure that the programmer and the program distribution process is trusted.2. From one of the following sources, determine which privileges are required by the program:
■ Ask the programmer.■ Search the source code for any privileges that the program expects to use.■ Search the source code for any authorizations that the program requires of its users.■ Use the debugging options to the ppriv command to search for use of privilege. For
examples, see the ppriv(1) man page.3. Examine the source code to make sure that the code behaves in a trustworthy manner
regarding the privileges that the program needs to operate.If the program fails to use privilege in a trustworthy manner, and you can modify theprogram's source code, then modify the code. A security consultant or developer who isknowledgeable about security can modify the code. Modifications might include privilegebracketing or checking for authorizations.The assignment of privileges must be manual. A program that fails due to lack of privilegecan be assigned privileges. Alternatively, the security administrator might decide to assignan effective UID or GID to make the privilege unnecessary.
Trusted Processes in the Window SystemIn Solaris Trusted Extensions (CDE), the following window system processes are trusted:
■ Front Panel■ Subpanels of the Front Panel■ Workspace Menu■ File Manager■ Application Manager
Trusted Processes in the Window System
Oracle Solaris Trusted Extensions Administrator's Procedures • September 2010258
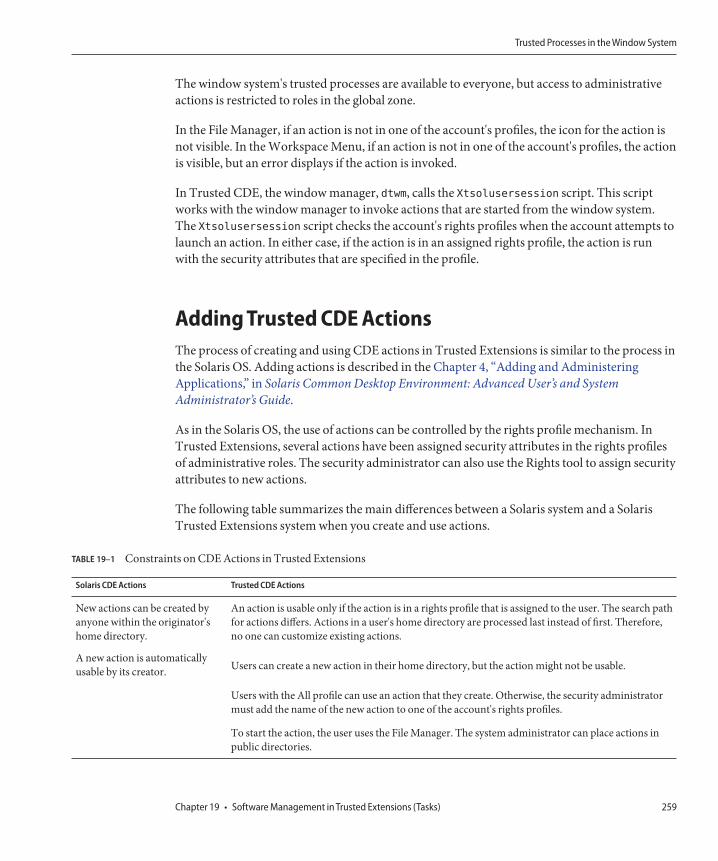
The window system's trusted processes are available to everyone, but access to administrativeactions is restricted to roles in the global zone.
In the File Manager, if an action is not in one of the account's profiles, the icon for the action isnot visible. In the Workspace Menu, if an action is not in one of the account's profiles, the actionis visible, but an error displays if the action is invoked.
In Trusted CDE, the window manager, dtwm, calls the Xtsolusersession script. This scriptworks with the window manager to invoke actions that are started from the window system.The Xtsolusersession script checks the account's rights profiles when the account attempts tolaunch an action. In either case, if the action is in an assigned rights profile, the action is runwith the security attributes that are specified in the profile.
Adding Trusted CDE ActionsThe process of creating and using CDE actions in Trusted Extensions is similar to the process inthe Solaris OS. Adding actions is described in the Chapter 4, “Adding and AdministeringApplications,” in Solaris Common Desktop Environment: Advanced User’s and SystemAdministrator’s Guide.
As in the Solaris OS, the use of actions can be controlled by the rights profile mechanism. InTrusted Extensions, several actions have been assigned security attributes in the rights profilesof administrative roles. The security administrator can also use the Rights tool to assign securityattributes to new actions.
The following table summarizes the main differences between a Solaris system and a SolarisTrusted Extensions system when you create and use actions.
TABLE 19–1 Constraints on CDE Actions in Trusted Extensions
Solaris CDE Actions Trusted CDE Actions
New actions can be created byanyone within the originator'shome directory.
A new action is automaticallyusable by its creator.
An action is usable only if the action is in a rights profile that is assigned to the user. The search pathfor actions differs. Actions in a user's home directory are processed last instead of first. Therefore,no one can customize existing actions.
Users can create a new action in their home directory, but the action might not be usable.
Users with the All profile can use an action that they create. Otherwise, the security administratormust add the name of the new action to one of the account's rights profiles.
To start the action, the user uses the File Manager. The system administrator can place actions inpublic directories.
Trusted Processes in the Window System
Chapter 19 • Software Management in Trusted Extensions (Tasks) 259

TABLE 19–1 Constraints on CDE Actions in Trusted Extensions (Continued)Solaris CDE Actions Trusted CDE Actions
Actions can be dragged anddropped to the Front Panel.
The Front Panel is part of the trusted path. The window manager recognizes only theadministratively added actions that are located in the /usr/dt and /etc/dt subdirectories. Evenwith the All profile, a user cannot drag a new action to the Front Panel. Actions from a user's homedirectory are not recognized by the window manager. The manager only checks the publicdirectories.
Actions can do privilegedoperations if they are run byroot.
Actions can do privileged operations if the actions have been assigned privileges in a rights profilethat has been assigned to a user.
Actions are not managed by theSolaris Management Console.
Actions are assigned to rights profiles in the Rights tool of the Solaris Management Console. If newactions are added, the security administrator can make the new actions available.
Managing Software in Trusted Extensions (Tasks)Managing software in Trusted Extensions is similar to managing software on a Solaris systemthat has installed non-global zones. For details about zones, see Part II, “Zones,” in SystemAdministration Guide: Oracle Solaris Containers-Resource Management and Oracle SolarisZones.
▼ How to Add a Software Package in Trusted ExtensionsYou must be in a role that can allocate a device.
Start from the appropriate workspace.
■ To install a software package in the global zone, stay in the global zone.
■ To install a software package in a labeled zone, create a workspace at that label.For details, see “How to Change the Label of a Workspace” in Oracle Solaris TrustedExtensions User’s Guide.
Allocate the CD-ROM drive.For details, see “How to Allocate a Device in Trusted Extensions” in Oracle Solaris TrustedExtensions User’s Guide.
Install the software.For details, see “Where to Find Software Management Tasks” in System Administration Guide:Basic Administration.
Before You Begin
1
2
3
Managing Software in Trusted Extensions (Tasks)
Oracle Solaris Trusted Extensions Administrator's Procedures • September 2010260

Deallocate the device when you are finished.For details, see “How to Allocate a Device in Trusted Extensions” in Oracle Solaris TrustedExtensions User’s Guide.
▼ How to Install a Java Archive File in Trusted ExtensionsThis procedure downloads a Java archive (JAR) file to the global zone. From the global zone, theadministrator can make it available to regular users.
The security administrator has verified that the source of the Java program is trustworthy, thatthe method of delivery is secure, and that the program can run in a trustworthy manner.
You are in the System Administrator role in the global zone. In Trusted CDE, the SoftwareInstallation rights profile includes the Open action for Java code.
Download the JAR file to the /tmpdirectory.For example, if you are selecting software from http://www.sunfreeware.com, use the site's“Solaris pkg-get tool” instructions.
Open the File Manager and navigate to the /tmpdirectory.
Double-click the downloaded file.
To install the software, answer the questions in the dialog boxes.
Read the installation log.
Downloading a JAR File to a User Label
To limit the security risk, the system administrator downloads the software to a single labelwithin a regular user's accreditation range. Then, the security administrator tests the JAR file atthat label. When the software passes the test, the security administrator then downgrades thelabel to ADMIN_LOW. The system administrator installs the software on an NFS server to make itavailable to all users.
1. First, the system administrator creates a workspace at a user label.2. In that workspace, he downloads the JAR file.3. At that label, the security administrator tests the file.4. Then, the security administrator changes the label of the file to ADMIN_LOW.5. Finally, the system administrator copies the file to an NFS server whose label is ADMIN_LOW.
4
Before You Begin
1
2
3
4
5
Example 19–1
Managing Software in Trusted Extensions (Tasks)
Chapter 19 • Software Management in Trusted Extensions (Tasks) 261

262

Quick Reference to Trusted ExtensionsAdministration
Solaris Trusted Extensions interfaces extend the Solaris OS. This appendix provides a quickreference of the differences. For a detailed list of interfaces, including library routines andsystem calls, see Appendix B, “List of Trusted Extensions Man Pages.”
Administrative Interfaces in Trusted ExtensionsTrusted Extensions provides interfaces for its software. The following interfaces are availableonly when Trusted Extensions software is running:
txzonemgr script Provides a menu-based wizard for creating, installing,initializing, and booting labeled zones. The title of the menu isLabeled Zone Manager. This script also provides menu itemsfor networking options, name services options, and forclienting the global zone to an existing LDAP server.
Trusted CDE actions In Trusted CDE, Workspace Menu –> Application Manager –>Trusted_Extensions contains CDE actions that configure files,install and boot zones, and simplify other Trusted Extensionstasks. For the tasks that these actions perform, see “TrustedCDE Actions” on page 35. Trusted CDE online help alsodescribes these actions.
Admin Editor This trusted editor is used to edit system files. In Trusted CDE,Workspace Menu –> Application Manager –>Trusted_Extensions –> Admin Editor invokes the AdminEditor. In Trusted JDS, the editor is invoked from thecommand line. You provide the file to be edited as theargument, as in:
/usr/dt/bin/trusted_edit filename
AA P P E N D I X A
263

Device Allocation Manager In Trusted Extensions, this GUI is used to administer devices.The Device Administration dialog box is used byadministrators to configure devices.
The Device Allocation Manager is used by roles and regularusers to allocate devices. The GUI is available from the TrustedPath menu.
Label Builder This application is invoked when the user can choose a label ora clearance. This application also appears when a role assignslabels or label ranges to devices, zones, users, or roles.
Selection Manager This application is invoked when an authorized user orauthorized role attempts to upgrade or downgradeinformation.
Trusted Path menu This menu handles interactions with the trusted computingbase (TCB). For example, this menu has a Change Passwordmenu item. In Trusted CDE, you access the Trusted Path menufrom the workspace switch area. In Trusted JDS, you access theTrusted Path menu by clicking the trusted symbol at the left ofthe trusted stripe.
Administrative commands Trusted Extensions provides commands to obtain labels andperform other tasks. For a list of the commands, see“Command Line Tools in Trusted Extensions” on page 44.
Solaris Interfaces Extended by Trusted ExtensionsTrusted Extensions adds to existing Solaris configuration files, commands, and GUIs.
Administrative commands Trusted Extensions adds options to selected Solariscommands. For a list, see Table 2–5
Configuration files Trusted Extensions adds two privileges, net_mac_aware andnet_mlp. For the use of net_mac_aware, see “Access to NFSMounted Directories in Trusted Extensions” on page 135.
Trusted Extensions adds authorizations to the auth_attrdatabase. For a list, see “Additional Rights andAuthorizations in Trusted Extensions” in Solaris TrustedExtensions Transition Guide.
Trusted Extensions adds executables, including CDE actions,to the exec_attr database.
Solaris Interfaces Extended by Trusted Extensions
Oracle Solaris Trusted Extensions Administrator's Procedures • September 2010264

Trusted Extensions modifies existing rights profiles in theprof_attr database. It also adds profiles to the database.
Trusted Extensions adds CDE actions to the executables thatcan be privileged in the exec_attr database.
Trusted Extensions adds fields to the policy.conf database.For the fields, see “policy.conf File Defaults in TrustedExtensions” on page 78.
Trusted Extensions adds audit tokens, audit events, auditclasses, and audit policy options. For a list, see “TrustedExtensions Audit Reference” on page 246.
Solaris Management Console Trusted Extensions adds a Security Templates tool to theComputers and Networks tool set.
Trusted Extensions adds a Trusted Network Zones tool tothe Computers and Networks tool set.
Trusted Extensions adds a Trusted Extensions Attributes tabto the Users tool and the Administrative Roles tool.
Shared directories from zones Trusted Extensions enables you to share directories fromlabeled zones. The directories are shared at the label of thezone by creating an /etc/dfs/dfstab file from the globalzone.
Tighter Security Defaults in Trusted ExtensionsTrusted Extensions establishes tighter security defaults than the Solaris OS:
Auditing By default, auditing is enabled.
An administrator can turn off auditing. However, auditing is typically required atsites that install Trusted Extensions.
Devices By default, device allocation is enabled.
By default, device allocation requires authorization. Therefore, by default, regularusers cannot use removable media.
An administrator can remove the authorization requirement. However, deviceallocation is typically required at sites that install Trusted Extensions.
Printing Regular users can print only to printers that include the user's label in the printer'slabel range.
Tighter Security Defaults in Trusted Extensions
Appendix A • Quick Reference to Trusted Extensions Administration 265

By default, printed output has trailer and banner pages. These pages, and the bodypages, include the label of the print job.
By default, users cannot print PostScript files.
Roles Roles are available in the Solaris OS, but their use is optional. In TrustedExtensions, roles are required for proper administration.
Making the root user a role is possible in the Solaris OS. In Trusted Extensions,the root user is made a role to better audit who is acting as superuser.
Limited Options in Trusted ExtensionsTrusted Extensions narrows the range of Solaris configuration options:
Desktop Trusted Extensions offers two desktops, the Solaris Trusted Extensions(CDE) and the Solaris Trusted Extensions (JDS).
Trusted Extensions offers the Solaris Trusted Extensions (GNOME)desktop.
Naming service The LDAP naming service is supported. All zones must be administeredfrom one naming service.
Zones The global zone is an administrative zone. Only the root user or a role canenter the global zone. Therefore, administrative interfaces that are availableto regular Solaris users are not available to regular Trusted Extensionsusers. For example, in Trusted Extensions, users cannot bring up the SolarisManagement Console.
Non-global zones are labeled zones. Users work in labeled zones.
All zones must be administered from one naming service.
Limited Options in Trusted Extensions
Oracle Solaris Trusted Extensions Administrator's Procedures • September 2010266
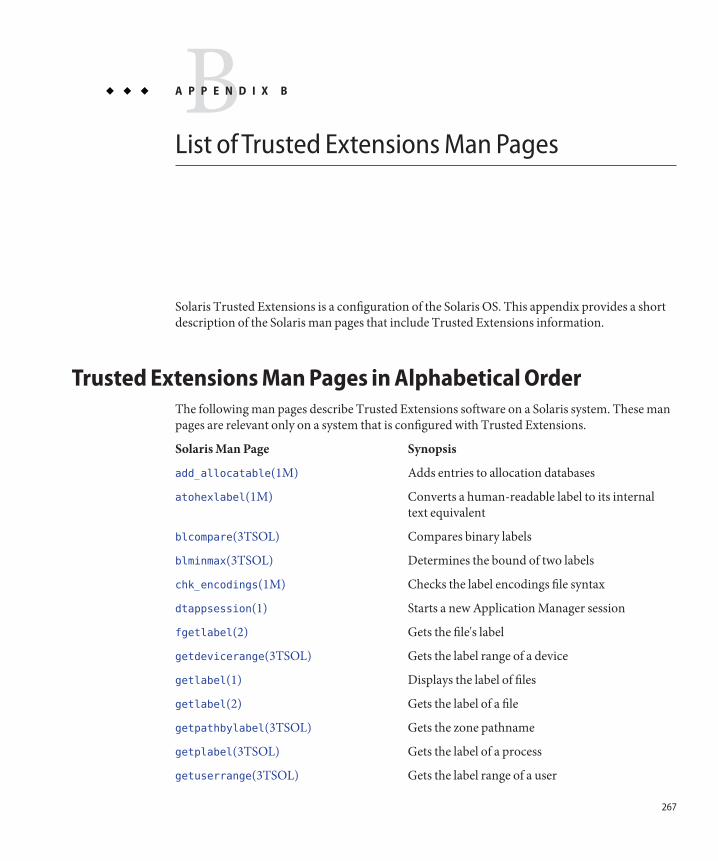
List of Trusted Extensions Man Pages
Solaris Trusted Extensions is a configuration of the Solaris OS. This appendix provides a shortdescription of the Solaris man pages that include Trusted Extensions information.
Trusted Extensions Man Pages in Alphabetical OrderThe following man pages describe Trusted Extensions software on a Solaris system. These manpages are relevant only on a system that is configured with Trusted Extensions.
Solaris Man Page Synopsis
add_allocatable(1M) Adds entries to allocation databases
atohexlabel(1M) Converts a human-readable label to its internaltext equivalent
blcompare(3TSOL) Compares binary labels
blminmax(3TSOL) Determines the bound of two labels
chk_encodings(1M) Checks the label encodings file syntax
dtappsession(1) Starts a new Application Manager session
fgetlabel(2) Gets the file's label
getdevicerange(3TSOL) Gets the label range of a device
getlabel(1) Displays the label of files
getlabel(2) Gets the label of a file
getpathbylabel(3TSOL) Gets the zone pathname
getplabel(3TSOL) Gets the label of a process
getuserrange(3TSOL) Gets the label range of a user
BA P P E N D I X B
267
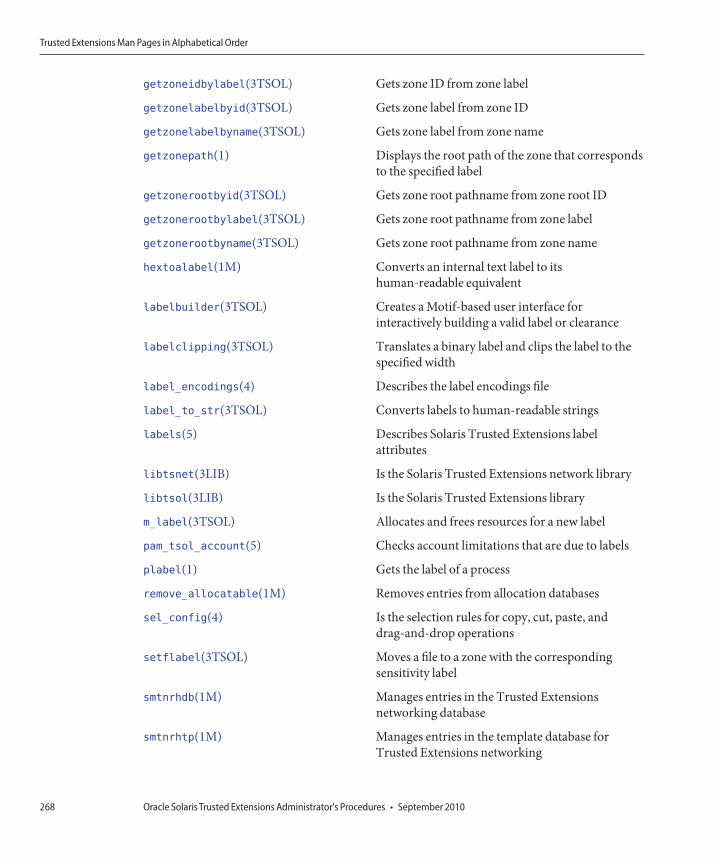
getzoneidbylabel(3TSOL) Gets zone ID from zone label
getzonelabelbyid(3TSOL) Gets zone label from zone ID
getzonelabelbyname(3TSOL) Gets zone label from zone name
getzonepath(1) Displays the root path of the zone that correspondsto the specified label
getzonerootbyid(3TSOL) Gets zone root pathname from zone root ID
getzonerootbylabel(3TSOL) Gets zone root pathname from zone label
getzonerootbyname(3TSOL) Gets zone root pathname from zone name
hextoalabel(1M) Converts an internal text label to itshuman-readable equivalent
labelbuilder(3TSOL) Creates a Motif-based user interface forinteractively building a valid label or clearance
labelclipping(3TSOL) Translates a binary label and clips the label to thespecified width
label_encodings(4) Describes the label encodings file
label_to_str(3TSOL) Converts labels to human-readable strings
labels(5) Describes Solaris Trusted Extensions labelattributes
libtsnet(3LIB) Is the Solaris Trusted Extensions network library
libtsol(3LIB) Is the Solaris Trusted Extensions library
m_label(3TSOL) Allocates and frees resources for a new label
pam_tsol_account(5) Checks account limitations that are due to labels
plabel(1) Gets the label of a process
remove_allocatable(1M) Removes entries from allocation databases
sel_config(4) Is the selection rules for copy, cut, paste, anddrag-and-drop operations
setflabel(3TSOL) Moves a file to a zone with the correspondingsensitivity label
smtnrhdb(1M) Manages entries in the Trusted Extensionsnetworking database
smtnrhtp(1M) Manages entries in the template database forTrusted Extensions networking
Trusted Extensions Man Pages in Alphabetical Order
Oracle Solaris Trusted Extensions Administrator's Procedures • September 2010268
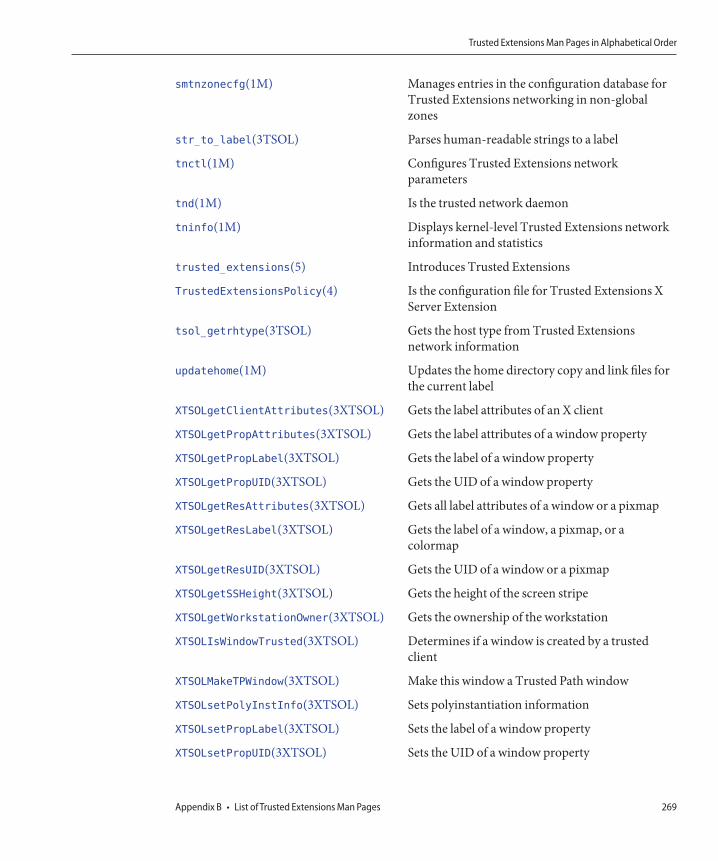
smtnzonecfg(1M) Manages entries in the configuration database forTrusted Extensions networking in non-globalzones
str_to_label(3TSOL) Parses human-readable strings to a label
tnctl(1M) Configures Trusted Extensions networkparameters
tnd(1M) Is the trusted network daemon
tninfo(1M) Displays kernel-level Trusted Extensions networkinformation and statistics
trusted_extensions(5) Introduces Trusted Extensions
TrustedExtensionsPolicy(4) Is the configuration file for Trusted Extensions XServer Extension
tsol_getrhtype(3TSOL) Gets the host type from Trusted Extensionsnetwork information
updatehome(1M) Updates the home directory copy and link files forthe current label
XTSOLgetClientAttributes(3XTSOL) Gets the label attributes of an X client
XTSOLgetPropAttributes(3XTSOL) Gets the label attributes of a window property
XTSOLgetPropLabel(3XTSOL) Gets the label of a window property
XTSOLgetPropUID(3XTSOL) Gets the UID of a window property
XTSOLgetResAttributes(3XTSOL) Gets all label attributes of a window or a pixmap
XTSOLgetResLabel(3XTSOL) Gets the label of a window, a pixmap, or acolormap
XTSOLgetResUID(3XTSOL) Gets the UID of a window or a pixmap
XTSOLgetSSHeight(3XTSOL) Gets the height of the screen stripe
XTSOLgetWorkstationOwner(3XTSOL) Gets the ownership of the workstation
XTSOLIsWindowTrusted(3XTSOL) Determines if a window is created by a trustedclient
XTSOLMakeTPWindow(3XTSOL) Make this window a Trusted Path window
XTSOLsetPolyInstInfo(3XTSOL) Sets polyinstantiation information
XTSOLsetPropLabel(3XTSOL) Sets the label of a window property
XTSOLsetPropUID(3XTSOL) Sets the UID of a window property
Trusted Extensions Man Pages in Alphabetical Order
Appendix B • List of Trusted Extensions Man Pages 269
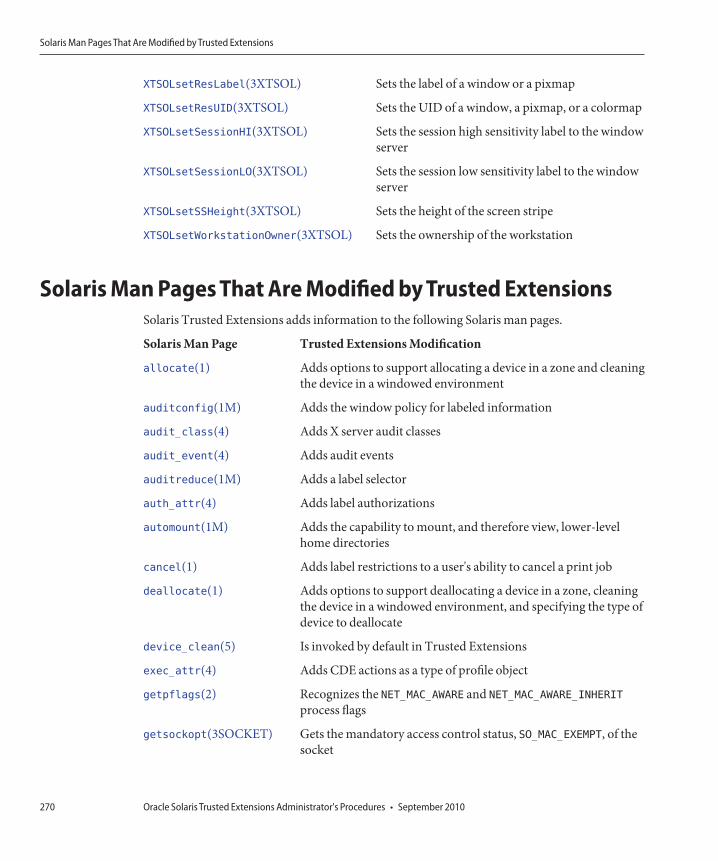
XTSOLsetResLabel(3XTSOL) Sets the label of a window or a pixmap
XTSOLsetResUID(3XTSOL) Sets the UID of a window, a pixmap, or a colormap
XTSOLsetSessionHI(3XTSOL) Sets the session high sensitivity label to the windowserver
XTSOLsetSessionLO(3XTSOL) Sets the session low sensitivity label to the windowserver
XTSOLsetSSHeight(3XTSOL) Sets the height of the screen stripe
XTSOLsetWorkstationOwner(3XTSOL) Sets the ownership of the workstation
Solaris Man Pages That Are Modified by Trusted ExtensionsSolaris Trusted Extensions adds information to the following Solaris man pages.
Solaris Man Page Trusted Extensions Modification
allocate(1) Adds options to support allocating a device in a zone and cleaningthe device in a windowed environment
auditconfig(1M) Adds the window policy for labeled information
audit_class(4) Adds X server audit classes
audit_event(4) Adds audit events
auditreduce(1M) Adds a label selector
auth_attr(4) Adds label authorizations
automount(1M) Adds the capability to mount, and therefore view, lower-levelhome directories
cancel(1) Adds label restrictions to a user's ability to cancel a print job
deallocate(1) Adds options to support deallocating a device in a zone, cleaningthe device in a windowed environment, and specifying the type ofdevice to deallocate
device_clean(5) Is invoked by default in Trusted Extensions
exec_attr(4) Adds CDE actions as a type of profile object
getpflags(2) Recognizes the NET_MAC_AWARE and NET_MAC_AWARE_INHERIT
process flags
getsockopt(3SOCKET) Gets the mandatory access control status, SO_MAC_EXEMPT, of thesocket
Solaris Man Pages That Are Modified by Trusted Extensions
Oracle Solaris Trusted Extensions Administrator's Procedures • September 2010270

getsockopt(3XNET) Gets the mandatory access control status, SO_MAC_EXEMPT, of thesocket
ifconfig(1M) Adds the all-zones interface
is_system_labeled(3C) Determines whether the system is configured with TrustedExtensions
ldaplist(1) Adds Trusted Extensions network databases
list_devices(1) Adds attributes, such as labels, that are associated with a device
lp(1) Adds the -nolabels option
lpadmin(1M) Adds label restrictions to the administrator's ability to administerprinting
lpmove(1M) Adds label restrictions to the administrator's ability to move aprint job
lpq(1B) Adds label restrictions to the display of print queue information
lprm(1B) Adds label restrictions to the caller's ability to remove printrequests
lpsched(1M) Adds label restrictions to the administrator's ability to stop andrestart the print service
lpstat(1) Adds label restrictions to the display of the print service status
netstat(1M) Adds the -R option to display extended security attributes
privileges(5) Adds Trusted Extensions privileges, such asPRIV_FILE_DOWNGRADE_SL
prof_attr(4) Adds rights profiles, such as Object Label Management
route(1M) Adds the -secattr option to add extended security attributes to aroute
setpflags(2) Sets the NET_MAC_AWARE per-process flag
setsockopt(3SOCKET) Sets the SO_MAC_EXEMPT option
setsockopt(3XNET) Sets the mandatory access control, SO_MAC_EXEMPT, on the socket
smexec(1M) Adds options to support the CDE action type
smrole(1M) Adds options to support a role's label
smuser(1M) Adds options to support a user's label and other securityattributes, such as permitted idle time
socket.h(3HEAD) Supports the SO_MAC_EXEMPT option for unlabeled peers
Solaris Man Pages That Are Modified by Trusted Extensions
Appendix B • List of Trusted Extensions Man Pages 271

tar(1) Adds including labels in tar files and extracting files according tolabel
tar.h(3HEAD) Adds attribute types that are used in labeled tar files
ucred_getlabel(3C) Adds getting the label value on a user credential
user_attr(4) Adds user security attributes that are specific to TrustedExtensions
Solaris Man Pages That Are Modified by Trusted Extensions
Oracle Solaris Trusted Extensions Administrator's Procedures • September 2010272

Index
Aaccess, See computer accessaccess policy
devices, 221Discretionary Access Control (DAC), 23, 24-25Mandatory Access Control (MAC), 24
accessingAdmin Editor action, 54-55administrative tools, 49-55audit records by label, 246devices, 219-221global zone, 50-51home directories, 115printers, 193-200remote multilevel desktop, 109-110Solaris Management Console, 52-53trusted CDE actions, 53-54ZFS dataset mounted in lower-level zone from
higher-level zone, 127-128account locking, preventing, 96accounts
See rolesSee also users
accreditation checks, 160-161accreditation ranges, label_encodings file, 30actions
See also individual actions by nameadding new Trusted CDE actions, 259-260Admin Editor, 54-55Device Allocation Manager, 221-223list of trusted CDE, 35-36Name Service Switch, 187
actions (Continued)restricted by rights profiles, 259use differences between CDE and Trusted CDE, 259
add_allocatable command, 44Add Allocatable Device action, 35Admin Editor action, 35
opening, 54-55ADMIN_HIGH label, 29ADMIN_LOW label
lowest label, 30protecting administrative files, 61
administeringaccount locking, 96assigning device authorizations, 240-241audio device to play music, 233-234auditing in Trusted Extensions, 244-246changing label of information, 96-97convenient authorizations for users, 92-94device allocation, 240-241device authorizations, 236-239devices, 225-241file systems
mounting, 142-147overview, 133troubleshooting, 147-148
filesbacking up, 139-140restoring, 140
from the global zone, 50-51labeled printing, 193-218LDAP, 111-114mail, 191-192
273
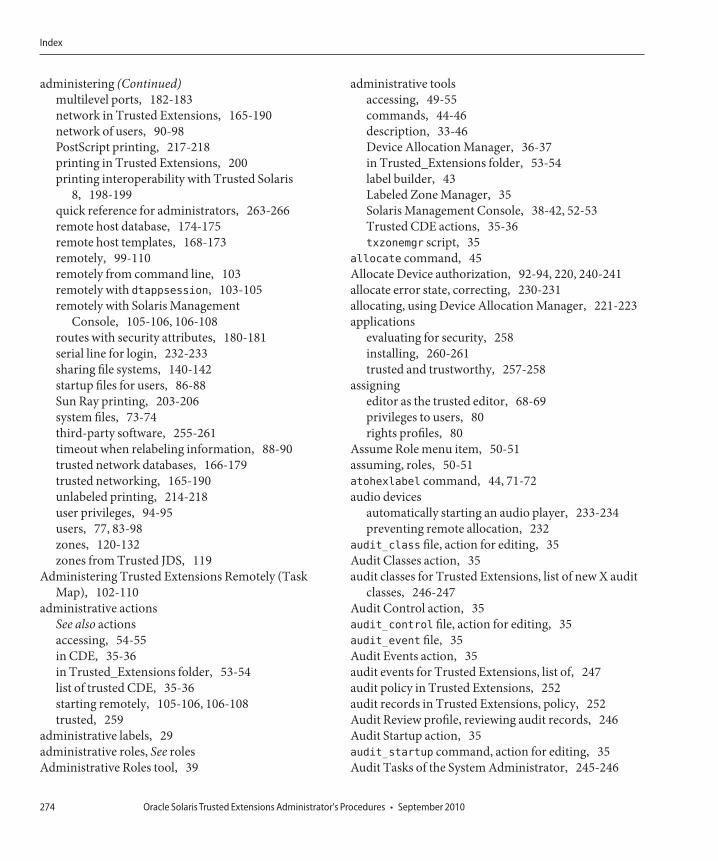
administering (Continued)multilevel ports, 182-183network in Trusted Extensions, 165-190network of users, 90-98PostScript printing, 217-218printing in Trusted Extensions, 200printing interoperability with Trusted Solaris
8, 198-199quick reference for administrators, 263-266remote host database, 174-175remote host templates, 168-173remotely, 99-110remotely from command line, 103remotely with dtappsession, 103-105remotely with Solaris Management
Console, 105-106, 106-108routes with security attributes, 180-181serial line for login, 232-233sharing file systems, 140-142startup files for users, 86-88Sun Ray printing, 203-206system files, 73-74third-party software, 255-261timeout when relabeling information, 88-90trusted network databases, 166-179trusted networking, 165-190unlabeled printing, 214-218user privileges, 94-95users, 77, 83-98zones, 120-132zones from Trusted JDS, 119
Administering Trusted Extensions Remotely (TaskMap), 102-110
administrative actionsSee also actionsaccessing, 54-55in CDE, 35-36in Trusted_Extensions folder, 53-54list of trusted CDE, 35-36starting remotely, 105-106, 106-108trusted, 259
administrative labels, 29administrative roles, See rolesAdministrative Roles tool, 39
administrative toolsaccessing, 49-55commands, 44-46description, 33-46Device Allocation Manager, 36-37in Trusted_Extensions folder, 53-54label builder, 43Labeled Zone Manager, 35Solaris Management Console, 38-42, 52-53Trusted CDE actions, 35-36txzonemgr script, 35
allocate command, 45Allocate Device authorization, 92-94, 220, 240-241allocate error state, correcting, 230-231allocating, using Device Allocation Manager, 221-223applications
evaluating for security, 258installing, 260-261trusted and trustworthy, 257-258
assigningeditor as the trusted editor, 68-69privileges to users, 80rights profiles, 80
Assume Role menu item, 50-51assuming, roles, 50-51atohexlabel command, 44, 71-72audio devices
automatically starting an audio player, 233-234preventing remote allocation, 232
audit_class file, action for editing, 35Audit Classes action, 35audit classes for Trusted Extensions, list of new X audit
classes, 246-247Audit Control action, 35audit_control file, action for editing, 35audit_event file, 35Audit Events action, 35audit events for Trusted Extensions, list of, 247audit policy in Trusted Extensions, 252audit records in Trusted Extensions, policy, 252Audit Review profile, reviewing audit records, 246Audit Startup action, 35audit_startup command, action for editing, 35Audit Tasks of the System Administrator, 245-246
Index
Oracle Solaris Trusted Extensions Administrator's Procedures • September 2010274

audit tokens for Trusted Extensionslabel token, 248list of, 247-252xatom token, 248-249xclient token, 249xcolormap token, 249xcursor token, 249xfont token, 250xgc token, 250xpixmap token, 250xproperty token, 251xselect token, 251-252xwindow token, 252
auditconfig command, 46auditing in Trusted Extensions
additional audit events, 247additional audit policies, 252additional audit tokens, 247-252additions to existing auditing commands, 253differences from Solaris auditing, 243reference, 243-253roles for administering, 244-246security administrator tasks, 245system administrator tasks, 245-246tasks, 244X audit classes, 246-247
auditreduce command, 46authorizations
adding new device authorizations, 236-239Allocate Device, 220, 240-241assigning, 80assigning device authorizations, 240-241authorizing a user or role to change label, 96-97Configure Device Attributes, 241convenient for users, 92-94creating customized device authorizations, 237-238creating local and remote device
authorizations, 238-239customizing for devices, 239-240granted, 27Print Postscript, 197-198Print PostScript, 217-218profiles that include device allocation
authorizations, 240
authorizations (Continued)Revoke or Reclaim Device, 240-241solaris.print.nobanner, 217solaris.print.ps, 217-218
authorizingdevice allocation, 240-241PostScript printing, 214-218unlabeled printing, 214-218
automount command, 46
BBacking Up, Sharing, and Mounting Labeled Files (Task
Map), 139-148banner pages
description of labeled, 195-197difference from trailer page, 195-196printing without labels, 217typical, 195
body pagesdescription of labeled, 194-195unlabeled for all users, 216unlabeled for specific users, 216-217
Ccascade printing, 206-209CD-ROM drives
accessing, 220playing music automatically, 233-234
CDE actions, See actionsChange Password menu item
description, 58using to change root password, 69-70
changingIDLETIME keyword, 85labels by authorized users, 96-97rules for label changes, 63security level of data, 96-97Selection Confirmer defaults, 63system security defaults, 73-74user privileges, 94-95
Check Encodings action, 35
Index
275

Check TN Files action, 35chk_encodings command, 44
action for invoking, 35choosing, See selectingclassification label component, 29clearances, label overview, 28Clone Zone action, 36colors, indicating label of workspace, 32commands
executing with privilege, 50-51troubleshooting networking, 186trusted_edit trusted editor, 54-55
commercial applications, evaluating, 258Common Tasks in Trusted Extensions (Task
Map), 67-74compartment label component, 29component definitions, label_encodings file, 30computer access
administrator responsibilities, 60-61restricting, 220-221
Computers and Networks tooladding known hosts, 173-174, 174-175modifying tnrhdb database, 166-179
Computers and Networks tool set, 40Configure Device Attributes authorization, 241Configure Selection Confirmation action, 35Configure Zone action, 36configuring
audio device to play music, 233-234auditing, 245authorizations for devices, 236-239devices, 227-230labeled printing, 201-213routes with security attributes, 180-181serial line for login, 232-233startup files for users, 86-88trusted network, 165-190
Configuring Labeled Printing (Task Map), 201-213Configuring Routes and Checking Network
Information in Trusted Extensions (TaskMap), 179-185
Configuring Trusted Network Databases (TaskMap), 166-179
controlling, See restricting
.copy_files filedescription, 81setting up for users, 86-88startup file, 45
Copy Zone action, 36Create LDAP Client action, 35creating
authorizations for devices, 236-239home directories, 136-137
customizingdevice authorizations, 239-240label_encodings file, 30unlabeled printing, 214-218user accounts, 83-90
Customizing Device Authorizations in TrustedExtensions (Task Map), 236-241
Customizing User Environment for Security (TaskMap), 83-90
cut and paste, and labels, 61-63cutting and pasting, configuring rules for label
changes, 63
DDAC, See discretionary access control (DAC)databases
devices, 35in LDAP, 111trusted network, 152
datasets, See ZFSdeallocate command, 45deallocating, forcing, 230-231debugging, See troubleshootingdesktops
accessing multilevel remotely, 109-110logging in to a failsafe session, 90workspace color changes, 51
/dev/kmem kernel image file, security violation, 257developer responsibilities, 257device allocation
authorizing, 240-241overview, 219-221preventing File Manager display, 234-235profiles that include allocation authorizations, 240
Index
Oracle Solaris Trusted Extensions Administrator's Procedures • September 2010276

Device Allocation Manageradministrative tool, 34description, 221-223
device-clean scriptsadding to devices, 235requirements, 221
device databases, action for editing, 35Device Manager
administrative tool, 34use by administrators, 227-230
devicesaccess policy, 221accessing, 221-223adding customized authorizations, 239-240adding device_clean script, 235administering, 225-241administering with Device Manager, 227-230allocating, 219-221automatically starting an audio player, 233-234configuring devices, 227-230configuring serial line, 232-233creating new authorizations, 236-239in Trusted Extensions, 219-223policy defaults, 221preventing remote allocation of audio, 232protecting, 36-37protecting nonallocatable, 231-232reclaiming, 230-231setting label range for nonallocatable, 220-221setting policy, 221setting up audio, 233-234troubleshooting, 230-231using, 226
dfstab fileaction for editing, 36for public zone, 136
differencesadministrative interfaces in Trusted
Extensions, 263-264between Trusted Extensions and Solaris
auditing, 243between Trusted Extensions and Solaris OS, 24-25defaults in Trusted Extensions, 265-266extending Solaris interfaces, 264-265
differences (Continued)limited options in Trusted Extensions, 266
directoriesaccessing lower-level, 115authorizing a user or role to change label of, 96-97mounting, 140-142sharing, 140-142
discretionary access control (DAC), 27diskettes, accessing, 220displaying
labels of file systems in labeled zone, 123-124status of every zone, 121
DOI, remote host templates, 154dominance of labels, 29-30Downgrade DragNDrop or CutPaste Info
authorization, 92-94Downgrade File Label authorization, 92-94downgrading labels, configuring rules for selection
confirmer, 63DragNDrop or CutPaste without viewing contents
authorization, 92-94dtappsession command, 44dtsession command, running updatehome, 81dtterm terminal, forcing the sourcing of .profile, 88dtwm command, 259
EEdit Encodings action, 35editing
system files, 73-74using trusted editor, 54-55
enablingDOI different from 1, 47-48keyboard shutdown, 73-74
/etc/default/kbd file, how to edit, 73-74/etc/default/login file, how to edit, 73-74/etc/default/passwd file, how to edit, 73-74/etc/default/print file, 217/etc/dfs/dfstab file, 36/etc/dfs/dfstab file for public zone, 136/etc/dt/config/sel_config file, 63/etc/hosts file, 173-174, 174-175/etc/motd file, action for editing, 36
Index
277
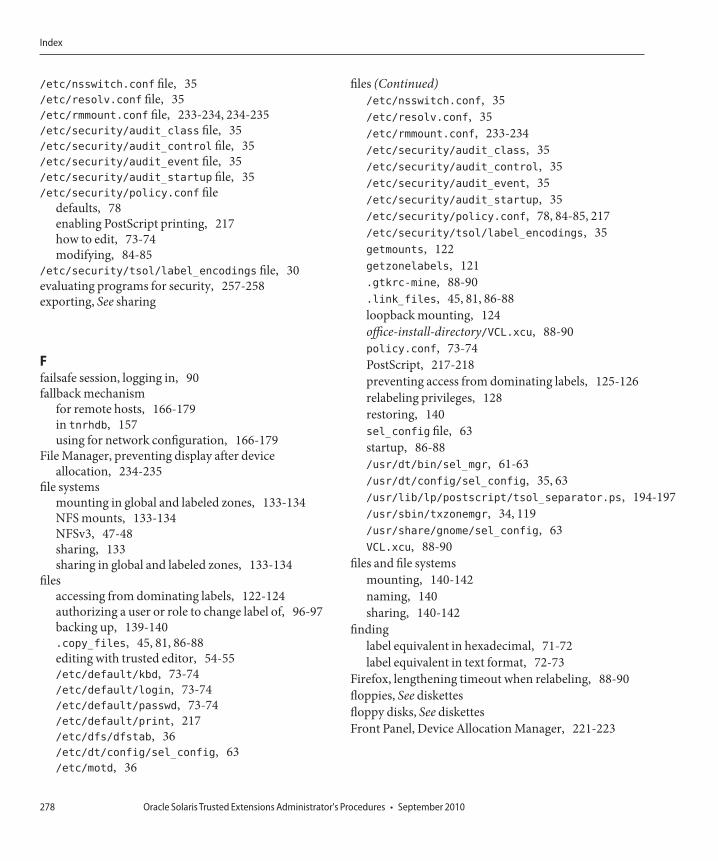
/etc/nsswitch.conf file, 35/etc/resolv.conf file, 35/etc/rmmount.conf file, 233-234, 234-235/etc/security/audit_class file, 35/etc/security/audit_control file, 35/etc/security/audit_event file, 35/etc/security/audit_startup file, 35/etc/security/policy.conf file
defaults, 78enabling PostScript printing, 217how to edit, 73-74modifying, 84-85
/etc/security/tsol/label_encodings file, 30evaluating programs for security, 257-258exporting, See sharing
Ffailsafe session, logging in, 90fallback mechanism
for remote hosts, 166-179in tnrhdb, 157using for network configuration, 166-179
File Manager, preventing display after deviceallocation, 234-235
file systemsmounting in global and labeled zones, 133-134NFS mounts, 133-134NFSv3, 47-48sharing, 133sharing in global and labeled zones, 133-134
filesaccessing from dominating labels, 122-124authorizing a user or role to change label of, 96-97backing up, 139-140.copy_files, 45, 81, 86-88editing with trusted editor, 54-55/etc/default/kbd, 73-74/etc/default/login, 73-74/etc/default/passwd, 73-74/etc/default/print, 217/etc/dfs/dfstab, 36/etc/dt/config/sel_config, 63/etc/motd, 36
files (Continued)/etc/nsswitch.conf, 35/etc/resolv.conf, 35/etc/rmmount.conf, 233-234/etc/security/audit_class, 35/etc/security/audit_control, 35/etc/security/audit_event, 35/etc/security/audit_startup, 35/etc/security/policy.conf, 78, 84-85, 217/etc/security/tsol/label_encodings, 35getmounts, 122getzonelabels, 121.gtkrc-mine, 88-90.link_files, 45, 81, 86-88loopback mounting, 124office-install-directory/VCL.xcu, 88-90policy.conf, 73-74PostScript, 217-218preventing access from dominating labels, 125-126relabeling privileges, 128restoring, 140sel_config file, 63startup, 86-88/usr/dt/bin/sel_mgr, 61-63/usr/dt/config/sel_config, 35, 63/usr/lib/lp/postscript/tsol_separator.ps, 194-197/usr/sbin/txzonemgr, 34, 119/usr/share/gnome/sel_config, 63VCL.xcu, 88-90
files and file systemsmounting, 140-142naming, 140sharing, 140-142
findinglabel equivalent in hexadecimal, 71-72label equivalent in text format, 72-73
Firefox, lengthening timeout when relabeling, 88-90floppies, See diskettesfloppy disks, See diskettesFront Panel, Device Allocation Manager, 221-223
Index
Oracle Solaris Trusted Extensions Administrator's Procedures • September 2010278
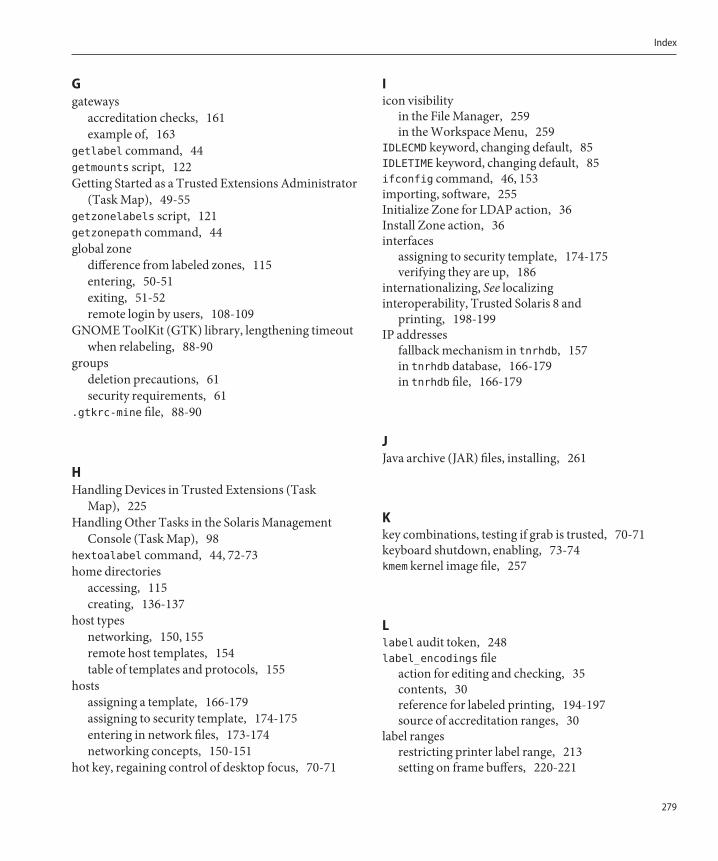
Ggateways
accreditation checks, 161example of, 163
getlabel command, 44getmounts script, 122Getting Started as a Trusted Extensions Administrator
(Task Map), 49-55getzonelabels script, 121getzonepath command, 44global zone
difference from labeled zones, 115entering, 50-51exiting, 51-52remote login by users, 108-109
GNOME ToolKit (GTK) library, lengthening timeoutwhen relabeling, 88-90
groupsdeletion precautions, 61security requirements, 61
.gtkrc-mine file, 88-90
HHandling Devices in Trusted Extensions (Task
Map), 225Handling Other Tasks in the Solaris Management
Console (Task Map), 98hextoalabel command, 44, 72-73home directories
accessing, 115creating, 136-137
host typesnetworking, 150, 155remote host templates, 154table of templates and protocols, 155
hostsassigning a template, 166-179assigning to security template, 174-175entering in network files, 173-174networking concepts, 150-151
hot key, regaining control of desktop focus, 70-71
Iicon visibility
in the File Manager, 259in the Workspace Menu, 259
IDLECMD keyword, changing default, 85IDLETIME keyword, changing default, 85ifconfig command, 46, 153importing, software, 255Initialize Zone for LDAP action, 36Install Zone action, 36interfaces
assigning to security template, 174-175verifying they are up, 186
internationalizing, See localizinginteroperability, Trusted Solaris 8 and
printing, 198-199IP addresses
fallback mechanism in tnrhdb, 157in tnrhdb database, 166-179in tnrhdb file, 166-179
JJava archive (JAR) files, installing, 261
Kkey combinations, testing if grab is trusted, 70-71keyboard shutdown, enabling, 73-74kmem kernel image file, 257
Llabel audit token, 248label_encodings file
action for editing and checking, 35contents, 30reference for labeled printing, 194-197source of accreditation ranges, 30
label rangesrestricting printer label range, 213setting on frame buffers, 220-221
Index
279

label ranges (Continued)setting on printers, 220-221
labeled printingbanner pages, 195-197body pages, 194-195PostScript files, 217-218removing label, 92-94removing PostScript restriction, 92-94Sun Ray clients, 203-206without banner page, 92-94, 217
labeled zones, See zoneslabels
See also label rangesauthorizing a user or role to change label of
data, 96-97classification component, 29compartment component, 29configuring rules for label changes, 63default in remote host templates, 154described, 27determining text equivalents, 72-73displaying in hexadecimal, 71-72displaying labels of file systems in labeled
zone, 123-124dominance, 29-30downgrading and upgrading, 63of processes, 31-32of user processes, 31on printer output, 194-197overview, 28printing without page labels, 216relationships, 29-30repairing in internal databases, 72-73troubleshooting, 72-73well-formed, 30
LDAPaction for creating global zone clients, 35displaying entries, 113managing the naming service, 113-114naming service for Trusted Extensions, 111-113starting, 114stopping, 114troubleshooting, 189-190Trusted Extensions databases, 111
lengthening timeout, for relabeling, 88-90limiting, defined hosts on the network, 175-179.link_files file
description, 81setting up for users, 86-88startup file, 45
list_devices command, 45localizing, changing labeled printer output, 196login
by roles, 48-49configuring serial line, 232-233remote by roles, 101-102
logout, requiring, 85
MMAC, See mandatory access control (MAC)mail
administering, 191-192implementation in Trusted Extensions, 191-192multilevel, 191
man pages, quick reference for Trusted Extensionsadministrators, 267-272
managing, See administeringManaging Devices in Trusted Extensions (Task
Map), 226-235Managing Printing in Trusted Extensions (Task
Map), 200Managing Software in Trusted Extensions
(Tasks), 260-261Managing Trusted Networking (Task Map), 165Managing Users and Rights With the Solaris
Management Console (Task Map), 90-98Managing Zones (Task Map), 120-132mandatory access control (MAC)
enforcing on the network, 149-154in Trusted Extensions, 27
maximum labels, remote host templates, 154minimum labels, remote host templates, 154MLPs, See multilevel ports (MLPs)modifying, sel_config file, 63motd file, action for editing, 36mounting
file systems, 140-142
Index
Oracle Solaris Trusted Extensions Administrator's Procedures • September 2010280

mounting (Continued)files by loopback mounting, 124NFSv3 file systems, 47-48overview, 133-134troubleshooting, 147-148ZFS dataset on labeled zone, 126-128
Mozilla, lengthening timeout when relabeling, 88-90multiheaded system, trusted stripe, 25multilevel mounts, NFS protocol versions, 138-139multilevel ports (MLPs)
administering, 182-183example of NFSv3 MLP, 130example of web proxy MLP, 131
multilevel printingaccessing by print client, 211-212configuring, 201-203Sun Ray clients, 206-209
NName Service Switch action, 35, 187names of file systems, 140naming services
databases unique to Trusted Extensions, 111LDAP, 111-114managing LDAP, 113-114
net_mac_aware privilege, 125-126netstat command, 46, 153, 186network, See trusted networknetwork databases
action for checking, 35description, 152in LDAP, 111
network packets, 150networking concepts, 150-151NFS mounts
accessing lower-level directories, 135-138in global and labeled zones, 133-134
nonallocatable devicesprotecting, 231-232setting label range, 220-221
nsswitch.conf file, action for editing, 35
O-o nobanner option to lp command, 217office-install-directory/VCL.xcu, 88-90OpenOffice, See StarOffice
Ppackages, accessing the media, 260-261passwords
assigning, 80Change Password menu item, 58, 69-70changing for root, 69-70changing user passwords, 58storage, 61testing if password prompt is trusted, 71
plabel command, 44policy.conf file
changing defaults, 73-74changing Trusted Extensions keywords, 85defaults, 78how to edit, 84-85
PostScriptenabling to print, 217-218printing restrictions in Trusted Extensions, 197-198
preventing, See protectingPrint Postscript authorization, 92-94, 197-198,
217-218Print without Banner authorization, 92-94, 217Print without Label authorization, 92-94printer output, See printingprinters, setting label range, 220-221printing
adding conversion filters, 198and label_encodings file, 30authorizations for unlabeled output from a public
system, 85configuring for multilevel labeled output, 201-203configuring for print client, 211-212configuring for Sun Ray clients, 203-206configuring labeled zone, 209-210configuring labels and text, 196configuring public print jobs, 215-216in local language, 196internationalizing labeled output, 196
Index
281
printing (Continued)interoperability with Trusted Solaris 8, 198-199labeling a Solaris print server, 215-216localizing labeled output, 196managing, 193-200model scripts, 198PostScript files, 217-218PostScript restrictions in Trusted
Extensions, 197-198preventing labels on output, 214-215public jobs from a Solaris print server, 215-216removing PostScript restriction, 92-94restricting label range, 213using a Solaris print server, 215-216without labeled banners and trailers, 92-94, 217without page labels, 92-94, 216
privilegeschanging defaults for users, 80non-obvious reasons for requiring, 257removing proc_info from basic set, 85restricting users', 94-95when executing commands, 50-51
proc_info privilege, removing from basic set, 85procedures, See tasks and task mapsprocesses
labels of, 31-32labels of user processes, 31preventing users from seeing others' processes, 85
profiles, See rights profilesprograms, See applicationsprotecting
devices, 36-37, 219-221devices from remote allocation, 232file systems by using non-proprietary names, 140files at lower labels from being accessed, 125-126from access by arbitrary hosts, 175-179information with labels, 31-32labeled hosts from contact by arbitrary unlabeled
hosts, 175-179nonallocatable devices, 231-232
Rreal UID of root, required for applications, 257
Reducing Printing Restrictions in Trusted Extensions(Task Map), 214-218
regaining control of desktop focus, 70-71regular users, See usersrelabeling information, 96-97remote administration
defaults, 99-100methods, 100
remote host templatesassigning, 166-179assigning to hosts, 174-175creating, 168-173tool for administering, 40-41
remote hosts, using fallback mechanism in tnrhdb, 157Remote Login authorization, 92-94remote multilevel desktop, accessing, 109-110removable media, mounting, 260-261remove_allocatable command, 44removing, labels on printer output, 214-215repairing, labels in internal databases, 72-73resolv.conf file, action for editing, 35Restart Zone action, 36restoring control of desktop focus, 70-71restricting
access to computer based on label, 220-221access to devices, 219-221access to global zone, 49access to lower-level files, 125-126access to printers with labels, 194actions by rights profiles, 259mounts of lower-level files, 125-126printer access with labels, 194printer label range, 213remote access, 99-100
Revoke or Reclaim Device authorization, 240-241rights, See rights profilesrights profiles
assigning, 80controlling the use of actions, 259Convenient Authorizations, 92-94with Allocate Device authorization, 240with device allocation authorizations, 240with new device authorizations, 238-239
Rights tool, 39
Index
Oracle Solaris Trusted Extensions Administrator's Procedures • September 2010282

rmmount.conf file, 233-234, 234-235role workspace, global zone, 48-49roles
administering auditing, 244administering remotely, 105-106, 106-108assigning rights, 80assuming, 48-49, 50-51creating, 48-49leaving role workspace, 51-52remote login, 101-102role assumption from unlabeled host, 101trusted application access, 33workspaces, 48-49
root UID, required for applications, 257route command, 46, 153routing, 159
accreditation checks, 160-161commands in Trusted Extensions, 163concepts, 161example of, 163static with security attributes, 180-181tables, 159-160, 162using route command, 180-181
Sscripts
getmounts, 122getzonelabels, 121/usr/sbin/txzonemgr, 34, 119
secure attention, key combination, 70-71Security Administrator role
administering network of users, 90-98administering PostScript restriction, 198administering printer security, 193assigning authorizations to users, 92-94audit tasks, 245configuring a device, 227-230configuring serial line for login, 232-233creating Convenient Authorizations rights
profile, 92-94enabling unlabeled body pages from a public
system, 85enforcing security, 223
Security Administrator role (Continued)modifying window configuration files, 64protecting nonallocatable devices, 231-232
security administrators, See Security Administrator rolesecurity attributes, 159-160
modifying defaults for all users, 84-85modifying user defaults, 84setting for remote hosts, 168-173using in routing, 180-181
security information, on printer output, 194-197security label set, remote host templates, 155security mechanisms
extensible, 58Solaris, 256
security policyauditing, 252training users, 59users and devices, 223
security templates, See remote host templatesSecurity Templates tool, 40
assigning templates, 174-175modifying tnrhdb, 166-179using, 168
sel_config file, 63action for editing, 35configuring selection transfer rules, 63
sel_mgr application, 61-63selecting, audit records by label, 246Selection Confirmer, changing defaults, 63Selection Manager
changing timeout, 88-90configuring rules for selection confirmer, 63
Selection Manager application, 61-63serial line, configuring for logins, 232-233service management facility (SMF), Trusted Extensions
service, 47-48session range, 31sessions, failsafe, 90Set Daily Message action, 36Set Default Routes action, 36Set DNS Servers action, 35setlabel command, 44Share Filesystems action, 36Share Logical Interface action, 36
Index
283

Share Physical Interface action, 36sharing, ZFS dataset from labeled zone, 126-128Shut Down Zone action, 36Shutdown authorization, 92-94similarities
between Trusted Extensions and Solarisauditing, 243
between Trusted Extensions and Solaris OS, 23-24single-label operation, 31single-label printing, configuring for a zone, 209-210smtnrhdb command, 44smtnrhtp command, 45smtnzonecfg command, 45snoop command, 153, 186software
administering third-party, 255-261importing, 255installing Java programs, 261
Solaris Management Consoleadministering trusted network, 166-179administering users, 90-98Computers and Networks tool, 173-174description of tools and toolboxes, 38-42Security Templates tool, 40-41, 168starting, 52-53toolboxes, 38Trusted Network Zones tool, 41
Solaris OSdifferences from Trusted Extensions, 24-25differences from Trusted Extensions auditing, 243similarities with Trusted Extensions, 23-24similarities with Trusted Extensions auditing, 243
solaris.print.nobanner authorization, 85, 217solaris.print.ps authorization, 217-218solaris.print.unlabeled authorization, 85StarOffice, lengthening timeout when relabeling, 88-90Start Zone action, 36startup files, procedures for customizing, 86-88Stop-A, enabling, 73-74Sun Ray systems
configuring network printer, 203-206enabling initial contact between client and
server, 178preventing users from seeing others' processes, 85
Sun Ray systems (Continued)tnrhdb address for client contact, 176
System Administrator roleadding device_clean script, 235adding print conversion filters, 198administering printers, 193audit tasks, 245-246enabling music to play automatically, 233-234preventing File Manager display, 234-235reclaiming a device, 230-231reviewing audit records, 246
system filesediting, 54-55, 73-74Solaris /etc/default/print, 217Solaris policy.conf, 217Trusted Extensions sel_config, 63Trusted Extensions tsol_separator.ps, 216
Ttape devices, accessing, 220tar command, 46tasks and task maps
Administering Trusted Extensions Remotely (TaskMap), 102-110
Audit Tasks of the Security Administrator, 245Audit Tasks of the System Administrator, 245-246Backing Up, Sharing, and Mounting Labeled Files
(Task Map), 139-148Common Tasks in Trusted Extensions (Task
Map), 67-74Configuring Labeled Printing (Task Map), 201-213Configuring Routes and Checking Network
Information in Trusted Extensions (TaskMap), 179-185
Configuring Trusted Network Databases (TaskMap), 166-179
Customizing Device Authorizations in TrustedExtensions (Task Map), 236-241
Customizing User Environment for Security (TaskMap), 83-90
Getting Started as a Trusted ExtensionsAdministrator (Task Map), 49-55
Index
Oracle Solaris Trusted Extensions Administrator's Procedures • September 2010284

tasks and task maps (Continued)Handling Devices in Trusted Extensions (Task
Map), 225Handling Other Tasks in the Solaris Management
Console (Task Map), 98Managing Devices in Trusted Extensions (Task
Map), 226-235Managing Printing in Trusted Extensions (Task
Map), 200Managing Software in Trusted Extensions
(Tasks), 260-261Managing Trusted Networking (Task Map), 165Managing Users and Rights With the Solaris
Management Console, 90-98Managing Zones (Task Map), 120-132Reducing Printing Restrictions in Trusted
Extensions (Task Map), 214-218Troubleshooting the Trusted Network (Task
Map), 185-190Using Devices in Trusted Extensions (Tasks
Map), 226text label equivalents, determining, 72-73Thunderbird, lengthening timeout when
relabeling, 88-90tnchkdb command
action for checking, 35description, 152summary, 45
tnctl commanddescription, 152summary, 45updating kernel cache, 183using, 185
tnd commanddescription, 153summary, 45
tninfo commanddescription, 153summary, 45using, 188, 189
tnrhdb database0.0.0.0 host address, 158, 1760.0.0.0 wildcard address, 176action for checking, 35
tnrhdb database (Continued)adding to, 174-175configuring, 166-179entry for Sun Ray servers, 176fallback mechanism, 157, 166-179tool for administering, 40-41wildcard address, 166-179
tnrhtp databaseaction for checking, 35adding to, 168-173tool for administering, 40-41
toolboxes, defined, 38tools, See administrative toolsTools subpanel, Device Allocation Manager, 221-223trailer pages, See banner pagestranslation, See localizingtroubleshooting
failed login, 90LDAP, 189-190mounted file systems, 147-148network, 185-190reclaiming a device, 230-231repairing labels in internal databases, 72-73trusted network, 186-189verifying interface is up, 186viewing ZFS dataset mounted in lower-level
zone, 128Troubleshooting the Trusted Network (Task
Map), 185-190trusted actions, in CDE, 35-36trusted applications, in a role workspace, 33trusted_edit trusted editor, 54-55trusted editor
assigning your favorite editor, 68-69starting, 54-55
Trusted Extensionsdifferences from Solaris auditing, 243differences from Solaris OS, 24-25man pages quick reference, 267-272quick reference to administration, 263-266similarities with Solaris auditing, 243similarities with Solaris OS, 23-24
Trusted Extensions DOI, enabling DOI different from1, 47-48
Index
285

Trusted_Extensions folderlocation, 34using actions in, 53-54using Admin Editor from, 54-55
trusted grab, key combination, 70-71trusted network
0.0.0.0 tnrhdb entry, 175-179action for setting default routes, 36administering with Solaris Management
Console, 166-179checking syntax of files, 181concepts, 149-163default labeling, 160editing local files, 166-179example of routing, 163host types, 155labels and MAC enforcement, 149-154using templates, 166-179
Trusted Network toolsdescription, 40using, 168
Trusted Network Zones toolconfiguring a multilevel port, 130configuring a multilevel print server, 201-203creating a multilevel port, 131description, 40, 41
trusted path attribute, when available, 28Trusted Path menu, Assume Role, 50-51trusted processes
in the window system, 258-260starting actions, 259
trusted programsadding, 257-258defined, 257-258
trusted stripeon multiheaded system, 25warping pointer to, 71
trustworthy programs, 257-258tsol_separator.ps file
configurable values, 196customizing labeled printing, 194-197
Uunlabeled printing, configuring, 214-218updatehome command, 45, 81Upgrade DragNDrop or CutPaste Info
authorization, 92-94Upgrade File Label authorization, 92-94upgrading labels, configuring rules for selection
confirmer, 63User Accounts tool, 39users
accessing devices, 219-221accessing printers, 193-200assigning authorizations to, 80assigning labels, 81assigning passwords, 80assigning rights, 80assigning roles to, 80authorizations for, 92-94Change Password menu item, 58changing default privileges, 80creating, 76customizing environment, 83-90deletion precautions, 61labels of processes, 31lengthening timeout when relabeling, 88-90logging in remotely to the global zone, 108-109logging in to a failsafe session, 90modifying security defaults, 84modifying security defaults for all users, 84-85planning for, 77preventing account locking, 96preventing from seeing others' processes, 85printing, 193-200removing some privileges, 94-95restoring control of desktop focus, 70-71security precautions, 61security training, 58, 61, 223session range, 31setting up skeleton directories, 86-88startup files, 86-88using .copy_files file, 86-88using .link_files file, 86-88using devices, 226
Using Devices in Trusted Extensions (Task Map), 226
Index
Oracle Solaris Trusted Extensions Administrator's Procedures • September 2010286

/usr/dt/bin/sel_mgr application, 61-63/usr/dt/bin/trusted_edit trusted editor, 54-55/usr/dt/config/sel_config file, 63/usr/lib/lp/postscript/tsol_separator.ps file,
labeling printer output, 194-197/usr/local/scripts/getmounts script, 122/usr/local/scripts/getzonelabels script, 121/usr/sbin/txzonemgr script, 34, 119/usr/share/gnome/sel_config file, 63utadm command, default Sun Ray server
configuration, 178
VVCL.xcu file, 88-90verifying
interface is up, 186syntax of network databases, 181
viewing, See accessingvirtual network computing (vnc), See Xvnc systems
running Trusted Extensions
Wwell-formed labels, 30wildcard address, See fallback mechanismwindow manager, 259window system, trusted processes, 258-260workspaces
color changes, 51colors indicating label of, 32global zone, 48-49
XX audit classes, 246-247xatom audit token, 248-249xc audit class, 246xclient audit token, 249xcolormap audit token, 249xcursor audit token, 249xfont audit token, 250
xgc audit token, 250xp audit class, 246xpixmap audit token, 250xproperty audit token, 251xs audit class, 246xselect audit token, 251-252Xtsolusersession script, 259Xvnc systems running Trusted Extensions
remote access to, 100, 109-110xwindow audit token, 252xx audit class, 246
ZZFS
adding dataset to labeled zone, 126-128mounting dataset read-write on labeled
zone, 126-128viewing mounted dataset read-only from
higher-level zone, 127-128/zone/public/etc/dfs/dfstab file, 136Zone Terminal Console action, 36zones
action for cloning, 36action for configuring, 36action for copying, 36action for initializing, 36action for installing, 36action for restarting, 36action for sharing logical interface, 36action for sharing physical interface, 36action for shutting down, 36action for starting, 36action for viewing from console, 36administering, 120-132administering from Trusted JDS, 119creating MLP, 131creating MLP for NFSv3, 130displaying labels of file systems, 123-124displaying status, 121global, 115in Trusted Extensions, 115-132managing, 115-132net_mac_aware privilege, 142-147
Index
287

zones (Continued)tool for labeling, 41
Index
Oracle Solaris Trusted Extensions Administrator's Procedures • September 2010288