Oracle® Fusion Middleware · What's New in This Guide for Release 11.1.1.6.x ... 2.10 Signal...
188
Oracle® Fusion Middleware Getting Started Guide for Oracle Complex Event Processing 11g Release 1 (11.1.1.6.3) E14476-10 August 2012 Documentation for administrators and developers that describes how to get started with Oracle Complex Event Processing (Oracle CEP), a Java server for developing high-performance event-driven applications. It includes an overview of features and concepts, sample applications, and installation guidelines.
Transcript of Oracle® Fusion Middleware · What's New in This Guide for Release 11.1.1.6.x ... 2.10 Signal...
Oracle® Fusion MiddlewareGetting Started Guide for Oracle Complex Event Processing
11g Release 1 (11.1.1.6.3)
E14476-10
August 2012
Documentation for administrators and developers that describes how to get started with Oracle Complex Event Processing (Oracle CEP), a Java server for developing high-performance event-driven applications. It includes an overview of features and concepts, sample applications, and installation guidelines.

Oracle Fusion Middleware Getting Started Guide for Oracle Complex Event Processing 11g Release 1 (11.1.1.6.3)
E14476-10
Copyright © 2007, 2012, Oracle and/or its affiliates. All rights reserved.
Primary Author: Steve Traut, Peter Purich
This software and related documentation are provided under a license agreement containing restrictions on use and disclosure and are protected by intellectual property laws. Except as expressly permitted in your license agreement or allowed by law, you may not use, copy, reproduce, translate, broadcast, modify, license, transmit, distribute, exhibit, perform, publish, or display any part, in any form, or by any means. Reverse engineering, disassembly, or decompilation of this software, unless required by law for interoperability, is prohibited.
The information contained herein is subject to change without notice and is not warranted to be error-free. If you find any errors, please report them to us in writing.
If this is software or related documentation that is delivered to the U.S. Government or anyone licensing it on behalf of the U.S. Government, the following notice is applicable:
U.S. GOVERNMENT RIGHTS Programs, software, databases, and related documentation and technical data delivered to U.S. Government customers are "commercial computer software" or "commercial technical data" pursuant to the applicable Federal Acquisition Regulation and agency-specific supplemental regulations. As such, the use, duplication, disclosure, modification, and adaptation shall be subject to the restrictions and license terms set forth in the applicable Government contract, and, to the extent applicable by the terms of the Government contract, the additional rights set forth in FAR 52.227-19, Commercial Computer Software License (December 2007). Oracle America, Inc., 500 Oracle Parkway, Redwood City, CA 94065.
This software or hardware is developed for general use in a variety of information management applications. It is not developed or intended for use in any inherently dangerous applications, including applications that may create a risk of personal injury. If you use this software or hardware in dangerous applications, then you shall be responsible to take all appropriate fail-safe, backup, redundancy, and other measures to ensure its safe use. Oracle Corporation and its affiliates disclaim any liability for any damages caused by use of this software or hardware in dangerous applications.
Oracle and Java are registered trademarks of Oracle and/or its affiliates. Other names may be trademarks of their respective owners.
Intel and Intel Xeon are trademarks or registered trademarks of Intel Corporation. All SPARC trademarks are used under license and are trademarks or registered trademarks of SPARC International, Inc. AMD, Opteron, the AMD logo, and the AMD Opteron logo are trademarks or registered trademarks of Advanced Micro Devices. UNIX is a registered trademark of The Open Group.
This software or hardware and documentation may provide access to or information on content, products, and services from third parties. Oracle Corporation and its affiliates are not responsible for and expressly disclaim all warranties of any kind with respect to third-party content, products, and services. Oracle Corporation and its affiliates will not be responsible for any loss, costs, or damages incurred due to your access to or use of third-party content, products, or services.

iii
Contents
Preface ............................................................................................................................................................... xiii
Audience..................................................................................................................................................... xiiiDocumentation Accessibility ................................................................................................................... xiiiRelated Documents ................................................................................................................................... xiiiConventions ............................................................................................................................................... xiv
What's New in This Guide for Release 11.1.1.6.x .................................................................... xv
1 Overview of Oracle CEP
1.1 Introduction to Oracle Complex Event Processing................................................................ 1-11.2 Conceptual Overview of Oracle CEP....................................................................................... 1-11.3 Event Processing Networks....................................................................................................... 1-31.4 Use Cases...................................................................................................................................... 1-41.5 Summary of Oracle CEP Features ............................................................................................ 1-41.6 Supported Platforms................................................................................................................... 1-61.7 Oracle CEP IDE for Eclipse........................................................................................................ 1-61.8 Oracle CEP Visualizer ................................................................................................................ 1-81.9 Next Steps .................................................................................................................................... 1-8
2 Oracle CEP Samples
2.1 Overview of the Samples Provided in the Distribution Kit.................................................. 2-12.1.1 Ready-to-Run Samples........................................................................................................ 2-22.1.2 Sample Source ...................................................................................................................... 2-22.2 Installing the Default ocep_domain and Samples ................................................................. 2-32.3 Using Oracle CEP Visualizer With the Samples..................................................................... 2-32.4 Increasing the Performance of the Samples ............................................................................ 2-42.5 Setting Your Development Environment................................................................................ 2-42.5.1 How to Set Your Development Environment on Windows.......................................... 2-42.5.2 How to Set Your Development Environment on UNIX ................................................ 2-62.6 HelloWorld Example.................................................................................................................. 2-72.6.1 Running the HelloWorld Example from the helloworld Domain................................ 2-82.6.2 Building and Deploying the HelloWorld Example from the Source Directory ......... 2-82.6.3 Description of the Ant Targets to Build Hello World .................................................... 2-92.6.4 Implementation of the HelloWorld Example ............................................................... 2-102.6.5 The HelloWorld EPN Assembly File ............................................................................. 2-11

iv
2.6.6 The HelloWorld Component Configuration File ......................................................... 2-132.7 Oracle Continuous Query Language (CQL) Example........................................................ 2-142.7.1 Running the CQL Example ............................................................................................. 2-152.7.2 Building and Deploying the CQL Example .................................................................. 2-172.7.3 Description of the Ant Targets to Build the CQL Example ........................................ 2-182.7.4 Implementation of the CQL Example............................................................................ 2-182.7.4.1 Creating the Missing Event Query.......................................................................... 2-182.7.4.2 Creating the Moving Average Query..................................................................... 2-422.8 Oracle Spatial Example ........................................................................................................... 2-812.8.1 Running the Oracle Spatial Example ............................................................................. 2-832.8.2 Building and Deploying the Oracle Spatial Example.................................................. 2-862.8.3 Description of the Ant Targets to Build the Oracle Spatial Example........................ 2-872.8.4 Implementation of the Oracle Spatial Example............................................................ 2-872.8.5 Oracle Spatial Example EPN Assembly File................................................................. 2-882.8.6 Oracle Spatial Example Component Configuration File............................................. 2-912.9 Foreign Exchange (FX) Example............................................................................................ 2-922.9.1 Running the Foreign Exchange Example ...................................................................... 2-932.9.2 Building and Deploying the Foreign Exchange Example from the Source Directory.......
2-952.9.3 Description of the Ant Targets to Build FX................................................................... 2-962.9.4 Implementation of the FX Example ............................................................................... 2-962.9.5 The FX EPN Assembly File ............................................................................................. 2-982.9.6 The FX Processor Component Configuration Files ................................................... 2-1012.9.6.1 FX Processor Component Configuration File: spreader.xml ............................ 2-1022.9.6.2 FX Processor Component Configuration File: SummarizeResults.xml........... 2-1042.10 Signal Generation Example .................................................................................................. 2-1052.10.1 Running the Signal Generation Example .................................................................... 2-1062.10.2 Building and Deploying the Signal Generation Example from the Source Directory.......
2-1082.10.3 Description of the Ant Targets to Build Signal Generation...................................... 2-1092.10.4 Implementation of the Signal Generation Example................................................... 2-1092.10.5 The Signal Generation EPN Assembly File................................................................. 2-1102.10.6 The Signal Generation Component Configuration Files........................................... 2-1132.11 Event Record and Playback Example ................................................................................. 2-1162.11.1 Running the Event Record/Playback Example ......................................................... 2-1172.11.2 Building and Deploying the Event Record/Playback Example from the Source
Directory 2-1232.11.3 Description of the Ant Targets to Build the Record and Playback Example ......... 2-1242.11.4 Implementation of the Record and Playback Example............................................. 2-125
3 Installing Oracle CEP
3.1 Installation Overview................................................................................................................. 3-13.1.1 Before You Start the Installation Program ....................................................................... 3-23.1.2 Choosing Your JVM ............................................................................................................ 3-23.1.2.1 Oracle JRockit Real Time ............................................................................................. 3-23.1.2.2 Sun JVM ......................................................................................................................... 3-33.1.2.3 Other Platform-Specific JVMs..................................................................................... 3-3
v
3.1.3 Default Oracle CEP Domain ocep_domain and Samples .............................................. 3-33.1.4 Oracle Fusion Middleware Directory Structure and Concepts..................................... 3-33.1.4.1 Oracle CEP-Specific Middleware Home ................................................................... 3-33.1.4.2 Existing Oracle Fusion Middleware Home .............................................................. 3-43.1.5 Installation Mode................................................................................................................. 3-53.1.5.1 Graphical Mode ............................................................................................................ 3-53.1.5.2 Console Mode ............................................................................................................... 3-63.1.5.3 Silent Mode.................................................................................................................... 3-63.2 Installing Oracle CEP in Graphical Mode ............................................................................... 3-63.3 Installing Oracle CEP in Console Mode .................................................................................. 3-93.4 Installing Oracle CEP in Silent Mode.................................................................................... 3-123.4.1 Creating a silent.xml File for Silent-Mode Installation ............................................... 3-143.4.2 Guidelines for Component Selection ............................................................................. 3-153.4.3 Returning Exit Codes to the Command Window........................................................ 3-163.5 Installing an Oracle CEP Patch .............................................................................................. 3-163.6 Post-Installation Steps ............................................................................................................. 3-163.6.1 Configuring Oracle CEP for the IBM JDK..................................................................... 3-173.6.1.1 How to Configure Oracle CEP for the IBM JVM on IBM AIX (64-bit) .............. 3-173.7 Installing the Oracle CEP IDE for Eclipse ............................................................................ 3-173.8 Upgrading to Oracle CEP 11g Release 1 (11.1.1.6.3) ........................................................... 3-183.8.1 Upgrading a WebLogic Event Server 2.0 Domain to Oracle CEP 10.3 ..................... 3-183.8.2 Upgrading an Oracle CEP 10.3 Domain to Oracle CEP 11g Release 1 (11.1.1.6.3) .. 3-203.8.3 Upgrading a WebLogic Event Server 2.0 Application to Run on Oracle CEP 10.3. 3-213.8.4 Upgrading an Oracle CEP 10.3 Application to Run on Oracle CEP 11g Release 1
(11.1.1.6.3) 3-233.8.5 Backward Compatibility Issues ...................................................................................... 3-25
Glossary
Index

vi
vii
List of Examples
2–1 HelloWorld EPN Assembly File ............................................................................................ 2-112–2 HelloWorld Component Configuration File........................................................................ 2-132–3 Oracle Spatial Example EPN Assembly File ........................................................................ 2-892–4 Oracle Spatial Example Component Configuration File.................................................... 2-912–5 FX EPN Assembly File ............................................................................................................ 2-982–6 Nested Component Definition............................................................................................. 2-1012–7 FX Processor Component Configuration File: spreader.xml........................................... 2-1022–8 FX Processor Component Configuration File: SummarizeResults.xml ......................... 2-1052–9 Signal Generation EPN Assembly File................................................................................ 2-1112–10 Signal Generation Component Configuration File ........................................................... 2-1132–11 recplay Application Configuration File config.xml: adapter Element........................... 2-1203–1 Sample silent.xml File for Silent-Mode Installation............................................................ 3-143–2 Sample Windows Command File Displaying Silent-Mode Exit Codes........................... 3-163–3 Adapter Using loadgen Provider .......................................................................................... 3-233–4 Registering a StockTick Event................................................................................................ 3-233–5 Spring-DM Declared Adapter Factory.................................................................................. 3-253–6 wlevs:factory............................................................................................................................. 3-25
viii
List of Figures
1–1 Example Event -Driven System ................................................................................................ 1-21–2 Oracle CEP Application ............................................................................................................. 1-31–3 Oracle CEP IDE for Eclipse........................................................................................................ 1-71–4 Oracle CEP Visualizer ................................................................................................................ 1-82–1 The HelloWorld Example Event Processing Network .......................................................... 2-72–2 The CQL Example Event Processing Network.................................................................... 2-152–3 Oracle CEP Visualizer Logon Screen .................................................................................... 2-192–4 Oracle CEP Visualizer Dashboard......................................................................................... 2-202–5 CQL Application Screen: General Tab.................................................................................. 2-212–6 CQL Application: Event Processing Network Tab ............................................................. 2-222–7 Oracle CQL Processor: General Tab...................................................................................... 2-232–8 Oracle CQL Processor: Query Wizard Tab .......................................................................... 2-242–9 Template Tab ............................................................................................................................ 2-252–10 SSource Configuration Dialog................................................................................................ 2-262–11 Pattern Configuration Dialog: Pattern Tab .......................................................................... 2-272–12 Pattern Configuration Dialog: Define Tab ........................................................................... 2-282–13 Expression Builder: CustOrder .............................................................................................. 2-292–14 Pattern Configuration Dialog: Define Tab With CustOrder Condition........................... 2-302–15 Expression Builder: NoApproval .......................................................................................... 2-312–16 Expression Builder: Shipment................................................................................................ 2-322–17 Pattern Configuration Dialog: Define Tab Complete ......................................................... 2-332–18 Measure Tab.............................................................................................................................. 2-342–19 Expression Builder: orderid.................................................................................................... 2-352–20 Expression Builder: amount ................................................................................................... 2-362–21 Measure Tab: Complete .......................................................................................................... 2-372–22 Select Configuration Dialog: Project Tab.............................................................................. 2-382–23 Select Configuration Dialog: Project Tab Complete ........................................................... 2-392–24 Output Configuration Dialog................................................................................................. 2-402–25 Inject Rule Confirmation Dialog............................................................................................ 2-402–26 CQL Rules Tab With Tracking Query................................................................................... 2-412–27 Stream Visualizer: Showing Missing Events ....................................................................... 2-422–28 Oracle CEP Visualizer Logon Screen .................................................................................... 2-432–29 Oracle CEP Visualizer Dashboard......................................................................................... 2-442–30 CQL Application Screen: General Tab.................................................................................. 2-452–31 CQL Application: Event Processing Network Tab ............................................................. 2-462–32 Oracle CQL Processor: General Tab...................................................................................... 2-472–33 Oracle CQL Processor: Query Wizard Tab .......................................................................... 2-482–34 Query Wizard: SSource ........................................................................................................... 2-492–35 SSource Configuration Dialog................................................................................................ 2-502–36 Query Wizard: Filter................................................................................................................ 2-512–37 Connecting the SSource and Filter Icons .............................................................................. 2-512–38 Filter Configuration Dialog .................................................................................................... 2-522–39 Filter Expression Builder......................................................................................................... 2-532–40 Filter Configuration Dialog: After Adding the Filter ......................................................... 2-542–41 Query Wizard: Select............................................................................................................... 2-552–42 Select Configuration Dialog: Properties Selected................................................................ 2-562–43 Query Wizard: Output ............................................................................................................ 2-572–44 Output Configuration Dialog................................................................................................. 2-582–45 Inject Rule Confirmation Dialog............................................................................................ 2-582–46 CQL Rules Tab With View StockVolGt1000 ........................................................................ 2-592–47 Oracle CEP Visualizer Logon Screen .................................................................................... 2-602–48 Oracle CEP Visualizer Dashboard......................................................................................... 2-612–49 CQL Application Screen: General Tab.................................................................................. 2-622–50 CQL Application: Event Processing Network Tab ............................................................. 2-63

ix
2–51 Oracle CQL Processor: General Tab...................................................................................... 2-642–52 Oracle CQL Processor: Query Wizard Tab .......................................................................... 2-652–53 Query Wizard: SSource for Moving Average Query.......................................................... 2-662–54 SSource Configuration Dialog: Moving Average Query ................................................... 2-672–55 Query Wizard: Window for Moving Average Query ........................................................ 2-682–56 Window Configuration Dialog: After Adding Window.................................................... 2-692–57 Query Wizard: Select for Moving Average Query.............................................................. 2-702–58 Select Configuration Dialog: Source Property symbol Selected ....................................... 2-712–59 Select Configuration Dialog: Source Property symbol Mapped to Output Event Property....
2-722–60 Select Configuration Dialog: Source Property price Selected ........................................... 2-732–61 Expression Builder: Applying the AVG Function............................................................... 2-742–62 Select Configuration Dialog: With Expression .................................................................... 2-752–63 Select Configuration Dialog: Source Property price Mapped to Output Event Property........
2-762–64 Validation Error: GROUP BY................................................................................................. 2-762–65 Group Tab: With symbol Grouping Property ..................................................................... 2-772–66 Query Wizard: Output ............................................................................................................ 2-782–67 Output Configuration Dialog................................................................................................. 2-792–68 Inject Rule Confirmation Dialog............................................................................................ 2-792–69 CQL Rules Tab With View MovingAverage ....................................................................... 2-802–70 Stream Visualizer: Showing Moving Average Query Output .......................................... 2-812–71 Oracle Spatial Example Event Processing Network ........................................................... 2-822–72 Oracle Spatial Web Page ......................................................................................................... 2-842–73 Oracle Spatial Web Page: Bus Stop Arrivals Tab ................................................................ 2-852–74 Oracle Spatial Web Page: Bus Tracking................................................................................ 2-862–75 FX Example Event Processing Network ............................................................................... 2-932–76 The Signal Generation Example Event Processing Network .......................................... 2-1052–77 Signal Generation Dashboard .............................................................................................. 2-1082–78 The Event Record and Playback Example Event Processing Network.......................... 2-1162–79 Oracle CEP Visualizer Logon Screen .................................................................................. 2-1182–80 Oracle CEP Visualizer Dashboard....................................................................................... 2-1192–81 Event Record Tab ................................................................................................................... 2-1202–82 Start Recording Alert Dialog ................................................................................................ 2-1212–83 Event Playback Tab................................................................................................................ 2-1212–84 Start Playback Alert Dialog .................................................................................................. 2-1222–85 Stream Visualizer ................................................................................................................... 2-1233–1 Oracle CEP-Specific Middleware Home.................................................................................. 3-43–2 Oracle CEP in an Existing Oracle Fusion Middleware Home.............................................. 3-5

x

xi
List of Tables
2–1 Valid Order Workflow ........................................................................................................... 2-182–2 Invalid Order Workflow ........................................................................................................ 2-182–3 MATCH_RECOGNIZE Pattern Quantifiers ....................................................................... 2-272–4 Condition Definitions............................................................................................................. 2-283–1 Home Directories and Oracle CEP-Specific Middleware Home ........................................ 3-43–2 Home Directories and Existing Middleware Home ............................................................. 3-53–3 Values for the silent.xml File ................................................................................................. 3-143–4 Exit Codes ................................................................................................................................ 3-163–5 Upgrade Paths ......................................................................................................................... 3-18

xii

xiii
Preface
This document provides general background information and detailed code samples to help you learn about Oracle Complex Event Processing (Oracle CEP) and the Oracle Continuous Query Language (Oracle CQL).
AudienceThis document is intended for users interested in learning about Oracle CEP and Oracle CQL. Readers should be familiar with basic Java development. Some knowledge of SQL would be helpful.
Documentation AccessibilityFor information about Oracle's commitment to accessibility, visit the Oracle Accessibility Program website at http://www.oracle.com/pls/topic/lookup?ctx=acc&id=docacc.
Access to Oracle SupportOracle customers have access to electronic support through My Oracle Support. For information, visit http://www.oracle.com/pls/topic/lookup?ctx=acc&id=info or visit http://www.oracle.com/pls/topic/lookup?ctx=acc&id=trs if you are hearing impaired.
Related DocumentsFor more information, see the following:
■ Oracle Fusion Middleware Administrator's Guide for Oracle Complex Event Processing
■ Oracle Fusion Middleware Developer's Guide for Oracle Complex Event Processing for Eclipse
■ Oracle Fusion Middleware Visualizer User's Guide for Oracle Complex Event Processing
■ Oracle Fusion Middleware Java API Reference for Oracle Complex Event Processing
■ Oracle Fusion Middleware CQL Language Reference for Oracle Complex Event Processing
■ Oracle Fusion Middleware EPL Language Reference for Oracle Complex Event Processing

xiv
■ Oracle Database SQL Language Reference at http://download.oracle.com/docs/cd/B28359_01/server.111/b28286/toc.htm
■ SQL99 Specifications (ISO/IEC 9075-1:1999, ISO/IEC 9075-2:1999, ISO/IEC 9075-3:1999, and ISO/IEC 9075-4:1999)
■ Oracle CEP Forum: http://forums.oracle.com/forums/forum.jspa?forumID=820
■ Oracle CEP Samples: http://www.oracle.com/technologies/soa/complex-event-processing.html
■ Oracle Event Driven Architecture Suite sample code: http://www.oracle.com/technology/sample_code/products/event-driven-architecture
ConventionsThe following text conventions are used in this document:
Convention Meaning
boldface Boldface type indicates graphical user interface elements associated with an action, or terms defined in text or the glossary.
italic Italic type indicates book titles, emphasis, or placeholder variables for which you supply particular values.
monospace Monospace type indicates commands within a paragraph, URLs, code in examples, text that appears on the screen, or text that you enter.

xv
What's New in This Guide for Release11.1.1.6.x
For Release 11.1.1.6.x, this guide has been updated in several ways. The following table lists the sections that have been added or changed. If a feature was not available in the first release of 11.1.1.6.x, the last columns denote which documentation release contains the update.
For a list of known issues (release notes), see the "Known Issues for for Oracle SOA Products and Oracle AIA Foundation Pack" at http://www.oracle.com/technetwork/middleware/docs/soa-aiafp-knownissuesindex-364630.html.
Sections Changes Made 11.1.1.6.0 11.1.1.6.1 11.1.1.6.2 11.1.1.6.3
None

xvi

1
Overview of Oracle CEP 1-1
1Overview of Oracle CEP
This chapter provides an overview of Oracle Complex Event Processing (Oracle CEP). It describes key concepts, features, and use cases, including event processing networks, developing with the Eclipse IDE, and managing applications with Oracle CEP Visualizer.
■ Section 1.1, "Introduction to Oracle Complex Event Processing"
■ Section 1.2, "Conceptual Overview of Oracle CEP"
■ Section 1.3, "Event Processing Networks"
■ Section 1.4, "Use Cases"
■ Section 1.5, "Summary of Oracle CEP Features"
■ Section 1.6, "Supported Platforms"
■ Section 1.7, "Oracle CEP IDE for Eclipse"
■ Section 1.8, "Oracle CEP Visualizer"
■ Section 1.9, "Next Steps"
1.1 Introduction to Oracle Complex Event ProcessingOracle CEP (formally known as the WebLogic Event Server) is a Java server for the development and deployment of high-performance event driven applications. It is a lightweight Java application container based on Equinox OSGi, with shared services, including the Oracle CEP Service Engine, which provides a rich, declarative environment based on Oracle Continuous Query Language (Oracle CQL) - a query language based on SQL with added constructs that support streaming data - to improve the efficiency and effectiveness of managing business operations. Oracle CEP supports ultra-high throughput and microsecond latency using JRockit Real Time and provides Oracle CEP Visualizer and Oracle CEP IDE for Eclipse developer tooling for a complete real time end-to-end Java Event-Driven Architecture (EDA) development platform.
Oracle CEP has the capability of deploying user Java code (POJOs) which contain the business logic. Running the business logic within Oracle CEP provides a highly tuned framework for time and event driven applications.
1.2 Conceptual Overview of Oracle CEPFigure 1–1 provides a high level view of an event-driven system.

Conceptual Overview of Oracle CEP
1-2 Oracle Fusion Middleware Getting Started Guide for Oracle Complex Event Processing
Figure 1–1 Example Event -Driven System
An event-driven system is generally comprised of several event sources, the real-time event-driven applications, and event sinks. Oracle CEP server and the Oracle CEP applications you deploy to it comprises the event-driven applications. The event sources generate streams of ordinary event data. The Oracle CEP applications listen to the event streams, process these events, and generate notable events. Event sinks receive the notable events.
Event sources, event-driven applications, and event sinks are decoupled from each other; one can add or remove any of these components without causing changes to the other components. This is a key attribute of event-driven architectures.
Event-driven applications are rule-driven. In Oracle CEP, rules are expressed as queries using the Oracle Continuous Query Language (Oracle CQL). These queries are persisted to a data store and are used for processing the inbound stream of events and generating the outbound stream of events. Queries typically perform filtering and aggregation functions to discover and extract notable events from the inbound event streams. As a result, the number of outbound events is generally much lower than that of the inbound events.
Oracle CEP is a middleware for the development of event-driven applications. An Oracle CEP application is essentially an event-driven application.
Next, consider the application itself, which is hosted by the Oracle CEP server, a light-weight container as shown in Figure 1–2.

Event Processing Networks
Overview of Oracle CEP 1-3
Figure 1–2 Oracle CEP Application
An Oracle CEP application is typically composed of the following main component types:
■ Adapters interface directly to the inbound and outbound stream and relation sources and sinks. Adapters understand the inbound and outbound protocol, and are responsible for converting the event data into a normalized form that can be queried by a processor. Adapters forward the normalized event data into channels or outbound stream and relation sinks.
■ Channels are event processing endpoints. Among other things, streams are responsible for queuing event data until the event processing agent can act upon it.
■ Processors (or event processing agents) consume normalized event data from a channel, process it using queries, and may generate new events to an output channel.
■ Beans register to listen to the output channel, and are triggered by the insertion of a new event into the output channel. This user code is generally a plain-old-Java-object (POJO). The user application makes use of a set of external services, such as JMS, Web services, and file writers, to forward the generated events to external event sinks.
■ Event Beans register to listen to the output channel, and is triggered by the insertion of a new event into the output channel. This user code uses the Oracle CEP event bean API so that the bean can be managed by Oracle CEP.
1.3 Event Processing NetworksAdapters, channels, processors, and business logic POJOs can be connected arbitrarily to each other, forming event processing networks (EPN). Examples of topologies of EPNs are:
■ Adapter - Channel - Business Logic POJO
Scenario: no processing is needed; only adaptation from proprietary protocol to some normalized model.
■ Adapter - Channel - Processor - Channel - Business Logic POJO
Scenario: straight through processing to user code.
■ Adapter - Channel - Processor - Channel - Business Logic POJO - Channel - Processor - Channel - Business Logic POJO
Scenario: two layers of event processing; the first processor creates causality between events and the second processor aggregates events into complex (notable) events.

Use Cases
1-4 Oracle Fusion Middleware Getting Started Guide for Oracle Complex Event Processing
EPNs have two important attributes:
■ Event processing networks can be used to create a hierarchy of processing agents, and thus achieve very complex processing of events. Each layer of the EPN aggregates events of its layer into complex events that become simple events in the layer above it.
■ Event processing networks improve integrability, that is, the quality of having separately developed components work correctly together. For example, one can add user code and reference to external services at several places in the network.
1.4 Use CasesThe use cases for Oracle CEP span a variety of businesses and applications. Just a few of these diverse use cases include:
■ Financial: Algorithmic Trading
Automate stock trading based on market movement. Sample query: if, within any 20 second window, StockB rises by more than 2% and StockA does not, then automatically buy StockA.
For an example, see Section 2.10, "Signal Generation Example".
■ Transportation: Security and Fraud Detection
Discover fraudulent activity by detecting patterns among events. Sample query: if a single ID card is used twice in less than 5 seconds to gain access to a city's subway system, alert security for piggybacking.
■ Energy and Telecommunications: Alarm Correlation
Reduce false positive alarms. Sample query: When 15 alarms are received within any 5 second window, but less than 5 similar alarms detected within 30 seconds, then do nothing.
■ Health Care: Patient Monitoring
Monitor the vital signs of a patient and perform some task if a particular event happens. Sample query: When a change in medication is followed by a rise in blood pressure within 20% of maximum allowable for this patient within any 10 second window, alert nearest nurse.
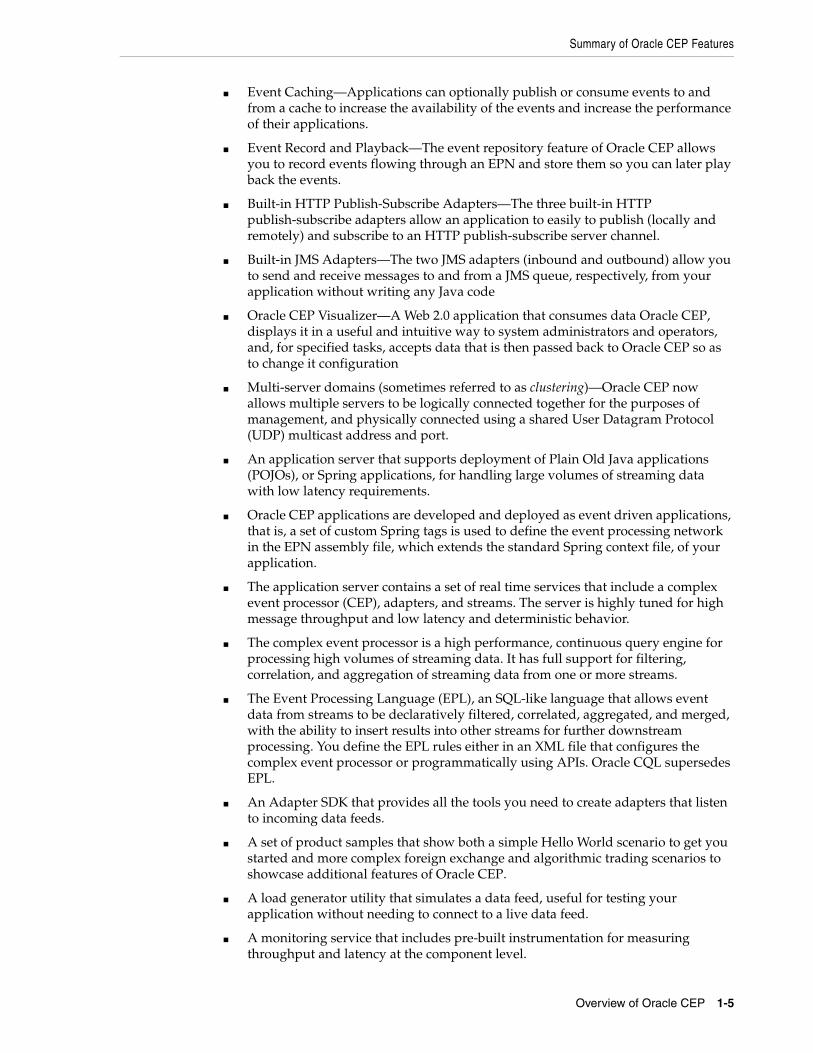
1.5 Summary of Oracle CEP FeaturesThe following list summarizes the main features of Oracle CEP:
■ New in 11g Release 1 (11.1.1): Oracle Continuous Query Language (Oracle CQL) is a query language based on SQL with added constructs that support streaming data. Using Oracle CQL, you can express queries on data streams to perform complex event processing (CEP) using Oracle CEP. Oracle CQL is scalable and comprehensive. It provides a wide range of operators (including extensive window operators), functions (including built-in, Colt, and java.lang.Math functions), and statements. Oracle CQL supersedes EPL.
■ New in 11g Release 1 (11.1.1): Support for Coherence clustering and distributed cache.
■ New in 11g Release 1 (11.1.1): Oracle CEP Visualizer query constructor, query plan generator, and support for Coherence clustering and distributed cache.
Summary of Oracle CEP Features
Overview of Oracle CEP 1-5
■ Event Caching—Applications can optionally publish or consume events to and from a cache to increase the availability of the events and increase the performance of their applications.
■ Event Record and Playback—The event repository feature of Oracle CEP allows you to record events flowing through an EPN and store them so you can later play back the events.
■ Built-in HTTP Publish-Subscribe Adapters—The three built-in HTTP publish-subscribe adapters allow an application to easily to publish (locally and remotely) and subscribe to an HTTP publish-subscribe server channel.
■ Built-in JMS Adapters—The two JMS adapters (inbound and outbound) allow you to send and receive messages to and from a JMS queue, respectively, from your application without writing any Java code
■ Oracle CEP Visualizer—A Web 2.0 application that consumes data Oracle CEP, displays it in a useful and intuitive way to system administrators and operators, and, for specified tasks, accepts data that is then passed back to Oracle CEP so as to change it configuration
■ Multi-server domains (sometimes referred to as clustering)—Oracle CEP now allows multiple servers to be logically connected together for the purposes of management, and physically connected using a shared User Datagram Protocol (UDP) multicast address and port.
■ An application server that supports deployment of Plain Old Java applications (POJOs), or Spring applications, for handling large volumes of streaming data with low latency requirements.
■ Oracle CEP applications are developed and deployed as event driven applications, that is, a set of custom Spring tags is used to define the event processing network in the EPN assembly file, which extends the standard Spring context file, of your application.
■ The application server contains a set of real time services that include a complex event processor (CEP), adapters, and streams. The server is highly tuned for high message throughput and low latency and deterministic behavior.
■ The complex event processor is a high performance, continuous query engine for processing high volumes of streaming data. It has full support for filtering, correlation, and aggregation of streaming data from one or more streams.
■ The Event Processing Language (EPL), an SQL-like language that allows event data from streams to be declaratively filtered, correlated, aggregated, and merged, with the ability to insert results into other streams for further downstream processing. You define the EPL rules either in an XML file that configures the complex event processor or programmatically using APIs. Oracle CQL supersedes EPL.
■ An Adapter SDK that provides all the tools you need to create adapters that listen to incoming data feeds.
■ A set of product samples that show both a simple Hello World scenario to get you started and more complex foreign exchange and algorithmic trading scenarios to showcase additional features of Oracle CEP.
■ A load generator utility that simulates a data feed, useful for testing your application without needing to connect to a live data feed.
■ A monitoring service that includes pre-built instrumentation for measuring throughput and latency at the component level.
Supported Platforms
1-6 Oracle Fusion Middleware Getting Started Guide for Oracle Complex Event Processing
■ A static and dynamic configuration framework. Static configuration is performed using XML files; dynamic configuration is performed by accessing configuration and runtime MBeans using JMX and with the command-line utility wlevs.Admin.
■ Oracle CEP is built on the Oracle microServices Architecture (mSA) which uses an OSGi-based framework to manage services provided by modules or feature sets. Oracle mSA provides the following services:
■ Jetty, an HTTP container for running servlets.
■ javax.sql.DataSource implementation and thin JDBC drivers for accessing a relational database.
■ Logging and debugging.
■ Authentication and authorization security.
1.6 Supported PlatformsFor detailed information on the platforms that Oracle CEP supports, see: http://www.oracle.com/technology/software/products/ias/files/oracle%20fusion%20middleware%2011gR1%20(11.1.1.x)%20certification%20matrix.xls.
You can find the installation program appropriate for your platform here: http://www.oracle.com/technology/software/products/middleware/htdocs/111110_fmw.html. For more information, see Section 3.1, "Installation Overview".
1.7 Oracle CEP IDE for EclipseOracle CEP IDE for Eclipse is targeted specifically to programmers that want to develop Oracle CEP applications as Figure 1–3 shows.

Oracle CEP IDE for Eclipse
Overview of Oracle CEP 1-7
Figure 1–3 Oracle CEP IDE for Eclipse
The Oracle CEP IDE for Eclipse is a set of plugins for the Eclipse IDE designed to help develop, deploy, and debug Oracle CEP applications.
The key features of Oracle CEP IDE for Eclipse are:
■ Project creation wizards and templates to quickly get started building event driven applications.
■ Advanced editors for source files including Java and XML files common to Oracle CEP applications.
■ Integrated server management to seamlessly start, stop, and deploy to Oracle CEP server instances all from within the IDE.
■ Integrated debugging.
■ Event Processing Network (EPN) visual design views for orienting and navigating in event processing applications.
■ Integrated support for the Oracle CEP Visualizer so you can use the Oracle CEP Visualizer from within the IDE (see Section 1.8, "Oracle CEP Visualizer").
For more information, see:
■ Section 3.7, "Installing the Oracle CEP IDE for Eclipse"
■ Oracle Fusion Middleware Developer's Guide for Oracle Complex Event Processing for Eclipse

Oracle CEP Visualizer
1-8 Oracle Fusion Middleware Getting Started Guide for Oracle Complex Event Processing
■ http://www.oracle.com/technology/products/event-driven-architecture/cep-ide/11/index.html
1.8 Oracle CEP VisualizerOracle CEP provides an advanced run-time administration console called the Oracle CEP Visualizer as Figure 1–4 shows.
Figure 1–4 Oracle CEP Visualizer
Using Oracle CEP Visualizer, you can manage, tune, and monitor Oracle CEP server domains and the Oracle CEP applications you deploy to them all from a browser. Oracle CEP Visualizer provides a variety of sophisticated run-time administration tools, including support for Oracle CQL and EPL rule maintenance and creation.
Oracle CEP Visualizer is pre-installed in every Oracle CEP server.
For more information, see Oracle Fusion Middleware Visualizer User's Guide for Oracle Complex Event Processing
1.9 Next Steps■ Install Oracle CEP 11g Release 1 (11.1.1).
See Chapter 3, "Installing Oracle CEP."

Next Steps
Overview of Oracle CEP 1-9
■ Run the samples from their respective domains.
See:
– Section 2.1, "Overview of the Samples Provided in the Distribution Kit"
– Section 2.6.1, "Running the HelloWorld Example from the helloworld Domain"
– Section 2.9.1, "Running the Foreign Exchange Example"
– Section 2.10.1, "Running the Signal Generation Example"
– Section 2.11.1, "Running the Event Record/Playback Example"
– Section 2.7.1, "Running the CQL Example"
■ Understand how the sample applications have been programmed by viewing the source and configuration files and then building them from their respective source directories.
See:
– Section 2.6.2, "Building and Deploying the HelloWorld Example from the Source Directory"
– Section 2.9.2, "Building and Deploying the Foreign Exchange Example from the Source Directory"
– Section 2.10.2, "Building and Deploying the Signal Generation Example from the Source Directory"
■ Create your own Oracle CEP domain.
See:
■ "Creating an Oracle CEP Standalone-Server Domain" in the Oracle Fusion Middleware Administrator's Guide for Oracle Complex Event Processing
■ "Creating an Oracle CEP Multi-Server Domain" in the Oracle Fusion Middleware Administrator's Guide for Oracle Complex Event Processing
■ Create a new Oracle CEP application and deploy it to your new domain.
See "Overview of Creating Oracle CEP Applications" in the Oracle Fusion Middleware Developer's Guide for Oracle Complex Event Processing for Eclipse.
■ Pose questions and find solutions using the Oracle CEP forum: http://forums.oracle.com/forums/forum.jspa?forumID=820

Next Steps
1-10 Oracle Fusion Middleware Getting Started Guide for Oracle Complex Event Processing

2
Oracle CEP Samples 2-1
2Oracle CEP Samples
This chapter introduces sample code provided with Oracle Complex Event Processing (Oracle CEP), describing how to set up and use code ranging from simple "Hello World" to applications of Oracle Continuous Query Language (CQL), as well as for spatial and industry-focused scenarios.
■ Section 2.1, "Overview of the Samples Provided in the Distribution Kit"
■ Section 2.2, "Installing the Default ocep_domain and Samples"
■ Section 2.3, "Using Oracle CEP Visualizer With the Samples"
■ Section 2.4, "Increasing the Performance of the Samples"
■ Section 2.5, "Setting Your Development Environment"
■ Section 2.6, "HelloWorld Example"
■ Section 2.7, "Oracle Continuous Query Language (CQL) Example"
■ Section 2.8, "Oracle Spatial Example"
■ Section 2.9, "Foreign Exchange (FX) Example"
■ Section 2.10, "Signal Generation Example"
■ Section 2.11, "Event Record and Playback Example"
2.1 Overview of the Samples Provided in the Distribution KitOracle CEP includes the following samples:
■ HelloWorld: a basic skeleton of a typical Oracle CEP application.
■ Oracle Continuous Query Language (CQL): an example that shows how to use the Oracle CEP Visualizer Query Wizard to construct various Oracle CQL queries to process event streams.
■ Oracle Spatial: an example that shows how to use Oracle Spatial with Oracle CQL queries to process a stream of Global Positioning System (GPS) events to track the GPS location of buses and generate alerts when a bus arrives at its pre-determined bus stop positions.
■ Foreign Exchange (FX): a complete example that includes multiple components.
■ Signal Generation: an example that simulates market trading and trend detection.
■ Event record and playback: an example that shows how to configure event record and playback using a persistent event store.
These samples are provided in two forms, as follows:

Overview of the Samples Provided in the Distribution Kit
2-2 Oracle Fusion Middleware Getting Started Guide for Oracle Complex Event Processing
■ Section 2.1.1, "Ready-to-Run Samples"
■ Section 2.1.2, "Sample Source"
The samples use Ant as their development tool; for details about Ant and installing it on your computer, see http://ant.apache.org/.
2.1.1 Ready-to-Run SamplesOut-of-the-box sample domains pre-configured to deploy an assembled application; each sample has its own domain for simplicity. Each domain is a standalone server domain; the server files are located in the defaultserver subdirectory of the domain directory. To deploy the application you simply start the default server in the domain.
■ The sample HelloWorld domain is located in \MIDDLEWARE_HOME\ocep_11.1\samples\domains\helloworld_domain, where MIDDLEWARE_HOME refers to the Middleware directory you specified when you installed Oracle CEP, such as d:\Oracle\Middleware.
See Section 2.6.1, "Running the HelloWorld Example from the helloworld Domain" for details.
■ The sample CQL domain is located in MIDDLEWARE_HOME\ocep_11.1\samples\domains\cql_domain.
See Section 2.7.1, "Running the CQL Example" for details.
■ The sample Oracle Spatial domain is located in MIDDLEWARE_HOME\ocep_11.1\samples\domains\spatial_domain.
See Section 2.8.1, "Running the Oracle Spatial Example" for details.
■ The sample Foreign Exchange domain is located in MIDDLEWARE_HOME\ocep_11.1\samples\domains\fx_domain.
See Section 2.9.1, "Running the Foreign Exchange Example" for details.
■ The sample Signal Generation domain is located in MIDDLEWARE_HOME\ocep_11.1\samples\domains\signalgeneration_domain.
See Section 2.10.1, "Running the Signal Generation Example" for details.
■ The sample Record and Playback domain is located in MIDDLEWARE_HOME\ocep_11.1\samples\domains\recplay_domain.
See Section 2.11.1, "Running the Event Record/Playback Example" for details.
2.1.2 Sample SourceThe Java and configuration XML source for each sample is provided in a separate source directory that describes a sample development environment.
■ The HelloWorld source directory is located in MIDDLEWARE_HOME\ocep_11.1\samples\source\applications\helloworld, where MIDDLEWARE_HOME refers to the Middleware directory you specified when you installed Oracle CEP, such as d:\Oracle\Middleware.
Note: "Additional Oracle CEP sample code can be found at http://www.oracle.com/technology/sample_code/products/event-driven-architecture".

Using Oracle CEP Visualizer With the Samples
Oracle CEP Samples 2-3
See Section 2.6.4, "Implementation of the HelloWorld Example" for details.
■ The CQL source directory is located in MIDDLEWARE_HOME\ocep_11.1\\samples\source\applications\cql.
See Section 2.7.4, "Implementation of the CQL Example" for details.
■ The Oracle Spatial source directory is located in MIDDLEWARE_HOME\ocep_11.1\\samples\source\applications\spatial.
See Section 2.8.4, "Implementation of the Oracle Spatial Example" for details.
■ The Foreign Exchange source directory is located in MIDDLEWARE_HOME\ocep_11.1\samples\source\applications\fx.
See Section 2.9.4, "Implementation of the FX Example" for details.
■ The Signal Generation source directory is located in MIDDLEWARE_HOME\ocep_11.1\samples\source\applications\signalgeneration.
See Section 2.10.4, "Implementation of the Signal Generation Example" for details.
■ The Record and Playback source directory is located in MIDDLEWARE_HOME\ocep_11.1\\samples\source\applications\recplay.
See Section 2.11.4, "Implementation of the Record and Playback Example" for details.
2.2 Installing the Default ocep_domain and SamplesTo install all Oracle CEP components including the default ocep_domain domain (with default passwords) and the samples, you must chose the Custom option to also install the samples. The Typical option does not include the default ocep_domain and samples.
If you previously installed Oracle CEP using the Typical option, and you now want to also install the samples, re-run the Oracle CEP installation process and specify the same Oracle CEP home directory; a later step in the installation process allows you to then install just the samples.
2.3 Using Oracle CEP Visualizer With the SamplesThe Oracle CEP Visualizer is a Web 2.0 application that consumes data from Oracle CEP, displays it in a useful and intuitive way to system administrators and operators, and, for specified tasks, accepts data that is then passed back to Oracle CEP so as to change it configuration.
Visualizer is itself an Oracle CEP application and is automatically deployed in each server instance. To use it with the samples, be sure you have started the server (instructions provided for each sample below) and then invoke the following URL in your browser:
http://host:9002/wlevs
where host refers to the name of the computer hosting Oracle CEP; if it is the same as the computer on which the browser is running you can use localhost.
Security is disabled for the HelloWorld application, so you can click Logon at the login screen without entering a username and password. For the FX and signal generation samples, however, security is enabled, so use the following to logon:
User Id: wlevs

Increasing the Performance of the Samples
2-4 Oracle Fusion Middleware Getting Started Guide for Oracle Complex Event Processing
Password: wlevs
For more information about Visualizer, see Section 1.8, "Oracle CEP Visualizer".
2.4 Increasing the Performance of the SamplesTo increase the throughput and latency when running the samples, and Oracle CEP applications in general, Oracle recommends the following:
■ Use the JRockit JDK included in Oracle JRockit Real Time and enable the deterministic garbage collector by passing the -dgc parameter to the command that starts the Oracle CEP instance for the appropriate domain:
prompt> startwlevs.cmd -dgc
By default the deterministic garbage collector is disabled for the samples.
For more information on Oracle JRockit Real Time, see http://www.oracle.com/technology/products/jrockit/jrrt/index.html.
■ When running Oracle CEP on a computer with a larger amount of memory, you should set the load generator and server heap sizes appropriately for the size of the computer. On computers with sufficient memory, Oracle recommend a heap size of 1 GB for the server and between 512MB - 1GB for the load generator.
2.5 Setting Your Development EnvironmentYou must set your development environment before you can start Oracle CEP instances and run the samples. In particular, you must set the PATH and JAVA_HOME environment variables so that you are using the correct version of the JRockit JDK.
There are two ways in which JRockit might have been installed on your computer:
■ As part of the Oracle JRockit Real Time installation. This version of the JRockit JDK includes the deterministic garbage collector.
■ As part of the Oracle CEP 11g Release 1 (11.1.1) installation. This version of the JRockit JDK does not include the deterministic garbage collector, and is provided for testing purposes only.
Although not required, Oracle recommends that you run Oracle CEP using the JRockit JDK version included in Oracle JRockit Real Time for best results; however, the following procedures describe how to set your environment for either case.
For more information about JRockit, see Section 2.4, "Increasing the Performance of the Samples".
This section describes:
■ Section 2.5.1, "How to Set Your Development Environment on Windows"
■ Section 2.5.2, "How to Set Your Development Environment on UNIX"
2.5.1 How to Set Your Development Environment on WindowsThis procedure describes how to set your development environment on Windows.
To make it easier to reset your development environment after logging out of a session, you can create a command file, such as setEnv.cmd, that contains the set commands this section describes.

Setting Your Development Environment
Oracle CEP Samples 2-5
You can also set the required environment variables permanently on your Windows computer by invoking the Control Panel > System window, clicking the Advanced tab, and then clicking the Environment Variables button. You can set the environment variables for the current user or for the entire system.
To set your development environment on Windows:1. Update your PATH environment variable to include the bin directory of the
JRockit JDK. Also, be sure that your PATH environment variable includes the bin directory of your Ant installation:
a. If using the JRockit JDK installed with Oracle JRockit Real Time:
If you installed Oracle JRockit Real Time in the d:\jrockit directory and Ant is installed in the d:\ant directory, set your PATH environment variable as shown:
prompt> set PATH=d:\jrockit\[JRRT_HOME]\bin;d:\ant\bin;%PATH%
where JRRT_HOME is the JRockit Real Time directory.
b. If using the JRockit JDK installed with Oracle CEP:
If you installed Oracle CEP in the d:\Oracle\Middleware directory and Ant is installed in the d:\ant directory, set your PATH environment variable as shown:
prompt> set PATH=d:\Oracle\Middleware\jrockit_160_20\bin;d:\ant\bin;%PATH%
2. Ensure that the JAVA_HOME variable in the setDomainEnv.cmd script points to the correct JRockit JDK. If it does not, edit the script.
The setDomainEnv.cmd script is located in the defaultserver subdirectory of the main domain directory; the defaultserver subdirectory contains the files for the standalone server of each domain. For example, the HelloWorld domain is located in MIDDLEWARE_HOME\ocep_11.1\samples\domains\helloworld_domain, where MIDDLEWARE_HOME refers to the Middleware home directory you specified when you installed Oracle CEP, such as d:\Oracle\Middleware.
a. If using the JRockit JDK installed with Oracle JRockit Real Time:
The set command should be as follows:
set JAVA_HOME=d:\jrockit\[JRRT_HOME]
where JRRT_HOME is the JRockit Real Time directory.
b. If using the JRockit JDK installed with Oracle CEP:
The set command should be as follows:
set JAVA_HOME=d:\Oracle\Middleware\jrockit_160_20
3. Set the JAVA_HOME variable in your own development environment to point to the JRockit JDK.
a. If using the JRockit JDK installed with Oracle JRockit Real Time:
The set command should be as follows:
prompt> set JAVA_HOME=d:\jrockit\[JRRT_HOME]
where JRRT_HOME is the JRockit Real Time directory.

Setting Your Development Environment
2-6 Oracle Fusion Middleware Getting Started Guide for Oracle Complex Event Processing
b. If using the JRockit JDK installed with Oracle CEP:
The set command should be as follows:
prompt> set JAVA_HOME=d:\Oracle\Middleware\jrockit_160_20
2.5.2 How to Set Your Development Environment on UNIXThis procedure describes how to set your development environment on UNIX.
To make it easier to reset your development environment after logging out of a session, you can create a command file, such as setEnv.sh, that contains the set commands this section describes.
To set your development environment on UNIX:1. Update your PATH environment variable to include the bin directory of the
JRockit JDK. Also, be sure that your PATH environment variable includes the bin directory of your Ant installation.
a. If using the JRockit JDK installed with Oracle JRockit Real Time:
If you installed Oracle JRockit Real Time in the /jrockit directory and Ant is installed in the /ant directory, set your PATH environment variable as follows:
prompt> PATH=/jrockit/j[JRRT_HOME]/bin:/ant/bin:$PATH
where JRRT_HOME is the JRockit Real Time directory.
b. If using the JRockit JDK installed with Oracle CEP:
If you installed Oracle CEP in the /Oracle/Middleware directory and Ant is installed in the /ant directory, set your PATH environment variable as shown:
prompt> PATH=/Oracle/Middleware/jrockit_160_20/bin:/ant/bin:$PATH
2. Ensure that the JAVA_HOME variable in the setDomainEnv.sh script points to the correct JRockit JDK. If it does not, edit the script.
The setDomainEnv.sh script is located in the defaultserver subdirectory of the main domain directory; the defaultserver subdirectory contains the files for the standalone server of each domain. For example, the HelloWorld domain is located in MIDDLEWARE_HOME/ocep_11.1/samples/domains/helloworld_domain, where MIDDLEWARE_HOME refers to the Middleware home directory you specified when you installed Oracle CEP, such as /Oracle/Middleware.
a. If using the JRockit JDK installed with Oracle JRockit Real Time:
The JAVA_HOME variable should be set as follows:
JAVA_HOME=/jrockit/[JRRT_HOME]
where JRRT_HOME is the JRockit Real Time directory.
b. If using the JRockit JDK installed with Oracle CEP:
The JAVA_HOME variable should be set as follows:
JAVA_HOME=/Oracle/Middleware/jrockit_160_20
3. Set the JAVA_HOME variable in your development environment to point to the JRockit JDK.

HelloWorld Example
Oracle CEP Samples 2-7
a. If using the JRockit JDK installed with Oracle JRockit Real Time:
The JAVA_HOME variable should be set as follows:
prompt> JAVA_HOME=/jrockit/[JRRT_HOME]
where JRRT_HOME is the JRockit Real Time directory.
b. If using the JRockit JDK installed with Oracle CEP:
The JAVA_HOME variable should be set as follows:
prompt> JAVA_HOME=/Oracle/Middleware/jrockit_160_20
2.6 HelloWorld ExampleThe first example that shows how to create an Oracle CEP application is the ubiquitous HelloWorld.
Figure 2–1 shows the HelloWorld example Event Processing Network (EPN). The EPN contains the components that make up the application and how they fit together.
Figure 2–1 The HelloWorld Example Event Processing Network
The example includes the following components:
■ helloworldAdapter—Component that generates Hello World messages every second. In a real-world scenario, this component would typically read a stream of data from a source, such as a data feed from a financial institution, and convert it into a stream of events that the complex event processor can understand. The HelloWorld application also includes a HelloWorldAdapterFactory that creates instances of HelloWorldAdapter.
■ helloworldInputChannel—Component that streams the events generated by the adapter (in this case Hello World messages) to the complex event processor.
■ helloworldProcessor—Component that simply forwards the messages from the helloworldAdapter component to the POJO that contains the business logic. In a real-world scenario, this component would typically execute additional and possibly much more complex processing of the events from the stream, such as selecting a subset of events based on a property value, grouping events, and so on using Oracle CQL.
■ helloworldOutputChannel—Component that streams the events processed by the complex event processor to the POJO that contains the user-defined business logic.
■ helloworldBean—POJO component that simply prints out a message every time it receives a batch of messages from the processor via the output channel. In a real-world scenario, this component would contain the business logic of the

HelloWorld Example
2-8 Oracle Fusion Middleware Getting Started Guide for Oracle Complex Event Processing
application, such as running reports on the set of events from the processor, sending appropriate emails or alerts, and so on.
2.6.1 Running the HelloWorld Example from the helloworld DomainThe HelloWorld application is pre-deployed to the helloworld domain. To run the application, you simply start an instance of Oracle CEP server.
To run the HelloWorld example from the helloworld domain:1. Open a command window and change to the default server directory of the
helloworld domain directory, located in MIDDLEWARE_HOME\ocep_11.1\samples\domains\helloworld_domain\defaultserver, where MIDDLEWARE_HOME refers to the Middleware home directory you specified when you installed Oracle CEP, such as d:\Oracle\Middleware.
prompt> cd d:\Oracle\Middleware\ocep_11.1\samples\domains\helloworld_domain\defaultserver
2. Ensure the environment is set correctly in the server startup script.
For more information, see Section 2.5, "Setting Your Development Environment."
3. Start Oracle CEP by executing the appropriate script with the correct command line arguments:
a. On Windows:
* If you are using the JRockit JDK included in Oracle JRockit Real Time, enable the deterministic garbage collector by passing the -dgc parameter to the command:
prompt> startwlevs.cmd -dgc
* If you are not using the JRockit JDK included in Oracle JRockit Real Time:
prompt> startwlevs.cmd
b. On UNIX:
* If you are using the JRockit JDK included in Oracle JRockit Real Time, enable the deterministic garbage collector by passing the -dgc parameter to the command:
prompt> startwlevs.sh -dgc
* If you are not using the JRockit JDK included in Oracle JRockit Real Time:
prompt> startwlevs.sh
After server status messages scroll by, you should see the following message printed to the output about every second:
Message: HelloWorld - the current time is: 3:56:57 PM
This message indicates that the HelloWorld example is running correctly.
2.6.2 Building and Deploying the HelloWorld Example from the Source DirectoryThe HelloWorld sample source directory contains the Java source, along with other required resources such as configuration XML files, that make up the HelloWorld application. The build.xml Ant file contains targets to build and deploy the application to the helloworld domain.
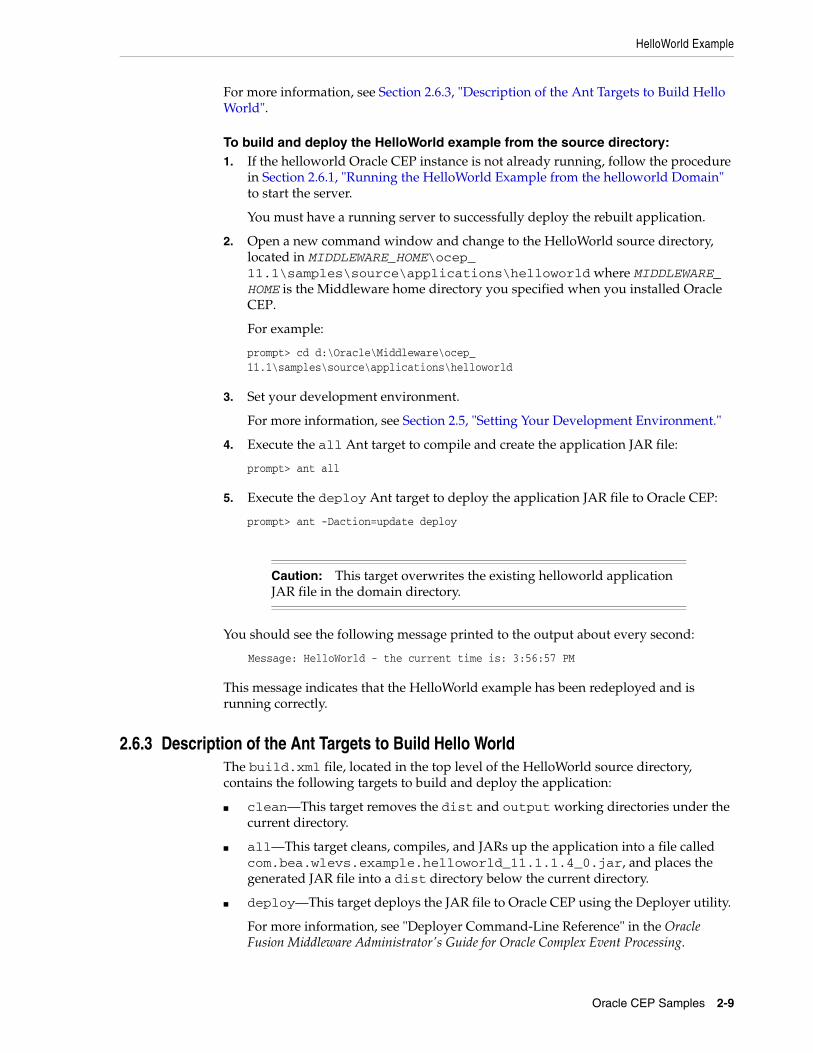
HelloWorld Example
Oracle CEP Samples 2-9
For more information, see Section 2.6.3, "Description of the Ant Targets to Build Hello World".
To build and deploy the HelloWorld example from the source directory:1. If the helloworld Oracle CEP instance is not already running, follow the procedure
in Section 2.6.1, "Running the HelloWorld Example from the helloworld Domain" to start the server.
You must have a running server to successfully deploy the rebuilt application.
2. Open a new command window and change to the HelloWorld source directory, located in MIDDLEWARE_HOME\ocep_11.1\samples\source\applications\helloworld where MIDDLEWARE_HOME is the Middleware home directory you specified when you installed Oracle CEP.
For example:
prompt> cd d:\Oracle\Middleware\ocep_11.1\samples\source\applications\helloworld
3. Set your development environment.
For more information, see Section 2.5, "Setting Your Development Environment."
4. Execute the all Ant target to compile and create the application JAR file:
prompt> ant all
5. Execute the deploy Ant target to deploy the application JAR file to Oracle CEP:
prompt> ant -Daction=update deploy
You should see the following message printed to the output about every second:
Message: HelloWorld - the current time is: 3:56:57 PM
This message indicates that the HelloWorld example has been redeployed and is running correctly.
2.6.3 Description of the Ant Targets to Build Hello WorldThe build.xml file, located in the top level of the HelloWorld source directory, contains the following targets to build and deploy the application:
■ clean—This target removes the dist and output working directories under the current directory.
■ all—This target cleans, compiles, and JARs up the application into a file called com.bea.wlevs.example.helloworld_11.1.1.4_0.jar, and places the generated JAR file into a dist directory below the current directory.
■ deploy—This target deploys the JAR file to Oracle CEP using the Deployer utility.
For more information, see "Deployer Command-Line Reference" in the Oracle Fusion Middleware Administrator's Guide for Oracle Complex Event Processing.
Caution: This target overwrites the existing helloworld application JAR file in the domain directory.

HelloWorld Example
2-10 Oracle Fusion Middleware Getting Started Guide for Oracle Complex Event Processing
2.6.4 Implementation of the HelloWorld ExampleThe implementation of the HelloWorld example generally follows "Creating Oracle CEP Applications: Typical Steps" in the Oracle Fusion Middleware Developer's Guide for Oracle Complex Event Processing for Eclipse.
Refer to that section for a task-oriented procedure that describes the typical development process.
The HelloWorld example, because it is relatively simple, does not use all the components and configuration files described in the general procedure for creating an Oracle CEP application.
All the example files are located relative to the MIDDLEWARE_HOME\ocep_11.1\samples\source\applications\helloworld directory, where MIDDLEWARE_HOME refers to the Middleware directory you specified when you installed Oracle CEP c:\Oracle\Middleware. Oracle recommends that you use this example directory setup in your own environment, although it is obviously not required.
The files used by the HelloWorld example include:
■ An EPN assembly file that describes each component in the application and how all the components are connected together. The EPN assembly file extends the standard Spring context file. The file also registers the event types used in the application. You are required to include this XML file in your Oracle CEP application.
In the example, the file is called com.bea.wlevs.example.helloworld-context.xml and is located in the META-INF/spring directory.
For details, see Section 2.6.5, "The HelloWorld EPN Assembly File."
■ Java source file for the helloworldAdapter component.
In the example, the file is called HelloWorldAdapter.java and is located in the src/com/bea/wlevs/adapter/example/helloworld directory.
For a detailed description of this file and how to program the adapter Java files in general, see "Extending the Oracle CEP Event Processing Network" in the Oracle Fusion Middleware Developer's Guide for Oracle Complex Event Processing for Eclipse.
■ Java source file that describes the HelloWorldEvent event type.
In the example, the file is called HelloWorldEvent.java and is located in the src/com/bea/wlevs/event/example/helloworld directory.
For a detailed description of this file, as well as general information about programming event types, see "Creating the Event Types" in the Oracle Fusion Middleware Developer's Guide for Oracle Complex Event Processing for Eclipse.
■ An XML file that configures the helloworldProcessor and helloworldOutputChannel components. An important part of this file is the set of EPL rules that select the set of events that the HelloWorld application processes. You are required to include a processor configuration file in your Oracle CEP application, although the adapter and channel configuration is optional.
In the example, the file is called config.xml and is located in the META-INF/wlevs directory.
For details, see Section 2.6.6, "The HelloWorld Component Configuration File."

HelloWorld Example
Oracle CEP Samples 2-11
■ A Java file that implements the helloworldBean component of the application, a POJO that contains the business logic.
In the example, the file is called HelloWorldBean.java and is located in the src/com/bea/wlevs/example/helloworld directory.
For a detailed description of this file, as well as general information about programming event sinks, see "Extending the Oracle CEP Event Processing Network" in the Oracle Fusion Middleware Developer's Guide for Oracle Complex Event Processing for Eclipse.
■ A MANIFEST.MF file that describes the contents of the OSGi bundle that will be deployed to Oracle CEP.
In the example, the MANIFEST.MF file is located in the META-INF directory.
For more information about creating this file, as well as a description of creating the OSGi bundle that you deploy to Oracle CEP, see "Overview of Application Assembly and Deployment" in the Oracle Fusion Middleware Developer's Guide for Oracle Complex Event Processing for Eclipse.
The HelloWorld example uses a build.xml Ant file to compile, assemble, and deploy the OSGi bundle; see Section 2.6.2, "Building and Deploying the HelloWorld Example from the Source Directory" for a description of this build.xml file if you also use Ant in your development environment.
2.6.5 The HelloWorld EPN Assembly FileOne of the main purposes of the EPN assembly file is to define the event processing network by declaring the components of the application and how they are all connected, or in other word, which components listen to which other components. Oracle CEP provides a set of custom Spring tags used to declare the network. You also use the EPN assembly file to register the event types used by your application and its EPL rules.
You use the EPN assembly file in the typical way to define the application component beans in the Spring application context; the application components beans are those implemented with Java classes, such as adapters and the POJO that contains the business logic.
For more information, see:
■ "Schema Reference: EPN Assembly spring-wlevs-v11_1_1_6.xsd" in the Oracle Fusion Middleware Developer's Guide for Oracle Complex Event Processing for Eclipse
■ "Oracle CEP Schemas" in the Oracle Fusion Middleware Developer's Guide for Oracle Complex Event Processing for Eclipse
Example 2–1 shows the EPN assembly file used in the HelloWorld sample application; see the explanation after the example for details about the entries in bold.
Example 2–1 HelloWorld EPN Assembly File
<?xml version="1.0" encoding="UTF-8"?><beans xmlns="http://www.springframework.org/schema/beans"
xmlns:xsi="http://www.w3.org/2001/XMLSchema-instance"xmlns:osgi="http://www.springframework.org/schema/osgi"xmlns:wlevs="http://www.bea.com/ns/wlevs/spring"xsi:schemaLocation="
http://www.springframework.org/schema/beanshttp://www.springframework.org/schema/beans/spring-beans.xsdhttp://www.springframework.org/schema/osgihttp://www.springframework.org/schema/osgi/spring-osgi.xsd

HelloWorld Example
2-12 Oracle Fusion Middleware Getting Started Guide for Oracle Complex Event Processing
http://www.bea.com/ns/wlevs/springhttp://www.bea.com/ns/wlevs/spring/spring-wlevs-v11_1_1_6.xsd"><wlevs:event-type-repository>
<wlevs:event-type type-name="HelloWorldEvent"><wlevs:class>com.bea.wlevs.event.example.helloworld.HelloWorldEvent</wlevs:class>
</wlevs:event-type></wlevs:event-type-repository><wlevs:adapter id="helloworldAdapter"
class="com.bea.wlevs.adapter.example.helloworld.HelloWorldAdapter" ><wlevs:instance-property name="message" value="HelloWorld - the currenttime is:"/>
</wlevs:adapter><wlevs:processor id="helloworldProcessor" /><wlevs:channel id="helloworldInstream" >
<wlevs:listener ref="helloworldProcessor"/><wlevs:source ref="helloworldAdapter"/>
</wlevs:channel><wlevs:channel id="helloworldOutstream" manageable="true">
<wlevs:listener><bean class="com.bea.wlevs.example.helloworld.HelloWorldBean"/>
</wlevs:listener><wlevs:source ref="helloworldProcessor"/>
</wlevs:channel></beans>
In the preceding example:
■ The wlevs:event-type-repository element registers the event types that are used throughout the application; in the HelloWorld application, there is just a single event type: HelloWorldEvent, implemented with the com.bea.wlevs.event.example.helloworld.HelloWorldEvent class. Oracle CEP automatically creates instances of this data type when needed. You can also reference this data type in the EPL rules of the application.
■ The wlevs:adapter, wlevs:processor, and wlevs:channel elements together define the event processor network by declaring each component in the network:
– The wlevs:adapter element defines the adapter component of the HelloWorld application:
<wlevs:adapter id="helloworldAdapter" class="com.bea.wlevs.adapter.example.helloworld.HelloWorldAdapter" > <wlevs:instance-property name="message" value="HelloWorld - the currenttime is:"/></wlevs:adapter>
The id attribute specifies a unique identifier for this component; the id will be referenced later by other components. The class attribute specifies the class that implements the adapter; in this case it is com.bea.wlevs.adapter.example.helloworld.HelloWorldAdapter.
The wlevs:instance-property child element passes an instance variable to the adapter instance; the name of the variable is message and the value is HelloWorld - the current time is: .
– The wlevs:processor element defines the processor component of the application:
<wlevs:processor id="helloworldProcessor" />
The id attribute functions the same as that of wlevs:adapter element.

HelloWorld Example
Oracle CEP Samples 2-13
– The wlevs:channel elements define the two channel components of the application:
<wlevs:channel id="helloworldInstream" > <wlevs:listener ref="helloworldProcessor"/> <wlevs:source ref="helloworldAdapter"/></wlevs:channel><wlevs:channel id="helloworldOutstream" manageable="true"> <wlevs:listener> <bean class="com.bea.wlevs.example.helloworld.HelloWorldBean"/> </wlevs:listener> <wlevs:source ref="helloworldProcessor"/></wlevs:channel>
The id attribute for streams functions the same as that of wlevs:adapter. The manageable attribute enables monitoring of the channel; by default the manageability of components is disabled.
The wlevs:channel element with id="helloworldInstream" uses the wlevs:listener child element to specify that the helloworldProcessor listens to the channel, and the wlevs:source child element to specify that the channel gets its events from the helloworldAdapter component.
The wlevs:channel element with id="helloworldOutstream" also uses these listener and source tags. One difference, however, is that it directly nests the definition of the business logic POJO in the wlevs:listener element rather than reference a unique identifier. In this case, the nested tag is a standard Spring bean element that specifies that the POJO is implemented with the com.bea.wlevs.example.helloworld.HelloWorldBean class.
2.6.6 The HelloWorld Component Configuration FileThe HelloWorld application configures the processor in the component configuration file that Example 2–2 shows.
Example 2–2 HelloWorld Component Configuration File
<?xml version="1.0" encoding="UTF-8"?><n1:config xmlns:n1="http://www.bea.com/ns/wlevs/config/application"xmlns:xsi="http://www.w3.org/2001/XMLSchema-instance"><processor><name>helloworldProcessor</name><rules><query id="helloworldRule"><![CDATA[ select * from helloworldInputChannel ]]>
</query></rules>
</processor></n1:config>
If your application contains multiple processors, adapters or streams, you can either declare them all in a single configuration file, or create separate configuration files for each component; the method you chose depends on which you find easier to manage.
For each component you configure, you must add the name child element to explicitly declare the specific component to which you are referring. The value of the name element must correspond to the component's unique identifier of its declaration in the EPN assembly file.
For example, assume a processor is declared in the EPN assembly file as follows:
<wlevs:processor id="helloworldProcessor" ...>
Oracle Continuous Query Language (CQL) Example
2-14 Oracle Fusion Middleware Getting Started Guide for Oracle Complex Event Processing
Then its corresponding XML configuration would be as follows:
<processor><name>helloworldProcessor</name>...
</processor>
The HelloWorld example uses a single configuration file for one processor with the name helloworldProcessor. This name corresponds with the declaration of the components in the EPN assembly file.
The processor element configures the processor component. The most important part of the processor configuration is the declaration of the set of Oracle Continuous Query Language (Oracle CQL) rules that this processor executes; these rules select the set of events that are eventually passed to the application business object. Each rule is declared with a query or relation element using an XML <![CDATA[...]]> section; all query and relation elements are grouped together within a single rules element. You can define as many rules as you want for a particular processor.
The HelloWorld application has a single, very simple rule:
select * from helloworldInputChannel
The purpose of this query is to show how to pass input data through as is (without manipulation) and output this data as a stream (not a relation). That is why this query does not use a window operator (such as [now] or [range 1]). With a window operator, the output is a relation and not a stream. Consider the downstream HelloWorldBean POJO: it only implements StreamSink (and not RelationSink) because the output of this query is a stream (not a relation generated by a window operator). Consequently, the HelloWorldBean POJO prints only the insert events. It will not print the delete events since it does not implement RelationSink.Typically, you create queries (and views) that output relations (using a window operator) for consumption by subsequent queries or views that produce streams.
For additional information and samples about using Oracle CEP query languages, see:
■ Oracle Fusion Middleware CQL Language Reference for Oracle Complex Event Processing.
■ Oracle Fusion Middleware EPL Language Reference for Oracle Complex Event Processing.
2.7 Oracle Continuous Query Language (CQL) ExampleThe CQL example shows how to use the Oracle CEP Visualizer Query Wizard to construct various types of Oracle CQL queries.
Figure 2–2 shows the CQL example Event Processing Network (EPN). The EPN contains the components that make up the application and how they fit together.
Note: Oracle EPL is superseded by Oracle CQL.

Oracle Continuous Query Language (CQL) Example
Oracle CEP Samples 2-15
Figure 2–2 The CQL Example Event Processing Network
The application contains three separate event paths in its EPN:
■ Missing events: this event path consists of an adapter orderCVSAdapter connected to a channel orderChannel. The orderChannel is connected to processor orderProcessor which is connected to channel alertChannel which is connected to adapter alertOutput.
This event path is used to detect missing events in a customer order workflow.
For more information on how to construct the query that the cqlProc processor executes, see Section 2.7.4.1, "Creating the Missing Event Query".
■ Moving average: this event path consists of channel stockChannel connected to processor stockProcessor which is connected to channel movingAvgChannel which is connected to adapter movingOutput.
This event path is used to compute a moving average on stock whose volume is greater than 1000.
For more information on how to construct the query that the cqlProc processor executes, see Section 2.7.4.2, "Creating the Moving Average Query".
■ Cache: this event path consists of adapter adapter connected to channel S1 connected to Oracle CQL processor cacheProcessor connected to channel S2 connected to bean Bean. There is a cache stockCache also connected to the Oracle CQL processor cacheProcessor. There is also a bean Loader.
This event path is used to access information from a cache in an Oracle CQL query.
2.7.1 Running the CQL ExampleFor optimal demonstration purposes, Oracle recommends that you run this example on a powerful computer, such as one with multiple CPUs or a 3 GHz dual-core Intel, with a minimum of 2 GB of RAM.
Note: For more information about the various components in the EPN, see the other samples in this book.

Oracle Continuous Query Language (CQL) Example
2-16 Oracle Fusion Middleware Getting Started Guide for Oracle Complex Event Processing
The CQL application is pre-deployed to the cql_domain domain. To run the application, you simply start an instance of Oracle CEP server.
To run the CQL example:1. Open a command window and change to the default server directory of the CQL
domain directory, located in MIDDLEWARE_HOME\ocep_11.1\samples\domains\cql_domain\defaultserver, where MIDDLEWARE_HOME refers to the Middleware directory you specified when you installed Oracle CEP, such as d:\Oracle\Middleware.
prompt> cd d:\Oracle\Middleware\ocep_11.1\samples\domains\cql_domain\defaultserver
2. Set your development environment, as described in Section 2.5, "Setting Your Development Environment."
3. Start Oracle CEP by executing the appropriate script with the correct command line arguments:
a. On Windows:
* If you are using the JRockit JDK included in Oracle JRockit Real Time, enable the deterministic garbage collector by passing the -dgc parameter to the command:
prompt> startwlevs.cmd -dgc
* If you are not using the JRockit JDK included in Oracle JRockit Real Time:
prompt> startwlevs.cmd
b. On UNIX:
* If you are using the JRockit JDK included in Oracle JRockit Real Time, enable the deterministic garbage collector by passing the -dgc parameter to the command:
prompt> startwlevs.sh -dgc
* If you are not using the JRockit JDK included in Oracle JRockit Real Time:
prompt> startwlevs.sh
The CQL application is now ready to receive data from the data feeds.
4. To simulate the data feed for the missing event query, open a new command window and set your environment as described in Section 2.5, "Setting Your Development Environment."
5. Change to the MIDDLEWARE_HOME\ocep_11.1\utils\load-generator directory, where MIDDLEWARE_HOME refers to the Middleware directory you specified when you installed Oracle CEP, such as d:\Oracle\Middleware.
6. Run the load generator using the orderData.prop properties file:
a. On Windows:
prompt> runloadgen.cmd orderData.prop
b. On UNIX:
prompt> runloadgen.sh orderData.prop

Oracle Continuous Query Language (CQL) Example
Oracle CEP Samples 2-17
7. To simulate the data feed for the moving average query, open a new command window and set your environment as described in Section 2.5, "Setting Your Development Environment."
8. Change to the MIDDLEWARE_HOME\ocep_11.1\utils\load-generator directory, where MIDDLEWARE_HOME refers to the Middleware directory you specified when you installed Oracle CEP, such as d:\Oracle\Middleware.
9. Run the load generator using the stockData.prop properties file:
a. On Windows:
prompt> runloadgen.cmd stockData.prop
b. On UNIX:
prompt> runloadgen.sh stockData.prop
10. To simulate the data feed for the cache query, you only need to run the example.
The load data is generated by Adaptor.java and the cache data is generated by Loader.java. You can verify that data is flowing through by turning on statistics in the Oracle CEP Visualizer Query Plan.
2.7.2 Building and Deploying the CQL ExampleThe CQL sample source directory contains the Java source, along with other required resources such as configuration XML files, that make up the CQL application. The build.xml Ant file contains targets to build and deploy the application to the cql_domain domain, as described in Section 2.7.3, "Description of the Ant Targets to Build the CQL Example."
To build and deploy the CQL example from the source directory:1. If the CQL Oracle CEP instance is not already running, follow the procedure in
Section 2.7.1, "Running the CQL Example" to start the server.
You must have a running server to successfully deploy the rebuilt application.
2. Open a new command window and change to the CQL source directory, located in MIDDLEWARE_HOME\ocep_11.1\samples\source\applications\cql, where MIDDLEWARE_HOME refers to the Middleware directory you specified when you installed Oracle CEP, such as d:\Oracle\Middleware.
prompt> cd d:\Oracle\Middleware\ocep_11.1\samples\source\applications\cql
3. Set your development environment, as described in Section 2.5, "Setting Your Development Environment."
4. Execute the all Ant target to compile and create the application JAR file:
prompt> ant all
5. Execute the deploy Ant target to deploy the application JAR file to Oracle CEP:
prompt> ant -Dusername=wlevs -Dpassword=wlevs -Daction=update deploy
Caution: This target overwrites the existing CQL application JAR file in the domain directory.
Oracle Continuous Query Language (CQL) Example
2-18 Oracle Fusion Middleware Getting Started Guide for Oracle Complex Event Processing
6. If the load generators required by the CQL application are not running, start them as described in Section 2.7.1, "Running the CQL Example."
2.7.3 Description of the Ant Targets to Build the CQL ExampleThe build.xml file, located in the top-level directory of the CQL source, contains the following targets to build and deploy the application:
■ clean—This target removes the dist and output working directories under the current directory.
■ all—This target cleans, compiles, and jars up the application into a file called com.bea.wlevs.example.cql_11.1.1.4_0.jar, and places the generated JAR file into a dist directory below the current directory.
■ deploy—This target deploys the JAR file to Oracle CEP using the Deployer utility.
For more information, see "Deployer Command-Line Reference" in the Oracle Fusion Middleware Administrator's Guide for Oracle Complex Event Processing.
2.7.4 Implementation of the CQL ExampleThis section describes how to create the queries that the CQL example uses, including:
■ Section 2.7.4.1, "Creating the Missing Event Query"
■ Section 2.7.4.2, "Creating the Moving Average Query"
2.7.4.1 Creating the Missing Event QueryThis section describes how to use the Oracle CEP Visualizer Query Wizard to create the Oracle CQL pattern matching query that the cqlProc processor executes to detect missing events.
Consider a customer order workflow in which you have customer order workflow events flowing into the Oracle CEP system.
In a valid scenario, you see events in the order that Table 2–1 lists:
However, it is an error if an order is shipped without an approval event as Table 2–2 lists:
You will create and test a query that detects the missing approval event and generates an alert event:
■ "To create the missing event query:" on page 2-19
Table 2–1 Valid Order Workflow
Event Type Description
C Customer order
A Approval
S Shipment
Table 2–2 Invalid Order Workflow
Event Type Description
C Customer order
S Shipment

Oracle Continuous Query Language (CQL) Example
Oracle CEP Samples 2-19
■ "To test the missing event query:" on page 2-41
To create the missing event query:1. If the CQL Oracle CEP instance is not already running, follow the procedure in
Section 2.7.1, "Running the CQL Example" to start the server.
You must have a running server to use the Oracle CEP Visualizer.
2. Invoke the following URL in your browser:
http://host:port/wlevs
where host refers to the name of the computer on which Oracle CEP is running and port refers to the Jetty NetIO port configured for the server (default value 9002).
The Logon screen appears as Figure 2–3 shows.
Figure 2–3 Oracle CEP Visualizer Logon Screen
3. In the Logon screen, enter the User Id wlevs and Password wlevs, and click Log In.
The Oracle CEP Visualizer dashboard appears as Figure 2–4 shows.

Oracle Continuous Query Language (CQL) Example
2-20 Oracle Fusion Middleware Getting Started Guide for Oracle Complex Event Processing
Figure 2–4 Oracle CEP Visualizer Dashboard
For more information about the Oracle CEP Visualizer user interface, see "Understanding the Oracle CEP Visualizer User Interface" in the Oracle Fusion Middleware Visualizer User's Guide for Oracle Complex Event Processing.
4. In the right-hand pane, expand WLEventServerDomain > NonClusteredServer > Applications.
5. Select the cql node.
The CQL application screen appears as Figure 2–5 shows.

Oracle Continuous Query Language (CQL) Example
Oracle CEP Samples 2-21
Figure 2–5 CQL Application Screen: General Tab
6. Select the Event Processing Network tab.
The Event Processing Network screen appears as Figure 2–6 shows.
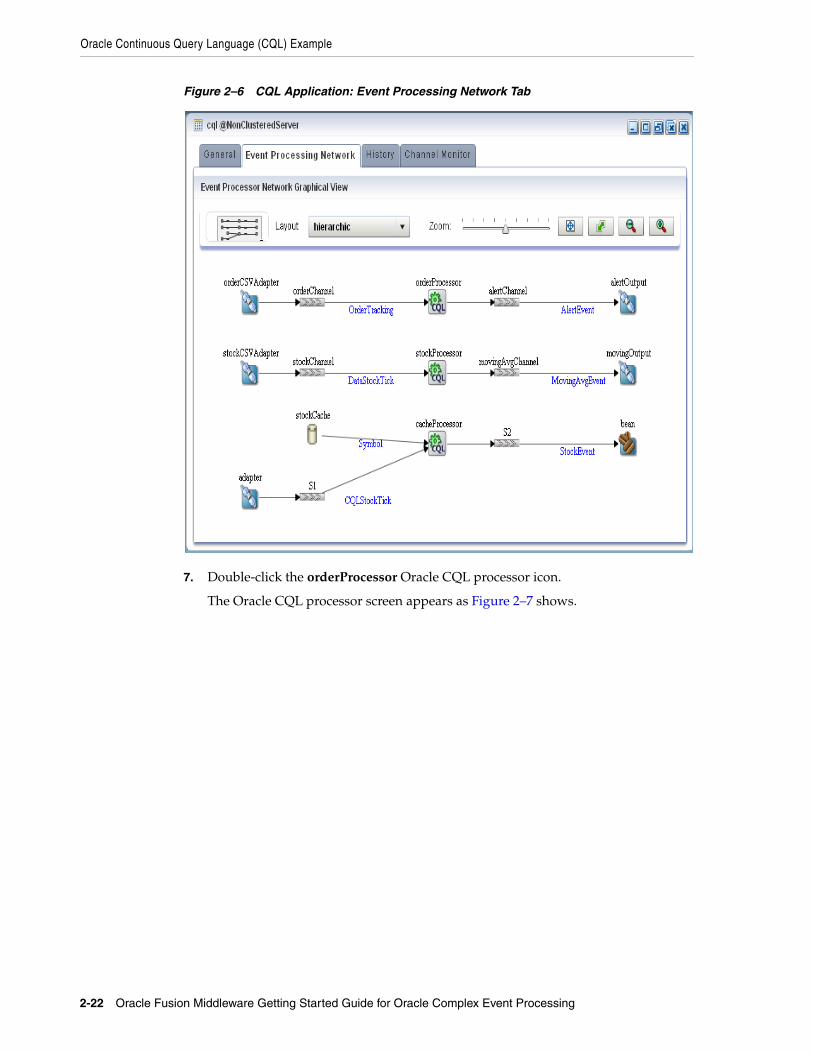
Oracle Continuous Query Language (CQL) Example
2-22 Oracle Fusion Middleware Getting Started Guide for Oracle Complex Event Processing
Figure 2–6 CQL Application: Event Processing Network Tab
7. Double-click the orderProcessor Oracle CQL processor icon.
The Oracle CQL processor screen appears as Figure 2–7 shows.

Oracle Continuous Query Language (CQL) Example
Oracle CEP Samples 2-23
Figure 2–7 Oracle CQL Processor: General Tab
8. Select the Query Wizard tab.
The Query Wizard screen appears as Figure 2–8 shows.

Oracle Continuous Query Language (CQL) Example
2-24 Oracle Fusion Middleware Getting Started Guide for Oracle Complex Event Processing
Figure 2–8 Oracle CQL Processor: Query Wizard Tab
You can use the Oracle CQL Query Wizard to construct an Oracle CQL query from a template or from individual Oracle CQL constructs.
In this procedure, you are going to create an Oracle CQL query from a template.
For more information, see "Creating a Rule in an Oracle CQL Processor Using the Query Wizard" in the Oracle Fusion Middleware Visualizer User's Guide for Oracle Complex Event Processing.
9. Click the Templates tab.
The Templates tab appears as Figure 2–9 shows.

Oracle Continuous Query Language (CQL) Example
Oracle CEP Samples 2-25
Figure 2–9 Template Tab
10. Click and drag the Pattern Match Template from the Templates palette and drop it anywhere in the Query Wizard canvas as shown in Figure 2–9.
11. Double-click the SSource icon.
The SSource configuration screen appears as Figure 2–10 shows.

Oracle Continuous Query Language (CQL) Example
2-26 Oracle Fusion Middleware Getting Started Guide for Oracle Complex Event Processing
Figure 2–10 SSource Configuration Dialog
The source of your query will be the orderChannel stream.
12. Configure the SSource as follows:
■ Select Stream as the Type.
■ Select orderChannel from the Select a source pull-down menu.
13. Click Save.
14. Click Save Query.
15. Double-click the Pattern icon.
The Pattern configuration screen appears as Figure 2–11 shows.

Oracle Continuous Query Language (CQL) Example
Oracle CEP Samples 2-27
Figure 2–11 Pattern Configuration Dialog: Pattern Tab
Using the Pattern tab, you will define the pattern expression that matches when missed events occur. The expression is made in terms of named conditions that you will specify on the Define tab in a later step.
16. Enter the following expression in the Pattern Expression field:
CustOrder NoApproval*? Shipment
This pattern uses the Oracle CQL pattern quantifiers that Table 2–3 lists. Use the pattern quantifiers to specify the allowed range of pattern matches. The one-character pattern quantifiers are maximal or "greedy"; they will attempt to match the biggest quantity first. The two-character pattern quantifiers are minimal or "reluctant"; they will attempt to match the smallest quantity first.
For more information, see:
■ "PATTERN Condition" in the Oracle Fusion Middleware CQL Language Reference for Oracle Complex Event Processing
■ "MATCH_RECOGNIZE Condition" in the Oracle Fusion Middleware CQL Language Reference for Oracle Complex Event Processing
Table 2–3 MATCH_RECOGNIZE Pattern Quantifiers
Maximal Minimal Description
* *? 0 or more times
+ +? 1 or more times.
? ?? 0 or 1 time.
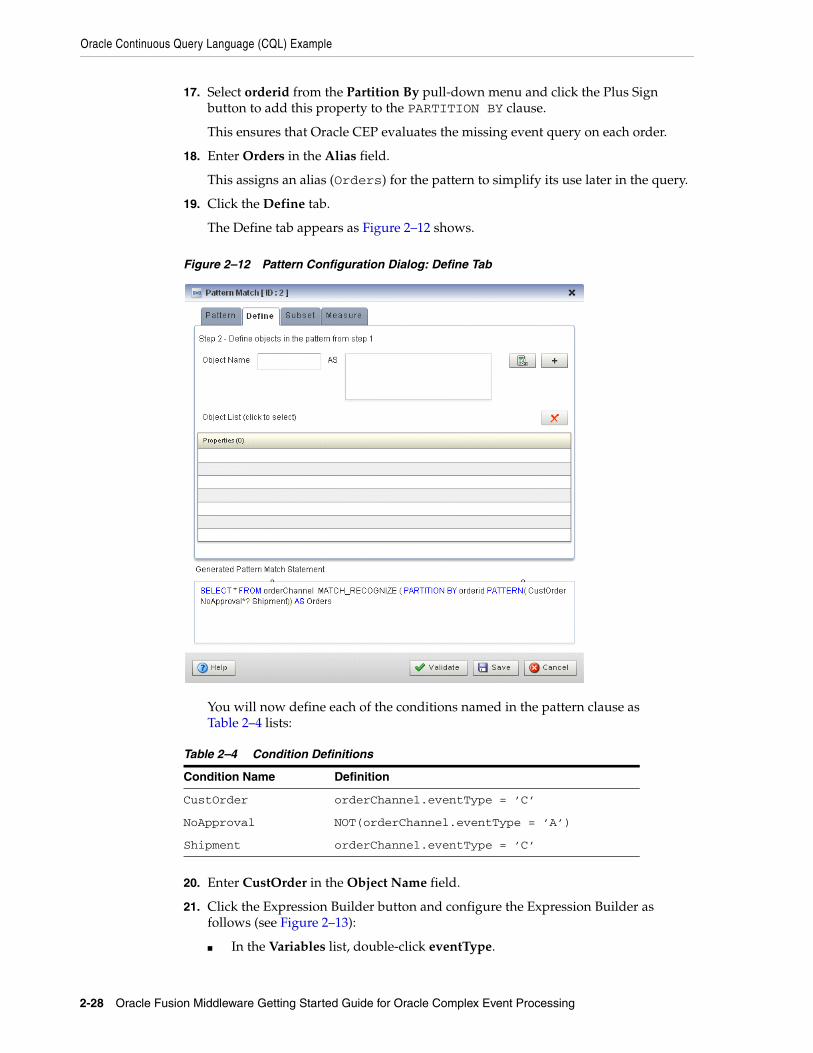
Oracle Continuous Query Language (CQL) Example
2-28 Oracle Fusion Middleware Getting Started Guide for Oracle Complex Event Processing
17. Select orderid from the Partition By pull-down menu and click the Plus Sign button to add this property to the PARTITION BY clause.
This ensures that Oracle CEP evaluates the missing event query on each order.
18. Enter Orders in the Alias field.
This assigns an alias (Orders) for the pattern to simplify its use later in the query.
19. Click the Define tab.
The Define tab appears as Figure 2–12 shows.
Figure 2–12 Pattern Configuration Dialog: Define Tab
You will now define each of the conditions named in the pattern clause as Table 2–4 lists:
20. Enter CustOrder in the Object Name field.
21. Click the Expression Builder button and configure the Expression Builder as follows (see Figure 2–13):
■ In the Variables list, double-click eventType.
Table 2–4 Condition Definitions
Condition Name Definition
CustOrder orderChannel.eventType = ’C’
NoApproval NOT(orderChannel.eventType = ’A’)
Shipment orderChannel.eventType = ’C’

Oracle Continuous Query Language (CQL) Example
Oracle CEP Samples 2-29
■ In the Operands list, double-click =.
■ After the = operand, enter the value ’C’.
Figure 2–13 Expression Builder: CustOrder
22. Click Save.
23. Click the Plus Sign button.
The condition definition is added to the Object List as Figure 2–14 shows.
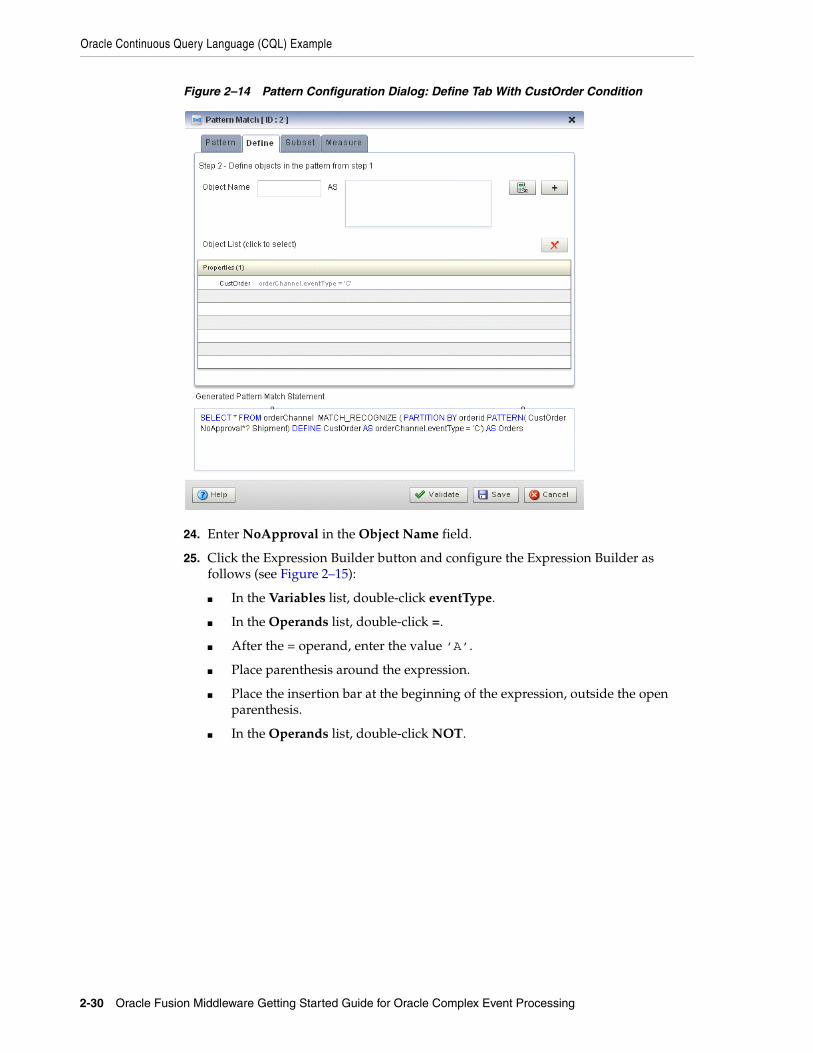
Oracle Continuous Query Language (CQL) Example
2-30 Oracle Fusion Middleware Getting Started Guide for Oracle Complex Event Processing
Figure 2–14 Pattern Configuration Dialog: Define Tab With CustOrder Condition
24. Enter NoApproval in the Object Name field.
25. Click the Expression Builder button and configure the Expression Builder as follows (see Figure 2–15):
■ In the Variables list, double-click eventType.
■ In the Operands list, double-click =.
■ After the = operand, enter the value ’A’.
■ Place parenthesis around the expression.
■ Place the insertion bar at the beginning of the expression, outside the open parenthesis.
■ In the Operands list, double-click NOT.

Oracle Continuous Query Language (CQL) Example
Oracle CEP Samples 2-31
Figure 2–15 Expression Builder: NoApproval
26. Click Save.
27. Click the Plus Sign button.
The condition definition is added to the Object List.
28. Enter Shipment in the Object Name field.
29. Click the Expression Builder button and configure the Expression Builder as follows (see Figure 2–16):
■ In the Variables list, double-click eventType.
■ In the Operands list, double-click =.
■ After the = operand, enter the value ’S’.

Oracle Continuous Query Language (CQL) Example
2-32 Oracle Fusion Middleware Getting Started Guide for Oracle Complex Event Processing
Figure 2–16 Expression Builder: Shipment
30. Click Save.
31. Click the Plus Sign button.
The Define tab appears as Figure 2–17 shows.

Oracle Continuous Query Language (CQL) Example
Oracle CEP Samples 2-33
Figure 2–17 Pattern Configuration Dialog: Define Tab Complete
32. Click the Measure tab.
The Measure tab appears as Figure 2–18 shows.

Oracle Continuous Query Language (CQL) Example
2-34 Oracle Fusion Middleware Getting Started Guide for Oracle Complex Event Processing
Figure 2–18 Measure Tab
Use the Measure tab to define expressions in a MATCH_RECOGNIZE condition and to bind stream elements that match conditions in the DEFINE clause to arguments that you can include in the select statement of a query.
Use the Measure tab to specify the following:
■ CustOrder.orderid AS orderid
■ CustOrder.amount AS amount
For more information, see:
■ "MEASURES Clause" in the Oracle Fusion Middleware CQL Language Reference for Oracle Complex Event Processing
■ "MATCH_RECOGNIZE Condition" in the Oracle Fusion Middleware CQL Language Reference for Oracle Complex Event Processing
33. Enter orderid in the Object Name field.
34. Click the Expression Builder button and configure the Expression Builder as follows (see Figure 2–19):
■ In the Variables list, double-click CustOrder.orderid.

Oracle Continuous Query Language (CQL) Example
Oracle CEP Samples 2-35
Figure 2–19 Expression Builder: orderid
35. Click Save.
36. Click the Plus Sign button.
37. Enter amount in the Object Name field.
38. Click the Expression Builder button and configure the Expression Builder as follows (see Figure 2–20):
■ In the Variables list, double-click CustOrder.amount.

Oracle Continuous Query Language (CQL) Example
2-36 Oracle Fusion Middleware Getting Started Guide for Oracle Complex Event Processing
Figure 2–20 Expression Builder: amount
39. Click Save.
40. Click the Plus Sign button.
The Measure tab appears as Figure 2–21 shows.
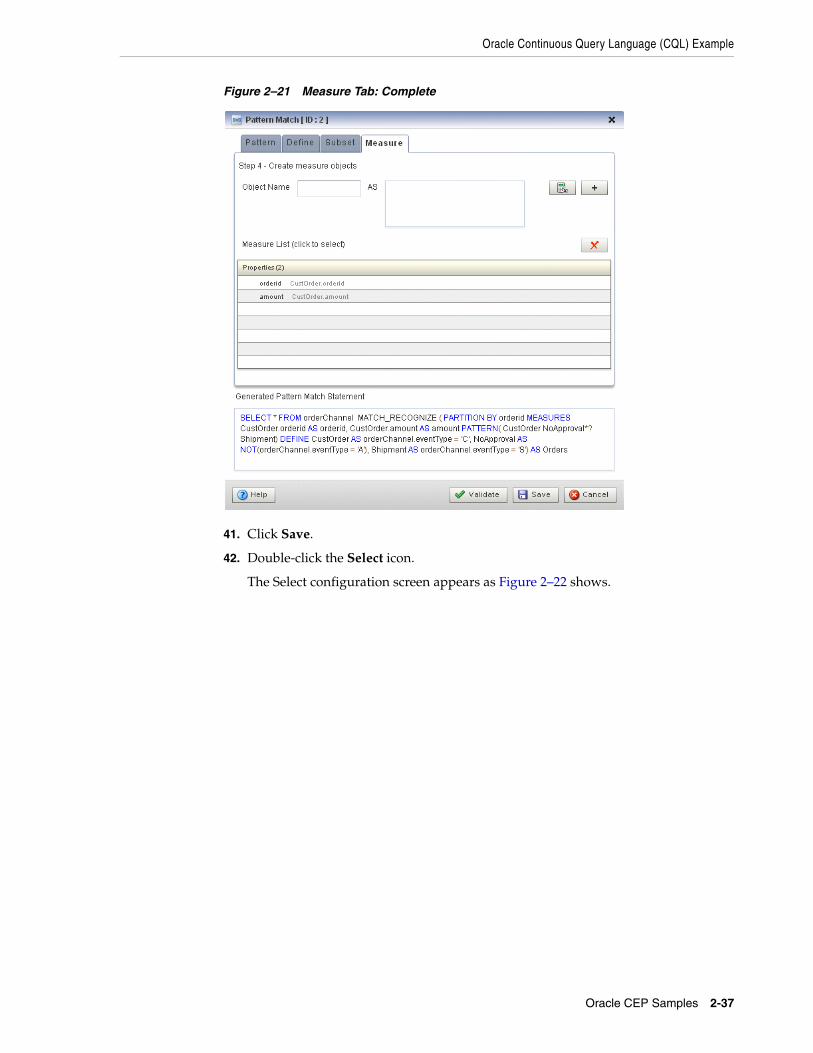
Oracle Continuous Query Language (CQL) Example
Oracle CEP Samples 2-37
Figure 2–21 Measure Tab: Complete
41. Click Save.
42. Double-click the Select icon.
The Select configuration screen appears as Figure 2–22 shows.

Oracle Continuous Query Language (CQL) Example
2-38 Oracle Fusion Middleware Getting Started Guide for Oracle Complex Event Processing
Figure 2–22 Select Configuration Dialog: Project Tab
43. Configure the Project tab as follows:
■ Select AlertEvent from the Select or Input Event Type pull-down menu.
■ Select Orders from the Select a source pull-down menu.
44. Double-click orderid in the Properties list and select orderid from the Select or Input Alias pull-down menu.
45. Click the Plus Sign button to add the property to the Generated CQL Statement.
46. Double-click amount in the Properties list and select amount from the Select or Input Alias pull-down menu.
47. Click the Plus Sign button to add the property to the Generated CQL Statement.
48. Click in the Project Expression field and enter the value "Error - Missing Approval" and select alertType from the Select or Input Alias pull-down menu.
49. Click the Plus Sign button to add the property to the Generated CQL Statement.
The Project tab appears as Figure 2–23 shows.

Oracle Continuous Query Language (CQL) Example
Oracle CEP Samples 2-39
Figure 2–23 Select Configuration Dialog: Project Tab Complete
50. Click Save.
51. Click Save Query.
52. Double-click the Output icon.
The Output configuration screen appears as Figure 2–24 shows.

Oracle Continuous Query Language (CQL) Example
2-40 Oracle Fusion Middleware Getting Started Guide for Oracle Complex Event Processing
Figure 2–24 Output Configuration Dialog
53. Configure the Output as follows:
■ Select Query.
■ Enter Tracking as the Query Name.
54. Click Inject Rule.
The Inject Rule Confirmation dialog appears as Figure 2–25 shows.
Figure 2–25 Inject Rule Confirmation Dialog
55. Click OK.
The Query Wizard adds the rule to the cqlProc processor.
56. Click Save.
57. Click on the CQL Rules tab.
The CQL Rules tab appears as Figure 2–26 shows.
58. Click on the Query radio button.
Confirm that your Tracking query is present.

Oracle Continuous Query Language (CQL) Example
Oracle CEP Samples 2-41
Figure 2–26 CQL Rules Tab With Tracking Query
To test the missing event query:1. To simulate the data feed for the missing event query, open a new command
window and set your environment as described in Section 2.5, "Setting Your Development Environment."
2. Change to the MIDDLEWARE_HOME\ocep_11.1\utils\load-generator directory, where MIDDLEWARE_HOME refers to the Middleware directory created when you installed Oracle CEP, such as d:\Oracle\Middleware.
3. Run the load generator using the orderData.prop properties file:
a. On Windows:
prompt> runloadgen.cmd orderData.prop
b. On UNIX:
prompt> runloadgen.sh orderData.prop
4. In the Oracle CEP Visualizer, click the ViewStream button in the top pane.
The Stream Visualizer screen appears as Figure 2–27 shows.

Oracle Continuous Query Language (CQL) Example
2-42 Oracle Fusion Middleware Getting Started Guide for Oracle Complex Event Processing
Figure 2–27 Stream Visualizer: Showing Missing Events
5. Click Initialize Client.
6. Click the Subscribe tab.
7. Select the orderalert radio button.
8. Click Subscribe.
As missing events are detected, the Oracle CEP updates the Received Messages area showing the AlertEvents generated.
2.7.4.2 Creating the Moving Average QueryThis section describes how to use the Oracle CEP Visualizer Query Wizard to create the Oracle CQL moving average query that the stockProc processor executes.
You do this in two steps:
■ First, you create a view (the Oracle CQL equivalent of a subquery) that serves as the source of the moving average query.
See "To create a view source for the moving average query:" on page 2-43.
■ Second, you create the moving average query using the source view.
See "To create the moving average query using the view source:" on page 2-59.
■ Finally, you test the moving average query.
See "To test the moving average query:" on page 2-80.

Oracle Continuous Query Language (CQL) Example
Oracle CEP Samples 2-43
To create a view source for the moving average query:1. If the CQL Oracle CEP instance is not already running, follow the procedure in
Section 2.7.1, "Running the CQL Example" to start the server.
You must have a running server to use the Oracle CEP Visualizer.
2. Invoke the following URL in your browser:
http://host:port/wlevs
where host refers to the name of the computer on which Oracle CEP is running and port refers to the Jetty NetIO port configured for the server (default value 9002).
The Logon screen appears as Figure 2–28 shows.
Figure 2–28 Oracle CEP Visualizer Logon Screen
3. In the Logon screen, enter the User Id wlevs and Password wlevs, and click Log In.
The Oracle CEP Visualizer dashboard appears as Figure 2–29 shows.

Oracle Continuous Query Language (CQL) Example
2-44 Oracle Fusion Middleware Getting Started Guide for Oracle Complex Event Processing
Figure 2–29 Oracle CEP Visualizer Dashboard
For more information about the Oracle CEP Visualizer user interface, see "Understanding the Oracle CEP Visualizer User Interface" in the Oracle Fusion Middleware Visualizer User's Guide for Oracle Complex Event Processing.
4. In the right-hand pane, expand WLEventServerDomain > NonClusteredServer > Applications.
5. Select the cql node.
The CQL application screen appears as Figure 2–30 shows.

Oracle Continuous Query Language (CQL) Example
Oracle CEP Samples 2-45
Figure 2–30 CQL Application Screen: General Tab
6. Select the Event Processing Network tab.
The Event Processing Network screen appears as Figure 2–31 shows.

Oracle Continuous Query Language (CQL) Example
2-46 Oracle Fusion Middleware Getting Started Guide for Oracle Complex Event Processing
Figure 2–31 CQL Application: Event Processing Network Tab
7. Double-click the stockProcessor Oracle CQL processor icon.
The Oracle CQL processor screen appears as Figure 2–32 shows.

Oracle Continuous Query Language (CQL) Example
Oracle CEP Samples 2-47
Figure 2–32 Oracle CQL Processor: General Tab
8. Select the Query Wizard tab.
The Query Wizard screen appears as Figure 2–33 shows.

Oracle Continuous Query Language (CQL) Example
2-48 Oracle Fusion Middleware Getting Started Guide for Oracle Complex Event Processing
Figure 2–33 Oracle CQL Processor: Query Wizard Tab
You can use the Oracle CQL Query Wizard to construct an Oracle CQL query from a template or from individual Oracle CQL constructs.
In this procedure, you are going to create an Oracle CQL view and query from individual Oracle CQL constructs.
For more information, see "Creating a Rule in an Oracle CQL Processor Using the Query Wizard" in the Oracle Fusion Middleware Visualizer User's Guide for Oracle Complex Event Processing.
9. Click and drag an SSource icon (Stream Source) from the CQL Constructs palette and drop it anywhere in the Query Wizard canvas as Figure 2–34 shows.
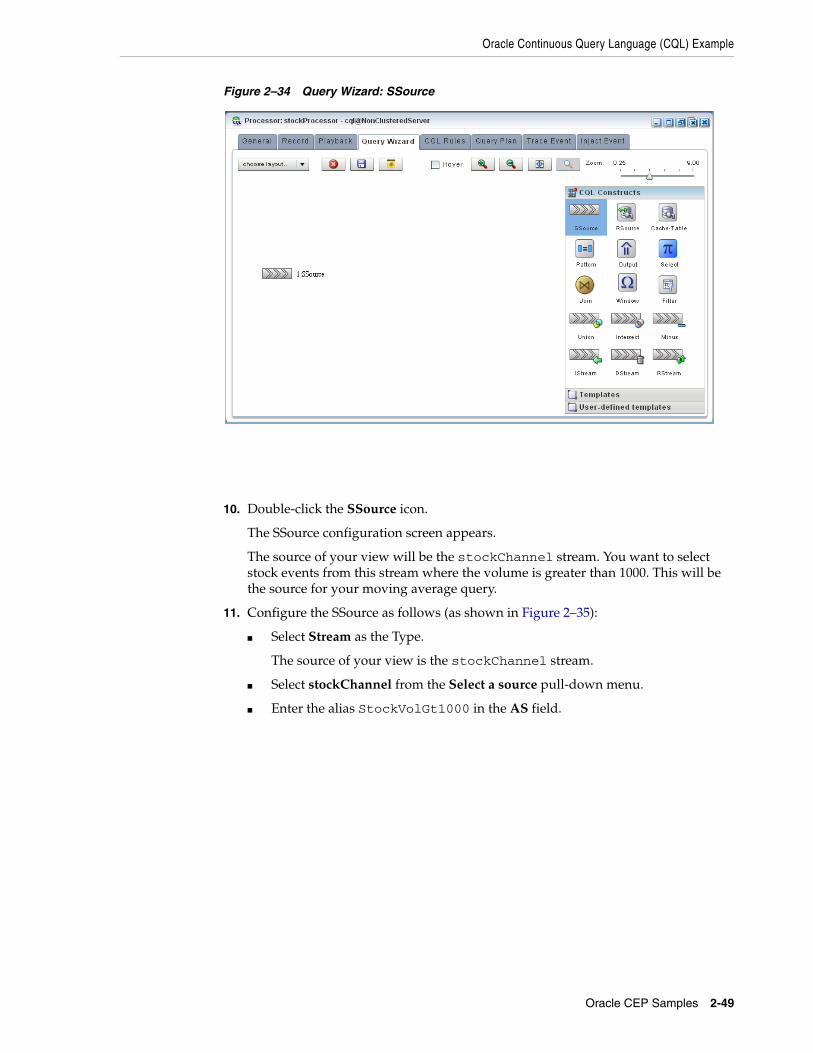
Oracle Continuous Query Language (CQL) Example
Oracle CEP Samples 2-49
Figure 2–34 Query Wizard: SSource
10. Double-click the SSource icon.
The SSource configuration screen appears.
The source of your view will be the stockChannel stream. You want to select stock events from this stream where the volume is greater than 1000. This will be the source for your moving average query.
11. Configure the SSource as follows (as shown in Figure 2–35):
■ Select Stream as the Type.
The source of your view is the stockChannel stream.
■ Select stockChannel from the Select a source pull-down menu.
■ Enter the alias StockVolGt1000 in the AS field.

Oracle Continuous Query Language (CQL) Example
2-50 Oracle Fusion Middleware Getting Started Guide for Oracle Complex Event Processing
Figure 2–35 SSource Configuration Dialog
12. Click Save.
13. Click Save Query.
14. When prompted, enter StockVolGt1000 in the Query Id field.
15. Click Save.
Next, you will add an Oracle CQL filter.
16. Click and drag a Filter icon from the CQL Constructs palette and drop it anywhere in the Query Wizard canvas as Figure 2–36 shows.

Oracle Continuous Query Language (CQL) Example
Oracle CEP Samples 2-51
Figure 2–36 Query Wizard: Filter
17. Click on the SSource icon and drag to the Window icon to connect the Oracle CQL constructs as Figure 2–37 shows.
Figure 2–37 Connecting the SSource and Filter Icons
18. Double-click the Filter icon.
The Filter configuration screen appears as Figure 2–38 shows.

Oracle Continuous Query Language (CQL) Example
2-52 Oracle Fusion Middleware Getting Started Guide for Oracle Complex Event Processing
Figure 2–38 Filter Configuration Dialog
19. Click the Expression Builder button.
The Expression Builder dialog appears.
20. Configure the Expression Builder as follows (as shown in Figure 2–39):
■ Select StockVolGt100 from the Select an Event Type pull-down menu to define the variables you can use in this expression.
■ Double-click the volume variable to add it to the Expression Builder field.
■ Double-click > in the Operands list to add it to the Expression Builder field.
■ Enter the value 1000 after the > operand.

Oracle Continuous Query Language (CQL) Example
Oracle CEP Samples 2-53
Figure 2–39 Filter Expression Builder
21. Click Save.
22. Click Add Filter.
The Query Wizard adds the expression to the Generated CQL Statement as Figure 2–40 shows.

Oracle Continuous Query Language (CQL) Example
2-54 Oracle Fusion Middleware Getting Started Guide for Oracle Complex Event Processing
Figure 2–40 Filter Configuration Dialog: After Adding the Filter
23. Click Save.
24. Click Save Query.
Next you want to add a select statement.
25. Click and drag a Select icon from the CQL Constructs palette and drop it anywhere in the Query Wizard canvas as Figure 2–41 shows.

Oracle Continuous Query Language (CQL) Example
Oracle CEP Samples 2-55
Figure 2–41 Query Wizard: Select
26. Click on the Filter icon and drag to the Select icon to connect the Oracle CQL constructs.
27. Double-click the Select icon.
The Select configuration screen appears.
You want to select price, symbol, and volume from your StockVolGt1000 stream.
28. Configure the Select as follows:
■ Select StockVolGt1000 from the Select a source pull-down menu.
■ Select the price property and click the Plus Sign button.
The Query Wizard adds the property to Generated CQL Statement
■ Repeat for the symbol and volume properties.
The Select configuration dialog appears as Figure 2–42 shows.
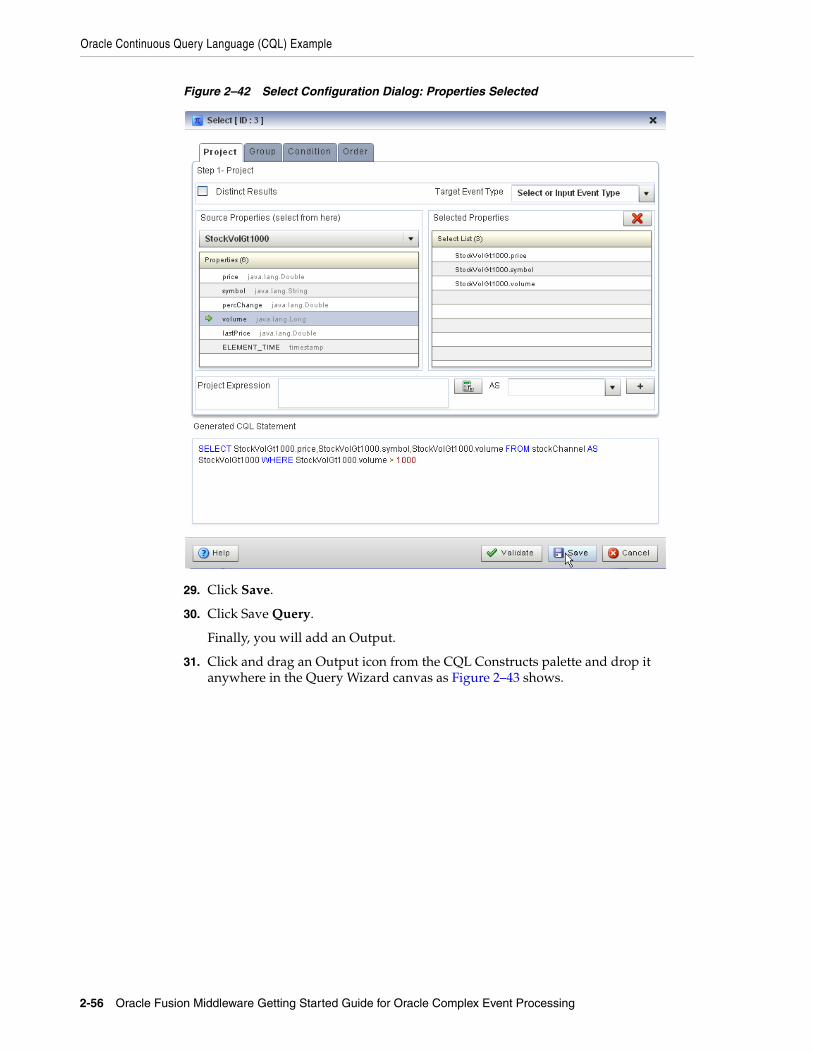
Oracle Continuous Query Language (CQL) Example
2-56 Oracle Fusion Middleware Getting Started Guide for Oracle Complex Event Processing
Figure 2–42 Select Configuration Dialog: Properties Selected
29. Click Save.
30. Click Save Query.
Finally, you will add an Output.
31. Click and drag an Output icon from the CQL Constructs palette and drop it anywhere in the Query Wizard canvas as Figure 2–43 shows.

Oracle Continuous Query Language (CQL) Example
Oracle CEP Samples 2-57
Figure 2–43 Query Wizard: Output
32. Click on the Select icon and drag to the Output icon to connect the Oracle CQL constructs.
33. Double-click the Output icon.
The Output configuration screen appears.
34. Configure the Output as follows (as shown in Figure 2–44):
■ Select View.
■ Configure View Name as StockVolGt1000.
■ Delete the contents of the View Schema field.
You can let the Oracle CEP server define the view schema for you.
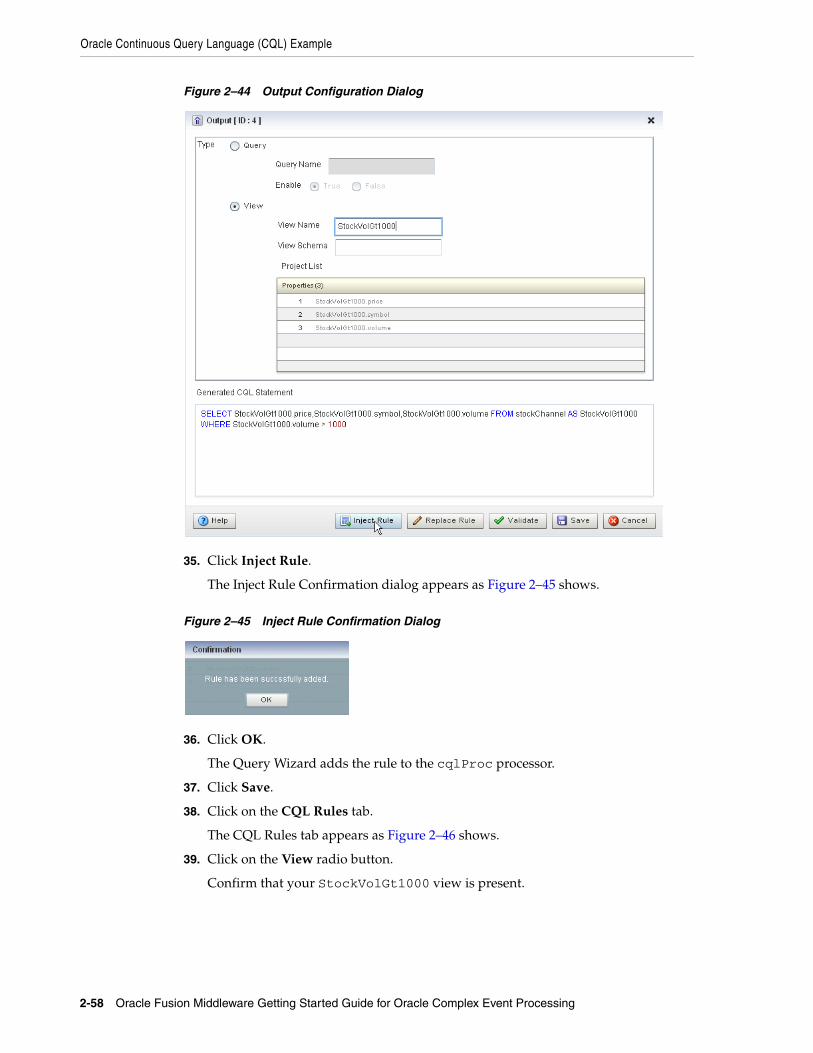
Oracle Continuous Query Language (CQL) Example
2-58 Oracle Fusion Middleware Getting Started Guide for Oracle Complex Event Processing
Figure 2–44 Output Configuration Dialog
35. Click Inject Rule.
The Inject Rule Confirmation dialog appears as Figure 2–45 shows.
Figure 2–45 Inject Rule Confirmation Dialog
36. Click OK.
The Query Wizard adds the rule to the cqlProc processor.
37. Click Save.
38. Click on the CQL Rules tab.
The CQL Rules tab appears as Figure 2–46 shows.
39. Click on the View radio button.
Confirm that your StockVolGt1000 view is present.

Oracle Continuous Query Language (CQL) Example
Oracle CEP Samples 2-59
Figure 2–46 CQL Rules Tab With View StockVolGt1000
To create the moving average query using the view source:1. If the CQL Oracle CEP instance is not already running, follow the procedure in
Section 2.7.1, "Running the CQL Example" to start the server.
You must have a running server to use the Oracle CEP Visualizer.
2. Invoke the following URL in your browser:
http://host:port/wlevs
where host refers to the name of the computer on which Oracle CEP is running and port refers to the Jetty NetIO port configured for the server (default value 9002).
The Logon screen appears as Figure 2–47 shows.

Oracle Continuous Query Language (CQL) Example
2-60 Oracle Fusion Middleware Getting Started Guide for Oracle Complex Event Processing
Figure 2–47 Oracle CEP Visualizer Logon Screen
3. In the Logon screen, enter the User Id wlevs and Password wlevs, and click Log In.
The Oracle CEP Visualizer dashboard appears as Figure 2–48 shows.

Oracle Continuous Query Language (CQL) Example
Oracle CEP Samples 2-61
Figure 2–48 Oracle CEP Visualizer Dashboard
For more information about the Oracle CEP Visualizer user interface, see "Understanding the Oracle CEP Visualizer User Interface" in the Oracle Fusion Middleware Visualizer User's Guide for Oracle Complex Event Processing.
4. In the left-hand pane, expand WLEventServerDomain > NonClusteredServer > Applications.
5. Select the cql node.
The CQL application screen appears as Figure 2–49 shows.
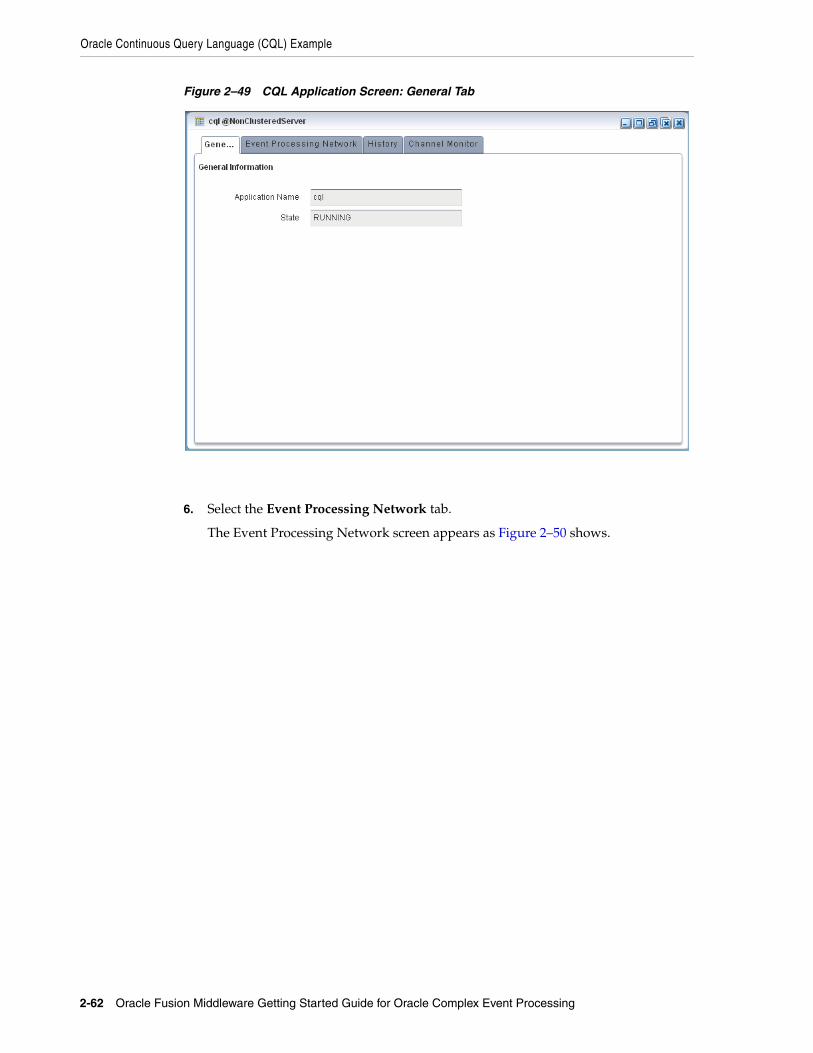
Oracle Continuous Query Language (CQL) Example
2-62 Oracle Fusion Middleware Getting Started Guide for Oracle Complex Event Processing
Figure 2–49 CQL Application Screen: General Tab
6. Select the Event Processing Network tab.
The Event Processing Network screen appears as Figure 2–50 shows.

Oracle Continuous Query Language (CQL) Example
Oracle CEP Samples 2-63
Figure 2–50 CQL Application: Event Processing Network Tab
7. Double-click the stockProcessor Oracle CQL processor icon.
The Oracle CQL processor screen appears as Figure 2–51 shows.
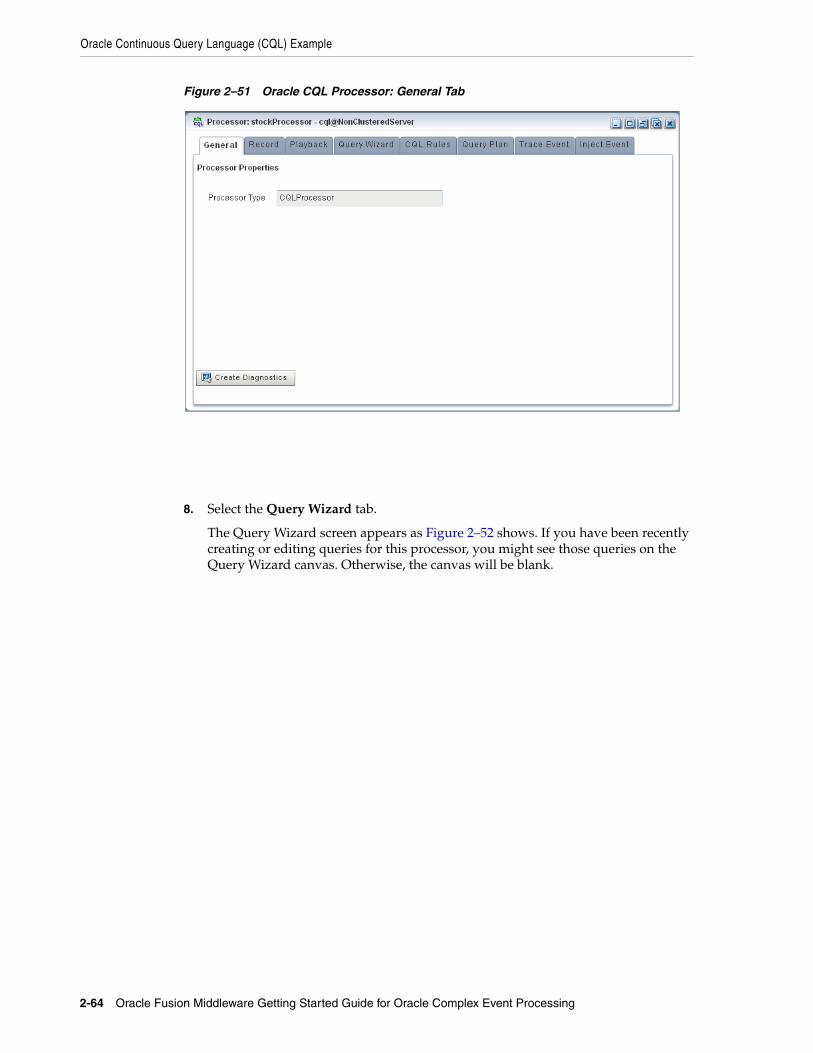
Oracle Continuous Query Language (CQL) Example
2-64 Oracle Fusion Middleware Getting Started Guide for Oracle Complex Event Processing
Figure 2–51 Oracle CQL Processor: General Tab
8. Select the Query Wizard tab.
The Query Wizard screen appears as Figure 2–52 shows. If you have been recently creating or editing queries for this processor, you might see those queries on the Query Wizard canvas. Otherwise, the canvas will be blank.

Oracle Continuous Query Language (CQL) Example
Oracle CEP Samples 2-65
Figure 2–52 Oracle CQL Processor: Query Wizard Tab
You can use the Oracle CQL Query Wizard to construct an Oracle CQL query from a template or from individual Oracle CQL constructs.
In this procedure, you are going to create an Oracle CQL view and query from individual Oracle CQL constructs.
For more information, see "Creating a Rule in an Oracle CQL Processor Using the Query Wizard" in the Oracle Fusion Middleware Visualizer User's Guide for Oracle Complex Event Processing.
9. Click and drag an SSource icon (Stream Source) from the CQL Constructs palette and drop it anywhere in the Query Wizard canvas as Figure 2–53 shows.

Oracle Continuous Query Language (CQL) Example
2-66 Oracle Fusion Middleware Getting Started Guide for Oracle Complex Event Processing
Figure 2–53 Query Wizard: SSource for Moving Average Query
10. Double-click the SSource icon.
The SSource configuration screen appears.
11. Configure the SSource dialog as follows (as shown in Figure 2–54):
■ Select View as the Type.
■ Select the StockVolGt1000 view from the Select a source pull-down menu.

Oracle Continuous Query Language (CQL) Example
Oracle CEP Samples 2-67
Figure 2–54 SSource Configuration Dialog: Moving Average Query
12. Click Save.
13. Click Save Query.
14. Click and drag a Window icon from the CQL Constructs palette and drop it anywhere in the Query Wizard canvas as Figure 2–55 shows.

Oracle Continuous Query Language (CQL) Example
2-68 Oracle Fusion Middleware Getting Started Guide for Oracle Complex Event Processing
Figure 2–55 Query Wizard: Window for Moving Average Query
15. Click on the SSource icon and drag to the Window icon to connect the Oracle CQL constructs.
16. Double-click the Window icon.
The SSource configuration screen appears.
You want to create a sliding window over the last 2 events, partitioned by symbol.
17. Configure the Window dialog as follows (as shown in Figure 2–56):
■ Select symbol in the Source Property List to add it to the Partition List.
■ Select Partition as the Type.
■ Select Row Based and enter 2 in the Row Based field.
18. Click Add Window.
The Query Wizard adds the sliding window to the Generated CQL Statement as Figure 2–56 shows.

Oracle Continuous Query Language (CQL) Example
Oracle CEP Samples 2-69
Figure 2–56 Window Configuration Dialog: After Adding Window
19. Click Save.
20. Click Save Query.
21. Click and drag a Select icon from the CQL Constructs palette and drop it anywhere in the Query Wizard canvas as Figure 2–57 shows.

Oracle Continuous Query Language (CQL) Example
2-70 Oracle Fusion Middleware Getting Started Guide for Oracle Complex Event Processing
Figure 2–57 Query Wizard: Select for Moving Average Query
22. Click on the Window icon and drag to the Select icon to connect the Oracle CQL constructs.
23. Double-click the Select icon.
The Select configuration screen appears.
24. Select StockVolGt1000 from the Select a source pull-down menu.
This is the source of moving average query: the view you created earlier (see "To create a view source for the moving average query:" on page 2-43).
25. Select MovingAvgEvent from the Target Event Type pull-down menu.
This is the output event your moving average query will produced. You will map properties from the source events to this output event.
26. In the Source Properties list, select symbol.
The selected source property is added to the Project Expression as Figure 2–58 shows.

Oracle Continuous Query Language (CQL) Example
Oracle CEP Samples 2-71
Figure 2–58 Select Configuration Dialog: Source Property symbol Selected
In this case, you just want to map the source property symbol to output event property symbol as is.
27. Click on the pull-down menu next to the AS field and select symbol.
28. Click the Plus Sign button.
The source property is added to the project expression of the Generated CQL Statement as Figure 2–59 shows.

Oracle Continuous Query Language (CQL) Example
2-72 Oracle Fusion Middleware Getting Started Guide for Oracle Complex Event Processing
Figure 2–59 Select Configuration Dialog: Source Property symbol Mapped to Output Event Property
29. In the Source Properties list, select price.
The selected source property is added to the Project Expression as Figure 2–60 shows.

Oracle Continuous Query Language (CQL) Example
Oracle CEP Samples 2-73
Figure 2–60 Select Configuration Dialog: Source Property price Selected
In this case, you want to process the source property price before you map it to the output event.
30. Click the Expression Builder button.
The Expression Builder dialog appears.
31. Select Aggregate Function from the Select a function type pull-down menu.
A list of the aggregate functions that Oracle CQL provides is displayed. You are going to use the AVG function.
32. Select the StockVolGt1000.price in the Expression Builder field.
33. Double-click the AVG function.
The AVG() function is wrapped around your selection in the Expression Builder field as Figure 2–61 shows.

Oracle Continuous Query Language (CQL) Example
2-74 Oracle Fusion Middleware Getting Started Guide for Oracle Complex Event Processing
Figure 2–61 Expression Builder: Applying the AVG Function
34. Click Save.
The expression is added to the Project Expression field as Figure 2–62 shows.

Oracle Continuous Query Language (CQL) Example
Oracle CEP Samples 2-75
Figure 2–62 Select Configuration Dialog: With Expression
35. Click on the pull-down menu next to the AS field and select movingAvgPrice.
36. Click the plus Sign button.
The source property is added to the project expression of the Generated CQL Statement as Figure 2–63 shows.

Oracle Continuous Query Language (CQL) Example
2-76 Oracle Fusion Middleware Getting Started Guide for Oracle Complex Event Processing
Figure 2–63 Select Configuration Dialog: Source Property price Mapped to Output Event Property
37. Click Validate.
A validation error dialog is shown as Figure 2–64 shows.
Figure 2–64 Validation Error: GROUP BY
Because you are partitioning, you must specify a GROUP BY clause.
38. Select the Group tab.
The Group tab appears.
39. Configure the Group tab as follows (as shown in Figure 2–65):
■ Select StockVolGt1000 from the Select a source pull-down menu.

Oracle Continuous Query Language (CQL) Example
Oracle CEP Samples 2-77
■ Select symbol from the Properties list.
■ Click the Plus Sign button.
The symbol property is added to GROUP BY clause as Figure 2–65 shows.
Figure 2–65 Group Tab: With symbol Grouping Property
40. Click Save.
41. Click Save Query.
Next, you want to connect the query to an output.
42. Click and drag an Output icon from the CQL Constructs palette and drop it anywhere in the Query Wizard canvas as Figure 2–66 shows.

Oracle Continuous Query Language (CQL) Example
2-78 Oracle Fusion Middleware Getting Started Guide for Oracle Complex Event Processing
Figure 2–66 Query Wizard: Output
43. Click on the Select icon and drag to the Output icon to connect the Oracle CQL constructs.
44. Double-click the Output icon.
The Output configuration screen appears.
45. Configure the Output as follows (as shown in Figure 2–67):
■ Select Query.
■ Enter MovingAverage as the Query Name.

Oracle Continuous Query Language (CQL) Example
Oracle CEP Samples 2-79
Figure 2–67 Output Configuration Dialog
46. Click Inject Rule.
The Inject Rule Confirmation dialog appears as Figure 2–68 shows.
Figure 2–68 Inject Rule Confirmation Dialog
47. Click OK.
The Query Wizard adds the rule to the cqlProc processor.
48. Click Save.
49. Click on the CQL Rules tab.
The CQL Rules tab appears as Figure 2–69 shows.
50. Click on the Query radio button.
Confirm that your MovingAverage query is present.
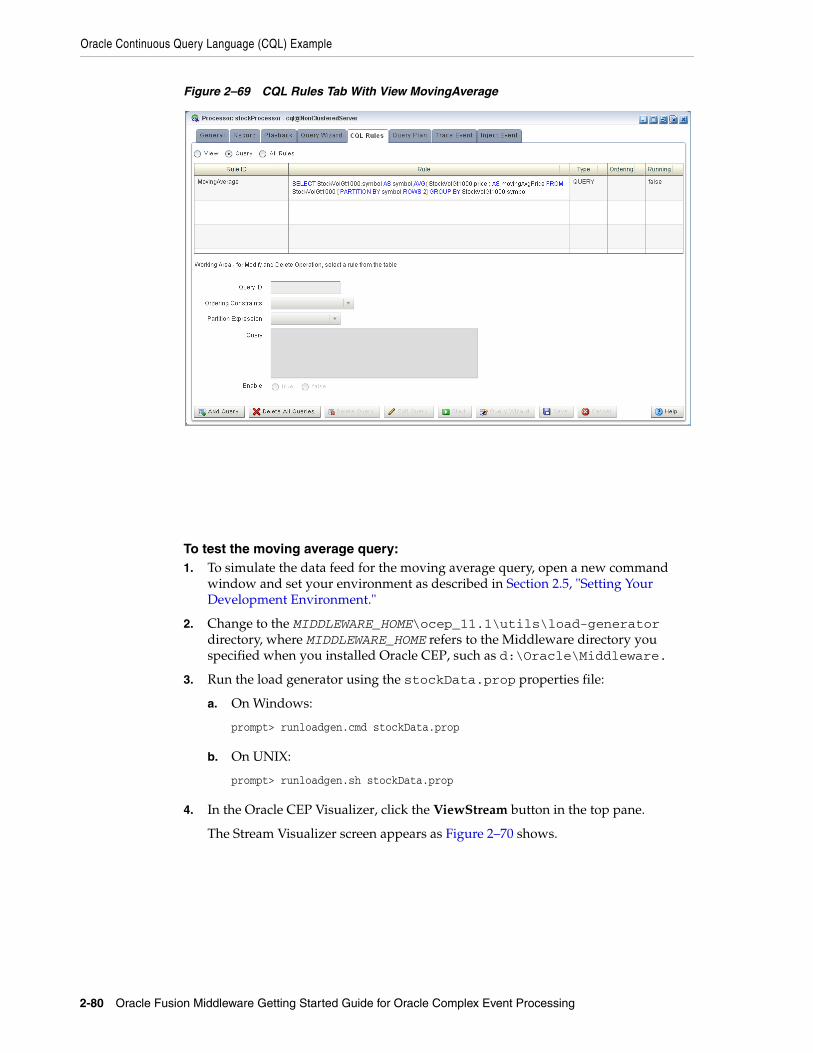
Oracle Continuous Query Language (CQL) Example
2-80 Oracle Fusion Middleware Getting Started Guide for Oracle Complex Event Processing
Figure 2–69 CQL Rules Tab With View MovingAverage
To test the moving average query:1. To simulate the data feed for the moving average query, open a new command
window and set your environment as described in Section 2.5, "Setting Your Development Environment."
2. Change to the MIDDLEWARE_HOME\ocep_11.1\utils\load-generator directory, where MIDDLEWARE_HOME refers to the Middleware directory you specified when you installed Oracle CEP, such as d:\Oracle\Middleware.
3. Run the load generator using the stockData.prop properties file:
a. On Windows:
prompt> runloadgen.cmd stockData.prop
b. On UNIX:
prompt> runloadgen.sh stockData.prop
4. In the Oracle CEP Visualizer, click the ViewStream button in the top pane.
The Stream Visualizer screen appears as Figure 2–70 shows.

Oracle Spatial Example
Oracle CEP Samples 2-81
Figure 2–70 Stream Visualizer: Showing Moving Average Query Output
5. Click Initialize Client.
6. Enter /stockmoving in the Initialize client field.
7. Click Subscribe.
As the moving average query outputs events, the Oracle CEP updates the Received Messages area showing the events generated.
2.8 Oracle Spatial ExampleThis example shows how to use Oracle Spatial with Oracle CQL queries to process a stream of Global Positioning System (GPS) events to track the GPS location of buses and generate alerts when a bus arrives at its pre-determined bus stop positions.
Figure 2–71 shows Oracle Spatial example Event Processing Network (EPN). The EPN contains the components that make up the application and how they fit together.

Oracle Spatial Example
2-82 Oracle Fusion Middleware Getting Started Guide for Oracle Complex Event Processing
Figure 2–71 Oracle Spatial Example Event Processing Network
The example includes the following components:
■ BusPositionGen—Component that simulates an input stream of bus position GPS events. It uses the Oracle CEP loadgen utility and csvgen adapter provider to read in comma separated values (CSV) and deliver them to the EPN as BusPos events.
■ BusStopAdapter—Custom adapter component that generates bus stop positions based on MIDDLEWARE_HOME\ocep_11.1\samples\domains\spatial_domain\defaultserver\applications\spatial_sample\bus_stops.csv, where MIDDLEWARE_HOME refers to the Middleware directory you specified when you installed Oracle CEP, such as d:\Oracle\Middleware.
■ BusPosStream—Component that transmits BusPos events to the Processor as a stream.
■ BusStopRelation—Component that transmits BusPos events to the Processor as a relation.
■ Processor—Component that executes Oracle CQL queries on the incoming BusPos events.
■ BusStopChannel, BusPosChannel, and BusStopArrivalChannel—Components that each specify a different selector to transmit the results of a different query from the Processor component to the appropriate outbound adapter or output bean.
■ BusStopPub, BusPosPub, and BusStopArrivalPub—Components that publish the results of the Processor component’s queries.
■ BusStopArrivalOutputBean—POJO event bean component that logs a message for each insert, delete, and update event to help visualize the relation offered by the BusStopArrivalChannel.
Note: For more information about data cartridges, see:
■ "Introduction to Data Cartridges" in the Oracle Fusion Middleware CQL Language Reference for Oracle Complex Event Processing
■ "Oracle Spatial" in the Oracle Fusion Middleware CQL Language Reference for Oracle Complex Event Processing

Oracle Spatial Example
Oracle CEP Samples 2-83
2.8.1 Running the Oracle Spatial ExampleThe Oracle Spatial application is pre-deployed to the spatial_domain domain. To run the application, you simply start an instance of Oracle CEP server.
To run the Oracle Spatial example from the spatial_domain domain:1. Open a command window and change to the default server directory of the Oracle
Spatial example domain directory, located in MIDDLEWARE_HOME\ocep_11.1\samples\domains\spatial_domain\defaultserver, where MIDDLEWARE_HOME refers to the Middleware directory you specified when you installed Oracle CEP, such as d:\Oracle\Middleware.
prompt> cd d:\Oracle iddleware\ocep_11.1\samples\domains\spatial_domain\defaultserver
2. Ensure the environment is set correctly in the server startup script.
For more information, see Section 2.5, "Setting Your Development Environment."
3. Start Oracle CEP by executing the appropriate script with the correct command line arguments:
a. On Windows:
* If you are using the JRockit JDK included in Oracle JRockit Real Time, enable the deterministic garbage collector by passing the -dgc parameter to the command:
prompt> startwlevs.cmd -dgc
* If you are not using the JRockit JDK included in Oracle JRockit Real Time:
prompt> startwlevs.cmd
b. On UNIX:
* If you are using the JRockit JDK included in Oracle JRockit Real Time, enable the deterministic garbage collector by passing the -dgc parameter to the command:
prompt> startwlevs.sh -dgc
* If you are not using the JRockit JDK included in Oracle JRockit Real Time:
prompt> startwlevs.sh
Wait for the console log to show:
<Mar 4, 2010 2:13:15 PM EST> <Notice> <Spring> <BEA-2047000> <The application context for "spatial_sample" was started successfully><Mar 4, 2010 2:13:15 PM EST> <Notice> <Server> <BEA-2046000> <Server STARTED>
This message indicates that the Oracle Spatial example is running correctly.
4. On the same host as the Oracle Spatial example is running, launch a browser and navigate to http://localhost:9002/bus/main.html.
Note: You cannot run this example on one host and browse to it from another host. This is a limitation of the Google API Key that the example uses and is not a limitation of Oracle CEP.

Oracle Spatial Example
2-84 Oracle Fusion Middleware Getting Started Guide for Oracle Complex Event Processing
The Oracle Spatial example Web page appears as Figure 2–72 shows.
Figure 2–72 Oracle Spatial Web Page
Click the Bus Top Arrivals tab to view bus stop arrivals as Figure 2–73 shows.
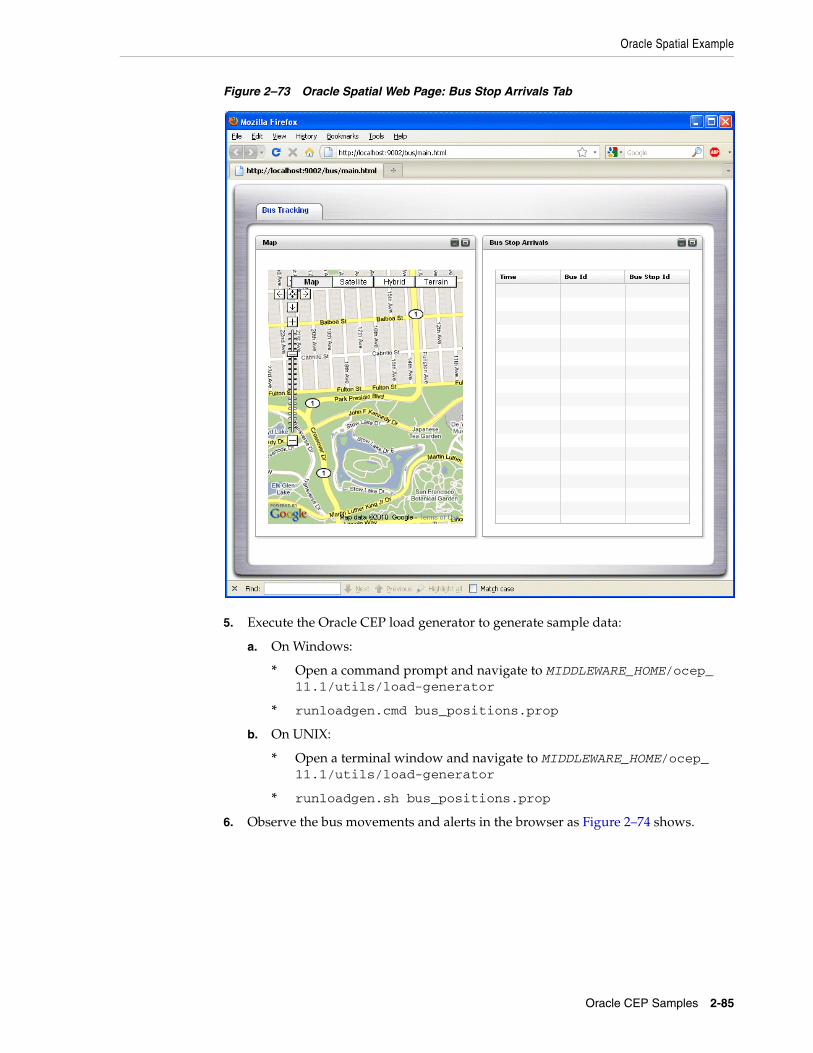
Oracle Spatial Example
Oracle CEP Samples 2-85
Figure 2–73 Oracle Spatial Web Page: Bus Stop Arrivals Tab
5. Execute the Oracle CEP load generator to generate sample data:
a. On Windows:
* Open a command prompt and navigate to MIDDLEWARE_HOME/ocep_11.1/utils/load-generator
* runloadgen.cmd bus_positions.prop
b. On UNIX:
* Open a terminal window and navigate to MIDDLEWARE_HOME/ocep_11.1/utils/load-generator
* runloadgen.sh bus_positions.prop
6. Observe the bus movements and alerts in the browser as Figure 2–74 shows.

Oracle Spatial Example
2-86 Oracle Fusion Middleware Getting Started Guide for Oracle Complex Event Processing
Figure 2–74 Oracle Spatial Web Page: Bus Tracking
2.8.2 Building and Deploying the Oracle Spatial ExampleThe Oracle Spatial sample source directory contains the Java source, along with other required resources such as configuration XML files, that make up the Oracle Spatial application. The build.xml Ant file contains targets to build and deploy the application to the spatial_domain domain.
For more information, see Section 2.8.3, "Description of the Ant Targets to Build the Oracle Spatial Example".
To build and deploy the Oracle Spatial example from the source directory:1. If the spatial_domain Oracle CEP instance is not already running, follow the
procedure in Section 2.8.1, "Running the Oracle Spatial Example" to start the server.
You must have a running server to successfully deploy the rebuilt application.
2. Open a new command window and change to the Oracle Spatial source directory, located in MIDDLEWARE_HOME\ocep_11.1\samples\source\applications\spatial where MIDDLEWARE_HOME is the Middleware directory you specified when you installed Oracle CEP.
For example:
prompt> cd d:\Oracle\Middleware\ocep_11.1\samples\source\applications\spatial
3. Set your development environment.

Oracle Spatial Example
Oracle CEP Samples 2-87
For more information, see Section 2.5, "Setting Your Development Environment."
4. Execute the all Ant target to compile and create the application JAR file:
prompt> ant all
5. Execute the deploy Ant target to deploy the application JAR file to Oracle CEP:
prompt> ant -Daction=update deploy
2.8.3 Description of the Ant Targets to Build the Oracle Spatial ExampleThe build.xml file, located in the top level of the Oracle Spatial source directory, contains the following targets to build and deploy the application:
■ clean—This target removes the dist and output working directories under the current directory.
■ all—This target cleans, compiles, and JARs up the application into a file called com.bea.wlevs.example.helloworld_11.1.1.4_0.jar, and places the generated JAR file into a dist directory below the current directory.
■ deploy—This target deploys the JAR file to Oracle CEP using the Deployer utility.
For more information, see "Deployer Command-Line Reference" in the Oracle Fusion Middleware Administrator's Guide for Oracle Complex Event Processing.
2.8.4 Implementation of the Oracle Spatial ExampleThe implementation of the Oracle Spatial example generally follows "Creating Oracle CEP Applications: Typical Steps" in the Oracle Fusion Middleware Developer's Guide for Oracle Complex Event Processing for Eclipse.
Refer to that section for a task-oriented procedure that describes the typical development process.
All the files of the Oracle Spatial example are located relative to the MIDDLEWARE_HOME\ocep_11.1\samples\source\applications\spatial directory, where MIDDLEWARE_HOME refers to the Middleware directory you specified when you installed Oracle CEP, such as c:\Oracle\Middleware. Oracle recommends that you use this example directory setup in your own environment, although it is obviously not required.
The files used by the Oracle Spatial example include:
■ An EPN assembly file that describes each component in the application and how all the components are connected together. You are required to include this XML file in your Oracle CEP application.
In the example, the file is called context.xml and is located in the META-INF/spring directory.
For details, see Section 2.8.5, "Oracle Spatial Example EPN Assembly File."
■ A component configuration file that configures the various components on the EPN including the processor component of the application:
Caution: This target overwrites the existing Oracle Spatial application JAR file in the domain directory.

Oracle Spatial Example
2-88 Oracle Fusion Middleware Getting Started Guide for Oracle Complex Event Processing
In the example, this file is called config.xml and is located in the META-INF/wlevs directory.
For details, see Section 2.8.6, "Oracle Spatial Example Component Configuration File."
■ Java files that implement:
– BusStopAdapter: Custom adapter component that generates bus stop positions based on MIDDLEWARE_HOME\ocep_11.1\samples\domains\spatial_domain\defaultserver\applications\spatial_sample\bus_stops.csv, where MIDDLEWARE_HOME refers to the Middleware directory you specified when you installed Oracle CEP, such as d:\Oracle\Middleware.
– OutputBean: POJO event bean component that logs a message for each insert, delete, and update event to help visualize the relation offered by the BusStopArrivalChannel
– OrdsHelper: Helper class that provides method getOrds to return the ordinates from a JGeometry as a List of Double values.
These Java files are located in the source\applications\spatial\src\com\oracle\cep\sample\spatial directory.
For additional information about the Oracle CEP APIs referenced in this POJO, see Oracle Fusion Middleware Java API Reference for Oracle Complex Event Processing.
■ A MANIFEST.MF file that describes the contents of the OSGi bundle that will be deployed to Oracle CEP.
In the example, the MANIFEST.MF file is located in the META-INF directory.
For more information about creating this file, as well as a description of creating the OSGi bundle that you deploy to Oracle CEP, see "Overview of Application Assembly and Deployment" in the Oracle Fusion Middleware Developer's Guide for Oracle Complex Event Processing for Eclipse.
The Oracle Spatial example uses a build.xml Ant file to compile, assemble, and deploy the OSGi bundle; see Section 2.8.2, "Building and Deploying the Oracle Spatial Example" for a description of this build.xml file if you also use Ant in your development environment.
2.8.5 Oracle Spatial Example EPN Assembly FileOne of the main purposes of the EPN assembly file is to define the event processing network by declaring the components of the application and how they are all connected, or in other word, which components listen to which other components. Oracle CEP provides a set of custom Spring tags used to declare the network. You also use the EPN assembly file to register the event types used by your application and its Oracle CQL or EPL rules.
You use the EPN assembly file in the typical way to define the application component beans in the Spring application context; the application components beans are those implemented with Java classes, such as adapters and the POJO that contains the business logic.
For more information, see:

Oracle Spatial Example
Oracle CEP Samples 2-89
■ "Schema Reference: EPN Assembly spring-wlevs-v11_1_1_6.xsd" in the Oracle Fusion Middleware Developer's Guide for Oracle Complex Event Processing for Eclipse
■ "Oracle CEP Schemas" in the Oracle Fusion Middleware Developer's Guide for Oracle Complex Event Processing for Eclipse
Example 2–3 shows the EPN assembly file used in the Oracle Spatial sample application.
Example 2–3 Oracle Spatial Example EPN Assembly File
<?xml version="1.0" encoding="UTF-8"?><beans xmlns="http://www.springframework.org/schema/beans"
xmlns:xsi="http://www.w3.org/2001/XMLSchema-instance" xmlns:osgi="http://www.springframework.org/schema/osgi" xmlns:wlevs="http://www.bea.com/ns/wlevs/spring" xsi:schemaLocation="
http://www.springframework.org/schema/beanshttp://www.springframework.org/schema/beans/spring-beans.xsdhttp://www.springframework.org/schema/osgihttp://www.springframework.org/schema/osgi/spring-osgi.xsdhttp://www.bea.com/ns/wlevs/springhttp://www.bea.com/ns/wlevs/spring/spring-wlevs-v11_1_1_6.xsd">
<wlevs:event-type-repository><wlevs:event-type type-name="BusPos">
<wlevs:properties type="tuple"><wlevs:property name="busId" type="int"/><wlevs:property name="seq" type="int"/><wlevs:property name="longitude" type="double"/><wlevs:property name="latitude" type="double"/>
</wlevs:properties></wlevs:event-type>
<wlevs:event-type type-name="BusStop"><wlevs:properties type="tuple">
<wlevs:property name="busId" type="int"/><wlevs:property name="seq" type="int"/><wlevs:property name="geom"
type="com.oracle.cep.cartridge.spatial.Geometry"/></wlevs:properties>
</wlevs:event-type>
<wlevs:event-type type-name="BusPosEvent"><wlevs:properties type="tuple">
<wlevs:property name="busId" type="int"/><wlevs:property name="seq" type="int"/><wlevs:property name="geom"
type="com.oracle.cep.cartridge.spatial.Geometry"/></wlevs:properties>
</wlevs:event-type>
<wlevs:event-type type-name="BusStopArrivalEvent"><wlevs:properties type="tuple">
<wlevs:property name="incidentTime" type="int"/><wlevs:property name="busId" type="int"/><wlevs:property name="stopSeq" type="int"/>
</wlevs:properties></wlevs:event-type>
<wlevs:event-type type-name="BusPosPubEvent"><wlevs:properties type="tuple">
<wlevs:property name="lastTime" type="int"/><wlevs:property name="busId" type="int"/><wlevs:property name="longitude" type="double"/><wlevs:property name="latitude" type="double"/>

Oracle Spatial Example
2-90 Oracle Fusion Middleware Getting Started Guide for Oracle Complex Event Processing
</wlevs:properties></wlevs:event-type>
<wlevs:event-type type-name="BusStopPubEvent"><wlevs:properties type="tuple">
<wlevs:property name="busId" type="int"/><wlevs:property name="id" type="int"/><wlevs:property name="coords" type="java.util.List"/>
</wlevs:properties></wlevs:event-type>
</wlevs:event-type-repository>
<!-- Assemble EPN (event processing network) -->
<wlevs:adapter id="BusPositionGen" provider="csvgen"><wlevs:instance-property name="port" value="9020"/><wlevs:instance-property name="eventTypeName" value="BusPos"/><wlevs:instance-property
name="eventPropertyNames"value="busId,seq,longitude,latitude"/>
<wlevs:listener ref="BusPosStream"/><wlevs:listener ref="BusStopAdapter"/>
</wlevs:adapter>
<wlevs:adapter id="BusStopAdapter" class="com.oracle.cep.sample.spatial.BusStopAdapter" ><wlevs:instance-property name="path" value="bus_stops.csv"/><wlevs:instance-property name="eventType" value="BusStop"/>
<wlevs:instance-property name="buffer" value="30.0"/></wlevs:adapter>
<wlevs:channel id="BusPosStream" event-type="BusPos"max-size="0" max-threads="0"><wlevs:listener ref="Processor"/>
</wlevs:channel>
<wlevs:channel id="BusStopRelation" event-type="BusStop" is-relation="true" ><wlevs:listener ref="Processor"/><wlevs:source ref="BusStopAdapter"/>
</wlevs:channel>
<wlevs:processor id="Processor" ></wlevs:processor>
<!-- bus stops --><wlevs:channel id="BusStopChannel" event-type="BusStopPubEvent">
<wlevs:listener ref="BusStopPub" /><wlevs:source ref="Processor"/>
</wlevs:channel>
<wlevs:adapter id="BusStopPub" provider="httppub" />
<!-- bus position --><wlevs:channel id="BusPosChannel" event-type="BusPosPubEvent">
<wlevs:listener ref="BusPosPub" /><wlevs:source ref="Processor"/>
</wlevs:channel>
<wlevs:adapter id="BusPosPub" provider="httppub" />
<!-- bus stop arrival --><wlevs:channel id="BusStopArrivalChannel" event-type="BusStopArrivalEvent">
<wlevs:listener ref="BusStopArrivalPub" /><wlevs:listener ref="BusStopArrivalOutputBean" /><wlevs:source ref="Processor"/>

Oracle Spatial Example
Oracle CEP Samples 2-91
</wlevs:channel>
<wlevs:event-bean id="BusStopArrivalOutputBean" class="com.oracle.cep.sample.spatial.OutputBean">
</wlevs:event-bean>
<wlevs:adapter id="BusStopArrivalPub" provider="httppub" />
</beans>
2.8.6 Oracle Spatial Example Component Configuration FileThe Oracle Spatial application uses five processors: three to handle the three data feeds, one that joins the resulting events, and one that generates summarized results.
These XML files contain the Oracle CEP queries executed against input events. This sample uses the Oracle CQL language. For additional information and samples about using Oracle CEP query languages, see:
■ Oracle Fusion Middleware CQL Language Reference for Oracle Complex Event Processing.
■ Oracle Fusion Middleware EPL Language Reference for Oracle Complex Event Processing.
Example 2–4 shows the component configuration file used in the Oracle Spatial sample application.
The processor element contains the Oracle CQL views and queries that use the Oracle Spatial to process geometric data using Oracle CEP.
Example 2–4 Oracle Spatial Example Component Configuration File
<?xml version="1.0" encoding="UTF-8"?><n1:config
xsi:schemaLocation="http://www.bea.com/ns/wlevs/config/application wlevs_application_config.xsd"
xmlns:n1="http://www.bea.com/ns/wlevs/config/application" xmlns:xsi="http://www.w3.org/2001/XMLSchema-instance"><http-pub-sub-adapter>
<name>BusPosPub</name><server-url>http://localhost:9002/pubsub</server-url><channel>/bus/buspos</channel><event-type>BusPosPubEvent</event-type>
</http-pub-sub-adapter>
<http-pub-sub-adapter><name>BusStopPub</name><server-url>http://localhost:9002/pubsub</server-url><channel>/bus/busstop</channel><event-type>BusStopPubEvent</event-type>
Note: Oracle EPL is superseded by Oracle CQL.
Note: For more information about data cartridges, see:
■ "Introduction to Data Cartridges" in the Oracle Fusion Middleware CQL Language Reference for Oracle Complex Event Processing
■ "Oracle Spatial" in the Oracle Fusion Middleware CQL Language Reference for Oracle Complex Event Processing

Foreign Exchange (FX) Example
2-92 Oracle Fusion Middleware Getting Started Guide for Oracle Complex Event Processing
</http-pub-sub-adapter>
<http-pub-sub-adapter><name>BusStopArrivalPub</name><server-url>http://localhost:9002/pubsub</server-url><channel>/bus/busstoparrival</channel><event-type>BusStopArrivalEvent</event-type>
</http-pub-sub-adapter>
<processor><name>Processor</name><rules>
<view id="BusPosGeomStream" >select bus.busId as busId, bus.seq as seq, com.oracle.cep.cartridge.spatial.Geometry.createPoint(8307, bus.longitude,
bus.latitude) as geomfrom BusPosStream as bus
</view>
<query id="BusArrival">ISTREAM(
select systimestamp() as incidentTime, bus.busId as busId, busstop.seq as stopSeqfrom BusPosGeomStream[NOW] as bus, BusStopRelation as busstopwhere CONTAIN@spatial(busstop.geom, bus.geom, 0.0d) = true and
bus.busId = busstop.busId)
</query>
<query id="BusStopOut">select busId, seq as id, com.oracle.cep.sample.spatial.OrdsHelper.getOrds(geom) as
coords from BusStopRelation</query>
<query id="BusPosOut">select systimestamp() as lastTime, busId, longitude, latitude from BusPosStream
</query> </rules></processor>
<channel><name>BusStopArrivalChannel</name><selector>BusArrival</selector>
</channel>
<channel><name>BusPosChannel</name><selector>BusPosOut</selector>
</channel>
<channel><name>BusStopChannel</name><selector>BusStopOut</selector>
</channel>
</n1:config>
2.9 Foreign Exchange (FX) ExampleThe foreign exchange example, called FX for simplicity, is a more complex example than the HelloWorld example because it includes multiple processors that handle information from multiple data feeds. In the example, the data feeds are simulated using the Oracle CEP load generator utility.

Foreign Exchange (FX) Example
Oracle CEP Samples 2-93
Figure 2–75 shows the FX example Event Processing Network (EPN). The EPN contains the components that make up the application and how they fit together.
Figure 2–75 FX Example Event Processing Network
In this scenario, three data feeds, simulated using the load generator, send a constant pair of values from different parts of the world; the value pairs consist of a currency pair, such as USDEUR for US dollar - European euro, and an exchange rate between the two currencies. The fxMarketAmer, fxMarketAsia, and fxMarketEuro adapters receive the data from the feeds, convert them into events, and pass them to the corresponding FilterAmer, FilterAsia, and FilterEuro processors. Each processor performs an initial stale check to ensure that no event is more than 1 second old and then a boundary check to ensure that the exchange rate between the two currencies is within a current boundary. The processor also only selects a specific currency pair from a particular channel; for example, the server selects USDEUR from the simulated American data feed, but rejects all other pairs, such as USDAUD (Australian dollar).
After the data from each data feed provider passes this initial preparation phase, a different processor, called FindCrossRate, joins all events across all providers, calculates the mid-point between the maximum and minimum rate, and then applies a trader-specified spread. Finally, the processor forwards the rate to the POJO that contains the business code; in this example, the POJO simply publishes the rate to clients.
The Oracle CEP monitor is configured to watch if the event latency in the last step exceeds some threshold, such as no updated rates in a 30 second time-span, and if there is too much variance between two consecutive rates for the same currency pair. Finally, the last rate of each currency pair is forwarded to the Oracle CEP http pub-sub server.
2.9.1 Running the Foreign Exchange ExampleFor optimal demonstration purposes, Oracle recommends that you run this example on a powerful computer, such as one with multiple CPUs or a 3 GHz dual-core Intel, with a minimum of 2 GB of RAM.
The Foreign Exchange (FX) application is pre-deployed to the fx_domain domain. To run the application, you simply start an instance of Oracle CEP server.
To run the foreign exchange example:1. Open a command window and change to the default server directory of the FX
domain directory, located in MIDDLEWARE_HOME\ocep_

Foreign Exchange (FX) Example
2-94 Oracle Fusion Middleware Getting Started Guide for Oracle Complex Event Processing
11.1\samples\domains\fx_domain\defaultserver, where MIDDLEWARE_HOME refers to the Middleware directory you specified when you installed Oracle CEP, such as d:\Oracle\Middleware.
prompt> cd d:\Oracle iddleware\ocep_11.1\samples\domains\fx_domain\defaultserver
2. Set your development environment, as described in Section 2.5, "Setting Your Development Environment."
3. Start Oracle CEP by executing the appropriate script with the correct command line arguments:
a. On Windows:
* If you are using the JRockit JDK included in Oracle JRockit Real Time, enable the deterministic garbage collector by passing the -dgc parameter to the command:
prompt> startwlevs.cmd -dgc
* If you are not using the JRockit JDK included in Oracle JRockit Real Time:
prompt> startwlevs.cmd
b. On UNIX:
* If you are using the JRockit JDK included in Oracle JRockit Real Time, enable the deterministic garbage collector by passing the -dgc parameter to the command:
prompt> startwlevs.sh -dgc
* If you are not using the JRockit JDK included in Oracle JRockit Real Time:
prompt> startwlevs.sh
The FX application is now ready to receive data from the data feeds.
4. To simulate an American data feed, open a new command window and set your environment as described in Section 2.5, "Setting Your Development Environment."
5. Change to the MIDDLEWARE_HOME\ocep_11.1\utils\load-generator directory, where MIDDLEWARE_HOME refers to the Middleware directory you specified when you installed Oracle CEP, such as d:\Oracle\Middleware.
6. Run the load generator using the fxAmer.prop properties file:
a. On Windows:
prompt> runloadgen.cmd fxAmer.prop
b. On UNIX:
prompt> runloadgen.sh fxAmer.prop
7. Repeat steps 4 - 6 to simulate an Asian data feed, using the fxAsia.prop properties file:
a. On Windows:
prompt> runloadgen.cmd fxAsia.prop
b. On UNIX:
Foreign Exchange (FX) Example
Oracle CEP Samples 2-95
prompt> runloadgen.sh fxAsia.prop
8. Repeat steps 4 - 6 to simulate an European data feed, using the fxEuro.prop properties file:
a. On Windows:
prompt> runloadgen.cmd fxEuro.prop
b. On UNIX:
prompt> runloadgen.sh fxEuro.prop
After the server status messages scroll by in the command window from which you started the server, and the three load generators start, you should see messages similar to the following being printed to the server command window (the message will likely be on one line):
OutputBean:onEvent() + <TupleValue>
<EventType>SpreaderOuputEvent</EventType><ObjectName>FindCrossRatesRule</ObjectName><Timestamp>1843704855846</Timestamp><TupleKind>null</TupleKind><DoubleAttribute>
<Value>90.08350000074516</Value></DoubleAttribute><CharAttribute>
<Value>USD</Value><Length>3</Length>
</CharAttribute><CharAttribute>
<Value>JPY</Value><Length>3</Length>
</CharAttribute><IsTotalOrderGuarantee>false</IsTotalOrderGuarantee>
</TupleValue>
These messages indicate that the Foreign Exchange example is running correctly. The output shows the cross rates of US dollars to Japanese yen and US dollars to UK pounds sterling.
2.9.2 Building and Deploying the Foreign Exchange Example from the Source DirectoryThe Foreign Exchange (FX) sample source directory contains the Java source, along with other required resources such as configuration XML files, that make up the FX application. The build.xml Ant file contains targets to build and deploy the application to the fx_domain domain, as described in Section 2.9.3, "Description of the Ant Targets to Build FX."
To build and deploy the foreign exchange example from the source directory:1. If the FX Oracle CEP instance is not already running, follow the procedure in
Section 2.9.1, "Running the Foreign Exchange Example" to start the server.
You must have a running server to successfully deploy the rebuilt application.
2. Open a new command window and change to the FX source directory, located in MIDDLEWARE_HOME\ocep_11.1\samples\source\applications\fx, where MIDDLEWARE_HOME refers to the Middleware directory you specified when

Foreign Exchange (FX) Example
2-96 Oracle Fusion Middleware Getting Started Guide for Oracle Complex Event Processing
you installed Oracle CEP installation directory, such as d:\Oracle\Middleware.
prompt> cd d:\Oracle\Middleware\ocep_11.1\samples\source\applications\fx
3. Set your development environment, as described in Section 2.5, "Setting Your Development Environment."
4. Execute the all Ant target to compile and create the application JAR file:
prompt> ant all
5. Execute the deploy Ant target to deploy the application JAR file to Oracle CEP:
prompt> ant -Dusername=wlevs -Dpassword=wlevs -Daction=update deploy
6. If the load generators required by the FX application are not running, start them as described in Section 2.9.1, "Running the Foreign Exchange Example."
After server status messages scroll by, you should see the following message printed to the output:
{crossRate=USDJPY, internalPrice=119.09934499999781}, {crossRate=USDGBP, internalPrice=0.5031949999999915}, {crossRate=USDJPY, internalPrice=117.73945624999783}
This message indicates that the FX example has been redeployed and is running correctly.
2.9.3 Description of the Ant Targets to Build FXThe build.xml file, located in the top-level directory of the FX source, contains the following targets to build and deploy the application:
■ clean—This target removes the dist and output working directories under the current directory.
■ all—This target cleans, compiles, and jars up the application into a file called com.bea.wlevs.example.fx_11.1.1.4_0.jar, and places the generated JAR file into a dist directory below the current directory.
■ deploy—This target deploys the JAR file to Oracle CEP using the Deployer utility.
For more information, see "Deployer Command-Line Reference" in the Oracle Fusion Middleware Administrator's Guide for Oracle Complex Event Processing.
2.9.4 Implementation of the FX ExampleThe implementation of the foreign exchange (FX) example generally follows "Creating Oracle CEP Applications: Typical Steps" in the Oracle Fusion Middleware Developer's Guide for Oracle Complex Event Processing for Eclipse.
Refer to that section for a task-oriented procedure that describes the typical development process.
All the files of the FX example are located relative to the MIDDLEWARE_HOME\ocep_11.1\samples\source\applications\fx directory, where MIDDLEWARE_HOME
Caution: This target overwrites the existing FX application JAR file in the domain directory.

Foreign Exchange (FX) Example
Oracle CEP Samples 2-97
is the Middleware home directory you specified when you installed Oracle CEP c:\Oracle\Middleware. Oracle recommends that you use this example directory setup in your own environment, although it is obviously not required.
The files used by the FX example include:
■ An EPN assembly file that describes each component in the application and how all the components are connected together. You are required to include this XML file in your Oracle CEP application.
In the example, the file is called com.oracle.cep.sample.fx.context.xml and is located in the META-INF/spring directory.
For details, see Section 2.9.5, "The FX EPN Assembly File."
■ Two XML files that configure the processor components of the application:
The first XML file configures the filterAmer, filterAsia, filterEuro, and FindCrossRates processors, all in a single file. This XML file includes the Oracle CQL rules that select particular currency pairs from particular simulated market feeds and joins together all the events that were selected by the pre-processors, calculates an internal price for the particular currency pair, and then calculates the cross rate. In the example, this file is called spreader.xml and is located in the META-INF/wlevs directory.
The second XML file configures the summarizeResults processor and includes the Oracle CQL rule that summarizes the results of the FindCrossRates processor. In the example, this file is called SummarizeResults.xml and is located in the META-INF/wlevs directory.
For details, see Section 2.9.6, "The FX Processor Component Configuration Files."
■ An XML file that configures the PublishSummaryResults http pub-sub adapter. In the example, this file is called PubSubAdapterConfiguration.xml and is located in the META-INF/wlevs directory.
■ A Java file that implements the OutputBean component of the application, a POJO that contains the business logic. This POJO prints out to the screen the events that it receives, programmed in the onEvent method. The POJO also registers into the event type repository the ForeignExchangeEvent event type.
In the example, the file is called OutputBean.java and is located in the src/com/oracle/cep/sample/fx directory.
For additional information about the Oracle CEP APIs referenced in this POJO, see Oracle Fusion Middleware Java API Reference for Oracle Complex Event Processing.
■ A MANIFEST.MF file that describes the contents of the OSGi bundle that will be deployed to Oracle CEP.
In the example, the MANIFEST.MF file is located in the META-INF directory.
For more information about creating this file, as well as a description of creating the OSGi bundle that you deploy to Oracle CEP, see "Overview of Application Assembly and Deployment" in the Oracle Fusion Middleware Developer's Guide for Oracle Complex Event Processing for Eclipse.
The FX example uses a build.xml Ant file to compile, assemble, and deploy the OSGi bundle; see Section 2.9.2, "Building and Deploying the Foreign Exchange Example from the Source Directory" for a description of this build.xml file if you also use Ant in your development environment.

Foreign Exchange (FX) Example
2-98 Oracle Fusion Middleware Getting Started Guide for Oracle Complex Event Processing
2.9.5 The FX EPN Assembly FileOne of the main purposes of the EPN assembly file is to define the event processing network by declaring the components of the application and how they are all connected, or in other word, which components listen to which other components. Oracle CEP provides a set of custom Spring tags used to declare the network. You also use the EPN assembly file to register the event types used by your application and its Oracle CQL or EPL rules.
You use the EPN assembly file in the typical way to define the application component beans in the Spring application context; the application components beans are those implemented with Java classes, such as adapters and the POJO that contains the business logic.
For more information, see:
■ "Schema Reference: EPN Assembly spring-wlevs-v11_1_1_6.xsd" in the Oracle Fusion Middleware Developer's Guide for Oracle Complex Event Processing for Eclipse
■ "Oracle CEP Schemas" in the Oracle Fusion Middleware Developer's Guide for Oracle Complex Event Processing for Eclipse
Example 2–5 shows the EPN assembly file used in the FX sample application; see the explanation after the example for details about the entries in bold.
Example 2–5 FX EPN Assembly File
<?xml version="1.0" encoding="UTF-8"?><beans xmlns="http://www.springframework.org/schema/beans"
xmlns:xsi="http://www.w3.org/2001/XMLSchema-instance" xmlns:osgi="http://www.springframework.org/schema/osgi" xmlns:wlevs="http://www.bea.com/ns/wlevs/spring" xsi:schemaLocation="
http://www.springframework.org/schema/beanshttp://www.springframework.org/schema/beans/spring-beans.xsdhttp://www.springframework.org/schema/osgihttp://www.springframework.org/schema/osgi/spring-osgi.xsdhttp://www.bea.com/ns/wlevs/springhttp://www.bea.com/ns/wlevs/spring/spring-wlevs-v11_1_1_6.xsd">
<wlevs:event-type-repository>
<wlevs:event-type type-name="StockTick"><wlevs:properties>
<wlevs:property name="lastPrice" type="double"/><wlevs:property name="symbol" type="char"/>
</wlevs:properties></wlevs:event-type><wlevs:event-type type-name="CrossRateEvent">
<wlevs:properties><wlevs:property name="price" type="double"/><wlevs:property name="fromRate" type="char"/><wlevs:property name="toRate" type="char"/>
</wlevs:properties></wlevs:event-type><wlevs:event-type type-name="SpreaderOuputEvent">
<wlevs:properties type="tuple"><wlevs:property name="internalPrice" type="double"/><wlevs:property name="crossRate1" type="char"/><wlevs:property name="crossRate2" type="char"/>
</wlevs:properties></wlevs:event-type><wlevs:event-type type-name="CrossrateSummaryEvent">
<wlevs:properties><wlevs:property name="averageInternalPrice" type="double"/><wlevs:property name="crossRatePair" type="char"/>

Foreign Exchange (FX) Example
Oracle CEP Samples 2-99
<wlevs:property name="totalCount" type="int"/></wlevs:properties>
</wlevs:event-type></wlevs:event-type-repository>
<!-- Assemble EPN (event processing network) --><wlevs:adapter id="fxMarketAmer" provider="loadgen">
<wlevs:instance-property name="port" value="9011"/><wlevs:listener ref="FilterAmerStream"/>
</wlevs:adapter>
<!-- This processor is simply here to filter the inbound event datato make it appear more realistic. It would not normally be requiredin a real application --><wlevs:channel id="FilterAmerStream" event-type="StockTick">
<wlevs:listener ref="FilterAmer"/></wlevs:channel><wlevs:processor id="FilterAmer" provider="cql">
<wlevs:listener ref="FxQuoteStream"/></wlevs:processor>
<wlevs:adapter id="fxMarketAsia" provider="loadgen">
<wlevs:instance-property name="port" value="9012"/><wlevs:listener ref="FilterAsiaStream"/>
</wlevs:adapter>
<!-- This processor is simply here to filter the inbound event datato make it appear more realistic. It would not normally be requiredin a real application --><wlevs:channel id="FilterAsiaStream" event-type="StockTick">
<wlevs:listener ref="FilterAsia"/></wlevs:channel><wlevs:processor id="FilterAsia" provider="cql">
<wlevs:listener ref="FxQuoteStream"/></wlevs:processor>
<wlevs:adapter id="fxMarketEuro" provider="loadgen">
<wlevs:instance-property name="port" value="9013"/><wlevs:listener ref="FilterEuroStream"/>
</wlevs:adapter>
<!-- This processor is simply here to filter the inbound event datato make it appear more realistic. It would not normally be requiredin a real application --><wlevs:channel id="FilterEuroStream" event-type="StockTick">
<wlevs:listener ref="FilterEuro"/></wlevs:channel><wlevs:processor id="FilterEuro" provider="cql">
<wlevs:listener ref="FxQuoteStream"/></wlevs:processor>
<!-- this it to allow delivery of specifc values for testing --><wlevs:adapter id="csvTestData" provider="csvgen">
<wlevs:instance-property name="port" value="9014"/><wlevs:instance-property name="eventTypeName" value="StockTick"/><wlevs:instance-property
name="eventPropertyNames"value="symbol,lastPrice"/>
<wlevs:listener ref="FxQuoteStream"/></wlevs:adapter>
<wlevs:channel id="FxQuoteStream" event-type="CrossRateEvent">
<wlevs:listener ref="FindCrossRates"/></wlevs:channel>
<wlevs:processor id="FindCrossRates" provider="cql">

Foreign Exchange (FX) Example
2-100 Oracle Fusion Middleware Getting Started Guide for Oracle Complex Event Processing
<wlevs:listener ref="CrossRateStream"/></wlevs:processor>
<wlevs:channel id="CrossRateStream" event-type="SpreaderOuputEvent" advertise="true">
<wlevs:listener ref="summarizeResults"/><wlevs:listener>
<bean class="com.oracle.cep.sample.fx.OutputBean" autowire="byName"/></wlevs:listener>
</wlevs:channel>
<wlevs:processor id="summarizeResults" provider="cql"><wlevs:listener ref="SummaryResultsStream"/>
</wlevs:processor>
<wlevs:adapter id="PublishSummaryResults" provider="httppub"></wlevs:adapter><wlevs:channel id="SummaryResultsStream"
event-type="CrossrateSummaryEvent"><wlevs:listener>
<bean class="com.oracle.cep.sample.fx.OutputBean" autowire="byName"/></wlevs:listener>
<wlevs:listener ref="PublishSummaryResults"/>
</wlevs:channel>
</beans>
In the preceding example:
■ The wlevs:event-type-repository element registers the event types that are used throughout the application. These events are all of type tuple and include:
– StockTick: input events.
– CrossRateEvent: event type output by the FilterAmer, FilterAsia, and FilterEuro processors.
– SpreaderOutputEvent: event type output by the FindCrossRates processor.
– CrossrateSummaryEvent: event type output by the summarizeResults processor.
Oracle CEP automatically creates instances of these event types when needed. You can then reference this data in the Oracle CQL rules of the application, the adapter Java class, and the POJO.
For more information, see "Event Types" in the Oracle Fusion Middleware Developer's Guide for Oracle Complex Event Processing for Eclipse .
■ The set of wlevs:adapter, wlevs:processor, and wlevs:channel elements set up the event processor network by declaring each component in the network. The network consists of three adapters, four processors, and five streams, as described in Figure 2–75.
Each component is given a unique ID which can be referenced by other components when they declare their listeners and sources.
– The wlevs:adapter elements specify adapter components, for example:
<wlevs:adapter id="fxMarketAmer" provider="loadgen"><wlevs:instance-property name="port" value="9011"/>
</wlevs:adapter>
The fxMarketAmer, fxMarketAsia, and fxMarketEuro adapters provide the principle input data sources. These adapters use the

Foreign Exchange (FX) Example
Oracle CEP Samples 2-101
provider="loadgen" attribute of each wlevs:adapter element to specify that the adapters get their data from the Oracle CEP load generator utility. The wlevs:instance-property child element specifies the port number to which the adapter should listen.
The csvTestData adapter is an optional adapter you can use to feed test data into the application. This adapter uses the provider="csvgen" attribute to specify that this adapter gets its data from a comma separated value (CSV) file. For more information, see "Testing Applications With the Load Generator and csvgen Adapter" in the Oracle Fusion Middleware Developer's Guide for Oracle Complex Event Processing for Eclipse
The PublishSummaryResults adapter outputs events to the Oracle CEP http pub-sub server.
– The wlevs:processor elements specify the complex event processors, for example:
<wlevs:processor id="FilterAmer" provider="cql"><wlevs:listener ref="FxQuoteStream"/>
</wlevs:processor>
You can use the listeners attribute, common to all component elements, or a wlevs:listener child element to specify the components that listen to the processor; in this case, it is a channel called FxQuoteStream.
– The wlevs:channel elements specify the event streams between components, for example:
<wlevs:channel id="FxQuoteStream" event-type="CrossRateEvent"> <wlevs:listener ref="FindCrossRates"/></wlevs:channel>
As with all components, you can use the wlevs:listener and wlevs:source child elements to specify the other components that act as listeners and sources for this component.
In the example, the FindCrossRates processor listens to the FxQuoteStream channel.
Example 2–6 shows how you can nest the definition of a component inside a wlevs:listener element:
Example 2–6 Nested Component Definition
<wlevs:channel id="CrossRateStream" event-type="SpreaderOuputEvent" advertise="true">
<wlevs:listener ref="summarizeResults"/><wlevs:listener>
<bean class="com.oracle.cep.sample.fx.OutputBean" autowire="byName"/></wlevs:listener>
</wlevs:channel>
In Example 2–6, the OutputBean POJO, declared as a standard Spring bean using the <bean> tag, listens to the CrossRateStream channel.
2.9.6 The FX Processor Component Configuration FilesThe FX application uses five processors: three to handle the three data feeds, one that joins the resulting events, and one that generates summarized results.

Foreign Exchange (FX) Example
2-102 Oracle Fusion Middleware Getting Started Guide for Oracle Complex Event Processing
The first four processors are configured in a single XML file, called spreader.xml. For more information, see Section 2.9.6.1, "FX Processor Component Configuration File: spreader.xml."
The fifth processor is configured in the XML file called SummarizeResults.xml. For more information, see Section 2.9.6.2, "FX Processor Component Configuration File: SummarizeResults.xml."
These XML files contain the Oracle CEP queries executed against input events. This sample uses the Oracle CQL language. For additional information and samples about using Oracle CEP query languages, see:
■ Oracle Fusion Middleware CQL Language Reference for Oracle Complex Event Processing.
■ Oracle Fusion Middleware EPL Language Reference for Oracle Complex Event Processing.
2.9.6.1 FX Processor Component Configuration File: spreader.xmlThe first four processors are configured in a single XML file, called spreader.xml, as Example 2–7 shows.
Example 2–7 FX Processor Component Configuration File: spreader.xml
<?xml version="1.0" encoding="UTF-8"?><n1:config xsi:schemaLocation="http://www.bea.com/ns/wlevs/config/application wlevs_application_config.xsd"
xmlns:n1="http://www.bea.com/ns/wlevs/config/application" xmlns:xsi="http://www.w3.org/2001/XMLSchema-instance">
<processor><name>FilterAmer</name><rules>
<view id="UsdToEur" schema="lastPrice symbol"><![CDATA[select lastPrice, symbol from FilterAmerStream [range 1] where
symbol="USDEUR"]]></view>
<view id="UsdToEurPre" schema="price fromRate toRate"><![CDATA[select avg(lastPrice) as price, "USD" as fromRate, "EUR" as toRatefrom UsdToEurwhere lastPrice < 3.0 and lastPrice > 0.25]]></view>
<query id="AmerFilterCrossRates"><![CDATA[select * from UsdToEurPre]]></query>
</rules></processor><processor>
<name>FilterAsia</name><rules>
<view id="EurToJpy" schema="lastPrice symbol"><![CDATA[select lastPrice, symbol from FilterAsiaStream [range 1] where
symbol="EURJPY"]]></view>
<view id="EurToJpyPre" schema="price fromRate toRate"><![CDATA[select avg(lastPrice) as price, "EUR" as fromRate, "JPY" as toRatefrom EurToJpywhere lastPrice < 200.0 and lastPrice > 100.0]]></view>
Note: Oracle EPL is superseded by Oracle CQL.

Foreign Exchange (FX) Example
Oracle CEP Samples 2-103
<query id="AsiaFilterCrossRates"><![CDATA[select * from EurToJpyPre]]></query>
</rules></processor><processor>
<name>FilterEuro</name><rules>
<view id="EurToGbp" schema="lastPrice symbol"><![CDATA[select lastPrice, symbol from FilterEuroStream [range 1] where
symbol="EURGBP"]]></view>
<view id="EurToGbpPre" schema="price fromRate toRate"><![CDATA[select avg(lastPrice) as price, "EUR" as fromRate, "GBP" as toRate from EurToGbp where lastPrice < 1.5 and lastPrice > 0.5]]></view>
<query id="EuroFilterCrossRates"><![CDATA[select * from EurToGbpPre]]></query>
</rules></processor>
<processor>
<name>FindCrossRates</name><rules>
<query id="FindCrossRatesRule"><![CDATA[select ((a.price * b.price) + 0.05) as internalPrice,
a.fromRate as crossRate1, b.toRate as crossRate2
from FxQuoteStream [range 1] as a, FxQuoteStream [range 1] as b where NOT (a.price IS NULL)
andNOT (b.price IS NULL)
anda.toRate = b.fromRate
]]></query></rules>
</processor></n1:config>
The FilterAmer, FilterAsia, and FilterEuro processors in this file are all essentially the same; the differences lie only in the values used in the Oracle CQL queries for querying different items from the data feeds and applying different boundary conditions. For this reason, this section will discuss just the FilterAmer processor.
The Oracle CQL rules executed by the FilterAmer processor are:
<processor><name>FilterAmer</name><rules>
<view id="UsdToEur" schema="lastPrice symbol"><![CDATA[select lastPrice, symbol from FilterAmerStream [range 1] where
symbol="USDEUR"]]></view>
<view id="UsdToEurPre" schema="price fromRate toRate"><![CDATA[select avg(lastPrice) as price, "USD" as fromRate, "EUR" as toRatefrom UsdToEurwhere lastPrice < 3.0 and lastPrice > 0.25]]></view>
<query id="AmerFilterCrossRates"><
Foreign Exchange (FX) Example
2-104 Oracle Fusion Middleware Getting Started Guide for Oracle Complex Event Processing
UsdToEurPre]]></query></rules>
</processor>
To understand the query, one must look at the various clauses, as follows:
■ The UsdToEur view serves as a subquery that selects only those items from the StockTick data feed in which the symbol value is USDEUR (US dollar - European euro exchange) and should reject all other items. The from clause specifies also specifies that the window of time for which this Oracle CQL query executes is 1 second.
■ The UsdToEurPre view serves as a subquery that selects from the UsdToEur view. Its where clause specifies the boundary condition to ensure that the rates for a particular item from the feed fall within an accepted range; in this case, the lastPrice for a particular item from the feed must be between $3.00 and $0.25.
■ The AmerFilterCrossRates query selects everything from the UsdToEurPre view. Only the results of a query are output to the down-stream channels that listen to a processor.
The Oracle CQL rule executed by the FindCrossRates processor are:
<processor><name>FindCrossRates</name><rules>
<query id="FindCrossRatesRule"><![CDATA[select ((a.price * b.price) + 0.05) as internalPrice,
a.fromRate as crossRate1, b.toRate as crossRate2
from FxQuoteStream [range 1] as a, FxQuoteStream [range 1] as b where NOT (a.price IS NULL)
andNOT (b.price IS NULL)
anda.toRate = b.fromRate
]]></query></rules>
</processor>
To understand the query, one must look at the various clauses, as follows:
■ The from and where clauses join two events from the CrossRateEvent object (which contains events selected by the FilterAmer, FilterAsia, and FilterEuro processors) where the value of the toRate and fromRate are the same. The from clause also sets the processing window, again of 1 second.
■ The select clause calculates an internal price of a particular currency, which averages the to and from rate of a the currency plus a fee of $.05, and also calculates a cross rate, which is defined as the price of one currency in terms of another currency in the market of a third country.
The result of this query is then sent to the business object POJO and the summarizeResults processor.
2.9.6.2 FX Processor Component Configuration File: SummarizeResults.xmlThe fifth processor is configured in the XML file called SummarizeResults.xml as Example 2–8 shows.

Signal Generation Example
Oracle CEP Samples 2-105
Example 2–8 FX Processor Component Configuration File: SummarizeResults.xml
<?xml version="1.0" encoding="UTF-8"?><wlevs:config xmlns:wlevs="http://www.bea.com/ns/wlevs/config/application">
<processor><name>summarizeResults</name><rules>
<query id="Rule"><![CDATA[ select
crossRate1 || crossRate2 as crossRatePair,count(*) as totalCount,avg(internalPrice) as averageInternalPrice
from CrossRateStream [RANGE 1 SLIDE 1]group by crossRate1,crossRate2 having count(*) > 0
]]></query></rules>
</processor></wlevs:config>
The result of this query is then sent to the business object POJO and the PublishSummaryResults adapter.
2.10 Signal Generation ExampleThe signal generation sample application receives simulated market data and verifies if the price of a security has fluctuated more than two percent. The application also detects if there is a trend occurring by keeping track of successive stock prices for a particular symbol; if more than three successive prices fluctuate more than two percent, this is considered a trend.
Figure 2–76 shows the signal generation example Event Processing Network (EPN). The EPN contains the components that make up the application and how they fit together.
Figure 2–76 The Signal Generation Example Event Processing Network
The application simulates a market data feed using the Oracle CEP load generator utility; in this example, the load generator generates up to 10,000 messages per second. The example includes an HTML dashboard which displays the matched events along with the latencies; events consist of a stock symbol, a timestamp, and the price.

Signal Generation Example
2-106 Oracle Fusion Middleware Getting Started Guide for Oracle Complex Event Processing
The example demonstrates very low latencies, with minimum latency jitter under high throughputs. Once the application starts running, the processor matches an average of 800 messages per second. If the application is run on the minimum configured system, the example shows very low average latencies (30-300 microsecond, on average) with minimal latency spikes (low milliseconds).
The example computes and displays latency values based on the difference between a timestamp generated on the load generator and timestamp on Oracle CEP. Computing valid latencies requires very tight clock synchronization, such as 1 millisecond, between the computer running the load generator and the computer running Oracle CEP. For this reason, Oracle recommends running both the load generator and Oracle CEP on a single multi-CPU computer where they will share a common clock.
The example also shows how to use the Oracle CEP event caching feature. In particular the single processor in the EPN sends events to both an event bean and a cache.
The example also demonstrates how to use Oracle CQL queries.
2.10.1 Running the Signal Generation ExampleFor optimal demonstration purposes, Oracle recommends that you run this example on a powerful computer, such as one with multiple CPUs or a 3 GHz dual-core Intel, with a minimum of 2 GB of RAM.
The signalgeneration_domain domain contains a single application: the signal generation sample application. To run the signal generation application, you simply start an instance of Oracle CEP in that domain.
To run the signal generation example:1. Open a command window and change to the default server directory of the
signalgeneration_domain domain directory, located in MIDDLEWARE_HOME\ocep_11.1\samples\domains\signalgeneration_domain\defaultserver, where MIDDLEWARE_HOME refers to the Middleware home directory you specified when you installed Oracle CEP, such as d:\Oracle\Middleware.
prompt> cd d:\Oracle\Middleware\ocep_11.1\samples\domains\signalgeneration_domain\defaultserver
2. Set your development environment, as described in Section 2.5, "Setting Your Development Environment."
3. Start Oracle CEP by executing the appropriate script with the correct command line arguments:
a. On Windows:
* If you are using the JRockit JDK included in Oracle JRockit Real Time, enable the deterministic garbage collector by passing the -dgc parameter to the command:
prompt> startwlevs.cmd -dgc
* If you are not using the JRockit JDK included in Oracle JRockit Real Time:
prompt> startwlevs.cmd
b. On UNIX:

Signal Generation Example
Oracle CEP Samples 2-107
* If you are using the JRockit JDK included in Oracle JRockit Real Time, enable the deterministic garbage collector by passing the -dgc parameter to the command:
prompt> startwlevs.sh -dgc
* If you are not using the JRockit JDK included in Oracle JRockit Real Time:
prompt> startwlevs.sh
4. Wait until you see console messages like this:
<Apr 24, 2009 11:40:37 AM EDT> <Notice> <Server> <BEA-2046000> <Server STARTED>Throughput (msg per second): 0. Average latency (microseconds): 0Throughput (msg per second): 0. Average latency (microseconds): 0Throughput (msg per second): 0. Average latency (microseconds): 0Throughput (msg per second): 0. Average latency (microseconds): 0...
The signal generation application is now ready to receive data from the data feeds.
Next, to simulate a data feed, you use a load generator programmed specifically for the example.
5. 0pen a new command window.
6. Change to the MIDDLEWARE_HOME\ocep_11.1\samples\domains\signalgeneration_domain\defaultserver\utils directory, where MIDDLEWARE_HOME refers to the Middleware home directory you specified when you installed Oracle CEP, such as d:Oracle\Middleware.
7. Run the startDataFeed command:
a. On Windows:
prompt> startDataFeed.cmd
b. On UNIX:
prompt> startDataFeed.sh
8. Invoke the example dashboard by starting a browser and opening the following HTML page:
http://host:9002/signalgeneration/dashboard.html
Replace host with the name of the computer on which Oracle CEP is running; if it is the same computer as your browser, you can use localhost.
9. In the browser, click Start on the HTML page.
You should start seeing the events that match the Oracle CQL rules configured for this example as Figure 2–77 shows.

Signal Generation Example
2-108 Oracle Fusion Middleware Getting Started Guide for Oracle Complex Event Processing
Figure 2–77 Signal Generation Dashboard
2.10.2 Building and Deploying the Signal Generation Example from the Source Directory
The signal generation sample source directory contains the Java source, along with other required resources, such as configuration XML files, EPN assembly file, and DOJO client JavaScript libraries, that make up the signal generation application. The build.xml Ant file contains targets to build and deploy the application to the signalgeneration_domain domain, as described in Section 2.10.3, "Description of the Ant Targets to Build Signal Generation."
To build and deploy the signal generation example from the source directory:1. If the signal generation Oracle CEP instance is not already running, follow the
procedure in Section 2.10.1, "Running the Signal Generation Example" to start the server. You must have a running server to successfully deploy the rebuilt application.
2. Open a new command window and change to the signal generation source directory, located in MIDDLEWARE_HOME\ocep_11.1\samples\source\applications\signalgeneration, where MIDDLEWARE_HOME refers to the Middleware home directory you specified when you installed Oracle CEP, such as d:\Oracle\Middleware.
prompt> cd d:\Oracle\Middleware\ocep_11.1\samples\source\applications\signalgeneration
Signal Generation Example
Oracle CEP Samples 2-109
3. Set your development environment, as described in Section 2.5, "Setting Your Development Environment."
4. Execute the all Ant target to compile and create the application JAR file:
prompt> ant all
5. Execute the deploy Ant target to deploy the application JAR file to the MIDDLEWARE_HOME\ocep_11.1\samples\domains\signalgeneration_domain\defaultserver\applications\signalgeneration directory:
prompt> ant deploy
6. If the load generator required by the signal generation application is not running, start it as described in Section 2.10.1, "Running the Signal Generation Example."
7. Invoke the example dashboard as described in Section 2.10.1, "Running the Signal Generation Example."
2.10.3 Description of the Ant Targets to Build Signal GenerationThe build.xml file, located in the top-level directory of the signal generation example source, contains the following targets to build and deploy the application:
■ clean—This target removes the dist and output working directories under the current directory.
■ all—This target cleans, compiles, and jars up the application into a file called com.bea.wlevs.example.signalgen_11.1.1.4_0.jar, and places the generated JAR file into a dist directory below the current directory.
■ deploy—This target deploys the JAR file to Oracle CEP using the Deployer utility.
For more information, see "Deployer Command-Line Reference" in the Oracle Fusion Middleware Administrator's Guide for Oracle Complex Event Processing.
2.10.4 Implementation of the Signal Generation ExampleThe implementation of the signal generation example generally follows "Creating Oracle CEP Applications: Typical Steps" in the Oracle Fusion Middleware Developer's Guide for Oracle Complex Event Processing for Eclipse.
Refer to that section for a task-oriented procedure that describes the typical development process.
All the files of the signal generation are located relative to the MIDDLEWARE_HOME\ocep_11.1\samples\source\applications\signalgeneration directory, where MIDDLEWARE_HOME refers to the Middleware home directory you specified when you installed Oracle CEP, such as c:\Oracle\Middleware. Oracle recommends that you use this example directory setup in your own environment, although it is obviously not required.
The files used by the signal generation example include:
■ A EPN assembly file that describes each component in the application and how all the components are connected together.
Caution: This target overwrites the existing signal generation application JAR file in the domain directory.

Signal Generation Example
2-110 Oracle Fusion Middleware Getting Started Guide for Oracle Complex Event Processing
In the example, the file is called epn_assembly.xml and is located in the META-INF/spring directory.
For details, see Section 2.10.5, "The Signal Generation EPN Assembly File."
■ An XML file that configures the processor component of the application; this file is called config.xml and is located in the META-INF/wlevs directory
The config.xml file configures the processor1 Oracle CQL processor, in particular the Oracle CQL rules that verify whether the price of a security has fluctuated more than two percent and whether a trend has occurred in its price.
For details, see Section 2.10.6, "The Signal Generation Component Configuration Files."
■ A Java file that implements the SignalgenOutputBean component of the application, a POJO that contains the business logic. This POJO is an HttpServlet and an EventSink. Its onEvent method consumes PercentTick and TrendTick event instances, computes latency, and displays dashboard information.
In the example, the file is called SignalgenOutputBean.java and is located in the src/oracle/cep/example/signalgen directory.
For a detailed description of this file, as well as general information about programming event sinks, see "Stream Sources and Stream Sinks and Relation Sources and Relation Sinks" in the Oracle Fusion Middleware Developer's Guide for Oracle Complex Event Processing for Eclipse.
■ A MANIFEST.MF file that describes the contents of the OSGi bundle that will be deployed to Oracle CEP.
In the example, the MANIFEST.MF file is located in the META-INF directory
For more information about creating this file, as well as a description of creating the OSGi bundle that you deploy to Oracle CEP, see "Overview of Application Assembly and Deployment" in the Oracle Fusion Middleware Developer's Guide for Oracle Complex Event Processing for Eclipse.
■ A dashboard.html file in the main example directory; this HTML file is the example dashboard that displays events and latencies of the running signal generation application. The HTML file uses Dojo JavaScript libraries from http://dojotoolkit.org/, located in the dojo directory.
For additional information about the Oracle CEP APIs referenced in ForeignExchangeBuilderFactory, see Oracle Fusion Middleware Java API Reference for Oracle Complex Event Processing.
The signal generation example uses a build.xml Ant file to compile, assemble, and deploy the OSGi bundle; see Section 2.10.2, "Building and Deploying the Signal Generation Example from the Source Directory" for a description of this build.xml file if you also use Ant in your development environment.
2.10.5 The Signal Generation EPN Assembly FileOne of the main purposes of the EPN assembly file is to define the event processing network by declaring the components of the application and how they are all connected, or in other word, which components listen to which other components. Oracle CEP provides a set of custom Spring tags used to declare the network. You also use the EPN assembly file to register the event types used by your application and its Oracle CQL rules.

Signal Generation Example
Oracle CEP Samples 2-111
You use the EPN assembly file in the typical way to define the application component beans in the Spring application context; the application components beans are those implemented with Java classes, such as adapters and the POJO that contains the business logic.
For more information, see:
■ "Schema Reference: EPN Assembly spring-wlevs-v11_1_1_6.xsd" in the Oracle Fusion Middleware Developer's Guide for Oracle Complex Event Processing for Eclipse
■ "Oracle CEP Schemas" in the Oracle Fusion Middleware Developer's Guide for Oracle Complex Event Processing for Eclipse
Example 2–9 shows the EPN assembly file used in the signal generation sample application; see the explanation after the example for details about the entries in bold.
Example 2–9 Signal Generation EPN Assembly File
<?xml version="1.0" encoding="UTF-8"?><beans xmlns="http://www.springframework.org/schema/beans"
xmlns:xsi="http://www.w3.org/2001/XMLSchema-instance" xmlns:osgi="http://www.springframework.org/schema/osgi" xmlns:wlevs="http://www.bea.com/ns/wlevs/spring" xmlns:cqlx="http://www.oracle.com/schema/cqlx" xsi:schemaLocation="http://www.springframework.org/schema/beans
http://www.springframework.org/schema/beans/spring-beans.xsd http://www.springframework.org/schema/osgi http://www.springframework.org/schema/osgi/spring-osgi.xsd http://www.bea.com/ns/wlevs/spring http://www.bea.com/ns/wlevs/spring/spring-wlevs-v11_1_1_6.xsd">
<wlevs:event-type-repository>
<wlevs:event-type type-name="TrendTick"><wlevs:properties>
<wlevs:property name="symbol" type="char"/><wlevs:property name="lastPrice" type="double"/><wlevs:property name="trendLastPrice" type="bigint"/><wlevs:property name="startTimestamp" type="bigint"/>
</wlevs:properties></wlevs:event-type><wlevs:event-type type-name="PercentTick">
<wlevs:properties><wlevs:property name="symbol" type="char"/><wlevs:property name="lastPrice" type="double"/><wlevs:property name="percentLastPrice" type="double"/><wlevs:property name="startTimestamp" type="bigint"/>
</wlevs:properties></wlevs:event-type><wlevs:event-type type-name="Symbols">
<wlevs:properties><wlevs:property name="symbol" type="char" length="10"/>
</wlevs:properties></wlevs:event-type>
</wlevs:event-type-repository>
<wlevs:adapter id="loadgenAdapter" provider="loadgen"><wlevs:instance-property name="port" value="9001"/><wlevs:instance-property name="threadContextTimestamp" value="true"/>
</wlevs:adapter>
<!-- definition for cache that holds the symbols --><wlevs:caching-system id="signalgenCachingSystem"/><wlevs:cache id="symbolsCache" key-properties="symbol" value-type="Symbols">
<wlevs:caching-system ref="signalgenCachingSystem"/><wlevs:cache-loader ref="symbolsCacheLoader"/>
</wlevs:cache>

Signal Generation Example
2-112 Oracle Fusion Middleware Getting Started Guide for Oracle Complex Event Processing
<wlevs:processor id="processor1">
<wlevs:cache-source ref="symbolsCache"/></wlevs:processor>
<!-- Streams are just place-holders in this scenario, they just pass-through --><wlevs:channel id="StockTickStream" max-threads="0" max-size="0"
event-type="OracleStockTick"><wlevs:listener ref="processor1"/><wlevs:source ref="loadgenAdapter"/>
</wlevs:channel>
<!-- advertise for monitoring --><wlevs:channel id="TrendStream" max-threads="0" max-size="0" advertise="true"
event-type="TrendTick">
<wlevs:listener ref="outputbean"/><wlevs:source ref="processor1"/>
</wlevs:channel>
<wlevs:channel id="PercentStream" max-threads="0" max-size="0" advertise="true" event-type="PercentTick">
<wlevs:listener ref="outputbean"/><wlevs:source ref="processor1"/>
</wlevs:channel>
<bean id="outputbean" class="oracle.cep.example.signalgen.SignalgenOutputBean"><property name="timestampProperty" value="startTimestamp"/>
</bean>
<bean id="symbolsCacheLoader" class="oracle.cep.example.signalgen.SymbolsCacheLoader"><property name="symbolsFileName" value="applications/MySigGen/symbols.txt"/><property name="eventTypeName" value="Symbols"/>
</bean> </beans>
In the preceding example:
■ The wlevs:event-type-repository element creates the event types that are used throughout the application as tuples; in the signal generation application, there are the following events:
– TrendTick: defined in the EPN assembly file.
– PercentTick: defined in the EPN assembly file.
– Symbols: defined in the EPN assembly file.
■ The set of wlevs:adapter, wlevs:processor, wlevs:channel, and wlevs:caching-system entries set up the event processor network by declaring each component in the network as described in Figure 2–76.
Each component is given a unique ID which can be referenced by other components when they declare their listeners and sources.
– The wlevs:adapter element specifies the adapter, for example:
<wlevs:adapter id="loadgenAdapter" provider="loadgen"><wlevs:instance-property name="port" value="9001"/><wlevs:instance-property name="threadContextTimestamp" value="true"/>
</wlevs:adapter>
The wlevs:adapter element provider="loadgen" attribute specifies that the adapter gets its data from the Oracle CEP load generator utility. The

Signal Generation Example
Oracle CEP Samples 2-113
wlevs:instance-property child element specifies the port number to which the adapter should listen.
– The wlevs:processor element specifies the Oracle CQL processor, for example:
<wlevs:processor id="processor1"><wlevs:cache-source ref="symbolsCache"/>
</wlevs:processor>
The listener attribute, common to all component tags, specifies the component that listens to the processor; in this case, the listener is symbolsCache.
– The wlevs:caching-system element specifies the Oracle CEP local event cache the application uses to improve performance, for example:
<wlevs:caching-system id="signalgenCachingSystem"/><wlevs:cache id="symbolsCache" key-properties="symbol" value-type="Symbols">
<wlevs:caching-system ref="signalgenCachingSystem"/><wlevs:cache-loader ref="symbolsCacheLoader"/>
</wlevs:cache>
For more information on caches, see "Configuring Oracle CEP Caching" in the Oracle Fusion Middleware Developer's Guide for Oracle Complex Event Processing for Eclipse.
2.10.6 The Signal Generation Component Configuration FilesThe Signal Generation application configures its processor and cache in a component configuration file that Example 2–10 shows.
Example 2–10 Signal Generation Component Configuration File
<?xml version="1.0" encoding="UTF-8"?><!-- this is here to test that you ignore this file --><n1:config xsi:schemaLocation="http://www.bea.com/ns/wlevs/config/application wlevs_application_config.xsd"
xmlns:n1="http://www.bea.com/ns/wlevs/config/application" xmlns:xsi="http://www.w3.org/2001/XMLSchema-instance" >
<processor><name>processor1</name><rules> <view id="S" schema="symbol price">
<![CDATA[ RStream(select T.symbol, T.lastPrice from StockTickStream[now] as T, symbolsCache
as R where T.symbol = R.symbol)]]>
</view> <query id="percent">
<
Signal Generation Example
2-114 Oracle Fusion Middleware Getting Started Guide for Oracle Complex Event Processing
B AS (100*(B.price - A.price)/A.price > 2.0 or 100*(B.price - A.price)/A.price < -2.0 )
) as T]]>
</query> <view id="vTrend">
<![CDATA[select symbol, lastPrice, trendLastPrice, startTimestampfrom S MATCH_RECOGNIZE ( PARTITION BY symbol MEASURES
C.symbol as symbol,C.lastPrice as lastPriceZ.ELEMEMT_TIME as startTimestamp,count(C.*) as trendLastPrice
ALL MATCHES PATTERN (A B C+) DEFINE
A AS ((A.lastPrice > PREV(A.lastPrice, 1)) AND (NOT(PREV(A.lastPrice, 1) > PREV(A.lastPrice, 2)))
),B AS (B.lastPrice > PREV(B.lastPrice, 1)),C AS (C.lastPrice > PREV(C.lastPrice, 1))
) as T]]>
</view> <query id="trend">
<![CDATA[ select symbol, lastPrice, trendLastPrice, ELEMENT_TIME as startTimestamp from vTrend
where trendLastPrice > 2]]>
</query></rules>
</processor> <channel>
<name>TrendStream</name><selector>trend</selector>
</channel> <channel>
<name>PercentStream</name><selector>percent</selector>
</channel></n1:config>
If your application contains multiple processors, adapters or channels, you can either declare them all in a single configuration file, or create separate configuration files for each component; the method you chose depends on which you find easier to manage.
For each component you configure, you must add the name child element to explicitly declare the specific component to which you are referring. The value of the name element must correspond to the component's unique identifier of its declaration in the EPN assembly file.
For example, assume a processor is declared in the EPN assembly file as follows:
<wlevs:processor id="processor1" ...>
Then its corresponding XML configuration would be as follows:
<processor><name>processor1</name>...
</processor>

Signal Generation Example
Oracle CEP Samples 2-115
The Signal Generation example uses a single configuration file for one processor with the name processor1 and one cache with the name symbolsCache. These names correspond with the declaration of the components in the EPN assembly file.
The processor element configures the processor component. The most important part of the processor configuration is the declaration of the set of Oracle Continuous Query Language (Oracle CQL) rules that this processor executes; these rules select the set of events that are eventually passed to the application business object. Each rule is declared with a query or relation element using an XML <![CDATA[...]]> section; all query and relation elements are grouped together within a single rules element. You can define as many rules as you want for a particular processor.
The Signal Generation application has the following rules:
<rules> <view id="S" schema="symbol price">
<![CDATA[ RStream(select T.symbol, T.lastPrice from StockTickStream[now] as T, symbolsCache
as R where T.symbol = R.symbol)]]>
</view> <query id="percent">
<![CDATA[ select symbol, lastPrice, percentLastPrice, startTimestampfrom S MATCH_RECOGNIZE ( PARTITION BY symbol MEASURES
B.symbol as symbol,B.price as lastPrice,100*(B.price - A.price)/A.price as percentLastPrice,
B.ELEMENT_TIME as startTimestamp ALL MATCHES
PATTERN (A B) DEFINE
B AS (100*(B.price - A.price)/A.price > 2.0 or 100*(B.price - A.price)/A.price < -2.0 )
) as T]]>
</query> <view id="vTrend" schema="symbol lastPrice trendLastPrice">
<![CDATA[select symbol, lastPrice, trendLastPricefrom S MATCH_RECOGNIZE ( PARTITION BY symbol MEASURES
Z.symbol as symbol,Z.price as lastPrice,count(A.*)-count(B.*) as trendLastPrice
ALL MATCHES PATTERN (X (A|B|C) (A|B|C) (A|B|C) (A|B|C) ) SUBSET Z = (A, B, C) DEFINE
A AS (A.price > PREV(A.price)), B AS (B.price < PREV(B.price)),C AS (C.price = PREV(C.price))
) as T]]>
</view> <query id="trend">
<![CDATA[ select symbol, lastPrice, trendLastPrice, ELEMENT_TIME as startTimestamp from vTrend
where trendLastPrice > 2]]>
</query>

Event Record and Playback Example
2-116 Oracle Fusion Middleware Getting Started Guide for Oracle Complex Event Processing
</rules>
For more information, see Oracle Fusion Middleware CQL Language Reference for Oracle Complex Event Processing.
2.11 Event Record and Playback ExampleThe record and playback example shows how to configure a component to record events to an event store and then configure another component in the network to playback events from the store. The example uses the Oracle CEP-provided default Berkeley database to store the events. The example also shows how to configure a publishing HTTP pub-sub adapter as a node in the event processing network.
Figure 2–78 shows the event record and playback example Event Processing Network (EPN). The EPN contains the components that make up the application and how they fit together.
Figure 2–78 The Event Record and Playback Example Event Processing Network
The application contains four components in its event processing network:
■ simpleEventSource: an adapter that generates simple events for purposes of the example. This component has been configured to record events, as shown in the graphic.
The configuration source for this adapter is:
<adapter><name>simpleEventSource</name><record-parameters>
...</record-parameters>
</adapter>
■ eventStream: a channel that connects the simpleEventSource adapter and recplayEventSink event bean. This component has been configured to playback events.
The configuration source for this channel is:
<channel><name>eventStream</name><playback-parameters>
...</playback-parameters>...
</channel>
■ recplayEventSink: an event bean that acts as a sink for the events generated by the adapter.

Event Record and Playback Example
Oracle CEP Samples 2-117
■ playbackHttpPublisher: a publishing HTTP pub-sub adapter that listens to the recplayEventSink event bean and publishes to a channel called /playbackchannel of the Oracle CEP HTTP Pub-Sub server.
2.11.1 Running the Event Record/Playback ExampleThe recplay_domain domain contains a single application: the record and playback sample application. To run this application, you first start an instance of Oracle CEP in the domain, as described in the following procedure.
The procedure then shows you how to use Oracle CEP Visualizer to start the recording and playback of events at the simpleEventSource and eventStream components, respectively. Finally, the procedure shows you how to use Oracle CEP Visualizer to view the stream of events being published to a channel by the playbackHttpPublisher adapter.
To run the event record/playback example:1. Open a command window and change to the default server directory of the
recplay_domain domain directory, located in MIDDLEWARE_HOME\ocep_11.1\samples\domains\recplay_domain\defaultserver, where MIDDLEWARE_HOME refers to the Middleware directory you specified when you installed Oracle CEP, such as d:\Oracle\Middleware.
prompt> cd d:\Oracle\Middleware\ocep_11.1\samples\domains\recplay_domain\defaultserver
2. Set your development environment, as described in Section 2.5, "Setting Your Development Environment."
3. Start Oracle CEP by executing the appropriate script with the correct command line arguments:
a. On Windows:
* If you are using the JRockit JDK included in Oracle JRockit Real Time, enable the deterministic garbage collector by passing the -dgc parameter to the command:
prompt> startwlevs.cmd -dgc
* If you are not using the JRockit JDK included in Oracle JRockit Real Time:
prompt> startwlevs.cmd
b. On UNIX:
* If you are using the JRockit JDK included in Oracle JRockit Real Time, enable the deterministic garbage collector by passing the -dgc parameter to the command:
prompt> startwlevs.sh -dgc
* If you are not using the JRockit JDK included in Oracle JRockit Real Time:
prompt> startwlevs.sh
After server status messages scroll by, you should see the following message printed to the output:
SimpleEvent created at: 14:33:40.441

Event Record and Playback Example
2-118 Oracle Fusion Middleware Getting Started Guide for Oracle Complex Event Processing
This message indicates that the Oracle CEP server started correctly and that the simpleEventSource component is creating events.
4. Invoke the following URL in your browser:
http://host:port/wlevs
where host refers to the name of the computer on which Oracle CEP is running and port refers to the Jetty NetIO port configured for the server (default value 9002).
The Logon screen appears as Figure 2–79 shows.
Figure 2–79 Oracle CEP Visualizer Logon Screen
5. In the Logon screen, enter the User Id wlevs and Password wlevs, and click Log In.
The Oracle CEP Visualizer dashboard appears as Figure 2–80 shows.

Event Record and Playback Example
Oracle CEP Samples 2-119
Figure 2–80 Oracle CEP Visualizer Dashboard
For more information about the Oracle CEP Visualizer user interface, see "Understanding the Oracle CEP Visualizer User Interface" in the Oracle Fusion Middleware Visualizer User's Guide for Oracle Complex Event Processing.
6. In the left pane, select WLEventServerDomain > NonClusteredServer > Applications > recplay > Stages > simpleEventSource.
7. In the right pane, select the Record tab as shown in Figure 2–81.

Event Record and Playback Example
2-120 Oracle Fusion Middleware Getting Started Guide for Oracle Complex Event Processing
Figure 2–81 Event Record Tab
The DataSet Name field contains the value of the record-parameters child element dataset-name element from the simpleEventSource adapter application configuration file ORACLE-CEP-HOME\ocep_11.1\samples\domains\recplay_domain\defaultserver\applications\recplay\config.xml as Example 2–11 shows.
Example 2–11 recplay Application Configuration File config.xml: adapter Element
<adapter><name>simpleEventSource</name><record-parameters>
<dataset-name>recplay_sample</dataset-name><event-type-list>
<event-type>SimpleEvent</event-type></event-type-list><batch-size>1</batch-size><batch-time-out>10</batch-time-out>
</record-parameters></adapter>
8. At the bottom of the Record tab, click Start.
An Alert dialog appears as shown in Figure 2–82.

Event Record and Playback Example
Oracle CEP Samples 2-121
Figure 2–82 Start Recording Alert Dialog
9. Click OK.
The Current Status field reads Recording....
As soon as you click OK, events start to flow out of the simpleEventSource component and are stored in the configured database.
You can further configure when events are recorded using the Start Recording and Stop Recording fields.
10. In the left pane, select eventStream.
11. In the right pane, select the Playback tab as shown in Figure 2–83.
Figure 2–83 Event Playback Tab
12. At the bottom of the tab, click Start.
An Alert dialog appears as shown in Figure 2–84.

Event Record and Playback Example
2-122 Oracle Fusion Middleware Getting Started Guide for Oracle Complex Event Processing
Figure 2–84 Start Playback Alert Dialog
13. Click OK.
The Current Status field reads Playing....
As soon as you click OK, events that had been recorded by the simpleEventSource component are now played back to the simpleStream component.
You should see the following messages being printed to the command window from which you started Oracle CEP server to indicate that both original events and playback events are streaming through the EPN:
SimpleEvent created at: 14:33:11.501Played back: Original time=14:15:23.141 Playback time=14:33:11.657
You can further configure the playback parameters, such as the recorded time period for which you want playback events and the speed that they are played back, by updating the appropriate field and clicking Change Parameters. You must restart the playback after changing any playback parameters.
14. To view the events that the playbackHttpPublisher adapter is publishing to a channel, follow these steps:
a. In the top pane, select Viewstream.
The Viewstream window appears as shown in Figure 2–85.
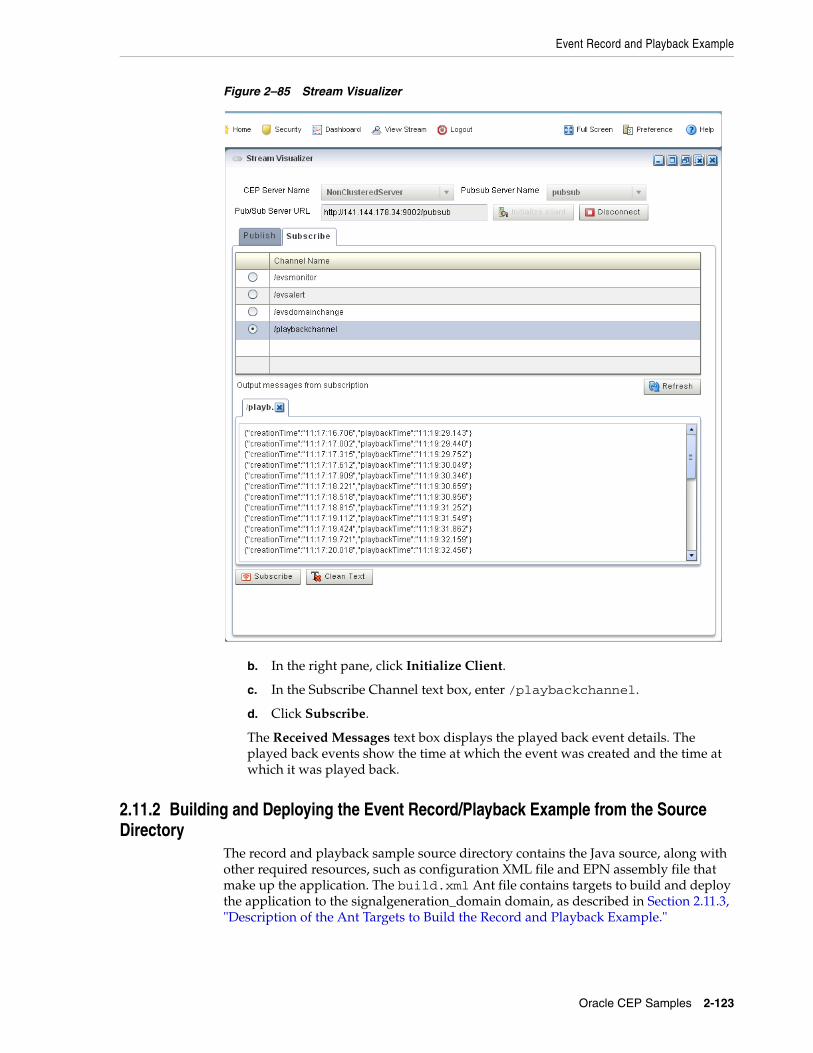
Event Record and Playback Example
Oracle CEP Samples 2-123
Figure 2–85 Stream Visualizer
b. In the right pane, click Initialize Client.
c. In the Subscribe Channel text box, enter /playbackchannel.
d. Click Subscribe.
The Received Messages text box displays the played back event details. The played back events show the time at which the event was created and the time at which it was played back.
2.11.2 Building and Deploying the Event Record/Playback Example from the Source Directory
The record and playback sample source directory contains the Java source, along with other required resources, such as configuration XML file and EPN assembly file that make up the application. The build.xml Ant file contains targets to build and deploy the application to the signalgeneration_domain domain, as described in Section 2.11.3, "Description of the Ant Targets to Build the Record and Playback Example."

Event Record and Playback Example
2-124 Oracle Fusion Middleware Getting Started Guide for Oracle Complex Event Processing
To build and deploy the event record/playback example from the source directory:1. If the record/playback Oracle CEP instance is not already running, follow the
procedure in Section 2.11.1, "Running the Event Record/Playback Example" to start the server. You must have a running server to successfully deploy the rebuilt application.
2. Open a new command window and change to the record/playback source directory, located in MIDDLEWARE_HOME\ocep_11.1\samples\source\applications\recplay, where MIDDLEWARE_HOME refers to the Middleware home directory you specified when you installed Oracle CEP, such as d:\Oracle\Middleware.
prompt> cd d:\Oracle\Middleware\ocep_11.1\samples\source\applications\recplay
3. Set your development environment, as described in Section 2.5, "Setting Your Development Environment."
4. Execute the all Ant target to compile and create the application JAR file:
prompt> ant all
5. Execute the deploy Ant target to deploy the application JAR file to the MIDDLEWARE_HOME\ocep_11.1\samples\domains\recplay_domain\defaultserver\applications\recplay directory:
prompt> ant -Dusername=wlevs -Dpassword=wlevs -Daction=update deploy
After an application redeploy message, you should see the following message printed to the output about every second:
SimpleEvent created at: 14:33:40.441
This message indicates that the record and playback example has been redeployed and is running correctly.
6. Follow the instructions in Section 2.11.1, "Running the Event Record/Playback Example," starting at step 4, to invoke Oracle CEP Visualizer and start recording and playing back events.
2.11.3 Description of the Ant Targets to Build the Record and Playback ExampleThe build.xml file, located in the top-level directory of the record/playback source, contains the following targets to build and deploy the application:
■ clean—This target removes the dist and output working directories under the current directory.
■ all—This target cleans, compiles, and jars up the application into a file called com.bea.wlevs.example.recplay_11.1.1.4_0.jar, and places the generated JAR file into a dist directory below the current directory.
■ deploy—This target deploys the JAR file to Oracle CEP using the Deployer utility.
For more information, see "Deployer Command-Line Reference" in the Oracle Fusion Middleware Administrator's Guide for Oracle Complex Event Processing.
Caution: This target overwrites the existing event record/playback application JAR file in the domain directory.

Event Record and Playback Example
Oracle CEP Samples 2-125
2.11.4 Implementation of the Record and Playback ExampleThe implementation of the signal generation example generally follows "Creating Oracle CEP Applications: Typical Steps" in the Oracle Fusion Middleware Developer's Guide for Oracle Complex Event Processing for Eclipse.
Refer to that section for a task-oriented procedure that describes the typical development process.
All the files of the example are located relative to the MIDDLEWARE_HOME\ocep_11.1\samples\source\applications\recplay directory, where MIDDLEWARE_HOME refers to the Middleware home directory you specified when you installed Oracle CEP, such as c:\Oracle\Middleware. Oracle recommends that you use this example directory setup in your own environment, although it is obviously not required.
The files used by the record and playback example include:
■ An EPN assembly file that describes each component in the application and how all the components are connected together as shown in Figure 2–78.
In the example, the file is called com.bea.wlevs.example.recplay-context.xml and is located in the META-INF/spring directory.
■ Java source file for the simpleEventSource adapter.
In the example, the file is called SimpleEventSource.java and is located in the src/com/bea/wlevs/adapter/example/recplay directory.
For a detailed description of this file and how to program the adapter Java files in general, see "Creating Custom Adapters and Event Beans" in the Oracle Fusion Middleware Developer's Guide for Oracle Complex Event Processing for Eclipse.
■ Java source file that describes the PlayedBackEvent and SimpleEvent event types. The SimpleEvent event type is the one originally generated by the adapter, but the PlayedBackEvent event type is used for the events that are played back after having been recorded. The PlayedBackEvents look almost exactly the same as SimpleEvent except they have an extra field, the time the event was recorded.
In the example, the two events are called SimpleEvent.java and PlayedBackEvent.java and are located in the src/com/bea/wlevs/event/example/recplay directory.
For a detailed description of this file, as well as general information about programming event types, see "Creating the Event Types" in the Oracle Fusion Middleware Developer's Guide for Oracle Complex Event Processing for Eclipse.
■ A Java file that implements the recplayEventSink event bean of the application, which is an event sink that receives both realtime events from the simpleEventSource adapter as well as playback events.
In the example, the file is called RecplayEventSink.java and is located in the src/com/bea/wlevs/example/recplay directory.
For a detailed description of this file and how to program the adapter Java files in general, see "Creating Custom Adapters and Event Beans" in the Oracle Fusion Middleware Developer's Guide for Oracle Complex Event Processing for Eclipse.
■ An XML file that configures the simpleEventSource adapter and eventStream channel components. The adapter includes a <record-parameters> element that specifies that the component will record

Event Record and Playback Example
2-126 Oracle Fusion Middleware Getting Started Guide for Oracle Complex Event Processing
events to the event store; similarly, the channel includes a <playback-parameters> element that specifies that it receives playback events.
In the example, the file is called config.xml and is located in the META-INF/wlevs directory.
■ A MANIFEST.MF file that describes the contents of the OSGi bundle that will be deployed to Oracle CEP.
In the example, the MANIFEST.MF file is located in the META-INF directory
For more information about creating this file, as well as a description of creating the OSGi bundle that you deploy to Oracle CEP, see "Overview of Application Assembly and Deployment" in the Oracle Fusion Middleware Developer's Guide for Oracle Complex Event Processing for Eclipse.
The record/playback example uses a build.xml Ant file to compile, assemble, and deploy the OSGi bundle; see Section 2.11.2, "Building and Deploying the Event Record/Playback Example from the Source Directory" for a description of this build.xml file if you also use Ant in your development environment.

3
Installing Oracle CEP 3-1
3Installing Oracle CEP
This chapter describes how to install and upgrade Oracle Complex Event Processing (Oracle CEP), including development tools for use with the Eclipse IDE.
■ Section 3.1, "Installation Overview"
■ Section 3.2, "Installing Oracle CEP in Graphical Mode"
■ Section 3.3, "Installing Oracle CEP in Console Mode"
■ Section 3.4, "Installing Oracle CEP in Silent Mode"
■ Section 3.5, "Installing an Oracle CEP Patch"
■ Section 3.7, "Installing the Oracle CEP IDE for Eclipse"
■ Section 3.6, "Post-Installation Steps"
■ Section 3.8, "Upgrading to Oracle CEP 11g Release 1 (11.1.1.6.3)"
3.1 Installation OverviewTo install Oracle CEP 11g Release 1 (11.1.1.6.3):
1. Download the Oracle CEP installer appropriate for your platform.
See Section 1.6, "Supported Platforms".
2. Choose the JVM you will use.
See Section 3.1.2, "Choosing Your JVM"
3. Decide if you are installing in a production environment or development environment.
See Section 3.1.3, "Default Oracle CEP Domain ocep_domain and Samples".
4. Familiarize yourself with Oracle Fusion Middleware directory structure and concepts.
See Section 3.1.4, "Oracle Fusion Middleware Directory Structure and Concepts".
5. Install Oracle CEP using the installer mode of your choice.
See Section 3.1.5, "Installation Mode".
6. Install Oracle CEP patches, if required.
See Section 3.5, "Installing an Oracle CEP Patch".
7. Perform post-installation tasks, if applicable.
See Section 3.6, "Post-Installation Steps".

Installation Overview
3-2 Oracle Fusion Middleware Getting Started Guide for Oracle Complex Event Processing
8. Decide whether or not you need to upgrade Oracle CEP and Oracle CEP applications to the current release.
See Section 3.8, "Upgrading to Oracle CEP 11g Release 1 (11.1.1.6.3)".
9. Install Apache Ant, a Java-based build tool.
See the Apache Ant Project at http://ant.apache.org/.
3.1.1 Before You Start the Installation ProgramBefore you start the installation program, review the following information:
■ If you are using the Generic Package installer or the Linux 64-bit installer to install Oracle CEP on a UNIX or Linux system, Oracle recommends that you set the umask to 027 on your system prior to installation. This ensures that WebLogic Server file permissions will be set properly during installation. Use the following command:
umask 027
You must enter this command in the same terminal window from which you plan to run the Oracle CEP installer.
3.1.2 Choosing Your JVMOracle CEP supports the following Java Virtual Machines (JVM):
■ Section 3.1.2.1, "Oracle JRockit Real Time"
■ Section 3.1.2.2, "Sun JVM"
■ Section 3.1.2.3, "Other Platform-Specific JVMs"
3.1.2.1 Oracle JRockit Real TimeBy default, Oracle CEP includes its own version of JRockit (in MIDDLEWARE_HOME/jrockit_JAVA-VERSION_RJROCKIT-VERSION), but it does not include the deterministic garbage collector.
Oracle CEP performs optimally when it can access certain features from Oracle JRockit Real Time, in particular the JRockit deterministic garbage collector.
If your application requires low latency, optionally install Oracle JRockit Real Time.
For more information on Oracle JRockit Real Time, see http://www.oracle.com/technology/products/jrockit/jrrt/index.html.
Note: The Oracle CEP installer for the Sun JVM does not include a version of JRockit.
Caution: Be sure you install the version of Oracle JRockit Real Time for Java version 5.0 or 6.0. Oracle JRockit Real Time for Java version 1.4.2 is not compatible with this version of Oracle CEP.

Installation Overview
Installing Oracle CEP 3-3
3.1.2.2 Sun JVMThe Sun JVM is the default JVM on Solaris SPARC and is included in the Solaris SPARC installer. If you want to use the Sun JVM (instead of JRockit) on platforms other than Solaris, download the JVM from the Oracle Java SE download site.
For more information, see:
■ Section 1.6, "Supported Platforms"
■ http://www.oracle.com/technetwork/java/javase/downloads/index.html
3.1.2.3 Other Platform-Specific JVMsFor other platforms (such as HP or IBM/AIX), ensure that you have the appropriate platform-specific JVM installed.
For more information, see:
■ Section 1.6, "Supported Platforms"
■ Section 3.6.1, "Configuring Oracle CEP for the IBM JDK"
3.1.3 Default Oracle CEP Domain ocep_domain and SamplesWhen you choose a Typical install, the installation does not include the default ocep_domain domain (with default passwords) and the product samples.
If you want to install the default ocep_domain and samples (recommended), choose the Custom option.
The Typical install is appropriate for a production environment while the Custom install is appropriate for a development environment.
3.1.4 Oracle Fusion Middleware Directory Structure and ConceptsWhen you install Oracle CEP, consider the following scenarios:
■ Section 3.1.4.1, "Oracle CEP-Specific Middleware Home"
■ Section 3.1.4.2, "Existing Oracle Fusion Middleware Home"
For more information, see "Oracle Fusion Middleware Directory Structure and Concepts" in the Oracle Fusion Middleware Installation Planning Guide.
3.1.4.1 Oracle CEP-Specific Middleware HomeIn this scenario, you install Oracle CEP in a stand-alone configuration, in its own Middleware Home directory as Figure 3–1 shows.

Installation Overview
3-4 Oracle Fusion Middleware Getting Started Guide for Oracle Complex Event Processing
Figure 3–1 Oracle CEP-Specific Middleware Home
Table 3–1 lists the various home directories applicable to Oracle CEP in this scenario.
3.1.4.2 Existing Oracle Fusion Middleware HomeIn this scenario, you install Oracle CEP into an existing Oracle Fusion Middleware home as Figure 3–2 shows.
In this scenario, you install Oracle CEP into its own Product Oracle Home but you create Oracle CEP domains in the existing ORACLE_FUSION_MIDDLEWARE_HOME/user_projects/domains directory as Figure 3–2 shows.
Table 3–1 Home Directories and Oracle CEP-Specific Middleware Home
Home Directory Type Home Directory
Middleware Home As selected by the user at Oracle CEP install time.
WebLogic Server Home N/A
Oracle Product Home1
1 Also known as simply the Oracle Home.
ocep_11.1
Oracle Common Home N/A
Domain MIDDLEWARE_HOME/user_projects/domains/ocep_domain

Installation Overview
Installing Oracle CEP 3-5
Figure 3–2 Oracle CEP in an Existing Oracle Fusion Middleware Home
In this example topology, there are two Oracle products installed in the same Middleware Home:
■ Oracle CEP
■ Oracle SOA Suite
Table 3–2 lists the various home directories applicable to Oracle CEP in this scenario.
3.1.5 Installation ModeYou use the Oracle CEP installer in the following modes:
■ Section 3.1.5.1, "Graphical Mode"
■ Section 3.1.5.2, "Console Mode"
■ Section 3.1.5.3, "Silent Mode"
3.1.5.1 Graphical ModeGraphical-mode installation is an interactive, GUI-based method for installing your software. It can be run on both Windows and UNIX systems. See Section 3.2, "Installing Oracle CEP in Graphical Mode."
Table 3–2 Home Directories and Existing Middleware Home
Home Directory Type Home Directory
Middleware Home As selected by the user at Oracle Fusion Middleware install time.
WebLogic Server Home As determined by Oracle Fusion Middleware installer.
Oracle Product Home1
1 Also known as simply the Oracle Home.
ocep_11.1
Oracle Common Home As determined by Oracle Fusion Middleware installer.
Domain MIDDLEWARE_HOME/user_projects/domains/ocep_domain

Installing Oracle CEP in Graphical Mode
3-6 Oracle Fusion Middleware Getting Started Guide for Oracle Complex Event Processing
3.1.5.2 Console ModeConsole-mode installation is an interactive, text-based method for installing your software from the command line, on either a UNIX system or a Windows system. See Section 3.3, "Installing Oracle CEP in Console Mode."
3.1.5.3 Silent ModeSilent-mode installation is a non-interactive method of installing your software that requires the use of an XML properties file for selecting installation options. You can run silent-mode installation in either of two ways: as part of a script or from the command line. Silent-mode installation is a way of setting installation configurations only once and then using those configurations to duplicate the installation on many machines. See Section 3.4, "Installing Oracle CEP in Silent Mode."
3.2 Installing Oracle CEP in Graphical ModeThis section describes how to install using the Oracle CEP installer in graphical mode.
For more information, see Section 3.1, "Installation Overview".
To install Oracle CEP in graphical mode:1. Log in to the Windows or UNIX computer on which you want to install Oracle
CEP.
Be sure you log in to the computer as the user that will be the main administrator of the Oracle CEP installation.
2. Download the product distribution file for the platform on which you want to install Oracle CEP.
3. Launch the installation program in graphical mode using the commands listed in the following table appropriate for your platform.
Caution: If you want to run graphical-mode installation, the console attached to the machine on which you are installing the software must support a Java-based GUI. All consoles for Windows systems support Java-based GUIs, but not all consoles for UNIX systems do. If you attempt to start the installation program in graphical mode on a system that cannot support a graphical display, the installation program automatically starts console-mode installation.
Platform Instructions
Windows Using Windows Explorer, double-click the appropriate installation program file from its download directory.

Installing Oracle CEP in Graphical Mode
Installing Oracle CEP 3-7
After the installation program has finished loading, you will see the standard Welcome window.
4. Click Next.
5. In the Choose Middleware Home Directory window, you can specify either an existing Oracle Middleware Home directory or create a new one:
a. To install into an existing Oracle Middleware Home directory:
– Select Use an Existing Middleware Home.
– Select an existing Oracle Middleware Home directory from the list on the right.
b. To install into a new Oracle Middleware Home directory:
– Select Create a New Middleware Home.
– Click the Browse button to browse your computer to select an existing directory or click Reset to reset the directory to the default, C:\Oracle\Middleware.
– Click Open.
The Oracle Middleware Home directory is the main installation directory for Oracle CEP, such as c:\oracle_cep. You can have one or many Oracle Middleware Home directories on your computer, whichever suits your development and production environments best.
For more information, see Section 3.1.4, "Oracle Fusion Middleware Directory Structure and Concepts".
6. Click Next.
7. In the Choose Install Type window, you can choose one of the following options:
a. To install all Oracle CEP components except the samples and use the Oracle JRockit JVM included with Oracle CEP:
* Select Typical.
* Click Next.
* Proceed to step 10.
The installer program checks to see if the Oracle Middleware Home directory contains the version of JRockit required by this release of Oracle CEP:
– If it finds the required JRockit installation, it does not install a new one.
Linux or Solaris
Open a command window, change to the download directory, and enter these commands:
prompt> chmod a+x filenameprompt> ./filename
In the preceding commands, filename is the name of the installation program specific to your platform (for more information, see http://www.oracle.com/technology/software/products/middleware/htdocs/111110_fmw.html.)
If you want to create an installation log, use the -log=full_path_to_log_file option; for example:
prompt> ./filename -log=C:\logs\server_install.log
Platform Instructions

Installing Oracle CEP in Graphical Mode
3-8 Oracle Fusion Middleware Getting Started Guide for Oracle Complex Event Processing
– If it does not find an appropriate JRockit installation, then the installer installs its own version in the Oracle Middleware Home directory.
b. To install all Oracle CEP components including the default ocep_domain domain (with default passwords) and the samples and select a previously installed Sun or platform-specific JVM (or use the Oracle JRockit JVM included with Oracle CEP):
* Select Custom.
* In the Choose Products and Components window, check the components you want to install, such as the product samples.
* Click Next.
The installer program allows you to choose the JDK to use and to decide whether or not to install the Oracle JRockit JVM included with Oracle CEP.
8. In the JDK Selection window, you can choose the JDK for the Oracle CEP server.
Use the Browse button to select the Sun or platform-specific JDK you installed previously.
If you do not want the installer to install the Oracle JRockit JVM included with Oracle CEP, uncheck this item.
9. Click Next.
10. In the Choose Product Installation Directories window, you can change the default name of the Oracle Product Home directory for Oracle CEP, ocep_11.1.
Although you can name this directory anything you want, Oracle recommends that you use the default name for clarity and standardization. For example, the documentation assumes that the Oracle Product Home directory is ocep_11.1.
For more information, see Section 3.1.4, "Oracle Fusion Middleware Directory Structure and Concepts".
11. Click Next.
12. If you are installing on Windows, and you logged in as a user with Administrator privileges, then you will see the Choose Shortcut Location window where you can choose where you want the Start Menu folder to appear. The following table describes the options available:
Note: By default, the complete installation does not include the default ocep_domain domain (with default passwords) and the product samples. If you want to install the samples (recommended), choose the Custom option.
If you want to use a Sun or platform-specific JVM, you must choose the Custom option.
If you select . . . The following occurs . . .
All Users Recommended. All users registered on the machine are provided with access to the installed software. Subsequently, if users without Administrator privileges use the Configuration Wizard from this installation to create domains, Start menu shortcuts to the domains are not created. In this case, users can manually create shortcuts in their local Start menu folders, if desired.

Installing Oracle CEP in Console Mode
Installing Oracle CEP 3-9
If you logged in as a user without Administrator privileges, the Start menu entries are created in your user's local Start menu folder.
13. Click Next.
14. The Installation Summary window shows the products and components you are about to install, along with the approximate size in MB. This window is for your information only; to change the components to be installed, use the Previous button to return to the appropriate window.
15. Click Next.
The installer program installs Oracle CEP. The Installation Complete window indicates that the product was installed successfully.
16. Click Done to exit the program.
17. Review the post-installation steps that Section 3.6, "Post-Installation Steps" describes.
3.3 Installing Oracle CEP in Console ModeThis section describes how to install using the Oracle CEP installer in console mode.
Console-mode installation is an interactive, text-based method for installing your software from the command line, on either a UNIX or Windows system.
When installing in console-mode, respond to the prompts in each section by entering the number associated with your choice or by pressing Enter to accept the default. To exit the installation process, enter exit (or x, for short) in response to any prompt. To review or change your selection, enter previous (or p, for short) at the prompt. To proceed to the following window, enter next (or n, for short).
For more information, see Section 3.1, "Installation Overview".
To install Oracle CEP in graphical mode:1. Log in to the Windows or Linux computer on which you want to install Oracle
CEP.
Be sure you log in to the computer as the user that will be the main administrator of the Oracle CEP installation.
2. Download the product distribution file for the platform on which you want to install Oracle CEP.
3. Launch the installation program in console mode using the commands listed in the following table appropriate for your platform.
Local user Other users registered on this machine will not have access to the Start menu entries for this installation.
Note: In the following procedure, Windows conventions (such as back-slashes in pathnames) are used, for example, C:\oracle_cep\ocep_11.1. When entering pathnames on a UNIX system, be sure to use UNIX conventions, instead. For example, use forward slashes in pathnames, such as /oracle_cep/ocep_11.1.
If you select . . . The following occurs . . .

Installing Oracle CEP in Console Mode
3-10 Oracle Fusion Middleware Getting Started Guide for Oracle Complex Event Processing
4. At the Welcome prompt, type next (or n for short) or press Enter to continue with the installation process.
5. In the Choose Middleware Home Directory window, you can specify either an existing Oracle Middleware Home directory or create a new one:
a. To install into an existing Oracle Middleware Home directory:
– Type the number of the existing Oracle Middleware Home directory.
b. To install into a new Oracle Middleware Home directory:
– Type 1 to create a new Oracle Middleware Home directory.
– The installation program guides you through the required steps to create the new Oracle Middleware Home.
Be sure to enter the full path of the Oracle Middleware Home directory, for example C:\oracle_cep2.
If you specify a directory that does not exist, the installation program cre-ates it for you.
The Oracle Middleware Home directory is the main installation directory for Oracle CEP, such as c:\oracle_cep. You can have one or many Oracle Middleware Home directories on your computer, whichever suits your development and production environments best.
For more information, see Section 3.1.4, "Oracle Fusion Middleware Directory Structure and Concepts".
Platform Instructions
Windows Open a command window, change to the download directory, and enter the following command:
prompt> filename -mode=console
In the preceding command, filename is the name of the installation program specific to your platform (for more information, see http://www.oracle.com/technology/software/products/middleware/htdocs/111110_fmw.html).
If you want to create an installation log, use the -log=full_path_to_log_file option; for example:
prompt> filename -mode=console -log=C:\logs\server_install.log
Linux Open a command window, change to the download directory, and enter these commands:
prompt> chmod a+x filenameprompt> ./filename -mode=console
In the preceding commands, filename is the name of the installation program specific to your platform (for more information, see http://www.oracle.com/technology/software/products/middleware/htdocs/111110_fmw.html).
If you want to create an installation log, use the -log=full_path_to_log_file option; for example:
prompt> ./filename -mode=console -log=C:\logs\server_install.log
Note: Do not terminate the path with a file separator character. That is, enter C:\mydir and not C:\mydir\.

Installing Oracle CEP in Console Mode
Installing Oracle CEP 3-11
6. Confirm your choice for Oracle Middleware Home directory and enter next (or n).
7. In the Choose Install Type window, you can choose one of the following options:
a. To install all Oracle CEP components except the samples and use the Oracle JRockit JVM included with Oracle CEP:
* Type 1 to choose a Typical install.
* Proceed to step 9.
The installer program checks to see if the Oracle Middleware Home directory contains the version of JRockit required by this release of Oracle CEP:
– If it finds the required JRockit installation, it does not install a new one.
– If it does not find an appropriate JRockit installation, then the installer installs its own version in the Oracle Middleware Home directory.
b. To install all Oracle CEP components including the default ocep_domain domain (with default passwords) and the samples and select a previously installed Sun or platform-specific JVM (or use the Oracle JRockit JVM included with Oracle CEP):
* Type 2 to choose a Custom install.
* In the Choose Components to Install window, enter the numbers in brackets to toggle the components you want to install, such as the samples. To toggle a selection in the list, types its number. When a check mark appears next to the option, the option is selected. To unselect the option, enter its number again to remove the check mark
* Enter next (or n) when you have chosen the components.
The installer program allows you to choose the JDK to use and to decide whether or not to install the Oracle JRockit JVM included with Oracle CEP.
8. In the JDK Selection window, you can choose the JDK for the Oracle CEP server:
■ To add a local JDK, select the Add Local JDK option (1).
The installation program guides you through the required steps to add a local JDK.
Be sure to enter the full path to the JDK directory, for example:
C:\Program Files\Java\jdk1.6.0_14
To add additional JDKs, select 1 again.
■ In the JDK Selection window, enter the numbers in brackets to toggle the JDKs you want. To toggle a selection in the list, types its number. When a check mark appears next to the option, the option is selected. To unselect the option, enter its number again to remove the check mark.
Note: By default, the complete installation does not include the default ocep_domain domain (with default passwords) and the product samples. If you want to install the samples (recommended), choose the Custom option.
If you want to use a Sun or platform-specific JVM, you must choose the Custom option.

Installing Oracle CEP in Silent Mode
3-12 Oracle Fusion Middleware Getting Started Guide for Oracle Complex Event Processing
If you do not want the installer to install the Oracle JRockit JVM included with Oracle CEP, uncheck this item.
■ Enter next (or n) when you have selected the local JDK.
9. In the Choose Product Installation Directories window, you can change the default name of the Oracle Product Home directory for Oracle CEP, ocep_11.1.
Although you can name this directory anything you want, Oracle recommends that you use the default name for clarity and standardization. For example, the documentation assumes that the Oracle Product Home directory is ocep_11.1.
For more information, see Section 3.1.4, "Oracle Fusion Middleware Directory Structure and Concepts".
Enter next (or n) when you are done.
10. If you are installing on Windows, and you logged in as a user with Administrator privileges, then you will see the Choose Shortcut Location window where you can choose where you want the Start Menu folder to appear. The following table describes the options available:
If you logged in as a user without Administrator privileges, the Start menu entries are created in your user's local Start menu folder.
Enter the appropriate number.
11. Enter next (or n) when you are done.
12. The Installation Summary window shows the products and components you are about to install, along with the approximate size in MB. This window is for your information only; to change the components to be installed, type Previous to return to the appropriate window.
13. Enter next (or n).
The installer program installs Oracle CEP. The Installation Complete window indicates that the product was installed successfully.
14. Type exit to exit the program.
15. Review the post-installation steps that Section 3.6, "Post-Installation Steps" describes.
3.4 Installing Oracle CEP in Silent ModeThis section describes how to install using the Oracle CEP installer in silent mode.
Silent-mode installation is a non-interactive method of installing your software that requires the use of an XML properties file for selecting installation options.
For more information, see Section 3.1, "Installation Overview".
If you select . . . The following occurs . . .
1 "All Users" Recommended. All users registered on the machine are provided with access to the installed software. Subsequently, if users without Administrator privileges use the Configuration Wizard from this installation to create domains, Start menu shortcuts to the domains are not created. In this case, users can manually create shortcuts in their local Start menu folders, if desired.
2 "Local user" Other users registered on this machine will not have access to the Start menu entries for this installation.

Installing Oracle CEP in Silent Mode
Installing Oracle CEP 3-13
To install Oracle CEP in silent mode:1. Log in to the Windows or UNIX computer on which you want to install Oracle
CEP.
Be sure you log in to the computer as the user that will be the main administrator of the Oracle CEP installation.
2. Download the product distribution file for the platform on which you want to install Oracle CEP.
3. Create a silent.xml file that defines the configuration settings normally entered by a user during an interactive installation process.
See Section 3.4.1, "Creating a silent.xml File for Silent-Mode Installation."
4. Launch the installation program in silent mode using the commands in the following table appropriate for your platform.
An Oracle Installer window is displayed, indicating that the files are being extracted. No other prompt or text is displayed.
The installation is complete when the Oracle Installer window disappears.
See Section 3.4.3, "Returning Exit Codes to the Command Window" for getting information about the success or failure of the silent installation.
Note: Incorrect entries in the silent.xml file can cause installation failures. To help you determine the cause of a failure, we recommend that you create a log file when you launch the installation program.
Platform Instructions
Windows Open a command window, change to the download directory, and enter the following command:
prompt> filename -mode=silent -silent_xml=path_to_xml_file
In the preceding command, filename is the name of the installation program specific to your platform (for more information, see http://www.oracle.com/technology/software/products/middleware/htdocs/111110_fmw.html) and path_to_xml_file is the full pathname of the silent.xml template file you created in the preceding step.
If you want to create an installation log, use the -log=full_path_to_log_file option; for example:
prompt> filename -mode=silent -silent_xml=path_to_xml_file -log=C:\logs\server_install.log
Linux or Solaris
Open a command window, change to the download directory, and enter these commands:
prompt> chmod a+x filenameprompt> ./filename -mode=silent -silent_xml=path_to_xml_file
In the preceding commands, filename is the name of the installation program specific to your platform (for more information, see http://www.oracle.com/technology/software/products/middleware/htdocs/111110_fmw.html) and path_to_xml_file is the full pathname of the silent.xml template file you created in the preceding step.
If you want to create an installation log, use the -log=full_path_to_log_file option; for example:
prompt> ./filename -mode=silent -silent_xml=path_to_xml_file -log=C:\logs\server_install.log
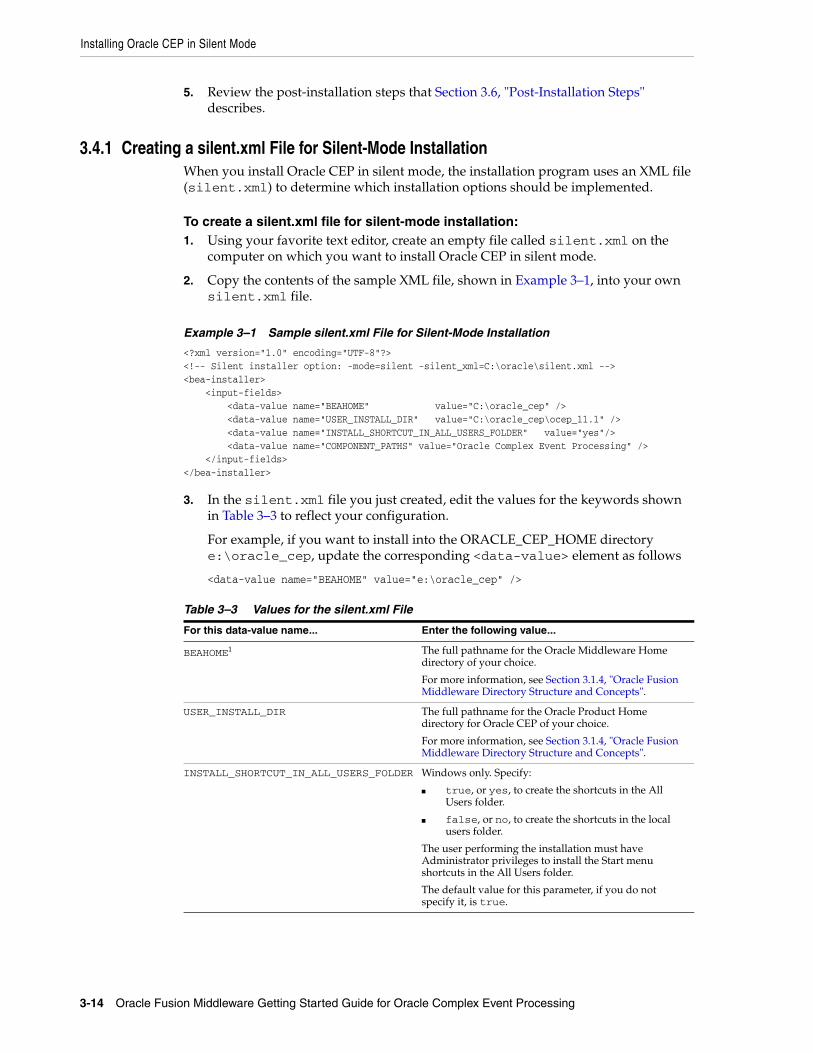
Installing Oracle CEP in Silent Mode
3-14 Oracle Fusion Middleware Getting Started Guide for Oracle Complex Event Processing
5. Review the post-installation steps that Section 3.6, "Post-Installation Steps" describes.
3.4.1 Creating a silent.xml File for Silent-Mode InstallationWhen you install Oracle CEP in silent mode, the installation program uses an XML file (silent.xml) to determine which installation options should be implemented.
To create a silent.xml file for silent-mode installation:1. Using your favorite text editor, create an empty file called silent.xml on the
computer on which you want to install Oracle CEP in silent mode.
2. Copy the contents of the sample XML file, shown in Example 3–1, into your own silent.xml file.
Example 3–1 Sample silent.xml File for Silent-Mode Installation
<?xml version="1.0" encoding="UTF-8"?><!-- Silent installer option: -mode=silent -silent_xml=C:\oracle\silent.xml --><bea-installer>
<input-fields><data-value name="BEAHOME" value="C:\oracle_cep" /><data-value name="USER_INSTALL_DIR" value="C:\oracle_cep\ocep_11.1" /><data-value name="INSTALL_SHORTCUT_IN_ALL_USERS_FOLDER" value="yes"/><data-value name="COMPONENT_PATHS" value="Oracle Complex Event Processing" />
</input-fields> </bea-installer>
3. In the silent.xml file you just created, edit the values for the keywords shown in Table 3–3 to reflect your configuration.
For example, if you want to install into the ORACLE_CEP_HOME directory e:\oracle_cep, update the corresponding <data-value> element as follows
<data-value name="BEAHOME" value="e:\oracle_cep" />
Table 3–3 Values for the silent.xml File
For this data-value name... Enter the following value...
BEAHOME1 The full pathname for the Oracle Middleware Home directory of your choice.
For more information, see Section 3.1.4, "Oracle Fusion Middleware Directory Structure and Concepts".
USER_INSTALL_DIR The full pathname for the Oracle Product Home directory for Oracle CEP of your choice.
For more information, see Section 3.1.4, "Oracle Fusion Middleware Directory Structure and Concepts".
INSTALL_SHORTCUT_IN_ALL_USERS_FOLDER Windows only. Specify:
■ true, or yes, to create the shortcuts in the All Users folder.
■ false, or no, to create the shortcuts in the local users folder.
The user performing the installation must have Administrator privileges to install the Start menu shortcuts in the All Users folder.
The default value for this parameter, if you do not specify it, is true.

Installing Oracle CEP in Silent Mode
Installing Oracle CEP 3-15
4. Save the file in the directory of your choice.
3.4.2 Guidelines for Component SelectionUse the following guidelines when you specify values for the COMPONENT_PATHS data-value name:
■ When you specify a product component to be installed, all subcomponents that are installed by default in a complete installation are also installed. For example, the following entry installs both Oracle CEP and the samples:
<data-value name="COMPONENT_PATHS" value="Oracle Complex Event Processing" />
■ To install multiple components or subcomponents, separate the components with a bar (|). Do not leave a space before or after the bar.
■ To specify subcomponents, you must specify a component/subcomponent combination for each entry. For example, to explicitly install Oracle CEP and the samples, enter the following line in the file:
<data-value name="COMPONENT_PATHS" value="Oracle Complex Event Processing/Event Server|Oracle Complex Event Processing/Event Server Samples" />
COMPONENT_PATHS Specify the components and subcomponents of Oracle CEP you want to install on your system. Use the following values:
■ Oracle Complex Event Processing
■ Oracle Complex Event Processing/Event Server
■ Oracle Complex Event Processing/Event Server Samples
For additional information about entering these values, see Section 3.4.2, "Guidelines for Component Selection."
If you do not include the COMPONENT_PATHS data-value name in the silent.xml file, the complete Oracle CEP product is installed.
LOCAL_JVMS Option to select supported JVM, which is already installed.
Note: The presence of the LOCAL_JVMS token negates any default selection and only sets the values assigned for the token as user selection. The value of the token can be a pipe (|) separated JavaHomes.
1 Do not terminate the pathname with a file separator. That is, enter this C:\mydirectory and not C:\mydirectory\.
Note: Silent install does not support the LOCAL_JVMS data-value. To define a local JVM, you must use graphical mode installation as Section 3.2, "Installing Oracle CEP in Graphical Mode" describes.
Note: Because this release of Oracle CEP includes only the server itself and samples, the preceding example is equivalent to the example in the first bullet.
Table 3–3 (Cont.) Values for the silent.xml File
For this data-value name... Enter the following value...
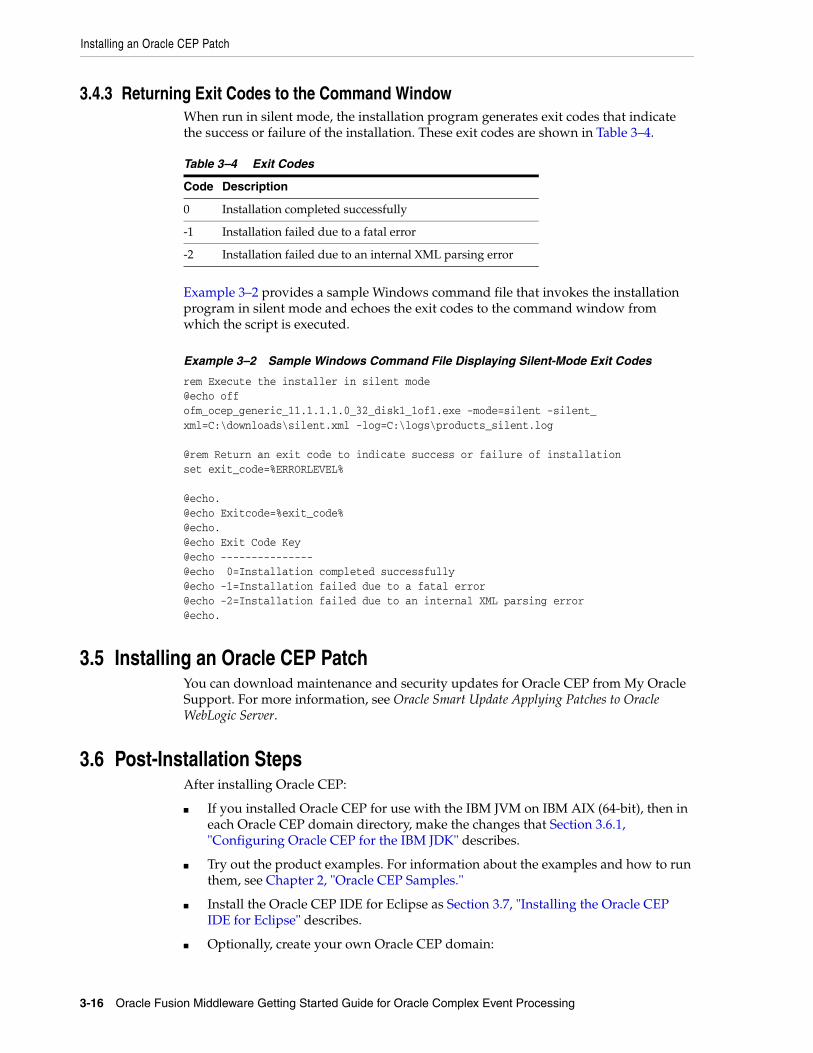
Installing an Oracle CEP Patch
3-16 Oracle Fusion Middleware Getting Started Guide for Oracle Complex Event Processing
3.4.3 Returning Exit Codes to the Command WindowWhen run in silent mode, the installation program generates exit codes that indicate the success or failure of the installation. These exit codes are shown in Table 3–4.
Example 3–2 provides a sample Windows command file that invokes the installation program in silent mode and echoes the exit codes to the command window from which the script is executed.
Example 3–2 Sample Windows Command File Displaying Silent-Mode Exit Codes
rem Execute the installer in silent mode@echo offofm_ocep_generic_11.1.1.1.0_32_disk1_1of1.exe -mode=silent -silent_xml=C:\downloads\silent.xml -log=C:\logs\products_silent.log
@rem Return an exit code to indicate success or failure of installationset exit_code=%ERRORLEVEL%
@echo.@echo Exitcode=%exit_code%@echo.@echo Exit Code Key@echo ---------------@echo 0=Installation completed successfully@echo -1=Installation failed due to a fatal error@echo -2=Installation failed due to an internal XML parsing error@echo.
3.5 Installing an Oracle CEP PatchYou can download maintenance and security updates for Oracle CEP from My Oracle Support. For more information, see Oracle Smart Update Applying Patches to Oracle WebLogic Server.
3.6 Post-Installation StepsAfter installing Oracle CEP:
■ If you installed Oracle CEP for use with the IBM JVM on IBM AIX (64-bit), then in each Oracle CEP domain directory, make the changes that Section 3.6.1, "Configuring Oracle CEP for the IBM JDK" describes.
■ Try out the product examples. For information about the examples and how to run them, see Chapter 2, "Oracle CEP Samples."
■ Install the Oracle CEP IDE for Eclipse as Section 3.7, "Installing the Oracle CEP IDE for Eclipse" describes.
■ Optionally, create your own Oracle CEP domain:
Table 3–4 Exit Codes
Code Description
0 Installation completed successfully
-1 Installation failed due to a fatal error
-2 Installation failed due to an internal XML parsing error

Installing the Oracle CEP IDE for Eclipse
Installing Oracle CEP 3-17
See:
■ "Creating an Oracle CEP Standalone-Server Domain" in the Oracle Fusion Middleware Administrator's Guide for Oracle Complex Event Processing
■ "Creating an Oracle CEP Multi-Server Domain" in the Oracle Fusion Middleware Administrator's Guide for Oracle Complex Event Processing
■ Create an Oracle CEP application and deploy it to your domain.
For a description of the programming model, details about the various components that make up an application, and how they all fit together, see "Overview of Creating Oracle CEP Applications" in the Oracle Fusion Middleware Developer's Guide for Oracle Complex Event Processing for Eclipse.
3.6.1 Configuring Oracle CEP for the IBM JDKIf you installed Oracle CEP for use with the IBM JDK, depending on your operating system and processor architecture, you must make changes to the IBM AIX network options and the setDomainEnv script in each Oracle CEP domain directory. This section describes:
■ Section 3.6.1.1, "How to Configure Oracle CEP for the IBM JVM on IBM AIX (64-bit)"
3.6.1.1 How to Configure Oracle CEP for the IBM JVM on IBM AIX (64-bit)If you installed Oracle CEP for use with the IBM JDK on IBM AIX (64-bit), you must make changes to the IBM AIX network options and the setDomainEnv script in each Oracle CEP domain directory.
To configure Oracle CEP for the IBM JVM on IBM AIX (64-bit):1. Execute the following commands (using super user privileges or sudo) to modify
the AIX network options:
no -o rfc1323=1no -o sb_max=4194304
2. Go to the domain directory.
For example, MIDDLEWARE_HOME/user_projects/domains/ocep_domain/defaultserver
3. Edit the setDomainEnv.sh script and add the following line:
export IBM_JAVA_OPTIONS="-Djava.net.preferIPv4Stack=true -Djava.net.preferIPv6Addresses=false"
3.7 Installing the Oracle CEP IDE for EclipseOracle CEP IDE for Eclipse is a set of plugins for the Eclipse IDE designed to help develop, deploy, and debug applications for Oracle CEP.
For more information, see:
Note: If you installed Oracle CEP using the default option, you must create your own Oracle CEP domain. For more information, see Section 3.1.3, "Default Oracle CEP Domain ocep_domain and Samples".

Upgrading to Oracle CEP 11g Release 1 (11.1.1.6.3)
3-18 Oracle Fusion Middleware Getting Started Guide for Oracle Complex Event Processing
■ "Installing the Latest Oracle CEP IDE for Eclipse" in the Oracle Fusion Middleware Developer's Guide for Oracle Complex Event Processing for Eclipse
■ "Installing the Oracle CEP IDE for Eclipse Distributed With Oracle CEP" in the Oracle Fusion Middleware Developer's Guide for Oracle Complex Event Processing for Eclipse
3.8 Upgrading to Oracle CEP 11g Release 1 (11.1.1.6.3)Upgrading to Oracle CEP 11g Release 1 (11.1.1.6.3) is a two-step process: first you must upgrade your applications and then you must upgrade the domain to which the applications are deployed.
Table 3–5 lists the steps you must take for each supported upgrade path:
For more information, see Section 3.8.5, "Backward Compatibility Issues".
3.8.1 Upgrading a WebLogic Event Server 2.0 Domain to Oracle CEP 10.3This section describes the steps you must take to upgrade a WebLogic Event Server 2.0 domain so that it runs correctly in Oracle CEP 10.3. For clarity, it is assumed that the existing WebLogic Event Server 2.0 domain is located in the /bea/user_projects/domains/mydomain20 directory.
To upgrade a WebLogic Event Server 2.0 domain to Oracle CEP 10.3:1. Using the Configuration Wizard, create a temporary Oracle CEP 10.3 domain.
Later steps in this procedure require you to use or refer to files in a new Oracle CEP 10.3 domain, and it is best to use a new domain. You can later delete this domain if you want.
For the purposes of this procedure, it is assumed that the new Oracle CEP 10.3 domain is called mydomain30, it contains a single server called defaultserver, and the server files are located in the /oracle_cep/user_projects/domains/mydomain30/defaultserver directory.
See "Creating an Oracle CEP Standalone-Server Domain" in the Oracle Fusion Middleware Administrator's Guide for Oracle Complex Event Processing.
2. If the WebLogic Event Server 2.0 server is currently running, stop it.
Table 3–5 Upgrade Paths
From Release To Release 10.3 To Release 11gR1 (11.1.1)
2.0 1. Section 3.8.1, "Upgrading a WebLogic Event Server 2.0 Domain to Oracle CEP 10.3"
2. Section 3.8.3, "Upgrading a WebLogic Event Server 2.0 Application to Run on Oracle CEP 10.3"
1. Section 3.8.1, "Upgrading a WebLogic Event Server 2.0 Domain to Oracle CEP 10.3"
2. Section 3.8.2, "Upgrading an Oracle CEP 10.3 Domain to Oracle CEP 11g Release 1 (11.1.1.6.3)"
3. Section 3.8.3, "Upgrading a WebLogic Event Server 2.0 Application to Run on Oracle CEP 10.3"
4. Section 3.8.4, "Upgrading an Oracle CEP 10.3 Application to Run on Oracle CEP 11g Release 1 (11.1.1.6.3)"
10.3 Not Applicable. 1. Section 3.8.2, "Upgrading an Oracle CEP 10.3 Domain to Oracle CEP 11g Release 1 (11.1.1.6.3)"
2. Section 3.8.4, "Upgrading an Oracle CEP 10.3 Application to Run on Oracle CEP 11g Release 1 (11.1.1.6.3)"

Upgrading to Oracle CEP 11g Release 1 (11.1.1.6.3)
Installing Oracle CEP 3-19
3. Make a backup copy of your WebLogic Event Server 2.0 domain in case you need to revert back.
4. Replace the following two files in the WebLogic Event Server 2.0 domain with the equivalent files from the Oracle CEP 10.3 domain.
■ lib/XACMLAuthorizerInit.ldift
■ lib/XACMLRoleMapperInit.ldift
The WebLogic Event Server 2.0 files are located relative to the domain directory (/bea/user_projects/domains/mydomain20 in our example) and the Oracle CEP 10.3 files are located relative to the server directory under the domain directory (/oracle_cep/user_projects/domains/mydomain30/defaultserver in our example).
5. Using your favorite text editor, open the atnstore.txt file in the WebLogic Event Server 2.0 domain, located in the config sub-directory of the main domain directory, and add the new Oracle 10.3 groups:
group: wlevsDeployersdescription:group: wlevsApplicationAdminsdescription:group: wlevsBusinessUsersdescription:group: wlevsOperatorsdescription:
6. Remove the following files and directories (if they exist) in the WebLogic Event Server 2.0 domain:
■ FileBasedDefaultCredentialMappermy-realmInit.initialized
■ FileBasedXACMLAuthorizermy-realmInit.initialized
■ FileBasedXACMLRoleMappermy-realmInit.initialized
■ rm
■ cm
■ atz
7. Update the startwlevs.cmd (Windows) or startwlevs.sh (Unix) command scripts in the WebLogic Event Server 2.0 domain to point to the new Oracle 10.3 binaries.
8. Update the stopwlevs.cmd (Windows) or stopwlevs.sh (Unix) command scripts in the WebLogic Event Server 2.0 domain to point to the new Oracle 10.3 binaries.
9. Start the server in the 2.0 domain using the Oracle 10.3 binaries.
"Starting and Stopping an Oracle CEP Server in a Standalone-Server Domain" in the Oracle Fusion Middleware Administrator's Guide for Oracle Complex Event Processing.
10. This upgrade procedure might have changed the security configuration of your 2.0 domain, especially if you created new users and assigned them to groups. If this is the case, use Visualizer to reconfigure the security.
See:

Upgrading to Oracle CEP 11g Release 1 (11.1.1.6.3)
3-20 Oracle Fusion Middleware Getting Started Guide for Oracle Complex Event Processing
■ "Security Tasks" in the Oracle Fusion Middleware Visualizer User's Guide for Oracle Complex Event Processing
■ "Configuring Security for Oracle CEP" in the Oracle Fusion Middleware Administrator's Guide for Oracle Complex Event Processing
3.8.2 Upgrading an Oracle CEP 10.3 Domain to Oracle CEP 11g Release 1 (11.1.1.6.3)This section describes the steps you must take to upgrade an Oracle CEP 10.3 domain so that it runs correctly in Oracle CEP 11g Release 1 (11.1.1). For clarity, it is assumed that the existing Oracle CEP 10.3 domain is located in the /bea/user_projects/domains/mydomain103 directory.
To upgrade an Oracle CEP 10.3 domain to Oracle CEP release 11g Release 1 (11.1.1.6.3):1. Using the Configuration Wizard, create a temporary Oracle CEP 11g Release 1
(11.1.1.6.3) domain. Later steps in this procedure require you to use or refer to files in a new Oracle CEP 11g Release 1 (11.1.1.6.3) domain, and it is best to use a new domain. You can later delete this domain if you want.
For the purposes of this procedure, it is assumed that the new Oracle CEP 11g Release 1 (11.1.1) domain is called mydomain11, it contains a single server called defaultserver, and the server files are located in the /oracle_cep/user_projects/domains/mydomain11/defaultserver directory.
See "Creating an Oracle CEP Standalone-Server Domain" in the Oracle Fusion Middleware Administrator's Guide for Oracle Complex Event Processing.
2. If the WebLogic Event Server 10.3 server is currently running, stop it.
3. Make a backup copy of your WebLogic Event Server 10.3 domain in case you need to revert back.
4. Replace the following two files in the WebLogic Event Server 10.3 domain with the equivalent files from the Oracle CEP 11g Release 1 (11.1.1) domain.
■ lib/XACMLAuthorizerInit.ldift
■ lib/XACMLRoleMapperInit.ldift
The WebLogic Event Server 10.3 files are located relative to the domain directory (/bea/user_projects/domains/mydomain30 in our example) and the Oracle CEP 11g Release 1 (11.1.1) files are located relative to the server directory under the domain directory (/oracle_cep/user_projects/domains/mydomain11/defaultserver in our example).
5. Using your favorite text editor, open the atnstore.txt file in the WebLogic Event Server 10.3 domain, located in the config sub-directory of the main domain directory, and add the new Oracle 11g Release 1 (11.1.1.6.3) groups:
group: wlevsDeployersdescription:group: wlevsApplicationAdminsdescription:group: wlevsBusinessUsersdescription:group: wlevsOperatorsdescription:
6. Remove the following files and directories (if they exist) in the WebLogic Event Server 10.3 domain:

Upgrading to Oracle CEP 11g Release 1 (11.1.1.6.3)
Installing Oracle CEP 3-21
■ FileBasedDefaultCredentialMappermy-realmInit.initialized
■ FileBasedXACMLAuthorizermy-realmInit.initialized
■ FileBasedXACMLRoleMappermy-realmInit.initialized
■ rm
■ cm
■ atz
7. Update the startwlevs.cmd (Windows) or startwlevs.sh (Unix) command scripts in the WebLogic Event Server 10.3 domain to point to the new Oracle 11g Release 1 (11.1.1.6.3) binaries.
8. Update the stopwlevs.cmd (Windows) or stopwlevs.sh (Unix) command scripts in the WebLogic Event Server 10.3 domain to point to the new Oracle 11g Release 1 (11.1.1.6.3) binaries.
9. Start the server in the 10.3 domain using the Oracle 11g Release 1 (11.1.1.6.3) binaries.
"Starting and Stopping an Oracle CEP Server in a Standalone-Server Domain" in the Oracle Fusion Middleware Administrator's Guide for Oracle Complex Event Processing.
10. This upgrade procedure might have changed the security configuration of your 10.3 domain, especially if you created new users and assigned them to groups. If this is the case, use Visualizer to reconfigure the security.
See:
■ "Security Tasks" in the Oracle Fusion Middleware Visualizer User's Guide for Oracle Complex Event Processing
■ "Configuring Security for Oracle CEP" in the Oracle Fusion Middleware Administrator's Guide for Oracle Complex Event Processing
3.8.3 Upgrading a WebLogic Event Server 2.0 Application to Run on Oracle CEP 10.3This section describes the steps you must take to upgrade an application that you developed in Version 2.0 of WebLogic Event Server so that it runs on Oracle CEP 10.3.
To upgrade a WebLogic Event Server 2.0 application to run on Oracle CEP 10.3:1. Update the MANIFEST.MF file to import new versions of Spring framework and
Oracle CEP packages, as well as new required packages. In particular:
■ Update the version of all imported Spring framework packages to 2.5.5. For example:
Import-Package:org.springframework.aop.framework;version="2.5.5",org.springframework.aop;version="2.5.5",...
■ Update the version of any imported Oracle CEP packages to 3.0.0.0. For example:
Import-Package:com.bea.wlevs.ede;version="3.0.0.0",com.bea.wlevs.ede.api;version="3.0.0.0",...

Upgrading to Oracle CEP 11g Release 1 (11.1.1.6.3)
3-22 Oracle Fusion Middleware Getting Started Guide for Oracle Complex Event Processing
■ Add the following packages to the Import-Package header if they are not already included:
Import-Package:com.bea.wlevs.management.configuration.spi;version="3.0.0.0",com.bea.wlevs.management.spi;version="3.0.0.0",com.bea.wlevs.monitor;version="3.0.0.0",com.bea.wlevs.spi;version="3.0.0.0",com.bea.wlevs.spring.support;version="3.0.0.0",commonj.work;version="1.4.0.0",org.springframework.osgi.extensions.annotation;version="1.1.0",com.bea.wlevs.ede.spi;version="3.0.0.0",com.bea.wlevs.configuration.internal;version="3.0.0.0",...
2. If you use Spring or Spring Dynamic Modules for OSGI (Spring DM) features in your application, it is possible that the declaration of the features in the Spring application context file has changed. If this is the case, you must update these declarations in the EPN assembly file of your Oracle CEP application.
Refer to the appropriate 2.5 XSD Schemas for any changes:
■ Spring: http://www.springframework.org/schema/beans/spring-beans.xsd
■ Spring DM: http://www.springframework.org/schema/osgi/spring-osgi.xsd
The following bullets list some of the typical changes you might have to make; the following list is not complete:
■ When specifying a property to the <osgi:service-property> tag, use the <entry> tag with the key and value attributes, rather than the old <prop> tag.
For example, change the following 2.0 tag from:
<osgi:service-properties><prop key="type">SocketAdapterType</prop>
</osgi:service-properties>
To:
<osgi:service-properties><entry key="type" value="SocketAdapterType"/>
</osgi:service-properties>
■ The value or ref attribute of an instance-property must always be set to an explicit value; it can no longer be an empty string to indicate an implicit use of a default value.
For example, change the following 2.0 tag from:
<wlevs:adapter id="fileAdapter" provider="FileAdapterType"><!-- file: empty value uses default<wlevs:instance-property name="file" value="" />
Note: This change is a result of the upgrade of the Spring framework (from 2.0 to 2.5) that occurred between WebLogic Event Server 2.0 and Oracle CEP 10.3, not as a direct result of the Oracle CEP upgrade

Upgrading to Oracle CEP 11g Release 1 (11.1.1.6.3)
Installing Oracle CEP 3-23
<wlevs:listener ref="algoTradingProcessor"/></wlevs:adapter>
To:
<wlevs:adapter id="fileAdapter" provider="FileAdapterType"><wlevs:instance-property name="file" value="test.file" /><wlevs:listener ref="algoTradingProcessor"/>
</wlevs:adapter>
3. Recompile the Java code of your 2.0 adapter and business POJO implementations using your IDE. If you get compile-time errors, check the latest 10.3 Javadoc (http://download.oracle.com/docs/cd/E13157_01/wlevs/docs30/javadocs/wlevs/index.html) that describe the new Oracle CEP APIs and make the appropriate source code changes.
4. If your 2.0 application has an adapter that uses the loadgen provider as Example 3–3 shows, then you must register a StockTick event type in your EPN assembly file as Example 3–4 shows.
Example 3–3 Adapter Using loadgen Provider
<wlevs:adapter id="fxMarketAmer" provider="loadgen"><wlevs:instance-property name="port" value="9011"/>
</wlevs:adapter>
Example 3–4 Registering a StockTick Event
<wlevs:event-type-repository><wlevs:event-type type-name="StockTick">
<wlevs:class>com.bea.wlevs.adapter.defaultprovider.StockTickEvent</wlevs:class>
</wlevs:event-type></wlevs:event-type-repository>
5. After you have made the preceding changes, reassemble the application and deploy it to Oracle CEP 10.3.
See "Assembling and Deploying Oracle CEP Applications" in the Oracle Fusion Middleware Developer's Guide for Oracle Complex Event Processing for Eclipse.
If, during deployment, you get an exception that indicates that a package is invisible, add this package to the Import-Package header of the MANIFEST.MF file, then reassemble and redeploy the application. Keep adding packages in this manner until the application deploys successfully.
3.8.4 Upgrading an Oracle CEP 10.3 Application to Run on Oracle CEP 11g Release 1 (11.1.1.6.3)
This section describes the steps you must take to upgrade an application that you developed in Oracle CEP 10.3 so that it runs on Oracle CEP 11g Release 1 (11.1.1.6.3).
To upgrade an Oracle CEP 10.3 application to run on Oracle CEP release 1111g Release 1 (11.1.1.6.3):1. Update the MANIFEST.MF file to import new versions of Spring framework and
Oracle CEP packages, as well as new required packages.
Upgrading to Oracle CEP 11g Release 1 (11.1.1.6.3)
3-24 Oracle Fusion Middleware Getting Started Guide for Oracle Complex Event Processing
Note that alternatively you can specify unversioned packages which will not require updating and also that you can specify larger versions in order to avoid minor version updates, that is, use "2.5" instead of "2.5.6".
In particular:
■ Update the version of all imported Spring framework packages to 2.5.6. For example:
Import-Package:org.springframework.aop.framework;version="2.5.6",org.springframework.aop;version="2.5.6",...
■ Update the version of all imported Spring-DM framework packages to 1.2.0. For example:
Import-Package:org.springframework.osgi.context="1.2.0",...
■ Update the version of any imported Oracle CEP packages to 11.1.1.4_0. For example:
Import-Package:com.bea.wlevs.ede;version="11.1.1.4_0",com.bea.wlevs.ede.api;version="11.1.1.4_0",...
■ Add the following packages to the Import-Package header if they are not already included (see the sample source for a complete list of headers that may be required):
Import-Package:com.bea.wlevs.management.spi;version="11.1.1.4_0",com.bea.wlevs.spring.support;version="11.1.1.4_0",com.bea.wlevs.ede.spi;version="11.1.1.4_0",org.springframework.osgi.extensions.annotation;version="1.2.0",...
2. If you use Spring or Spring Dynamic Modules for OSGI (Spring DM) features in your application, it is possible that the declaration of the features in the Spring application context file has changed. If this is the case, you must update these declarations in the EPN assembly file of your Oracle CEP application.
Refer to the appropriate 2.5 XSD Schemas for any changes:
■ Spring: http://www.springframework.org/schema/beans/spring-beans.xsd
■ Spring DM: http://www.springframework.org/schema/osgi/spring-osgi.xsd
In particular convert any Spring-DM declared adapter factories to use the <wlevs:factory/> tag instead. For example, if your 10.3 EPN assembly file
Note: This change is a result of the upgrade of the Spring-DM framework (from 1.1 to 1.2) that occurred between Oracle CEP 10.3 and Oracle CEP 11.1, not as a direct result of the Oracle CEP upgrade.

Upgrading to Oracle CEP 11g Release 1 (11.1.1.6.3)
Installing Oracle CEP 3-25
contains the service that Example 3–5 shows, then you must replace this service with the wlevs:factory that Example 3–6 shows.
Example 3–5 Spring-DM Declared Adapter Factory
<osgi:service interface="com.bea.wlevs.ede.api.AdapterFactory"><osgi:service-properties>
<entry key="type" value="SocketAdapterType"/></osgi:service-properties><bean class="com.bea.wlevs.example.algotrading.adapter.SocketAdapterFactory"
/></osgi:service>
Example 3–6 wlevs:factory
<wlevs:factory provider-name="SocketAdapterType" class="com.bea.wlevs.example.algotrading.adapter.SocketAdapterFactory"/>
3. Recompile the Java code of your 10.3 adapter and business POJO implementations using your IDE. If you get compile-time errors, check the latest 11g Release 1 (11.1.1) Javadoc (see Oracle Fusion Middleware Java API Reference for Oracle Complex Event Processing) that describe the new Oracle CEP APIs and make the appropriate source code changes.
Consider changing deprecated Java API and Oracle CEP schema:
■ "Deprecated API and Schemas" in the Oracle Fusion Middleware Release Notes
■ "Adapter Changes" in the Oracle Fusion Middleware Release Notes
4. After you have made the preceding changes, reassemble the application and deploy it to Oracle CEP 11g Release 1 (11.1.1).
See "Assembling and Deploying Oracle CEP Applications" in the Oracle Fusion Middleware Developer's Guide for Oracle Complex Event Processing for Eclipse.
If, during deployment, you get an exception that indicates that a package is invisible, add this package to the Import-Package header of the MANIFEST.MF file, then reassemble and redeploy the application. Keep adding packages in this manner until the application deploys successfully.
3.8.5 Backward Compatibility IssuesThe following are non-backward compatible changes in the management framework:
■ The following classes have been deprecated and removed from all operation signatures:
– com.bea.wlevs.management.ManagementException
– com.bea.wlevs.management.ManagementRuntimeException
– com.bea.wlevs.management.MbeanOperationsException
■ The following methods have been removed from all MBeans: isRegistered(), preRegister(), postRegister(), getMBeanInfo().
■ The monitoring-related methods have been removed from StageMBean and replaced by com.bea.wlevs.monitor.management.MonitorRuntimeMBean.
■ The com.bea.wlevs.management.boot.BootMBean has been removed.
Upgrading to Oracle CEP 11g Release 1 (11.1.1.6.3)
3-26 Oracle Fusion Middleware Getting Started Guide for Oracle Complex Event Processing
■ The com.bea.wlevs.management.configuration.ConfigSessionBean has been removed.
■ The ObjectName for the AppDeploymentMBean has been changed to include the DomainMBean as a parent.
■ The class com.bea.wlevs.server.management.mbean.ServerRuntimeMBean has been changed to com.bea.wlevs.management.runtime.ServerRuntimeMBean.
■ Two additional modules have been added: com.bea.wlevs.management.api_* and com.bea.wlevs.management.spi_*, in addition to the existing com.bea.wlevs.management_*.
■ The service com.bea.wlevs.spi.ManagementService has been moved from bundle com.bea.wlevs.spi_* to com.bea.wlevs.management.spi_*.

Glossary-1
Glossary
Adapter
An element of the EPN that interfaces directly to an inbound event source. Adapters understand the inbound protocol, and are responsible for converting the event data into a normalized form that can be queried by a POJO. Adapters forward the normalized event data into a Stream.
Aggregate Function
Aggregate functions return a single aggregate result based on group of tuples, rather than on a single tuple.
See also Function and Single-Row Function.
CEP
Complex Event Processing.
Channel
A channel represents the physical conduit through which events flow between other types of components, such as between an Adapter and a Processor, and between a Processor and an Event Bean. A channel can model a Stream or Relation.
Condition
An Oracle CQL condition specifies a combination of one or more expressions and logical (Boolean) operators and returns a value of TRUE, FALSE, or UNKNOWN.
Constant value
A fixed data value. Synonymous with Literal.
CQL
Oracle Continuous Query Language. Supersedes EPL.
Data Feed
A synonym for Event Source.
Destination
An Oracle CQL destination identifies a consumer of query results such as the Enterprise Link BAM Adapter, JMS queue or topic, or file.

Deterministic Garbage Collection
Glossary-2
Deterministic Garbage Collection
Short, predictable pause times for memory heap garbage collection, which is the process of clearing dead objects from the heap, thus releasing that space for new objects.
DStream
A relation-to-stream operator that represents deleted tuples.
EDA
Event-Driven Architecture.
EPL
Oracle Event Processing Language. Superseded by CQL.
EPN
Oracle Event Processing Network. An EPN is the arbitrary interconnection of Adapter, Stream, POJO, and business logic POJOs used by Oracle CEP to process events.
Event Bean
A POJO to that contains the business logic executed when a notable event is detected. An event bean is an Event Sink.
Event Rule
A query, expressed in CQL or EPL, executed by a POJO to filter and aggregate events.
Event Sink
A component that consumes events, such as a Processor.
See also Event Source.
Event Source
A component that provides events, such as a sensor, wire service, or stock ticker.
See also Data Feed and Event Sink.
Expressions
An Oracle CQL expression is a combination of one or more values, operators, and Oracle CQL functions that evaluates to a value. An expression generally assumes the datatype of its components.
See also Condition and Function.
Format model
A character literal that describes the format of datetime or numeric data stored in a character string.
Function
Oracle CQL functions are similar to operators in that they manipulate data items and return a result. Functions differ from operators in the format of their arguments. This format enables them to operate on zero, one, two, or more arguments.
See also Condition, Aggregate Function, and Single-Row Function.

Partitioned window
Glossary-3
Incremental Processing
A user-defined aggregate function design pattern that improves scalability and performance by ensuring that the cost of (re)computation on arrival of new events will be proportional to the number of new events as opposed to the total number of events seen thus far.
If your user-defined aggregate function supports incremental processing, you specify the supports incremental processing clause in the register function statement to instruct the Oracle CEP Service Engine to supply only the new event data as opposed to performing a rescan over already processed event data.
IStream
A relation-to-stream operator that represents inserted tuples.
Join
A query that combines rows from two or more streams, views, or relations.
Latency
An expression of how much time it takes for data to get from one designated point to another.
Literal
A fixed data value. Synonymous with Constant value.
Monotonic
A sequence of values that are consistently increasing and never decreasing or consistently decreasing and never increasing. The sequence may contain multiple consecutive occurrences of the same value.
Now window
A special case of the time-based sliding window on a stream S that takes a time-interval T as a parameter and is specified by: S [Range T]. A Now window is defined as: S [Now] (short for S [Range 0]). When T = 0, the relation at time t consists of tuples obtained from elements of S with timestamp t.
See also Sliding window.
Operators
Oracle CQL operators manipulate data items and return a result. Syntactically, an operator appears before or after an operand or between two operands.
OSGi
A dynamic module system for Java that provides a service-oriented, component-based environment and standardized software lifecycle management. Oracle CEP applications are packaged and deployed as OSGi bundles. For more information, see http://www.osgi.org/.
Partitioned window
A partitioned sliding window on a stream S takes a positive integer number of tuples N and a subset {A1,... Ak} of the stream's attributes as parameters and is specified by: S[Partition By A1 ... Ak Rows N] or, optionally, S[Partition By A1 ... Ak Rows N Range T].
See also Sliding window.
POJO
Glossary-4
POJO
A Plain Old Java Object. A Java class that is not required to implement a third-party interface or extend a third-party class. In Oracle CEP, you can express your business logic using POJOs.
Processor
An element of the EPN that consumes normalized event data from a stream, processes it using queries (expressed in CQL or EPL), and may generate new events to an output stream.
Query
A query is an operation that retrieves data from one or more streams or views. In this reference, a top-level SELECT statement is called a query.
Real-time
A level of computer responsiveness that a user senses as sufficiently immediate or that enables the computer to keep up with some external process (for example, to present visualizations of the weather as it constantly changes).
Relation
A relation is time-varying bag of tuples. Here "time" refers to an instant in the time domain. At every instant of time, a relation is a bounded set. It can also be represented as a sequence of timestamped tuples that includes insertions, deletions, and updates to capture the changing state of the relation. The updates are required to arrive at the system in the order of increasing timestamps. Like streams, relations have a fixed schema to which all tuples conform.
RStream
A relation-to-stream operator that maintains the entire current state of its input relation and outputs all of the tuples as insertions at each time step.
Single-Row Function
Single-row functions return a single result row for every row of a queried stream or view.
See also Function and Aggregate Function.
Sliding window
A stream-to-relation operator based on the window specification derived from SQL99.
See also: Now window, Partitioned window, Unbounded window, tuple-based, and Unbounded window, time-based.
Source
An Oracle CQL source identifies a producer of data that a Oracle CQL query operates on such as the Enterprise Link BAM Adapter, JMS queue or topic, or file.
Spring Framework
A light-weight, open source application framework for Java. Oracle CEP server uses the Spring Framework to host Oracle CEP applications. For more information, see http://www.springframework.org/.
View
Glossary-5
Stream
A stream is a sequence of timestamped tuples. There could be more than one tuple with the same timestamp. The tuples of an input stream are required to arrive at the system in the order of increasing timestamps. A stream has an associated schema consisting of a set of named attributes, and all tuples of the stream conform to the schema.
A stream is a bag (or multi-set) of tuple-timestamp pairs, which can be represented as a sequence of timestamped tuple "insertions".
In Oracle CEP, a stream is modeled as a channel component.
See also Tuple and Channel.
Throughput
An Oracle CQL source identifies a producer of data that a Oracle CQL query operates on such as the Enterprise Link BAM Adapter, JMS queue or topic, or file.
Tuple
The term "tuple of a stream" denotes the ordered list of data (excluding timestamp data) portion of a stream element (the s of <s,t>). For example, a stock ticker data stream might appear like this where each stream element is made up of <timestamp value>, <stock symbol>, and <stock price>:
...<timestampN> NVDA,4<timestampN+1> ORCL,62<timestampN+2> PCAR,38<timestampN+3> SPOT,53<timestampN+4> PDCO,44<timestampN+5> PTEN,50...
In the stream element <timestampN+1> ORCL,62, the tuple is ORCL,62.
See also Stream.
Unbounded window, time-based
A special case of the time-based sliding window on a stream S that takes a time-interval T as a parameter and is specified by: S [Range T]. An Unbounded window is defined as: S [Range Unbounded] (short for S [Range infinity]). When T = infinity, the relation at time t consists of tuples obtained from all elements of S up to t.
See also Sliding window.
Unbounded window, tuple-based
A special case of the tuple-based sliding window on a stream S that takes a number of tuples N as a parameter and is specified by: S [Rows N]. An Unbounded window is defined as: S [Rows Unbounded] (short for S [Rows infinity] and equivalent to S [Range Unbounded]). When T = infinity, the relation at time t consists of tuples obtained from all elements of S up to t.
See also Sliding window.
View
An Oracle CQL view represents an alternative selection on a stream or relation. In Oracle CQL, you use a view instead of a subquery.

View
Glossary-6

Index-1
Index
Symbols*
maximal pattern quantifier (0 or more times), 2-27
*?minimal pattern quantifier (0 or more times), 2-27
+maximal pattern quantifier (1 or more
times), 2-27+?
minimal pattern quantifier (1 or more times), 2-27?
maximal pattern quantifier (0 or 1 time), 2-27??
minimal pattern quantifier (0 or 1 time), 2-27
Aadapters, 1-3Ant
CQL sample targets, 2-18Event Record and Playback sample targets, 2-124FX sample targets, 2-96HelloWorld sample targets, 2-9installing, 3-1Oracle Spatial sample targets, 2-87Signal Generation sample targets, 2-109
Bbeans, 1-3
Cchannels, 1-3CQL sample
about, 2-14Ant targets, 2-18building, 2-17deploying, 2-17running, 2-15
Ddata cartridge samples
Oracle Spatial
about, 2-81Ant targets, 2-87building, 2-86component configuration file, 2-91deploying, 2-86EPN assembly file, 2-88implementation, 2-87running, 2-83
development environment, 2-4
EEDA
decoupled components, 1-2event sinks, 1-2event sources, 1-2event streams, 1-2example, 1-1rule driven, 1-2
environment, 2-4EPN
about, 1-3FX sample assembly file, 2-98HelloWorld sample assembly file, 2-11Oracle Spatial sample assembly file, 2-88Signal Generation sample assembly file, 2-110topologies, 1-3
event beans, 1-3Event Processing Network. See EPNEvent Record and Playback sample
about, 2-116Ant targets, 2-124building, 2-123deploying, 2-123implementation, 2-125running, 2-117
event sinks, 1-2event sources, 1-2event streams, 1-2Event-Driven Architecture. See EDA
FFX sample
about, 2-92Ant targets, 2-96

Index-2
building, 2-95component configuration file, 2-101deploying, 2-95EPN assembly file, 2-98implementation, 2-96running, 2-93
HHelloWorld sample
about, 2-7Ant targets, 2-9building, 2-8component configuration file, 2-13deploying, 2-8EPN assembly file, 2-11implementation, 2-10running, 2-8
Iinstallation
Ant, 3-1default domain, 3-3file name, 1-6installation programs, 1-6installers, 1-6JRockit, 3-1JVM, 3-2middleware home, 3-3mode
console, 3-6graphical, 3-5silent, 3-6
Oracle CEP IDE for Eclipse, 3-17Oracle Fusion Middleware directory, 3-3patches, 3-16post-installation tasks, 3-16pre-installation tasks, 3-1samples, 2-3, 3-3
JJRockit
installing, 3-1JVM
about, 3-2HP, 3-3IBM/AIX, 3-3Oracle JRockit Real Time, 3-2Sun JVM, 3-3
MMATCH_RECOGNIZE clause, 2-34MEASURES clause, 2-34middleware home, 3-3
OOracle CEP IDE for Eclipse
about, 3-17installing, 3-17
Oracle CEP Visualizer, 2-3Oracle Spatial sample
about, 2-81Ant targets, 2-87building, 2-86component configuration file, 2-91deploying, 2-86EPN assembly file, 2-88implementation, 2-87running, 2-83
Ppatches, 3-16platforms, 1-6processors, 1-3
Ssamples
about, 2-1Ant targets
CQL, 2-18Event Record and Playback, 2-124FX, 2-96HelloWorld, 2-9Oracle Spatial, 2-87Signal Generation, 2-109
buildingCQL, 2-17Event Record and Playback, 2-123FX, 2-95HelloWorld, 2-8Oracle Spatial, 2-86Signal Generation, 2-108
component configuration fileFX, 2-101HelloWorld, 2-13Oracle Spatial, 2-91Signal Generation, 2-113
deployingCQL, 2-17Event Record and Playback, 2-123FX, 2-95HelloWorld, 2-8Oracle Spatial, 2-86Signal Generation, 2-108
development environment, 2-4EPN assembly file
FX, 2-98HelloWorld, 2-11Oracle Spatial, 2-88Signal Generation, 2-110
implementationEvent Record and Playback, 2-125FX, 2-96HelloWorld, 2-10Oracle Spatial, 2-87

Index-3
Signal Generation, 2-109installing, 2-3Oracle CEP Visualizer, 2-3performance, 2-4ready-to-run, 2-2running
CQL, 2-15Event Record and Playback, 2-117FX, 2-93HelloWorld, 2-8Oracle Spatial, 2-83Signal Generation, 2-106
source, 2-2Signal Generation sample
about, 2-105Ant targets, 2-109building, 2-108component configuration file, 2-113deploying, 2-108EPN assembly file, 2-110implementation, 2-109running, 2-106
supported platforms, 1-6
Ttools
Oracle CEP IDE for Eclipseabout, 1-6installing, 3-17
Oracle CEP Visualizerabout, 1-8
topologies, 1-3
Uuser code, 1-3

Index-4