Oracle CPQ Connector for Salesforce Upgrade and Data ...
112
Oracle CPQ Connector for Salesforce Upgrade and Data Migration Guide
Transcript of Oracle CPQ Connector for Salesforce Upgrade and Data ...

Oracle CPQ Connector for Salesforce
Upgrade and Data Migration Guide

TABLE OF CONTENTS TABLE OF CONTENTS .............................................................................................................................................. 2
REVISION HISTORY ................................................................................................................................................. 4
OVERVIEW ............................................................................................................................................................. 5
PREREQUISITES ...................................................................................................................................................... 6
UPDATE THE CPQ CLOUD INTEGRATION SETTINGS ................................................................................................ 7
CHECK THE REFERENCE APPLICATION VERSION .............................................................................................................. 7 Locate the CPQ Cloud Version Info ............................................................................................................................8 Locate the Reference Application Information ..........................................................................................................9
CREATE THE QUOTE INTEGRATIONS .......................................................................................................................... 11 Create the Lightning Quote Upsert Integration ....................................................................................................... 11 Create the Quote Import Integration ...................................................................................................................... 14
CREATE THE LIGHTNING SYNC ACTION ...................................................................................................................... 16 UPDATE THE EXISTING COMMERCE INTEGRATIONS ....................................................................................................... 19
Replace the Opportunity Import Integration XSLs ................................................................................................... 20 Replace the User Import Integration XSLs ............................................................................................................... 22 Replace the Quote Upsert Integration XSLs ............................................................................................................. 24 Replace the Line Item Upsert Integration XSLs ........................................................................................................ 26 Replace the Quote Upsert Complete Integration XSLs ............................................................................................. 28 Modify the Existing Integration XSLs ....................................................................................................................... 30
Change the Namespace of Packaged Objects ......................................................................................................... 30 Change the API Name of Packaged Fields............................................................................................................... 31
UPDATE THE EXISTING ACCOUNT INTEGRATIONS ......................................................................................................... 33 Create the Account Import Integration XSLs ............................................................................................................ 33 Create the Contact Import Integration XSLs ............................................................................................................ 36
UPDATE THE EXISTING PARTS INTEGRATIONS .............................................................................................................. 38 Modify Existing Integration XSLs ............................................................................................................................. 38 Update the Import/Export Parts Integration XSLs ................................................................................................... 39 Update the Import/Export Parts Extended Descripions Integration XSLs ................................................................. 42 Update the Import/Export Price Book Entry Integration XSLs .................................................................................. 45
MIGRATE SALESFORCE DATA TO THE NEW PACKAGE OBJECTS ............................................................................ 48
PRODUCT MIGRATION ........................................................................................................................................... 49 Export Part Numbers .............................................................................................................................................. 50 Update Part Numbers ............................................................................................................................................. 52
QUOTE MIGRATION .............................................................................................................................................. 57 Prepare the Oracle Quote Object ............................................................................................................................ 59 Export the Legacy Quotes ....................................................................................................................................... 60 Prepare the Quote Upload File ................................................................................................................................ 63 Insert the Legacy Quotes Into the New Object ........................................................................................................ 65
QUOTE LINE ITEM MIGRATION ................................................................................................................................ 70 Prepare the Oracle Quote Line Item Object ............................................................................................................. 71 Export the New Oracle Quotes ................................................................................................................................ 72 Export the Quote Products ...................................................................................................................................... 75 Prepare the Quote Line Item Upload File................................................................................................................. 77 Insert the Legacy Quote Products Into the New Object............................................................................................ 79 Mark New Quotes as Active .................................................................................................................................... 84

3
USER MIGRATION ................................................................................................................................................ 94 Export the Legacy Users .......................................................................................................................................... 96 Prepare the User Upload File .................................................................................................................................. 99 Insert the Legacy Users Into the New Object ......................................................................................................... 106

4
REVISION HISTORY
This document will continue to evolve as existing sections change and new information is added. All updates appear in the following table:
Date What's Changed Notes July 2019 Initial Document Creation.

5
OVERVIEW
This document is written for the administrator of your organization who has the access and permissions to change your Salesforce Org and your CPQ Cloud Site. The purpose of this document is to supplement the Oracle CPQ Connector for Salesforce Installation and Setup Guide by giving additional detail to customers upgrading from older installations for the Salesforce Commerce Integration (managed package version 7 and earlier) to the new Oracle CPQ Connector for Salesforce (managed package version 8 and later). The Oracle CPQ Connector for Salesforce is also sometimes referred to as the Salesforce Connector or Salesforce Lightning Adapter.
New customers integrating Salesforce and CPQ Cloud for the first time typically are provisioned with the latest (version 5) Salesforce Reference Application (Ref App). If version 5 of the Salesforce Ref App is already preloaded on your site, you do not need to perform the Upgrade procedures in this document.
If you never have installed managed package version 7 or earlier into your Salesforce environment, you do not need to perform the Migration procedures in this document.
This guide focuses on the following:
• Updating your CPQ Cloud site to use the latest integration settings and transforms
• Migrating your existing CPQ data from the old Salesforce objects to the new ones
GIVE US FEEDBACK
We welcome your comments and suggestions to improve the content. Please send us your feedback at [email protected].

6
PREREQUISITES
This document assumes you have already read and completed the steps outlined in the Oracle CPQ Connector for Salesforce Installation and Setup Guide, there are a few additional pre-requisites to be aware of which are listed in the table below.
Prerequisite
Description/Additional Information
Integration Files Retrieve the ZIP folder containing the latest integration files from the Integrate CPQ Cloud with Salesforce article in My Oracle Support.
Salesforce Data Loader Download and install the Data Loader. This tool is used to export, insert and delate Salesforce records in bulk.
Other 3rd party Salesforce Data Loaders or ETL tools can be used but the steps provided below may not apply.
Microsoft Excel or similar Some steps below will require the preparation and transformation of data.
Microsoft Excel was used as the reference for these procedures, however you may choose to use another tool to perform these steps.
My Oracle Support Account You need an active My Oracle Support account to complete these steps and receive assistance. Refer to My Oracle Support.
IMPORTANT: The Migration portion of this guide was authored for and certified against the latest version of the Oracle CPQ Connector for Salesforce, Version 8.2. The steps will be similar for Version 8 (Summer 18) and Version 8.1 but they may not be identical.

UPDATE THE CPQ CLOUD INTEGRATION SETTINGS
Oracle CPQ Cloud typically provisions new CPQ Cloud sites with one of a few different Reference Applications. The Reference Application (referred to as Ref App) is a set of pre-configured metadata including attributes, actions, integrations, icons, and themes which are applied to each customer’s CPQ site to accelerate their initial implementation.
New customers intending to integrate to Salesforce are provisioned with the Salesforce Reference Application. However there are some situations where a CPQ site may not have the latest Salesforce Ref App applied. For example, if the site was provisioned with an older Salesforce Ref App version and needs to be updated, or if the site is being integrated to Salesforce after moving from another CRM solution.
This section describes the steps to update your CPQ site’s integration settings to align with the latest version of the Salesforce Ref App which supports the Salesforce Connector.
IMPORTANT: Ensure that you have the latest Integration XSL files. Contact My Oracle Support if you need assistance.
CHECK THE REFERENCE APPLICATION VERSION
Before you begin it is important to check the version of the Reference Application applied to your CPQ site. This section provides the steps to retrieve the Ref App version and the Catalog of Ref App elements. This provides a more detailed view of the initial state of your site.
This section provides procedures for the following:
• Locate the CPQ Cloud Version Information • Locate the Reference Application Information

8
LOCATE THE CPQ CLOUD VERSION INFO
To locate the CPQ Cloud version information, complete the following steps:
1. Log in to CPQ Cloud.
2. Navigate to the Admin Home page.
3. Click CPQ Version Info. The Releases page displays.
4. Note the Version.
5. Click Back.
9
LOCATE THE REFERENCE APPLICATION INFORMATION
When a CPQ Cloud site is provisioned, the Ref App is pre-loaded into the environment. In addition, files are added to the File Manager which indicate the version of the Ref App that is provisioned and describes the change history for the Ref App. These files are used to identify if your site requires updating to connect to the latest Managed package.
To locate the current Reference Application Version Info and Read Me files, complete the following steps:
1. Log in to CPQ Cloud.
2. Navigate to the Admin Home page.
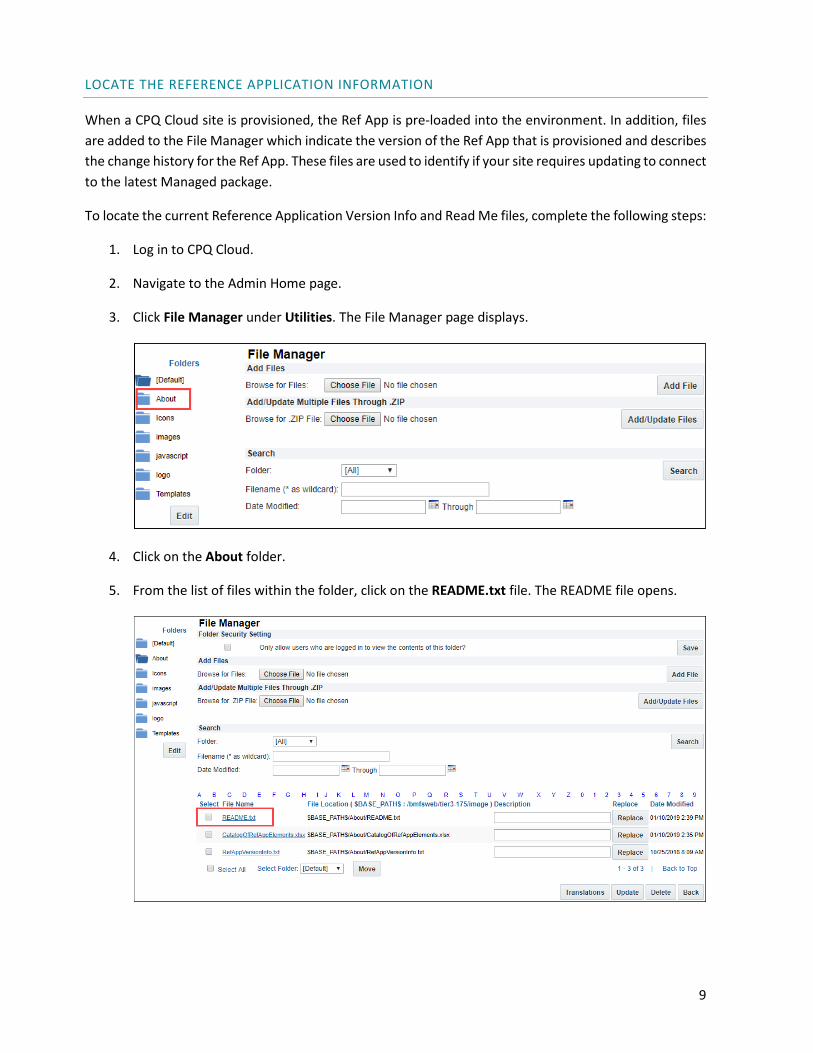
3. Click File Manager under Utilities. The File Manager page displays.
4. Click on the About folder.
5. From the list of files within the folder, click on the README.txt file. The README file opens.

10
6. Review the Oracle CPQ Cloud Reference Application version information to check if you have Salesforce Ref App Version 5.0 or later. If you have version 5.0 or later, you do not need to complete the remaining steps in the Update the CPQ Cloud Integration Settings section.
7. (Optional) Return to the About folder and select the RefAppVersionInfo.txt file. The RefAppVersionInfo file opens. Review the change log and Ref App version information.
8. (Optional) Return to the About folder and select the CatalogOfRefAppElements.xlsx file. The CatalogOfRefAppElements file opens. Review the Microsoft Excel file which itemizes all of the elements contains in the latest Ref App.

11
CREATE THE QUOTE INTEGRATIONS
The Oracle CPQ Connector requires two additional Integrations that were not present in version 4 or earlier of the Ref App. These must be created manually before Quotes can be created from Salesforce. This section provides steps to create these two required Integrations.
The two new integrations are:
• Lightning Quote Upsert Integration • Quote Import Integration
CREATE THE LIGHTNING QUOTE UPSERT INTEGRATION
The Lightning Quote Upsert Integration is a new Commerce Integration of type Export. It is associated with the Lightning Sync action and pushes the unique Transaction ID back to Salesforce immediately after the Transaction is created. It populates the External ID field on the Oracle Quote object.
To create the new Integration on each Commerce Process you are connecting to Salesforce, complete the following steps:
1. Navigate to the Admin Home page.
2. Click on Process Definition under Commerce and Documents. The Processes page displays.
3. Select your process and click Integrations from the Navigation drop down.
4. Click List. The Integrations page displays.
5. Click Add. The Select Integration Types page displays.
12
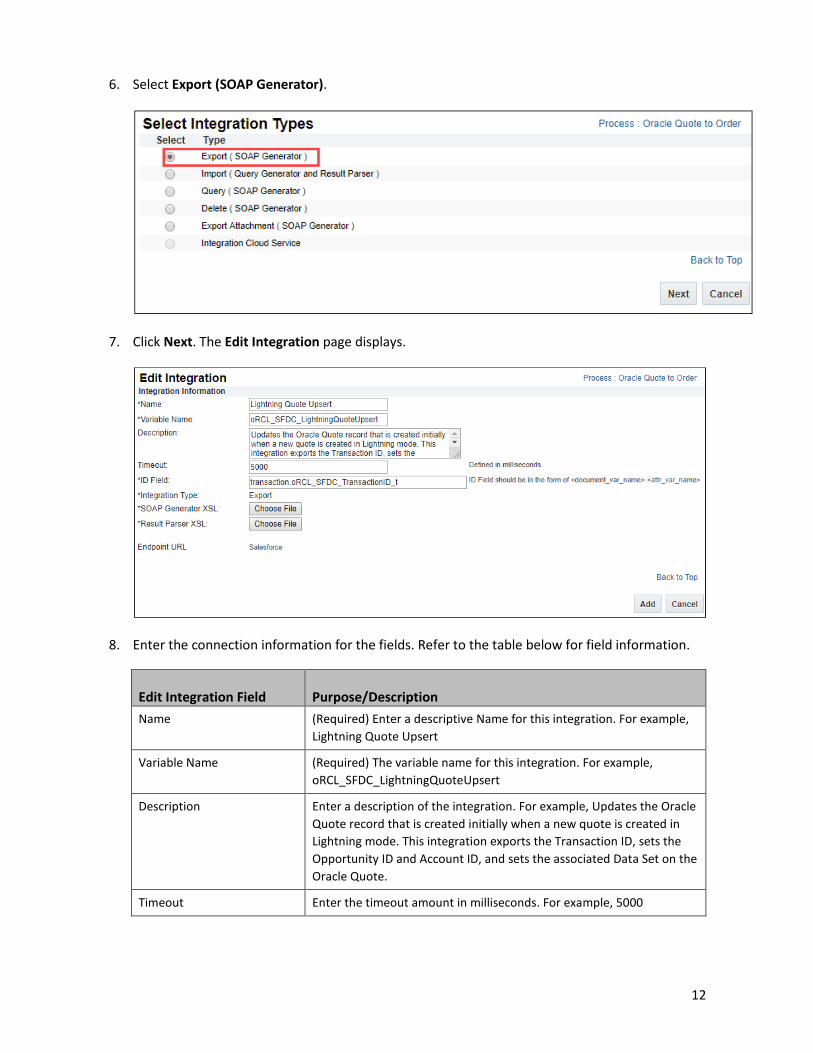
6. Select Export (SOAP Generator).
7. Click Next. The Edit Integration page displays.
8. Enter the connection information for the fields. Refer to the table below for field information.
Edit Integration Field
Purpose/Description
Name (Required) Enter a descriptive Name for this integration. For example, Lightning Quote Upsert
Variable Name (Required) The variable name for this integration. For example, oRCL_SFDC_LightningQuoteUpsert
Description Enter a description of the integration. For example, Updates the Oracle Quote record that is created initially when a new quote is created in Lightning mode. This integration exports the Transaction ID, sets the Opportunity ID and Account ID, and sets the associated Data Set on the Oracle Quote.
Timeout Enter the timeout amount in milliseconds. For example, 5000

13
Edit Integration Field
Purpose/Description
ID Field (Required) Enter the ID field for this integration in the form of <document_var_name>.<attr_var_name>.
The ID field must precisely match the previously defined name.
For example, transaction.oRCL_SFDC_TransactionID_t
9. Click Choose File next to SOAP Generator XSL. Browse to the location of the file and select the file. The file name is oRCL_SFDC_LightningQuoteUpsert_SOAPGenerator.xsl and click Open.
10. Click Choose File next to Result Parser XSL. Browse to the location of the file and select the file. The file name is oRCL_SFDC_LightningQuoteUpsert_ResultParser.xsl and click Open.
11. Click Add.
IMPORTANT: If you experience issues with the Integration files, enter a sample Transaction ID then click Preview SOAP XML to view the XML result.

14
CREATE THE QUOTE IMPORT INTEGRATION
The Quote Import Integration is a new Commerce Integration of type Import. It is used to retrieve the latest information from the Oracle Quote when a Transaction is opened. Particularly important when an Oracle Quote has been copied or moved underneath a new parent account or opportunity.
To create the new Integration on each Commerce Process you are connecting to Salesforce, complete the following steps:
1. Navigate to the Admin Home page.
2. Click on Process Definition under Commerce and Documents. The Processes page displays.
3. Select your process and click Integrations from the Navigation drop down.
4. Click List. The Integrations page displays.
5. Click Add. The Select Integration Types page displays.
6. Select Export (SOAP Generator).

15
7. Click Next. The Edit Integration page displays.
8. Enter the connection information for the fields. Refer to the table below for field information.
Edit Integration Field
Purpose/Description
Name (Required) Enter a descriptive Name for this integration. For example, Quote Import
Variable Name (Required) The variable name for this integration. For example, oRCL_SFDC_QuoteImport
Description Enter a description of the integration. For example, Imports the Oracle Quote details and populates the corresponding attribute values on the Transaction.
Timeout Enter the timeout amount in milliseconds. For example, 5000
ID Field (Required) Enter the ID field for this integration in the form of <document_var_name>.<attr_var_name>.
The ID field must precisely match the previously defined name.
For example, transaction.opportunityID_t
9. Click Choose File next to SOAP Generator XSL. Browse to the location of the file and select the file. The file name is oRCL_SFDC_QuoteImport_SOAPGenerator.xsl and click Open.
10. Click Choose File next to Result Parser XSL. Browse to the location of the file and select the file. The file name is oRCL_SFDC_QuoteImport_ResultParser.xsl and click Open.
11. Click Add.
IMPORTANT: If you experience issues with the Integration files, enter a sample Transaction ID then click Preview SOAP XML to view the XML result.

16
CREATE THE LIGHTNING SYNC ACTION
When configuring the CPQ Site Settings in the CPQ Connector users are prompted to supply a Lightning Sync Action. This Lightning Sync Action is not present in version 4 or earlier of the Ref App. This must be created manually before Quotes can be created from Salesforce. This section provides steps to create this action.
The Lightning Sync Action is a special action that is only to be used by the Lightning UI. It should not be included on the Transaction Layout. When new Quotes are created using the new Lightning UI, the Lightning Sync action runs as a nested action inside of the New Transaction action. It uses the Lightning Quote Upsert Integration to write the External ID value for the Transaction back to the Oracle Quote record in Salesforce immediately after the Transaction is created.
To create and configure the Lightning Sync action, complete the following steps:
1. Navigate to the Admin Home page.
2. Click on Process Definition under Commerce and Documents. The Processes page displays.
3. Select your process and click Documents from the Navigation drop down.
4. Click List. The Document List page displays.
5. Locate your Main Document and click Actions from the Navigation drop down.
6. Click List. The Action List page displays.

17
7. Click Add. The Admin Action page displays.
8. Enter the connection information for the fields. Refer to the table below for field information.
Edit Integration Field
Purpose/Description
Label (Required) Enter a descriptive Name for this integration. For example, Lightning Sync
Variable Name (Required) The variable name for this integration. For example, oRCL_SFDC_LightningSync_t
Action Type (Required) Select the action type from the drop down. For example, Modify.
9. Click Add.
10. Enter the connection information for the fields. We recommend you leave the default settings for this action. Refer to the table below for field information.
Edit Integration Field
Purpose/Description
Description Enter a description for this integration. For example, Runs when a new Oracle Quote has been created using Lightning mode in the Oracle CPQ Connector. This action runs the related Lightning Quote Upsert integration that associates the Transaction to the Oracle Quote
Action Icon Sets the icon graphic to display for this specific action.
Show Loading Dialog Specifies if the loading icon displays while the action runs. Select Yes or No.
Action Timeout Specifies the amount of time before action session times out.
Execute Action If Associated Integrations Timeout
Specifies the amount of time before action session times out if the associated integration session times out.
Desktop Layout Path Specifies the desktop layout for this action.
Mobile Layout Path Specifies the mobile layout for this action.

18
Edit Integration Field
Purpose/Description
Run Validation Before Modify
Specifies if validation is run before the modify action.
Advanced Modify – Before Formulas
Specifies any BML you want to execute before formulas evaluate.
Advanced Modify – After Formulas
Specifies any BML you want to execute after formulas evaluate.
Advanced Validation Specifies the different validation types for this action.
11. Click on the Integration tab.
12. Select the Lightning Quote Upsert (Export) from the Integration list.
13. Click Update.
19
UPDATE THE EXISTING COMMERCE INTEGRATIONS
Existing CPQ sites typically have a set of integrations that are used to import data from the Opportunity and the User objects and also export data to the Oracle Quote and Oracle Quote Line Items. You may have created a number of custom integrations to import or export data from additional Salesforce objects.
When upgrading the administrator needs to decide how to refactor each Integration to use the new objects which are part of the Oracle CPQ Connector for Salesforce. There are two options:
1. Replace your existing integrations with the new reference integrations and merge your field mappings and other customizations into the reference integration.
2. Keep your existing integrations and modify them to point to the new Salesforce Objects.
Generally, if you have made only modest changes to the original integrations since your initial deployment, we would recommend choosing Option 1 since the new behavior will closely mirror the original functionality and the effort to re-map fields is minimal.
If you have highly customized integrations which have complex queries or work in concert with custom triggers in Salesforce, we recommend Option 2. In this scenario your existing test cases remain and you do not need to re-develop any of these customizations.
This section provides directional guidance for both approaches.
IMPORTANT: The integration names mentioned below may not precisely match the integration names that exist in your environment.

20
REPLACE THE OPPORTUNITY IMPORT INTEGRATION XSLS
Most Salesforce to CPQ integrations have a process by which Opportunity data is imported from Salesforce and saved to the Transaction in CPQ Cloud. This Integration typically runs on the New Transaction action and contains the SOAP Generator XSL and the Result Parser XSL that require modification.
The SOAP Generator constructs the select query which fetches the Opportunity field values for example, name, stage, close date and win probability for the specified Opportunity ID.
The Result Parser transforms the response into a XML document which maps the results of the query to Commerce Attributes on the Transaction.
To replace the existing XSL files with new files, complete the following steps:
1. If you have made customizations to your existing Integration, modify the reference XSL files provided to include these customizations. For example, custom field mappings, custom object queries, transform templates, or comments.
2. Navigate to the Admin Home page.
3. Click on Process Definition under Commerce and Documents. The Processes page displays.
4. Select your process and click Integrations from the Navigation drop down.
5. Click List. The Integrations page displays.

21
6. Click the Opportunity Import link under the Name column. The Edit Integration page displays.
7. Click Choose File next to SOAP Generator XSL. Browse to the location of the file and select the file. The file name is oRCL_SFDC_OpportunityImport_SOAPGenerator.xsl and click Open.
8. Click Choose File next to Result Parser XSL. Browse to the location of the file and select the file. The file name is oRCL_SFDC_OpportunityImport_ResultParser.xsl and click Open.
9. Click Update.
IMPORTANT:
• If you experience issues with the Integration files, enter a sample Transaction ID then click Preview SOAP XML to view the XML result.
• Each provided XSL file includes comments which provide guidance on how to modify these files to suit your needs. Open these files in the text editor of your choice, make your desired changes, save and re-upload to CPQ.

22
REPLACE THE USER IMPORT INTEGRATION XSLS
Some Salesforce to CPQ integrations have a process by which User data is imported from Salesforce and saved to the Transaction in CPQ Cloud. This Integration typically runs on the New Transaction action and contains the SOAP Generator XSL and the Result Parser XSL that require modification.
The SOAP Generator constructs the select query which fetches the User field values for example, name and contact information for the specified User ID.
The Result Parser transforms the response into a XML document which maps the results of the query to Commerce Attributes on the Transaction.
To replace the existing XSL files with new files, complete the following steps:
1. If you have made customizations to your existing Integration, modify the reference XSL files provided to include these customizations. For example, custom field mappings, custom object queries, transform templates, or comments.
2. Navigate to the Admin Home page.
3. Click on Process Definition under Commerce and Documents. The Processes page displays.
4. Select your process and click Integrations from the Navigation drop down.
5. Click List. The Integrations page displays.

23
6. Click the User Import link under the Name column. The Edit Integration page displays.
7. Click Choose File next to SOAP Generator XSL. Browse to the location of the file and select the file. The file name is oRCL_SFDC_UserImport_SOAPGenerator.xsl and click Open.
8. Click Choose File next to Result Parser XSL. Browse to the location of the file and select the file. The file name is oRCL_SFDC_UserImport_ResultParser.xsl and click Open.
9. Click Update.
IMPORTANT:
• If you experience issues with the Integration files, enter a sample Transaction ID then click Preview SOAP XML to view the XML result.
• Each provided XSL file includes comments which provide guidance on how to modify these files to suit your needs. Open these files in the text editor of your choice, make your desired changes, save and re-upload to CPQ.

24
REPLACE THE QUOTE UPSERT INTEGRATION XSLS
All Salesforce to CPQ integrations have a process by which Transaction data is exported to Salesforce and saved to the Oracle Quote object that is part of the managed package. This Integration typically runs on the Return to Opportunity action and contains the SOAP Generator XSL and the Result Parser XSL that require modification.
The SOAP Generator aggregates the Transaction attribute values and constructs the upsert query which creates the Oracle Quote, if it does not exist, and populates the associated Oracle Quote field values for the specified Oracle Quote ID.
The Result Parser transforms the response into a XML document which writes the results of the upsert, usually just the Oracle Quote ID which was created or updated, to corresponding Commerce Attributes on the Transaction.
To replace the existing XSL files with new files, complete the following steps:
1. If you have made customizations to your existing Integration, modify the reference XSL files provided to include these customizations. For example, custom field mappings, custom object queries, transform templates, or comments.
2. Navigate to the Admin Home page.
3. Click on Process Definition under Commerce and Documents. The Processes page displays.
4. Select your process and click Integrations from the Navigation drop down.
5. Click List. The Integrations page displays.

25
6. Click the Quote Upsert link under the Name column. The Edit Integration page displays.
7. Click Choose File next to SOAP Generator XSL. Browse to the location of the file and select the file. The file name is oRCL_SFDC_QuoteUpsert_SOAPGenerator.xsl and click Open.
8. Click Choose File next to Result Parser XSL. Browse to the location of the file and select the file. The file name is oRCL_SFDC_QuoteUpsert_ResultParser.xsl and click Open.
9. Click Update.
IMPORTANT:
• If you experience issues with the Integration files, enter a sample Transaction ID then click Preview SOAP XML to view the XML result.
• Each provided XSL file includes comments which provide guidance on how to modify these files to suit your needs. Open these files in the text editor of your choice, make your desired changes, save and re-upload to CPQ.

26
REPLACE THE LINE ITEM UPSERT INTEGRATION XSLS
All Salesforce to CPQ integrations have a process by which Transaction Line data is exported to Salesforce and saved to the Oracle Quote Line Item object that is part of the managed package. Because Salesforce limits the number of records which can be created in a single operation to 200 rows, we provide a set of Integrations which run in sequence that can upsert up to 1000 lines. If you have quotes larger than 1000 lines, you may have more integrations.
These Integrations typically run on the Return to Opportunity action and contains the SOAP Generator XSL and the Result Parser XSL that require modification.
The SOAP Generator aggregates the Transaction Lines and their attribute values and constructs the upsert query which creates the Oracle Quote Line Items which do not already exists and populates the associated field values for the specified Oracle Quote Line Item IDs.
The Result Parser transforms the response into a XML document which writes the results of the upsert, usually just the Oracle Quote Line Item IDs which were created or modified, to corresponding Commerce Attributes on the Transaction Lines.
To replace the existing XSL files with new files, complete the following steps:
1. If you have made customizations to your existing Integration, modify the reference XSL files provided to include these customizations. For example, custom field mappings, custom object queries, transform templates, or comments.
2. Navigate to the Admin Home page.
3. Click on Process Definition under Commerce and Documents. The Processes page displays.
4. Select your process and click Integrations from the Navigation drop down.
5. Click List. The Integrations page displays.

27
6. Click the Line Item Upsert 200 link under the Name column. The Edit Integration page displays.
7. Click Choose File next to SOAP Generator XSL. Browse to the location of the file and select the file. The file name is oRCL_SFDC_LineItemUpsert200_SOAPGenerator.xsl and click Open.
8. Click Choose File next to Result Parser XSL. Browse to the location of the file and select the file. The file name is oRCL_SFDC_LineItemUpsert200_ResultParser.xsl and click Open.
9. Click Update.
10. Repeat these steps for every Line Item Upsert integration.
IMPORTANT:
• If you experience issues with the Integration files, enter a sample Transaction ID then click Preview SOAP XML to view the XML result.
• Each provided XSL file includes comments which provide guidance on how to modify these files to suit your needs. Open these files in the text editor of your choice, make your desired changes, save and re-upload to CPQ.

28
REPLACE THE QUOTE UPSERT COMPLETE INTEGRATION XSLS
Since Quotes and their Line Items must be upserted in batches, all Salesforce to CPQ integrations have a process which updates a flag on the Oracle Quote object that tells the managed package that the upsert process is complete. When this flag is set, a trigger runs which removes deleted lines and also updates the Opportunity Products if the Quote is marked as primary/active. This Integration typically runs on the Return to Opportunity action and contains the SOAP Generator XSL and the Result Parser XSL that require modification.
The SOAP Generator constructs the update query which sets the Start Deleting Lines checkbox to True on the Oracle Quote with the specified Oracle Quote ID.
The Result Parser transforms the response into a XML document which writes the results of the update, usually just the Oracle Quote ID which was updated, to corresponding Commerce Attributes on the Transaction.
To replace the existing XSL files with new files, complete the following steps:
1. If you have made customizations to your existing Integration, modify the reference XSL files provided to include these customizations. For example, custom field mappings, custom object queries, transform templates, or comments.
2. Navigate to the Admin Home page.
3. Click on Process Definition under Commerce and Documents. The Processes page displays.
4. Select your process and click Integrations from the Navigation drop down.
5. Click List. The Integrations page displays.

29
6. Click the Quote Upsert Complete link under the Name column. The Edit Integration page displays.
7. Click Choose File next to SOAP Generator XSL. Browse to the location of the file and select the file. The file name is oRCL_SFDC_QuoteUpsertComplete_SOAPGenerator.xsl and click Open.
8. Click Choose File next to Result Parser XSL. Browse to the location of the file and select the file. The file name is oRCL_SFDC_QuoteUpsertComplete_ResultParser.xsl and click Open.
9. Click Update.
IMPORTANT:
• If you experience issues with the Integration files, enter a sample Transaction ID then click Preview SOAP XML to view the XML result.
• Each provided XSL file includes comments which provide guidance on how to modify these files to suit your needs. Open these files in the text editor of your choice, make your desired changes, save and re-upload to CPQ.

30
MODIFY THE EXISTING INTEGRATION XSLS
Customers who have several custom integrations or who have made substantial changes to the original integrations that were part a version 4 or earlier Ref App may need to refactor their XSLs instead of simply replacing them.
Because the Oracle CPQ Connector for Salesforce is a new managed package made up of new Salesforce objects, existing XSLs must be updated so that queries point at the new objects and fields. The API names for some packaged fields have changed and may behave differently.
Below are the most common modifications that must be made:
• Change the namespace of packaged objects • Change the API name of packaged fields
IMPORTANT: This section describes the most likely changes required, but it may not be a comprehensive list of every change required for your unique implementation.
If you are unfamiliar with the history and expected behavior of your existing integrations, we recommend engaging with a consulting partner to help manage and implement the changes.
Change the Namespace of Packaged Objects
Salesforce managed package version 4 or earlier was built using the legacy BigMachines branding and contain a similar Namespace Prefix which is appended to the beginning of all Object and Field names contained within.
The table below shows the namespaces for the legacy and current package version.
Package Version Package Name Namespace Prefix 7.2 and earlier Oracle CPQ Commerce Integration BigMachines__
8.0 and later Oracle CPQ Connector for Salesforce Cafsl__
Some XSL files specify a default namespace one time in the SOAP Header. Other XSL files specify the namespace as a prefix of every object name. In either case, you need to identify each instance of the old prefix and replace it with the new one.
These prefixes are most commonly specified in the SOAP Generator for each integration and must be updated across all integrations to prevent errors.

31
Change the API Name of Packaged Fields
Version 7.2 or earlier of Salesforce managed package contained a set of standard fields which were used in the Integrations that were part of the Salesforce Ref App version 4 or earlier. Some of these fields have changed in the new managed package, some have been removed. All fields in Salesforce have a display name and a unique API name. XSL files typically only use the unique API names.
The tables below show the version 7.2 or earlier packaged field names and the corresponding version 8.0 or later packaged field names for each object.
IMPORTANT: The API names below omit the namespace prefix mentioned above. If the XSLs in your site are not using a default namespace in the SOAP header, each field will contain both the namespace prefix and the API name.
Oracle Quotes
Old API Name New API Name Comments Account__c Account__c
Opportunity__c Opportunity__c
Description__c Description__c
Transaction_Id__c CPQ_External_Id__c
Prep_Sync__c Start_Upserting_Lines__c
Process_Sync__c Start_Deleting_Lines__c
Is_Primary__c Syncing__c
Is_Forced_Sync__c No longer included.
Line_Items__c No longer included.
Total_Amount__c No longer included.
Site__c No longer included.
Pricebook_Id__c No longer included.
Status__c No longer included.
Amount__c No longer included.
Total__c No longer included.
Data_set__c New field: Indicates which Data Set this Process is tied to.
Transaction_Id__c New field: Duplicates the CPQ_External_Id__c field, not required
IMPORTANT: Some optional fields are no longer included by default in the managed package. If you want to continue storing this data on the Oracle Quote, you must create a new custom field manually and map that custom field’s API name in your XSL file.

32
Oracle Quote Line Items
Old API Name New API Name Comments Product__c Product__c
Quantity__c Quantity__c
Sales_Price__c Sales_Price__c
Total_Price__c Total_Price__c
Quote__c Oracle_Quote__c
External_Id__c CPQ_External_Id__c
Prep_Delete__c Line_Upsert_Deletion_Flag__c
Description__c No longer included.
Synchronization_Id__c No longer included.
BM_List_Price __c No longer included.
Pricebook_Entry__c New field: The Price Book Entry ID for the synced Product
Data_set__c New field: Indicates which Data Set this Process is tied to.
External_Id__c New field: Duplicates the CPQ_External_Id__c field, not required
IMPORTANT: Some optional fields are no longer included by default in the managed package. If you want to continue storing this data on the Oracle Quote Line Item, you must create a new custom field manually and map that custom field’s API name in your XSL file.

33
UPDATE THE EXISTING ACCOUNT INTEGRATIONS
Existing CPQ Cloud sites typically have a set of integrations that are used to import data from the Account and Contact objects. These integrations usually operate independently of the managed package and thus may not require any modification.
If you are not currently using Account integrations this section provides the steps required to create them.
IMPORTANT: The integration names mentioned below may not precisely match the integration names that exist in your environment.
CREATE THE ACCOUNT IMPORT INTEGRATION XSLS
Some Salesforce to CPQ integrations have a process by which Account data is imported from Salesforce and saved to the Transaction in CPQ. When the Account Autofill option on the Process is enabled, this integration runs on the New Transaction action and can always be triggered manually using the Refresh Address action. It contains the SOAP Generator XSL and the Result Parser XSL that must be uploaded.
The SOAP Generator constructs the select query which fetches the Account field values like name and address information for the specified Account ID.
The Result Parser transforms the response into a XML document which maps the results of the query to a set of CPQ Account Attributes.
To create the Integration, complete the following steps:
1. Navigate to the Admin Home page.
2. Click on Accounts under Integration Platform. The Accounts page displays.
3. Click Integration. The Integration for CRM page displays.

34
4. Click Add. The Edit Integration page displays.
5. Enter the connection information for the fields. Refer to the table below for field information.
Edit Integration Field
Purpose/Description
Name (Required) Enter a descriptive Name for this integration. For example, Account Import
Variable Name (Required) The variable name for this integration. For example, oRCL_SFDC_AccountImport
Description Enter a description of the integration. For example, Imports the Account information from the CRM and maps those values to Account attributes. It is used by the Refresh Address action to populate the mapped values on the transaction. When Account Auto Fill is enabled, the Refresh Address action runs automatically when the transaction is first created.
ID Field (Required) Enter the ID field for this integration in the form of <document_var_name>.<attr_var_name>.
The ID field must precisely match the previously defined name.
For example, _customer_id
6. Click Choose File next to SOAP Generator XSL. Browse to the location of the file and select the file. The file name is oRCL_SFDC_AccountImport_SOAPGenerator.xsl and click Open.
7. Click Choose File next to Result Parser XSL. Browse to the location of the file and select the file. The file name is oRCL_SFDC_AccountImport_ResultParser.xsl and click Open.

35
8. Click Add.
IMPORTANT:
• If you experience issues with the Integration files, enter a sample Transaction ID then click Preview SOAP XML to view the XML result.
• Each provided XSL file includes comments which provide guidance on how to modify these files to suit your needs. Open these files in the text editor of your choice, make your desired changes, save and re-upload to CPQ.

36
CREATE THE CONTACT IMPORT INTEGRATION XSLS
Some Salesforce to CPQ integrations have a process by which Contact data is imported from Salesforce and saved to the Transaction in CPQ. This integration runs when the Select Alternate Address action is used. It contains the SOAP Generator XSL and the Result Parser XSL that must be uploaded.
The SOAP Generator constructs the select query which fetches a list of Contacts and the field values like name and address information for each.
Once a Contact is selected, the Result Parser generates a XML document which maps the chosen Contact’s information to a set of CPQ Account Attributes.
To create the Integration, complete the following steps:
1. Navigate to the Admin Home page.
2. Click on Accounts under Integration Platform. The Accounts page displays.
3. Click Integration. The Integration for CRM page displays.
4. Click Add. The Edit Integration page displays.

37
5. Enter the connection information for the fields. Refer to the table below for field information.
Edit Integration Field
Purpose/Description
Name (Required) Enter a descriptive Name for this integration. For example, Contact Import
Variable Name (Required) The variable name for this integration. For example, oRCL_SFDC_ContactImport
Description Enter a description of the integration. For example, Imports the Contact information from the CRM and maps those values to Account Address attributes. It is used by the Select An Alternate Address action to populate the mapped values on the transaction.
ID Field (Required) Enter the ID field for this integration in the form of <document_var_name>.<attr_var_name>.
The ID field must precisely match the previously defined name.
For example, none
6. Click Choose File next to SOAP Generator XSL. Browse to the location of the file and select the file. The file name is oRCL_SFDC_ContactImport_SOAPGenerator.xsl and click Open.
7. Click Choose File next to Result Parser XSL. Browse to the location of the file and select the file. The file name is oRCL_SFDC_ContactImport_ResultParser.xsl and click Open.
8. Click Add.
IMPORTANT:
• If you experience issues with the Integration files, enter a sample Transaction ID then click Preview SOAP XML to view the XML result.
• Each provided XSL file includes comments which provide guidance on how to modify these files to suit your needs. Open these files in the text editor of your choice, make your desired changes, save and re-upload to CPQ.

38
UPDATE THE EXISTING PARTS INTEGRATIONS
Existing CPQ sites typically have a set of integrations that are used to sync Product and Price Book data between Salesforce and CPQ Cloud. These integrations can be of two types, Export integrations which are used when CPQ Cloud is designated as the Parts Master, and Import Integrations which are used when Salesforce is designated as the Parts Master. A given CPQ site can only use one of these integrations modes at a time.
Parts, Parts Extended Descriptions, and Price Book Entry integrations are lightly dependent on the managed package because only one packaged field is used to support these integrations. This field is called the Oracle CPQ Part Number and is included in both managed packages version 7 and 8.
IMPORTANT: In most cases, we recommend simply changing the namespace prefix for Oracle CPQ Part Number field in your XSL file on your existing integrations. Refer to Modify Existing Integration XSLs.
This section provides the steps required to update the Parts Integrations, if needed, for the latest managed package.
IMPORTANT: The Integration names mentioned below may not precisely match the Integration names that exist in your environment.
MODIFY EXISTING INTEGRATION XSLS
We recommend that you modify your existing Parts, Parts Extended Description, and Price Book Entry integrations as opposed to replacing them. This process requires minimal changes for each of the three integrations.
Because the Oracle CPQ Connector for Salesforce is a new managed package, existing XSLs needs to be updated so that these queries point at a new field called Oracle CPQ Part Number on the Product object. The field’s API name has not changed, but the namespace has changed.
The table below shows the namespace and API name for the older and current package version.
Package Version Namespace Oracle CPQ Cloud Part Number Field API Name 7.2 and earlier BigMachines__ Part_Number__c
8.0 and later cafsl__ Part_Number__c
Some XSL files specify a default namespace in the SOAP Header. Other XSL files specify the namespace as a prefix of the field name. In either case, replace the namespace in the SOAP Generator for each Integration as indicated above.

39
UPDATE THE IMPORT/EXPORT PARTS INTEGRATION XSLS
Most Salesforce to CPQ integrations have a process by which Parts data is periodically synced between Salesforce and CPQ. Depending on which system is designated as the Parts Master these integrations may be of the type Import or Export, and contain the SOAP Generator XSL and the Result Parser XSL that must be uploaded. The steps to update these integrations is the same for both options.
The SOAP Generator constructs the query which either retrieves or upserts the Parts.
The Result Parser transforms the response into a XML document which maps the results of the query to each Part in CPQ.
To update the Integration, complete the following steps:
1. Navigate to the Admin Home page.
2. Click on Parts under Products. The Part Administration page displays.
3. Click Integration under Item Master.

40
4. Click Import Parts or Export Parts link under the Name column in the List Integrations section. The Edit Integration page displays.
5. Review the connection information for the fields. Refer to the table below for field information.
Edit Integration Field
Purpose/Description
Name (Required) Enter a descriptive Name for this integration. For example, Import Parts or Export Parts
Variable Name The variable name for this integration. For example, _import_parts_xsl or _export_parts_xsl
Description Enter a description of the integration. For example, When Salesforce is the Parts Master, creates new Parts/Items in CPQ for each new Product and updates existing Parts with any new Product details.
ID Field Specifies the ID field for this integration. For example, _partner_part_id

41
6. Click Choose File next to SOAP Generator XSL. Browse to the location of the file and select the file. The file name is import_parts_soap_generator.xsl or export_parts_soap_generator.xsl and click Open.
7. Click Choose File next to Result Parser XSL. Browse to the location of the file and select the file. The file name is import_parts_result_parser.xsl or export_parts_result_parser.xsl and click Open.
8. Click Update.
IMPORTANT:
• If you experience issues with the Integration files, click Preview SOAP XML to view the XML result.
• Each provided XSL file includes comments which provide guidance on how to modify these files to suit your needs. Open these files in the text editor of your choice, make your desired changes, save and re-upload to CPQ.

42
UPDATE THE IMPORT/EXPORT PARTS EXTENDED DESCRIPIONS INTEGRATION XSLS
Some Salesforce to CPQ integrations have a process by which Part Extended Descriptions are periodically synced between Salesforce and CPQ. Depending on which system is designated as the Parts Master these integrations may be of the type Import or Export, and contain the SOAP Generator XSL and the Result Parser XSL that must be uploaded. The steps to update these integrations is the same for both options.
The SOAP Generator constructs the query which either retrieves or upserts the Extended Descriptions for each part.
The Result Parser transforms the response into a XML document which maps the results of the query to each Part Extended Description in CPQ.
To update the Integration, complete the following steps:
1. Navigate to the Admin Home page.
2. Click on Parts under Products. The Part Administration page displays.
3. Click Integration under Item Master.

43
4. Click Import Part Extended Descriptions or Export Part Extended Descriptions link under the Name column. The Edit Integration page displays.
5. Review the connection information for the fields. Refer to the table below for field information.
Edit Integration Field
Purpose/Description
Name Specifies a descriptive Name for this integration. For example, Import Part Extended Descriptions or Export Part Extended Descriptions
Variable Name The variable name for this integration. For example, _import_part_extended_descriptions_xsl or _export_ part_extended_descriptions_xsl
Description Enter a description of the integration. For example, When Salesforce is the Parts Master, updates Parts Extended Description in CPQ with any new Product details.
ID Field Specifies the ID field for this integration. For example, _partner_part_id

44
6. Click Choose File next to SOAP Generator XSL. Browse to the location of the file and select the file. The file name is import_part_extended_desc_soap_generator.xsl or export_part_extended_desc_soap_generator.xsl and click Open.
7. Click Choose File next to Result Parser XSL. Browse to the location of the file and select the file. The file name is import_part_extended_desc_result_parser.xsl or export_part_extended_desc_result_parser.xsl and click Open.
8. Click Update.
IMPORTANT:
• If you experience issues with the Integration files, click Preview SOAP XML to view the XML result.
• Each provided XSL file includes comments which provide guidance on how to modify these files to suit your needs. Open these files in the text editor of your choice, make your desired changes, save and re-upload to CPQ.

45
UPDATE THE IMPORT/EXPORT PRICE BOOK ENTRY INTEGRATION XSLS
Most Salesforce to CPQ integrations have a process by which Part Prices are periodically synced between Salesforce and CPQ. Depending on which system is designated as the Parts Master these integrations may be of the type Import or Export, and contain the SOAP Generator XSL and the Result Parser XSL that must be uploaded. The steps to update these integrations is the same for both options.
The SOAP Generator constructs the query which either retrieves or upserts the Price Book Entries for each Part and Price Book combination.
The Result Parser transforms the response into a XML document which maps the results of the query to each Part Price in CPQ.
To update the Integration, complete the following steps:
1. Navigate to the Admin Home page.
2. Click on Parts under Products. The Part Administration page displays.
3. Click Integration under Item Master.

46
4. Click Import Price Book Entries or Export Price Book Entries link under the Name column. The Edit Integration page displays.
5. Review the connection information for the fields. Refer to the table below for field information.
Edit Integration Field
Purpose/Description
Name Specifies a descriptive Name for this integration. For example, Import Price Book Entries or Export Price Book Entries
Variable Name The variable name for this integration. For example, _import_price_book_entries_xsl or _export_ price_book_entries_xsl
Description Enter a description of the integration. For example, When Salesforce is the Parts Master, updates Prices on Parts in CPQ with the Price Book Entry from any mapped Price Book.
ID Field Specifies the ID field for this integration. For example, _partner_price_book_entry_id

47
6. Click Choose File next to SOAP Generator XSL. Browse to the location of the file and select the file. The file name is import_pba_soap_generator.xsl or export_pba_soap_generator.xsl and click Open.
7. Click Choose File next to Result Parser XSL. Browse to the location of the file and select the file. The file name is import_pba_result_parser.xsl or export_pba_result_parser.xsl and click Open.
8. Click Update.
IMPORTANT:
• If you experience issues with the Integration files, click Preview SOAP XML to view the XML result.
• Each provided XSL file includes comments which provide guidance on how to modify these files to suit your needs. Open these files in the text editor of your choice, make your desired changes, save and re-upload to CPQ.

48
MIGRATE SALESFORCE DATA TO THE NEW PACKAGE OBJECTS
The Oracle CPQ Connector for Salesforce is a new managed package. It fully replaces all earlier versions of the Salesforce integration provided by Oracle/BigMachines. The Salesforce Connector (v8 or later) cannot be installed directly on top of the legacy Salesforce Commerce Integration (v7 or earlier), in other words version 7 cannot be upgraded directly to version 8. However, it can be installed alongside the legacy package.
Because the Salesforce Connector is a new managed package, when it is installed it creates a new collection of Salesforce Objects. New quotes are created as records on a newly installed object. Legacy quotes cannot be accessed using the new connector unless they are migrated from the old objects to the new objects.
This section provides all the steps which are required to fully migrate your quote, user and product data from these legacy objects to the new objects.
WARNING:
The legacy quote, user and product data will remain in your Salesforce organization after the new Salesforce Connector is installed. It will not be modified or deleted, it will continue to be accessible.
Uninstalling the legacy managed package will remove all this historic data and that process is irreversible. If you wish to retain access to this Salesforce data, you must complete this migration and thoroughly validate it before uninstalling previous versions.
Administrators should act with caution when working with critical business data such as this. If you are not comfortable making these types of changes, you are strongly encouraged to engage a partner who specializes in system integration and data migration.
IMPORTANT: Review the Prerequisites for this document before proceeding.

49
PRODUCT MIGRATION
Both the legacy package and the new package add a custom field to Salesforce’s standard Product object. This custom field stores the external ID for the CPQ Cloud Part Number associated to each Salesforce Product record. The field is of the same type in both packages.
Legacy Part Number (v7) Field
New Part Number (v8) Field
Description
BigMachines__Part_Number__c cafsl__Part_Number__c Maps the CPQ Part Number to the Salesforce Product record.
IMPORTANT:
• Always perform the following steps in a test or sandbox environment before working in production. We recommend testing this process with a small sample set of records before beginning mass updates.
• If you have completed the Update the Existing Parts Integrations section and designated CPQ Cloud as your Parts Master, you can instead use the Export Parts Integration to populate the Part Numbers in the new cafsl__Part_Number__c field.
• If you have an alternative process already defined to synchronize parts between systems, you can leverage that to manage these mappings.

50
EXPORT PART NUMBERS
To export the part numbers from the legacy field, complete the following steps:
1. Run the Salesforce Data Loader. Log in when prompted.
2. On the Data Loader home screen, click Export.
3. Select the Product (Product2) Salesforce object.

51
4. Choose a target for extraction.
5. Click Next.
6. Choose Id and BigMachines__Part_Number__c as your query fields.
• Optionally, you can click Select all fields to retrieve the entire record.
• Optionally, you can add where clauses to your query to reduce the number of results and work in batches.
7. Click Finish. If prompted with a warning message, click Yes to proceed.
8. When complete, the Operation Finished screen displays. Click OK.
• Optionally, you can click View Extraction to review the results.
9. Open the extracted CSV file. Verify the extracted records contain the expected values.

52
UPDATE PART NUMBERS
To add the part numbers to the new field, complete the following steps:
1. On Data Loader home screen, Click Update.
2. Select the Product (Product2) object.
3. Choose the CSV file previously extracted.
4. The Data Selection screen displays. Click OK.

53
5. Click Create or Edit a Map.
6. Drag the Salesforce fields down to the column mapping. The mapping should be as follows:
File Column Header
Name
ID Id
BIGMACHINES__PART_NUMBER__C cafsl__Part_Number__c

54
7. Click OK.
• Optionally, you can Save Mapping to reuse this later.

55
8. Verify your mappings and click Next.

56
9. Choose a location to save the results files. Click Finish.
10. Review the Success and Failure files. Verify the changes are properly reflected on the affected Product records.

57
QUOTE MIGRATION
Both the legacy package and the new package include a custom Quote object. In v7 and prior it was called BigMachines Quotes or Oracle Quotes and Orders, in v8 it is called Oracle Quotes.
This object stores a subset of the transaction (main document) details which are created and mastered in CPQ. The fields on this object store a few key pieces of information which are critical to support the standard quoting flows as well as business data which may be used in forecasting and reporting.
To use the new package to open historic and inflight quotes originally created using the legacy package, legacy quote records must be migrated from the old objects into the new objects. Some of the fields and data types have changed, some fields are no longer included or needed.
BigMachines Quote (v7) Fields
Oracle Quote (v8) Fields
Description
BigMachines__Account__c cafsl__Account__c Account lookup value.
BigMachines__Total_Amount__c No longer included.
BigMachines__Description__c No longer included.
BigMachines__Is_Forced_Sync__c No longer included.
BigMachines__Is_Primary__c cafsl__Syncing__c Indicates that this is the primary quote on the related Opportunity.
Changing this value triggers the Opportunity-Quote Sync.
BigMachines__Line_Items__c No longer included.
BigMachines__Opportunity__c cafsl__Opportunity__c Opportunity lookup value.
BigMachines__Site__c cafsl__Data_Set__c Indicates which connected CPQ Site or Process the Quote was created in.
BigMachines__Prep_Sync__c cafsl__Start_Upserting_Lines__c Used transiently when syncing lines.
BigMachines__Pricebook_Id__c No longer included.
BigMachines__Process_Sync__c cafsl__Start_Deleting_Lines__c Used transiently when syncing lines.
BigMachines__Status__c No longer included.
BigMachines__Amount__c No longer included.
BigMachines__Total__c No longer included.
BigMachines__Transaction_Id__c cafsl__CPQ_External_Id__c External ID of the linked CPQ Transaction.
cafsl__Transaction_ID__c No longer used.

58
Notes on the above table:
• This table only lists the packaged custom fields. Many customers will have added their own custom fields to the Quote object. Review these with your company’s stakeholders to verify which fields should be carried over to the new object.
• Several fields that existed in the legacy managed package are no longer included. If you are using those fields and wish to retain that data, you will need to add custom fields on the new object to store them.
• Some fields are only used transiently during the quote syncing process. The values stored in these fields should not be carried over during migration. They should always be false when at rest.
IMPORTANT: Always perform the following steps in a test or sandbox environment before working in production. We recommend testing this process with a small sample set of records before beginning mass updates.

59
PREPARE THE ORACLE QUOTE OBJECT
Before migrating the data, you need to create custom fields on the new object that will temporarily store values from the legacy object. These values will facilitate the linking of line items later in this document.
In addition, if you have critical business information stored in either the deprecated fields or custom fields on the legacy quote object you must create new custom fields on the new quote object to receive that data.
To prepare the Oracle Quote object for the migration, complete the following steps:
1. Navigate to Setup.
2. Under Build expand the Create group. Click Objects. The Custom Objects list displays.
3. Locate the Oracle Quote object from the list. It will be part of the Installed Package Oracle CPQ Extension for Salesforce.
4. Click Oracle Quote. The Custom Object Definition Detail page displays.
5. Locate the Custom Fields & Relationships section.
6. Click New.
7. Create the following Fields of the specified Type.
Field Name
Type
Description
BigMachines_Quote_ID__c Text (length 18)
Lookup Relationship or External ID are also acceptable data types.
Will store the Salesforce ID for the legacy quote record this replaces.
BigMachines_Quote_Primary__c Checkbox Will store the current syncing state of the legacy quote.
8. Optionally, create additional Fields for any additional deprecated or custom fields you want to carry forward to the new object.

60
EXPORT THE LEGACY QUOTES
To export the legacy quotes, complete the following steps:
1. Run the Salesforce Data Loader. Log in when prompted.
2. On Data Loader home screen, click Export.

61
3. Select the Oracle Quotes and Orders (BigMachines__Quote__c) object. The label for this object may different in your environment.
4. Choose a target for extraction.
5. Click Next.
6. Choose the query fields that you want to carry forward to the new object.
• Optionally, you can click Select all fields to retrieve the entire record.
• Optionally, you can add where clauses to your query to reduce the number of results.

62
7. Click Finish. If prompted with a warning message, click Yes to proceed.
8. When complete, the Operation Finished screen displays. Click OK.
• Optionally, you can click View Extraction to review the results.
9. Open the extracted CSV file. Verify the extracted records contain the expected values.

63
PREPARE THE QUOTE UPLOAD FILE
Before you can upload the exported legacy quotes to the new object you must prepare a new upload file containing the records from the previous export.
To prepare the quote upload file, complete the following steps:
1. Create a new CSV which has a column for each of the fields in the new object. Each column must use the field’s API name as its header. Any one of the following methods can be used to complete this step:
• Manually create a new blank CSV file which uses the correct column headers.
• Export the Oracle Quotes (cafsl__Oracle_Quote__c) object using the Data Loader to retrieve the correct column headers.
• Create a copy of the previously exported Oracle Quotes and Orders (BigMachines__Quote__c) file and rename the columns using the correct column headers.
2. Copy the values from the previously exported Oracle Quotes and Orders (BigMachines__Quote__c) file into the corresponding column as shown in the table below. These values will recreate the associations to existing records.
Legacy Quotes Column
New Quotes Column
BigMachines__Account__c cafsl__Account__c
BigMachines__Opportunity__c cafsl__Opportunity__c
BigMachines__Pricebook_Id__c cafsl__Pricebook_ID__c
BigMachines__Transaction_Id__c cafsl__CPQ_External_Id__c
3. Copy the values from the previously exported Oracle Quotes and Orders (BigMachines__Quote__c) file into the corresponding columns as shown in the table below. These columns were created in the Prepare the Oracle Quote Object section and will be used later.
Legacy Quotes Column
New Quotes Column
ID BigMachines_Quote_ID__c
BigMachines__Is_Primary__c BigMachines_Quote_Primary__c

64
4. Populate the following columns with the value specified in the table below.
New Quotes Column
Value
cafsl__Data_Set__c The new Data Set name that corresponds to the legacy CPQ Site Settings value. See the Oracle CPQ Connector for Salesforce Installation and Setup Guide
cafsl__Syncing__c FALSE
cafsl__Start_Upserting_Lines__c FALSE
cafsl__Start_Deleting_Lines__c FALSE
5. Optionally, copy the values from the previously exported Oracle Quotes and Orders (BigMachines__Quote__c) file into the corresponding columns for any of the deprecated fields or any custom fields you created in the Prepare the Oracle Quote Object section.
6. Save the CSV.
IMPORTANT:
• If you are using a multi-currency environment, you must include an additional column which sets the correct currency ISO code for each Oracle Quote.
• Optionally, you can copy the Created By and Owner IDs for each legacy Oracle Quote to the new Oracle Quote record to ensure that record sharing policies are retained.
• While not required, typically you want to copy the legacy Oracle Quote Name to the new Oracle Quote record.

65
INSERT THE LEGACY QUOTES INTO THE NEW OBJECT
To upload the legacy quotes to the new object, complete the following steps:
1. On Data Loader home screen, click Insert.
2. Select the Oracle Quote (cafsl__Oracle_Quote__c) object.
3. Choose the CSV file created in the Prepare the Quote Upload File section.
4. Click Next.
5. The Data Selection screen displays. Click OK.

66
6. Click Create or Edit a Map.

67
7. Click Auto-Match Fields to Columns.
8. Verify the Field Mappings were successfully created.
9. Click OK.
• Optionally, you can Save Mapping to reuse this later.

68
10. Verify your mappings again and click Next.

69
11. Choose a location to save the results files. Click Finish.
12. Review the Success and Failure files. Verify the new Oracle Quotes were created with the desired initial values.

70
QUOTE LINE ITEM MIGRATION
Both the legacy package and the new package include a custom Quote Line Item object. In v7 and prior it was called Quote Product, in v8 it is called Oracle Quote Line Item.
This object stores a subset of the transaction line (sub document) details which are created and mastered in CPQ. The fields on this object store a few key pieces of information which are critical to support the standard quoting flows as well as additional product and pricing detail.
Some of the fields and data types have changed, some fields are no longer included or needed.
Quote Product (v7) Fields
Oracle Quote Line Item (v8) Fields
Description
BigMachines__Description__c No longer included.
BigMachines__External_Id__c cafsl__CPQ_External_Id__c External ID of the linked CPQ Transaction Line.
BigMachines__Prep_Delete__c cafsl__Line_Upsert_Deletion_Flag__c Used transiently when syncing lines.
BigMachines__Product__c cafsl__Product__c Product lookup value.
BigMachines__Quantity__c cafsl__Quantity__c Item quantity.
BigMachines__Quote__c cafsl__Oracle_Quote__c ID of the parent Oracle Quote.
BigMachines__Sales_Price__c cafsl__Sales_Price__c Item sales price.
BigMachines__Synchronization_Id__c No longer included.
BigMachines__Total_Price__c cafsl__Total_Price__c Item total price.
cafsl__Data_Set__c Indicates which connected CPQ Site or Process the Quote Line was created in.
cafsl__Pricebook_Entry__c Price Book Entry ID for the associated product.
cafsl__External_Id__c No longer used.

71
Notes on the above table:
• This table only lists the packaged custom fields. Many customers will have added their own custom fields to the Quote Product object. Review these with your company’s stakeholders to verify which fields should be carried over to the new object.
• Several fields that existed in the legacy managed package are no longer included. If you are using those fields and wish to retain that data, you will need to add custom fields on the new object to store them.
• Some fields are only used transiently during the quote syncing process. The values stored in these fields should not be carried over during migration. They should always be false when at rest.
IMPORTANT: Always perform the following steps in a test or sandbox environment before working in production. We recommend testing this process with a small sample set of records before beginning mass updates.
PREPARE THE ORACLE QUOTE LINE ITEM OBJECT
If you have critical business information stored in either the deprecated fields or custom fields on the legacy quote product object you must create new custom fields on the new quote line item object to receive that data.
To prepare the Oracle Quote Line Item object for the migration, complete the following steps:
1. Navigate to Setup.
2. Under Build expand the Create group. Click Objects. The Custom Objects list displays.
3. Locate the Oracle Quote Line Item object from the list. It will be part of the Installed Package Oracle CPQ Extension for Salesforce.
4. Click Oracle Quote Line Item. The Custom Object Definition Detail page displays.
5. Locate the Custom Fields & Relationships section.
6. Click New.
7. Create the Fields for any deprecated or custom fields you want to carry forward to the new object.

72
EXPORT THE NEW ORACLE QUOTES
Before you can begin inserting the Oracle Quote Line Items you must retrieve the Oracle Quotes that were created in the Insert the Legacy Quotes into the New Object section.
To export the new Oracle Quotes, complete the following steps:
1. Run the Salesforce Data Loader. Log in when prompted.
2. On Data Loader home screen, click Export.

73
3. Select the Oracle Quotes (cafsl__Oracle_Quote__c) object. The label for this object may different in your environment.
4. Choose a target for extraction.
5. Click Next.

74
6. Click Select all fields.
7. Click Finish. If prompted with a warning message, click Yes to proceed.
8. When complete, the Operation Finished screen displays. Click OK.
• Optionally, you can click View Extraction to review the results.
9. Open the extracted CSV file. Verify the extracted records contain the expected values. Save this file for use later.

75
EXPORT THE QUOTE PRODUCTS
To export the legacy Quote Products, complete the following steps:
1. Run the Salesforce Data Loader. Log in when prompted.
2. On Data Loader home screen, click Export.
3. Select the Quote Products (BigMachines__Quote_Product__c) object. The label for this object may different in your environment.

76
4. Choose a target for extraction.
5. Click Next.
6. Click Select all fields.
7. Click Finish. If prompted with a warning message, click Yes to proceed.
8. When complete, the Operation Finished screen displays. Click OK.
• Optionally, you can click View Extraction to review the results.
9. Open the extracted CSV file. Verify the extracted records contain the expected values.

77
PREPARE THE QUOTE LINE ITEM UPLOAD FILE
Before you can upload the exported legacy quote products to the new object you must prepare a new upload file containing the records from the previous export.
To prepare the quote line item upload file, complete the following steps:
1. Create a new CSV which has a column for each of the fields in the new object. Each column must use the field’s API name as its header. Any one of the following methods can be used to complete this step:
• Manually create a new blank CSV file which uses the correct column headers.
• Export the Oracle Quote Line Items (cafsl__Oracle_Quote_Line_Item__c) object using the Data Loader to retrieve the correct column headers.
• Create a copy of the previously exported Quote Products (BigMachines__Quote_Product__c) file and rename the columns using the correct column headers.
2. Copy the values from the previously exported Quote Products (BigMachines__Quote_Product__c) file into the corresponding column as shown in the table below. These values will recreate the associations to existing records.
Legacy Quotes Column
New Quotes Column
BigMachines__Product__c cafsl__Product__c
BigMachines__Quantity__c cafsl__Quantity__c
BigMachines__Sales_Price__c cafsl__Sales_Price__c
BigMachines__Total_Price__c cafsl__Total_Price__c
BigMachines__External_Id__c cafsl__CPQ_External_Id__c
3. Populate the following columns with the value specified in the table below.
New Quotes Column
Value
cafsl__Data_Set__c The new Data Set name that corresponds to the legacy CPQ Site Settings value. See the Oracle CPQ Connector for Salesforce Installation and Setup Guide
cafsl__Line_Upsert_Deletion_Flag__c FALSE

78
4. Optionally, copy the values from the previously exported Quote Products (BigMachines__Quote_Product__c) file into the corresponding columns for any of the deprecated fields or custom fields you created in the Prepare the Oracle Quote Line Item Object section.
5. Copy the BigMachines__Quote__c column from the previously exported Quote Products (BigMachines__Quote_Product__c) into a new column.
6. Open the file from Export the New Oracle Quotes section. This includes a map between the legacy Quote ID (BigMachines_Quote_ID__c) and the new Quote ID (ID) for each record.
7. Use the BigMachines__Quote__c column as a reference to populate the cafsl__Oracle_Quote__c column with the corresponding ID for each record using the map from the previous step.
• There are several methods in Excel which can be used to populate these IDs in the CSV. Detailed steps on this process are beyond the scope of this document.
• This mapping can also be accomplished using the Salesforce Data Loader or with various 3rd party tools. Contact the vendor for additional assistance on using those tools.
8. Save the CSV.
IMPORTANT:
• If you are using a multi-currency environment, you must include an additional column which sets the correct currency ISO code for each Oracle Quote Line Item.
• Optionally, you can copy the Created By and Owner IDs for each legacy Oracle Quote to the new Oracle Quote record to ensure that record sharing policies are retained.
• In the new package the Quote Line Item Name is automatically assigned using an Auto Number. If you wish to retain the Quote Product names from the legacy package you must create a new custom field.
• Prior to version 8.2 of the CPQ Connector for Salesforce, the cafsl__Pricebook_Entry__c field was required when inserting Oracle Quote Line Items. If you are using an earlier version of this integration additional steps are required to populate that field in the upload file.
• When working in environments with very large numbers of legacy quotes, Excel may encounter issues with large row counts. In this case we recommend working in batches or choosing an alternative method to bulk upload these records.
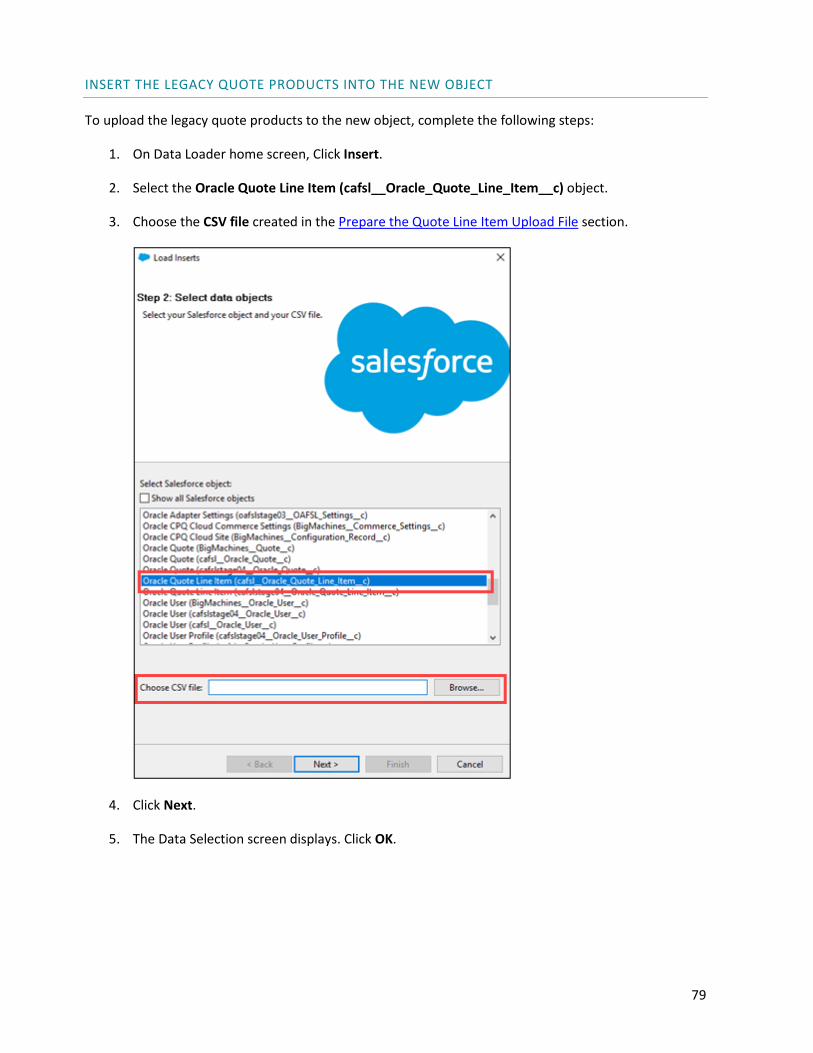
79
INSERT THE LEGACY QUOTE PRODUCTS INTO THE NEW OBJECT
To upload the legacy quote products to the new object, complete the following steps:
1. On Data Loader home screen, Click Insert.
2. Select the Oracle Quote Line Item (cafsl__Oracle_Quote_Line_Item__c) object.
3. Choose the CSV file created in the Prepare the Quote Line Item Upload File section.
4. Click Next.
5. The Data Selection screen displays. Click OK.

80
6. Click Create or Edit a Map.

81
7. Click Auto-Match Fields to Columns.
8. Verify the Field Mappings were successfully created.
9. Click OK.
• Optionally, you can Save Mapping to reuse this later.

82
10. Verify your mappings again and click Next.

83
11. Choose a location to save the results files. Click Finish.
12. Review the Success and Failure files. Verify the new Oracle Quote Line Items were created with the desired initial values and are correctly linked to the proper Oracle Quote.

84
MARK NEW QUOTES AS ACTIVE
Once the Oracle Quotes and their child Oracle Quote Line Items have been successfully uploaded and verified, you must switch the active, or primary, quote from the legacy Quote to the new Quote.
To mark the new quotes as active, complete the following steps:
1. Run the Salesforce Data Loader. Log in when prompted.
2. On Data Loader home screen, click Export.

85
3. Select the Oracle Quotes (cafsl__Oracle_Quote__c) object. The label for this object may different in your environment.
4. Choose a target for extraction.
5. Click Next.
6. Choose Id, cafsl__Syncing__c and BigMachines_Quote_Primary__c as your query fields.
• Optionally, you can click Select all fields to retrieve the entire record.

86
7. Create a where clause which only returns syncing Quotes using the following steps:
a. Select BigMachines_Quote_Primary__c from the Fields drop down.
b. Select equals from the Operation drop down.
c. Enter TRUE as the Value.
d. Click Add condition.
8. Click Finish. If prompted with a warning message, click Yes to proceed.
9. When complete, the Operation Finished screen displays. Click OK.
• Optionally, you can click View Extraction to review the results.
10. Open the extracted CSV file. Verify the extracted records contain the expected values.
11. Copy the BigMachines_Quote_Primary__c column into the cafsl__Syncing__c column. All values should be set to TRUE.
12. Save the CSV.
13. Run the Salesforce Data Loader. Log in when prompted.

87
14. Open the Settings from the Settings menu.
15. Set the Batch size to 1.
16. Click OK.
17. On Data Loader home screen, click Update. Log in when prompted.
18. Select the Oracle Quotes (cafsl__Oracle_Quote__c) object. The label for this object may different in your environment.

88
19. Choose the CSV file saved in Step 12.
20. Click Next.
21. The Data Selection screen displays. Click OK.

89
22. Click Create or Edit a Map.

90
23. Click Auto-Match Fields to Columns.
24. Verify the Field Mappings were successfully created.
25. Click OK.
• Optionally, you can Save Mapping to reuse this later.

91
26. Verify your mappings again and click Next.

92
27. Choose a location to save the results files. Click Finish.
28. Review the Success and Failure files. Verify the new Oracle Quotes are now marked as Syncing and the Opportunity Products are correct for each active quote.

93
IMPORTANT:
• We recommend testing this process is small batches to verify the expected results before performing this step against all active Quotes.
• This step may take a long time in environments with large numbers of quotes or very large quotes.
• Depending on your settings, you may need to follow a similar process to stop syncing legacy quotes.
• Verify the Keep Unquoted Opportunity Products setting in the new package matches the Preserve Ad-hoc Products setting in the legacy package. If the new package is set to FALSE any unquoted, or ad-hoc, products will be deleted when the sync trigger runs.
• Each updated Oracle Quote will trigger an update to Opportunities and Opportunity Products. Any additional custom triggers on these objects will also fire. Any triggers which are not bulk safe may cause issues.

94
USER MIGRATION
Both the legacy package and the new package include a custom User object. In v7 and prior it was called BigMachines User or Oracle User, in v8 it is called Oracle User.
This object stores the user’s CPQ preferences which are synchronized with their linked CPQ user account. It also stores several settings which control the user’s access rights and other integration behaviors.
To access quotes using the new package each Salesforce user must have an associated Oracle User record. The old Oracle User records can be migrated from the old objects into the new objects. Some of the fields and data types have changed, some fields are no longer included or needed.
Oracle User (v7) Field
Oracle User (v8) Field
Description
BigMachines__Access_Type__c cafsl__User_Type__c Specifies the CPQ User type
BigMachines__Allow_Quote_Creation__c cafsl__Allow_Quote_Creation__c Controls whether the user can create quotes using this connection.
BigMachines__Association_to_Organization__c cafsl__Partner_User__c Indicates if the user is an Internal or Partner user.
BigMachines__Currency_Preference__c cafsl__Currency_Preference__c User’s default currency.
BigMachines__Date_Time_Format__c cafsl__Date_Time_Format__c User’s preferred date-time format.
BigMachines__Language_Preference__c cafsl__Language_Preference__c User’s preferred language.
BigMachines__Number_Format__c cafsl__Number_Format__c User’s preferred number format.
BigMachines__Delegated_Approver__c cafsl__Delegated_Approver__c Specifies the user’s delegated approver.
BigMachines__Oracle_CPQ_Cloud_Login__c cafsl__Oracle_CPQ_Cloud_Login__c Formula which generates the CPQ user login.
BigMachines__Oracle_CPQ_Cloud_Site__c cafsl__Embedded_CPQ_Settings__c Specifies which connection this Oracle User record controls.
BigMachines__Partner_Organization__c cafsl__Partner_Organization__c Specifies the Company Name for the Partner User.

95
Oracle User (v7) Field
Oracle User (v8) Field
Description
BigMachines__Salesforce_User__c cafsl__User__c Salesforce User lookup value.
BigMachines__Bulk_Synchronization__c cafsl__Suspend_CPQ_User_Sync__c Pauses user sync for this user record.
BigMachines__Provisioned__c cafsl__Link_to_CPQ_User__c Triggers the provisioning and synchronization of the user to the CPQ.
BigMachines__Time_Zone__c cafsl__Time_Zone__c User’s time zone.
BigMachines__Unit_System__c cafsl__Units__c User’s preferred unit system.
BigMachines__User_Groups__c cafsl__Groups__c Groups the user belongs to.
cafsl__Oracle_User_Profile__c Oracle User Profile lookup value.
Notes on the above table:
• This table only lists the packaged custom fields. Though unlikely, you may have added custom fields to the Oracle User object. Review these with your company’s stakeholders to verify which fields should be carried over to the new object.
• Prior to assigning the Group for users you should edit the picklist values to match those in your CPQ site. See the Oracle CPQ Connector for Salesforce Installation and Setup Guide for additional details.
• If you are using Oracle User Profiles, many of these values can be automatically populated. See the Oracle CPQ Connector for Salesforce Installation and Setup Guide for additional details.
IMPORTANT:
• Always perform the following steps in a test or sandbox environment before working in production. We recommend testing this process with a small sample set of records before beginning mass updates.
• If you have a low to moderate number of users in your environment, it may be more expedient to manually synchronize each user.

96
EXPORT THE LEGACY USERS
To export the legacy users, complete the following steps:
1. Run the Salesforce Data Loader. Log in when prompted.
2. On Data Loader home screen, click Export.

97
3. Select the Oracle User (BigMachines__Oracle_User__c) object. The label for this object may different in your environment.
4. Choose a target for extraction.
5. Click Next.

98
6. Click Select all fields.
• Optionally, you can add where clauses to your query to reduce the number of results and work in batches.
7. Click Finish. If prompted with a warning message, click Yes to proceed.
8. When complete, the Operation Finished screen displays. Click OK.
• Optionally, you can click View Extraction to review the results.
9. Open the extracted CSV file. Verify the extracted records contain the expected values.

99
PREPARE THE USER UPLOAD FILE
Before you can upload the exported legacy users to the new object you must prepare a new upload file containing the records from the previous export.
To prepare the user upload file, complete the following steps:
1. Create a new CSV which has a column for each of the fields in the new object. Each column should use the field’s API name as its header. Any one of the following methods can be used to complete this step:
• Manually create a new blank CSV file which uses the correct column headers.
• Export the Oracle Users (cafsl__Oracle_User__c) object using the Data Loader to retrieve the correct column headers.
• Create a copy of the previously exported Oracle Users (BigMachines__Oracle_User__c) file and rename the columns using the correct column headers.
2. Copy the values from the previously exported Oracle Users (BigMachines__Oracle_User__c) file into the corresponding column as shown in the table below.
Legacy Users Column
New Users Column
BigMachines__Allow_Quote_Creation__c cafsl__Allow_Quote_Creation__c
BigMachines__Currency_Preference__c cafsl__Currency_Preference__c
BigMachines__Delegated_Approver__c cafsl__Delegated_Approver__c
BigMachines__Language_Preference__c cafsl__Language_Preference__c
BigMachines__Provisioned__c cafsl__Link_to_CPQ_User__c
BigMachines__User_Groups__c cafsl__Groups__c
BigMachines__Bulk_Synchronization__c cafsl__Suspend_CPQ_User_Sync__c
BigMachines__Salesforce_User__c cafsl__User__c
BigMachines__Partner_Organization__c cafsl__Partner_Organization__c
3. Populate the cafsl__Embedded_CPQ_Settings__c column by determining one of the two options and then complete those steps, as follows:
• If you only have one connected CPQ Site, you can fill in every row with the same value. Locate the Salesforce ID for the Embedded CPQ Settings using the following steps:
a. In Salesforce Classic, navigate to All Tabs.
b. Click the Embedded CPQ Settings tab.

100
c. Locate the Embedded CPQ Site Settings record for your connection. Click on the Embedded CPQ Site Settings Name.
d. Copy the 15-digit Salesforce ID from the URL in your web browsers address bar.
e. Paste it into the cafsl__Embedded_CPQ_Settings__c column of the first row in your file and use autocomplete to populate every row with the same value.
• If you have more than one connected CPQ Site, you must identify which Embedded CPQ Settings record corresponds to each Oracle CPQ Cloud Site record. Complete the following steps to map the Salesforce IDs to each of these records:
a. In Salesforce Classic, navigate to All Tabs.
b. Click the Embedded CPQ Settings tab.
c. Locate the Embedded CPQ Site Settings record for each connection. Click on each Embedded CPQ Site Settings Name.
d. Record the 15-digit or 18-digit Salesforce ID from the URL in your web browser’s address bar and the associated Data Set name for each new connection.
e. Return to All Tabs.
f. Click the CPQ Site Settings tab.
g. Locate the CPQ Site Settings record for each connection. Click on each CPQ Site Setting Name.
h. Record the Callout URL that corresponds to each Data Set.
i. Return to All Tabs.
j. Click the legacy Oracle CPQ Cloud Site or BigMachines Site tab.
k. Locate the Site Name record for each legacy connection. Click on each Record Number.
l. Record the 15-digit or 18-digit Salesforce ID from the URL in your web browsers address bar and Site Name for each legacy connection.
m. Map the legacy Site Name’s Salesforce ID to the new Embedded CPQ Site Settings Salesforce ID using the recorded values. The Callout URL on the new connection will be the same as the Site Name on the legacy connection.
n. Populate the cafsl__Embedded_CPQ_Settings__c column for each record with the Embedded CPQ Site Settings Salesforce ID using the map above to cross-reference the Site Name’s Salesforce ID from the legacy Oracle Users.

101
4. Copy the BigMachines__Date_Time_Format__c column from the previously exported Oracle Users (BigMachines__Oracle_User__c) to a new temporary column in the upload file.
5. The Date-Time Format is stored differently on the new User record. Use the following mapping to populate the cafsl__Date_Time_Format__c with the new values that correspond to the legacy values for each row.
Legacy Date Time Format (v7) Value
New Date Time Format (v8) Value
MM/dd/yyyy h:mm a 0
MM/dd/yyyy HH:mm 1
dd/MM/yyyy HH:mm 2
dd.MM.yyyy HH:mm 3
yyyy/MM/dd HH:mm 4
yyyy.MM.dd HH:mm 5
dd/MM/yyyy H:mm 7
yyyy/MM/dd H:mm 8
yyyy-MM-dd h:mm 9
yyyy/MM/dd h:mm 11
dd/MM/yyyy h:mm a 16
yyyy-MM-dd HH:mm 17
6. Copy the BigMachines__Number_Format__c column from the previously exported Oracle Users (BigMachines__Oracle_User__c) to a new temporary column in the upload file.
7. The Number Format is stored differently on the new User record. Use the following mapping to populate the cafsl__Number_Format__c with the new values that correspond to the legacy values for each row.
Legacy Number Format (v7) Value
New Number Format (v8) Value
####.## 0
####,## 1

102
8. Copy the BigMachines__Time_Zone__c column from the previously exported Oracle Users (BigMachines__Oracle_User__c) to a new temporary column in the upload file.
9. The Time Zone Format is stored differently on the new User record. Use the following mapping to populate the cafsl__Time_Zone__c with the new values that correspond to the legacy values for each row.
Legacy Time Zone (v7) Value
New Time Zone (v8) Value
(GMT-12:00 GMT-12:00) Etc/GMT+12 (GMT-11:00 GMT-11:00) Samoa US/Samoa (GMT-10:00 GMT-10:00) Hawaii US/Hawaii (GMT-10:00 GMT-9:00) Aleutian US/Aleutian (GMT-9:30 GMT-9:30) Marquesas Pacific/Marquesas (GMT-9:00 GMT-9:00) Gambier Pacific/Gambier (GMT-9:00 GMT-8:00) Alaska US/Alaska (GMT-8:00 GMT-8:00) Pitcairn Pacific/Pitcairn (GMT-8:00 GMT-7:00) US Pacific Time US/Pacific (GMT-7:00 GMT-7:00) Arizona US/Arizona (GMT-7:00 GMT-6:00) Mountain US/Mountain (GMT-6:00 GMT-6:00) Saskatchewan Canada/Saskatchewan (GMT-6:00 GMT-5:00) US Central Time US/Central (GMT-5:00 GMT-5:00) Indianapolis America/Indianapolis (GMT-5:00 GMT-4:00) US Eastern Time US/Eastern (GMT-4:00 GMT-4:00) Puerto Rico America/Puerto_Rico (GMT-3:00 GMT-4:00) Chile Chile/Continental (GMT-4:00 GMT-3:00) Canada Atlantic Time Canada/Atlantic (GMT-3:00 GMT-3:00) Buenos Aires America/Beunos_Aires (GMT-3:30 GMT-2:30) Newfoundland Canada/Newfoundland (GMT-2:00 GMT-3:00) Sao Paulo America/Sao_Paulo (GMT-2:00 GMT-2:00) Brazil/DeNoronha Brazil/DeNoronha (GMT-1:00 GMT-1:00) Cape Verde Atlantic/Cape_Verde (GMT-1:00 GMT+0:00) Azores Atlantic/Azores (GMT+0:00 GMT+0:00) GMT GMT (GMT+0:00 GMT+1:00) London Europe/London (GMT+1:00 GMT+1:00) Algiers Africa/Algiers (GMT+2:00 GMT+1:00) Windhoek Africa/Windhoek (GMT+1:00 GMT+2:00) Amsterdam Europe/Amsterdam (GMT+2:00 GMT+2:00) Tripoli Africa/Tripoli (GMT+2:00 GMT+3:00) Israel Israel (GMT+3:00 GMT+3:00) Nairobi Africa/Nairobi (GMT+3:00 GMT+4:00) Moscow Europe/Moscow (GMT+3:30 GMT+4:30) Tehran Asia/Tehran

103
Legacy Time Zone (v7) Value
New Time Zone (v8) Value
(GMT+4:00 GMT+4:00) Dubai Asia/Dubai (GMT+4:00 GMT+5:00) Oral Asia/Oral (GMT+4:30 GMT+4:30) Kabul Asia/Kabul (GMT+5:00 GMT+5:00) Karachi Asia/Karachi (GMT+5:00 GMT+6:00) Yekaterinburg Asia/Yekaterinburg (GMT+5:30 GMT+5:30) Calcutta Asia/Calcutta (GMT+5:45 GMT+5:45) Katmandu Asia/Katmandu (GMT+6:00 GMT+6:00) Dhaka Asia/Dhaka (GMT+6:00 GMT+7:00) Novosibirsk Asia/Novosibirsk (GMT+6:30 GMT+6:30) Rangoon Asia/Rangoon (GMT+7:00 GMT+7:00) Bangkok Asia/Bangkok (GMT+7:00 GMT+8:00) Krasnoyarsk Asia/Krasnoyarsk (GMT+8:00 GMT+8:00) Taipei Asia/Taipei (GMT+8:00 GMT+8:00) Perth Australia/Perth (GMT+8:00 GMT+9:00) Irkutsk Asia/Irkutsk (GMT+9:00 GMT+9:00) Seoul Asia/Seoul (GMT+9:00 GMT+10:00) Yakutsk Asia/Yakutsk (GMT+9:30 GMT+9:30) Darwin Australia/Darwin (GMT+10:00 GMT+10:00) Queensland Australia/Queensland (GMT+10:30 GMT+9:30) Adelaide Australia/Adelaide (GMT+11:00 GMT+10:00) Canberra Australia/Canberra (GMT+11:00 GMT+10:00) Melbourne Australia/Melbourne (GMT+11:00 GMT+10:00) Sydney Australia/Sydney (GMT+10:00 GMT+11:00) Vladivostok Asia/Vladivostok (GMT+11:00 GMT+10:30) Lord Howe Australia/Lord_Howe (GMT+11:00 GMT+11:00) Ponape Pacific/Ponape (GMT+11:00 GMT+12:00) Magadan Asia/Magadan (GMT+11:30 GMT+11:30) Norfolk Pacific/Norfolk (GMT+12:00 GMT+12:00) Fiji Pacific/Fiji (GMT+13:00 GMT+12:00) Auckland NZ (GMT+12:00 GMT+13:00) Kamchatka Asia/Kamchatka (GMT+13:00 GMT+13:00) Enderbury Pacific/Enderbury (GMT+13:45 GMT+12:45) Chatham Pacific/Chatham

104
10. Copy the BigMachines__Unit_System__c column from the previously exported Oracle Users (BigMachines__Oracle_User__c) to a new temporary column in the upload file.
11. The Units preference is stored differently on the new User record. Use the following mapping to populate the cafsl__Units__c with the new values that correspond to the legacy values for each row.
Legacy Unit System (v7) Value
New Units (v8) Value
System Default 0 English 1 Metric 2
12. Copy the BigMachines__Access_Type__c column from the previously exported Oracle Users (BigMachines__Oracle_User__c) to a new temporary column in the upload file.
13. The User Type is stored differently on the new User record. Use the following mapping to populate the cafsl__User_Type__c with the new values that correspond to the legacy values for each row.
Legacy Access Type (v7) Value
New User Type (v8) Value
FullAccess FULL_ACCESS SalesAgent SALES_AGENT ChannelAgent CHANNEL_AGENT BuyAccess BUY_ACCESS RestrictedAccess RESTRICTED_ACCESS

105
14. Copy the BigMachines__ Association_to_Organization__c column from the previously exported Oracle Users (BigMachines__Oracle_User__c) to a new temporary column in the upload file.
15. The Partner User designation is stored differently on the new User record. Use the following mapping to populate the cafsl__Partner_User __c with the new values that correspond to the legacy values for each row.
Legacy Association to Organization (v7) Value
New Partner User (v8) Value
Internal User FALSE Partner User TRUE
16. Save the CSV.
IMPORTANT:
• Optionally, you can copy the Created By and Owner IDs for each legacy Oracle User to the new Oracle Quote record to ensure that record sharing policies are retained.
• There are several methods in Excel which can be used to populate these new values in the CSV. Detailed steps on this process are beyond the scope of this document.

106
INSERT THE LEGACY USERS INTO THE NEW OBJECT
To upload the legacy users to the new object, complete the following steps:
1. Open the Settings from the Settings menu.
2. Set the Batch size to 1.
3. Click OK.
4. On Data Loader home screen, click Insert. Log in when prompted.

107
5. Select the Oracle User (cafsl__Oracle_User__c) object.
6. Choose the CSV file created in the Prepare the User Upload File section.
7. Click Next.
8. The Data Selection screen displays. Click OK.

108
9. Click Create or Edit a Map.

109
10. Click Auto-Match Fields to Columns.
11. Verify the Field Mappings were successfully created.
12. Click OK.
• Optionally, you can Save Mapping to reuse this later.

110
13. Verify your mappings again and click Next.

111
14. Choose a location to save the results files. Click Finish.
15. Review the Success and Failure files. Verify the new Oracle Users were created with the desired initial values.
16. Verify that the User preferences in CPQ match the newly uploaded values on the Oracle User.
17. Log in as one of the newly created Oracle Users and verify that you can edit Quotes.

Copyright © 2019 Oracle and/or its affiliates. All rights reserved.
This software and related documentation are provided under a license agreement containing restrictions on use and disclosure and are protected by intellectual property laws. Except as expressly permitted in your license agreement or allowed by law, you may not use, copy, reproduce, translate, broadcast, modify, license, transmit, distribute, exhibit, perform, publish, or display any part, in any form, or by any means. Reverse engineering, disassembly, or decompilation of this software, unless required by law for interoperability, is prohibited.
The information contained herein is subject to change without notice and is not warranted to be error-free. If you find any errors, please report them to us in writing.
If this is software or related documentation that is delivered to the U.S. Government or anyone licensing it on behalf of the U.S. Government, then the following notice is applicable:
U.S. GOVERNMENT END USERS: Oracle programs, including any operating system, integrated software, any programs installed on the hardware, and/or documentation, delivered to U.S. Government end users are "commercial computer software" pursuant to the applicable Federal Acquisition Regulation and agency-specific supplemental regulations. As such, use, duplication, disclosure, modification, and adaptation of the programs, including any operating system, integrated software, any programs installed on the hardware, and/or documentation, shall be subject to license terms and license restrictions applicable to the programs. No other rights are granted to the U.S. Government.
This software or hardware is developed for general use in a variety of information management applications. It is not developed or intended for use in any inherently dangerous applications, including applications that may create a risk of personal injury. If you use this software or hardware in dangerous applications, then you shall be responsible to take all appropriate fail-safe, backup, redundancy, and other measures to ensure its safe use. Oracle Corporation and its affiliates disclaim any liability for any damages caused by use of this software or hardware in dangerous applications.
Oracle and Java are registered trademarks of Oracle and/or its affiliates. Other names may be trademarks of their respective owners.
Intel and Intel Xeon are trademarks or registered trademarks of Intel Corporation. All SPARC trademarks are used under license and are trademarks or registered trademarks of SPARC International, Inc. AMD, Opteron, the AMD logo, and the AMD Opteron logo are trademarks or registered trademarks of Advanced Micro Devices. UNIX is a registered trademark of The Open Group.
This software or hardware and documentation may provide access to or information about content, products, and services from third parties. Oracle Corporation and its affiliates are not responsible for and expressly disclaim all warranties of any kind with respect to third-party content, products, and services unless otherwise set forth in an applicable agreement between you and Oracle. Oracle Corporation and its affiliates will not be responsible for any loss, costs, or damages incurred due to your access to or use of third-party content, products, or services, except as set forth in an applicable agreement between you and Oracle.