Oracle Automatic Storage Management - Oracle Help … · Oracle® Automatic Storage Management...
646
Oracle ® Automatic Storage Management Administrator's Guide 12c Release 1 (12.1) E41058-12 July 2017
Transcript of Oracle Automatic Storage Management - Oracle Help … · Oracle® Automatic Storage Management...

Oracle® Automatic Storage ManagementAdministrator's Guide
12c Release 1 (12.1)
E41058-12
July 2017

Oracle Automatic Storage Management Administrator's Guide, 12c Release 1 (12.1)
E41058-12
Copyright © 2007, 2017, Oracle and/or its affiliates. All rights reserved.
Primary Author: Eric Belden
Contributing Authors: Jerry Abraham, Prasad Bagal, Mark Bauer, Bill Bridge, Chan Chan, Xiaobin Chen,Hanlin Chien, Jonathan Creighton, Steve Fogel, Dave Friedman, Barb Glover, Fred Glover, Allan Graves,Shie-rei Huang, Rekha Iyer, Diane Lebel, Rich Long, Colin McGregor, Gregory Mengel, Harendra Mishra,Valarie Moore, Nitin Munjal, Darshan Nagarajappa, Harish Nandyala, Bob Nelson, Balaji Pagadala, SatishPanchumarthy, Soma Prasad, Kathy Rich, Harshavardhan Sabbineni, Francisco Sanchez, Santhosh Selvaraj,Ara Shakian, Duane Smith, Joshua Smith, Malai Stalin, Amar Subba, Yaser Suleiman, Elisabeth Thibault,Michael Timpanaro-Perrotta, Samarjeet Tomar, Brian Tsao, Nitin Vengurlekar, P Venkatraman, AntonVerhulst, Radek Vingralek, Ron Weiss, Ric Werme, Rajiv Wickremesinghe, Jim A. Williams, SivakumarYarlagadda, Song Ye, Krishnan Yegnashankaran, Jon Zolla
This software and related documentation are provided under a license agreement containing restrictions onuse and disclosure and are protected by intellectual property laws. Except as expressly permitted in yourlicense agreement or allowed by law, you may not use, copy, reproduce, translate, broadcast, modify, license,transmit, distribute, exhibit, perform, publish, or display any part, in any form, or by any means. Reverseengineering, disassembly, or decompilation of this software, unless required by law for interoperability, isprohibited.
The information contained herein is subject to change without notice and is not warranted to be error-free. Ifyou find any errors, please report them to us in writing.
If this is software or related documentation that is delivered to the U.S. Government or anyone licensing it onbehalf of the U.S. Government, then the following notice is applicable:
U.S. GOVERNMENT END USERS: Oracle programs, including any operating system, integrated software,any programs installed on the hardware, and/or documentation, delivered to U.S. Government end users are"commercial computer software" pursuant to the applicable Federal Acquisition Regulation and agency-specific supplemental regulations. As such, use, duplication, disclosure, modification, and adaptation of theprograms, including any operating system, integrated software, any programs installed on the hardware,and/or documentation, shall be subject to license terms and license restrictions applicable to the programs.No other rights are granted to the U.S. Government.
This software or hardware is developed for general use in a variety of information management applications.It is not developed or intended for use in any inherently dangerous applications, including applications thatmay create a risk of personal injury. If you use this software or hardware in dangerous applications, then youshall be responsible to take all appropriate fail-safe, backup, redundancy, and other measures to ensure itssafe use. Oracle Corporation and its affiliates disclaim any liability for any damages caused by use of thissoftware or hardware in dangerous applications.
Oracle and Java are registered trademarks of Oracle and/or its affiliates. Other names may be trademarks oftheir respective owners.
Intel and Intel Xeon are trademarks or registered trademarks of Intel Corporation. All SPARC trademarks areused under license and are trademarks or registered trademarks of SPARC International, Inc. AMD, Opteron,the AMD logo, and the AMD Opteron logo are trademarks or registered trademarks of Advanced MicroDevices. UNIX is a registered trademark of The Open Group.
This software or hardware and documentation may provide access to or information about content, products,and services from third parties. Oracle Corporation and its affiliates are not responsible for and expresslydisclaim all warranties of any kind with respect to third-party content, products, and services unlessotherwise set forth in an applicable agreement between you and Oracle. Oracle Corporation and its affiliateswill not be responsible for any loss, costs, or damages incurred due to your access to or use of third-partycontent, products, or services, except as set forth in an applicable agreement between you and Oracle.

Contents
Preface .......................................................................................................................................................... xxxiii
Audience ................................................................................................................................................. xxxiii
Documentation Accessibility ............................................................................................................... xxxiii
Related Documents................................................................................................................................ xxxiv
Conventions............................................................................................................................................ xxxiv
Changes in This Release for Oracle Automatic Storage ManagementAdministrator's Guide ........................................................................................................................ xxxv
Changes in Oracle Automatic Storage Management 12c Release 1 (12.1.0.2)................................ xxxv
New Features .................................................................................................................................. xxxv
Changes in Oracle Automatic Storage Management 12c Release 1 (12.1.0.1)............................... xxxvi
New Features ................................................................................................................................. xxxvi
Deprecated Features............................................................................................................................ xl
Desupported Features ........................................................................................................................ xl
Changes in Oracle ACFS and Oracle ADVM for Oracle ASM 12c Release 1 (12.1.0.2) ..................... xl
New Features ....................................................................................................................................... xl
Changes in Oracle ACFS and Oracle ADVM for Oracle ASM 12c Release 1 (12.1.0.1) ................... xlii
New Features ..................................................................................................................................... xlii
Part I Introduction
1 Introducing Oracle Automatic Storage Management
Overview of Oracle Automatic Storage Management ........................................................................ 1-1
About Oracle Automatic Storage Management Cluster File System................................................ 1-2
Understanding Oracle ASM Concepts .................................................................................................. 1-2
About Oracle ASM Instances.......................................................................................................... 1-3
About Oracle ASM Disk Groups.................................................................................................... 1-6
About Mirroring and Failure Groups............................................................................................ 1-6
About Oracle ASM Disks ................................................................................................................ 1-7
About Oracle ASM Allocation Units ............................................................................................ 1-7
About Oracle ASM Files .................................................................................................................. 1-7
iii

Understanding Oracle ASM Disk Group Administration................................................................ 1-11
About Discovering Disks .............................................................................................................. 1-11
About Mounting and Dismounting Disk Groups ..................................................................... 1-11
About Adding and Dropping Disks ............................................................................................ 1-12
About Online Storage Reconfigurations and Dynamic Rebalancing ..................................... 1-12
2 Exploring Considerations for Oracle ASM Storage
Storage Resources for Disk Groups........................................................................................................ 2-1
Oracle ASM and Multipathing ............................................................................................................... 2-3
Recommendations for Storage Preparation .......................................................................................... 2-4
Storage Device Path and Permission Persistence................................................................................. 2-5
Part II Oracle ASM Instances and Disk Groups
3 Administering Oracle ASM Instances
Operating with Different Releases of Oracle ASM and Database Instances Simultaneously ....... 3-1
Initialization Parameters for Oracle ASM Instances............................................................................ 3-2
About Initialization Parameter Files for an Oracle ASM Instance ............................................ 3-3
About Backing Up, Copying, and Moving an Oracle ASM Initialization Parameter File..... 3-4
About Oracle ASM Initialization Parameter Settings ................................................................. 3-6
About Automatic Memory Management for Oracle ASM......................................................... 3-7
Recommended Settings for Oracle ASM Initialization Parameters .......................................... 3-8
About Setting Database Initialization Parameters for Use with Oracle ASM ....................... 3-14
Administration of Oracle ASM Instances............................................................................................ 3-15
Managing Oracle Flex ASM.......................................................................................................... 3-16
Using Oracle Restart ...................................................................................................................... 3-21
About Starting Up an Oracle ASM Instance............................................................................... 3-22
About Shutting Down an Oracle ASM Instance ........................................................................ 3-25
About Administering Oracle ASM Instances with Server Control Utility ............................ 3-27
About Out of Place Upgrades....................................................................................................... 3-27
About Configuring Oracle Grid Infrastructure with the Configuration Wizard.................. 3-27
About Active Session History Sampling for Oracle ASM........................................................ 3-28
About Oracle Home User on Windows ...................................................................................... 3-28
Upgrading and Patching Oracle ASM................................................................................................. 3-29
About Oracle ASM Rolling Upgrade........................................................................................... 3-29
About Oracle ASM Rolling Patches............................................................................................. 3-30
About Converting to Oracle Flex ASM ....................................................................................... 3-31
Oracle ASM Filter Driver....................................................................................................................... 3-34
About Oracle ASM Filter Driver .................................................................................................. 3-35
Deciding Between Oracle ASMLIB and Oracle ASM Filter Driver......................................... 3-35
Configuring Oracle ASM Filter Driver........................................................................................ 3-36
About Migrating to Oracle ASM Filter Driver From ASMLIB ................................................ 3-39
Determining Whether Oracle ASM Filter Driver Has Been Configured ............................... 3-41
iv

Updating the Oracle ASM Filter Driver AFD_DISKSTRING Parameter............................... 3-42
Updating the Oracle ASM ASM_DISKSTRING Parameter for Oracle ASM Filter Driver
Disks ........................................................................................................................................... 3-42
Setting, Clearing, and Scanning Oracle ASM Filter Driver Labels ......................................... 3-43
Deconfiguring Oracle ASM Filter Driver.................................................................................... 3-44
Authentication for Accessing Oracle ASM Instances ........................................................................ 3-46
About Privileges for Oracle ASM................................................................................................. 3-47
Creating Users with the SYSASM Privilege ............................................................................... 3-50
Operating System Authentication for Oracle ASM .................................................................. 3-51
Password File Authentication for Oracle ASM ......................................................................... 3-52
Managing a Shared Password File in a Disk Group ................................................................. 3-52
Migration of a Database to Use Oracle ASM ...................................................................................... 3-55
About Using Oracle Recovery Manager to Migrate Databases to Oracle ASM.................... 3-56
Best Practices White Papers on Migrating to Oracle ASM....................................................... 3-56
4 Administering Oracle ASM Disk Groups
Managing Disk Group Attributes .......................................................................................................... 4-2
About Viewing and Setting Disk Group Attributes.................................................................... 4-2
Summary of Disk Group Attributes .............................................................................................. 4-2
Creating Disk Groups .............................................................................................................................. 4-7
Using the CREATE DISKGROUP SQL Statement....................................................................... 4-7
Creating Disk Groups for Data and Fast Recovery Area ........................................................... 4-9
Creating Disk Groups for a New Oracle Installation................................................................ 4-10
Specifying the Sector Size for Drives........................................................................................... 4-11
Storing Oracle Cluster Registry and Voting Files in Oracle ASM Disk Groups ................... 4-13
Altering Disk Groups ............................................................................................................................. 4-15
Managing Oracle ADVM Volumes in a Disk Group ................................................................ 4-16
Adding Disks to a Disk Group ..................................................................................................... 4-17
Using the ALTER DISKGROUP SQL Statement to Add Disks to a Disk Group ................. 4-17
Replacing Disks in Disk Groups .................................................................................................. 4-18
Renaming Disks in Disk Groups.................................................................................................. 4-18
Dropping Disks from Disk Groups.............................................................................................. 4-19
Intelligent Data Placement ............................................................................................................ 4-20
Resizing Disks in Disk Groups..................................................................................................... 4-21
Undropping Disks in Disk Groups.............................................................................................. 4-21
Manually Rebalancing Disk Groups............................................................................................ 4-21
Tuning Rebalance Operations ...................................................................................................... 4-23
Scrubbing Disk Groups ................................................................................................................. 4-24
Oracle ASM Disk Discovery ................................................................................................................. 4-25
How A Disk is Discovered............................................................................................................ 4-25
Disk Discovery Rules ..................................................................................................................... 4-26
Improving Disk Discovery Time.................................................................................................. 4-27
Managing Capacity in Disk Groups..................................................................................................... 4-27
v

Negative Values of USABLE_FILE_MB...................................................................................... 4-30
Oracle ASM Mirroring and Disk Group Redundancy ...................................................................... 4-30
Mirroring, Redundancy, and Failure Group Options............................................................... 4-30
Oracle ASM Recovery from Read and Write I/O Errors ......................................................... 4-33
Oracle ASM Fast Mirror Resync................................................................................................... 4-34
Even Read for Disk Groups .......................................................................................................... 4-37
Preferred Read Failure Groups .................................................................................................... 4-37
Performance and Scalability Considerations for Disk Groups ........................................................ 4-39
Determining the Number of Disk Groups.................................................................................. 4-39
Performance Characteristics When Grouping Disks ................................................................ 4-39
Oracle ASM Storage Limits........................................................................................................... 4-39
Disk Group Compatibility..................................................................................................................... 4-41
Overview of Disk Group Compatibility ..................................................................................... 4-41
Disk Group Compatibility Attributes ......................................................................................... 4-42
Setting Disk Group Compatibility Attributes ............................................................................ 4-43
Features Enabled By Disk Group Compatibility Attribute Settings....................................... 4-47
Considerations When Setting Disk Group Compatibility in Replicated Environments ..... 4-49
Managing Oracle ASM File Access Control for Disk Groups .......................................................... 4-50
About Oracle ASM File Access Control ...................................................................................... 4-50
Setting Disk Group Attributes for Oracle ASM File Access Control ...................................... 4-51
Using SQL Statements to Manage Oracle ASM File Access Control ...................................... 4-52
Maintaining Disk Groups ...................................................................................................................... 4-55
Mounting and Dismounting Disk Groups ................................................................................. 4-55
Mounting Disk Groups Using the FORCE Option.................................................................... 4-56
Checking the Internal Consistency of Disk Group Metadata .................................................. 4-56
Dropping Disk Groups .................................................................................................................. 4-57
Renaming Disks Groups................................................................................................................ 4-58
5 Administering Oracle ASM Files, Directories, and Templates
What Types of Files Does Oracle ASM Support?................................................................................. 5-1
About Oracle ASM File Names............................................................................................................... 5-3
Single File Creation Form................................................................................................................ 5-4
Multiple File Creation Form ........................................................................................................... 5-4
Fully Qualified File Name Form .................................................................................................... 5-4
Alias Oracle ASM File Name Forms.............................................................................................. 5-6
Creating a Tablespace in Oracle ASM: Using a Data File with an Alias Name ...................... 5-7
Alias Oracle ASM File Name with Template Form..................................................................... 5-7
Incomplete Oracle ASM File Name Form..................................................................................... 5-8
Incomplete Oracle ASM File Name with Template Form.......................................................... 5-8
Creating and Referencing Oracle ASM Files in the Database ............................................................ 5-8
Creating Oracle ASM Files Using a Default File Location for Disk Group Specification...... 5-8
Using Oracle ASM File Names in SQL Statements ................................................................... 5-10
Moving Data Files Between Disk Groups With ALTER DATABASE.................................... 5-10
vi

Oracle Database File Mapping for Oracle ASM Files ............................................................... 5-11
Managing Alias Names for Oracle ASM File Names ........................................................................ 5-13
Adding an Alias Name for an Oracle ASM File Name............................................................. 5-14
Renaming an Alias Name for an Oracle ASM File Name ........................................................ 5-14
Dropping an Alias Name for an Oracle ASM File Name ......................................................... 5-14
Dropping Files and Associated Aliases from a Disk Group .................................................... 5-14
Managing Disk Group Directories ....................................................................................................... 5-15
Creating a Directory....................................................................................................................... 5-15
Renaming a Directory.................................................................................................................... 5-16
Dropping a Directory..................................................................................................................... 5-16
Accessing Oracle ASM Files with the XML DB Virtual Folder........................................................ 5-16
Inside /sys/asm ............................................................................................................................. 5-17
Using DBMS_FILE Transfer Utility for Oracle ASM......................................................................... 5-18
Managing Disk Group Templates ........................................................................................................ 5-19
Template Attributes ....................................................................................................................... 5-20
Adding Templates to a Disk Group............................................................................................. 5-21
Modifying a Disk Group Template.............................................................................................. 5-22
Dropping Templates from a Disk Group.................................................................................... 5-22
Creating Tablespaces in Oracle ASM: Specifying Attributes with Templates ...................... 5-23
6 Using Views to Display Oracle ASM Information
Views Containing Oracle ASM Disk Group Information................................................................... 6-1
Viewing Oracle ASM File Access Control Information ...................................................................... 6-4
Viewing Disk Region Information ......................................................................................................... 6-5
7 Administering Oracle ASM with Oracle Enterprise Manager
Accessing the Oracle Automatic Storage Management Home Page................................................. 7-2
Configuring Oracle ASM Initialization Parameters with Oracle Enterprise Manager................... 7-3
Managing Oracle ASM Users with Oracle Enterprise Manager........................................................ 7-4
Managing Disk Groups with Oracle Enterprise Manager.................................................................. 7-5
Creating Disk Groups ...................................................................................................................... 7-6
Adding Disks to Disk Groups ........................................................................................................ 7-8
Bringing Disks Online and Offline ................................................................................................ 7-9
Dropping Disks from Disk Groups.............................................................................................. 7-12
Dropping Disk Groups .................................................................................................................. 7-13
Monitoring Disk Group Usage..................................................................................................... 7-14
Mounting and Dismounting Disk Groups ................................................................................. 7-14
Administering Advanced Disk Group Properties..................................................................... 7-15
Specifying a Power Limit For Disk Online ................................................................................. 7-17
Replacing An Existing Disk With a New Disk........................................................................... 7-18
Setting and Modifying Content Type for the Disk Group ....................................................... 7-18
Setting and Modifying the Failure Group Repair Time............................................................ 7-19
Running Rebalance on Multiple Disk Groups ........................................................................... 7-19
vii
Viewing Rebalance Process Related Data................................................................................... 7-19
Setting and Modifying the Thin Provisioned Disk Group Attribute...................................... 7-20
Running the On Demand Scrubbing Process............................................................................. 7-20
Determining Whether Scrubbing Process Is Running .............................................................. 7-21
Managing Oracle ASM File Access Control with Oracle Enterprise Manager.............................. 7-21
Managing Directories, Files, and Aliases with Oracle Enterprise Manager .................................. 7-22
Managing Disk Group Templates with Oracle Enterprise Manager .............................................. 7-23
Managing Oracle ASM Filter Driver With Oracle Enterprise Manager ......................................... 7-24
Discovering ASM Filter Driver Disks.......................................................................................... 7-24
Provisioning ASM Filter Driver Disks ........................................................................................ 7-24
Releasing ASM Filter Driver Disks .............................................................................................. 7-25
Monitoring Oracle ASM Performance With Oracle Enterprise Manager ...................................... 7-25
Monitoring General Oracle ASM Performance.......................................................................... 7-25
Checking Disk Group Integrity.................................................................................................... 7-26
Backing Up Oracle ASM Files with Oracle Enterprise Manager ..................................................... 7-27
Performing Bad Block Recovery with Oracle Enterprise Manager ................................................. 7-27
Migrating to Oracle ASM with Oracle Enterprise Manager............................................................. 7-28
Monitoring Alerts and Incidents With Oracle ASM Support Workbench..................................... 7-29
Monitoring Oracle Flex ASM ................................................................................................................ 7-31
8 Performing Oracle ASM Data Migration with RMAN
Overview of Oracle ASM Data Migration............................................................................................. 8-1
Purpose of Oracle ASM Data Migration ....................................................................................... 8-2
Basic Concepts of Oracle ASM Data Migration ........................................................................... 8-2
Basic Steps of Data Migration to Oracle ASM Using RMAN .................................................... 8-2
Preparing to Migrate the Database to Oracle ASM Using RMAN.................................................... 8-3
Migrating the Database to Oracle ASM Using RMAN ....................................................................... 8-6
Migrating a Database from Oracle ASM to Alternative Storage ....................................................... 8-9
Moving Data Files Between Oracle ASM Disk Groups Using RMAN ............................................. 8-9
9 Managing Oracle ASM With ASMCA
Getting Started With the ASMCA GUI Tool......................................................................................... 9-1
Managing Instances and Disk Groups With ASMCA......................................................................... 9-2
Creating Oracle ASM Instances with ASMCA............................................................................. 9-2
Upgrading an Oracle ASM Instance with ASMCA..................................................................... 9-4
Managing Disk Groups with ASMCA .......................................................................................... 9-5
ASMCA Command-Line Interface......................................................................................................... 9-8
Running ASMCA Command-Line ................................................................................................ 9-8
ASMCA Commands for Instances and Disk Groups.................................................................. 9-9
10 Managing Oracle ASM with ASMCMD
About ASMCMD .................................................................................................................................... 10-1
Types of ASMCMD Commands .................................................................................................. 10-1
viii

About Oracle ASM Files, File Names, Directories, and Aliases .............................................. 10-2
Preparing to Run ASMCMD......................................................................................................... 10-6
Running ASMCMD in Interactive Mode .................................................................................... 10-7
Running ASMCMD in Noninteractive Mode ............................................................................ 10-9
Getting Help.................................................................................................................................. 10-11
ASMCMD Instance Management Commands ................................................................................. 10-11
dsget ............................................................................................................................................... 10-12
dsset................................................................................................................................................ 10-13
lsct ................................................................................................................................................... 10-14
lsop ................................................................................................................................................. 10-15
lspwusr........................................................................................................................................... 10-15
orapwusr........................................................................................................................................ 10-16
pwcopy........................................................................................................................................... 10-17
pwcreate......................................................................................................................................... 10-18
pwdelete......................................................................................................................................... 10-18
pwget.............................................................................................................................................. 10-19
pwmove ......................................................................................................................................... 10-20
pwset .............................................................................................................................................. 10-21
showclustermode ......................................................................................................................... 10-21
showclusterstate ........................................................................................................................... 10-22
showpatches .................................................................................................................................. 10-22
showversion .................................................................................................................................. 10-22
shutdown....................................................................................................................................... 10-23
spbackup........................................................................................................................................ 10-24
spcopy ............................................................................................................................................ 10-25
spget ............................................................................................................................................... 10-26
spmove........................................................................................................................................... 10-27
spset................................................................................................................................................ 10-28
startup ............................................................................................................................................ 10-28
ASMCMD Oracle ASM Filter Driver Management Commands ................................................... 10-29
afd_configure ................................................................................................................................ 10-29
afd_deconfigure............................................................................................................................ 10-30
afd_dsget........................................................................................................................................ 10-31
afd_dsset ........................................................................................................................................ 10-31
afd_filter......................................................................................................................................... 10-32
afd_label......................................................................................................................................... 10-32
afd_lsdsk........................................................................................................................................ 10-33
afd_scan ......................................................................................................................................... 10-33
afd_state......................................................................................................................................... 10-34
afd_unlabel .................................................................................................................................... 10-34
ASMCMD File Management Commands ......................................................................................... 10-35
amdu_extract................................................................................................................................. 10-36
cd..................................................................................................................................................... 10-36
ix
cp..................................................................................................................................................... 10-37
du .................................................................................................................................................... 10-38
find.................................................................................................................................................. 10-39
ls ...................................................................................................................................................... 10-40
lsof................................................................................................................................................... 10-42
mkalias ........................................................................................................................................... 10-43
mkdir .............................................................................................................................................. 10-44
pwd................................................................................................................................................. 10-44
rm.................................................................................................................................................... 10-45
rmalias............................................................................................................................................ 10-46
ASMCMD Disk Group Management Commands........................................................................... 10-46
chdg ................................................................................................................................................ 10-47
chkdg.............................................................................................................................................. 10-49
dropdg............................................................................................................................................ 10-50
iostat ............................................................................................................................................... 10-51
lsattr................................................................................................................................................ 10-53
lsdg ................................................................................................................................................. 10-54
lsdsk................................................................................................................................................ 10-56
lsod ................................................................................................................................................. 10-58
md_backup.................................................................................................................................... 10-59
md_restore..................................................................................................................................... 10-60
mkdg .............................................................................................................................................. 10-61
mount ............................................................................................................................................. 10-63
offline ............................................................................................................................................. 10-63
online.............................................................................................................................................. 10-64
rebal ................................................................................................................................................ 10-65
remap ............................................................................................................................................. 10-66
setattr.............................................................................................................................................. 10-67
umount........................................................................................................................................... 10-67
ASMCMD Template Management Commands ............................................................................... 10-68
chtmpl ............................................................................................................................................ 10-68
lstmpl.............................................................................................................................................. 10-69
mktmpl........................................................................................................................................... 10-70
rmtmpl ........................................................................................................................................... 10-71
ASMCMD File Access Control Commands ...................................................................................... 10-72
chgrp............................................................................................................................................... 10-72
chmod............................................................................................................................................. 10-73
chown............................................................................................................................................. 10-75
groups ............................................................................................................................................ 10-75
grpmod........................................................................................................................................... 10-76
lsgrp................................................................................................................................................ 10-77
lsusr ................................................................................................................................................ 10-77
mkgrp............................................................................................................................................. 10-78
x
mkusr ............................................................................................................................................. 10-79
passwd ........................................................................................................................................... 10-79
rmgrp.............................................................................................................................................. 10-80
rmusr .............................................................................................................................................. 10-81
rpusr ............................................................................................................................................... 10-81
Part III Oracle Automatic Storage Management Cluster File System
11 Introducing Oracle ACFS and Oracle ADVM
Overview of Oracle ACFS ..................................................................................................................... 11-1
Understanding Oracle ACFS Concepts ............................................................................................... 11-4
About Oracle ACFS........................................................................................................................ 11-4
About the Oracle ACFS Mount Model and Namespace .......................................................... 11-5
About Oracle ACFS and Database Data Files ............................................................................ 11-5
About Oracle ACFS and Oracle Database Homes..................................................................... 11-7
About Oracle ASM Dynamic Volume Manager ........................................................................ 11-9
About the Oracle ACFS Driver Model ........................................................................................ 11-9
About the Oracle ACFS Mount Registry .................................................................................... 11-9
About Oracle ACFS Snapshots................................................................................................... 11-10
About Oracle ACFS and Backup and Restore.......................................................................... 11-12
About Oracle ACFS Integration with Oracle ASM ................................................................. 11-12
About Oracle ACFS and External Tables on Windows .......................................................... 11-13
Understanding Oracle ACFS Administration .................................................................................. 11-13
Oracle ACFS and File Access and Administration Security .................................................. 11-13
Oracle ACFS and Grid Infrastructure Installation .................................................................. 11-14
Oracle ACFS Configuration ........................................................................................................ 11-14
Oracle Clusterware Resources and Oracle ACFS Administration........................................ 11-15
Oracle ACFS and Dismount or Shutdown Operations........................................................... 11-19
Oracle ACFS Security................................................................................................................... 11-19
Oracle ACFS Encryption ............................................................................................................. 11-22
Oracle ACFS Auditing................................................................................................................. 11-24
Oracle ACFS Replication ............................................................................................................. 11-30
Oracle ACFS Tagging .................................................................................................................. 11-33
Using Replication with Auditing, Encryption, and Security ................................................. 11-35
Oracle ACFS Plugins.................................................................................................................... 11-36
High Availability Network File Storage for Oracle Grid Infrastructure.............................. 11-37
Overview of Oracle ASM Dynamic Volume Manager.................................................................... 11-39
12 Using Views to Display Oracle ACFS Information
Views Containing Oracle ACFS Information ..................................................................................... 12-1
Oracle ACFS Support for Oracle Database File Mapping Views .................................................... 12-7
xi

13 Administering Oracle ACFS with Oracle Enterprise Manager
Managing Oracle ACFS File Systems and Volumes with Oracle Enterprise Manager ................ 13-1
Creating Oracle ACFS File Systems and Volumes .................................................................... 13-2
Viewing and Modifying Oracle ACFS Volumes and File Systems......................................... 13-4
Managing Oracle ACFS Snapshots with Oracle Enterprise Manager ............................................ 13-5
Creating, Modifying, and Viewing Snapshots........................................................................... 13-6
Converting Snapshots Between Read-Only and Read-Write .................................................. 13-7
Creating Child Snapshots from Existing Snapshots.................................................................. 13-7
Managing Security Features with Oracle Enterprise Manager........................................................ 13-8
Initializing Oracle ACFS Security ................................................................................................ 13-9
Preparing an Oracle ACFS For Security.................................................................................... 13-10
Undoing Oracle ACFS Security.................................................................................................. 13-10
Enabling Security on Oracle ACFS ............................................................................................ 13-11
Disabling Security on Oracle ACFS ........................................................................................... 13-11
Viewing Security Status............................................................................................................... 13-11
Adding an Oracle ACFS Security Administrator .................................................................... 13-12
Changing an Oracle ACFS Security Administrator Password .............................................. 13-12
Deleting an Oracle ACFS Security Administrator................................................................... 13-12
Viewing Oracle ACFS Security Administrators ...................................................................... 13-12
Creating a Rule ............................................................................................................................. 13-13
Cloning a Rule............................................................................................................................... 13-13
Editing a Rule................................................................................................................................ 13-14
Deleting a Rule.............................................................................................................................. 13-14
Searching For and Viewing Rules.............................................................................................. 13-14
Creating a Ruleset ........................................................................................................................ 13-15
Cloning a Ruleset.......................................................................................................................... 13-16
Editing a Ruleset........................................................................................................................... 13-16
Deleting a Ruleset......................................................................................................................... 13-16
Searching For and Viewing Rulesets ......................................................................................... 13-17
Creating a Realm .......................................................................................................................... 13-18
Cloning a Realm ........................................................................................................................... 13-18
Adding Objects to a Realm ......................................................................................................... 13-19
Deleting Objects from a Realm................................................................................................... 13-19
Deleting a Realm........................................................................................................................... 13-20
Viewing Realms............................................................................................................................ 13-20
Managing Encryption Features with Oracle Enterprise Manager................................................. 13-21
Initializing Oracle ACFS Encryption......................................................................................... 13-21
Enabling, Disabling, and Setting Parameters for Encryption On an Oracle ACFS ............ 13-22
Viewing Encryption Status ......................................................................................................... 13-22
Managing Tagging Features with Oracle Enterprise Manager...................................................... 13-22
Adding a Tag in Oracle ACFS .................................................................................................... 13-23
Removing a Tag in Oracle ACFS................................................................................................ 13-23
xii

Searching for Tags in Oracle ACFS............................................................................................ 13-24
14 Managing Oracle ACFS and Oracle ADVM With ASMCA
ASMCA GUI Tool for Managing Oracle ACFS and Oracle ADVM................................................ 14-1
Managing Oracle ADVM Volumes with ASMCA..................................................................... 14-1
Managing Oracle ACFS File Systems with ASMCA................................................................. 14-3
Managing Security and Encryption for Oracle ACFS with ASMCA...................................... 14-5
Creating an Oracle ACFS File System for Database Use .......................................................... 14-7
ASMCA Command-Line Interface for Managing Oracle ACFS and Oracle ADVM.................... 14-9
ASMCA Commands for Oracle ACFS and Oracle ADVM ...................................................... 14-9
15 Managing Oracle ADVM with ASMCMD
ASMCMD Volume Management Commands.................................................................................... 15-1
volcreate........................................................................................................................................... 15-1
voldelete........................................................................................................................................... 15-4
voldisable......................................................................................................................................... 15-4
volenable.......................................................................................................................................... 15-5
volinfo .............................................................................................................................................. 15-6
volresize ........................................................................................................................................... 15-7
volset ................................................................................................................................................ 15-8
volstat ............................................................................................................................................... 15-9
16 Managing Oracle ACFS with Command-Line Tools
Basic Steps to Manage Oracle ACFS Systems..................................................................................... 16-1
Creating an Oracle ACFS File System ......................................................................................... 16-2
Accessing an Oracle ACFS File System on a Different Node in the Cluster ......................... 16-4
Managing Oracle ACFS Snapshots .............................................................................................. 16-5
Securing Oracle ACFS File Systems............................................................................................. 16-6
Encrypting Oracle ACFS File Systems ...................................................................................... 16-11
Tagging Oracle ACFS File Systems ........................................................................................... 16-12
Replicating Oracle ACFS File Systems ...................................................................................... 16-14
Deregistering, Dismounting, and Disabling Volumes and Oracle ACFS File Systems ..... 16-20
Removing an Oracle ACFS File System and a Volume .......................................................... 16-21
Oracle ACFS Command-line Tools for Linux Environments ........................................................ 16-22
fsck.................................................................................................................................................. 16-23
mkfs ................................................................................................................................................ 16-24
mount ............................................................................................................................................. 16-26
umount........................................................................................................................................... 16-28
Oracle ACFS Command-line Tools for the Solaris Environment .................................................. 16-29
fsck.................................................................................................................................................. 16-30
mkfs ................................................................................................................................................ 16-31
mount ............................................................................................................................................. 16-33
umount/umountall...................................................................................................................... 16-35
xiii

Oracle ACFS Command-line Tools for the AIX Environment....................................................... 16-36
fsck.................................................................................................................................................. 16-37
mkfs ................................................................................................................................................ 16-39
mount ............................................................................................................................................. 16-41
umount/umountall...................................................................................................................... 16-43
Oracle ACFS Command-line Tools for Windows Environments.................................................. 16-44
acfschkdsk ..................................................................................................................................... 16-44
acfsdismount ................................................................................................................................. 16-46
acfsformat ...................................................................................................................................... 16-47
acfsmountvol................................................................................................................................. 16-48
acfsutil detach ............................................................................................................................... 16-50
advmutil dismount....................................................................................................................... 16-50
advmutil list .................................................................................................................................. 16-52
advmutil mount............................................................................................................................ 16-52
Oracle ACFS Command-Line Tools for Tagging ............................................................................. 16-54
acfsutil tag info.............................................................................................................................. 16-54
acfsutil tag set................................................................................................................................ 16-55
acfsutil tag unset........................................................................................................................... 16-57
Oracle ACFS Command-Line Tools for Replication........................................................................ 16-58
acfsutil repl bg............................................................................................................................... 16-58
acfsutil repl compare.................................................................................................................... 16-60
acfsutil repl info ............................................................................................................................ 16-61
acfsutil repl init ............................................................................................................................. 16-63
acfsutil repl pause......................................................................................................................... 16-65
acfsutil repl resume...................................................................................................................... 16-66
acfsutil repl sync ........................................................................................................................... 16-67
acfsutil repl terminate .................................................................................................................. 16-68
acfsutil repl trace .......................................................................................................................... 16-69
acfsutil repl update....................................................................................................................... 16-69
Oracle ACFS Command-Line Tools for Auditing ........................................................................... 16-70
acfsutil audit archive.................................................................................................................... 16-71
acfsutil audit disable .................................................................................................................... 16-72
acfsutil audit enable ..................................................................................................................... 16-72
acfsutil audit info.......................................................................................................................... 16-73
acfsutil audit init........................................................................................................................... 16-74
acfsutil audit purge ...................................................................................................................... 16-75
acfsutil audit read......................................................................................................................... 16-75
Oracle ACFS Command-Line Tools for Security ............................................................................. 16-76
acfsutil sec admin add ................................................................................................................. 16-77
acfsutil sec admin password....................................................................................................... 16-78
acfsutil sec admin remove........................................................................................................... 16-79
acfsutil sec batch ........................................................................................................................... 16-79
acfsutil sec disable ........................................................................................................................ 16-80
xiv

acfsutil sec enable ......................................................................................................................... 16-81
acfsutil sec info.............................................................................................................................. 16-82
acfsutil sec info file ....................................................................................................................... 16-83
acfsutil sec init............................................................................................................................... 16-83
acfsutil sec load............................................................................................................................. 16-85
acfsutil sec prepare....................................................................................................................... 16-86
acfsutil sec realm add................................................................................................................... 16-88
acfsutil sec realm audit disable................................................................................................... 16-92
acfsutil sec realm audit enable.................................................................................................... 16-93
acfsutil sec realm audit info ........................................................................................................ 16-95
acfsutil sec realm clone ................................................................................................................ 16-95
acfsutil sec realm create ............................................................................................................... 16-97
acfsutil sec realm delete............................................................................................................... 16-98
acfsutil sec realm destroy ............................................................................................................ 16-99
acfsutil sec rule clone ................................................................................................................... 16-99
acfsutil sec rule create ................................................................................................................ 16-100
acfsutil sec rule destroy ............................................................................................................. 16-102
acfsutil sec rule edit.................................................................................................................... 16-102
acfsutil sec ruleset clone ............................................................................................................ 16-103
acfsutil sec ruleset create ........................................................................................................... 16-104
acfsutil sec ruleset destroy ........................................................................................................ 16-105
acfsutil sec ruleset edit............................................................................................................... 16-106
acfsutil sec save........................................................................................................................... 16-106
Oracle ACFS Command-Line Tools for Encryption...................................................................... 16-107
acfsutil encr info ......................................................................................................................... 16-108
acfsutil encr init .......................................................................................................................... 16-109
acfsutil encr off............................................................................................................................ 16-110
acfsutil encr on............................................................................................................................ 16-111
acfsutil encr rekey....................................................................................................................... 16-112
acfsutil encr set............................................................................................................................ 16-113
acfsutil keystore migrate ........................................................................................................... 16-115
Oracle ACFS Command-Line Utilities ............................................................................................ 16-115
acfsdbg ......................................................................................................................................... 16-116
acfsutil info file ........................................................................................................................... 16-120
acfsutil info fs .............................................................................................................................. 16-120
acfsutil info id ............................................................................................................................. 16-125
acfsutil plugin disable................................................................................................................ 16-125
acfsutil plugin enable................................................................................................................. 16-126
acfsutil plugin info ..................................................................................................................... 16-128
acfsutil registry ........................................................................................................................... 16-129
acfsutil rmfs................................................................................................................................. 16-131
acfsutil size .................................................................................................................................. 16-132
acfsutil snap convert .................................................................................................................. 16-134
xv
acfsutil snap create ..................................................................................................................... 16-135
acfsutil snap delete ..................................................................................................................... 16-137
acfsutil snap info......................................................................................................................... 16-138
acfsutil tune ................................................................................................................................. 16-139
advmutil canonical ..................................................................................................................... 16-140
advmutil tune.............................................................................................................................. 16-141
advmutil volinfo ......................................................................................................................... 16-142
Part IV Additional Information
17 Creating Database Files in Oracle ASM Using SQL*Plus
Creating a Database that Uses Oracle ASM........................................................................................ 17-1
Creating Tablespaces in Oracle ASM................................................................................................... 17-2
Creating Redo Logs in Oracle ASM ..................................................................................................... 17-2
Creating Control Files in Oracle ASM ................................................................................................. 17-3
Creating Control Files in Oracle ASM: Example 1 .................................................................... 17-3
Creating Control Files in Oracle ASM: Example 2 .................................................................... 17-4
Creating Archive Log Files in Oracle ASM......................................................................................... 17-4
18 Understanding Oracle ACFS Advanced Topics
Limits of Oracle ACFS............................................................................................................................ 18-1
Oracle ACFS Disk Space Usage.................................................................................................... 18-2
Oracle ACFS Error Handling........................................................................................................ 18-2
Oracle ACFS and NFS.................................................................................................................... 18-3
Limits of Oracle ADVM ......................................................................................................................... 18-3
Oracle ACFS Drivers Resource Management..................................................................................... 18-4
Oracle ACFS Registry Resource Management ................................................................................... 18-4
Oracle ACFS File System Resource Management.............................................................................. 18-4
Oracle ACFS and Oracle Restart........................................................................................................... 18-5
Oracle ACFS Driver Commands .......................................................................................................... 18-5
acfsload ............................................................................................................................................ 18-5
acfsdriverstate ................................................................................................................................. 18-6
Oracle ACFS Plug-in Generic Application Programming Interface ............................................... 18-7
Oracle ACFS Pre-defined Metric Types ...................................................................................... 18-7
acfsplugin ........................................................................................................................................ 18-8
Oracle ACFS Tagging Generic Application Programming Interface............................................ 18-10
Oracle ACFS Tag Name Specifications ..................................................................................... 18-11
Oracle ACFS Tagging Error Values ........................................................................................... 18-11
acfsgettag ....................................................................................................................................... 18-12
acfslisttags...................................................................................................................................... 18-13
acfsremovetag ............................................................................................................................... 18-14
acfssettag........................................................................................................................................ 18-15
Understanding Oracle ACFS I/O Failure Console Messages ........................................................ 18-16
xvi

Glossary
Index
xvii

xviii

List of Examples
3-1 Sample diagnostic directory for an Oracle ASM instance................................................... 3-123-2 Determining rolling patch mode and patch level................................................................. 3-314-1 Creating the DATA disk group............................................................................................... 4-104-2 Creating the FRA disk group................................................................................................... 4-104-3 Creating a disk group of 4K sector size.................................................................................. 4-134-4 Using the QUORUM keyword when creating a failure group.......................................... 4-154-5 Managing volumes with ALTER DISKGROUP VOLUME statements............................. 4-164-6 Dropping disks from disk groups........................................................................................... 4-204-7 Resizing disks in disk groups.................................................................................................. 4-214-8 Undropping disks in disk groups........................................................................................... 4-214-9 Manually rebalancing a disk group........................................................................................ 4-234-10 Querying V$ASM_DISK for header status............................................................................ 4-264-11 Setting up Oracle ASM File Access Control.......................................................................... 4-524-12 Using renamedg........................................................................................................................ 4-605-1 Creating a tablespace using an alias name.............................................................................. 5-75-2 Using an Oracle ASM File name in a SQL statement........................................................... 5-105-3 Moving data files online with ALTER DATABASE MOVE DATAFILE.......................... 5-115-4 Adding an alias name for an Oracle ASM file name............................................................ 5-145-5 Renaming an alias name for an Oracle ASM file name....................................................... 5-145-6 Dropping an alias name for an Oracle ASM file name........................................................ 5-145-7 Dropping an alias name for an Oracle ASM file name........................................................ 5-145-8 Dropping a file and alias from a disk group using the alias name.................................... 5-155-9 Dropping a file and alias from a disk group using the system-generated name............. 5-155-10 Creating a new directory.......................................................................................................... 5-165-11 Creating a new subdirectory................................................................................................... 5-165-12 Renaming a directory................................................................................................................ 5-165-13 Dropping a directory................................................................................................................ 5-165-14 Adding a template with high redundancy to a disk group................................................ 5-225-15 Adding a template with external redundancy to a disk group.......................................... 5-225-16 Modifying a disk group template........................................................................................... 5-225-17 Dropping a template from a disk group................................................................................ 5-235-18 Using a user-defined template to specify attributes............................................................ 5-236-1 Viewing disk group attributes with V$ASM_ATTRIBUTE.................................................. 6-36-2 Viewing the compatibility of a disk group with V$ASM_DISKGROUP............................ 6-36-3 Viewing disks in disk groups with V$ASM_DISK................................................................. 6-36-4 Viewing disk group clients with V$ASM_CLIENT................................................................ 6-46-5 Viewing Oracle ASM File Access Control information with V$ASM_USER..................... 6-46-6 Viewing File Access Control information with V$ASM_USERGROUP............................. 6-56-7 Viewing File Access Control information with V$ASM_USERGROUP_MEMBER.......... 6-56-8 Viewing Oracle ASM File Access Control information with V$ASM_FILE....................... 6-56-9 Viewing Intelligent Data Placement information with V$ASM_FILE................................. 6-66-10 Viewing Intelligent Data Placement information with V$ASM_TEMPLATE.................... 6-68-1 Migrating the online redo logs.................................................................................................. 8-89-1 Using asmca -silent -convertToFlexASM............................................................................... 9-109-2 Using asmca -silent -configureASM....................................................................................... 9-129-3 Using asmca -silent -upgradeASM......................................................................................... 9-129-4 Using asmca -silent -configureParameter.............................................................................. 9-139-5 Using asmca -silent -deleteASM............................................................................................. 9-139-6 Using asmca -silent -createDiskGroup................................................................................... 9-159-7 Using asmca -silent -addDisk.................................................................................................. 9-1610-1 Using wildcards with ASMCMD commands....................................................................... 10-5
xix
10-2 Running ASMCMD commands in noninteractive mode.................................................. 10-1010-3 Displaying a return code when running ASMCMD in noninteractive mode................ 10-1010-4 Running ASMCMD commands in a script.......................................................................... 10-1010-5 Displaying ASMCMD help text............................................................................................ 10-1110-6 Using the ASMCMD dsget command.................................................................................. 10-1310-7 Using the ASMCMD dsset command.................................................................................. 10-1410-8 Using the ASMCMD lsct command..................................................................................... 10-1510-9 Using the ASMCMD lsop command.................................................................................... 10-1510-10 Using the ASMCMD lspwusr command............................................................................. 10-1610-11 Using the ASMCMD orapwusr command.......................................................................... 10-1710-12 Using the ASMCMD pwcopy command............................................................................. 10-1810-13 Using the ASMCMD pwcreate command........................................................................... 10-1810-14 Using the ASMCMD pwdelete command........................................................................... 10-1910-15 Using the ASMCMD pwget command................................................................................ 10-2010-16 Using the ASMCMD pwmove command........................................................................... 10-2110-17 Using the ASMCMD pwset command................................................................................ 10-2110-18 Using the ASMCMD showclustermode command............................................................ 10-2210-19 Using the ASMCMD showclusterstate command............................................................. 10-2210-20 Using the ASMCMD showpatches command.................................................................... 10-2210-21 Using the ASMCMD showversion command.................................................................... 10-2310-22 Using the ASMCMD shutdown command......................................................................... 10-2410-23 Using the ASMCMD spbackup command.......................................................................... 10-2510-24 Using the ASMCMD spcopy command.............................................................................. 10-2610-25 Using the ASMCMD spget command.................................................................................. 10-2710-26 Using the ASMCMD spmove command............................................................................. 10-2710-27 Using the ASMCMD spset command.................................................................................. 10-2810-28 Using the ASMCMD startup command.............................................................................. 10-2910-29 Using the afd_configure command...................................................................................... 10-3010-30 Using the afd_deconfigure command.................................................................................. 10-3110-31 Using the afd_dsget command............................................................................................. 10-3110-32 Using the afd_dsset command.............................................................................................. 10-3110-33 Using the afd_filter command............................................................................................... 10-3210-34 Using the afd_label command............................................................................................... 10-3310-35 Using the afd_lsdsk commmand.......................................................................................... 10-3310-36 Using the afd_scan command............................................................................................... 10-3410-37 Using the afd_state command............................................................................................... 10-3410-38 Using the afd_unlabel command.......................................................................................... 10-3510-39 Using the ASMCMD amdu_extract command................................................................... 10-3610-40 Using the ASMCMD cd command....................................................................................... 10-3710-41 Using the ASMCMD cp command....................................................................................... 10-3810-42 Using the ASMCMD du command...................................................................................... 10-3910-43 Using the ASMCMD find command.................................................................................... 10-4010-44 Using the ASMCMD ls command........................................................................................ 10-4110-45 Using the ASMCMD lsof command..................................................................................... 10-4310-46 Using the ASMCMD mkalias command............................................................................. 10-4310-47 Using the ASMCMD mkdir command................................................................................ 10-4410-48 Using the ASMCMD pwd command................................................................................... 10-4510-49 Using the ASMCMD rm command...................................................................................... 10-4610-50 Using the ASMCMD rmalias command.............................................................................. 10-4610-51 Tags for the chdg XML configuration template................................................................. 10-4810-52 chdg sample XML configuration file ................................................................................... 10-4910-53 Using the ASMCMD chdg command.................................................................................. 10-4910-54 Using the ASMCMD chkdg command................................................................................ 10-5010-55 Using the ASMCMD dropdg command.............................................................................. 10-50
xx

10-56 Using the ASMCMD iostat command................................................................................. 10-5210-57 Using the ASMCMD lsattr command.................................................................................. 10-5310-58 Using the ASMCMD lsdg command.................................................................................... 10-5510-59 Using the ASMCMD lsdsk command.................................................................................. 10-5710-60 Using the ASMCMD lsod command.................................................................................... 10-5810-61 Using the ASMCMD md_backup command...................................................................... 10-5910-62 Using the ASMCMD md_restore command....................................................................... 10-6110-63 Tags for mkdg XML configuration file................................................................................ 10-6210-64 mkdg sample XML configuration file.................................................................................. 10-6210-65 Using the ASMCMD mkdg command................................................................................. 10-6310-66 Using the ASMCMD mount command............................................................................... 10-6310-67 Using the ASMCMD offline command................................................................................ 10-6410-68 Using the ASMCMD online command................................................................................ 10-6510-69 Using the ASMCMD rebal command.................................................................................. 10-6610-70 Using the ASMCMD remap command................................................................................ 10-6710-71 Using the ASMCMD setattr command................................................................................ 10-6710-72 Using the ASMCMD umount command............................................................................. 10-6810-73 Using the ASMCMD chtmpl command............................................................................... 10-6910-74 Using the ASMCMD lstmpl command................................................................................ 10-7010-75 Using the ASMCMD mktmpl command............................................................................. 10-7110-76 Using the ASMCMD rmtmpl command.............................................................................. 10-7110-77 Using the ASMCMD chgrp command................................................................................. 10-7310-78 Using the ASMCMD chmod command............................................................................... 10-7410-79 Using the ASMCMD chown command............................................................................... 10-7510-80 Using the ASMCMD groups command............................................................................... 10-7610-81 Using the ASMCMD grpmod command............................................................................. 10-7710-82 Using the ASMCMD lsgrp command.................................................................................. 10-7710-83 Using the ASMCMD lsusr command................................................................................... 10-7810-84 Using the ASMCMD mkgrp command............................................................................... 10-7910-85 Using the ASMCMD mkusr command................................................................................ 10-7910-86 Using the ASMCMD passwd command.............................................................................. 10-8010-87 Using the ASMCMD rmgrp command................................................................................ 10-8010-88 Using the ASMCMD rmusr command................................................................................ 10-8110-89 Using the ASMCMD rpusr command................................................................................. 10-8211-1 Sample audit trail file............................................................................................................. 11-2712-1 Viewing encryption information in V$ASM_ACFS_ENCRYPTION_INFO.................... 12-412-2 Viewing security information in V$ASM_ACFS_SECURITY_INFO................................ 12-412-3 Viewing security rules information in V$ASM_ACFS_SEC_RULE.................................. 12-512-4 Viewing security ruleset information in V$ASM_ACFS_SEC_RULESET........................ 12-512-5 Viewing security ruleset information in V$ASM_ACFS_SEC_RULESET_RULE........... 12-512-6 Viewing snapshot information in V$ASM_ACFSSNAPSHOTS........................................ 12-512-7 Viewing volume information with V$ASM_ACFSVOLUMES.......................................... 12-612-8 Viewing volume information with V$ASM_FILESYSTEM................................................ 12-612-9 Viewing volume information with V$ASM_VOLUME...................................................... 12-612-10 Viewing volume information with V$ASM_VOLUME_STAT.......................................... 12-612-11 Viewing tag name information with V$ASM_ACFSTAG................................................... 12-612-12 Viewing Oracle ASM information with V$MAP_ELEMENT............................................. 12-812-13 Viewing Oracle ACFS Data File Information with V$MAP_FILE..................................... 12-812-14 Viewing Element and File Offset Information with V$MAP_FILE_EXTENT................. 12-812-15 Viewing Extent Information With V$MAP_FILE_IO_STACK........................................... 12-814-1 Using asmca -silent -createVolume...................................................................................... 14-1014-2 Using asmca -silent -createACFS.......................................................................................... 14-1115-1 Using the ASMCMD volcreate command............................................................................. 15-315-2 Using the ASMCMD voldelete command............................................................................. 15-4
xxi

15-3 Using the ASMCMD voldisable command........................................................................... 15-515-4 Using the ASMCMD volenable command............................................................................ 15-615-5 Using the ASMCMD volinfo command................................................................................. 15-615-6 Using the ASMCMD volresize command............................................................................. 15-815-7 Using the ASMCMD volset command................................................................................... 15-815-8 Using the ASMCMD volstat command................................................................................. 15-916-1 Using the fsck command........................................................................................................ 16-2416-2 Using the mkfs command...................................................................................................... 16-2616-3 Using the mount command................................................................................................... 16-2816-4 Using the umount command................................................................................................. 16-2916-5 Using the fsck command........................................................................................................ 16-3116-6 Using the mkfs command...................................................................................................... 16-3316-7 Using the mount command................................................................................................... 16-3516-8 Using the umount command................................................................................................. 16-3616-9 Using the fsck command........................................................................................................ 16-3916-10 Using the mkfs command...................................................................................................... 16-4016-11 Using the mount command................................................................................................... 16-4316-12 Using the umount command................................................................................................. 16-4416-13 Using the acfschkdsk command........................................................................................... 16-4616-14 Using the acfsdismount command....................................................................................... 16-4716-15 Using the acfsformat command............................................................................................ 16-4816-16 Using the acfsmountvol command....................................................................................... 16-4916-17 Using the acfsutil detach command..................................................................................... 16-5016-18 Using the advmutil dismount command............................................................................ 16-5116-19 Using the advmutil list command........................................................................................ 16-5216-20 Using the advmutil mount command.................................................................................. 16-5316-21 Using the acfsutil tag info command................................................................................... 16-5516-22 Using the acfsutil tag set command...................................................................................... 16-5616-23 Using the acfsutil tag unset command................................................................................. 16-5716-24 Using the acfsutil repl bg command.................................................................................... 16-5916-25 Using the acfsutil repl compare command.......................................................................... 16-6116-26 Using the acfsutil repl info command.................................................................................. 16-6216-27 Using the acfsutil repl init command................................................................................... 16-6516-28 Using the acfsutil repl pause command.............................................................................. 16-6616-29 Using the acfsutil repl resume command............................................................................ 16-6716-30 Using the acfsutil repl sync command................................................................................. 16-6816-31 Using the acfsutil repl terminate command........................................................................ 16-6916-32 Using the acfsutil repl trace command................................................................................ 16-6916-33 Using the acfsutil repl update command............................................................................ 16-7016-34 Using the acfsutil audit archive command.......................................................................... 16-7216-35 Using the acfsutil audit disable command.......................................................................... 16-7216-36 Using the acfsutil audit enable command........................................................................... 16-7316-37 Using the acfsutil audit info command................................................................................ 16-7316-38 Using the acfsutil audit init command................................................................................. 16-7416-39 Using the acfsutil audit purge command............................................................................ 16-7516-40 Using the acfsutil audit read command............................................................................... 16-7616-41 Using the acfsutil sec admin add command....................................................................... 16-7816-42 Using the acfsutil sec admin password command............................................................. 16-7916-43 Using the acfsutil sec admin remove command................................................................. 16-7916-44 Using the acfsutil sec batch command................................................................................. 16-8016-45 Using the acfsutil sec disable command.............................................................................. 16-8116-46 Using the acfsutil sec enable command............................................................................... 16-8216-47 Using the acfsutil sec info command.................................................................................... 16-8316-48 Using the acfsutil sec info file command............................................................................. 16-83
xxii
16-49 Using the acfsutil sec init command..................................................................................... 16-8516-50 Using the acfsutil sec load command................................................................................... 16-8616-51 Using the acfsutil sec prepare command............................................................................. 16-8816-52 Using the acfsutil sec realm add command........................................................................ 16-9116-53 Using the acfsutil sec realm audit disable command........................................................ 16-9216-54 Auditing Oracle ACFS security backup operators............................................................. 16-9416-55 Auditing only security realm users...................................................................................... 16-9416-56 Running acfsutil sec realm audit enable multiple times................................................... 16-9416-57 Running acfsutil sec realm audit info.................................................................................. 16-9516-58 Using the acfsutil sec realm clone command...................................................................... 16-9616-59 Using the acfsutil sec realm create command..................................................................... 16-9816-60 Using the acfsutil sec realm delete command..................................................................... 16-9916-61 Using the acfsutil sec realm destroy command.................................................................. 16-9916-62 Using the acfsutil sec rule clone command....................................................................... 16-10016-63 Using the acfsutil sec rule create command...................................................................... 16-10116-64 Using the acfsutil sec rule destroy command................................................................... 16-10216-65 Using the acfsutil sec rule edit command......................................................................... 16-10316-66 Using the acfsutil sec ruleset clone command.................................................................. 16-10416-67 Using the acfsutil sec ruleset create command................................................................. 16-10516-68 Using the acfsutil sec ruleset destroy command.............................................................. 16-10616-69 Using the acfsutil sec ruleset edit command..................................................................... 16-10616-70 Using the acfsutil sec save command................................................................................ 16-10716-71 Using the acfsutil encr info command............................................................................... 16-10916-72 Using the acfsutil encr init command................................................................................ 16-11016-73 Using the acfsutil encr off command................................................................................. 16-11116-74 Using the acfsutil encr on command.................................................................................. 16-11216-75 Using the acfsutil encr rekey command............................................................................ 16-11316-76 Using the acfsutil encr set command................................................................................. 16-11516-77 Using the acfsutil keystore migrate command................................................................. 16-11516-78 Using the acfsdbg command............................................................................................... 16-11916-79 Using the acfsutil info file command................................................................................. 16-12016-80 Using the acfsutil info fs command on Linux................................................................... 16-12316-81 Using the acfsutil info fs command on Windows............................................................ 16-12416-82 Using the acfsutil info fs command with the -s option................................................... 16-12416-83 Using the acfsutil info id command................................................................................... 16-12516-84 Disabling the Oracle ACFS driver...................................................................................... 16-12616-85 Enabling the Oracle ACFS driver for storage visibility: poll model.............................. 16-12716-86 Enabling the Oracle ACFS driver for storage visibility: post on interval model......... 16-12816-87 Displaying information about the Oracle ACFS driver.................................................. 16-12916-88 Using the acfsutil registry command................................................................................. 16-13116-89 Using the acfsutil rmfs command....................................................................................... 16-13216-90 Using the acfsutil size command........................................................................................ 16-13416-91 Using the acfsutil snap convert command........................................................................ 16-13516-92 Using the acfsutil snap create command on Linux.......................................................... 16-13616-93 Using the acfsutil snap create command on Windows................................................... 16-13716-94 Using the acfsutil snap delete command........................................................................... 16-13816-95 Using the acfsutil snap info command on Linux............................................................. 16-13916-96 Using the acfsutil snap info command on Windows....................................................... 16-13916-97 Using the acfsutil tune command....................................................................................... 16-14016-98 Using advmutil canonical.................................................................................................... 16-14116-99 Using advmutil tune............................................................................................................. 16-14216-100 Using advmutil volinfo........................................................................................................ 16-14317-1 Creating control files in Oracle ASM using NORESETLOGS............................................. 17-317-2 Creating control files in Oracle ASM using RESETLOGS................................................... 17-4
xxiii

17-3 Archived log files in an Oracle ASM disk group.................................................................. 17-518-1 Application Plug-in for Storage Visibility: Poll Model........................................................ 18-918-2 Application Plug-in for File Content: Post Model................................................................ 18-918-3 Retrieving a file tag value...................................................................................................... 18-1218-4 Listing file tags......................................................................................................................... 18-1418-5 Removing file tags................................................................................................................... 18-1518-6 Setting file tags......................................................................................................................... 18-16
xxiv

List of Figures
1-1 Oracle ASM for Single-Instance Oracle Databases ................................................................ 1-41-2 Oracle ASM Cluster Configuration with Oracle RAC........................................................... 1-51-3 Oracle ASM Cluster with Single-Instance Oracle Databases................................................ 1-51-4 Oracle ASM File Allocation in a Disk Group.......................................................................... 1-91-5 Oracle ASM Fine-Grained Striping......................................................................................... 1-101-6 Oracle ASM Coarse-Grained Striping.................................................................................... 1-103-1 Oracle Flex ASM Configurations............................................................................................ 3-163-2 Oracle ACFS and Oracle ADVM in Oracle Flex ASM......................................................... 3-183-3 Oracle ASM Configuration Assistant Configure ASM Instances Page............................. 3-323-4 Oracle ASM Configuration Assistant Convert to Oracle Flex ASM Dialog Box.............. 3-333-5 Oracle ASM Configuration Assistant ASM Conversion Dialog Box................................. 3-335-1 Hierarchical Structure of Oracle ASM Folders in an XML DB Installation...................... 5-187-1 Oracle Automatic Storage Management Home Page............................................................. 7-27-2 Oracle Automatic Storage Management Configuration Parameters Page.......................... 7-37-3 Oracle Automatic Storage Management Users Page.............................................................. 7-47-4 Oracle Automatic Storage Management Create Disk Group Page...................................... 7-77-5 Oracle Automatic Storage Management Disk Groups List Page....................................... 7-107-6 Oracle Automatic Storage Management Disk Group General Page.................................. 7-107-7 Oracle Automatic Storage Management Edit Advanced Attributes Page........................ 7-167-8 Oracle Automatic Storage Management Disk Group Access Control Home Page......... 7-217-9 Oracle Automatic Storage Management Files Tab............................................................... 7-227-10 Oracle Automatic Storage Management Templates Page................................................... 7-237-11 Oracle Automatic Storage Management Performance Page............................................... 7-267-12 Oracle Automatic Storage Management Check Diskgroup Confirmation Dialog.......... 7-277-13 Oracle Automatic Storage Management Support Workbench Problems......................... 7-307-14 Oracle Automatic Storage Management Support Workbench Packages.......................... 7-317-15 Oracle Flex ASM Home Page.................................................................................................. 7-317-16 Oracle Flex ASM Members Page............................................................................................. 7-327-17 Oracle Flex ASM Topology Page............................................................................................ 7-329-1 Oracle ASM Configuration Assistant Create ASM Page....................................................... 9-39-2 Oracle ASM Configuration Assistant Create ASM Page....................................................... 9-49-3 Oracle ASM Configuration Assistant Upgrade ASM Page................................................... 9-59-4 Oracle ASM Configuration Assistant Configure Disk Groups Page................................... 9-69-5 Oracle ASM Configuration Assistant Create Disk Groups Page.......................................... 9-79-6 Oracle ASM Configuration Assistant Create Disk Groups - Advanced Options.............. 9-811-1 Oracle Automatic Storage Management Storage Layers..................................................... 11-213-1 Oracle ACFS Create ASM Volume Page................................................................................ 13-313-2 Oracle ACFS Page..................................................................................................................... 13-413-3 Oracle ACFS General Page....................................................................................................... 13-513-4 Oracle ACFS Volume Page...................................................................................................... 13-513-5 Oracle ACFS Snapshots Tab.................................................................................................... 13-613-6 Oracle ACFS Create Snapshot Page........................................................................................ 13-713-7 Oracle ACFS Security Configuration Page.......................................................................... 13-1013-8 Oracle ACFS Security Rules Page......................................................................................... 13-1513-9 Oracle ACFS Security Rulesets Page.................................................................................... 13-1813-10 Oracle ACFS Security Realms Page...................................................................................... 13-2113-11 Oracle ACFS Encryption Configuration Page.................................................................... 13-2214-1 Oracle ASM Configuration Assistant Configure ASM Volumes Page.............................. 14-214-2 Oracle ASM Configuration Assistant Create an ASM Volume Page................................ 14-314-3 Oracle ASM Configuration Assistant Configure Oracle ACFS Page................................. 14-414-4 Oracle ASM Configuration Assistant Create Oracle ACFS Dialog.................................... 14-5
xxv

14-5 Oracle ASM Configuration Assistant Configure Security and Encryption Dialog......... 14-614-6 Oracle ASM Configuration Assistant Oracle ACFS Security Menu Options................... 14-714-7 Oracle ASM Configuration Assistant Create Oracle ACFS for Database Use Dialog..... 14-9
xxvi

List of Tables
3-1 One operating system group and one set of privileges for all Oracle ASM users........... 3-483-2 Separated operating system groups and privileges for Oracle ASM users...................... 3-494-1 Mirroring options for Oracle ASM disk group types.......................................................... 4-304-2 Examples of disk group compatibility attribute settings.................................................... 4-444-3 Oracle ASM features enabled by disk group compatibility attribute settings................. 4-474-4 Oracle ACFS features enabled by disk group compatibility attribute settings................ 4-484-5 Maximum Oracle ASM file sizes for disk groups with AU_SIZE equal to 1 MB............ 4-495-1 File types supported by Oracle ASM........................................................................................ 5-15-2 Valid usage for Oracle ASM file name forms.......................................................................... 5-45-3 Oracle file types and Oracle ASM file type tags..................................................................... 5-55-4 Permitted values for Oracle ASM template striping attribute............................................ 5-205-5 Permitted values for Oracle ASM template redundancy attribute.................................... 5-205-6 Oracle ASM system default templates attribute settings.................................................... 5-205-7 Permitted values for Oracle ASM template primary and mirror region attribute.......... 5-216-1 Oracle ASM dynamic views for disk group information...................................................... 6-19-1 Options for the ASMCA command-line tool........................................................................... 9-89-2 Options for the -convertToFlexASM command.................................................................... 9-109-3 Options for the -configureASM command............................................................................ 9-119-4 Options for the -configureParameter command................................................................... 9-129-5 Options for the -deleteASM command.................................................................................. 9-139-6 Options for the -createDiskGroup command........................................................................ 9-149-7 Options for the -addDisk command....................................................................................... 9-1510-1 Types of ASMCMD commands.............................................................................................. 10-210-2 ASMCMD interactive options................................................................................................. 10-810-3 ASMCMD return codes.......................................................................................................... 10-1010-4 Summary of ASMCMD instance management commands.............................................. 10-1110-5 Options for the dsget command........................................................................................... 10-1310-6 Options for the dsset command............................................................................................ 10-1310-7 Options for the lsct command............................................................................................... 10-1410-8 Options for the lspwusr command ...................................................................................... 10-1610-9 Options for the orapwusr command ................................................................................... 10-1610-10 Options for the pwcopy command....................................................................................... 10-1710-11 Options for the pwcreate command..................................................................................... 10-1810-12 Options for the pwdelete command..................................................................................... 10-1910-13 Options for the pwget command.......................................................................................... 10-1910-14 Options for the pwmove command..................................................................................... 10-2010-15 Options for the pwset command.......................................................................................... 10-2110-16 Options for the showversion command.............................................................................. 10-2310-17 Options for the shutdown command................................................................................... 10-2310-18 Options for the spbackup command.................................................................................... 10-2410-19 Options for the spcopy command........................................................................................ 10-2510-20 Options for the spmove command....................................................................................... 10-2710-21 Options for the spset command............................................................................................ 10-2810-22 Options for the startup command........................................................................................ 10-2810-23 Summary of ASMCMD Oracle ASM Filter Driver management commands................ 10-2910-24 Options for the afd_dsset command.................................................................................... 10-3110-25 Options for the afd_filter command..................................................................................... 10-3210-26 Options for the afd_label command..................................................................................... 10-3210-27 Options for the afd_scan command..................................................................................... 10-3410-28 Options for the afd_unlabel command................................................................................ 10-3510-29 Summary of ASMCMD file management commands....................................................... 10-35
xxvii

10-30 Options for the amdu_extract command ............................................................................ 10-3610-31 Options for the cd command ................................................................................................ 10-3610-32 Options for the cp command ................................................................................................ 10-3710-33 Options for the du command................................................................................................ 10-3910-34 Options for the find command ............................................................................................. 10-3910-35 Options for the ls command.................................................................................................. 10-4010-36 Options for the lsof command............................................................................................... 10-4210-37 Options for the mkalias command....................................................................................... 10-4310-38 Options for the mkdir command.......................................................................................... 10-4410-39 Options for the rm command................................................................................................ 10-4510-40 Options for the rmalias command........................................................................................ 10-4610-41 Summary of ASMCMD Disk group management commands......................................... 10-4710-42 Options for the chdg command ........................................................................................... 10-4810-43 Options for the chkdg command ......................................................................................... 10-4910-44 Options for the dropdg command ....................................................................................... 10-5010-45 Options for the iostat command........................................................................................... 10-5110-46 Attribute descriptions for iostat command output............................................................ 10-5110-47 Options for the lsattr command............................................................................................ 10-5310-48 Options for the lsdg command............................................................................................. 10-5410-49 Attribute descriptions for lsdg command output.............................................................. 10-5510-50 Options for the lsdsk command............................................................................................ 10-5610-51 Options for the lsod command.............................................................................................. 10-5810-52 Options for the md_backup command................................................................................ 10-5910-53 Options for the md_restore command................................................................................. 10-6010-54 Options for the mkdg command .......................................................................................... 10-6110-55 Options for the mount command ........................................................................................ 10-6310-56 Options for the offline command.......................................................................................... 10-6410-57 Options for the online command.......................................................................................... 10-6410-58 Options for the rebal command............................................................................................ 10-6510-59 Options for the remap command.......................................................................................... 10-6610-60 Options for the setattr command.......................................................................................... 10-6710-61 Options for the umount command ...................................................................................... 10-6810-62 Summary of ASMCMD template management commands............................................. 10-6810-63 Options for the chtmpl command ....................................................................................... 10-6910-64 Options for the lstmpl command.......................................................................................... 10-6910-65 Options for the mktmpl command ...................................................................................... 10-7010-66 Options for the rmtmpl command ...................................................................................... 10-7110-67 Summary of ASMCMD file access control commands...................................................... 10-7210-68 Options for the chgrp command .......................................................................................... 10-7310-69 Options for the chmod command ........................................................................................ 10-7410-70 Options for the chown command ........................................................................................ 10-7510-71 Options for the groups command ........................................................................................ 10-7610-72 Options for the grpmod command ...................................................................................... 10-7610-73 Options for the lsgrp command............................................................................................ 10-7710-74 Options for the lsusr command............................................................................................ 10-7810-75 Options for the mkgrp command ........................................................................................ 10-7810-76 Options for the mkusr command.......................................................................................... 10-7910-77 Options for the passwd command....................................................................................... 10-8010-78 Options for the rmgrp command ......................................................................................... 10-8010-79 Options for the rmusr command.......................................................................................... 10-8110-80 Options for the rpusr command........................................................................................... 10-8112-1 Oracle ASM dynamic views for Oracle ACFS information................................................ 12-114-1 Options for the -createVolume command........................................................................... 14-1014-2 Options for the -createACFS command............................................................................... 14-11
xxviii

15-1 Summary of ASMCMD volume management commands................................................. 15-115-2 Options for the volcreate command....................................................................................... 15-215-3 Options for the voldelete command....................................................................................... 15-415-4 Options for the voldisable command..................................................................................... 15-415-5 Options for the volenable command...................................................................................... 15-515-6 Options for the volinfo command........................................................................................... 15-615-7 Options for the volresize command....................................................................................... 15-715-8 Options for the volset command............................................................................................. 15-815-9 Options for the volstat command........................................................................................... 15-916-1 Summary of Oracle ACFS commands for Linux environments...................................... 16-2316-2 Options for the Linux fsck command................................................................................... 16-2316-3 Options for the Linux mkfs command................................................................................. 16-2516-4 Options for the Linux mount command.............................................................................. 16-2716-5 Options for the Linux umount command........................................................................... 16-2816-6 Summary of Oracle ACFS commands for Solaris.............................................................. 16-2916-7 Options for the Solaris fsck command................................................................................. 16-3016-8 Options for the Solaris mkfs command............................................................................... 16-3216-9 Options for the Solaris mount command............................................................................ 16-3316-10 Options for the Solaris umount command.......................................................................... 16-3616-11 Summary of Oracle ACFS commands for AIX................................................................... 16-3716-12 Options for the AIX fsck command...................................................................................... 16-3816-13 Options for the AIX mkfs command.................................................................................... 16-3916-14 Options for the AIX mount command................................................................................. 16-4116-15 Options for the AIX umount command............................................................................... 16-4316-16 Summary of Oracle ACFS file system commands for Windows..................................... 16-4416-17 Summary of Non-Oracle ACFS file system commands for Windows............................ 16-4416-18 Options for the acfschkdsk command.................................................................................. 16-4516-19 Options for the acfsdismount command............................................................................. 16-4716-20 Options for the acfsformat command.................................................................................. 16-4816-21 Options for the acfsmountvol command............................................................................. 16-4916-22 Options for the advmutil dismount command................................................................... 16-5016-23 Options for the advmutil list command.............................................................................. 16-5216-24 Options for the advmutil mount command........................................................................ 16-5316-25 Summary of commands for Oracle ACFS tagging............................................................. 16-5416-26 Options for the acfsutil tag info command.......................................................................... 16-5516-27 Options for the acfsutil tag set command............................................................................ 16-5616-28 Options for the acfsutil tag unset command....................................................................... 16-5716-29 Summary of commands for Oracle ACFS replication....................................................... 16-5816-30 Options for the acfsutil repl bg command........................................................................... 16-5916-31 Options for the acfsutil repl compare command................................................................ 16-6016-32 Options for the acfsutil repl info command........................................................................ 16-6116-33 Options for the acfsutil repl init command......................................................................... 16-6316-34 Options for the acfsutil repl pause command..................................................................... 16-6516-35 Options for the acfsutil repl resume command.................................................................. 16-6616-36 Options for the acfsutil repl sync command....................................................................... 16-6716-37 Options for the acfsutil repl terminate command.............................................................. 16-6816-38 Options for the acfsutil repl trace command....................................................................... 16-6916-39 Options for the acfsutil repl update command................................................................... 16-7016-40 Summary of commands for Oracle ACFS auditing........................................................... 16-7116-41 Options for the acfsutil audit archive command................................................................ 16-7116-42 Options for the acfsutil audit disable command................................................................ 16-7216-43 Options for the acfsutil audit enable command................................................................. 16-7316-44 Options for the acfsutil audit info command...................................................................... 16-7316-45 Options for the acfsutil audit init command....................................................................... 16-74
xxix
16-46 Options for the acfsutil audit purge command.................................................................. 16-7516-47 Options for the acfsutil audit read command..................................................................... 16-7516-48 Summary of commands for Oracle ACFS security............................................................ 16-7616-49 Options for the acfsutil sec admin add command............................................................. 16-7816-50 Options for the acfsutil sec admin remove command....................................................... 16-7916-51 Options for the acfsutil sec batch command....................................................................... 16-8016-52 Options for the acfsutil sec disable command.................................................................... 16-8116-53 Options for the acfsutil sec enable command..................................................................... 16-8116-54 Options for the acfsutil sec info command.......................................................................... 16-8216-55 Options for the acfsutil sec info file command................................................................... 16-8316-56 Options for the acfsutil sec init command........................................................................... 16-8416-57 Options for the acfsutil sec load command......................................................................... 16-8516-58 Options for the acfsutil sec prepare command................................................................... 16-8616-59 Options for the acfsutil sec realm add command............................................................... 16-8816-60 Command Rules...................................................................................................................... 16-9016-61 Options for the acfsutil sec realm audit disable command............................................... 16-9216-62 Options for the acfsutil sec realm audit enable command................................................ 16-9316-63 Options for the acfsutil sec realm audit info command.................................................... 16-9516-64 Options for the acfsutil sec realm clone command............................................................ 16-9616-65 Options for the acfsutil sec realm create command........................................................... 16-9716-66 Options for the acfsutil sec realm delete command........................................................... 16-9816-67 Options for the acfsutil sec realm destroy command........................................................ 16-9916-68 Options for the acfsutil sec rule clone command............................................................. 16-10016-69 Options for the acfsutil sec rule create command............................................................ 16-10116-70 Options for the acfsutil sec rule destroy command......................................................... 16-10216-71 Options for the acfsutil sec rule edit command................................................................ 16-10316-72 Options for the acfsutil sec ruleset clone command........................................................ 16-10316-73 Options for the acfsutil sec ruleset create command....................................................... 16-10416-74 Options for the acfsutil sec ruleset destroy command.................................................... 16-10516-75 Options for the acfsutil sec ruleset edit command........................................................... 16-10616-76 Options for the acfsutil sec save command....................................................................... 16-10716-77 Summary of commands for Oracle ACFS encryption..................................................... 16-10816-78 Options for the acfsutil encr info command..................................................................... 16-10816-79 Options for the acfsutil encr init command...................................................................... 16-10916-80 Options for the acfsutil encr off command....................................................................... 16-11016-81 Options for the acfsutil encr on command........................................................................ 16-11116-82 Options for the acfsutil encr rekey command.................................................................. 16-11216-83 Options for the acfsutil encr set command....................................................................... 16-11316-84 Options for the acfsutil keystore migrate command....................................................... 16-11516-85 Summary of Oracle ACFS command-line utilities........................................................... 16-11616-86 Options for the acfsdbg command..................................................................................... 16-11716-87 Subcommands for acfsdbg.................................................................................................. 16-11716-88 Options for the acfsutil info file command....................................................................... 16-12016-89 Options for the acfsutil info fs command.......................................................................... 16-12116-90 Options for the acfsutil info id command......................................................................... 16-12516-91 Options for the acfsutil plugin disable command............................................................ 16-12616-92 Options for the acfsutil plugin enable command............................................................. 16-12616-93 Options for the acfsutil plugin info command................................................................. 16-12816-94 Options for the acfsutil registry command....................................................................... 16-13016-95 Options for the acfsutil rmfs command............................................................................. 16-13216-96 Options for the acfsutil size command.............................................................................. 16-13316-97 Options for the acfsutil snap convert command.............................................................. 16-13416-98 Options for the acfsutil snap create command................................................................. 16-13516-99 Options for the acfsutil snap delete command................................................................. 16-137
xxx

16-100 Options for the acfsutil snap info command..................................................................... 16-13816-101 Options for the acfsutil tune command............................................................................. 16-14016-102 Options for the advmutil canonical command................................................................. 16-14116-103 Options for the advmutil tune command.......................................................................... 16-14216-104 Options for the advmutil volinfo command..................................................................... 16-14218-1 Options for the acfsload command......................................................................................... 18-618-2 Options for the acfsdriverstate command............................................................................. 18-618-3 Options for the acfsgettag command................................................................................... 18-1218-4 Options for the acfslisttags command.................................................................................. 18-1318-5 Options for the acfsremovetag command........................................................................... 18-1418-6 Options for the acfssettag command.................................................................................... 18-15
xxxi

xxxii
Preface
The Oracle Automatic Storage Management Administrator's Guide describes how toadminister Oracle Automatic Storage Management (Oracle ASM) for Oracle Database.
This Preface contains the following topics:
• Audience (page xxxiii)
• Documentation Accessibility (page xxxiii)
• Related Documents (page xxxiv)
• Conventions (page xxxiv)
AudienceThe audience for this book includes system administrators, database administrators,and storage administrators. The Oracle Automatic Storage Management Administrator'sGuide is intended for database and storage administrators who perform the followingtasks:
• Administer and manage Oracle ASM
• Configure and administer Oracle ASM
To use this document, you should be familiar with basic Oracle Database concepts andadministrative procedures. Also, you might want to review the documentation forOracle Clusterware and Oracle Real Application Clusters (Oracle RAC). See "RelatedDocuments (page xxxiv)".
Documentation AccessibilityFor information about Oracle's commitment to accessibility, visit the OracleAccessibility Program website at http://www.oracle.com/pls/topic/lookup?ctx=acc&id=docacc.
Access to Oracle Support
Oracle customers have access to electronic support through My Oracle Support. Forinformation, visit http://www.oracle.com/pls/topic/lookup?ctx=acc&id=info or visit http://www.oracle.com/pls/topic/lookup?ctx=acc&id=trs if you are hearing impaired.
xxxiii

Related DocumentsFor more information, refer to the following Oracle resources:
• Oracle Database Administrator's Guide
• Oracle Database Concepts
• Oracle Database Reference
• Oracle Database SQL Language Reference
• Oracle Database 2 Day + Real Application Clusters Guide
• Oracle Clusterware Administration and Deployment Guide
• Oracle Real Application Clusters Administration and Deployment Guide
• Platform-specific guides, including Oracle Database, Oracle Grid Infrastructure,and Oracle Real Application Clusters installation guides
ConventionsThe following text conventions are used in this document:
Convention Meaning
boldface Boldface type indicates graphical user interface elements associatedwith an action, or terms defined in text or the glossary.
italic Italic type indicates book titles, emphasis, or placeholder variables forwhich you supply particular values.
monospace Monospace type indicates commands within a paragraph, URLs, codein examples, text that appears on the screen, or text that you enter.
xxxiv

Changes in This Release for OracleAutomatic Storage Management
Administrator's Guide
This chapter describes changes in Oracle Automatic Storage Management Administrator'sGuide.
• Changes in Oracle Automatic Storage Management 12c Release 1 (12.1.0.2)(page xxxv)
• Changes in Oracle Automatic Storage Management 12c Release 1 (12.1.0.1)(page xxxvi)
• Changes in Oracle ACFS and Oracle ADVM for Oracle ASM 12c Release 1(12.1.0.2) (page xl)
• Changes in Oracle ACFS and Oracle ADVM for Oracle ASM 12c Release 1(12.1.0.1) (page xlii)
See Also:
Oracle Database New Features Guide for a complete description of the newfeatures in Oracle Database 12c Release 1 (12.1)
Changes in Oracle Automatic Storage Management 12c Release 1(12.1.0.2)
This section describes changes to Oracle Automatic Storage Management 12c Release 1(12.1.0.2).
This section contains the following topic:
• New Features (page xxxv)
New FeaturesThe following are new features for Oracle ASM 12c Release 1 (12.1.0.2):
• Oracle ASM Filter Driver (page xxxvi)
xxxv
Oracle ASM Filter Driver
Note:
This feature is available on Linux systems starting with Oracle Database 12cRelease 1 (12.1.0.2).
Oracle ASM Filter Driver (Oracle ASMFD) is a kernel module that resides in the I/Opath of the Oracle ASM disks. Oracle ASM uses the filter driver to validate write I/Orequests to Oracle ASM disks.
The Oracle ASM Filter Driver rejects any I/O requests that are invalid. This actioneliminates accidental overwrites of Oracle ASM disks that would cause corruption inthe disks and files within the disk group. For example, the Oracle ASM Filter Driverfilters out all non-Oracle I/Os which could cause accidental overwrites.
For more information about Oracle ASMFD, refer to "Oracle ASM Filter Driver(page 3-34)".
Changes in Oracle Automatic Storage Management 12c Release 1(12.1.0.1)
This section describes changes to Oracle Automatic Storage Management 12c Release 1(12.1.0.1).
• New Features (page xxxvi)
• Deprecated Features (page xl)
• Desupported Features (page xl)
New FeaturesThe following are new features for Oracle ASM 12c Release 1 (12.1.0.1):
• General Oracle ASM Enhancements (page xxxvii)
• Oracle Flex ASM (page xxxvii)
• Oracle ASM Disk Scrubbing (page xxxvii)
• Oracle ASM Disk Resync Enhancements (page xxxvii)
• Even Read For Disk Groups (page xxxviii)
• Oracle ASM Rebalance Enhancements (page xxxviii)
• Shared Oracle ASM Password File in a Disk Group (page xxxviii)
• Oracle ASM File Access Control Enhancements on Windows (page xxxviii)
• Rolling Migration Framework for Oracle ASM One-off Patches (page xxxix)
• Updated Key Management Framework (page xxxix)
• Oracle Enterprise Manager (page xl)
xxxvi

General Oracle ASM Enhancements
This feature provides general enhancements to Oracle ASM, including:
• Revised version of the physical metadata replication point
Oracle ASM now replicates physically addressed metadata, such as the diskheader and allocation tables, within each disk. This enhancement ensures thatOracle ASM is more resilient to bad disk sectors and external corruptions. Thedisk group attribute PHYS_META_REPLICATED is provided to track thereplication status of a disk group.
For more information on the PHYS_META_REPLICATED attribute, refer to"PHYS_META_REPLICATED (page 4-6)".
• Support for increased storage limits
Oracle ASM now supports 511 disk groups. The maximum Oracle ASM disk sizeis now 32 petabytes (PB).
For information about Oracle ASM size limits, refer to "Oracle ASM StorageLimits (page 4-39)".
• The ALTER DISKGROUP statement has been updated with a REPLACE clause.
For more information about replacing disks in a disk group, refer to "ReplacingDisks in Disk Groups (page 4-18)".
Oracle Flex ASM
Oracle Flex ASM enables an Oracle ASM instance to run on a separate physical serverfrom the database servers. Many Oracle ASM instances can be clustered to support alarge number of database clients.
This feature enables you to consolidate all the storage requirements into a single set ofdisk groups. All these disk groups can be managed by a small set of Oracle ASMinstances running in a single cluster.
Oracle Flex ASM supports only Oracle Database 12c Release 1 (12.1) and later releases.
For information, refer to "Managing Oracle Flex ASM (page 3-16)".
Oracle ASM Disk Scrubbing
Oracle ASM disk scrubbing checks logical data corruptions and repairs thecorruptions automatically in normal and high redundancy disks groups. The feature isdesigned so that it does not have any impact to the regular input and output (I/O)operations in production systems. The scrubbing process repairs logical corruptionsusing the Oracle ASM mirror disks. Disk scrubbing uses Oracle ASM rebalancing tominimize I/O overhead.
The scrubbing process is visible in fields of the V$ASM_OPERATION view.
For more information, refer to "Scrubbing Disk Groups (page 4-24)".
Oracle ASM Disk Resync Enhancements
The disk resync enhancements enable fast recovery from instance failure and fasterresync performance overall. Oracle ASM disk resync enables multiple disks to bebrought online simultaneously or to control the speed of the resync operation. OracleASM disk resync has a resync power limit to control resync parallelism and improveperformance. Disk resync checkpoint functionality provides faster recovery from
xxxvii

instance failures by enabling the resync to resume from the point at which the processwas interrupted or stopped, instead of starting from the beginning.
For more information about disk resync, refer to "Oracle ASM Fast Mirror Resync(page 4-34)".
Even Read For Disk Groups
The even read feature distributes data reads evenly across all the disks in a disk group.For each I/O request presented to the system, there may be one or more disks thatcontain the data. With this feature, each request to read can be sent to the least loadedof the possible source disks.
Even read functionality is enabled by default on all Oracle Database and Oracle ASMinstances of version 12.1 and higher in non-Exadata environments. The functionality isenabled in an Exadata environment when there is a failure. Even read functionality isapplicable only to disk groups with normal or high redundancy.
For information about even read for disk groups, refer to "Even Read for Disk Groups(page 4-37)".
Oracle ASM Rebalance Enhancements
Oracle ASM rebalance enhancements improve scalability, performance, and reliabilityof the rebalance operation. This feature extends the rebalance process to operate onmultiple disk groups in a single instance. In addition, this feature improves supportfor thin provisioning, user-data validation, and improved error handling.
For more information about disk group rebalancing, refer to "Manually RebalancingDisk Groups (page 4-21)" and "Tuning Rebalance Operations (page 4-23)".
Shared Oracle ASM Password File in a Disk Group
This feature implements the infrastructure needed to address the bootstrapping issuesof Oracle ASM shared password file in an Oracle ASM disk group. This feature solvesthe bootstrapping problem for storing shared Oracle ASM password files in a diskgroup.
For information about a shared password file in a disk group, refer to "Managing aShared Password File in a Disk Group (page 3-52)". For information about ASMCMDcommands to manage an Oracle ASM or database instance password file in a diskgroup, refer to "ASMCMD Instance Management Commands (page 10-11)".
See Also:
• Oracle Database Administrator's Guide for information about ORAPWDcommands
• Oracle Database Administrator's Guide for information SRVCTL commands
• Oracle Real Application Clusters Administration and Deployment Guide forinformation about SRVCTL commands
Oracle ASM File Access Control Enhancements on Windows
This feature provides enhancements to Oracle ASM File Access Control on Windowsplatforms.
xxxviii

Oracle Database now supports the use of an Oracle home user, which can be specifiedat installation time. The Oracle home user is associated with an Oracle home and itcannot be changed after installation. Different Oracle homes on a system can share thesame Oracle home user or use different Oracle home user names. For moreinformation, refer to "About Oracle Home User on Windows (page 3-28)".
You can now use access control to separate roles in Windows environments. WithOracle Database services running as users rather than Local System, the Oracle ASMaccess control feature is enabled to support role separation on Windows. In previousreleases, this feature was disabled on Windows because all Oracle services run asLocal System.
You can change the identity of an Oracle ASM user from one operating system (OS)user to another OS user without having to drop and re-create the user, which requiresdropping all the files a user owns, which improves the manageability of Oracle ASMusers and the files they own.
You can modify Windows file access controls while files are open using ASMCMD fileaccess control commands, such as chgrp, chmod, and chown.
For more information about Oracle ASM File Access Control, refer to "ManagingOracle ASM File Access Control for Disk Groups (page 4-50)". For information aboutOracle ASM File Access Control ASMCMD commands, refer to "ASMCMD File AccessControl Commands (page 10-72)".
See Also:
Oracle Database Platform Guide for Microsoft Windows for information aboutrunning Oracle services on Windows platforms, different types of Windowsuser accounts, and access control on Windows platforms
Rolling Migration Framework for Oracle ASM One-off Patches
This feature enhances the rolling migration framework to apply oneoff patchesreleased for Oracle ASM in a rolling manner.
You can use this feature in a clustered Oracle ASM 12c Release 1 (12.1) and higherenvironment to update one node at a time to the latest patch level without affectingthe overall availability of the Oracle ASM cluster or the database clusters using OracleASM for storage. This feature improves database availability by migrating thedatabase to another Oracle ASM instance before a shut down and upgrade operation.
For information, refer to "About Oracle ASM Rolling Patches (page 3-30)".
See Also:
Oracle Grid Infrastructure Installation Guide for information about rollingmigration of Oracle ASM and Oracle Grid Infrastructure homes
Updated Key Management Framework
This feature updates Oracle key management commands to unify the keymanagement application programming interface (API) layer. The updated keymanagement framework makes interacting with keys in the wallet easier and addsnew key metadata that describes how the keys are being used.
xxxix
This feature adds a new capability to store a credential file (wallet) in Oracle ASM diskgroups. For information about file types supported by Oracle ASM, refer to "WhatTypes of Files Does Oracle ASM Support? (page 5-1)".
See Also:
Oracle Database Advanced Security Guide for information about the Oracle keymanagement framework
Oracle Enterprise Manager
Oracle Enterprise Manager replaces Enterprise Manager Database Control foradministering Oracle Automatic Storage Management. For more information, refer to Administering Oracle ASM with Oracle Enterprise Manager (page 7-1).
Deprecated FeaturesThe following are the Oracle ASM 12c Release 1 (12.1.0.1) deprecated features.
Deprecation of single letter SRVCTL CLI options in future releases
All SRVCTL commands have been enhanced to accept more meaningful and user-friendly keyword-style options instead of the single letter options. All new SRVCTLcommand line interface options added in this release support keyword-style optionsonly and do not have single-letter equivalents. The previous style of using single-letterkeyword options as existed in previous releases remain fully supported. In a futurerelease, the singe-letter options may no longer be supported and customers may wantto change their scripts to adapt the keyword-style command options.
Desupported FeaturesThe following are the Oracle ASM 12c Release 1 (12.1.0.1) desupported features.
Desupport of RAW (Block) Storage Devices for Oracle Database and RelatedTechnologies
Oracle Database 12c and related technologies, such as Oracle Clusterware 12c, nolonger support the use of raw (block) storage devices. This means that files must bemoved to Oracle ASM before upgrading to Oracle Clusterware 12c.
Changes in Oracle ACFS and Oracle ADVM for Oracle ASM 12c Release 1(12.1.0.2)
This section describes changes to Oracle Automatic Storage Management Cluster FileSystem (Oracle ACFS) and Oracle ASM Dynamic Volume Manager (Oracle ADVM)for Oracle ASM 12c Release 1 (12.1.0.2).
This section contains the following topic:
• New Features (page xl)
New FeaturesThe following are Oracle ACFS and Oracle ADVM new features in Oracle ASM 12cRelease 1 (12.1.0.2):
xl

• Oracle ACFS Support For Database Data Files on Windows (page xli)
• Oracle Exadata Support for Oracle ACFS and Oracle ACFS Support for GeneralPurpose Files (page xli)
• Oracle ACFS Support for 1023 Snapshots (page xli)
• Oracle ACFS Support for Oracle Database File Mapping Views (page xlii)
• Oracle ACFS Encryption Support for Oracle Key Vault (page xlii)
Oracle ACFS Support For Database Data Files on Windows
Note:
This feature is available starting with Oracle Database 12c Release 1 (12.1.0.2).
Oracle ACFS in Oracle Grid 12c Release 1 (12.1.0.2) on Windows supports all databasefiles, except for data files and redo logs in an Oracle Restart (standalone server)configuration. For support of database files on Windows, the COMPATIBLE.ADVMattribute must be set to 12.1.0.2.
For more information about database files on Oracle ACFS, refer to "About OracleACFS and Database Data Files (page 11-5)".
Oracle Exadata Support for Oracle ACFS and Oracle ACFS Support for GeneralPurpose Files
Note:
This feature is available starting with Oracle Database 12c Release 1 (12.1.0.2).
Oracle Exadata on Linux supports Oracle ACFS in Oracle Grid 12c Release 1 (12.1.0.2).Oracle ACFS supports general purpose files as well as database files; however, OracleASM is the best practice for support of database files.
Oracle ACFS can be configured for use with the database, particularly to leverageOracle ACFS snapshots for database testing and development. However, Oracle ACFSdoes not currently have the ability to push database operations directly into storage.
For more information about database files on Oracle ACFS, refer to "About OracleACFS and Database Data Files (page 11-5)".
Oracle ACFS Support for 1023 Snapshots
Note:
This feature is available starting with Oracle Database 12c Release 1 (12.1.0.2).
A total of 1023 read-only, read-write, or combination of read-only and read-writesnapshot views are supported for each file system. For information about Oracle ACFSsnapshots, refer to "About Oracle ACFS Snapshots (page 11-10)".
xli
Oracle ACFS Support for Oracle Database File Mapping Views
Note:
This feature is available starting with Oracle Database 12c Release 1 (12.1.0.2).
Oracle ACFS supports Oracle Database file mapping views to the Oracle ASM devicelevel. For information about file mapping views related to Oracle ACFS, refer to"Oracle ACFS Support for Oracle Database File Mapping Views (page 12-7)".
Oracle ACFS Encryption Support for Oracle Key Vault
Note:
This feature is available starting with Oracle Database 12c Release 1 (12.1.0.2).
Oracle ACFS encryption supports Oracle Key Vault as a key store. For informationabout using this feature with Oracle ACFS encryption, refer to "Oracle ACFSEncryption (page 11-22)".
See Also:
Oracle Key Vault Administrator's Guide for information about Oracle Key Vault
Changes in Oracle ACFS and Oracle ADVM for Oracle ASM 12c Release 1(12.1.0.1)
This section describes changes to Oracle Automatic Storage Management Cluster FileSystem (Oracle ACFS) and Oracle ASM Dynamic Volume Manager (Oracle ADVM)for Oracle ASM 12c Release 1 (12.1.0.1).
This section contains the following topic:
• New Features (page xlii)
New FeaturesThe following are Oracle ACFS and Oracle ADVM new features in Oracle ASM 12cRelease 1 (12.1.0.1):
• Oracle ACFS Enhancements (page xliii)
• Oracle ACFS Enhancements Supporting Network File Storage (NFS) (page xliv)
• Enhancements for Oracle ACFS Snapshots (page xliv)
• Oracle ACFS Tagging Generic Application Programming Interface (page xliv)
• Oracle Clusterware Resources Supporting Oracle ACFS (page xlv)
• Oracle ACFS Plugins (page xlv)
xlii

• Integration of Oracle ACFS Replication With Auditing_ Encryption_ and Security(page xlv)
• Oracle ACFS Auditing and Support for Importing Auditing Data into Audit VaultServer (page xlv)
• Support for Oracle ACFS Replication and Tagging on Solaris (page xlvi)
• Support for Oracle ACFS Replication and Tagging on AIX (page xlvi)
• Support for Oracle ACFS Security and Encryption on Solaris (page xlvi)
• Oracle Enterprise Manager (page xlvi)
Oracle ACFS Enhancements
This feature introduces enhancements for Oracle ACFS, including:
• Oracle ACFS in Oracle Grid 12c Release 1 (12.1) supports all database files forOracle Database 11g Release 2 (11.2.0.4) or later, except for data files and redo logsin an Oracle Restart (standalone server) configuration. For this feature, theCOMPATIBLE.ADVM attribute must be set to 12.1 or later for the disk group thatcontains the Oracle ACFS file system.
Using Oracle ACFS replication or encryption with database files on Oracle ACFSis not supported. For information about other replication options for database fileson Oracle ACFS, refer to Oracle Data Guard Concepts and Administration and OracleGoldenGate documentation. Oracle GoldenGate is an Oracle product soldindependently of the Oracle Database. To encrypt database data files on OracleACFS, Oracle recommends Oracle Advanced Security. Oracle Advanced Securityprovides Transparent Data Encryption (TDE) to encrypt data files for entiretablespaces. For information about Transparent Data Encryption (TDE), refer to Oracle Database Advanced Security Guide.
• Oracle ACFS supports clusterwide, file granular fcntl advisory file lockingwhile byte range locks continue to operate in node local mode.
• Oracle ACFS directory listing performance is improved for newly createddirectories.
• Oracle ACFS supports end-to-end storage visibility for files with the -d option ofacfsutil info file. The -d option displays details about a file extent location,from the Oracle ACFS extent to the Oracle ASM devices in the disk group. Forinformation, refer to "acfsutil info file (page 16-120)".
• Oracle ACFS ASMCMD commands have enhanced syntax. For information aboutASMCMD commands for Oracle ACFS, refer to "ASMCMD Volume ManagementCommands (page 15-1)".
• Oracle ACFS supports unlimited expansions when resizing a file system in a diskgroup with ADVM compatibility set to 11.2.0.4 or higher.
• Oracle ACFS performance and scalability improvements for ls and find in adisk group with ADVM compatibility set to 11.2.0.4 or higher.
For more information about Oracle ACFS, refer to "Overview of Oracle ACFS(page 11-1)"
xliii

Oracle ACFS Enhancements Supporting Network File Storage (NFS)
Note:
This feature is not supported in Oracle Restart configurations.
High Availability NFS for Oracle Grid Infrastructure provides uninterrupted serviceof NFS V2/V3/V4 exported paths by exposing NFS exports on Highly AvailableVirtual IPs (HAVIP) and using Oracle Clusterware agents to ensure that the HAVIPsand NFS exports are always online. While base NFS supports file locking, HANFSdoes not support NFS file locking.
Oracle ACFS file system exports (using NFS) include Golden Images and patchupdates applied to Oracle ACFS snapshots. Note that NFS is deployed with OracleGrid Infrastructure servers in support of Oracle Grid Infrastructure client systems.Application VIP and NFS export resources are employed for Oracle ACFS and highlyavailable NFS.
High Availability NFS can also be used as a general high availability solution forOracle ACFS exported file systems.
For information about High Availability NFS for Oracle Grid Infrastructure homes,refer to "High Availability Network File Storage for Oracle Grid Infrastructure(page 11-37)".
See Also:
• Oracle Real Application Clusters Administration and Deployment Guide forinformation about SRVCTL commands
• Oracle Clusterware Administration and Deployment Guide for informationabout Oracle Clusterware and clusters
Enhancements for Oracle ACFS Snapshots
Oracle ACFS supports the creation of a snapshot from an existing snapshot in thesame Oracle ACFS file system. In addition, snapshot conversions are enabled betweenread-only and read-write snapshots.
For information about Oracle ACFS snapshots, refer to "About Oracle ACFS Snapshots(page 11-10)". For information about Oracle ACFS snapshot commands, refer to "OracleACFS Command-Line Utilities (page 16-115)".
Oracle ACFS Tagging Generic Application Programming Interface
Tagging operations are available as C application programming interfaces (APIs),described in "Oracle ACFS Tagging Generic Application Programming Interface(page 18-10)".
For information about Oracle ACFS tagging, refer to "Oracle ACFS Tagging(page 11-33)". For information about Oracle ACFS tagging operations available throughthe acfsutil tag commands, refer to "Oracle ACFS Command-Line Tools forTagging (page 16-54)".
xliv

Oracle Clusterware Resources Supporting Oracle ACFS
Note:
This feature is not supported in Oracle Restart configurations.
Oracle ACFS and Oracle ADVM resource support is enhanced for both performanceand coverage. Oracle Clusterware (CRS) managed resource support is extended toinclude enhancements for Oracle ACFS Oracle homes, Oracle ACFS General Purposefile systems, and Oracle ADVM volumes in supporting Oracle Grid InfrastructureServer Oracle ACFS export (using NFS) configurations. SRVCTL has updates tocommands for managing Oracle ACFS and Oracle ADVM resources.
For information about Oracle Clusterware resources and Oracle ACFS, refer to "OracleClusterware Resources and Oracle ACFS Administration (page 11-15)".
See Also:
• Oracle Real Application Clusters Administration and Deployment Guide forinformation about SRVCTL commands
• Oracle Clusterware Administration and Deployment Guide for informationabout Oracle Clusterware resources
Oracle ACFS Plugins
The Oracle ACFS plugin functionality enables a user space application to collect just-in-time Oracle ACFS file and Oracle ADVM volume metrics from the operating systemenvironment. Applications can use the Oracle ACFS plug-in infrastructure to createcustomized solutions that extend the general application file metric interfaces toinclude detailed Oracle ACFS file system and volume data.
For information about Oracle ACFS plugins, refer to "Oracle ACFS Plugins(page 11-36)". For information about Oracle ACFS plugin commands, refer to "OracleACFS Command-Line Utilities (page 16-115)". For information about the Oracle ACFSplug-in application programming interface, refer to "Oracle ACFS Plug-in GenericApplication Programming Interface (page 18-7)".
Integration of Oracle ACFS Replication With Auditing, Encryption, and Security
This feature enables the integration of Oracle Automatic Storage Management ClusterFile System (Oracle ACFS) replication with Oracle ACFS auditing, encryption, andsecurity.
For more information, refer to "Using Replication with Auditing_ Encryption_ andSecurity (page 11-35)".
Oracle ACFS Auditing and Support for Importing Auditing Data into Audit VaultServer
This feature provides auditing for Oracle ACFS security and encryption. In addition,this feature also generates an XML file containing Oracle ACFS audit trail data whichcan be imported by Audit Vault Server.
xlv

For more information, refer to "Oracle ACFS Auditing (page 11-24)". For informationabout Oracle ACFS commands for auditing, refer to "Oracle ACFS Command-LineTools for Auditing (page 16-70)" and the acfsutil sec realm enable andacfsutil sec realm disable commands described in "Oracle ACFS Command-Line Tools for Security (page 16-76)".
Support for Oracle ACFS Replication and Tagging on Solaris
This feature supports Oracle ACFS replication and tagging on Solaris platforms.
For information about Oracle ACFS, refer to Introducing Oracle ACFS and OracleADVM (page 11-1).
Support for Oracle ACFS Replication and Tagging on AIX
This feature supports Oracle ACFS replication and tagging on AIX platforms.
For information about Oracle ACFS, refer to Introducing Oracle ACFS and OracleADVM (page 11-1).
Support for Oracle ACFS Security and Encryption on Solaris
This feature extends support for Oracle ACFS Security and Encryption Features onSolaris systems. Changes in functionality for Solaris environments are noted with theindividual security and encryption commands.
For more information, refer to "Oracle ACFS Security (page 11-19)" and "Oracle ACFSEncryption (page 11-22)".
Oracle Enterprise Manager
Oracle Enterprise Manager replaces Enterprise Manager Database Control foradministering Oracle Automatic Storage Management Cluster File System. For moreinformation, refer to Administering Oracle ACFS with Oracle Enterprise Manager(page 13-1).
xlvi
Part IIntroduction
Part I provides an overview of Oracle Automatic Storage Management (Oracle ASM)concepts and features in the following chapters:
• Introducing Oracle Automatic Storage Management (page 1-1)
• Exploring Considerations for Oracle ASM Storage (page 2-1)


1Introducing Oracle Automatic Storage
Management
This chapter describes Oracle Automatic Storage Management (Oracle ASM) conceptsand provides an overview of Oracle ASM features. This chapter contains the followingtopics:
• Overview of Oracle Automatic Storage Management (page 1-1)
• About Oracle Automatic Storage Management Cluster File System (page 1-2)
• Understanding Oracle ASM Concepts (page 1-2)
• Understanding Oracle ASM Disk Group Administration (page 1-11)
For a list of the terms that are used in the Oracle Automatic Storage ManagementAdministrator's Guide and their definitions, refer to the Glossary (page 1) in thisguide.
See Also:
• The Oracle Cloud Storage page on the Oracle Technology Networkwebsite at http://www.oracle.com/technetwork/database/cloud-storage/index.html for more information about Oracle ASM
• "Master Note for Automatic Storage Management (ASM) (Doc ID1187723.1)" at My Oracle Support (https://support.oracle.com)
Overview of Oracle Automatic Storage ManagementOracle ASM is a volume manager and a file system for Oracle Database files thatsupports single-instance Oracle Database and Oracle Real Application Clusters (OracleRAC) configurations. Oracle ASM is Oracle's recommended storage managementsolution that provides an alternative to conventional volume managers, file systems,and raw devices.
Oracle ASM uses disk groups to store data files; an Oracle ASM disk group is acollection of disks that Oracle ASM manages as a unit. Within a disk group, OracleASM exposes a file system interface for Oracle Database files. The content of files thatare stored in a disk group is evenly distributed to eliminate hot spots and to provideuniform performance across the disks. The performance is comparable to theperformance of raw devices.
You can add or remove disks from a disk group while a database continues to accessfiles from the disk group. When you add or remove disks from a disk group, OracleASM automatically redistributes the file contents and eliminates the need for
Introducing Oracle Automatic Storage Management 1-1

downtime when redistributing the content. For information about administering diskgroups, see Administering Oracle ASM Disk Groups (page 4-1).
The Oracle ASM volume manager functionality provides flexible server-basedmirroring options. The Oracle ASM normal and high redundancy disk groups enabletwo-way and three-way mirroring respectively. You can use external redundancy toenable a Redundant Array of Independent Disks (RAID) storage subsystem to performthe mirroring protection function.
Oracle ASM also uses the Oracle Managed Files (OMF) feature to simplify databasefile management. OMF automatically creates files in designated locations. OMF alsonames files and removes them while relinquishing space when tablespaces or files aredeleted.
Oracle ASM reduces the administrative overhead for managing database storage byconsolidating data storage into a small number of disk groups. The smaller number ofdisk groups consolidates the storage for multiple databases and provides forimproved I/O performance.
Oracle ASM files can coexist with other storage management options such as rawdisks and third-party file systems. This capability simplifies the integration of OracleASM into pre-existing environments.
Oracle ASM has easy to use management interfaces such as SQL*Plus, the Oracle ASMCommand Line Utility (ASMCMD) command-line interface, and Oracle ASMConfiguration Assistant (ASMCA). For information about Oracle ASM ConfigurationAssistant, see Managing Oracle ASM With ASMCA (page 9-1). For informationabout the ASMCMD command-line interface, see Managing Oracle ASM withASMCMD (page 10-1).
See Also:
Oracle Database Administrator's Guide for information about Oracle Databasestructure and storage
About Oracle Automatic Storage Management Cluster File SystemOracle Automatic Storage Management Cluster File System (Oracle ACFS) is a multi-platform, scalable file system, and storage management technology that extendsOracle Automatic Storage Management (Oracle ASM) functionality to support allcustomer files. The Oracle ASM Dynamic Volume Manager (Oracle ADVM) providesvolume management services and a standard disk device driver interface to clients.
For more information about Oracle ACFS and Oracle ADVM, refer to OracleAutomatic Storage Management Cluster File System (page 1).
Understanding Oracle ASM ConceptsThis section describes concepts for the key Oracle ASM components and it contains thefollowing topics:
• About Oracle ASM Instances (page 1-3)
• About Oracle ASM Disk Groups (page 1-6)
• About Mirroring and Failure Groups (page 1-6)
About Oracle Automatic Storage Management Cluster File System
1-2 Oracle Automatic Storage Management Administrator's Guide

• About Oracle ASM Disks (page 1-7)
• About Oracle ASM Allocation Units (page 1-7)
• About Oracle ASM Files (page 1-7)
For information about preparing your storage environment, see ExploringConsiderations for Oracle ASM Storage (page 2-1).
About Oracle ASM InstancesAn Oracle ASM instance is built on the same technology as an Oracle Databaseinstance. An Oracle ASM instance has a System Global Area (SGA) and backgroundprocesses that are similar to those of Oracle Database. However, because Oracle ASMperforms fewer tasks than a database, an Oracle ASM SGA is much smaller than adatabase SGA. In addition, Oracle ASM has a minimal performance effect on a server.Oracle ASM instances mount disk groups to make Oracle ASM files available todatabase instances; Oracle ASM instances do not mount databases. For informationabout managing an Oracle ASM instance, see Administering Oracle ASM Instances(page 3-1).
Oracle ASM is installed in the Oracle Grid Infrastructure home before Oracle Databaseis installed in a separate Oracle home. Oracle ASM and database instances requireshared access to the disks in a disk group. Oracle ASM instances manage the metadataof the disk group and provide file layout information to the database instances.
Oracle ASM metadata is the information that Oracle ASM uses to control a disk groupand the metadata resides within the disk group. Oracle ASM metadata includes thefollowing information:
• The disks that belong to a disk group
• The amount of space that is available in a disk group
• The file names of the files in a disk group
• The location of disk group data file extents
• A redo log that records information about atomically changing metadata blocks
• Oracle ADVM volume information
Oracle ASM instances can be clustered using Oracle Clusterware; there is one OracleASM instance for each cluster node. If there are several database instances for differentdatabases on the same node, then the database instances share the same single OracleASM instance on that node.
If the Oracle ASM instance on a node in a Standard Oracle ASM cluster fails, then allof the database instances on that node also fail. However, in an Oracle Flex ASMconfiguration, Oracle 12c database instances would not fail as they would be able toaccess another Oracle ASM instance remotely on another node. For information aboutOracle Flex ASM, refer to "Managing Oracle Flex ASM (page 3-16)".
Unlike a file system driver failure, an Oracle ASM instance failure does not requirerestarting the operating system. In an Oracle RAC environment, the Oracle ASM anddatabase instances on the surviving nodes automatically recover from an Oracle ASMinstance failure on a node.
Figure 1-1 (page 1-4) shows a single node configuration with one Oracle ASMinstance and multiple database instances. The Oracle ASM instance manages themetadata and provides space allocation for the Oracle ASM files. When a database
Understanding Oracle ASM Concepts
Introducing Oracle Automatic Storage Management 1-3
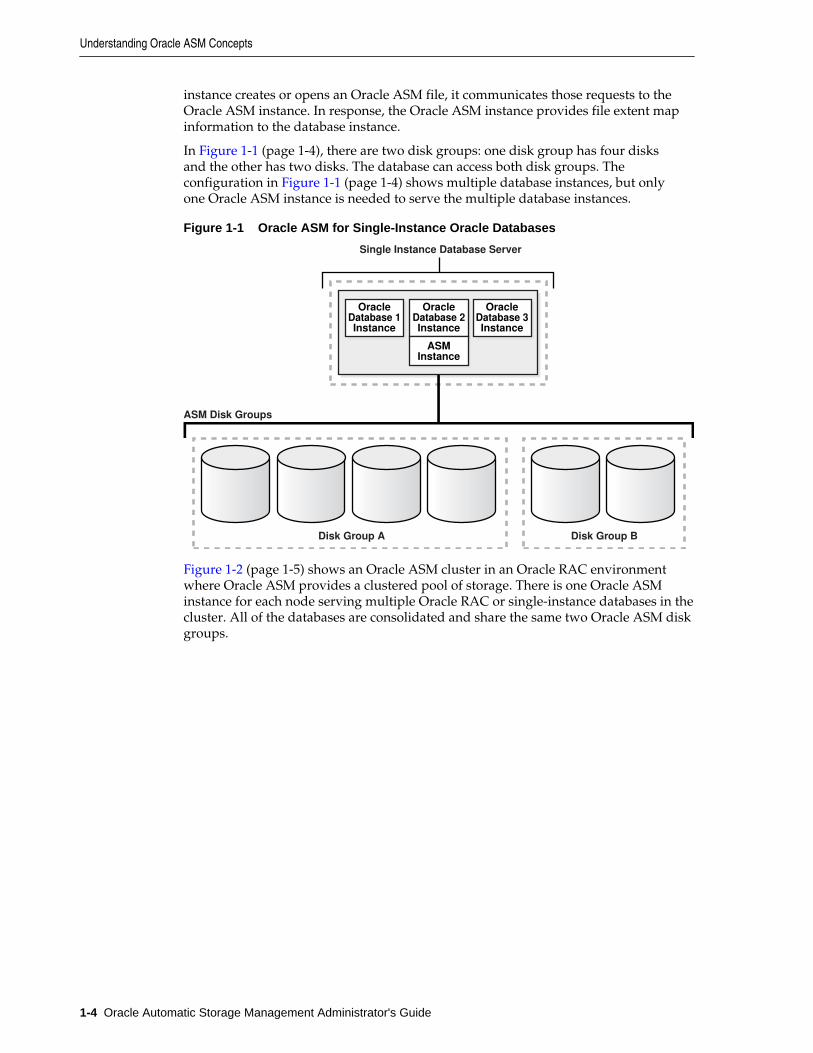
instance creates or opens an Oracle ASM file, it communicates those requests to theOracle ASM instance. In response, the Oracle ASM instance provides file extent mapinformation to the database instance.
In Figure 1-1 (page 1-4), there are two disk groups: one disk group has four disksand the other has two disks. The database can access both disk groups. Theconfiguration in Figure 1-1 (page 1-4) shows multiple database instances, but onlyone Oracle ASM instance is needed to serve the multiple database instances.
Figure 1-1 Oracle ASM for Single-Instance Oracle Databases
Disk Group B
Oracle Recovery Catalog
Oracle Recovery Catalog
Oracle Recovery Catalog
Oracle Recovery Catalog
Oracle Recovery Catalog
Oracle Recovery Catalog
Disk Group A
ASM Disk Groups
Oracle�Database 3�Instance
Single Instance Database Server
Oracle�Database 2�Instance
ASM�Instance
Oracle�Database 1�Instance
Figure 1-2 (page 1-5) shows an Oracle ASM cluster in an Oracle RAC environmentwhere Oracle ASM provides a clustered pool of storage. There is one Oracle ASMinstance for each node serving multiple Oracle RAC or single-instance databases in thecluster. All of the databases are consolidated and share the same two Oracle ASM diskgroups.
Understanding Oracle ASM Concepts
1-4 Oracle Automatic Storage Management Administrator's Guide

Figure 1-2 Oracle ASM Cluster Configuration with Oracle RAC
Disk Group B
Oracle Recovery Catalog
Oracle Recovery Catalog
Oracle Recovery Catalog
Oracle Recovery Catalog
Oracle Recovery Catalog
Oracle Recovery Catalog
Disk Group A
Oracle�Database�Instance
ASM Clustered Pool of Storage
Oracle RAC �
Oracle�Database�Instance
Oracle�Database�Instance
Oracle�Database�Instance
Oracle�Database�Instance
ASM�Instance
ASM�Instance
ASM�Instance
ASM�Instance
ASM�Instance
A clustered storage pool can be shared by multiple single-instance Oracle Databases asshown in Figure 1-3 (page 1-5). In this case, multiple databases share common diskgroups. A shared Oracle ASM storage pool is achieved by using Oracle Clusterware.However, in such environments an Oracle RAC license is not required.
To share a disk group among multiple nodes, you must install Oracle Clusterware onall of the nodes, regardless of whether you install Oracle RAC on the nodes. OracleASM instances that are on separate nodes do not need to be part of an Oracle ASMcluster. However, if the Oracle ASM instances are not part of an Oracle ASM cluster,they cannot communicate with each other. Multiple nodes that are not part of anOracle ASM cluster cannot share a disk group.
Figure 1-3 Oracle ASM Cluster with Single-Instance Oracle Databases
Disk Group B
Oracle Recovery Catalog
Oracle Recovery Catalog
Oracle Recovery Catalog
Oracle Recovery Catalog
Oracle Recovery Catalog
Oracle Recovery Catalog
Disk Group A
Oracle�Database�Instance
ASM Clustered Pool of Storage
Single Instance Database Servers
Oracle�Database�Instance
ASM�Instance
ASM�Instance
Oracle�Database�Instance
ASM�Instance
Understanding Oracle ASM Concepts
Introducing Oracle Automatic Storage Management 1-5
For information about Oracle Flex ASM configurations, refer to "Managing Oracle FlexASM (page 3-16)".
About Oracle ASM Disk GroupsA disk group consists of multiple disks and is the fundamental object that Oracle ASMmanages. Each disk group contains the metadata that is required for the managementof space in the disk group. Disk group components include disks, files, and allocationunits.
Files are allocated from disk groups. Any Oracle ASM file is completely containedwithin a single disk group. However, a disk group might contain files belonging toseveral databases and a single database can use files from multiple disk groups. Formost installations you need only a small number of disk groups, usually two, andrarely more than three. For more information about managing disk groups, see Administering Oracle ASM Disk Groups (page 4-1).
About Mirroring and Failure GroupsMirroring protects data integrity by storing copies of data on multiple disks. Whenyou create a disk group, you specify an Oracle ASM disk group type based on one ofthe following three redundancy levels:
• Normal for 2-way mirroring
• High for 3-way mirroring
• External to not use Oracle ASM mirroring, such as when you configure hardwareRAID for redundancy
The redundancy level controls how many disk failures are tolerated withoutdismounting the disk group or losing data. The disk group type determines themirroring levels with which Oracle creates files in a disk group. For information aboutdisk group types and templates, see "Managing Disk Group Templates (page 5-19)".
Oracle ASM mirroring is more flexible than traditional RAID mirroring. For a diskgroup specified as NORMAL redundancy, you can specify the redundancy level for eachfile. For example, two files can share the same disk group with one file being mirroredwhile the other is not.
When Oracle ASM allocates an extent for a mirrored file, Oracle ASM allocates aprimary copy and a mirror copy. Oracle ASM chooses the disk on which to store themirror copy in a different failure group than the primary copy. Failure groups areused to place mirrored copies of data so that each copy is on a disk in a differentfailure group. The simultaneous failure of all disks in a failure group does not result indata loss.
You define the failure groups for a disk group when you create an Oracle ASM diskgroup. After a disk group is created, you cannot alter the redundancy level of the diskgroup. If you omit the failure group specification, then Oracle ASM automaticallyplaces each disk into its own failure group, except for disk groups containing disks onOracle Exadata cells. Normal redundancy disk groups require at least two failuregroups. High redundancy disk groups require at least three failure groups. Diskgroups with external redundancy do not use failure groups.
For more information about mirroring and failure groups, see "Mirroring_Redundancy_ and Failure Group Options (page 4-30)".
Understanding Oracle ASM Concepts
1-6 Oracle Automatic Storage Management Administrator's Guide

About Oracle ASM DisksOracle ASM disks are the storage devices that are provisioned to Oracle ASM diskgroups. Examples of Oracle ASM disks include:
• A disk or partition from a storage array
• An entire disk or the partitions of a disk
• Logical volumes
• Network-attached files (NFS)
When you add a disk to a disk group, you can assign an Oracle ASM disk name orOracle ASM assigns the Oracle ASM disk name automatically. This name is differentfrom the path name used by the operating system. In a cluster, a disk may be assigneddifferent operating system device names on different nodes, but the disk has the sameOracle ASM disk name on all of the nodes. In a cluster, an Oracle ASM disk must beaccessible from all of the instances that share the disk group.
Oracle ASM spreads the files proportionally across all of the disks in the disk group.This allocation pattern maintains every disk at the same capacity level and ensuresthat all of the disks in a disk group have the same I/O load. Because Oracle ASM loadbalances among all of the disks in a disk group, different Oracle ASM disks should notshare the same physical drive.
About Oracle ASM Allocation UnitsEvery Oracle ASM disk is divided into allocation units (AU). An allocation unit is thefundamental unit of allocation within a disk group. A file extent consists of one ormore allocation units. An Oracle ASM file consists of one or more file extents.
When you create a disk group, you can set the Oracle ASM allocation unit size withthe AU_SIZE disk group attribute. The values can be 1, 2, 4, 8, 16, 32, or 64 MB,depending on the specific disk group compatibility level. Larger AU sizes typicallyprovide performance advantages for data warehouse applications that use largesequential reads.
Refer to Example 4-1 (page 4-10) for an example that shows how the AU_SIZE isspecified with the CREATE DISKGROUP SQL statement. For information aboutallocation unit sizes and disk group compatibility attributes, see "Features Enabled ByDisk Group Compatibility Attribute Settings (page 4-47)".
See Also:
Articles at My Oracle Support (https://support.oracle.com) foradditional information about allocation units and Oracle ASM
About Oracle ASM FilesFiles that are stored in Oracle ASM disk groups are called Oracle ASM files. EachOracle ASM file is contained within a single Oracle ASM disk group. Oracle Databasecommunicates with Oracle ASM in terms of files. This is similar to the way OracleDatabase uses files on any file system. You can store the various file types in OracleASM disk groups, including:
Understanding Oracle ASM Concepts
Introducing Oracle Automatic Storage Management 1-7

• Control files
• Data files, temporary data files, and data file copies
• SPFILEs
• Online redo logs, archive logs, and Flashback logs
• RMAN backups
• Disaster recovery configurations
• Change tracking bitmaps
• Data Pump dumpsets
Oracle ASM automatically generates Oracle ASM file names as part of file creation andtablespace creation. Oracle ASM file names begin with a plus sign (+) followed by adisk group name. You can specify user-friendly aliases for Oracle ASM files and createa hierarchical directory structure for the aliases.
The following sections describe the Oracle ASM file components:
• Understanding Oracle ASM Extents (page 1-8)
• Understanding Oracle ASM Striping (page 1-9)
• About Oracle ASM File Templates (page 1-11)
Understanding Oracle ASM Extents
The contents of Oracle ASM files are stored in a disk group as a set, or collection, of extents that are stored on individual disks within disk groups. Each extent resides onan individual disk. Extents consist of one or more allocation units (AU). Toaccommodate increasingly larger files, Oracle ASM uses variable size extents.
Variable size extents enable support for larger Oracle ASM data files, reduce SGAmemory requirements for very large databases, and improve performance for filecreate and open operations. The initial extent size equals the disk group allocation unitsize and it increases by a factor of 4 or 16 at predefined thresholds. The various extentsizes are described in this section.
For disk groups with AU size less than 4 MB:
• Extent size always equals the disk group AU size for the first 20000 extent sets (0 -19999).
• Extent size equals 4*AU size for the next 20000 extent sets (20000 - 39999).
• Extent size equals 16*AU size for the next 20000 and higher extent sets (40000+).
For disk groups with AU size greater than or equal to 4 MB and the disk groupRDBMS compatibility greater than or equal to 11.2.0.4, the counts for extents ofsizes (the disk group AU size, 4*AU size, or 16*AU size) are calculated using theapplication block size to support maximum file size.
The extent sizing feature is automatic for newly created and resized data files whenspecific disk group compatibility attributes are set to 11.1 or higher. For informationabout compatibility attributes, see "Disk Group Compatibility (page 4-41)".
Figure 1-4 (page 1-9) shows the Oracle ASM file extent relationship with allocationunits. The first eight extents (0 to 7) are distributed on four Oracle ASM disks and are
Understanding Oracle ASM Concepts
1-8 Oracle Automatic Storage Management Administrator's Guide
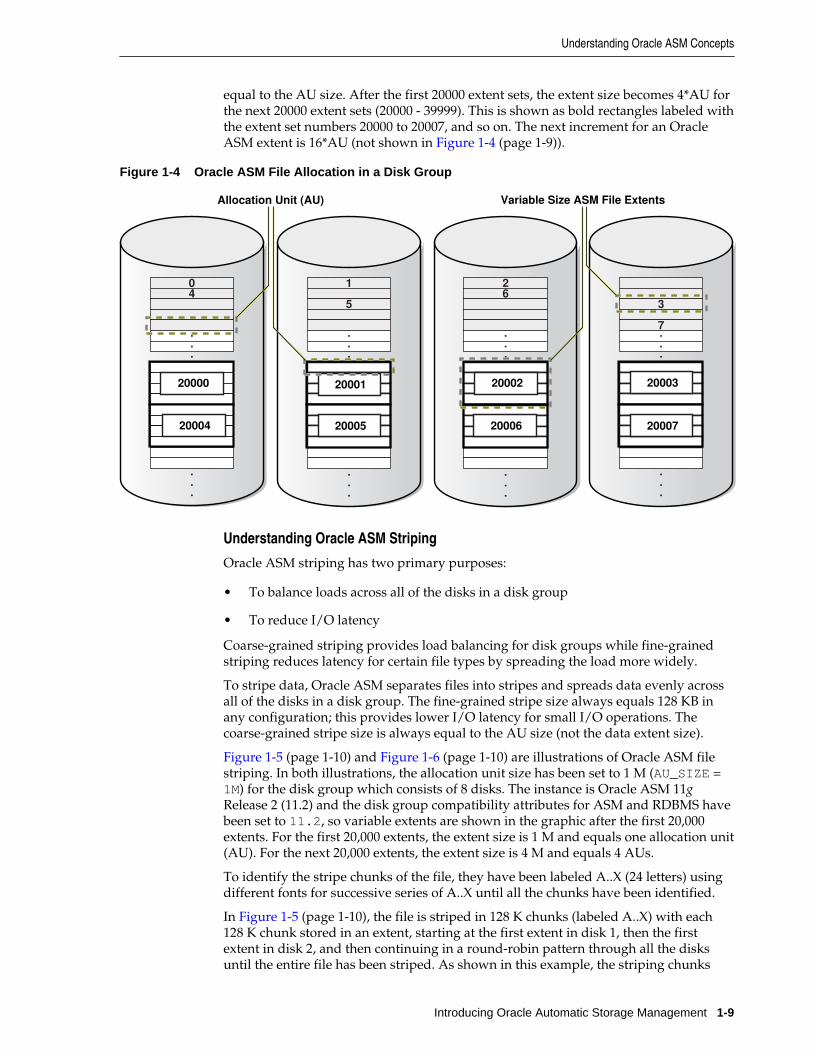
equal to the AU size. After the first 20000 extent sets, the extent size becomes 4*AU forthe next 20000 extent sets (20000 - 39999). This is shown as bold rectangles labeled withthe extent set numbers 20000 to 20007, and so on. The next increment for an OracleASM extent is 16*AU (not shown in Figure 1-4 (page 1-9)).
Figure 1-4 Oracle ASM File Allocation in a Disk Group
Allocation Unit (AU) Variable Size ASM File Extents�
04 ...
.
.
.
20000
20004
1
5 ...
.
.
.
20001
20005
26 ...
.
.
.
20002
20006
3
7...
.
.
.
20003
20007
Understanding Oracle ASM Striping
Oracle ASM striping has two primary purposes:
• To balance loads across all of the disks in a disk group
• To reduce I/O latency
Coarse-grained striping provides load balancing for disk groups while fine-grainedstriping reduces latency for certain file types by spreading the load more widely.
To stripe data, Oracle ASM separates files into stripes and spreads data evenly acrossall of the disks in a disk group. The fine-grained stripe size always equals 128 KB inany configuration; this provides lower I/O latency for small I/O operations. Thecoarse-grained stripe size is always equal to the AU size (not the data extent size).
Figure 1-5 (page 1-10) and Figure 1-6 (page 1-10) are illustrations of Oracle ASM filestriping. In both illustrations, the allocation unit size has been set to 1 M (AU_SIZE =1M) for the disk group which consists of 8 disks. The instance is Oracle ASM 11gRelease 2 (11.2) and the disk group compatibility attributes for ASM and RDBMS havebeen set to 11.2, so variable extents are shown in the graphic after the first 20,000extents. For the first 20,000 extents, the extent size is 1 M and equals one allocation unit(AU). For the next 20,000 extents, the extent size is 4 M and equals 4 AUs.
To identify the stripe chunks of the file, they have been labeled A..X (24 letters) usingdifferent fonts for successive series of A..X until all the chunks have been identified.
In Figure 1-5 (page 1-10), the file is striped in 128 K chunks (labeled A..X) with each128 K chunk stored in an extent, starting at the first extent in disk 1, then the firstextent in disk 2, and then continuing in a round-robin pattern through all the disksuntil the entire file has been striped. As shown in this example, the striping chunks
Understanding Oracle ASM Concepts
Introducing Oracle Automatic Storage Management 1-9

first fill up the first extent of each disk, then the second extent of each disk, and so onuntil the entire file has been striped.
Figure 1-5 Oracle ASM Fine-Grained Striping
21
Allocation Unit (AU)
C D E F G H I J K L M N O P Q R S T U V W X A B C D E . . . A B C D E . . .
. . .
. . .
. . .
. . .
. . .
3 4 8
.
.
.
.
.
.
...
...
...
A B
H P XD L TDC K S CB J R BA I Q A
Variable Size ASM File Extents
In Figure 1-6 (page 1-10), the file is striped in 1 M chunks (labeled A..X) with each 1M chunk stored uniquely in an extent, starting at the first extent in disk 1, then the firstextent in disk 2, and then continuing in a round-robin pattern through all the disksuntil the entire file has been striped. For the first 20,000 extents where the AU equalsthe extent size (1 M), the stripe equals the extent size and allocation unit size.For thevariable extents, where an extent is composed of multiple allocation units, the filestripe is located in an AU of the extent. The striping chunks are placed in the allocationunits of the first extents of all the disks before the striping continues to the next extent.
Figure 1-6 Oracle ASM Coarse-Grained Striping
.
.
.
B
RJ
2
J
1
.
.
.
AI
QI
Allocation Unit (AU) Variable Size ASM File Extents
C D E F G H I J K L M N O P Q R S T U V W X A B C D E . . . A B C D E . . .
. . .
. . .
. . .
. . .
. . .
3 4 8
C
.
.
.
C
S
K
K
.
.
.
D
L
H
.
.
.
H
XP
. . .. . .. . .. . . . . .
D
TL
A
A B
B
Understanding Oracle ASM Concepts
1-10 Oracle Automatic Storage Management Administrator's Guide
About Oracle ASM File Templates
Templates are collections of attribute values that are used to specify disk regions, filemirroring, and striping attributes for an Oracle ASM file when it is created. Whencreating a file, you can include a template name and assign desired attributes based onan individual file rather than the file type.
A default template is provided for every Oracle file type, but you can customizetemplates to meet unique requirements. Each disk group has a default templateassociated with each file type.
For more information about Oracle ASM templates, see "Managing Disk GroupTemplates (page 5-19)".
Understanding Oracle ASM Disk Group AdministrationThis section describes Oracle ASM disk group administration and it contains thefollowing topics:
• About Discovering Disks (page 1-11)
• About Mounting and Dismounting Disk Groups (page 1-11)
• About Adding and Dropping Disks (page 1-12)
• About Online Storage Reconfigurations and Dynamic Rebalancing (page 1-12)
About Discovering DisksThe disk discovery process locates the operating system names for disks that OracleASM can access. Disk discovery finds all of the disks that comprise a disk group to bemounted. The set of discovered disks also includes disks that could be added to a diskgroup.
An Oracle ASM instance requires an ASM_DISKSTRING initialization parameter valueto specify its discovery strings. Only path names that the Oracle ASM instance haspermission to open are discovered. The exact syntax of a discovery string dependsvarious factors, such as the platform and whether Oracle Exadata disks are used. Thepath names that an operating system accepts are always usable as discovery strings.
For information about the ASM_DISKSTRING initialization parameter, refer to"ASM_DISKSTRING (page 3-9)". For information about disk discovery, refer to"Oracle ASM Disk Discovery (page 4-25)". For information about Oracle ASM FilterDriver, refer to "Oracle ASM Filter Driver (page 3-34)".
About Mounting and Dismounting Disk GroupsA disk group must be mounted by a local Oracle ASM instance before databaseinstances can access the files in the disk group. Mounting the disk group requiresdiscovering all of the disks and locating the files in the disk group that is beingmounted.
You can explicitly dismount a disk group. Oracle reports an error if you attempt todismount a disk group without the force option when any of the disk group files areopen. It is possible to have disks fail in excess of the Oracle ASM redundancy setting.If this happens, then the disk group is forcibly dismounted. If the disk group isforcibly dismounted, a database cannot access files in the disk group.
Understanding Oracle ASM Disk Group Administration
Introducing Oracle Automatic Storage Management 1-11

For more information about disk groups, see "Mounting and Dismounting DiskGroups (page 4-55)".
About Adding and Dropping DisksYou can add a disk to an existing disk group to add space and to improve throughput.The specified discovery string identifies the disk or disks that you could add. Thedisks that you add must be discovered by every Oracle ASM instance using itsASM_DISKSTRING initialization parameter. After you add a disk, Oracle ASMrebalancing operations move data onto the new disk. To minimize the rebalancingI/O, it is more efficient to add multiple disks at the same time.
You can drop a disk from a disk group if it fails or to re-purpose capacity. Use theOracle ASM disk name to drop a disk, not the discovery string device name. If an erroroccurs while writing to a disk, then Oracle ASM drops the disk automatically.
For more information about altering disk group membership, see "Altering DiskGroups (page 4-15)".
About Online Storage Reconfigurations and Dynamic RebalancingRebalancing a disk group moves data between disks to ensure that every file is evenlyspread across all of the disks in a disk group. When all of the files are evenlydispersed, all of the disks are evenly filled to the same percentage; this ensures loadbalancing. Rebalancing does not relocate data based on I/O statistics nor isrebalancing started based on I/O statistics. Oracle ASM rebalancing operations arecontrolled by the size of the disks in a disk group.
Oracle ASM automatically initiates a rebalance after storage configuration changes,such as when you add, drop, or resize disks. The power setting parameter determinesthe speed with which rebalancing operations occur.
You can manually start a rebalance to change the power setting of a runningrebalance. A rebalance is automatically restarted if the instance on which therebalancing is running stops. Databases can remain operational during rebalancingoperations.
You can minimize the impact on database performance with the setting of theASM_POWER_LIMIT initialization parameter. For more information about the powerlimit setting, see "ASM_POWER_LIMIT (page 3-10)". For more information aboutdisk rebalancing, see "Manually Rebalancing Disk Groups (page 4-21)".
Understanding Oracle ASM Disk Group Administration
1-12 Oracle Automatic Storage Management Administrator's Guide
2Exploring Considerations for Oracle ASM
Storage
This chapter discusses issues to consider about the storage subsystem before youconfigure Oracle Automatic Storage Management (Oracle ASM). When preparingyour storage to use Oracle ASM, first determine the storage option for your systemand then prepare the disk storage for your specific operating system environment.
When configuring your system's storage, you must consider the initial capacity of thesystem and your plans for future growth. Oracle ASM simplifies the task ofaccommodating growth. However, your growth plans can affect choices, such as thesize of the Oracle ASM disks. You must also consider that I/O performance dependson the interconnect between the storage and host, not just the storage disks. As youscale up the number of nodes in a cluster, you must also scale up the storagesubsystem.
This chapter contains the following topics:
• Storage Resources for Disk Groups (page 2-1)
• Oracle ASM and Multipathing (page 2-3)
• Recommendations for Storage Preparation (page 2-4)
• Storage Device Path and Permission Persistence (page 2-5)
Storage Resources for Disk GroupsYou can create an Oracle ASM disk group using one of the following storageresources:
• Disk Partition
A disk partition can be the entire disk drive or a section of a disk drive. However,the Oracle ASM disk cannot be in a partition that includes the partition tablebecause the partition table would be overwritten.
• Logical Unit Number (LUN)
A LUN is a disk presented to a computer system by a storage array. Oraclerecommends that you use hardware RAID functionality to create LUNs. Storagehardware RAID 0+1 or RAID5, and other RAID configurations, can be providedto Oracle ASM as Oracle ASM disks.
• Logical Volume
A logical volume is supported in less complicated configurations where a logicalvolume is mapped to a LUN, or a logical volume uses disks or raw partitions.Logical volume configurations are not recommended by Oracle because they
Exploring Considerations for Oracle ASM Storage 2-1

create a duplication of functionality. Oracle also does not recommended usinglogical volume managers for mirroring because Oracle ASM provides mirroring.
• Network File System (NFS)
An Oracle ASM disk group can be created from NFS files, including Oracle DirectNFS (dNFS), such as whole disks, partitions, and LUNs. The NFS files that areprovisioned to a disk group may be from multiple NFS servers to provide betterload balancing and flexible capacity planning.
You can use Direct NFS to store data files, but is not supported for OracleClusterware files. To install Oracle Real Application Clusters (Oracle RAC) onWindows using Direct NFS, you must also have access to a shared storage methodother than NFS for Oracle Clusterware files.
See Also:
Oracle Grid Infrastructure Installation Guide for your operating system forinformation about Oracle Direct NFS
Note:
• Oracle ASM Dynamic Volume Manager (Oracle ADVM) volumes andOracle Automatic Storage Management Cluster File System (OracleACFS) file systems are currently not supported on disk groups that havebeen created from NFS or Common Internet File System (CIFS) files.However, Oracle ACFS file systems may be exported as NFS or CIFS filesystems to network clients in some cases. Samba/CIFS clients onWindows cannot use ACLs when interfacing with Oracle ACFS Linux,Solaris, or AIX servers.
• Mounting loopback file systems over Oracle ACFS files is not supported.
• Block or raw devices are not supported by Oracle Universal Installer(OUI) or Database Configuration Assistant (DBCA).
The procedures for preparing storage resources for Oracle ASM are:
• Identify or create the storage devices for Oracle ASM by identifying all of thestorage resource device names that you can use to create an Oracle ASM diskgroup. For example, on Linux systems device names are typically presented fromthe /dev directory with the /dev/device_name_identifier name syntax.
• Change the ownership and the permissions on storage device resources.
For example, the following steps are required on Linux systems:
– Change the user and group ownership of devices, such as grid:asmadmin
For information about Oracle ASM privileges, see "About Privileges forOracle ASM (page 3-47)".
– Change the device permissions to read/write
Storage Resources for Disk Groups
2-2 Oracle Automatic Storage Management Administrator's Guide
Note:
To ensure that ownership and permission settings are persistent, you can useudev to ensure that the disks do not revert to root ownership when thesystems restart.
After you have configured Oracle ASM, ensure that disk discovery has beenconfigured correctly by setting the ASM_DISKSTRING initialization parameter. Forinformation about the ASM_DISKSTRING parameter, see "ASM_DISKSTRING(page 3-9)".
Note:
Setting the ownership to oracle:dba is one example that corresponds to thedefault settings. A nondefault installation may require different settings. Ingeneral, the owner of the disk devices should be the same as the owner of theOracle binary software. The group ownership should be OSDBA of the OracleASM instance, which is defined at installation. For information about OracleASM privileges, see "About Privileges for Oracle ASM (page 3-47)".
For detailed information about preparing disks for an Oracle ASM installation, refer toyour platform-specific installation guide for Oracle Database, Oracle Clusterware, andOracle Real Application Clusters (Oracle RAC).
See Also:
Oracle Exadata documentation for information about preparing OracleExadata storage
Oracle ASM and MultipathingMultipathing solutions provide failover by using redundant physical pathcomponents. These components include adapters, cables, and switches that residebetween the server and the storage subsystem. If one or more of these componentsfails, then applications can still access their data, eliminating a single point of failurewith the Storage Area Network (SAN), Host Bus Adapter, interface cable, or host porton a multiported storage array.
Multipathing is a software technology implemented at the operating system devicedriver level. Multipathing creates a pseudo device to facilitate the sharing andbalancing of I/O operations across all of the available I/O paths. Multipathing alsoimproves system performance by distributing the I/O load across all available paths,providing a higher level of data availability through automatic failover and failback.
Although Oracle ASM is not designed with multipathing functionality, Oracle ASMdoes operate with multipathing technologies. Multipathing technologies are availablefrom many sources. Storage vendors offer multipathing products to support theirspecific storage products, while software vendors usually develop multipathingproducts to support several server platforms and storage products.
Oracle ASM and Multipathing
Exploring Considerations for Oracle ASM Storage 2-3

See Also:
Your storage or software vendor multipathing documentation for moreinformation about multipathing options for specific platforms and storageproducts
With Oracle ASM, you can ensure the discovery of a multipath disk by setting thevalue of the ASM_DISKSTRING initialization parameter to a pattern that matches thepseudo devices that represents the multipath disk. When I/O is sent to the pseudodevice, the multipath driver intercepts it and provides load balancing to theunderlying subpaths.
If Oracle ASM discovers multiple paths to the same disk device, Oracle ASM thenraises an error. Because a single disk can appear multiple times in a multipathconfiguration, you must configure Oracle ASM to discover only the multipath disk.
For information about disk discovery, see "Oracle ASM Disk Discovery (page 4-25)".
See Also:
• Articles at My Oracle Support (https://support.oracle.com) forinformation about Oracle ASM and Multipathing
• Your platform-specific installation guide for information aboutconfiguring multipathing for your system
Recommendations for Storage PreparationThe following are guidelines for preparing storage for use with Oracle ASM:
• Configure two disk groups, one for data and the other for the fast recovery area.
See Also:
– Oracle Database Backup and Recovery User's Guide for information aboutconfiguring the fast recovery area
– Oracle Database Administrator's Guide for information about specifying afast recovery area
• The number of LUNs (Oracle ASM disks) for each disk group should be at leastequal to four times the number of active I/O paths. For example, if a disk grouphas two active I/O paths, then minimum of eight LUNs should be used. TheLUNs should be of equal size and performance for each disk group.
An I/O path is a distinct channel or connection between storage presenting LUNsand the server. An active I/O path is an I/O path in which the I/O load on a LUNis multiplexed through multipathing software.
• Ensure that all Oracle ASM disks in a disk group have similar storageperformance and availability characteristics. In storage configurations with mixed
Recommendations for Storage Preparation
2-4 Oracle Automatic Storage Management Administrator's Guide

speed drives, such as flash memory and hard disk drives (HDD), I/Operformance is constrained by the slowest speed drive.
• Oracle ASM data distribution policy is capacity-based. Ensure that Oracle ASMdisks in a disk group have the same capacity to maintain balance.
• Configure a minimum of three failure groups for normal redundancy disk groupsand five failure groups for high redundancy disk groups to maintain thenecessary number of copies of the Partner Status Table (PST) to ensure robustnesswith respect to storage hardware failures. For more information, refer to "OracleASM Failure Groups (page 4-31)".
• Create external redundancy disk groups when using high-end storage arrays.High-end storage arrays generally provide hardware RAID protection. Use OracleASM mirroring redundancy when not using hardware RAID, or when you needhost-based volume management functionality, such as mirroring across storagesystems. You can use Oracle ASM mirroring in configurations when mirroringbetween geographically-separated sites (extended clusters).
• Minimize I/O contention between Oracle ASM disks and other applications bydedicating disks in Oracle ASM disk groups.
• Choose a hardware RAID stripe size that is a power of 2 and less than or equal tothe size of the Oracle ASM allocation unit.
• Use the Oracle ASM Filter Driver feature to provide consistent device naming andpermission persistency.
See Also:
– The Oracle Cloud Storage page on the Oracle Technology Networkwebsite at http://www.oracle.com/technetwork/database/cloud-storage/index.html for more information about Oracle ASM
– Information about Oracle ASM Filter Driver at "Oracle ASM Filter Driver(page 3-34)"
Storage Device Path and Permission PersistenceBefore installation, or before configuring new storage devices to use with Oracle ASM,administrators must configure storage device names and ownership to ensure thatstorage paths and ownership persist after system restarts. Use Oracle ASM FilterDriver to maintain permissions and manage device paths. On Oracle Solaris, you canalso use the Solaris I/O multipathing features to maintain permissions and devicepaths.
See Also:
Oracle Grid Infrastructure Installation Guide for your operating system for moreinformation about configuring storage devices for path and permissionpersistence.
Storage Device Path and Permission Persistence
Exploring Considerations for Oracle ASM Storage 2-5

Storage Device Path and Permission Persistence
2-6 Administrator's Guide

Part IIOracle ASM Instances and Disk Groups
Part II discusses the administration of Oracle ASM instances and disk groups in thefollowing chapters:
• Administering Oracle ASM Instances (page 3-1)
• Administering Oracle ASM Disk Groups (page 4-1)
• Administering Oracle ASM Files_ Directories_ and Templates (page 5-1)
• Using Views to Display Oracle ASM Information (page 6-1)
• Administering Oracle ASM with Oracle Enterprise Manager (page 7-1)
• Performing Oracle ASM Data Migration with RMAN (page 8-1)
• Managing Oracle ASM With ASMCA (page 9-1)
• Managing Oracle ASM with ASMCMD (page 10-1)


3Administering Oracle ASM Instances
This chapter describes how to administer Automatic Storage Management (OracleASM) instances. It explains how to configure Oracle ASM instance parameters andhow to set Oracle Database parameters for use with Oracle ASM. The chapter alsodescribes Oracle ASM upgrading, patching, and authentication for Oracle ASMinstance access. You can also use procedures in this chapter to migrate a database touse Oracle ASM.
Administering an Oracle ASM instance is similar to administering an Oracle Databaseinstance, but the process requires fewer procedures. You can use Oracle ASMCommand Line Utility (ASMCMD) command-line interface, Oracle ASMConfiguration Assistant (ASMCA), and SQL*Plus to perform Oracle ASM instanceadministration tasks.
This chapter contains the following topics:
• Operating with Different Releases of Oracle ASM and Database InstancesSimultaneously (page 3-1)
• Initialization Parameters for Oracle ASM Instances (page 3-2)
• Administration of Oracle ASM Instances (page 3-15)
• Upgrading and Patching Oracle ASM (page 3-29)
• Oracle ASM Filter Driver (page 3-34)
• Authentication for Accessing Oracle ASM Instances (page 3-46)
• Migration of a Database to Use Oracle ASM (page 3-55)
For a description of an Oracle ASM instance, see "About Oracle ASM Instances(page 1-3)".
Operating with Different Releases of Oracle ASM and Database InstancesSimultaneously
Oracle Automatic Storage Management (Oracle ASM) in Oracle Database 12c Release 1(12.1) supports Oracle Database 12c Release 1 (12.1) or older software versions,including Oracle Database 10g Release 1 (10.1).
Administering Oracle ASM Instances 3-1
Note:
• An Oracle ASM instance must be at Oracle ASM 12c Release 1 (12.1) tosupport Oracle Database 12c Release 1 (12.1).
• See Oracle Exadata documentation for information about the OracleDatabase versions that Oracle ASM 12c Release 1 (12.1) supports whenOracle Exadata storage is present.
There are additional compatibility considerations when using disk groups withdifferent releases of Oracle ASM and database instances. For information about diskgroup compatibility attributes settings, see "Disk Group Compatibility (page 4-41)".
When using different software versions, the database instance supports Oracle ASMfunctionality of the earliest release in use. For example, an Oracle Database 10g Release1 (10.1) database instance operating with an Oracle ASM 11g Release 2 (11.2) instancesupports only Oracle ASM 10g Release 1 (10.1) features.
The V$ASM_CLIENT view contains the SOFTWARE_VERSION andCOMPATIBLE_VERSION columns with information about the software versionnumber and instance compatibility level.
• The SOFTWARE_VERSION column of V$ASM_CLIENT contains the softwareversion number of the database or Oracle ASM instance for the selected diskgroup connection.
• The COMPATIBLE_VERSION column contains the setting of the COMPATIBLEparameter of the database or Oracle ASM instance for the selected disk groupconnection.
You can query the V$ASM_CLIENT view on both Oracle ASM and database instances.For an example showing a query on the V$ASM_CLIENT view, see Example 6-4(page 6-4). For more information about the V$ASM_CLIENT and V$ASM_* views,see "Views Containing Oracle ASM Disk Group Information (page 6-1)".
Initialization Parameters for Oracle ASM InstancesThis section discusses initialization parameter files and parameter settings for OracleASM instances. To install and initially configure an Oracle ASM instance, use OracleUniversal Installer (OUI) and Oracle ASM Configuration Assistant (ASMCA). Refer toyour platform-specific Oracle Grid Infrastructure Installation Guide for details aboutinstalling and configuring Oracle ASM.
After an Oracle ASM instance has been installed on a single-instance Oracle Databaseor in an Oracle Real Application Clusters (Oracle RAC) environment, the final OracleASM configuration can be performed. Only a few Oracle ASM-specific instanceinitialization parameters must be configured. The default values are usually sufficient.
See Also:
The Oracle Cloud Storage page on the Oracle Technology Network website at http://www.oracle.com/technetwork/database/cloud-storage/index.html for more information about Oracle ASM best practices
Initialization Parameters for Oracle ASM Instances
3-2 Oracle Automatic Storage Management Administrator's Guide

This section contains the following topics:
• About Initialization Parameter Files for an Oracle ASM Instance (page 3-3)
• About Backing Up_ Copying_ and Moving an Oracle ASM InitializationParameter File (page 3-4)
• About Oracle ASM Initialization Parameter Settings (page 3-6)
• About Automatic Memory Management for Oracle ASM (page 3-7)
• Recommended Settings for Oracle ASM Initialization Parameters (page 3-8)
• About Setting Database Initialization Parameters for Use with Oracle ASM(page 3-14)
See Also:
• Oracle Database Reference for information about initialization parameters
• Oracle Database Administrator's Guide for information about initializationparameter files
About Initialization Parameter Files for an Oracle ASM InstanceWhen installing Oracle ASM in an Oracle Restart (standalone) configuration, OracleUniversal Installer (OUI) creates a separate server parameter file (SPFILE) andpassword file for the Oracle ASM instance. The ASM SPFILE is stored in a disk groupduring installation.
When installing Oracle ASM in a clustered Oracle ASM environment, OUI creates asingle, shared SPFILE for Oracle ASM in a disk group.
When upgrading an Oracle ASM instance, if the ASM SPFILE was originally in ashared file system, then the upgraded Oracle ASM instance retains the SPFILE in thesame location. If the original Oracle ASM instance used a PFILE, then after an upgradethe instance continues to use a PFILE.
You can use an SPFILE or a text-based initialization parameter file (PFILE) as theOracle ASM instance parameter file. If you use an SPFILE in a clustered Oracle ASMenvironment, then you must place the SPFILE in a disk group or on a cluster filesystem. Oracle recommends that the Oracle ASM SPFILE is placed in a disk group.You cannot use a new alias created on an existing Oracle ASM SPFILE to start theOracle ASM instance
If you do not use a shared Oracle Grid Infrastructure home, then the Oracle ASMinstance can use a PFILE. The same rules for file name, default location, and searchorder that apply to database initialization parameter files also apply to Oracle ASMinitialization parameter files.
When an Oracle ASM instance searches for an initialization parameter file, the searchorder is:
1. The location of the initialization parameter file specified in the Grid Plug and Play(GPnP) profile
2. If the location has not been set in the GPnP profile, then the search order changesto:
Initialization Parameters for Oracle ASM Instances
Administering Oracle ASM Instances 3-3
a. SPFILE in the Oracle ASM instance home
For example, the SPFILE for Oracle ASM has the following default path in theOracle Grid Infrastructure home in a Linux environment:
$ORACLE_HOME/dbs/spfile+ASM.ora
b. PFILE in the Oracle ASM instance home
Note:
A PFILE or SPFILE is required if your configuration uses nondefaultinitialization parameters for the Oracle ASM instance.
You can administer Oracle ASM initialization parameter files with SQL*Plus, ASMCA,and ASMCMD commands. For information about the ASMCA GUI and command-line interfaces, see Managing Oracle ASM With ASMCA (page 9-1). For informationabout ASMCMD commands for managing an Oracle ASM SPFILE; such as spbackup,spcopy, and spmove; see "ASMCMD Instance Management Commands(page 10-11)".
See Also:
• Oracle Database Administrator's Guide for more information about creatingand maintaining initialization parameter files
• Oracle Database SQL Language Reference for information about creating anSPFILE with the CREATE SPFILE SQL statement
About Backing Up, Copying, and Moving an Oracle ASM Initialization Parameter FileYou can back up, copy, or move an Oracle ASM SPFILE with the ASMCMDspbackup, spcopy, or spmove commands. In addition, you can use the SQL CREATESPFILE to create an Oracle ASM SPFILE when connected to the Oracle ASM instance.
You can also copy and move an Oracle ASM PFILE with the commands available onthe specific platform, such as cp for Linux.
After copying or moving an SPFILE or PFILE, you must restart the instance with theSPFILE or PFILE in the new location to use that SPFILE or PFILE.
This section contains the following topics:
• Creating_ Copying_ and Moving an SPFILE Into a Disk Group (page 3-5)
• Making a Back Up Copy of an Oracle ASM SPFILE in a Disk Group (page 3-5)
For information about ASMCMD commands for managing an SPFILE, see "spbackup(page 10-24)", "spcopy (page 10-25)", and "spmove (page 10-27)".
Initialization Parameters for Oracle ASM Instances
3-4 Oracle Automatic Storage Management Administrator's Guide
See Also:
• Oracle Database Administrator's Guide for more information about creatingand maintaining initialization parameter files
• Oracle Database SQL Language Reference for information about creating anSPFILE with the CREATE SPFILE SQL statement
• Oracle Real Application Clusters Installation Guide for information aboutGrid Plug and Play (GPnP)
Creating, Copying, and Moving an SPFILE Into a Disk Group
If the COMPATIBLE.ASM disk group attribute is set to 11.2 or greater for a diskgroup, you can create, copy, or move an Oracle ASM SPFILE into the disk group.
For example, after upgrading an instance from Oracle ASM 11g Release 1 (11.1) toOracle ASM 11g Release 2 (11.2), you could place the Oracle ASM SPFILE in a diskgroup that has COMPATIBLE.ASM set to 11.2. For information about disk groupcompatibility attributes, see "Disk Group Compatibility (page 4-41)".
In the following steps, assume an Oracle ASM 11g Release 2 (11.2) instance is using aPFILE stored in $ORACLE_HOME/dbs/asmpfile.ora. You can use the SQL CREATESPFILE statement to create an SPFILE from a PFILE stored in a local or shared filesystem. If a PFILE does not exist, then it could be created with the SQL CREATE PFILEstatement.
To create an SPFILE in a disk group, perform the following steps:
1. Connect to the Oracle ASM instance.
For example:
$ sqlplus / as sysasm
2. Create an SPFILE in a disk group that has COMPATIBLE.ASM set to 11.2 with theSQL CREATE SPFILE statement.
For example, create an Oracle ASM SPFILE from the existing PFILE.
SQL> CREATE SPFILE = '+DATA/asmspfile.ora' FROM PFILE = '$ORACLE_HOME/dbs/asmpfile.ora';
The CREATE SPFILE statement also updates the Grid Plug and Play (GPnP)profile. You can check the location of the Oracle ASM SPFILE in the GPnP profilewith the ASMCMD spget command. See "spget (page 10-26)".
3. Restart the Oracle ASM instance so that the instance reads the SPFILE in the newlocation.
For information on shutting down and starting up an Oracle ASM instance, see"About Starting Up an Oracle ASM Instance (page 3-22)" and "About ShuttingDown an Oracle ASM Instance (page 3-25)".
Making a Back Up Copy of an Oracle ASM SPFILE in a Disk Group
This section describes the steps to make a back up copy of an Oracle ASM SPFILE inanother disk group using the ASMCMD commands. If necessary, then the backupcopy can be used to restore the Oracle ASM SPFILE.
Initialization Parameters for Oracle ASM Instances
Administering Oracle ASM Instances 3-5

The source and target disk groups must have the disk group attributeCOMPATIBLE.ASM set to 11.2 or higher.
To make a copy of the Oracle ASM SPFILE in another disk group with the spcopycommand perform the following steps:
1. Locate the Oracle ASM SPFILE using the ASMCMD spget command.
For example:
ASMCMD [+] > spget+DATA/ASM/ASMPARAMETERFILE/registry.253.849343867
2. Copy the Oracle ASM SPFILE to another disk group with spcopy command.
For example:
ASMCMD [+] > spcopy +DATA/ASM/ASMPARAMETERFILE/registry.253.849343867 +FRA/spfileCopyASM.ora
Running spcopy without the -u option does not update the location of the OracleASM SPFILE. You can use spset to set the location of the Oracle ASM SPFILE inthe Grid Plug and Play (GPnP) profile.
3. List all the copies of the Oracle ASM SPFILE file contained in the FRA disk groupusing the ASMCMD ls command.
For example:
ASMCMD [+] > ls -l --absolutepath FRA/ASM/ASMPARAMETERFILEType Redund Striped Time Sys NameASMPARAMETERFILE MIRROR COARSE JUN 06 13:00:00 Y +FRA/spfileCopyASM.ora => REGISTRY.253.849533009
4. Verify the current location of the Oracle ASM SPFILE file with the spgetcommand.
For example:
ASMCMD [+] > spget+DATA/ASM/ASMPARAMETERFILE/registry.253.849343867
In the event that the current Oracle ASM SPFILE file in a disk group has beencorrupted or that disk group is not accessible, you can use spset or spcopy with the-u option to restore the Oracle ASM SPFILE file using the backup copy that you havepreviously created.
For example:
ASMCMD [+] > spcopy -u +FRA/spfileCopyASM.ora +DATA2/ASM/spfileASM.ora
About Oracle ASM Initialization Parameter SettingsThere are several initialization parameters that you must set for an Oracle ASMinstance. You can set these parameters with Oracle ASM Configuration Assistant(ASMCA). You can also set some parameters after database creation using SQL ALTERSYSTEM or ALTER SESSION statements.
The Oracle ASM parameters use suitable defaults for most environments. You cannotuse parameters with names that are prefixed with ASM_* in database instanceparameter files.
Initialization Parameters for Oracle ASM Instances
3-6 Oracle Automatic Storage Management Administrator's Guide
About Automatic Memory Management for Oracle ASMAutomatic memory management automatically manages the memory-relatedparameters for both Oracle ASM and database instances with the MEMORY_TARGETparameter. Automatic memory management is enabled by default on an Oracle ASMinstance, even when the MEMORY_TARGET parameter is not explicitly set. The defaultvalue used for MEMORY_TARGET is acceptable for most environments. This is the onlyparameter that you must set for complete Oracle ASM memory management. Oraclestrongly recommends that you use automatic memory management for Oracle ASM.
If you do not set a value for MEMORY_TARGET, but you do set values for other memoryrelated parameters, Oracle internally calculates the optimum value forMEMORY_TARGET based on those memory parameter values. You can also increaseMEMORY_TARGET dynamically, up to the value of the MEMORY_MAX_TARGETparameter, just as you can do for the database instance.
Although it is not recommended, you can disable automatic memory management byeither setting the value for MEMORY_TARGET to 0 in the Oracle ASM parameter file orby running an ALTER SYSTEM SET MEMORY_TARGET=0 statement. When you disableautomatic memory management, Oracle reverts to automatic shared memorymanagement and automatic PGA memory management. To revert to Oracle Database10g Release 2 (10.2) functionality to manually manage Oracle ASM SGA memory, alsorun the ALTER SYSTEM SET SGA_TARGET=0 statement. Unless specified, thebehaviors of the automatic memory management parameters in Oracle ASM instancesbehave the same as in Oracle Database instances.
Note:
• For a Linux environment, automatic memory management cannot workif /dev/shm is not available or is undersized. For more information, see Oracle Database Administrator's Reference for Linux and UNIX-BasedOperating Systems. For information about platforms that supportautomatic memory management, see Oracle Database Administrator'sGuide.
• The minimum MEMORY_TARGET for Oracle ASM is 1 GB. If you setMEMORY_TARGET lower, then Oracle increases the value forMEMORY_TARGET to 1 GB automatically.
• For the recommended settings of memory initialization parameters in anOracle Exadata environment, refer to the Oracle Exadata documentation.
See Also:
• Oracle Database Administrator's Guide for more information about thefunctionality of automatic memory management for database instances,which varies from Oracle ASM
• Oracle Database Concepts for an overview of memory managementmethods
Initialization Parameters for Oracle ASM Instances
Administering Oracle ASM Instances 3-7

Recommended Settings for Oracle ASM Initialization ParametersThis section contains information about the following initialization parameters forOracle ASM:
• ASM_DISKGROUPS (page 3-8)
• ASM_DISKSTRING (page 3-9)
• ASM_POWER_LIMIT (page 3-10)
• ASM_PREFERRED_READ_FAILURE_GROUPS (page 3-11)
• DB_CACHE_SIZE (page 3-11)
• DIAGNOSTIC_DEST (page 3-12)
• INSTANCE_TYPE (page 3-12)
• LARGE_POOL_SIZE (page 3-12)
• PROCESSES (page 3-13)
• REMOTE_LOGIN_PASSWORDFILE (page 3-13)
• SHARED_POOL_SIZE (page 3-14)
See Also:
Oracle Database Administrator's Guide for more information about creating andmaintaining an initialization parameter file
ASM_DISKGROUPS
The ASM_DISKGROUPS initialization parameter specifies a list of disk group namesthat an Oracle ASM instance mounts at startup when the SQL ALTER DISKGROUP ALLMOUNT statement is issued. The Oracle ASM instance startup process executes ALTERDISKGROUP ALL MOUNT unless the NOMOUNT startup option is specified.
The default value of the ASM_DISKGROUPS parameter is a NULL string. Forinformation about disk groups that are mounted at startup time, see "About MountingDisk Groups at Startup (page 3-25)".
The ASM_DISKGROUPS parameter is dynamic. If you are using a server parameter file(SPFILE), then you do not have to manually alter the value of ASM_DISKGROUPS.Oracle ASM automatically adds a disk group to the parameter when the disk group issuccessfully created or mounted. Oracle ASM also automatically removes a disk groupfrom the parameter when the disk group is dropped or dismounted.
The following is an example of setting the ASM_DISKGROUPS parameter dynamically:
SQL> ALTER SYSTEM SET ASM_DISKGROUPS = DATA, FRA;
When using a text initialization parameter file (PFILE), you may edit the initializationparameter file to add the name of any disk group so that it is mounted automaticallyat instance startup. You must remove the name of any disk group that you no longerwant automatically mounted.
Initialization Parameters for Oracle ASM Instances
3-8 Oracle Automatic Storage Management Administrator's Guide

The following is an example of the ASM_DISKGROUPS parameter in the initializationfile:
ASM_DISKGROUPS = DATA, FRA
Note:
Issuing the ALTER DISKGROUP...ALL MOUNT or ALTER DISKGROUP...ALLDISMOUNT commands does not affect the value of ASM_DISKGROUPS.
For additional information about mounting Oracle ASM disk groups, see "Mountingand Dismounting Disk Groups (page 4-55)".
For Oracle Database 12c Release 1 or later, Oracle ASM configurations support up to511 disk groups. Oracle ASM configurations with Oracle Database releases before 12cRelease 1 can only support up to 63 disk groups.
See Also:
Oracle Database Reference for more information about the ASM_DISKGROUPSinitialization parameter
ASM_DISKSTRING
The ASM_DISKSTRING initialization parameter specifies a comma-delimited list ofstrings that limits the set of disks that an Oracle ASM instance discovers. Thediscovery strings can include wildcard characters. Only disks that match one of thestrings are discovered. The same disk cannot be discovered twice.
The discovery string format depends on the Oracle ASM library and the operatingsystem that are in use. Pattern matching is supported. Refer to your operating system-specific installation guide for information about the default pattern matching.
For example on a Linux server, to limit the discovery process to only include disks thatare in the /dev/rdsk/mydisks directory for an Oracle ASM instance that does notuse Oracle ASM Filter Driver (Oracle ASMFD) or ASMLIB, set the ASM_DISKSTRINGinitialization parameter to:
/dev/rdsk/mydisks/*
The asterisk is required.
To limit the discovery process to only include disks that have a name that ends indisk3 or disk4, you could set ASM_DISKSTRING as follows on a Linux system:
ASM_DISKSTRING = '/dev/rdsk/*disk3', '/dev/rdsk/*disk4'
The ? character, when used as the first character of a path, expands to the Oracle homedirectory. Depending on the operating system, when you use the ? characterelsewhere in the path, it is a wildcard for one character.
The default value of the ASM_DISKSTRING parameter is a NULL string. A NULL valuecauses Oracle ASM to search a default path for all disks in the system to which theOracle ASM instance has read and write access. The default search path is platform-specific. Refer to your operating system-specific installation guide for moreinformation about the default search path.
Initialization Parameters for Oracle ASM Instances
Administering Oracle ASM Instances 3-9

Oracle ASM cannot use a disk unless all of the Oracle ASM instances in the cluster candiscover the disk through one of their own discovery strings. The names do not haveto be the same on every node, but all disks must be discoverable by all of the nodes inthe cluster. This may require dynamically changing the initialization parameter toenable adding new storage.
For additional information about discovering disks, see "Oracle ASM Disk Discovery(page 4-25)".
See Also:
• Oracle Exadata documentation for information about the Oracle ASMdiscovery string format for Oracle Exadata
• Oracle Database Reference for more information about theASM_DISKSTRING initialization parameter
ASM_POWER_LIMIT
The ASM_POWER_LIMIT initialization parameter specifies the default power for diskrebalancing in a disk group. The range of values is 0 to 1024. The default value is 1. Avalue of 0 disables rebalancing. Higher numeric values enable the rebalancingoperation to complete more quickly, but might result in higher I/O overhead andmore rebalancing processes.
• For disk groups that have the disk group ASM compatibility set to 11.2.0.2 orhigher (for example, COMPATIBLE.ASM = 11.2.0.2), the operational range ofvalues is 0 to 1024 for the rebalance power.
• For disk groups that have the disk group ASM compatibility set to less than11.2.0.2, the operational range of values is 0 to 11 inclusive. If the value forASM_POWER_LIMIT is larger than 11, a value of 11 is used for these disk groups.
You can also specify the power of the rebalancing operation in a disk group with thePOWER clause of the SQL ALTER DISKGROUP .. REBALANCE statement. The range ofallowable values for the POWER clause is the same for the ASM_POWER_LIMITinitialization parameter. If the value of the POWER clause is specified larger than 11 fora disk group with ASM compatibility set to less than 11.2.0.2, then a warning isdisplayed and a POWER value equal to 11 is used for rebalancing.
The specification of the power of the rebalancing operation in a disk group only affectsrebalance operations, not new allocations to a disk group.
For information about the ASM_POWER_LIMIT initialization parameter, and thePOWER clause, refer to "Manually Rebalancing Disk Groups (page 4-21)" and "TuningRebalance Operations (page 4-23)". For information about disk group compatibility,see "Disk Group Compatibility (page 4-41)".
Initialization Parameters for Oracle ASM Instances
3-10 Oracle Automatic Storage Management Administrator's Guide

See Also:
• Oracle Database Reference for more information about theASM_POWER_LIMIT initialization parameter
• Oracle Database SQL Language Reference for more information about thePOWER clause of the SQL ALTER DISKGROUP REBALANCE statement
ASM_PREFERRED_READ_FAILURE_GROUPS
The ASM_PREFERRED_READ_FAILURE_GROUPS initialization parameter value is acomma-delimited list of strings that specifies the failure groups that should bepreferentially read by the given instance. TheASM_PREFERRED_READ_FAILURE_GROUPS parameter setting is instance specific.The default value is NULL. This parameter is generally used for clustered Oracle ASMinstances and its value can be different on different nodes.
For example:
diskgroup_name1.failure_group_name1, ...
For more information about ASM_PREFERRED_READ_FAILURE_GROUPS, refer to"Preferred Read Failure Groups (page 4-37)".
See Also:
• Oracle Real Application Clusters Administration and Deployment Guide formore information about configuring preferred disks in extended clusters
• Oracle Database Reference for more information about theASM_PREFERRED_READ_FAILURE_GROUPS initialization parameter
DB_CACHE_SIZE
You do not have to set a value for the DB_CACHE_SIZE initialization parameter if youuse automatic memory management. The setting for the DB_CACHE_SIZE parameterdetermines the size of the buffer cache. This buffer cache stores metadata blocks. Thedefault value for this parameter is suitable for most environments.
See Also:
• Oracle Database Administrator's Guide for more information about settingthe DB_CACHE_SIZE initialization parameter
• Oracle Database Performance Tuning Guide for more information aboutmemory configuration
• Oracle Database Reference for more information about the DB_CACHE_SIZEparameter
Initialization Parameters for Oracle ASM Instances
Administering Oracle ASM Instances 3-11

DIAGNOSTIC_DEST
The DIAGNOSTIC_DEST initialization parameter specifies the directory wherediagnostics for an instance are located. The default value for an Oracle ASM instance isthe $ORACLE_BASE directory for the Oracle Grid Infrastructure installation.
Example 3-1 (page 3-12) shows an example of the diagnostic directory for an OracleASM instance.
See Also:
• Oracle Database Administrator's Guide for more information about theDIAGNOSTIC_DEST initialization parameter and the fault diagnosabilityinfrastructure.
• Oracle Database Reference for more information about theDIAGNOSTIC_DEST parameter
Example 3-1 Sample diagnostic directory for an Oracle ASM instance
$ ls $ORACLE_BASE/diag/asm/+asm/+ASMalert cdump hm incident incpkg ir lck metadata stage sweep trace
INSTANCE_TYPE
The following is an example of the INSTANCE_TYPE parameter in the initializationfile:
INSTANCE_TYPE = ASM
In addition to values asm and rdbms, INSTANCE_TYPE can be set to asmproxy in anOracle Flex ASM configuration. For more information about Oracle Flex ASM, refer to"Managing Oracle Flex ASM (page 3-16)".
See Also:
Oracle Database Reference for more information about the INSTANCE_TYPEparameter
LARGE_POOL_SIZE
You do not have to set a value for the LARGE_POOL_SIZE initialization parameter ifyou use automatic memory management.
The setting for the LARGE_POOL_SIZE parameter is used for large allocations. Thedefault value for this parameter is suitable for most environments.
Initialization Parameters for Oracle ASM Instances
3-12 Oracle Automatic Storage Management Administrator's Guide
See Also:
• Oracle Database Administrator's Guide for more information about settingthe LARGE_POOL_SIZE initialization parameter
• Oracle Database Performance Tuning Guide for more information aboutmemory configuration
• Oracle Database Reference for more information about theLARGE_POOL_SIZE parameter
PROCESSES
The PROCESSES initialization parameter affects Oracle ASM, but the default value isusually suitable. However, if multiple database instances are connected to an OracleASM instance, then you can use the following formulas, where n is the number ofdatabase instances connecting to the Oracle ASM instance.
In a non-Exadata environment, the recommended settings are:
• For n < 10, PROCESSES = 50*n + 50
• For n >= 10, PROCESSES = 10*n + 450
In an Oracle Exadata environment, the recommended setting is PROCESSES = MAX(450+ 10*n, 1024).
See Also:
• Oracle Database Administrator's Guide for more information about settingthe PROCESSES initialization parameter
• Oracle Database Reference for more information about the PROCESSESparameter
REMOTE_LOGIN_PASSWORDFILE
The REMOTE_LOGIN_PASSWORDFILE initialization parameter specifies whether theOracle ASM instance checks for a password file. This parameter operates the same forOracle ASM and database instances.
See Also:
• Oracle Database Administrator's Guide for more information about settingthe REMOTE_LOGIN_PASSWORDFILE initialization parameter
• Oracle Database Reference for more information about theREMOTE_LOGIN_PASSWORDFILE parameter
Initialization Parameters for Oracle ASM Instances
Administering Oracle ASM Instances 3-13
SHARED_POOL_SIZE
You do not have to set a value for the SHARED_POOL_SIZE initialization parameter ifyou use automatic memory management. The setting for the SHARED_POOL_SIZEparameter determines the amount of memory required to manage the instance. Thesetting for this parameter is also used to determine the amount of space that isallocated for extent storage. The default value for this parameter is suitable for mostenvironments.
See Also:
• Oracle Database Administrator's Guide for more information about settingthe SHARED_POOL_SIZE initialization parameter
• Oracle Database Performance Tuning Guide for more information aboutmemory configuration
• Oracle Database Reference for more information about theSHARED_POOL_SIZE parameter
About Setting Database Initialization Parameters for Use with Oracle ASMWhen you do not use automatic memory management in a database instance, the SGAparameter settings for a database instance may require minor modifications to supportOracle ASM. When you use automatic memory management, the sizing datadiscussed in this section can be treated as informational only or as supplementalinformation to help determine the appropriate values that you should use for the SGA.Oracle highly recommends using automatic memory management.
See Also:
• Oracle Database Administrator's Guide for information about managingmemory allocation in an Oracle Database instance
• Oracle Database Performance Tuning Guide for more information aboutmemory configuration and use
The following are configuration guidelines for SGA sizing on the database instance:
• PROCESSES initialization parameter—Add 16 to the current value
• LARGE_POOL_SIZE initialization parameter—Add an additional 600K to thecurrent value
• SHARED_POOL_SIZE initialization parameter—Aggregate the values from thefollowing queries to obtain the current database storage size that is either onOracle ASM or stored in Oracle ASM. Next, determine the redundancy type andcalculate the SHARED_POOL_SIZE using the aggregated value as input.
SELECT SUM(bytes)/(1024*1024*1024) FROM V$DATAFILE;SELECT SUM(bytes)/(1024*1024*1024) FROM V$LOGFILE a, V$LOG b WHERE a.group#=b.group#;
Initialization Parameters for Oracle ASM Instances
3-14 Oracle Automatic Storage Management Administrator's Guide

SELECT SUM(bytes)/(1024*1024*1024) FROM V$TEMPFILE WHERE status='ONLINE';
– For disk groups using external redundancy, every 100 GB of space needs 1MB of extra shared pool plus 2 MB
– For disk groups using normal redundancy, every 50 GB of space needs 1 MBof extra shared pool plus 4 MB
– For disk groups using high redundancy, every 33 GB of space needs 1 MB ofextra shared pool plus 6 MB
See Also:
• Oracle Database Administrator's Guide for information about managingmemory allocation in an Oracle Database instance
• Oracle Database Performance Tuning Guide for more information aboutmemory configuration and use
Administration of Oracle ASM InstancesOracle ASM is typically installed in an Oracle Grid Infrastructure home separate fromthe Oracle Database home. Only one Oracle ASM instance is supported on a server ina standard configuration; however, Oracle Flex ASM provides additionalconfiguration options.
When managing an Oracle ASM instance, the administration activity should beperformed in the Oracle Grid Infrastructure home.
This section describes how to administer Oracle ASM instances under the followingtopics:
• Managing Oracle Flex ASM (page 3-16)
• Using Oracle Restart (page 3-21)
• About Starting Up an Oracle ASM Instance (page 3-22)
• About Shutting Down an Oracle ASM Instance (page 3-25)
• About Administering Oracle ASM Instances with Server Control Utility(page 3-27)
• About Out of Place Upgrades (page 3-27)
• About Configuring Oracle Grid Infrastructure with the Configuration Wizard(page 3-27)
• About Active Session History Sampling for Oracle ASM (page 3-28)
• About Oracle Home User on Windows (page 3-28)
Administration of Oracle ASM Instances
Administering Oracle ASM Instances 3-15

Managing Oracle Flex ASMOracle Flex ASM enables Oracle ASM instances to run on a separate physical serverfrom the database servers. This section discusses Oracle Flex ASM in the followingtopics:
• Overview of Oracle Flex ASM (page 3-16)
• About Setting Up Oracle Flex ASM (page 3-18)
• Administering Oracle Flex ASM (page 3-19)
See Also:
Oracle Clusterware Administration and Deployment Guide for information aboutOracle Flex Cluster support
Overview of Oracle Flex ASM
An Oracle ASM instance can operate in several configurations in Oracle Flex ASM, asshown in Figure 3-1 (page 3-16). This illustration shows the distinct modes ofoperation which are available for Oracle Flex ASM in Oracle ASM 12c Release 1 (12.1).
Figure 3-1 Oracle Flex ASM Configurations
Oracle ASM Disk Storage
Hub Node Hub Node
Oracle ASM
Instance
Oracle ASM
Instance
Database
Instance
Hub Node
Database
Instance
A B C
Oracle Flex ASM enables an Oracle ASM instance to run on a separate physical serverfrom the database servers. With this deployment, larger clusters of Oracle ASM
Administration of Oracle ASM Instances
3-16 Oracle Automatic Storage Management Administrator's Guide

instances can support more database clients while reducing the Oracle ASM footprintfor the overall system.
When using Oracle Flex ASM, Oracle ASM clients are configured with direct access tostorage.
With Oracle Flex ASM, you can consolidate all the storage requirements into a singleset of disk groups. All these disk groups are mounted by and managed by a small setof Oracle ASM instances running in a single cluster. You can specify the number ofOracle ASM instances with a cardinality setting. The default is three instances.
A cluster is a set of nodes that provide group membership services. Each cluster has aname that is globally unique. Every cluster has one or more Hub nodes. The Hubnodes have access to Oracle ASM disks. Every cluster has at least one private networkand one public network. If the cluster is going to use Oracle ASM for storage, it has atleast one Oracle ASM network. A single network can be used as both a private and anOracle ASM network. For security reasons, an Oracle ASM network should never bepublic. There can be only one Oracle Flex ASM configuration running within a cluster.
The configurations of Oracle ASM in Oracle Flex ASM are:
• Local Oracle ASM clients with direct access to Oracle ASM disks
With this mode (Standard Oracle ASM cluster), Oracle ASM continues to supportexisting standard architecture in which database clients are running with anOracle ASM instance on the same host computer. The local client architecture isonly supported on a Hub node. This mode is labeled A in Figure 3-1 (page 3-16).
In this configuration, the database instances are on the same Hub node as theOracle ASM instance and are referred to as local Oracle ASM client instances.Oracle ASM metadata moves between Oracle ASM and the database instances.This client has direct I/O access to Oracle ASM disks.
Local mode does not use Oracle Flex ASM, so clusters configured with localOracle ASM do not require an Oracle ASM network, nor do they contain otherOracle Flex ASM services.
• Oracle Flex ASM clients with direct access to Oracle ASM disks
With this mode, database clients that are running on Hub nodes of the OracleASM cluster access Oracle ASM remotely for metadata, but perform block I/Ooperations directly to Oracle ASM disks. The hosts running the Oracle ASMserver and the remote database client must both be Hub nodes. A Hub node is anode in an Oracle ASM cluster that is tightly connected with other servers and hasdirect access to a shared disk. This mode is labeled B in Figure 3-1 (page 3-16).
In this configuration, the database instances are on different host computers thanthe nearby Oracle ASM instance and are referred to as Oracle ASM clientinstances. This Oracle ASM instance is shown on the node labeled C in Figure 3-1(page 3-16). The databases are in the same Oracle ASM cluster as the Oracle ASMinstance and the database instances are located on a Hub node. Oracle ASMmetadata moves between Oracle ASM and the database instance. This client hasdirect I/O access to Oracle ASM disks.
Depending on the distribution of database instances and Oracle ASM instances, adatabase client may access Oracle ASM locally on the same node or remotely overthe Oracle ASM network. This mode of operation is used by database clients onHub nodes in the Oracle ASM cluster. Direct access mode is also the only OracleFlex ASM configuration supported by Oracle ASM cluster file system.
• Oracle ACFS access through the Oracle ASM proxy instance
Administration of Oracle ASM Instances
Administering Oracle ASM Instances 3-17

An Oracle ASM proxy instance is an Oracle instance running on a Hub node witha direct Oracle ASM client. Oracle Automatic Storage Management Cluster FileSystem (Oracle ACFS) and Oracle ASM Dynamic Volume Manager (OracleADVM) are supported with an Oracle ASM proxy instance. This configuration isshown in Figure 3-2 (page 3-18).
The INSTANCE_TYPE initialization parameter is set to ASMPROXY for Oracle ASMproxy instances.
Figure 3-2 (page 3-18) shows the configuration of Oracle ACFS and Oracle ADVM inOracle Flex ASM.
Figure 3-2 Oracle ACFS and Oracle ADVM in Oracle Flex ASM
Oracle ASM Disk Storage
Hub Node
ADVM &ACFS
Hub Node
ASM ProxyASM Pr
DBInstance
ASM Proxy
ADVM &ACFS
Oracle ASM
About Setting Up Oracle Flex ASM
During the installation process with Oracle Universal Installer (OUI), you can choosethe type of the Oracle Clusterware that should be installed. The Oracle Clusterwarecan be an Oracle Flex ASM deployment that manages its own storage or a regularOracle ASM cluster.
Administration of Oracle ASM Instances
3-18 Oracle Automatic Storage Management Administrator's Guide

Note:
• If you choose to install an Oracle Flex Cluster, Oracle Flex ASM is enabledby default because an Oracle Flex Cluster requires Oracle Flex ASM.
• Clients based on releases before Oracle Database 12c Release 1 (12.1)require the local Oracle ASM clients configuration described in "Overviewof Oracle Flex ASM (page 3-16)" or an Oracle Flex ASM configurationwith the Oracle ASM instance count (cardinality) set to ALL.
For information about administering Oracle Flex ASM with SRVCTLcommands, refer to "Administering Oracle Flex ASM (page 3-19)".
• Oracle does not support changing Oracle Flex ASM to a standard OracleASM configuration.
To install an Oracle Flex ASM deployment, note the following:
• Categorize the networks and choose the list of networks for use as Oracle ASMnetworks.
If you choose Oracle Flex ASM during a new installation, OUI requires you tochoose the Oracle ASM networks.
The Oracle ASM listener resource is automatically created for each Oracle ASMnetwork and then started on all nodes.
• Enable Oracle Flex ASM if necessary.
Run Oracle ASM Configuration Assistant (ASMCA) to enable Oracle Flex ASM ina standard Oracle ASM cluster. This functionality is only available in an OracleGrid Infrastructure configuration, not an Oracle Restart configuration. Forinformation about converting to Oracle Flex ASM, refer to "About Converting toOracle Flex ASM (page 3-31)".
To determine whether an Oracle Flex ASM has been enabled, use the ASMCMDshowclustermode command. For information about showclustermode, referto "showclustermode (page 10-21)".
The ASMCA GUI utility steps through the requirements and changes alldependencies as required, including dependencies on Oracle ACFS. ASMCAinforms you if additional tasks, such as moving a server parameter file (SPFILE)or password file (ORAPWD file) to a disk group, are required before theconversion. For information about those tasks, refer to "About Backing Up_Copying_ and Moving an Oracle ASM Initialization Parameter File (page 3-4)"and "Managing a Shared Password File in a Disk Group (page 3-52)".
See Also:
Oracle Grid Infrastructure Installation Guide for information about OracleClusterware installation
Administering Oracle Flex ASM
Oracle Flex ASM is managed by ASMCA, CRSCTL, SQL*Plus, and SRVCTL. TheINSTANCE_TYPE initialization parameter specifies the type of instance.
Administration of Oracle ASM Instances
Administering Oracle ASM Instances 3-19

The INSTANCE_TYPE initialization parameter has an additional value ASMPROXY, inaddition to ASM and RDBMS, to identify Oracle ASM proxy instances. An Oracle ASMproxy instance has its parameter set to ASMPROXY.
You can use the ASMCMD showclustermode command to determine whetherOracle Flex ASM is enabled. For example:
$ asmcmd showclustermodeASM cluster : Flex mode enabled
SRVCTL is extended to enable an administrator to create or change attributes of OracleClusterware resources. You can use SRVCTL to determine the status of the instances inan Oracle Flex ASM configuration. For example:
$ srvctl status asm -detailASM is running on mynoden02,mynoden01ASM is enabled.
You can also use SRVCTL to determine whether Oracle Flex ASM is enabled. Ifenabled, then srvctl config asm displays the number of Oracle ASM instances thathas been specified for use with the Oracle Flex ASM configuration. For example:
$ srvctl config asmASM instance count: 3
You can modify the Oracle ASM instance count, or cardinality, with the SRVCTLmodify asm command. For example:
$ srvctl modify asm -count 4
$ srvctl modify asm -count ALL
You can view Oracle Flex ASM connections with SQL*Plus and ASMCMD commands.Fore example:
SQL> SELECT instance_name, db_name, status FROM V$ASM_CLIENT;INSTANCE_NAME DB_NAME STATUS--------------- -------- ------------+ASM1 +ASM CONNECTEDorcl1 orcl CONNECTEDorcl2 orcl CONNECTED
$ asmcmd lsct dataDB_Name Status Software_Version Compatible_version Instance_Name Disk_Group+ASM CONNECTED 12.1.0.0.2 12.1.0.0.2 +ASM DATAorcl CONNECTED 12.1.0.0.2 12.0.0.0.0 orcl1 DATAorcl CONNECTED 12.1.0.0.2 12.0.0.0.0 orcl2 DATA
Clients are automatically relocated to another instance if an Oracle ASM instance fails.If necessary, clients can be manually relocated using the ALTER SYSTEM RELOCATECLIENT command. For example:
SQL> ALTER SYSTEM RELOCATE CLIENT 'client-id';
In the previous SQL statement, client-id is of the forminstance_name:db_name. The INSTANCE_NAME and DB_NAME columns arecontained in the V$ASM_CLIENT view. You must connect as SYSASM to the OracleASM instance to run the SQL statement. When you issue this statement, theconnection to the client is terminated and the client fails over to the least loadedinstance. If the client is currently connected to the least loaded instance, then theconnection to the client is terminated and the client fails over to that same instance.
Administration of Oracle ASM Instances
3-20 Oracle Automatic Storage Management Administrator's Guide

Every database user must have a wallet with credentials to connect to Oracle ASM.CRSCTL commands can be used by the database user to manage this wallet. All OracleASM user names and passwords are system generated.
There are no new initialization parameters specifically for instances in an Oracle FlexASM configuration; however, the settings of existing parameters should be reviewedand possibly adjusted for the Oracle Flex ASM environment. Refer to "RecommendedSettings for Oracle ASM Initialization Parameters (page 3-8)".
See Also:
• Oracle Database Reference for more information about the INSTANCE_TYPEinitialization parameter
• Oracle Database SQL Language Reference for information about the ALTERSYSTEM statement
• Oracle Clusterware Administration and Deployment Guide for informationabout CRSCTL commands
• Oracle Real Application Clusters Administration and Deployment Guide forinformation about SRVCTL commands
• Oracle Grid Infrastructure Installation Guide for information about installingOracle Clusterware
Using Oracle RestartOracle Restart improves the availability of your Oracle Database. When you install theOracle Grid Infrastructure for a standalone server, it includes both Oracle ASM andOracle Restart. Oracle Restart runs out of the Oracle Grid Infrastructure home, whichyou install separately from Oracle Database homes.
Oracle Restart provides managed startup and restart of a single-instance (non-clustered) Oracle Database, Oracle ASM instance, service, listener, and any otherprocess running on the server. If an interruption of a service occurs after a hardwareor software failure, Oracle Restart automatically takes the necessary steps to restart thecomponent.
With Server Control Utility (SRVCTL) you can add a component, such as an OracleASM instance, to Oracle Restart. You then enable Oracle Restart protection for theOracle ASM instance. With SRVCTL, you also remove or disable Oracle Restartprotection.
Administration of Oracle ASM Instances
Administering Oracle ASM Instances 3-21

See Also:
• Oracle Database Administrator's Guide for information about configuringand administering Oracle Restart
• Oracle Real Application Clusters Administration and Deployment Guide forinformation about automatically restarting single-instance databasesresiding on an Oracle RAC node
• Oracle Grid Infrastructure Installation Guide for information aboutinstallation of Oracle Grid Infrastructure
About Starting Up an Oracle ASM InstanceThis section describes how to start Oracle ASM instances under the following topics:
• Connecting To and Starting Up an Oracle ASM Instance (page 3-22)
• Starting Up an Oracle ASM instance with an Incorrect SPFILE Path (page 3-24)
• About Mounting Disk Groups at Startup (page 3-25)
• About Restricted Mode (page 3-25)
Connecting To and Starting Up an Oracle ASM Instance
You start an Oracle ASM instance similarly to the way in which you start an OracleDatabase instance with some minor differences.
When starting an Oracle ASM instance, note the following:
• To connect to a local Oracle ASM instance with SQL*Plus, set the ORACLE_SIDenvironment variable to the Oracle ASM system identifier (SID).
The default Oracle ASM SID for a single-instance database is +ASM, and thedefault SID for Oracle ASM for an Oracle RAC node is +ASMnode_number wherenode_number is the number of the node. The ORACLE_HOME environmentvariable must be set to the Grid Infrastructure home where Oracle ASM wasinstalled.
Note:
Oracle recommends that you do not change the default Oracle ASM SIDname.
• The initialization parameter file must contain the following entry:
INSTANCE_TYPE = ASM
This parameter indicates that an Oracle ASM instance, not a database instance, isstarting.
• When you run the STARTUP command, rather than trying to mount and open adatabase, this command attempts to mount Oracle ASM disk groups.
For information about disk groups that are mounted at startup time, see "AboutMounting Disk Groups at Startup (page 3-25)".
Administration of Oracle ASM Instances
3-22 Oracle Automatic Storage Management Administrator's Guide
After the Oracle ASM instance has started, you can mount disk groups with theALTER DISKGROUP...MOUNT command. See "Mounting and Dismounting DiskGroups (page 4-55)" for more information.
• The associated Oracle Database instance does not have to be running when youstart the associated Oracle ASM instance.
The following list describes how Oracle ASM interprets SQL*Plus STARTUP commandparameters.
• FORCE Parameter
Issues a SHUTDOWN ABORT to the Oracle ASM instance before restarting it.
If an Oracle Automatic Storage Management Cluster File System (Oracle ACFS)file system is currently mounted on Oracle ADVM volumes, the file systemshould first be dismounted. Otherwise, applications encounter I/O errors andOracle ACFS user data and metadata may not be written to storage before theOracle ASM storage is fenced. For information about dismounting an OracleACFS file system, see "Deregistering_ Dismounting_ and Disabling Volumes andOracle ACFS File Systems (page 16-20)".
• MOUNT or OPEN Parameter
Mounts the disk groups specified in the ASM_DISKGROUPS initializationparameter. This is the default if no command parameter is specified.
• NOMOUNT Parameter
Starts up the Oracle ASM instance without mounting any disk groups.
• RESTRICT Parameter
Starts up an instance in restricted mode that enables access only to users with boththe CREATE SESSION and RESTRICTED SESSION system privileges. You can usethe RESTRICT clause in combination with the MOUNT, NOMOUNT, and OPENclauses.
See Also:
"About Restricted Mode (page 3-25)" for more information
In restricted mode, database instances cannot use the disk groups. In other words,databases cannot open files that are in that disk group. Also, the disk groupcannot be mounted by any other instance in the cluster. Mounting the disk groupin restricted mode enables only one Oracle ASM instance to mount the diskgroup. This mode is useful to mount the disk group for repairing configurationissues.
The following is a sample SQL*Plus session for starting an Oracle ASM instance.
SQLPLUS /NOLOGSQL> CONNECT SYS AS SYSASMEnter password: sys_passwordConnected to an idle instance.
SQL> STARTUPASM instance started
Total System Global Area 71303168 bytes
Administration of Oracle ASM Instances
Administering Oracle ASM Instances 3-23

Fixed Size 1069292 bytesVariable Size 45068052 bytesASM Cache 25165824 bytesASM disk groups mounted
For more information about user authentication, see "Authentication for AccessingOracle ASM Instances (page 3-46)".
See Also:
• Oracle Database Administrator's Guide for more information about usingenvironment variables to select instances
• Oracle Database Administrator's Guide for more information about startingup and shutting down Oracle instances
• Oracle Real Application Clusters Administration and Deployment Guide forinformation about starting an Oracle ASM instance with SRVCTL inOracle RAC
• Oracle Clusterware Administration and Deployment Guide for informationabout Oracle Clusterware Cluster subcomponent processes andbackground processes
• Oracle Database Concepts for information about Oracle Databasebackground processes
• Oracle Database Reference for a description of the Oracle backgroundprocesses
Starting Up an Oracle ASM instance with an Incorrect SPFILE Path
If the SPFILE path in the GPnP profile is incorrect, you can start the Oracle ASMinstance as follows:
1. Create a PFILE with one line in it that identifies the path to the SPFILE.
For example:
Create the /oracle/dbs/spfileasm_init.ora file that contains:
SPFILE='+DATA/asm/asmparameterfile/asmspfile.ora'
2. Start up the instance using the initialization parameter file.
For example:
SQL> STARTUP PFILE=/oracle/dbs/spfileasm_init.ora
3. After the instance is running, use the ASMCMD spset command to update theSPFILE path in the GPnP profile. See "spset (page 10-28)".
For example:
ASMCMD> spset +DATA/asm/asmparameterfile/asmspfile.ora
Administration of Oracle ASM Instances
3-24 Oracle Automatic Storage Management Administrator's Guide

See Also:
Oracle Database Administrator's Guide for more information about usingSTARTUP with a nondefault server parameter file
About Mounting Disk Groups at Startup
At startup, the Oracle ASM instance attempts to mount the following disk groups:
• Disk groups specified in the ASM_DISKGROUPS initialization parameter
• Disk group used by Cluster Synchronization Services (CSS) for voting files
• Disk groups used by Oracle Clusterware for Oracle Cluster Registry (OCR)
• Disk group used by the Oracle ASM instance to store the ASM server parameterfile (SPFILE)
If no disk groups are found in the previous list, then the Oracle ASM instance does notmount any disk groups at startup. After the Oracle ASM instance has started, you canmount disk groups with the ALTER DISKGROUP...MOUNT command. For moreinformation, see "Mounting and Dismounting Disk Groups (page 4-55)".
About Restricted Mode
You can use the STARTUP RESTRICT command to control access to an Oracle ASMinstance while you perform maintenance. When an Oracle ASM instance is active inthis mode, all of the disk groups that are defined in the ASM_DISKGROUPS parameterare mounted in RESTRICTED mode. This prevents databases from connecting to theOracle ASM instance. In addition, the restricted clause of the ALTER SYSTEMstatement is disabled for the Oracle ASM instance. The ALTER DISKGROUPdiskgroup MOUNT statement is extended to enable Oracle ASM to mount a diskgroup in restricted mode.
When you mount a disk group in RESTRICTED mode, the disk group can only bemounted by one instance. Clients of Oracle ASM on that node cannot access that diskgroup while the disk group is mounted in RESTRICTED mode. The RESTRICTEDmode enables you to perform maintenance tasks on a disk group in the Oracle ASMinstance without interference from clients.
Rebalance operations that occur while a disk group is in RESTRICTED mode eliminatethe lock and unlock extent map messaging that occurs between Oracle ASM instancesin an Oracle RAC environment. This improves the overall rebalance throughput. Atthe end of a maintenance period, you must explicitly dismount the disk group andremount it in normal mode.
About Shutting Down an Oracle ASM InstanceThe Oracle ASM shutdown process is initiated when you run the SHUTDOWNcommand in SQL*Plus. Before you run this command, ensure that the ORACLE_SIDenvironment variable is set to the Oracle ASM SID so that you can connect to the localOracle ASM instance. The default Oracle ASM SID for a single-instance database is+ASM, and the default SID for Oracle ASM for an Oracle RAC node is+ASMnode_number where node_number is the number of the node. TheORACLE_HOME environment variable must be set to the Grid Infrastructure homewhere Oracle ASM was installed.
Administration of Oracle ASM Instances
Administering Oracle ASM Instances 3-25

If you are not using Oracle Flex ASM, Oracle strongly recommends that you shutdown all database instances that use the Oracle ASM instance and dismount all filesystems mounted on Oracle ASM Dynamic Volume Manager (Oracle ADVM)volumes before attempting to shut down the Oracle ASM instance. If you are usingOracle Flex ASM, Oracle Flex ASM clients move to other running Oracle ASMinstances if an Oracle ASM instance is shut down.
If Oracle Cluster Registry (OCR) or voting files are stored in a disk group, the diskgroup can only be dismounted by shutting down the Oracle ASM instance as part ofshutting down the clusterware on a node. To shut down the clusterware, run crsctlstop crs.
See Also:
• Oracle Database Administrator's Guide for more information about usingenvironment variables to select instances
• Oracle Database Administrator's Guide for more information about startingup and shutting down Oracle instances
• Oracle Clusterware Administration and Deployment Guide for informationabout managing voting files, Oracle Cluster Registry (OCR), and OracleLocal Registry (OLR)
To shut down an Oracle ASM instance, perform the following steps:
SQLPLUS /NOLOGSQL> CONNECT SYS AS SYSASMEnter password: sys_passwordConnected.SQL> SHUTDOWN NORMAL
For more information about user authentication, see "Authentication for AccessingOracle ASM Instances (page 3-46)".
The following list describes the SHUTDOWN modes and the behavior of the Oracle ASMinstance in each mode.
• NORMAL Clause
Oracle ASM waits for any in-progress SQL to complete before performing anorderly dismount of all of the disk groups and shutting down the Oracle ASMinstance. Before the instance is shut down, Oracle ASM waits for all of thecurrently connected users to disconnect from the instance. If any databaseinstances are connected to the Oracle ASM instance, then the SHUTDOWNcommand returns an error and leaves the Oracle ASM instance running. NORMALis the default shutdown mode.
• IMMEDIATE or TRANSACTIONAL Clause
Oracle ASM waits for any in-progress SQL to complete before performing anorderly dismount of all of the disk groups and shutting down the Oracle ASMinstance. Oracle ASM does not wait for users currently connected to the instanceto disconnect. If any database instances are connected to the Oracle ASM instance,then the SHUTDOWN command returns an error and leaves the Oracle ASMinstance running. Because the Oracle ASM instance does not contain anytransactions, the TRANSACTIONAL mode behaves the same as IMMEDIATE mode.
Administration of Oracle ASM Instances
3-26 Oracle Automatic Storage Management Administrator's Guide

• ABORT Clause
The Oracle ASM instance immediately shuts down without the orderly dismountof disk groups. This causes recovery to occur upon the next Oracle ASM startup.
If any database instance is connected to the Oracle ASM instance, then thedatabase instance aborts.
If any Oracle Automatic Storage Management Cluster File System (Oracle ACFS)file systems are currently mounted on Oracle ADVM volumes, those file systemsshould first be dismounted. Otherwise, applications encounter I/O errors andOracle ACFS user data and metadata may not be written to storage before theOracle ASM storage is fenced. For information about dismounting an OracleACFS file system, see "Deregistering_ Dismounting_ and Disabling Volumes andOracle ACFS File Systems (page 16-20)". For more information about userauthentication on Oracle ASM instance, see "Authentication for Accessing OracleASM Instances (page 3-46)".
About Administering Oracle ASM Instances with Server Control UtilityIn addition to the Oracle ASM administration procedures that this section describes,you can use Server Control Utility (SRVCTL) in clustered Oracle ASM environmentsto perform the following Oracle ASM administration tasks:
• Add and remove the Oracle ASM Oracle Clusterware (CRS) resource in OracleCluster Registry (OCR)
• Enable, disable, start, and stop Oracle ASM instances
• Display the Oracle ASM instance configuration and status
See Also:
The Oracle Real Application Clusters Administration and Deployment Guide forinformation about administering Oracle ASM instances with SRVCTL
About Out of Place UpgradesWith an out-of-place upgrade, the installer installs the newer version of Oracle GridInfrastructure in a separate Oracle Grid Infrastructure home.
An in-place upgrade of Oracle Grid Infrastructure 11g Release 2 (11.2) is notsupported. For example, an upgrade of Oracle Grid Infrastructure 11g Release 2(11.2.0.1) to Oracle Grid Infrastructure 11g Release 2 (11.2.0.2) must be an out of placeupgrade.
See Also:
Oracle Grid Infrastructure Installation Guide for information about installingOracle Grid Infrastructure, out of place upgrades, and performing rollingupgrades of Oracle Grid Infrastructure and Oracle ASM
About Configuring Oracle Grid Infrastructure with the Configuration WizardThe Oracle Grid Infrastructure configuration wizard can update the configuration ofan Oracle Grid Infrastructure environment after the software has been installed. The
Administration of Oracle ASM Instances
Administering Oracle ASM Instances 3-27
configuration wizard accepts your input, validates the input, and populates theconfiguration data into the CRSCONFIG_PARAMS file. If additional scripts must be run,the configuration wizard directs you to run those scripts.
See Also:
Oracle Clusterware Administration and Deployment Guide for information aboutthe Oracle Grid Infrastructure configuration wizard.
About Active Session History Sampling for Oracle ASMActive Session History sampling is now available on Oracle ASM instances. Thisactivity is exposed in the dynamic V$ACTIVE_SESSION_HISTORY view. ActiveSession History sampling requires a diagnostic pack license for the Oracle ASMinstance.
See Also:
• Oracle Database Performance Tuning Guide for more information aboutgathering performance statistics
• Oracle Database Reference for a description of the V$ACTIVE_SESSION_HISTORY view
About Oracle Home User on WindowsOracle Database supports the use of an Oracle home user, which can be specified atinstallation time. The Oracle home user is associated with an Oracle home and itcannot be changed after installation. Different Oracle homes on a system can share thesame Oracle home user or use different Oracle home user names.
In previous releases on Windows operating systems, Oracle services were required torun as Local System privileges, which are fully privileged. This feature enables thedatabase, listener, and job scheduler services to run with low and non-administrativeuser privileges to allow tighter control of security. The Oracle home user can be abuilt-in account or a Windows user account. A Windows user account should be a lowprivileged (non-Administrator) account to ensure that the Oracle home user has alimited set of privileges, ensuring that Oracle Database services have only thoseprivileges required to run Oracle products. The Windows user account can be a LocalUser, a Domain User, or a Managed Services Account in general. However, OracleRAC, Oracle Restart, and Oracle Grid Infrastructure installations require the use of theDomain User as the Oracle home user because a clusterwide identity is necessary.
See Also:
Oracle Database Platform Guide for Microsoft Windows for information aboutrunning Oracle services on Windows platforms and different types ofWindows user accounts
Administration of Oracle ASM Instances
3-28 Oracle Automatic Storage Management Administrator's Guide

Upgrading and Patching Oracle ASMThis section contains the following topics:
• About Oracle ASM Rolling Upgrade (page 3-29)
• About Oracle ASM Rolling Patches (page 3-30)
• About Converting to Oracle Flex ASM (page 3-31)
Note:
• For Oracle RAC environments, the Oracle Clusterware version numbermust be at least equal to the version number of the patch that you areapplying to the Oracle Database.
• You must apply the patch to the Oracle Grid Infrastructure home beforeyou apply it to the Oracle Database home.
About Oracle ASM Rolling UpgradeOracle ASM rolling upgrade enables you to independently upgrade or patch clusteredOracle ASM nodes without affecting database availability, thus providing greateruptime. Rolling upgrade means that some features of a clustered Oracle ASMenvironment continue to function when one or more of the nodes in the cluster usesdifferent software versions. Oracle recommends that you perform an Oracle ASMrolling upgrade when performing an Oracle Clusterware rolling upgrade.
To perform a rolling upgrade, your environment must be prepared. OracleClusterware must be fully upgraded to the next patch or release version before youstart the Oracle ASM rolling upgrade. In addition, you should prepare your OracleClusterware in a rolling upgrade manner to ensure high availability and maximumuptime.
Note that Oracle ASM is upgraded with Oracle Clusterware for Oracle 11g Release 2(11.2) or later as both are in the Oracle Grid Infrastructure home.
Note:
• Rolling upgrades only apply to clustered Oracle ASM instances, and youcan only perform rolling upgrades on environments with Oracle Database11g or later. You cannot use this feature to upgrade from Oracle Database10g to Oracle Database 11g.
• See Oracle Exadata documentation for information about performing arolling upgrading of an Oracle ASM instance when Oracle Exadatastorage is present.
Upgrading and Patching Oracle ASM
Administering Oracle ASM Instances 3-29

See Also:
• Oracle Grid Infrastructure Installation Guide for information aboutperforming, and restrictions related to, a rolling upgrade of Oracle ASM
• Oracle Database Upgrade Guide for information about upgrading OracleDatabase
• Oracle Database SQL Language Reference for information about the rollingmigration clause of the ALTER SYSTEM command
About Oracle ASM Rolling PatchesYou can apply patches in a clustered Oracle ASM environment to update one node ata time to the latest patch level without affecting the overall availability of the OracleASM cluster or the database clusters using Oracle ASM for storage.
The ALTER SYSTEM ROLLING PATCH SQL statement enables you to start and stoprolling patches. For example:
SQL> ALTER SYSTEM START ROLLING PATCH;
SQL> ALTER SYSTEM STOP ROLLING PATCH;
You can determine if the cluster is in rolling patch mode by executing a SYS_CONTEXTSQL query for Cluster State. A new state (In Rolling Patch) is added to informing theuser that the cluster is in rolling patch mode.
The queries in Example 3-2 (page 3-31) display information about rolling patches. Torun these queries, you must be connected to the Oracle ASM instance in the Gridhome, and the Grid Infrastructure home must be configured with the OracleClusterware option for an Oracle RAC environment.
You can view all the patch Ids applied on the node and cluster by querying the V$PATCHES view.
ASMCMD commands for rolling patches include:
• showclusterstate
• showpatches
• showversion
For information about ASMCMD commands to monitor upgrade operations on anOracle ASM instance, refer to "ASMCMD Instance Management Commands(page 10-11)".
See Also:
• Oracle Database SQL Language Reference for information about the rollingpatch clause of the ALTER SYSTEM command
• Oracle Grid Infrastructure Installation Guide for information aboutperforming, and restrictions related to, a rolling migration of Oracle ASMand Oracle Grid Infrastructure homes
Upgrading and Patching Oracle ASM
3-30 Oracle Automatic Storage Management Administrator's Guide

Example 3-2 Determining rolling patch mode and patch level
SELECT SYS_CONTEXT('SYS_CLUSTER_PROPERTIES', 'CLUSTER_STATE') FROM DUAL;
SELECT SYS_CONTEXT('SYS_CLUSTER_PROPERTIES', 'CURRENT_PATCHLVL') FROM DUAL;
About Converting to Oracle Flex ASMYou can convert an Oracle ASM configuration to an Oracle Flex ASM using ASMCA.This functionality is only available in an Oracle Grid Infrastructure 12c configuration.For information about using ASMCA, refer to "Getting Started With the ASMCA GUITool (page 9-1)". For
Note:
• If you plan to introduce databases before Oracle Database 12c Release 1(12.1) into a cluster configured with Oracle Flex ASM, you must ensurethat Oracle ASM instances are running on all nodes in the cluster,including nodes that are added in the future. To ensure this requirementfor the Oracle Flex ASM configuration, you must set the count of OracleASM instances to ALL with the SRVCTL modify asm command. Forinformation about administering Oracle Flex ASM with SRVCTLcommands, refer to "Administering Oracle Flex ASM (page 3-19)".
• For additional considerations, refer to the Notes in "About Setting UpOracle Flex ASM (page 3-18)".
Before you convert an Oracle ASM configuration to an Oracle Flex ASM, you mustensure the following:
• Oracle Cluster Registry (OCR) is stored in a disk group. For information aboutstoring OCR in a disk group, refer to "Storing Oracle Cluster Registry and VotingFiles in Oracle ASM Disk Groups (page 4-13)".
See Also:
Oracle Clusterware Administration and Deployment Guide for information aboutmanaging Oracle Cluster Registry and Oracle Local Registry
• The server parameter file (SPFILE) is stored in a disk group. For informationabout storing an SPFILE file in a disk group, refer to "About Backing Up_Copying_ and Moving an Oracle ASM Initialization Parameter File (page 3-4)".
• The password file (ORAPWD file) is stored in a disk group. For information aboutstoring an ORAPWD file in a disk group, refer to "Managing a Shared PasswordFile in a Disk Group (page 3-52)".
• The disk group where the OCR, SPFILE, and ORAPWD files are stored has OracleASM compatibility (COMPATIBLE.ASM) set to 12.1 or higher. For informationabout disk group compatibility, refer to "Disk Group Compatibility (page 4-41)".
ASMCA informs you if any requirement, such as storing an ORAPWD file in a diskgroup, has not been met before starting the conversion.
Upgrading and Patching Oracle ASM
Administering Oracle ASM Instances 3-31

Figure 3-3 (page 3-32) shows the Configure ASM: ASM Instances page that enablesyou to perform operations on selected Oracle ASM instances.
Figure 3-3 Oracle ASM Configuration Assistant Configure ASM Instances Page
Figure 3-4 (page 3-33) shows the Convert to Oracle Flex ASM dialog box that enablesyou to specify the listener port and network interface for the conversion to Oracle FlexASM.
Upgrading and Patching Oracle ASM
3-32 Oracle Automatic Storage Management Administrator's Guide
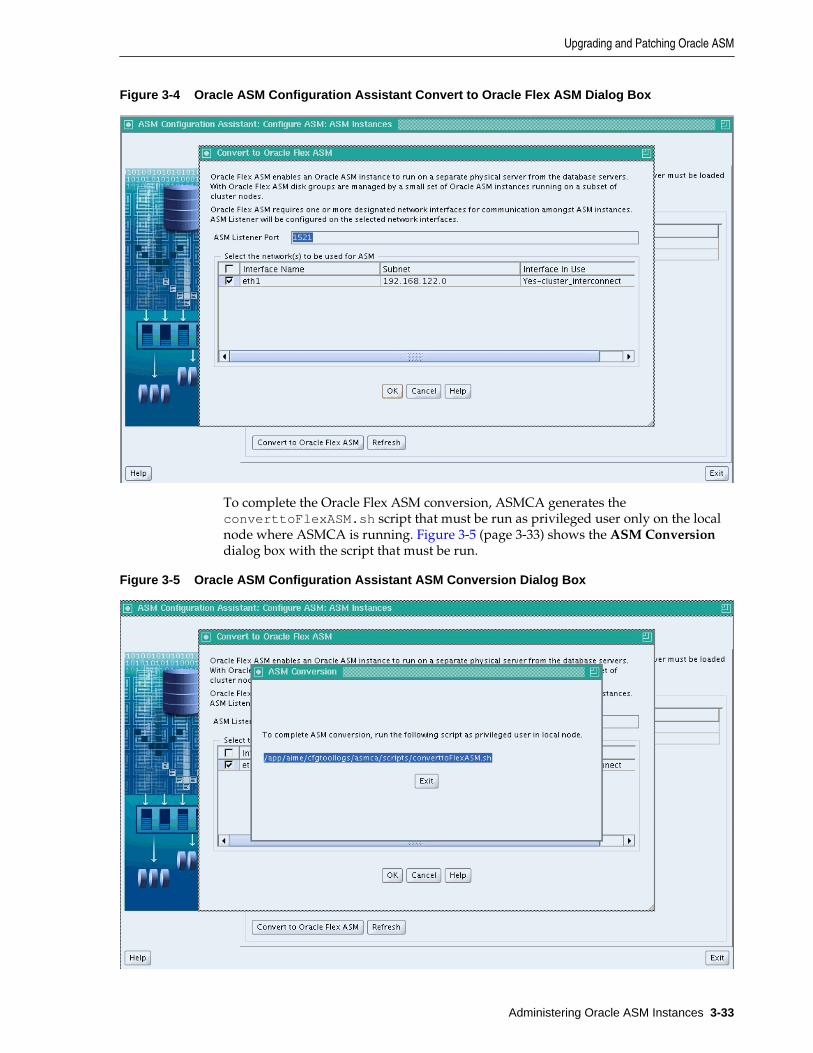
Figure 3-4 Oracle ASM Configuration Assistant Convert to Oracle Flex ASM Dialog Box
To complete the Oracle Flex ASM conversion, ASMCA generates theconverttoFlexASM.sh script that must be run as privileged user only on the localnode where ASMCA is running. Figure 3-5 (page 3-33) shows the ASM Conversiondialog box with the script that must be run.
Figure 3-5 Oracle ASM Configuration Assistant ASM Conversion Dialog Box
Upgrading and Patching Oracle ASM
Administering Oracle ASM Instances 3-33

For information about the ASMCA command-line option for converting to Oracle FlexASM, refer to "Convert to Oracle Flex ASM (page 9-10)".
For information about Oracle Flex ASM, refer to "Managing Oracle Flex ASM(page 3-16)".
See Also:
Oracle Grid Infrastructure Installation Guide for information about installing andupgrading Oracle Grid Infrastructure
Oracle ASM Filter Driver
Note:
This feature is available on Linux systems starting with Oracle Database 12cRelease 1 (12.1.0.2).
Oracle ASM Filter Driver (Oracle ASMFD) is a kernel module that resides in the I/Opath of the Oracle ASM disks. After installation of Oracle Grid Infrastructure, you canoptionally configure Oracle ASMFD for your system. If ASMLIB is configured for anexisting Oracle ASM installation, then you must explicitly migrate the existingASMLIB configuration to Oracle ASMFD.
Note:
In the steps of the procedures in this section, the $ORACLE_HOMEenvironmental variable is set to the directory path of the Oracle GridInfrastructure home. Commands that show # as the operating system promptmust be run as the root user. Commands that show $ as the operating systemprompt should be run as the owner of Oracle Grid Infrastructure home.
This section contains the following topics:
• About Oracle ASM Filter Driver (page 3-35)
• Deciding Between Oracle ASMLIB and Oracle ASM Filter Driver (page 3-35)
• Configuring Oracle ASM Filter Driver (page 3-36)
• About Migrating to Oracle ASM Filter Driver From ASMLIB (page 3-39)
• Determining Whether Oracle ASM Filter Driver Has Been Configured(page 3-41)
• Updating the Oracle ASM Filter Driver AFD_DISKSTRING Parameter(page 3-42)
• Updating the Oracle ASM ASM_DISKSTRING Parameter for Oracle ASM FilterDriver Disks (page 3-42)
• Setting_ Clearing_ and Scanning Oracle ASM Filter Driver Labels (page 3-43)
Oracle ASM Filter Driver
3-34 Oracle Automatic Storage Management Administrator's Guide

• Deconfiguring Oracle ASM Filter Driver (page 3-44)
For information about the ASMCMD commands for administering Oracle ASMFD,refer to "ASMCMD Oracle ASM Filter Driver Management Commands (page 10-29)".
For information about all the ASMCMD commands, refer to "About ASMCMD(page 10-1)".
For information about using Oracle Enterprise Manager to administer Oracle ASMFD,refer to "Managing Oracle ASM Filter Driver With Oracle Enterprise Manager(page 7-24)".
See Also:
Oracle Grid Infrastructure Installation Guide for your operating system forinformation about installing and configuring Oracle Grid Infrastructure
About Oracle ASM Filter DriverOracle ASM Filter Driver (Oracle ASMFD) is a kernel module that resides in the I/Opath of the Oracle ASM disks. Oracle ASM uses the filter driver to validate write I/Orequests to Oracle ASM disks.
The Oracle ASMFD simplifies the configuration and management of disk devices byeliminating the need to rebind disk devices used with Oracle ASM each time thesystem is restarted.
The Oracle ASM Filter Driver rejects any I/O requests that are invalid. This actioneliminates accidental overwrites of Oracle ASM disks that would cause corruption inthe disks and files within the disk group. For example, the Oracle ASM Filter Driverfilters out all non-Oracle I/Os which could cause accidental overwrites.
Deciding Between Oracle ASMLIB and Oracle ASM Filter DriverOracle ASM Filter Driver (Oracle ASMFD) is installed with an Oracle GridInfrastructure installation. If you have an existing Oracle ASM library driver (OracleASMLIB) configuration, then depending on whether you want to use Oracle ASMLIBor Oracle ASMFD, consider the following scenarios:
• If you use Oracle ASMLIB to manage your Oracle ASM devices and you want tocontinue to use Oracle ASMLIB, then upgrade to Oracle Grid Infrastructure 12cRelease 1 (12.1.0.2).
Although Oracle ASMFD is installed, Oracle ASMLIB continues to be used fordevice persistence.
• If you use Oracle ASMLIB to manage your Oracle ASM devices and you want tomigrate to Oracle ASMFD, then perform the following steps:
1. Upgrade to Oracle Grid Infrastructure 12c Release 1 (12.1.0.2).
This process installs Oracle ASMFD.
2. Migrate from Oracle ASMLIB to Oracle ASMFD.
Refer to "Configuring Oracle ASM Filter Driver (page 3-36)" to removeOracle ASMLIB and configure your Oracle ASM devices to use OracleASMFD for device persistence.
Oracle ASM Filter Driver
Administering Oracle ASM Instances 3-35
• If Oracle ASMLIB is installed, but you do not use Oracle ASM because OracleGrid Infrastructure is not installed, and want to use Oracle ASMFD, then followthese steps:
1. Deinstall Oracle ASMLIB.
See Also:
Oracle Grid Infrastructure Installation Guide for your operating system forinformation about installing and deinstalling Oracle ASMLIB
2. Install Oracle Grid Infrastructure 12c Release 1 (12.1.0.2).
This process installs Oracle ASMFD.
3. Configure your Oracle ASM devices to use Oracle ASMFD for devicepersistence.
Refer to "Configuring Oracle ASM Filter Driver (page 3-36)".
4. Create disk labels to enable migration of Oracle ASM disk groups to OracleASMFD.
Refer to "About Migrating to Oracle ASM Filter Driver From ASMLIB(page 3-39)".
You can also set udev rules, in addition to or instead of Oracle ASMFD and OracleASMLIB, for device persistence.
Configuring Oracle ASM Filter DriverAfter installing Oracle Grid Infrastructure 12c Release 1 (12.1.0.2), you can configureyour Oracle ASM devices to use Oracle ASM Filter Driver (ASMFD) for devicepersistence.
This section contains the following topics:
• "Configuring Oracle ASM in an Oracle Grid Infrastructure ClusterwareEnvironment (page 3-36)"
• "Configuring Oracle ASM in an Oracle Grid Infrastructure Standalone (OracleRestart) Environment (page 3-38)"
See Also:
Oracle Clusterware Administration and Deployment Guide for information aboutusing CRSCTL commands
Configuring Oracle ASM in an Oracle Grid Infrastructure Clusterware Environment
To configure Oracle ASMFD in an Oracle Clusterware environment, follow thesesteps:
1. As the Oracle Grid Infrastructure owner update the Oracle ASM disk discoverystring to enable Oracle ASMFD to discover devices in the future.
For example, check the current value of the Oracle ASM disk discovery string andthen update the value.
Oracle ASM Filter Driver
3-36 Oracle Automatic Storage Management Administrator's Guide

$ $ORACLE_HOME/bin/asmcmd dsget
$ $ORACLE_HOME/bin/asmcmd dsset old_diskstring, 'AFD:*'
The value of old_diskstring is the current Oracle ASM disk discovery stringvalue.
For information about updating the Oracle ASM discovery string, refer to"Updating the Oracle ASM ASM_DISKSTRING Parameter for Oracle ASM FilterDriver Disks (page 3-42)".
2. As the Oracle Grid Infrastructure owner list the nodes and node roles in yourcluster:
$ $ORACLE_HOME/bin/olsnodes -a
3. On each Hub node, do the following, either in rolling or non-rolling mode:
a. Log in as the root user and stop Oracle Grid Infrastructure:
# $ORACLE_HOME/bin/crsctl stop crs
If the command returns an error, then stop Oracle Grid Infrastructure forciblyas follows:
# $ORACLE_HOME/bin/crsctl stop crs -f
b. As root, configure Oracle ASMFD to filter at the node level:
# $ORACLE_HOME/bin/asmcmd afd_configure
c. As the Oracle Grid Infrastructure owner verify the status of Oracle ASMFD:
$ $ORACLE_HOME/bin/asmcmd afd_stateASMCMD-9526: The AFD state is 'LOADED' and filtering is 'ENABLED' on host 'myhost'
For information about checking on the state of the Oracle ASM Filter Driver,refer to "Determining Whether Oracle ASM Filter Driver Has BeenConfigured (page 3-41)".
d. As root, start the Oracle Clusterware stack on the node:
# $ORACLE_HOME/bin/crsctl start crs
e. As the Oracle Grid Infrastructure owner set the Oracle ASMFD discoverydisk string to the original Oracle ASM disk discovery string value that wasretrieved in Step 1:
$ $ORACLE_HOME/bin/asmcmd afd_dsset old_diskstring
The value of old_diskstring is the old disk discovery string value withoutthe AFD: (Oracle ASMFD) path.
For information about updating the Oracle ASM Filter Driver discovery diskdiscovery string, refer to "Updating the Oracle ASM Filter DriverAFD_DISKSTRING Parameter (page 3-42)".
For information about updating the Oracle ASM discovery disk discoverystring, refer to "Updating the Oracle ASM ASM_DISKSTRING Parameter forOracle ASM Filter Driver Disks (page 3-42)".
Oracle ASM Filter Driver
Administering Oracle ASM Instances 3-37

Oracle ASM Filter Driver should identify and start managing disks previouslymanaged by Oracle ASMLIB.
Configuring Oracle ASM in an Oracle Grid Infrastructure Standalone (Oracle Restart)Environment
To configure Oracle ASMFD in a standalone environment, follow these steps:
1. As the Oracle Grid Infrastructure standalone server owner update the Oracle ASMdisk discovery string to enable Oracle ASMFD to discover disk devices.
For example, check the current value of the Oracle ASM disk discovery string andthen update the value.
$ $ORACLE_HOME/bin/asmcmd dsget
$ $ORACLE_HOME/bin/asmcmd dsset old_diskstring, 'AFD:*'
Where old_diskstring is the current disk discovery string value.
For information about updating the Oracle ASM discovery string, refer to"Updating the Oracle ASM ASM_DISKSTRING Parameter for Oracle ASM FilterDriver Disks (page 3-42)".
2. Log in as the root user and stop Oracle Grid Infrastructure for a standalone serverusing the following command:
# $ORACLE_HOME/bin/crsctl stop has -f
3. As root, configure Oracle ASMFD using the following command:
# $ORACLE_HOME/bin/asmcmd afd_configure
This command configures Oracle ASMFD and deconfigures Oracle ASMLIB, if itexists.
4. As the Oracle Grid Infrastructure standalone server owner verify the OracleASMFD status:
$ $ORACLE_HOME/bin/asmcmd afd_state
ASMCMD-9526: The AFD state is 'LOADED' and filtering is 'ENABLED' on host 'myhost'
For information about checking on the state of the Oracle ASM Filter Driver, referto "Determining Whether Oracle ASM Filter Driver Has Been Configured(page 3-41)".
5. As root, start Oracle Grid Infrastructure for a standalone server:
# $ORACLE_HOME/bin/crsctl start has
6. As the Oracle Grid Infrastructure standalone server owner set the Oracle ASMFDdisk discovery string to the original value of the Oracle ASM disk discovery stringthat was retrieved in Step 1:
$ $ORACLE_HOME/bin/asmcmd afd_dsset disk_string
Oracle ASM Filter Driver should identify and start managing disks previouslymanaged by Oracle ASMLIB.
Oracle ASM Filter Driver
3-38 Oracle Automatic Storage Management Administrator's Guide

About Migrating to Oracle ASM Filter Driver From ASMLIBIf Oracle ASMLIB was installed, but not used earlier, you must create disk labels toenable migration of Oracle ASM disk groups to Oracle ASM Filter Driver (OracleASMFD) after installing Oracle Grid Infrastructure 12c Release 1 (12.1.0.2).
Oracle recommends that you temporarily move Oracle Cluster Registry (OCR) andvoting files to another disk group if one is available, as described in "Migrating OracleASM Disk Groups without Oracle Cluster Registry or Voting Files (page 3-39)", andmigrate the disk group to use Oracle ASMFD. After migrating the disk group to useOracle ASMFD, move OCR and voting files back to the disk group. You can similarlymigrate any other disk groups if they contain OCR or voting files to ensure onlinemigration of all disk groups to Oracle ASMFD.
This section contains the following topics:
• "Migrating Oracle ASM Disk Groups without Oracle Cluster Registry or VotingFiles (page 3-39)"
• "Migrating Oracle ASM Disk Groups with Oracle Cluster Registry or Voting Files(page 3-40)"
• "Migrating Oracle ASM Disk Groups in an Oracle Grid Infrastructure Standalone(Oracle Restart) Environment (page 3-40)"
See Also:
• Oracle Clusterware Administration and Deployment Guide for informationabout replacing Oracle Cluster Registry locations and migrating votingfiles
• Oracle Clusterware Administration and Deployment Guide for informationabout using CRSCTL commands
• Oracle Clusterware Administration and Deployment Guide for informationabout managing voting files, Oracle Cluster Registry (OCR), and OracleLocal Registry (OLR)
• Oracle Real Application Clusters Administration and Deployment Guide forinformation about SRVCTL commands
Migrating Oracle ASM Disk Groups without Oracle Cluster Registry or Voting Files
To migrate Oracle ASM disk groups without Oracle Cluster Registry (OCR) or votingfiles to Oracle ASMFD:
1. Log in as the Oracle Grid Infrastructure owner on any node to run the commandsin this procedure.
2. List the existing disk groups:
$ $ORACLE_HOME/bin/asmcmd lsdg
3. List the associated disks:
$ $ORACLE_HOME/bin/asmcmd lsdsk -G diskgroup
Oracle ASM Filter Driver
Administering Oracle ASM Instances 3-39

4. Check if Oracle ASM is active:
$ $ORACLE_HOME/bin/srvctl status asm
5. Stop the databases and dismount the disk group on all nodes:
$ $ORACLE_HOME/bin/srvctl stop diskgroup -diskgroup diskgroup -f
6. Label all existing disks in the disk group by running the following command foreach disk on a Hub node:
$ $ORACLE_HOME/bin/asmcmd afd_label label disk_path --migrate
7. Scan the disks on all Hub nodes:
$ $ORACLE_HOME/bin/asmcmd afd_scan
8. Start the databases and mount the disk group on all nodes:
$ $ORACLE_HOME/bin/srvctl start diskgroup -diskgroup diskgroup
Migrating Oracle ASM Disk Groups with Oracle Cluster Registry or Voting Files
To migrate Oracle ASM disk groups with Oracle Cluster Registry (OCR) or voting filesto Oracle ASM Filter Driver (Oracle ASMFD):
1. Log in as the root user and list the disk groups with OCR and voting files byrunning the following commands on one node:
# $ORACLE_HOME/bin/ocrcheck -config
# $ORACLE_HOME/bin/crsctl query css votedisk
2. As the Oracle Grid Infrastructure owner list the disks associated with the diskgroups:
$ $ORACLE_HOME/bin/asmcmd lsdsk -G disk_group
3. As root, stop the databases and Oracle Clusterware on all nodes:
# $ORACLE_HOME/bin/crsctl stop cluster -all
4. As the Oracle Grid Infrastructure owner label all existing disks in the disk group byrunning the following command for each disk on a Hub node:
$ $ORACLE_HOME/bin/asmcmd afd_label label disk_path --migrate
5. As the Oracle Grid Infrastructure owner rescan the disks on all Hub nodes byrunning the following command on all of the Hub nodes:
$ $ORACLE_HOME/bin/asmcmd afd_scan
6. As root, start the Oracle Clusterware stack on all nodes and mount the OCR andvoting files disk groups and databases:
# $ORACLE_HOME/bin/crsctl start cluster -all
Migrating Oracle ASM Disk Groups in an Oracle Grid Infrastructure Standalone(Oracle Restart) Environment
To migrate your existing Oracle ASM disk groups to Oracle ASM Filter Driver in anOracle Grid Infrastructure standalone environment, perform the following steps:
Oracle ASM Filter Driver
3-40 Oracle Automatic Storage Management Administrator's Guide
1. Log in as the Oracle Grid Infrastructure standalone server owner to run the steps inthis procedure.
2. List the existing disk groups:
$ $ORACLE_HOME/bin/asmcmd lsdg
3. List the existing disks:
$ $ORACLE_HOME/bin/asmcmd lsdsk -G diskgroup_name
4. Check if the status of your Oracle ASM instance is active:
$ $ORACLE_HOME/bin/srvctl status asm
5. Stop all the databases and dismount all disk groups. For each database, run thefollowing commands:
$ $ORACLE_HOME/bin/srvctl stop database -db db_unique_name
$ /$ORACLE_HOME/bin/srvctl stop diskgroup -diskgroup diskgroup_name -f
6. Label all existing disks in the disk group by running the following command foreach disk:
$ $ORACLE_HOME/bin/asmcmd afd_label label disk_path --migrate
7. Rescan the disks:
$ $ORACLE_HOME/bin/asmcmd afd_scan
8. Start the database and mount the disk group:
$ $ORACLE_HOME/bin/srvctl start diskgroup -diskgroup diskgroup_name
Determining Whether Oracle ASM Filter Driver Has Been ConfiguredThe value of the AFD_STATE parameter of SYS_ASMFD_PROPERTIES specifieswhether Oracle ASMFD is configured for the Oracle ASM instance.
You can check the state of Oracle ASMFD with the ASMCMD afd_state command.For example:
$ $ORACLE_HOME/bin/asmcmd afd_stateASMCMD-9526: The AFD state is 'LOADED' and filtering is 'DEFAULT' on host 'myhost'
For information about using the ASMCMD afd_state command to determine thestate of Oracle ASMFD, refer to "afd_state (page 10-34)".
To determine if Oracles ASMFD is present on the host, you can also display the valueof AFD_STATE from SYS_CONTEXT. You must run the query on the Oracle ASMinstance.
If the value of AFD_STATE is equal to NOT AVAILABLE, then Oracle ASMFD is notconfigured.
SQL> SELECT SYS_CONTEXT('SYS_ASMFD_PROPERTIES', 'AFD_STATE') FROM DUAL;SYS_CONTEXT('SYS_ASMFD_PROPERTIES','AFD_STATE')--------------------------------------------------------------------------------NOT AVAILABLE
Oracle ASM Filter Driver
Administering Oracle ASM Instances 3-41

A value of CONFIGURED means that Oracle ASMFD is completely set up and theOracle ASM instance can register with the driver.
SQL> SELECT SYS_CONTEXT('SYS_ASMFD_PROPERTIES', 'AFD_STATE') FROM DUAL;SYS_CONTEXT('SYS_ASMFD_PROPERTIES','AFD_STATE')--------------------------------------------------------------------------------CONFIGURED
Updating the Oracle ASM Filter Driver AFD_DISKSTRING ParameterThe AFD_DISKSTRING parameter specifies the Oracle ASMFD disk discovery stringthat is used to identify the disks to be managed by Oracle ASMFD.
You can set and display the AFD_DISKSTRING parameter with the ASMCMDafd_dsset and afd_dgset commands. For example:
$ $ORACLE_HOME/bin/asmcmd afd_dsset '/dev/rdsk/mydisks/*'
$ $ORACLE_HOME/bin/asmcmd afd_dsgetAFD discovery string: /dev/rdsk/mydisks/*
For information about ASMCMD commands to display and set the Oracle ASMFDdisk discovery string, refer to "afd_dsget (page 10-31)" and "afd_dsset (page 10-31)".
You can also set the AFD_DISKSTRING with the ALTER SYSTEM SQL statement. Alabel is created in the disk header of those disks identified by the Oracle ASMFD diskdiscovery string.
SQL> ALTER SYSTEM AFD_DISKSTRING SET '/dev/disk0','/dev/disk1','/devices/dsk/*';System altered.
You can retrieve the value of AFD_DISKSTRING parameter with the following query.
SQL> SELECT SYS_CONTEXT('SYS_ASMFD_PROPERTIES', 'AFD_DISKSTRING') FROM DUAL;SYS_CONTEXT('SYS_ASMFD_PROPERTIES','AFD_DISKSTRING')--------------------------------------------------------------------------------'/dev/disk0','/dev/disk1','/devices/dsk/*'
Updating the Oracle ASM ASM_DISKSTRING Parameter for Oracle ASM Filter DriverDisks
You can update the Oracle ASM disk discovery string to add or remove OracleASMFD disk label names to and from the ASM_DIKSTRING initialization parameter.
For example, you can add the Oracle ASMFD disks to the ASM_DIKSTRINGinitialization parameter as follows:
ASM_DISKSTRING = 'AFD:DISK0', 'AFD:DISK1', '/dev/rdsk/mydisks/*'
Or you can set the ASM_DIKSTRING initialization parameter as follows:
ASM_DISKSTRING = 'AFD:*', '/dev/rdsk/mydisks/*'
You can display and set the Oracle ASM disk discovery string with the ASMCMDdsget and dsset commands. For example, you can set the Oracle ASM diskdiscovery string to add Oracle ASMFD disks as follows:
$ $ORACLE_HOME/bin/asmcmd dsset 'AFD:*','/dev/rdsk/mydisks/*'
You can remove previously added Oracle ASMFD disks as follows:
$ $ORACLE_HOME/bin/asmcmd dsset '/dev/rdsk/mydisks/*'
Oracle ASM Filter Driver
3-42 Oracle Automatic Storage Management Administrator's Guide

For information about ASMCMD commands to display and set the Oracle ASM diskdiscovery string, refer to "dsget (page 10-12)" and "dsset (page 10-13)".
For information about the ASM_DISKSTRING initialization parameter, refer to"ASM_DISKSTRING (page 3-9)".
Setting, Clearing, and Scanning Oracle ASM Filter Driver LabelsSetting a label provisions a disk to be used by Oracle ASMFD. After the label is set, thespecified disk is managed by Oracle ASMFD.
You can add, remove, and scan labels with the ASMCMD afd_label,afd_unlabel, and afd_scan commands. For example:
$ $ORACLE_HOME/bin/asmcmd afd_label 'disk0' '/dev/rdsk/mydisks/disk0'
$ $ORACLE_HOME/bin/asmcmd afd_unlabel 'disk0'
$ $ORACLE_HOME/bin/asmcmd afd_scan '/dev/rdsk/mydisks/*'
For information about ASMCMD commands to add and remove labels on OracleASMFD disks, refer to "afd_label (page 10-32)", "afd_unlabel (page 10-34)", and"afd_scan (page 10-33)". In addition, ASMCA provides support for adding andremoving labels on Oracle ASMFD disks. For information about using ASMCA toadminister disk groups, refer to "Managing Disk Groups with ASMCA (page 9-5)".
You can also manage labels with SQL statements. You can set a label with the ALTERSYSTEM LABEL SET SQL statement. For example:
SQL> ALTER SYSTEM LABEL SET 'disk0' TO '/dev/disk0';System altered.
SQL> SELECT UPPER(path) FROM V$ASM_DISK ORDER BY PATH;UPPER(PATH)--------------------------------------------------------------------------------AFD:DISK0
When you run the statement, you can use the optional RENAME or MIGRATE option. Ifa disk was previously provisioned for Oracle ASMFD, you can rename the label withthe RENAME option. Note that the device should not be managed with Oracle ASMFDwhen the command is run. If a disk was previously used for an Oracle ASM diskgroup and the disk group has been dismounted, then you can label this disk using theMIGRATE option.
You can use ALTER SYSTEM LABEL CLEAR to remove the label from a device and stopOracle ASMFD from managing the device. For example:
SQL> ALTER SYSTEM LABEL CLEAR 'disk0';System altered.
You can use ALTER SYSTEM LABEL SCAN on remote nodes after the ALTER SYSTEMLABEL SET command is run on the local node.
Because ALTER SYSTEM LABEL SET statement writes the label on the disk header andthe disk is shared across nodes, the same statement is not run on other nodes of thecluster.
If the device-path is not specified, then the statement uses the AFD_DISKSTRINGparameter value to perform the scan operation.
SQL> ALTER SYSTEM LABEL SCAN
Oracle ASM Filter Driver
Administering Oracle ASM Instances 3-43

Deconfiguring Oracle ASM Filter DriverYou can deconfigure Oracle ASM Filter Driver (Oracle ASMFD) if it has beenconfigured on your system.
This section contains the following topics:
• "Deconfiguring Oracle ASM Filter Driver in an Oracle Grid InfrastructureClusterware Environment (page 3-44)"
• "Deconfiguring Oracle ASM Filter Driver in an Oracle Grid InfrastructureStandalone (Oracle Restart) Environment (page 3-45)"
For information about the ASMCMD commands for administering Oracle ASMFD,refer to "ASMCMD Oracle ASM Filter Driver Management Commands (page 10-29)".
See Also:
Oracle Clusterware Administration and Deployment Guide for information aboutusing CRSCTL commands
Deconfiguring Oracle ASM Filter Driver in an Oracle Grid Infrastructure ClusterwareEnvironment
Perform the following steps to deconfigure Oracle ASM Filter Driver in an OracleClusterware environment:
1. Update the Oracle ASM disk discovery string to enable Oracle ASM to discoverdisk devices after Oracle ASMFD is deconfigured.
For information about updating the Oracle ASM disk discovery string, refer to"Updating the Oracle ASM ASM_DISKSTRING Parameter for Oracle ASM FilterDriver Disks (page 3-42)".
2. As the Oracle Grid Infrastructure owner list the nodes and node roles in yourcluster by running the following command on any node:
$ $ORACLE_HOME/bin/olsnodes -a
3. On each Hub node, do the following, either in rolling or non-rolling mode:
a. Log in as the root user and stop Oracle Grid Infrastructure:
# $ORACLE_HOME/bin/crsctl stop crs
If the command returns any error, then stop Oracle Grid Infrastructureforcibly as follows:
# $ORACLE_HOME/bin/crsctl stop crs -f
b. As root, stop Oracle ACFS kernel modules to ensure the most reliableshutdown:
# $ORACLE_HOME/bin/acfsload stop
For information about the acfsload command, refer to "acfsload(page 18-5)".
c. As root, deconfigure Oracle ASMFD:
Oracle ASM Filter Driver
3-44 Oracle Automatic Storage Management Administrator's Guide

# $ORACLE_HOME/bin/asmcmd afd_deconfigure
d. As root, start ACFS kernel modules:
# $ORACLE_HOME/bin/acfsload start
For information about the acfsload command, refer to "acfsload(page 18-5)".
e. As root, start the Oracle Clusterware stack on the node:
# $ORACLE_HOME/bin/crsctl start crs
f. As the Oracle Grid Infrastructure owner verify the status of Oracle ASMFD:
$ $ORACLE_HOME/bin/asmcmd afd_state
For information about checking on the state of the Oracle ASM Filter Driver,refer to "Determining Whether Oracle ASM Filter Driver Has BeenConfigured (page 3-41)".
4. As the Oracle Grid Infrastructure owner update the Oracle ASM discovery stringto remove the Oracle ASMFD path:
$ $ORACLE_HOME/bin/asmcmd dsget
$ $ORACLE_HOME/bin/asmcmd dsset old_diskstring
Check the current value of the Oracle ASM disk discovery string before updatingthe value. The old_diskstring value is the old disk discovery string valuebefore updating with the AFD: (Oracle ASMFD) paths.
For information about updating the Oracle ASM discovery string, refer to"Updating the Oracle ASM ASM_DISKSTRING Parameter for Oracle ASM FilterDriver Disks (page 3-42)".
For information about updating the Oracle ASM Filter Driver discovery diskdiscovery string, refer to "Updating the Oracle ASM Filter DriverAFD_DISKSTRING Parameter (page 3-42)".
Deconfiguring Oracle ASM Filter Driver in an Oracle Grid Infrastructure Standalone(Oracle Restart) Environment
Perform the following steps to deconfigure Oracle ASM Filter Driver in an Oracle GridInfrastructure standalone environment:
1. Update the Oracle ASM disk discovery string to enable Oracle ASM to discoverdisk devices after Oracle ASMFD is deconfigured.
For information about updating the Oracle ASM disk discovery string, refer to"Updating the Oracle ASM ASM_DISKSTRING Parameter for Oracle ASM FilterDriver Disks (page 3-42)".
2. Log in as the root user and stop Oracle Grid Infrastructure for a standalone serverusing the following command:
# $ORACLE_HOME/bin/crsctl stop has
If the previous command returns an error, then use the following command:
# $ORACLE_HOME/bin/crsctl stop has -f
Oracle ASM Filter Driver
Administering Oracle ASM Instances 3-45

3. As root, stop Oracle ACFS kernel modules to ensure the most reliable shutdown:
# $ORACLE_HOME/bin/acfsload stop
For information about the acfsload command, refer to "acfsload (page 18-5)".
4. As root, deconfigure Oracle ASMFD:
# $ORACLE_HOME/bin/asmcmd afd_deconfigure
5. As root, start ACFS kernel modules:
# $ORACLE_HOME/bin/acfsload start
For information about the acfsload command, refer to "acfsload (page 18-5)".
6. As root, start Oracle Grid Infrastructure for a standalone server:
# $ORACLE_HOME/bin/crsctl start has
7. As the Oracle Grid Infrastructure standalone server owner verify the OracleASMFD status:
$ $ORACLE_HOME/bin/asmcmd afd_state
For information about checking on the state of the Oracle ASM Filter Driver, referto "Determining Whether Oracle ASM Filter Driver Has Been Configured(page 3-41)".
8. As the Oracle Grid Infrastructure standalone server owner update the Oracle ASMdisk discovery string to remove the Oracle ASMFD paths:
$ $ORACLE_HOME/bin/asmcmd dsget
$ $ORACLE_HOME/bin/asmcmd dsset old_diskstring
Check the current value of the Oracle ASM disk discovery string before updatingthe value. The old_diskstring value is the old disk discovery string valuebefore updating with the AFD: (Oracle ASMFD) paths.
For information about updating the Oracle ASM discovery string, refer to"Updating the Oracle ASM ASM_DISKSTRING Parameter for Oracle ASM FilterDriver Disks (page 3-42)".
For information about updating the Oracle ASM Filter Driver discovery diskdiscovery string, refer to "Updating the Oracle ASM Filter DriverAFD_DISKSTRING Parameter (page 3-42)".
Authentication for Accessing Oracle ASM InstancesAn Oracle ASM instance does not have a data dictionary, so the only way to connect toan Oracle ASM instance is by using one of three system privileges, SYSASM, SYSDBA,or SYSOPER. There are three modes of connecting to Oracle ASM instances:
• Local connection using operating system authentication
• Local connection using password authentication
• Remote connection by way of Oracle Net Services using password authentication
Authentication for Accessing Oracle ASM Instances
3-46 Oracle Automatic Storage Management Administrator's Guide

See Also:
Your operating system-specific Oracle Grid Infrastructure Installation Guide forinformation about how to ensure that the Oracle ASM and database instanceshave member disk access
This section describes the following topics:
• About Privileges for Oracle ASM (page 3-47)
• Creating Users with the SYSASM Privilege (page 3-50)
• Operating System Authentication for Oracle ASM (page 3-51)
• Password File Authentication for Oracle ASM (page 3-52)
• Managing a Shared Password File in a Disk Group (page 3-52)
The Oracle ASM and database instances must have read/write operating systemaccess rights to disk groups. For example, the Oracle ASM instance and the databaseinstance must have identical read and write permissions for the disks that comprisethe related Oracle ASM disk group. For Linux and UNIX systems, this is typicallyprovided through shared Linux and UNIX group membership (OSASM group). OnWindows systems, the Oracle ASM service must be run as Administrator. Forinformation about file permissions and Oracle ASM File Access Control, see"Managing Oracle ASM File Access Control for Disk Groups (page 4-50)".
See Also:
Oracle Database Security Guide for information about maintaining databasesecurity, including assigning passwords
About Privileges for Oracle ASMDuring Oracle ASM installation, you can use one operating system group for all usersor divide system privileges so that database administrators, storage administrators,and database operators each have distinct operating system privilege groups.
Whether you create separate operating system privilege groups or use one group toprovide operating system authentication for all system privileges, you should useSYSASM to administer an Oracle ASM instance. The SYSDBA privilege cannot be usedto administer an Oracle ASM instance. If you use the SYSDBA privilege to runadministrative commands on an Oracle ASM instance, the operation results in anerror. The SYSDBA privilege is intended to be used by the database to access diskgroups.
Oracle also recommends the use of a less privileged user, such as ASMSNMP withSYSDBA privileges that is created during installation, for monitoring the Oracle ASMinstance.
Operating system authentication using membership in the group or groups designatedas OSDBA, OSOPER, and OSASM is valid on all Oracle platforms. Connecting to anOracle ASM instance as SYSASM grants you full access to all of the available OracleASM disk groups and management functions.
This section contains these topics:
Authentication for Accessing Oracle ASM Instances
Administering Oracle ASM Instances 3-47
• Using One Operating System Group for Oracle ASM Users (page 3-48)
• Using Separate Operating System Groups for Oracle ASM Users (page 3-48)
• The SYSASM Privilege for Administering Oracle ASM (page 3-49)
• The SYSDBA Privilege for Managing Oracle ASM Components (page 3-50)
For information about privileges and Oracle ACFS, see "Oracle ACFS and File Accessand Administration Security (page 11-13)".
Using One Operating System Group for Oracle ASM Users
If you do not want to divide the privileges for system access into separate operatingsystem groups, then you can designate one operating system group as the groupwhose members are granted access as OSDBA, OSOPER, and OSASM for Oracle ASMprivileges. The default operating system group name for all of these is usually dbaand that group is typically chosen for the default configuration.
Table 3-1 (page 3-48) shows an example of a Linux deployment without separatedprivileges for Oracle ASM users.
Table 3-1 One operating system group and one set of privileges for all Oracle ASM users
Role/Software Owner User Group/Privilege
Oracle ASM administrator/Oracle GridInfrastructure home
oracle dba/SYSASM, SYSDBA, SYSOPER
Database administrator 1/Database home 1 oracle dba/SYSASM, SYSDBA, SYSOPER
Database administrator 2/Database home 2 oracle dba/SYSASM, SYSDBA, SYSOPER
Operating system disk device owner oracle dba
Using Separate Operating System Groups for Oracle ASM Users
You can designate separate operating system groups as the operating systemauthentication groups for privileges on Oracle ASM. The following list describes theseparate operating system authentication groups for Oracle ASM and the privilegesthat their members are granted.
• OSASM group
This group is granted the SYSASM privilege, which provides full administrativeprivileges for the Oracle ASM instance. For example, the group could beasmadmin.
• OSDBA for Oracle ASM group
This group is granted the SYSDBA privilege on the Oracle ASM instance, whichgrants access to data stored on Oracle ASM. This group has a subset of theprivileges of the OSASM group.
When you implement separate administrator privileges, choose an OSDBA groupfor the Oracle ASM instance that is different than the group that you select for thedatabase instance, such as dba. For example, the group could be asmdba.
• OSOPER for Oracle ASM group
Authentication for Accessing Oracle ASM Instances
3-48 Oracle Automatic Storage Management Administrator's Guide

This group is granted the SYSOPER privilege on the Oracle ASM instance, whichprovides operations such as startup, shutdown, mount, dismount, and check diskgroup. This group has a subset of the privileges of the OSASM group. Forexample, the group could be asmoper.
When you implement separate Oracle ASM and database administrator duties, thisconfiguration requires different group and different software owners. Implicitly thisimplementation requires that the OSASM and OSDBA are different groups. For thisconfiguration, you must create an OSDBA for Oracle ASM group and a databaseinstance must be a member of that group to access the Oracle ASM instance.
In an installation that has been configured as Oracle Grid Infrastructure, the OracleASM user, such as grid, does not have to be a member of the Oracle DatabaseOSDBA group, such as dba1 or dba2, because the Oracle Clusterware database agentruns as the database owner and can use SYSDBA to connect to the database.
However, in an Oracle Restart configuration, the Oracle ASM user (grid) must be amember of the OSDBA group (dba1, dba2, ...) of every database. This requirement isnecessary because Oracle Restart software runs as the Oracle ASM user (grid) andthis user must be able to start and stop the databases using the CONNECT / AS SYSDBAauthentication.
Additionally, the owner of the operating system disk devices should be the same asthe owner of the Oracle ASM software.
Table 3-2 (page 3-49) shows an example of a Linux deployment using separateoperating system privilege groups for Oracle ASM users.
Table 3-2 Separated operating system groups and privileges for Oracle ASM users
Role/Software Owner User Group/Privilege
Oracle ASM administrator/Oracle GridInfrastructure home
grid asmadmin (OSASM)/SYSASM
asmdba (OSDBA for ASM)/SYSDBA
asmoper (OSOPER for ASM)/SYSOPER
dba1, dba2, ... (OSDBA for the databaseswhen in an Oracle Restart configuration)
Database administrator 1/Database home 1 oracle1 asmdba (OSDBA for ASM)/SYSDBA
oper1 (OSOPER for database 1)/SYSOPER
dba1 (OSDBA for database 1)/SYSDBA
Database administrator 2/Database home 2 oracle2 asmdba (OSDBA for ASM)/SYSDBA
oper2 (OSOPER for database 2)/SYSOPER
dba2 (OSDBA for database 2)/SYSDBA
Operating system disk device owner grid asmadmin (OSASM)
The SYSASM Privilege for Administering Oracle ASM
SYSASM is a system privilege that enables the separation of the SYSDBA databaseadministration privilege from the Oracle ASM storage administration privilege. Accessto the SYSASM privilege is granted by membership in an operating system group thatis designated as the OSASM group. This is similar to SYSDBA and SYSOPERprivileges, which are system privileges granted through membership in the groupsdesignated as the OSDBA and OSOPER operating system groups. You can designateone group for all of these system privileges, or you can designate separate groups foreach operating system privilege.
Authentication for Accessing Oracle ASM Instances
Administering Oracle ASM Instances 3-49

You can also grant the SYSASM privilege with password file authentication, asdiscussed in "Password File Authentication for Oracle ASM (page 3-52)".
To connect locally as SYSASM using password authentication with SQL*Plus, use thefollowing statement:
sqlplus SYS AS SYSASM...Enter password:
To connect remotely as SYSASM using password authentication with SQL*Plus, usethe following statement:
sqlplus sys@\"myhost.mydomain.com:1521/+ASM\" AS SYSASM...Enter password:
In the previous example, +ASM is the service name of the Oracle ASM instance.
To connect locally as SYSASM to an Oracle ASM instance using operating systemauthentication with SQL*Plus, use the following statement:
sqlplus / AS SYSASM
The SYSDBA Privilege for Managing Oracle ASM Components
You can connect as SYSDBA to use SQL*Plus or ASMCMD commands to manageOracle ASM components associated with the database. When running SQL orASMCMD operations with the SYSDBA privilege, connect to the database instancerather than the Oracle ASM instance.
Connecting as SYSDBA to the database instance has a limited set of Oracle ASMprivileges. For example, you cannot create a disk group when connected with theSYSDBA privilege.
When connected as SYSDBA to the database instance, the Oracle ASM operations arelimited to:
• Create and delete files, aliases, directories, and templates
• Examine various Oracle ASM instance views
• Operate on files that were created by this user or only access files to whichanother user had explicitly granted access
• Granting Oracle ASM File Access Control to other users
Creating Users with the SYSASM PrivilegeWhen you are logged in to an Oracle ASM instance as SYSASM, you can use thecombination of CREATE USER and GRANT SQL statements to create a user who has theSYSASM privilege. You also can revoke the SYSASM privilege from a user using theREVOKE command, and you can drop a user from the password file using the DROPUSER command.
Authentication for Accessing Oracle ASM Instances
3-50 Oracle Automatic Storage Management Administrator's Guide

Note:
• These commands update the password file for the local Oracle ASMinstance only.
• Oracle ASM does not support the creation of external and global users.
The following example describes how to perform these SQL operations for the useridentified as new_user:
REM create a new user, then grant the SYSASM privilegeSQL> CREATE USER new_user IDENTIFIED by new_user_passwd;SQL> GRANT SYSASM TO new_user;
REM connect the user to the ASM instanceSQL> CONNECT new_user AS SYSASM;Enter password:
REM revoke the SYSASM privilege, then drop the userSQL> REVOKE SYSASM FROM new_user;SQL> DROP USER new_user;
When you revoke the last privilege of a user in an Oracle ASM password file, the useris not automatically deleted as is done in the Oracle Database password file. You mustrun DROP USER to delete a user with no privileges in an Oracle ASM password file.
For information about creating a user with Oracle ASM command-line utility(ASMCMD), see "orapwusr (page 10-16)".
See Also:
• Oracle Database SQL Language Reference for information about the CREATEUSER and GRANT commands
• Oracle Database Administrator's Guide for information about creating andmaintaining a password file
Operating System Authentication for Oracle ASMMembership in the operating system group designated as the OSASM group providesoperating system authentication for the SYSASM system privilege. OSASM isprovided exclusively for Oracle ASM. Initially, only the user that installs ASM is amember of the OSASM group, if you use a separate operating system group for thatprivilege. However, you can add other users. Members of the OSASM group areauthorized to connect using the SYSASM privilege and have full access to OracleASM, including administrative access to all disk groups that are managed by thatOracle ASM instance.
On Linux and UNIX systems, dba is the default operating system group designated asOSASM, OSOPER, and OSDBA for Oracle ASM.
On Windows systems, ORA_ASMADMIN, ORA_ASMDBA, and ORA_ASMOPER arethe operating system groups designated for OSASM, OSDBA and OSOPERrespectively for Oracle ASM.
Authentication for Accessing Oracle ASM Instances
Administering Oracle ASM Instances 3-51

SQL*Plus commands, ASMCMD commands, and ASMCA use operating systemauthentication.
See Also:
• Oracle Database Administrator's Guide for more information about usingoperating system authentication
• Oracle Grid Infrastructure Installation Guide for information aboutinstallation of the Oracle Grid Infrastructure
• Oracle Database Installation Guide for your specific operating system forinformation about default operating system groups
Password File Authentication for Oracle ASMPassword file authentication for Oracle ASM can work both locally and remotely. Toenable password file authentication, you must create a password file for Oracle ASM.
If you select the Oracle ASM storage option, then ASMCA creates a password file forOracle ASM with initial users (SYS and ASMSNMP) when ASMCA configures theOracle ASM disk groups. To add other users to the password file, you can use theCREATE USER and GRANT commands as described previously in the section titled"About Privileges for Oracle ASM (page 3-47)".
If you configure an Oracle ASM instance without using ASMCA, then you mustmanually create a password file and grant the SYSASM privilege to user SYS.
SQL*Plus commands use password file authentication.
See Also:
• Oracle Database Administrator's Guide for information about creating andmaintaining a password file
• Oracle Database SQL Language Reference for information about the CREATEUSER and GRANT commands
• Oracle Database Security Guide for information about database security
• Oracle Database Reference for information about the V$PWFILE_USERSview which lists users who have been granted SYSASM, SYSDBA, andSYSOPER privileges as derived from the password file.
Managing a Shared Password File in a Disk GroupYou can manage a shared password file on a disk group enabling access to the singlefile across the cluster system.
This sections contains these topics:
• About a Shared Password File in a Disk Group (page 3-53)
• Creating a Password File in a Disk Group (page 3-54)
Authentication for Accessing Oracle ASM Instances
3-52 Oracle Automatic Storage Management Administrator's Guide
• Backing Up and Restoring an Oracle ASM Password File in a Disk Group(page 3-54)
For information about ASMCMD commands to manage an Oracle ASM or databaseinstance password file in a disk group; such as pwcopy, pwcreate, and pwmove; referto "ASMCMD Instance Management Commands (page 10-11)".
See Also:
• Oracle Database Administrator's Guide for information about maintaining apassword file
• Oracle Database Reference for information about theREMOTE_LOGIN_PASSWORDFILE initialization parameter
• Oracle Real Application Clusters Administration and Deployment Guide forinformation about SRVCTL
About a Shared Password File in a Disk Group
An individual password file for Oracle Database or Oracle ASM can reside on adesignated Oracle ASM disk group. Having the password files reside on a singlelocation accessible across the cluster reduces maintenance costs and situations wherepasswords become out of sync.
You can use a password file located on a disk group for authentication only if theOracle ASM instance is running and the designated disk group is mounted.Otherwise, operating system authentication must be used to bootstrap the startup ofthe Oracle ASM instance and stack.
The COMPATIBLE.ASM disk group attribute must be set to at least 12.1 for the diskgroup where the password is to be located. The SYSASM privilege is required tomanage the Oracle ASM password file. The SYSDBA privilege on Oracle ASM isrequired to manage the database password file.
The shared password file in a disk group is managed by ASMCMD commands, theORAPWD tool, and SRVCTL commands. ORAPWD supports the creation of passwordfiles on an Oracle ASM disk group. All other password file manipulation is performedwith ASMCMD or SRVCTL commands.
Before running commands, such as ORAPWD, to create a password file, ensure that theORACLE_SID and ORACLE_HOME environmental variables have been set properly. Forexample, before setting the password file for Oracle ASM, set the ORACLE_SID andORACLE_HOME environmental variables to ensure that you can connect to the localOracle ASM instance. For information about environmental variables and connectingto an Oracle ASM instance, refer to "Connecting To and Starting Up an Oracle ASMInstance (page 3-22)".
SRVCTL provides commands to manage a password file in a disk group, such as thefollowing commands for updating and displaying the location of the password file:
$ srvctl modify asm -pwfile location$ srvctl modify database -db dbname -pwfile location$ srvctl config asm
Authentication for Accessing Oracle ASM Instances
Administering Oracle ASM Instances 3-53

Creating a Password File in a Disk Group
When using orapwd to create a database password file in a disk group, you mustspecify the disk group location and database unique name.
For example:
$ orapwd file='+data/ORCL/orapwdb' dbuniquename='orcl'
Enter password for SYS:
The asm switch specifies that orapwd create an Oracle ASM password file rather thana database password file.
For example:
$ orapwd file='+data/ASM/orapwasm' asm=y
Enter password for SYS:
You can create a new password file in a disk group using a password file from aprevious release.
For example:
$ orapwd input_file='/oraclegrid/dbs/orapwasm' file='+data/ASM/orapwasm' asm=y
Enter password for SYS:
Backing Up and Restoring an Oracle ASM Password File in a Disk Group
You can make a backup of the Oracle ASM password file, and if the Oracle ASMpassword file is lost or the disk group becomes inaccessible, then you can restore thebackup password file.
This section describes the steps to back up the Oracle ASM password file to a diskgroup and the steps to restore the Oracle ASM password file.
The source and target disk groups must have the disk group attributeCOMPATIBLE.ASM set to 12.1 or higher.
1. Locate the password file using the ASMCMD pwget command.
For example:
ASMCMD [+] > pwget --asm+DATA/orapwasm
2. Back up the password file to another disk group with the pwcopy command.
For example:
ASMCMD [+] > pwcopy +DATA/orapwasm +FRA/my_pwfile_backup
Using pwcopy without the --asm or --dbuniquename option does not changethe current location of the password file. If necessary after the copy is made, youcan set the current password file location with the pwset command.
3. Verify which password file is in the current location after making a backup withthe pwcopy command.
For example:
Authentication for Accessing Oracle ASM Instances
3-54 Oracle Automatic Storage Management Administrator's Guide
ASMCMD [+] > pwget --asm+DATA/orapwasm
4. Verify the backup password file was created.
For example:
ASMCMD [+] > ls +fra/my_pwfile_backupmy_pwfile_backup
5. To restore the Oracle ASM password file, you can use pwset or pwcopy.
To restore the Oracle ASM password file from the backup and use the existinglocation, use the pwset command with the --asm option.
For example:
ASMCMD [+] > pwset --asm +FRA/my_pwfile_backup
To restore the Oracle ASM password file from the backup to another disk group,use the pwcopy command with the --asm option.
For example:
ASMCMD [+] > pwcopy --asm +FRA/my_pwfile_backup +DATA2/my_orapwasm
The --asm option with the pwset and pwcopy command sets the passwordlocation for the Oracle ASM instance.
6. Verify the location of the current password file with the pwget command if youhave changed the location.
For example:
ASMCMD [+] > pwget --asm+DATA2/my_orapwasm
Migration of a Database to Use Oracle ASMWith a new installation of Oracle Database and Oracle ASM, you can initially createyour database and select the Oracle ASM storage option. If you have an existingOracle Database that stores database files in the operating system file system, then youcan migrate some or all of your data files to Oracle ASM storage.
Oracle provides several methods for migrating your database to Oracle ASM. UsingOracle ASM enables you to realize the benefits of automation and simplicity inmanaging your database storage. To migrate to Oracle ASM, you can use the methodsdescribed in the following sections:
• About Using Oracle Recovery Manager to Migrate Databases to Oracle ASM(page 3-56)
• Best Practices White Papers on Migrating to Oracle ASM (page 3-56)
Note:
You must upgrade to at least Oracle Database 10g before migrating yourdatabase to Oracle ASM.
Migration of a Database to Use Oracle ASM
Administering Oracle ASM Instances 3-55

About Using Oracle Recovery Manager to Migrate Databases to Oracle ASMYou can use Oracle Recovery Manager (RMAN) to manually migrate to Oracle ASM.You can also use RMAN to migrate a single tablespace or data file to Oracle ASM.
For more information, see Performing Oracle ASM Data Migration with RMAN(page 8-1).
Best Practices White Papers on Migrating to Oracle ASMThe Oracle Maximum Availability Architecture (MAA) website provides excellent bestpractices technical white papers based on different scenarios, such as:
• Minimal Downtime Migration to Oracle ASM
• Platform Migration using Transportable Tablespaces
• Platform Migration using Transportable Database
See Also:
For information about Oracle ASM best practices for migrating to Oracle ASMfrom environments that do not use Oracle ASM, refer to the documentation atthe MAA link on Oracle Technology Network:
http://www.oracle.com/technetwork/database/features/availability/maa-096107.html
Migration of a Database to Use Oracle ASM
3-56 Oracle Automatic Storage Management Administrator's Guide
4Administering Oracle ASM Disk Groups
This chapter describes how to administer Oracle Automatic Storage Management(Oracle ASM) disk groups. This information includes how to create, alter, drop,mount, and dismount Oracle ASM disk groups. The database instances that use OracleASM can continue operating while you administer disk groups.
The examples in this chapter use SQL statements. These examples assume thatSQL*Plus is run from the Oracle grid home where Oracle ASM is installed and theOracle environmental variables are set to this home. The examples also assume thatthe Oracle ASM instance is running. This chapter contains the following topics:
• Managing Disk Group Attributes (page 4-2)
• Creating Disk Groups (page 4-7)
• Altering Disk Groups (page 4-15)
• Oracle ASM Disk Discovery (page 4-25)
• Managing Capacity in Disk Groups (page 4-27)
• Oracle ASM Mirroring and Disk Group Redundancy (page 4-30)
• Performance and Scalability Considerations for Disk Groups (page 4-39)
• Disk Group Compatibility (page 4-41)
• Managing Oracle ASM File Access Control for Disk Groups (page 4-50)
• Maintaining Disk Groups (page 4-55)
For information about starting up an Oracle ASM instance, refer to "About Starting Upan Oracle ASM Instance (page 3-22)".
For information about administering Oracle ASM disk groups with Oracle ASMConfiguration Assistant (ASMCA), refer to Managing Oracle ASM With ASMCA(page 9-1).
For information about administering Oracle ASM disk groups with ASMCMD, refer to Managing Oracle ASM with ASMCMD (page 10-1).
See Also:
The Oracle Cloud Storage page on the Oracle Technology Network website at http://www.oracle.com/technetwork/database/cloud-storage/index.html for more information about Oracle ASM
Administering Oracle ASM Disk Groups 4-1

Managing Disk Group AttributesDisk group attributes are parameters that are bound to a disk group, rather than anOracle ASM instance. Some disk group attributes can be set when a disk group iscreated or altered. Other disk attributes can only be set when a disk group is created oronly be set when a disk group is altered.
This section contains the following topics:
• About Viewing and Setting Disk Group Attributes (page 4-2)
• Summary of Disk Group Attributes (page 4-2)
In addition to the disk group attributes listed in this section, template attributes arealso assigned to a disk group. For information about template attributes, see"Managing Disk Group Templates (page 5-19)".
About Viewing and Setting Disk Group AttributesYou can display disk group attributes with the V$ASM_ATTRIBUTE view and theASMCMD lsattr command. For an example of the use of the V$ASM_ATTRIBUTEview, see Example 6-1 (page 6-3). For information about the lsattr command, see"lsattr (page 10-53)".
Disk group attributes can be set with the ATTRIBUTE clause of the ALTER DISKGROUPor CREATE DISKGROUP SQL statement and the ASMCMD setattr and mkdgcommands. For information about the setattr and mkdg commands, see "setattr(page 10-67)" and "mkdg (page 10-61)".
You can also set disk group attributes with Oracle ASM Configuration Assistant(ASMCA). For information about managing disk groups with ASMCA, refer to"Managing Disk Groups with ASMCA (page 9-5)".
Summary of Disk Group AttributesThe Oracle ASM disk group attributes are listed in this section.
• ACCESS_CONTROL.ENABLED (page 4-3)
• ACCESS_CONTROL.UMASK (page 4-3)
• AU_SIZE (page 4-3)
• CELL.SMART_SCAN_CAPABLE (page 4-3)
• CELL.SPARSE_DG (page 4-3)
• COMPATIBLE.ASM (page 4-3)
• COMPATIBLE.RDBMS (page 4-4)
• COMPATIBLE.ADVM (page 4-4)
• CONTENT.CHECK (page 4-4)
• CONTENT.TYPE (page 4-4)
• DISK_REPAIR_TIME (page 4-5)
Managing Disk Group Attributes
4-2 Oracle Automatic Storage Management Administrator's Guide

• FAILGROUP_REPAIR_TIME (page 4-5)
• IDP.BOUNDARY and IDP.TYPE (page 4-5)
• PHYS_META_REPLICATED (page 4-6)
• SECTOR_SIZE (page 4-6)
• STORAGE.TYPE (page 4-6)
• THIN_PROVISIONED (page 4-7)
ACCESS_CONTROL.ENABLED
This attribute configures Oracle ASM File Access Control and can only be set whenaltering a disk group.
For information about the ACCESS_CONTROL.ENABLED attribute, see "Setting DiskGroup Attributes for Oracle ASM File Access Control (page 4-51)".
ACCESS_CONTROL.UMASK
This attribute configures Oracle ASM File Access Control and can only be set whenaltering a disk group.
For information about the ACCESS_CONTROL.UMASK attribute, see "Setting DiskGroup Attributes for Oracle ASM File Access Control (page 4-51)".
AU_SIZE
This attribute specifies allocation unit (AU) size and can only be set when creating adisk group. Example 4-1 (page 4-10) shows how the AU_SIZE is specified with theCREATE DISKGROUP SQL statement.
For information about allocation units, refer to "About Oracle ASM Allocation Units(page 1-7)".
CELL.SMART_SCAN_CAPABLE
This attribute is only applicable to the configuration of Oracle Exadata storage.
See Also:
Oracle Exadata documentation
CELL.SPARSE_DG
This attribute is only applicable to the configuration of Oracle Exadata storage.
See Also:
Oracle Exadata documentation
COMPATIBLE.ASM
This attribute specifies the Oracle ASM compatibility level of a disk group.Compatibility attributes can be set when the disk group is created and advanced whena disk group is altered, but compatibility attributes cannot be reversed. For
Managing Disk Group Attributes
Administering Oracle ASM Disk Groups 4-3

information about the COMPATIBLE.ASM attribute, see "COMPATIBLE.ASM(page 4-42)".
COMPATIBLE.RDBMS
This attribute specifies the database compatibility level of a disk group. Compatibilityattributes can be set when the disk group is created and advanced when a disk groupis altered, but compatibility attributes cannot be reversed. For information about theCOMPATIBLE.RDBMS attribute, see "COMPATIBLE.RDBMS (page 4-42)".
COMPATIBLE.ADVM
This attribute specifies the Oracle Automatic Storage Management Cluster File System(Oracle ACFS) and Oracle ASM Dynamic Volume Manager (Oracle ADVM)compatibility level of a disk group. Compatibility attributes can be set when the diskgroup is created and advanced when a disk group is altered, but compatibilityattributes cannot be reversed. For information about the COMPATIBLE.ADVM attribute,see "COMPATIBLE.ADVM (page 4-43)" and "Overview of Oracle ASM DynamicVolume Manager (page 11-39)".
CONTENT.CHECK
This attributes enables or disables content checking when performing data copyoperations for rebalancing a disk group. The attribute value can be set to true orfalse.
The content checking can include Hardware Assisted Resilient Data (HARD) checkson user data, validation of file types from the file directory against the block contentsand file directory information, and mirror side comparison.
When the attribute is set to true, logical content checking is enabled for all rebalanceoperations.
For information about disk group rebalancing, refer to "Manually Rebalancing DiskGroups (page 4-21)" and "Tuning Rebalance Operations (page 4-23)".
CONTENT.TYPE
This attribute identifies the disk group type: data, recovery, or system. The typevalue determines where Oracle ASM places the nearest neighbor disk in the failuregroup where Oracle ASM mirrors copies of the data. Oracle ASM uses this attributevalue to make it less likely that a double failure in the storage medium causes diskgroups of different content types to become unavailable. Specifying this attributeenables Oracle ASM to better deploy all disk groups in the available storage.
The default value is data which specifies a distance of 1 to the nearest neighbor disk.A value of recovery specifies a distance of 3 to the nearest neighbor disk and a valueof system specifies a distance of 5.
The attribute can be specified when creating or altering a disk group. IfCONTENT.TYPE attribute is set or changed using ALTER DISKGROUP, then the newconfiguration does not take effect until a disk group rebalance is explicitly run.
The CONTENT.TYPE attribute is only valid for disk groups that are set to normal orhigh redundancy. The COMPATIBLE.ASM attribute must be set to 11.2.0.3 or higherto enable the CONTENT.TYPE attribute for the disk group.
This attribute can be set with ASMCMD mkdg or SQL CREATE and ALTERDISKGROUP statements.
For example:
Managing Disk Group Attributes
4-4 Oracle Automatic Storage Management Administrator's Guide

SQL> CREATE DISKGROUP data NORMAL REDUNDANCY FAILGROUP controller1 DISK '/devices/diska1' NAME diska1,... ATTRIBUTE 'compatible.asm' = '12.1.0.1', 'content.type' = 'recovery',...
SQL> ALTER DISKGROUP data SET ATTRIBUTE 'content.type' = 'data';
This attribute is primarily intended for use with Oracle Exadata storage.
For information about disk resync, see "Oracle ASM Fast Mirror Resync (page 4-34)".
See Also:
• Oracle Exadata documentation
• My Oracle Support (https://support.oracle.com) for informationabout using the CONTENT.TYPE attribute with Oracle Exadata storage
DISK_REPAIR_TIME
This attribute specifies the time interval to repair a disk and bring it back online.before initiating the drop operation. This attribute can only be set when altering a diskgroup and is only applicable to normal and high redundancy disk groups.
For information about disk repair time, see "Oracle ASM Fast Mirror Resync(page 4-34)".
FAILGROUP_REPAIR_TIME
This attribute specifies a default repair time for the failure groups in the disk group.The failure group repair time is used if Oracle ASM determines that an entire failuregroup has failed. The default value is 24 hours (24h). If there is a repair time specifiedfor a disk, such as with the DROP AFTER clause of the SQL ALTER DISKGROUPOFFLINE DISK statement, that disk repair time overrides the failure group repairtime.
This attribute can only be set when altering a disk group and is only applicable tonormal and high redundancy disk groups.
For information about failure group repair time, see "Oracle ASM Fast Mirror Resync(page 4-34)".
IDP.BOUNDARY and IDP.TYPE
These attributes are used to configure Oracle Exadata storage.
See Also:
Oracle Exadata documentation
Managing Disk Group Attributes
Administering Oracle ASM Disk Groups 4-5

PHYS_META_REPLICATED
This disk group attribute tracks the replication status of a disk group. When the OracleASM compatibility of a disk group is advanced to 12.1 or higher, the physicalmetadata of each disk is replicated. This metadata includes the disk header, free spacetable blocks, and allocation table blocks. The replication is performed onlineasynchronously. This attribute value is set to true by Oracle ASM if the physicalmetadata of every disk in the disk group has been replicated.
This disk group attribute is only defined in a disk group with the Oracle ASM diskgroup compatibility (COMPATIBLE.ASM) set to 12.1 and higher. This attribute isread-only and is intended for information only. A user cannot set or change its value.The values are either true or false.
SECTOR_SIZE
This attribute specifies the sector size for disks in a disk group and can only be setwhen creating a disk group.
For information about the SECTOR_SIZE attribute, see "Specifying the Sector Size forDrives (page 4-11)".
STORAGE.TYPE
This disk group attribute specifies the type of the disks in the disk group. The possiblevalues are AXIOM, ZFSSA, and OTHER. If the attribute is set to AXIOM or ZFSSA, thenall disks in the disk group must be of that type. If the attribute is set to OTHER, thenany types of disks can be in the disk group.
If the STORAGE.TYPE disk group attribute is set to AXIOM or ZFSSA, thenfunctionality for Hybrid Columnar Compression (HCC) can be enabled for PillarAxiom or ZFS storage.
Note:
Pillar Axiom storage must be added as SCSI/Fiber Channel.
To set the STORAGE.TYPE attribute, the COMPATIBLE.ASM and COMPATIBLE.RDBMSdisk group attributes must be set to 11.2.0.3 or higher. For maximum support withZFS storage, set the COMPATIBLE.ASM and COMPATIBLE.RDBMS disk groupattributes to 11.2.0.4 or higher. For information about disk group compatibilityattributes, refer to "Disk Group Compatibility (page 4-41)".
The STORAGE.TYPE attribute can be set when creating a disk group or when alteringa disk group. The attribute cannot be set when clients are connected to the disk group.For example, the attribute cannot be set when an Oracle ADVM volume is enabled onthe disk group.
The attribute is not visible in the V$ASM_ATTRIBUTE view or with the ASMCMDlsattr command until the attribute has been set.
See Also:
Oracle Database Concepts for more information about Hybrid ColumnarCompression. Hybrid Columnar Compression is a feature of certain Oraclestorage systems.
Managing Disk Group Attributes
4-6 Oracle Automatic Storage Management Administrator's Guide
THIN_PROVISIONED
This attribute enables or disables the functionality to discard unused storage spaceafter a disk group rebalance is completed. The attribute value can be true or false.The default value is false.
Storage vendor products that support thin provisioning have the capability to reusethe discarded storage space for a more efficient overall physical storage utilization.
Note:
The THIN_PROVISIONED attribute is supported only in Oracle Database 12cRelease 1 with Oracle ASM Filter Driver (Oracle ASMFD).
For information about disk group rebalancing, refer to "Tuning Rebalance Operations(page 4-23)".
Creating Disk GroupsThis section contains information about creating disk groups. You can use the CREATEDISKGROUP SQL statement to create a disk group.
This section contains the following topics:
• Using the CREATE DISKGROUP SQL Statement (page 4-7)
• Creating Disk Groups for Data and Fast Recovery Area (page 4-9)
• Creating Disk Groups for a New Oracle Installation (page 4-10)
• Specifying the Sector Size for Drives (page 4-11)
• Storing Oracle Cluster Registry and Voting Files in Oracle ASM Disk Groups(page 4-13)
Using the CREATE DISKGROUP SQL StatementYou can use CREATE DISKGROUP SQL statement to create disk groups. Whencreating a disk group, you:
• Assign a unique name to the disk group.
The specified disk group name is not case sensitive and is always converted touppercase when stored internally.
Note:
Oracle does not recommend using identifiers for database object names thatmust be quoted. While these quoted identifiers may be valid as names in theSQL CREATE statement, such as CREATE DISKGROUP "1DATA", the namesmay not be valid when using other tools that manage the database object. Formore information about naming database objects, refer to Oracle Database SQLLanguage Reference.
• Specify the redundancy level of the disk group.
Creating Disk Groups
Administering Oracle ASM Disk Groups 4-7

For Oracle ASM to mirror files, specify the redundancy level as NORMALREDUNDANCY (2-way mirroring by default for most file types) or HIGHREDUNDANCY (3-way mirroring for all files). Specify EXTERNAL REDUNDANCY ifyou do not want mirroring by Oracle ASM. For example, you might chooseEXTERNAL REDUNDANCY to use storage array protection features.
After a disk group is created, you cannot alter the redundancy level of the diskgroup. To change the redundancy level, you must create another disk group withthe appropriate redundancy and then move the files to the new disk group.
Oracle recommends that you create failure groups of equal size to maintain spacebalance and even distribution of mirror data.
For more information about redundancy levels, refer to "Mirroring_ Redundancy_and Failure Group Options (page 4-30)".
• Specify the disks that are to be formatted as Oracle ASM disks belonging to thedisk group.
The disks can be specified using operating system dependent wildcard charactersin search strings that Oracle ASM then uses to find the disks. You can specifynames for the disks with the NAME clause or use the system-generated names.
• Optionally specify the disks as belonging to specific failure groups.
For information about failure groups, refer to "Understanding Oracle ASMConcepts (page 1-2)" and "Mirroring_ Redundancy_ and Failure Group Options(page 4-30)".
• Optionally specify the type of failure group.
For information about QUORUM and REGULAR failure groups, refer to "StoringOracle Cluster Registry and Voting Files in Oracle ASM Disk Groups(page 4-13)".
• Optionally specify disk group attributes, such as software compatibility orallocation unit size.
Oracle ASM programmatically determines the size of each disk. If for some reason thisis not possible, or to restrict the amount of space used on a disk, you can specify aSIZE clause for each disk. Oracle ASM creates operating system–independent namesfor the disks in a disk group that you can use to reference the disks in other SQLstatements. Optionally, you can provide your own name for a disk using the NAMEclause. Disk names are available in the V$ASM_DISK view.
Note:
A disk cannot belong to multiple disk groups.
The Oracle ASM instance ensures that any disk in a newly created disk group isaddressable and is not currently a member of another disk group. You must useFORCE only when adding a disk that was dropped with FORCE. If a disk is droppedwith NOFORCE, then you can add it with NOFORCE. For example, a disk might havefailed and was dropped from its disk group. After the disk is repaired, it is no longerpart of any disk group, but Oracle ASM still recognizes that the disk had been amember of a disk group. You must use the FORCE flag to include the disk in a newdisk group. In addition, the disk must be addressable, and the original disk groupmust not be mounted. Otherwise, the operation fails.
Creating Disk Groups
4-8 Oracle Automatic Storage Management Administrator's Guide

Note:
Use caution when using the FORCE option to add a previously used disk to adisk group; you might cause another disk group to become unusable.
The CREATE DISKGROUP statement mounts the disk group for the first time, andadds the disk group name to the ASM_DISKGROUPS initialization parameter if a serverparameter file is being used. If a text initialization parameter file is being used and youwant the disk group to be automatically mounted at instance startup, then you mustremember to add the disk group name to the ASM_DISKGROUPS initializationparameter before you shut down and restart the Oracle ASM instance. You can alsocreate disk groups with Oracle ASM Configuration Assistant (ASMCA). Refer to"Managing Disk Groups with ASMCA (page 9-5)".
See Also:
The CREATE DISKGROUP SQL statement in the Oracle Database SQL LanguageReference
Creating Disk Groups for Data and Fast Recovery AreaThis topic discusses how to create a disk group for data and a disk group for the fastrecovery area.
The SQL statement in Example 4-1 (page 4-10) creates a disk group named data withnormal redundancy consisting of two failure groups controller1 or controller2with four disks in each failure group. The data disk group is typically used to storedatabase data files.
The example assumes that the ASM_DISKSTRING initialization parameter is set to the'/devices/*' string. Oracle ASM disk discovery identifies diska1 through diska4and diskb1 through diskb4 in the /devices directory.
In Example 4-1 (page 4-10), the NAME clauses enable you to explicitly assign names tothe disks rather than the default system-generated names. The system-generatednames are in the form diskgroup_nnnn, where nnnn is the disk number for the diskin the disk group. For information about the disk name format when using OracleASM Filter Driver, refer to "Oracle ASM Filter Driver (page 3-34)".
When creating the disk group in Example 4-1 (page 4-10), the values of following disk group attributes were explicitly set:
• AU_SIZE
Specifies the size of the allocation unit for the disk group. For information aboutallocation units, see "About Oracle ASM Allocation Units (page 1-7)".
You can view the value of the AU_SIZE disk group attribute in theALLOCATION_UNIT_SIZE column of the V$ASM_DISKGROUP view.
• COMPATIBLE.ASM
Determines the minimum software version for any Oracle ASM instance that usesa disk group. For information about the COMPATIBLE.ASM attribute, see"COMPATIBLE.ASM (page 4-42)".
• COMPATIBLE.RDBMS
Creating Disk Groups
Administering Oracle ASM Disk Groups 4-9

Determines the minimum software version for any database instance that uses adisk group. For information about the COMPATIBLE.RDBMS attribute, see"COMPATIBLE.RDBMS (page 4-42)".
• COMPATIBLE.ADVM
Determines whether the disk group can contain Oracle ADVM volumes. Forinformation about the COMPATIBLE.ADVM attribute, see "COMPATIBLE.ADVM(page 4-43)".
In Example 4-2 (page 4-10), the fra disk group (typically created for the fast recoveryarea) is created with the default disk group attribute values. Names are not specifiedfor the Oracle ASM disks and failure groups are not explicitly specified. This exampleassumes that diskc1 through diskc9 are present in the /devices directory.
Example 4-1 Creating the DATA disk group
CREATE DISKGROUP data NORMAL REDUNDANCY FAILGROUP controller1 DISK '/devices/diska1' NAME diska1, '/devices/diska2' NAME diska2, '/devices/diska3' NAME diska3, '/devices/diska4' NAME diska4 FAILGROUP controller2 DISK '/devices/diskb1' NAME diskb1, '/devices/diskb2' NAME diskb2, '/devices/diskb3' NAME diskb3, '/devices/diskb4' NAME diskb4 ATTRIBUTE 'au_size'='4M', 'compatible.asm' = '11.2', 'compatible.rdbms' = '11.2', 'compatible.advm' = '11.2';
Example 4-2 Creating the FRA disk group
CREATE DISKGROUP fra NORMAL REDUNDANCY DISK '/devices/diskc*';
Creating Disk Groups for a New Oracle InstallationThis section describes the basic procedure to follow when creating disk groups duringa new installation of Oracle Restart and Oracle Database. This information also appliesto an Oracle Grid Infrastructure installation.
The procedure assumes that the data disk group is used for the storage of thedatabase data files and the fra disk group is used for storage of the fast recovery areafiles. Detailed information about installation with Oracle Universal Installer (OUI) anddatabase creation with Database Configuration Assistant (DBCA) is available in theinstallation guides for your specific operating system.
1. Install Oracle Restart with OUI, following the screen prompts.
During the installation, create the data disk group for storing database files suchas the data and control files.
This OUI process is similar to creating a disk group with Oracle ASMConfiguration Assistant (ASMCA). For information about using ASMCA to createdisk groups, see "Managing Disk Groups with ASMCA (page 9-5)".
The data disk group is the disk group used for storing Oracle Cluster Registry(OCR) and voting files in an Oracle Grid Infrastructure installation. See "Storing
Creating Disk Groups
4-10 Oracle Automatic Storage Management Administrator's Guide

Oracle Cluster Registry and Voting Files in Oracle ASM Disk Groups(page 4-13)"
2. After Oracle Restart is installed, use ASMCA to create the fra disk group forstoring the fast recovery area files.
Create the fra disk group to hold the fast recovery area files.
At this time, you can also update the data disk group if necessary. Forinformation about using ASMCA to create or alter disk groups, see "ManagingDisk Groups with ASMCA (page 9-5)".
You can also create the fra disk group with SQL*Plus or ASMCMD commandsrun from the Oracle Restart home. For information, see "Using the CREATEDISKGROUP SQL Statement (page 4-7)" and "mkdg (page 10-61)".
See Also:
• Oracle Database Backup and Recovery User's Guide for information aboutconfiguring the fast recovery area
• Oracle Database Administrator's Guide for information about specifying afast recovery area
3. Install the Oracle Database software with OUI, following the screen prompts.
4. After the database software has been installed, run DBCA to create a database,following the screen prompts.
During the creation of the database, make the appropriate selections to use OracleASM for storage of data files and fast recovery area files. When prompted:
• Store database data files in the data disk group
• Store fast recovery area files in the fra disk group
See Also:
• Oracle Grid Infrastructure Installation Guide for your operating system fordetailed information about installation of Oracle Grid Infrastructure andOracle Restart
• Oracle Database Installation Guide for your operating system for detailedinformation about installation of an Oracle Database
Specifying the Sector Size for DrivesYou can use the optional SECTOR_SIZE disk group attribute with the CREATEDISKGROUP SQL statement to specify disks with the sector size set to the value ofSECTOR_SIZE for the disk group. Oracle ASM provides support for 4 KB sector diskdrives without negatively affecting performance. The SECTOR_SIZE disk groupattribute can be set only during disk group creation.
The values for SECTOR_SIZE can be set to 512, 4096, or 4K if the disks support thosevalues. The default value is platform dependent. The COMPATIBLE.ASM and
Creating Disk Groups
Administering Oracle ASM Disk Groups 4-11

COMPATIBLE.RDBMS disk group attributes must be set to 11.2 or higher to set thesector size to a value other than the default value.
Note:
Oracle Automatic Storage Management Cluster File System (Oracle ACFS)does not support 4 KB sector drives. There is a performance penalty for OracleACFS when using 4 KB sector disk drives in 512 sector emulation mode.
The following validations apply to the sector size disk group attribute.
• Oracle ASM prevents disks of different sector sizes from being added to the samedisk group. This validation occurs during CREATE DISKGROUP, ALTERDISKGROUP ADD DISK, and ALTER DISKGROUP MOUNT operations.
• If the SECTOR_SIZE attribute is explicitly specified when creating a disk group,then Oracle ASM attempts to verify that all disks discovered through disk searchstrings have a sector size equal to the specified value. If one or more disks werefound to have a sector size different from the specified value, or if Oracle ASMwas not able to verify a disk sector size, then the create operation fails.
Oracle ASM also attempts to verify disk sector size during the mount operationand the operation fails if one or more disks have a sector size different than thevalue of the SECTOR_SIZE attribute.
• If the SECTOR_SIZE attribute is not specified when creating a disk group andOracle ASM can verify that all discovered disks have the same sector value, thenthat value is assumed for the disk group sector size that is created. If the diskshave different sector sizes, the create operation fails.
• When new disks are added to an existing disk group using the ALTERDISKGROUP .. ADD DISK SQL statement, you must ensure that the new disks to beadded have the same value as the SECTOR_SIZE disk group attribute. If the newdisks have different sector sizes, the alter operation fails.
• You can determine the sector size value that has either been assumed or explicitlyset for a successful disk group creation by querying the V$ASM_ATTRIBUTE viewor run the ASMCMD lsattr command. You can also query the SECTOR_SIZEcolumn in the V$ASM_DISKGROUP view.
SQL> SELECT name, value FROM V$ASM_ATTRIBUTE WHERE name = 'sector_size' AND group_number = 1;NAME VALUE--------------------------- -----------------------sector_size 512
SQL> SELECT group_number, sector_size FROM V$ASM_DISKGROUP WHERE group_number = 1;
GROUP_NUMBER SECTOR_SIZE------------ ----------- 1 512
• Not all disks support all of the possible SECTOR_SIZE values. The sector sizeattribute setting must be compatible with the physical hardware.
Creating Disk Groups
4-12 Oracle Automatic Storage Management Administrator's Guide
As shown in Example 4-3 (page 4-13), you can use the SECTOR_SIZE attribute withthe CREATE DISKGROUP SQL statement to specify the sector size of the disk drive onwhich the Oracle ASM disk group is located.
See Also:
• Oracle Database SQL Language Reference for information about the diskgroup attributes and the CREATE DISKGROUP SQL statement
• Oracle Database SQL Language Reference for information about theBLOCKSIZE keyword
• Oracle Database Reference for details about the V$ASM_ATTRIBUTE and V$ASM_DISKGROUP views
Example 4-3 Creating a disk group of 4K sector size
CREATE DISKGROUP data NORMAL REDUNDANCYFAILGROUP controller1 DISK'/devices/diska1','/devices/diska2','/devices/diska3','/devices/diska4'FAILGROUP controller2 DISK'/devices/diskb1','/devices/diskb2','/devices/diskb3','/devices/diskb4'ATTRIBUTE 'compatible.asm' = '11.2', 'compatible.rdbms' = '11.2', 'sector_size'='4096';
Storing Oracle Cluster Registry and Voting Files in Oracle ASM Disk GroupsYou can store Oracle Cluster Registry (OCR) and voting files in Oracle ASM diskgroups. You can also store a backup of the OCR file in a disk group. Voting files andOCR are two important components of Oracle Clusterware. Voting files manageinformation about node membership. OCR manages cluster and Oracle RealApplication Clusters (Oracle RAC) database configuration information.
A quorum failure group is a special type of failure group that does not contain userdata. Quorum failure groups are used for storing Oracle ASM metadata. A quorumfailure group may also contain voting files if those files are stored in a disk group thatcontains a quorum failure group. Additionally, Oracle ASM uses a quorum failuregroup to help determine if the disk group can be mounted in the event of the loss ofone or more failure groups.
Because disks in quorum failure groups do not contain user data, a quorum failuregroup is not considered when determining redundancy requirements in respect tostoring user data. For information about failure groups, see "Oracle ASM FailureGroups (page 4-31)".
You can manage and monitor OCR and voting files with CRSCTL and ocrconfigcommand-line tools, CREATE and ALTER DISKGROUP SQL statements, and V$ASMviews.
Creating Disk Groups
Administering Oracle ASM Disk Groups 4-13

The CRSCTL and ocrconfig commands enable the placement of OCR storage andCluster Synchronization Services (CSS) voting files inside the disk groups managed byOracle ASM.
The QUORUM and REGULAR keywords in CREATE and ALTER DISKGROUP SQLstatements enable the specification of an additional qualifier for failure groups or diskswhen creating or altering a disk group. Note that QUORUM disks (or disks in QUORUMfailure groups) cannot contain user data, while REGULAR disks (or disks in non-quorum failure groups) do not have this restriction.
You can use these keywords before the keyword FAILGROUP if a failure group isbeing explicitly specified. If the failure group is implicitly implied, you can use thesekeywords (QUORUM/REGULAR) before the keyword DISK. When failure groups areexplicitly specified, it is an error to specify these keywords (QUORUM/REGULAR)immediately before the keyword DISK. REGULAR is the default failure group type.
When performing operations on existing disks or failure groups, the qualifier specifiedin the SQL must match the qualifier that was specified when the disks or failuregroups were added to the disk group.
Example 4-4 (page 4-15) shows the creation of a disk group with a QUORUM failuregroup. For Oracle Clusterware files a minimum of three disk devices or three failuregroups is required with a normal redundancy disk group. A QUORUM failure group isnot considered when determining redundancy requirements in respect to storing userdata. The COMPATIBLE.ASM disk group compatibility attribute must be set to 11.2 orgreater to store OCR or voting files in a disk group.
The FAILGROUP_TYPE column in the V$ASM_DISK or V$ASM_DISK_STAT viewsspecifies the failure group type. The value for this column is REGULAR for regularfailure groups and QUORUM for quorum failure groups.
The VOTING_FILE column in the V$ASM_DISK or V$ASM_DISK_STAT viewsspecifies whether a disk contains a voting file. The value for this column is either Y ifthe disk contains a voting file or N if not.
The value of USABLE_FILE_MB in V$ASM_DISKGROUP or V$ASM_DISKGROUP_STATdoes not consider any free space that is present in QUORUM disks because that space isnot available for client data files.
For information about V$ASM views, refer to "Views Containing Oracle ASM DiskGroup Information (page 6-1)".
See Also:
• Oracle Grid Infrastructure Installation Guide for information aboutconfiguring voting files and Oracle Cluster Registry (OCR)
• Oracle Clusterware Administration and Deployment Guide for informationabout managing Oracle Cluster Registry and voting files
• Oracle Database SQL Language Reference for information about the CREATEDISKGROUP and ALTER DISKGROUP SQL statements
• Oracle Database Reference for details about the V$ASM* dynamicperformance views
Creating Disk Groups
4-14 Oracle Automatic Storage Management Administrator's Guide

Example 4-4 Using the QUORUM keyword when creating a failure group
CREATE DISKGROUP ocr_data NORMAL REDUNDANCY FAILGROUP fg1 DISK '/devices/diskg1' FAILGROUP fg2 DISK '/devices/diskg2' QUORUM FAILGROUP fg3 DISK '/devices/diskg3' ATTRIBUTE 'compatible.asm' = '12.1.0.0.0';
Altering Disk GroupsYou can use the ALTER DISKGROUP SQL statement to alter a disk group configuration.You can add, resize, or drop disks while the database remains online. Wheneverpossible, multiple operations in a single ALTER DISKGROUP statement arerecommended. Grouping operations in a single ALTER DISKGROUP statement canreduce rebalancing operations.
Oracle ASM automatically rebalances when the configuration of a disk group changes.By default, the ALTER DISKGROUP statement does not wait until the operation iscomplete before returning. Query the V$ASM_OPERATION view to monitor the statusof this operation.
Use the REBALANCE WAIT clause to cause the ALTER DISKGROUP statementprocessing to wait until the rebalance operation is complete before returning. This isespecially useful in scripts. The statement also accepts a REBALANCE NOWAIT clausethat invokes the default behavior of conducting the rebalance operationasynchronously in the background.
You can interrupt a rebalance running in wait mode by typing CTRL+C on mostplatforms. This causes the statement to return immediately with the messageORA-01013: user requested cancel of current operation, and then tocontinue the operation asynchronously. Typing CTRL+C does not cancel the rebalanceoperation or any disk add, drop, or resize operations.
To control the speed and resource consumption of the rebalance operation, you caninclude the REBALANCE POWER clause in statements that add, drop, or resize disks.Refer to "Manually Rebalancing Disk Groups (page 4-21)" for more information aboutthis clause.
This section contains the following topics:
• Managing Oracle ADVM Volumes in a Disk Group (page 4-16)
• Adding Disks to a Disk Group (page 4-17)
• Using the ALTER DISKGROUP SQL Statement to Add Disks to a Disk Group(page 4-17)
• Replacing Disks in Disk Groups (page 4-18)
• Renaming Disks in Disk Groups (page 4-18)
• Dropping Disks from Disk Groups (page 4-19)
• Intelligent Data Placement (page 4-20)
• Resizing Disks in Disk Groups (page 4-21)
• Undropping Disks in Disk Groups (page 4-21)
• Manually Rebalancing Disk Groups (page 4-21)
Altering Disk Groups
Administering Oracle ASM Disk Groups 4-15

• Tuning Rebalance Operations (page 4-23)
• Scrubbing Disk Groups (page 4-24)
See Also:
The ALTER DISKGROUP SQL statement in the Oracle Database SQL LanguageReference
Managing Oracle ADVM Volumes in a Disk GroupYou can create an Oracle ASM Dynamic Volume Manager (Oracle ADVM) volume ina disk group. The volume device associated with the dynamic volume can then beused to host an Oracle ACFS file system.
The compatibility parameters COMPATIBLE.ASM and COMPATIBLE.ADVM must be setto 11.2 or higher for the disk group. See "Disk Group Compatibility Attributes(page 4-42)".
The ALTER DISKGROUP VOLUME SQL statements enable you to manage Oracle ADVMvolumes, including the functionality to add, modify, resize, disable, enable, and dropvolumes. The following are examples of the ALTER DISKGROUP VOLUME statement.
If the volume is hosting an Oracle ACFS file system, then you cannot resize thatvolume with the SQL ALTER DISKGROUP statement. Instead you must use theacfsutil size command. For information, see "acfsutil size (page 16-132)".
For information about Oracle ADVM, see "Overview of Oracle ASM Dynamic VolumeManager (page 11-39)". For information about managing Oracle ADVM volumes withASMCMD, see Managing Oracle ADVM with ASMCMD (page 15-1). For informationabout managing Oracle ADVM volumes with ASMCA, see "ASMCA GUI Tool forManaging Oracle ACFS and Oracle ADVM (page 14-1)".
See Also:
The ALTER DISKGROUP SQL statement in the Oracle Database SQL LanguageReference
Example 4-5 Managing volumes with ALTER DISKGROUP VOLUME statements
SQL> ALTER DISKGROUP data ADD VOLUME volume1 SIZE 10G;Diskgroup altered.
SQL> ALTER DISKGROUP data RESIZE VOLUME volume1 SIZE 15G;Diskgroup altered.
SQL> ALTER DISKGROUP data DISABLE VOLUME volume1;Diskgroup altered.
SQL> ALTER DISKGROUP data ENABLE VOLUME volume1;Diskgroup altered.
SQL> ALTER DISKGROUP ALL DISABLE VOLUME ALL;Diskgroup altered.
SQL> ALTER DISKGROUP data DROP VOLUME volume1;Diskgroup altered.
Altering Disk Groups
4-16 Oracle Automatic Storage Management Administrator's Guide
Adding Disks to a Disk GroupYou can use the ADD clause of the ALTER DISKGROUP statement to add a disk or afailure group to a disk group. You can use the same syntax with the ALTERDISKGROUP statement that you use to add a disk or failure group with the CREATEDISKGROUP statement. For an example of the CREATE DISKGROUP SQL statement,refer to Example 4-1 (page 4-10). After you add new disks, the new disks graduallybegin to accommodate their share of the workload as rebalancing progresses.
Using SQL statements to add disks to a disk group is illustrated in "Using the ALTERDISKGROUP SQL Statement to Add Disks to a Disk Group (page 4-17)". You can alsoadd disks to a disk group with ASMCA. Refer to "Managing Disk Groups withASMCA (page 9-5)".
Using the ALTER DISKGROUP SQL Statement to Add Disks to a Disk GroupThe SQL statements presented in the following example demonstrate the interactionsof disk discovery with the ADD DISK operation.
Assume that disk discovery identifies the following disks in directory /devices:
/devices/diska1 -- member of data1/devices/diska2 -- member of data1/devices/diska3 -- member of data1/devices/diska4 -- member of data1/devices/diska5 -- candidate disk/devices/diska6 -- candidate disk/devices/diska7 -- candidate disk/devices/diska8 -- candidate disk
/devices/diskb1 -- member of data1/devices/diskb2 -- member of data1/devices/diskb3 -- member of data1/devices/diskb4 -- member of data2
/devices/diskc1 -- member of data2/devices/diskc2 -- member of data2/devices/diskc3 -- member of data3/devices/diskc4 -- candidate disk
/devices/diskd1 -- candidate disk/devices/diskd2 -- candidate disk/devices/diskd3 -- candidate disk/devices/diskd4 -- candidate disk/devices/diskd5 -- candidate disk/devices/diskd6 -- candidate disk/devices/diskd7 -- candidate disk/devices/diskd8 -- candidate disk
You can query the V$ASM_DISK view to display the status of Oracle ASM disks. See"Views Containing Oracle ASM Disk Group Information (page 6-1)".
The following statement would fail because /devices/diska1 through /devices/diska4 currently belong to the disk group data1.
ALTER DISKGROUP data1 ADD DISK '/devices/diska*';
The following statement successfully adds disks /devices/diska5 through /devices/diska8 to data1. Because no FAILGROUP clauses are included in the
Altering Disk Groups
Administering Oracle ASM Disk Groups 4-17
ALTER DISKGROUP statement, each disk is assigned to its own failure group. TheNAME clauses assign names to the disks, otherwise they would have been assignedsystem-generated names.
ALTER DISKGROUP data1 ADD DISK '/devices/diska5' NAME diska5, '/devices/diska6' NAME diska6, '/devices/diska7' NAME diska7, '/devices/diska8' NAME diska8;
The following statement would fail because the search string matches disks that arecontained in other disk groups. Specifically, /devices/diska4 belongs to diskgroup data1 and /devices/diskb4 belongs to disk group data2.
ALTER DISKGROUP data1 ADD DISK '/devices/disk*4';
The following statement would successfully add /devices/diskd1 through /devices/diskd8 to disk group data1. This statement runs with a rebalance powerof 5, and does not return until the rebalance operation is complete.
ALTER DISKGROUP data1 ADD DISK '/devices/diskd*' REBALANCE POWER 5 WAIT;
If /devices/diskc3 was previously a member of a disk group that no longer exists,then you could use the FORCE option to add the disk as a member of another diskgroup. For example, the following use of the FORCE clause enables /devices/diskc3 to be added to data2, even though it is a current member of data3. For thisstatement to succeed, data3 cannot be mounted.
ALTER DISKGROUP data2 ADD DISK '/devices/diskc3' FORCE;
Replacing Disks in Disk GroupsA disk or multiple disks in a disk group can be replaced, rather than dropped andadded back. The single replace operation is more efficient than dropping and addingdisks. This operation is especially useful when disks are missing or damaged.
For example, you can issue the following statement to replace the diskc7 disk withanother disk identified by the /devices/diskc18 path.
SQL> ALTER DISKGROUP data2 REPLACE DISK diskc7 WITH '/devices/diskc18' POWER 3;
The power option operates the same as the power option for the ALTER DISKGROUPREBALANCE statement, except that the power option cannot be set to 0. Forinformation about the power option in rebalancing a disk group, refer to "ManuallyRebalancing Disk Groups (page 4-21)". For information about theASM_POWER_LIMIT initialization parameter, refer to "ASM_POWER_LIMIT(page 3-10)".
The ALTER DISKGROUP SQL statement with the REPLACE clause includes a WAIT orNOWAIT option, plus the FORCE option.
Renaming Disks in Disk GroupsYou can rename a disk in a disk group with the ALTER DISKGROUP RENAME DISKSQL statement. In one SQL statement, you can rename one or multiple disks, orrename all disks in a disk group using the RENAME DISKS ALL clause.
Altering Disk Groups
4-18 Oracle Automatic Storage Management Administrator's Guide
For example, you can rename disks as follows:
SQL> ALTER DISKGROUP fra2 MOUNT RESTRICTED;
SQL> ALTER DISKGROUP fra2 RENAME DISK 'FRA1_0001' TO 'FRA2_0001', 'FRA1_0002' TO 'FRA2_0002';
The ALTER DISKGROUP diskgroupname RENAME DISKS ALL statement can be runafter the renamedg utility to change the names of the disks in the renamed diskgroup. For information about renamedg, refer to "Renaming Disks Groups(page 4-58)".
When you run the ALTER DISKGROUP diskgroupname RENAME DISKS ALLstatement, any disk name that is not in the format diskgroupname_number isrenamed to that format. Disk names that are already in the diskgroupname_numberformat are not changed.
You can only use the RENAME DISK operation when the disk group that contains thedisk is in the MOUNT RESTRICTED state. If any disks in the disk group are offline, thenthe RENAME operation fails. If the new disk name exists, then the RENAME operationfails. You must have SYSASM privileges to rename a disk.
Dropping Disks from Disk GroupsTo drop disks from a disk group, use the DROP DISK clause of the ALTER DISKGROUPstatement. You can also drop all of the disks in specified failure groups using the DROPDISKS IN FAILGROUP clause.
When a disk is dropped, the disk group is rebalanced by moving all of the file extentsfrom the dropped disk to other disks in the disk group. A drop disk operation mightfail if not enough space is available on the other disks. The best approach is to performboth the add and drop operation with the same ALTER DISKGROUP statement. Thishas the benefit of rebalancing data extents only one time and ensuring that there isenough space for the rebalance operation to succeed.
Caution:
The ALTER DISKGROUP...DROP DISK SQL statement returns to SQL promptbefore the drop and rebalance operations are complete. Do not reuse, remove,or disconnect the dropped disk until the HEADER_STATUS column for thisdisk in the V$ASM_DISK view changes to FORMER. You can query the V$ASM_OPERATION view to determine the amount of time remaining for thedrop/rebalance operation to complete. For more information, refer to the Oracle Database SQL Language Reference and the Oracle Database Reference.
If you specify the FORCE clause for the drop operation, the disk is dropped even ifOracle ASM cannot read or write to the disk. You cannot use the FORCE flag whendropping a disk from an external redundancy disk group.
Caution:
A DROP FORCE operation leaves data at reduced redundancy until thesubsequent rebalance operation completes. This increases your exposure todata loss if there is a subsequent disk failure during rebalancing. Use DROPFORCE with caution.
Altering Disk Groups
Administering Oracle ASM Disk Groups 4-19

You can also drop disks from a disk group with ASMCA. Refer to "Managing DiskGroups with ASMCA (page 9-5)".
The statements in Example 4-6 (page 4-20) demonstrate how to drop disks from thedisk group data1 described in "Using the ALTER DISKGROUP SQL Statement toAdd Disks to a Disk Group (page 4-17)". The first example drops diska5 from diskgroup data1. The second example drops diska5 from disk group data1, and alsoillustrates how multiple actions are possible with one ALTER DISKGROUP statement.
Example 4-6 Dropping disks from disk groups
ALTER DISKGROUP data1 DROP DISK diska5;
ALTER DISKGROUP data1 DROP DISK diska5 ADD FAILGROUP failgrp1 DISK '/devices/diska9' NAME diska9;
Intelligent Data PlacementIntelligent Data Placement enables you to specify disk regions on Oracle ASM disksfor best performance. Using the disk region settings, you can ensure that frequentlyaccessed data is placed on the outermost (hot) tracks which have greater speed andhigher bandwidth. In addition, files with similar access patterns are located physicallyclose, reducing latency. Intelligent Data Placement also enables the placement ofprimary and mirror extents into different hot or cold regions.
Intelligent Data Placement settings can be specified for a file or in disk grouptemplates. The disk region settings can be modified after the disk group has beencreated. The disk region setting can improve I/O performance by placing morefrequently accessed data in regions furthest from the spindle, while reducing your costby increasing the usable space on a disk.
Intelligent Data Placement works best for the following:
• Databases with data files that are accessed at different rates. A database thataccesses all data files in the same way is unlikely to benefit from Intelligent DataPlacement.
• Disk groups that are more than 25% full. If the disk group is only 25% full, themanagement overhead is unlikely to be worth any benefit.
• Disks that have better performance at the beginning of the media relative to theend. Because Intelligent Data Placement leverages the geometry of the disk, it iswell suited to JBOD (just a bunch of disks). In contrast, a storage array with LUNscomposed of concatenated volumes masks the geometry from Oracle ASM.
The COMPATIBLE.ASM and COMPATIBLE.RDBMS disk group attributes must be set to11.2 or higher to use Intelligent Data Placement.
Intelligent Data Placement can be managed with the ALTER DISKGROUP ADD orMODIFY TEMPLATE SQL statements and the ALTER DISKGROUP MODIFY FILE SQLstatement.
• The ALTER DISKGROUP TEMPLATE SQL statement includes a disk region clausefor setting hot/mirrorhot or cold/mirrorcold regions in a template:
ALTER DISKGROUP data ADD TEMPLATE datafile_hot ATTRIBUTE ( HOT MIRRORHOT);
Altering Disk Groups
4-20 Oracle Automatic Storage Management Administrator's Guide

• The ALTER DISKGROUP MODIFY FILE SQL statement that sets disk regionattributes for hot/mirrorhot or cold/mirrorcold regions:
ALTER DISKGROUP data MODIFY FILE '+data/orcl/datafile/users.259.679156903' ATTRIBUTE ( HOT MIRRORHOT);
When you modify the disk region settings for a file, this action applies to newextensions of the file, but existing file contents are not affected until a rebalanceoperation. To apply the new Intelligent Data Placement policy for existing filecontents, you can manually initiate a rebalance. A rebalance operation uses thelast specified policy for the file extents. For information on the rebalanceoperation, see "Manually Rebalancing Disk Groups (page 4-21)".
Oracle ASM Configuration Assistant (ASMCA) supports Intelligent Data Placementwith template creation during disk group alterations. See "Managing Disk Groupswith ASMCA (page 9-5)".
To display information about Intelligent Data Placement regions, see "Viewing DiskRegion Information (page 6-5)" and "iostat (page 10-51)".
Resizing Disks in Disk GroupsThe RESIZE clause of ALTER DISKGROUP enables you to resize disks in a disk group.All disks in the disk group must be of equal size.
If you do not specify a new size in the SIZE clause, then Oracle ASM uses the size ofthe disks as returned by the operating system. The new size is written to the OracleASM disk header and if the size is increasing, then the new space is immediatelyavailable for allocation. If the size is decreasing, rebalancing must relocate file extentsbeyond the new size limit to available space below the limit. If the rebalance operationcan successfully relocate all extents, then the new size is made permanent, otherwisethe rebalance fails.
The following example resizes all of the disks in the disk group data1. If the new sizeis greater than the capacity of a disk, then the statement fails.
Example 4-7 Resizing disks in disk groups
ALTER DISKGROUP data1 RESIZE ALL SIZE 100G;
Undropping Disks in Disk GroupsThe UNDROP DISKS clause of the ALTER DISKGROUP statement enables you to cancelall pending drops of disks within disk groups. If a drop disk operation has completed,then this statement cannot be used to restore it. This statement cannot be used torestore disks that are being dropped as the result of a DROP DISKGROUP statement, orfor disks that are being dropped using the FORCE clause.
The following example cancels the dropping of disks from disk group data1:
Example 4-8 Undropping disks in disk groups
ALTER DISKGROUP data1 UNDROP DISKS;
Manually Rebalancing Disk GroupsYou can manually rebalance the files in a disk group using the REBALANCE clause ofthe ALTER DISKGROUP statement. This would normally not be required, becauseOracle ASM automatically rebalances disk groups when their configuration changes.
Altering Disk Groups
Administering Oracle ASM Disk Groups 4-21
You might want to do a manual rebalance operation to control the speed of whatwould otherwise be an automatic rebalance operation.
The POWER clause of the ALTER DISKGROUP REBALANCE statement specifies thedegree of parallelism, and thus the speed of the rebalance operation. It can be set to aminimum value of 0 which halts a rebalancing operation until the statement is eitherimplicitly or explicitly rerun. A higher value increases the speed of the rebalanceoperation.
The default rebalance power is set by the ASM_POWER_LIMIT initialization parameter.The range of values for the POWER clause is the same for the ASM_POWER_LIMITinitialization parameter. For information about the ASM_POWER_LIMIT initializationparameter, refer to "ASM_POWER_LIMIT (page 3-10)".
The power level of an ongoing rebalance operation can be changed by entering therebalance statement with a new level.
The ALTER DISKGROUP...REBALANCE command by default returns immediately sothat you can run other commands while the rebalance operation takes placeasynchronously in the background. You can query the V$ASM_OPERATION view forthe status of the rebalance operation.
To cause the ALTER DISKGROUP...REBALANCE command to wait until therebalance operation is complete before returning, add the WAIT keyword to theREBALANCE clause. The wait functionality is especially useful in scripts. The commandalso accepts a NOWAIT keyword, which invokes the default behavior of conducting therebalance operation asynchronously. You can interrupt a rebalance running in waitmode by typing CTRL+C on most platforms. This causes the command to returnimmediately with the message ORA-01013: user requested cancel ofcurrent operation, and then continue the rebalance operation asynchronously.
Additional rules for the rebalance operation include the following:
• An ongoing rebalance command is restarted if the storage configuration changeseither when you alter the configuration, or if the configuration changes due to afailure or an outage. Furthermore, if the new rebalance fails because of a usererror, then a manual rebalance may be required.
• The ALTER DISKGROUP...REBALANCE statement runs on a single node even ifyou are using Oracle Real Application Clusters (Oracle RAC).
• Oracle ASM can perform one disk group rebalance at a time on a given instance. Ifyou have initiated multiple rebalances on different disk groups on a single node,then Oracle processes these operations in parallel on additional nodes if available;otherwise the rebalances are performed serially on the single node. You canexplicitly initiate rebalances on different disk groups on different nodes inparallel.
• Rebalancing continues across a failure of the Oracle ASM instance performing therebalance.
• The REBALANCE clause (with its associated POWER and WAIT/NOWAIT keywords)can also be used in ALTER DISKGROUP commands that add, drop, or resize disks.
Altering Disk Groups
4-22 Oracle Automatic Storage Management Administrator's Guide

Note:
Oracle restarts the processing of an ongoing rebalance operation if the storageconfiguration changes. If the next rebalance operation fails because of a usererror, then a manual rebalance may be required.
The following example manually rebalances the disk group data2. The commanddoes not return until the rebalance operation is complete.
For more information about rebalancing operations, refer to "Tuning RebalanceOperations (page 4-23)".
Example 4-9 Manually rebalancing a disk group
ALTER DISKGROUP data2 REBALANCE POWER 5 WAIT;
Tuning Rebalance OperationsIf the POWER clause is not specified in an ALTER DISKGROUP statement, or whenrebalance is implicitly run by adding or dropping a disk, then the rebalance powerdefaults to the value of the ASM_POWER_LIMIT initialization parameter. You canadjust the value of this parameter dynamically. The range of values for the POWERclause is the same for the ASM_POWER_LIMIT initialization parameter. Forinformation about the ASM_POWER_LIMIT initialization parameter, refer to"ASM_POWER_LIMIT (page 3-10)".
The higher the power limit, the more quickly a rebalance operation can complete.Rebalancing takes longer with lower power values, but consumes fewer processingand I/O resources which are shared by other applications, such as the database.
Oracle ASM tries to keep a rebalance I/O for each unit of power. Each I/O requiresPGA memory for the extent involved in the relocation.
The default value of 1 minimizes disruption to other applications. The appropriatevalue is dependent on your hardware configuration, performance requirements, andavailability requirements. Oracle ASM always adjusts the power to fit availablememory.
When the COMPATIBLE.ASM disk group is set to 11.2.0.2 or higher, the rebalanceoperation may be run as one process using asynchronous I/O. You can check theOracle ASM alert log for details on the rebalance process.
If a rebalance is in progress because a disk is manually or automatically dropped, thenincreasing the power of the rebalance shortens the time frame during whichredundant copies of that data on the dropped disk are reconstructed on other disks.
You can also affect rebalance behavior with the CONTENT.CHECK andTHIN_PROVISIONED disk group attributes. For information about disk groupattributes, refer to "Summary of Disk Group Attributes (page 4-2)".
The EXPLAIN WORK SQL statement determines the amount of work for a rebalanceoperation and the resulting calculations are displayed in the V$ASM_ESTIMATE view.
For example:
EXPLAIN WORK FOR ALTER DISKGROUP data DROP DISK data_0000;Explained.
SELECT est_work FROM V$ASM_ESTIMATE;EST_WORK--------
Altering Disk Groups
Administering Oracle ASM Disk Groups 4-23

4211
EXPLAIN WORK SET STATEMENT_ID='online' FOR ALTER DISKGROUP data ONLINE disk data_000;Explained.
SELECT est_work FROM V$ASM_ESTIMATE WHERE STATEMENT_ID='online';EST_WORK-------- 421
The V$ASM_ESTIMATE view provides information for adjusting ASM_POWER_LIMITand the resulting power of rebalance operations. The EST_WORK column provides anestimate of the number of allocation units that have to be moved by the rebalanceoperation to complete.
The PASS column of V$ASM_OPERATION is updated for resync and rebalanceoperations. The contents of the column can be RESYNC, REBALANCE, or COMPACT. Forexample, the following SQL query shows values in the PASS column during arebalance operation.
SQL> SELECT GROUP_NUMBER, PASS, STATE FROM V$ASM_OPERATION;
GROUP_NUMBER PASS STAT------------ --------- ---- 2 RESYNC WAIT 2 REBALANCE WAIT 2 COMPACT WAIT
For more information about rebalancing disk groups, refer to "Manually RebalancingDisk Groups (page 4-21)".
Scrubbing Disk GroupsOracle ASM disk scrubbing improves availability and reliability by searching for datathat may be less likely to be read. Disk scrubbing checks logical data corruptions andrepairs them automatically in normal and high redundancy disks groups. Thescrubbing process repairs logical corruptions using the mirror disks. Disk scrubbingcan be combined with disk group rebalancing to reduce I/O resources. The diskscrubbing process has minimal impact to the regular I/O in production systems.
You can perform scrubbing on a disk group, a specified disk, or a specified file of adisk group with the ALTER DISKGROUP SQL statement. For example, the followingSQL statements show various options used when running the ALTER DISKGROUPdisk_group SCRUB SQL statement.
SQL> ALTER DISKGROUP data SCRUB POWER LOW;
SQL> ALTER DISKGROUP data SCRUB FILE '+DATA/ORCL/DATAFILE/example.266.806582193' REPAIR POWER HIGH FORCE;
SQL> ALTER DISKGROUP data SCRUB DISK DATA_0005 REPAIR POWER HIGH FORCE;
When using ALTER DISKGROUP with the SCRUB option, the following items apply:
• The optional REPAIR option automatically repairs disk corruptions. If the REPAIRoption is not specified, then the SCRUB option only checks and reports logicalcorruptions of the specified target.
Altering Disk Groups
4-24 Oracle Automatic Storage Management Administrator's Guide

• The optional POWER value can be set to AUTO, LOW, HIGH, or MAX. If the POWERoption is not specified, the power value defaults to AUTO and the power adjusts tothe optimum level for the system.
• If the optional WAIT option is specified, the command returns after the scrubbingoperation has completed. If the WAIT option is not specified, the scrubbingoperation is added into the scrubbing queue and the command returnsimmediately.
• If the optional FORCE option is specified, the command is processed even if thesystem I/O load is high or scrubbing has been disabled internally at the systemlevel.
The scrubbing process is visible in the fields of the V$ASM_OPERATION view while thescrubbing process is running.
Oracle ASM Disk DiscoveryDisk discovery is the mechanism used to find the operating system names for disksOracle ASM can access. This mechanism finds all the disks that comprise a disk groupto be mounted, the disks an administrator wants to add to a disk group, or the disksthe administrator might consider adding to a disk group. This section contains thefollowing topics:
• How A Disk is Discovered (page 4-25)
• Disk Discovery Rules (page 4-26)
• Improving Disk Discovery Time (page 4-27)
For additional information about disk discovery and the ASM_DISKSTRINGinitialization parameter, refer to "ASM_DISKSTRING (page 3-9)".
How A Disk is DiscoveredWhen an Oracle ASM instance is initialized, Oracle ASM discovers and examines thecontents of all of the disks that are in the paths that you designated with values in theASM_DISKSTRING initialization parameter.
Disk discovery also occurs when you:
• Run the following SQL statements
– Mount a disk group with ALTER DISKGROUP MOUNT
– Online a disk with ALTER DISKGROUP ONLINE DISK
– Add a disk to a disk group with CREATE or ALTER DISKGROUP...ADD DISK
– Resize a disk in a disk group with ALTER DISKGROUP...RESIZE DISK
– Query with SELECT FROM V$ASM_DISKGROUP or V$ASM_DISK views
• Run Oracle ASM Configuration Assistant (ASMCA) operations or ASMCMDcommands that perform the same operations as the SQL statements previouslylisted
After Oracle ASM successfully discovers a disk, the disk appears in the V$ASM_DISKview. Disks that belong to a disk group, that is, disks that have a disk group name inthe disk header, show a header status of MEMBER. Disks that were discovered, but that
Oracle ASM Disk Discovery
Administering Oracle ASM Disk Groups 4-25
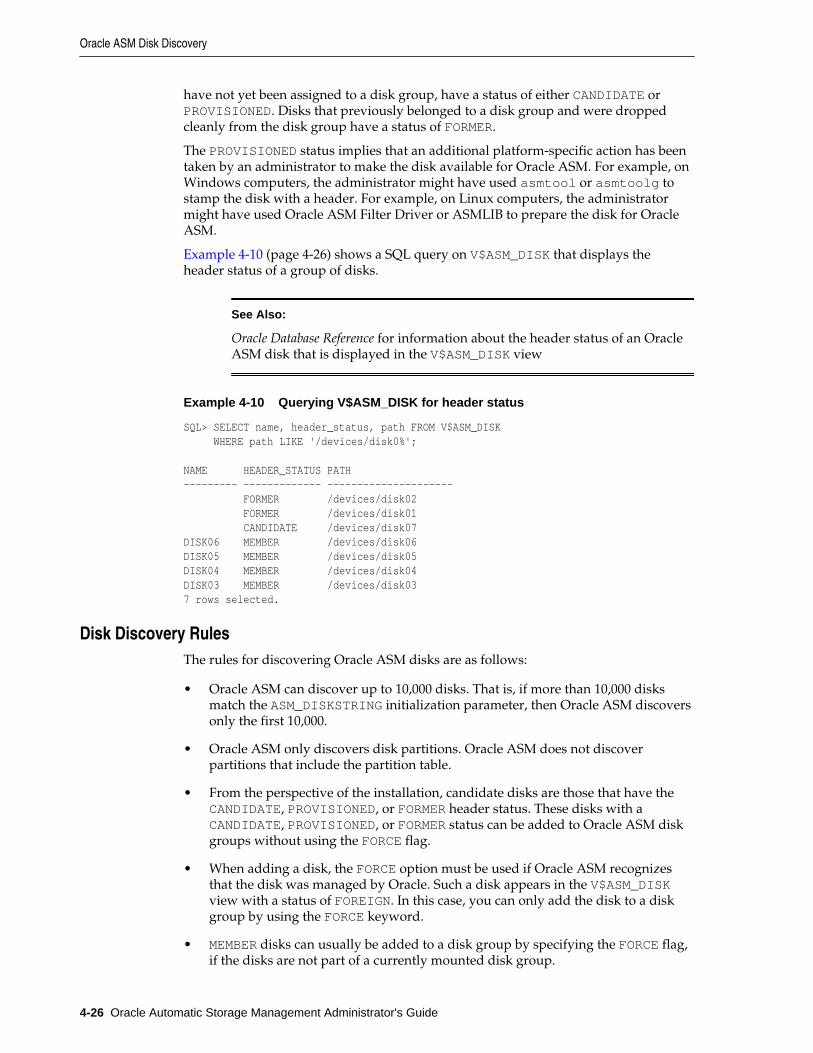
have not yet been assigned to a disk group, have a status of either CANDIDATE orPROVISIONED. Disks that previously belonged to a disk group and were droppedcleanly from the disk group have a status of FORMER.
The PROVISIONED status implies that an additional platform-specific action has beentaken by an administrator to make the disk available for Oracle ASM. For example, onWindows computers, the administrator might have used asmtool or asmtoolg tostamp the disk with a header. For example, on Linux computers, the administratormight have used Oracle ASM Filter Driver or ASMLIB to prepare the disk for OracleASM.
Example 4-10 (page 4-26) shows a SQL query on V$ASM_DISK that displays theheader status of a group of disks.
See Also:
Oracle Database Reference for information about the header status of an OracleASM disk that is displayed in the V$ASM_DISK view
Example 4-10 Querying V$ASM_DISK for header status
SQL> SELECT name, header_status, path FROM V$ASM_DISK WHERE path LIKE '/devices/disk0%';
NAME HEADER_STATUS PATH--------- ------------- --------------------- FORMER /devices/disk02 FORMER /devices/disk01 CANDIDATE /devices/disk07DISK06 MEMBER /devices/disk06DISK05 MEMBER /devices/disk05DISK04 MEMBER /devices/disk04DISK03 MEMBER /devices/disk037 rows selected.
Disk Discovery RulesThe rules for discovering Oracle ASM disks are as follows:
• Oracle ASM can discover up to 10,000 disks. That is, if more than 10,000 disksmatch the ASM_DISKSTRING initialization parameter, then Oracle ASM discoversonly the first 10,000.
• Oracle ASM only discovers disk partitions. Oracle ASM does not discoverpartitions that include the partition table.
• From the perspective of the installation, candidate disks are those that have theCANDIDATE, PROVISIONED, or FORMER header status. These disks with aCANDIDATE, PROVISIONED, or FORMER status can be added to Oracle ASM diskgroups without using the FORCE flag.
• When adding a disk, the FORCE option must be used if Oracle ASM recognizesthat the disk was managed by Oracle. Such a disk appears in the V$ASM_DISKview with a status of FOREIGN. In this case, you can only add the disk to a diskgroup by using the FORCE keyword.
• MEMBER disks can usually be added to a disk group by specifying the FORCE flag,if the disks are not part of a currently mounted disk group.
Oracle ASM Disk Discovery
4-26 Oracle Automatic Storage Management Administrator's Guide

In addition, Oracle ASM identifies the following configuration errors duringdiscovery:
• Multiple paths to the same disk
In this case, if the disk is part of a disk group, then disk group mount fails. If thedisk is being added to a disk group with the ADD DISK or CREATE DISKGROUPcommand, then the command fails. To correct the error, adjust theASM_DISKSTRING value so that Oracle ASM does not discover multiple paths tothe same disk. Or if you are using multipathing software, then ensure that youinclude only the pseudo-device name in the ASM_DISKSTRING value. See "OracleASM and Multipathing (page 2-3)".
• Multiple Oracle ASM disks with the same disk header
This can be caused by having copied one disk onto another. In this case, the diskgroup mount operation fails.
Improving Disk Discovery TimeThe value for the ASM_DISKSTRING initialization parameter is an operating system–dependent value that Oracle ASM uses to limit the set of paths that the discoveryprocess uses to search for disks. When a new disk is added to a disk group, eachOracle ASM instance that has the disk group mounted must be able to discover thenew disk using its ASM_DISKSTRING.
In many cases, the default value (NULL) is sufficient. Using a more restrictive valuemight reduce the time required for Oracle ASM to perform discovery, and thusimprove disk group mount time or the time for adding a disk to a disk group. Oraclemay dynamically change the ASM_DISKSTRING before adding a disk so that the newdisk is discovered through this parameter.
The default value of ASM_DISKSTRING might not find all disks in all situations. Ifyour site is using Oracle ASM Filter Driver or a third-party vendor, then you mayhave discovery string conventions that you must use for ASM_DISKSTRING. Forinformation about Oracle ASM Filter Driver, refer to "Oracle ASM Filter Driver(page 3-34)".
In addition, if your installation uses multipathing software, then the software mightplace pseudo-devices in a path that is different from the operating system default. See"Oracle ASM and Multipathing (page 2-3)" and consult the multipathing vendordocumentation for details.
Managing Capacity in Disk GroupsWhen Oracle ASM provides redundancy, such as when you create a disk group withNORMAL or HIGH redundancy, you must have sufficient capacity in each disk group tomanage a re-creation of data that is lost after a failure of one or two failure groups.After one or more disks fail, the process of restoring redundancy for all data requiresspace from the surviving disks in the disk group. If not enough space remains, thensome files might end up with reduced redundancy.
Reduced redundancy means that one or more extents in the file are not mirrored at theexpected level. For example, a reduced redundancy file in a high redundancy diskgroup has at least one file extent with two or fewer total copies of the extent instead ofthree. For unprotected files, data extents could be completely missing. Other causes ofreduced redundancy files are disks running out of space or an insufficient number of
Managing Capacity in Disk Groups
Administering Oracle ASM Disk Groups 4-27
failure groups. The REDUNDANCY_LOWERED column in the V$ASM_FILE viewprovides information about files with reduced redundancy.
The following guidelines help ensure that you have sufficient space to restore fullredundancy for all disk group data after the failure of one or more disks.
• Normal redundancy disk group - It is best to have enough free space in your diskgroup to tolerate the loss of all disks in one failure group. The amount of freespace should be equivalent to the size of the largest failure group.
• High redundancy disk group - It is best to have enough free space to cope withthe loss of all disks in two failure groups. The amount of free space should beequivalent to the sum of the sizes of the two largest failure groups.
Note:
When you lose multiple disks from multiple failure groups, then you couldlose both the primary and the redundant copies of your data. In addition, ifyou do not have enough capacity to restore redundancy, then Oracle ASM cancontinue to operate. However, if another disk fails, then the system may notbe able to tolerate additional failures.
The V$ASM_DISKGROUP view contains the following columns that containinformation to help you manage capacity:
• REQUIRED_MIRROR_FREE_MB indicates the amount of space that must beavailable in a disk group to restore full redundancy after the worst failure that canbe tolerated by the disk group without adding additional storage. Thisrequirement ensures that there are sufficient failure groups to restore redundancy.Also, this worst failure refers to a permanent failure where the disks must bedropped, not the case where the disks go offline and then back online.
The amount of space displayed in this column takes the effects of mirroring intoaccount. The value is computed as follows:
– A normal redundancy disk group with more than two REGULAR failuregroups
The value is the total raw space for all of the disks in the largest failure group.The largest failure group is the one with the largest total raw capacity. Forexample, if each disk is in its own failure group, then the value would be thesize of the largest capacity disk.
– A high redundancy disk group with more than three REGULAR failuregroups
The value is the total raw space for all of the disks in the two largest failuregroups.
See Also:
Oracle Exadata documentation for information about calculatingREQUIRED_MIRROR_FREE_MB on Oracle Exadata systems.
Oracle Database Appliance documentation for information about calculatingREQUIRED_MIRROR_FREE_MB on Oracle Database Appliance systems.
Managing Capacity in Disk Groups
4-28 Oracle Automatic Storage Management Administrator's Guide

• USABLE_FILE_MB indicates the amount of free space, adjusted for mirroring, thatis available for new files to restore redundancy after a disk failure.USABLE_FILE_MB is computed by subtracting REQUIRED_MIRROR_FREE_MBfrom the total free space in the disk group and then adjusting the value formirroring. For example, in a normal redundancy disk group where by default themirrored files use disk space equal to twice their size, if 4 GB of actual usable filespace remains, then USABLE_FILE_MB equals roughly 2 GB. You can then add afile that is up to 2 GB. For information about negative values ofUSABLE_FILE_MB, refer to "Negative Values of USABLE_FILE_MB (page 4-30)".
• TOTAL_MB is the total usable capacity of a disk group in megabytes. Thecalculations for data in this column take the disk header overhead intoconsideration. The disk header overhead depends on the number of Oracle ASMdisks and Oracle ASM files. This value is typically about 1% of the total rawstorage capacity. For example, if the total LUN capacity provisioned for OracleASM is 100 GB, then the value in the TOTAL_MB column would be about 99 GB.
• FREE_MB is the unused capacity of the disk group in megabytes, withoutconsidering any data imbalance. There may be situations where the value in theFREE_MB column shows unused capacity but because one Oracle ASM disk is full,database writes fail because of the imbalance in the disk group. Ensure that youinitiate a manual rebalance to force even data distribution which results in anaccurate presentation of the values in the FREE_MB column.
With fine grain striping using 128 KB, the storage is preallocated to be eight timesthe AU size. The data file size may appear slightly larger on Oracle ASM than on alocal file system because of the preallocation.
When you use Oracle ASM normal or high redundancy, the disk space utilizationbecomes more complex to measure because it depends on several variables.
Note:
The values in the TOTAL_MB and FREE_MB columns best describe space usagewhen you do not configure Oracle ASM mirroring, that is, when you useexternal redundancy.
The results from the following query show capacity metrics for a normal redundancydisk group that consists of six 1 GB (1024 MB) disks, each in its own failure group:
SQL> SELECT name, type, total_mb, free_mb, required_mirror_free_mb, usable_file_mb FROM V$ASM_DISKGROUP;
NAME TYPE TOTAL_MB FREE_MB REQUIRED_MIRROR_FREE_MB USABLE_FILE_MB------------ ------ ---------- ---------- ----------------------- --------------DATA NORMAL 6144 3768 1024 1372
The REQUIRED_MIRROR_FREE_MB column shows that 1 GB of extra capacity must beavailable to restore full redundancy after one or more disks fail. The first threenumeric columns in the query results are raw numbers. That is, they do not takeredundancy into account. Only the last column is adjusted for normal redundancy. Inthe query output example for the data disk group, the calculation is as follows:
(FREE_MB - REQUIRED_MIRROR_FREE_MB) / 2 = USABLE_FILE_MB
(3768 - 1024) / 2 = 2744 / 2 = 1372
Managing Capacity in Disk Groups
Administering Oracle ASM Disk Groups 4-29

Negative Values of USABLE_FILE_MBDue to the relationship between FREE_MB, REQUIRED_MIRROR_FREE_MB, andUSABLE_FILE_MB, USABLE_FILE_MB can become negative. Although this is notnecessarily a critical situation, it does mean that:
• Depending on the value of FREE_MB, you may not be able to create new files.
• The next failure might result in files with reduced redundancy.
If USABLE_FILE_MB becomes negative, it is strongly recommended that you addmore space to the disk group as soon as possible.
Oracle ASM Mirroring and Disk Group RedundancyThis section contains the following topics:
• Mirroring_ Redundancy_ and Failure Group Options (page 4-30)
• Oracle ASM Recovery from Read and Write I/O Errors (page 4-33)
• Oracle ASM Fast Mirror Resync (page 4-34)
• Even Read for Disk Groups (page 4-37)
• Preferred Read Failure Groups (page 4-37)
Mirroring, Redundancy, and Failure Group OptionsIf you specify mirroring for a file, then Oracle ASM automatically stores redundantcopies of the file extents in separate failure groups. Failure groups apply only tonormal and high redundancy disk groups. You can define the failure groups for eachdisk group when you create or alter the disk group.
There are three types of disk groups based on the Oracle ASM redundancy level. Table 4-1 (page 4-30) lists the types with their supported and default mirroring levels.The default mirroring levels indicate the mirroring level with which each file is createdunless a different mirroring level is designated.
Table 4-1 Mirroring options for Oracle ASM disk group types
Disk Group Type Supported Mirroring Levels Default Mirroring Level
External redundancy Unprotected (none) Unprotected
Normal redundancy Two-way, three-way, unprotected(none)
Two-way
High redundancy Three-way Three-way
The redundancy level controls how many disk failures are tolerated withoutdismounting the disk group or losing data. Each file is allocated based on its ownredundancy, but the default comes from the disk group.
The redundancy levels are:
• External redundancy
Oracle ASM Mirroring and Disk Group Redundancy
4-30 Oracle Automatic Storage Management Administrator's Guide

Oracle ASM does not provide mirroring redundancy and relies on the storagesystem to provide RAID functionality. Any write error causes a forced dismountof the disk group. All disks must be located to successfully mount the disk group.
• Normal redundancy
Oracle ASM provides two-way mirroring by default, which means that all files aremirrored so that there are two copies of every extent. A loss of one Oracle ASMdisk is tolerated. You can optionally choose three-way or unprotected mirroring.
A file specified with HIGH redundancy (three-way mirroring) in a NORMALredundancy disk group provides additional protection from a bad disk sector, notprotection from a disk failure.
• High redundancy
Oracle ASM provides triple mirroring by default. A loss of two Oracle ASM disksin different failure groups is tolerated.
If there are not enough online failure groups to satisfy the file mirroring (redundancyattribute value) specified in the disk group file type template, Oracle ASM allocates asmany mirrors copies as possible and subsequently allocates the remaining mirrorswhen sufficient online failure groups are available. For information about specifyingOracle ASM disk group templates, see "Managing Disk Group Templates(page 5-19)".
Failure groups enable the mirroring of metadata and user data. System reliability candiminish if your environment has an insufficient number of failure groups.
This section contains these topics:
• Oracle ASM Failure Groups (page 4-31)
• How Oracle ASM Manages Disk Failures (page 4-32)
• Guidelines for Using Failure Groups (page 4-32)
• Failure Group Frequently Asked Questions (page 4-33)
Oracle ASM Failure Groups
Failure groups are used to store mirror copies of data. When Oracle ASM allocates anextent for a normal redundancy file, Oracle ASM allocates a primary copy and asecondary copy. Oracle ASM chooses the disk on which to store the secondary copy sothat it is in a different failure group than the primary copy. Each copy is on a disk in adifferent failure group so that the simultaneous failure of all disks in a failure groupdoes not result in data loss.
A failure group is a subset of the disks in a disk group, which could fail at the sametime because they share hardware. The failure of common hardware must betolerated. Four drives that are in a single removable tray of a large JBOD (Just a Bunchof Disks) array should be in the same failure group because the tray could be removedmaking all four drives fail at the same time. Drives in the same cabinet could be inmultiple failure groups if the cabinet has redundant power and cooling so that it is notnecessary to protect against failure of the entire cabinet. However, Oracle ASMmirroring is not intended to protect against a fire in the computer room that destroysthe entire cabinet.
There are always failure groups even if they are not explicitly created. If you do notspecify a failure group for a disk, then Oracle automatically creates a new failure
Oracle ASM Mirroring and Disk Group Redundancy
Administering Oracle ASM Disk Groups 4-31

group containing just that disk, except for disk groups containing disks on OracleExadata cells.
A normal redundancy disk group must contain at least two failure groups. A highredundancy disk group must contain at least three failure groups. However, Oraclerecommends using more failure groups. A small number of failure groups, or failuregroups of uneven capacity, can create allocation problems that prevent full use of all ofthe available storage.
Oracle recommends a minimum of three failure groups for normal redundancy diskgroups and five failure groups for high redundancy disk groups to maintain thenecessary number of copies of the Partner Status Table (PST) and to ensure robustnesswith respect to storage hardware failures.
In the event of a system failure, three failure groups in a normal redundancy diskgroup allow a comparison among three PSTs to accurately determine the most up todate and correct version of the PST, which could not be done with a comparisonbetween only two PSTs. Similarly with a high redundancy disk group, if two failuregroups are offline, then Oracle ASM would be able to make a comparison among thethree remaining PSTs.
If configuring an extra failure group presents a problem with storage capacitymanagement, then a quorum failure group can be used as the extra failure group tostore a copy of the PST. A quorum failure group does not require the same capacity asthe other failure groups.
Failure groups can be specified as regular or quorum failure groups. For informationabout quorum failure groups, see "Storing Oracle Cluster Registry and Voting Files inOracle ASM Disk Groups (page 4-13)".
See Also:
Oracle Exadata documentation for information about Oracle Exadata failuregroups
How Oracle ASM Manages Disk Failures
Depending on the redundancy level of a disk group and how you define failuregroups, the failure of one or more disks could result in either of the following:
• The disks are first taken offline and then automatically dropped. In this case, thedisk group remains mounted and serviceable. In addition, because of mirroring,all of the disk group data remains accessible. After the disk drop operation, OracleASM performs a rebalance to restore full redundancy for the data on the faileddisks.
• The entire disk group is automatically dismounted, which means loss of dataaccessibility.
Guidelines for Using Failure Groups
The following are guidelines for using failure groups:
• Each disk in a disk group can belong to only one failure group.
• Failure groups should all be of the same size. Failure groups of different sizes maylead to reduced availability.
Oracle ASM Mirroring and Disk Group Redundancy
4-32 Oracle Automatic Storage Management Administrator's Guide
• Oracle ASM requires at least two failure groups to create a normal redundancydisk group and at least three failure groups to create a high redundancy diskgroup.
Failure Group Frequently Asked Questions
This section discusses frequently asked questions about failure group under thefollowing topics:
• How Many Failure Groups Should I Create? (page 4-33)
• How are Multiple Failure Groups Recovered after Simultaneous Failures?(page 4-33)
• When Should External, Normal, or High Redundancy Be Used? (page 4-33)
How Many Failure Groups Should I Create?
Choosing the number of failure groups to create depends on the types of failures thatmust be tolerated without data loss. For small numbers of disks, such as fewer than 20,it is usually best to use the default failure group creation that puts every disk in itsown failure group.
Using the default failure group creation for small numbers of disks is also applicablefor large numbers of disks where your main concern is disk failure. For example, adisk group might be configured from several small modular disk arrays. If the systemmust continue operating when an entire modular array fails, then a failure groupshould consist of all of the disks in one module. If one module fails, then all of the dataon that module is relocated to other modules to restore redundancy. Disks should beplaced in the same failure group if they depend on a common piece of hardwarewhose failure must be tolerated with no loss of availability.
How are Multiple Failure Groups Recovered after Simultaneous Failures?
A simultaneous failure can occur if there is a failure of a piece of hardware used bymultiple failure groups. This type of failure usually forces a dismount of the diskgroup if all disks are unavailable.
When Should External, Normal, or High Redundancy Be Used?
Oracle ASM mirroring runs on the database server and Oracle recommends to off loadthis processing to the storage hardware RAID controller by using externalredundancy. You can use normal redundancy in the following scenarios:
• Storage system does not have RAID controller
• Mirroring across storage arrays
• Extended cluster configurations
In general, Oracle ASM mirroring is the Oracle alternative to third party logicalvolume managers. Oracle ASM mirroring eliminates the deployment of additionallayers of software complexity in your Oracle Database environment.
Oracle ASM Recovery from Read and Write I/O ErrorsRead errors can be the result of a loss of access to the entire disk or media corruptionson an otherwise a healthy disk. Oracle ASM tries to recover from read errors oncorrupted sectors on a disk. When a read error by the database or Oracle ASM triggersthe Oracle ASM instance to attempt bad block remapping, Oracle ASM reads a goodcopy of the extent and copies it to the disk that had the read error.
Oracle ASM Mirroring and Disk Group Redundancy
Administering Oracle ASM Disk Groups 4-33

• If the write to the same location succeeds, then the underlying allocation unit(sector) is deemed healthy. This might be because the underlying disk did its ownbad block reallocation.
• If the write fails, Oracle ASM attempts to write the extent to a new allocation uniton the same disk. If this write succeeds, the original allocation unit is marked asunusable. If the write fails, the disk is taken offline.
One unique benefit on Oracle ASM based mirroring is that the database instance isaware of the mirroring. For many types of logical corruptions such as a bad checksumor incorrect System Change Number (SCN), the database instance proceeds throughthe mirror side looking for valid content and proceeds without errors. If the process inthe database that encountered the read can obtain the appropriate locks to ensure dataconsistency, it writes the correct data to all mirror sides.
When encountering a write error, a database instance sends the Oracle ASM instance adisk offline message.
• If database can successfully complete a write to at least one extent copy andreceive acknowledgment of the offline disk from Oracle ASM, the write isconsidered successful.
• If the write to all mirror side fails, database takes the appropriate actions inresponse to a write error such as taking the tablespace offline.
When the Oracle ASM instance receives a write error message from a databaseinstance or when an Oracle ASM instance encounters a write error itself, the OracleASM instance attempts to take the disk offline. Oracle ASM consults the Partner StatusTable (PST) to see whether any of the disk's partners are offline. If too many partnersare offline, Oracle ASM forces the dismounting of the disk group. Otherwise, OracleASM takes the disk offline.
The ASMCMD remap command was introduced to address situations where a rangeof bad sectors exists on a disk and must be corrected before Oracle ASM or databaseI/O. For information about the remap command, see "remap (page 10-66)".
Oracle ASM Fast Mirror ResyncRestoring the redundancy of an Oracle ASM disk group after a transient disk pathfailure can be time consuming. This is especially true if the recovery process requiresrebuilding an entire Oracle ASM disk group. Oracle ASM fast mirror resyncsignificantly reduces the time to resynchronize a failed disk in such situations. Whenyou replace the failed disk, Oracle ASM can quickly resynchronize the Oracle ASMdisk extents.
Note:
To use this feature, the disk group compatibility attributes must be set to 11.1or higher. For more information, refer to "Disk Group Compatibility(page 4-41)".
Any problems that make a failure group temporarily unavailable are consideredtransient failures that can be recovered by the Oracle ASM fast mirror resync feature.For example, transient failures can be caused by disk path malfunctions, such as cablefailures, host bus adapter failures, controller failures, or disk power supplyinterruptions.
Oracle ASM Mirroring and Disk Group Redundancy
4-34 Oracle Automatic Storage Management Administrator's Guide

Oracle ASM fast resync keeps track of pending changes to extents on an offline diskduring an outage. The extents are resynced when the disk is brought back online.
By default, Oracle ASM drops a disk in 3.6 hours after it is taken offline. You can setthe DISK_REPAIR_TIME disk group attribute to delay the drop operation byspecifying a time interval to repair the disk and bring it back online. The time can bespecified in units of minutes (m or M) or hours (h or H). If you omit the unit, then thedefault unit is hours. The DISK_REPAIR_TIME disk group attribute can only be setwith the ALTER DISKGROUP SQL statement and is only applicable to normal and highredundancy disk groups.
If the attribute is not set explicitly, then the default value (3.6h) applies to disks thathave been set to OFFLINE mode without an explicit DROP AFTER clause. Disks takenoffline due to I/O errors do not have a DROP AFTER clause.
The default DISK_REPAIR_TIME attribute value is an estimate that should beadequate for most environments. However, ensure that the attribute value is set to theamount of time that you think is necessary in your environment to fix any transientdisk error, and during which you are able to tolerate reduced data redundancy.
The elapsed time (since the disk was set to OFFLINE mode) is incremented only whenthe disk group containing the offline disks is mounted. The REPAIR_TIMER column ofV$ASM_DISK shows the amount of time left (in seconds) before an offline disk isdropped. After the specified time has elapsed, Oracle ASM drops the disk. You canoverride this attribute with the ALTER DISKGROUP OFFLINE DISK statement and theDROP AFTER clause.
Note:
If a disk is offlined by Oracle ASM because of an I/O (write) error or isexplicitly offlined using the ALTER DISKGROUP... OFFLINE statement withoutthe DROP AFTER clause, then the value specified for the DISK_REPAIR_TIMEattribute for the disk group is used.
Altering the DISK_REPAIR_TIME attribute has no effect on offline disks. Thenew value is used for any disks that go offline after the attribute is updated.You can confirm this behavior by viewing the Oracle ASM alert log.
If an offline disk is taken offline for a second time, then the elapsed time is reset andrestarted. If another time is specified with the DROP AFTER clause for this disk, thefirst value is overridden and the new value applies. A disk that is in OFFLINE modecannot be dropped with an ALTER DISKGROUP DROP DISK statement; an error isreturned if attempted. If for some reason the disk must be dropped (such as the diskcannot be repaired) before the repair time has expired, a disk can be droppedimmediately by issuing a second OFFLINE statement with a DROP AFTER clausespecifying 0h or 0m.
You can use ALTER DISKGROUP to set the DISK_REPAIR_TIME attribute to aspecified hour or minute value, such as 4.5 hours or 270 minutes. For example:
ALTER DISKGROUP data SET ATTRIBUTE 'disk_repair_time' = '4.5h'ALTER DISKGROUP data SET ATTRIBUTE 'disk_repair_time' = '270m'
After you repair the disk, run the SQL statement ALTER DISKGROUP ONLINE DISK.This statement brings a repaired disk group back online to enable writes so that nonew writes are missed. This statement also starts a procedure to copy of all of theextents that are marked as stale on their redundant copies.
Oracle ASM Mirroring and Disk Group Redundancy
Administering Oracle ASM Disk Groups 4-35
If a disk goes offline when the Oracle ASM instance is in rolling upgrade mode, thedisk remains offline until the rolling upgrade has ended and the timer for droppingthe disk is stopped until the Oracle ASM cluster is out of rolling upgrade mode. See"Upgrading and Patching Oracle ASM (page 3-29)". Examples of taking disks offlineand bringing them online follow.
The following example takes disk DATA_001 offline and drops it after five minutes.
ALTER DISKGROUP data OFFLINE DISK DATA_001 DROP AFTER 5m;
The next example takes the disk DATA_001 offline and drops it after the time perioddesignated by DISK_REPAIR_TIME elapses:
ALTER DISKGROUP data OFFLINE DISK DATA_001;
This example takes all of the disks in failure group FG2 offline and drops them afterthe time period designated by DISK_REPAIR_TIME elapses. If you used a DROPAFTER clause, then the disks would be dropped after the specified time:
ALTER DISKGROUP data OFFLINE DISKS IN FAILGROUP FG2;
The next example brings all of the disks in failure group FG2 online:
ALTER DISKGROUP data ONLINE DISKS IN FAILGROUP FG2;
This example brings only disk DATA_001 online:
ALTER DISKGROUP data ONLINE DISK DATA_001;
This example brings all of the disks in disk group DATA online:
ALTER DISKGROUP data ONLINE ALL;
Querying the V$ASM_OPERATION view while you run ALTER DISKGROUP ONLINEstatements displays the name and state of the current operation that you areperforming. For example, the following SQL query shows values in the PASS columnduring an online operation.
SQL> SELECT GROUP_NUMBER, PASS, STATE FROM V$ASM_OPERATION; GROUP_NUMBER PASS STAT------------ --------- ---- 1 RESYNC RUN 1 REBALANCE WAIT 1 COMPACT WAIT
An offline operation does not generate a display in a V$ASM_OPERATION view query.
You can set the FAILGROUP_REPAIR_TIME and CONTENT.TYPE disk groupattributes. The FAILGROUP_REPAIR_TIME disk group attribute specifies a defaultrepair time for the failure groups in the disk group. The CONTENT.TYPE disk groupattribute specifies the type of data expected to be stored in a disk group. You can setthese attributes with ASMCA, ASMCMD mkdg, or SQL CREATE and ALTERDISKGROUP statements. For information about disk group attributes, refer to"Managing Disk Group Attributes (page 4-2)".
The ASMCMD lsop command shows the resync time estimate. There are separaterows in the V$ASM_OPERATION table for different phases of rebalance: disk resync,rebalance, and data compaction.
Oracle ASM Mirroring and Disk Group Redundancy
4-36 Oracle Automatic Storage Management Administrator's Guide

The ASMCMD online command has a power option to specify the power for theonline operation. The SQL ALTER DISKGROUP REPLACE DISK statement also has thepower option.
The ASMCMD chdg command provides the replace option in addition to the addand drop tags. The ASMCMD mkdg command has an additional time parameter (-t)to specify the time to offline a failure group.
See Also:
Oracle Database SQL Language Reference for information about ALTERDISKGROUP and CREATE DISKGROUP
Even Read for Disk GroupsThe Even Read feature distributes data reads evenly across all the disks in a diskgroup. For each I/O request presented to the system, there may be one or more disksthat contain the data. With this feature, each request to read can be sent to the leastloaded of the possible source disks.
The Even Read functionality is enabled by default on all Oracle Database and OracleASM instances of version 12.1 and higher in non-Exadata environments. Thefunctionality is enabled in an Exadata environment when there is a failure.
Preferred Read Failure GroupsWhen you configure Oracle ASM failure groups, it might be more efficient for a nodeto read from an extent that is closest to the node, even if that extent is a secondaryextent. In other words, you can configure Oracle ASM to read from a secondary extentif that extent is closer to the node instead of Oracle ASM reading from the primarycopy which might be farther from the node. Using the preferred read failure groupsfeature is most useful in extended clusters.
To use this feature, Oracle recommends that you configure at least one mirrored extentcopy from a disk that is local to a node in an extended cluster. However, a failuregroup that is preferred for one instance might be remote to another instance in thesame Oracle RAC database. The parameter setting for preferred read failure groups isinstance specific. For information about configuring preferred read failure groups,refer to "Configuring and Administering Preferred Read Failure Groups (page 4-38)".
Both the Oracle ASM clients and Oracle ASM require Oracle Database 11g Release 1(11.1) or higher to use preferred read failure groups.
Note:
If you do not specify failure groups for a disk group, each disk in the diskgroup belongs to its own failure group. Oracle does not recommend that youconfigure multiple preferred read failure groups in a disk group for an OracleASM instance. For any given instance, if you specify multiple failure groups inthe same disk group as preferred read, a warning message is written to thealert log.
Oracle ASM Mirroring and Disk Group Redundancy
Administering Oracle ASM Disk Groups 4-37

See Also:
Oracle Real Application Clusters Administration and Deployment Guide forinformation about configuring preferred read disks in extended clusters
Configuring and Administering Preferred Read Failure Groups
To configure this feature, set the ASM_PREFERRED_READ_FAILURE_GROUPSinitialization parameter to specify a list of failure group names as preferred read disks.For more information about this initialization parameter, refer to"ASM_PREFERRED_READ_FAILURE_GROUPS (page 3-11)".
Set the parameter where diskgroup is the name of the disk group andfailuregroup is the name of the failure group, separating these variables with aperiod. Oracle ASM ignores the name of a failure group that you use in this parametersetting if the failure group does not exist in the named disk group. You can appendmultiple values using commas as a separator as follows:
ASM_PREFERRED_READ_FAILURE_GROUPS = diskgroup.failuregroup,...
In an extended cluster, the failure groups that you specify with settings for theASM_PREFERRED_READ_FAILURE_GROUPS parameter should only contain disks thatare local to the instance. For normal redundancy disk groups, there should be only onefailure group on each site of the extended cluster.
If there are multiple mirrored copies and you have set a value for theASM_PREFERRED_READ_FAILURE_GROUPS parameter, then Oracle ASM first readsthe copy that resides on a preferred read disk. If that read fails, then Oracle ASMattempts to read from the next mirrored copy that might not be on a preferred readdisk.
Having multiple failure groups on one site can cause the loss of access to the diskgroup by the other sites if the site containing multiple failure groups fails. In addition,by having multiple failure groups on a site, an extent might not be mirrored to anothersite. This can diminish the read performance of the failure group on the other site.
For example, for a normal redundancy disk group, if a site contains two failure groupsof a disk group, then Oracle ASM might put both mirror copies of an extent on thesame site. In this configuration, Oracle ASM cannot protect against data loss from asite failure.
You should configure at most two failure groups on a site for a high redundancy diskgroup. If there are three sites in an extended cluster, for the same reason previouslymentioned, then you should only create one failure group.
For a two-site extended cluster, a normal redundancy disk group only has two failuregroups. In this case, you can only specify one failure group as a preferred read failuregroup for each instance.
You can use views to identify preferred read failure groups, such as the V$ASM_DISKview that shows whether a disk is a preferred read disk by the value in thePREFERRED_READ column. You can also use V$ASM_DISK to verify whether localdisks in an extended cluster are preferred read disks. Use the Oracle ASM disk I/Ostatistics to verify that read operations are using the preferred read disks that youconfigured.
If a disk group is not optimally configured for an extended cluster, then Oracle ASMrecords warning messages in the alert logs. To identify specific performance issueswith Oracle ASM preferred read failure groups, use the V$ASM_DISK_IOSTAT view.
Oracle ASM Mirroring and Disk Group Redundancy
4-38 Oracle Automatic Storage Management Administrator's Guide

This view displays disk I/O statistics for each Oracle ASM client. You can also querythe V$ASM_DISK_IOSTAT view on a database instance. However, this query onlyshows the I/O statistics for the database instance. In general, optimal preferred readextended cluster configurations balance performance with disk group availability.
See Also:
Oracle Database Reference for details about the V$ASM* dynamic performanceviews
Performance and Scalability Considerations for Disk GroupsThis section discusses the following considerations for evaluating disk groupperformance:
• Determining the Number of Disk Groups (page 4-39)
• Performance Characteristics When Grouping Disks (page 4-39)
• Oracle ASM Storage Limits (page 4-39)
Determining the Number of Disk GroupsUse the following criteria to determine the number of disk groups to create:
• Disks in a given disk group should have similar size and performancecharacteristics. If you have several different types of disks in terms of size andperformance, then create several disk groups that contain similar characteristics.
• Create separate disk groups for your database files and fast recovery area forbackup files. This configuration allows fast recovery should a disk group failureoccur.
For information about creating disk groups for a new installation, refer to "CreatingDisk Groups for a New Oracle Installation (page 4-10)".
Performance Characteristics When Grouping DisksOracle ASM load balances the file activity by uniformly distributing file extents acrossall of the disks in a disk group. For this technique to be effective it is important thatdisks in a disk group be of similar performance characteristics. For example, thenewest and fastest disks might reside in a disk group reserved for the database workarea, and slower drives could reside in a disk group reserved for the fast recoveryarea.
There might be situations where it is acceptable to temporarily have disks of differentsizes and performance characteristics coexist in a disk group. This would be the casewhen migrating from an old set of disks to a new set of disks. The new disks would beadded and the old disks dropped. As the old disks are dropped, their storage ismigrated to the new disks while the disk group is online.
Oracle ASM Storage LimitsOracle ASM provides near unlimited capacity for future growth, but does have somestorage limits. Oracle ASM has the following limits on the number of disk groups,disks, and files:
Performance and Scalability Considerations for Disk Groups
Administering Oracle ASM Disk Groups 4-39

• 511 disk groups in a storage system for Oracle Database 12c Release 1 or later
• 10,000 Oracle ASM disks in a storage system
• 1 million files for each disk group
Without any Oracle Exadata Storage, Oracle ASM has the following storage limits ifthe COMPATIBLE.ASM or COMPATIBLE.RDBMS disk group attribute is set to less than12.1:
• 2 terabytes (TB) maximum storage for each Oracle ASM disk
• 20 petabytes (PB) maximum for the storage system
Without any Oracle Exadata Storage, Oracle ASM has the following storage limits ifthe COMPATIBLE.ASM and COMPATIBLE.RDBMS disk group attributes are set to 12.1or greater:
• 4 PB maximum storage for each Oracle ASM disk with the allocation unit (AU)size equal to 1 MB
• 8 PB maximum storage for each Oracle ASM disk with the AU size equal to 2 MB
• 16 PB maximum storage for each Oracle ASM disk with the AU size equal to 4 MB
• 32 PB maximum storage for each Oracle ASM disk with the AU size equal to 8 MB
• 320 exabytes (EB) maximum for the storage system
With all Oracle Exadata Storage, Oracle ASM has the following storage limits:
• 4 PB maximum storage for each Oracle ASM disk with the AU size equal to 1 MB
• 8 PB maximum storage for each Oracle ASM disk with the AU size equal to 2 MB
• 16 PB maximum storage for each Oracle ASM disk with the AU size equal to 4 MB
• 32 PB maximum storage for each Oracle ASM disk with the AU size equal to 8 MB
• 320 EB maximum for the storage system
The maximum size limit of a disk group equals the maximum disk size multiplied bythe maximum number of disks in a disk group (10,000).
The maximum number of disks across all disk groups is 10,000. The 10,000 disks canbe in one disk group or distributed across a maximum of 511 disk groups. This is alimitation on the number of Oracle ASM disks, not necessarily the number of spindles.A storage array could group multiple spindles into a LUN that is used as a singleOracle ASM disk.
File size limits are dependent on the value of the disk group compatibility attributes.Oracle ASM supports file sizes greater than 128 TB in any redundancy mode when theCOMPATIBLE.RDBMS disk group attribute is set greater than 10.1.
If COMPATIBLE.RDBMS is set to 10.1, the file size limits are less. For example, withCOMPATIBLE.RDBMS equal to 10.1 and the AU size equal to 1 MB, Oracle ASM filesize limits are:
• External redundancy: 16 TB
• Normal redundancy: 5.8 TB
Performance and Scalability Considerations for Disk Groups
4-40 Oracle Automatic Storage Management Administrator's Guide

• High redundancy: 3.9 TB
Note:
Oracle Database supports data file sizes up to 128 TB depending on the filesystem. In addition, Oracle Database has a file size limit that is dependent onthe DB_BLOCK_SIZE initialization parameter.
For information about Oracle ASM disk group compatibility attributes, see "DiskGroup Compatibility (page 4-41)". For information about Oracle ASM file size limits,see Table 4-5 (page 4-49).
Disk Group CompatibilityThis section describes disk group compatibility under the following topics:
• Overview of Disk Group Compatibility (page 4-41)
• Disk Group Compatibility Attributes (page 4-42)
• Setting Disk Group Compatibility Attributes (page 4-43)
• Features Enabled By Disk Group Compatibility Attribute Settings (page 4-47)
• Considerations When Setting Disk Group Compatibility in ReplicatedEnvironments (page 4-49)
Overview of Disk Group CompatibilityAdvancing the disk group compatibility settings enables you to use the new OracleASM features that are available in a later release. For example, a disk group with thedisk group compatibility attributes set to 12.1 can take advantage of Oracle ASM 12cRelease 1 (12.1) features. See Table 4-3 (page 4-47) for the features enabled forcombinations of compatibility attribute settings.
The disk group compatibility feature also enables environments to interoperate whenthey use disk groups from both Oracle Database 10g and Oracle Database 11ginstances. For example, disk group compatibility settings that are set to OracleDatabase 10g Release 2 (10.2) enable an Oracle Database 10g Release 2 (10.2) client toaccess a disk group created with Oracle ASM 12c Release 1 (12.1).
The disk group attributes that determine compatibility are COMPATIBLE.ASM,COMPATIBLE.RDBMS. and COMPATIBLE.ADVM. The COMPATIBLE.ASM andCOMPATIBLE.RDBMS attribute settings determine the minimum Oracle Databasesoftware version numbers that a system can use for Oracle ASM and the databaseinstance types respectively. For example, if the Oracle ASM compatibility setting is12.1, and RDBMS compatibility is set to 11.2, then the Oracle ASM software versionmust be at least 12.1, and the Oracle Database client software version must be at least11.2. The COMPATIBLE.ADVM attribute determines whether the Oracle ASMDynamic Volume Manager feature can create a volume in a disk group.
When you create a disk group, you can specify the disk group compatibility attributesettings in the CREATE DISKGROUP SQL statement. The ALTER DISKGROUP SQLstatement can update the compatible attribute settings for existing disk groups. See Table 4-2 (page 4-44) for examples of valid combinations of compatible attributesettings.
Disk Group Compatibility
Administering Oracle ASM Disk Groups 4-41

The compatibility attributes are not set to zero releases, such as 11.0 or 12.0 or anyvalue with all zeroes following the first dot.
You can set and update disk group attributes with the ASMCMD setattr command.For information about the ASMCMD setattr command, see "setattr (page 10-67)".
Note:
• The disk group compatibility settings determine whether yourenvironment can use the latest Oracle ASM features.
• The disk group compatibility settings can only be advanced; you cannotrevert to a lower compatibility setting. See "Reverting Disk GroupCompatibility (page 4-46)".
• The COMPATIBLE.ASM attribute must be advanced before advancingother disk group compatibility attributes and its value must be greaterthan or equal to the value of other disk group compatibility attributes.
Disk Group Compatibility AttributesThe disk group compatibility attributes specify the disk group compatibility settingsfor Oracle ASM and database instances. These attributes are described under thefollowing topics:
• COMPATIBLE.ASM (page 4-42)
• COMPATIBLE.RDBMS (page 4-42)
• COMPATIBLE.ADVM (page 4-43)
COMPATIBLE.ASM
The value for the disk group COMPATIBLE.ASM attribute determines the minimumsoftware version for an Oracle ASM instance that can use the disk group. This settingalso affects the format of the data structures for the Oracle ASM metadata on the disk.The format of other file contents is determined by Oracle ASM Dynamic VolumeManager (Oracle ADVM) and the database instance.
For Oracle ASM 12c, 12.1 is the default setting for the COMPATIBLE.ASM attributewhen using ASMCA. The default setting is 10.1 when using the SQL CREATEDISKGROUP statement and the ASMCMD mkdg command.
COMPATIBLE.RDBMS
The value for the disk group COMPATIBLE.RDBMS attribute determines the minimumCOMPATIBLE database initialization parameter setting for any database instance thatis allowed to use the disk group. Before advancing the COMPATIBLE.RDBMS attribute,ensure that the values for the COMPATIBLE initialization parameter for all of thedatabases that access the disk group are set to at least the value of the new setting forCOMPATIBLE.RDBMS.
For example, if the COMPATIBLE initialization parameters of the databases are set toeither 11.2 or 12.1, then COMPATIBLE.RDBMS can be set to any value between 10.1and 11.2 inclusively.
Disk Group Compatibility
4-42 Oracle Automatic Storage Management Administrator's Guide

For Oracle ASM 12c, 10.1 is the default setting for the COMPATIBLE.RDBMS attributewhen using the SQL CREATE DISKGROUP statement, the ASMCMD mkdg command,and ASMCA.
Note:
The database initialization parameter COMPATIBLE enables you to use a newrelease of Oracle Database, while at the same time guaranteeing backwardcompatibility with an earlier release. See Oracle Database Reference for moreinformation about the COMPATIBLE initialization parameter.
COMPATIBLE.ADVM
The value for the disk group COMPATIBLE.ADVM attribute determines whether thedisk group can contain Oracle ADVM volumes. The value must be set to 11.2 orhigher. Before setting this attribute, the COMPATIBLE.ASM value must be 11.2 orhigher. Also, the Oracle ADVM volume drivers must be loaded in the supportedenvironment.
By default, the value of the COMPATIBLE.ADVM attribute is empty until set.
For more information about Oracle ADVM, see "Overview of Oracle ASM DynamicVolume Manager (page 11-39)".
Setting Disk Group Compatibility AttributesThis section discusses the settings of the disk group compatibility attributes and howto set the attribute values with the CREATE DISKGROUP or ALTER DISKGROUP SQLstatement.
This section contains these topics:
• Valid Combinations of Compatibility Attribute Settings (page 4-44)
• Using CREATE DISKGROUP with Compatibility Attributes (page 4-44)
• Using ALTER DISKGROUP with Compatibility Attributes (page 4-45)
• Viewing Compatibility Attribute Settings (page 4-45)
• Reverting Disk Group Compatibility (page 4-46)
You can also set the disk group compatibility settings withOracle ASM command-lineutility (ASMCMD) and Oracle ASM Configuration Assistant (ASMCA). Refer to Managing Oracle ASM With ASMCA (page 9-1) and Managing Oracle ASM withASMCMD (page 10-1).
Note:
Advancing the values for disk group compatibility attributes is an irreversibleoperation. See "Reverting Disk Group Compatibility (page 4-46)".
Disk Group Compatibility
Administering Oracle ASM Disk Groups 4-43

See Also:
Oracle Database SQL Language Reference for more information about the diskgroup compatibility SQL statements
Valid Combinations of Compatibility Attribute Settings
When setting the values for the disk group attributes, specify at least the major andminor versions of a valid Oracle Database release number. For example, you canspecify compatibility as '11.2' or '12.1'; Oracle assumes that any missing versionnumber digits are zeros.
Table 4-2 (page 4-44) shows some valid combinations of the disk group compatibilityattributes and the valid Oracle ASM and database instance versions for eachcombination.
Table 4-2 Examples of disk group compatibility attribute settings
COMPATIBLE.ASM COMPATIBLE.RDBMS COMPATIBLE.ADVM Oracle ASMInstanceVersion
COMPATIBLESetting for RDBMSInstance
10.1 10.1 n/a >= 10.1 >= 10.1
11.1 10.1 n/a >= 11.1 >= 10.1
11.2 11.2 11.2 >= 11.2 >= 11.2
12.1 12.1 12.1 >= 12.1 >= 12.1
These are some possible combinations of Oracle ASM and database releases:
• The database release is Oracle Database 11g Release 2 (11.2) (databaseinitialization parameter COMPATIBLE is set to 11.2) and the Oracle ASM releaseis Oracle ASM 11g Release 2 (11.2). The COMPATIBLE.ASM andCOMPATIBLE.RDBMS disk group attributes are set to 10.2 for a disk group.
The Oracle ASM disk group functionality remains at Oracle Database 10g Release2 (10.2).
• The database release is Oracle Database 10g Release 1 (10.1) and the Oracle ASMrelease is 11.2. COMPATIBLE.ASM is set to 11.2 and COMPATIBLE.RDBMS is setto 10.1 for a disk group.
The disk group features enabled for this combination of attribute settings areshown in Table 4-3 (page 4-47).
• The database release is Oracle Database 12c Release 1 (12.1) (databaseinitialization parameter COMPATIBLE is set to 12.1) and the Oracle ASM releaseis Oracle ASM 12c Release 1 (12.1). All the disk group compatibility attributes areset to 12.1 for a disk group.
The disk group features enabled for this combination of attribute settings areshown in Table 4-3 (page 4-47).
Using CREATE DISKGROUP with Compatibility Attributes
You can specify the compatibility settings for a disk group with the CREATEDISKGROUP statement when creating the disk group.
Disk Group Compatibility
4-44 Oracle Automatic Storage Management Administrator's Guide
The following example creates a normal redundancy disk group data1 with theOracle ASM compatibility set to 12.1 and the RDBMS compatibility set to the default(the COMPATIBLE.RDBMS default is less than or equal to 12.1):
CREATE DISKGROUP data1 DISK '/dev/sd*' ATTRIBUTE 'compatible.asm' = '12.1';
The following example creates a normal redundancy disk group data2 with the ASM,RDBMS, and ADVM compatibility set to 12.1:
CREATE DISKGROUP data2 DISK '/dev/sd*' ATTRIBUTE 'compatible.asm' = '12.1', 'compatible.rdbms' = '12.1', 'compatible.advm' = '12.1';
Using ALTER DISKGROUP with Compatibility Attributes
After a disk group has been created, you can use the ALTER DISKGROUP SQLstatement to change the compatibility attributes. The ALTER DISKGROUP SQLstatement ensures that Oracle can advance the compatibility of the specified diskgroup before committing the change.
All of the affected databases and file systems should be online when running ALTERDISKGROUP to ensure that advancing compatibility does not reduce the database andfile system access. When advancing disk group compatibility, you must advance theCOMPATIBLE.ASM attribute before the COMPATIBLE.RDBMS or COMPATIBLE.ADVMattribute to ensure a valid combination of compatible attribute settings as shown in Table 4-2 (page 4-44). You can advance only one compatibility attribute in a singleALTER DISKGROUP statement.
The following example advances the Oracle ASM compatibility for disk group data3to 12.1. An Oracle ASM instance must be at Oracle ASM 12c Release 1 (12.1) or higherto access the data3 disk group.
ALTER DISKGROUP data3 SET ATTRIBUTE 'compatible.asm' = '12.1';
The following example advances the COMPATIBLE.RDBMS and COMPATIBLE.ADVMcompatibility attributes of the disk group data3 to 12.1. This example assumes thatthe value of COMPATIBLE.ASM is set to 12.1.
ALTER DISKGROUP data3 SET ATTRIBUTE 'compatible.rdbms' = '12.1',ALTER DISKGROUP data3 SET ATTRIBUTE 'compatible.advm' = '12.1';
Viewing Compatibility Attribute Settings
You can view the disk group compatibility settings in the V$ASM_ATTRIBUTE view.However, the V$ASM_ATTRIBUTE view does not display any rows when theCOMPATIBLE.ASM value is set to 10.1. Instead you can determine the values for theCOMPATIBLE.ASM and COMPATIBLE.RDBMS disk group compatibility attributes withthe COMPATIBILITY and DATABASE_COMPATIBILITY columns of the V$ASM_DISKGROUP view.
See Example 6-1 (page 6-3) for an example querying the V$ASM_ATTRIBUTE view.
You can also display the disk group compatibility attributes with the ASMCMDcommand lsattr. For information about lsattr, see "lsattr (page 10-53)".
Disk Group Compatibility
Administering Oracle ASM Disk Groups 4-45

See Also:
• Oracle Database SQL Language Reference for information about disk groupattributes
• Oracle Database Reference for details on the V$ASM_DISKGROUP and V$ASM_ATTRIBUTE dynamic performance views
Reverting Disk Group Compatibility
Advancing the values for disk group compatibility attributes is an irreversibleoperation. If you advance the disk group compatibility settings, you cannot change thevalues back to the previous settings. To revert to the previous values, you must createa new disk group with the old compatibility attribute settings and then restore thedatabase files that were in the disk group to the new disk group.
When you revert to a new disk group with the old compatibility attribute settings, thelatest Oracle ASM features might not be available. For example, if you revert the diskgroup compatibility to a pre-11.2 value, Oracle ACFS functionality is not available.
For example, you could perform the following procedure to revert a disk group toprevious compatibility settings:
1. If the Oracle ASM SPFILE is in the disk group, move this SPFILE out of the diskgroup:
a. Connect with SQL*Plus to the Oracle ASM instance.
b. Create a PFILE in the file system.
For example:
SQL> CREATE PFILE '$ORACLE_HOME/dbs/asmspfile.ora' FROM SPFILE;
2. If the OCR and voting files are in the disk group, move them out of this diskgroup.
See Also:
The Oracle Clusterware Administration and Deployment Guide for informationabout administering OCR and voting files
3. Back up any files that must be saved.
a. Back up the database files.
b. If an Oracle ACFS file system is mounted on an Oracle ADVM volume on thedisk group, the operating system files in the file system must be backed up orcopied to a location outside the file system mount point.
4. Create a new disk group using SQL CREATE DISKGROUP specifying the previousvalues for the disk group attribute settings.
For information about creating a disk group, see "Using the CREATEDISKGROUP SQL Statement (page 4-7)".
Disk Group Compatibility
4-46 Oracle Automatic Storage Management Administrator's Guide

5. Move or restore the database files into the newly created disk group using eitherthe ALTER DATABASE MOVE DATAFILE SQL statement or Recovery Manager(RMAN).
For information about moving data files between disk groups, refer to "MovingData Files Between Disk Groups With ALTER DATABASE (page 5-10)".
For information about moving database files with RMAN, refer to "Moving DataFiles Between Oracle ASM Disk Groups Using RMAN (page 8-9)".
See Also:
Oracle Database Administrator's Guide for information about using the ALTERDATABASE MOVE DATAFILE SQL statement to move data files between OracleASM disk groups.
6. Drop the disk group with the advanced disk group compatibility settings usingSQL DROP DISKGROUP INCLUDING CONTENTS to remove the disk group and itscontents.
This SQL statement also removes any Oracle ACFS file system and its contents.
For information about dropping a disk group, see "Dropping Disk Groups(page 4-57)".
Features Enabled By Disk Group Compatibility Attribute SettingsTable 4-3 (page 4-47) describes the Oracle ASM features enabled by validcombinations of the disk group compatibility attribute settings.
Table 4-3 Oracle ASM features enabled by disk group compatibility attribute settings
Disk Group Features Enabled COMPATIBLE.ASM COMPATIBLE.RDBMS COMPATIBLE.ADVM
Support for larger AU sizes (32 or 64MB)
>= 11.1 >= 11.1 n/a
Attributes are displayed in the V$ASM_ATTRIBUTE view
>= 11.1 n/a n/a
Fast mirror resync >= 11.1 >= 11.1 n/a
Variable size extents >= 11.1 >= 11.1 n/a
Exadata storage >= 11.1.0.7 >= 11.1.0.7 n/a
Intelligent Data Placement >= 11.2 >= 11.2 n/a
OCR and voting files in a disk group >= 11.2 n/a n/a
Sector size set to nondefault value >= 11.2 >= 11.2 n/a
Oracle ASM SPFILE in a disk group >= 11.2 n/a n/a
Oracle ASM File Access Control >= 11.2 >= 11.2 n/a
ASM_POWER_LIMIT value up to 1024 >= 11.2.0.2 n/a n/a
Content type of a disk group >= 11.2.0.3 n/a n/a
Disk Group Compatibility
Administering Oracle ASM Disk Groups 4-47

Table 4-3 (Cont.) Oracle ASM features enabled by disk group compatibility attribute settings
Disk Group Features Enabled COMPATIBLE.ASM COMPATIBLE.RDBMS COMPATIBLE.ADVM
Replication status of a disk group >= 12.1 n/a n/a
Managing a shared password file in adisk group
>= 12.1 n/a n/a
Greater than 2 TB Oracle ASM diskswithout Oracle Exadata storage
>= 12.1 >= 12.1 n/a
Table 4-4 (page 4-48) describe the Oracle ACFS features enabled by validcombinations of the disk group compatibility attribute settings.
Table 4-4 Oracle ACFS features enabled by disk group compatibility attribute settings
Disk Group Features Enabled COMPATIBLE.ASM COMPATIBLE.RDBMS COMPATIBLE.ADVM
Volumes in disk groups >= 11.2 n/a >= 11.2
Encryption, replication, security,tagging (Linux systems)
>= 11.2.0.2 n/a >= 11.2.0.2
Read-only snapshots >= 11.2.0.2 n/a >= 11.2.0.2
Encryption, replication, security,tagging (Windows systems)
>= 11.2.0.3 n/a >= 11.2.0.3
Read-write snapshots >= 11.2.0.3 n/a >= 11.2.0.3
Unlimited file system expansion >= 11.2.0.4 n/a >= 11.2.0.4
Performance and scalabilityimprovements in ls and find
>= 11.2.0.4 n/a >= 11.2.0.4
Storing database data files and redologs in Oracle ACFS file systems (onWindows the software must be 12.1.0.2or higher and COMPATIBLE.ADVM mustbe set to 12.1.0.2)
>= 12.1 n/a >= 12.1
Encryption, replication, security,tagging (Solaris systems)
>= 12.1 n/a >= 12.1
Replication and tagging (AIX systems) >= 12.1 n/a >= 12.1
Creation from an existing snapshot andconversion of a snapshot
>= 12.1 n/a >= 12.1
Support for 1023 snapshots >= 12.1 n/a >= 12.1.0.2
Accelerator volume for Oracle ACFS filesystem
>= 12.1 n/a >= 12.1.0.2
The following list applies to Table 4-3 (page 4-47) and Table 4-4 (page 4-48).
• If encryption is configured for the first time on Oracle ASM 11g Release 2 (11.2.0.3)on Linux or if encryption parameters must be changed or a new volume
Disk Group Compatibility
4-48 Oracle Automatic Storage Management Administrator's Guide

encryption key must be created following a software upgrade to Oracle ASM 11gRelease 2 (11.2.0.3) on Linux, then the disk group compatibility attributes for ASMand ADVM must be set to 11.2.0.3 or higher.
• All database files for Oracle Database can be stored in Oracle ACFS starting withOracle Database 11g Release 2 (11.2.0.4), except for data files and redo logs in anOracle Restart configuration. Using replication or encryption with database fileson Oracle ACFS is not supported. For additional information, including anylimitations or restrictions about storing data files in an Oracle ACFS file system,refer to "Overview of Oracle ACFS (page 11-1)".
• Oracle ASM and Oracle ACFS features not explicitly listed in Table 4-3 (page 4-47)and Table 4-4 (page 4-48) do not require advancing the disk group compatibilityattribute settings.
• Oracle ASM and Oracle ACFS features explicitly identified by an operatingsystem in Table 4-3 (page 4-47) and Table 4-4 (page 4-48) are available on thatoperating system starting with the associated disk group attribute settings.
• The value of COMPATIBLE.ASM must always be greater than or equal to the valueof COMPATIBLE.RDBMS and COMPATIBLE.ADVM.
• A value of not applicable (n/a) means that the setting of the attribute has no effecton the feature.
• For information about the rebalancing process and the ASM_POWER_LIMITinitialization parameter, refer to "ASM_POWER_LIMIT (page 3-10)".
Considerations When Setting Disk Group Compatibility in Replicated EnvironmentsIf you advance disk group compatibility, then you could enable the creation of filesthat are too large to be managed by a previous release of Oracle Database. You mustbe aware of the file size limits because replicated sites cannot continue using thesoftware from a previous release to manage these large files. The disk groupcompatibility settings should be the same for all replicated environments.
Table 4-5 (page 4-49) shows the maximum Oracle ASM file sizes supported forCOMPATIBLE.RDBMS settings when the AU_SIZE attribute is set to one megabyte for adisk group.
Table 4-5 Maximum Oracle ASM file sizes for disk groups with AU_SIZE equal to 1MB
Redundancy COMPATIBLE.RDBMS = 10.1 COMPATIBLE.RDBMS >= 11.1
External 16 TB 140 PB
Normal 5.8 TB 23 PB
High 3.9 TB 15 PB
Table 4-5 (page 4-49) shows that Oracle Database 10g can only support a file size of upto 16 TB for external redundancy. If you advance the COMPATIBILE.RDBMS attributeto 11.1 or greater, then a file can grow beyond 16 TB. However, the larger size causesthe file to be unusable in a replicated and disaster recovery site if the disaster recoverysite has a disk group COMPATIBLE.RDBMS setting that is incompatible with the largersize.
Disk Group Compatibility
Administering Oracle ASM Disk Groups 4-49

For information about Oracle ASM storage sizes, see "Oracle ASM Storage Limits(page 4-39)".
See Also:
• Oracle Database Upgrade Guide for information about databasecompatibility
• Oracle Database Administrator's Guide for information about theCOMPATIBLE initialization parameter and irreversible compatibility
• Oracle Database Reference for information about the COMPATIBLEinitialization parameter
Managing Oracle ASM File Access Control for Disk GroupsOracle ASM File Access Control provides optional protection for the content of OracleASM disk groups from accidental access by unauthorized Oracle ASM clients, such asan unauthorized database.
To set up Oracle ASM File Access Control, you must designate separate operatingsystem groups as described in "Using Separate Operating System Groups for OracleASM Users (page 3-48)". Oracle ASM File Access Control is available for Linux andUNIX computers only.
You can manage Oracle ASM file access control with ASMCMD commands and SQLstatements.
This section contains these topics:
• About Oracle ASM File Access Control (page 4-50)
• Setting Disk Group Attributes for Oracle ASM File Access Control (page 4-51)
• Using SQL Statements to Manage Oracle ASM File Access Control (page 4-52)
For information about managing Oracle ASM File Access Control with ASMCMDcommands, see "ASMCMD File Access Control Commands (page 10-72)".
For information about views that provide details about Oracle ASM file access control,see "Viewing Oracle ASM File Access Control Information (page 6-4)".
For information about controlling accessing to Oracle ASM instances, see"Authentication for Accessing Oracle ASM Instances (page 3-46)".
About Oracle ASM File Access ControlOracle ASM File Access Control restricts the access of files to specific Oracle ASMclients that connect as SYSDBA. An Oracle ASM client is typically a database, which isidentified as the user that owns the database instance home. Oracle ASM File AccessControl uses this user name to identify a database. Oracle ASM File Access Controlrestricts access based on the operating system effective user identification number of adatabase owner. For example, in Table 3-2 (page 3-49) the databases are identified asoracle1 and oracle2.
Oracle ASM uses file access control to determine the additional privileges that aregiven to a database that has been authenticated AS SYSDBA on the Oracle ASM
Managing Oracle ASM File Access Control for Disk Groups
4-50 Oracle Automatic Storage Management Administrator's Guide

instance. These additional privileges include the ability to modify and delete certainfiles, aliases, and user groups.
You can set up user groups to specify the list of databases that share the same accesspermissions to Oracle ASM files. User groups are lists of databases and any databasethat authenticates AS SYSDBA can create a user group. However, only the creator of agroup can delete it or modify its membership list.
Each Oracle ASM file has three categories of privileges: owner, group, and other. Eachcategory can have no permission, read-only permission, or read-write permission.
The file owner is usually the creator of the file and can assign permissions for the filein any of the owner, group, or other categories. The owner can also change the groupassociated with the file.
When you create a file, a group is not automatically associated with the file. You mustuse the asmcmd chgrp command to set the group manually because Oracle ASM FileAccess Control does not have the concept of the primary group of a user.
When administering Oracle ASM File Access Control, Oracle recommends that youconnect as SYSDBA to the database instance that is the owner, or planned owner, ofthe files in the disk group.
To set up Oracle ASM File Access Control for files in a disk group, perform thefollowing steps:
1. Alter a new or existing disk group to set the Oracle ASM File Access Control diskgroup attributes.
For a newly-created disk group, you should set the disk group attributes beforecreating any files in the disk group.
See "Setting Disk Group Attributes for Oracle ASM File Access Control(page 4-51)".
2. For files that exist in a disk group before setting the Oracle ASM File AccessControl disk group attributes, you must explicitly set the permissions andownership on those existing files.
Ensure that the user exists before setting ownership or permissions on a file. Thefile must be closed before setting the ownership or permissions.
See ALTER DISKGROUP SET PERMISSION and ALTER DISKGROUP SETOWNERSHIP in "Using SQL Statements to Manage Oracle ASM File Access Control(page 4-52)".
3. Optionally, you can create user groups that are groups of database users thatshare the same access permissions to Oracle ASM files.
See ALTER DISKGROUP ADD USERGROUP in "Using SQL Statements to ManageOracle ASM File Access Control (page 4-52)".
Setting Disk Group Attributes for Oracle ASM File Access ControlTo manage Oracle ASM File Access Control for a disk group, you must set theACCESS_CONTROL.ENABLED and ACCESS_CONTROL.UMASK disk group attributes.You can set the attributes by altering the disk group with the ALTER DISKGROUP SQLstatement or you can set the attributes with the ASMCMD setattr command. Forinformation about the ASMCMD setattr command, see "setattr (page 10-67)".
When you set up file access control on an existing disk group, the files previouslycreated remain accessible by everyone, unless you run the ALTER DISKGROUP SET
Managing Oracle ASM File Access Control for Disk Groups
Administering Oracle ASM Disk Groups 4-51
PERMISSION SQL statement or the ASMCMD chmod command to restrict thepermissions. For information about the ASMCMD chmod command, see "chmod(page 10-73)".
The COMPATIBLE.ASM and COMPATIBLE.RDBMS disk group attributes must be set to11.2 or higher to enable Oracle ASM File Access Control. For information about diskgroup compatibility attributes, see "Disk Group Compatibility (page 4-41)".
The disk group attributes that control Oracle ASM File Access Control are thefollowing:
• ACCESS_CONTROL.ENABLED
This attribute determines whether Oracle ASM File Access Control is enabled for adisk group.
The value can be true or false. The default is false.
If the attribute is set to true, accessing Oracle ASM files is subject to accesscontrol. If false, any user can access every file in the disk group. All otheroperations behave independently of this attribute.
• ACCESS_CONTROL.UMASK
This attribute determines which permissions are masked out on the creation of anOracle ASM file for the user that owns the file, users in the same user group, andothers not in the user group. This attribute applies to all files on a disk group.
The values can be combinations of three digits {0|2|6} {0|2|6} {0|2|6}. Thedefault is 066.
Setting to 0 masks out nothing. Setting to 2 masks out write permission. Setting to6 masks out both read and write permissions.
Before setting the ACCESS_CONTROL.UMASK disk group attribute, you must setthe ACCESS_CONTROL.ENABLED attribute to true to enable Oracle ASM FileAccess Control.
Example 4-11 (page 4-52) shows how to enable Oracle ASM File Access Control for adisk group using SQL*Plus. In this example, the umask permissions setting is 026which enables read-write access for the owner (masks out nothing with 0), read accessfor users in the group (masks out write permission with 2), and no access to others(masks out all access with 6) not in the group.
Example 4-11 Setting up Oracle ASM File Access Control
ALTER DISKGROUP data1 SET ATTRIBUTE 'access_control.enabled' = 'true';ALTER DISKGROUP data1 SET ATTRIBUTE 'access_control.umask' = '026';
Using SQL Statements to Manage Oracle ASM File Access ControlYou can use the ALTER DISKGROUP SQL statement to manage file access control forOracle ASM disk groups. These SQL statements are available for both database andOracle ASM instances.
When administering users with SQL*Plus, the users must be existing operating systemusers and their user names must have corresponding operating system user IDs.However, only users in the same cluster as the Oracle ASM instance can be validated.
Managing Oracle ASM File Access Control for Disk Groups
4-52 Oracle Automatic Storage Management Administrator's Guide
Note:
When modifying ownership of files, the previous owner of a file cannot bedropped while the file is still open even after the ownership of the file haschanged.
The SQL statements that support disk group access control are:
• ALTER DISKGROUP ADD USERGROUP WITH MEMBER
Adds an Oracle ASM user group to a disk group. The user group name is limitedto a maximum of 30 characters. The operating system users of the databasesidentified in the MEMBER clause must be in the disk group, as shown by V$ASM_USER, or the command returns an error. Any users authenticated asSYSASM or SYSDBA can create new user groups. For example:
SQL> SELECT group_number, os_name FROM V$ASM_USER;
GROUP_NUMBER OS_NAME------------ ---------------------------------------------------------------- 1 oracle1 1 oracle2...
SQL> ALTER DISKGROUP data ADD USERGROUP 'test_grp1' WITH MEMBER 'oracle1','oracle2';
• ALTER DISKGROUP DROP USERGROUP
Drops an Oracle ASM user group from a disk group. Dropping a group mightleave some files without a valid group. For those files to have a valid group, youmust manually update the group associated with those files to a valid group.
SQL> ALTER DISKGROUP data DROP USERGROUP 'test_grp1';
• ALTER DISKGROUP MODIFY USERGROUP ADD MEMBER
Adds users to the specified user group. The users must be in the disk group, asshown by V$ASM_USER, or the command returns an error. Only the creator of thegroup or the Oracle ASM administrator can modify group membership.
SQL> ALTER DISKGROUP data MODIFY USERGROUP 'test_grp2' ADD MEMBER 'oracle2';
• ALTER DISKGROUP MODIFY USERGROUP DROP MEMBER
Removes users from the specified user group. If a member is not in the usergroup, then an error is returned. Only the creator of the group or the Oracle ASMadministrator can modify group membership.
SQL> ALTER DISKGROUP data MODIFY USERGROUP 'test_grp2' DROP MEMBER 'oracle2';
• ALTER DISKGROUP ADD USER
Adds operating system (OS) users to an Oracle ASM disk group, so that theseusers can have access privileges on the disk group. If a user exists in the diskgroup, as shown by V$ASM_USER, then the command records an error andcontinues to add other users, if any.
The operating system user of a running database instance is automatically addedto a disk group when the database instance accesses that disk group and createsfiles. However, for a database instance to read files in a disk group without
Managing Oracle ASM File Access Control for Disk Groups
Administering Oracle ASM Disk Groups 4-53

creating any files, then you must use the ADD USER clause to add the operatingsystem user associated with that database to the disk group. Also, you can use thisclause to add the operating system user associated with a database to an existingdisk group immediately after setting the Oracle ASM File Access Control diskgroup attributes and before creating new files.
SQL> ALTER DISKGROUP DATA ADD USER 'oracle1';
• ALTER DISKGROUP DROP USER
Drops operating system users from an Oracle ASM disk group. If a user is not inthe disk group, then this command records an error and continues to drop otherusers, if any.
If the user owns any files on the same Oracle ASM disk group, then this commandfails with an error, unless the CASCADE keyword is specified. If the latter case,then the user is deleted, along with all the files that the user owns.
If any files owned by the user are currently open, then the DROP USER commandfails, and no files are deleted.
SQL> ALTER DISKGROUP DATA DROP USER 'oracle1';
• ALTER DISKGROUP REPLACE USER
Replaces one operating system user with another in an Oracle ASM disk group.The replacement user must not be a user currently in the disk group user list.
If the command succeeds, all files that were previously owned by current user arenow owned by the replacement user. The current user is automatically removedfrom the user list of the disk group. Adding the current user back to the diskgroup is possible, but this user does not own any files.
When changing the owner of an open file, the new owner cannot be dropped withthe owner's files until all instances within a cluster are restarted.
Only an Oracle ASM administrator can run this command.
SQL> ALTER DISKGROUP disk_group REPLACE USER oracle1 WITH oracle2;
• ALTER DISKGROUP SET PERMISSION
Modifies permissions of an Oracle ASM file. Setting read only permission to afile that has read write permission revokes the write permission. Only the fileowner or the Oracle ASM administrator can change the permissions of a file.
SQL> ALTER DISKGROUP data SET PERMISSION OWNER=read write, GROUP=read only, OTHER=none FOR FILE '+data/controlfile.f';
• ALTER DISKGROUP SET OWNERSHIP
Changes the owner or group of a file to the specified user or user group name,respectively. If the specified user or user group name does not exist, thiscommand fails with an error. Only the owner of the file or the Oracle ASMadministrator can run this command, and only the Oracle ASM administrator canchange the owner. Also, the user group name must exist, and the owner of the filemust be a member of that group.
SQL> ALTER DISKGROUP data SET OWNERSHIP OWNER='oracle1', GROUP='test_grp1' FOR FILE '+data/controlfile.f';
Managing Oracle ASM File Access Control for Disk Groups
4-54 Oracle Automatic Storage Management Administrator's Guide

See Also:
The ALTER DISKGROUP SQL statement in the Oracle Database SQL LanguageReference
Maintaining Disk GroupsThis section discusses maintenance operations performed on disk groups.
This section contains the following topics:
• Mounting and Dismounting Disk Groups (page 4-55)
• Mounting Disk Groups Using the FORCE Option (page 4-56)
• Checking the Internal Consistency of Disk Group Metadata (page 4-56)
• Dropping Disk Groups (page 4-57)
• Renaming Disks Groups (page 4-58)
Mounting and Dismounting Disk GroupsDisk groups that are specified in the ASM_DISKGROUPS initialization parameter aremounted automatically at Oracle ASM instance startup. This process makes the diskgroups available to all database instances running on the same node as Oracle ASM.The disk groups are dismounted at Oracle ASM instance shutdown. Oracle ASM alsoautomatically mounts a disk group when you initially create it, and dismounts a diskgroup if you drop it.
When a disk group is mounted, a disk group number is chosen. This number maychange across disk group mounts. A disk group number is not recorded in anypersistent structure, but the current value can be viewed in the GROUP_NUMBERcolumn of the V$ASM views.
When you want to mount or dismount disk groups manually, use the ALTERDISKGROUP...MOUNT or ALTER DISKGROUP...DISMOUNT statement. You canmount or dismount disk groups by name, or specify ALL. You can also specify theoptional FORCE option. For information about using the FORCE option, refer to"Mounting Disk Groups Using the FORCE Option (page 4-56)".
If you try to dismount a disk group that contains open files, the statement fails, unlessyou also specify the FORCE clause.
In a clustered Oracle ASM environment in RESTRICTED mode, a disk group ismounted in single-instance exclusive mode. No other Oracle ASM instance in thatcluster can mount that disk group. In this mode the disk group is not usable by anyOracle ASM client. Use this mode to perform a fast rebalance.
The following SQL statement dismounts all disk groups that are currently mounted tothe Oracle ASM instance:
ALTER DISKGROUP ALL DISMOUNT;
The following SQL statement mounts disk group data1:
ALTER DISKGROUP data1 MOUNT;
Maintaining Disk Groups
Administering Oracle ASM Disk Groups 4-55

Mounting Disk Groups Using the FORCE OptionOracle ASM provides a MOUNT FORCE option with ALTER DISKGROUP to enableOracle ASM disk groups to be mounted in normal or high redundancy modes eventhough some Oracle ASM disks may be unavailable to the disk group at mount time.The default behavior without the FORCE option is to fail to mount a disk group thathas damaged or missing disks.
The MOUNT FORCE option is useful in situations where a disk is temporarilyunavailable and you want to mount the disk group with reduced redundancy whileyou correct the situation that caused the outage.
To successfully mount with the MOUNT FORCE option, Oracle ASM must be able tofind at least one copy of the extents for all of the files in the disk group. In this case,Oracle ASM can successfully mount the disk group, but with potentially reducedredundancy.
The disks that Oracle ASM cannot access are placed in an offline mode. Oracle ASMthen begins timing the period that these disks are in an offline mode. If the disk offlinetime period exceeds the timer threshold set by DISK_REPAIR_TIME disk groupattribute, then those disks are permanently dropped from the disk group. You canchange the offline timer after a disk is put in an offline state by using the ALTERDISKGROUP OFFLINE statement. For more information about setting theDISK_REPAIR_TIME disk group attribute, see "Oracle ASM Fast Mirror Resync(page 4-34)".
Note:
An Oracle ASM instance mounts an incomplete disk group differentlydepending on the specified compatibility. See "Features Enabled By DiskGroup Compatibility Attribute Settings (page 4-47)".
In clustered Oracle ASM environments, if an Oracle ASM instance is not the firstinstance to mount the disk group, then using the MOUNT FORCE statement fails. This isbecause the disks have been accessed by another instance and the disks are not locallyaccessible.
If all disks are available, then using the FORCE option causes the MOUNT command tofail. This discourages unnecessary and improper use of the feature.
The following example shows how to use the FORCE option to force the mount of thedata1 disk group:
SQL> ALTER DISKGROUP data1 MOUNT FORCE;
See Also:
The Oracle Database SQL Language Reference for additional information aboutthe ALTER DISKGROUP statement and the FORCE option
Checking the Internal Consistency of Disk Group MetadataYou can check the internal consistency of disk group metadata using the ALTERDISKGROUP statement with the CHECK keyword. You can use this statement to checkspecific files in a disk group, specific disks or all disks in a disk group, or specific
Maintaining Disk Groups
4-56 Oracle Automatic Storage Management Administrator's Guide

failure groups within a disk group. The disk group must be mounted to perform thesechecks.
By default, the CHECK DISK GROUP clause verifies all of the metadata directories.Oracle ASM displays summary errors and writes the details about the errors in analert log. The CHECK keyword performs the following operations:
• Verifies the consistency of the disk
• Cross checks all of the file extent maps and allocation tables for consistency
• Checks that the alias metadata directory and file directory are linked correctly
• Verifies that the alias directory tree is linked correctly
• Checks that Oracle ASM metadata directories do not have unreachable allocatedblocks
The REPAIR | NOREPAIR clause specifies whether Oracle ASM should attempt torepair errors that are found during the check. The default is NOREPAIR. Use theNOREPAIR clause to receive alerts about inconsistencies and to suppress Oracle ASMfrom resolving the errors automatically. The following example statement checks forconsistency in the metadata for all disks in the data1 disk group:
ALTER DISKGROUP data1 CHECK ALL;
See Also:
The Oracle Database SQL Language Reference for additional information aboutthe CHECK clause syntax
Dropping Disk GroupsThe DROP DISKGROUP statement enables you to delete an Oracle ASM disk group andoptionally, all of its files. You can specify the INCLUDING CONTENTS clause if you alsowant to delete all files that are contained in the disk group. The default is EXCLUDINGCONTENTS, which provides syntactic consistency and prevents you from dropping thedisk group if it has any contents
The Oracle ASM instance must be started and the disk group must be mounted withnone of the disk group files open, in order for the DROP DISKGROUP statement tosucceed. The statement does not return until the disk group has been dropped.
When you drop a disk group, Oracle ASM dismounts the disk group and removes thedisk group name from the ASM_DISKGROUPS initialization parameter if a serverparameter file is being used. If a text initialization parameter file is being used, and thedisk group is mentioned in the ASM_DISKGROUPS initialization parameter, then youmust remove the disk group name from the ASM_DISKGROUPS initializationparameter before the next time that you shut down and restart the Oracle ASMinstance.
The following statement deletes data1:
DROP DISKGROUP data1;
After ensuring that none of the files contained in data1 are open, Oracle ASMrewrites the header of each disk in the disk group to remove Oracle ASM formattinginformation. The statement does not specify INCLUDING CONTENTS, so the dropoperation fails if the disk group contains any files.
Maintaining Disk Groups
Administering Oracle ASM Disk Groups 4-57
If an Oracle Automatic Storage Management Cluster File System (Oracle ACFS) filesystem is mounted on a volume contained in the disk group, then the file system mustbe dismounted. If the file system has been registered, then it must be deregistered. TheINCLUDING CONTENTS clause must be used to drop this disk group. All data in thefile system is destroyed. To view the volumes and mount paths associated with a diskgroup, you can query the V$ASM_VOLUME view. For an example of a query on the V$ASM_VOLUME view, see Example 12-9 (page 12-6). For information aboutderegistering and dismounting Oracle ACFS file systems, see "Deregistering_Dismounting_ and Disabling Volumes and Oracle ACFS File Systems (page 16-20)".
If you cannot mount a disk group but must drop it, you can use the FORCE option ofthe DROP DISKGROUP statement. This command enables you to remove the headers ondisks that belong to a disk group that cannot be mounted by any Oracle ASMinstances as shown in the following example:
SQL> DROP DISKGROUP data1 FORCE;
The disk group on which you perform this operation should not be mountedanywhere in the cluster. When you use the FORCE option, the Oracle ASM instancedoes not attempt to verify that a disk group is being used by another Oracle ASMinstance in the same storage subsystem.
Note:
Use the FORCE option with extreme caution.
You can also drop disks from a disk group with ASMCA. Refer to "Managing DiskGroups with ASMCA (page 9-5)".
Renaming Disks GroupsThe renamedg tool enables you to change the name of a cloned disk group. The diskgroup must be dismounted on all nodes in the cluster before running renamedg onthe disk group.
renamedg renames a disk group using a two-step process:
1. Phase one
This phase generates a configuration file to be used in phase two.
2. Phase two
This phase uses the configuration file to perform the renaming of the disk group.
The syntax is:
renamedg {-help | help=true}
renamedg [phase={one|two |both}] dgname=diskgroup newdgname=newdiskgroup [config=configfile] [asm_diskstring=discoverystring, discoverystring ...] [clean={true|false}] [check={true|false}] [confirm={true|false}] [verbose={ true|false}] [keep_voting_files={true|false}]
• phase={one|two|both}
Maintaining Disk Groups
4-58 Oracle Automatic Storage Management Administrator's Guide

Specifies the phase to be run. Allowed values are one, two, or both. Thisargument is optional. The default is both.
Typically you would run both phases. If a problem occurs during the secondphase, then you can rerun phase two using the generated configuration file.
• dgname=diskgroup
Specifies the name of the disk group to be renamed.
• newdgname=newdiskgroup
Specifies the new name for the disk group.
• config=configfile
Specifies the path to the configuration file to be generated during phase one orspecifies the path to the configuration file to be used during phase two.
This argument is optional. The default configuration file is namedrenamedg_config and is located in the directory in which the command is run.The single quotations may be required on some platforms.
• asm_diskstring=discoverystring, discoverystring ...
Specifies the Oracle ASM discovery strings. The asm_diskstring value must bespecified if the Oracle ASM disks are not in the default location for the platform.The single quotations may be required on some platforms, usually when wildcardcharacters are specified.
• clean={true|false}
Specifies whether to clean errors that are otherwise ignored. The default is true.
• check={true|false}
Specifies a boolean value that is used in the second phase. If true, then the toolprints the list of changes that are to be made to the disks. No writes are issued. Itis an optional parameter that defaults to false.
• confirm={true|false}
Specifies a boolean value that is used in the second phase. If false, then the toolprints the changes that are to be made and seeks confirmation before actuallymaking the changes. It is an optional value that defaults to false. If check is setto true, then the value of this parameter is redundant.
• verbose={true|false}
Specifies verbose execution when verbose=true. The default is false.
• keep_voting_files={true|false}
Specifies whether voting files are kept in the renamed disk group. The default isfalse which deletes the voting files from the renamed disk group.
Maintaining Disk Groups
Administering Oracle ASM Disk Groups 4-59
Note:
renamedg does not update resources, nor does renamedg update any filereferences within the database. Because of this behavior, the original diskgroup resource is not automatically deleted after the completion of phase two.The status of the old disk group resource can be checked with the OracleClusterware Control (CRSCTL) crsctl stat res -t command and thenmanually deleted with the Server Control Utility (SRVCTL) srvctl removediskgroup command.
Example 4-12 (page 4-60) shows several examples of the use of renamedg. The firstexample renames the fra1 disk group to fra2 using a disk string to locate the disksand the verbose option is enabled. The second example only creates a configurationfile during the completion of phase one of the renamedg operation. The thirdexample runs phase two of the renamedg operation using a configuration filegenerated from a phase one execution of renamedg.
After renaming a disk group, you can rename the disks in the disk group to match thenew disk group name. For example:
SQL> ALTER DISKGROUP fra2 RENAME DISKS ALL;
For information about renaming disks, refer to "Renaming Disks in Disk Groups(page 4-18)".
Example 4-12 Using renamedg
$ renamedg dgname=fra1 newdgname=fra2 asm_diskstring='/devices/disk*' verbose=true
$ renamedg phase=one dgname=fra1 newdgname=fra2 asm_diskstring='/devices/disk*' config=/tmp/fra2.conf verbose=true
$ renamedg phase=two dgname=fra1 newdgname=fra2 config=/tmp/fra2.conf verbose=true
Maintaining Disk Groups
4-60 Oracle Automatic Storage Management Administrator's Guide

5Administering Oracle ASM Files,
Directories, and Templates
This chapter describes how to administer files when you use the Oracle AutomaticStorage Management (Oracle ASM) storage option.
This chapter contains the following topics:
• What Types of Files Does Oracle ASM Support? (page 5-1)
• About Oracle ASM File Names (page 5-3)
• Creating and Referencing Oracle ASM Files in the Database (page 5-8)
• Managing Alias Names for Oracle ASM File Names (page 5-13)
• Managing Disk Group Directories (page 5-15)
• Accessing Oracle ASM Files with the XML DB Virtual Folder (page 5-16)
• Using DBMS_FILE Transfer Utility for Oracle ASM (page 5-18)
• Managing Disk Group Templates (page 5-19)
What Types of Files Does Oracle ASM Support?Oracle ASM supports most file types required by the database. Table 5-1 (page 5-1)lists file types that are supported directly by Oracle ASM and lists the system defaulttemplate that provides the attributes for file creation. Some file types shown in thetable are related to specific products or features, and are not discussed in this book.
Table 5-1 File types supported by Oracle ASM
File Type Default Templates
Archive log files ARCHIVELOG
Oracle ASM Persistent initialization parameter file(SPFILE)
ASMPARAMETERFILE
Oracle ASM Persistent initialization parameter file(SPFILE) backup
ASMPARAMETERFILEBACKUP
Audit spill files AUDIT_SPILLFILES
Automatically generated control file backup AUTOBACKUP
Auto-login software keystore AUTOLOGIN_KEY_STORE
Archive log backup piece BACKUPSET
Administering Oracle ASM Files, Directories, and Templates 5-1
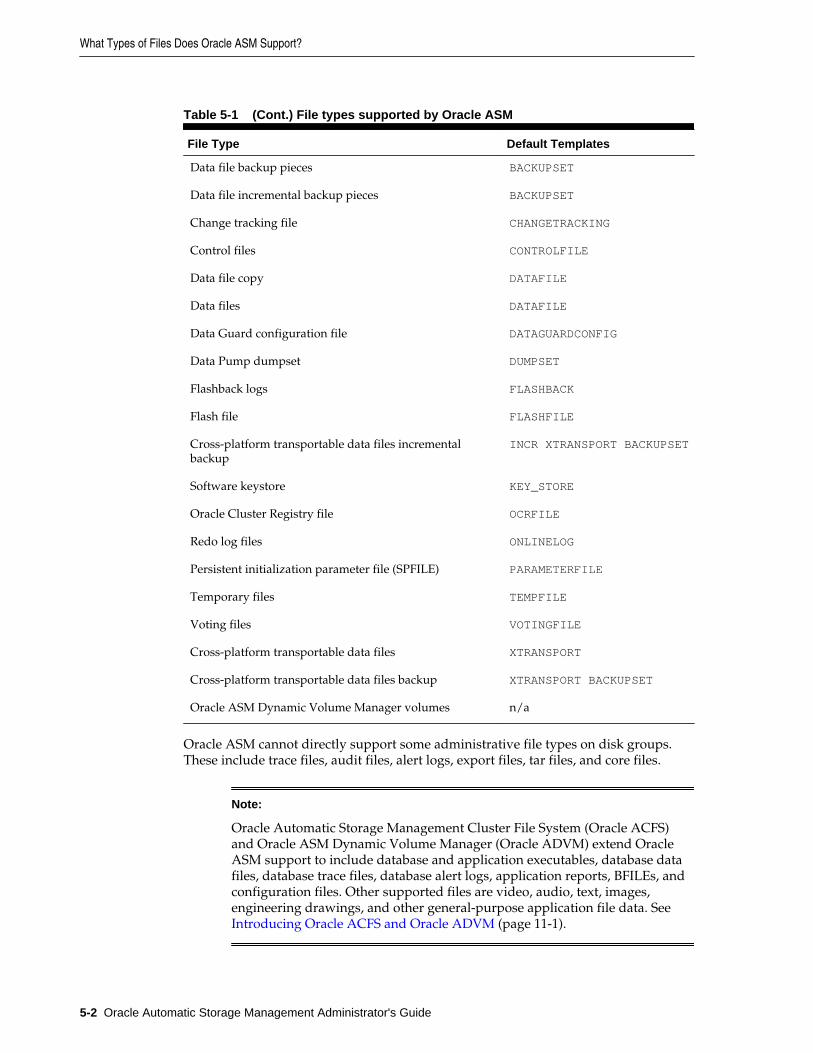
Table 5-1 (Cont.) File types supported by Oracle ASM
File Type Default Templates
Data file backup pieces BACKUPSET
Data file incremental backup pieces BACKUPSET
Change tracking file CHANGETRACKING
Control files CONTROLFILE
Data file copy DATAFILE
Data files DATAFILE
Data Guard configuration file DATAGUARDCONFIG
Data Pump dumpset DUMPSET
Flashback logs FLASHBACK
Flash file FLASHFILE
Cross-platform transportable data files incrementalbackup
INCR XTRANSPORT BACKUPSET
Software keystore KEY_STORE
Oracle Cluster Registry file OCRFILE
Redo log files ONLINELOG
Persistent initialization parameter file (SPFILE) PARAMETERFILE
Temporary files TEMPFILE
Voting files VOTINGFILE
Cross-platform transportable data files XTRANSPORT
Cross-platform transportable data files backup XTRANSPORT BACKUPSET
Oracle ASM Dynamic Volume Manager volumes n/a
Oracle ASM cannot directly support some administrative file types on disk groups.These include trace files, audit files, alert logs, export files, tar files, and core files.
Note:
Oracle Automatic Storage Management Cluster File System (Oracle ACFS)and Oracle ASM Dynamic Volume Manager (Oracle ADVM) extend OracleASM support to include database and application executables, database datafiles, database trace files, database alert logs, application reports, BFILEs, andconfiguration files. Other supported files are video, audio, text, images,engineering drawings, and other general-purpose application file data. See Introducing Oracle ACFS and Oracle ADVM (page 11-1).
What Types of Files Does Oracle ASM Support?
5-2 Oracle Automatic Storage Management Administrator's Guide

For a description of the system default templates, refer to "Managing Disk GroupTemplates (page 5-19)". For an example of the output of the V$ASM_TEMPLATE view,refer to Example 6-10 (page 6-6). For an example of the output of the ASMCMDlstmpl command, refer to "lstmpl (page 10-69)".
About Oracle ASM File NamesEvery file created in Oracle ASM is provided a file name generated by OracleManaged Files, known as a fully qualified file name (or system-generated file name).The fully qualified file name represents a complete path name in the Oracle ASM filesystem. An example of a fully qualified file name is:
+data/orcl/controlfile/Current.256.541956473
You can use the fully qualified file name to reference (read or retrieve) an Oracle ASMfile. You can also use other abbreviated file name formats, such as an alias Oracle ASMfile name described in "Alias Oracle ASM File Name Forms (page 5-6)", to referencean Oracle ASM file.
Oracle ASM generates a fully qualified file name upon any request to create a file. Acreation request does not or cannot specify a fully qualified file name. Instead, it uses asimpler syntax to specify a file, such as an alias or just a disk group name. Oracle ASMthen creates the file, placing it in the correct Oracle ASM path according to file type,and then assigns an appropriate fully qualified file name. If you specify an alias in thecreation request, Oracle ASM also creates the alias so that it references the fullyqualified file name.
Oracle ASM file creation requests are either single file creation requests or multiple filecreation request.
Note:
• You can find the generated name in database views displaying Oracle filenames, such as V$DATAFILE and V$LOGFILE. You can use this name, oran abbreviated form of it, if you later must reference an Oracle ASM file ina SQL statement. As with other Oracle Database file names, Oracle ASMfile names are kept in the control file and the RMAN catalog.
• You can use fully qualified and numeric file names in single-file creationif you specify the REUSE keyword, as described in "Using Oracle ASMFile Names in SQL Statements (page 5-10)".
• Forward slash (/) and backslash (\) are interchangeable in file names. Filenames are case insensitive, but case retentive.
This section contains the following topics:
• Single File Creation Form (page 5-4)
• Multiple File Creation Form (page 5-4)
• Fully Qualified File Name Form (page 5-4)
• Alias Oracle ASM File Name Forms (page 5-6)
About Oracle ASM File Names
Administering Oracle ASM Files, Directories, and Templates 5-3

• Creating a Tablespace in Oracle ASM: Using a Data File with an Alias Name(page 5-7)
• Alias Oracle ASM File Name with Template Form (page 5-7)
• Incomplete Oracle ASM File Name Form (page 5-8)
• Incomplete Oracle ASM File Name with Template Form (page 5-8)
Table 5-2 (page 5-4) specifies the valid usage for each file name form. If the form isused for file creation, the table specifies whether the created file is an Oracle ManagedFiles (OMF).
Table 5-2 Valid usage for Oracle ASM file name forms
File Name Form Reference toFile?
Single-fileCreation?
Multiple FileCreation?
Created asOMF?
Fully qualified file name Yes No No No
Alias file name Yes Yes No No
Alias with template file name No Yes No No
Incomplete file name No Yes Yes Yes
Incomplete file name with template No Yes Yes Yes
Single File Creation FormA single file creation form is used to create a single file, such as a data file or a controlfile. The form of the Oracle ASM file name in this type is either an alias, such as+data/orcl/ctl.f, or an incomplete file name, such as a disk group namepreceded by a plus sign (+data). You use the alias or disk group name where a filename is called for in a SQL statement, such as CREATE TABLESPACE, CREATECONTROLFILE.
Multiple File Creation FormA multiple file creation form is used multiple times to create Oracle ASM files, such aswhen assigning a value to the initialization parameter DB_CREATE_FILE_DEST. Youcan also run a CREATE TABLESPACE statement (without a file name specification)multiple times. Each time, Oracle ASM creates a different unique data file name.
When using the multiple file creation form, you can use an incomplete file name form,such as a disk group name preceded by a plus sign (+data). In this case, you setDB_CREATE_FILE_DEST to an incomplete file name (for example, +data), andwhenever a command is run that must create a database file inDB_CREATE_FILE_DEST, the file is created in the designated disk group and assigneda unique fully qualified name. You can use an incomplete file name in other *_DESTinitialization parameters.
Fully Qualified File Name FormYou can use a fully qualified form for referencing existing Oracle ASM files in OracleASM operations, except for disk group creation. This form is the Oracle ASM file namethat Oracle ASM automatically generates when an Oracle ASM file is created.
A fully qualified file name has the following form:
About Oracle ASM File Names
5-4 Oracle Automatic Storage Management Administrator's Guide

+diskgroup/dbname/filetype/filetypetag.file.incarnation
Where:
• +diskgroup is the disk group name preceded by a plus sign.
You can think of the plus sign (+) as the root directory of the Oracle ASM filesystem, similar to the slash (/) on UNIX or Linux computers.
• dbname is the DB_UNIQUE_NAME of the database to which the file belongs.
• filetype is the Oracle file type and can be one of the file types shown in Table 5-3 (page 5-5).
• filetypetag is type-specific information about the file and can be one of thetags shown in Table 5-3 (page 5-5).
• file.incarnation is the file/incarnation pair, used to ensure uniqueness.
An example of a fully qualified Oracle ASM file name is:
+data/orcl/controlfile/Current.256.541956473
Table 5-3 Oracle file types and Oracle ASM file type tags
Oracle ASM File Type Description Oracle ASM File TypeTag
Comments
CONTROLFILE Control files andbackup control files
Current
Backup
Archive
Backup
DATAFILE Data files and datafile copies
tblspname Name of the tablespace intowhich the file is added
ONLINELOG Online logs group_loggroup#
ARCHIVELOG Archive logs thread_thread#_seq_sequence#
TEMPFILE Tempfiles tsname Name of the tablespace intowhich the file is added
BACKUPSET Data file and archivelog backup pieces;data file incrementalbackup pieces
spfile?_timestamp spfile? can take one of twovalues: s indicates that thebackup set includes the spfile;n indicates that the backup setdoes not include the spfile.
timestamp is the time that thebackup is started.
PARAMETERFILE Persistent parameterfiles
spfile Name of the SPFILE
DATAGUARDCONFIG Data Guardconfiguration file
db-unique-name Data Guard uses the value of theDB_UNIQUE_NAME initializationparameter.
FLASHBACK Flashback logs log_flashbacklog#
CHANGETRACKING Block changetracking data
ctf Used during incrementalbackups
About Oracle ASM File Names
Administering Oracle ASM Files, Directories, and Templates 5-5
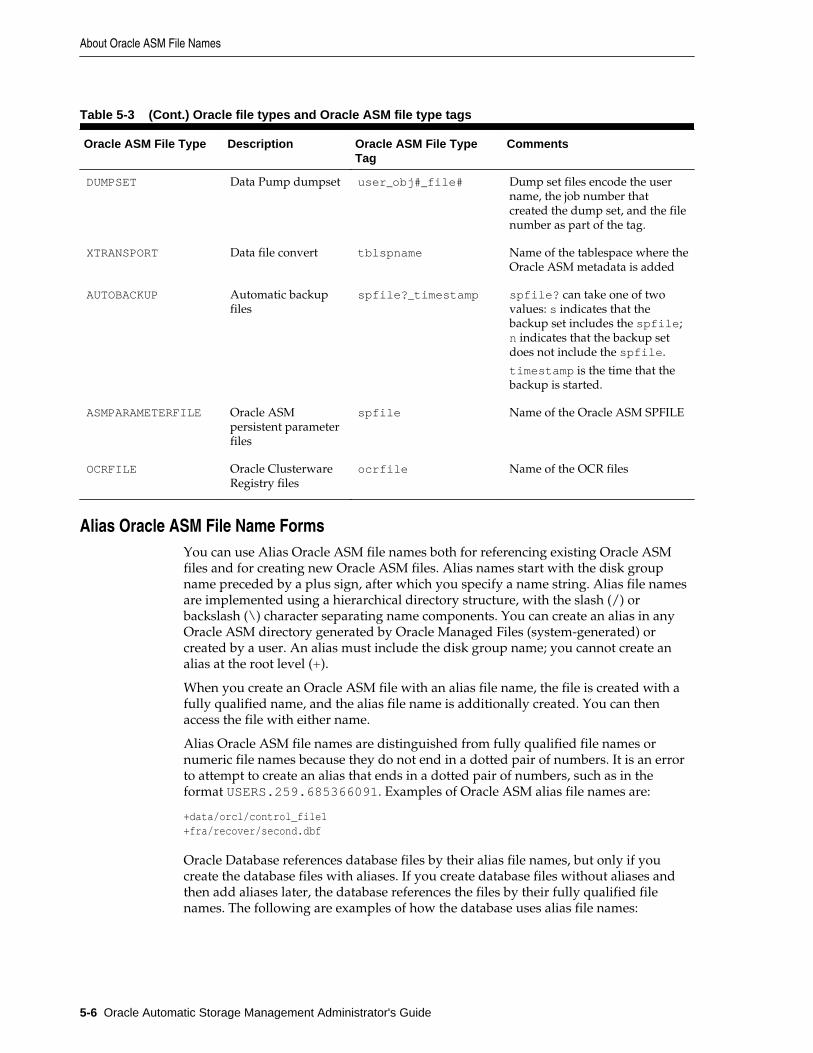
Table 5-3 (Cont.) Oracle file types and Oracle ASM file type tags
Oracle ASM File Type Description Oracle ASM File TypeTag
Comments
DUMPSET Data Pump dumpset user_obj#_file# Dump set files encode the username, the job number thatcreated the dump set, and the filenumber as part of the tag.
XTRANSPORT Data file convert tblspname Name of the tablespace where theOracle ASM metadata is added
AUTOBACKUP Automatic backupfiles
spfile?_timestamp spfile? can take one of twovalues: s indicates that thebackup set includes the spfile;n indicates that the backup setdoes not include the spfile.
timestamp is the time that thebackup is started.
ASMPARAMETERFILE Oracle ASMpersistent parameterfiles
spfile Name of the Oracle ASM SPFILE
OCRFILE Oracle ClusterwareRegistry files
ocrfile Name of the OCR files
Alias Oracle ASM File Name FormsYou can use Alias Oracle ASM file names both for referencing existing Oracle ASMfiles and for creating new Oracle ASM files. Alias names start with the disk groupname preceded by a plus sign, after which you specify a name string. Alias file namesare implemented using a hierarchical directory structure, with the slash (/) orbackslash (\) character separating name components. You can create an alias in anyOracle ASM directory generated by Oracle Managed Files (system-generated) orcreated by a user. An alias must include the disk group name; you cannot create analias at the root level (+).
When you create an Oracle ASM file with an alias file name, the file is created with afully qualified name, and the alias file name is additionally created. You can thenaccess the file with either name.
Alias Oracle ASM file names are distinguished from fully qualified file names ornumeric file names because they do not end in a dotted pair of numbers. It is an errorto attempt to create an alias that ends in a dotted pair of numbers, such as in theformat USERS.259.685366091. Examples of Oracle ASM alias file names are:
+data/orcl/control_file1+fra/recover/second.dbf
Oracle Database references database files by their alias file names, but only if youcreate the database files with aliases. If you create database files without aliases andthen add aliases later, the database references the files by their fully qualified filenames. The following are examples of how the database uses alias file names:
About Oracle ASM File Names
5-6 Oracle Automatic Storage Management Administrator's Guide

• Alias file names appear in V$ views. For example, if you create a tablespace anduse an alias file name for the data file, the V$DATAFILE view shows the alias filename.
• When a control file points to data files and online redo log files, it can use alias filenames.
• The CONTROL_FILES initialization parameter can use the alias file names of thecontrol files. Database Configuration Assistant (DBCA) creates control files withalias file names.
Note:
Files created using an alias file name are not considered Oracle Managed Filesand might require manual deletion in the future if they are no longer needed.
For more information about alias file names, see "Managing Alias Names for OracleASM File Names (page 5-13)".
Creating a Tablespace in Oracle ASM: Using a Data File with an Alias NameExample 5-1 (page 5-7) creates an undo tablespace with a data file that has an aliasname, and with attributes that are set by the user-defined templatemy_undo_template. This example assumes that a directory has been created in diskgroup data to contain the alias name and that the user-defined template exists.
Because an alias is used when creating the data file, the file is not an Oracle ManagedFiles (OMF) file and the file is not automatically deleted when the tablespace isdropped. To drop the file manually after the tablespace has been dropped, use thefollowing SQL statement:
ALTER DISKGROUP data DROP FILE '+data/orcl/my_undo_ts';
Example 5-1 Creating a tablespace using an alias name
CREATE UNDO TABLESPACE myundo DATAFILE '+data(my_undo_template)/orcl/my_undo_ts' SIZE 200M;
Alias Oracle ASM File Name with Template FormAn alias Oracle ASM file name with template is used only for Oracle ASM file creationoperations. It has the following format:
+diskgroup(templatename)/alias
Alias file names with template behave identically to alias file names except that a filecreated with an alias file name with template receives the attributes specified by thenamed template. The template must belong to the disk group that the file is beingcreated in. See Example 5-1 (page 5-7).
The creation and maintenance of Oracle ASM templates is discussed in "ManagingDisk Group Templates (page 5-19)".
An example of an alias Oracle ASM file name with template is:
+data(mytemplate)/config1
Explicitly specifying a template name, as in the previous example, overrides thesystem default template for the type of file being created.
About Oracle ASM File Names
Administering Oracle ASM Files, Directories, and Templates 5-7
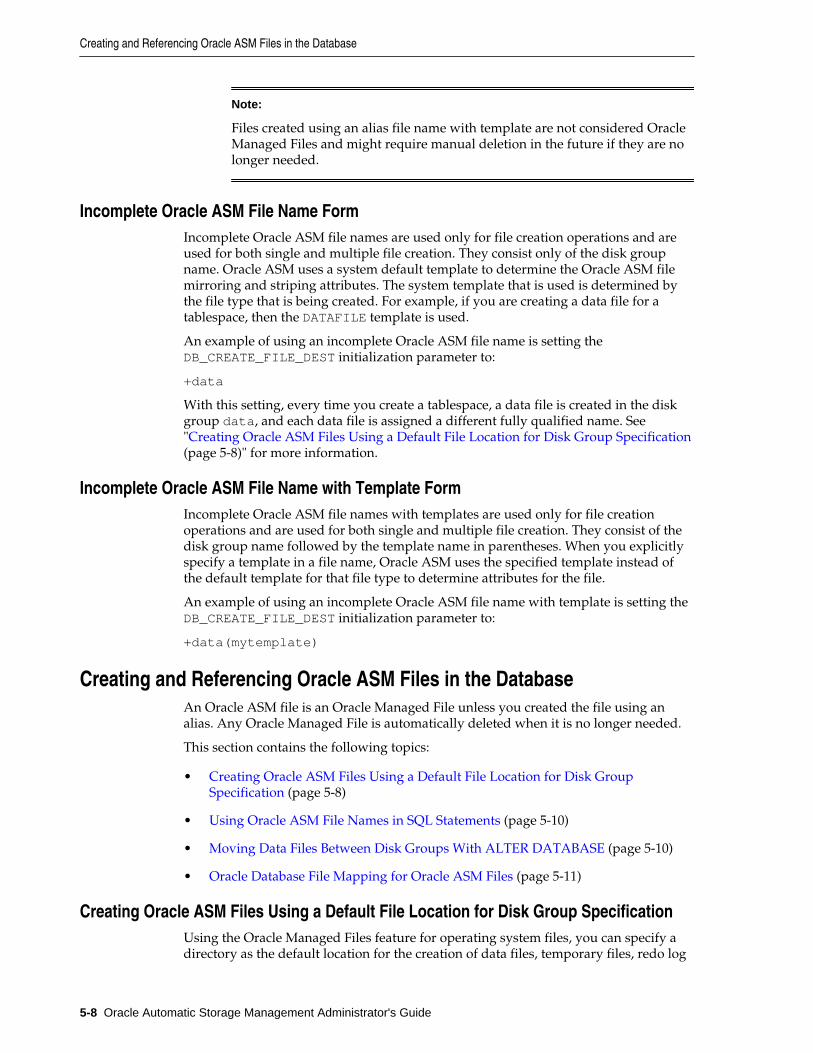
Note:
Files created using an alias file name with template are not considered OracleManaged Files and might require manual deletion in the future if they are nolonger needed.
Incomplete Oracle ASM File Name FormIncomplete Oracle ASM file names are used only for file creation operations and areused for both single and multiple file creation. They consist only of the disk groupname. Oracle ASM uses a system default template to determine the Oracle ASM filemirroring and striping attributes. The system template that is used is determined bythe file type that is being created. For example, if you are creating a data file for atablespace, then the DATAFILE template is used.
An example of using an incomplete Oracle ASM file name is setting theDB_CREATE_FILE_DEST initialization parameter to:
+data
With this setting, every time you create a tablespace, a data file is created in the diskgroup data, and each data file is assigned a different fully qualified name. See"Creating Oracle ASM Files Using a Default File Location for Disk Group Specification(page 5-8)" for more information.
Incomplete Oracle ASM File Name with Template FormIncomplete Oracle ASM file names with templates are used only for file creationoperations and are used for both single and multiple file creation. They consist of thedisk group name followed by the template name in parentheses. When you explicitlyspecify a template in a file name, Oracle ASM uses the specified template instead ofthe default template for that file type to determine attributes for the file.
An example of using an incomplete Oracle ASM file name with template is setting theDB_CREATE_FILE_DEST initialization parameter to:
+data(mytemplate)
Creating and Referencing Oracle ASM Files in the DatabaseAn Oracle ASM file is an Oracle Managed File unless you created the file using analias. Any Oracle Managed File is automatically deleted when it is no longer needed.
This section contains the following topics:
• Creating Oracle ASM Files Using a Default File Location for Disk GroupSpecification (page 5-8)
• Using Oracle ASM File Names in SQL Statements (page 5-10)
• Moving Data Files Between Disk Groups With ALTER DATABASE (page 5-10)
• Oracle Database File Mapping for Oracle ASM Files (page 5-11)
Creating Oracle ASM Files Using a Default File Location for Disk Group SpecificationUsing the Oracle Managed Files feature for operating system files, you can specify adirectory as the default location for the creation of data files, temporary files, redo log
Creating and Referencing Oracle ASM Files in the Database
5-8 Oracle Automatic Storage Management Administrator's Guide

files, and control files. Using the Oracle Managed Files feature for Oracle ASM, youcan specify a disk group, in the form of an incomplete Oracle ASM file name, as thedefault location for creation of these files, and additional types of files, includingarchived log files. As for operating system files, the name of the default disk group isstored in an initialization parameter and is used whenever a file specification (forexample, DATAFILE clause) is not explicitly specified during file creation.
The following initialization parameters accept the multiple file creation context formof Oracle ASM file names as a destination:
• DB_CREATE_FILE_DEST
Specifies the default disk group location in which to create data and temp files.
• DB_CREATE_ONLINE_LOG_DEST_n
Specifies the default disk group location in which to create redo log and controlfiles.
• DB_RECOVERY_FILE_DEST
Specifies a default disk group for a fast recovery area that contains a copy of thecontrol file and redo log files if this parameter is specified andDB_CREATE_ONLINE_LOG_DEST_n and CONTROL_FILES are not specified.
• CONTROL_FILES
Specifies a disk group in which to create control files.
The following initialization parameters accept the multiple file creation context formof the Oracle ASM file names and Oracle ASM directory names as a destination:
• LOG_ARCHIVE_DEST_n
Specifies a default disk group or Oracle ASM directory as destination forarchiving redo log files
• LOG_ARCHIVE_DEST
Optional parameter to use to specify a default disk group or Oracle ASM directoryas destination for archiving redo log files. Use when specifying only onedestination.
• STANDBY_ARCHIVE_DEST
Relevant only for a standby database. It specifies a default disk group or OracleASM directory that is the location of archive logs arriving from a primarydatabase. Not discussed in this book. This parameter has been deprecated. SeeOracle Data Guard Concepts and Administration.
The following CREATE TABLESPACE SQL statement illustrates how an Oracle ASMfile, in this case a data file, might be created in a default disk group. This exampleassumes that the DB_CREATE_FILE_DEST initialization parameter has been set to+data.
SQL> CREATE TABLESPACE mytblspace;
Oracle ASM automatically creates and manages the data file for mytblspace onOracle ASM disks in the disk group data. File extents are stored using the attributesdefined by the default template for a data file.
Creating and Referencing Oracle ASM Files in the Database
Administering Oracle ASM Files, Directories, and Templates 5-9

See Also:
• Oracle Database Reference for information about initialization parameters
• Oracle Database Administrator's Guide for information about initializationparameter files
Using Oracle ASM File Names in SQL StatementsYou can specify Oracle ASM file names in the file specification clause of your SQLstatements. If you are creating a file for the first time, then use the creation form of anOracle ASM file name. If the Oracle ASM file exists, then you must use the referenceform of the file name, and if you are trying to re-create the file, you must add theREUSE keyword so that the space is reused for the new file. This usage might occurwhen, for example, trying to re-create a control file, as shown in "Creating ControlFiles in Oracle ASM (page 17-3)".
If a reference form is used with the REUSE keyword and the file does not exist, anerror results.
Example 5-2 (page 5-10) is an example of specifying an Oracle ASM file name in aSQL statement. In this case, it is used in the file creation form.
The tablespace mytblspace is created and comprises one data file of size 200 MBcontained in the disk group data. The data file is set to auto-extensible with anunlimited maximum size. You can use an AUTOEXTEND clause to override this default.
For more examples of the use of Oracle ASM file name in SQL statements, see CreatingDatabase Files in Oracle ASM Using SQL*Plus (page 17-1).
Example 5-2 Using an Oracle ASM File name in a SQL statement
CREATE TABLESPACE mytblspace DATAFILE '+data' SIZE 200M AUTOEXTEND ON;
Moving Data Files Between Disk Groups With ALTER DATABASEYou can use the ALTER DATABASE MOVE DATAFILE SQL statement to move data filesbetween disk groups while the database is open and users are accessing the data files.
Example 5-3 (page 5-11) shows how you can move a data file from the DATA diskgroup to the DATA2 disk group.
See Also:
• Oracle Database Administrator's Guide for more information about using theALTER DATABASE MOVE DATAFILE SQL statement to move data files
• Oracle Database SQL Language Reference for information about using theALTER DATABASE SQL statement.
• "Moving Data Files Between Oracle ASM Disk Groups Using RMAN(page 8-9)" for information about using RMAN to move data filesbetween disk groups
Creating and Referencing Oracle ASM Files in the Database
5-10 Oracle Automatic Storage Management Administrator's Guide
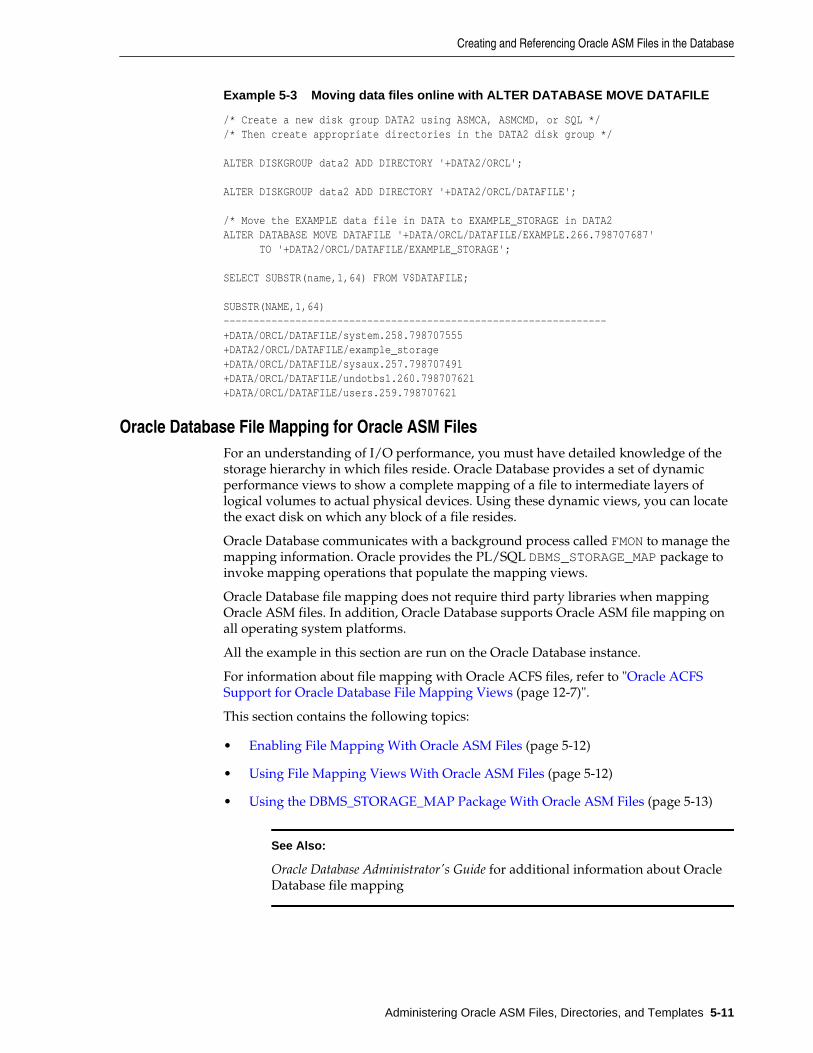
Example 5-3 Moving data files online with ALTER DATABASE MOVE DATAFILE
/* Create a new disk group DATA2 using ASMCA, ASMCMD, or SQL *//* Then create appropriate directories in the DATA2 disk group */
ALTER DISKGROUP data2 ADD DIRECTORY '+DATA2/ORCL';
ALTER DISKGROUP data2 ADD DIRECTORY '+DATA2/ORCL/DATAFILE';
/* Move the EXAMPLE data file in DATA to EXAMPLE_STORAGE in DATA2ALTER DATABASE MOVE DATAFILE '+DATA/ORCL/DATAFILE/EXAMPLE.266.798707687' TO '+DATA2/ORCL/DATAFILE/EXAMPLE_STORAGE';
SELECT SUBSTR(name,1,64) FROM V$DATAFILE; SUBSTR(NAME,1,64)----------------------------------------------------------------+DATA/ORCL/DATAFILE/system.258.798707555+DATA2/ORCL/DATAFILE/example_storage+DATA/ORCL/DATAFILE/sysaux.257.798707491+DATA/ORCL/DATAFILE/undotbs1.260.798707621+DATA/ORCL/DATAFILE/users.259.798707621
Oracle Database File Mapping for Oracle ASM FilesFor an understanding of I/O performance, you must have detailed knowledge of thestorage hierarchy in which files reside. Oracle Database provides a set of dynamicperformance views to show a complete mapping of a file to intermediate layers oflogical volumes to actual physical devices. Using these dynamic views, you can locatethe exact disk on which any block of a file resides.
Oracle Database communicates with a background process called FMON to manage themapping information. Oracle provides the PL/SQL DBMS_STORAGE_MAP package toinvoke mapping operations that populate the mapping views.
Oracle Database file mapping does not require third party libraries when mappingOracle ASM files. In addition, Oracle Database supports Oracle ASM file mapping onall operating system platforms.
All the example in this section are run on the Oracle Database instance.
For information about file mapping with Oracle ACFS files, refer to "Oracle ACFSSupport for Oracle Database File Mapping Views (page 12-7)".
This section contains the following topics:
• Enabling File Mapping With Oracle ASM Files (page 5-12)
• Using File Mapping Views With Oracle ASM Files (page 5-12)
• Using the DBMS_STORAGE_MAP Package With Oracle ASM Files (page 5-13)
See Also:
Oracle Database Administrator's Guide for additional information about OracleDatabase file mapping
Creating and Referencing Oracle ASM Files in the Database
Administering Oracle ASM Files, Directories, and Templates 5-11

Enabling File Mapping With Oracle ASM Files
To enable file mapping, set the FILE_MAPPING initialization parameter to TRUE. Thedatabase instance does not have to be shut down to set this parameter. You can set theparameter using the following ALTER SYSTEM statement:
SQL> ALTER SYSTEM SET FILE_MAPPING=TRUE;
Run the appropriate DBMS_STORAGE_MAP mapping procedure.
• In a cold startup scenario, the Oracle Database has just started and no mappingoperation has been invoked yet. You can execute theDBMS_STORAGE_MAP.MAP_ALL procedure to build the mapping information forthe entire I/O subsystem associated with the database.
For example, the following command builds mapping information and providesfor 10000 extents:
SQL> EXECUTE DBMS_STORAGE_MAP.MAP_ALL(10000);
• In a warm start scenario where the mapping information has already been built,you have the option to invoke the DBMS_STORAGE_MAP.MAP_SAVE procedure tosave the mapping information in the data dictionary.
This procedure is invoked in DBMS_STORAGE_MAP.MAP_ALL() by default. Thisforces all of the mapping information in the SGA to be flushed to disk. TheDBMS_STORAGE_MAP.MAP_SAVE procedure is invoked inDBMS_STORAGE_MAP.MAP_ALL() by default.
After you restart the database, use DBMS_STORAGE_MAP.RESTORE() to restore themapping information into the SGA. If needed, DBMS_STORAGE_MAP.MAP_ALL() canbe called to refresh the mapping information.
Using File Mapping Views With Oracle ASM Files
Mapping information generated by DBMS_STORAGE_MAP package is captured indynamic performance views. These views include V$MAP_COMP_LIST, V$MAP_ELEMENT, V$MAP_EXT_ELEMENT, V$MAP_FILE, V$MAP_FILE_EXTENT, V$MAP_FILE_IO_STACK, V$MAP_LIBRARY, and V$MAP_SUBELEMENT.
For example, you can view file mappings with V$MAP_FILE.
SQL> SELECT FILE_MAP_IDX, SUBSTR(FILE_NAME,1,45), FILE_TYPE, FILE_STRUCTURE FROM V$MAP_FILE;
FILE_MAP_IDX SUBSTR(FILE_NAME,1,45) FILE_TYPE FILE_STRU------------ --------------------------------------------- ----------- --------- 0 +DATA/ORCL/DATAFILE/system.258.841314095 DATAFILE ASMFILE 1 +DATA/ORCL/DATAFILE/sysaux.257.841314021 DATAFILE ASMFILE 2 +DATA/ORCL/DATAFILE/undotbs1.260.841314161 DATAFILE ASMFILE 3 +DATA/ORCL/DATAFILE/example.266.841314219 DATAFILE ASMFILE 4 +DATA/ORCL/DATAFILE/users.259.841314161 DATAFILE ASMFILE 5 +DATA/ORCL/ONLINELOG/group_3.264.841314209 LOGFILE ASMFILE 6 +FRA/ORCL/ONLINELOG/group_3.259.841314211 LOGFILE ASMFILE 7 +DATA/ORCL/ONLINELOG/group_2.263.841314207 LOGFILE ASMFILE 8 +FRA/ORCL/ONLINELOG/group_2.258.841314207 LOGFILE ASMFILE 9 +DATA/ORCL/ONLINELOG/group_1.262.841314203 LOGFILE ASMFILE 10 +FRA/ORCL/ONLINELOG/group_1.257.841314203 LOGFILE ASMFILE 11 +DATA/ORCL/TEMPFILE/temp.265.841314217 TEMPFILE ASMFILE 12 +DATA/ORCL/CONTROLFILE/current.261.841314199 CONTROLFILE ASMFILE 13 +FRA/ORCL/CONTROLFILE/current.256.841314201 CONTROLFILE ASMFILE
Creating and Referencing Oracle ASM Files in the Database
5-12 Oracle Automatic Storage Management Administrator's Guide
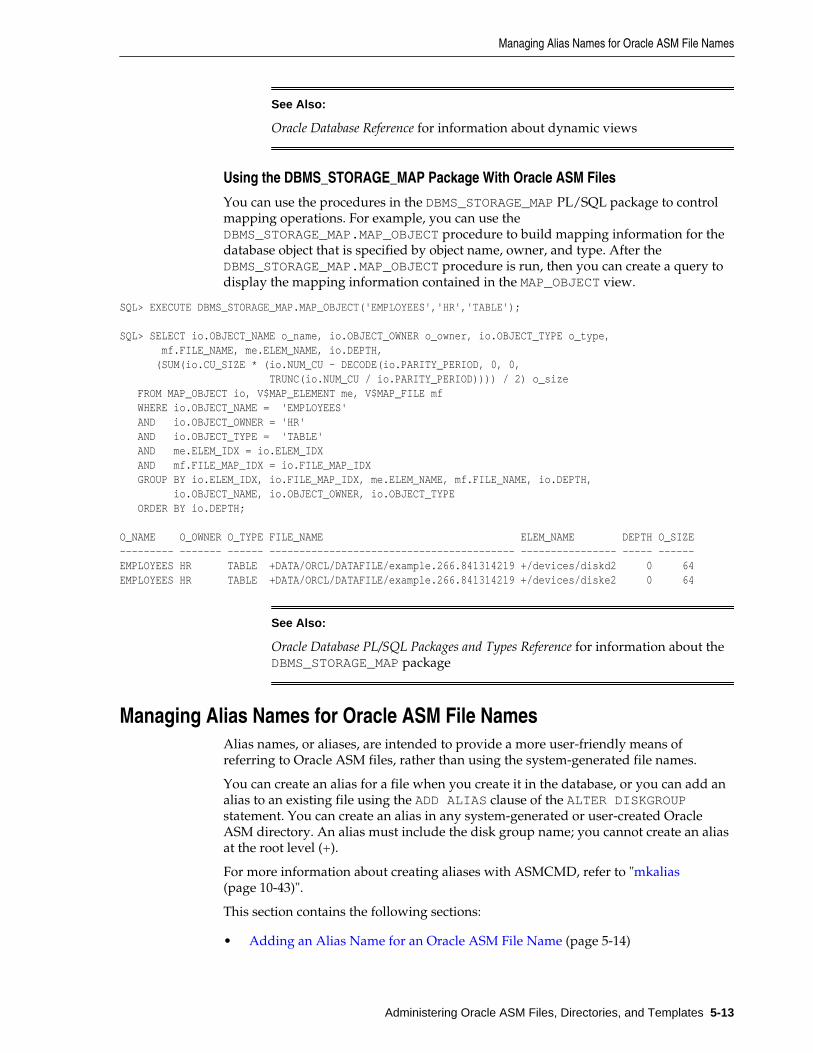
See Also:
Oracle Database Reference for information about dynamic views
Using the DBMS_STORAGE_MAP Package With Oracle ASM Files
You can use the procedures in the DBMS_STORAGE_MAP PL/SQL package to controlmapping operations. For example, you can use theDBMS_STORAGE_MAP.MAP_OBJECT procedure to build mapping information for thedatabase object that is specified by object name, owner, and type. After theDBMS_STORAGE_MAP.MAP_OBJECT procedure is run, then you can create a query todisplay the mapping information contained in the MAP_OBJECT view.
SQL> EXECUTE DBMS_STORAGE_MAP.MAP_OBJECT('EMPLOYEES','HR','TABLE');
SQL> SELECT io.OBJECT_NAME o_name, io.OBJECT_OWNER o_owner, io.OBJECT_TYPE o_type, mf.FILE_NAME, me.ELEM_NAME, io.DEPTH, (SUM(io.CU_SIZE * (io.NUM_CU - DECODE(io.PARITY_PERIOD, 0, 0, TRUNC(io.NUM_CU / io.PARITY_PERIOD)))) / 2) o_size FROM MAP_OBJECT io, V$MAP_ELEMENT me, V$MAP_FILE mf WHERE io.OBJECT_NAME = 'EMPLOYEES' AND io.OBJECT_OWNER = 'HR' AND io.OBJECT_TYPE = 'TABLE' AND me.ELEM_IDX = io.ELEM_IDX AND mf.FILE_MAP_IDX = io.FILE_MAP_IDX GROUP BY io.ELEM_IDX, io.FILE_MAP_IDX, me.ELEM_NAME, mf.FILE_NAME, io.DEPTH, io.OBJECT_NAME, io.OBJECT_OWNER, io.OBJECT_TYPE ORDER BY io.DEPTH; O_NAME O_OWNER O_TYPE FILE_NAME ELEM_NAME DEPTH O_SIZE--------- ------- ------ ----------------------------------------- ---------------- ----- ------EMPLOYEES HR TABLE +DATA/ORCL/DATAFILE/example.266.841314219 +/devices/diskd2 0 64EMPLOYEES HR TABLE +DATA/ORCL/DATAFILE/example.266.841314219 +/devices/diske2 0 64
See Also:
Oracle Database PL/SQL Packages and Types Reference for information about theDBMS_STORAGE_MAP package
Managing Alias Names for Oracle ASM File NamesAlias names, or aliases, are intended to provide a more user-friendly means ofreferring to Oracle ASM files, rather than using the system-generated file names.
You can create an alias for a file when you create it in the database, or you can add analias to an existing file using the ADD ALIAS clause of the ALTER DISKGROUPstatement. You can create an alias in any system-generated or user-created OracleASM directory. An alias must include the disk group name; you cannot create an aliasat the root level (+).
For more information about creating aliases with ASMCMD, refer to "mkalias(page 10-43)".
This section contains the following sections:
• Adding an Alias Name for an Oracle ASM File Name (page 5-14)
Managing Alias Names for Oracle ASM File Names
Administering Oracle ASM Files, Directories, and Templates 5-13

• Renaming an Alias Name for an Oracle ASM File Name (page 5-14)
• Dropping an Alias Name for an Oracle ASM File Name (page 5-14)
• Dropping Files and Associated Aliases from a Disk Group (page 5-14)
Adding an Alias Name for an Oracle ASM File NameUse the ADD ALIAS clause of the ALTER DISKGROUP statement to create an aliasname for an Oracle ASM file name. The alias name must consist of the full directorypath and the alias itself.
Example 5-4 (page 5-14) adds a new alias name for a system-generated file name.
Example 5-4 Adding an alias name for an Oracle ASM file name
ALTER DISKGROUP data ADD ALIAS '+data/orcl/second.dbf' FOR '+data/orcl/datafile/mytable.342.123456789';
Renaming an Alias Name for an Oracle ASM File NameUse the RENAME ALIAS clause of the ALTER DISKGROUP statement to rename analias for an Oracle ASM file name. The old and the new alias names must consist of thefull directory paths of the alias names.
Example 5-5 (page 5-14) renames an alias.
Renaming an alias does not update the database reference to the alias.
Example 5-5 Renaming an alias name for an Oracle ASM file name
ALTER DISKGROUP data RENAME ALIAS '+data/orcl/datafile.dbf' TO '+data/payroll/compensation.dbf';
Dropping an Alias Name for an Oracle ASM File NameUse the DROP ALIAS clause of the ALTER DISKGROUP statement to drop an alias foran Oracle ASM file name. The alias name must consist of the full directory path andthe alias itself. The underlying file to which the alias refers is unchanged.
Example 5-6 (page 5-14) drops an alias.
Example 5-7 (page 5-14) fails because it attempts to drop a system-generated filename and this syntax is not allowed.
Example 5-6 Dropping an alias name for an Oracle ASM file name
ALTER DISKGROUP data DROP ALIAS '+data/payroll/compensation.dbf';
Example 5-7 Dropping an alias name for an Oracle ASM file name
ALTER DISKGROUP data DROP ALIAS '+data/orcl/datafile/mytable.342.123456789';
Dropping Files and Associated Aliases from a Disk GroupYou can delete Oracle ASM files and their associated aliases from a disk group usingthe DROP FILE clause of the ALTER DISKGROUP statement. You must use a fullyqualified file name, or an alias name when specifying the file to delete. The underlyingfile on the file system is not dropped when the alias is dropped.
Some reasons why you may want to delete files include:
Managing Alias Names for Oracle ASM File Names
5-14 Oracle Automatic Storage Management Administrator's Guide

• A file created using aliases is not an Oracle Managed File. Consequently, it is notautomatically deleted.
• A point-in-time-recovery of a database might restore the database to a time beforea tablespace was created. The restore does not delete the tablespace, but there isno reference to the tablespace or its data file in the restored database. You couldmanually delete the data file.
In Example 5-8 (page 5-15), the alias name for the file is used when deleting both thefile and the alias from a disk group.
In Example 5-9 (page 5-15), the Oracle Managed Files (system-generated) file name isused when dropping the file and any associated alias.
Example 5-8 Dropping a file and alias from a disk group using the alias name
ALTER DISKGROUP data DROP FILE '+data/payroll/compensation.dbf';
Example 5-9 Dropping a file and alias from a disk group using the system-generated name
ALTER DISKGROUP data DROP FILE '+data/orcl/datafile/mytable.342.123456789';
Managing Disk Group DirectoriesOracle ASM disk groups contain a system-generated hierarchical directory structurefor storing Oracle ASM files. The system-generated file name that Oracle ASM assignsto each file represents a path in this directory hierarchy. The following is an exampleof a system-generated file name:
+data/orcl/CONTROLFILE/Current.256.541956473
The plus sign represents the root of the Oracle ASM file system. The data directory isthe parent directory for all files in the data disk group. The orcl directory is theparent directory for all files in the orcl database, and the CONTROLFILE directorycontains all control files for the orcl database.
You can create your own directories within this hierarchy to store aliases that youcreate. Thus, in addition to having user-friendly alias names for Oracle ASM files, youcan have user-friendly paths to those names.
This section describes how to use the ALTER DISKGROUP statement to create adirectory structure for aliases. It also describes how you can rename a directory ordrop a directory. This section contains the following topics:
• Creating a Directory (page 5-15)
• Renaming a Directory (page 5-16)
• Dropping a Directory (page 5-16)
Creating a DirectoryUse the ADD DIRECTORY clause of the ALTER DISKGROUP statement to create ahierarchical directory structure for alias names for Oracle ASM files. Use the slash (/)or backslash (\) character to separate components of the directory path. The directorypath must start with the disk group name, preceded by a plus sign (+), followed byany subdirectory names of your choice.
Managing Disk Group Directories
Administering Oracle ASM Files, Directories, and Templates 5-15

The parent directory must exist before attempting to create a subdirectory or alias inthat directory. A directory must be created below the disk group level.
Example 5-10 (page 5-16) creates a hierarchical directory for disk group data, whichcan contain, for example, the alias name +data/orcl/control_file1.
Assuming no subdirectory exists under the directory +data/orcl, the SQL statementfails in Example 5-11 (page 5-16).
Example 5-10 Creating a new directory
ALTER DISKGROUP data ADD DIRECTORY '+data/orcl';
Example 5-11 Creating a new subdirectory
ALTER DISKGROUP data ADD DIRECTORY '+data/orcl/first_dir/second_dir';
Renaming a DirectoryThe RENAME DIRECTORY clause of the ALTER DISKGROUP statement enables you torename a directory. System-created directories (those containing system-generatednames) cannot be renamed. The root level (disk group name) cannot be renamed.
Example 5-12 (page 5-16) renames a directory.
Example 5-12 Renaming a directory
ALTER DISKGROUP data RENAME DIRECTORY '+data/mydir' TO '+data/yourdir';
Dropping a DirectoryYou can delete a directory using the DROP DIRECTORY clause of the ALTERDISKGROUP statement. You cannot drop a system-created directory. You cannot dropa directory containing alias names unless you also specify the FORCE clause.
Example 5-13 (page 5-16) deletes a directory along with its contents.
Example 5-13 Dropping a directory
ALTER DISKGROUP data DROP DIRECTORY '+data/yourdir' FORCE;
Accessing Oracle ASM Files with the XML DB Virtual FolderOracle ASM files and directories can be accessed through a virtual folder in the XMLDB repository. The repository path to the virtual folder is /sys/asm. The folder isvirtual because its contents do not actually reside in the repository; they exist asnormal Oracle ASM files and directories. For example, /sys/asm provides a means toaccess and manipulate the Oracle ASM files and directories with programmatic APIssuch as the DBMS_XDB package and with XML DB protocols such as FTP and HTTP/WebDAV. You can also use the ASMCMD cp command to copy files. See "cp(page 10-37)".
A typical use for this capability might be to view /sys/asm as a Web Folder in agraphical user interface (with the WebDAV protocol), and then copy a Data Pumpdumpset from an Oracle ASM disk group to an operating system file system bydragging and dropping.
You must log in as a user other than SYS and you must have been granted the DBArole to access /sys/asm with XML DB protocols. For additional information aboutthe /sys/asm folder, refer to "Inside /sys/asm (page 5-17)".
Accessing Oracle ASM Files with the XML DB Virtual Folder
5-16 Oracle Automatic Storage Management Administrator's Guide

Note:
For security reasons, FTP is disabled, by default. This is because the IETF FTPprotocol specification requires that passwords be transmitted in clear text.Disabling is done by configuring the FTP server port as zero (0). To enableFTP, set the ftp-port parameter to the FTP port to use, such as 2100.
See Also:
• Oracle XML DB Developer's Guide for information about Oracle XML DB,including additional ways to configure port numbers for the XML DBprotocol servers
• Oracle Database PL/SQL Packages and Types Reference for information aboutthe DBMS_XDB package
Inside /sys/asmThe Oracle ASM virtual folder is created by default during XML DB installation. If thedatabase is not configured to use Oracle ASM, the folder is empty and no operationsare permitted on it.
The Oracle ASM virtual folder contains folders and subfolders that follow thehierarchy defined by the structure of an Oracle ASM fully qualified file name. Figure 5-1 (page 5-18) illustrates an example of this hierarchy, which for simplicity,excludes directories created for aliases.
The folder /sys/asm contains one subfolder for every mounted disk group, and eachdisk group folder contains one subfolder for each database that uses the disk group. Inaddition, a disk group folder might contain files and folders corresponding to aliasescreated by the administrator. Continuing the hierarchy, the database folders containfile type folders, which contain the Oracle ASM files.
Accessing Oracle ASM Files with the XML DB Virtual Folder
Administering Oracle ASM Files, Directories, and Templates 5-17

Figure 5-1 Hierarchical Structure of Oracle ASM Folders in an XML DB Installation
DATAFILE TEMPFILE CONTROLFILE ONLINELOG CONTROLFILE ONLINELOG ARCHIVELOG
File�Types
Databases
Disk Groups
HR MFG HR MFG
DATA RECOVERY
/sys/asm
The following are usage restrictions on /sys/asm:
• You cannot create hard links to existing Oracle ASM files or directories with APIssuch as DBMS_XDB.LINK.
• You cannot rename (move) an Oracle ASM file to another disk group or to adirectory outside Oracle ASM.
You can use the directory /sys/asm for storing the names of disk groups. You cannotstore other files in this directory. Within the disk group directories under /sys/asm,such as /sys/asm/DATA, you can only store database files in these sub-directories.Oracle ASM rejects attempts to store non-database files in these directories.
Using DBMS_FILE Transfer Utility for Oracle ASMThe DBMS_FILE_TRANSFER package provides procedures to copy Oracle ASM fileswithin a database or to transfer binary files between databases that use Oracle ASM.The DBMS_FILE_TRANSFER package has the following procedures:
• COPY_FILE—Reads a file from a source directory and creates a copy of the file ina destination directory. The source and destination directories can both be in alocal file system or in an Oracle ASM disk group. You can also use this procedureto copy between a local file system and an Oracle ASM disk group; the copyoperation is valid in either direction.
• GET_FILE—Contacts a remote database to read a remote file and then creates acopy of the file in the local file system or Oracle ASM disk group.
• PUT_FILE—Reads a local file or Oracle ASM disk group and contacts a remotedatabase to create a copy of the file in the remote file system.
Using DBMS_FILE Transfer Utility for Oracle ASM
5-18 Oracle Automatic Storage Management Administrator's Guide

See Also:
Oracle Database PL/SQL Packages and Types Reference for more informationabout the DBMS_FILE_TRANSFER package
Managing Disk Group TemplatesThis section describes how to manage disk group templates under the followingtopics:
• Template Attributes (page 5-20)
• Adding Templates to a Disk Group (page 5-21)
• Modifying a Disk Group Template (page 5-22)
• Dropping Templates from a Disk Group (page 5-22)
• Creating Tablespaces in Oracle ASM: Specifying Attributes with Templates(page 5-23)
Templates are used to set attributes of files created in an Oracle ASM disk group.When a file is created, redundancy and striping attributes are set for that file based onan explicitly named template or the system template that is the default template forthe file type.
When a disk group is created, Oracle ASM creates a set of default templates for thatdisk group. The set consists of one template for each file type (data file, control file,redo log file, and so on) that is supported by Oracle ASM. For example, a templatenamed ONLINELOG provides the default file redundancy and striping attributes for allredo log files written to Oracle ASM disks. Default template settings depend on thedisk group type. The default template for data files for a normal redundancy diskgroup sets two-way mirroring, while the corresponding default template in a highredundancy disk group sets three-way mirroring. You can modify these defaulttemplates.
For example, default redundancy for the online redo log files (ONLINELOG template)for a normal redundancy disk group is MIRROR. In Example 4-1 (page 4-10), thissetting means that when one copy of a redo log file extent is written to a disk in failuregroup controller1, a mirrored copy of the file extent is written to a disk in failuregroup controller2. To support the default mirroring of a normal redundancy diskgroup, at least two failure groups must be defined.
Table 5-6 (page 5-20) lists the default templates and the attributes that are associatedto matching files. As the table shows, the initial redundancy value of each defaulttemplate depends on the type of disk group that the template belongs to.
Using clauses of the ALTER DISKGROUP statement, you can add new templates to adisk group, modify existing ones, or drop templates. The reason to add templates is tocreate the right combination of attributes to meet unique requirements. You can thenreference a template name when creating a file, thereby assigning desired attributesbased on an individual file rather than on the file type.
The V$ASM_TEMPLATE view lists all of the templates known to the Oracle ASMinstance. For an example of the information displayed in the V$ASM_TEMPLATE view,see Example 6-10 (page 6-6).
Managing Disk Group Templates
Administering Oracle ASM Files, Directories, and Templates 5-19

Template AttributesTable 5-4 (page 5-20) shows the permitted striping attribute values and allocationunit size chunks. These values correspond to the STRIPE column of V$ASM_TEMPLATE.
Table 5-4 Permitted values for Oracle ASM template striping attribute
Striping Attribute Value Description
FINE Striping in 128 KB chunks.
COARSE Striping in 1 MB chunks.
Table 5-5 (page 5-20) shows the permitted redundancy values for Oracle ASMtemplates. These values correspond to the REDUND column of V$ASM_TEMPLATE.
Table 5-5 Permitted values for Oracle ASM template redundancy attribute
RedundancyAttribute Value
Resulting Mirroring inNormal Redundancy DiskGroup
Resulting Mirroring in HighRedundancy Disk Group
Resulting Mirroring inExternal Redundancy DiskGroup
MIRROR Two-way mirroring Three-way mirroring (Not allowed)
HIGH Three-way mirroring Three-way mirroring (Not allowed)
UNPROTECTED No mirroring (Not allowed) No mirroring
Table 5-6 (page 5-20) shows the initial attribute settings for some default templates.The type of mirroring associated with the Mirroring column for normal, high, andexternal redundancy disk groups is specified in Table 5-5 (page 5-20). For example, theMirror column for high redundancy disk groups displays MIRROR in Table 5-6(page 5-20). In Table 5-5 (page 5-20), the MIRROR value for high redundancy diskgroups corresponds to Three-way mirroring.
For an example of the output of the V$ASM_TEMPLATE view, refer to Example 6-10(page 6-6).
Table 5-6 Oracle ASM system default templates attribute settings
Template Name FileStriping
Mirroring,NormalRedundancyDisk Group
Mirroring,HighRedundancyDisk Group
Mirroring,ExternalRedundancyDisk Group
PrimaryRegion
Mirror Region
ARCHIVELOG COARSE MIRROR MIRROR UNPROTECTED COLD MIRRORCOLD
ASMPARAMETERFILE COARSE MIRROR MIRROR UNPROTECTED COLD MIRRORCOLD
AUDIT_SPILLFILES COARSE MIRROR MIRROR UNPROTECTED COLD MIRRORCOLD
AUTOBACKUP COARSE MIRROR MIRROR UNPROTECTED COLD MIRRORCOLD
BACKUPSET COARSE MIRROR MIRROR UNPROTECTED COLD MIRRORCOLD
CHANGETRACKING COARSE MIRROR MIRROR UNPROTECTED COLD MIRRORCOLD
Managing Disk Group Templates
5-20 Oracle Automatic Storage Management Administrator's Guide

Table 5-6 (Cont.) Oracle ASM system default templates attribute settings
Template Name FileStriping
Mirroring,NormalRedundancyDisk Group
Mirroring,HighRedundancyDisk Group
Mirroring,ExternalRedundancyDisk Group
PrimaryRegion
Mirror Region
CONTROLFILE FINE HIGH MIRROR UNPROTECTED COLD MIRRORCOLD
DATAFILE COARSE MIRROR MIRROR UNPROTECTED COLD MIRRORCOLD
DATAGUARDCONFIG COARSE MIRROR MIRROR UNPROTECTED COLD MIRRORCOLD
DUMPSET COARSE MIRROR MIRROR UNPROTECTED COLD MIRRORCOLD
FLASHBACK COARSE MIRROR MIRROR UNPROTECTED COLD MIRRORCOLD
FLASHFILE COARSE MIRROR MIRROR UNPROTECTED COLD MIRRORCOLD
KEY_STORE COARSE MIRROR MIRROR UNPROTECTED COLD MIRRORCOLD
OCRFILE COARSE MIRROR MIRROR UNPROTECTED COLD MIRRORCOLD
ONLINELOG COARSE MIRROR MIRROR UNPROTECTED COLD MIRRORCOLD
PARAMETERFILE COARSE MIRROR MIRROR UNPROTECTED COLD MIRRORCOLD
TEMPFILE COARSE MIRROR MIRROR UNPROTECTED COLD MIRRORCOLD
VOTINGFILE COARSE MIRROR MIRROR UNPROTECTED COLD MIRRORCOLD
XTRANSPORT COARSE MIRROR MIRROR UNPROTECTED COLD MIRRORCOLD
Table 5-7 (page 5-21) shows the permitted primary and mirror region values forOracle ASM templates. These values correspond to the PRIMARY_REGION andMIRROR_REGION columns of V$ASM_TEMPLATE. For more information about diskregions, see "Intelligent Data Placement (page 4-20)".
Table 5-7 Permitted values for Oracle ASM template primary and mirror regionattribute
Primary and Mirror Region AttributeValue
Description
COLD, MIRRORCOLD Use the inner most tracks (closest to spindle) on thedisk drive.
HOT, MIRRORHOT Use the outermost tracks which have greater speedand higher bandwidth.
Adding Templates to a Disk GroupTo add a template to a disk group, use the ADD TEMPLATE clause of the ALTERDISKGROUP statement.
If the name of your new template is not listed in Table 5-6 (page 5-20), then it is notused as a default template for database file types. To use the template, you mustreference its name when creating a file.
Managing Disk Group Templates
Administering Oracle ASM Files, Directories, and Templates 5-21
When adding a template to a disk group, the attributes are optional. If no redundancyattribute is specified, then the value defaults to MIRROR for a normal redundancy diskgroup, HIGH for a high redundancy disk group, and UNPROTECTED for an externalredundancy disk group. If you do not specify a striping attribute, then the valuedefaults to COARSE. If you do not specify a value for the primary or mirror regionattributes, then the value defaults to COLD and MIRRORCOLD respectively.
Example 5-14 (page 5-22) creates a new template named reliable for the normalredundancy disk group data.
Example 5-15 (page 5-22) creates a new template named unreliable that specifiesUNPROTECTED (no mirroring) for files.
Note:
Oracle discourages using unprotected files unless you have implementedhardware mirroring. The previous example is presented only to furtherillustrate how the attributes for templates are set.
See Also:
Oracle Database SQL Language Reference for more information about the ALTERDISKGROUP...ADD TEMPLATE command
Example 5-14 Adding a template with high redundancy to a disk group
ALTER DISKGROUP data ADD TEMPLATE reliable ATTRIBUTES (HIGH FINE);
Example 5-15 Adding a template with external redundancy to a disk group
ALTER DISKGROUP data ADD TEMPLATE unreliable ATTRIBUTES (UNPROTECTED);
Modifying a Disk Group TemplateThe MODIFY TEMPLATE clause of the ALTER DISKGROUP statement enables you tomodify the attribute specifications of an existing system default or user-defined diskgroup template. Only specified template attributes are changed. Unspecifiedproperties retain their current value. When you modify an existing template, only newfiles created by the template reflect the attribute changes. Existing files maintain theirattributes.
Example 5-16 (page 5-22) changes the striping attribute specification of thereliable template for disk group data.
Example 5-16 Modifying a disk group template
ALTER DISKGROUP data MODIFY TEMPLATE reliable ATTRIBUTES (COARSE);
Dropping Templates from a Disk GroupUse the DROP TEMPLATE clause of the ALTER DISKGROUP statement to drop one ormore templates from a disk group. You can only drop templates that are user-defined;you cannot drop system default templates.
Example 5-17 (page 5-23) drops the previously created template unreliable fromdata:
Managing Disk Group Templates
5-22 Oracle Automatic Storage Management Administrator's Guide

Example 5-17 Dropping a template from a disk group
ALTER DISKGROUP data DROP TEMPLATE unreliable;
Creating Tablespaces in Oracle ASM: Specifying Attributes with TemplatesUse the SQL ALTER SYSTEM and CREATE TABLESPACE statements to create atablespace that uses a user-defined template to specify the attributes of the data file.
Example 5-18 (page 5-23) assumes that the template (mytemplate) has been defined.
Example 5-18 Using a user-defined template to specify attributes
ALTER SYSTEM SET DB_CREATE_FILE_DEST = '+data(mytemplate)';
CREATE TABLESPACE mytblspace;
Managing Disk Group Templates
Administering Oracle ASM Files, Directories, and Templates 5-23

Managing Disk Group Templates
5-24 Administrator's Guide

6Using Views to Display Oracle ASM
Information
This chapter contains information about using dynamic views to display OracleAutomatic Storage Management (Oracle ASM) information.
• Views Containing Oracle ASM Disk Group Information (page 6-1)
• Viewing Oracle ASM File Access Control Information (page 6-4)
• Viewing Disk Region Information (page 6-5)
See Also:
Oracle Database Reference for information about all of the V$ASM* dynamicperformance views
Views Containing Oracle ASM Disk Group InformationYou can use the views in Table 6-1 (page 6-1) to obtain information about OracleASM disk groups.
Table 6-1 Oracle ASM dynamic views for disk group information
View Description
V$ASM_ALIAS Contains one row for every alias present in every disk groupmounted by the Oracle ASM instance.
V$ASM_ATTRIBUTE Displays one row for each attribute defined. In addition to attributesspecified by CREATE DISKGROUP and ALTER DISKGROUP statements,the view may show other attributes that are created automatically.Attributes are only displayed for disk groups whereCOMPATIBLE.ASM is set to 11.1 or higher.
V$ASM_AUDIT_CLEAN_EVENTS Displays information about the history of audit trail cleanup or purgeevents.
V$ASM_AUDIT_CLEANUP_JOBS Displays information about the configured audit trail purge jobs.
V$ASM_AUDIT_CONFIG_PARAMS Displays information about the currently configured audit trailproperties.
V$ASM_AUDIT_LAST_ARCH_TS Displays information about the last archive timestamps set for audittrail cleanup or purges.
Using Views to Display Oracle ASM Information 6-1
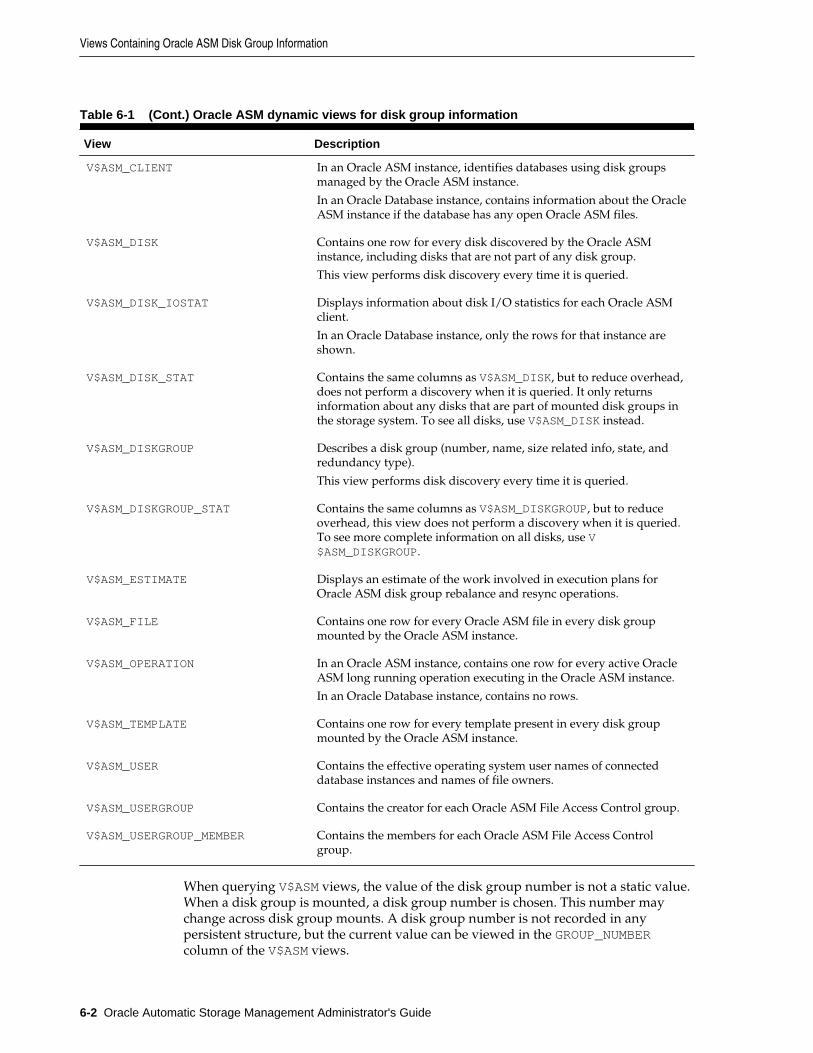
Table 6-1 (Cont.) Oracle ASM dynamic views for disk group information
View Description
V$ASM_CLIENT In an Oracle ASM instance, identifies databases using disk groupsmanaged by the Oracle ASM instance.
In an Oracle Database instance, contains information about the OracleASM instance if the database has any open Oracle ASM files.
V$ASM_DISK Contains one row for every disk discovered by the Oracle ASMinstance, including disks that are not part of any disk group.
This view performs disk discovery every time it is queried.
V$ASM_DISK_IOSTAT Displays information about disk I/O statistics for each Oracle ASMclient.
In an Oracle Database instance, only the rows for that instance areshown.
V$ASM_DISK_STAT Contains the same columns as V$ASM_DISK, but to reduce overhead,does not perform a discovery when it is queried. It only returnsinformation about any disks that are part of mounted disk groups inthe storage system. To see all disks, use V$ASM_DISK instead.
V$ASM_DISKGROUP Describes a disk group (number, name, size related info, state, andredundancy type).
This view performs disk discovery every time it is queried.
V$ASM_DISKGROUP_STAT Contains the same columns as V$ASM_DISKGROUP, but to reduceoverhead, this view does not perform a discovery when it is queried.To see more complete information on all disks, use V$ASM_DISKGROUP.
V$ASM_ESTIMATE Displays an estimate of the work involved in execution plans forOracle ASM disk group rebalance and resync operations.
V$ASM_FILE Contains one row for every Oracle ASM file in every disk groupmounted by the Oracle ASM instance.
V$ASM_OPERATION In an Oracle ASM instance, contains one row for every active OracleASM long running operation executing in the Oracle ASM instance.
In an Oracle Database instance, contains no rows.
V$ASM_TEMPLATE Contains one row for every template present in every disk groupmounted by the Oracle ASM instance.
V$ASM_USER Contains the effective operating system user names of connecteddatabase instances and names of file owners.
V$ASM_USERGROUP Contains the creator for each Oracle ASM File Access Control group.
V$ASM_USERGROUP_MEMBER Contains the members for each Oracle ASM File Access Controlgroup.
When querying V$ASM views, the value of the disk group number is not a static value.When a disk group is mounted, a disk group number is chosen. This number maychange across disk group mounts. A disk group number is not recorded in anypersistent structure, but the current value can be viewed in the GROUP_NUMBERcolumn of the V$ASM views.
Views Containing Oracle ASM Disk Group Information
6-2 Oracle Automatic Storage Management Administrator's Guide
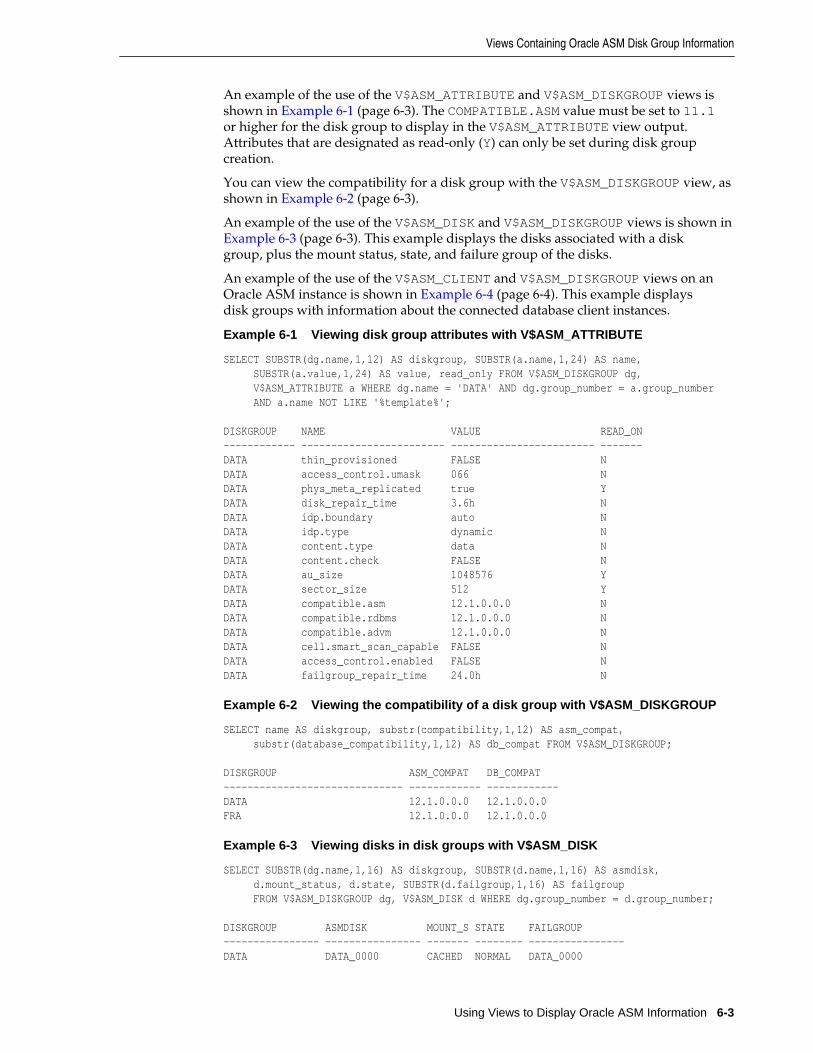
An example of the use of the V$ASM_ATTRIBUTE and V$ASM_DISKGROUP views isshown in Example 6-1 (page 6-3). The COMPATIBLE.ASM value must be set to 11.1or higher for the disk group to display in the V$ASM_ATTRIBUTE view output.Attributes that are designated as read-only (Y) can only be set during disk groupcreation.
You can view the compatibility for a disk group with the V$ASM_DISKGROUP view, asshown in Example 6-2 (page 6-3).
An example of the use of the V$ASM_DISK and V$ASM_DISKGROUP views is shown in Example 6-3 (page 6-3). This example displays the disks associated with a diskgroup, plus the mount status, state, and failure group of the disks.
An example of the use of the V$ASM_CLIENT and V$ASM_DISKGROUP views on anOracle ASM instance is shown in Example 6-4 (page 6-4). This example displaysdisk groups with information about the connected database client instances.
Example 6-1 Viewing disk group attributes with V$ASM_ATTRIBUTE
SELECT SUBSTR(dg.name,1,12) AS diskgroup, SUBSTR(a.name,1,24) AS name, SUBSTR(a.value,1,24) AS value, read_only FROM V$ASM_DISKGROUP dg, V$ASM_ATTRIBUTE a WHERE dg.name = 'DATA' AND dg.group_number = a.group_number AND a.name NOT LIKE '%template%'; DISKGROUP NAME VALUE READ_ON------------ ------------------------ ------------------------ -------DATA thin_provisioned FALSE NDATA access_control.umask 066 NDATA phys_meta_replicated true YDATA disk_repair_time 3.6h NDATA idp.boundary auto NDATA idp.type dynamic NDATA content.type data NDATA content.check FALSE NDATA au_size 1048576 YDATA sector_size 512 YDATA compatible.asm 12.1.0.0.0 NDATA compatible.rdbms 12.1.0.0.0 NDATA compatible.advm 12.1.0.0.0 NDATA cell.smart_scan_capable FALSE NDATA access_control.enabled FALSE NDATA failgroup_repair_time 24.0h N
Example 6-2 Viewing the compatibility of a disk group with V$ASM_DISKGROUP
SELECT name AS diskgroup, substr(compatibility,1,12) AS asm_compat, substr(database_compatibility,1,12) AS db_compat FROM V$ASM_DISKGROUP; DISKGROUP ASM_COMPAT DB_COMPAT------------------------------ ------------ ------------DATA 12.1.0.0.0 12.1.0.0.0FRA 12.1.0.0.0 12.1.0.0.0
Example 6-3 Viewing disks in disk groups with V$ASM_DISK
SELECT SUBSTR(dg.name,1,16) AS diskgroup, SUBSTR(d.name,1,16) AS asmdisk, d.mount_status, d.state, SUBSTR(d.failgroup,1,16) AS failgroup FROM V$ASM_DISKGROUP dg, V$ASM_DISK d WHERE dg.group_number = d.group_number;
DISKGROUP ASMDISK MOUNT_S STATE FAILGROUP---------------- ---------------- ------- -------- ----------------DATA DATA_0000 CACHED NORMAL DATA_0000
Views Containing Oracle ASM Disk Group Information
Using Views to Display Oracle ASM Information 6-3

DATA DATA_0010 CACHED NORMAL DATA_0010DATA DATA_0001 CACHED NORMAL DATA_0001DATA DATA_0003 CACHED NORMAL DATA_0003DATA DATA_0009 CACHED NORMAL DATA_0009DATA DATA_0007 CACHED NORMAL DATA_0007DATA DATA_0004 CACHED NORMAL DATA_0004DATA DATA_0008 CACHED NORMAL DATA_0008DATA DATA_0006 CACHED NORMAL DATA_0006DATA DATA_0011 CACHED NORMAL DATA_0011DATA DATA_0005 CACHED NORMAL DATA_0005DATA DATA_0002 CACHED NORMAL DATA_0002FRA FRA_0011 CACHED NORMAL FRA_0011FRA FRA_0002 CACHED NORMAL FRA_0002FRA FRA_0001 CACHED NORMAL FRA_0001FRA FRA_0003 CACHED NORMAL FRA_0003FRA FRA_0004 CACHED NORMAL FRA_0004FRA FRA_0000 CACHED NORMAL FRA_0000...
Example 6-4 Viewing disk group clients with V$ASM_CLIENT
SELECT dg.name AS diskgroup, SUBSTR(c.instance_name,1,12) AS instance, SUBSTR(c.db_name,1,12) AS dbname, SUBSTR(c.SOFTWARE_VERSION,1,12) AS software, SUBSTR(c.COMPATIBLE_VERSION,1,12) AS compatible FROM V$ASM_DISKGROUP dg, V$ASM_CLIENT c WHERE dg.group_number = c.group_number; DISKGROUP INSTANCE DBNAME SOFTWARE COMPATIBLE------------------------------ ------------ -------- ------------ ------------DATA +ASM +ASM 12.1.0.1.0 12.1.0.1.0DATA orcl orcl 12.1.0.1.0 12.1.0.1.0DATA +ASM asmvol 12.1.0.1.0 12.1.0.1.0FRA orcl orcl 12.1.0.1.0 12.1.0.1.0...
Viewing Oracle ASM File Access Control InformationYou can view information about Oracle ASM File Access Control in the columns of theV$ASM_USER, V$ASM_USERGROUP, V$ASM_USERGROUP_MEMBER, and V$ASM_FILEviews.
Example 6-5 (page 6-4) shows information about Oracle ASM File Access Controlusers displayed in the V$ASM_USER view.
Example 6-6 (page 6-5) shows information about Oracle ASM File Access Controluser groups displayed in the V$ASM_USERGROUP view.
Example 6-7 (page 6-5) shows information about Oracle ASM File Access Controluser groups and members displayed in the V$ASM_USERGROUP_MEMBER view.
Example 6-8 (page 6-5) shows information about Oracle ASM File Access Controlfile permissions displayed in the V$ASM_FILE view.
For more information about Oracle ASM File Access Control, see "Managing OracleASM File Access Control for Disk Groups (page 4-50)".
Example 6-5 Viewing Oracle ASM File Access Control information with V$ASM_USER
SELECT dg.name AS diskgroup, u.group_number, u.user_number, u.os_id, u.os_name FROM V$ASM_DISKGROUP dg, V$ASM_USER u WHERE dg.group_number = u.group_number AND dg.name = 'DATA';
Viewing Oracle ASM File Access Control Information
6-4 Oracle Automatic Storage Management Administrator's Guide

DISKGROUP GROUP_NUMBER USER_NUMBER OS_ID OS_NAME--------------- ------------ ----------- ----- -------DATA 1 1 1001 oracle1DATA 1 2 1002 oracle2DATA 1 3 1003 grid
Example 6-6 Viewing File Access Control information with V$ASM_USERGROUP
SELECT dg.name AS diskgroup, ug.group_number, ug.owner_number, u.os_name, ug.usergroup_number, ug.name FROM V$ASM_DISKGROUP dg, V$ASM_USER u, V$ASM_USERGROUP ug WHERE dg.group_number = ug.group_number AND dg.name = 'DATA' AND ug.owner_number = u.user_number;
DISKGROUP GROUP_NUMBER OWNER_NUMBER OS_NAME USERGROUP_NUMBER NAME----------------- ------------ ------------ --------------- ---------------- --------DATA 1 3 grid 1 asm_data
Example 6-7 Viewing File Access Control information with V$ASM_USERGROUP_MEMBER
SELECT dg.name AS diskgroup, um.group_number, um.member_number, u.os_name, um.usergroup_number, ug.name FROM V$ASM_DISKGROUP dg, V$ASM_USER u, V$ASM_USERGROUP_MEMBER um, V$ASM_USERGROUP ug WHERE dg.group_number = um.group_number AND dg.group_number = ug.group_number AND dg.group_number = u.group_number AND dg.name = 'DATA' AND um.member_number = u.user_number AND um.usergroup_number = ug.usergroup_number;
DISKGROUP GROUP_NUMBER MEMBER_NUMBER OS_NAME USERGROUP_NUMBER NAME--------------- ------------ ------------- ------------------ ---------------- --------DATA 1 1 oracle1 1 asm_dataDATA 1 2 oracle2 1 asm_data
Example 6-8 Viewing Oracle ASM File Access Control information with V$ASM_FILE
SELECT dg.name AS diskgroup, a.name, f.permissions, f.user_number, u.os_name, f.usergroup_number, ug.name FROM V$ASM_DISKGROUP dg, V$ASM_USER u, V$ASM_USERGROUP ug, V$ASM_FILE f, V$ASM_ALIAS a WHERE dg.name = 'FRA' AND dg.group_number = u.group_number AND u.group_number = ug.group_number AND ug.group_number = f.group_number AND f.group_number = a.group_number AND f.usergroup_number = ug.usergroup_number AND f.user_number = u.user_number AND f.file_number = a.file_number;
DISKGROUP NAME PERMISSIONS USER_NUMBER OS_NAME USERGROUP_NUMBER NAME--------- ---------------------- ----------- ----------- ------- ---------------- -------DATA USERS.259.685366091 rw-r----- 3 grid 1 asm_fra DATA TEMP.264.685366227 rw-r----- 3 grid 1 asm_fra ...
Viewing Disk Region InformationInformation about Intelligent Data Placement is displayed in the columns of the V$ASM_DISK, V$ASM_DISK_IOSTAT, V$ASM_FILE, and V$ASM_TEMPLATE views.
Example 6-9 (page 6-6) shows queries for Intelligent Data Placement information inthe PRIMARY_REGION and MIRROR_REGION columns of the V$ASM_FILE view.
Example 6-10 (page 6-6) displays Intelligent Data Placement information in thePRIMARY_REGION and MIRROR_REGION columns of the V$ASM_TEMPLATE view.
For information about setting Intelligent Data Placement, see "Intelligent DataPlacement (page 4-20)".
Viewing Disk Region Information
Using Views to Display Oracle ASM Information 6-5

Example 6-9 Viewing Intelligent Data Placement information with V$ASM_FILE
SELECT dg.name AS diskgroup, f.file_number, f.primary_region, f.mirror_region, f.hot_reads, f.hot_writes, f.cold_reads, f.cold_writes FROM V$ASM_DISKGROUP dg, V$ASM_FILE f WHERE dg.group_number = f.group_number and dg.name = 'DATA'; DISKGROUP FILE_NUMBER PRIM MIRR HOT_READS HOT_WRITES COLD_READS COLD_WRITES-------------------- ----------- ---- ---- ---------- ---------- ---------- -----------DATA 257 COLD COLD 0 0 119770 886575DATA 258 COLD COLD 0 0 1396 222282DATA 259 COLD COLD 0 0 2056 199DATA 260 COLD COLD 0 0 42377 1331016DATA 261 COLD COLD 0 0 4336300 1331027...
Example 6-10 Viewing Intelligent Data Placement information with V$ASM_TEMPLATE
SELECT dg.name AS diskgroup, t.name, t.stripe, t.redundancy, t.primary_region, t.mirror_region FROM V$ASM_DISKGROUP dg, V$ASM_TEMPLATE t WHERE dg.group_number = t.group_number and dg.name = 'DATA' ORDER BY t.name;
DISKGROUP NAME STRIPE REDUND PRIM MIRR------------------------------ ------------------------------ ------ ------ ---- ----DATA ARCHIVELOG COARSE MIRROR COLD COLDDATA ASMPARAMETERFILE COARSE MIRROR COLD COLDDATA AUDIT_SPILLFILES COARSE MIRROR COLD COLDDATA AUTOBACKUP COARSE MIRROR COLD COLDDATA AUTOLOGIN_KEY_STORE COARSE MIRROR COLD COLDDATA BACKUPSET COARSE MIRROR COLD COLDDATA CHANGETRACKING COARSE MIRROR COLD COLDDATA CONTROLFILE FINE HIGH COLD COLDDATA DATAFILE COARSE MIRROR COLD COLDDATA DATAGUARDCONFIG COARSE MIRROR COLD COLDDATA DUMPSET COARSE MIRROR COLD COLDDATA FLASHBACK COARSE MIRROR COLD COLDDATA FLASHFILE COARSE MIRROR COLD COLDDATA INCR XTRANSPORT BACKUPSET COARSE MIRROR COLD COLDDATA KEY_STORE COARSE MIRROR COLD COLDDATA OCRFILE COARSE MIRROR COLD COLDDATA ONLINELOG COARSE MIRROR COLD COLDDATA PARAMETERFILE COARSE MIRROR COLD COLDDATA TEMPFILE COARSE MIRROR COLD COLDDATA VOTINGFILE COARSE MIRROR COLD COLDDATA XTRANSPORT COARSE MIRROR COLD COLDDATA XTRANSPORT BACKUPSET COARSE MIRROR COLD COLD
22 rows selected.
Viewing Disk Region Information
6-6 Oracle Automatic Storage Management Administrator's Guide
7Administering Oracle ASM with Oracle
Enterprise Manager
This chapter describes how to administer Oracle Automatic Storage Management(Oracle ASM) with Oracle Enterprise Manager Cloud Control.
This chapter contains the following topics:
• Accessing the Oracle Automatic Storage Management Home Page (page 7-2)
• Configuring Oracle ASM Initialization Parameters with Oracle EnterpriseManager (page 7-3)
• Managing Oracle ASM Users with Oracle Enterprise Manager (page 7-4)
• Managing Disk Groups with Oracle Enterprise Manager (page 7-5)
• Managing Oracle ASM File Access Control with Oracle Enterprise Manager(page 7-21)
• Managing Directories_ Files_ and Aliases with Oracle Enterprise Manager(page 7-22)
• Managing Disk Group Templates with Oracle Enterprise Manager (page 7-23)
• Managing Oracle ASM Filter Driver With Oracle Enterprise Manager (page 7-24)
• Monitoring Oracle ASM Performance With Oracle Enterprise Manager(page 7-25)
• Backing Up Oracle ASM Files with Oracle Enterprise Manager (page 7-27)
• Performing Bad Block Recovery with Oracle Enterprise Manager (page 7-27)
• Migrating to Oracle ASM with Oracle Enterprise Manager (page 7-28)
• Monitoring Alerts and Incidents With Oracle ASM Support Workbench(page 7-29)
• Monitoring Oracle Flex ASM (page 7-31)
See Also:
• Oracle Enterprise Manager Cloud Administration Guide
• Oracle Enterprise Manager Administration
Administering Oracle ASM with Oracle Enterprise Manager 7-1

Accessing the Oracle Automatic Storage Management Home PageAll Oracle ASM administration tasks begin with the Oracle Automatic StorageManagement home page in Oracle Enterprise Manager Cloud Control, similar to thegraphic shown in Figure 7-1 (page 7-2). The Oracle Automatic Storage Managementhome page displays:
• The status of the Oracle ASM instance.
• A chart that shows the used and free space of each disk group and disk groupinternal usage.
• A list of databases that are serviced by the Oracle ASM instance.
• A list of Oracle Automatic Storage Management Cluster File System (OracleACFS) file systems that are serviced by the Oracle ASM instance.
• A list of other non-Oracle ACFS volumes.
• A list of alerts for the Oracle ASM instance and the host computer.
• Links to the Oracle ASM Performance, Disk Groups, Configuration, Users, andOracle ACFS pages.
Figure 7-1 Oracle Automatic Storage Management Home Page
Accessing the Oracle Automatic Storage Management Home Page
7-2 Oracle Automatic Storage Management Administrator's Guide

To access the Oracle Automatic Storage Management home page on a single-instancesystem:
1. Log in to Oracle Enterprise Manager Cloud Control.
2. Under the Targets drop down menu at the top of the page, select All Targets.
3. In the lists of targets on the All Targets page, click the target for the Oracle ASMinstance.
4. If prompted for Oracle ASM login credentials, then enter the user SYS, providethe SYS password that was set for the Oracle ASM instance during installation,and connect as SYSASM. The Oracle Automatic Storage Management home pagedisplays similar to the page in Figure 7-1 (page 7-2).
For more information about authentication, refer to "Authentication for AccessingOracle ASM Instances (page 3-46)".
Configuring Oracle ASM Initialization Parameters with Oracle EnterpriseManager
You can configure Oracle ASM with the Oracle Enterprise Manager ConfigurationParameters page similar to the screen shown in Figure 7-2 (page 7-3).
Figure 7-2 Oracle Automatic Storage Management Configuration Parameters Page
To configure the Oracle ASM instance:
1. Access the Oracle Automatic Storage Management home page.
See "Accessing the Oracle Automatic Storage Management Home Page (page 7-2)"for instructions.
2. Click the Configuration link at the top of the page to view the ConfigurationParameters page.
3. Update the configuration options on the page as follows:
• Disk Discovery Path (ASM_DISKSTRING initialization parameter)
Enter a string value. See "ASM_DISKSTRING (page 3-9)".
• Auto Mount Disk Groups (ASM_DISKGROUPS initialization parameter)
Configuring Oracle ASM Initialization Parameters with Oracle Enterprise Manager
Administering Oracle ASM with Oracle Enterprise Manager 7-3
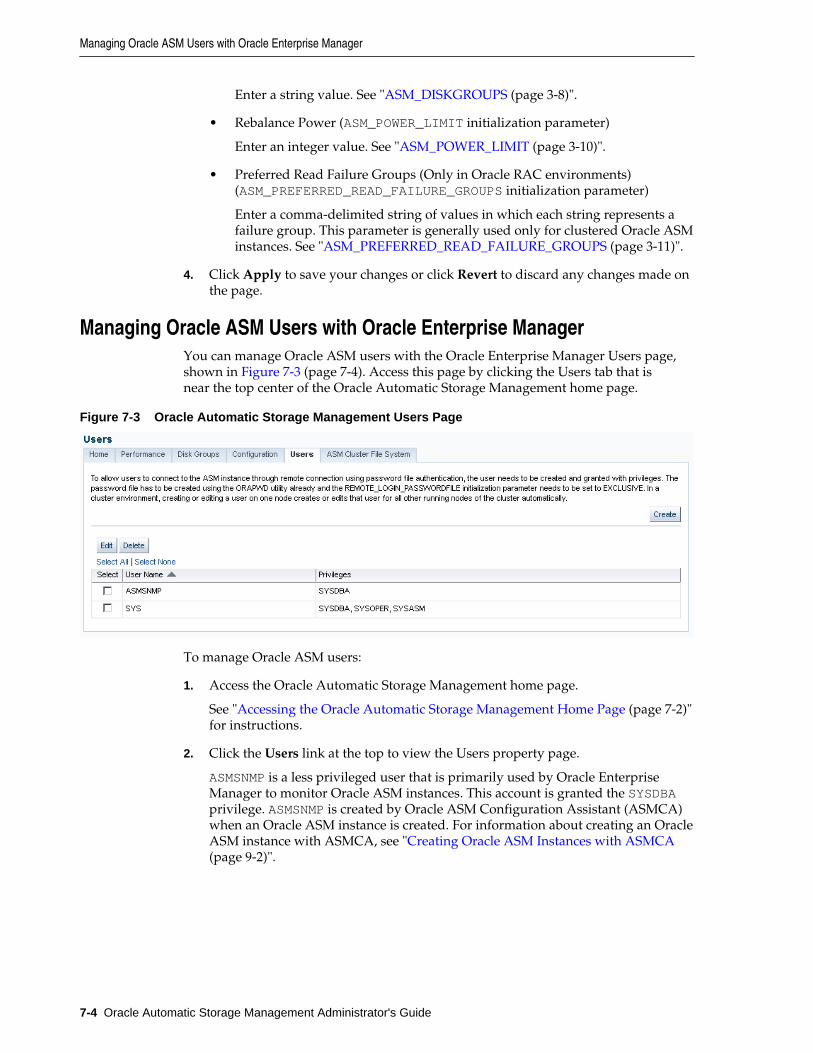
Enter a string value. See "ASM_DISKGROUPS (page 3-8)".
• Rebalance Power (ASM_POWER_LIMIT initialization parameter)
Enter an integer value. See "ASM_POWER_LIMIT (page 3-10)".
• Preferred Read Failure Groups (Only in Oracle RAC environments)(ASM_PREFERRED_READ_FAILURE_GROUPS initialization parameter)
Enter a comma-delimited string of values in which each string represents afailure group. This parameter is generally used only for clustered Oracle ASMinstances. See "ASM_PREFERRED_READ_FAILURE_GROUPS (page 3-11)".
4. Click Apply to save your changes or click Revert to discard any changes made onthe page.
Managing Oracle ASM Users with Oracle Enterprise ManagerYou can manage Oracle ASM users with the Oracle Enterprise Manager Users page,shown in Figure 7-3 (page 7-4). Access this page by clicking the Users tab that isnear the top center of the Oracle Automatic Storage Management home page.
Figure 7-3 Oracle Automatic Storage Management Users Page
To manage Oracle ASM users:
1. Access the Oracle Automatic Storage Management home page.
See "Accessing the Oracle Automatic Storage Management Home Page (page 7-2)"for instructions.
2. Click the Users link at the top to view the Users property page.
ASMSNMP is a less privileged user that is primarily used by Oracle EnterpriseManager to monitor Oracle ASM instances. This account is granted the SYSDBAprivilege. ASMSNMP is created by Oracle ASM Configuration Assistant (ASMCA)when an Oracle ASM instance is created. For information about creating an OracleASM instance with ASMCA, see "Creating Oracle ASM Instances with ASMCA(page 9-2)".
Managing Oracle ASM Users with Oracle Enterprise Manager
7-4 Oracle Automatic Storage Management Administrator's Guide
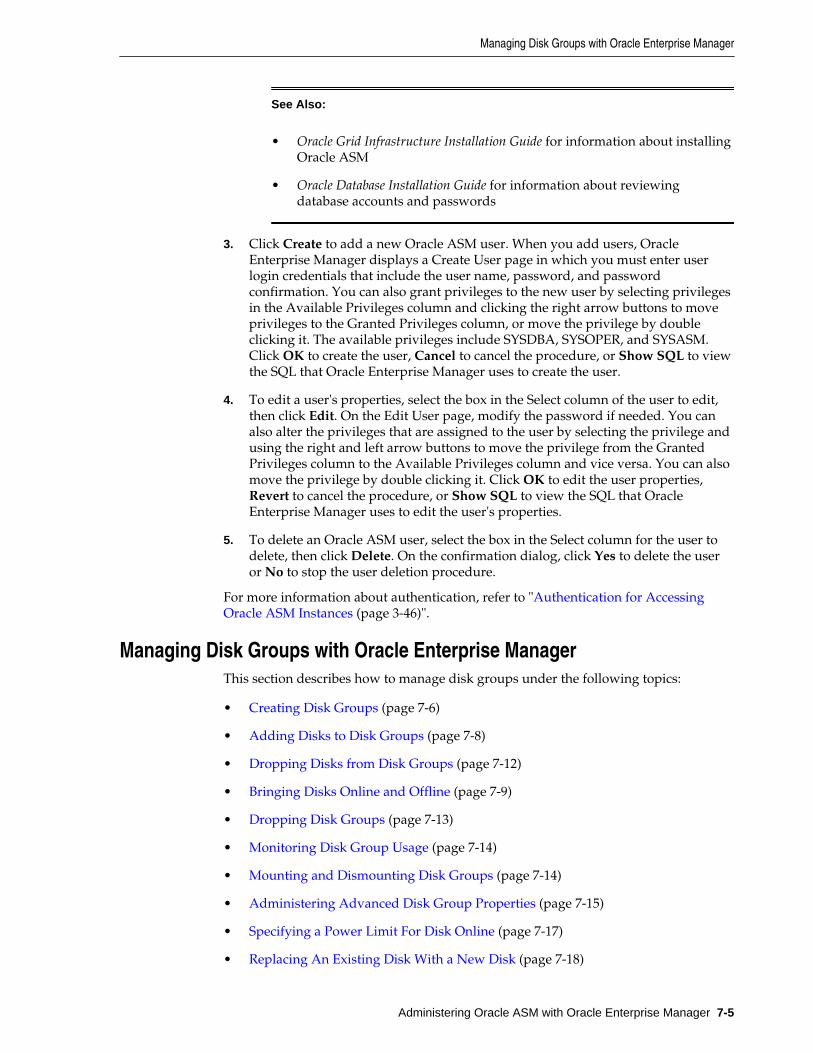
See Also:
• Oracle Grid Infrastructure Installation Guide for information about installingOracle ASM
• Oracle Database Installation Guide for information about reviewingdatabase accounts and passwords
3. Click Create to add a new Oracle ASM user. When you add users, OracleEnterprise Manager displays a Create User page in which you must enter userlogin credentials that include the user name, password, and passwordconfirmation. You can also grant privileges to the new user by selecting privilegesin the Available Privileges column and clicking the right arrow buttons to moveprivileges to the Granted Privileges column, or move the privilege by doubleclicking it. The available privileges include SYSDBA, SYSOPER, and SYSASM.Click OK to create the user, Cancel to cancel the procedure, or Show SQL to viewthe SQL that Oracle Enterprise Manager uses to create the user.
4. To edit a user's properties, select the box in the Select column of the user to edit,then click Edit. On the Edit User page, modify the password if needed. You canalso alter the privileges that are assigned to the user by selecting the privilege andusing the right and left arrow buttons to move the privilege from the GrantedPrivileges column to the Available Privileges column and vice versa. You can alsomove the privilege by double clicking it. Click OK to edit the user properties,Revert to cancel the procedure, or Show SQL to view the SQL that OracleEnterprise Manager uses to edit the user's properties.
5. To delete an Oracle ASM user, select the box in the Select column for the user todelete, then click Delete. On the confirmation dialog, click Yes to delete the useror No to stop the user deletion procedure.
For more information about authentication, refer to "Authentication for AccessingOracle ASM Instances (page 3-46)".
Managing Disk Groups with Oracle Enterprise ManagerThis section describes how to manage disk groups under the following topics:
• Creating Disk Groups (page 7-6)
• Adding Disks to Disk Groups (page 7-8)
• Dropping Disks from Disk Groups (page 7-12)
• Bringing Disks Online and Offline (page 7-9)
• Dropping Disk Groups (page 7-13)
• Monitoring Disk Group Usage (page 7-14)
• Mounting and Dismounting Disk Groups (page 7-14)
• Administering Advanced Disk Group Properties (page 7-15)
• Specifying a Power Limit For Disk Online (page 7-17)
• Replacing An Existing Disk With a New Disk (page 7-18)
Managing Disk Groups with Oracle Enterprise Manager
Administering Oracle ASM with Oracle Enterprise Manager 7-5

• Setting and Modifying Content Type for the Disk Group (page 7-18)
• Setting and Modifying the Failure Group Repair Time (page 7-19)
• Running Rebalance on Multiple Disk Groups (page 7-19)
• Viewing Rebalance Process Related Data (page 7-19)
• Setting and Modifying the Thin Provisioned Disk Group Attribute (page 7-20)
• Running the On Demand Scrubbing Process (page 7-20)
• Determining Whether Scrubbing Process Is Running (page 7-21)
For more information about managing Oracle ASM disk groups, refer to Administering Oracle ASM Disk Groups (page 4-1)
Creating Disk GroupsYou can create additional Oracle ASM disk groups to:
• Have disk groups with different redundancy levels (normal, high, or external),depending on availability requirements and storage system capabilities.
• Separate different classes of storage, such as SCSI drives and SATA drives, intodifferent disk groups. Disks in a disk group should have similar size andperformance characteristics.
• Store the fast recovery area in a separate disk group from the database.
To create a disk group:
1. Access the Oracle Automatic Storage Management home page.
See "Accessing the Oracle Automatic Storage Management Home Page (page 7-2)"for instructions.
2. Click the Disk Groups link at the top of the page to display the Disk Groupsproperty page.
3. If you are not logged in, then the Log In page appears and you should log in asthe SYS user, connecting as SYSASM. Provide the SYS password for the OracleASM instance. This password was set up when the Oracle ASM instance wascreated.
4. Click Create and Oracle Enterprise Manager displays a Create Disk Group pagesimilar to the page in Figure 7-4 (page 7-7). The Create Disk Group pagedisplays a list of Oracle ASM disks that are available to be added to a disk group.This includes disks with a header status of CANDIDATE, PROVISIONED, orFORMER, and so on.
Managing Disk Groups with Oracle Enterprise Manager
7-6 Oracle Automatic Storage Management Administrator's Guide
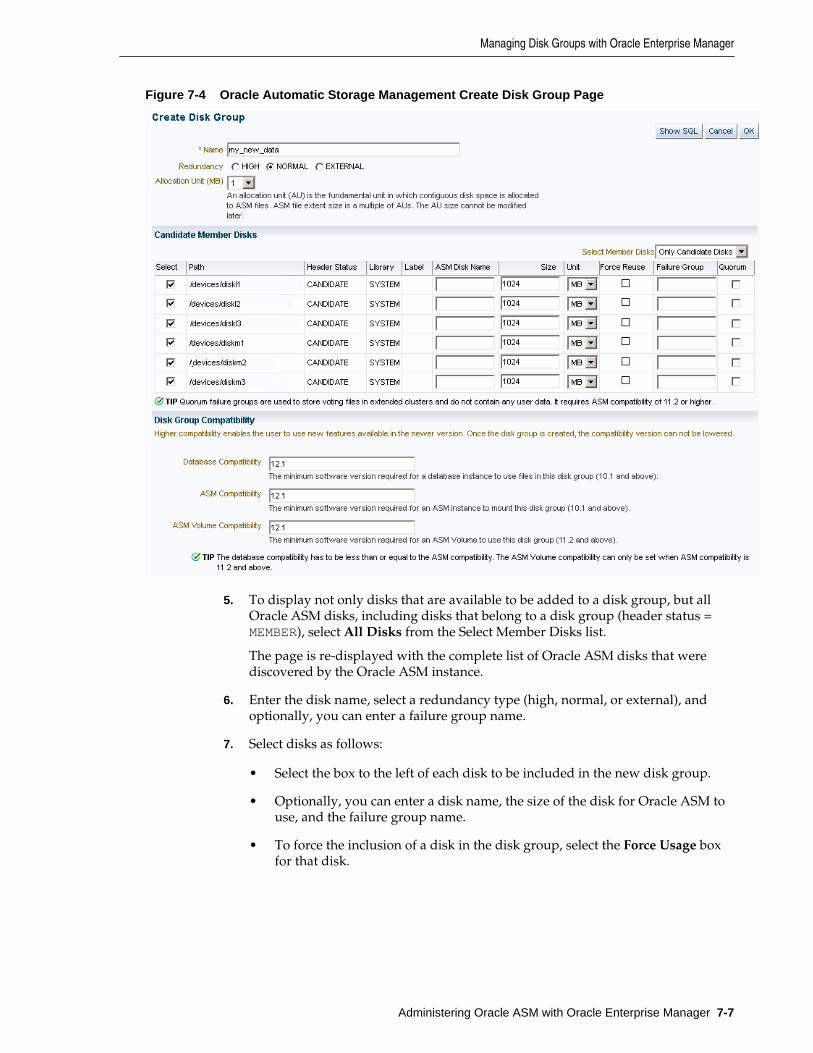
Figure 7-4 Oracle Automatic Storage Management Create Disk Group Page
5. To display not only disks that are available to be added to a disk group, but allOracle ASM disks, including disks that belong to a disk group (header status =MEMBER), select All Disks from the Select Member Disks list.
The page is re-displayed with the complete list of Oracle ASM disks that werediscovered by the Oracle ASM instance.
6. Enter the disk name, select a redundancy type (high, normal, or external), andoptionally, you can enter a failure group name.
7. Select disks as follows:
• Select the box to the left of each disk to be included in the new disk group.
• Optionally, you can enter a disk name, the size of the disk for Oracle ASM touse, and the failure group name.
• To force the inclusion of a disk in the disk group, select the Force Usage boxfor that disk.
Managing Disk Groups with Oracle Enterprise Manager
Administering Oracle ASM with Oracle Enterprise Manager 7-7

Caution:
Selecting the Force Usage box causes the disk to be added to the new diskgroup even if the disk belongs to another disk group and has valid databasedata. The existing data is then lost. You must be certain that you are selectinga disk that can legitimately be added to the disk group. See "Creating DiskGroups (page 4-7)" for a discussion of the FORCE option.
8. Specify a Disk Compatibility value for the disk group to enable your system touse the latest Oracle ASM features. See "Configuring Disk Group CompatibilityAttributes (page 7-16)".
Note:
You cannot reverse the setting of a disk group compatibility value.
For information about disk group compatibility attributes, see "Disk GroupCompatibility (page 4-41)".
9. Click OK to create the disk group or click Cancel to stop the disk group creationoperation. You can also click Show SQL to show the SQL statements that the diskgroup creation operation uses.
For more information about creating disk groups, see "Creating Disk Groups(page 4-7)".
Adding Disks to Disk GroupsYou can add disks to a disk group to increase the storage space in a disk group. If youadd multiple disks in a single operation, then Oracle ASM rebalances the disk groupto evenly distribute the data on all disks, including the newly added disks.
You can control the power of a rebalance operation with the setting of the RebalancePower. The higher the number, the faster the rebalance operation completes. Lowernumbers cause rebalancing to take longer, but consume fewer processing and I/Oresources. This leaves these resources available for the database. The default value of 1minimizes disruption to the database.
A value of 0 blocks the rebalance operation. Manual or automatic rebalance can thenoccur later. You might want to postpone rebalancing until there are fewer demands onthe database, or when you have completed all of your disk group changes.
For information about controlling rebalance operations, refer to "ManuallyRebalancing Disk Groups (page 4-21)" and "Tuning Rebalance Operations (page 4-23)".For information about rebalance power settings and the ASM_POWER_LIMITinitialization parameter, refer to "ASM_POWER_LIMIT (page 3-10)".
To add one or more disks to a disk group:
1. Access the Oracle Automatic Storage Management home page.
For instructions, refer to "Accessing the Oracle Automatic Storage ManagementHome Page (page 7-2)".
2. Click the Disk Groups link to display the Disk Groups property page.
Managing Disk Groups with Oracle Enterprise Manager
7-8 Oracle Automatic Storage Management Administrator's Guide
3. If the Oracle ASM Login page appears, then log in as the SYS user, connecting asSYSASM. Provide the SYS password for the Oracle ASM instance. This passwordwas set up when the Oracle ASM instance was created.
4. Click a link in the Name column to select the disk group to which you want toadd disks. The Disk Group page similar to the page in Figure 7-6 (page 7-10)appears, displaying a list of disks that are in the disk group.
5. Click Add and Oracle Enterprise Manager displays the Add Disks page. This pagedisplays a list of Oracle ASM disks that are available to be added to the diskgroup. This includes disks with the header status of CANDIDATE, PROVISIONED,or FORMER, and so on.
6. To display not only disks that are available to be added to a disk group, but all ofthe Oracle ASM disks, including disks that belong to a disk group (header status =MEMBER), select All Disks from the Select Member Disks drop-down list on theright hand side of the page. Oracle Enterprise Manager re-displays the page withthe complete list of Oracle ASM disks that were discovered by the Oracle ASMinstance.
7. Optionally change the rebalance power by selecting a value from the RebalancePower list.
8. Select disks as follows:
• Check the box to the left of each disk to be added to the disk group.
• To force the inclusion of a disk in the disk group, select the Force Reuse boxin the right-most column.
Caution:
The Force Reuse box causes the disk to be added to the disk group even if thedisk belongs to another disk group and has valid database data. The existingdata is then lost. You must be certain that you are selecting a disk that canlegitimately be added to the disk group. Refer to "Adding Disks to a DiskGroup (page 4-17)" for an example of the FORCE option.
• Optionally enter an Oracle ASM disk name for each disk. Oracle ASMprovides a name if you do not.
9. Click OK to add the selected disks.
For more information about modifying disk group properties, see "Altering DiskGroups (page 4-15)".
Bringing Disks Online and OfflinePerform the following procedures to bring a disk online or offline:
1. Access the Oracle Automatic Storage Management home page.
See "Accessing the Oracle Automatic Storage Management Home Page (page 7-2)"for instructions.
2. Click the Disk Groups link at the top of the page to view the Disk Groups page.Oracle Enterprise Manager displays a page similar to the one shown in Figure 7-5(page 7-10).
Managing Disk Groups with Oracle Enterprise Manager
Administering Oracle ASM with Oracle Enterprise Manager 7-9
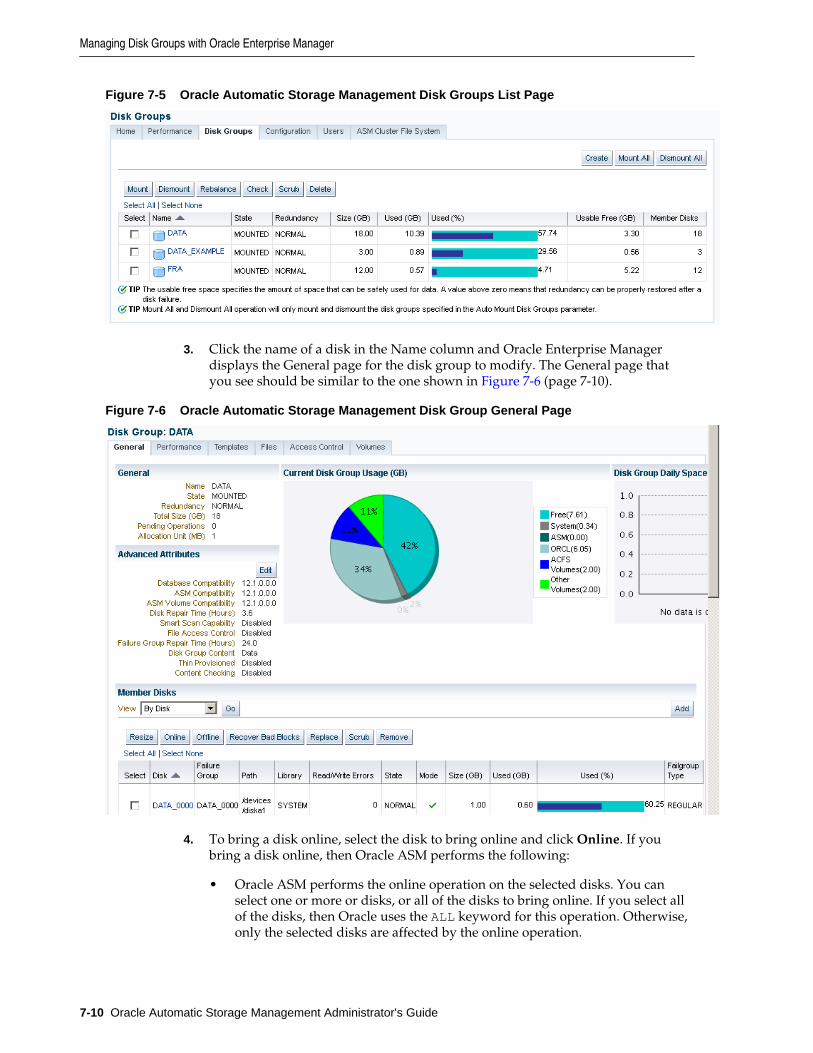
Figure 7-5 Oracle Automatic Storage Management Disk Groups List Page
3. Click the name of a disk in the Name column and Oracle Enterprise Managerdisplays the General page for the disk group to modify. The General page thatyou see should be similar to the one shown in Figure 7-6 (page 7-10).
Figure 7-6 Oracle Automatic Storage Management Disk Group General Page
4. To bring a disk online, select the disk to bring online and click Online. If youbring a disk online, then Oracle ASM performs the following:
• Oracle ASM performs the online operation on the selected disks. You canselect one or more or disks, or all of the disks to bring online. If you select allof the disks, then Oracle uses the ALL keyword for this operation. Otherwise,only the selected disks are affected by the online operation.
Managing Disk Groups with Oracle Enterprise Manager
7-10 Oracle Automatic Storage Management Administrator's Guide

• During the online process, Oracle Enterprise Manager first places a disk intoonline mode to accommodate write operations. Then Oracle EnterpriseManager resynchronizes stale data on the disk with the current data until thedisk is fully online for read operations; this is the Oracle ASM fast mirrorresync feature.
• You can also choose the By Failure Group view to perform this operation on aselected disk group. In this case, Oracle uses the SQL for disks in failuregroup.
• You can also select a disk that is online, but Oracle Enterprise Managerignores that selection and only brings disks online that were previouslyoffline.
• Click Yes on the Oracle Enterprise Manager Confirmation dialog to beginbringing the disk online or click No to cancel the operation. You can also clickShow SQL to review the SQL that Oracle Enterprise Manager uses for theonline operation.
5. To take a disk offline, select the disk to take offline and click Offline. If you bringa disk offline, then Oracle ASM performs the following:
• Depending on how much data is stale, the operation may require additionaltime to complete. You can monitor the operation's progress using the PendingOperations link from the Disk Group home page.
• The value that you set for Rebalance Power using ASM_POWER_LIMIT mustbe a whole number. The text on the page describes how the value ofRebalance Power affects the fast mirror resync operation. If theASM_POWER_LIMIT is set to 0, then Oracle ASM does not perform automaticrebalance. For information about rebalance power settings and theASM_POWER_LIMIT initialization parameter, refer to "ASM_POWER_LIMIT(page 3-10)".
• By default, the Rebalance Power value uses the value of theASM_POWER_LIMIT initialization parameter.
• Oracle Enterprise Manager displays an Offline Confirmation page and thetext on this page explains that after Oracle Enterprise Manager takes theselected disks offline, the Oracle ASM instance waits for the time interval thatis specified by the value that you have set for the DISK_REPAIR_TIMEinitialization parameter before Oracle ASM drops the disks. During the diskrepair time period, you can repair the disks and then place them back online.For each disk that you successfully place online, the pending drop operationis canceled and a resynchronization operation begins.
• If you have set DISK_REPAIR_TIME to a large value, for example, greaterthan one day, then this increases the possibility of data loss. This is becausethe files in the disk group are protected with a lower degree of redundancyduring this period.
Click Yes on the Oracle Enterprise Manager Conformation dialog to begin theoffline processing or click No to stop the operation. You can also click ShowSQL to see the SQL that Oracle Enterprise Manager uses for the offlineoperation.
Managing Disk Groups with Oracle Enterprise Manager
Administering Oracle ASM with Oracle Enterprise Manager 7-11

Dropping Disks from Disk GroupsWhen you drop a disk from a disk group, Oracle ASM rebalances the disk group bymoving all of the file extents from the dropped disk to other disks in the disk group.Oracle ASM then releases the disk and you can then add the disk to another diskgroup or use it for other purposes. You can drop one or more disks in a singleoperation. You can also optionally set rebalance power for the drop operation. Thefollowing is a list of possible reasons for dropping a disk:
• A disk is starting to fail and you must replace it
• To upgrade a disk
• To reallocate the disk to a different disk group or reallocate the disk to a differentstorage system
Note:
Dropping disks from a disk group only logically deletes the disks from thedisk group. It does not delete the disk contents. However, the contents are lostwhen you add the disk to a new disk group.
To drop one or more disks from a disk group:
1. Access the Oracle Automatic Storage Management home page.
See "Accessing the Oracle Automatic Storage Management Home Page (page 7-2)"for instructions.
2. Click the Disk Groups link to display the Disk Groups property page.
3. If the Oracle Automatic Storage Management Login page appears, log in as theSYS user, connecting as SYSASM. Provide the SYS password for the Oracle ASMinstance. This password was set up when the Oracle ASM instance was created.
4. Click a link in the Name column to select the disk group that contains the disks tobe dropped.
The Disk Group page appears.
5. Under the Member Disks heading, in the Select column, select the boxes for thedisks that you plan to drop, and then click Remove.
A confirmation page appears.
6. To change the rebalance power, or to set the FORCE option for dropping disks, dothe following:
a. Click Show Advanced Options.
b. Optionally select the Force option or select a rebalance power in theRebalance Power list.
Managing Disk Groups with Oracle Enterprise Manager
7-12 Oracle Automatic Storage Management Administrator's Guide

Note:
You might need the FORCE option if Oracle ASM cannot read from or write tothe disk. For a discussion of the FORCE option, see "Dropping Disks from DiskGroups (page 4-19)".
7. Click Yes to drop the disks.
The Disk Group page returns, and displays a state of DROPPING for each diskbeing dropped.
8. Refresh the page until the dropped disks no longer appear in the disk group.
Caution:
You cannot reuse or disconnect the dropped disks until the drop andrebalance operations are complete. Operations are complete when thedropped disks no longer appear in the disk group. For more informationabout dropping disks, see "Dropping Disks from Disk Groups (page 4-19)".
Dropping Disk GroupsWhen you drop a disk group, you delete the disk group optionally with all of its files.You cannot drop a disk group if any of its database files are open. Oracle ASM deletesall of the disk group contents only if you specify the including contents option. Afterdropping a disk group, you can add its member disks to other disk groups or usethem for other purposes.
One reason to drop a disk group is to change the redundancy level (normal, high, orexternal). Because you cannot change the redundancy of a disk group, you must dropthe disk group and then re-create it with the proper redundancy. In this case, youmust back up or move disk group data before you drop the disk group.
To drop a disk group:
1. Access the Oracle ASM home page.
See "Accessing the Oracle Automatic Storage Management Home Page (page 7-2)"for instructions.
2. Click the Disk Group tab to display the Disk Groups page.
3. If the Oracle ASM Login page appears, log in as the SYS user, connecting asSYSASM. Provide the SYS password for the Oracle ASM instance. This passwordwas set up when the Oracle ASM instance was created.
4. Click the box in the Select column to select a disk group that you plan to drop.
5. Click Delete and the confirmation page appears.
6. To delete the disk group even if it still contains files, click Show AdvancedOptions and ensure that the Including Contents option is selected. If the diskgroup contains files and the Including Contents option is not selected, then youcannot drop the disk group.
7. To delete a disk group that belongs to a disk group that you cannot mount, usethe FORCE option in the Advanced Options confirmation dialog. The FORCE
Managing Disk Groups with Oracle Enterprise Manager
Administering Oracle ASM with Oracle Enterprise Manager 7-13

option applies to the DISMOUNTED disk group only. This option enables you todelete a disk header and mark it as FORMER.
Caution:
Use extreme care when using the FORCE option because the Oracle ASMinstance does not verify whether the disk group is used by any other OracleASM instance before Oracle ASM deletes the disk group.
8. On the confirmation page, click Yes.
For more information about dropping disks, see "Dropping Disk Groups(page 4-57)".
Monitoring Disk Group UsagePerform the following procedures to monitor disk group usage:
To view Oracle ASM disk group usage and free space:
1. Access the Oracle Automatic Storage Management home page.
See "Accessing the Oracle Automatic Storage Management Home Page (page 7-2)"for instructions.
2. Click the Disk Groups link to view the Disk Groups property page.
3. If the Oracle ASM Login page appears, then log in as the SYS user, connecting asSYSASM. Provide the SYS password that was set up for Oracle ASM when theOracle ASM instance was created.
The Disk Group list page, similar to the page shown in Figure 7-5 (page 7-10), displaysall of the disk groups and their space usage information.
The Usable Free column displays the space in megabytes that is available in the diskgroup. The values in this column consider the redundancy level of the disk group, andexclude the space that the disk group reserves for restoring full redundancy for allfiles in the disk group after a disk failure.
For more information, see "Managing Capacity in Disk Groups (page 4-27)" and"Views Containing Oracle ASM Disk Group Information (page 6-1)"
Mounting and Dismounting Disk GroupsUse the FORCE option to mount a disk group when there are missing disks or missingfailure groups. The FORCE option corrects configuration errors, such as incorrectvalues for ASM_DISKSTRING, without incurring unnecessary rebalance operations.Disk groups mounted with the FORCE option have one or more disks offline if thedisks were not available at the time of the mount. You must take corrective action torestore those devices before the time set with the DISK_REPAIR_TIME value expires.Failing to restore and put those disks back online within the disk repair time frameresults in Oracle ASM automatically removing the disks from the disk group. Thiswould then require a rebalance operation to restore redundancy for all of the files inthe disk group. Perform the following procedures to mount a disk with the FORCEoption:
1. From the Oracle ASM home page click the Disk Groups tab.
Managing Disk Groups with Oracle Enterprise Manager
7-14 Oracle Automatic Storage Management Administrator's Guide
2. Select the disk group that has a disk that you must repair and click Dismount.Click OK on the Dismount confirmation dialog. The State column of the DiskGroup home page should show the Status as DISMOUNTED.
3. Perform any needed repairs to the disk in the disk group.
4. Click the box in the Select column next to the disk that you plan to force mount,then click Mount.
5. On the Disk Mount Confirmation dialog, click the Show Advanced Options link.
6. On the Mount Force Confirmation dialog, select the Force option and click Yes.You can also click No to cancel the mount force operation and Show SQL toreview the SQL that Oracle Enterprise Manager uses to perform the mount forceoperation.
Administering Advanced Disk Group PropertiesThis section explains how to administer advanced disk group properties.
Perform the following steps to change the values for disk group attributes that can bealtered after the disk group has been created.
1. On the Automatic Storage Disk Group List page, click a disk group name andOracle Enterprise Manager displays the Disk Group home page.
2. Click Edit under the Advanced Attributes section.
The topics contained in this section are:
• Configuring Disk Group Compatibility Attributes (page 7-16)
• Configuring Disk Repair Time (page 7-17)
• Configuring Smart Scan Compatibility (page 7-17)
• Configuring File Access Control (page 7-17)
Figure 7-7 (page 7-16) shows the advanced attributes that can be altered for anexisting disk group. This screenshot only shows the top portion of the Edit AdvancedAttributes for Disk Group Page.
Managing Disk Groups with Oracle Enterprise Manager
Administering Oracle ASM with Oracle Enterprise Manager 7-15

Figure 7-7 Oracle Automatic Storage Management Edit Advanced Attributes Page
Configuring Disk Group Compatibility Attributes
Specify a Disk Compatibility value for the disk group to enable your system to usethe latest Oracle ASM features.
Note:
You cannot reverse the setting of a disk group compatibility value.
• ASM Compatibility
Specify the value that is the minimum software version required for an OracleASM instance to mount this disk group.
• Database Compatibility
Specify a value that must be less than or equal to the Oracle ASM compatibility.This is the minimum software version that is required for a database instance touse the files in the disk group. If the database compatibility value that you use isgreater than the Oracle ASM compatibility, then Oracle Enterprise Managerdisplays an error.
Note:
You cannot modify the database compatibility for an Oracle ASM cluster thatis in a rolling migration state.
• ASM Volume
Specify a value that is 11.2 or greater to use the Oracle ASM Dynamic VolumeManager (Oracle ADVM) functionality. The ASM compatibility of the disk group
Managing Disk Groups with Oracle Enterprise Manager
7-16 Oracle Automatic Storage Management Administrator's Guide

must be set to 11.2 or greater to enable Oracle ADVM. Also, the Oracle ADVMvolume drivers must be loaded in the supported environment.
For information about disk group compatibility attributes, see "Disk GroupCompatibility (page 4-41)".
Configuring Disk Repair Time
Specify a time period that is long enough for you to repair a disk in the disk group.
For information about disk group repair time, see "Oracle ASM Fast Mirror Resync(page 4-34)".
Configuring Smart Scan Compatibility
Specify to disable or enable smart scan compatibility for the disk group.
This attribute is only applicable to Oracle Exadata storage.
See Also:
Oracle Exadata documentation for information about theCELL.SMART_SCAN_CAPABLE attribute
Configuring File Access Control
Specify to disable or enable Oracle ASM File Access Control. If Oracle ASM File AccessControl is enabled, then specify the default permissions for newly created files in thedisk group.
For information about Oracle ASM File Access Control, see "Managing Oracle ASMFile Access Control for Disk Groups (page 4-50)".
Specifying a Power Limit For Disk OnlineTo specify a power limit for disk online, follow these steps:
1. Access the Oracle Automatic Storage Management home page.
See "Accessing the Oracle Automatic Storage Management Home Page (page 7-2)"for instructions.
2. Select the Disk Groups tab. The Disk Groups page is displayed.
3. Select a disk group. The Disk Group page appears and shows all Member Disksthat belong to the disk group in the Member Disks table.
4. Select a disk, then click Online. The online confirmation page is displayed with theadvance option to specify a power limit.
5. Specify the Power Limit, then click Submit. The disk is set to online with thespecified power limit.
For information about the power option in rebalancing a disk group, refer to"Manually Rebalancing Disk Groups (page 4-21)". For information about theASM_POWER_LIMIT initialization parameter, refer to "ASM_POWER_LIMIT(page 3-10)".
Managing Disk Groups with Oracle Enterprise Manager
Administering Oracle ASM with Oracle Enterprise Manager 7-17
Replacing An Existing Disk With a New DiskTo replace an existing disk with a new disk, follow these steps:
1. Access the Oracle Automatic Storage Management home page.
See "Accessing the Oracle Automatic Storage Management Home Page (page 7-2)"for instructions.
2. Click the Disk Group tab. The Disk Group page displays.
3. Select a Disk Group. The Disk Group page appears which shows all Member Disksthat belong to the disk group.
4. Select an offline disk to replace. The Replace Disks page is displayed.
Select a new disk of size equal to or greater than the original disk being replaced toensure the same level of data protection.
5. Select a new disk and then specify the options, such as Rebalance Power, and thenclick OK. The disk is then replaced. Rebalance operations redistribute data evenlyacross all drives. Oracle ASM automatically rebalances a disk group wheneverdisks are added or dropped. To manually rebalance all disk groups, you mustspecify the Rebalance Power. Higher values use more I/O bandwidth andcomplete rebalance more quickly. Lower values cause rebalance to take longer, butuse less I/O bandwidth. Values range from 0 to 1024.
For additional information about replacing a disk, refer to "Replacing Disks in DiskGroups (page 4-18)".
Setting and Modifying Content Type for the Disk GroupTo set and modify the content type for a disk group, follow these steps:
1. Access the Oracle Automatic Storage Management home page.
See "Accessing the Oracle Automatic Storage Management Home Page (page 7-2)"for instructions.
2. Click the Disk Groups tab. The Disk Group page displays.
3. Click Create. In the Disk Resync Attributes section of the Create Disk Group page,you can select the value Recovery, Data or System from the Content Type drop-down list. The attribute can be set only if the ASM compatibility is greater than orequal to 12.1.0.0.
4. To edit the content type for an existing disk group, navigate to the Disk Grouphome page by clicking the disk group in the Disk Groups table. The Disk Grouphome page displays.
5. Click Edit in the Advanced Attribute Section. The Edit Advanced Attributes forDisk Group page appears. In the Disk Resync Attributes section, select from thevalues Recovery, Data, or System from the Content Type drop-down list.
For information about the CONTENT.TYPE disk group attribute, refer to"CONTENT.TYPE (page 4-4)".
Managing Disk Groups with Oracle Enterprise Manager
7-18 Oracle Automatic Storage Management Administrator's Guide

Setting and Modifying the Failure Group Repair TimeTo set and modify the Failure Group Repair Time, follow these steps:
1. Access the Oracle Automatic Storage Management home page.
See "Accessing the Oracle Automatic Storage Management Home Page (page 7-2)"for instructions.
2. Click the Disk Groups tab. The Disk Groups page displays.
3. Click Create. Specify the repair time for the Failure Group in the CandidateMember Disks table.
4. To edit an existing Failure Group repair time, from the Disk Group page choose theDisk Group for the repair time you want to modify. The Disk Group page appears.
5. In the Advanced Attributes section, click Edit. The Edit Advanced Attributes forDisk Group page displays.
6. In the Disk Resync Attributes section, modify the Failure Group Repair Time, thenclick OK. The failure Group Repair Time applies to all the failure groups in thedisk group except those containing only one disk. This value overrides the diskrepair time and is overridden by the actual value provided when a disk is takenoffline.
For additional information about setting and modifying the failure group repair time,refer to "Oracle ASM Fast Mirror Resync (page 4-34)".
Running Rebalance on Multiple Disk GroupsEnterprise Manager enables you to rebalance on multiple disk groups and distributethe data copy across other member instances in the cluster. To run rebalance onmultiple disk groups, follow these steps:
1. Access the Oracle Automatic Storage Management home page.
See "Accessing the Oracle Automatic Storage Management Home Page (page 7-2)"for instructions.
2. Click the Disk Group tab. The Disk Group page displays.
3. Select multiple disk groups then click Rebalance. The Rebalance Disk GroupsConfirmation page appears where you can set the Rebalance Power by displayingAdvanced Options.
4. Set the Rebalance Power value, then click OK. The command to rebalance issubmitted.
For additional information about rebalancing disk groups, refer to "ManuallyRebalancing Disk Groups (page 4-21)".
Viewing Rebalance Process Related DataTo view rebalance process-related data, including the number of participatinginstances on the Pending Operations page, follow these steps:
Managing Disk Groups with Oracle Enterprise Manager
Administering Oracle ASM with Oracle Enterprise Manager 7-19

1. Access the Oracle Automatic Storage Management home page.
See "Accessing the Oracle Automatic Storage Management Home Page (page 7-2)"for instructions.
2. Click the Disk Group tab. The Disk Groups page displays.
3. Click a Disk Group link. The Disk Group home page General section displays thenumber of Pending Operations as a link to the Pending Operations page.
4. Click the link. Information on the rebalance process, along with details on thenumber of participating instances, are displayed.
For additional information about rebalancing disk groups, refer to "Tuning RebalanceOperations (page 4-23)".
Setting and Modifying the Thin Provisioned Disk Group AttributeTo set and modify the thin-provisioned disk group attribute, follow these steps:
1. Access the Oracle Automatic Storage Management home page.
See "Accessing the Oracle Automatic Storage Management Home Page (page 7-2)"for instructions.
2. Click the Disk Groups tab. The Disk Groups page is displayed.
3. Click the Disk Group that contains the Thin Provisioned attribute you want tochange. The Disk Group page displays.
4. In the Advance Attributes section, click Edit. The Edit Advanced Attributes forDisk Group page displays.
5. In the Thin Provisioning section, select True or False from the Thin Provisionedfield drop-down list. If thin provisioning is enabled, the disk space not in use canbe returned to the array. This attribute can be set only if the ASM compatibility isgreater than or equal to 12.1.0.0.
For information about the THIN_PROVISIONED disk group attribute, refer to"THIN_PROVISIONED (page 4-7)".
Running the On Demand Scrubbing ProcessTo run the On Demand scrubbing process, follow these steps:
1. Access the Oracle Automatic Storage Management home page.
See "Accessing the Oracle Automatic Storage Management Home Page (page 7-2)"for instructions.
2. Click the Disk Group tab. The Disk Group page is displayed.
3. Click Scrub. The Scrub Disk Group page is displayed where you can use advancedoptions such as repair, power level, wait and force. You can also use the scrubaction on disks and files.
4. Provide the advance option and click OK. A background process is initiated thatscrubs the disk group.
Managing Disk Groups with Oracle Enterprise Manager
7-20 Oracle Automatic Storage Management Administrator's Guide

For additional information about scrubbing disk groups, refer to "Scrubbing DiskGroups (page 4-24)".
Determining Whether Scrubbing Process Is RunningTo determine whether the scrubbing process is running, follow these steps:
1. Access the Oracle Automatic Storage Management home page.
See "Accessing the Oracle Automatic Storage Management Home Page (page 7-2)"for instructions.
2. Click the Disk Group tab. The Disk Group page displays.
3. Click a Disk Group link. The Disk Group General Section displays a PendingOperation link if a scrubbing process is ongoing.
4. Click the link. Details on the scrubbing process are displayed.
Managing Oracle ASM File Access Control with Oracle EnterpriseManager
You can manage Oracle ASM File Access Control with Oracle Enterprise ManagerIntegration for Oracle ASM File Access Control, shown in Figure 7-8 (page 7-21).
Figure 7-8 Oracle Automatic Storage Management Disk Group Access Control Home Page
To manage Oracle ASM File Access Control:
1. Access the Oracle Automatic Storage Management home page.
See "Accessing the Oracle Automatic Storage Management Home Page (page 7-2)"for instructions.
2. Click the Disk Groups link to display the Disk Groups property page.
3. Click a link in the Name column to select a disk group.
4. Click the Access Control tab to display the Access Control page.
On this page, you can add, remove, or replace users from a user group and createor delete user groups. You can also modify the ownership or permission of files.
To access files in a disk group, operating system users must be granted accessprivileges to the disk group. After granted access privileges, users can be added as
Managing Oracle ASM File Access Control with Oracle Enterprise Manager
Administering Oracle ASM with Oracle Enterprise Manager 7-21

members of groups. The operating system user who owns the oracle binary for thedatabase instance is automatically added and cannot be removed.
Oracle ASM File Access Control operations on this page are available when thefiles are open.
For more information about Oracle ASM File Access Control, see "Managing OracleASM File Access Control for Disk Groups (page 4-50)".
Managing Directories, Files, and Aliases with Oracle Enterprise ManagerYou can manage directories, files, and aliases with the Files tab of the OracleEnterprise Manager Disk Group page, shown in Figure 7-9 (page 7-22).
Figure 7-9 Oracle Automatic Storage Management Files Tab
To manage Oracle ASM files:
1. Access the Oracle Automatic Storage Management home page.
See "Accessing the Oracle Automatic Storage Management Home Page (page 7-2)"for instructions.
2. Click the Disk Groups link to display the Disk Groups property page.
3. Click a link in the Name column to select a disk group.
4. Click the Files tab to display the Files page.
5. Click the icons to left on the folders to expand or contract the folders. When youexpand the folders, you can drill down to individual files.
Managing Directories, Files, and Aliases with Oracle Enterprise Manager
7-22 Oracle Automatic Storage Management Administrator's Guide

6. You can select a file with the Select box, then click Rename to rename the file,click Edit to change the properties of a file, or click Delete to remove a file. Youcan click the name of a file to display the properties page.
For more information about managing Oracle ASM files, directories, and aliases, see Administering Oracle ASM Files_ Directories_ and Templates (page 5-1).
Managing Disk Group Templates with Oracle Enterprise ManagerYou can manage disk group templates with the Templates tab of the Disk Group page,shown in Figure 7-10 (page 7-23).
Figure 7-10 Oracle Automatic Storage Management Templates Page
To manage Oracle ASM templates:
1. Access the Oracle Automatic Storage Management home page.
See "Accessing the Oracle Automatic Storage Management Home Page (page 7-2)"for instructions.
2. Click the Disk Groups link to display the Disk Groups property page.
3. Click a link in the Name column to select a disk group.
4. Click the Templates tab to display the Templates page.
Managing Disk Group Templates with Oracle Enterprise Manager
Administering Oracle ASM with Oracle Enterprise Manager 7-23

5. You can click Create to add a new template, click Edit to change a page, or clickDelete to remove a template.
If you click Create, then the Create Template page displays and you can enter aname in the Template Name field. You can also specify a redundancy level,striped granularity, and extent regions (hot or cold).
For more information about disk group templates, see "Managing Disk GroupTemplates (page 5-19)". For information about hot and cold disk regions, see"Intelligent Data Placement (page 4-20)".
Managing Oracle ASM Filter Driver With Oracle Enterprise ManagerYou can manage Oracle ASM Filter Driver with Oracle Enterprise Manager.
This section contains the following sections:
• Discovering ASM Filter Driver Disks (page 7-24)
• Provisioning ASM Filter Driver Disks (page 7-24)
• Releasing ASM Filter Driver Disks (page 7-25)
For more information about managing Oracle ASM Filter Driver, refer to "Oracle ASMFilter Driver (page 3-34)".
Discovering ASM Filter Driver DisksTo discover disks for Oracle ASM Filter Driver follow these steps:
1. From Targets menu, select All Targets.
2. On the All Targets page, select any target of type Automatic Storage Management.
3. On the target home page, from Automatic Storage Management menu, selectConfiguration Parameters.
4. On the Configuration page, click Manage Disk Provisioning. The ASM FilterDriver Page is displayed.
5. On the Disks available for Provisioning table, click Discover to discover additionalOracle ASM disks.
6. In the Discover Disks dialog box, enter additional discovery paths from where youwould like to provision disks. If you are providing more than one path, then ensurethat the values are separated by a comma.
For example, '/dev/','/tmp'.
7. Click Ok.
In the Disks available for Provisioning table, all the disks available in the discoverypaths are listed.
Provisioning ASM Filter Driver DisksTo provision a set of disks for Oracle ASM Filter Driver, follow these steps:
1. From Targets menu, select All Targets.
Managing Oracle ASM Filter Driver With Oracle Enterprise Manager
7-24 Oracle Automatic Storage Management Administrator's Guide
2. On the All Targets page, select any target of type Automatic Storage Management.
3. On the target home page, from Automatic Storage Management menu, selectConfiguration Parameters.
4. On the Configuration page, click Manage Disk Provisioning. The ASM FilterDriver Page is displayed.
5. From the Disks available for Provisioning table, select one or more disks, then clickProvision.
6. The Provision Disks dialog box lists all the disks that were selected forprovisioning. You can update the Label info if you want, then click OK.
After provisioning, the Oracle ASM disks appear in the Provisioned Disks table. Thesedisks display with their new label. For example, if you select /dev/loop3 to beprovisioned with a label LOOP3, then after provisioning the disk displays asAFD:LOOP3 in the Provisioned Disks table.
After the disks are provisioned, they become eligible to be managed by the OracleASM Filter Driver.
Releasing ASM Filter Driver DisksTo release the disks currently managed by Oracle ASM Filter Driver, follow thesesteps:
1. From Targets menu, select All Targets.
2. On the All Targets page, select any target of type Automatic Storage Management.
3. On the target home page, from Automatic Storage Management menu, selectConfiguration Parameters.
4. On the Configuration page, click Manage Disk Provisioning. The ASM FilterDriver Page is displayed.
5. From the Provisioned Disks table, select one or more disks, then click Release.
6. In the Release Provisioned Disks dialog box, click Yes to release the disks
After the disks are released, they are removed from the Provisioned Disks table. Theyinstead appear in the Disks available for provisioning table as a candidate eligible tobe provisioned.
Monitoring Oracle ASM Performance With Oracle Enterprise ManagerThis section describes how to perform the following performance-related Oracle ASMadministrative tasks:
• Monitoring General Oracle ASM Performance (page 7-25)
• Checking Disk Group Integrity (page 7-26)
Monitoring General Oracle ASM PerformanceYou can monitor Oracle ASM performance with the Oracle Enterprise ManagerPerformance page, shown in Figure 7-11 (page 7-26).
Monitoring Oracle ASM Performance With Oracle Enterprise Manager
Administering Oracle ASM with Oracle Enterprise Manager 7-25

Figure 7-11 Oracle Automatic Storage Management Performance Page
To monitor Oracle ASM performance:
1. Access the Oracle Automatic Storage Management home page.
See "Accessing the Oracle Automatic Storage Management Home Page (page 7-2)"for instructions.
2. Click the Performance link to view the Performance property page.
3. Determine the view and refresh rate of the performance graphs with the Viewand Refresh options. Click Refresh to manually refresh the graphs. The refreshoption has the following two intervals:
• Manual refresh: manual, 15 second interval, 30 second interval
• Historical data: Last 24 hours, last 7 days, last 31 days
For more information, refer to "Performance and Scalability Considerations forDisk Groups (page 4-39)".
Checking Disk Group IntegrityWhen you check the integrity of Oracle ASM disk groups, Oracle Enterprise Managerperforms consistency checks on all of the disk group metadata. If Oracle ASM detectserrors, then Oracle ASM stores information about errors in the alert log. To check diskgroups, perform the following steps:
1. From the Disk Groups page, select a disk group in the list and click Check.
Monitoring Oracle ASM Performance With Oracle Enterprise Manager
7-26 Oracle Automatic Storage Management Administrator's Guide

A confirmation dialog for the check disk group operation displays.
Figure 7-12 Oracle Automatic Storage Management Check Diskgroup Confirmation Dialog
2. Select Check Without Repair to record information about disk groupinconsistencies in the alert log. In this operation, Oracle ASM does not resolve theerrors. Select Check And Repair to attempt to repair errors that Oracle EnterpriseManager identifies during the disk group consistency check.
3. Click Yes to start the disk group check operation or No to cancel it. You can alsoselect Show SQL to review the SQL statements that the disk group checkoperation uses. Click OK to run the check operation as a command. To schedule ajob, click Schedule Job. Optionally, you can modify or reenter the job name anddescription. Also provide host credentials and enter the scheduling options byselecting Immediately or Later and modifying the date and time as needed. ClickOK to schedule the job or Cancel to terminate the job creation process.
Backing Up Oracle ASM Files with Oracle Enterprise ManagerOracle recommends that you use RMAN to back up files managed by Oracle ASM.The procedures for using RMAN are documented in Oracle Database 2 Day DBA.
You can also back up your Oracle ASM managed files by performing a files relatedoperation using the following procedures:
1. Create an alias.
2. Create a directory.
3. Delete the alias and directory.
4. Rename the alias and directory.
For information about migrating data with RMAN, see Performing Oracle ASM DataMigration with RMAN (page 8-1).
See Also:
For additional information about RMAN, refer to the Oracle Database Backupand Recovery User's Guide.
Performing Bad Block Recovery with Oracle Enterprise ManagerThe procedures that you use in Oracle Enterprise Manager to perform bad blockrecovery correspond to the steps that you could manually perform with the remap
Backing Up Oracle ASM Files with Oracle Enterprise Manager
Administering Oracle ASM with Oracle Enterprise Manager 7-27

command using the Oracle ASM Command utility (ASMCMD). Use the followingprocedures to perform bad block recovery:
1. Access the Oracle Automatic Storage Management home page.
See "Accessing the Oracle Automatic Storage Management Home Page (page 7-2)"for instructions.
2. Click the Disk Groups link at the top of the page.
3. If you are not logged in, then the Log In page appears and you should log in as theSYS user, connecting as SYSASM. Provide the SYS password for the Oracle ASMinstance. This password was set up when the Oracle ASM instance was created.
4. Click a disk group name and Oracle Enterprise Manager displays the disk grouphome page for that disk group.
5. Click a box in the Select column to the left of a disk in which to recover bad blocks,then click Recover Bad Blocks.
Note:
You can only recover bad blocks for disk groups that you have configuredwith normal or high redundancy; you cannot use this feature for disk groupsthat you have configured with external redundancy.
Migrating to Oracle ASM with Oracle Enterprise ManagerThis section explains how to use Oracle Enterprise Manager to migrate your databasestorage to use Oracle ASM.
Perform the following steps to migrate to Oracle ASM:
1. At the top of the Oracle Enterprise Manager Database Instance home page, click theAdministration pull down list and select Migrate to Oracle ASM.
2. You may need to set credentials for the database, Oracle ASM, and host.
If prompted for database login credentials, then enter the user SYS, provide theSYS password that was set for the Oracle Database instance during installation, andconnect as SYSDBA.
If prompted for Oracle ASM login credentials, then enter the user SYS, provide theSYS password that was set for the Oracle ASM instance during installation, andconnect as SYSASM. For more information about authentication, see"Authentication for Accessing Oracle ASM Instances (page 3-46)".
3. On the Migrate Database To ASM: Migration Options Page, which is the first stepin a four-step process, verify the information about the files that you plan tomigrate to Oracle ASM. If the target database is in ARCHIVELOG mode, then youcould perform online or offline migration by selecting the corresponding option.Otherwise, using offline migration is the default. If you perform an onlinemigration, then you can suspend the migration by selecting the check box next toSuspend Migration Job Before Switching Database To ASM.
Additionally, you can enter an e-mail address to which Oracle Enterprise Managersends a message to notify you about the suspension. By default on this page, theRecovery-related Files option is selected. Deselect this option if you do not want to
Migrating to Oracle ASM with Oracle Enterprise Manager
7-28 Oracle Automatic Storage Management Administrator's Guide

use it. Also verify the entry for the initialization parameter file. Lastly, theParallelize File Copy Operations option is selected by default. Deselect this if youdo not want Oracle Enterprise Manager to perform copy operations in parallel.Click Next when you complete your selections on this page and Oracle EnterpriseManager displays the Migrate Database To ASM: Disk Group Options page.
4. On the Disk Group Options page under Database Area, verify the location whereOracle ASM should create data files, temporary files, redo log files, and controlfiles. Also verify the fast recovery area where Oracle ASM should create therecovery-related files such as archived redo log files, backup files, and so on. Alsounder fast recovery area, the option for Setup fast recovery area without MigratingRecovery-related Files is selected by default. If needed, change the selection tomigrate the files. Click Next when you complete your selections on the Disk GroupOptions page.
5. If you chose to use a fast recovery area and Oracle Enterprise Manager displays awarning that the available space on the disk group is less than the specified fastrecovery area size for the migration, then you can either continue by clicking Yes,or click No to stop the operation and modify your storage.
6. When you continue, Oracle Enterprise Manager displays the Schedule page onwhich you can specify a job name and a date and time for the migration job tobegin. Click Next when you have configured your desired settings.
7. Oracle Enterprise Manager displays the Review page on which you can review allof your selections before beginning your migration operation. To expand thetablespace details and review them, click the plus (+) sign next to Tablespaces andFiles To Be Migrated. Click Back to modify any of your selections or Submit Job tobegin the migration. Click Cancel to cancel the operation.
Note:
If your migration job fails, then do not start your database until you completea recovery operation. Otherwise, you may corrupt your database.
8. After you submit your job, Oracle Enterprise Manager should display aconfirmation dialog indicating that the migration job was successful. Click ViewStatus on the confirmation dialog to examine the progress of your migration job.
After the migration job has completed, the Oracle ASM links on the Oracle EnterpriseManager page may not display immediately. You may need to wait for the links todisplay after a subsequent refresh.
Monitoring Alerts and Incidents With Oracle ASM Support WorkbenchOracle Enterprise Manager provides Support Workbench to monitor Oracle ASMalerts and incidents.
To access Support Workbench, select Diagnostics > Support Workbench under theAutomatic Storage Management target menu at the top of the page.
Figure 7-13 (page 7-30) shows the Oracle ASM Support Workbench page with theProblems tab displayed. You can view information about current and past problemsin this tab. On this page, you have options to view additional details and create apackage that you can send to Oracle Support Services.
Monitoring Alerts and Incidents With Oracle ASM Support Workbench
Administering Oracle ASM with Oracle Enterprise Manager 7-29
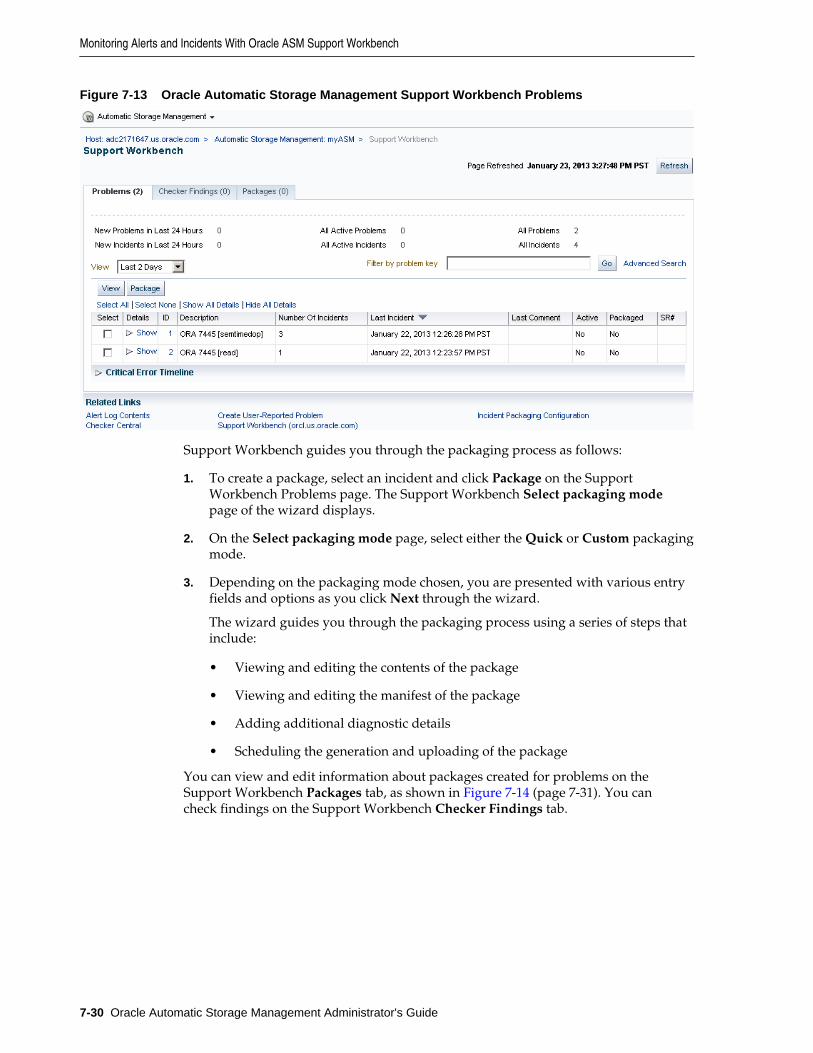
Figure 7-13 Oracle Automatic Storage Management Support Workbench Problems
Support Workbench guides you through the packaging process as follows:
1. To create a package, select an incident and click Package on the SupportWorkbench Problems page. The Support Workbench Select packaging modepage of the wizard displays.
2. On the Select packaging mode page, select either the Quick or Custom packagingmode.
3. Depending on the packaging mode chosen, you are presented with various entryfields and options as you click Next through the wizard.
The wizard guides you through the packaging process using a series of steps thatinclude:
• Viewing and editing the contents of the package
• Viewing and editing the manifest of the package
• Adding additional diagnostic details
• Scheduling the generation and uploading of the package
You can view and edit information about packages created for problems on theSupport Workbench Packages tab, as shown in Figure 7-14 (page 7-31). You cancheck findings on the Support Workbench Checker Findings tab.
Monitoring Alerts and Incidents With Oracle ASM Support Workbench
7-30 Oracle Automatic Storage Management Administrator's Guide

Figure 7-14 Oracle Automatic Storage Management Support Workbench Packages
See Also:
Oracle Database Administrator's Guide for information about viewing problemswith Oracle Enterprise Manager Support Workbench
Monitoring Oracle Flex ASMOracle Enterprise Manager provides functionality to monitor your Oracle Flex ASMconfiguration. For more information about Oracle Flex ASM, refer to "ManagingOracle Flex ASM (page 3-16)".
Figure 7-15 (page 7-31) shows the top portion of the Oracle Flex ASM home page. Onthe page, you can view and administer components of the Oracle Flex ASMconfiguration.
Figure 7-15 Oracle Flex ASM Home Page
Figure 7-16 (page 7-32) shows the Oracle Flex ASM Members page. On the page, youcan view all the members of the Oracle Flex ASM configuration.
Monitoring Oracle Flex ASM
Administering Oracle ASM with Oracle Enterprise Manager 7-31
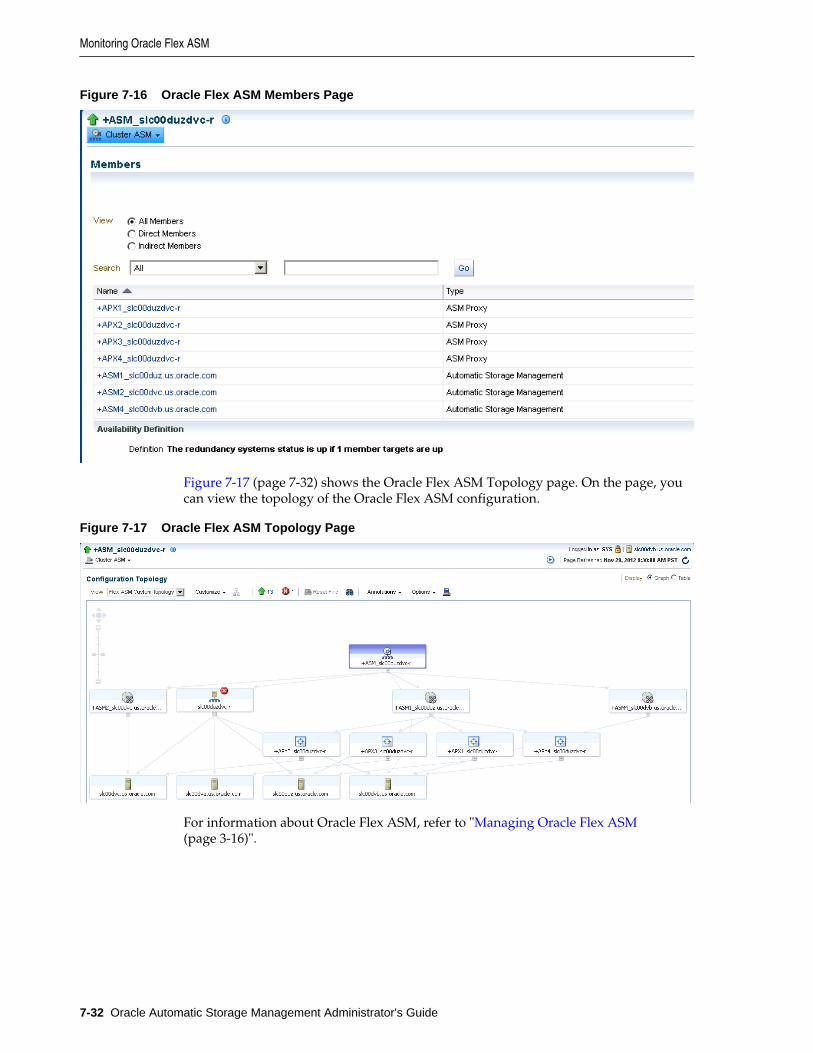
Figure 7-16 Oracle Flex ASM Members Page
Figure 7-17 (page 7-32) shows the Oracle Flex ASM Topology page. On the page, youcan view the topology of the Oracle Flex ASM configuration.
Figure 7-17 Oracle Flex ASM Topology Page
For information about Oracle Flex ASM, refer to "Managing Oracle Flex ASM(page 3-16)".
Monitoring Oracle Flex ASM
7-32 Oracle Automatic Storage Management Administrator's Guide

8Performing Oracle ASM Data Migration with
RMAN
This chapter describes how to migrate data into and out of Oracle Automatic StorageManagement (Oracle ASM) storage with Recovery Manager (RMAN).
This chapter includes the following topics:
• Overview of Oracle ASM Data Migration (page 8-1)
• Preparing to Migrate the Database to Oracle ASM Using RMAN (page 8-3)
• Migrating the Database to Oracle ASM Using RMAN (page 8-6)
• Migrating a Database from Oracle ASM to Alternative Storage (page 8-9)
• Moving Data Files Between Oracle ASM Disk Groups Using RMAN (page 8-9)
The procedures in this chapter cover an Oracle ASM standalone environment on aLinux platform. File locations and procedures may be different for different Oracleconfigurations and on other operating system platforms.
See Also:
• Oracle Database Backup and Recovery User's Guide for complete informationabout using RMAN
• Operating system-specific documentation for migrating data in and out ofOracle ASM on specific platforms
• Oracle Clusterware Administration and Deployment Guide for informationabout managing and migrating Oracle Cluster Registry and voting files
• Oracle Real Applications Cluster Administration and Deployment Guide formigrating data in and out of Oracle ASM in an Oracle RAC configuration
Overview of Oracle ASM Data MigrationThis section explains the basic concepts and tasks involved in migrating data to andfrom Oracle ASM.
This section includes the following topics:
• Purpose of Oracle ASM Data Migration (page 8-2)
• Basic Concepts of Oracle ASM Data Migration (page 8-2)
Performing Oracle ASM Data Migration with RMAN 8-1
• Basic Steps of Data Migration to Oracle ASM Using RMAN (page 8-2)
Purpose of Oracle ASM Data MigrationAlternatives to Oracle ASM storage include file systems, raw disks, and SANconfigurations. Oracle ASM includes numerous benefits over these storagealternatives, including performance optimization, redundancy protection, and loadbalancing. You do not need a third-party Logical Volume Manager because OracleASM manages disks for you. Oracle Real Application Clusters (Oracle RAC) databasesbenefit from Oracle ASM because it provides ready-made shared storage.
If a database currently uses a storage system other than Oracle ASM, then you canmigrate all or part of the database into Oracle ASM, thereby simplifying databaseadministration. You can also migrate a fast recovery area to Oracle ASM.
Native operating system commands such as Linux cp or Windows COPY cannot writeor read files in Oracle ASM storage. Because RMAN can read and write Oracle ASMfiles, you can use RMAN to copy data files into and out of Oracle ASM storage orbetween Oracle ASM disk groups. This technique is useful if you must store backupson user-managed disks.
Basic Concepts of Oracle ASM Data MigrationYou can migrate data to Oracle ASM with RMAN even if you are not using RMAN asyour primary backup tool. The migration requires one RMAN database backup.
If you have sufficient disk space to hold the entire database both in Oracle ASM andalternative storage systems, then you can move a database directly into Oracle ASM. Ifyou do not have sufficient storage, then you can back the database up to tape, createan Oracle ASM disk group that uses old disk space, and restore the database from tapeto Oracle ASM.
After you set the location of the new recovery area, existing backups remain in the oldrecovery area and count against the total disk quota of the recovery area. The backupsare deleted from the old recovery area when space is needed. These backups areusable by RMAN. It is not necessary to move legacy backups to the new Oracle ASMrecovery area unless you need disk space. To free space consumed by files in the oldrecovery area, you can back them up to tape or migrate them to the Oracle ASMrecovery area.
Note:
A foreign archived redo log is a log received by a logical standby database fora LogMiner session. Foreign archived redo logs cannot be migrated. Unlikenormal archived logs, foreign archived logs have a different internal databaseidentifier (DBID). For this reason, they cannot be backed up or restored on alogical standby database.
Migrating a database from Oracle ASM to an alternative storage system is similar tomigration from an alternative storage system to Oracle ASM. The primary change is tomodify each step to refer to file locations in the alternative storage system.
Basic Steps of Data Migration to Oracle ASM Using RMANThis section discusses the process of migrating the entire database and fast recoveryarea from alternative storage to Oracle ASM using RMAN.
Overview of Oracle ASM Data Migration
8-2 Oracle Automatic Storage Management Administrator's Guide
The fast recovery area is an optional disk location that you can use to store recovery-related files such as control file and online redo log copies, archived redo log files,flashback logs, and RMAN backups. Oracle Database and RMAN manage the files inthe fast recovery area automatically. You can specify the disk quota, which is the user-specified maximum size of the fast recovery area. When the disk quota is reached,Oracle automatically deletes files that are no longer needed.
Flashback logs are Oracle-generated logs used to perform flashback databaseoperations. The database can only write flashback logs to the fast recovery area.Flashback logs are written sequentially and are not archived. They cannot be backedup to disk.
To migrate the entire database and fast recovery area from alternative storage toOracle ASM, perform the following steps:
1. Back up the database and server parameter file, and disable Oracle FlashbackDatabase.
The Oracle Flashback Database option returns the entire database to a priorconsistent System Change Number (SCN) with the FLASHBACK DATABASEcommand in RMAN or SQL. A database flashback is different from traditionalmedia recovery because it does not involve the restore of physical files, insteadrestoring your current data files to past states using saved images of changed datablocks. This feature uses flashback logs and archived redo logs.
This step is described in "Preparing to Migrate the Database to Oracle ASM UsingRMAN (page 8-3)".
2. Restore files to Oracle ASM, recover the database, and optionally migrate the fastrecovery area to Oracle ASM.
This step is described in "Migrating the Database to Oracle ASM Using RMAN(page 8-6)".
To migrate files from Oracle ASM to alternative storage, see "Migrating a Databasefrom Oracle ASM to Alternative Storage (page 8-9)".
Preparing to Migrate the Database to Oracle ASM Using RMANThis section explains how to prepare the database for migration. This section makesthe following assumptions:
• You want to migrate the database to two Oracle ASM disk groups: +DATA for thedatabase and +FRA for the fast recovery area.
• The database to be migrated to Oracle ASM storage is named mydb.
To prepare the database for Oracle ASM migration:
1. If the COMPATIBLE initialization parameter setting for the database is less than11.0.0, then make any read-only transportable tablespaces read/write.
Read-only transportable tablespaces cannot be migrated because RMAN cannotback them up.
2. If the database is a physical standby database, and if managed recovery is started,then stop managed recovery.
A physical standby database is a copy of a production database that you can usefor disaster protection.
Preparing to Migrate the Database to Oracle ASM Using RMAN
Performing Oracle ASM Data Migration with RMAN 8-3

For example, connect SQL*Plus to the database with SYSBACKUP privileges(rather than SYSDBA privileges) to enforce the separation of duty security model,and run the following statement to stop managed recovery:
SQL> ALTER DATABASE RECOVER MANAGED STANDBY DATABASE CANCEL;
Keep this terminal window open.
3. Copy the server parameter file or initialization parameter file to a temporarylocation.
The following example uses an operating system utility to copy the serverparameter file:
$ cp spfileMYDB.ora orig_spfileMYDB.ora
4. In a new terminal window, start RMAN session and connect as TARGET to thedatabase to be migrated. Optionally, connect to a recovery catalog. Connect withSYSBACKUP privileges to enforce the separation of duty security model.
5. Back up the data files to the Oracle ASM disk group.
The following example uses a RUN command to make a level 0 incrementalbackup and allocates four channels to increase the backup speed. A level 0incremental backup is an RMAN incremental backup that backs up all data blocksin the data files being backed up. An incremental backup at level 0 is identical incontent to a full backup, but unlike a full backup the level 0 backup is considereda part of the incremental backup strategy.
An incremental backup is a RMAN backup in which only modified blocks arebacked up. Incremental backups are classified by level. A level 0 incrementalbackup performs the same function as a full backup in that they both back up allblocks that have ever been used. The difference is that a full backup does notaffect blocks backed up by subsequent incremental backups, whereas anincremental backup affects blocks backed up by subsequent incremental backups.
A full backup is a non-incremental RMAN backup. Full does not refer to howmuch of the database is backed up, but to the fact that the backup is notincremental. Consequently, you can make a full backup of one data file.
Increase or decrease this number accordingly. The format clause specifies +DATA,which is the name of the Oracle ASM disk group to be used for storing thedatabase.
RUN{ ALLOCATE CHANNEL dev1 DEVICE TYPE DISK; ALLOCATE CHANNEL dev2 DEVICE TYPE DISK; ALLOCATE CHANNEL dev3 DEVICE TYPE DISK; ALLOCATE CHANNEL dev4 DEVICE TYPE DISK; BACKUP AS COPY INCREMENTAL LEVEL 0 DATABASE FORMAT '+DATA' TAG 'ORA_ASM_MIGRATION';}
6. If block change tracking is enabled for the database, then optionally make a level 1incremental backup that you can use later to recover the database copy.
Block change tracking is a database option that causes Oracle to track data fileblocks affected by each database update. The tracking information is stored in a
Preparing to Migrate the Database to Oracle ASM Using RMAN
8-4 Oracle Automatic Storage Management Administrator's Guide
block change tracking file. When block change tracking is enabled, RMAN usesthe record of changed blocks from the change tracking file to improve incrementalbackup performance by only reading those blocks known to have changed,instead of reading data files in their entirety.
The following example makes an incremental level 1 copy of the level 0 backupcreated in the previous step:
RUN{ ALLOCATE CHANNEL dev1 DEVICE TYPE DISK; ALLOCATE CHANNEL dev2 DEVICE TYPE DISK; ALLOCATE CHANNEL dev3 DEVICE TYPE DISK; ALLOCATE CHANNEL dev4 DEVICE TYPE DISK; BACKUP INCREMENTAL LEVEL 1 FOR RECOVER OF COPY WITH TAG 'ORA_ASM_MIGRATION' DATABASE;}
7. If the database is in ARCHIVELOG mode, and if the database is open, then archivethe online logs.
The following example uses the SQL command to archive the current redo logs:
RMAN> SQL "ALTER SYSTEM ARCHIVE LOG CURRENT";
8. If the database instance is currently using a server parameter file, then back it up.
The following example backs up the server parameter file:
RMAN> BACKUP AS BACKUPSET SPFILE;
9. If block change tracking is enabled, then disable it.
The following command disables block change tracking:
RMAN> SQL "ALTER DATABASE DISABLE BLOCK CHANGE TRACKING";
10. If Flashback Database is enabled, then disable it and drop any guaranteed restorepoints.
Note:
If you are not migrating the fast recovery area, then skip this step.
Disabling Oracle Flashback Database is necessary because you cannot migrateflashback logs to Oracle ASM. The following command disables FlashbackDatabase:
RMAN> SQL "ALTER DATABASE FLASHBACK OFF";
The following command drops the guaranteed restore point named Q106:
RMAN> SQL "DROP RESTORE POINT Q106";
11. Shut down the database consistently.
The following command shuts down the database:
RMAN> SHUTDOWN IMMEDIATE;
Preparing to Migrate the Database to Oracle ASM Using RMAN
Performing Oracle ASM Data Migration with RMAN 8-5
Migrating the Database to Oracle ASM Using RMANThe following procedure is intended to minimize database downtime. The steps differslightly depending on whether you are migrating a primary or standby database. Theprocedure makes the same assumptions described in "Preparing to Migrate theDatabase to Oracle ASM Using RMAN (page 8-3)". If you are not migrating therecovery area to Oracle ASM, then you must modify some steps, which are noted.
Note:
The following procedure switches between SQL*Plus and RMAN, so keep aterminal window open for each utility.
To migrate the database to Oracle ASM:
1. Follow the steps in "Preparing to Migrate the Database to Oracle ASM UsingRMAN (page 8-3)".
2. Restore or create a server parameter file in Oracle ASM storage.
The steps depend on whether the database is using a server parameter file:
• If the database is using a server parameter file, then restore it to the OracleASM disk group with the following commands, where sid is the SID of theinstance:
RMAN> STARTUP MOUNT;RMAN> RESTORE SPFILE TO '+DATA/spfilesid.ora';RMAN> SHUTDOWN IMMEDIATE;
• If the database is not using a server parameter file, then create one in OracleASM. Run the CREATE SPFILE command in SQL*Plus as follows, wheresid is the SID of the database:
SQL> CREATE SPFILE='+DATA/spfilesid.ora' FROM PFILE='?/dbs/initsid.ora';
3. Set Oracle Managed Files initialization parameters to Oracle ASM locations.
Note:
If you are not migrating the fast recovery area, then do not change theDB_RECOVERY_FILE_DEST and DB_RECOVERY_FILE_DEST_SIZEinitialization parameter settings. However, you must setDB_CREATE_ONLINE_LOG_DEST_n parameter to an Oracle ASM location formigration of the online redo logs.
Set the DB_CREATE_FILE_DEST and optionalDB_CREATE_ONLINE_LOG_DEST_n initialization parameters to Oracle ASM diskgroups. If the database uses a recovery area, then change the recovery arealocation to the Oracle ASM disk group. Also, change the recovery area size.
Run commands in SQL*Plus as shown in the following example. The exampleassumes that the size of the fast recovery area is 100 GB and specifies the diskgroup +FRA for the fast recovery area.
Migrating the Database to Oracle ASM Using RMAN
8-6 Oracle Automatic Storage Management Administrator's Guide

SQL> STARTUP FORCE NOMOUNT;SQL> ALTER SYSTEM SET DB_CREATE_FILE_DEST='+DATA' SID='*';SQL> ALTER SYSTEM SET DB_RECOVERY_FILE_DEST_SIZE=100G SID='*';SQL> ALTER SYSTEM SET DB_RECOVERY_FILE_DEST='+FRA' SID='*';
4. Set the CONTROL_FILES initialization parameter to Oracle ASM locations.
If you are migrating the fast recovery area, then enter the following commands inSQL*Plus to restart the database instance and set the control file locations to diskgroups +DATA and +FRA:
SQL> STARTUP FORCE NOMOUNT;SQL> ALTER SYSTEM SET CONTROL_FILES='+DATA','+FRA' SCOPE=SPFILE SID='*';
If you are not migrating the fast recovery area, then enter the followingcommands in SQL*Plus to restart the database instance and set the control filelocations to disk group +DATA:
SQL> STARTUP FORCE NOMOUNT;SQL> ALTER SYSTEM SET CONTROL_FILES='+DATA','+DATA' SCOPE=SPFILE SID='*';
5. Migrate the control file to Oracle ASM and mount the control file.
Switch to the RMAN terminal to restore the control file. In the following example,original_cf_name is a control file name in the initialization parameter filebefore migration:
RMAN> STARTUP FORCE NOMOUNT;RMAN> RESTORE CONTROLFILE FROM 'original_cf_name';RMAN> ALTER DATABASE MOUNT;
6. Migrate the data files to Oracle ASM.
Use RMAN to switch to the database copy that you created in step 5 (page 8-4)"Back up the data files to the Oracle ASM disk group" in "Preparing to Migrate theDatabase to Oracle ASM Using RMAN (page 8-3)". The switch renames all thedata files to files on Oracle ASM disk groups. Afterward, recover the database. Ifincremental backups were taken, then RMAN applies them during recovery. Forexample, enter the following commands at the RMAN prompt:
SWITCH DATABASE TO COPY;RUN{ ALLOCATE CHANNEL dev1 DEVICE TYPE DISK; ALLOCATE CHANNEL dev2 DEVICE TYPE DISK; ALLOCATE CHANNEL dev3 DEVICE TYPE DISK; ALLOCATE CHANNEL dev4 DEVICE TYPE DISK; RECOVER DATABASE;}
7. If the database uses block change tracking or Flashback Database, then enablethese features.
Note:
If you are not migrating the recovery area, then you do not enable FlashbackDatabase unless you had disabled it previously.
For example, enter the following statements in SQL*Plus:
Migrating the Database to Oracle ASM Using RMAN
Performing Oracle ASM Data Migration with RMAN 8-7

SQL> ALTER DATABASE ENABLE BLOCK CHANGE TRACKING USING FILE '+DATA';SQL> ALTER DATABASE FLASHBACK ON;
8. Place the database in its normal operation mode.
The normal operational mode depends on whether the database is a primary orstandby database:
• If the database is a primary database, then open it as follows:
SQL> ALTER DATABASE OPEN;
• If the database is a standby database, then resume managed recovery mode asfollows:
SQL> ALTER DATABASE RECOVER MANAGED STANDBY DATABASE;
9. Drop the tempfiles and re-create them in Oracle ASM.
Use SQL*Plus to re-create the tempfiles. In the following example, the name of thetempfile in the original storage is tempfile_name. The name of the temporarytablespace is temp_tbs_name.
SQL> ALTER DATABASE TEMPFILE 'tempfile_name' DROP;SQL> ALTER TABLESPACE temp_tbs_name ADD TEMPFILE;
10. Migrate the online redo log files.
If this is a primary database, then add new log group members in Oracle ASMand drop the old members. You can use the following PL/SQL script to migratethe online redo log groups into an Oracle ASM disk group. The PL/SQL scriptassumes that the Oracle Managed Files initialization parameters specified in step 3(page 8-6) "Set Oracle Managed Files initialization parameters to Oracle ASMlocations" in "Migrating the Database to Oracle ASM Using RMAN (page 8-6)" areset.
11. Optionally, migrate backups and copies in the old fast recovery area to OracleASM as follows:
a. If foreign archived logs exists in the recovery area, then you cannot migratethem to Oracle ASM. Run the following command at the RMAN prompt:
RMAN> DELETE ARCHIVELOG ALL;
b. Back up archived redo log files, backup sets, and data file copies to OracleASM. For example, run the following command at the RMAN prompt:
RUN{ ALLOCATE CHANNEL dev1 DEVICE TYPE DISK; ALLOCATE CHANNEL dev2 DEVICE TYPE DISK; ALLOCATE CHANNEL dev3 DEVICE TYPE DISK; ALLOCATE CHANNEL dev4 DEVICE TYPE DISK;
BACKUP AS COPY ARCHIVELOG ALL DELETE INPUT; BACKUP BACKUPSET ALL DELETE INPUT; BACKUP AS COPY DATAFILECOPY ALL DELETE INPUT;}
Example 8-1 Migrating the online redo logs
SET SERVEROUTPUT ON;DECLARE
Migrating the Database to Oracle ASM Using RMAN
8-8 Oracle Automatic Storage Management Administrator's Guide

CURSOR rlc IS SELECT GROUP# GRP, THREAD# THR, BYTES, 'NO' SRL FROM V$LOG UNION SELECT GROUP# GRP, THREAD# THR, BYTES, 'YES' SRL FROM V$STANDBY_LOG ORDER BY 1; stmt VARCHAR2(2048);BEGIN FOR rlcRec IN rlc LOOP IF (rlcRec.srl = 'YES') THEN stmt := 'ALTER DATABASE ADD STANDBY LOGFILE THREAD ' || rlcRec.thr || ' SIZE ' || rlcRec.bytes; EXECUTE IMMEDIATE stmt; stmt := 'ALTER DATABASE DROP STANDBY LOGFILE GROUP ' || rlcRec.grp; EXECUTE IMMEDIATE stmt; ELSE stmt := 'ALTER DATABASE ADD LOGFILE THREAD ' || rlcRec.thr || ' SIZE ' || rlcRec.bytes; EXECUTE IMMEDIATE stmt; BEGIN stmt := 'ALTER DATABASE DROP LOGFILE GROUP ' || rlcRec.grp; DBMS_OUTPUT.PUT_LINE(stmt); EXECUTE IMMEDIATE stmt; EXCEPTION WHEN OTHERS THEN EXECUTE IMMEDIATE 'ALTER SYSTEM SWITCH LOGFILE'; EXECUTE IMMEDIATE 'ALTER SYSTEM CHECKPOINT GLOBAL'; EXECUTE IMMEDIATE stmt; END; END IF; END LOOP;END;/
Migrating a Database from Oracle ASM to Alternative StorageMigrating a database from Oracle ASM to an alternative storage system is essentiallythe reverse of the migration to Oracle ASM. Modify the steps in "Preparing to Migratethe Database to Oracle ASM Using RMAN (page 8-3)" and "Migrating the Database toOracle ASM Using RMAN (page 8-6)" as follows:
• If the procedure specifies Oracle Managed Files locations, then alter the procedureto use locations in alternative storage.
• If the FORMAT clause of the BACKUP command specifies an Oracle ASM location,then change the backup format to an alternative storage location.
• If a file name used in a SQL statement is an Oracle ASM location, then change it toa file name in the alternative storage location.
Moving Data Files Between Oracle ASM Disk Groups Using RMANYou may want to move an active data file in an ARCHIVELOG mode database from oneOracle ASM disk group to another. You can use RMAN BACKUP AS COPY to copy thedata file to the new disk group and SET NEWNAME and SWITCH commands to renamethe data file in the control file.
Migrating a Database from Oracle ASM to Alternative Storage
Performing Oracle ASM Data Migration with RMAN 8-9

You can also use the ALTER DATABASE MOVE DATAFILE. SQL statement to move datafiles. For information about moving data files online with ALTER DATABASE MOVEDATAFILE, refer to "Moving Data Files Between Disk Groups With ALTERDATABASE (page 5-10)".
For this scenario using RMAN, assume that you are using disk groups DATA andUSERDATA and you want to move the data file users.261.689589837 to disk groupUSERDATA. Ensure that ARCHIVELOG mode is enabled for the database beforebeginning the procedure to move data files.
To move a data file from one Oracle ASM disk group to another disk group using theRMAN BACKUP AS COPY procedure with the SET NEWNAME and SWITCH commands,perform the following steps.
1. Start RMAN and connect to the target database.
For example:
$ rmanRMAN> CONNECT TARGET SYS@orcltarget database Password: XXXXXXXXXconnected to target database: ORCL (DBID=1217369048)
2. Generate a report that shows the names of the data files.
Run the following REPORT command after connecting RMAN to the targetdatabase. Note the data file name of the file to be moved.
For example:
RMAN> REPORT SCHEMA;
Report of database schema for database with db_unique_name ORCL List of Permanent Datafiles===========================File Size(MB) Tablespace RB segs Datafile Name---- -------- -------------- ------- ------------------------1 740 SYSTEM *** +DATA/orcl/datafile/system.258.6895897372 570 SYSAUX *** +DATA/orcl/datafile/sysaux.259.6895897853 55 UNDOTBS1 *** +DATA/orcl/datafile/undotbs1.260.6895898314 5 USERS *** +DATA/orcl/datafile/users.261.689589837
List of Temporary Files=======================File Size(MB) Tablespace Maxsize(MB) Tempfile Name---- -------- -------------- ----------- --------------------1 20 TEMP 32767 +DATA/orcl/tempfile/temp.262.689589851
3. Back up the data file to the new Oracle ASM disk group.
Run the BACKUP AS COPY command to back up the data file on DATA toUSERDATA.
For example:
RMAN> BACKUP AS COPY DATAFILE "+DATA/orcl/datafile/users.261.689589837" FORMAT "+USERDATA";
Starting backup at 16-JUN-09allocated channel: ORA_DISK_1channel ORA_DISK_1: SID=51 device type=DISK
Moving Data Files Between Oracle ASM Disk Groups Using RMAN
8-10 Oracle Automatic Storage Management Administrator's Guide

channel ORA_DISK_1: starting datafile copyinput datafile file number=00004 name=+DATA/orcl/datafile/users.261.689589837output file name=+USERDATA/orcl/datafile/users.256.689682663 tag=TAG20090616T103101 RECID=13 STAMP=689682663channel ORA_DISK_1: datafile copy complete, elapsed time: 00:00:01Finished backup at 16-JUN-09
You could also specify the data file by the data file number and data file type.
For example:
BACKUP AS COPY DATAFILE 4 FORMAT "+USERDATA";
4. Offline the data file that you intend to move to a new disk group.
Run the following SQL command in the RMAN client. Use two single quotationmarks around the name of the data file, not double quotation marks.
For example:
RMAN> SQL "ALTER DATABASE DATAFILE ''+DATA/orcl/datafile/users.261.689589837'' OFFLINE";
sql statement: ALTER DATABASE DATAFILE ''+DATA/orcl/datafile/users.261.689589837'' OFFLINE
5. Point the control file to the newly created copy of the data file.
Run the SWITCH...TO COPY command in the RMAN client. The TO COPY optionof SWITCH switches the data file to the most recent copy of the data file.
For example:
RMAN> SWITCH DATAFILE "+DATA/orcl/datafile/users.261.689589837" TO COPY;
datafile 4 switched to datafile copy "+USERDATA/orcl/datafile/users.256.689682663"
The output of this command displays the new name of the data file.
6. Recover the renamed data file.
Run the RECOVER command in the RMAN client.
For example:
RMAN> RECOVER DATAFILE "+USERDATA/orcl/datafile/users.256.689682663";
Starting recover at 16-JUN-09using channel ORA_DISK_1starting media recoverymedia recovery complete, elapsed time: 00:00:01Finished recover at 16-JUN-09
7. Bring the data file online.
Run the SQL command in the RMAN client. Use two single quotation marksaround the name of the data file, not double quotation marks.
For example:
RMAN> SQL "ALTER DATABASE DATAFILE ''+USERDATA/orcl/datafile/users.256.689682663'' ONLINE";
Moving Data Files Between Oracle ASM Disk Groups Using RMAN
Performing Oracle ASM Data Migration with RMAN 8-11
sql statement: ALTER DATABASE DATAFILE ''+USERDATA/orcl/datafile/users.256.689682663'' ONLINE
8. Delete the data file copy from the original Oracle ASM disk group.
In this scenario, +DATA/orcl/datafile/users.261.689589837 is theoriginal data file in DATA. Because you issued SET NEWNAME and SWITCHcommands for this data file, the original file is now recorded in the RMANrepository as a data file copy. Run a DELETE command in the RMAN client toremove this file.
For example:
RMAN> DELETE DATAFILECOPY "+DATA/orcl/datafile/users.261.689589837";
released channel: ORA_DISK_1allocated channel: ORA_DISK_1channel ORA_DISK_1: SID=51 device type=DISKList of Datafile Copies=======================Key File S Completion Time Ckp SCN Ckp Time ------- ---- - --------------- ---------- ---------------14 4 A 16-JUN-09 864471 16-JUN-09 Name: +DATA/orcl/datafile/users.261.689589837 Tag: TAG20090615T084217
Do you really want to delete the above objects (enter YES or NO)? ydeleted datafile copydatafile copy file name=+DATA/orcl/datafile/users.261.689589837 RECID=14 STAMP=689683255Deleted 1 objects
Moving Data Files Between Oracle ASM Disk Groups Using RMAN
8-12 Oracle Automatic Storage Management Administrator's Guide
9Managing Oracle ASM With ASMCA
Oracle ASM Configuration Assistant (ASMCA) supports installing and configuringOracle ASM instances, Oracle ASM disk groups, Oracle ASM Dynamic VolumeManager (Oracle ADVM) volumes, and Oracle Automatic Storage ManagementCluster File System (Oracle ACFS) file systems. In addition, you can use the ASMCAcommand-line interface.
This chapter discusses the following topics:
• Getting Started With the ASMCA GUI Tool (page 9-1)
• Managing Instances and Disk Groups With ASMCA (page 9-2)
• ASMCA Command-Line Interface (page 9-8)
For information about managing Oracle ACFS and Oracle ADVM with ASMCA, referto Managing Oracle ACFS and Oracle ADVM With ASMCA (page 14-1). Forinformation about using ASMCA to convert to Oracle Flex ASM, refer to "AboutConverting to Oracle Flex ASM (page 3-31)".
Getting Started With the ASMCA GUI ToolTo start ASMCA, enter asmca at a command prompt inside the Oracle GridInfrastructure home. For example:
$ asmca
The GUI tool displays and attempts to connect to the Oracle ASM instance identifiedwith the Oracle system identifier (SID) set to +ASM.
• If ASMCA detects an Oracle ASM instance that is not running, then ASMCAprompts whether you want to start the instance.
• If ASMCA detects an Oracle ASM instance from a previous release, then ASMCAprompts whether you want to upgrade the instance. Oracle recommends that yourespond No this prompt.
An Oracle ASM instance should be upgraded with Oracle Universal Installer(OUI). OUI automatically defaults to upgrade mode when it detects an OracleASM instance at a previous release level.
To continue the upgrade process with ASMCA, see "Upgrading an Oracle ASMInstance with ASMCA (page 9-4)". If you need help with upgrading an OracleASM instance, contact Oracle Support Services.
The Instances tab functionality and some menu options of ASMCA are only availablein an Oracle RAC configuration.
To start the command-line ASMCA, see "ASMCA Command-Line Interface(page 9-8)".
Managing Oracle ASM With ASMCA 9-1

Managing Instances and Disk Groups With ASMCAThis section contains the following topics:
• Creating Oracle ASM Instances with ASMCA (page 9-2)
• Upgrading an Oracle ASM Instance with ASMCA (page 9-4)
• Managing Disk Groups with ASMCA (page 9-5)
Creating Oracle ASM Instances with ASMCAOracle ASM Configuration Assistant enables you to create an Oracle ASM instance ifan Oracle ASM instance is not found on the host, as shown in Figure 9-1 (page 9-3).
On the Create ASM page, you enter the SYS password for the administrator of theOracle ASM instance and the password for the ASMSNMP user that can monitor thisOracle ASM instance. ASMSNMP is a less privileged user that is primarily used tomonitor Oracle ASM instances.
See Also:
• Oracle Grid Infrastructure Installation Guide for information about installingOracle ASM
• Oracle Database Installation Guide for information about reviewingdatabase accounts and passwords
You can select the listener with which to register this Oracle ASM instance. Click ASMParameters to update the initialization parameters for the Oracle ASM instance.
Managing Instances and Disk Groups With ASMCA
9-2 Oracle Automatic Storage Management Administrator's Guide

Figure 9-1 Oracle ASM Configuration Assistant Create ASM Page
When you can click ASM Parameters in the Create ASM page, you can updateinitialization parameters for an Oracle ASM instance on the Oracle ASM ConfigurationAssistant page, as shown in Figure 9-2 (page 9-4).
For information about Oracle ASM instance initialization parameters, see"Initialization Parameters for Oracle ASM Instances (page 3-2)".
Managing Instances and Disk Groups With ASMCA
Managing Oracle ASM With ASMCA 9-3

Figure 9-2 Oracle ASM Configuration Assistant Create ASM Page
Upgrading an Oracle ASM Instance with ASMCAOracle ASM Configuration Assistant also enables you to upgrade an existing OracleASM instance to the current software level. However, the recommended practice is toupgrade an Oracle ASM instance with Oracle Universal Installer (OUI). OUIautomatically defaults to upgrade mode when it detects an Oracle ASM instance at aprevious release level.
If Oracle Clusterware has been upgraded, then there is no need to upgrade the OracleASM instance in that Oracle Grid Infrastructure home. Oracle ASM is usuallyupgraded as part of the Oracle Clusterware upgrade.
See Also:
• Oracle Grid Infrastructure Installation Guide for information about installingand upgrading Oracle Grid Infrastructure
• Articles at My Oracle Support (https://support.oracle.com) forinformation about upgrading Oracle ASM
Note:
The procedure described in this section upgrades the Oracle ASM instanceonly. Oracle Database, and Oracle Enterprise Manager, will not have the latestfeatures. To upgrade Oracle Database, see Oracle Database Upgrade Guide.
Managing Instances and Disk Groups With ASMCA
9-4 Oracle Automatic Storage Management Administrator's Guide

Figure 9-3 Oracle ASM Configuration Assistant Upgrade ASM Page
After upgrading an Oracle ASM instance, you can copy or move an Oracle ASMSPFILE. After copying or moving the SPFILE, you must restart the instance with theSPFILE in the new location to use that SPFILE. For information, see "About BackingUp_ Copying_ and Moving an Oracle ASM Initialization Parameter File (page 3-4)".
See Also:
• Oracle Database Upgrade Guide for information about upgrading OracleDatabase
• Oracle Grid Infrastructure Installation Guide for information about installingOracle Grid Infrastructure and performing a rolling upgrade of OracleASM
Managing Disk Groups with ASMCAOracle ASM Configuration Assistant enables you to configure or create Oracle ASMdisk groups with the Configure ASM Disk Groups tab, as shown in Figure 9-4(page 9-6). The disk group tab displays selected details about the disk group, such asname, size, free space, usable space, redundancy level, and state of the disk group.
See Also:
Oracle Database Reference for descriptions of disk group information displayedin the V$ASM_DISKGROUP view
Managing Instances and Disk Groups With ASMCA
Managing Oracle ASM With ASMCA 9-5
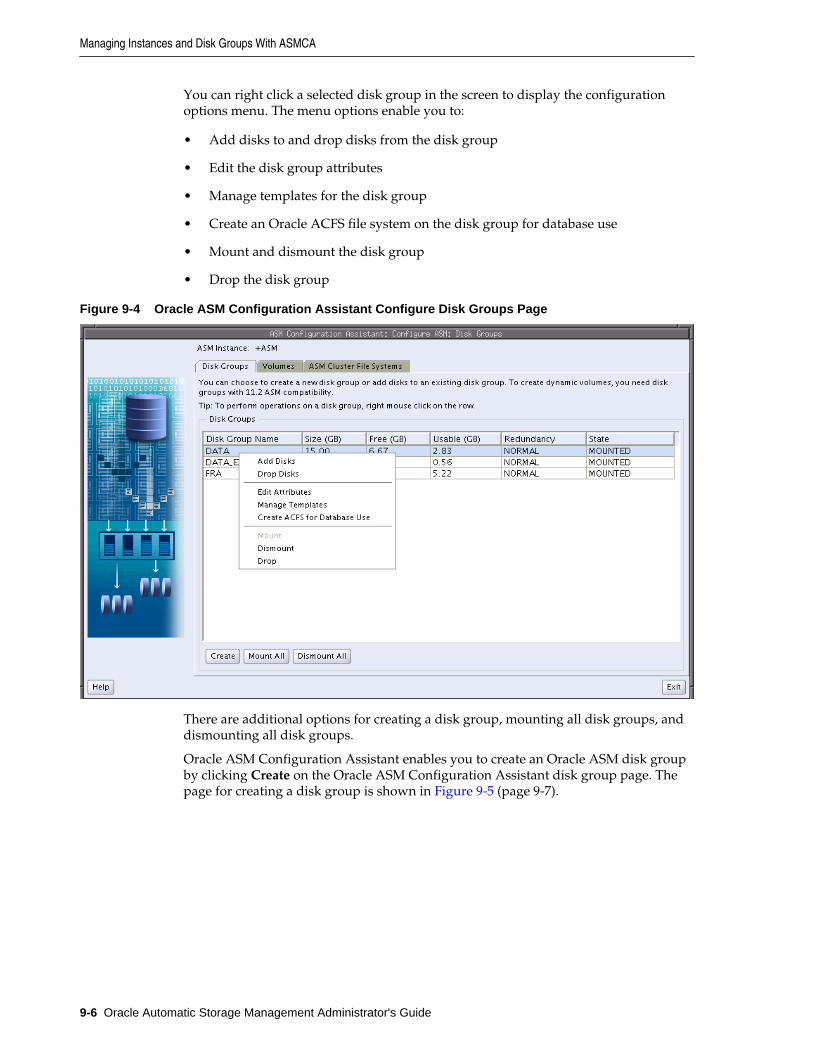
You can right click a selected disk group in the screen to display the configurationoptions menu. The menu options enable you to:
• Add disks to and drop disks from the disk group
• Edit the disk group attributes
• Manage templates for the disk group
• Create an Oracle ACFS file system on the disk group for database use
• Mount and dismount the disk group
• Drop the disk group
Figure 9-4 Oracle ASM Configuration Assistant Configure Disk Groups Page
There are additional options for creating a disk group, mounting all disk groups, anddismounting all disk groups.
Oracle ASM Configuration Assistant enables you to create an Oracle ASM disk groupby clicking Create on the Oracle ASM Configuration Assistant disk group page. Thepage for creating a disk group is shown in Figure 9-5 (page 9-7).
Managing Instances and Disk Groups With ASMCA
9-6 Oracle Automatic Storage Management Administrator's Guide

Figure 9-5 Oracle ASM Configuration Assistant Create Disk Groups Page
On this page, you can enter a name for the disk group, select the redundancy level,change the disk discovery path to locate disks in a different directory, identify thedisks to be in the disk group, enter a name for a failure group, and specify if the failuregroup is a quorum type.
A quorum failure group is a special type of failure group and disks in these failuregroups do not contain user data and a quorum failure group is not considered whendetermining redundancy requirements with respect to user storage. However, aquorum failure group counts when mounting a disk group. For information aboutquorum failure groups, see "Storing Oracle Cluster Registry and Voting Files in OracleASM Disk Groups (page 4-13)".
If Oracle ASM Filter Driver has been configured for your system, you can add OracleASM Filter Driver labels to disks or clear Oracle ASM Filter Driver labels from disks.For information about Oracle ASM Filter Driver, refer to "Oracle ASM Filter Driver(page 3-34)".
You can choose to show advanced options when creating a disk group, as shown in Figure 9-6 (page 9-8). The advanced options section enables you to set additionaloptions, such as disk group compatibility settings and allocation unit (AU) size. Whenyou are finished with the create disk group specifications, click OK.
For Oracle ASM 12c, the default disk group compatibility settings are 12.1 for OracleASM compatibility, 10.1 for database compatibility, and no value for Oracle ADVMcompatibility. For information about disk group compatibility attributes, see "DiskGroup Compatibility (page 4-41)". For information about disk discovery, see "OracleASM Disk Discovery (page 4-25)" and "ASM_DISKSTRING (page 3-9)".
Managing Instances and Disk Groups With ASMCA
Managing Oracle ASM With ASMCA 9-7

Note:
The disk group compatibility settings can only be advanced. You cannotrevert to a lower compatibility setting after you advance the disk groupcompatibility settings. See "Overview of Disk Group Compatibility(page 4-41)"
Figure 9-6 Oracle ASM Configuration Assistant Create Disk Groups - Advanced Options
For more information about managing disk groups, see Administering Oracle ASMDisk Groups (page 4-1).
ASMCA Command-Line InterfaceThe ASMCA command-line interface provides non-GUI support for configuringOracle ASM instances, Oracle ASM disk groups, volumes, and Oracle ACFS.
• Running ASMCA Command-Line (page 9-8)
• ASMCA Commands for Instances and Disk Groups (page 9-9)
Running ASMCA Command-LineThe syntax for running the ASMCA command-line tool is:
asmca -silent command_name [options]
Table 9-1 (page 9-8) contains the options available with the asmca command-linetool.
Table 9-1 Options for the ASMCA command-line tool
Option Description
-silent Specifies to run asmca in command-line mode.
ASMCA Command-Line Interface
9-8 Oracle Automatic Storage Management Administrator's Guide

Table 9-1 (Cont.) Options for the ASMCA command-line tool
Option Description
command_name Specifies the command to run. The command can be any of thefollowing:
-convertToFlexASM
-configureASM
-upgradeASM
-configureParameter
-deleteASM
-createDiskGroup
-addDisk
-createVolume
-createACFS
See "ASMCA Commands for Instances and Disk Groups(page 9-9)".
options Specifies the options to run for a command. The options varyby command. See the individual commands described in"ASMCA Commands for Instances and Disk Groups(page 9-9)" for the available options.
The following list describes the options that are common formultiple commands.
• -help
Displays help for running ASMCA in silent mode.• -asmsnmpPassword asmsnmp_password
The Oracle ASM monitor user (ASMSNMP) password. Thisis optional and only required when creating and migratingan Oracle ASM instance.
• -sysAsmPassword sysasm_password
The SYSASM password for Oracle ASM instance. Thisoption is required.
The following is an example of the -help option.
$ asmca -helpasmca [-silent] [-sysAsmPassword <SYS user password>] [-asmsnmpPassword <ASMSNMP password>] {<command> <options>}Please refer to the manual for details.You can enter one of the following commands:...
ASMCA Commands for Instances and Disk GroupsThis section describes the commands that can be run with ASMCA command-line.
• Convert to Oracle Flex ASM (page 9-10)
• Configure an Oracle ASM Instance (page 9-10)
• Upgrade an Oracle ASM Instance (page 9-12)
• Configure Parameters for an Oracle ASM Instance (page 9-12)
• Delete Oracle ASM Instances (page 9-13)
ASMCA Command-Line Interface
Managing Oracle ASM With ASMCA 9-9

• Create a Disk Group (page 9-13)
• Add a Disk to a Disk Group (page 9-15)
Convert to Oracle Flex ASM
-convertToFlexASM converts Oracle ASM to Oracle Flex ASM
Syntax
asmca -silent -convertToFlexASM -asmNetworks interface_name/subnet, interface_name/subnet... -asmListenerPort ASM_listener_port_number
Table 9-2 (page 9-10) contains the options available with the -convertToFlexASMcommand.
Table 9-2 Options for the -convertToFlexASM command
Option Description
-asmNetworks Specifies a comma-delimited list of Oracle ASMnetworks. Each network is of the forminterface_name/subnet. Specify the subnet,not the IP address for this option
-asmListenerPort Specifies the Oracle ASM listener port number.
This functionality is only available in an Oracle Grid Infrastructure configuration, notan Oracle Restart configuration.
For additional options that are common to multiple commands, see Table 9-1(page 9-8).
Examples
To convert Oracle ASM to Oracle Flex ASM:
Example 9-1 Using asmca -silent -convertToFlexASM
asmca -silent -convertToFlexASM -asmNetworks eth1/10.10.10.0 -asmListenerPort 1521
Configure an Oracle ASM Instance
-configureASM configures or creates an Oracle ASM instance.
Syntax
asmca -silent -configureASM [-sysAsmPassword sysasm_password ] [ -asmsnmpPassword asm_monitor_password ] [ { -param paramname=paramvalue , ... } ] [ { -diskString discovery_path { -diskGroupName diskgroup { -disk disk_path [-diskName disk] | -diskList disk_list
ASMCA Command-Line Interface
9-10 Oracle Automatic Storage Management Administrator's Guide

[-diskSize disk_size_MB] [-failuregroup failure_group] [-force|-noforce] [-quorum|-noquorum] } [ -redundancy { HIGH | NORMAL | EXTERNAL } ] } ] [-au_size value] [-compatible.asm value ] [-compatible.rdbms value ] [-compatible.advm value ] }
Table 9-3 (page 9-11) contains the options available with the -configureASMcommand.
Table 9-3 Options for the -configureASM command
Option Description
-param paramname=paramvalue , ... Specifies a list of initialization parameters withvalues for the Oracle ASM instance.
-diskString discovery_path Specifies the Oracle ASM discovery string forlocating disks.
-diskGroupName diskgroup Specifies the name of the Oracle ASM disk groupto create.
-disk disk_path Specifies the full path of the disk device.
-diskName disk Specifies a user-supplied disk name.
-diskList disk_list Specifies a comma-delimited list of disk names tobe added to the disk group.
-diskSize disk_size_MB Specifies the size of the disk to use for Oracle ASMstorage.
-failuregroup failure_group Specifies the failure group name.
-force | -noforce Specifies where to force the use of the disk.
-quorum | -noquorum Specifies a quorum or standard failure group.
-redundancy { HIGH | NORMAL |EXTERNAL}
Specifies the redundancy setting for the OracleASM disk group.
-au_size Specifies the allocation unit size (1,2,4,8,16,32,64)
-compatible.asm Specifies the attribute setting.
-compatible.rdbms Specifies the attribute setting.
-compatible.advm Specifies the attribute setting.
For additional options that are common to multiple commands, see Table 9-1(page 9-8).
Examples
To configure an Oracle ASM instance:
ASMCA Command-Line Interface
Managing Oracle ASM With ASMCA 9-11

Example 9-2 Using asmca -silent -configureASM
asmca -silent -configureASM -diskString '/devices/disk*' –sysAsmPassword my_sysasm_password -asmsnmpPassword my_asmsnmp_passwd
Upgrade an Oracle ASM Instance
-upgradeASM upgrades an Oracle ASM instance from a previous release to thecurrent software release.
Upgrading an Oracle ASM instance with ASMCA only updates the Oracle ASMinstance software and does not configure Oracle Clusterware or the listener.
An Oracle ASM instance should be upgraded with Oracle Universal Installer (OUI).OUI automatically defaults to upgrade mode when it detects an Oracle ASM instanceat a previous release level.
Syntax
asmca -silent -upgradeASM [-asmsnmpPassword asmsnmp_password]
The options available with the -upgradeASM command are common to multiplecommands. For a description of those options, see Table 9-1 (page 9-8).
Examples
To upgrade an Oracle ASM instance:
Example 9-3 Using asmca -silent -upgradeASM
asmca -silent -upgradeASM -asmsnmpPassword my_asmsnmp_passwd
Configure Parameters for an Oracle ASM Instance
-configureParameter modifies the parameters of an Oracle ASM instance.
Syntax
asmca -silent -configureParameter [{-param paramname=paramvalue , ... }] [-sysAsmPassword sysasm_password ]
Table 9-4 (page 9-12) contains the options available with the -configureParametercommand.
Table 9-4 Options for the -configureParameter command
Option Description
-param paramname=paramvalue , ... Specifies a list of initialization parameters withvalues for the Oracle ASM instance.
ASMCA Command-Line Interface
9-12 Oracle Automatic Storage Management Administrator's Guide
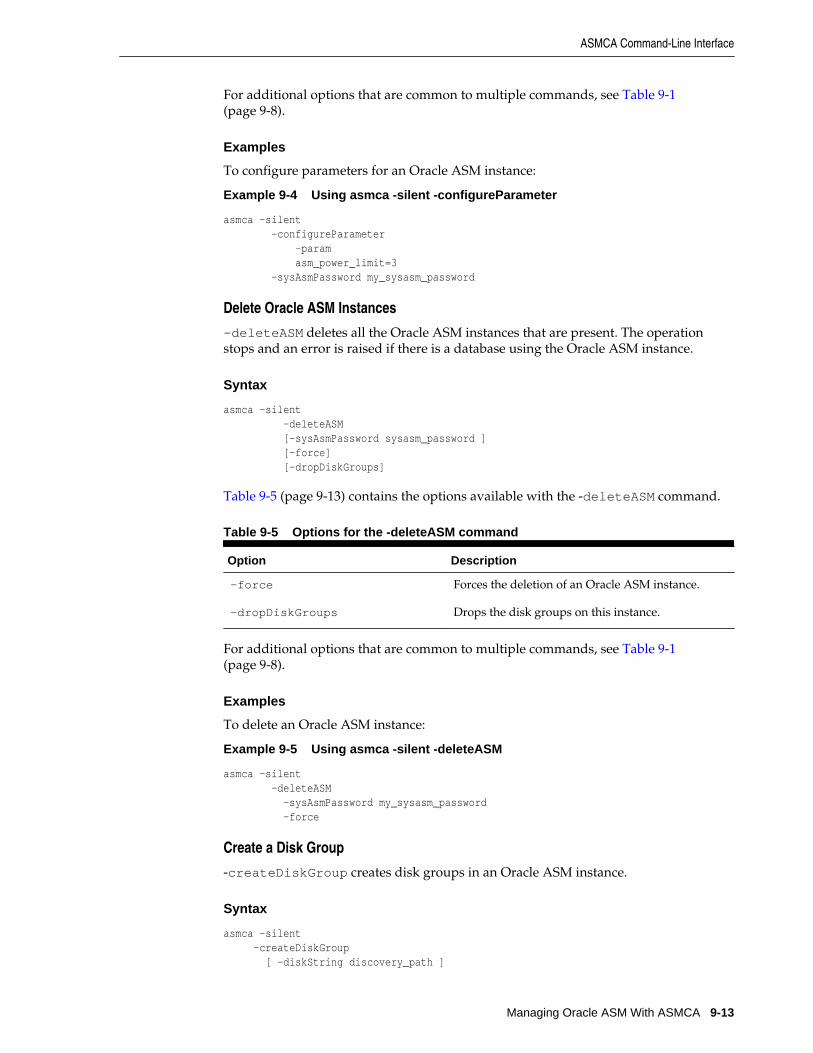
For additional options that are common to multiple commands, see Table 9-1(page 9-8).
Examples
To configure parameters for an Oracle ASM instance:
Example 9-4 Using asmca -silent -configureParameter
asmca -silent -configureParameter –param asm_power_limit=3 –sysAsmPassword my_sysasm_password
Delete Oracle ASM Instances
-deleteASM deletes all the Oracle ASM instances that are present. The operationstops and an error is raised if there is a database using the Oracle ASM instance.
Syntax
asmca -silent -deleteASM [-sysAsmPassword sysasm_password ] [-force] [-dropDiskGroups]
Table 9-5 (page 9-13) contains the options available with the -deleteASM command.
Table 9-5 Options for the -deleteASM command
Option Description
-force Forces the deletion of an Oracle ASM instance.
-dropDiskGroups Drops the disk groups on this instance.
For additional options that are common to multiple commands, see Table 9-1(page 9-8).
Examples
To delete an Oracle ASM instance:
Example 9-5 Using asmca -silent -deleteASM
asmca -silent -deleteASM –sysAsmPassword my_sysasm_password -force
Create a Disk Group
-createDiskGroup creates disk groups in an Oracle ASM instance.
Syntax
asmca -silent -createDiskGroup [ -diskString discovery_path ]
ASMCA Command-Line Interface
Managing Oracle ASM With ASMCA 9-13

{ -diskGroupName diskgroup { -disk disk_path [-diskName disk] | -diskList disk_list [-diskSize disk_size_MB] [-failuregroup failure_group] [-force|-noforce] [-quorum|-noquorum] } [ -redundancy { HIGH | NORMAL | EXTERNAL } ] } ] [-au_size value] [-compatible.asm value ] [-compatible.rdbms value ] [-compatible.advm value ] } [-sysAsmPassword sysasm_password ]
Table 9-6 (page 9-14) contains the options available with the -createDiskGroupcommand.
Table 9-6 Options for the -createDiskGroup command
Option Description
-diskString discovery_path Specifies the Oracle ASM discovery string forlocating disks.
-diskGroupName diskgroup Specifies the name of the Oracle ASM disk group tocreate.
-disk disk_path Specifies the full path of the disk device.
-diskName disk Specifies a user-supplied disk name.
-diskList disk_list Specifies a comma-delimited list of disk names tobe added to the disk group.
-diskSize disk_size_MB Specifies the size of the disk to use for Oracle ASMstorage.
-failuregroup failure_group Specifies the failure group name.
-force | -noforce Specifies where to force the use of the disk.
-quorum | -noquorum Specifies a quorum or standard failure group.
-redundancy { HIGH | NORMAL |EXTERNAL}
Specifies the redundancy setting for the OracleASM disk group.
-au_size Specifies the allocation unit size (1,2,4,8,16,32,64)
-compatible.asm Specifies the attribute setting.
-compatible.rdbms Specifies the attribute setting.
-compatible.advm Specifies the attribute setting.
For additional options that are common to multiple commands, see Table 9-1(page 9-8).
The default disk group compatibility settings are 11.2 for Oracle ASM compatibility,10.1 for database compatibility, and no value for Oracle ADVM compatibility. Forinformation about disk group compatibility attributes, see "Disk Group Compatibility(page 4-41)".
ASMCA Command-Line Interface
9-14 Oracle Automatic Storage Management Administrator's Guide

Examples
To create disk groups in an Oracle ASM instance:
Example 9-6 Using asmca -silent -createDiskGroup
$ asmca -silent -createDiskGroup -diskGroupName mynewdg -disk '/devices/diske*' -disk '/devices/diskk*' -redundancy NORMAL -au_size 64 -compatible.asm '11.2.0.0.0' -compatible.rdbms '11.2.0.0.0' -compatible.advm '11.2.0.0.0'
DiskGroup mynewdg created successfully.
Add a Disk to a Disk Group
-addDisk add disks to an existing disk group in an Oracle ASM instance.
Syntax
asmca -silent -addDisk [ -diskString discovery_path ] {-diskGroupName diskgroup {-disk disk_path [-diskName disk] | -diskList disk_list [-diskSize disk_size_MB] [-failuregroup failure_group] [-force|-noforce] [-quorum|-noquorum] } [-sysAsmPassword sysasm_password ]
Table 9-7 (page 9-15) contains the options available with the -addDisk command.
Table 9-7 Options for the -addDisk command
Option Description
-diskString discovery_path Specifies the Oracle ASM discovery string forlocating disks.
-diskGroupName diskgroup Specifies the name of the Oracle ASM disk group toupdate.
-diskList disk_list Specifies a comma-delimited list of disk names tobe added to the disk group.
-diskSize disk_size_MB Specifies the size of the disk to use for Oracle ASMstorage.
-failuregroup failure_group Specifies the failure group name.
-force | -noforce Specifies where to force the use of the disk.
-quorum | -noquorum Specifies a quorum or standard failure group.
ASMCA Command-Line Interface
Managing Oracle ASM With ASMCA 9-15

For additional options that are common to multiple commands, see Table 9-1(page 9-8).
Examples
To add disks to an existing disk group:
Example 9-7 Using asmca -silent -addDisk
asmca -silent -addDisk -diskGroupName mynewdg -disk '/devices/diskl1' -disk '/devices/diskl2'
Disks added successfully to diskgroup mynewdg.
ASMCA Command-Line Interface
9-16 Oracle Automatic Storage Management Administrator's Guide

10Managing Oracle ASM with ASMCMD
This chapter describes the Oracle Automatic Storage Management (Oracle ASM) Command-Line Utility (ASMCMD). This chapter contains the following topics:
• About ASMCMD (page 10-1)
• ASMCMD Instance Management Commands (page 10-11)
• ASMCMD Oracle ASM Filter Driver Management Commands (page 10-29)
• ASMCMD File Management Commands (page 10-35)
• ASMCMD Disk Group Management Commands (page 10-46)
• ASMCMD Template Management Commands (page 10-68)
• ASMCMD File Access Control Commands (page 10-72)
For information about ASMCMD commands to manage volumes, refer to ManagingOracle ADVM with ASMCMD (page 15-1).
About ASMCMDASMCMD is a command-line utility that you can use to manage Oracle ASMinstances, disk groups, file access control for disk groups, files and directories withindisk groups, templates for disk groups, and volumes.
You can run the ASMCMD utility in either interactive or noninteractive mode.
This section contains the following topics:
• Types of ASMCMD Commands (page 10-1)
• About Oracle ASM Files_ File Names_ Directories_ and Aliases (page 10-2)
• Preparing to Run ASMCMD (page 10-6)
• Running ASMCMD in Interactive Mode (page 10-7)
• Running ASMCMD in Noninteractive Mode (page 10-9)
• Getting Help (page 10-11)
Types of ASMCMD CommandsThe types of ASMCMD commands are listed in Table 10-1 (page 10-2).
Managing Oracle ASM with ASMCMD 10-1

Table 10-1 Types of ASMCMD commands
Category Commands
Oracle ASM instance management For a list of commands, refer to "ASMCMD InstanceManagement Commands (page 10-11)"
Oracle ASM Filter Driver management For a list of commands, refer to "ASMCMD Oracle ASMFilter Driver Management Commands (page 10-29)"
Oracle ASM file management For a list of commands, refer to "ASMCMD FileManagement Commands (page 10-35)"
Oracle ASM disk group management For a list of commands, refer to "ASMCMD Disk GroupManagement Commands (page 10-46)"
Oracle ASM template management For a list of commands, refer to "ASMCMD TemplateManagement Commands (page 10-68)"
Oracle ASM file access control For a list of commands, refer to "ASMCMD File AccessControl Commands (page 10-72)"
Oracle ADVM volume Refer to Managing Oracle ADVM with ASMCMD(page 15-1)
About Oracle ASM Files, File Names, Directories, and AliasesASMCMD works with Oracle ASM files, directories, and aliases. Before usingASMCMD, you should understand how these common computing concepts apply tothe Oracle ASM environment.
This section contains the following topics:
• System-Generated File Name or Fully Qualified File Name (page 10-2)
• Directory (page 10-3)
• Alias (page 10-4)
• Absolute Path and Relative Path (page 10-4)
• Wildcard Characters (page 10-5)
System-Generated File Name or Fully Qualified File Name
Every file created in Oracle ASM gets a system-generated file name, otherwise knownas a fully qualified file name. This is similar to a complete path name in a local filesystem.
Oracle ASM generates file names according to the following scheme:
+diskGroupName/databaseName/fileType/fileTypeTag.fileNumber.incarnation
An example of a fully qualified file name is the following:
+data/orcl/CONTROLFILE/Current.256.541956473
In the previous fully qualified file name, data is the disk group name, orcl is thedatabase name, CONTROLFILE is the file type, and so on.
About ASMCMD
10-2 Oracle Automatic Storage Management Administrator's Guide

Only the slash (/) is supported by ASMCMD. File Names are not case sensitive, butare case retentive. If you type a path name as lowercase, ASMCMD retains thelowercase.
For more information about Oracle ASM file names, refer to "Fully Qualified FileName Form (page 5-4)".
Directory
As in other file systems, an Oracle ASM directory is a container for files, and an OracleASM directory can be part of a tree structure of other directories. The fully qualifiedfile name represents a hierarchy of directories in which the plus sign (+) represents theroot directory. In each disk group, Oracle ASM automatically creates a directoryhierarchy that corresponds to the structure of the fully qualified file names in the diskgroup. The directories in this hierarchy are known as system-generated directories.
ASMCMD enables you to move up and down in this directory hierarchy with the cd(change directory) command. The ASMCMD ls (list directory) command lists thecontents of the current directory, while the pwd command prints the name of thecurrent directory.
When you start ASMCMD, the current directory is set to root (+). For an Oracle ASMinstance with two disk groups, for example, data and fra, entering an ls commandwith the root directory as the current directory produces the following output:
ASMCMD> lsdata/fra/
The following example demonstrates navigating the Oracle ASM directory tree (referto the fully qualified file name shown previously):
ASMCMD> cd +data/orcl/CONTROLFILEASMCMD> lsCurrent.256.541956473Current.257.541956475
You can create your own directories as subdirectories of the system-generateddirectories using the ASMCMD mkdir command. The directories that you create canhave subdirectories, and you can navigate the hierarchy of both system-generateddirectories and user-created directories with the cd command.
The following example creates the directory mydir under orcl in the disk groupdata:
ASMCMD> mkdir +data/orcl/mydir
Note:
The directory orcl is a system-generated directory. The contents of datarepresent the contents of disk group data.
If you start ASMCMD with the -p flag, then ASMCMD shows the current directory aspart of its prompt. See "Including the Current Directory in the ASMCMD Prompt(page 10-9)".
ASMCMD [+] > cd data/orclASMCMD [+data/orcl] >
About ASMCMD
Managing Oracle ASM with ASMCMD 10-3

ASMCMD retains the case of the directory that you entered.
Alias
Aliases are file names that are references or pointers to system-generated file names.However, aliases are user-friendly names. Aliases are similar to symbolic links inUNIX or Linux computers. You can create aliases to simplify Oracle ASM file nameadministration. You can create aliases with the mkalias ASMCMD command or aSQL ALTER DISKGROUP command.
An alias has at a minimum the disk group name as part of its complete path. You cancreate aliases at the disk group level or in any system-generated or user-createdsubdirectory. The following are examples of aliases:
+data/ctl1.f+data/orcl/ctl1.f+data/mydir/ctl1.f
If you run the ASMCMD ls (list directory) with the -l flag, each alias is listed withthe system-generated file to which the alias refers.
ctl1.f => +data/orcl/CONTROLFILE/Current.256.541956473
For more information about aliases, refer to "Alias Oracle ASM File Name Forms(page 5-6)".
Absolute Path and Relative Path
When you run an ASMCMD command that accepts a file name or directory name asan argument, you can use the name as either an absolute path or a relative path.
An absolute path refers to the full path of a file or directory. An absolute path beginswith a plus sign (+) followed by a disk group name, followed by subsequentdirectories in the directory tree. The absolute path includes directories until the file ordirectory of interest is reached. A complete system-generated file name, otherwiseknown as the fully qualified file name, is an example of an absolute path to a file.
Using an absolute path enables the command to access the file or directory regardlessof where the current directory is set. The following rm command uses an absolute pathfor the file name:
ASMCMD [+] > rm +data/orcl/datafile/users.259.555341963
The following cd command uses an absolute path to the directory.
ASMCMD [+data/mydir] > cd +data/orcl/CONTROLFILE
A relative path includes only the part of the file name or directory name that is notpart of the current directory. That is, the path to the file or directory is relative to thecurrent directory.
In the following example, the rm command operates on the fileundotbs1.272.557429239, which in this case is a relative path. ASMCMD appendsthe current directory to the command argument to obtain the absolute path to the file.In this example this is +data/orcl/DATAFILE/undotbs1.272.557429239.
ASMCMD [+] > cd +dataASMCMD [+data] > cd orcl/DATAFILEASMCMD [+data/orcl/DATAFILE] > lsEXAMPLE.269.555342243SYSAUX.257.555341961SYSTEM.256.555341961UNDOTBS1.258.555341963
About ASMCMD
10-4 Oracle Automatic Storage Management Administrator's Guide

UNDOTBS1.272.557429239USERS.259.555341963ASMCMD [+data/orcl/DATAFILE] > rm undotbs1.272.557429239
Paths to directories can also be relative. You can go up or down the hierarchy of thecurrent directory tree branch by providing a directory argument to the cd commandwhose path is relative to the current directory.
In addition, you can use the pseudo-directories "." and ".." rather than a directoryname. The "." pseudo-directory is the current directory. The ".." pseudo-directory isthe parent directory of the current directory.
The following example demonstrates how to use relative directory paths and pseudo-directories:
ASMCMD [+data/orcl] > cd DATAFILEASMCMD [+data/orcl/DATAFILE] >cd ..ASMCMD [+data/orcl] >
Wildcard Characters
The wildcard characters * and % match zero or more characters anywhere within anabsolute or relative path, which saves typing of the full directory or file name. The twowildcard characters behave identically. There are various ASMCMD commands thataccept wildcards, such as cd, du, find, ls, lsattr, lsdg, lsdsk, lsgrp, lsusr,and rm.
If a wildcard pattern matches only one directory when using wildcard characters withcd, then cd changes the directory to that destination. If the wildcard pattern matchesmultiple directories, then ASMCMD does not change the directory but instead returnsan error.
If you are running ASMCMD commands in noninteractive mode, then with mostoperating systems you must enclose the wildcard characters in quotes. For moreinformation, refer to "Running ASMCMD in Noninteractive Mode (page 10-9)".
Example 10-1 (page 10-5) illustrates the use of wildcards.
Example 10-1 Using wildcards with ASMCMD commands
ASMCMD [+] > cd +data/orcl/*FILEASMCMD-08005: +data/orcl/*FILE: ambiguous
ASMCMD [+] > cd +data/orcl/C*ASMCMD [+data/orcl/CONTROLFILE] >
ASMCMD [+] > ls +fra/orcl/A%2009_07_13/2009_07_14/
ASMCMD [+] > ls +fra/orcl/ARCHIVELOG/2009%
+fra/orcl/ARCHIVELOG/2009_07_13/:thread_1_seq_3.260.692103543thread_1_seq_4.261.692108897thread_1_seq_5.262.692125993thread_1_seq_6.263.692140729thread_1_seq_7.264.692143333 +fra/orcl/ARCHIVELOG/2009_07_14/:thread_1_seq_8.271.692158265
About ASMCMD
Managing Oracle ASM with ASMCMD 10-5
thread_1_seq_9.272.692174597
ASMCMD [+] > ls data/orcl/*
+data/orcl/CONTROLFILE/:Current.260.692103157
+data/orcl/DATAFILE/:EXAMPLE.265.692103187SYSAUX.257.692103045SYSTEM.256.692103045UNDOTBS1.258.692103045USERS.259.692103045
+data/orcl/ONLINELOG/:group_1.261.692103161group_2.262.692103165group_3.263.692103169
+data/orcl/PARAMETERFILE/:spfile.266.692103315
+data/orcl/TEMPFILE/:TEMP.264.692103181spfileorcl.ora
Preparing to Run ASMCMDYou can run the ASMCMD utility in either interactive or noninteractive mode.
Before running ASMCMD, review the items in the following list.
• Log in to the host which contains the Oracle ASM instance that you plan toadminister.
You must log in as a user that has SYSASM or SYSDBA privileges throughoperating system authentication. The SYSASM privilege is the requiredconnection to administer the Oracle ASM instance. See "Authentication forAccessing Oracle ASM Instances (page 3-46)".
See Also:
Refer to the Oracle Database Administrator's Guide for information aboutoperating system authentication
• To connect to the Oracle ASM instance, run ASMCMD that is located in the binsubdirectory of the Oracle Grid Infrastructure home (Oracle ASM home).
Connect as SYSASM, the default connection, to administer an Oracle ASMinstance.
Ensure that the ORACLE_HOME and ORACLE_SID environment variables to referto the Oracle ASM instance. Depending on your operating system, you mighthave to set other environment variables to properly connect to the Oracle ASMinstance.
Ensure that the bin subdirectory of your Oracle Grid Infrastructure home is inyour PATH environment variable.
About ASMCMD
10-6 Oracle Automatic Storage Management Administrator's Guide

See Also:
Refer to the Oracle Database Administrator's Guide for more information aboutsetting environment variables
The default value of the Oracle ASM SID for a single-instance database is +ASM. InOracle Real Application Clusters environments, the default value of the OracleASM SID on any node is +ASMnode#.
• To use most of the ASMCMD commands, ensure that the Oracle ASM instance isstarted and the Oracle ASM disk groups are mounted.
If the Oracle ASM instance is not running, ASMCMD runs only those commandsthat do not require an Oracle ASM instance. The commands include startup,shutdown, lsdsk, help, and exit. If you attempt to run other ASMCMDcommands, an error message displays.
• You can connect to the database instance as SYSDBA by running ASMCMD that islocated in the bin directory of the Oracle Database home.
Ensure that the ORACLE_HOME and ORACLE_SID environment variables to referto the database instance. Depending on your operating system, you might have toset other environment variables to properly connect to the database instance.
You must include the --privilege option to connect as SYSDBA. See"Specifying the Type of Connection (page 10-8)".
With this connection, there is a limited set of operations that can be run. For moreinformation, see "The SYSDBA Privilege for Managing Oracle ASM Components(page 3-50)".
When administering disk groups, Oracle recommends that you run ASMCMDfrom the database home of the database instance that is the owner of the files inthe disk group.
Running ASMCMD in Interactive ModeThe interactive mode of the ASMCMD utility provides a shell-like environment whereyou are prompted to enter ASMCMD commands.
This section contains the following topics:
• Syntax for Starting ASMCMD (page 10-7)
• Running ASMCMD without Any Options (page 10-8)
• Specifying the Type of Connection (page 10-8)
• Specifying the Verbose Mode (page 10-9)
• Including the Current Directory in the ASMCMD Prompt (page 10-9)
• Displaying the ASMCMD Version Number (page 10-9)
Syntax for Starting ASMCMD
The syntax for starting ASMCMD in interactive mode is:
About ASMCMD
Managing Oracle ASM with ASMCMD 10-7

asmcmd [-V]asmcmd [--nocp] [-v {errors|warnings|normal|info|debug}] [--privilege connection_type ] [-p]
Table 10-2 (page 10-8) summarizes the ASMCMD options.
Table 10-2 ASMCMD interactive options
Option Description
-V Displays the version of ASMCMD and then exits.
--nocp Disables connection pooling. For information about connectionpooling, refer to Oracle Database Administrator's Guide.
-v display_level Displays additional information with some commands to helpusers diagnose problems and writes to a message file whenlogging is required. normal is the default if the display level isnot specified.
--privilegeconnection_type
Specifies the privilege to connect as when accessing an OracleASM or database instance. Can be either SYSASM or SYSDBA.The default is SYSASM and is used when administering theOracle ASM instance.
-p Displays the current directory in the prompt.
ASMCMD can be started with multiple options. For example:
asmcmd -p -v info
For the majority of the examples in this chapter, ASMCMD was started with the -poption.
Running ASMCMD without Any Options
To run ASMCMD in interactive mode without any options:
1. Enter the following at the operating system command prompt:
asmcmd
Oracle displays an ASMCMD command prompt as follows:
ASMCMD>
2. Enter an ASMCMD command and press Enter. The command runs and displaysits output, if any, and then ASMCMD prompts for the next command.
3. Continue entering ASMCMD commands until you have completed the tasks.
4. Enter the exit or quit command to exit ASMCMD.
Specifying the Type of Connection
You can specify the --privilege option to choose the type of connection, eitherSYSASM or SYSDBA. The default value is SYSASM and is used when administering anOracle ASM instance. Connect as SYSDBA when connecting to the database instance.
For example:
$ asmcmd --privilege sysasm
About ASMCMD
10-8 Oracle Automatic Storage Management Administrator's Guide

Specifying the Verbose Mode
You can specify the -v option with the asmcmd command to display additionalinformation with some commands to help users diagnose problems as shown in thefollowing example:
$ asmcmd -v debug
When there is a message that must be logged during asmcmd operations, the messageis written to the alert.log file or the trace.trc file.
The alert.log file is created or updated when asmcmd is started with the -verrors, -v warning, or -v normal display level. The trace.trc file is created orupdated when asmcmd is started with the -v info or -v debug display level.
By default, the alert.log is file created in the $ORACLE_HOME/log/diag/asmcmd/user_username/hostname/alert/ directory. By default, thetrace.trc file is created in the $ORACLE_HOME/log/diag/asmcmd/user_username/hostname/trace/ directory.
Under certain circumstances, $ORACLE_BASE and $ORACLE_HOME can be set tooverride the default locations of the alert.log and trace.trc files.
Including the Current Directory in the ASMCMD Prompt
You can specify the -p option with the asmcmd command to include the currentdirectory in the ASMCMD prompt as shown in the following example:
$ asmcmd -pASMCMD [+] > cd dataASMCMD [+data] >
Displaying the ASMCMD Version Number
You can specify the -V option when starting asmcmd to display the asmcmd versionnumber. After displaying the version number, asmcmd immediately exits.
For example:
$ asmcmd -V asmcmd version 11.2.0.3.0$
Running ASMCMD in Noninteractive ModeIn noninteractive mode, you run a single ASMCMD command by including thecommand and command options on the command line when invoking ASMCMD.ASMCMD runs the command, generates output if any, and then exits. Thenoninteractive mode is especially useful for running scripts.
On most operating systems, wildcard characters must be enclosed in quotes whenrunning ASMCMD commands in noninteractive mode.
To run ASMCMD in noninteractive mode where command is any valid ASMCMDcommand and options is a list of command options, at the command prompt enterthe following:
asmcmd command options
In noninteractive mode, ASMCMD returns the codes listed in Table 10-3 (page 10-10).
About ASMCMD
Managing Oracle ASM with ASMCMD 10-9

Table 10-3 ASMCMD return codes
Type Return Code Description
General 0 No issues for the command.
General 1 Internal error.
General 255 or -1 External user error as returned by a command.
lsdsk 0 Results include member disks only.
lsdsk 1 Results include candidate disks only.
lsdsk 2 Results include both member and candidatedisks.
Example 10-2 (page 10-10) shows how to run ASMCMD in the noninteractive mode.The first command runs the ls command to list the disk groups for the Oracle ASMinstance. The second command redirects the output of the lsod command to themy_lsod_test file. The third command runs lsdsk using a pattern with a wildcardcharacter to list specific disks in the data disk group. Note that wildcard charactersmust be enclosed in quotes when running ASMCMD in noninteractive mode on mostoperating systems.
Example 10-3 (page 10-10) raises an error with an incorrect disk group name and thereturn code equal (255) is displayed.
Example 10-4 (page 10-10) shows an example of ASMCMD commands run innoninteractive mode inside a script.
Example 10-2 Running ASMCMD commands in noninteractive mode
$ asmcmd ls -lState Type Rebal NameMOUNTED NORMAL N DATA/MOUNTED NORMAL N FRA/
$ asmcmd lsod --suppressheader -G data > my_lsod_test
$ asmcmd lsdsk -G data '/devices/diska*'Path/devices/diska1/devices/diska2/devices/diska3
Example 10-3 Displaying a return code when running ASMCMD in noninteractivemode
$ asmcmd ls -l datASMCMD-08001: diskgroup 'dat' does not exist or is not mounted
$ echo $?255
Example 10-4 Running ASMCMD commands in a script
#!/bin/shfor ((i = 1; i <=3; i++)) do asmcmd lsdsk -G data '/devices/diska'$i
About ASMCMD
10-10 Oracle Automatic Storage Management Administrator's Guide

done
$ ./asmcmd_test_scriptPath/devices/diska1Path/devices/diska2Path/devices/diska3
Getting HelpType help at the ASMCMD prompt or as a command in noninteractive mode to viewgeneral information about ASMCMD and a list of available ASMCMD commands.
You can type help command to display help text for a specific command, includingusage information about how to run the command with its options.
The following is an example of the use of the help command.
Example 10-5 Displaying ASMCMD help text
ASMCMD [+] > help startup startup [--nomount] [--restrict] [--pfile <pfile.ora>] Start the ASM instance. [--nomount] specifies the nomount option. [--restrict] start the instance in restricted mode. [--pfile <pfile.ora>] specifies the location of the pfile.
ASMCMD Instance Management CommandsThis section describes the ASMCMD Oracle ASM instance management commands.
Some commands in this section affect the Grid Plug and Play (GPnP) profile, which isa resource in a clustered configuration. In an Oracle Restart configuration, the profileis actually located in a resource attribute, not the Grid Plug and Play (GPnP) profile.However, the functionality of the commands is the same for both configurations.
See Also:
Oracle Grid Infrastructure Installation Guide for your operating system forinformation about installing and configuring Oracle Grid Infrastructure
NOT_SUPPORTED (page 10-11) provides a summary of the Oracle ASM instancemanagement commands.
NOT_SUPPORTED
Command Description
dsgetNOT_SUPPORTED Retrieves the discovery diskstring value that is used by the Oracle ASMinstance and its clients.
dssetNOT_SUPPORTED Sets the disk discovery diskstring value that is used by the Oracle ASMinstance and its clients.
lsctNOT_SUPPORTED Lists information about current Oracle ASM clients.
ASMCMD Instance Management Commands
Managing Oracle ASM with ASMCMD 10-11
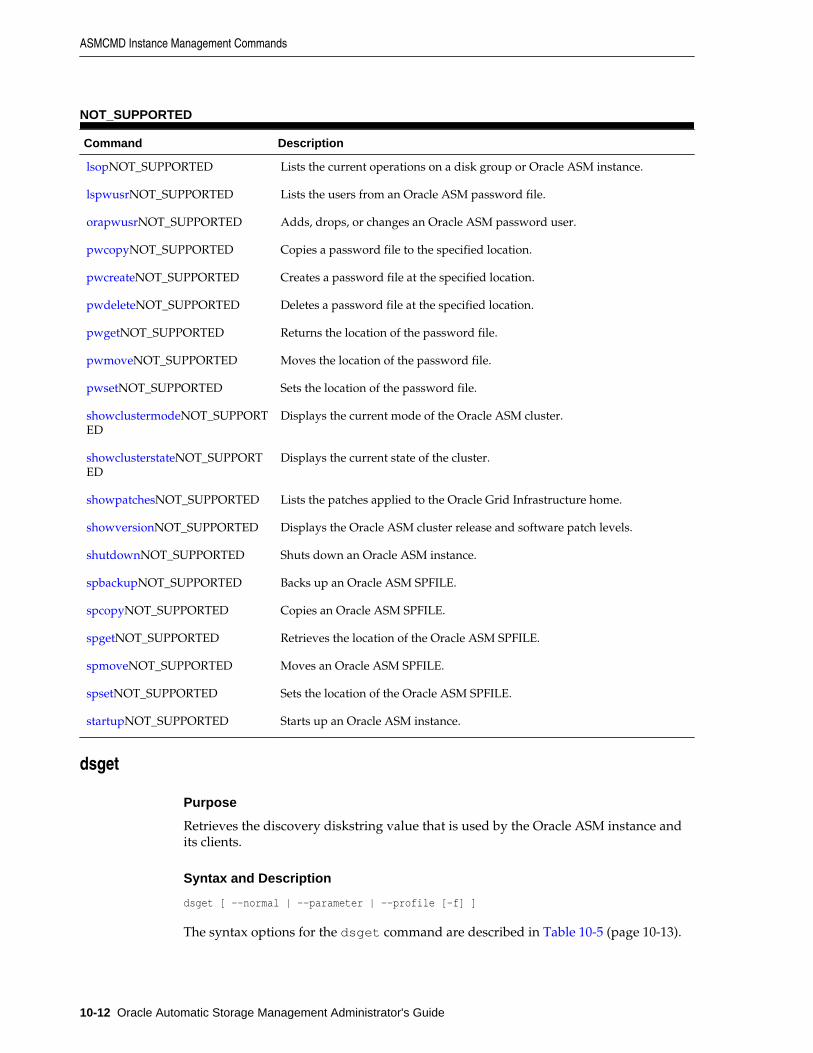
NOT_SUPPORTED
Command Description
lsopNOT_SUPPORTED Lists the current operations on a disk group or Oracle ASM instance.
lspwusrNOT_SUPPORTED Lists the users from an Oracle ASM password file.
orapwusrNOT_SUPPORTED Adds, drops, or changes an Oracle ASM password user.
pwcopyNOT_SUPPORTED Copies a password file to the specified location.
pwcreateNOT_SUPPORTED Creates a password file at the specified location.
pwdeleteNOT_SUPPORTED Deletes a password file at the specified location.
pwgetNOT_SUPPORTED Returns the location of the password file.
pwmoveNOT_SUPPORTED Moves the location of the password file.
pwsetNOT_SUPPORTED Sets the location of the password file.
showclustermodeNOT_SUPPORTED
Displays the current mode of the Oracle ASM cluster.
showclusterstateNOT_SUPPORTED
Displays the current state of the cluster.
showpatchesNOT_SUPPORTED Lists the patches applied to the Oracle Grid Infrastructure home.
showversionNOT_SUPPORTED Displays the Oracle ASM cluster release and software patch levels.
shutdownNOT_SUPPORTED Shuts down an Oracle ASM instance.
spbackupNOT_SUPPORTED Backs up an Oracle ASM SPFILE.
spcopyNOT_SUPPORTED Copies an Oracle ASM SPFILE.
spgetNOT_SUPPORTED Retrieves the location of the Oracle ASM SPFILE.
spmoveNOT_SUPPORTED Moves an Oracle ASM SPFILE.
spsetNOT_SUPPORTED Sets the location of the Oracle ASM SPFILE.
startupNOT_SUPPORTED Starts up an Oracle ASM instance.
dsget
Purpose
Retrieves the discovery diskstring value that is used by the Oracle ASM instance andits clients.
Syntax and Description
dsget [ --normal | --parameter | --profile [-f] ]
The syntax options for the dsget command are described in Table 10-5 (page 10-13).
ASMCMD Instance Management Commands
10-12 Oracle Automatic Storage Management Administrator's Guide

Table 10-5 Options for the dsget command
Option Description
--normal Retrieves the discovery string from the Grid Plug and Play(GPnP) profile and the one that is set in the Oracle ASMinstance. It returns one row each for the profile and parametersetting. This is the default setting.
--parameter Retrieves the ASM_DISKSTRING parameter setting of theOracle ASM instance.
--profile [-f] Retrieves the discovery string from the GPnP profile. If -f isspecified with --profile, dsget retrieves the discoverystring from the local GPnP profile.
Example
The following example uses dsget to retrieve the current discovery diskstring valuefrom the GPnP profile and the ASM_DISKSTRING parameter.
Example 10-6 Using the ASMCMD dsget command
ASMCMD [+] > dsgetprofile: /devices1/disk*parameter: /devices2/disk*
dsset
Purpose
Sets the discovery diskstring value that is used by the Oracle ASM instance and itsclients.
The specified diskstring must be valid for existing mounted disk groups. The updatedvalue takes effect immediately.
Syntax and Description
dsset [ --normal | --parameter | --profile [-f] ] diskstring
The syntax options for the dsset command are described in Table 10-6 (page 10-13).
Table 10-6 Options for the dsset command
Option Description
--normal Sets the discovery string in the Grid Plug and Play (GPnP)profile and in the Oracle ASM instance. The update occurs afterthe Oracle ASM instance has successfully validated that thespecified discovery string has discovered all the necessary diskgroups and voting files. This command fails if the instance isnot using a server parameter file (SPFILE).
This is the default setting.
ASMCMD Instance Management Commands
Managing Oracle ASM with ASMCMD 10-13
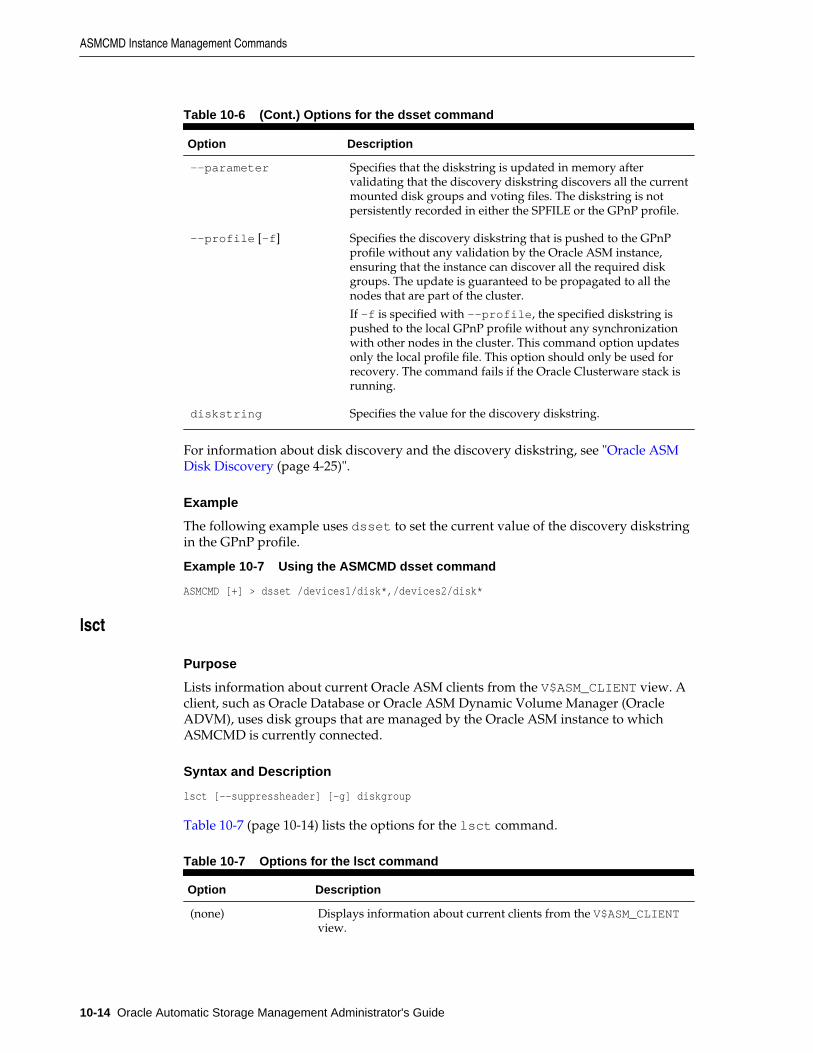
Table 10-6 (Cont.) Options for the dsset command
Option Description
--parameter Specifies that the diskstring is updated in memory aftervalidating that the discovery diskstring discovers all the currentmounted disk groups and voting files. The diskstring is notpersistently recorded in either the SPFILE or the GPnP profile.
--profile [-f] Specifies the discovery diskstring that is pushed to the GPnPprofile without any validation by the Oracle ASM instance,ensuring that the instance can discover all the required diskgroups. The update is guaranteed to be propagated to all thenodes that are part of the cluster.
If -f is specified with --profile, the specified diskstring ispushed to the local GPnP profile without any synchronizationwith other nodes in the cluster. This command option updatesonly the local profile file. This option should only be used forrecovery. The command fails if the Oracle Clusterware stack isrunning.
diskstring Specifies the value for the discovery diskstring.
For information about disk discovery and the discovery diskstring, see "Oracle ASMDisk Discovery (page 4-25)".
Example
The following example uses dsset to set the current value of the discovery diskstringin the GPnP profile.
Example 10-7 Using the ASMCMD dsset command
ASMCMD [+] > dsset /devices1/disk*,/devices2/disk*
lsct
Purpose
Lists information about current Oracle ASM clients from the V$ASM_CLIENT view. Aclient, such as Oracle Database or Oracle ASM Dynamic Volume Manager (OracleADVM), uses disk groups that are managed by the Oracle ASM instance to whichASMCMD is currently connected.
Syntax and Description
lsct [--suppressheader] [-g] diskgroup
Table 10-7 (page 10-14) lists the options for the lsct command.
Table 10-7 Options for the lsct command
Option Description
(none) Displays information about current clients from the V$ASM_CLIENTview.
ASMCMD Instance Management Commands
10-14 Oracle Automatic Storage Management Administrator's Guide

Table 10-7 (Cont.) Options for the lsct command
Option Description
-g Selects from the GV$ASM_CLIENT view. GV$ASM_CLIENT.INST_IDis included in the output.
--suppressheader Suppresses column headings.
diskgroup Specifies the disk group.
Client information is only listed for the specified disk group.
Example
The following example displays information about the clients that are accessing thedata disk group.
Example 10-8 Using the ASMCMD lsct command
ASMCMD [+] > lsct dataDB_Name Status Software_Version Compatible_version Instance_Name Disk_Group+ASM CONNECTED 12.1.0.0.1 12.1.0.0.1 +ASM DATAasmvol CONNECTED 12.1.0.0.1 12.1.0.0.1 +ASM DATAorcl CONNECTED 12.1.0.0.1 12.0.0.0.0 orcl DATA
lsop
Purpose
Lists the current operations on a disk group in an Oracle ASM instance.
Syntax and Description
lsop
lsop displays information from the V$ASM_OPERATION view.
Example
The following are examples of the lsop command. The examples list operations onthe disk groups of the current Oracle ASM instance.
Example 10-9 Using the ASMCMD lsop command
ASMCMD [+] > lsopGroup_Name Dsk_Num State PowerDATA REBAL WAIT 2
ASMCMD [+] > lsopGroup_Name Dsk_Num State Power FRA REBAL REAP 3
lspwusr
Purpose
List the users from the local Oracle ASM password file.
ASMCMD Instance Management Commands
Managing Oracle ASM with ASMCMD 10-15
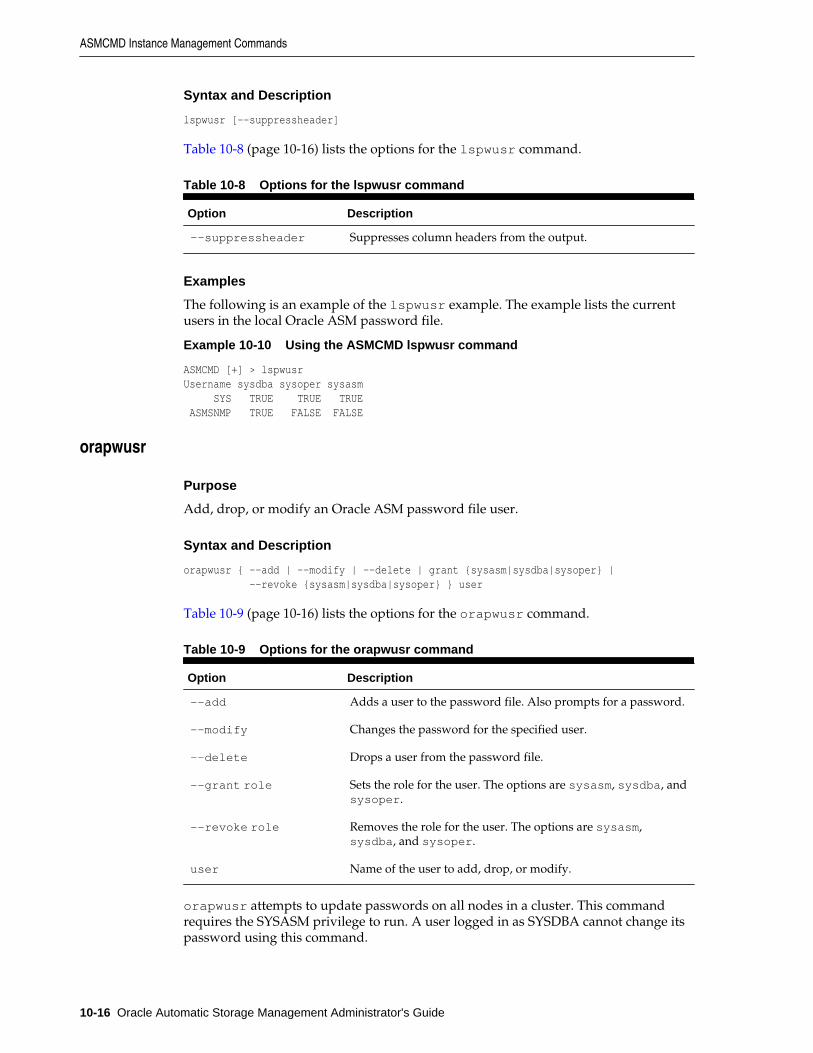
Syntax and Description
lspwusr [--suppressheader]
Table 10-8 (page 10-16) lists the options for the lspwusr command.
Table 10-8 Options for the lspwusr command
Option Description
--suppressheader Suppresses column headers from the output.
Examples
The following is an example of the lspwusr example. The example lists the currentusers in the local Oracle ASM password file.
Example 10-10 Using the ASMCMD lspwusr command
ASMCMD [+] > lspwusrUsername sysdba sysoper sysasm SYS TRUE TRUE TRUE ASMSNMP TRUE FALSE FALSE
orapwusr
Purpose
Add, drop, or modify an Oracle ASM password file user.
Syntax and Description
orapwusr { --add | --modify | --delete | grant {sysasm|sysdba|sysoper} | --revoke {sysasm|sysdba|sysoper} } user
Table 10-9 (page 10-16) lists the options for the orapwusr command.
Table 10-9 Options for the orapwusr command
Option Description
--add Adds a user to the password file. Also prompts for a password.
--modify Changes the password for the specified user.
--delete Drops a user from the password file.
--grant role Sets the role for the user. The options are sysasm, sysdba, andsysoper.
--revoke role Removes the role for the user. The options are sysasm,sysdba, and sysoper.
user Name of the user to add, drop, or modify.
orapwusr attempts to update passwords on all nodes in a cluster. This commandrequires the SYSASM privilege to run. A user logged in as SYSDBA cannot change itspassword using this command.
ASMCMD Instance Management Commands
10-16 Oracle Automatic Storage Management Administrator's Guide

Examples
The following is an example of the orapwusr command. This example adds thehruser to the Oracle ASM password file.
Example 10-11 Using the ASMCMD orapwusr command
ASMCMD [+] > orapwusr --add hruser
pwcopy
Purpose
Copies an Oracle ASM or database instance password file to the specified location.
Syntax and Description
pwcopy [--asm |--dbuniquename string] source destination [-f]
Table 10-10 (page 10-17) lists the options for the pwcopy command.
Table 10-10 Options for the pwcopy command
Option Description
--asm The --asm option associates the password file with the OracleASM instance that ASMCMD is logged into.
--dbuniquename string The --dbuniquename string option identifies the databaseunique name associated with the password file.
source The source value identifies the location where the existingpassword file is located.
destination The destination value identifies the location where youwant to copy the password file.
-f The —f option enables the password file to be copied withoutany checks.
pwcopy copies a password file from one disk group to another, from the operatingsystem to a disk group, or from a disk group to the operating system. If the —f optionis specified, then the password file can be copied to the same disk group.
Either –-asm or --dbuniquename is required to identify a CRSD resource. Wheneither –-asm or --dbuniquename is included in the pwcopy command, the target fileis set to the current password file.
The compatible.asm disk group attribute must be set to 12.1 or higher for the diskgroup where the password is to be copied.
The SYSASM or SYSDBA privilege is required to manage the Oracle ASM and databasepassword files.
Example
The following example copies an Oracle ASM password file in one disk group to adifferent disk group. Because the pwcopy command includes the --asm option, thetarget file (+fra/orapwasm_new) is set to the current password file.
ASMCMD Instance Management Commands
Managing Oracle ASM with ASMCMD 10-17
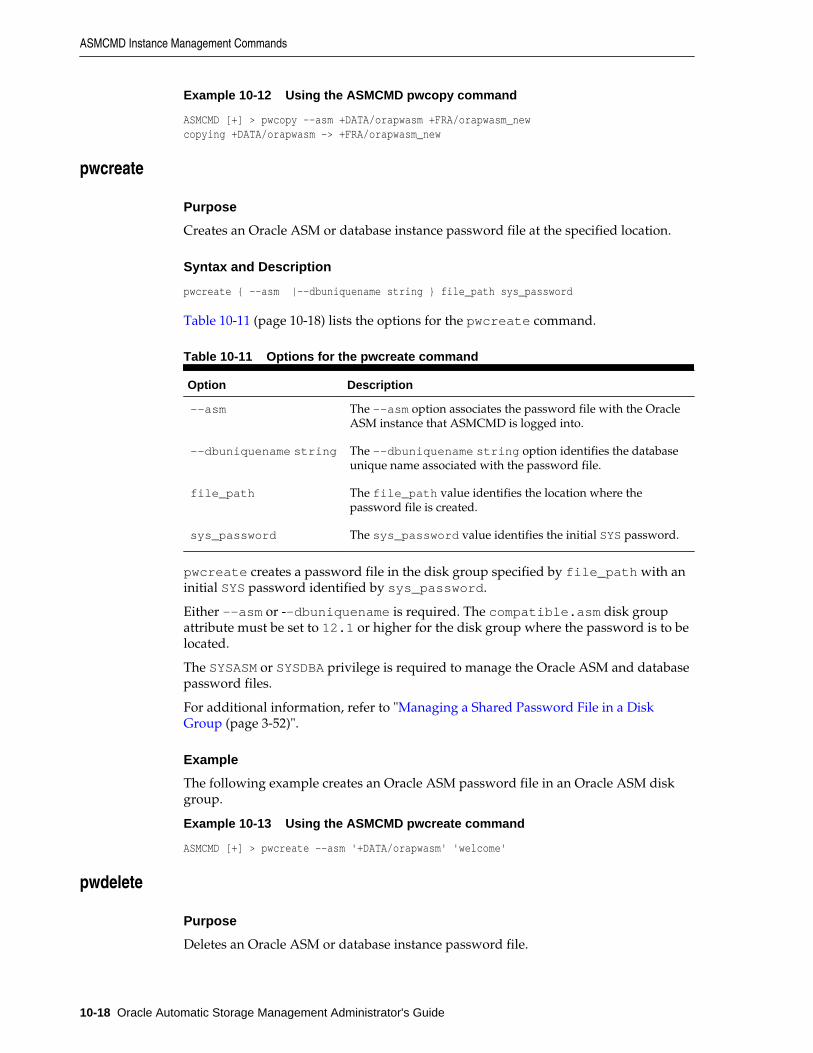
Example 10-12 Using the ASMCMD pwcopy command
ASMCMD [+] > pwcopy --asm +DATA/orapwasm +FRA/orapwasm_newcopying +DATA/orapwasm -> +FRA/orapwasm_new
pwcreate
Purpose
Creates an Oracle ASM or database instance password file at the specified location.
Syntax and Description
pwcreate { --asm |--dbuniquename string } file_path sys_password
Table 10-11 (page 10-18) lists the options for the pwcreate command.
Table 10-11 Options for the pwcreate command
Option Description
--asm The --asm option associates the password file with the OracleASM instance that ASMCMD is logged into.
--dbuniquename string The --dbuniquename string option identifies the databaseunique name associated with the password file.
file_path The file_path value identifies the location where thepassword file is created.
sys_password The sys_password value identifies the initial SYS password.
pwcreate creates a password file in the disk group specified by file_path with aninitial SYS password identified by sys_password.
Either –-asm or --dbuniquename is required. The compatible.asm disk groupattribute must be set to 12.1 or higher for the disk group where the password is to belocated.
The SYSASM or SYSDBA privilege is required to manage the Oracle ASM and databasepassword files.
For additional information, refer to "Managing a Shared Password File in a DiskGroup (page 3-52)".
Example
The following example creates an Oracle ASM password file in an Oracle ASM diskgroup.
Example 10-13 Using the ASMCMD pwcreate command
ASMCMD [+] > pwcreate –-asm '+DATA/orapwasm' 'welcome'
pwdelete
Purpose
Deletes an Oracle ASM or database instance password file.
ASMCMD Instance Management Commands
10-18 Oracle Automatic Storage Management Administrator's Guide
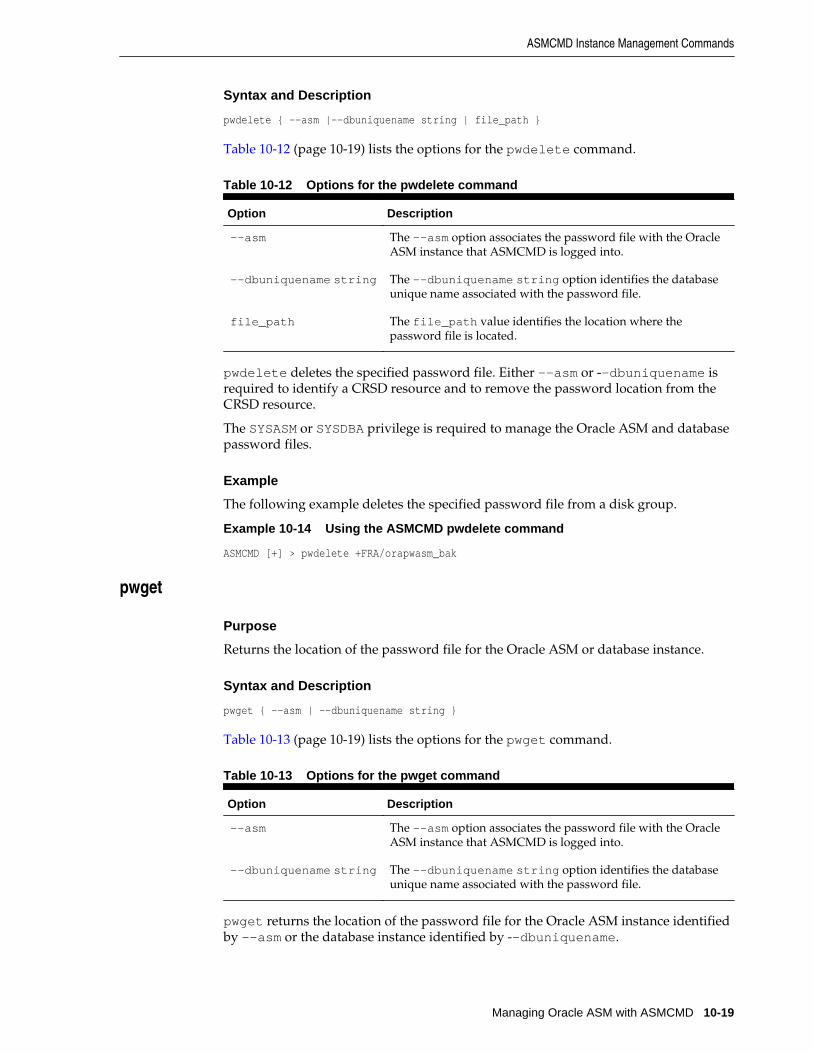
Syntax and Description
pwdelete { --asm |--dbuniquename string | file_path }
Table 10-12 (page 10-19) lists the options for the pwdelete command.
Table 10-12 Options for the pwdelete command
Option Description
--asm The --asm option associates the password file with the OracleASM instance that ASMCMD is logged into.
--dbuniquename string The --dbuniquename string option identifies the databaseunique name associated with the password file.
file_path The file_path value identifies the location where thepassword file is located.
pwdelete deletes the specified password file. Either –-asm or --dbuniquename isrequired to identify a CRSD resource and to remove the password location from theCRSD resource.
The SYSASM or SYSDBA privilege is required to manage the Oracle ASM and databasepassword files.
Example
The following example deletes the specified password file from a disk group.
Example 10-14 Using the ASMCMD pwdelete command
ASMCMD [+] > pwdelete +FRA/orapwasm_bak
pwget
Purpose
Returns the location of the password file for the Oracle ASM or database instance.
Syntax and Description
pwget { --asm | --dbuniquename string }
Table 10-13 (page 10-19) lists the options for the pwget command.
Table 10-13 Options for the pwget command
Option Description
--asm The --asm option associates the password file with the OracleASM instance that ASMCMD is logged into.
--dbuniquename string The --dbuniquename string option identifies the databaseunique name associated with the password file.
pwget returns the location of the password file for the Oracle ASM instance identifiedby –-asm or the database instance identified by --dbuniquename.
ASMCMD Instance Management Commands
Managing Oracle ASM with ASMCMD 10-19
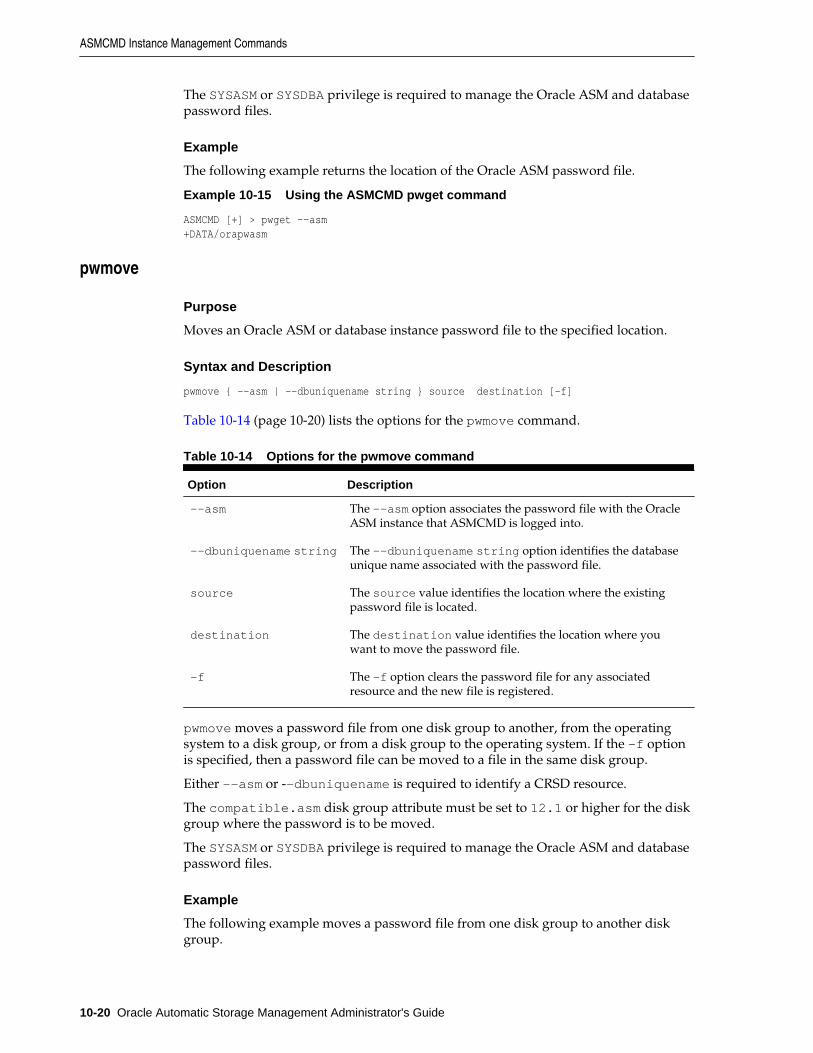
The SYSASM or SYSDBA privilege is required to manage the Oracle ASM and databasepassword files.
Example
The following example returns the location of the Oracle ASM password file.
Example 10-15 Using the ASMCMD pwget command
ASMCMD [+] > pwget --asm+DATA/orapwasm
pwmove
Purpose
Moves an Oracle ASM or database instance password file to the specified location.
Syntax and Description
pwmove { --asm | --dbuniquename string } source destination [-f]
Table 10-14 (page 10-20) lists the options for the pwmove command.
Table 10-14 Options for the pwmove command
Option Description
--asm The --asm option associates the password file with the OracleASM instance that ASMCMD is logged into.
--dbuniquename string The --dbuniquename string option identifies the databaseunique name associated with the password file.
source The source value identifies the location where the existingpassword file is located.
destination The destination value identifies the location where youwant to move the password file.
-f The —f option clears the password file for any associatedresource and the new file is registered.
pwmove moves a password file from one disk group to another, from the operatingsystem to a disk group, or from a disk group to the operating system. If the —f optionis specified, then a password file can be moved to a file in the same disk group.
Either –-asm or --dbuniquename is required to identify a CRSD resource.
The compatible.asm disk group attribute must be set to 12.1 or higher for the diskgroup where the password is to be moved.
The SYSASM or SYSDBA privilege is required to manage the Oracle ASM and databasepassword files.
Example
The following example moves a password file from one disk group to another diskgroup.
ASMCMD Instance Management Commands
10-20 Oracle Automatic Storage Management Administrator's Guide

Example 10-16 Using the ASMCMD pwmove command
ASMCMD [+] > pwmove --asm +FRA/orapwasm_bak +DATA/orapwasmmoving +FRA/orapwasm_bak -> +DATA/orapwasm
pwset
Purpose
Sets the location of the password file for an Oracle ASM or database instance.
Syntax and Description
pwset { --asm | --dbuniquename string } file_path
Table 10-15 (page 10-21) lists the options for the pwset command.
Table 10-15 Options for the pwset command
Option Description
--asm The --asm option associates the password file with the OracleASM instance that ASMCMD is logged into.
--dbuniquename string The --dbuniquename string option identifies the databaseunique name associated with the password file.
file_path The file_path value identifies the location where thepassword file is located.
pwset sets the location of the password file for an Oracle ASM or database instance tothe value specified by file_path. Either --dbuniquename or –-asm is required toidentify a CRSD resource.
The SYSASM or SYSDBA privilege is required to manage the Oracle ASM and databasepassword files.
Example
The following example sets the location of the Oracle ASM password file in a diskgroup.
Example 10-17 Using the ASMCMD pwset command
ASMCMD [+] > pwset --asm +DATA/orapwasm
showclustermode
Purpose
Displays the current mode of the Oracle ASM cluster.
Syntax and Description
showclustermode
showclustermode displays the mode that the Oracle ASM cluster is currently in.The possible return values are ASM cluster : Flex mode enabled or ASM cluster : Flexmode disabled.
ASMCMD Instance Management Commands
Managing Oracle ASM with ASMCMD 10-21
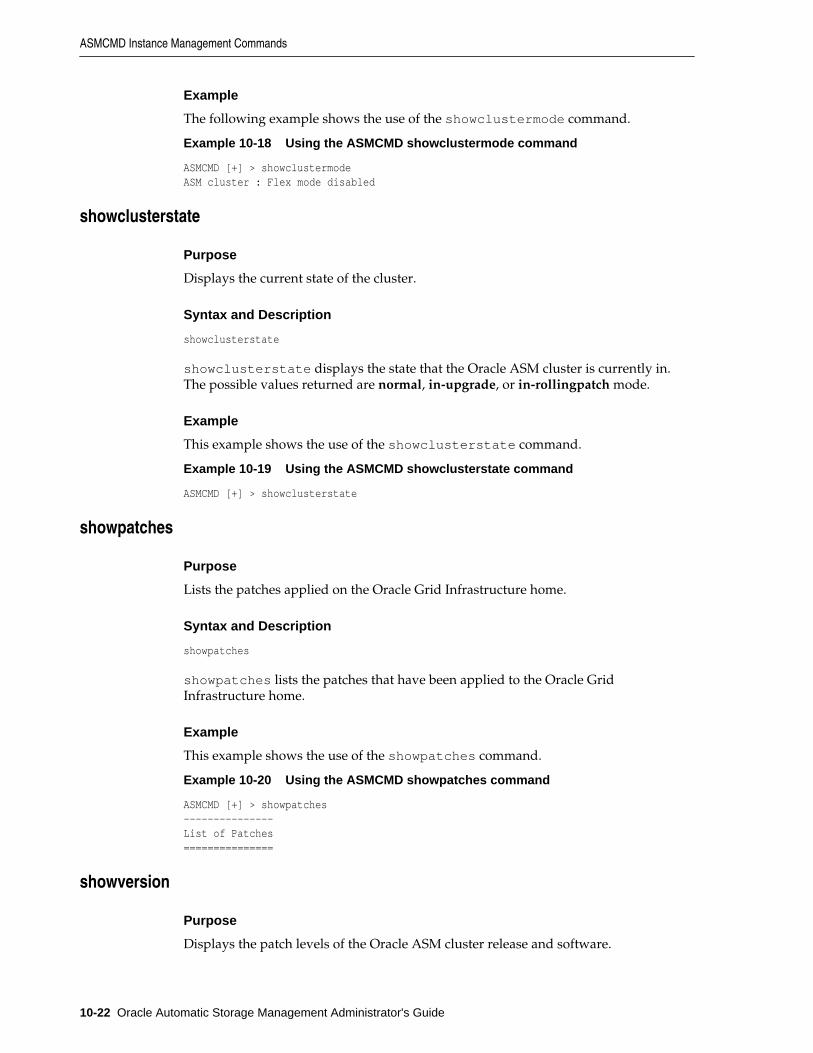
Example
The following example shows the use of the showclustermode command.
Example 10-18 Using the ASMCMD showclustermode command
ASMCMD [+] > showclustermodeASM cluster : Flex mode disabled
showclusterstate
Purpose
Displays the current state of the cluster.
Syntax and Description
showclusterstate
showclusterstate displays the state that the Oracle ASM cluster is currently in.The possible values returned are normal, in-upgrade, or in-rollingpatch mode.
Example
This example shows the use of the showclusterstate command.
Example 10-19 Using the ASMCMD showclusterstate command
ASMCMD [+] > showclusterstate
showpatches
Purpose
Lists the patches applied on the Oracle Grid Infrastructure home.
Syntax and Description
showpatches
showpatches lists the patches that have been applied to the Oracle GridInfrastructure home.
Example
This example shows the use of the showpatches command.
Example 10-20 Using the ASMCMD showpatches command
ASMCMD [+] > showpatches---------------List of Patches===============
showversion
Purpose
Displays the patch levels of the Oracle ASM cluster release and software.
ASMCMD Instance Management Commands
10-22 Oracle Automatic Storage Management Administrator's Guide
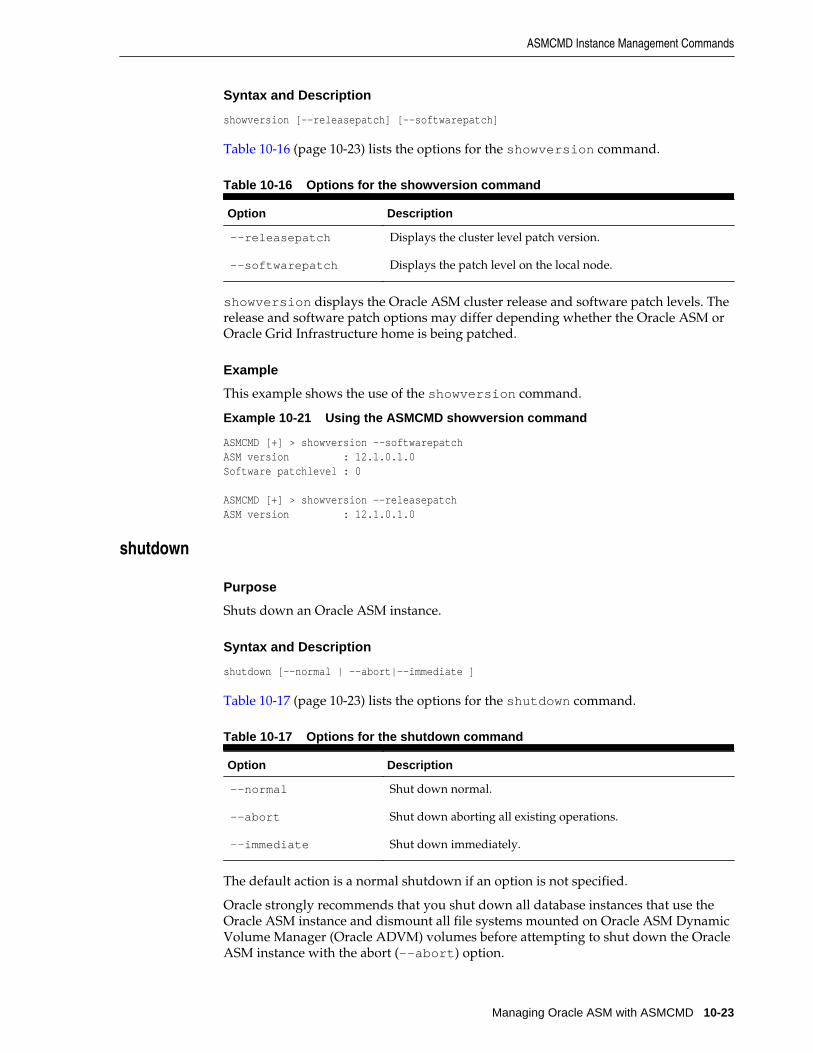
Syntax and Description
showversion [--releasepatch] [--softwarepatch]
Table 10-16 (page 10-23) lists the options for the showversion command.
Table 10-16 Options for the showversion command
Option Description
--releasepatch Displays the cluster level patch version.
--softwarepatch Displays the patch level on the local node.
showversion displays the Oracle ASM cluster release and software patch levels. Therelease and software patch options may differ depending whether the Oracle ASM orOracle Grid Infrastructure home is being patched.
Example
This example shows the use of the showversion command.
Example 10-21 Using the ASMCMD showversion command
ASMCMD [+] > showversion --softwarepatchASM version : 12.1.0.1.0Software patchlevel : 0
ASMCMD [+] > showversion --releasepatchASM version : 12.1.0.1.0
shutdown
Purpose
Shuts down an Oracle ASM instance.
Syntax and Description
shutdown [--normal | --abort|--immediate ]
Table 10-17 (page 10-23) lists the options for the shutdown command.
Table 10-17 Options for the shutdown command
Option Description
--normal Shut down normal.
--abort Shut down aborting all existing operations.
--immediate Shut down immediately.
The default action is a normal shutdown if an option is not specified.
Oracle strongly recommends that you shut down all database instances that use theOracle ASM instance and dismount all file systems mounted on Oracle ASM DynamicVolume Manager (Oracle ADVM) volumes before attempting to shut down the OracleASM instance with the abort (--abort) option.
ASMCMD Instance Management Commands
Managing Oracle ASM with ASMCMD 10-23
For more information about shutting down an Oracle ASM instance, see "AboutShutting Down an Oracle ASM Instance (page 3-25)".
Example
The following are examples of the shutdown command. The first example performs ashut down of the Oracle ASM instance with normal action. The second exampleperforms a shut down with immediate action. The third example performs a shutdown that aborts all existing operations.
Example 10-22 Using the ASMCMD shutdown command
ASMCMD [+] > shutdown --normal
ASMCMD [+] > shutdown --immediate
ASMCMD [+] > shutdown --abort
spbackup
Purpose
Backs up an Oracle ASM SPFILE to a backup file.
Syntax and Description
spbackup source destination
Table 10-18 (page 10-24) lists the options for the spbackup command.
Table 10-18 Options for the spbackup command
Option Description
source Specifies the source file name.
destination Specifies the destination file.
spbackup should be used when you want to make single or multiple backups of anSPFILE in the same or a different disk group without creating an SPFILE in the targetdisk group.
Note the following about the use of spbackup:
• spbackup can back up an Oracle ASM SPFILE from a disk group to a disk groupor to an operating system file.
• spbackup can back up an Oracle ASM SPFILE from an operating system file to adisk group.
• spbackup can back up an Oracle ASM SPFILE when the SPFILE is being used byan open Oracle ASM instance.
• spbackup can make multiple backups of an Oracle ASM SPFILE in the same diskgroup.
spbackup does not affect the GPnP profile. The backup file that is created is not aspecial file type and is not identified as an SPFILE. This backup file cannot be copied
ASMCMD Instance Management Commands
10-24 Oracle Automatic Storage Management Administrator's Guide
with spcopy. To copy this backup file to and from a disk group, use the ASMCMD cpcommand.
To make a copy of a backup file in a disk group that is identified as an SPFILE file:
1. Use the ASMCMD cp command to copy the backup file from the disk group to anoperating system file. See "cp (page 10-37)".
2. Use the ASMCMD spcopy command to copy the operating system file to a diskgroup. See "spcopy (page 10-25)".
Example
The following are examples of the spbackup command. The first example backs upthe SPFILE in the data disk group. The second example backs up the SPFILE from thedata disk group to the fra disk group.
Example 10-23 Using the ASMCMD spbackup command
ASMCMD> spbackup +DATA/asm/asmparameterfile/registry.253.721810181 +DATA/spfileBackASM.bak
ASMCMD> spbackup +DATA/asm/asmparameterfile/registry.253.721810181 +FRA/spfileBackASM.bak
spcopy
Purpose
Copies an Oracle ASM SPFILE from the source location to an SPFILE in the destinationlocation.
Syntax and Description
spcopy [-u] source destination
Table 10-19 (page 10-25) lists the options for the spcopy command.
Table 10-19 Options for the spcopy command
Option Description
-u Updates the Grid Plug and Play (GPnP) profile.
source Specifies the source file name.
destination Specifies the destination.
Note the following about the use of spcopy:
• spcopy can copy an Oracle ASM SPFILE from a disk group to a different diskgroup or to an operating system file.
• spcopy can copy an Oracle ASM SPFILE from an operating system file to a diskgroup.
• spcopy can copy an Oracle ASM SPFILE when the SPFILE is being used by anopen Oracle ASM instance.
ASMCMD Instance Management Commands
Managing Oracle ASM with ASMCMD 10-25

• spcopy cannot make multiple copies of an Oracle ASM SPFILE in the same diskgroup. You can use spbackup for that purpose.
To update the GPnP profile, include the -u option with spcopy. You can also usespset to update the GPnP profile if spcopy is run without the -u option. See "spset(page 10-28)". For information about copying and moving an Oracle ASM instanceinitialization parameter file after upgrading, see "About Backing Up_ Copying_ andMoving an Oracle ASM Initialization Parameter File (page 3-4)".
After copying the SPFILE and updating the GPnP profile, you must restart theinstance with the SPFILE in the new location to use that SPFILE. When the OracleASM instance is running with the SPFILE in the new location, you can remove thesource SPFILE.
To copy an Oracle ASM SPFILE into a disk group using spcopy, theCOMPATIBLE.ASM attribute must be set to 11.2 or greater in the target disk group.
See Also:
The CREATE SPFILE SQL statement in the Oracle Database SQL LanguageReference for information about creating a server parameter file
Example
The following are examples of the spcopy command. The first example copies theOracle ASM SPFILE from the data disk group to the fra disk group. The secondexample copies the Oracle ASM SPFILE from the data disk group to an operatingsystem location. The third example copies an Oracle ASM SPFILE from an operatingsystem location to the data disk group and updates the GPnP profile with the -uoption.
Example 10-24 Using the ASMCMD spcopy command
ASMCMD> spcopy +DATA/asm/asmparameterfile/registry.253.721810181 +FRA/spfileCopyASM.ora
ASMCMD> spcopy +DATA/asm/asmparameterfile/registry.253.721810181 $ORACLE_HOME/dbs/spfileCopyASM.ora
ASMCMD> spcopy -u /oracle/product/11.2.0/grid/dbs/spfileTestASM.ora +DATA/ASM/spfileCopyASM.ora
spget
Purpose
Retrieves the location of the Oracle ASM SPFILE from the Grid Plug and Play (GPnP)profile.
Syntax and Description
spget
The location retrieved by spget is the location in the GPnP profile, but not always thelocation of the SPFILE currently used. For example, the location could have beenrecently updated by spset or spcopy with the -u option on an Oracle ASM instancethat has not been restarted. After the next restart of the Oracle ASM, this locationpoints to the Oracle ASM SPFILE currently being used.
ASMCMD Instance Management Commands
10-26 Oracle Automatic Storage Management Administrator's Guide

Example
The following is an example of the spget command that retrieves and displays thelocation of the SPFILE from the GPnP profile.
Example 10-25 Using the ASMCMD spget command
ASMCMD [+] > spget+DATA/ASM/ASMPARAMETERFILE/registry.253.813507611
spmove
Purpose
Moves an Oracle ASM SPFILE from source to destination and automatically updatesthe GPnP profile.
Syntax and Description
spmove source destination
Table 10-20 (page 10-27) lists the options for the spmove command.
Table 10-20 Options for the spmove command
Option Description
source Specifies the source file.
destination Specifies the destination file.
Note the following about the use of spmove:
• spmove can move an Oracle ASM SPFILE when the open instance is using aPFILE or a different SPFILE. After moving the SPFILE, you must restart theinstance with the SPFILE in the new location to use that SPFILE.
• spmove cannot move an Oracle ASM SPFILE when the SPFILE is being used byan open Oracle ASM instance.
For information about copying and moving an Oracle ASM instance initializationparameter file after upgrading, see "About Backing Up_ Copying_ and Moving anOracle ASM Initialization Parameter File (page 3-4)".
To use spmove to move an Oracle ASM SPFILE into a disk group, the disk groupattribute COMPATIBLE.ASM must be set to 11.2 or greater.
Example
The following are examples of the spmove command. The first example moves anOracle ASM SPFILE from the data disk group to an operating system location. Thesecond example moves an SPFILE from an operating system location to the data diskgroup.
Example 10-26 Using the ASMCMD spmove command
ASMCMD> spmove +DATA/spfileASM.ora /oracle/product/11.2.0/grid/dbs/spfileMoveASM.ora
ASMCMD Instance Management Commands
Managing Oracle ASM with ASMCMD 10-27

ASMCMD> spmove /oracle/product/11.2.0/grid/dbs/spfile+ASM.ora +DATA/ASM/spfileMoveASM.ora
spset
Purpose
Sets the location of the Oracle ASM SPFILE in the Grid Plug and Play (GPnP) profile.
Syntax and Description
spset location
Table 10-21 (page 10-28) lists the options for the spset command.
Table 10-21 Options for the spset command
Option Description
location Specifies the location of the Oracle ASM SPFILE. The location isthe full path to the SPFILE.
Example
The following is an example of the spset command that sets the location of theOracle ASM SPFILE command in the data disk group.
Example 10-27 Using the ASMCMD spset command
ASMCMD> spset +DATA/asm/asmparameterfile/asmspfile.ora
startup
Purpose
Starts up an Oracle ASM instance.
Syntax and Description
startup [--nomount] [--restrict] [ --pfile pfile ]
Table 10-22 (page 10-28) lists the options for the startup command.
Table 10-22 Options for the startup command
Option Description
--nomount Specifies no mount operation.
--restrict Specifies restricted mode.
--pfile pfile Oracle ASM initialization parameter file.
The default action is a startup that mounts disk groups and enables Oracle ASMDynamic Volume Manager (Oracle ADVM) volumes. For information about diskgroups that are mounted at startup time, see "About Mounting Disk Groups at Startup(page 3-25)".
ASMCMD Instance Management Commands
10-28 Oracle Automatic Storage Management Administrator's Guide

For more information about starting up an Oracle ASM instance, see "About StartingUp an Oracle ASM Instance (page 3-22)".
Example
The following is an example of the startup command that starts the Oracle ASMinstance without mounting disk groups and uses the asm_init.ora initializationparameter file.
Example 10-28 Using the ASMCMD startup command
ASMCMD> startup --nomount --pfile asm_init.ora
ASMCMD Oracle ASM Filter Driver Management CommandsThis section describes the ASMCMD Oracle ASM Filter Driver managementcommands.
See Also:
Oracle Grid Infrastructure Installation Guide for your operating system forinformation about installing and configuring Oracle Grid Infrastructure
NOT_SUPPORTED (page 10-29) provides a summary of the Oracle ASM Filter Drivermanagement commands.
NOT_SUPPORTED
Command Description
afd_configureNOT_SUPPORTED Configures Oracle ASM Filter Driver.
afd_deconfigureNOT_SUPPORTED
Deconfigures Oracle ASM Filter Driver.
afd_dsgetNOT_SUPPORTED Retrieves the Oracle ASM Filter Driver diskstring value.
afd_dssetNOT_SUPPORTED Sets the Oracle ASM Filter Driver diskstring value.
afd_filterNOT_SUPPORTED Sets the Oracle ASM Filter Driver mode on a given disk path.
afd_labelNOT_SUPPORTED Sets an Oracle ASM Filter Driver label to a disk.
afd_lsdskNOT_SUPPORTED Lists Oracle ASM Filter Driver disks.
afd_scanNOT_SUPPORTED Scans for Oracle ASM Filter Driver disks.
afd_stateNOT_SUPPORTED Returns the state of Oracle ASM Filter Driver.
afd_unlabelNOT_SUPPORTED Clears an existing Oracle ASM Filter Driver label.
afd_configure
Purpose
Configures Oracle ASM Filter Driver.
ASMCMD Oracle ASM Filter Driver Management Commands
Managing Oracle ASM with ASMCMD 10-29

Syntax and Description
# asmcmd afd_configure
The afd_configure command must be run noninteractively as a root user. Beforerunning the command on a node, the Oracle Clusterware stack must be shut down onthat node. After the afd_configure command has been run, restart OracleClusterware on each node.
For information about Oracle ASM Filter Driver, refer to "Oracle ASM Filter Driver(page 3-34)".
See Also:
Oracle Grid Infrastructure Installation Guide for your operating system forinformation about installing and configuring Oracle Grid Infrastructure
Example
The following example configures Oracle ASM Filter Driver on the node on which thecommand was run. $ORACLE_HOME in the example refers to the Oracle GridInfrastructure home.
Example 10-29 Using the afd_configure command
# $ORACLE_HOME/bin/asmcmd afd_configure
afd_deconfigure
Purpose
Deconfigures Oracle ASM Filter Driver.
Syntax and Description
# asmcmd afd_deconfigure
The afd_deconfigure command must be run noninteractively as a root user.Before running the command on a node, the Oracle Clusterware stack must be shutdown on that node. After the afd_deconfigure command has been run, restartOracle Clusterware on each node.
For information about Oracle ASM Filter Driver, refer to "Oracle ASM Filter Driver(page 3-34)".
See Also:
Oracle Grid Infrastructure Installation Guide for your operating system forinformation about installing and configuring Oracle Grid Infrastructure
Example
The following example deconfigures Oracle ASM Filter Driver on the node on whichthe command was run. $ORACLE_HOME in the example refers to the Oracle GridInfrastructure home.
ASMCMD Oracle ASM Filter Driver Management Commands
10-30 Oracle Automatic Storage Management Administrator's Guide

Example 10-30 Using the afd_deconfigure command
# $ORACLE_HOME/bin/asmcmd afd_deconfigure
afd_dsget
Purpose
Retrieves the Oracle ASM Filter Driver discovery diskstring value.
Syntax and Description
afd_dsget
For information about Oracle ASM Filter Driver, refer to "Oracle ASM Filter Driver(page 3-34)".
Example
The following example returns the current Oracle ASM Filter Driver discoverydiskstring value.
Example 10-31 Using the afd_dsget command
ASMCMD [+] > afd_dsgetAFD discovery string: /dev/rdsk/mydisks/*
afd_dsset
Purpose
Sets the Oracle ASM Filter Driver discovery diskstring value.
Syntax and Description
afd_dsset afd_diskstring
The syntax options for the afd_dsset command are described in Table 10-24(page 10-31).
Table 10-24 Options for the afd_dsset command
Option Description
afd_diskstring Specifies the value for the Oracle ASM Filter Driver discoverydiskstring.
For information about Oracle ASM Filter Driver, refer to "Oracle ASM Filter Driver(page 3-34)".
Example
The following example sets the current Oracle ASM Filter Driver discovery diskstringvalue.
Example 10-32 Using the afd_dsset command
ASMCMD [+] > afd_dsset /dev/rdsk/mydisks/*
ASMCMD Oracle ASM Filter Driver Management Commands
Managing Oracle ASM with ASMCMD 10-31

afd_filter
Purpose
Sets the Oracle ASM Filter Driver filtering mode on a given disk path.
Syntax and Description
afd_filter {-e | -d } [disk_path]
The syntax options for the afd_filter command are described in the followingtable.
Table 10-25 Options for the afd_filter command
Option Description
-e Enables Oracle ASM Filter Driver mode.
-d Disables Oracle ASM Filter Driver mode.
disk_path Specifies the path to the disks.
If the command is executed without specifying a disk path, then filtering is set at thenode level.
Example
The following example uses afd_filter to enable Oracle ASM Filter Driver filteringon a specified disk path.
Example 10-33 Using the afd_filter command
ASMCMD [+] > afd_filter -e /dev/sdq
afd_label
Purpose
Sets an Oracle ASM Filter Driver label to the specified disk.
Syntax and Description
afd_label afd_label disk_path [--migrate | --rename]
The syntax options for the afd_label command are described in Table 10-26(page 10-32).
Table 10-26 Options for the afd_label command
Option Description
afd_label Specifies an Oracle ASM Filter Driver label.
disk_path Specifies the path to the disks to which the label is applied.
ASMCMD Oracle ASM Filter Driver Management Commands
10-32 Oracle Automatic Storage Management Administrator's Guide

Table 10-26 (Cont.) Options for the afd_label command
Option Description
--migrate Specifies to migrate Oracle ASM Filter Driver disk labels to alldisks in the disk_path..
--rename Specifies to label a disk that was previously labeled.
For information about Oracle ASM Filter Driver, refer to "Oracle ASM Filter Driver(page 3-34)".
Example
The following example sets an Oracle ASM Filter Driver label to a specified disk.
Example 10-34 Using the afd_label command
ASMCMD [+] > afd_label 'disk0' '/dev/rdsk/mydisks/disk0'
afd_lsdsk
Purpose
Lists Oracle ASM Filter Driver disks.
Syntax and Description
afd_lsdsk
Example
The following example lists Oracle ASM Filter Driver disks.
Example 10-35 Using the afd_lsdsk commmand
ASMCMD [+] > afd_lsdsk--------------------------------------------------------------------------------Label Filtering Path================================================================================DISK0 ENABLED /dev/sddDISK1 DISABLED /dev/sdmDISK2 ENABLED /dev/sdq
afd_scan
Purpose
Scans for Oracle ASM Filter Driver disks.
Syntax and Description
afd_scan [afd_diskstring]
The syntax options for the afd_scan command are described in Table 10-27(page 10-34).
ASMCMD Oracle ASM Filter Driver Management Commands
Managing Oracle ASM with ASMCMD 10-33

Table 10-27 Options for the afd_scan command
Option Description
afd_diskstring Specifies the value for the Oracle ASM Filter Driver discoverydiskstring.
afd_scan scans for Oracle ASM Filter Driver disks using the specified discoverystring. If the command is executed without specifying a disk string, then afd_scanuses the Oracle ASM Filter Driver discovery diskstring value in the afd.conf file.
For information about Oracle ASM Filter Driver, refer to "Oracle ASM Filter Driver(page 3-34)".
Example
The following example scans for Oracle ASM Filter Driver disks with a specifieddiskstring.
Example 10-36 Using the afd_scan command
ASMCMD [+] > afd_scan /dev/sd*
afd_state
Purpose
Returns the state of Oracle ASM Filter Driver.
Syntax and Description
afd_state
For information about Oracle ASM Filter Driver, refer to "Oracle ASM Filter Driver(page 3-34)".
Example
The following example returns the current state of Oracle ASM Filter Driver.
Example 10-37 Using the afd_state command
ASMCMD [+] > afd_stateASMCMD-9526: The AFD state is 'LOADED' and filtering is 'DEFAULT' on host 'myhost'
afd_unlabel
Purpose
Clears a specified Oracle ASM Filter Driver label.
Syntax and Description
afd_unlabel afd_label
The syntax options for the afd_unlabel command are described in Table 10-28(page 10-35).
ASMCMD Oracle ASM Filter Driver Management Commands
10-34 Oracle Automatic Storage Management Administrator's Guide

Table 10-28 Options for the afd_unlabel command
Option Description
afd_unlabel Specifies an existing Oracle ASM Filter Driver label to clear.
For information about Oracle ASM Filter Driver, refer to "Oracle ASM Filter Driver(page 3-34)".
Example
The following example clears an existing Oracle ASM Filter Driver label.
Example 10-38 Using the afd_unlabel command
ASMCMD [+] > afd_unlabel 'disk0'
ASMCMD File Management CommandsThis section describes the ASMCMD file management commands.
NOT_SUPPORTED (page 10-35) provides a summary of the file managementcommands.
NOT_SUPPORTED
Command Description
amdu_extractNOT_SUPPORTED Extracts a file from a disk group.
cdNOT_SUPPORTED Changes the current directory to the specified directory.
cpNOT_SUPPORTED Enables you to copy files between disk groups, and between a diskgroup and the operating system.
duNOT_SUPPORTED Displays the total disk space occupied by files in the specified OracleASM directory and all of its subdirectories, recursively.
findNOT_SUPPORTED Lists the paths of all occurrences of the specified name (withwildcards) under the specified directory.
lsNOT_SUPPORTED Lists the contents of an Oracle ASM directory, the attributes of thespecified file, or the names and attributes of all disk groups.
lsofNOT_SUPPORTED Lists the open files.
mkaliasNOT_SUPPORTED Creates an alias for system-generated file names.
mkdirNOT_SUPPORTED Creates Oracle ASM directories.
pwdNOT_SUPPORTED Displays the path of the current Oracle ASM directory.
rmNOT_SUPPORTED Deletes the specified Oracle ASM files or directories.
rmaliasNOT_SUPPORTED Deletes the specified alias, retaining the file that the alias points to.
ASMCMD File Management Commands
Managing Oracle ASM with ASMCMD 10-35

amdu_extract
Purpose
Extracts a file from a disk group.
Syntax and Description
amdu_extract diskgroup file_name disk_string
Table 10-30 Options for the amdu_extract command
Option Description
diskgroup Name of the disk group where the file is located.
file_name Name of the file to extract. The file name must be an OracleASM alias name.
The file name can be specified as an absolute or a relative path.
disk_string Value for the Oracle ASM discovery diskstring.
amdu_extract calls the Oracle ASM Metadata Dump Utility (AMDU) command toextract a file using an Oracle ASM alias name.
Example
The following is an example of the amdu_extract command used to extract a filefrom the data disk group.
Example 10-39 Using the ASMCMD amdu_extract command
ASMCMD> amdu_extract data data/orcl/my_alias_filename /devices/disk*
cd
Purpose
Changes the current directory to the specified directory.
Syntax and Description
cd [dir]
Table 10-31 (page 10-36) lists the options for the cd command.
Table 10-31 Options for the cd command
Option Description
dir Name of the directory.
dir can be specified as either an absolute path or a relative path, including the .and .. pseudo-directories. dir can contain wildcard characters. See "WildcardCharacters (page 10-5)".
ASMCMD File Management Commands
10-36 Oracle Automatic Storage Management Administrator's Guide
Examples
The following are examples of the cd command changing into various directories.
Example 10-40 Using the ASMCMD cd command
ASMCMD [+data/hr] > cd +data/orcl
ASMCMD [+data/orcl] > cd DATAFILE
ASMCMD [+data/orcl/DATAFILE] >cd ..
cp
Purpose
Enables you to copy files between Oracle ASM disk groups and between a disk groupand the operating system.
Syntax and Description
cp src_file [--service service_name] [--port port_num] [connect_str:]tgt_file
Table 10-32 (page 10-37) lists the syntax options for the cp command.
Table 10-32 Options for the cp command
Option Description
--serviceservice_name
Specifies the Oracle ASM instance name if not the default+ASM.
--port port_num Specifies the listener port number. The default is 1521.
connect_str Specifies the connection string for a remote instance.
src_file Name of the source file to copy.
tgt_file A user alias for the created target file name or an alias directoryname.
cp cannot copy files between two remote instances. The local Oracle ASM instancemust be either the source or the target of the operation.
You can use the cp command to:
• Copy files from a disk group to the operating system
• Copy files from a disk group to a disk group
• Copy files from the operating system to a disk group
Some file types cannot be the source or destination of the cp command. These filetypes include OCR and OCR backup file types. To back up, copy, or move an OracleASM SPFILE, use the spbackup, spcopy, or spmove commands.
The format of copied files is portable between Little-Endian and Big-Endian systems ifthe files exist in an Oracle ASM disk group. Oracle ASM automatically converts theformat when the files are written. For copying a non-Oracle ASM file from or to anOracle ASM disk group, you can copy the file to a different endian platform and thenuse one of the commonly used utilities to convert the file.
ASMCMD File Management Commands
Managing Oracle ASM with ASMCMD 10-37

connect_str is not required for a local instance copy, which is the default case. For aremote instance copy, you must specify the connect string and Oracle ASM promptsfor a password in a non-echoing prompt. The connect_str is in the form:
user, host, and SID are required in the connect_str parameter. The default portnumber is 1521 and can be changed with the --port option.
The connection privilege (SYSASM or SYSDBA) is determined by the use of the --privilege option when starting ASMCMD. For more information, refer to"Specifying the Type of Connection (page 10-8)".
See Also:
Oracle Database Net Services Administrator's Guide for more information aboutconnection strings
src_file must be either a fully qualified file name or an Oracle ASM alias.
During an ASMCMD copy process, the Oracle ASM server creates an Oracle ManagedFile (OMF) file in the following format:
diskgroup/db_unique_name/file_type/file_name.#.#
where db_uniq_name is set to ASM and # is a string of digits. In the copy process,ASMCMD cp creates the directory structure for the destination and creates a user aliasfrom that location to the actual OMF file that is created.
Examples
The following are examples of the cp command. The first example shows a copy of afile in the data disk group to a file on the operating system. The second exampleshows a copy of a file on the operating system to the data disk group. The thirdexample shows how to copy a file in the data disk group to a remote server. You areprompted to enter a password.
Example 10-41 Using the ASMCMD cp command
ASMCMD [+] > cp +data/orcl/datafile/EXAMPLE.265.691577295 /mybackups/example.bakcopying +data/orcl/datafile/EXAMPLE.265.691577295 -> /mybackups/example.bak
ASMCMD [+] > cp /mybackups/examples.bak +data/orcl/datafile/myexamples.bakcopying /mybackups/examples.bak -> +data/orcl/datafile/myexamples.bak
ASMCMD [+] > cp +data/orcl/datafile/EXAMPLE.265.691577295 sys@myserver.+ASM:/scratch/backup/myexamples.bakEnter Password:
du
Purpose
Displays the total space used for files in the specified directory and in the entiredirectory tree under the directory.
Syntax and Description
du [--suppressheader] [dir]
ASMCMD File Management Commands
10-38 Oracle Automatic Storage Management Administrator's Guide

Table 10-33 (page 10-39) lists the syntax options for the du command.
Table 10-33 Options for the du command
Option Description
dir Name of the directory.
--suppressheader Suppresses column headings from the output.
If you do not specify dir, then information about the current directory is displayed.dir can contain wildcard characters. See "Wildcard Characters (page 10-5)".
The following two values are displayed, both in units of megabytes.
• Used_MB - This value does not include mirroring.
• Mirror_used_MB - This value includes mirroring.
For example, if a normal redundancy disk group contains 100 MB of data and each filein the disk group is 2-way mirrored, then Used_MB is 100 MB and Mirror_used_MBis roughly 200 MB.
Example
The following is an example of the du command. The example shows disk space usedin the orcl directory in the data disk group, including all of the directories under theorcl directory.
Example 10-42 Using the ASMCMD du command
ASMCMD [+] > du data/orclUsed_MB Mirror_used_MB 1756 3519
find
Purpose
Displays the absolute paths of all occurrences of the specified name pattern (withwildcards) in a specified directory and its subdirectories.
Syntax and Description
find [--type type] dir pattern
Table 10-34 (page 10-39) lists the syntax options for the find command.
Table 10-34 Options for the find command
Option Description
--type type Type of target to find.
dir Directory name where you want to start searching.
pattern Name of a target or a wildcard pattern.
ASMCMD File Management Commands
Managing Oracle ASM with ASMCMD 10-39
This command searches the specified directory and all subdirectories under it in thedirectory tree for the supplied pattern. The value used for pattern can be adirectory name or a file name, and can include wildcard characters. See "WildcardCharacters (page 10-5)".
The ASMCMD find command is case insensitive.
In the output of the command, directory names are suffixed with the slash character(/) to distinguish them from file names.
Use the --type flag to find all the files of a particular type (specified as type). Forexample, you can search for control files by specifying type as CONTROLFILE. Validvalues for type are listed in Table 5-1 (page 5-1). These are type values from the typecolumn of the V$ASM_FILE view.
Examples
The following are examples of the find command. The first example searches thedata disk group for files that begin with undo. The second example returns theabsolute path of all the control files (--type CONTROLFILE) in the +data/orcldirectory.
Example 10-43 Using the ASMCMD find command
ASMCMD [+] > find +data undo*+data/ORCL/DATAFILE/UNDOTBS1.258.691577151
ASMCMD [+] > find --type CONTROLFILE +data/orcl *+data/orcl/CONTROLFILE/Current.260.691577263
ls
Purpose
Lists the contents of an Oracle ASM directory, the attributes of the specified file, or thenames and attributes of all disk groups.
Syntax and Description
ls [--suppressheader] [-lsdtLg][--absolutepath][--reverse] [--permission][pattern]
Table 10-35 (page 10-40) lists the syntax options for the ls command.
Table 10-35 Options for the ls command
Option Description
(none) Displays only file names and directory names.
-l Displays extended file information, including striping andredundancy information and whether the file was system-generated(indicated by Y under the SYS column) or user-created (as with analias, indicated by N under the SYS column). When used in the "ls -l +" command, displays directory information.
Not all possible file attributes or disk group attributes are included.To view the complete set of column values for a file or a disk group,query the V$ASM_FILE and V$ASM_DISKGROUP views.
-s Displays file space information.
ASMCMD File Management Commands
10-40 Oracle Automatic Storage Management Administrator's Guide

Table 10-35 (Cont.) Options for the ls command
Option Description
-d If the value for the pattern argument is a directory, then lsdisplays information about that directory, rather than the directorycontents. Typically used with another flag, such as the -l flag.
--reverse Reverses the sort order of the listing.
-t Sorts the listing by timestamp (latest first) instead of by name.
-L If the value for the pattern argument is an alias, then ASMCMDdisplays information about the file that it references. Typically usedwith another flag, such as the -l flag.
--absolutepath For each listed file, displays the absolute path of the alias thatreferences it, if any.
-g GV$ASM_DISKGROUP.INST_ID is included in the output.
--suppressheader Suppresses column headings.
--permission Shows the permissions of a file (V$ASM_FILE.permission, V$ASM_FILE.owner, V$ASM_FILE.usergroup, V$ASM_ALIAS.name).
pattern Name of a file, directory, or a pattern.
Command options enable you to modify and customize the output of the command. Table 10-35 (page 10-40) lists the options and their descriptions. For disk groupinformation, this command queries the V$ASM_DISKGROUP_STAT view by default. Ifyou specify all of the options, then the command shows a union of their attributes,with duplicates removed. If you enter ls +, the top level directory structure isdisplayed.
pattern can be a file name, directory name, or a pattern including wildcardcharacters. See "Wildcard Characters (page 10-5)".
• If pattern is a directory name, then ls lists the contents of the directory anddepending on flag settings, ls also lists information about each directorymember. Directories are listed with a trailing slash (/) to distinguish them fromfiles.
• If the value that you enter for pattern is a file name, then ls lists the file anddepending on the flag settings, ls also lists information about the file. The filemust be located in the current directory if the file name is specified with a relativepath.
Examples
The following are examples of the ls command that display various informationabout directories and the contents of the directories.
Example 10-44 Using the ASMCMD ls command
ASMCMD [+] > ls +data/orcl/datafileEXAMPLE.265.691577295SYSAUX.257.691577149
ASMCMD File Management Commands
Managing Oracle ASM with ASMCMD 10-41
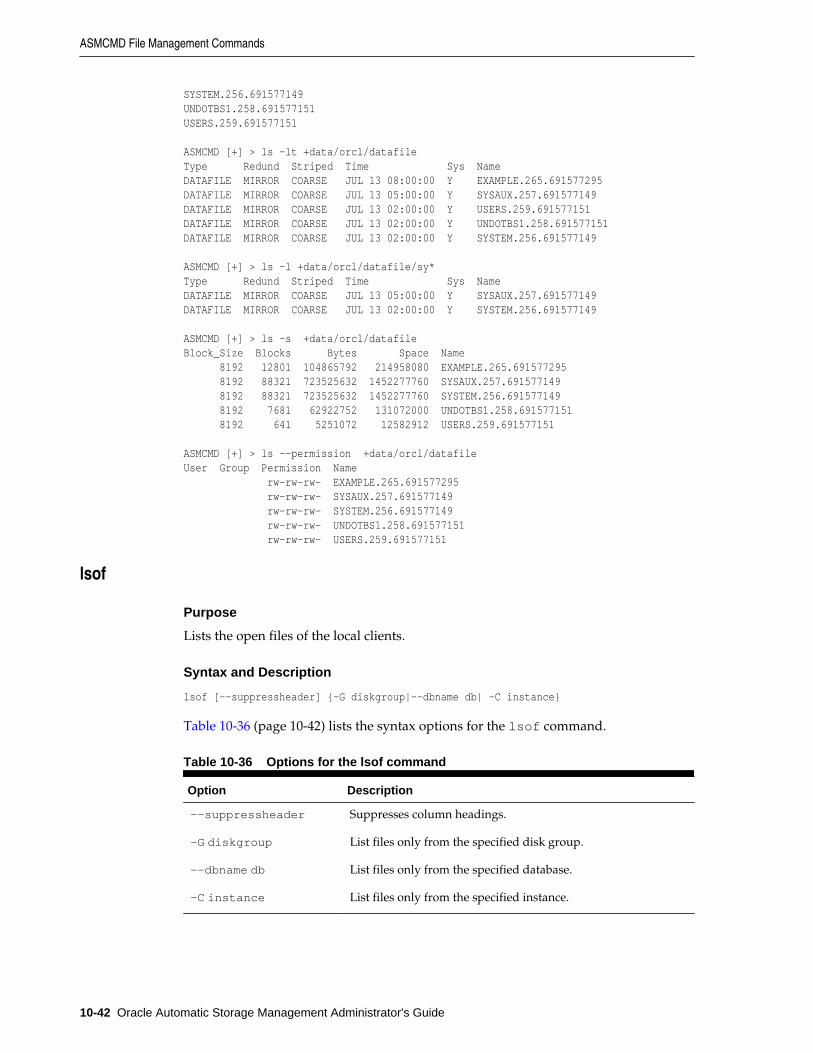
SYSTEM.256.691577149UNDOTBS1.258.691577151USERS.259.691577151
ASMCMD [+] > ls -lt +data/orcl/datafileType Redund Striped Time Sys NameDATAFILE MIRROR COARSE JUL 13 08:00:00 Y EXAMPLE.265.691577295DATAFILE MIRROR COARSE JUL 13 05:00:00 Y SYSAUX.257.691577149DATAFILE MIRROR COARSE JUL 13 02:00:00 Y USERS.259.691577151DATAFILE MIRROR COARSE JUL 13 02:00:00 Y UNDOTBS1.258.691577151DATAFILE MIRROR COARSE JUL 13 02:00:00 Y SYSTEM.256.691577149
ASMCMD [+] > ls -l +data/orcl/datafile/sy*Type Redund Striped Time Sys NameDATAFILE MIRROR COARSE JUL 13 05:00:00 Y SYSAUX.257.691577149DATAFILE MIRROR COARSE JUL 13 02:00:00 Y SYSTEM.256.691577149
ASMCMD [+] > ls -s +data/orcl/datafileBlock_Size Blocks Bytes Space Name 8192 12801 104865792 214958080 EXAMPLE.265.691577295 8192 88321 723525632 1452277760 SYSAUX.257.691577149 8192 88321 723525632 1452277760 SYSTEM.256.691577149 8192 7681 62922752 131072000 UNDOTBS1.258.691577151 8192 641 5251072 12582912 USERS.259.691577151
ASMCMD [+] > ls --permission +data/orcl/datafileUser Group Permission Name rw-rw-rw- EXAMPLE.265.691577295 rw-rw-rw- SYSAUX.257.691577149 rw-rw-rw- SYSTEM.256.691577149 rw-rw-rw- UNDOTBS1.258.691577151 rw-rw-rw- USERS.259.691577151
lsof
Purpose
Lists the open files of the local clients.
Syntax and Description
lsof [--suppressheader] {-G diskgroup|--dbname db| -C instance}
Table 10-36 (page 10-42) lists the syntax options for the lsof command.
Table 10-36 Options for the lsof command
Option Description
--suppressheader Suppresses column headings.
-G diskgroup List files only from the specified disk group.
--dbname db List files only from the specified database.
-C instance List files only from the specified instance.
ASMCMD File Management Commands
10-42 Oracle Automatic Storage Management Administrator's Guide

Example
The following are examples of the lsof command. The first example lists the openfiles for the data disk group. The second example lists the open files for the OracleASM instance.
Example 10-45 Using the ASMCMD lsof command
ASMCMD [+] > lsof -G dataDB_Name Instance_Name Path orcl orcl +data/orcl/controlfile/current.260.691577263 orcl orcl +data/orcl/datafile/example.265.691577295 orcl orcl +data/orcl/datafile/sysaux.257.691577149 orcl orcl +data/orcl/datafile/system.256.691577149 orcl orcl +data/orcl/datafile/undotbs1.258.691577151 orcl orcl +data/orcl/datafile/users.259.691577151 orcl orcl +data/orcl/onlinelog/group_1.261.691577267 orcl orcl +data/orcl/onlinelog/group_2.262.691577271 orcl orcl +data/orcl/onlinelog/group_3.263.691577275 orcl orcl +data/orcl/tempfile/temp.264.691577287
ASMCMD [+] > lsof -C +ASM DB_Name Instance_Name Pathasmvol +ASM +data/VOLUME1.271.679226013asmvol +ASM +data/VOLUME2.272.679227351
mkalias
Purpose
Creates an alias for the specified system-generated file name.
Syntax and Description
mkalias file alias
Table 10-37 (page 10-43) lists the syntax options for the mkalias command.
Table 10-37 Options for the mkalias command
Option Description
file System-generated file name.
alias Alias for the file name.
alias must be in the same disk group as the system-generated file. Only one alias ispermitted for each Oracle ASM file.
Example
The following example creates the sysaux.f alias for the fully qualified file name+data/orcl/DATAFILE/SYSAUX.257.721811945. Following the mkaliascommand, ls --absolutepath is run to check the results.
Example 10-46 Using the ASMCMD mkalias command
ASMCMD [+data/orcl/datafile] > mkalias SYSAUX.257.721811945 sysaux.f
ASMCMD [+data/orcl/datafile] > ls --absolutepath
ASMCMD File Management Commands
Managing Oracle ASM with ASMCMD 10-43

none => EXAMPLE.265.721812093+DATA/ORCL/DATAFILE/sysaux.f => SYSAUX.257.721811945none => SYSTEM.256.721811945none => UNDOTBS1.258.721811945none => USERS.259.721811947sysaux.f
mkdir
Purpose
Creates Oracle ASM directories under the current directory.
Syntax and Description
mkdir dir [dir . . .]
Table 10-38 (page 10-44) lists the syntax options for the mkdir command.
Table 10-38 Options for the mkdir command
Option Description
dir Directory name to create.
The directory from which mkdir is run can be a system-created or user-createddirectory. You cannot create a directory at the root (+) level.
Example
The following is an example of the mkdir command. The example creates thedirectories subdir1 and subdir2 at the disk group level in the disk group data.
Example 10-47 Using the ASMCMD mkdir command
ASMCMD [+data] > mkdir subdir1 subdir2
ASMCMD [+data] > lsASM/ORCL/subdir1/subdir2/
pwd
Purpose
Displays the absolute path of the current directory.
Syntax and Description
pwd
Example
The following is an example of the pwd command. The example displays the currentdirectory.
ASMCMD File Management Commands
10-44 Oracle Automatic Storage Management Administrator's Guide

Example 10-48 Using the ASMCMD pwd command
ASMCMD [+data/orcl/datafile] > pwd+data/orcl/datafile
rm
Purpose
Deletes the specified Oracle ASM files and directories.
Syntax and Description
rm [-f|-r] pattern [pattern...]
Table 10-39 (page 10-45) lists the syntax options for the rm command.
Table 10-39 Options for the rm command
Option Description
-r Recursively deletes files and subdirectories.
-f Deletes files and subdirectories without prompting forconfirmation.
pattern Name of a file, directory, or wildcard pattern.
If pattern is a file or alias, then the rm command can delete the file or alias only if itis not currently in use. If pattern is a directory, then the rm command can delete itonly if it is empty (unless the -r flag is used) and it is not a system-generateddirectory. If pattern is an alias, then the rm command deletes both the alias and thefile to which the alias refers. To delete only an alias and retain the file that the aliasreferences, use the rmalias command.
Note:
When you delete all of the files in a system-created directory, the directory isremoved. If the parent directories are empty, all of the parent directories arealso removed.
pattern can contain wildcard characters. See "Wildcard Characters (page 10-5)".
If you use a wildcard, the rm command deletes all of the matches except nonemptydirectories, unless you use the -r flag. To recursively delete, use the -r flag. With -roption you can delete a nonempty directory, including all files and directories in it andin the entire directory tree underneath it. If you use the -r flag or a wildcardcharacter, then the rm command prompts you to confirm the deletion beforeproceeding, unless you specify the -f flag.If a wildcard character matches an alias or asystem-generated file that has an alias, then both the alias and the system-generatedfile that it references are deleted. When using the -r flag to delete an alias thatmatches a wildcard pattern, either the alias or the system-generated file that has analias must be present in the directory in which you run the rm command.
For example, if you have a user alias, +data/dir1/file.alias that points to+data/orcl/DATAFILE/System.256.146589651, then running the rm -r
ASMCMD File Management Commands
Managing Oracle ASM with ASMCMD 10-45
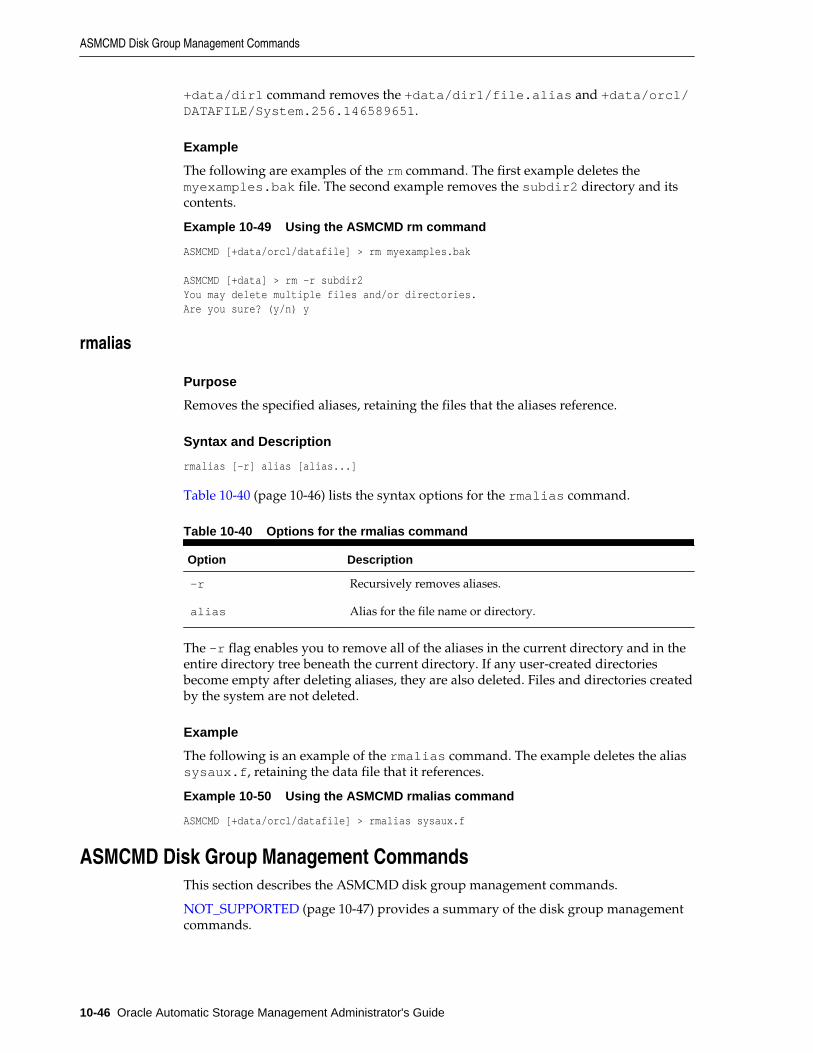
+data/dir1 command removes the +data/dir1/file.alias and +data/orcl/DATAFILE/System.256.146589651.
Example
The following are examples of the rm command. The first example deletes themyexamples.bak file. The second example removes the subdir2 directory and itscontents.
Example 10-49 Using the ASMCMD rm command
ASMCMD [+data/orcl/datafile] > rm myexamples.bak
ASMCMD [+data] > rm -r subdir2You may delete multiple files and/or directories. Are you sure? (y/n) y
rmalias
Purpose
Removes the specified aliases, retaining the files that the aliases reference.
Syntax and Description
rmalias [-r] alias [alias...]
Table 10-40 (page 10-46) lists the syntax options for the rmalias command.
Table 10-40 Options for the rmalias command
Option Description
-r Recursively removes aliases.
alias Alias for the file name or directory.
The -r flag enables you to remove all of the aliases in the current directory and in theentire directory tree beneath the current directory. If any user-created directoriesbecome empty after deleting aliases, they are also deleted. Files and directories createdby the system are not deleted.
Example
The following is an example of the rmalias command. The example deletes the aliassysaux.f, retaining the data file that it references.
Example 10-50 Using the ASMCMD rmalias command
ASMCMD [+data/orcl/datafile] > rmalias sysaux.f
ASMCMD Disk Group Management CommandsThis section describes the ASMCMD disk group management commands.
NOT_SUPPORTED (page 10-47) provides a summary of the disk group managementcommands.
ASMCMD Disk Group Management Commands
10-46 Oracle Automatic Storage Management Administrator's Guide
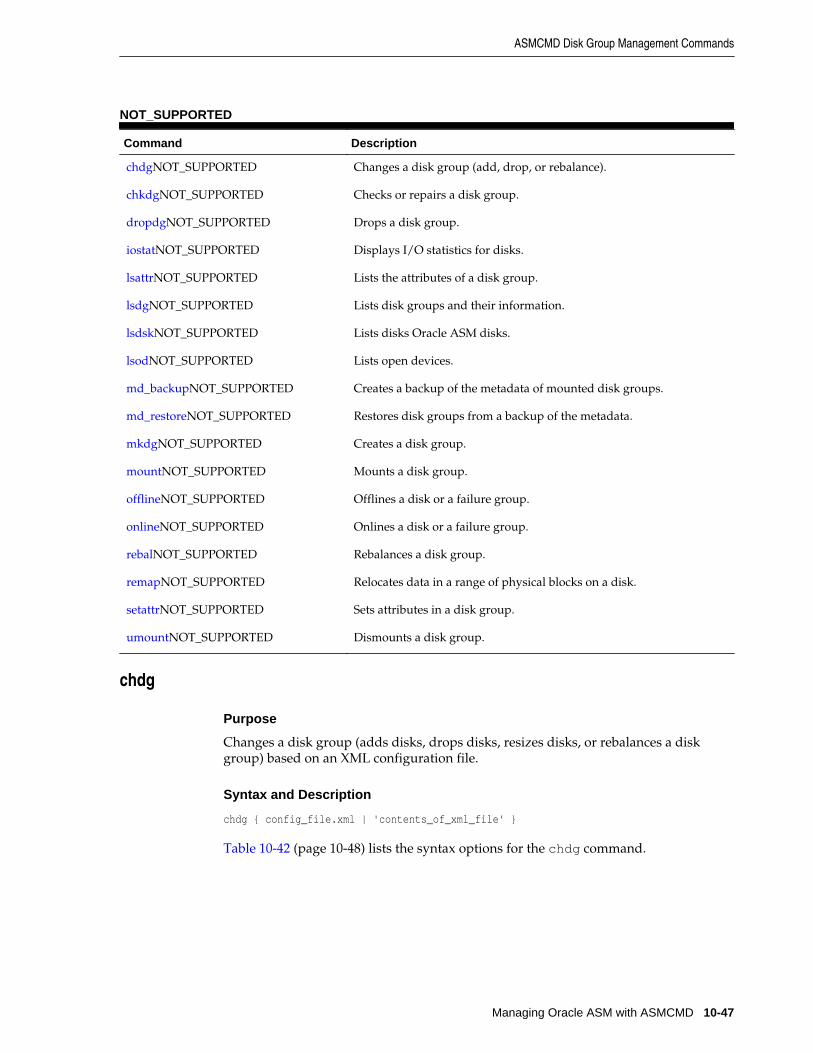
NOT_SUPPORTED
Command Description
chdgNOT_SUPPORTED Changes a disk group (add, drop, or rebalance).
chkdgNOT_SUPPORTED Checks or repairs a disk group.
dropdgNOT_SUPPORTED Drops a disk group.
iostatNOT_SUPPORTED Displays I/O statistics for disks.
lsattrNOT_SUPPORTED Lists the attributes of a disk group.
lsdgNOT_SUPPORTED Lists disk groups and their information.
lsdskNOT_SUPPORTED Lists disks Oracle ASM disks.
lsodNOT_SUPPORTED Lists open devices.
md_backupNOT_SUPPORTED Creates a backup of the metadata of mounted disk groups.
md_restoreNOT_SUPPORTED Restores disk groups from a backup of the metadata.
mkdgNOT_SUPPORTED Creates a disk group.
mountNOT_SUPPORTED Mounts a disk group.
offlineNOT_SUPPORTED Offlines a disk or a failure group.
onlineNOT_SUPPORTED Onlines a disk or a failure group.
rebalNOT_SUPPORTED Rebalances a disk group.
remapNOT_SUPPORTED Relocates data in a range of physical blocks on a disk.
setattrNOT_SUPPORTED Sets attributes in a disk group.
umountNOT_SUPPORTED Dismounts a disk group.
chdg
Purpose
Changes a disk group (adds disks, drops disks, resizes disks, or rebalances a diskgroup) based on an XML configuration file.
Syntax and Description
chdg { config_file.xml | 'contents_of_xml_file' }
Table 10-42 (page 10-48) lists the syntax options for the chdg command.
ASMCMD Disk Group Management Commands
Managing Oracle ASM with ASMCMD 10-47

Table 10-42 Options for the chdg command
Option Description
config_file Name of the XML file that contains the changes for the diskgroup. chdg searches for the XML file in the directory whereASMCMD was started unless a path is specified.
For examples of the valid tags and XML configuration file, see Example 10-51 (page 10-48) and Example 10-52 (page 10-49).
contents_of_xml_file The XML script enclosed in single quotations.
chdg modifies a disk group based on an XML configuration file. The modificationincludes adding, replacing, or deleting disks from an existing disk group, and thesetting rebalance or replace power level. The power level can be set to the same valuesas the ASM_POWER_LIMIT initialization parameter. For information about theinitialization parameter, see "ASM_POWER_LIMIT (page 3-10)".
When adding disks to a disk group, the diskstring must be specified in a formatsimilar to the ASM_DISKSTRING initialization parameter. For information about theinitialization parameter, see "ASM_DISKSTRING (page 3-9)".
The failure groups are optional parameters. The default causes every disk to belong toa its own failure group. For information about failure groups, see"Oracle ASM FailureGroups (page 4-31)".
Dropping disks from a disk group can be performed through this operation. Anindividual disk can be referenced by its Oracle ASM disk name. A set of disks thatbelong to a failure group can be specified by the failure group name. For informationabout dropping disks, see"Dropping Disks from Disk Groups (page 4-19)".
You can resize a disk inside a disk group with chdg. The resize operation fails if thereis not enough space for storing data after the resize. For information about resizingdisks, see"Resizing Disks in Disk Groups (page 4-21)".
Example 10-51 (page 10-48) shows the basic structure and the valid tags with theirrespective attributes for the chdg XML configuration file.
Example 10-51 Tags for the chdg XML configuration template
<chdg> update disk clause (add/delete disks/failure groups) name disk group to change power power to perform rebalance or replace <add> items to add are placed here</add>
<replace> items to replace are placed here</replace>
<drop> items to drop are placed here</drop>
<fg> failure group name failure group name</fg>
<dsk> disk name disk name string disk path
ASMCMD Disk Group Management Commands
10-48 Oracle Automatic Storage Management Administrator's Guide

size size of the disk to add force true specifies to use the force option</dsk>
</chdg>
For information about creating a disk group with ASMCMD mkdg, see "mkdg(page 10-61)". For information about altering disk groups, see "Altering Disk Groups(page 4-15)".
Example
The following is an example of an XML configuration file for chdg. This XML filealters the disk group named data. The failure group fg1 is dropped and the diskdata_0001 is also dropped. The /dev/disk5 disk is added to failure group fg2.The rebalance power level is set to 3.
Example 10-52 chdg sample XML configuration file
<chdg name="data" power="3"> <drop> <fg name="fg1"></fg> <dsk name="data_0001"/> </drop> <add> <fg name="fg2"> <dsk string="/dev/disk5"/> </fg> </add></chdg>
The following are examples of the chdg command with the configuration file orconfiguration information on the command line.
Example 10-53 Using the ASMCMD chdg command
ASMCMD [+] > chdg data_config.xml
ASMCMD [+] > chdg '<chdg name="data" power="3"> <drop><fg name="fg1"></fg><dsk name="data_0001"/></drop> <add><fg name="fg2"><dsk string="/dev/disk5"/></fg></add></chdg>'
chkdg
Purpose
Checks or repairs the metadata of a disk group.
Syntax and Description
chkdg [--repair] diskgroup
Table 10-43 (page 10-49) lists the syntax options for the chkdg command.
Table 10-43 Options for the chkdg command
Option Description
--repair Repairs the disk group.
ASMCMD Disk Group Management Commands
Managing Oracle ASM with ASMCMD 10-49

Table 10-43 (Cont.) Options for the chkdg command
Option Description
diskgroup Name of disk group to check or repair.
chkdg checks the metadata of a disk group for errors and optionally repairs the errors.
Example
The following is an example of the chkdg command used to check and repair thedata disk group.
Example 10-54 Using the ASMCMD chkdg command
ASMCMD [+] > chkdg --repair data
dropdg
Purpose
Drops a disk group.
Syntax and Description
dropdg [-r [-f]] diskgroup
Table 10-44 (page 10-50) lists the syntax options for the dropdg command.
Table 10-44 Options for the dropdg command
Option Description
-f Force the operation. Only applicable if the disk group cannot bemounted.
-r Recursive, include contents.
diskgroup Name of disk group to drop.
dropdg drops an existing disk group. The disk group should not be mounted onmultiple nodes.
Example
These are examples of the use of dropdg. The first example forces the drop of the diskgroup data, including any data in the disk group. The second example drops the diskgroup fra, including any data in the disk group.
Example 10-55 Using the ASMCMD dropdg command
ASMCMD [+] > dropdg -r -f data
ASMCMD [+] > dropdg -r fra
ASMCMD Disk Group Management Commands
10-50 Oracle Automatic Storage Management Administrator's Guide

iostat
Purpose
Displays I/O statistics for Oracle ASM disks in mounted disk groups.
Syntax and Description
iostat [--suppressheader] [-et] [--io] [--region] [-G diskgroup] [interval]
iostat lists disk group statistics using the V$ASM_DISK_IOSTAT view.
Table 10-45 (page 10-51) lists the syntax options for the iostat command.
Table 10-45 Options for the iostat command
Option Description
-e Displays error statistics (Read_Err, Write_Err).
-G diskgroup Displays statistics for the disk group name.
--suppressheader Suppresses column headings.
--io Displays information in number of I/Os, instead of bytes.
-t Displays time statistics (Read_Time, Write_Time).
--region Displays information for cold and hot disk regions(Cold_Reads, Cold_Writes, Hot_Reads, Hot_Writes).
interval Refreshes the statistics display based on the interval value(seconds). Use CTRL+C to stop the interval display.
Table 10-46 (page 10-51) shows the statistics for a disk group. To view the completeset of statistics for a disk group, use the V$ASM_DISK_IOSTAT view.
Table 10-46 Attribute descriptions for iostat command output
Attribute Name Description
Group_Name Name of the disk group.
Dsk_Name Name of the disk.
Reads Number of bytes read from the disk. If the --io option is entered,then the value is displayed as number of I/Os.
Writes Number of bytes written to the disk. If the --io option is entered,then the value is displayed as number of I/Os.
Cold_Reads Number of bytes read from the cold disk region. If the --io option isentered, then the value is displayed as number of I/Os.
Cold_Writes Number of bytes written from the cold disk region. If the --io optionis entered, then the value is displayed as number of I/Os.
ASMCMD Disk Group Management Commands
Managing Oracle ASM with ASMCMD 10-51

Table 10-46 (Cont.) Attribute descriptions for iostat command output
Attribute Name Description
Hot_Reads Number of bytes read from the hot disk region. If the --io option isentered, then the value is displayed as number of I/Os.
Hot_Writes Number of bytes written to the hot disk region. If the --io option isentered, then the value is displayed as number of I/Os.
Read_Err Number of failed I/O read requests for the disk.
Write_Err Number of failed I/O write requests for the disk.
Read_Time I/O time (in seconds) for read requests for the disk if theTIMED_STATISTICS initialization parameter is set to TRUE (0 if setto FALSE).
Write_Time I/O time (in seconds) for write requests for the disk if theTIMED_STATISTICS initialization parameter is set to TRUE (0 if setto FALSE).
If a refresh interval is not specified, the number displayed represents the total numberof bytes or I/Os. If a refresh interval is specified, then the value displayed (bytes orI/Os) is the difference between the previous and current values, not the total value.
Example
The following are examples of the iostat command. The first example displays diskI/O statistics for the data disk group in total number of bytes. The second exampledisplays disk I/O statistics for the data disk group in total number of I/O operations.
Example 10-56 Using the ASMCMD iostat command
ASMCMD [+] > iostat -G dataGroup_Name Dsk_Name Reads Writes DATA DATA_0000 180488192 473707520 DATA DATA_0001 1089585152 469538816 DATA DATA_0002 191648256 489570304 DATA DATA_0003 175724032 424845824 DATA DATA_0004 183421952 781429248 DATA DATA_0005 1102540800 855269888 DATA DATA_0006 171290624 447662592 DATA DATA_0007 172281856 361337344 DATA DATA_0008 173225472 390840320 DATA DATA_0009 288497152 838680576 DATA DATA_0010 196657152 375764480 DATA DATA_0011 436420096 356003840
ASMCMD [+] > iostat --io -G dataGroup_Name Dsk_Name Reads Writes DATA DATA_0000 2801 34918 DATA DATA_0001 58301 35700 DATA DATA_0002 3320 36345 DATA DATA_0003 2816 10629 DATA DATA_0004 2883 34850 DATA DATA_0005 59306 38097 DATA DATA_0006 2151 10129 DATA DATA_0007 2686 10376 DATA DATA_0008 2105 8955
ASMCMD Disk Group Management Commands
10-52 Oracle Automatic Storage Management Administrator's Guide
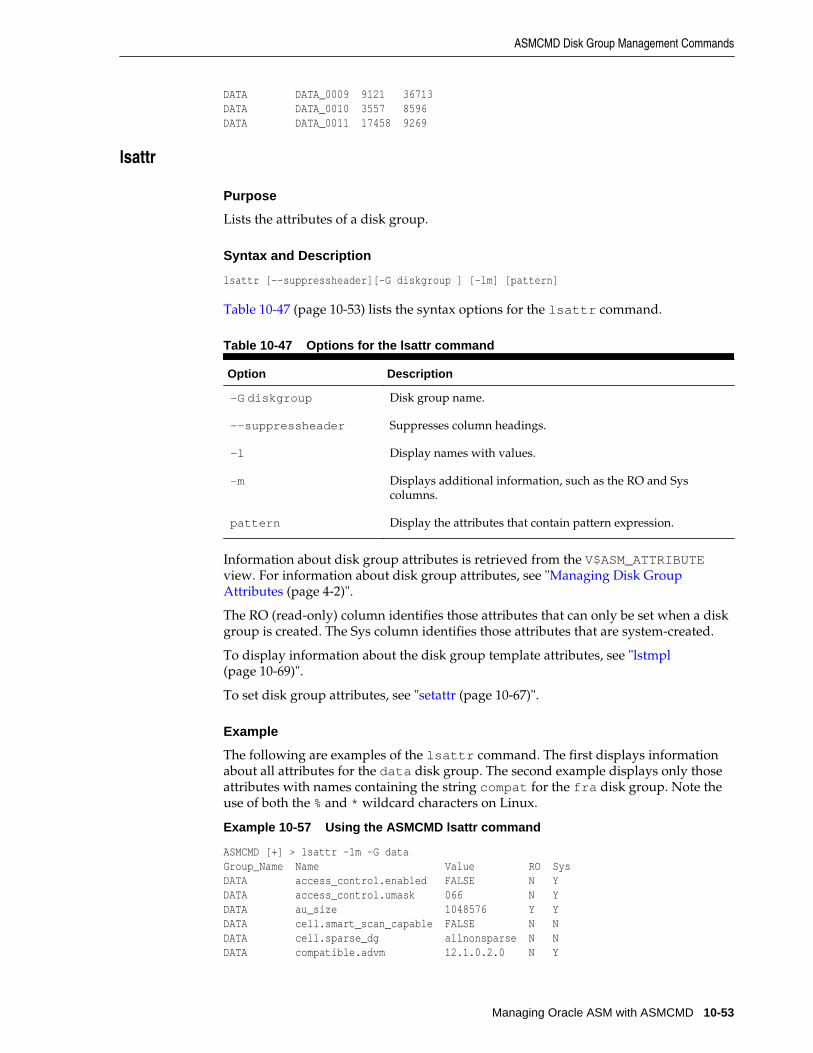
DATA DATA_0009 9121 36713 DATA DATA_0010 3557 8596 DATA DATA_0011 17458 9269
lsattr
Purpose
Lists the attributes of a disk group.
Syntax and Description
lsattr [--suppressheader][-G diskgroup ] [-lm] [pattern]
Table 10-47 (page 10-53) lists the syntax options for the lsattr command.
Table 10-47 Options for the lsattr command
Option Description
-G diskgroup Disk group name.
--suppressheader Suppresses column headings.
-l Display names with values.
-m Displays additional information, such as the RO and Syscolumns.
pattern Display the attributes that contain pattern expression.
Information about disk group attributes is retrieved from the V$ASM_ATTRIBUTEview. For information about disk group attributes, see "Managing Disk GroupAttributes (page 4-2)".
The RO (read-only) column identifies those attributes that can only be set when a diskgroup is created. The Sys column identifies those attributes that are system-created.
To display information about the disk group template attributes, see "lstmpl(page 10-69)".
To set disk group attributes, see "setattr (page 10-67)".
Example
The following are examples of the lsattr command. The first displays informationabout all attributes for the data disk group. The second example displays only thoseattributes with names containing the string compat for the fra disk group. Note theuse of both the % and * wildcard characters on Linux.
Example 10-57 Using the ASMCMD lsattr command
ASMCMD [+] > lsattr -lm -G dataGroup_Name Name Value RO Sys DATA access_control.enabled FALSE N Y DATA access_control.umask 066 N Y DATA au_size 1048576 Y Y DATA cell.smart_scan_capable FALSE N N DATA cell.sparse_dg allnonsparse N N DATA compatible.advm 12.1.0.2.0 N Y
ASMCMD Disk Group Management Commands
Managing Oracle ASM with ASMCMD 10-53
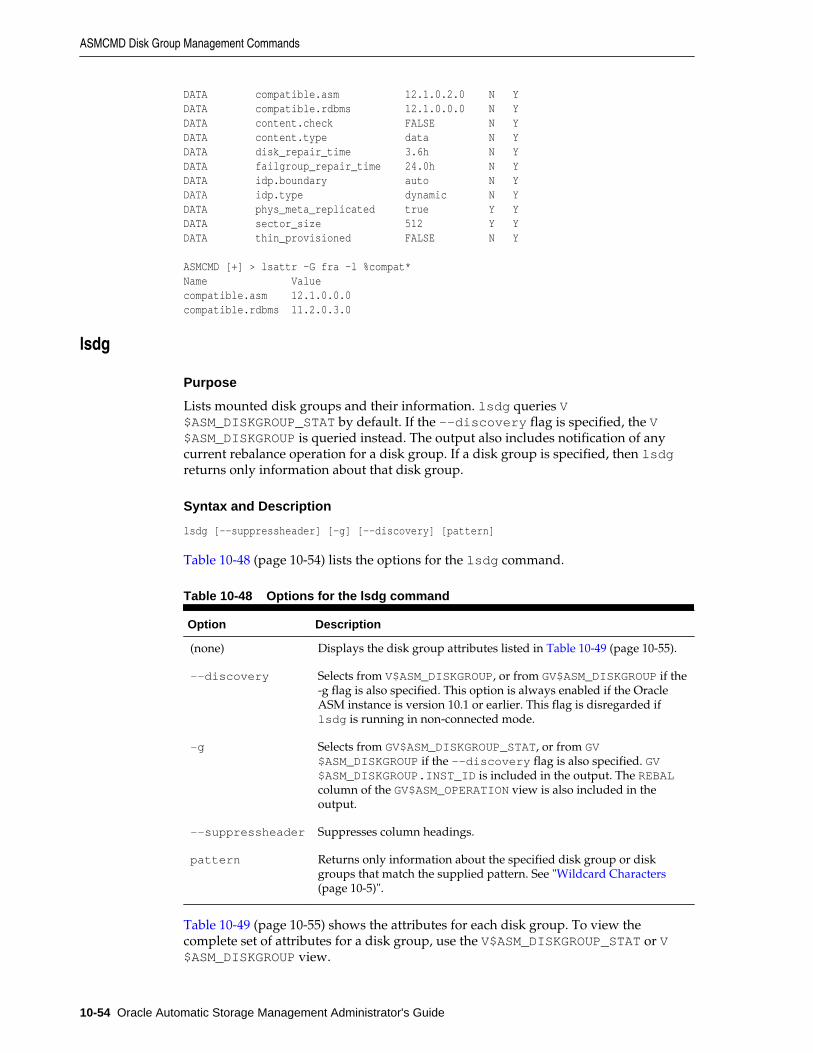
DATA compatible.asm 12.1.0.2.0 N Y DATA compatible.rdbms 12.1.0.0.0 N Y DATA content.check FALSE N Y DATA content.type data N Y DATA disk_repair_time 3.6h N Y DATA failgroup_repair_time 24.0h N Y DATA idp.boundary auto N Y DATA idp.type dynamic N Y DATA phys_meta_replicated true Y Y DATA sector_size 512 Y Y DATA thin_provisioned FALSE N Y
ASMCMD [+] > lsattr -G fra -l %compat*Name Value compatible.asm 12.1.0.0.0 compatible.rdbms 11.2.0.3.0
lsdg
Purpose
Lists mounted disk groups and their information. lsdg queries V$ASM_DISKGROUP_STAT by default. If the --discovery flag is specified, the V$ASM_DISKGROUP is queried instead. The output also includes notification of anycurrent rebalance operation for a disk group. If a disk group is specified, then lsdgreturns only information about that disk group.
Syntax and Description
lsdg [--suppressheader] [-g] [--discovery] [pattern]
Table 10-48 (page 10-54) lists the options for the lsdg command.
Table 10-48 Options for the lsdg command
Option Description
(none) Displays the disk group attributes listed in Table 10-49 (page 10-55).
--discovery Selects from V$ASM_DISKGROUP, or from GV$ASM_DISKGROUP if the-g flag is also specified. This option is always enabled if the OracleASM instance is version 10.1 or earlier. This flag is disregarded iflsdg is running in non-connected mode.
-g Selects from GV$ASM_DISKGROUP_STAT, or from GV$ASM_DISKGROUP if the --discovery flag is also specified. GV$ASM_DISKGROUP.INST_ID is included in the output. The REBALcolumn of the GV$ASM_OPERATION view is also included in theoutput.
--suppressheader Suppresses column headings.
pattern Returns only information about the specified disk group or diskgroups that match the supplied pattern. See "Wildcard Characters(page 10-5)".
Table 10-49 (page 10-55) shows the attributes for each disk group. To view thecomplete set of attributes for a disk group, use the V$ASM_DISKGROUP_STAT or V$ASM_DISKGROUP view.
ASMCMD Disk Group Management Commands
10-54 Oracle Automatic Storage Management Administrator's Guide

See Also:
Oracle Database Reference for descriptions of disk group information displayedin the V$ASM_DISKGROUP view
Table 10-49 Attribute descriptions for lsdg command output
Attribute Name Description
State State of the disk group. Values include BROKEN, CONNECTED,DISMOUNTED, MOUNTED, QUIESCING, and UNKNOWN.
Type Disk group redundancy (NORMAL, HIGH, EXTERNAL).
Rebal Y if a rebalance operation is in progress.
Sector Sector size in bytes.
Block Block size in bytes.
AU Allocation unit size in bytes.
Total_MB Size of the disk group in megabytes.
Free_MB Free space in the disk group in megabytes, without regard toredundancy. From the V$ASM_DISKGROUP view.
Req_mir_free_MB Amount of space that must be available in the disk group to restorefull redundancy after the most severe failure that can be tolerated bythe disk group. This is the REQUIRED_MIRROR_FREE_MB columnfrom the V$ASM_DISKGROUP view.
Usable_file_MB Amount of free space, adjusted for mirroring, that is available for newfiles. From the V$ASM_DISKGROUP view.
Offline_disks Number of offline disks in the disk group. Offline disks areeventually dropped.
Voting_files Specifies whether the disk group contains voting files (Y or N).
Name Disk group name.
Example
The following example lists the attributes of the data disk group.
Example 10-58 Using the ASMCMD lsdg command
ASMCMD [+] > lsdg dataState Type Rebal Sector Block AU Total_MB Free_MB Req_mir_free_MB Usable_file_MBMOUNTED NORMAL N 512 4096 4194304 12288 8835 1117 3859
(continued)Offline_disks Voting_files Name 0 N DATA
ASMCMD Disk Group Management Commands
Managing Oracle ASM with ASMCMD 10-55

lsdsk
Purpose
Lists Oracle ASM disks.
Syntax and Description
lsdsk [--suppressheader] [-kptgMI] [-G diskgroup ] [ --member|--candidate] [--discovery][--statistics][pattern]
Table 10-50 (page 10-56) lists the options for the lsdsk command.
Table 10-50 Options for the lsdsk command
Option Description
(none) Displays the PATH column of the V$ASM_DISK_STAT view.
-k Displays the TOTAL_MB, FREE_MB, OS_MB,NAME, FAILGROUP,LIBRARY, LABEL, UDID, PRODUCT, REDUNDANCY, and PATH columnsof the V$ASM_DISK view.
--statistics Displays the READS, WRITES, READ_ERRS, WRITE_ERRS,READ_TIME, WRITE_TIME, BYTES_READ, BYTES_WRITTEN, and thePATH columns of the V$ASM_DISK view.
-p Displays the GROUP_NUMBER, DISK_NUMBER, INCARNATION,MOUNT_STATUS, HEADER_STATUS, MODE_STATUS, STATE, and thePATH columns of the V$ASM_DISK view.
-t Displays the CREATE_DATE, MOUNT_DATE, REPAIR_TIMER, and thePATH columns of the V$ASM_DISK view.
-g Selects from GV$ASM_DISK_STAT, or from GV$ASM_DISK if the --discovery flag is also specified. GV$ASM_DISK.INST_ID isincluded in the output.
--discovery Selects from V$ASM_DISK, or from GV$ASM_DISK if the -g flag is alsospecified. This option is always enabled if the Oracle ASM instance isversion 10.1 or earlier. This flag is disregarded if lsdsk is running innon-connected mode.
--suppressheader Suppresses column headings.
-I Scans disk headers for information rather than extracting theinformation from an Oracle ASM instance. This option forces non-connected mode.
-G Restricts results to only those disks that belong to the group specifiedby diskgroup.
-M Displays the disks that are visible to some but not all active instances.These are disks that, if included in a disk group, cause the mount ofthat disk group to fail on the instances where the disks are not visible.
--candidate Restricts results to only disks having membership status equal toCANDIDATE.
ASMCMD Disk Group Management Commands
10-56 Oracle Automatic Storage Management Administrator's Guide
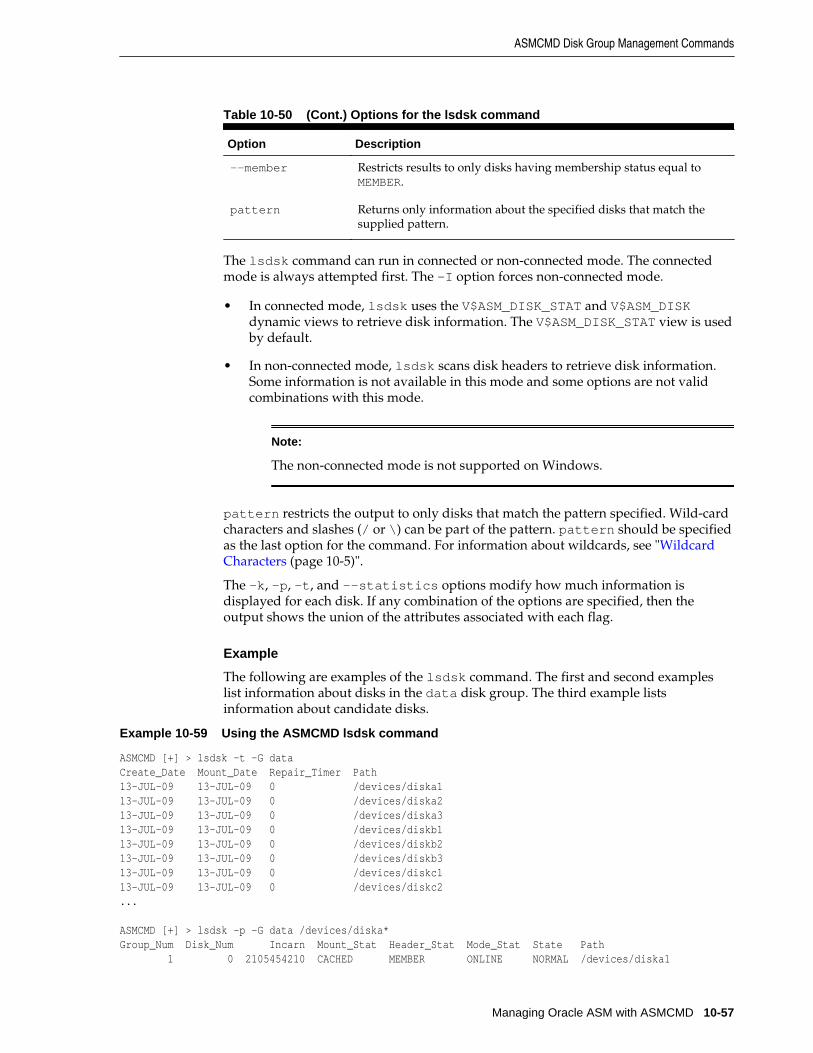
Table 10-50 (Cont.) Options for the lsdsk command
Option Description
--member Restricts results to only disks having membership status equal toMEMBER.
pattern Returns only information about the specified disks that match thesupplied pattern.
The lsdsk command can run in connected or non-connected mode. The connectedmode is always attempted first. The -I option forces non-connected mode.
• In connected mode, lsdsk uses the V$ASM_DISK_STAT and V$ASM_DISKdynamic views to retrieve disk information. The V$ASM_DISK_STAT view is usedby default.
• In non-connected mode, lsdsk scans disk headers to retrieve disk information.Some information is not available in this mode and some options are not validcombinations with this mode.
Note:
The non-connected mode is not supported on Windows.
pattern restricts the output to only disks that match the pattern specified. Wild-cardcharacters and slashes (/ or \) can be part of the pattern. pattern should be specifiedas the last option for the command. For information about wildcards, see "WildcardCharacters (page 10-5)".
The -k, -p, -t, and --statistics options modify how much information isdisplayed for each disk. If any combination of the options are specified, then theoutput shows the union of the attributes associated with each flag.
Example
The following are examples of the lsdsk command. The first and second exampleslist information about disks in the data disk group. The third example listsinformation about candidate disks.
Example 10-59 Using the ASMCMD lsdsk command
ASMCMD [+] > lsdsk -t -G dataCreate_Date Mount_Date Repair_Timer Path13-JUL-09 13-JUL-09 0 /devices/diska113-JUL-09 13-JUL-09 0 /devices/diska213-JUL-09 13-JUL-09 0 /devices/diska313-JUL-09 13-JUL-09 0 /devices/diskb113-JUL-09 13-JUL-09 0 /devices/diskb213-JUL-09 13-JUL-09 0 /devices/diskb313-JUL-09 13-JUL-09 0 /devices/diskc113-JUL-09 13-JUL-09 0 /devices/diskc2...
ASMCMD [+] > lsdsk -p -G data /devices/diska*Group_Num Disk_Num Incarn Mount_Stat Header_Stat Mode_Stat State Path 1 0 2105454210 CACHED MEMBER ONLINE NORMAL /devices/diska1
ASMCMD Disk Group Management Commands
Managing Oracle ASM with ASMCMD 10-57

1 1 2105454199 CACHED MEMBER ONLINE NORMAL /devices/diska2 1 2 2105454205 CACHED MEMBER ONLINE NORMAL /devices/diska3
ASMCMD [+] > lsdsk --candidate -pGroup_Num Disk_Num Incarn Mount_Stat Header_Stat Mode_Stat State Path 0 5 2105454171 CLOSED CANDIDATE ONLINE NORMAL /devices/diske1 0 25 2105454191 CLOSED CANDIDATE ONLINE NORMAL /devices/diske2 0 18 2105454184 CLOSED CANDIDATE ONLINE NORMAL /devices/diske3 0 31 2105454197 CLOSED CANDIDATE ONLINE NORMAL /devices/diskk1 0 21 2105454187 CLOSED CANDIDATE ONLINE NORMAL /devices/diskk2 0 26 2105454192 CLOSED CANDIDATE ONLINE NORMAL /devices/diskk3 0 14 2105454180 CLOSED CANDIDATE ONLINE NORMAL /devices/diskl1...
lsod
Purpose
Lists the open Oracle ASM disks.
Syntax and Description
lsod [--suppressheader] [-G diskgroup] [--process process] [pattern]
Table 10-51 (page 10-58) lists the syntax options for the lsod command.
Table 10-51 Options for the lsod command
Option Description
--suppressheader Suppresses column header information from the output.
-G diskgroup Specifies the disk group that contains the open disks.
--process process Specifies a pattern to filter the list of processes.
pattern Specifies a pattern to filter the list of disks.
The rebalance operation (RBAL) opens a disk both globally and locally so the samedisk may be listed twice in the output for the RBAL process.
Example
The following are examples of the lsod command. The first example lists the opendevices associated with the data disk group and the LGWR process. The secondexample lists the open devices associated with the LGWR process for disks that matchthe diska pattern.
Example 10-60 Using the ASMCMD lsod command
ASMCMD [+] > lsod -G data --process *LGWR*Instance Process OSPID Path1 oracle@myserver02 (LGWR) 26593 /devices/diska1 1 oracle@myserver02 (LGWR) 26593 /devices/diska2 1 oracle@myserver02 (LGWR) 26593 /devices/diska3 1 oracle@myserver02 (LGWR) 26593 /devices/diskb1 1 oracle@myserver02 (LGWR) 26593 /devices/diskb2 1 oracle@myserver02 (LGWR) 26593 /devices/diskb3 1 oracle@myserver02 (LGWR) 26593 /devices/diskd1
ASMCMD Disk Group Management Commands
10-58 Oracle Automatic Storage Management Administrator's Guide

ASMCMD [+] > lsod --process *LGWR* *diska*Instance Process OSPID Path1 oracle@myserver02 (LGWR) 26593 /devices/diska1 1 oracle@myserver02 (LGWR) 26593 /devices/diska2 1 oracle@myserver02 (LGWR) 26593 /devices/diska3
For another example of the lsod command, see Example 10-2 (page 10-10).
md_backup
Purpose
The md_backup command creates a backup file containing metadata for one or moredisk groups.
Syntax and Description
md_backup backup_file [-G 'diskgroup [,diskgroup,...]']
Table 10-52 (page 10-59) describes the options for the md_backup command.
Table 10-52 Options for the md_backup command
Option Description
backup_file Specifies the backup file in which you want to store themetadata.
-G diskgroup Specifies the disk group name of the disk group that must bebacked up
By default all the mounted disk groups are included in the backup file, which is savedin the current working directory if a path is not specified with the file name.
Oracle Automatic Storage Management Cluster File System (Oracle ACFS) file systemand Oracle ASM Dynamic Volume Manager(Oracle ADVM) volume information isnot backed up.
Example
The first example shows the use of the backup command when run without the diskgroup option. This example backs up all the mounted disk groups and creates thebackup image in the /scratch/backup/alldgs20100422 file. The second examplecreates a backup of the data disk group. The metadata backup that this examplecreates is saved in the /scratch/backup/data20100422 file.
Example 10-61 Using the ASMCMD md_backup command
ASMCMD [+] > md_backup /scratch/backup/alldgs20100422Disk group metadata to be backed up: DATADisk group metadata to be backed up: FRACurrent alias directory path: ORCL/ONLINELOGCurrent alias directory path: ORCL/PARAMETERFILECurrent alias directory path: ORCLCurrent alias directory path: ASMCurrent alias directory path: ORCL/DATAFILECurrent alias directory path: ORCL/CONTROLFILECurrent alias directory path: ASM/ASMPARAMETERFILE
ASMCMD Disk Group Management Commands
Managing Oracle ASM with ASMCMD 10-59

Current alias directory path: ORCL/TEMPFILECurrent alias directory path: ORCL/ARCHIVELOG/2010_04_20Current alias directory path: ORCLCurrent alias directory path: ORCL/BACKUPSET/2010_04_21Current alias directory path: ORCL/ARCHIVELOG/2010_04_19Current alias directory path: ORCL/BACKUPSET/2010_04_22Current alias directory path: ORCL/ONLINELOGCurrent alias directory path: ORCL/BACKUPSET/2010_04_20Current alias directory path: ORCL/ARCHIVELOGCurrent alias directory path: ORCL/BACKUPSETCurrent alias directory path: ORCL/ARCHIVELOG/2010_04_22Current alias directory path: ORCL/DATAFILECurrent alias directory path: ORCL/CONTROLFILECurrent alias directory path: ORCL/ARCHIVELOG/2010_04_21
ASMCMD [+] > md_backup /scratch/backup/data20100422 -G dataDisk group metadata to be backed up: DATACurrent alias directory path: ORCL/ONLINELOGCurrent alias directory path: ASMCurrent alias directory path: ORCL/CONTROLFILECurrent alias directory path: ASM/ASMPARAMETERFILECurrent alias directory path: ORCL/PARAMETERFILECurrent alias directory path: ORCLCurrent alias directory path: ORCL/DATAFILECurrent alias directory path: ORCL/TEMPFILE
md_restore
Purpose
The md_restore command restores disk groups from a metadata backup file.
Syntax and Description
md_restore backup_file [--silent] [--full|--nodg|--newdg -o 'old_diskgroup:new_diskgroup [,...]'] [-S sql_script_file] [-G 'diskgroup [,diskgroup...]']
Table 10-53 (page 10-60) describes the options for the md_restore command.
Table 10-53 Options for the md_restore command
Option Description
backup_file Reads the metadata information from backup_file.
--silent Ignore errors. Typically, if md_restore encounters anerror, it stops. Specifying this flag ignores any errors.
--full Specifies to create a disk group and restore metadata.
--nodg Specifies to restore metadata only.
--newdg -oold_diskgroup:new_diskgroup]
Specifies to create a disk group with a different namewhen restoring metadata. The -o option is required with--newdg.
-S sql_script_file Write SQL commands to the specified SQL script fileinstead of executing the commands.
ASMCMD Disk Group Management Commands
10-60 Oracle Automatic Storage Management Administrator's Guide
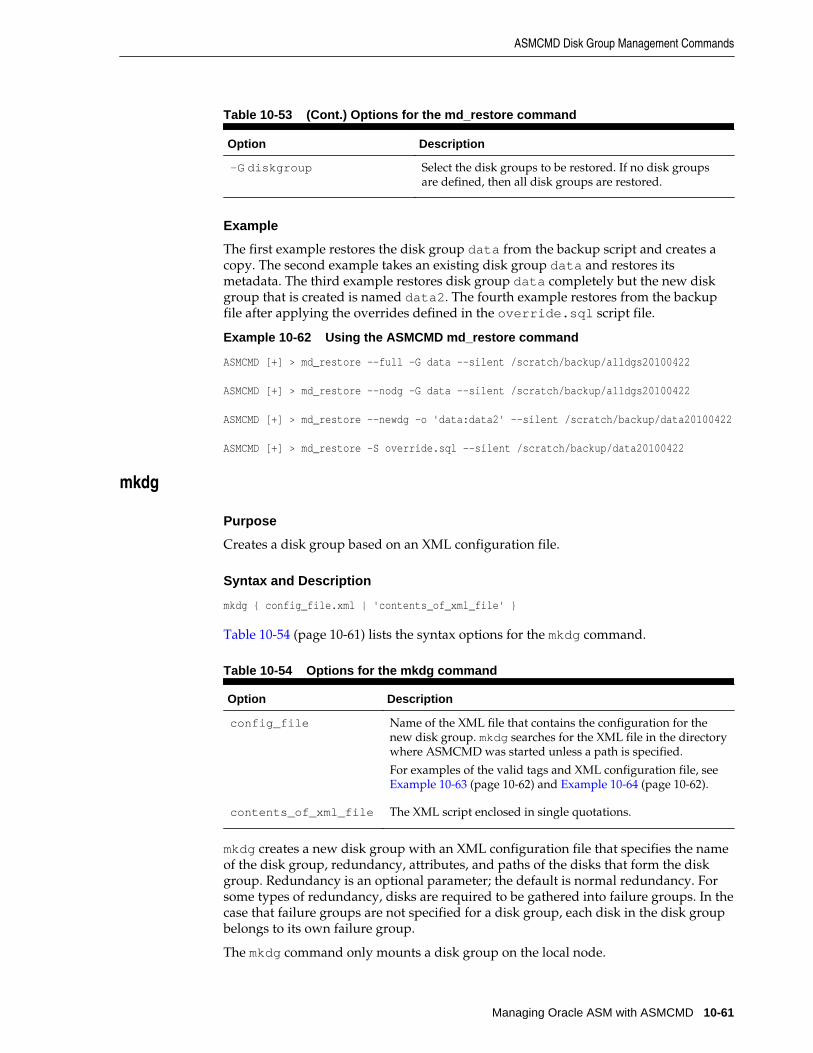
Table 10-53 (Cont.) Options for the md_restore command
Option Description
-G diskgroup Select the disk groups to be restored. If no disk groupsare defined, then all disk groups are restored.
Example
The first example restores the disk group data from the backup script and creates acopy. The second example takes an existing disk group data and restores itsmetadata. The third example restores disk group data completely but the new diskgroup that is created is named data2. The fourth example restores from the backupfile after applying the overrides defined in the override.sql script file.
Example 10-62 Using the ASMCMD md_restore command
ASMCMD [+] > md_restore –-full –G data –-silent /scratch/backup/alldgs20100422
ASMCMD [+] > md_restore –-nodg –G data –-silent /scratch/backup/alldgs20100422
ASMCMD [+] > md_restore –-newdg -o 'data:data2' --silent /scratch/backup/data20100422
ASMCMD [+] > md_restore -S override.sql --silent /scratch/backup/data20100422
mkdg
Purpose
Creates a disk group based on an XML configuration file.
Syntax and Description
mkdg { config_file.xml | 'contents_of_xml_file' }
Table 10-54 (page 10-61) lists the syntax options for the mkdg command.
Table 10-54 Options for the mkdg command
Option Description
config_file Name of the XML file that contains the configuration for thenew disk group. mkdg searches for the XML file in the directorywhere ASMCMD was started unless a path is specified.
For examples of the valid tags and XML configuration file, see Example 10-63 (page 10-62) and Example 10-64 (page 10-62).
contents_of_xml_file The XML script enclosed in single quotations.
mkdg creates a new disk group with an XML configuration file that specifies the nameof the disk group, redundancy, attributes, and paths of the disks that form the diskgroup. Redundancy is an optional parameter; the default is normal redundancy. Forsome types of redundancy, disks are required to be gathered into failure groups. In thecase that failure groups are not specified for a disk group, each disk in the disk groupbelongs to its own failure group.
The mkdg command only mounts a disk group on the local node.
ASMCMD Disk Group Management Commands
Managing Oracle ASM with ASMCMD 10-61
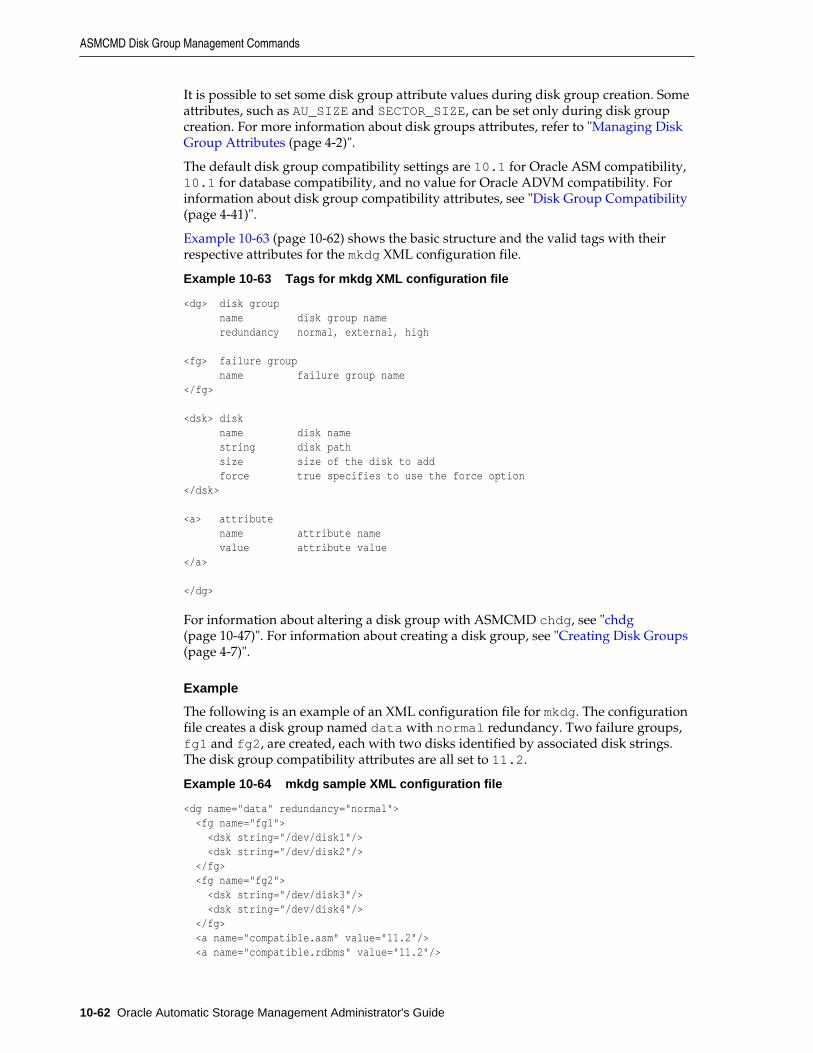
It is possible to set some disk group attribute values during disk group creation. Someattributes, such as AU_SIZE and SECTOR_SIZE, can be set only during disk groupcreation. For more information about disk groups attributes, refer to "Managing DiskGroup Attributes (page 4-2)".
The default disk group compatibility settings are 10.1 for Oracle ASM compatibility,10.1 for database compatibility, and no value for Oracle ADVM compatibility. Forinformation about disk group compatibility attributes, see "Disk Group Compatibility(page 4-41)".
Example 10-63 (page 10-62) shows the basic structure and the valid tags with theirrespective attributes for the mkdg XML configuration file.
Example 10-63 Tags for mkdg XML configuration file
<dg> disk group name disk group name redundancy normal, external, high <fg> failure group name failure group name</fg>
<dsk> disk name disk name string disk path size size of the disk to add force true specifies to use the force option</dsk>
<a> attribute name attribute name value attribute value</a>
</dg>
For information about altering a disk group with ASMCMD chdg, see "chdg(page 10-47)". For information about creating a disk group, see "Creating Disk Groups(page 4-7)".
Example
The following is an example of an XML configuration file for mkdg. The configurationfile creates a disk group named data with normal redundancy. Two failure groups,fg1 and fg2, are created, each with two disks identified by associated disk strings.The disk group compatibility attributes are all set to 11.2.
Example 10-64 mkdg sample XML configuration file
<dg name="data" redundancy="normal"> <fg name="fg1"> <dsk string="/dev/disk1"/> <dsk string="/dev/disk2"/> </fg> <fg name="fg2"> <dsk string="/dev/disk3"/> <dsk string="/dev/disk4"/> </fg> <a name="compatible.asm" value="11.2"/> <a name="compatible.rdbms" value="11.2"/>
ASMCMD Disk Group Management Commands
10-62 Oracle Automatic Storage Management Administrator's Guide

<a name="compatible.advm" value="11.2"/></dg>
The following are examples of the mkdg command. The first example runs mkdg withan XML configuration file in the directory where ASMCMD was started. The secondexample runs mkdg using information on the command line.
Example 10-65 Using the ASMCMD mkdg command
ASMCMD [+] > mkdg data_config.xml
ASMCMD [+] > mkdg '<dg name="data"><dsk string="/dev/disk*"/></dg>'
mount
Purpose
Mounts a disk group.
Syntax and Description
mount [--restrict] { [-a] | [-f] diskgroup[ diskgroup ...] }
Table 10-55 (page 10-63) lists the syntax options for the mount command.
Table 10-55 Options for the mount command
Option Description
diskgroup Name of the disk group.
-a Mounts all disk groups.
--restrict Mounts in restricted mode.
-f Forces the mount operation.
This operation mounts one or more disk groups. A disk group can be mounted with orwithout force or restricted options. For more information about mounting disk groups,see "Mounting and Dismounting Disk Groups (page 4-55)".
Example
The following are examples of the mount command showing the use of the force,restrict, and all options.
Example 10-66 Using the ASMCMD mount command
ASMCMD [+] > mount -f data
ASMCMD [+] > mount --restrict data
ASMCMD [+] > mount -a
offline
Purpose
Offline disks or failure groups that belong to a disk group.
ASMCMD Disk Group Management Commands
Managing Oracle ASM with ASMCMD 10-63

Syntax and Description
offline -G diskgroup { -F failgroup |-D disk} [-t {minutes | hours}]
Table 10-56 (page 10-64) lists the syntax options for the offline command.
Table 10-56 Options for the offline command
Option Description
-G diskgroup Disk group name.
-F failgroup Failure group name.
-D disk Specifies a single disk name.
-t minutes | hours Specifies the time before the specified disk is dropped as nm ornh, where m specifies minutes and h specifies hours. Forexample, 120m or 2h.The default unit is hours.
When a failure group is specified, this implies all the disks that belong to it should beofflined.
Example
The following are examples of the offline command. The first example offlines thefailgroup1 failure group of the data disk group. The second example offlines thedata_0001 disk of the data disk group with a time of 1.5 hours before the disk isdropped.
Example 10-67 Using the ASMCMD offline command
ASMCMD [+] > offline -G data -F failgroup1
ASMCMD [+] > offline -G data -D data_0001 -t 1.5h
online
Purpose
Online all disks, a single disk, or a failure group that belongs to a disk group.
Syntax and Description
online -G diskgroup { -a | -F failgroup |-D disk} [--power n] [-w]
Table 10-57 (page 10-64) lists the syntax options for the online command.
Table 10-57 Options for the online command
Option Description
-a Online all offline disks in the disk group.
-G diskgroup Disk group name.
ASMCMD Disk Group Management Commands
10-64 Oracle Automatic Storage Management Administrator's Guide
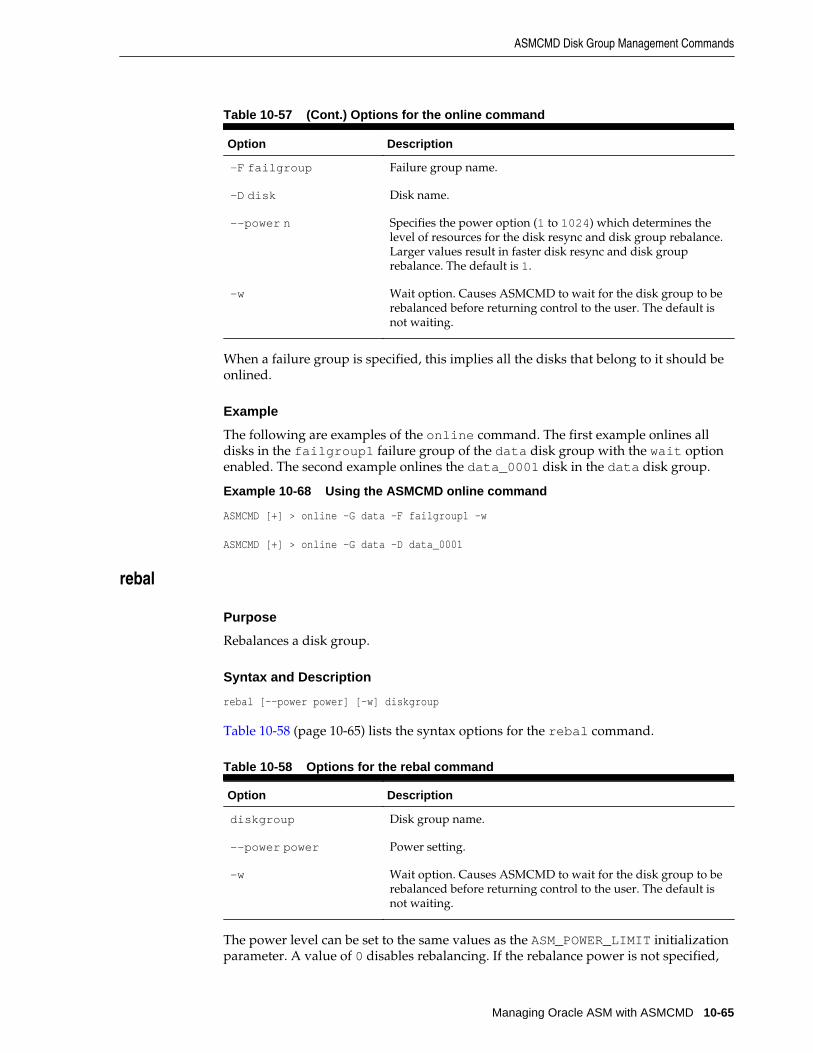
Table 10-57 (Cont.) Options for the online command
Option Description
-F failgroup Failure group name.
-D disk Disk name.
--power n Specifies the power option (1 to 1024) which determines thelevel of resources for the disk resync and disk group rebalance.Larger values result in faster disk resync and disk grouprebalance. The default is 1.
-w Wait option. Causes ASMCMD to wait for the disk group to berebalanced before returning control to the user. The default isnot waiting.
When a failure group is specified, this implies all the disks that belong to it should beonlined.
Example
The following are examples of the online command. The first example onlines alldisks in the failgroup1 failure group of the data disk group with the wait optionenabled. The second example onlines the data_0001 disk in the data disk group.
Example 10-68 Using the ASMCMD online command
ASMCMD [+] > online -G data -F failgroup1 -w
ASMCMD [+] > online -G data -D data_0001
rebal
Purpose
Rebalances a disk group.
Syntax and Description
rebal [--power power] [-w] diskgroup
Table 10-58 (page 10-65) lists the syntax options for the rebal command.
Table 10-58 Options for the rebal command
Option Description
diskgroup Disk group name.
--power power Power setting.
-w Wait option. Causes ASMCMD to wait for the disk group to berebalanced before returning control to the user. The default isnot waiting.
The power level can be set to the same values as the ASM_POWER_LIMIT initializationparameter. A value of 0 disables rebalancing. If the rebalance power is not specified,
ASMCMD Disk Group Management Commands
Managing Oracle ASM with ASMCMD 10-65

the value defaults to the setting of the ASM_POWER_LIMIT initialization parameter.For information about the power level, see "ASM_POWER_LIMIT (page 3-10)" and"Tuning Rebalance Operations (page 4-23)".
You can determine if a rebalance operation is occurring with the ASMCMD lsopcommand. See "lsop (page 10-15)". For more information about rebalancing a diskgroup, see "Manually Rebalancing Disk Groups (page 4-21)".
Example
The following is an example of the rebal command that rebalances the fra diskgroup with a power level set to 4.
Example 10-69 Using the ASMCMD rebal command
ASMCMD [+] > rebal --power 4 fra
ASMCMD [+] > lsopGroup_Name Dsk_Num State PowerFRA REBAL RUN 4
remap
Purpose
Marks a range of blocks as unusable on the disk and relocates any data allocated inthat range.
Syntax and Description
remap diskgroup disk block_range
Table 10-59 (page 10-66) lists the syntax options for the remap command.
Table 10-59 Options for the remap command
Option Description
diskgroup Disk group name in which a disk must have data relocated.
disk Name of the disk that must have data relocated. The name mustmatch the NAME column in the V$ASM_DISK view.
block_range Range of physical blocks to relocate in the formatstart_range_number-end_range_number.
The remap command only relocates blocks. It does not correct or repair blocks thatcontain corrupted contents. The command uses a physical block size based on theSECTOR_SIZE disk group attribute.
Examples
The first example remaps blocks 5000 through 5999 for disk DATA_0001 in diskgroup DATA. The second example remaps blocks 6230 through 6339 for diskFRA_0002 in disk group FRA
ASMCMD Disk Group Management Commands
10-66 Oracle Automatic Storage Management Administrator's Guide
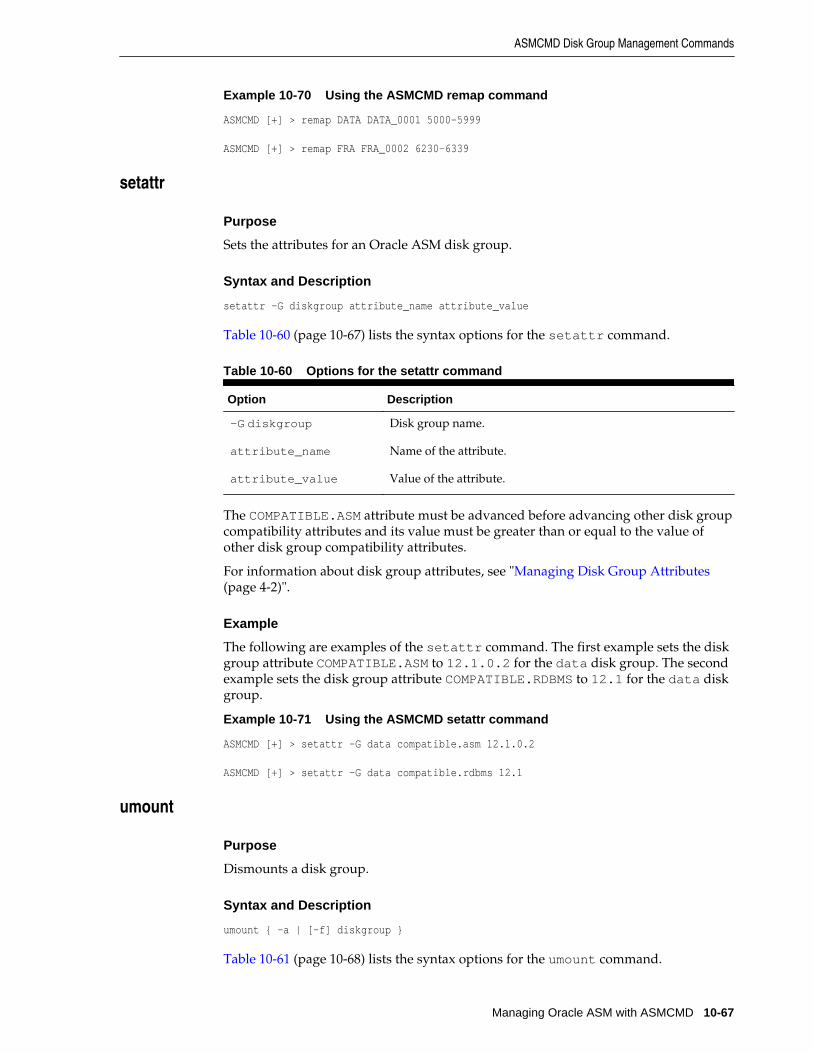
Example 10-70 Using the ASMCMD remap command
ASMCMD [+] > remap DATA DATA_0001 5000-5999
ASMCMD [+] > remap FRA FRA_0002 6230-6339
setattr
Purpose
Sets the attributes for an Oracle ASM disk group.
Syntax and Description
setattr -G diskgroup attribute_name attribute_value
Table 10-60 (page 10-67) lists the syntax options for the setattr command.
Table 10-60 Options for the setattr command
Option Description
-G diskgroup Disk group name.
attribute_name Name of the attribute.
attribute_value Value of the attribute.
The COMPATIBLE.ASM attribute must be advanced before advancing other disk groupcompatibility attributes and its value must be greater than or equal to the value ofother disk group compatibility attributes.
For information about disk group attributes, see "Managing Disk Group Attributes(page 4-2)".
Example
The following are examples of the setattr command. The first example sets the diskgroup attribute COMPATIBLE.ASM to 12.1.0.2 for the data disk group. The secondexample sets the disk group attribute COMPATIBLE.RDBMS to 12.1 for the data diskgroup.
Example 10-71 Using the ASMCMD setattr command
ASMCMD [+] > setattr -G data compatible.asm 12.1.0.2
ASMCMD [+] > setattr -G data compatible.rdbms 12.1
umount
Purpose
Dismounts a disk group.
Syntax and Description
umount { -a | [-f] diskgroup }
Table 10-61 (page 10-68) lists the syntax options for the umount command.
ASMCMD Disk Group Management Commands
Managing Oracle ASM with ASMCMD 10-67

Table 10-61 Options for the umount command
Option Description
diskgroup Name of the disk group.
-a Dismounts all mounted disk groups. These disk groups arelisted in the output of the V$ASM_DISKGROUP view.
-f Forces the dismount operation.
Example
The following are examples of the umount command. The first example dismounts alldisk groups mounted on the Oracle ASM instance. The second example forces thedismount of the data disk group.
Example 10-72 Using the ASMCMD umount command
ASMCMD [+] > umount -a
ASMCMD [+] > umount -f data
ASMCMD Template Management CommandsThis section describes the ASMCMD template management commands.
NOT_SUPPORTED (page 10-68) provides a summary of the template managementcommands.
NOT_SUPPORTED
Command Description
chtmplNOT_SUPPORTED Changes the attributes of a template.
lstmplNOT_SUPPORTED Lists disk group templates.
mktmplNOT_SUPPORTED Adds a template to a disk group.
rmtmplNOT_SUPPORTED Removes a template from a disk group.
chtmpl
Purpose
Changes the attributes of a template.
Syntax and Description
chtmpl -G diskgroup { [--striping {coarse|fine}] [--redundancy {high|mirror|unprotected} ] [--primary {hot|cold}] [--secondary {hot|cold}]} template
Table 10-63 (page 10-69) lists the syntax options for the chtmpl command.
ASMCMD Template Management Commands
10-68 Oracle Automatic Storage Management Administrator's Guide
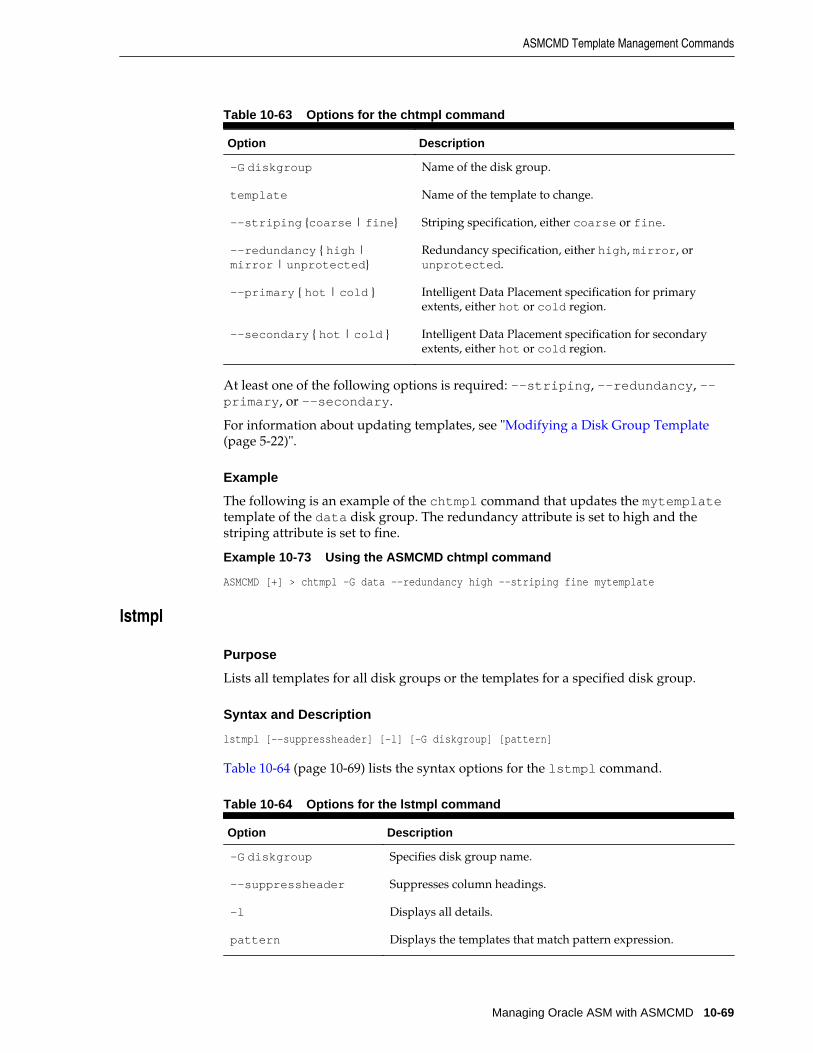
Table 10-63 Options for the chtmpl command
Option Description
-G diskgroup Name of the disk group.
template Name of the template to change.
--striping {coarse | fine} Striping specification, either coarse or fine.
--redundancy { high |mirror | unprotected}
Redundancy specification, either high, mirror, orunprotected.
--primary { hot | cold } Intelligent Data Placement specification for primaryextents, either hot or cold region.
--secondary { hot | cold } Intelligent Data Placement specification for secondaryextents, either hot or cold region.
At least one of the following options is required: --striping, --redundancy, --primary, or --secondary.
For information about updating templates, see "Modifying a Disk Group Template(page 5-22)".
Example
The following is an example of the chtmpl command that updates the mytemplatetemplate of the data disk group. The redundancy attribute is set to high and thestriping attribute is set to fine.
Example 10-73 Using the ASMCMD chtmpl command
ASMCMD [+] > chtmpl -G data --redundancy high --striping fine mytemplate
lstmpl
Purpose
Lists all templates for all disk groups or the templates for a specified disk group.
Syntax and Description
lstmpl [--suppressheader] [-l] [-G diskgroup] [pattern]
Table 10-64 (page 10-69) lists the syntax options for the lstmpl command.
Table 10-64 Options for the lstmpl command
Option Description
-G diskgroup Specifies disk group name.
--suppressheader Suppresses column headings.
-l Displays all details.
pattern Displays the templates that match pattern expression.
ASMCMD Template Management Commands
Managing Oracle ASM with ASMCMD 10-69

For information about template attributes, see "Template Attributes (page 5-20)".
Example
The following is an example of the lstmpl command. The example lists all details ofthe templates in the data disk group.
Example 10-74 Using the ASMCMD lstmpl command
ASMCMD [+] > lstmpl -l -G data
Group_Name Group_Num Name Stripe Sys Redund PriReg MirrReg DATA 1 ARCHIVELOG COARSE Y MIRROR COLD COLDDATA 1 ASMPARAMETERFILE COARSE Y MIRROR COLD COLDDATA 1 AUDIT_SPILLFILES COARSE Y MIRROR COLD COLDDATA 1 AUTOBACKUP COARSE Y MIRROR COLD COLDDATA 1 AUTOLOGIN_KEY_STORE COARSE Y MIRROR COLD COLDDATA 1 BACKUPSET COARSE Y MIRROR COLD COLDDATA 1 CHANGETRACKING COARSE Y MIRROR COLD COLDDATA 1 CONTROLFILE FINE Y HIGH COLD COLDDATA 1 DATAFILE COARSE Y MIRROR COLD COLDDATA 1 DATAGUARDCONFIG COARSE Y MIRROR COLD COLDDATA 1 DUMPSET COARSE Y MIRROR COLD COLDDATA 1 FLASHBACK COARSE Y MIRROR COLD COLDDATA 1 FLASHFILE COARSE Y MIRROR COLD COLDDATA 1 INCR XTRANSPORT BACKUPSET COARSE Y MIRROR COLD COLDDATA 1 KEY_STORE COARSE Y MIRROR COLD COLDDATA 1 OCRFILE COARSE Y MIRROR COLD COLDDATA 1 ONLINELOG COARSE Y MIRROR COLD COLDDATA 1 PARAMETERFILE COARSE Y MIRROR COLD COLDDATA 1 TEMPFILE COARSE Y MIRROR COLD COLDDATA 1 VOTINGFILE COARSE Y MIRROR COLD COLDDATA 1 XTRANSPORT COARSE Y MIRROR COLD COLDDATA 1 XTRANSPORT BACKUPSET COARSE Y MIRROR COLD COLD
mktmpl
Purpose
Adds a template to a disk group.
Syntax and Description
mktmpl -G diskgroup [--striping {coarse|fine}] [--redundancy {high|mirror|unprotected} ] [--primary {hot|cold}] [--secondary {hot|cold}] template
Table 10-65 (page 10-70) lists the syntax options for the mktmpl command.
Table 10-65 Options for the mktmpl command
Option Description
-G diskgroup Name of the disk group.
template Name of the template to create.
--striping {coarse | fine} Striping specification, either coarse or fine.
ASMCMD Template Management Commands
10-70 Oracle Automatic Storage Management Administrator's Guide

Table 10-65 (Cont.) Options for the mktmpl command
Option Description
--redundancy { high |mirror | unprotected}
Redundancy specification, either high, mirror, orunprotected.
--primary { hot | cold } Intelligent Data Placement specification for primaryextents, either hot or cold region.
--secondary { hot | cold } Intelligent Data Placement specification for secondaryextents, either hot or cold region.
For information about adding templates, see "Adding Templates to a Disk Group(page 5-21)".
Example
The following is an example of the mktmpl command that adds the mytemplatetemplate to the data disk group. The new template has the redundancy set to mirrorand the striping set to coarse.
Example 10-75 Using the ASMCMD mktmpl command
ASMCMD [+] > mktmpl -G data --redundancy mirror --striping coarse mytemplate
rmtmpl
Purpose
Removes a template from a disk group.
Syntax and Description
rmtmpl -G diskgroup template
Table 10-66 (page 10-71) lists the syntax options for the rmtmpl command.
Table 10-66 Options for the rmtmpl command
Option Description
-G diskgroup Name of the disk group.
template Name of the template to delete.
For information about template attributes, see "Template Attributes (page 5-20)".
Example
The following is an example of the rmtmpl command that removes the mytemplatetemplate from the data disk group.
Example 10-76 Using the ASMCMD rmtmpl command
ASMCMD [+] > rmtmpl -G data mytemplate
ASMCMD Template Management Commands
Managing Oracle ASM with ASMCMD 10-71
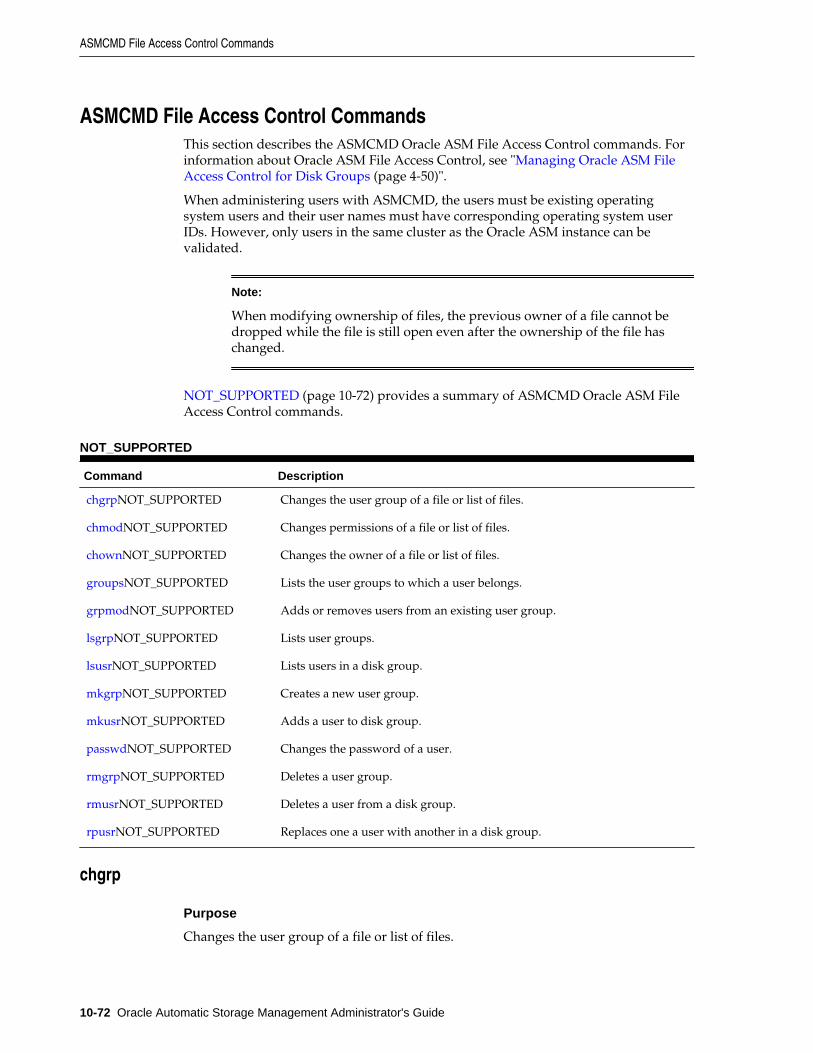
ASMCMD File Access Control CommandsThis section describes the ASMCMD Oracle ASM File Access Control commands. Forinformation about Oracle ASM File Access Control, see "Managing Oracle ASM FileAccess Control for Disk Groups (page 4-50)".
When administering users with ASMCMD, the users must be existing operatingsystem users and their user names must have corresponding operating system userIDs. However, only users in the same cluster as the Oracle ASM instance can bevalidated.
Note:
When modifying ownership of files, the previous owner of a file cannot bedropped while the file is still open even after the ownership of the file haschanged.
NOT_SUPPORTED (page 10-72) provides a summary of ASMCMD Oracle ASM FileAccess Control commands.
NOT_SUPPORTED
Command Description
chgrpNOT_SUPPORTED Changes the user group of a file or list of files.
chmodNOT_SUPPORTED Changes permissions of a file or list of files.
chownNOT_SUPPORTED Changes the owner of a file or list of files.
groupsNOT_SUPPORTED Lists the user groups to which a user belongs.
grpmodNOT_SUPPORTED Adds or removes users from an existing user group.
lsgrpNOT_SUPPORTED Lists user groups.
lsusrNOT_SUPPORTED Lists users in a disk group.
mkgrpNOT_SUPPORTED Creates a new user group.
mkusrNOT_SUPPORTED Adds a user to disk group.
passwdNOT_SUPPORTED Changes the password of a user.
rmgrpNOT_SUPPORTED Deletes a user group.
rmusrNOT_SUPPORTED Deletes a user from a disk group.
rpusrNOT_SUPPORTED Replaces one a user with another in a disk group.
chgrp
Purpose
Changes the user group of a file or list of files.
ASMCMD File Access Control Commands
10-72 Oracle Automatic Storage Management Administrator's Guide

Syntax and Description
chgrp usergroup file [file ...]
Table 10-68 (page 10-73) lists the syntax options for the chgrp command.
Table 10-68 Options for the chgrp command
Option Description
usergroup Name of the user group.
file Name of a file.
Only the file owner or the Oracle ASM administrator can use this command. If theuser is the file owner, then the user must also be either the owner or a member of thegroup for this command to succeed.
This command accepts a file name or multiple file names separated by spaces.
If you change the user group settings of an open file, then the operation currentlyrunning on the file completes using the old user group settings. The new settings takeeffect when re-authentication is required.
Examples
The following are examples of the chgrp command that change the Oracle ASM usergroup of the specified files.
Example 10-77 Using the ASMCMD chgrp command
ASMCMD [+] > chgrp asm_data +data/orcl/controlfile/Current.260.684924747
ASMCMD [+fra/orcl/archivelog/flashback] > chgrp asm_fra log_7.264.684968167 log_8.265.684972027
chmod
Purpose
Changes permissions of a file or list of files.
Syntax and Description
chmod mode file [file ...]
mode can be one of the following forms:
• { ugo | ug | uo | go | u | g | o | a } {+|- } {r|w |rw}
a specifies permissions for all users, u specifies permissions for the owner of thefile, g specifies the group permissions, and o specifies permissions for other users.
• { 0|4|6} {0|4|6} {0|4|6}
The first digit specifies owner permissions, the second digit specifies grouppermissions, and the third digit specifies other permissions.
Table 10-69 (page 10-74) lists the syntax options for the chmod command.
ASMCMD File Access Control Commands
Managing Oracle ASM with ASMCMD 10-73

Table 10-69 Options for the chmod command
Option Description
6 Read write permissions
4 Read only permissions
0 No permissions
u Owner permissions, used with r or w
g Group permissions, used with r or w
o Other user permissions, used with r or w
a All user permissions, used with r or w
+ Add a permission, used with r or w
- Removes a permission, used with r or w
r Read permission
w Write permission
file Name of a file
This command accepts a file name or multiple file names separated by spaces.
You can only set file permissions to read-write, read-only, and no permissions. Youcannot set file permissions to write-only.
If you change the permission settings of an open file, then the operation currentlyrunning on the file completes using the old permission settings. The new settings takeeffect when re-authentication is required.
To view the permissions on a file, use the ASMCMD ls command with the --permission option. See "ls (page 10-40)".
Examples
The following are examples of the chmod command that change the permissions of thespecified files.
Example 10-78 Using the ASMCMD chmod command
ASMCMD [+fra/orcl/archivelog/flashback] > chmod ug+rw log_7.264.684968167 log_8.265.684972027
ASMCMD [+fra/orcl/archivelog/flashback] > chmod 640 log_7.264.684968167 log_8.265.684972027
ASMCMD [+] > ls --permission +fra/orcl/archivelog/flashbackUser Group Permission Namegrid asm_fra rw-r----- log_7.264.684968167grid asm_fra rw-r----- log_8.265.684972027
ASMCMD File Access Control Commands
10-74 Oracle Automatic Storage Management Administrator's Guide

chown
Purpose
Changes the owner of a file or list of files.
Syntax and Description
chown user[:usergroup ] file [file ...]
Table 10-70 (page 10-75) lists the syntax options for the chown command.
Table 10-70 Options for the chown command
Option Description
user The name of the user that becomes the new owner.
usergroup Name of the user group to which the user belongs.
file Name of a file.
user typically refers to the user that owns the database instance home. Oracle ASMFile Access Control uses the operating system (OS) name to identify a database.
This command accepts a file name or multiple file names separated by spaces.
If you change the ownership settings of an open file, then the following applies:
• The operation currently running on the file completes using the old ownershipand user group settings. The new settings take effect when re-authentication isrequired.
• The new owner of the file cannot be dropped from the disk group until allinstances in a cluster are restarted in a rolling manner.
Only the Oracle ASM administrator can use this command.
Examples
The following are examples of the chown command that change the owner of thespecified files to the oracle1 operating system user.
Example 10-79 Using the ASMCMD chown command
ASMCMD [+fra/orcl/archivelog/flashback] > chown oracle1 log_7.264.684968167 log_8.265.684972027
ASMCMD [+fra/orcl/archivelog/flashback] > chown oracle1:asm_fra log_9.264.687650269
groups
Purpose
Lists all the user groups to which the specified user belongs.
Syntax and Description
groups diskgroup user
ASMCMD File Access Control Commands
Managing Oracle ASM with ASMCMD 10-75

Table 10-71 (page 10-76) lists the syntax options for the groups command.
Table 10-71 Options for the groups command
Option Description
diskgroup Name of the disk group to which the user belongs.
user Name of the user.
Examples
The following is an example of the groups command that displays the user groups ofthe data disk group to which the oracle1 user belongs.
Example 10-80 Using the ASMCMD groups command
ASMCMD [+] > groups data oracle1asm_data
grpmod
Purpose
Adds or removes operating system (OS) users to and from an existing Oracle ASMuser group.
Syntax and Description
grpmod { --add | --delete } diskgroup usergroup user [user...]
Table 10-72 (page 10-76) lists the syntax options for the grpmod command.
Table 10-72 Options for the grpmod command
Option Description
--add Specifies to add users to the user group.
--delete Specifies to delete users from the user group.
diskgroup Name of the disk group to which the user group belongs.
usergroup Name of the user group.
user Name of the user to add or remove from the user group.
Only the owner of the user group can use this command. The command requires theSYSASM privilege to run.
This command accepts an operating system user name or multiple user namesseparated by spaces. The operating system users are typically owners of a databaseinstance home.
Examples
The following are examples of the grpmod command. The first example adds theoracle1 and oracle2 users to the asm_fra user group of the fra disk group. The
ASMCMD File Access Control Commands
10-76 Oracle Automatic Storage Management Administrator's Guide
second example removes the oracle2 user from the asm_data user group of thedata disk group.
Example 10-81 Using the ASMCMD grpmod command
ASMCMD [+] > grpmod –-add fra asm_fra oracle1 oracle2
ASMCMD [+] > grpmod –-delete data asm_data oracle2
lsgrp
Purpose
Lists all Oracle ASM user groups or only groups that match a specified pattern.
Syntax and Description
lsgrp [--suppressheader][-a] [ -G diskgroup ] [ pattern ]
Table 10-73 (page 10-77) lists the syntax options for the lsgrp command.
Table 10-73 Options for the lsgrp command
Option Description
--suppressheader Suppresses column headings.
-a Lists all columns.
-G diskgroup Limits the results to the specified disk group name.
pattern Displays the user groups that match the pattern expression.
Examples
The following are examples of the lsgrp command. The first example displays asubset of information about the user groups whose name matches the asm% pattern.The second example displays all information about all the user groups.
Example 10-82 Using the ASMCMD lsgrp command
ASMCMD [+] > lsgrp asm%DG_Name Grp_Name OwnerFRA asm_fra gridDATA asm_data grid
ASMCMD [+] > lsgrp -aDG_Name Grp_Name Owner MembersFRA asm_fra grid oracle1DATA asm_data grid oracle1 oracle2
lsusr
Purpose
Lists Oracle ASM users in a disk group.
ASMCMD File Access Control Commands
Managing Oracle ASM with ASMCMD 10-77

Syntax and Description
lsusr [--suppressheader][-a] [-G diskgroup ] [ pattern ]
Table 10-74 (page 10-78) lists the syntax options for the lsusr command.
Table 10-74 Options for the lsusr command
Option Description
-a List all users and the disk groups to which the users belong.
--suppressheader Suppresses column headings.
-G diskgroup Limits the results to the specified disk group name.
pattern Displays the users that match the pattern expression.
Examples
The following is an example of the lsusr command. The example lists users in thedata disk group and also shows the operating system Id assigned to the user.
Example 10-83 Using the ASMCMD lsusr command
ASMCMD [+] > lsusr -G dataUser_Num OS_ID OS_Name 3 1001 grid1 1021 oracle12 1022 oracle2
mkgrp
Purpose
Creates a new Oracle ASM user group.
Syntax and Description
mkgrp diskgroup usergroup [user] [user...]
Table 10-75 (page 10-78) lists the syntax options for the mkgrp command.
Table 10-75 Options for the mkgrp command
Option Description
diskgroup Name of the disk group to which the user group is added.
usergroup Name of the user group to add. 30 is the maximum number ofcharacters.
user Name of the database user to add to the user group.
You can optionally specify a list of users to be included as members of the new usergroup.
ASMCMD File Access Control Commands
10-78 Oracle Automatic Storage Management Administrator's Guide

Examples
The following is an example of the mkgrp command. This example creates theasm_data user group in the data disk group and adds the oracle1 and oracle2users to the user group.
Example 10-84 Using the ASMCMD mkgrp command
ASMCMD [+] > mkgrp data asm_data oracle1 oracle2
mkusr
Purpose
Adds an operating system (OS) user to a disk group.
Syntax and Description
mkusr diskgroup user
Table 10-76 (page 10-79) lists the syntax options for the mkusr command.
Table 10-76 Options for the mkusr command
Option Description
diskgroup Specifies the name of the disk group to which the user is to beadded.
user Name of the user to add.
The user to be added must be a valid operating system user. Only a user authenticatedas SYSASM can run this command.
Examples
The following are examples of the mkusr command. The first example adds theoracle1 user to the data disk group. The second example adds the oracle2 user tothe fra disk group.
Example 10-85 Using the ASMCMD mkusr command
ASMCMD [+] > mkusr data oracle1
ASMCMD [+] > mkusr fra oracle2
passwd
Purpose
Changes the password of a user.
Syntax and Description
passwd user
Table 10-77 (page 10-80) lists the syntax options for the passwd command.
ASMCMD File Access Control Commands
Managing Oracle ASM with ASMCMD 10-79
Table 10-77 Options for the passwd command
Option Description
user Name of the user.
An error is raised if the user does not exist in the Oracle ASM password file. The useris first prompted for the current password, then the new password. The commandrequires the SYSASM privilege to run.
Examples
The following is an example of the passwd command that changes the password ofthe oracle2 user.
Example 10-86 Using the ASMCMD passwd command
ASMCMD [+] > passwd oracle2Enter old password (optional): Enter new password: ******
rmgrp
Purpose
Removes a user group from a disk group.
Syntax and Description
rmgrp diskgroup usergroup
Table 10-78 (page 10-80) lists the syntax options for the rmgrp command.
Table 10-78 Options for the rmgrp command
Option Description
diskgroup Name of the disk group to which the user group belongs.
usergroup Name of the user group to delete.
Removing a group might leave some files without a valid user group. To ensure thatthose files have a valid group, explicitly update those files to a valid user group. See"chgrp (page 10-72)".
The command must be run by the owner of the user group and also requires theSYSASM privilege to run.
Examples
The following is an example of the rmgrp command that removes the asm_data usergroup from the data disk group.
Example 10-87 Using the ASMCMD rmgrp command
ASMCMD [+] > rmgrp data asm_data
ASMCMD File Access Control Commands
10-80 Oracle Automatic Storage Management Administrator's Guide
rmusr
Purpose
Deletes an operating system (OS) user from a disk group.
Syntax and Description
rmusr [-r] diskgroup user
Table 10-79 (page 10-81) lists the syntax options for the rmusr command.
Table 10-79 Options for the rmusr command
Option Description
-r Removes all files in the disk group that the user owns at thesame time that the user is removed.
diskgroup Specifies the name of the disk group from which the user is tobe deleted.
user Name of the user to delete.
The command requires the SYSASM privilege to run.
Examples
The following is an example of the rmusr command that removes the oracle2 userfrom the data disk group.
Example 10-88 Using the ASMCMD rmusr command
ASMCMD [+] > rmusr data oracle2
rpusr
Purpose
Replaces one operating system (OS) user with another in a disk group.
Syntax and Description
rpusr diskgroup user1 user2
Table 10-80 (page 10-81) lists the syntax options for the rpusr command.
Table 10-80 Options for the rpusr command
Option Description
diskgroup Specifies the name of the disk group.
user1 Name of the user to be replaced.
user2 Name of user that replaces the existing user in the disk group.
ASMCMD File Access Control Commands
Managing Oracle ASM with ASMCMD 10-81

The rpusr command replaces one operating system user with another in an OracleASM disk group. The replacement user must not be a user currently in the disk groupuser list.
If the command succeeds, all files that were previously owned by current user are nowowned by the replacement user. The current user is automatically removed from theuser list of the disk group. Adding the current user back to the disk group is possiblebut this user will not own any files.
When changing the ownership of an open file, the new owner cannot be dropped withthe owner's files until all instances within a cluster are restarted.
The command requires the SYSASM privilege to run.
Examples
The following is an example of the rpusr command that replaces the oracle1 userwith the oracle2 user in the data disk group.
Example 10-89 Using the ASMCMD rpusr command
ASMCMD [+] > rpusr data oracle1 oracle2
ASMCMD File Access Control Commands
10-82 Oracle Automatic Storage Management Administrator's Guide
Part IIIOracle Automatic Storage Management
Cluster File System
Part III discusses Oracle Automatic Storage Management Cluster File System (OracleACFS) and Oracle ASM Dynamic Volume Manager (Oracle ADVM), in the followingchapters:
• Introducing Oracle ACFS and Oracle ADVM (page 11-1)
• Using Views to Display Oracle ACFS Information (page 12-1)
• Administering Oracle ACFS with Oracle Enterprise Manager (page 13-1)
• Managing Oracle ACFS and Oracle ADVM With ASMCA (page 14-1)
• Managing Oracle ADVM with ASMCMD (page 15-1)
• Managing Oracle ACFS with Command-Line Tools (page 16-1)


11Introducing Oracle ACFS and Oracle ADVM
This chapter describes the components of Oracle Automatic Storage ManagementCluster File System (Oracle ACFS) and Oracle ASM Dynamic Volume Manager(Oracle ADVM).
This chapter provides concepts and an overview of Oracle ACFS and Oracle ADVMfeatures with the following topics:
• Overview of Oracle ACFS (page 11-1)
• Understanding Oracle ACFS Concepts (page 11-4)
• Understanding Oracle ACFS Administration (page 11-13)
• Overview of Oracle ASM Dynamic Volume Manager (page 11-39)
See Also:
• "Managing Oracle ADVM Volumes in a Disk Group (page 4-16)" forinformation about using SQL*Plus to administer volumes
• "Features Enabled By Disk Group Compatibility Attribute Settings(page 4-47)" for information about Oracle ACFS features and disk groupattribute settings
• Managing Oracle ASM With ASMCA (page 9-1) for information aboutusing Oracle ASM Configuration Assistant to administer Oracle ACFS
• Using Views to Display Oracle ACFS Information (page 12-1) forinformation about using views to obtain Oracle ACFS information
• Managing Oracle ADVM with ASMCMD (page 15-1) for informationabout volume management commands
• Managing Oracle ACFS with Command-Line Tools (page 16-1) forinformation about Oracle ACFS operating system utilities
Overview of Oracle ACFSOracle Automatic Storage Management Cluster File System (Oracle ACFS) is a multi-platform, scalable file system, and storage management technology that extendsOracle Automatic Storage Management (Oracle ASM) functionality to support allcustomer files. Oracle ACFS supports Oracle Database files and application files,including executables, database data files, database trace files, database alert logs,application reports, BFILEs, and configuration files. Other supported files are video,audio, text, images, engineering drawings, and all other general-purpose application
Introducing Oracle ACFS and Oracle ADVM 11-1

file data. Oracle ACFS conforms to POSIX standards for Linux and UNIX, and toWindows standards for Windows.
An Oracle ACFS file system communicates with Oracle ASM and is configured withOracle ASM storage, as shown in Figure 11-1 (page 11-2). Oracle ACFS leveragesOracle ASM functionality that enables:
• Oracle ACFS dynamic file system resizing
• Maximized performance through direct access to Oracle ASM disk group storage
• Balanced distribution of Oracle ACFS across Oracle ASM disk group storage forincreased I/O parallelism
• Data reliability through Oracle ASM mirroring protection mechanisms
Figure 11-1 Oracle Automatic Storage Management Storage Layers
Oracle ASM DynamicVolume Manager
(ADVM)
OracleASM Cluster FileSystem (ACFS)
Oracle ASMFiles forOracle
Database
Third PartyFile System
Oracle Automatic Storage Management
Operating System
Application ApplicationOracle RAC
Oracle Database
Oracle ACFS establishes and maintains communication with the Oracle ASM instanceto participate in Oracle ASM state transitions including Oracle ASM instance and diskgroup status updates and disk group rebalancing. Oracle Automatic StorageManagement with Oracle ACFS and Oracle ASM Dynamic Volume Manager (OracleADVM) delivers support for all customer data and presents a common set of Oraclestorage management tools and services across multiple vendor platforms andoperating system environments on both Oracle Restart (standalone) and clusterconfigurations. For an overview of Oracle ADVM, see "Overview of Oracle ASMDynamic Volume Manager (page 11-39)".
Oracle ACFS is tightly coupled with Oracle Clusterware technology, participatingdirectly in Clusterware cluster membership state transitions and in Oracle Clusterwareresource-based high availability (HA) management. In addition, Oracle installation,configuration, verification, and management tools have been updated to supportOracle ACFS.
Oracle ACFS can be accessed and managed using native operating system file systemtools and standard application programming interfaces (APIs). Oracle ACFS can alsobe managed with Oracle ASM Configuration Assistant. Oracle ACFS can be accessedusing industry standard Network Attached Storage (NAS) File Access Protocols:Network File System (NFS) and Common Internet File System (CIFS). However, CIFSclients on Windows cannot use ACLs when interfacing with Oracle ACFS Linux,Solaris, or AIX servers, but can use ACLs with Oracle ACFS on Windows.
In addition to sharing file data, Oracle ACFS provides additional storage managementservices including support for the Oracle Grid Infrastructure clusterwide mount
Overview of Oracle ACFS
11-2 Oracle Automatic Storage Management Administrator's Guide

registry, dynamic online file system resizing, and multiple space efficient snapshotsfor each file system.
Oracle ACFS contributes to the overall Oracle storage management by providing:
• A general-purpose standalone server and cluster file system solution that isintegrated with Oracle ASM and Oracle Clusterware technologies
• A common set of file system features across multiple vendor platforms andoperating systems, offering an alternative to native operating system or third-party file system solutions
• Standalone and clusterwide shared Oracle Database homes, all Oracle Databasefiles, and application data
• Uniform, coherent shared file access and clusterwide naming of all customerapplication files
• Integration with Oracle Clusterware High Availability Resources
For more information, refer to "Oracle Clusterware Resources and Oracle ACFSAdministration (page 11-15)"
Oracle ACFS accommodates large storage capacities and large numbers of clusternodes. It efficiently manages large numbers of file systems, files, and supports bothsmall and large sized files with exabyte-capable file and file system capacities. OracleACFS provides optimized fast directory lookup for large directories with millions offiles.
Oracle ACFS file systems are generally mounted on all Oracle Cluster SynchronizationServices (CSS) cluster members. In the event of a member failure, another clustermember quickly recovers any outstanding metadata transactions on behalf of thefailed member. Following recovery, access by other active cluster members and anyremote client systems can resume.
The following list provides important information about Oracle ACFS:
• For all applications, Oracle ACFS performance is best with larger write() sizes,such as 8 K or larger.
• For best performance, use the Deadline I/O Scheduler for the disks in the diskgroup on a Linux system.
• When creating Oracle ACFS file systems on Windows, log on as a Windowsdomain user. Also, when creating files in an Oracle ACFS file system onWindows, you should be logged in as a Windows domain user to ensure that thefiles are accessible by all nodes.
• When using a file system across cluster nodes on Windows platforms, the bestpractice is to mount the file system using a domain user, to ensure that thesecurity identifier is the same across cluster nodes. Windows security identifiers,which are used in defining access rights to files and directories, use informationwhich identifies the user. Local users are only known in the context of the localnode. Oracle ACFS uses this information during the first file system mount to setthe default access rights to the file system.
Refer to the Oracle Database Installation Guide for the Windows platform forinformation about Oracle Base permissions when a file system is mounted underOracle Base.
Overview of Oracle ACFS
Introducing Oracle ACFS and Oracle ADVM 11-3

• Oracle ACFS does not support any files associated with the management of OracleASM, such as files in the Oracle Grid Infrastructure home and in the Oracle ASMdiagnostic directory.
• Oracle ACFS does not support Oracle Cluster Registry (OCR) and voting files.
• Oracle ACFS functionality requires that the disk group compatibility attributes forASM and ADVM be set to 11.2 or higher. For information about disk groupcompatibility, refer to "Disk Group Compatibility (page 4-41)".
• To use an Oracle ACFS file system for an Oracle Database home, the release levelmust be Oracle 11g Release 2 (11.2) or later.
For information about managing and monitoring Oracle ACFS, refer to ManagingOracle ACFS with Command-Line Tools (page 16-1) and Using Views to DisplayOracle ACFS Information (page 12-1).
Understanding Oracle ACFS ConceptsThis section describes concepts for the key Oracle ACFS components and contains thefollowing topics:
• About Oracle ACFS (page 11-4)
• About the Oracle ACFS Mount Model and Namespace (page 11-5)
• About Oracle ACFS and Database Data Files (page 11-5)
• About Oracle ACFS and Oracle Database Homes (page 11-7)
• About Oracle ASM Dynamic Volume Manager (page 11-9)
• About the Oracle ACFS Driver Model (page 11-9)
• About the Oracle ACFS Mount Registry (page 11-9)
• About Oracle ACFS Snapshots (page 11-10)
• About Oracle ACFS and Backup and Restore (page 11-12)
• About Oracle ACFS Integration with Oracle ASM (page 11-12)
• About Oracle ACFS and External Tables on Windows (page 11-13)
About Oracle ACFSOracle ACFS is designed as a general-purpose, standalone server and clusterwide filesystem that delivers support for all customer files. Users and applications can accessand manage Oracle ACFS using native operating system file system applicationprogramming interfaces (APIs) and command-line interface (CLI) tools. Users can alsomanage Oracle ACFS with Oracle ASM Configuration Assistant (ASMCA).
Oracle ACFS supports large files with 64-bit file and file system data structure sizesleading to exabyte capable file and file system capacities on 64 bit platforms. Variableextent-based storage allocation and high-performance directories contribute to fastperformance and shared disk configurations that provide direct storage paths toOracle ACFS file data from each cluster member. File system integrity and fastrecovery is achieved with Oracle ACFS metadata checksums and journaling. Oracle
Understanding Oracle ACFS Concepts
11-4 Oracle Automatic Storage Management Administrator's Guide
ACFS is designed as a multi-node, shared file system model that delivers coherent,cached, direct storage paths to Oracle ACFS file data from each cluster member.
Oracle ACFS files systems are typically configured for clusterwide access. Filesystems, files, and directories are visible and accessible from all cluster members andcan be referenced by users and applications using the same path names from anycluster member. This design enables simplified application deployments across clustermembers and facilitates both multiple instance cluster applications and highavailability (HA) failover of unmodified standalone server applications.
Oracle ACFS presents single system file access semantics across cluster configurations.Applications and users on all cluster members are always presented with the sameview of shared Oracle ACFS file data, supported by the Oracle ACFS clusterwide userand metadata cache coherency mechanism.
About the Oracle ACFS Mount Model and NamespaceOracle ACFS is designed as a hierarchical file system containing files andsubdirectories organized into a tree-structured namespace with files at the leaves. Thenamespace design is a single-file system naming model for both standalone server andcluster configurations. This design enables each cluster member to present shared filesto cluster applications using the same path names, simplifying multi-node applicationand user access, and overall file system administration. The Oracle ACFS mountmodel also accommodates node local mounts and cluster node subset mounts incluster configurations to accommodate additional customer requirements.
It is best practice for Oracle ACFS file systems to be Oracle Clusterware managed withOracle Clusterware resources to ensure they are properly handled during Oracle GridInfrastructure startup and shutdown.
You can explicitly use the mount command. However, if the resource has beencreated, then the file system may already be mounted.
About Oracle ACFS and Database Data Files
Note:
The best practice for data files in Oracle ACFS is to use a clusterwide resourcefor the Oracle ACFS File system that stores the data files. For additionalinformation, refer to "Creating Oracle ACFS Resources (page 11-16)".
If the data files are added after the database installation is complete, you mustmodify the database dependencies to list the new Oracle ACFS filesystem. Failure to do so results in errors with application reliability. To specifythe file systems in the dependency list, use the SRVCTL database objectcommand to modify the Oracle ACFS paths used by the resource.
Oracle ACFS in Oracle Grid 12c Release 1 (12.1) supports all database files startingwith Oracle Database 11g Release 2 (11.2.0.4), except for data files and redo logs in anOracle Restart (standalone server) configuration. Oracle ACFS can be configured foruse with the database particularly to leverage Oracle ACFS snapshots for databasetesting and development. To support database files, the COMPATIBLE.ADVM attributemust be set to 12.1 or higher for the disk group that contains the Oracle ACFS filesystem.
Understanding Oracle ACFS Concepts
Introducing Oracle ACFS and Oracle ADVM 11-5

Support for database data files on Windows begins with Oracle Grid 12c Release 1(12.1.0.2). For support of database files on Windows, the COMPATIBLE.ADVM attributemust be set to 12.1.0.2 or higher.
Support for database data files on Oracle Exadata (Linux) begins with Oracle Grid 12cRelease 1 (12.1.0.2). However, Oracle ACFS does not currently have the ability to pushdatabase operations directly into storage.
Oracle ACFS additionally supports all database files for Oracle Database 10g Release 2(10.2.0.4 and 10.2.0.5) on Oracle Exadata (Linux) storage only. For database filesupport with Oracle Database 10g Release 2 (10.2.0.4 and 10.2.0.5) on Oracle Exadatastorage, the following conditions must be met:
• When creating an Oracle Database with DBCA, you must set theREMOTE_LISTENER initialization parameter to your_scan_vip:1521 otherwiseDBCA fails during the create process. For information about theREMOTE_LISTENER initialization parameter, refer to Oracle Database Reference.
• You must modify all the start and stop dependencies of the database instanceresources to ensure that the resources start when starting Oracle Clusterware. Forinformation about resource dependencies, refer to Oracle ClusterwareAdministration and Deployment Guide.
The following list provides important information about using Oracle ACFS withdatabase files:
• Oracle ACFS support includes all file types supported by Oracle ASM. For a list offile types supported by Oracle ASM, refer to Table 5-1 (page 5-1).
• Oracle ACFS does not support data files or redo logs in an Oracle Restartconfiguration. Oracle ACFS does not support direct I/O in an Oracle Restartconfiguration.
• When storing database data files on Oracle ACFS, you must set theFILESYSTEMIO_OPTIONS initialization parameter to setall; other settings arenot supported. To achieve optimal performance with database data files, set ASMand ADVM compatibility attributes to 12.1 or higher for the disk group thatcontains the Oracle ADVM volume intended to hold the data files. For volumescreated before 12.1.0.2, set the stripe columns to 1, or set the stripe columns to 8and the stripe width to 1 MB. Volumes created while running 12.1.0.2 or higheralready default to the high performance configuration (stripe columns = 8 andstripe width = 1 MB). For information about creating a volume, refer to "volcreate(page 15-1)".
• To obtain optimal database performance with snapshots, the snapshots must becreated after the ADVM compatibility attribute is set to 12.1 or higher.
• Use a 4 K or larger database block size and tablespace block size with OracleACFS for best performance.
• If a data file is configured to automatically extend, then the size of the incrementsshould be large enough to ensure that the extend operation occurs infrequently.Frequent automatic extends have a negative performance impact.
• Running a workload in a snapshot reduces resources for the primary workloadrunning on the base files because the storage is shared between the base filesystem and the snapshots. To run test scenarios in Oracle ACFS snapshots withoutimpacting the primary workload, copy the file system and then run testworkloads on snapshots created in the copied file system.
Understanding Oracle ACFS Concepts
11-6 Oracle Automatic Storage Management Administrator's Guide

• Using Oracle ACFS replication or encryption with database files on Oracle ACFSis not supported. For information about other replication options for database fileson Oracle ACFS, refer to Oracle Data Guard Concepts and Administration and OracleGoldenGate documentation. Oracle GoldenGate is an Oracle product soldindependently of the Oracle Database. To encrypt database data files on OracleACFS, Oracle recommends Oracle Advanced Security. Oracle Advanced Securityprovides Transparent Data Encryption (TDE) to encrypt data files for entiretablespaces. For information about Transparent Data Encryption (TDE), refer to Oracle Database Advanced Security Guide.
About Oracle ACFS and Oracle Database HomesAn Oracle ACFS file system can be configured as an Oracle Database home. Wheninstalling a database in a cluster, it is required to use a shared Oracle ACFS file systemfor the database home. You can use an Oracle ACFS file system for an Oracle Databasehome with Oracle 11g Release 2 (11.2) or later.
When installing Oracle Software, there must be a separate Oracle base(ORACLE_BASE) associated with each operating system user. For example, thereshould be a separate Oracle base for a grid user and a database user.
See Also:
Oracle Database Installation Guide for information about Optimal FlexibleArchitecture (OFA) recommendations for Oracle base and home directories
You can locate the Oracle Database base (ORACLE_BASE for database) directory andhome (ORACLE_HOME for database) directory on an Oracle ACFS file system. TheOracle Database base (ORACLE_BASE for database) directory should not be the OracleGrid Infrastructure base (ORACLE_BASE for grid) directory or should not be locatedunder the Oracle Grid Infrastructure base directory (ORACLE_BASE for grid).
The Oracle Grid Infrastructure base (ORACLE_BASE for grid) directory and home(ORACLE_HOME for grid) directory cannot be located on the Oracle ACFS file systembecause the Oracle ACFS file system cannot be created until Oracle Grid Infrastructureis installed.
One or more Oracle Database homes on Oracle ACFS can be created under the samemount point with each home using a separate Oracle ACFS file system.
After the installation of Oracle Grid Infrastructure Software and before the installationof the Oracle Database software with Oracle Universal Installer (OUI), you can createan Oracle ACFS file system to be configured for use as an Oracle Database home.
You can also use the Oracle ASM Configuration Assistant (ASMCA) or Oracle ACFScommands to create the file system. For information about using ASMCA, refer to"Creating an Oracle ACFS File System for Database Use (page 14-7)".
For information about using Oracle ACFS commands to create a file system, refer to Managing Oracle ACFS with Command-Line Tools (page 16-1).
Understanding Oracle ACFS Concepts
Introducing Oracle ACFS and Oracle ADVM 11-7

Note:
When an Oracle ACFS file system contains an Oracle Database home or OracleDatabase uses the file system for any file storage, the file system must have anOracle ACFS file system resource. If you have not used Oracle ASMConfiguration Assistant to setup the mount point, then you must use ServerControl Utility (SRVCTL) commands to set up Oracle Database dependencies.For information about SRVCTL, see Oracle Real Application ClustersAdministration and Deployment Guide.
In an Oracle Grid Infrastructure clusterware configuration, a clusterwide Oracle ACFSresource is required when using Oracle ACFS for the database home. To enable thedatabase owner to act on the resource, the owner must be specified as a permitted userwhen creating the resource. You can specify the database owner with the -u option ofthe srvctl add filesystem or acfsutil registry command. Root privilege isrequired when adding the resource in Linux or Unix environments. For additionalinformation, refer to "Creating Oracle ACFS Resources (page 11-16)".
After the Oracle ACFS file system and resources are created, the Oracle ACFS-baseddatabase home mount point location can be selected as the Oracle Database homelocation by browsing to and then choosing the directory during the Oracle UniversalInstaller (OUI) Database Software installation.
You can use the srvctl start filesystem command to manually mount theOracle ACFS file system.
Note:
When additional Oracle ACFS file systems are added to an Oracle Databaseafter creation, they must be specified in the Oracle Database ResourceDependency list. Failure to do so results in errors with application reliability.To specify the file systems in the dependency list, use the SRVCTL databaseobject command to modify the Oracle ACFS paths used by the resource.
Oracle ACFS file systems can be also configured for use as a home for applications.However, Oracle ACFS file systems cannot be used for an Oracle base directory or anOracle Grid Infrastructure home that contains the software for Oracle Clusterware,Oracle ASM, Oracle ACFS, and Oracle ADVM components.
To reduce contention on an Oracle ACFS file system in an Oracle RAC environmentwhere the Oracle Database home is shared on Oracle ACFS, Oracle Database auditingoperating system files should be configured as node specific. For a node-specific setup,you must ensure that the AUDIT_FILE_DEST initialization parameter in theconfiguration file of each database instance points to a unique location rather than onelocation for all the database instances.
For example, if you have a database with the Oracle name set to TEST and you want toensure that the location of AUDIT_FILE_DEST initialization parameter for eachdatabase instance, such as TEST1 or TEST2, points to a node specific location for thatinstance, you can run the following SQL statement:
SQL> ALTER SYSTEM SET AUDIT_FILE_DEST='$ORACLE_BASE/admin/adump/TEST/@' SCOPE=SPFILE SID='*';
Understanding Oracle ACFS Concepts
11-8 Oracle Automatic Storage Management Administrator's Guide
In the previous example, @ expands to the ORACLE_SID of each instance. IfORACLE_BASE has been set to /acfsmounts in this example, then that value couldhave been used in place of the ORACLE_BASE variable.
See Also:
• Oracle Database Installation Guide for your environment for informationabout the installation of Oracle Database software and storage options
• Oracle Grid Infrastructure Installation Guide for your environment forinformation about the installation of Oracle Grid Infrastructure softwareand storage options
• Oracle Database Administrator's Guide for information about using OracleManaged files
• Oracle Database Reference for information about the AUDIT_FILE_DESTinitialization parameter
About Oracle ASM Dynamic Volume ManagerThe Oracle ASM Dynamic Volume Manager (Oracle ADVM) provides volumemanagement services and a standard disk device driver interface to clients. Filesystems and other disk-based applications send I/O requests to Oracle ADVM volumedevices as they would to other storage devices on a vendor operating system.
For more information about Oracle ADVM, refer to "Overview of Oracle ASMDynamic Volume Manager (page 11-39)".
About the Oracle ACFS Driver ModelAn Oracle ACFS file system is installed as a dynamically loadable vendor operatingsystem (OS) file system driver and tool set that is developed for each supportedoperating system platform. The driver is implemented as a Virtual File System (VFS)and processes all file and directory operations directed to a specific file system.
Note:
Errors encountered by the drivers are written to the native operating systemconsole and system event loggers. Refer to "Understanding Oracle ACFS I/OFailure Console Messages (page 18-16)".
About the Oracle ACFS Mount RegistryThe Oracle ACFS mount registry supports Oracle Grid Infrastructure clusterconfigurations, but does not support Oracle Restart configurations. File systems thatare to be mounted persistently (across restarts) can be registered with the Oracle ACFSmount registry. In cluster configurations, registered Oracle ACFS file systems areautomatically mounted by the mount registry, similar to a clusterwide mount table.However, in Oracle Restart configurations the automatic mounting of registeredOracle ACFS file systems is not supported. For more information, see "Oracle ACFSand Oracle Restart (page 18-5)".
Understanding Oracle ACFS Concepts
Introducing Oracle ACFS and Oracle ADVM 11-9

By default, an Oracle ACFS file system that is inserted into the Oracle ACFS mountregistry is automatically mounted on all cluster members, including cluster membersthat are added after the registry addition. However, the Oracle ACFS mount registryalso accommodates standalone and multi-node (subset of cluster nodes) file systemregistrations. The mount registry actions for each cluster member mount onlyregistered file systems that have been designated for mounting on that member.
The Oracle ACFS mount registry is implemented using Oracle Clusterware resources,specifically the Oracle ACFS resource. The Oracle ACFS resource actions are designedto automatically mount a file system only one time for each Oracle Grid Infrastructureinitialization to avoid potential conflicts with administrative actions to dismount agiven file system.
For information about registering an Oracle ACFS file system using the acfsutilcommand, refer to "acfsutil registry (page 16-129)" or the SRVCTL srvctl addfilesystem command.
For more information about the implementation of the mount registry and OracleACFS resources, refer to "Oracle Clusterware Resources and Oracle ACFSAdministration (page 11-15)".
See Also:
• Oracle Real Application Clusters Administration and Deployment Guide forinformation about the SRVCTL srvctl add filesystem command andregistering an Oracle ACFS file system
• Oracle Clusterware Administration and Deployment Guide for informationabout Oracle Clusterware resources
About Oracle ACFS SnapshotsAn Oracle ACFS snapshot is an online, read-only or read-write, point in time copy ofan Oracle ACFS file system. The snapshot copy is space-efficient and uses Copy-On-Write functionality. Before an Oracle ACFS file extent is modified or deleted, itscurrent value is copied to the snapshot to maintain the point-in-time view of the filesystem.
Oracle ACFS snapshots are immediately available for use after they are created. Thesnapshots are created in the .ACFS/snaps/ directory of the file system. They arealways online while the file system is mounted. Consequently, an Oracle ACFSsnapshot can support the online recovery of files inadvertently modified or deletedfrom a file system. With up to a total of 1023 read-only, read-write, or combination ofread-only and read-write snapshot views supported for each file system, flexibleonline file recovery solutions spanning multiple views can be employed. An OracleACFS snapshot can also be used as the source of a file system backup, as it can becreated on demand to deliver a current, consistent, online view of an active filesystem. For information about the number of snapshots supported, refer to "OracleACFS Disk Space Usage (page 18-2)".
Oracle ACFS read-write snapshots enable fast creation of an snapshot image that canbe both read and written without impacting the state of the Oracle ACFS file systemhosting the snapshot images. You can use read-write snapshots for:
Understanding Oracle ACFS Concepts
11-10 Oracle Automatic Storage Management Administrator's Guide

• Testing of new versions of application software on production file data reflectedin the read-write snapshot image without modifying the original production filesystem
• Running test scenarios on a real data set without modifying the originalproduction file system
To use Oracle ACFS read-write snapshots, the disk group compatibility attribute forADVM must be set to 11.2.0.3.0 or higher. If you create a read-write snapshot on anexisting Oracle ACFS file system from a version earlier than 11.2.0.3.0, then thefile system is updated to the 11.2.0.3.0 or higher format. After a file system hasbeen updated to a higher version, an Oracle ACFS file system cannot be reverted to anearlier version, and accordingly cannot be mounted on an earlier Oracle GridInfrastructure version.
You can create a snapshot from an existing snapshot in the same Oracle ACFS filesystem. In addition, you can convert a snapshot between read-only and read-writeformats. To create from an existing snapshot or convert a snapshot, the disk groupcompatibility attribute for ADVM must be set to 12.1 or higher. In addition, creationfrom an existing snapshot is not permitted if there are:
• Any snapshots present in the file system that were created with the ADVMcompatibility set to less than 12.1
• Any snapshots of the file system that were created after ADVM compatibility wasset to 12.1 but while 11.2 snapshots existed
Oracle ACFS snapshot storage is maintained within the file system, eliminating themanagement of separate storage pools for file systems and snapshots. Oracle ACFS filesystems can be dynamically resized to accommodate additional file and snapshotstorage requirements.
You cannot modify security or encryption metadata in read-write snapshots except forenabling or disabling security or encryption. No other alteration is permitted onOracle ACFS security or encryption metadata in a snapshot. If a file was not securedby a security realm in the snapshot, it cannot be realm secured by adding thecorresponding file in the active file system to a security realm. If a file was notencrypted in the snapshot, that file cannot be encrypted by encrypting thecorresponding file in the active file system.
A new file created in a realm-secured directory in a read-write snapshot inherits therealm security attributes of the parent directory. If the realm protecting the new filehas encryption turned on, the file is encrypted with the encryption parameters set inthe realm. If the realm protecting the new file has encryption turned off, the file isdecrypted. Files and directories in a read-write snapshot cannot be added to orremoved from any security realm.
Files in a read-write snapshot can be encrypted, decrypted, or rekeyed if the operationtarget is a path specified for a file or directory of the read-write snapshot. However, ifan encryption, decryption, or rekey operation is specified at the file system level, thenthe operation does not process files and directories of snapshots in the .ACFS/snaps/ directory.
All Oracle ACFS snapshot operations are serialized clusterwide in the kernel. Forexample, if a snapshot create operation is initiated at the same time as a snapshotdelete operation, then both operations would complete, but they would not run inparallel inside of the kernel. One operation would complete before the other wasstarted.
Understanding Oracle ACFS Concepts
Introducing Oracle ACFS and Oracle ADVM 11-11

For information about Oracle ACFS security, refer to "Oracle ACFS Security(page 11-19)".
For information about Oracle ACFS encryption, refer to "Oracle ACFS Encryption(page 11-22)".
Oracle ACFS snapshots are administered with the acfsutil snap commands. Forinformation about the acfsutil snap commands, refer to "acfsutil snap create(page 16-135)", "acfsutil snap delete (page 16-137)", and "acfsutil snap info(page 16-138)".
Note:
The link() and rename() system calls fail if an attempt is made to link orrename a file in the Oracle ACFS file system and a file in any associated read-write snapshot, or vice versa. Any tools which use the link() and rename()system calls, such as ln and mv, also fail in the same scenario.
About Oracle ACFS and Backup and RestoreOracle ACFS runs on operating system platforms as a native file system technologysupporting native operating system file system application programming interfaces(APIs). Consequently, backup applications that access files using the native operatingsystem file system interfaces are able to access and backup Oracle ACFS file systemsand other native operating system file systems. Oracle ACFS snapshots can bedynamically created and used to present a consistent, on-line view of an active filesystem to a backup application.
Backup applications that use interfaces other than the standard operating systeminterfaces (read or write) are not supported with Oracle ACFS. For example, Windowsbackup applications that depend upon the presence of reparse points or the WindowsVolume Shadow Copy Service (VSS) are not supported.
For information about using common operating system utilities to preserve ExtendAttributes for tagging definitions, refer to "Oracle ACFS Tagging (page 11-33)".
About Oracle ACFS Integration with Oracle ASMOracle ACFS is always configured with Oracle ASM storage and interfaces with OracleASM storage through a traditional device file. This device file is presented by OracleADVM and is constructed using a dynamic volume file. The Oracle ADVM volumedevice file is created automatically following the creation of an Oracle ADVM volume.An Oracle ACFS file system is then bound to the Oracle ADVM device file during thefile system creation.
After an Oracle ACFS is configured and mounted, the file system inherits the OracleASM storage management features associated with an Oracle ADVM volume,including dynamic balanced distribution, mirroring and striping, and dynamicresizing.
The Oracle ACFS driver establishes communication with the Oracle ASM instance toreceive Oracle ASM status information including Oracle ASM instance and disk groupstate transitions. However, I/O does not go through Oracle ASM nor through theOracle ASM proxy, but rather goes directly to the underlying Oracle ASM storage.
For information about Oracle ACFS and Oracle ASM operations, refer to "Oracle ACFSand Dismount or Shutdown Operations (page 11-19)".
Understanding Oracle ACFS Concepts
11-12 Oracle Automatic Storage Management Administrator's Guide

About Oracle ACFS and External Tables on WindowsTo access an external table stored on an Oracle ACFS file system on Windows, theexternal table must be created with the DISABLE_DIRECTORY_LINK_CHECK accessparameter.
See Also:
• Oracle Database Utilities for information about theDISABLE_DIRECTORY_LINK_CHECK access parameter
• Oracle Database SQL Language Reference for information about creatingexternal tables
Understanding Oracle ACFS AdministrationThis section describes Oracle ACFS administration and contains the following topics:
• Oracle ACFS and File Access and Administration Security (page 11-13)
• Oracle ACFS and Grid Infrastructure Installation (page 11-14)
• Oracle ACFS Configuration (page 11-14)
• Oracle Clusterware Resources and Oracle ACFS Administration (page 11-15)
• Oracle ACFS and Dismount or Shutdown Operations (page 11-19)
• Oracle ACFS Security (page 11-19)
• Oracle ACFS Encryption (page 11-22)
• Oracle ACFS Auditing (page 11-24)
• Oracle ACFS Replication (page 11-30)
• Oracle ACFS Tagging (page 11-33)
• Using Replication with Auditing_ Encryption_ and Security (page 11-35)
• Oracle ACFS Plugins (page 11-36)
• High Availability Network File Storage for Oracle Grid Infrastructure(page 11-37)
Oracle ACFS and File Access and Administration SecurityOracle ACFS supports both traditional Unix-style file access control classes (user,group, other) for Linux environments and the Windows Security Model including fileaccess control lists (ACLs) for Windows platforms. Most Oracle ACFS administrativeactions are performed by users with either root or Oracle ASM administrationprivileges for Linux environments and by users with Windows Administrativeprivileges on Windows platforms. General Oracle ACFS information for file systemscan be accessed by any system user.
Understanding Oracle ACFS Administration
Introducing Oracle ACFS and Oracle ADVM 11-13
In support of Oracle ACFS administration, Oracle recommends that the Oracle ASMadministrator role is given to a root privileged user, as many common Oracle ACFSfile system management tasks including mount, umount, fsck, driver load, and driverunload are root privileged operations. Other privileged Oracle ACFS file systemoperations that do not require root privileges can be performed by the Oracle ASMadministrator. If the Oracle ASM administrator role is not given to a root privilegeduser, access to Oracle ACFS file systems can be restricted with the norootsuid andnodev mount options.
Additional fine grain access control is provided for Oracle ACFS file systems with thesecurity infrastructure feature. For information about Oracle ACFS securityinfrastructure, refer to "Oracle ACFS Security (page 11-19)".
For information about Oracle ACFS encryption, refer to "Oracle ACFS Encryption(page 11-22)".
For information about Oracle ASM privileges, refer to "About Privileges for OracleASM (page 3-47)".
For information about administering Oracle ACFS, refer to Managing Oracle ACFSwith Command-Line Tools (page 16-1).
Oracle ACFS and Grid Infrastructure InstallationOracle Grid Infrastructure includes Oracle Clusterware, Oracle ASM, Oracle ACFS,Oracle ADVM, and driver resources software components, which are installed into theGrid Infrastructure home using the Oracle Universal Installation (OUI) tool.
Oracle ACFS ConfigurationAfter a Grid Infrastructure installation and with an operational Oracle Clusterware,you can use Oracle ASM Configuration Assistant (ASMCA) to start the Oracle ASMinstance and create Oracle ASM disk groups, Oracle ADVM volumes, and OracleACFS file systems. Alternatively, Oracle ASM disk groups and Oracle ADVM volumescan be created using SQL*Plus and ASMCMD command line tools. File systems can becreated using operating system command-line tools.
Oracle ACFS file systems are configured with Oracle ADVM based operating systemstorage devices that are created automatically following the creation of an OracleADVM dynamic volume file. After a volume file and its associated volume device fileare created, a file system can be created and bound to that operating system storagedevice. Following creation, an Oracle ACFS file system can be mounted, after which itis accessible to authorized users and applications executing file and file systemoperations.
For an example of the specific actions required to create a file system, refer to "BasicSteps to Manage Oracle ACFS Systems (page 16-1)".
For information about managing Oracle ACFS file systems with ASMCA, refer to"ASMCA GUI Tool for Managing Oracle ACFS and Oracle ADVM (page 14-1)".
For information about using Oracle ACFS commands to create a file system, refer to Managing Oracle ACFS with Command-Line Tools (page 16-1).
For information about configuring Oracle Clusterware resources for use with thedatabase, refer to "Oracle Clusterware Resources and Oracle ACFS Administration(page 11-15)".
Understanding Oracle ACFS Administration
11-14 Oracle Automatic Storage Management Administrator's Guide
Oracle Clusterware Resources and Oracle ACFS AdministrationOracle Clusterware resources support all aspects of Oracle ACFS. The resources areresponsible for enabling and disabling volumes, loading drivers and mounting andunmounting file systems.
This section discusses the following topics:
• Summary of Oracle ACFS Resource-based Management (page 11-15)
• High Availability Actions (page 11-16)
• Creating Oracle ACFS Resources (page 11-16)
• Node-Local or Clusterwide File Systems (page 11-17)
• Monitoring Oracle ACFS resources (page 11-18)
• Stopping Oracle ACFS resources (page 11-18)
• Oracle ACFS resource Limitations (page 11-18)
Summary of Oracle ACFS Resource-based Management
The following list provides a summary of Oracle ACFS resource-based management.
• The Oracle ACFS, Oracle Kernel Services (OKS), and Oracle ADVM drivers aredynamically loaded when the Oracle ASM instance is started.
– Oracle ACFS
This driver processes all Oracle ACFS file and directory operations.
– Oracle ADVM
This driver provides block device services for Oracle ADVM volume files thatare used by file systems for creating file systems.
– Oracle Kernel Services Driver (OKS)
This driver provides portable driver services for memory allocation,synchronization primitives, and distributed locking services to Oracle ACFSand Oracle ADVM.
The drivers are managed as a single resource set. For additional information, see"Oracle ACFS Drivers Resource Management (page 18-4)" and "Oracle ACFSDriver Commands (page 18-5)".
• When a volume is created, Oracle ADVM creates a resource with the name ofora.DISKGROUP.VOLUME.advm. This resource is usually managed throughtransparent high availability calls from Oracle ASM and requires no userinteraction. However, the user may choose to use the SRVCTL command interfaceto start and stop volumes as well as control the default state of the volume after anOracle ASM restart. This is especially beneficial in a large cluster or an Oracle FlexASM cluster, as volumes on other nodes may be operated upon.
In addition, these Oracle ADVM resources can be used by other resources in theOracle Clusterware stack to maintain dependency chains. Dependency chainsensure that the resources a program requires to run are available. For instance, if aresource was monitoring a backup application that was backing up to Oracle
Understanding Oracle ACFS Administration
Introducing Oracle ACFS and Oracle ADVM 11-15
ADVM volume, the backup application would want to ensure that it specified theOracle ADVM volume resource in it's START and STOP dependency list. Becausethe Oracle ADVM volume resource will enable the volume, this ensures that thevolume is available before the backup begins.
• Oracle ACFS file systems are either manually mounted or dismounted using anOracle ACFS or Oracle Clusterware command-line tool, or automatically mountedor dismounted based on an Oracle Clusterware resource action.
For example, a file system hosting an Oracle Database home is named in thedependency list of the associated Oracle Database resource such that issuing astart on the database resource results in mounting the dependent Oracle ACFShosted database home file system.
Oracle ACFS file system resources provide the following actions:
– MOUNT
During the START operation the resource mounts the file system on the pathconfigured in the resource. The Oracle ACFS file system resource requires allcomponents of the Oracle ASM stack to be active (volume device, ASM) andensures that they are active before attempting the mount.
– UNMOUNT
During the STOP operation, the resource attempts to unmount a file system.
• Oracle provides two resource types for Oracle Highly Available NFS. For moreinformation, refer to "High Availability Network File Storage for Oracle GridInfrastructure (page 11-37)".
As with all Oracle Clusterware resources, these resources provide for high availabilityby monitoring the underlying device, file system, or driver to ensure that the objectremains available. In the event that the underlying object becomes unavailable, eachresource attempts to make the underlying object available again.
High Availability Actions
The following are the actions of the High Availability resources:
• Oracle ACFS resource
This resource attempts to unmount the file system. After the unmount hassucceeded, the resource remounts the file system, making the file system availableagain. If processes are active on the file system during unmount, the resourceidentifies and terminates those processes.
• Oracle ADVM resource
This resource attempts to disable any volume device, and then reenable thevolume device. At that point, any configured Oracle ACFS resource can remountthe file system. If processes are active on the volume during this period, theresource identifies and terminates the processes.
Creating Oracle ACFS Resources
Oracle ACFS resources can be created with the following methods:
• Oracle ASM Configuration Assistant (ASMCA) provides a GUI that exposes themost common functionality. In all cases, creating a file system resource does not
Understanding Oracle ACFS Administration
11-16 Oracle Automatic Storage Management Administrator's Guide

format the underlying file system. Attempts to start the resource require the userto format the file system either manually or with ASMCA.
• SRVCTL provides a highly flexible command line utility for creating Oracle ACFSfile system resources through the filesystem object. Oracle ACFS resourcescreated through this mechanism have access to the full feature set, includingserver pools.
• acfsutil commands provide an alternative method to create Oracle ACFS filesystem resources using the registry object. Oracle ACFS resources createdthrough this methodology have access to a limited set of options.
The differences between SRVCTL and acfsutil commands are:
• Oracle ACFS resources created through SRVCTL and specifying a server pool orlist of nodes are only mounted on one of those nodes. (node-local)
• Oracle ACFS resources created through SRVCTL can take advantage of OracleServer Pools.
• Oracle ACFS resources created through acfsutil commands and specifying alist of nodes are mounted on all listed nodes. (node-local)
• Oracle ACFS resources created through acfsutil commands are created withAUTOSTART set to ALWAYS.
• Oracle ACFS resources created through SRVCTL allow for advanced ApplicationID functionality. Using this functionality enables the resource type to be set by theadministrator. After the type is set, other resources can depend on this type,allowing different node-local file systems to be used to fulfill dependencies oneach node. In a simplified example, this would allow the administrator to have adifferent device mounted on the /log directory on each node of the cluster, andbe able to run an Apache resource. The Apache resource would specify the newtype in its resource dependency structure, rather than specifying an individualresource.
• Oracle ACFS resources created through SRVCTL can specify additionalAUTOSTART parameters. These parameters can be used to prevent the resourcefrom starting on stack startup, to always force the resource to start, or to only startthe resource if it was previously running.
• Oracle ACFS resources created through SRVCTL have access to functionality suchas accelerator volumes.
The common elements of both SRVCTL and acfsutil commands are:
• User
This is an additional user that can act upon the resource. By default, you must bethe root user to start and stop an Oracle ACFS resource.
• Options
These are mount options that should be used to mount the file system when theresource is starting.
Node-Local or Clusterwide File Systems
When creating Oracle ACFS file system resources, you can create a node-local filesystem or to create a clusterwide file system.
Understanding Oracle ACFS Administration
Introducing Oracle ACFS and Oracle ADVM 11-17

• Node-local
This file system type is limited to the number of nodes it can mount on.Depending on if it is created with SRVCTL or acfsutil commands, it may onlymount on one node, a subset of nodes, or all the configured nodes. In some cases,this could look the same as a full cluster configuration, but if new nodes are addedto the cluster, the file system is not automatically mounted on them withoutmodifying the list of allowable nodes.
• Clusterwide
This type of file system mounts on all nodes of the cluster, with no exceptions.When new members are added to the cluster, the file system is automaticallyavailable on them. This type of resource is required for certain configurations,such as Oracle Database or Oracle HANFS.
Monitoring Oracle ACFS resources
Similar to all Oracle Clusterware resources, Oracle ACFS resources enables you tomonitor the state of the system. You can do this monitoring with the followingcommands:
• Using SRVCTL commands
When the command srvctl status filesystem or srvctl status volumeis run, the output of the command reports if the file system is mounted or thevolume is enabled, and which nodes this is true on.
• Using CRSCTL commands
When the crsctl status resource command is run, a state of ONLINE isreported for each resource that is available, whether through a mounted filesystem or an enabled volume. A state of OFFLINE is reported for each resourcethat is not available, whether through an unmounted file system or a disabledvolume. Additional status may be presented in the STATUS field of this output.
Stopping Oracle ACFS resources
You can be stop Oracle ACFS file system resources with the following methods:
• You can stop the entire Oracle Clusterware stack. When the Oracle Clusterwarestack is stopped, all Oracle ACFS resources are automatically stopped.
• To stop individual resources, you can use SRVCTL management commands withthe filesystem or volume object. The command may require the -forceoption if there are other resources that are depending on the resource that you areattempting to stop.
• You may engage a manual action, such as running unmount on a file system or bymanually stopping a volume using ASMCMD or SQL*Plus commands. In thiscase, the Oracle ACFS resource transitions to the OFFLINE state automatically.
Oracle ACFS resource Limitations
Oracle ACFS has the following resource limitations:
• All Oracle ACFS resources require root privileges to create.
• All Oracle ACFS resources require root privileges to remove.
Understanding Oracle ACFS Administration
11-18 Oracle Automatic Storage Management Administrator's Guide

• All Oracle ACFS file system resources require root privileges to act upon, such asstarting and stopping the resources, but can be configured to allow another user,such as a database user, to do so. In this case, the root user must be used toconfigure the resource.
• All Oracle ADVM volume resources allow the ASMADMIN user to act upon them.
• All Oracle ACFS resources are only available in Oracle RAC mode. Oracle ACFSresources are not supported in Oracle Restart configurations. For moreinformation about Oracle ACFS and Oracle Restart, refer to "Oracle ACFS andOracle Restart (page 18-5)".
Oracle ACFS and Dismount or Shutdown OperationsIt is important to dismount any active file system configured with an Oracle ADVMvolume device file before an Oracle ASM instance is shutdown or a disk group isdismounted. After the file systems are dismounted, all open references to Oracle ASMfiles are removed and associated disk groups can be dismounted or the instance shutdown.
If the Oracle ASM instance or disk group is forcibly shut down or fails while anassociated Oracle ACFS is active, the file system is placed into an offline error state. Ifany file systems are currently mounted on Oracle ADVM volume files, the SHUTDOWNABORT command should not be used to terminate the Oracle ASM instance withoutfirst dismounting those file systems. Otherwise, applications encounter I/O errors andOracle ACFS user data and metadata being written at the time of the termination maynot be flushed to storage before the Oracle ASM storage is fenced. If it is not possibleto dismount the file system, then you should run two sync (1) commands to flushcached file system data and metadata to persistent storage before issuing theSHUTDOWN ABORT operation.
Any subsequent attempt to access an offline file system returns an error. Recovering afile system from that state requires dismounting and remounting the Oracle ACFS filesystem. Dismounting an active file system, even one that is offline, requires stoppingall applications using the file system, including any shell references. For example, aprevious change directory (cd) into a file system directory. The Linux fuser or lsofcommands or Windows handle command list information about processes and openfiles.
For information about shutting down an Oracle ASM instance, see "About ShuttingDown an Oracle ASM Instance (page 3-25)". For information about dismounting a diskgroup, see "Mounting and Dismounting Disk Groups (page 4-55)".
Oracle ACFS SecurityOracle ACFS security provides realm-based security for Oracle ACFS file systems,enabling you to create realms to specify security policies for users and groups todetermine access on file system objects. This security feature provides a finer-grainedaccess control on top of the access control provided by the operating system. OracleACFS security can use the encryption feature to protect the contents of realm-securedfiles stored in Oracle ACFS file systems.
Oracle ACFS security uses realms, rules, rule sets, and command rules to enforcesecurity policies.
• An Oracle ACFS security realm is a group of files or directories that are securedfor access by a user or a group of users. Realms are defined with rule sets which
Understanding Oracle ACFS Administration
Introducing Oracle ACFS and Oracle ADVM 11-19

contain groups of rules that apply fine grain access control. Oracle ACFS securityrealms can also be used as containers to enable encryption.
• Oracle ACFS security rules are Boolean expressions that evaluate to true or falsebased on a system parameter on which the rule is based.
• Oracle ACFS rule sets are collection of rules. Rule sets evaluate to TRUE or FALSEbased on the evaluation of the rules a rule set contains.
• Oracle ACFS command rules are associations of the file system operation to a ruleset. For example, the association of a file system create, delete, or renameoperation to a rule set. Command rules are associated with an Oracle ACFS realm.
An existing operating system user must be designated as the first Oracle ACFSsecurity administrator and an existing operating system group must be designated asthe security administrator admin group. Security administrators must be members ofthe designated security group. Additional users can be designated as securityadministrators. An Oracle ACFS security administrator can manage encryption for anOracle ACFS file system on a per-realm basis. An Oracle ACFS security administratoris authenticated for security operations with a security realm password, not theoperating system password of the user.
The first security administrator is created during the initialization of Oracle ACFSsecurity with the acfsutil sec init command which is run by the root user. Whenthe first security administrator is created, the administrator is assigned a passwordthat can be changed by the administrator. Each time a security administrator runs anacfsutil sec command, the administrator is prompted for the security password.The security realm passwords for administrators are stored in a wallet created duringthe security initialization process. This wallet is located in the Oracle Cluster Registry(OCR).
Auditing and diagnostic data are logged for Oracle ACFS security. The log filesinclude information such as acfsutil commands that have been run, the use ofsecurity or system administrator privileges, and run-time failures such as realm checkauthorization failures.
Auditing events, such as realm creation or encryption enabled, are written to these logfiles only if auditing is not enabled for on the file system. If auditing is enabled, theseevents are written into the audit trail. Diagnostic messages related to security andencryption are always written to the sec-hostname_fsid.log file regardless ofwhether auditing is enabled or not. For information about Oracle ACFS auditing, referto "Oracle ACFS Auditing (page 11-24)".
Logs are written to the following files:
• mount_point/.Security/realm/logs/sec-hostname_fsid.log
The directory is created with acfsutil sec prepare command and protectedby Oracle ACFS security. Refer to "acfsutil sec prepare (page 16-86)".
• GRID_HOME/log/hostname/acfs/security/acfssec.log
The messages that are logged to this file are for commands that are not associatedwith a specific file system, such as acfsutil sec init. The directory is createdduring installation and is owned by the root user.
When an active log file grows to a pre-defined maximum size (10 MB), the file isautomatically moved to log_file_name.bak, the administrator is notified, andlogging continues to the regular log file name. When the administrator is notified, theadministrator must archive and remove the log_file_name.bak file. If an active log
Understanding Oracle ACFS Administration
11-20 Oracle Automatic Storage Management Administrator's Guide

file grows to the maximum size and the log_file_name.bak file exists, loggingstops until the backup file is removed. After the backup log file is removed, loggingrestarts automatically.
Oracle ACFS security protects the following objects from unauthorized accesses:
• Realm-secured directories and user files
The directories and files reside on a file system secured by Oracle ACFS security.
• The Oracle ACFS security directory (mount_point/.Security) and its contents
The security directory contains the log files in plain-text format and a securitymetadata backup file in XML format. The log files generated by Oracle ACFSsecurity can only be accessed by valid Oracle ACFS security administrators.
• Oracle ACFS security objects
These objects are the security realms, rules, and rule sets used to manage OracleACFS security.
Access to files in a security realm of an Oracle ACFS file system must be authorized byboth the security realm and the underlying operating system permissions, such as(owner, group, other) permissions on Linux and Access Control Lists (ACLs) onWindows. Each access to a realm-secured file is first checked for security realmauthorization. If the access is authorized by the security realm, then access to the filesis checked by the underlying operating system access control checks. If both checkspass, access is allowed to the realm-secured file.
Note the following when working with Oracle ACFS security:
• Oracle ACFS security does not provide any protection for data sent on thenetwork.
• A copy of a realm-protected file is not realm-protected unless the copy is made ina security realm-protected directory.
Some applications, such as the vi editor, re-create a file when the file is modified.The modified file is saved as a temporary file, the original file is removed, andtemporary file is copied with the original file name as the destination name. Thisprocess creates a new file. If the new file is created in a realm-protected directory,the security policies of the realm also apply to the new file. If the new file is notcreated in a realm-protected directory, then the new file is not realm-protected. Ifyou are planning to copy a realm-protected file, you should ensure that the parentdirectory is also security realm protected.
Security policies also apply to any temporary files created in a realm-protecteddirectory.
To use Oracle ACFS security functionality on Linux, the disk group compatibilityattributes for ASM and ADVM must be set to 11.2.0.2 or higher. To use Oracle ACFSsecurity functionality on Windows, the disk group compatibility attributes for ASMand ADVM must be set to 11.2.0.3 or higher. For information about disk groupcompatibility, refer to "Disk Group Compatibility (page 4-41)".
For information about Oracle ACFS security and snapshots, refer to "About OracleACFS Snapshots (page 11-10)".
Security information for Oracle ACFS file systems is displayed in the V$ASM_ACFS_SECURITY_INFO view. For information about V$ASM_ACFS views, referto Using Views to Display Oracle ACFS Information (page 12-1).
Understanding Oracle ACFS Administration
Introducing Oracle ACFS and Oracle ADVM 11-21

To configure security for Oracle ACFS file systems, you can use the acfsutil seccommand-line functions described in "Securing Oracle ACFS File Systems(page 16-6)" and "Oracle ACFS Command-Line Tools for Security (page 16-76)".Also, you can use ASMCA described in "Managing Security and Encryption for OracleACFS with ASMCA (page 14-5)".
See Also:
Your operating system-specific (OS) documentation for information aboutsetting up OS users and OS groups
Oracle ACFS EncryptionOracle ACFS encryption enables you to encrypt data stored on disk (data-at-rest). Theencryption feature protects data in an Oracle ACFS file system in encrypted format toprevent unauthorized use of data in the case of data loss or theft. Both encrypted andnon-encrypted files can exist in the same Oracle ACFS file system.
Some encryption functionality requires system administrator privileges. Thisfunctionality incudes the commands for initiating, setting, and reconfiguringencryption.
System administrators and Oracle ACFS security administrators can initiateencryption operations. Also, unprivileged users can initiate encryption for files theyown.
Oracle ACFS encryption provides two type of encryption keys:
• File Encryption Key
This is a key for a file and is used to encrypt the data in the file.
• Volume Encryption Key
This is a key for a file system and is used to encrypt the file encryption keys.
You must first create the encryption key store, then specify file system-levelencryption parameters and identify the directories. No extra steps are required for auser to read encrypted files if the user has the appropriate privileges for accessing thefile data.
Oracle ACFS encryption supports both Oracle Cluster Registry (OCR) and Oracle KeyVault as a key store. Both OCR and Oracle Key Vault can be used in the same cluster.However, a single file system uses either OCR or Oracle Key Vault as a key store, butnot both. Oracle Key Vault is currently only available with file systems on Linux.
See Also:
Oracle Key Vault Administrator's Guide for information about Oracle Key Vault
If you are using OCR as a key store, you should back up the OCR after creating orupdating an encryption key to ensure there is an OCR backup that contains all of thevolume encryption keys (VEKs) for the file system.
Oracle ACFS encryption protects data stored on secondary storage against the threatof theft or direct access to the storage medium. Data is never written to secondarystorage in plaintext. Even if physical storage is stolen, the data stored cannot be
Understanding Oracle ACFS Administration
11-22 Oracle Automatic Storage Management Administrator's Guide

accessed without the encryption keys. The encryption keys are never stored inplaintext. The keys are either obfuscated, or encrypted using a user-suppliedpassword.
An Oracle ACFS security administrator can manage encryption parameters on a per-realm basis. After a file is placed under realm security, file-level encryption operationsare not allowed on that file. Even if the realm security allows the file owner or the rootuser to open the file, file-level encryption operations are blocked. Encryption of realm-protected files is managed entirely by the Oracle ACFS security administrator, whocan enable and disable encryption for files at a security realm level.
After a directory has been added to a security realm, all files created in the directoryinherit the realm-level encryption parameters, not the directory or file system-levelparameters. When a file is removed from its last security realm, the file is encrypted ordecrypted to match the file system-level encryption status. The file is not re-encryptedto match file system-level parameters if it has been encrypted with security realmparameters.
A system administrator cannot rekey realm-secured files at the file system or file level.To ensure all realm-secured files are encrypted with the most recent volumeencryption key (VEK), you must first remove encryption from all realms, and then re-enable encryption. This action re-encrypts all files with the most recent VEK.
Auditing and diagnostic data are logged for Oracle ACFS encryption. The log filesinclude information such as acfsutil commands that have been run, the use ofsecurity or system administrator privileges, and run-time failures. Logs are written tothe following files:
• mount_point/.Security/encryption/logs/encr-hostname_fsid.log
The directory is created with acfsutil encr set command and protected byOracle ACFS security if security is enabled. Refer to "acfsutil encr set(page 16-113)".
• GRID_HOME/log/hostname/acfs/security/acfssec.log
The messages that are logged to this file are for commands that are not associatedwith a specific file system, such as acfsutil encr init. The directory is createdduring installation and is owned by the root user.
When an active log file grows to a pre-defined maximum size (10 MB), the file isautomatically moved to log_file_name.bak, the administrator is notified, andlogging continues to the regular log file name. When the administrator is notified, theadministrator must archive and remove the log_file_name.bak file. If an active logfile grows to the maximum size and the log_file_name.bak file exists, loggingstops until the backup file is removed. After the backup log file is removed, loggingrestarts automatically.
Note the following when working with Oracle ACFS encryption:
• A copy of an encrypted file is not encrypted unless the copy of the file is made inan encrypted directory.
Some applications, such as the vi editor, re-create a file when the file is modified.The modified file is saved as a temporary file, the original file is removed, andtemporary file is copied with the original file name as the destination name. Thisprocess creates a new file. The new file is not encrypted unless it is created in anencrypted directory. If you are planning to copy an encrypted file, you shouldensure that the parent directory is also encrypted.
Understanding Oracle ACFS Administration
Introducing Oracle ACFS and Oracle ADVM 11-23
• Using encryption with database files on Oracle ACFS is not supported.
To use Oracle ACFS encryption functionality on Linux, the disk group compatibilityattributes for ASM and ADVM must be set to 11.2.0.2 or higher. The disk groupcompatibility attributes for ASM and ADVM must be set to 11.2.0.3 or higher onLinux for the following cases:
• If encryption is configured for the first time on Oracle ASM 11g Release 2(11.2.0.3).
• If encryption parameters must be changed or a new volume encryption key mustbe created following a software upgrade to Oracle ASM 11g Release 2 (11.2.0.3).For information, see "acfsutil encr set (page 16-113)" and "acfsutil encr rekey(page 16-112)".
To use Oracle ACFS encryption functionality on Windows, the disk groupcompatibility attributes for ASM and ADVM must be set to 11.2.0.3 or higher.
For information about disk group compatibility, refer to "Disk Group Compatibility(page 4-41)".
For information about Oracle ACFS encryption and snapshots, refer to "About OracleACFS Snapshots (page 11-10)".
Encryption information for Oracle ACFS file systems is displayed in the V$ASM_ACFS_ENCRYPTION_INFO view. For information about V$ASM_ACFS views,refer to Using Views to Display Oracle ACFS Information (page 12-1).
To configure encryption and manage encryptedOracle ACFS file systems, you can usethe acfsutil encr command-line functions described in "Encrypting Oracle ACFSFile Systems (page 16-11)" and "Oracle ACFS Command-Line Tools for Encryption(page 16-107)". Also, you can use Oracle ASM Configuration Assistant with encryptionfeatures as described in "Managing Security and Encryption for Oracle ACFS withASMCA (page 14-5)".
Oracle ACFS AuditingOracle ACFS auditing provides auditing capabilities for Oracle ACFS security andencryption. This auditing framework produces a separate audit trail for each OracleACFS file system on each individual node, and enforces separation of duties regardingthe management and review of this audit source.
Audit sources are the source of events, such as Oracle ACFS security and Oracle ACFSencryption. Audit trails are the logs where the audit records are written.
This section contains the following topics:
• About Oracle ACFS Auditing (page 11-24)
• Audit Trail File (page 11-26)
• File Access Events (page 11-28)
• Privilege Use Events (page 11-29)
• Evaluation Result Events (page 11-30)
About Oracle ACFS Auditing
Both Oracle ACFS security and encryption are also audit sources, and these sourcescan be enabled and disabled by an Oracle ACFS audit manager. These sources
Understanding Oracle ACFS Administration
11-24 Oracle Automatic Storage Management Administrator's Guide

generate events as a result of the execution of Oracle ACFS security or encryptioncommands.
The Oracle ACFS security administrator can enable auditing at the realm level so thatsecurity violations and authorizations can also be audited as well as enabling auditingon security to audit all the events executed by a security administrator. An OracleACFS security source must be enabled before Oracle ACFS realm security auditing canbe used.
Setting the realm auditing policy to audit all authorizations and violations for allcommand rules can cause the audit trail to quickly increase to its maximum size.Administrators should carefully adjust the auditing level to their requirements and beaware that auditing policies generating more verbose auditing output requireadditional active monitoring and management, such as archiving and purging, of theaudit trail and audit trail backup files.
Along with the generation of a file system audit source, Oracle ACFS auditing allowsfine-grained auditing policies to be set separately on each realm basis. The OracleACFS auditing capability provides the infrastructure for an audit vault collector toimport data into Oracle Audit Vault and Database Firewall. The collector is separatefrom Oracle ACFS and functions as means for Oracle ACFS auditing data to beimported into Audit Vault Server.
The responsibilities for configuration and management of the audit source areseparated into the Oracle ACFS audit manager and Oracle ACFS auditor roles. Thesystem administrator has the authority to add and remove users to and from theOracle ACFS audit manager and Oracle ACFS auditor operating system (OS) groups.
The Oracle ACFS audit managers have access to the contents of audit sources and canread audit data; however, the audit managers cannot modify the audit sources. The setof Oracle ACFS audit managers is the same across a cluster.
The Oracle ACFS auditors are responsible for viewing and analyzing the contents ofthe audit source, such as indicating to the Oracle ACFS audit managers which recordshave been analyzed and archived and are safe to purge. The Oracle ACFS auditorsshould be the only users on the system with access to the contents of the audit source.The Oracle ACFS auditor do not have the required permissions to remove or purgeaudit records. The set of Oracle ACFS auditors is the same across a cluster.
The audit archiving process renames audit trail log files (.log) to a audit trail backupfile (.log.bak) and generates an XML file, which can be imported by Audit VaultServer. Audit Vault Server has only read access to the audit trail directory andfunctions as an auditor in this case. After the data from the XML file is imported in theAudit Vault Server, the auditor function marks the audit trail backup file as read, andthen audit manager can execute a purge to remove audit trail backup files and XMLfiles.
To configure auditing for an Oracle ACFS file system, run the acfsutil audit initcommand to initialize auditing for Oracle ACFS and then run acfsutil auditenable to enable auditing for Oracle ACFS encryption or security on the specified filesystem. For information about the acfsutil audit commands, refer to "OracleACFS Command-Line Tools for Auditing (page 16-70)".
For information about enabling or disabling auditing for specific commands in anOracle ACFS security realm, refer to the acfsutil sec realm audit enable andacfsutil sec realm audit disable commands described in "Oracle ACFSCommand-Line Tools for Security (page 16-76)".
For information about views that are relevant to Oracle ACFS auditing, refer to "ViewsContaining Oracle ACFS Information (page 12-1)".
Understanding Oracle ACFS Administration
Introducing Oracle ACFS and Oracle ADVM 11-25

See Also:
• Oracle Audit Vault and Database Firewall Administrator's Guide forinformation about the Audit Vault Server
• Your operating system-specific (OS) documentation for information aboutsetting up OS users and OS groups
Audit Trail File
Audit trail files consist of a set of audit records. Each audit record represents a singleevent. Audit trail files are located in the mount_point/.Security/auditdirectory.
Audit trail files generated by Oracle ACFS auditing are meant to be available for thefollowing:
• Manual review by an Oracle ACFS auditor using text viewing tools
• Import into Oracle Audit Vault and Database Firewall
• Third party products that can parse and import the audit sources
The audit trail file consists of audit records. There are several different types of auditrecords, each of which represent a unique type of event and contain differentinformation relevant to diagnosing the event. The types of events are:
• File Access Events (page 11-28)
• Privilege Use Events (page 11-29)
• Evaluation Result Events (page 11-30)
The combination of audit record fields entered in the audit trail file depends on theevent type.
Each record is written to the audit trail file as a set of field names and values.Depending on the type of record, the number and type of fields may vary. Fieldsconsist of a name and value pair, in the form field name:value, followed by an end ofline character.
The audit record fields that can be present in the audit trail file are described in thefollowing list. The string in parenthesis is the field name that appears in the audit traillog file.
• Timestamp (Timestamp): The time at which the event occurred, always specifiedin UTC. The format for the time stamp is: MM/DD/YYYY HH:MM:SS UTC
• Event Code (Event): A code identifying the type of event. For the list ofevaluation result codes, refer to "File Access Events (page 11-28)" and "PrivilegeUse Events (page 11-29)".
• Source (Source): Oracle ACFS
• User identification (User): The user who triggered the event. On Linux platformsthis is a user ID and on Windows this is the user SID.
Understanding Oracle ACFS Administration
11-26 Oracle Automatic Storage Management Administrator's Guide

• Group identification (Group): The primary group of the user who triggered theevent. On Linux platforms this is the ID the primary group of the user and onWindows this is the SID of the primary group of the user.
• Process identification (Process): The current process ID.
• Host name (Host): The host which recorded the event.
• Application name (Application): The application name for the current process.
• Realm name (Realm): The name of the realm which was violated, or the realmthat is authorized and is protecting the file.
• File name (File): The file name which the user was accessing.
• Evaluation Result (Evaluation Result): This field contains the informationabout the result of the command executed. For the list of evaluation result codes,refer to "Evaluation Result Events (page 11-30)".
• File system Id (FileSystem-ID):
• Message (Message): The message field has the information about the commandexecuted and its result.
Example 11-1 (page 11-27) shows an example of an audit trail file.
Example 11-1 Sample audit trail file
Timestamp: 06/08/12 11:00:37:616 UTCEvent: ACFS_AUDIT_READ_OPSource: Oracle_ACFSUser: 0Group: 0Process: 1234Host: slc01hugApplication: catRealm: MedicalDataRealmFile: f2.txtEvaluation Result: ACFS_AUDIT_REALM_VIOLATIONFileSystem-ID: 1079529531Message: Realm authorization failed for file ops READ
Timestamp: 06/08/12 11:00:37:616 UTCEvent: ACFS_AUDIT_WRITE_OPSource: Oracle_ACFSUser: 102Group: 102Process: 4567Host: slc01hugApplication: viRealm: PayrollRealm,SecuredFilesFile: f2.txtEvaluation Result: ACFS_AUDIT_REALM_AUTHFileSystem-ID: 1079529531Message: Realm authorization succeeded for file ops WRITE
Timestamp: 06/08/12 10:42:20:977 UTCEvent: ACFS_SEC_PREPARESource: Oracle_ACFSUser: 507867Group: 8500Process: 603
Understanding Oracle ACFS Administration
Introducing Oracle ACFS and Oracle ADVM 11-27

Host: slc01hugApplication: acfsutil.binEvaluation Result: ACFS_CMD_SUCCESSFileSystem-ID: 1079529531Message: acfsutil sec prepare: ACFS-10627: Mount point '/mnt' is nowprepared for security operations.
File Access Events
File access events include both realm authorization and violation records. These eventsshare a similar structure with all events, but have a different event code. TheEvaluation Result (Evaluation Result) field can contain eitherACFS_AUDIT_REALM_VIOLATION or ACFS_AUDIT_REALM_AUTH.
The possible event code (Event) for file access events include the following:
• ACFS_AUDIT_APPENDFILE_OP
• ACFS_AUDIT_CHGRP_OP
• ACFS_AUDIT_CHMOD_OP
• ACFS_AUDIT_CHOWN_OP
• ACFS_AUDIT_CREATEFILE_OP
• ACFS_AUDIT_DELETEFILE_OP
• ACFS_AUDIT_EXTEND_OP
• ACFS_AUDIT_GET_EXTATTR_OP
• ACFS_AUDIT_LINKFILE_OP
• ACFS_AUDIT_MKDIR_OP
• ACFS_AUDIT_MMAPREAD_OP
• ACFS_AUDIT_MMAPWRITE_OP
• ACFS_AUDIT_MUTABLE_OP
• ACFS_AUDIT_OPENFILE_OP
• ACFS_AUDIT_OVERWRITE_OP
• ACFS_AUDIT_READ_OP
• ACFS_AUDIT_READDIR_OP
• ACFS_AUDIT_RENAME_OP
• ACFS_AUDIT_RMDIR_OP
• ACFS_AUDIT_SET_EXTATTR_OP
• ACFS_AUDIT_SYMLINK_OP
• ACFS_AUDIT_TRUNCATE_OP
• ACFS_AUDIT_WRITE_OP
Understanding Oracle ACFS Administration
11-28 Oracle Automatic Storage Management Administrator's Guide

Privilege Use Events
Privilege use events include security commands run by the security administrator orsystem administrator, and encryption commands run by the system administrator orfile owners.
The ACFS_AUDIT_INIT, ACFS_SEC_INIT, and ACFS_ENCR_INIT events are writteninto the global log that is located in Oracle Grid Infrastructure home.
The possible event code (Event) for privilege use events include the following:
• ACFS_AUDIT_ARCHIVE
• ACFS_AUDIT_DISABLE
• ACFS_AUDIT_ENABLE
• ACFS_AUDIT_INIT
• ACFS_AUDIT_PURGE
• ACFS_AUDIT_READ
• ACFS_ENCR_FILE_OFF
• ACFS_ENCR_FILE_ON
• ACFS_ENCR_FILE_REKEY
• ACFS_ENCR_FS_OFF
• ACFS_ENCR_FS_ON
• ACFS_ENCR_INIT
• ACFS_ENCR_SET
• ACFS_ENCR_SET_UNDO
• ACFS_ENCR_VOL_REKEY
• ACFS_ENCR_WALLET_STORE
• ACFS_REALM_AUDIT_DISABLE
• ACFS_REALM_EDIT_ENCR
• ACFS_REALM_AUDIT_ENABLE
• ACFS_SEC_LOAD
• ACFS_SEC_PREPARE
• ACFS_SEC_PREPARE_UNDO
• ACFS_SEC_REALM_ADD
• ACFS_SEC_REALM_CLONE
• ACFS_SEC_REALM_CREATE
• ACFS_SEC_REALM_DELETE
Understanding Oracle ACFS Administration
Introducing Oracle ACFS and Oracle ADVM 11-29

• ACFS_SEC_REALM_DESTROY
• ACFS_SEC_RULE_CREATE
• ACFS_SEC_RULE_DESTROY
• ACFS_SEC_RULE_EDIT
• ACFS_SEC_RULESET_CREATE
• ACFS_SEC_RULESET_DESTROY
• ACFS_SEC_RULESET_EDIT
• ACFS_SEC_SAVE
Evaluation Result Events
Evaluation result event codes provide information about the execution status of acommand.
The evaluation result event codes can be one of the following:
• ACFS_AUDIT_REALM_VIOLATION – The user executing the command does nothave the proper realm access permission to execute the command.
• ACFS_AUDIT_REALM_AUTH - Indicates the result of a realm evaluation.
• ACFS_AUDIT_MGR_PRIV – Audit manager privileges are required, but have notbeen granted to the user.
• ACFS_AUDITOR_PRIV – Auditor privileges are required, but have not beengranted to the user.
• ACFS_CMD_SUCCESS - The command has been successful in performing the task.
• ACFS_CMD_FAILURE - The command has failed in performing the task.
• ACFS_ENCR_WALLET_AUTH_FAIL – A system administrator provides anincorrect password when opening an encryption wallet.
• ACFS_INSUFFICIENT_PRIV – Either file owner or system administratorprivileges are required, but have not been granted to the user.
• ACFS_SEC_ADMIN_PRIV – Security administrator privileges are required, but theuser is not a security administrator
• ACFS_SEC_ADMIN_AUTH_FAIL – A valid security administrator fails toauthenticate properly using their Oracle ACFS security administration password
• ACFS_SYS_ADMIN_PRIV – System administrator privileges are required, buthave not been granted to the user.
Oracle ACFS ReplicationOracle ACFS replication enables replication of Oracle ACFS file systems across thenetwork to a remote site, providing disaster recovery capability for the file system.
Understanding Oracle ACFS Administration
11-30 Oracle Automatic Storage Management Administrator's Guide

Note:
• Oracle ACFS replication functionality supports only one standby filesystem for each primary file system.
• Oracle ACFS replication supports eight or fewer nodes mounting theprimary file system.
• The sites hosting the primary and standby file systems must be runningthe same operating system and must have the same system architecture.
• The primary and standby sites should be running the same version of theOracle Grid Infrastructure software. When upgrading the sites, update thestandby site first.
• The primary file system requires internal metadata files that are notvisible to user-level commands, such as du or ls. The amount of internalstorage for the primary file system is approximately 1 GB for each node.This extra internal storage accounts for the difference in storage usagebetween primary and standby file systems containing the same user files.
• Oracle wallets should be used to manage security credentials whenconfiguring the primary and standby file systems.
• Using replication with database files on Oracle ACFS is not supported.
• Oracle ACFS replication is not supported with Oracle Restart.
The source Oracle ACFS file system of an Oracle ACFS replication is referred to as aprimary file system. The target Oracle ACFS file system of an Oracle ACFS replicationis referred to as a standby file system.
A site can host both primary and standby file systems. For example, if there are clustersites A and B, a primary file system hosted at site A can be replicated to a standby filesystem at site B. Also, a primary file system hosted at site B can be replicated to astandby file system at site A. However, an Oracle ACFS file system cannot be used as aprimary and a standby file system.
Oracle ACFS replication captures file system changes written to disk for a primary filesystem and records the changes in files called replication logs. These logs aretransported to the site hosting the associated standby file system where backgroundprocesses read the logs and apply the changes recorded in the logs to the standby filesystem. After the changes recorded in a replication log have been successfully appliedto the standby file system, the replication log is deleted from the sites hosting theprimary and standby file systems.
It is critical that there is enough disk space available on both sites hosting the primaryand the standby file systems to contain the replication logs. If the primary file systemruns out of space, applications running on the file system may fail because OracleACFS cannot create a new replication log to capture the file system changes made bythe application. If the standby file system runs out of space, it cannot accept newreplication logs from the primary file system and cannot apply those changes to thestandby file system. In addition, replication logs accumulate on the primary filesystem and consume the available disk space.
If the primary file system has less than 2 GB available free disk space, Oracle ACFSattempts to automatically terminate replication on the primary file system. This action
Understanding Oracle ACFS Administration
Introducing Oracle ACFS and Oracle ADVM 11-31
prevents further consumption of disk space for replication operations and frees diskspace consumed by any replication logs that remain. The auto-terminate process canprevent the primary file system from running out of space in most cases, but it is stillpossible that the auto-terminate process does not occur quickly enough. Beforereaching the 2 GB limit, Oracle ACFS writes warnings about the free space problem inthe Oracle Grid Infrastructure home alert log.
You should prevent both the primary file system and the standby file system fromrunning out of space. If either file system runs out of available storage, you shouldeither expand the file system or remove files from the file system to free up space. Ifthe primary file system runs out of space and you decide to free up space by removingfiles, you should only remove files that are not being replicated because the removal ofa file that is replicated is captured in a replication log. Another option is to delete anyOracle ACFS snapshots. For information about resizing an Oracle ACFS file system,refer to "acfsutil size (page 16-132)".
Because replication logs can accumulate when replication is paused, you shouldresume replication soon after pausing replication. For information on pausing andresuming replication, refer to "acfsutil repl pause (page 16-65)" and "acfsutil replresume (page 16-66)".
Before using replication on a file system, ensure that you have checked the following:
• There is sufficient network bandwidth to support replication between the primaryand standby file systems.
• The configuration of the sites hosting the primary and standby file systems allowthe standby file system to keep up with the rate of change on the primary filesystem.
• The standby file system has sufficient capacity to manage the replication logs thatare sent.
• There is sufficient storage capacity to hold excess replication logs that mightcollect on the primary and the standby file systems when the standby file systemcannot process replication logs quickly. For example, this situation can occurduring network problems or maintenance on the site hosting the standby filesystem.
• The primary file system must have a minimum size of 4 GB for each node that ismounting the file system. The standby file system must have a minimum size of 4GB and should be sized appropriately for the amount of data being replicated andthe space necessary for the replication logs sent from the primary file system.
See Also:
For information about tuning the network, refer to the documentation at theMAA link on Oracle Technology Network:
http://www.oracle.com/technetwork/database/features/availability/maa-096107.html
Relevant information on tuning the network can be found in the Data GuardRedo Transport & Network Configuration paper.
Understanding Oracle ACFS Administration
11-32 Oracle Automatic Storage Management Administrator's Guide

Directories and files in an Oracle ACFS file system can be tagged to select the objectsthat you want to replicate in a file system. For information on tagging, see "OracleACFS Tagging (page 11-33)".
Before replicating an Oracle ACFS file system, a replication configuration must beestablished that identifies information such as the site hosting the primary file system,the site hosting the standby file system, the file system to be replicated, mount point ofthe file system, and a list of tags if desired.
The primary and standby sites must share the same user and group configurations,including all uids and gids in use in the file system. Because the replication daemonsrun with the credentials of oinstall and the Oracle ASM administration group, thepermissions on the mount points must be configured so that the daemons are able toread and traverse the directory mount point in order to access and create files underthe .ACFS/repl directory, which is the internal working location for replication logsand associated files.
To use Oracle ACFS replication functionality on Linux, the disk group compatibilityattributes for ASM and ADVM must be set to 11.2.0.2 or higher for the disk groupsthat contain the primary and standby file systems. To use Oracle ACFS replicationfunctionality on Windows, the disk group compatibility attributes for ASM and ADVMmust be set to 11.2.0.3 or higher. To use Oracle ACFS replication functionality onSolaris or AIX, the disk group compatibility attributes for ASM and ADVM must be set to12.1 or higher. For information about disk group compatibility, refer to "Disk GroupCompatibility (page 4-41)".
To use Oracle ACFS replication on Solaris Sparc hardware, the system must berunning Solaris 10 update 8 or later.
To configure replication and manage replicated Oracle ACFS file systems, use theacfsutil repl command-line functions described in "Replicating Oracle ACFS FileSystems (page 16-14)" and "Oracle ACFS Command-Line Tools for Replication(page 16-58)".
Oracle ACFS TaggingOracle ACFS tagging assigns a common naming attribute to a group of files. OracleACFS Replication can use this tag to select files with a unique tag name for replicationto a different remote cluster site. The tagging option avoids having to replicate anentire Oracle ACFS file system.
Oracle ACFS implements tagging with Extended Attributes. Some editing tools andbackup utilities do not retain the Extended Attributes of the original file by default;you must set a specific switch. The following list describes the necessary requirementsand switch settings for some common utilities to ensure Oracle ACFS tag names arepreserved on the original file.
• The cp command requires flags to preserve tag names.
Install the coreutils library (versioncoreutils-5.97-23.el5_4.1.src.rpm orcoreutils-5.97-23.el5_4.2.x86_64.rpm or later) on Linux to installversions of the cp command that supports Extended Attribute preservation withthe --preserve=xattr switch and the mv command that supports ExtendedAttribute preservation without any switches.
cp does not preserve tag names assigned to symbolic link files.
The cp switches required to preserve tag names on files and directories are:
Understanding Oracle ACFS Administration
Introducing Oracle ACFS and Oracle ADVM 11-33
– Linux: --preserve=xattr
– Solaris: -@
– AIX: -U
– Windows: no switch necessary
• The cpio file transfer utility requires flags to preserve tag names.
The cpio switches required to preserve tag names on files and directories are:
– Linux: cpio does not preserve tag names
– Solaris: -@ is required to preserve or restore tag names for files anddirectories, but does not preserve tag names for symbolic link files
– AIX: -U is required to preserve or restore tag names for files and directories,but does not preserve tag names for symbolic link files
– Windows: not available
• emacs requires that the backup-by-copying option is set to a non-nil value topreserve tag names on the original file name rather than a backup copy. Thisoption must be added to the .emacs file.
• The pax file transfer utility requires flags to preserve tag names.
The pax switches required to preserve tag names on files and directories are:
– Linux: pax does not preserve tag names
– Solaris: -@ is required to preserve or restore tag names for files anddirectories, but does not preserve tag names for symbolic link files
– AIX: -U is required to preserve or restore tag names for files and directories,but does not preserve tag names for symbolic link files
– Windows: not available
• The rsync file transfer utility requires flags to preserve tag names.
The rsync switches required to preserve tag names on files and directories are:
– Linux: -X -l are required to preserve tag names for files and directories, butthese switches do not preserve tag names for symbolic link files
– Solaris: rsync does not preserve tag names
– AIX: not available
– Windows: not available
• The tar backup utility can have flags set on the command line to preserve tagnames on a file. However, tar does not retain the tag names assigned to symboliclink files.
The tar backup utility on Windows currently provides no support to retain tagnames as no switch exists to save Extended Attributes.
The tar switches required to preserve tag names on files and directories are:
Understanding Oracle ACFS Administration
11-34 Oracle Automatic Storage Management Administrator's Guide

– Linux: --xattrs
– Solaris: -@
– AIX: -U
– Windows: tar does not preserve tag names
• The vim or vi editors require the set bkc=yes option in the .vimrc (Linux) or_vimrc (Windows) file to make a backup copy of a file and overwrite theoriginal. This preserves tag names on the original file.
To use Oracle ACFS tagging functionality on Linux, the disk group compatibilityattributes for ASM and ADVM must be set to 11.2.0.2 or higher. To use Oracle ACFStagging functionality on Windows, the disk group compatibility attributes for ASM andADVM must be set to 11.2.0.3 or higher. To use Oracle ACFS tagging functionalityon Solaris or AIX, the disk group compatibility attributes for ASM and ADVM must beset to 12.1 or higher. For information about disk group compatibility, refer to "DiskGroup Compatibility (page 4-41)".
To configure tagging and manage tagged Oracle ACFS file systems, use the acfsutiltag command-line functions described in "Tagging Oracle ACFS File Systems(page 16-12)" and "Oracle ACFS Command-Line Tools for Tagging (page 16-54)". Forinformation about Oracle ACFS tagging application programming interfaces (APIs),refer to "Oracle ACFS Tagging Generic Application Programming Interface(page 18-10)".
Using Replication with Auditing, Encryption, and SecurityAudited, encrypted, or security realm-secured file systems can be enabled on anOracle ACFS file system on which replication has been configured. The replicatedstandby file system is secured with the same auditing, security, or encryption policiesas the primary file system. For this replicated environment, the primary and standbyfile systems must both be 12.1 or higher installations. For more information aboutOracle ACFS replication, refer to "Oracle ACFS Replication (page 11-30)".
To ensure successful replication, the standby file system must be a generic file systemwithout auditing, encryption, or security metadata on it. Oracle ACFS does notsupport using a standby file system that once had security or encryption and then hadsecurity or encryption removed. Additional conditions that must be met for OracleACFS auditing, encryption, and security are listed in this section.
Note the following about Oracle ACFS audited file systems:
• Before replicating an audit-enabled file system or auditing a replicated file system,auditing must be initialized on the standby file system.
• Auditing policies present on the primary file system are replicated to the standbyand any policy actions taken on the primary file system are enacted on thestandby file system.
• Two sets of audit trails are present on the standby file system. Trails from primaryfile system are replicated to the standby file system as ordinary files. File systemactivity may generate events on the standby file system, which are recorded in theaudit trail for the standby file system. Audit trail names help distinguish the twosets of trails because they contain both the host name and FSID.
Note the following about Oracle ACFS encrypted file systems:
Understanding Oracle ACFS Administration
Introducing Oracle ACFS and Oracle ADVM 11-35

• Encrypted files on the primary file system remain encrypted on the standby filesystem with the same key and encryption parameters (algorithm and key length).
• Encryption operations done on the primary file system are replayed on thestandby file system - on, off, and rekey.
• Encryption may be enabled before or after a file system is replicated. In eithercase, an encryption wallet is transparently created on the standby file system ifone does not exist because acfsutil encr init has not been run on the standbyfile system.
• A password-protected wallet is not supported on the standby file system. If aPKCS wallet already exists on a site that is to be used as a standby file system, theadministrator must use the acfsutil keystore migrate command to transfer all keysto an SSO wallet.
Note the following about Oracle ACFS secured file systems:
• Standby file systems should be initialized for security before replicating a securityenabled file system.
• The rules, rule sets and realms are replicated to the standby file system and samepolicies exist on the standby file system. In terms of the policies and protection offiles, the standby file system is exactly same.
• Replication can be enabled on a security enabled file system or security can beenabled on a replicated file system. As part of security preparation, security is alsoenabled on the standby file system.
• Having security and replication together on a file system does not require anyextra user intervention or additional steps.
• A different set of security administrators or security administrator groups can beset up on the standby file system.
Oracle ACFS PluginsThe Oracle ACFS plugin functionality enables a user space application to collect just-in-time Oracle ACFS file and Oracle ADVM volume metrics from the operating systemenvironment. Applications can use the Oracle ACFS plug-in infrastructure to createcustomized solutions that extend the general application file metric interfaces toinclude detailed Oracle ACFS file system and volume data.
The Oracle ACFS plug-in functionality can be enabled on separate Oracle ACFS filesystems mounted on a standalone host or on one or more nodes of an Oracle Gridcluster where the Oracle ACFS file system is mounted. This functionality enablesmessage communication between a node-local plugin enabled Oracle ACFS file systemand an associated user space application module using Oracle ACFS plug-inapplication programming interfaces (APIs).
The plugin message APIs support both polling and posting message delivery modelsand multiple message payload types.
For information about Oracle ACFS plugin commands, refer to "Oracle ACFSCommand-Line Utilities (page 16-115)". For information about the Oracle ACFS plug-in application programming interface, refer to "Oracle ACFS Plug-in GenericApplication Programming Interface (page 18-7)".
Understanding Oracle ACFS Administration
11-36 Oracle Automatic Storage Management Administrator's Guide
High Availability Network File Storage for Oracle Grid InfrastructureHigh Availability Network File Storage (NFS) for Oracle Grid Infrastructure providesuninterrupted service of NFS V2/V3/V4 exported paths by exposing NFS exports onHighly Available Virtual IPs (HAVIP) and using Oracle Clusterware agents to ensurethat the HAVIPs and NFS exports are always online. While base NFS supports filelocking, HANFS does not support NFS file locking.
Note:
• This functionality relies on a working NFS server configuration availableon the host computer. You must configure the NFS server beforeattempting to use the Oracle ACFS NFS export functionality.
• This functionality is not available on Windows.
• This functionality is not supported in Oracle Restart configurations.
• The HAVIP cannot be started until at least one file system export resourcehas been created for it.
To set up High Availability NFS for Oracle Grid Infrastructure, perform the followingsteps:
1. Add and register a new HAVIP resource.
For example:
# srvctl add havip -id hrexports -address my_havip_name
In the example, my_havip_name is mapped in the domain name server (DNS) tothe VIP address and is used by the client systems when mounting the file system.
The initial processing of srvctl add havip ensures that:
• The address being used is static, not dynamic
• Any DNS names resolve to only one host, not round-robin multiple DNSresolutions
• The network resource and provided IP address and resolved name are in thesame subnet
• The name is not in use
SRVCTL creates the appropriate HAVIP name using the id, ensuring it is unique.As a final validation step, SRVCTL ensures that the network resource (ifprovided) of ora.net#.network exists. After this step, SRVCTL adds a newhavip of type ora.havip.type with the name of ora.id.havip. In thisexample, the name is ora.hrexports.havip.
Next SRVCTL modifies HAVIP start dependencies, such as activedispersion; sets the stop dependencies; and ensures the descriptionattribute (if provided) is appropriately set.
2. Create a shared Oracle ACFS file system.
Understanding Oracle ACFS Administration
Introducing Oracle ACFS and Oracle ADVM 11-37
High Availability NFS for Oracle Grid Infrastructure operates only with OracleACFS file systems configured for clusterwide accessibility and does not supportOracle ACFS file systems configured for access on particular subsets of clusternodes. High Availability NFS is not supported with non-Oracle ACFS filesystems.
For information on creating an Oracle ACFS file system, refer to "Creating anOracle ACFS File System (page 16-2)".
3. Register the Oracle ACFS file system.
For example:
$ srvctl add filesystem -device /dev/asm/d1volume1-295 -volume VOLUME1 \ -diskgroup HR_DATA -mountpath /oracle/cluster1/acfs1
See Also:
Oracle Real Application Clusters Administration and Deployment Guide forinformation about the srvctl add filesystem command
4. Create an Oracle ACFS file system export resource.
For example:
# srvctl add exportfs -id hrexports -path /oracle/cluster1/acfs1 \ -name hrexport1
After the file system export resource has been created, then you can start theHAVIP created in step 1 to export the file system using the srvctl start havipcommand.
The NFS mount option FSID is added to any export options, in the range of onebillion or higher to minimize potential collisions with other FSIDs that are set onthe server. This FSID option provides for reliable fail over between nodes andallows the usage of snapshot mounting.
The default mount and export options for configured exports are the defaults forthe NFS server.
Relative paths that are fully-qualified are converted to absolute paths. Relativepaths that are not fully-qualified are not accepted as an export path.
HAVIPs attempts to find the best server to run on based on available file systemsand other running HAVIPs, but this dispersion only occurs during CSSmembership change events, such as a node joining or leaving the cluster.
Note:
It is not recommended to start and stop exports individually; this functionalityshould be provided through the start and stop operations of HAVIP.
When HAVIP is not running, exports can exist on different nodes. After theassociated HAVIP is started, the exports gather on a single node.
Clients that are using an export that is stopped while HAVIP is running raisethe NFS error estale, and must dismount and remount the file system.
Understanding Oracle ACFS Administration
11-38 Oracle Automatic Storage Management Administrator's Guide
See Also:
• Oracle Real Application Clusters Administration and Deployment Guide forinformation about SRVCTL commands
• Oracle Clusterware Administration and Deployment Guide for informationabout Oracle Clusterware resources
Overview of Oracle ASM Dynamic Volume ManagerOracle ASM Dynamic Volume Manager (Oracle ADVM) provides volumemanagement services and a standard disk device driver interface to clients. Filesystems and other disk-based applications send I/O requests to Oracle ADVM volumedevices as they would to other storage devices on a vendor operating system.
An Oracle ADVM volume device is constructed from an Oracle ASM dynamicvolume. One or more Oracle ADVM volume devices may be configured within eachOracle ASM disk group. The Oracle ADVM Driver maps I/O requests against anOracle ADVM volume device to blocks in a corresponding Oracle ASM dynamicvolume and disk set located within an Oracle ASM disk group. An Oracle ADVMvolume device exports Oracle ASM volume manager features and ensures that volumemirrors remain consistent in the face of abnormal system shutdowns, Oracle ASMinstance failures, or system failures.
Oracle ADVM extends Oracle ASM by providing a disk driver interface to OracleASM storage allocated as Oracle ADVM volume files. You can use Oracle ADVM tocreate virtual disks that contain file systems. These file systems contained on OracleADVM volumes are able to support files beyond Oracle Database files, such asexecutable files, report files, trace files, alert logs, and other application data files.Because Oracle ADVM volumes are actually Oracle ASM files, they require the sameadministrative privileges as the Oracle ASM files.
Oracle Automatic Storage Management Cluster File System (Oracle ACFS)communicates with Oracle ASM through the Oracle ADVM interface. With theaddition of the Oracle ADVM, Oracle ASM becomes a complete storage solution ofuser data for both database and non-database file needs.
To add a volume to an Oracle ASM disk group, disk group attributesCOMPATIBLE.ASM and COMPATIBLE.ADVM must be set to '11.2'.
Note:
Dynamic volumes supersede traditional device partitioning. Each volume isindividually named and may be configured for a single file system. OracleADVM volumes may be created on demand from Oracle ASM disk groupstorage and dynamically resized as required. These attributes make OracleADVM volumes far more flexible than physical devices and associatedpartitioning schemes.
The Oracle ADVM functionality includes the following:
• The ALTER DISKGROUP ADD | RESIZE |DROP | ENABLE | DISABLE | MODIFYVOLUME SQL statements that manage Oracle ADVM volumes.
See "Managing Oracle ADVM Volumes in a Disk Group (page 4-16)".
Overview of Oracle ASM Dynamic Volume Manager
Introducing Oracle ACFS and Oracle ADVM 11-39

See Also:
Oracle Database SQL Language Reference for information about the ALTERDISKGROUP SQL statement
• ASMCMD command-line tools for managing Oracle ADVM volumes.
See Managing Oracle ADVM with ASMCMD (page 15-1).
• There are new V$ASM views display information about Oracle ADVM volumes.
See Using Views to Display Oracle ACFS Information (page 12-1).
• Oracle ACFS operating system utilities for managing file systems and volumedevice files.
See Managing Oracle ACFS with Command-Line Tools (page 16-1).
Overview of Oracle ASM Dynamic Volume Manager
11-40 Oracle Automatic Storage Management Administrator's Guide
12Using Views to Display Oracle ACFS
Information
This chapter contains information about using dynamic views to display OracleAutomatic Storage Management Cluster File System (Oracle ACFS) and Oracle ASMDynamic Volume Manager (Oracle ADVM) information.
• Views Containing Oracle ACFS Information (page 12-1)
• Oracle ACFS Support for Oracle Database File Mapping Views (page 12-7)
See Also:
Oracle Database Reference for information about all of the V$ASM* dynamicperformance views
Views Containing Oracle ACFS InformationYou can use the views in Table 12-1 (page 12-1) to obtain information about OracleAutomatic Storage Management Cluster File System (Oracle ACFS). These views areaccessible from the Oracle ASM instance.
Note:
• To display information about Oracle ACFS file systems or volumes thatare located on nodes in an Oracle Flex ASM configuration, you mustconnect to the Oracle ASM proxy instance instead of the local Oracle ASMinstance. For information about Oracle Flex ASM, refer to "ManagingOracle Flex ASM (page 3-16)".
• When viewing space usage values in Oracle ACFS views on Windowssystems, the values may differ from sizes in Windows folders. Themechanism used by Folder Properties on Windows systems onlyaccounts for files and should be considered an approximate value.
Table 12-1 Oracle ASM dynamic views for Oracle ACFS information
View Description
V$ASM_ACFS_ENCRYPTION_INFO Contains encryption information for each Oracle ACFS file system.
V$ASM_ACFS_SECURITY_INFO Contains security realm information for each Oracle ACFS file system.
Using Views to Display Oracle ACFS Information 12-1

Table 12-1 (Cont.) Oracle ASM dynamic views for Oracle ACFS information
View Description
V$ASM_ACFS_SEC_ADMIN Contains information about Oracle ACFS security administrator in thecluster.
V$ASM_ACFS_SEC_CMDRULE Contains information about Oracle ACFS security command rules foreach Oracle ACFS file system.
V$ASM_ACFS_SEC_REALM Contains information about every realm in the Oracle ACFS securityrealm for each Oracle ACFS file system.
V$ASM_ACFS_SEC_REALM_FILTER Contains information about every filter in the Oracle ACFS securityrealm for each Oracle ACFS file system. A filter is a defined ascommandrule/ruleset pair in a realm.
V$ASM_ACFS_SEC_REALM_GROUP Contains information about every group in the Oracle ACFS securityrealm for each Oracle ACFS file system.
V$ASM_ACFS_SEC_REALM_USER Contains information about every user in the Oracle ACFS securityrealm for each Oracle ACFS file system.
V$ASM_ACFS_SEC_RULE Contains information about every Oracle ACFS security rule for eachOracle ACFS file system.
V$ASM_ACFS_SEC_RULESET Contains information about every Oracle ACFS security ruleset foreach Oracle ACFS file system.
V$ASM_ACFS_SEC_RULESET_RULE Contains information about every rule in Oracle ACFS securityruleset for each Oracle ACFS file system.
V$ASM_ACFSSNAPSHOTS Contains snapshot information about every mounted Oracle ACFSfile system.
V$ASM_ACFSTAG Contains all tag name information about files on all mounted OracleACFS file systems
V$ASM_ACFSVOLUMES Contains information about mounted Oracle ADVM volumes,correlated with V$ASM_FILESYSTEM.
V$ASM_AUDIT_CLEAN_EVENTS Contains information about the history of audit trail cleanup or purgeevents in an Oracle ASM instance.
V$ASM_AUDIT_CLEANUP_JOBS Contains information about the configured audit trail purge jobs in anOracle ASM instance.
V$ASM_AUDIT_CONFIG_PARAMS Contains information about the currently configured audit trailproperties in an Oracle ASM instance that are used by theDBMS_AUDIT_MGMT PL/SQL package.
V$ASM_AUDIT_LAST_ARCH_TS Contains information about the last archive timestamps set for audittrail cleanup or purges in an Oracle ASM instance.
V$ASM_FILESYSTEM Contains information about every mounted Oracle ACFS file system.
V$ASM_VOLUME Contains information about each Oracle ADVM volume that is amember of an Oracle ASM instance.
V$ASM_VOLUME_STAT Contains information about statistics for each Oracle ADVM volume.
Views Containing Oracle ACFS Information
12-2 Oracle Automatic Storage Management Administrator's Guide

Example 12-1 (page 12-4) shows information displayed from the V$ASM_ACFS_ENCRYPTION_INFO view. The FS_NAME column contains the mountpoint. The VOL_DEVICE contains the name of the Oracle ADVM device.
See Also:
Oracle Database Reference for information about the V$ASM_ACFS_ENCRYPTION_INFO view
Example 12-2 (page 12-4) shows information displayed from the V$ASM_ACFS_SECURITY_INFO view. The FS_NAME column contains the mount point.The VOL_DEVICE contains the name of the Oracle ADVM device.
See Also:
Oracle Database Reference for information about the V$ASM_ACFS_SECURITY_INFO view
Example 12-3 (page 12-5) shows information displayed from the V$ASM_ACFS_SEC_RULE view. The FS_NAME column contains the mount point.
Example 12-4 (page 12-5) shows information displayed from the V$ASM_ACFS_SEC_RULESET view. The FS_NAME column contains the mount point.
Example 12-5 (page 12-5) shows information displayed from the V$ASM_ACFS_SEC_RULESET_RULE view. The FS_NAME column contains the mountpoint.
Example 12-6 (page 12-5) shows information displayed from the V$ASM_ACFSSNAPSHOTS view. The FS_NAME column contains the mount point. TheVOL_DEVICE contains the name of the Oracle ADVM device.
See Also:
Oracle Database Reference for information about the V$ASM_ACFSSNAPSHOTSview
Example 12-7 (page 12-6) shows information displayed from the V$ASM_ACFSVOLUMES view. The PRIMARY_VOL column contains TRUE if the volume isthe primary volume for the file system.
See Also:
Oracle Database Reference for information about the V$ASM_ACFSVOLUMESview
Example 12-8 (page 12-6) shows information displayed from the V$ASM_FILESYSTEM view.
The STATE column contains the status of the file system, either AVAILABLE orOFFLINE. An offline file system can only be dismounted; other attempts at accessresult in errors. Offline means that either the Oracle ASM instance is down, the disk
Views Containing Oracle ACFS Information
Using Views to Display Oracle ACFS Information 12-3

group has been forced dismounted, or less commonly, a metadata I/O failureoccurred or serious metadata corruption was detected. With a metadata I/O failure,the file system is also marked as corrupt.
The CORRUPT column indicates whether the file system needs the fsck oracfschkdsk command run on it. See "fsck (page 16-23)" and "acfschkdsk(page 16-44)".
See Also:
Oracle Database Reference for information about the V$ASM_FILESYSTEM view
Example 12-9 (page 12-6) shows information displayed from the V$ASM_VOLUMEview for volumes contained in the DATA disk group.
See Also:
Oracle Database Reference for information about the V$ASM_VOLUME view
Example 12-10 (page 12-6) shows information displayed from the V$ASM_VOLUME_STAT view for volumes contained in the DATA disk group. TheBYTES_READ column contains the total number of bytes read for the volume. TheBYTES_WRITTEN column contains the total number of bytes written for the volume.
See Also:
Oracle Database Reference for information about the V$ASM_VOLUME_STATview
Example 12-11 (page 12-6) shows tag names for the /acfsmounts/acfs1 filesystem displayed from the V$ASM_ACFSTAG view.
See Also:
Oracle Database Reference for information about the V$ASM_ACFSTAG view
Example 12-1 Viewing encryption information in V$ASM_ACFS_ENCRYPTION_INFO
SELECT SUBSTR(fs_name,1,24) FILESYSTEM, SUBSTR(vol_device,1,20) DEVICE, set_status, enabled_status, algorithm, key_length, last_rekey_time FROM V$ASM_ACFS_ENCRYPTION_INFO;
FILESYSTEM DEVICE SET_STA ENABLED_ ALGORIT KEY_LEN LAST_REKE------------ ----------- ---------------------- ------- -------- ------- ------- ---------/acfsmounts/acfs1 /dev/asm/volume1-228 YES ENABLED AES 192
Example 12-2 Viewing security information in V$ASM_ACFS_SECURITY_INFO
SELECT SUBSTR(fs_name,1,24) FILESYSTEM, SUBSTR(vol_device,1,20) DEVICE, prepared_status, enabled_status FROM V$ASM_ACFS_SECURITY_INFO;
FILESYSTEM DEVICE PREPARE ENABLED_------------------------- ---------------------- ------- --------/acfsmounts/acfs1 /dev/asm/volume1-228 YES ENABLED
Views Containing Oracle ACFS Information
12-4 Oracle Automatic Storage Management Administrator's Guide

Example 12-3 Viewing security rules information in V$ASM_ACFS_SEC_RULE
SELECT SUBSTR(rule_name,1,24) rule, SUBSTR(rule_type,1,12) type, SUBSTR(rule_value,1,16) value, SUBSTR(fs_name,1,24) filesystem FROM V$ASM_ACFS_SEC_RULE; RULE TYPE VALUE FILESYSTEM------------------------ ------------ ---------------- ------------------------medHistRule1a TIME 22:00:00 /acfsmounts/acfs1medHistRule1c TIME 08:00:00 /acfsmounts/acfs1medHistRule1b USERNAME medMaintenance /acfsmounts/acfs1medHistRule1d USERNAME medBrowse /acfsmounts/acfs1SYSTEM_RULE_Auditor GROUPNAME myaudit_mgr_grp /acfsmounts/acfs1SYSTEM_RULE_AuditManager GROUPNAME myauditor_grp /acfsmounts/acfs1SYSTEM_RULE_Always TIME 00:00:00 /acfsmounts/acfs1
Example 12-4 Viewing security ruleset information in V$ASM_ACFS_SEC_RULESET
SELECT SUBSTR(ruleset_name,1,36) ruleset, ruleset_option r_option, SUBSTR(fs_name,1,24) filesystem FROM V$ASM_ACFS_SEC_RULESET;
RULESET R_OPTION FILESYSTEM------------------------------------ -------- -----------------medRuleSet1 ALL_TRUE /acfsmounts/acfs1medRuleSet2 ALL_TRUE /acfsmounts/acfs1SYSTEM_RULESET_Auditor ALL_TRUE /acfsmounts/acfs1SYSTEM_RULESET_AuditManager ALL_TRUE /acfsmounts/acfs1SYSTEM_RULESET_AuditMgr_Auditor ANY_TRUE /acfsmounts/acfs1SYSTEM_RULESET_AlwaysDeny ANY_TRUE /acfsmounts/acfs1
Example 12-5 Viewing security ruleset information in V$ASM_ACFS_SEC_RULESET_RULE
SELECT SUBSTR(ruleset_name,1,36) ruleset, substr(rule_name,1,24) rule, SUBSTR(fs_name,1,36) filesystem FROM V$ASM_ACFS_SEC_RULESET_RULE; RULESET RULE FILESYSTEM------------------------------------ ------------------------ ------------------medRuleSet1 medHistRule1a /acfsmounts/acfs1medRuleSet1 medHistRule1b /acfsmounts/acfs1medRuleSet2 medHistRule1c /acfsmounts/acfs1medRuleSet2 medHistRule1d /acfsmounts/acfs1SYSTEM_RULESET_Auditor SYSTEM_RULE_Auditor /acfsmounts/acfs1SYSTEM_RULESET_AuditManager SYSTEM_RULE_AuditManager /acfsmounts/acfs1SYSTEM_RULESET_AuditMgr_Auditor SYSTEM_RULE_Auditor /acfsmounts/acfs1SYSTEM_RULESET_AuditMgr_Auditor SYSTEM_RULE_AuditManager /acfsmounts/acfs1SYSTEM_RULESET_AlwaysDeny SYSTEM_RULE_Always /acfsmounts/acfs1
Example 12-6 Viewing snapshot information in V$ASM_ACFSSNAPSHOTS
SELECT SUBSTR(FS_NAME,1,24) FILESYSTEM, SUBSTR(VOL_DEVICE,1,22) DEVICE, SUBSTR(SNAP_NAME,1,12) SNAPSHOT, CREATE_TIME TIME, SUBSTR(PARENT,1,10) PARENT, SUBSTR(TYPE,1,4) TYPE FROM V$ASM_ACFSSNAPSHOTS;
FILESYSTEM DEVICE SNAPSHOT TIME PARENT TY------------------------ ---------------------- ------------ --------- ---------- --/acfsmounts/acfs1 /dev/asm/volume1-229 snaprw 13-MAR-12 NULL RW/acfsmounts/acfs1 /dev/asm/volume1-229 snaprw_child 13-MAR-12 snaprw RW/acfsmounts/acfs2 /dev/asm/volume2-321 snapro 13-MAR-12 NULL RO
Views Containing Oracle ACFS Information
Using Views to Display Oracle ACFS Information 12-5

Example 12-7 Viewing volume information with V$ASM_ACFSVOLUMES
SELECT fs_name, vol_device, primary_vol, total_mb, free_mb FROM V$ASM_ACFSVOLUMES;
FS_NAME VOL_DEVICE PRIMARY_VOL TOTAL_MB FREE_MB------------------ ---------------------- ----------- --------- ----------/acfsmounts/acfs1 /dev/asm/volume1-228 TRUE 1024000 578626.522/acfsmounts/acfs2 /dev/asm/volume2-375 TRUE 1024000 685761.463...
Example 12-8 Viewing volume information with V$ASM_FILESYSTEM
SELECT fs_name, available_time, block_size, state, corrupt FROM V$ASM_FILESYSTEM;
FS_NAME AVAILABLE BLOCK_SIZE STATE CORRUPT-------------------------- --------- ---------- ------------- -------/acfsmounts/acfs1 19-JUL-09 4 AVAILABLE FALSE/acfsmounts/acfs2 19-JUL-09 4 AVAILABLE FALSE
Example 12-9 Viewing volume information with V$ASM_VOLUME
SELECT dg.name AS diskgroup, v.volume_name, v.volume_device, v.mountpath FROM V$ASM_DISKGROUP dg, V$ASM_VOLUME v WHERE dg.group_number = v.group_number and dg.name = 'DATA';
DISKGROUP VOLUME_NAME VOLUME_DEVICE MOUNTPATH---------------- ----------------- ----------------------- ------------------DATA VOLUME1 /dev/asm/volume1-228 /acfsmounts/acfs1DATA VOLUME2 /dev/asm/volume2-375 /acfsmounts/acfs2
Example 12-10 Viewing volume information with V$ASM_VOLUME_STAT
SELECT dg.name AS diskgroup, v.volume_name, v.bytes_read, v.bytes_written FROM V$ASM_DISKGROUP dg, V$ASM_VOLUME_STAT v WHERE dg.group_number = v.group_number and dg.name = 'DATA';
DISKGROUP VOLUME_NAME BYTES_READ BYTES_WRITTEN------------------------------ ------------------------------ ----------- -------------DATA VOLUME1 12370105856 43510272DATA VOLUME2 2685728 32201504
Example 12-11 Viewing tag name information with V$ASM_ACFSTAG
SELECT SUBSTR(TAG_NAME,1,8) TAG_NAME, SUBSTR(FS_NAME,1,20) FS_NAME, SUBSTR(PATH_NAME,1,42) PATH_NAME FROM V$ASM_ACFSTAG WHERE TAG_NAME='tag5';
TAG_NAME FS_NAME PATH_NAME-------- --------------------- --------------------------------------tag5 /acfsmounts/acfs1 /acfsmounts/acfs1/d1/d2/d3/d4/d5/f6tag5 /acfsmounts/acfs1 /acfsmounts/acfs1/d1/d2/d3/d4/d5tag5 /acfsmounts/acfs1 /acfsmounts/acfs1/d1/d2/d3/d4tag5 /acfsmounts/acfs1 /acfsmounts/acfs1/d1/d2/d3tag5 /acfsmounts/acfs1 /acfsmounts/acfs1/d1/d2tag5 /acfsmounts/acfs1 /acfsmounts/acfs1/d1tag5 /acfsmounts/acfs1 /acfsmounts/acfs1/f1tag5 /acfsmounts/acfs1 /acfsmounts/acfs1
Views Containing Oracle ACFS Information
12-6 Oracle Automatic Storage Management Administrator's Guide

Oracle ACFS Support for Oracle Database File Mapping Views
Note:
This feature is available starting with Oracle Database 12c Release 1 (12.1.0.2).
Oracle ACFS supports Oracle Database file mapping views to the Oracle ASM devicelevel. For information about file mapping to Oracle ASM files, refer to "OracleDatabase File Mapping for Oracle ASM Files (page 5-11)".
The following database mapping views are supported by Oracle ACFS:
• V$MAP_FILE
• V$MAP_FILE_EXTENT
• V$MAP_ELEMENT
• V$MAP_FILE_IO_STACK
These V$MAP views are only refreshed by executing the procedureDBMS_STORAGE_MAP.MAP_ALL. The Oracle ACFS file mapping interface does notutilize the external fmputl process or its supporting libraries.
Note:
• Oracle ACFS does not provide support for Oracle Database file mappingon Windows.
• Oracle ACFS does not provide support for the V$MAP_SUBELEMENTview.
Before running any queries on the V$MAP views, ensure that the FILE_MAPPINGinitialization is set to TRUE, then run the DBMS_STORAGE_MAP.MAP_ALL procedure tobuild the mapping information for the entire I/O subsystem associated with thedatabase. For example, connect as SYSDBA to the database instance and run thefollowing:
SQL> ALTER SYSTEM SET file_mapping=true;
SQL> EXEC DBMS_STORAGE_MAP.MAP_ALL(10000);
The SQL statements in Example 12-12 (page 12-8) to Example 12-15 (page 12-8)are run from the Oracle Database instance. Example 12-12 (page 12-8) displaysinformation from the V$MAP_ELEMENT view.
Example 12-13 (page 12-8) displays information from the V$MAP_FILE view.
Example 12-14 (page 12-8) displays the element offset versus file offset informationfor each extent with V$MAP_FILE_EXTENT, specifying FILE_MAP_IDX equal to 4,which is the file map index of the /dbdata/orcl/users01.dbf file.
Example 12-15 (page 12-8) displays information from V$MAP_FILE_IO_STACKspecifying FILE_MAP_IDX equal to 4. The V$MAP_FILE_IO_STACK view is similar to
Oracle ACFS Support for Oracle Database File Mapping Views
Using Views to Display Oracle ACFS Information 12-7

V$MAP_FILE_EXTENT, but the display groups contiguous extents which are on thesame device or element and of the same size.
See Also:
• Oracle Database Administrator's Guide for information about the OracleDatabase File Mapping Interface
• Oracle Database Reference for details about the V$MAP views
Example 12-12 Viewing Oracle ASM information with V$MAP_ELEMENT
SQL> SELECT ELEM_NAME, ELEM_IDX, ELEM_TYPE, ELEM_SIZE, ELEM_DESCR FROM V$MAP_ELEMENT;
ELEM_NAME ELEM_IDX ELEM_TYPE ELEM_SIZE ELEM_DESCR------------ ---------- ---------- ---------- -----------------+/dev/xvdd1 0 ASMDISK 117184512 TEST_0001+/dev/xvdc1 1 ASMDISK 117184512 TEST_0000
Example 12-13 Viewing Oracle ACFS Data File Information with V$MAP_FILE
SQL> SELECT FILE_NAME, FILE_MAP_IDX, FILE_TYPE, FILE_STRUCTURE, FILE_SIZE, FILE_NEXTS FROM V$MAP_FILE WHERE REGEXP_LIKE(FILE_NAME, '*users01.dbf');
FILE_NAME FILE_MAP_IDX FILE_TYPE FILE_STRU FILE_SIZE FILE_NEXTS------------------------- ------------ --------- --------- --------- ----------/dbdata1/orcl/users01.dbf 4 DATAFILE FILE 10256 41
Example 12-14 Viewing Element and File Offset Information with V$MAP_FILE_EXTENT
SQL> SELECT FILE_MAP_IDX, EXT_NUM, EXT_ELEM_OFF, EXT_SIZE, EXT_FILE_OFF, EXT_TYPE, ELEM_IDX FROM V$MAP_FILE_EXTENT WHERE FILE_MAP_IDX=4;
FILE_MAP_IDX EXT_NUM EXT_ELEM_OFF EXT_SIZE EXT_FILE_OFF EXT_TY ELEM_IDX------------ ---------- ------------ ---------- ------------ ------ ---------- 4 0 58105664 192 0 DATA 0 4 1 58154752 256 192 DATA 1 4 2 58089472 256 448 DATA 0... 4 39 58140928 256 9920 DATA 1 4 40 58108160 88 10176 DATA 041 rows selected.
Example 12-15 Viewing Extent Information With V$MAP_FILE_IO_STACK
SQL> SELECT FILE_MAP_IDX, ELEM_IDX, CU_SIZE,STRIDE, NUM_CU,ELEM_OFFSET, FILE_OFFSET FROM V$MAP_FILE_IO_STACK WHERE FILE_MAP_IDX=4;
FILE_MAP_IDX ELEM_IDX CU_SIZE STRIDE NUM_CU ELEM_OFFSET FILE_OFFSET------------ ---------- ---------- ---------- ---------- ----------- ----------- 4 0 256 1024 10 58089472 448 4 0 192 0 1 58105664 0 4 0 256 1024 9 58105856 960 4 0 88 0 1 58108160 10176 4 1 256 1024 10 58138624 704 4 1 256 1024 10 58154752 192
Oracle ACFS Support for Oracle Database File Mapping Views
12-8 Oracle Automatic Storage Management Administrator's Guide

6 rows selected.
Oracle ACFS Support for Oracle Database File Mapping Views
Using Views to Display Oracle ACFS Information 12-9

Oracle ACFS Support for Oracle Database File Mapping Views
12-10 Administrator's Guide

13Administering Oracle ACFS with Oracle
Enterprise Manager
This chapter describes how to administer Oracle Automatic Storage ManagementCluster File System (Oracle ACFS) with Oracle Enterprise Manager Cloud Control.
All Oracle ASM administration tasks begin with the Oracle Automatic StorageManagement home page in Oracle Enterprise Manager Cloud Control. Forinformation about the Oracle ASM home page and how to access that page, see"Accessing the Oracle Automatic Storage Management Home Page (page 7-2)".
For information about using command-line tools to administer Oracle ACFS filesystems, see Managing Oracle ACFS with Command-Line Tools (page 16-1). Forinformation about the basic steps for creating Oracle ACFS file systems, see "BasicSteps to Manage Oracle ACFS Systems (page 16-1)".
This chapter contains the following topics:
• Managing Oracle ACFS File Systems and Volumes with Oracle EnterpriseManager (page 13-1)
• Managing Oracle ACFS Snapshots with Oracle Enterprise Manager (page 13-5)
• Managing Security Features with Oracle Enterprise Manager (page 13-8)
• Managing Encryption Features with Oracle Enterprise Manager (page 13-21)
• Managing Tagging Features with Oracle Enterprise Manager (page 13-22)
Note:
To manage or monitor Oracle ACFS file systems or volumes that are locatedon nodes in an Oracle Flex ASM configuration, you must connect to the OracleASM proxy instance instead of the local Oracle ASM instance. For informationabout Oracle Flex ASM, refer to "Managing Oracle Flex ASM (page 3-16)".
Managing Oracle ACFS File Systems and Volumes with Oracle EnterpriseManager
This section discusses how to manage Oracle ACFS file systems and volumes systemswith Oracle Enterprise Manager Cloud Control.
This section contains the following topics:
• Creating Oracle ACFS File Systems and Volumes (page 13-2)
• Viewing and Modifying Oracle ACFS Volumes and File Systems (page 13-4)
Administering Oracle ACFS with Oracle Enterprise Manager 13-1
For more information about Oracle ACFS file systems and volumes, refer to "AboutOracle ACFS (page 11-4)".
See Also:
• Oracle Enterprise Manager Cloud Administration Guide
• Oracle Enterprise Manager Administration
Creating Oracle ACFS File Systems and VolumesTo create an Oracle ACFS volume, perform the following steps.
1. Access the Disk Groups page from the Oracle ASM home page.
For information about the Oracle ASM home page and how to access that page,see "Accessing the Oracle Automatic Storage Management Home Page (page 7-2)".
2. Click the Volumes link in the General tab of the Disk Group page. See Figure 13-4 (page 13-5).
3. Click Create in the Volumes tab of the Disk Group page.
The Create ASM Volume page displays, shown in Figure 13-1 (page 13-3).
Enter the volume name, disk group name that contains the volume, and the initialsize of the volume.
You can also select the redundancy setting for the volume and the region settingsfor primary and mirror extents. For information about redundancy settings, referto "Mirroring_ Redundancy_ and Failure Group Options (page 4-30)". Forinformation about hot and cold disk regions, refer to "Intelligent Data Placement(page 4-20)". For information about creating a volume with the ASMCMDvolcreate command, refer to "ASMCMD Volume Management Commands(page 15-1)".
Figure 13-1 (page 13-3) shows the Oracle ASM Create ASM Volume page.
Managing Oracle ACFS File Systems and Volumes with Oracle Enterprise Manager
13-2 Oracle Automatic Storage Management Administrator's Guide

Figure 13-1 Oracle ACFS Create ASM Volume Page
To create an Oracle ACFS file system on a volume in a disk group, perform thefollowing steps.
1. Access the Volumes tab of the Disk Group page. See Figure 13-4 (page 13-5).
2. Select an existing volume in the disk group and click Create ASM Cluster FileSystem.
The compatibility parameters COMPATIBLE.ASM and COMPATIBLE.ADVM mustbe set to 11.2 or higher for the disk group. See "Disk Group CompatibilityAttributes (page 4-42)".
3. On the Create ASM Cluster File System page, enter the information to create afile system. You can optionally register and mount the file system.
You must enter the volume name. You can enter an optional volume label.
You can optionally choose to register and mount the file system when it is created.Select a mount point from available directories.
Enter the host credentials needed to run the command when prompted. Toregister or mount a file system, you need root or administrator privileges. Forinformation about the registry process, see "About the Oracle ACFS MountRegistry (page 11-9)".
After a directory has been selected, click Show Command to have OracleEnterprise Manager generate the commands that you can run at an operatingsystem prompt. Examples of commands on a Linux system are:
/sbin/mkfs -t acfs -b 4k /dev/asm/volume1-361/sbin/acfsutil registry -f -a /dev/asm/volume1-361 /oracle/acfsmounts/acfs2/bin/mount -t acfs -rw /dev/asm/volume1-361 /oracle/acfsmounts/acfs2
You can also generate the commands to register or mount an Oracle ACFS filesystem on the ASM Cluster File System tab.
Managing Oracle ACFS File Systems and Volumes with Oracle Enterprise Manager
Administering Oracle ACFS with Oracle Enterprise Manager 13-3

Viewing and Modifying Oracle ACFS Volumes and File SystemsTo view and modify information about Oracle ACFS file systems, click the ASMCluster File System link in the Oracle ASM home page.
Figure 13-2 (page 13-4) shows the ASM Cluster File System tab in Oracle EnterpriseManager. This tab lists all of the Oracle ACFS associated with the Oracle ASMinstance.
On this page, you can choose to mount, dismount, delete, create snapshot, viewcontent, register, and deregister a selected file system. In addition, you can create a filesystem, mount all file systems, or dismount all file systems.
For each Oracle ACFS, the columns provide information for Mount Point, Availability,State, Snapshots, Used (%), Used (GB), Size (GB), Allocated Space, Redundancy,Volume, and Disk Group. Redundancy, Volume, and Disk Group columns are on thefar right of the page and are not shown in the illustration. The mount point, snapshots,volume, and disk group are provided as links to further information.
Figure 13-2 Oracle ACFS Page
To view information about a specific volume, click the volume name in the Volumecolumn on the ASM Cluster File System page to display the General tab of the ASMVolumes page.
To view information about a file system, click the link in the Mount Point column onthe ASM Cluster File System page.
Figure 13-3 (page 13-5) shows the General tab of the ASM Cluster File Systempage.
Managing Oracle ACFS File Systems and Volumes with Oracle Enterprise Manager
13-4 Oracle Automatic Storage Management Administrator's Guide

Figure 13-3 Oracle ACFS General Page
To view information about a disk group for an Oracle ACFS, click the disk groupname in the Disk Group column on the ASM Cluster File System page. The Generaltab of the Disk Group page displays as shown in Figure 7-6 (page 7-10).
To view information about volumes in a disk group, click the Volumes tab at the topof the Disk Group page.
Figure 13-4 (page 13-5) shows the Oracle ACFS Volume page.
Figure 13-4 Oracle ACFS Volume Page
Managing Oracle ACFS Snapshots with Oracle Enterprise ManagerThis section describes how to manage snapshots with Oracle Enterprise Manager.
• Creating_ Modifying_ and Viewing Snapshots (page 13-6)
• Converting Snapshots Between Read-Only and Read-Write (page 13-7)
• Creating Child Snapshots from Existing Snapshots (page 13-7)
Managing Oracle ACFS Snapshots with Oracle Enterprise Manager
Administering Oracle ACFS with Oracle Enterprise Manager 13-5

For more information about Oracle ACFS snapshots, refer to "About Oracle ACFSSnapshots (page 11-10)".
Creating, Modifying, and Viewing SnapshotsTo view and modify information about existing snapshots or create snapshots for a filesystem, perform the following steps.
1. Click the ASM Cluster File System tab on the Oracle ASM home page
2. Click a mount point link in the Mount Point column as shown in Figure 13-2(page 13-4)
3. Click the Snapshots tab, shown in Figure 13-5 (page 13-6).
Optionally, you can click a number link for existing snapshots in the Snapshotscolumn on the ASM Cluster File System page to display the Snapshots page.
On the Snapshots page, you can create snapshots or search for and display specificsnapshots. To search for a snapshot, enter a name with optional wildcard characters inthe search field then click Search.
Figure 13-5 Oracle ACFS Snapshots Tab
To create a snapshot, perform the following steps.
1. Click Create in the Snapshots page.
Figure 13-6 (page 13-7) shows the Create Snapshot page.
2. Complete the information on the page.
Accept the default snapshot name, or provide a name. Optionally, you can chooseto delete the oldest snapshot.
Managing Oracle ACFS Snapshots with Oracle Enterprise Manager
13-6 Oracle Automatic Storage Management Administrator's Guide

3. When you have completed the screen, you can click OK to run the command, orclick Show Command to view the generated command.
For example, the following is a generated command for creating a snapshot:
/sbin/acfsutil snap create "snapshot_20090702_142135" /oracle/acfsmounts/acfs1
To run the generated command, you need the appropriate privileges on the hostcomputer. Oracle Enterprise Manager prompts you to enter host credentials ifthey have not been set up.
You can also open a Telnet session from the Create Snapshot page to manuallyenter the generated operating system command.
Figure 13-6 Oracle ACFS Create Snapshot Page
To drill down in a snapshot directory, click the snapshot name in the Snapshots pageto display the Search and List Directory page.
Converting Snapshots Between Read-Only and Read-WriteYou can use edit snapshot to convert the snapshot attribute between Read Only andRead Write. To edit a snapshot, follow these steps:
1. From the Oracle ASM home page, select the ASM Cluster File System tab to displaythe mount points in the cluster file system.
2. Click the file or directory in which you want to edit a snapshot.
Enterprise Manager displays ASM Cluster File System page.
3. Click the Snapshots tab.
4. Select the snapshot you want to edit, then click Edit.
The Snapshot page displays.
5. Change the Attribute. You can choose Read Only or Read Write.
6. Click OK.
Creating Child Snapshots from Existing SnapshotsUse the Create Child snapshot operation to create a point-in-time copy of an existingOracle ACFS snapshot. Future changes to the parent snapshot are not inherited by thechild snapshot. To create a child snapshot of an existing snapshot, follow these steps:
Managing Oracle ACFS Snapshots with Oracle Enterprise Manager
Administering Oracle ACFS with Oracle Enterprise Manager 13-7

1. From the Oracle ASM home page, select the ASM Cluster File System tab to displaythe mount points in the cluster file system.
2. Click the file or directory Mount Point in which you want to create a childsnapshot.
Enterprise Manager displays ASM Cluster File System page.
3. Click the Snapshots tab.
4. Select the parent snapshot you want to use to create a child snapshot, then clickCreate Child.
The Create Child Snapshot on ASM Cluster File System page displays.
5. The Snapshot Name field is automatically populated with a default child snapshotname. You can replace the name with a name you designate.
6. Set the Attribute to Read Only or Read Write.
7. Optionally you can turn on the option to delete the oldest snapshot by turning onthe delete option. Oracle Enterprise Manager tabulates the number of remainingsnapshots before the maximum limit is reached.
8. Click OK to create the child snapshot.
Oracle Enterprise Manager returns to the Snapshots tab where you can see the newsnapshot with its Parent Name listed in the table.
Managing Security Features with Oracle Enterprise ManagerThis section describes how to manage security with Oracle Enterprise Manager.
• Initializing Oracle ACFS Security (page 13-9)
• Preparing an Oracle ACFS For Security (page 13-10)
• Undoing Oracle ACFS Security (page 13-10)
• Enabling Security on Oracle ACFS (page 13-11)
• Disabling Security on Oracle ACFS (page 13-11)
• Viewing Security Status (page 13-11)
• Adding an Oracle ACFS Security Administrator (page 13-12)
• Changing an Oracle ACFS Security Administrator Password (page 13-12)
• Deleting an Oracle ACFS Security Administrator (page 13-12)
• Viewing Oracle ACFS Security Administrators (page 13-12)
• Creating a Rule (page 13-13)
• Cloning a Rule (page 13-13)
• Editing a Rule (page 13-14)
• Deleting a Rule (page 13-14)
Managing Security Features with Oracle Enterprise Manager
13-8 Oracle Automatic Storage Management Administrator's Guide
• Searching For and Viewing Rules (page 13-14)
• Creating a Ruleset (page 13-15)
• Cloning a Ruleset (page 13-16)
• Editing a Ruleset (page 13-16)
• Deleting a Ruleset (page 13-16)
• Searching For and Viewing Rulesets (page 13-17)
• Creating a Realm (page 13-18)
• Cloning a Realm (page 13-18)
• Adding Objects to a Realm (page 13-19)
• Deleting Objects from a Realm (page 13-19)
• Deleting a Realm (page 13-20)
• Viewing Realms (page 13-20)
For more information about Oracle ACFS security, refer to "Oracle ACFS Security(page 11-19)".
Initializing Oracle ACFS SecurityOracle ACFS security provides a unified security infrastructure that allows users todefine security policies and groups for accessing file system objects. Oracle ACFSencryption allows users to store data on disk in an encrypted format. To initializeOracle ACFS security, follow these steps:
1. From the Oracle ASM home page, select the ASM Cluster File System tab todisplay the mount points in the cluster file system.
For information about the Oracle ASM home page and how to access that page,see "Accessing the Oracle Automatic Storage Management Home Page (page 7-2)".
2. Click a mount point in the list.
3. Click the Security/Encryption to display the Security and Encryption section.
4. In the Security Configuration section, you can click Configuration, Rules,Rulesets, and Realms under Security to display various options as shown in Figure 13-7 (page 13-10).
5. If Oracle ACFS security is not initialized in the cluster, the Initialize Securitybutton displays on the page. Click the button to initialize Oracle ACFS security.This operation needs to be performed only once in the cluster. On this page, youcan also prepare security for the file system.
Managing Security Features with Oracle Enterprise Manager
Administering Oracle ACFS with Oracle Enterprise Manager 13-9

Figure 13-7 Oracle ACFS Security Configuration Page
Preparing an Oracle ACFS For SecurityTo prepare an Oracle ACFS for security, follow these steps:
1. From the Oracle ASM home page, select the ASM Cluster File System tab to displaythe mount points in the cluster file system.
For information about the Oracle ASM home page and how to access that page, see"Accessing the Oracle Automatic Storage Management Home Page (page 7-2)".
2. Click the Mount Point of the file system for which you want to prepare security.
Enterprise Manager displays the ASM Cluster File System page for that mountpoint.
3. Click the Security/Encryption tab to display the Security Overview section. Thispage shows the security details for the current file system.
4. From the Actions menu, click Prepare Security.
Undoing Oracle ACFS SecurityTo undo preparation for Oracle ACFS security, follow these steps:
1. From the Oracle ASM home page, select the ASM Cluster File System tab to displaythe mount points in the cluster file system.
For information about the Oracle ASM home page and how to access that page, see"Accessing the Oracle Automatic Storage Management Home Page (page 7-2)".
2. Click the Mount Point of the file system for which you want to unprepare security.
Enterprise Manager displays the ASM Cluster File System page for that mountpoint.
Managing Security Features with Oracle Enterprise Manager
13-10 Oracle Automatic Storage Management Administrator's Guide

3. Click the Security/Encryption tab to display the Security Overview section. Thispage shows the security details for the current file system.
4. From the Actions menu, click Unprepare Security.
Enabling Security on Oracle ACFSTo enable security on Oracle ACFS, follow these steps:
1. From the Oracle ASM home page, select the ASM Cluster File System tab to displaythe mount points in the cluster file system.
For information about the Oracle ASM home page and how to access that page, see"Accessing the Oracle Automatic Storage Management Home Page (page 7-2)".
2. Click the Mount Point of the file system for which you want to enable security.
Enterprise Manager displays the ASM Cluster File System page for that mountpoint.
3. Click the Security/Encryption tab to display the Security Overview section. Thispage shows the security details for the current file system.
4. From the Actions menu, click Enable Security.
Disabling Security on Oracle ACFSTo disable security on an Oracle ACFS, follow these steps:
1. From the Oracle ASM home page, select the ASM Cluster File System tab to displaythe mount points in the cluster file system.
For information about the Oracle ASM home page and how to access that page, see"Accessing the Oracle Automatic Storage Management Home Page (page 7-2)".
2. Click the Mount Point of the file system for which you want to disable security.
Enterprise Manager displays the ASM Cluster File System page for that mountpoint.
3. Click the Security/Encryption tab to display the Security Overview section. Thispage shows the security details for the current file system.
4. From the Actions menu, click Disable Security.
Viewing Security StatusTo view security status, follow these steps:
1. From the Oracle ASM home page, select the ASM Cluster File System tab to displaythe mount points in the cluster file system.
For information about the Oracle ASM home page and how to access that page, see"Accessing the Oracle Automatic Storage Management Home Page (page 7-2)".
2. Click Show Security and Encryption to display the Security and Encryptionsection.
The section displays the mount points and the security and encryption settings foreach.
Managing Security Features with Oracle Enterprise Manager
Administering Oracle ACFS with Oracle Enterprise Manager 13-11

Adding an Oracle ACFS Security AdministratorTo add an Oracle ACFS security administrator, follow these steps:
1. From the Oracle ASM home page, select the ASM Cluster File System tab to displaythe mount points in the cluster file system.
For information about the Oracle ASM home page and how to access that page, see"Accessing the Oracle Automatic Storage Management Home Page (page 7-2)".
2. Click Show Security and Encryption to display the Security and Encryptionsection.
3. The list of Oracle ACFS security administrators in this cluster is displayed. Clickthe Create button. The Create Administrator page is displayed.
4. Enter the input details and click OK.
Changing an Oracle ACFS Security Administrator PasswordTo change an Oracle ACFS security administrator password, follow these steps:
1. From the Oracle ASM home page, select the ASM Cluster File System tab to displaythe mount points in the cluster file system.
For information about the Oracle ASM home page and how to access that page, see"Accessing the Oracle Automatic Storage Management Home Page (page 7-2)".
2. Click Show Security and Encryption to display the Security and Encryptionsection.
3. The list of Oracle ACFS security administrators in this cluster is displayed. Select asecurity administrator and click the Change Password button. The ChangeAdministrator Password page is displayed.
4. Enter the input details and click OK.
Deleting an Oracle ACFS Security AdministratorTo delete an Oracle ACFS security administrator, follow these steps:
1. From the Oracle ASM home page, select the ASM Cluster File System tab to displaythe mount points in the cluster file system.
For information about the Oracle ASM home page and how to access that page, see"Accessing the Oracle Automatic Storage Management Home Page (page 7-2)".
2. Click Show Security and Encryption to display the Security and Encryptionsection.
3. The list of Oracle ACFS security administrators in this cluster is displayed. Clickthe Delete button.
Viewing Oracle ACFS Security AdministratorsTo view Oracle ACFS security administrators, follow these steps:
Managing Security Features with Oracle Enterprise Manager
13-12 Oracle Automatic Storage Management Administrator's Guide
1. From the Oracle ASM home page, select the ASM Cluster File System tab to displaythe mount points in the cluster file system.
For information about the Oracle ASM home page and how to access that page, see"Accessing the Oracle Automatic Storage Management Home Page (page 7-2)".
2. Click Show Security and Encryption to display the Security and Encryptionsection.
3. The list of Oracle ACFS security administrators in this cluster is displayed.
Creating a RuleRules are created in a file system and can be added to one or more rulesets, which canthen be applied on an Oracle ACFS realm. Rules can also be cloned within the samefile system or across file systems.
To create a rule, follow these steps:
1. From the Oracle ASM home page, select the ASM Cluster File System tab to displaythe mount points in the cluster file system.
For information about the Oracle ASM home page and how to access that page, see"Accessing the Oracle Automatic Storage Management Home Page (page 7-2)".
2. Click a Mount Point. The Oracle ACFS home page is displayed for this mountpoint.
3. Click the Security/Encryption tab.
4. In the Security section, click Rules.
The list of rules in the mount point is displayed.
5. Click Create. The Create Rule page displays along with the available rule options.
6. Enter the input details and click OK.
Cloning a RuleRules can be cloned within the same mount point or across mount points. To clone arule, follow these steps:
1. From the Oracle ASM home page, select the ASM Cluster File System tab to displaythe mount points in the cluster file system.
For information about the Oracle ASM home page and how to access that page, see"Accessing the Oracle Automatic Storage Management Home Page (page 7-2)".
2. Click a Mount Point. The Oracle ACFS home page is displayed for this mountpoint.
3. Click the Security/Encryption tab.
4. In the Security section, click Rules.
The list of rules in the mount point is displayed.
5. Click Clone. The Clone Rule page is displayed with the available rule options.
Managing Security Features with Oracle Enterprise Manager
Administering Oracle ACFS with Oracle Enterprise Manager 13-13

6. Enter the input details and click OK.
Editing a RuleYou can modify values and options for an existing rules. Rule types cannot bechanged. To edit a rule, follow these steps:
1. From the Oracle ASM home page, select the ASM Cluster File System tab to displaythe mount points in the cluster file system.
For information about the Oracle ASM home page and how to access that page, see"Accessing the Oracle Automatic Storage Management Home Page (page 7-2)".
2. Click a Mount Point. The Oracle ACFS home page is displayed for this mountpoint.
3. Click the Security/Encryption tab.
4. In the Security section, click Rules.
The list of rules in the mount point is displayed.
5. Select a rule and click Edit.
6. Edit the input details and click OK.
Deleting a RuleYou can delete a rule so it no longer is used to enforce security on realms. To delete arule, follow these steps:
1. From the Oracle ASM home page, select the ASM Cluster File System tab to displaythe mount points in the cluster file system.
For information about the Oracle ASM home page and how to access that page, see"Accessing the Oracle Automatic Storage Management Home Page (page 7-2)".
2. Click a Mount Point. The Oracle ACFS home page is displayed for this mountpoint.
3. Click the Security/Encryption tab.
4. In the Security section, click Rules.
The list of rules in the mount point is displayed.
5. Select a rule and click the Delete Rule button.
Searching For and Viewing RulesYou can view or search the list of rules on a mount point, including the details of eachrule. To search for and view rules, follow these steps:
1. From the Oracle ASM home page, select the ASM Cluster File System tab todisplay the mount points in the cluster file system.
For information about the Oracle ASM home page and how to access that page,see "Accessing the Oracle Automatic Storage Management Home Page (page 7-2)".
2. Click a Mount Point. The Oracle ACFS home page is displayed for this mountpoint.
Managing Security Features with Oracle Enterprise Manager
13-14 Oracle Automatic Storage Management Administrator's Guide

3. Click the Security/Encryption tab.
4. In the Security section, click Rules.
The list of rules in the file system is displayed as shown in Figure 13-8(page 13-15).
Figure 13-8 Oracle ACFS Security Rules Page
Creating a RulesetYou can create a ruleset which is a collection of one or more rules that you canassociate with a command rule for realm authorization. A ruleset evaluates to true orfalse based on the evaluation of each rule it contains and the evaluation type (All Trueor Any True). Rulesets cannot be applied on an Oracle ACFS security realm directly;they are always associated with a Command Rule, which are then applied on a realmto enforce security. To create a ruleset, follow these steps:
1. From the Oracle ASM home page, select the ASM Cluster File System tab to displaythe mount points in the cluster file system.
For information about the Oracle ASM home page and how to access that page, see"Accessing the Oracle Automatic Storage Management Home Page (page 7-2)".
2. Click a Mount Point. The Oracle ACFS home page is displayed for this mountpoint.
3. Click the Security/Encryption tab.
4. In the Security section, click Rulesets.
The list of rulesets in the mount point is displayed.
5. Click Create. The Create Ruleset page is displayed along with the available rulesetoptions.
Managing Security Features with Oracle Enterprise Manager
Administering Oracle ACFS with Oracle Enterprise Manager 13-15

6. Enter the input details and click OK.
Cloning a RulesetRulesets can be cloned within the same mount point or across mount points. To clonea ruleset, follow these steps:
1. From the Oracle ASM home page, select the ASM Cluster File System tab to displaythe mount points in the cluster file system.
For information about the Oracle ASM home page and how to access that page, see"Accessing the Oracle Automatic Storage Management Home Page (page 7-2)".
2. Click a Mount Point. The Oracle ACFS home page is displayed for this mountpoint.
3. Click the Security/Encryption tab.
4. In the Security section, click Rulesets.
The list of rulesets in the mount point is displayed.
5. Click the ruleset you want to clone then click Clone. The Clone Ruleset page isdisplayed along with the available ruleset options.
6. Enter input details and click OK.
Editing a RulesetYou can add or delete rules to or from a Ruleset. You can also edit the Ruleset options.To edit a ruleset, follow these steps:
1. From the Oracle ASM home page, select the ASM Cluster File System tab to displaythe mount points in the cluster file system.
For information about the Oracle ASM home page and how to access that page, see"Accessing the Oracle Automatic Storage Management Home Page (page 7-2)".
2. Click a Mount Point. The Oracle ACFS home page is displayed for this mountpoint.
3. Click the Security/Encryption tab.
4. In the Security section, click Rulesets.
The list of rulesets in the mount point is displayed.
5. Select a ruleset and click Edit. The Edit Ruleset page is displayed along with all theruleset values.
6. Edit the ruleset details and click OK.
Deleting a RulesetDeleted rulesets are no longer used to enforce security on realms. To delete a ruleset,follow these steps:
1. From the Oracle ASM home page, select the ASM Cluster File System tab to displaythe mount points in the cluster file system.
Managing Security Features with Oracle Enterprise Manager
13-16 Oracle Automatic Storage Management Administrator's Guide

For information about the Oracle ASM home page and how to access that page, see"Accessing the Oracle Automatic Storage Management Home Page (page 7-2)".
2. Click a Mount Point. The Oracle ACFS home page is displayed for this mountpoint.
3. Click the Security/Encryption tab.
4. In the Security section, click Rulesets.
The list of rulesets in the mount point is displayed.
5. Select a ruleset and click Delete.
Searching For and Viewing RulesetsA ruleset is a collection of one or more rules that you can associate with a commandrule for realm authorization. A ruleset evaluates to true or false based on theevaluation of each rule it contains and the evaluation type (All True or Any True).Enterprise Manager enables you to view and search the list of rulesets applied on anOracle ACFS mount point, including the details of each ruleset. To search for and viewrulesets, follow these steps:
1. From the Oracle ASM home page, select the ASM Cluster File System tab todisplay the mount points in the cluster file system.
For information about the Oracle ASM home page and how to access that page,see "Accessing the Oracle Automatic Storage Management Home Page (page 7-2)".
2. Click a Mount Point. The Oracle ACFS home page is displayed for this mountpoint.
3. Click the Security/Encryption tab.
4. In the Security section, click Rulesets.
The list of rulesets in the file system is displayed as shown in Figure 13-9(page 13-18).
Managing Security Features with Oracle Enterprise Manager
Administering Oracle ACFS with Oracle Enterprise Manager 13-17
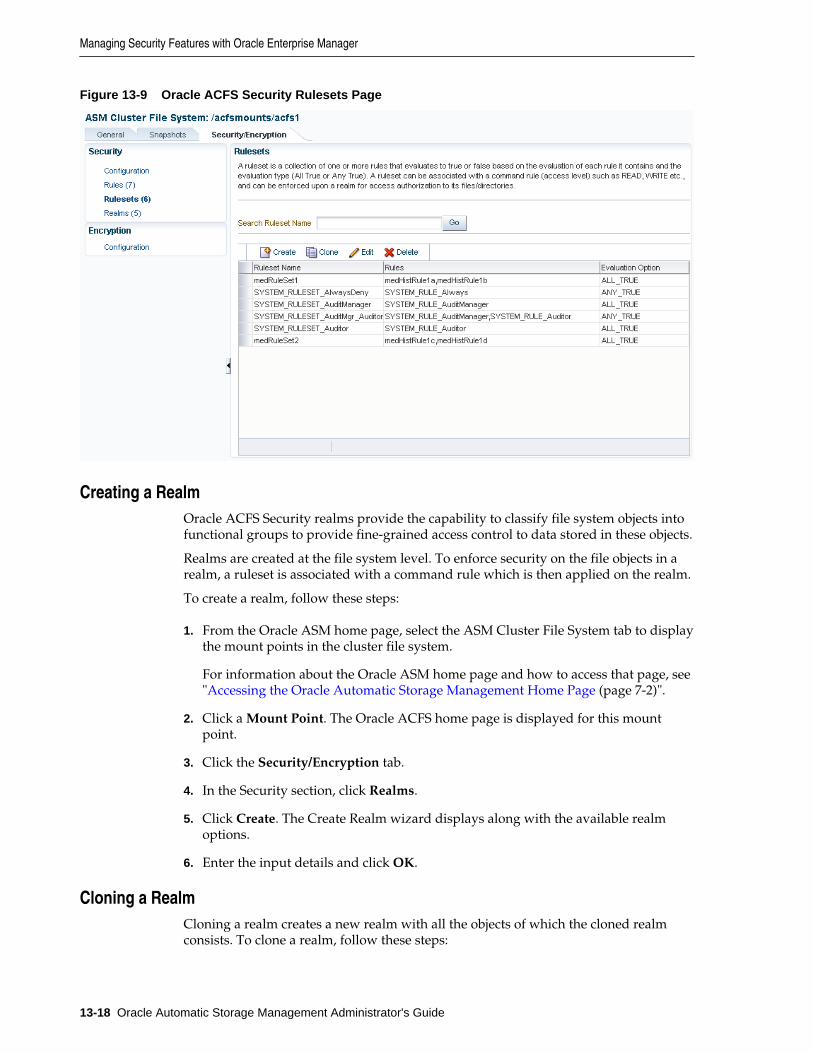
Figure 13-9 Oracle ACFS Security Rulesets Page
Creating a RealmOracle ACFS Security realms provide the capability to classify file system objects intofunctional groups to provide fine-grained access control to data stored in these objects.
Realms are created at the file system level. To enforce security on the file objects in arealm, a ruleset is associated with a command rule which is then applied on the realm.
To create a realm, follow these steps:
1. From the Oracle ASM home page, select the ASM Cluster File System tab to displaythe mount points in the cluster file system.
For information about the Oracle ASM home page and how to access that page, see"Accessing the Oracle Automatic Storage Management Home Page (page 7-2)".
2. Click a Mount Point. The Oracle ACFS home page is displayed for this mountpoint.
3. Click the Security/Encryption tab.
4. In the Security section, click Realms.
5. Click Create. The Create Realm wizard displays along with the available realmoptions.
6. Enter the input details and click OK.
Cloning a RealmCloning a realm creates a new realm with all the objects of which the cloned realmconsists. To clone a realm, follow these steps:
Managing Security Features with Oracle Enterprise Manager
13-18 Oracle Automatic Storage Management Administrator's Guide
1. From the Oracle ASM home page, select the ASM Cluster File System tab to displaythe mount points in the cluster file system.
For information about the Oracle ASM home page and how to access that page, see"Accessing the Oracle Automatic Storage Management Home Page (page 7-2)".
2. Click a Mount Point. The Oracle ACFS home page is displayed for this mountpoint.
3. Click the Security/Encryption tab.
4. In the Security section, click Realms. The list of realms in the mount point isdisplayed.
5. Select a realm and click Clone Realm. The Clone Realm page is displayed alongwith the available realm options. A realm can be cloned within the same mountpoint with a different name or across mount points. You can choose the properties;such as users, groups, and encryption; to propagate to the cloned realm.
6. Enter the input details and click OK.
Adding Objects to a RealmOnce a realm is created, you can add objects to a realm. To add objects to a realm,follow these steps:
1. From the Oracle ASM home page, select the ASM Cluster File System tab to displaythe mount points in the cluster file system.
For information about the Oracle ASM home page and how to access that page, see"Accessing the Oracle Automatic Storage Management Home Page (page 7-2)".
2. Click the Mount Point that contains the realm to which you want to add objects.The Oracle ACFS home page is displayed for this mount point.
3. Click the Security/Encryption tab.
4. In the Security section, click Realms. The list of realms in the mount point isdisplayed.
5. Select a realm and click the Edit button. The Edit Realm wizard displays.
6. Click Next to move to the Realm Objects page where you can click Add to addobjects to the realm.
7. Click Done.
Deleting Objects from a RealmYou can delete various objects from a realm. If a file or directory is removed from arealm, it is not subjected to security or encryption that is enforced on the realm. If acommand rule is deleted from a realm, it is not evaluated while enforcing security onthe realm. The command rule still continues to exist for use in other realms. If anencryption object is removed, it disables encryption on the realm and results indecryption of all encrypted files in the realm.
To delete an object from a realm, follow these steps:
1. From the Oracle ASM home page, select the ASM Cluster File System tab to displaythe mount points in the cluster file system.
Managing Security Features with Oracle Enterprise Manager
Administering Oracle ACFS with Oracle Enterprise Manager 13-19

For information about the Oracle ASM home page and how to access that page, see"Accessing the Oracle Automatic Storage Management Home Page (page 7-2)".
2. Click the Mount Point that contains the realm from which you want to deleteobjects. The Oracle ACFS home page is displayed for this mount point.
3. Click the Security/Encryption tab.
4. In the Security section, click Realms. The list of realms in the mount point isdisplayed.
5. Select a realm and click the Edit button. The Edit Realm wizard displays.
6. Click Next to move to the Realm Objects page where you can click Remove todelete objects from the realm.
7. Click Done.
Deleting a RealmYou can delete a realm from an Oracle ACFS file system. After a realm is deleted,access to all objects that were part of the realm is reverted to the state prior to theiraddition to the realm. These objects are not subjected to security and encryption thatwere enabled on the realm.
To delete a realm, follow these steps:
1. From the Oracle ASM home page, select the ASM Cluster File System tab to displaythe mount points in the cluster file system.
For information about the Oracle ASM home page and how to access that page, see"Accessing the Oracle Automatic Storage Management Home Page (page 7-2)".
2. Click the Mount Point that contains the realm you want to delete. The Oracle ACFShome page is displayed for this mount point.
3. Click the Security/Encryption tab.
4. In the Security section, click Realms. The list of realms in the mount point isdisplayed.
5. Select the realm you want to delete and click Delete.
Viewing RealmsTo view realms, follow these steps:
1. From the Oracle ASM home page, select the ASM Cluster File System tab todisplay the mount points in the cluster file system.
For information about the Oracle ASM home page and how to access that page,see "Accessing the Oracle Automatic Storage Management Home Page (page 7-2)".
2. Click the Mount Point that contains the realms you want to view. The OracleACFS home page is displayed for this mount point.
3. Click the Security/Encryption tab.
4. In the Security section, click Realms. The list of realms in the file system isdisplayed as shown in Figure 13-10 (page 13-21).
Managing Security Features with Oracle Enterprise Manager
13-20 Oracle Automatic Storage Management Administrator's Guide

Figure 13-10 Oracle ACFS Security Realms Page
Managing Encryption Features with Oracle Enterprise ManagerThis section describes how to manage encryption with Oracle Enterprise Manager.
• Initializing Oracle ACFS Encryption (page 13-21)
• Enabling_ Disabling_ and Setting Parameters for Encryption On an Oracle ACFS(page 13-22)
• Viewing Encryption Status (page 13-22)
For more information about Oracle ACFS encryption, refer to "Oracle ACFSEncryption (page 11-22)".
Initializing Oracle ACFS EncryptionTo initialize Oracle ACFS encryption, follow these steps:
1. From the Oracle ASM home page, select the ASM Cluster File System tab todisplay the mount points in the cluster file system.
For information about the Oracle ASM home page and how to access that page,see "Accessing the Oracle Automatic Storage Management Home Page (page 7-2)".
2. Click a mount point in the list.
3. Click the Security/Encryption tab to display the Security and Encryption section.
4. In the Encryption Configuration section, you can specify various options, such asUnset Encryption Parameters, as shown in Figure 13-11 (page 13-22).
Managing Encryption Features with Oracle Enterprise Manager
Administering Oracle ACFS with Oracle Enterprise Manager 13-21

5. If Oracle ACFS encryption is not initialized in the cluster, the InitializeEncryption button displays. Click the button to initialize Oracle ACFS encryption.This operation needs to be performed only once in the cluster.
Figure 13-11 Oracle ACFS Encryption Configuration Page
Enabling, Disabling, and Setting Parameters for Encryption On an Oracle ACFSTo enable, disable, or set parameters for Oracle ACFS encryption, follow these steps:
1. From the Oracle ASM home page, select the ASM Cluster File System tab to displaythe mount points in the cluster file system.
2. Click the Mount Point that contains the realms you want to view. The Oracle ACFShome page is displayed for this mount point.
3. Click the Security/Encryption tab.
4. Click Encryption Configuration link to display the Encryption configurationsection.
Viewing Encryption StatusTo view encryption status, follow these steps:
1. From the Oracle ASM home page, select the ASM Cluster File System tab to displaythe mount points in the cluster file system.
For information about the Oracle ASM home page and how to access that page, see"Accessing the Oracle Automatic Storage Management Home Page (page 7-2)".
2. Click Show Security and Encryption to display the Security and Encryptionsection.
The section displays the mount points and the security and encryption settings foreach.
Managing Tagging Features with Oracle Enterprise ManagerThis section describes how to manage tagging with Oracle Enterprise Manager.
• Adding a Tag in Oracle ACFS (page 13-23)
• Removing a Tag in Oracle ACFS (page 13-23)
• Searching for Tags in Oracle ACFS (page 13-24)
Managing Tagging Features with Oracle Enterprise Manager
13-22 Oracle Automatic Storage Management Administrator's Guide

For more information about Oracle ACFS tagging, refer to "Oracle ACFS Tagging(page 11-33)".
Adding a Tag in Oracle ACFSYou can add tags to directories and files that reside in a single Oracle ACFS file systemor across multiple Oracle ACFS file systems. With the tag names, you can organizeyour files or perform operations, such as search and replication.
To add tags for specific files or directories from the ASM Cluster File System Page,follow these steps:
1. From the Oracle ASM home page, select the ASM Cluster File System tab to displaythe mount points in the cluster file system.
For information about the Oracle ASM home page and how to access that page, see"Accessing the Oracle Automatic Storage Management Home Page (page 7-2)".
2. Select the file or directory you want to tag and select Add Tag from the Actionsmenu, then click Go.
Enterprise Manager displays the Add Tag page.
3. Add a Tag Name (or a comma-delimited list of names) in the Tag Name box.Optionally, you can turn on the option that enables you to add tags recursively tosubdirectories and files.
4. In the Directories and Files section, enter either the directory paths directly as acomma-delimited list in the Enter Directory box, or search for directory paths withthe ASM Cluster File System by selecting Search Directory. You can add adirectory path by clicking Add.
5. Click OK to add tags.
Removing a Tag in Oracle ACFSYou can remove tags for specific files or directories in an Oracle ACFS file system.Optionally, you can recursively apply the remove operation to all subdirectories andfiles.
To remove tags, follow these steps:
1. From the Oracle ASM home page, select the ASM Cluster File System tab to displaythe mount points in the cluster file system.
For information about the Oracle ASM home page and how to access that page, see"Accessing the Oracle Automatic Storage Management Home Page (page 7-2)".
2. Select the file or directory from which you want to remove tags and select RemoveTag from the Actions menu, then click Go.
Enterprise Manager displays the Remove Tag page.
3. In the Tag Name box, enter the name of the tag you want to remove or specify acomma-delimited list of tag names to remove. Optionally, you can remove tagsrecursively from all directories and files that exist in the specified directory pathsby turning on the option.
4. In the Directories and Files section, select Enter Directory to enter the directorypaths directly as a comma-delimited list, or select Search Directory to search for
Managing Tagging Features with Oracle Enterprise Manager
Administering Oracle ACFS with Oracle Enterprise Manager 13-23

directory paths within an Oracle ACFS file system. To add directory pathsrepeatedly from different Oracle ACFS file systems, choose the file system and clickAdd.
5. Click OK to remove tags.
Searching for Tags in Oracle ACFSYou can search for tags from selected files and directories in an Oracle ACFS filesystem. Optionally, you can recursively apply this operation to all subdirectories andfiles. To search for tags for specific files or directories in an Oracle ACFS file system,follow these steps:
1. From the Oracle ASM home page, select the ASM Cluster File System tab to displaythe mount points in the cluster file system.
For information about the Oracle ASM home page and how to access that page, see"Accessing the Oracle Automatic Storage Management Home Page (page 7-2)".
2. From the Action menu, select Search Tags, then click Go.
Enterprise Manager displays the Search Tags page.
3. In the Search Criteria section, specify a comma-delimited list of tag names in theTag Name box. Optionally, you can search tags recursively in all directories andfiles by turning on the option.
4. In the Directories and Files section, select Enter Directory to enter the directorypath as a comma-delimited list, or select Search Directory to choose the OracleACFS file system and click Add to add directory paths repeatedly from differentOracle ACFS file systems.
5. Click Search.
The results of the search appear in the Search Results table.
6. Click Return to navigate back to the Oracle ASM home page displaying the ASMCluster File System tab.
Managing Tagging Features with Oracle Enterprise Manager
13-24 Oracle Automatic Storage Management Administrator's Guide

14Managing Oracle ACFS and Oracle ADVM
With ASMCA
Oracle ASM Configuration Assistant (ASMCA) supports installing and configuringOracle ASM instances, Oracle ASM disk groups, Oracle ASM Dynamic VolumeManager (Oracle ADVM) volumes, and Oracle Automatic Storage ManagementCluster File System (Oracle ACFS) file systems. In addition, you can use the ASMCAcommand-line interface.
This chapter discusses the following topics:
• ASMCA GUI Tool for Managing Oracle ACFS and Oracle ADVM (page 14-1)
• ASMCA Command-Line Interface for Managing Oracle ACFS and Oracle ADVM(page 14-9)
The Instances tab functionality and some menu options of ASMCA are only availablein an Oracle RAC configuration. For information about managing Oracle ASMinstances and disk groups with ASMCA, refer to Managing Oracle ASM With ASMCA(page 9-1).
ASMCA GUI Tool for Managing Oracle ACFS and Oracle ADVMThis section contains the following topics:
• Managing Oracle ADVM Volumes with ASMCA (page 14-1)
• Managing Oracle ACFS File Systems with ASMCA (page 14-3)
• Managing Security and Encryption for Oracle ACFS with ASMCA (page 14-5)
• Creating an Oracle ACFS File System for Database Use (page 14-7)
Managing Oracle ADVM Volumes with ASMCA
Note:
When creating an Oracle ADVM volume for an Oracle ACFS file system that isintended to store database files, use the ASMCMD volcreate command orthe SQL ALTER DISKGROUP ADD VOLUME SQL statement rather than theASMCA tool to ensure that the column striping is set to 1. For informationabout the volcreate command, refer to "volcreate (page 15-1)". Forinformation about the ALTER DISKGROUP ADD VOLUME statement, refer to"Managing Oracle ADVM Volumes in a Disk Group (page 4-16)".
Managing Oracle ACFS and Oracle ADVM With ASMCA 14-1

Oracle ASM Configuration Assistant enables you to create or configure an OracleADVM volume, as shown in Figure 14-1 (page 14-2).
Right click a selected volume in the Oracle ASM Configuration Assistant screen todisplay the configuration options menu.
The menu includes options to:
• Enable disabled volumes and disable enabled volumes
• View status details
• Resize volumes that have not been mounted on an Oracle ACFS file system
• Delete volumes
There are options for creating a volume, enabling all volumes, and disabling allvolumes.
Figure 14-1 Oracle ASM Configuration Assistant Configure ASM Volumes Page
Click Create to display the dialog for creating a volume. You must provide a uniquevolume name for the existing Oracle ASM disk group that you select from the list ofdisk groups. You must also specify the size for the volume. You can optionally chooseto display advanced options for creating a volume which enables you to specify theredundancy level and striping characteristics. For information about the advancedoptions when creating a volume, refer to "volcreate (page 15-1)".
The compatibility parameters COMPATIBLE.ASM and COMPATIBLE.ADVM must be setto 11.2 or higher for the disk group to contain an Oracle ADVM volume. To useOracle ACFS encryption, replication, security, or tagging, the disk group on which thevolume is created for the file system must have compatibility attributes for ASM andADVM set to 11.2.0.2 or higher. See "Disk Group Compatibility Attributes(page 4-42)".
ASMCA GUI Tool for Managing Oracle ACFS and Oracle ADVM
14-2 Oracle Automatic Storage Management Administrator's Guide

Before creating an Oracle ADVM volume on AIX, ensure that the necessary userauthorizations have been created. For information, refer to "Oracle ACFS Command-line Tools for the AIX Environment (page 16-36)".
Figure 14-2 Oracle ASM Configuration Assistant Create an ASM Volume Page
For information about creating a volume with the ASMCMD volcreate command,refer to Managing Oracle ADVM with ASMCMD (page 15-1). For an overview ofOracle ACFS, see Introducing Oracle ACFS and Oracle ADVM (page 11-1).
Managing Oracle ACFS File Systems with ASMCAOracle ASM Configuration Assistant enables you to create or configure an OracleACFS file system, as shown in Figure 14-3 (page 14-4).
To configure an existing file system, right click a selected file system in the OracleASM Configuration Assistant screen to display the configuration options menu.
The menu includes options to:
• View status details
• Mount and dismount the file system
• Resize the file system
• Delete the file system
• Display the security commands
Some commands require root privileges, such as mounting a file system. ASMCAgenerates the command for you to run manually as root.
When creating Oracle ACFS file systems on Windows, run ASMCA as a Windowsdomain user who is also an administrator of the computer.
ASMCA GUI Tool for Managing Oracle ACFS and Oracle ADVM
Managing Oracle ACFS and Oracle ADVM With ASMCA 14-3

There are buttons for Create, Mount All, Dismount All, and Security and Encryptioncommands.
Figure 14-3 Oracle ASM Configuration Assistant Configure Oracle ACFS Page
Oracle ASM Configuration Assistant enables you to create an Oracle ACFS file system,as shown in Figure 14-3 (page 14-4).
Select Create, then select the type of Oracle ACFS file system you want to create andan existing Oracle ADVM volume from the lists. Specify the mount point field; themount point must be an existing directory. The file system must be mounted to makeit available. You can choose to enable the Auto Mount option. You can also provide adescription of the file system in the Description field.
The mount command must be manually run as root or the Windows Administratorat an operating system prompt. For information about mounting an Oracle ACFS filesystem, see "mount (page 16-26)" for Linux or "acfsmountvol (page 16-48)" forWindows.
You can choose to create an Oracle ACFS file system for an Oracle Database. For moreinformation about creating a file system for a database home, see "Creating an OracleACFS File System for Database Use (page 14-7)".
ASMCA GUI Tool for Managing Oracle ACFS and Oracle ADVM
14-4 Oracle Automatic Storage Management Administrator's Guide
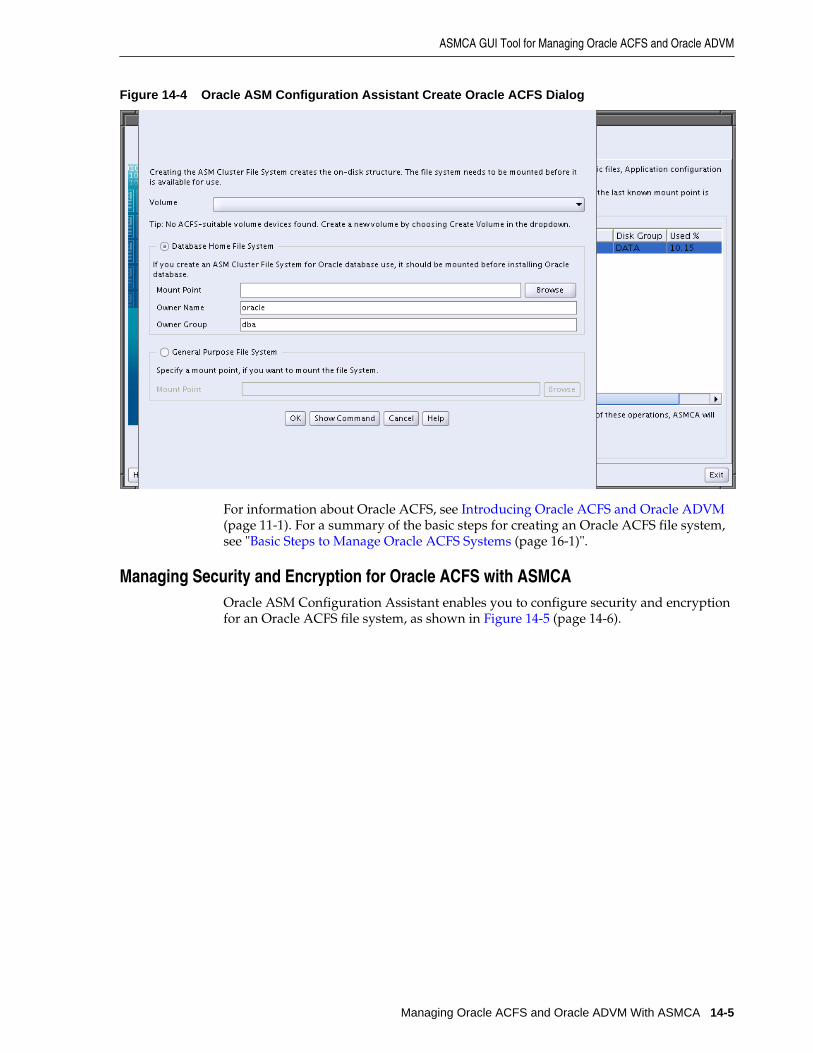
Figure 14-4 Oracle ASM Configuration Assistant Create Oracle ACFS Dialog
For information about Oracle ACFS, see Introducing Oracle ACFS and Oracle ADVM(page 11-1). For a summary of the basic steps for creating an Oracle ACFS file system,see "Basic Steps to Manage Oracle ACFS Systems (page 16-1)".
Managing Security and Encryption for Oracle ACFS with ASMCAOracle ASM Configuration Assistant enables you to configure security and encryptionfor an Oracle ACFS file system, as shown in Figure 14-5 (page 14-6).
ASMCA GUI Tool for Managing Oracle ACFS and Oracle ADVM
Managing Oracle ACFS and Oracle ADVM With ASMCA 14-5
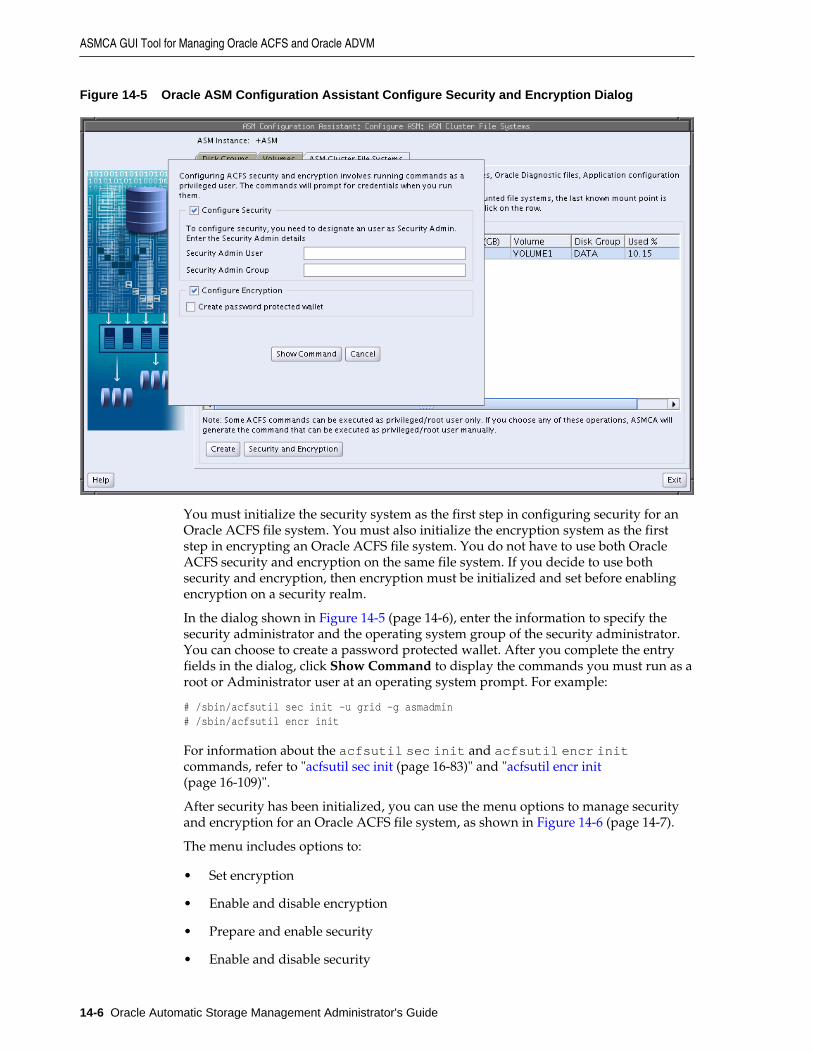
Figure 14-5 Oracle ASM Configuration Assistant Configure Security and Encryption Dialog
You must initialize the security system as the first step in configuring security for anOracle ACFS file system. You must also initialize the encryption system as the firststep in encrypting an Oracle ACFS file system. You do not have to use both OracleACFS security and encryption on the same file system. If you decide to use bothsecurity and encryption, then encryption must be initialized and set before enablingencryption on a security realm.
In the dialog shown in Figure 14-5 (page 14-6), enter the information to specify thesecurity administrator and the operating system group of the security administrator.You can choose to create a password protected wallet. After you complete the entryfields in the dialog, click Show Command to display the commands you must run as aroot or Administrator user at an operating system prompt. For example:
# /sbin/acfsutil sec init -u grid -g asmadmin# /sbin/acfsutil encr init
For information about the acfsutil sec init and acfsutil encr initcommands, refer to "acfsutil sec init (page 16-83)" and "acfsutil encr init(page 16-109)".
After security has been initialized, you can use the menu options to manage securityand encryption for an Oracle ACFS file system, as shown in Figure 14-6 (page 14-7).
The menu includes options to:
• Set encryption
• Enable and disable encryption
• Prepare and enable security
• Enable and disable security
ASMCA GUI Tool for Managing Oracle ACFS and Oracle ADVM
14-6 Oracle Automatic Storage Management Administrator's Guide

Figure 14-6 Oracle ASM Configuration Assistant Oracle ACFS Security Menu Options
For information about Oracle ACFS security, see "Oracle ACFS Security (page 11-19)".For a summary of the basic steps for setting up security on an Oracle ACFS file system,see "Securing Oracle ACFS File Systems (page 16-6)".
For information about Oracle ACFS encryption, see "Oracle ACFS Encryption(page 11-22)". For a summary of the basic steps for setting up encryption on an OracleACFS file system, see "Encrypting Oracle ACFS File Systems (page 16-11)".
For information about the acfsutil encr and acfsutil sec commands, see"Oracle ACFS Command-Line Utilities (page 16-115)".
Creating an Oracle ACFS File System for Database UseTo create an Oracle ACFS file system for database use, you can select the Create ACFSfor Database Use from the disk group configuration options menu, as shown in Figure 9-4 (page 9-6). A dialog displays as shown in Figure 14-7 (page 14-9).
Note:
When creating an Oracle ADVM volume for an Oracle ACFS file system that isintended to store database files, use the ASMCMD volcreate command orthe SQL ALTER DISKGROUP ADD VOLUME SQL statement rather than theASMCA tool to ensure that the column striping is set to 1. For informationabout the volcreate command, refer to "volcreate (page 15-1)". Forinformation about the ALTER DISKGROUP ADD VOLUME statement, refer to"Managing Oracle ADVM Volumes in a Disk Group (page 4-16)".
In this dialog, you must enter:
ASMCA GUI Tool for Managing Oracle ACFS and Oracle ADVM
Managing Oracle ACFS and Oracle ADVM With ASMCA 14-7

• Database Home Volume Name
This is the name of the Oracle ADVM volume you want to create. For informationabout Oracle ADVM volumes, refer to "Overview of Oracle ASM DynamicVolume Manager (page 11-39)" and "volcreate (page 15-1)".
• Database Home Mount Point
This is the mount point for the file system where you want to install the databasehome. The file system that contains the database home should not be locatedunder the Oracle Grid Infrastructure base (ORACLE_BASE for grid) directory. Forinformation about mount points and database homes, see "About Oracle ACFSand Oracle Database Homes (page 11-7)".
• Database Home Size in gigabytes (GB)
The default is 7 GB and the minimum recommended size.
• Database Home Owner Name
This is the operating system name of the user that installs the database and ownsthe software in the database home.
• Database Home Owner Group
This is the operating system group of the owner of the database home.
The mount point must be an existing directory. The file system must be mounted tomake it available. The mount command must be manually run as root or theWindows Administrator at an operating system prompt. For information aboutmounting an Oracle ACFS file system, see "mount (page 16-26)" for Linux or"acfsmountvol (page 16-48)" for Windows.
For information on the mount registry, see "About the Oracle ACFS Mount Registry(page 11-9)".
ASMCA GUI Tool for Managing Oracle ACFS and Oracle ADVM
14-8 Oracle Automatic Storage Management Administrator's Guide

Figure 14-7 Oracle ASM Configuration Assistant Create Oracle ACFS for Database Use Dialog
ASMCA Command-Line Interface for Managing Oracle ACFS and OracleADVM
The ASMCA command-line interface provides non-GUI support for configuringOracle ASM disk groups, volumes, and Oracle ACFS.
• ASMCA Commands for Oracle ACFS and Oracle ADVM (page 14-9)
For general information about running ASMCA command-line interface, refer to"Running ASMCA Command-Line (page 9-8)".
ASMCA Commands for Oracle ACFS and Oracle ADVMThis section describes the commands that can be run with ASMCA command-line.
• Create a Volume (page 14-9)
• Create an Oracle ACFS File System (page 14-10)
Run ASMCA commands as a Windows domain user.
Create a Volume
-createVolume creates Oracle ADVM volumes.
Syntax
asmca -silent -createVolume { -volumeName volume_name -volumeDiskGroup diskgroup
ASMCA Command-Line Interface for Managing Oracle ACFS and Oracle ADVM
Managing Oracle ACFS and Oracle ADVM With ASMCA 14-9
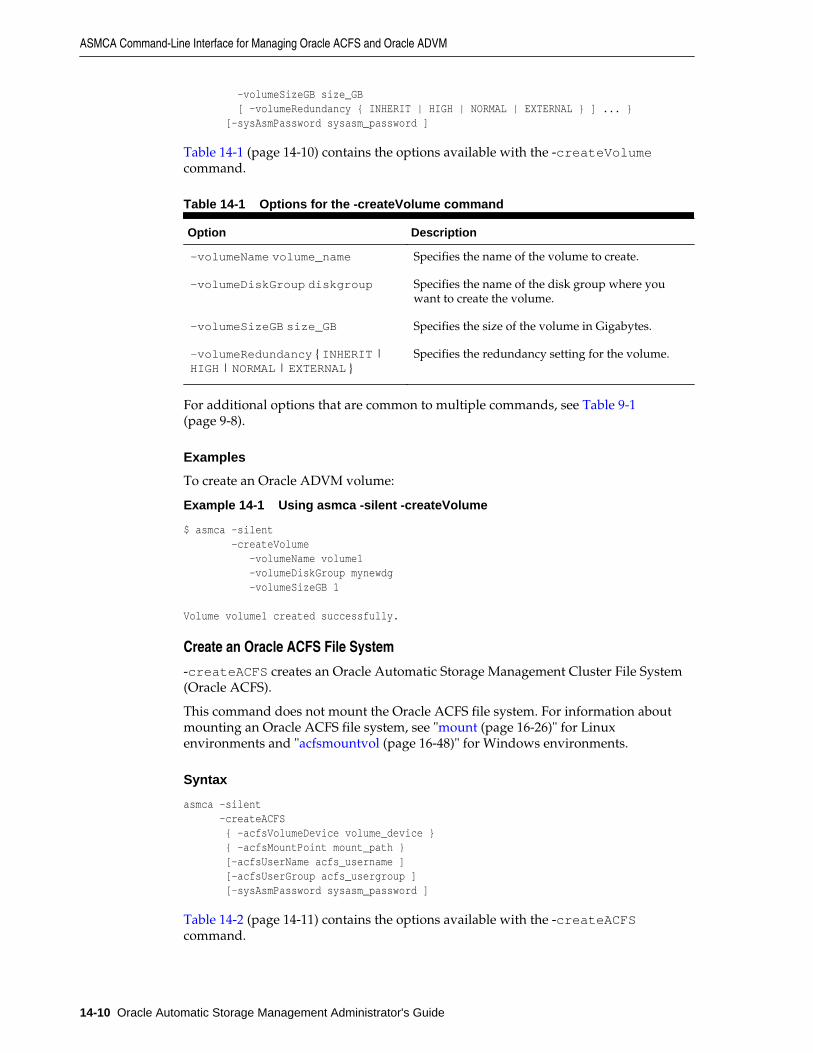
-volumeSizeGB size_GB [ -volumeRedundancy { INHERIT | HIGH | NORMAL | EXTERNAL } ] ... } [-sysAsmPassword sysasm_password ]
Table 14-1 (page 14-10) contains the options available with the -createVolumecommand.
Table 14-1 Options for the -createVolume command
Option Description
-volumeName volume_name Specifies the name of the volume to create.
-volumeDiskGroup diskgroup Specifies the name of the disk group where youwant to create the volume.
-volumeSizeGB size_GB Specifies the size of the volume in Gigabytes.
-volumeRedundancy { INHERIT |HIGH | NORMAL | EXTERNAL }
Specifies the redundancy setting for the volume.
For additional options that are common to multiple commands, see Table 9-1(page 9-8).
Examples
To create an Oracle ADVM volume:
Example 14-1 Using asmca -silent -createVolume
$ asmca -silent -createVolume -volumeName volume1 -volumeDiskGroup mynewdg -volumeSizeGB 1
Volume volume1 created successfully.
Create an Oracle ACFS File System
-createACFS creates an Oracle Automatic Storage Management Cluster File System(Oracle ACFS).
This command does not mount the Oracle ACFS file system. For information aboutmounting an Oracle ACFS file system, see "mount (page 16-26)" for Linuxenvironments and "acfsmountvol (page 16-48)" for Windows environments.
Syntax
asmca -silent -createACFS { -acfsVolumeDevice volume_device } { -acfsMountPoint mount_path } [-acfsUserName acfs_username ] [-acfsUserGroup acfs_usergroup ] [-sysAsmPassword sysasm_password ]
Table 14-2 (page 14-11) contains the options available with the -createACFScommand.
ASMCA Command-Line Interface for Managing Oracle ACFS and Oracle ADVM
14-10 Oracle Automatic Storage Management Administrator's Guide

Table 14-2 Options for the -createACFS command
Option Description
-acfsVolumeDevicevolume_device
Specifies the name of the Oracle ADVM volumedevice.
-acfsMountPoint mount_path Specifies an existing path to be used as the mountpoint. This is required in an Oracle RACenvironment.
-acfsUserName acfs_username Specifies the Oracle ACFS user name.
-acfsUserGroup acfs_usergroup Specifies the Oracle ACFS group name.
For additional options that are common to multiple commands, see Table 9-1(page 9-8).
Examples
To create an Oracle ACFS file system:
Example 14-2 Using asmca -silent -createACFS
$ asmca -silent -createACFS -acfsVolumeDevice /dev/asm/volume1-457 -acfsMountPoint /acfsmounts/acfs1
ASMCA Command-Line Interface for Managing Oracle ACFS and Oracle ADVM
Managing Oracle ACFS and Oracle ADVM With ASMCA 14-11

ASMCA Command-Line Interface for Managing Oracle ACFS and Oracle ADVM
14-12 Administrator's Guide

15Managing Oracle ADVM with ASMCMD
This chapter describes the Oracle Automatic Storage Management (Oracle ASM) Command-Line Utility (ASMCMD) volume management commands.
• ASMCMD Volume Management Commands (page 15-1)
For information about Oracle ASM Dynamic Volume Manager (Oracle ADVM), referto "Overview of Oracle ASM Dynamic Volume Manager (page 11-39)". Forinformation about using SQL statements to manage Oracle ADVM volumes, refer to"Managing Oracle ADVM Volumes in a Disk Group (page 4-16)".
For information about using ASMCMD, refer to "About ASMCMD (page 10-1)".
ASMCMD Volume Management CommandsNOT_SUPPORTED (page 15-1) provides a summary of the Oracle ADVM volumemanagement commands. To successfully run these commands, the local Oracle ASMinstance must be running and the disk group required by this command must havebeen created and mounted in the Oracle ASM instance.
NOT_SUPPORTED
Command Description
volcreateNOT_SUPPORTED Creates an Oracle ADVM volume in the specified disk group.
voldeleteNOT_SUPPORTED Deletes an Oracle ADVM volume.
voldisableNOT_SUPPORTED Disables Oracle ADVM volumes in mounted disk groups.
volenableNOT_SUPPORTED Enables Oracle ADVM volumes in mounted disk groups.
volinfoNOT_SUPPORTED Displays information about Oracle ADVM volumes.
volresizeNOT_SUPPORTED Resizes an Oracle ADVM volume.
volsetNOT_SUPPORTED Sets attributes of an Oracle ADVM volume in mounted disk groups.
volstatNOT_SUPPORTED Reports volume I/O statistics.
volcreate
Purpose
Creates an Oracle ADVM volume in the specified disk group.
Managing Oracle ADVM with ASMCMD 15-1

Syntax and Description
volcreate -G diskgroup -s size [ --column number ] [ --width stripe_width ] [--redundancy {high|mirror|unprotected}] [--primary {hot|cold}] [--secondary {hot|cold}] volume
Table 15-2 (page 15-2) describes the options for the volcreate command.
Table 15-2 Options for the volcreate command
Option Description
-G diskgroup Name of the disk group containing the volume.
-s size Size of the volume to be created in units of K, M, G, or T.The value must be a positive integer. The unitdesignation must be appended to the number specified. Aspace is not allowed between the number and the unitdesignation. For example: 200M or 20G
--column number Number of columns in a stripe set. Values range from 1to 8. The default value is 8.
--width stripe Stripe width of a volume in units of K or M. The value canrange from 4 KB to 1 MB, at power-of-two intervals. Thedefault is 1M.
--redundancy {high|mirror|unprotected}
Redundancy of the Oracle ADVM volume which can beonly specified for normal redundancy disk groups. Ifredundancy is not specified, the setting defaults to theredundancy level of the disk group and this is therecommended setting. The range of values is as follows:unprotected for non-mirrored redundancy, mirror fordouble-mirrored redundancy, or high for triple-mirroredredundancy.
--primary {hot|cold} Intelligent Data Placement specification for primaryextents, either hot or cold region.
--secondary {hot|cold} Intelligent Data Placement specification for secondaryextents, either hot or cold region.
volume Name of the volume. Only alphanumeric characters areallowed; hyphens are not allowed. The first charactermust be alphabetic.
WARNING:
Specifying --redundancy unprotected means that Oracle ASM mirroringis not available for data recovery with the Oracle ADVM volume. Theredundancy setting (normal) of the disk group does not provide mirroringfor an unprotected Oracle ADVM volume. The unprotected configuration isnot recommended for production environments as intermittent storage accessfailures can result in the loss of data. Backups are strongly recommended.
ASMCMD Volume Management Commands
15-2 Oracle Automatic Storage Management Administrator's Guide

When creating an Oracle ADVM volume, a volume device name is created with aunique Oracle ADVM persistent disk group number that is concatenated to the end ofthe volume name. The unique number can be one to three digits.
On Linux, the volume device name is in the format volume_name-nnn, such asvolume1-123. On Windows the volume device name is in the format asm-volume_name-nnn, such as asm-volume1-123. For information on mounting thevolume device file, see "Creating an Oracle ACFS File System (page 16-2)".
On Linux platforms, the volume name must be less than or equal to elevenalphanumeric characters, starting with an alphabetic character. On AIX platforms, thevolume name must be less than or equal to twenty three alphanumeric characters,starting with an alphabetic character. On Windows and Solaris platforms, the volumename must be less than or equal to thirty alphanumeric characters, starting with analphabetic character.
You can determine the volume device name with the volinfo command, describedin "volinfo (page 15-6)".
If the --column option is set to 1, then striping is disabled and the stripe widthequals the volume extent size. The volume extent size is 8 MB if the disk groupallocation unit (AU) is less than or equal to 8 MB. If the AU size is greater than 8 MB,then the Oracle ADVM volume extent size is equivalent to the disk group AU size. Forinformation about Oracle ADVM limits, refer to "Limits of Oracle ADVM(page 18-3)". Setting the --column option to 8 (the default) is recommended toachieve optimal performance with database data files and other files.
A successful volume creation automatically enables the volume device.
The volume device file functions as any other disk or logical volume to mount filesystems or for applications to use directly.
When creating an accelerator volume, create the volume on a disk group with storagethat is significantly faster than the primary volume's storage. For more informationabout the accelerator volume, refer to "mkfs (page 16-24)".
For information about redundancy settings, see "Mirroring_ Redundancy_ and FailureGroup Options (page 4-30)". For information about hot and cold disk regions, see"Intelligent Data Placement (page 4-20)".
Before creating an Oracle ADVM volume on AIX, ensure that the necessary userauthorizations have been created. For information, refer to "Oracle ACFS Command-line Tools for the AIX Environment (page 16-36)".
Examples
The following is an example of the volcreate command that creates volume1 in thedata disk group with the size set to 10 gigabytes.
Example 15-1 Using the ASMCMD volcreate command
ASMCMD [+] > volcreate -G data -s 10G --width 1M --column 8 volume1
ASMCMD [+] > volinfo -G data volume1Diskgroup Name: DATA Volume Name: VOLUME1 Volume Device: /dev/asm/volume1-123 State: ENABLED Size (MB): 10240 Resize Unit (MB): 64 Redundancy: MIRROR
ASMCMD Volume Management Commands
Managing Oracle ADVM with ASMCMD 15-3

Stripe Columns: 8 Stripe Width (K): 1024 Usage: Mountpath:
voldelete
Purpose
Deletes an Oracle ADVM volume.
Syntax and Description
voldelete -G diskgroup volume
Table 15-3 (page 15-4) describes the options for the voldelete command.
Table 15-3 Options for the voldelete command
Option Description
-G diskgroup Name of the disk group containing the volume.
volume Name of the volume.
To successfully run this command, the local Oracle ASM instance must be runningand the disk group required by this command must be mounted in the Oracle ASMinstance. Before deleting a volume, you must ensure that there are no active filesystems associated with the volume.
Examples
The following is an example of the voldelete command that deletes volume1 fromthe data disk group.
Example 15-2 Using the ASMCMD voldelete command
ASMCMD [+] > voldelete -G data volume1
voldisable
Purpose
Disables Oracle ADVM volumes in mounted disk groups and removes the volumedevice on the local node.
Syntax and Description
voldisable { --all |{ -G diskgroup { -a | volume } } }
Table 15-4 (page 15-4) describes the options for the voldisable command.
Table 15-4 Options for the voldisable command
Option Description
-all Specifies all volumes within all disk groups.
ASMCMD Volume Management Commands
15-4 Oracle Automatic Storage Management Administrator's Guide

Table 15-4 (Cont.) Options for the voldisable command
Option Description
-G diskgroup Name of the disk group containing the volume.
-a Specifies all volumes within the specified disk group.
volume Name of the volume.
You can disable volumes before shutting down an Oracle ASM instance ordismounting a disk group to verify that the operations can be accomplished normallywithout including a force option due to open volume files. Disabling a volume alsoprevents any subsequent opens on the volume or device file because it no longerexists.
Before disabling a volume, you must ensure that there are no active file systemsassociated with the volume. You must first dismount the Oracle ACFS file systembefore disabling the volume. See "Dismounting an Oracle ACFS File System(page 16-20)".
You can delete a volume without first disabling the volume.
Examples
The following is an example of the voldisable command that disables volume1 inthe data disk group.
Example 15-3 Using the ASMCMD voldisable command
ASMCMD [+] > voldisable -G data volume1
volenable
Purpose
Enables Oracle ADVM volumes in mounted disk groups.
Syntax and Description
volenable { --all |{ -G diskgroup { -a | volume } } }
Table 15-5 (page 15-5) describes the options for the volenable command.
Table 15-5 Options for the volenable command
Option Description
-all Specifies all volumes within all disk groups.
-G diskgroup Name of the disk group containing the volume.
-a Specifies all volumes within the specified disk group.
volume Name of the volume.
A volume is enabled when it is created.
ASMCMD Volume Management Commands
Managing Oracle ADVM with ASMCMD 15-5

Examples
The following is an example of the volenable command that enables volume1 in thedata disk group.
Example 15-4 Using the ASMCMD volenable command
ASMCMD [+] > volenable -G data volume1
volinfo
Purpose
Displays information about Oracle ADVM volumes.
Syntax and Description
volinfo { --all |{ -G diskgroup { -a | volume } } }volinfo {--show_diskgroup |--show_volume} volumedevice
Table 15-6 (page 15-6) describes the options for the volinfo command.
Table 15-6 Options for the volinfo command
Option Description
-all Specifies all volumes within all disk groups.
-G diskgroup Name of the disk group containing the volume.
-a Specifies all volumes within the specified disk group.
volume Name of the volume.
--show_diskgroup Returns only the disk group name. A volume devicename is required.
--show_volume Returns only the volume name. A volume device name isrequired.
volumedevice Name of the volume device.
Examples
The first example displays information about the volume1 volume in the data diskgroup. This example was produced in a Linux environment. The second exampledisplays information about the volume1 volume in the data disk group and wasproduced in a Windows environment.
The Mountpath field contains the path where the volume is currently mounted orwhere the volume was last mounted.
Example 15-5 Using the ASMCMD volinfo command
ASMCMD [+] > volinfo -G data volume1Diskgroup Name: DATA Volume Name: VOLUME1 Volume Device: /dev/asm/volume1-123 State: ENABLED Size (MB): 10240 Resize Unit (MB): 64
ASMCMD Volume Management Commands
15-6 Oracle Automatic Storage Management Administrator's Guide

Redundancy: MIRROR Stripe Columns: 8 Stripe Width (K): 1024 Usage: ACFS Mountpath: /acfsmounts/acfs1
ASMCMD [+] > volinfo -G data -aDiskgroup Name: DATA Volume Name: VOLUME1 Volume Device: \\.\asm-volume1-311 State: ENABLED Size (MB): 10240 Resize Unit (MB): 64 Redundancy: MIRROR Stripe Columns: 8 Stripe Width (K): 1024 Usage: ACFS Mountpath: C:\oracle\acfsmounts\acfs1
volresize
Purpose
Resizes an Oracle ADVM volume.
Syntax and Description
volresize -G diskgroup -s size [ -f ] volume
Table 15-7 (page 15-7) describes the options for the volresize command.
Table 15-7 Options for the volresize command
Option Description
-G diskgroup Name of the disk group containing the volume.
-f Forces the shrinking of a volume that is not an Oracle ACFS volumeand suppresses any warning message.
volume Name of the volume.
-s size New size of the volume in units of K, M, G, or T.
If the volume is mounted on a non-Oracle ACFS file system, then dismount the filesystem first before resizing. If the new size is smaller than current, you are warned ofpossible data corruption. Unless the -f (force) option is specified, you are promptedwhether to continue with the operation.
If there is an Oracle ACFS file system on the volume, then you cannot resize thevolume with the volresize command. You must use the acfsutil sizecommand, which also resizes the volume and file system. For information, see "acfsutilsize (page 16-132)".
Examples
The following is an example of the volresize command that resizes volume1 in thedata disk group to 20 gigabytes.
ASMCMD Volume Management Commands
Managing Oracle ADVM with ASMCMD 15-7

Example 15-6 Using the ASMCMD volresize command
ASMCMD [+] > volresize -G data -s 20G volume1
volset
Purpose
Sets attributes of an Oracle ADVM volume in mounted disk groups.
Syntax and Description
volset -G diskgroup [ --usagestring string] [--mountpath mount_path ] [--primary {hot|cold}] [--secondary {hot|cold}] volume
Table 15-8 (page 15-8) describes the options for the volset command.
Table 15-8 Options for the volset command
Option Description
-G diskgroup Name of the disk group containing the volume.
--usagestring string Optional usage string to tag a volume which can be up to30 characters. This string is set to ACFS when the volumeis attached to an Oracle ACFS file system and should notbe changed.
--mountpath mount_path Optional string to tag a volume with its mount pathstring which can be up to 1024 characters. This string isset when the file system is mounted and should not bechanged.
--primary {hot|cold} Intelligent Data Placement specification for primaryextents, either hot or cold region.
--secondary {hot|cold} Intelligent Data Placement specification for secondaryextents, either hot or cold region.
volume Name of the volume.
When running the mkfs command to create a file system, the usage field is set to ACFSand mountpath field is reset to an empty string if it has been set. The usage fieldshould remain at ACFS.
When running the mount command to mount a file system, the mountpath field is setto the mount path value to identify the mount point for the file system. After the valueis set by the mount command, the mountpath field should not be updated.
Examples
The following is an example of a volset command that sets the usage string for avolume that is not associated with a file system.
Example 15-7 Using the ASMCMD volset command
ASMCMD [+] > volset -G data --usagestring 'no file system created' volume1
ASMCMD Volume Management Commands
15-8 Oracle Automatic Storage Management Administrator's Guide

volstat
Purpose
Reports I/O statistics for Oracle ADVM volumes.
Syntax and Description
volstat [-G diskgroup] [volume]
Table 15-9 (page 15-9) describes the options for the volstat command.
Table 15-9 Options for the volstat command
Option Description
-G diskgroup Name of the mounted disk group containing the volume.
volume Name of the volume.
The following apply when using the volstat command.
• If the disk group is not specified and the volume name is specified, all mounteddisk groups are searched for the specified volume name.
• If the disk group name is specified and the volume name is omitted, all volumesare displayed for the named disk group.
• If both the disk group name and the volume name are omitted, all volumes on alldisk groups are displayed.
Examples
The following is an example of the volstat command that displays informationabout volumes in the data disk group.
Example 15-8 Using the ASMCMD volstat command
ASMCMD [+] > volstat -G dataDISKGROUP NUMBER / NAME: 1 / DATA--------------------------------------- VOLUME_NAME READS BYTES_READ READ_TIME READ_ERRS WRITES BYTES_WRITTEN WRITE_TIME WRITE_ERRS ------------------------------------------------------------- VOLUME1 10085 2290573312 22923 0 1382 5309440 1482 0
ASMCMD Volume Management Commands
Managing Oracle ADVM with ASMCMD 15-9

ASMCMD Volume Management Commands
15-10 Administrator's Guide

16Managing Oracle ACFS with Command-Line
Tools
Command-line tools for managing and implementing Oracle Automatic StorageManagement Cluster File System (Oracle ACFS), include the following:
• Basic Steps to Manage Oracle ACFS Systems (page 16-1)
• Oracle ACFS Command-line Tools for Linux Environments (page 16-22)
• Oracle ACFS Command-line Tools for the Solaris Environment (page 16-29)
• Oracle ACFS Command-line Tools for the AIX Environment (page 16-36)
• Oracle ACFS Command-line Tools for Windows Environments (page 16-44)
• Oracle ACFS Command-Line Tools for Tagging (page 16-54)
• Oracle ACFS Command-Line Tools for Replication (page 16-58)
• Oracle ACFS Command-Line Tools for Auditing (page 16-70)
• Oracle ACFS Command-Line Tools for Security (page 16-76)
• Oracle ACFS Command-Line Tools for Encryption (page 16-107)
• Oracle ACFS Command-Line Utilities (page 16-115)
Note:
Oracle ACFS encryption, replication, security, and tagging are availablestarting with Oracle Automatic Storage Management (Oracle ASM) 11gRelease 2 (11.2.0.2) on Linux and Oracle ASM 11g Release 2 (11.2.0.3) onWindows.
Basic Steps to Manage Oracle ACFS SystemsThis section provides an outline of the basic steps when managing Oracle ACFS filesystems using command-line utilities.
The examples in this section show operating system commands that are run in a Linuxenvironment system. ASMCMD commands manage the Oracle ADVM volumes, butyou can also use SQL*PLus and Oracle ASM Configuration Assistant (ASMCA) tomanage volumes.
This section contains these topics:
• Creating an Oracle ACFS File System (page 16-2)
Managing Oracle ACFS with Command-Line Tools 16-1

• Accessing an Oracle ACFS File System on a Different Node in the Cluster(page 16-4)
• Managing Oracle ACFS Snapshots (page 16-5)
• Securing Oracle ACFS File Systems (page 16-6)
• Encrypting Oracle ACFS File Systems (page 16-11)
• Tagging Oracle ACFS File Systems (page 16-12)
• Replicating Oracle ACFS File Systems (page 16-14)
• Deregistering_ Dismounting_ and Disabling Volumes and Oracle ACFS FileSystems (page 16-20)
• Removing an Oracle ACFS File System and a Volume (page 16-21)
Creating an Oracle ACFS File SystemTo create and verify a file system, perform the following steps:
1. Create an Oracle ADVM volume in a mounted disk group with the ASMCMDvolcreate command.
The compatibility parameters COMPATIBLE.ASM and COMPATIBLE.ADVM must beset to 11.2 or higher for the disk group to contain an Oracle ADVM volume. Touse Oracle ACFS encryption, replication, security, or tagging, the disk group onwhich the volume is created for the file system must have compatibility attributesfor ASM and ADVM set to 11.2.0.2 or higher. See "Disk Group CompatibilityAttributes (page 4-42)".
Start ASMCMD connected to the Oracle ASM instance. You must be a user in theOSASM operating system group. See "About Privileges for Oracle ASM(page 3-47)".
When configuring Oracle ADVM volume devices within a disk group, Oraclerecommends assigning the Oracle Grid Infrastructure user and Oracle ASMadministrator roles to users who have root privileges.
To create a volume:
ASMCMD [+] > volcreate -G data -s 10G volume1
When creating an Oracle ADVM volume, a volume device name is created thatincludes a unique Oracle ADVM persistent disk group number. The volume devicefile functions in the same manner as any other disk or logical volume to mount filesystems or for applications to use directly.
The format of the volume name is platform-specific. For information about thesyntax of the volcreate command, see "ASMCMD Volume ManagementCommands (page 15-1)".
2. Determine the device name of the volume that was created.
You can determine the volume device name with the ASMCMD volinfocommand or from the VOLUME_DEVICE column in the V$ASM_VOLUME view.
For example:
ASMCMD [+] > volinfo -G data volume1Diskgroup Name: DATA
Basic Steps to Manage Oracle ACFS Systems
16-2 Oracle Automatic Storage Management Administrator's Guide

Volume Name: VOLUME1 Volume Device: /dev/asm/volume1-123 State: ENABLED ...
SQL> SELECT volume_name, volume_device FROM V$ASM_VOLUME WHERE volume_name ='VOLUME1';
VOLUME_NAME VOLUME_DEVICE----------------- --------------------------------------VOLUME1 /dev/asm/volume1-123
For information about the volinfo command, see Managing Oracle ADVM withASMCMD (page 15-1).
See Also:
Oracle Database Reference for information about the V$ASM_VOLUME view
3. Create a file system with the Oracle ACFS mkfs command.
Create a file system using an existing volume device.
For example:
$ /sbin/mkfs -t acfs /dev/asm/volume1-123
mkfs.acfs: version = 11.2.0.1.0.0mkfs.acfs: on-disk version = 39.0mkfs.acfs: volume = /dev/asm/volume1-123mkfs.acfs: volume size = 10737418240mkfs.acfs: Format complete.
See "mkfs (page 16-24)" (Linux environments) or "acfsformat (page 16-47)"(Windows). The root privilege is not required. The ownership of the volumedevice file dictates who can run this command.
4. Optionally register the file system with the acfsutil registry command.
For example:
$ /sbin/acfsutil registry -a /dev/asm/volume1-123 /acfsmounts/acfs1
acfsutil registry: mount point /acfsmounts/acfs1 successfully added to Oracle Registry
See "acfsutil registry (page 16-129)". The root or asmadmin privileges are requiredto modify the registry. The Windows Administrator privilege is equivalent tothe root privilege on Linux.
Registering a file system is optional. After registering an Oracle ACFS file system inthe cluster mount registry, the file system is mounted automatically on each clustermember listed in the registry entry during the next registry check action. Thisautomatic process runs every 30 seconds and eliminates the requirement tomanually mount the file system on each member of the cluster.
Registering an Oracle ACFS file system also causes the file system to be mountedautomatically whenever Oracle Clusterware or the system is restarted.
Basic Steps to Manage Oracle ACFS Systems
Managing Oracle ACFS with Command-Line Tools 16-3
Note:
In an Oracle Grid Infrastructure Clusterware configuration, you can runsrvctl add filesystem to automount a file system; this method is requiredwhen an Oracle Database home is installed on an Oracle ACFS file system.However, that file system should not be added to the registry. For informationabout Server Control Utility (SRVCTL), see Oracle Real Application ClustersAdministration and Deployment Guide.
For more information, see "About the Oracle ACFS Mount Registry (page 11-9)".
Note:
Oracle ACFS registration (acfsutil registry) is not supported in anOracle Restart (standalone) configuration, which is a single-instance (non-clustered) environment.
5. Mount the file system with the Oracle ACFS mount command. You can mount afile system before or after registering the file system. If the file system has beenregistered, you can wait for the file system to be mounted automatically.
For example:
# /bin/mount -t acfs /dev/asm/volume1-123 /acfsmounts/acfs1
See "mount (page 16-26)" (Linux environments) or "acfsmountvol (page 16-48)"(Windows). The root privilege is required to run the mount command and theWindows Administrator privilege is required to run the acfsmountvolcommand.
After the file system has been mounted, ensure that the permissions are set to allowaccess to the file system for the appropriate users. For example:
# chown -R oracle:dba /acfsmounts/acfs1
6. Create a test file in the file system.
The user that creates the test file should be a user that is intended to access the filesystem. This test ensures that the appropriate user can write to the file system.
For example:
$ echo "Oracle ACFS File System" > /acfsmounts/acfs1/myfile
7. List the contents of the test file that was created in the file system.
For example:
$ cat /acfsmounts/acfs1/myfileOracle ACFS File System
Accessing an Oracle ACFS File System on a Different Node in the ClusterIf the node is part of a cluster, perform the following steps on node 2 to view the testfile you created on node 1.
Basic Steps to Manage Oracle ACFS Systems
16-4 Oracle Automatic Storage Management Administrator's Guide
Note:
If the file system has been registered with the Oracle ACFS mount registry,you can skip steps 1 to 3.
1. Enable the volume that was previously created and enabled on node 1.
Start ASMCMD connected to the Oracle ASM instance. You must be a user in theOSASM operating system group. See "About Privileges for Oracle ASM(page 3-47)".
For example:
ASMCMD [+] > volenable -G data volume1
See Managing Oracle ADVM with ASMCMD (page 15-1).
2. View information about the volume that you created on node 1.
For example:
ASMCMD [+] > volinfo -G data volume1
See Managing Oracle ADVM with ASMCMD (page 15-1).
3. Mount the file system using the Oracle ACFS mount command.
For example:
# /bin/mount -t acfs /dev/asm/volume1-123 /acfsmounts/acfs1
See "mount (page 16-26)" (Linux environments) or "acfsmountvol (page 16-48)"(Windows). The root privilege is required run the mount command and theWindows Administrator privilege is required to run the acfsmountvolcommand.
After the file system has been mounted, ensure that the permissions are set to allowaccess for the appropriate users.
4. List the contents of the test file you previously created on the file system.
For example:
$ cat /acfsmounts/acfs1/myfileOracle ACFS File System
The contents should match the file created previously on node 1.
Managing Oracle ACFS SnapshotsTo create and verify a snapshot on node 1:
1. Create snapshot of the new file system created on node 1.
For example:
$ /sbin/acfsutil snap create mysnapshot_20090725 /acfsmounts/acfs1
See "acfsutil snap create (page 16-135)".
Basic Steps to Manage Oracle ACFS Systems
Managing Oracle ACFS with Command-Line Tools 16-5
2. Update the test file in the file system so that it is different than the snapshot.
For example:
$ echo "Modifying a file in Oracle ACFS File System" > /acfsmounts/acfs1/myfile
3. List the contents of the test file and the snapshot view of the test file.
For example:
$ cat /acfsmounts/acfs1/myfile
$ cat /acfsmounts/acfs1/.ACFS/snaps/mysnapshot_20090725/myfile
The contents of the test file and snapshot should be different. If node 1 is in acluster, then you can perform the same list operation on node 2.
Securing Oracle ACFS File SystemsThis section discusses the basic operations to manage security for an Oracle ACFS filesystem on Linux.
The scenario in this section shows how to use Oracle ACFS security to ensure that onlythe maintenance user can access medical history files during the maintenance period.Oracle ACFS encryption is also enabled on the same file system.
In this scenario, the disk group on which the volume is created for the file system hascompatibility attributes for ASM and ADVM set to 11.2.0.3 or higher. For informationabout disk group compatibility, refer to "Disk Group Compatibility (page 4-41)".
For the examples in this section, various operating system users, operating systemgroups, and directories must exist.
The basic steps to manage security are:
1. Initialize security for Oracle ACFS.
Run the acfsutil sec init command to configure storage for securitycredentials and identify an operating system user as the first securityadministrator and the operating system security group. The securityadministrator must belong to the operating system group. This command must berun before any other security command and requires root or WindowsAdministrator privileges to run.
The acfsutil sec init command is only run once to set up Oracle ACFSsecurity for each cluster and can be run from any node in the cluster. Othersecurity commands can also be run from any node in a cluster. Securityadministrators are common for all Oracle ACFS file systems in a cluster.
For example, the following command initializes security for a cluster and createsthe first security administrator (medHistAdmin1).
# /sbin/acfsutil sec init -u medHistAdmin1 -g medHistAdminGrp
The medHistAdmin1 security administrator must belong to themedHistAdminGrp operating system group. That group is identified as thesecurity group for the security administrators.
When the root user or Windows Administrator user runs the command, theuser assigns a security password to the security administrator. The first securityadministrator can change the password with the acfsutil sec adminpassword command. The valid password format is described in "acfsutil sec init
Basic Steps to Manage Oracle ACFS Systems
16-6 Oracle Automatic Storage Management Administrator's Guide

(page 16-83)". For information about acfsutil sec admin password, refer to"acfsutil sec admin password (page 16-78)".
All acfsutil sec commands (other than acfsutil sec init) must be run byan Oracle ACFS security administrator and the administrator is prompted for thesecurity administrator's password when each command is run.
Note:
When prompting for the security administrator's password, the following textdisplays: Realm management password
The password required is the Oracle ACFS security administrator's password,not the operating system password of the user.
Security administrators are allowed to browse all directories in an Oracle ACFSfile system whether they have the underlying operating system permissions andwhether any realm checks allow it. This functionality enables a securityadministrator to check the location of the files when securing them with OracleACFS security realms. However, a security administrator cannot view thecontents of individual files without the appropriate operating system and securityrealm permissions.
For more information, refer to "acfsutil sec init (page 16-83)" and "acfsutil secadmin password (page 16-78)".
2. Add additional security administrators as necessary.
The first security administrator can add additional security administrators toadminister Oracle ACFS security with the acfsutil sec admin add command.
For example, add a new security administrator medHistAdmin2.
$ /sbin/acfsutil sec admin add medHistAdmin2
The medHistAdmin2 user must belong to the operating system group(medHistAdminGrp) identified as the security administrator group with theacfsutil sec init command.
The medHistAdmin2 security administrator should change the assignedtemporary security password with the acfsutil sec admin passwordcommand. The medHistAdmin2 administrator can add new securityadministrators.
For more information, refer to "acfsutil sec admin add (page 16-77)" and "acfsutilsec admin password (page 16-78)".
3. Prepare an Oracle ACFS file system for security.
Run the acfsutil sec prepare on an Oracle ACFS file system before addingany security realms.
For example, prepare the Oracle ACFS file system mounted on /acfsmounts/acfs1 for Oracle ACFS security.
$ /sbin/acfsutil sec prepare -m /acfsmounts/acfs1
By default, security is enabled for a file system after running this command. Youcan explicitly disable or enable security with the acfsutil sec disable or
Basic Steps to Manage Oracle ACFS Systems
Managing Oracle ACFS with Command-Line Tools 16-7

acfsutil sec enable commands. For more information, refer to "acfsutil secdisable (page 16-80)" and "acfsutil sec enable (page 16-81)".
This command automatically creates several security realms, such as theSYSTEM_BackupOperators security realm. Administrators can add users to theSYSTEM_BackupOperators realm which gives those users permissions to makebackups of realm-secured files in the Oracle ACFS file system.
For more information, refer to "acfsutil sec prepare (page 16-86)".
4. Provide encryption for this file system.
Encrypting the file system is optional, but is enabled in this scenario.
a. First, run the acfsutil encr init command to initialize encryption andcreate the storage necessary for the encryption keys. This command must berun one time for each cluster on which encryption is set up.
For example, the following command initializes encryption for a cluster.
# /sbin/acfsutil encr init
This command must be run before any other encryption command andrequires root or administrator privileges to run. For more information, referto "acfsutil encr init (page 16-109)".
b. Next, run the acfsutil encr set command to set encryption for the OracleACFS file system.
For example, the following command sets encryption for the file systemmounted on the /acfsmounts/acfs1 directory.
# /sbin/acfsutil encr set -m /acfsmounts/acfs1/
The acfsutil encr set command transparently generates a volumeencryption key which is stored in the key store that was previouslyconfigured with the acfsutil encr init command. This commandrequires root or administrator privileges to run.
For more information, refer to "acfsutil encr init (page 16-109)" and "acfsutil encrset (page 16-113)".
5. Create a security realm on the file system.
Run the acfsutil sec realm create command to create a security realm for afile system.
For example, create a security realm named medHistRealm which containsmedical records files with all files encrypted in the realm.
$ /sbin/acfsutil sec realm create medHistRealm -m /acfsmounts/acfs1/ -e on -a AES -k 128
The -e option specifies that all the files in the realm are encrypted with the AESalgorithm and the key length set to 128 bits. The file system must first be preparedfor encryption with the acfsutil encr init and acfsutil encr setcommands. You do not have to enter the same value for the -k option withacfsutil sec realm create as you have entered with the acfsutil encrset command.
For more information, refer to "acfsutil sec realm create (page 16-97)".
6. Create security rules.
Basic Steps to Manage Oracle ACFS Systems
16-8 Oracle Automatic Storage Management Administrator's Guide
Run the acfsutil sec rule create command to create rules which determineaccess to the files and directories of a security realm.
For example, create rules that can enable the medMaintenance user to accessmedical records for the time period 10 PM to 2 AM for file maintenance. Also,create rules that can deny operations during the time period 8 AM to 9 AM anddeny operations to the medBrowse user.
$ /sbin/acfsutil sec rule create medHistRule1a -m /acfsmounts/acfs1/ -t time 22:00:00,02:00:00 -o ALLOW
$ /sbin/acfsutil sec rule create medHistRule1b -m /acfsmounts/acfs1/ -t username medMaintenance -o ALLOW
$ /sbin/acfsutil sec rule create medHistRule1c -m /acfsmounts/acfs1/ -t time 08:00:00,09:00:00 -o DENY
$ /sbin/acfsutil sec rule create medHistRule1d -m /acfsmounts/acfs1/ -t username medBrowse -o DENY
You can edit rules with the acfsutil sec rule edit command.
For more information, refer to "acfsutil sec rule create (page 16-100)" and "acfsutilsec rule edit (page 16-102)".
7. Create security rule sets and add rules to rule sets.
Run the acfsutil sec ruleset create command to create rule sets to whichrules can be added.
For example, create rule sets named medRuleSet1 and medRuleSet2 thatinclude rules for operations on the files and directories of the securitymedHistRealm realm.
$ /sbin/acfsutil sec ruleset create medRuleSet1 -m /acfsmounts/acfs1/
$ /sbin/acfsutil sec ruleset create medRuleSet2 -m /acfsmounts/acfs1/
Add existing rules to the rule sets.
$ /sbin/acfsutil sec ruleset edit medRuleSet1 -m /acfsmounts/acfs1/ -a medHistRule1a,medHistRule1b -o ALL_TRUE
$ /sbin/acfsutil sec ruleset edit medRuleSet2 –m /acfsmounts/acfs1/ -a medHistRule1c,medHistRule1d -o ALL_TRUE
The ALL_TRUE option is the default action, but is added here to emphasize thatboth rules in each rule set must be true.
For more information, refer to "acfsutil sec ruleset create (page 16-104)" and"acfsutil sec ruleset edit (page 16-106)".
8. Add objects to a security realm.
Run the acfsutil sec realm add command to add objects, such as commandrules, rule sets, and files, to a security realm. For example, add the medRuleSet1and medRuleSet2 rule sets and all the files in the /acfsmounts/acfs1/medicalrecords directory to the medHistRealm.
When adding a rule set to a realm, the rule set is added with a command rule,such as DELETEFILE:medRuleSet1. Only one rule set can be included with
Basic Steps to Manage Oracle ACFS Systems
Managing Oracle ACFS with Command-Line Tools 16-9

each command rule. To display a list of the command rules, use acfsutil secinfo with the -c option. Refer to "acfsutil sec info (page 16-82)".
The following acfsutil sec realm add command enables themedMaintenance user to delete medical records during the time period 10 PM to2 AM, but blocks writing to files during 8 AM to 9 AM.
$ /sbin/acfsutil sec realm add medHistRealm -m /acfsmounts/acfs1/ -l DELETEFILE:medRuleSet1 -f -r /acfsmounts/acfs1/medicalrecords
This acfsutil sec realm add command prevents the medBrowse user fromwriting or deleting medical records anytime.
$ /sbin/acfsutil sec realm add medHistRealm -m /acfsmounts/acfs1/ -l WRITE:medRuleSet2 -f -r /acfsmounts/acfs1/medicalrecords
This acfsutil sec realm add command adds backup operators to theSYSTEM_BackupOperators security realm that was automatically created withthe acfsutil sec prepare command.
$ /sbin/acfsutil sec realm add SYSTEM_BackupOperators -m /acfsmounts/acfs1/ -G sysBackupGrp
Users that belong to the sysBackupGrp operating system group can now makebackups of realm-secured files in the Oracle ACFS file system.
For more information, refer to "acfsutil sec realm add (page 16-88)" and "acfsutilsec realm delete (page 16-98)".
9. Display security information.
Run the acfsutil sec info command to display information for a securityrealm. For example, display security information for the medHistRealm realm.
$ /sbin/acfsutil sec info -m /acfsmounts/acfs1/ –n medHistRealm
To display the security realms to which a file or a directory belongs, run theacfsutil sec info file command. For example:
$ /sbin/acfsutil sec info file -m /acfsmounts/acfs1/ /acfsmounts/acfs1/medicalrecords
For more information, refer to "acfsutil sec info (page 16-82)" and "acfsutil secinfo file (page 16-83)".
10. Save security metadata as a backup.
Run the acfsutil sec save command to save the security metadata of a filesystem.
For example, save the security metadata of the /acfsmounts/acfs1 file systemto the acfs1_backup.xml file.
$ /sbin/acfsutil sec save –m /acfsmounts/acfs1 –p acfs1_backup.xml
The acfs1_backup.xml security metadata backup file is saved in the /acfsmounts/acfs1/.Security/backup/ directory. The saved XML file canbe loaded with the acfsutil sec load command.
Basic Steps to Manage Oracle ACFS Systems
16-10 Oracle Automatic Storage Management Administrator's Guide

For more information, refer to "acfsutil sec save (page 16-106)" and "acfsutil secload (page 16-85)".
You can run some acfsutil sec commands in a batch file with the acfsutil secbatch command. For example, you could create a batch file that contains a group ofacfsutil sec rule and acfsutil sec ruleset commands. For moreinformation, refer to "acfsutil sec batch (page 16-79)".
Auditing and diagnostic data for Oracle ACFS security is saved to log files. For moreinformation about Oracle ACFS security, including the log files, refer to "Oracle ACFSSecurity (page 11-19)".
Encrypting Oracle ACFS File SystemsThis section discusses the basic operations to manage encryption on an Oracle ACFSfile system on Linux. The examples in this section show a scenario in which themedical history files are encrypted in an Oracle ACFS file system.
The steps in this section assume Oracle ACFS security is not configured for the filesystem; however, you can use both Oracle ACFS security and encryption on the samefile system. If you decide to use both security and encryption, then both encryptionand security must be initialized for the cluster containing the file system. Aftersecurity is initialized on the file system, then an Oracle ACFS security administratorruns acfsutil sec commands to provide encryption for the file system. Forinformation about setting up security with encryption, refer to "Securing Oracle ACFSFile Systems (page 16-6)".
Because the acfsutil encr set and acfsutil encr rekey -v commands modifythe encryption key store, you should back up the Oracle Cluster Registry (OCR) afterrunning these commands to ensure there is an OCR backup that contains all of thevolume encryption keys (VEKs) for the file system.
The disk group on which the volume is created for the file system has compatibilityattributes for ASM and ADVM set to 11.2.0.3 or higher. For information about diskgroup compatibility, refer to "Disk Group Compatibility (page 4-41)".
For the examples in this section, various operating system users, operating systemgroups, and directories must exist.
The basic steps to manage encryption are:
1. Initialize encryption.
Run the acfsutil encr init command to initialize encryption and create thestorage necessary for the encryption keys. This command must be run one timefor each cluster on which encryption is set up.
For example, the following command initializes encryption for a cluster.
# /sbin/acfsutil encr init
This command must be run before any other encryption command and requiresroot or administrator privileges to run.
For more information, refer to "acfsutil encr init (page 16-109)".
2. Set encryption parameters.
Run the acfsutil encr set command to set the encryption parameters for theentire Oracle ACFS file system.
Basic Steps to Manage Oracle ACFS Systems
Managing Oracle ACFS with Command-Line Tools 16-11

For example, the following command sets the AES encryption algorithm and a filekey length of 128 for a file system mounted on the /acfsmounts/acfs1directory.
# /sbin/acfsutil encr set -a AES -k 128 -m /acfsmounts/acfs1/
The acfsutil encr set command also transparently generates a volumeencryption key which is stored in the key store that was previously configuredwith the acfsutil encr init command.
This command requires root or administrator privileges to run.
For more information, refer to "acfsutil encr set (page 16-113)".
3. Enable encryption.
Run the acfsutil encr on command to enable encryption for directories andfiles.
For example, the following command enables encryption recursively on all files inthe /acfsmounts/acfs1/medicalrecords directory.
# /sbin/acfsutil encr on -r /acfsmounts/acfs1/medicalrecords -m /acfsmounts/acfs1/
For users that have appropriate permissions to access files in the /acfsmounts/acfs1/medicalrecords directory, they can still read the decrypted files.
This command can be run by an administrator or the file owner.
For more information, refer to "acfsutil encr on (page 16-111)".
4. Display encryption information.
Run the acfsutil encr info command to display encryption information fordirectories and files.
# /sbin/acfsutil encr info -m /acfsmounts/acfs1/ -r /acfsmounts/acfs1/medicalrecords
This command can be run by an administrator or the file owner.
For more information, refer to "acfsutil encr info (page 16-108)".
Auditing and diagnostic data for Oracle ACFS encryption is saved to log files. Formore information about Oracle ACFS encryption, including the log files, refer to"Oracle ACFS Encryption (page 11-22)".
Tagging Oracle ACFS File SystemsThis section discusses the operations to manage tagging on directories and files in anOracle ACFS file system on Linux.
The disk group on which the volume is created for the file system has compatibilityattributes for ASM and ADVM set to 11.2.0.3 or higher. For information about diskgroup compatibility, refer to "Disk Group Compatibility (page 4-41)".
Oracle ACFS implements tagging with Extended Attributes. There are somerequirements for using Extended Attributes; refer to "Oracle ACFS Tagging(page 11-33)".
The steps to manage tagging are:
1. Specify tag names for directories and files.
Basic Steps to Manage Oracle ACFS Systems
16-12 Oracle Automatic Storage Management Administrator's Guide

Run the acfsutil tag set command to set tags on directories or files. You canuse these tags to specify which objects are replicated.
For example, add the comedy and drama tags to the files in the subdirectories ofthe /acfsmounts/repl_data/films directory.
$ /sbin/acfsutil tag set -r comedy /acfsmounts/repl_data/films/comedies
$ /sbin/acfsutil tag set -r drama /acfsmounts/repl_data/films/dramas
$ /sbin/acfsutil tag set -r drama /acfsmounts/repl_data/films/mysteries
In this example, the drama tag is purposely used twice and that tag is changed ina later step.
You must have system administrator privileges or be the file owner to run thiscommand.
For more information, refer to "acfsutil tag set (page 16-55)".
2. Display tagging information.
Run the acfsutil tag info command to display the tag names for directoriesor files in Oracle ACFS file systems. Files without tags are not be displayed.
For example, display tagging information for files in the /acfsmounts/repl_data/films directory.
$ /sbin/acfsutil tag info -r /acfsmounts/repl_data/films
Display tagging information for files with the drama tag in the /acfsmounts/repl_data/films directory.
$ /sbin/acfsutil tag info -t drama -r /acfsmounts/repl_data/films
You must have system administrator privileges or be the file owner to run thiscommand.
For more information, refer to "acfsutil tag info (page 16-54)".
3. Remove and change tag names if necessary.
Run the acfsutil tag unset command to remove tags on directories or files.For example, unset the drama tag on the files in the mysteries subdirectory ofthe /acfsmounts/repl_data/films directory to apply a different tag to thesubdirectory.
$ /sbin/acfsutil tag unset -r drama /acfsmounts/repl_data/films/mysteries
Add the mystery tag to the files in the mysteries subdirectory of the /acfsmounts/repl_data/films directory.
$ /sbin/acfsutil tag set -r mystery /acfsmounts/repl_data/films/mysteries
You must have system administrator privileges or be the file owner to run thesecommands.
For more information, refer to "acfsutil tag unset (page 16-57)".
For more information about tagging an Oracle ACFS file system, refer to "Oracle ACFSTagging (page 11-33)".
Basic Steps to Manage Oracle ACFS Systems
Managing Oracle ACFS with Command-Line Tools 16-13
Replicating Oracle ACFS File SystemsThis section discusses the operations to manage replication on an Oracle ACFS filesystem on Linux.
The disk groups on which volumes are created for the primary and standby filesystems must have compatibility attributes for ASM and ADVM set to 11.2.0.3 orhigher. For information about disk group compatibility, refer to "Disk GroupCompatibility (page 4-41)".
The steps to manage replication are:
1. Determine the storage capacity necessary for replication on the sites hosting theprimary and standby file systems. The primary file system must have a minimumsize of 4 GB for each node that is mounting the file system. The standby filesystem must have a minimum size of 4 GB and should be sized appropriately forthe amount of data being replicated and the space necessary for the replicationlogs sent from the primary file system.
Calculate the replication-related storage requirement for the primary file system,then use the same size requirement for the standby file system. If Oracle ACFStagging is used to replicate only a subset of the files in the primary file system,then the size requirement for the standby file system is proportional to that subsetof the primary file system.
Run the acfsutil info fs command with the -s interval option on the nodewhere the primary file system is mounted to display the amount and rate ofchange to the primary file system for the node. The amount of change includes alluser and metadata modifications to the primary file system. This amountapproximates the size of replication logs that are generated when recordingchanges to the file system. Changes are stored in temporary files called replicationlogs which are kept in a special directory in the primary file system until they canbe sent to the standby to be applied. After confirmation is received that thechanges contained in a replication log have been successfully applied to thestandby file system, the replication logs on the primary file system are deleted.
To approximate the extra storage capacity necessary for the replication logs,determine the following:
• The time interval during which the site hosting the primary file system mayexperience network connectivity problems or slowdowns when accessing thesite hosting the standby file system.
• The time interval during which the site hosting the standby file system maybe taken offline for maintenance.
These time intervals are used in calculating the amount and rate of change instorage space. You must account for the time interval when the primary filesystem cannot send the replication logs over to the standby file system at its usualrate or when standby file systems are inaccessible while undergoing maintenance.The replication logs continue to accumulate on the site hosting the primary filesystem and may eventually cause that site to run out of space.
For the following scenario, assume t = 60 minutes is the time interval in yourenvironment that would adequately account for network problems ormaintenance on site hosting the standby file system.
Run acfsutil info fs -s 900 on the primary file system to collect the averagerate of change over a 24 hour period with a 15 minute (900 seconds) interval. The
Basic Steps to Manage Oracle ACFS Systems
16-14 Oracle Automatic Storage Management Administrator's Guide

t/4 (60/4=15) result is the value for the sampling interval. Do not exceed a valueof t/2 for the time interval as you may miss some important peaks.
$ /sbin/acfsutil info fs -s 900 /acfsmounts/repl_data
With the output, you can determine the average rate of change, the peak rate ofchange, and how long the peaks last. However, the command displaysinformation only for the node on which the command is run. To collect the totalamount of change in the file system the command must be run on every node thatis modifying the file system. The maximum number of supported nodes is eight.
The following formula approximates the extra storage capacity needed:
Extra storage capacity to hold replication logs = (Number-nodes-on-primary * 1GB) + P
where P is the peak amount of change generated across all nodes for time t asreported by the acfsutil info fs –s output.
In the example, you must total the changes from four 15-minute intervals to findthe total amount of change that could occur in 60 minutes. You may choose to usethe single hour that generated the largest amount of change, or you could selectthe top four 15-minute intervals even if they did not occur together to prepare forthe worst-case scenario.
Assume that you have four nodes modifying the primary file system, and thatduring the measured interval, the peak amount of change reported for the 60minutes is approximately 20 GB for all nodes. Using the storage capacity formula,24 GB of excess storage capacity on each site hosting the primary file system isrequired for storage of the replication logs.
Extra storage capacity to hold replication logs = (4 * 1GB per node) + 20GB maximum change per hour = 24GB of extra storage capacity
Next, check that the network transfer rate is greater than or equal to the rate ofchange observed during the monitoring period. In the previous example, the peakof 20 GB of changed data per hour is equivalent to a peak rate of change of about5.5 MB/sec. To keep up with this rate of change, you must ensure that thenetwork can reliably transfer at least this amount of data per second withoutnegatively impacting your existing network workloads.
To estimate your current actual network transfer rate, calculate the elapsed timerequired to FTP a 1 GB file from the primary file system to the intended standbyfile system during an interval when network usage is low. For example, if the 1GB file transfers in 30 seconds, then your current FTP transfer rate is 33 MB perseconds (1000 MB/30 seconds = 33 MB per second). Because of various delaysinherent in the transfers, for planning purposes you should reduce this measuredFTP transfer rate by 20%, and then by an additional 5% per node.
In the previous example with 4 nodes, the FTP transfer rate used for planning is:
33 MB/sec * (1 – (0.2) – (4 * 0.05)) = 33 * (0.6) = ~20MB/sec
Because the peak rate of change was only 5.5 MB/second, you can expect thenetwork to be able to handle this additional workload in this example. However,if the network capacity is close to fully utilized, you might want to considerincreasing network capacity before implementing replication for this file systemand workload.
Basic Steps to Manage Oracle ACFS Systems
Managing Oracle ACFS with Command-Line Tools 16-15

In addition, insure you have sufficient network capacity to allow replication tocatch up after times when network problems prevent a primary file system fromsending replication logs to the standby file system.
For more information, refer to "acfsutil info fs (page 16-120)".
2. Set up tags, user names, and service names.
When starting replication on an Oracle ACFS file system, first perform thefollowing steps:
• Determine the user name and password that the sites hosting the primary andstandby file systems use to connect to the remote Oracle ASM instance as theOracle ASM and DBA administrator. All nodes that have the file systemmounted must support this user name and password. The user must haveSYSASM and SYSDBA privileges. For example:
SQL> CREATE USER primary_admin IDENTIFIED BY primary_passwd;SQL> GRANT sysasm,sysdba TO primary_admin;
Oracle wallets should be used to manage security credentials.
See Also:
– Oracle Database Enterprise User Security Administrator's Guide forinformation about Oracle wallets
– Oracle Database SecureFiles and Large Objects Developer's Guide forinformation about wallet management
– Oracle Database Net Services Reference for information about walletparameters in the SQLNET.ORA file
• Determine a unique service name for the replicated file system.
When both the primary and standby file systems are located in differentclusters for disaster tolerance, then the service names for the primary andstandby file systems can be the same. However, if the both file systems aremounted on the same node, such as a test configuration, then unique servicenames must be used for the primary and standby file systems. Using uniqueservice names for the primary and standby file systems requires the use of the-c option during replication initialization. Service names are limited to amaximum of 128 bytes.
Note:
– You must specify a service name other than +ASM because that servicename is currently in use by the Oracle ASM instance.
– You must specify a unique service name for each file system that youwant to replicate when there are multiple replicated file systems on anode or cluster.
Using this service name, create a net service alias on the sites hosting theprimary and standby file system that connects to the remote site. This alias
Basic Steps to Manage Oracle ACFS Systems
16-16 Oracle Automatic Storage Management Administrator's Guide
along with the user name and password are used as the connection string inthe replication initialization commands.
For example, the following are examples of connect descriptors with netservice aliases for the sites hosting the primary and standby file systems.
primary_repl_site=(DESCRIPTION= (ADDRESS=(PROTOCOL=tcp)(HOST=primary1.example.com)(PORT=1521)) (ADDRESS=(PROTOCOL=tcp)(HOST=primary2.example.com)(PORT=1521)) (CONNECT_DATA=(SERVICE_NAME=primary_service)))
standby_repl_site=(DESCRIPTION= (ADDRESS=(PROTOCOL=tcp)(HOST=standby1.example.com)(PORT=1521)) (CONNECT_DATA=(SERVICE_NAME=standby_service)))
If you want to perform replication using a single client access name (SCAN)VIP, you must update the REMOTE_LISTENER initialization parameter in theOracle ASM instance before initializing replication. You can update theparameter in the initialization file or with the ALTER SYSTEM SQL statement.
For example:
SQL> ALTER SYSTEM SET remote_listener='SCAN_NAME:1521' sid='*' scope=both;
See Also:
Oracle Database Net Services Administrator's Guide for information aboutconnect descriptors
• Optionally set tags on directories and files to replicate only selected files in anOracle ACFS file system. You can also add tags to files after replication hasstarted. For information about the steps to tag files, refer to "Tagging OracleACFS File Systems (page 16-12)".
3. Configure the site hosting the standby file system.
Before replicating an Oracle ACFS file system, configure the site hosting thestandby file system by performing the following procedures.
• Create a new file system of adequate size to hold the replicated files andassociated replication logs from the primary file system. For example: /standby/repl_data
• Mount the file system on one node only.
• Run the acfsutil repl init standby command. If this command isinterrupted for any reason, the user must re-create the file system, mount iton one node only, and rerun the command. This command requires thefollowing configuration information:
– The connect string to be used to connect to the site hosting the primaryfile system. For example:
/@primary_repl_site
The connect string searches in the user's wallet for the user name andpassword associated with the alias primary_repl_site. The user musthave SYSASM and SYSDBA privileges.
Basic Steps to Manage Oracle ACFS Systems
Managing Oracle ACFS with Command-Line Tools 16-17

– If the standby file system is using a different service name than theprimary file system, then the use -c option. This option specifies theservice name for the standby file system. For example:
standby_repl_service
– The mount point of the standby file system. For example:
/standby/repl_data
For example, run the following acfsutil repl init standby command on thesite hosting the standby file system.
$ /sbin/acfsutil repl init standby -p /@primary_repl_site -c standby_repl_service /standby/repl_data
The acfsutil repl init standby command requires root or systemadministrator privileges to run.
For more information, refer to "acfsutil repl init (page 16-63)".
4. Configure the site hosting the primary file system.
After the standby file system has been set up, configure the site hosting theprimary file system and start replication by performing the following procedures.
Run the acfsutil repl init primary command. This command requires thefollowing configuration information:
• The connect string to be used to connect to the site hosting the standby filesystem. For example:
/@standby_repl_site
The connect string searches in the user's wallet for the user name andpassword associated with the alias standby_repl_site. The user musthave SYSASM and SYSDBA privileges.
• The mount point of the primary file system. For example: /acfsmounts/repl_data
• If the primary file system is using a different service name than the standbyfile system, then use the -c option. This option specifies the service name onthe site hosting the primary file system. For example:
primary_repl_service
• If the mount point is different on the site hosting the standby file system thanit is on the site hosting the primary file system, specify the mount point on thestandby file system with the -m standby_mount_point option. Forexample:
-m /standby/repl_data
For example, run the following acfsutil repl init primary command on thesite hosting the primary file system.
$ /sbin/acfsutil repl init primary -s /@standby_repl_site -m /standby/repl_data -c primary_repl_service /acfsmounts/repl_data
Basic Steps to Manage Oracle ACFS Systems
16-18 Oracle Automatic Storage Management Administrator's Guide

The acfsutil repl init primary command requires root or systemadministrator privileges to run.
For more information, refer to "acfsutil repl init (page 16-63)".
5. Monitor information about replication on the file system.
The acfsutil repl info command displays information about the state of thereplication processing on the primary or standby file system.
For example, run the following acfsutil repl info command on the sitehosting the primary file system to display configuration information.
$ /sbin/acfsutil repl info -c -v /acfsmounts/repl_data
You must have system administrator or Oracle ASM administrator privileges torun this command.
For information, refer to "acfsutil repl info (page 16-61)".
6. Manage replication background processes.
Run the acfsutil repl bg command to start, stop, or retrieve informationabout replication background processes.
For example, the following example displays information about the replicationprocesses for the /acfsmounts/repl_data file system.
$ /sbin/acfsutil repl bg info /acfsmounts/repl_data
You must have system administrator or Oracle ASM administrator privileges torun the acfsutil repl bg info command.
For more information, refer to "acfsutil repl bg (page 16-58)".
7. Pause replication momentarily only if necessary.
Run the acfsutil repl pause to momentarily stop replication. You should runthe acfsutil repl resume command soon as possible to resume replication.
For example, the following command pauses replication on the /acfsmounts/repl_data file system.
$ /sbin/acfsutil repl pause /acfsmounts/repl_data
The following command resumes replication on the /acfsmounts/repl_datafile system.
$ /sbin/acfsutil repl resume /acfsmounts/repl_data
You must have system administrator or Oracle ASM administrator privileges torun these commands.
For more information, refer to "acfsutil repl pause (page 16-65)" and "acfsutil replresume (page 16-66)".
8. Failing over to a standby or turning a standby file system into an active filesystem.
If the primary file system is gone, you can run the acfsutil terminatestandby mount_point command to turn the standby file system into an activefile system. If the primary file system still exists, you should terminate theprimary first with acfsutil terminate primary mount_point.
Basic Steps to Manage Oracle ACFS Systems
Managing Oracle ACFS with Command-Line Tools 16-19

Before terminating replication with acfsutil repl terminate on the standbyfile system, you can determine the point in time of the primary file system that thestandby file system represents. This timestamp is displayed with the acfsutilrepl info -c command as Last sync time with primary. If the failoveraction must be coordinated with Oracle Data Guard, you can use the timestamp toset back the database if needed or perform other necessary actions that are basedon the time stamp. For information, refer to "acfsutil repl info (page 16-61)".
Note:
On an Oracle ACFS file system df reports space usage by internal metadataplus user files and directories. du only reports the space usage of user files anddirectories. Depending on the size of the volume and number of the nodes,internal metadata is allocated in varying sizes. Additionally, with replicationenabled an internal replication log is allocated for each node that is used torecord changes to the file system before exposing the replication log to userspace daemons to transport to the standby.
For more information about replicating an Oracle ACFS file system, refer to "OracleACFS Replication (page 11-30)".
Deregistering, Dismounting, and Disabling Volumes and Oracle ACFS File SystemsThis section discusses the operations to deregister or dismount a file system anddisable a volume. This section contains these topics:
• Deregistering an Oracle ACFS File System (page 16-20)
• Dismounting an Oracle ACFS File System (page 16-20)
• Disabling a Volume (page 16-21)
Deregistering an Oracle ACFS File System
You can deregister an Oracle ACFS file system if you do not want the file system to beautomatically mounted.
For example:
$ /sbin/acfsutil registry -d /acfsmounts/acfs1
If you deregister a file system, then you must explicitly mount the file system afterOracle Clusterware or the system is restarted.
For more information about the registry, see "About the Oracle ACFS Mount Registry(page 11-9)". For information about acfsutil registry, see "acfsutil registry(page 16-129)".
Dismounting an Oracle ACFS File System
You can dismount a file system without deregistering the file system or disabling thevolume on which the file system is mounted.
For example, you can dismount a file system and run fsck to check the file system.
# /bin/umount /acfsmounts/acfs1
# /sbin/fsck -a -v -y -t acfs /dev/asm/volume1-123
Basic Steps to Manage Oracle ACFS Systems
16-20 Oracle Automatic Storage Management Administrator's Guide

After you dismount a file system, you must explicitly mount the file system.
Use umount on Linux systems or acfsdismount on Windows systems. Forinformation about the commands to dismount a file system, see "umount(page 16-28)" or "acfsdismount (page 16-46)".
Use fsck on Linux systems or acfschkdsk on Windows systems to check a filesystem. For information about the commands to check a file system, see "fsck(page 16-23)" or "acfschkdsk (page 16-44)".
Disabling a Volume
To disable a volume, you must first dismount the file system on which the volume ismounted.
For example:
# /bin/umount /acfsmounts/acfs1
After a file system is dismounted, you can disable the volume and remove the volumedevice file.
For example:
ASMCMD> voldisable -G data volume1
Dismounting the file system and disabling a volume does not destroy data in the filesystem. You can enable the volume and mount the file system to access the existingdata. For information about voldisable and volenable, see Managing OracleADVM with ASMCMD (page 15-1).
Removing an Oracle ACFS File System and a VolumeTo permanently remove a volume and Oracle ACFS file system, perform the followingsteps. These steps destroy the data in the file system.
1. Deregister the file system with acfsutil registry -d.
For example:
$ /sbin/acfsutil registry -d /acfsmounts/acfs1acfsutil registry: successfully removed ACFS mount point /acfsmounts/acfs1 from Oracle Registry
For information about running acfsutil registry, see "acfsutil registry(page 16-129)".
2. Dismount the file system.
For example:
# /bin/umount /acfsmounts/acfs1
You must dismount the file system on all nodes of a cluster.
Use umount on Linux systems or acfsdismount on Windows systems. Forinformation about running umount or acfsdismount, see "umount (page 16-28)"or "acfsdismount (page 16-46)".
3. Remove the file system with acfsutil rmfs.
Basic Steps to Manage Oracle ACFS Systems
Managing Oracle ACFS with Command-Line Tools 16-21

If you were not planning to remove the volume in a later step, this step is necessaryto remove the file system. Otherwise, the file system is removed when the volumeis deleted.
For example:
$ /sbin/acfsutil rmfs /dev/asm/volume1-123
For information about running acfsutil rmfs, see "acfsutil rmfs (page 16-131)".
4. Optionally you can disable the volume with the ASMCMD voldisablecommand.
For example:
ASMCMD> voldisable -G data volume1
For information about running voldisable, see Managing Oracle ADVM withASMCMD (page 15-1).
5. Delete the volume with the ASMCMD voldelete command.
For example:
ASMCMD> voldelete -G data volume1
For information about running voldelete, see Managing Oracle ADVM withASMCMD (page 15-1).
Oracle ACFS Command-line Tools for Linux EnvironmentsNOT_SUPPORTED (page 16-23) contains a summary of the Oracle ACFS commandsfor Linux environments. The commands in NOT_SUPPORTED (page 16-23) havebeen extended with additional options to support Oracle ACFS. All other Linux filesystem commands operate without change for Oracle ACFS.
For example, Oracle ACFS adds a set of Oracle ACFS-specific mount options to thoseprovided with the base operating system platform. You should review both the mountoptions for the Linux platforms in addition to the Oracle ACFS-specific options for thecomplete set of file system mount options.
File systems on Oracle ADVM volumes that are not Oracle ACFS file systems, such asext3, are managed with the same Linux commands that are listed in NOT_SUPPORTED (page 16-23) using the file-specific options for the type of filesystem. You can refer to the man pages for options available for the Linux commandsin NOT_SUPPORTED (page 16-23).
Note:
When using Security-Enhanced Linux (SELinux) in enforcing mode withOracle ACFS, ensure that the Oracle ACFS file systems are mounted with anSELinux default context. Refer to your Linux vendor documentation forinformation about the context mount option.
Oracle ACFS Command-line Tools for Linux Environments
16-22 Oracle Automatic Storage Management Administrator's Guide

NOT_SUPPORTED
Command Description
fsckNOT_SUPPORTED Checks and repairs an Oracle ACFS file system.
mkfsNOT_SUPPORTED Creates an Oracle ACFS file system.
mountNOT_SUPPORTED Mounts an Oracle ACFS file system.
umountNOT_SUPPORTED Dismounts an Oracle ACFS file system.
fsck
Purpose
Checks and repairs an Oracle ACFS file system.
Syntax and Description
fsck -t acfs -h /dev/nullfsck [-a|-f] [-v] -t acfs [-n|-y] volume_device
fsck -t acfs -h /dev/null displays usage text and exits.
Table 16-2 (page 16-23) contains the options available with the fsck command.
Table 16-2 Options for the Linux fsck command
Option Description
-a Specifies to automatically repair the file system.
-f Forces the file system into mountable state without completinga file system check or repair.
-v Specifies verbose mode. The progress is displayed as theoperation occurs. Running in verbose mode can impactperformance.
-h Displays the usage help text and exits.
-n Answers no to any prompts.
-y Answers yes to any prompts.
volume_device Specifies the primary Oracle ADVM volume device.
fsck checks and repairs an existing Oracle ACFS. This command can only be run on adismounted file system. root privileges are required to run fsck. The Oracle ACFSdriver must be loaded for fsck to work.
By default, fsck only checks for and reports any errors. The -a flag must be specifiedto instruct fsck to repair errors in the file system. Do not interrupt fsck during therepair operation.
In a few cases, fsck prompts for questions before proceeding to check a file system.These cases include:
Oracle ACFS Command-line Tools for Linux Environments
Managing Oracle ACFS with Command-Line Tools 16-23

• If fsck detects that another fsck is in progress on the file system
• If fsck detects that the Oracle ACFS driver is not loaded
• If the file system does not appear to be Oracle ACFS
In checking mode, fsck also prompts if there are transaction logs that have not beenprocessed completely due to an incomplete shutdown. To run in a non-interactivemode, include either the -y or -n options to answer yes or no to any questions.
fsck creates working files before it checks a file system. These working files arecreated in /usr/tmp if space is available. /tmp is used if /usr/tmp does not exist. Ifinsufficient space is available in the tmp directory, fsck attempts to write to thecurrent working directory. The files that fsck creates are roughly the size of the filesystem being checked divided by 32K. At most three such files are allocated. Forexample, a 2 GB file system being checked causes fsck to generate one to three 64Kworking files in the /usr/tmp directory. These files are deleted after fsck hasfinished.
In the event that fsck finds a file or directory in the file system for which it cannotdetermine its name or intended location (possibly due to a corruption in its parentdirectory), it places this object in the /lost+found directory when fsck is run in fixmode. For security reasons only the root user on Linux can read files in /lost+found. If the administrator can later determine the original name and location of thefile based on its contents, the file can be moved or copied into its intended location.
The file names in the /lost+found directory are in the following formats:
parent.id.file.id.time-in-sec-since-1970parent.id.dir.id.time-in-sec-since-1970
The id fields are the internal Oracle ACFS numeric identifiers for each file anddirectory in the file system.
You can use acfsutil info id id mount_point to attempt to determine thedirectory associated with parent.id. This directory is assumed to be where thedeleted object originated. For information about acfsutil info, see "acfsutil info file(page 16-120)".
If the parent directory is not known, the parent id field is set to UNKNOWN.
Note:
It is not possible to see the contents of the /lost+found directory from asnapshot.
Examples
The following example shows how to check and repair an Oracle ACFS file system.
Example 16-1 Using the fsck command
# /sbin/fsck -a -y -t acfs /dev/asm/volume1-123
mkfs
Purpose
Creates an Oracle ACFS file system.
Oracle ACFS Command-line Tools for Linux Environments
16-24 Oracle Automatic Storage Management Administrator's Guide
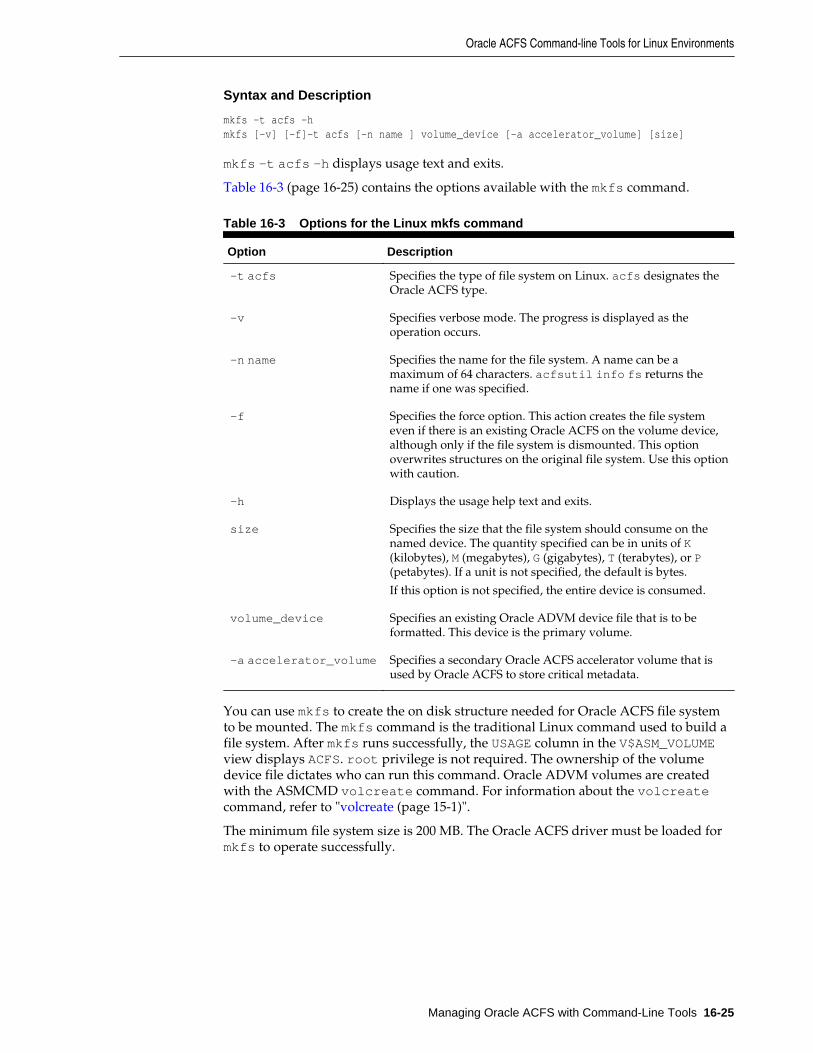
Syntax and Description
mkfs -t acfs -hmkfs [-v] [-f]-t acfs [-n name ] volume_device [-a accelerator_volume] [size]
mkfs -t acfs -h displays usage text and exits.
Table 16-3 (page 16-25) contains the options available with the mkfs command.
Table 16-3 Options for the Linux mkfs command
Option Description
-t acfs Specifies the type of file system on Linux. acfs designates theOracle ACFS type.
-v Specifies verbose mode. The progress is displayed as theoperation occurs.
-n name Specifies the name for the file system. A name can be amaximum of 64 characters. acfsutil info fs returns thename if one was specified.
-f Specifies the force option. This action creates the file systemeven if there is an existing Oracle ACFS on the volume device,although only if the file system is dismounted. This optionoverwrites structures on the original file system. Use this optionwith caution.
-h Displays the usage help text and exits.
size Specifies the size that the file system should consume on thenamed device. The quantity specified can be in units of K(kilobytes), M (megabytes), G (gigabytes), T (terabytes), or P(petabytes). If a unit is not specified, the default is bytes.
If this option is not specified, the entire device is consumed.
volume_device Specifies an existing Oracle ADVM device file that is to beformatted. This device is the primary volume.
-a accelerator_volume Specifies a secondary Oracle ACFS accelerator volume that isused by Oracle ACFS to store critical metadata.
You can use mkfs to create the on disk structure needed for Oracle ACFS file systemto be mounted. The mkfs command is the traditional Linux command used to build afile system. After mkfs runs successfully, the USAGE column in the V$ASM_VOLUMEview displays ACFS. root privilege is not required. The ownership of the volumedevice file dictates who can run this command. Oracle ADVM volumes are createdwith the ASMCMD volcreate command. For information about the volcreatecommand, refer to "volcreate (page 15-1)".
The minimum file system size is 200 MB. The Oracle ACFS driver must be loaded formkfs to operate successfully.
Oracle ACFS Command-line Tools for Linux Environments
Managing Oracle ACFS with Command-Line Tools 16-25
Oracle ACFS Accelerator Volume
Note:
This feature is included starting with Oracle Database 12c Release 1 (12.1.0.2).The feature is reserved for future use. Oracle ACFS accelerator volumecurrently provides no performance gain in 12.1.0.2.
Use an accelerator volume to reduce the time to access the Oracle ACFS metadata log,which is located on the accelerator volume. The accelerator volume is created with the-a option with the mkfs command. The value of COMPATIBLE.ADVM must be at least12.1.0.2 to use the -a option.
Create the accelerator volume on a disk group with storage that is significantly fasterthan the primary volume's storage. For example, Solid State Disk (SSD) storage couldbe used. The size of the accelerator volume should be at least 32 MB for each node inthe cluster. For example, in an eight-node cluster the recommended minimum size ofthe accelerator volume is 256 MB. If an accelerator volume is smaller than therecommended size, the file system can operate normally, but the full benefit of thestorage accelerator may not be achieved. The minimum size of the accelerator volumeis 128 MB. Oracle ADVM volumes are created with the ASMCMD volcreatecommand. For information about the volcreate command, refer to "volcreate(page 15-1)".
The accelerator volume is linked to the primary volume specified with the mkfscommand. When mounting a file system, only the primary volume is specified. If theaccelerator volume becomes inaccessible for any reason after a file system with thevolume is mounted, the file system is taken offline. Only one storage acceleratorvolume can be associated with an Oracle ACFS file system. After an acceleratorvolume is associated with a file system, the volume cannot be disassociated from thefile system. The accelerator volume cannot be resized.
Examples
Before creating an Oracle ACFS file system, first determine which Oracle ADVMvolume devices are available. You can use the ASMCMD volinfo command todisplay information about the volumes and volume devices.
ASMCMD [+] > volinfo -a... Volume Name: VOLUME1 Volume Device: /dev/asm/volume1-123 State: ENABLED...
For information about the volcreate and volinfo commands, refer to ManagingOracle ADVM with ASMCMD (page 15-1).
Next create an Oracle ACFS file system on a volume device file.
Example 16-2 Using the mkfs command
$ /sbin/mkfs -t acfs /dev/asm/volume1-123
$ /sbin/mkfs -t acfs /dev/asm/volume1-127 -a /dev/asm/volume2-130
mount
Oracle ACFS Command-line Tools for Linux Environments
16-26 Oracle Automatic Storage Management Administrator's Guide

Purpose
Mounts an Oracle ACFS file system.
Syntax and Description
mount -hmount [-v] -n -t acfs [-o options] volume_device mount_pointmount
mount -h displays usage text and exits.
Table 16-4 (page 16-27) contains the options available with the mount command.
Table 16-4 Options for the Linux mount command
Option Description
-h Displays the usage help text and exits.
-t acfs Specifies the type of file system on Linux. acfs designates theOracle ACFS type.
-v Specifies verbose mode. The progress is displayed as theoperation occurs.
-n Specifies not to update the /etc/mtab file.
-o Options are specified with the -o flag followed by a comma-delimited string of options. The following options are available:
• all
Reads the Oracle ACFS managed file systems in the OracleClusterware namespace, mounting all file systems with theAUTO_START=always.
When the -o all option is specified, other -o options areignored.
To specify mount options for a registry entry, includethose options with the acfsutil registry commandwhen you add the entry to the registry.
• ro
Mounts the file system in read-only mode.• norootsuid
Fails the execution of binaries by non-root users whosepermissions allow set user Id execution, and are owned byroot. An attempt to run these executables as a non-rootuser fails with a permission denied error.
• rootsuid
Allows the execution of binaries by non-root users of setuser Id files owned by root. This is the default action.
volume_device Specifies a primary Oracle ADVM volume device file that hasbeen formatted by mkfs. device is required but can be adummy value.
mount_point Specifies the directory where the file system is mounted. Thisdirectory must exist before you run the mount command.
mount attaches a file system to the Oracle ACFS hierarchy at the mount point that isthe name of a directory. The mount happens on the node where the mount command
Oracle ACFS Command-line Tools for Linux Environments
Managing Oracle ACFS with Command-Line Tools 16-27
was issued. The mount command returns an error if the file system is not in adismounted state on this node.
It is not always possible to return the cause of a mount failure to the mount command.When this happens Oracle ACFS writes the cause of the failure to the system consoleand associated system log file.
After mount runs successfully, the MOUNTPATH field in the V$ASM_VOLUME viewdisplays the directory name on which the file system is now mounted.
An Oracle ACFS file system should only be mounted on one mount point. The samemount point name should be used on all cluster members.
The mount command lists all mounted file systems if it is run with no parameters.
root privilege is required to run mount.
Examples
The first example shows how to mount volume1-123 on the mount point /acfsmounts/acfs1. The second example shows how to mount all the registeredOracle ACFS file systems. The dummy names (none) have been entered for the deviceand directory as they are required, but not used, when the all option is specified.
Example 16-3 Using the mount command
# /bin/mount -t acfs /dev/asm/volume1-123 /acfsmounts/acfs1
# /bin/mount -t acfs -o all none none
umount
Purpose
Dismounts an Oracle ACFS file system.
Syntax and Description
umount -humount [-v] -l -n volume_device |mount_pointumount -a -l -n [-t acfs]
umount -h displays usage text and exits.
Table 16-5 (page 16-28) contains the options available with the umount command.
Table 16-5 Options for the Linux umount command
Option Description
-h Displays the usage help text and exits.
-t acfs Specifies the type of file system on Linux. acfs designates theOracle ACFS type.
-v Specifies verbose mode. The progress is displayed as theoperation occurs.
-a Specifies to dismount all Oracle ACFS file systems on this node.
Oracle ACFS Command-line Tools for Linux Environments
16-28 Oracle Automatic Storage Management Administrator's Guide

Table 16-5 (Cont.) Options for the Linux umount command
Option Description
-l Specifies a lazy unmount. The Oracle ACFS file system isdismounted, but the cleanup of all references to the file systemoccurs when the system is no longer busy.
-n Specifies not to update the /etc/mtab file.
volume_device Specifies an Oracle ADVM volume device file that has beenformatted by mkfs.
mount_point Specifies the directory where the file system is mounted. Thisdirectory must exist before you run the mount command.
umount detaches an Oracle ACFS from the file system hierarchy on the current node.If the file system is busy, umount fails.
root privileges are required to run the umount command.
Examples
The following examples show how to dismount an Oracle ACFS file system. The firstexample uses the volume device file and the second example uses the file system.
Example 16-4 Using the umount command
# /bin/umount /dev/asm/volume1-123
# /bin/umount /acfsmounts/acfs1
Oracle ACFS Command-line Tools for the Solaris Environment
Note:
If a disk group is dismounted with the force option on Solaris, any OracleADVM volumes device files that were on that disk group remain on thesystem. These files are removed when the disk group is remounted.
NOT_SUPPORTED (page 16-29) contains a summary of the Oracle ACFS commandsfor Solaris. The commands in NOT_SUPPORTED (page 16-29) have been extendedwith additional options to support Oracle ACFS on Solaris.
NOT_SUPPORTED
Command Description
fsckNOT_SUPPORTED Checks and repairs an Oracle ACFS file system on Solaris.
mkfsNOT_SUPPORTED Creates an Oracle ACFS file system on Solaris.
mountNOT_SUPPORTED Mounts an Oracle ACFS file system on Solaris.
umount/umountallNOT_SUPPORTED Dismounts an Oracle ACFS file system on Solaris.
Oracle ACFS Command-line Tools for the Solaris Environment
Managing Oracle ACFS with Command-Line Tools 16-29

fsck
Purpose
Checks and repairs an Oracle ACFS file system on the Solaris operating system.
Syntax and Description
fsck -F acfs -o h /dev/nullfsck -F acfs [{-n|N}|{-y|Y}] [-o options] volume_device
fsck -F acfs -o h /dev/null displays usage text and exits.
Table 16-7 (page 16-30) contains the options available with the fsck command.
Table 16-7 Options for the Solaris fsck command
Option Description
-F acfs Specifies the type of file system on Solaris. acfs designates theOracle ACFS type.
-n |N Answers no to any prompts.
-y|Y Answers yes to any prompts.
-o Specifies that options follow (a, f, h, v). Options are precededwith the -o flag and entered as a comma-delimited string. Forexample: -o a,v
• a
Specifies to automatically fix the file system.• f
Forces the file system into mountable state withoutcompleting a file system check or fix.
• h
Displays the usage text and exits.• v
Specifies verbose mode. The progress is displayed as theoperation occurs. Running in verbose mode can impactperformance.
volume_device Specifies an Oracle ADVM device file.
fsck checks and repairs an existing Oracle ACFS file system. This command can onlybe run on a dismounted file system. root privileges are required to run fsck. TheOracle ACFS driver must be loaded for fsck to work.
By default, fsck only checks for and reports any errors. The -o a option must bespecified to instruct fsck to fix errors in the file system. Do not interrupt fsck duringthe repair operation.
In a few cases, fsck prompts for questions before proceeding to check a file system.These cases include:
• If fsck detects that another fsck is in progress on the file system
• If fsck detects that the Oracle ACFS driver is not loaded
Oracle ACFS Command-line Tools for the Solaris Environment
16-30 Oracle Automatic Storage Management Administrator's Guide

• If the file system does not appear to be Oracle ACFS
In checking mode, fsck also prompts if there are transaction logs that have not beenprocessed completely due to an incomplete shutdown. To run in a non-interactivemode, include either the -y or -n options to answer yes or no to any questions.
fsck creates working files before it checks a file system. These working files arecreated in /usr/tmp if space is available. /tmp is used if /usr/tmp does not exist. Ifinsufficient space is available in the tmp directory, fsck attempts to write to thecurrent working directory. The files that fsck creates are roughly the size of the filesystem being checked divided by 32K. At most three such files are allocated. Forexample, a 2 GB file system being checked causes fsck to generate one to three 64Kworking files in the /usr/tmp directory. These files are deleted after fsck hasfinished.
In the event that fsck finds a file or directory in the file system for which it cannotdetermine its name or intended location (possibly due to a corruption in its parentdirectory), it places this object in the /lost+found directory when fsck is run in fixmode. For security reasons only the root user on Linux can read files in /lost+found. If the administrator can later determine the original name and location of thefile based on its contents, the file can be moved or copied into its intended location.
The file names in the /lost+found directory are in the following formats:
parent.id.file.id.time-in-sec-since-1970parent.id.dir.id.time-in-sec-since-1970
The id fields are the internal Oracle ACFS numeric identifiers for each file anddirectory in the file system.
You can use acfsutil info id id mount_point to attempt to determine thedirectory associated with parent.id. This directory is assumed to be where thedeleted object originated. For information about acfsutil info, see "acfsutil info file(page 16-120)".
If the parent directory is not known, the parent id field is set to UNKNOWN.
Note:
It is not possible to see the contents of the /lost+found directory from asnapshot.
Examples
The following example shows how to check and repair an Oracle ACFS file system.
Example 16-5 Using the fsck command
# /usr/sbin/fsck -F acfs -y -o a /dev/asm/volume1-123
mkfs
Purpose
Creates an Oracle ACFS file system on the Solaris operating system.
Oracle ACFS Command-line Tools for the Solaris Environment
Managing Oracle ACFS with Command-Line Tools 16-31

Syntax and Description
mkfs -F acfs -o h /dev/nullmkfs -F acfs [-o options] volume_device size
mkfs -F acfs -o h /dev/null displays usage text and exits.
Table 16-8 (page 16-32) contains the options available with the mkfs command.
Table 16-8 Options for the Solaris mkfs command
Option Description
-F acfs Specifies the type of file system on Solaris. acfs designates theOracle ACFS type.
-o options Specifies that options follow (f, h, n, v). Options are precededwith the -o flag and entered as a comma-delimited string. Forexample: -o f,v
• h
Displays the usage text and exits.• f
Specifies the force option. This action creates the filesystem even if there is an existing Oracle ACFS on thevolume device, although only if the file system isdismounted. This option overwrites structures on theoriginal file system. Use this option with caution.
• n=name
Specifies the name for the file system. A name can be amaximum of 64 characters. acfsutil info fs returns thename if one was specified.
• v
Specifies verbose mode. The progress is displayed as theoperation occurs.
volume_device Specifies an Oracle ADVM device file.
size Specifies the size of the file system in 512-byte units or in unitsof K|M|G|T|P. Units specified are in K (kilobytes), M(megabytes), G (gigabytes), T (terabytes), or P (petabytes).
You can use mkfs to create the on disk structure needed for Oracle ACFS file systemto be mounted. The mkfs command is the traditional Linux command used to build afile system. After mkfs runs successfully, the USAGE column in the V$ASM_VOLUMEview displays ACFS. root privilege is not required. The ownership of the volumedevice file dictates who can run this command.
The minimum file system size is 200 MB.
The Oracle ACFS driver must be loaded for mkfs to work.
Examples
Before creating an Oracle ACFS file system, first determine which Oracle ADVMvolume devices are available. You can use the ASMCMD volinfo command todisplay information about the volumes and volume devices.
ASMCMD [+] > volinfo -a... Volume Name: VOLUME1
Oracle ACFS Command-line Tools for the Solaris Environment
16-32 Oracle Automatic Storage Management Administrator's Guide

Volume Device: /dev/asm/volume1-123 State: ENABLED...
See Managing Oracle ADVM with ASMCMD (page 15-1).
Next create an Oracle ACFS file system on the volume device file.
Example 16-6 Using the mkfs command
$ /usr/sbin/mkfs -F acfs /dev/asm/volume1-123
mount
Purpose
Mounts an Oracle ACFS file system on the Solaris operating system.
Syntax and Description
mount -F acfs -o h /tmp /dev/nullmount -F acfs [-r] [-o options] volume_device mount_point
mount -F acfs -o h /tmp /dev/null displays usage text and exits.
Table 16-9 (page 16-33) contains the options available with the mount command.
Table 16-9 Options for the Solaris mount command
Option Description
-F acfs Specifies the type of file system on Solaris. acfs designates theOracle ACFS type.
-r Mounts in read-only mode.
Oracle ACFS Command-line Tools for the Solaris Environment
Managing Oracle ACFS with Command-Line Tools 16-33

Table 16-9 (Cont.) Options for the Solaris mount command
Option Description
-o Specifies that options follow. Options are preceded with the -oflag followed by a comma-delimited string of options. Forexample: -o all,v
The following options are available:
• all
Reads the Oracle ACFS managed file systems in the OracleClusterware namespace, mounting all file systems with theAUTO_START=always.
The -o all option requires two placeholders to satisfy thecommand arguments: a dummy argument for the volumedevice and any valid directory.
When the -o all option is specified, other -o options areignored.
To specify mount options for a registry entry, includethose options with the acfsutil registry commandwhen you add the entry to the registry.
• devices/nodevices
Allows or disallows the opening of any character or blockspecial devices from this mount.
• exec/noexec
Allows or disallows the execution of programs in this filesystem.
• h
Displays the usage help text and exits.• rootsuid/norootsuid
Allows or disallows the execution of setuid to rootexecutables (binaries by non-root users whose permissionsallow set user Id execution, and are owned by root).rootsuid is the default action. If norootsuid isspecified, an attempt to run these executables as a non-rootuser fails with a permission denied error.
• ro
Mounts the file system in read-only mode.• rw
Mounts the file system in read-write mode.• setuid/nosetuid
Allows or disallows the execution of setuid and setgidprograms.
• suid/nosuid
Allows or disallows the execution of setuid and setgidprograms and the opening of any character or blockspecial devices from this mount.
• v
Specifies verbose mode. The progress is displayed as theoperation occurs.
volume_device Specifies an Oracle ADVM volume device file that has beenformatted by mkfs. device is required but can be a dummyvalue.
Oracle ACFS Command-line Tools for the Solaris Environment
16-34 Oracle Automatic Storage Management Administrator's Guide
Table 16-9 (Cont.) Options for the Solaris mount command
Option Description
mount_point Specifies the directory where the file system is mounted. Thisdirectory must exist before you run the mount command.
mount attaches a file system to the Oracle ACFS hierarchy at the mount point that isthe name of a directory. The mount occurs on the node where the mount commandwas issued. The mount command returns an error if the file system is not in adismounted state on this node.
It is not always possible to return the cause of a mount failure to the mount command.When this happens Oracle ACFS writes the cause of the failure to the system consoleand associated system log file.
After mount runs successfully, the MOUNTPATH field in the V$ASM_VOLUME viewdisplays the directory name on which the file system is now mounted.
An Oracle ACFS file system should only be mounted on one mount point. The samemount point name should be used on all cluster members.
root privilege is required to run mount.
Examples
The first example shows how to mount volume1-123 on the mount point /acfsmounts/acfs1. The second example shows how to mount all the registeredOracle ACFS file systems. Placeholder arguments must be provided for the volumedevice name and mount point when specifying the -o all option. The volume devicecan be a dummy value, such as none. Any valid directory can be specified for themount point, such as /tmp.
Example 16-7 Using the mount command
# /sbin/mount -F acfs /dev/asm/volume1-123 /acfsmounts/acfs1
# /sbin/mount -F acfs -o all none /tmp
umount/umountall
Purpose
Dismounts an Oracle ACFS file system on the Solaris operating system.
Syntax and Description
umount -V [mount_point | volume_device]umountall -F acfs
unmountall -F acfs dismounts all Oracle ACFS file systems.
Table 16-10 (page 16-36) contains the options available with the umount command.
Oracle ACFS Command-line Tools for the Solaris Environment
Managing Oracle ACFS with Command-Line Tools 16-35

Table 16-10 Options for the Solaris umount command
Option Description
-V Echoes the complete command line, but does not run thecommand. Use this option to verify and validate the commandline before execution. Valid only with umount.
mount_point Specifies the directory where the file system is mounted. Validonly with umount.
volume_device Specifies the Oracle ADVM volume device name associatedwith the file system. Valid only with umount.
-F acfs Specifies the type of file system on Solaris. acfs designates theOracle ACFS type. Valid only with umountall.
umount and umountall detach an Oracle ACFS from the file system hierarchy on thecurrent node. If a file system is busy, umount and umountall fail.
root privileges are required to run the umount and umountall commands.
Examples
The following examples show how to dismount an Oracle ACFS file system. The firstexample specifies the mount point of the file system to dismount. The second examplespecifies the volume device associated with the file system to dismount. The thirdexample dismounts all Oracle ACFS file systems.
Example 16-8 Using the umount command
# /sbin/umount /dev/asm/volume1-123
# /sbin/umount /acfsmounts/acfs1
# /sbin/umountall -F acfs
Oracle ACFS Command-line Tools for the AIX EnvironmentDuring the installation of Oracle ACFS and Oracle ADVM with Oracle GridInfrastructure on AIX, several system security classes (authorizations) are created forOracle ACFS and Oracle ADVM operations. These authorizations enable the followingoperations:
• Configuration of Oracle ACFS and Oracle ADVM devices
• Removal of Oracle ACFS and Oracle ADVM devices
• Definition of Oracle ACFS and Oracle ADVM devices
These authorizations are collected in a role (oracle_devmgmt) which is assigned bydefault to the Oracle Grid Infrastructure user and Oracle ASM administrator. You canrun the lsrole or rolelist command after installation to see this new role. Thesecommands can be run at any time to ensure that the user has the proper authorizationto manage Oracle ACFS and Oracle ADVM.
For example, run the following as the Oracle ASM administrator:
$ rolelist -e oracle_devmgmt
Oracle ACFS Command-line Tools for the AIX Environment
16-36 Oracle Automatic Storage Management Administrator's Guide

After the initial installation on an AIX operating system, the shell from which the rootscript was run does not inherit the new role. If the role is not present for the user, thenthe swrole command must be run before performing Oracle ACFS or Oracle ADVMoperations.
For example, run the following as the Oracle ASM administrator:
$ swrole oracle_devmgmt
Alternatively, you can open a new shell to perform Oracle ACFS or Oracle ADVMoperations.
During the removal of Oracle Grid Infrastructure, the oracle_devmgmt role and itsassociated authorizations are deleted from the system.
See Also:
Oracle Grid Infrastructure on AIX, refer to Oracle Grid Infrastructure InstallationGuide for IBM AIX on POWER Systems (64-Bit) for more information aboutinstalling
Note:
If a disk group is dismounted with the force option on AIX, any Oracle ADVMvolumes device files that were on that disk group remain on the system. Thesefiles are removed when the disk group is remounted.
NOT_SUPPORTED (page 16-37) contains a summary of the Oracle ACFS commandsfor the AIX operating system. The commands in NOT_SUPPORTED (page 16-37)have been extended with additional options to support Oracle ACFS on AIX.
NOT_SUPPORTED
Command Description
fsckNOT_SUPPORTED Checks and repairs an Oracle ACFS file system on AIX.
mkfsNOT_SUPPORTED Creates an Oracle ACFS file system on AIX.
mountNOT_SUPPORTED Mounts an Oracle ACFS file system on AIX.
umount/umountallNOT_SUPPORTED Dismounts an Oracle ACFS file system on AIX.
fsck
Purpose
Checks and repairs an Oracle ACFS file system on the AIX operating system.
Syntax and Description
fsck -V acfs [-n|-y] [-o options] volume_device
Table 16-12 (page 16-38) contains the options available with the AIX fsck command.
Oracle ACFS Command-line Tools for the AIX Environment
Managing Oracle ACFS with Command-Line Tools 16-37

Table 16-12 Options for the AIX fsck command
Option Description
-V acfs Specifies an Oracle ADVM volume on AIX. acfs designates theOracle ACFS type.
-n Answers no to any prompts.
-y Answers yes to any prompts.
-o options Specifies that options follow (a, f, v). Options are preceded withthe -o flag and entered as a comma-delimited string. Forexample: -o a,v
• a
Specifies to automatically fix the file system.• f
Forces the file system into mountable state withoutcompleting a file system check or fix.
• v
Specifies verbose mode. The progress is displayed as theoperation occurs. Running in verbose mode can impactperformance.
volume_device Specifies the primary Oracle ADVM volume device.
fsck checks and repairs an existing Oracle ACFS. This command can only be run on adismounted file system. root privileges are required to run fsck. The Oracle ACFSdriver must be loaded for fsck to work.
By default, fsck only checks for and reports any errors. The -a flag must be specifiedto instruct fsck to fix errors in the file system. Do not interrupt fsck during therepair operation.
In a few cases, fsck prompts for questions before proceeding to check a file system.These cases include:
• If fsck detects that another fsck is in progress on the file system
• If fsck detects that the Oracle ACFS driver is not loaded
• If the file system does not appear to be Oracle ACFS
In checking mode, fsck also prompts if there are transaction logs that have not beenprocessed completely due to an incomplete shutdown. To run in a non-interactivemode, include either the -y or -n options to answer yes or no to any questions.
fsck creates working files before it checks a file system. These working files arecreated in /usr/tmp if space is available. /tmp is used if /usr/tmp does not exist. Ifinsufficient space is available in the tmp directory, fsck attempts to write to thecurrent working directory. The files that fsck creates are roughly the size of the filesystem being checked divided by 32K. At most three such files are allocated. Forexample, a 2 GB file system being checked causes fsck to generate one to three 64Kworking files in the /usr/tmp directory. These files are deleted after fsck hasfinished.
In the event that fsck finds a file or directory in the file system for which it cannotdetermine its name or intended location (possibly due to a corruption in its parent
Oracle ACFS Command-line Tools for the AIX Environment
16-38 Oracle Automatic Storage Management Administrator's Guide

directory), it places this object in the /lost+found directory when fsck is run in fixmode. For security reasons only the root user on Linux can read files in /lost+found. If the administrator can later determine the original name and location of thefile based on its contents, the file can be moved or copied into its intended location.
The file names in the /lost+found directory are in the following formats:
parent.id.file.id.time-in-sec-since-1970parent.id.dir.id.time-in-sec-since-1970
The id fields are the internal Oracle ACFS numeric identifiers for each file anddirectory in the file system.
You can use acfsutil info id id mount_point to attempt to determine thedirectory associated with parent.id. This directory is assumed to be where thedeleted object originated. For information about acfsutil info, see "acfsutil info file(page 16-120)".
If the parent directory is not known, the parent id field is set to UNKNOWN.
Note:
It is not possible to see the contents of the /lost+found directory from asnapshot.
Examples
The following example shows how to check and repair an Oracle ACFS file system.
Example 16-9 Using the fsck command
# /usr/sbin/fsck -V acfs -y -o a /dev/asm/volume1-123
mkfs
Purpose
Creates an Oracle ACFS file system on the AIX operating system.
Syntax and Description
mkfs -V acfs -o h /dev/nullmkfs -V acfs [-v name ] [-s size][-o options] volume_device
mkfs -V acfs -o h /dev/null displays usage text and exits.
Table 16-13 (page 16-39) contains the options available with the AIX mkfs command.
Table 16-13 Options for the AIX mkfs command
Option Description
-V acfs Specifies the type of file system on AIX. acfs designates theOracle ACFS type.
-v name Specifies the name for the file system. A name can be amaximum of 64 characters. acfsutil info fs returns thename if one was specified.
Oracle ACFS Command-line Tools for the AIX Environment
Managing Oracle ACFS with Command-Line Tools 16-39

Table 16-13 (Cont.) Options for the AIX mkfs command
Option Description
-s size Specifies the size of the file system in 512-byte units or in unitsof K|M|G|T|P. Units specified are in K (kilobytes), M(megabytes), G (gigabytes), T (terabytes), or P (petabytes).
-o options Specifies that options follow (f, h, v). Options are preceded withthe -o flag and entered as a comma-delimited string. Forexample: -o f,v
• f
Specifies the force option. This action creates the filesystem even if there is an existing Oracle ACFS on thevolume device, although only if the file system isdismounted. This option overwrites structures on theoriginal file system. Use this option with caution.
• h
Displays the usage text and exits.• v
Specifies verbose mode. The progress is displayed as theoperation occurs.
volume_device Specifies an Oracle ADVM device file that is to be formatted.
You can use mkfs to create the on disk structure needed for Oracle ACFS file systemto be mounted. The mkfs command is the traditional Linux command used to build afile system. After mkfs runs successfully, the USAGE column in the V$ASM_VOLUMEview displays ACFS. root privilege is not required. The ownership of the volumedevice file dictates who can run this command.
The minimum file system size is 200 MB.
The Oracle ACFS driver must be loaded for mkfs to work.
Examples
Before creating an Oracle ACFS file system, first determine which Oracle ADVMvolume devices are available. You can use the ASMCMD volinfo command todisplay information about the volumes and volume devices.
ASMCMD [+] > volinfo -a... Volume Name: VOLUME1 Volume Device: /dev/asm/volume1-123 State: ENABLED...
See Managing Oracle ADVM with ASMCMD (page 15-1).
Next create an Oracle ACFS file system on the volume device file.
Example 16-10 Using the mkfs command
$ /usr/sbin/mkfs -V acfs /dev/asm/volume1-123
Oracle ACFS Command-line Tools for the AIX Environment
16-40 Oracle Automatic Storage Management Administrator's Guide
mount
Purpose
Mounts an Oracle ACFS file system on the AIX operating system.
Syntax and Description
mount -V acfs -o h /dev/null /xxxmount -v acfs [-o options] volume_device mount_point
mount -V acfs -o h /dev/null /xxx displays usage text and exits.
Table 16-14 (page 16-41) contains the options available with the mount command.
Table 16-14 Options for the AIX mount command
Option Description
-v acfs Specifies the type of file system on AIX. acfs designates theOracle ACFS type.
Oracle ACFS Command-line Tools for the AIX Environment
Managing Oracle ACFS with Command-Line Tools 16-41

Table 16-14 (Cont.) Options for the AIX mount command
Option Description
-o options Specifies that options follow. Options are preceded with the -oflag followed by a comma-delimited string of options. Forexample: -o all,ro,v
The following options are available:
• all
Reads the Oracle ACFS managed file systems in the OracleClusterware namespace, mounting all file systems with theAUTO_START=always.
The -o all option requires two placeholders to satisfy thecommand arguments: a dummy argument for the volumedevice and directory.
When the -o all option is specified, other -o options areignored.
To specify mount options for a registry entry, includethose options with the acfsutil registry commandwhen you add the entry to the registry.
• h
Displays the usage help text and exits.• nosuid
Specifies that the execution of setuid and setgidprograms by way of this mount is not allowed.
• nodev
Specifies that you cannot open devices from this mount.• norootsuid
Fails the execution of binaries by non-root users whosepermissions allow set user Id execution, and are owned byroot. An attempt to run these executables as a non-rootuser fails with a permission denied error.
• rootsuid
Allows the execution of binaries by non-root users of setuser Id files owned by root. This is the default action.
• ro
Mounts the file system in read-only mode.• rw
Mounts the file system in read-write mode.• v
Specifies verbose mode. The progress is displayed as theoperation occurs.
volume_device Specifies an Oracle ADVM volume device file that has beenformatted by mkfs. device is required but can be a dummyvalue.
mount_point Specifies the directory where the file system is mounted. Thisdirectory must exist before you run the mount command.
mount attaches a file system to the Oracle ACFS hierarchy at the mount point that isthe name of a directory. The mount happens on the node where the mount commandwas issued. The mount command returns an error if the file system is not in adismounted state on this node.
Oracle ACFS Command-line Tools for the AIX Environment
16-42 Oracle Automatic Storage Management Administrator's Guide

It is not always possible to return the cause of a mount failure to the mount command.When this happens Oracle ACFS writes the cause of the failure to the system consoleand associated system log file.
After mount runs successfully, the MOUNTPATH field in the V$ASM_VOLUME viewdisplays the directory name on which the file system is now mounted.
An Oracle ACFS file system should only be mounted on one mount point. The samemount point name should be used on all cluster members.
root privilege is required to run mount.
Examples
The first example shows how to mount volume1-123 on the mount point /acfsmounts/acfs1. The second example shows how to mount all the registeredOracle ACFS file systems. The dummy names (none) have been entered asplaceholders for the device and directory as these arguments are required, but notused, when the all option is specified.
Example 16-11 Using the mount command
# /usr/sbin/mount -v acfs /dev/asm/volume1-123 /acfsmounts/acfs1
# /usr/sbin/mount -v acfs -o all none none
umount/umountall
Purpose
Dismounts an Oracle ACFS file system on the AIX operating system.
Syntax and Description
umount [mount_point | volume_device]umountall -F acfs
unmountall -F acfs dismounts all Oracle ACFS file systems.
Table 16-15 (page 16-43) contains the options available with the umount command.
Table 16-15 Options for the AIX umount command
Option Description
mount_point Specifies the directory where the file system is mounted. Validonly with umount.
volume_device Specifies the Oracle ADVM volume device name associatedwith the file system. Valid only with umount.
-F acfs Specifies the type of file system on AIX. acfs designates theOracle ACFS type. Valid only with umountall.
umount and umountall detach an Oracle ACFS from the file system hierarchy on thecurrent node. If a file system is busy, umount and umountall fail.
root privileges are required to run the umount and umountall commands.
Oracle ACFS Command-line Tools for the AIX Environment
Managing Oracle ACFS with Command-Line Tools 16-43

Examples
The following examples show how to dismount an Oracle ACFS file system. The firstexample specifies the mount point of the file system to dismount. The second examplespecifies the volume device associated with the file system to dismount. The thirdexample dismounts all Oracle ACFS file systems.
Example 16-12 Using the umount command
# /usr/sbin/umount /dev/asm/volume1-123
# /usr/sbin/umount /acfsmounts/acfs1
# /usr/sbin/umountall -F acfs
Oracle ACFS Command-line Tools for Windows EnvironmentsNOT_SUPPORTED (page 16-44) contains a summary of the Oracle ACFS file systemcommands for Windows. These commands have been extended to support OracleACFS. All other Windows file system commands operate without change for OracleACFS.
NOT_SUPPORTED
Command Description
acfschkdskNOT_SUPPORTED Checks and repairs an Oracle ACFS file system on Windows.
acfsdismountNOT_SUPPORTED Dismounts an Oracle ACFS on Windows.
acfsformatNOT_SUPPORTED Creates an Oracle ACFS file system on Windows.
acfsmountvolNOT_SUPPORTED Mounts an Oracle ACFS file system on Windows.
acfsutil detachNOT_SUPPORTED Prepares the Oracle ACFS driver for module unload on Windows.
NOT_SUPPORTED (page 16-44) contains a summary of the non-Oracle ACFS filesystem commands for Windows.
NOT_SUPPORTED
Command Description
advmutil dismountNOT_SUPPORTED Dismounts Oracle ADVM volume devices for file systems that are notOracle ACFS on Windows.
advmutil listNOT_SUPPORTED Lists Oracle ADVM volume devices for file systems that are not OracleACFS on Windows.
advmutil mountNOT_SUPPORTED Mounts Oracle ADVM volume devices for file systems that are notOracle ACFS on Windows.
acfschkdsk
Purpose
Checks and repairs an Oracle ACFS file system.
Oracle ACFS Command-line Tools for Windows Environments
16-44 Oracle Automatic Storage Management Administrator's Guide

Syntax and Description
acfschkdsk /hacfschkdsk [/a|/f] [/v] [/n|/y] volume_device
Table 16-18 (page 16-45) contains the options available with the acfschkdskcommand.
Table 16-18 Options for the acfschkdsk command
Option Description
/a Specifies to automatically repair the file system.
/f Forces the file system into mountable state without completinga file system check or repair.
/v Specifies verbose mode. The progress is displayed as theoperation occurs. Running in verbose mode can impactperformance.
/h Displays the usage help text and exits.
/n Answers no to any prompts.
/y Answers yes to any prompts.
volume_device Specifies the Oracle ADVM volume device.
acfschkdsk checks and repairs an existing Oracle ACFS. This command can only berun on a file system that has been dismounted clusterwide.
The Oracle ACFS driver must be loaded for acfschkdsk to work. If the driver is notloaded, the administrator is prompted to ensure this is intentional. For informationabout loading drivers, see "Oracle ACFS Drivers Resource Management(page 18-4)".
The Oracle ACFS driver normally ensures that acfschkdsk is the only user of the filesystem clusterwide. In extreme cases it may be necessary to fix a file system withoutloading the driver if the file system automount causes the system to fail. Theverifications that are normally done by the driver for exclusive access are bypassed inthis case.
By default acfschkdsk only checks for and only reports errors. The /a flag must bespecified to instruct acfschkdsk to repair errors in the file system. Do not interruptacfschkdsk during the repair operation.
In a few cases, acfschkdsk prompts for questions before proceeding to check a filesystem. For example, if acfschkdsk detects that another acfschkdsk is in progresson the file system, or if acfschkdsk detects that the Oracle ACFS driver is notloaded, or if the file system does not appear to be Oracle ACFS. In checking mode,acfschkdsk also prompts if there are transaction logs that have not been processedcompletely due to an incomplete shutdown. To run in a non-interactive mode, includeeither the /y or /n options to answer yes or no to any questions.
acfschkdsk creates working files before it checks a file system. These working filesare created in the temp directory if space is available. If insufficient space is available,acfschkdsk attempts to write in the current working directory. The filesacfschkdsk creates are roughly the size of the file system being checked divided by
Oracle ACFS Command-line Tools for Windows Environments
Managing Oracle ACFS with Command-Line Tools 16-45

32K. At most three files are allocated. These files are deleted when acfschkdsk hasfinished.
In the event that acfschkdsk finds a file or directory in the file system for which itcannot determine its name or intended location (possibly due to a corruption in itsparent directory), it places this object in the \lost+found directory whenacfschkdsk is run in fix mode. For security reasons, only the WindowsAdministrator can read files in \lost+found. If the administrator can laterdetermine the original name and location of the file based on its contents, the file canbe moved or copied into its intended location.
The file names in the \lost+found directory are in the following formats:
parent.id.file.id.time-in-sec-since-1970parent.id.dir.id.time-in-sec-since-1970
The id fields are the internal Oracle ACFS numeric identifiers for each file anddirectory in the file system.
You can use acfsutil info id id mount_point to attempt to determine thedirectory associated with parent.id. This directory is assumed to be where thedeleted object originated. For information about acfsutil info, see "acfsutil info file(page 16-120)".
If the parent directory is not known, the parent id field is set to UNKNOWN.
Note:
It is not possible to see the contents of the \lost+found directory from asnapshot.
Examples
The following example shows how to check an Oracle ACFS file system on Windows.
Example 16-13 Using the acfschkdsk command
C:\> acfschkdsk asm-volume1-311
acfsdismount
Purpose
Dismounts an Oracle ACFS file system and removes its mount point (name spaceattachment).
Syntax and Description
acfsdismount /hacfsdismount [/v] {drive_letter | mount_point} acfsdismount [/v] /all
Table 16-19 (page 16-47) contains the options available with the acfsdismountcommand.
Oracle ACFS Command-line Tools for Windows Environments
16-46 Oracle Automatic Storage Management Administrator's Guide

Table 16-19 Options for the acfsdismount command
Option Description
/v Specifies verbose mode. The progress is displayed as theoperation occurs.
/h Displays help text and exits.
/all Specifies to dismount all Oracle ACFS file systems on this node.
drive_letter Specifies the drive letter followed by a colon.
mount_point Specifies the full path of the mount point including the driveletter.
acfsdismount removes the mount point (name space attachment) for the specifiedfile system on the current node and dismounts the file system if it is mounted. Whenthe file system is in the dismounted state, the data is preserved on the device and thefile system can be re-mounted with the acfsmountvol command.
acfsdismount can fail in some circumstances because there are open file referencesfrom various programs, such as a virus scanner, Process Explorer, or Oracle EnterpriseManager.
Windows Administrator privileges are required to use the acfsdismount command.
Examples
The following examples show how to dismount an Oracle ACFS file system. The firstexample dismounts a file system using only the drive letter. The second exampledismounts a file system using the full path name. The third examples dismounts allmounted file systems. All the examples enable the verbose mode.
Example 16-14 Using the acfsdismount command
C:\> acfsdismount /v O:
C:\> acfsdismount /v O:\mnt\
C:\oracle>acfsdismount /v /allacfsdismount: valid path name: C:\oracle\acfsmounts\acfs1\acfsdismount: opening handle to volume C:\oracle\acfsmounts\acfs1acfsdismount: locking volume C:\oracle\acfsmounts\acfs1acfsdismount: dismounting volume C:\oracle\acfsmounts\acfs1acfsdismount: removing volume mount point on C:\oracle\acfsmounts\acfs1\acfsdismount: closing handle to volume C:\oracle\acfsmounts\acfs1 and exiting cleanly
acfsformat
Purpose
Creates an Oracle ACFS file system.
Syntax and Description
acfsformat /hacfsformat [/v] [/f] [/n name] volume_device [blocks]
Oracle ACFS Command-line Tools for Windows Environments
Managing Oracle ACFS with Command-Line Tools 16-47
Table 16-20 (page 16-48) contains the options available with the acfsformatcommand.
Table 16-20 Options for the acfsformat command
Option Description
/v Specifies verbose mode. The progress is displayed as theoperation occurs.
/n name Specifies the name for the file system. This is also known as avolume label. acfsutil info fs returns the name if one wasspecified. This can also be displayed from the VOL_LABELcolumn in the V$ASM_ACFSVOLUMES view.
/f Specifies the force option. This action creates the file systemeven if there is an existing Oracle ACFS on the device, althoughonly if the file system is dismounted. This option overwritesstructures on the original file system. Use this option withcaution.
/h Displays the usage help text.
blocks Specifies the number of blocks that the file system shouldconsume on the named device. The quantity specified can be inunits of K (kilobytes), M (megabytes), G (gigabytes), or T(terabytes). If a unit is not specified, the default is bytes. If thisoption is not specified, the entire device is consumed.
volume_device Specifies an Oracle ADVM device file to be formatted.
acfsformat creates the on disk structure needed for Oracle ACFS to be mounted.acfsformat performs a quick format on the target volume. After acfsformat runssuccessfully, the USAGE column in the V$ASM_VOLUME view displays ACFS.
The minimum file system size is 200 MB.
The Oracle ACFS driver must be loaded for acfsformat to work.
Windows Administrator privileges are required to run this command.
Examples
This example shows how to create an Oracle ACFS file system. The verbose option isspecified in this example.
Example 16-15 Using the acfsformat command
C:\> acfsformat /v asm-volume1-311
acfsmountvol
Purpose
Mounts an Oracle ACFS file system.
Syntax and Description
acfsmountvol /hacfsmountvol
Oracle ACFS Command-line Tools for Windows Environments
16-48 Oracle Automatic Storage Management Administrator's Guide

acfsmountvol [/v] /all acfsmountvol [/v] { drive_letter |dir } volume_device
Table 16-21 (page 16-49) contains the options available with the acfsmountvolcommand.
Table 16-21 Options for the acfsmountvol command
Option Description
/v Specifies verbose mode. The progress is displayed as theoperation occurs.
/h Displays the help usage text and exits.
/all Reads the ACFS mount registry created with acfsutilregistry and mounts the file systems listed in it on this node.
drive_letter The Windows drive letter to link to an Oracle ADVM volumedevice.
dir Specifies the full directory of the mount point including thedrive letter.
volume_device Specifies an Oracle ADVM volume device file that has beenformatted by acfsformat.
acfsmountvol attaches an Oracle ACFS to the file system hierarchy at the specifiedpath name or drive letter. dir must be an empty directory. Oracle ACFS mount pointscan be created on any empty directory and they can be hierarchical (nested).
After acfsmountvol runs successfully, the MOUNTPATH column in the V$ASM_VOLUME view displays the full path or drive letter on which the file system isnow mounted. If no arguments are specified, the command lists all mounted OracleACFS file systems on this node.
It is not always possible to return the cause of a mount failure to the acfsmountvolcommand. When this happens Oracle ACFS writes the cause of the failure to theWindows system event logger.
An Oracle ACFS file system should only be mounted on one mount point. The samemount point name should be used on all cluster members.
Windows Administrator privileges are required to mount an Oracle ACFS.
Examples
The first example shows how to mount asm-volume1-311 on the mount pointidentified as the F: drive. The second example shows how to mount asm-volume1-215 on the mount point specified by c:\oracle\acfsmounts\acfs1\.The first two examples enable verbose mode. The third example lists all the mountedfile systems on the node.
Example 16-16 Using the acfsmountvol command
C:\> acfsmountvol /v F: asm-volume1-215
C:\> acfsmountvol /v c:\oracle\acfsmounts\acfs1 asm-volume1-311
C:\oracle>acfsmountvol
Oracle ACFS Command-line Tools for Windows Environments
Managing Oracle ACFS with Command-Line Tools 16-49

asm-volume1-311 C:\oracle\acfsmounts\acfs1
acfsutil detach
Purpose
Prepares the Oracle ACFS driver for module unload.
Syntax and Description
acfsutil detach
acfsutil detach prepares Oracle ACFS for having its driver unloaded. OracleACFS registers itself as a base file system upon driver load. In order for the Windowsservice control manager to send a stop command to the driver, Oracle ACFS mustunregister itself as a base file system in addition to deleting any device objectsassociated with the driver.
After acfsutil detach has completed successfully, and all volumes have beendismounted, then the administrator can run the Windows service control manager'sstop command to the Oracle ACFS driver. If the acfsutil detach command is notused, then the stop command does not call the Oracle ACFS driver unload routine.This command can only be run by the Windows Administrator. It is calledautomatically by the Oracle ACFS shutdown scripts.
Examples
The following examples show how to detach all Oracle ACFS file systems and unloaddrivers on Windows. The first example dismounts all the Oracle ACFS file systemsvolume devices. The second example detaches the volume devices.
Example 16-17 Using the acfsutil detach command
C:\> acfsdismount /all
C:\> acfsutil detach
advmutil dismount
Purpose
The advmutil dismount command dismounts Oracle ADVM volume devices for filesystems that are not Oracle ACFS.
Syntax and Description
advmutil dismount [/unregister] {drive_letter | dir}advmutil dismount [/unregister] [/all | /dg=disk_group]
Table 16-22 (page 16-50) contains the options available with the Windows advmutildismount command.
Table 16-22 Options for the advmutil dismount command
Option Description
drive_letter Specifies the drive letter to dismount.
Oracle ACFS Command-line Tools for Windows Environments
16-50 Oracle Automatic Storage Management Administrator's Guide

Table 16-22 (Cont.) Options for the advmutil dismount command
Option Description
dir Specifies the directory of the mount point, including the driveletter.
/all Specifies to dismount all file systems on this node.
/unregister Optionally unregister an Oracle ADVM volume device and itsdrive letter from the system registry. Upon startup of the OracleASM instance and Oracle ACFS, the unregistered drive letterand Oracle ADVM volume symbolic links are not created.
/dg=disk_group Optional name of the disk group containing the registeredOracle ADVM volume devices to create drive letters or possiblymount or dismount file systems.
Note:
To format an Oracle ADVM volume device with NTFS, it must be mounted ona drive letter. After formatting, Oracle ADVM volume devices with NTFS canbe mounted on either a drive letter or a directory.
To successfully run this command, the local Oracle ASM instance must be runningand the disk groups required by this command must have been created and mountedin the Oracle ASM instance and volumes enabled.
Examples
These examples show how to dismount a file system that is not Oracle ACFS.
1. The first example shows how to remove a drive letter for an Oracle ADVMvolume device which disallows access to the file system.
2. The second example shows how to remove a drive letter for an Oracle ADVMvolume device which disallows access to the file system and removes it from theregistry.
3. The third example shows how to remove a drive letter for all registered OracleADVM volume devices which disallows access to all file systems.
4. The fourth example shows how to remove a drive letter for all registered OracleADVM volume devices in a particular Oracle ASM disk group which disallowsaccess to all related file systems.
Example 16-18 Using the advmutil dismount command
C:\> advmutil dismount H:
C:\> advmutil dismount H: /unregister
C:\> advmutil dismount /all
C:\> advmutil dismount /dg=data
Oracle ACFS Command-line Tools for Windows Environments
Managing Oracle ACFS with Command-Line Tools 16-51

advmutil list
Purpose
The advmutil list command lists the Oracle ADVM volume devices that wereregistered with advmutil mount /register.
Syntax and Description
advmutil list /registry
Table 16-23 (page 16-52) contains the options available with the Windows advmutillist command.
Table 16-23 Options for the advmutil list command
Option Description
list /registry Lists the drive letter and corresponding Oracle ADVM volumedevice name contained in the Windows registry.
To successfully run this command, the local Oracle ASM instance must be runningand the disk groups required by this command must have been created and mountedin the Oracle ASM instance and volumes enabled.
For information about listing Oracle ADVM volume devices for Oracle ACFS, see"acfsutil info file (page 16-120)".
Examples
The following example shows how to list all entries in the system registry.
Example 16-19 Using the advmutil list command
C:\> advmutil list /registry
Drive Letter Asm Volume =================================== H: asm-volume1-123 K: asm-volume2-245
advmutil mount
Purpose
The advmutil mount command mounts Oracle ADVM volume devices for filesystems that are not Oracle ACFS.
Syntax and Description
advmutil mount [/register] {drive_letter | dir} volume_deviceadvmutil mount /all
Table 16-24 (page 16-53) contains the options available with the Windows advmutilmount command.
Oracle ACFS Command-line Tools for Windows Environments
16-52 Oracle Automatic Storage Management Administrator's Guide

Table 16-24 Options for the advmutil mount command
Option Description
drive_letter Specifies the drive letter to mount.
dir Specifies the directory of the mount point, including the driveletter.
volume_device Indicates the Oracle ADVM volume device.
/all Specifies to mount all non-Oracle ACFS file systems on thisnode.
/register Optionally register an Oracle ADVM volume device and itsdrive letter in the Windows system registry. After startup of theOracle ASM instance and Oracle ACFS, all registered driveletters and Oracle ADVM volume symbolic links are created.This allows for automatic file system mounting by Windows asis also done for Oracle ACFS file systems.
Note:
To format an Oracle ADVM volume device with NTFS, it must be mounted ona drive letter. After formatting, Oracle ADVM volume devices with NTFS canbe mounted on either a drive letter or a directory.
To successfully run this command, the local Oracle ASM instance must be runningand the disk groups required by this command must have been created and mountedin the Oracle ASM instance and volumes enabled.
For information about registering Oracle ADVM volume devices for Oracle ACFS, see"acfsutil registry (page 16-129)".
Examples
These examples show how to mount a file system that is not Oracle ACFS.
1. The first example shows how to create a drive letter for an Oracle ADVM volumedevice for use as a non-Oracle ACFS access which you could then use to formatthe volume for use with NTFS.
2. The second example shows how to create a drive letter for an Oracle ADVMvolume device for use as a non-Oracle ACFS access which you could then use toformat the volume for use with NTFS and save it in the Windows system registry.
3. The third example shows how to create a drive letter for all Oracle ADVM volumedevices which were saved in the system registry which also allows a file system tobe accessible.
Example 16-20 Using the advmutil mount command
C:\> advmutil mount H: asm-volume1-123
C:\> advmutil mount H: asm-volume1-123 /register
C:\> advmutil mount /all
Oracle ACFS Command-line Tools for Windows Environments
Managing Oracle ACFS with Command-Line Tools 16-53
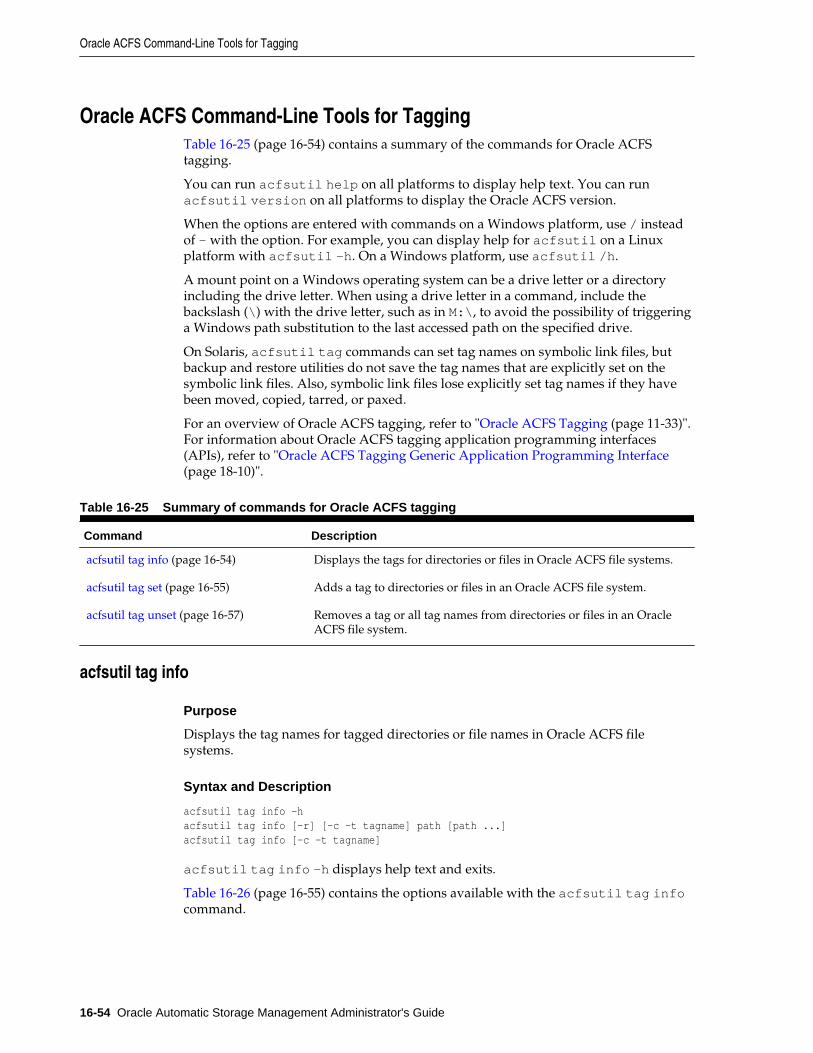
Oracle ACFS Command-Line Tools for TaggingTable 16-25 (page 16-54) contains a summary of the commands for Oracle ACFStagging.
You can run acfsutil help on all platforms to display help text. You can runacfsutil version on all platforms to display the Oracle ACFS version.
When the options are entered with commands on a Windows platform, use / insteadof - with the option. For example, you can display help for acfsutil on a Linuxplatform with acfsutil -h. On a Windows platform, use acfsutil /h.
A mount point on a Windows operating system can be a drive letter or a directoryincluding the drive letter. When using a drive letter in a command, include thebackslash (\) with the drive letter, such as in M:\, to avoid the possibility of triggeringa Windows path substitution to the last accessed path on the specified drive.
On Solaris, acfsutil tag commands can set tag names on symbolic link files, butbackup and restore utilities do not save the tag names that are explicitly set on thesymbolic link files. Also, symbolic link files lose explicitly set tag names if they havebeen moved, copied, tarred, or paxed.
For an overview of Oracle ACFS tagging, refer to "Oracle ACFS Tagging (page 11-33)".For information about Oracle ACFS tagging application programming interfaces(APIs), refer to "Oracle ACFS Tagging Generic Application Programming Interface(page 18-10)".
Table 16-25 Summary of commands for Oracle ACFS tagging
Command Description
acfsutil tag info (page 16-54) Displays the tags for directories or files in Oracle ACFS file systems.
acfsutil tag set (page 16-55) Adds a tag to directories or files in an Oracle ACFS file system.
acfsutil tag unset (page 16-57) Removes a tag or all tag names from directories or files in an OracleACFS file system.
acfsutil tag info
Purpose
Displays the tag names for tagged directories or file names in Oracle ACFS filesystems.
Syntax and Description
acfsutil tag info -hacfsutil tag info [-r] [-c -t tagname] path [path ...]acfsutil tag info [-c -t tagname]
acfsutil tag info -h displays help text and exits.
Table 16-26 (page 16-55) contains the options available with the acfsutil tag infocommand.
Oracle ACFS Command-Line Tools for Tagging
16-54 Oracle Automatic Storage Management Administrator's Guide

Table 16-26 Options for the acfsutil tag info command
Option Description
-t tagname Specifies the tag name string to display. Enclose the string inquotes if the string contains a space.
path Specifies the path name to one or more files or directories.
-r Specifies recursive action on a specified path.
-c Specifies case-insensitive partial matching on the tag name.
The acfsutil tag info command can recursively apply the operation to all childfiles and subdirectories if the -r option is included with specified directory pathnames.
If no path names are specified, the acfsutil tag info command searches all OracleACFS mount points for tagged files.
Only the paths of tagged files in an Oracle ACFS file system are displayed. If the -ttagname option is included, only paths of files with a tag name exactly matching thespecified tagname are displayed. If the -c option is included, then tagname can be acase-insensitive substring of a tag name for a successful match. For example, theacfsutil tag info -c -t AG command would display path names of files with tagnames such as tag1, ag, or AG.
Any user may use this command to display tag info on a directory that the user hasread access privileges.
Running acfsutil tag info on a file or directory that is protected by a securityrealm fails. If a user runs acfsutil tag info with the -r option on a directoryprotected by a security realm and the user does not have browse permissions on thedirectory, then no output is displayed. To resolve this issue, the user must be added tothe security realm and granted READDIR permissions. For information about addingobjects to an Oracle ACFS security realm, refer to "acfsutil sec realm add(page 16-88)".
Examples
The following example show the use of the acfsutil tag info command.
Example 16-21 Using the acfsutil tag info command
$ /sbin/acfsutil tag info -r /acfsmounts/acfs1/myrepfiles/
acfsutil tag set
Purpose
Adds the given tag to the specified files or directories in an Oracle ACFS file system
Syntax and Description
acfsutil tag set -hacfsutil tag set [-v] [-r] tagname path [path ...]
acfsutil tag set -h displays help text and exits.
Oracle ACFS Command-Line Tools for Tagging
Managing Oracle ACFS with Command-Line Tools 16-55

Table 16-27 (page 16-56) contains the options available with the acfsutil tag setcommand.
Table 16-27 Options for the acfsutil tag set command
Option Description
tagname Specifies a tag name string. Enclose the string in quotes if thestring contains a space.
The tag string can be composed of ASCII characters thatinclude: a-b, A-Z, 0-9, the space character, the hyphen, and theunderscore. The maximum length of a tag name is 32characters.
all is a reserved tag name and cannot be set on any file ordirectory.
path Specifies the path string to one or more files or directories.
-r Specifies recursive action on the specified path.
-v Displays the progress of the operation.
The command can recursively apply the operation to all child files and subdirectoriesfor the specified directory path names.
When adding a tag name to a file or directory, the existing tags on that file or directoryremain unchanged. New files that are created after a directory is assigned a tagimplicitly inherit tags from their parent directories. Existing files in the directory donot inherit the new tag; these files must be explicitly assigned the tag. Renaming a fileor moving a file to a subdirectory within the same file system does not cause the file toinherit tag names from the new parent directory. Moving a file between file systemsuses a copy operation and the newly created file does inherit the tag names of theparent directory.
There is no fixed maximum number of tag names for an Oracle ACFS file system or foreach file and directory. However, the number of tag names is limited by the tag namesthat fit in up to 64 KB of special metadata storage for each file and directory. Thismetadata also contains information to manage the extended attributes. Longer tagnames reduce the total of tag names that can be set on a file or directory. For example,if all tag names were 4 bytes long, then it is possible to hold approximately 1730 tagnames, assuming no other extended attribute information is present.
Any user who has the privilege to modify the target file or directory may run thiscommand.
If a user runs acfsutil tag set with the -r option on a directory protected by asecurity realm and does not have browse permissions on the directory, then no tagsare applied. To resolve this issue, the user must be added to the security realm andgranted READDIR permissions. For information about adding objects to an OracleACFS security realm, refer to "acfsutil sec realm add (page 16-88)".
Examples
The following example show the use of the acfsutil tag set command.
Example 16-22 Using the acfsutil tag set command
$ /sbin/acfsutil tag set repl_grp1 -r /acfsmounts/acfs1/myrepfiles/*.dat
Oracle ACFS Command-Line Tools for Tagging
16-56 Oracle Automatic Storage Management Administrator's Guide
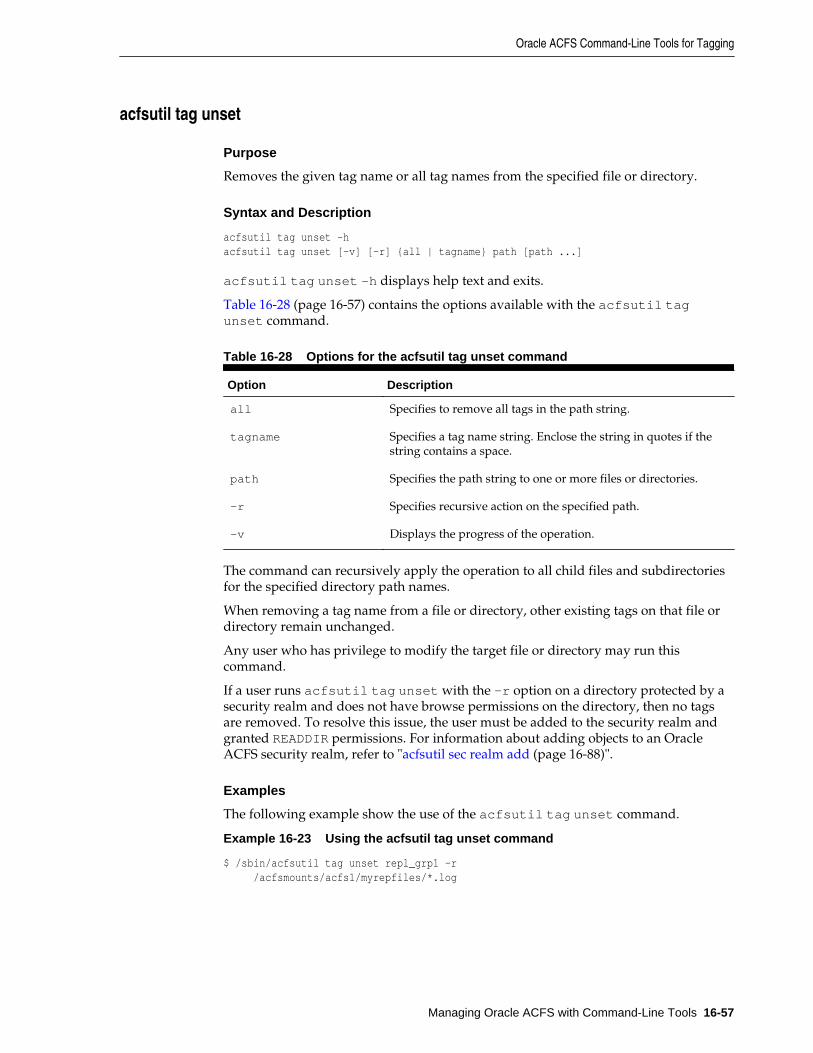
acfsutil tag unset
Purpose
Removes the given tag name or all tag names from the specified file or directory.
Syntax and Description
acfsutil tag unset -hacfsutil tag unset [-v] [-r] {all | tagname} path [path ...]
acfsutil tag unset -h displays help text and exits.
Table 16-28 (page 16-57) contains the options available with the acfsutil tagunset command.
Table 16-28 Options for the acfsutil tag unset command
Option Description
all Specifies to remove all tags in the path string.
tagname Specifies a tag name string. Enclose the string in quotes if thestring contains a space.
path Specifies the path string to one or more files or directories.
-r Specifies recursive action on the specified path.
-v Displays the progress of the operation.
The command can recursively apply the operation to all child files and subdirectoriesfor the specified directory path names.
When removing a tag name from a file or directory, other existing tags on that file ordirectory remain unchanged.
Any user who has privilege to modify the target file or directory may run thiscommand.
If a user runs acfsutil tag unset with the -r option on a directory protected by asecurity realm and does not have browse permissions on the directory, then no tagsare removed. To resolve this issue, the user must be added to the security realm andgranted READDIR permissions. For information about adding objects to an OracleACFS security realm, refer to "acfsutil sec realm add (page 16-88)".
Examples
The following example show the use of the acfsutil tag unset command.
Example 16-23 Using the acfsutil tag unset command
$ /sbin/acfsutil tag unset repl_grp1 -r /acfsmounts/acfs1/myrepfiles/*.log
Oracle ACFS Command-Line Tools for Tagging
Managing Oracle ACFS with Command-Line Tools 16-57
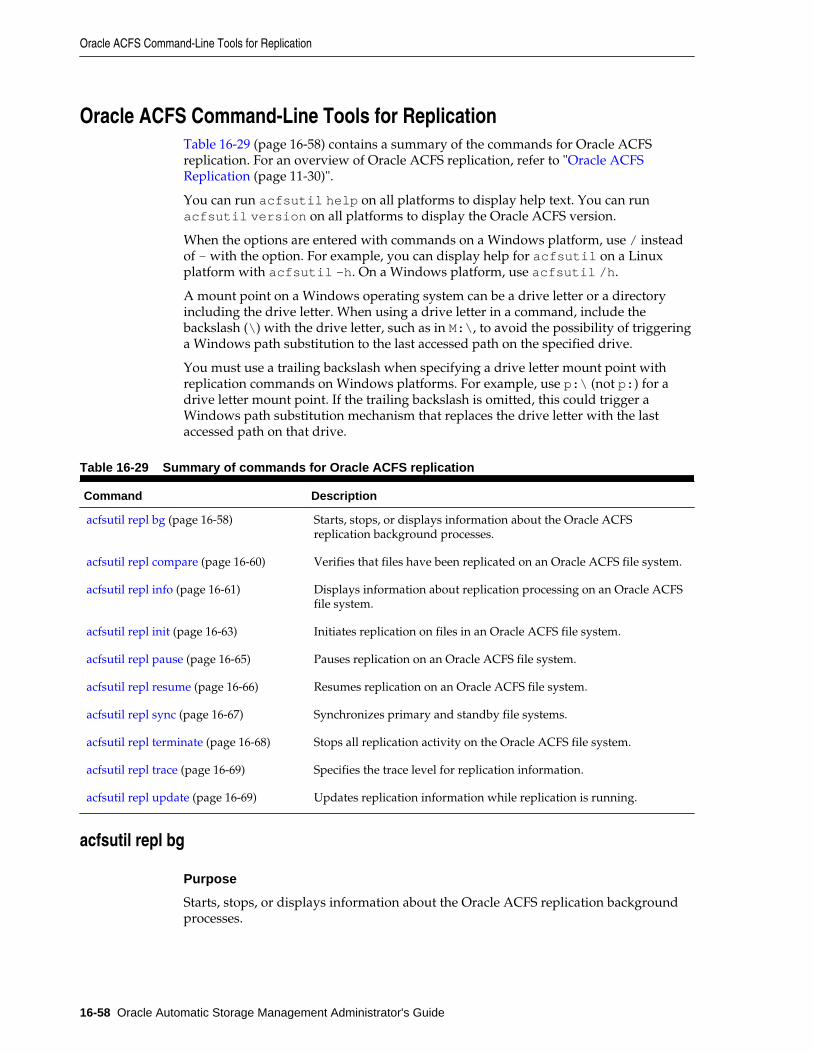
Oracle ACFS Command-Line Tools for ReplicationTable 16-29 (page 16-58) contains a summary of the commands for Oracle ACFSreplication. For an overview of Oracle ACFS replication, refer to "Oracle ACFSReplication (page 11-30)".
You can run acfsutil help on all platforms to display help text. You can runacfsutil version on all platforms to display the Oracle ACFS version.
When the options are entered with commands on a Windows platform, use / insteadof - with the option. For example, you can display help for acfsutil on a Linuxplatform with acfsutil -h. On a Windows platform, use acfsutil /h.
A mount point on a Windows operating system can be a drive letter or a directoryincluding the drive letter. When using a drive letter in a command, include thebackslash (\) with the drive letter, such as in M:\, to avoid the possibility of triggeringa Windows path substitution to the last accessed path on the specified drive.
You must use a trailing backslash when specifying a drive letter mount point withreplication commands on Windows platforms. For example, use p:\ (not p:) for adrive letter mount point. If the trailing backslash is omitted, this could trigger aWindows path substitution mechanism that replaces the drive letter with the lastaccessed path on that drive.
Table 16-29 Summary of commands for Oracle ACFS replication
Command Description
acfsutil repl bg (page 16-58) Starts, stops, or displays information about the Oracle ACFSreplication background processes.
acfsutil repl compare (page 16-60) Verifies that files have been replicated on an Oracle ACFS file system.
acfsutil repl info (page 16-61) Displays information about replication processing on an Oracle ACFSfile system.
acfsutil repl init (page 16-63) Initiates replication on files in an Oracle ACFS file system.
acfsutil repl pause (page 16-65) Pauses replication on an Oracle ACFS file system.
acfsutil repl resume (page 16-66) Resumes replication on an Oracle ACFS file system.
acfsutil repl sync (page 16-67) Synchronizes primary and standby file systems.
acfsutil repl terminate (page 16-68) Stops all replication activity on the Oracle ACFS file system.
acfsutil repl trace (page 16-69) Specifies the trace level for replication information.
acfsutil repl update (page 16-69) Updates replication information while replication is running.
acfsutil repl bg
Purpose
Starts, stops, or displays information about the Oracle ACFS replication backgroundprocesses.
Oracle ACFS Command-Line Tools for Replication
16-58 Oracle Automatic Storage Management Administrator's Guide

Syntax and Description
acfsutil repl bg -hacfsutil repl bg {start |stop|info} mount_point
acfsutil repl bg -h displays help text and exits.
Table 16-30 (page 16-59) contains the options available with the acfsutil repl bgcommand.
Table 16-30 Options for the acfsutil repl bg command
Option Description
start Starts the replication background processing.
stop Stops the replication background processing
info Displays information about the replication backgroundprocesses.
mount_point Specifies the directory where the file system is mounted.
Oracle ACFS replication uses background processes to transport file system changes,to communicate between the sites hosting the primary and standby file systems, tomonitor the state of replication processing, and to apply file system changes to thestandby file system. These background processes must be running for replication tofunction.
When replication is started with the acfsutil repl init command, thesebackground processes are started and are registered with Oracle Clusterware so thatthey are automatically restarted after a restart or system failure. Usually it is notnecessary to run the acfsutil repl bg command because Oracle Clusterwareautomatically starts and stops the background processes as file systems are mountedand unmounted or node membership changes after replication is initialized. However,replication cannot progress if one of the daemons is not running. In this case runningrepl bg stop followed by repl bg start ensures that all the daemons are running.
acfsutil bg start ensures that all the necessary daemons for replication arerunning. The daemons may run on different cluster nodes. acfsutil bg stopensures that no daemons for the file system are running on the local node andrelocates the daemons to another node if available.
You must have system administrator privileges to run the acfsutil repl bg startor acfsutil repl bg stop commands.You must have system administrator orOracle ASM administrator privileges to run the acfsutil repl bg info command.
Examples
Example 16-24 (page 16-59) shows the use of the acfsutil repl bg command.
Example 16-24 Using the acfsutil repl bg command
$ /sbin/acfsutil repl bg start /acfsmounts/acfs1
$ /sbin/acfsutil repl bg stop /acfsmounts/acfs1
$ /sbin/acfsutil repl bg info /acfsmounts/acfs1
Oracle ACFS Command-Line Tools for Replication
Managing Oracle ACFS with Command-Line Tools 16-59
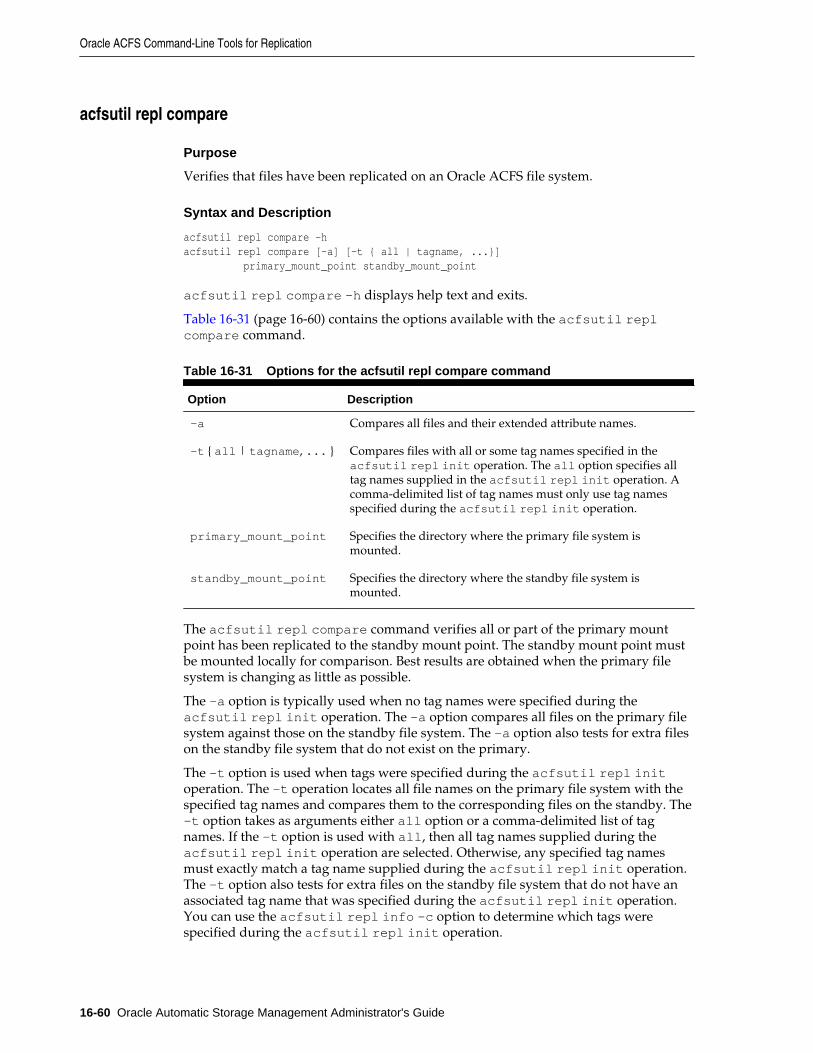
acfsutil repl compare
Purpose
Verifies that files have been replicated on an Oracle ACFS file system.
Syntax and Description
acfsutil repl compare -h acfsutil repl compare [-a] [-t { all | tagname, ...}] primary_mount_point standby_mount_point
acfsutil repl compare -h displays help text and exits.
Table 16-31 (page 16-60) contains the options available with the acfsutil replcompare command.
Table 16-31 Options for the acfsutil repl compare command
Option Description
-a Compares all files and their extended attribute names.
-t { all | tagname, ... } Compares files with all or some tag names specified in theacfsutil repl init operation. The all option specifies alltag names supplied in the acfsutil repl init operation. Acomma-delimited list of tag names must only use tag namesspecified during the acfsutil repl init operation.
primary_mount_point Specifies the directory where the primary file system ismounted.
standby_mount_point Specifies the directory where the standby file system ismounted.
The acfsutil repl compare command verifies all or part of the primary mountpoint has been replicated to the standby mount point. The standby mount point mustbe mounted locally for comparison. Best results are obtained when the primary filesystem is changing as little as possible.
The -a option is typically used when no tag names were specified during theacfsutil repl init operation. The -a option compares all files on the primary filesystem against those on the standby file system. The -a option also tests for extra fileson the standby file system that do not exist on the primary.
The -t option is used when tags were specified during the acfsutil repl initoperation. The -t operation locates all file names on the primary file system with thespecified tag names and compares them to the corresponding files on the standby. The-t option takes as arguments either all option or a comma-delimited list of tagnames. If the -t option is used with all, then all tag names supplied during theacfsutil repl init operation are selected. Otherwise, any specified tag namesmust exactly match a tag name supplied during the acfsutil repl init operation.The -t option also tests for extra files on the standby file system that do not have anassociated tag name that was specified during the acfsutil repl init operation.You can use the acfsutil repl info -c option to determine which tags werespecified during the acfsutil repl init operation.
Oracle ACFS Command-Line Tools for Replication
16-60 Oracle Automatic Storage Management Administrator's Guide
If neither the -a nor -t option is provided, a primary to standby file comparison isdone without testing tag names nor extended attributes.
If NFS is used to mount the standby file system locally, the standby cannot be checkedfor matching tag names and extended attributes due to limitations in the NFS protocol.
Examples
Example 16-25 (page 16-61) shows the use of the acfsutil repl comparecommand.
Example 16-25 Using the acfsutil repl compare command
$ /sbin/acfsutil repl compare /acfsmounts/acfs1 /nfs_mounted_standby
acfsutil repl info
Purpose
Displays information about replication processing on an Oracle ACFS file system.
Syntax and Description
acfsutil repl info -h acfsutil repl info -c [-v] mount_pointacfsutil repl info -s [-v][-l] [-n number{m|h|d|w|y}] [-r start_time[#stop_time]] {-f eventlog | mount_point}acfsutil repl info [-a|-e|-t] [-v][-l] [-r start_time[#stop_time]] {-f eventlog | mount_point }
acfsutil repl info -h displays help text and exits.
Table 16-32 (page 16-61) contains the options available with the acfsutil replinfo command.
Table 16-32 Options for the acfsutil repl info command
Option Description
-a Displays only apply records from the replication event log. Anapply record contains the date and time that the set of filesystem changes were captured on the primary file system andthe date and time that they were applied on the standby filesystem.
-c Displays configuration information.
-e Displays only error records from the replication event log.
-f eventlog Specifies the absolute path to the replication event log to beused as the source of the information. The default location is:mount_point/.ACFS/repl/logs/ReplicationEventsLog
-h Displays help text.
-l Displays last event only.
Oracle ACFS Command-Line Tools for Replication
Managing Oracle ACFS with Command-Line Tools 16-61

Table 16-32 (Cont.) Options for the acfsutil repl info command
Option Description
-n number{m|h|d|w|y} Specifies the interval to display information. number specifiesthe number of minutes (m), hours (h), days (d), weeks (w), oryears (y). For example: -n 5d
The statistics are summarized in the units of time specified.
-rstart_time[#stop_time]
Specifies the start and stop time to display information. Theformat for the time period is yyyy-nn-ddThh:mm:ss.
yyyy - yearnn - month (01..12)dd - day (01..31)hh - hour (00..23)mm - minute (00..59)ss - second (00..59)
For example:
-r 2010-05-05T08:30:00#2010-05-05T15:30:00
-s Displays statistical information. This option is valid only whenrun on the primary file system. It is important that the primaryand standby nodes are running a network time service toensure that the statistics are meaningful.
-t Displays only transport records from the replication event log.
-v Displays verbose output.
mount_point Specifies the directory where the file system is mounted.
To display information about replication configuration, use acfsutil repl infowith the -c option. The configuration information includes a Last sync time withprimary timestamp that identifies the point in time on the primary file system thatthe standby file system represents. You can use this timestamp to set back a databaseto this point in time if it is necessary to keep the data in Oracle ACFS file systemsynchronized with the database data replicated with Oracle Data Guard.
To display information about replication statistics, use acfsutil repl info with the-s option.
To display information about replication events, use acfsutil repl info with the -a, -e, or -t options.
You must have system administrator or Oracle ASM administrator privileges to runthis command.
Examples
Example 16-26 (page 16-62) shows the use of the acfsutil repl info command.
Example 16-26 Using the acfsutil repl info command
$ /sbin/acfsutil repl info -c /acfsmounts/acfs1
$ /sbin/acfsutil repl info -s -n 5d /acfsmounts/acfs1
$ /sbin/acfsutil repl info -a -v /acfsmounts/acfs1
Oracle ACFS Command-Line Tools for Replication
16-62 Oracle Automatic Storage Management Administrator's Guide

acfsutil repl init
Purpose
Initiates replication on all the files in an Oracle ACFS file system or only those fileswith a specified list of tags.
Syntax and Description
acfsutil repl init -hacfsutil repl init primary -s standby_connect_string [tagname...] [-m standby_mount_point] [-c primary_service] [-d trace_level] [-z {on|off}] mount_pointacfsutil repl init standby -p primary_connect_string [-c standby_service] [-d trace_level] mount_point
acfsutil repl init -h displays help text and exits.
Table 16-33 (page 16-63) contains the options available with the acfsutil replinit command.
Table 16-33 Options for the acfsutil repl init command
Option Description
primary Specifies replication of the primary file system.
standby Specifies replication of the standby file system.
-sstandby_connect_string
Specifies the connection string for the site hosting the standbyfile system. The user in the connection string must haveSYSASM and SYSDBA privileges. Oracle wallets should be usedto manage security credentials.
-pprimary_connect_string
Specifies the connection string for the site hosting the primaryfile system. The user in the connection string must haveSYSASM and SYSDBA privileges. Oracle wallets should be usedto manage security credentials.
tagname Specifies the tag names of the files to be replicated.
-mstandby_mount_point
Specifies the directory where the standby file system ismounted if it is different than the primary file system. This isvalid only for the primary file system initialization.
-c primary_service Specifies the service name for the primary file system. Requiredif the primary file system is using a different service name thanthe standby file system.
-c standby_service Specifies the service name for the standby file system. Requiredif the standby file system is using a different service name thanthe primary file system.
-d trace_level Specifies the trace level setting (0..6) for replication logs.
-z on|off Turn on or off compression on replication logs. Compression isoff by default.
Oracle ACFS Command-Line Tools for Replication
Managing Oracle ACFS with Command-Line Tools 16-63
Table 16-33 (Cont.) Options for the acfsutil repl init command
Option Description
mount_point Specifies the directory where the file system is mounted. Forrepl init primary, mount_point specifies the primary filesystem. For repl init standby, mount_point specifies thestandby file system.
When the acfsutil repl init primary command completes successfully,processing begins to replicate initial copies of all specified files to the standby filesystem. In addition, any changes to these files and any new files subsequently createdin the file system on the primary file system are captured and transported to thestandby file system. However, successful completion of the command does notindicate that the specified files have been copied in full to the standby file system. Tomonitor the progress of the initial replication of all specified files to the standby filesystem, users run the acfsutil repl info -c command.
The first phase of the initial replication copy process begins with a complete copy ofthe file system directory tree structure, not the files within the directory tree, to thestandby file system. This copy process includes directories without specified tags.During the copy process, attempts to rename directories may fail. After the directorytree structure has been successfully copied to the standby file system, replicationinitialization begins the second phase of the initial copy process: copying all files to bereplicated to the standby file system. While a file is being copied to the standby filesystem during this initial replication phase, writes and truncates to that file areblocked.
Symbolic link files are replicated as is. If the symbolic link resolves to an absolute pathname, and that path name does not exist on the standby file system, then referencingthe symbolic link results in errors.
A new service name must be created for replication. You cannot use the +ASM servicename. You must specify a unique service name for each file system that you want toreplicate when there are multiple replicated file systems on a node or cluster.
A file system being replicated can only be mounted on one path for the primary orstandby file system. Otherwise, dismounting any path on a node where it is mountedon multiple paths stops the replication background threads.
A replicated Oracle ACFS file system must be mounted on the same directory within acluster. The file system does not have to be mounted on all of the nodes in a cluster,but if it is mounted, it must be mounted on the directory specified with the acfsutilrepl init command. In addition, no other file system can be mounted on thatdirectory on other nodes.
A single Oracle ACFS file system cannot be configured both as a primary and astandby file system. If replication is configured on the same host or within the samecluster, then the primary and standby file systems cannot use the same named mountpoint.
The primary file system must have a minimum size of 4 GB for each node that ismounting the file system. The standby file system must have a minimum size of 4 GBand should be sized appropriately for the amount of data being replicated and thespace necessary for the replication logs sent from the primary file system.
The sites hosting the primary and standby file systems must be running the sameoperating system and must have the same system architecture.
Oracle ACFS Command-Line Tools for Replication
16-64 Oracle Automatic Storage Management Administrator's Guide

Oracle wallets should be used to manage security credentials.
See Also:
• Oracle Database Enterprise User Security Administrator's Guide forinformation about Oracle wallets
• Oracle Database SecureFiles and Large Objects Developer's Guide forinformation about wallet management
• Oracle Database Net Services Reference for information about walletparameters in the SQLNET.ORA file
You must have system administrator privileges to run this command.
Examples
Example 16-27 (page 16-65) shows the use of the acfsutil repl init command toset up the primary and standby file systems. In these examples, the connect stringsearches in the user's wallet for the user name and password associated with the aliasprimary_repl_site or primary_repl_site.
Example 16-27 Using the acfsutil repl init command
$ /sbin/acfsutil repl init primary -s /@standby_repl_site -m /standby/repl_data -c primary_repl_service /acfsmounts/repl_data
$ /sbin/acfsutil repl init standby -p /@primary_repl_site -c standby_repl_service /standby/repl_data
acfsutil repl pause
Purpose
Pauses replication on an Oracle ACFS file system.
Syntax and Description
acfsutil repl pause -hacfsutil repl pause mount_point
acfsutil repl pause -h displays help text and exits.
Table 16-34 (page 16-65) contains the options available with the acfsutil replpause command.
Table 16-34 Options for the acfsutil repl pause command
Option Description
mount_point Specifies the directory where the file system is mounted.
Oracle ACFS Command-Line Tools for Replication
Managing Oracle ACFS with Command-Line Tools 16-65
The acfsutil repl pause command temporarily stops the replication process untilthe acfsutil repl resume command is run. The command can be run at either thesite hosting the primary or a standby file system. acfsutil repl resume should berun soon after acfsutil repl pause to resume replication.
You can use the acfsutil repl pause command to temporarily stop thetransportation of replication logs from the primary file system to the standby filesystem, but logs continue to be generated on the primary file system. Logs are notdeleted until they are transported to the standby file system and applied to thestandby file system.
The acfsutil repl pause command can also be used to temporarily stop theapplication of replication logs to a standby file system, but the command does not stopthe transportation of logs to the standby file system. Logs are not deleted from thestandby file system until they are applied to the file system.
When replication is paused on either the site hosting the primary or standby filesystem, replication logs still accumulate on the standby and primary file system. Theselogs can consume all available storage space in the file system so you must checkavailable storage on the sites hosting the file systems if you have paused replication.Ensure that you run acfsutil repl resume before the accumulated replication logsconsume all available space in the file system.
You must have system administrator or Oracle ASM administrator privileges to runthis command.
Examples
Example 16-28 (page 16-66) shows the use of the acfsutil repl pause command.
Example 16-28 Using the acfsutil repl pause command
$ /sbin/acfsutil repl pause /acfsmounts/acfs1
acfsutil repl resume
Purpose
Resumes replication on an Oracle ACFS file system where replication has beenpaused.
Syntax and Description
acfsutil repl resume -hacfsutil repl resume mount_point
acfsutil repl resume -h displays help text and exits.
Table 16-35 (page 16-66) contains the options available with the acfsutil replresume command.
Table 16-35 Options for the acfsutil repl resume command
Option Description
mount_point Specifies the directory where the file system is mounted.
Oracle ACFS Command-Line Tools for Replication
16-66 Oracle Automatic Storage Management Administrator's Guide

This command resumes the replication process after the acfsutil repl pausecommand has been run. This command should be run soon after replication has beenpaused with the acfsutil repl pause command.
You must have system administrator or Oracle ASM administrator privileges to runthis command.
Examples
Example 16-29 (page 16-67) shows the use of the acfsutil repl resume command.
Example 16-29 Using the acfsutil repl resume command
$ /sbin/acfsutil repl resume /acfsmounts/acfs1
acfsutil repl sync
Purpose
Synchronizes primary and standby file systems.
Syntax and Description
acfsutil repl sync -hacfsutil repl sync [apply] mount_point
acfsutil repl sync -h displays help text and exits.
Table 16-36 (page 16-67) contains the options available with the acfsutil replsync command.
Table 16-36 Options for the acfsutil repl sync command
Option Description
apply Specifies that all changes be applied to the standby file system.
mount_point Specifies the directory where the primary file system ismounted.
You can use the acfsutil repl sync command to synchronize the state of theprimary and standby file system. This command can only be run on the site hostingthe primary file system.
You should first quiesce your applications and run a sync(1) call so that thesynchronized state is known and meaningful to you. The acfsutil repl synccommand then causes all outstanding replication data to be shipped from the primaryto the standby file system.
The acfsutil repl sync command returns success when this transfer is completeor, if the apply parameter is supplied, when all of these changes have beensuccessfully applied to the standby file system. At this point, unless an unmount of thelast node on the primary site cluster is about to occur, applications can be restarted.You can use the acfsutil repl sync command before dismounting the file systemon the last node to ensure that all modifications have been sent to the standby filesystem.
If acfsutil repl info -c reports the primary file system is in the Initializingstate, the acfsutil repl sync command does not guarantee that all files to bereplicated in the file system have been sent to the standby file system. Files that existed
Oracle ACFS Command-Line Tools for Replication
Managing Oracle ACFS with Command-Line Tools 16-67
in the file system before running the acfsutil repl init command are sent to thestandby file system in the background.
You must have system administrator or Oracle ASM administrator privileges to runthis command.
Examples
Example 16-30 (page 16-68) shows the use of the acfsutil repl sync command.
Example 16-30 Using the acfsutil repl sync command
$ /sbin/acfsutil repl sync /acfsmounts/acfs1
acfsutil repl terminate
Purpose
Stops all replication activity on the Oracle ACFS file system at the site where it is run.
Syntax and Description
acfsutil repl terminate -hacfsutil repl terminate primary mount_pointacfsutil repl terminate standby [immediate] mount_point
acfsutil repl terminate -h displays help text and exits.
Table 16-37 (page 16-68) contains the options available with the acfsutil replterminate command.
Table 16-37 Options for the acfsutil repl terminate command
Option Description
primary Stops replication on the primary file system.
standby Stops replication on the standby file system.
immediate Stops replication processing immediately on the standby filesystem.
mount_point Specifies the directory where the file system is mounted.
The acfsutil repl terminate command stops all replication processing. Whenterminating replication, you should terminate replication for the primary file systemfirst, and then the standby file system. If you want to ensure all changes are sent to thestandby file system before terminating the primary site, ensure that all applications arequiesced and run the acfsutil repl sync command. The terminate command mustbe run on both sites if both sites hosting the file systems are available.
After acfsutil repl terminate standby has been run, you can use the standbyfile system in read-write mode. After acfsutil repl terminate has been run oneither the primary file system or standby file system, you must start replication fromthe beginning with the acfsutil repl init command.
The repl terminate standby command waits until replication data at the standbyfile system has been applied. If you want to terminate replication immediately withoutapplying all the replication data, use the immediate option. However, this option canleave some files at the standby file system in an indeterminate state.
Oracle ACFS Command-Line Tools for Replication
16-68 Oracle Automatic Storage Management Administrator's Guide

To momentarily stop Oracle ACFS replication, you can use the acfsutil replpause command, followed soon after by the acfsutil repl resume command.
You must have system administrator privileges to run this command.
Examples
Example 16-31 (page 16-69) shows the use of the acfsutil repl terminatecommand.
Example 16-31 Using the acfsutil repl terminate command
$ /sbin/acfsutil repl terminate /acfsmounts/acfs1
acfsutil repl trace
Purpose
Sets the replication trace level for gathering trace information on an Oracle ACFS filesystem.
Syntax and Description
acfsutil repl trace -hacfsutil repl trace level mount_point
acfsutil repl trace -h displays help text and exits.
Table 16-39 (page 16-70) contains the options available with the acfsutil repltrace command.
Table 16-38 Options for the acfsutil repl trace command
Option Description
level Specifies the trace level setting (0..6). The default level is 2.
mount_point Specifies the directory where the file system is mounted.
Increasing the trace level can have a performance impact and should be done at therecommendation of Oracle support services.
Trace files for Oracle ACFS replication are stored in the following locations:
GRID_HOME/log/hostname/acfsrepl*GRID_HOME/log/hostname/client/acfsutil.log
You must have system administrator or Oracle ASM administrator privileges to runthis command.
Examples
Example 16-32 (page 16-69) shows the use of the acfsutil repl trace command.
Example 16-32 Using the acfsutil repl trace command
$ /sbin/acfsutil repl trace 5 /acfsmounts/acfs1
acfsutil repl update
Oracle ACFS Command-Line Tools for Replication
Managing Oracle ACFS with Command-Line Tools 16-69

Purpose
Updates replication information while replication is running on an Oracle ACFS filesystem.
Syntax and Description
acfsutil repl update -hacfsutil repl update [-p primary_connect_string ] [-s standby_connect_string] [-z {on|off}] mount_point
acfsutil repl update -h displays help text and exits.
Table 16-39 (page 16-70) contains the options available with the acfsutil replupdate command.
Table 16-39 Options for the acfsutil repl update command
Option Description
-pprimary_connect_string
Specifies the connection string for the primary file system. Theuser in the connection string must have SYSASM and SYSDBAprivileges.
-sstandby_connect_string
Specifies the connection string for the standby file system. Theuser in the connection string must have SYSASM and SYSDBAprivileges.
-z on|off Turn on or off compression on replication logs. Compression isoff by default.
mount_point Specifies the directory where the primary file system ismounted.
The acfsutil repl update command updates replication information afterreplication has been started. This command can only be run on the site hosting theprimary file system. The connection strings for the primary and standby file systemscan be altered.
You can specify any combination of the -p, -s, and -z options, but you must specifyat least one of those options.
While replication is running, compression can be turned on or off with the -z option.
You must have system administrator privileges to run this command.
Examples
Example 16-33 (page 16-70) shows the use of the acfsutil repl update command.
Example 16-33 Using the acfsutil repl update command
$ /sbin/acfsutil repl update -s [email protected] /acfsmounts/acfs1
Oracle ACFS Command-Line Tools for AuditingTable 16-40 (page 16-71) contains a summary of the commands for Oracle ACFSauditing. For an overview of Oracle ACFS auditing, refer to "Oracle ACFS Auditing(page 11-24)".
Oracle ACFS Command-Line Tools for Auditing
16-70 Oracle Automatic Storage Management Administrator's Guide

You can run acfsutil help on all platforms to display help text. You can runacfsutil version on all platforms to display the Oracle ACFS version.
When the options are entered with commands on a Windows platform, use / insteadof - with the option. For example, you can display help for acfsutil on a Linuxplatform with acfsutil -h. On a Windows platform, use acfsutil /h.
A mount point on a Windows operating system can be a drive letter or a directoryincluding the drive letter. When using a drive letter in a command, include thebackslash (\) with the drive letter, such as in M:\, to avoid the possibility of triggeringa Windows path substitution to the last accessed path on the specified drive.
Table 16-40 Summary of commands for Oracle ACFS auditing
Command Description
acfsutil audit archive (page 16-71) Forces an archival of the audit trail.
acfsutil audit disable (page 16-72) Disables auditing for Oracle ACFS encryption or security.
acfsutil audit enable (page 16-72) Enables auditing for Oracle ACFS encryption or security.
acfsutil audit info (page 16-73) Displays auditing information.
acfsutil audit init (page 16-74) Initializes auditing on an Oracle ACFS environment.
acfsutil audit purge (page 16-75) Purges the audit trail for a specified file system.
acfsutil audit read (page 16-75) Marks the audit trail to indicate that the audit trail has been read.
acfsutil audit archive
Purpose
Forces an archival of the audit trail for the current host on the specified Oracle ACFSfile system.
Syntax and Description
acfsutil audit archive -hacfsutil audit archive -m mount_point
acfsutil audit archive -h displays help text and exits.
Table 16-41 (page 16-71) contains the options available with the acfsutil auditarchive command.
Table 16-41 Options for the acfsutil audit archive command
Option Description
-m mount_point Specifies the directory where the file system is mounted.
You can use the acfsutil audit archive command to safely back up or removeaudit data without the possibility of losing intermediate audit messages.
Only an audit manager can run this command.
Oracle ACFS Command-Line Tools for Auditing
Managing Oracle ACFS with Command-Line Tools 16-71

Examples
The following example shows the use of the acfsutil audit archive command.
Example 16-34 Using the acfsutil audit archive command
$ /sbin/acfsutil audit archive -m /acfsmounts/acfs1
acfsutil audit disable
Purpose
Disables auditing for either Oracle ACFS encryption or security on a specified filesystem.
Syntax and Description
acfsutil audit disable -hacfsutil audit disable -m mount_point -s {encr |sec}
acfsutil audit disable -h displays help text and exits.
Table 16-42 (page 16-72) contains the options available with the acfsutil auditdisable command.
Table 16-42 Options for the acfsutil audit disable command
Option Description
-m mount_point Specifies the directory where the file system is mounted.
-s {encr | sec} Specifies whether to disable auditing for encryption or security.
Only an audit manager can run this command.
Examples
The following example shows the use of the acfsutil audit disable command.
Example 16-35 Using the acfsutil audit disable command
$ /sbin/acfsutil audit disable -m /acfsmounts/acfs1 -s encr
acfsutil audit enable
Purpose
Enables auditing for either Oracle ACFS encryption or security on a specified filesystem.
Syntax and Description
acfsutil audit enable -hacfsutil audit enable -m mount_point -s {encr |sec}
acfsutil audit enable -h displays help text and exits.
Table 16-43 (page 16-73) contains the options available with the acfsutil auditenable command.
Oracle ACFS Command-Line Tools for Auditing
16-72 Oracle Automatic Storage Management Administrator's Guide

Table 16-43 Options for the acfsutil audit enable command
Option Description
-m mount_point Specifies the directory where the file system is mounted.
-s {encr | sec} Specifies whether to enable auditing for encryption or security.
The acfsutil audit enable command may also create themount_point/.Security/audit directory, which is a location for audit sourcefiles. The audit directory is created when auditing first is enabled for a file system, as aresult of either the acfsutil encr set, acfsutil sec prepare, or acfsutilaudit enable command.
Only an audit manager can run this command.
Examples
The following example shows the use of the acfsutil audit enable command.
Example 16-36 Using the acfsutil audit enable command
$ /sbin/acfsutil audit enable -m /acfsmounts/acfs1 -s encr
acfsutil audit info
Purpose
Displays auditing information.
Syntax and Description
acfsutil audit info -hacfsutil audit info [-m mount_point ]
acfsutil audit info -h displays help text and exits.
Table 16-44 (page 16-73) contains the options available with the acfsutil auditinfo command.
Table 16-44 Options for the acfsutil audit info command
Option Description
-m mount_point Optionally specifies the directory where the file system ismounted.
Only an audit manager can run this command.
Examples
The following example shows the use of the acfsutil audit info command.
Example 16-37 Using the acfsutil audit info command
$ /sbin/acfsutil audit info -m /acfsmounts/acfs1
Auditing information for '/acfsmounts/acfs1':Audit trail size: 10MB
Oracle ACFS Command-Line Tools for Auditing
Managing Oracle ACFS with Command-Line Tools 16-73
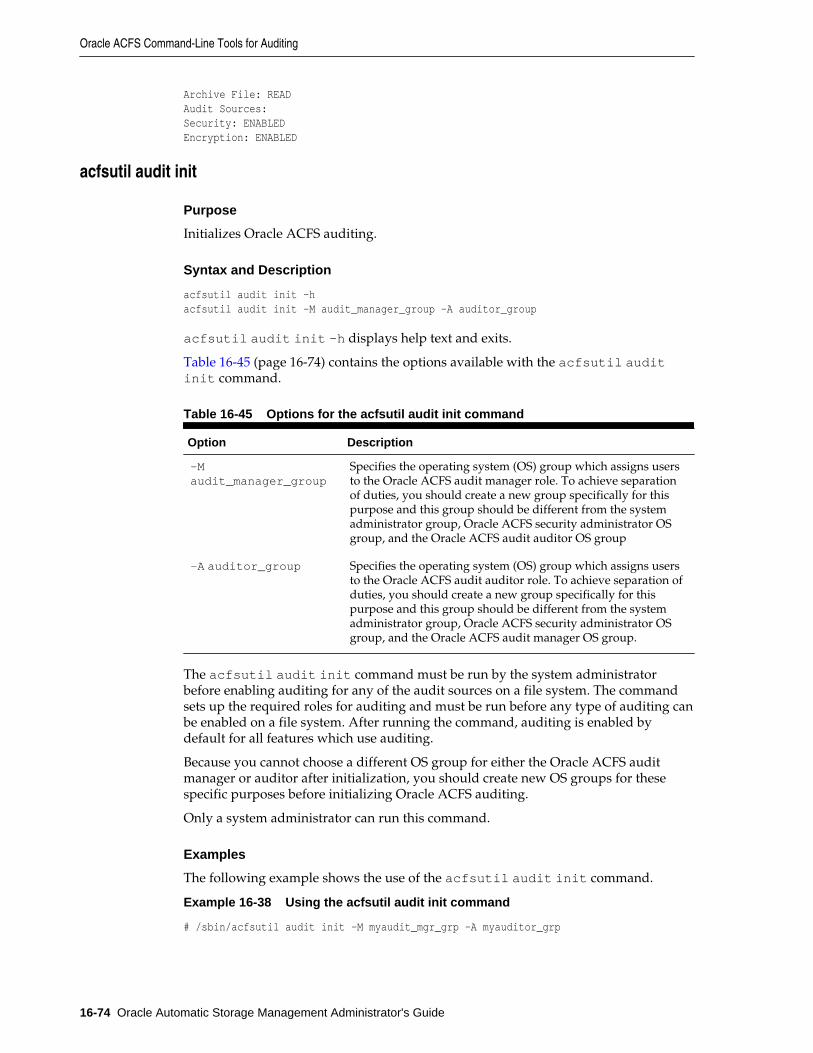
Archive File: READAudit Sources:Security: ENABLEDEncryption: ENABLED
acfsutil audit init
Purpose
Initializes Oracle ACFS auditing.
Syntax and Description
acfsutil audit init -hacfsutil audit init -M audit_manager_group -A auditor_group
acfsutil audit init -h displays help text and exits.
Table 16-45 (page 16-74) contains the options available with the acfsutil auditinit command.
Table 16-45 Options for the acfsutil audit init command
Option Description
-Maudit_manager_group
Specifies the operating system (OS) group which assigns usersto the Oracle ACFS audit manager role. To achieve separationof duties, you should create a new group specifically for thispurpose and this group should be different from the systemadministrator group, Oracle ACFS security administrator OSgroup, and the Oracle ACFS audit auditor OS group
-A auditor_group Specifies the operating system (OS) group which assigns usersto the Oracle ACFS audit auditor role. To achieve separation ofduties, you should create a new group specifically for thispurpose and this group should be different from the systemadministrator group, Oracle ACFS security administrator OSgroup, and the Oracle ACFS audit manager OS group.
The acfsutil audit init command must be run by the system administratorbefore enabling auditing for any of the audit sources on a file system. The commandsets up the required roles for auditing and must be run before any type of auditing canbe enabled on a file system. After running the command, auditing is enabled bydefault for all features which use auditing.
Because you cannot choose a different OS group for either the Oracle ACFS auditmanager or auditor after initialization, you should create new OS groups for thesespecific purposes before initializing Oracle ACFS auditing.
Only a system administrator can run this command.
Examples
The following example shows the use of the acfsutil audit init command.
Example 16-38 Using the acfsutil audit init command
# /sbin/acfsutil audit init -M myaudit_mgr_grp -A myauditor_grp
Oracle ACFS Command-Line Tools for Auditing
16-74 Oracle Automatic Storage Management Administrator's Guide
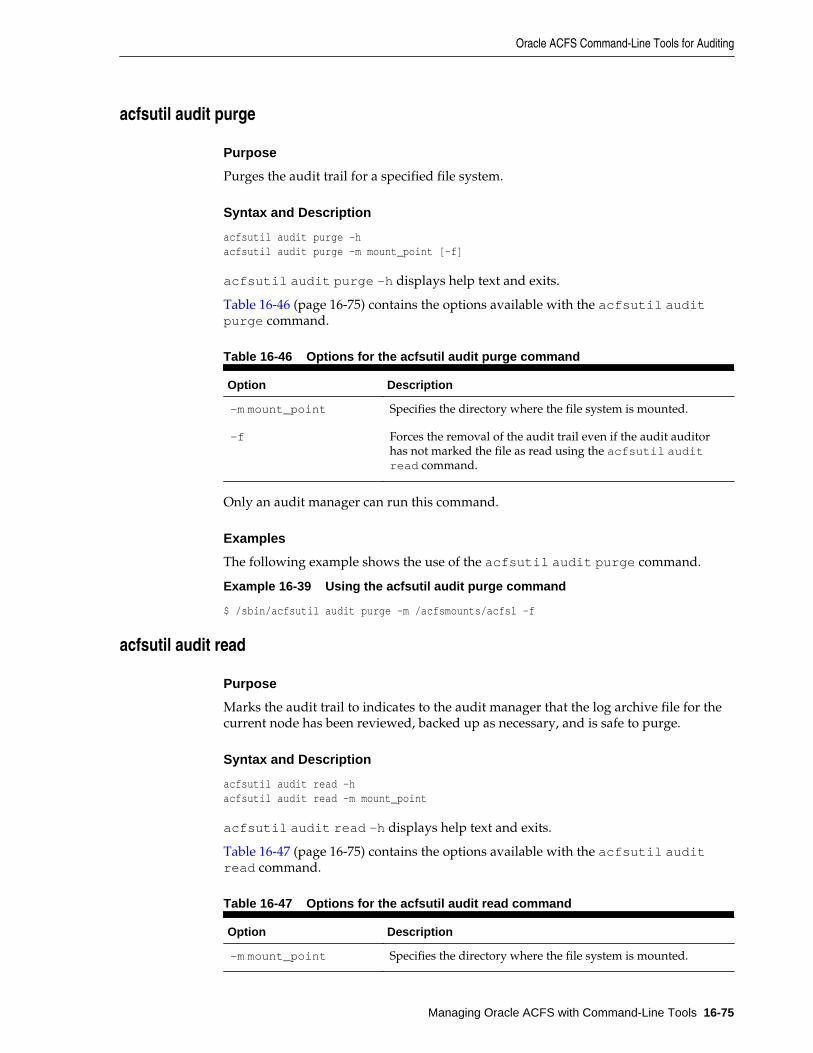
acfsutil audit purge
Purpose
Purges the audit trail for a specified file system.
Syntax and Description
acfsutil audit purge -hacfsutil audit purge -m mount_point [-f]
acfsutil audit purge -h displays help text and exits.
Table 16-46 (page 16-75) contains the options available with the acfsutil auditpurge command.
Table 16-46 Options for the acfsutil audit purge command
Option Description
-m mount_point Specifies the directory where the file system is mounted.
-f Forces the removal of the audit trail even if the audit auditorhas not marked the file as read using the acfsutil auditread command.
Only an audit manager can run this command.
Examples
The following example shows the use of the acfsutil audit purge command.
Example 16-39 Using the acfsutil audit purge command
$ /sbin/acfsutil audit purge -m /acfsmounts/acfs1 -f
acfsutil audit read
Purpose
Marks the audit trail to indicates to the audit manager that the log archive file for thecurrent node has been reviewed, backed up as necessary, and is safe to purge.
Syntax and Description
acfsutil audit read -hacfsutil audit read -m mount_point
acfsutil audit read -h displays help text and exits.
Table 16-47 (page 16-75) contains the options available with the acfsutil auditread command.
Table 16-47 Options for the acfsutil audit read command
Option Description
-m mount_point Specifies the directory where the file system is mounted.
Oracle ACFS Command-Line Tools for Auditing
Managing Oracle ACFS with Command-Line Tools 16-75

Only an audit auditor can run this command.
Examples
The following example shows the use of the acfsutil audit read command.
Example 16-40 Using the acfsutil audit read command
$ /sbin/acfsutil audit read -m /acfsmounts/acfs1
Oracle ACFS Command-Line Tools for SecurityTable 16-48 (page 16-76) contains a summary of the commands for Oracle ACFSsecurity. For an overview of Oracle ACFS security, refer to "Oracle ACFS Security(page 11-19)".
You can run acfsutil help on all platforms to display help text. You can runacfsutil version on all platforms to display the Oracle ACFS version.
When the options are entered with commands on a Windows platform, use / insteadof - with the option. For example, you can display help for acfsutil on a Linuxplatform with acfsutil -h. On a Windows platform, use acfsutil /h.
A mount point on a Windows operating system can be a drive letter or a directoryincluding the drive letter. When using a drive letter in a command, include thebackslash (\) with the drive letter, such as in M:\, to avoid the possibility of triggeringa Windows path substitution to the last accessed path on the specified drive.
Table 16-48 Summary of commands for Oracle ACFS security
Command Description
acfsutil sec admin add (page 16-77) Adds a security administrator.
acfsutil sec admin password(page 16-78)
Changes the password of a security administrator.
acfsutil sec admin remove (page 16-79) Removes a security administrator.
acfsutil sec batch (page 16-79) Runs a batch file.
acfsutil sec disable (page 16-80) Disables Oracle ACFS security.
acfsutil sec enable (page 16-81) Enables Oracle ACFS security.
acfsutil sec info (page 16-82) Displays Oracle ACFS file system security information.
acfsutil sec info file (page 16-83) Lists the security realms that a specified file or directory belongs to.
acfsutil sec init (page 16-83) Initializes Oracle ACFS file system security.
acfsutil sec load (page 16-85) Loads Oracle ACFS file system security metadata.
acfsutil sec prepare (page 16-86) Prepares an Oracle ACFS file system for security.
acfsutil sec realm add (page 16-88) Adds objects to an Oracle ACFS file system security realm.
acfsutil sec realm audit disable(page 16-92)
Disables auditing of command rules for files in an Oracle ACFSsecurity realm.
Oracle ACFS Command-Line Tools for Security
16-76 Oracle Automatic Storage Management Administrator's Guide
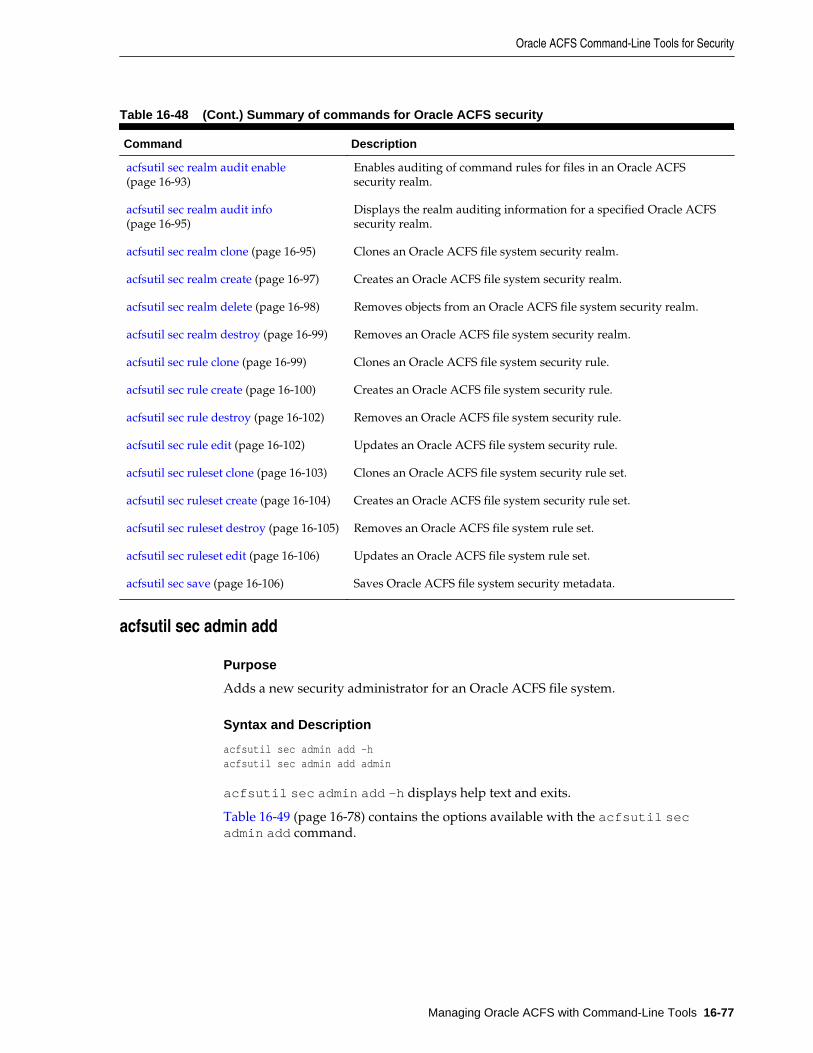
Table 16-48 (Cont.) Summary of commands for Oracle ACFS security
Command Description
acfsutil sec realm audit enable(page 16-93)
Enables auditing of command rules for files in an Oracle ACFSsecurity realm.
acfsutil sec realm audit info(page 16-95)
Displays the realm auditing information for a specified Oracle ACFSsecurity realm.
acfsutil sec realm clone (page 16-95) Clones an Oracle ACFS file system security realm.
acfsutil sec realm create (page 16-97) Creates an Oracle ACFS file system security realm.
acfsutil sec realm delete (page 16-98) Removes objects from an Oracle ACFS file system security realm.
acfsutil sec realm destroy (page 16-99) Removes an Oracle ACFS file system security realm.
acfsutil sec rule clone (page 16-99) Clones an Oracle ACFS file system security rule.
acfsutil sec rule create (page 16-100) Creates an Oracle ACFS file system security rule.
acfsutil sec rule destroy (page 16-102) Removes an Oracle ACFS file system security rule.
acfsutil sec rule edit (page 16-102) Updates an Oracle ACFS file system security rule.
acfsutil sec ruleset clone (page 16-103) Clones an Oracle ACFS file system security rule set.
acfsutil sec ruleset create (page 16-104) Creates an Oracle ACFS file system security rule set.
acfsutil sec ruleset destroy (page 16-105) Removes an Oracle ACFS file system rule set.
acfsutil sec ruleset edit (page 16-106) Updates an Oracle ACFS file system rule set.
acfsutil sec save (page 16-106) Saves Oracle ACFS file system security metadata.
acfsutil sec admin add
Purpose
Adds a new security administrator for an Oracle ACFS file system.
Syntax and Description
acfsutil sec admin add -hacfsutil sec admin add admin
acfsutil sec admin add -h displays help text and exits.
Table 16-49 (page 16-78) contains the options available with the acfsutil secadmin add command.
Oracle ACFS Command-Line Tools for Security
Managing Oracle ACFS with Command-Line Tools 16-77
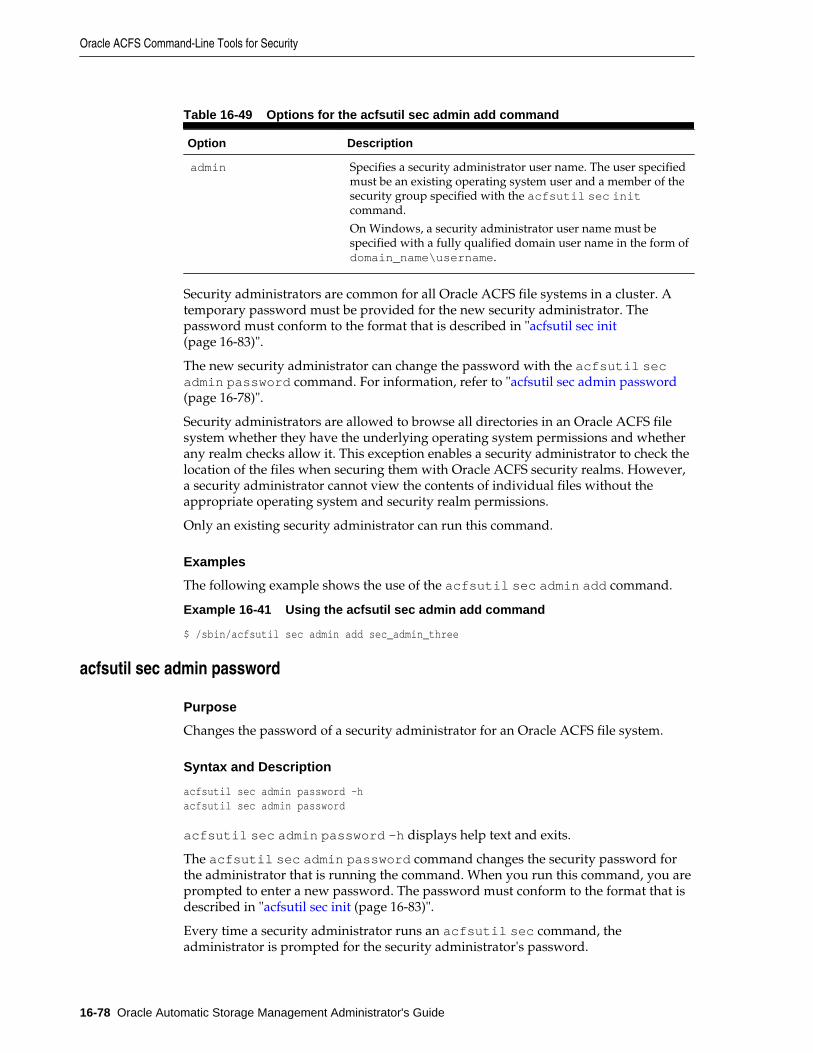
Table 16-49 Options for the acfsutil sec admin add command
Option Description
admin Specifies a security administrator user name. The user specifiedmust be an existing operating system user and a member of thesecurity group specified with the acfsutil sec initcommand.
On Windows, a security administrator user name must bespecified with a fully qualified domain user name in the form ofdomain_name\username.
Security administrators are common for all Oracle ACFS file systems in a cluster. Atemporary password must be provided for the new security administrator. Thepassword must conform to the format that is described in "acfsutil sec init(page 16-83)".
The new security administrator can change the password with the acfsutil secadmin password command. For information, refer to "acfsutil sec admin password(page 16-78)".
Security administrators are allowed to browse all directories in an Oracle ACFS filesystem whether they have the underlying operating system permissions and whetherany realm checks allow it. This exception enables a security administrator to check thelocation of the files when securing them with Oracle ACFS security realms. However,a security administrator cannot view the contents of individual files without theappropriate operating system and security realm permissions.
Only an existing security administrator can run this command.
Examples
The following example shows the use of the acfsutil sec admin add command.
Example 16-41 Using the acfsutil sec admin add command
$ /sbin/acfsutil sec admin add sec_admin_three
acfsutil sec admin password
Purpose
Changes the password of a security administrator for an Oracle ACFS file system.
Syntax and Description
acfsutil sec admin password -hacfsutil sec admin password
acfsutil sec admin password -h displays help text and exits.
The acfsutil sec admin password command changes the security password forthe administrator that is running the command. When you run this command, you areprompted to enter a new password. The password must conform to the format that isdescribed in "acfsutil sec init (page 16-83)".
Every time a security administrator runs an acfsutil sec command, theadministrator is prompted for the security administrator's password.
Oracle ACFS Command-Line Tools for Security
16-78 Oracle Automatic Storage Management Administrator's Guide
Only a security administrator can run this command.
Examples
The following example shows the use of the acfsutil sec admin passwordcommand.
Example 16-42 Using the acfsutil sec admin password command
$ /sbin/acfsutil sec admin passwordACFS Security administrator password:New password:Re-enter new password:
acfsutil sec admin remove
Purpose
Removes a security administrator from an Oracle ACFS file system.
Syntax and Description
acfsutil sec admin remove -hacfsutil sec admin remove admin
acfsutil sec admin remove -h displays help text and exits.
Table 16-50 (page 16-79) contains the options available with the acfsutil secadmin remove command.
Table 16-50 Options for the acfsutil sec admin remove command
Option Description
admin Specifies an existing security administrator user name.
On Windows, the security administrator user name must bespecified with a fully qualified user name in the form ofdomain_name\username.
Only a security administrator can run this command.
Examples
The following example shows the use of the acfsutil sec admin removecommand.
Example 16-43 Using the acfsutil sec admin remove command
$ /sbin/acfsutil sec admin remove sec_admin_three
acfsutil sec batch
Purpose
Runs a specified batch file.
Oracle ACFS Command-Line Tools for Security
Managing Oracle ACFS with Command-Line Tools 16-79

Syntax and Description
acfsutil sec batch -hacfsutil sec batch batch_file
acfsutil sec batch -h displays help text and exits.
Table 16-51 (page 16-80) contains the options available with the acfsutil secbatch command.
Table 16-51 Options for the acfsutil sec batch command
Option Description
batch_file Specifies an existing batch file name. The batch file contains alist of acfsutil sec commands.
The batch file can only contain security realm management commands. Interactivecommands are not recommended. The acfsutil sec admin add, acfsutil secadmin password, and acfsutil sec init commands are not supported in thebatch file. Also, other acfsutil commands, such as acfsutil encr commands, arenot allowed in the batch file. If a command in the batch file fails, subsequentcommands in the batch file are not run.
The following are examples of commands that can be in a batch file:
acfsutil sec realm create my_realm1 -m /mnt1 -e offacfsutil sec realm create my_realm2 -m /mnt2 -e off
Only a security administrator can run this command. When the command is run, theadministrator is prompted once for a password.
Examples
The following example shows the use of the acfsutil sec batch command.
Example 16-44 Using the acfsutil sec batch command
$ /sbin/acfsutil sec batch my_batch_file
acfsutil sec disable
Purpose
Disables Oracle ACFS security on a mount point or a realm in a mount point.
Syntax and Description
acfsutil sec disable -hacfsutil sec disable -m mount_point [-S snap_name] [realm]
acfsutil sec disable -h displays help text and exits.
Table 16-52 (page 16-81) contains the options available with the acfsutil secdisable command.
Oracle ACFS Command-Line Tools for Security
16-80 Oracle Automatic Storage Management Administrator's Guide

Table 16-52 Options for the acfsutil sec disable command
Option Description
-m mount_point Specifies the directory where the file system is mounted.
-S snap_name Disables security for the specified read-write snapshot.
realm Specifies the name of the security realm in the Oracle ACFS filesystem.
The acfsutil sec disable -m mount_point command disables securityfunctionality on the Oracle ACFS file system specified by the mount point option.When security is disabled on the file system, security realms do not enforce realmauthorization.
The acfsutil sec disable -m mount_point realm command disables securityfor the realm specified in the command.
Only a security administrator can run this command.
Examples
The following example shows the use of the acfsutil sec disable command.
Example 16-45 Using the acfsutil sec disable command
$ /sbin/acfsutil sec disable -m /acfsmounts/acfs1 my_realm
acfsutil sec enable
Purpose
Enables Oracle ACFS security on a mount point or a realm in a mount point.
Syntax and Description
acfsutil sec enable -hacfsutil sec enable -m mount_point [-S snap_name] [realm]
acfsutil sec enable -h displays help text and exits.
Table 16-53 (page 16-81) contains the options available with the acfsutil secenable command.
Table 16-53 Options for the acfsutil sec enable command
Option Description
-m mount_point Specifies the directory where the file system is mounted.
-S snap_name Enables security for the specified read-write snapshot.
realm Specifies the name of the security realm.
The acfsutil sec enable -m mount_point command enables securityfunctionality on the Oracle ACFS file system specified by the mount point option.When security is enabled on the file system, security realms that have been enabled
Oracle ACFS Command-Line Tools for Security
Managing Oracle ACFS with Command-Line Tools 16-81

enforce realm authorization. You should run this command before enabling anyindividual security realm.
The acfsutil sec enable -m mount_point realm command enables security forthe realm specified in the command. The realm enforces authorization if security hasbeen enabled on the file system.
Only a security administrator can run this command.
Examples
These example shows the use of the acfsutil sec enable command.
Example 16-46 Using the acfsutil sec enable command
$ /sbin/acfsutil sec enable -m /acfsmounts/acfs1
$ /sbin/acfsutil sec enable -m /acfsmounts/acfs1 my_realm
acfsutil sec info
Purpose
Displays information about Oracle ACFS security.
Syntax and Description
acfsutil sec info -hacfsutil sec info -m mount_point [{-n [realm] | -l [rule] |-s [ruleset] |-c }] [-S snap_name]
acfsutil sec info -h displays help text and exits.
Table 16-54 (page 16-82) contains the options available with the acfsutil sec infocommand.
Table 16-54 Options for the acfsutil sec info command
Option Description
-m mount_point Specifies the directory where the file system is mounted.
-n realm Displays information about the specified security realm. If therealm name is omitted, a list of all realms is displayed.
-l rule Displays information about the specified rule. If the rule nameis omitted, a list of all rules is displayed.
-s ruleset Displays information about the specified rule set. If the rule setname is omitted, a list of all rule sets is displayed.
-c Lists all the command rules.
-S snap_name Displays information about the realms, rules, and rule sets inthe specified snapshot.
The acfsutil sec info command retrieves information about the list of realms,rules, and rule sets on the specified mount point. By specifying a particular realm,rule, or ruleset, you can retrieve information specific about the specified realm, rule, orruleset. You can also display information about a specified snapshot.
Oracle ACFS Command-Line Tools for Security
16-82 Oracle Automatic Storage Management Administrator's Guide

If the -m option is specified without any other options, then the security enabled statusand prepared status are displayed for the specified mount point.
To access files in the system security realms, the user should be assigned as a securityadministrator with the acfsutil sec admin add command. Only a securityadministrator can run this command.
Examples
The following example shows the use of the acfsutil sec info command.
Example 16-47 Using the acfsutil sec info command
$ /sbin/acfsutil sec info -m /acfsmounts/acfs1 -n my_realm
acfsutil sec info file
Purpose
Lists the names of the Oracle ACFS security realms that the specified file or directorybelongs to.
Syntax and Description
acfsutil sec info file -hacfsutil sec info file -m mount_point path
acfsutil sec info file -h displays help text and exits.
Table 16-55 (page 16-83) contains the options available with the acfsutil sec infofile command.
Table 16-55 Options for the acfsutil sec info file command
Option Description
-m mount_point Specifies the directory where the file system is mounted.
path Specifies the path of the file or directory in the file system.
This command also displays the encryption status of files.
Only a security administrator can run this command.
Examples
The following example shows the use of the acfsutil sec info file command.
Example 16-48 Using the acfsutil sec info file command
$ /sbin/acfsutil sec info file -m /acfsmounts/acfs1 /acfsmounts/acfs1/myfiles
acfsutil sec init
Purpose
Initializes Oracle ACFS security.
Oracle ACFS Command-Line Tools for Security
Managing Oracle ACFS with Command-Line Tools 16-83

Syntax and Description
acfsutil sec init -hacfsutil sec init -u admin -g admin_sec_group
acfsutil sec init -h displays help text and exits.
Table 16-56 (page 16-84) contains the options available with the acfsutil sec initcommand.
Table 16-56 Options for the acfsutil sec init command
Option Description
-u admin Specifies the first security administrator user name. The userspecified must be an existing operating system (OS) user and amember of the operating system group specified by the -goption.
On Windows, the security administrator user name must bespecified with a fully qualified user name in the form ofdomain_name\username.
-g admin_sec_group Specifies the name of the security group for the administrator.The group specified must be an existing operating system (OS)group.
On Windows, the group name must be specified with a fullyqualified domain group name in the form of domain_name\groupname. If the domain_name\groupname contains aspace, then enclose the string in quotes (" ").
The acfsutil sec init command creates the storage necessary for securitycredentials and identifies an operating system user as the first security administrator.The command also identifies the operating system group that is the designatedsecurity group. All users that are security administrators must be members of thedesignated security group. Security administrators are common for all Oracle ACFSfile systems.
If you are setting up an OS user and OS group, refer to your operating system-specific(OS) documentation for information.
The acfsutil sec init command is run once to set up Oracle ACFS security foreach cluster and can be run from any node in the cluster. Other security commandscan also be run from any node in a cluster.
Only the root user or Windows Administrator user can run this command. Theuser specifies a password for the security administrator. The security administratorpassword must conform to the following format:
• The maximum number of characters is 20.
• The minimum number of characters is 8.
• The password must contain at least one digit.
• The password must contain at least one letter.
The new security administrator can change the password with the acfsutil secadmin password command. For information, refer to "acfsutil sec admin password(page 16-78)".
Oracle ACFS Command-Line Tools for Security
16-84 Oracle Automatic Storage Management Administrator's Guide

Security administrators are allowed to browse all directories in an Oracle ACFS filesystem whether they have the underlying operating system permissions and whetherany realm checks allow it. This exception enables a security administrator to check thelocation of the files when securing them with Oracle ACFS security realms. However,a security administrator cannot view the contents of individual files without theappropriate operating system and security realm permissions.
Examples
The following example shows the use of the acfsutil sec init command.
Example 16-49 Using the acfsutil sec init command
$ /sbin/acfsutil sec init -u grid -g asmadmin
acfsutil sec load
Purpose
Loads Oracle ACFS security metadata into a file system identified by a mount point.
Syntax and Description
acfsutil sec load -hacfsutil sec load -m mount_point -p file
acfsutil sec load -h displays help text and exits.
Table 16-57 (page 16-85) contains the options available with the acfsutil sec loadcommand.
Table 16-57 Options for the acfsutil sec load command
Option Description
-m mount_point Specifies the directory where the file system is mounted.
-p file Specifies the name of an existing saved security metadata file.
The acfsutil sec load command loads the security metadata in a saved XML fileinto the specified Oracle ACFS file system.
To run the acfsutil sec load command, the destination mount point must have afile system that has been prepared for security and does not contain any user-createdsecurity objects.
If the file system mounted on destination mount point contains security objects, thenyou must run acfsutil sec prepare -u to remove all previously created securityobjects on the file system. After successfully running acfsutil sec prepare -u,you must run acfsutil sec prepare to prepare the file system for security. Aftersuccessfully running acfsutil sec prepare, you can run acfsutil sec load onthe file system. For information about preparing security on or removing security froma file system, refer to "acfsutil sec prepare (page 16-86)".
The acfsutil sec load command does not load system security realms from thebackup file. System security realms are created with the acfsutil sec preparecommand; acfsutil sec load does not re-create these realms. For informationabout the system-created security realms, refer to "acfsutil sec prepare (page 16-86)".
Only a security administrator can run this command.
Oracle ACFS Command-Line Tools for Security
Managing Oracle ACFS with Command-Line Tools 16-85

Examples
The following example shows the use of the acfsutil sec load command.
Example 16-50 Using the acfsutil sec load command
$ /sbin/acfsutil sec load -m /acfsmounts/acfs1 -p my_metadata_file.xml
acfsutil sec prepare
Purpose
Prepares an Oracle ACFS file system for security features.
Syntax and Description
acfsutil sec prepare -hacfsutil sec prepare [-u] -m mount_point
acfsutil sec prepare -h displays help text and exits.
Table 16-58 (page 16-86) contains the options available with the acfsutil secprepare command.
Table 16-58 Options for the acfsutil sec prepare command
Option Description
-m mount_point Specifies the directory where the file system is mounted.
-u Backs out security for the specified mount point.
This command removes security from in the file system andreverts the file system to the state before acfsutil secprepare was run on the file system.
This command removes all realm-secured files and directoriesfrom the realms and then destroys all Oracle ACFS securityrules, rule sets and realms from the file system. However,the .Security directory and its contents, including log filesand the security metadata backup files, are not deleted.
If you want to remove encryption and security is being used,then this command must be run before encryption is backedout. To back out encryption, refer to "acfsutil encr set(page 16-113)".
The acfsutil sec prepare command must be run before any of the realmmanagement commands. This command prepares the specified Oracle ACFS filesystem for security and by default turns security on for the file system.
When running acfsutil sec prepare -u, ensure that no other Oracle ACFSsecurity commands are run until acfsutil sec prepare has completed.
If auditing is initialized on a cluster, this command also enables an Oracle ACFSsecurity auditing source on the file system. The actions performed when enabling thisaudit source are the same as those done when the acfsutil audit enablecommand is run directly. For more information, refer to "acfsutil audit enable(page 16-72)".
This command creates the /mount_point/.Security, /mount_point/.Security/backup, and /mount_point/.Security/realm/logs directories where mount_point is the option specified in the command line.
Oracle ACFS Command-Line Tools for Security
16-86 Oracle Automatic Storage Management Administrator's Guide
This command creates the following system security realms:
• SYSTEM_Logs
This is a system-created realm to protect the Oracle ACFS security log files in thedirectory .Security/realm/logs/ directory.
• SYSTEM_Audit
This is a system-created realm to protect audit trail files. This realm is created ifauditing has been initialized. If auditing has not been initialized, it is createdwhen auditing is enabled for the security source through the acfsutil auditenable command. This realm secures the audit trail file so that the auditmanager can read and write and the auditor can read the file, and no one else hasaccess. This realm also protects the audit trail file so the audit manager cannotdelete (without running the acfsutil audit purge command), truncate,overwrite, or chmod the file.
• SYSTEM_SecurityMetadata
This is a system-created realm to protect the Oracle ACFS metadata XML file inthe directory .Security/backup/ directory.
• SYSTEM_Antivirus
This is a system-created realm that allows access for the antivirus software that isrunning on an Oracle ACFS file system. For every realm protected file ordirectory, the SYSTEM_Antivirus realm is evaluated when authorization checksare performed to determine if the SYSTEM_Antivirus realm allows access to thefile or directory.
To allow the antivirus process to access realm-protected files or directories, youmust add the LocalSystem or SYSTEM group to the realm with the acfsutilsec realm add command, as shown in Example 16-52 (page 16-91). If otherantivirus processes are running as Administrator, then the userAdministrator must be added to the SYSTEM_Antivirus realm to allowaccess to realm protected files and directories.
If no Antivirus products have been installed, do not add any users or groups tothe SYSTEM_Antivirus realm. Because users or groups added to theSYSTEM_Antivirus realm have READ and READDIR access, limit the users orgroups added to this realm. You can restrict the time window when the users orgroups of this realm can access the realm protected files or directories with time-based rules. You can also have application-based rules if you can identify theprocess name for the antivirus installation that scans the files.
The SYSTEM_Antivirus realm can only perform the following operations on afile or directory: OPEN, READ, READDIR, and setting time attributes. To remove ordelete files or directories, you may need to disable security to clean up theinfected files.
This realm is set up only for Windows systems.
• SYSTEM_BackupOperators
This is a system-created realm that enables you to authorize users that can backup realm-secured files and directories. You can add users, groups, rule sets, andcommand rules to this realm to provide fine-grain authorization for backing uprealm-secured files and directories. A user must be added to this realm to back uprealm-secured files and directories.
Oracle ACFS Command-Line Tools for Security
Managing Oracle ACFS with Command-Line Tools 16-87

Use caution when adding groups to this system realm. After you add a group tothis system realm, all the users of the added group are able to override the realmprotections to access files.
To access files in the system security realms, the user should be assigned as a securityadministrator with the acfsutil sec admin add command.
You can add users, groups, rule sets, and command rules to system-created realmswith the acfsutil sec realm add command, the same as for user-created realms.However, adding files and directories to system realms is not recommended. You canuse the acfsutil sec realm delete command to delete objects from the system-created realms.
System-created security realms cannot be removed by a security administrator withthe acfsutil sec admin destroy command. These realms are only removed whensecurity is backed out of a file system when executing the acfsutil sec preparecommand with the -u option.
The acfsutil sec prepare –u command is not allowed if any snapshots exist in thefile system.
Only a security administrator can run the acfsutil sec prepare command.
Examples
The following example shows the use of the acfsutil sec prepare command.
Example 16-51 Using the acfsutil sec prepare command
$ /sbin/acfsutil sec prepare -m /acfsmounts/acfs1
acfsutil sec realm add
Purpose
Adds objects to an Oracle ACFS security realm.
Syntax and Description
acfsutil sec realm add -hacfsutil sec realm add realm -m mount_point {[-u user, ...] [-G os_group,...] [-l commandrule:ruleset,commandrule:ruleset, ...] [-e [-a {AES}] [-k {128|192|256}]] [-f [ -r] path ...]}
acfsutil sec realm add -h displays help text and exits.
Table 16-59 (page 16-88) contains the options available with the acfsutil secrealm add command.
Table 16-59 Options for the acfsutil sec realm add command
Option Description
realm Specifies the realm name to add.
-m mount_point Specifies the directory where the file system is mounted.
-u user Specifies user names to add.
Oracle ACFS Command-Line Tools for Security
16-88 Oracle Automatic Storage Management Administrator's Guide

Table 16-59 (Cont.) Options for the acfsutil sec realm add command
Option Description
-G os_group Specifies the operating system groups to add.
-lcommandrule:ruleset
Specifies the filters to add. The commandrule switch is used toadd one or more command rules to the realm with a rule set.
ruleset specifies the rule set associated with the commandrule for this realm. Only one rule set can be included with eachcommand rule.
For a list of command rules, refer to Table 16-60 (page 16-90).To display a list of the command rules, use acfsutil secinfo with the -c option. Refer to "acfsutil sec info(page 16-82)".
-e Enables encryption on the realm. Turning encryption on for therealm causes all files contained in the realm to be encrypted.These files remain encrypted until they are no longer part of anencrypted realm.
Files that are encrypted are not re-encrypted to match the newspecified encryption parameters.
-a {AES} Specifies the encryption algorithm for the realm.
-k { 128|192|256} Specifies the encryption key length.
-f [-r] path ... Adds files specified by path to the realm. -r specifies arecursive operation. File paths must be separated by spaces andmust be placed at the end of the command.
If a specified file is not realm secured, the file is encrypted ordecrypted to match the encryption status for the realm.
The acfsutil sec realm add command adds objects to the specified realm. Theobjects to be added include users, groups, command rules, rule sets, and files. If thecommand encounters an error when adding an object, a message is displayed and thecommand continues processing the remaining objects.
Multiple entries can be added in a comma-delimited list when adding users, operatingsystem groups, or command rules. Do not use spaces in the comma-delimited list. Ifspaces are added, then enclose the list in quotes.
If the -e option is specified, then encryption must have been initialized for the clusterand set on the file system. For more information, refer to "acfsutil encr init(page 16-109)" and "acfsutil encr set (page 16-113)".
If the entire mount point, which includes the .Security directory, is added to therealm then the security administrator operating system group should be added to therealm to maintain security logging and backing up operations.
The supported command rules are listed in Table 16-60 (page 16-90). These commandrules restrict or protect against file system operations on realm-secured files anddirectories.
Oracle ACFS Command-Line Tools for Security
Managing Oracle ACFS with Command-Line Tools 16-89

Table 16-60 Command Rules
Rule Description
ALL Protects against all file system operations on files anddirectories.
APPENDFILE Restricts against additions to the end of a file. Restrictionsinclude writes that start within the current file size, but proceedbeyond the end of the file.
CHGRP Protects from changing the group ownership on a file ordirectory.
CHMOD Protects from changing the permissions on a file or directory.
CHOWN Protects from changing the owner information of a file ordirectory.
CREATEFILE Protects from creation of new file in a directory.
DELETEFILE Protects from deletion of a file from a directory.
EXTEND Restricts the extension operation of a file size. A file size maystill be modifiable with other operations. EXTEND does notprotect against a truncate followed by an append operation.
IMMUTABLE Denies any changes to the files and directories in the realmexcept changes to extended attributes resulting from commandssuch as acfsutil tag and acfsutil encr.
Includes the following protection for a file or directory:APPENDFILE, CHGRP, CHMOD, CHOWN, DELETEFILE, EXTEND,OVERWRITE, RENAME, RMDIR, TRUNCATE, and WRITE.
IMMUTABLE does not deny any changes to the atime attribute.The atime attribute changes when a user accesses the file.
Can be set to archive the files and directories in a securityrealm.
LINKFILE Restricts the creation of hard links to files.
MKDIR Protects from the creation of new directory in a directory.
MMAPREAD Protects a file from being memory mapped for a read operationusing mmap() on Linux or using CreateFileMappingfollowed by MapViewOfFile() on Windows.
MMAPWRITE Protects a file from being memory mapped for a writeoperation. Setting MMAPWRITE also protects a file frommapping for read as the operating system maps a file for bothread and write.
OPENFILE Protects from the opening of a file.
Oracle ACFS Command-Line Tools for Security
16-90 Oracle Automatic Storage Management Administrator's Guide

Table 16-60 (Cont.) Command Rules
Rule Description
OVERWRITE Prevents existing content in a file from being overwritten with awrite operation whose start and end offsets are within thecurrent file size.
If the operations on a file are truncate followed by append,OVERWRITE does not protect the file. To provide additionalprotection from both append and overwrite operations, usethe WRITE command rule.
READDIR Restricts for a directory listing, except for use by the securityadministrator group.
READ Protects from reading the contents of a file. READ also protectsagainst read operations using mmap(2).
RENAME Protects against renaming a file or directory.
RMDIR Protects against removing a directory.
SYMLINK Restricts the creation of symbolic links in the directoriesprotected by a security realm. When creating symbolic links, itdoes not matter whether the source file is protected by asecurity realm.
TRUNCATE Restricts the truncation of a file.
WRITE Protects a file against the write system call. WRITE alsoprotects against append and overwrite operations, pluswrite operations using mmap(2).
A file may still be modifiable with other file operations. Toprotect the file from other modifications, also use theTRUNCATE and DELETEFILE command rules.
Only a security administrator can run this command.
Examples
Example 16-52 (page 16-91) shows the use of the acfsutil sec realm addcommand. The first acfsutil sec command adds a user group to a security realm.The second and third commands add the LocalSystem or SYSTEM group to theSYSTEM_Antivirus realm in a Windows environment.
Example 16-52 Using the acfsutil sec realm add command
$ /sbin/acfsutil sec realm add my_security_realm -m /acfsmounts/acfs1 -G my_os_group
C:\> acfsutil sec realm add SYSTEM_Antivirus /m e: /G "NT AUTHORITY\\SYSTEM"
C:\> acfsutil sec realm add SYSTEM_Antivirus /m e: /G "SYSTEM"
Oracle ACFS Command-Line Tools for Security
Managing Oracle ACFS with Command-Line Tools 16-91

acfsutil sec realm audit disable
Purpose
Disables auditing of a specific command rule or all command rules for files in anOracle ACFS security realm.
Syntax and Description
acfsutil sec realm audit disable -hacfsutil sec realm audit disable realm -m mount_point [-l commandrule,commandrule,...] {-a |-v }
acfsutil sec realm audit disable -h displays help text and exits.
Table 16-61 (page 16-92) contains the options available with the acfsutil secrealm audit disable command.
Table 16-61 Options for the acfsutil sec realm audit disable command
Option Description
realm Specifies the security realm name.
-m mount_point Specifies the directory where the file system is mounted.
-l commandrule Specifies the command rules on which to disable auditing.
If this option is not specified, then the list of all command rulesis the default.
For a list of command rules, refer to Table 16-60 (page 16-90).To display a list of the command rules, use acfsutil secinfo with the -c option. Refer to "acfsutil sec info(page 16-82)".
-a | -v Specifies to disable audit realm authorizations (-a) or disableaudit realm violations (-v). Either –a or –v must be specified.
Multiple entries can be added in a comma-delimited list when listing command rules.Do not use spaces in the comma-delimited list. If spaces are added, then enclose thelist in quotes.
Only a security administrator can run this command. This command is authenticatedusing the Oracle ACFS security administrator password.
Examples
Example 16-53 (page 16-92) shows the use of the acfsutil sec realm auditdisable command. This command disables auditing on the OPEN (all violations) andWRITE (all violations) command rules.
Example 16-53 Using the acfsutil sec realm audit disable command
$ /sbin/acfsutil sec realm audit disable mySecureRealm –m /acfsmounts/acfs1 –l OPEN,WRITE –v
Oracle ACFS Command-Line Tools for Security
16-92 Oracle Automatic Storage Management Administrator's Guide

acfsutil sec realm audit enable
Purpose
Enables auditing of a specific command rule or all command rules for files in anOracle ACFS security realm.
Syntax and Description
acfsutil sec realm audit enable -hacfsutil sec realm audit enable realm -m mount_point [-l commandrule,commandrule,...] [-a ] [-v [ -u] ]
acfsutil sec realm audit enable -h displays help text and exits.
Table 16-62 (page 16-93) contains the options available with the acfsutil secrealm audit enable command.
Table 16-62 Options for the acfsutil sec realm audit enable command
Option Description
realm Specifies the security realm name.
-m mount_point Specifies the directory where the file system is mounted.
-l commandrule Specifies the command rules on which to enable auditing.
If this option is not specified, then the list of all command rulesis the default.
For a list of command rules, refer to Table 16-60 (page 16-90).To display a list of the command rules, use acfsutil secinfo with the -c option. Refer to "acfsutil sec info(page 16-82)".
-a Specifies to audit realm authorizations.
-v [-u] Specifies to audit realm violations. If –u is also specified, onlyrealm violations by users who are members of a realm areaudited.
If the acfsutil sec realm audit enable command is run multiple times, then theearlier configuration is not negated and the new settings are also applied. Anexception to this behavior occurs when the command is run with the –v option andthe specified command rule has auditing set for realm violations. In this case, thebehavior is updated according to whether the –u flag was specified. For moreinformation, see Example 16-56 (page 16-94).
Multiple entries can be added in a comma-delimited list when listing command rules.Do not use spaces in the comma-delimited list. If spaces are added, then enclose thelist in quotes.
If neither –a or –v are specified with the acfsutil sec realm audit enablecommand, the default is –v. Both –a and –v can be specified.
Only a security administrator can run this command. This command is authenticatedusing the Oracle ACFS security administrator password.
Oracle ACFS Command-Line Tools for Security
Managing Oracle ACFS with Command-Line Tools 16-93

Examples
Example 16-54 (page 16-94) shows how to enable auditing of the Oracle ACFS backupoperators. Because these users are allowed access to files through theSYSTEM_Backup realm and are granted special privileges that give them access to allfiles on the file system, a security administrator may want to audit their actions. Afterthe command is executed, any time a member of the SYSTEM_Backup realm opens afile an audit record is written to the Oracle ACFS Security audit trail on the file system.
Example 16-54 Auditing Oracle ACFS security backup operators
$ /sbin/acfsutil sec realm audit enable SYSTEM_Backup –m /acfsmounts/acfs1 –l OPEN –a
Example 16-55 (page 16-94) shows how to use the –u option to audit realm violationsby users who are part of the realm. In this scenario sensitive human resourcesinformation is stored in HumanResources security realm and the hr group is allowedto access this information. However, a ruleset applied to the ALL command ruleprevents access to this data from 6 PM to 8 AM. With this command, the securityadministrator could discover if any human resource employees are attempting toaccess sensitive data outside of the allowed time period. After this command isexecuted, only access violations by users who are members of the hr group areaudited.
Example 16-55 Auditing only security realm users
$ /sbin/acfsutil sec realm audit enable HumanResources –m /acfsmounts/acfs1 –l ALL –v –u
Example 16-56 (page 16-94) shows multiple runs of the acfsutil sec realm auditenable command. After run 1, the OPEN (all violations) and WRITE (all violations)command rules are audited. After run 2, the OPEN (all violations), WRITE (allviolations), and DELETEFILE (authorizations) command rules are audited. After run3, the OPEN (authorizations and realm user violations), WRITE (all violations),DELETEFILE (authorizations), and TRUNCATE (authorizations and realm userviolations) command rules are audited. After run 4, all violations are audited on allcommand rules. In addition, authorizations are audited for OPEN, DELETEFILE, andTRUNCATE.
Example 16-56 Running acfsutil sec realm audit enable multiple times
$ echo run 1$ /sbin/acfsutil sec realm audit enable mySecureRealm –m /acfsmounts/acfs1 –l OPEN,WRITE –v
$ echo run 2$ /sbin/acfsutil sec realm audit enable mySecureRealm –m /acfsmounts/acfs1 –l DELETEFILE –a
$ echo run 3$ /sbin/acfsutil sec realm audit enable mySecureRealm -m /acfsmounts/acfs1 –l OPEN,TRUNCATE –a –v -u
$ echo run 4$ /sbin/acfsutil sec realm audit enable mySecureRealm –m /acfsmounts/acfs1 –v
Oracle ACFS Command-Line Tools for Security
16-94 Oracle Automatic Storage Management Administrator's Guide

acfsutil sec realm audit info
Purpose
Displays the realm auditing information for a specified Oracle ACFS security realm.
Syntax and Description
acfsutil sec realm audit info -hacfsutil sec realm audit info -m mount_point -n realm
acfsutil sec realm audit info -h displays help text and exits.
Table 16-62 (page 16-93) contains the options available with the acfsutil sec realmaudit info command.
Table 16-63 Options for the acfsutil sec realm audit info command
Option Description
-m mount_point Specifies the directory where the file system is mounted.
-n realm Specifies the security realm name.
The acfsutil sec realm audit info command provides information about aspecified Oracle ACFS security realm.
Examples
Example 16-57 (page 16-95) shows an example of the acfsutil sec realm auditinfo command.
Example 16-57 Running acfsutil sec realm audit info
$ /sbin/acfsutil sec realm audit info –m /acfsmounts/acfs1 -n mySecureRealm
Command rule auditing information for realm 'mySecureRealm' on mount point '/acfsmounts/acfs1': Realm authorization : 'READ, WRITE'Realm violation for all users : 'READ, OPENFILE'Realm violation for realm users: 'None'
acfsutil sec realm clone
Purpose
Clones an Oracle ACFS security realm.
Syntax and Description
acfsutil sec realm clone -hacfsutil sec realm clone realm -s src_mount_point new_realm [-e] [-f] [-G] [-l] [-u]acfsutil sec realm clone realm -s src_mount_point [new_realm] -d destination_mount_point [-e] [-G] [-l] [-u]
Oracle ACFS Command-Line Tools for Security
Managing Oracle ACFS with Command-Line Tools 16-95
acfsutil sec realm clone -h displays help text and exits.
Table 16-64 (page 16-96) contains the options available with the acfsutil secrealm clone command.
Table 16-64 Options for the acfsutil sec realm clone command
Option Description
realm Specifies the realm name to be cloned.
-s src_mount_point Specifies the directory where the source file system is mounted.
new_realm Specifies the new realm name.
-ddestination_mount_point
Specifies the directory for the destination mount point for thenew realm.
-e Copy encryption attributes to the new realm.
-f Copy file objects to the new realm.
-G Copy operating system groups to the new realm.
-l Copy filters to the new realm.
-u Copy users to the new realm.
The acfsutil sec realm clone makes a copy of the specified realm in thedestination mount point. If the source and mount points are different and the newrealm name is not specified, then the realm is cloned using the existing realm name inthe Oracle ACFS file system specified by destination mount point. If the destinationmount point is not specified, then the cloned realm is located in the source mountpoint and a new unique realm name must be specified.
If the -l option is specified and the destination mount point is different than thesource mount point, then the rules and rule sets must be cloned first.
If the -e option is specified and the destination mount point is different than thesource mount point, then encryption must be set on destination mount point. For moreinformation, refer to "acfsutil encr set (page 16-113)".
The -f option can only be used if the destination mount point is the same as thesource mount point.
Only a security administrator can run this command.
Examples
The following example shows the use of the acfsutil sec realm clone command.
Example 16-58 Using the acfsutil sec realm clone command
$ /sbin/acfsutil sec realm clone my_security_realm -s /acfsmounts/acfs1 my_new_security_realm -d /acfsmounts/acfs2 -G
Oracle ACFS Command-Line Tools for Security
16-96 Oracle Automatic Storage Management Administrator's Guide

acfsutil sec realm create
Purpose
Creates an Oracle ACFS security realm.
Syntax and Description
acfsutil sec realm create -hacfsutil sec realm create realm -m mount_point -e { on -a {AES} -k {128|192|256} | off } [-o {enable|disable}] [-d "description"]
acfsutil sec realm create -h displays help text and exits.
Table 16-65 (page 16-97) contains the options available with the acfsutil secrealm create command.
Table 16-65 Options for the acfsutil sec realm create command
Option Description
realm Specifies the realm name.
-m mount_point Specifies the mount point for the file system. A mount point isspecified as a path on Linux platforms.
-e {on|off} Specifies encryption on or off for the realm.
-a {AES} Specifies the encryption algorithm.
-k { 128|192|256} Specifies the encryption key length.
-o {enable|disable} Specifies where security is on or off for the realm.
-d "description" Specifies a realm description.
The acfsutil sec create realm creates a new realm in the specified Oracle ACFSfile system. The new realm name must be unique in the file system identified by themount point.
A maximum of 500 Oracle ACFS security realms can be created, including any defaultsystem realms created by the acfsutil sec prepare command.
The realm is enabled by default unless the -o disable option is specified.
If the -e on option is specified, then encryption must have been initialized for thecluster and set on the file system. For more information, refer to "acfsutil encr init(page 16-109)" and "acfsutil encr set (page 16-113)".
If the -e off option is specified, you cannot specify the -a and -k options.
Only a security administrator can run this command.
Examples
The following example shows the use of the acfsutil sec realm createcommand.
Oracle ACFS Command-Line Tools for Security
Managing Oracle ACFS with Command-Line Tools 16-97
Example 16-59 Using the acfsutil sec realm create command
$ /sbin/acfsutil sec realm create my_security_realm -m /acfsmounts/acfs1 -e on -a AES -k 192 -o enable
acfsutil sec realm delete
Purpose
Deletes objects from an Oracle ACFS security realm.
Syntax and Description
acfsutil sec realm delete -hacfsutil sec realm delete realm -m mount_point {[-u user, ...] [-G os_group, ...] [-l :ruleset,commandrule:ruleset, ...] [-f [ -r] path, ...] ] [-e ]}
acfsutil sec realm delete -h displays help text and exits.
Table 16-66 (page 16-98) contains the options available with the acfsutil secrealm delete command.
Table 16-66 Options for the acfsutil sec realm delete command
Option Description
realm Specifies the realm name.
-m mount_point Specifies the directory where the file system is mounted.
-u user Specifies user names to delete.
-G os_group Specifies the operating system groups to delete.
-lcommandrule:ruleset
Specifies the filters to delete from the realm. To display a list ofthe command rules, use acfsutil sec info with the -coption. ruleset specifies the rule set associated with thecommand rule for this realm.
-f [-r] path ... Deletes files specified by path from the realm. -r specifies arecursive operation. File paths must be separated by spaces.
If this is the last realm securing the file, the file is encrypted ordecrypted to match the file system level encryption state.
-e Disables encryption on the realm.
When disabling encryption, this option decrypts any files in therealm that do not belong to any other encrypted realms. If a fileis part of another realm which is encrypted or if encryption isturned on for the file system, then the file remains encrypted.
The acfsutil sec realm delete command removes objects from the specifiedrealm. The objects to be deleted include users, groups, rule sets, and files. If thecommand encounters an error when deleting an object, a message is displayed and thecommand continues processing the remaining objects.
Multiple entries can be added in a comma-delimited list when adding users, operatingsystem groups, or command rules. Do not use spaces in the comma-delimited list. Ifspaces are added, then enclose the list in quotes.
Oracle ACFS Command-Line Tools for Security
16-98 Oracle Automatic Storage Management Administrator's Guide

Only a security administrator can run this command.
Examples
The following example shows the use of the acfsutil sec realm deletecommand.
Example 16-60 Using the acfsutil sec realm delete command
$ /sbin/acfsutil sec realm delete my_security_realm -m /acfsmounts/acfs1 -f -r /acfsmounts/acfs1/myoldfiles/*.log
acfsutil sec realm destroy
Purpose
Destroys an Oracle ACFS security realm.
Syntax and Description
acfsutil sec realm destroy -hacfsutil sec realm destroy realm -m mount_point
acfsutil sec realm destroy -h displays help text and exits.
Table 16-67 (page 16-99) contains the options available with the acfsutil secrealm destroy command.
Table 16-67 Options for the acfsutil sec realm destroy command
Option Description
realm Specifies the realm name.
-m mount_point Specifies the directory where the file system is mounted.
The acfsutil sec destroy realm removes a security realm from the specifiedOracle ACFS file system. Destroying the realm does not destroy the objects in therealm; this command simply removes the security associated with the realm from theobjects.
Only a security administrator can run this command.
Examples
The following example shows the use of the acfsutil sec realm destroycommand.
Example 16-61 Using the acfsutil sec realm destroy command
$ /sbin/acfsutil sec realm destroy my_security_realm -m /acfsmounts/acfs1
acfsutil sec rule clone
Purpose
Clones a security rule.
Oracle ACFS Command-Line Tools for Security
Managing Oracle ACFS with Command-Line Tools 16-99

Syntax and Description
acfsutil sec rule clone -hacfsutil sec rule clone rule -s src_mount_point new_ruleacfsutil sec rule clone rule -s src_mount_point [new_rule] -d mount_point
acfsutil sec rule clone -h displays help text and exits.
Table 16-68 (page 16-100) contains the options available with the acfsutil sec ruleclone command.
Table 16-68 Options for the acfsutil sec rule clone command
Option Description
rule Specifies the existing name of the rule. If the name contains aspace, enclose in quotes (" ").
-s src_mount_point Specifies the directory where the source file system is mounted.
-d mount_point Specifies the directory for the destination mount point of thefile system.
new_rule Specifies the new name of the rule. If the name contains a space,enclose in quotes (" ").
If the source and mount points are different and the new rule name is not specified,then the rule is cloned using the existing rule name in the Oracle ACFS file systemspecified by destination mount point. If the destination mount point is not specified,then the cloned rule is located in the source mount point and a new unique rule namemust be specified.
Only a security administrator can run this command.
Examples
The following example shows the use of the acfsutil sec rule clone command.
Example 16-62 Using the acfsutil sec rule clone command
$ /sbin/acfsutil sec rule clone my_security_rule -s /acfsmounts/acfs1 my_new_security_rule -d /acfsmounts/acfs2
acfsutil sec rule create
Purpose
Creates a security rule.
Syntax and Description
acfsutil sec rule create -hacfsutil sec rule create rule -m mount_point -t rule_type rule_value [-o {ALLOW|DENY}]
acfsutil sec rule create -h displays help text and exits.
Table 16-69 (page 16-101) contains the options available with the acfsutil sec rulecreate command.
Oracle ACFS Command-Line Tools for Security
16-100 Oracle Automatic Storage Management Administrator's Guide
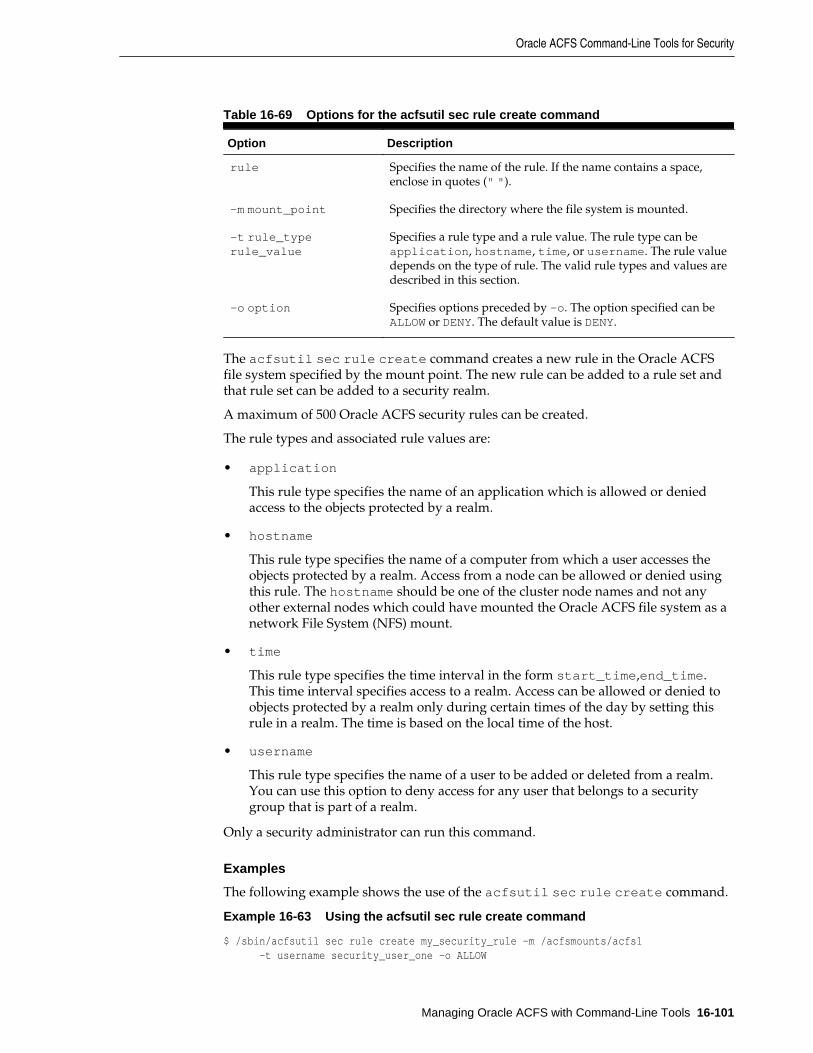
Table 16-69 Options for the acfsutil sec rule create command
Option Description
rule Specifies the name of the rule. If the name contains a space,enclose in quotes (" ").
-m mount_point Specifies the directory where the file system is mounted.
-t rule_typerule_value
Specifies a rule type and a rule value. The rule type can beapplication, hostname, time, or username. The rule valuedepends on the type of rule. The valid rule types and values aredescribed in this section.
-o option Specifies options preceded by -o. The option specified can beALLOW or DENY. The default value is DENY.
The acfsutil sec rule create command creates a new rule in the Oracle ACFSfile system specified by the mount point. The new rule can be added to a rule set andthat rule set can be added to a security realm.
A maximum of 500 Oracle ACFS security rules can be created.
The rule types and associated rule values are:
• application
This rule type specifies the name of an application which is allowed or deniedaccess to the objects protected by a realm.
• hostname
This rule type specifies the name of a computer from which a user accesses theobjects protected by a realm. Access from a node can be allowed or denied usingthis rule. The hostname should be one of the cluster node names and not anyother external nodes which could have mounted the Oracle ACFS file system as anetwork File System (NFS) mount.
• time
This rule type specifies the time interval in the form start_time,end_time.This time interval specifies access to a realm. Access can be allowed or denied toobjects protected by a realm only during certain times of the day by setting thisrule in a realm. The time is based on the local time of the host.
• username
This rule type specifies the name of a user to be added or deleted from a realm.You can use this option to deny access for any user that belongs to a securitygroup that is part of a realm.
Only a security administrator can run this command.
Examples
The following example shows the use of the acfsutil sec rule create command.
Example 16-63 Using the acfsutil sec rule create command
$ /sbin/acfsutil sec rule create my_security_rule -m /acfsmounts/acfs1 -t username security_user_one -o ALLOW
Oracle ACFS Command-Line Tools for Security
Managing Oracle ACFS with Command-Line Tools 16-101

acfsutil sec rule destroy
Purpose
Removes a security rule.
Syntax and Description
acfsutil sec rule destroy -hacfsutil sec rule destroy rule -m mount_point
acfsutil sec rule destroy -h displays help text and exits.
Table 16-70 (page 16-102) contains the options available with the acfsutil sec ruledestroy command.
Table 16-70 Options for the acfsutil sec rule destroy command
Option Description
rule Specifies the name of the rule. If the name contains a space,enclose in quotes (" ").
-m mount_point Specifies the directory where the file system is mounted.
The acfsutil sec rule destroy command removes a rule from the rule sets in theOracle ACFS file system specified by the mount point. A rule set is not destroyed if allthe rules are destroyed. The empty rule set must be explicitly destroyed.
Only a security administrator can run this command.
Examples
The following example shows the use of the acfsutil sec rule destroycommand.
Example 16-64 Using the acfsutil sec rule destroy command
$ /sbin/acfsutil sec rule destroy my_security_rule -m /acfsmounts/acfs1
acfsutil sec rule edit
Purpose
Updates a security rule.
Syntax and Description
acfsutil sec rule edit -hacfsutil sec rule edit rule -m mount_point { [-t rule_type rule_value ] [-o {ALLOW|DENY}] }
acfsutil sec rule edit -h displays help text and exits.
Table 16-71 (page 16-103) contains the options available with the acfsutil sec ruleedit command.
Oracle ACFS Command-Line Tools for Security
16-102 Oracle Automatic Storage Management Administrator's Guide
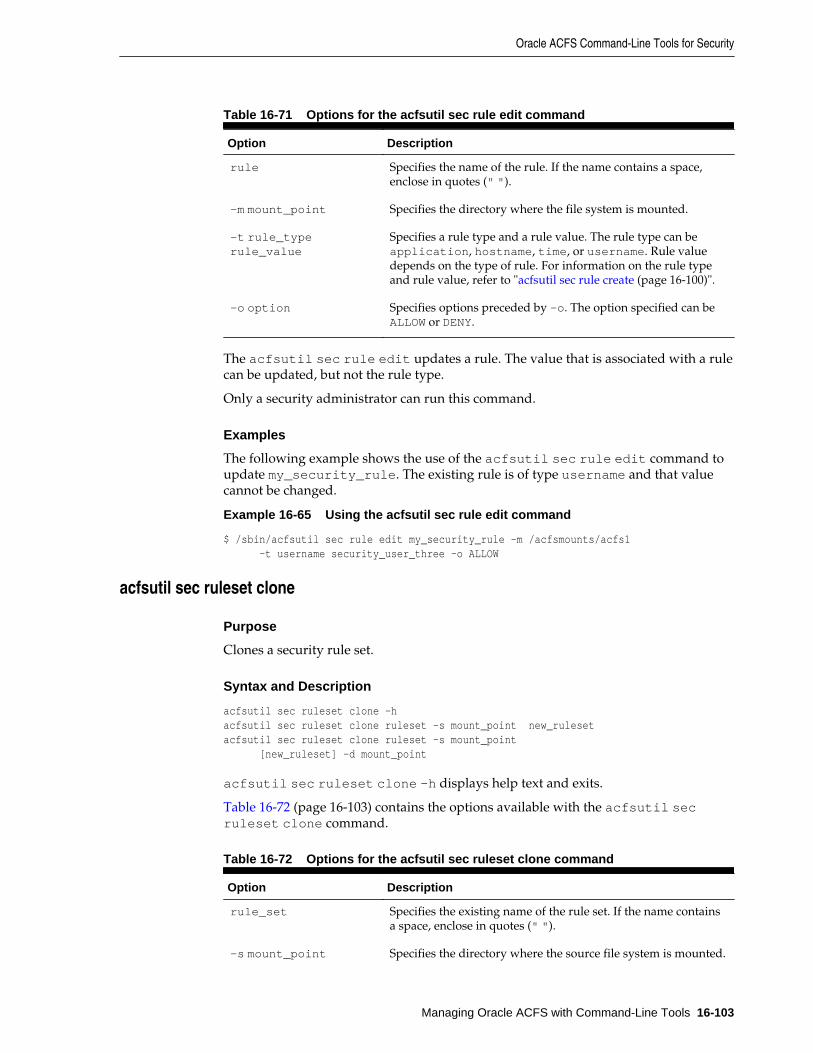
Table 16-71 Options for the acfsutil sec rule edit command
Option Description
rule Specifies the name of the rule. If the name contains a space,enclose in quotes (" ").
-m mount_point Specifies the directory where the file system is mounted.
-t rule_typerule_value
Specifies a rule type and a rule value. The rule type can beapplication, hostname, time, or username. Rule valuedepends on the type of rule. For information on the rule typeand rule value, refer to "acfsutil sec rule create (page 16-100)".
-o option Specifies options preceded by -o. The option specified can beALLOW or DENY.
The acfsutil sec rule edit updates a rule. The value that is associated with a rulecan be updated, but not the rule type.
Only a security administrator can run this command.
Examples
The following example shows the use of the acfsutil sec rule edit command toupdate my_security_rule. The existing rule is of type username and that valuecannot be changed.
Example 16-65 Using the acfsutil sec rule edit command
$ /sbin/acfsutil sec rule edit my_security_rule -m /acfsmounts/acfs1 -t username security_user_three -o ALLOW
acfsutil sec ruleset clone
Purpose
Clones a security rule set.
Syntax and Description
acfsutil sec ruleset clone -hacfsutil sec ruleset clone ruleset -s mount_point new_rulesetacfsutil sec ruleset clone ruleset -s mount_point [new_ruleset] -d mount_point
acfsutil sec ruleset clone -h displays help text and exits.
Table 16-72 (page 16-103) contains the options available with the acfsutil secruleset clone command.
Table 16-72 Options for the acfsutil sec ruleset clone command
Option Description
rule_set Specifies the existing name of the rule set. If the name containsa space, enclose in quotes (" ").
-s mount_point Specifies the directory where the source file system is mounted.
Oracle ACFS Command-Line Tools for Security
Managing Oracle ACFS with Command-Line Tools 16-103

Table 16-72 (Cont.) Options for the acfsutil sec ruleset clone command
Option Description
-d mount_point Specifies the directory for the destination mount point of thefile system.
new_rule_set Specifies the new name of the rule set. If the name contains aspace, enclose in quotes (" ").
If the source mount point is different from destination mount point, the rules in therule set must be cloned first.
If the source and mount points are different and the new rule set name is not specified,then the rule set is cloned using the existing rule set name in the Oracle ACFS filesystem specified by destination mount point. If the destination mount point is notspecified, then the cloned rule set is located in the source mount point and a newunique rule set name must be specified.
Only a security administrator can run this command.
Examples
The following example shows the use of the acfsutil sec ruleset clonecommand.
Example 16-66 Using the acfsutil sec ruleset clone command
$ /sbin/acfsutil sec ruleset clone my_security_ruleset -s /acfsmounts/acfs1 my_new_security_ruleset -d /acfsmounts/acfs2
acfsutil sec ruleset create
Purpose
Creates a security rule set.
Syntax and Description
acfsutil sec ruleset create -hacfsutil sec ruleset create rule_set -m mount_point [-o {ALL_TRUE|ANY_TRUE}]
acfsutil sec ruleset create -h displays help text and exits.
Table 16-73 (page 16-104) contains the options available with the acfsutil secruleset create command.
Table 16-73 Options for the acfsutil sec ruleset create command
Option Description
rule_set Specifies the name of the rule set. If the name contains a space,enclose in quotes (" ").
-m mount_point Specifies the directory where the file system is mounted.
Oracle ACFS Command-Line Tools for Security
16-104 Oracle Automatic Storage Management Administrator's Guide

Table 16-73 (Cont.) Options for the acfsutil sec ruleset create command
Option Description
-o option Specifies options preceded by -o. The option specified can beALL_TRUE or ANY_TRUE. The default value is ALL_TRUE.
The acfsutil sec ruleset create command creates a new rule set in thespecified mount point.
A maximum of 500 Oracle ACFS security rule sets can be created.
Only a security administrator can run this command.
Examples
The following example shows the use of the acfsutil sec ruleset createcommand.
Example 16-67 Using the acfsutil sec ruleset create command
$ /sbin/acfsutil sec ruleset create my_security_ruleset -m /acfsmounts/acfs1 -o ANY_TRUE
acfsutil sec ruleset destroy
Purpose
Removes a security rule set.
Syntax and Description
acfsutil sec ruleset destroy -hacfsutil sec ruleset destroy rule_set -m mount_point
acfsutil sec ruleset destroy -h displays help text and exits.
Table 16-74 (page 16-105) contains the options available with the acfsutil secruleset destroy command.
Table 16-74 Options for the acfsutil sec ruleset destroy command
Option Description
rule_set Specifies the name of the rule set. If the name contains a space,enclose in quotes (" ").
-m mount_point Specifies the directory where the file system is mounted.
The acfsutil sec ruleset destroy command removes a rule set from the OracleACFS file system specified by the mount point. Only a security administrator can runthis command.
Examples
The following example shows the use of the acfsutil sec ruleset destroycommand.
Oracle ACFS Command-Line Tools for Security
Managing Oracle ACFS with Command-Line Tools 16-105

Example 16-68 Using the acfsutil sec ruleset destroy command
$ /sbin/acfsutil sec ruleset destroy my_security_ruleset -m /acfsmounts/acfs1
acfsutil sec ruleset edit
Purpose
Updates a security rule set.
Syntax and Description
acfsutil sec ruleset edit -hacfsutil sec ruleset edit rule_set -m mount_point { [-a rule,...] [-d rule,...] [-o {ALL_TRUE|ANY_TRUE}]}
acfsutil sec ruleset edit -h displays help text and exits.
Table 16-75 (page 16-106) contains the options available with the acfsutil secruleset edit command.
Table 16-75 Options for the acfsutil sec ruleset edit command
Option Description
rule_set Specifies the name of the rule set. If the name contains a space,enclose in quotes (" ").
-m mount_point Specifies the directory where the file system is mounted.
-a rule Specifies the rule to add.
-d rule Specifies the rule to remove.
-o option Specifies options preceded by -o. The option specified can beALL_TRUE or ANY_TRUE.
The acfsutil sec ruleset edit command updates a rule set in the Oracle ACFSfile system specified by the mount point.
Only a security administrator can run this command.
Examples
The following example shows the use of the acfsutil sec ruleset editcommand.
Example 16-69 Using the acfsutil sec ruleset edit command
$ /sbin/acfsutil sec ruleset edit my_security_ruleset -m /acfsmounts/acfs1 -a my_new_rule -o ANY_TRUE
acfsutil sec save
Purpose
Saves Oracle ACFS file system security metadata.
Oracle ACFS Command-Line Tools for Security
16-106 Oracle Automatic Storage Management Administrator's Guide
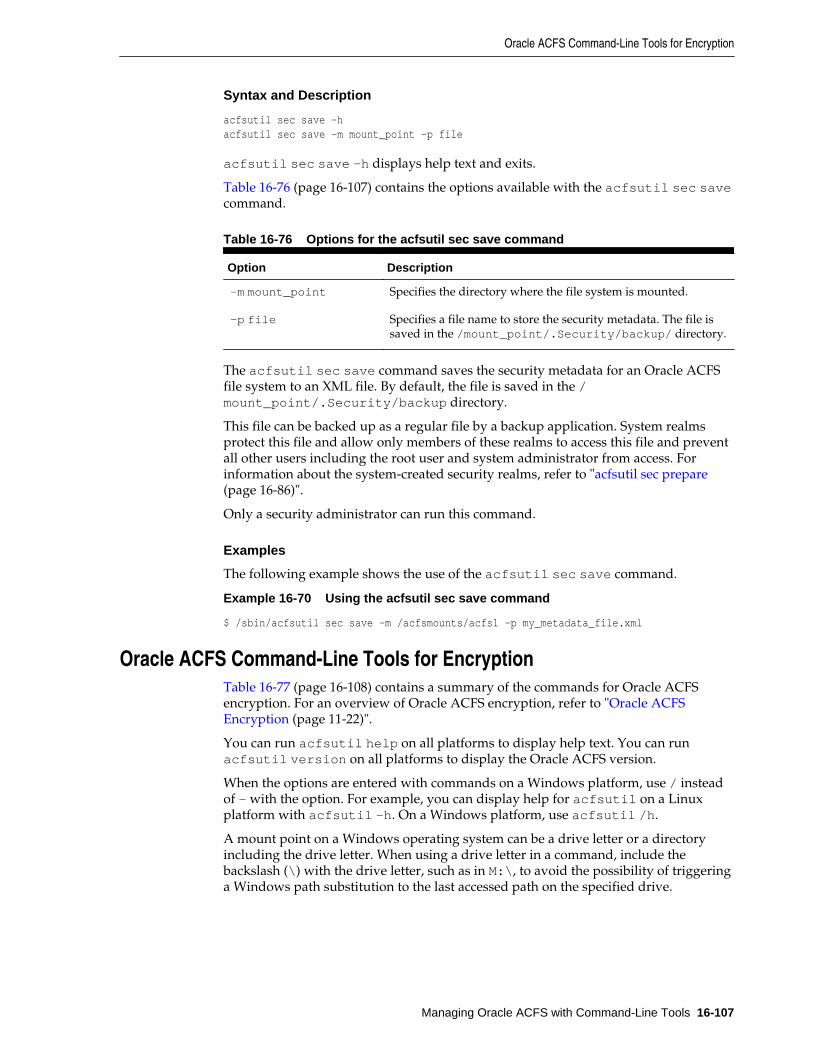
Syntax and Description
acfsutil sec save -hacfsutil sec save -m mount_point -p file
acfsutil sec save -h displays help text and exits.
Table 16-76 (page 16-107) contains the options available with the acfsutil sec savecommand.
Table 16-76 Options for the acfsutil sec save command
Option Description
-m mount_point Specifies the directory where the file system is mounted.
-p file Specifies a file name to store the security metadata. The file issaved in the /mount_point/.Security/backup/ directory.
The acfsutil sec save command saves the security metadata for an Oracle ACFSfile system to an XML file. By default, the file is saved in the /mount_point/.Security/backup directory.
This file can be backed up as a regular file by a backup application. System realmsprotect this file and allow only members of these realms to access this file and preventall other users including the root user and system administrator from access. Forinformation about the system-created security realms, refer to "acfsutil sec prepare(page 16-86)".
Only a security administrator can run this command.
Examples
The following example shows the use of the acfsutil sec save command.
Example 16-70 Using the acfsutil sec save command
$ /sbin/acfsutil sec save -m /acfsmounts/acfs1 -p my_metadata_file.xml
Oracle ACFS Command-Line Tools for EncryptionTable 16-77 (page 16-108) contains a summary of the commands for Oracle ACFSencryption. For an overview of Oracle ACFS encryption, refer to "Oracle ACFSEncryption (page 11-22)".
You can run acfsutil help on all platforms to display help text. You can runacfsutil version on all platforms to display the Oracle ACFS version.
When the options are entered with commands on a Windows platform, use / insteadof - with the option. For example, you can display help for acfsutil on a Linuxplatform with acfsutil -h. On a Windows platform, use acfsutil /h.
A mount point on a Windows operating system can be a drive letter or a directoryincluding the drive letter. When using a drive letter in a command, include thebackslash (\) with the drive letter, such as in M:\, to avoid the possibility of triggeringa Windows path substitution to the last accessed path on the specified drive.
Oracle ACFS Command-Line Tools for Encryption
Managing Oracle ACFS with Command-Line Tools 16-107

Table 16-77 Summary of commands for Oracle ACFS encryption
Command Description
acfsutil encr info (page 16-108) Displays encryption-related information about Oracle ACFS filesystems.
acfsutil encr init (page 16-109) Creates storage for encryption keys.
acfsutil encr off (page 16-110) Disables encryption for an Oracle ACFS file system.
acfsutil encr on (page 16-111) Encrypts an Oracle ACFS file system.
acfsutil encr rekey (page 16-112) Generates a new key and re-encrypts an Oracle ACFS file system.
acfsutil encr set (page 16-113) Sets or changes encryption parameters for an Oracle ACFS file system.
acfsutil keystore migrate (page 16-115) Migrates the encryption keystore.
acfsutil encr info
Purpose
Displays encryption-related information about Oracle ACFS file systems, directories,or files.
Syntax and Description
acfsutil encr info -hacfsutil encr info -m mount_point [[-r] path [path …]]
acfsutil encr info -h displays help text and exits.
Table 16-78 (page 16-108) contains the options available with the acfsutil encrinfo command.
Table 16-78 Options for the acfsutil encr info command
Option Description
-m mount_point Specifies the directory where the file system is mounted.
-r Specifies recursive action under an existing directory folderidentified by path.
path Specifies the absolute or relative path of a directory. Multiplepath values are allowed.
If -m is specified without a path, the encryption status, algorithm, and key length aredisplayed for the file system level.
If -r is specified with a path, the encryption status, algorithm, and key length aredisplayed for all objects under the directory specified by path.
The acfsutil encr info command displays encryption status and parameters forfiles in a snapshot if the files are specified with the path option.
This command fails when it is run on realm-secured objects.
Oracle ACFS Command-Line Tools for Encryption
16-108 Oracle Automatic Storage Management Administrator's Guide
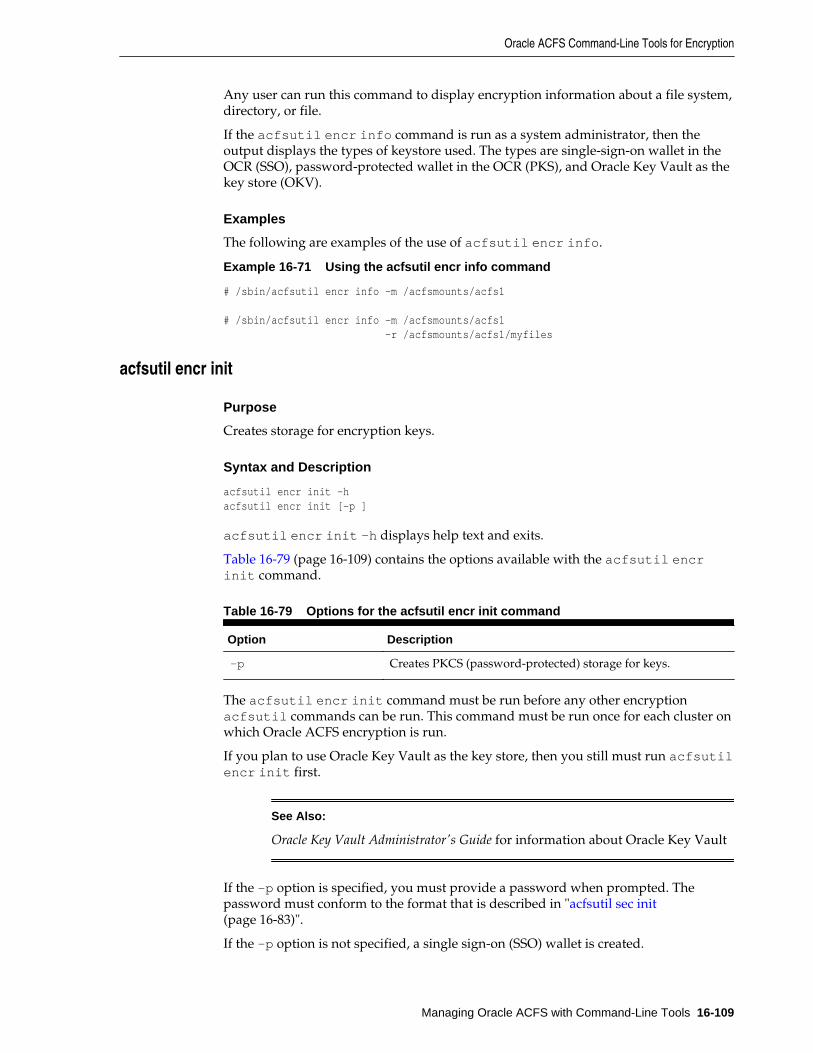
Any user can run this command to display encryption information about a file system,directory, or file.
If the acfsutil encr info command is run as a system administrator, then theoutput displays the types of keystore used. The types are single-sign-on wallet in theOCR (SSO), password-protected wallet in the OCR (PKS), and Oracle Key Vault as thekey store (OKV).
Examples
The following are examples of the use of acfsutil encr info.
Example 16-71 Using the acfsutil encr info command
# /sbin/acfsutil encr info -m /acfsmounts/acfs1
# /sbin/acfsutil encr info -m /acfsmounts/acfs1 -r /acfsmounts/acfs1/myfiles
acfsutil encr init
Purpose
Creates storage for encryption keys.
Syntax and Description
acfsutil encr init -hacfsutil encr init [-p ]
acfsutil encr init -h displays help text and exits.
Table 16-79 (page 16-109) contains the options available with the acfsutil encrinit command.
Table 16-79 Options for the acfsutil encr init command
Option Description
-p Creates PKCS (password-protected) storage for keys.
The acfsutil encr init command must be run before any other encryptionacfsutil commands can be run. This command must be run once for each cluster onwhich Oracle ACFS encryption is run.
If you plan to use Oracle Key Vault as the key store, then you still must run acfsutilencr init first.
See Also:
Oracle Key Vault Administrator's Guide for information about Oracle Key Vault
If the -p option is specified, you must provide a password when prompted. Thepassword must conform to the format that is described in "acfsutil sec init(page 16-83)".
If the -p option is not specified, a single sign-on (SSO) wallet is created.
Oracle ACFS Command-Line Tools for Encryption
Managing Oracle ACFS with Command-Line Tools 16-109

Only a user with root or system administrator privileges can run this command.
Examples
The following is an example of the use of acfsutil encr init.
Example 16-72 Using the acfsutil encr init command
# /sbin/acfsutil encr init
acfsutil encr off
Purpose
Disables encryption for an Oracle ACFS file system, directories, or individual files.
Syntax and Description
acfsutil encr off -hacfsutil encr off -m mount_point [[-r] path [ path ...]]
acfsutil encr off -h displays help text and exits.
Table 16-81 (page 16-111) contains the options available with the acfsutil encr offcommand.
Table 16-80 Options for the acfsutil encr off command
Option Description
-m mount_point Specifies the directory where the file system is mounted.
-r Specifies to disable encryption recursively under an existingdirectory identified by path.
path Specifies the absolute or relative path of a directory. Multiplepath values are allowed.
This command cannot be run on security realm-protected files.
Only an administrator can run this command on an Oracle ACFS file system (-moption without a path specified). When the -m option is specified without a path, allthe files under the mount point are decrypted.
The path option can specify a path to a file or directory in a read-write snapshot. Ifthe -r option is specified with the command on the root directory, the command doesnot transverse the snapshots under the .ACFS directory. If a decryption operation isspecified at the file system level, then the operation does not process files anddirectories of snapshots in the .ACFS/snaps/ directory.
Only a user with root or system administrator privileges can run this command todisable encryption on a file system. The file owner can also run this command todisable encryption on a directory or file.
Examples
The following are examples of the use of acfsutil encr off.
Oracle ACFS Command-Line Tools for Encryption
16-110 Oracle Automatic Storage Management Administrator's Guide

Example 16-73 Using the acfsutil encr off command
# /sbin/acfsutil encr off -m /acfsmounts/acfs1
# /sbin/acfsutil encr off -m /acfsmounts/acfs1 -r /acfsmounts/acfs1/myfiles
acfsutil encr on
Purpose
Encrypts an Oracle ACFS file system, directories, or individual files.
Syntax and Description
acfsutil encr on -hacfsutil encr on -m mount_point [-a {AES} -k {128|192|256}] [[-r] path [path...]]
acfsutil encr on -h displays help text and exits.
Table 16-81 (page 16-111) contains the options available with the acfsutil encr oncommand.
Table 16-81 Options for the acfsutil encr on command
Option Description
-m mount_point Specifies the directory where the file system is mounted.
-a algorithm Specifies the encryption algorithm type for a directory or file.Advanced Encryption Standard (AES) is the only encryptionalgorithm supported for this release.
-k key_length Specifies the encryption key length for a directory or file.
-r Specifies encryption recursively under existing directory folderidentified by path.
path Specifies the absolute or relative path of a directory. Multiplepath values are allowed.
This command cannot be run on realm-protected files.
The default values for the -a and -k are determined by the volume parametersspecified when acfsutil encr set was run. To set the key length at the volumelevel, use the acfsutil encr set command.
Only an administrator can run this command on an Oracle ACFS file system (-moption without a path specified). When the -m option is specified without a path, allthe files under the mount point are encrypted.
The path option can specify a path to a file or directory in a read-write snapshot. Ifthe -r option is specified with the command on the root directory, the command doesnot transverse the snapshots under the .ACFS directory. If an encryption operation isspecified at the file system level, then the operation does not process files anddirectories of snapshots in the .ACFS/snaps/ directory.
When you run acfsutil encr on with the -r option, the command encrypts thespecified directory recursively, but does not enable encryption on the file system level.
Oracle ACFS Command-Line Tools for Encryption
Managing Oracle ACFS with Command-Line Tools 16-111
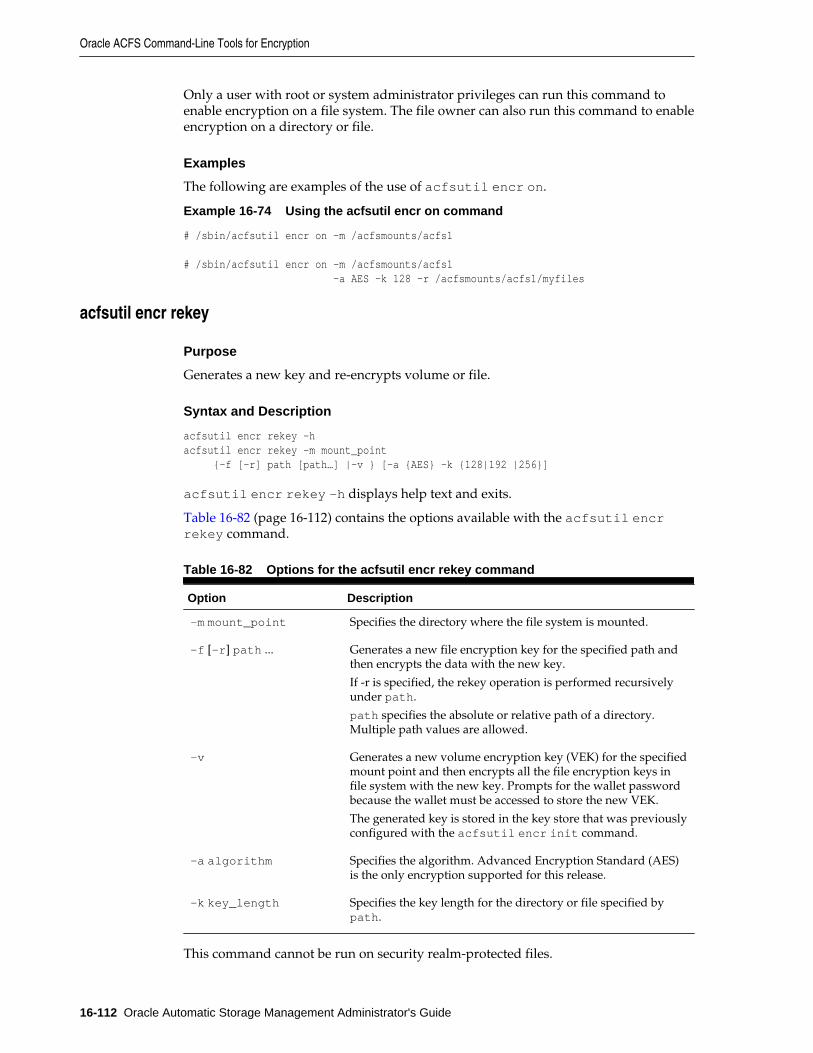
Only a user with root or system administrator privileges can run this command toenable encryption on a file system. The file owner can also run this command to enableencryption on a directory or file.
Examples
The following are examples of the use of acfsutil encr on.
Example 16-74 Using the acfsutil encr on command
# /sbin/acfsutil encr on -m /acfsmounts/acfs1
# /sbin/acfsutil encr on -m /acfsmounts/acfs1 -a AES -k 128 -r /acfsmounts/acfs1/myfiles
acfsutil encr rekey
Purpose
Generates a new key and re-encrypts volume or file.
Syntax and Description
acfsutil encr rekey -hacfsutil encr rekey -m mount_point {-f [-r] path [path…] |-v } [-a {AES} -k {128|192 |256}]
acfsutil encr rekey -h displays help text and exits.
Table 16-82 (page 16-112) contains the options available with the acfsutil encrrekey command.
Table 16-82 Options for the acfsutil encr rekey command
Option Description
-m mount_point Specifies the directory where the file system is mounted.
-f [-r] path ... Generates a new file encryption key for the specified path andthen encrypts the data with the new key.
If -r is specified, the rekey operation is performed recursivelyunder path.
path specifies the absolute or relative path of a directory.Multiple path values are allowed.
-v Generates a new volume encryption key (VEK) for the specifiedmount point and then encrypts all the file encryption keys infile system with the new key. Prompts for the wallet passwordbecause the wallet must be accessed to store the new VEK.
The generated key is stored in the key store that was previouslyconfigured with the acfsutil encr init command.
-a algorithm Specifies the algorithm. Advanced Encryption Standard (AES)is the only encryption supported for this release.
-k key_length Specifies the key length for the directory or file specified bypath.
This command cannot be run on security realm-protected files.
Oracle ACFS Command-Line Tools for Encryption
16-112 Oracle Automatic Storage Management Administrator's Guide

The default values for the -a and -k are determined by the volume parametersspecified when acfsutil encr set was run.
The path option can specify a path to a file or directory in a read-write snapshot. Ifthe -r option is specified with the command on the root directory, the command doesnot transverse the snapshots under the .ACFS directory. If a rekey operation isspecified at the file system level, then the operation does not process files anddirectories of snapshots in the .ACFS/snaps/ directory.
If Oracle Key Vault is the key store for the file system, then the Oracle Key Vault homeenvironmental variable (OKV_HOME) must be set when using the -v option to generatea new volume key. If the client was configured to use a password with Oracle KeyVault, then the same password must be entered when prompted.
See Also:
Oracle Key Vault Administrator's Guide for information about Oracle Key Vault
Only a user with root or system administrator privileges can run this command withthe -v option. The file owner can also run this command with the -f option to rekeyencryption on the directory or file.
Examples
The following are examples of the use of acfsutil encr rekey.
Example 16-75 Using the acfsutil encr rekey command
# /sbin/acfsutil encr rekey -m /acfsmounts/acfs1 -v
# /sbin/acfsutil encr rekey -m /acfsmounts/acfs1 -f -r /acfsmounts/acfs1/myfiles
acfsutil encr set
Purpose
Sets or changes encryption parameters for an Oracle ACFS file system.
Syntax and Description
acfsutil encr set -hacfsutil encr set [ [-a {AES} -k {128|192|256}] [-e] | -u ] -m mount_point
acfsutil encr set -h displays help text and exits.
Table 16-83 (page 16-113) contains the options available with the acfsutil encr setcommand.
Table 16-83 Options for the acfsutil encr set command
Option Description
-a algorithm Specifies the algorithm. Advanced Encryption Standard (AES)is the default value and the only encryption supported for thisrelease. The algorithm must be specified if -k is specified.
Oracle ACFS Command-Line Tools for Encryption
Managing Oracle ACFS with Command-Line Tools 16-113

Table 16-83 (Cont.) Options for the acfsutil encr set command
Option Description
-k {128|192|256} Specifies the key length. The key length is set at the volumelevel. The default is 192. Must be specified if -a is specified.
-e Specifies to use Oracle Key Vault as the key store.
-u Backs out encryption. Decrypts all encrypted files in the filesystem and reverts the file system to the state before acfsutilencr set was run on the file system. If security is being used,then this command can only be run after security has beenbacked out. To remove security, refer to "acfsutil sec prepare(page 16-86)".
-m mount_point Specifies the directory where the file system is mounted.
Before running the acfsutil encr set command, you must first run the acfsutilencr init command.
The acfsutil encr set command configures encryption parameters for a filesystem, transparently generates a volume encryption key, and stores that thegenerated key in the key store that was previously configured with the acfsutilencr init command.
If auditing is initialized on a cluster, this command also enables an Oracle ACFSencryption auditing source on the file system. The actions performed when enablingthis audit source are the same as those done when the acfsutil audit enablecommand is run directly. For more information, refer to "acfsutil audit enable(page 16-72)".
In addition acfsutil encr set creates the mount_point/.Security/encryption/logs/ directory that contains the log file (encr-hostname_fsid.log) that collects auditing and diagnostic data.
Password requirements when storing the key are dependent on how the encryptionkey storage was configured. If -p was specified with acfsutil encr init, then apassword is required to run this command.
Before using the -e option to specify Oracle Key Vault as the key store, Oracle KeyVault must be configured first. If you want to choose Oracle Key Vault as the key storefor the file system, then the Oracle Key Vault home environmental variable(OKV_HOME) must be set when running the command with the -e option. If the clientwas configured to use a password with Oracle Key Vault, then the same passwordmust be entered when prompted.
See Also:
Oracle Key Vault Administrator's Guide for information about configuringOracle Key Vault
The acfsutil encr set –u command is not allowed if any snapshots exist in the filesystem.
Only a user with root or system administrator privileges can run the acfsutil encrset command.
Oracle ACFS Command-Line Tools for Encryption
16-114 Oracle Automatic Storage Management Administrator's Guide

Examples
The following example shows the use of acfsutil encr set command.
Example 16-76 Using the acfsutil encr set command
# /sbin/acfsutil encr set -a AES -k 256 -m /acfsmounts/acfs1
acfsutil keystore migrate
Purpose
Migrates the encryption keystore.
Syntax and Description
acfsutil keystore migrate -hacfsutil keystore migrate [-p ]
acfsutil keystore migrate -h displays help text and exits.
Table 16-79 (page 16-109) contains the options available with the acfsutilkeystore migrate command.
Table 16-84 Options for the acfsutil keystore migrate command
Option Description
-p Converts the encryption keystore from a SSO wallet to a PKCSwallet.
If the -p option is specified, acfsutil keystore migrate converts the SSO walletto a PKCS wallet. If the -p option is not specified, acfsutil keystore migrateconverts the PKCS wallet to a SSO wallet.
Only a user with root or system administrator privileges can run this command.
Examples
The following is an example of the use of acfsutil keystore migrate.
Example 16-77 Using the acfsutil keystore migrate command
# /sbin/acfsutil keystore migrate
Oracle ACFS Command-Line UtilitiesNOT_SUPPORTED (page 16-116) contains a summary of various Oracle ACFScommand-line utilities. For an overview of Oracle ACFS snapshots, refer to "AboutOracle ACFS Snapshots (page 11-10)". For an overview of Oracle ACFS plugins, referto "Oracle ACFS Plugins (page 11-36)".
You can use acfsutil help on all platforms to display help text. You can runacfsutil version on all platforms to display the Oracle ACFS version.
When the options are entered with commands on a Windows platform, use / insteadof - with the option. For example, you can display help for acfsutil on a Linuxplatform with acfsutil -h. On a Windows platform, use acfsutil /h.
A mount point on a Windows operating system can be a drive letter or a directoryincluding the drive letter. When using a drive letter in a command, include the
Oracle ACFS Command-Line Utilities
Managing Oracle ACFS with Command-Line Tools 16-115
backslash (\) with the drive letter, such as in M:\, to avoid the possibility of triggeringa Windows path substitution to the last accessed path on the specified drive.
NOT_SUPPORTED
Command Description
acfsdbgNOT_SUPPORTED Debugs an Oracle ACFS file system.
acfsutil info fileNOT_SUPPORTED Displays information for a file in an Oracle ACFS file system.
acfsutil info fsNOT_SUPPORTED Displays detailed Oracle ACFS file system information.
acfsutil info idNOT_SUPPORTED Displays Oracle ACFS file system information for a specified fileidentifier and mount point.
acfsutil plugindisableNOT_SUPPORTED
Disables the Oracle ACFS plug-in infrastructure.
acfsutil pluginenableNOT_SUPPORTED
Enables the Oracle ACFS plug-in infrastructure.
acfsutil plugin infoNOT_SUPPORTED Displays information about the Oracle ACFS plug-in infrastructure.
acfsutil registryNOT_SUPPORTED Adds, deletes, or displays entries in the Oracle ACFS mount registry.
acfsutil rmfsNOT_SUPPORTED Removes an Oracle ACFS file system.
acfsutil sizeNOT_SUPPORTED Resizes an Oracle ACFS file system.
acfsutil snap convertNOT_SUPPORTED Converts the type of an existing snapshot.
acfsutil snap createNOT_SUPPORTED Creates a snapshot of an Oracle ACFS file system or an existingsnapshot.
acfsutil snap deleteNOT_SUPPORTED Deletes a snapshot of an Oracle ACFS file system.
acfsutil snap infoNOT_SUPPORTED Displays information about Oracle ACFS file system snapshots.
acfsutil tuneNOT_SUPPORTED Modifies or displays Oracle ACFS tunable parameters.
advmutil canonicalNOT_SUPPORTED Displays the canonical name of an Oracle ADVM volume.
advmutil tuneNOT_SUPPORTED Modifies or displays Oracle ADVM parameters.
advmutil volinfoNOT_SUPPORTED Displays information about Oracle ADVM volumes.
acfsdbg
Purpose
Debugs an Oracle ACFS file system.
Syntax and Description
acfsdbg -hacfsdbg [-r] [-l] volume_device
Table 16-86 (page 16-117) contains the options available with the acfsdbg command.
Oracle ACFS Command-Line Utilities
16-116 Oracle Automatic Storage Management Administrator's Guide

Table 16-86 Options for the acfsdbg command
Option Description
-h Prints out the usage message which displays the variousoptions that are available when invoking the acfsdbgcommand, then exits.
-r Operates in read-only mode. No data is modified on the filesystem and all write commands are disabled. If the device ismounted anywhere, acfsdbg may not display the latest databecause some data is cached by the file system mounts.
-l Processes kernel log files. The default is to not process the logfiles.
volume_device Specifies the device name of the volume.
acfsdbg is an extension to fsck and acfschkdsk, and is an interactive programthat views and modifies on disk structures of the file system. This command isintended for experienced development and support engineers to examine on diskstructures to diagnose problems. Use with caution.
When acfsdbg is started, it displays a command prompt. At the command prompt,you can enter the subcommands listed in Table 16-87 (page 16-117).
You can also use acfsdbg for scripts by echoing acfsdbg subcommands with a shellpipe to the acfsdbg binary.
By default the file system is not modified when running the tool. If the -l option isused, the file system metadata in the transaction logs is applied before the interactivedisk block dump session. The volume device must specify a volume with adismounted Oracle ACFS file system. If the volume device has a mounted OracleACFS file system, acfsdbg displays an error message and exits.
You must be the administrator or a member of the Oracle ASM administrator group torun acfsdbg.
Subcommands
Table 16-87 (page 16-117) lists the subcommands of acfsdbg.
Table 16-87 Subcommands for acfsdbg
Option Description Syntax
calculate Calculates simple arithmetic expressions
Valid operators: + - * / % & | ^ ~ << >>
White space starts a new expression
0-1 represents a negative 1
calculate [-v] expr […]
-v Verbose modeexpr Simple 2+2 expression
Oracle ACFS Command-Line Utilities
Managing Oracle ACFS with Command-Line Tools 16-117

Table 16-87 (Cont.) Subcommands for acfsdbg
Option Description Syntax
cksum Generates and replaces checksum in header
Header offset can be an expression as usedby the calculate subcommand
White space starts a new header offset
Command is disabled in read-only mode
cksum [-C | -CE] header_offset […]
-C Regenerate for normal structurechecksum-CE Re-generate for Extent structurechecksumheader_offset Offset of the on diskstructure header. The value can be anexpression as used by the calculatesubcommand
close Closes the open handle to the device close
echo Echoes text on command line to stdout echo
fenum Displays the specified File Entry TAble(FETA) entry
fenum [-f | -e | -d] FETA_entry_number
-f Displays all on disk structures related tothis structure-e Displays all on disk extent informationrelated to this structure-d Casts the structure as a directory anddisplays its contentsFETA_entry_number The File Entry Tablenumber used to identify a file on the filesystem
help Displays help message help
offset Displays structure at disk offset offset [-c cast] [-f | -d] disk_offset
-f Displays all on disk structures related tothis structure-d Casts the structure as a directory anddisplays its contentsdisk_offset Disk offset to display. Thevalue can be an expression as used by thecalculate subcommand
open Opens a handle to a device. The default isthe volume device name entered on thecommand line
open [volume_device]
primary Sets the context of commands to the primaryfile system
primary
prompt Sets the prompt to the specified string prompt "prompt_string"
quit Exits the acfsdbg debugger command quit
Oracle ACFS Command-Line Utilities
16-118 Oracle Automatic Storage Management Administrator's Guide

Table 16-87 (Cont.) Subcommands for acfsdbg
Option Description Syntax
read Reads value from offset
The default size to read in is 8 bytes
The default count to read is 1
read [-1 | -2 | -4 | -8 | -s] [count]offset
-1 Read byte value-2 Read 2 byte (short) value-4 Read 4 byte (int) value-8 Read 8 byte (long) value-s Read null- terminated stringcount Number of values to read. If notspecified, the default is 1offset Disk offset to read. The value canbe an expression as used by the calculatesubcommand
snapshot Sets the context of commands to thespecified snapshot
snapshot snapshot_name
write Writes hexadecimal, octal, or decimal valuesat the disk offset, estimating how many bytesto write based on value size or number ofdigits in leading 0 hexadecimal values
The disk offset can be an expression used bythe calculate subcommand
Numeric values can also be an expression asused by the calculate subcommand
This command is disabled in read-only mode
write [-1 | -2 | -4 | -8 | -c | -s] [-C | -CE] offset value
-1 Write byte value-2 Write 2 byte (short) value-4 Write 4 byte (int) value-8 Write 8 byte (long) value-c Write text (no null termination). Enclosestring in single-quotes (')-s Write null-terminated string. Enclosestring in quotes (")-C Regenerate normal structure checksum-CE Regenerate extent structure checksumoffset Disk offset to write. The value canbe an expression used by the calculatesubcommandvalue The value to write. If numeric, thevalue can be an expression as used by thecalculate subcommand
Examples
Example 16-78 (page 16-119) shows the use of the acfsdbg subcommand.
Example 16-78 Using the acfsdbg command
$ /sbin/acfsdbg /dev/asm/voume1-123acfsdbg: version = 11.2.0.3.0Oracle ASM Cluster File System (ACFS) On-Disk Structure Version: 39.0The ACFS volume was created at Mon Mar 2 14:57:45 2011acfsdbg>
acfsbdg> calculate 60*1024 61,440 61440 61440 0xf000 0170000
Oracle ACFS Command-Line Utilities
Managing Oracle ACFS with Command-Line Tools 16-119

1111:0000:0000:0000
acfsdbg> prompt "acfsdbg test>"acfsdbg test>
echo "offset 64*1024" | acfsdbg /dev/asm/volume1-123
acfsutil info file
Purpose
Displays information for a file in an Oracle ACFS file system.
Syntax and Description
acfsutil info file -hacfsutil info file [-d] [-o acfs_extent_offset] path
acfsutil info file -h displays help text and exits.
Table 16-88 (page 16-120) contains the options available with the acfsutil infofile command.
Table 16-88 Options for the acfsutil info file command
Option Description
-d Displays detailed extent information, from Oracle ACFS to theOracle ASM devices in the disk group.
-o acfs_extent_offset Narrows the extent display to the Oracle ACFS file offsetspecified.
path Specifies the full path name of a file.
The acfsutil info file command displays information about a file in an OracleACFS file system. The information includes the extent map which details the locationsof the blocks comprising the file and the used versus allocated storage for a file.Tagging information is also displayed for a file.
You must have read access to the specified file to run acfsutil info file.
Examples
The following is an example of acfsutil info file.
Example 16-79 Using the acfsutil info file command
$ /sbin/acfsutil info file /acfsmounts/acfs1/myfile
acfsutil info fs
Purpose
Displays detailed Oracle ACFS file system information.
Oracle ACFS Command-Line Utilities
16-120 Oracle Automatic Storage Management Administrator's Guide

Syntax and Description
acfsutil info fs -hacfsutil info fs [ {-o item | -s [interval [count] [-d] ] | -f [-v] } ] [mount_point]
acfsutil info fs -h displays help text and exits.
Table 16-89 (page 16-121) contains the options available with the acfsutil info fscommand.
Table 16-89 Options for the acfsutil info fs command
Option Description
-o Displays the specific file system item from the following list:
• freespace - Amount of free space available in the filesystem
• totalspace - Size of the file system• mountpoints - Mount points associated with file
systems.• volumes - Number of volumes associated with the file
system• primaryvolume - Path name of the device associated
with file system• available - Length of time the file system has been
available• isadvm - 1 if an Oracle ADVM volume is present, 0 if not• ismountpoint - 1 if path is the mount point, 0 if path is
not a mount point• isavailable - 1 if the file system is available, 0 if file
system is not available• iscorrupt - 1 if the file system is corrupt, 0 if file system
is not corrupt• isreplprimary - 1 if primary file system, 0 if not• isreplstandby - 1 if standby file system, 0 if not• diskgroup - Name of the disk group associated with
path
• redundancy - Type of redundancy used by the OracleADVM volume
• replication - 1 if file system has been initialized forreplication as the primary or standby file system, 0 if notinitialized for replication
• resizeincrement - Allocation unit size in bytes of theOracle ADVM volume used by path
• stripewidth - Stripe width for the Oracle ADVMvolume used by path
• stripecolumns - Stripe set columns for the OracleADVM volume used by path
• fetasize - File entry table size which is the amount ofstorage consumed by the on disk metadata for inodes
Oracle ACFS Command-Line Utilities
Managing Oracle ACFS with Command-Line Tools 16-121

Table 16-89 (Cont.) Options for the acfsutil info fs command
Option Description
-s [interval [count] [-d]]
Displays file system statistics.
The optional interval parameter specifies the amount of timein seconds between each report. The first report containsstatistics for the time since the file system mount. Eachsubsequent report contains statistics collected during theinterval since the previous report.
The optional count parameter can be specified with theinterval parameter. If the count parameter is specified, thevalue of count determines the number of reports generated atinterval seconds apart.
If the interval parameter is specified without the countparameter, the command generates reports continuously untilyou break out of the command with Ctrl+c.
The optional -d option displays more detailed statisticalinformation.
-f [-v] Displays file system fragmentation. The -v option displaysadditional fragmentation information.
mount_point Specifies the directory where the file system is mounted. Not avalid option for replication data.
acfsutil info fs displays information and statistics about Oracle ACFS filesystems. If replication has been initiated on a file system, additional flags and statusinformation are displayed. The values for the replication status field are primary,standby, or disabled.
The -o item option displays file system information for the item specified.
The -s option displays the amount and rate of change currently on a file system forthe node that the command is run on.
With no option specified, the command displays file system information that includesthe volume device name, the size of the file system, the amount of space available onthe volume device, the file system mount time on this node, the state of the file system,the user specified block size, the number of Oracle ACFS snapshots, the spaceconsumed by snapshots in the file system, and the optional name or volume labelassociated with the file system. The possible file system states are displayed in theflags line. These states include:
• Offline indicates that the underlying devices are not accessible, possibly due toan Oracle ASM instance failure, disk group forced dismount, or an irrecoverableI/O error. The file system on this node can only be dismounted. All otherattempts at access result in errors.
• Available indicates that the file system is on line and operational.
• Corrupt indicates that the file system should be checked and repaired at theearliest possible convenience to correct a detected inconsistency. For example, runthe fsck command on Linux or the acfschkdsk command on Windows tocheck and repair the file system. Ensure that you run the command in repairmode to correct the problem. For more information, refer to "fsck (page 16-23)"and "acfschkdsk (page 16-44)".
Oracle ACFS Command-Line Utilities
16-122 Oracle Automatic Storage Management Administrator's Guide
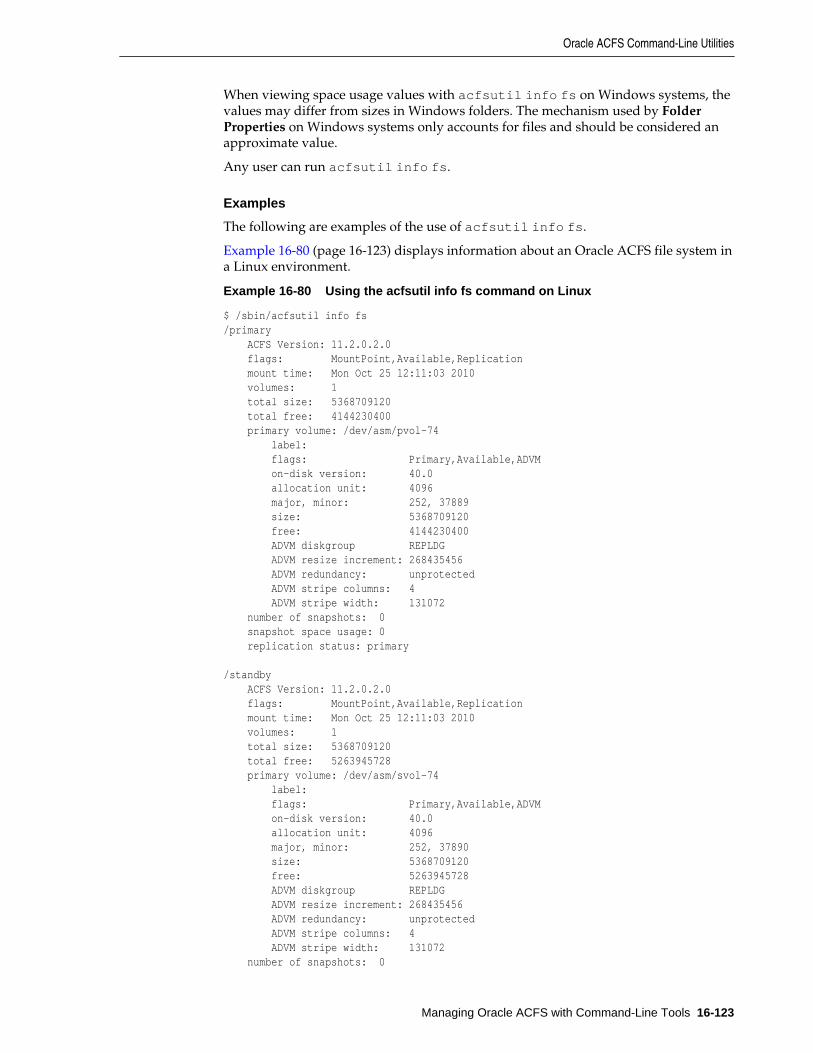
When viewing space usage values with acfsutil info fs on Windows systems, thevalues may differ from sizes in Windows folders. The mechanism used by FolderProperties on Windows systems only accounts for files and should be considered anapproximate value.
Any user can run acfsutil info fs.
Examples
The following are examples of the use of acfsutil info fs.
Example 16-80 (page 16-123) displays information about an Oracle ACFS file system ina Linux environment.
Example 16-80 Using the acfsutil info fs command on Linux
$ /sbin/acfsutil info fs/primary ACFS Version: 11.2.0.2.0 flags: MountPoint,Available,Replication mount time: Mon Oct 25 12:11:03 2010 volumes: 1 total size: 5368709120 total free: 4144230400 primary volume: /dev/asm/pvol-74 label: flags: Primary,Available,ADVM on-disk version: 40.0 allocation unit: 4096 major, minor: 252, 37889 size: 5368709120 free: 4144230400 ADVM diskgroup REPLDG ADVM resize increment: 268435456 ADVM redundancy: unprotected ADVM stripe columns: 4 ADVM stripe width: 131072 number of snapshots: 0 snapshot space usage: 0 replication status: primary
/standby ACFS Version: 11.2.0.2.0 flags: MountPoint,Available,Replication mount time: Mon Oct 25 12:11:03 2010 volumes: 1 total size: 5368709120 total free: 5263945728 primary volume: /dev/asm/svol-74 label: flags: Primary,Available,ADVM on-disk version: 40.0 allocation unit: 4096 major, minor: 252, 37890 size: 5368709120 free: 5263945728 ADVM diskgroup REPLDG ADVM resize increment: 268435456 ADVM redundancy: unprotected ADVM stripe columns: 4 ADVM stripe width: 131072 number of snapshots: 0
Oracle ACFS Command-Line Utilities
Managing Oracle ACFS with Command-Line Tools 16-123
snapshot space usage: 0 replication status: standby
$ /sbin/acfsutil info fs -o mountpoints,replication/primary1/standby1
$ /sbin/acfsutil info fs -o mountpoints,isreplprimary/primary1/standby0
$ /sbin/acfsutil info fs -o mountpoints,isreplstandby/primary0/standby1
Example 16-81 (page 16-124) illustrates the use of acfsutil info fs in a Windowsenvironment.
Example 16-81 Using the acfsutil info fs command on Windows
C:\oracle>acfsutil info fs /o freespace c:\oracle\acfsmounts\acfs1968667136
C:\oracle>acfsutil info fs /o totalspace c:\oracle\acfsmounts\acfs11073741824
C:\oracle>acfsutil info fs /o volume c:\oracle\acfsmounts\acfs11
C:\oracle>acfsutil info fs /o primaryvolume c:\oracle\acfsmounts\acfs1asm-volume1-311
C:\oracle>acfsutil info fs /o diskgroup c:\oracle\acfsmounts\acfs1DATA
C:\oracle>acfsutil info fs /o redundancy c:\oracle\acfsmounts\acfs1mirror
Example 16-82 (page 16-124) illustrates the use of acfsutil info fs with -s optionto display the current amount and rate of change on a file system.
Example 16-82 Using the acfsutil info fs command with the -s option
$ /sbin/acfsutil info fs -s /acfsmounts/acfs1 amount of change since mount: 359.22 MB average rate of change since mount: 3 KB
$ /sbin/acfsutil info fs -s 60 4 /acfsmounts/acfs1 amount of change since mount: 359.22 MB average rate of change since mount: 3 KB/s
amount of change: 15.02 MB rate of change: 256 KB/s amount of change: 9.46 MB rate of change: 161 KB/s amount of change: 7.32 MB rate of change: 125 KB/s amount of change: 6.89 MB rate of change: 117 KB/s...
Oracle ACFS Command-Line Utilities
16-124 Oracle Automatic Storage Management Administrator's Guide

acfsutil info id
Purpose
Displays Oracle ACFS file system information for a specified file identifier numberand mount point.
Syntax and Description
acfsutil info id -hacfsutil info id file_identifier mount_point
acfsutil info id -h displays help text and exits.
Table 16-90 (page 16-125) contains the options available with the acfsutil info idcommand.
Table 16-90 Options for the acfsutil info id command
Option Description
mount_point Specifies the directory where the file system is mounted.
file_identifier Specifies the Oracle ACFS file identifier number reported by theOracle ACFS driver. The file identifier number should bespecified in decimal format.
You can use acfsutil info id to translate an internal numeric Oracle ACFS fileidentifier to a path name in the file system. This is useful when the Oracle ACFS driverreports I/O errors to the system event logger associated with a particular file in anOracle ACFS and identifies it by its internal identifier. You must have administratorprivileges or you must be a member of the Oracle ASM administrator group to runacfsutil info id.
Examples
The following is an example of acfsutil info id.
Example 16-83 Using the acfsutil info id command
$ /sbin/acfsutil info id 117 /acfsmounts/acfs1
acfsutil plugin disable
Purpose
Disables the Oracle ACFS plug-in infrastructure for an Oracle ACFS file system.
Syntax and Description
acfsutil plugin disable -hacfsutil plugin disable mount_point
acfsutil plugin disable -h displays help text and exits.
Table 16-91 (page 16-126) contains the options available with the acfsutil plugindisable command.
Oracle ACFS Command-Line Utilities
Managing Oracle ACFS with Command-Line Tools 16-125

Table 16-91 Options for the acfsutil plugin disable command
Option Description
mount_point Specifies the directory where the file system is mounted.
acfsutil plugin disable disables the collection of Oracle ACFS plug-in metricsand the associated communication with a plug-in application.
Administrator privileges are required to use this command or you must be a memberof the Oracle ASM administrator group.
Examples
Example 16-84 (page 16-126) shows the use of the acfsutil plugin disablecommand. After monitoring has completed for the Oracle ACFS file metric data for thefile system mounted on the /humanresources, the command in Example 16-84(page 16-126) disables the subsequent collection of summary data in the Oracle ACFSdriver.
Example 16-84 Disabling the Oracle ACFS driver
# /sbin/acfsutil plugin disable /humanresource
acfsutil plugin enable
Purpose
Enables the Oracle ACFS plug-in infrastructure for an Oracle ACFS file system.
Syntax and Description
acfsutil plugin enable -hacfsutil plugin enable -m metrictype [-t tag, ...] [-i interval[s|m]] mount_point
acfsutil plugin enable -h displays help text and exits.
Table 16-92 (page 16-126) contains the options available with the acfsutil pluginenable command.
Table 16-92 Options for the acfsutil plugin enable command
Option Description
-t tag, ... An optional list of tag names selecting Oracle ACFS files thatyou want to be monitored. The maximum number of tags is 12.The names are separated by commas. The default is to monitorall files in the Oracle ACFS file system.
-m metrictype Selects the message payload to be transmitted from OracleACFS to the plug-in module with each call-out message. OracleACFS provides the acfsmetric1 pre-defined metric type.
Oracle ACFS Command-Line Utilities
16-126 Oracle Automatic Storage Management Administrator's Guide
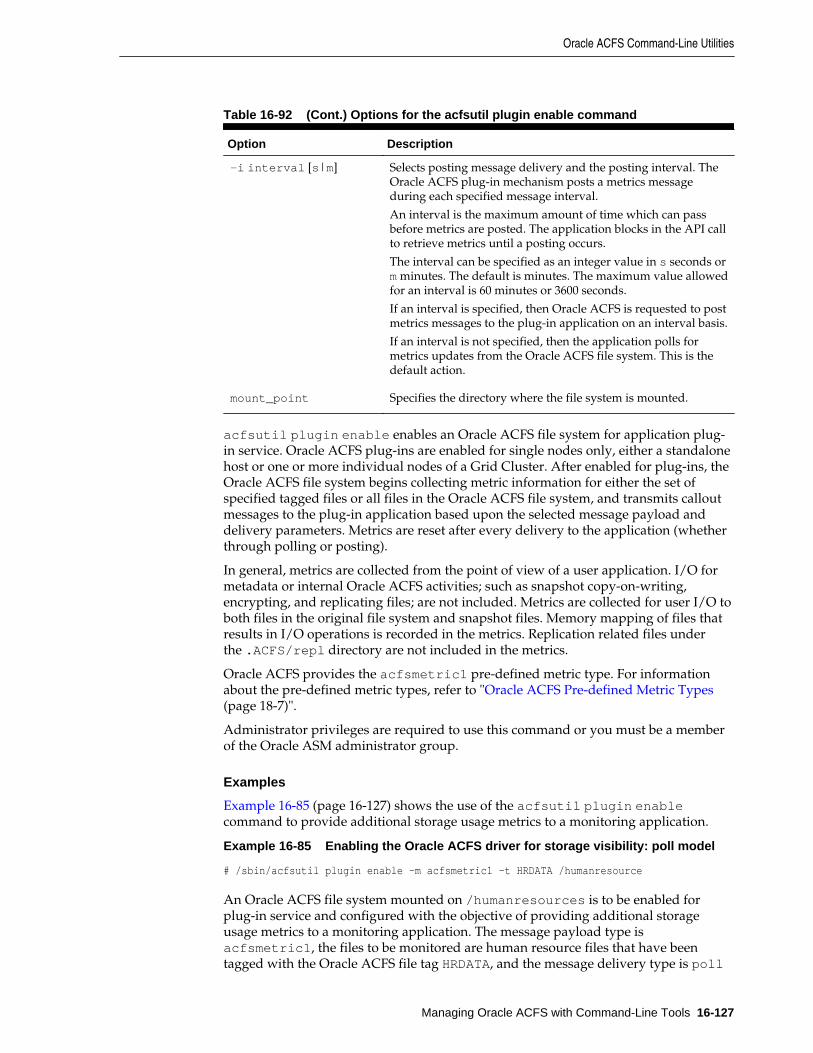
Table 16-92 (Cont.) Options for the acfsutil plugin enable command
Option Description
-i interval [s|m] Selects posting message delivery and the posting interval. TheOracle ACFS plug-in mechanism posts a metrics messageduring each specified message interval.
An interval is the maximum amount of time which can passbefore metrics are posted. The application blocks in the API callto retrieve metrics until a posting occurs.
The interval can be specified as an integer value in s seconds orm minutes. The default is minutes. The maximum value allowedfor an interval is 60 minutes or 3600 seconds.
If an interval is specified, then Oracle ACFS is requested to postmetrics messages to the plug-in application on an interval basis.
If an interval is not specified, then the application polls formetrics updates from the Oracle ACFS file system. This is thedefault action.
mount_point Specifies the directory where the file system is mounted.
acfsutil plugin enable enables an Oracle ACFS file system for application plug-in service. Oracle ACFS plug-ins are enabled for single nodes only, either a standalonehost or one or more individual nodes of a Grid Cluster. After enabled for plug-ins, theOracle ACFS file system begins collecting metric information for either the set ofspecified tagged files or all files in the Oracle ACFS file system, and transmits calloutmessages to the plug-in application based upon the selected message payload anddelivery parameters. Metrics are reset after every delivery to the application (whetherthrough polling or posting).
In general, metrics are collected from the point of view of a user application. I/O formetadata or internal Oracle ACFS activities; such as snapshot copy-on-writing,encrypting, and replicating files; are not included. Metrics are collected for user I/O toboth files in the original file system and snapshot files. Memory mapping of files thatresults in I/O operations is recorded in the metrics. Replication related files underthe .ACFS/repl directory are not included in the metrics.
Oracle ACFS provides the acfsmetric1 pre-defined metric type. For informationabout the pre-defined metric types, refer to "Oracle ACFS Pre-defined Metric Types(page 18-7)".
Administrator privileges are required to use this command or you must be a memberof the Oracle ASM administrator group.
Examples
Example 16-85 (page 16-127) shows the use of the acfsutil plugin enablecommand to provide additional storage usage metrics to a monitoring application.
Example 16-85 Enabling the Oracle ACFS driver for storage visibility: poll model
# /sbin/acfsutil plugin enable -m acfsmetric1 -t HRDATA /humanresource
An Oracle ACFS file system mounted on /humanresources is to be enabled forplug-in service and configured with the objective of providing additional storageusage metrics to a monitoring application. The message payload type isacfsmetric1, the files to be monitored are human resource files that have beentagged with the Oracle ACFS file tag HRDATA, and the message delivery type is poll
Oracle ACFS Command-Line Utilities
Managing Oracle ACFS with Command-Line Tools 16-127

which means that the application plug-in polls to request metric data updatemessages. No interval is specified with polled message delivery.
When the command in Example 16-85 (page 16-127) completes, the Oracle ACFS filesystem mounted on the /humanresources mount point is enabled for plug-incommunication and begins collecting Oracle ACFS file access metrics for files taggedwith HRDATA. Oracle ACFS maintains metrics collecting a summary of read and writeactivity. Each time the associated application plug-in module polls for the metrics,Oracle ACFS sends a message with the data as defined in the ACFS_METRIC1structure that is a summary of the selected Oracle ACFS activity since either the OracleACFS driver plug-in functionality was enabled or since the last delivery of metric data.
Example 16-86 (page 16-128) shows the use of the acfsutil plugin enablecommand to monitor movie file updates.
Example 16-86 Enabling the Oracle ACFS driver for storage visibility: post oninterval model
# /sbin/acfsutil plugin enable -m acfsmetric1 -t FILECONTENT -i 120s /moviemods
An Oracle ACFS file system mounted on /moviemods is enabled for plug-in serviceand is configured to record and deliver storage usage messages to a monitoringapplication. On an interval basis, the Oracle ACFS file system sends a wakeup on adriver event on which the application API call is waiting. The application then collectsa summary of read and write activity on the files.
The message payload type is acfsmetric1 and the files to be monitored are moviefiles that have been tagged with the FILECONTENT tag. The message delivery type ispost, which means that Oracle ACFS posts messages containing the metrics to theplug-in application for the specified interval of 120 seconds.
When the command in Example 16-86 (page 16-128) completes, the Oracle ACFS filesystem mounted on the /moviemods mount point is enabled for plug-incommunication and begins collecting Oracle ACFS storage visibility metrics for filestagged with FILECONTENT. On each interval, Oracle ACFS posts one or moremessages to the application plug-in containing the storage visibility information.
acfsutil plugin info
Purpose
Displays information about the Oracle ACFS plug-in infrastructure for an OracleACFS file system.
Syntax and Description
acfsutil plugin info -hacfsutil plugin info mount_point
acfsutil plugin info -h displays help text and exits.
Table 16-93 (page 16-128) contains the options available with the acfsutil plugininfo command.
Table 16-93 Options for the acfsutil plugin info command
Option Description
mount_point Specifies the directory where the file system is mounted.
Oracle ACFS Command-Line Utilities
16-128 Oracle Automatic Storage Management Administrator's Guide

acfsutil plugin info displays information about the state of the Oracle ACFSplug-in mechanism.
Administrator privileges are required to use this command or you must be a memberof the Oracle ASM administrator group.
Examples
Example 16-87 (page 16-129) shows the use of the acfsutil plugin info command.
Example 16-87 Displaying information about the Oracle ACFS driver
# /sbin/acfsutil plugin info /humanresource
Plug-in status: ENABLEDMetric type: acfsmetric1Enabled tags: HRDATADelivery method: PollPost interval (seconds):
# /sbin/acfsutil plugin info /moviemods
Plug-in status: ENABLEDMetric type: acfsmetric1Enabled tags: FILECONTENTDelivery method: PostPost interval (seconds): 120
acfsutil registry
Purpose
Adds, deletes, or displays entries in the Oracle ACFS mount registry.
Syntax and Description
acfsutil registry -hacfsutil registryacfsutil registry -a [-f] [-o moptions] [-n { nodes|all } ] [-u user] [-t description] device mount_pointacfsutil registry -c {device | mount_point} [-o moptions] [-n { nodes|all } ] [-u user] [-t description]acfsutil registry -d {device | mount_point}acfsutil registry -l [device | mount_point]acfsutil registry -m deviceacfsutil registry -r
acfsutil registry -h displays help text and exits.
If no options are specified, the command displays all the Oracle ACFS file systems thatare configured for automatic start.
Table 16-94 (page 16-130) contains the options available with the acfsutilregistry command.
Oracle ACFS Command-Line Utilities
Managing Oracle ACFS with Command-Line Tools 16-129

Table 16-94 Options for the acfsutil registry command
Option Description
-a Add the device, mount point, and associated moptions to theOracle ACFS mount registry. The Oracle ADVM volume devicespecified must exist on the local node to add the information tothe mount registry.
The arguments represent all the information needed to mountthe file system. At Oracle ACFS startup time these file systemsare automatically mounted.
Duplicate device entries are not allowed. Duplicate mountpoints are allowed but must be include the -n option fordisjoint node-specific mounts.
-c Changes an existing registry entry for the specified device ormount point.
-d Deletes the specified device or mount point from the OracleACFS mount registry. If a mount point is specified and it is notunique in the Oracle ACFS mount registry, the command failsand you must run the command again specifying the device.
-f This option is used in combination with -a when the specifieddevice might exist in the registry and the administrator wantsto replace the registration.
-l [device |mount_point]
Without specifying a device or mount point, the -l option listsall the file systems currently in the registry on a single line, withfields separated by a colon (:). With a device specified, listsinformation about the device in the Oracle ACFS registry. Witha mount point specified, lists information about the mountpoint in the Oracle ACFS registry.
-m device Lists the registered mount point, if one exists, associated withthe specified device. The mount point is only returned if theOracle ACFS file system has been registered or has beenpreviously mounted.
-n { nodes | all} This option, used in combination with -a and -c, specifies anoptional comma-delimited list of nodes, or the all keyword.This specifies which nodes should attempt to mount this deviceon the specified mount point. Host names should be specified.The all keyword is functionally equivalent to not specifying alist of nodes and indicates that the device should be mountedon all nodes. Mounting on all nodes is the default behavior.
-o moptions Specifies the mount options for use when mounting the filesystem. Valid for Linux, Solaris, and AIX. Used in combinationwith -a and -c. For specific -o moptions, refer to the mountcommand for each operating system. All the options for eachoperating system are available except the all option.
-r Displays all registered file systems, not just file systems withauto_start=always.
-t description Adds a description of the mount. Used in combination with -aand -c. For example: -t "HR Exports share". Thisdescription can be seen later when looking at configuredresources.
Oracle ACFS Command-Line Utilities
16-130 Oracle Automatic Storage Management Administrator's Guide

Table 16-94 (Cont.) Options for the acfsutil registry command
Option Description
-u user Specifies a user that is allowed to mount or umount (start andstop) the file system. This option, used in combination with -aand -c, is useful for creating a registered file system that can bestarted or stopped by someone other than root.
mount_point Specifies the directory where the file system is mounted.
device Specifies an Oracle ACFS device file that has been formatted.
acfsutil registry adds, deletes, or displays a file system from the Oracle ACFSpersistent mount registry. The mount registry is a global registry that is used at OracleACFS startup on each node to mount all file systems specified in it. root orasmadmin privileges are required to modify the registry. For information aboutoperating system group privileges, see "About Privileges for Oracle ASM (page 3-47)".
Any user is allowed to display the contents of the registry. To mount all the filesystems in the Oracle ACFS mount registry, use the platform specific mount commandwith the all option. This is done automatically at Oracle ACFS startup on each node.
Note:
Oracle ACFS registration (acfsutil registry) is not supported in anOracle Restart (standalone) configuration, which is a single-instance (non-clustered) environment.
See "About the Oracle ACFS Mount Registry (page 11-9)".
Examples
The following examples show the use of acfsutil registry. The first exampleshows how to add the volume device file and file system mount point to the registry.The second example shows how to list the registered mount point associated with thespecified volume device file. The third example shows how to delete the specifiedvolume device file from the registry.
Example 16-88 Using the acfsutil registry command
$ /sbin/acfsutil registry -a /dev/asm/volume1-123 /acfsmounts/acfs1
$ /sbin/acfsutil registry -m /dev/asm/volume1-123
$ /sbin/acfsutil registry -d /dev/asm/volume1-123
acfsutil rmfs
Purpose
Removes an Oracle ACFS file system.
Oracle ACFS Command-Line Utilities
Managing Oracle ACFS with Command-Line Tools 16-131
Syntax and Description
acfsutil rmfs -hacfsutil rmfs deviceacfsutil rmfs device -b
acfsutil rmfs -h displays help text and exits.
Table 16-95 (page 16-132) contains the options available with the acfsutil rmfscommand.
Table 16-95 Options for the acfsutil rmfs command
Option Description
device Specifies an Oracle ACFS device file that has been formatted.
-b Specifies batch mode. No user interaction is required.
You can use acfsutil rmfs to remove an Oracle ACFS that is dismounted. When thecommand is run, the superblock of the file system is disabled. root or asmadminprivileges are required to run this command. For information about operating systemgroup privileges, see "About Privileges for Oracle ASM (page 3-47)".
After acfsutil rmfs runs successfully, the MOUNTPATH and USAGE columns in the V$ASM_VOLUME view are cleared for the device. The removed Oracle ACFS can berestored using fsck or acfschkdsk. The device can be reformatted with a newOracle ACFS using the mkfs or acfsformat commands.
Examples
The following example shows the use of acfsutil rmfs to remove the specifiedvolume device file and associated file system.
Example 16-89 Using the acfsutil rmfs command
$ /sbin/acfsutil rmfs /dev/asm/volume1-123
acfsutil size
Purpose
Resizes an Oracle ACFS file system.
Syntax and Description
acfsutil size -hacfsutil size [+|-]n[K|M|G|T|P ] mount_point
acfsutil size -h displays help text and exits.
Table 16-96 (page 16-133) contains the options available with the acfsutil sizecommand.
Oracle ACFS Command-Line Utilities
16-132 Oracle Automatic Storage Management Administrator's Guide

Table 16-96 Options for the acfsutil size command
Option Description
[+|-]n Specifies the new size for the Oracle ACFS file system where nis a valid positive whole number greater than zero. The numbercan be preceded by a + or - to indicate the amount to add ordecrease. If no operand exists, the new size is the absolute size.
K|M|G|T|P Specifies that the integer supplied for size is in the units of K(Kilobytes), M (Megabytes), G (Gigabytes), T (Terabytes), or P(Petabytes). If the unit indicator is specified, then it must beappended to the integer. If omitted, the default unit is bytes.
mount_point Specifies the directory where the file system is mounted
acfsutil size grows or shrinks the mounted Oracle ACFS and its underlyingOracle ADVM storage to match the new size specified. This operation also resizes theunderlying Oracle ADVM volume file to match the new length that is specified.However, the disk group must have enough free storage to accommodate anyrequested increase to the file system size.
Reducing a file system size returns unused storage space located at the end of the filesystem to the disk group. Shrinking in this release is intended for accidents when thewrong initial size or resize increment was specified, and before the storage wasactually used. After storage has been used for user data or file system metadata, it maynot be possible to shrink the file system, even if the files using that storage have beendeleted.
Note:
Defragmenting a file system is not supported in this release; only unusedstorage can be deallocated from the end of the file system.
The size value is rounded up based on the block size of the file system and theallocation unit of the Oracle ADVM volume device file. To determine the OracleADVM volume device resize increment, examine the RESIZE_UNIT_MB field in the V$ASM_VOLUME view, Resize Unit in the output of asmcmd volinfo, or ADVMresize increment in the output of acfsutil info fs.
There is no limit to the number of times a file system can be expanded for a disk groupwith the ADVM compatibility attribute set to 11.2.0.4 or higher.
For a disk group with the ADVM compatibility attribute set to less than 11.2.0.4,there is a limit of 5 extents for the file system's internal storage bitmap. This causes anyattempts to increase the file system to fail after it has been increased four or moretimes. However, if after increasing the file system four times or more times the filesystem size is decreased, then you may be able to increase the file system size again ifthe size of the increase is less than the size of the decrease. When the limit on a filesystem expansion has been reached, running fsck or acfschkdsk with the -a optionmay consolidate the internal storage bitmap, allowing future file system expansion.
root or users who are members of the asmadmin group can run this command. Forinformation about operating system group privileges, see "About Privileges for OracleASM (page 3-47)".
Oracle ACFS Command-Line Utilities
Managing Oracle ACFS with Command-Line Tools 16-133

Examples
The following example shows the use of acfsutil size. This example increases theprimary device file of /acfsmounts/acfs1 file system by 500 MB.
Example 16-90 Using the acfsutil size command
$ /sbin/acfsutil size +500M /acfsmounts/acfs1
acfsutil snap convert
Purpose
Converts the type of an existing snapshot image from read-only to read-write or read-write to read-only.
Syntax and Description
acfsutil snap convert -hacfsutil snap convert [-r|-w] snapshot mount_point
acfsutil snap convert -h displays help text and exits.
Table 16-97 (page 16-134) contains the options available with the acfsutil snapconvert command.
Table 16-97 Options for the acfsutil snap convert command
Option Description
-r Converts snapshot to read-only snapshot.
-w Converts snapshot to read-write snapshot.
snapshot Specifies the name of the snapshot to be converted.
mount_point Specifies the directory where the file system is mounted.
acfsutil snap convert converts the type of an existing snapshot image from aread-only snapshot image to a read-write snapshot image, or from a read-writesnapshot image to a read-only snapshot image.
The type option (-r or -w) is required for the convert operation. Specifying a typeparameter that matches the type of the existing snapshot image results in noconversion and no failure. An 11.2 read-only snapshot image can be converted to aread-write snapshot image, but this conversion results in an update of the OracleACFS on-disk structure version. After the Oracle ACFS on-disk structure version hasbeen updated, the updated version is not compatible with previous Oracle ACFS 11.2versions.
Administrator privileges are required to use this command or you must be a memberof the Oracle ASM administrator group.
Examples
Example 16-91 (page 16-135) shows the use of the acfsutil snap convertcommand.
Oracle ACFS Command-Line Utilities
16-134 Oracle Automatic Storage Management Administrator's Guide

Example 16-91 Using the acfsutil snap convert command
$ acfsutil snap convert -w midday_test1 /acfsmounts/critical_apps
$ acfsutil snap convert -r midday_test2 /acfsmounts/critical_apps
acfsutil snap create
Purpose
Creates a read-only or read-write snapshot of an Oracle ACFS file system or anexisting snapshot.
Syntax and Description
acfsutil snap create -hacfsutil snap create [-r|-w] [-p parent_snapshot] snapshot mount_point
acfsutil snap create -h displays help text and exits.
Table 16-98 (page 16-135) contains the options available with the acfsutil snapcreate command.
Table 16-98 Options for the acfsutil snap create command
Option Description
-r Creates a read-only snapshot. This is the default setting.
-w Creates a read-write snapshot.
snapshot Specifies a name for the snapshot. The name provided must bea valid directory name. The.ACFS/snaps directory itselfcannot be snapped.
-p parent_snapshot Specifies the name of an existing snapshot image within theOracle ACFS file system.
mount_point Specifies the directory where the file system is mounted.
acfsutil snap create creates a read-only or read-write snapshot of the OracleACFS file system mounted on mount_point or creates a snapshot of an existingsnapshot if the -p option is specified. You can specify -r for read-only or -w for read-write; read-only is the default if neither -r or -w are specified.
The read-write snapshot enables the fast creation of an Oracle ACFS snapshot imagethat can be both read and written without impacting the state of the Oracle ACFS filesystem hosting the snapshot images. You can use the read-write functionality fortesting new versions of application software or running test scenarios on productionfile data without modifying the original file system.
Snapshots are not separate file systems. The snapshot appears in the .ACFS/snaps/snapshot directory and initially is a complete replica of the file system at the time thesnapshot command was given. A read-only snapshot continues to preserve that initialpoint-in-time view. A read-write snapshot can be modified by updates written directlyto the files located within the .ACFS/snaps/snapshot hierarchy.
A symbol link (symlink) file is a pointer to a path specified at the time that the symlinkis created. For any existing symlink in the source of the afsutil snap createcommand, a new link is made in the snapshot; however, the stored path to the symlink
Oracle ACFS Command-Line Utilities
Managing Oracle ACFS with Command-Line Tools 16-135

target is not modified during snap creation time. When an absolute path is used as thetarget of the link, the link target of the snapshot still refers to the absolute path,outside the newly-created snapshot namespace. Future modifications to the targetedfile can occur through the snapshot symlink, not to a new target inside the snapshotnamespace. The contents of the targeted file can also be changed outside of thesnapshot. Because of this behavior, you should use relative path targets for allsymlinks that are within the same file system.
Any user can access the snapshot directory by specifying the path name. However,the .ACFS directory itself is hidden from directory listings of the root of the file system.This prevents recursive commands, such as rm -rf or acfsutil tag set -r, fromthe root of the file system inadvertently operating on snapshot files.
Snapshots usually use very little storage initially as they share file system blocks withthe original file system until a file changes.
Tools such as du report the total disk space usage of the snapshotted files, whichincludes the storage shared with the original versions of the files. To determine thetotal space used for the snapshots, use the acfsutil snap info or acfsutil infofs command. See "acfsutil info fs (page 16-120)".
Oracle ACFS snapshots are immediately available for use after they are created. Theyare always online under the.ACFS/snaps directory when the original file system ismounted. No separate command is needed to mount them.
The acfsutil snap create operation fails if the cluster is in rolling migration.
Creation from an existing snapshot is not permitted if there are:
• Any snapshots present in the file system that were created with the ADVMcompatibility set to less than 12.1
• Any snapshots of the file system that were created after ADVM compatibility wasset to 12.1 but while 11.2 snapshots existed
• Any snapshot deletion cleanup operations still running in the background for theabove conditions
You can display pending snapshot operations with the acfsutil snap infocommand. For information, refer to "acfsutil snap info (page 16-138)".
Administrator privileges are required to use this command or you must be a memberof the Oracle ASM administrator group.
For more information about Oracle ACFS snapshots, refer to "About Oracle ACFSSnapshots (page 11-10)". For information about the number of snapshots supported,refer to "Oracle ACFS Disk Space Usage (page 18-2)".
Examples
Example 16-92 (page 16-136) shows the use of the acfsutil snap create commandto create snapshots on a Linux platform.
Example 16-92 Using the acfsutil snap create command on Linux
$ acfsutil snap create -w midday_test1 /acfsmounts/critical_apps
$ acfsutil snap create -w midday_test2 /acfsmounts/critical_apps
$ /sbin/acfsutil snap create payroll_report1 /acfsmounts/critical_apps
$ /sbin/acfsutil snap create payroll_report2 /acfsmounts/critical_apps
Oracle ACFS Command-Line Utilities
16-136 Oracle Automatic Storage Management Administrator's Guide

$ ls /acfsmounts/critical_apps/.ACFS/snapsmidday_test1 midday_test2 payroll_report1 payroll_report2
Example 16-93 (page 16-137) shows the use of the acfsutil snap create commandto create snapshots on a Windows platform. This example shows the creation of asnapshot from an existing snapshot.
Example 16-93 Using the acfsutil snap create command on Windows
$ /sbin/acfsutil snap create /w snap_1 e:
$ /sbin/acfsutil snap create /w snap_1-1 /p snap_1 e:
acfsutil snap delete
Purpose
Deletes a snapshot of an Oracle ACFS file system.
Syntax and Description
acfsutil snap delete -hacfsutil snap delete snapshot mount_point
acfsutil snap delete -h displays help text and exits.
Table 16-99 (page 16-137) contains the options available with the acfsutil snapdelete command.
Table 16-99 Options for the acfsutil snap delete command
Option Description
snapshot Specifies a name for the snapshot.
mount_point Specifies the directory where the file system is mounted.
acfsutil snap delete deletes the snapshot named snapshot in the Oracle ACFSmounted on mount_point. After successful completion of the command, therepresentation of the snapshot in the.ACFS/snaps directory is removed. Thecommand fails if any file within the snapshot is open on any cluster node. The diskspace used by the snapshot being deleted is freed by a background task after thecompletion of the acfsutil snap delete command. If one of these backgroundthreads is running to clean up a deleted snapshot, then the acfsutil snap infocommand shows a pending delete operation. For information about the acfsutilsnap info command, refer to "acfsutil snap info (page 16-138)".
The acfsutil snap delete operation fails if the cluster is in rolling migration
Administrator privileges are required to use this command or you must be a memberof the Oracle ASM administrator group.
Examples
Example 16-94 (page 16-138) shows the use of the acfsutil snap delete command.
Oracle ACFS Command-Line Utilities
Managing Oracle ACFS with Command-Line Tools 16-137

Example 16-94 Using the acfsutil snap delete command
$ /sbin/acfsutil snap delete midday_test1 /acfsmounts/critical_appsacfsutil snap delete: Snapshot operation is complete.
acfsutil snap info
Purpose
Displays information about Oracle ACFS file system snapshots.
Syntax and Description
acfsutil snap info -hacfsutil snap info -t [snapshot] mount_point
acfsutil snap info -h displays help text and exits.
Table 16-100 (page 16-138) contains the options available with the acfsutil snapinfo command.
Table 16-100 Options for the acfsutil snap info command
Option Description
-t Displays a tree structure for the specified snapshot and mountpoint.
snapshot Specifies a name for the snapshot.
mount_point Specifies the directory where the file system is mounted.
The acfsutil snap info command displays information about an individualspecified snapshot or all snapshots in the specified Oracle ACFS file system. Thesnapshot name, snapshot type (RO or RW), parent name, creation date and time, andspace used are displayed. The parent name is either the mount point, or the parentsnapshot if the snapshot was created from an existing snapshot.
The snapshot space usage amount includes snapshot metadata. If all the files aredeleted from a snapshot, some metadata still remains and that amount is displayedwith acfsutil snap info.
To reclaim the disk space used by snapshots, delete the snapshots. Deleting the fileswithin the snapshots may not reclaim this disk space.
The acfsutil snap info command also shows pending delete operations.
Oracle ACFS caches and asynchronously updates snapshot storage usage statistics. Ifan Oracle ASM instance is killed, power is lost to the machine, or the Oracle ACFS filesystem goes offline for any reason, one of these cached updates may be lost. This losscan result in the display of a message similar to Reported snapshot space usageis inaccurate when acfsutil snap info is run.
Examples
Example 16-95 (page 16-139) shows the use of the acfsutil snap info command ona Linux platform when there is a pending delete operation. When the backgroundprocess finishes the clean up of the deleted snapshot, the delete pending row does notappear in the output.
Oracle ACFS Command-Line Utilities
16-138 Oracle Automatic Storage Management Administrator's Guide

Example 16-95 Using the acfsutil snap info command on Linux
$ /sbin/acfsutil snap info /acfsmounts/critical_appssnapshot name: midday_test2RO snapshot or RW snapshot: RWparent name: /acfsmounts/critical_appssnapshot creation time: Fri Feb 18 06:10:59 2011
snapshot name: payroll_report1RO snapshot or RW snapshot: ROparent name: /acfsmounts/critical_appssnapshot creation time: Tue Feb 22 06:56:34 2011
snapshot name: payroll_report2RO snapshot or RW snapshot: ROparent name: /acfsmounts/critical_appssnapshot creation time: Tue Feb 22 06:57:21 2011
number of snapshots: 3 (active) 1 (delete pending) snapshot space usage: 8383348736
Example 16-96 (page 16-139) shows the use of the acfsutil snap info command ona Windows platform. These commands were run after the acfsutil snap createcommands in Example 16-93 (page 16-137).
Example 16-96 Using the acfsutil snap info command on Windows
$ /sbin/acfsutil snap info e:
snapshot name: snap_1RO snapshot or RW snapshot: RWparent name: e:snapshot creation time: Thu Oct 13 13:24:52 2011
snapshot name: snap_1-1RO snapshot or RW snapshot: RWparent name: snap_1snapshot creation time: Thu Oct 13 13:30:31 2011
number of snapshots: 2 snapshot space usage: 65536
$ /sbin/acfsutil snap info /t e:
e: RWsnap_1 RW e:snap_1-1 RW snap_1
$ /sbin/acfsutil snap info /t snap1 e:
snap_1 RWsnap_1-1 RW snap_1
acfsutil tune
Purpose
The acfsutil tune command displays the value of a specific tunable parameter orall Oracle ACFS tunable parameters, or sets the value of a tunable parameter in apersistent manner on a particular node.
Oracle ACFS Command-Line Utilities
Managing Oracle ACFS with Command-Line Tools 16-139
Syntax and Description
acfsutil tune -hacfsutil tune [tunable_name]acfsutil tune tunable_name=value
acfsutil tune -h displays help text and exits.
Table 16-101 (page 16-140) contains the options available with the acfsutil tunecommand.
Table 16-101 Options for the acfsutil tune command
Option Description
tunable_name Specifies the name of the tunable parameter.
value Specifies the value for a tunable parameter.
The Oracle ACFS tunable parameter AcfsMaxOpenFiles limits the number of openOracle ACFS files on Windows and AIX. Normally you do not have to change thevalue of this tunable parameter; however, you may want to consider increasing thevalue if you have a large working set of files in your Oracle ACFS file systems.
The Oracle ACFS tunable parameter AcfsMaxCachedFiles sets the maximumnumber of closed files that remain cached in memory on Windows and AIX. Normallyyou do not have to change value of this tunable parameter; however, you many toconsider changing the value to get better performance.
Changing a tunable parameter has an immediate effect and persists across restarts.You must be a root user or the Windows Administrator to change the value of atunable parameter.
Examples
The first command prints Oracle ACFS tunable parameters. The second commandchanges the value of a tunable parameter.
Example 16-97 Using the acfsutil tune command
$ /sbin/acfsutil tune
$ acfsutil tune AcfsMaxOpenFiles=50000
advmutil canonical
Purpose
advmutil canonical displays the canonical name of the specified Oracle ADVMdevice name.
Syntax and Description
advmutil -hadvmutil canonical volume_device
advmutil -h displays help text and exits.
Table 16-102 (page 16-141) contains the options available with the advmutilcanonical command.
Oracle ACFS Command-Line Utilities
16-140 Oracle Automatic Storage Management Administrator's Guide

Table 16-102 Options for the advmutil canonical command
Option Description
volume_device Specifies a string identifying an Oracle ADVM volume device.
There are several different formats that can identify an Oracle ADVM volume device,but a normalized, unambiguous (canonical) name should be used when the volumedevice name is used with other commands such as SRVCTL.
For example, on the Windows operating system you can use the following prefixeswith a volume device name: \\.\, \??\, \\?\
The advmutil canonical command would return the canonical name that anotherutility would recognize without having to strip off extra characters. The commandwould most likely be used in a script.
Examples
The following examples show the use of advmutil canonical on a Windowsoperating system. For each example, the command returns the canonical name of thevolume device.
Example 16-98 Using advmutil canonical
[C:\]advmutil canonical asm-volume1-274asm-volume1-274 [C:\]advmutil canonical \\.\asm-volume1-274asm-volume1-274 [C:\]advmutil canonical \\?\asm-volume1-274asm-volume1-274 [C:\]advmutil canonical \??\asm-volume1-274asm-volume1-274
advmutil tune
Purpose
advmutil tune displays the value of a specific Oracle ADVM parameter or sets thevalue of a specific Oracle ADVM parameter.
Syntax and Description
advmutil -hadvmutil tune parameter [= value]
advmutil -h displays help text and exits.
Table 16-103 (page 16-142) contains the options available with the advmutil tunecommand.
Oracle ACFS Command-Line Utilities
Managing Oracle ACFS with Command-Line Tools 16-141

Table 16-103 Options for the advmutil tune command
Option Description
parameter Specifies the parameter for which you want to set or display thevalue.
value Optional value provided to set the value of the specifiedparameter.
If a value is not provided, the advmutil tune command displays the value that iscurrently assigned to the specified parameter.
The parameter that can be specified with advmutil tune is the maximum time inminutes for the deadlock timer (deadlock_timer).
You must be a privileged user to set a parameter.
Note:
The deadlock_timer parameter should only be set by Oracle SupportServices.
Examples
The first example changes the maximum time in minutes for the deadlock timer. Thesecond example queries the current setting of a parameter.
Example 16-99 Using advmutil tune
$ /sbin/advmutil tune deadlock_timer = 20
$ /sbin/advmutil tune deadlock_timer deadlock_timer = 20 (0x14)
advmutil volinfo
Purpose
advmutil volinfo displays information about Oracle ADVM volume devices.
Syntax and Description
advmutil -hadvmutil volinfo [-l][-L] [volume_device]
advmutil -h displays help text and exits.
Table 16-104 (page 16-142) contains the options available with the advmutilvolinfo command.
Table 16-104 Options for the advmutil volinfo command
Option Description
volume_device Specifies an optional volume device name.
Oracle ACFS Command-Line Utilities
16-142 Oracle Automatic Storage Management Administrator's Guide
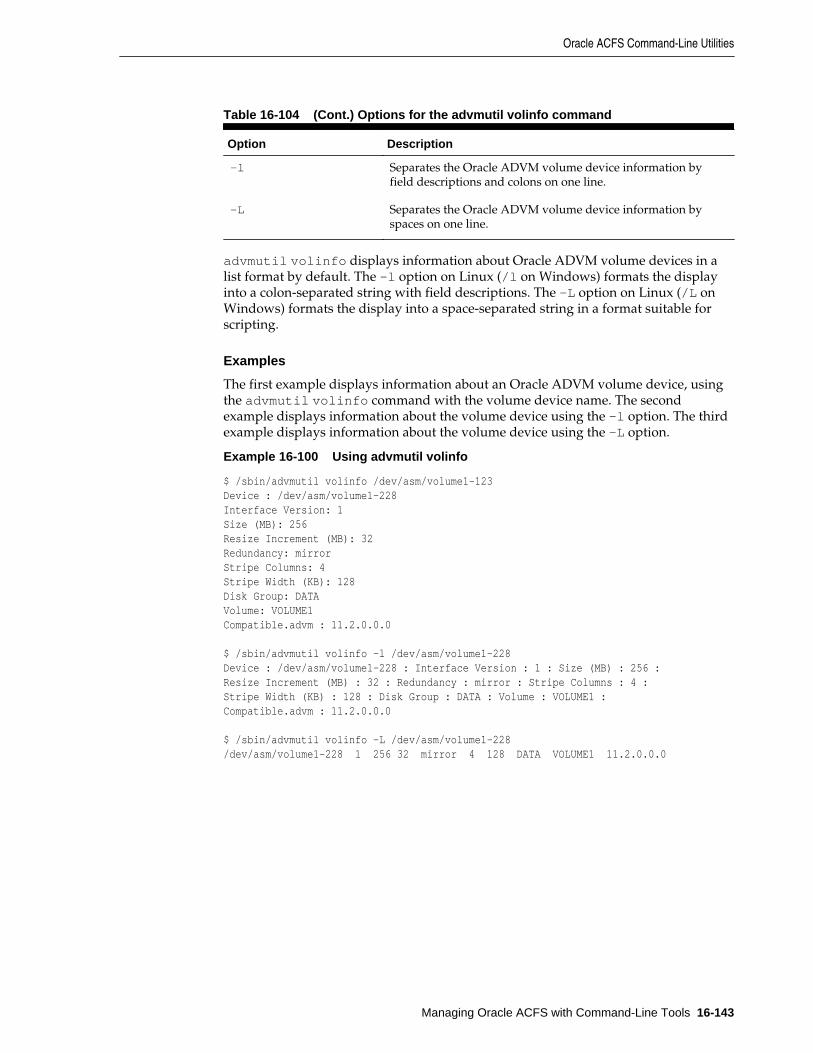
Table 16-104 (Cont.) Options for the advmutil volinfo command
Option Description
-l Separates the Oracle ADVM volume device information byfield descriptions and colons on one line.
-L Separates the Oracle ADVM volume device information byspaces on one line.
advmutil volinfo displays information about Oracle ADVM volume devices in alist format by default. The -l option on Linux (/l on Windows) formats the displayinto a colon-separated string with field descriptions. The -L option on Linux (/L onWindows) formats the display into a space-separated string in a format suitable forscripting.
Examples
The first example displays information about an Oracle ADVM volume device, usingthe advmutil volinfo command with the volume device name. The secondexample displays information about the volume device using the -l option. The thirdexample displays information about the volume device using the -L option.
Example 16-100 Using advmutil volinfo
$ /sbin/advmutil volinfo /dev/asm/volume1-123Device : /dev/asm/volume1-228Interface Version: 1Size (MB): 256Resize Increment (MB): 32Redundancy: mirrorStripe Columns: 4Stripe Width (KB): 128Disk Group: DATAVolume: VOLUME1Compatible.advm : 11.2.0.0.0
$ /sbin/advmutil volinfo -l /dev/asm/volume1-228Device : /dev/asm/volume1-228 : Interface Version : 1 : Size (MB) : 256 : Resize Increment (MB) : 32 : Redundancy : mirror : Stripe Columns : 4 : Stripe Width (KB) : 128 : Disk Group : DATA : Volume : VOLUME1 : Compatible.advm : 11.2.0.0.0
$ /sbin/advmutil volinfo -L /dev/asm/volume1-228/dev/asm/volume1-228 1 256 32 mirror 4 128 DATA VOLUME1 11.2.0.0.0
Oracle ACFS Command-Line Utilities
Managing Oracle ACFS with Command-Line Tools 16-143

Oracle ACFS Command-Line Utilities
16-144 Administrator's Guide

Part IVAdditional Information
Part IV contains the following chapters:
• Creating Database Files in Oracle ASM Using SQL*Plus (page 17-1)
• Understanding Oracle ACFS Advanced Topics (page 18-1)

17Creating Database Files in Oracle ASM
Using SQL*Plus
This appendix describes how to deploy Oracle Automatic Storage Management(Oracle ASM) using SQL*Plus under the following topics:
• Creating a Database that Uses Oracle ASM (page 17-1)
• Creating Tablespaces in Oracle ASM (page 17-2)
• Creating Redo Logs in Oracle ASM (page 17-2)
• Creating Control Files in Oracle ASM (page 17-3)
• Creating Archive Log Files in Oracle ASM (page 17-4)
See Also:
Oracle Database Administrator's Guide for information about using OracleManaged Files (OMF)
Creating a Database that Uses Oracle ASMThe recommended method of creating your database is to use Database ConfigurationAssistant (DBCA). However, if you create your database manually using the CREATEDATABASE statement, then Oracle ASM enables you to create a database and all of itsunderlying files with a minimum of input.
The following example shows the use of the CREATE DATABASE statement, wheredatabase files are created and managed automatically by Oracle ASM. This examplecreates a database with the following Oracle ASM files:
• A SYSTEM tablespace data file in disk group data.
• A SYSAUX tablespace data file in disk group data. The tablespace is locallymanaged with automatic segment-space management.
• A multiplexed online redo log with two online log groups, one member of each indata and fra (fast recovery area).
• If automatic undo management mode is enabled, then an undo tablespace datafile in directory data.
• If you do not specify a value for the CONTROL_FILES initialization parameter,then two control files, one in data and another in fra (fast recovery area). Thecontrol file in data is the primary control file.
Creating Database Files in Oracle ASM Using SQL*Plus 17-1

The following initialization parameter settings are included in the initializationparameter file:
DB_CREATE_FILE_DEST = +dataDB_RECOVERY_FILE_DEST = +fraDB_RECOVERY_FILE_DEST_SIZE = 10G
The following statement can be run at the SQL prompt:
SQL> CREATE DATABASE orcl;
Creating Tablespaces in Oracle ASMWhen Oracle ASM creates a data file for a permanent tablespace (or a temporary filefor a temporary tablespace), the data file is set to auto-extensible with an unlimitedmaximum size and 100 MB default size. You can use the AUTOEXTEND clause tooverride this default extensibility and the SIZE clause to override the default size.
Oracle ASM applies attributes to the data file, as specified in the system defaulttemplate for a data file as shown in the table in "Managing Disk Group Templates(page 5-19)". You can also create and specify your own template.
Files in a tablespace might be in both Oracle ASM files and non-Oracle ASM files dueto the tablespace history. RMAN commands enable non-Oracle ASM files to berelocated to an Oracle ASM disk group and enable Oracle ASM files to be relocated asnon-Oracle ASM files.
For example, if there is a disk group named data, then you can create a tablespacetblspace in that disk group with the following SQL statement:
SQL> CREATE TABLESPACE tblspace DATAFILE '+data';
The following example illustrates the usage of Oracle ASM with defaults. Thisexample enables Oracle ASM to create and manage the tablespace data file for you,using Oracle supplied defaults that are adequate for most situations.
Assume the following initialization parameter setting:
DB_CREATE_FILE_DEST = +data
The following statement creates the tablespace and its data file:
SQL> CREATE TABLESPACE tblspace;
Creating Redo Logs in Oracle ASMOnline redo logs can be created in multiple disk groups, either implicitly in aninitialization parameter file or explicitly in an ALTER DATABASE...ADD LOGFILEstatement. Each online log should have one log member in multiple disk groups. Thefile names for log file members are automatically generated. All partially created redolog files, created because of a system error, are automatically deleted.
For example, if there are disk groups named data1 and data2, you can create a logfile with a member in each disk group with the following SQL statement:
SQL> ALTER DATABASE ADD LOGFILE (+data1,+data2);
The following example creates a log file with a member in each of the disk groupsdata1 and data2. These parameter settings are included in the initializationparameter file:
Creating Tablespaces in Oracle ASM
17-2 Oracle Automatic Storage Management Administrator's Guide
DB_CREATE_ONLINE_LOG_DEST_1 = +data1DB_CREATE_ONLINE_LOG_DEST_2 = +data2
The following statement can be run at the SQL prompt:
SQL> ALTER DATABASE ADD LOGFILE;
Creating Control Files in Oracle ASMControl files can be explicitly created in multiple disk groups. The file names forcontrol files are automatically generated.
If you must specify a control file by name, then you can use alias file names toreference Oracle ASM files and use easy to understand names. Using aliases in thespecification of a control file during its creation enables you to later refer to the controlfile with a user-specified name. An alias can also be specified as a control file name inthe CONTROL_FILES initialization parameter.
When creating a control file, data files and log files that are stored in Oracle ASM diskgroups should be given to the CREATE CONTROLFILE command using the filereference form of their Oracle ASM file names. However, the use of the RESETLOGSoption requires the use of a file creation form for the specification of the log files.
• Creating Control Files in Oracle ASM: Example 1 (page 17-3)
• Creating Control Files in Oracle ASM: Example 2 (page 17-4)
Creating Control Files in Oracle ASM: Example 1The CREATE CONTROLFILE SQL statement in Example 17-1 (page 17-3) is generatedby an ALTER DATABASE BACKUP CONTROLFILE TO TRACE command for a databasewith data files and log files created on disk groups data and fra:
Example 17-1 Creating control files in Oracle ASM using NORESETLOGS
CREATE CONTROLFILE REUSE DATABASE "ORCL" NORESETLOGS ARCHIVELOG MAXLOGFILES 16 MAXLOGMEMBERS 3 MAXDATAFILES 100 MAXINSTANCES 8 MAXLOGHISTORY 292LOGFILE GROUP 1 ( '+DATA/orcl/onlinelog/group_1.261.685366203', '+FRA/orcl/onlinelog/group_1.257.685366205' ) SIZE 50M BLOCKSIZE 512, GROUP 2 ( '+DATA/orcl/onlinelog/group_2.262.685366207', '+FRA/orcl/onlinelog/group_2.258.685366211' ) SIZE 50M BLOCKSIZE 512, GROUP 3 ( '+DATA/orcl/onlinelog/group_3.263.685366213', '+FRA/orcl/onlinelog/group_3.259.685366215' ) SIZE 50M BLOCKSIZE 512-- STANDBY LOGFILEDATAFILE '+DATA/orcl/datafile/system.256.685366089', '+DATA/orcl/datafile/sysaux.257.685366089', '+DATA/orcl/datafile/undotbs1.258.685366091', '+DATA/orcl/datafile/users.259.685366091'
Creating Control Files in Oracle ASM
Creating Database Files in Oracle ASM Using SQL*Plus 17-3

CHARACTER SET WE8MSWIN1252;
Creating Control Files in Oracle ASM: Example 2Example 17-2 (page 17-4) is a CREATE CONTROLFILE SQL statement for a databasewith data files, but uses a RESETLOGS clause, which uses the creation form for logfiles:
Example 17-2 Creating control files in Oracle ASM using RESETLOGS
CREATE CONTROLFILE REUSE DATABASE "ORCL" RESETLOGS ARCHIVELOG MAXLOGFILES 16 MAXLOGMEMBERS 3 MAXDATAFILES 100 MAXINSTANCES 8 MAXLOGHISTORY 292LOGFILE GROUP 1 ( '+DATA/orcl/onlinelog/group_1.261.685366203', '+FRA/orcl/onlinelog/group_1.257.685366205' ) SIZE 50M BLOCKSIZE 512, GROUP 2 ( '+DATA/orcl/onlinelog/group_2.262.685366207', '+FRA/orcl/onlinelog/group_2.258.685366211' ) SIZE 50M BLOCKSIZE 512, GROUP 3 ( '+DATA/orcl/onlinelog/group_3.263.685366213', '+FRA/orcl/onlinelog/group_3.259.685366215' ) SIZE 50M BLOCKSIZE 512-- STANDBY LOGFILEDATAFILE '+DATA/orcl/datafile/system.256.685366089', '+DATA/orcl/datafile/sysaux.257.685366089', '+DATA/orcl/datafile/undotbs1.258.685366091', '+DATA/orcl/datafile/users.259.685366091'CHARACTER SET WE8MSWIN1252;
Creating Archive Log Files in Oracle ASMDisk groups can be specified as archive log destinations in the LOG_ARCHIVE_DESTand LOG_ARCHIVE_DEST_n initialization parameters. When destinations arespecified in this manner, the archive log file names are created in defaultsubdirectories with unique names. However, all LOG_ARCHIVE_DEST_n parametersmust have a unique string. To enter the same disk group more than once,subdirectories must be used. For example, you can set LOG_ARCHIVE_DEST_n asfollows:
LOG_ARCHIVE_DEST_1 = 'LOCATION=+FRA/orcl/arc_1'LOG_ARCHIVE_DEST_2 = 'LOCATION=+FRA/orcl/arc_2'...
If LOG_ARCHIVE_DEST is set to a disk group name, LOG_ARCHIVE_FORMAT isignored. Unique filenames for archived logs are automatically created by OracleDatabase under default subdirectories. If LOG_ARCHIVE_DEST is set to a directory in adisk group, LOG_ARCHIVE_FORMAT has its normal semantics for the file alias. Theunderlying file is still generated in the default directories for the disk group with asystem generated name.
Creating Archive Log Files in Oracle ASM
17-4 Oracle Automatic Storage Management Administrator's Guide

You can also set the DB_RECOVERY_FILE_DEST initialization parameter to a diskgroup destination. In Example 17-3 (page 17-5), archive log files are generated withARCHIVELOG mode enabled, DB_RECOVERY_FILE_DEST set to the +FRA disk group,and ORCL is the value of the DB_UNIQUE_NAME parameter.
See Also:
Oracle Database Administrator's Guide for information about managing archivedredo log files
Example 17-3 Archived log files in an Oracle ASM disk group
SQL> SHOW PARAMETER DB_RECOVERY_FILE_DEST
NAME TYPE VALUE------------------------------------ ----------- ------------------------------db_recovery_file_dest string +FRA
SQL> SELECT SUBSTR(name,1,64) name FROM V$ARCHIVED_LOG; NAME----------------------------------------------------------------+FRA/ORCL/ARCHIVELOG/2013_06_24/thread_1_seq_112.260.818960623+FRA/ORCL/ARCHIVELOG/2013_06_24/thread_1_seq_113.261.818978423+FRA/ORCL/ARCHIVELOG/2013_06_25/thread_1_seq_114.262.818993031+FRA/ORCL/ARCHIVELOG/2013_06_25/thread_1_seq_115.263.819032439+FRA/ORCL/ARCHIVELOG/2013_06_25/thread_1_seq_116.264.819047121+FRA/ORCL/ARCHIVELOG/2013_06_25/thread_1_seq_117.265.819064815+FRA/ORCL/ARCHIVELOG/2013_06_26/thread_1_seq_118.266.819079417...
Creating Archive Log Files in Oracle ASM
Creating Database Files in Oracle ASM Using SQL*Plus 17-5

Creating Archive Log Files in Oracle ASM
17-6 Administrator's Guide

18Understanding Oracle ACFS Advanced
Topics
This appendix discusses Oracle Automatic Storage Management Cluster File System(Oracle ACFS) advanced topics, including limits, advanced administration, andtroubleshooting.
See Also:
Articles available at My Oracle Support (https://support.oracle.com)for information about Oracle ACFS and Oracle ADVM.
This appendix contains the following topics:
• Limits of Oracle ACFS (page 18-1)
• Limits of Oracle ADVM (page 18-3)
• Oracle ACFS Drivers Resource Management (page 18-4)
• Oracle ACFS Registry Resource Management (page 18-4)
• Oracle ACFS File System Resource Management (page 18-4)
• Oracle ACFS and Oracle Restart (page 18-5)
• Oracle ACFS Driver Commands (page 18-5)
• Oracle ACFS Plug-in Generic Application Programming Interface (page 18-7)
• Oracle ACFS Tagging Generic Application Programming Interface (page 18-10)
• Understanding Oracle ACFS I/O Failure Console Messages (page 18-16)
For an overview of Oracle ACFS, see Introducing Oracle ACFS and Oracle ADVM(page 11-1).
Limits of Oracle ACFSThe limits of Oracle ACFS are discussed in this section.
The topics contained in this section are:
• Oracle ACFS Disk Space Usage (page 18-2)
• Oracle ACFS Error Handling (page 18-2)
• Oracle ACFS and NFS (page 18-3)
Understanding Oracle ACFS Advanced Topics 18-1
Note:
Oracle ACFS does not support hard links on directories.
Oracle ACFS Disk Space UsageOracle ACFS supports 64 mounted file systems on 32-bit systems, and 256 mounts on64-bit systems. However, more file systems can be mounted if there is adequatememory.
Oracle ACFS supports 2^40 (1 trillion) files in a file system. More than 4 billion fileshave been tested. 32-bit Linux systems are limited to 2^26 (67 million) files. There is noabsolute limit to the number of directories in a file system; the limit is based onhardware resources.
Oracle ACFS supports 1023 snapshots on 64-bit systems. These snapshots can be anycombination of read-only and read-write snapshots. To support the creation of 1023snapshots, the disk group compatibility attribute for ADVM must be set to 12.1.0.2 orhigher. Before or after setting COMPATIBLE.ADVM to 12.1.0.2, all existing snapshotsmust be deleted or the limit remains at 63 snapshots.
Oracle ACFS preallocates large user files to improve performance when writing data.This storage is not returned when the file is closed, but it is returned when the file isdeleted. Oracle ACFS also allocates local metadata files as nodes mount the file systemfor the first time. This can result in a mount failing due to an out of space error, andmuch of this storage must be contiguous. This storage is approximately 64-128megabytes per node.
Oracle ACFS also keeps local bitmaps available to reduce contention on the globalstorage bitmap when searching for free space. This disk space is reported as in use bytools such as the Linux df command even though some space may not actually beallocated yet. This local storage pool can be as large as 128 megabytes per node andcan allow space allocations to succeed, even though commands, such as df, report lessspace available than what is being allocated.
Oracle ACFS Error HandlingOracle ASM instance failure or forced shutdown while Oracle ACFS or another filesystem is using an Oracle ADVM volume results in I/O failures. The volumes must beclosed and re-opened to access the volume again. This requires dismounting any filesystems that were mounted when the local Oracle ASM instance failed. After theinstance is restarted, the corresponding disk group must be mounted with the volumeenabled followed by a remount of the file system. See "Deregistering_ Dismounting_and Disabling Volumes and Oracle ACFS File Systems (page 16-20)".
If any file systems are currently mounted on Oracle ADVM volume files, theSHUTDOWN ABORT command should not be used to terminate the Oracle ASM instancewithout first dismounting those file systems. Otherwise, applications encounter I/Oerrors and Oracle ACFS user data and metadata being written at the time of thetermination may not be flushed to storage before the Oracle ASM storage is fenced. Ifthere is not time to permit the file system to dismount, then you should run two sync(1) commands to flush cached file system data and metadata to persistent storagebefore issuing the SHUTDOWN ABORT operation.
Oracle ACFS does not interrupt the operating system environment when a metadatawrite fails, whether due to Oracle ASM instance failure or storage failure. Instead,Oracle ACFS isolates errors to a specific file system, putting it in an offline error state.
Limits of Oracle ACFS
18-2 Oracle Automatic Storage Management Administrator's Guide

The only operation that succeeds on that node for that file system from that pointforward is a dismount operation. Another node recovers any outstanding metadatatransactions, assuming it can write the metadata out to the storage. It is possible toremount the file system on the offlined node after the I/O condition is resolved.
It might not be possible for an administrator to dismount a file system while it is in theoffline error state if there are processes referencing the file system, such as a directoryof the file system being the current working directory for a process. To dismount thefile system in this case it would be necessary to identify all processes on that node withreferences to files and directories on the file system and cause them to exit. The Linuxfuser or lsof commands or Window handle command list information aboutprocesses and open files.
If Oracle ACFS detects inconsistent file metadata returned from a read operation,based on checksum or expected type comparisons, Oracle ACFS takes the appropriateaction to isolate the affected file system components and generate a notification thatfsck or acfschkdsk should be run as soon as possible. Each time the file system ismounted a notification is generated with a system event logger message until fsck oracfschkdsk is run.
Oracle ACFS and NFSWhen exporting file systems through NFS on Linux, use the -fsid=num exportsoption. This option forces the file system identification portion of the file handle usedto communicate with NFS clients to be the specified number instead of a numberderived from the major and minor number of the block device on which the filesystem is mounted. You can use any 32-bit number for num, but it must be uniqueamong all the exported file systems. In addition, num must be unique among membersof the cluster and must be the same num on each member of the cluster for a given filesystem. This is needed because Oracle ASM DVM block device major numbers are notguaranteed to be the same across restarts of the same node or across different nodes inthe cluster.
When using High Availability NFS for Grid Home Clusters (HANFS), HANFSautomatically handles the situation described in the previous paragraph. Forinformation about HANFS, refer to "High Availability Network File Storage for OracleGrid Infrastructure (page 11-37)".
Limits of Oracle ADVMThe limits of Oracle ADVM and these discussed in this section.
The default configuration for an Oracle ADVM volume is 8 columns and a 1 MB stripewidth. The volume extent size is 8 megabytes (MB) if the disk group allocation unit(AU) is less than or equal to 8 MB. If the AU size is greater than 8 MB, then the OracleADVM volume extent size is equivalent to the disk group AU size.
Oracle ADVM writes data as 1 megabyte (MB) stripe chunks in round robin fashion toeach column and fills a stripe set of eight 8 MB extents with 64 stripe chunks beforemoving to a second stripe set of eight 8 MB extents for volumes greater than 64 MB.Setting the number of columns on an Oracle ADVM dynamic volume to 1 effectivelyturns off striping for the Oracle ADVM volume.
On Linux platforms Oracle ASM Dynamic Volume Manager (Oracle ADVM) volumedevices are created as block devices regardless of the configuration of the underlyingstorage in the Oracle ASM disk group. Do not use raw (8) to map Oracle ADVMvolume block devices into raw volume devices.
Limits of Oracle ADVM
Understanding Oracle ACFS Advanced Topics 18-3
For information about ASMCMD commands to manage Oracle ADVM volumes, referto Managing Oracle ADVM with ASMCMD (page 15-1).
Oracle ACFS Drivers Resource ManagementOracle ACFS, Oracle ADVM, and OKS drivers are loaded during the start of theOracle Grid Infrastructure stack, except in an Oracle Restart configuration. The driversremain loaded until the system is rebooted, at which point, they are loaded againwhen the Oracle Grid Infrastructure stack restarts.
For information about commands to manage Oracle ACFS, Oracle ADVM, and OKSdrivers, refer to "Oracle ACFS Driver Commands (page 18-5)".
Oracle ACFS Registry Resource ManagementThe Oracle ACFS registry resource is supported only for Oracle Grid Infrastructurecluster configurations; it is not supported for Oracle Restart configurations. See"Oracle ACFS and Oracle Restart (page 18-5)".
With Oracle ASM 12c Release 1 (12.1), the Oracle ACFS registry uses the standardsingle file system resource available through the SRVCTL file system interface. Formore information, refer to "Oracle ACFS File System Resource Management(page 18-4)". Using SRVCTL enables applications to depend on registered filesystems, such as for management of the registered file systems using srvctlfilesystem. By default, acfsutil registry shows only file systems that are set tobe always mounted, with the AUTO_START attribute set to always.
The Oracle ACFS registry requires root privileges to register and delete file systems,however, other users can be entitled to start and stop (mount and unmount) the filesystems by use of the user option.
Oracle ACFS File System Resource ManagementThe Oracle ACFS file system resource is supported only for Oracle Grid Infrastructurecluster configurations; it is not supported for Oracle Restart configurations. See"Oracle ACFS and Oracle Restart (page 18-5)".
Oracle ASM Configuration Assistant (ASMCA) facilitates the creation of Oracle ACFSfile system resources (ora.diskgroup.volume.acfs). During database creationwith Database Configuration Assistant (DBCA), the Oracle ACFS file system resourceis included in the dependency list of its associated disk group so that stopping the diskgroup also attempts to stop any dependent Oracle ACFS file systems.
An Oracle ACFS file system resource is typically created for use with applicationresource dependency lists. For example, if an Oracle ACFS file system is configuredfor use as an Oracle Database home, then a resource created for the file system can beincluded in the resource dependency list of the Oracle Database application. Thisdependency causes the file system and stack to be automatically mounted due to thestart action of the database application.
The start action for an Oracle ACFS file system resource is to mount the file system.This Oracle ACFS file system resource action includes confirming that the associatedfile system storage stack is active and mounting the disk group, enabling the volumefile, and creating the mount point if necessary to complete the mount operation. If thefile system is successfully mounted, the state of the resource is set to online;otherwise, it is set to offline.
Oracle ACFS Drivers Resource Management
18-4 Oracle Automatic Storage Management Administrator's Guide

The check action for an Oracle ACFS file system resource verifies that the file system ismounted. It sets the state of the resource to online status if mounted, otherwise thestatus is set to offline.
The stop action for an Oracle ACFS file system resource attempts to dismount the filesystem. If the file system cannot be dismounted due to open references, the stop actiondisplays and logs the process identifiers for any processes holding a reference.
Use of the srvctl start and stop actions to manage the Oracle ACFS file systemresources maintains their correct resource state.
Oracle ACFS and Oracle RestartOracle Restart does not support root-based Oracle ACFS resources for this release.Consequently, the following operations are not automatically performed:
• Loading Oracle ACFS drivers
You can load or unload the drivers manually with the acfsload command. Formore information, refer to "acfsload (page 18-5)".
• Mounting Oracle ACFS file systems listed in the Oracle ACFS mount registry
You can mount Oracle ACFS file systems manually with the mount command.For information, refer to Managing Oracle ACFS with Command-Line Tools(page 16-1).
• Mounting resource-based Oracle ACFS database home file systems
The Oracle ACFS resources associated with these actions are not created for OracleRestart configurations.
While Oracle ACFS resource management is fully supported for Oracle GridInfrastructure configurations, the Oracle ACFS resource-based management actionsmust be replaced with alternative, sometimes manual, operations in Oracle Restartconfigurations.
Oracle ACFS Driver CommandsThis section describes the Oracle ACFS driver commands that are used duringinstallation to manage Oracle ACFS, Oracle ADVM, and Oracle Kernel Services Driver(OKS) drivers. These commands are located in the /bin directory of the Oracle GridInfrastructure home.
• acfsload (page 18-5)
• acfsdriverstate (page 18-6)
acfsload
Purpose
acfsload loads or unloads Oracle ACFS, Oracle ADVM, and Oracle Kernel ServicesDriver (OKS) drivers.
Syntax
acfsload { start | stop } [ -s ]
Oracle ACFS and Oracle Restart
Understanding Oracle ACFS Advanced Topics 18-5

Table 18-1 (page 18-6) contains the options available with the acfsload command.
Table 18-1 Options for the acfsload command
Option Description
start Loads the Oracle ACFS, Oracle ADVM, and OKS drivers.
stop Unloads the Oracle ACFS, Oracle ADVM, and OKS drivers.
-s Operate in silent mode.
Description
You can use acfsload to manually load or unload the Oracle ACFS, Oracle ADVM,and OKS drivers.
Before unloading drivers with the stop option, you must dismount Oracle ACFS filesystems and shut down Oracle ASM. For information about dismounting Oracle ACFSfile systems, refer to "Deregistering_ Dismounting_ and Disabling Volumes and OracleACFS File Systems (page 16-20)".
root or administrator privilege is required to run acfsload.
Examples
The following is an example of the use of acfsload to stop (unload) all drivers.
# acfsload stop
acfsdriverstate
Purpose
acfsdriverstate provides information on the current state of the Oracle ACFS,Oracle ADVM, and Oracle Kernel Services Driver (OKS) drivers.
Syntax
acfsdriverstate [-orahome ORACLE_HOME ] { installed | loaded | version | supported }
Table 18-2 (page 18-6) contains the options available with the acfsdriverstatecommand.
Table 18-2 Options for the acfsdriverstate command
Option Description
-orahome ORACLE_HOME Specifies the Oracle Grid Infrastructure home in which the userhas permission to execute the acfsdriverstate command.
installed Determines whether Oracle ACFS is installed on the system.
loaded Determines whether the Oracle ADVM, Oracle ACFS, and OKSdrivers are loaded in memory.
version Reports the currently installed version of the Oracle ACFSsystem software.
Oracle ACFS Driver Commands
18-6 Oracle Automatic Storage Management Administrator's Guide
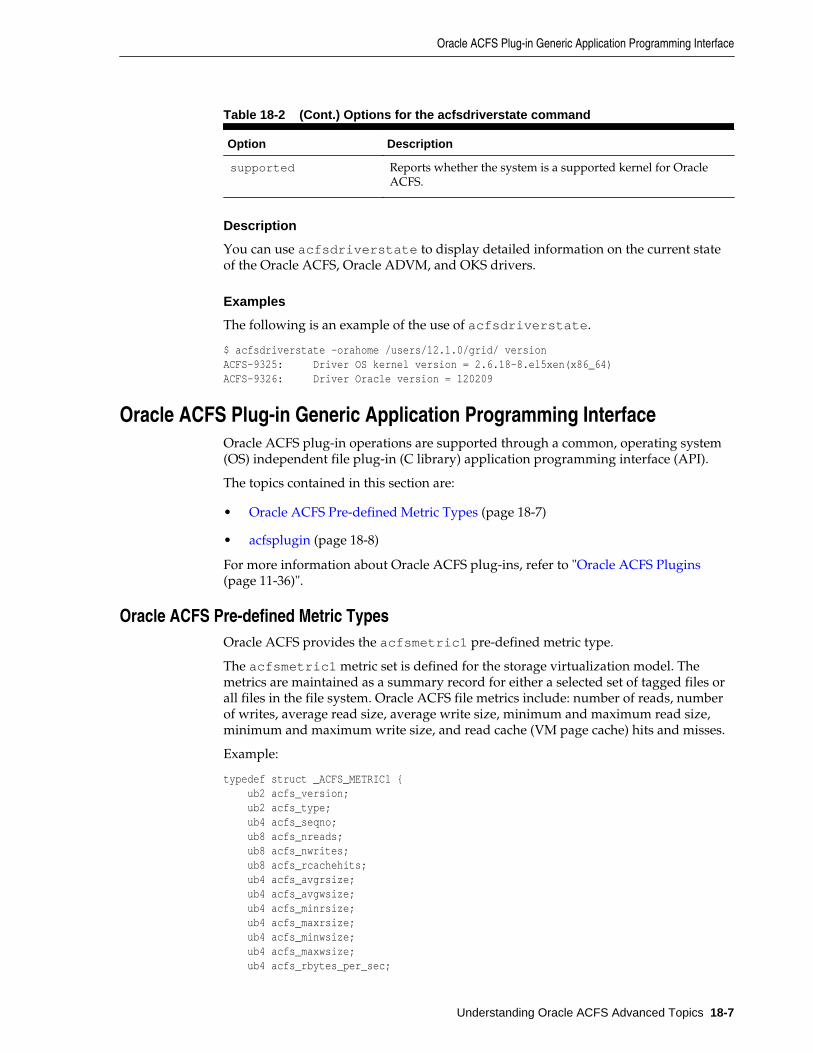
Table 18-2 (Cont.) Options for the acfsdriverstate command
Option Description
supported Reports whether the system is a supported kernel for OracleACFS.
Description
You can use acfsdriverstate to display detailed information on the current stateof the Oracle ACFS, Oracle ADVM, and OKS drivers.
Examples
The following is an example of the use of acfsdriverstate.
$ acfsdriverstate -orahome /users/12.1.0/grid/ versionACFS-9325: Driver OS kernel version = 2.6.18-8.el5xen(x86_64)ACFS-9326: Driver Oracle version = 120209
Oracle ACFS Plug-in Generic Application Programming InterfaceOracle ACFS plug-in operations are supported through a common, operating system(OS) independent file plug-in (C library) application programming interface (API).
The topics contained in this section are:
• Oracle ACFS Pre-defined Metric Types (page 18-7)
• acfsplugin (page 18-8)
For more information about Oracle ACFS plug-ins, refer to "Oracle ACFS Plugins(page 11-36)".
Oracle ACFS Pre-defined Metric TypesOracle ACFS provides the acfsmetric1 pre-defined metric type.
The acfsmetric1 metric set is defined for the storage virtualization model. Themetrics are maintained as a summary record for either a selected set of tagged files orall files in the file system. Oracle ACFS file metrics include: number of reads, numberof writes, average read size, average write size, minimum and maximum read size,minimum and maximum write size, and read cache (VM page cache) hits and misses.
Example:
typedef struct _ACFS_METRIC1 { ub2 acfs_version; ub2 acfs_type; ub4 acfs_seqno; ub8 acfs_nreads; ub8 acfs_nwrites; ub8 acfs_rcachehits; ub4 acfs_avgrsize; ub4 acfs_avgwsize; ub4 acfs_minrsize; ub4 acfs_maxrsize; ub4 acfs_minwsize; ub4 acfs_maxwsize; ub4 acfs_rbytes_per_sec;
Oracle ACFS Plug-in Generic Application Programming Interface
Understanding Oracle ACFS Advanced Topics 18-7

ub4 acfs_wbytes_per_sec; ub8 acfs_timestamp; ub8 acfs_elapsed_secs;} ACFS_METRIC1;
acfsplugin
Purpose
The acfsplugin application programming interface (API) sends and receivesmessages to and from the local plug-in enabled Oracle ACFS driver from theapplication plug-in module.
Syntax
sb8 acfsplugin_metrics(ub4 metric_type, ub1 *metrics, ub4 metric_buf_len, oratext *mountp );
Description
The Oracle ACFS plug-in API is used by an Oracle ACFS application plug-in moduleto retrieve metrics from the Oracle ACFS driver. The Oracle ACFS driver must first beenabled for plug-in communication using the acfsutil plugin enable command.The selected application plug-in metric type model must match the plug-inconfiguration defined with the Oracle ACFS plug-in enable command. For informationabout the acfsutil plugin enable command, refer to "acfsutil plugin enable(page 16-126)". The application must provide a buffer large enough to store the metricstructures described in "Oracle ACFS Pre-defined Metric Types (page 18-7)".
If the provided buffer is NULL and metric_buf_len = 0, the return value is the sizerequired to hold all the currently collected metrics. The application can first queryOracle ACFS to see how big a buffer is required, then allocate a buffer of the necessarysize to pass back to Oracle ACFS.
The mount path must be provided to the API to identify the plug-in enabled OracleACFS file system that is being referenced.
A nonnegative value is returned for success: 0 for success with no more metrics tocollect, 1 to indicate that more metrics are available, or 2 to indicate that no newmetrics were collected during the interval. In the case of an error, a negative value isreturned and errno is set on Linux environments or SetLastError is called onWindows.
System administrator or Oracle ASM administrator privileges are required to send andreceive messages to and from the plug-in enabled Oracle ACFS file system driver.
Writing Applications
To use the plugin API, applications must include the C header file acfslib.h whichdefines the API functions and structures.
#include <acfslib.h>
When building the application executable, the application must be linked with theacfs12 library. Check the platform-specific documentation for information aboutenvironment variables that must be defined. For example:
Oracle ACFS Plug-in Generic Application Programming Interface
18-8 Oracle Automatic Storage Management Administrator's Guide
export LD_LIBRARY_PATH=${ORACLE_HOME}/lib:${LD_LIBRARY_PATH}
Then when linking, add the -lacfs12 flag.
Examples
In Example 18-1 (page 18-9), the command enables an Oracle ACFS file systemmounted on /humanresources for the plug-in service.
Example 18-1 Application Plug-in for Storage Visibility: Poll Model
$ /sbin/acfsutil plugin enable -m acfsmetric1 -t HRDATA /humanresources
With this command, the application plug-in polls the Oracle ACFS plug-in enableddriver for summary metrics associated with files tagged with HRDATA. The applicationcode includes the following:
#include <acfslib.h>.../* allocate message buffers */ACFS_METRIC1 *metrics = malloc (sizeof(ACFS_METRIC1));/* poll for metric1 data */while (condition) { /* read next summary message from ACFS driver */ if ((rc = acfsplugin_metrics(ACFS_METRIC_TYPE1,(ub1*)metrics,sizeof(*metrics), mountp)) < 0) { perror("….Receive failure … "); break; } /* print message data */ printf ("reads %8llu ", metrics->acfs_nreads); printf("writes %8llu ", metrics->acfs_nwrites); printf("avg read size %8u ", metrics->acfs_avgrsize); printf("avg write size %8u ", metrics->acfs_avgwsize); printf("min read size %8u ", metrics->acfs_minrsize); printf("max read size %8u ", metrics->acfs_maxrsize); ... sleep (timebeforenextpoll);}
In Example 18-2 (page 18-9), the command enables an Oracle ACFS file systemmounted on /humanresources for the plug-in service.
Example 18-2 Application Plug-in for File Content: Post Model
$ /sbin/acfsutil plugin enable -m acfsmetric1 -t HRDATA -i 5m /humanresources
With this command, every 5 minutes the Oracle ACFS plug-in enabled driver posts filecontent metrics associated with files tagged with HRDATA. In the application code, thecall to acfsplugin_metrics() is blocked until the metrics are posted. Theapplication code includes the following:
#include <acfslib.h>... ACFS_METRIC1 *metrics = malloc (sizeof(ACFS_METRIC1)); /* Wait for metric Data */ while (condition) { /* Wait for next file content posting from ACFS driver */ rc = ACFS_PLUGIN_MORE_AVAIL; /* A return code of 1 indicates that more metrics are available
Oracle ACFS Plug-in Generic Application Programming Interface
Understanding Oracle ACFS Advanced Topics 18-9

* in the current set of metrics. */ while( rc == ACFS_PLUGIN_MORE_AVAIL) { /* This call blocks until metrics are available. */ rc = acfsplugin_metrics(ACFS_METRIC_TYPE1,(ub1*)metrics,sizeof(*metrics), mountp); if (rc < 0) { perror("….Receive failure … "); break; } else if (rc == ACFS_PLUGIN_NO_NEW_METRICS) { printf("No new metrics available."); break; } if (last_seqno != metrics->acfs_seqno-1 ) { printf("Warning: Unable to keep up with metrics collection."); printf("Missed %d sets of posted metrics.", (metrics->acfs_seqno-1)-last_seqno); }
/* print message data */ printf ("reads %8llu ", metrics->acfs_nreads); printf("writes %8llu ", metrics->acfs_nwrites); printf("avg read size %8u ", metrics->acfs_avgrsize); printf("avg write size %8u ", metrics->acfs_avgwsize); printf("min read size %8u ", metrics->acfs_minrsize); printf("max read size %8u ", metrics->acfs_maxrsize); ... last_seqno = metrics->acfs_seqno; } } free(metrics);
Oracle ACFS Tagging Generic Application Programming InterfaceOracle ACFS tagging operations are supported through a common operating system(OS) independent file tag (C library) application programming interface (API).
An Oracle ACFS tagging API demonstration utility is provided. The demo providesinstructions to build the utility with a makefile on each supported platform.
On Solaris, Oracle ACFS tagging APIs can set tag names on symbolic link files, butbackup and restore utilities do not save the tag names that are explicitly set on thesymbolic link files. Also, symbolic link files lose explicitly set tag names if they havebeen moved, copied, tarred, or paxed.
The following files are included:
• $ORACLE_HOME/usm/public/acfslib.h
• $ORACLE_HOME/usm/demo/acfstagsdemo.c
• $ORACLE_HOME/usm/demo/Makefile
Linux, Solaris, or AIX makefile for creating the demo utility.
• $ORACLE_HOME/usm/demo/MAKEFILE
Windows demo utility MAKEFILE (for use by the nmake utility) to create thedemo utility.
Oracle ACFS Tagging Generic Application Programming Interface
18-10 Oracle Automatic Storage Management Administrator's Guide

The topics contained in this section are:
• Oracle ACFS Tag Name Specifications (page 18-11)
• Oracle ACFS Tagging Error Values (page 18-11)
• acfsgettag (page 18-12)
• acfslisttags (page 18-13)
• acfsremovetag (page 18-14)
• acfssettag (page 18-15)
Oracle ACFS Tag Name SpecificationsAn Oracle ACFS tag name can be from 1 to 32 characters in length and consist of acombination of the following set of characters only:
• uppercase and lowercase alphabetic characters (A-Z, a-z)
• numbers (0-9)
• hyphen (-)
• underscore (_)
• blank (space)
Oracle ACFS Tagging Error ValuesThe following are the values for Linux, Solaris, or AIX errno in case of failure:
• EINVAL – The tag name syntax is invalid or too long.
• ENODATA – The tag name does not exist for this file or directory.
• ERANGE - The value buffer is too small to hold the returned value.
• EACCES – Search permission denied for a directory in the path prefix of path; orthe user does not have permission on the file to read tag names.
• ENAMETOOLONG – The file name is too long.
• ENOENT – A component of path does not exist.
The following are the values that Windows GetLastError() returns in case offailure:
• ERROR_INVALID_PARAMETER - The tag name does not exist for this file ordirectory or the tag name is syntactically incorrect.
• ERROR_INSUFFICIENT_BUFFER - The value buffer is too small to hold thereturned value.
• ERROR_ACCESS_DENIED - Search permission denied for a directory in the pathprefix of path; or the user does not have permission on the file to read tag names.
• ERROR_INVALID_NAME - The file name or path name is too long or is malformed.
• ERROR_FILE_NOT_FOUND - The system cannot find the file specified.
Oracle ACFS Tagging Generic Application Programming Interface
Understanding Oracle ACFS Advanced Topics 18-11
acfsgettag
Purpose
Retrieves the value associated with an Oracle ACFS file tag name.
Syntax
sb8 acfsgettag(const oratext *path, const oratext *tagname, oratext *value, size_t size, ub4 flags);
Table 18-3 (page 18-12) contains the options available with the acfsgettagcommand.
Table 18-3 Options for the acfsgettag command
Option Description
path Specifies a pointer to a file or directory path name.
tagname Specifies a pointer to a NULL-terminated Oracle ACFS tagname in the format of a valid tag name for regular files anddirectories.
value Specifies the memory buffer to retrieve the Oracle ACFS tagvalue.
size Specifies the byte size of the memory buffer that holds thereturned Oracle ACFS tag value.
flags Reserved for future use. Must be set to 0.
Description
The acfsgettag library call retrieves the value string of the Oracle ACFS tag name.The return value is the nonzero byte length of the output value string on success orACFS_TAG_FAIL on failure. For information about operating system-specificextended error information values that may be obtained when an ACFS_TAG_FAIL isreturned, refer to "Oracle ACFS Tagging Error Values (page 18-11)".
Because Oracle ACFS tag names currently use a fixed value string of 0 (the numberzero character with a byte length of one) the value is the same for all Oracle ACFS tagname entries. The size of the value buffer can be determined by calling acfsgettagwith a NULL value and 0 size. The library call returns the byte size necessary tohold the value string of the tag name. acfsgettag returns an ENODATA error whenthe tag name is not set on the file.
Examples
Example 18-3 (page 18-12) is an example of the use of the acfsgettag function call.
Example 18-3 Retrieving a file tag value
sb8 rc;size_t size;oratext value[2];const oratext *path = "/mnt/dir1/dir2/file2";const oratext *tagname = "patch_set_11_1";
Oracle ACFS Tagging Generic Application Programming Interface
18-12 Oracle Automatic Storage Management Administrator's Guide

size = 1; (byte)memset((void *)value, 0, 2*sizeof(oratext));rc = acfsgettag (path, tagname, value, size, 0);If (rc == ACFS_TAG_FAIL) /* check errno or GetLastError() to process error returns /*
acfslisttags
Purpose
Lists the tag names assigned to an Oracle ACFS file. For additional information, referto "acfsutil tag info (page 16-54)".
Syntax
sb8 acfslisttags(const oratext *path, oratext *list, size_t size, ub4 flags);
Table 18-3 (page 18-12) contains the options available with the acfslisttagscommand.
Table 18-4 Options for the acfslisttags command
Option Description
path Specifies a pointer to a file or directory path name.
list Specifies a pointer to a memory buffer containing the list ofOracle ACFS tag names.
size Specifies the size (bytes) of the memory buffer that holds thereturned Oracle ACFS tag name list.
flags Reserved for future use. Must be set to 0.
Description
The acfslisttags library call retrieves all the tag names assigned to an OracleACFS file. acfslisttags returns a list of tag names into the list memory buffer.Each tag name in the list is terminated with a NULL. If a file has no tag names then thelist is empty. The memory buffer must be large enough to hold all of the tag namesassigned to an Oracle ACFS file.
An application must allocate a buffer and specify a list size large enough to hold all ofthe tag names assigned to an Oracle ACFS file. An application can optionally obtainthe list buffer size needed by first calling acfslisttags with a zero value buffer sizeand NULL list buffer. The application then checks for nonzero, positive list size returnvalues to allocate a list buffer and call acfslisttags to retrieve the actual tag namelist.
On success, the return value is a positive byte size of the tag name list or 0 when thefile has no tag names. On failure, the return value is ACFS_TAG_FAIL. Forinformation about operating system-specific extended error information values thatmay be obtained when an ACFS_TAG_FAIL is returned, refer to "Oracle ACFSTagging Error Values (page 18-11)".
Oracle ACFS Tagging Generic Application Programming Interface
Understanding Oracle ACFS Advanced Topics 18-13
Examples
Example 18-4 (page 18-14) is an example of the use of the acfslisttags functioncall.
Example 18-4 Listing file tags
sb8 listsize;sb8 listsize2;const oratext *path = "/mnt/dir1/dir2/file2";oratext *list;/* Determine size of buffer to store list */listsize = acfslisttags (path, NULL, 0, 0);if (listsize == ACFS_TAG_FAIL)/* retrieve the error code and return */
if (listsize){ list = malloc(listsize) /* Retrieve list of tag names */ listsize2 = acfslisttags (path, list, listsize, 0); if (listsize2 == ACFS_TAG_FAIL) /* check errno or GetLastError() to process error returns */ if (listsize2 > 0) /* file has a list of tag names to process */ else /* file has no tag names. */}else/* file has no tag names. */
acfsremovetag
Purpose
Removes the tag name on an Oracle ACFS file.
Syntax
sb8 acfsremovetag(const oratext *path, const oratext *tagname, ub4 flags);
Table 18-5 (page 18-14) contains the options available with the acfsremovetagcommand.
Table 18-5 Options for the acfsremovetag command
Option Description
path Specifies a pointer to a file or directory path name.
tagname Specifies a pointer to a NULL-terminated Oracle ACFS tagname in the format of a valid tag name for regular files anddirectories.
flags Reserved for future use. Must be set to 0.
Description
The acfsremovetag library call removes a tag name on an Oracle ACFS file. Thereturn value is ACFS_TAG_SUCCESS or ACFS_TAG_FAIL. For information about
Oracle ACFS Tagging Generic Application Programming Interface
18-14 Oracle Automatic Storage Management Administrator's Guide

operating system-specific extended error information values that may be obtainedwhen an ACFS_TAG_FAIL is returned, refer to "Oracle ACFS Tagging Error Values(page 18-11)".
Examples
Example 18-5 (page 18-15) is an example of the use of the acfsremovetag functioncall.
Example 18-5 Removing file tags
sb8 rc;const oratext *path= "/mnt/dir1/dir2/file2";const oratext *tagname = "patch_set_11_1";rc = acfsremovetag (path, tagname, 0);If (rc == ACFS_TAG_FAIL) /* check errno or GetLastError() to process error returns */
acfssettag
Purpose
Sets the tag name on an Oracle ACFS file. For additional information, refer to "acfsutiltag set (page 16-55)".
Syntax
sb8 acfssettag(const oratext *path, const oratext *tagname, oratext *value, size_t size, ub4 flags);
Table 18-6 (page 18-15) contains the options available with the acfssettagcommand.
Table 18-6 Options for the acfssettag command
Option Description
path Specifies a pointer to a file or directory path name.
tagname Specifies a pointer to a NULL-terminated Oracle ACFS tagname in the format of a valid tag name for regular files anddirectories.
value Specifies the memory buffer to set the Oracle ACFS tag value.
size Specifies the byte size of the Oracle ACFS tag value.
flags Reserved for future use. Must be set to 0.
Description
The acfssettag library call sets a tag name on an Oracle ACFS file. The return valueis ACFS_TAG_SUCCESS or ACFS_TAG_FAIL. For information about operating system-specific extended error information values that may be obtained when anACFS_TAG_FAIL is returned, refer to "Oracle ACFS Tagging Error Values(page 18-11)".
Oracle ACFS Tagging Generic Application Programming Interface
Understanding Oracle ACFS Advanced Topics 18-15

Because Oracle ACFS tag names currently use a fixed value string of 0 (the numberzero character with a byte length of one) the value is the same for all Oracle ACFS tagname entries.
Examples
Example 18-6 (page 18-16) is an example of the use of the acfssettag function call.
Example 18-6 Setting file tags
sb8 rc;size_t size;const oratext *value ;const oratext *path= "/mnt/dir1/dir2/file2";const oratext *tagname = "patch_set_11_1";value = "0"; /* zero */size = 1; (byte)rc = acfssettag (path, tagname, (oratext *)value, size, 0);If (rc == ACFS_TAG_FAIL) /* check errno and GetLastError() to process error returns */
Understanding Oracle ACFS I/O Failure Console MessagesOracle ACFS logs information for I/O failures in the operating-specific system eventlog.
A console message has the following format:
[Oracle ACFS]: I/O failure (error_code) with device device_name during a operation_name op_type.file_entry_num Starting offset: offset. Length of data transfer: io_length bytes.Impact: acfs_type Object: object_type Oper.Context: operation_context Snapshot?: yes_or_no AcfsObjectID: acfs_object_id . Internal ACFS Location: code_location.
The italicized variables in the console message syntax correspond to the following:
• I/O failure
The operating system-specific error code, in Hex, seen by Oracle ACFS for a failedI/O. This may indicate a hardware problem, or it might indicate a failure toinitiate the I/O for some other reason.
• Device
The device involved, usually the ADVM device file, but under somecircumstances it might be a string indicating the device minor number
• Operation name
The kind of operation involved:
user data, metadata, or paging
• Operation type
The type of operation involved:
synch read, synch write, asynch read, or asynch write
• File entry number
The Oracle ACFS File entry number of the file system object involved, as adecimal number. The acfsutil info fileid tool finds the corresponding filename.
Understanding Oracle ACFS I/O Failure Console Messages
18-16 Oracle Automatic Storage Management Administrator's Guide

• Offset
The disk offset of the I/O, as a decimal number.
• Length of I/O
The length of the I/O in bytes, as decimal number.
• File system object impacted
An indication that the file system object involved is either node-local, or is aresource accessed clusterwide. For example:
Node or Cluster
• Type of object impacted
A string indicating the kind of file system object involved, when possible. Forexample:
Unknown, User Dir., User Symlink, User File, Sys.Dir, Sys.File, orMetaData
– Sys.Dir.
Oracle ACFS-administered directory within the visible namespace
– sys.File
Oracle ACFS-administered file within the visible namespace
– MetaData
Oracle ACFS-administered resources outside of the visible namespace
• Operational context
A higher-level view of what code context was issuing the I/O. This is for use byOracle Support Services. For example:
Unknown, Read, Write, Grow, Shrink, Commit, or Recovery
• Snapshot
An indication of whether, if possible to determine, the data involved was from aSnapshot. For example:
Yes, No, or ?
• Object type of the file system
An internal identifier for the type of file system object. For use by Oracle SupportServices.
• Location of the code
An internal identifier of the code location issuing this message. For use by OracleSupport Services.
The following is an example from /var/log/messages in a Linux environment:
[Oracle ACFS]: I/O failure (0xc0000001) with device /dev/sdb during a metadata synch write .Fenum Unknown. Starting offset: 67113984. Length of data transfer: 2560 bytes.Impact: Node Object: MetaData Oper.Context: WriteSnapshot?: ? AcfsObjectID: 8 . Internal ACFS Location: 5 .
Understanding Oracle ACFS I/O Failure Console Messages
Understanding Oracle ACFS Advanced Topics 18-17

Understanding Oracle ACFS I/O Failure Console Messages
18-18 Administrator's Guide

Glossary
ASMLIBASMLIB is an application programming interface (API) developed by Oracle tosimplify the operating system–to-database interface and to exploit the capabilities ofvendors' storage arrays on Linux-based systems.
Oracle ASM Filter Driver is the recommended replacement for ASMLIB. Forinformation about Oracle ASM Filter Driver, refer to "Oracle ASM Filter Driver(page 3-34)".
Cluster File System (CFS)A Cluster File System, or CFS, is a file system that is distributed across multiplecomputer systems. Generally, the computer systems share access to a disk connectedthrough a Storage Area Network (SAN). The CFS component on each individualcomputer system coordinates access to the disks using a global communicationmechanism.
Cluster Synchronization Services (CSS)Cluster Synchronization Services (CSS) provide the foundation for coordinated, inter-process communication activities across a set of nodes. CSS services include groupservices, lock services, node information and cluster configuration services, and nodemonitoring services that detect nodes joining and leaving the cluster.
CSS ClusterA CSS cluster is the cluster configuration defined by the CSS cluster membershipservices. CSS maintains the authoritative membership for an Oracle cluster andmonitors nodes joining and leaving the cluster configuration. There is at most one CSScluster defined for a given set of nodes.
disk groupAn Oracle ASM disk group is a collection of disks that Oracle ASM manages as a unit.Within a disk group, Oracle ASM exposes a file system interface for Oracle Databasefiles. The content of files that are stored in a disk group are evenly distributed, orstriped, to eliminate hot spots and to provide uniform performance across the disks.Oracle ASM files may also be optionally mirrored within a disk group. Theperformance of disks in a disk group is comparable to the performance of raw devices.
Glossary-1
Direct Attached Storage (DAS)Direct Attached Storage, or DAS, consists of storage devices that attach directly to hostwithout an intervening network. DAS generally costs less than SAN attached storage,but also offers less flexibility and functionality. Examples of DAS include SATA disks,common to most desktop systems, and SCSI disks that are found on many servers.
extentAn extent, also called data extent, is the raw storage used to hold the contents of a file.Each extent consists of one or more allocation units (AU) on a specific disk.
extent mapAn extent map is a list of extent pointers that point to all the data extents of a file. Thisis the raw storage for the file. Each extent pointer gives the disk and allocation unit ofthe data extent. For reliability, each extent pointer also includes a check byte to ensureit has not been damaged. This is particularly important when using an in-memorycopy of the extent map to direct file I/O to a particular disk location.
fibre channelFibre channel is a set of standards that define the interface between computer systemsand peripherals. The fibre channel interface is a serial bus interface originally designedto supersede the SCSI standard. However, both the fibre channel and SCSI interfaceshave evolved independently of each other and have benefited from the existence of theother. Fibre is spelled with re rather than an er to indicate a distinction from termssuch as fiber optics. Both copper and optical fiber are commonly used as a media forfibre channel.
file systemA file system is a software component providing structured access to disks. Filesystems present objects, such as files, to application programs. Access to files isgenerally specified with standard API defining operating system calls such as Open/Close and Read/Write that the application program uses for accessing files. Filesystems are usually provided as a component of an operating system, but may beprovided as an independent software component.
fileA file is an object presented to an application program by a file system. A file issubdivided into blocks by the file system. A file system typically places what appearsto the application program as consecutive blocks, into nonconsecutive locations ondisks. The mapping of the file blocks to the locations on disks is kept in what is knownas an extent map.
host bus adapter (HBA)A host bus adapter (HBA), or host adapter, connects a host system to other networkand storage devices, such as, eSATA, and SCSI devices.
Direct Attached Storage (DAS)
Glossary-2

Logical Unit Number (LUN)In storage technology, the term LUN is often used to denote a disk presented to acomputer system by a storage array. In SCSI terminology, a Logical Unit Number, orLUN, is a number representing a device address presented to a computer system.
mirroringIn storage systems, mirroring is a means for protecting the integrity of data by storingcopies of data on multiple disks. If a disk fails, then a secondary copy of the data isavailable on a second or third disk. Generally, mirroring can be deployed in one oftwo ways. In the most common case, as with a RAID storage array, a fixed amount ofphysical storage space on a single disk is uniformly copied on multiple disks. Throughsoftware on the storage array, the physically mirrored space on multiple devices ispresented to the host as a single disk. Another approach to mirroring is to copy fixedsegments of a file onto multiple disks. Oracle ASM uses the second approach formaximum flexibility.
Network Attached Storage (NAS)Network Attached Storage, or NAS, comprises a class of systems providing fileservices to host computers. A device driver in the operating system accesses datausing protocols such as NFS or Common Internet File System (CIFS). From theapplication program's point of view, Network Attached Storage appears as a filesystem local to the host computer on which the application program resides.
Network File System (NFS)A network file system, or NFS, is an industry standard providing Network AttachedStorage on many platforms. NFS extends the local file system framework to providedevice sharing to users on an IP network. The user view of an NFS is that a remote filesystem on a host appears as if it were locally mounted.
Oracle Automatic Storage Management ClusterAn Oracle Automatic Storage Management (Oracle ASM) cluster is a collection ofinterconnected nodes, each with an Oracle ASM instance, operating as a unifiedcluster using Oracle Clusterware. An Oracle ASM cluster presents a shared pool ofstorage to one or more Oracle Databases that are also operating on the nodes. Thedatabases can also be clustered using Oracle Real Application Clusters, but that is nota requirement. The disks that provide the shared storage pool must be accessible fromall of the nodes in the Oracle ASM cluster.
partitionOperating systems typically provide a means for splitting a disk into sections calledpartitions. To an application, a partition appears as an independent disk, even thoughthat is not the case. The operating system provides a command for managing the sizeand locations of partitions on a disk. This command writes a partition map onto thedisk in an area that is not visible to the application program.
partition
Glossary-3

Redundant Array of Inexpensive Disks (RAID)Redundant Array of Inexpensive Disks, or RAID, is a means for combining multipledisks through software and presenting them to a host as a collection of apparentlydistinct disks. Mirroring and striping are two means used for combining the disks as acollection. RAID can be implemented as a software component of a computer systemor as software operating inside of a storage array. RAID operates on the physicalpresentation of storage as opposed to Oracle ASM mirroring and striping at the logicalfile level.
Storage Area Network (SAN)Storage Area Network, or SAN, is a specialized network designed for attachingstorage devices, such as disk arrays and tape drives, to computer systems. The mostcommon network infrastructure used in SANs is fibre channel. SANs provide greatflexibility by allowing a common interconnect infrastructure in which any storagedevice can be connected to any computer system. Zoning and LUN masking arecommonly used for access control for SANs. Zoning is a mechanism where the SANinfrastructure determines the access rights of storage devices to computer systems.LUN masking is a mechanism where the storage device determines the access rights ofwhat computer systems are permitted to connect to the device.
Small Computer System Interface (SCSI)Small Computer System Interface, or SCSI, is a standard defining the interfacebetween computer systems and peripherals, most commonly storage devices. TheSCSI standard defines both the logical and physical aspects of the interface betweencomputer systems and peripherals.
stripingIn storage systems, striping is a means for spreading data across multiple disks asopposed to storing the data on a single disk. Striping is usually done to improveperformance. Generally, striping can be deployed in one of two ways. In the mostcommon case, as with a RAID storage array, a fixed amount of physical storage spacethat could have been stored on a single disk is uniformly striped across multiple disks.Through software on the storage array, the physically striped space on multipledevices is presented to the host as a single disk. Another approach to striping is tostripe fixed segments of a file across multiple disks connected to the host. Oracle ASMuses the second approach for maximum performance.
volumeIn the storage realm, the meaning of volume has many related definitions. Volumesare often thought of as the virtual entity represented as a Logical Unit Number(LUN). Volumes often are presented as an aggregation of pieces from several disks. Avolume is managed by a software component called a volume manager.
volume managerA volume manager is a software component that manages the mapping of thecollection of the pieces of the disks into a volume.
Redundant Array of Inexpensive Disks (RAID)
Glossary-4

Index
Symbols.ACFS directory
Oracle ACFS snapshots, 11-10, 16-135
Aaccelerator volume
enabled by compatibility attributes, 4-48Oracle ADVM, 4-48, 16-26
access controldisk groups, 4-50
ACCESS_CONTROL.ENABLED disk group attribute,4-3, 4-52
ACCESS_CONTROL.UMASK disk group attribute,4-3, 4-52
ACFSSee Oracle Automatic Storage Management ClusterFile System
acfschkdsk command, 16-44acfsdbg command, 16-116acfsdismount command, 16-46acfsdriverstate
Oracle ACFS driver command, 18-6acfsformat command, 16-47acfsgettag
Oracle ACFS tagging API, 18-12acfslisttags
Oracle ACFS tagging API, 18-13acfsload
Oracle ACFS driver command, 18-5AcfsMaxCachedFiles
Oracle ACFS tunable parameter, 16-140AcfsMaxOpenFiles
Oracle ACFS tunable parameter, 16-140acfsmountvol command, 16-48acfsplugin
Oracle ACFS API, 18-8acfsremovetag
Oracle ACFS tagging API, 18-14acfssettag
Oracle ACFS tagging API, 18-15acfsutil audit archive command, 16-71acfsutil audit disable command, 16-72
acfsutil audit enable command, 16-72acfsutil audit info command, 16-73acfsutil audit init command, 16-74acfsutil audit purge command, 16-75acfsutil audit read command, 16-75acfsutil detach command, 16-50acfsutil encr command, 16-111acfsutil encr info command, 16-108acfsutil encr init command, 16-109acfsutil encr off command, 16-110acfsutil encr rekey command, 16-112acfsutil encr set command, 16-113acfsutil info file command, 16-120acfsutil info fs command, 16-120acfsutil info id command, 16-125acfsutil keystore migrate command, 16-115acfsutil plugin disable command, 16-125acfsutil plugin enable command, 16-126acfsutil plugin info command, 16-128acfsutil registry command, 16-129acfsutil repl bg command, 16-58acfsutil repl info command, 16-61acfsutil repl info compare, 16-60acfsutil repl init command, 16-63acfsutil repl pause command, 16-65acfsutil repl resume command, 16-66acfsutil repl sync command, 16-67acfsutil repl terminate command, 16-68acfsutil repl trace command, 16-69acfsutil repl update command, 16-69acfsutil rmfs command, 16-131acfsutil sec admin add command, 16-77acfsutil sec admin password command, 16-78acfsutil sec admin remove command, 16-79acfsutil sec batch command, 16-79acfsutil sec disable command, 16-80acfsutil sec enable command, 16-81acfsutil sec info command, 16-82acfsutil sec info file command, 16-83acfsutil sec init command, 16-83acfsutil sec load command, 16-85acfsutil sec prepare command, 16-86
Index-1

acfsutil sec realm add command, 16-88acfsutil sec realm audit disable command, 16-92acfsutil sec realm audit enable command, 16-93acfsutil sec realm audit info command, 16-95acfsutil sec realm clone command, 16-95acfsutil sec realm create command, 16-97acfsutil sec realm delete command, 16-98acfsutil sec realm destroy command, 16-99acfsutil sec rule clone command, 16-99acfsutil sec rule create command, 16-100acfsutil sec rule destroy command, 16-102acfsutil sec rule edit command, 16-102acfsutil sec ruleset clone command, 16-103acfsutil sec ruleset create command, 16-104acfsutil sec ruleset destroy command, 16-105acfsutil sec ruleset edit command, 16-106acfsutil sec save command, 16-106acfsutil size command, 16-132acfsutil snap convert command, 16-134acfsutil snap create command, 16-135acfsutil snap delete command, 16-137acfsutil snap info command, 16-138acfsutil tag info command, 16-54acfsutil tag set command, 16-55acfsutil tag unset command, 16-57acfsutil tune command, 16-139active session history sampling
Oracle Automatic Storage Management, 3-28adding aliases
Oracle ASM, 5-14adding disks to a disk group, 1-12adding disks to a disk group with Oracle Enterprise
Manager, 7-8adding disks to an Oracle ASM disk group
Oracle ASM Configuration Assistant, 9-15adding objects to security realms
Oracle ACFS, 16-9adding security administrators
Oracle ACFS file systems, 16-7adding templates to a disk group, 5-21administering
disk groups, 4-1Oracle ACFS, 11-13
advmutil canonical command, 16-140advmutil dismount command, 16-50advmutil list command, 16-52advmutil mount command, 16-52advmutil tune command, 16-141advmutil volinfo command, 16-142afd_configure command
ASMCMD utility, 10-29afd_deconfigure command
ASMCMD utility, 10-30afd_dsget command
ASMCMD utility, 10-31afd_dsset command
afd_dsset command (continued)ASMCMD utility, 10-31
afd_filter commandASMCMD utility, 10-32
afd_label commandASMCMD utility, 10-32
afd_lsdsk commandASMCMD utility, 10-33
afd_scan commandASMCMD utility, 10-33
afd_state commandASMCMD utility, 10-34
afd_unlabel commandASMCMD utility, 10-34
AIXOracle ACFS command-line tools, 16-37
alias file namesOracle ASM, 5-6
aliasesadding for an Oracle ASM file name, 5-14dropping from a disk group, 5-14
ALL command rule, 16-89allocation units
different sizes enabled by compatibility attributes,4-47
Oracle ASM, 1-7size for disk groups, 4-3
ALTER DISKGROUP command, 4-15altering disk groups
replacing disks, 4-18amdu_extract command
ASMCMD utility, 10-36APPENDFILE command rule, 16-89archive log files
creating in Oracle ASM, 17-4ASM
See Oracle Automatic Storage ManagementASM SPFILE in a disk group
enabled by compatibility attributes, 4-47ASM_DISKGROUPS initialization parameter
Oracle ASM instance, 3-8ASM_DISKSTRING initialization parameter
discovering disks, 1-11Oracle ASM instance, 3-9
ASM_POWER_LIMIT initialization parameterOracle ASM instance, 3-10rebalancing process, 3-10values enabled by compatibility attributes, 4-47
ASM_PREFERRED_READ_FAILURE_GROUPSinitialization parameter
Oracle ASM instance, 3-11asmadmin group, 3-48ASMCA
See Oracle ASM Configuration AssistantASMCMD utility
about, 10-1afd_configure command, 10-29afd_deconfigure command, 10-30
Index-2

ASMCMD utility (continued)afd_dsget command, 10-31afd_dsset command, 10-31afd_filter command, 10-32afd_label command, 10-32afd_lsdsk command, 10-33afd_scan command, 10-33afd_state command, 10-34afd_unlabel command, 10-34aliases, and, 10-4amdu_extract command, 10-36cd command, 10-36chdg command, 10-47chgrp command, 10-72chkdg command, 10-49chmod command, 10-73chown command, 10-75chtmpl command, 10-68command-line utility, 10-1, 15-1cp command, 10-37directories, and, 10-3disk group management commands, 10-46displaying the version number, 10-9dropdg command, 10-50dsget command, 10-12dsset command, 10-13du command, 10-38exit command, 10-8file access control commands, 10-72file management commands, 10-35find command, 10-39groups command, 10-75grpmod command, 10-76help command, 10-11including directory in prompt, 10-9instance management commands, 10-11, 10-29iostat command, 10-51ls command, 10-40lsattr command, 10-53lsct command, 10-14lsdg command, 10-54lsdsk command, 10-56lsgrp command, 10-77lsod command, 10-58lsof command, 10-42lsop command, 10-15lspwusr command, 10-15lstmpl command, 10-69lsusr command, 10-77md_backup command, 10-59md_restore command, 10-60mkalias command, 10-43mkdg command, 10-61mkdir command, 10-44mkgrp command, 10-78mktmpl command, 10-70
ASMCMD utility (continued)mkusr command, 10-79mount command, 10-63offline command, 10-63online command, 10-64orapwusr command, 10-16passwd command, 10-79preparing to run, 10-6pwcopy command, 10-17pwcreate command, 10-18pwd command, 10-44pwdelete command, 10-18pwget command, 10-19pwmove command, 10-20pwset command, 10-21rebal command, 10-65remap command, 10-66rm command, 10-45rmalias command, 10-46rmgrp command, 10-80rmtmpl command, 10-71rmusr command, 10-81rpusr command, 10-81running in a database home, 10-7running in an Oracle grid infrastructure home,
10-6running in interactive mode, 10-7running in noninteractive mode, 10-9running without any options, 10-8setattr command, 10-67showclustermode command, 10-21showclusterstate command, 10-22showpatches command, 10-22showversion command, 10-22shutdown command, 10-23spbackup command, 10-24spcopy command, 10-25specifying the verbose mode, 10-9spget command, 10-26spmove command, 10-27spset command, 10-28startup command, 10-28syntax for starting in interactive mode, 10-7SYSASM privilege, 10-8system-generated file names, and, 10-2template management commands, 10-68type of connection, 10-8umount command, 10-67using quotes for wildcards in noninteractive
mode, 10-9using with absolute and relative paths, 10-4using with wildcard characters, 10-5volcreate command, 15-1voldelete command, 15-4voldisable command, 15-4volenable command, 15-5
Index-3

ASMCMD utility (continued)volinfo command, 15-6volresize command, 15-7volset command, 15-8volstat command, 15-9volume management commands, 15-1
asmdba group, 3-48ASMFD
migrating, 3-36asmoper group, 3-49ASMSNMP user
for monitoring the Oracle ASM instance, 3-47Oracle ASM, 9-2Oracle ASM in Oracle Enterprise Manager, 7-4
attributesdisk group compatibility, 4-42disk groups, 4-2DISK_REPAIR_TIME, 4-35for disk groups, 4-9in templates for Oracle Automatic Storage
Management, 5-20list of for disk groups, 4-2setting for disk groups, 4-2viewing for disk groups, 4-2
AU_SIZE disk group attributedifferent sizes enabled by compatibility attributes,
4-47auditing
Oracle ACFS audit trail file, 11-26Oracle ACFS evaluation result events, 11-30Oracle ACFS file access events, 11-28Oracle ACFS privilege use events, 11-29Oracle ACFS security and encryption, 11-24
authenticationoperating system with Oracle ASM, 3-51Oracle ASM, 3-46password file with Oracle ASM, 3-52
Automatic Storage Managementhome page on Oracle Enterprise Manager, 13-1
Bbacking up Oracle ASM files
Oracle Enterprise Manager, 7-27backup and restore
Oracle ACFS, 11-12bad block recovery in Oracle ASM disks
Oracle Enterprise Manager, 7-27
Ccapacity
managing in disk groups, 4-27cd command
ASMCMD utility, 10-36CELL.SMART_SCAN_CAPABLE disk group attribute,
4-3
CELL.SPARSE_DG disk group attribute, 4-3changing tag names
Oracle ACFS, 16-13chdg command
ASMCMD utility, 10-47chgrp command
ASMCMD utility, 10-72CHGRP command rule, 16-89chkdg command
ASMCMD utility, 10-49chmod command
ASMCMD utility, 10-73CHMOD command rule, 16-89chown command
ASMCMD utility, 10-75CHOWN command rule, 16-89chtmpl command
ASMCMD utility, 10-68command rules
ALL, 16-89APPENDFILE, 16-89CHGRP, 16-89CHMOD, 16-89CHOWN, 16-89CREATEFILE, 16-89DELETEFILE, 16-89EXTEND, 16-89IMMUTABLE, 16-89LINKFILE, 16-89MKDIR, 16-89MMAPREAD, 16-89MMAPWRITE, 16-89OPENFILE, 16-89Oracle ACFS security, 16-89OVERWRITE, 16-89READ, 16-89READDIR, 16-89RENAME, 16-89RMDIR, 16-89SYMLINK, 16-89TRUNCATE, 16-89WRITE, 16-89
command utilitiesOracle ACFS, 16-115Oracle ACFS for auditing, 16-70
compatibilitydisk groups, 4-41, 7-8Oracle ASM and database instances, 3-1reverting disk groups to previous settings, 4-46
COMPATIBLEdatabase initialization parameter, 4-42
COMPATIBLE.ADVM disk group attributedefault value, 4-43
COMPATIBLE.ASM disk group attributedefault value, 4-42
COMPATIBLE.RDBMS disk group attributedefault value, 4-43
Index-4
componentsOracle ASM, 1-2
conceptsOracle ASM, 1-1
configuration pageOracle ASM on Oracle Enterprise Manager, 7-3
configuring an Oracle ASM instanceOracle ASM Configuration Assistant, 9-10Oracle Enterprise Manager, 7-3
configuring parameters for an Oracle ASM instanceOracle ASM Configuration Assistant, 9-12
content type of a disk groupenabled by compatibility attributes, 4-47
CONTENT.CHECK disk group attribute, 4-4CONTENT.TYPE disk group attribute, 4-4control file
creating in Oracle ASM, 17-3converting snapshots
enabled by compatibility attributes, 4-48converting to Oracle Flex ASM
Oracle ASM Configuration Assistant, 3-31, 9-10cp command
ASMCMD utility, 10-37CREATEFILE command rule, 16-89creating a database home
with Oracle ASMCA, 14-7creating a database using Oracle ASM, 17-1creating a new directory
Oracle ASM, 5-15creating an Oracle ACFS file system
Oracle ASM Configuration Assistant, 14-10creating an Oracle ADVM volume
Oracle ASM Configuration Assistant, 14-9creating an Oracle ASM disk group
Oracle ASM Configuration Assistant, 9-13creating disk groups, 4-7creating disk groups and adding disks, 4-8creating disk groups and attributes, 4-8creating disk groups and failure group types, 4-8creating disk groups and failure groups, 4-8creating disk groups and redundancy level, 4-7creating disk groups in a new installation, 4-10creating files in the database
Oracle ASM, 5-8creating files using a default file location
Oracle ASM, 5-8creating from existing snapshots
enabled by compatibility attributes, 4-48creating Oracle ACFS file systems, 16-3creating security realms
Oracle ACFS, 16-8creating security rule sets
Oracle ACFS, 16-9creating security rules
Oracle ACFS, 16-9
Ddata files
moving between disk groups, 5-10data files with alias names
Oracle ASM, 5-7database files
Oracle ACFS on Oracle Exadata, 11-6DB_CACHE_SIZE initialization parameter
Oracle ASM instance, 3-11default configuration
Oracle ADVM, 15-3, 18-3DELETEFILE command rule, 16-89deleting Oracle ASM instances
Oracle ASM Configuration Assistant, 9-13deregistering file systems
Oracle ACFS, 16-20determining the volume device name
Oracle ACFS, 16-2diagnostic directory
Oracle ASM instance, 3-12DIAGNOSTIC_DEST initialization parameter
Oracle ASM instance, 3-12directories
ACFS for snapshots, 11-10, 16-135creating disk group, 5-15dropping disk group, 5-16managing disk group, 5-15Oracle ASM, 5-15renaming disk group, 5-16
disabling a volumeOracle ACFS, 16-21
disk discoveryabout, 4-25improving time, 4-27in Oracle ASM, 4-25Oracle ASM, 1-11rules, 4-26
disk failuresin Oracle Automatic Storage Management, 4-32
disk group compatibilityconfiguring with Oracle Enterprise Manager, 7-16considerations for replicated environments, 4-49considerations in a replicated environments, 4-49Oracle ACFS features enabled by settings, 4-48Oracle ASM features enabled by settings, 4-47setting, 4-43setting in Oracle Enterprise Manager, 7-8setting with ALTER DISKGROUP, 4-45setting with CREATE DISKGROUP, 4-44valid combinations, 4-44viewing compatibility settings, 4-45
disk group management commandsASMCMD utility, 10-46
disk group propertiesconfiguring with Oracle Enterprise Manager, 7-15
disk group repair time
Index-5

disk group repair time (continued)configuring with Oracle Enterprise Manager, 7-17
disk group smart scan compatibilityconfiguring with Oracle Enterprise Manager, 7-17
disk groupsaccess control, 4-50ACCESS_CONTROL.ENABLED attribute, 4-52ACCESS_CONTROL.UMASK attribute, 4-52adding disks to with Oracle ASM Configuration
Assistant, 9-15adding disks to with Oracle Enterprise Manager,
7-8adding templates to, 5-21administering, 4-1allocation unit size, 4-3altering membership of, 4-15attributes, 4-2, 4-9checking internal consistency, 4-56compatibility, 4-41compatibility attributes, 4-42creating, 4-7creating and adding disks, 4-8creating and attributes, 4-8creating and failure group types, 4-8creating and failure groups, 4-8creating and redundancy level, 4-7creating for a new installation, 4-10creating Oracle Enterprise Manager, 7-6creating with Oracle ASM Configuration
Assistant, 9-13creating with SQL*Plus, 4-7determining the number of, 4-39directories, 5-15discovering disks, 4-25dismounting, 1-11dismounting with Oracle Enterprise Manager,
7-14dropping, 4-57dropping disks from, 4-19dropping disks with Oracle Enterprise Manager,
7-12dropping in Oracle Enterprise Manager, 7-13even read, 4-37failure groups, 4-30, 4-31list of attributes, 4-2managing a shared password file, 3-53managing capacity in, 4-27manually rebalancing, 4-21mirroring, 4-30monitoring disk space usage in Oracle Enterprise
Manager, 7-14mounting, 1-11mounting and dismounting, 4-55mounting at startup, 3-25mounting with force, 4-56mounting with Oracle Enterprise Manager, 7-14
disk groups (continued)moving data files between, 5-10names, 4-7Oracle ASM, 1-6Oracle Cluster Registry (OCR), and, 4-13performance and scalability, 4-39performance characteristics when grouping disks,
4-39preferred read, 3-11quorum failure groups, 4-13rebalancing, 1-12redundancy, 4-30renamedg, 4-58renaming, 4-58renaming disks, 4-18replacing disks, 4-18resizing disks in, 4-21reverting compatibility, 4-46scrubbing, 4-24sector size, 4-11setting attributes, 4-2storage limits, 4-39tracking the replication status, 4-6undropping disks in, 4-21validations for sector size, 4-12viewing attributes, 4-2voting files, and, 4-13when to use external, normal, or high
redundancy, 4-33disk partitions
storage resources, 2-1disk regions
intelligent data placement, 4-20Oracle Automatic Storage Management, 4-20rebalance operations, and, 4-21
DISK_REPAIR_TIME disk group attributefast disk resync, 4-35
disksadding to a disk group, 1-12discovering, 1-11, 4-25dropping from a disk group, 1-12Oracle ASM, 1-7regions, 4-20
dismounting disk groups, 1-11dismounting file systems
Oracle ACFS, 16-20dismounting or shutting down
Oracle ACFS, 11-19displaying encryption information
Oracle ACFS, 16-12displaying security information
Oracle ACFS, 16-10displaying tagging information
Oracle ACFS, 16-13driver commands
acfsdriverstate, 18-6acfsload, 18-5
Index-6
driver commands (continued)Oracle ACFS, 18-5
driver modelOracle ACFS, 11-9
drivers resourceOracle ACFS, 18-4
dropdg commandASMCMD utility, 10-50
dropping a directoryOracle ASM, 5-16
dropping aliasesOracle ASM, 5-14
dropping aliases from a disk group, 5-14dropping disk groups, 4-57dropping disks from a disk group, 1-12, 4-19dropping disks from disk groups in Oracle Enterprise
Manager, 7-12dropping files from a disk group
Oracle ASM, 5-14dropping Oracle ASM templates, 5-22dsget command
ASMCMD utility, 10-12dsset command
ASMCMD utility, 10-13du command
ASMCMD utility, 10-38dynamic views, 6-1, 12-1
Eenabling encryption
Oracle ACFS, 16-12encrypting file systems
Oracle ACFS, 16-11encrypting secure file systems
Oracle ACFS, 16-8encryption
configuring with Oracle ASMCA, 14-5enabled by compatibility attributes, 4-48Oracle ACFS, 11-22Oracle ACFS and snapshots, 11-11
encryption keysOracle ACFS, 11-22
Enterprise ManagerSee Oracle Enterprise Manager
Enterprise Manager Cloud ControlSee Oracle Enterprise Manager
error handlingOracle ACFS, 18-2
even readdisk groups, 4-37distributing data reads, 4-37
Exadata storageenabled by compatibility attributes, 4-47
exit commandASMCMD utility, 10-8
EXTEND command rule, 16-89Extended Attributes
Extended Attributes (continued)requirements for tagging, 11-33
extentsOracle ASM, 1-7, 1-8variable size, 1-7, 1-8, 4-29, 4-47
external tablesand Oracle ACFS, 11-13
FFAILGROUP_REPAIR_TIME disk group attribute
fast disk resync, 4-36failure groups
about, 4-31disk failures, 4-32guidelines, 4-32how many to create, 4-33minimum recommended, 4-32mirroring, and, 4-30Oracle ASM, 1-6preferred read, 4-37quorum type, 4-13simultaneous failure, 4-33when to use external, normal, or high
redundancy, 4-33fast mirror resync
enabled by compatibility attributes, 4-47managing with Oracle Enterprise Manager, 7-10,
7-11file access and security
Oracle ACFS, 11-13file access control
enabled by compatibility attributes, 4-47enabling with Oracle Enterprise Manager, 7-17managing with SQL statements, 4-52Oracle Automatic Storage Management, 4-50restricting access to files, 4-50setting up for files in a disk group, 4-51setting with SQL statements, 4-51
file management commandsASMCMD utility, 10-35
file namesOracle ASM, 5-3Oracle Automatic Storage Management, 5-3
file names in SQL statementsOracle ASM, 5-10
file names with template formOracle ASM, 5-7
file templatesunderstanding, 1-11
file types supportedOracle ASM, 5-1
filesOracle ASM, 1-7templates, 1-11
filter driverOracle ASM, 3-35
Index-7

find commandASMCMD utility, 10-39
fsck commandAIX, 16-37Linux environments, 16-23Solaris, 16-30
fully qualified file namesOracle ASM, 5-4
Ggreater than 2 TB Oracle ASM disks
enabled by compatibility attributes, 4-48grid infrastructure configuration
Oracle ACFS, 11-14grid infrastructure installation
Oracle ACFS, 11-14grid plug and play (GPnP)
retrieving the location of an ASM SPFILE, 10-26setting the location of the ASM SPFILE, 10-28
groupsOSASM, 3-47, 3-50–3-52
groups commandASMCMD utility, 10-75
grpmod commandASMCMD utility, 10-76
Hhelp command
ASMCMD utility, 10-11High Availability NFS for Oracle Grid Home
notes, 11-37Oracle ACFS, 11-37setting up for an Oracle ACFS file system, 11-37
II/O failure console messages
Oracle ACFS, 18-16IDP.BOUNDARY disk group attribute, 4-5IDP.TYPE disk group attribute, 4-5IMMUTABLE command rule, 16-89incomplete file name form
Oracle ASM, 5-8incomplete file name template form
Oracle ASM, 5-8individual file system resource
Oracle ACFS, 18-4initialization parameter files
backing up, copying, and moving, 3-4creating an SPFILE in a disk group, 3-5Oracle ASM, 3-3search order for Oracle ASM, 3-3
initialization parametersCOMPATIBLE, 4-42database for use with Oracle ASM instance, 3-14
initialization parameters (continued)Oracle ASM instance, 3-8Oracle Automatic Storage Management, 3-2setting for Oracle ASM instance, 3-6
initializing encryption on file systemsOracle ACFS, 16-11
initializing securityOracle ACFS file systems, 16-6
instance management commandsASMCMD utility, 10-11, 10-29
INSTANCE_TYPE initialization parameterOracle ASM instance, 3-12
instancesOracle ASM, 1-3
intelligent data placementdisk regions, 4-20enabled by compatibility attributes, 4-47rebalance operations, and, 4-21
iostat commandASMCMD utility, 10-51
Kkeys
encryption, 11-22
LLARGE_POOL_SIZE initialization parameter
Oracle ASM instance, 3-12limits
Oracle ACFS, 18-1Oracle ADVM, 18-3
LINKFILE command rule, 16-89Linux environments
Oracle ACFS command-line tools, 16-22logical unit number
storage resources, 2-1logical volumes
storage resources, 2-1ls command
ASMCMD utility, 10-40lsattr command
ASMCMD utility, 10-53lsct command
ASMCMD utility, 10-14lsdg command
ASMCMD utility, 10-54lsdsk command
ASMCMD utility, 10-56lsgrp command
ASMCMD utility, 10-77lsod command
ASMCMD utility, 10-58lsof command
ASMCMD utility, 10-42lsop command
ASMCMD utility, 10-15
Index-8

lspwusr commandASMCMD utility, 10-15
lstmpl commandASMCMD utility, 10-69
lsusr commandASMCMD utility, 10-77
Mmanaging a shared password file in a disk group
enabled by compatibility attributes, 4-48managing aliases
Oracle ASM, 5-13managing capacity in disk groups, 4-27managing file access control
Oracle Enterprise Manager, 7-21managing file access control for disk groups
Oracle Enterprise Manager, 7-21managing Oracle ASM files
Oracle Enterprise Manager, 7-22managing Oracle ASM templates
Oracle Enterprise Manager, 7-23managing Oracle ASM templates page
Oracle Enterprise Manager, 7-23managing templates
Oracle Automatic Storage Management, 5-19managing users
Oracle ASM in Oracle Enterprise Manager, 7-4md_backup command
ASMCMD utility, 10-59md_restore command
ASMCMD utility, 10-60memory management
Oracle Automatic Storage Management, 3-7migrating a database
to Oracle ASM, 3-55migrating data
Oracle ASM with Recovery Manager, 8-1migrating data to alternative storage
Oracle ASM, 8-9migrating data to Oracle ASM
with Recovery Manager, 8-6migrating to Oracle ASM
Oracle Enterprise Manager, 7-28mirror
fast resync, 4-34, 7-10, 7-11mirroring
failure groups, and, 4-30Oracle ASM, 1-6with failure groups, 1-6
mkalias commandASMCMD utility, 10-43
mkdg commandASMCMD utility, 10-61
mkdir commandASMCMD utility, 10-44
MKDIR command rule, 16-89mkfs command
mkfs command (continued)AIX, 16-39Linux environments, 16-24Solaris, 16-31
mkgrp commandASMCMD utility, 10-78
mktmpl commandASMCMD utility, 10-70
mkusr commandASMCMD utility, 10-79
MMAPREAD command rule, 16-89MMAPWRITE command rule, 16-89modifying a file
disk regions, 4-21monitoring Oracle ASM performance
Oracle Enterprise Manager, 7-26mount command
AIX, 16-41ASMCMD utility, 10-63Linux environments, 16-26Solaris, 16-33
mount modelOracle ACFS, 11-5
mount registryOracle ACFS, 11-9
mounting and dismounting disk groups, 4-55mounting disk groups
using force, 4-56mounting Oracle ACFS file systems, 16-4moving data between disk groups
Oracle ASM, 8-9multipathing
with Oracle ASM, 2-3multiple file creation form
Oracle ASM, 5-4
Nnamespace
Oracle ACFS, 11-5naming
disk groups, 4-7network file systems
storage resources, 2-2NFS
and Oracle ACFS, 18-3NOWAIT keyword
in REBALANCE clause, 4-15
OOCR in disk groups
enabled by compatibility attributes, 4-47offline command
ASMCMD utility, 10-63online command
ASMCMD utility, 10-64open files
Index-9

open files (continued)and chgrp command, 10-73and chmod command, 10-74and chown command, 10-75
OPENFILE command rule, 16-89operating system authentication
for Oracle Automatic Storage Management, 3-51Oracle ASM, 3-51SYSASM, 3-51
ora.diskgroup.volume.acfs file system resourceOracle ACFS, 11-16
ora.drivers.acfs drivers resourceOracle ACFS, 11-15
Oracle ACFSSee Oracle Automatic Storage Management ClusterFile System
Oracle ACFS securitycommand rules, 16-89
Oracle ADVMSee Oracle Automatic Storage ManagementDynamic Volume Manager
Oracle ADVM volume devicescreating, 16-2
Oracle ASMSee Oracle Automatic Storage Management
Oracle ASM Configuration Assistantabout, 9-1, 14-1addDisk command, 9-15commands, 9-9, 14-9configureASM command, 9-10configureParameter command, 9-12configuring an Oracle ACFS, 14-3configuring an Oracle ADVM volume, 14-2configuring disk groups, 9-5configuring Oracle ACFS encryption, 14-5configuring Oracle ACFS for a database home,
14-7configuring Oracle ACFS security, 14-5converting to Oracle Flex ASM, 3-31convertToFlexASM command, 9-10createACFS command, 14-10createDiskGroup command, 9-13createVolume command, 14-9creating a database home on Oracle ACFS, 14-7creating an Oracle ACFS file system, 14-4creating an Oracle ADVM volume, 14-2creating an Oracle ASM instance, 9-2creating disk groups, 9-6deleteASM command, 9-13mounting or dismounting an Oracle ACFS, 14-4running in command-line mode, 9-8running in silent mode, 9-8starting, 9-1updating Oracle ASM instance parameters, 9-3upgradeASM command, 9-12upgrading an Oracle ASM instance, 9-4
Oracle ASM Dynamic Volume Manager
Oracle ASM Dynamic Volume Manager (continued)overview, 11-1
Oracle ASM file access control commandsASMCMD utility, 10-72
Oracle ASM Filter Driverabout, 3-35and Oracle ASMLIB, 3-35configuring, 3-36deconfiguring, 3-44determining the state, 3-41managing labels, 3-43manged by Oracle Enterprise Manager, 7-24migrating, 3-36, 3-39updating AFD_DISKSTRING, 3-42updating ASM_DISKSTRING, 3-42
Oracle ASM performanceOracle Enterprise Manager, 7-26
Oracle ASM preferred readfailure groups, 4-37
Oracle ASM proxy instanceOracle ACFS and Oracle ADVM, 3-17
Oracle Automatic Storage Managementaccessing files with the XML DB virtual folder,
5-16active session history sampling, 3-28adding aliases, 5-14administering, 3-1administering Oracle Flex ASM, 3-19alias file names, 5-6aliases, 5-13and Oracle Enterprise Manager, 7-1ASM_POWER_LIMIT initialization parameter,
3-10ASM_PREFERRED_READ_FAILURE_GROUPS
initialization parameter, 3-11ASMSNMP, 9-2ASMSNMP user in Oracle Enterprise Manager,
7-4authentication, 3-46backing up initialization parameter files, 3-4command-line utility, 10-1, 15-1components, 1-2concepts, 1-1configuring initialization parameters, 3-2connecting to an instance, 3-22converting to Oracle Flex ASM, 3-31copying initialization parameter files, 3-4creating a database example, 17-1creating a database in, 17-1creating a new directory, 5-15creating archive log files in, 17-4creating control file example, 17-3, 17-4creating control file in, 17-3creating files in the database, 5-8creating files using a default file location, 5-8creating redo logs in, 17-2
Index-10

Oracle Automatic Storage Management (continued)creating SPFILE in a disk group, 3-5creating tablespaces in, 17-2data files with alias names, 5-7database initialization parameters, 3-14DB_CACHE_SIZE initialization parameter, 3-11diagnostic directory, 3-12DIAGNOSTIC_DEST initialization parameter,
3-12directories, 5-15discovering disks, 1-11, 4-25disk discovery, 4-25disk discovery string, 1-11disk failures in, 4-32disk groups, 1-6disk partitions for storage resources, 2-1disk regions, 4-20disks, 1-7dropping a directory, 5-16dropping aliases, 5-14dropping files, 5-14extents, 1-8failure groups, 4-31failure groups recommendations, 4-32file access control, 4-50file names, 5-3file names with template form, 5-7file templates, 1-11file types supported, 5-1files, 1-7fully qualified file names, 5-4home page on Oracle Enterprise Manager, 7-2incomplete file name form, 5-8incomplete file name template form, 5-8initialization parameter files, 3-3initialization parameters, 3-8INSTANCE_TYPE initialization parameter, 3-12instances, 1-3integration with Oracle ACFS, 11-12LARGE_POOL_SIZE initialization parameter,
3-12logical volumes for storage resources, 2-1LUNs for storage resources, 2-1managing aliases, 5-13memory management, 3-7migrating a database to, 3-55migrating data, 8-1, 8-2migrating data to, 8-6migrating data to alternative storage, 8-9mirroring and failure groups, 1-6moving data between disk groups, 8-9moving initialization parameter files, 3-4multipathing, 2-3multiple file creation form, 5-4network file systems for storage resources, 2-2
Oracle Automatic Storage Management (continued)one operating system group for all privileges,
3-48operating system authentication for, 3-51Oracle Database file mapping, 5-11Oracle Flex ASM, 3-16ORACLE_HOME, 3-22ORACLE_SID, 3-22overview, 1-1password file authentication for, 3-52preparing storage resources, 2-2privileges, 3-47PROCESSES initialization parameter, 3-13recommendations for storage preparation, 2-4Recovery Manager, and, 8-1, 8-2referencing files in the database, 5-8REMOTE_LOGIN_PASSWORDFILE initialization
parameter, 3-13renaming a directory, 5-16renaming aliases, 5-14rolling patches, 3-30rolling upgrades, 3-29search order for initialization parameter files, 3-3separate operating system groups for privileges,
3-48setting initialization parameters, 3-6setting up Oracle Flex ASM, 3-18SHARED_POOL_SIZE initialization parameter,
3-14shutting down an instance, 3-25shutting down an instance with OCR or voting
files in a disk group, 3-26shutting down an instance with Oracle ACFS,
3-27single file creation form, 5-4starting up an instance, 3-22starting up an instance with incorrect SPFILE
path, 3-24storage considerations, 2-1storage limits, 4-39storage resources, 2-1striping, 1-9upgrading an instance with Oracle ASM
Configuration Assistant, 9-4users page in Oracle Enterprise Manager, 7-4using file names in SQL statements, 5-10views, 6-1XML DB virtual folder, 5-16
Oracle Automatic Storage Management Cluster FileSystem
about, 11-4accelerator volume, 16-26adding objects to security realms, 16-9adding security administrators, 16-7administering, 11-13and external tables on Windows, 11-13
Index-11

Oracle Automatic Storage Management Cluster File System (continued)and NFS, 18-3and Oracle Enterprise Manager, 13-1and Oracle Restart, 18-5auditing files and Oracle Database homes, 11-8auditing security and encryption, 11-24backup and restore, 11-12basic steps to access a file system, 16-4basic steps to create a file system, 16-2basic steps to deregister, dismount, and disable a
volume and file system, 16-20basic steps to manage snapshots, 16-5basic steps to manage with command-line tools,
16-1basic steps to remove a file system and volume,
16-21changing tag names, 16-13command-line tools, 16-1creating file systems, 16-3creating security realms, 16-8creating security rule sets, 16-9creating security rules, 16-9creating snapshots with Oracle Enterprise
Manager, 13-6creating volumes and file systems with Oracle
Enterprise Manager, 13-2database files with Oracle Exadata, 11-6deregistering file systems, 16-20determining the Oracle ADVM volume device
name, 16-2disabling a volume, 16-21disk group compatibility, 16-2dismount or shut down, 11-19dismounting file systems, 16-20displaying encryption information, 16-12displaying security information, 16-10displaying tagging information, 16-13driver commands, 18-5driver model, 11-9drivers resource, 18-4enabling encryption, 16-12encrypting file systems, 16-11encrypting secure file systems, 16-8encryption, 11-22encryption keys, 11-22error handling, 18-2file access and security, 11-13file mapping, 12-7file systems on other nodes, 16-4grid infrastructure configuration, 11-14grid infrastructure installation, 11-14High Availability NFS for Oracle Grid Home,
11-37I/O failure console messages, 18-16important considerations with database files, 11-5important general considerations, 11-3
Oracle Automatic Storage Management Cluster File System (continued)individual file system resource, 18-4initializing encryption on file systems, 16-11initializing security on file systems, 16-6integration with Oracle ASM, 11-12limit on the number of snapshots, 18-2limits, 18-1mount model, 11-5mount point and Oracle Database homes, 11-7mount registry, 11-9mounting file systems, 16-4namespace, 11-5ora.diskgroup.volume.acfs file system resource,
11-16ora.drivers.acfs drivers resource, 11-15Oracle ADVM, 11-39Oracle ADVM volume devices, 16-2Oracle ASM proxy instance, 3-17Oracle Clusterware resource types, 11-15Oracle Database homes, and, 11-7overview, 1-2, 11-1plug-in API, 18-7plugins, 11-36preparing security on file systems, 16-7read-only and read-write snapshots, 11-10read-write snapshots, 11-10registering file systems, 16-3registry resource, 18-4removing tag names, 16-13replicating file systems, 16-14replication, 11-30replication with auditing, encryption, and
security, 11-35restrictions for storage resource, 2-2saving security information, 16-10securing file systems, 16-6security, 11-19setting encryption parameters, 16-11snapshots, 16-135, 16-137, 16-138space usage, 18-2specifying tag names for file systems, 16-13supported file types, 11-1system-created security realms, 16-87tagging, 11-33tagging API, 18-10tagging file systems, 16-12viewing and modifying snapshots with Oracle
Enterprise Manager, 13-6viewing and modifying volumes and file systems
with Oracle Enterprise Manager, 13-4views, 12-1
Oracle Automatic Storage Management DynamicVolume Manager
accelerator volume, 16-26default configuration, 15-3, 18-3limits, 18-3
Index-12

Oracle Automatic Storage Management Dynamic Volume Manager (continued)Oracle ACFS, 11-39overview, 11-9, 11-39
Oracle Cluster Registry (OCR)in disk groups, 4-13
Oracle Clusterware resource typesKernel Services Driver (OKS), 11-15Oracle ACFS, 11-15Oracle ADVM, 11-15
Oracle Database file mappingwith Oracle ACFS, 12-7with Oracle ASM, 5-11
Oracle Database homesOracle ACFS, and, 11-7
Oracle Enterprise Manageraccessing the Oracle ASM home page, 7-2, 13-1adding disks to a disk group, 7-8and Oracle ACFS, 13-1and Oracle ASM, 7-1backing up Oracle ASM files, 7-27bad block recovery in Oracle ASM disks, 7-27creating disk groups, 7-6creating Oracle ACFS file systems, 13-2creating Oracle ACFS snapshots, 13-6creating Oracle ACFS volumes, 13-2disk group compatibility, 7-16disk group file access control, 7-17disk group properties, 7-15disk group repair time, 7-17disk group smart scan compatibility, 7-17dismounting disk groups, 7-14dropping disk groups, 7-13dropping disks from disk groups, 7-12managing fast mirror resync, 7-10managing file access control for disk groups, 7-21managing Oracle ASM files, 7-22managing Oracle ASM Filter Driver, 7-24managing Oracle ASM templates, 7-23migrating to Oracle ASM, 7-28monitoring Oracle ASM disk group space usage,
7-14mounting disk groups, 7-14Oracle ASM configuration page, 7-3Oracle ASM performance page, 7-26Oracle ASM users page, 7-4setting disk group compatibility, 7-8support workbench for Oracle ASM, 7-29, 7-31viewing and modifying Oracle ACFS snapshots,
13-6viewing and modifying Oracle ACFS volumes
and file systems, 13-4Oracle Flex ASM
administering, 3-19configuring, 3-18converting to, 3-31database clients, 3-16
Oracle Flex ASM (continued)direct Oracle ASM clients, 3-17INSTANCE_TYPE initialization parameter, 3-18local Oracle ASM clients, 3-17multiple Oracle ASM instances, 3-16Oracle ASM proxy instance, 3-17overview, 3-16relocating clients, 3-20setting up, 3-18
Oracle Home user on Windowslower privileged user, 3-28
Oracle Restartabout, 3-21and Oracle ACFS, 18-5standalone server, 3-21with Oracle ASM, 3-21
ORACLE_HOMEOracle ASM, 3-22
ORACLE_SIDOracle ASM, 3-22
orapwusr commandASMCMD utility, 10-16
OSASM group, 3-47, 3-48, 3-50–3-52OSDBA group, 3-48OSOPER group, 3-49OSTMG10048, 4-25overview
Oracle ACFS, 1-2, 11-1Oracle ACFS and Oracle ADVM, 11-1Oracle ADVM, 11-9Oracle ASM, 1-1
OVERWRITE command rule, 16-89
Ppasswd command
ASMCMD utility, 10-79password file authentication
for Oracle Automatic Storage Management, 3-52Oracle ASM, 3-52
performance and scalability improvements for ls andfind
enabled by compatibility attributes, 4-48PHYS_META_REPLICATED disk group attribute, 4-6plug-in API
acfsplugin, 18-8Oracle ACFS, 18-7Oracle ACFS pre-defined metric type, 18-7
pluginsOracle ACFS, 11-36Oracle ADVM, 11-36
pre-defined metric typeOracle ACFS plug-in API, 18-7
preferred readfailure groups, 4-37
preferred read failure groupsadministering, 4-38
Index-13

preparing security on file systemsOracle ACFS, 16-7
privilegesASMCMD utility, 10-8for one operating system group, 3-48Oracle ASM, 3-47separate operating system groups, 3-48SYSASM, 3-49, 3-50, 3-52SYSASM and Oracle Enterprise Manager, 7-3, 7-5SYSASM in Oracle Enterprise Manager, 7-6, 7-9SYSDBA with Oracle ASM, 3-50
PROCESSES initialization parameterOracle ASM instance, 3-13
pwcopy commandASMCMD utility, 10-17
pwcreate commandASMCMD utility, 10-18
pwd commandASMCMD utility, 10-44
pwdelete commandASMCMD utility, 10-18
pwget commandASMCMD utility, 10-19
pwmove commandASMCMD utility, 10-20
pwset commandASMCMD utility, 10-21
Q
quorum failure group, 4-13
R
READ command rule, 16-89read errors
recovery, 4-33read-only snapshots
enabled by compatibility attributes, 4-48read-write snapshots
enabled by compatibility attributes, 4-48READDIR command rule, 16-89realms
system-created security, 16-87rebal command
ASMCMD utility, 10-65rebalance
and CONTENT.CHECK disk group attribute,4-23
and THIN_PROVISIONED disk group attribute,4-23
REBALANCE NOWAIT clause, 4-15REBALANCE WAIT clause, 4-15rebalancing
disk groups, 1-12, 4-21rebalancing disk groups
tuning, 4-23
rebalancing processASM_POWER_LIMIT initialization parameter,
3-10recommendations for storage preparation
for Oracle ASM, 2-4recovery
read errors, 4-33write errors, 4-34
redo logscreating in Oracle ASM, 17-2
referencing files in the databaseOracle ASM, 5-8
regionsintelligent data placement, 4-20
registeringOracle ACFS file system, 16-3
registry resourceOracle ACFS, 18-4
remap commandASMCMD utility, 10-66
REMOTE_LOGIN_PASSWORDFILE initializationparameter
Oracle ASM instance, 3-13removing tag names
Oracle ACFS, 16-13RENAME command rule, 16-89renamedg tool
renaming disk groups, 4-58updating resources, 4-60
renaming a directoryOracle ASM, 5-16
renaming aliasesOracle ASM, 5-14
renaming disk groupsrenamedg and updating resources, 4-60
renaming disks in a disk group, 4-18replacing disks
altering disk groups, 4-18replacing disks in a disk group, 4-18replicated environments
disk group compatibility considerations, 4-49replicating file systems
calculating storage requirements, 16-14configuring the site hosting the primary file
system, 16-18configuring the site hosting the standby file
system, 16-17managing replication background processes,
16-19monitoring replication on the file system, 16-19Oracle ACFS, 16-14Oracle wallets, 16-16pausing replication processes, 16-19setting up tags, 16-16unique service names for replicated file systems,
16-16user names and service names, 16-16
replication
Index-14

replication (continued)enabled by compatibility attributes, 4-48Oracle ACFS, 11-30storage requirements for Oracle ACFS file
systems, 16-14using with Oracle ACFS auditing, encryption, and
security, 11-35replication status of a disk group
enabled by compatibility attributes, 4-48resizing disks in disk groups, 4-21restricting at startup, 3-25resync
fast mirror, 4-34, 7-10, 7-11reverting compatibility settings
disk groups, 4-46rm command
ASMCMD utility, 10-45rmalias command
ASMCMD utility, 10-46RMDIR command rule, 16-89rmgrp command
ASMCMD utility, 10-80rmtmpl command
ASMCMD utility, 10-71rmusr command
ASMCMD utility, 10-81rolling patches
Oracle ASM, 3-30rolling upgrades
Oracle Automatic Storage Management, 3-29rpusr command
ASMCMD utility, 10-81running
ASMCMD utility, 10-6ASMCMD utility in a database home, 10-7ASMCMD utility in an Oracle grid infrastructure,
10-6
Ssaving security information
Oracle ACFS, 16-10scrubbing disk groups, 4-24sector size
disk groups, 4-11enabled by compatibility attributes, 4-47validations for disk groups, 4-12
SECTOR_SIZE disk group attribute, 4-6securing file systems
Oracle ACFS, 16-6security
configuring with Oracle ASMCA, 14-5enabled by compatibility attributes, 4-48Oracle ACFS, 11-19Oracle ACFS and snapshots, 11-11system-created realms, 16-87
setattr command
setattr command (continued)ASMCMD utility, 10-67
setting encryption parametersOracle ACFS, 16-11
shared password filefor Oracle ASM instance, 3-53managing in a disk group, 3-53
SHARED_POOL_SIZE initialization parameterOracle ASM instance, 3-14
showclustermode commandASMCMD utility, 10-21
showclusterstate commandASMCMD utility, 10-22
showpatches commandASMCMD utility, 10-22
showversion commandASMCMD utility, 10-22
shutdown commandASMCMD utility, 10-23
shutting down an Oracle ASM instanceabout, 3-25with OCR or voting files in a disk group, 3-26with Oracle ACFS file system mounted, 3-27
single file creation formOracle ASM, 5-4
snapshots.ACFS directory, 11-10, 16-135converting format of an existing Oracle ACFS
snapshot, 11-11creating from existing Oracle ACFS snapshot,
11-11creating Oracle ACFS read-only, 16-135creating Oracle ACFS read-write, 16-135limit on the number of, 18-2Oracle ACFS, 11-10, 16-135, 16-137, 16-138Oracle ACFS and encryption, 11-11Oracle ACFS and security, 11-11read-write in Oracle ACFS, 11-10snap directory, 11-10snaps directory, 16-135
SolarisOracle ACFS command-line tools, 16-29
space usageOracle ACFS, 18-2
spbackup commandASMCMD utility, 10-24backing up an Oracle ASM SPFILE, 10-24
spcopy commandASMCMD utility, 10-25copying an Oracle ASM SPFILE, 10-25
specifying tag names for file systemsOracle ACFS, 16-13
spget commandASMCMD utility, 10-26retrieving the location of an ASM SPFILE, 10-26
spmove commandASMCMD utility, 10-27
Index-15

spmove command (continued)moving an Oracle ASM SPFILE, 10-27
spset commandASMCMD utility, 10-28setting the location of an ASM SPFILE, 10-28
standalone serverOracle Restart, 3-21
starting up an Oracle ASM instanceabout, 3-22with incorrect SPFILE path, 3-24
startupmounting disk groups, 3-25restricting disk groups, 3-25
startup commandASMCMD utility, 10-28
storage considerationsfor Oracle ASM, 2-1
storage limitsdisk groups, 4-39Oracle ASM disks, 4-39Oracle Automatic Storage Management, 4-39
storage resourcesdisk partitions and Oracle ASM, 2-1for Oracle ASM, 2-1logical volumes and Oracle ASM, 2-1LUNs and Oracle ASM, 2-1network file systems and Oracle ASM, 2-2preparation for Oracle ASM, 2-2restrictions for Oracle ACFS, 2-2
STORAGE.TYPE disk group attribute, 4-6storing data files and redo logs in Oracle ACFS file
systemsenabled by compatibility attributes, 4-48
stripingfiles, 1-9Oracle ASM, 1-9
support for 1023 snapshotsenabled by compatibility attributes, 4-48
support workbench for Oracle ASMOracle Enterprise Manager, 7-29, 7-31
supported file typesOracle ACFS, 11-1
SYMLINK command rule, 16-89SYSASM privilege
accessing the Oracle ASM home page in OracleEnterprise Manager, 7-3
Oracle Enterprise Manager, 7-5, 7-6, 7-9SYSDBA privilege with Oracle ASM, 3-50system-created realms
security, 16-87
Ttablespaces
creating in Oracle ASM, 17-2tagging
enabled by compatibility attributes, 4-48
tagging (continued)Extended Attributes requirements, 11-33Oracle ACFS, 11-33requirements for Oracle ACFS, 11-33
tagging APIOracle ACFS, 18-10
tagging error valuesOracle ACFS, 18-11
tagging file systemsOracle ACFS, 16-12
tagging name specificationOracle ACFS, 18-11
template management commandsASMCMD utility, 10-68
templatesadding to a disk group, 5-21attributes, 5-20dropping, 5-22for specifying redundancy and striping, 5-23managing Oracle ASM, 5-19modifying an Oracle ASM, 5-22Oracle ASM, 1-11user-defined for Oracle ASM, 5-23
THIN_PROVISIONED disk group attribute, 4-7tracking the replication status
for disk groups, 4-6TRUNCATE command rule, 16-89tuning rebalance operations, 4-23
Uumount command
AIX, 16-43ASMCMD utility, 10-67Linux environments, 16-28Solaris, 16-35
umountall commandAIX, 16-43Solaris, 16-35
undropping disks in disk groups, 4-21unlimited file system expansion
acfsutil size command, 16-133enabled by compatibility attributes, 4-48
upgrading an Oracle ASM instanceOracle ASM Configuration Assistant, 9-12
V
V$ASM_ACFS_ENCRYPTION_INFO view, 12-1V$ASM_ACFS_SEC_ADMIN view, 12-2V$ASM_ACFS_SEC_CMDRULE view, 12-2V$ASM_ACFS_SEC_REALM_FILTER view, 12-2V$ASM_ACFS_SEC_REALM_GROUP view, 12-2V$ASM_ACFS_SEC_REALM_USER view, 12-2V$ASM_ACFS_SEC_RULESET_RULE view, 12-2V$ASM_ACFSSNAPSHOTS view, 12-2V$ASM_ACFSTAG view, 12-2
Index-16

V$ASM_ACFSVOLUMES view, 12-2V$ASM_ALIAS view, 6-1V$ASM_ATTRIBUTE view
enabled by compatibility attributes, 4-47V$ASM_AUDIT_CLEAN_EVENTS view, 6-1, 12-2V$ASM_AUDIT_CLEANUP_JOBS view, 12-2V$ASM_AUDIT_CONFIG_PARAMS view, 6-1, 12-2V$ASM_AUDIT_LAST_ARCH_TS view, 12-2V$ASM_CLIENT view, 6-2V$ASM_DISK view, 6-2V$ASM_DISK_IOSTAT view, 6-2V$ASM_DISK_STAT view, 6-2V$ASM_DISKGROUP view, 4-45, 6-2V$ASM_DISKGROUP_STAT view, 6-2V$ASM_ESTIMATE view, 6-2V$ASM_FILE view, 6-2V$ASM_FILESYSTEM view, 12-2V$ASM_OPERATION view, 6-2V$ASM_TEMPLATE view, 6-2V$ASM_USER view, 6-2V$ASM_USERGROUP view, 6-2V$ASM_USERGROUP_MEMBER view, 6-2V$ASM_VOLUME view, 12-2V$ASM_VOLUME_STAT view, 12-2variable size extents
enabled by compatibility attributes, 4-47views
displaying Oracle ACFS information, 12-1displaying Oracle ASM information, 6-1
volcreate commandASMCMD utility, 15-1
voldelete commandASMCMD utility, 15-4
voldelete command (continued)voldisable command
ASMCMD utility, 15-4volenable command
ASMCMD utility, 15-5volinfo command
ASMCMD utility, 15-6volresize command
ASMCMD utility, 15-7volset command
ASMCMD utility, 15-8volstat command
ASMCMD utility, 15-9volume management commands
ASMCMD utility, 15-1volumes
enabled by compatibility attributes, 4-48voting files in disk groups
enabled by compatibility attributes, 4-47
WWAIT keyword
in REBALANCE clause, 4-15wildcard characters
using quotes in ASMCMD commands, 10-9WRITE command rule, 16-89write errors
recovery, 4-34
XXML DB
virtual folder for Oracle ASM, 5-16
Index-17

Index-18