Oracle 10g Installation
65
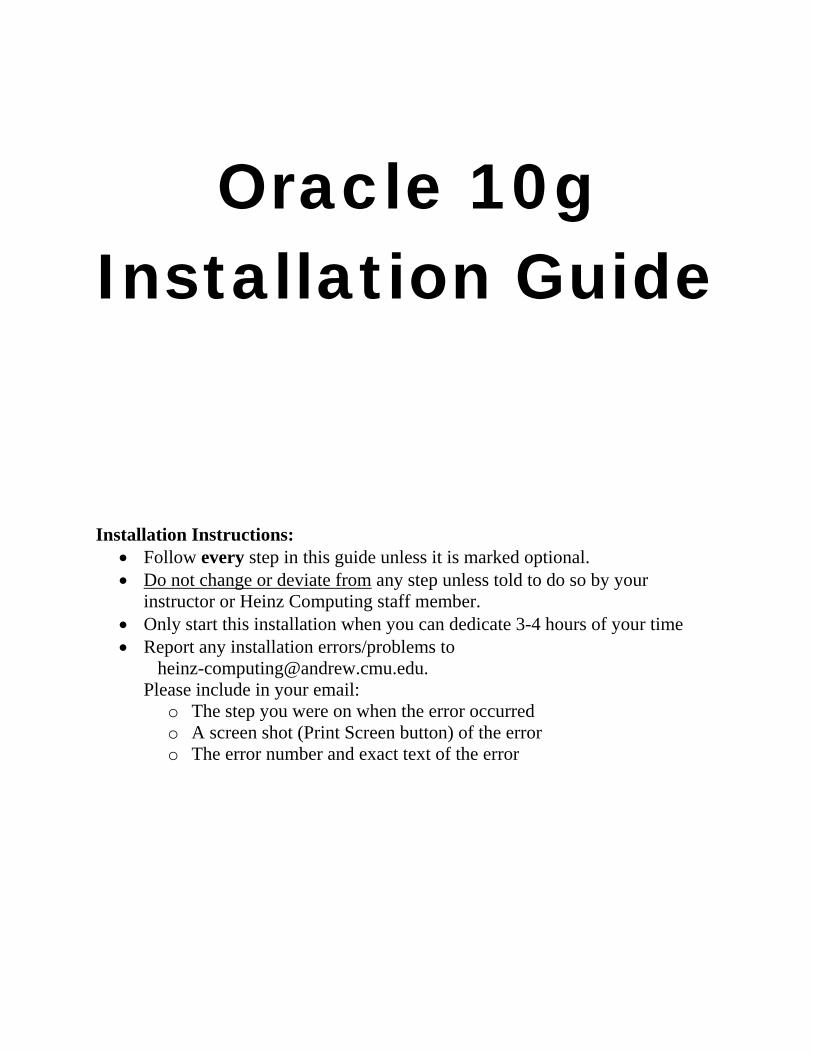
Oracle 10g Installation Guide Installation Instructions: • Follow every step in this guide unless it is marked optional. • Do not change or deviate from any step unless told to do so by your instructor or Heinz Computing staff member. • Only start this installation when you can dedicate 3-4 hours of your time • Report any installation errors/problems to [email protected]. Please include in your email: o The step you were on when the error occurred o A screen shot (Print Screen button) of the error o The error number and exact text of the error
Transcript of Oracle 10g Installation
Oracle 10g Installation Guide Installation Instructions:
• Follow every step in this guide unless it is marked optional. • Do not change or deviate from any step unless told to do so by your
instructor or Heinz Computing staff member. • Only start this installation when you can dedicate 3-4 hours of your time • Report any installation errors/problems to
[email protected]. Please include in your email:
o The step you were on when the error occurred o A screen shot (Print Screen button) of the error o The error number and exact text of the error
Installing Oracle Products
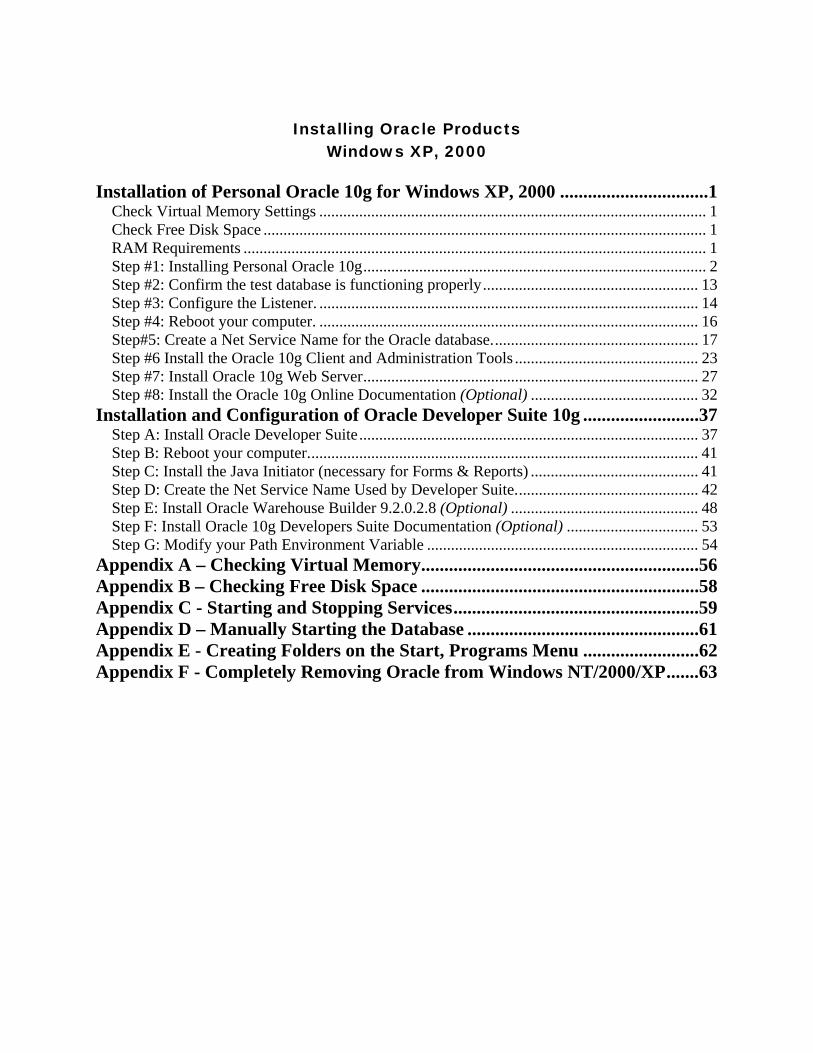
Windows XP, 2000 Installation of Personal Oracle 10g for Windows XP, 2000 ................................1
Check Virtual Memory Settings ................................................................................................. 1 Check Free Disk Space ............................................................................................................... 1 RAM Requirements .................................................................................................................... 1 Step #1: Installing Personal Oracle 10g...................................................................................... 2 Step #2: Confirm the test database is functioning properly...................................................... 13 Step #3: Configure the Listener. ............................................................................................... 14 Step #4: Reboot your computer. ............................................................................................... 16 Step#5: Create a Net Service Name for the Oracle database.................................................... 17 Step #6 Install the Oracle 10g Client and Administration Tools .............................................. 23 Step #7: Install Oracle 10g Web Server.................................................................................... 27 Step #8: Install the Oracle 10g Online Documentation (Optional) .......................................... 32
Installation and Configuration of Oracle Developer Suite 10g .........................37 Step A: Install Oracle Developer Suite..................................................................................... 37 Step B: Reboot your computer.................................................................................................. 41 Step C: Install the Java Initiator (necessary for Forms & Reports) .......................................... 41 Step D: Create the Net Service Name Used by Developer Suite.............................................. 42 Step E: Install Oracle Warehouse Builder 9.2.0.2.8 (Optional) ............................................... 48 Step F: Install Oracle 10g Developers Suite Documentation (Optional) ................................. 53 Step G: Modify your Path Environment Variable .................................................................... 54
Appendix A – Checking Virtual Memory............................................................56 Appendix B – Checking Free Disk Space ............................................................58 Appendix C - Starting and Stopping Services.....................................................59 Appendix D – Manually Starting the Database ..................................................61 Appendix E - Creating Folders on the Start, Programs Menu .........................62 Appendix F - Completely Removing Oracle from Windows NT/2000/XP.......63
Installing Personal Oracle 10g
Windows XP, 2000, NT Page 1
Installation of Personal Oracle 10g for Windows XP, 2000 This document contains instructions for installing Personal Oracle 10g on computers using the
Windows XP Professional or Windows 2000 Workstation operating system. Instructions may vary slightly for each operating system. For example, to see the program listings with Windows XP, you select All Programs from the Start menu, but with Windows 2000, you select Programs from the Start menu. Only significant differences will be noted. Oracle installations can be lengthy, plan for at least an hour for just Personal Oracle. Make sure your operating system has all current updates and patches prior to installation.
SpeedStep Technology and the Oracle Installation We have found that Dell 5000 notebooks using SpeedStep technology need to have SpeedStep
disabled during the Oracle installation. We recommend the disabling of SpeedStep during an Oracle installation if you have this notebook model. It is possible this problem may occur with other notebook models using SpeedStep. We have not seen this problem with IBM Thinkpads.
Installation User Name To install Oracle software, you must login to your computer with the same User name as you
will to use the software. In addition, that User name must be a member of the administrator’s group.
Check Virtual Memory Settings You need a minimum of 768 MB.. See Appendix A on page 56, for operating system specific
instructions on changing virtual memory.
Check Free Disk Space You need 3.5GB of disk space to install Personal Oracle 10g, including 140 MB on the system
drive (usually C:), with the rest of the space on any single uncompressed drive. Oracle documentation uses an additional 600 MB. Oracle Developer Suite 10g uses an additional 1.1GB. See Appendix B on page 58, for operating system specific instructions on checking disk space.
RAM Requirements You need 512 MB minimum, 1024 MB is preferred. Right click on My Computer and choose
Properties to determine your computers currently installed RAM.
Installing Personal Oracle 10g
Page 2 Windows XP, 2000, NT
Step #1: Installing Personal Oracle 10g
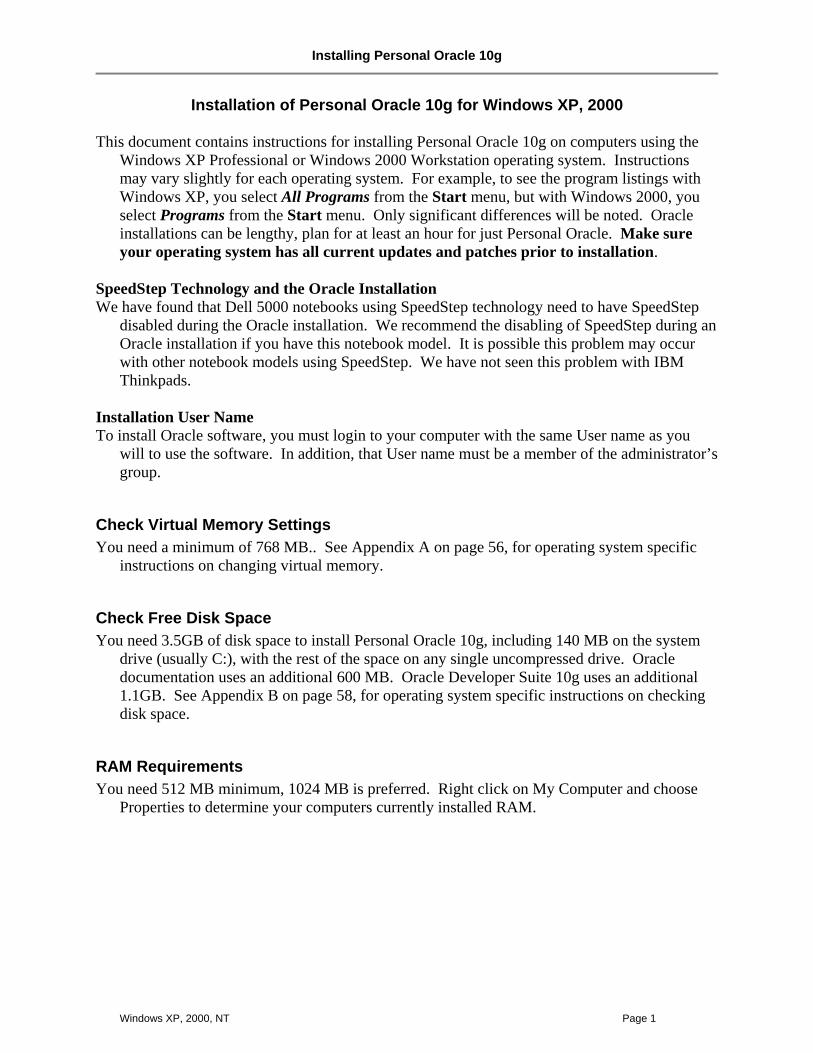
1-1. Insert the Oracle 10g Database10.1. 1-2. Select the Install/Deinstall Products button.
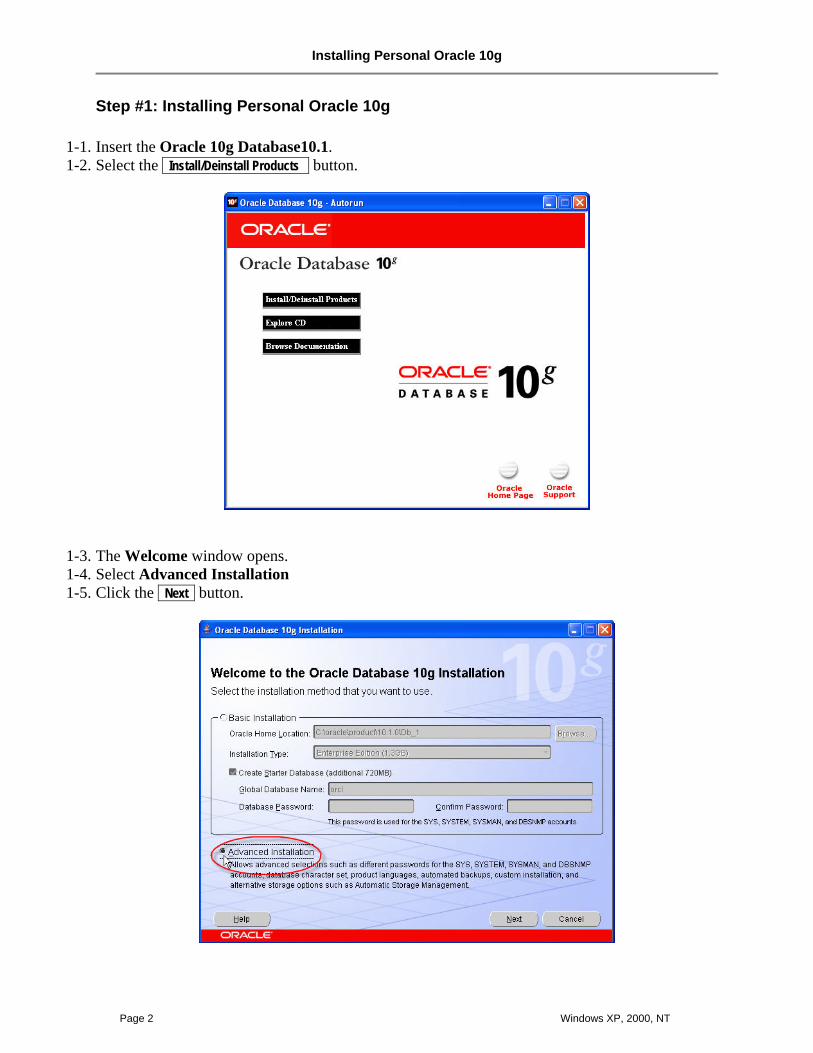
1-3. The Welcome window opens. 1-4. Select Advanced Installation 1-5. Click the Next button.
Installing Personal Oracle 10g
Windows XP, 2000, NT Page 3
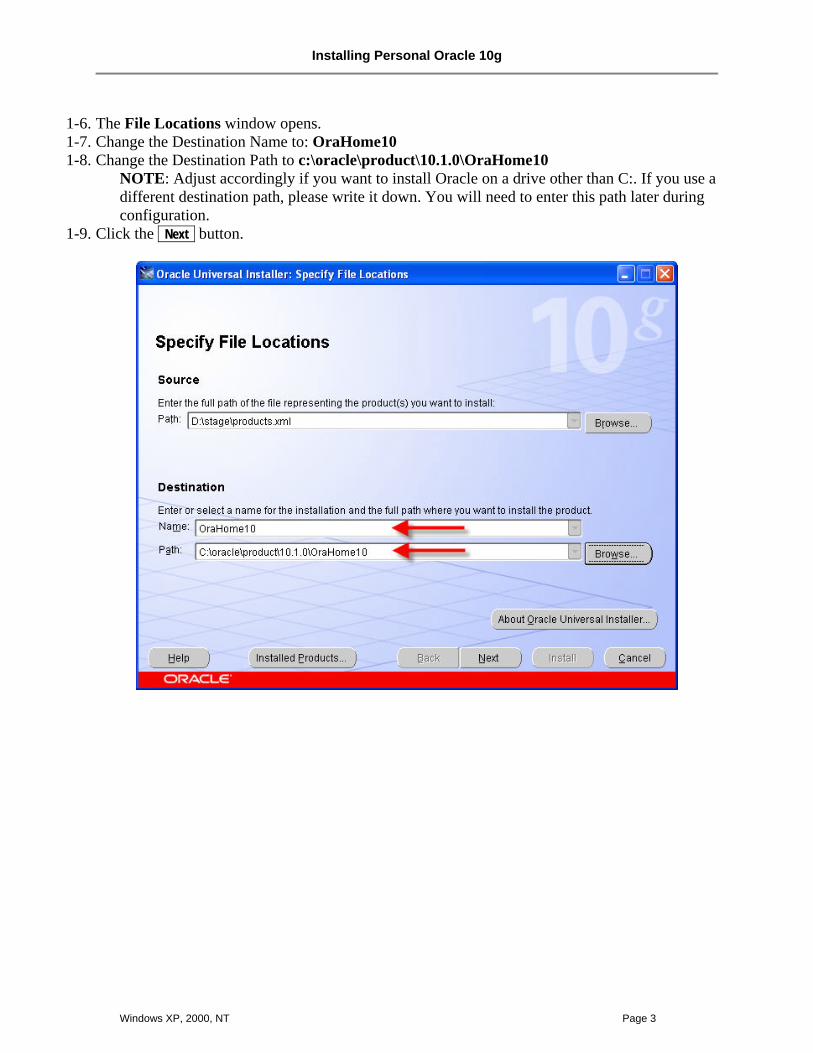
1-6. The File Locations window opens. 1-7. Change the Destination Name to: OraHome10 1-8. Change the Destination Path to c:\oracle\product\10.1.0\OraHome10
NOTE: Adjust accordingly if you want to install Oracle on a drive other than C:. If you use a different destination path, please write it down. You will need to enter this path later during configuration.
1-9. Click the Next button.

Installing Personal Oracle 10g
Page 4 Windows XP, 2000, NT
1-10. The Select Installation Type window opens. 1-11. Select Personal Edition (804 MB). 1-12. Click the Next button.
1-13. You may see the following error message several times during your installation. Click the
Continue button each time you see the message.
Installing Personal Oracle 10g
Windows XP, 2000, NT Page 5
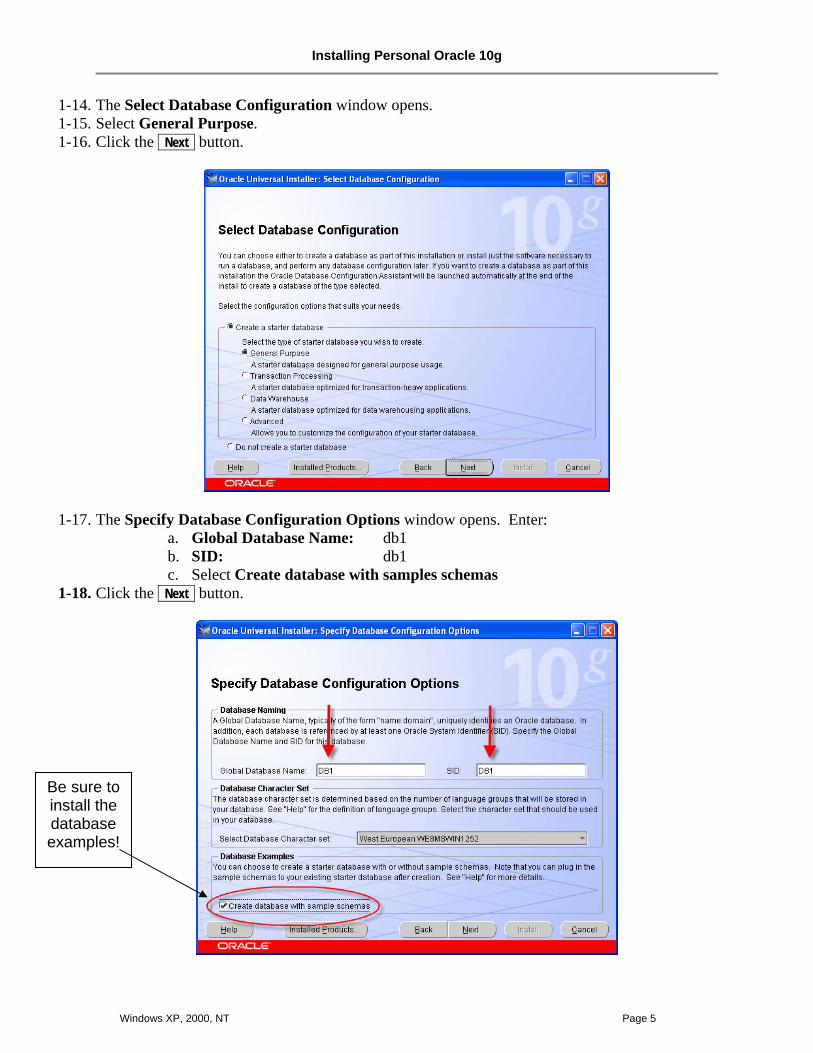
1-14. The Select Database Configuration window opens. 1-15. Select General Purpose. 1-16. Click the Next button.
1-17. The Specify Database Configuration Options window opens. Enter: a. Global Database Name: db1 b. SID: db1 c. Select Create database with samples schemas
1-18. Click the Next button.
Be sure to install the database examples!
Installing Personal Oracle 10g
Page 6 Windows XP, 2000, NT
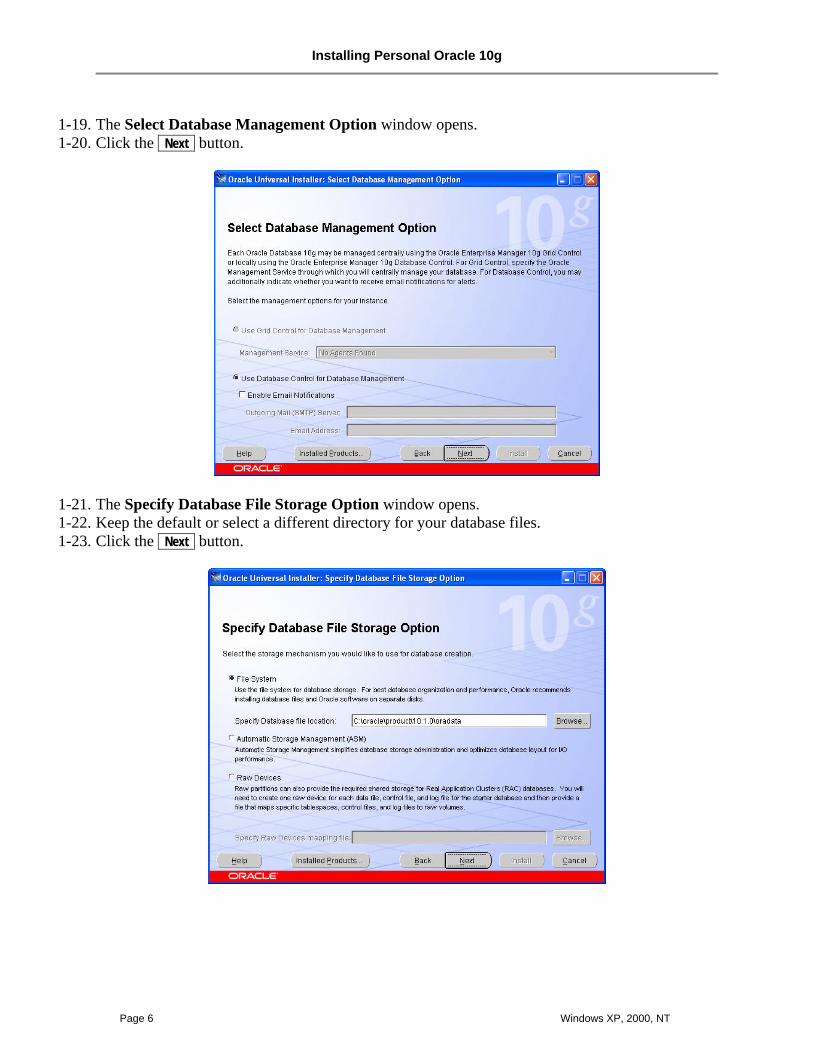
1-19. The Select Database Management Option window opens. 1-20. Click the Next button.
1-21. The Specify Database File Storage Option window opens. 1-22. Keep the default or select a different directory for your database files. 1-23. Click the Next button.
Installing Personal Oracle 10g
Windows XP, 2000, NT Page 7
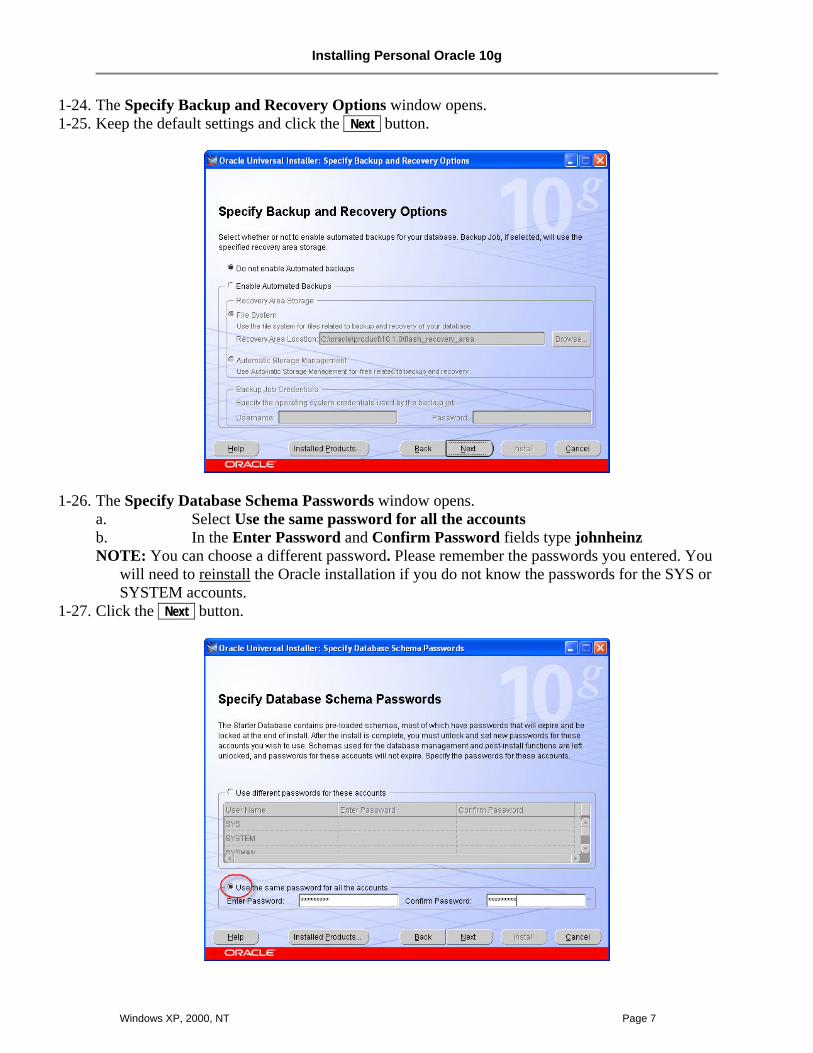
1-24. The Specify Backup and Recovery Options window opens. 1-25. Keep the default settings and click the Next button.
1-26. The Specify Database Schema Passwords window opens. a. Select Use the same password for all the accounts b. In the Enter Password and Confirm Password fields type johnheinz NOTE: You can choose a different password. Please remember the passwords you entered. You
will need to reinstall the Oracle installation if you do not know the passwords for the SYS or SYSTEM accounts.
1-27. Click the Next button.
Installing Personal Oracle 10g
Page 8 Windows XP, 2000, NT
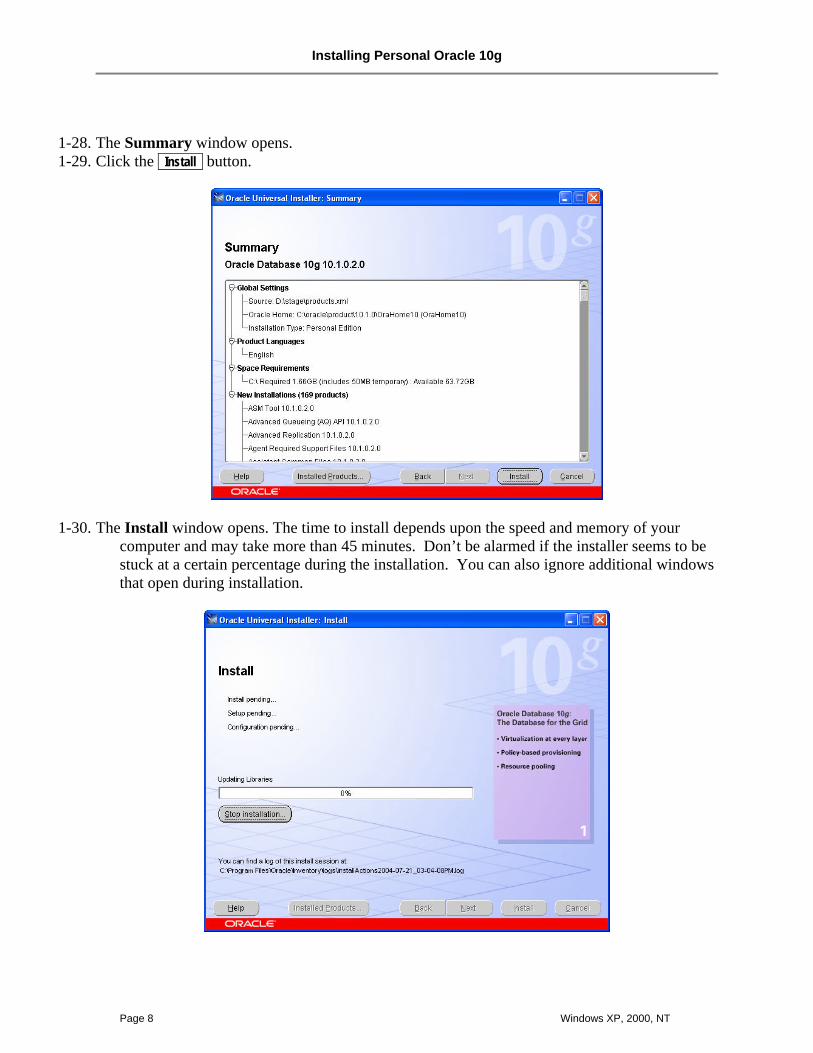
1-28. The Summary window opens. 1-29. Click the Install button.
1-30. The Install window opens. The time to install depends upon the speed and memory of your computer and may take more than 45 minutes. Don’t be alarmed if the installer seems to be stuck at a certain percentage during the installation. You can also ignore additional windows that open during installation.
Installing Personal Oracle 10g
Windows XP, 2000, NT Page 9
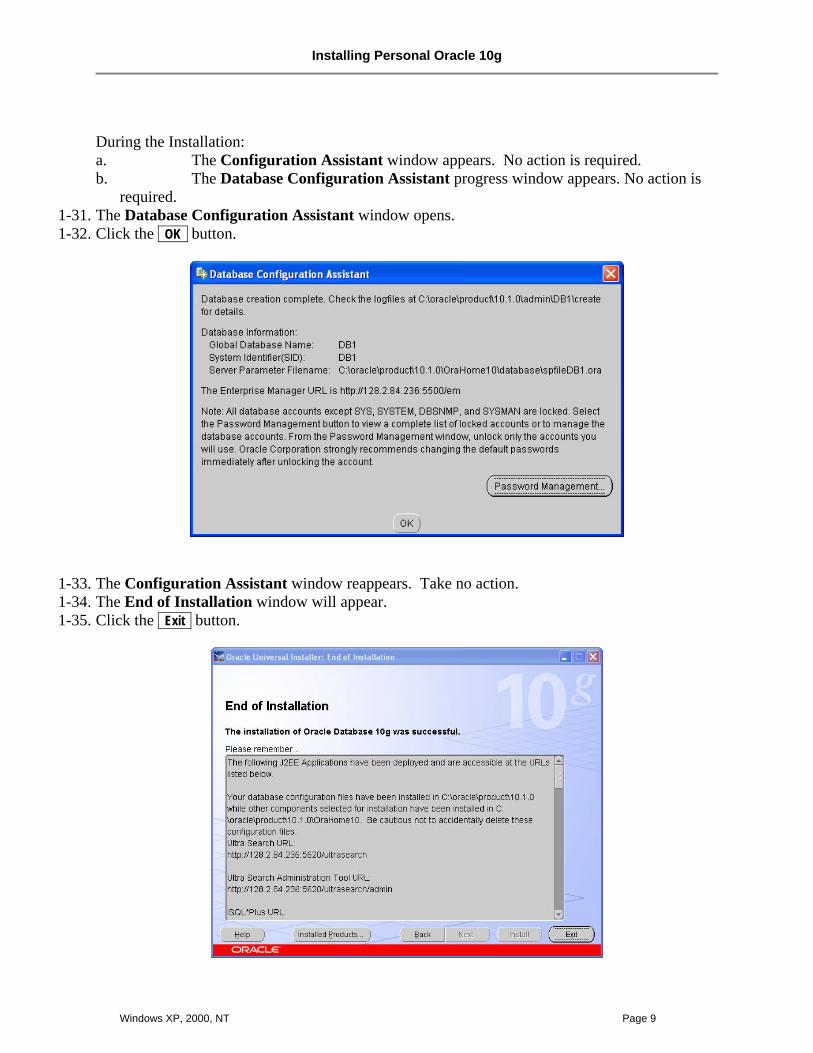
During the Installation: a. The Configuration Assistant window appears. No action is required. b. The Database Configuration Assistant progress window appears. No action is
required. 1-31. The Database Configuration Assistant window opens. 1-32. Click the OK button.
1-33. The Configuration Assistant window reappears. Take no action. 1-34. The End of Installation window will appear. 1-35. Click the Exit button.
Installing Personal Oracle 10g
Page 10 Windows XP, 2000, NT
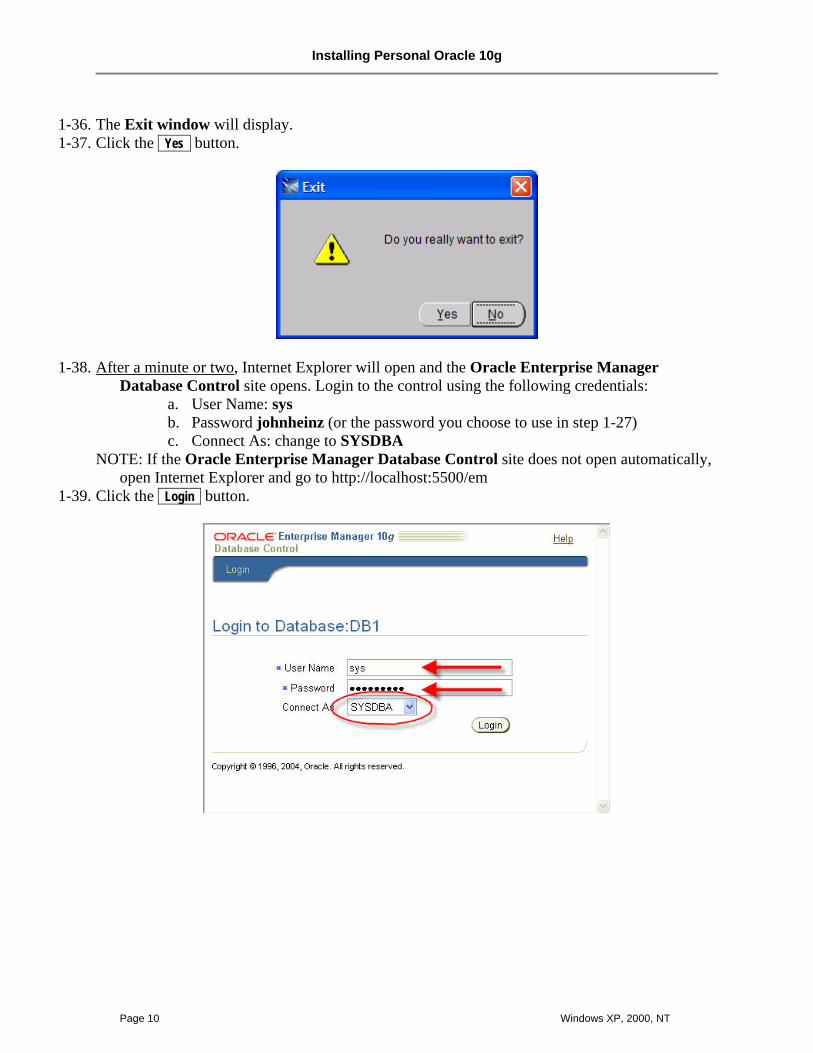
1-36. The Exit window will display. 1-37. Click the Yes button.
1-38. After a minute or two, Internet Explorer will open and the Oracle Enterprise Manager Database Control site opens. Login to the control using the following credentials:
a. User Name: sys b. Password johnheinz (or the password you choose to use in step 1-27) c. Connect As: change to SYSDBA
NOTE: If the Oracle Enterprise Manager Database Control site does not open automatically, open Internet Explorer and go to http://localhost:5500/em
1-39. Click the Login button.
Installing Personal Oracle 10g
Windows XP, 2000, NT Page 11
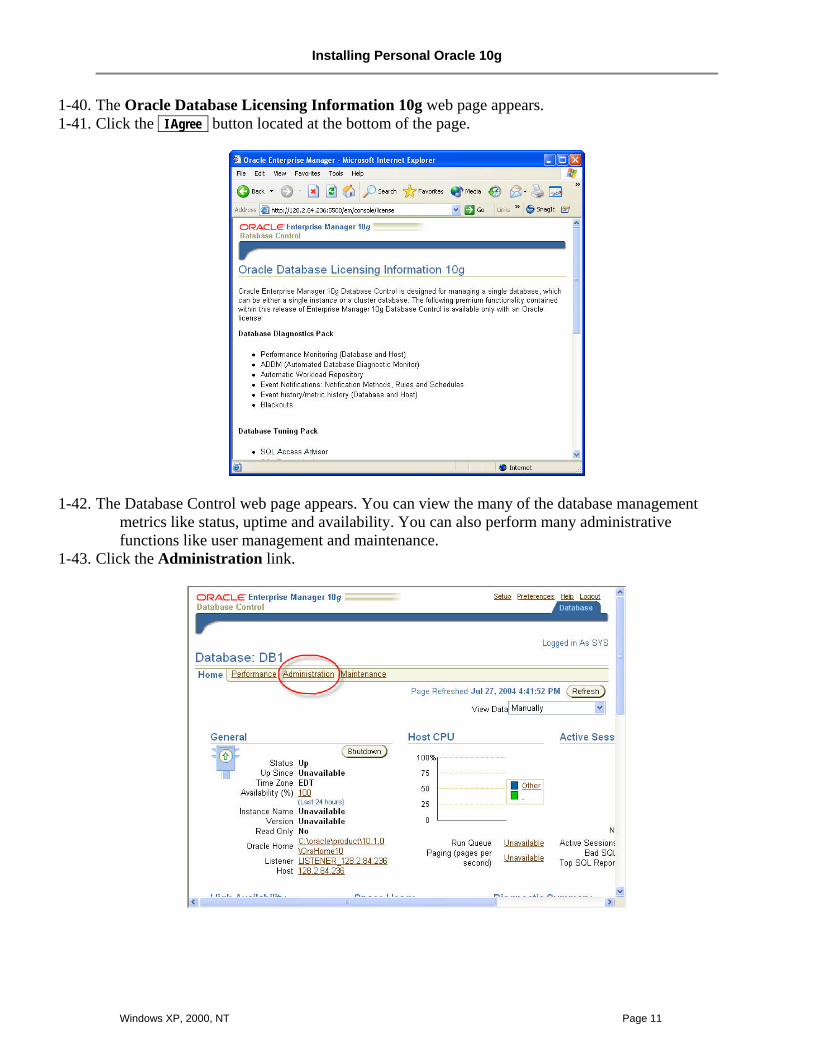
1-40. The Oracle Database Licensing Information 10g web page appears. 1-41. Click the I Agree button located at the bottom of the page.
1-42. The Database Control web page appears. You can view the many of the database management metrics like status, uptime and availability. You can also perform many administrative functions like user management and maintenance.
1-43. Click the Administration link.
Installing Personal Oracle 10g
Page 12 Windows XP, 2000, NT
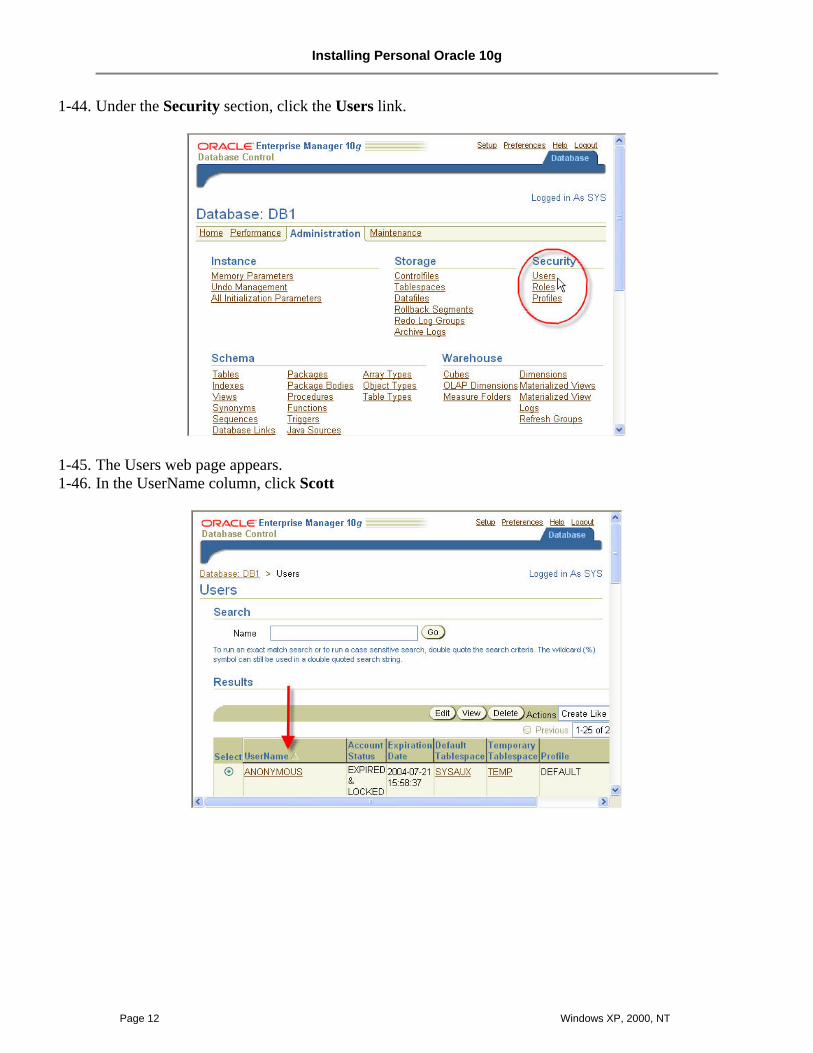
1-44. Under the Security section, click the Users link.
1-45. The Users web page appears. 1-46. In the UserName column, click Scott
Installing Personal Oracle 10g
Windows XP, 2000, NT Page 13
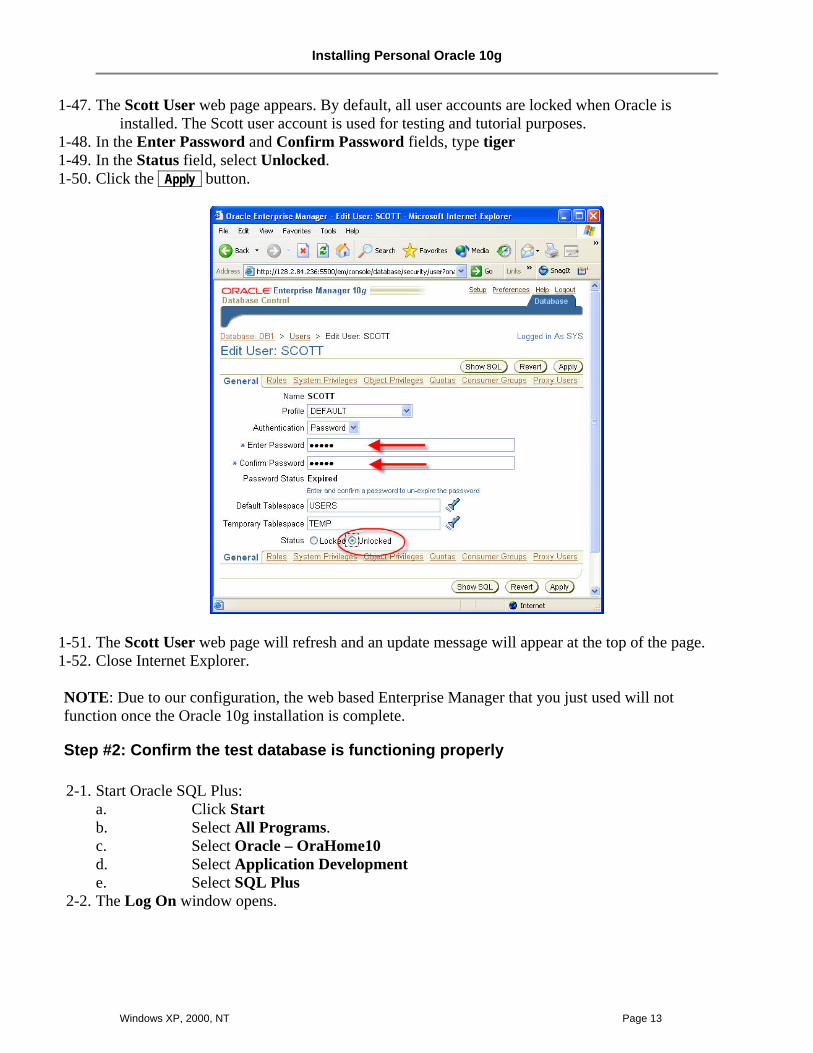
1-47. The Scott User web page appears. By default, all user accounts are locked when Oracle is installed. The Scott user account is used for testing and tutorial purposes.
1-48. In the Enter Password and Confirm Password fields, type tiger 1-49. In the Status field, select Unlocked. 1-50. Click the Apply button.
1-51. The Scott User web page will refresh and an update message will appear at the top of the page. 1-52. Close Internet Explorer.
NOTE: Due to our configuration, the web based Enterprise Manager that you just used will not function once the Oracle 10g installation is complete.
Step #2: Confirm the test database is functioning properly
2-1. Start Oracle SQL Plus: a. Click Start b. Select All Programs. c. Select Oracle – OraHome10 d. Select Application Development e. Select SQL Plus
2-2. The Log On window opens.
Installing Personal Oracle 10g
Page 14 Windows XP, 2000, NT
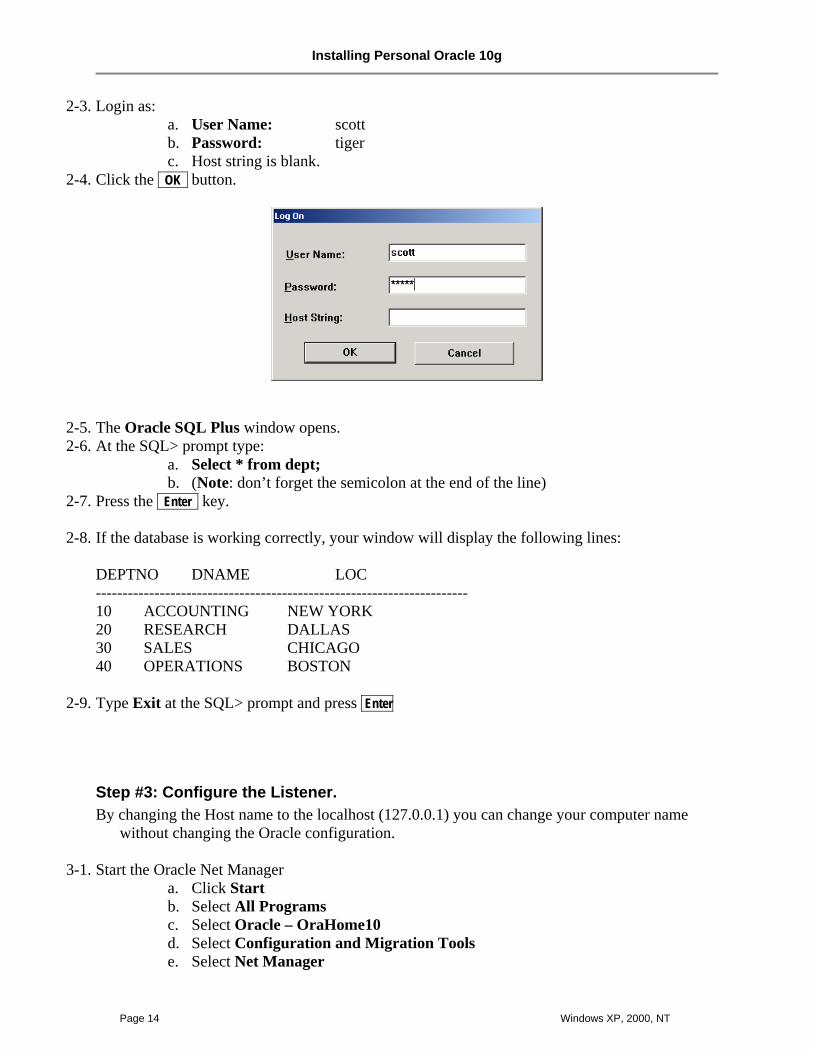
2-3. Login as: a. User Name: scott b. Password: tiger c. Host string is blank.
2-4. Click the OK button.
2-5. The Oracle SQL Plus window opens. 2-6. At the SQL> prompt type:
a. Select * from dept; b. (Note: don’t forget the semicolon at the end of the line)
2-7. Press the Enter key.
2-8. If the database is working correctly, your window will display the following lines:
DEPTNO DNAME LOC ---------------------------------------------------------------------- 10 ACCOUNTING NEW YORK 20 RESEARCH DALLAS 30 SALES CHICAGO 40 OPERATIONS BOSTON
2-9. Type Exit at the SQL> prompt and press Enter
Step #3: Configure the Listener. By changing the Host name to the localhost (127.0.0.1) you can change your computer name
without changing the Oracle configuration.
3-1. Start the Oracle Net Manager a. Click Start b. Select All Programs c. Select Oracle – OraHome10 d. Select Configuration and Migration Tools e. Select Net Manager
Installing Personal Oracle 10g
Windows XP, 2000, NT Page 15
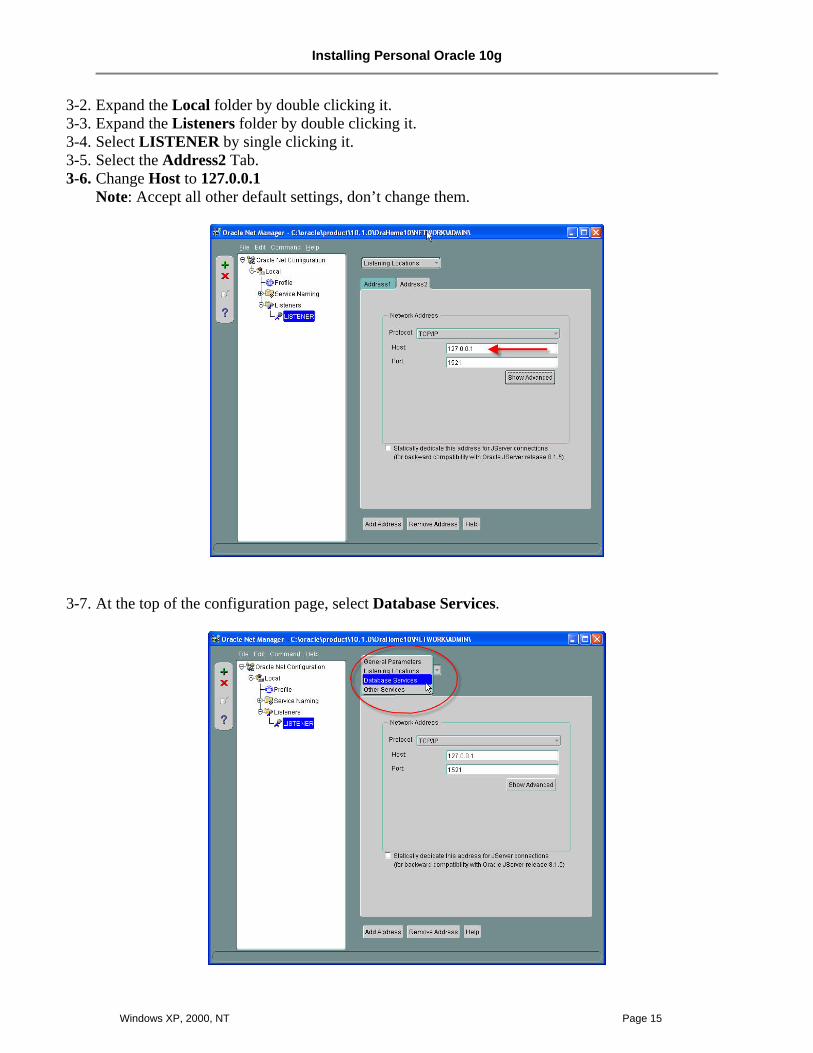
3-2. Expand the Local folder by double clicking it. 3-3. Expand the Listeners folder by double clicking it. 3-4. Select LISTENER by single clicking it. 3-5. Select the Address2 Tab. 3-6. Change Host to 127.0.0.1
Note: Accept all other default settings, don’t change them.
3-7. At the top of the configuration page, select Database Services.
Installing Personal Oracle 10g
Page 16 Windows XP, 2000, NT
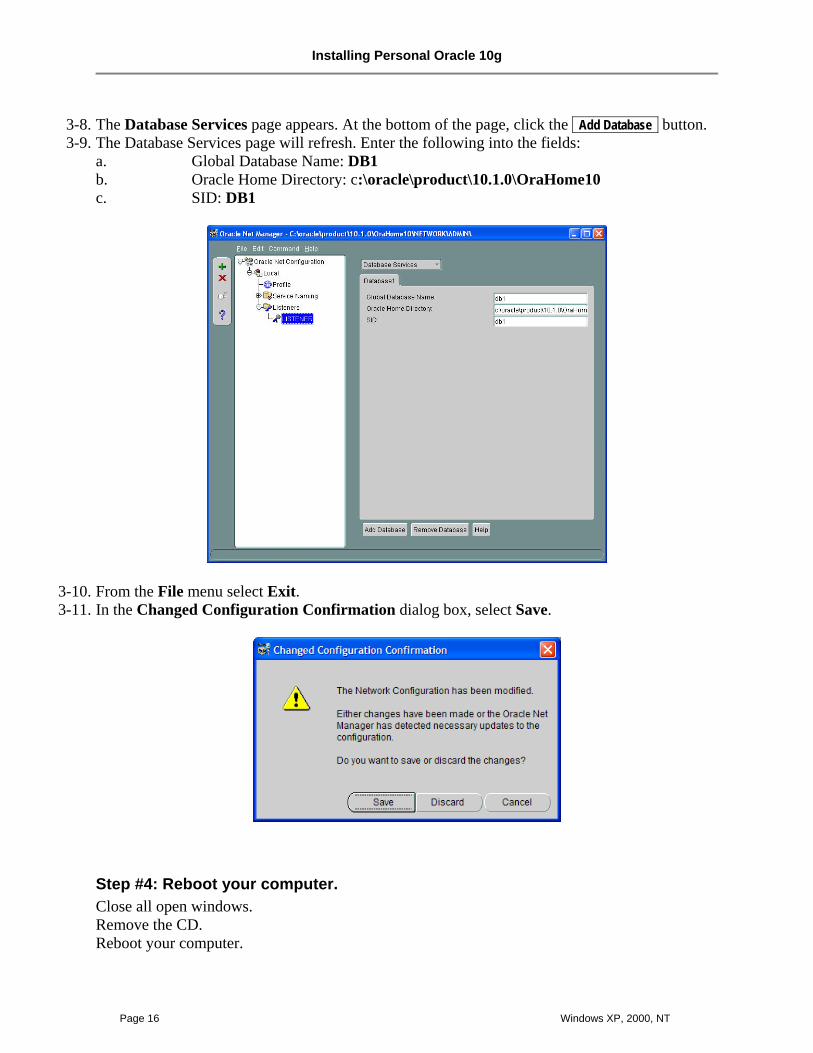
3-8. The Database Services page appears. At the bottom of the page, click the Add Database button. 3-9. The Database Services page will refresh. Enter the following into the fields:
a. Global Database Name: DB1 b. Oracle Home Directory: c:\oracle\product\10.1.0\OraHome10 c. SID: DB1
3-10. From the File menu select Exit. 3-11. In the Changed Configuration Confirmation dialog box, select Save.
Step #4: Reboot your computer. Close all open windows. Remove the CD. Reboot your computer.
Installing Personal Oracle 10g
Windows XP, 2000, NT Page 17
Step#5: Create a Net Service Name for the Oracle database. The net services name DB1 will be used as the Host string for your personal database.
5-1. Start the Oracle Net Configuration Assistant
a. Click Start b. Select All Programs c. Select Oracle – OraHome10 d. Select Configuration and Migration Tools e. Select Net Configuration Assistant
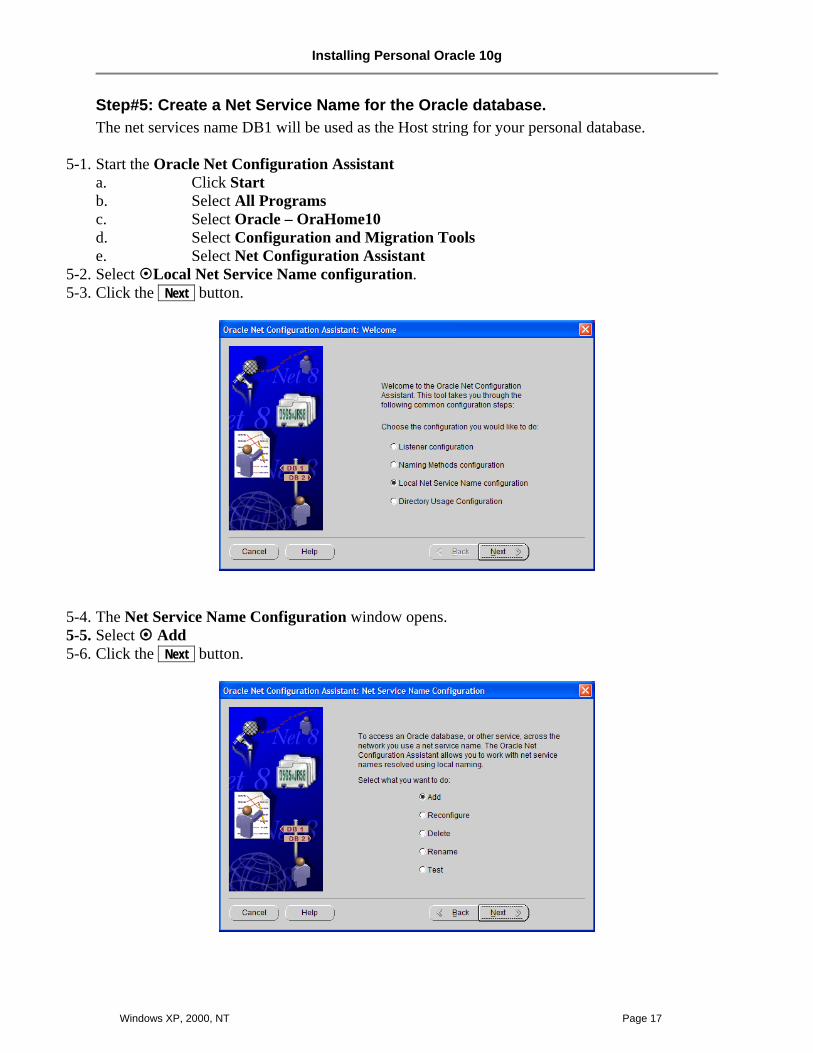
5-2. Select Local Net Service Name configuration. 5-3. Click the Next button.
5-4. The Net Service Name Configuration window opens. 5-5. Select Add 5-6. Click the Next button.
Installing Personal Oracle 10g
Page 18 Windows XP, 2000, NT
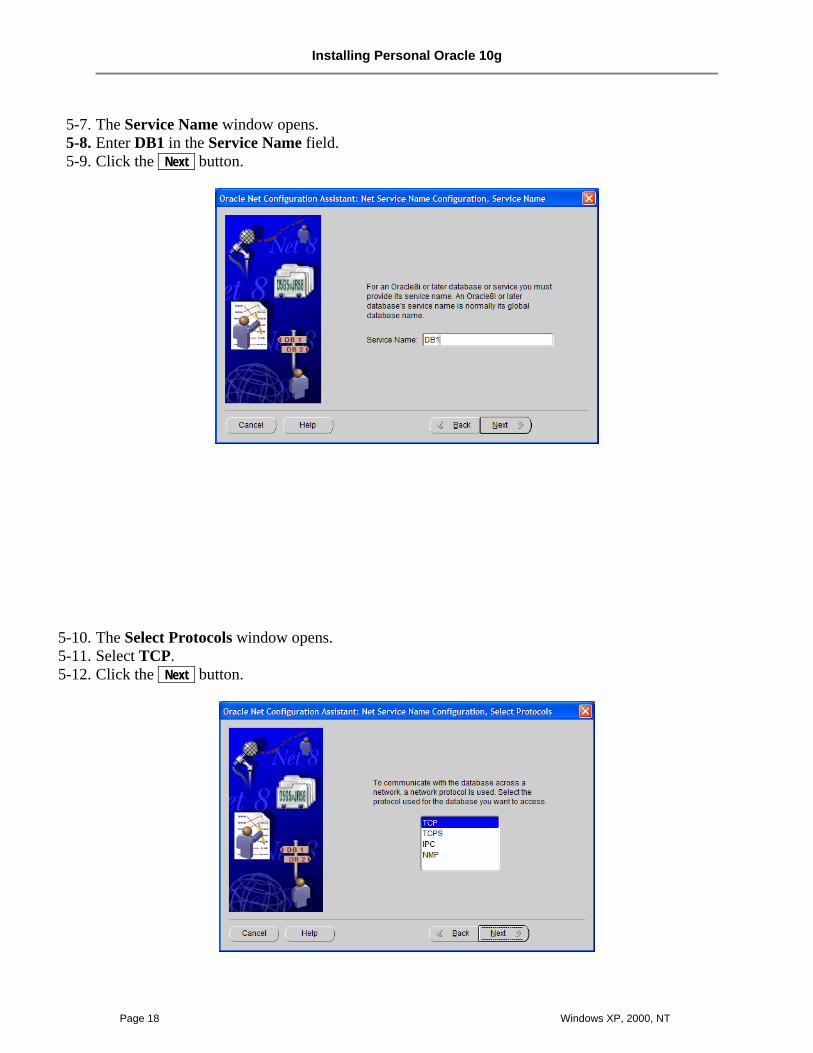
5-7. The Service Name window opens. 5-8. Enter DB1 in the Service Name field. 5-9. Click the Next button.
5-10. The Select Protocols window opens. 5-11. Select TCP. 5-12. Click the Next button.

Installing Personal Oracle 10g
Windows XP, 2000, NT Page 19
5-13. The TCP/IP Protocols window opens. 5-14. Enter 127.0.0.1 in the Host Name: field. 5-15. Click the Next Button.
5-16. The Test window prompts to test the connection. 5-17. Select Yes, perform a test. 5-18. Click the Next button.
Installing Personal Oracle 10g
Page 20 Windows XP, 2000, NT
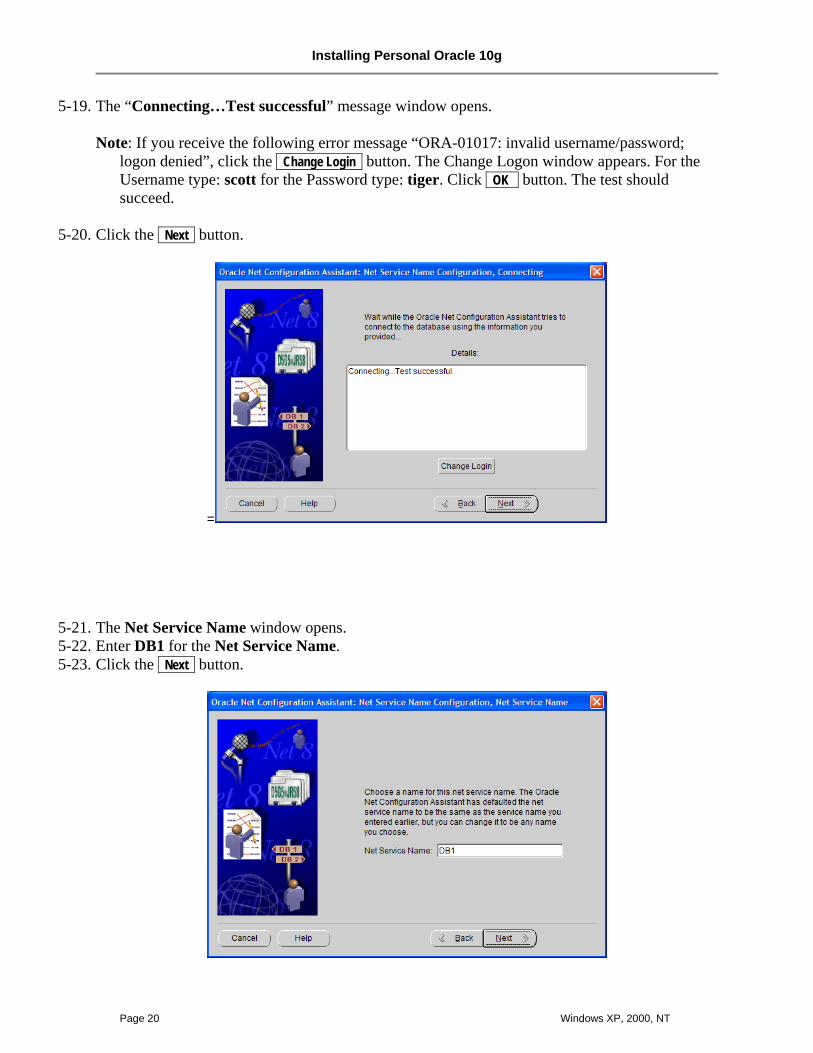
5-19. The “Connecting…Test successful” message window opens. Note: If you receive the following error message “ORA-01017: invalid username/password;
logon denied”, click the Change Login button. The Change Logon window appears. For the Username type: scott for the Password type: tiger. Click OK button. The test should succeed.
5-20. Click the Next button.
=
5-21. The Net Service Name window opens. 5-22. Enter DB1 for the Net Service Name. 5-23. Click the Next button.
Installing Personal Oracle 10g
Windows XP, 2000, NT Page 21
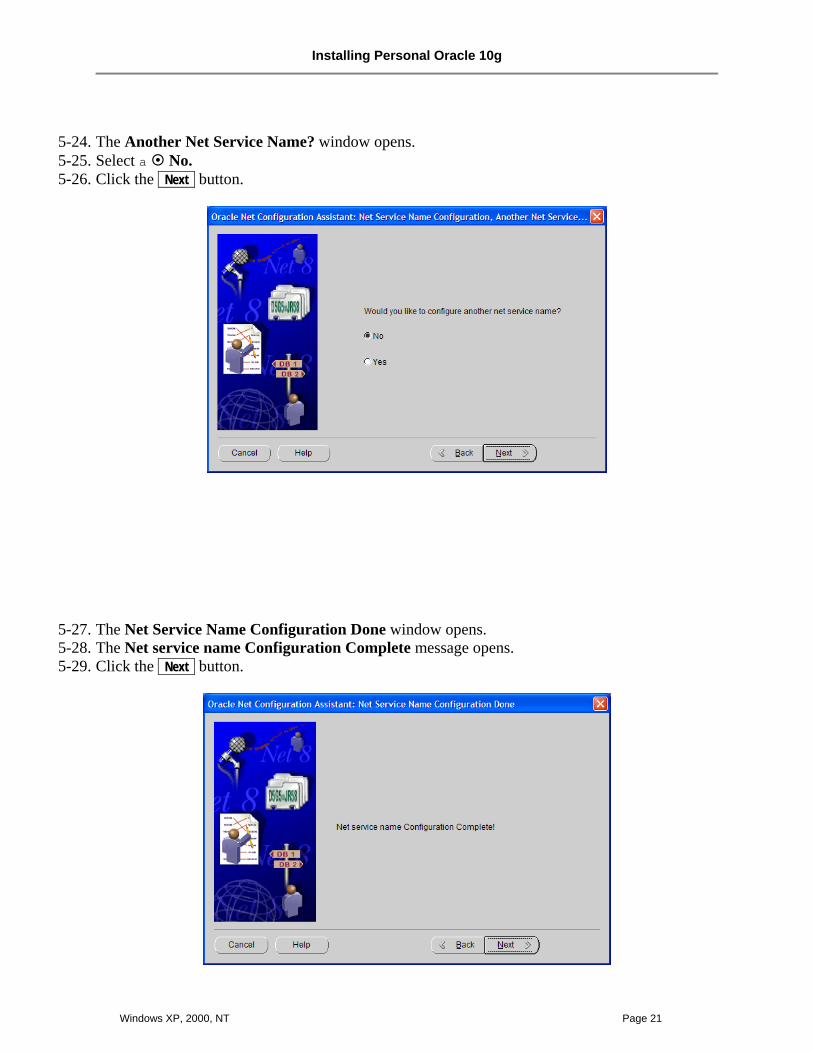
5-24. The Another Net Service Name? window opens. 5-25. Select a No. 5-26. Click the Next button.
5-27. The Net Service Name Configuration Done window opens. 5-28. The Net service name Configuration Complete message opens. 5-29. Click the Next button.
Installing Personal Oracle 10g
Page 22 Windows XP, 2000, NT
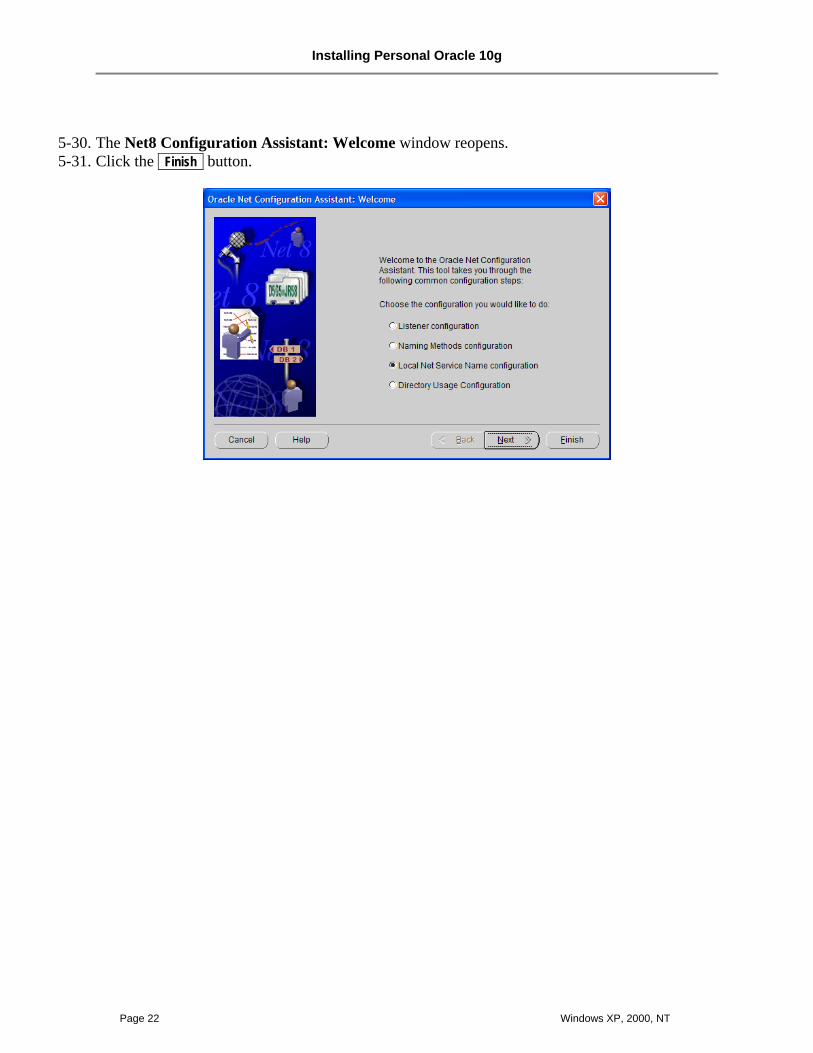
5-30. The Net8 Configuration Assistant: Welcome window reopens. 5-31. Click the Finish button.
Installing Personal Oracle 10g
Windows XP, 2000, NT Page 23
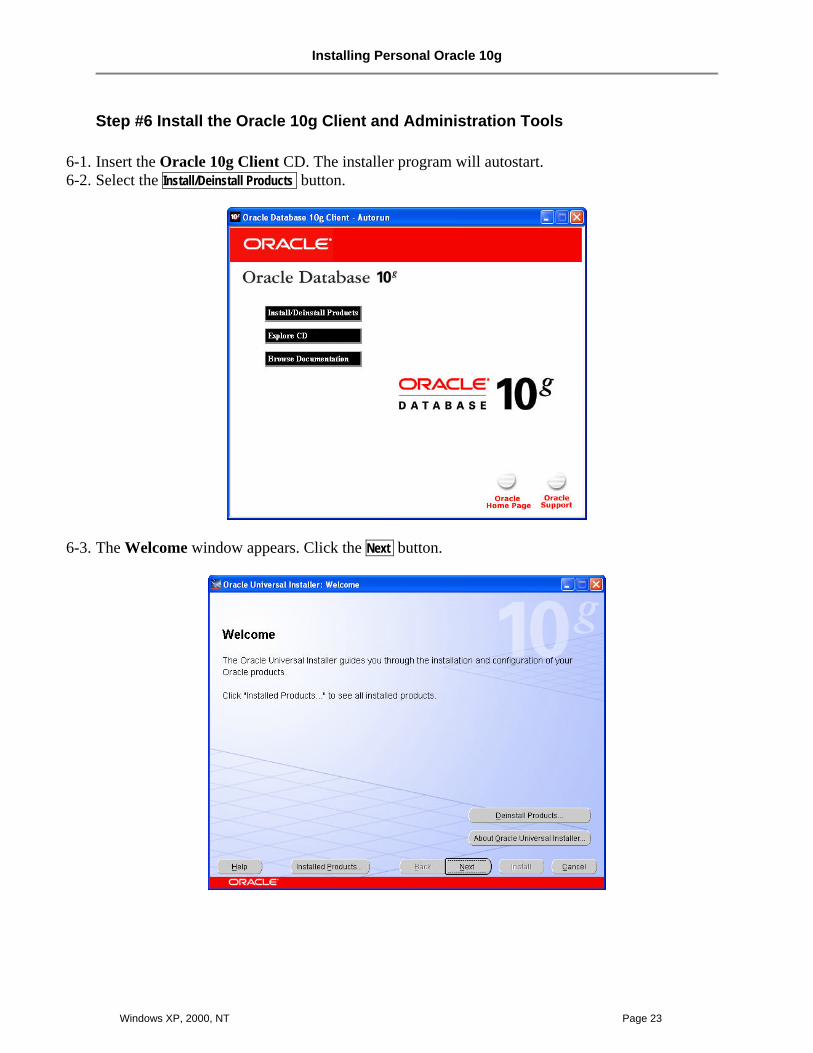
Step #6 Install the Oracle 10g Client and Administration Tools
6-1. Insert the Oracle 10g Client CD. The installer program will autostart. 6-2. Select the Install/Deinstall Products button.
6-3. The Welcome window appears. Click the Next button.
Installing Personal Oracle 10g
Page 24 Windows XP, 2000, NT
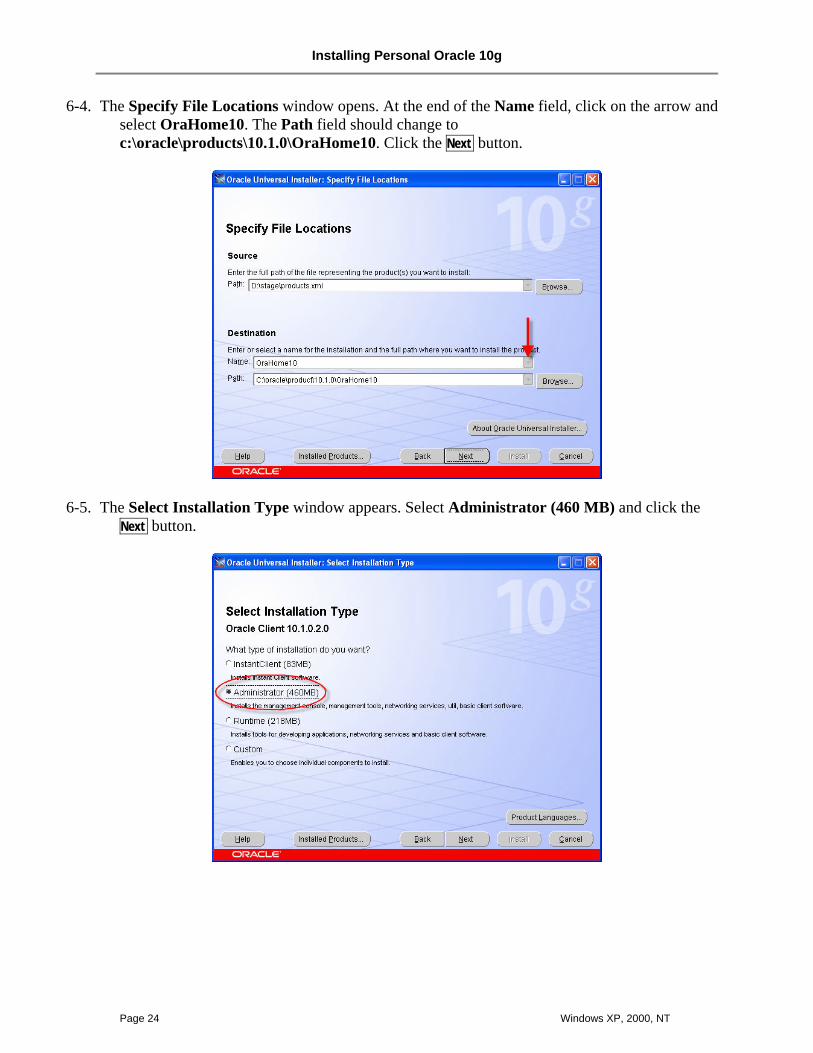
6-4. The Specify File Locations window opens. At the end of the Name field, click on the arrow and select OraHome10. The Path field should change to c:\oracle\products\10.1.0\OraHome10. Click the Next button.
6-5. The Select Installation Type window appears. Select Administrator (460 MB) and click the Next button.
Installing Personal Oracle 10g
Windows XP, 2000, NT Page 25
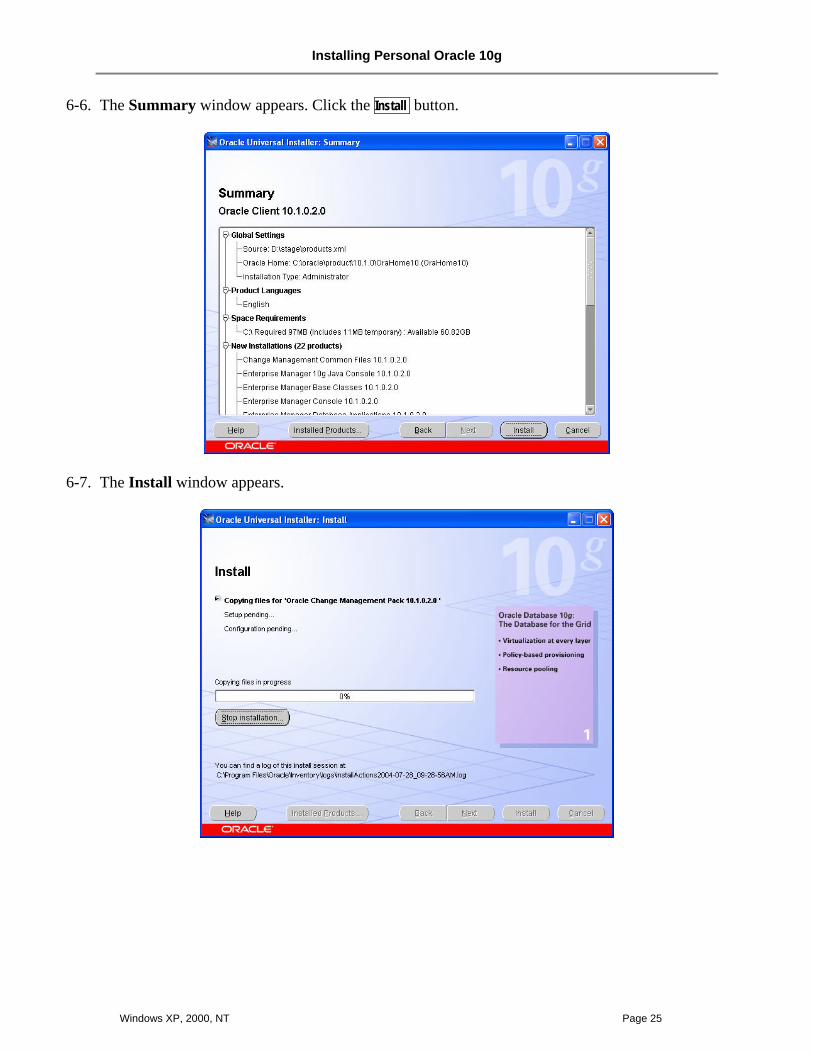
6-6. The Summary window appears. Click the Install button.
6-7. The Install window appears.
Installing Personal Oracle 10g
Page 26 Windows XP, 2000, NT
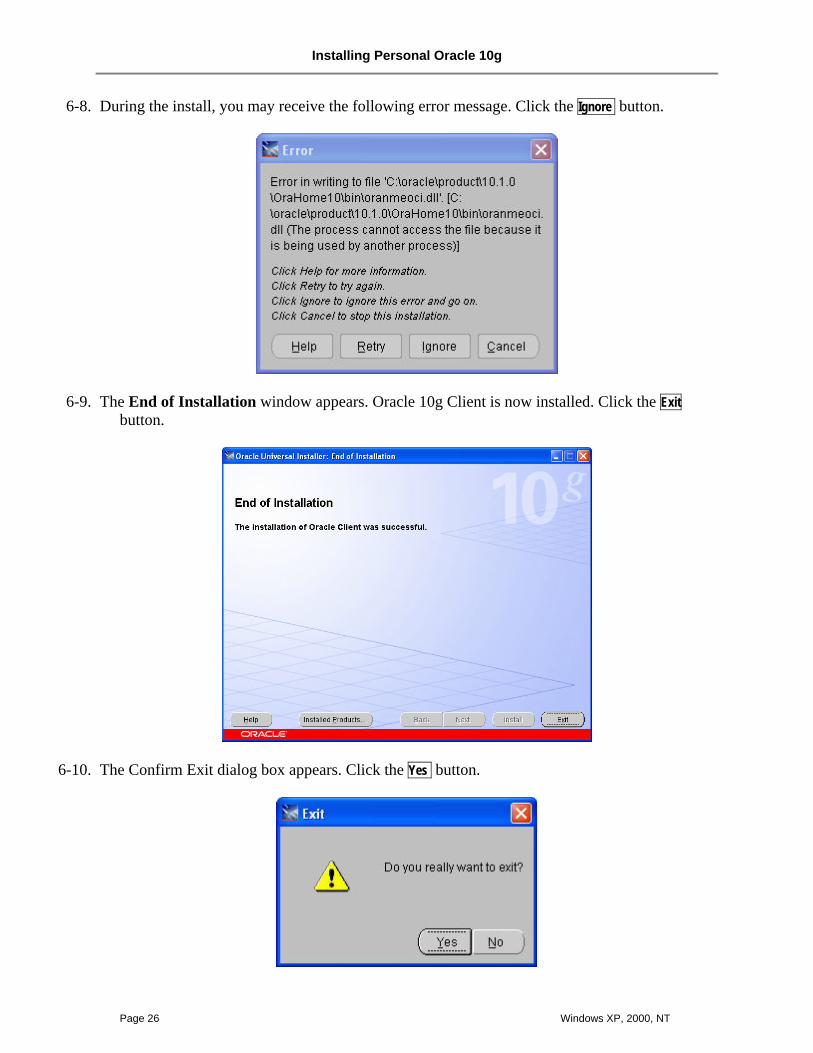
6-8. During the install, you may receive the following error message. Click the Ignore button.
6-9. The End of Installation window appears. Oracle 10g Client is now installed. Click the Exit button.
6-10. The Confirm Exit dialog box appears. Click the Yes button.

Installing Personal Oracle 10g
Windows XP, 2000, NT Page 27
Step #7: Install Oracle 10g Web Server
7-1. Insert the Oracle 10g Database Companion CD. The autostart program will appear. Click the Install/Deinstall Products button.
7-2. The Welcome window appears. Click the Next button.
Installing Personal Oracle 10g
Page 28 Windows XP, 2000, NT
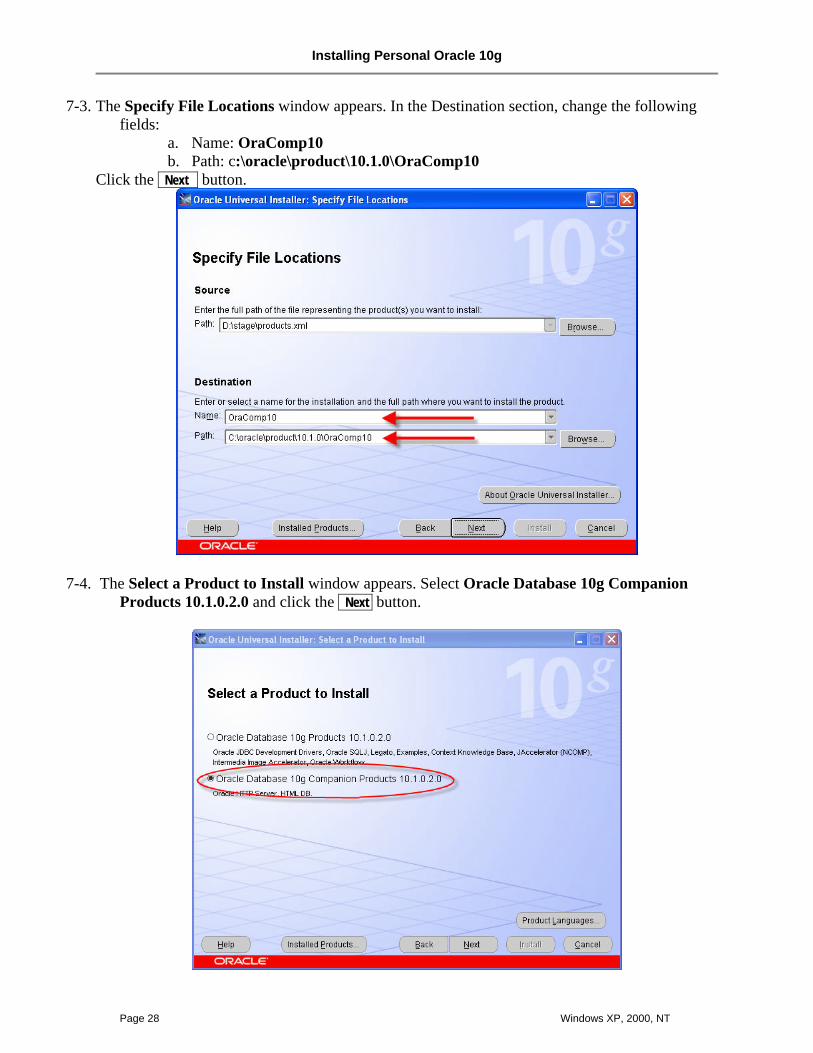
7-3. The Specify File Locations window appears. In the Destination section, change the following fields:
a. Name: OraComp10 b. Path: c:\oracle\product\10.1.0\OraComp10
Click the Next button.
7-4. The Select a Product to Install window appears. Select Oracle Database 10g Companion Products 10.1.0.2.0 and click the Next button.
Installing Personal Oracle 10g
Windows XP, 2000, NT Page 29
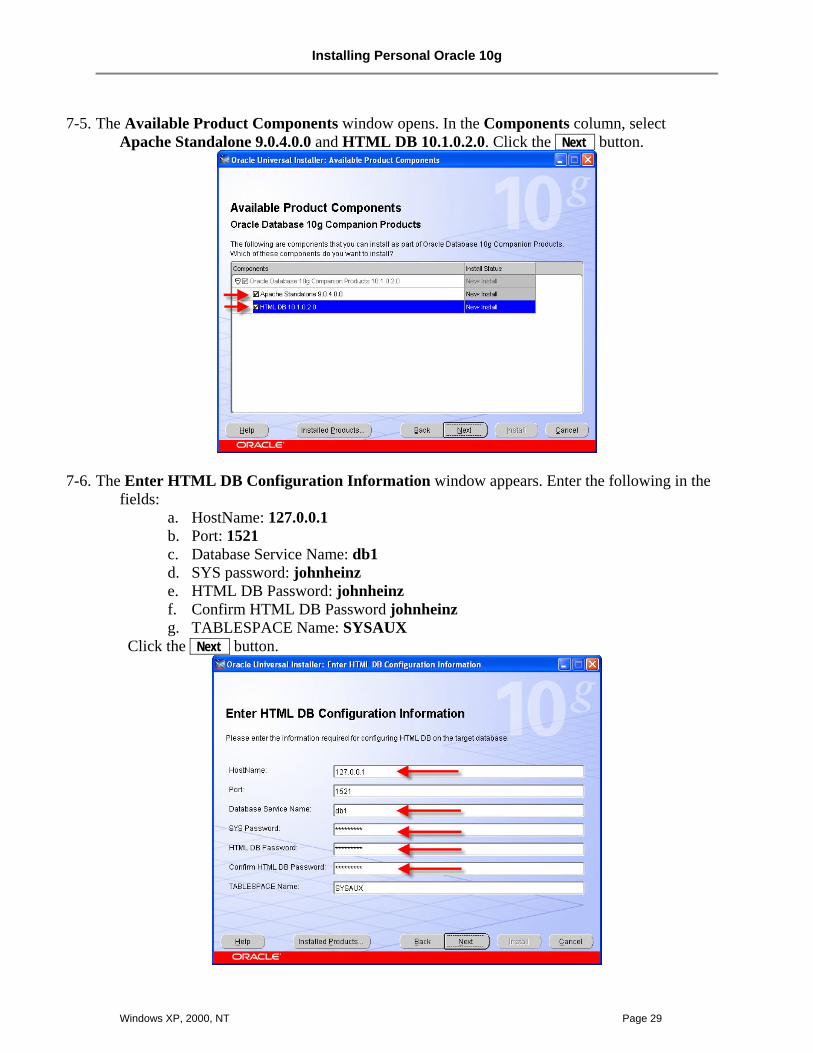
7-5. The Available Product Components window opens. In the Components column, select
Apache Standalone 9.0.4.0.0 and HTML DB 10.1.0.2.0. Click the Next button.
7-6. The Enter HTML DB Configuration Information window appears. Enter the following in the fields:
a. HostName: 127.0.0.1 b. Port: 1521 c. Database Service Name: db1 d. SYS password: johnheinz e. HTML DB Password: johnheinz f. Confirm HTML DB Password johnheinz g. TABLESPACE Name: SYSAUX
Click the Next button.
Installing Personal Oracle 10g
Page 30 Windows XP, 2000, NT
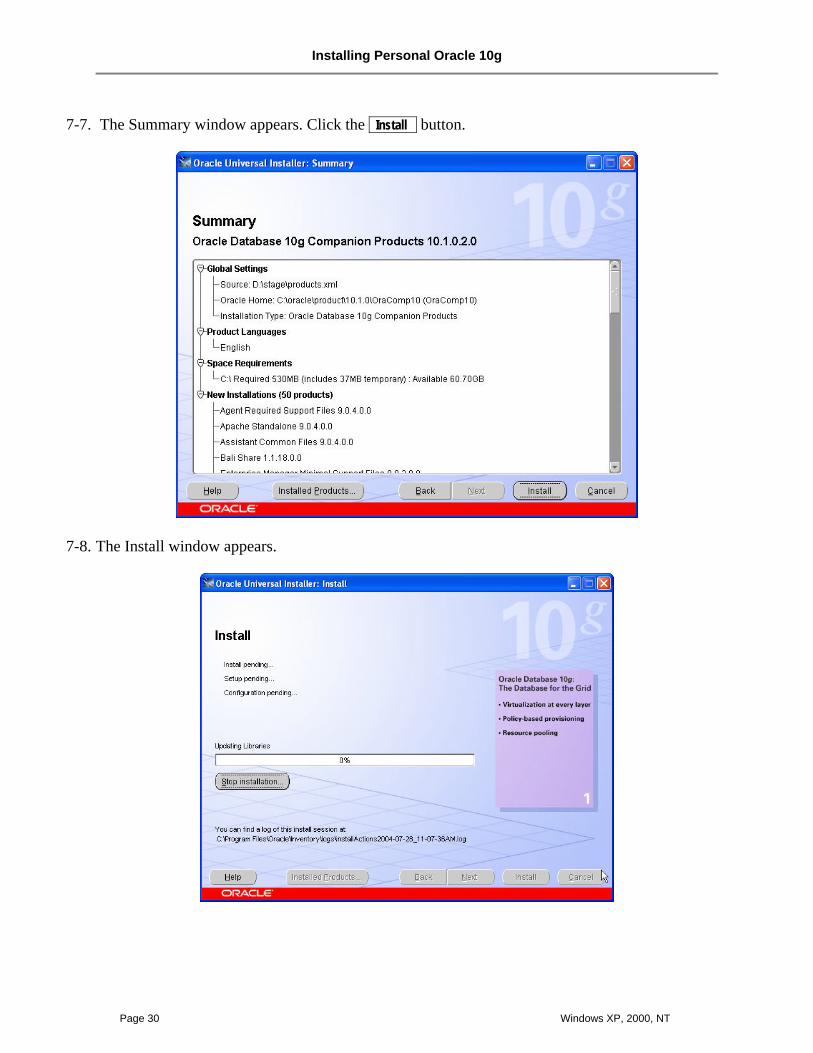
7-7. The Summary window appears. Click the Install button.
7-8. The Install window appears.
Installing Personal Oracle 10g
Windows XP, 2000, NT Page 31
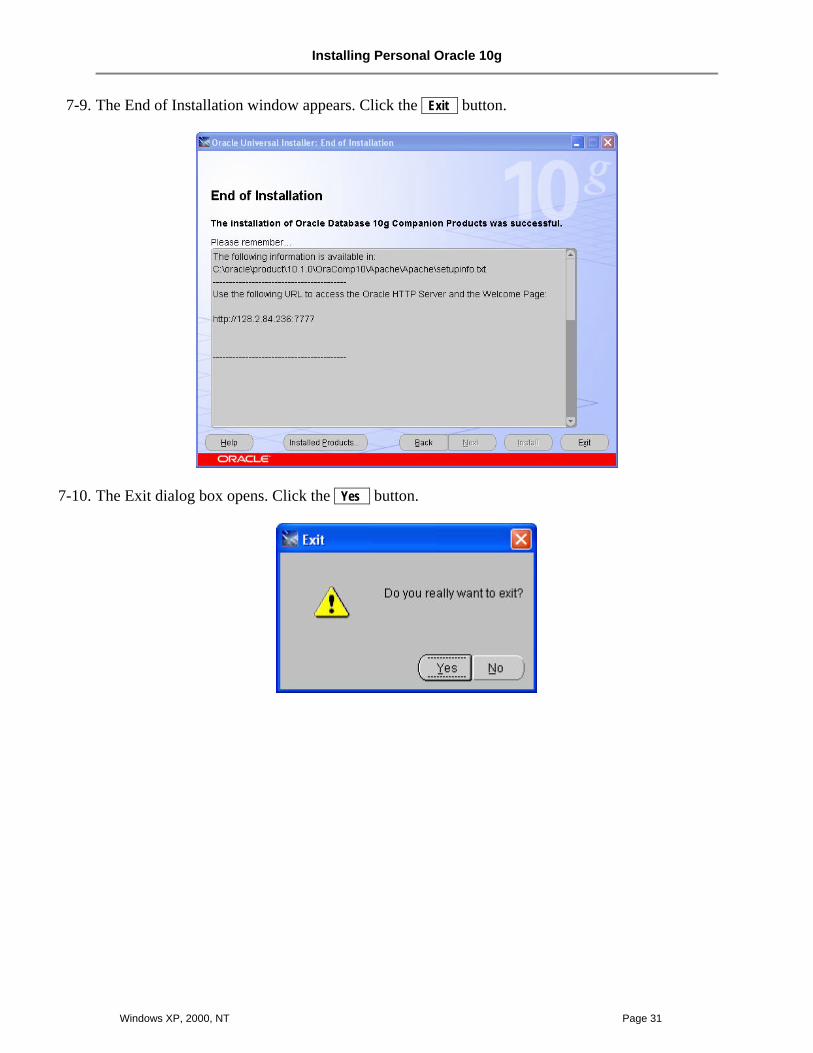
7-9. The End of Installation window appears. Click the Exit button.
7-10. The Exit dialog box opens. Click the Yes button.
Installing Personal Oracle 10g
Page 32 Windows XP, 2000, NT
Step #8: Install the Oracle 10g Online Documentation (Optional) This step involves decompressing a file. The instructions illustrate how to extract the file contents using the Windows XP native decompression utilities. Windows XP user with third party decompression utility programs and Windows 2000 users will have to modify the instruction as needed.
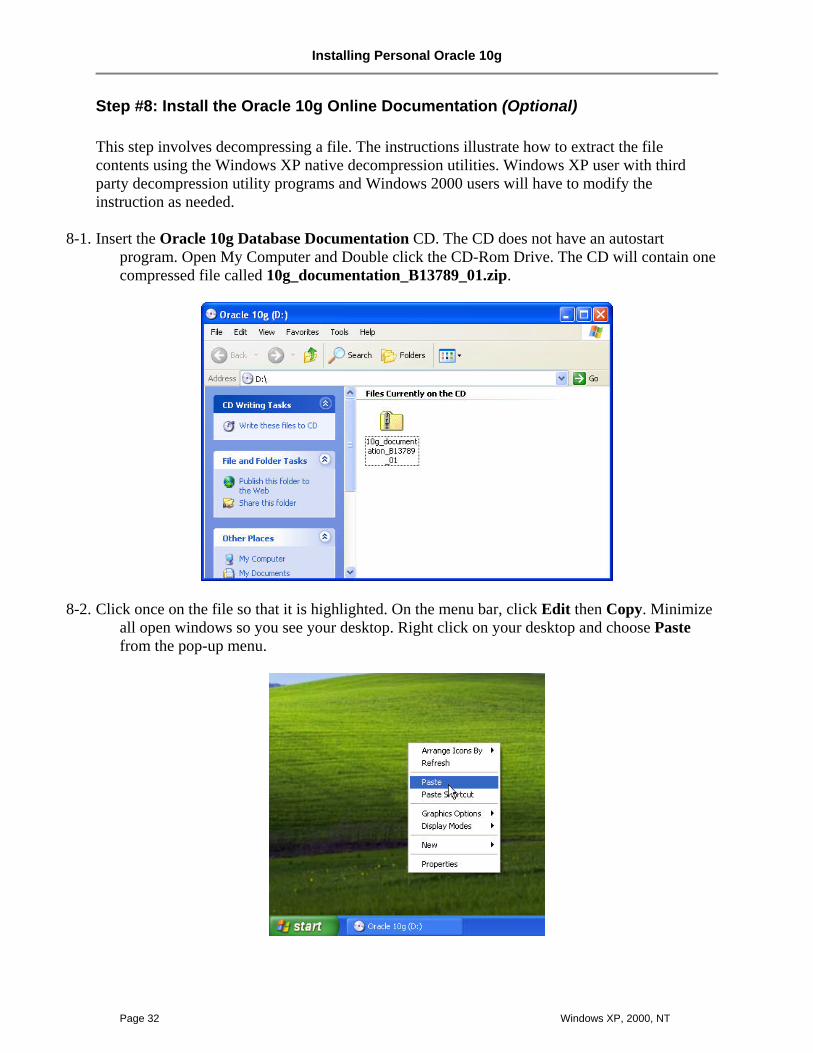
8-1. Insert the Oracle 10g Database Documentation CD. The CD does not have an autostart
program. Open My Computer and Double click the CD-Rom Drive. The CD will contain one compressed file called 10g_documentation_B13789_01.zip.
8-2. Click once on the file so that it is highlighted. On the menu bar, click Edit then Copy. Minimize all open windows so you see your desktop. Right click on your desktop and choose Paste from the pop-up menu.
Installing Personal Oracle 10g
Windows XP, 2000, NT Page 33
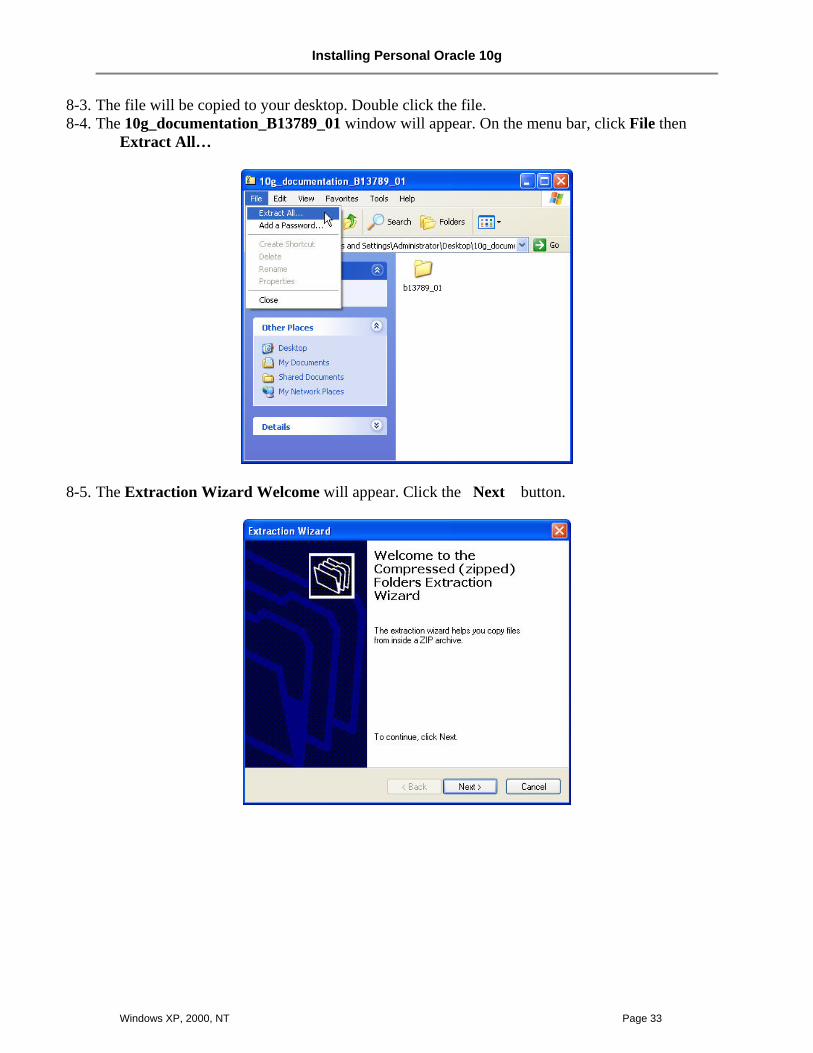
8-3. The file will be copied to your desktop. Double click the file. 8-4. The 10g_documentation_B13789_01 window will appear. On the menu bar, click File then
Extract All…
8-5. The Extraction Wizard Welcome will appear. Click the Next button.
Installing Personal Oracle 10g
Page 34 Windows XP, 2000, NT
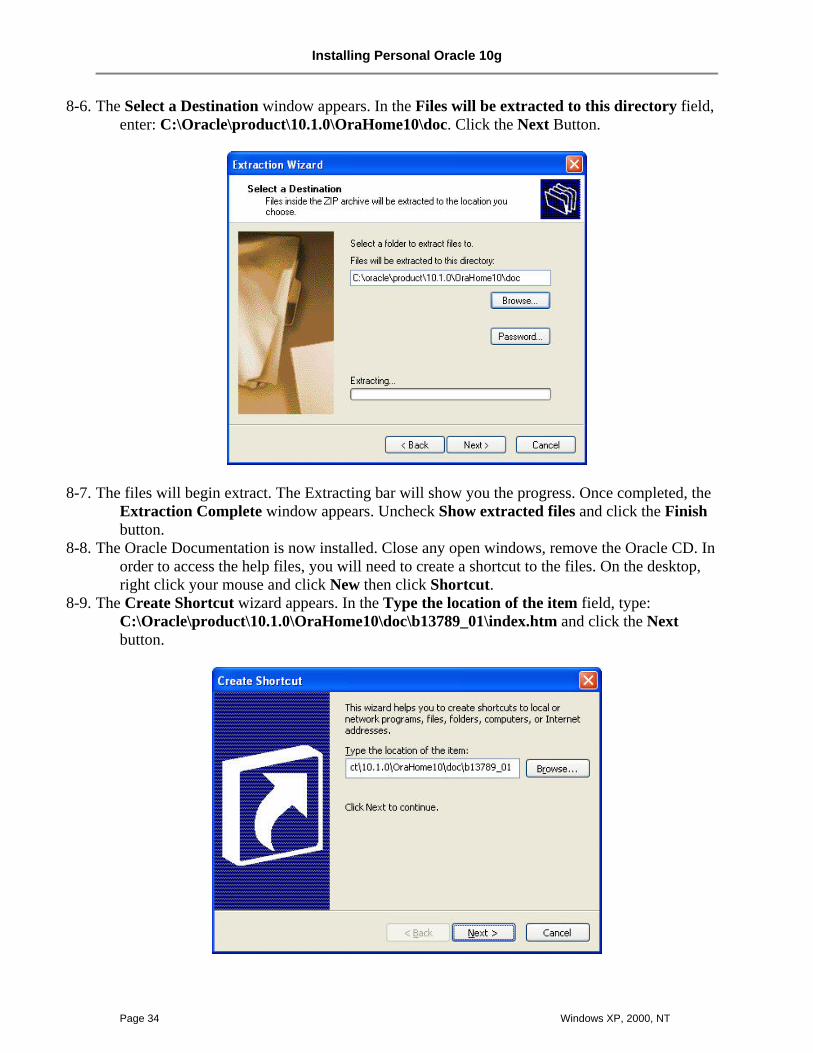
8-6. The Select a Destination window appears. In the Files will be extracted to this directory field, enter: C:\Oracle\product\10.1.0\OraHome10\doc. Click the Next Button.
8-7. The files will begin extract. The Extracting bar will show you the progress. Once completed, the Extraction Complete window appears. Uncheck Show extracted files and click the Finish button.
8-8. The Oracle Documentation is now installed. Close any open windows, remove the Oracle CD. In order to access the help files, you will need to create a shortcut to the files. On the desktop, right click your mouse and click New then click Shortcut.
8-9. The Create Shortcut wizard appears. In the Type the location of the item field, type: C:\Oracle\product\10.1.0\OraHome10\doc\b13789_01\index.htm and click the Next button.
Installing Personal Oracle 10g
Windows XP, 2000, NT Page 35
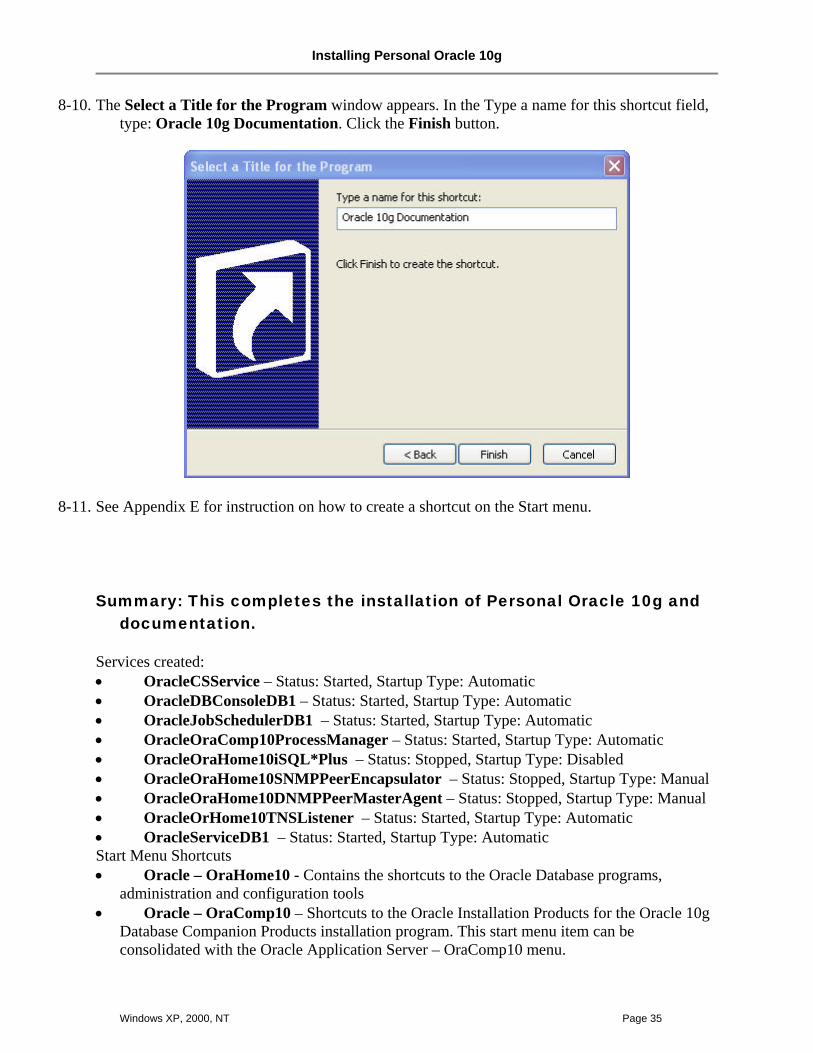
8-10. The Select a Title for the Program window appears. In the Type a name for this shortcut field, type: Oracle 10g Documentation. Click the Finish button.
8-11. See Appendix E for instruction on how to create a shortcut on the Start menu.
Summary: This completes the installation of Personal Oracle 10g and
documentation. Services created: • OracleCSService – Status: Started, Startup Type: Automatic • OracleDBConsoleDB1 – Status: Started, Startup Type: Automatic • OracleJobSchedulerDB1 – Status: Started, Startup Type: Automatic • OracleOraComp10ProcessManager – Status: Started, Startup Type: Automatic • OracleOraHome10iSQL*Plus – Status: Stopped, Startup Type: Disabled • OracleOraHome10SNMPPeerEncapsulator – Status: Stopped, Startup Type: Manual • OracleOraHome10DNMPPeerMasterAgent – Status: Stopped, Startup Type: Manual • OracleOrHome10TNSListener – Status: Started, Startup Type: Automatic • OracleServiceDB1 – Status: Started, Startup Type: Automatic Start Menu Shortcuts • Oracle – OraHome10 - Contains the shortcuts to the Oracle Database programs,
administration and configuration tools • Oracle – OraComp10 – Shortcuts to the Oracle Installation Products for the Oracle 10g
Database Companion Products installation program. This start menu item can be consolidated with the Oracle Application Server – OraComp10 menu.
Installing Personal Oracle 10g
Page 36 Windows XP, 2000, NT
• Oracle Application Server – OraComp10 – Provides shortcuts to start and stop the Oracle HTTP Server.
Starting services like these slow the computer’s startup time and use memory. If you do not
regularly use Oracle, you can switch these services to manual and start them yourself when you want to use the database. See Appendix C, page59, for instructions on starting and stopping services.
The default for preconfigured notebooks in the MISM and MSIT program is for the HTTPServer
(Apache) to manually start, so remember to start this service if you need it. The default is also for the database service to automatically start but not the database itself. See Appendix D for instructions on manually starting the database.
If you change network cards, shut down all Oracle services before installing the new card. Occasionally Oracle becomes corrupted and the Oracle service will start, but the database itself
will not. See Appendix D, page 61 for a workaround.
Installing Oracle Developer Suite 10g
Windows XP, 2000, NT Page 37
Installation and Configuration of Oracle Developer Suite 10g
Step A: Install Oracle Developer Suite Note: Oracle Developer Suite will install Oracle 10g Discoverer Administrator and Desktop,
Forms 10g, JDeveloper, Designer and Reports 10g.
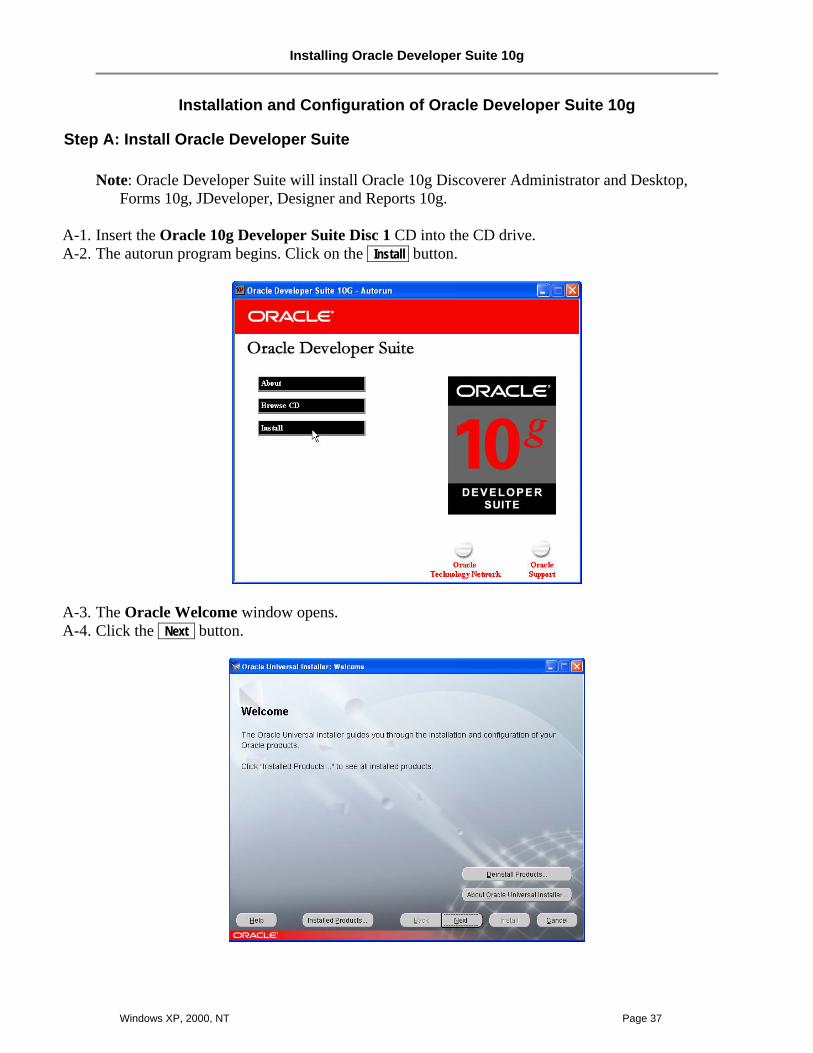
A-1. Insert the Oracle 10g Developer Suite Disc 1 CD into the CD drive. A-2. The autorun program begins. Click on the Install button.
A-3. The Oracle Welcome window opens. A-4. Click the Next button.
Installing Oracle Developer Suite 10g
Page 38 Windows XP, 2000, NT
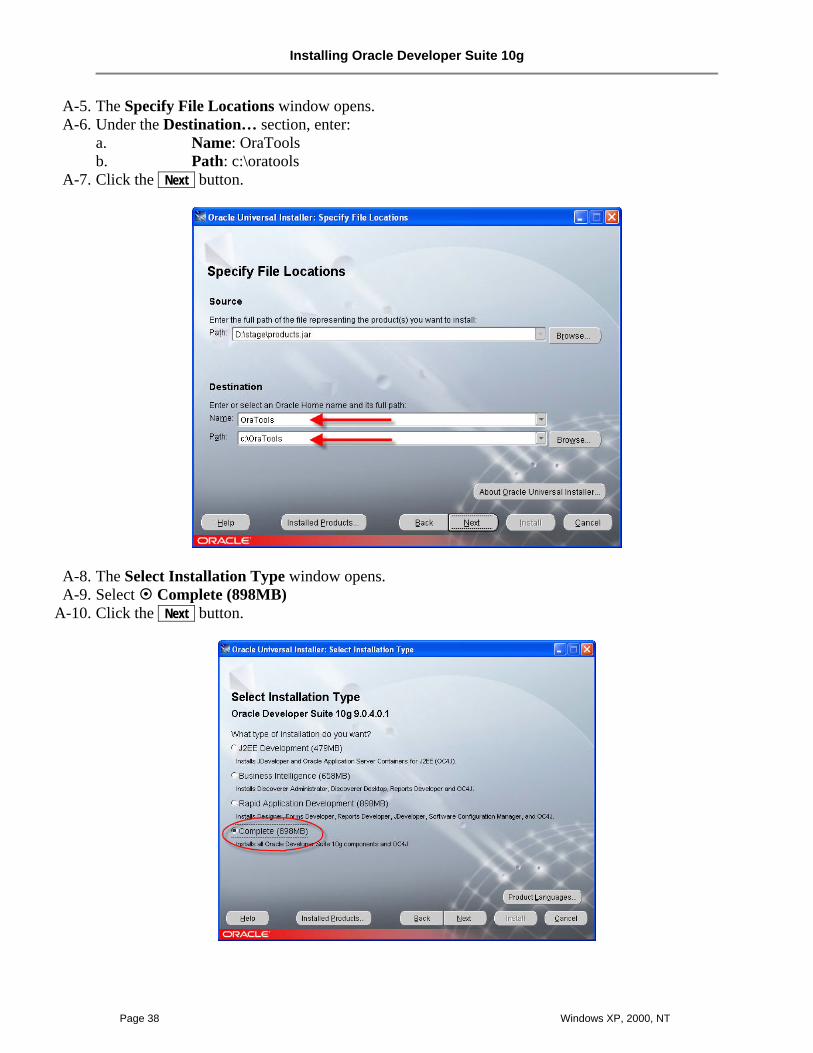
A-5. The Specify File Locations window opens. A-6. Under the Destination… section, enter:
a. Name: OraTools b. Path: c:\oratools
A-7. Click the Next button.
A-8. The Select Installation Type window opens. A-9. Select Complete (898MB)
A-10. Click the Next button.
Installing Oracle Developer Suite 10g
Windows XP, 2000, NT Page 39
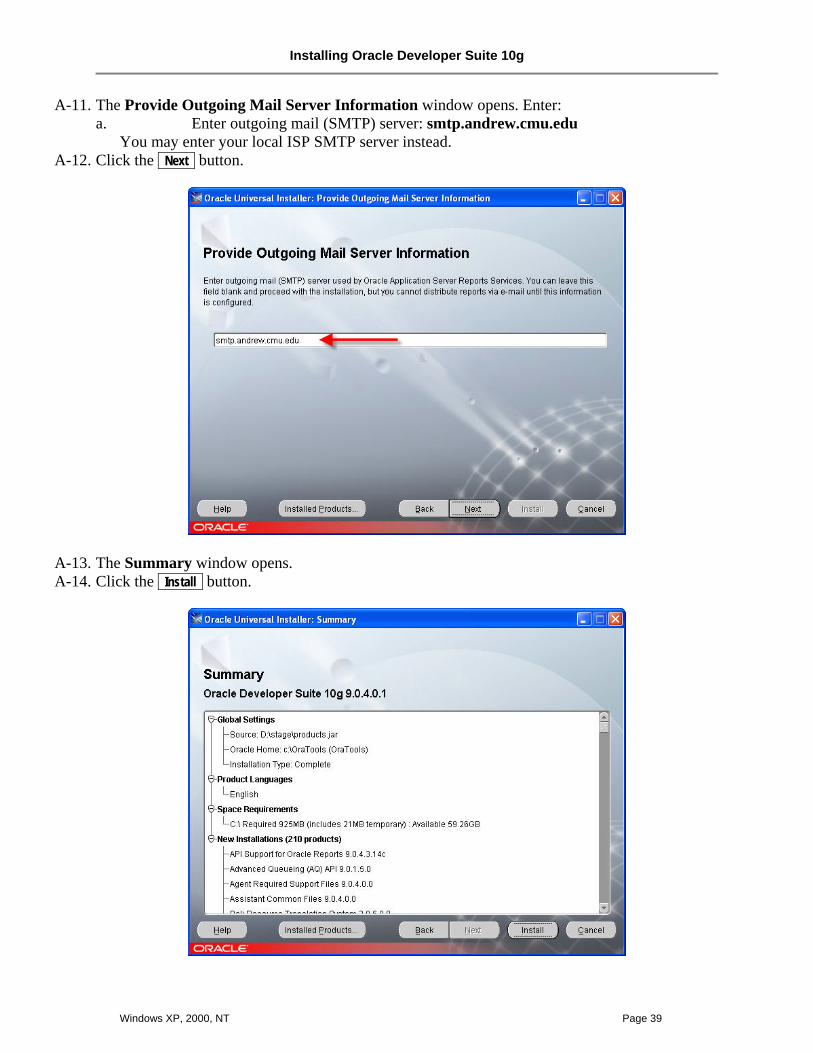
A-11. The Provide Outgoing Mail Server Information window opens. Enter: a. Enter outgoing mail (SMTP) server: smtp.andrew.cmu.edu
You may enter your local ISP SMTP server instead. A-12. Click the Next button.
A-13. The Summary window opens. A-14. Click the Install button.

Installing Oracle Developer Suite 10g
Page 40 Windows XP, 2000, NT
A-15. The Install window opens and the installation begins.
A-16. During the installation, you will be prompted to insert disk 2 .
A-17. The End of Installation window opens with the Installation Successful message. A-18. Click the Exit button.
Installing Oracle Developer Suite 10g
Windows XP, 2000, NT Page 41
A-19. The Exit dialog box appears. Click the Yes button.
Step B: Reboot your computer. B-1. Close all open windows. B-2. Remove Oracle Developer Suite CD. B-3. Restart your computer.
Step C: Install the Java Initiator (necessary for Forms & Reports) C-1. Start the Java installation:
a. Select Start b. Select Run
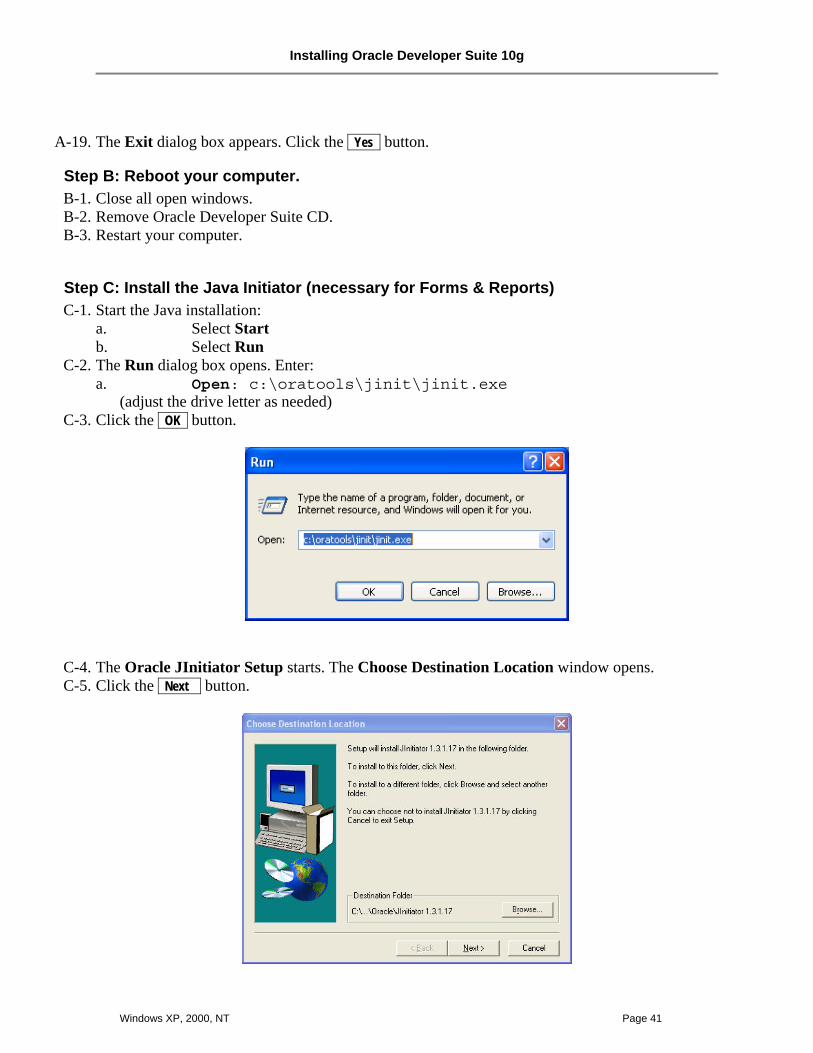
C-2. The Run dialog box opens. Enter: a. Open: c:\oratools\jinit\jinit.exe
(adjust the drive letter as needed) C-3. Click the OK button.
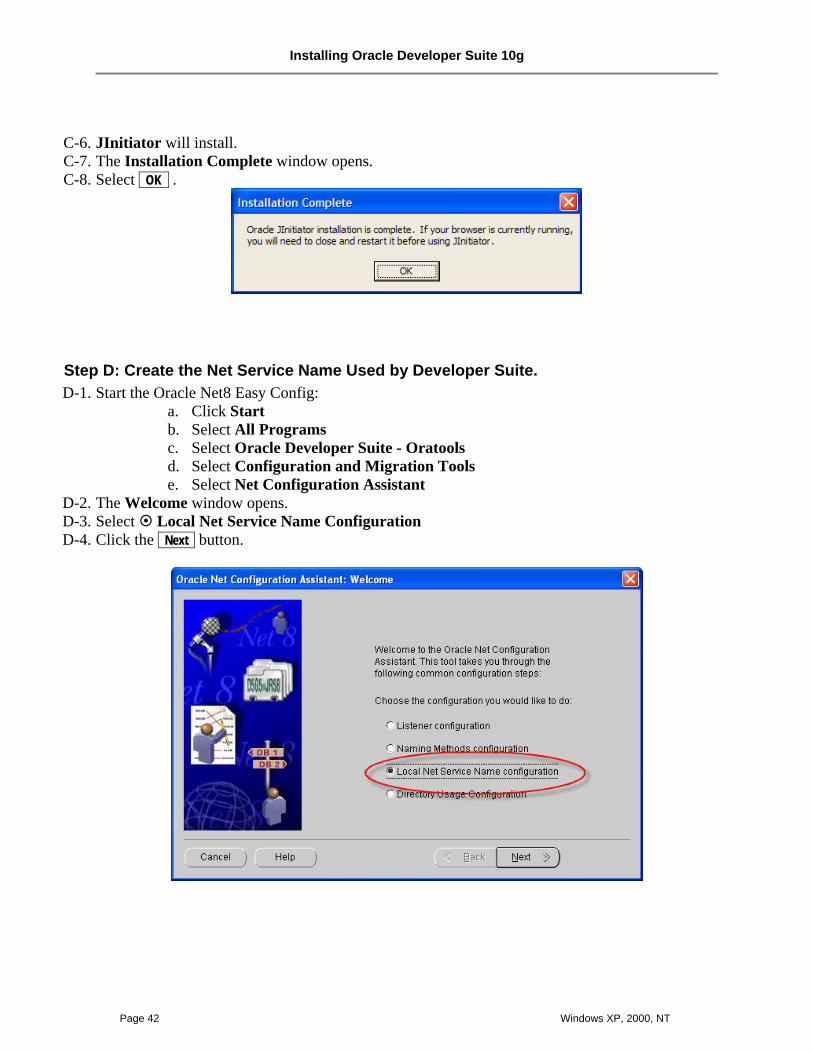
C-4. The Oracle JInitiator Setup starts. The Choose Destination Location window opens. C-5. Click the Next button.
Installing Oracle Developer Suite 10g
Page 42 Windows XP, 2000, NT
C-6. JInitiator will install. C-7. The Installation Complete window opens. C-8. Select OK .
Step D: Create the Net Service Name Used by Developer Suite. D-1. Start the Oracle Net8 Easy Config:
a. Click Start b. Select All Programs c. Select Oracle Developer Suite - Oratools d. Select Configuration and Migration Tools e. Select Net Configuration Assistant
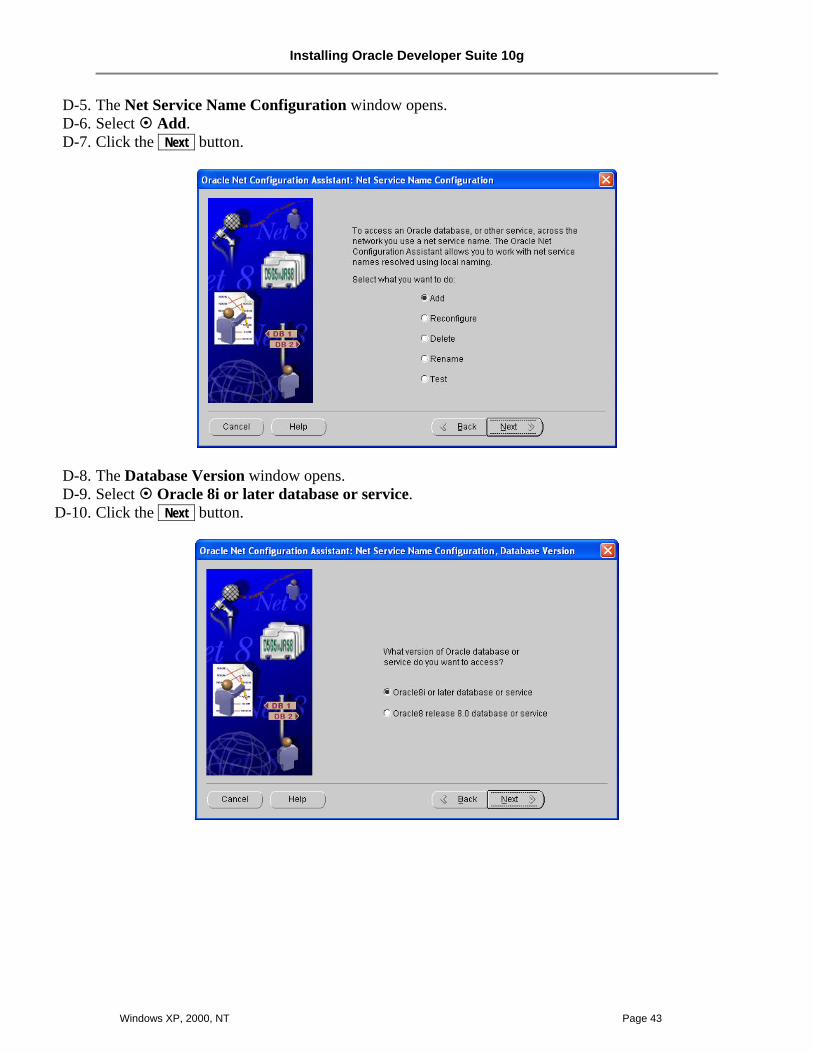
D-2. The Welcome window opens. D-3. Select Local Net Service Name Configuration D-4. Click the Next button.
Installing Oracle Developer Suite 10g
Windows XP, 2000, NT Page 43
D-5. The Net Service Name Configuration window opens. D-6. Select Add. D-7. Click the Next button.
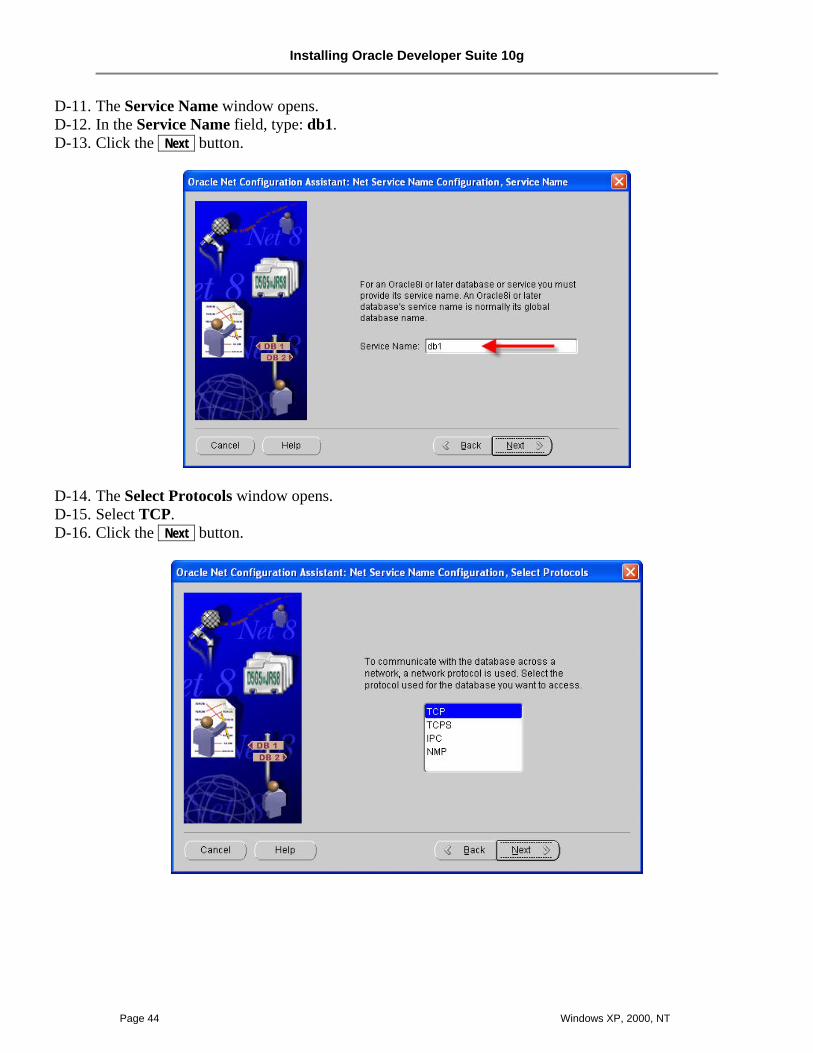
D-8. The Database Version window opens. D-9. Select Oracle 8i or later database or service.
D-10. Click the Next button.
Installing Oracle Developer Suite 10g
Page 44 Windows XP, 2000, NT
D-11. The Service Name window opens. D-12. In the Service Name field, type: db1. D-13. Click the Next button.
D-14. The Select Protocols window opens. D-15. Select TCP. D-16. Click the Next button.
Installing Oracle Developer Suite 10g
Windows XP, 2000, NT Page 45
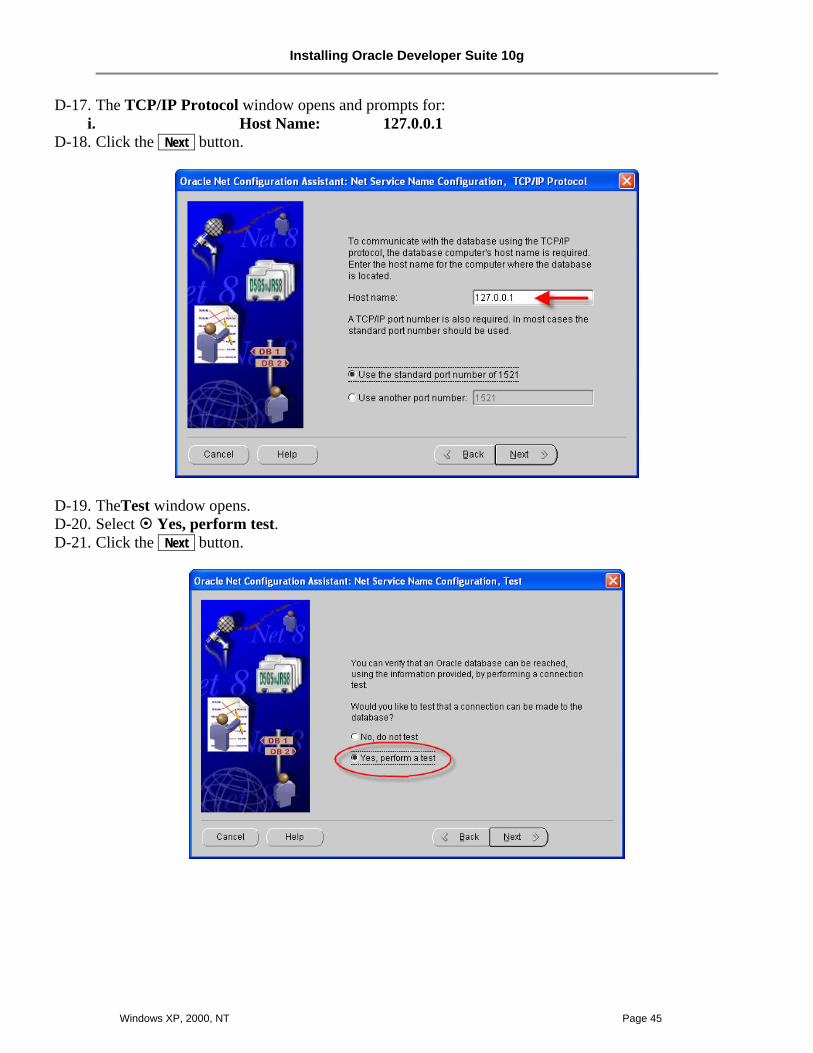
D-17. The TCP/IP Protocol window opens and prompts for: i. Host Name: 127.0.0.1
D-18. Click the Next button.
D-19. TheTest window opens. D-20. Select Yes, perform test. D-21. Click the Next button.
Installing Oracle Developer Suite 10g
Page 46 Windows XP, 2000, NT
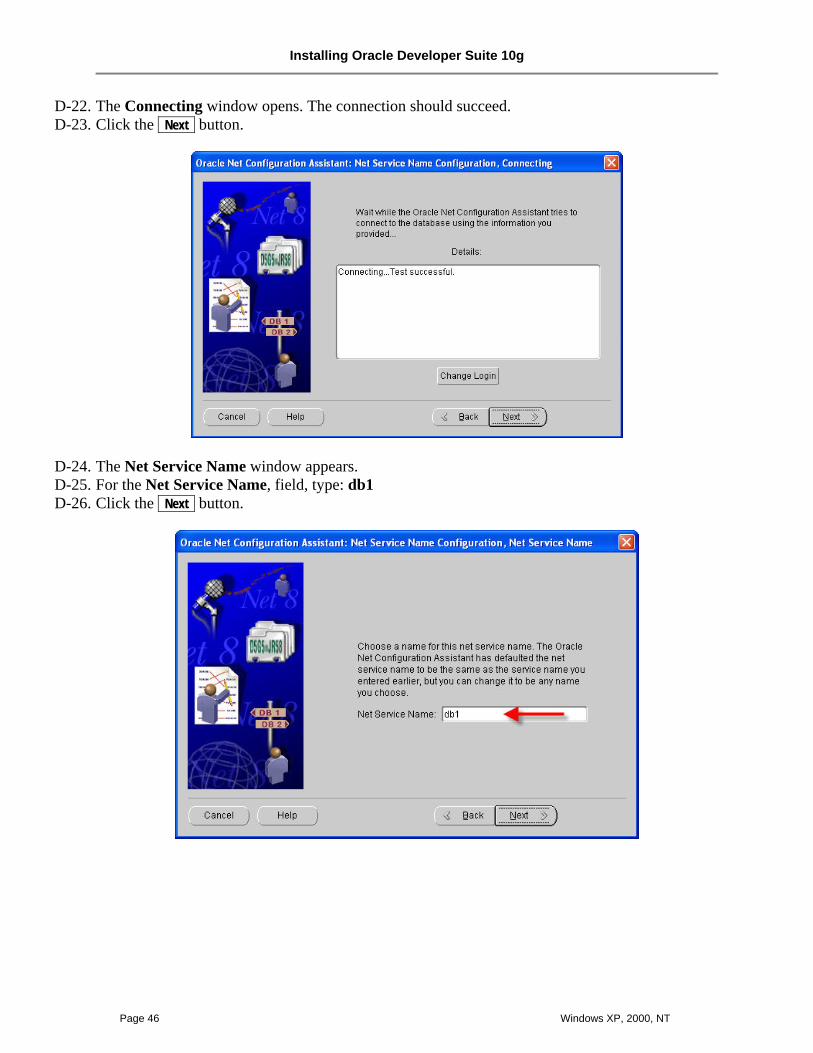
D-22. The Connecting window opens. The connection should succeed. D-23. Click the Next button.
D-24. The Net Service Name window appears. D-25. For the Net Service Name, field, type: db1 D-26. Click the Next button.
Installing Oracle Developer Suite 10g
Windows XP, 2000, NT Page 47
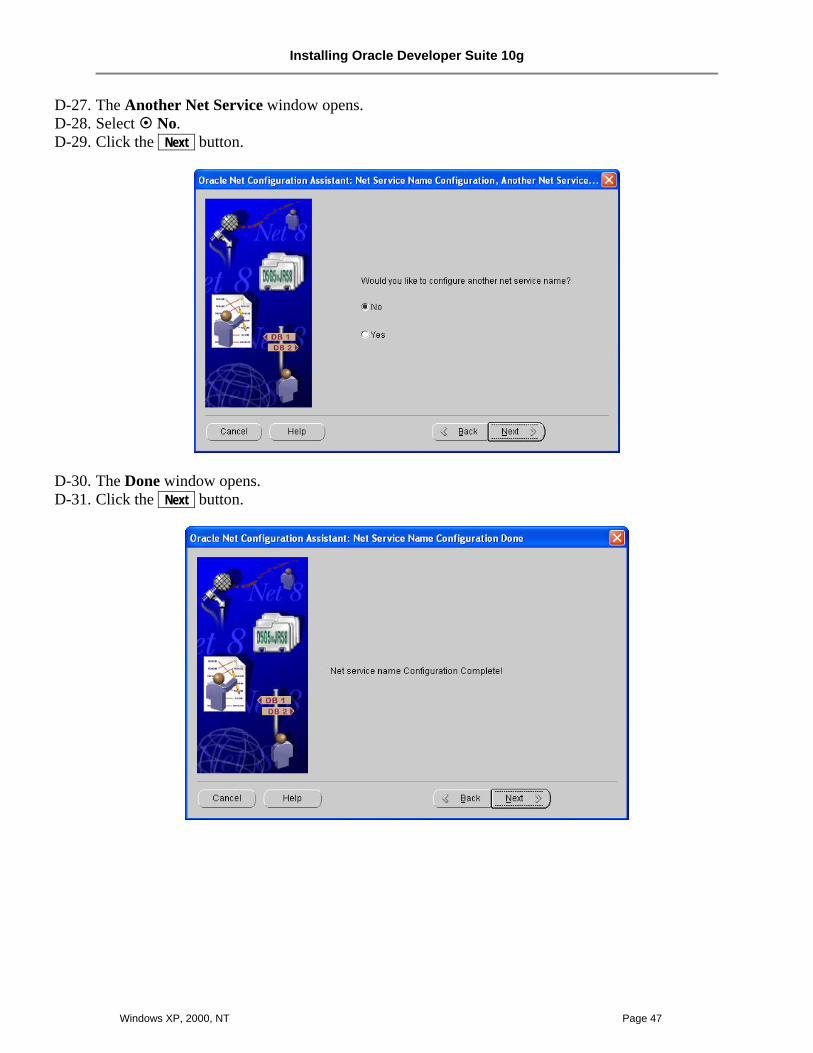
D-27. The Another Net Service window opens. D-28. Select No. D-29. Click the Next button.
D-30. The Done window opens. D-31. Click the Next button.
Installing Oracle Developer Suite 10g
Page 48 Windows XP, 2000, NT
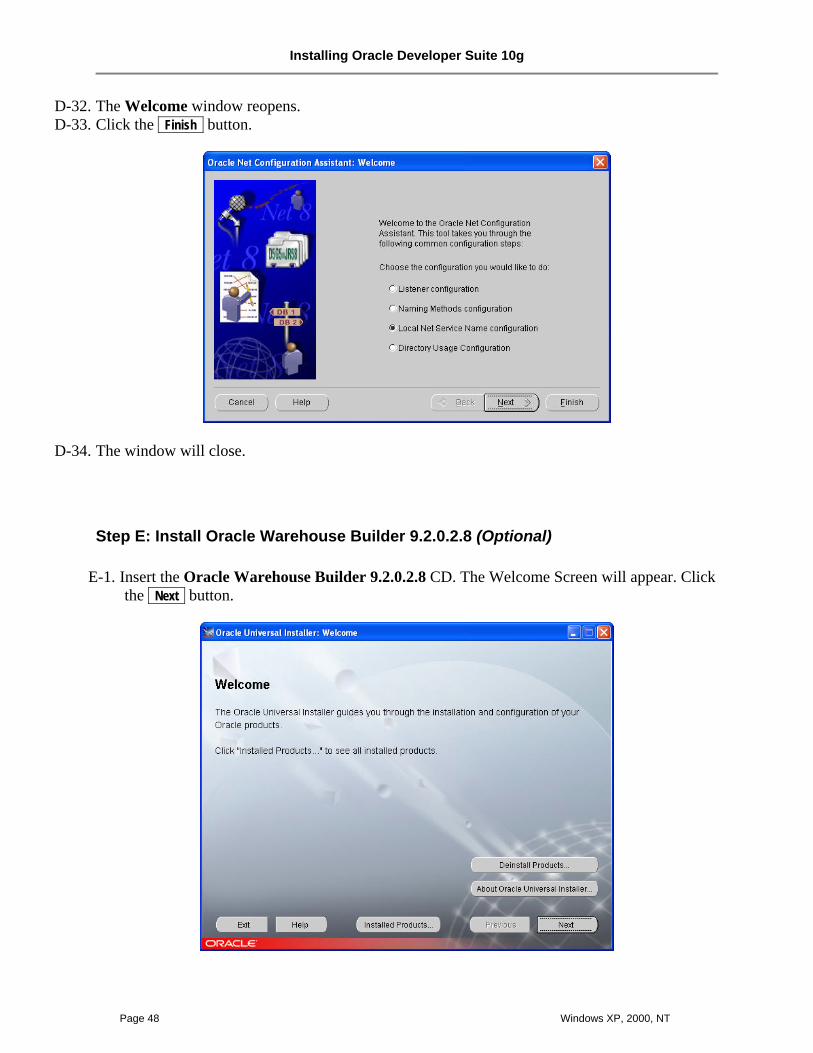
D-32. The Welcome window reopens. D-33. Click the Finish button.
D-34. The window will close.
Step E: Install Oracle Warehouse Builder 9.2.0.2.8 (Optional)
E-1. Insert the Oracle Warehouse Builder 9.2.0.2.8 CD. The Welcome Screen will appear. Click the Next button.
Installing Oracle Developer Suite 10g
Windows XP, 2000, NT Page 49
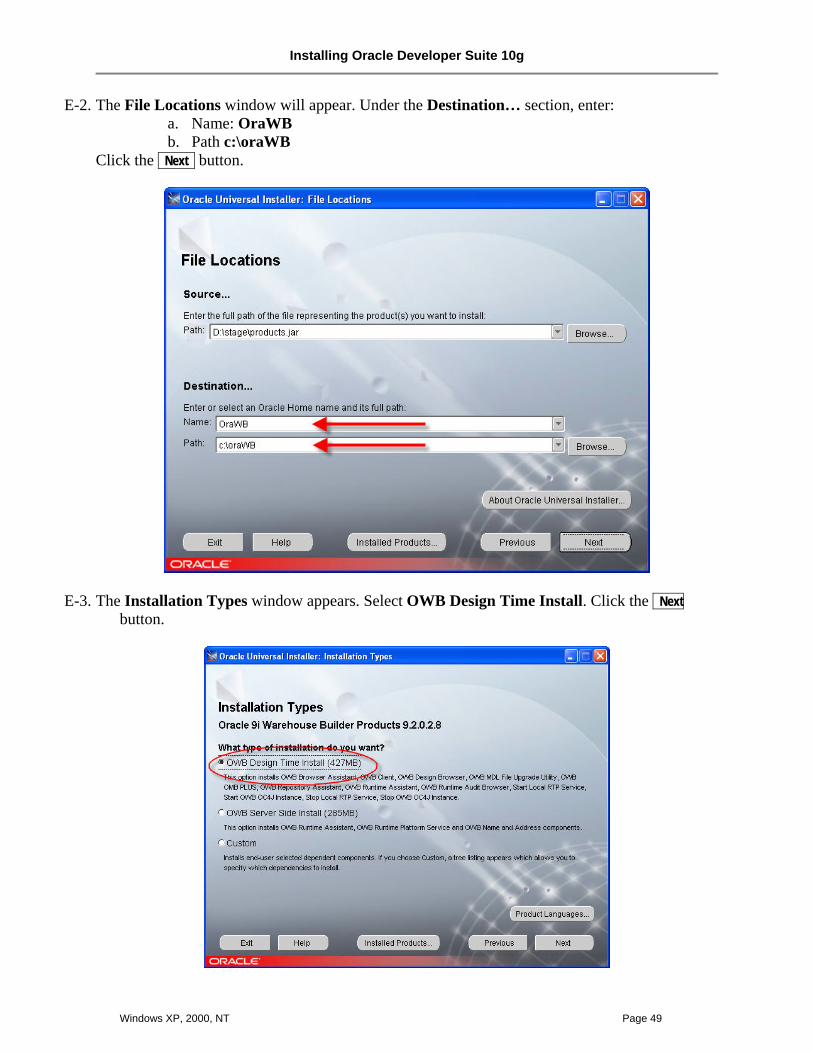
E-2. The File Locations window will appear. Under the Destination… section, enter: a. Name: OraWB b. Path c:\oraWB
Click the Next button.
E-3. The Installation Types window appears. Select OWB Design Time Install. Click the Next button.
Installing Oracle Developer Suite 10g
Page 50 Windows XP, 2000, NT
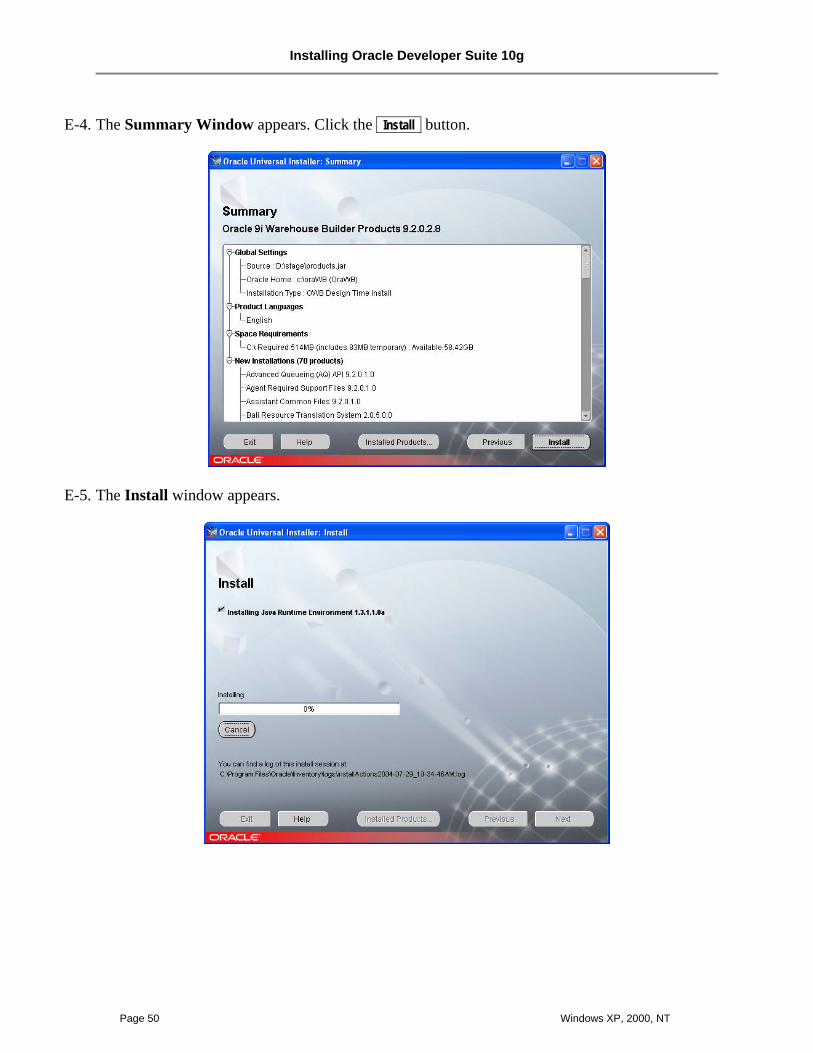
E-4. The Summary Window appears. Click the Install button.
E-5. The Install window appears.
Installing Oracle Developer Suite 10g
Windows XP, 2000, NT Page 51
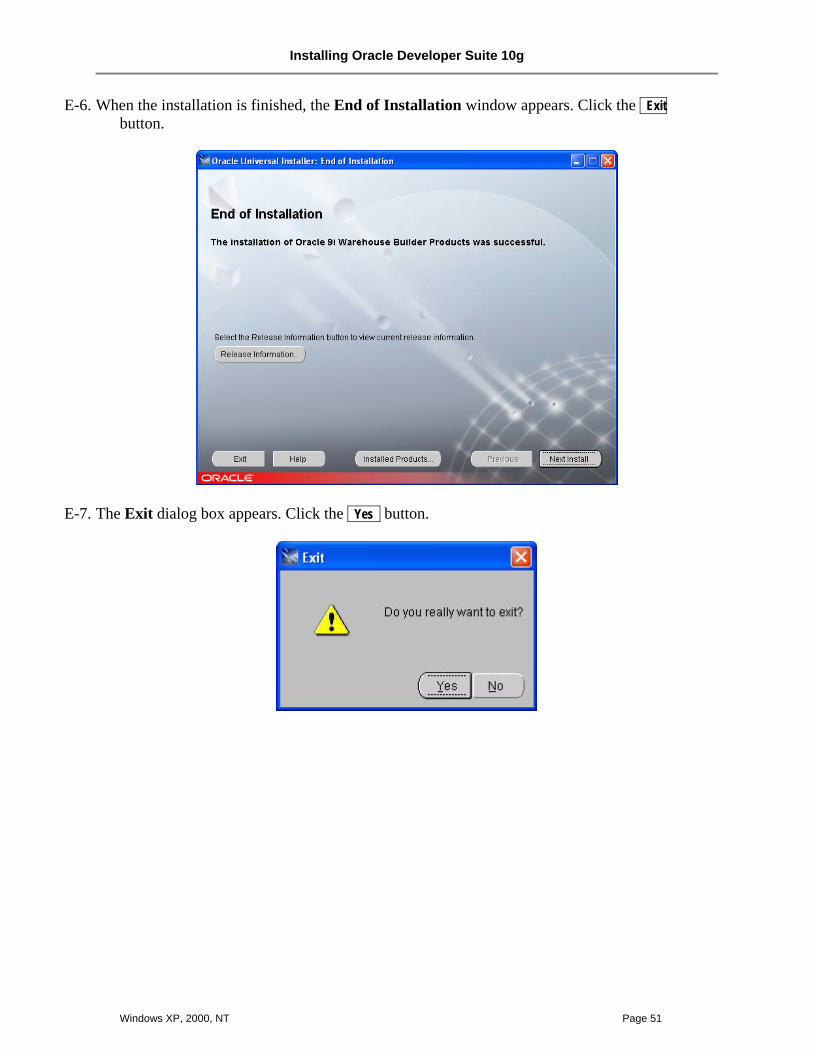
E-6. When the installation is finished, the End of Installation window appears. Click the Exit button.
E-7. The Exit dialog box appears. Click the Yes button.
Installing Oracle Developer Suite 10g
Page 52 Windows XP, 2000, NT
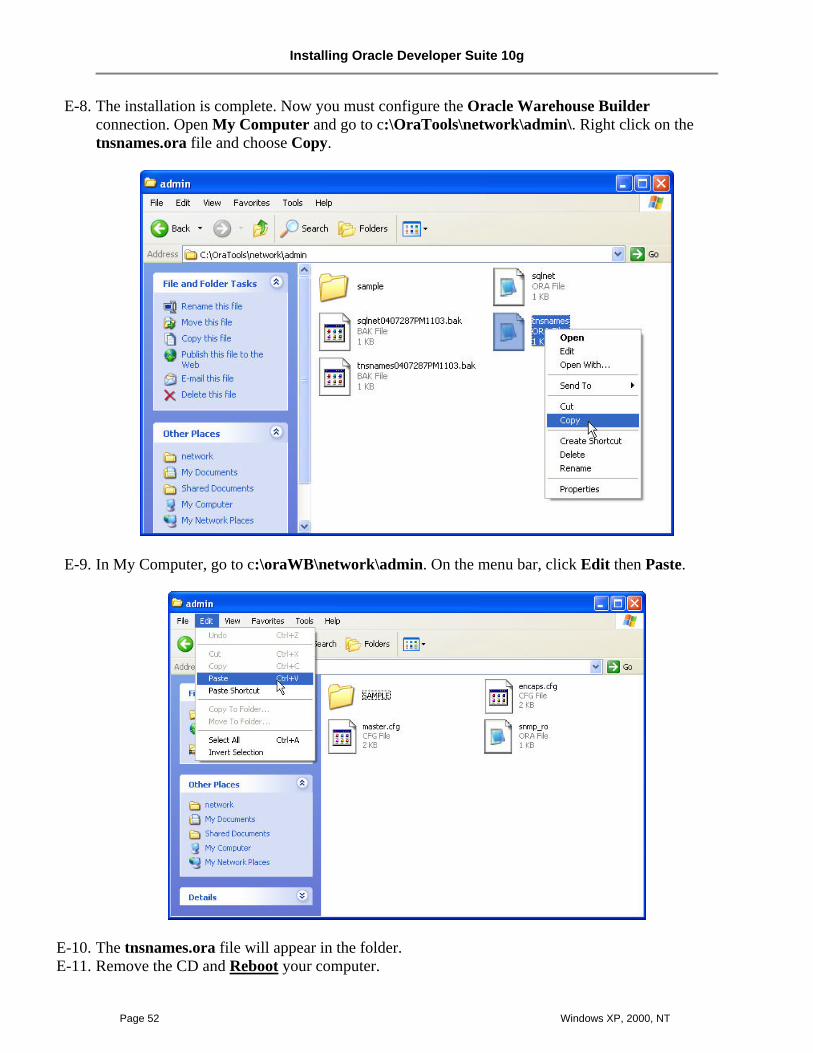
E-8. The installation is complete. Now you must configure the Oracle Warehouse Builder connection. Open My Computer and go to c:\OraTools\network\admin\. Right click on the tnsnames.ora file and choose Copy.
E-9. In My Computer, go to c:\oraWB\network\admin. On the menu bar, click Edit then Paste.
E-10. The tnsnames.ora file will appear in the folder. E-11. Remove the CD and Reboot your computer.
Installing Oracle Developer Suite 10g
Windows XP, 2000, NT Page 53
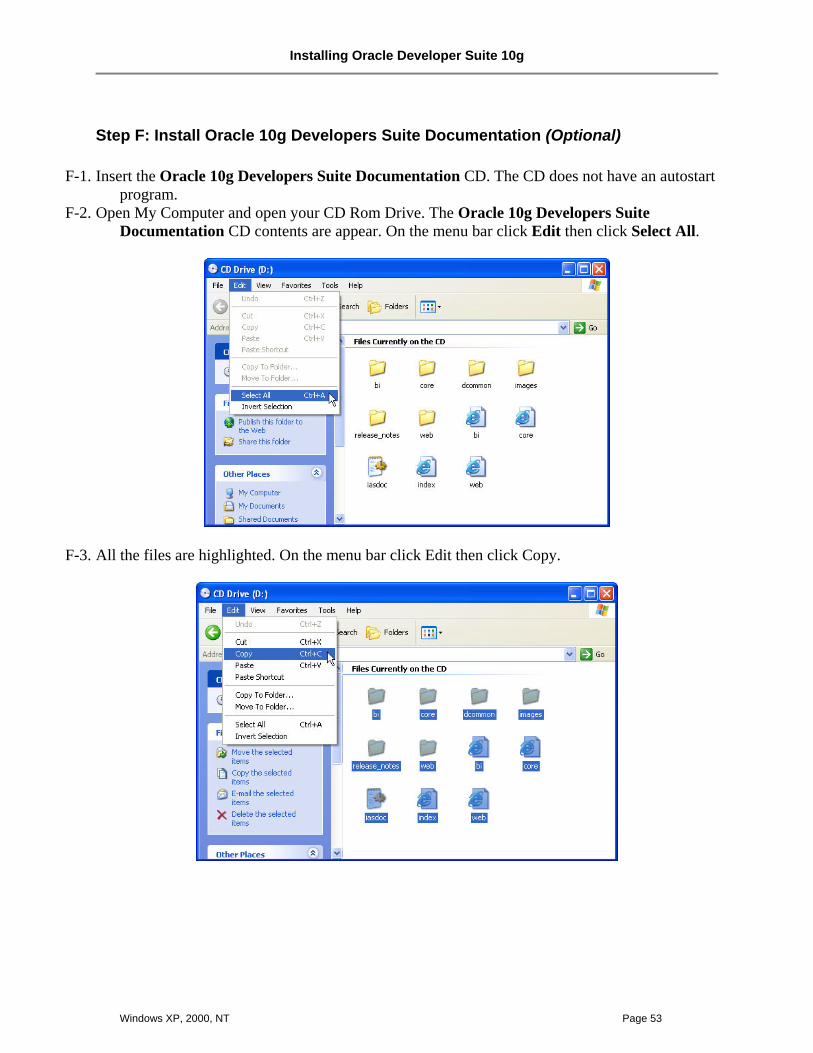
Step F: Install Oracle 10g Developers Suite Documentation (Optional)
F-1. Insert the Oracle 10g Developers Suite Documentation CD. The CD does not have an autostart program.
F-2. Open My Computer and open your CD Rom Drive. The Oracle 10g Developers Suite Documentation CD contents are appear. On the menu bar click Edit then click Select All.
F-3. All the files are highlighted. On the menu bar click Edit then click Copy.
Installing Oracle Developer Suite 10g
Page 54 Windows XP, 2000, NT
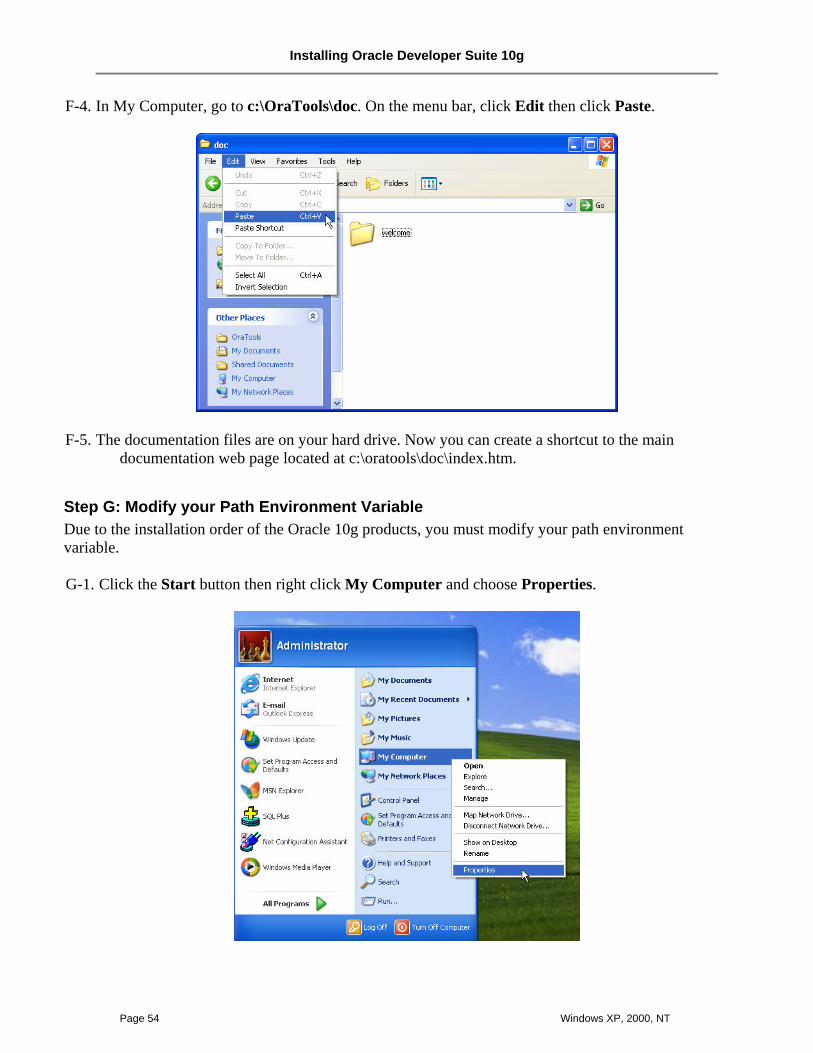
F-4. In My Computer, go to c:\OraTools\doc. On the menu bar, click Edit then click Paste.
F-5. The documentation files are on your hard drive. Now you can create a shortcut to the main documentation web page located at c:\oratools\doc\index.htm.
Step G: Modify your Path Environment Variable Due to the installation order of the Oracle 10g products, you must modify your path environment variable.
G-1. Click the Start button then right click My Computer and choose Properties.
Installing Oracle Developer Suite 10g
Windows XP, 2000, NT Page 55
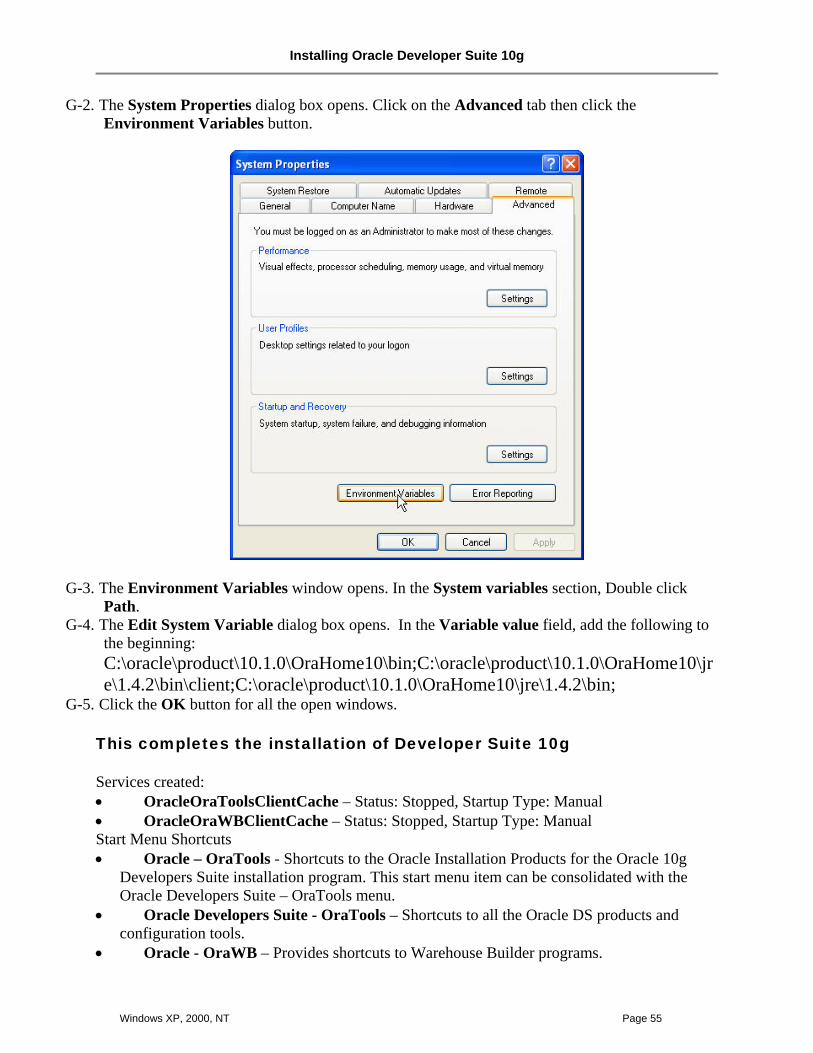
G-2. The System Properties dialog box opens. Click on the Advanced tab then click the Environment Variables button.
G-3. The Environment Variables window opens. In the System variables section, Double click Path.
G-4. The Edit System Variable dialog box opens. In the Variable value field, add the following to the beginning: C:\oracle\product\10.1.0\OraHome10\bin;C:\oracle\product\10.1.0\OraHome10\jre\1.4.2\bin\client;C:\oracle\product\10.1.0\OraHome10\jre\1.4.2\bin;
G-5. Click the OK button for all the open windows. This completes the installation of Developer Suite 10g Services created: • OracleOraToolsClientCache – Status: Stopped, Startup Type: Manual • OracleOraWBClientCache – Status: Stopped, Startup Type: Manual Start Menu Shortcuts • Oracle – OraTools - Shortcuts to the Oracle Installation Products for the Oracle 10g
Developers Suite installation program. This start menu item can be consolidated with the Oracle Developers Suite – OraTools menu.
• Oracle Developers Suite - OraTools – Shortcuts to all the Oracle DS products and configuration tools.
• Oracle - OraWB – Provides shortcuts to Warehouse Builder programs.
Checking Virtual Memory
Page 56 Windows XP, 2000, NT
Appendix A – Checking Virtual Memory
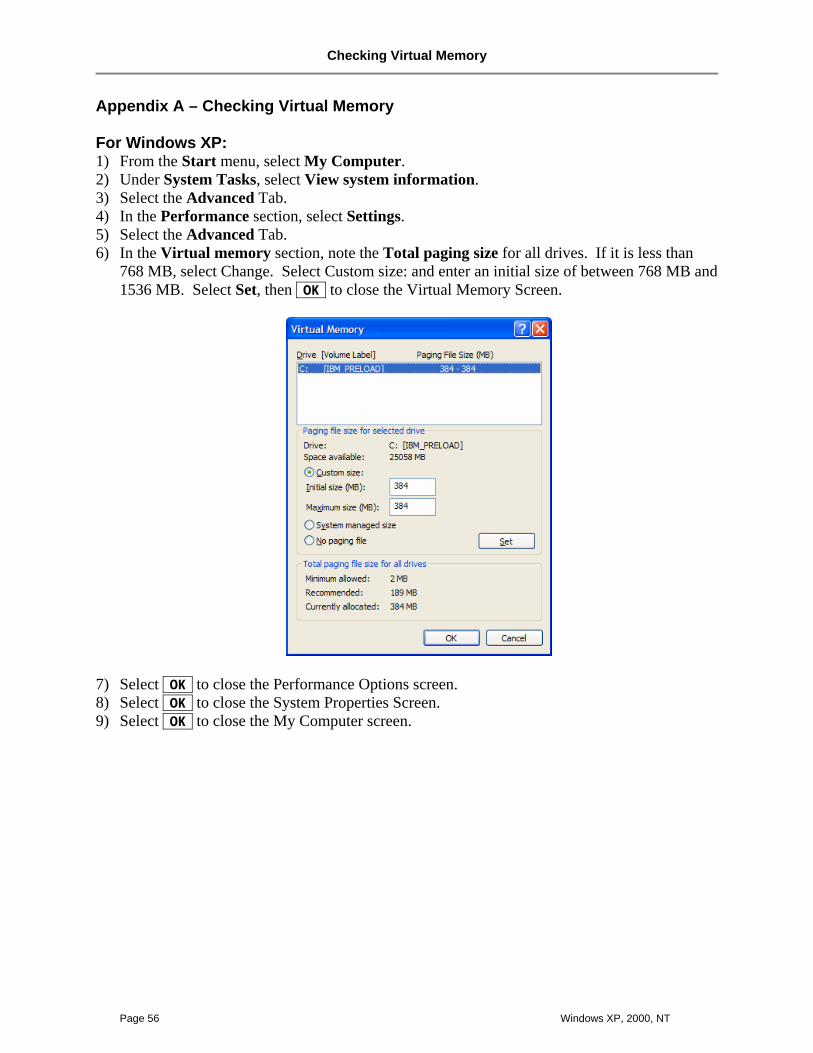
For Windows XP: 1) From the Start menu, select My Computer. 2) Under System Tasks, select View system information. 3) Select the Advanced Tab. 4) In the Performance section, select Settings. 5) Select the Advanced Tab. 6) In the Virtual memory section, note the Total paging size for all drives. If it is less than
768 MB, select Change. Select Custom size: and enter an initial size of between 768 MB and 1536 MB. Select Set, then OK to close the Virtual Memory Screen.
7) Select OK to close the Performance Options screen. 8) Select OK to close the System Properties Screen. 9) Select OK to close the My Computer screen.
Checking Virtual Memory
Windows XP, 2000, NT Page 57
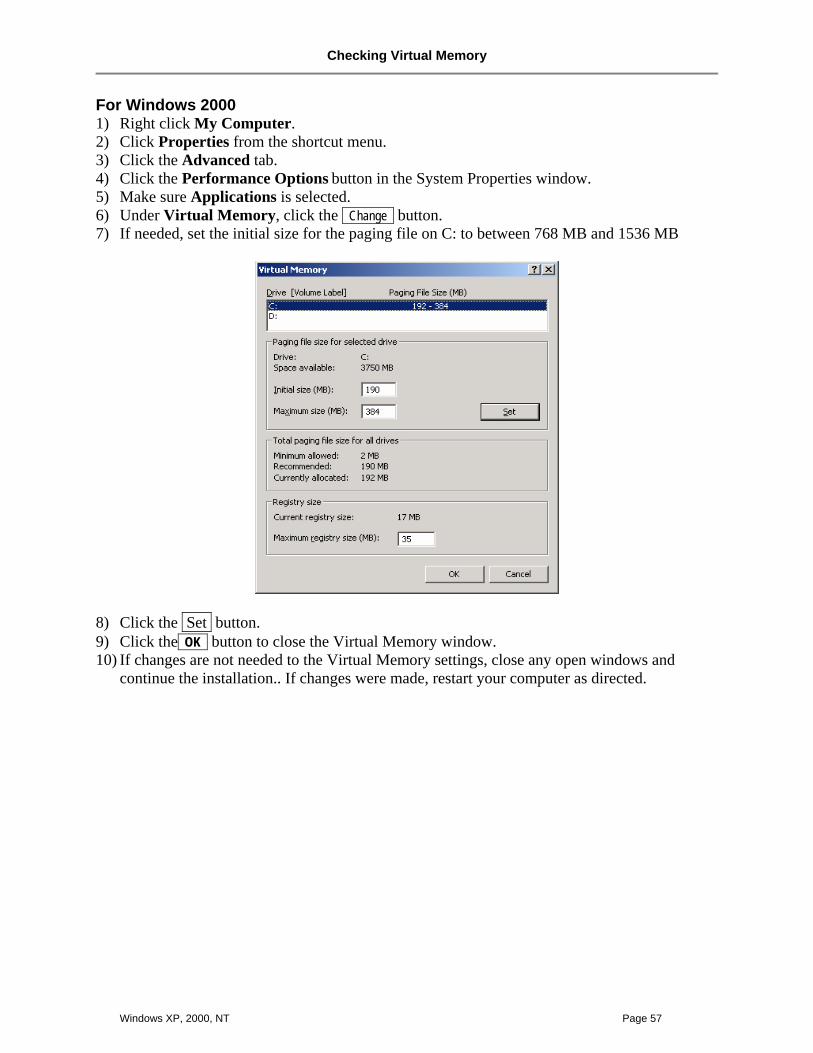
For Windows 2000 1) Right click My Computer. 2) Click Properties from the shortcut menu. 3) Click the Advanced tab. 4) Click the Performance Options button in the System Properties window. 5) Make sure Applications is selected. 6) Under Virtual Memory, click the Change button. 7) If needed, set the initial size for the paging file on C: to between 768 MB and 1536 MB
8) Click the Set button. 9) Click the OK button to close the Virtual Memory window. 10) If changes are not needed to the Virtual Memory settings, close any open windows and
continue the installation.. If changes were made, restart your computer as directed.
Starting and Stopping Services
Page 58 Windows XP, 2000, NT
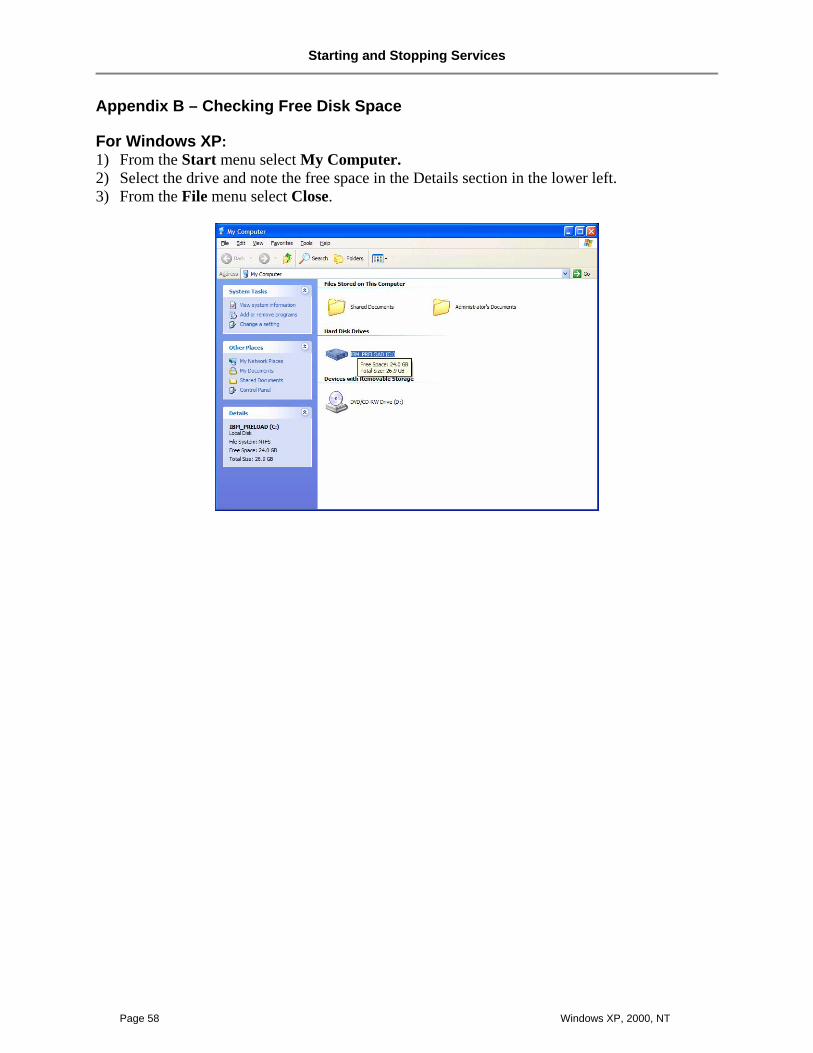
Appendix B – Checking Free Disk Space For Windows XP: 1) From the Start menu select My Computer. 2) Select the drive and note the free space in the Details section in the lower left. 3) From the File menu select Close.
Starting and Stopping Services
Windows XP, 2000, NT Page 59
Appendix C - Starting and Stopping Services
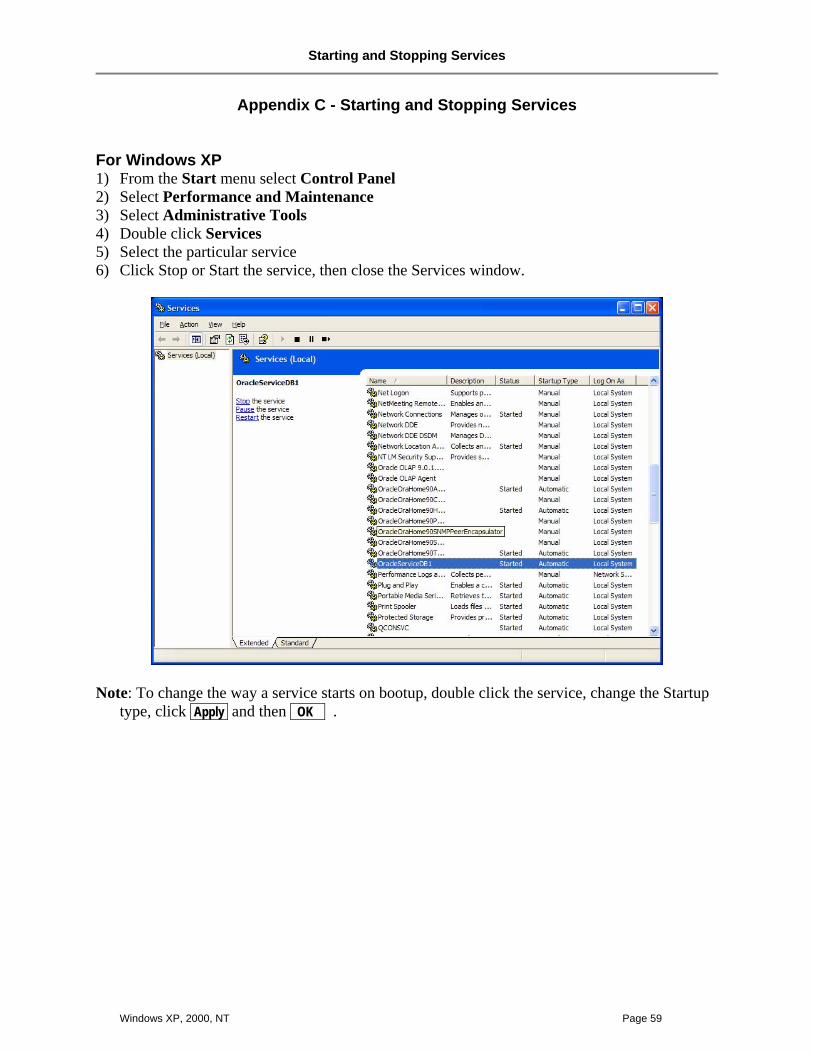
For Windows XP 1) From the Start menu select Control Panel 2) Select Performance and Maintenance 3) Select Administrative Tools 4) Double click Services 5) Select the particular service 6) Click Stop or Start the service, then close the Services window.
Note: To change the way a service starts on bootup, double click the service, change the Startup type, click Apply and then OK .
Starting and Stopping Services
Page 60 Windows XP, 2000, NT
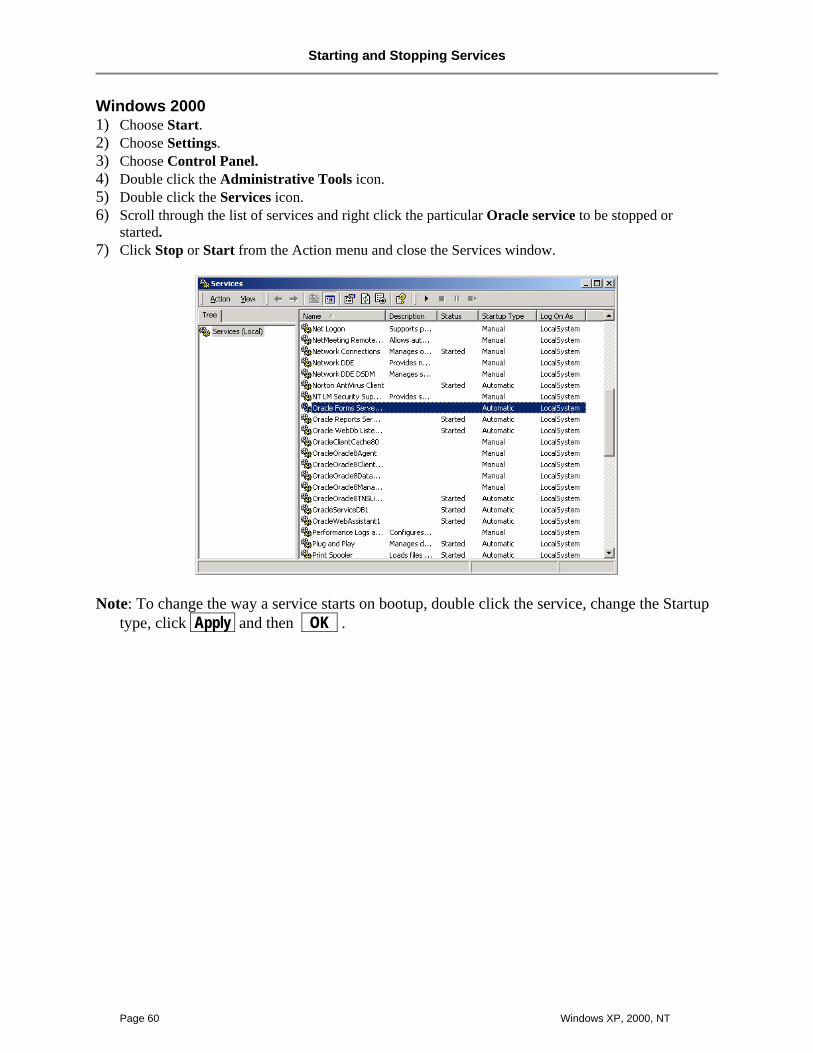
Windows 2000 1) Choose Start. 2) Choose Settings. 3) Choose Control Panel. 4) Double click the Administrative Tools icon. 5) Double click the Services icon. 6) Scroll through the list of services and right click the particular Oracle service to be stopped or
started. 7) Click Stop or Start from the Action menu and close the Services window.
Note: To change the way a service starts on bootup, double click the service, change the Startup type, click Apply and then OK .
Manually Starting the Database
Windows XP, 2000, NT Page 61
Appendix D – Manually Starting the Database
The Oracle database service can sometimes become corrupted and never start. If the service is always listed as “Starting” rather than “Started” you can separate the start of the Oracle service from the Oracle database. To do this, edit this registry key:
HKEY_LOCAL_MACHINE\SOFTWARE\ORACLE\KEY_OraHome10\ORA_DB1_AUTOSTART and change the value to FALSE. Do this just once.
Now whenever the Oracle service starts, whether automatically or manually, the database instance itself is not mounted and opened. In order to start the database instance, each time you want to use it, use the Oracle Enterprise Management console.
1. From the Start menu, select All Programs. 2. Select Oracle-OraHome10, then Enterprise Management Console. 3. If your database is not added, the Add Databases to Tree window appears.
a. Select a Add select database from your local tnsnames.ora file. b. Check the DB1 database and uncheck the others. c. Click OK
(You’ll only need to add the database once.) 4. Open the Database folder in the navigation panel to the left. 5. Right click the DB1 icon and select Connect. 6. Login as system with the system password. Connect as: SYSDBA. Click OK . 7. Right click the DB1 icon again and select Startup. 8. Select Open as the Startup mode and click OK .
Note: Once the database starts you can close any open windows and exit the Management
Console.

Creating Folders on the Start, Programs Menu
Page 62 Windows XP, 2000, NT
Appendix E - Creating Folders on the Start, Programs Menu
1. Right click the Start button and select Open All Users. 2. Double click the Programs folder. 3. From the File menu select New. 4. Select Folder and name the new folder. 5. Drag and drop other items from the Programs folder into the new folder.
Completely Removing Oracle from Windows
Windows XP, 2000, NT Page 63
Appendix F - Completely Removing Oracle from Windows NT/2000/XP
The Oracle Installer does not completely remove all traces of Oracle. To do a clean uninstall, follow the instructions below. These steps are for an installation typically done by Heinz/MISM students.
1. Stop all Oracle programs and services. Close all oracle programs you may have open. Stop all services that begin with Oracle. See Appendix C about how to stop services.
2. Using regedit or regedt32, start the registry editor and remove the following keys: HKEY_LOCAL_MACHINE\Software\Oracle HKEY_LOCAL_MACHINE\System\CurrentControlSet\Services\Oracle* (all services starting with ‘Oracle’)
3. If you have created any DSN definitions with ODBC, start the ODBC administrator applet and remove any Oracle DSN definitions.
4. Edit your paths and other system variables to remove any reference to Oracle. Remove the PERL5LIB variable.
5. Remove any Oracle related icons from your desktop and any references to Oracle programs from the Start/Programs menu.
6. Reboot your computer. DO NOT SKIP THIS STEP! 7. Remove all Oracle software by deleting the following folders and all subfolders within;
a. c:\oratools b. c:\oracle c. c:\oraWB d. c:\program files\oracle
Adjust drive letters according to your installation. If there are errors deleting certain files, reboot, and delete the remaining oracle files and folders.