or GATLING GUNS, - Replica Plansreplicaplans.com/Firearms Manuals/Gattling Gun Caliber 45.pdf · 4...
35
or GATLING GUNS, .-::b.S., WI T!! RUES , \XD REGUATJOXS FOR TIIEIR IISPECTIOJ. GL;XS IX THEIR CARRIAGES, TRIPODS, .AXD HARXESS. P"CJJLI C\ TTO •• .l "CTTIOflfZED TI Y TIIE >':CC'ltET.1fl1 OF ·w .lfl. W.d..SIII:NGTO-T: GOV E RN:II E ::-l'T PRINTING OFFI O E. 18 7 8.
Transcript of or GATLING GUNS, - Replica Plansreplicaplans.com/Firearms Manuals/Gattling Gun Caliber 45.pdf · 4...

DESCRIPTIO~
or
GATLING GUNS, C_.L_~LIDETI .-::b.S.,
W IT!!
RUES ,\XD REGUATJOXS FOR TIIEIR IISPECTIOJ.
GL;XS IX ~ ERYICE, THEIR IXTERCH~L\GElBILITY CARRIAGES, TRIPODS, .AXD HARXESS.
P"CJJLIC \ TTO •• .l "CTTIOflfZED TIY TIIE >':CC'ltET.1fl1 OF ·w .lfl.
W.d..SIII:NGTO-T: GOV E RN:II E ::-l'T PRINTING OFFI O E.
18 7 8.

THE GATLING ('
Gij N.
<TENERAL DESCRIPTION.
The Gatling gun consists of a series of barrels grouped around and parallel to a common shaft or axis, aboLlt wilich they re>oh-e. Tile barrels are bored entirely througil, and chambered for a flanged, centerfire, metallic-case cartri<lge. The breech end' of the barrels are screwed into a brass plate, which abut against a shoulder on, and is splined to, the shaft.
The front ends pass through another plate, which is both pinned and splined to the shaft. Behind the rear barrel-plate, on the shaft, is a brass cylinder, called the carrier-block, in the surface of which are gt·oo>es in line with the cartl'idge-chambers, which recei>e the cartridge from a hopper and guide them as they are pushed by the lock-tubes into the chambers. In rear of the carrier-block, also on the shaft, is a 1ock-cylinder, in whose surface are also grooves, continuations of those in the carrier-block. The e guide the locks, which not onl,y fire tile car .. tridges but support their heads against the pressure of the powder-gas. The lock-cylinuer is splined to the shaft to pre•ent turning; a nut ou the shaft prevents it from lipping to the rear. The carrier-block is connected by a dowel-pin with the rear barrel-plate and the lock-cylin der. A toothed wheel at the rear extremity of the shaft completes the rotating system. A fi·ame, to which trunnions are attached, extend · along the sides and front of tbe barrels. A bronze casing firmly screwed to the frame protects tile locks, lock-cylinder, &c.; it also con· tains a partition or diaphragm, which is journaled for the rear of the shaft, the frame transom being journaled for its front . . Inside the caRing, and connected with the diaphragm, is a hollow cylInder, having in its iuter;or nrface two spiral or cam groo>es, whicil receive lugs on the locks. Tbe groo>e are connected at the front by a plane surface, against vrhich the rear ends of the locks are supported at the instant of firing. The cylinder, or cam, with its grooves being fixed, while the locks '11-ith the lock-cylinder, &c., rotate, the locks are alternately advancing and retreating, due to the lugs following the grooves. Each lock-tube is pro>ided with a firing-pin and spring and a hook-shaped extractor. The rear end of the firing-pin terminate in a button which enter au uuder-et1t groove in a steel projection called tbe cocking-switch. It is retained there, the lock-tube still acl>ancing,

4 5
nutil the base of tile lock-tube is supporteu by a steel recoil-plate on front washer, by tumin g- freely about its screw, <lirninisll es the friction the surface connecting the earn-grooves. \\lleu the head of the pin which would otben>ise take place between the adjn ting-screw and the lea\'eS the other end of the S\\itch, the firing-pin, impelled by its corn- front end of the rnaiu shaft. Ir:. models prior to 1816 the \\asher i not pressed spring, strikes again t the base of the cartridge and explod{-': secured by a screw, and care should be taken that it does not fall out it. As the lock retreats the extra~tor-hook, taking on the flange, with- when the gnu is taken apart. The adjusting-screw cap protects t he ad-(lraws the empty shell which stt·ikiug against a metal plow on the hop- j nsting- crew ft·om rust, dirt," - .. and lH'e,·ents its being unsc•·ewed by per is deflected from the carrier-block. Rotation is cornnmuicnteu by blows, and from being tampered 1nth. It also gi•es a neat fiuish to the a toothed wheel ou the rear end of the main shaft, worked by a worw g·nn. ou the crau k-shaft at right angles to the axis of the barrels. Th e The gas-collar prevents fon.ling of the main haft and jon mal- box, and breech-casing projects beyond the gearing, and is closed by a cascabel- diminishes friction between them. plate. _\.pertnres in the cascabel-plateaud diaphragm permit, lly means Fig. 6 represents tl1e Main Shaft with its ca. ing of l1·ather. Th e haft of a hook, easy withdrawal of the locks. A hopper receives the car- is the axis of the rotating system. The screw-thread near it,.: rear end trillges from a feed-case, and ueliYers them, oue by one, in the grooYes is left-handed: it receives the rear gnide-nnt. Tlte leather ea .,ing pre-of the carrier-block. vents to a certain extent beating of the Rhaft.
The gun i::; turned automatically throug-h a limitell arc by means of a Fig. 7 represents the Front Spline. The spline i,.: f<bt 1•uPd to the traversing-cam or c;ylinder on the crank-shaft, with a cam-grOO\e ou its main shaft by the,ti·ont-spline scre1c. It::: object is to pre\ eut th l! lrout surface, aml all oscillator connected with the elevating-screw. A doYe- barrel-plate turning on the shaft tail cnt iu t!Je lo..,er 1)01tion of tile lH·eech-casing receives the oscil- Fig. 8 represents the Rear Spline. This spline is fastenetl to the lator-tlange, over \\hich the casing i~ free to slitle. The oscillat<n·-piu main shaft by two 7'eco·-spline scre1cs. It wennt,; the rear barrel-plate enters the cam-grooYe of the cylimler. A the crank is turned the silles and the lock-cylinder turning on the shaft. of tile groo,·e bearing on the p"iu traverse the gun from right to left and Fig. 9 represents one of the Barret ~ . A. is the ·cre w-threa1l by wllich rice rersa . Dy placing the pin in <t plain groove ou this cylintler the it is connected with the rear barrel-plate, B the s honlrler agaiu-;'t which tire may ue concentrated on a single point. t!Je front barrel- plate abuts. The front end of the barrel i • made hex
agonal, for the reception of a wrench to screw it into the rear barrel-N01IE?\CL\1Tlm A::-iD DETAILED DESCRIP'l'IO~ OF PARTS OF CAL. 0".-!5, l Jl ate. The rifling and chambering are e' entially the same a · in the
TE:\-llARREL GA.'J'LING G~. Bpringfield rifle.
Fig. 1 repre,.:ents the Frame. The office of t!Je frame is to p•o,ide a Fig. 10 represents the Rear Barrel-Plate, iuto which the barrels are bearing in "'~bich the main shaft may rotate, and, by means of the trun firmly Rcrewed. A is the recess for the extractor : B is a flange which nions which are riveted to it, to support tile entire system on the mu- enters the recess in thP carrier-block; C 0 are barrel-boles · D is the . ' riage. The transom is journaled to receive tile front end of the main mam shaft or center bole. shaft. To the frame are screwed, at ..i, the front sight; at B, tue !Jop- Figs. 11 and 12 repre~ent the Front Barrel-Plate and .Front Barrel-per-hinge block; at C, the breech-ca:sing, anu, at D, the crank-latch . Plate Key. The plate is slippell on the ti·ont euds of the lJarrels and
Fig. 2 repre:-;euts the Front Sight, which is attacheu to the frame by abuts against the shonltlers (a slight space being left for exp::lll~:iou of tlle front-sil-(bt ~crew. the barrel ) a few inc!Jes in rear of t!Je muzzle;;;. A is the slot fur the
Fig. 3 revre,_,e 11 t.- the Crank-Latch. The office of tue latch is to spc·un• front spline. Tile key passes at right angles through the hub B of the the crank to the fmwe wlteu the gun is not in action. plate and the main sllaft. It prevents motion of the plate longitudi-
Fig. 4 represents the Crank-Latch Screw and Crank Latch \Ya .-ltPr. naUy with the shaft, and also assists the front spline in preventino- its The screw fastens the crank-latch to the frame and the washer allo''"" it turning on the haft. "' to turn freely aronnu tile body of the screw. Fig. 13 represents the Carrier-Block. The ol~ject of the block is to
Fig . .J represents, at A., a section of the frame transom tbrongll t!1e receive the cartridges as they fall from tlte hopper and carry them maiu sltaft jonrnal-uo:x; at B, a section of the adjusting-screw; at C, o opposite the chambers in which they are fired. It al ·o receives the the ar1justi 11 y-sr;ren• nz~t; at D, of the front u:asher; atE, of the front · empty shells aull carries them to the proper point for ejection. A A washer .~cren• ; at G, of the gas-collar, and, at F, of the adjusting-sere t' are the under cut g-rooves in which the locks slide a they pu b the cap. Tbe ohject of the adjusting- crew is to so regulate the gun tu.lt tit c~rtridges iu and witht1raw, by their extractors, the shelis from the beads of thP cartritl~f''i rna~- be 111 1jWI'l,v .;upporterl at the in..;taut u c ambers. Hrin g·. 1 1 • a lj 1-;ti t..;-' · t'l '''. nnt t·'t • ·';: · •hr- 111 •tio-t of t 11P s"r"'-'· Th Fig. 14 repre~ents the. Carrier-Block Dowel-Pin. Pas ing longitudi-
....11.1--

6 7
nally through the block an1l extemling beyond both ends, it SPrves to 25. The spring thus inclosed between the crew and the bottom of the connect it with the rear bane!-plate in front and with the lock-cylinder cylindrical portion of the latch presses the latter into a corresponding in rear. hole in the ureech-casing. The hopper is thus held in place.
Figs. 15 and IG represent the IIopper (body and mouth-piece). A, Figs. 26 and 27 represent the Lock-Cylinder (body and face). The Fig. 15, is the hinge-pin bole; B, the ser.t for the hopper-hatch; c 0 are face is secured to the body by mo lock-cylinder screws. A. A., &c., Fig. 26, plow- crew holes. D D, Fig. 16, the hopper-;:;crew boles, antl E E the are the slots in which the locks move back and forth under the influence front cartridge-guard-sere'' holes. F is the cartridge-gnide scat. The of the cam. B is the slot for the rear spline. 0 C, Fig. 27, are the lock-feed-cases are in. erted in the mouth of th, hopper through which the cylinder-screw boles; Dis the carrier-block dowel-pin hole. cartridges fall to the canier-ulock groons. On tlle under side of the Figs. 28 and 29 represent the Rear Guide-:i{ut, and Rf:'ar Guide-~nt hopper-boLl.) is a cam-:-;harw<l ledg-e (not shown in the figure), which pre- Key. The nut is screwed on the main shaft ju . tin rear of the lock->ents the cartridges, on their way to the chambers, falliug fl'Om the cylinder. It sen-es to bring the lock-cylinder and carr:ier-block to a firm canier-block. bearing against the rear barrel-plate, and also, by bearing against the
Figs. 17 auLl J8 represent the Hopper-Hinge mock and Hopper-Hinge journal-box or bub on the diaphragm, pre>ent the barrel system mov-Pin. The block is connected to the frame by two hopper-hinge scretcs ing to the rear more than the slight distance required for adjusting the and to the llopper-binge by the pin. The head of the pin abutting· gun to the use of different cartridg·es. In addition to its screw-thread against the breech-casing pre>ent: the pin being· lost out. A A are being left-banded, to prevent unscrewing, it is secured by the key which the hopper-lliuge-screw holes; D is the hinge-pin bole. passes through it and the main shaft. The key in turn is prevented
Figs. HJ and 30 reprf:'sent the Frout aud Rear Cartridge-Guards, from working out by the rear guide-nut-key sm·ew, which, let in through respecti>ely. These serve to preYent the cartridges sliding to the front the lock-cylinder, abuts against the larger end of the key. A., Fig. 28, or rear when the gun is fired at a depression (as from the gunwale of a is the hole which receives the key. "hip) or at an elevation . The former is scrf:'wecl to the hopper-body aml Fig. 30 represents the Breech-Casing. A A are the :fl.anges which, the latter to the rear sitle of the plow IJ.\- fi ·ont allll 1-ear t;ltrtridge-guarcl resting on the frame, are secured to it by six breech-casing screws. B B, liCl'eu·s, re .. pectin>ly. c c., are the con·e ponding screw-hole . Cis the slot for the guide-stop
Fig. ~1 represeuts the Cartridge-GniLle. Irs office is to g-uide the ou the cascabel-plate. D is the groo>e in which the lock-plug hook front ends of the cartridge~ ns tlley fall from thfl hopper into the carrier- s~ides. 'rile breech-casing serves to hold the cam, cocking-switch, and block groon•s. The rear end of tile plow pelforrns a like office for the dmphragm, and to protect the locks, lock-cylinder, &c., from blows, rust base of the cartridges; it al~o prevents the rear of the cartridge from and dirt. It also supports at E the crank-shaft, at F the oscillator, falling hefore the front, whicb "·onld otherwise tip up and be caught and at G the rear-sight stand. between the carrier block aml tile hopper. Sbonld occasion reqnire, the Fig. 31 represents the Diaphragm. In models prior to 1876 the dia-barrel ~yBtem may be turned backward withont removing the cartridge, pbragm is permanently fa ·tenecl to the breech-ca ing by steel pins let the g-nHle and plow toget!Jer retaining it jn,;;t below the hopper-month. through the casing into its edg·es. In late models the pius are replaced The guide i ~ecuretl in its :seat iu the month-piece by the head of one by lliaplwagm-screzcs. The office of the diaphragm i. to transmit the of the hopper-screws. recoil communicated by the cam to tbe breech-casing and thence to the
Fig. ~3 represents the Plo1>. The plow i.;; :-;ecnl'ed to tile huppel' by trunnions; also to give a bearing for the rear eucl of the main shaft, two plow-screzcs. A. A are the plow-screw !Jules; B B rear cartridge- and by the ends of its journal-box, A., abutting against the rear guide-guanl scl'ew-holes. The chief ollice of the plow is to deflect the empty nut, to pre>ent tile barrel system moving to the rear. B B are cas-shells from tl1e carrier-block as they are llra wn back by the extractors. cabel-plate-screw holes, and 0 C cam-screw boles. D is one of the lock-It accomrlishes tllis by the point C pa:;:siug behind the upper rigbt side plug-sleeve-screw holes (the other two do n'ot extend clear through). E of the flange of the shell, while tlle extractor is pulling on the left and ~he ~?ck-plug aperture, F groo>e for oiling the shaft-bearing, and G the under. The sbell is thus thrown to tile left and downward, clear of the oc ... Jn g-switch-spring-piu bole. gnu. Fig. 33 represents the Lock-Plug Sleeve. The slee>e is attached to
Figs. 33, ~±,and 35 represent t!Je Hopper-L,ttch, Hopper-Latch Spring, the rear of the diaphragm by three lock-plug-sleere screws. It serves and IIopper-Latcb Screw, respectively. _\.,Fig. :?3, is the cylin<lrical seat me~ely to guide the locks into their corresponding grooYes in the lock-for the hopper-latch spring. Iu models pl'iot· to tbat of 1877 the ur)per cylhnder when they are passed through the opening in the cascabel
pate A· end of the spring abnts agttin t a s~op, which is h•~hl in place on the hop· . · IS the opPning for the lock-plug !Jook.
b F~M per y a screw. In that of 1ST/ it auut:s dil'ectly ag11inst the screw, Fig::.·..___ · represents tbe Cam and Recoil-Plate. The cam, securely fas-

8·
tened to the diaphragm l>y C(Uit·.~crew8, is usetl to impart a reciprocating motion to the locks when the barrels, lock·cylinder, &c., are revolved. This is accomplished by the aid of two helicoidal or cam grooves, against the upper surfaces of which the lugs on the locks bear, while the locks themselves are held back against the lower surfaces A A, which, being much broader, extend f<trther iu tow·ard the center of the cam-body. The recoil-plate B is made of steel. It is dove. tailed in two directions into the cam and also secured by two teel pius. The locks abut against the plate at tlw instant of discharge.
Figs. 3-!, 3.3, and 3G represent the Cocking·Switch, Cocking-Switch Spriuo· and Cockiug-S';Iitch-SpringPin. The office of the switch is to hold
"'' . back the firing-pin and release it at .the proper moment to fire the gun. The seat for the body of the switch is a dove. tailed groove in tlle cam body at its rear end. A cylindrical bole in the body A of the switch receive the spring and its inclosed pin, the bead of the pin being first inserteu. When the barrels, &c., are turned to the right, the llead of tlle firing·pin enters the under-cut groove of the switch B, and i retained while the lock advances, thns compressing the firing-pin spring. \\~hen the base of the lock has ad,·anced Car enough to be supported by the recoil-plate, the head of the firing-pin "'llill have pas eel through the groove leaving it at C. At the instant of leaving the groove the firing-pin, impelletl by its expanuing spring, strikes again t the head of the cartriuge antl explodes it. \Tllen the barreb, .,·c., are turned to the left, the llead of tlle firing.piu does not enter the grooYe, but rides over the bevel, D, pressing the switch to the rear. In this case the small end of tlle cock· ing-switch·spring· pin pa ses tbrough a small hole in the diapllragm wllile the spring i com pre !"eLl its rear Learing on that part of the dia· pllragm snrroundiug the pin. \\ben tlle pre sure is relie,·ed the spring returns the switcll to its original position.
Figs. 37, 38, and 39 repre ent the Rear-Sigllt Stem, Rear-Sight Stand, and Rj3ar·Sight Spring. Tbe ~ rem !las a longitudinal motion in tile stanu and is preventeu from modug too freely b.1 the spring. The stand is attached to the ureecll-casing by two scre\IS. One of them, the ?'ear· sigltt.spl'ing sc1·en·, passes througll the flauge on the tand, at tlle same time ecuring the spring, aull enters the tlauge on the breech-casing; the other, the ?'ear.sight- ·ttuu1 11Cren·, enters the body of the stand at A .
Fig. 40 represents the 'Yorm.Gear. Tbis gear i.' slipped on the rear end of the main shaft and is pre,·ente(l fr·om tnruing on it by a spline and from coming off by the ICOI'm·geur scrcLc. It office, in connection with the worm on tlle crank.:shaft, is to rotate the haft, and with it the barrels, locks, &c.
Figs . .n, ±2, -!3, and-!! t'Ppre,;ent the Crank·Shafr, Crauk.Shaft Collar, Crank (and Handle), and\\ orm, re pecli ,·ely. Tue ::.haft passes at right angles through til at portion or the breech·ca. i ng to the rear of the dia· phragm. Tlte cmnk i · screwed to the shaft at .d.. ; tbe crank.key pin, at B, pre>ents its becoming un,;crewetl. Tile collar turns loosely around
9
tbe end of tbe shaft next tile crank and diminishes friction between the sbaft anu breech-casing. Tile worm i · prevented from turning on the shaft by the worm·key pin. U, Fig. 41, in the worm.key·pin bole. The worm screw·thread working in the teeth of the worm-gear rotates the main shaft and the parts connected "'llith it.
Figs. ±.3 anu 4G represent the Traversing-Cam and Traversing.Cam Key. The cam, slipped on the small end of the crank-sllaft, is prevented from turning on it by the key, and from coming off by the tmversingcam sm·ezc. The cam has on its surface two grooves for the pin of the oscillator. One of them is plain, and is nsed when dispersion of fire is not required. The sides of .tbe other form a sort of double inclined plane. As the crank.shaft revolves, the inclined ides of the groove bear against the pin, and, as the pin is stationary, alternately traverse the gun from right to left.
Fig. 47 represents the Oascabel-Piate. This plate llas a flange, wbicll fits snugly over the rear of the breecll.ca ing. It is secured by two cascabelplate screws to the diaphragm. An aperature, A, permits the insertion and withdrawal of the locks. The aperature is closed by the Jock-plug. A small piece of metal, called the guide·stop, is riveted to the inside of the plate close up to the flange. It fits in a corresponding recess at the end of tile ca ing, and thus brings the screw-holes in tile plate in line witll those in the diaphragm. B B are the cascabel·platescrew boles.
Figs. -!8, -!9, and 50 represent the Lock-Plug (body), Lock·Plug Han. dle, and Lock-Plug llook. Tbe stem A of tile body entet·s tile cylin· drical recess B in the bantlle. An oblong bole is cut in the stem for the reception of the end of the lock·plztg screw, which passes tllrough p~rt C of tile handle. Tbe hanrlle is free to turn, to the extent permitted by the oblong llole, around the stem. A projection: D, of the h~ndle turus in behind the cascabel·plate aud prevents the plug drop· ptng out. The book is fasteneu to tile body by the lock-plug.lzook crezc8. By means of the hook taking on the lngs of the locks, the latter can be L'eadily withdrawn. The lock-plug is attached by a chain and rings to the knob of the cascabel·plate.
Fig. 51 represents the Lock-Tubes. The office of the tnbe i~< to carrr ~he fir~ng.pin and S~Jrin.g by which the cartridge is fired, the extract~r
Y Wlltcb the shell IS Withdrawn, and to support tile cartridge !lead at the moment of explosion. A is tlte flanged rib which slides in the unrlercut _groove in the lock·cylincl er; B the lug which "'llorks in the groove of the cam, and C tile extrnctor-seat. . Fig. 5~ represents the Extractor. Tbe extractor is secured in its seat In the lock-tube u.r the CJ..'iractor.suezc. The hole A, through which the screw pa ' ses, is oblong, admitting of a slight longitudinal motion or tbe extractor. As the lock advance' tile ext-ractor is pushed back, to the extent . . . B . penlllttetl by the oblong Lole by the cartndge before the book
8Prtngs o\-et' its tlauge; when the extractor begins to draw on the

10
shell the fi'Ont portion move, forward aTHl down ward, dne to the incline C riding under a cOITespOlHiing incline in the lock-tube. The grip on tl.Je sl.Jell is thus assured.
Figs. 33 and 34 represent tl.Je ~lain-Spring and Firing-Pin with its attachments. A, Fig·. 54 is the jiring-pi1L nut, secured at B by the Jiriuy-pin-nut pin to the firing-pin. Tl.Je unt serves as a sl10nlller for the main-spring. 0 is tlH' firing-pin bushing. The bushing IJas a S(;rew. thread on its surface, 1rllich fit' a corresponding thread at the rear of tiJe lock-tnbe. It is preventeJ from unscrewing by the firing-_pin -uushing screw through tiJe fiangeu rib oD the lock-tube. On the rear of tiJ bn,IJiug are two small boles for the reception of the lock screw-driver . The firing-pin is free to mo\e through tiJe bushing wiJile the spring i com pressed !Jet ween it and the firing- pin n n t.
Fig. JJ represents the 0 ·cillator (partly in section and partly in elevation). A is tile boc7y, B tile cap, C the trarersing-screu·, D the tmvel·sing-screw heacl, E the trm•ersing-screzc-heacl]Jin, F the tmver~ing-screta nut, G the trct'l:ersing-pin, H the tnc'!:en;ing-pin catch, I tile traversing-]Yin· catch pin, J the trarersing-pin-catch spring, K the traversing-pin roll, L the trarersing-pin-mll screw. TIJe cap, screwed on the body, is prevented from tnrning by the cap-screu:. A bole in the center of the cap permit tile tra,ersing-screw to pass through up to its shoulder. The tra>ers. ing--screw head is pinned on the projecting end. Tile traversing-screw nnt carries tlle pin wiJich, working iu the groO\·es of the traversing-cam, turns tile gun alternately to the rigllt antl left. The roll ou tlle traversing-pin diminislles friction between tile groo,es and tile pin; it i secnred to the pin by its screw. By means of the travPrsing-screw and its unt, tile direction of the fire ma;y be cLanged, whetller tiH' gun be oscilla tiug or not.
Fig. JG represents the Implements is ned with each guo .
Component parts.-Gal. "AJ, 10-uarrel gnn.
1. Ft•atnf'. 1-1. Gas-collar. 29. Hopper-montb-pieet> . 2. Trunnions (2). 15. Aclju ting-screw cap. 30. Hopper-screws (:3). 3. Front sigl!t. 16. :i.Uain shaft. 31. Hopper-binge l1lock. ~-Front-sight friction- 17. Front spline. 32. Hopper-hingescr ws(2).
springs• (2). lil. Front-spline screw. 33. Hopper-hiuge-pin. 5. Front-sight friction- 19. Rear spline. 34. Front cartritlge-gnard.
spring screws• (2 ). 20. Rear-spline scre,l"s ~ 2). 33. Front cartt·idge-gna.rcl G. Front-sight screw. 21. Casing, leatl!er. screwst (2) . 7. Crank-latch. 22. Bat•t·els (10). 36. Rear cartridge-guarcU
. Crank-latch screw. 23. Rear barrel-plate. Rear cartridge-guard 9. Crank-latch Will!het-. 24. Frout barrel-plate. screwsj (2).
10. Arljnstiug-~cre\1", 25. Front barrel-plate key. 37. Cartridge-guide.~ 1J. Arljusting·screw nut. 26. CatTiet·-blocl.:. 33. Plow. 1:.. Front washer. 27. Carrier-block dowel-pin. 39. Plow-screws. 13. Front-wasl!er screw. 2 . IIO))p2t', body. .JO. Hopper·latch.
' Not iu models later than 1oi-l. tOne in model of 1874. l Xot iu models of l 74 aud 1' 75.
11
41. Hopper-latch spring. 64. Heat• sight, steau. 92. Main-springs (10). 42. Hopl)er·latch stop." 65. Rear-sight stand. 93. Extractors (lO). 13. Hopper-latch screw. 66. Rear- ight-stancl screw. 9.J. Extractor-screws (10). J4. Lock- c y I in tl e I', 67. Rear-sight s1wing. 95. Firing-pins (10).
body. Grl. Rear-sight- pring screw. !!6. }'iring-pin nuts (10). 45. Lock-cyliuder, face. 69. 'l't•ade-card. 97. Firiug-pin-nut pins (10). ~G. Lock-cyliuderscrews (2). 70. Trade-card screws (2). !J-'. Firing-pin bus!Jiogs(20). J7. Heargnicle-nnt. 71. Wot'Dt-geat·. 9CJ. Firing-pin-hushing 48. Rear guide-nut key. 72. \Yorrn-gear screw. screws (10). 49. Rear gnide- n n t- key 7:3. Ca·ank·sha ft. lOll. O,;cillator.
screw. i.J. Crank-shaft collar. :;o. Bt•eecb-casiug. i.J. Crank (and handlt! ). Implements, ,f·r. 51. Breech-casing scre\\·s (6). 76. Cr::mk-key pin. 52. Dia),lll'agm, bocly. 77. Wot·m. 101. Wiping-rod . 53. Diaphragm-screws (2). i-l. Worm-key pin. 102. Shell-driver.
Diaphragm- screw riv- 79. Tt·avea·sing-catn. 103. Worm-gear clamp, !Joel y er (2). 130. Traversing-cam key. 104. ·worm- gear c 1 amp
i\4. Lock-plng lee>e. 'l. Traversing-cam ~crew. screw. 55. Lock-plug-sleeYe screws ~2. Cascabel-plate. 105. Rear guide-nut wrench.
(3). 83. Cascabel·I•late screws (2).106. Adjusting-screw "'rench 56. Cam, bocly. i3J . Guide-stop (ri\' eted). 107. Pin wrench. • 57. Cam-screws t (3). '5. Lock-plu!!l", body. 108. T screw-driver. 5 . Recoil-plate. i36. Look-plug handle. 109. Small screw-driver. 59. Recoil-plate pins (2). 7. Lock-plug sere"·· 110. Lock screw-dri,·er. GO. Cocking-switch. i3 • Lock-ping hook. 111. Drift. 61. Cocking-switch spring. n9. Lock-plug-hook screws 112. Headless case extract 62. Cocking switch spriug (2) . ors (2).
pin. 90. Chain and ring . 11:3. Book of instructions. 63. Cocking-switch screw. 91. Locks, tubes (10). 11-!. Packing-case.
DIRECTIONS FOR TITLING THE GU~ APART A~D REA.SSE"liBLTNG IT.
1. Remove the locks. To clo this, hun the crank until one of the marks on tlw rear barrel·plate comes in line with the auow on the hopper. Turn the hant1le of tiJe lock-plug until it is llorizontal, and pull the plug to tile rear. Its book will withdraw a lock. Insert tl.Je plug-, and repeat tlle operation for eacll lock.
2. Tum out the cascable-plate screws and remo\e the plate. 3. Remo\-e the crank-shaft. To do tiJi~, tum ont the traversing.cam
screw antl pull off tile cam. Dri'e out the \\'Orm-key pin and pull the shaft out at the right of the gnn . The worm can tiJen be remo\ecl.
4. Turn out the worm-gear screw antl remo\e the gear by means of the worm-gear clamp.
5. Remove the hopper-llinge screws and hopper. G. Bolster up the gnu, remove the breech-casing· screws, and slide off
the casing. \Vithdraw tile end of tbe main shaft from the casing; see that the front washer does not fall out in those models (prior to that of 18~6) .
~ In which it is not secnretl by a screw. ~ · To remoYe the lock-cylinder and carrier-block, turn out the rear
~Ulde-nut key-screw, dri\e ont the key, and unscrew the nut (left-hand bread ). Pull off the cylinder and aftenl'arcl the block.
t Nnt. in morlAls lat.Ar' t.hn.n 1R7A

12
8. Turn out tile cam-scre'i\S aud draw the cam out t!Je frout end of the by means of a fht ngeu projection on its in ner sllL'fLce, tu rning in a cor-ea ing. . responding recess iu the rear of the ca~iug. d. screw let through the
9. Remove the diap!Jragm screws (in those models in 'ilhiclJ t!Je dia. pla"te in to ttJe base of the cam pre,euts motion of the former. T!J e p!Jragrn is not riveted to tlle casing) and draw out the diaplJraglll. lock-plug bas no hook, the locks being readily pushed out with ti.Je
10. Hold ti.Je cylinder of barrels vertically, muzzles up, antl. trike t he finger. The adjusting-nut is screwed on t!Je extreme rear of the main rear end of the main shaft on tlJe floor. T!Je s!Jaft and front barrel- shaft. Br tuming it to the right, t!Je barrels are l>rought furt!Jer to plate will separate from ttJe barrels and rear plate. Drive out the front the rear, d iminislJing their distance from the front of t!Je locks. Tbe barrel-plate key and remo\e tlJe plate. T!Je barrels sbould not be nn- unt also secures the cmuk in position. The rear barrel-plate, carrierscrewed from the rear barrel-plate unless absolutely nee ·sary, and t ll en block, lock-cylinder, &c., lliffer from tlJose de:;cribed only in being ar-on ly by an armorer. ranged for five barrels and locks. The locks are t!Je same, as are also
To assemble, re\flrse the entire operation. the hopper and its attaclJments. There is no hopper-hinge block, the
.A.DITST:HE:\T OF THE GUK.
Sllonlll it be found in firing that the beads of shells are eitlJer S\Telled or blown off, it would in,1 icate that the gnu needs adjusting. To do this, remo\e all t!Je locks but one. nnsm·ew the adjusting-screw cap. slacken tbe check-nut, and turn in the adjusting-scre'il. Place a cartridge in that lmrrl'l wbiclJ has ti.Je remaiuing lock, and turn the crank. Should . lig-ht friction on head of cartridge be felt, just before it i.· fired, ttJ e acljn ·tment is probably complete. Examine head of slJell after firing; if satisfactory, replace the loeks, et up ti.Je check-uut and crew on th e cap. StJould friction on !Jeads of cartridges be too gt·eat, it would indicate lbat the shaft had been set too far to tlJe reat·. and t!Je pres ure of tlJe adjusting-screw slJouhl be corre.-;poudiugly relie,·ed.
TilE SIIORT Fll'E-B...1RREL, CAL. O."<l.i, G...1TLING GJJJ.\".
TIJis gun, shown in Fig . .JS. does not differ in principle from that already described . Its mneb less number of parts, lighter weig·ht, and the ease with which it can be taken apart ami assembled (four or fi,·e minutes being ample for this pnri_Jose) , are manifest advantages as compared with former guns of tbis ,·ystem.
It tliff'ers from its predecessors in the follo'iling particulars: A l>ronze casing extends the \T!Jole lengch of the gun. The trunnion
arp solid with the casing, and the frame is dispensed with. The cran k is applied directly to the rear end of the main si.Jaft, thus di pensing 'ilith the crank-shaft, 'i\Orm, worm-gear, &c. The front sight i on the casing ; tbe rear sight slides in an nuder-cut groove in the cascable· p late. There is no diaphragm, tlJe cascable-plate receidng the recoil trau. mi tted by the cam and iu tum tran mitting it to the casing, thence tllrongh ti.Je trunnions to tbe carriage.
The front barrel-plate cloC'es tbe ca ing iu front; it has a hub which receives the front end of the main shaft. The front barrel-plate key, which pa. ses at rigbt angles tbl'ongh tlJe hub and si.Jaft, prevents the former from sliding off tbe ,;IJaft. Ou the outer surface of that portion of tbe plate which enters t!Je casing is a ring 'i\hich dimini he friction between the two snrfaces. ~-\.. flange ou the plate prevents it from bei ng
I.Jopper being bingecl to the casing. The oscillator is entirely unlike any in ser\ice. Its nut rests on tlJe bead of the ele,ating-screw. A hollow screw 'ilith square thread-tlJe tra\ersiug- cre'il-passes t!Jroug!J projections on the under rear surface of the casing, aud through tlJe nut which is between them. By this crew the direction of ti.Je firing may l.te changed, 'i\bether the gun be oscillatiug or not. A brouze beau i ~ placed on the left extremity of the scre~r, antl is secured to it l>y a pin . \VittJin this screw is another-the a<lju·ting-t::.crew-with r ight and left hand threads meeting at a little to the lt>ft of its midd le point. Two uuts- tlJe adjusting-sere" nuts-are put on t!Jis screw and run nt:i unti l they meet. Each nut has t'i\O projection , 'i\IJich fit in groons on tl.Je interior of ti.Je traversing-screw lengti.Jwise 'ilith it. The nuts are tlJns pre,ented from tuming, but ha\e a longitudiualmotion along the inner screw, 'i\hen the latter itself is turned. T'ilo spiral spriugs are slippe1l on the inner screw, oue in rear of each nut. TlJe crew is then placell iuside the tra,ersing-screw. A. shoulller on ti.Je interior of the latter uem· i ts ri ght-band extremity pro,itles a bearing for one spring, ti.J e screw passin g through and beyond, while the bronze bead of ti.Je traversing-screw, wl.J.ich is put on and pinned, affords a bearing for the otlJer. Over that end of the inner sere"· which projects beyond tlJe tra\ersiug-screw (the right-hand extremity when tlJe oscillator is on the gun) is a bushing for the adjusting-screw head, whici.J serves at~ a collar to hold the screw-llead against the projection on the casing. The bead and its bushing are secured to tlJe scre'i\ by a pin. If this head be turned while the traversing-screw head is held fast, the inner scre'i\ turns, causing the adjusting-crew nuts to mo\e in opposite directious, thus compressing the springs
and limiting t!Je amplitude of tlJe oscillation. The springs act as buffers to pre,ent the threads on the screw and nuts from being upset and to eliminate t!Je si.Jock otherwise produced. The osci llation is caused merel~' by puslJing the gun to the rigi.Jt and left by the crank. This is naturally done iu the act of turniug it. 'IT hen the banclle is farthest from the person turning it the force appliell is in the nature of a push, a nd wtJeu nearest him of a pull. T!Je oscillator-nut on ti.Je bead of ti.Je elevatiug-s!'l'ew holding the tra,ersing-.ert~"-' firmly, the motion of the gun compr(' ses an1l rl'lic\eS the springs alteruately.
1 t. • l . i 1 0' . rph .::JI':ml 1 .. . , , tP i<> <~Hat>horl tn thn n..,.,; ,~--

14 15
Fig. 5!) represents, at A the main shaft, at B the front spline, at C 0 spline which enters the recess on the rear end of the main ~haft_ a~d prethe ban·els, at D tlle 1·ecm· barrel-plate, at E the carder-block, at F the ents the crank turning on the shaft. B is the crank-spnng; 1t ts faslock-&ylinder face, at G the lock-cylinder body, at H Llle 1·ea1· gnide-nut, at ;ened to the crank by the crank-spring sm·ew. Tbe object of the spring I tlle rectr guide-nut key, and at J the 1·ea1· spline. K is tbe slot for the is to prevent the unscrewing of the adjnsting-nut. This is accomylis~ted crank-spline, aud L the screw-threa(l for the adjusting-nut. The lock· by the point Centering one of the notnhes on the front of the aclJn -~mg cylinder body is lightened by the remoml of metal at .iU l\I, &c. N .e nut. The crctnk-handle Dis of bronze; it turns freely arouud the, pmd le are lock-cylinder grooves. E which is riveted in the arm F .
.Fig. 60 represents the Front Barrel-Plate. A is t il e hub, or box, 1rhicb 'Fig. 65 represents the Adjusting-Nut. This uut is screwed on the rear receives the eud of the main shaft, B the slot for the front spline, U the end of the main shaft. It erves to pre•ent the remo•al of the crank front barrel-plate key-l10le, D the fhwge '-"l'hich by bearing agaiu.' t the and to adjust the gun to the cartridge. By screwing- it up , the main shaft, front of the casing pre1·ents the plate from ueiug drawn through it. barrels, &c., are brougllt to thereat·, iuce the nut bears against the Lub The portion E enters the casi ng allll tnrw within it. The front barrel· of the crank, while the latter bears against that on the cascabel-plate. plate cente~·-screu closes the bub iu front; the lot of the screw is on it 'Ibe front of tbe adjusting-nut has notches increasiug in depth ft·om tile inner end . outer surface to the center. For cartridge-heatls of differ~ut tuickue 'e ·
Fig. Gl represents the Front Barrel-Plate Friction-Ring. This ring i the crank-spring should enter different notches. }larks on the adjustslipped over the partE of tile plate; it sen·es to diminish the frictio n iug-nut and the hub of the crank should be brought in lin e for tile between the plate and casing. .::\. is the oil-groo•e; B B are hole Frankford Arsenal ser\ice cartridges. In screwing up the nut, press on through wbieh the oil reaches the plate. A bole in the casing admit the point B of the crank-spring until the marks coincide. oil to the groo\e, Fig. G6 represents the Oscillator (iu section). A is the nut, B the
]]g. 63 represents t he Cam (rear view), Cocking-Switch, &c. A is on traversing-screw, C the tmrersing-.screw heacl, D the tmverliing-screw-head of the cam-groo•es, B cascabel-plate-screw hole, 0 cam-spline, D cocking- pin, E the cte1j1tsting-sc1·ew (w·ith right and left hand threads); F :B' <tre szcitch, I;J cocking-switch plate; F F are cockiug-s'-"l'itch-plate-screw boles. the adjnsting-sm·ew nttts (right aud left), G G the ailjnsting-springs; H The cam-spline, secured to the cam-body by the ca1n-spline screw, pre- is tbe adjusting-sm·ew head, I the ttdjMting-screw-head bnshing, and J vents the earn turning in the casing. The cocking-switch plate is fas- the adjustihg-screw-heacl pin; K K are sPctious of projections on the tened to tbe cam body by the cockl:ng-szoitch-puLte screws. It provides a under surface of the casing til rough which the traversing-screw passes. bearing for the cocking-switch-spring pin. In this switch the larger The operation of this oscillator has already been described. head of the pin is at the outer end, and the spring is compressed be· · Oom]Jonent parts of 5-ba~Tel gun. tween it and the bottom of the hole in the switch.
Fig. 63 represents the Cascabel-Plato, Rear-Sight, Lock-Plug, &c. The cascai.Jel-plate is attached to the casing by means of flanged projection· tum ing in corresponding nuder-cut recesses on the interior of the casing. The cascabe~plate screw (the corresponding screw hole shown at A), which enters the cam body, merely prevents the plate from being turned so as to come off. The rear sight has a vertical motion in the under-cut groove B. A friction spring between the sight and bottom of the groo\6 hollis the sight in any position. A pin on the spring fitting in a small hole in the plate pre\ents the spring moving. A small piece of metal, the ~·ear-sight stop, is fastened by a screw (sho'-"l'u at C) to the under part of the sight; this, by bearing ag-ainst the spring, prevents the sight be· ing drawn out at the upper end of the groo•e, '-"l'hile a shoulder on the in ide of the sight at its upper end prevents it being deawn out at th bottom. D is the lock-plug plate (steel), E the lockplug bocly (bronze), F the lock-]Jlug handle; G G are lock-plug 1·ivets by which the plate is secured to the body; His the end of the handle riveted through bodY and plate.
Fig. 64 represents the Crank with its attachments. A is the cranl:·
1. Casing. 20. Ta·ade-cal'd. 39. Rear guide-nut key. 2. Front sight. 21. Trade-card screws (2). 40. Locks, tubes (5). 3. Front-sight screw. 22. lllaiu shat't. 41. l\Iain-spriugs (5). 4. Hop))CI', body. 23. Front spline. 42. Extractors (5). 5. Hopper-mouth-piece. 2~. Front-spline crew. 43. Extractor-screws (5). 6. Hopper-screws (3). 25. Rt:ar spline. 44. Firing-pins (5). 7. Hopper-stop. 26. R•mr-spline screws (2). 4:). Firing-pin nuts (n). 8. Hopper-latch. 27. Banels (5). 46. Firing-pin-nut pius(:) ). 9. Hopper-latch spring. 28. Rear barrei-]Jiate. 47. Firing-pin bushing.· (3) .
10. Hopper-latch screw. 2fl. Front barrel-plate. 4'3. Firing· pi u- bush in~ 11. Hopper-hinge pin. 30. Front barrel-11late center- screws (5) . 12. Hopper-hinge-pin key. screw. 49. Cant, botly. 1:'!. Plow. 31. Front barrel-phtte fric- 50. Cam- pliue. 14. Plow. crews (2). tion-ring. 51. Cam-spline scrc\1'. 15. Cartridge-guide. 3~. Front barrel-plate key. f>2. Recoil-plate. 16· Front cartridge-guard 3:3. Cat'l'iea·-blocl.:. 53. Recoil-plate pins (2).
(steel) . 3~. Carrier-block dowel-pin. 54. Cocking-switch. 17· Front cartridge-guard :35. Lock. c y I i ntlea·, 55. Cocking·s'Witcb spring.
screws (2). body. 56. Cock'g-switch-spring pin· i~ · Rear cart.ridge-gnard. 36. Lock-cyli1Hler, face. ~7. Cocki_ng-swi_tch plate.
· Rear cartridge-guard 37. Lock -c~·linder screws (2). nS. Cockmg-sw1t c b- plate sct·ews (2) . 3"'. Rear gnicle-nnt. screws (2) .

59. Cascable-pla1 e. 6Ll. Cascable-plMe scrtlw. 61. Rea•· sight. o~. Rear-sight spriug. li:l . Rear- ight stop. ~~~. Rear-sight-stop screw. li::i. Lock-l•lng, body. llrJ. Lock-plug handle. (ii. Lock-ping rivets (2) . ti3. Lock-plug plate.
16
75. Oscillatot•,Nut. 84 .. O~cillator-ndjnsting. 76. O.;cillator- t r a. v e r in g screw-head piu.
screw (Slt - thread ). ii. O;cillntor-t r a \' "r s i n g
screw head. ImplemeiiiB, ~··c.
7"3. O.;cillator-t rnvers ing- 35. Wiping-rod. scrow-heml pin. 86. Sllell-driver.
if!. Oscillator-atljusting ' 7. Rear guide-nut wrench. screw. !:lB. T screw-driver.
80. 0 ;cillu.!;or-a dj us tin g- Cl. Small screw-driver. screw nuts ('J). 90. Lock-screw-driver. ti0. Chain au•l riu~~
iO. C•·anli:, lmru1Ic and ~1. Oscillator-a dj u tin g- £11. Drift. spindle.
il. Crank-spline. i-2. Crank-spring. i:3. Crauk-~pring SC'rew. 71. Adjusliug-1 nr.
springs (spiral, 2). 92. Heauless-case extractor ~2. O;cillator-a dj n sting- (2).
sere\\- head. 93. Book of instrnctious. ::.3. O;cillator-a 1l j n ·tin g- 9-t. Packing-case.
crew-head lJu~l!iug.
TlJi:s g·un i.s mounted eitber on the two-wheel ca\all·J·-carriage or on tl1e tripod, mo<lel of '77. It canuot be mounted on the tripods pre,· iousl, i ·sued, because the arc supporting the trnuuions is too low.
DIRECTIO~>S FOR TAKING- TilE Gt:':\" APJ.RT AND REASSEJIBLI~G IT.
1. Remon the lock-plug by tnrning the handle horizontally antl then tha~>ing- it to the rear.
~- Bring tiH' locks, one b.> one, in Iiue with the lock-plug apertnre by turning· the crauk, and push them out with the fingers.
3. Remo,·e the aclj Llsting-nut by pressiug ou the cran k-spriug an u at the same time turniug the nut to the left.
4. Remo,·e the crauk by simply pulling it to the rear. 5. hemove the casccLbel-plate. To do this: take out the cascable·
plate crew and turn the phtte to the left (n:-iug the rear sight as a lenr if neces,;ary) until the arrow on the plate comes in line with that on th ca.;;ing·, then pull it directly to the rear.
6. Remo\e the cam by pulling it to the rear. 7. Remove the front barrel-plate. To do thi': opeu tbe hopper, pu<:b
tbe barrel system to the front tluongll the casing faL' enough (t 11·o or three inche ·) to admit of the frou t barrel-plate key being- dri ,-eu on t, then tlraw tbe system back again allll the phte will fall off.
.'', Draw the barrels, lock-c~-Jiutler, &c., tlirectly to the rear ont of tiJC casing.
D. To rem n·e thr lrwk-cyliwler an•l carrier-block, drive ont tlw renr gnille-uut key antl uu ere v the nut (left-hand tbreatl), pnll ott th cylimler a111l after,-varLl the carrier-block.
LIJ. To remu,·e the lloppcr take ont the hopper-hinge-pin key and dl'ir' ont tile pi u.
The b·u-rels shonldnot b'3 uuscrewc.J l'nm the rertr barrel-pl.tt•' nnles" absol nt1'ly nece.~,;ary, au,l then only by an a r•uorer.
17
ADJUSTMENT OF THE GUN IN THE FIELD.
Should it be found that the beads of the sllells are swelled or blown off in firing, it would indicate that the gtm needs adjusting. To do this: remove all locks but one and place a cartridge in that barrel which bas the remaining lock. Press on the crank-spring ·and set up the adjusting-nut. Tum the crank; sllould slight friction be felt ou head of cartridge just before it is fired, tlle adj nstment is probably com· plete. Examine bead of shell; if neitller swelled nor blown off, replace the locks. Should the friction when firing be so great as to cause tbe system to rotate with difficulty, it would indicate that the nut slloulrl be unscrewed and the pressure relie\ed.
GATLING GUXS IN SERVICE. &c.
There have been purchased by the United States Gatling guns as follows:
50 6-barrel, calibre 1", model 1866. 110-barrel (No. 121) calibre 1", model 1873.
50 6-barrel, calibre 0".50, model 1866. "9 10-barrel ( os. 100 to lOS) calibre 0".50, model 1871. 56 10-barrel, short, calibre 0".45, model1874.
8 10-barrel, long, calibre 0".45, model1874. 44 10-barrel, long, calibre 0".45, moclel1875. 4 10-barrel, short, calibre 0".45, model1875.
19 10-barrel, long, calibre 0".45, model 1876. \ ·1110-barrel, loug, calibre 0".45, modell877.
17 5-barrel, short, calibre 0".45, model1877. The numbers of the short 10-barrel guns, model 1874, are from 1 to
56, and of the model1875, 159 to 162, all numbers inclusi\e. The loug 10-barrel guns, model1874, are numbered 57 to 63, inclnsi,e, and 103.
The numbers of tbe long 10-barrel guns, model1875, are from 107 to 146 ancl163 to 166, all numbers inclnsi\e. ThosP. of the model1876 are 170 to 188 inclusive, and those of the model1l:!77 are 191, 192, 1D3, 196, 197, 198, 199, 200, 201, 235, and 226. Tbe year of atloptiou of model is stamped on those of 1876 and 1877.
I.NTE RCDANGEARILITY,
Tile 6-barrel, calibre 0" . .30, guns are not interchangeable ~>ith tho e of auy other model. Tbe same is true of the 10-barrel, calibre 0" .. 30, the 6-barrel, calibre 1", and the 10-barrel of same calibre.
Tile model of 1875, cal. 0".43, differs from tbat of '74 (of which only the sbort guns aro in ser-vice, all except No. 37 ha\ing been iss ned to tile various States) in tile follo~>ing parts: The hopper and i.ts attach:ents, the gas-collar, the lock-ping book and screws, the locks (by the ~n their front end ), the front sigut, and by the abseuce of the
To assemble, reverse the eutire opt'r<ttion. ~ Recei\·ell in exchange for au equal number of 6-barrel guns, calibre 0" .50 . .....;.IL--- -
• 18
fmnt-sight spring. In these models the diaphragm is riveted in th( casing. There is no cartridge-guide either front or rear, and no reat cartridge-guard . Both these models are side feed, that is, the feed-cas( cloes not stand vertically o>er the axis of piece. The model '76 differ from that of' 75 in the following parts: Tile hopper and its attachment the carrier-block, the locks (be\els on their front ends), tlle presence o: a front cartridge-guide, tlle alteration of the plow to serve as a cartridge guide in the rear, and the addition of the rear cartridge-guard. Th diaphragm is screwed to tlle casing: and is consequently remo\abl The cam and diaphragm are connected by two screws only, while tho ( of '7-! and '75 are held together by three; tllese parts are therefore no interchangeable. This model is center feecl. The model of '77 differ from that of '76 in the hopper and its attacluneuts, and also in the pitcl of tlle worm-gear and its corresponding worm. The latter change wru made for the purpose of increasing the rapidity of revolution of tll shaft and consequently of fil'ing. Tllis worm-geal' can be applied to the model 'iG pro\ided its corresponding worm accompany it. The alter tion of the hopper resulted from tlle alteration of the rate of firing. T pro>ide room for the more rapid ejection of shells the body is cut awa and its attachments are slightly altered. The intention was tllat tb hopper and its attacllments, as a whole, should interchange with tba of '76, but not its parts separately. The locks of the models '76 can b used in any of tlle models of gnus of cal. 0".45. The locks of the mod '75 can be used in tllat of '74, but not in that of '76. In otller word the locks of later rnouels can be used in any of those preceding, b ut those of the preceding cannot be used in guns of a later model. Whil all other parts than those mentioned are the same and are supposed t be interchangeable, it cannot, indeed, be asserted positively that they a • o, even in the same lot of guns, since the limited number sold bas no justified the expense of pro,iding standard ganges, and more or le fitting is alll"ays done when assembling.
The new moLlel 5-barrel gun is complete in itself, with the exceptio of its locks (which are the same as the model '16), and is of course n Interchangeable with other guns.
WEIGHTS. Pound
Long 10-barrel gnu...... . .... . ..................... . . . ....... 19 Long 10-barrel gnu with oscillator .. .............. .. .... ... .. . Short 10-barrel gun . .. . ... . .... . •............... . ............ Short 10-barrel gun with oscillater ... . .....• . . . ......... • . . ... Short 5-barrel gun with oscillator . ...... • ••...................
FEED-VASE.
Fig. 67 represents the Feed-Oase. The boc7y A, of tin, is closed at to by a cap, B, and stiffened at bottom by a bnncl, C, both of bronze. TlJ ccttch D, ri•eted to the springE, pre\ents the cartridges falling from t ll
19
case except when the case is on the gLln . 1:1 the latter event the inclined surface of the catch, riding over a col'responcling snrfc~.ce on the hopper, uncovers "the lower end of the case, wheu the carlirillges are free to fall through t ile hopper to the cq.rrier-block gr<>oves. Tha.follower F, resting on the cal'tridges, a-ssists in insuring their mpid descent. In extremely rapid firing it h:1S b3eU fouull. auvisable to aid tll3 follower by bearing down on the thumb-piece G of its gtticle. The spring is riveted to a piece of tiu, which is afterward soldered to tile baLly of the case. The cn,tch and follower are ma1le of bronze.
TRIPODS.
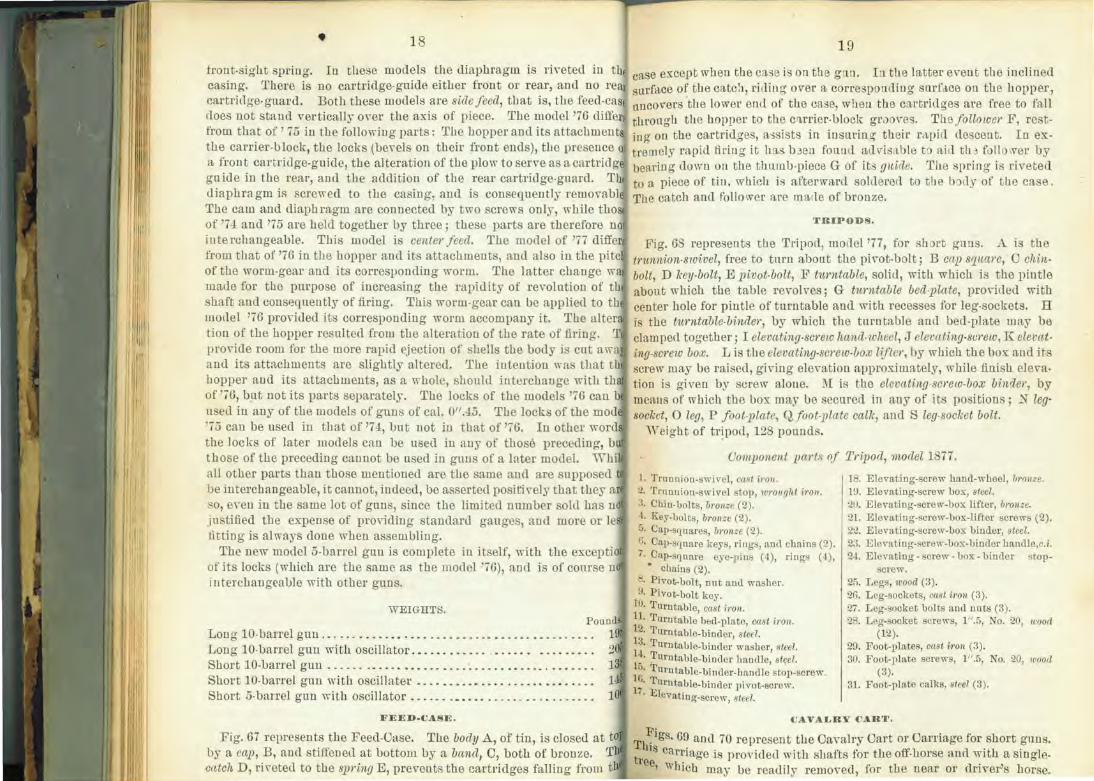
Fig. 68 represents the Tripod, model '77, for short guns. A. is the trunnion-swi·vel, free to tnrn about the pi,ot-bolt; B cnp sqnarc, C chinbolt, D key-bolt, E pivot-bolt, F tw·ntable, soliu, with which is the l)intle about which tile table re>ol ves; G tw·ntetble bed-plette, pronded with center hole for pintle of turntable anu with recesses for leg-sockets. H is the t1m~table-binder, by which the turntable and bed-plate may be clamped together; I elevating-screw hcmd-wheel, J elevctting-svrew, K cleL•ctting-sm·ew box. Lis the elevating-screw-box lifter, by which the box and its screw may be raised, giving elevation approximately, wllile finish elevation is given by screw alone. .1\1 is the eleVCtting-screw-box binder by means of which the box may l.Je secured in any of its positions; N leg· sockft, 0 leg, P foot.-plate, (~foot-plate calk, and S leg-socket bolt.
n eight of tr!pod, 128 pounds.
Component petrts of Tripod, moclel1877.
1. Trunniou-swiYel, cast irou. 2. Trnuuiou-swivel stop, wrought i1·on. 3. Chin- bolts, bronze (2) . -l. Key-bolts, bronze (2). 5. Cap-squares, b1·on zt (2). G. Cap-sqnare keys, rings, and chains (2). 7. Cap-srjuare ye-pins (4), rings (4),
• chains (2). : . Pivot-bolt, nut aud washer. !J. P ivot-bolt key.
10· T urntable, cnst iron. 11. Turntable bed-plate, cast iron. 12· Turntable-binder, steel. ~3. Turntable-binder washer, steel. 4· Turntable-b inder handle, steel.
15· T urntable-binder-handle stop-screw. l G. T urntaiJle-biuder pivot-screw. 17· Elevat ing-screw, steel.
18. Elevating-screw hand-wheel, bronze. 1!J. Elevating-screw IJo:s:, ste I. :20. Elevating-screw-box lifter, bronze. 21. Elevatiug-screw-IJo:s:-lifter screws (2). 22. Elevating-screw-IJo:s: binder, steel. 23. Elevating-screw-box-binder ha.uclle,c.i. 2-1. Elevating· screw· box· binder stop-
screw. 2il. Legs, wood (3) . 26. Leg-sockets, cast iron (::!). 27. Leg-socket bolts and nuts (3). 28. Leg-socket screws, 1" .5, No. 20, wood
(12). 29. Foot-plates, cast i1·on (3 ). 30. Foot-plate screws, 1" .5, No. 20, u·ood
(3). 31. Foot-plate callts steel (3).
VAVALRY (;ART.
~igs. G!J and 70 represent tlle Cavalry Cart or Carriage for short guns. Thls carriage is provided with shafts for the off-horse and with a singletree, Which maj· l.Je reauily removed, for the near or driver's horse.

20
There are three ammunition-chests. The lo\fer carries 2,000 cartridges in their original pa,~ing-boxes; also a small box co.ntaining t~e imple· ments belonging to the gun. Each upper chest carnes twenty-four feed· cases, containing 960 cartridges.
Height of wheel, 4' 7"; track, 5'; weight, 770 pounds.
Component JHWls.
GATLI::\G-GUN CAYALRY-CARRLIGE (CART).
Body.
\Yootl: 1. Axle-IJod)-. 2. Hounds (2). 3. Houud-bol ter. 4 .• 'pliuter-bar. 5. Singletree. 6. Floor-1Jonrd6 ( ~). i . Foot-board. 8. Foot-board IJracketd (3). 9. Shafts (2).
10. Sbaft-]Jrop (2 l~gs, 1 eros -pi~ce). ll. Kaves (2). 12. Spokes (2~ ). 13. Fdloes ( 1~). 14. Dowels.
Iron:
15. Trun nion-swi,·el. 16. Cap-squares, bronze (2). 17. Cap-sr1uare pivot-pins (2). 1 . Cap-square latches (2). 19. Cap-square latch-stops (2). 20. Turntable. 21. Turntable pivot-bolt and nut. 22. Tul'Utable clamp-bolt and nut. 23. Turntable bed-plate. 24 . Tumtable bed-plate bolts and nuts
(front). 25. Turntable bed-plate bolts and nuts
(rear) (2). 26. Elevating-screw. 27. Elevating-screw hand-w!Jeel. 2 . E levating-screw hand- wheel stop-
screws (3). 29. Elevating-sere" box. 30. Elevating-screw-box feather. 31. Bottom-board screws, wood (30). 32. Foot-board screws, woocl ( :~ ).
33. Foot-hoard nails (3). :l4. Ammunition-chest stay-strap (I). 35. Auununition-cbest stay-strap rh-ets
( ..J) . 36. Ammunition-chest stay-l.Jolts and nuts
(2 long, 2 s!Jort) (..J) .
37. Ammunition-chest padlock chains (3). 3il. Ammunition-chest-chain screws, lt'Ood
(3). 39. Axle-tree. 40. Hound and axle-body bolts, nut;, and
washers (2). 41. Hound and axle straps (2).
42. Hound and axlestrap bolts, nuts , and "ashers ( 4).
43. Hound and spli nter-bar bolts and nu t (2), washers (4).
44. Hound-rivets (2). 45. Shaft and splinter-bar bolts and nu t
(2), \"l'ashers (4). 46. Splinter-bar nvets (2). 47. Splinter-bar strap. 48. Splinter-oar-strap screw, 1rood. 49. Singletree-strap (and hook). 50. Singletree-strap screw, !coocl. 51. Singletree end-bands (2). 52. Singletree end-band rivets (2). 53. Singletree eye-pins (2). 54. Siugletree eye-pin rivets (2). 55. Shaft and hound rei uforce strap. 56. Shaft and hound reinforce strap rive
( 4). 57. Shaft and hound bolster strap bolts (3
nuts, and washers (3). 58. Shaft-nnderstrap. 59. Shaft-understrap screw, 1t'O!Icl.
60. Shaft end-loops (2). 61. Shaft end-loop screws (4). 62. Shaft end-loop rivets (4). 63. Shaft eyebol ts and nuts (2),
( 4). 64. ShafG-prop hinge-strap (lower). 6:i. Shaft-prop hinge-strap rh-cts ( .J ). 66. Shaft-prop binge-pin. 67. Shaft-prop hinge-strap~ (upper) (2). 6B. Shaft-prop hinge-strap scre"·s, wo
(~).
60. Shaft-prop ring. 70. Shaft-prop staple. 71. Shaft-prop scre"·s, woocl ( 4). 72. Shaft-prop hook.
21
73. Shaft-prop-hook screws, 1roocl (3).
74. Step.
75. Step-rivet.
76. Step-bolt, nut anu washer. ;7. Nave-bands ( ') .
1 . Na>e-band nails (24). ; 9. ~ave-boxes (2).
o. Linchpins (2). 81. Linchpin-guards (2).
2. Linchpin-guard rivets (2). 83. Linchpin-washers (2).
J, Shoulder-washers (2). ~5 . Tires (2). t<6. Tire-bolts, nuts nud washers (14).
Rear bo:c jo1· anwwnilion.
"ood :
1. Bottom. 2. Ends (2). 3. Back. 4. Lid.
Iron: 5. Understraps (3). 6. Understrap-screws, wood (10). 7. Understrap-bolts and nuts (4).
. Chest and hound bolts, nuts and washers (4) .
9. Chest and hound screws, wood (2). 10. Wiping-rod holder. ju. Wiping-rod-holder screws, wood (3). 12. Hinges (2).
1
13. Hinge-screws, wood (10) . U. Hinge-rive ts (4) . 15. Lid-catches (complete) (2). 16. Lid-catch rivets ( ..J).
117. Lid-catch screws, wood (6). 18. Lid-catch strike-plates (2). 19. Lid-catch strike-plate screws, wood
I c 4).
1
20. Padlock (1). 21. Nails.
__lmmunition-chests (11P1Jer), 2.
CO)IPO).~XT PARTS EACII CHEST.
\Vood : 1. Bottom. 2. Top. 3. Sides (2). .J. End. 5. Lid .
. 6. Partitions (23). Iron:
7. Side and end corner-plates, rear (2). 8. Side and end corner-plates, front (2.) 9. Side and end corn er-plate scre"l"l's, woocl
(36). 10. Handle. 11. Handle-rivets (4). 21. Strap-hinges (2) . 13. Strap-hinge screws, woocl (12). 14. Strap-hinge rivets (8). 15. Back·stays (2). 16. Back-stay screw!!, 1vood (18). 17. Partition face-plates, bronze (2). 1 · Partition face-plate screws, woocl (12). 19. Lid-catch complete.
20. Lid-catch screws, woocl (1). 21. Lid-catch rivets (2) . 22. Lid-catch strike-plate. 23. Lid-catch strike-plate screws, woocl (3). 2J. Padlocks (2) . 25. Nail~.
CO)!PONEXT PARTS TOOL-BOX.
Wood:
1. ::)ides (2). 2. Ends (2). 3. Bottom (1).
Iron: 4. Lock screw-driver bntton. 5. Lock screw-driver-button screw. 6. T screw-driver bntton. 7. T screw-driver-button screw.
. Worm-gear cla.mp-bnttou. 9. Worm-gear clamp-button screw.
10. Socket-wrench pin. 11. Socket-wrench-pin screw. 12. Nails (28).
The nomenclature of the cart for five-barrel Gatling (new moue1) differs from the foregoin g only in the follo"in g parts:
Carriagd.
(3.) For bound bolster (wood) substitute rondelles (2) iron. (55·) 8haft and bound reinforce-strap, omitted. (56·) haft and hound rein force-strap rivets, omitted.

22
(57.) For shaft and hound bolster-strap bolts, &c., sujJstitute sllaft and hound ro udelle bolts (2), nuts (2),.,.nd washers (4 \
(75.) "Step-rivet," substitute step-rh•ets (2). (76.) Step-bolt, nut, and wasller (omitted).
Rem·-bo:r for cmtllllmition, ammunition-chests (upper), tool-bor.
Ko change, except that there are 14 partition face-plate screws instead of 12 ( Ko. 1:!) .
HARNESS.
Fig-. 7 t represent:;; the llaruess for au d mode of attaching sl.Jaft-borse to ca;mlry-cart.
Fig. 72 represents the same for the driYer's horse. As the latter horse assists only i1.1 the draught, no breecbi1.1g is reqmred. When he is detached the singletree is hooked up on the back of the saddle. Should it b e found necessary at any time to attach an additional horse, it may be done, tandem, by means of the loops on the front ends of the shafts.
CARRIAGE FOR LONG GUNS (COLT'S ARi.US CO. PATTERN.)
Fig. 73 represents the carriage for lo1.1g guus. This carriage does not differ essentially from ordinary field carriages except in the addition of the following parts, viz: The tmnnion-swivel and bed-JJlc~te, the seat on the trail, and the elevating-~;c1·ew bincle~·. The ammumtion-cbest is arranged to carry fifty fePd-cases; its lid turns about horizontal binges at the lo""er edge of the chest, and is supported, when open, by a strong leather strap. The "~>heels are of tl.Je pattern known as the'' San·en." Their height is 44~ inches. The track is 44 inches.
Weight of carriage, 816 pounds.
Component pw·ts of carriage jm· Gatling guns.
Gt' ' CARRIAGE.
Wood: 1. Trail stock. 2. Cheeks (2). 3. Axle body. 4. Na.,es (2). 5. Spokes (36). 6. Felloes (4).
Iron :
7. Lunette. 8. Lunette-bolts, nuts and washers (4).
9. Lunette-calks (3). 10. Trail-plate. 11. Trail-plate rivets (I!). 12. Pointing-ring. 13. Trail-llandles (2). 14. Trail-handle !Jolts and un ts (2). 15. Seat. 16. Seat-rivets (4). 17. Seat hinge-plates (2).
18. Seat hinge-plate screws, Ko. 15, It" u·oocl ( 4).
19. Seat hinge-pin. 20. Seat-rest. 21. Seat-rest llinge-plates (2). 22. Seat-rest hinge-lJlate rivets (4) . 23. Seat· rest hinge-pin. 24. Seat-rest hinge-stop. 25. Seat-rest hinge-stop rivets (2) . 26. Seat-turnbuckle. 27. Seat-turnbuckle bed. 28. ~!'at turnbuckle-bed rivets (4). 29. Seat turnbuckle-bed plate. 30. Seat turnbnckle-becl-plate screws, No.
15, 111, 1V00Cl (6) .
31. ~heel guard-plates (2). 32. Wheel gnard-11late screws, No. 15, li"•
1COOCl (8). 33. Elevating-screw. ::!4. Elevating-screw hand-wheel, bronse. 35. Elevating-screw box.
36. Elevating-screw-box bolts, nuts and washerd (2).
37. Elevating-screw binder.
3:> Elevatinrr-screw-!Jinder llamlle.
3~: Elevatiu~-screw-!Jiuder stop-screw.
40. Handspike-llooks (2). 41. Haudspike-llook screws, Ko. 15, Jt",
n•ood ( 4).
42. Hanllspike clamp-rings (2).
43. Lock-chain (with toggle).
44. Lock-chain eye-plate. 45. Lock-chain eye-plate !Jolt, nut and
"~<"asller.
46. Lock-cbaiu llook. 47. Assembling-bolt , nuts and wasllers
(2). 4c. Assemuliug-screws, No. 20, 3", wood (4). 49. Cheek-bauds l2). !10. Cheek-band nails, round head, (20). 51. Axle. 52. Under straps (2). 53. Axle-strap. 54. Axle· strap bolts aucluuts (2). 55. Axle-bauds (2). 56. Axle-baud nails, round head, (6). 57. Trail and axle brace. 5 . Trail and axle brace bolts, nuts and
washers (2). 59. Trail and a.xle-bra,ce coach-screw. tiO. Nave-boxes (2). 61. ·ave-bauds, encl, (4). 62. Nave-band nails (12). 63. Kave-bands, flanged, (4) . 64. Nave-baud ri.,ets (1 ). 65. Tires (2). 66. Tire-bolts, nuts and "1"1-ashers (12). 67. Lincll-pius (2). 6 . Linch-pin wasllers (2). 69. Sllonlder-wasllers (2 ). 70. Trunnion-swivel. 71. Cllin- bolts (2). 72. Key-bolts (2). 73. Cap squares (2). 74. Cap-square keys, rings, and cllains (2). 75. Cap-square eye-pins (4), rings (4).
chains (2). 76. Trunnion-swivel bed-plate. 77. Trunnion-swivel bed-plate bolts and
nuts (4J. 7 · T:runnion-swi.,el stop-pin, rings (2),
chain, and hook 79 . . · Ptvot-bolt, nut and washer.
0· Pivot-bolt key. 81 w· . 82' ~Ping-rod holder.
· W,piug-rod-bolder screw, 'o. 20, 2!", Il"ood.
3. Wiping-rod-bolder clamp-ring. 84. 'Vi ping-rod-holder key, ring, cllaiu,
and screw, Ko. 9, 111, woocl.
" ' OOL1: 1. Axle body. 2. Hou11ds (2) . a. Cross bar. 4. Fork. 5. Splinter bar. 6. Foot-board.
LDlBER.
7. Foot-board brackets (4) . . Pole.
9. Pole-prop . 10. Naves (2). 11. Spokes (36). 12. Felloes ( 4 ).
Lea tiler: 13. Pole-prop strap.
Iron: 14. Cross bar and llouud screws, No. 16,
211, n·ooc1 (6).
15. Foot-board screws, No. 20, tllree 2!11,
three :3" , wood (6). 16. Foot-board-bracket nails ( ). 17. Hound and axle body bolts, nuts, and
washers (2). 1 . Trace-hooks (4). 19. Splinter bar end-bands (2). 20. Splinter bar end-baud rivets (2). 2l. Splinter bar center-straps (2). 22. Splinter bar center-strap bolts and
nuts (2). 2l. Splinter bar auclllound bolts, nuts, and
wasllers (2). 24. Pole and fork-bolt nut and wasller. 25. Pole-1)rop socket. 26. Pole-prop-socket ri"et. 27. Pole-prop-socket eye-plate. 2 . Pole· prop ferrule. 29. Pole-prop-ferrule rivet. 30. Pole-prop-strap screws, No. 12, ! 11
, 1rood (2).
31. Pole-ferrule. 32. Pole-strap. 33. Pole-chains (2). 34. Pole-strap bolt and nut. 35. Bucket-books. 36. Bucket-llook screws, No. 15, 1t" , woocl
(4). 37. Pintle-llook. 38. Pintle-hook bolts, nuts, and washers,
2 short, 1loug (3). 39. Pintle-key, cllain, rings (2), and eye
bolts.

24 25 40 . .Ammunition-chest stud-bolts, nuts,
and washers (2) . 41. .Ammunition. ch~ stud. bolt keys,
chains, rings, and staples (2). 42 . .A.mmuui tion-chest stay-plate. 43. Ammunition-chest stay-plate staple. 44 . .Ammunition-chest stay-plate rivets (2). 45 . .Axle. 46 . .Axle and hound straps (2). 47 . .Axle and hound strap bolts and nuts ( 4). 4 . Nave-boxes (2). 49. Nave-bands (end) (.I). 50. Nave-band nails (12). 51. Nave-bands (flanged) ( .1) . 52. Nave-band rivets ( 1 ). 53. Tires (2) . ii.l. Tire-bolts, nuts and washers (12). 55. Linchpins (2). 56. Linchpin-washers (2) . 57. Shoulder-washers (2).
. I)DIU NITIOX·CHEST.
Wood: 1. Top. 2. Bottom. 3. Ends (2). 4. Side. 5. Lid. 6. Partitions.
Leather: 7. Lid-strap.
Iron: 8. Top and eud corner-plates. 9. Top and end corner-plate screws, No.
1.1, It", wood (4.1). 10. Bottom and end corner-pla.tes (2).
11. Bottom and end corner-plate screws, <J2 Seat (with brass turn-buckle), sheet-No. 1.1, It", wood (44). ~ ' iron, No. 11 wire guage, hinged to
12. Side and end corner-plates (2). plate of same, fastened by 7 screws 13. Side and end corner-plate screws, No. It", No. 14, to the stock.
14, eight t", eight It", 1oood ( 16). 23. Trail-handles (2). 14. Lid face-plate. <J-t. Bolts No . 2 A (2). 15. Lid face-plate screws, No.l4,lt" , wood ~5 . Nuts (2).
(16). 26. Lunette and plate, fastened together 16. Handles (2). by 2 rivets, No.3 D, and to the stock 17. Handle-rivets (8). lJy 2 screws, 1!" "o. 16, and 2 point-l B. Cover, zinc. ing rings on plate attached by 4 19. Cover-nails copper (69). bolts, No. 2 C. 20. Lid-strap buckles (3). 27 . Elevating-screw, steel, and brass wheel 21. Lid-strap staples ( 4 ). handle. 22. Strap-hinges (2). 2 . Elevating-screw box, brass, secnred by 23. Strap-hinge screws, No. 20, It ", wood 2 bolts, No.2 C, and 2 nuts on clamp-
(26). screw. 2-t. Hasp. 29, Bed-plate and trunnion-frame (cast 25. Hasp-screws, r o. 14, It ", wood (6). iron), with cap-squares (brass). 26. Turnbuckle. 30. Keys for cap-squares (2).
J 27. Turnbuckle-plate. 31. Rings (2) and chains (2), No.1, 7 links 28. Turnbuckle-plate screws, No. 20, 1±", each.
wood (2). 32. Stay-key for trunnion-frame, t" round.
129. Turnbuckle-stud. 33. Ring and chain No.1, lllinks. 30. Turnbuckle-washer. 3~. Center bolt for bed-plate and trunniou-31. End stays (2). frame, B head, t" bolt, with 1" nut 32. End-stay screws, No. 16, 1t' ', wood ( 4). and pring key. 33. Back stay. 35. Implement case of 1'' gas-pipe pass-3-1. Back-stay screws, No. 16, 1:!-" , 1rood (3) ing through axle-body and fast-35. Back-stay rivets (2). ened by 1 screw, 2" No.l-1, for shell-36. Back screws, No. 12, 2", wood (16). hook and wipiu"-rod.
niPLE;\IEXTS. 3\i. Key-chain and sta]Jle for the same. Wood:
1. Trail handspikes (2). Iron:
2. Handspike-rings and eye-pins (2). 3. Handspike-stops (2).
TWO A>DIU:I;!TIO:-< CHESTS FOR CARRIAGE·
BODY.
Wood: L Sides ( 4).
C . .lRRIAGE FOR LONG GUNS (U. S. PATTERN, PLATE XIV.) 2. Tops (2). 3. Ends (2).
Wood:
1. Stock. 2 . .Axle-body. 3. Cheeks (2). ~- Pins or dowels (4).
Iron:
5 . .Axle-tree. G. Shoulder-washers (2J. 7. Linch-washers (2). 8. Linch-pins, with springs (2). 9 . .Axle-bands (2).
10. Band-nails (6). 11. Under straps (2). 12. Bolts, No. 2, hexagon heads, passing
through cheeks and bed-plate (4).
13. Nuts (.I). 14. Handspike-rings, ri veted in the under
straps (2).
1
15. Cheek-straps, No. 14, wire gauge, fast· ened by 20 nails D heads (2).
16. Stock and axle-body urace, fastened to a.."\ie-body by 2 bolts, No. 2 A.
17. Nuts (2), washers (2), and to stock by one of the bolts of the ele>ating· screw box.
1
18. Assembling bolts No. 2 .A (2). 19. Nuts (2) and washers (4). 20. Handspike-hooks, fastened by4 sere""
lt", No. 14 (2). 21. Wheel guard-plates, fastened by
screws, 2-inch No. 14 (2).
-1. Fronts, ou hinges, black walnut (2). 5. Bottoms, oak, with interiors for cases,
(2).
Iron: 6. Corner-irons, wire gauge No. H , (4
for each box), fastened by 42 screws, !",No. 9, (!:l) .
7. Pairs hinges, fastened by 16 rivets t", and 16 screws 1" . No. 14, (2).
· Spring locks, fasteu'ed by 4 rivets -(!,",
9 and 4 screws!" , No. !l, (2) .
· Catches, fastened uy 2 ri,ets t ", and
10 6 screws 1", No.1~, (2) . · Stay-irons, on the bottom fastened by
11 S 16 screws 1" , Xo.l.J, (4). · tar-straps,+" circles, fastened to the
sides of the chests by 20 ri >ets t"• and uuts No. 2, with bolts at the euds, passing under straps to secu re the chests to the axle-body, (.I).
12. Nuts for stay-strap bolts, No.2, (8).
O:-<E LDIBER.
'Vood: 1. .Axle-botly. 2. Hounds (2). 3. Fork. 4. Splinter-bar. G. Foot-boards (3). 6. Pole. 7. Pole-prop. B. Foot-board brackets ( -1 ).
Iron: 9. Pole ferrule, fastened byl rivet t ".
10. Strap with loops, for pole-strap. 11. Bolt, No.2 . 12. Nut. 13. Pole-yoke complete, same as field. 1-l. Bolts for hounds and splinter-bar, No.
2 D, (2). 15. Nuts (2), and washers(4), bolts (2) for
fork andsplintcr-bar,No. 2D, 2 nuts, 16. End bands (2). 17. Middle bands (2) aud trace-hooks (4). 1, . Bolt for tongue and fork, No. 2 .A. 19. Nut (1) antl washers (2). 20. Screws, 2" , No.14, for brackets (4). 21. Screws, 3", No.l4, (-I), and screws, 2"
No. 14, for fastening foot--boo,rds, ( 16).
22. Watering-bucket hook, fastened by 2 screws, I", No. 14.
2~. Tar-bucket hook, fastened by 2 screws, 1" , No. 14.
24. Plate and staple, fastened to the fork by 2 rivets, t " .
25. J oint bolts, No. 2 (2), and nuts (2). 26. Angle-irons, the joint bolts passing
throuo-h them for securing the limber-chest (2), and bolts o. 2 E (2).
27. Nuts (2). 28 . .A:s:le-tree. 29. Sbonlder-washers (2). 30. Linch-washers (2) aud linch-pins (2),
with springs. :n. A:s:le-band (2) and baud-nails (6). 32. Pintle-hook.
1 33. Bolts, No.2 C (3). 3.1. Nuts (3) aml washers (J). 35. Pintle-key.

• 26 27 36. Rings (2). 3i. Chain, No. 2, of 6 links and eye-pin. 3 . nderstraps (2).
7. Handles, fastened by 4 rivets, !", and 16 screws, 1" , No. 14, (2).
~ n I ~ . -~ _g ~-a 39. Bolts, No.2 E (4). 40. Nnts (4). 41. Pole-fork st rap, with eye for the prop
~ocket hook. 42. Pole-]Jrop socket and fernie. 43. Pole-1>rop loop and eye-llin.
Ol\"'E LlliBEH CHEST.
Wood: 1. Sides, front and back, (2). 2. Ends (2) and tops (2), of walnut. 3. Bottom (oak), with the interior parti
tion of white wood.
Iron: 4. Corner-irons, Jo. 14, fastened by 50
screws, i", No. 9, (4). 5. Front corner-iron, fastened by 9 screws,
'1:", No. 9. 6. Back stay, and end stays (2), fasten ell
by 3 rivets, i ", and screws (18) 1", No.14.
8. Strap-hinges, fastened by 24 rivets, t'' and2 screws, 111
, No.14, (2). 9. Spring-lock, fastened by 2 rivets,!''
1 screw, 1", 1'\o. 14, and 2 screws, !1:'' No.9.
10. Lock-catch 11late, fastened by 3 rivet ·i1r"·
FOUR WHEELS.
Wood:
1. Naves(4 ). 2. Spokes (64). 3. Half-rims, bent, ( ).
Iron :
4. Nave-boxes, bras , ( 4). 5. Nave-bands (16). 6. Baud-na ils ( 48). 7. Tires, Bessemer steel, ( 4). 8. Felly-clips (8). 9. Tire-bolts, !", (40).
10. Kuts (40) and wasllers (<!4).
.:. .; Finished dimensions.
0 .,; "' Rough dimensions. §"c5 0
I " 0 " .:c_~ " Names of parts. ·~
I .'!>- 0 0 "' 0 ""' '"' c ;: ,;:
c; oo rg c "' ::: ·= " "" §:;:; z · 0 t> .= 0 t;: ;3
~ ...:: E-1 >-J H .- .... C) - --- ---~--------- ---- , Gu»-car rige body. ln. In. In. In. ln. In. Stock ......................... ... . 1 I 7ti. 25 i. :J2 5. 5 80 ~ 0. 25 27.78 Axle- body .. ..... ........... . . .... . 1 51. 2lj 4. 5 4 54 5. 25 4. 75 17.32 Cheeks ... . .. ~;,;;~:;.· ............ .
1
2 13 5. 87 2. 05 15 7 2. 5 3. 64
I 48. i4
Axle-boily .. .. .. . ...... ..... . ... . . . J 1 51. 28 5. 5 4 54 6. 75 4. 75 11. 98 Fork ........•..................... I 32 i 2. 75 35 7. i 5 3. 5 6. 55 Hounds .. . .....• ... . ... . ..... .. .. .. 2 43 2. 75 2.12 46 3. 5 2. 15 6. 10 Splinter-bar . .... ... . . .. . . .... . .... 1 6e. 75 2. 75 2.12 72 3. 5 2. 75 4. 81 Front foot -board ..... . ..... _ .. __ .. 1 45 •J. 5 87 4d 5 1. 25 2.08 R ear foot-hoard . . ...... . .. _ ........ 2 45 3. 5 87 4 4 1.25 3. 32 Polo . .. . . ..• ... ... ...... . .. .... .... 125 3. 275 2. 25 128l
4 4 }to. e 3 3 Pole-prop . ....... .. •.... . ... ... .. . . 24.5 ' 1. 87 *1. 5 27 2. 25 2. 25 0 94
2 Carriage-chests.
I 46.67 Sides ... ....••..... .. .. ...... . .. .. . 4 22. 4 13.33 24 15 I. 31 13.0 Rear ends .. .. ..... ........ .. . .. . .. 2 11.12 13.38 15 15 1. 31 4. 08 Fronts ............................ 2 12.25 12.75 15 I5 1. 31 4. Od Tops .. .. ... .. .............. . ....... 2 12.12 23.45 15 25 1. 31 6. 82 Bottoms ......... ... ...... ........ . 2 ll.12 22.9 15 25 1. 31 6. 8'2
Limber-chest. 34. 88
Sides .. .... ................ .. .. .... 2 45 16 48 l7 1.31 14. 841 Ends ..................... .. .... .. 2 I9. 5 16 22 li 1. 31 6. 80 Top .. .... .... . . .............. .... . 1
I 45 20 48 21 I. 31 9. 17 Bottom ...... . .......... . ....... .. . 1 45 18. 5 47 19.5 1. 31 8. 34
4 Wheels (55 inches high) . 39. 15
~;If~~~~~::::::::::::::::: :: ::::: : : I 4 8.3 6. 5 Round. I 11 7. 5 Round. 13. 48 86.44 J. 75 1.83 96 2. 25 2.30 27. 60 I 64 25.8 I. 75 1.2 29 2. 25 1. 6 46. 72
---87.80
~ 5 ~tg .._. ~ rn o ~ =-~ e.: (f) o lS ~ E z=- ~:::: 8 til ~ ~
• ames of parts. Total.
--------------+--!--;;;;-;;:--;;;: ----;;;; -;;:1----;;: IJody I Ill 36 ........ ....... . H I 61
~~r~~~~-bodi·)·::::::: : :::::::::::::: : :::::: I 76 ..... ... ........ ....... . ........ 76 ~munition-chests on c_arrmg:e ---· .... . .. . 2 20 20 ... . .. . . ........ 40 ~mmnnition .chcsts ou llwber .... .. .. .. ... 1 21 29 .... .. . . ..... ... 50
heels.. .... .......... . ................... 4 e ....... . ........ 87 14 109
Total. ........................ . ... . ...... . ----236,-36-49 - 87 -28-4:!6
p ·inoipal dimensions and weiqhts of gun-cm'l'iage a11Cllimber jo1· the long-barrel Gatling gun, 1 caliber .·15 ( U. S.11atlern).
istance between the ins ides of t he trunnion-plates ...•••..••••. ---·-· .•••.. iameter of the trunnion-holes ..••••. ·----- .•••••.••••..•••••.••••••••• ---
Distance of axis of trunnions in rear of t!Je axis of axle-tree, the piece being in battery, on horizontal ground .••• ... -- •• - ••••.•••••. -.--- •••• -- ---· --.
Distance from axis of trunnions to axis of axle-tree ..•. -- •.••••••..•••.. ----. Heirrht of axis of trunnions above the ground . . ----· ... ---.-.--- .• ----------
"' ) above the !Jorizon tal line...... . • • • • • 16° 00" Extreme vertical field of fire} below the horizontal line-·---··----· 16o 30" Distance between the points of contact of trail and wheels with the ground
line ..•••. : ..................... .......... ...... . ------ ••••••.••••• --··--Distance from front of wheels to end of trail, the piece being in battery . . --- . Distance of the muzzle of the piece in battery from the front of the wheels .. .
) without ammunition chests ....... . Length of gun-carriagE>, without wheels~ with ammunition chests .••• ••••.• .
Length of limber, without wheels, with pole, yoke closed . .••••.•••••.•.• ---· Length of limber, without wheels or pole ...•.. ·----· .•••• . ---·---·----······ Lepgth of limber, with wheels and pole, yoke closed . .•••• ·----------------Distance between the centers of arle-trees of gun-carriage and limber .• ••. -.Total length of carriage limbered up, pole-yoke closed . . •.• ---- .•••..••..•••• Distance of muzzle of piece, when limbered up, to front of the pole, yoke closed. Whole length of the axle-tree ... --- .. ---- .. ---- .•• ---·- --· -· -- ---·---······ Track of the wheels ... ___ ..••..........••....••••. -- •...••••• ·--- -· .-- -- · -Height of the wheel ··- -·· ·- - --·.-- --- · - - - -- .. ---. ·-- -- . . - ·- •. -- . ---- . . ---. Dish of finished wheel .•••.•••.•••.•••.. ·--- - -·--- . • •• · -----·----··--····· ·
WEIGHTS.
Inches. 8.30 1. 25
1. 00 U!.26 40. i 6
60. 00 97.12 4.62
81.12 86.22
155. 55 43. 0
172.25 77.25
230.0 250. 0
71. 2~ 60.00 54. i5
1. 15
Pounds. Gun-carriage, without wheels or ammunition-chests.-- -··--- · ---·- .••• •• ---· 217. 50 Two ammunition-chests on gun-carriage . ..... ---· ..•••. ·----------- •••• - --- 116.00 Ammunition-chests on limber----·----·-----·.............................. 146. OU One wheel, gun-carriage or limber ...•.•.••. ---- ..•••• --····-----·------·--- 6:3.50 G~-carriage complete, without ammunition or implements ••. - -·-- •.•• .... . 460.50 Ltmber complete, without ammunition or implements .•.•...••. ---··----·- ·- 44 · 00 Gun-carriage and limber complete .•...• ..... .•. --.---- . . . --·-··--·-·····-.. 908.50 '[wo handspikes ••••.•••••.•.•••••••.••• ____ •.••.•.••..•. ••.•.••...••• --- -. 6. 00 Gmplements and wiping-rods .. ___ . ___ .---- ___ . __ ----- •.• ----------··--·---- 6. 50
_uu-cania ge, w ith feed-cases in chests filled (5,000 rounds) ------ · ------ • • ·-- 666. 50 ~~her, with feed-cases in chests fi lled (5,000 rounds)·-----····--·-··------- 826.20 w::ght of gun-carriage and limber .........•••• -.--- · - • ••• ·---- · -- 908. ~0 ~ 1, 422. iO
Pr~ht of_ ammunition ________ •.. __ .•.•.••... _. __ .. ---:·---·-- .• - f\84. -0 .> Porttonate weight of loatl of ammunition to weight of loaded carnage, 64. 3
Per cent.

28 29
WEJGTIT OF Gt:X·CARRLI.GE i OR TTIE SA)I E GUX1 ) JADE BY COLTS' AR)lS COMPAXY, Inspection of JJ1c~in Shaft.
Gun-carriage no amm 't' - h t 5 without wl!eels ..................... . ' um 100 c es s, I with wheels additional .••. . ••••.••..
Pound\ 222 see that the fron t and rear splines are properly fitted and that the 131
Liml!er, with ammunition chests and wheels addi t ional for chest ..... .... .. {
li mber alone . .••••.••••.••••• _ 154 baft is well covered witllleather between collars. Gange length and di-178 :meter of journals and examine thread for rear-guifte nut. Stamp with 131 inspector's initial and model year in rear of gas-collar. additional for wheels ........ .
Gun -carriage and limber complete ........................................ .. 816 Oue wheel, gun-carriage or limber .............. .. ......................... . 65 .. Preparation of BcMTel fo1' Proof.
Height of wheels ........................................................ .. Track of wheel
Inch -H The barrel should be bored up to cal. ".±±, and thread cut on breecl1 45 one-eighth of inch abo,-e finish-size. Block containing proving-cam is
Poua screwed up agaiust end of barrel forming temporary breech-piu. .. .............................................................. .... ··· --· ........... ........... .... ... .
·weight of gun-carriage and limber ...................... .. . _.. . .. • .. 16 { Weight of ammunition .............................................. 20 1 1 , ~ Proof of Bc~n·el.
Proportionate weight of load of ammunition to weight of loaded carriage, 25. per cent. Fire barrel twice with charge of 200 grains service-powder and lead
cylincler weighing 930 grains. Use wads between powder and lead and over all. After proof wasll barrel in hot soda water and examine care
of t h1 fully for flaws, seams, and other defects. Should the barrel be accepted,
RULES FOR TilE INSPECTION OF GA.TLING GVNS IN DETA.lL.
Examine material and finish, or wot·kmanship , of every part gun, and in addition as follows: stamp with proof letter P, 0".4 from thread on breech.
Inspection of the Frame.
Examine drilling, tapping, and countersinking of all screw-hole ~auge tim> ads for the adjusting-screw and adjusting-screw cap ; als JOtlfnal-box for main shaft. Gauge length and diameter of trunnion and distance bet\l"een their bases. Stamp with inspector's initial an wod_el year on transom above journal-box; also, with number of gu on nght branch two inches in front of hopper-hinge block.
Inspection of Front Sight.
Apply gauge to determine height of sight a fter it is attached to tb frame. When assembleu see that it does not project beyond front frame. SLamp with inspector's initial on front euge opposite sere\\' hole.
Inspection of Onmk-Latch.
Gauge width of recess for crank. Stamp with inspector's initial on outer surface, nea rly opposite sere
hole. Inspection of Gas-Oollat·.
Gauge length, interior and exterior diameters. Stamp with inspeo or's initial on outer surface.
Inspection of Adj1tsting-Screw Gap.
. Gauge opening with screw-plug gauge; also, gauge sq uares for adjnS 1ng-screw wrench. Stamp with inspector's initial on outer end.
Inspection of Bm-rel.
The bore should be carefully wiped, and, if neeessary, the barrel straiglltenell on an anvil by a hammer. To ascert~in if the barrel be straight it should be Iield up to the light and a straight-edge be reflected on the different parts of the bore. If the barrel be straight the reflected image will be straight in all positions.
Ins1Jection of Ban·el (finished).
See that tile exterior is smoothly finished; that the lands and bottoms of the grooves are well polisbed, and that the edgf\S of the land· are not rough or torn. Gange caliber at each eud, a llowing a >ariation of 0".001 more or less. Gauge threau at breech, extractor-slot, depth and diameter of counter-bore for cartridge-head, diameter and length of chamber. Stamp with inspector's initial near breech, just forward of number of barrel.
Inspection of Front Ban·el-Plate.
Gau ge each barrelllole and main siJ aft bole with plug gauge. Gauge thickness of plate and length of bub. Stamp with inspector s initial on edge mid way between barrel holes.
Inspection of Rem· Bcw1'el-Plate.
Gauge ceuter hole witiJ plug gauge, and each barrel hole with screwPlug gauge; the latter should be a yery snug fit iu order that the barreL may be fil'ruly held in the plate. Examine extractor-slot and slot fol' ~~ar spline. Starnu with iuspector's initial and model year on surface
.......lL--..;fi:;:a~nge wichYHv lwt>I'P.f\11 barl'f\l holes.

30 31
Inspection of GmTier-Block. nk-shaft. Stamp with inspector's initial just in rear of tradec~r~r:nd with model year on right flange, between rear two holes for
Try Jock-gauge in each groove; see that rear ends of grooves ar asing-screws. cornered that the locks. may readily enter as the cylinder revolves. S Inspection of Dictphragm. that the outer edges of the lands are rounded in order that shells rna h
1 d
1 ngth of bub Examine tapping of screw-
f 11 ]'l , - Gauge center o e an e · S a out reac 1 y. Gauge extreme length; also, diameter of center hoi h r h m fits well in casing when assembled. tamp Examine fit of dowel-pin. Stamp with inspector's initial in center boles. See t at~~~~ lrag urface ], 1 'th inspector's 1mtm on rears · dnC. Wl
Inspection of Hopper (mul its a.ttachments ). Inspection of L()clc-Plug Sleeve.
See that joint between body and mouth-piece is close-fitting, tuat th _ h 1
fitt'n of face with diaphragm, and see that uinge is of proper width for the ulock, that the seat for the cartridge Exam we screw-ho eks,. . 1 gline with that in diaphragm and on inner
. . . 1 t for lock-plug oo IS m f gmde IS properly cut, and that the plow and cartndge-guards fit close!, s o . St with inspectors initial on rear surface o to the surfaces to which they are attached. Examine drilling, tappin surface of casmg. amp and countersinking of all screw-holes. Gauge the height of the wedge flange. Inspection of Gam. haped lellge 011 the umler side of the body, the interior of the month .
1 t .
11 piece, the 11iam eter of the cylindrical portion of the latch, of the ho]1 See that lock-groo\es are smoothly cut, that the recmll a ~IS ~e in the latch, and bevel on plow. Oomprcss hopper-latch Rprings for 1! fitted and pinned, that all screw-holes are proper~y tappe d ~~ ~ :h e.~ hours in fixture, and see that they do not set or break. Stamp body 0' assembled, that the cocking-switch is properly, adJ~St~d an ~ .. ~1
1 hopper with inspector's initial and model year on upper surface a is a close fit between the cam and casing. Stamp w1th mspector s llll a corner nearest the hopper-latch and .4.3 C. on upper surface of hiuge on outer surface of recoil-plate. Stamp guards, guide, latch, and binge-block with inspector s initial an model year on outer surfaces.
Inspection of Lock- Cylinder.
Examine material and workmanship. Gange center hole with plu gauge, and see that it is accurately l>ored. Try lock-gauge in eacli groove, sliding it backward and forward. Obsen·e tha,t clue allowanc is mac.le between the groove and the locks. See that there is not to much play, permitting the locks to throw out of line when the extracto engages head of cartridge. Examine all machine cuts, that they ar uniformly smooth, and that the grooves are cornered to permit a fr entrance of the locks during t be revolution of the cylinder. See tha the joint between body and face is close-fitting. Gauge the extrem length of the cylinder, also thickness of the flange. Stamp with in pector's initi al on surface of l>ody and front of face .25 of an inch fro
edge. Inspection of Rear G1t·We-Nut.
Gauge center bole witl! a screw-plug gauge; also gauge squares oil
nut. See that rear-guide-nnt key fits snugly. Stamp with inspector's initial on outer end.
Inspection of Bt·eech- Casing.
See that all screw-boles are JWoperly drilled and tapped, that flang8 does not project beyond frame, and that interior diameter is of rigbt ize for dia hra ill and am, T::l.U Rlirl j 0' a t f,..,, nnn;lln'--- .. - .1 '· - 1
Inspection of Cocking-Switch and Sp1·ing.
See that the firiuO'-piu groove is sufficiently smooth to prevent friction in rotating the c~rlinder, and that the end!t of groove are cornered anu beveled, in order that the firing-pin may en~e~ and pas_s ~:llf~et~~{ Try end of firing-pin in groove. See that the shd1ng p~rt IS
and screw-hole tapped· also, that hole for spring is of nght depth, and ' · b' d' C mpress tile outer end countersunk to prevent the pm from m mg. 0 l·
prings for 12 hours in fixture and see that they do not set or brea '"' Stamp switch with inspector's initial on outer surface.
InslJection of Rea1• Sight ancl Sight-Sp1·ing.
Gauge diameter of stem and height of V-slot when_ sight is on gn~, point of reference being under side of flange on rear-sight stand. .
Stamp with inspector's initial on rear surface of bead. Tap the sprmg with a hammer· it should not set or break.
' Inspection of Rectr-Sight Stand.
Gauge hole for sight-stem anu height of shoulder abo:e_t?at surface of flange which rests on frame. Stamp with inspector's 1mtial on rear surface.
Inspection of Worm-Gear.
See that teeth are smootl! and well cut. Gauge their thickness ; also gauge center hol~. Stamp with inspector's initial on outer end of hub.

32 33
Inspection of Wonn. Inspection of Main- Rpring.
See that threads are smoothly cut. Gauo-e crank-sllaft hole and e see that the ends on the inner surface are cornered to prevent friction amine fitting wbeu assembled on shaft. st:mp with inspector's initi~gainst the firing-pin. To test the temper, compress several coils on pins on hub. •nd Jet them remain so for twelve hours ; th en weigh in testing fixture.
t nspection of Cmnk-Shaft and Collet?', fhey should not set or break. When compressed one inch, they should ustain 14 pounds; after being assembled, should " weigh " 17 pounds.
Gauge length and diameter ot journals, and screw-thread for crank Gauge exterior and interior diameter of collar and extreme length. Insp ection of F i1·ing-Pin.
Inspection of Crank (mul handle). Gauge diameter of the head, of the body, of t he point, of the thread, _ . . and the ext reme length. Try t he temper wi th a file; it should be spring
Examme tappmg of hole for end of shaft and gauge same. See that Stamp with inspector's initial on rear surface of the head. handle is smoothly finished, and that it is properly riveted to crank emper. Stamp with inspector'::> initial and model year on fac:e of crank near Inspection of F i1·ing-P in Nttt . shaft-bole.
InsJJection of Tmt•ersing-Oam. Examiue tapping ; gauge diameter of square, the extreme length, the . bread, the diameter of the countersinking in t he rear end. The front
Gau_ge d1ameter ancllength of earn; also crank-shaft hole and groove nd of nut should be tempered a high spring t emper; try its hardness Exam me seat for cam-key. Stamp with inspector's initial and mode with tbe file. Stamp with inspector's initial on outer surface before it year on outer end . ·'l tempered.
Inspection of Cascabel-Plate. Inspection of F iring-Pin B ttshing.
Gauge iuside diameter of that part wbicil fits o>er breech-casing; al o Examine the reaming of the firing-pin hole; gauge the diameter of lock-plug aperture. Examine drilling and countersinking of screw he thread, the extreme length, and t he slot for the screw-driver. Try boles. Stamp witil inspector's initial and model year on upper surfa the temper with the file; it should be a high ~pring temper. Stamp, of riD?- . before being tempered, with inspector's initial on outer encl.
Ins]Jection of Lock-Plug.
Gauge length and diameter of body, length of hook, and widtil of slo in hook. Examine screw-holes; see that plug is firmly held agains casr.abel-plate when assembled with it. Stamp witil inspector's initia on rear surface of handle.
Inspection of Lock-Tttbe.
Gauge exterior in recmnng-gauge. Gauge extreme leugth of tub widtil of extractor seat, thread for firing-pin bushing, firing-pin bol and bevels on front end of tube. See that the extractor-screw hole h not been bored through top of tube, tbat the firing-pin Ilole is centr throughout, and the tube has not beeu bored too thin, or tbrougil, at tb angle next the extractor seat. In tile latter case, see that solder has no been used for tbe purpose of filliug up. Test for hardness with a file Stamp with iuspector's initial on lug.
Inspection of E:ctmcto1·.
Gange thickness and length of extractor amllength of hook ''hen loc is assembled. Place extractors in fix:tme for twelve hours to test tempe (should be spring temper); tiley should not set or break. Test harclnes
Inspection of L ock (assembled).
Try receiving-gauge for general form and size. Gauge extractor when fully back, and when drawn out to full limit. Gauge length of firingpin from face of lock-tube. Try receiving-gauge for head of extractor ~ see that it fits the circle well and rests firmly on same, but does not bind. Press extractor fully fo rward, and ho~d it firmly in place; then, with the thumb and finger, take hold of head of extractor and press outward ; see that there is no plcty, as in working the gun the extractor may slip over tile bead of car tridge. Gauge length of rear end of firingPin from but t of lock; examine tbe fittings of all screws ; weigh with spring balance the standard weight being 17 pounds, (with one pouucl Variation each 'way) , in order to compress the firi ng-pin spring one inch. Stamp wi th inspector's init ial on outer surface, one inch from front end and ".4 from line of extractor-seat.
I nspection of Oscillator.
with a file. Stamp with inspector's initial on upper surface.
G~uge sliding bearing of that part of body which euters casing of gun, beanngs of t raversing-nut, socket for elevating-screw, and thread for :~p, Gauge square , center hole, and t hread of cap. Gauge thread
traversin g-screw, extreme length, and length from outer end to .......... _ _ ___.:>-....

3± 35
shoulder. Gange center hole of traversiug.screw head and thickue 6
volley is fired, and iu the event of there being uo wind, tho shots should of hub. Gauge thread of traversing.nut, gmoves, hole for traversing
6n cluster within the 18-inch diameter circle. In the preliminary firing
pin, seat for traversing-pin catch. Gauge leogtll of traversing-pinthe front sigllt has not been .filed down, and the rear sight has been corgroove, diameter ~nd length of that portion which receives the rollrespondingly raised. The gun being left in the position in which it was Gauge exterior and inte1·ior diameter and length of rolls. Stamp witJaimed, the rear sight is brought down to its lowest point; the front sight inspector's initial on rear surface of body. is now filed down until its highesL point is brought in line with the V
Inspection of Screws. of the rear sight and the bull's-eye of the 200-yard target, and tile sighting of the gun is then complete, the graduations of the rear sight being
See that threads and slots are well cut, and that case.llardening i onstant for all guns of the same calibre. The barrels must not be bent perfect in those that require it. or sprung sufficiently to injure the interior, and should be carefully in-
Inspectio n of Feed-Case. pected after adjustment. Tlw short liarrel sllould have a plug four
inches long, fitting the calibre aurl extending into the barrel to a dis-The tin should be "double fourcross ,; of good quality. Exam in tance of one inch beyond the front barrel-plate. A burnisher may be
material aud workmanship; try receiving-gauge for lower end; s used in connection witll the le•er, . '0 a ' to a>oid bending the barrel too that the slide passes freely in its slot from top to bottom ; gauge extrem much.
FINAL INSPECTION. length of case, and of case and spring assembled ; test temper of sprin and see that it is elastic, that catch passes freely owr the end of t case, aud holds firmly in place. See that the tin has not been crack at the corners after being bent on the former, and that solder has u been used to conceal defects. Stamp with inspector's initial on low end, near the slot.
The gun being assetubled, take hold of the crank <tud revolve the barrel system slowly; see that bearing points do not bind, that the barrel-plates run true, and that all parts are properly adjusted and fitted. Re•ol•e rapidly and observe as before. I{evolve backward and see that cockiug-switch spring is elastic. It Ahould return the switch to
Gr~ ASSEMDLED. position after passage of each lock. Turn forward again and firing-pin . . .. · . hould enter groove, if switc~ is in place. Fire 100 shots. All parts
To adjust the gun to the head of the ca l t1 ~dge.-Remove all the locks b h ld h , 1 d d .1 1 Th 1 k h ld b t k t d . . s ou t en oe c eane an 01 ec. e oc -s s on e a en apar an one, also the adJnstmg screw-cap, and loosen the check-nut. Placet . . . . . .
I ( d l f t 'd ) · th t b 1 h' h h th 1 k each part carefully mspected. to see that It has sustamecl no mJnry m p ug gauge mo e o car L'I ge m a arre w 1c as e oc an fi . . . . t t ·t· f fi · W'th h ·t· f d' t. rmg. 01l the workmg parts and reas emble. The locks bemg re-urn o pos1 wn o rmg. 1 wreuc vary pos1 wn o a JUS mg-scre
t -1 1. ht f · t' h 1 f · f lt h · fi . . moved, the firing-pin spring should be tested by the balance, and the un 1 s 1g nc wn on eal o O'ano·e IS e w en passmO' rmg pow . . R t th t "' d., 1 d 1 k"' F' " pomts of the firing-pins gauged to see that they have not been dnven emove gauge, se up e uu , au rep ace cap au oc s. ; Ire a 11l '£ d . . rounds and examine heads of empty shells; if any are swelled or blo orwar m the finug. Off, the adjusting Screw Should be turned ill Still farther. RULES FOB TIIE INSPE(;T.ION OF TIIE 3-DARKEL GUN.
TO SIGHT THE GUN.
Prepare target, outer circle being 18 inches in diameter, with a tw inch bull's eye five feet from the ground. Let the tar get be 200 yar removed from the gun. Fasten the gun carriage firmly to oak pla sunk in the ground, so that there can be no yielding of the gun or riage. Fire each barrel separately five or more times, in order to esta lish the mean absolute deviation of ceo ter of impact from the point aim at. Correct its deviation in the following manne1·: A steel band or bra having been fastened over the rear banel-plate to the frame, and a sta or su)1port under the front barrel-plate, the whole is held firmly in pia A socket or wrench is now slippe(l over the muzzle of the barrel, whi enables the latter to be sprung in a direction opposite to its deviati ou the target, aucl the error is thereby corrected. Each barrel in turn treated in the same manner, until Lhe whole are adjusted. After t
Inspection of the Casing.
See that the shell is free from flaws or other defects, that it is the right length, that it is of suitable diameter at rear for the cam and at fmnt for tile friction-ring. Gauge length and diameter of trunnions and distances between rim-bases. To ascertain whether the axis of the trunn~ons intersects the axis of tlw casing, apply the branches of the trunnion-square to the trunnions and press down the slide until its point touches the surface of the casinO'· secure it in this position by the th ~
_nmb-screw. Turn the casing over and apply the square to the trnn-0100s as before. If the point of the slide touches the casing, the axes or the trunnions and casing are iu the same plane. If the slide does ~ot touch the surface, or if the slide touche~ the surface and Lhe branches
t{ 0
not touch tile trunnions the axes are i"ep:Hatecl by one-half the dis-ance ' neces:;ary to make the cont'tct. To find whether the axe . .., are at
36 37 right angles measftre from the face of the casing to the surface of tb GUN ASSEMBLED.
trunnions by means of tlle trunnion rule. Stamp with inspector's ini tial just in rear of trade-cat·d aDll with number of gun on right rilll· bas To ailju.st the gm~ to the head of the cat·tridge.-Remove all the locks
but one. Place the plug-gauge (model of cartridge) in that barrel Inspection of Front BmTel-Plate. ~>hich has the remaining lock. Turn the crank and vary the position
G t '· 1 h b 1 h 1 1· t f t" f · t' · of the adjusting-nut until slight fl'iction be felt on head of gauge at auge cen er uo e, eac arre o e, c tame er o sea tOr ric wn-rmg . . . 1
h 1
k , d I t '· f' h b E · fi · f t 1 fitt. f b 1 instant of passmg firmg pomt; remove the gauge, rep ace t e oc s a net an eng u o u . 'xamme ttmg o cen er-screw, auc mg o arre .
I t k St I · h · t · ·t· 1 f f · fire a few rounds. If properly adJusted, the heads of shells should not p a e ey. amp pate wit wspec or s m1 1a on sur ace o nm. ff be swelled nor blown o .
Inspection of Friction-Ring.
Gauge exterior and interior diameters and width of ring.
In spection of Cascabel-Plate.
Gauge center hole, Jock-plug aperture, groo'e for sight, and insid diameter of rim. Stamp with inspector's initial on top surface of rim.
Inspection of O?·ank-Spt·ing.
Compress springs, while on crank, by weight on lmttons for 12 hour They should not set.
In spection of il.iljusting-K1tt.
Gange center bole with screw-plug gauge. See that grooves a smoothly cut on front surface. Stamp with inspector's initial dn reru surface.
Inspection of Oscillator-N1tt.
Gauge thread with screw-ping gauge; also seat for head of elevatin screw. Stamp with inspector'd initial on rear surface of nut opposi axis of thread.
Inspection of Oscillato·r·Trm:ersing-Scrmo and Screw-Head.
Gauge thread of screw, extreme length, interior diameter, aud'groov on inner surface. Stamp with inspector's initial near pin hole. Gau tenon of head. See that joint between end of screw and shoulder rear of teuon is close and that pin fits well. Stamp head with inspec or's initial near shoulder.
Inspection of Oscillato1·-Ailjusting-Screw, X1tts, Sp1·ing, A.c7justing-Scre Hectd, and Screw-Head Bush·ing.
Gauge thread; also extreme length of screw. Gauge-thread of nut projections on outer surface and exterior diameter. Oompress sprin in fixture for 12 hours. See that they do not set or break. Gauge cent hole of head. Stamp with inspector's initial on outer surface of hU Gauge exterior diameter of body and flange of bushing, lengtlt fro outer end to shoulder, aud screw-thread with screw-plug gauge.
Other parts are iuspecteu as prescribed for the 10-barrel gnu.
nur.ES FOR THE INSPECTION OF TRIPODS FOR GATLING GUJVS.
Examine material and workmanship of every part.
Inspect,ion of Tnmnion-Swivel.
Gauge the trunnion-beds and the distance between their inner plane surfaces; also the pivot-bolt hole and the boles for the screw ends of the key and chin bolts.
Inspection of Key anc1 Chin Bolts.
Gauge screw ends in receiving-gauge, the width of bolts, the size of the key-holes, and their distances from the shoulders.
Inspection of Gap-Squares.
Gauge their widths, the diameter and depth of their cylindrical por· tions, the key and chin bolt holes; see that the riveting of the eye-pius is well done. Stamp with inspector's initial and model year on upper surface near key-bolt hole.
Inspection of Pivot-Bolt, K1tt, and Washet·.
Gauge length, diameter, and screw-thread of bolt, corresponding· screw-thread, and thickness of nut, and diameter of center hole and thickness of washer. Stamp nut and washer with inspector's initial and model year on upper surfaces.
Inspect·ion of T1tmtable.
Gauge pivot-bolt hole, thickness of plate as seat of binder, binderhole, position and size of pintle, seat for elevating-screw box, thread for screw-box binder, and width of slot for screw-box lifter.
Inspection of Twmtable Bec1-Plate.
Gauge pintle hole, thickness of plate along its edge, the interior elimensions of those parts which receive the leg-sockets and the corre· ~OUding bolt holes. Stamp with inspector's initial on edge of plate, also
Ith Year of adoption of model.

38
Inspection of Tumtable-Bincler, Handle, lYasher, and Screw.
Gauge length and diameter of binder, thickness of hinge portion, and pivot-screw hole; tae hinge portion of handle, pivot-screw hole, anct form of eccentric in receiving-gauge; the center hole and thickness or washer, the length and diameter of pivot-screw and its screw-thread. Stamp binder below stop-screw, handle on side near pivot-hole, and washer on upper surface with inspector's initial and model year.
Inspection of Blerating-Sc1·ew, Hand- Wheel, Elevating-Screw Box, cmrl Lijtet-.
INDEX.
Gauge thread of screw in receinng-gauge, length of crew, size of Page.
head, diameter at seat of hand-wheel; the center hole of wheel; the General description of Gatling. guo .....•....•......................... ·· · ... 1-4
thread of screw box and exterior diameter the width and depth of Description of parts··············································· ·· · ··· ·· · · 4- 10 ~ b' d d h ]if h 1 1 G ·d h d Directions for takino- gnu apart, &c.......................................... 11
groove or m e~, an t_ e ter:scr~w. o es. au~e WI t an cun·a. Directioua for adjus~ing gun........................................... .• • . .• 12 tnre of that portiOn of lifter whiCh IS m contact With the box, and the Description of short 5-barrel guo . . .... ...•.• ••• .. .•. ... •.•. ••.. .... ...... ...• 12 position of its screw-holes. Stamp screw on head, wheel on bub, box Description of parts of ...•...........•...•....•...•...•••••••.••..••••...... 12-15 on upper surface, and lifter on rear surface between screw-holes wirh Directions for taking apart, &c.............................................. 16 inspector's initial and model year. Directions for adjusting..................................................... 17
Guns in service .... . . .... .... ..• •.• .. .. .. .•. • ... • ... ... .. . .•. . • . ••. .. . . .. .. . 17
Inspection of Screw-Box Binder.
Gange thread of screw, length to handle, hole for and length of stopscrew. Stamp handle on center of outer surface with inspectors initial and model year.
Gauge diameter
Inspection of Leg-Sockets, Bolts, and Foot-Plates.
interior of sockets and size of bolt holes; the lengtl.J and of bolts and size of threads, and the interior of foot-plates.
Examine drilling and countersinking of screw-boles in sockets and plate .
Inspection of Legs.
See that tl.Je wood is well seasoned oak or hickory, that it is straig!Jt grained and free from all cracks or other defects. Gange the tenous. Stamp on outer surface with inspector's initial aud model year.
Final Inspection.-Tripoc1 assembled.
Put on cap-Sf]uares and drive in the keys. Try plng gauge in trun· nion-be<ls. See that turntable works smoothly, that binder operates o hold it in any position; that the elevating-screw works freely, but not too loosely, in its box; that the latter slides easily in its seat, and that its binder secures it in position.
Examine the fitting of the leg'1 in their seats and see th·1t thei r shonlders come rruarely against tlte en•ls ot' tlle sockets and foJ -plftteS ·
Interchangeability of........................................................ 17 \\'eights................................. . .. .. .............................. 18 Feed-cases .. . . . . .. • . • . . . . . . . . . . . . • . .. . . • .. .. . • . . . • • . • . . . . . .. • • . . .. . . .. . . .. . . 1 Tripods............ .. . ... ...••. ... ••. .. . ... .... ...•. ..•. .... .. . ... ... • . •. . .• 19 Cavalry-cart for short guns • . .. .. .. .. .. .. .. .. . . . • . . . .•• .. .. . . . • .. .. .. .. . . .. .. 19-21 Harness for .. .. .. . . .. . • . . . . . . . . . . . . . . .. .. .. . . . . . . . . .. . . . . . . . • . . . . • .. • . .. . . . . 22 C~rriages for !aug gnus ...................................................... 22-28 Rules for inspection of Gatling guns ......................................... 2 -37 Rules for inspection of tripods ...................... ..... ............. ....... 37-3
0

FIG. 1
• d lllfll
. :: :: r/~ B
Fro.~
FIG. 4
Fro. 5
G
Fro. 3
PLATE I.
- ; <r> I . s ...
~ ~ ~
A

PLATE II. •
FIG. 7 FIG. 8
FIG. 9
l A B
FIG. 10 FIG. 11
•
Fro. 13 Fro. 12
(. J
FIG. 14

PL.A. TE III.
FIG. 15
• Fm. 16
B
A
Fm. 17 FIG. 18 Fra. 19
D
FIG. 22
FIG. 20 FIG. 21
Fm. ~a FIG. 24 FIG. 25

FIG. 2i
FIG. 31
0 ·
FIG.28
Fro. 30
PLATE IV.
FIG. 26
FIG. 32
FIG. 29

PLATE V.
"F!G. 33 FIG. 34
FIG. 35
FrG. 37 FrG.38 FIG. 36
.A
FIG. 40
FIG. 39
FIG. 41 FIG. 42

PLATE VI.
FIG. 43 FIG. 44
FIG. 47 FIG. 45
... FIG.46
FIG. 48 FIG. 49
FIG. 50
FIG. 51
B FIG. 52
A
FIG. 54 FIG. 53
.:Z"'>O c

PLATE VII. FIG. 55
L
G
' FIG. 56
A. Rear Guide-Nut Wrench, side view. B. Rear Guide-Nut Wren~b, top view: C. Brass Wiping-Roo. D. Shell-Driver. E. Pin Wrench. F. Adjusting-Screw Wrench. G. T Screw-Driver.
• H. I.ock Screw-Driver. I. Small Screw-Driver . J. Clamp for W o~ Gear.
I~
.J~ hnplemento IRoned wltb EMb Gun.
Fm. 58

PLATE VIII. FIG. 59
D F
FIG. 61

PLATE IX.
FIG. 65
FJG. 68 G

PLATE X.
Fig . . 69.
GATLING GUN CAVALRY CART.

Fig. 70.
GATLING GUN CAVALRY CART.
(REAR VIEW)
!'LATE XI.

• PLATE XII .
w Cl) a: 0 :r
I
1-I.... ' <( :r Cl)
(.!)
z :X: 0 <(
I-1-<(
I.... 0 w 0 0 2 0 z <(
~
a: 0 I....
(/) (/) w z a: <( :r

PLATE XIIL
Fig. 72.
HARNESS FOR DRIVER'S HORSE

PLATE XIY.
w C> <(
a:: a:: <( (.)
z :::J C>
(.!)
z _J
1-<( (.!)

PLATE XV.
w (!)
~ n:: cc_ <t::i.
-..;; oa:: 1'-
w f-
e:iJ Zf-:::J <( ..... a..
~ (!) vi
(!):::i
~ ....J f-<{ (.!)