
OQ -Analyst V 4.07.01 User’s Guide Guides/OQ-AHS_Full... · Introduction The adult Outcome...
97
OQ ® -Analyst V 4.07.01 User’s Guide December, 2006
Transcript of OQ -Analyst V 4.07.01 User’s Guide Guides/OQ-AHS_Full... · Introduction The adult Outcome...

OQ®-Analyst
V 4.07.01
User’s Guide December, 2006
© 2007, Lanark Systems Page 2
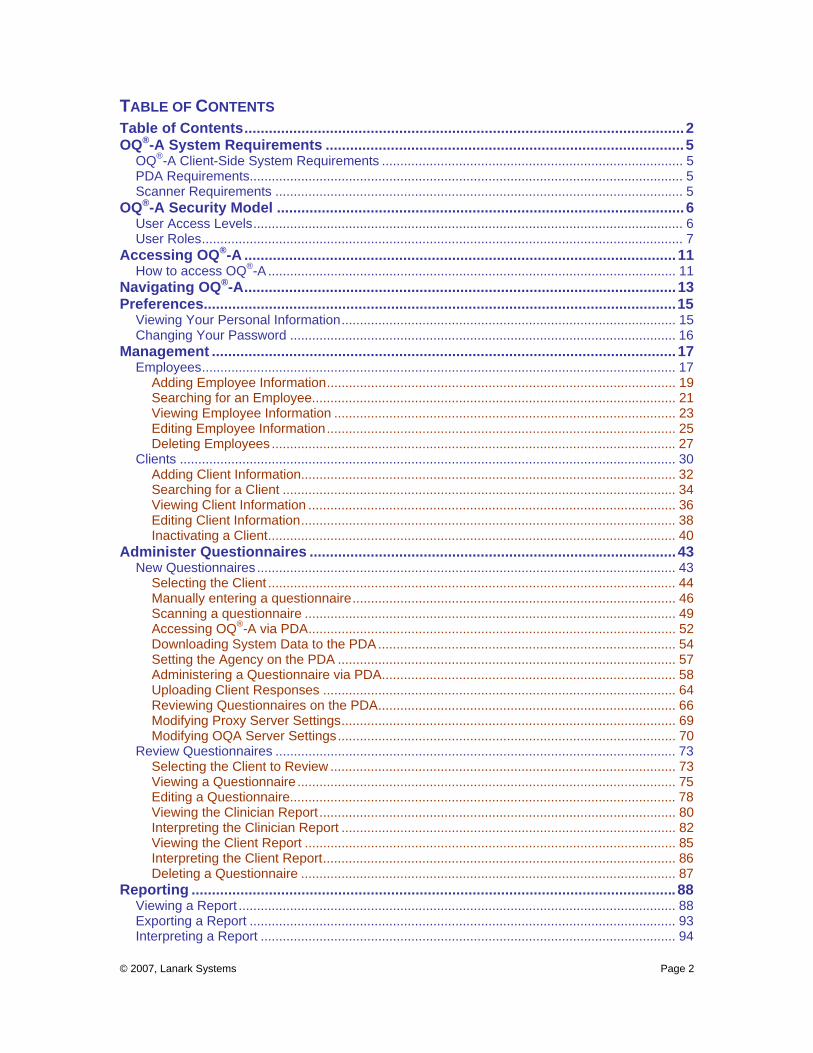
TABLE OF CONTENTS Table of Contents............................................................................................................2 OQ®-A System Requirements ........................................................................................5
OQ®-A Client-Side System Requirements .................................................................................. 5 PDA Requirements...................................................................................................................... 5 Scanner Requirements ............................................................................................................... 5
OQ®-A Security Model ....................................................................................................6 User Access Levels..................................................................................................................... 6 User Roles................................................................................................................................... 7
Accessing OQ®-A ..........................................................................................................11 How to access OQ®-A ............................................................................................................... 11
Navigating OQ®-A..........................................................................................................13 Preferences....................................................................................................................15
Viewing Your Personal Information........................................................................................... 15 Changing Your Password ......................................................................................................... 16
Management ..................................................................................................................17 Employees................................................................................................................................. 17
Adding Employee Information............................................................................................... 19 Searching for an Employee................................................................................................... 21 Viewing Employee Information ............................................................................................. 23 Editing Employee Information............................................................................................... 25 Deleting Employees .............................................................................................................. 27
Clients ....................................................................................................................................... 30 Adding Client Information...................................................................................................... 32 Searching for a Client ........................................................................................................... 34 Viewing Client Information .................................................................................................... 36 Editing Client Information...................................................................................................... 38 Inactivating a Client............................................................................................................... 40
Administer Questionnaires ..........................................................................................43 New Questionnaires.................................................................................................................. 43
Selecting the Client ............................................................................................................... 44 Manually entering a questionnaire........................................................................................ 46 Scanning a questionnaire ..................................................................................................... 49 Accessing OQ®-A via PDA.................................................................................................... 52 Downloading System Data to the PDA................................................................................. 54 Setting the Agency on the PDA ............................................................................................ 57 Administering a Questionnaire via PDA................................................................................ 58 Uploading Client Responses ................................................................................................ 64 Reviewing Questionnaires on the PDA................................................................................. 66 Modifying Proxy Server Settings........................................................................................... 69 Modifying OQA Server Settings............................................................................................ 70
Review Questionnaires ............................................................................................................. 73 Selecting the Client to Review .............................................................................................. 73 Viewing a Questionnaire ....................................................................................................... 75 Editing a Questionnaire......................................................................................................... 78 Viewing the Clinician Report ................................................................................................. 80 Interpreting the Clinician Report ........................................................................................... 82 Viewing the Client Report ..................................................................................................... 85 Interpreting the Client Report................................................................................................ 86 Deleting a Questionnaire ...................................................................................................... 87
Reporting .......................................................................................................................88 Viewing a Report ....................................................................................................................... 88 Exporting a Report .................................................................................................................... 93 Interpreting a Report ................................................................................................................. 94

© 2007, Lanark Systems Page 3
Logging Off OQ®-Analyst .............................................................................................96 OQ®-Analyst Online Help..............................................................................................97 OQ®-Analyst Technical Support ..................................................................................97

Introduction The adult Outcome Questionnaire (OQ ®-45.2) and it’s closely related child-adolescent version, the Youth Outcome Questionnaires (Y-OQ ® 2.0 and YOQ®-SR), have for a number of years been recognized as one of the leading outcome tracking methodologies for quantifying and evaluating the progress of behavioral health therapy. The accompanying manual for each instrument provides a brief summary of salient research findings and a rich bibliography of scientific studies testing the instruments and their use in clinical practice. These outcome measures have been widely adopted by a variety of behavioral and other health care service organizations (e.g., small clinics, large heath care institutions, university counseling centers and all branches of the military) since their release in the early 1990s. However, leveraging the full power of these tools in everyday clinical practice requires a software program that incorporates the latest technological methodologies and research findings. This software solution is called OQ® Analyst, or OQ®-A, and was developed in partnership with Lanark Systems. The purpose of this document is to provide a User Guide to the OQ® Analyst (OQ®-A). Some of the characteristics of the OQ® solution are:
A platform that can easily allow for distributed, online reporting Allows for installation with a minimum of technical support Faithfully incorporates the rigorous OQ ®-45 and Y-OQ ® research findings.
© 2007, Lanark Systems Page 5
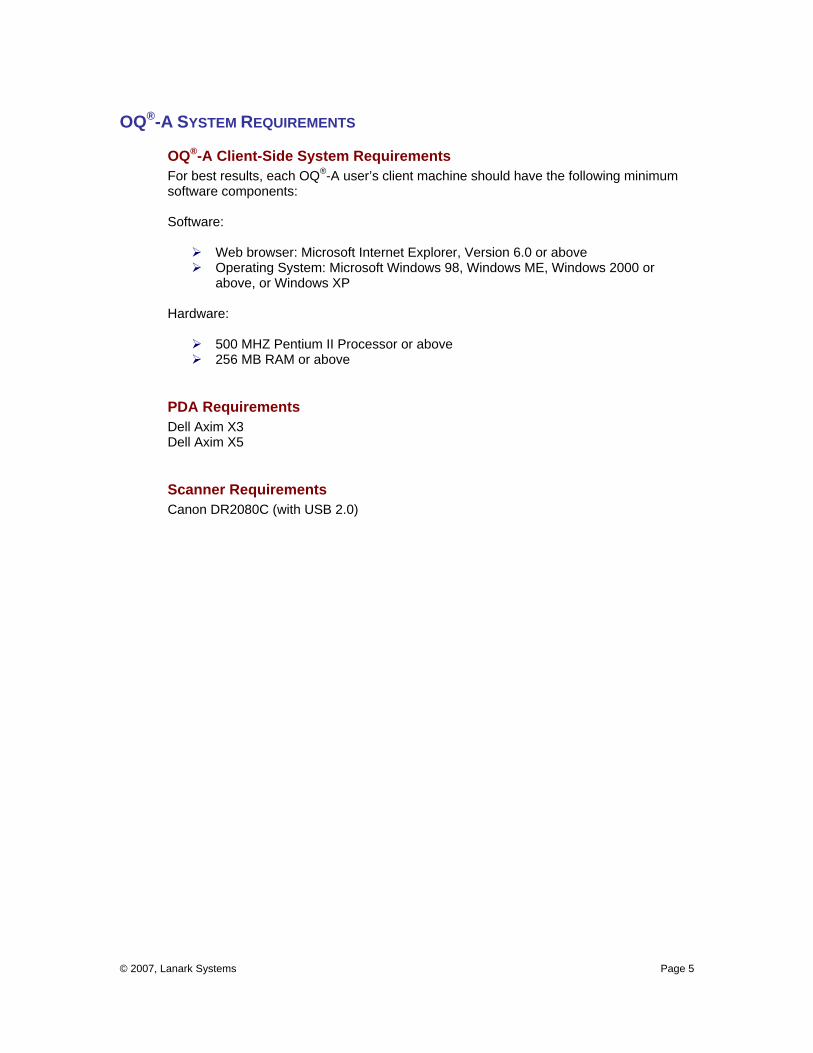
OQ®-A SYSTEM REQUIREMENTS
OQ®-A Client-Side System Requirements For best results, each OQ®-A user’s client machine should have the following minimum software components: Software:
Web browser: Microsoft Internet Explorer, Version 6.0 or above Operating System: Microsoft Windows 98, Windows ME, Windows 2000 or
above, or Windows XP Hardware:
500 MHZ Pentium II Processor or above 256 MB RAM or above
PDA Requirements Dell Axim X3 Dell Axim X5
Scanner Requirements Canon DR2080C (with USB 2.0)
© 2007, Lanark Systems Page 6
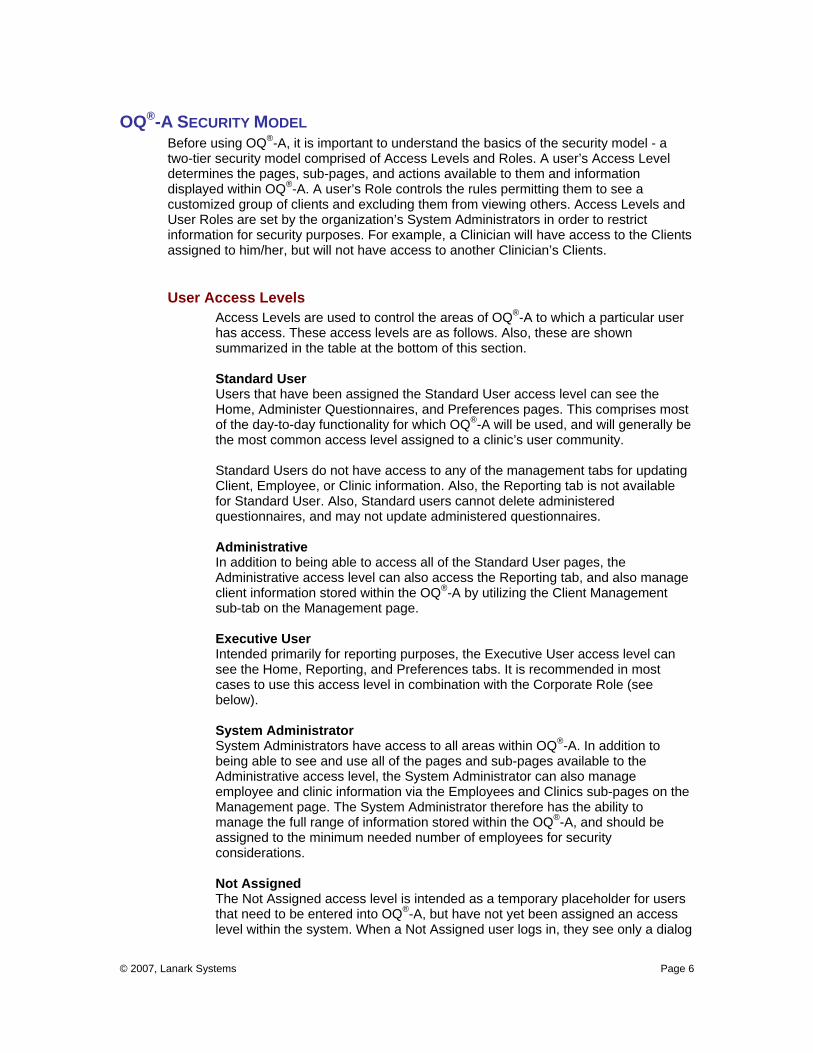
OQ®-A SECURITY MODEL Before using OQ®-A, it is important to understand the basics of the security model - a two-tier security model comprised of Access Levels and Roles. A user’s Access Level determines the pages, sub-pages, and actions available to them and information displayed within OQ®-A. A user’s Role controls the rules permitting them to see a customized group of clients and excluding them from viewing others. Access Levels and User Roles are set by the organization’s System Administrators in order to restrict information for security purposes. For example, a Clinician will have access to the Clients assigned to him/her, but will not have access to another Clinician’s Clients.
User Access Levels Access Levels are used to control the areas of OQ®-A to which a particular user has access. These access levels are as follows. Also, these are shown summarized in the table at the bottom of this section. Standard User Users that have been assigned the Standard User access level can see the Home, Administer Questionnaires, and Preferences pages. This comprises most of the day-to-day functionality for which OQ®-A will be used, and will generally be the most common access level assigned to a clinic’s user community. Standard Users do not have access to any of the management tabs for updating Client, Employee, or Clinic information. Also, the Reporting tab is not available for Standard User. Also, Standard users cannot delete administered questionnaires, and may not update administered questionnaires. Administrative In addition to being able to access all of the Standard User pages, the Administrative access level can also access the Reporting tab, and also manage client information stored within the OQ®-A by utilizing the Client Management sub-tab on the Management page. Executive User Intended primarily for reporting purposes, the Executive User access level can see the Home, Reporting, and Preferences tabs. It is recommended in most cases to use this access level in combination with the Corporate Role (see below). System Administrator System Administrators have access to all areas within OQ®-A. In addition to being able to see and use all of the pages and sub-pages available to the Administrative access level, the System Administrator can also manage employee and clinic information via the Employees and Clinics sub-pages on the Management page. The System Administrator therefore has the ability to manage the full range of information stored within the OQ®-A, and should be assigned to the minimum needed number of employees for security considerations. Not Assigned The Not Assigned access level is intended as a temporary placeholder for users that need to be entered into OQ®-A, but have not yet been assigned an access level within the system. When a Not Assigned user logs in, they see only a dialog

© 2007, Lanark Systems Page 7
box pop-up that reads: “You are not presently assigned access to the OQ®-A. Please contact your OQ®-A System Administrator.” Depending on their role, Not Assigned users still appear within the system and can have assignments made to them. For example, if a given user is Not Assigned and in the Clinician role, they can have clients assigned to them.
User Roles In contrast to Access Levels, which can be thought of as enabling or disabling access to specific page and/or sub-pages, Roles are driven by the nature of the client lists to which a user has access. Note: A user must either be in the Clinician or Supervisor role in order to have Clients assigned to them. Clerical Clerical users can see and search against all the Clients in the system. As with other user roles, the specific pages and sub-pages to which they have access are determined by their Access Level. Clinician Assigning users the role of Clinician enables making that user available in Clinician-assignment lists to be assigned to one or more Clients. Users assigned the role of Clinician can only see and manage the Clients which have been specifically assigned to them. In this way, both security and information personalization for the clinician community are supported. Supervisor Assigning users the role of Clinician enables making that user available in Clinician-assignment lists to be assigned to one or more Clients. In addition, these users also appear in the Supervisor-assignment lists in the Employee Management tab for assignment to one or more employees (especially Clinicians, because much of the reporting is based on the Supervisor-Clinician relationship). Users assigned the role of Supervisor can see and manage the Clients which have been specifically assigned to them. In addition, they can also see and manage Clients which have been assigned to Clinicians that report to them. Therefore, client confidentiality is maximized. Corporate The Corporate role is intended primarily as a reporting access role for users with management responsibilities, but who will not be assigned specific clients. It is recommended in most cases to use this role in combination with the Executive User access level (see above).

© 2007, Lanark Systems Page 8
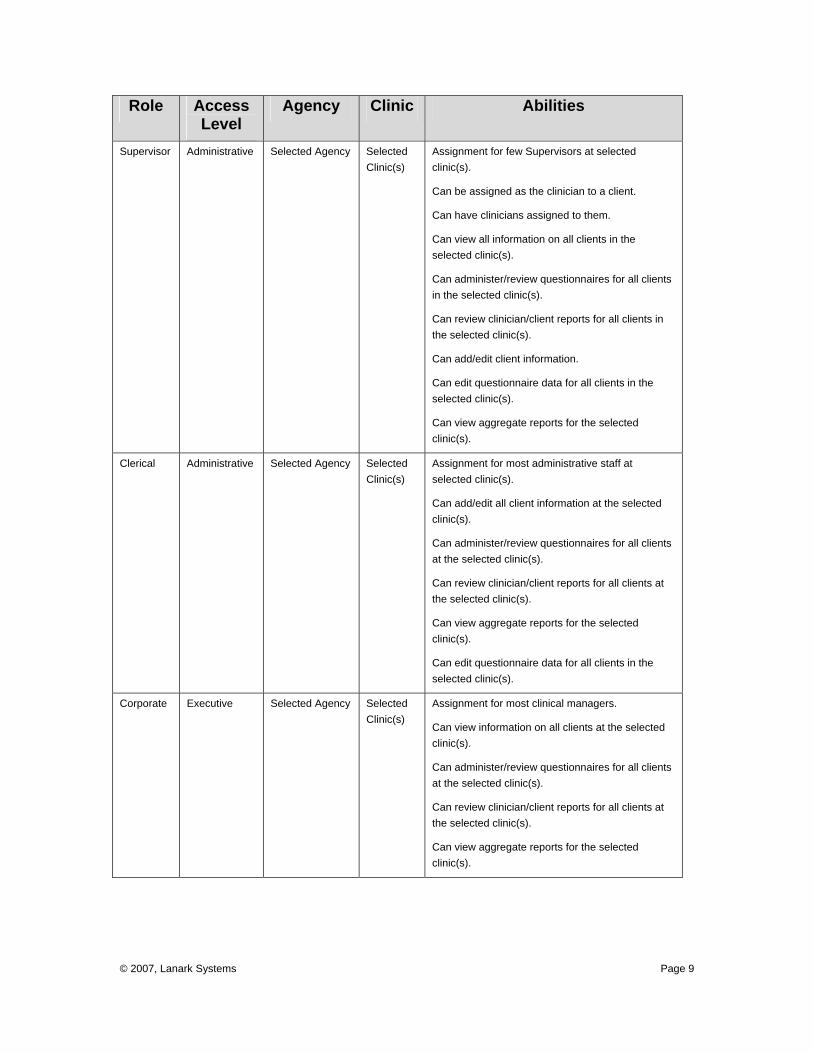
The following table breaks out common Role/Access level combinations and describes the abilities that they grant:
Role Access Level
Agency Clinic Abilities
Clinician Standard User Selected Agency Selected Clinic(s)
Assignment for most Clinicians at selected clinic(s).
Can be assigned as the clinician to a client.
Can view all information on clients that are assigned to them.
Can administer/review questionnaires for clients assigned to them.
Can review clinician/client reports for clients assigned to them.
Not able to edit questionnaire data.
Unable to view aggregate reports.
Clinician Administrative Selected Agency Selected Clinic(s)
Assignment for few Clinicians at selected clinic(s).
Can be assigned as the clinician to a client.
Can view all information on all clients at the selected clinic(s).
Can administer/review questionnaires for all clients at the selected clinic(s).
Can review clinician/client reports for all clients at the selected clinic(s).
Can add/edit client information.
Can edit questionnaire data for all clients at the selected clinic(s).
Can view aggregate reports for the selected clinic(s).
Supervisor Standard User Selected Agency Selected Clinic(s)
Assignment for most Supervisors at selected clinic(s).
Can be assigned as the clinician to a client.
Can have clinicians assigned to them.
Can view all information on clients that are assigned to them or their clinicians.
Can administer/review questionnaires for clients assigned to them or their clinicians.
Can review clinician/client reports for clients assigned to them or their clinicians.
Not able to edit questionnaire data.
Unable to view aggregate reports.
© 2007, Lanark Systems Page 9
Role Access Level
Agency Clinic Abilities
Supervisor Administrative Selected Agency Selected Clinic(s)
Assignment for few Supervisors at selected clinic(s).
Can be assigned as the clinician to a client.
Can have clinicians assigned to them.
Can view all information on all clients in the selected clinic(s).
Can administer/review questionnaires for all clients in the selected clinic(s).
Can review clinician/client reports for all clients in the selected clinic(s).
Can add/edit client information.
Can edit questionnaire data for all clients in the selected clinic(s).
Can view aggregate reports for the selected clinic(s).
Clerical Administrative Selected Agency Selected Clinic(s)
Assignment for most administrative staff at selected clinic(s).
Can add/edit all client information at the selected clinic(s).
Can administer/review questionnaires for all clients at the selected clinic(s).
Can review clinician/client reports for all clients at the selected clinic(s).
Can view aggregate reports for the selected clinic(s).
Can edit questionnaire data for all clients in the selected clinic(s).
Corporate Executive Selected Agency Selected Clinic(s)
Assignment for most clinical managers.
Can view information on all clients at the selected clinic(s).
Can administer/review questionnaires for all clients at the selected clinic(s).
Can review clinician/client reports for all clients at the selected clinic(s).
Can view aggregate reports for the selected clinic(s).
© 2007, Lanark Systems Page 10
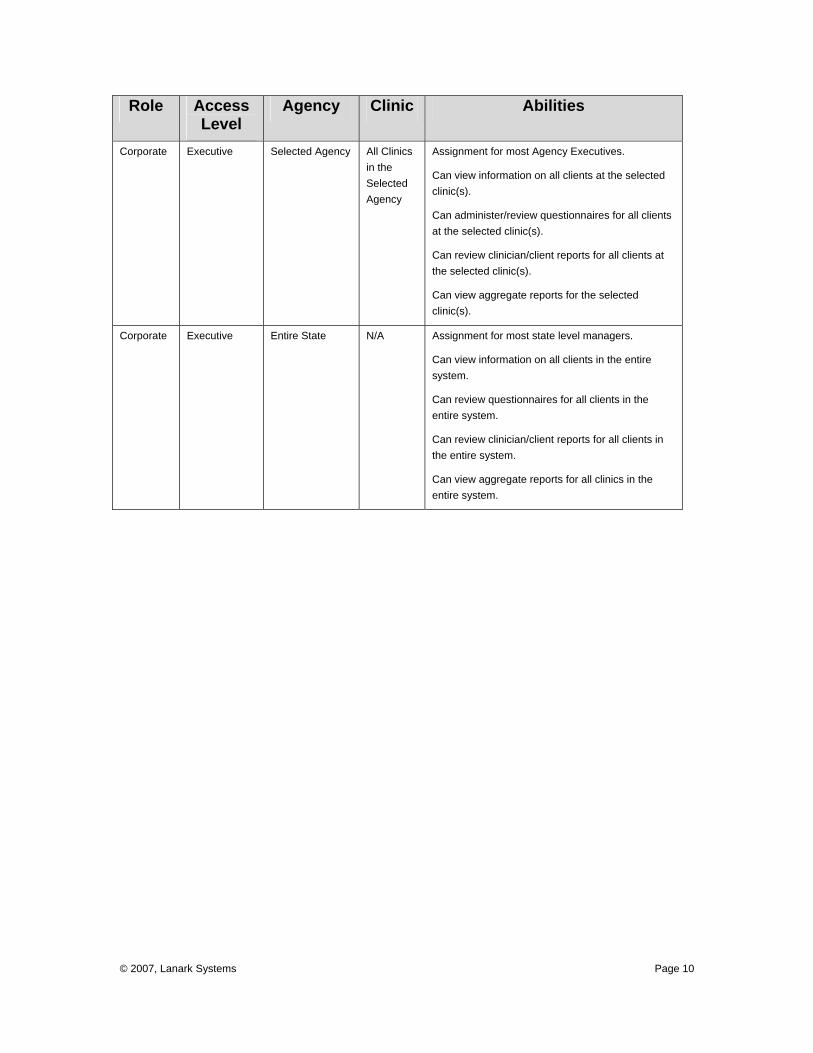
Role Access Level
Agency Clinic Abilities
Corporate Executive Selected Agency All Clinics in the Selected Agency
Assignment for most Agency Executives.
Can view information on all clients at the selected clinic(s).
Can administer/review questionnaires for all clients at the selected clinic(s).
Can review clinician/client reports for all clients at the selected clinic(s).
Can view aggregate reports for the selected clinic(s).
Corporate Executive Entire State N/A Assignment for most state level managers.
Can view information on all clients in the entire system.
Can review questionnaires for all clients in the entire system.
Can review clinician/client reports for all clients in the entire system.
Can view aggregate reports for all clinics in the entire system.

© 2007, Lanark Systems Page 11
The following table lists the options for system administrators at multiple levels of the system:
Agency Clinic Abilities State Level N/A OQ Measures’ administrator has full permissions throughout the
system and performs the following for the State and its agencies.
• View/add/edit all clinics for the entire system
• View all reports for the entire system
• Add/edit Agencies
• Add/edit settings of care
• Add/edit diagnosis
Selected Agency All Clinics in the selected agency
Agency Administrator with full permissions throughout the entire agency.
• View/edit all client records for the agency
• View/edit all employee records for the agency
• View all reports for the agency
Selected Agency Multi-clinic Administrator with full permissions over a group of clinics in an agency.
• View/edit all client records for the selected clinics
• View/edit all employee records for the selected clinics
• View all reports for the selected clinics
Selected Agency Single Clinic Administrator with full permissions over a single clinic only.
• View/edit all client records for the selected clinic
• View/edit all employee records for the selected clinic
• View all reports for the selected clinic
ACCESSING OQ®-A
How to access OQ®-A 1. Logon to a computer with an internet connection. 2. Open an Internet Explorer window and go to solution URL 3. Type in your user name in the User Name field. 4. Type in your password in the Password field.
Note: If you have forgotten your password, contact your clinic’s OQ®-A System Administrator to have it reset.
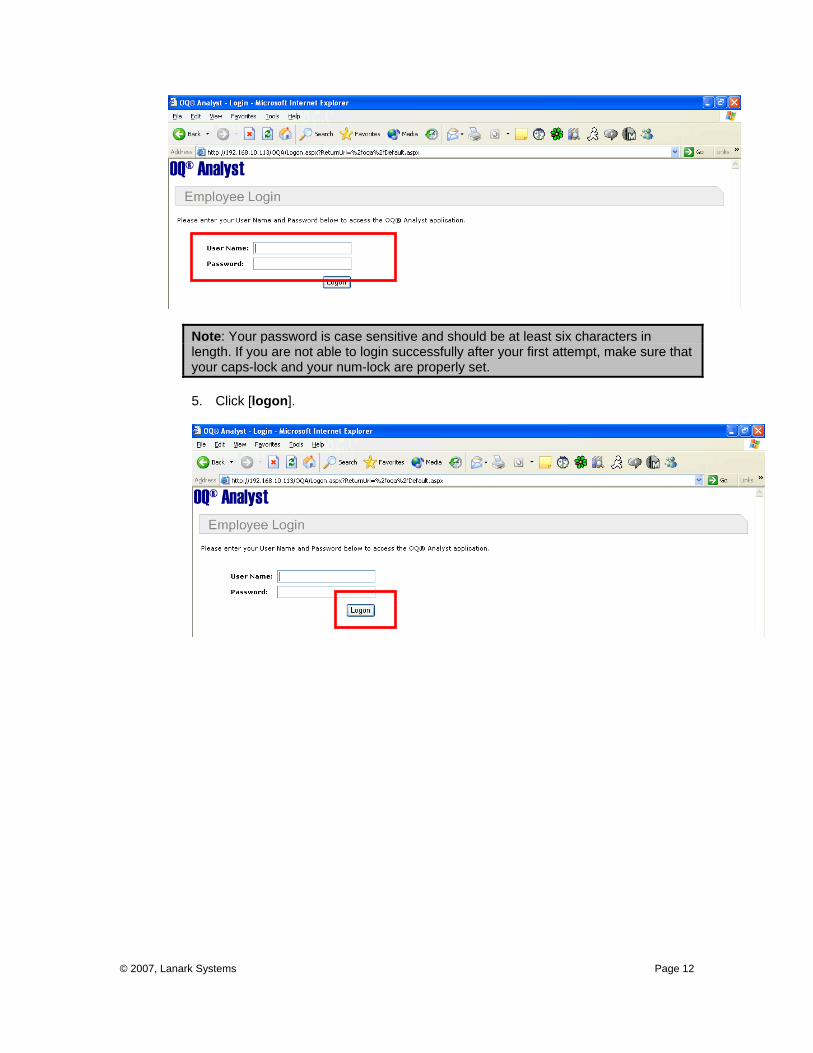
© 2007, Lanark Systems Page 12
Note: Your password is case sensitive and should be at least six characters in length. If you are not able to login successfully after your first attempt, make sure that your caps-lock and your num-lock are properly set. 5. Click [logon].

© 2007, Lanark Systems Page 13
NAVIGATING OQ®-A When you first login, OQ®-A will open to your Home page. The OQ®-A Navigation bar is located at the top of each page within the application.
1. Your current page is indicated by the blue tab.
2. Several of the pages also have sub-pages. Sub-pages, if available, are indicated on the blue bar directly below the navigation. Your current sub-page is indicated in bold lettering.

© 2007, Lanark Systems Page 14
3. To navigate between the pages, click the tab for the desired page then select the desired sub-page, if needed.
© 2007, Lanark Systems Page 15
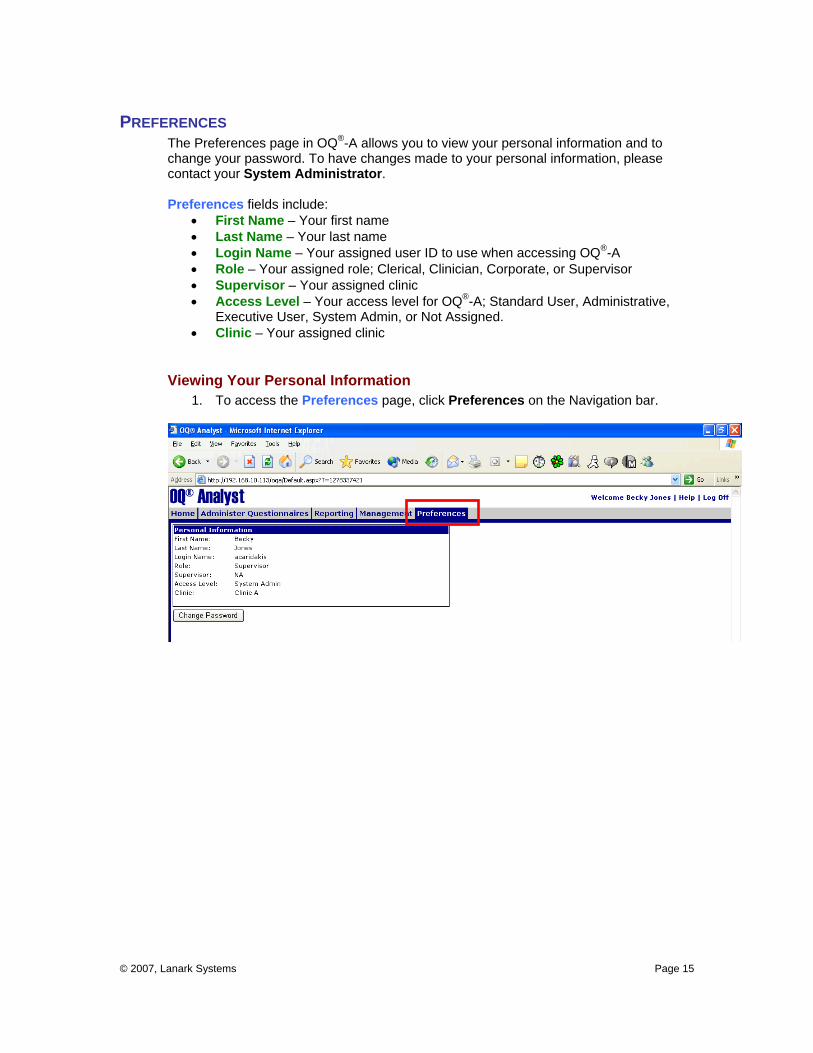
PREFERENCES The Preferences page in OQ®-A allows you to view your personal information and to change your password. To have changes made to your personal information, please contact your System Administrator. Preferences fields include:
• First Name – Your first name • Last Name – Your last name • Login Name – Your assigned user ID to use when accessing OQ®-A • Role – Your assigned role; Clerical, Clinician, Corporate, or Supervisor • Supervisor – Your assigned clinic • Access Level – Your access level for OQ®-A; Standard User, Administrative,
Executive User, System Admin, or Not Assigned. • Clinic – Your assigned clinic
Viewing Your Personal Information 1. To access the Preferences page, click Preferences on the Navigation bar.
© 2007, Lanark Systems Page 16
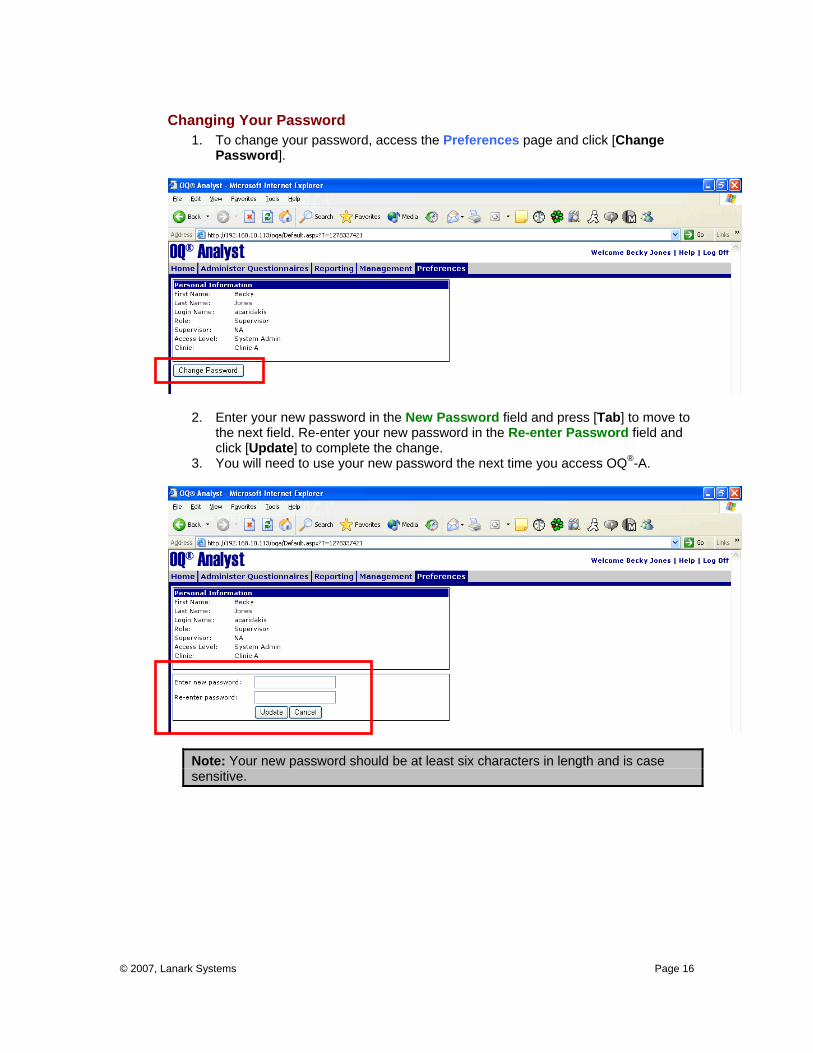
Changing Your Password 1. To change your password, access the Preferences page and click [Change
Password].
2. Enter your new password in the New Password field and press [Tab] to move to the next field. Re-enter your new password in the Re-enter Password field and click [Update] to complete the change.
3. You will need to use your new password the next time you access OQ®-A.
Note: Your new password should be at least six characters in length and is case sensitive.
© 2007, Lanark Systems Page 17
MANAGEMENT The Management page allows you to add, view and edit clinic, employee and client information. There are three sub-pages accessible from the Management page – Clients and Employees.
Note: Only those users with an Administrative or System Administrative access level will be able to access the Management page.
Employees The Employees page allows you to add, delete, view, search and edit information about clinic employees. Employees’ fields include:
• First Name * – The first name of the employee • Last Name *– The last name of the employee • Login Name * – The assigned user ID that the employee will use when
accessing OQ®-A • Password * – The default password for the employee • Re-enter * – Re-enter the default password for confirmation • Role *– Clerical, Clinician, Corporate, or Supervisor • Access Level * – Standard User, Administrative, Executive User, System Admin,
or Not Assigned • Agency * - The Agency in which the employee works • Clinic(s) * - The clinic(s) where the employee is assigned. The list of available
clinics contains only clinics in the selected agency. • Supervisor – A list of employees filtered to only those assigned the role of
Supervisor within OQ®-A * Required fields
© 2007, Lanark Systems Page 18
Note: Only those users with a System Administrative access level will be able to access the Employees page and its functions.

© 2007, Lanark Systems Page 19
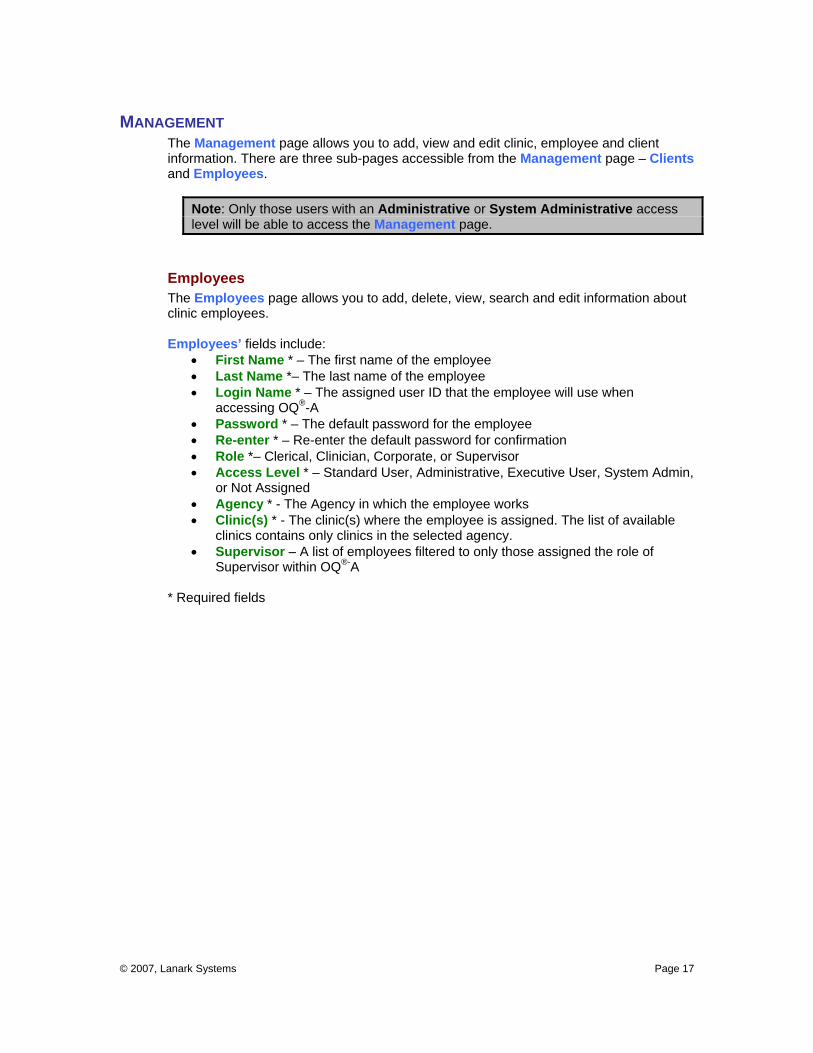
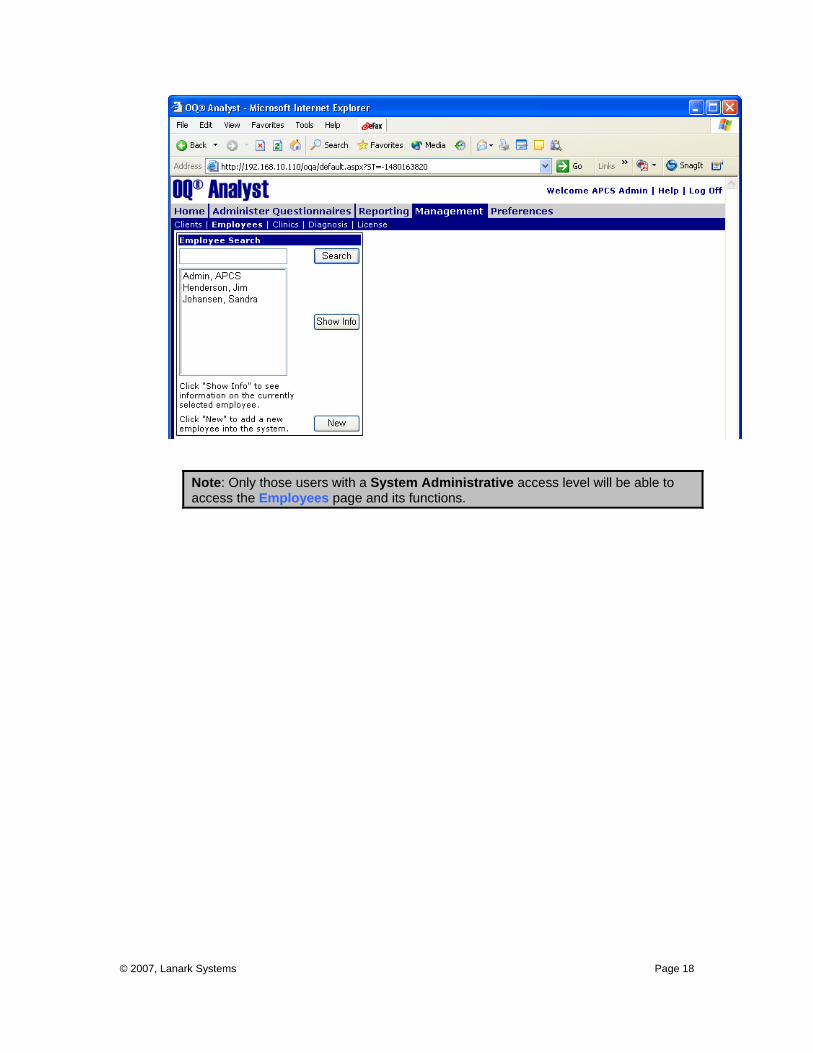
Adding Employee Information 1. Access the Management page and select Employees to be taken to the
Employees page. 2. Select [New].
Note: In order to add an employee, the clinic to which they are assigned must be added to OQ®-A first. Please see the ADDING A CLINIC section.
© 2007, Lanark Systems Page 20
3. Enter the required information for the employee in the Add Employee box and click [Add].

© 2007, Lanark Systems Page 21
Searching for an Employee 1. Access the Management page and select Employees to be taken to the
Employees page. 2. Enter the all or part of the name of the desired employee in the Employee
Search box and click [Search].
3. The information for the selected employee will now be displayed in the Employee Information box. To make changes to the employee information, please see the EDITING EMPLOYEE INFORMATION section.
© 2007, Lanark Systems Page 22

© 2007, Lanark Systems Page 23
Viewing Employee Information 1. Access the Management page and select Employees to be taken to the
Employees page. 2. Select the desired Employee Name from the listing and select [Show Info].
Note: For longer listings, you may automatically scroll through the list by highlighting the first employee name and typing the last name of your desired employee. The selector bar will move through the listing to your desired employee name as you type the letters.
© 2007, Lanark Systems Page 24
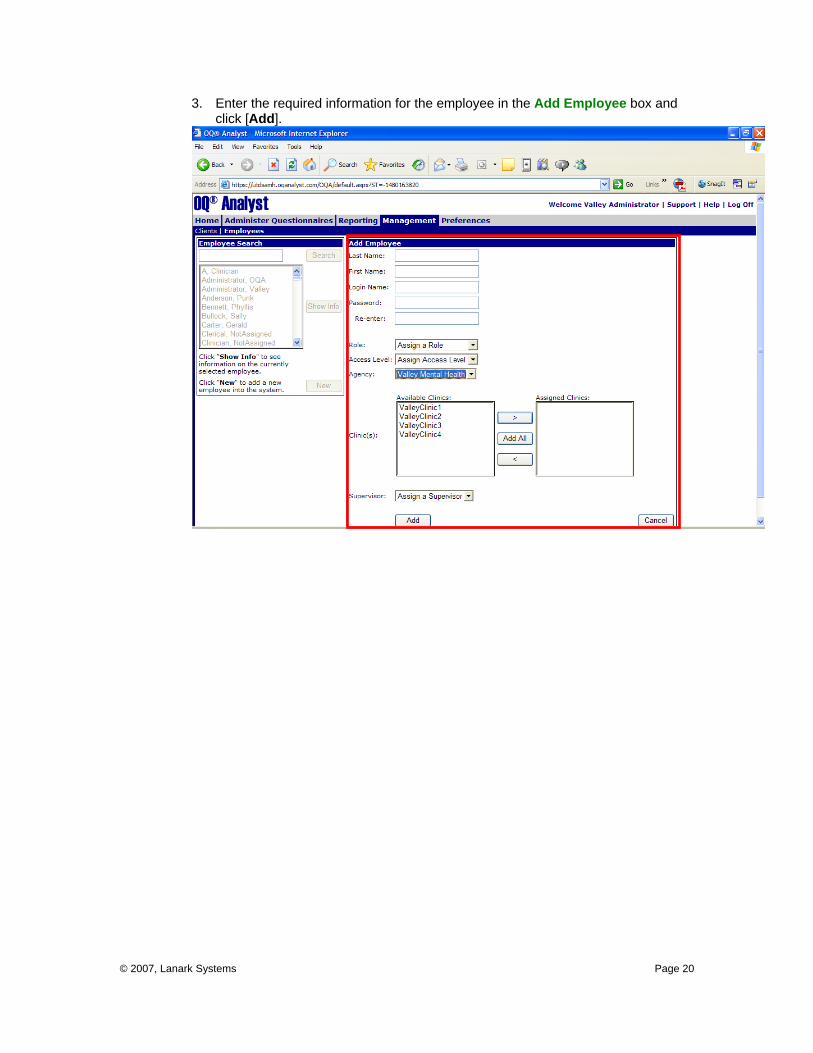
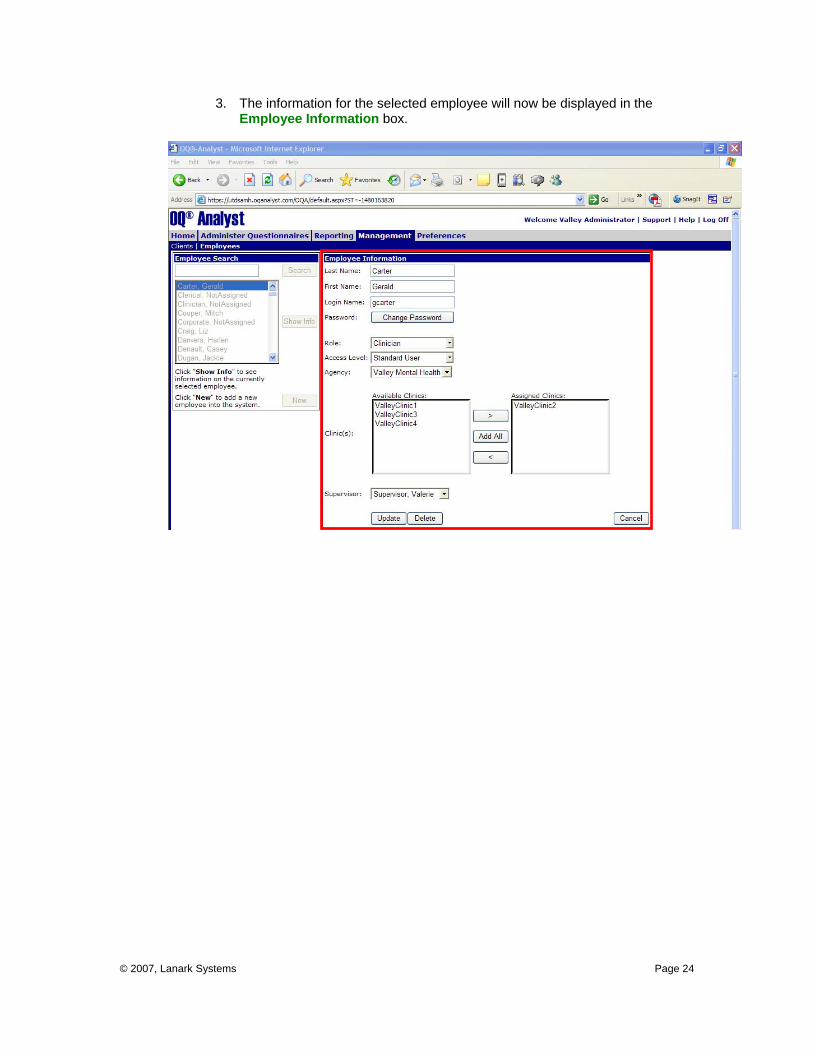
3. The information for the selected employee will now be displayed in the Employee Information box.
© 2007, Lanark Systems Page 25
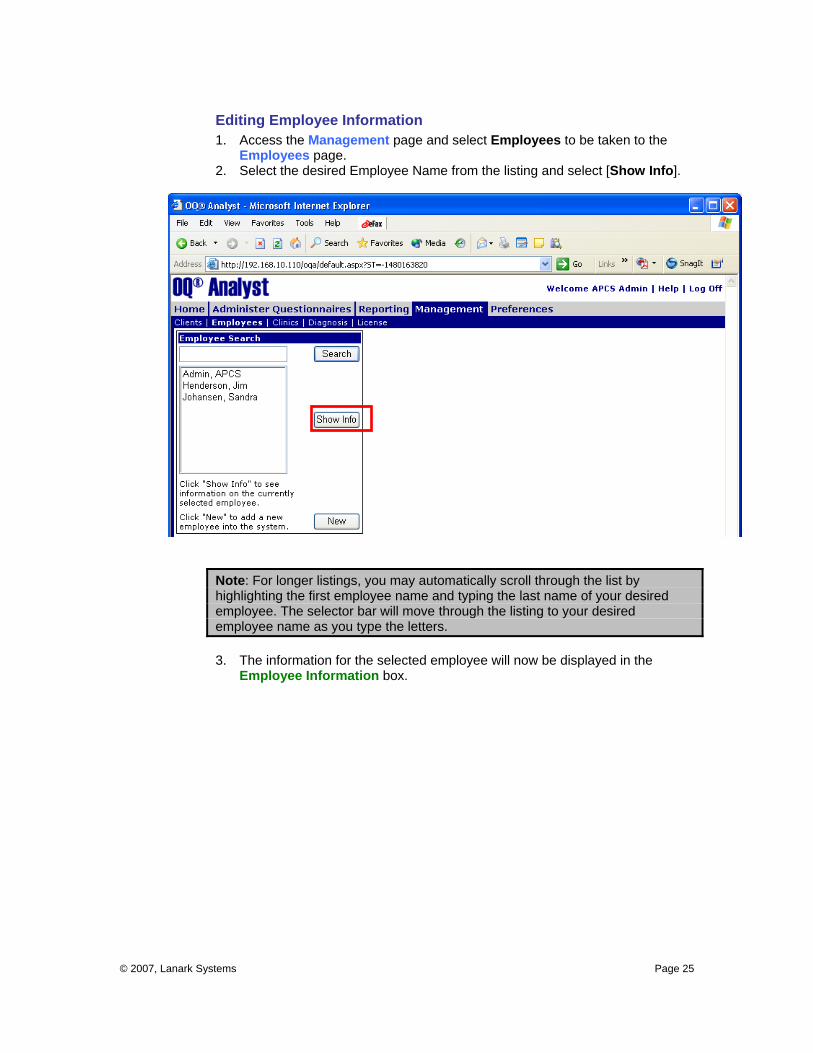
Editing Employee Information 1. Access the Management page and select Employees to be taken to the
Employees page. 2. Select the desired Employee Name from the listing and select [Show Info].
Note: For longer listings, you may automatically scroll through the list by highlighting the first employee name and typing the last name of your desired employee. The selector bar will move through the listing to your desired employee name as you type the letters.
3. The information for the selected employee will now be displayed in the
Employee Information box.
© 2007, Lanark Systems Page 26
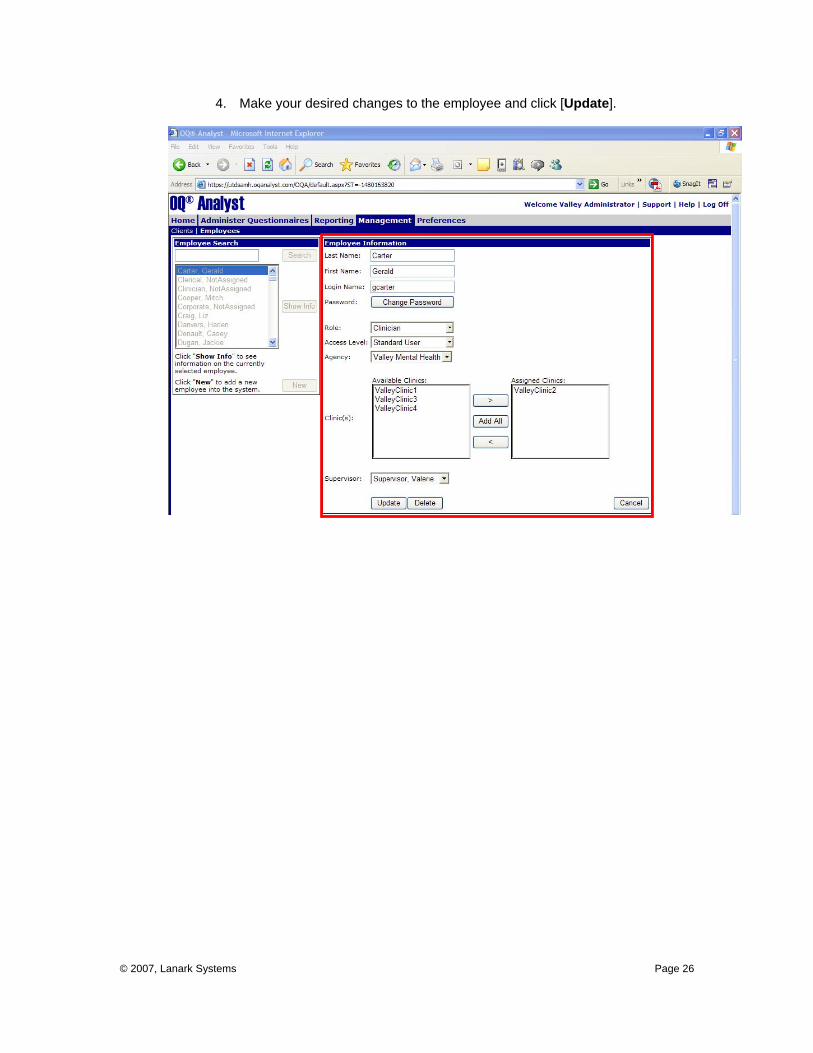
4. Make your desired changes to the employee and click [Update].
© 2007, Lanark Systems Page 27
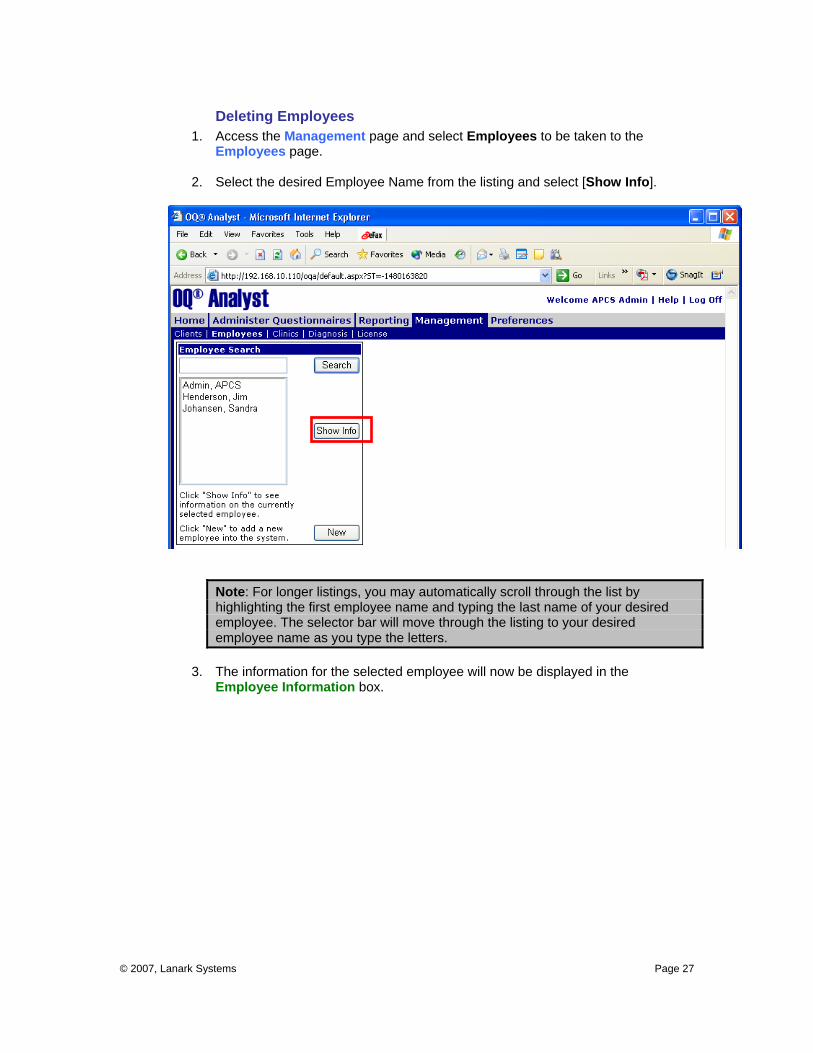
Deleting Employees 1. Access the Management page and select Employees to be taken to the
Employees page.
2. Select the desired Employee Name from the listing and select [Show Info].
Note: For longer listings, you may automatically scroll through the list by highlighting the first employee name and typing the last name of your desired employee. The selector bar will move through the listing to your desired employee name as you type the letters.
3. The information for the selected employee will now be displayed in the
Employee Information box.
© 2007, Lanark Systems Page 28
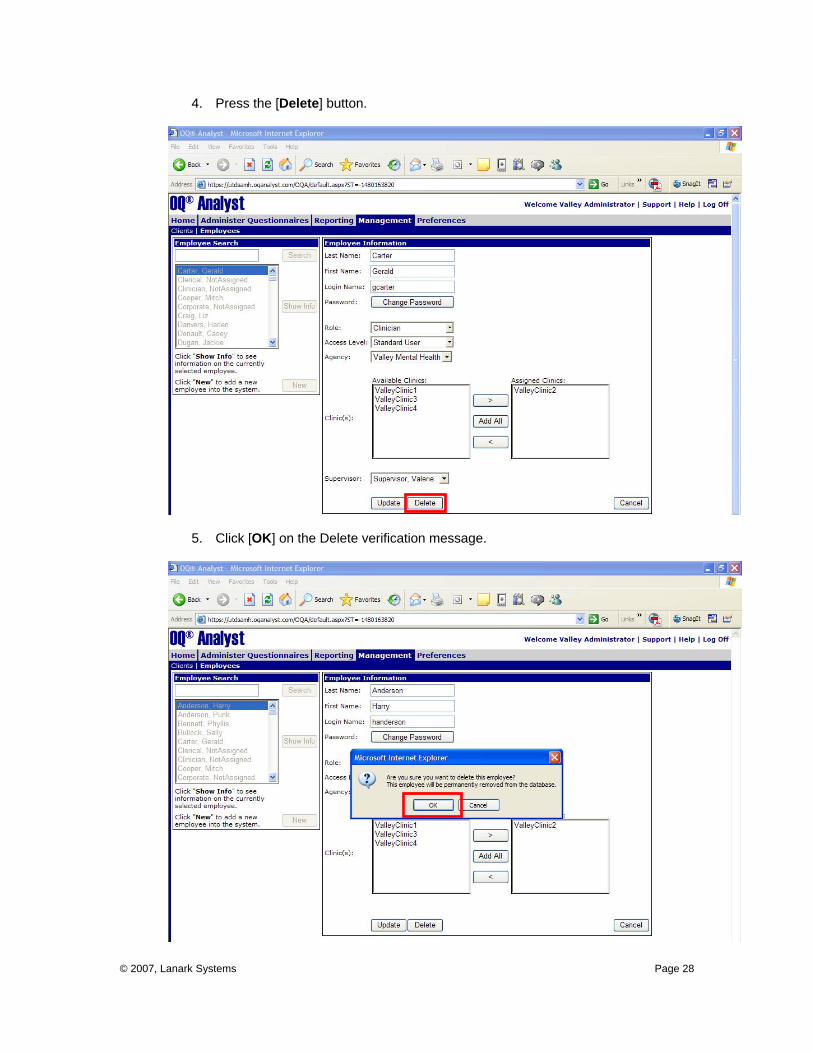
4. Press the [Delete] button.
5. Click [OK] on the Delete verification message.
© 2007, Lanark Systems Page 29
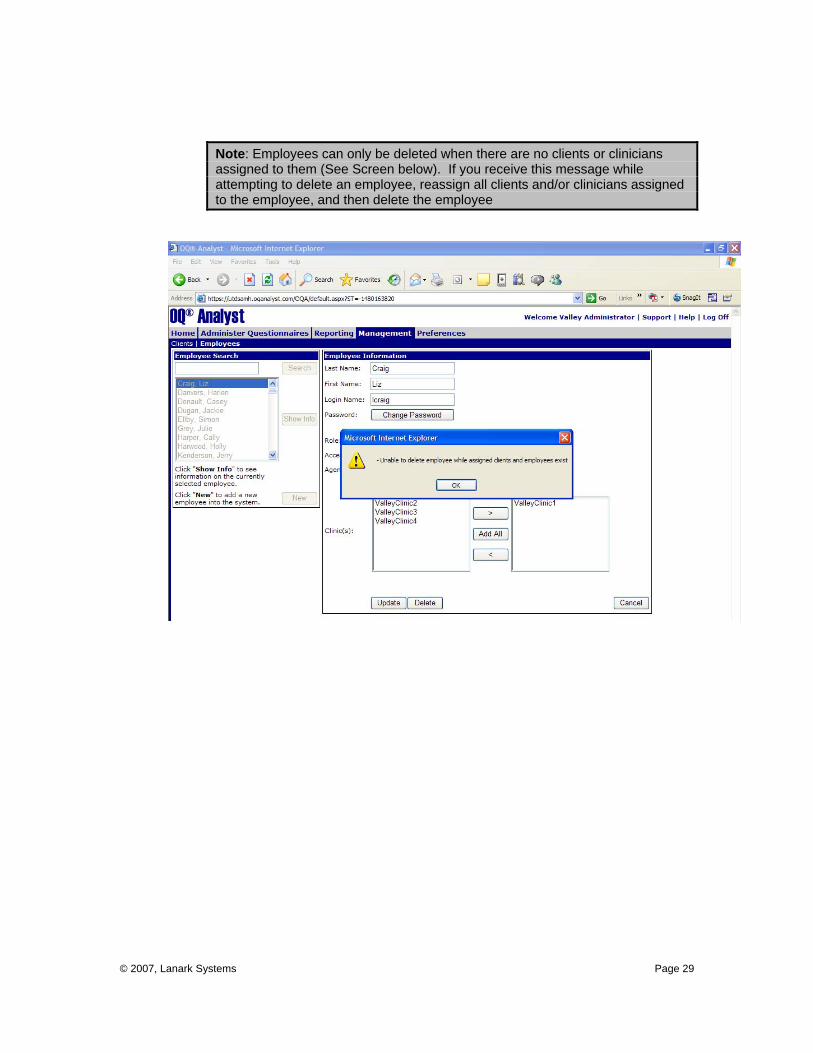
Note: Employees can only be deleted when there are no clients or clinicians assigned to them (See Screen below). If you receive this message while attempting to delete an employee, reassign all clients and/or clinicians assigned to the employee, and then delete the employee

© 2007, Lanark Systems Page 30
Clients The Clients page allows you to add, inactivate, view, search and edit information about persons receiving treatment. Clients’ fields include:
• First Name * – The first name of the client • Middle Name – The middle name of the client, used to distinguish between
clients with similar names • Last Name *– The last name of the client • Medical Record Number – A unique number up to 10 digits assigned by the
clinic for client identification; for example, the client’s social security number • Birth Date * – The client’s date of birth • Gender * – The gender of the client • Diagnosis – A listing of possible client diagnoses; this list may be customized by
the clinic • Clinic * – The clinic to which the client is assigned • Clinician* – The clinician to which the client is assigned; this listing is filtered to
only those employees with a Clinician or Supervisor role who are assigned to the client’s clinic
• Default Instrument* – The Primary Instrument being used in treating this client • Secondary Clinicians – Clinicians who are participating in the treatment of this
client; this listing is filtered to only those employees with a Clinician or Supervisor role who are assigned to the client’s clinic
* Required fields
Note: There may be instances of clients with similar names. For example, John P. Smith and John H. Smith. The Medical Record # and Birth Date fields are unique identifiers used to ensure the correct client has been selected.

© 2007, Lanark Systems Page 31
Note: Only those users with an Administrative or System Administrative access level will be able to access the Clients page and its functions.
© 2007, Lanark Systems Page 32
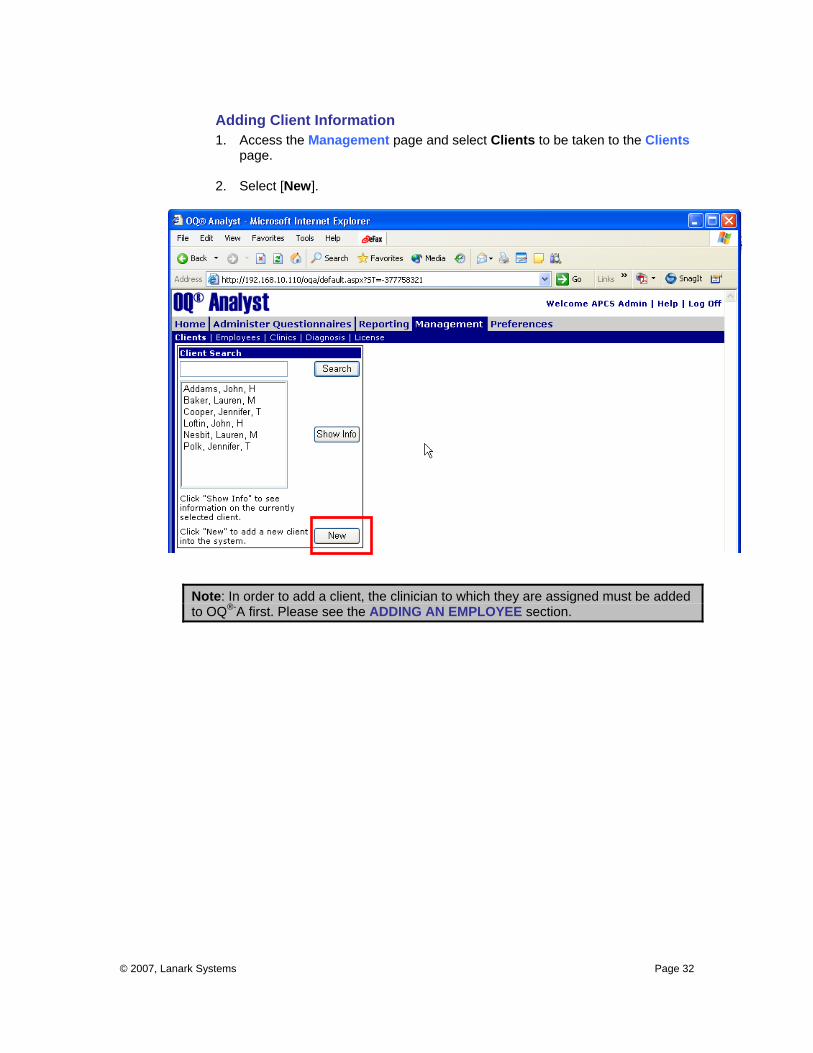
Adding Client Information 1. Access the Management page and select Clients to be taken to the Clients
page.
2. Select [New].
Note: In order to add a client, the clinician to which they are assigned must be added to OQ®-A first. Please see the ADDING AN EMPLOYEE section.
© 2007, Lanark Systems Page 33
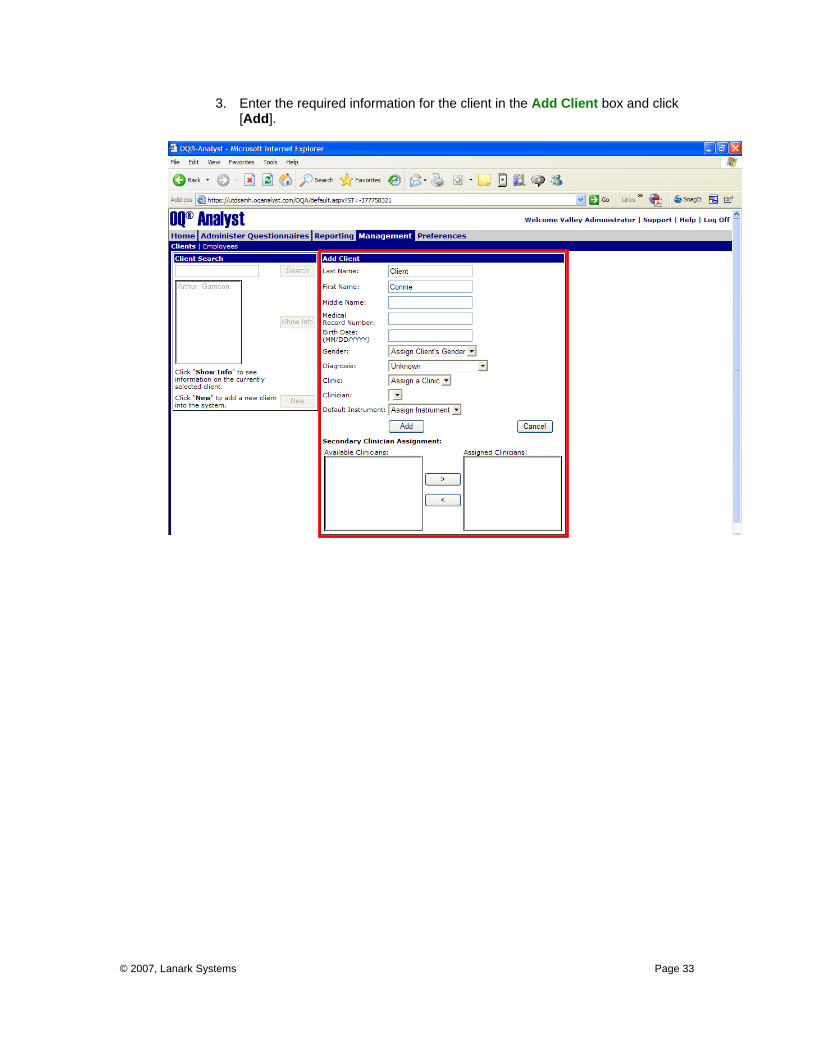
3. Enter the required information for the client in the Add Client box and click [Add].
© 2007, Lanark Systems Page 34
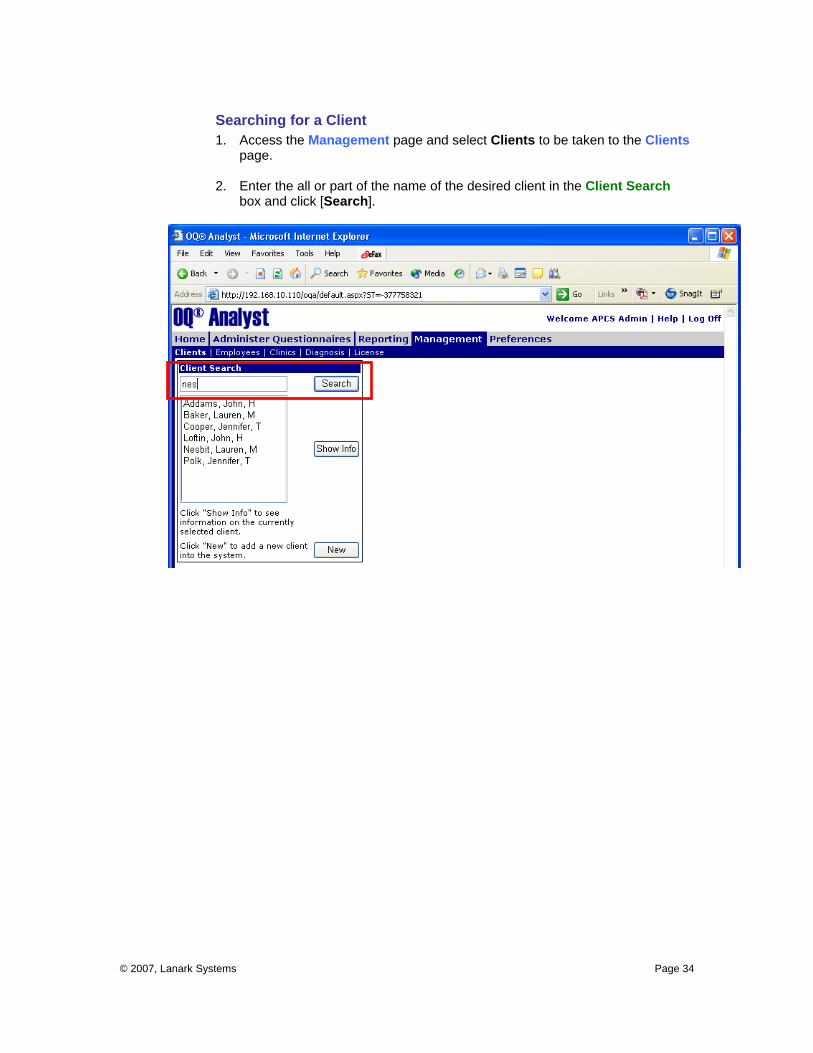
Searching for a Client 1. Access the Management page and select Clients to be taken to the Clients
page.
2. Enter the all or part of the name of the desired client in the Client Search box and click [Search].
© 2007, Lanark Systems Page 35
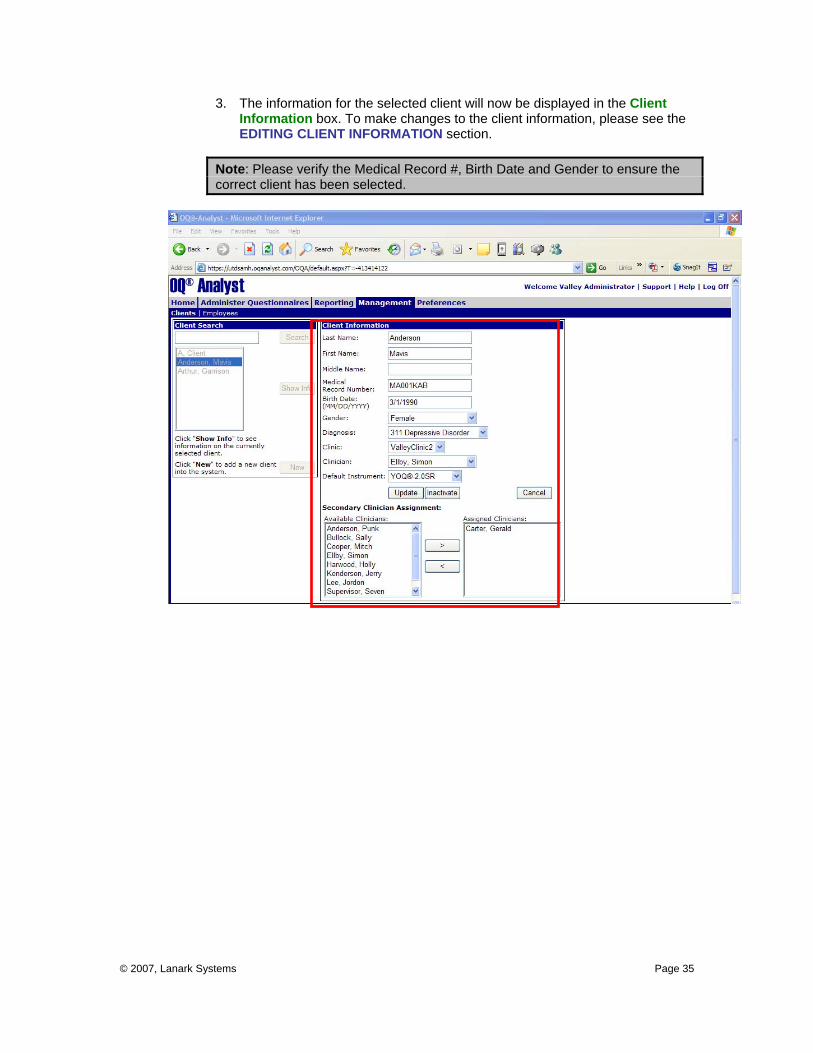
3. The information for the selected client will now be displayed in the Client Information box. To make changes to the client information, please see the EDITING CLIENT INFORMATION section.
Note: Please verify the Medical Record #, Birth Date and Gender to ensure the correct client has been selected.
© 2007, Lanark Systems Page 36
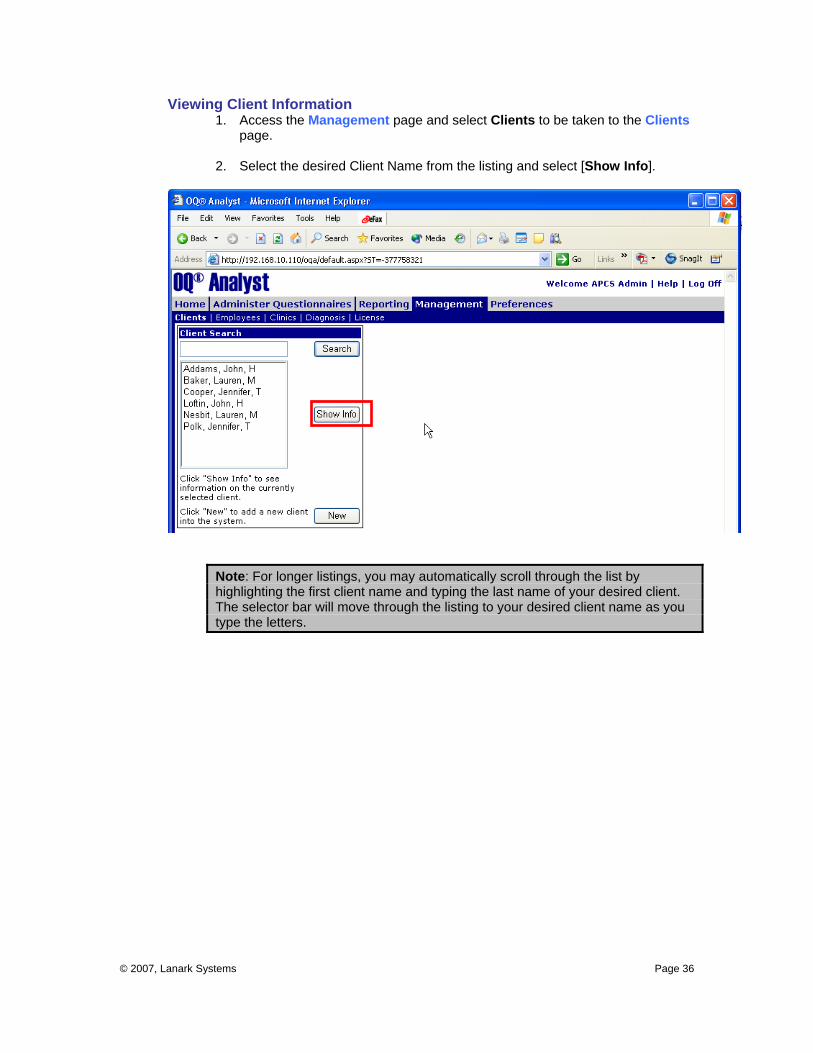
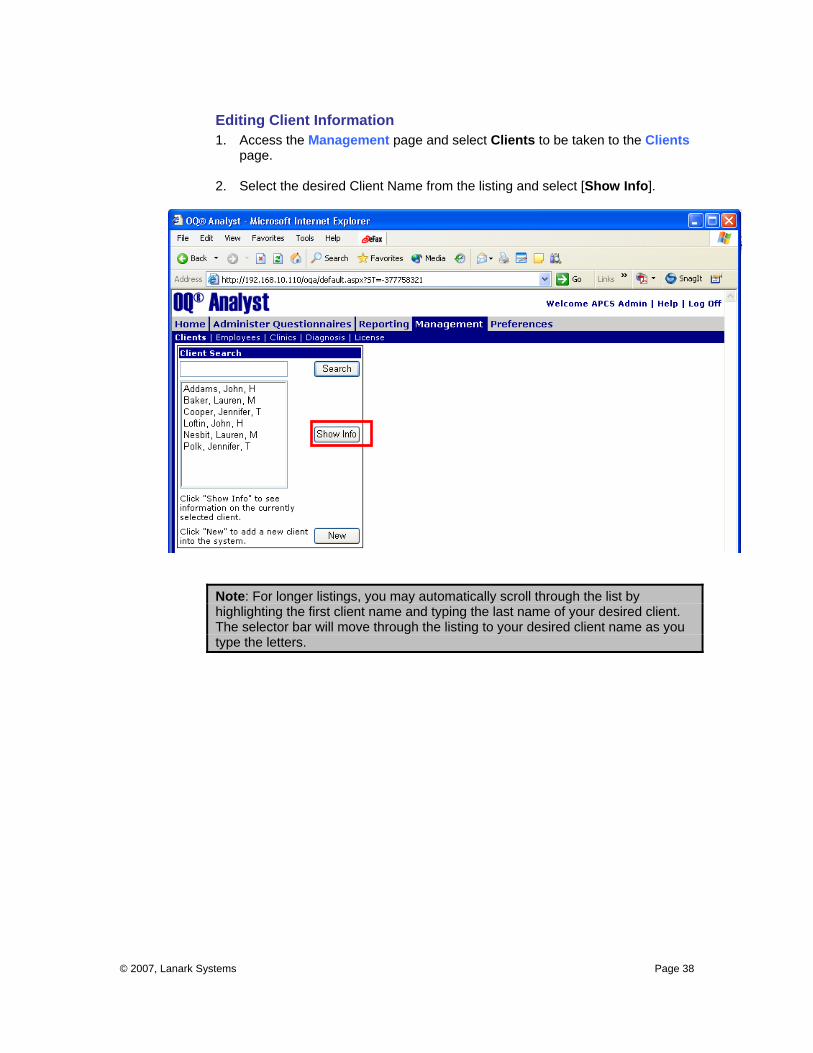
Viewing Client Information 1. Access the Management page and select Clients to be taken to the Clients
page.
2. Select the desired Client Name from the listing and select [Show Info].
Note: For longer listings, you may automatically scroll through the list by highlighting the first client name and typing the last name of your desired client. The selector bar will move through the listing to your desired client name as you type the letters.
© 2007, Lanark Systems Page 37
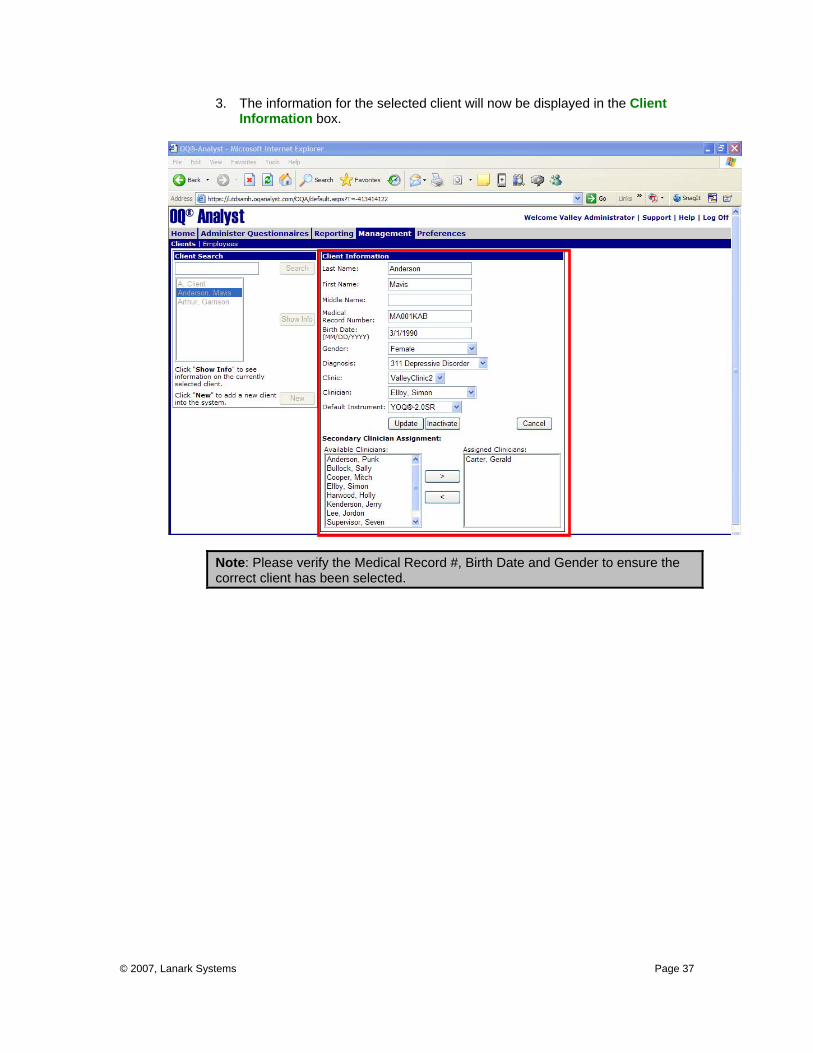
3. The information for the selected client will now be displayed in the Client Information box.
Note: Please verify the Medical Record #, Birth Date and Gender to ensure the correct client has been selected.
© 2007, Lanark Systems Page 38
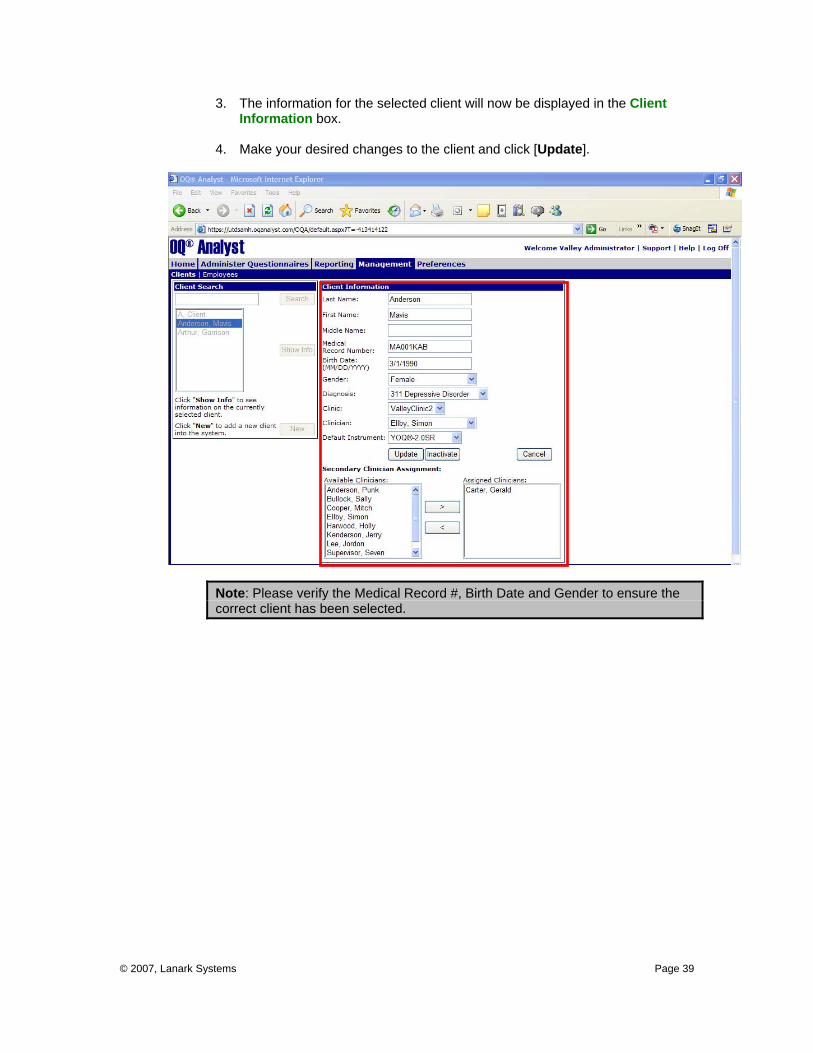
Editing Client Information 1. Access the Management page and select Clients to be taken to the Clients
page.
2. Select the desired Client Name from the listing and select [Show Info].
Note: For longer listings, you may automatically scroll through the list by highlighting the first client name and typing the last name of your desired client. The selector bar will move through the listing to your desired client name as you type the letters.
© 2007, Lanark Systems Page 39
3. The information for the selected client will now be displayed in the Client Information box.
4. Make your desired changes to the client and click [Update].
Note: Please verify the Medical Record #, Birth Date and Gender to ensure the correct client has been selected.

© 2007, Lanark Systems Page 40
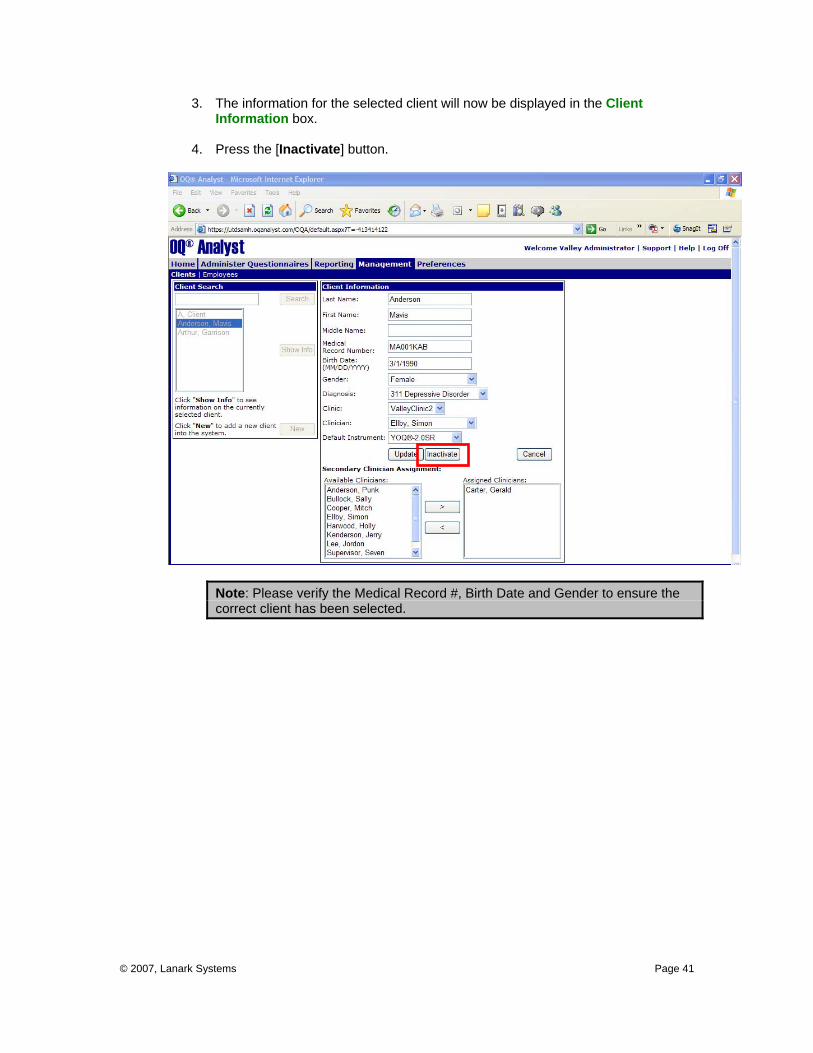
Inactivating a Client 1. Access the Management page and select Clients to be taken to the Clients
page.
2. Select the desired Client Name from the listing and select [Show Info].
Note: For longer listings, you may automatically scroll through the list by highlighting the first client name and typing the last name of your desired client. The selector bar will move through the listing to your desired client name as you type the letters.
© 2007, Lanark Systems Page 41
3. The information for the selected client will now be displayed in the Client Information box.
4. Press the [Inactivate] button.
Note: Please verify the Medical Record #, Birth Date and Gender to ensure the correct client has been selected.
© 2007, Lanark Systems Page 42
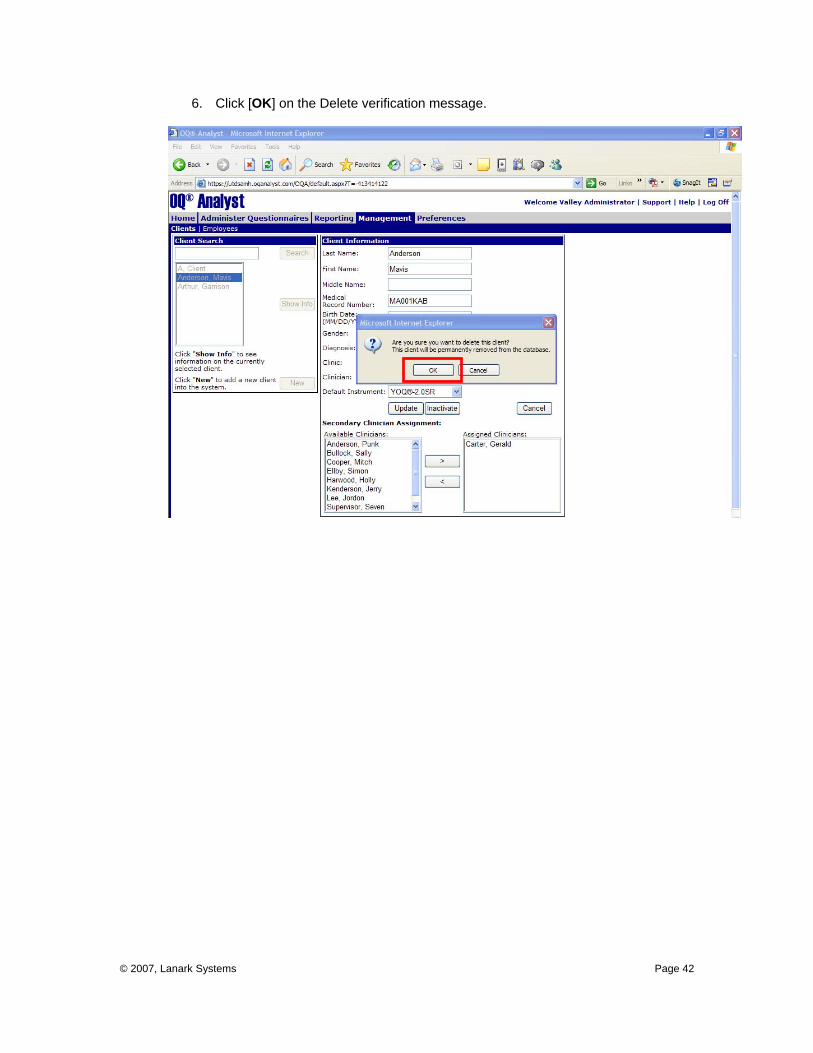
6. Click [OK] on the Delete verification message.

© 2007, Lanark Systems Page 43
ADMINISTER QUESTIONNAIRES The Administer Questionnaires page allows you to enter, review, and delete questionnaire responses, as well as generate Clinician and Client Reports. (Please see the Outcome Questionnaire Methodology document for a description of these reports). There are two subpages accessible from the Administer Questionnaires page – New Questionnaire and Review Questionnaires.
New Questionnaires Client questionnaires can be entered into OQ®-A manually, via a scanner, or by synchronizing a questionnaire taken via a PDA. Questionnaire fields include:
• Session Number – The session number during which the questionnaire was administered
• Completed By (YOQ 2.0 only) – Caseworker, Clinician, Father, Guardian, Mother or Other
• Date – The date the questionnaire was administered. This field will automatically default date to the current date.
• Clinic – Clinic where the questionnaire was administered. • Setting of Care – Setting where the questionnaire was administered. • Inpatient/Outpatient – Patient’s status when the questionnaire was
administered.
© 2007, Lanark Systems Page 44
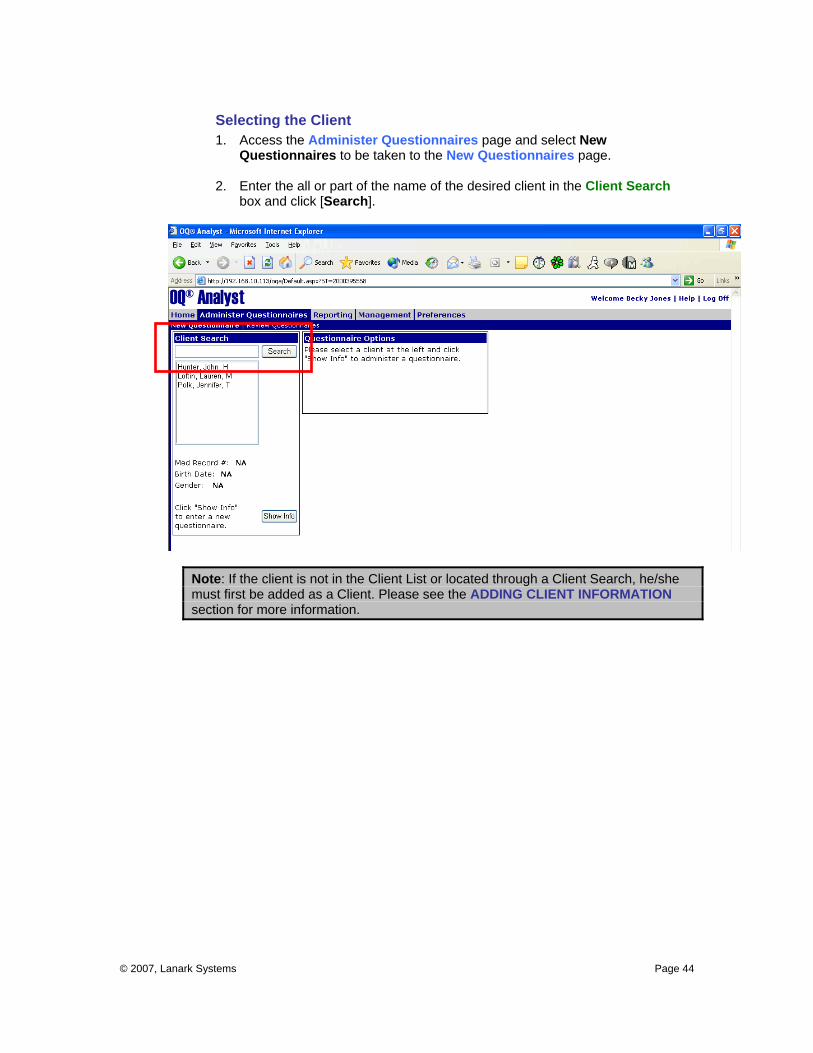
Selecting the Client 1. Access the Administer Questionnaires page and select New
Questionnaires to be taken to the New Questionnaires page.
2. Enter the all or part of the name of the desired client in the Client Search box and click [Search].
Note: If the client is not in the Client List or located through a Client Search, he/she must first be added as a Client. Please see the ADDING CLIENT INFORMATION section for more information.
© 2007, Lanark Systems Page 45
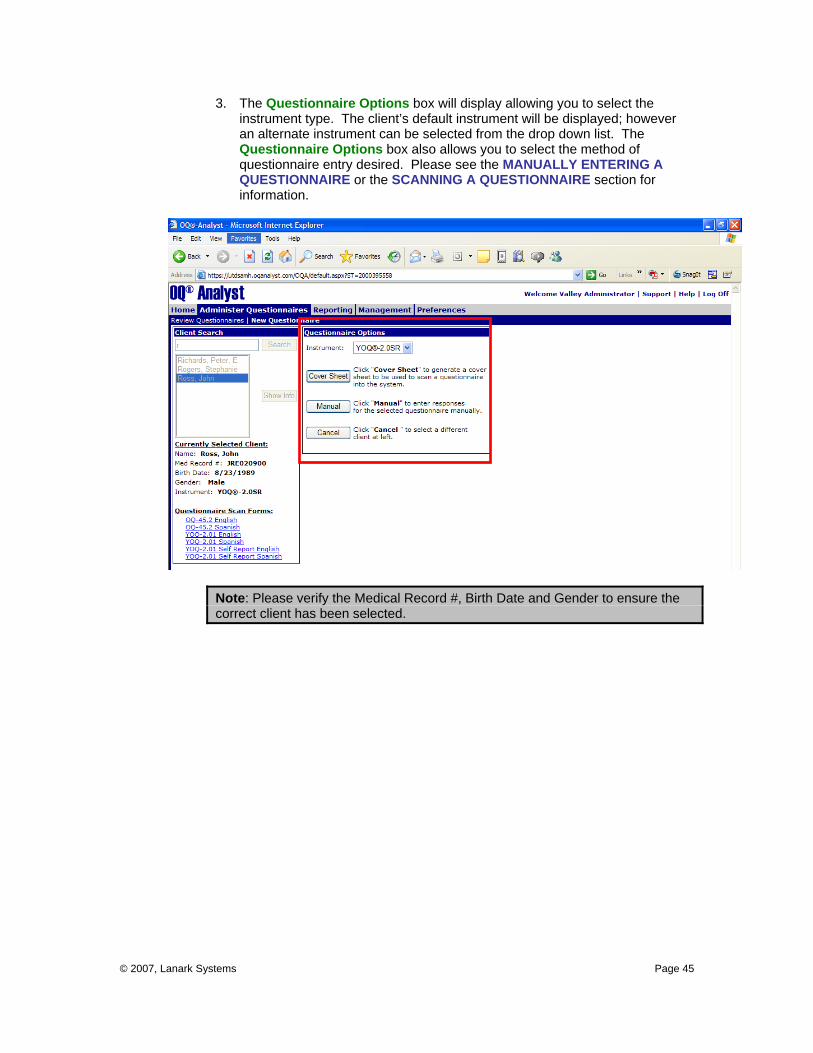
3. The Questionnaire Options box will display allowing you to select the instrument type. The client’s default instrument will be displayed; however an alternate instrument can be selected from the drop down list. The Questionnaire Options box also allows you to select the method of questionnaire entry desired. Please see the MANUALLY ENTERING A QUESTIONNAIRE or the SCANNING A QUESTIONNAIRE section for information.
Note: Please verify the Medical Record #, Birth Date and Gender to ensure the correct client has been selected.
© 2007, Lanark Systems Page 46
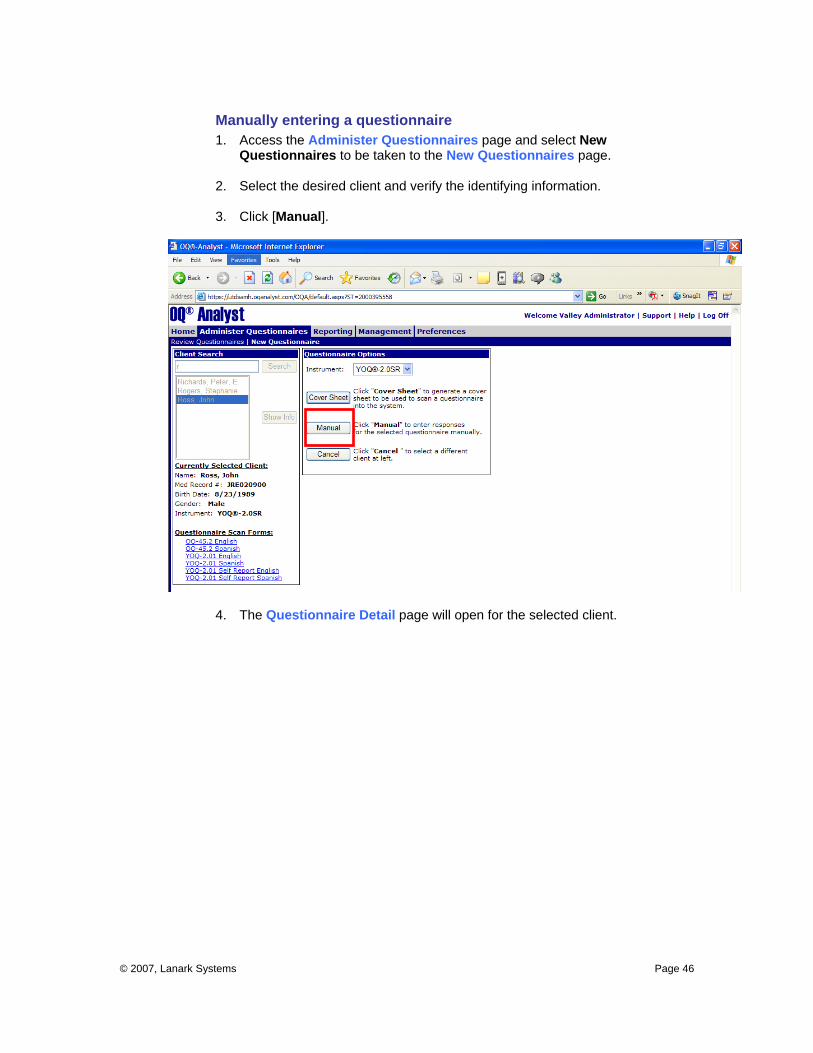
Manually entering a questionnaire 1. Access the Administer Questionnaires page and select New
Questionnaires to be taken to the New Questionnaires page.
2. Select the desired client and verify the identifying information.
3. Click [Manual].
4. The Questionnaire Detail page will open for the selected client.
© 2007, Lanark Systems Page 47
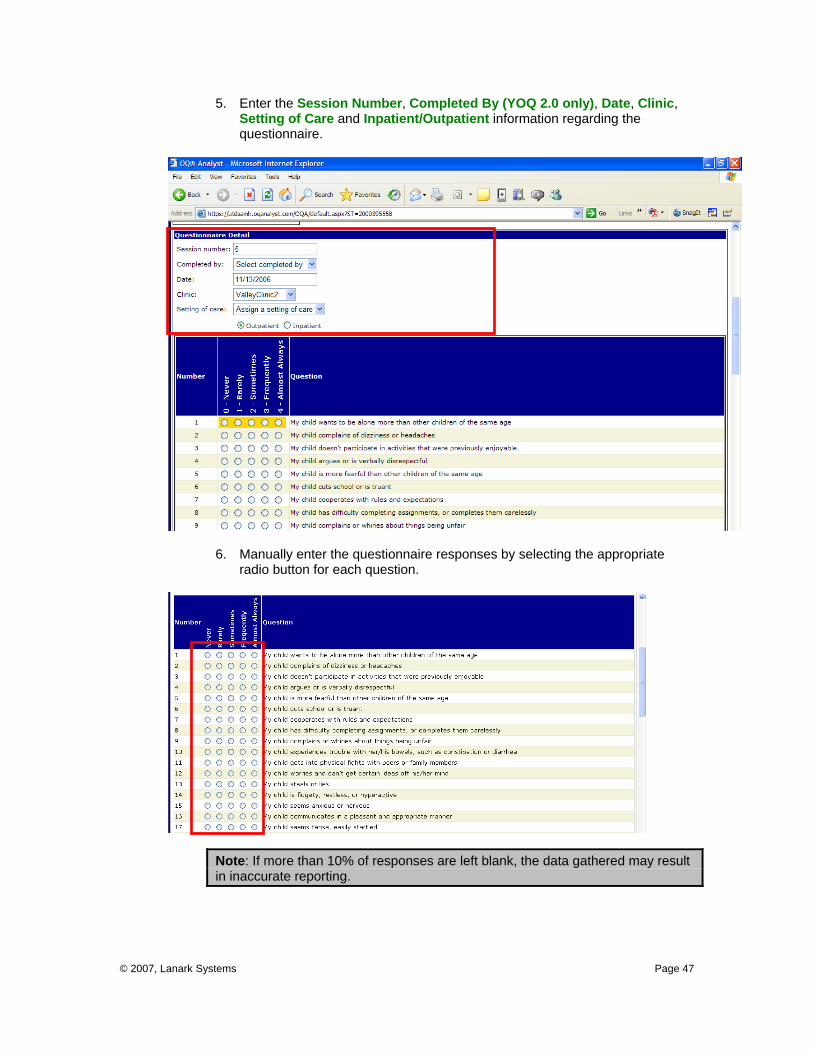
5. Enter the Session Number, Completed By (YOQ 2.0 only), Date, Clinic, Setting of Care and Inpatient/Outpatient information regarding the questionnaire.
6. Manually enter the questionnaire responses by selecting the appropriate radio button for each question.
Note: If more than 10% of responses are left blank, the data gathered may result in inaccurate reporting.
© 2007, Lanark Systems Page 48
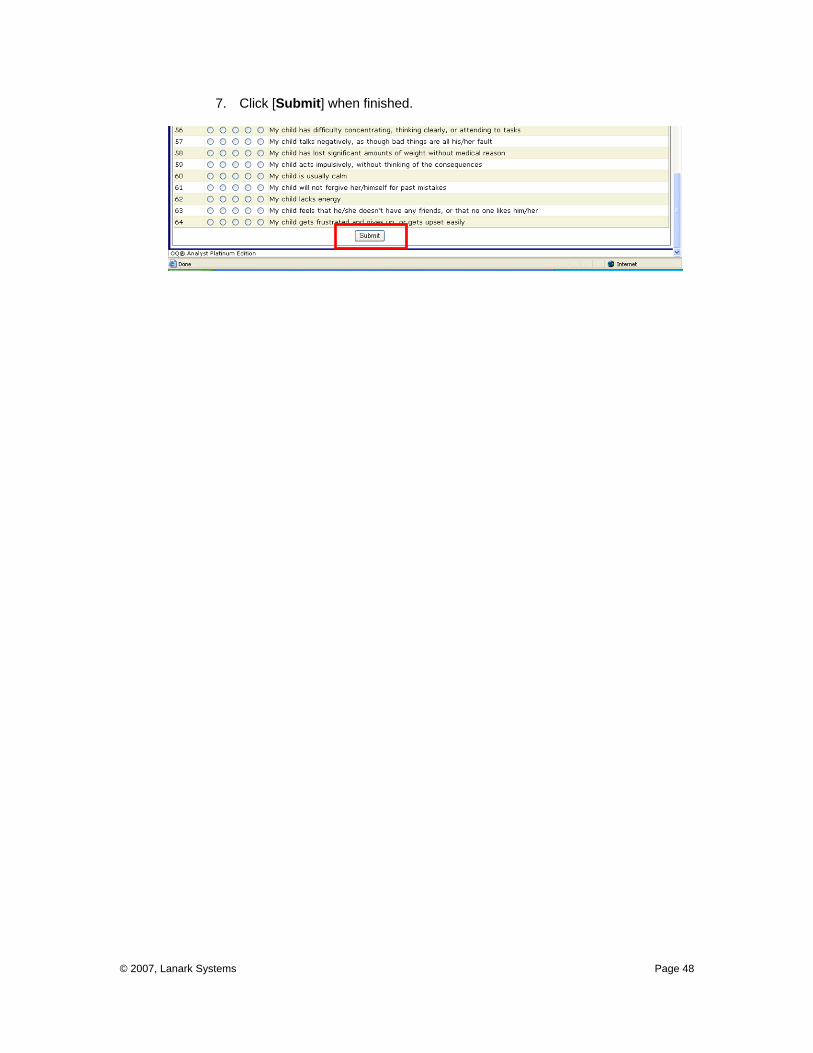
7. Click [Submit] when finished.
© 2007, Lanark Systems Page 49
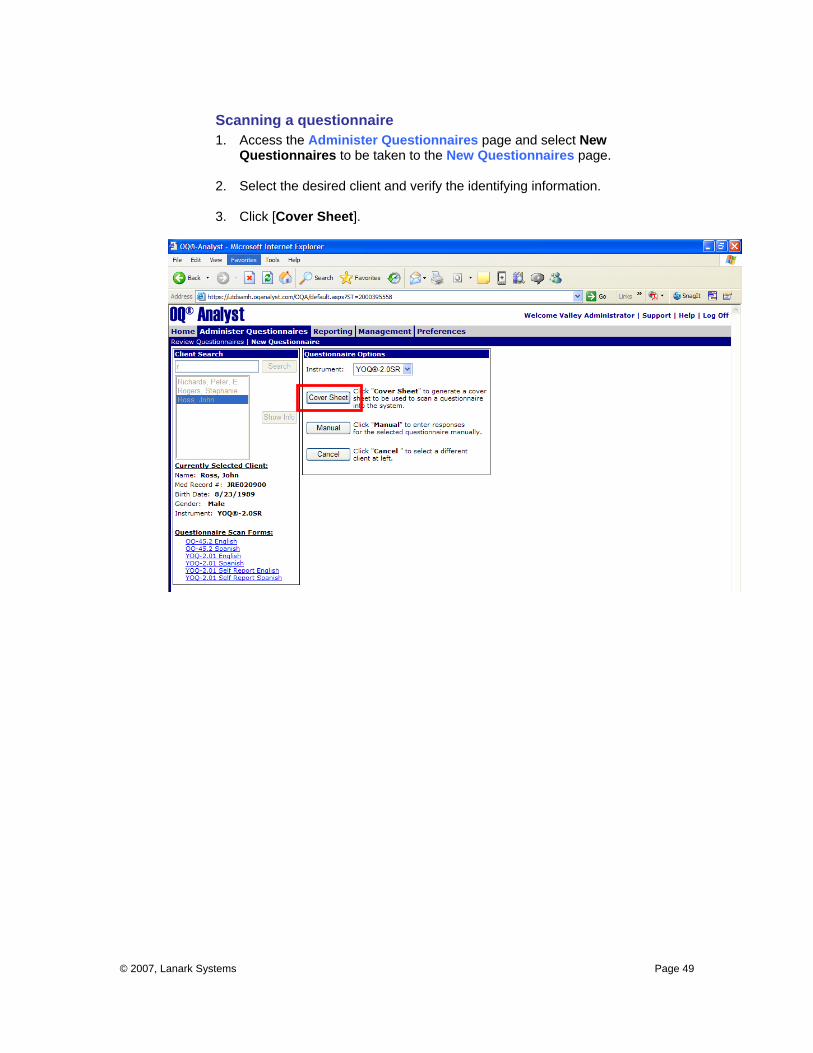
Scanning a questionnaire 1. Access the Administer Questionnaires page and select New
Questionnaires to be taken to the New Questionnaires page.
2. Select the desired client and verify the identifying information.
3. Click [Cover Sheet].
© 2007, Lanark Systems Page 50
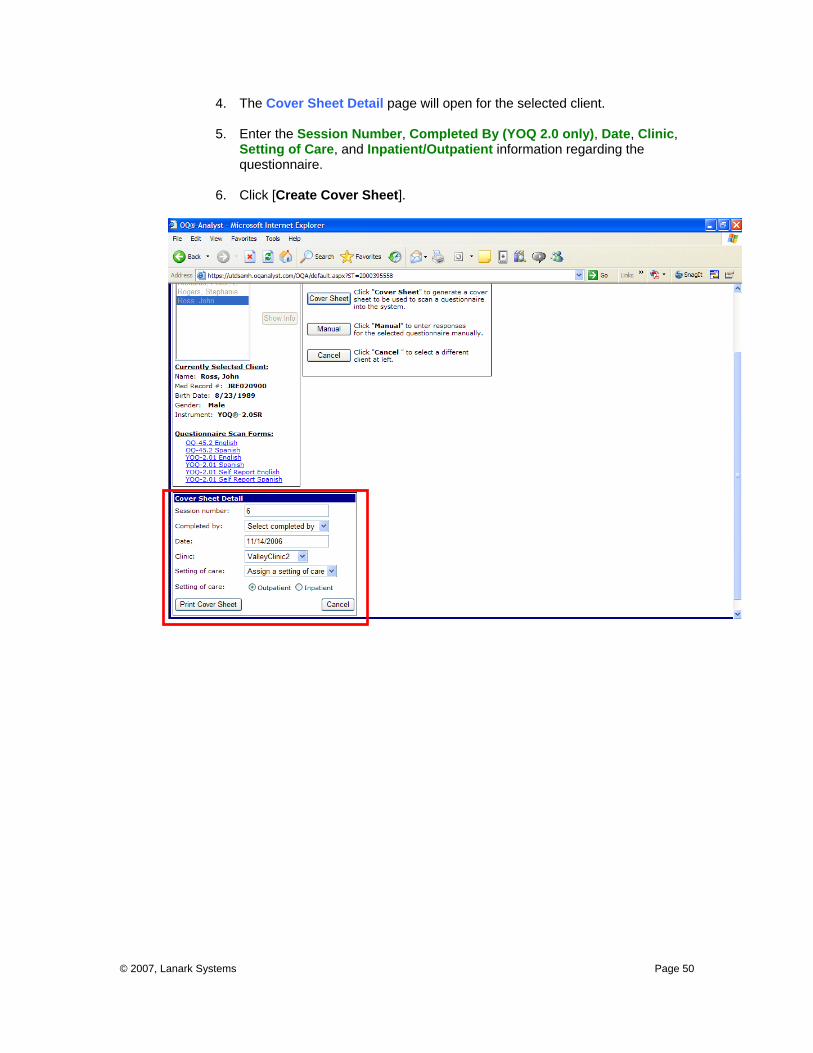
4. The Cover Sheet Detail page will open for the selected client.
5. Enter the Session Number, Completed By (YOQ 2.0 only), Date, Clinic, Setting of Care, and Inpatient/Outpatient information regarding the questionnaire.
6. Click [Create Cover Sheet].

© 2007, Lanark Systems Page 51
7. A new window will open containing a scannable cover page with bubbles filled in with the questionnaire heading information.
8. Select [File] and [Print] to print the page for scanning.
9. Place the corresponding cover sheet on top of the completed questionnaire.
Note: Multiple questionnaires may be scanned into OQ®-A at the same time. During the scanning process, the cover page must be placed directly on top of the respective questionnaire for proper capture of data.
10. Place the cover sheet(s) and completed questionnaire(s) into the scanner’s
batch feed area and initiate the scanning process.
11. When the scanning is completed, the questionnaire responses will be recorded in OQ®-A and accessible via the Review Questionnaires page for the appropriate client(s). Please see the REVIEW QUESTIONNAIRES section for more information.
© 2007, Lanark Systems Page 52
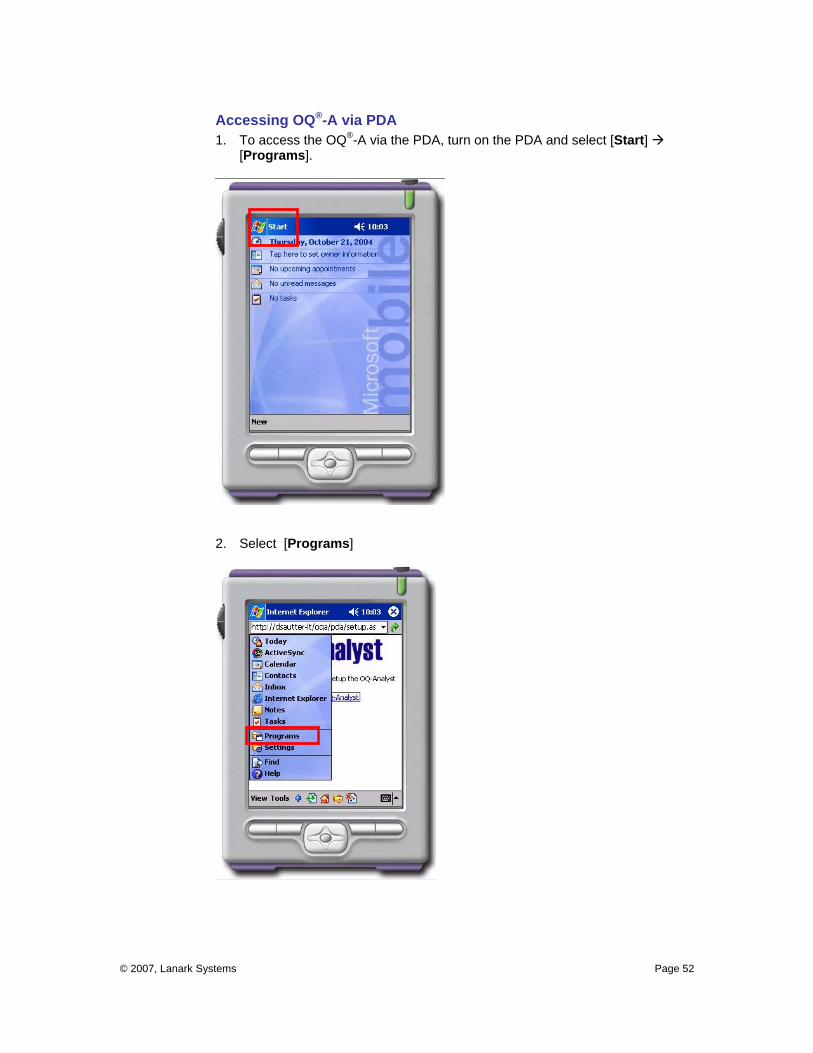
Accessing OQ®-A via PDA 1. To access the OQ®-A via the PDA, turn on the PDA and select [Start]
[Programs].
2. Select [Programs]
© 2007, Lanark Systems Page 53
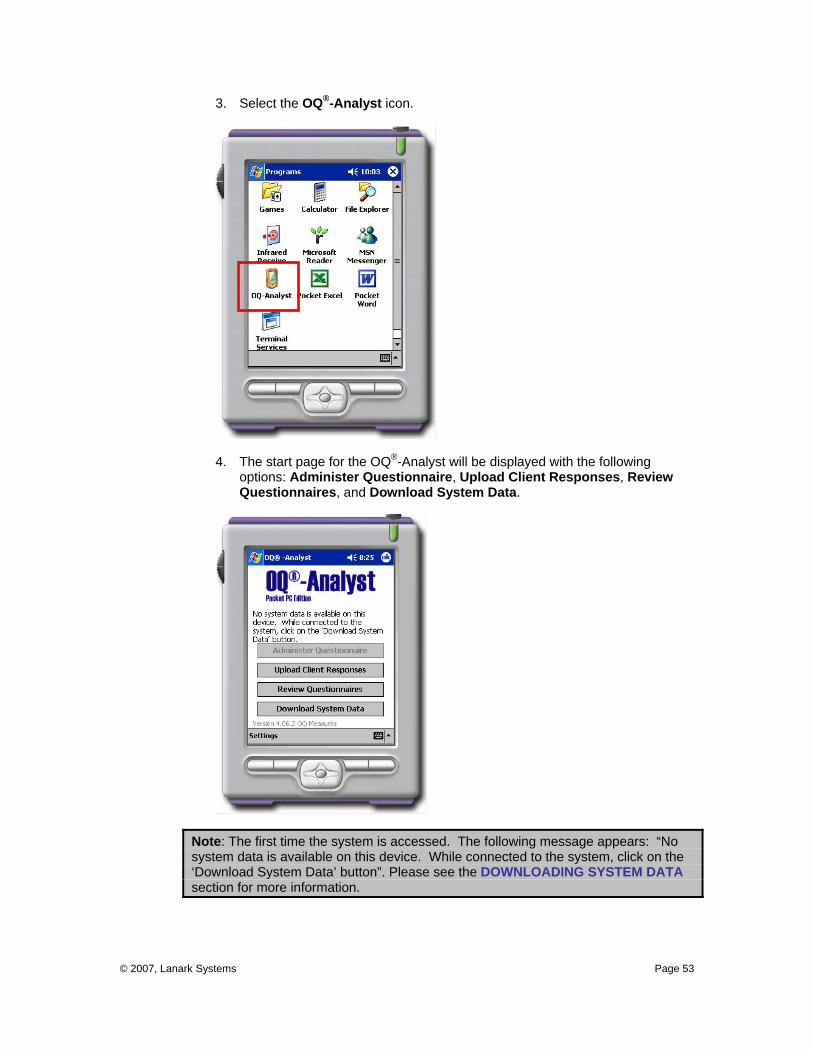
3. Select the OQ®-Analyst icon.
4. The start page for the OQ®-Analyst will be displayed with the following
options: Administer Questionnaire, Upload Client Responses, Review Questionnaires, and Download System Data.
Note: The first time the system is accessed. The following message appears: “No system data is available on this device. While connected to the system, click on the ‘Download System Data’ button”. Please see the DOWNLOADING SYSTEM DATA section for more information.
© 2007, Lanark Systems Page 54
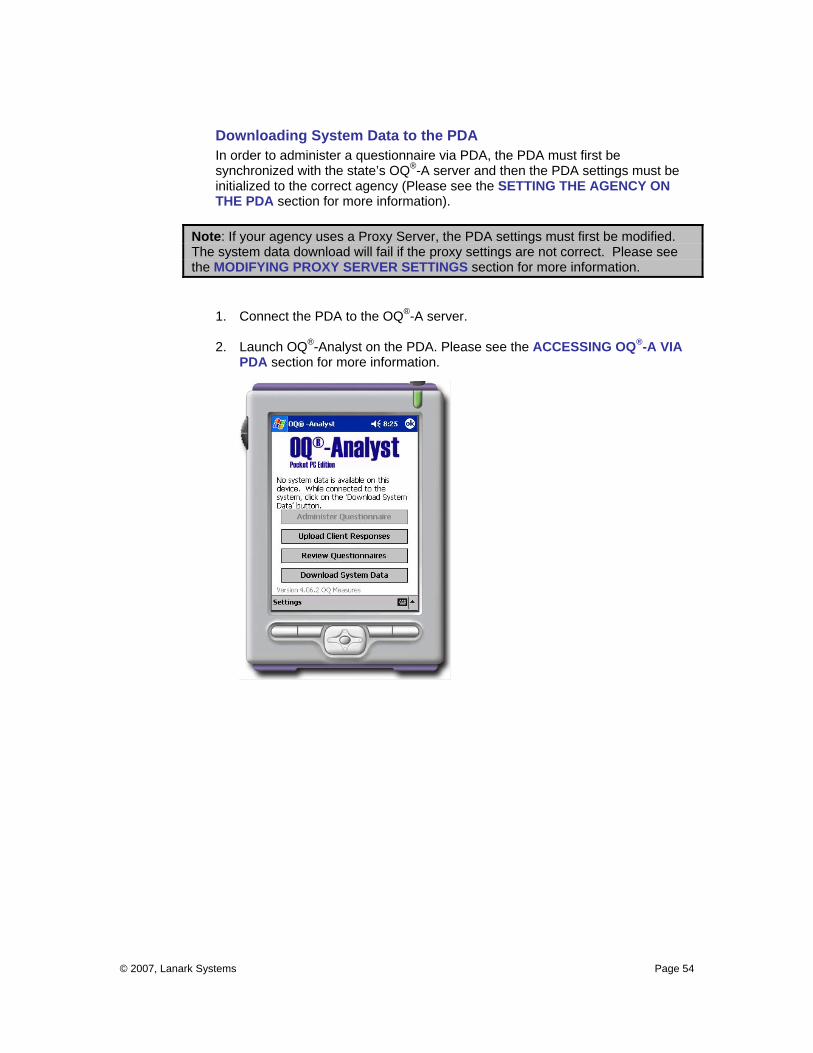
Downloading System Data to the PDA In order to administer a questionnaire via PDA, the PDA must first be synchronized with the state’s OQ®-A server and then the PDA settings must be initialized to the correct agency (Please see the SETTING THE AGENCY ON THE PDA section for more information).
Note: If your agency uses a Proxy Server, the PDA settings must first be modified. The system data download will fail if the proxy settings are not correct. Please see the MODIFYING PROXY SERVER SETTINGS section for more information.
1. Connect the PDA to the OQ®-A server.
2. Launch OQ®-Analyst on the PDA. Please see the ACCESSING OQ®-A VIA
PDA section for more information.
© 2007, Lanark Systems Page 55
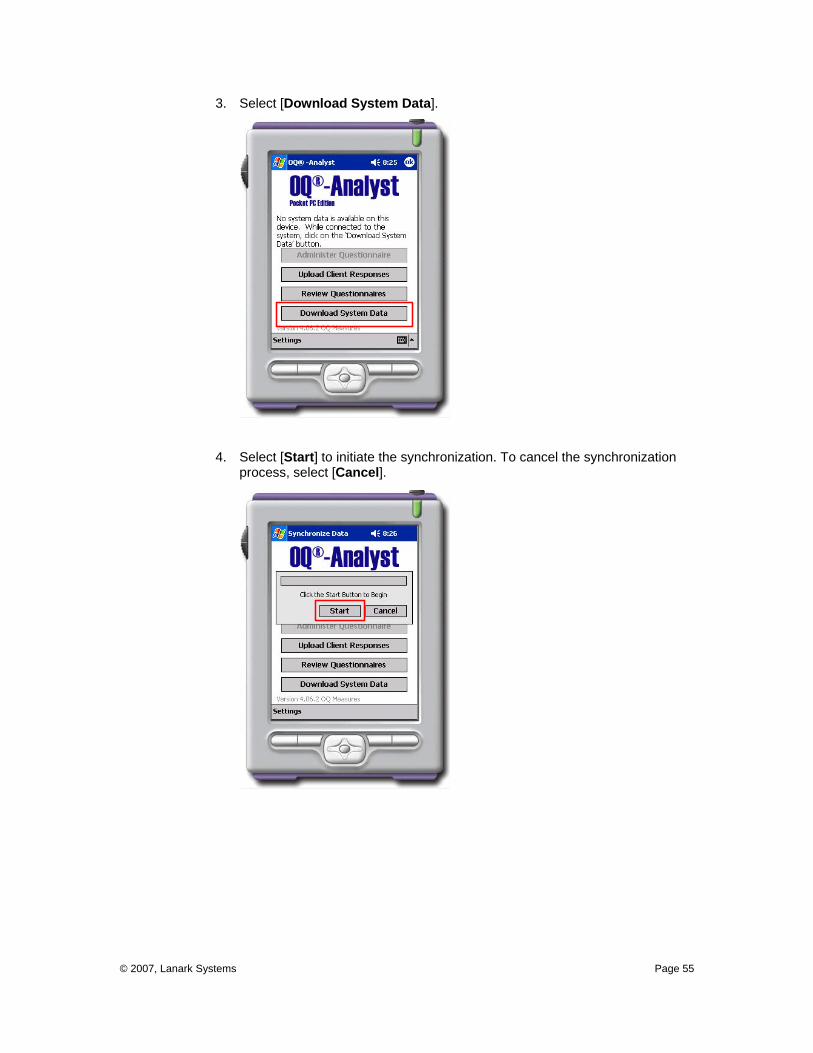
3. Select [Download System Data].
4. Select [Start] to initiate the synchronization. To cancel the synchronization process, select [Cancel].
© 2007, Lanark Systems Page 56
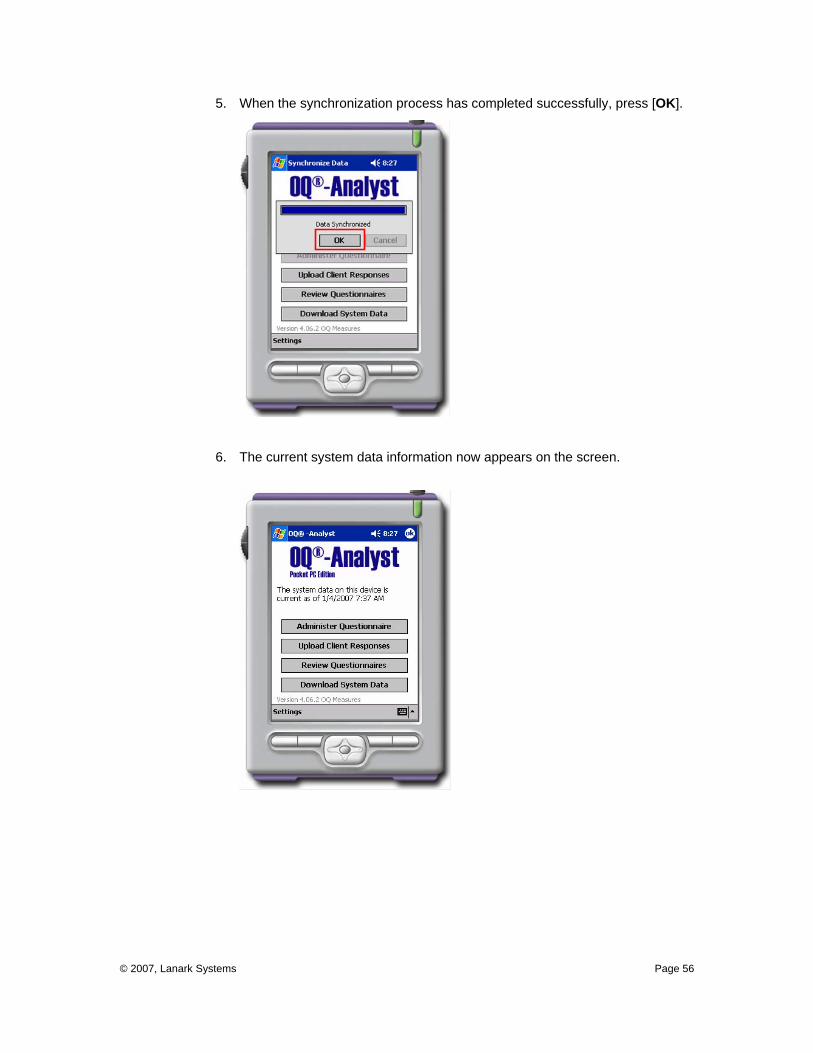
5. When the synchronization process has completed successfully, press [OK].
6. The current system data information now appears on the screen.
© 2007, Lanark Systems Page 57
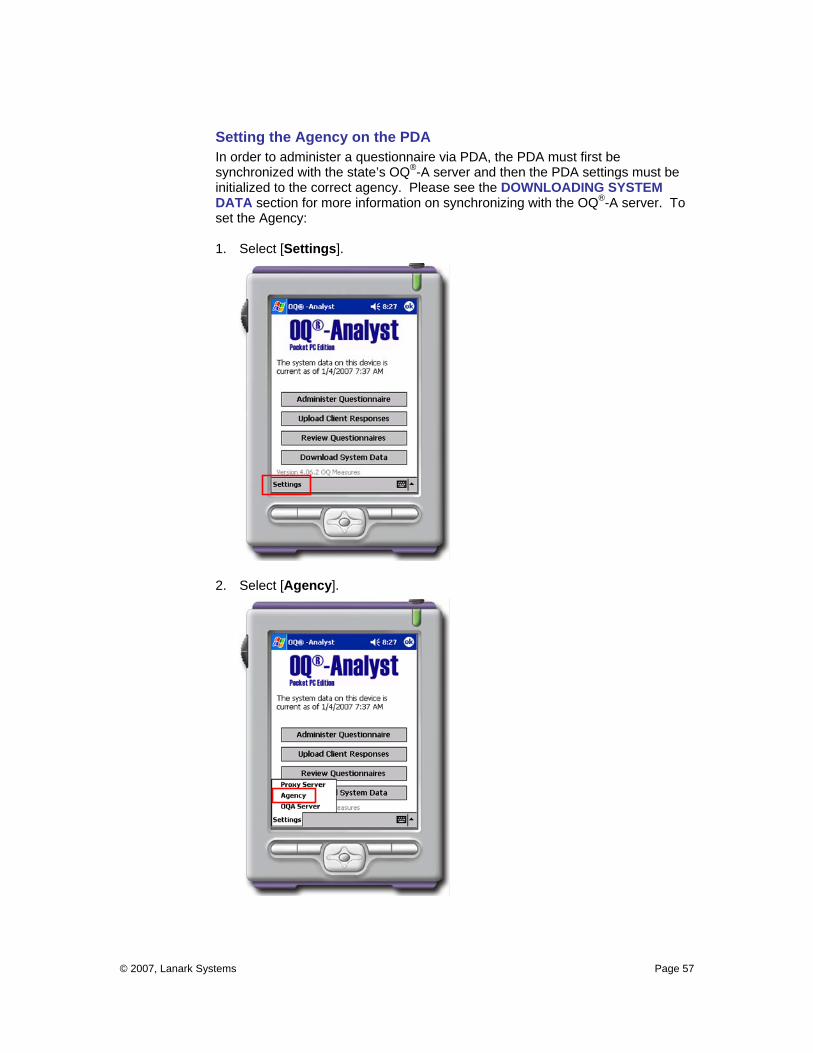
Setting the Agency on the PDA In order to administer a questionnaire via PDA, the PDA must first be synchronized with the state’s OQ®-A server and then the PDA settings must be initialized to the correct agency. Please see the DOWNLOADING SYSTEM DATA section for more information on synchronizing with the OQ®-A server. To set the Agency: 1. Select [Settings].
2. Select [Agency].
© 2007, Lanark Systems Page 58
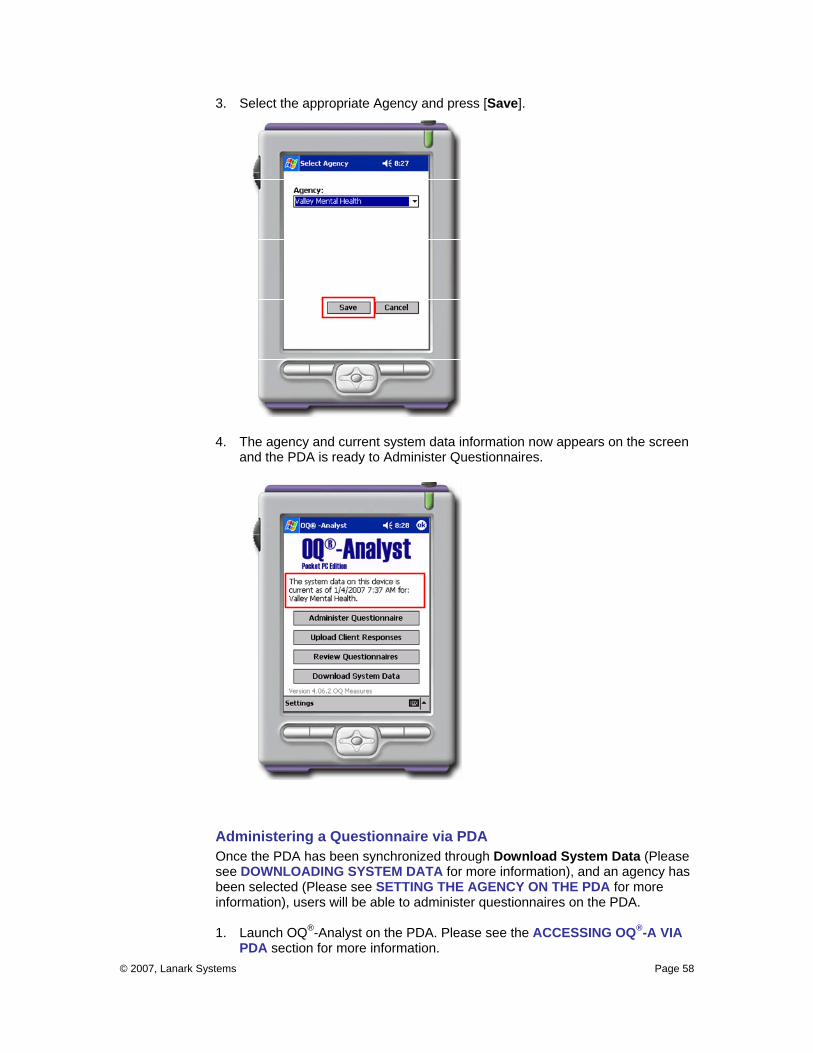
3. Select the appropriate Agency and press [Save].
4. The agency and current system data information now appears on the screen
and the PDA is ready to Administer Questionnaires.
Administering a Questionnaire via PDA Once the PDA has been synchronized through Download System Data (Please see DOWNLOADING SYSTEM DATA for more information), and an agency has been selected (Please see SETTING THE AGENCY ON THE PDA for more information), users will be able to administer questionnaires on the PDA. 1. Launch OQ®-Analyst on the PDA. Please see the ACCESSING OQ®-A VIA
PDA section for more information.
© 2007, Lanark Systems Page 59
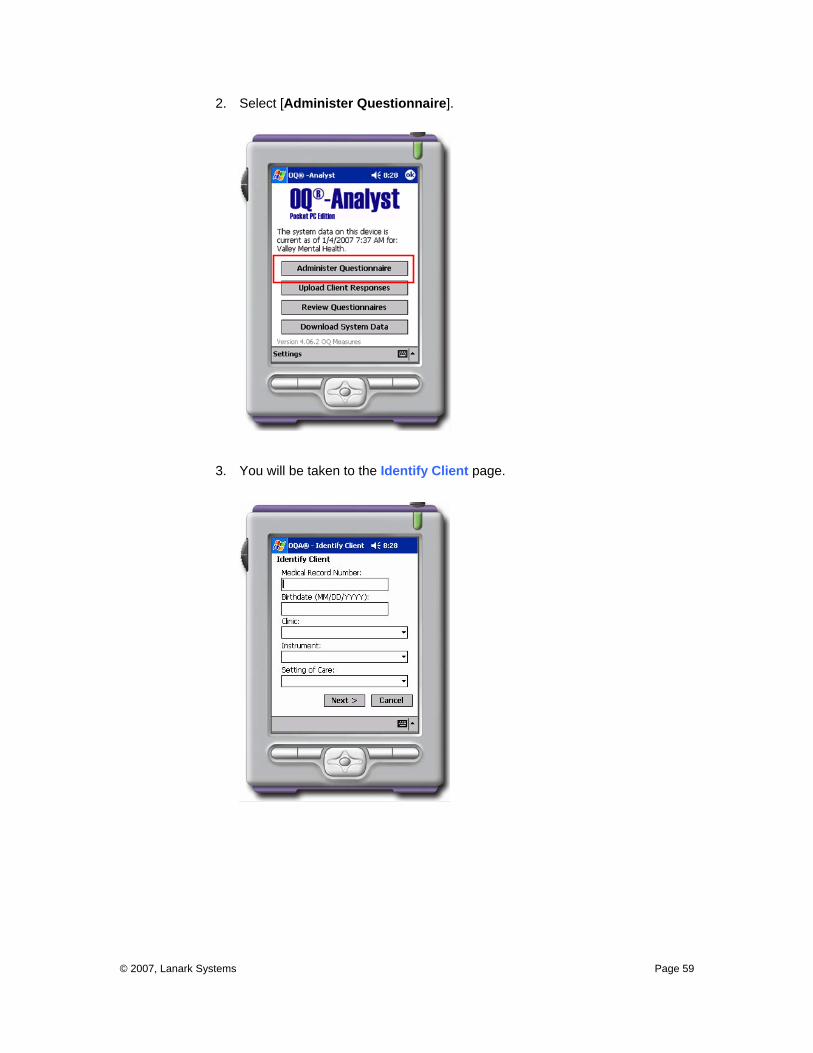
2. Select [Administer Questionnaire].
3. You will be taken to the Identify Client page.
© 2007, Lanark Systems Page 60
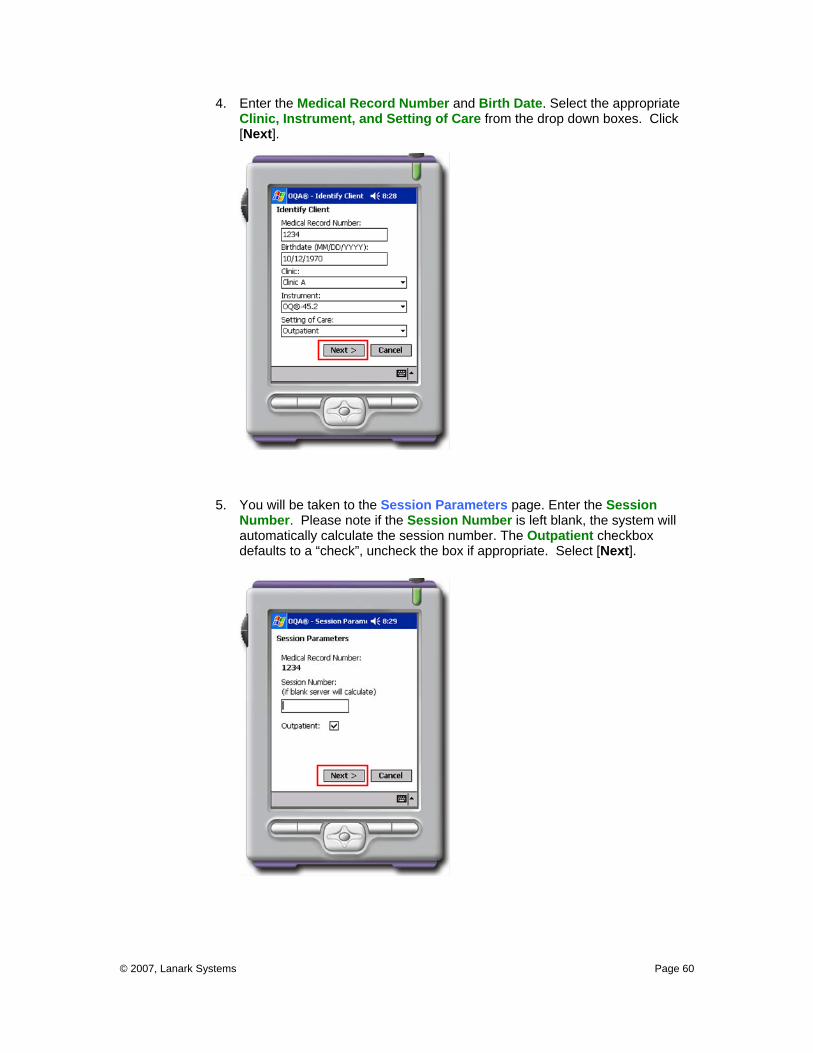
4. Enter the Medical Record Number and Birth Date. Select the appropriate Clinic, Instrument, and Setting of Care from the drop down boxes. Click [Next].
5. You will be taken to the Session Parameters page. Enter the Session
Number. Please note if the Session Number is left blank, the system will automatically calculate the session number. The Outpatient checkbox defaults to a “check”, uncheck the box if appropriate. Select [Next].

© 2007, Lanark Systems Page 61
6. The instructions for the questionnaire will be presented. The PDA is now ready to be handed to the questionnaire respondent.
7. To be taken to the first question, click [Start].
Note: If the respondent or administrator clicks [Cancel], the PDA will be reset and steps 2 - 7 above must be completed again.
© 2007, Lanark Systems Page 62
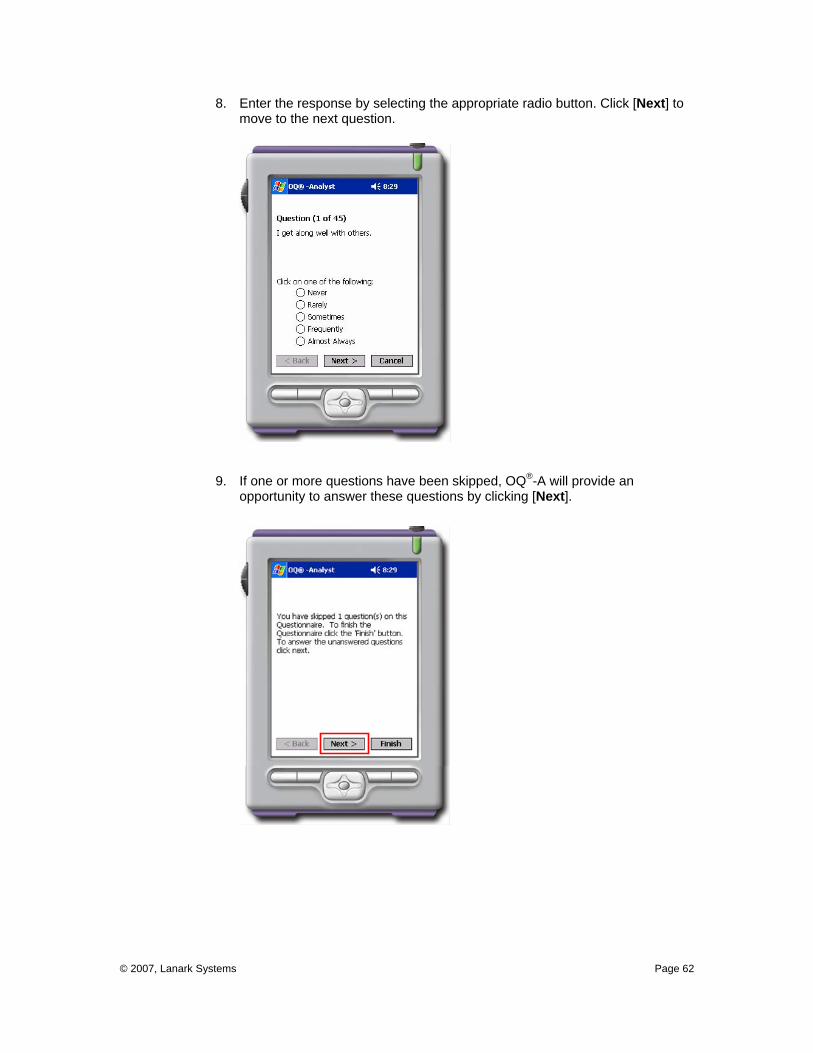
8. Enter the response by selecting the appropriate radio button. Click [Next] to move to the next question.
9. If one or more questions have been skipped, OQ®-A will provide an
opportunity to answer these questions by clicking [Next].

© 2007, Lanark Systems Page 63
10. To complete the questionnaire, click [Finish].
Note: If more than 10% of responses are left blank, the data gathered may result in inaccurate reporting.
11. Click [OK], when the Questionnaire complete message appears.
© 2007, Lanark Systems Page 64
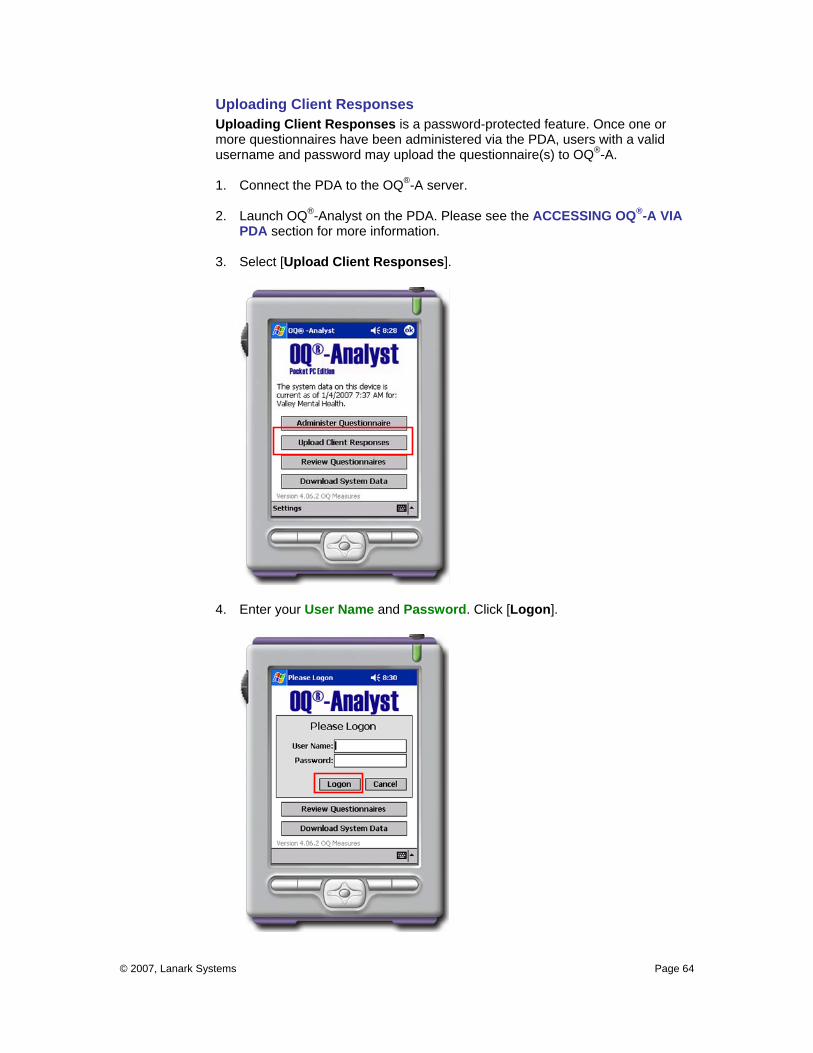
Uploading Client Responses Uploading Client Responses is a password-protected feature. Once one or more questionnaires have been administered via the PDA, users with a valid username and password may upload the questionnaire(s) to OQ®-A. 1. Connect the PDA to the OQ®-A server. 2. Launch OQ®-Analyst on the PDA. Please see the ACCESSING OQ®-A VIA
PDA section for more information.
3. Select [Upload Client Responses].
4. Enter your User Name and Password. Click [Logon].
© 2007, Lanark Systems Page 65
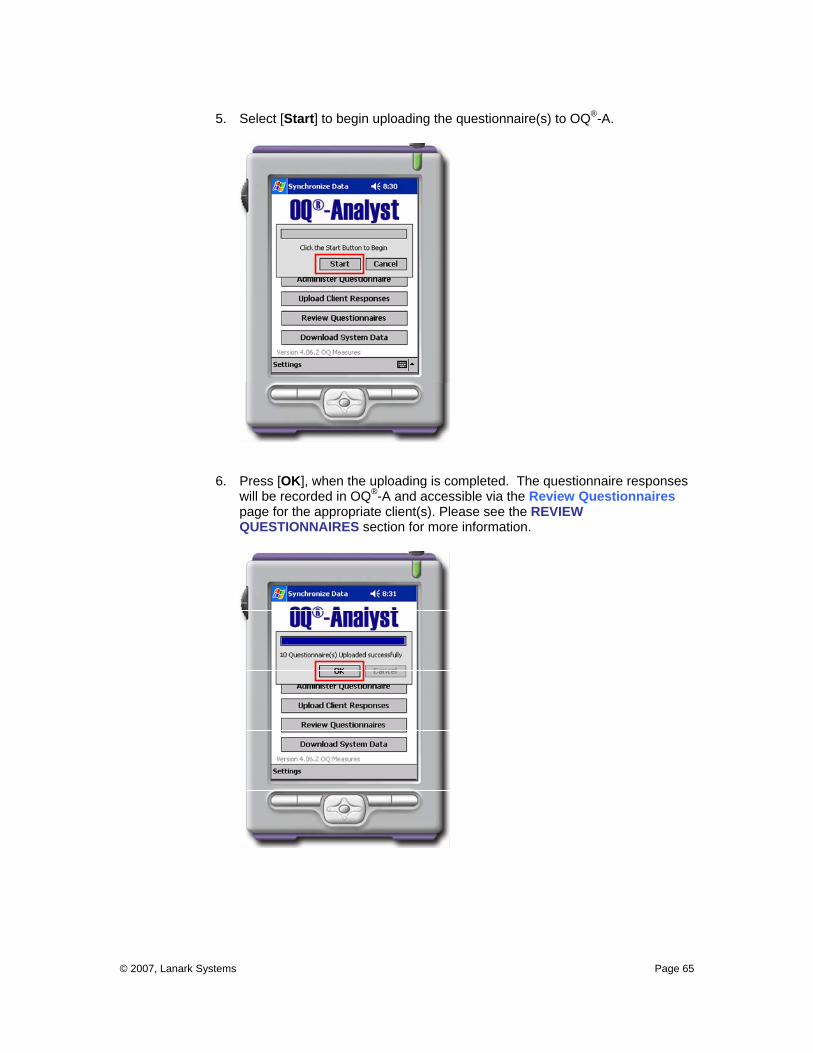
5. Select [Start] to begin uploading the questionnaire(s) to OQ®-A.
6. Press [OK], when the uploading is completed. The questionnaire responses
will be recorded in OQ®-A and accessible via the Review Questionnaires page for the appropriate client(s). Please see the REVIEW QUESTIONNAIRES section for more information.
111
© 2007, Lanark Systems Page 66
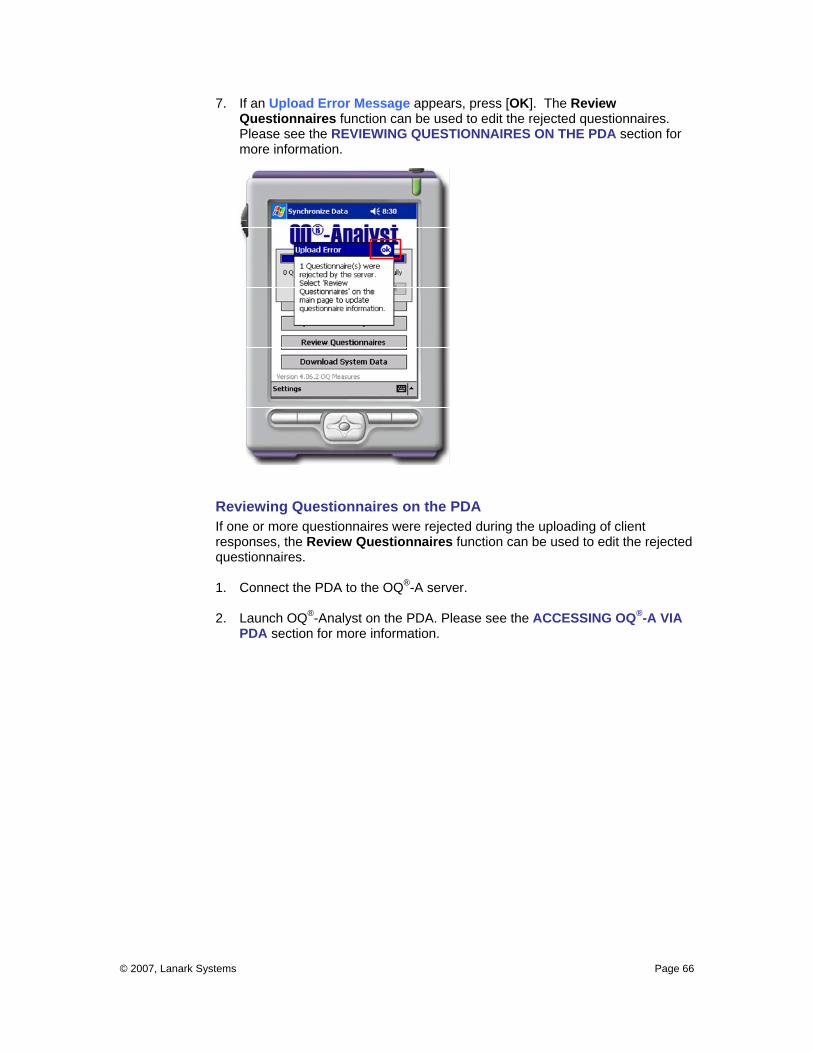
7. If an Upload Error Message appears, press [OK]. The Review Questionnaires function can be used to edit the rejected questionnaires. Please see the REVIEWING QUESTIONNAIRES ON THE PDA section for more information.
Reviewing Questionnaires on the PDA If one or more questionnaires were rejected during the uploading of client responses, the Review Questionnaires function can be used to edit the rejected questionnaires. 1. Connect the PDA to the OQ®-A server. 2. Launch OQ®-Analyst on the PDA. Please see the ACCESSING OQ®-A VIA
PDA section for more information.

© 2007, Lanark Systems Page 67
3. Select [Review Questionnaires].
4. Select the questionnaire and press [Edit].
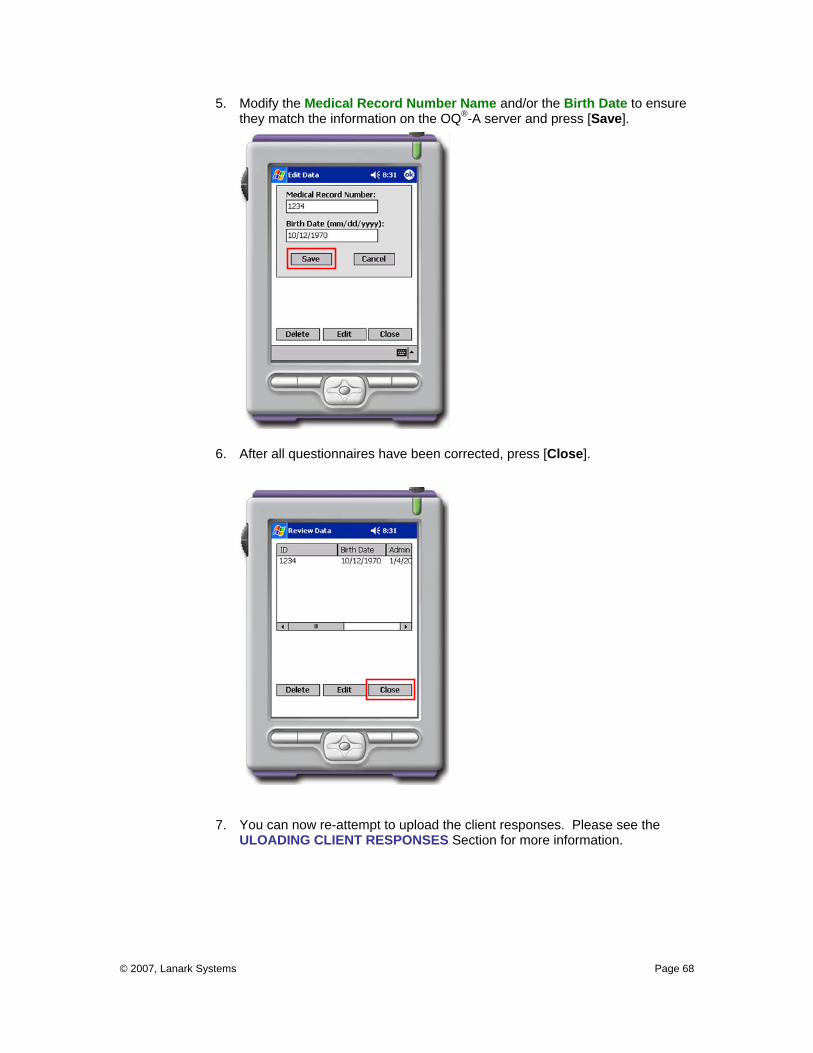
© 2007, Lanark Systems Page 68
5. Modify the Medical Record Number Name and/or the Birth Date to ensure they match the information on the OQ®-A server and press [Save].
6. After all questionnaires have been corrected, press [Close].
7. You can now re-attempt to upload the client responses. Please see the ULOADING CLIENT RESPONSES Section for more information.
© 2007, Lanark Systems Page 69
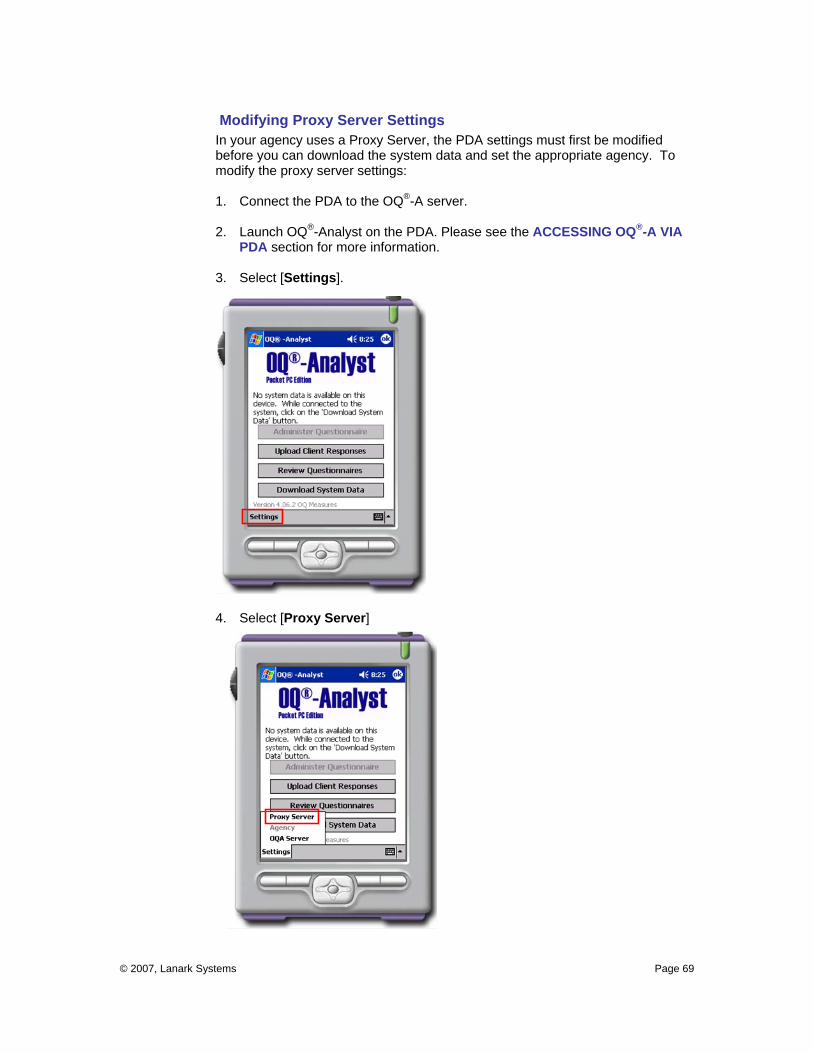
Modifying Proxy Server Settings In your agency uses a Proxy Server, the PDA settings must first be modified before you can download the system data and set the appropriate agency. To modify the proxy server settings: 1. Connect the PDA to the OQ®-A server.
2. Launch OQ®-Analyst on the PDA. Please see the ACCESSING OQ®-A VIA
PDA section for more information.
3. Select [Settings].
4. Select [Proxy Server]
© 2007, Lanark Systems Page 70
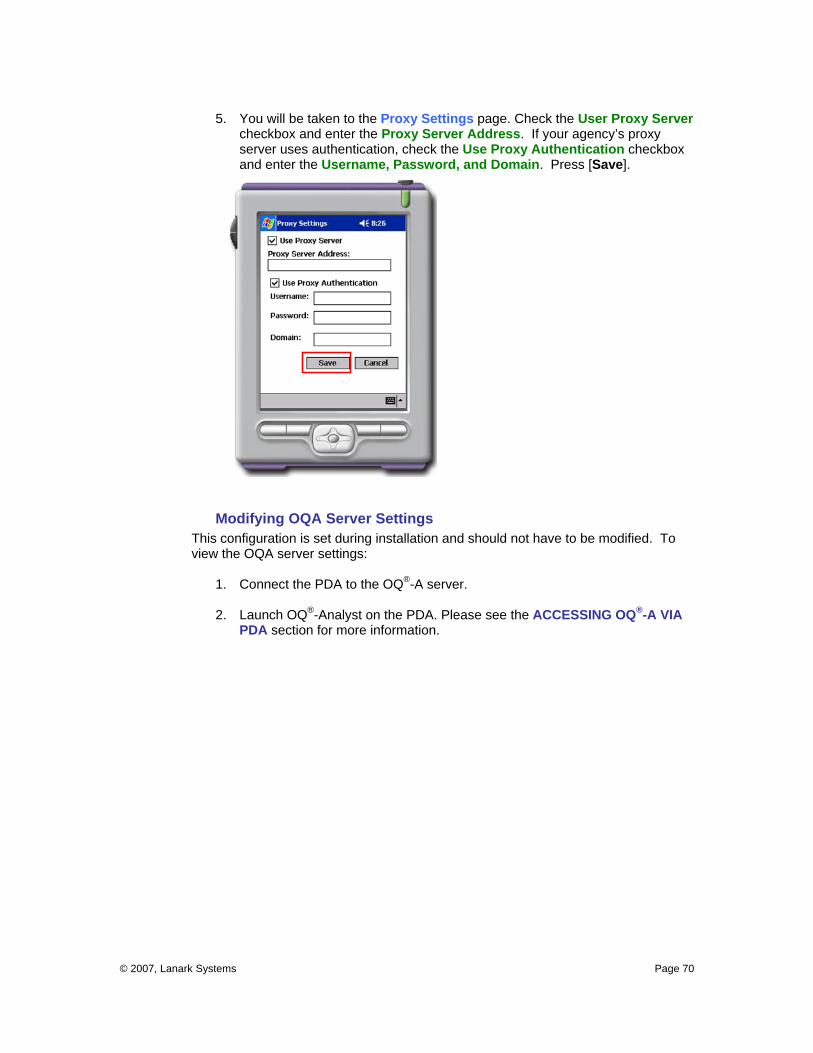
5. You will be taken to the Proxy Settings page. Check the User Proxy Server
checkbox and enter the Proxy Server Address. If your agency’s proxy server uses authentication, check the Use Proxy Authentication checkbox and enter the Username, Password, and Domain. Press [Save].
Modifying OQA Server Settings This configuration is set during installation and should not have to be modified. To view the OQA server settings:
1. Connect the PDA to the OQ®-A server.
2. Launch OQ®-Analyst on the PDA. Please see the ACCESSING OQ®-A VIA PDA section for more information.

© 2007, Lanark Systems Page 71
3. Select [Settings].
4. Select [OQA Server]
© 2007, Lanark Systems Page 72
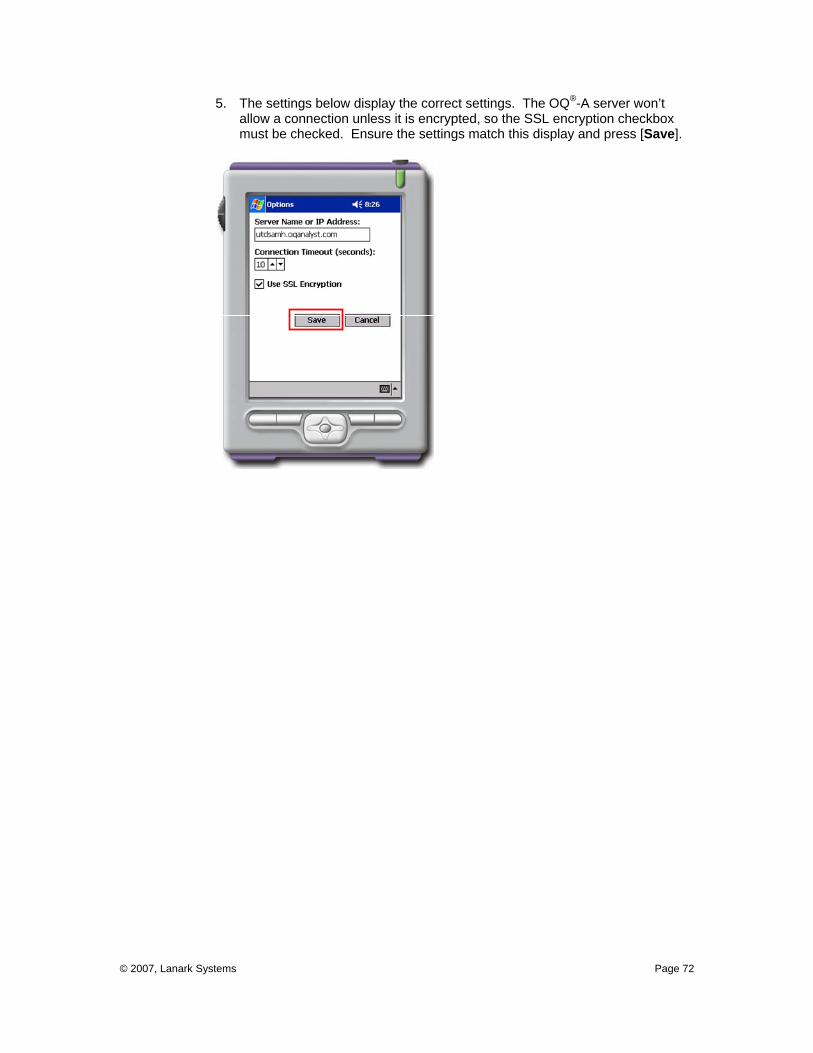
5. The settings below display the correct settings. The OQ®-A server won’t allow a connection unless it is encrypted, so the SSL encryption checkbox must be checked. Ensure the settings match this display and press [Save].

© 2007, Lanark Systems Page 73
Review Questionnaires Review Questionnaires allows you to view, edit and delete questionnaires and responses, as well as generate Clinician and Client Reports. Questionnaire fields include:
• Admin Date – The date the questionnaire was administered • Session Number – The session number during which the questionnaire was
administered • Questions Answered – The number of questions responded to in the
questionnaire; questionnaires with blank responses are indicated in red • Score – The score of the questionnaire • Completed By – Caseworker, Clinician, Father, Guardian, Mother, Other or Self
Selecting the Client to Review 1. Access the Administer Questionnaires page and select Review
Questionnaires to be taken to the Review Questionnaires page.
2. Enter the all or part of the name of the desired client in the Client Search box and click [Search].
© 2007, Lanark Systems Page 74
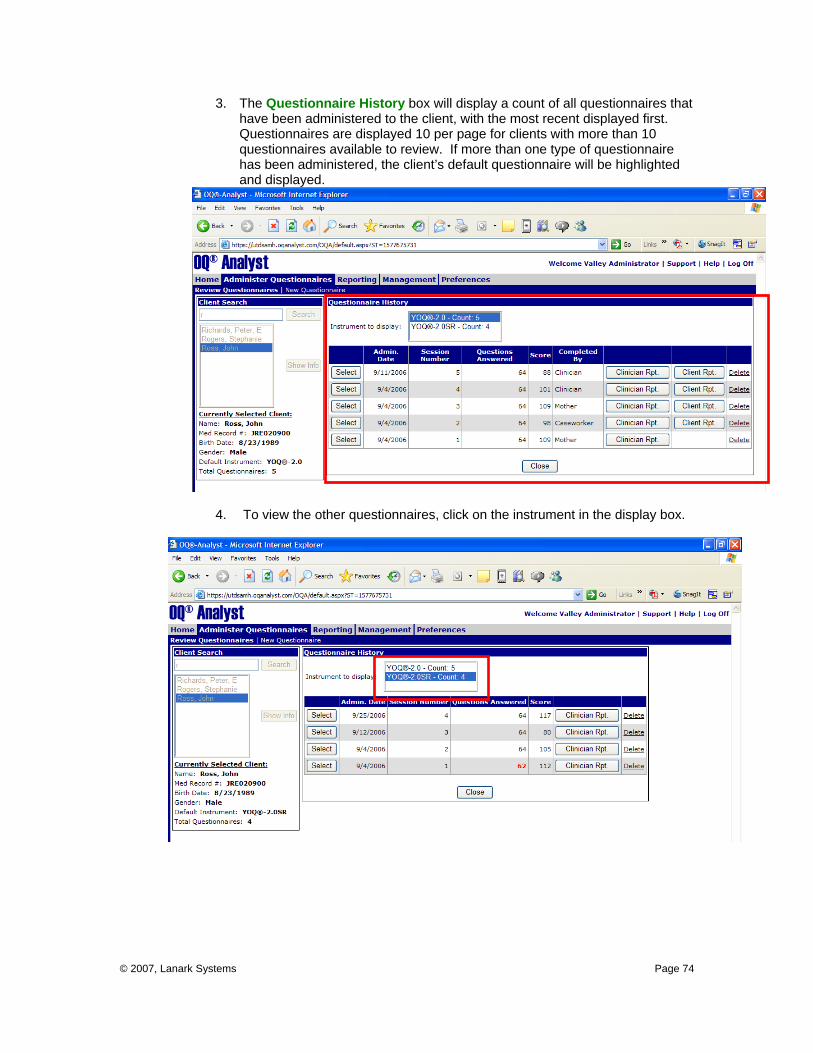
3. The Questionnaire History box will display a count of all questionnaires that have been administered to the client, with the most recent displayed first. Questionnaires are displayed 10 per page for clients with more than 10 questionnaires available to review. If more than one type of questionnaire has been administered, the client’s default questionnaire will be highlighted and displayed.
4. To view the other questionnaires, click on the instrument in the display box.
© 2007, Lanark Systems Page 75
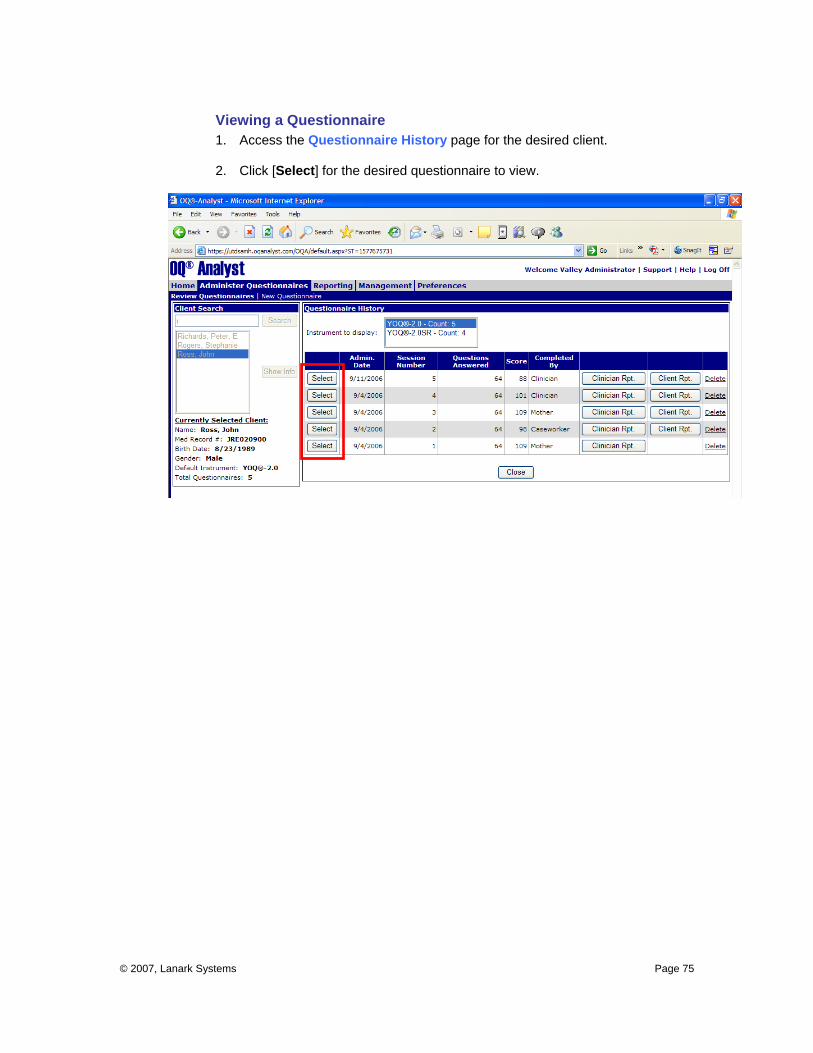
Viewing a Questionnaire 1. Access the Questionnaire History page for the desired client.
2. Click [Select] for the desired questionnaire to view.
© 2007, Lanark Systems Page 76
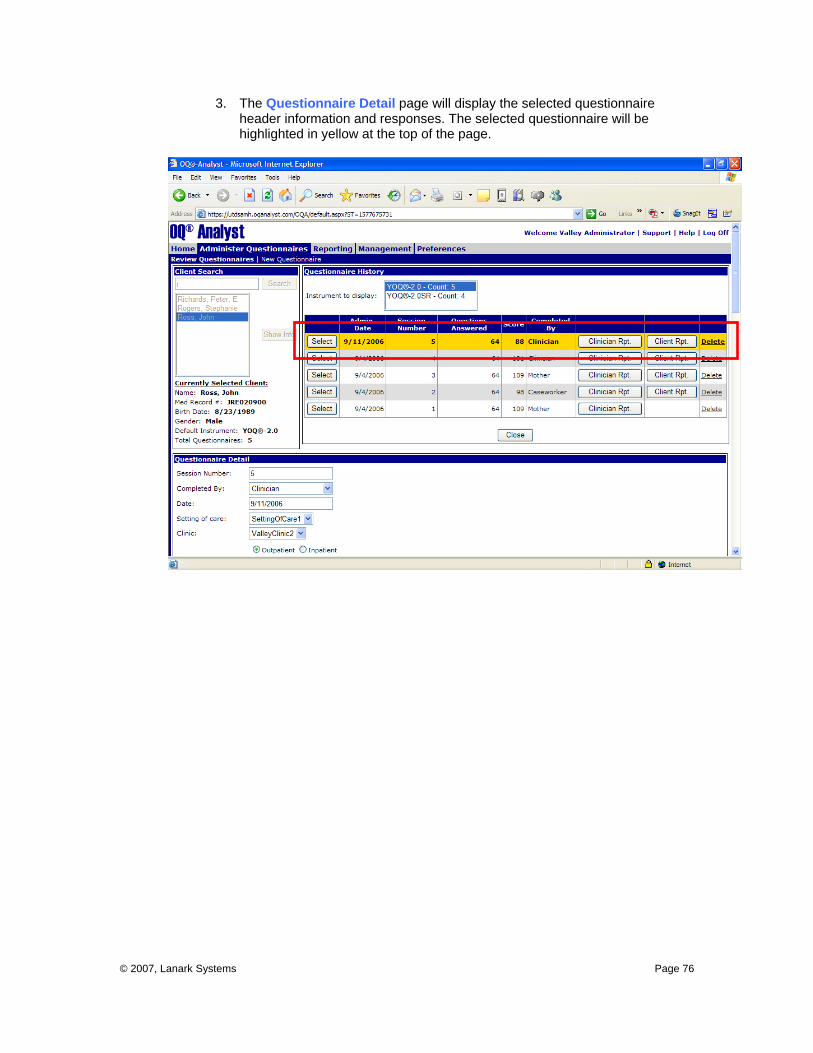
3. The Questionnaire Detail page will display the selected questionnaire header information and responses. The selected questionnaire will be highlighted in yellow at the top of the page.

© 2007, Lanark Systems Page 77
4. The questionnaire header information and responses will be displayed in the lower section of the page. To make changes to any responses, please see the EDITING A QUESTIONNAIRE section.
© 2007, Lanark Systems Page 78
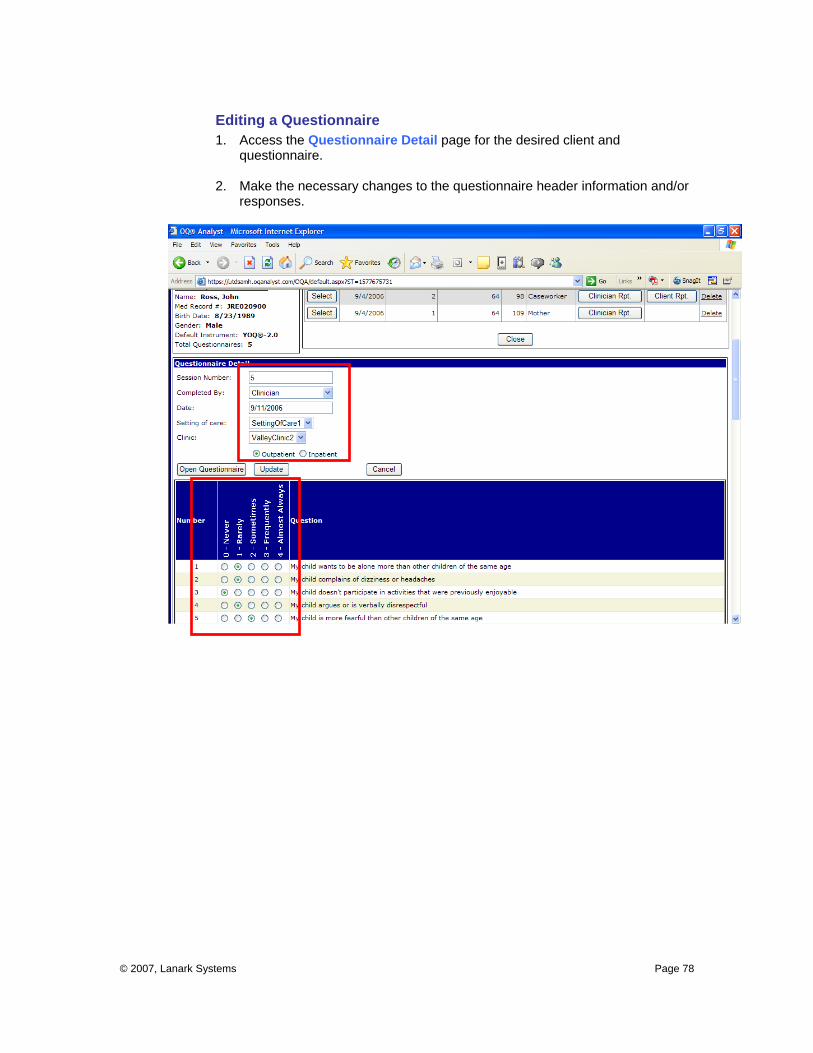
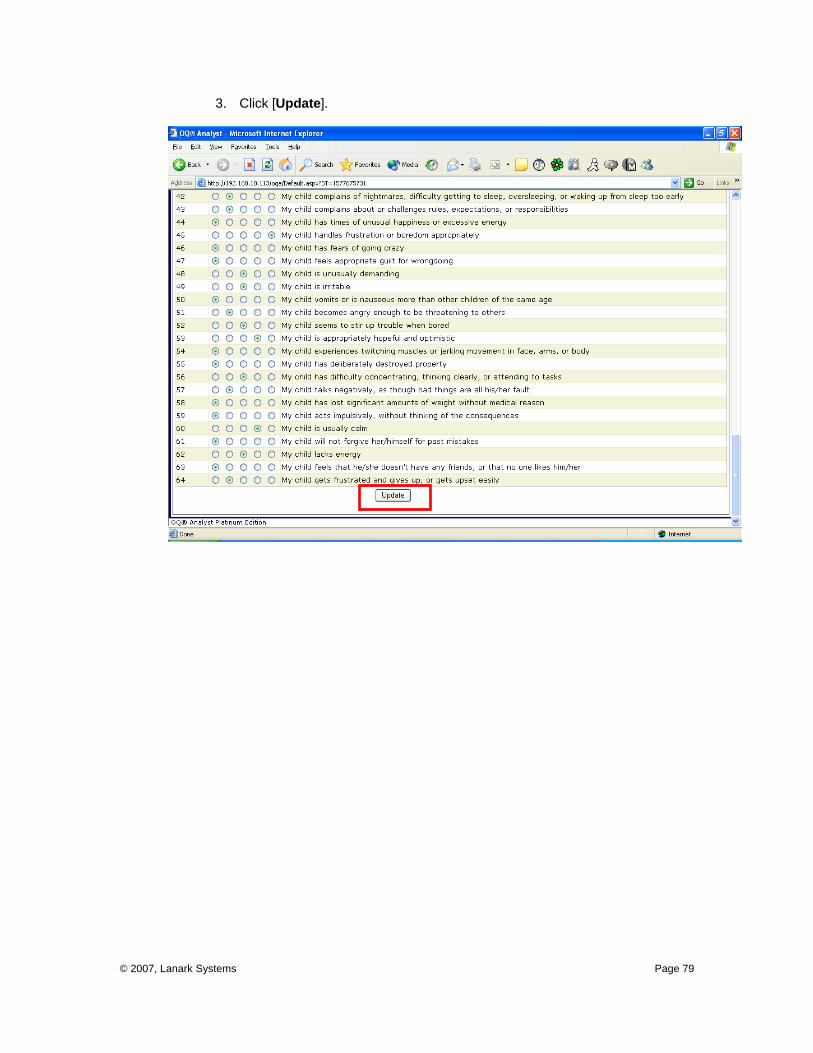
Editing a Questionnaire 1. Access the Questionnaire Detail page for the desired client and
questionnaire.
2. Make the necessary changes to the questionnaire header information and/or responses.
© 2007, Lanark Systems Page 79
3. Click [Update].

© 2007, Lanark Systems Page 80
Viewing the Clinician Report 1. Access the Questionnaire History page for the desired client.
2. Select [Clinician Report] for the desired questionnaire.

© 2007, Lanark Systems Page 81
3. A new window will open containing the Clinician Report.
4. Select [File] and [Print] to print the page for the clinician.
© 2007, Lanark Systems Page 82
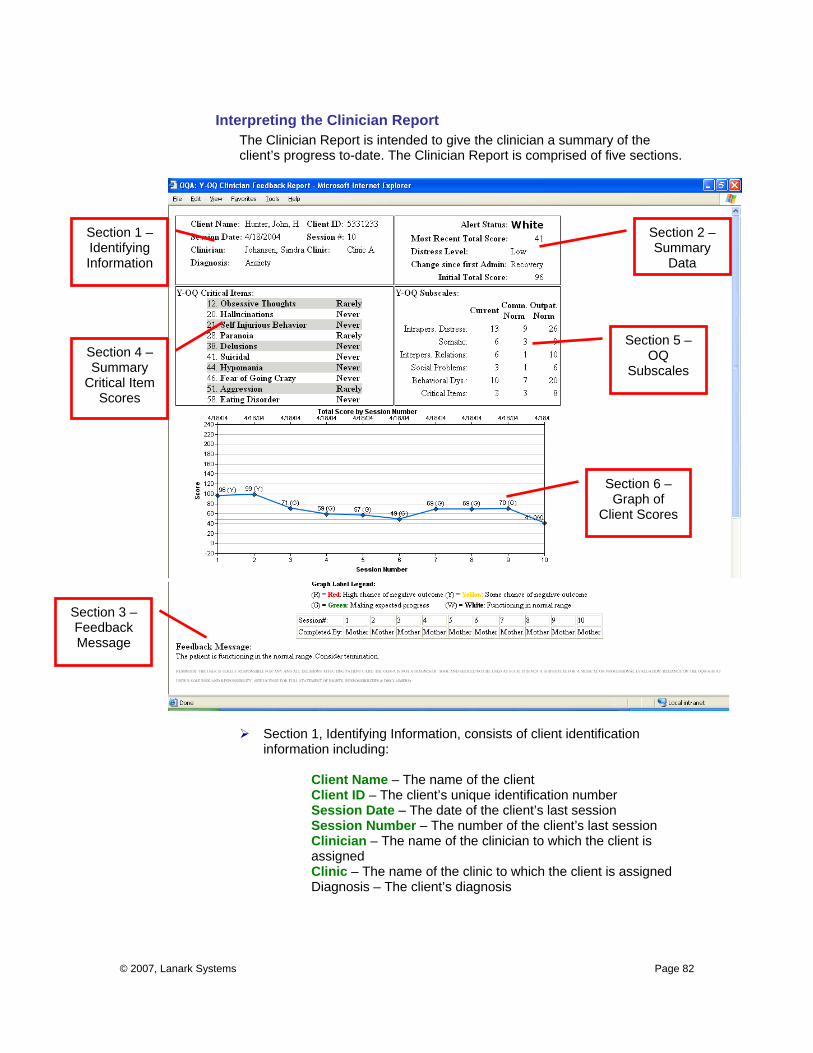
Interpreting the Clinician Report The Clinician Report is intended to give the clinician a summary of the client’s progress to-date. The Clinician Report is comprised of five sections.
Section 1, Identifying Information, consists of client identification information including:
Client Name – The name of the client Client ID – The client’s unique identification number Session Date – The date of the client’s last session Session Number – The number of the client’s last session Clinician – The name of the clinician to which the client is assigned Clinic – The name of the clinic to which the client is assigned Diagnosis – The client’s diagnosis
Section 6 – Graph of
Client Scores
Section 2 – Summary
Data
Section 5 – OQ
Subscales Section 4 – Summary
Critical Item Scores
Section 1 – Identifying Information
Section 3 – Feedback Message

© 2007, Lanark Systems Page 83
Section 2, Summary Data, provides summary data including:
Alert Status – Conveys information about client treatment response as determined by statistical algorithms. Alert Status may be White, Green, Yellow, or Red. Most Recent Total Score – Total score for the most recent administration of the questionnaire Distress Level – A classification of distress level. Distress Level may be Low, Moderate, High, or Very High Change Since First Administration – A classification of change based on calculations of clinically significant change using Jacobson & Truax formulas (see Administration and Scoring Manuals for cutoffs). Change may be Recovered, Reliably Improved, No Reliable Change, Deteriorated Initial Total Score – Total score for the initial administration of the questionnaire
Section 3, Feedback Message, provides a feedback message consisting of a verbal summary of the Alert Status. Of most significance in the Alert Status, are signals that are Yellow or Red. As the messages that accompany them suggest, research has shown that patients who get either signal anytime during treatment are at risk for leaving treatment with a negative outcome. Research also suggests that a Red signal is much more often associated with patient deterioration than a Yellow signal.
Section 4, Summary Critical Item Scores, provides summary scores for
the client’s response to questionnaire items that are intended to screen for risk of suicide(Item 8), substance abuse(Items 11, 26, & 32) and violence at work (Item 44) on the OQ-45 and a wider variety of disturbing symptoms in children on the Y-OQ. It is recommended that clinicians consider any response other than Never as an alert to possible risk in these areas.
Section 5, OQ Subscales, provides a comparison of the client’s current
subscale scores from the OQ-45 (Symptom Distress, Interpersonal Relations, and Social Role Performance) or the Y-OQ (Intrapersonal Distress, Somatic Complaints, Interpersonal Relations, Behavioral Dysfunction, and Critical Items). Summary benchmark data based on both non-client and client samples are provided in order to compare the client under consideration with other groups of persons (see Administration and Scoring Manual for the instruments for technical details).
Section 6, Graph of Client Scores, provides a graph of client scores from
the first administration through the most current administration of the questionnaire. The horizontal line drawn across the graph represents the Jacobson-Truax cut off for being in either the Functional Range or Dysfunctional Range -64 or above on the OQ-45 and 47 and above on the Y-OQ. (See Administration and Scoring Manuals for technical justification). In general, one goal of treatment is to help clients feel well enough to report symptom scores that do not exceed 63 in adults or 46 for children. Signal Alert status is indicated by the letter inside parentheses - W, G, Y, or R. The graph displays the results of the ten previous sessions. Graphs displaying earlier sessions for clients with

© 2007, Lanark Systems Page 84
more than 10 sessions may be seen by viewing Clinician Reports from earlier treatment sessions.
Note: Since the Y-OQ may be completed by the client or others and different respondents may be used during different sessions, the bottom section indicates the person completing the Y-OQ for each session. This knowledge helps the clinician keep track of who is reporting progress. Obviously, it is highly desirable for weekly ratings on client progress to come from a single informant. As this is not always possible, this software helps the clinician keep track of who is rating client symptoms.
The Clinician Report for the first administration of the questionnaire
emphasizes interpretation of the test score and implications for treatment planning, and is intended to help the clinician recognize the client’s degree of overall disturbance. Below is an example of a typical report that is delivered to the clinician when the first OQ-45 is taken by a client. A similar report is created for the first administration of the Y-OQ. In general, the more disturbed the client is, the more sessions of therapy will be necessary for the client to return to a normal state of functioning.
There are ten distinct messages that accompany first administration of the OQ-45. These ten messages are based on ten score bands ranging from a low initial score between 1 and 20 to a high of 121 and above. The Feedback Message supplies information about the possible invalidity of a test score, the score’s relationship to client normative information, and expected length of treatment based on survival statistics as they estimate the dose/response relationship. Similar bands and information are used with the Y-OQ in the form of nine score bands with a low between -16 and 0, and a high of 131and above.
© 2007, Lanark Systems Page 85
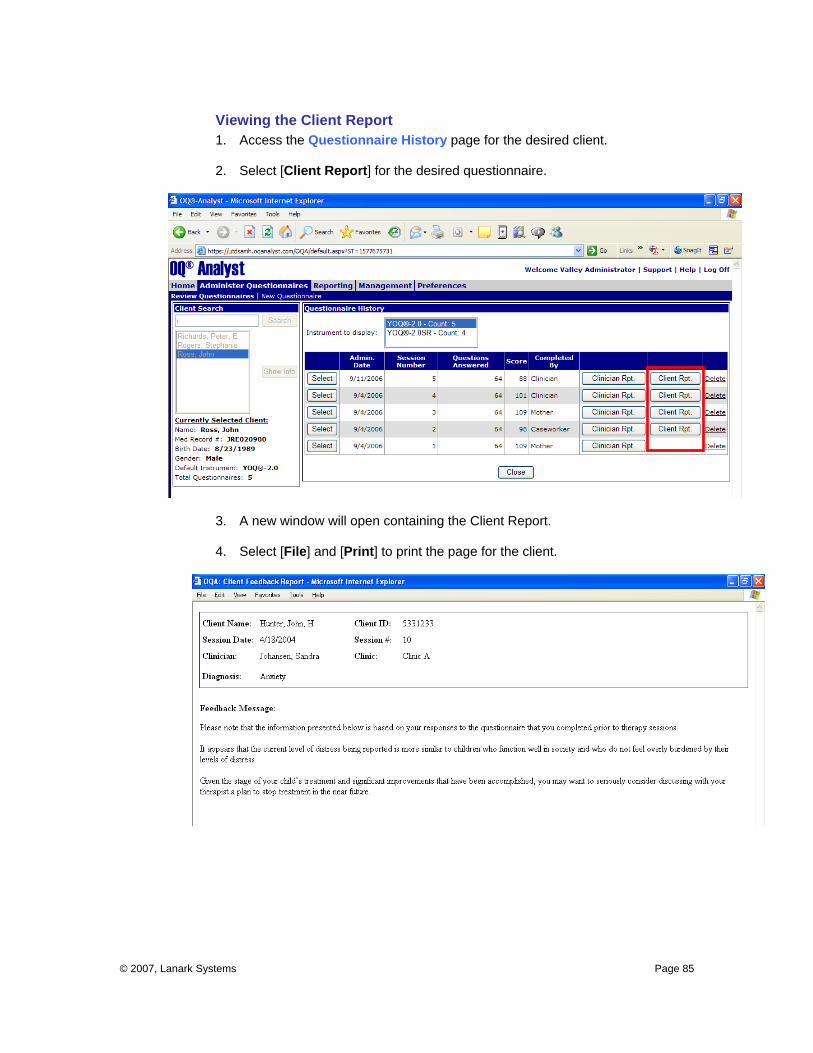
Viewing the Client Report 1. Access the Questionnaire History page for the desired client.
2. Select [Client Report] for the desired questionnaire.
3. A new window will open containing the Client Report.
4. Select [File] and [Print] to print the page for the client.
© 2007, Lanark Systems Page 86
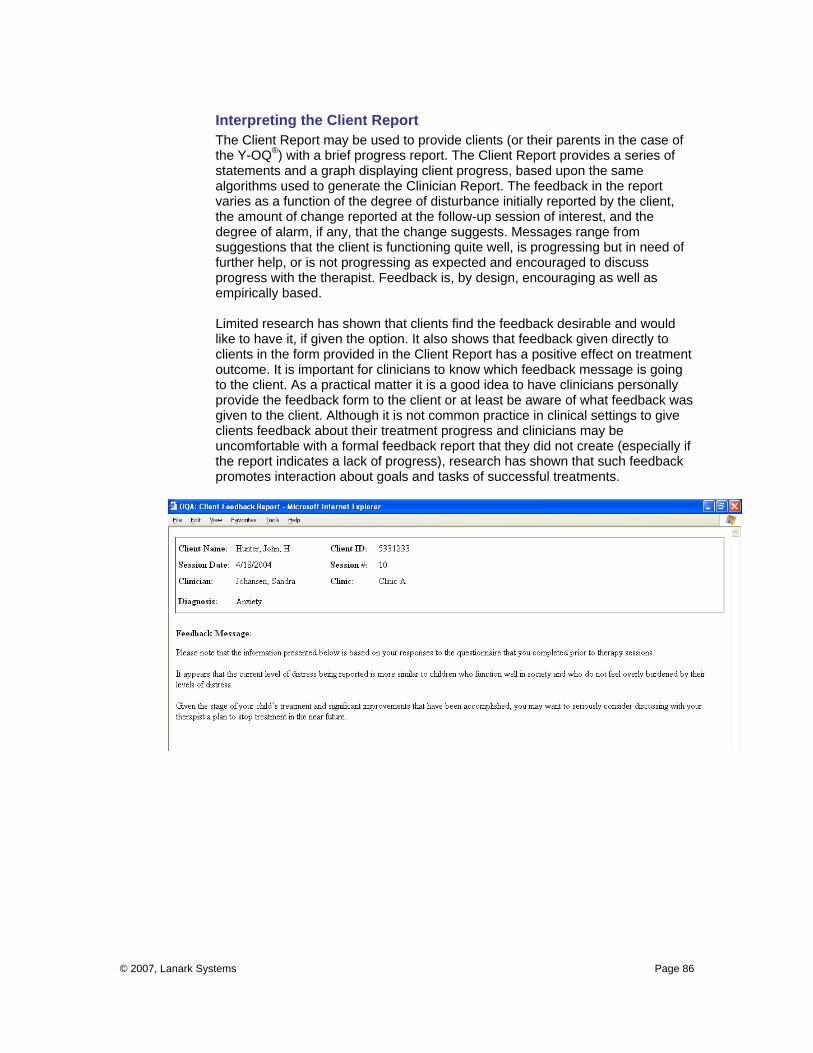
Interpreting the Client Report The Client Report may be used to provide clients (or their parents in the case of the Y-OQ®) with a brief progress report. The Client Report provides a series of statements and a graph displaying client progress, based upon the same algorithms used to generate the Clinician Report. The feedback in the report varies as a function of the degree of disturbance initially reported by the client, the amount of change reported at the follow-up session of interest, and the degree of alarm, if any, that the change suggests. Messages range from suggestions that the client is functioning quite well, is progressing but in need of further help, or is not progressing as expected and encouraged to discuss progress with the therapist. Feedback is, by design, encouraging as well as empirically based. Limited research has shown that clients find the feedback desirable and would like to have it, if given the option. It also shows that feedback given directly to clients in the form provided in the Client Report has a positive effect on treatment outcome. It is important for clinicians to know which feedback message is going to the client. As a practical matter it is a good idea to have clinicians personally provide the feedback form to the client or at least be aware of what feedback was given to the client. Although it is not common practice in clinical settings to give clients feedback about their treatment progress and clinicians may be uncomfortable with a formal feedback report that they did not create (especially if the report indicates a lack of progress), research has shown that such feedback promotes interaction about goals and tasks of successful treatments.

© 2007, Lanark Systems Page 87
Deleting a Questionnaire 1. Access the Questionnaire History page for the desired client.
2. Select [Delete] for the desired questionnaire to be deleted.
3. Click [OK] to confirm the deletion.

© 2007, Lanark Systems Page 88
REPORTING Reports can be generated by diagnosis, gender, supervisor, clinician, clinic, or for all questionnaire responses for each type of instrument used (OQ®-45.2, YOQ®-2.0 Self, and YOQ®-2.0).
Viewing a Report 1. Access the Reporting page by clicking Reporting on the Navigation bar.
2. Select the instrument to be reported from the Select Instrument drop-down menu. If the organization is licensed for one instrument only, the drop-down box will reflect only the licensed instrument name.

© 2007, Lanark Systems Page 89
3. Select the clinic to be reported from the Select Clinic drop-down menu. If the report is desired for all clinics, select All Clinics.
4. Select the type of report to be run from the Select a Category drop-down
menu. If the report is desired for all categories, select All.

© 2007, Lanark Systems Page 90
5. If desired, change the reporting timeframe by entering a new start date and end date in the Start Date and End Date boxes.
6. Click [Generate] to run the report.

© 2007, Lanark Systems Page 91
7. The report with your selected parameters will now be displayed.
Note: To use the report charts in an external application such as PowerPoint or Word, right-click the desired chart and select [Save Picture As].
© 2007, Lanark Systems Page 92
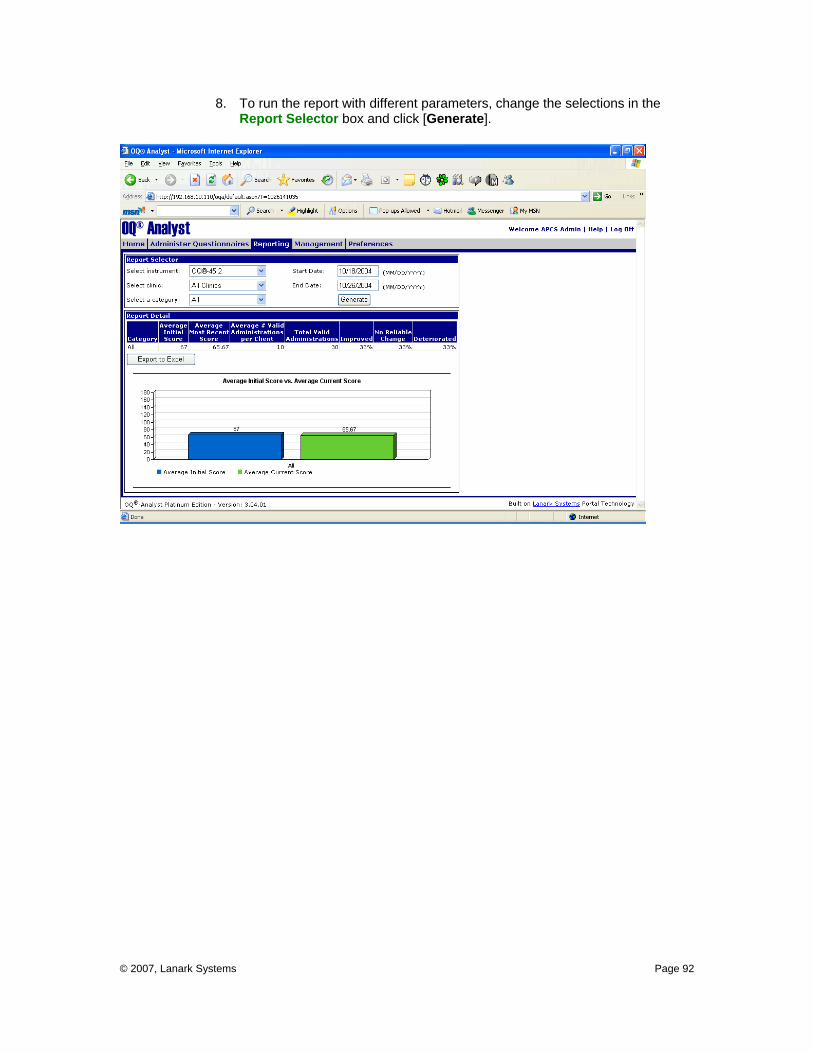
8. To run the report with different parameters, change the selections in the Report Selector box and click [Generate].
© 2007, Lanark Systems Page 93
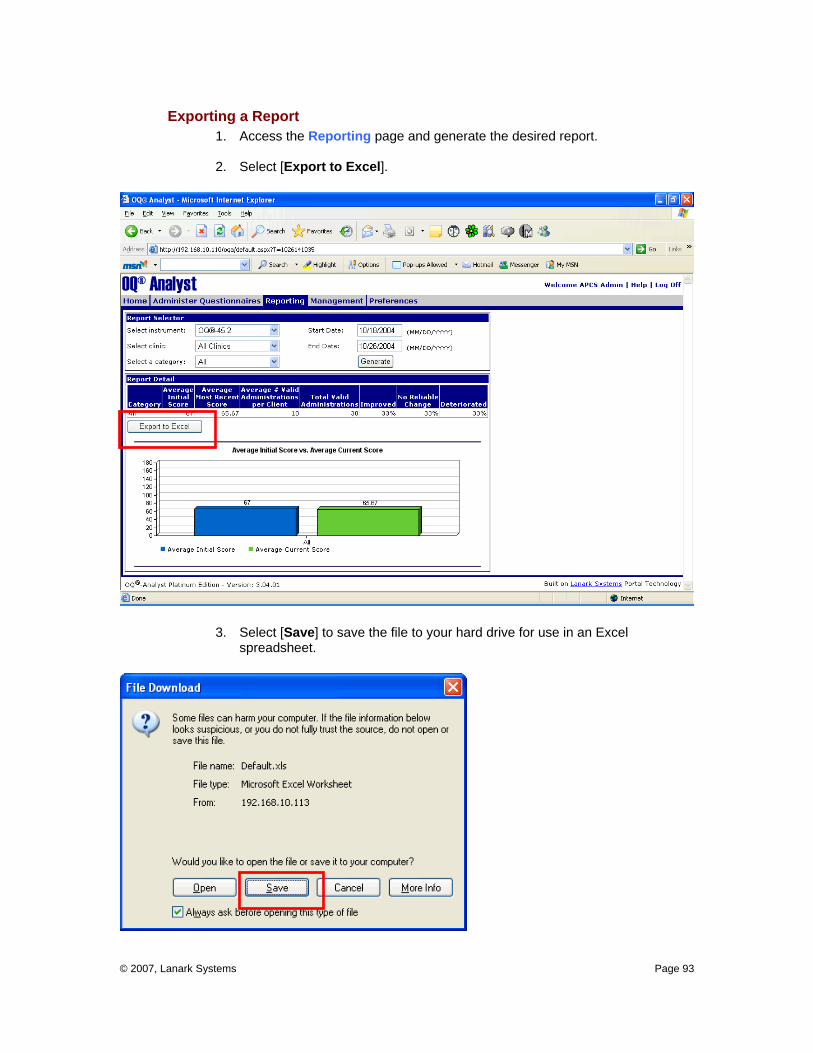
Exporting a Report 1. Access the Reporting page and generate the desired report.
2. Select [Export to Excel].
3. Select [Save] to save the file to your hard drive for use in an Excel spreadsheet.

© 2007, Lanark Systems Page 94
Note: By clicking [Open] the Excel file will be displayed in a browser window and will not be saved. Click [Back] to return to OQ®-Analyst.
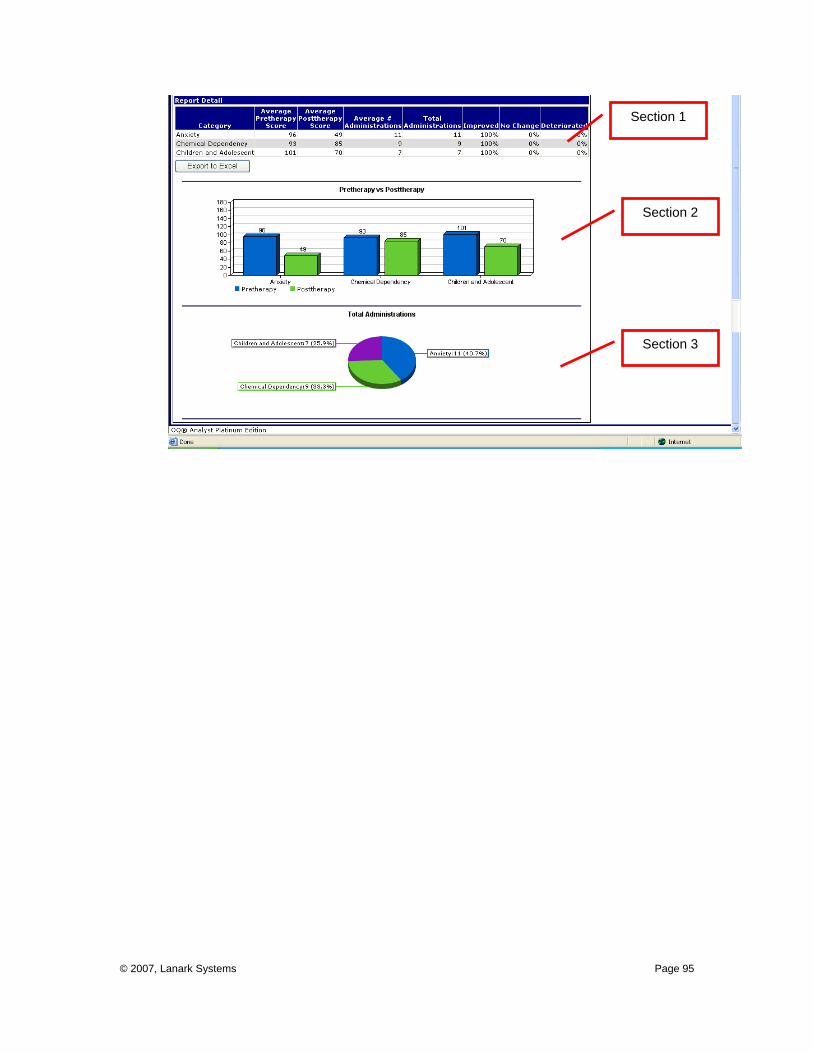
Interpreting a Report The reports generated in OQ®-Analyst provide data that is essential to understanding treatment outcomes. After selecting the type of report from the Report Selector drop-down menu (e.g., diagnosis, gender, etc.), outcome information is displayed in the Report Detail section in terms of average OQ-45/Y-OQ at intake (first administration), termination (last administration), the average number of administrations per client, and the total number of administrations on which the report is based. The information provided on average number of administrations per client allows for an estimate of the number of treatment sessions (assuming the OQ-45 or Y-OQ are administered on a weekly bases) on which pre-test and post-test changes are based. In general the more sessions of treatment per client, the larger the difference between pre-test and post-test scores. In addition to the foregoing information, Section 1 also provides a summary of treatment success based on the Jacobson & Truax formulas for estimating clinically significant change. Only three of Jacobson’s Categories are used: Improved (which includes Reliable Change and Recovered), No Reliable Change, and Deteriorated (which includes Reliable Worsening). The Administration and Scoring Manuals of the OQ-45 and Y-OQ provide the technical information used to estimate the cut-offs for classification. The Jacobson & Truax cut-offs are applied to each individual client and are the most widely used standards for classification of individual client change. Section 2 provides a graph of pre-test and post-test change by the selected reporting category, along with the rounded average total score of the first and last administrations of the questionnaire. Section 3 presents a graphic representation of the percent of cases falling into each selected reporting category, along with the actual number of cases within each category. This information is useful in judging how reliable the information on outcomes might be, since very low numbers could cause unreliable estimates of percentage and amount of change.
© 2007, Lanark Systems Page 95
Section 1
Section 2
Section 3

© 2007, Lanark Systems Page 96
LOGGING OFF OQ®-ANALYST When you are finished accessing OQ®-Analyst, please remember to end your session by clicking [Log Off] in the upper-right of any page within the application.

© 2007, Lanark Systems Page 97
OQ®-ANALYST ONLINE HELP Online Help is available from each page within OQ-Analyst. To access the Online Help, click [Help] in the upper-right of any page within the application.
OQ®-ANALYST TECHNICAL SUPPORT If you have any questions regarding this User’s Guide, or are in need of technical support, please contact OQM technical support at 1-888-647-2673 or by email at [email protected].