
Optimized Distribution Feeder Protection With Remote and ...
19
Optimized Distribution Feeder Protection With Remote and Local Control G. B. Rauch Schweitzer Engineering Laboratories, Inc. Presented at the DistribuTECH Conference San Diego, California February 5–7, 2001 Originally presented at the China International Conference on Electricity Distribution, October 2000
Transcript of Optimized Distribution Feeder Protection With Remote and ...

Optimized Distribution Feeder Protection With Remote and Local Control
G. B. Rauch Schweitzer Engineering Laboratories, Inc.
Presented at the DistribuTECH Conference
San Diego, California February 5–7, 2001
Originally presented at the China International Conference on Electricity Distribution, October 2000

OPTIMIZED DISTRIBUTION FEEDER PROTECTION WITH REMOTE AND LOCAL CONTROL
G. B. Rauch, P.E. Schweitzer Engineering Laboratories, Inc.
Pullman, WA USA
ABSTRACT A recently developed microprocessor-based protective relay provides feeder protection, control, metering, monitoring, and automation functions in one package. Built-in local and remote switch functions, latching relay functions, local display elements, and serial port communications make this relay suitable for substation automation projects. Programmable front-panel operator control buttons and indicating lamps further enhance applications. The control buttons can enable/ disable protection functions such as underfrequency load shedding and ground overcurrent elements. The relay front panel also supports breaker open and close functions. An application example illustrates the replacement of an electromechanical protection and control scheme by the microprocessor-based relay. This replacement brought significant cost savings while simultaneously providing automation capabilities for improved system operation.
INTRODUCTION
Microprocessor-based relaying opened new vistas for the design and application of substation feeder protection and control. The numerous features of numerical relays afford many functions that previously required single -function devices. For instance, typical hardware used in historic distribution feeder applications included single -phase overcurrent relays for phase and ground fault protection, a separate reclosing relay for mult iple-shot breaker control, panel meters and associated selector switches for local viewing of feeder voltage and current, and breaker trip/close switches with associated indicating lamps. The relays, meters, and switches required regular inspection and testing to identify hardware degradation and loss of calibration. Faulty electromechanical relay components could, in theory, go undiscovered for long periods of time and fail to operate when needed. The latest generation of numerical feeder protection relays addresses reliability and testing concerns while providing extensive functionality at relatively low installation and operation costs.
PROTECTION FUNCTIONS Figure 1 shows an example of the protection and control functions provided by a microprocessor feeder protection relay. Eight analog input channels accommodate four input currents and four input voltages. This combination supports a wide range of distribution feeder protection and control functions in a single hardware package.

SEL-351S Relay
/1
Breaker
Feeder
27Undervoltage
59Overvoltage
27
Undervoltage
59
Overvoltage
67 PGQ
Directional Phase,Ground, Neg.-Seq.
79Reclosing
25
Phase, Ground,Neg.-Seq. O/C
52
67N
50PGQ
Phase, Ground,Neg.-Seq. Time O/C
50N 51N
/3
Bus
DirectionalNeutral-Ground
Neutral-Ground O/C
Neutral-GroundTime O/C
SynchronismCheck
51 PGQ
81
32
*PowerElements
Under-/Over-Frequency
/1
/3
Figure 1 Functional Diagram for Digital Feeder Protection Relay
A common belief about electromechanical, single -function overcurrent protection schemes was that they had redundancy. In fact, they did not. For example, if the ground overcurrent relay failed, the typically higher-set phase overcurrent relay of the faulted phase could not sense a fault that had only a slight amount of resistance. Attempting to lower the pickup of the phase overcurrent protection only decreased security because of load concerns.
Phase Overcurrent Elements
As shown in Figure 1, a sensitive and secure mix of phase, negative-sequence, residual-ground, and neutral-ground overcurrent elements provides the core functions for coordinated overcurrent protection schemes. Both phase and negative-sequence overcurrent elements detect phase faults. The negative-sequence elements that do not respond to balanced three-phase load currents show an increased sensitivity for phase-to-phase faults, as compared with phase current elements. Phase overcurrent elements protect for three-phase faults where significant negative-sequence quantities are typically not present during a balanced fault.

Load-OutRegionRegion
Load-In
X1LINE
FAULT
52LINE
3Ø FAULT
POSITIVE-SEQUENCEIMPEDANCE PLANE
SEL-351S
MAXIMUM LOAD-OUTMINIMUM LOAD IMPEDENCE
*
Figure 2 Load-Encroachment Logic Security for Sensitive Phase Overcurrent Settings
On heavily loaded feeders, load-encroachment logic adds security to an overcurrent protection scheme. This logic allows secure setting of phase overcurrent element pickup below load to see end-of-line phase faults in heavily loaded feeder applications. The logic uses positive-sequence load-in and load-out region elements to discriminate between load and fault conditions, as described by Roberts and Zimmerman in reference [1]. As shown in Figure 2, the load-encroachment logic blocks phase overcurrent elements when the load impedance, Z1, resides in a load region. When a three-phase fault occurs, Z1 moves from a load region to the line angle, at which time the load-encroachment logic resets and unblocks the phase overcurrent elements. The logic also controls the phase directional element. Torque-controlling the phase overcurrent elements with the phase directional element then automatically includes load-encroachment torque control. It is also possible to torque control the phase overcurrent elements through external input.
Ground Overcurrent Elements
Residual (IG) and neutral (IN) overcurrent elements detect phase-to-ground faults. Controlling these elements using optoisolated inputs or with the internal ground directional element increases security. The ground directional element includes load-adaptive security logic for heavily or lightly loaded unbalanced feeder applications.
Directional Elements
Phase and ground directional elements provide directional control of the phase and negative-sequence overcurrent elements, and for the ground and neutral overcurrent elements, respectively. An automatic setting mode sets all directional threshold settings based upon replica line-impedance settings.
The phase directional characteristics include positive-sequence and negative-sequence directional elements that work together. Memory in the positive-sequence directional element provides a reliable output for close-in, forward- or reverse-bolted, three-phase faults where each phase voltage is zero. The negative-sequence directional element uses a patented operating principle implemented in other distance protection relays used in EHV/HV applications.

Three directional elements work together to provide ground directional function. They include a negative-sequence voltage-polarized element, a zero-sequence voltage-polarized directional element, and a zero-sequence current-polarized directional element. A unique logic scheme selects the best ground directional element for the system conditions. This logic eliminates directional element settings for almost all applications. It can be overridden for special applications.
Frequency Relaying
Up to six steps of under-/overfrequency levels allow implementation of an internal multistage frequency trip/restore scheme at each breaker location. Independently time-delayed outputs of these elements shed load or trip local generation. Phase undervoltage supervision prevents undesired frequency element operation during and immediately following faults. Built-in frequency elements avoid the cost of wiring a complicated trip and control scheme from a separate frequency relay. Figure 3 illustrates a portion of the user-interface setting screen for setting each frequency step and associated timer.
Figure 3 User-Interface Screen for Setting Frequency Elements and Associated Timers
Power Elements
The relay includes four independently set power elements, each set to detect either: positive (forward) or negative (reverse) real power, or positive (forward lagging) or negative (reverse lagging) reactive power. Each element has an independently set time delay. Figure 4 shows a portion of the relay settings from the settings menu.

Figure 4 User Settings for Directional Power Elements
Relay engineers often apply power elements in capacitor bank switching/VAR control schemes, for reverse power detection for cogeneration schemes, and for open phase detection.
Figure 5 shows a scheme with capacitor bank control, and overcurrent protection. In this scheme, Relay 1 senses total bus VAR loading and uses power elements (set as VAR elements) to provide VAR control by tripping and closing the capacitor bank circuit breaker 52-C at selected bus reactive-power levels.
52-B
52-C
Trip
Trip
Close
Trip
VARControl
Block CloseRelay 2
Relay 1
Figure 5 Capacitor Bank Protection and Control
Relay 2 provides overcurrent protection for the capacitor bank. If Relay 2 trips the capacitor off-line for a fault condition, it sends a block signal to Relay 1 to prevent Relay 1 from trying to close circuit breaker 52-C for VAR control. Internal relay logic performs these control functions.
Fault Locator
An accurate estimation of fault location contributes to efficient dispatch of line crews and faster restoration of electric service to customers. The fault-locating algorithm uses fault type, replica line impedance settings, and fault conditions to develop an estimate of fault location without communications channels, special instrument transformers, or pre-fault information.

CONTROL FUNCTIONS Programmable operator controls on the relay provide an interface for 10 different functions. Figure 6 shows the assigned factory defaults for these controls. The availability of operator controls on the relay helps minimize panel space requirements and the cost for wiring external control switches and indicating lamps.
Figure 6 Programmable Front-Panel Operator Control Buttons
Breaker Trip
Figure 7a shows an application of the “TRIP” pushbutton. This example has the “TRIP” operator control button set with a fixed time delay since most situations involving front-panel tripping are not emergencies (e.g., the operator has to open the breaker after bypassing it for maintenance). The time delay allows an operator to move a safe distance away from the breaker before the relay issues a trip.
The operational sequence follows:
After an operator presses the “TRIP” control button, the corresponding BREAKER OPEN LED flashes on and off, indicating a pending trip. After a user-set time delay, the relay completes the trip sequence, and the BREAKER OPEN LED illuminates continuously.
The pending trip can be aborted by pressing the “TRIP” control button again or by pressing the “CLOSE” control button.
PRESS
Flashing LEDindicating
pending trip
Pulse toTrip Logic
BREAKEROPEN
TRIP
TRIP
TRIP
BREAKEROPEN
BREAKEROPEN
a. Trip Control
PRESS
Flashing LEDindicating
pending close
Pulse toClose Logic
BREAKERCLOSED
CLOSE
BREAKERCLOSED
CLOSE
CLOSEBREAKERCLOSED
b. Close Control
Figure 7 Operational Sequence for Operator-initiated Breaker Trip and Close Commands
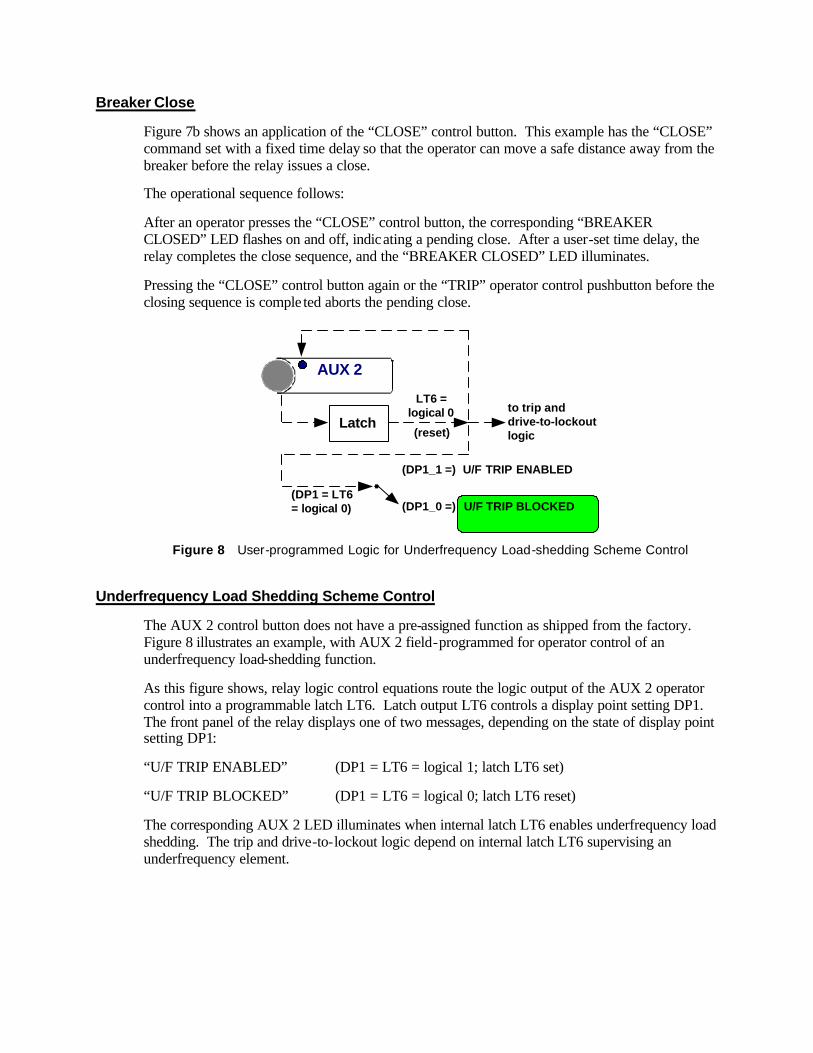
Breaker Close
Figure 7b shows an application of the “CLOSE” control button. This example has the “CLOSE” command set with a fixed time delay so that the operator can move a safe distance away from the breaker before the relay issues a close.
The operational sequence follows:
After an operator presses the “CLOSE” control button, the corresponding “BREAKER CLOSED” LED flashes on and off, indicating a pending close. After a user-set time delay, the relay completes the close sequence, and the “BREAKER CLOSED” LED illuminates.
Pressing the “CLOSE” control button again or the “TRIP” operator control pushbutton before the closing sequence is comple ted aborts the pending close.
LT6 =logical 0 to trip and
drive-to-lockoutlogic
(DP1 = LT6= logical 0) U/F TRIP BLOCKED(DP1_0 =)
(reset)
AUX 2
U/F TRIP ENABLED(DP1_1 =)
Latch
Figure 8 User-programmed Logic for Underfrequency Load-shedding Scheme Control
Underfrequency Load Shedding Scheme Control
The AUX 2 control button does not have a pre-assigned function as shipped from the factory. Figure 8 illustrates an example, with AUX 2 field-programmed for operator control of an underfrequency load-shedding function.
As this figure shows, relay logic control equations route the logic output of the AUX 2 operator control into a programmable latch LT6. Latch output LT6 controls a display point setting DP1. The front panel of the relay displays one of two messages, depending on the state of display point setting DP1:
“U/F TRIP ENABLED” (DP1 = LT6 = logical 1; latch LT6 set)
“U/F TRIP BLOCKED” (DP1 = LT6 = logical 0; latch LT6 reset)
The corresponding AUX 2 LED illuminates when internal latch LT6 enables underfrequency load shedding. The trip and drive-to-lockout logic depend on internal latch LT6 supervising an underfrequency element.

PRESS
Latch
LT6 =logical 1 to trip and
drive-to-lockoutlogic
(DP1 = LT6= logical 0) U/F TRIP BLOCKED(DP1_0 =)
(reset)
AUX 2
U/F TRIP ENABLED(DP1_1 =)
pulse
PRESS
Latch
LT6 =logical 0 to trip and
drive-to-lockoutlogic
(DP1 = LT6= logical 0) U/F TRIP BLOCKED(DP1_0 =)
(reset)
AUX 2
U/F TRIP ENABLED(DP1_1 =)
pulse
Figure 9 Application of AUX 2 for Controlling an Underfrequency Load-shedding Scheme
The operational sequence for enabling/disabling the load-shedding scheme follows:
1. The operator presses the AUX 2 operator control and the pulsed output (PB8 = logical 1) causes la tch LT6 to go from logical 0 to logical 1.
2. The front-panel display then shows: “U/F TRIP ENABLED” (DP1 = LT6 = logical 1; latch LT6 set). The corresponding AUX 2 LED illuminates: LED8 = LT6 (= logical 1).
3. The underfrequency element (81D1T) in the trip and drive-to-lockout logic, now enabled, can get through to trip. The operator presses the AUX 2 control again and the pulsed output (PB8 = logical 1) causes latch LT6 to go from logical 1 to logical 0.
5. The front-panel display then shows: “U/F TRIP BLOCKED” (DP1 = LT6 = logical 0; latch LT6 reset) The corresponding AUX 2 LED illuminates: LED8 = LT6 (= logical 1).
6. The underfrequency element (81D1T) in the trip and drive-to-lockout logic, now disabled, cannot get through to trip.
Circuit Breaker Reclosing Control
The relay provides a four-shot reclosing control scheme. The available scheme makes a variety of application practices possible. Synchronism and voltage check functions supervise reclosing logic when needed. Figure 10 illustrates settings applied for reclosing control.

Figure 10 Settings Applied for Reclosing Control
Synchronism Check Supervision
In applications where an undesirable phase angle difference can exist across the open poles of a circuit breaker, a synchronism check function supervises automatic reclosing control. Figure 11 shows two possible scenarios where dissimilar transformer connections cause steady-state apparent phase angle differences. Appropriate user-applied settings compensate constant phase angle differences that result from VT and/or power transformer connections.
VA N
VA
VS NS
VS
330°
A
ABC
A
52
A
B
C
SYNCP setting= 330°
(VS lags VA)
Relay
a. Synchronism Across a Delta-Wye Transformer
52
90°
C B
A
Relay
VA N
VA
VS NS
VS
SYNCP setting= 90°
(VS lags VA)
b. Synchronism Across a Breaker
Figure 11 Constant Apparent Phase Angle Differences Introduced by Dissimilar Transformer Connections
The circuit in Figure 11a shows that both voltage inputs VA-N and VS-NS are connected phase-to-neutral on either side of the breaker. However, synchronism check voltage input VS/NS is beyond a delta-wye transformer bank, just as it would be for a unit transformer connected to a generator. The resultant voltage VS lags voltage VA by 330° because of the phase shift introduced by the delta-wye transformer bank. In this case, “SYNCP” is set = 330. Setting “SYNCP” = 330 accounts for the constant 330° phase angle difference (voltage VS lags voltage VA) in performing synchronism check between voltage VA and voltage VS. This representation also presumes counter-clockwise ABC rotation. Figure 11a does not show the other two voltage inputs, VB and VC. They likewise connect to terminal N, forming a three-phase wye connection with VA.
The circuit in Figure 11b has voltage input VAN connected phase-to-neutral on one side of the breaker. However, synchronism check voltage input VS/NS is connected phase-to-phase on the

other side of the breaker. The resultant voltage VS lags voltage VA by 90°. Thus, the steady-state phase angle difference setting “SYNCP” is set = 90. Setting SYNCP = 90 accounts for the constant 90° phase angle difference (voltage VS lags voltage VA) in performing synchronism check between voltage VA and voltage VS. The above representation presumes counter-clockwise ABC rotation. Figure 11b does not show the other two voltage inputs, VB and VC. They likewise connect to terminals VBN and VCN, respectively, forming a three-phase wye connection with VAN.
The synchronizing phase setting “SYNCP” is in 30-degree increments (0°, 30, 60, …, 270°, 300°, 330°, see Figure 12). Set “SYNCP” to VA, VB, or VC if the synchronism check voltage input VS/NS is to be connected phase-to-neutral, directly across the breaker from voltage input VA-N, VB-N, or VC-N, respectively.
90°
210°
330°
270°
150°
30°
VS connected Ph - Ph;VS connected Ph - N
beyond delta-wye bank
Other Scenarios(e.g., VS connected Ph - Ph
beyond delta-wye bank)
300°
240°
180°
120°
60°
0°
Figure 12 Steady-state Synchronizing Phase Angle Compensation Settings
The user setting menu for the synchronism check function is shown in Figure 13.
Figure 13 User Settings for Synchronism Check Function
AUTOMATION FUNCTIONS
The automation features in numerical relays reduce the need for external metering and control devices. Automation elements include 16 each local control switches, remote control switches, latch control switches, and display points.

Local control switch elements function as separately mounted switches, without the cost burden of installing and documenting physical devices. Any one of the 16 switches is available for a variety of purposes including inputs to internal relay logic and for operator-entered switch values to other devices or systems. Figure 14 depicts the local control switch elements and LCD on the front of the relay.
GROUPCNTRLSET
EXIT
OTHEREVENTS STATUS
SELECT
METERRESET
CANCELTESTLAMP
TARGET
Press CNTRL forLocal Control
Figure 14 Local Control Switch Elements
Remote control switch elements, configured as on/off/momentary switches, are set, cleared, and/or pulsed via serial port commands from remote systems or human-machine interfaces. These elements provide inputs to relay logic and control of relay output contacts. Typical applications include input to nonvolatile latched control switches for SCADA operations such as trip, close, and settings group selection.
Examples of latch control switch applications include enabling/disabling reclose functions, ground protection elements, and hot-line tags. Latch control switches can select relay setting groups to adapt to different operating conditions, such as during live-line maintenance procedures and for seasonal changes in ground protection sensitivity. Figure 15 is a diagrammatic representation of one of 16 latch control switches provided in the relay.
Traditional LatchingRelay
(–)
(+)
set input reset input
output
Figure 15 Functional Equivalent of Latch Control Switch
Display points provide 16 user-programmed messages for the front-panel LCD. Custom-created messages report power system and relay conditions. Relay logic handles the control of displayed messages. Any logical point in the relay can drive the LCD. Figure 16 illustrates an example of a custom message that indicates the logical state of an underfrequency load-shedding scheme.

U/F TRIP ENABLED(DP1_1 =)= logical 1
U/F TRIP BLOCKED(DP1_0 =)
Figure 16 User-programmed Display Points for Logic Status and System Condition
MONITORING FUNCTIONS
Circuit Breaker Contact Wear
Circuit breakers experience mechanical and electrical wear every time they operate. Intelligent scheduling of breaker maintenance compares manufacturers’ published breaker wear data, interruption levels, and operation count with actual field data. The numeric relay breaker monitoring function captures the total interrupted current and number of operations.
Setpoint 1
Clo
se t
o O
pen
(C/O
AX
IS)
Setpoint 3
kA Interrupted (kA Axis)
Setpoint 2
Figure 17 Breaker Contact Wear Curve and Settings
Each time the monitored breaker trips, the relay integrates the interrupted current with previously stored current values. When the results exceed the threshold set by the breaker wear curve as shown in Figure 17, the relay initiates an alarm via an output contact, serial port, or front-panel display. This information permits timely, economical scheduling of breaker maintenance.
Substation Battery Voltage
The numeric relay measures and reports the substation battery voltage presented to its power supply terminals. It also provides two programmable threshold comparators and associated logic for alarm and control. For example, if the substation battery charger fails, the measured dc voltage eventually falls below a programmed threshold. An alarm message notifies operations personnel before the substation battery voltage reaches unsatisfactory levels. Supplementary communications processor hardware can monitor these thresholds and trigger messages, telephone calls, or other actions to alert operations personnel of low battery voltage levels.

The relay reports the measured dc battery voltage in real time, as well as in oscillographic event reports. Event reports show how much the substation battery voltage drops during trip, close, and other control operations.
Power Quality and Event Oscillography
Momentary voltage sags (or dips) and interruptions cause most industrial power quality problems. A large percentage of supply-side voltage variations result from power system faults. When momentary interruptions or sags occur, sensitive electronic equipment such as programmable logic controllers and adjustable speed drive controllers can fail to “ride through” the event. The subsequent resetting of critical process control devices can mean significant economic losses for the affected industry.
The microprocessor-based relay detects and records RMS voltage variations. Figure 18 shows user-entered threshold settings for reporting voltage sags, swells, and interruptions. IEEE Standard 1159-1995 [2] defines a short duration voltage interruption as when the voltage magnitude falls below 0.1 per-unit nominal RMS voltage for a period of time not exceeding one minute. Voltage sags are short duration reductions in phase voltage to between 0.1 and 0.9 per-unit nominal RMS voltage. A voltage swell is a short duration phase voltage increase between 1.1 and 1.8 per-unit nominal RMS voltage. The time duration for sags and swells is from 0.5 cycle to one minute.
Figure 18 User Settings for Voltage Sag/Swell/Interruption Thresholds
IEEE Standard 1159 further defines three classifications of short duration voltage variations: instantaneous (0.5 to 30 cycles), momentary (30 cycles to 3 seconds), and temporary (3 seconds to 1 minute). The relay detects and identifies each classification of voltage variation, and reports them in a sequential events recorder report. Figure 19 shows an example report.

FEEDER 1 Date: 03/07/98 Time: 03:29:48.297 STATION A Current(%Inom) Voltage(%Vbase) Vbase SSI No. Date Time Ia Ib Ic Ig In Va Vb Vc Vs (kV) Condition 85 03/07/98 03:29:29.107 100 100 100 0 0 100 97 100 0 18.0 PRE 84 03/07/98 03:29:29.111 100 100 100 0 0 100 97 100 0 18.0 PRE 83 03/07/98 03:29:29.115 100 100 100 0 0 100 92 100 0 18.0 PRE 82 03/07/98 03:29:29.119 100 100 100 0 0 100 91 100 0 18.0 PRE 81 03/07/98 03:29:29.123 100 100 100 0 0 100 90 100 0 18.0 PRE 80 03/07/98 03:29:29.128 100 100 100 0 0 100 89 100 0 18.0 PRE 79 03/07/98 03:29:29.132 100 100 100 0 0 100 89 100 0 18.0 PRE 78 03/07/98 03:29:29.136 100 100 100 0 0 101 89 101 0 17.9 PRE 77 03/07/98 03:29:29.140 100 100 100 0 0 101 90 101 0 17.9 SAG 76 03/07/98 03:29:29.144 100 100 100 0 0 101 90 101 0 17.9 SAG . . . 2 03/07/98 03:29:30.140 100 100 100 1 0 101 90 101 0 17.9 SAG 1 03/07/98 03:29:33.499 100 100 100 0 0 101 97 101 0 17.9 POST =>>
Figure 19 Example Sag/Swell/Interruption Report
Including RMS voltage variation recording in a protective device provides a low-cost alternative to more expensive, dedicated power quality monitoring equipment. Factual power quality data is a necessity for correlating and validating utility customer complaints and identifying the root cause of voltage-disturbance-related problems.
Voltage Interruption Trigger
As shown in Figure 18, the relay compares each phase voltage magnitude against a settable interruption threshold, “VINT.” This threshold is a percentage of the positive-sequence memory voltage. By using memory voltage as a reference, the trigger thresholds are able to adapt to slow system voltage variations such as from load-tap changer operations, for example, which helps avoid nuisance power quality triggers.
If the A-phase voltage magnitude drops below the “VINT” threshold, the relay records the event as an interruption. When the A-phase voltage returns above the “VINT” restoration threshold for one-cycle, the corresponding power quality interruption logic resets. The voltage restoration level is five percent higher than the “VINT” threshold to prevent threshold detection logic chatter for boundary conditions.
Voltage Sag and Swell Triggers
The relay also compares each phase voltage magnitude against two adaptive thresholds, “VSAG” and “VSWELL” (refer to Figure 18). Each threshold is a set percentage of the memorized positive-sequence voltage.
As an example, consider the case when the A-phase voltage magnitude drops below the “VSAG” threshold, and remains above the “VINT” threshold (typically 0.1•VNOM) for one-cycle. The appropriate relay logic asserts. There is similar logic for B- and C-phase voltages. When the phase voltage(s) magnitude(s) increases above the “VSAG” restoration threshold for one-cycle, the voltage sag logic resets.

Event Oscillography
Oscillographic event reports simplify analysis of faults and power quality events, and help improve the user’s understanding of simple and complex protective scheme operations. In response to a user-selected trigger, the voltage, current, frequency, and relay element status information confirms relay, scheme, and system performance for every recorded event. Figure 20 shows an example of an oscillographic event.
Figure 20 Oscillographic Event Report
METERING FUNCTIONS
Volts, Amperes, Power
The relay computes instantaneous values of voltage, current, and power, efficiently transferring this metering information to communications processing devices in a binary format. System operators can access this data to determine circuit loads, bus voltage, and reactive power flows.
Load Profiling
The Load Profile function provides trend data of parameters measured and computed by the relay. As shown in Figure 21, the relay makes periodic measurements every 5, 10, 15, 30, or 60 minutes, depending on the user-applied setting. Table 1 shows the measured and computed parameters available in Load Profile reports.
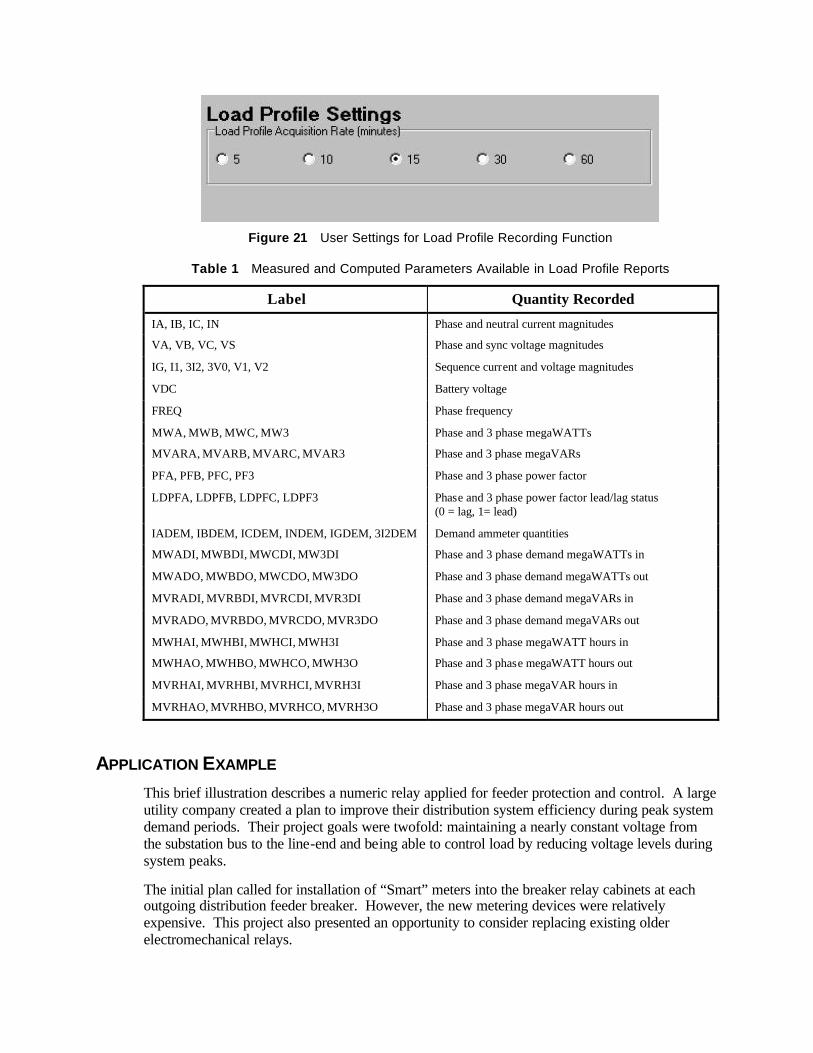
Figure 21 User Settings for Load Profile Recording Function
Table 1 Measured and Computed Parameters Available in Load Profile Reports
Label Quantity Recorded
IA, IB, IC, IN Phase and neutral current magnitudes
VA, VB, VC, VS Phase and sync voltage magnitudes
IG, I1, 3I2, 3V0, V1, V2 Sequence current and voltage magnitudes
VDC Battery voltage
FREQ Phase frequency
MWA, MWB, MWC, MW3 Phase and 3 phase megaWATTs
MVARA, MVARB, MVARC, MVAR3 Phase and 3 phase megaVARs
PFA, PFB, PFC, PF3 Phase and 3 phase power factor
LDPFA, LDPFB, LDPFC, LDPF3 Phase and 3 phase power factor lead/lag status (0 = lag, 1= lead)
IADEM, IBDEM, ICDEM, INDEM, IGDEM, 3I2DEM Demand ammeter quantities
MWADI, MWBDI, MWCDI, MW3DI Phase and 3 phase demand megaWATTs in
MWADO, MWBDO, MWCDO, MW3DO Phase and 3 phase demand megaWATTs out
MVRADI, MVRBDI, MVRCDI, MVR3DI Phase and 3 phase demand megaVARs in
MVRADO, MVRBDO, MVRCDO, MVR3DO Phase and 3 phase demand megaVARs out
MWHAI, MWHBI, MWHCI, MWH3I Phase and 3 phase megaWATT hours in
MWHAO, MWHBO, MWHCO, MWH3O Phase and 3 phase megaWATT hours out
MVRHAI, MVRHBI, MVRHCI, MVRH3I Phase and 3 phase megaVAR hours in
MVRHAO, MVRHBO, MVRHCO, MVRH3O Phase and 3 phase megaVAR hours out
APPLICATION EXAMPLE This brief illustration describes a numeric relay applied for feeder protection and control. A large utility company created a plan to improve their distribution system efficiency during peak system demand periods. Their project goals were twofold: maintaining a nearly constant voltage from the substation bus to the line-end and being able to control load by reducing voltage levels during system peaks.
The initial plan called for installation of “Smart” meters into the breaker relay cabinets at each outgoing distribution feeder breaker. However, the new metering devices were relatively expensive. This project also presented an opportunity to consider replacing existing older electromechanical relays.

After further review, the utility created a new plan for each feeder breaker protection and control cabinet. The new objectives were replacing existing protective devices, replacing all control and toggle switches, replacing all indicating lamps, and providing for highly accurate metering, all at a cost that was competitive with the “Smart” meter.
Figure 22 shows the existing hardware before implementation of the new design.
Figure 22 Breaker Control Cabinet with Electromechanical Relays, Meters,
Control Switches and Indicating Lamps
The estimated cost for all devices mounted in the panel shown in Figure 22, including a new “Smart” meter, was $7400, excluding labor and installation costs. By comparison, the numeric relay selected for this project provided all of the needed functions and cost less than half this amount. Figure 23 illustrates the resulting installation of the retrofitted numeric relay into the breaker control cabinet.
The benefits to the utility included being able to operate their distribution feeders more efficiently using accurate metering information. In addition, the oscillographic event reports and sequential event recorder (SER) reports provided them with a higher level of secure, improved, reliable protection.

Figure 23 Breaker Control Cabinet with Retrofitted Numeric Relay
CONCLUSION
Technological advances in the design and application of microprocessor-based protective relays have extended the functionality of single hardware platforms. Programmable logic functions, local and remote operator control functions, and a variety of monitoring and metering functions now join traditional relay functions such as protection and control. Having these new capabilities in a highly reliable hardware platform means the need for programmable logic controllers (PLCs), remote terminal units (RTUs), external control switches and indicating lamps, as well as separately mounted metering devices, is either greatly reduced or eliminated altogether. This results in considerable cost savings for retrofit projects and new construction.
REFERENCES [1] Jeff Roberts and Karl Zimmerman, “Trip and Restore Distribution Circuits at Transmission
Speeds,” 25th Annual Western Protective Relay Conference, Spokane, Washington, October 1998.
[2] IEEE Std 1159-1995, IEEE Recommended Practice for Monitoring Electric Power Quality.
BIOGRAPHY Gregory B. Rauch is the Utility Solutions Manager for Schweitzer Engineering Laboratories in Pullman, Washington, USA. He holds BSEE and MEEE degrees from Brigham Young University. During his industry career he has worked in many capacities, including relay application engineer, EPRI project manager, and consulting engineer. He is a Senior Member of the IEEE, and a registered professional engineer in the state of California.
Copyright © SEL 2000All rights reserved. Printed in USA.
20001016 • TP6106-01


![[MS-RDPEVOR]: Remote Desktop Protocol: Video Optimized ...... · Release: September 12, 2018 1 Introduction The Remote Desktop Protocol: Video Optimized Remoting Virtual Channel Extension](https://static.fdocuments.in/doc/165x107/5f3652086a60c62ef366b34b/ms-rdpevor-remote-desktop-protocol-video-optimized-release-september.jpg)


![[MS-RDPEVOR]: Remote Desktop Protocol: Video Optimized ...€¦ · Protocol: Video Optimized Remoting Virtual Channel Extension is used to redirect certain rapidly changing graphics](https://static.fdocuments.in/doc/165x107/5f4e3e83b018897d9852a69b/ms-rdpevor-remote-desktop-protocol-video-optimized-protocol-video-optimized.jpg)