Optimize your computer for peak performance your computer for peak performance ... You must be...
12
Optimize your computer for peak performance The following tips can help improve your computer's performance and help make your computer run faster. The examples in this article are for Windows 7, Windows Vista, and Windows XP. However, these procedures work for all versions of the Windows operating system, with some slight variations from version to version. These tasks use utilities provided within Windows, so you can run them—free of charge and as often as you’d like—to help you achieve the best system performance and to help improve computer speed. Note: This article does not address or recommend tinkering with the registry files. Such activities can be detrimental to your computer and should only be attempted by properly trained professionals. Clean up disk errors Run once a week Whenever a program crashes or you experience a power outage, your computer may create errors on its hard disk (sometimes referred to as a hard drive). Over time, the errors can result in a slow PC. Fortunately, the Windows operating system includes several PC tools, including a Check Disk program, to identify and clean any errors on your computer and to help keep it running smoothly. Note: You must be logged on as an administrator to perform these steps. If you aren't logged on as an administrator, you can only change settings that apply to your user account. Run Check Disk: Windows 7 and Windows Vista users 1. Click the Start button , and then click Computer. 2. Right-click the hard disk drive that you want to check, and then click Properties. 3. Click the Tools tab, and then, under Error-checking, click Check now.
Transcript of Optimize your computer for peak performance your computer for peak performance ... You must be...

Optimize your computer for peak
performance
The following tips can help improve your computer's performance and help make your
computer run faster. The examples in this article are for Windows 7, Windows Vista, and
Windows XP. However, these procedures work for all versions of the Windows operating
system, with some slight variations from version to version.
These tasks use utilities provided within Windows, so you can run them—free of charge
and as often as you’d like—to help you achieve the best system performance and to help
improve computer speed.
Note: This article does not address or recommend tinkering with the registry files. Such
activities can be detrimental to your computer and should only be attempted by properly
trained professionals.
Clean up disk errors
Run once a week
Whenever a program crashes or you experience a power outage, your computer may
create errors on its hard disk (sometimes referred to as a hard drive). Over time, the errors
can result in a slow PC. Fortunately, the Windows operating system includes several PC
tools, including a Check Disk program, to identify and clean any errors on your computer
and to help keep it running smoothly.
Note: You must be logged on as an administrator to perform these steps. If you aren't
logged on as an administrator, you can only change settings that apply to your user
account.
Run Check Disk:
Windows 7 and Windows Vista users
1. Click the Start button , and then click Computer.
2. Right-click the hard disk drive that you want to check, and then click Properties.
3. Click the Tools tab, and then, under Error-checking, click Check now.

o To automatically repair problems with files and folders that the scan
detects, select Automatically fix file system errors. Otherwise, the disk
check will simply report problems but not fix them.
o To perform a thorough disk check, select Scan for and attempt recovery
of bad sectors. This scan attempts to find and repair physical errors on the
hard disk itself, and it can take much longer to complete.
o To check for both file errors and physical errors, select both
Automatically fix file system errors and Scan for and attempt recovery
of bad sectors.
4. Click Start.
Depending upon the size of your hard disk, this may take several minutes. For best
results, don't use your computer for any other tasks while it's checking for errors.
Note: If you select Automatically fix file system errors for a disk that is in use, you'll
be prompted to reschedule the disk check for the next time you restart your computer.
Windows XP users
1. In the Start menu, click My Computer.
2. In the My Computer dialog box, right-click the drive you wish to check for
errors (for most of us, this is the C: drive, unless you have multiple drives on your
computer), and then click Properties.
3. In the Properties dialog box, click the Tools tab. In the Error-Checking section,
click the Check now… button. A Check Disk dialog box appears.
4. In the Check Disk dialog box, select all the check boxes, and then click Start.
5. You will see a message box that says you can schedule the disk check to start the
next time you restart your computer. Click Yes. The next time you restart your
computer, it will automatically run through a disk check before displaying your

login screen. After the disk check finishes, Windows will automatically bring you
to your login screen.
Note: Check Disk can take more than an hour to check and clean errors on your
computer.
Remove temporary files
Run once a week
Your computer can pick up and store temporary files when you're looking at webpages
and even when you're working on files in programs, such as Microsoft Word. Over time,
these files slow your computer's performance. You can use the Windows Disk Cleanup
tool to rid your computer of these unneeded files and to help your PC run faster.
Run Disk Cleanup:
Windows 7 users
1. In the Start menu, click All Programs, click Accessories, click System Tools,
and then click Disk Cleanup. Disk Cleanup will automatically begin to scan your
disk for files you can delete.
Note: If the Disk Cleanup: Drive Selection dialog box appears, select the hard
disk drive that you want to clean up, and then click OK.
2. Click the Disk Cleanup tab, and then select the check boxes for the files you
want to delete.
3. When you finish selecting the files you want to delete, click OK, and then, to
confirm the operation, click Delete files. Disk Cleanup then removes all
unnecessary files from your computer.
The More Options tab is available when you choose to clean files from all users on the
computer.
Windows Vista users

Windows XP users
1. In the Start menu, click My Computer.
2. In the My Computer dialog box, right-click the drive you wish to check for
errors (for most of us, this is the C: drive, unless you have multiple drives on your
computer), and then click Properties.
3. In the Properties dialog box, click Disk Cleanup.
4. Disk Cleanup calculates how much space you can free up on your hard drive.
After its scan, the Disk Cleanup dialog box reports a list of files that you can
remove from your computer. This scan can take a while depending on how many
files you have on your computer.

5. After the scan is complete, in the Disk Cleanup dialog box, click View Files to
see what Disk Cleanup will discard (if you accept the suggestions). You can select
and deselect check boxes to define what you wish to keep or discard. When you're
ready, click OK.
6. You can also select the More Options tab within the Disk Cleanup screen to look
for software programs you don't use much anymore. You then have the choice to
remove these unused programs.
Optimize your data
Run once a week
As you add programs and files to your computer, it often breaks files side by side to
increase the speed of access and retrieval. However, as files are updated, your computer
saves these updates on the largest space available on the hard drive, often found far away
from the other adjacent sectors of the file.
The result is a fragmented file. Fragmented files cause slower performance because your
computer must now search for all of the file's parts. In other words, your computer knows

where all the pieces are, but putting them back together in the correct order—when you
need them—can slow your computer down.
Windows includes a Disk Defragmenter program to piece all your files back together
again and to make them available to open more quickly.
Note: Windows 7 and Windows Vista are preconfigured to run Disk Defragmenter on a
weekly basis. If you would like to run the tool manually or to adjust the schedule, click
the section for your specific operating system.
Run Disk Defragmenter:
Windows 7 users
Run Disk Defragmenter manually:
1. Click the Start button, click All Programs, click Accessories, click System
Tools, and then click Disk Defragmenter. If you are prompted for an
administrator password or confirmation, type the password or provide
confirmation.
2. Select the drive you want to defragment, and then click Analyze disk. Disk
Defragmenter will evaluate your disk and then make a recommendation as to
whether a disk requires defragmentation.

3. If disk defragmentation is recommended, click Defragment disk to clean up your
computer. The Disk Defragmenter reorganizes files by placing them together and
sorting them by program and size.
Adjust the schedule:
1. Click the Start button, click All Programs, click Accessories, click System
Tools, and then click Disk Defragmenter. If you are prompted for an
administrator password or confirmation, type the password or provide
confirmation.
2. Click Configure schedule....
3. In the Disk Defragmenter: Modify Schedule dialog box, choose how often,
which day, what time of day you want defragmentation to occur, and on which
disks, and then click OK.
4. Click OK again.
Windows Vista users
Windows XP users
1. In the Start menu, click My Computer.
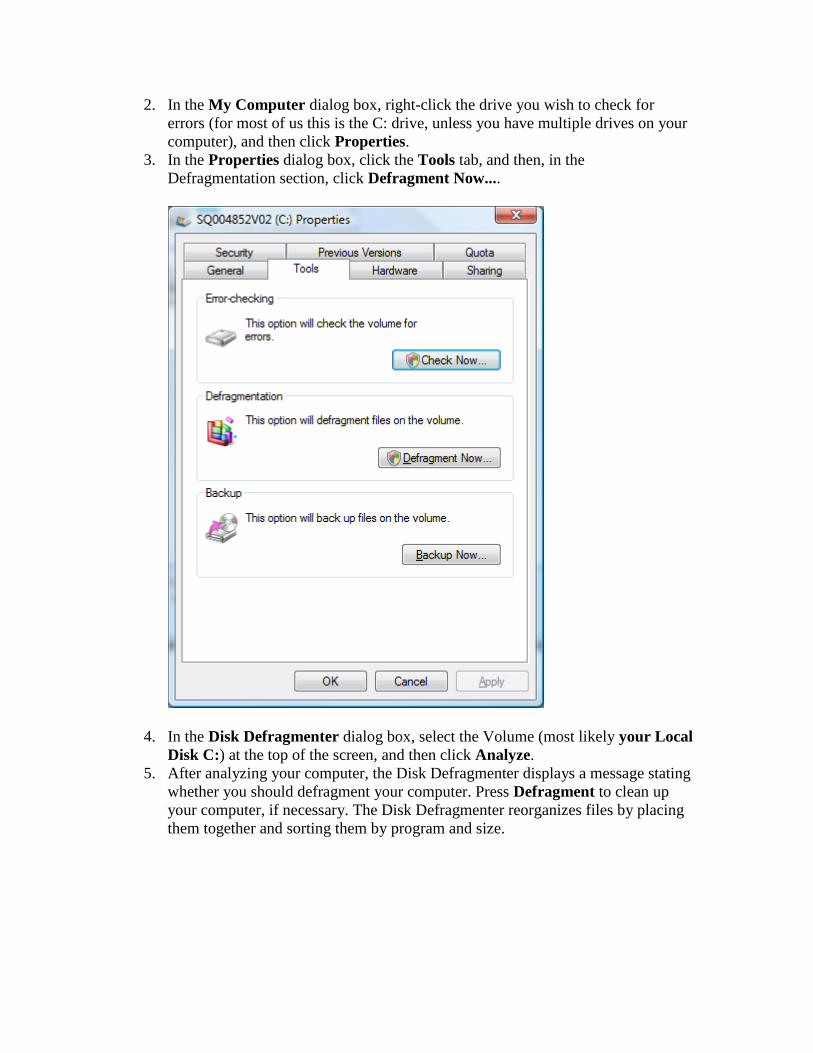
2. In the My Computer dialog box, right-click the drive you wish to check for
errors (for most of us this is the C: drive, unless you have multiple drives on your
computer), and then click Properties.
3. In the Properties dialog box, click the Tools tab, and then, in the
Defragmentation section, click Defragment Now....
4. In the Disk Defragmenter dialog box, select the Volume (most likely your Local
Disk C:) at the top of the screen, and then click Analyze.
5. After analyzing your computer, the Disk Defragmenter displays a message stating
whether you should defragment your computer. Press Defragment to clean up
your computer, if necessary. The Disk Defragmenter reorganizes files by placing
them together and sorting them by program and size.

Make Internet Explorer run faster
The Internet is everywhere—from the home to office to the classroom. We use it to
communicate, to work, to play—and even occasionally to waste time.
Yet there's nothing more frustrating than having this technical marvel at our fingertips 24
hours a day, 7 days a week, only to wait while our computers access it at a crawling pace.
Thankfully, Windows Internet Explorer provides some useful options for quicker web
surfing.
Reduce the size of your webpage history
Internet Explorer stores visited webpages to your computer, organizing them within a
page history by day. Although it's useful to keep a couple days of web history within your
computer, there's no need to store more than a week's worth. Any more than that and the
collected webpages can slow down your computer's performance.
Note: Depending on which version of Internet Explorer you're using, the steps outlined
and images shown may vary slightly.
Reduce your webpage history
Don't save encrypted webpages
Encrypted webpages ask for user names and passwords. These pages scramble
information to prevent the reading of sensitive information. You can configure Internet
Explorer to not save these types of pages. You'll free up space by saving fewer files to
your computer, in addition to keeping secure information off of your computer.
Change setting to not save encrypted webpages
If Internet Explorer is not as quick as you'd like it to be, check out the article Is Internet
Explorer slow? 5 things to try for a few more tips specific to your browser.
Automate Windows Update
Configure once
Microsoft works constantly to release updates to Windows and other Microsoft products,
including Microsoft Office. With Windows Update, you can find and install all these
updates—not just the critical ones. Often, the updates can improve your computer's
performance.
You can make life easier by automating Windows Update so that your computer
downloads and installs all the updates without you having to worry about them.
Automate Windows Update:
Windows 7 users
1. Click the Start button , click All Programs, and then click Windows Update.
2. In the left pane, click Change settings.
3. Under Important Updates, choose Install Updates automatically
(recommended).
4. Under Recommended updates, select the Give me updates the same way I
receive important updates check box, and then click OK.

Windows Vista users
Windows XP users
1. In the Start menu, click Control Panel.
2. In the Automatic Updates dialog box, select the Automatic (Recommended)
check box. You can define the time of day that your computer should check for
updates. If the computer finds any updates, it will download and install them
automatically for you.
3. Click OK.

Remove spyware, and help protect your computer from
viruses
Download once, and get automatic updates
While you're busy surfing the web, spyware and other types of malicious software (also
known as malware) are collecting personal information about you, often without your
knowledge. The result is that your personal information could possibly be compromised.
At the same time, spyware and malware can slow down your computer. Download
Microsoft Security Essentials for free to help guard your system in the future from
viruses, spyware, adware, and other malware. Microsoft Security Essentials acts as a
spyware removal tool and includes automatic updates to help keep your system running
efficiently and to help protect it from emerging threats.
Note: For specific virus definitions and news, visit the Microsoft Malware Protection
Center.