Optimal Steam Shower Package - ThermaSolcdn.thermasol.com/pdf/manuals/manual_ospc-xx.pdfOptimal...
18
Optimal Steam Shower Package Installation Manual For Tutorials and Troubleshooting visit www.thermasol.com/solutions OSPC-XX, OSPT-XX, OSPMR-XX, OSPR-XX OVER 55 YEARS OF STEAM SHOWER INNOVATION
Transcript of Optimal Steam Shower Package - ThermaSolcdn.thermasol.com/pdf/manuals/manual_ospc-xx.pdfOptimal...

Op
timal
Ste
am S
ho
wer
Pac
kag
eInstallation ManualFor Tutorials and Troubleshooting visit www.thermasol.com/solutions
OSPC-XX, OSPT-XX, OSPMR-XX, OSPR-XX
OVER 55 YEARS OF STEAM SHOWER INNOVATION
Optimal Steam Shower Package Installation Instructions
THERMASOL.COM - 1.800.776.0711 PN: 81197_REV_NC 2/16
2
Read warnings on page 2. For illustrative purposes only. Consult with qualified professional for steam room construction details.
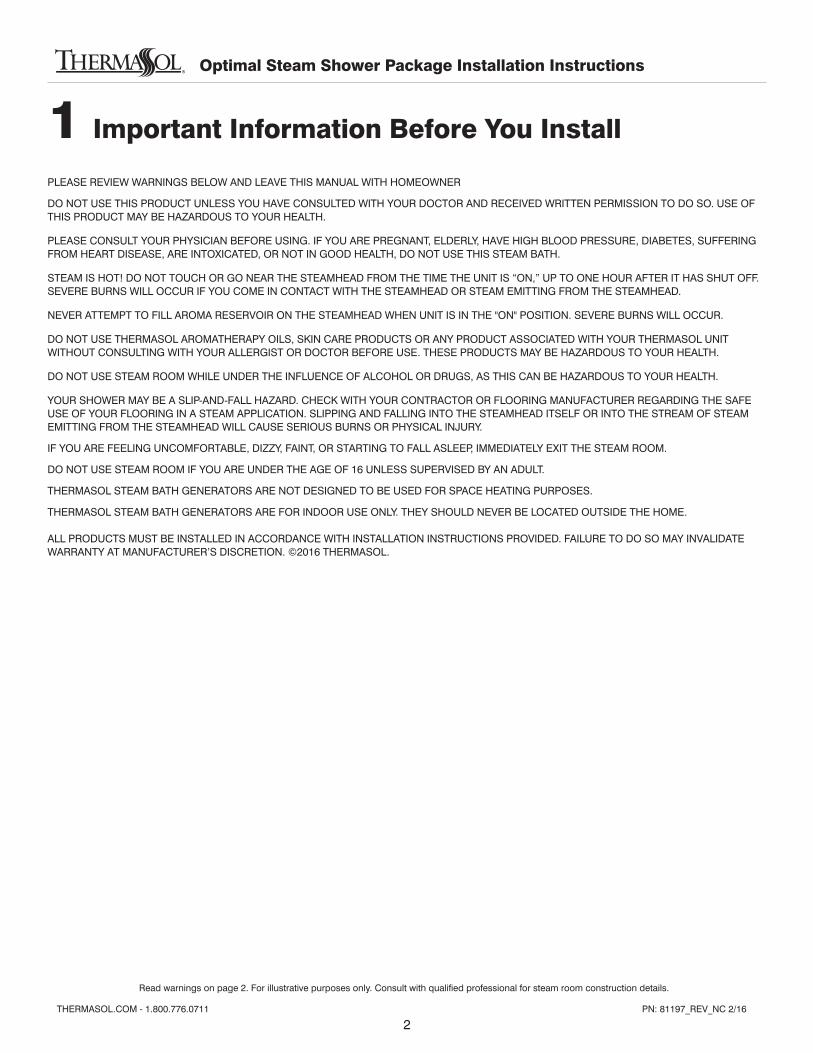
PLEASE REVIEW WARNINGS BELOW AND LEAVE THIS MANUAL WITH HOMEOWNER
DO NOT USE THIS PRODUCT UNLESS YOU HAVE CONSULTED WITH YOUR DOCTOR AND RECEIVED WRITTEN PERMISSION TO DO SO. USE OF THIS PRODUCT MAY BE HAZARDOUS TO YOUR HEALTH.
PLEASE CONSULT YOUR PHYSICIAN BEFORE USING. IF YOU ARE PREGNANT, ELDERLY, HAVE HIGH BLOOD PRESSURE, DIABETES, SUFFERING FROM HEART DISEASE, ARE INTOXICATED, OR NOT IN GOOD HEALTH, DO NOT USE THIS STEAM BATH.
STEAM IS HOT! DO NOT TOUCH OR GO NEAR THE STEAMHEAD FROM THE TIME THE UNIT IS “ON,” UP TO ONE HOUR AFTER IT HAS SHUT OFF. SEVERE BURNS WILL OCCUR IF YOU COME IN CONTACT WITH THE STEAMHEAD OR STEAM EMITTING FROM THE STEAMHEAD.
NEVER ATTEMPT TO FILL AROMA RESERVOIR ON THE STEAMHEAD WHEN UNIT IS IN THE "ON" POSITION. SEVERE BURNS WILL OCCUR.
DO NOT USE THERMASOL AROMATHERAPY OILS, SKIN CARE PRODUCTS OR ANY PRODUCT ASSOCIATED WITH YOUR THERMASOL UNIT WITHOUT CONSULTING WITH YOUR ALLERGIST OR DOCTOR BEFORE USE. THESE PRODUCTS MAY BE HAZARDOUS TO YOUR HEALTH.
DO NOT USE STEAM ROOM WHILE UNDER THE INFLUENCE OF ALCOHOL OR DRUGS, AS THIS CAN BE HAZARDOUS TO YOUR HEALTH.
YOUR SHOWER MAY BE A SLIP-AND-FALL HAZARD. CHECK WITH YOUR CONTRACTOR OR FLOORING MANUFACTURER REGARDING THE SAFE USE OF YOUR FLOORING IN A STEAM APPLICATION. SLIPPING AND FALLING INTO THE STEAMHEAD ITSELF OR INTO THE STREAM OF STEAM EMITTING FROM THE STEAMHEAD WILL CAUSE SERIOUS BURNS OR PHYSICAL INJURY.
IF YOU ARE FEELING UNCOMFORTABLE, DIZZY, FAINT, OR STARTING TO FALL ASLEEP, IMMEDIATELY EXIT THE STEAM ROOM.
DO NOT USE STEAM ROOM IF YOU ARE UNDER THE AGE OF 16 UNLESS SUPERVISED BY AN ADULT.
THERMASOL STEAM BATH GENERATORS ARE NOT DESIGNED TO BE USED FOR SPACE HEATING PURPOSES.
THERMASOL STEAM BATH GENERATORS ARE FOR INDOOR USE ONLY. THEY SHOULD NEVER BE LOCATED OUTSIDE THE HOME.
ALL PRODUCTS MUST BE INSTALLED IN ACCORDANCE WITH INSTALLATION INSTRUCTIONS PROVIDED. FAILURE TO DO SO MAY INVALIDATE WARRANTY AT MANUFACTURER’S DISCRETION. ©2016 THERMASOL.
Important Information Before You Install1
Optimal Steam Shower Package Installation Instructions
THERMASOL.COM - 1.800.776.0711 PN: 81197_REV_NC 2/16
3
Read warnings on page 2. For illustrative purposes only. Consult with qualified professional for steam room construction details.
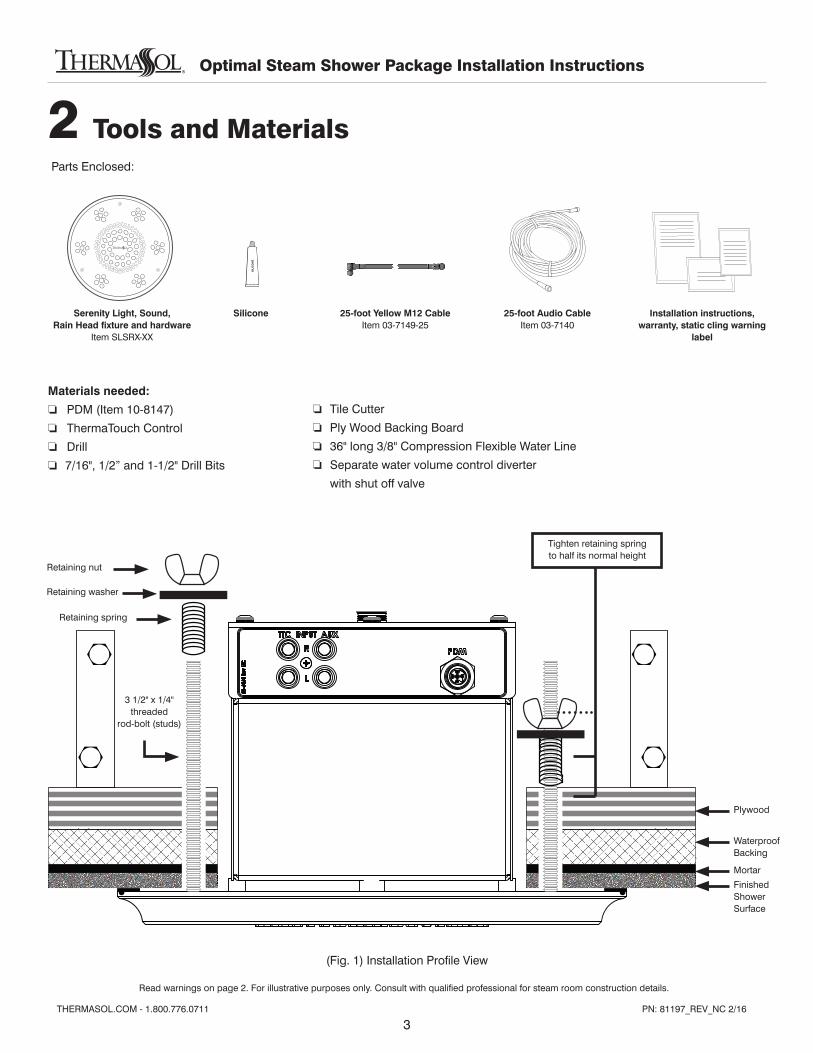
Tools and Materials2Parts Enclosed:
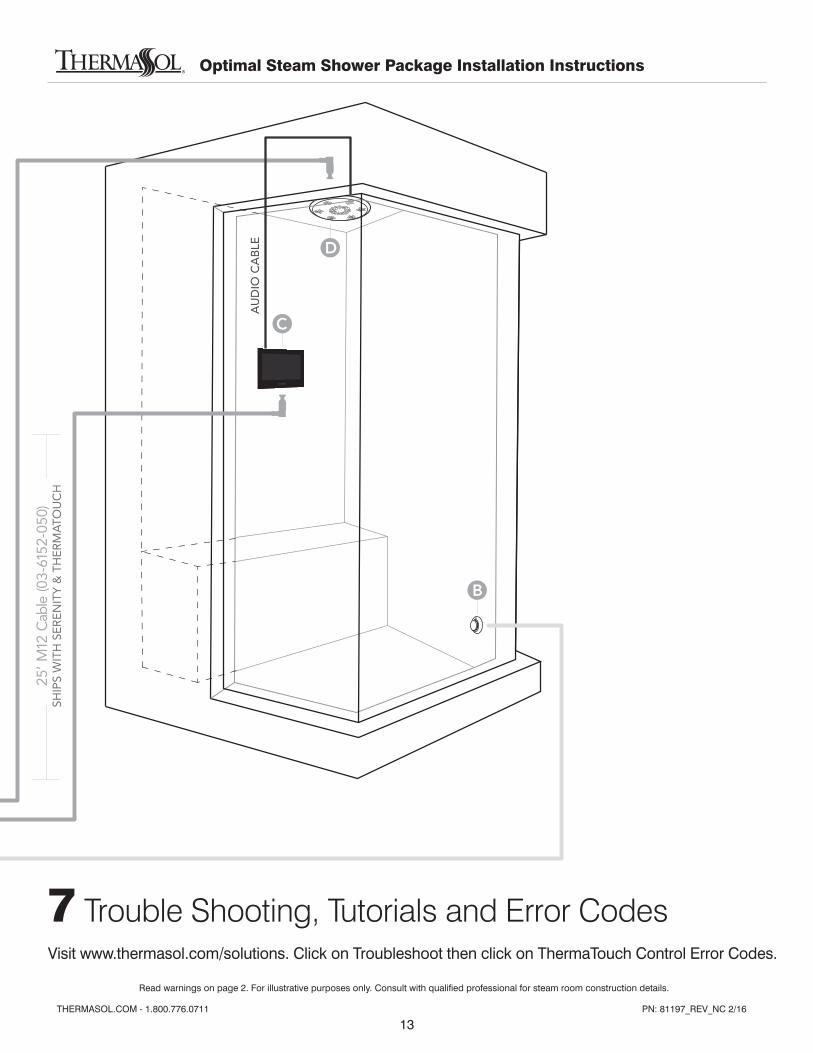
Serenity Light, Sound, Rain Head fixture and hardware
Item SLSRX-XX
Silicone 25-foot Yellow M12 CableItem 03-7149-25
25-foot Audio Cable Item 03-7140
Installation instructions, warranty, static cling warning
label
Materials needed:
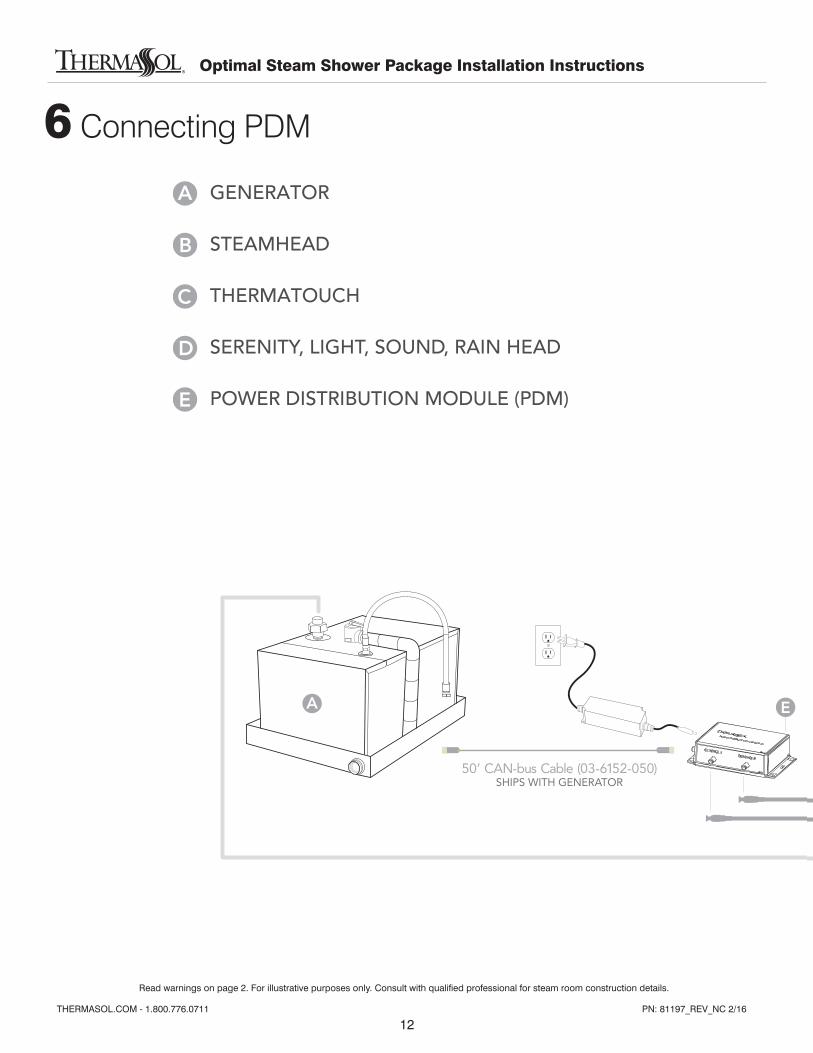
o PDM (Item 10-8147)
o ThermaTouch Control
o Drill
o 7/16", 1/2” and 1-1/2" Drill Bits
o Tile Cutter
o Ply Wood Backing Board
o 36" long 3/8" Compression Flexible Water Line
o Separate water volume control diverter
with shut off valve
Tighten retaining spring to half its normal height
Plywood
Waterproof Backing
Mortar
Finished Shower Surface
3 1/2" x 1/4" threaded
rod-bolt (studs)
Retaining nut
Retaining washer
Retaining spring
(Fig. 1) Installation Profile View

Optimal Steam Shower Package Installation Instructions
THERMASOL.COM - 1.800.776.0711 PN: 81197_REV_NC 2/16
4
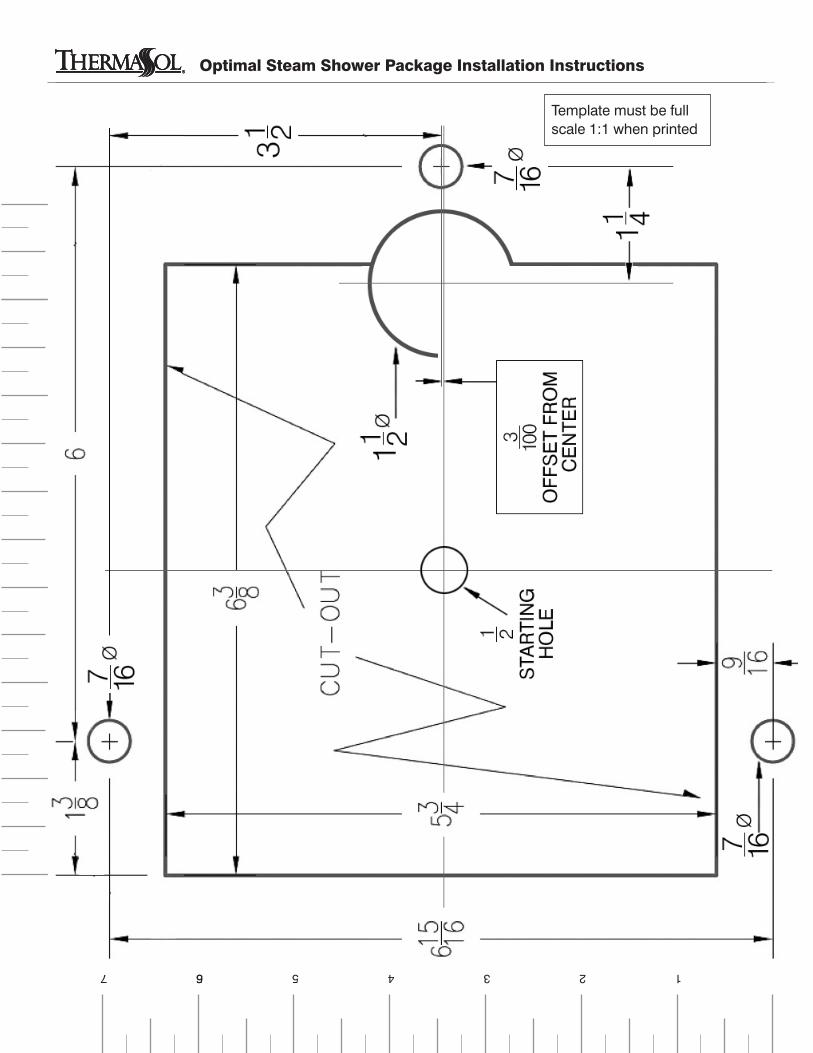
Placing and Cutting Template3After completing the shower construction and running the necessary cables, water supplies and etc. using template included in these instructions (page 8) proceed to:
• After choosing the desired location, use the printed template to drill the three 7/16” holes
• Then proceed cutting the cutout Note: Template must be printed out at actual size.
Install suitable wood support between joists.
7/16”
Cutout
PDM Sold and shipswith ThermaTouch control
ThermaTouch Controlsold separately
This 25-foot Yellow M12 CableItem 03-7149-25
ships with ThermaTouch control
This 25-foot Yellow M12 Cable
Item 03-7149-25 ships with Serenity Light,
Sound, Rain Head
25-foot Audio Cable Item 03-7140
ships with Serenity Light, Sound, Rain Head
Template (see back cover)
Optimal Steam Shower Package Installation Instructions
THERMASOL.COM - 1.800.776.0711 PN: 81197_REV_NC 2/16
5
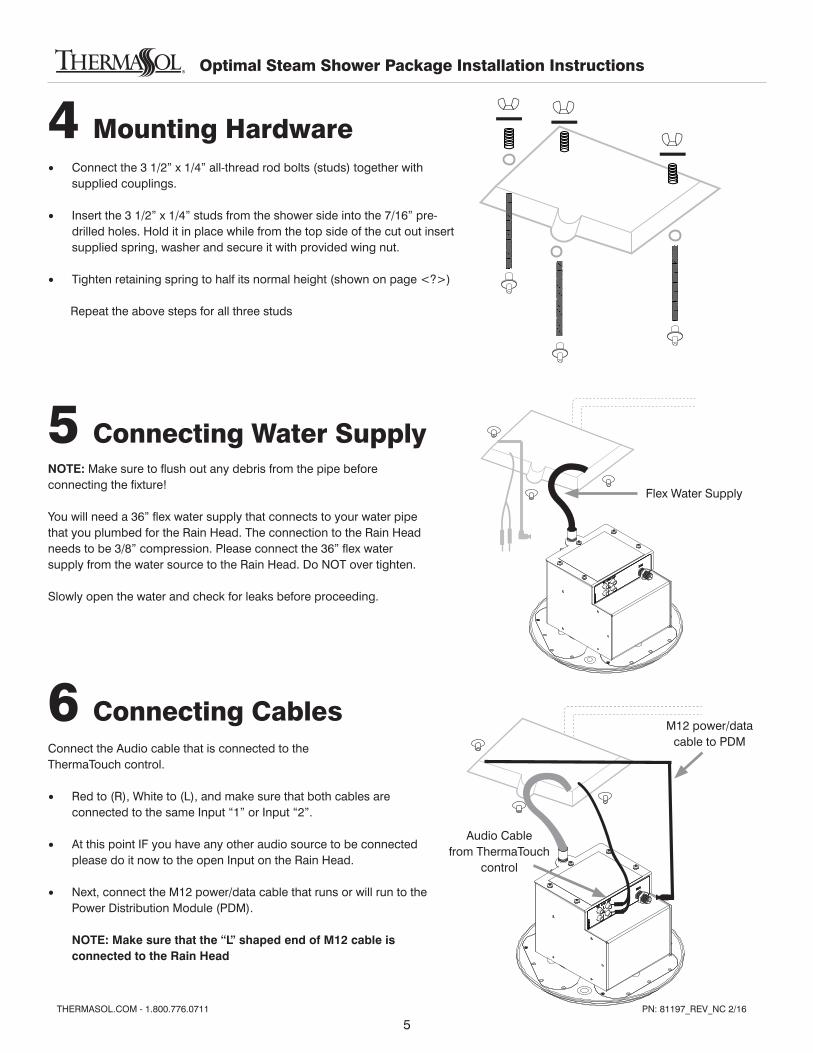
Connecting Cables6
Mounting Hardware4
Connecting Water Supply5
• Connect the 3 1/2” x 1/4” all-thread rod bolts (studs) together with supplied couplings.
• Insert the 3 1/2” x 1/4” studs from the shower side into the 7/16” pre-drilled holes. Hold it in place while from the top side of the cut out insert supplied spring, washer and secure it with provided wing nut.
• Tighten retaining spring to half its normal height (shown on page <?>)
Repeat the above steps for all three studs
NOTE: Make sure to flush out any debris from the pipe before connecting the fixture!
You will need a 36” flex water supply that connects to your water pipe that you plumbed for the Rain Head. The connection to the Rain Head needs to be 3/8” compression. Please connect the 36” flex water supply from the water source to the Rain Head. Do NOT over tighten.
Slowly open the water and check for leaks before proceeding.
Flex Water Supply
Connect the Audio cable that is connected to the ThermaTouch control.
• Red to (R), White to (L), and make sure that both cables are connected to the same Input “1” or Input “2”.
• At this point IF you have any other audio source to be connected please do it now to the open Input on the Rain Head.
• Next, connect the M12 power/data cable that runs or will run to the Power Distribution Module (PDM). NOTE: Make sure that the “L” shaped end of M12 cable is connected to the Rain Head
Audio Cablefrom ThermaTouch
control
M12 power/data cable to PDM
Optimal Steam Shower Package Installation Instructions
THERMASOL.COM - 1.800.776.0711 PN: 81197_REV_NC 2/16
6
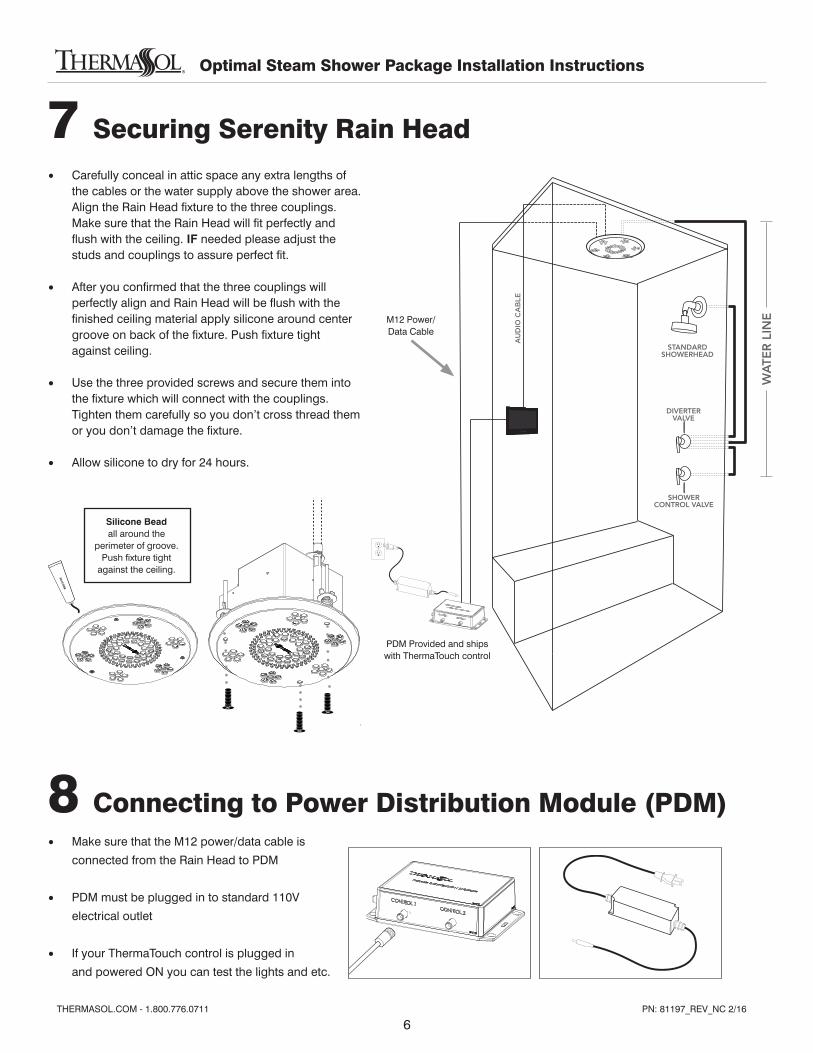
• Carefully conceal in attic space any extra lengths of the cables or the water supply above the shower area. Align the Rain Head fixture to the three couplings. Make sure that the Rain Head will fit perfectly and flush with the ceiling. IF needed please adjust the studs and couplings to assure perfect fit.
• After you confirmed that the three couplings will perfectly align and Rain Head will be flush with the finished ceiling material apply silicone around center groove on back of the fixture. Push fixture tight against ceiling.
• Use the three provided screws and secure them into the fixture which will connect with the couplings. Tighten them carefully so you don’t cross thread them or you don’t damage the fixture.
• Allow silicone to dry for 24 hours.
• Make sure that the M12 power/data cable is
connected from the Rain Head to PDM
• PDM must be plugged in to standard 110V
electrical outlet
• If your ThermaTouch control is plugged in
and powered ON you can test the lights and etc.
AU
DIO
CA
BLE
PDM Provided and shipswith ThermaTouch control
M12 Power/Data Cable
Silicone Beadall around the
perimeter of groove.Push fixture tight
against the ceiling.
Securing Serenity Rain Head7
Connecting to Power Distribution Module (PDM)8
Optimal Steam Shower Package Installation Instructions1
23
45
67
Template must be full scale 1:1 when printed
1234557 6

ThermaTouch Control

Optimal Steam Shower Package Installation Instructions
THERMASOL.COM - 1.800.776.0711 PN: 81197_REV_NC 2/16
9
Read warnings on page 2. For illustrative purposes only. Consult with qualified professional for steam room construction details.
7.5” W by 5.5” opening for recessed mount TTMR-BK Mud Ring
3 Mud Ring Application
Materials needed:o ThermaTouch controlo M12 cableo Siliconeo Power Distribution Module (PDM)o Mud Ringo Ethernet Cable with RJ-45 Connector (not supplied)o Other materials as required
ControllerItem TTMR-BK
Installation instructions, warranty, static cling warning label
PDMItem 10-8147
Mud RingItem 04-8544
Silicone 25-foot Yellow M12 Cable Item 03-7149-25
2 Tools and Materials
Shower wall
Shower wall
Mud Ring goes inside wall opening
Back of Control
Power/Data M12 connection
Audio Out
Plug in network cable RJ-45 for updates over the internet
Bluetooth Antenna
Finished wall must be flush with the mud ring.
Power Supply BrickItem 03-7142
Reminder: in order to receive software updates the unit must be plugged into the internet using an Ethernet Cable connected to a Router (Router and Ethernet Cable not supplied).
Optimal Steam Shower Package Installation Instructions
THERMASOL.COM - 1.800.776.0711 PN: 81197_REV_NC 2/16
10
Read warnings on page 2. For illustrative purposes only. Consult with qualified professional for steam room construction details.
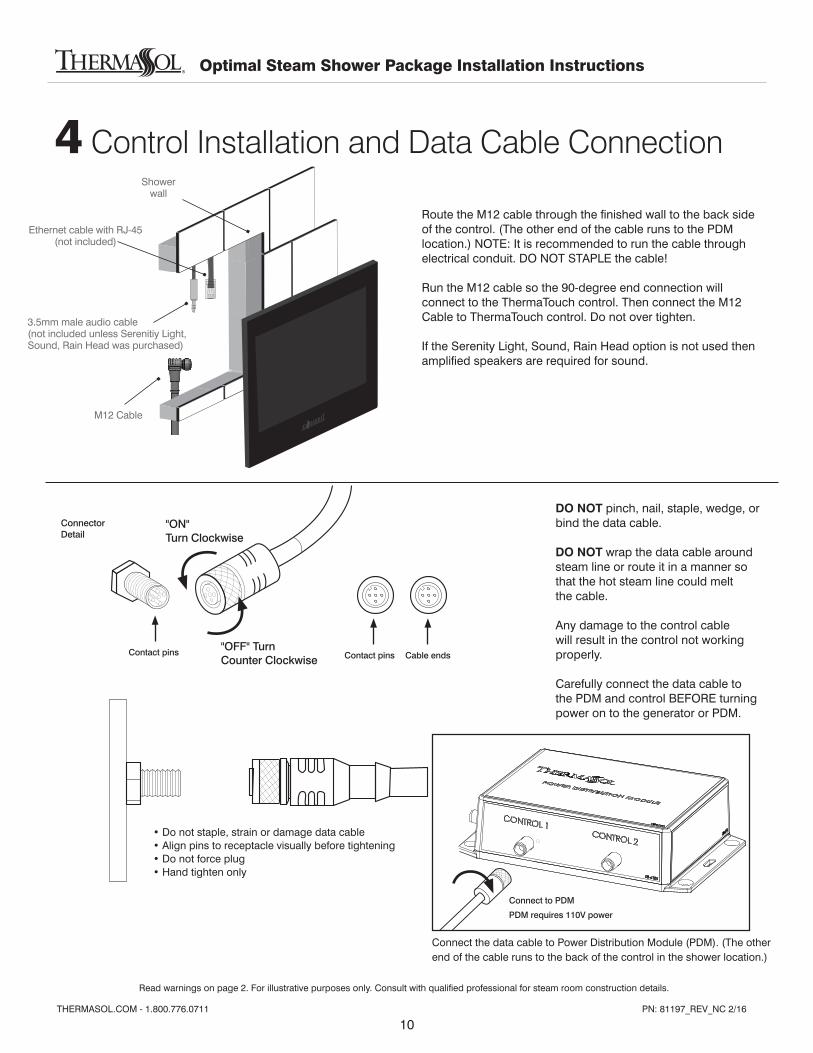
Shower wall
Route the M12 cable through the finished wall to the back side of the control. (The other end of the cable runs to the PDM location.) NOTE: It is recommended to run the cable through electrical conduit. DO NOT STAPLE the cable!
Run the M12 cable so the 90-degree end connection will connect to the ThermaTouch control. Then connect the M12 Cable to ThermaTouch control. Do not over tighten.
If the Serenity Light, Sound, Rain Head option is not used then amplified speakers are required for sound.
Connect the data cable to Power Distribution Module (PDM). (The other end of the cable runs to the back of the control in the shower location.)
DO NOT pinch, nail, staple, wedge, or bind the data cable.
DO NOT wrap the data cable around steam line or route it in a manner so that the hot steam line could melt the cable.
Any damage to the control cable will result in the control not working properly.
Carefully connect the data cable to the PDM and control BEFORE turning power on to the generator or PDM.
"ON" Turn Clockwise
"OFF" Turn Counter Clockwise
• Do not staple, strain or damage data cable• Align pins to receptacle visually before tightening• Do not force plug• Hand tighten only
Connector Detail
Connect to PDM
PDM requires 110V power
Contact pins
4 Control Installation and Data Cable Connection
Contact pins Cable ends
3.5mm male audio cable (not included unless Serenitiy Light, Sound, Rain Head was purchased)
M12 Cable
Ethernet cable with RJ-45(not included)
Optimal Steam Shower Package Installation Instructions
THERMASOL.COM - 1.800.776.0711 PN: 81197_REV_NC 2/16
11
Read warnings on page 2. For illustrative purposes only. Consult with qualified professional for steam room construction details.
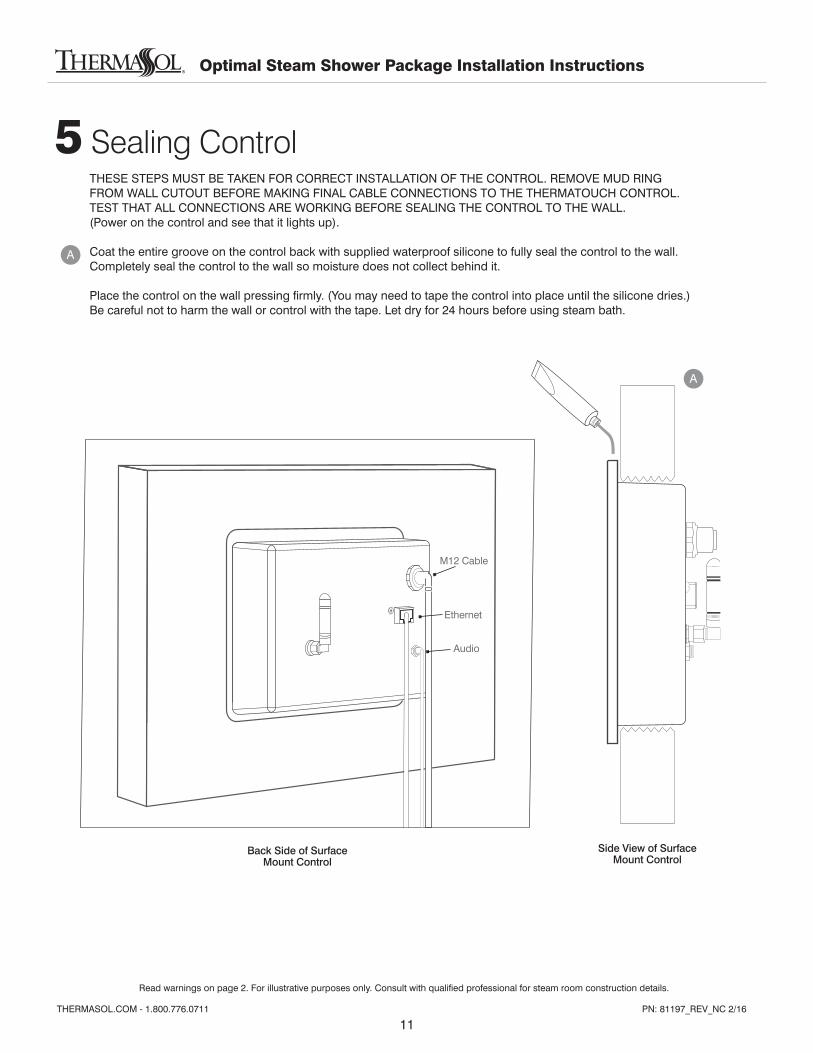
THESE STEPS MUST BE TAKEN FOR CORRECT INSTALLATION OF THE CONTROL. REMOVE MUD RING FROM WALL CUTOUT BEFORE MAKING FINAL CABLE CONNECTIONS TO THE THERMATOUCH CONTROL.TEST THAT ALL CONNECTIONS ARE WORKING BEFORE SEALING THE CONTROL TO THE WALL. (Power on the control and see that it lights up).
Coat the entire groove on the control back with supplied waterproof silicone to fully seal the control to the wall.Completely seal the control to the wall so moisture does not collect behind it.
Place the control on the wall pressing firmly. (You may need to tape the control into place until the silicone dries.) Be careful not to harm the wall or control with the tape. Let dry for 24 hours before using steam bath.
A
5 Sealing Control
Side View of Surface Mount Control
Back Side of Surface Mount Control
A
M12 Cable
Ethernet
Audio
Optimal Steam Shower Package Installation Instructions
THERMASOL.COM - 1.800.776.0711 PN: 81197_REV_NC 2/16
12
Read warnings on page 2. For illustrative purposes only. Consult with qualified professional for steam room construction details.
AUDI
O C
ABLE
6 Connecting PDM
AUDI
O C
ABLE
Optimal Steam Shower Package Installation Instructions
THERMASOL.COM - 1.800.776.0711 PN: 81197_REV_NC 2/16
13
Read warnings on page 2. For illustrative purposes only. Consult with qualified professional for steam room construction details.
AUDI
O C
ABLE
7 Trouble Shooting, Tutorials and Error CodesVisit www.thermasol.com/solutions. Click on Troubleshoot then click on ThermaTouch Control Error Codes.
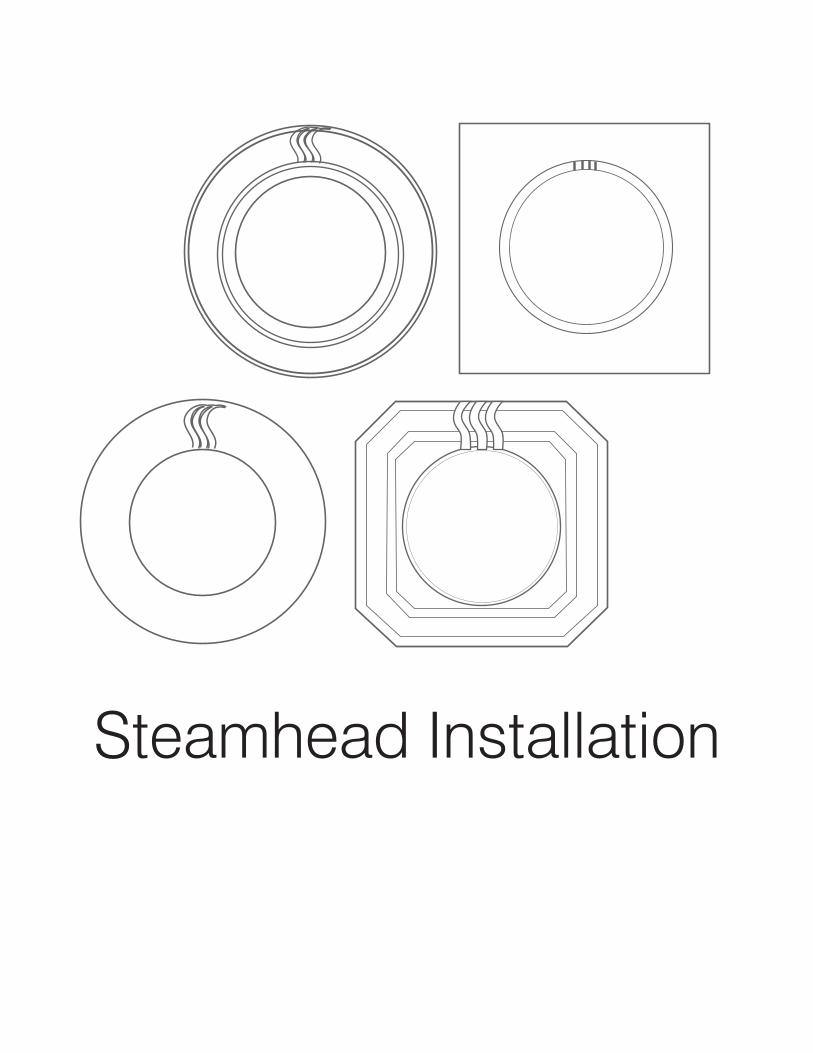
Steamhead Installation
Steamhead Installation Instructions
PLEASE REVIEW WARNINGS BELOW AND LEAVE THIS MANUAL WITH HOMEOWNER
DO NOT USE THIS PRODUCT UNLESS YOU HAVE CONSULTED WITH YOUR DOCTOR AND RECEIVED WRITTEN PERMISSION TO DO SO. USE OF THIS PRODUCT MAY BE HAZARDOUS TO YOUR HEALTH.
PLEASE CONSULT YOUR PHYSICIAN BEFORE USING. IF YOU ARE PREGNANT, ELDERLY, HAVE HIGH BLOOD PRESSURE, DIABETES, SUFFERING FROM HEART DISEASE, ARE INTOXICATED, OR NOT IN GOOD HEALTH, DO NOT USE THIS STEAM BATH.
STEAM IS HOT! DO NOT TOUCH OR GO NEAR THE STEAMHEAD FROM THE TIME THE UNIT IS “ON,” UP TO ONE HOUR AFTER IT HAS SHUT OFF. SEVERE BURNS WILL OCCUR IF YOU COME IN CONTACT WITH THE STEAMHEAD OR STEAM EMITTING FROM THE STEAMHEAD.
NEVER ATTEMPT TO FILL AROMA RESERVOIR ON THE STEAMHEAD WHEN UNIT IS IN THE "ON" POSITION. SEVERE BURNS WILL OCCUR.
DO NOT USE THERMASOL AROMATHERAPY OILS, SKIN CARE PRODUCTS OR ANY PRODUCT ASSOCIATED WITH YOUR THERMASOL UNIT WITHOUT CONSULTING WITH YOUR ALLERGIST OR DOCTOR BEFORE USE. THESE PRODUCTS MAY BE HAZARDOUS TO YOUR HEALTH.
DO NOT USE STEAM ROOM WHILE UNDER THE INFLUENCE OF ALCOHOL OR DRUGS, AS THIS CAN BE HAZARDOUS TO YOUR HEALTH.
YOUR SHOWER MAY BE A SLIP-AND-FALL HAZARD. CHECK WITH YOUR CONTRACTOR OR FLOORING MANUFACTURER REGARDING THE SAFE USE OF YOUR FLOORING IN A STEAM APPLICATION. SLIPPING AND FALLING INTO THE STEAMHEAD ITSELF OR INTO THE STREAM OF STEAM EMITTING FROM THE STEAMHEAD WILL CAUSE SERIOUS BURNS OR PHYSICAL INJURY.
IF YOU ARE FEELING UNCOMFORTABLE, DIZZY, FAINT, OR STARTING TO FALL ASLEEP, IMMEDIATELY EXIT THE STEAM ROOM.
DO NOT USE STEAM ROOM IF YOU ARE UNDER THE AGE OF 16 UNLESS SUPERVISED BY AN ADULT.
THERMASOL STEAM BATH GENERATORS ARE NOT DESIGNED TO BE USED FOR SPACE HEATING PURPOSES.
THERMASOL STEAM BATH GENERATORS ARE FOR INDOOR USE ONLY. THEY SHOULD NEVER BE LOCATED OUTSIDE THE HOME.
All products must be installed in accordance with installation instructions provided. Failure to do so may invalidate warranty at manufacturer’s discretion. ©2016 ThermaSol.
THERMASOL.COM I 800.776.0711
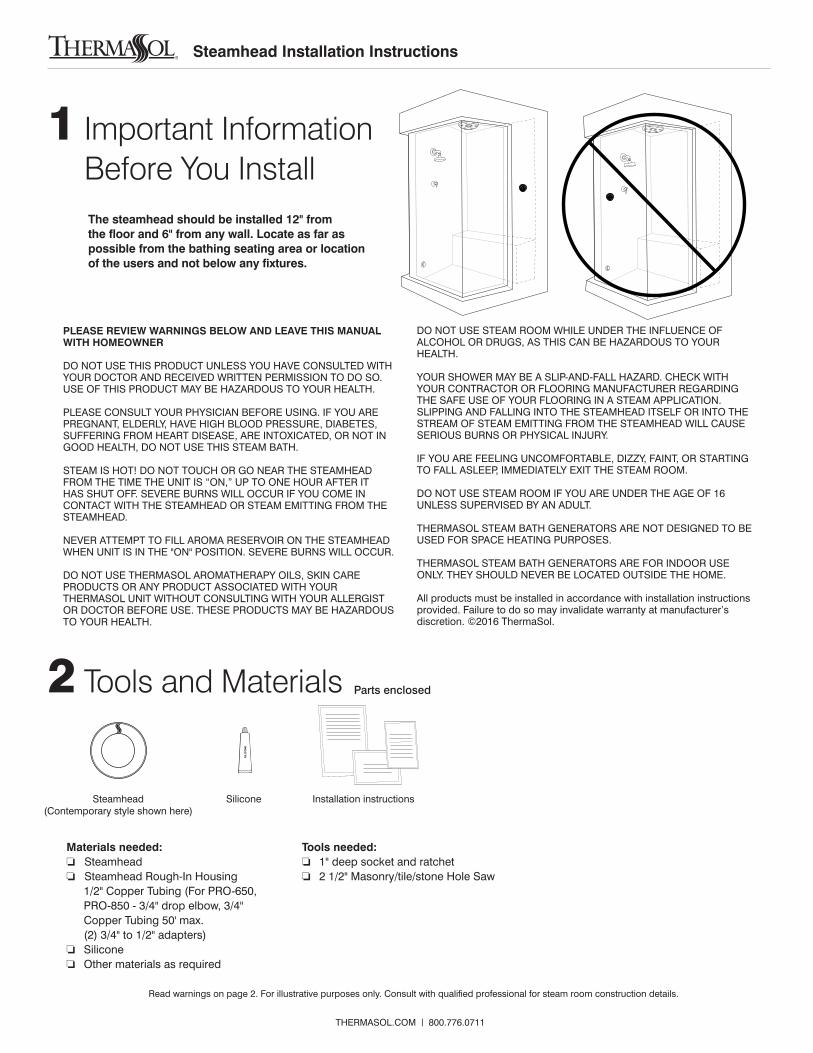
1 Important Information Before You Install
Materials needed:o Steamheado Steamhead Rough-In Housing 1/2" Copper Tubing (For PRO-650, PRO-850 - 3/4" drop elbow, 3/4" Copper Tubing 50' max. (2) 3/4" to 1/2" adapters)o Siliconeo Other materials as required
Tools needed:o 1" deep socket and ratcheto 2 1/2" Masonry/tile/stone Hole Saw
Steamhead(Contemporary style shown here)
Installation instructionsSilicone
2 Tools and Materials Parts enclosed
The steamhead should be installed 12" from the floor and 6" from any wall. Locate as far as possible from the bathing seating area or location of the users and not below any fixtures.
Read warnings on page 2. For illustrative purposes only. Consult with qualified professional for steam room construction details.
Optimal Steam Shower Package Installation Instructions
THERMASOL.COM - 1.800.776.0711 PN: 81197_REV_NC 2/16
16
Read warnings on page 2. For illustrative purposes only. Consult with qualified professional for steam room construction details.
Steamhead Location
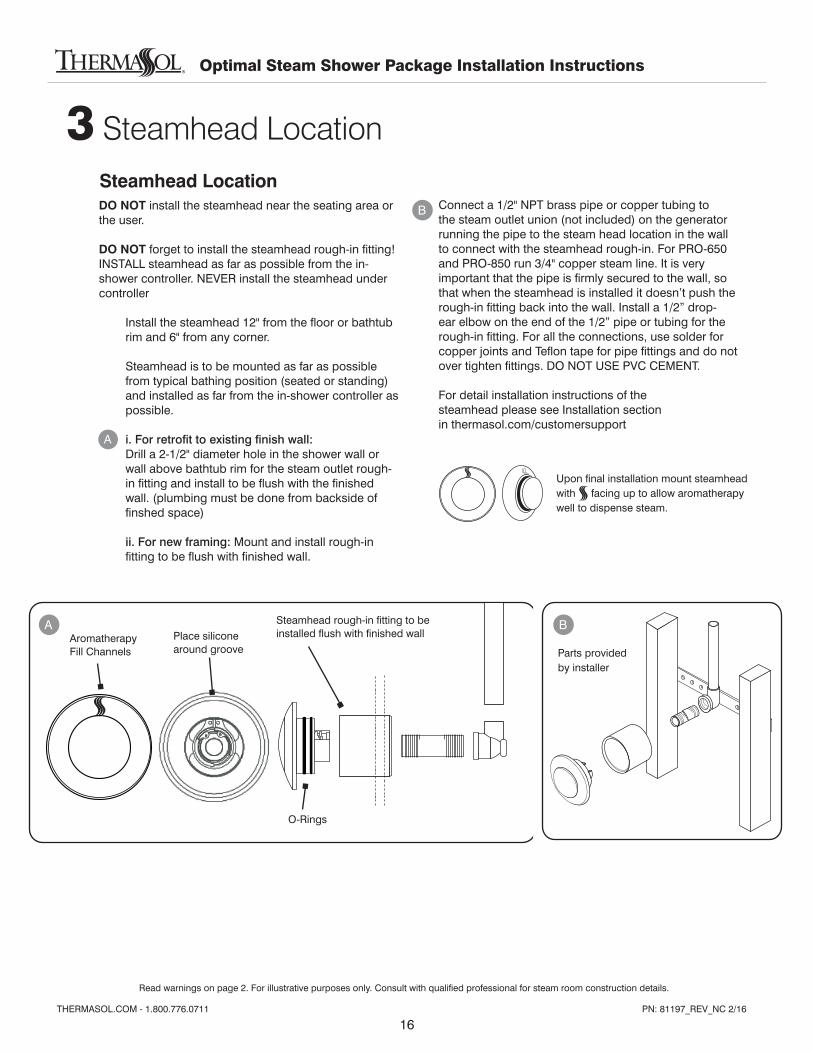
Upon final installation mount steamhead with facing up to allow aromatherapy well to dispense steam.
DO NOT install the steamhead near the seating area or the user.
DO NOT forget to install the steamhead rough-in fitting!INSTALL steamhead as far as possible from the in-shower controller. NEVER install the steamhead under controller
Install the steamhead 12" from the floor or bathtub rim and 6" from any corner.
Steamhead is to be mounted as far as possible from typical bathing position (seated or standing) and installed as far from the in-shower controller as possible.
i. For retrofit to existing finish wall: Drill a 2-1/2" diameter hole in the shower wall or wall above bathtub rim for the steam outlet rough- in fitting and install to be flush with the finished wall. (plumbing must be done from backside of finshed space)
ii. For new framing: Mount and install rough-in fitting to be flush with finished wall.
Connect a 1/2" NPT brass pipe or copper tubing to the steam outlet union (not included) on the generator running the pipe to the steam head location in the wall to connect with the steamhead rough-in. For PRO-650 and PRO-850 run 3/4" copper steam line. It is very important that the pipe is firmly secured to the wall, so that when the steamhead is installed it doesn’t push the rough-in fitting back into the wall. Install a 1/2” drop-ear elbow on the end of the 1/2” pipe or tubing for the rough-in fitting. For all the connections, use solder for copper joints and Teflon tape for pipe fittings and do not over tighten fittings. DO NOT USE PVC CEMENT.
For detail installation instructions of thesteamhead please see Installation sectionin thermasol.com/customersupport
A
Steamhead rough-in fitting to be installed flush with finished wall
A B
B
Parts provided by installer
3 Steamhead Location
Aromatherapy Fill Channels
Place silicone around groove
O-Rings
Optimal Steam Shower Package Installation Instructions
THERMASOL.COM - 1.800.776.0711 PN: 81197_REV_NC 2/16
17
Read warnings on page 2. For illustrative purposes only. Consult with qualified professional for steam room construction details.
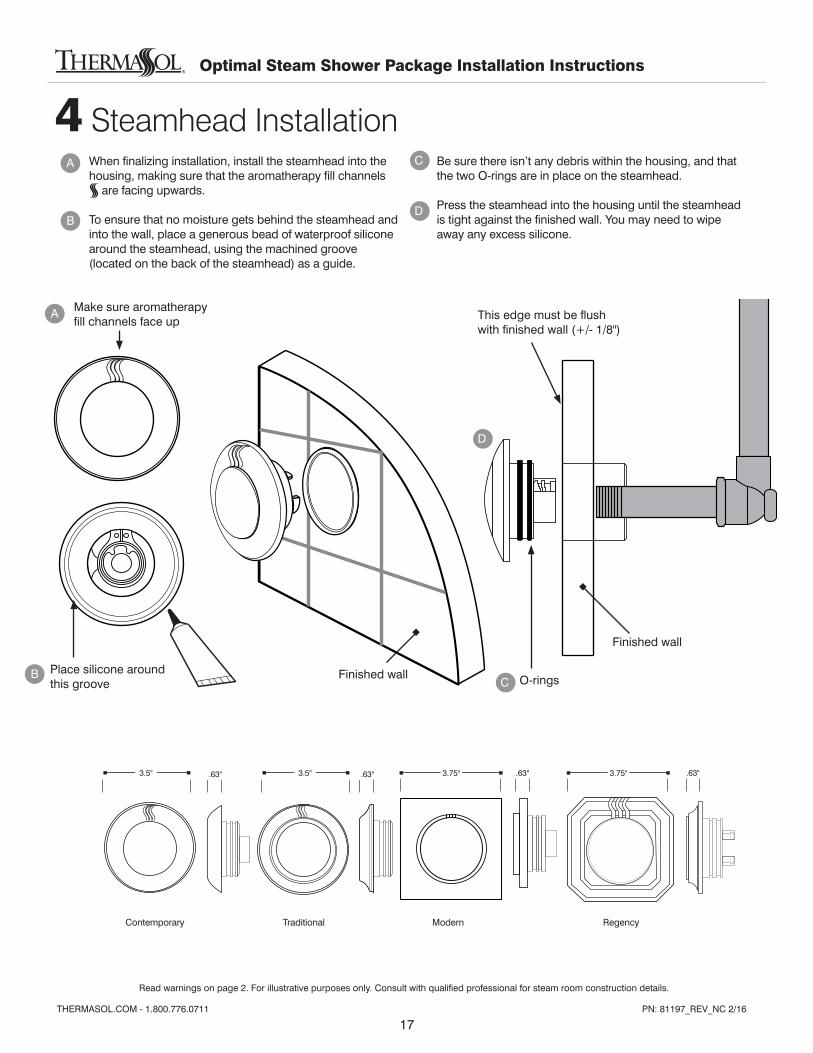
When finalizing installation, install the steamhead into the housing, making sure that the aromatherapy fill channels
are facing upwards.
To ensure that no moisture gets behind the steamhead and into the wall, place a generous bead of waterproof silicone around the steamhead, using the machined groove (located on the back of the steamhead) as a guide.
Be sure there isn’t any debris within the housing, and that the two O-rings are in place on the steamhead.
Press the steamhead into the housing until the steamhead is tight against the finished wall. You may need to wipe away any excess silicone.
Make sure aromatherapy fill channels face up
Place silicone around this groove O-rings
This edge must be flush with finished wall (+/- 1/8")
Finished wall
Finished wall
.63"
Contemporary
.63"
Traditional
3.5" 3.5" 3.75" 3.75" .63" .63"
Modern Regency
A
A
B
B
C
C
D
D
4 Steamhead Installation

1958 STEAM WAY ROUND ROCK, TX 78665PHONE: 800.776.0711 | FAX: 800.556.5257 | WWW.THERMASOL.COM