OptiFlex Installation Guide - slowchinese.com€¦ · OptiFlex Installation Guide. About Omnicell...
156
OptiFlex Installation Guide
Transcript of OptiFlex Installation Guide - slowchinese.com€¦ · OptiFlex Installation Guide. About Omnicell...

OptiFlex Installation Guide

About OmnicellEstablished in 1992, Omnicell (NASDAQ: OMCL) is a leading provider of patient safety solutions preferred by nurses. Improving patient care by enhancing operational efficiency, Omnicell solutions are used throughout the healthcare facility–in the pharmacy, nursing units, surgical services, cath lab, and all the way to the patient’s bedside. The company's MedGuard line of solutions for the medication-use process includes systems for physician order management, automated pharmacy retrieval, medication packaging, medication dispensing, and nursing workflow automation with bar code medication administration. For the medical-surgical supply chain, Omnicell's OptiFlex™ product line provides open bar code systems, cabinet-based supply management, integrated open and cabinet-based systems, and Web-based procurement. More than 1,500 healthcare facilities use Omnicell solutions to help reduce medication errors, operate more efficiently, and decrease costs--ultimately contributing to improved clinical and financial outcomes. For more information, visit www.omnicell.com.This guide and accompanying software and/or hardware described in it are protected under copyright laws and may not be copied, wholly or in part, without the express written consent of Omnicell, Inc. The same proprietary and copyright notices must be attached to any permitted copies as were attached to the original works.
OMNICELL and the OMNICELL design mark, DECISIONCENTER, MEDGUARD, OMNIBUYER, OMNICENTER, OMNIEVOLVE, OMNIGATE, OMNILINKRX, OMNIRX, OMNISUPPLIER, OPTIFLEX, SAFETYMED, SAFETYPAK, SAFETYSTOCK, SECUREVAULT, SURE-MED, TOUCH & GO, and WORKFLOWRX are trademarks or registered trademarks of Omnicell, Inc. in the United States and internationally. All other trademarks and trade names are the property of their respective owners.©2004 Omnicell, Inc. All rights reserved.

OptiFlex • TOC 1
1. TOCDocument OverviewOptiFlex MS (Medical Services) ............................................................1.1OptiFlex SS (Surgical Services) ............................................................1.1Reference ..............................................................................................1.1
MS: OverviewRequired Equipment/Software...............................................................2.1Components ..........................................................................................2.1
Hospital Systems .............................................................................2.2OptiFlex DB Server ..........................................................................2.2OptiFlex Inventory/Requisitions Station (ICM/REQM) .....................2.2OptiFlex Nurse Station (ScanReq) ..................................................2.2
OptiFlex SQL DB ..................................................................................... 2.3Transaction Tables ..........................................................................2.3
tbl_TransactionTypes .................................................................2.3tbl_Transactions .........................................................................2.3tbl_ReceivingTransactions (1, 6) ................................................2.3
Transaction Types ...........................................................................2.4Charge patient (CHG) ................................................................2.4
ISSUE (2) .................................................................................2.4CREDIT (8) ..............................................................................2.4PRE_PICKED (12) ...................................................................2.4PRE_PICKCR (13) ..................................................................2.4
Order Material (REQ) .................................................................2.5ORDER_HOST (3) ..................................................................2.5ORDER_USER (4) ..................................................................2.5ORDER_DEL (11) ...................................................................2.5
Receive Material (INV) ...............................................................2.5RECEIVE (1) ............................................................................2.5ADJUST (6) .............................................................................2.5
Inventory Material (INV) .............................................................2.6COUNT (5) (OnOrder -) ...........................................................2.6INVENTORY (9) (OnOrder NO CHANGE) ..............................2.6ADDITEM (10) .........................................................................2.6
DB Connections ...............................................................................2.7Host (Omnigate) to Server DB Sockets (via IFE) .......................2.8Inventory/Client to Server DB Connections ................................2.8
Installation Process ...............................................................................2.9Timeplan ..........................................................................................2.9Required Tools ................................................................................2.9
Site Connectivity .........................................................................2.9Remote Control Software ...........................................................2.9
MS: Hospital SystemsBin Installation .......................................................................................3.1Data Exchange with Hospital Systems ..................................................3.1
MS: DB ServerDB Installation........................................................................................4.1
SQL Server Authentication ..............................................................4.1

2 OptiFlex • TOC
Attach DB’s ...................................................................................... 4.2Quick Start: Test DB .................................................................. 4.2Customer Install: Live and Test DB’s ......................................... 4.2
Login Configuration ......................................................................... 4.3Quick Start: Delete User ScanReq1 ........................................... 4.3Create Login ScanReq1 ............................................................. 4.4Add Login Station(s) ................................................................... 4.5Add Permission .......................................................................... 4.6Enter Facility/Program Parameters ............................................ 4.6
IFE Installation ...................................................................................... 4.6Install Application ............................................................................ 4.6Configure Interfaces.mdb ................................................................ 4.7Setup InterfaceEngine.exe as Service ............................................ 4.7Start the Interface Engine ................................................................ 4.7
Test with Test Hospital Systems .......................................................... 4.7Connect to Production Hospital Systems .............................................. 4.7
MS: Inventory Station (ICM)Install PC Applications........................................................................... 5.1
Install Applications ........................................................................... 5.1Setup ScanReqC.mdb Tables ......................................................... 5.2
MS Access ................................................................................. 5.2Table Databases ..................................................................... 5.2Table Applications ................................................................... 5.2
Setup Menu ................................................................................ 5.3Open the Setup Menu ............................................................. 5.3Table Databases ..................................................................... 5.4Table Applications ................................................................... 5.4
Open ICM ........................................................................................ 5.5Configure REQM ............................................................................. 5.6Configure PocketPRO Client (DB Connection) ............................... 5.8Configure Videx Client (DB Connection) ......................................... 5.8
Install Scanner Applications ................................................................. 5.9PocketPro ........................................................................................ 5.9
Connect to the PC ...................................................................... 5.9Install MSASYNC.EXE ............................................................... 5.9Copy Files .................................................................................. 5.9Reset ........................................................................................ 5.10
VidexPro ........................................................................................ 5.11Connect to the PC .................................................................... 5.11Program ................................................................................... 5.11
Configure the SATO Label Printer ...................................................... 5.11Setup Facilities ................................................................................... 5.12
Create Facilities ............................................................................. 5.12Specify Facility Details .................................................................. 5.12Create Users ................................................................................. 5.13Link Dept’s to PAR’s ...................................................................... 5.14Link Stations/Rooms to Dept’s/PAR’s ........................................... 5.14
Setup Facility Inventory (Items/Categories/CP’s) ............................... 5.15Verify Existing Facility Items .......................................................... 5.15

OptiFlex • TOC 3
Create Facility Items ......................................................................5.15Create Facility Item Categories .....................................................5.17
Add Category ...........................................................................5.17Add Item to Category ...............................................................5.18
Create Facility Charge Procedures ...............................................5.19Create Charge Procedure ........................................................5.19Print Charge Procedure Label ..................................................5.19
Setup PAR Inventory (Items/Kits) .......................................................5.20PAR Items .....................................................................................5.20
Verify existing PAR items .........................................................5.20Add PAR Items .........................................................................5.21Copy PAR Items .......................................................................5.22Remove PAR Items ..................................................................5.22Cross-Reference PAR items ....................................................5.22Print Item Labels ......................................................................5.23
PAR Kits ........................................................................................5.23Create PAR Kits .......................................................................5.23Print Kit Label ...........................................................................5.24
Test (Inventory/Orders/Reports) .........................................................5.25Count / Inventory (INV) ..................................................................5.25
PocketPro .................................................................................5.25Scan Items .............................................................................5.25Connect with ActiveSync .......................................................5.25Download Data ......................................................................5.25View Transaction Details in ICM/SQL DB ..............................5.25
Videx ........................................................................................5.26Scan Items .............................................................................5.26Download Data ......................................................................5.26
Order (REQ) ..................................................................................5.27Manual Order (ToOrder) ...........................................................5.27
Modification of ToOrder in Dialog “Inventory Management” ..5.27PocketPro ..............................................................................5.27
Scan items ..........................................................................5.27Connect with ActiveSync .....................................................5.27Download Data ....................................................................5.27View Transaction Details in ICM/SQL DB ...........................5.27
Videx ......................................................................................5.28Scan items ..........................................................................5.28Download Data ....................................................................5.28
Set OnHand < Min, System Automated ...................................5.29Send the Order to the Hospital Systems ..................................5.29Print a Receipt ..........................................................................5.31
Reports ..........................................................................................5.31
MS: Nurse StationPC Application: Install/Configure ...........................................................6.1
Install Application .............................................................................6.1Quick Start ..................................................................................6.1Customer Install .........................................................................6.1Quick Start / Customer Install .....................................................6.1
4 OptiFlex • TOC
Modify ScanReqC.mdb Tables ........................................................ 6.1MS Access ................................................................................. 6.1
Customer Install only: Table Databases .................................. 6.1Table Applications ................................................................... 6.2
Setup Menu ................................................................................ 6.2Open the Setup Menu ............................................................. 6.2Customer Install: Table Databases ......................................... 6.3Table Applications ................................................................... 6.4
Open OptiFlex ................................................................................. 6.5Open OptiFlex MM .......................................................................... 6.5
Touchscreen Setup .............................................................................. 6.6Connect the Monitor ........................................................................ 6.6Install Drivers ................................................................................... 6.6Calibrate Monitor ............................................................................. 6.6Test ................................................................................................. 6.6Specify File/Dir Location in OptiFlex ............................................... 6.6
Scanner P470 Setup ............................................................................ 6.7Connect to PC ................................................................................. 6.7Program ........................................................................................... 6.7
Omnicell Cabinet Setup ...................................................................... 6.10Connect the Cables ....................................................................... 6.10Set Zone Switches ........................................................................ 6.10Set Drawer Switches ..................................................................... 6.11
Zone Location .......................................................................... 6.11Row Location within Zone ........................................................ 6.11
Detect Cathracks ........................................................................... 6.12Station Facility/PAR Settings .............................................................. 6.13Label Bins............................................................................................ 6.14Test ADT, CHG, INV, REQ ................................................................. 6.15
ADT (Admissions/Discharges) ...................................................... 6.15Rooms ...................................................................................... 6.15Patients .................................................................................... 6.15
Verify in Room ....................................................................... 6.15Add ........................................................................................ 6.15Remove ................................................................................. 6.15Transfer ................................................................................. 6.16
INV (Count/Inventory) .................................................................... 6.17Inventory .................................................................................. 6.17Count ........................................................................................ 6.18
Charge ........................................................................................... 6.19Patient ...................................................................................... 6.19
Items ...................................................................................... 6.19Kits ......................................................................................... 6.21Charge Procedures ............................................................... 6.21
Floor ......................................................................................... 6.22Items ...................................................................................... 6.22Charge Procedures ............................................................... 6.22
REQ (orders) ................................................................................. 6.23Items ........................................................................................ 6.23

OptiFlex • TOC 5
Receipts .........................................................................................6.24Print the Order Receipt .............................................................6.24Scan the Order Receipt ............................................................6.24Scan the Item Label .................................................................6.25
Calibrate ........................................................................................6.25Assign bin ......................................................................................6.25
Count inventory ...................................................................................6.26
MS: Go LiveServer (Interfaces.mdb) .........................................................................7.1Inventory Station (ScanReqC.mdb) .......................................................7.1Nurse Station 1 (ScanReqC.mdb) .........................................................7.1Remaining Nurse Stations .....................................................................7.1
SS: OverviewRequired Equipment/Software...............................................................8.1Components ..........................................................................................8.1OptiFlex SQL DB....................................................................................8.1
Transaction Tables ..........................................................................8.1tbl_ORTransactionType .............................................................8.1tbl_ORTransactions (2, 8) ..........................................................8.1
Transaction Types ...........................................................................8.1DB Connections ...............................................................................8.2
Installation Process................................................................................8.2
SS: ICMInstall/Configure.....................................................................................9.1Create Doctors.......................................................................................9.1Create/Verify Inventory ..........................................................................9.2
Verify Regular Items from Hospital Systems ...................................9.2Create Instruments (13) ...................................................................9.3Create Equipment (6) ......................................................................9.4Create Medications (10) ..................................................................9.5
Create Procedures.................................................................................9.6Create Prefcard Procedures ............................................................9.6Create Charge Procedures ..............................................................9.7
Create Preference Cards.......................................................................9.8New .................................................................................................9.8
Position, Prep, Linen ..................................................................9.8Sutures .......................................................................................9.8Supplies ......................................................................................9.9Instruments .................................................................................9.9Equipment ................................................................................9.10Medicine ...................................................................................9.10Dressing ...................................................................................9.11Notes ........................................................................................9.11Links .........................................................................................9.12Images ......................................................................................9.12
Copy ..............................................................................................9.13

6 OptiFlex • TOC
Search/Replace Items ................................................................... 9.13Test Case Build ................................................................................... 9.14
Create/Edit Case ........................................................................... 9.14Print ............................................................................................... 9.15Close ............................................................................................. 9.15
SS: Nurse stationInstall/Configure/Test........................................................................... 10.1Test Case ............................................................................................ 10.1
Open .............................................................................................. 10.1Charge items ................................................................................. 10.2
Manually Adjust Amount for Listed Item ................................... 10.2Scan Amount for Listed/Non-listed Items ................................. 10.3Total Touch Items .................................................................... 10.3Special Items ............................................................................ 10.4
Execute Timers ............................................................................. 10.5Room Time ............................................................................... 10.5Anesthesia Time ...................................................................... 10.5Surgeon Time ........................................................................... 10.5
Close ............................................................................................. 10.6
Reference: DatabasesSQL DB ............................................................................................... 11.1
ProgramParameters ...................................................................... 11.2Reports .......................................................................................... 11.2Room ............................................................................................. 11.3tbl_AdmissionPrinters .................................................................... 11.3tbl_Categories ............................................................................... 11.3tbl_CategoryItems ......................................................................... 11.4tbl_DepartmentMaster ................................................................... 11.4tbl_Doctor ...................................................................................... 11.4tbl_DoctorAssistant ....................................................................... 11.5tbl_DoctorProceduresLink ............................................................. 11.5tbl_DoctorType .............................................................................. 11.5tbl_EmployeeType ......................................................................... 11.5tbl_Facility ..................................................................................... 11.6tbl_InventoryDetail ......................................................................... 11.7tbl_InventoryGroups ...................................................................... 11.8tbl_InventoryMaster ....................................................................... 11.8tbl_InvSysGridPosition .................................................................. 11.9tbl_KitDetail ................................................................................... 11.9tbl_KitMaster ............................................................................... 11.10tbl_LabelPrintingLocations .......................................................... 11.10tbl_LoginHistory ........................................................................... 11.10tbl_LoginStations ......................................................................... 11.10tbl_OmniCathRack ...................................................................... 11.12tbl_OmniItemLocation ................................................................. 11.12tbl_ORAutoAddItems ................................................................... 11.12tbl_ORButtonGroup ..................................................................... 11.12tbl_ORCase ................................................................................. 11.13tbl_ORCase_SpecialItems .......................................................... 11.13

OptiFlex • TOC 7
tbl_ORCase_Timers ....................................................................11.14tbl_ORCaseScrubNurse ..............................................................11.14tbl_ORCaseStatus .......................................................................11.14tbl_ORChargeLevel .....................................................................11.14tbl_ORChargeProcedures ...........................................................11.14tbl_ORChargeTime ......................................................................11.15tbl_OrderLines .............................................................................11.15tbl_OrderMaster ...........................................................................11.15tbl_ORDoctorAssistantLink ..........................................................11.16tbl_ORDraping .............................................................................11.16tbl_OREquipment ........................................................................11.16tbl_ORInstruments .......................................................................11.16tbl_ORMedication ........................................................................11.17tbl_ORMedicationPreferenceCardLink ........................................11.17tbl_ORPositioning ........................................................................11.17tbl_ORPreferenceCardImages ....................................................11.17tbl_ORProcedureHaveReady ......................................................11.18tbl_ORScrubNurse ......................................................................11.18tbl_ORSpecialConsiderations ......................................................11.18tbl_ORTimerType ........................................................................11.18tbl_ORTransactions .....................................................................11.19tbl_ORTransactionType ...............................................................11.19tbl_PARsMaster ...........................................................................11.19tbl_Patients ..................................................................................11.20tbl_PatientVisit .............................................................................11.21tbl_Permissions ...........................................................................11.21tbl_PrintFile ..................................................................................11.22tbl_ProcedureItems .....................................................................11.23tbl_ProcedureORChargeProcedure ............................................11.23tbl_ProcedureORDraping ............................................................11.23tbl_ProcedureOREquipment ........................................................11.23tbl_ProcedureORInstruments ......................................................11.24tbl_ProcedureORPositioning .......................................................11.24tbl_Procedures ............................................................................11.24tbl_ReceivingTransactions ..........................................................11.24tbl_ReportType ............................................................................11.25tbl_ScanReqMessages ................................................................11.25tbl_SchedulesPARsLink ..............................................................11.25tbl_Transactions ..........................................................................11.25tbl_TransactionTypes ..................................................................11.26tbl_UnitOfMeasure .......................................................................11.26tbl_Vendor ...................................................................................11.26
Interfaces.mdb ..................................................................................11.27tbl_Databases ..............................................................................11.27tbl_Facilities .................................................................................11.27tbl_App_Settings .........................................................................11.28tbl_ADT_Settings .........................................................................11.28tbl_ChargeFileFuncType (not used) ............................................11.29tbl_CHG_Socket_Settings ...........................................................11.29tbl_EmailTo ..................................................................................11.29tbl_ErrorNotify ..............................................................................11.29tbl_File_Function .........................................................................11.29
8 OptiFlex • TOC
tbl_File_Process_Settings (priority 1) .......................................... 11.30tbl_ItemFileFuncType (not used) ................................................. 11.30tbl_ReqFileFuncType (not used) ................................................. 11.30tbl_Req_Settings (not used) ........................................................ 11.30tbl_Sockets (priority 1) ................................................................. 11.31tbl_SocketFunction ...................................................................... 11.31tbl_ZIT_Settings .......................................................................... 11.31tbl_ZPA_Settings ......................................................................... 11.31
ScanReqC.mdb ................................................................................ 11.32Applications ................................................................................. 11.32Databases ................................................................................... 11.32Database_Types ......................................................................... 11.32DeptOrder (not used) .................................................................. 11.33Directories ................................................................................... 11.33FTP_Settings ............................................................................... 11.33Options ........................................................................................ 11.33ReplicationData ........................................................................... 11.33REQ_Settings .............................................................................. 11.33SQL_Settings .............................................................................. 11.34StationParameters ....................................................................... 11.34
LOF
INDEX

OptiFlex • Document Overview 1.1
Document OverviewThis document is for Omnicell internal use only. It describes how to install and configure OptiFlex.
OptiFlex MS (Medical Services)• MS: Overview (page 2.1). • MS: Hospital Systems (page 3.1). • MS: DB Server (page 4.1). • MS: Inventory Station (ICM) (page 5.1).• MS: Nurse Station (page 6.1).• MS: Go Live (page 7.1).
OptiFlex SS (Surgical Services)• SS: Overview (page 8.1). • SS: ICM (page 9.1). • SS: Nurse station (page 10.1).
Reference• Reference: Databases (page 11.1).

1.2 OptiFlex • Document Overview

OptiFlex • MS: Overview 2.1
MS: Overview
Required Equipment/SoftwareRequired:1. PC with
• Windows 2000 • Microsoft SQL Server
2. OptiFlex Server installer 3. OptiFlex Client installer 4. OptiFlex Server SQL database 5. One of the following Materials Management (MM) department scanners
• Symbol PPT2800 PocketPro• Videx LaserLite Pro/Mx
6. Nurse station scanner Symbol P470 7. Scanner labels for DB items Recommended:8. Omnicell cabinet 9. Elo Touchscreen monitor and driver 10.SATO label printer
Components
Figure 2.1: Hospital systems/OptiFlex components
IF E
O P T IF L E X S E R V E R
S C A N R E Q P C
H O S P IT A L S Y S T E M S
M A T E R IA L SM A N A G E M E N T
P A T IE N TA C C O U N T IN G
O M N IG A T E
S Q L D B
IC M P C
S C A N N E RO M N IC E L LC A B IN E T SS C A N N E R
L A B E LP R IN T E R
A D TIN V
IN V E N T O R YS T A T IO N
N U R S ES T A T IO N
R E Q C H G

2.2 OptiFlex • MS: Overview
Hospital SystemsHospital systems include
• Materials Management (MM) System• Patient Accounting System
OptiFlex receives the following data from the hospital systems:• ADT, patient admission/discharge information• IT, inventory data• PA, PARS data
The hospital systems send the following data to OptiFlex• REQ, requisition data• CHG, charge data
OptiFlex DB ServerThe OptiFlex DB Server is a Windows 2000/XP computer with
• SQL Server 2000• OptiFlex DB• OptiFlex Interface Engine (IFE)• Omnigate
IFE exchanges information, ADT, IT, PA, CHG, REQ, between the host system, via OmniGate, and the OptiFlex DB Server database.
OptiFlex Inventory/Requisitions Station (ICM/REQM)The ICM station consists of
• PC• Scanner such as Symbol, PocketPRO, or VidexPRO• Label printer, SATO
OptiFlex Nurse Station (ScanReq)The nurse station consists of
• PC with touchscreen• Scanner such as Symbol, PocketPRO, or VidexPRO• Omnicell cabinets, optional

OptiFlex • MS: Overview 2.3
OptiFlex SQL DB
Transaction Tables
tbl_TransactionTypesThis table defines valid transaction types. If a transaction is not listed in this table, then it can not be entered into the transaction table.
Figure 2.2: tbl_TransactionTypes
The following transaction types are not used:• Transfers (7)• AddItem (10), one customer requested this transaction type and never used it.
tbl_TransactionsThis table records all transactions except
• OR• Receiving
Figure 2.3: tbl_Transactions
tbl_ReceivingTransactions (1, 6)A transaction is created in this table when inventory is received, even if the received amount is 0. The transaction type is usually 1, in rare cases 6.
Figure 2.4: tbl_ReceivingTransactions

2.4 OptiFlex • MS: Overview
Transaction Types
Charge patient (CHG)ISSUE (2)This transaction is created when the following occurs:
• An item is scanned and billed to a patient.This transaction causes the following actions:
• Issue a patient charge.• Decrement OnHand, when tracking inventory.• Increment PlaceOnOrder, when not tracking inventory.
Quantity is always > 0.
CREDIT (8)This transaction is created when the following occurs:
• An item that was previously billed to a patient in error is credited to the patient.This transaction causes the following actions:
• Credit the patient for the item.• Increment OnHand, when tracking inventory.• Decrement PlaceOnOrder, when not tracking inventory.
Quantity is always > 0.
PRE_PICKED (12)This transaction is used to manage inventory that is related to charging a patient.This transaction is created when the following occurs:
• Items have been taken from inventory, for use in the future.This transaction causes the following actions:
• Inform the hospital system that an item has been pre-picked for use in an OR case.Note: After issued to patient: tbl_Transactions field Closed = 1.
PRE_PICKCR (13)This transaction is created when the following occurs:
• Pre-picked item is returned to inventory, not used.This transaction causes the following actions:
• Send a request to the hospital system to credit an item pre-picked for use in an OR case.• The request is created manually.• The item is actually returned by materials before the OR case.• If all pre-picked items are not used in an OR case, then when the case is closed no pre-pick credit transaction
is created.• If not tracking inventory, then subtract the number of credited items from PlaceOnOrder.• If tracking inventory, then add the number of unused items to OnHand.

OptiFlex • MS: Overview 2.5
Order Material (REQ)ORDER_HOST (3)This transaction is created when one of the following occurs:
• A user creates an order with ReqMaster.• An order is automatically generated. This is under development.
One customer is requesting this, and it is installed at only one hospital, every seven minutes orders for the warehouse PAR are checked.
• If tracking inventory, then after each specified time period if OnHand < Min.• If not tracking inventory, then when PlaceOnOrder > 0.
This transaction causes the following actions:• IFE processes the transaction after two minutes or after it has been posted. The posted field in tbl_Transactions
= 1. When the first created transaction occurs posted = 0. When the last line for order is written to the transaction table, the posted fields for all items in the order = 1. This avoids the break up of orders.
After IFE has sent the orders to the host: Field Closed = 1.
ORDER_USER (4)This transaction is created when one of the following occurs:
• The user requests an order, in ICM or ScanReq. • The user manually changes the inventory order quantity.
This transaction causes the following actions:• When posted = 0: ReqMaster or the auto-ordering program uses the user orders to generate type 3 transactions
(order host) and then sets posted = 1.Notes:
• The user order will only be processed if <= 24 hours old.• Automatic ordering is overridden. For example, if more is ordered than required, then the order is still generated.• The order amount can be 0. This forces a non-order.
ORDER_DEL (11)This transaction is created when the following occurs:
• In ScanReq the order is deleted manually during receiving by setting quantity < 0. The response can be one of the following
• Refuse to receive. • Delete if can not be obtained anyway, only used when tracking backorders.
This transaction causes the following actions:• An item order on a receipt is deleted. • An order item is removed.• The item is posted in the receiving lines with adjustments.
Receive Material (INV)RECEIVE (1)This transaction is created when one of the following occurs:
• Order items are received.• An order is cancelled in ICM and the quantity received is set = 0.
This transaction causes the following actions:• Decrement OnOrder.• Increment PlaceOnOrder, when not tracking inventory.
ADJUST (6)Not used. May be used in future.

2.6 OptiFlex • MS: Overview
Inventory Material (INV)COUNT (5) (OnOrder -)This transaction is created when the following occurs:
• In ScanReq the MM count button is clicked. This occurs when doing inventory with inventory tracking.This transaction causes the following actions:
• Set LastOnHand = OnHand.• Update OnHand.• Set OnOrder = 0.
Notes: • A manual order item can not be counted.• If performing a count on an item with open orders, then generate a warning message that the order will be
closed.
INVENTORY (9) (OnOrder NO CHANGE)This transaction is created when the following occurs:
• In ScanReq, the MM inventory button is clicked. Used when doing inventory.This transaction causes the following actions:
• Update OnHand. Notes:
• OnOrder is not changed.• Manual order and non-tracked items can be inventoried.
ADDITEM (10)Not used.This transaction is created when the following occurs:
• The scanned item does not exist for Dept/PAR and the flag in tbl_loginstation indicates that this is allowed.This transaction causes the following actions:
• The system adds inventory item to the detail table.

OptiFlex • MS: Overview 2.7
DB ConnectionsThe Server DB Connections include• Host (Omnigate) to Server DB Sockets (via IFE)• Inventory/Client to Server DB ConnectionsThese connections are shown in the following diagram.
Figure 2.5: Server DB Connections
D B P C
S Q L D B L i v e
H o s t s y s t e m s
R e m o t e H o s t d g t e s t . l h n . l o c a l
R e m o t e H o s t 5 0 . 6 3 . 9 . 1 2 1
S Q L D B T e s t
I C M P C
S c a n R e q C . m d b( t b l ) D a t a b a s e s
A D T Z I T Z P A C H G R E Q
R e m o t e H o s t d g p r o d . l h n . l o c a l
C H G R E Q
N U R S E P C
D a t a b a s e I D K C H P r o dF i l e F u n c t i o n I D R e q , F T P A d d r e s s x x x xF T P D i r e c t o r y x x x x , F T P F i l e N a m e x x x x
P 2 9 0 0 1P 3 2 5 0 5
P 3 2 5 0 7
A D T Z I T Z P A
P 2 9 0 0 1P 3 2 5 0 4
P 3 2 5 0 6
I n t e r f a c e s . m d b
t b l _ S o c k e t s
t b l _ D a t a b a s e s
t b l _ F i l e _P r o c e s s _ S e t t i n g s
D B I D : K C H T E S TD a t a S o u r c e k c h - f s 4 . k c h . c o mI n i t i a l C a t a l o g T e s t O p t i F l e x 6
D B I D : K C H P R O DD a t a S o u r c e k c h - f s 4 . k c h . c o m
I n i t i a l C a t a l o g O p t i F l e x 6
D a t a S o u r c e k c h - f s 4 . k c h . c o mI n i t i a l C a t a l o g T e s t O p t i F l e x 6
D a t a S o u r c e k c h - f s 4 . k c h . c o mI n i t i a l C a t a l o g O p t i F l e x 6
D B I D : K C H T E S T D B I D : K C H P R O D
FID
: AD
T
FID
: RE
Q
FID
: CH
G
FID
: ZP
A
FID
: ZIT
FID
: AD
T
FID
: RE
Q
FID
: CH
G
FID
: ZP
A
FID
: ZIT
S c a n R e q C . m d b ( t b l ) D a t a b a s e s
D B I D : D a t a b a s e I D / F I D : F u n c t i o n I D / S I D : S o c k e t I D / P : P o r t
P 2 9 0 1 5P 2 9 0 1 4P 3 3 3 3 7
O m n i g a t e
I F E
SID
: KC
HAD
T
SID
: KC
HZI
TT
SID
: K
CH
RE
QT
SID
: KC
HC
HG
T
SID
: KC
HZP
AT
SID
: KC
HAD
T
SID
: K
CH
ZIT
SID
: K
CH
CH
G
SID
: K
CH
ZPA

2.8 OptiFlex • MS: Overview
Host (Omnigate) to Server DB Sockets (via IFE)Tables in C:\Program Files\Apps\BCX\ScanReq\Interface Engine\Interfaces.mdb define the sockets between Omnigate and the Server DB.
Figure 2.6: Interfaces.mdb tbl_databases
Figure 2.7: Interfaces.mdb tbl_sockets
The sockets are shown in IFE.
Figure 2.8: Interface Engine socket monitor
Figure 2.9: Interfaces.mdb tbl_File_Process_Settings
Inventory/Client to Server DB ConnectionsTables in C:\Program Files\BCX\ScanReqC.mdb define the connection between the Server DB and the ICM/Scan-Req PC.
Figure 2.10: ScanReqC.mdb table Databases

OptiFlex • MS: Overview 2.9
Installation Process
TimeplanThe installation process is unique for each customer site. Therefore, this document does not try to define all possi-ble installation configurations. The following describes the steps involved in a typical basic installation. 1. The contract is signed.2. The kick-off meeting occurs.
• The generic project plan is presented.• The host system information, ADT feed setup, is collected.
3. One day: A facility survey is conducted.• Inventory and nursing stations are identified.• Adequate power supplies, for computers and scanners, are identified.• Adequate network drops are identified.• Existing bins and shelves are identified and changes recommended.
4. The project plan is implemented.• One hour: Attach a DB on the DB server. The hospital buys or uses existing an PC, with SQL Server installed.• One hour: Copy installation software, server and client.• One hour: Install IFE, on DB Server PC or other PC.• Two hours: Set up ICM.• One hour: Set up a nurse test station.• One month: Test interfaces, ADT, etc., and modify IFE.• One week: Switch to live.
5. The acceptance document is signed.6. The contract is billed.
Required Tools
Site ConnectivitySite connectivity is usually via one of the following:
• VPN, Nortel or Cisco, this is the preferred method.• Checkpoint secure remote• Microsoft PPTP• Dialup
Remote Control SoftwareRemote control software is required if working off-site.
• PCAnywhere, preferred• VNC client• Remote desktop computing, built into WinXP• Net meeting

2.10 OptiFlex • MS: Overview

OptiFlex • MS: Hospital Systems 3.1
MS: Hospital Systems
Bin InstallationInventory bins must be installed at all inventory and nurse stations. Many stations keep multiple items in a single container. OptiFlex requires that each item be kept in a separate bin. Each bin will eventually have a label with information reqired by OptiFlex. The label will be created with ICM.
Data Exchange with Hospital SystemsOptiFlex requires that Omnigate is installed on the Server PC. Omnigate facilitates all data exchange between the hospital systems and OptiFlex. IFE must be configured for the data formats and content of the hospital systems.

3.2 OptiFlex • MS: Hospital Systems

OptiFlex • MS: DB Server 4.1
MS: DB ServerThis chapter describes how to install the OptiFlex Server.
DB Installation
SQL Server Authentication1. In the SQL Server Enterprise Manager: Right-click on the SQL server, Quickstart: “local (Windows NT)”.2. Select Properties.3. In tab Security: Set authentication to SQL Server and Windows.
Figure 4.1: Server authentication, SQL Server and Windows

4.2 OptiFlex • MS: DB Server
Attach DB’s
Quick Start: Test DB1. Copy to the server, typically directory C:\Program Files\Microsoft SQL Server\MSSQL\Data, the following:
• DemoDataFileNew.mdf• DemoDataFileNew.ldf
2. In SQL Server Enterprise Manager: Right-click on Databases.3. Select All tasks/Attach database....4. For “MDF file of database to attach”: Select C:\Program Files\Microsoft SQL
Server\MSSQL\Data\DemoDataFileNew.mdf.
Figure 4.2: Quick Start: Database attachment settings
5. Click OK. A message appears stating that the database was attached successfully.6. Click OK.
Customer Install: Live and Test DB’s1. Copy to the server, typically directory C:\Program Files\Microsoft SQL Server\MSSQL\Data, the following:
• DataFile6_Init.mdf• DataFile6_Init.ldf
2. Rename the files:• DataFile.mdf• DataFile.ldf
3. Copy the files and rename to:• DataFileTest.mdf• DataFileTest.ldf
4. In SQL Server Enterprise Manager: Right-click on Databases.5. Select All tasks / Attach database....6. Select DataFile.mdf.7. Click OK.8. Change the current file locations to DataFile.mdf and DataFile.ldf.

OptiFlex • MS: DB Server 4.3
9. Change “Attach as...” to DataFile.
Figure 4.3: Customer Install: Database attachment settings
10.Click OK. A message appears stating that the database was attached successfully.11.Click OK.12.Attach DataFileTest similarly.
Login Configuration
Quick Start: Delete User ScanReq11. In SQL Enterprise Manager: Delete user ScanReq1.
Figure 4.4: User ScanReq1

4.4 OptiFlex • MS: DB Server
Create Login ScanReq1Used by the client to login to the Server DB.1. For the server: Right-click on Security / Logins.2. Select New Login....3. In tab General: For Name: Enter ScanReq1.4. Select SQL Server Authentication.5. Enter the password, do not click OK.
Figure 4.5: New Login tab General
6. Quick Start: In tab Database Access: Select DemoDataFileNew.7. Quick Start: Add public and database owner roles.
Figure 4.6: Quick Start: Database access settings

OptiFlex • MS: DB Server 4.5
8. Customer Install: In tab Database Access: Specify both databases.9. Customer Install: Add public and database owner roles.
Figure 4.7: Customer Install: Database access settings
10.Click OK.11.Enter the password again to confirm.12.Click OK.
Add Login Station(s)Specify IP address of the client, ICM/ScanReq, computers.1. Right-click on the DB, Quick Start: DemoDataFileNew, table tbl_LoginStations.2. Select Open Table/Return all rows. A list of login stations is returned.3. Select the IPAddress optiflex1, the actual address selected is not important; however, the settings of the
selected address should be close to those required for the computer. The line turns black.4. Click CTRL-C, copy.5. Click on the last row, with the * asterisk. The row turns black.6. Click CTRL-V, paste. The new line appears.
Figure 4.8: Copied login station entry
7. In column rowguid: Change a single digit, hexidecimal, to ensure that the rowguid entry is unique.8. Change the IPAddress to the IP address of the client computer.
Quick Start: Set the IPAddress to the name of your computer. To find out the computer name: 1. Right-click on the My Computer icon on the desktop. 2. Select Properties. 3. Select tab Network Identification. Note the full computer name.
9. Change the PCName to the network name of the computer. Important: It is highly recommended that PCName <> IPAddress. This may cause a client side error in certain situations.
4.6 OptiFlex • MS: DB Server
10.Customer Install: Do the above for the second DB.11.Customer Install: Do the above for all users, for GoLive.
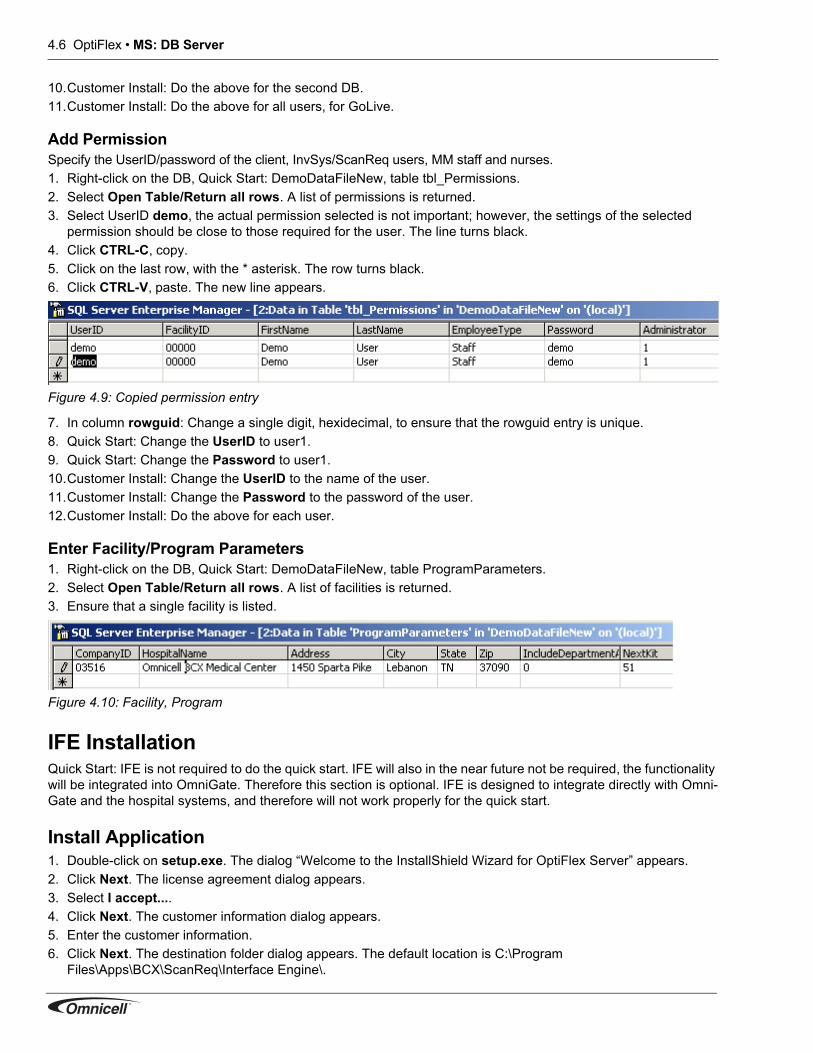
Add PermissionSpecify the UserID/password of the client, InvSys/ScanReq users, MM staff and nurses.1. Right-click on the DB, Quick Start: DemoDataFileNew, table tbl_Permissions.2. Select Open Table/Return all rows. A list of permissions is returned.3. Select UserID demo, the actual permission selected is not important; however, the settings of the selected
permission should be close to those required for the user. The line turns black.4. Click CTRL-C, copy.5. Click on the last row, with the * asterisk. The row turns black.6. Click CTRL-V, paste. The new line appears.
Figure 4.9: Copied permission entry
7. In column rowguid: Change a single digit, hexidecimal, to ensure that the rowguid entry is unique.8. Quick Start: Change the UserID to user1.9. Quick Start: Change the Password to user1.10.Customer Install: Change the UserID to the name of the user.11.Customer Install: Change the Password to the password of the user.12.Customer Install: Do the above for each user.
Enter Facility/Program Parameters1. Right-click on the DB, Quick Start: DemoDataFileNew, table ProgramParameters.2. Select Open Table/Return all rows. A list of facilities is returned.3. Ensure that a single facility is listed.
Figure 4.10: Facility, Program
IFE InstallationQuick Start: IFE is not required to do the quick start. IFE will also in the near future not be required, the functionality will be integrated into OmniGate. Therefore this section is optional. IFE is designed to integrate directly with Omni-Gate and the hospital systems, and therefore will not work properly for the quick start.
Install Application1. Double-click on setup.exe. The dialog “Welcome to the InstallShield Wizard for OptiFlex Server” appears.2. Click Next. The license agreement dialog appears.3. Select I accept....4. Click Next. The customer information dialog appears.5. Enter the customer information.6. Click Next. The destination folder dialog appears. The default location is C:\Program
Files\Apps\BCX\ScanReq\Interface Engine\.

OptiFlex • MS: DB Server 4.7
7. Click Next. The current settings are displayed.8. Click Install. The dialog “InstallShield Wizard Complete” appears.9. Click Finish.The following files are in C:\Program Files\Apps\BCX\ScanReq\Interface Engine:
• InterfaceEngine.exe• Interfaces.mdb
Configure Interfaces.mdb10.Configure Interfaces.mdb. See Interfaces.mdb (page 11.27) for a complete description.
Setup InterfaceEngine.exe as Service11.Setup InterfaceEngine.exe as a service using ServiceMill.
Start the Interface Engine12.If IFE is running as an application: Start IFE.
If IFE is running as a service: IFE starts automatically when the PC is booted.
Test with Test Hospital SystemsQuick Start: This section requires a connection to the hospital systems.IFE should be tested with the hospital system for one week to verify that
• The hospital systems send test patient information via ADT.• The hospital systems send a test item master and detailed information, file or socket.• IFE sends charge and requisition information.
Typically no problems are encountered. However, ADT should run for at least one day to ensure that all events occur. Patient admissions, transfers, and discharges should be verified. Item master and detail are typically easy, requiring only a few runs. Charge is easy, HL7 standardized sockets. Requistions are more difficult, a week is required for testing.
Connect to Production Hospital SystemsQuick Start: This section requires a connection to the hospital systems.Connection to the hospital production systems involves the following: 1. Connect to the live hospital systems server. 2. Push a full item master and detail, takes about half a day.Typically ADT is flowing for one to two weeks into the live DB so that all patients are populated when going live. Patients that have been there longer may have to be entered manuallly, or the hospital may have to send a feed from a month earlier. Sometimes modifications are required on the hospital side. Such modifications require changes to Interfaces.mdb. If the hospital system has multiple ports, this will probably not require changes to Inter-faces.mdb.

4.8 OptiFlex • MS: DB Server

OptiFlex • MS: Inventory Station (ICM) 5.1
MS: Inventory Station (ICM)
Install PC Applications
Install Applications1. Double-click on setup.exe. Note that both the Server and the client, InvSys/ScanReq, installation files are
normally called setup.exe. After several minutes the dialog “Welcome to the InstallShield Wizard for OptiFlex Applications” appears.
2. Click Next. The license agreement dialog appears.3. Select I accept....4. Click Next. The customer information dialog appears.5. Enter the customer information.6. Click Next. The destination folder dialog appears. The default location is C:\Program Files\BCX\.7. Click Next. The custom setup dialog appears. 8. Quick Start: Select This feature will be installed on local drive for the following:
• ReqMaster• VidexPro• PocketPro• OptiFlex/TotalTouch• OptilFlex ICM• Critical Reports
Figure 5.1: OptiFlex applications in the InstallShield Wizard
9. Customer Install: Select the features to install.10.Click Next. The current settings are displayed.11.Click Install. The application is installed. The InstallShield Wizard Complete dialog appears.12.Click Finish.The following files are copied to C:\Program Files\BCX\InvSys\:
• Inv_Sys.exe

5.2 OptiFlex • MS: Inventory Station (ICM)
• ReqMaster.exe• CriticalReport.exe
The following files are copied to C:\Program Files\BCX\:• BCXLauncher.exe• ScanReqC.mdb
Setup ScanReqC.mdb TablesSet up the database tables Databases/Applications using one of the following:• MS Access• Setup Menu
MS AccessTable Databases1. Open database table Databases.2. Enter the required information
• DatabaseID • InitialCatalog • DataSource
Figure 5.2: Table Databases
3. Save the changes.
Table Applications4. Open database table Applications.5. Enter the required information
• Initial Catalog, Quick Start: DemoDataFileNew• Data Source, Quick Start: localhost
Figure 5.3: Table Applications
6. Save the changes.

OptiFlex • MS: Inventory Station (ICM) 5.3
Setup MenuOpen the Setup Menu1. Click on the OptiFlex launch icon, on the desktop. The dialog “OptiFlex Launcher” appears.
Figure 5.4: OptiFlex launcher (no applications available)
2. Click on the X, in the upper right corner.3. Click CTRL-SHIFT-F1. The dialog “Login” appears.4. Enter the following information:
• Server: SQL Server name, Quick Start: localhost• Database: SQL Server DB name, Quick Start: DemoDataFileNew• User Name: Name of the user, Quick Start: user1• Password: Password of the user, Quick Start: user1.
Figure 5.5: Quick Start: Login dialog
5. Click OK. The dialog “Setup Menu” appears.
Figure 5.6: Setup menu

5.4 OptiFlex • MS: Inventory Station (ICM)
Table Databases6. Click Setup Databases. ScanReqC.mdb table Databases is opened.7. Enter the required information
• Initial Catalog, Quick Start: DemoDataFileNew• Data Source, Quick Start: localhost
Figure 5.7: ScanReqC.mdb table Databases
8. Click OK.
Table Applications9. Click Setup applications.10.Select from the application drop-down list InvSys.11.Check Active.
Figure 5.8: Dialog “Application Setup” for InvSys, ICM
12.Click Save.13.Click Exit.14.In the dialog “Setup Menu”: Click Exit. Note that the ICM button has appeared.
Figure 5.9: Button “Launch ICM” in the OptiFlex launcher

OptiFlex • MS: Inventory Station (ICM) 5.5
Open ICM1. Click Launch ICM. The ICM login dialog appears.
Figure 5.10: ICM login
2. To connect to a different DB: Click CTRL-SHIFT-F1. The DB connection information is displayed.
Figure 5.11: ICM login DB Connection, this session
3. Enter the user name, Quick Start: user1.4. Enter the password, Quick Start: user1.5. Click OK. The ICM main dialog appears.
Figure 5.12: ICM main dialog

5.6 OptiFlex • MS: Inventory Station (ICM)
Configure REQM1. Click on the ReqMaster desktop icon. The login dialog appears.
Figure 5.13: REQM login
2. Enter the UserID / Password, Quick Start: user1/user1.3. Click OK.4. Click CTRL-SHIFT-F1. The dialog “Settings Update Login” appears.
Figure 5.14: Requisition module settings update login
5. Enter the UserID / Password, Quick Start: user1/user1.6. Click OK. The Requisition Program Settings dialog appears.7. Quick Start: Select all facilities.8. Quick Start: Use the following file destination settings:
• Folder = C:\Program Files\BCX• IP Address = 0.0.0.0• UserID = 00000• Password = None

OptiFlex • MS: Inventory Station (ICM) 5.7
9. Customer Install: Contact Kevin Carnes for the required information.
Figure 5.15: Dialog “Requisition Program Settings”
10.Click OK.11.Click Close.

5.8 OptiFlex • MS: Inventory Station (ICM)
Configure PocketPRO Client (DB Connection)1. Click on the PocketPro icon on desktop.2. Click CTRL-SHIFT-F1.3. Enter
• Server name, Quick Start: localhost• DB name, Quick Start: DemoDataFileNew• Facility id, Quick Start: 03516
Figure 5.16: PocketPro client DB Connection settings, Quick Start
4. Click Save.5. Restart the application, required for changes to take effect.
Configure Videx Client (DB Connection)1. Click on the VidexPro icon on the desktop.2. Click on X.3. Press CTRL-SHIFT-F1.4. Enter
• Server name • Database name• Facility ID• COM port
Figure 5.17: VidexPro client DB Connection settings, Quick Start
5. Click Save.6. Click Exit.

OptiFlex • MS: Inventory Station (ICM) 5.9
Install Scanner Applications
PocketPro
Connect to the PC1. Connect the cradle serial cable to the PC serial port.2. Plug in the cradle power.
Install MSASYNC.EXE3. Download MSASYNC.EXE from http://www.microsoft.com/windowsmobile/downloads/activesync37.mspx.4. Double-click on MSASYNC.EXE. Follow the installation directions. The dialog “Get Connected” appears. 5. Click Next. The application finds the PocketPro on the COM1 port. The dialog “New Partnership” appears.6. Select Cancel, no partnership. The info dialog “Partnership Not Set Up” appears.7. Click OK.8. Click Next. The ActiveSync dialog appears.
Figure 5.18: MS ActiveSync dialog
Copy Files9. Copy all files from C:\Program Files\BCX\Pocket PRO\Application, copied during installation, to the mobile
application folder. Overwrite any existing files.
The File Conversion dialog box appears.10.Click OK. ActiveSync converts the files to the Pocket PC format. The Database Conversion dialog appears.

5.10 OptiFlex • MS: Inventory Station (ICM)
11.Change the folder path to \Application\BCX.cdb.
Figure 5.19: Dialog “Import from Database to Mobile Device”
12.Click OK. Overwrite if the file already exists. A Synchronization Warning message appears.13.Click OK.
Reset14.Remove the back battery cover.
Figure 5.20: Resetting PocketPro
15.Simultaneously press the Function and Reset buttons.16.Replace the battery cover.17.Press the Power button. Follow the screen prompts for device intialization. Note: The time zone must be set
correctly.The PocketPro is now ready for use.

OptiFlex • MS: Inventory Station (ICM) 5.11
VidexPro
Connect to the PC1. Important: If the Videx has non-rechargeable batteries: Switch the Charge button on the base station to Off.2. Connect the base station RJ socket to the PC serial port.3. Connect the base station to power.
Program4. Double-click on the desktop icon. The OptiFlex VidexPro application dialog appears.
Figure 5.21: VidexPro application dialog
5. Click Program.6. Place the scanner in the base.7. Press the scanner Scan button.8. Click OK, on the PC. Files are copied. The VidexPro is now ready for use.
Configure the SATO Label Printer1. Connect the SATO printer cable to the USB port.2. Power on the printer.3. Select Start/Settings/Printers.4. Double-click Add Printer. The Add Printer Wizard appears.5. Click Next. The local or network dialog appears.6. Select Local.7. Check Automatically detect and install....8. Click Next. A dialog appears stating that no printers were found.9. Click Next, install manually. The dialog to select the printer port appears.10.Select Use the following port.11.Select USB001, description = Virtual printer port for USB.12.Click Next. The dialog to select the manufacturer and model appears.13.Select manufacturer Generic.14.Select printer Generic/Text only.15.Click Next. The dialog “Name your Printer” appears.16.For printer name: Enter SATO.17.As default printer: Select No.18.Click Next.19.Specify if share.20.Click Next.21.For test page print: Select No.22.Click Next. The dialog “Completing the Add Printer Wizard” appears.23.Click Finish.

5.12 OptiFlex • MS: Inventory Station (ICM)
Setup FacilitiesQuick Start: The hospital facilities settings are already specified in the demo DB. However, it is recommended to read through this section to see how facilities can be created/maintained in a production environment.The hospital facility parameters are normally specified directly in the database. However, they can also be set in ICM.
Create FacilitiesA facility is created by adding an entry to the SQL table tbl_Facility.
Specify Facility Details1. In the ICM main menu under “System Settings”: Click Hospital Setup Parms. The dialog “System and Program
Settings” appears.
Figure 5.22: Dialog “System and Program Settings”
2. Enter the “Company Name and Address” information.3. Enter the “Systems Settings”.4. Edit the broadcast messages.5. Edit the facility settings.6. Click Save Changes.7. Click Main Menu.

OptiFlex • MS: Inventory Station (ICM) 5.13
Create UsersQuick Start: The only user in the system (user1) was entered directly in the database, and this is the only user required for the Quick Start. However, it is recommended to read through this section to see how users are created and maintained in a production environment.Users are entered into the system in any of the following ways:
• Enter manually as described below.• Import an Excel spreadsheet provided by the hospital that lists all users. Lists for previous customers have had
as few as four or as many as 1200 users.• Enter via a customized interface developed by Omnicell.
To enter a new user:1. In the ICM main menu under “System Settings”: Click Users. The dialog “Add or Edit User Information”
appears.
Figure 5.23: Dialog “Add or Edit User Information”
2. Click Add User to add a user. A new entry is created in the SQL DB tbl_Permissions.3. Enter the User ID and Password. 4. Click OK.5. Enter the user
• First Name • Last Name • Emp Type
6. Check if Administrator.7. Click User Profile. The dialog “Set User Permissions for User: (userID)” appears.8. Check the appropriate permissions.9. Click on Print Labels.10.Print the label for the user. The label can be scanned to login the user.11.Click Main Menu to exit.

5.14 OptiFlex • MS: Inventory Station (ICM)
Link Dept’s to PAR’sRooms and PARs have to be linked.1. In the ICM main menu under “System Settings”: Click Dept/PAR Setup. The dialog “Department / PAR Setup”
appears.
Figure 5.24: Dialog “Department / PAR Setup”
2. Add any unlisted Departments.3. Add any unlisted PAR’s.4. Click Main Menu.
Link Stations/Rooms to Dept’s/PAR’sRoom and patient information is received via ADT. Therefore, normally it is not required to specify the department or PAR that a room belongs to. However, this information should be verified.1. In the ICM main menu under “System Settings”: Click Room Maintenance. The dialog “Room Maintenance”
appears.
Figure 5.25: Dialog “Room Maintenance”
2. Ensure that the data is correct.

OptiFlex • MS: Inventory Station (ICM) 5.15
Setup Facility Inventory (Items/Categories/CP’s)Quick Start: Briefly review the information in this section. If no item labels are available but a SATO label printer is available, then PAR inventory labels can be printed.
Verify Existing Facility Items1. Click View/Edit Inventory.2. Click Add/Edit/Remove Items. The list of all facility items is shown under “Available Items”.
Figure 5.26: List of all facility items
Create Facility ItemsAll items should normally be in the above master list. If an item, however, is not in the hospital systems, then the item can be added, to the SQL DB as a temporary measure.1. Click Item/procedures. The list of items is shown.
Figure 5.27: List of facility items

5.16 OptiFlex • MS: Inventory Station (ICM)
2. Click Add items. The dialog “Add item master” appears.
Figure 5.28: Dialog “Add item master”
3. Enter the required information.4. Click Add. The information is added to SQL table tbl_InventoryMaster.5. Select Exit. The item is listed in the item master.

OptiFlex • MS: Inventory Station (ICM) 5.17
Create Facility Item CategoriesItems can be categorized for use with TotalTouch.
Add Category1. In ICM: Click on Item categories.2. Select the facility.3. Select the category to add the new category, as a subcategory, to.4. Click Add a category.5. Enter the category description.
Figure 5.29: Add ToualTouch category fields
6. Click Add.

5.18 OptiFlex • MS: Inventory Station (ICM)
Add Item to Category1. Select the category.2. Select Add/remove item. The dialog Add items to a category appears.3. Select the department.4. Check the inventory items to include.
Figure 5.30: Included category inventory items
5. Click Save changes.6. Click the item category. The new items are shown.
Figure 5.31: New items in a category

OptiFlex • MS: Inventory Station (ICM) 5.19
Create Facility Charge Procedures
Create Charge Procedure1. Click on Item/procedures.2. Click on tab Charge procedures. The list of charge procedures is shown.
Figure 5.32: List of charge procedures
3. Click Add item. The dialog “Add charge procedure” appears.
Figure 5.33: Dialog “Add charge procedure”
4. Enter the required information.5. Click Add.6. Select Exit. The new item is listed.
Print Charge Procedure Label7. Add the charge procedure to a PAR.
Figure 5.34: Add a charge procedure to a PAR

5.20 OptiFlex • MS: Inventory Station (ICM)
8. In the PAR inventory list: Select the charge procedure.
Figure 5.35: Charge procedure in a PAR item list
9. Click Print Labels.10.Click Print to print the charge procedure label.This label can be scanned to charge the procedure.
Setup PAR Inventory (Items/Kits)Quick Start: Briefly review the information in this section. If no item labels are available but a SATO label printer is available, then PAR inventory labels can be printed.
PAR Items
Verify existing PAR items1. In the ICM main menu under “System Settings”: Click View/Order Inventory. The dialog “Inventory
Management” appears.2. Select the Facility and Dept/PAR to display the inventory detail for the par.3. Verify that the list “Inventory Detail” includes all items.
Figure 5.36: Dialog “Inventory Management”

OptiFlex • MS: Inventory Station (ICM) 5.21
Add PAR ItemsNote: PAR inventory information is sent with the item file. At 80% of facilities these dialogs are never required to add, delete or change the properties of an item. 1. Click Add/Remove items.2. Select the available items, use the standard Windows CTRL or SHIFT to select several items.
Figure 5.37: Dialog “Add/Remove/Edit Items for Dept/PAR”
3. To add items: Click Add selected items to PAR. A confirmation dialog appears.4. Click OK. The items are added.
Figure 5.38: Items added to a PAR
5. Specify MIN values.6. Specify MAX values.7. Click Exit. The items are added to the PAR.
Figure 5.39: Items added to a PAR

5.22 OptiFlex • MS: Inventory Station (ICM)
Copy PAR ItemsItems can be copied from one PAR to another PAR. Note that all PAR items will be copied.1. In the ICM main menu under “System Settings”: Click View/Order Inventory. The dialog “Inventory
Management” appears.2. Click Add/Edit/Remove Items.3. Under “Copy New Items From Another Location”: Select the Facility and Dept/PAR to copy items from.
Figure 5.40: Dept/PAR to copy items from
4. Click Copy. The dialog “Verify copy” appears.5. Click Yes. The dialog “Copy finished” appears. The number of items copied is listed, items that were not copied
were already in the PAR.6. Click OK.
Remove PAR Items1. Click on View/Order Inventory.2. Click on Add/Edit/Remove Items.3. In the list “Edit item detail information”: Select the items to delete from the PAR.
Figure 5.41: Selected items to delete from PAR
4. Click Remove Selected Items from PAR. A dialog asks for verification.5. Click OK. The items are deleted from the PAR.
Cross-Reference PAR itemsThe OptiFlex bin bar code for an item can be referenced to the manufacturer’s item bar code. This allows the man-ufacturer’s bar code to be scanned.1. Click on View/Order Inventory.2. Select an item in the list “Inventory Detail”.3. Click Xref Item. The dialog “Cross Reference for Item xxxx” appears.4. Scan the manufacturer’s bar code on the item.
Figure 5.42: Scanned manufacturer’s bar code
5. Click OK.6. Click on the item again in the inventory list.7. Click Xref Item. The cross reference information is displayed.The cross reference will be tested later when using the nurse station.

OptiFlex • MS: Inventory Station (ICM) 5.23
Print Item LabelsNote: A SATO label printer is required to print labels.If items were added to a PAR, then the labels will have to be printed for the added items.1. Select the items.2. Click Print labels.
Figure 5.43: Dialog “Print labels”
3. Click Print. The labels are printed.
PAR Kits
Create PAR Kits1. In ICM: Click Kit Setup. The dialog “Kit Setup” appears.2. Click Build New Kit. The dialog for the kit description appears.3. Select the department and default PAR.4. Enter the kit description.
Figure 5.44: Description for kit
5. Click OK. A list of inventory items appears.

5.24 OptiFlex • MS: Inventory Station (ICM)
6. Check Include for the item(s) to include in the kit.
Figure 5.45: Included items in kit
7. Click Save changes. An entry is created in SQL tbl_KitMaster.
Print Kit Label1. Click Print kit label.2. Specify the number of labels to print.
Figure 5.46: Number of labels to print
3. Click OK. The label is printed on the SATO printer.

OptiFlex • MS: Inventory Station (ICM) 5.25
Test (Inventory/Orders/Reports)
Count / Inventory (INV)The Videx and PocketPro scanners are used to scan items that are not located within reach of an OptiFlex PC.
PocketProScan Items1. On the PocketPro: Click Start/Programs/ScanMat.2. Click
• Count to perform an item count, sets all OnOrder values to 0.• Inventory to perform an item inventory, OnOrder values do not change.
3. Press the yellow button to scan.4. Enter the item quantity.5. Press Enter.6. Click Exit.7. Click Exit, exit ScanMat.
Connect with ActiveSync8. On the OptiFlex PC: Start ActiveSync, in the Windows start menu; should already be started.9. Place PocketPro in the cradle. After several seconds a connection is established. Do not setup a partnership.
Download Data10.Double-click on the desktop PocketPRO icon. The dialog PocketPro appears.11.Click Process. The data is transferred. After several minutes the process complete message appears.
Figure 5.47: PocketPro dialog message “Message complete”
View Transaction Details in ICM/SQL DB12.In ICM: Click Refresh. The item count and OnHand values have been updated.
Figure 5.48: Transaction details in ICM

5.26 OptiFlex • MS: Inventory Station (ICM)
13.In SQL Server Enterprise Manager: Right-click on tbl_Transactions.14.Select Open Table / Query.15.Perform the following query, replace “1/1/2005” with today’s date; click on “!” to execute: SELECT * FROM tbl_Transactions WHERE ( TransactionDate >= ‘1/1/2005’ )The transaction is displayed.
Figure 5.49: Transaction details in SQL DB
VidexScan Items1. On the Videx: Click Scan.2. Click on
• 1 to perform an item count, sets all OnOrder values to 0.• 3 to perform an item inventory, OnOrder values do not change.
3. Scan the item.4. Enter the quantity.5. Click ENT, yellow button.
Download Data6. Click Input Data.7. Put the Videx in the base.8. Click the scan button, on the Videx, to turn on the Videx.9. Click OK. The dialog “Communications Progress” appears.
Figure 5.50: Dialog “Communications Progress”
10.The message “Process complete” appears.
Figure 5.51: Message “Process Complete”
11.Verify in ICM that the item count has changed, click Refresh.

OptiFlex • MS: Inventory Station (ICM) 5.27
Order (REQ)
Manual Order (ToOrder)The Videx and PocketPro scanners are used to scan items that are not located within easy reach of an OptiFlex PC. The following describes how to order items with• Modification of ToOrder in Dialog “Inventory Management”• PocketPro• Videx
Modification of ToOrder in Dialog “Inventory Management”The variable ToOrder can be modified directly in dialog “Inventory Management”.12.Click View/Order Inventory.13.Change the value for the item in the list “Inventory Detail”.
Figure 5.52: Changing ToOrder manually in Inventory Detail
PocketProScan items1. On the PocketPro: Click Start/Programs/ScanMat.2. Click on Order.3. Press the yellow button to scan.4. Enter the item quantity.5. Press Enter.6. Click Exit.7. Click Exit, exit ScanMat.
Connect with ActiveSync8. On the OptiFlex PC: Start ActiveSync.9. Place PocketPro in the cradle, no partnership.
Download Data10.Double-click on the desktop PocketPro icon.11.Click Process. The data is transferred.
View Transaction Details in ICM/SQL DB12.In ICM: Click Refresh. ToOrder has been updated.
Figure 5.53: Transaction details in ICM

5.28 OptiFlex • MS: Inventory Station (ICM)
13.In SQL Server Enterprise Manager: Right-click on tbl_Transactions.14.Select Open Table/Query.15.Perform the following query (click on “!” to execute): SELECT * FROM tbl_Transactions WHERE ( TransactionDate >= ‘1/1/2005’ )The transaction is displayed, TransactionTypeKey = 4.
Figure 5.54: Transaction details in SQL DB
VidexScan items1. On the Videx: Click Scan.2. Click on 2 to perform an item order.3. Scan the item.4. Enter the quantity.5. Click ENT, yellow button.
Download Data6. Click Input Data.7. Put the Videx in the base.8. Click the scan button, on the Videx, to turn on the Videx.9. Click OK. The dialog “Communications Progress” appears.
Figure 5.55: Dialog “Communications Progress”
The message “Process complete” appears.
Figure 5.56: Message “Process Complete”
10.Verify in ICM that the item OnOrder has changed, click Refresh.

OptiFlex • MS: Inventory Station (ICM) 5.29
Set OnHand < Min, System AutomatedNormally items are added to the order list automatically, when enough items have been scanned at the nurse sta-tion. The nursing station is introduced in the next chapter, but it is possible to test automated ordering by manually changing the number of items in the SQL DB table tbl_InventoryDetail, this value is also changed when an item is billed to a patient at the nurse station.1. Perform the following SQL query on tbl_InventoryDetail: SELECT * FROM tbl_InventoryDetail WHERE (PARsKey = '624f80') and (itemid = ‘000004’)2. Set OnHand = 0, less than min.3. Place the cursor in a different row to save.
Figure 5.57: Setting OnHand = 0 in SQL
4. In ICM: Click Refresh. The item OnHand is less than min.
Figure 5.58: OnHand in ICM
Send the Order to the Hospital Systems5. Click Order Inventory.6. Select the PAR.
Figure 5.59: PAR selected for order
7. Click Place Orders for Facilities.8. Uncheck Automatically print receipts.9. Click Order. A confirmation dialog appears.

5.30 OptiFlex • MS: Inventory Station (ICM)
10.Click Yes. An information message appears.
Figure 5.60: Charge/Requisition Information dialog
11.Click OK. The dialog “SELECT RECEIPTS TO VIEW OR PRINT” appears.
Figure 5.61: Dialog “SELECT RECEIPTS TO VIEW OR PRINT”
12.Click Refresh in ICM. Note that the OnOrder value has changed.
Figure 5.62: OnOrder in ICM
13.Customer Install: Ensure that the hospital systems received the order.

OptiFlex • MS: Inventory Station (ICM) 5.31
Print a Receipt1. In ReqMaster: Check Preview Receipts.2. Click Print Receipts. The receipt is shown in the reports viewer.
Figure 5.63: Receipt in Reports Viewer
3. Click Exit.4. Click Close.
Reports1. Open the ICM main menu.2. Click Reports. The dialog “Reports Selection” appears.
Figure 5.64: Dialog “Reports Selection”

5.32 OptiFlex • MS: Inventory Station (ICM)
3. Click Report. The dialog “Select department/PAR” appears.4. Select the Dept/PAR.5. Click OK. The dialog “Enter date range for report” appears.6. Select the starting date/time.7. Select the ending date/time.
Figure 5.65: Starting/ending date for report
8. Click OK. The report appears.
Figure 5.66: Report
9. Customer Install: Test all reports.
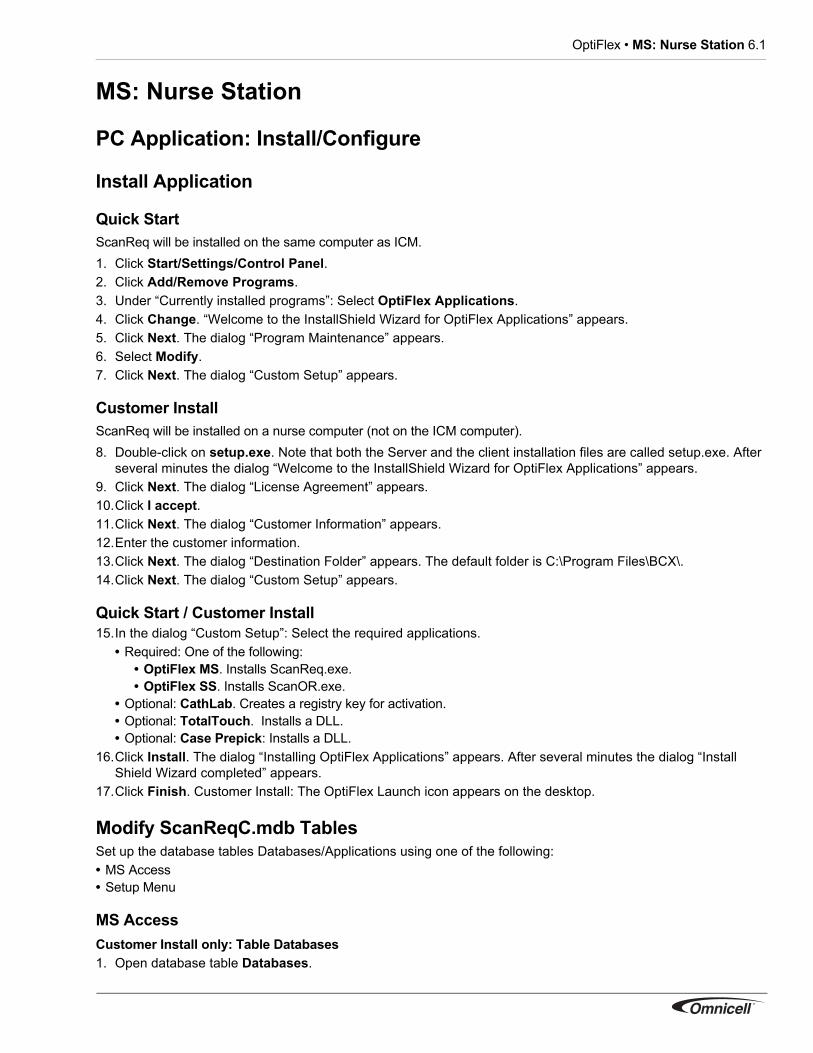
OptiFlex • MS: Nurse Station 6.1
MS: Nurse Station
PC Application: Install/Configure
Install Application
Quick StartScanReq will be installed on the same computer as ICM.1. Click Start/Settings/Control Panel.2. Click Add/Remove Programs.3. Under “Currently installed programs”: Select OptiFlex Applications.4. Click Change. “Welcome to the InstallShield Wizard for OptiFlex Applications” appears.5. Click Next. The dialog “Program Maintenance” appears.6. Select Modify.7. Click Next. The dialog “Custom Setup” appears.
Customer InstallScanReq will be installed on a nurse computer (not on the ICM computer).8. Double-click on setup.exe. Note that both the Server and the client installation files are called setup.exe. After
several minutes the dialog “Welcome to the InstallShield Wizard for OptiFlex Applications” appears.9. Click Next. The dialog “License Agreement” appears.10.Click I accept. 11.Click Next. The dialog “Customer Information” appears.12.Enter the customer information.13.Click Next. The dialog “Destination Folder” appears. The default folder is C:\Program Files\BCX\.14.Click Next. The dialog “Custom Setup” appears.
Quick Start / Customer Install15.In the dialog “Custom Setup”: Select the required applications.
• Required: One of the following:• OptiFlex MS. Installs ScanReq.exe.• OptiFlex SS. Installs ScanOR.exe.
• Optional: CathLab. Creates a registry key for activation.• Optional: TotalTouch. Installs a DLL.• Optional: Case Prepick: Installs a DLL.
16.Click Install. The dialog “Installing OptiFlex Applications” appears. After several minutes the dialog “Install Shield Wizard completed” appears.
17.Click Finish. Customer Install: The OptiFlex Launch icon appears on the desktop.
Modify ScanReqC.mdb TablesSet up the database tables Databases/Applications using one of the following:• MS Access• Setup Menu
MS AccessCustomer Install only: Table Databases1. Open database table Databases.

6.2 OptiFlex • MS: Nurse Station
2. Enter the required information:• DatabaseID • InitialCatalog • DataSource
Figure 6.1: Table Databases
3. Save the changes.
Table Applications4. Open database table Applications.5. Enter the required information:L
• Initial Catalog, Quick Start: DemoDataFileNew• Data Source, Quick Start: localhost
Figure 6.2: Table Applications
6. Save the changes.
Setup MenuOpen the Setup Menu1. Click on the icon OptiFlex Launch icon. The “OptiFlex Launcher” dialog appears.
Figure 6.3: Quick Start: OptiFlex Launch dialog
2. Click on the X in the upper-right corner of the dialog. 3. Press CTRL-SHIFT-F1. The dialog “Login” for the SQL DB appears.

OptiFlex • MS: Nurse Station 6.3
4. Enter the following information:• Server: SQL DB server.• Database: SQL DB.• User Name.• Password.
Figure 6.4: DB Server Login dialog
5. Click OK. The dialog “Setup Menu” appears.
Figure 6.5: Setup Menu dialogCustomer Install: Table Databases6. Click Setup Databases. A dialog for editting ScanReqC.mdb table Databases appears.7. Enter the required info:
• Database• Security• User ID• Initial Catalog• Data Source• Active
Figure 6.6: Dialog “Setup Parameters”, for ScanReqC.mdb Databases8. Click OK.

6.4 OptiFlex • MS: Nurse Station
Table Applications9. In the dialog “Setup Menu”: Click Setup Applications.10.From the drop-down list “Application”: Select ScanReq or ScanReq/OR.11.Customer Install: Enter the Touch Folder Path, the location of updated version of the ScanReq exe; this has
nothing to do with TouchScreen functionality.12.Check Active.
Figure 6.7: Dialog “Application Setup” for ScanReq
13.Click Save.14.Click Exit.15.In the dialog “Setup Menu”: Click Exit. Note that the Launch OptiFlex button has appeared.
Figure 6.8: Button “Launch OptiFlex” in OptiFlex launcher

OptiFlex • MS: Nurse Station 6.5
Open OptiFlex16.Click on Launch OptiFlex. A list of doctors appears. This is the “main dialog” for nurses.
Figure 6.9: OptiFlex “main dialog”, doctors
Open OptiFlex MM17.Press MM. Note that the letters are shown near the bottom of the OptiFlex main dialog for a fraction of a
second.
Figure 6.10: OptiFlex “MM” entry
Then the OptiFlex MM dialog is displayed. This is the “main dialog” that the MM staff uses at the nurse station.
Figure 6.11: OptiFlex MM “main dialog”

6.6 OptiFlex • MS: Nurse Station
Touchscreen SetupConnect the Monitor1. Connect the following Touchscreen cables:
• Power• Monitor, to PC monitor port• USB
Install Drivers2. Download from http://elotouch.com/support/dnld.asp the Windows XP/2000 Universal Driver sw500930.exe.3. Double-click sw500930.exe. The WinZip Welcome dialog appears.4. Click OK. The WinZip Self Extractor dialog appears.5. Enter in “Unzip to folder” c:\Elo.6. Check “When done unzipping open: .\Elosetup.exe”.7. Click Unzip. The dialog “unzipped successfully” appears.8. Click OK. The dialog “Elo Touchscreen setup” appears.9. Check one of the following, depending on how the PC is connected the monitor:
• “Install USB Touchscreen Drivers”• “Install Serial Touchscreen Drivers”
10.Click Next. The dialog “License Agreement” appears.11.Click Yes. If serial touchscreen drivers were installed: The dialog “Auto-detect Elo devices” appears.12.Check “Auto-detect Elo devices”.13.Click Next. A list of COM ports appears.14.Check the COM port to be used, typically COM1.15.Click Next. The selected COM ports are listed.16.Click Next. Drivers and components are installed. The dialog “Setup Complete” appears.17.Check Calibrate Elo Touchscreen monitors.18.Click Finish. The monitor calibration targets appear.
Calibrate Monitor19.Touch the target three times.20.Touch the green check mark.21.Touch the target three times.22.Touch the green check mark. Installation is complete.
Test23.Press on the monitor to verify operation.
Specify File/Dir Location in OptiFlex24.Launch OptiFlex from the OptiFlex launcher. The User Login dialog appears.25.Click MM.26.Click Setup Department.27.Enter User Name and Password.28.Click OK.29.Click on tab Directories.30.For Directory Type = Calibrate:
• Set “Directory Location” = C:\Elo\.• Set “File Name” = Elova.exe.
31.Click Save Changes....

OptiFlex • MS: Nurse Station 6.7
Scanner P470 Setup
Connect to PC1. Disconnect the scanner power.2. Connect the scanner to the computer.
Figure 6.12: Scanner cable connection to computer
3. Connect the scanner to power.
Program4. Scan the “Pair” barcode label in the scanner base.5. Place the scanner in the base. The scanner is paired to the base.6. Scan the “Reset to Default” barcode below. The Scanner display should read “SKU:”.
Figure 6.13: Scanner barcode: Reset to default
7. Scan the “Synapse bar codes: Keyboard Wedge” barcode below. The Scanner display should read “SKU:”.
Figure 6.14: Scanner barcode: Keyboard wedge
8. Scan the “Parameter settings 1” barcode, below. The Scanner display should read “Parameter Settings: Next to scan: 2/3”.
9. Scan the “Parameter settings 2” barcode, below. The Scanner display should read “Parameter Settings: Next to scan: 3/3”.
Reset to Default
1/1
Synapse bar codes : Keyboard Wedge
1/1

6.8 OptiFlex • MS: Nurse Station
10.Scan the “Parameter settings 1” barcodes below. The Scanner display should read “Scan remaining bar codes”.
Figure 6.15: Scanner barcodes: Parameter settings
11.Scan the “ADF Rules 1” barcode below. The Scanner display should read “Next to scan: 2 of 9”.12.Scan the “ADF Rules 2” barcode below. The Scanner display should read “Next to scan: 3 of 9”.
Figure 6.16: Scanner barcodes: ADF rules
Parameter Settings
1/3
2/3
3/3
ADF Rule(s)
1/9
2/9

OptiFlex • MS: Nurse Station 6.9
13.Scan the “ADF Rules 3” barcode below. The Scanner display should read “Next to scan: 4 of 9”.14.Scan the “ADF Rules 4” barcode below. The Scanner display should read “Next to scan: 5 of 9”.15.Scan the “ADF Rules 5” barcode below. The Scanner display should read “Next to scan: 6 of 9”.16.Scan the “ADF Rules 6” barcode below. The Scanner display should read “Next to scan: 7 of 9”.17.Scan the “ADF Rules 7” barcode below. The Scanner display should read “Next to scan: 8 of 9”.18.Scan the “ADF Rules 8” barcode below. The Scanner display should read “Next to scan: 9 of 9”.19.Scan the “ADF Rules 9” barcode below. The Scanner display should read “Scan remaining bar codes”.
Figure 6.17: Scanner barcodes: ADF rules (continued)
20.Scan the “Reset Scanner” barcode, below. The Scanner display should read “Initializing” and finally “SKU”.
Figure 6.18: Scanner barcodes: Reset scanner
The scanner is ready for use.
3/9
4/9
5/9
6/9
7/9
8/9
9/9
Reset Scanner
1/1

6.10 OptiFlex • MS: Nurse Station
Omnicell Cabinet Setup
Connect the Cables1. Turn off power.2. Connect RS-485 cables between cabinets.3. Connect an RS-232 cable between cabinet 0 and the PC.
Set Zone SwitchesThe following diagram shows the cabinet zones.
Figure 6.19: Cabinet zones
4. Set the zone switches as specified in the following table.Table 6.1: Zone Switch Settings
Cabinet Zone 1 2 3 4 5 6 7 80 0 ON ON ON ON ON ON ON ON0 1 OFF ON ON ON ON ON ON ON0 2 ON OFF ON ON ON ON ON ON0 3 OFF OFF ON ON ON ON ON ON0 4 ON ON OFF ON ON ON ON ON0 5 OFF ON OFF ON ON ON ON ON0 6 ON OFF OFF ON ON ON ON ON0 7 OFF OFF OFF ON ON ON ON ON0 8 ON ON ON OFF ON ON ON ON1 9 OFF ON ON OFF ON ON ON ON1 10 ON OFF ON OFF ON ON ON ON1 11 OFF OFF ON OFF ON ON ON ON1 12 ON ON OFF OFF ON ON ON ON1 13 OFF ON OFF OFF ON ON ON ON1 14 ON OFF OFF OFF ON ON ON ON1 15 OFF OFF OFF OFF ON ON ON ON1 16 ON ON ON ON OFF ON ON ON1 17 OFF ON ON ON OFF ON ON ON2 18 ON OFF ON ON OFF ON ON ON2 19 OFF OFF ON ON OFF ON ON ON2 20 ON ON OFF ON OFF ON ON ON2 21 OFF ON OFF ON OFF ON ON ON2 22 ON OFF OFF ON OFF ON ON ON2 23 OFF OFF OFF ON OFF ON ON ON2 24 ON ON ON OFF OFF ON ON ON2 25 OFF ON ON OFF OFF ON ON ON2 26 ON OFF ON OFF OFF ON ON ON3 27 OFF OFF ON OFF OFF ON ON ON3 28 ON ON OFF OFF OFF ON ON ON3 29 OFF ON OFF OFF OFF ON ON ON3 30 ON OFF OFF OFF OFF ON ON ON3 31 OFF OFF OFF OFF OFF ON ON ON3 32 ON ON ON ON ON OFF ON ON3 33 OFF ON ON ON ON OFF ON ON3 34 ON OFF ON ON ON OFF ON ON3 35 OFF OFF ON ON ON OFF ON ON

OptiFlex • MS: Nurse Station 6.11
Set Drawer SwitchesFor each drawer switches for the following must be set:• Zone Location• Row Location within ZoneSwitch
• Up position = ON.• Down position = OFF.
DIP switch numbers 1-8 are read from left to right.
Figure 6.20: Drawer switches
Zone Location5. Set the S1, cabinet zone, switch for each drawer as specified in the following diagram.
Row Location within Zone6. Set the S2, row location, switch for each drawer as specified in the following diagram.
Table 6.2: Drawer switch S1 (cabinet zone) settings
Zone 8 7 6 5 4 3 2 10 OFF ON ON ON ON ON ON ON1 OFF ON ON ON ON ON ON OFF2 OFF ON ON ON ON ON OFF ON3 OFF ON ON ON ON ON OFF OFF4 OFF ON ON ON ON OFF ON ON5 OFF ON ON ON ON OFF ON OFF6 OFF ON ON ON ON OFF OFF ON7 OFF ON ON ON ON OFF OFF OFF8 OFF ON ON ON OFF ON ON ON9 OFF ON ON ON OFF ON ON OFF10 OFF ON ON ON OFF ON OFF ON11 OFF ON ON ON OFF ON OFF OFF12 OFF ON ON ON OFF OFF ON ON
Table 6.3: Drawer switch S2 (row location) settings
Drawer access 8 7 6 5 4 3 2 11 ON ON ON ON ON ON ON OFF2 ON ON ON ON ON ON OFF ON3 ON ON ON ON ON ON OFF OFF4 ON ON ON ON ON OFF ON ON

6.12 OptiFlex • MS: Nurse Station
Detect Cathracks7. Turn on Cathrack power.8. Enter OptiFlex MM.9. Enter Setup department tab OptiFlex.10.Specify Omni ID.11.Select Com Port.12.Click in the Cath Rack 1 field.13.On the right-most Cath Rack slider: Press the left-most, toward the front of the cabinet, green button. The Cath
Rack code appears.
Figure 6.21: Omnicell Cath Rack code
14.Repeat the above for each Cath Rack.
5 ON ON ON ON ON OFF ON OFF
Table 6.3: Drawer switch S2 (row location) settings

OptiFlex • MS: Nurse Station 6.13
Station Facility/PAR Settings1. Enter OptiFlex MM.2. Click Setup Dept. The OptiFlex User Login dialog appears.3. Enter username, Quick Start: user1.4. Enter password, Quick Start: user1.
Figure 6.22: OptiFlex User Login dialog
5. Click Enter. The dialog for department configuration appears.
Figure 6.23: OptiFlex dialog for department configuration
6. Enter the Station ID.7. Enter the Facility ID.8. Select the Dept/PAR.9. Click Save Changes and Return to Main Menu.

6.14 OptiFlex • MS: Nurse Station
Label Bins1. In ICM: Click View/Order Inventory. The dialog “Inventory Managerment” appears.2. Select Facility.3. Select Dept/PAR.4. Click Print Labels. The dialog “Print Labels” appears.
Figure 6.24: Dialog “Print Labels”
5. Print labels for all items in the Dept/PAR.6. Put the labels on the bins.

OptiFlex • MS: Nurse Station 6.15
Test ADT, CHG, INV, REQ
ADT (Admissions/Discharges)Quick Start: There is no hospital ADT feed. Therefore this section cannot be tested.Room and patient information from the hospital systems must be verified.
RoomsIf a room is missing, then the room has not been assigned to the correct PAR. To correct the PAR, in ICM, see Link Stations/Rooms to Dept’s/PAR’s (page 5.14).To check rooms do the following.1. Open OptiFlex.2. Type MM.3. Click Setup Department.4. Login.5. Under “Station settings/Display opt”: Select Rooms.6. Deselect Show doctor form.7. Click Save changes.8. Click Patient issues.9. Verify that all rooms are shown.
PatientsVerify in Room1. Verify that all patients are in the proper rooms.If a patient is not shown in a room, then a rare glitch has occurred. This typically happens when, for example, the ADT feed has sent a new patient room admission data before sending the discharge data for the previous patient, in which case the admission transaction is simply ignored. If such a problem occurs, then a temporary solution, until the next ADT transaction for that room/patient fixes the problem, is to add the patient manually to the room in ICM, with the Add patient button; see Link Stations/Rooms to Dept’s/PAR’s (page 5.14).
Add1. In ICM: Click Room Maintenance. The dialog “Room Maintenance” appears.2. Select an empty room.3. Click Add Patient. The dialog “Select Patient to Add” appears.4. Select the patient from the drop-down list.
Figure 6.25: Dialog “Select Patient to Add”
5. Click OK. The patient is added to the room.
Remove1. In ICM: Click Room Maintenance. The dialog “Room Maintenance” appears.2. Select a room with a patient.3. Click Remove/Transfer. The dialog “Select Transaction Type” appears.

6.16 OptiFlex • MS: Nurse Station
4. Select Remove from Room.
Figure 6.26: Dialog “Select Transaction Type”
5. Click OK. The patient is removed from the room.
Transfer1. In ICM: Click Room Maintenance. The dialog “Room Maintenance” appears.2. Select a room with a patient.3. Click Remove/Transfer. The dialog “Select Transaction Type” appears.4. Select Transfer. A list of empty rooms is shown.5. Select the room to transfer to.
Figure 6.27: Dialog “Select Transaction Type”
6. Click OK. The patient is transferred.

OptiFlex • MS: Nurse Station 6.17
INV (Count/Inventory)Count/inventory in ICM were previously described in Count / Inventory (INV) (page 5.25).It is possible to perform count/inventory at a nurse station with the same procedure. However, this is rarely done, since an ICM-style count/inventory is not “real-time”, since the data must be downloaded after returning to the ICM computer, and during this interval any changes in the nurse station inventory will not be registered. Therefore, count/inventory at the nurse station is typically performed with the nurse station scanner.
Inventory1. Open ScanReq.2. Click MM.3. Click Inventory.4. Scan the item to be inventoried.5. Enter the number of items.
Figure 6.28: Dialog “Physical count”, inventory
6. Click Done with this item. Note that if too long of a delay occurs before doing this, then the scan is reset.7. Click Return.In ICM click Refresh. Note that
• OnHand = number of items counted.• OnOrder has not changed.
Figure 6.29: OnHand = number of items counted

6.18 OptiFlex • MS: Nurse Station
Count1. Open ScanReq.2. Click MM.3. Click Count.4. Scan the item to be counted. If the item has an open order, then the following message appears:
Figure 6.30: Continue with count?
5. Click Yes. The dialog “Count with Replenishment” appears.6. Enter the number of items.
Figure 6.31: Dialog “count with replenishment” (count)
7. Click Done with this item. Note that if too long of a delay occurs before doing this, then the scan is reset.8. Click Return.In ICM click Refresh. Note that
• OnHand = number of items counted• OnOrder = 0
Figure 6.32: OnHand = number of items counted

OptiFlex • MS: Nurse Station 6.19
ChargeNote:• To enable Totaltouch: In Station Settings: Check TotalTouch.• To view SQL DB transactions: On SQL DB tbl_Transactions perform the following, replace ‘1/7/2005’ with current
date: SELECT * FROM tbl_Transactions WHERE (TransactionDate >= '1/7/2005')
PatientItemsWorking with PAR items in ICM, including printing labels, was discussed in PAR Items (page 5.20).Items can be issued to a patient by:
• Scanning the item bin bar code.• Scanning the item bar code, if a cross-reference has been created for that item in the PAR.• Entering the item bar code number manually.• Using TotalTouch, if the item was entered into the TotalTouch hierarchy.
To test an item issue to a patient:1. Open ScanReq.2. Click on a patient.3. To issue with a scanner: Scan the item.4. To issue without a scanner: Enter the item number.5. To issue with TotalTouch: Click Total Touch.
Figure 6.33: Totaltouch initial dialog
6. Click down on the category hierarchy until the item is shown.7. Click on the item to order.

6.20 OptiFlex • MS: Nurse Station
8. Click on other items to order.
Figure 6.34: Totaltouch items selected
9. Click Done. The items are shown.
Figure 6.35: List of ordered totaltouch items
10.Select Review/Credit patient issues. Verify that the scanned items are in the list of items ordered for the patient.
11.Click Exit/Return.12.Click Done with this patient.

OptiFlex • MS: Nurse Station 6.21
KitsWorking with kits in ICM, including printing labels, was discussed in PAR Kits (page 5.23).Kits can be issued to a patient by:• Scanning the kit bar code.• Entering the kit bar code number manually, prefixed with “k”.To test a kit issue to a patient:1. Open ScanReq.2. Click on the patient.3. To issue with a scanner: Scan the kit.4. To issue without a scanner: Enter the kit number, prefixed with “K”.
Figure 6.36: Kit number entry
5. Click Enter.6. Click Done. The kit items are shown.7. Click Done. The kit items are shown. Select Review/Credit patient issues. Verify that the scanned items are in
the list of items ordered for the patient.8. Click Exit/Return.9. Click Done with this patient.Charge ProceduresWorking with charge procedures in ICM, including printing labels, was discussed in Create Facility Charge Proce-dures (page 5.19).Charge procedures can be issued to a patient by:
• Scanning the charge procedure bar code.• Entering the charge procedure bar code number manually, prefixed with “cp”.
To test a charge procedure issue to a patient:1. Open ScanReq.2. Click on patient.3. To issue with a scanner: Scan the kit.4. To issue without a scanner: Enter the charge procedure number, prefixed with “CP”.
Figure 6.37: Charge procedure number entry
5. Click Enter.6. Click Done. Charge procedures are shown.7. Click Done. Charge procedures are shown.Select Review/Credit patient issues. Verify that the scanned
charge procedures are in the list of items ordered for the patient.8. Click Exit/Return.9. Click Done with this patient.

6.22 OptiFlex • MS: Nurse Station
Floor• Items (page 6.22)• Charge Procedures (page 6.22)
ItemsTo test an item issue to a floor:1. Open ScanReq.2. Click Floor charge.3. To issue with a scanner: Scan the item.4. To issue without a scanner: Enter the item number.5. To issue with TotalTouch: Click TotalTouch.6. Click down in the category hierarchy until the item is shown.7. Click on the item to order.8. Click on other items to order.9. Click Done. The items are shown.10.Select Review/Credit Floor Changes. Verify that the scanned items are in the list of items ordered for the floor.11.Click Exit/Return.12.Click Done with this patient.Charge ProceduresTo test a charge procedure issue to a floor:1. Open ScanReq.2. Click Floor charge.3. To issue with a scanner: Scan the charge procedure.4. To issue without a scanner: Enter the charge procedure number, prefixed with “CP”.5. Select Review/Credit Floor Changes. Verify that the scanned charge procedures are in the list of items
ordered for the floor.6. Click Exit/Return.7. Click Done with this patient.

OptiFlex • MS: Nurse Station 6.23
REQ (orders)
ItemsNormally items are ordered when at the nurse station the item level < min and at the ICM station an order is gener-ated. However, items can be ordered manually at the nurse station.1. Open ScanReq.2. Click MM.3. Click Order items.4. Scan the item to order.5. Enter the number to order. Note the quantity to order, already OnOrder.
Figure 6.38: Order items
6. Click Order quantity entered.7. Click Exit.8. In ICM: Refresh to see the order amount. The order could have been made also by simply changing the value in
ICM.
Figure 6.39: Ordered quantity in the ICM inventory detail
9. Customer Install: Ensure that the hospital systems received the order.

6.24 OptiFlex • MS: Nurse Station
Receipts
Print the Order Receipt1. In ICM: Generate an order for the Dept/PAR.2. Print the receipt report.
Scan the Order Receipt3. Open ScanReq.4. Click MM.5. Click Receipts.6. Scan the top barcode on the receipt. The list of items is shown.
Figure 6.40: Scanning receipt barcode
7. Click The above items are correct.8. In ICM: Refresh the inventory for the PAR. Note that OnHand and OnOrder are updated.
Figure 6.41: Inventory detail after receipt scanned

OptiFlex • MS: Nurse Station 6.25
Scan the Item Label9. Open ScanReq.10.Click MM.11.Click Receipts.12.Scan the item barcode. If the item is on a receipt, then it will be shown.
Figure 6.42: Item on receipt barcode scan.
13.Click The Above items are correct.
CalibrateTouchscreen calibration is demonstrated in Touchscreen Setup (page 6.6).
Assign binAn Omnicell Cabinet is required.1. Click Assign bin.2. Click on a bin in the cabinet.3. Click to select an item.
Figure 6.43: Select item for bin assignment
4. Click Assign. The bin has been assigned to the item.

6.26 OptiFlex • MS: Nurse Station
Count inventoryCustomer Install only: All inventory items must be counted.1. For the PAR: Ensure that OnHand items = max.2. Specify the true OnHand for all items.

OptiFlex • MS: Go Live 7.1
MS: Go Live
Server (Interfaces.mdb)1. Specify the production DB as the target DB in Interfaces.mdb in
• tbl_sockets, see tbl_Sockets (priority 1) (page 11.31)• tbl_databases, see tbl_Databases (page 11.27)
2. The following changes are required:• ADT. Typically production ADT is already running, so usually go live with ADT early, populating the DB with
patients actually in the hospital. Transactions are required to populate appropriate tables.• CHG. Often pointing to a test charge system. Point to the production system.• REQ. Typically already running production.• IT/PA. Typically already running production.
Inventory Station (ScanReqC.mdb)3. Modify ScanReqC.mdb table Databases (page 11.32) with production entries.
Nurse Station 1 (ScanReqC.mdb)4. Modify ScanReqC.mdb table Databases (page 11.32) with production entries.
Remaining Nurse Stations5. For each remaining nurse station:
• Ghost the station, change the workstation name; if static IP, then change IP address.• Specify the PAR, in station settings.• Print / affix labels• Count the items• Test

7.2 OptiFlex • MS: Go Live

OptiFlex • SS: Overview 8.1
SS: OverviewThis chapter provides information in addition to that in MS: Overview (page 2.1).
Required Equipment/SoftwareThese items are the same as for MS.
ComponentsThese items are the same as for MS.
OptiFlex SQL DB
Transaction TablesThese are the same as for MS, with the following additions:• tbl_ORTransactionType• tbl_ORTransactions (2, 8)
tbl_ORTransactionTypeDefines the issue/credit types.
Figure 8.1: tbl_ORTransactionType
tbl_ORTransactions (2, 8)Lists all OR transactions, issues and credits. If
• Quantity = 0: The item was on the preference card but was never issued.• Quantity < 0: Credit.
Figure 8.2: tbl_ORTransactions
Transaction TypesThese items are the same as for MS.

8.2 OptiFlex • SS: Overview
DB ConnectionsThese items are the same as for MS.
Installation ProcessThese items are the same as for MS.

OptiFlex • SS: ICM 9.1
SS: ICM
Install/Configure1. Install and configure ICM as described in MS: Inventory Station (ICM) (page 5.1).
Create Doctors1. Click Doctor Maintenance. The dialog “Doctor Maintenance” appears.2. Click Add Doctor.3. Enter the required doctor information.
Figure 9.1: Dialog “Add Doctor”
4. Click Add.5. Click Exit. The new doctor is shown in the doctor list.
Figure 9.2: Dialog “Doctor Maintenance”
6. Click Main Menu.

9.2 OptiFlex • SS: ICM
Create/Verify Inventory
Verify Regular Items from Hospital Systems1. Click File Maintenance. The dialog “OR File Maintenance” appears. 2. Select the facility.3. Select tab “Item Description”.
Figure 9.3: Dialog “Doctor Maintenance” tab “Item Description”
4. Verify the items.5. Click Main Menu.

OptiFlex • SS: ICM 9.3
Create Instruments (13)1. Click on File Maintenance.2. Select the facility.3. Select tab “Instruments”.4. Select Add item. The dialog “Add instrument” appears.5. Enter the required information.
Figure 9.4: Dialog “Add Instrument”
6. Click Add.7. Click Exit. The item appears in the list and was added to tbl_ORInstruments.
Figure 9.5: Dialog “OR File Maintenance” tab “Instruments”
8. Create the remaining items.

9.4 OptiFlex • SS: ICM
Create Equipment (6)1. Select tab Equipment.2. Select Add item. The dialog “Add equipment” appears.3. Enter the required information.
Figure 9.6: Dialog “Add Equipment”
4. Click Add.5. Click Exit. The item appears in the list and was added to tbl_OREquipment.
Figure 9.7: Dialog “OR File Maintenance” tab “Equipment”
6. Create the remaining items.

OptiFlex • SS: ICM 9.5
Create Medications (10)1. Select tab Medications.2. Select Add item. The dialog “Add medication” appears.3. Enter the required information.
Figure 9.8: Dialog “Add Medication”
4. Click Add.5. Click Exit. The item appears in the list and was added to tbl_ORMedication.
Figure 9.9: Dialog “OR File Maintenance” tab “Medications”
6. Create the remaining items.
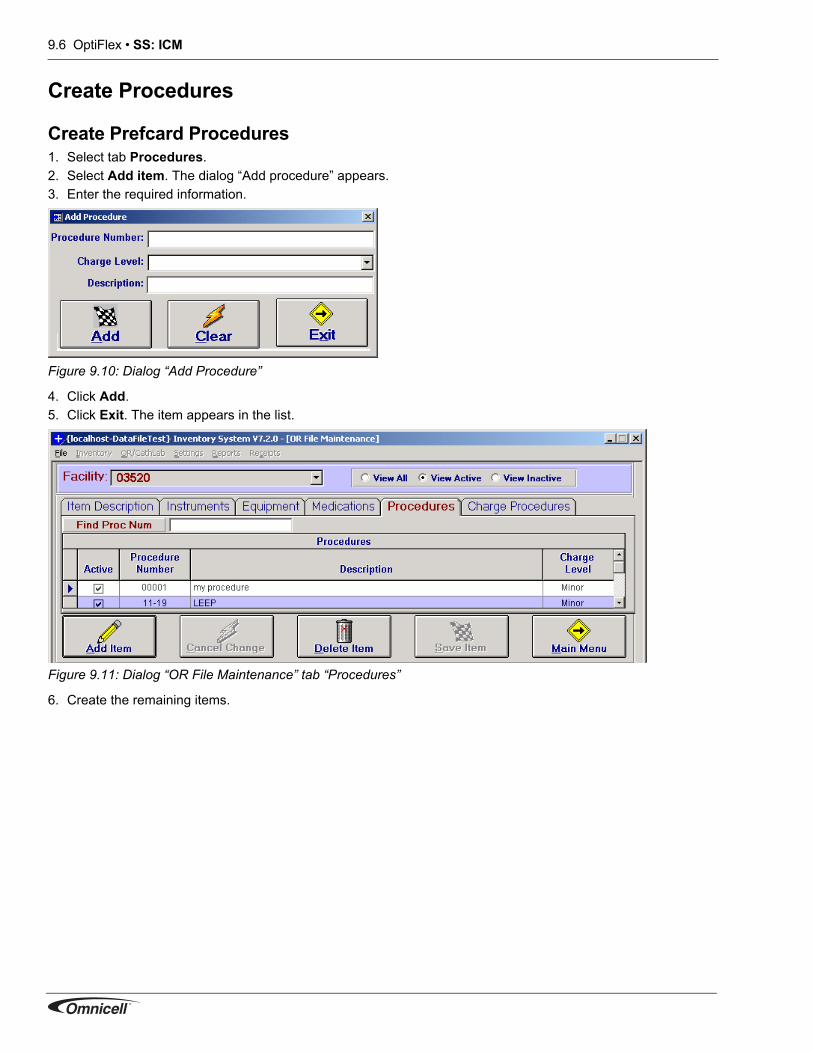
9.6 OptiFlex • SS: ICM
Create Procedures
Create Prefcard Procedures1. Select tab Procedures.2. Select Add item. The dialog “Add procedure” appears.3. Enter the required information.
Figure 9.10: Dialog “Add Procedure”
4. Click Add.5. Click Exit. The item appears in the list.
Figure 9.11: Dialog “OR File Maintenance” tab “Procedures”
6. Create the remaining items.

OptiFlex • SS: ICM 9.7
Create Charge Procedures1. Select tab Charge procedures.2. Select Add item. The dialog “Add charge procedure” appears.3. Enter the required information.
Figure 9.12: Dialog “Add Charge Procedure”
4. Click Add.5. Click Exit. The item appears in the list.
Figure 9.13: Dialog “OR File Maintenance” tab “Charge Procedures”

9.8 OptiFlex • SS: ICM
Create Preference Cards
New1. In the ICM main dialog: Click Pref Card Setup. The dialog “OR Preference Card Selection/Creation” appears.2. From the drop-down list “Select Doctor”: Select the doctor.3. From the drop-down list “Select a Procedure to Create a Preference card for Selected doctor”: Select a
peference card.4. Click Create Preference card. The dialog “Preference Card Setup” appears.
Position, Prep, Linen5. In tab “Position, Prep, Linen”: Enter the required information.
Figure 9.14: Dialog “Preference Card Setup” tab “Position, Prep, Linen”
SuturesIn tab “Sutures”: Check the Include checkbox for required items.
Figure 9.15: Dialog “Preference Card Setup” tab “Sutures”

OptiFlex • SS: ICM 9.9
Supplies6. In tab “Supplies”: Check the Include checkbox for required items.
Figure 9.16: Dialog “Preference Card Setup” tab “Supplies”
Instruments7. In tab “Instruments”: Check the Include checkbox for required items.
Figure 9.17: Dialog “Preference Card Setup” tab “Instruments”

9.10 OptiFlex • SS: ICM
Equipment8. In tab “Equipment”: Check the Include checkbox for required items.
Figure 9.18: Dialog “Preference Card Setup” tab “Equipment”
Medicine9. In tab “Medicine”: Check the Include checkbox for required items.
Figure 9.19: Dialog “Preference Card Setup” tab “Medicine”

OptiFlex • SS: ICM 9.11
Dressing10.In tab “Dressing”: Check the Include checkbox for required items.
Figure 9.20: Dialog “Preference Card Setup” tab “Dressing”
Notes11.In the text box “New Preference Card Note”: Enter the note text.12.Click Add New Note.
Figure 9.21: Dialog “Preference Card Setup” tab “Notes”
13.Add remaining notes.

9.12 OptiFlex • SS: ICM
Links14.In tab “Links, Images” tab “Preference card links”: Select an available preference card.15.Click Add New Preference Card Link.
Figure 9.22: Dialog “Preference Card Setup” tab “Preference Card Links”
16.Add remaining preference card links.
Images17.In tab “Links, Images” tab “Images”: Specify the New Image File Location.18.Enter the Description.19.Click Add New Image. The image is listed in the image sequence.
Figure 9.23: Dialog “Preference Card Setup” tab “Links, Images”
20.Add remaining images.

OptiFlex • SS: ICM 9.13
Copy1. Click Pref Card Setup.2. Select the doctor.3. Select the existing preference card.4. Click Copy. The dialog “Preference card copy” appears.5. Select the doctor/procedure to copy from.6. Select the doctor/procedure to copy to.
Figure 9.24: Dialog “Preference Card Copy”
7. Click Copy. An informational dialog appears.8. Click OK.9. Click Exit.
Search/Replace Items1. Click Pref Card Setup.2. Select the doctor.3. Select the preference card.4. Click Search and replace items. The dialog “Item search and replace” appears.5. Select Dept/Par and Item to search for.6. Select Dept/Par and Item to replace with.7. Specify to replace for All Occurrences or Select Doctor Only.
Figure 9.25: Dialog “Item Search and Replace”
8. Click Replace. The message “confirm removal” appears.9. Click Yes. 10.Click Main Menu.

9.14 OptiFlex • SS: ICM
Test Case Build
Create/Edit Case1. Click Build Case. The dialog “OR Cases” appears.2. Click Create.3. Select the
• Facility • Doctor • Procedure • Patient • Date • Suite
Figure 9.26: Dialog for building case
4. Click Create. If a linked procedure exits a dialog will appear warning that a case will be created for the linked procedures.
5. Click Exit. The case, and any linked cases, is displayed in the case list.
Figure 9.27: Built case in case list

OptiFlex • SS: ICM 9.15
Print1. Select a case.2. Click Print case.
Figure 9.28: Printed case
3. Click Print to print the case.
Close1. Select a Case.2. Click Close.3. Click Yes. The case is closed and no longer shown in the case list.

9.16 OptiFlex • SS: ICM

OptiFlex • SS: Nurse station 10.1
SS: Nurse station
Install/Configure/TestInstall, configure and test as described in MS: Nurse Station (page 6.1).
Test Case
Open1. Click on a patient who has a pending case. The dialog “Select OR Case for Patient” appears.2. Enter or scan the case ID.
Figure 10.1: Enter/scan case ID
3. Click Enter. The dialog “Patient Care” appears.
Figure 10.2: Dialog “Patient care”

10.2 OptiFlex • SS: Nurse station
Charge items• Sutures• Supplies• Instruments• Equipment• Medicine• Dressing• Anesthesia
Manually Adjust Amount for Listed Item1. Select the tab.2. Double-click on the item.3. Edit the amount.
Figure 10.3: Edit item amount
4. Click Save adjusted quantity.
Figure 10.4: Adjusted quantity

OptiFlex • SS: Nurse station 10.3
Scan Amount for Listed/Non-listed Items1. Scan the item.
• If the item is listed in the procedure: Qty is updated.• If the item is not listed in the procedure: The item appears in list of added items and Qty = 1.
Total Touch Items1. Select the tab Pick items.2. Click Touch Here to Start Total Touch. The total touch dialog appears.3. Select the number of items.
Figure 10.5: Selected total touch items
4. Click Done. The selected items are shown.
Figure 10.6: Select total touch items

10.4 OptiFlex • SS: Nurse station
Special Items1. Click Special Items.2. Enter the required information.
Figure 10.7: Special item data
3. Click Save Item Data.
Figure 10.8: Special item in list
4. Click Done with items.

OptiFlex • SS: Nurse station 10.5
Execute Timers
Room Time1. In tab Timers: Click in text area for Room Time/Start Time to set the start time to the current time.
Figure 10.9: Setting a timer
2. To adjust: Click again. The date adjustment dialog appears.
Figure 10.10: Adjusting a timer
3. Adjust the time.4. Click OK.5. Set the room Stop Time.
Anesthesia Time6. Set the anesthesia Start Time.7. Set the anesthesia Stop Time.
Surgeon Time8. Set the surgeon Start Time.9. Set the surgeon Stop Time.

10.6 OptiFlex • SS: Nurse station
Close1. Click Done with patient. The message “Are you sure?” appears.2. Click Yes. The update case level dialog appears.3. Do one of the following
• Click the level and then Yes, Change it to change the level.
Figure 10.11: Dialog “Update case level”
• Click Do not change to close the case without changing the level.The list of doctors appears.

OptiFlex • Reference: Databases 11.1
Reference: Databases
SQL DBThe most important tables in the SQL DB are the following:
• Room• tbl_Facility• tbl_LoginStations• tbl_PARsMaster• tbl_Permissions (sometimes import data during setup)
The following lists all tables• ProgramParameters• Reports• Room• tbl_AdmissionPrinters• tbl_Categories• tbl_CategoryItems• tbl_DepartmentMaster• tbl_Doctor• tbl_DoctorAssistant• tbl_DoctorProceduresLink• tbl_DoctorType• tbl_EmployeeType• tbl_Facility• tbl_InventoryDetail• tbl_InventoryGroups• tbl_InventoryMaster• tbl_InvSysGridPosition• tbl_KitDetail• tbl_KitMaster• tbl_LabelPrintingLocations• tbl_LoginHistory• tbl_LoginStations• tbl_OmniCathRack• tbl_OmniItemLocation• tbl_ORAutoAddItems• tbl_ORButtonGroup• tbl_ORCase• tbl_ORCase_SpecialItems• tbl_ORCase_Timers• tbl_ORCaseScrubNurse• tbl_ORCaseStatus• tbl_ORChargeLevel• tbl_ORChargeProcedures• tbl_ORChargeTime• tbl_OrderLines• tbl_OrderMaster• tbl_ORDoctorAssistantLink• tbl_ORDraping• tbl_OREquipment• tbl_ORInstruments

11.2 OptiFlex • Reference: Databases
• tbl_ORMedication• tbl_ORMedicationPreferenceCardLink• tbl_ORPositioning• tbl_ORPreferenceCardImages• tbl_ORProcedureHaveReady• tbl_ORScrubNurse• tbl_ORSpecialConsiderations• tbl_ORTimerType• tbl_ORTransactions• tbl_ORTransactionType• tbl_PARsMaster• tbl_Patients• tbl_PatientVisit• tbl_Permissions• tbl_PrintFile• tbl_ProcedureItems• tbl_ProcedureORChargeProcedure• tbl_ProcedureORDraping• tbl_ProcedureOREquipment• tbl_ProcedureORInstruments• tbl_ProcedureORPositioning• tbl_Procedures• tbl_ReceivingTransactions• tbl_ReportType• tbl_ScanReqMessages• tbl_SchedulesPARsLink• tbl_Transactions• tbl_TransactionTypes• tbl_UnitOfMeasure• tbl_Vendor
ProgramParametersDefines hospital address information.
ReportsDefines ICM reports.
Address Hospital street address.City Hospital city.CompanyID Hospital company ID.CurrentTerminal Not used.HospitalName Hospital name.IncludeDepartmentAutomatic
Not used.
NextKit Not used.OrderSystem Not used.PurgeDays Not used.State Hospital state.Zip Hospital zip code.
DateRange Prompt for a date range for the data to be reported?

OptiFlex • Reference: Databases 11.3
RoomSpecifies hospital rooms and room patients. Used to manually populate rooms before ADT populates.
tbl_AdmissionPrinters
tbl_CategoriesCategory groups for items.
DateType Code identifying Date field to be used to filter data on the report when a DateRange is prompted for.
DeptPAR Filter data on the report by department or PAR?DoctorID Filter data on the report by DoctorID?ItemID Filter data on the report by ItemID?LotSerialNumber Filter data on the report by Lot or Serial Number?PID Filter data on the report by PatientAccountID?ProcedureID Filter data on the report by ProcedureID?ReportDescription Description of the report.ReportFileName File Name of the Report.ReportType Type of report. Used to group reports into categories.TimerTypeID Filter data on the report by OR TimeTypeID?VendorNumber Filter data on the report by Vendor Number?ViewName Name of the view used by the report.
FacilityID Unique hospital/facility identifier from host system.LastTransaction Last type of transaction performed on the record.LastUpdate Date/Time record was last modified.Location Nursing station identifier within facility.PARsKey Department / PAR identifier for the room within the facility.PatientAccountID Patient Account Number. Uniquely Identifies patient visit.Room Room number.rowguid Unique record identifier for the table.
CopiesEndTimeLocationPrinterNamePrinterName2ReportNameReportName2StartTime
Active Is category active?CategoryID Category identifier code within the Facility.Description Description of the category.FacilityID Unique hospital/facility identifier from Host system.ParentID Category that is the parent of CategoryID. Must exist to add the child.rowguid Unique record identifier for the table.

11.4 OptiFlex • Reference: Databases
tbl_CategoryItemsCategories in which items reside.
tbl_DepartmentMasterDepartment information.
tbl_DoctorDoctor Information.
CategoryID Category identifier code within the Facility.FacilityID Unique hospital/facility identifier from Host system.InventoryDetailkey Key field identifier for items in departments and PARs within a facility.rowguid Unique record identifier for the table.Sequence Sequence in which items are to be displayed in TotalTouch.
ActiveDepartment Is department active or disabled?Department Department identifier code.Description Department description.FacilityID Unique hospital/facility identifier from Host system.InActiveDate Date/Time department was deactivated.MatManID Not used.OrderByDeptOrPAR Are orders generated for each PAR location within the department or combined in one
PAR location within the department?OrderPAR PAR used to generate orders when one PAR location within the department is used for
ordering.rowguid Unique record identifier for the table.
AssistantGloveSize Glove size used by the special assistant to the doctor.AssistantGownSize Size of gowns used by the special assistant to the doctor.AssistantName Name of special assistant used by the doctor.DoctorActive Is the doctor actively working in the hospital system?DoctorFirstName Doctor first name.DoctorGloveSize Glove size used by doctor.DoctorGownSize Size of gowns used by doctor.DoctorID Internal number used to uniquely identify doctor.DoctorLastName Doctor last name.DoctorNumber Doctor identifier generated by host system.DoctorSalutation Prefix to doctor name.DoctorTitle Suffix to doctor name.DoctorTypeID Code identifying the type of doctor.rowguid Unique record identifier for the table.ScrubNurseGloveSize
Glove size used by the scrub nurse used by the doctor.
ScrubNurseGownSize
Size of gowns used by the scrub nurse used by the doctor.
ScrubNurseName Name of scrub nurse used by the doctor.SpecialNeeds Unique, general instructions given by the doctor when performing

OptiFlex • Reference: Databases 11.5
tbl_DoctorAssistantTable of information on assistants to OR doctors.
tbl_DoctorProceduresLinkTable defining OR procedures used by doctors.
tbl_DoctorTypeTable of types of doctors.
tbl_EmployeeTypeTypes of employees.
AssistantActive Is the assistant active in the system?AssistantFirstName First name of doctor assistant.AssistantGloveSize Glove size used by assistant to the doctor.AssistantGownSize Size of gowns used by the assistant to the doctor.AssistantID Key field uniquely identifying the assistant.AssistantLastName Last name of doctor assistant.
Active Is the procedure currently being actively used by the physician?ChargeForLinen Should this OR Procedure include a Linen Charge?DoctorID Number internal to the system used to uniquely identify a doctor.DressingInstructions Instructions from the physician related to the dressing to use for the procedure.EquipmentInstructions
Special instructions from the physician relative to the equipment to be used for the proce-dure.
InstrumentInstructions
Special instructions from the physician relative to the instruments to be used for the pro-cedure.
LinenInstructions Instructions from the physician on what linen to use and how to arrange it for the proce-dure.
MedicineInstructions Special instructions from the physician relative to the medication to be used for the proce-dure.
PositioningInstructions
Instructions from the physician on how to position the patient for the procedure.
PrepInstructions Instructions from the physician on how to prepare the patient for the procedure.ProcedureID Number internal to the system used to uniquely identify a procedure.ScrubNurseID Identification number of the nurse if the physician specifically requests a scrub nurse to
assist with preperation for the procedure.SupplyInstructions Special instructions from the physician relative to the supplies to use for the procedure.SutureInstructions Special instructions from the physician relative to the sutures to use for the procedure.
DoctorTypeDescription
Description of the doctor type.
DoctorTypeID Key field uniquely identifying the type of doctor.
EmployeeType Employee position type.EmpTypeDescription Description of the employee type.tbl_EmptyRoomIssues
Items issued to empty rooms.
Date Date/time at which the item was issued to the empty room.Deleted Not used!

11.6 OptiFlex • Reference: Databases
tbl_FacilityHospital / Facility information and settings
Description Item description.FacilityID Unique hospital/facility identifier from Host system.InventoryDetailKey Value identifying the item issued to the empty room.ItemLotNumber For items requiring a lot number, the lot number of the item.ItemSerialNumber For items requiring a serial number, the serial number of the item.Location Nursing station identifier within the facility.PatientAccountID Patient account number to which items are to be issued whenPosted Flag indicating whether or not the item issue has been transfered to a patient. Should
always be False in an empty room.Quantity How many of the item were issued to the empty room?Room Room within the facility to which items are being issued.rowguid Unique record identifier for the table.
ActiveFacility Flag indicating whether facility is active or not.ADTCode Patient admission, discharge, transfer code used to identify theADTFilter Not used!AllowItemMasterMaintenance
Allow Item Master maintenance in InvSys under System Settings?
BackupFilePurge-Days
The number of days to keep backup files before deleting them.
ChargeDepartment Default department number used by the facility.ChargeFormat Code that determines the format of information passed through the charging interface.ChargePAR Default Charge PAR location used by the facility.ChargeTimeExtend Number of hours items can be issued to a patient after they have been discharged.cKeyID Not used!Comment1_Description
Description for Comment1 Field in tbl_InventoryMaster.
Comment2_Description
Description for Comment2 Field in tbl_InventoryMaster.
Comment3_Description
Description for Comment3 Field in tbl_InventoryMaster.
DataArchiveDays The number of days to keep data in the Live database tables before archiving it.Default_PAR_PrefixDefaultORPAR Default PAR in OR from which inventory is issued.DefaultORSutureItemNo
InventoryDetailKey of suture used by default in the OR.
ExpenseEntityCode Facility identifier used with some charging interfaces.FacilityDescription Facility description.FacilityID Unique hospital/facility identifier from Host system.FloorChargeCreditDays
Number of days allowed to credit a floor charge after it has been created.
ForceInventoryMethod
Flag determining whether or not the inventory management method for the facility is forced to be either tracking or usage.
InactivateMissingItems
Flag indicating whether or not items are inactivated at the PAR level if they are missing in the interface to update inventory information at the PAR level.
LoginToMM Force users to login to the MM Functions?

OptiFlex • Reference: Databases 11.7
tbl_InventoryDetailDetail information on items at the facility par level.
MaxSutures Maximum number of sutures that can be issued before a warning message is displayed when issuing items in OR.
ORChargeTimeWait Number of minutes to wait before processing charges for items issued in the OR.ORDepartment Default department in OR from which inventory is issued.ORUseDefault Flag indicating whether identification numbers are automatically generated when adding
information in the OR system.PasswordLifeDays Life of Passwords in Days.PasswordMinimumLength
Minimum Length of the password.
ProcedureNumberPrefix
Prefix used to identify procedure type items in the item master table.
ReqNumberLengthrowguid Unique record identifier for the table.ScanReqVersion Current version of ScanReq used by the facility.SecondaryFacilityID Facility identifier used with the charging interface. Should be set to the same value as
FacilityID by default.StripADTCodePID Remove ADTCode from PatientAccountID when received on ADT interface?UpdateChargePatient Flag indicating whether or not the charge patient flag is updated at the par level based on
the setting at the item master level.UpdateStockItemFlagInvSys
Can StockItem Flag be updated in the Add/Edit/Remove function of InvSys?
ActiveItem Is the item active or inactive for the PAR?ChargeNo Number used when charging a patient for the item.ChargePatient Charge the patient when the item is issued?Consignment Is the item a consignment item?ConvertUOM Use purchase unit of measure to displaying information about items on receiving func-
tions.CriticalInventory On hand quantity at which a warning message is generated that the inventory level is low.CriticalReport Indicates whether or not a warning message has been generated when the quantity on
hand reaches the critical inventory level.CriticalReportDate Date/time the last warning message was generated that the quantity on hand had
reached the critical level.FacilityID Unique hospital/facility identifier from Host system.InventoryDetailKey Key field identifying items used at the department and PAR level.IssueUnitOfMeasure The unit of measure used to issue the item to the nursing station.IssueUnitOfMeasureCost
Cost of the item in the issue unit of measure.
ItemID Item identification code.ItemLocation Bin location of the item on the nursing floor.LastCountDate The date/time of the last count.LastOnHand The quantity the system had on hand the last time a count was done.LastOrderDate Date/time of the most recent order of the item.ManualOrder Is the item only ordered by a user request?Maximum When tracking inventory, the maximum quantity to maintain at the nursing station.Minimum When tracking inventory, the minimum quantity to maintain at the nursing station.OnHand When tracking inventory, the number of items currently on hand.

11.8 OptiFlex • Reference: Databases
tbl_InventoryGroupsGroupings for items.
tbl_InventoryMasterInformation about inventory items.
OnOrder The number of items currently on order and not received.OrderFromLocationPARsKey The department / PAR within the facility using the item.PatientIssueUnitOfMeasure
Unit of measure in which the item is issued to the patient.
PatientIssueUnitOfMeasureFactor
Conversion factor between issue unit of measure and patient issue unit of measure.
PlaceOnOrder The number of items to order when inventory management is based on usage.PreviousOrder The number of items ordered on the last received order.PrintBarcodeLabels Not used!PurchaseUnitOfMeasure
Unit of measure used to purchase item.
PurchaseUnitOfMeasureFactor
Conversion factor between purchase unit of measure and issue unit of measure.
QuantityPrePick Quantity pre-picked for OR cases.RequireLotNumber Is the lot number required when the item is issued to a patient?RequireSerialNumber Is the serial number required when the item is issued to a patient?rowguid Unique record identifier for the table.StockItem Is the item a stock item or a non stock item?UpdateDate Date/time information on the item was last changed.UpdateUser The user who last made modifications to item information.
CategoryCode Group category code obtained from the item master interface.GroupCode Internal code uniquely identifying the group.GroupName Group description.ORAnesthesia Is the item an anesthesia item used in the OR?ORButtonGroupID Group identification number for item grouping used in the OR.ORDressing Is the item a dressing item used in the OR?ORSuture Is the item a suture item used in the OR?
AccountCategory Category code for the item required for some requisitioning interfaces.ActiveItem Flag indicating whether or not the item is active.AlternateItemNumber Alternate identification number for the item. Usually the HIBCC or UCC number found on
the item packaging.ChargeNo Number used when charging a patient for the item.Comment1 Generic use field for the user to enter whatever they want.Comment2 Generic use field for the user to enter whatever they want.Comment3 Generic use field for the user to enter whatever they want.CrossReferenceProductID
The company ID and product number obtained from the AlternateItemNumber field when the AlternateItemNumber is a standard HIBCC or UCC code.
Description Description of the item.DescriptionLabel Alternate item description.DescriptionNurse Item description used by nursing.

OptiFlex • Reference: Databases 11.9
tbl_InvSysGridPositionInformation used by InvSys to position columns within various grids based on the PC running the application
tbl_KitDetailInformation on items assigned to kits.
GroupCode Grouping identification code.IssueUnitOfMeasurePrice
Cost of the item in the issue unit of measure.
ItemID Item identification code.LocationWarehouse Item stock room location.ManuallyAddedItem Was the Item Added Manually by a User?ManufacturerItemNumber
Number used by the manufacturer to identify the item.
ManufacturerNumber Number used to identify the manufacturer of the item.PatientCost Cost of the item to the patient.PatientIssueUnitOfMeasure
Unit of measure in which the item is issued to the patient.
PatientIssueUnitOfMeasureFactor
Conversion factor between issue unit of measure and patient issue unit of measure.
PurchaseUnitOfMeasure
Unit of measure used to purchase item.
PurchaseUnitOfMeasureFactor
Conversion factor between purchase unit of measure and issue unit of measure.
PurchaseUnitOfMeasurePrice
Cost of the item in the purchase unit of measure.
rowguid Unique record identifier for the table.StockItem Flag indicating whether the item is a stock or a non stock item.UpdateDate Date/Time item master information was last updated.UpdateUser User identification code of user last updating item master information.VendorItemNumber Item identification number used by the vendor.VendorNumber Identification number of the vendor supplying the item to the facility.
ColumnName Name of a column in the grid indicated.GridName Name of a grid in InvSys.GridWidth Width of the column in the unit of measure used on the grid.PCID IP Address or name of computer using InvSys.Position Position of the column within the grid.
IncludeKitItem Is the item active and included in the kit?ItemID Identification number of item assigned to the kit.KitDetailKey Internal key field for the table.KitID ID of kit to which item is assigned.Notes Comments or notes that may be included with the kit item.PARsKey Department / PAR within the facility. The location the item is obtained from when the kit is
scanned and it does not exist in the default location assigned to the scanning station.Quantity Number of the items included in the kit.rowguid Unique record identifier for the table.

11.10 OptiFlex • Reference: Databases
tbl_KitMasterKit description information.
tbl_LabelPrintingLocations
tbl_LoginHistoryInformation on when ScanReq and InvSys stations logged in and out of the applications.
tbl_LoginStationsSetup information for ScanReq and InvSys stations.
Active Is the kit active?DateKitCreated Date/time kit was created.Department Department within the facility. Default department kit items are obtained from.DoctorID Not used!FacilityID Unique hospital/facility identifier from Host system.KitDescription Description of the kit.KitID Identification number assigned to the kit.PARsKey Department / PAR within the facility. Default location kit items are obtained from.rowguid Unique record identifier for the table.UserKitCreate User ID of person creating the kit.
IPAddressLocationLocationDescriptionLocID
LogDate Date/time the application was started or terminated.LogType Was the application being logged into or out of?PCID The IP Address or name of the computer the application is running on.Program The application for which information is being recorded: ScanReq or InvSys.rowguid Unique record identifier for the table.UserID The user identification number of the user logging into or out of the application.
AddNewItem Is the user allowed to add items to a location if they are not assigned to the location when doing counts or orders in ScanReq?
AllowAutoVersionUpdate
Automatically load a newer version of the ScanReq software on the station if one is avail-able?
AllowChangeToItemIssueDate
Can users on the ScanReq Station change the date items are issued to patients?
AllowORCaseSummaryPrint
Allow printing of the OR case summary report when OR case is completed on an OR sta-tion?
CreditByDateOfService
Restrict the quantity that can be credited in ScanReq to the quantity issued on the date of the item selected for crediting?
DefaultDept The default department for the ScanReq stationDefaultPAR The default PAR for the ScanReq station.DisplayOption What patient selection display is used in ScanReq? Rooms, Patients, Alpha, KeyDisplayPatientID Display Patient identification information in ScanReq when selecting a patient to issue
items to?

OptiFlex • Reference: Databases 11.11
FacilityID Unique hospital/facility identifier from Host system. Used by ScanReq to identify facility from which data is obtained.
FacilityID_InvSys Unique hospital/facility identifier from Host system. Used by InvSys to identify facility from which data are obtained. If value is 00000, data from all facilities are available to InvSys.
FacilityID_InvSys Unique hospital/facility identifier from Host system. Used by InvSys to identify facility from which data are obtained. If value is 00000, data from all facilities are available to Inv-Sys.
FloorChargeAlert Is the ScanReq station prevented from doing floor charges?InvSys Does the station have the right to run InvSys?InvSysVersion The version of InvSys currently loaded on the stationIPAddress IP Address or name of computer using the system. Computer name is required if IP
Address is dynamicIssueTimeOut The number of seconds of idle time on the item issue screen in ScanReq that will elapse
before automatically returning to the patient selection screen and issuing scanned items to the selected patient.
LabelPrinter Name of printer used to print labels.LabelReport Not used!LoginReqMaster Is login to ReqMaster required?LoginRequired Is the user required to log into ScanReq?MaskNames Hide patient names in ScanReq?MaskScanReqUserIDLogin
Mask UserID in ScanReq on Login?
MinimizeScanReq Can ScanReq be minimized?OmniArea Omnicell code identifying the area the nursing station is located in.OmniCommPort Comm Port used to connect to Omnicell CabinetOmniID Identification code used to uniquely identify Omnicell cabinets used by a ScanReq sta-
tion.OmniStation Is this station an Omnicell cabinet?ORImageFolder The folder in which images used with the OR preference card report are found.ORRoom The room number of the room where the stationis located if the station is an OR station.ORStation Is the station located in the OR?ORSupplyRoom Is the station located in the OR supply room?PadZeros Add zeros to the front of item numbers scanned in ScanReq if the length of the item num-
ber is less than 6?PasswordRequired Is the user required enter a password when they are required to log into ScanReq?PatientFilter Criteria used to filter patients available for selection in ScanReq: ALL, ER, OR, OUTPatientIDType The type of patient identification information to display in ScanReq: PID, MRN, SSNPCName Name of computer using the system.PreviewReports View reports in ScanReq? If reports are not viewed, they are automatically printed to the
station default printer.PrintBinLocation Print item bin location on shelf labels when they are printed from InvSys?PrintCriticalReport Print the critical level report from the critical level application when inventory reaches the
critical level? If the report is not printed, only a warning message is displayed on the pc running the application.
PrintManufNumber Print item manufacturer number on shelf labels when they are printed from InvSys?PrintUOM Print unit of measure information on shelf labels when they are printed from InvSys?RefreshInterval How often, in seconds, does ScanReq requery the database for room and patient
updates?ReportFolder The folder in which InvSys reports are found when they are not found in the folder con-
taining the InvSys executable.

11.12 OptiFlex • Reference: Databases
tbl_OmniCathRackIdentify location of cathracks in an Omnicell cabinet.
tbl_OmniItemLocation
tbl_ORAutoAddItemsItems automatically added to all OR cases.
tbl_ORButtonGroupDefines the grouping of supplies in OR for display filtering.
Rowguid Unique record identifier for the table.ScanREQ Does the station have the right to run ScanReq?ScanReqBannerScrollSpeed
Speed in milliseconds at which ScanReq banner scrolls. Scrolls 1 pixel at a time.
ScanReqPatientIDScan
Defines search criteria for Patient scan: PID, MRN, BOTH
ScanReqVersion The version of the ScanReq software currently loaded on the station.SearchOption What search form is used in ScanReq when searching for a patient: Alpha or KeySelectDoctor Require doctor selection in ScanReq when issuing items to a patient?ShowNurseDescription
Show Nurse Description instead of default Description in ScanReq?
SoundEnabled Is sound enabled on the ScanReq station?StripCodeID Remove all non numeric characters from the beginning of strings scanned in ScanReq?TotalTouch Allow TotalTouch to be used at the station?UpdateScanReqInventory
Flag set when Inventory Tables change. Initiates requery of Inventory recordset in Scan-Req.
UseClientDate Use the Client computer date for transaction date?
CathRackStartingLocation
Zone and button for first CathRack. Allows determination of all CathRack locations.
FacilityID Unique hospital/facility identifier from Host system.OmniID Identification code used to uniquely identify Omnicell cabinets used by a ScanReq sta-
tion. Links table information to a station.
FacilityIDInventoryDetailKeyOmniButtonOmniIDOmniZone
Active Is the item active so that it is automatically added to all cases?FacilityID Unique hospital/facility identifier from Host system. Facility in which OR cases automati-
cally have the item added.HaveReady How many of the item are to be on hand in case they need to be added to OR cases.InventoryDetailKey Key field identifying the item automatically being added to all OR cases.Quantity How many of the item are automatically added to all OR cases.
ButtonDescription Long description of the OR supply group.

OptiFlex • Reference: Databases 11.13
tbl_ORCaseInformation on cases for the OR.
tbl_ORCase_SpecialItemsUsed to track items used in an OR case that are not in the item master (i.e consignment items).
ButtonGroupName Brief name given to the OR group. Used for display purposed in ScanReqOR.ORButtonGroupID Key field uniquely identifying the OR supply group.SortOrder Order in which OR supply groups are displayed in ScanReqOR.
CaseCommentsDateAdjustTime The date/time changes were made to the OR timer times.DateLastModified The date/time the OR case was last modified.DateORCaseClosed The date/time the OR case was closed.DateORCaseCreated The date/time the OR case was created.DateScheduled The date/time the operation is scheduled to take place.DoctorID Identification number of the doctor scheduled to perform the operation.FacilityID Unique hospital/facility identifier from Host system. Facility at which the operation is per-
formed.InUse Is the case currently in use? Is the patient in surgery?Location Code used to identify the location within the facilty.ORCaseClosed Is the case closed or open?ORCaseID Unique identification number given to the case.ORChargeLevelID Key field identifying the OR charge level for procedures.ORMasterCaseID Case identification number of the case the current case is a child of. This field will be
empty or null if the case has no parent.PARsKey The department / PAR of the room within the facility in which the operation is scheduled
to take place.PatientAccountID Patient account number of the patient on whom the operation is to be performed.ProcedureID Procdure identification number of the procedure to be performed in the operation.Room The room within the facility in which the operation is scheduled to take place.Status The current status of the case.TempPatientName Field used to temporarily store a patient name if the patient account ID is not yet available
at the time the case is created.UserIDAdjustTime The user ID of the person making changes to the OR timer times.UserLastModified The user ID of the person that last modified the case.UserORCaseClosed The ID code of the user closing the case.UserORCaseCreated The identification code of the user creating the case.
ChargeNo If the patient is charged for the item, the charge number associated with the item.ChargePatient Charge the patient for the item?IssueUnitOfMeasure The unit of mesure in which the item is issued.ItemCost The cost of the item.ItemDescription The item description.LotNumber The number of the lot from which the item came.MfgItemNumber The manufacturer's item identification number.MfgName The name of the item manufacturer.ORCaseID OR Case in which the item was used.ORSpecialItemKey Key field used to uniquely identify the item.

11.14 OptiFlex • Reference: Databases
tbl_ORCase_TimersTable identifying the timers used with an OR case.
tbl_ORCaseScrubNurseTable identifying scrub nurse assigned to a case.
tbl_ORCaseStatusTable of valid OR case statuses.
tbl_ORChargeLevelTable of levels at which an OR case can be charged (i.e Major, Minor).
tbl_ORChargeProceduresTable used to define procedures used in support of OR proceduresCurrently not used.
PatientCost The cost of the item to the patient.Quantity The number of items used on the patient.SerialNumber The serial number of the item.UpdateDate The date/time at which the item was assigned to the patient.UserID The identification number of the user assigning the item to the OR case.
ORCaseID The identification number of the OR case the timer is used on.StartDateTime The date/time the timer was started.StopDateTime The date/time the timer was stopped.TimerTypeID The identification number of the timer type used on the OR case.
ORCaseID The case number of the OR case.ScrubNurseID The identification number of the scrub nurse.
ORCaseStatusKey The identification number of the OR case status.ORStatusDescription The description of the OR case status.
ChargeNo If the patient is charged based on the OR procedure level, the chargeno used to charge the patient.
ChargePatient Charge patients based on the OR procedure charge level?LinenChargeNo If there is a charge to the patient for linen usage, the charge number used to charge the
patient.ORChargeLevelID Key field identifying the OR charge level for procedures.ORChargeLevelName Description of the OR charge level.PatientCost The cost to the patient of the OR procedure based on the procedure level.
ActiveChargeProcedure
Is the procedure active in the OR?
ChargeNo Charge number used when charging a patient for the use of the procedure.ChargePatient Charge the patient for the use of the procedure?ChargeProcedureDescription
Description of the procedure.
ChargeProcedureID Key field used to uniquely identify the procedure.

OptiFlex • Reference: Databases 11.15
tbl_ORChargeTimeDefines additional chargeable time periods for OR suites beyond the base times.
tbl_OrderLinesDetail on items ordered.
tbl_OrderMasterGeneral order information.
ChargeProcedureNumber
Number used within the hospital to identify the proceudre.
PatientCost Cost to the patient for use of the procedure.
ChargeNo The charge number used when charging a patient for the additional OR time.ORAdditionalChargeDescription
Description of the additional charge time.
ORAdditionalChargeTime
The additional time period in minutes for which the charge applies.
ORChargeLevelID The ID of the OR charge level for which the time applies.PatientCost The cost to the patient for the additional time in OR for the particular type of time.TimerTypeID The Identification code of the timer type for which the additional OR time applies.
AdvanceShipQuantity Used with EDI X12-855 to denote the number of items to beDateReceivingLineUpdate
Date/time receiving information on the item was last updated.
DisplayFactor Factor used to convert between QuantityOrdered and DisplayQuantity.DisplayQuantity The quantity displayed when receiving the item and on the Order Receipts report.DisplayUnitOfMeasure
Unit of measure displayed when receiving the item and on the Order Receipts report.
ItemID Item number of item ordered.Line Line number for the item within the order.OrderAdjustment Quantity received during the most recent receipt process.OrderKey Order number.OrderLineKey Key field uniquely identifying the order and line within the order.Posted Is receiving complete for the item?QuantityOrdered The number of items ordered. Issue unit of measure used for the quantity.rowguid Unique record identifier for the table.TotalQuantityReceived
The number of items currently received.
UserReceivingLineUpdate
User ID of person updating the item quantity received.
ControlNumber Sequential order number generated for some requisition interfaces.DateOrdered Date/time order was created.DateSent Date/time interface sent order to host.FacilityID Unique hospital/facility identifier from Host system.OrderAutoPrintedOrderAutoPrintedDate

11.16 OptiFlex • Reference: Databases
tbl_ORDoctorAssistantLinkIdentifies special assistants used by doctors.
tbl_ORDrapingIdentifies different drapings used in OR.
tbl_OREquipmentEquipment used in OR.
tbl_ORInstrumentsInstruments used in OR.
OrderAutoPrintedStationOrderKey Key field uniquely identifying the order.PARsKey Department / PAR within the facility that the order was generated for.ReceivingComplete Has order been received and closed?rowguid Unique record identifier for the table.Status Used to track status of sent orders for some requisition interfaces.UserIDOrdered User ID of person or system placing the order.
AssistantID Internal number used to uniquely identify a doctors assistant.DoctorID Internal number used to uniquely identify doctor.
ChargeNo If this item is chargable, number used when charging a patient for this item.ChargePatient Indicates if this item is chargable to the patient.DrapingActive Indicates if this item is currently active.DrapingDescription Description of this draping item.DrapingID Internal number used to uniquely identify draping.DrapingNumber Number used externally to identify this draping item.
ChargeNo If this item is chargable, number used when charging a patient for this item.ChargePatient Indicates if this item is chargable to the patient.EquipmentActive Indicates if this item is currently active.EquipmentDescription
Description of this equipment item.
EquipmentID Internal number used to uniquely identify this equipment.EquipmentNumber Number used externally to identify this equipment item.FacilityID Unique hospital/facility identifier from Host system.PatientCost Cost of the item to the patient.
ChargeNo If this item is chargable, number used when charging a patient for this item.ChargePatient Indicates if this item is chargable to the patient.FacilityID Unique hospital/facility identifier from Host system.InstrumentActive Indicates if this item is currently active.InstrumentDescription
Description of this instrument.
InstrumentID Internal number used to uniquely identify this instrument.InstrumentNumber Number used externally to identify this instrument.PatientCost Cost of the item to the patient.

OptiFlex • Reference: Databases 11.17
tbl_ORMedicationMedicine used in OR.
tbl_ORMedicationPreferenceCardLinkIdentifies medication used on a preference card.
tbl_ORPositioningPositions used when preparing a patient for surgery.
tbl_ORPreferenceCardImagesImages used on prefernce cards.
UseAtAllFacilities Indicates this item is shared by all facilities.
ActiveMedication Indicates if this medication is currently active.ChargeNo If this item is chargable, number used when charging a patient for this item.ChargePatient Indicates if this item is chargable to the patient.Description Description of this medication.MedicationID Number used to uniquely identify this medication.PatientCost Cost of the item to the patient per issue unit of measure.PatientIssueUnitOfMeasure
Unit of measure this medication is issued to a patient.
PatientIssueUnitOfMeasureFactor
Factor Used to Convert From Stock to Patient Issue Unit Of Measure
StockUnitOfMeasure Unit of measure this medication is kept in the supply room.StockUnitOfMeasureCost
Cost to Hospital to Purchase 1 Stock Unit Of Measure
ActiveMedication Indicates if this medication is currently active in this procedure.DoctorID Internal number used to uniquely identify doctor.HaveReady Additional quantity of this medication to have available when this procedure is performed.MedicationID Number used to uniquely identify medication.Notes Medication Notes to show on Pref Card.ProcedureID Internal number used to uniquely identify procedure.Quantity Quantity of this medication used to perform this procedure.
ChargeNo If this is chargable, number used when charging a patient for this.ChargePatient Indicates if this is chargable to the patient.PositioningActive Indicates if this is currently active.PositioningDescription
Description of this positioning instruction.
PositioningID Internal number used to uniquely identify this Positioning record.
ActiveImage Indicates if this image is currently active.DoctorID Internal number used to uniquely identify this doctor.FileType File type of this image.Image Image data.ImageDescription Description of this image.ImageID Internal number used to uniquely identify this Image.ProcedureID Internal number used to uniquely identify this procedure.

11.18 OptiFlex • Reference: Databases
tbl_ORProcedureHaveReadyProcedures to have ready for use with a primary procedure in case they are needed.
tbl_ORScrubNurseOR Scrub nurses.
tbl_ORSpecialConsiderationsGeneral notes for a procedure used by a doctor.
tbl_ORTimerTypeTimes tracked in OR (i.e Room time, Anesthesia time).
Sequence Determines the order images will show on the Pref Card.
ActiveHaveReadyProc
Indicates if this Have Ready instruction is currently active.
DoctorID Internal number used to uniquely identify this doctor.HaveReadyProcedureID
Internal number used to uniquely identify an additional procedure to be ready for.
Notes The Have Ready comment to print on the Pref card.ProcedureID Internal number used to uniquely identify the primary procedure.
ScrubNurseActive Indicates if this scrub nurse is active.ScrubNurseFirstName
First Name of the scrub nurse.
ScrubNurseGloveSize
Glove size of the scrub nurse.
ScrubNurseGownSize
Gown size of the scrub nurse.
ScrubNurseID Internal number used to uniquely identify a scrub nurse.ScrubNurseLastName
Last Name of the scrub nurse.
ActiveSpecialConsideration
Indicates if this Special Consideration is active.
DoctorID Unique identifier for this doctor.ProcedureID Unique identifier for this procedure.Sequence Order these notes will appear on the Pref Card.SpecialConsideration Special consideration text for the Pref Card.SpecialConsiderationID
Unique identifier for this Special Consideration.
Active Indicates if this timer type is active.AdditionalChargeTimeGracePeriod
Amount of time over charge time interval before additional time is charged.
BaseChargeTime Amount of time that is not chargable for this timer type.ChargePatient Indicates if this time is chargable to the patient.DefaultTimer Indicates if this is the default OR timer.Description Timer Description.FacilityID Unique hospital/facility identifier from Host system.MaximumChargeTime Maximum Time chargeable on the timer type.

OptiFlex • Reference: Databases 11.19
tbl_ORTransactionsOR Case issue and credit transactions.
tbl_ORTransactionTypeDefinition of types of OR Case Transactions.
tbl_PARsMasterPAR Information
TimerTypeID Unique identifier for this OR Timer Type.
ChargeDate Date this item was charged to the patient.ChargeNo If this item is chargable, number used when charging a patient for this item.ChargePatient Indicates if this item is chargable to the patient.ChargeProcedureID Uniquely identifier for a charge procedure.ChargeSkipped Indicates if charge should be skipped.Closed Indicates that the transaction is closed.EquipmentID Uniquely identifier for equipment.ExceptionComment The reason a charge transaction was not sent by the interface.FacilityID Unique hospital/facility identifier from Host system.InstrumentID Uniquely identify foran instrument.InventoryDetailKey Key field identifying items used at the department and PAR.ItemLotNumber Lot number for the item used.ItemSerialNumber Serial number for the item used.MedicationID Unique identifier for medication.Notes Special transaction notes.ORCaseID Unique Case identifier.ORSpecialItemKey Number used to uniquely identify this special or consignment item.ORTransactionKey Internal number used to uniquely identify this OR Transaction.ORTransactionTypeKey
Type of OR Transaction.
PatientCost Cost of the item to the patient per issue unit of measure.Posted Indicates that the transaction has been processed through the host system.Quantity Actual transaction quantity.QuantityPrefCard Quantity from the Pref Card.rowguid Unique record identifier for the table.ScanDate Date this item was scanned.TerminalID Station ID where this transaction was initiated.TimeStampDate Time Stamp from server of when transaction was created.TransactionDate Date of this transaction.UserID User who initiated this transaction.VendorNumber Vendor number of the vendor the item is purchased from.
Description OR transaction type description.ORTransactionTypeKey
Unique identifier for this transaction type.
TransactionCode Short code used to indicate the transaction type.
ActivePAR Flag indicating whether or not the PAR is active.

11.20 OptiFlex • Reference: Databases
tbl_PatientsInformation on individual patients.
ChargeDepartment Department code identifier used for patient charging.ConvertUOM Use purchase unit of measure to displaying information about items on receiving func-
tions.CreateUsageReceipt Create an open receipt for USAGE PAR locations?Department Department identifier.FacilityID Unique hospital/facility identifier from Host system.FillKill Close receipt when it is received even if there are unfilled orders?FillKillNonStockFillKillStockNonStockOrderPAR PARsKey of PAR used to order all nonstock items within theOrderInventoryMethod
Inventory management method used by the PAR location.
OrderNonStockItemsInIUOM
Order Non Stock Items Using Issue Unit Of Measure?
OrderStockItemsInPUOM
Order Stock Items Using Purchase Unit Of Measure?
PAR PAR location identifier.PARLocation Description of the PAR location.PARsKey Key field identifying department / PAR within the facility.PARType Type of PAR location. Can determine how orders are generated for some USAGE type
PAR locations.PARUpdateDate Date/Time PAR information was last updated.PARUpdateUser User ID of person that last updated PAR information.ReqByNonStockReqByOrderFromLocationReqByVendorReqDepartment Department code identifier used for requisitioning.ReqPAR PAR code identifier used for requisitioning.RestrictedPAR Hide Patient names in ScanReq for the PAR location?rowguid Unique record identifier for the table.StockOrderPAR PARsKey of PAR used to order all stock items within the department.WarehousePAR
Address Patient street address.ADTCode Patient admission, discharge, transfer code used to identify the facility.DateLastUpdated Date/time patient information was last updated.DateOfBirth Date on which patient was born.FacilityID Unique hospital/facility identifier from Host system.FirstName Patient first name.LastName Patient last name.MiddleName Patient middle name or initial.PatientID Patient medical record number.Phone Patient phone number.rowguid Unique record identifier for the table.Sex Patient sex.

OptiFlex • Reference: Databases 11.21
tbl_PatientVisitInformation concerning a specific visit by a patient to the facility.
tbl_PermissionsInformation on users of the system.
SocialSecurityNumber
Patient social security number.
AccountStatus Code indicating the status of the patient visit to the facility.AdmitDoctor Name of the doctor admitting the patient.AdmitDoctorNumber Identification number of admitting doctor generated by host system.ADTCode Patient admission, discharge, transfer code used to identify the facility.AttendDoctorName Name of the doctor attending the patient.AttendDoctorNumber Identification number of attending doctor generated by host system.DateAdmit Date/time patient was admitted to the facility.DateLastUpdated Date/time patient visit information was last modified.FacilityID Unique hospital/facility identifier from Host system.FinancialClass Code identifying patient source of financial reimbursement. Required for some charging
interfaces.LabelsPrinted Not used!LastTransaction Type of update last made to the patient visit.Location Nursing station identifier within the facility.ORAdmitDate Date/time patient was admitted to OR.ORDischargeDate Date/time patient was discharged from OR.ORPatient Is patient currently admitted to OR?PatientAccountID Patient Account Number. Uniquely Identifies patient visit to the facility.PatientClass Code identifying the patient is an in patient, out patient, emergency room patient, etc.PatientID Patient medical record number.PatientType Code further subclassifying patient within the patient class.Room Room number patient can be found in.rowguid Unique record identifier for the table.
Administrator Does user have administrative rights?EmployeeType Group type of the employee.FacilityID Unique hospital/facility identifier from Host system. Facility user has rights to.FirstName User first name.InvAddRmvItems Does the user have the right to modify par item information when doing inventory man-
agement in InvSys?InvEditInventory Does the user have the right to place a manual order when doing inventory management
in InvSys?InvMain Does user have rights in Inventory Management in InvSys?InvOrderInv Does the user have the right to generate orders when doing inventory management in
InvSys?InvPrintLabels Does the user have rights to print labels when doing inventory management in InvSys?InvXRef Does the user have rights to create item cross references when doing inventory manage-
ment in InvSys?LastName User last name.MainSwitch Is the user active in the system?

11.22 OptiFlex • Reference: Databases
tbl_PrintFile
Password Password used where login is required.PasswordUpdateDate Date User Password was Last Set.Receipts Does the user have the right to view receipts in InvSys?Reports Does the user have the right to generate reports in InvSys?RoomAddPatient Does the user have the right to add a patient to a room or remove a patient from a room
when doing room maintenance in InvSys?RoomDeptPAR Does the user have the right to modify the Department and PAR associated with a room
when doing room maintenance in InvSys?RoomMain Does the user have the right to do room maintenance in InvSys?RoomMovePatient Does the user have the right to transfer a patient from one room to another room when
doing room maintenance in InvSys?rowguid Unique record identifier for the table.SysComments Does the user have the right to update messages displayed in the ScanReq application?SysORBuildCase Does the user have the right to create and modify cases under the OR maintenance func-
tions of InvSys?SysORDocMaint Does the user have the right to update doctor information under the OR maintenance
functions of InvSys?SysORFileMaint Does the user have the right to update information used in the OR system under the OR
maintenance functions of InvSys? Information such as medication, instruments, equip-ment, etc.
SysORMaint Does the user have the right to enter the OR maintenance functions of InvSys?SysORPrefCard Does the user have the right to create and modify preference cards under the OR mainte-
nance functions of InvSys?SysParameters Does the user have the right to update information about the company under hospital
setup in InvSys?SysUp Does the user have rights to system maintenance functions in InvSys?SysUpDeptPAR Does the user have the right to update departments and pars under the system mainte-
nance functions of InvSys?SysUpHospital Does the user have the right to modify hospital level settings under the system mainte-
nance functions of InvSys?SysUpItems Allow access to Item Master Maintenance functions of InvSys?SysUpKits Does the user have the right to update kits under the system maintenance functions of
InvSys?SysUpUsers Does the user have the right to update user information under the system maintenance
functions of InvSys?UserID Identification code for the user.
Label1Line1Label1Line2Label1Line3Label1Line4Label1Line5Label2Line1Label2Line2Label2Line3Label2Line4RowNumber
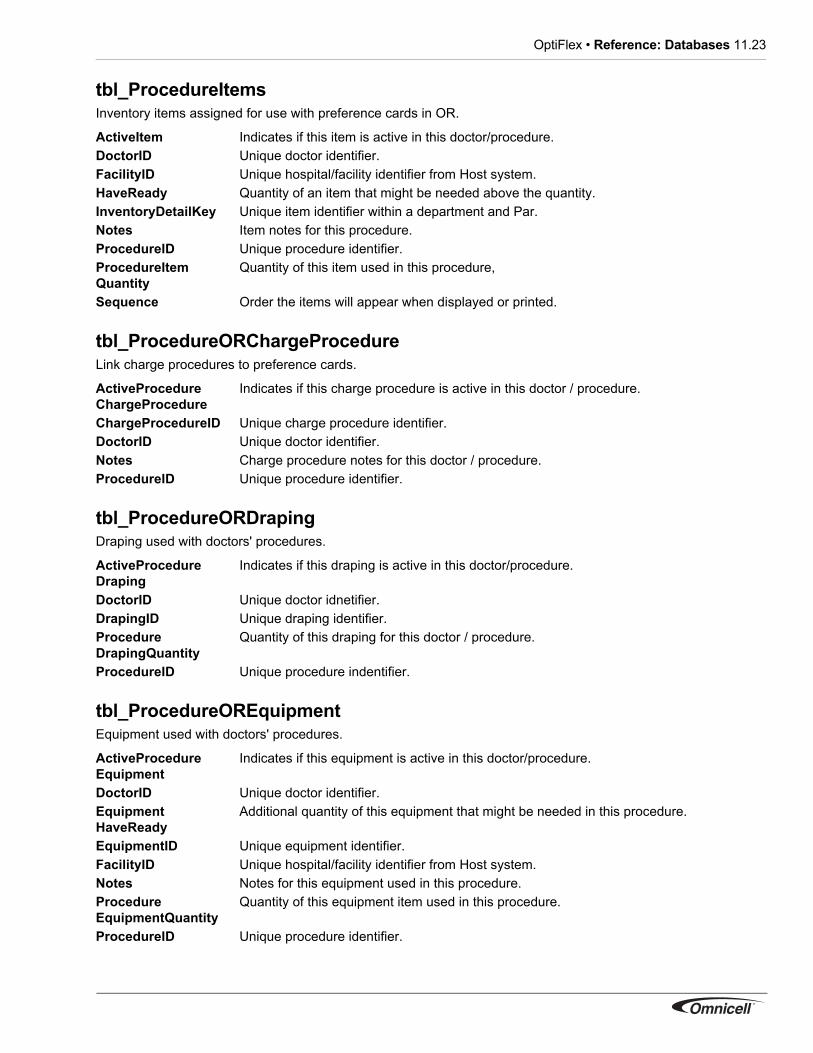
OptiFlex • Reference: Databases 11.23
tbl_ProcedureItemsInventory items assigned for use with preference cards in OR.
tbl_ProcedureORChargeProcedureLink charge procedures to preference cards.
tbl_ProcedureORDrapingDraping used with doctors' procedures.
tbl_ProcedureOREquipmentEquipment used with doctors' procedures.
ActiveItem Indicates if this item is active in this doctor/procedure.DoctorID Unique doctor identifier.FacilityID Unique hospital/facility identifier from Host system.HaveReady Quantity of an item that might be needed above the quantity.InventoryDetailKey Unique item identifier within a department and Par.Notes Item notes for this procedure.ProcedureID Unique procedure identifier.ProcedureItemQuantity
Quantity of this item used in this procedure,
Sequence Order the items will appear when displayed or printed.
ActiveProcedureChargeProcedure
Indicates if this charge procedure is active in this doctor / procedure.
ChargeProcedureID Unique charge procedure identifier.DoctorID Unique doctor identifier.Notes Charge procedure notes for this doctor / procedure.ProcedureID Unique procedure identifier.
ActiveProcedureDraping
Indicates if this draping is active in this doctor/procedure.
DoctorID Unique doctor idnetifier.DrapingID Unique draping identifier.ProcedureDrapingQuantity
Quantity of this draping for this doctor / procedure.
ProcedureID Unique procedure indentifier.
ActiveProcedureEquipment
Indicates if this equipment is active in this doctor/procedure.
DoctorID Unique doctor identifier.EquipmentHaveReady
Additional quantity of this equipment that might be needed in this procedure.
EquipmentID Unique equipment identifier.FacilityID Unique hospital/facility identifier from Host system.Notes Notes for this equipment used in this procedure.ProcedureEquipmentQuantity
Quantity of this equipment item used in this procedure.
ProcedureID Unique procedure identifier.

11.24 OptiFlex • Reference: Databases
tbl_ProcedureORInstrumentsInstruments assigned for use with doctors' procedures.
tbl_ProcedureORPositioningPositioning information for prefernce cards.
tbl_ProceduresOR procedures information.
tbl_ReceivingTransactionsReceipt information for each item received in ScanReq.
ActiveProcedureInstrument
Indicates if this instrument is active in this doctor/procedure.
DoctorID Unique doctor identifier.FacilityID Unique hospital/facility identifier from Host system.InstrumentID Unique instrument identifier.InstrumentsHaveReady
Additional quantity of this instrument that might be needed in this procedure.
Notes Instrument notes for this procedure.ProcedureID Unique procedure identifier.ProcedureInstrumentQuantity
Quantity of this instrument used in this procedure.
ActiveProcedurePositioning
Indicates if this positioning is active in this doctor/procedure.
DoctorID Unique doctor identifier.PositioningID Unique positioning identifier.ProcedureID Unique procedure identifier.
ChargeNo If this procedure is chargable, number used when charging a patient for this procedure.ChargePatient Indicates if this procedure is chargable to the patient.DetailedDescriptionORChargeLevelID Unique identifier for the assigned charge level.PatientCost Cost of the procedure to the patient.ProcedureActive Indicates if this procedure is active.ProcedureDescription
Description of this procedure.
ProcedureID Internal number uniquely identifying this procedure.ProcedureNumber External number assigned to this procedure.
DateRecTran Date/time the item is being received.OrderLineKey The receipt number for the item being received.Posted Flag used with some interfaces to indicate whether or not a receipt acknowledgement
has been sent to the host system.PostedDate Date/time the item is received.QuantityRecTran How many of the item are being received?RecevingTransKey Key field uniquely identifying the record within the database table.rowguid Unique record identifier for the table.StationIDReceive The IP address or name of the computer at which the item is being received.

OptiFlex • Reference: Databases 11.25
tbl_ReportTypeCategories for grouping reports.
tbl_ScanReqMessagesTable of messages displayed on the login form of ScanReq.
tbl_SchedulesPARsLink
tbl_TransactionsTransactional information taking place in the database. Patient issues and credits, inventory orders, counts, etc.
TransactionTypeKey Indentifier of the type of receipt transaction: Receipt or AdjustmentUserRecTran The user ID of the person receiving the item.
ReportType Report category group.
Active Is the message active or disabled?Comment Text of the message appearing at the ScanReq station.CommentDate Date/time the message was created.CommentKey Key field uniquely identifying the record in the table.FacilityID Unique hospital/facility identifier from Host system. The facility for which the message will
appear.rowguid Unique record identifier for the table.Sequence Defines the order in which messages will appear within a facility.
ActiveCreationDateCreationUserFacilityIDJobIDLastRunDatePARsKeyrequest_idrequest_sourceScheduleID
ChargeDate Date/time charge interface processed the transaction.ChargeSkipped Did charge interface send a charge transaction for the item?Closed Flag used to indicate when a transaction has been closed by one of the interfaces.ClosedDate Date/time transaction was closed.ClosedUserID Identification of user or interface system closing the transaction.CloseReason Where appropriate, the reason for closing the transaction.DisplayFactor The factor used to convert between issue unit of measure and unit of measure displayed
on orders receipt type functions.DisplayQuantity The quantity displayed when converting unit of measure on receiving functions to pur-
chase unit of measure.DisplayUnitOfMeasure
Unit of measure displayed when converting between issue unit of measure and purchase unit of mesure on orders.
DoctorID Identification of doctor in charge of issuing items to a patient.
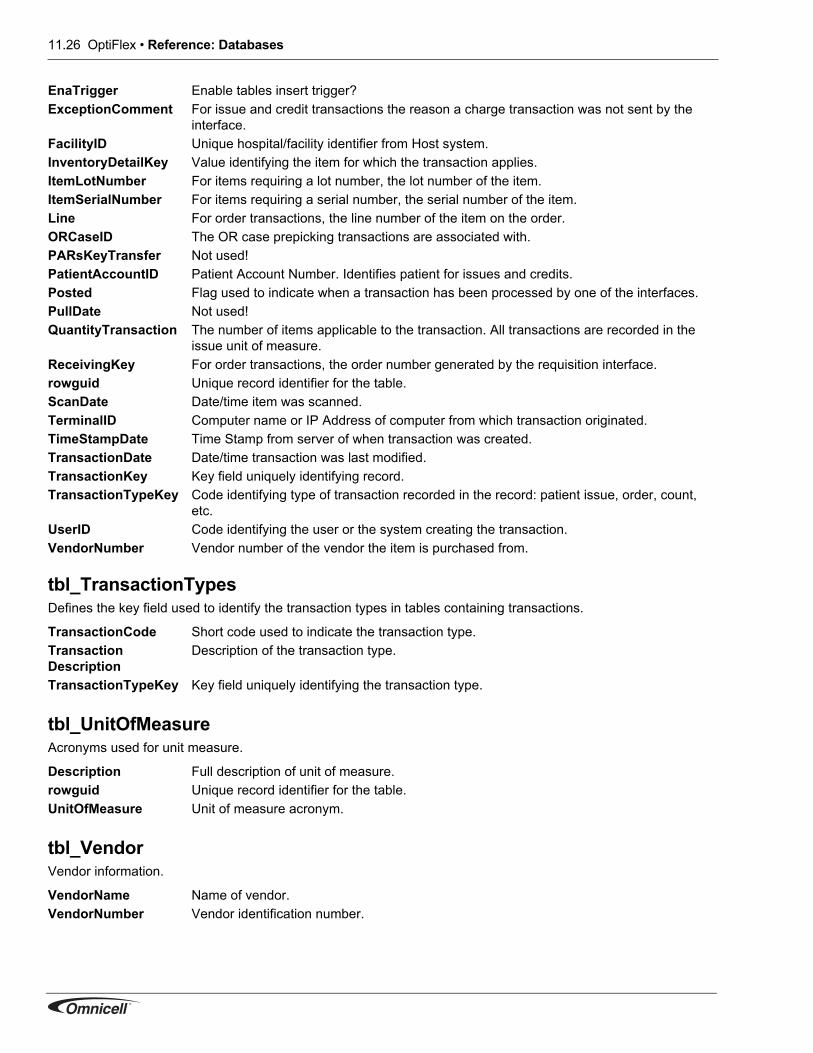
11.26 OptiFlex • Reference: Databases
tbl_TransactionTypesDefines the key field used to identify the transaction types in tables containing transactions.
tbl_UnitOfMeasureAcronyms used for unit measure.
tbl_VendorVendor information.
EnaTrigger Enable tables insert trigger?ExceptionComment For issue and credit transactions the reason a charge transaction was not sent by the
interface.FacilityID Unique hospital/facility identifier from Host system.InventoryDetailKey Value identifying the item for which the transaction applies.ItemLotNumber For items requiring a lot number, the lot number of the item.ItemSerialNumber For items requiring a serial number, the serial number of the item.Line For order transactions, the line number of the item on the order.ORCaseID The OR case prepicking transactions are associated with.PARsKeyTransfer Not used!PatientAccountID Patient Account Number. Identifies patient for issues and credits.Posted Flag used to indicate when a transaction has been processed by one of the interfaces.PullDate Not used!QuantityTransaction The number of items applicable to the transaction. All transactions are recorded in the
issue unit of measure.ReceivingKey For order transactions, the order number generated by the requisition interface.rowguid Unique record identifier for the table.ScanDate Date/time item was scanned.TerminalID Computer name or IP Address of computer from which transaction originated.TimeStampDate Time Stamp from server of when transaction was created.TransactionDate Date/time transaction was last modified.TransactionKey Key field uniquely identifying record.TransactionTypeKey Code identifying type of transaction recorded in the record: patient issue, order, count,
etc.UserID Code identifying the user or the system creating the transaction.VendorNumber Vendor number of the vendor the item is purchased from.
TransactionCode Short code used to indicate the transaction type.TransactionDescription
Description of the transaction type.
TransactionTypeKey Key field uniquely identifying the transaction type.
Description Full description of unit of measure.rowguid Unique record identifier for the table.UnitOfMeasure Unit of measure acronym.
VendorName Name of vendor.VendorNumber Vendor identification number.

OptiFlex • Reference: Databases 11.27
Interfaces.mdbInterfaces.mdb contains the following tables:
• tbl_Databases• tbl_Facilities• tbl_App_Settings• tbl_ADT_Settings• tbl_ChargeFileFuncType (not used)• tbl_CHG_Socket_Settings• tbl_EmailTo• tbl_ErrorNotify• tbl_File_Function• tbl_File_Process_Settings (priority 1)• tbl_ItemFileFuncType (not used)• tbl_ItemFileFuncType (not used)• tbl_ReqFileFuncType (not used)• tbl_Req_Settings (not used)• tbl_Sockets (priority 1)• tbl_SocketFunction• tbl_ZIT_Settings• tbl_ZPA_Settings
tbl_Databases
tbl_Facilities
DatabaseIDProvider Data provider (always SQLOLDDB; process used to connect to SQL Server).Security Usually True. True specifies connection to a user (user id and password required). False
specifies WINNT authentication for the client-server connection (no userid / password; client rights pass through to SQL Server.
UserIDPasswordInitialCatalog DB name.DataSource Server (name or IP address).ConnectionTimeout Length of time before connection timeout. Typically value is much greater than required
(no connection within 2-3 secs indicates an error).CommandTimeout Timeout for database query (program internal) return.Active If not checked: Do not actually connect (for database tests, etc.).
DatabaseID Must be the same as in tbl_Databases.FacilityID/FacilityDescription
Entry not required - the interface engine builds this table (data is from the facilities table in the SQL Server database).
ADTCode Code specifies facility to send data from ADT interface to.ChargeFormat If socket used: Format of data sent to host system.

11.28 OptiFlex • Reference: Databases
tbl_App_Settings
tbl_ADT_SettingsUsed for all ADT (patient) connections.
DaysOfLog Number of days a log file is active. After DaysOfLog: New log file created; old log file renamed *.old.
SearchInterval, DelayInterval (secs)
Used for the following:• Performing realltime charging.• Sending orders to the host system.• Processing item master or detail files.SearchInterval specifies how often to query to determine if there are:• Outgoing charges to send to host system.• Outgoing orders to process (send to host system).• New incoming item master and/or PAR detail file that requires processing.DelayInterval is used with a timer. If a file (item master or par detail) requires processing: Wait DelayInterval secs before processing file.This is required when the file is being created by the host system, since the file cannot be accessed during creation. Interface engine version 7.0.8 made the following changes: If file created locally or on FTP site, an attempt is made to rename the file. If succesful, this indicates that the file is available for processing. An error indicates that the file is locked by a different process (wait until process releases file).
RealTimeChargeInterval
Interval between charge queries when performing realtime charges (secs).
FirewallTimeOutInterval (minutes?)
Length of inactivity after which OptilFlex will disconnect. Required when the host system has a firewall (HCA). Firewall disconnects with no warning after specific period of inactiv-ity. OptiFlex can not detect the disconnect. Solution: Optiflex disconnects after Firewall-TimeOutInterval (OptiFlex is therefore aware of disconnect).
ChargeFileTime Time that daily batch charge file is created.SecChargeFileTime Time that second daily batch charge file is created.RecFileTime For a receiving process specific to Shands.RunAsService If checked: Application run as a service (using ServiceMill). If not checked: Icon appears
in system tray.
DatabaseIDFacilityIDSocketID Link to tbl_Sockets.ADTCode Identifies facility.DefaultADTCode Used internally by interface engine (should be = ADTCode).AppendADTPatient If checked: Append ADT code to account number and patient medical record number.AppendADTLocationAppendMiddleInitial If checked: Include middle initial with first name.IgnorePatientUpdates If checked: Ignore patient update transaction 08 (checked for 90% of installations).
Normally A08 is not ignored before going live, because this may be the only type of trans-action that will get the patient info into the database.Caution: If left unchecked after going live: Any type of update transaction will update patient info. The problem is that (as experience shows) update transactions often send inaccurate patient info. Ask Allen for details.
IgnoreRoomUpdates If checked (usually): For A08 transactions: Ignore room changes on transaction update.Why this field was created: Update transactions without room info would cause patient to be removed from room.
StripRoomADT Remove ADT code from room number.

OptiFlex • Reference: Databases 11.29
tbl_ChargeFileFuncType (not used)Not used.
tbl_CHG_Socket_SettingsOnly used if charges multiple facilties go through 1 socket.Example: IASIS (customer). Facilities throughout the USA. Charges for 4 facilities through 1 socket.
tbl_EmailToOnly used for Shands. Contains email addresses to notify when no 997 transaction (confirmation that the warehouse received an order) received (normally OptiFlex sends an order and the warehouse sends a 997 confirmation).
tbl_ErrorNotifyUsed with tbl_EmailTo.
tbl_File_FunctionLists file processing types.Fields are looked up by tbl_File_Process_Settings field FileFunctionID.
AutoDischarge If checked: Stored procedure is executed.AutoDischargeHours Specifies the time period (number of hours after admission) that causes an automatic
patient discharge. Used typically for outpatients and ER patients (most installations do not send discharges for these patients).
PIDFixFieldLength used (for 1 customer) if patient id needs to be certain length.if 10 and receive 8 charac-ters, prepend 2.
DatabaseID Unique (for row).FacilityID Unique (for row).SocketID The single socket (can be duplicated).
EmailTo Recipient(s) of notification.AlphaPager Pager to send message to.AlphaPagerNumber Pager number.EncodeChar Character encoding.Notify If checked: Activated.
NotifyTimeIntervalEmailFromEmailSubjectEmailBodyErrorTypeSMTPServerSMTPPort
FileFunctionID Charge, Master, Receipt or Req.Description

11.30 OptiFlex • Reference: Databases
tbl_File_Process_Settings (priority 1)Fundamental table. Used to process all files. Input / output.
tbl_ItemFileFuncType (not used)Not used.
tbl_ReqFileFuncType (not used)Not used.
tbl_Req_Settings (not used)Not used.
DatabaseID tbl_Databases.DatabaseID. FacilityID tbl_Facilities.FacilityID.FileFunctionID tbl_File_Function.FileFunctionID. Type of file processing (Charge, Master, Receipt or
Req).FileFormat File (input or output) format.
Example: Shands. Find corresponding IFE procedure (the specified format must match IFE format; developers know requirements for this field).
SetMinEqualMax For PAR detail IF: Specifies changes to MIN (from file / socket). If • NEVER (default): Never set MIN = MAX.• ZERO: If MIN = 0: Set MIN = MAX.• ALWAYS: Set MIN = MAX (always).
FTP If• Checked: Receive / send file from / to FTP site. • Not checked: Local file, UNC, mapped drive, etc.
FTPAddress If FTP checked: IP address.FTPDirectory If FTP checked: Directory.FTPFileName If FTP checked: Name of file to read from / write to. Options:
• Exact filename.• Extension only. Example: *.dat. Process all .dat files.• Blank. All files (if output: create file with own format).
FTPUserID If FTP checked: UserID.FTPPassword If FTP checked: Password.FTPBinary If
• Checked: Send binary.• No checked: Send ASCII.
FTPAppend If checked: Append file (FTP or local).LocalDirectory If FTP not checked: Directory of file to create or read from.LocalFileName If FTP not checked: Local filename. Options:
• Exact filename.• Extension only. Example: *.dat. Process all .dat files.• Blank. All files (if output: create file with own format).
BackupDirectory If backup: Location of backup file. Do not backup item master or PAR files.

OptiFlex • Reference: Databases 11.31
tbl_Sockets (priority 1)
tbl_SocketFunction
tbl_ZIT_SettingsUsed if ZIT item master IF. ZIT received via socket.
tbl_ZPA_SettingsUsed if ZPA item master IF. ZPA received via socket.
SocketID Unique socket ID.DatabaseID Database ID.FacilityID Facility ID.MultiDatabase If checked: Socket receives data from multiple facilities.FunctionID Socket function (type of processing).RemoteHost If client: Remote host name or IP address for outgoing data.ReqPathFile Not used (?).Port Local port for sending (server) or remote port to listen to (client). See field Server (next).Server If checked: Server (listening for data). If not checked: Client. LogData If checked: Log send/receive data to log file.Active If not checked: Socket not active.KeepAlive Not used (used previously for firewall).Firewall If checked (going through firewall): Disconnect and reconnect to keep firewall from sever-
ing connection.HeartBeatTime Time between messages sent (from client to server) to keep connection alive.
FunctionID Function ID. tbl_Sockets.FunctionID.Description Description.
DatabaseID tbl_Databases.DatabaseID.FacilityID tbl_Facilities.FacilityID.SocketID tbl_Sockets.SocketID.ADTCode ADT code.DeactivateNotAllowed
If checked: Even if ZIT record segment specifies that item is inactive, do not inactivate.
ChargeNumUpdateNotAllowed
If checked: When getting an item charge code in ZIT segment: Do not modify item charge number (in both inventory master and detail).
DatabaseID tbl_Databases.DatabaseID.FacilityID tbl_Facilities.FacilityID.SocketID tbl_Sockets.SocketID.ADTCode ADT code.DeactivateNotAllowed
If checked: Even if ZPA record segment specifies that item is inactive, do not inactivate.
ChargeNumUpdateNotAllowed
If checked: When getting an item charge code in ZPA segment: Do not modify item charge number (in both inventory detail).

11.32 OptiFlex • Reference: Databases
ScanReqC.mdb• Applications• Databases• Database_Types• DeptOrder (not used)• Directories• FTP_Settings• Options• ReplicationData• REQ_Settings• SQL_Settings• StationParameters
ApplicationsUsed by the launcher and applications.
Databases
Database_Types
ApplicationKeyApplicationDescriptionApplicationPath See TouchPath.ExecutableTouchPath A newer version of the application that appears in this folder will be copied to Application-
Path.Active If checked: Application is active on computer.DatabaseID Link to table Databases (see next).
DatabaseID Link to table Applications (see previous).Provider Always SQLOLEDB.Security If True: Use WINNT security. If False: UserID and password required.UserID DB user ID.Password DB password.InitialCatalog DB to connect to.DataSource Server.Publication For replication. Only used at 1 location.ConnectionTimeout Period of inactivity (secs) that causes a DB connect timeout.CommandTimeout Period (secs) to wait for query response before query timeout.Active If checked: Use DB.
TypeKeyDatabaseTypeDescription

OptiFlex • Reference: Databases 11.33
DeptOrder (not used)Not used.
DirectoriesSpecifies locations.
FTP_SettingsUsed by ReqMaster.
Options
ReplicationData
REQ_SettingsSets ReqMaster options for order generation.
DirectoryTypeDirectoryLocationFileNameDescription
ProgramType Internal application key. If value is “ReqXX”, then ReqMaster knows that “XX” is the facilty number. Can be set in ReqMaster (click CTRL-SHIFT-F1 to add entries to this table). Currently only used to create a transaction entry for something that must be ordered.
IPAddressFileNameLocationOnServer Not used (location for created file on server).ExportUserName FTP userID.PassWord FTP password.LastSaveFileNo # of last file.LastDateProcessed date of last file.
RestartScanReq
ReplicationTypeSubscriptionTypeSyncTypeDefaultPasswordSyncIntervalQueryTimeoutEnabledInitialized
FileType Usually (90%) = Default (InterfaceEngine will perform ordering to host engine).FileNameFormat Format of file created by ReqMaster.

11.34 OptiFlex • Reference: Databases
SQL_SettingsNot used (previously used to specify DB for applications to connect to).
StationParametersUsed by ReqMaster.
ReqModule Used to create different file format (most customers do not use). Example: Format 850 (complex to create; some customers want things slightly different; could set an option).
FilterPAR Not used.FilterMonth Not used.ChargeAll Not used.OrderByStock If checked: Separate stock and non-stock items into separate orders (almost always
used).OrderByVendor If checked: Separate non-stock orders by vendor.SubmitCounts If checked: Do not request replenishment of certain number of items. Instead send num-
ber of items on hand (for a customer tracking inventory with the host system).
FacilityID If 00000: Station can order for all facilities. If <> 00000: Station can order only for speci-fied FacilityID.
LabelPrinter Not used.PrintUOM Not used. SMART Not used.

OptiFlex • List of Figures 1
12. LOFDocument Overview
MS: Overview2.1: Hospital systems/OptiFlex components......................................... 2.12.2: tbl_TransactionTypes .................................................................... 2.32.3: tbl_Transactions ............................................................................ 2.32.4: tbl_ReceivingTransactions............................................................. 2.32.5: Server DB Connections ................................................................. 2.72.6: Interfaces.mdb tbl_databases........................................................ 2.82.7: Interfaces.mdb tbl_sockets ............................................................ 2.82.8: Interface Engine socket monitor .................................................... 2.82.9: Interfaces.mdb tbl_File_Process_Settings .................................... 2.82.10: ScanReqC.mdb table Databases ................................................ 2.8
MS: Hospital Systems
MS: DB Server4.1: Server authentication, SQL Server and Windows ......................... 4.14.2: Quick Start: Database attachment settings ................................... 4.24.3: Customer Install: Database attachment settings ........................... 4.34.4: User ScanReq1 ............................................................................. 4.34.5: New Login tab General .................................................................. 4.44.6: Quick Start: Database access settings .......................................... 4.44.7: Customer Install: Database access settings.................................. 4.54.8: Copied login station entry .............................................................. 4.54.9: Copied permission entry ................................................................ 4.64.10: Facility, Program.......................................................................... 4.6
MS: Inventory Station (ICM)5.1: OptiFlex applications in the InstallShield Wizard ........................... 5.15.2: Table Databases............................................................................ 5.25.3: Table Applications ......................................................................... 5.25.4: OptiFlex launcher (no applications available) ................................ 5.35.5: Quick Start: Login dialog................................................................ 5.35.6: Setup menu ................................................................................... 5.35.7: ScanReqC.mdb table Databases .................................................. 5.45.8: Dialog “Application Setup” for InvSys, ICM.................................... 5.45.9: Button “Launch ICM” in the OptiFlex launcher............................... 5.45.10: ICM login...................................................................................... 5.55.11: ICM login DB Connection, this session........................................ 5.55.12: ICM main dialog........................................................................... 5.55.13: REQM login ................................................................................. 5.65.14: Requisition module settings update login .................................... 5.65.15: Dialog “Requisition Program Settings”......................................... 5.75.16: PocketPro client DB Connection settings, Quick Start ................ 5.85.17: VidexPro client DB Connection settings, Quick Start .................. 5.85.18: MS ActiveSync dialog .................................................................. 5.95.19: Dialog “Import from Database to Mobile Device”....................... 5.105.20: Resetting PocketPro .................................................................. 5.105.21: VidexPro application dialog ....................................................... 5.115.22: Dialog “System and Program Settings” ..................................... 5.125.23: Dialog “Add or Edit User Information”........................................ 5.135.24: Dialog “Department / PAR Setup”.............................................. 5.145.25: Dialog “Room Maintenance” ...................................................... 5.145.26: List of all facility items ................................................................ 5.155.27: List of facility items..................................................................... 5.155.28: Dialog “Add item master” ........................................................... 5.16

2 OptiFlex • List of Figures
5.29: Add ToualTouch category fields ................................................ 5.175.30: Included category inventory items ............................................. 5.185.31: New items in a category ............................................................ 5.185.32: List of charge procedures .......................................................... 5.195.33: Dialog “Add charge procedure” ................................................. 5.195.34: Add a charge procedure to a PAR............................................. 5.195.35: Charge procedure in a PAR item list ......................................... 5.205.36: Dialog “Inventory Management” ................................................ 5.205.37: Dialog “Add/Remove/Edit Items for Dept/PAR” ......................... 5.215.38: Items added to a PAR ............................................................... 5.215.39: Items added to a PAR ............................................................... 5.215.40: Dept/PAR to copy items from .................................................... 5.225.41: Selected items to delete from PAR............................................ 5.225.42: Scanned manufacturer’s bar code............................................. 5.225.43: Dialog “Print labels” ................................................................... 5.235.44: Description for kit....................................................................... 5.235.45: Included items in kit ................................................................... 5.245.46: Number of labels to print ........................................................... 5.245.47: PocketPro dialog message “Message complete” ...................... 5.255.48: Transaction details in ICM......................................................... 5.255.49: Transaction details in SQL DB .................................................. 5.265.50: Dialog “Communications Progress”........................................... 5.265.51: Message “Process Complete” ................................................... 5.265.52: Changing ToOrder manually in Inventory Detail........................ 5.275.53: Transaction details in ICM......................................................... 5.275.54: Transaction details in SQL DB .................................................. 5.285.55: Dialog “Communications Progress”........................................... 5.285.56: Message “Process Complete” ................................................... 5.285.57: Setting OnHand = 0 in SQL....................................................... 5.295.58: OnHand in ICM.......................................................................... 5.295.59: PAR selected for order .............................................................. 5.295.60: Charge/Requisition Information dialog ...................................... 5.305.61: Dialog “SELECT RECEIPTS TO VIEW OR PRINT”.................. 5.305.62: OnOrder in ICM ......................................................................... 5.305.63: Receipt in Reports Viewer ......................................................... 5.315.64: Dialog “Reports Selection”......................................................... 5.315.65: Starting/ending date for report................................................... 5.325.66: Report........................................................................................ 5.32
MS: Nurse Station6.1: Table Databases ........................................................................... 6.26.2: Table Applications ......................................................................... 6.26.3: Quick Start: OptiFlex Launch dialog .............................................. 6.26.4: DB Server Login dialog.................................................................. 6.36.5: Setup Menu dialog......................................................................... 6.36.6: Dialog “Setup Parameters”, for ScanReqC.mdb Databases ......... 6.36.7: Dialog “Application Setup” for ScanReq ........................................ 6.46.8: Button “Launch OptiFlex” in OptiFlex launcher.............................. 6.46.9: OptiFlex “main dialog”, doctors...................................................... 6.56.10: OptiFlex “MM” entry..................................................................... 6.56.11: OptiFlex MM “main dialog” .......................................................... 6.56.12: Scanner cable connection to computer ....................................... 6.76.13: Scanner barcode: Reset to default .............................................. 6.76.14: Scanner barcode: Keyboard wedge ............................................ 6.76.15: Scanner barcodes: Parameter settings ....................................... 6.86.16: Scanner barcodes: ADF rules ..................................................... 6.8

OptiFlex • List of Figures 3
6.17: Scanner barcodes: ADF rules (continued)................................... 6.96.18: Scanner barcodes: Reset scanner .............................................. 6.96.19: Cabinet zones............................................................................ 6.106.20: Drawer switches ........................................................................ 6.116.21: Omnicell Cath Rack code .......................................................... 6.126.22: OptiFlex User Login dialog ........................................................ 6.136.23: OptiFlex dialog for department configuration............................. 6.136.24: Dialog “Print Labels” .................................................................. 6.146.25: Dialog “Select Patient to Add”.................................................... 6.156.26: Dialog “Select Transaction Type” .............................................. 6.166.27: Dialog “Select Transaction Type” .............................................. 6.166.28: Dialog “Physical count”, inventory ............................................. 6.176.29: OnHand = number of items counted.......................................... 6.176.30: Continue with count? ................................................................. 6.186.31: Dialog “count with replenishment” (count) ................................. 6.186.32: OnHand = number of items counted.......................................... 6.186.33: Totaltouch initial dialog .............................................................. 6.196.34: Totaltouch items selected .......................................................... 6.206.35: List of ordered totaltouch items.................................................. 6.206.36: Kit number entry ........................................................................ 6.216.37: Charge procedure number entry................................................ 6.216.38: Order items ................................................................................ 6.236.39: Ordered quantity in the ICM inventory detail ............................. 6.236.40: Scanning receipt barcode .......................................................... 6.246.41: Inventory detail after receipt scanned........................................ 6.246.42: Item on receipt barcode scan. ................................................... 6.256.43: Select item for bin assignment................................................... 6.25
MS: Go Live
SS: Overview8.1: tbl_ORTransactionType................................................................. 8.18.2: tbl_ORTransactions ....................................................................... 8.1
SS: ICM9.1: Dialog “Add Doctor” ....................................................................... 9.19.2: Dialog “Doctor Maintenance” ......................................................... 9.19.3: Dialog “Doctor Maintenance” tab “Item Description”...................... 9.29.4: Dialog “Add Instrument”................................................................. 9.39.5: Dialog “OR File Maintenance” tab “Instruments” ........................... 9.39.6: Dialog “Add Equipment”................................................................. 9.49.7: Dialog “OR File Maintenance” tab “Equipment”............................. 9.49.8: Dialog “Add Medication” ................................................................ 9.59.9: Dialog “OR File Maintenance” tab “Medications”........................... 9.59.10: Dialog “Add Procedure” ............................................................... 9.69.11: Dialog “OR File Maintenance” tab “Procedures”.......................... 9.69.12: Dialog “Add Charge Procedure” .................................................. 9.79.13: Dialog “OR File Maintenance” tab “Charge Procedures”............. 9.79.14: Dialog “Preference Card Setup” tab “Position, Prep, Linen”........ 9.89.15: Dialog “Preference Card Setup” tab “Sutures”............................. 9.89.16: Dialog “Preference Card Setup” tab “Supplies” ........................... 9.99.17: Dialog “Preference Card Setup” tab “Instruments” ...................... 9.99.18: Dialog “Preference Card Setup” tab “Equipment”...................... 9.109.19: Dialog “Preference Card Setup” tab “Medicine”......................... 9.109.20: Dialog “Preference Card Setup” tab “Dressing”......................... 9.119.21: Dialog “Preference Card Setup” tab “Notes”.............................. 9.119.22: Dialog “Preference Card Setup” tab “Preference Card Links” ... 9.12

4 OptiFlex • List of Figures
9.23: Dialog “Preference Card Setup” tab “Links, Images”................. 9.129.24: Dialog “Preference Card Copy” ................................................. 9.139.25: Dialog “Item Search and Replace” ............................................ 9.139.26: Dialog for building case ............................................................. 9.149.27: Built case in case list ................................................................. 9.149.28: Printed case............................................................................... 9.15
SS: Nurse station10.1: Enter/scan case ID .................................................................... 10.110.2: Dialog “Patient care”.................................................................. 10.110.3: Edit item amount........................................................................ 10.210.4: Adjusted quantity ....................................................................... 10.210.5: Selected total touch items ......................................................... 10.310.6: Select total touch items ............................................................. 10.310.7: Special item data ....................................................................... 10.410.8: Special item in list...................................................................... 10.410.9: Setting a timer ........................................................................... 10.510.10: Adjusting a timer...................................................................... 10.510.11: Dialog “Update case level” ...................................................... 10.6
Reference: Databases

OptiFlex • INDEX 1
1. INDEXAcceptance document 2.9Active 5.4Add Doctor 9.1Add Patient 6.15Add User 5.13Add/Edit/Remove Items 5.22Add/Remove Programs 6.1ADT 2.2Anesthesia time 10.5Assign bin 6.25Attach DB 4.2Authentication 4.1Automatically print receipts 5.29Battery cover 5.10BCXLauncher.exe 5.2Bins 3.1Broadcast messages 5.12Build New Kit 5.23Calibrate 6.25Calibrate Elo Touchscreen 6.6Case
Close 10.6Select 10.1Test 9.14
Case level 10.6Case Prepick 6.1Cath Lab (CL) 3.1, 4.1, 5.1Cath Rack 1 6.12CathLab 6.1Cathrack detection 6.12Charge Procedures 5.19Charge procedures 6.21, 9.7Checkpoint secure remote. 2.9CHG 2.2, 2.4, 6.19Cisco 2.9Close (case) 9.15CNT 6.18Count (ScanMat) 5.25Count (Videx) 5.26CriticalReport.exe 5.2Cross-Reference (PAR items) 5.22CTRL-SHIFT-F1 5.3, 5.5, 5.6, 6.2Custom interface 5.13DatabaseID 5.2, 6.2Databases
DataFile 4.2DataFile6_Init 4.2DataFileTest 4.2DemoDataFileNew 4.2Interfaces.mdb 2.8Roles 4.4ScanReqC.mdb 2.8, 5.2
DataSource 6.2Date range (report) 5.32Dept/PAR 6.13Dept/PAR Setup 5.14Dialup 2.9Doctor list 6.5Doctor Maintenance 9.1
Drawer switches 6.11Dressing 9.11Elosetup.exe 6.6Elova.exe 6.6Equipment 2.1, 9.4, 9.10Facilities
Setup 5.12Facility ID 6.13Facility Inventory 5.15Facility survey 2.9File Maintenance 9.2Floor 6.22Floor charge 6.22Ghost 7.1Go live 7.1HL7 4.7Hospital Setup Parms 5.12Hospital Systems 2.2ICM main dialog 5.5IFE Installation 4.6Images 9.12InitialCatalog 5.2, 6.2Instruments 9.3, 9.9Interface Engine 2.2INV 2.5, 2.6, 6.17Inv_Sys.exe 5.1Inventory (ScanMat) 5.25Inventory (Videx) 5.26IT 2.2Item Categories 5.17Items 5.15Kits 5.23, 6.21LastOnHand 2.6Launch ICM 5.4Launcher 6.2Links 9.12Login Station 4.5Manufacturer bar code 5.22Materials Management System 2.2MAX 5.21MDF 4.2Medical Surgical (MS) 3.1, 4.1, 5.1Medications 9.5Medicine 9.10MIN 5.21MM 6.5MSASYNC.EXE 5.9Net meeting 2.9Nortel 2.9Notes 9.11Nursing Station 2.2Omni ID 6.12Omnicell Cabinet 6.10OmniGate 2.2OnHand 2.6, 5.29, 6.26OptiFlex launcher 5.3OptiFlex MS 6.1OptiFlex SS 6.1OR Case 10.1
ORDER 2.5Order items 6.23P470 6.7PA 2.2PAR Inventory 5.20Partnership 5.9Patient Accounting System 2.2Patient issues 6.15PCAnywhere 2.9Permission (DB) 4.6Place Orders for Facilities 5.29PlaceOnOrder 2.4, 2.5PocketPRO
Client 5.8PocketPro
Application 5.9Position, Prep, Linen 9.8PPTP 2.9Pref Card Setup 9.8Preference card 9.8Preview Receipts 5.31Print case 9.15Print kit label 5.24Print Labels 6.14Print labels 5.23Print Receipts 5.31Procedures 9.6Query 5.26Receipt 5.31Receipts 6.24Remote control software 2.9Remove from Room 6.16Remove Selected Items 5.22Remove/Transfer 6.15Reports 5.31REQ 2.2, 6.23REQM configure 5.6ReqMaster.exe 5.2Requisition Station 2.2Review / Credit Floor Changes 6.22Review / Credit patient issues 6.20roles 4.4Room Maintenance 5.14, 6.15Room time 10.5rowguid 4.5RS-232 6.10RS-485 6.10SATO 5.11Save adjusted quantity 10.2ScanMat 5.25Scanner barcodes 6.7ScanOR.exe 6.1ScanReq 2.2ScanReq.exe 6.1ScanReq1 (login) 4.4ScanReq1 (user) 4.3ScanReqC.mdb 5.2, 6.1Server 2.2ServiceMill 4.7

2 OptiFlex • INDEX
Setup Applications 6.4Setup Databases 5.4, 6.3Setup Department 6.15Setup Menu 6.3Setup Menu (dialog) 5.3setup.exe 4.6, 6.1Show doctor form 6.15Site connectivity 2.9SKU 6.7Sockets 2.8Special items 10.4Start Time 10.5Station ID 6.13Stop Time 10.5Supplies 9.9Surgeon time 10.5Sutures 9.8sw500930.exe (touchscreen) 6.6
Synchronization Warning 5.10Tables
tbl_ORTransactions 8.1tbl_ORTransactionType 8.1tbl_Transactions 2.3tbl_TransactionTypes 2.3
Timeplan 2.9Timers 10.5Tools 2.9ToOrder 5.27Total Touch 6.19TotalTouch 6.1Touch Folder Path 6.4Touchscreen 6.6Transaction types 2.4
ADDITEM 2.6COUNT 2.6INVENTORY 2.6
ISSUE 2.4ORDER_DEL 2.5ORDER_HOST 2.5ORDER_USER 2.5PRE_PICKCR 2.4PRE_PICKED 2.4RECEIVE 2.5
User Profile 5.13Videx
Client 5.8VidexPro
Application 5.11View / Order Inventory 6.14View/Order Inventory 5.22VNC client 2.9VPN 2.9Xref Item 5.22Zone switches 6.10