Optical Flow OpenCV Implementation · 1. Introduction • It is an implementation of optical flow...
51
Optical Flow OpenCV Implementation
Transcript of Optical Flow OpenCV Implementation · 1. Introduction • It is an implementation of optical flow...
Optical Flow OpenCV Implementation
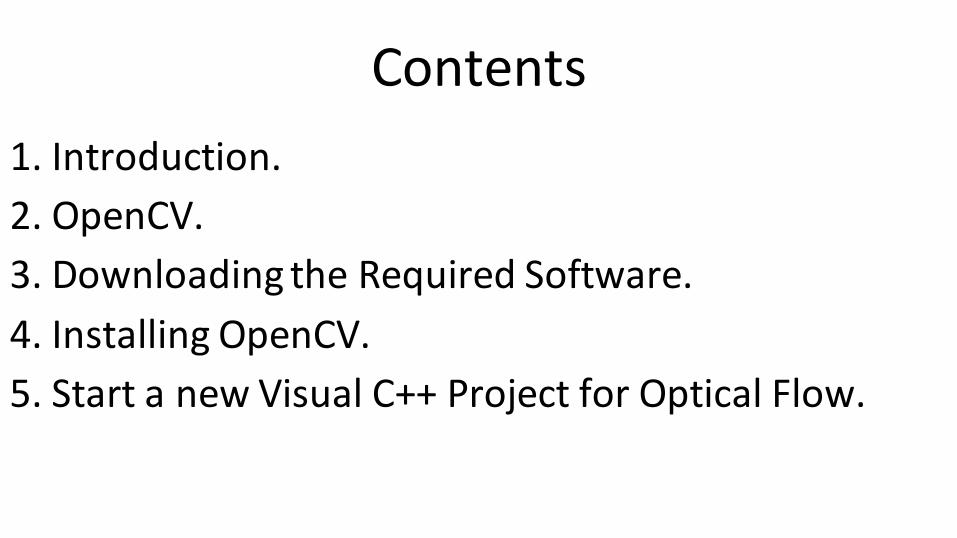
Contents
1. Introduction.
2. OpenCV.
3. Downloading the Required Software.
4. Installing OpenCV.
5. Start a new Visual C++ Project for Optical Flow.

Contents Cont.6. Editing the Project Properties.
6.1 Adding the OpenCV Include Directories.
6.2 Adding the OpenCV Library Directories.
6.3 Referencing Required OpenCV Libraries.
6.4 The Preprocessor Definitions.
6.5 Command Arguments.
6.6 Run The Project/Solution.

1. Introduction• It is an implementation of optical flow algorithm with OpenCV and
Visual Studio 2017 (any Visual Studio version can be used, but better to get VS2017) using VC++.
• This guide shows steps for VS2017 with OpenCV 2.4.9 on Windows 10. (We recommend you to do this assignment with the same versions to avoid any unexpected errors/issues)
• Implementation can run either real time to track moving objects (using webcam) or between two frames.

Visual Studio 2017 - InstallationDownload the Visual Studio 2017 (Community version) from the following link: https://visualstudio.microsoft.com/downloads/
(For Mac OS, select MacOS from the top right of this webpage (see purple arrow))
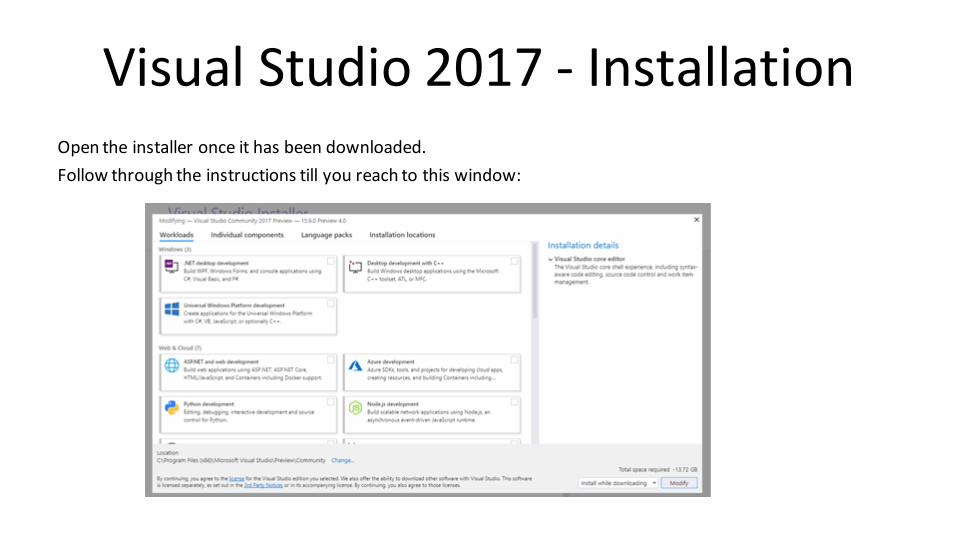
Visual Studio 2017 - InstallationOpen the installer once it has been downloaded.
Follow through the instructions till you reach to this window:
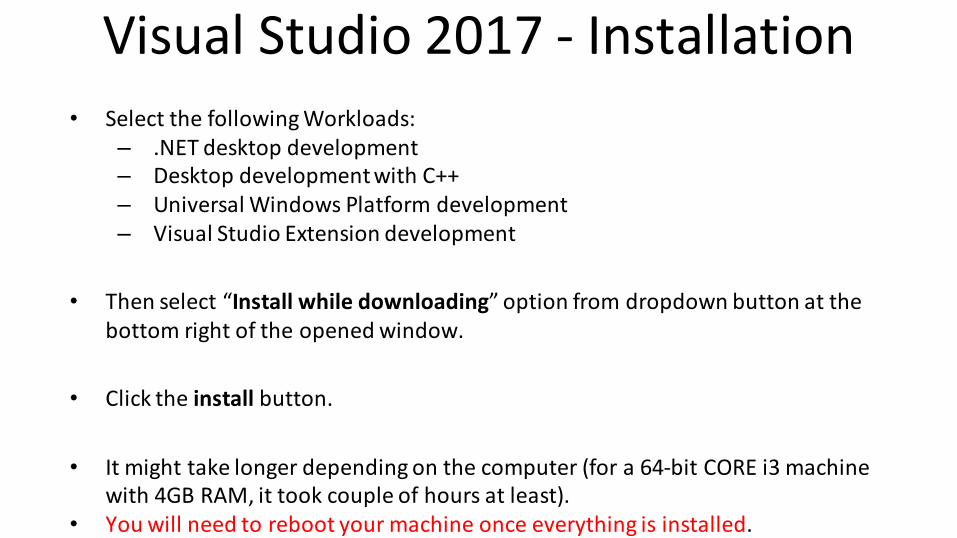
Visual Studio 2017 - Installation• Select the following Workloads:
– .NET desktop development– Desktop development with C++– Universal Windows Platform development– Visual Studio Extension development
• Then select “Install while downloading” option from dropdown button at the bottom right of the opened window.
• Click the install button.
• It might take longer depending on the computer (for a 64-bit CORE i3 machine with 4GB RAM, it took couple of hours at least).
• You will need to reboot your machine once everything is installed.
2. OpenCV
• OpenCV (Open Source Computer Vision Library) is an open source computer vision and machine learning software library.
• OpenCV was built to provide a common infrastructure for computer vision applications and to accelerate the use of machine perception in the commercial products.

• The library has more than 2500 optimized algorithms, which includes a comprehensive set of both classic and state-of-the-art computer vision and machine learning algorithms.

● These algorithms can be used to:○ detect and recognize faces,○ identify objects,○ classify human actions in videos,○ track camera movements,○ track moving objects,○ extract 3D models of objects, ○ produce 3D point clouds from stereo cameras,○ etc.


• It has C++, C, Python, Java and MATLAB interfaces and supports Windows, Linux, Android and Mac OS.

3. Downloading the Required Software
• Download from (opencv.org) or any other website that offers the download. You can download from the given link below: http://sourceforge.net/projects/opencvlibrary/files/
• For this tutorial, version 2.4.9 will be used.

4. Installing OpenCV
• Installation requires about 4GB of free disk space.
• Run the downloaded executable file (Note that the OpenCV installer simply creates a folder named “opencv” in the chosen “Extract to:”directory).

• You should choose an extraction directory that is safe, accessible, and unlikely to change. This guide uses an “Extract to:” directory of “C:\”.

• When it closes, confirm that the opencv directory was created in your Extract to: directory of choice:
• Then, go to https://www.dropbox.com/login and then sign in using the following information:
Email: [email protected] ,
and Password: robotvision
• Download the OpticalFlow_vs.zip file on your computer.
Note: This folder contains the implementation for Optical Flow assignment.
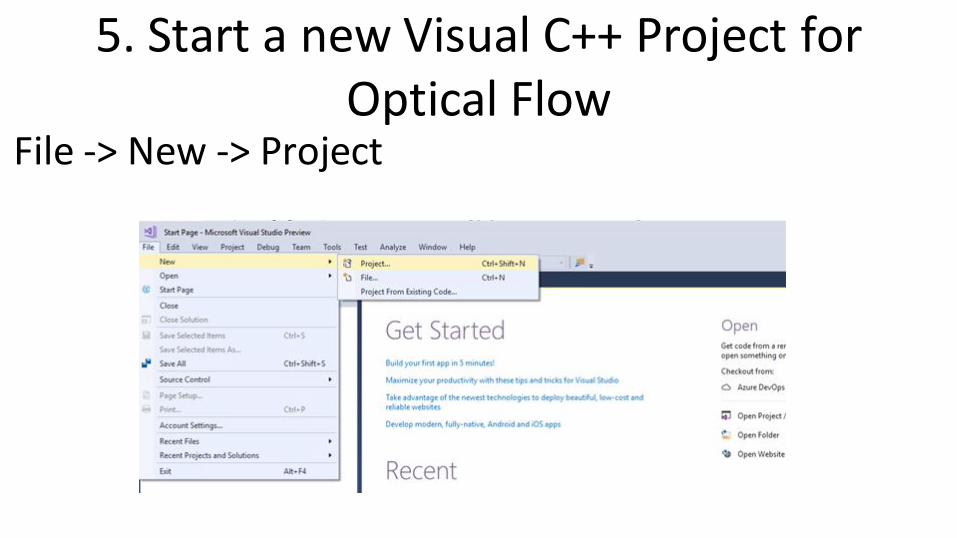
5. Start a new Visual C++ Project for Optical Flow
File -> New -> Project

• Visual C++ -> Windows Console Application
• Write the name you choose for the project. For example, Optical_Flow
• Then, Press OK.
Numbers with
arrows in the figure shows steps.

You will see the following window, when the project has been successfully created.

• Then, close the project.• File -> Close Solution

• Copy the following files (listed on next slide)
From: OpticalFlow_vs directory (the extracted zip file you have already downloaded from the Dropbox).
<the directory that contains the extracted zip file>\OpticalFlow_vs\OpticalFlow_vs\OpticalFlow_vs\OptiFlow
For example, C:\OpticalFlow_vs\OpticalFlow_vs\OpticalFlow_vs\OptiFlow
To: the project folder
<the new project directory>\Optical_Flow\Optical_Flow
For example, C:\Users\Vision\source\repos\Optical_Flow\Optical_Flow

between.h between.cpp image0.jpg
common.h cv_pyrlk.cpp image1.jpg
resource.h main.cpp stdafx.h
Tracker.h Tracker.cppstdafx.cpp
targetver.h

• In the new project directory, perform the following steps:
1. Delete the cpp file that contains the main function (its name is the same as the project name).
For example, delete
C:\Users\Vision\source\repos\Optical_Flow\Optical_Flow\Optical_Flow.cpp
2. Rename main.cpp to be the same name as the deleted file.

• Copy all dll files
From the following directory:
<OpenCV install directory>\build\\x86\vc11\bin
For example, C:\opencv\build\x86\vc11\bin
To
<the new project directory>\Optical_Flow\Optical_Flow
For example, C:\Users\Vision\source\repos\Optical_Flow\Optical_Flow

• Then, open the project again.• File -> Open -> Project/Solution

Select the Optical_Flow.sln file from the newly created Optical_Flow project directory. Click Open.

• Now, we need to add the source files (copied from Dropbox project to our project directory in previous step) to our solution.
• Right click on “Source Files” -> Add -> Existing Item

• Then, choose all h (header) and cpp files.• Numbers with arrows shows steps.
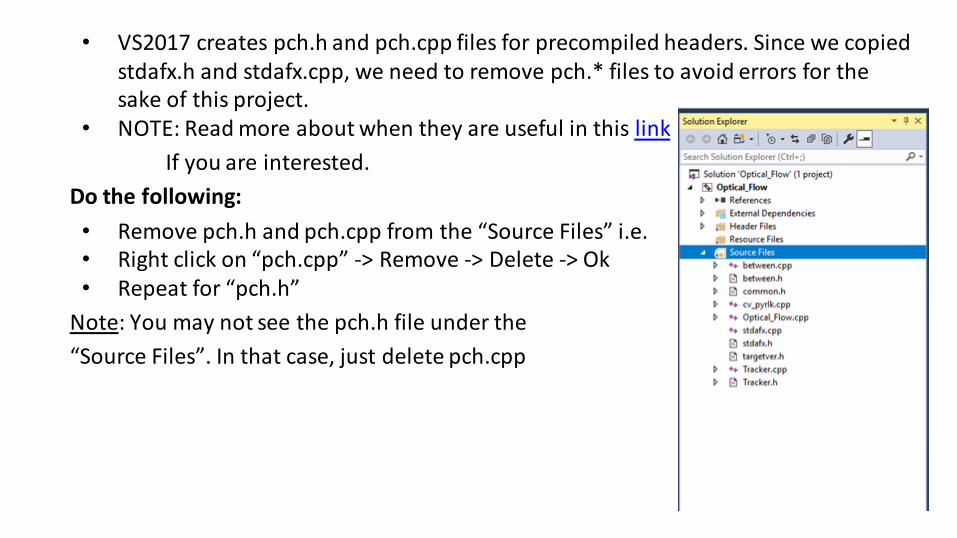
• VS2017 creates pch.h and pch.cpp files for precompiled headers. Since we copied stdafx.h and stdafx.cpp, we need to remove pch.* files to avoid errors for the sake of this project.
• NOTE: Read more about when they are useful in this link
If you are interested.
Do the following:
• Remove pch.h and pch.cpp from the “Source Files” i.e.• Right click on “pch.cpp” -> Remove -> Delete -> Ok• Repeat for “pch.h”
Note: You may not see the pch.h file under the
“Source Files”. In that case, just delete pch.cpp

6. Editing the Project Properties
• Open the Project Properties window via the Solution Explorerview.
• Right click Project>Properties


• Select VC++ Directories on the left pane of the Project Properties window.

6.1 Adding the OpenCV Include Directories
• Edit the Include Directories to point to include the three following directories:
<OpenCV install directory>\build\include
<OpenCV install directory>\build\include\opencv
<OpenCV install directory>\build\include\opencv2
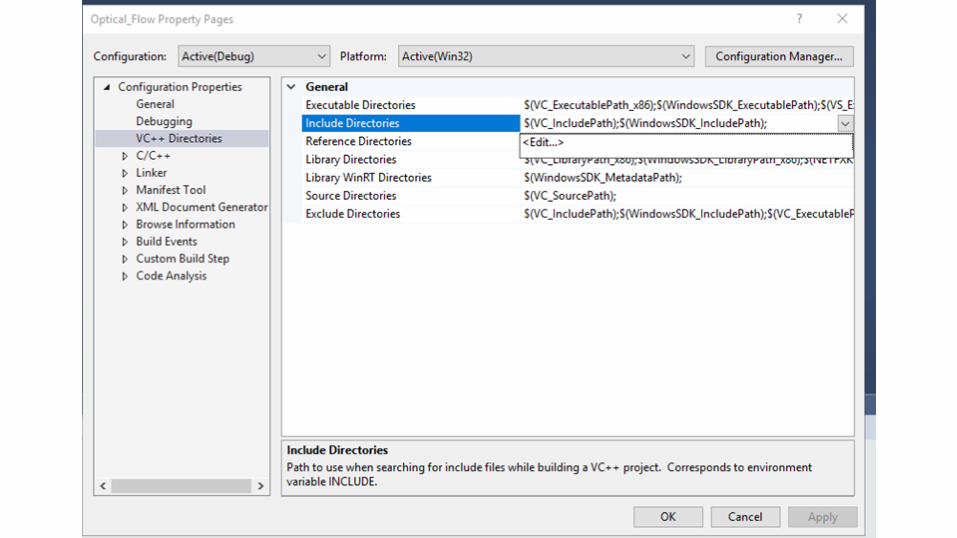

• For example, if your install directory was C:\opencv, include the three following directories:
C:\opencv\build\include
C:\opencv\build\include\opencv
C:\opencv\build\include\opencv2
2
Numbers in the left figure shows the
steps. 1. Adds new line
2. Browse to the directories you
wish to add.
NOTE: You can either copy these three lines directly or browse to them to select the directories.

6.2 Adding the OpenCV Library Directories
• Edit the Library Directories to include the following directory:
<OpenCV install directory>\build\x86\vc11\lib


• For example, if your install directory was C:\opencv, add the following library directory:
C:\opencv\build\x86\vc11\lib

6.3 Referencing Required OpenCV Libraries• To add OpenCV libraries, you must add the .lib files to
Linker>Input>AdditionalDependencies.

opencv_calib3d249.libopencv_calib3d249d.lib
opencv_contrib249.lib
opencv_contrib249d.libopencv_core249.lib
opencv_core249d.libopencv_features2d249.lib
opencv_features2d249d.lib
opencv_flann249.libopencv_flann249d.lib
opencv_gpu249.lib
opencv_gpu249d.libopencv_highgui249.lib
opencv_highgui249d.libopencv_imgproc249.lib
opencv_imgproc249d.lib
opencv_legacy249.libopencv_legacy249d.lib
opencv_ml249.lib
opencv_ml249d.libopencv_nonfree249.lib
opencv_nonfree249d.lib
opencv_objdetect249.libopencv_objdetect249d.lib
opencv_ocl249.libopencv_ocl249d.lib
opencv_photo249.lib
opencv_photo249d.libopencv_stitching249.lib
opencv_stitching249d.lib
opencv_superres249.libopencv_superres249d.lib
opencv_ts249.libopencv_ts249d.lib
opencv_video249.lib
opencv_video249d.libopencv_videostab249.lib
opencv_videostab249d.lib
Copy and paste the .lib files listed here into Additional
Dependencies (left figure).
NOTE!! Copying them from the slide may introduce some extra spaces at the end of each line
which may result in errors. Instead, copy them from the following text file
(https://docs.google.com/document/d/13a5ehxuOc3DNDamqYrc7RnCpNjDUwqOl4Vn9J9i3apo/edit?us
p=sharing).

• C/C++ -> Preprocessor ->Preprocessor Definitions
6.4 The Preprocessor Definitions

• Then, add the following:
_CRT_SECURE_NO_WARNINGSPurpose: Adding _CRT_SECURE_NO_WARNINGS_CRT_SECURE_NO_DEPRECATE to Preprocessor Definitions removes/supressesthe precompiler secure warnings that come up when you build the project.

6.5 Command Arguments• Project Properties > Configuration Properties > Debugging >Command Arguments• Add one of the following argument to your project:
i) camera: is for real-time tracking using the webcam.
ii) frames: apply Optical flow between two frames.

Do the following for each .cpp file:
Select the file in the solution explorer. Click on properties. Select the C++ options. Choose precompiled Headers. Select none.NOTE: For VS2015 and older, you don’t need to do this step.
Repeat the above step for all .cpp files.

6.6 Run The Project/Solution
• Save the project.
• Start debugging (F5).

7. Code AnalysisLoad Image 1
Interest Points
KLT Tracker using 2 images

7.1 KLT Tracker• Detect Harris corners in the first frame

7.1 KLT Tracker• Build the Optical Flow Pyramid

• For each Harris corner compute motion between consecutive frames
• Link motion vectors in successive frames to get a track for each Harris point

Thank You