Operator Manual 255 Rider Burnisher - B3Partners · 255 Rider Burnisher 2010 Edition: 1 R.P.S....
27
Operator Manual Model 255 255 Rider Burnisher 2010 Edition: 1 R.P.S. Corporation Phone: 1-800-450-9824 P.O. Box 241 Fax: 1-866-632-6961 Racine, Wisconsin 53401
Transcript of Operator Manual 255 Rider Burnisher - B3Partners · 255 Rider Burnisher 2010 Edition: 1 R.P.S....

Operator ManualModel 255255 Rider Burnisher
2010 Edition: 1
R.P.S. Corporation Phone: 1-800-450-9824P.O. Box 241 Fax: 1-866-632-6961Racine, Wisconsin 53401

This manual contains the following sections:
- HOW TO USE THIS MANUAL
- SAFETY
- OPERATIONS
- MAINTENANCE
- PARTS LIST
The HOW TO USE THIS MANUAL section will
tell you how to find important informationfor ordering the correct replacement parts.
Parts may be ordered from authorized dealers.When placing an order for parts, the machinemodel and serial number are important.
Refer to MACHINE INFORMATION on page one
of this manual, which is filled out during theinstallation of your machine.
The serial number of your machine is locatedon the lower half of steering tower of themachine. (See Picture Below)
The SAFETY section contains important information
regarding hazardous or unsafe practices of themachine.
Levels of hazards are identified that could resultin product or personal injury, or severe injuryresulting in death.
The OPERATIONS section is to familiarize the
operator with the operation and function of themachine.
The MAINTENANCE section contains preventative
maintenance information to keep the machine andits components in good working condition. They arelisted in this general order:
- Batteries - Burnising Pads - Cleaning Filter - Service Schedule - Machine Trouble Shooting
The PARTS LIST section contains assembled parts
illustrations and corresponding parts list. The partslists include the following columns of information:
- ITEM - Refers to the reference number on the parts illustration.
- PART NO. - Lists the part number for the part.
- QTY - Lists the quantity of the part used in that area of the machine.
- DESCRIPTION - Is a brief description of the part.
- COMMENTS -For information not noted by the other columns.
NOTE: If a service or option kit is installed on yourmachine, be sure to keep the KIT INSTRUCTIONS
which came with the kit. It contains replacementpart numbers needed for ordering future parts.
How to use this manual
SERIAL NUMBER PLATE

STANDARD WARRANTY POLICY
RPS Corporation warrants its Machines and Original Equipment Accessories to be free of manufacturer’s defects in materials or workmanship for the periods specified below. Warranty will be granted at the sole discretion of RPS Corporation and is subject to final claim and parts review by RPS Corporation and its vendors. This policy is effective January 1, 2014 and is subject to change on production units at a future date.
COVERAGE, EXCLUSIONS AND LIMITATIONS:
BATTERY POWERED MACHINES: PARTS: 36 months or 1,500 hours (Power On meter) LABOR: 12 months TRAVEL: 3 months (150 mile maximum) POLY TANKS: 7 Years or 3,000 hours (Water must not exceed 135°F/57°C) Freight coverage for 3 Years under the parts section of warranty.
AC POWERED MACHINES:
FLOOR MACHINES: All EDGE and ORBITZ Models PARTS: 1 Year LABOR: 90 Days MOTOR: 2 Years(1,500 hour)
ZERO3 WALL MOUNT/PORTABLE UNITS: Unit Must be Shipped back to Factory PARTS: 6 Month
BACKPACK VACUUMS: Unit Must be Shipped back to Factory PARTS: 3 Years LABOR: 3 Years
CARPET SPOTTER/EXTRACTOR: Unit Must be Shipped back to Factory PARTS: 3 Years LABOR: 3 Years
NEW PARTS: 90 day warranty on OEM replacement parts (when installed by an authorized dealer)
VALIDITY: Machine is serviced by Factory Authorized Personnel and a fully completed Machine Delivery Form (online or fax) is on record at RPS Corporation.
LIMITATION: Warranty will begin on date of machine installation to end-user or 6 months after shipment from RPS Corporation to the distributor if unsold at that time.
This warranty includes all parts and original equipment accessories on the machine except normal wear items. Some examples of these wear item exclusions are:
• EDGE/ORBITZ isolators (1,000 hours on average)• EDGE/ORBITZ Grip Face• Squeegee Blades, Wiper Blades, Skirts and Curtains.• Caster Wheels, Squeegee Wheels and Bumpers.• Lights (Strobe, Headlights, or Bulbs).• Chains and Belts.• Filters, Screens, and Vacuum Bags.• Motor Brushes and/or commutator wear.• Brooms, Brushes, Pads and Pad Retainers.• Hoses and Tubing.• Drive Tires, Foam Filled/Pneumatic Wheels, Tubes or Valve Stems.• Rubber Floor Seals or Gaskets.• Vacuum motors with evidence of moisture or debris intrusion or > 400 hours.• Batteries (see below)
NOT COVERED: Routine maintenance, adjustments or parts damaged from abuse, neglect, improper use of the machine, or lack of scheduled “daily, weekly, monthly” maintenance in accordance with our published PM Sheets.
BATTERIES: Warranted through the battery manufacturer for One Year (pro-rated) from the date of delivery. The battery manufacturer approves or denies the warranty coverage after their analysis. Labor and Travel credit through RPS is applicable once a warranty defect has been confirmed. NOT COVERED: Damage from lack of maintenance/lack of water, use of a non-OEM charger, or use of non-distilled water.
BATTERY TERMINALS: Battery terminals and cable connections are covered for 30 days from the shipment of the machine. (Battery terminals and cables should be inspected, cleaned and secured upon installation of the machine and then every 30 days thereafter.)

Machine informationPlease fill this area out at the time of installation for future reference.
Model number_____________________________________________________________
Serial number:______________________________________________________________
Installation date:___________________________________________________________
Installing dealer:__________________________________________________________
Dealer contact: ___________________________________________________________
Address:____________________________________________________________________
City, state, zip: _____________________________________________________________
Phone number:_____________________________________________________________
This operator and parts manual should be considered a permanent part of the unit and should remain with the unit atall times. This operator and parts manual covers all the tomcat 255 Series burnishers. You may find descriptions andfeatures that are not on your particular model. The information and specification included in this publication were ineffect at the time of printing. R.P.S. Corporation reserves the right to make changes without notice incurring anyobligation.
To register for warranty, fax your warranty registration form today!
Machine information formWarranty registration formMachine specificationsCommon wear partsSafety messages!!Safety precautions!!Machine controls and featuresControls and fuctionsMachine preparationMachine setupOperationPre-burnishing check listOne pass burnishingCharging batteriesMaintenancePreventative maintenance recordsLCD screen menu displayTroubleshooting central commandTroubleshootingMachine parts section
PAGE 1
Page 1Page 2Page 3Page 4Page 5Page 6Page 7Page 8Page 9Page 10Page 11Page 11Page 11Page 12Page 13Page 14-16Page 17Page 18-19Page 20-21Page 22-40
Table of contentsMachine Parts Illustration
Pages 23-24
Pages 25-26
Pages 27-28
Pages 29-30
Pages 31-32
Pages 33-34
Pages 35-36
Pages 37-38
Pages 39-40Pages 41-42Pages 43-44
Front wheel driveWheels and Rollers20" Burniher Deck
27" Burnisher deckMounting deckSteering UprightCentral CommandTop Front ComponentsActuator PiviotActuator Vac box and ChargerBatteries and Covers

MACHINE INSTALL / WARRANTY REGISTRATION
Installing Dealer: Installed By: Location: (City, State): Install Date: End-User Company Name: End-User Contact: Address: City/State: Zip:
Phone: Fax: Email:
Model: Serial #: Hour Meter:
BUYER’S REPRESENTATIVE HAS RECEIVED INSTRUCTION IN PROPER OPERATION OF THE FOLLOWING CONTROLS AND FEATURES:
SCRUBBERS: - Filling solution tank, Solution tank sight tube, Solution drain hose or valve for flushing and freezing conditions - Adjusting controls & operation, Double scrubbing, Squeegee lift delay, High Recovery RED Light, vacuum switch (horn honking) and vacuum timer
- Recovery tank draining & cleaning in APPROVED locations only, Common Squeegee hose clog points, vacuum screen removal and cleaning, drain saver basket emptied
- Shroud and pad/brush removal and installation - Side Wiper and Curtain adjustment and maintenance for water control - Solution valve and filter operation (removal and cleaning) - LCD display operation, 4 hour meters (key switch, brush, traction drive, vacuum) - Tank tilt back feature, only when both tanks are fully drained - Squeegee hose removal and checking for clogs
BURNISHERS -Train and have customer demonstrate proper removal and replacement of burnishing pad - Pad pressure gauge and proper operating range to avoid tripping the circuit breaker
SWEEPERS - Demonstrate proper removal and replacement of main broom and side brooms - Method for cleaning the dust filter, emptying out the debris hopper and correct installation - Correct operation of the main broom and side broom levers, and understands to park with brushes in UP position - Trained on the “Wet-Sweep” bypass door and not to operate through standing water
EDGE / ORBITZ MACHINES - EDGE / ORBITZ scrubbers must have their isolators & deck hour meter replaced every 1,000 hours of use - Customer understands the Grip Face is not warranted against damage from improper use or direct contact with the floor
ALL MACHINES - Checking for proper battery electrolyte level, electrolyte condition monthly, and check that battery terminals are properly torqued to 10ft/lbs
- Parking Brake works and Park Brake Override functions if installed / Always park on a solid and level surface, NEVER on a movable or inclinded surface
- Charging operation and customer understands batteries have limited “cycles” and recharging = 1 cycle - Seat and steering wheel adjustment - Customer has read and understands the list of WARNINGS/CAUTIONS in the Operator manual - Battery and Machine Maintenance Guide posters hung up and reviewed - Manufacturer’s website is a good source of information (Videos, PM Sheets) and sign up for quarterly newsletters - Operators and Parts manuals were delivered, reviewed, understood, and confirmation preventive maintenance is done every 100 hours of use and recorded on PM Sheets provided online or in manuals
Installed By (print) Signature Buyers Representative (print) Signature
Buyer agrees to pay for any repairs, adjustments, or secondary training that manufacturer determines is excluded from the warranty.
Complete Online at www.rpscorporation.com

PAGE 3
255
(10-gauge) 1/8” steel5,200 pounds(2) 12” x 3.5”2,300 pounds(1) 10” x 3”54.5” x 25” x 50”1,072 pounds714 pounds
(1) 20 inches or 27 inches(1) 4.0 hp(1) 4.0 hp2000 rpmDirect on 20" and Dual Belt on 27"0 - 75 poundsInfinite
(6) 245 ah(6) 325ah or 395 ahUp to 4 hours36 volt / 25 amp
PASSIVE or ACTIVEPaper1 Micron0.75 hp (optional)70 cfm
1.0 hp0-4.5 mph0-3 mphDynamic w/ Auto Parking Brake56”
45,000 sq. ft./hr34,817 sq. ft./hr
70 dBA at Driver's Position11 degrees / 19%
Specifications
CONSTRUCTION
Frame:Rear Axle Capacity:Rear Wheels (non-marking):Front Wheel Drive Capacity:Front Wheel (non-marking):Dimensions: (L x W x H):Weight (w/ batteries):Weight (w/out batteries):
BURNISHING SYSTEM
Pad Diameter:Pad Motor Power (standard):Pad Motor Power (optional):Pad Speed:Pad Engagement:Pad Pressure:Pad Pressure Settings:
BATTERY SYSTEM
Battery ah rating: (std)Battery ah rating: (opt)Battery Run Time:Charger (110v / 60 Hz / automatic):
FILTERING SYSTEM
Vacuum Description:Filtering Material:Filter Rating:Vacuum Power:Airflow Rating:
DRIVE SYSTEM
Transport Power:Forward Speed Control:Reverse Speed Control:Braking System:Minimum Aisle for U-Turn:
PRODUCTIVITY
Cleaning Rate/Hour (Max):Cleaning Rate/Hour (Normal):
GENERAL
Sound Level:Gradeability:

Common wear parts
PAGE 4
PadFunction
Ultra high speedHigh speed buffingAnd burnishing.
Ultra high speedbuffing andburnishing.
Ultra high speedbuffing andburnishing.
Ultra high speedbuffing andburnishing.
Ultra high speedbuffing andburnishing.
Ultra high speedbuffing andburnishing.
Results
For high speed buffingand burnishing. Forfrequent burnishing onsoft to mediumfinishes.
For burnishing softfloor finishes. May beused on a daily basis.Ideally suited for topdressing highlypolished floors.
Blended polyester andnatural fibers. Forfrequent burnishing onmedium finishes.
Blended natural fiberpad. For frequentminimal burnishing onhard finishes.
Blended natural fiberpad works on all UHSmachines. For minimalburnishing on mediumto hard finishes.
High content ofnatural fibers. Idealfor minimal burnishingon hard finishes.
20" PartNumber
20-4221
20-4222
20-4223
20-4224
20-4225
20-4226
Pad
Image ultra highspeed - beige
Luster lite - blue
Combo ultrahigh speed
Porko ultra highspeed
Porko elite
Porko plus
27" PartNumber
27-4221
27-4222
27-4223
27-4224
27-4225
27-4226

PAGE 5
Safety Messages
Your safety, and the safety of others, is very important and operating this unit safely is an important responsibility.
To help you make informed decisions about safety, we have provided operating procedures and other safetyinformation in this manual. This information informs you of potential hazards that could hurt you or others.
It is not practical or possible to warn you of all the hazards associated with operating this unit.You must use your own good judgment.
This is intended for commercial use. It is designed to be used on hard floors in an indoor environment,with the recommended pads.
1. DO NOT OPERATE UNIT:
Unless trained and authorized. Unless operator manual is read and understood. If unit is not in proper operating condition.
2. WHEN OPERATING UNIT:
Remove loose objects from the floor that may be projected from the revolving burnisher pad. Keep hands and feet away from revolving pads. Do not operate machine where flammable liquids or gasses are present. Use extreme caution when maneuvering.
3. BEFORE LEAVING:
Make sure machine is turned off. Stop on level surfaces. Disconnect batteries.
4. BEFORE SERVICING:
Stop on level surface, and secure machine. Disconnect batteries.

!! Safety Precaution!!
WARNING: Always use the charger provided bythe maufacurer to charge the machine.It is an automatic charger, specifically designedto charge at the appropriate rate. If you mustuse a different charger, disconnect the batteriesbefore charging. This will prevent damage to theelectronic speed controller.
WARNING: Understand the dynamic brakingsystem before you operate the machine onramps. Machine does not coast.
WARNING: Do not park the machine on rampsor slopes.
WARNING: Do not operate the machine ifany parts have been removed or damaged.
WARNING: Do not remove, paint over, or
destroy warning decals. If warning decalsbecome damaged, they must be replaced.
WARNING: Do not operate machine in unsafecondition. If the machine is in need of repair oris in any way unsafe to operate, the mattershould be reported immediately to the shiftsupervisor. Do not operate the machine until itis returned to proper operating condition.
WARNING: This machine must only beoperated by trained operator. As part of hisor her training, they must read this manualthoroughly. If extra copies are needed,contact your local dealer.
WARNING: Always turn off the machine,before leaving it unattended.
WARNING: Do not operate over electricalfloor outlets. May result in serious injury.
PAGE 6
WARNING: Hazardous voltage. Shock, burns orelectrocution can result. Always disconnect thebatteries before servicing machine.
WARNING: Batteries emit hydrogen gases. Explosion orfire can result. Keep sparks and open flames away.
WARNING: Charge unit in a well ventilated area, andkeep battery compartment open when charging.Explosion or fire could result.
WARNING: Battery acid can cause burns. Wearprotective eye wear and gloves when servicingbatteries.
WARNING: Do not store outdoors or pressure wash.Prevent electronic components from getting wet.
WARNING: The use of parts and solutions other thanthat recommended by the manufacturer may causedamage or endanger people.
WARNING: Dress safely. Do not wear rings or metal wristwatches while working on this machine. They cancause an electrical short, which, can cause seriousburns. Do not work on this machine while wearing atie, scarf or other loose, dangling neckware or clothing.These loose items can tangle in the rotating parts andcause serious injury or even death.
WARNING: Do not use the machine as a step ladder orchair.
WARNING: Only operate this machine from theoperators position. It was not designed to carrypassengers.
WARNING: Do not operate this machine on ramps oruneven surfaces. When climbing a ramp, always drivethe machine in forward straight up or down the ramp.Never drive across the incline. Do not back down orturn on ramps!

Machine Controls and Features
PAGE 7
28
29
27
30
31
32 36
34
35 38
3733
1
3
5
7
6
2
4
9
10
11
13
14
12
23 24
26
2522
8
191816 17 212015

PAGE 8
Controls and FuctionsSee figures (1-6) on page 7
1. Seat: Adjustable seat for operator comfort and ease of entry.2. Steering wheel: Used to steer the machine.3. Headlight: Helps you see in low light areas and to warn oncoming traffic.4. Front wheel: Steers and propels machine.5. Corner roller bumpers: helps prevent damage to machine when cleaning close to walls and other objects.6. Lower roller bumpers: Helps prevent damage to deck.7. Rear tires: Non-marking and extra wide tires for stability.8. Battery compartment lid: Holds batteries, on board battery charger, vac box, and actuator tower
9. Horn button: sounds horn.10. Adjustable steering: adjustable steering wheel for comfort and ease of entry.11. Hour Meter: Keeps track of how many hours are on the machine.12. Charge port: Gray 50 used to receive charger input. (Note: only use charger provided)13. Foot pedal: Makes machine go and release pedal to stop.14. Non slip floor plate: helps prevent slipping when getting on and off of machine.
15. Burnisher motor: This motor drives the burnishing deck.16. Adjustable Arm: Adjusts the pitch of the burnishing deck.17. Shroud: The shroud contains dust created from burnishing.18. Dust control hose: Two dust control hoses pull dust and debris from shroud to filter box.19. Actuator: The actuator lifts and lowers the deck.20. Belt Guard: The belt guard protects the belts and pulleys from debris.21. Vacuum motor: Provides suction to vac box.
22. Batteries: The machine comes with one set of six batteries.23. Spring Adjustment Knob: Increases or decreases the pad pressure.24. Actuator tower: Provides down pressure adjustment.25. Onboard Charger: Plug charger into outlet to charge machine.26. Vacuum box: Collects dust created from burnishing.
27. Burnishing deck pressure gauge: Settings green (safe operating range) - red (overload).28. Burnishing motor bursh indicator: Indicates when the burnisher motor needs new brushes.29. LCD screen display: Lists functions and settings of the machine.30. Menu control: Scrolls through different options on the LCD display.31. Forward/Reverse switch: Controls the direction of the traction motor.32. One touch button: Activates the burnishing deck, and dust control system simultaneously.
33. Vacuum switch: Allows you to turn on vacuum motor seperate from the one touch botton.34. Resetable 80 amp burnisher motor circuit breaker:
35. (+) 15 amp resetable circuit breaker: (15 amp) positive bus bar.36. (-) 15 amp resetable circuit breaker: (15 amp) negative buss bar.37. Key switch: Turns power to machine on and off.38. Emergence shut off: (optional) Shuts machine down in a emergency.

4. Check to see if hoses are clamped down to theshroud. Hose should have just enough slack to move upand down with the scrub deck and not interfere withother moving parts. (See below)
Connecting batteriesYour machine is equipped with (six) 6 volt,Deep cycle batteries, whichForm a 36 volt system. Maximum batteryDimensions are 7"w x 15"l x 15"h.
1. Turn all switches to the off position and remove key.
2. Hinge open the battery access lid to access the batterycompartment.
3. All of the six battery cables are connected to thebatteries. Locate any loose ones and connect to the openterminal. Tighten with 9/16" wrench. (see below)
4. Turn on main power switch and check the batterycondition meter to ensure correct installation. Chargebatteries if needed. (see: battery charging)
Connecting hosesYour machine is also equipped with two vacuumhoses which need to be connected for the dustcontrol to work properly.
1. Turn all switches to the off position.
2. Hinge open the battery access lid to access therear of the filter box and fan connections.
3. Check to see if hoses are clamped down to theshroud and the filter box securely. (you should notbe able to pull them off easily) if hoses are loosetighten the hose clamp with a screwdriver.(see below)
PAGE 9
Machine Preparation
Uncrating machineCarefully check the crate for any sign of damage. Batteriesare in the unit.To uncrate the machine, remove banding from around thecrate. Take off the top and sides And dispose of properly.Remove banding from machine. Remove the chocks aroundthe drive wheels. Fold down ramp, and roll machine off ofthe base. Notify the carrier immediately if concealeddamage is discovered.
Front

ATTACHING PAD
1. Turn on machine power
2. Assure that the deck is raised to the upposition by verifying that the uni-touch button isnot depressed (A yellow ring will appear around
the side of the uni-touch button). Turn machinepower back off and remove key. (See right)
3. Remove blue big mouth from pad holder.
4. Place pad on top of locking clip and slideboth below burnishing deck directly into thecenter of one burnishing disk. (see below)
5. With pad and clip directly in the center of theburnishing disk push up and screw in the pad clip.(Hand tighten only) (see below)
6. Run machine and check for vibraitons. Ifdeck vibrates badly the pad may not becentered on disk correctly. Remove pad andreistall pad in the center of disk.
PAGE 10
***FOR CORRECT PAD APPLICATION , CALL YOUR LOCAL DEALER***
MACHINE SETUP
KEY SWITCH
UNI-TOUCH BOTTON
PAD
BLUE BIG MOUTH PAD CLIP
BLUE BIG MOUTH PAD CLIP
PAD
SHROUD AND SHROIUD CURTAIN

Operating hints
PAGE 11
One PassBurnishingSteps: (see below)
1. Turn machine on with the key switch.
2. Lower burnishing head to the floor by simplydepressing the green "uni touch" button.
3. The dust control will activate automaticallywhen you begin burnishing.
4. Begin burnishing by depressing the footpedal slowly and then to the speed required,the headlight will illuminate.
6. Once the pad begins to move, check thepressure gauge. Start burnishing with in thegreen marks, do not use yellow marks withoutmanagement approval.
7. To operate machine in reverse, simply switchthe reverse switch to the reverse position, backup alarm will sound ( if equiped) and yourspeed is reduce to roughly 50% of forwardspeed.
8. To stop the machine, let off the foot pedal,and the machine will stop automatically.
OperationRead and understand the safety section on page5 and 6 before operating machine.
Pre- burnishingCheck list1. Check battery condition gauge on thecentral command II LCD screen. (See below) Tocheck gauge push menu control button untilbattery gauge appears. Make sure batteries arefully charged before using.
2. Check condition of pad and make sure it issecurely in place.
3. Check hose connections from filter box tofan and, from filter box to shroud. (See below)
5. Check condition of shroud curtain shroudcurtain needs to be in good condition for dustcontrol system to work properly. (See below) 1
LCD SCREEN
MENUCONTROL
2
4
5
6
7

Battery charging
Charger speccifications Output voltage of 36 volts.
Output current of 25 amps max.
Input voltage of 110 volts/60 Hz.
Automatic shut off circuit.
Made for deep cycle batteries.
Danger: always charge batteries in a well ventilated area.Batteries emit hydrogen gas. Explosion or fire can result. Keepsparks and flame away. Shield eyes when servicing batteriesand avoid contact with battery acid. Leave rear hood openwhen charging!
1. Transport machine to a well ventilated area for charging.
2. Turn the machine off.
3. Hinge opens the battery access hood to expose thebatteries. (Caution: always wear eye protection when batteriesare exposed)
4. Check the water level in each battery. Do not charge themachine unless the water is slightly higher than the plates. Ifneeded, add enough distilled water to just slightly cover theplates. Do not over fill. Batteries can overflow during charging.Replace caps before charging.
5. With the grey charger plug disconnected from the machine,plug the charger power cord into a grounded 110 volt standardwall outlet.
6. Connect the grey charger plug into the battery chargingport located on the lower portion of the steering tower.
7. The charger will automatically begin charging, andautomatically shut off when fully charged (check gauge)
8. After the charger has turned off, unplug the grey chargerplug from the machine and disconnect the charger from thewall outlet.
9. Recheck the cell level after charging. If needed, adddistilled water up to the correct level. Be certain to replace thecaps securely and to wipe off the top of the batteries with aclean cloth.
PAGE 12
Gray chargerplug
CAUTION: The following instructions are intended for the 36v chargersupplied with the machine. Do not use any other charger with this machine.

Maintenance
PAGE 13
Monthly
Maintenance
1. Check flex driver
2. Check to see if battery cables are tightened and clean. (Tighten if needed)
3. Check parking brake
4. Check condition of burnishing deck actuator.
5. Check condition of burnishing deck drive belts
Yearly
Maintenance1. Call your local dealer for yearly maintenance
Daily Maintenance
1. Check pad condition. (Replace if necessary)
2. Check battery charge.
3. Clean dust control filters.
4. Check hoses and verify there are no clogs.
5. Check pads for wear and replace if needed.
6. Charge unit and verify that charger is operating properly
Weekly Maintenance
1. Check battery water level.
2. Check condition of all three tires.
3. Check condition of dust curtains on shroud.
4. Check condition of dust control hoses.
5. Check to see if vacuum exhaust is clear.

PAGE 14
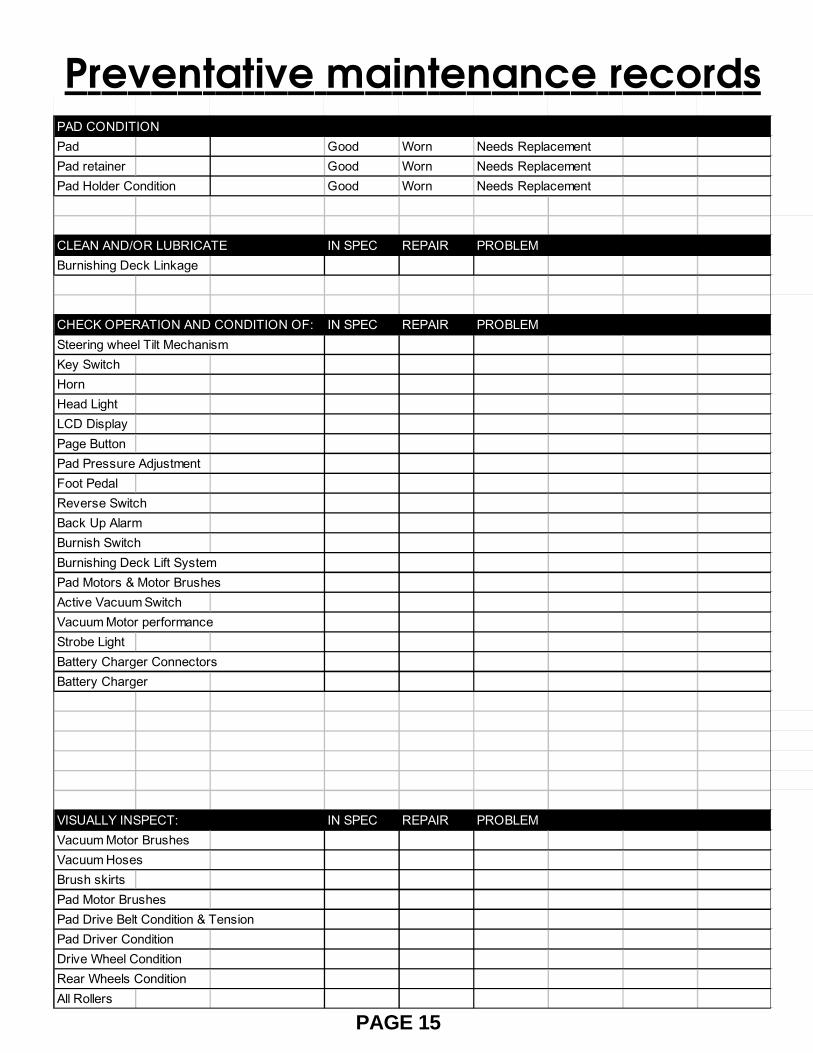
Preventative maintenance records
CUSTOMER INFORMATION
CUSTOMERADDRESSCITY STATE ZIP CODE
MACHINE INFORMATION
MODEL # SERIAL #WORK ORDER# HOUR METER:
BATTERY CONDITION Cell #1 Cell #2 Cell #3Battery # 1 Hydrometer Reading Battery # 1 Water Condition Battery # 2 Hydrometer Reading Battery # 2 Water condition Battery # 3 Hydrometer Reading Battery # 3 Water Condition Battery # 4 Hydrometer Reading Battery # 4 Water condition Battery # 5 Hydrometer Reading Battery # 5 Water Condition Battery # 6 Hydrometer Reading Battery # 6 Water Condition
Clean Battery Tops. Check Battery Cable and Terminal ConditionNOTES:
PAGE 15
PAD CONDITIONPad Good Worn Needs ReplacementPad retainer Good Worn Needs ReplacementPad Holder Condition Good Worn Needs Replacement
CLEAN AND/OR LUBRICATE IN SPEC REPAIR PROBLEMBurnishing Deck Linkage
CHECK OPERATION AND CONDITION OF: IN SPEC REPAIR PROBLEMSteering wheel Tilt MechanismKey SwitchHornHead LightLCD DisplayPage ButtonPad Pressure AdjustmentFoot PedalReverse SwitchBack Up AlarmBurnish Switch Burnishing Deck Lift SystemPad Motors & Motor BrushesActive Vacuum SwitchVacuum Motor performanceStrobe LightBattery Charger ConnectorsBattery Charger
VISUALLY INSPECT: IN SPEC REPAIR PROBLEMVacuum Motor BrushesVacuum HosesBrush skirtsPad Motor BrushesPad Drive Belt Condition & TensionPad Driver ConditionDrive Wheel ConditionRear Wheels ConditionAll Rollers
Preventative maintenance records

PAGE 16
COMMENTS
Technician's Name
Technician's Signature Date
Customer's Name:
Customer's Signature Date
©2005 R.P.S. Corporation
Preventative maintenance records

PAGE 17
1. Battery level indicator - indicates the energy level remaining in the batteries. (Shown on all menu displays)
2. Burnisher deck down pressure gauge - Indicates pressure on the burnishing pads.
3. Key switch hour meter - tells you the total hours the machine has been on.
4. Burnishing pad hour meter - tells you the total hours the burnishing motors have been used.
5. Transport hour meter - tells you the total hours the drive system has been used.
6. Vacuum/fan hour meter- Tells you the total hours the vacuum motor has been used.
7. Error warning symbol - indicates when there ius machine fault,- Displays diagnostic error code.
8. Diagnostic code - when the machine has detected an error it will display the warning symbol and a diagnostic code which indicates what's wrong.
( For common error codes and descriptions see page 18)
LCD Screen Menu DisplaysSCREEN # 2SCREEN # 1
SCREEN #1 W/ERROR CODE
*** USE GREEN MENU SELECTION BUTTON ON CONTROL PANEL TO CHANGE SCREENS***
1 1
1
2 3
4
5
8
7
6
2

PAGE 18
Troubleshooting Central CommandNOTE: This machine is operated by a sophisticated electronic "controller" that has many fail-safes within it. The
controller analyzes problems and displays a four-digit numeric code of what is wrong in the LCD window.
Most of these codes require a technician's attention. You should not attempt repairs you are uncomfortablewith, especially if you are not used to working on electronics.
The complete list of codes is published in the simplified electronic trobleshooting manual, which is available totechnical people. However, we have included the basic codes that you can usually resolve yourself.
1. 1500 ERROR. Parking brake circuit fault. Call a
technician.
2. 7601 AND 7602 ERROR. Pad current over load. Thiscan can occur when the pads hit a bump in thefloor. To restart the pads, turn off the key and turn iton again. To avoid this error, either slow down onbumpy parts of the floor, or reduce downpressure onthe pads.
3. 1600 ERROR. Voltage exceeds the maximum.Either the batteries are mis-wired, or the charger is stillplugged into the machine.
4. 7700, 7701, 7702, AND 7703 ERROR. The vacuumsystem has malfunctioned. Turn off key and turn onagain to clear. If the code does not clear call atechnician.

PAGE 19
9. All other error codes. Turn off the key, and disconnect the positve battery cable from the batteries for morethan one minute (the time is needed to drain the controller's on-board capacitor). Reconnect the cables,
being sure that they are tight, if they are loose you will burn the battery cables or the battery. If youovertighten the cables you can damage the battery's lead terminal.
10. If the problem cannot be solved by any of these solution's call your local dealer's service department.
5. 7900 AND 7901 ERROR. The emergency stop buttonis depressed.
6. HIGH THROTTLE ERROR. You pressed the drive buttonbefore turning on the key. Turn off the key, releasethe drive button and try again.
7. 2C00 AND 2C01 ERROR. Low voltage warning.Voltage has dropped down below the minimumrequired to operate the machine. If you wait a fewminutes, the batteries may coast up a bit in voltage,allowing you to drive very slowly to the rechargestation.
8. 7802 ERROR. The traction motor was used to climba ramp, and was running up the ramp for more thanthe 60 seconds allowed for this. Turn off the key, turnon again, and continue. You should not use thismachine to climb ramps so steep and so long that thiscode comes up repeatedly, or you could overheatthe traction motor.
Troubleshooting Central Command

Trouble Shooting
PAGE 20
Problem
No power, nothing operates.
Burnishing motor does not operate.
Drive motor does not operate.
Dust control fan does not operate.
Drive motor runs incorrectly.
Cause
Faulty key switch.Batteries need charging.Faulty battery.Loose battery cable.Main circuit breaker tripped.
Burnishing deck is not down.Foot pedal is not depressed.Burnishing circuit breaker tripped.
Carbon brushes worn.Faulty motor or wires.
Recharge switch misadjusted.Faulty speed controller or wires.Faulty drive motor.Faulty wiring.Carbon brushes worn.
Faulty vacuum switch.Vacuum circuit breaker tripped.
Faulty vacuum motor.Carbon brushes worn.
Faulty speed controller or wires.Faulty potentiometer.Loose wires.
Solution
Contact local servicing dealer.See charging batteries.Replace battery.Tighten loose cable.Wait 5 minutes for auto reset.determine cause and correct.
Put deck down.Engage foot pedal.Wait 5 minutes for auto resetDetermine cause and correct.Contact local servicing dealer.Contact local servicing dealer.
Contact local servicing dealer.Contact local servicing dealer.Contact local servicing dealer.Contact local servicing dealer.Contact local servicing dealer.
Try operating "white " toggle.Wait 5 minutes for auto reset.Determine cause and correct.Contact local servicing dealer.Contact local servicing dealer.
Contact local servicing dealer.Contact local servicing dealer.Contact local servicing dealer.

PAGE 21
Problem
Poor dust control.
Poor burnishing quality.
Burnishing scrub deck noisy.
Rear tires noisy.
Poor traction.
Short run time.
Cause
Main vacuum hose disconnected.Burnishing deck hose disconnected.Burnishing deck hose clogged.Damaged main vacuum hose.Damaged burnishing deck hose.Filter clogged.Filter door not closed tightly.
Filter door gasket faulty.Filter full.Torn shroud curtain.Faulty vacuum Motor.Battery charge is low.
Burnishing pads worn out.Debris stuck to burnishing pad.Torn burnishing pad.Faulty disk pad motor.Battery charge is low.
Missing burnishing pad.Burnishing pad worn out.Torn curtain hitting burnishing disks.Damaged shroud.
Bearings dry.Faulty hubs.
Excessive burnishing pad.Pressure.Worn drive tire.
Batteries run down.Batteries still down.Batteries low on water.
Batteries over cycled.
Solution
Reconnect hose.Reconnect hose.Remove debris.Contact local servicing dealer.Contact local servicing dealer.Clean out filters.Adjust screw on door clamp totighten seal.Contact local servicing dealer.Remove debris.Contact local servicing dealer.Contact local servicing dealer.Charge batteries overnight.
Replace pads.Remove debris.Replace pads.Contact local servicing dealer.Charge batteries overnight.
Replace pads.Replace pads.Contact local servicing dealer.Fix or replace shroud.
Grease bearings.Contact local servicing dealer.
Reduce pressure with switch.
Contact local servicing dealer.
Charge batteries twiceContact local servicing dealer.Fill with distilled water to 3/4" abovethe lead plates.Contact local servicing dealer.
Trouble Shooting