
An introduction to IAPT Richard Thwaites - First Step Clinical Lead May 2013.

3-4 Tonne
OPERATORINSTRUCTION
MANUAL
UK
Issu
e no
. 2

IntroductionThwaites Limited put Safety First.
It is the policy of Thwaites Limited to promote safety in the operation of its machines and to create a general awarenessof site safety and safe working practices for the operators of its machines.
This Operator Manual is intended for both new and experienced machine operators. It should remain with the machineat all times. All operators should be aware of its location and contents.
It is important that all operators are fully trained and familiar with the machine and that they have read and understoodthe information contained within this book before they attempt to operate in the site conditions for which the machinewas designed.
This book details practices and operations which Thwaites Limited recommend. DO NOT operate this machine in waysother than those detailed within this book.
This machine is designed for customary construction site operations, and the transportation of bulk materials commonlycarried on such sites; that is their �intended use�. Under certain controlled conditions the dumper may be used for towingwheeled loads.
Safety Symbols.� Attention! Correct Incorrect action/� Become Alert! action. procedure which� Your Safety Is Involved! should NOT be carried out.
Signal words:Signal words are used on the machine and within this manual to identify levels of hazard seriousness.
DANGER WARNING CAUTION

Read Operator Instruction Manual.
1. Questions - contact:Thwaites representative.
2. Learn to operate this dumper.3. Ensure you are fit to operate.4. Wear correct safety clothing and
ensure safety equipment is available.
Before You Operate This Machine1
Complete Checks in SectionComplete Checks in SectionComplete Checks in SectionComplete Checks in SectionComplete Checks in Section Befor Befor Befor Befor Before Stare Stare Stare Stare Starting The Engineting The Engineting The Engineting The Engineting The Engine1

WWWWWalk Around The Machinealk Around The Machinealk Around The Machinealk Around The Machinealk Around The Machine
Visually Check The Machine
1 Chassis/Skip Locks - Disengaged.2 Controls - Clean/Clear debris.3 Roll Over Protective (ROPS) frame -
Secure/Fully upright/Undamaged.4 Seatbelt Anchorage - Secure/Serviceable.5 Covers and Mudguards - Secure.6 No Fluid Leaks.7 All Labels - Legible.8 Tyres - No Cuts/Splits.9 Bolts - Tight/In Position.10 Perform Daily Maintenance Tasks.
(See Rear Cover)11. Report all faults immediately.
DO NOT OPERATE UNTIL ALLFAULTS HAVE BEEN RECTIFIED.
1 Before You Operate This Machine
Complete Checks in SectionComplete Checks in SectionComplete Checks in SectionComplete Checks in SectionComplete Checks in Section Befor Befor Befor Befor Before Stare Stare Stare Stare Starting The Engineting The Engineting The Engineting The Engineting The Engine1

Mount Machine & Check Controls
1 Use grabrails and footsteps providedto reach machine seat.(Mount and dismount facing machine).
2 Engine Cover - Secure/Locked.3 Seat - Adjust for Comfort/Reach.4 Wear Seatbelt - Adjust.5 Check Parking Brake - ON.6 Controls - to Neutral.7 Foot Brake - Pressure.8 Learn and check all control
functions explained in thefollowing pages.
WARNINGSeatbelt MUST BE WORN when operatingmachines fitted with Roll Over Protectiveframe.
1 Before You Operate This Machine
Complete Checks in SectionComplete Checks in SectionComplete Checks in SectionComplete Checks in SectionComplete Checks in Section Befor Befor Befor Befor Before Stare Stare Stare Stare Starting The Engineting The Engineting The Engineting The Engineting The Engine1

Controls Location & Functions 1. Steering Wheel. 2. Direction Indicator Selector -
Forward = Left turn - Back = Right turn.* 3. Lights - Twist 1 = Sidelights ON - Twist 2 =
Dipped headlights ON.* 4. Up = Flash. Down = Main beam.* 5. Hazard Warning Light Switch.* 6. Beacon Switch. 7. Foot Brake Pedal. 8. Throttle Pedal. 9. Parking Brake Lever.10. Engine Oil Pressure Warning Light.11. Water Temperature Warning Light.12. Headlamp Main Beam Pilot light.*13. Direction Indicator Pilot Light.*14. Heat/Start Pilot light.15. Battery Charging Warning Light.16. Horn Push.17. Bucket Raise/Lower/Rotate Lever.18. Gear Lever.19. Clutch Pedal (Start Inhibitor).20. Circuit Breakers (Push to reset).21. Ignition & Parking Brake Warning Buzzer.22. Ignition Switch.23. Maxi Fuse (under engine cover).* Optional items
CB1 CB3 CB5
CB2 CB4 CB6
CB1 Fuel/Direction Solenoids.CB2 Instrumentation/Warning.CB3 L/H Sidelights.*CB4 R/H Sidelights.*CB5 Ignition Fed Lights.*CB6 Battery Fed Lights.*
20
1 Controls Function - Layout
1
5.6
7
8
91011 12
13141516
17
181920
2221
2.3.4
Complete Checks in SectionComplete Checks in SectionComplete Checks in SectionComplete Checks in SectionComplete Checks in Section Befor Befor Befor Befor Before Stare Stare Stare Stare Starting The Engineting The Engineting The Engineting The Engineting The Engine1
23

Seat AdjustmentA - Push down to set driver weight (seat empty).
Push fully down and release to reset (seat empty).B - Lift to slide seat assembly forwards/backwards.C - Lift to slide cushion forward and set backrest.
Seatbelt (If Fitted)Adjust length of belt when sitting on machine.Press buckle blade into buckle lock.Pull belt webbing through buckle blade to remove slack.
Seatbelt should not be worn loose, it should pass comfortablyacross hip bones and not the abdomen.....
(8)- Throttle Pedal - Right FootPress down pedal, to increase speed.Lift pressure from the pedal to reduce speed.
(7) - Foot Brake Pedal - Right FootPush down on the pedal to slow/stop the machine.
(19) - Clutch Pedal - Left FootPress down before each gear change - select gear and release.
Start inhibitor fitted - press down clutch pedal before starting engine.
C
A
B
(7)(19)
(8)
1 Controls Function - Explained
Complete Checks in SectionComplete Checks in SectionComplete Checks in SectionComplete Checks in SectionComplete Checks in Section Befor Befor Befor Befor Before Stare Stare Stare Stare Starting The Engineting The Engineting The Engineting The Engineting The Engine1

(18) Gear Lever - Left HandForward Left Forward RightThird Gear First Gear
NeutralBack Left Back RightSecond Gear Reverse
(9) Parking Brake Lever - Right HandWhen the machine is stationary (or in an emergency):Pull up to apply.Pull catch and lower to release.
An audible warning device is fitted to your machine.This will sound when the parking brake is engaged.
1 Controls Function - Explained
Complete Checks in SectionComplete Checks in SectionComplete Checks in SectionComplete Checks in SectionComplete Checks in Section Befor Befor Befor Befor Before Stare Stare Stare Stare Starting The Engineting The Engineting The Engineting The Engineting The Engine1
ÿ�
� �
1
2
3
R
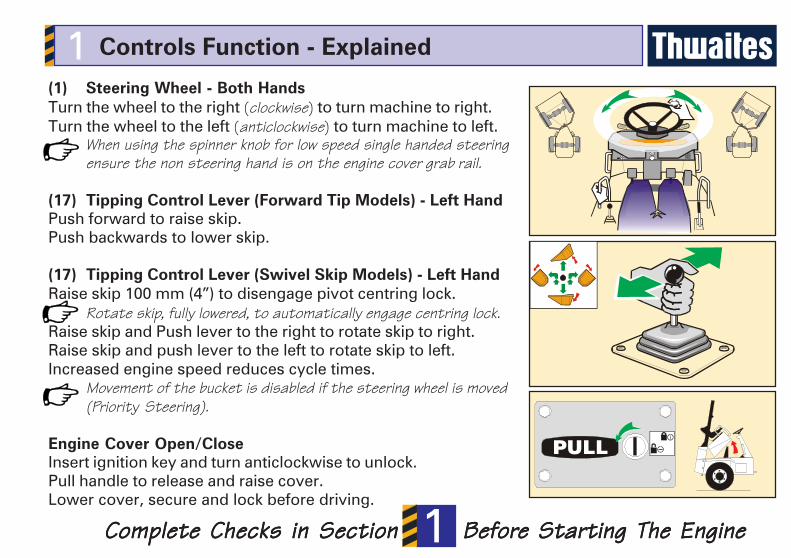
(1) Steering Wheel - Both HandsTurn the wheel to the right (clockwise) to turn machine to right.Turn the wheel to the left (anticlockwise) to turn machine to left.
When using the spinner knob for low speed single handed steeringensure the non steering hand is on the engine cover grab rail.
(17) Tipping Control Lever (Forward Tip Models) - Left HandPush forward to raise skip.Push backwards to lower skip.
(17) Tipping Control Lever (Swivel Skip Models) - Left HandRaise skip 100 mm (4�) to disengage pivot centring lock.
Rotate skip, fully lowered, to automatically engage centring lock.Raise skip and Push lever to the right to rotate skip to right.Raise skip and push lever to the left to rotate skip to left.Increased engine speed reduces cycle times.
Movement of the bucket is disabled if the steering wheel is moved(Priority Steering).
Engine Cover Open/CloseInsert ignition key and turn anticlockwise to unlock.Pull handle to release and raise cover.Lower cover, secure and lock before driving.
ÿþýý
1 Controls Function - Explained
Complete Checks in SectionComplete Checks in SectionComplete Checks in SectionComplete Checks in SectionComplete Checks in Section Befor Befor Befor Befor Before Stare Stare Stare Stare Starting The Engineting The Engineting The Engineting The Engineting The Engine1

1 Controls Function - Explained
Folding Roll Over Protective Frame - Lower & RaiseRemove linch pins and withdraw frame lock pins.Lower frame and insert lock pins and linch pins in new position.Reverse the procedure to raise the frame.Ensure all pins are secure before driving.
Tipping Lever Lock (If fitted)Place yolk over tipping lever and secure with linch pin.
Beacon StowageUnplug and remove beacon.Secure beacon on bracket provided beneath bonnet.
Battery Isolator (Beneath engine cover)Turn key anticlockwise to isolate the battery power supply.
þýþüûÿúüú��ý�û�ÿ
Complete Checks in SectionComplete Checks in SectionComplete Checks in SectionComplete Checks in SectionComplete Checks in Section Befor Befor Befor Befor Before Stare Stare Stare Stare Starting The Engineting The Engineting The Engineting The Engineting The Engine1

WarningDO NOT START THE ENGINE UNLESS YOUARE SITTING IN THE DRIVERS SEAT.
2
CautionIf a panel light remains ON switch off engine(key to �O�) and investigate problem.
To Start The Engine� Depress Clutch Pedal.(Start Inhibitor fitted).� Depress accelerator pedal fully and turn the
key clockwise to the start position (S).All panel lights self test (illuminate) and should extinguishon start-up.� Allow the engine to turn for 15 seconds max.If the engine does not start within 15 secondsreturn key to position O and wait 30 secondsbefore turning to S again.� When the engine fires, release key.(Springs back to 'Run' position (R)).� Reduce accelerator pedal pressure to prevent
over revving.Cold Start Aid -Turn key to position (H). When panel Light extinguishes start engine (as above).To Stop The Engine� Turn key to position (O).
CautionDo not use unauthorised starting aids.Do not TOW or BUMP start.
How to START and STOP the engine
Complete Checks In SectionComplete Checks In SectionComplete Checks In SectionComplete Checks In SectionComplete Checks In Section BeforBeforBeforBeforBefore Loading The Machinee Loading The Machinee Loading The Machinee Loading The Machinee Loading The Machine2
ÿ�
�
�
�� � �� �����
ÿ�
�
�

Function Checks - Engine ON
Brakes� Foot Brake pedal for firm feel.� Parking Brake.
Carry out Park Brake Test (Described on next page).
Steering� Rotate steering wheel left to right - right to left.
Electrics� Horn Sounds.� Reverse Alarm sounds (Optional).� Beacon Flashes.� Lights (Optional)- Side
MainStopIndicatorsHazards
Tipping Lever� Raise/Lower Bucket.� Rotate - Right to left/Left to Right.
(Swivel model only).
2 Check the following Control Functions
Complete Checks In SectionComplete Checks In SectionComplete Checks In SectionComplete Checks In SectionComplete Checks In Section BeforBeforBeforBeforBefore Loading The Machinee Loading The Machinee Loading The Machinee Loading The Machinee Loading The Machine2

Warning
Before testing Parking Brake ensure the machine ison firm level ground and the area is clear of people.
� Apply parking brake .� Depress clutch pedal and start engine.� Select 3rd gear.� Use the throttle pedal to gradually increase
engine speed to full revs.� Gradually release the clutch pedal.� Release throttle and apply clutch and foot brake
if the machine moves forwards.
You should be able to stall the enginebefore the machine moves.
� Select neutral.� Turn ignition key to off position.
WarningDo Not Operate a machine that has movedduring the above parking brake test.
How to Test the Parking Brake2
Complete Checks In SectionComplete Checks In SectionComplete Checks In SectionComplete Checks In SectionComplete Checks In Section BeforBeforBeforBeforBefore Loading The Machinee Loading The Machinee Loading The Machinee Loading The Machinee Loading The Machine2
ÿ
� �
��
�
�
��
�
�
3

Moving From Rest and Stopping� Depress clutch pedal.� Select gear- One.� Slowly depress accelerator pedal, release
clutch pedal and parkbrake lever and moveslowly.
� Hold steering wheel with both hands.� Remove foot from accelerator pedal.� Brake gently to a halt, using foot brake pedal,
and press clutch pedal to prevent stalling.� Apply park brake and select neutral.
Changing Speed/Direction� Release accelerator pedal.� Depress clutch pedal.� Select next gear.� Release clutch pedal and press accelerator
pedal.� STOP motion and engage parking brake
before changing direction (forward/reverse).
After Operating - Park Safe� Always leave bucket empty when not in use.� Ensure machine is on firm level ground.� Apply parking brake.� Engage neutral.� Hydraulic system at rest in a safe condition.� Stop engine and remove key.� Lock engine cover.
CautionNovice operators should always start withforward motion on clear, level ground.Low gear should always be selected wherea driver is unfamiliar with machine type.
2 Driving Procedure and Safe Parking
Complete Checks In SectionComplete Checks In SectionComplete Checks In SectionComplete Checks In SectionComplete Checks In Section BeforBeforBeforBeforBefore Loading The Machinee Loading The Machinee Loading The Machinee Loading The Machinee Loading The Machine2
1

IMMEDIATE HAZARDS WHICHDANGER WILL RESULT IN SEVERE PERSONAL INJURY OR DEATH3
WORKING ON GRADIENTS
DO NOT exceed maximum stated gradients.
DO NOT turn across gradients.
DO NOT brake suddenly in wet, muddy, icyconditions or when operating on loose surfaces.
DO NOT run down hill with controls in neutral.
Travel straight up, down or along a gradient.
Keep speed to a minimum and use the foot braketo reduce speed when travelling down gradients.
Always engage parking brake when stopped onsloping ground and in addition chock wheelssecurely when leaving the machine unattended toprevent movement.
Always position swivel bucket in central lock.
ÿþýÿþý
ÿ �
�������� �
�ÿ�����ÿ �
�������
� �
�ÿ�����ÿ �
�������ÿ �
�� �� ���
ÿ �
�� �� ���� �
�ÿ������ �
�� �����
� �
�ÿ�����ÿ �
�������� �
�� �� ���
ÿþýSwivel Skip
Forward Tip
Attention! SectionAttention! SectionAttention! SectionAttention! SectionAttention! Section CorrCorrCorrCorrCorrectectectectect and and and and and IncorrIncorrIncorrIncorrIncorrectectectectect W W W W Working Porking Porking Porking Porking Prrrrracticesacticesacticesacticesactices3

IMMEDIATE HAZARDS WHICHDANGER WILL RESULT IN SEVERE PERSONAL INJURY OR DEATH3
VISIBILITY
Check ahead and behind machine beforeoperation.
Be aware of low visibility areas when operating.
Sound the horn to warn people in the immediatearea before operating.
CRUSH ZONE
Stay clear of articulation areawhen the engine is running.
Never operate machinecontrols when standing oneither side of machine.
WORKING UNDERA RAISED BUCKET
Lock bucket Safety Prop duringmaintenance.
Never work under an unpropedbucket.
When using bucket Safety Propengage Tipping Lever Lock.(If fitted)
Attention! SectionAttention! SectionAttention! SectionAttention! SectionAttention! Section CorrCorrCorrCorrCorrectectectectect and and and and and IncorrIncorrIncorrIncorrIncorrectectectectect W W W W Working Porking Porking Porking Porking Prrrrracticesacticesacticesacticesactices3

HAZARDS OR UNSAFE PRACTICES WHICH COULDWARNING RESULT IN SEVERE PERSONAL INJURY OR DEATH3
LOADINGDO NOT exceed machines� ratedcapacity.
Parking Brake ON, drive to NEUTRAL, engine OFF,STAND CLEAR.
Clear debris from controls.
Ensure SAFE STABLE LOW load which allows goodvisibility.
Reduce payload if materials being carried are notfree flowing.
UNLOADING
Use STOPBOARDS and SUPPORT walls ontrenches.
DO NOT tip bucket if load is sticking.
DO NOT discharge load when working on slopingground.
Attention! SectionAttention! SectionAttention! SectionAttention! SectionAttention! Section CorrCorrCorrCorrCorrectectectectect and and and and and IncorrIncorrIncorrIncorrIncorrectectectectect W W W W Working Porking Porking Porking Porking Prrrrracticesacticesacticesacticesactices3

HAZARDS OR UNSAFE PRACTICES WHICH COULDWARNING RESULT IN SEVERE PERSONAL INJURY OR DEATH3
DO NOT drive withthe bucket tipped(bulldozing)
DO NOT carrypassengers
Avoid hazardoussite conditions -people, weather, ice etc.
DRIVING
NEVER dismount froma moving machine
Avoid confined workareas - exhaust fumesand noise can be ahazard
DO NOT operate withthe roll over protectivestructure folded down.
Attention! SectionAttention! SectionAttention! SectionAttention! SectionAttention! Section CorrCorrCorrCorrCorrectectectectect and and and and and IncorrIncorrIncorrIncorrIncorrectectectectect W W W W Working Porking Porking Porking Porking Prrrrracticesacticesacticesacticesactices3

HAZARDS OR UNSAFE PRACTICES WHICH COULDWARNING RESULT IN SEVERE PERSONAL INJURY OR DEATH3
TOWING A TRAILER
Place minimum 25%, of machine's rated payload,ballast load in skip.
Gross weight to be towed, plus ballast load, MUSTNOT exceed rated payload of machine.
DO NOT exceed maximum tow bar pull or verticalload.
Towing must not be carried out on sloping ground.
Always use Thwaites approved towing pin.
TRANSPORTATION
Reverse machine slowly onto a suitable trailer.
DO NOT drive forward up ramp when loading.
Apply parking brake.Stop engine.Chock wheels. (To prevent movement).Engage chassis locking bar.Secure to trailer.Ensure legal load. (Height/weight).
ÿþýüûúù
Attention! SectionAttention! SectionAttention! SectionAttention! SectionAttention! Section CorrCorrCorrCorrCorrectectectectect and and and and and IncorrIncorrIncorrIncorrIncorrectectectectect W W W W Working Porking Porking Porking Porking Prrrrracticesacticesacticesacticesactices3
þÿý

HAZARDS OR UNSAFE PRACTICES WHICH COULDCAUTION RESULT IN MINOR PERSONAL INJURY OR PRODUCT
OR PROPERTY DAMAGE.3
LIFTING
Tip bucket fully forward.
Engage bucket safety prop.
Engage chassis locking bar.
Lift using centre eye provided.
PARKING BRAKE
DO NOT apply parkingbrake if dumper is moving.Except in an emergency.
SLOPING SURFACES
DO NOT step on rear mudguardssloping surfaces.
Attention! SectionAttention! SectionAttention! SectionAttention! SectionAttention! Section CorrCorrCorrCorrCorrectectectectect and and and and and IncorrIncorrIncorrIncorrIncorrectectectectect W W W W Working Porking Porking Porking Porking Prrrrracticesacticesacticesacticesactices3

Problem Reason SolutionEngine will not start Isolator switch OFF Switch on
Clutch Pedal not pressed Press Clutch Pedal.Battery voltage too low. Check battery and connections.Faulty fuel supply. Check fuel level and connections.Electrical stop on fuel pump defective. Check connections.Circuit breaker tripped. Reset (Push to reset).
Complete loss of electrical Maxi fuse blown Rectify electrical fault and replacefunctions fuseMaxi Fuse blown Faulty starter motor/solenoid Replace motor/solenoid and maxi
fuse(Current drawn by solenoid exceeds 25A) (only replace with a 30 amp fuse)Short circuit on main feed or starter solenoid cables locate and repair
Engine starts and stops Blocked fuel or air filter. Replace fuel or air filter.Air in fuel system. Check fuel line connections.
Black engine smoke Air filter clogged (Indicator red). Replace or clean air filter.Fuel system defect. Contact Thwaites dealer.
Wrong fuel. Replace fuel and filter.
Engine oil pressure Low oil level. Top up engine oilHigh engine temperature Radiator choked. Clean radiator.
Low coolant level. Top up coolant.Irregular alternator Defective or loose alternator belt. Adjust replace alternator belt.ÿþþþþý
Always investigate panel warning lights, tripped circuit breakers and blown maxi fuse.
Machine Fault - Checks you can make4

Power Swivel - Data Chart
ÿ
Dimensions (mm) 3T 4T
A. Length 4010 4107B. Width 1770 1910C. Height (ROPS & Beacon) 2964 2993D. Bucket lip height 1500 1565E. Width over tyres 1760 1859F. Wheelbase 1930 1979G. Ground clearance 271 305H. Bucket load height 1600 1713I. Axle to rear 1130 1130J. Tipping ground clearance 1150 1068K. Tipping tyre clearance 475 422L. Height tipped (Bucket) 3290 3408M. Max height without ROPS 2013 2041N. Tipping side clearance 260 221P. Tyre clearance diameter (m) 8.2 8.4Q. Height (ROPS folded) 2460 2267
Weight (Kg) 3T 4T
UnladenFront axle 750 800Rear axle 1510 1615Total 2260 2415Rated payloadLadenFront axle 3255 4500Rear axle 2005 1915Total 5260 6415Towbar (Max)Pull load 2250 3000Vertical load 580 800Tyre PressureBar (psi) Front 3.4(50) 4.0(59)
Rear 2.0(29) 2.5(37)
Typical vibration levels - whole body 0.7 - 0.8 m/s². Hand/arm less than 2.5 m/s².
Noise
Airborne (10m)
Operator
4
ÿÿ
�
�
�
�
�
� �
�
�
�
�
�
ÿ

ÿ
Dimensions (mm) 3T 4T
A. Length 3848 3848B. Width 1930 1980C. Height (ROPS & Beacon) 2964 2993D. Bucket lip height 1447 1467E. Width over tyres 1857 1859F. Wheelbase 1930 1980G. Ground clearance 312 342H. Bucket load height 1506 1599I. Axle to rear 1131 1131J. Tipping ground clearance 175 365K. Tipping tyre clearance 620 422L. Height tipped (Bucket) 2110 3408M. Max height without ROPS 2013 2042
P. Tyre clearance diameter(m) 9.3 9.5Q. Height (ROPS folded) 2238 2267
Weight (Kg) 3T 4T
UnladenFront axle 725 750Rear axle 1450 1585Total 2175 2335Rated payloadLadenFront axle 3160 3990Rear axle 2015 2345Total 5175 6335Towbar (Max)Pull load 2250 3000Vertical load 580 800Tyre PressureBar (psi)Front 3.4(50) 3.5(51)Rear 2.0(29) 3.0(44)
Typical vibration levels - whole body 0.7 - 0.8 m/s². Hand/arm less than 2.5 m/s².
Noise
Airborne (10m)
Operator
Forward Tip - Data Chart4
ÿÿ
�
�
�
�
�
� �
�
�
�
�
�
ÿ

Daily/Weekly Checks4
This machine must be serviced after first 50 hoursNormal service intervals:
250 hours 500 hours1000 hours 2000 hours
Contact local Thwaites Distributor for details or www.thwaitesdumpers.co.uk
AXLE OIL 1 Mobil Fluid 422ENGINE OIL 2 SAE 10W 30TRANSMISSION OIL 3 Mobil EP 90HYDRAULIC OIL 4 Mobil DTE 24COOLANT LEVEL 5 H²0 + 33% AntifreezeFUEL LEVEL 6 DieselGREASE 7 Fill All PointsAIR CLEANER 8 Check IndicatorBRAKES 9 Test Park & Foot BrakeBRAKE OIL 10 Mobil DTE 24WHEEL NUTS 11 271Nm (200lb ft)TYRE PRESSURE 12 See Data ChartFAN BELT 13 Condition/Tension50H
10H
1
12
P
9
7
2
5
13
11
7
7
88
7
12
3 1
11
10 - 50hr CHECKS10
3
6
7 7
7
7 7
240/245/270/273
4