Operations Manual - DPMS
40
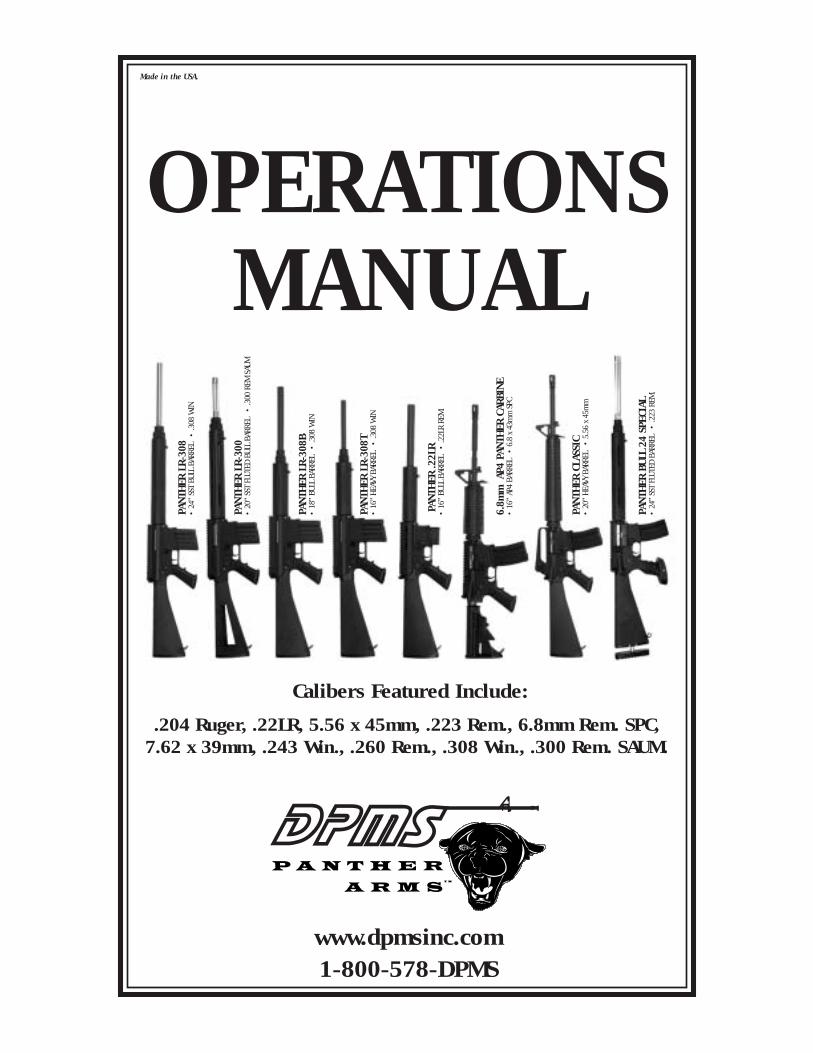
www.dpmsinc.com Made in the USA. PANTHER LR-308 • 24” SST BULL BARREL • .308 WIN PANTHER LR-300 • 20” SST FLUTED BULL BARREL • .300 REM SAUM PANTHER LR-308B • 18” BULL BARREL • .308 WIN PANTHER LR-308T • 16” HEAVY BARREL • .308 WIN 6.8mm AP4 PANTHER CARBINE • 16” AP4 BARREL • 6.8 x 43mm SPC PANTHER CLASSIC • 20” HEAVY BARREL • 5.56 x 45mm PANTHER .22LR • 16” BULL BARREL • .22LR REM. PANTHER BULL 24 SPECIAL • 24” SST FLUTED BARREL • .223 REM. 1-800-578-DPMS OPERATIONS MANUAL .204 Ruger, .22LR, 5.56 x 45mm, .223 Rem., 6.8mm Rem. SPC, 7.62 x 39mm, .243 Win., .260 Rem., .308 Win., .300 Rem. SAUM. Calibers Featured Include:
Transcript of Operations Manual - DPMS
www.dpmsinc.com
Made in the USA.
PANT
HER
LR-
308
• 24
” SS
T BU
LL B
ARRE
L •
.308
WIN
PANT
HER
LR-
300
• 20
” SS
T FL
UTED
BUL
L BA
RREL
•
.300
REM
SAU
M
PANT
HER
LR-
308B
• 18
” BU
LL B
ARRE
L •
.308
WIN
PANT
HER
LR-
308T
• 16
” H
EAVY
BAR
REL
• .3
08 W
IN
6.8m
m A
P4 P
ANTH
ER C
ARBI
NE•
16”
AP4
BARR
EL
• 6.
8 x
43m
m S
PC
PANT
HER
CLA
SSIC
• 20
” H
EAVY
BAR
REL
• 5
.56
x 45
mm
PANT
HER
.22L
R•
16”
BULL
BAR
REL
• .2
2LR
REM
.
PANT
HER
BUL
L 24
SPE
CIAL
• 24
” SS
T FL
UTED
BAR
REL
• .2
23 R
EM.
1-800-578-DPMS
OPERATIONSMANUAL
.204 Ruger, .22LR, 5.56 x 45mm, .223 Rem., 6.8mm Rem. SPC,7.62 x 39mm, .243 Win., .260 Rem., .308 Win., .300 Rem. SAUM.
Calibers Featured Include:

SERIAL NUMBER INFORMATIONRecord the serial number of your DPMS/Panther Arms firearm!
#
(When holding the firearm the serial number will be found on the left side of the firearm,stamped on the magazine well):
and a description of it:
Make a copy of this operations manual and proof of purchase/sales record. Maintain theseitems in a secure safe or fireproof container. These materials will be necessary if the firearmis damaged, stolen or returned to DPMS/Panther Arms for warranty or repair.
Attach original proof of purchase here!
TABLE OF CONTENTSWarnings & Notice . . . . . . . . . . . . . . . . . . . . . . . . . . . . . . . . . . . . . . . . . . . . . . . . . . . .4General Handling Cautions . . . . . . . . . . . . . . . . . . . . . . . . . . . . . . . . . . . . . . . . . . . . .5Dangerous Procedures . . . . . . . . . . . . . . . . . . . . . . . . . . . . . . . . . . . . . . . . . . . . . . . . .5Use of Safety Selector . . . . . . . . . . . . . . . . . . . . . . . . . . . . . . . . . . . . . . . . . . . . . . . . .5Function Check . . . . . . . . . . . . . . . . . . . . . . . . . . . . . . . . . . . . . . . . . . . . . . . . . . . . . .6Safety Features . . . . . . . . . . . . . . . . . . . . . . . . . . . . . . . . . . . . . . . . . . . . . . . . . . . . . .6
5.56 x 45mm/.223 Caliber . . . . . . . . . . . . . . . . . . . . . . . . . . . . .7-20, 34-35Sights . . . . . . . . . . . . . . . . . . . . . . . . . . . . . . . . . . . . . . . . . . . . . . . . . . . . . . .8-9Loading a Magazine . . . . . . . . . . . . . . . . . . . . . . . . . . . . . . . . . . . . . . . . . . . . .10Loading & Unloading the Rifle . . . . . . . . . . . . . . . . . . . . . . . . . . . . . . . . . . . . .10Firing the Rifle . . . . . . . . . . . . . . . . . . . . . . . . . . . . . . . . . . . . . . . . . . . . . . . . .11Maintenance . . . . . . . . . . . . . . . . . . . . . . . . . . . . . . . . . . . . . . . . . . . . . . . .12-13Cleaning the Rifle . . . . . . . . . . . . . . . . . . . . . . . . . . . . . . . . . . . . . . . . . . . .14-15Lubricating & Inspecting the Rifle . . . . . . . . . . . . . . . . . . . . . . . . . . . . . . . .16-17Assembly . . . . . . . . . . . . . . . . . . . . . . . . . . . . . . . . . . . . . . . . . . . . . . . . . . .18-19Extreme Conditions . . . . . . . . . . . . . . . . . . . . . . . . . . . . . . . . . . . . . . . . . . . . .20Troubleshooting . . . . . . . . . . . . . . . . . . . . . . . . . . . . . . . . . . . . . . . . . . . . . .34-35
.22LR Caliber . . . . . . . . . . . . . . . . . . . . . . . . . . . . . . . . . . . . . . . . . . . .21-27Sights . . . . . . . . . . . . . . . . . . . . . . . . . . . . . . . . . . . . . . . . . . . . . . . . . . . . . . . .22Loading a Magazine . . . . . . . . . . . . . . . . . . . . . . . . . . . . . . . . . . . . . . . . . . . . .22Loading & Unloading the Rifle . . . . . . . . . . . . . . . . . . . . . . . . . . . . . . . . . . . . .23Firing the Rifle . . . . . . . . . . . . . . . . . . . . . . . . . . . . . . . . . . . . . . . . . . . . . . . . .24Mounting Optics . . . . . . . . . . . . . . . . . . . . . . . . . . . . . . . . . . . . . . . . . . . . . . . .24Maintenance & Cleaning . . . . . . . . . . . . . . . . . . . . . . . . . . . . . . . . . . . . . . . . .25Unusual Conditions . . . . . . . . . . . . . . . . . . . . . . . . . . . . . . . . . . . . . . . . . . . . .26Troubleshooting . . . . . . . . . . . . . . . . . . . . . . . . . . . . . . . . . . . . . . . . . . . . . .26-27
.30 Caliber . . . . . . . . . . . . . . . . . . . . . . . . . . . . . . . . . . . . . . . . . . . . . .28-35Loading the Magazine . . . . . . . . . . . . . . . . . . . . . . . . . . . . . . . . . . . . . . . . . . .29Loading the Rifle . . . . . . . . . . . . . . . . . . . . . . . . . . . . . . . . . . . . . . . . . . . . . . .29Unloading the Rifle . . . . . . . . . . . . . . . . . . . . . . . . . . . . . . . . . . . . . . . . . . . . .30Firing the Rifle . . . . . . . . . . . . . . . . . . . . . . . . . . . . . . . . . . . . . . . . . . . . . . . . .30Mounting Optics . . . . . . . . . . . . . . . . . . . . . . . . . . . . . . . . . . . . . . . . . . . . . . .31Maintenance . . . . . . . . . . . . . . . . . . . . . . . . . . . . . . . . . . . . . . . . . . . . . . .31-32Cleaning . . . . . . . . . . . . . . . . . . . . . . . . . . . . . . . . . . . . . . . . . . . . . . . . . . .32-33Unusual Conditions . . . . . . . . . . . . . . . . . . . . . . . . . . . . . . . . . . . . . . . . . . . . .33Trouble Shooting . . . . . . . . . . . . . . . . . . . . . . . . . . . . . . . . . . . . . . . . . . . .34-35
Warranty . . . . . . . . . . . . . . . . . . . . . . . . . . . . . . . . . . . . . . . . . . . . . . . . . . . . . . . . . .36Alterations & Modifications . . . . . . . . . . . . . . . . . . . . . . . . . . . . . . . . . . . . . . . . . . . .36Returns . . . . . . . . . . . . . . . . . . . . . . . . . . . . . . . . . . . . . . . . . . . . . . . . . . . . . . . . . . . .36
WARNINGIf this firearm is carelessly or improperly handled, unintentional discharge could result andcould cause personal injury, death or damage to property.
FOR YOUR SAFETY AND THE SAFETY OF OTHERS, this Operations Manual contains impor-tant instructions, warnings and safety procedures that must be understood BEFORE usingyour DPMS/Panther Arms firearm. It is imperative that you read the ENTIRE MANUAL and ifyou do not understand any part of it or the operation of your DPMS/Panther Arms firearm,you should seek professional firearms instruction.
NOTICEDPMS shall not be responsible for personal injury, death or damage to property resultingfrom either intentional or accidental discharge of this firearm, or from its function whenused for purposes or subjected to treatment for which it was not designed. DPMS will nothonor claims involving this firearm which result from careless or improper handling, unau-thorized adjustment or parts replacement, corrosion, neglect, or the use of wrong caliberammunition, other than original high quality commercially manufactured ammunition ingood condition, or any combination thereof. DPMS will not honor claims involving thisfirearm for any reason or cause when the second or subsequent owner makes such claims.
Before the rifle left the factory, this firearm was tested, carefully inspected and packaged.DPMS cannot control product handling after it leaves the factory; therefore please examinethis firearm carefully at the time of purchase to ensure that it is unloaded and undamaged.
4
WARNINGChildren are attracted to and can operate firearms that can
cause severe injuries or death. Prevent child access byalways keeping guns locked away and unloaded when notin use. If you keep a loaded firearm where a child obtainsand improperly uses it, you may be fined or sent to prison.
ADVERTENCAA los niños los atraen las armas de fuego y las pueden
hacer funcionar. Ellos pueden causarse lesiones graves yla muerte. Evite que los niños tengan acceso a las armasde fuego guardándolas siemprecon llave y descargadas
cuando no las este utilizando. Si usted tiene una arma defuego cargada en un lugar en que un niño tiene acceso aella y la usa indebidamente, le pueden dar una multa o
enviarle a la cárcel.
!
!

GENERAL HANDLING CAUTIONS1. Do NOT alter or modify your DPMS/Panther Arms firearm, and have it serviced regularly!
2. Always handle your firearm as if loaded.
3. Never point your firearm at anything you don’t intend to shoot.
4. Always make sure your firearm is not loaded and the bolt is latched open and to the rearbefore laying it down or handing it to someone else.
5. Never leave a loaded firearm unattended.
6. Always be sure bore, muzzle, chamber and action are clear of obstruction.
7. Always check that ammunition is clean and undamaged.
8. Never drink alcoholic beverages or take drugs before or during shooting.
9. Always wear eye and ear protection when shooting.
10. Always keep safety on “SAFE” when firearm is loaded and a round is chambered until ready to shoot.
11. Never attempt to fire if water is in the bore.
12. Never indulge in “horseplay” when holding your firearm.
DANGEROUS PROCEDURES1. Be sure the cam pin is installed in the bolt group. If it isn’t, your rifle can still fire but it
could possibly explode, causing you personal injury or harm. (Applies only to the .308caliber and 5.56/.223 caliber rifles, not the .22LR rifle.)
2. DO NOT exchange or switch bolt assemblies from one rifle to another. It could cause personal injury to you and others and damages to your rifle.
3. If your firearm fails to fire, hold it, keep it pointed towards the target and wait 30 seconds. If a hangfire has occurred, the round will fire within 30 seconds. If the round does not fire, remove magazine, eject round and examine the primer. If firing pin indentis light, misaligned or non-existent, have your firearm examined by a competent gunsmith. If firing pin indent on primer appears normal (in comparison to previously fired rounds) assume faulty ammunition; appropriately dispose of misfired round from other live ammunition; reload and resume firing.
USE OF SAFETY SELECTORA selector lever, located on the left of lower receiver, has two positions, “FIRE” and “SAFE”.When set to “FIRE” the firearm will fire a single shot each time the trigger is squeezed.When set to “SAFE” a cam bears upon the rear of the trigger, blocking movements and pre-venting the hammer from being released.
5
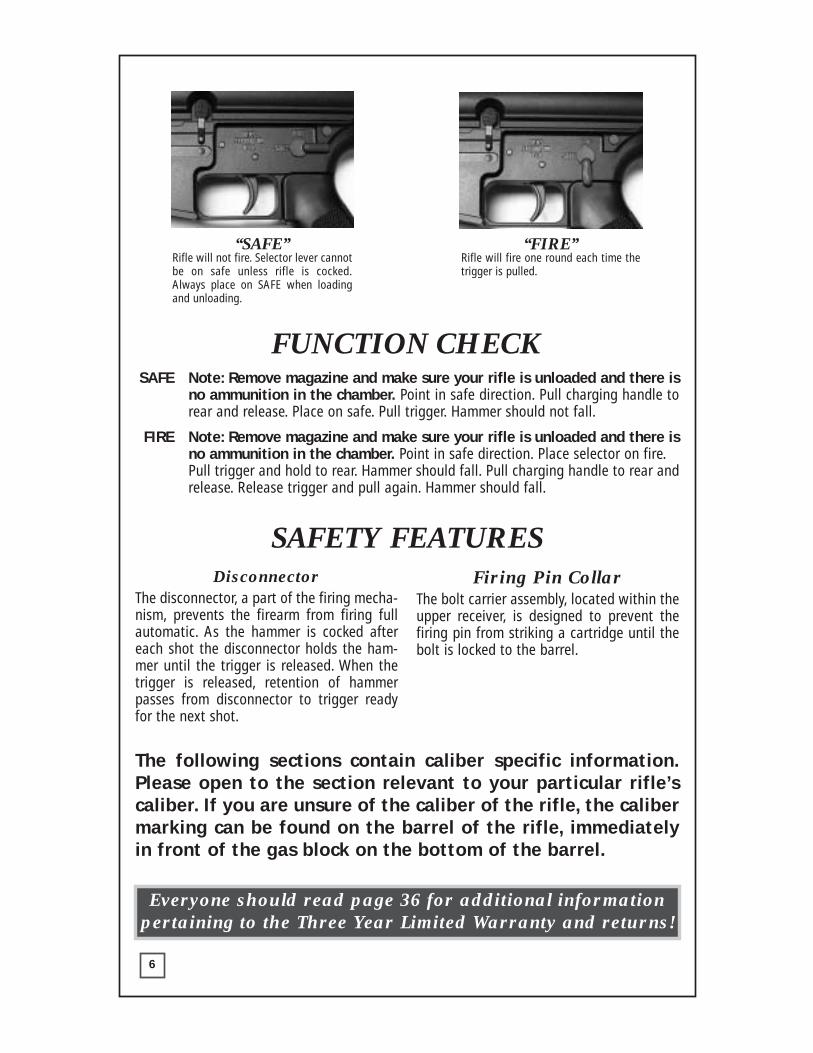
FUNCTION CHECKSAFE Note: Remove magazine and make sure your rifle is unloaded and there is
no ammunition in the chamber. Point in safe direction. Pull charging handle torear and release. Place on safe. Pull trigger. Hammer should not fall.
FIRE Note: Remove magazine and make sure your rifle is unloaded and there isno ammunition in the chamber. Point in safe direction. Place selector on fire.Pull trigger and hold to rear. Hammer should fall. Pull charging handle to rear andrelease. Release trigger and pull again. Hammer should fall.
SAFETY FEATURES
The following sections contain caliber specific information.Please open to the section relevant to your particular rifle’scaliber. If you are unsure of the caliber of the rifle, the calibermarking can be found on the barrel of the rifle, immediatelyin front of the gas block on the bottom of the barrel.
6
“SAFE”Rifle will not fire. Selector lever cannotbe on safe unless rifle is cocked.Always place on SAFE when loadingand unloading.
“FIRE”Rifle will fire one round each time thetrigger is pulled.
DisconnectorThe disconnector, a part of the firing mecha-nism, prevents the firearm from firing fullautomatic. As the hammer is cocked aftereach shot the disconnector holds the ham-mer until the trigger is released. When thetrigger is released, retention of hammerpasses from disconnector to trigger readyfor the next shot.
Firing Pin CollarThe bolt carrier assembly, located within theupper receiver, is designed to prevent thefiring pin from striking a cartridge until thebolt is locked to the barrel.
Everyone should read page 36 for additional informationpertaining to the Three Year Limited Warranty and returns!
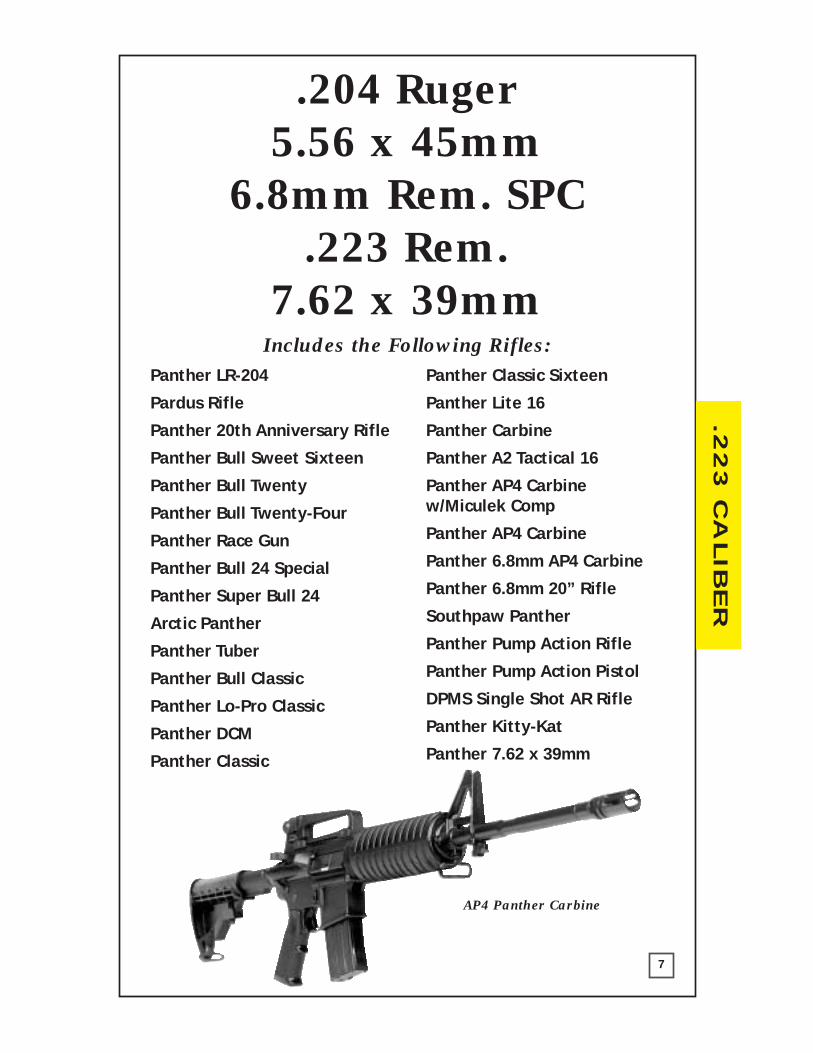
.204 Ruger5.56 x 45mm
6.8mm Rem. SPC.223 Rem.
7.62 x 39mm
.22
3 C
ALIB
ER
Panther LR-204
Pardus Rifle
Panther 20th Anniversary Rifle
Panther Bull Sweet Sixteen
Panther Bull Twenty
Panther Bull Twenty-Four
Panther Race Gun
Panther Bull 24 Special
Panther Super Bull 24
Arctic Panther
Panther Tuber
Panther Bull Classic
Panther Lo-Pro Classic
Panther DCM
Panther Classic
Panther Classic Sixteen
Panther Lite 16
Panther Carbine
Panther A2 Tactical 16
Panther AP4 Carbine w/Miculek Comp
Panther AP4 Carbine
Panther 6.8mm AP4 Carbine
Panther 6.8mm 20” Rifle
Southpaw Panther
Panther Pump Action Rifle
Panther Pump Action Pistol
DPMS Single Shot AR Rifle
Panther Kitty-Kat
Panther 7.62 x 39mm
Includes the Following Rifles:
7
AP4 Panther Carbine

SIGHTS1. Rear sight can be adjusted for both windage and elevation and has a dual aperture
peep sight, one for short range and one for long range.
2. When flipped forward, the aperture is marked O-2 for zero to 200 meters. When using this setting the elevation knob should be set at 8/3 low or 6/3 for detachable carry handle or flat top rear sights and at its lowest position.
3. When the aperture is flipped back, it is set for using the long range sight. When using this setting you can adjust the elevation knob for range required: 8/3 low for 300 m,4 for 400 m, 5 for 500 m, 6 for 600 m, 7 for 700 m, and 8/3 high for 800 m. There are click settings in between for fine tuning.
4. The windage knob is located on the right side of the rear sight. To adjust for horizontalmovement on target, turn knob clockwise for right and counter-clockwise for left.
5. The front sight is adjustable for elevation zeroing only, it is not used at any other timein firing.
ZEROING SIGHTSThis procedure is for .223 ammunition. For our rifles chambered in 7.62x39mm and 6.8mmSPC the trajectory will differ, please call DPMS with any questions. The procedure describedis for zeroing at 25 meters but may be adjusted accordingly for longer ranges. The following table shows change of impactper click at specific range.
Windage:25 m 3/8 in.100m 1 3/8 in.200m 2 3/8 in.
Elevation:25 m 1/8 in.
100 m 1/2 in.200 m 1 in.300 m 1 1/2 in.400 m 2 in.500 m 2 1/2 in.600 m 3 in.700 m 3 1/2 in.800 m 4 in.
8
FRONT SIGHT - To adjust elevation, depress detent,rotate post. To raise strike of bullet, rotate post in thedirection of arrow marked up. Reverse the direction ofrotation to lower strike of bullet. Each graduation(notch) moves the point of impact of bullet as indicated in chart.
SIGHT POSTSPRING-LOADED DETENT
.22
3 C
ALIB
ER
.22
3 C
ALIB
ER
ZEROING SIGHTS1. Set elevation to 8/3 low or 6/3 for detachable carry handle and flat top rear sights, then
raise it one click. No further adjustment should be made during zeroing.
2. Flip aperture to small long range sight.
3. Set aperture to mechanical zero by adjusting windage until sight is aligned with centerline on scale under sight.
4. Carefully aim and fire at bull's-eye on target at 25 meters: Fire ten rounds to establisha group.
5. Compare group with bull's-eye , if they match, no further adjustment is necessary.
6. If group does not match bull's-eye, measure vertical and horizontal distance from bull’seye.
7. Calculate clicks of windage required to move impact appropriate distance. Turn windageknob accordingly. (see chart on page 6 for 25m windage clicks)
8. Calculate clicks of front sight required to raise or lower impact appropriate distance.(1 click = 3/8 in. at 25 m)
9. Depress plunger and front sight required number of clicks. Clockwise will lower sight and raise impact, and counter-clockwise will raise sight and lower impact.
10. Repeat steps 4 through 9 until impact matches bull's-eye. Your sight is now zeroed.
11. Set elevation knob back to 8/3 or 6/3 low and flip aperture back to 0-2 for ranges of 0-200 m.
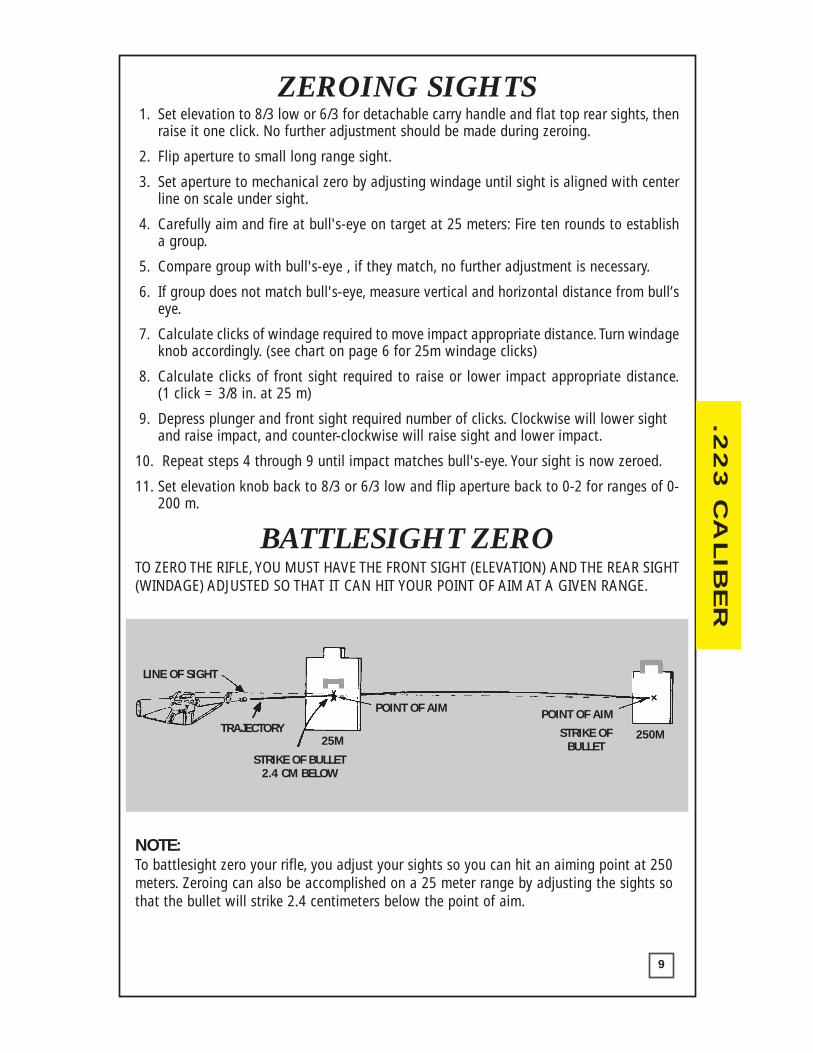
BATTLESIGHT ZERO
9
TO ZERO THE RIFLE, YOU MUST HAVE THE FRONT SIGHT (ELEVATION) AND THE REAR SIGHT(WINDAGE) ADJUSTED SO THAT IT CAN HIT YOUR POINT OF AIM AT A GIVEN RANGE.
NOTE:To battlesight zero your rifle, you adjust your sights so you can hit an aiming point at 250meters. Zeroing can also be accomplished on a 25 meter range by adjusting the sights sothat the bullet will strike 2.4 centimeters below the point of aim.
TRAJECTORY
POINT OF AIM POINT OF AIM
STRIKE OF BULLET2.4 CM BELOW
STRIKE OFBULLET25M 250M
LINE OF SIGHT
.22
3 C
ALIB
ER
LOADING
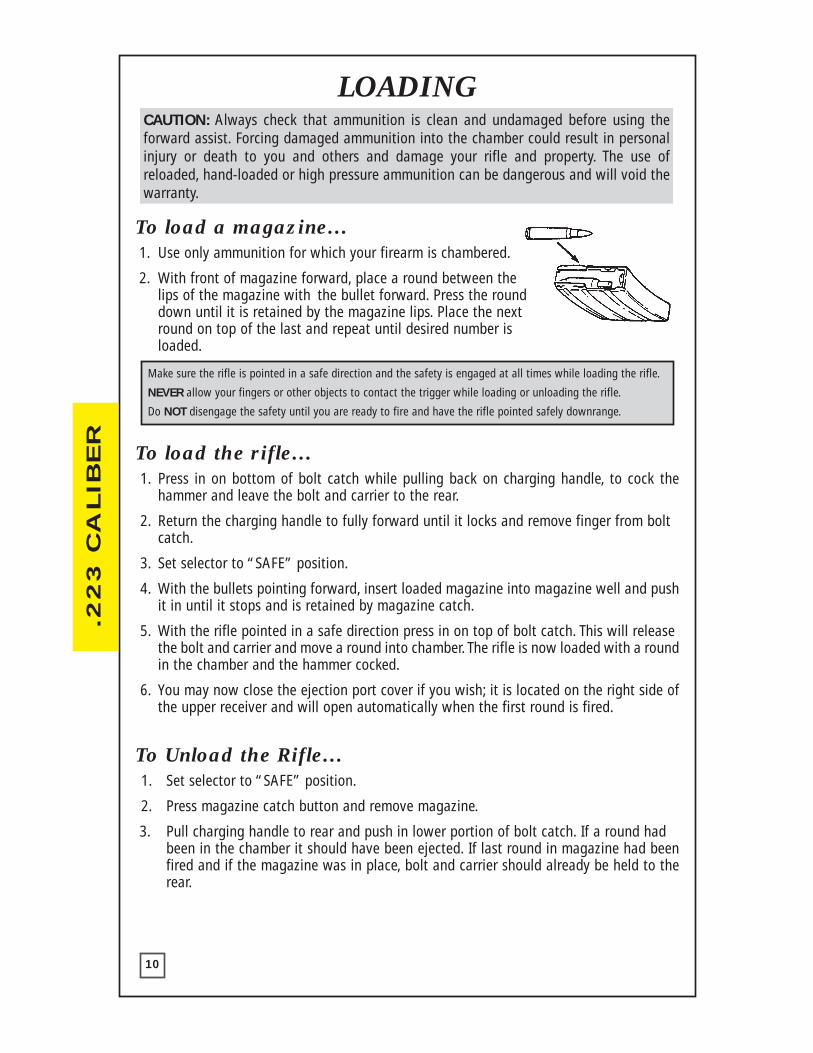
To load a magazine…1. Use only ammunition for which your firearm is chambered.
2. With front of magazine forward, place a round between the lips of the magazine with the bullet forward. Press the round down until it is retained by the magazine lips. Place the next round on top of the last and repeat until desired number is loaded.
To load the rifle…1. Press in on bottom of bolt catch while pulling back on charging handle, to cock the
hammer and leave the bolt and carrier to the rear.
2. Return the charging handle to fully forward until it locks and remove finger from bolt catch.
3. Set selector to “SAFE” position.
4. With the bullets pointing forward, insert loaded magazine into magazine well and pushit in until it stops and is retained by magazine catch.
5. With the rifle pointed in a safe direction press in on top of bolt catch. This will release the bolt and carrier and move a round into chamber. The rifle is now loaded with a roundin the chamber and the hammer cocked.
6. You may now close the ejection port cover if you wish; it is located on the right side ofthe upper receiver and will open automatically when the first round is fired.
To Unload the Rifle…1. Set selector to “SAFE” position.
2. Press magazine catch button and remove magazine.
3. Pull charging handle to rear and push in lower portion of bolt catch. If a round had been in the chamber it should have been ejected. If last round in magazine had beenfired and if the magazine was in place, bolt and carrier should already be held to therear.
10
CAUTION: Always check that ammunition is clean and undamaged before using the forward assist. Forcing damaged ammunition into the chamber could result in personalinjury or death to you and others and damage your rifle and property. The use ofreloaded, hand-loaded or high pressure ammunition can be dangerous and will void thewarranty.
Make sure the rifle is pointed in a safe direction and the safety is engaged at all times while loading the rifle.
NEVER allow your fingers or other objects to contact the trigger while loading or unloading the rifle.
Do NOT disengage the safety until you are ready to fire and have the rifle pointed safely downrange.
.22
3 C
ALIB
ER
CLEAR YOUR RIFLE FIRING
11
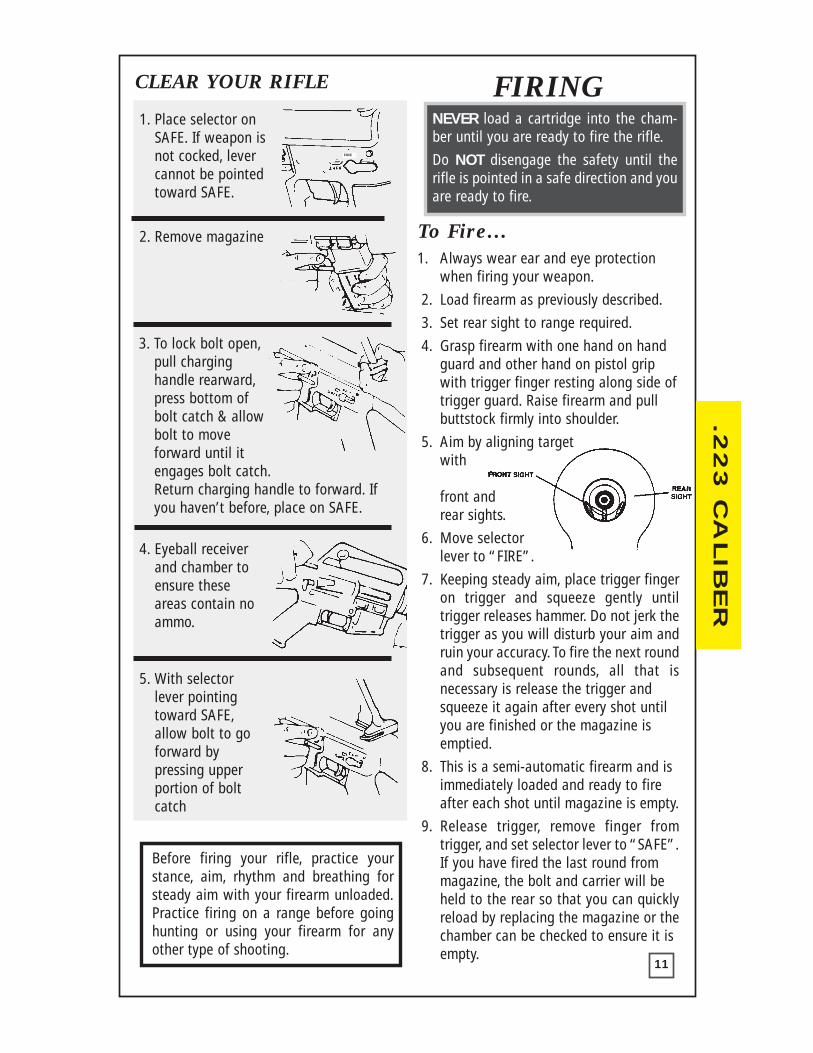
1. Place selector on SAFE. If weapon isnot cocked, lever cannot be pointedtoward SAFE.
4. Eyeball receiver and chamber to ensure theseareas contain no ammo.
5. With selector lever pointing toward SAFE,allow bolt to go forward by pressing upper portion of bolt catch
2. Remove magazine
FIRE
To Fire…1. Always wear ear and eye protection
when firing your weapon.
2. Load firearm as previously described.
3. Set rear sight to range required.
4. Grasp firearm with one hand on handguard and other hand on pistol grip with trigger finger resting along side oftrigger guard. Raise firearm and pull buttstock firmly into shoulder.
5. Aim by aligning targetwith
front and rear sights.
6. Move selector lever to “FIRE”.
7. Keeping steady aim, place trigger fingeron trigger and squeeze gently until trigger releases hammer. Do not jerk thetrigger as you will disturb your aim andruin your accuracy. To fire the next roundand subsequent rounds, all that is necessary is release the trigger and squeeze it again after every shot until you are finished or the magazine is emptied.
8. This is a semi-automatic firearm and is immediately loaded and ready to fire after each shot until magazine is empty.
9. Release trigger, remove finger from trigger, and set selector lever to “SAFE”.If you have fired the last round from magazine, the bolt and carrier will be held to the rear so that you can quicklyreload by replacing the magazine or thechamber can be checked to ensure it is empty.
Before firing your rifle, practice yourstance, aim, rhythm and breathing forsteady aim with your firearm unloaded.Practice firing on a range before goinghunting or using your firearm for anyother type of shooting.
NEVER load a cartridge into the cham-ber until you are ready to fire the rifle.
Do NOT disengage the safety until therifle is pointed in a safe direction and youare ready to fire.
3. To lock bolt open,pull charging handle rearward,press bottom of bolt catch & allow bolt to move forward until it engages bolt catch.Return charging handle to forward. If you haven’t before, place on SAFE.
.22
3 C
ALIB
ER
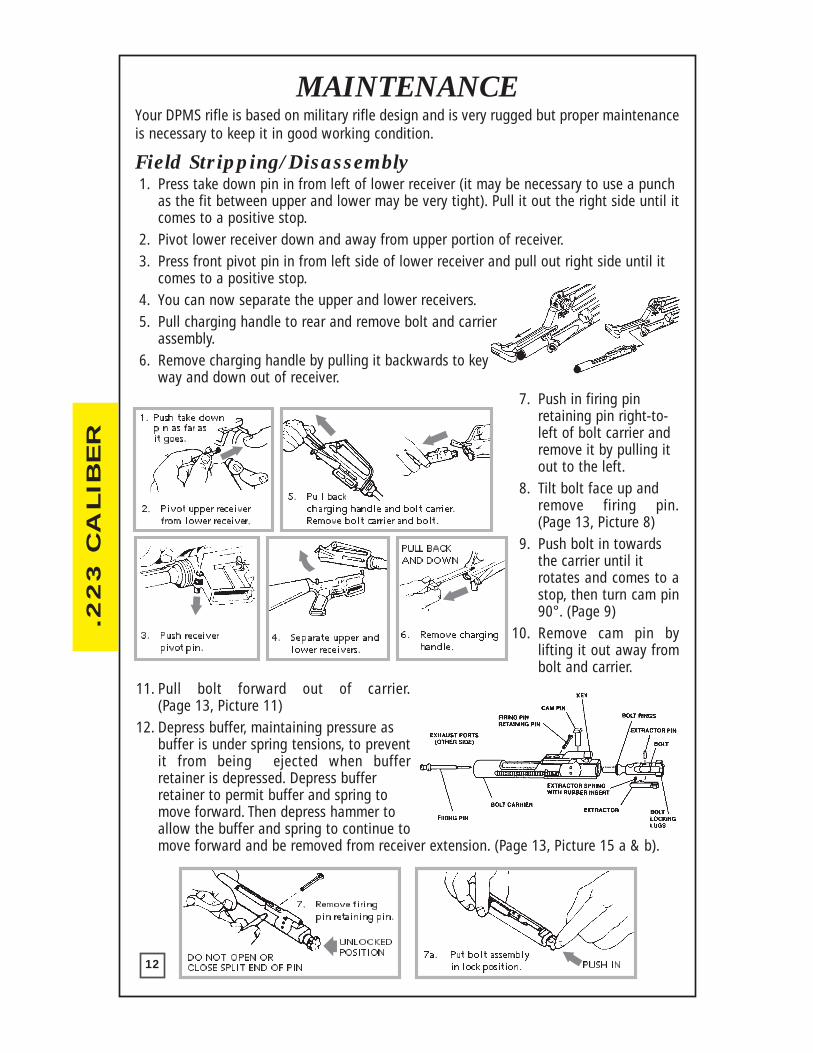
MAINTENANCEYour DPMS rifle is based on military rifle design and is very rugged but proper maintenanceis necessary to keep it in good working condition.
Field Stripping/Disassembly1. Press take down pin in from left of lower receiver (it may be necessary to use a punch
as the fit between upper and lower may be very tight). Pull it out the right side until itcomes to a positive stop.
2. Pivot lower receiver down and away from upper portion of receiver.3. Press front pivot pin in from left side of lower receiver and pull out right side until it
comes to a positive stop.4. You can now separate the upper and lower receivers.5. Pull charging handle to rear and remove bolt and carrier
assembly.6. Remove charging handle by pulling it backwards to key
way and down out of receiver.7. Push in firing pin
retaining pin right-to-left of bolt carrier and remove it by pulling it out to the left.
8. Tilt bolt face up and remove firing pin.(Page 13, Picture 8)
9. Push bolt in towards the carrier until it rotates and comes to astop, then turn cam pin90°. (Page 9)
10. Remove cam pin by lifting it out away frombolt and carrier.
11. Pull bolt forward out of carrier.(Page 13, Picture 11)
12. Depress buffer, maintaining pressure as buffer is under spring tensions, to preventit from being ejected when buffer retainer is depressed. Depress buffer retainer to permit buffer and spring to move forward. Then depress hammer to allow the buffer and spring to continue tomove forward and be removed from receiver extension. (Page 13, Picture 15 a & b).
12
2. Pivot upper receiverfrom lower receiver.
3. Push receiverpivot pin.
4. Separate upper andlower receivers.
5. Pull back charging handle and bolt carrier. Remove bolt carrier and bolt.
6. Remove charginghandle.
PULL BACKAND DOWN
1. Push take downpin as far asit goes.
7. Remove firingpin retaining pin.
7a. Put bolt assemblyin lock position.
DO NOT OPEN ORCLOSE SPLIT END OF PIN
UNLOCKEDPOSITION
PUSH IN
.22
3 C
ALIB
ER
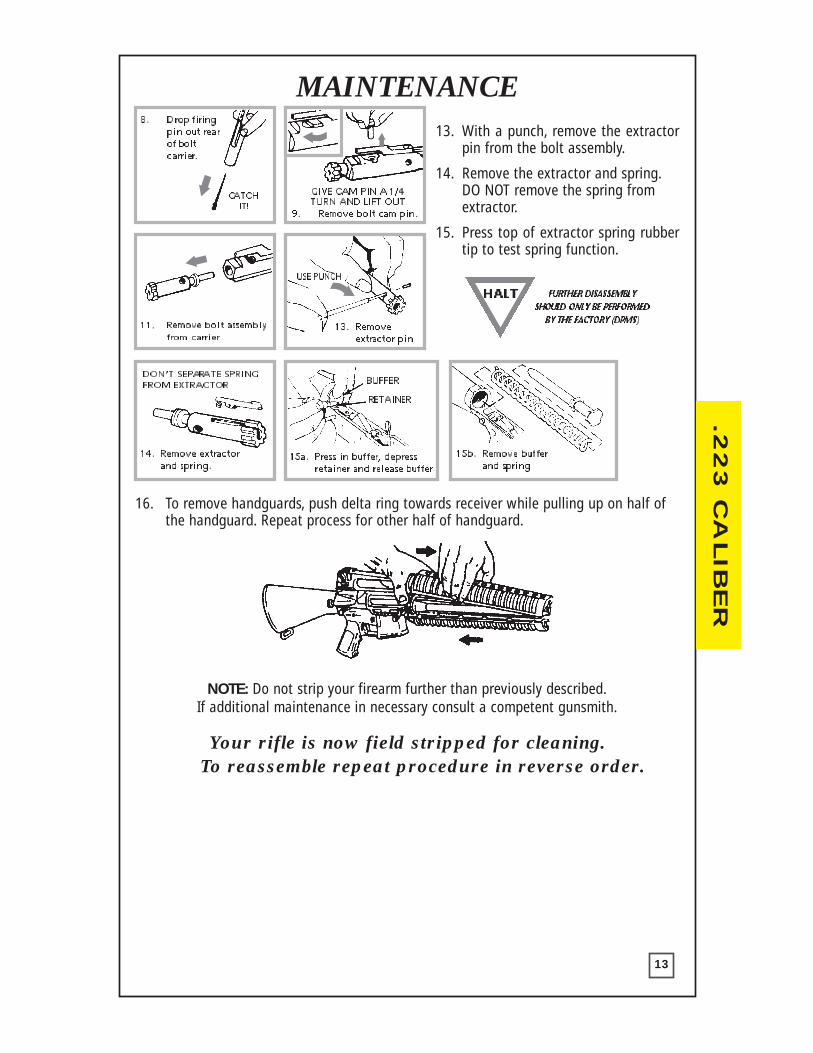
MAINTENANCE13. With a punch, remove the extractor
pin from the bolt assembly.
14. Remove the extractor and spring.DO NOT remove the spring from extractor.
15. Press top of extractor spring rubbertip to test spring function.
16. To remove handguards, push delta ring towards receiver while pulling up on half ofthe handguard. Repeat process for other half of handguard.
NOTE: Do not strip your firearm further than previously described.If additional maintenance in necessary consult a competent gunsmith.
Your rifle is now field stripped for cleaning. To reassemble repeat procedure in reverse order.
13
9. Remove bolt cam pin.
11. Remove bolt assemblyfrom carrier
8. Drop firingpin out rearof boltcarrier.
GIVE CAM PIN A1/4TURN AND LIFT OUT
CATCHIT!
13. Removeextractor pin
14. Remove extractorand spring.
15a. Press in buffer, depressretainer and release buffer
15b. Remove bufferand spring
DON’T SEPARATE SPRINGFROM EXTRACTOR
USE PUNCH
BUFFER
RETAINER
HALT FURTHER DISASSEMBLYSHOULD ONLY BE PERFORMED
BY THE FACTORY (DPMS)
.22
3 C
ALIB
ER
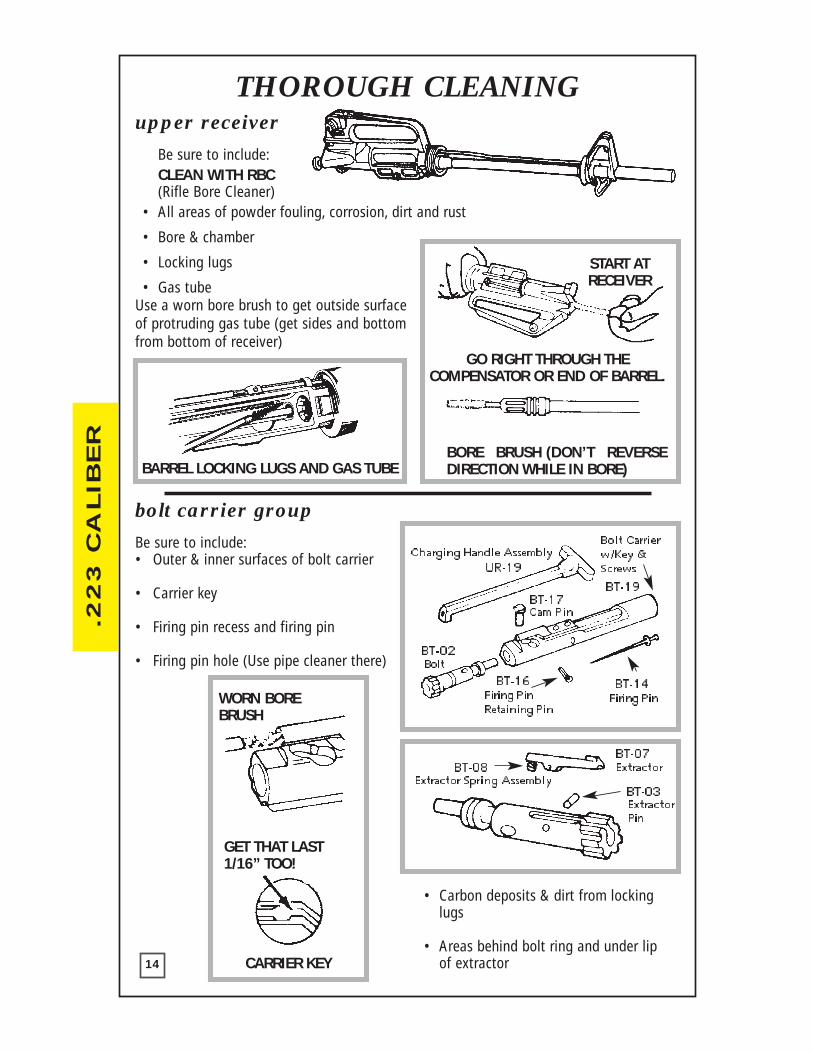
THOROUGH CLEANINGupper receiver
Be sure to include:CLEAN WITH RBC(Rifle Bore Cleaner)
• All areas of powder fouling, corrosion, dirt and rust
• Bore & chamber
• Locking lugs
• Gas tube
bolt carrier group
Be sure to include:• Outer & inner surfaces of bolt carrier
• Carrier key
• Firing pin recess and firing pin
• Firing pin hole (Use pipe cleaner there)
• Carbon deposits & dirt from locking lugs
• Areas behind bolt ring and under lip of extractor14
Use a worn bore brush to get outside surfaceof protruding gas tube (get sides and bottomfrom bottom of receiver)
START ATRECEIVER
GO RIGHT THROUGH THE COMPENSATOR OR END OF BARREL.
BORE BRUSH (DON’T REVERSEDIRECTION WHILE IN BORE)BARREL LOCKING LUGS AND GAS TUBE
WORN BOREBRUSH
GET THAT LAST1/16” TOO!
CARRIER KEY
UR-19
BT-02
BT-16
BT-08BT-07
BT-03
BT-17BT-19
BT-14
Extractor Spring AssemblyExtractor
ExtractorPin
Charging Handle Assembly
Cam Pin
Bolt Carrierw/Key &Screws
Firing PinFiring PinRetaining Pin
Bolt
.22
3 C
ALIB
ER
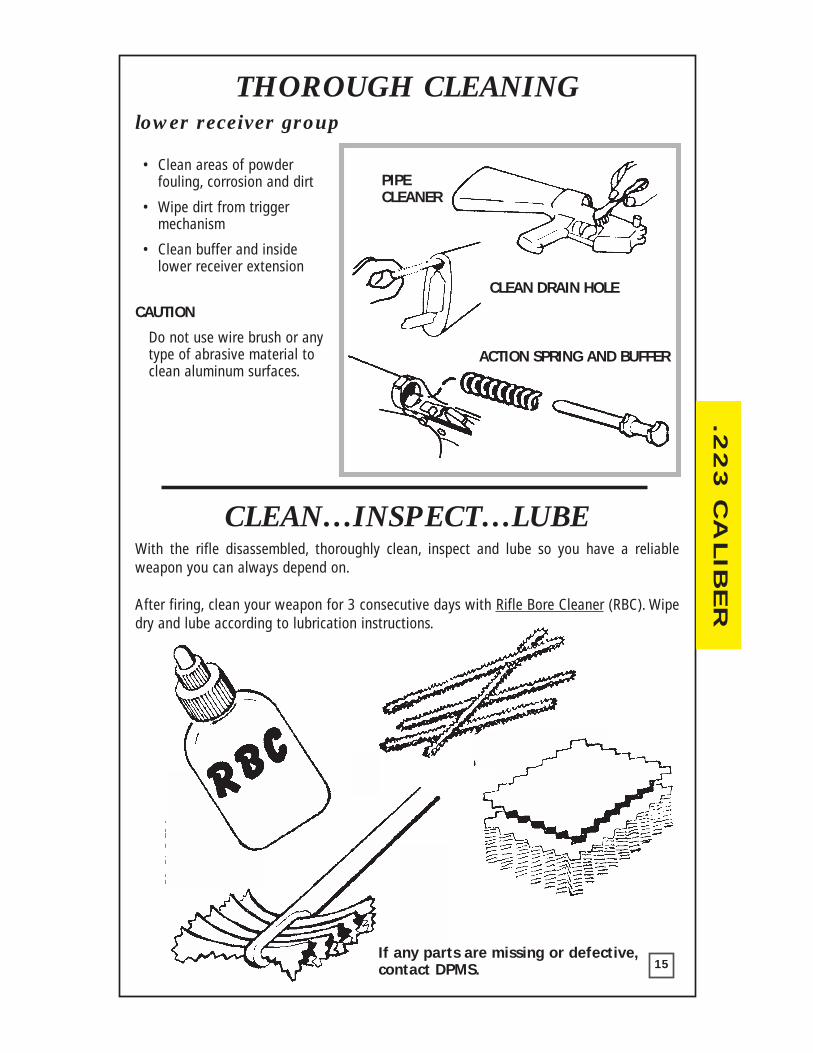
PIPECLEANER
CLEAN DRAIN HOLE
ACTION SPRING AND BUFFER
THOROUGH CLEANINGlower receiver group
• Clean areas of powder fouling, corrosion and dirt
• Wipe dirt from trigger mechanism
• Clean buffer and inside lower receiver extension
CAUTION
Do not use wire brush or any type of abrasive material to clean aluminum surfaces.
CLEAN…INSPECT…LUBEWith the rifle disassembled, thoroughly clean, inspect and lube so you have a reliableweapon you can always depend on.
After firing, clean your weapon for 3 consecutive days with Rifle Bore Cleaner (RBC). Wipedry and lube according to lubrication instructions.
If any parts are missing or defective,contact DPMS. 15
.22
3 C
ALIB
ER
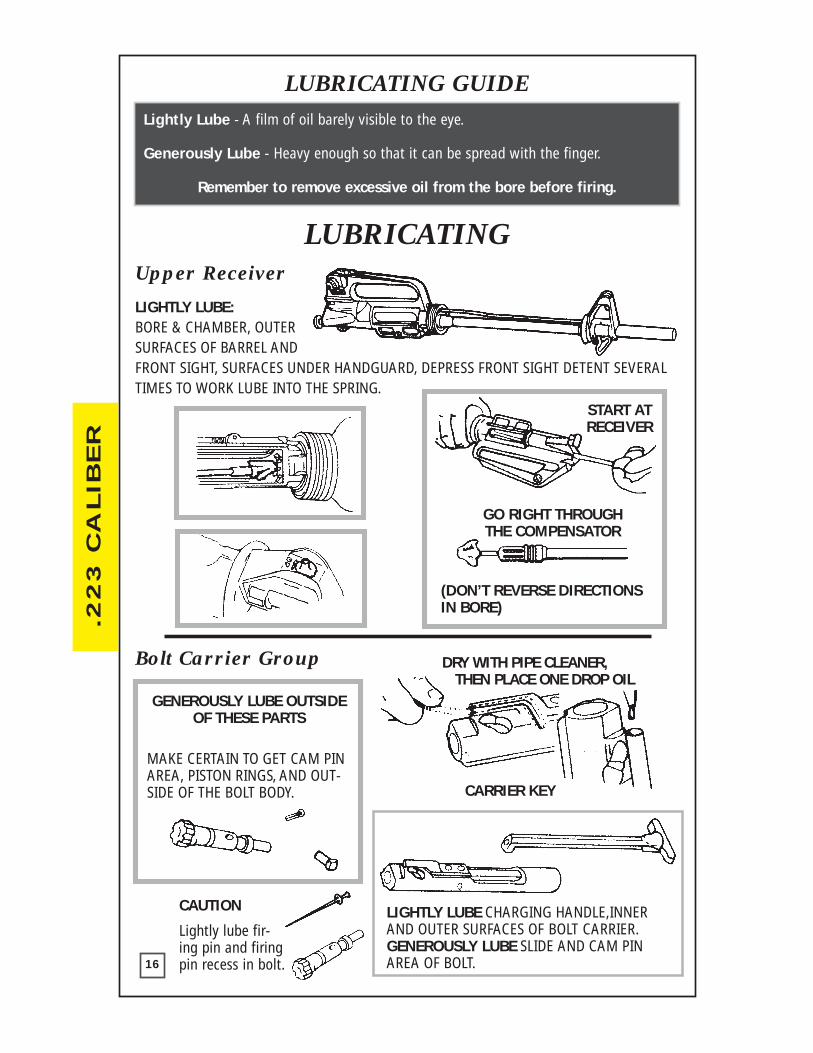
LUBRICATING GUIDE
LUBRICATINGUpper Receiver
LIGHTLY LUBE:BORE & CHAMBER, OUTERSURFACES OF BARREL ANDFRONT SIGHT, SURFACES UNDER HANDGUARD, DEPRESS FRONT SIGHT DETENT SEVERALTIMES TO WORK LUBE INTO THE SPRING.
Bolt Carrier Group
16
START ATRECEIVER
GO RIGHT THROUGHTHE COMPENSATOR
(DON’T REVERSE DIRECTIONSIN BORE)
Lightly Lube - A film of oil barely visible to the eye.
Generously Lube - Heavy enough so that it can be spread with the finger.
Remember to remove excessive oil from the bore before firing.
DRY WITH PIPE CLEANER,THEN PLACE ONE DROP OIL
CARRIER KEY
LIGHTLY LUBE CHARGING HANDLE,INNERAND OUTER SURFACES OF BOLT CARRIER.GENEROUSLY LUBE SLIDE AND CAM PINAREA OF BOLT.
GENEROUSLY LUBE OUTSIDEOF THESE PARTS
MAKE CERTAIN TO GET CAM PINAREA, PISTON RINGS, AND OUT-SIDE OF THE BOLT BODY.
CAUTION
Lightly lube fir-ing pin and firingpin recess in bolt.
.22
3 C
ALIB
ER
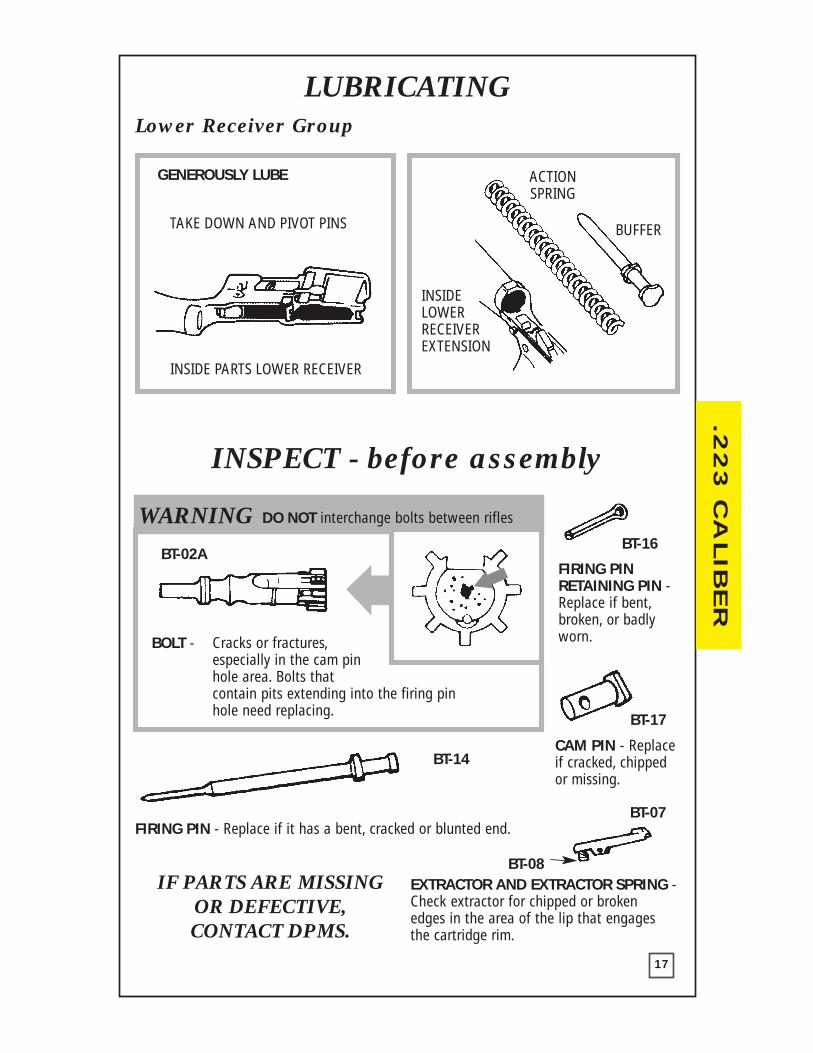
LUBRICATINGLower Receiver Group
INSPECT - before assembly
17
INSIDELOWERRECEIVEREXTENSION
ACTIONSPRING
TAKE DOWN AND PIVOT PINS
GENEROUSLY LUBE
INSIDE PARTS LOWER RECEIVER
BUFFER
WARNING
BOLT - Cracks or fractures,especially in the cam pinhole area. Bolts thatcontain pits extending into the firing pinhole need replacing.
FIRING PIN - Replace if it has a bent, cracked or blunted end.
FIRING PINRETAINING PIN -Replace if bent,broken, or badlyworn.
CAM PIN - Replaceif cracked, chippedor missing.
EXTRACTOR AND EXTRACTOR SPRING -Check extractor for chipped or broken edges in the area of the lip that engages the cartridge rim.
IF PARTS ARE MISSINGOR DEFECTIVE, CONTACT DPMS.
DO NOT interchange bolts between rifles
BT-02ABT-16
BT-17
BT-07
BT-08
BT-14
.22
3 C
ALIB
ER
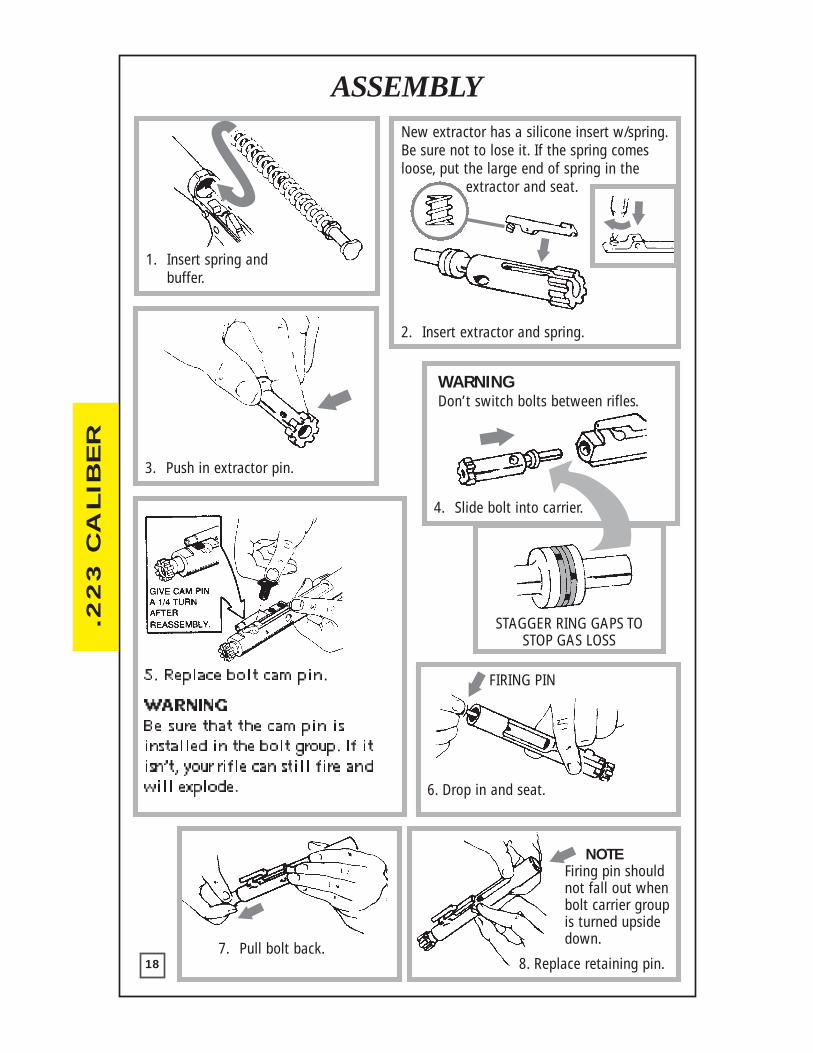
ASSEMBLY
18
1. Insert spring and buffer.
3. Push in extractor pin.
4. Slide bolt into carrier.
WARNINGDon’t switch bolts between rifles.
2. Insert extractor and spring.
New extractor has a silicone insert w/spring.Be sure not to lose it. If the spring comesloose, put the large end of spring in the
extractor and seat.
STAGGER RING GAPS TOSTOP GAS LOSS
7. Pull bolt back.8. Replace retaining pin.
5. Replace bolt cam pin.
6. Drop in and seat.
FIRING PIN
NOTEFiring pin should not fall out when bolt carrier groupis turned upsidedown.
WARNING
Be sure that the cam pin isinstalled in the bolt group. If itisn’t, your rifle can still fire andwill explode.
.22
3 C
ALIB
ER
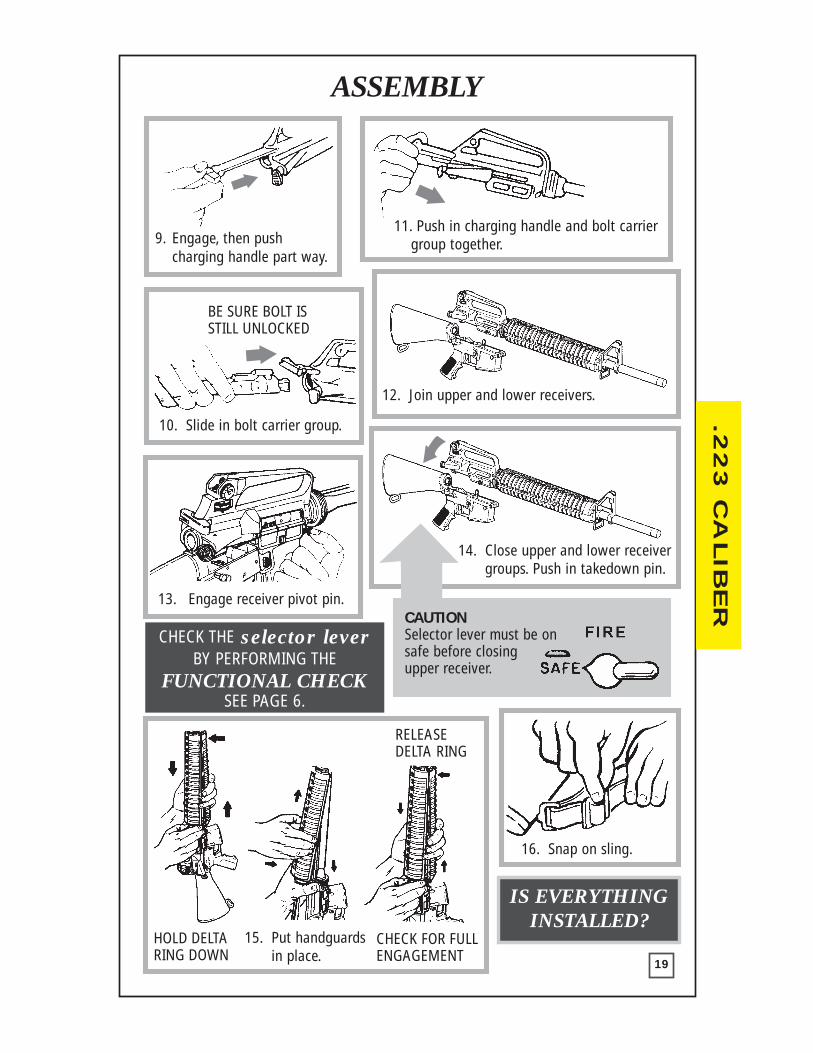
ASSEMBLY
19
10. Slide in bolt carrier group.
11. Push in charging handle and bolt carrier group together.
12. Join upper and lower receivers.
13. Engage receiver pivot pin.
BE SURE BOLT ISSTILL UNLOCKED
9. Engage, then push charging handle part way.
14. Close upper and lower receivergroups. Push in takedown pin.
15. Put handguardsin place.
16. Snap on sling.
HOLD DELTARING DOWN
RELEASEDELTA RING
CHECK FOR FULLENGAGEMENT
CAUTIONSelector lever must be on safe before closing upper receiver.
CHECK THE selector leverBY PERFORMING THE
FUNCTIONAL CHECKSEE PAGE 6.
IS EVERYTHINGINSTALLED?
.22
3 C
ALIB
ER
UNUSUAL CONDITIONSEXTREME COLD -
a. Clean and lubricate rifle with gun lubricant. Keep it moisture-free.
b. Operate controls through their entire range, at intervals, to keep them from freezing up.
c. When your rifle is not being used and kept outside, protect it with a cover.
HOT CLIMATES -
a. Inspect rifle and bipod more frequently, especially the hidden surfaces of bolt carrier group, forward assist assembly and lower receiver components. Make certain they are lubricated using gun lubricant.
b. When handling, make certain to wipe dry, as moisture could cause corrosion.After drying, lubricate with gun lubricant.
HOT, DRY CLIMATES -
Clean and oil rifle more frequently with gun lubricant.
DUSTY AND SANDY AREAS -
a. Clean and lubricate your rifle more frequently.
b. Keep sand out of parts when inspecting, lubricating, or assembling rifle. Apply only a very light amount of lubrication on outside of rifle.
c. Use magazine bag and muzzle cap for dust and sand protection.
CAUTION: Do not use magazine bag and muzzle cap on stored rifles.
PROJECTILE LODGED IN BORE
20
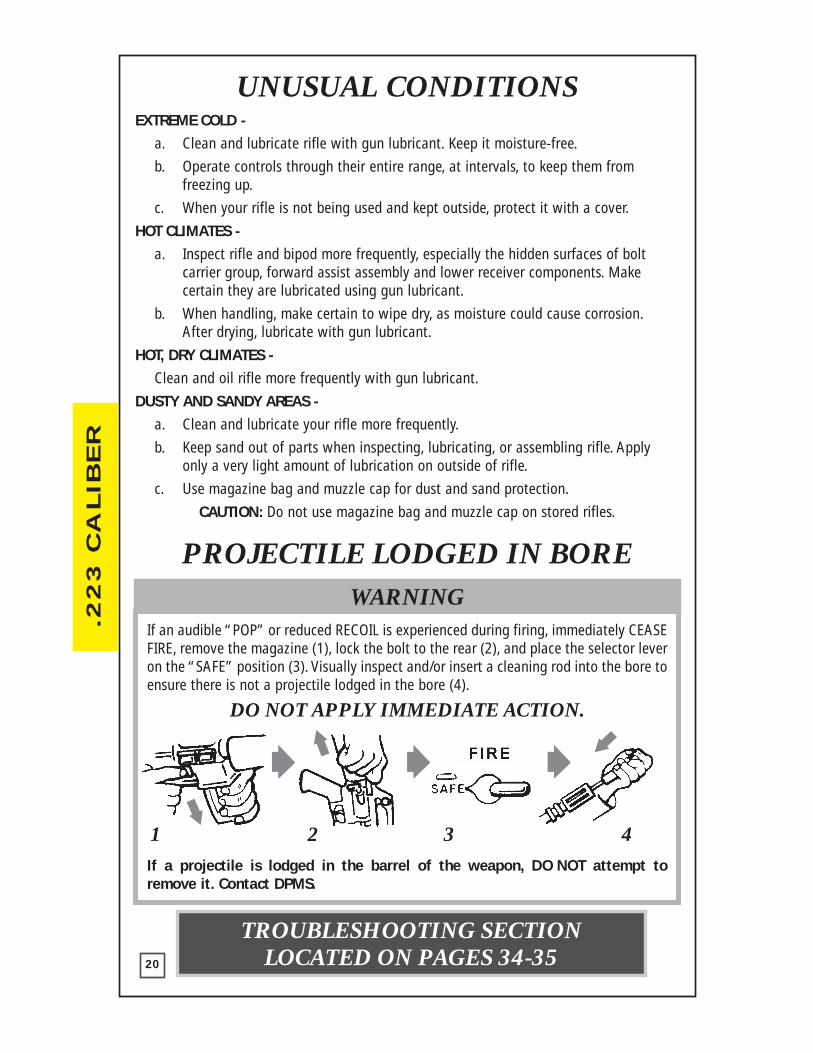
WARNINGIf an audible “POP” or reduced RECOIL is experienced during firing, immediately CEASEFIRE, remove the magazine (1), lock the bolt to the rear (2), and place the selector leveron the “SAFE” position (3). Visually inspect and/or insert a cleaning rod into the bore toensure there is not a projectile lodged in the bore (4).
DO NOT APPLY IMMEDIATE ACTION.
If a projectile is lodged in the barrel of the weapon, DO NOT attempt toremove it. Contact DPMS.
1 2 3 4
TROUBLESHOOTING SECTIONLOCATED ON PAGES 34-35
Includes the Following Rifles:
21
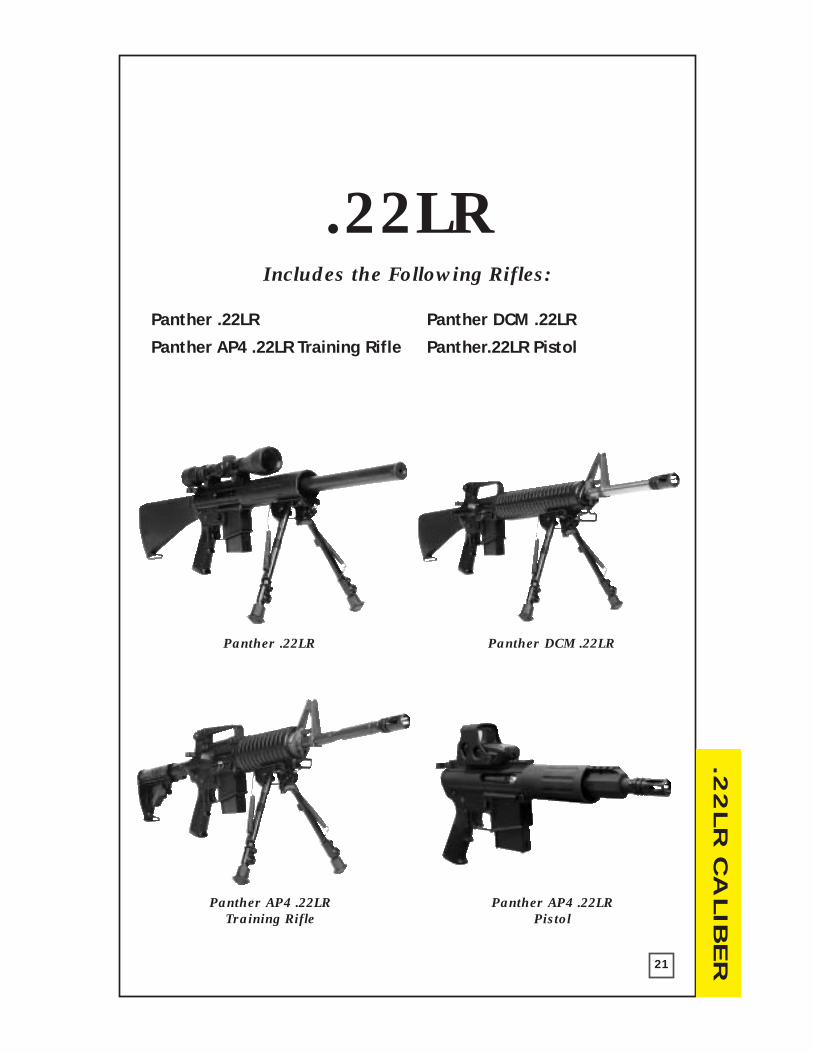
.22LR
Panther .22LR
Panther AP4 .22LR Training Rifle
Panther DCM .22LR
Panther.22LR Pistol
Panther .22LR Panther DCM .22LR
Panther AP4 .22LRTraining Rifle
Panther AP4 .22LRPistol
.22
LR
CA
LIB
ER
.22
LR
CA
LIB
ER
SIGHTSThe .22LR bull barrel and the AP4 training rifle can have a scope, reflex sight or other sighting device mounted directly to the Picatinny Rail on top of the receiver. The AP4 canalso utilize a detachable A2 sight or carry handle, and the DCM rifle comes standard withnational match A2 sights.
The front sight of both the DCM and the AP4 rifle is adjustable for elevation during zeroing.Once zeroed, the front sight is not adjusted during normal firing.
The rear sight is adjustable for both windage and elevation, and can be easily used duringshooting to compensate for range and windage.
Although the elevation knob is the same as the one used on other DPMS rifles, you will notbe able to “battle sight zero” and adjust for elevation as you would with the 5.56. This isdue to the reduced ballistics offered by the .22LR. In order to adjust the rear sight for elevation or windage, adjust the aperture in the direction you wish to move the impact ofthe bullet. For example, if you are hitting left of your intended target, move the rear sightto the right. If you are hitting low, adjust the sight higher, etc.
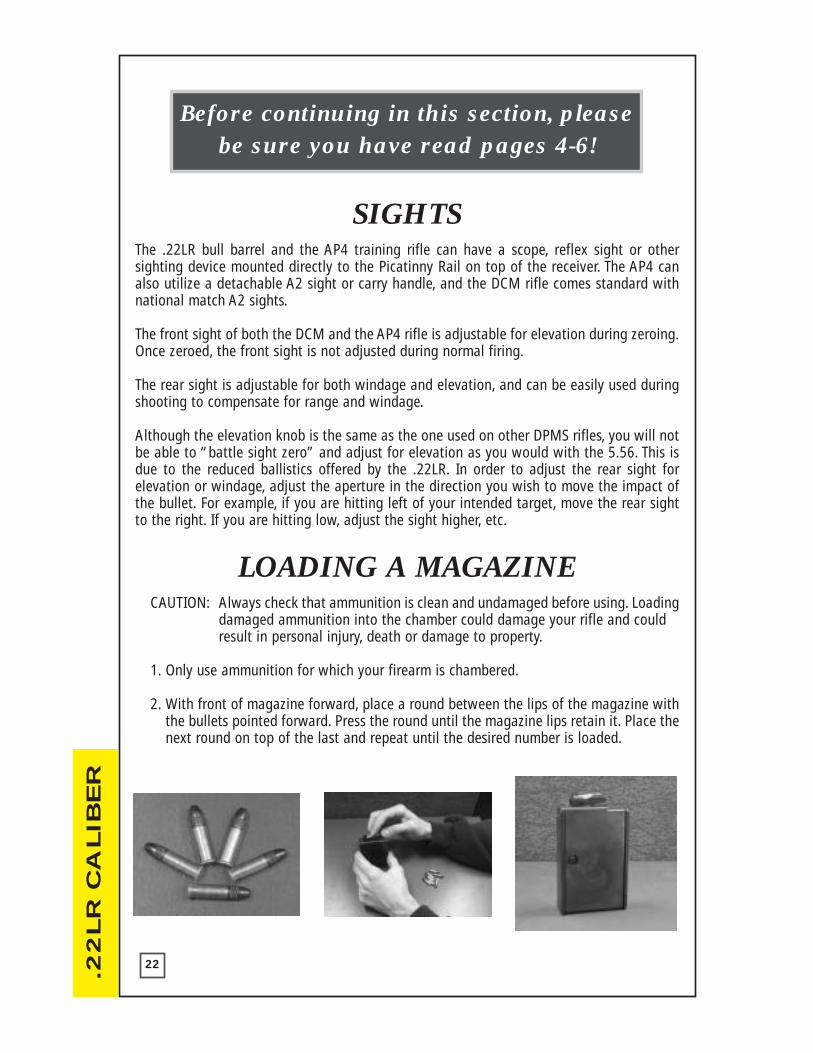
LOADING A MAGAZINECAUTION: Always check that ammunition is clean and undamaged before using. Loading
damaged ammunition into the chamber could damage your rifle and could result in personal injury, death or damage to property.
1. Only use ammunition for which your firearm is chambered.
2. With front of magazine forward, place a round between the lips of the magazine withthe bullets pointed forward. Press the round until the magazine lips retain it. Place thenext round on top of the last and repeat until the desired number is loaded.
22
Before continuing in this section, pleasebe sure you have read pages 4-6!
.22
LR
CA
LIB
ER
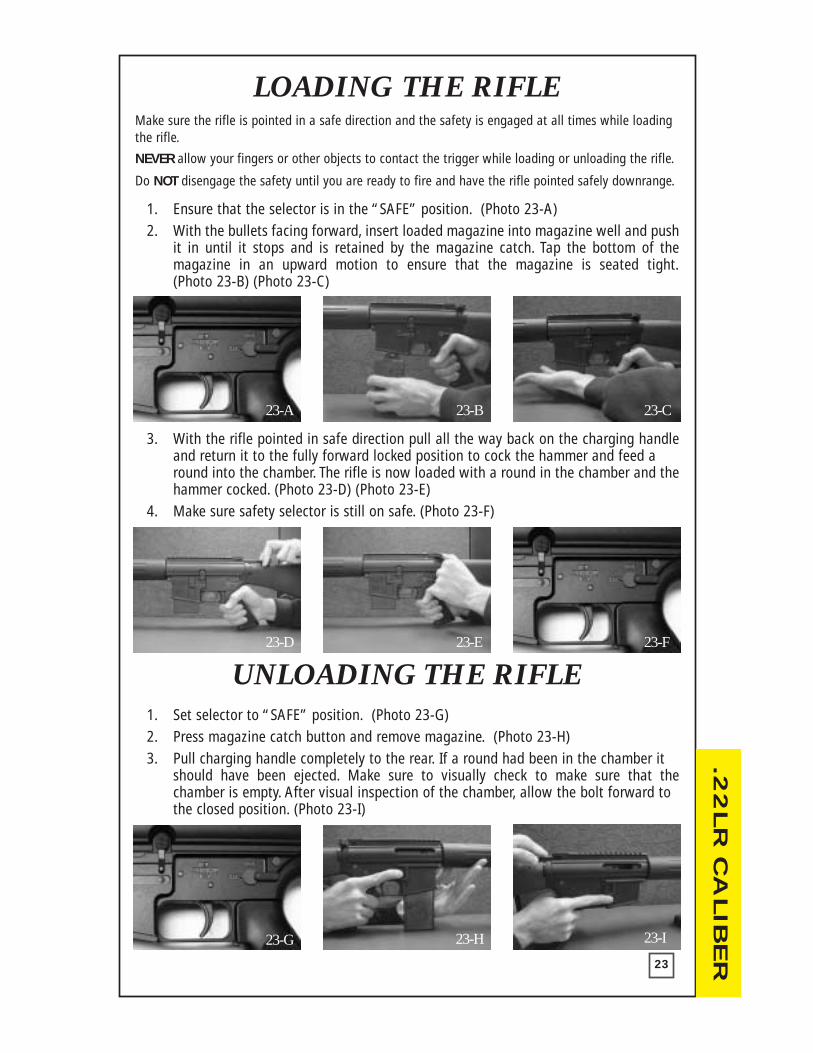
LOADING THE RIFLEMake sure the rifle is pointed in a safe direction and the safety is engaged at all times while loadingthe rifle.
NEVER allow your fingers or other objects to contact the trigger while loading or unloading the rifle.
Do NOT disengage the safety until you are ready to fire and have the rifle pointed safely downrange.
1. Ensure that the selector is in the “SAFE” position. (Photo 23-A)2. With the bullets facing forward, insert loaded magazine into magazine well and push
it in until it stops and is retained by the magazine catch. Tap the bottom of the magazine in an upward motion to ensure that the magazine is seated tight.(Photo 23-B) (Photo 23-C)
3. With the rifle pointed in safe direction pull all the way back on the charging handleand return it to the fully forward locked position to cock the hammer and feed a round into the chamber. The rifle is now loaded with a round in the chamber and thehammer cocked. (Photo 23-D) (Photo 23-E)
4. Make sure safety selector is still on safe. (Photo 23-F)
UNLOADING THE RIFLE1. Set selector to “SAFE” position. (Photo 23-G)2. Press magazine catch button and remove magazine. (Photo 23-H)3. Pull charging handle completely to the rear. If a round had been in the chamber it
should have been ejected. Make sure to visually check to make sure that the chamber is empty. After visual inspection of the chamber, allow the bolt forward to the closed position. (Photo 23-I)
23
23-A 23-B 23-C
23-F23-D 23-E
23-H 23-I23-G
.22
LR
CA
LIB
ERFIRING THE RIFLE
Firing PreparationBefore firing your rifle, practice your stance, aim, rhythm and breathing for a steady aimwith your firearm unloaded. You should practice firing on a range before going hunting orbefore using your firearm for any other type of shooting.
1. Always wear eye and ear protection when firing your weapon.
2. Load firearm as previously described.
3. Grasp firearm with one hand on handguard and the other hand on the pistol grip withtrigger finger resting along side of the trigger guard. Raise firearm and pull buttstockfirmly into shoulder.
4. Aim by aligning your scope with the target. (Scope not included)
5. Move selector to “FIRE”.
6. Keeping steady aim, place trigger finger on trigger and gently squeeze until trigger releases hammer. Do not jerk trigger as you will disturb your aim and ruin your accuracy. To fire the next round and subsequent rounds, all that is necessary is to release the trigger and gently squeeze the trigger again after every shot until you arefinished firing or the magazine is emptied.
7. This is a semi-automatic firearm and is immediately loaded and ready to fire after eachshot until the magazine is empty and the last round in the chamber has been fired.
8. Release trigger, remove finger from trigger and set selector lever to “SAFE.” If you have fired the last round from magazine, the bolt assembly will not be held to the rear,so you will need to pull back the bolt to ensure the chamber is empty.
9. Important! This rifle will fire a chambered round with the magazine removed.
Attention: No bolt hold open device for last round!
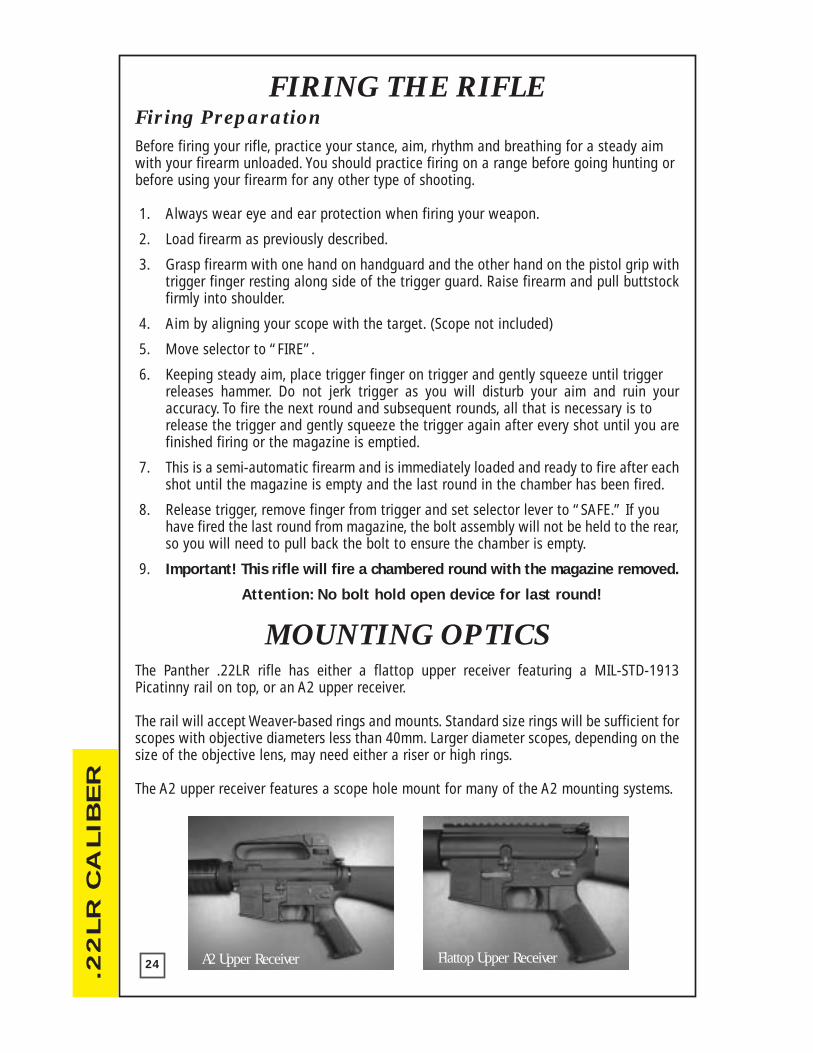
MOUNTING OPTICSThe Panther .22LR rifle has either a flattop upper receiver featuring a MIL-STD-1913Picatinny rail on top, or an A2 upper receiver.
The rail will accept Weaver-based rings and mounts. Standard size rings will be sufficient forscopes with objective diameters less than 40mm. Larger diameter scopes, depending on thesize of the objective lens, may need either a riser or high rings.
The A2 upper receiver features a scope hole mount for many of the A2 mounting systems.
24 A2 Upper Receiver Flattop Upper Receiver
.22
LR
CA
LIB
ER
MAINTENANCEYour DPMS rifle is based on a military rifle design and is very rugged but proper maintenance is necessary to keep it in good working condition.
Field Stripping Disassembly (Make sure your rifle is unloaded, with no ammunition in thechamber.)
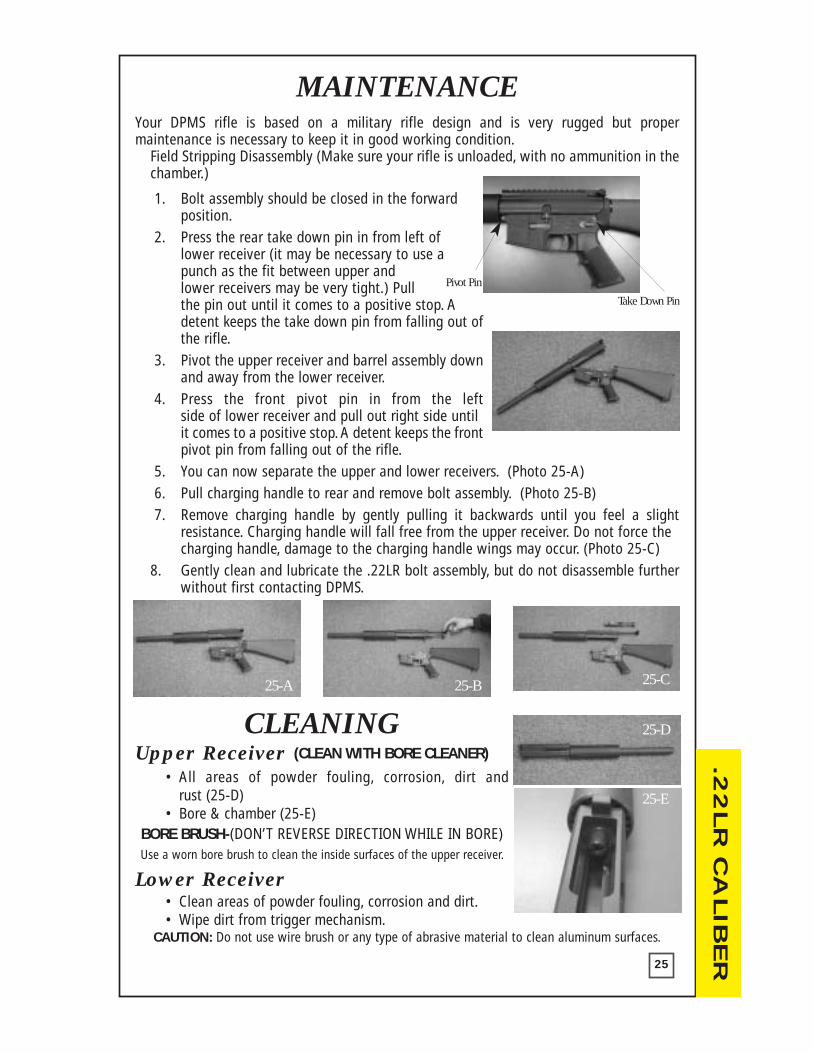
1. Bolt assembly should be closed in the forward position.
2. Press the rear take down pin in from left of lower receiver (it may be necessary to use a punch as the fit between upper and lower receivers may be very tight.) Pull the pin out until it comes to a positive stop. A detent keeps the take down pin from falling out ofthe rifle.
3. Pivot the upper receiver and barrel assembly downand away from the lower receiver.
4. Press the front pivot pin in from the left side of lower receiver and pull out right side until it comes to a positive stop. A detent keeps the frontpivot pin from falling out of the rifle.
5. You can now separate the upper and lower receivers. (Photo 25-A)6. Pull charging handle to rear and remove bolt assembly. (Photo 25-B)7. Remove charging handle by gently pulling it backwards until you feel a slight
resistance. Charging handle will fall free from the upper receiver. Do not force the charging handle, damage to the charging handle wings may occur. (Photo 25-C)
8. Gently clean and lubricate the .22LR bolt assembly, but do not disassemble furtherwithout first contacting DPMS.
CLEANINGUpper Receiver (CLEAN WITH BORE CLEANER)
• All areas of powder fouling, corrosion, dirt and rust (25-D)
• Bore & chamber (25-E)BORE BRUSH-(DON’T REVERSE DIRECTION WHILE IN BORE)Use a worn bore brush to clean the inside surfaces of the upper receiver.
Lower Receiver• Clean areas of powder fouling, corrosion and dirt.• Wipe dirt from trigger mechanism.
CAUTION: Do not use wire brush or any type of abrasive material to clean aluminum surfaces.
25
Pivot Pin
Take Down Pin
25-C25-B25-A
25-E
25-D
.22
LR
CA
LIB
ER
UNUSUAL CONDITIONSExtreme Cold-
a. Clean and lubricate rifle using a gun lubricant. (Break FreeTM, Mil-TechTM, etc.) Keep it moisture free.
b. Operate controls through their entire range, at intervals, to keep them from freezing up.
c. When your rifle is not being used and kept outside, protect it with a cover.
Hot Climates-
a. Inspect rifle more frequently, especially the hidden surfaces of the bolt assembly, and lower receiver components. Make certain they are lubricated witha gun lubricant.
b. When handling, make certain to wipe dry, as moisture could cause corrosion. Afterdrying, lubricate with gun lubricant.
Hot, Dry Climates-
a. Clean and oil rifle more frequently with a gun lubricant.
Dusty and Sandy Areas-
a. Clean and lubricate your rifle more frequently.
b. Keep sand out of parts when inspecting, lubricating, or assembling rifle. Apply only a very light amount of lubrication on outside of rifle. Using too much lubricant can attract dust and sand.
TROUBLESHOOTINGProblem Check For What To Do
Won’t Fire Selector lever on SAFE Put on FIREDefective ammo Remove & discardToo much carbon on firing pin Clean
Won’t Extract Broken extractor spring or extractor Contact DPMSDirty or corroded ammo Remove. Push the round
out by running a cleaning rod down the barrel from the muzzle.Be careful not to scrapeor gouge the rifling.
Carbon in chamber - Clean chamberFouling or carbon in extractor recess or lip.
Won’t Feed Dirty or corroded ammo CleanDirty magazine CleanDefective magazine Replace26
.22
LR
CA
LIB
ER
TROUBLESHOOTINGProblem Check For What To Do
Won’t Feed Magazine not fully seated Adjust magazine catch.(Press button on right side. Turn catch clockwise to tighten and counterclockwise to loosen.)
Won’t Chamber Dirty or corroded ammo Replace ammoDamaged ammo ReplaceCarbon in chamber Clean
Double Feed Defective magazine Replace
Short Recoil Defective ammo ReplaceCarbon or dirt in carrier Clean
Selector Lever Needs oil Lubricate with gun Binds lubricant
Additional information pertaining to the three year limited warranty, additional warnings and informationconcerning how to return merchandise to DPMS can befound on page 36.
27
ATTENTION:
Please Note: .22LR rifles may not function properly with an adjustable trigger installed.
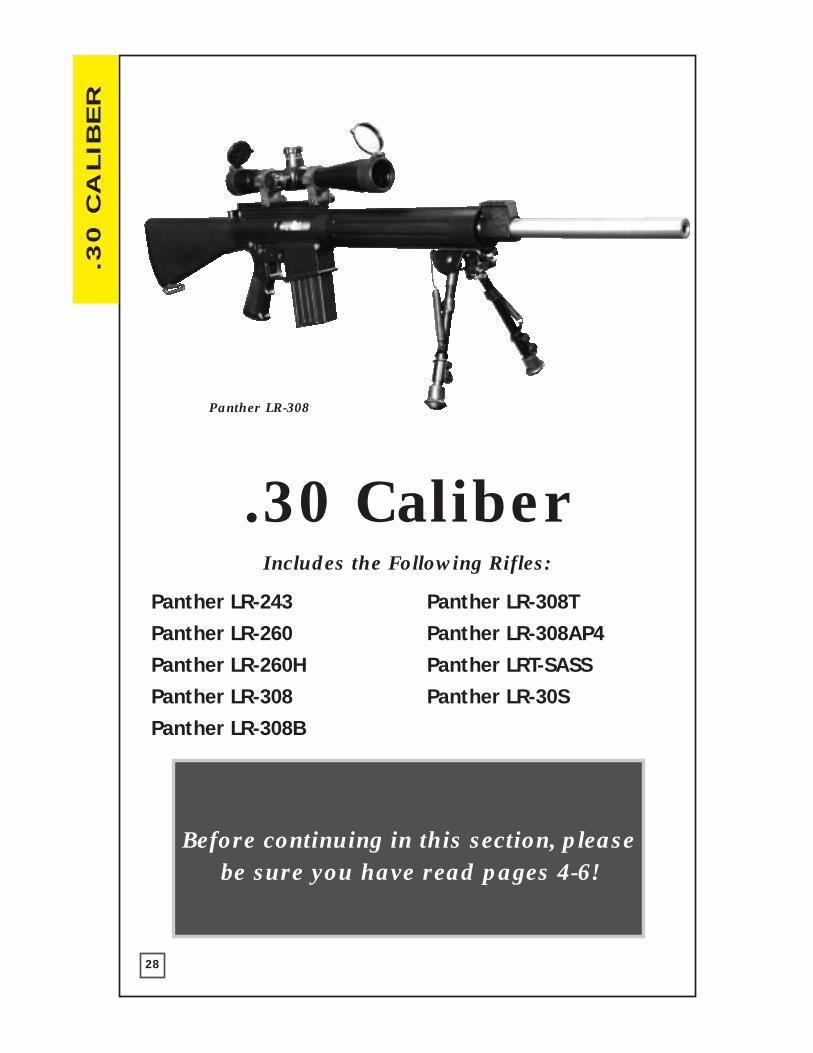
Includes the Following Rifles:
.30 Caliber
Panther LR-243
Panther LR-260
Panther LR-260H
Panther LR-308
Panther LR-308B
Panther LR-308T
Panther LR-308AP4
Panther LRT-SASS
Panther LR-30S
Before continuing in this section, pleasebe sure you have read pages 4-6!
Panther LR-308
.30
CA
LIB
ER
28
.30
CA
LIB
ER
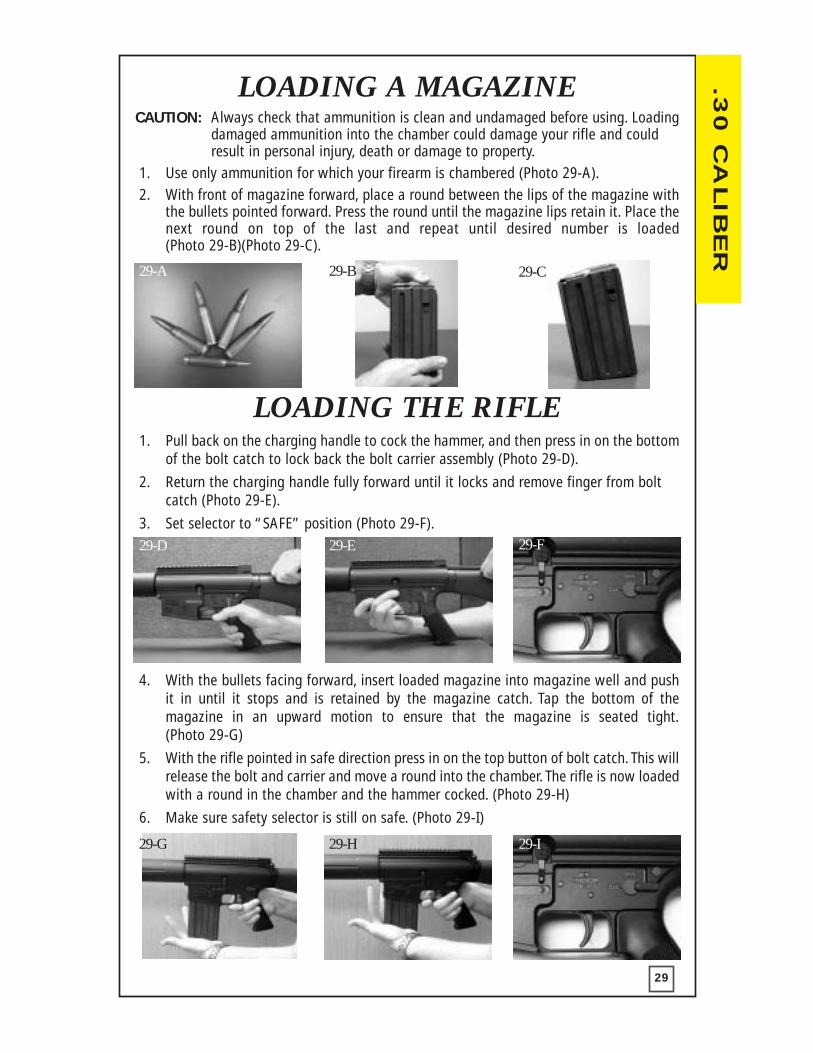
LOADING A MAGAZINECAUTION: Always check that ammunition is clean and undamaged before using. Loading
damaged ammunition into the chamber could damage your rifle and could result in personal injury, death or damage to property.
1. Use only ammunition for which your firearm is chambered (Photo 29-A).2. With front of magazine forward, place a round between the lips of the magazine with
the bullets pointed forward. Press the round until the magazine lips retain it. Place thenext round on top of the last and repeat until desired number is loaded (Photo 29-B)(Photo 29-C).
LOADING THE RIFLE1. Pull back on the charging handle to cock the hammer, and then press in on the bottom
of the bolt catch to lock back the bolt carrier assembly (Photo 29-D).
2. Return the charging handle fully forward until it locks and remove finger from bolt catch (Photo 29-E).
3. Set selector to “SAFE” position (Photo 29-F).
4. With the bullets facing forward, insert loaded magazine into magazine well and pushit in until it stops and is retained by the magazine catch. Tap the bottom of the magazine in an upward motion to ensure that the magazine is seated tight.(Photo 29-G)
5. With the rifle pointed in safe direction press in on the top button of bolt catch. This willrelease the bolt and carrier and move a round into the chamber. The rifle is now loadedwith a round in the chamber and the hammer cocked. (Photo 29-H)
6. Make sure safety selector is still on safe. (Photo 29-I)
29-B29-A 29-C
29-D 29-E 29-F
29-H29-G 29-I
29
.30
CA
LIB
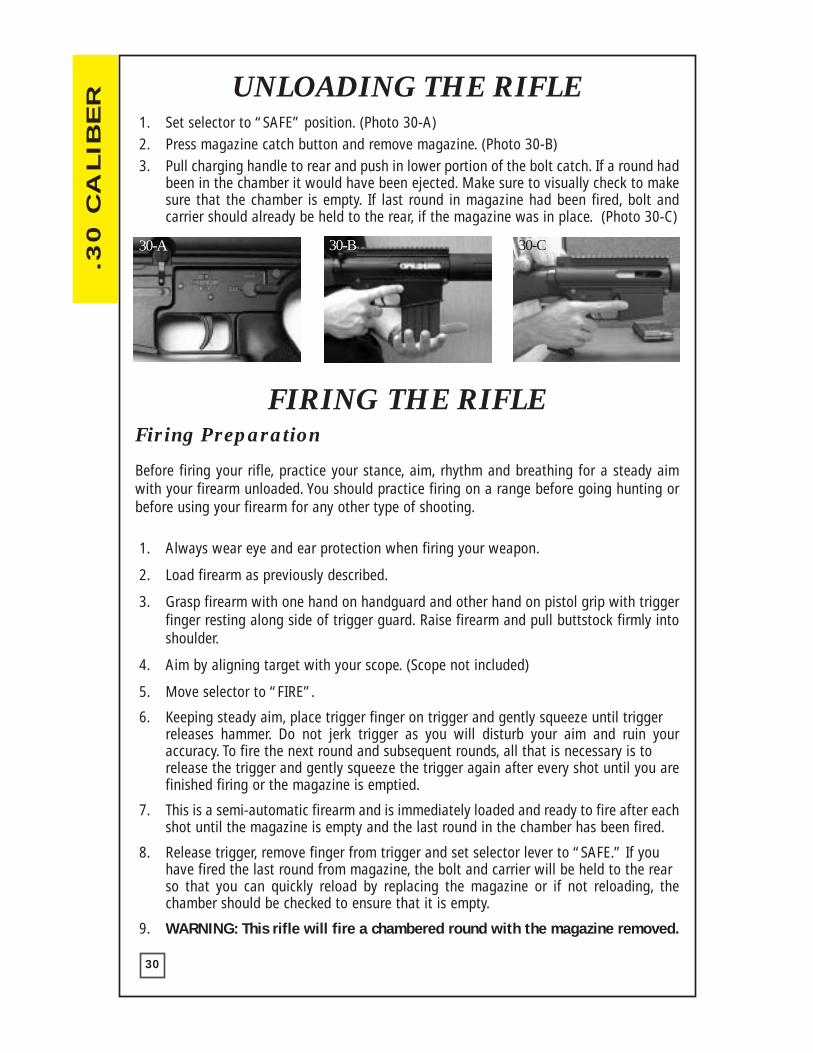
ER UNLOADING THE RIFLE
1. Set selector to “SAFE” position. (Photo 30-A)2. Press magazine catch button and remove magazine. (Photo 30-B)3. Pull charging handle to rear and push in lower portion of the bolt catch. If a round had
been in the chamber it would have been ejected. Make sure to visually check to makesure that the chamber is empty. If last round in magazine had been fired, bolt and carrier should already be held to the rear, if the magazine was in place. (Photo 30-C)
FIRING THE RIFLEFiring Preparation
Before firing your rifle, practice your stance, aim, rhythm and breathing for a steady aimwith your firearm unloaded. You should practice firing on a range before going hunting orbefore using your firearm for any other type of shooting.
1. Always wear eye and ear protection when firing your weapon.
2. Load firearm as previously described.
3. Grasp firearm with one hand on handguard and other hand on pistol grip with triggerfinger resting along side of trigger guard. Raise firearm and pull buttstock firmly intoshoulder.
4. Aim by aligning target with your scope. (Scope not included)
5. Move selector to “FIRE”.
6. Keeping steady aim, place trigger finger on trigger and gently squeeze until trigger releases hammer. Do not jerk trigger as you will disturb your aim and ruin your accuracy. To fire the next round and subsequent rounds, all that is necessary is to release the trigger and gently squeeze the trigger again after every shot until you arefinished firing or the magazine is emptied.
7. This is a semi-automatic firearm and is immediately loaded and ready to fire after eachshot until the magazine is empty and the last round in the chamber has been fired.
8. Release trigger, remove finger from trigger and set selector lever to “SAFE.” If you have fired the last round from magazine, the bolt and carrier will be held to the rear so that you can quickly reload by replacing the magazine or if not reloading, the chamber should be checked to ensure that it is empty.
9. WARNING: This rifle will fire a chambered round with the magazine removed.
30
30-B 30-C30-A
.30
CA
LIB
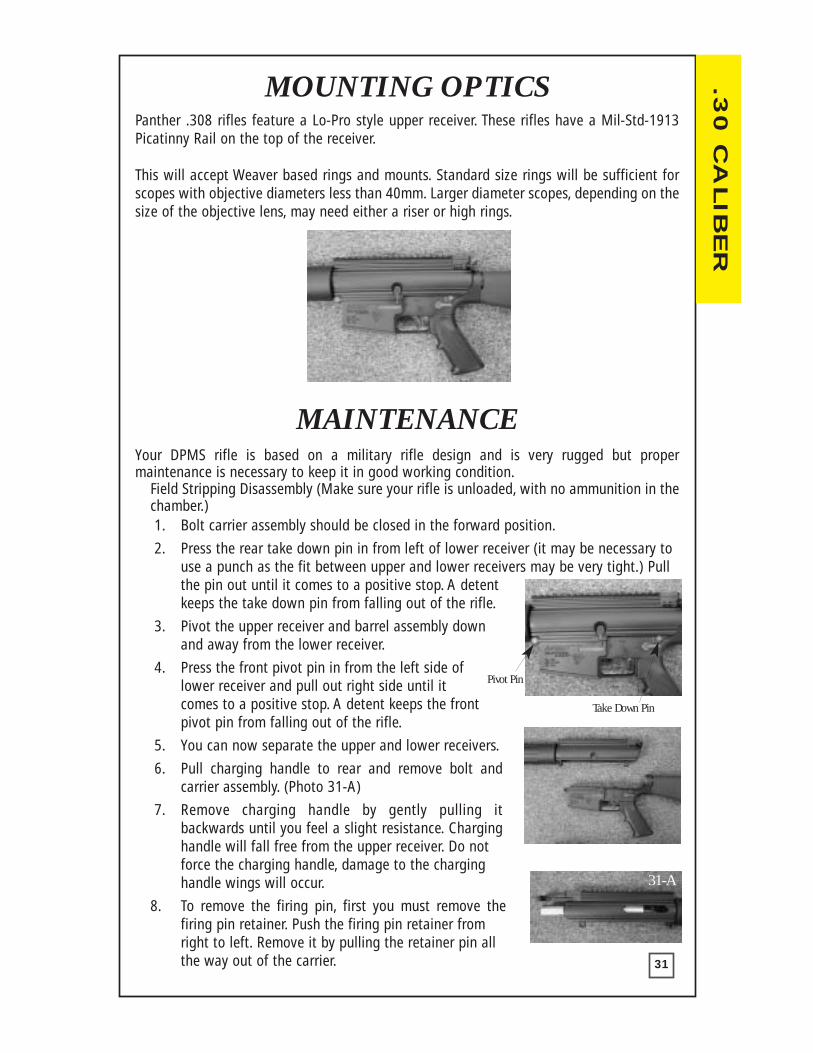
ERMOUNTING OPTICS
Panther .308 rifles feature a Lo-Pro style upper receiver. These rifles have a Mil-Std-1913Picatinny Rail on the top of the receiver.
This will accept Weaver based rings and mounts. Standard size rings will be sufficient forscopes with objective diameters less than 40mm. Larger diameter scopes, depending on thesize of the objective lens, may need either a riser or high rings.
MAINTENANCEYour DPMS rifle is based on a military rifle design and is very rugged but proper maintenance is necessary to keep it in good working condition.
Field Stripping Disassembly (Make sure your rifle is unloaded, with no ammunition in thechamber.)1. Bolt carrier assembly should be closed in the forward position.
2. Press the rear take down pin in from left of lower receiver (it may be necessary to use a punch as the fit between upper and lower receivers may be very tight.) Pull the pin out until it comes to a positive stop. A detent keeps the take down pin from falling out of the rifle.
3. Pivot the upper receiver and barrel assembly down and away from the lower receiver.
4. Press the front pivot pin in from the left side oflower receiver and pull out right side until it comes to a positive stop. A detent keeps the front pivot pin from falling out of the rifle.
5. You can now separate the upper and lower receivers.
6. Pull charging handle to rear and remove bolt and carrier assembly. (Photo 31-A)
7. Remove charging handle by gently pulling it backwards until you feel a slight resistance. Charginghandle will fall free from the upper receiver. Do not force the charging handle, damage to the charging handle wings will occur.
8. To remove the firing pin, first you must remove the firing pin retainer. Push the firing pin retainer from right to left. Remove it by pulling the retainer pin all the way out of the carrier. 31
Pivot Pin
Take Down Pin
31-A
.30
CA
LIB
ER MAINTENANCE
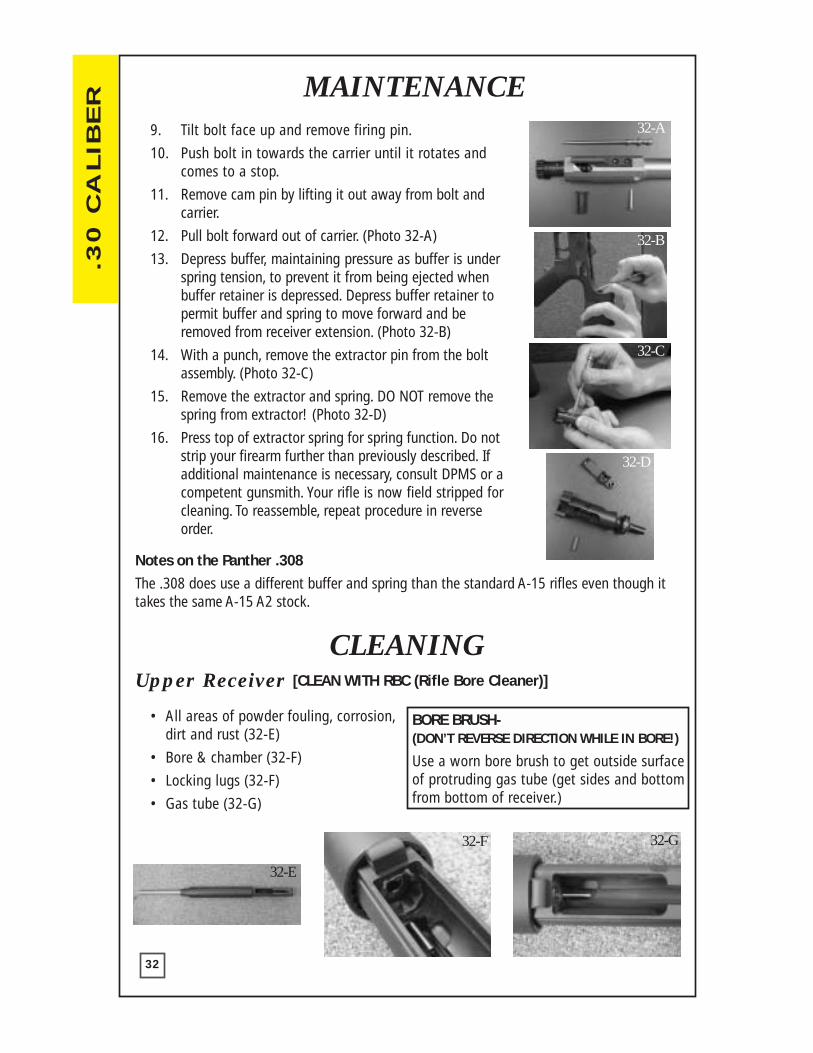
9. Tilt bolt face up and remove firing pin.
10. Push bolt in towards the carrier until it rotates and comes to a stop.
11. Remove cam pin by lifting it out away from bolt and carrier.
12. Pull bolt forward out of carrier. (Photo 32-A)
13. Depress buffer, maintaining pressure as buffer is underspring tension, to prevent it from being ejected when buffer retainer is depressed. Depress buffer retainer to permit buffer and spring to move forward and be removed from receiver extension. (Photo 32-B)
14. With a punch, remove the extractor pin from the bolt assembly. (Photo 32-C)
15. Remove the extractor and spring. DO NOT remove the spring from extractor! (Photo 32-D)
16. Press top of extractor spring for spring function. Do notstrip your firearm further than previously described. If additional maintenance is necessary, consult DPMS or a competent gunsmith. Your rifle is now field stripped forcleaning. To reassemble, repeat procedure in reverse order.
Notes on the Panther .308
The .308 does use a different buffer and spring than the standard A-15 rifles even though ittakes the same A-15 A2 stock.
CLEANINGUpper Receiver [CLEAN WITH RBC (Rifle Bore Cleaner)]
• All areas of powder fouling, corrosion,dirt and rust (32-E)
• Bore & chamber (32-F)
• Locking lugs (32-F)
• Gas tube (32-G)
32
32-A
32-C
32-D
32-B
32-F 32-G
32-E
BORE BRUSH-(DON’T REVERSE DIRECTION WHILE IN BORE!)
Use a worn bore brush to get outside surfaceof protruding gas tube (get sides and bottomfrom bottom of receiver.)
.30
CA
LIB
ER
CLEANINGLower Receiver
• Clean areas of powder fouling, corrosion and dirt.
• Wipe dirt from trigger mechanism.
• Clean buffer and inside lower receiver extension.
CAUTION: Do not use wire brush or any type of abrasive material to clean aluminum surfaces.
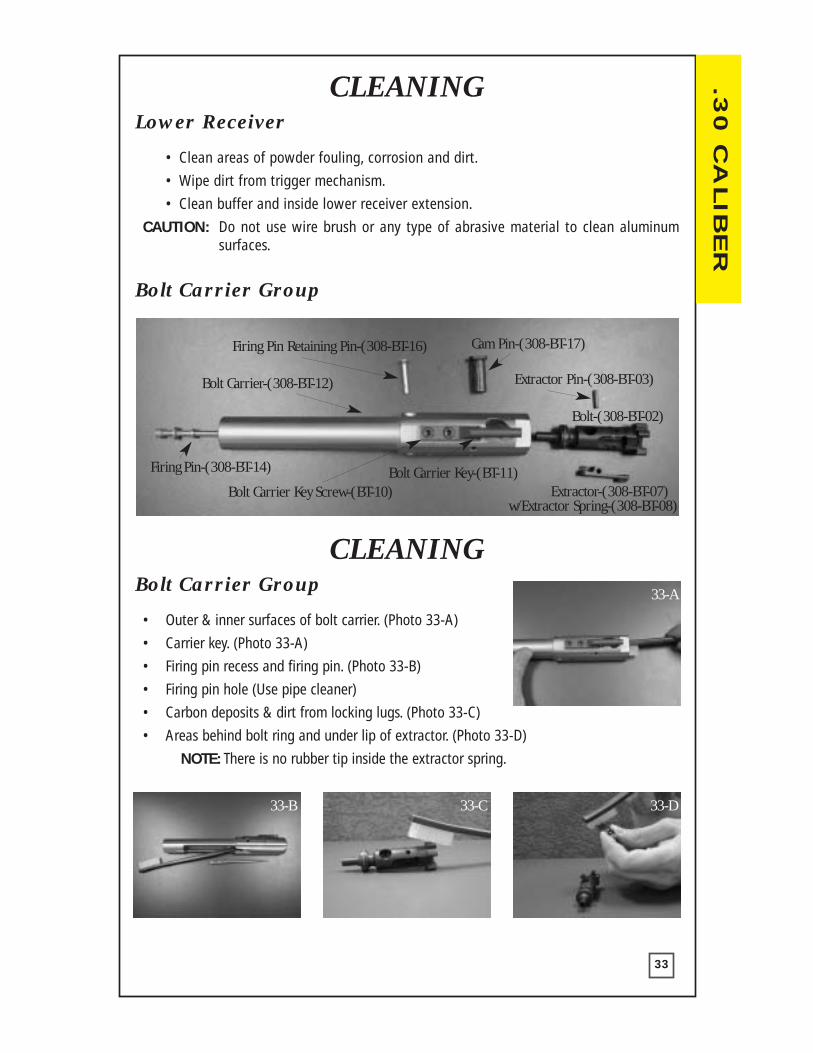
Bolt Carrier Group
CLEANINGBolt Carrier Group
• Outer & inner surfaces of bolt carrier. (Photo 33-A)
• Carrier key. (Photo 33-A)
• Firing pin recess and firing pin. (Photo 33-B)
• Firing pin hole (Use pipe cleaner)
• Carbon deposits & dirt from locking lugs. (Photo 33-C)
• Areas behind bolt ring and under lip of extractor. (Photo 33-D)
NOTE: There is no rubber tip inside the extractor spring.
33
33-A
33-B 33-C 33-D
Firing Pin Retaining Pin-(308-BT-16) Cam Pin-(308-BT-17)
Extractor Pin-(308-BT-03)
Firing Pin-(308-BT-14)
Extractor-(308-BT-07)
Bolt Carrier-(308-BT-12)
Bolt-(308-BT-02)
Bolt Carrier Key-(BT-11)Bolt Carrier Key Screw-(BT-10)
w/Extractor Spring-(308-BT-08)
.30
CA
LIB
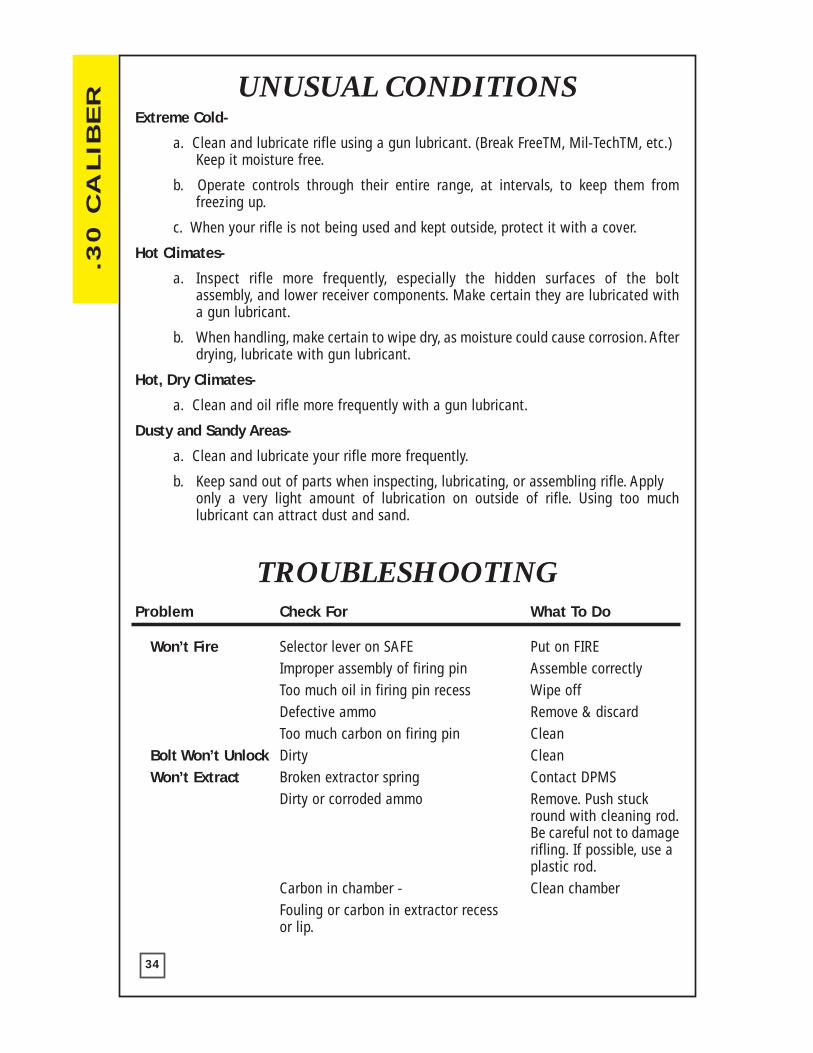
ER UNUSUAL CONDITIONS
Extreme Cold-
a. Clean and lubricate rifle using a gun lubricant. (Break FreeTM, Mil-TechTM, etc.) Keep it moisture free.
b. Operate controls through their entire range, at intervals, to keep them from freezing up.
c. When your rifle is not being used and kept outside, protect it with a cover.
Hot Climates-
a. Inspect rifle more frequently, especially the hidden surfaces of the bolt assembly, and lower receiver components. Make certain they are lubricated witha gun lubricant.
b. When handling, make certain to wipe dry, as moisture could cause corrosion. Afterdrying, lubricate with gun lubricant.
Hot, Dry Climates-
a. Clean and oil rifle more frequently with a gun lubricant.
Dusty and Sandy Areas-
a. Clean and lubricate your rifle more frequently.
b. Keep sand out of parts when inspecting, lubricating, or assembling rifle. Apply only a very light amount of lubrication on outside of rifle. Using too much lubricant can attract dust and sand.
TROUBLESHOOTINGProblem Check For What To Do
Won’t Fire Selector lever on SAFE Put on FIREImproper assembly of firing pin Assemble correctlyToo much oil in firing pin recess Wipe offDefective ammo Remove & discardToo much carbon on firing pin Clean
Bolt Won’t Unlock Dirty CleanWon’t Extract Broken extractor spring Contact DPMS
Dirty or corroded ammo Remove. Push stuck round with cleaning rod.Be careful not to damagerifling. If possible, use a plastic rod.
Carbon in chamber - Clean chamberFouling or carbon in extractor recess or lip.
34

.30
CA
LIB
ERTROUBLESHOOTING
Problem Check For What To Do
Won’t Feed Dirty or corroded ammo CleanDirty magazine CleanDefective magazine ReplaceToo many rounds in magazine Take out excessRestricted buffer assembly action Take out buffer and
spring, clean
Magazine not fully seated Adjust magazine catch.(Press button on right side. Turn catch clockwise to tighten and counterclockwise to loosen.)
Won’t Chamber Dirty or corroded ammo Replace ammoDamaged ammo ReplaceCarbon in chamber Clean
Won’t Lock Dirt, corrosion or carbon buildup Clean lugs in barrel locking lugsFrozen extractor Remove and cleanRestricted buffer assembly Remove and clean
Restricted movement of bolt Remove, clean, lube carrier group.
(When putting bolt back in, make sure gas tube fits into carrier key and moves freely).
Double Feed Defective magazine Replace
Short Recoil Gaps in bolt rings (not staggered) Stagger ring gapsCarbon or dirt in carrier key or on Clean outside of gas tube
Bolt Fails to LockAfter Last Round Dirty or corroded bolt catch Clean
Faulty magazine Replace
Selector LeverBinds Needs oil Lubricate with a gun
lubricant
Bolt Carrier“Hung Up” Round jammed between bolt and charging handle
1. Remove magazine charging handle 2. Hold charging handle back and bang rifle butt on ground.
KEEP CLEAR OF MUZZLE! Caution: After round is removed, bolt is under tension.3. While bolt is held to rear, push charging handle forward. Round should fall through
magazine well.35
THREE YEAR LIMITED WARRANTYThis DPMS/Panther Arms firearm is warranted to the original retail customer for Three Yearsfrom the date of purchase against defects in material and workmanship. All parts and laboror replacement at our option are covered.
Transportation to and from our repair facilities, government fees, damage caused by failureto perform normal maintenance, sales outside the United States, damage due to high velocity, high pressure, reloaded or other nonstandard ammunition, or any unauthorizedrepair, modification, misuse, abuse, or alteration of the product is not covered by thisLimited Warranty.
Any implied warranties, including the implied warranties of merchantability and fitness fora particular purpose, are limited to one year from date of purchase. Consequential or incidental damages and/or expenses, or any other expenses are not covered by this warranty.
To obtain warranty performance send your firearm with proof of retail purchase, freight prepaid to:
DPMS/Panther Arms3312 12th Street SESt. Cloud, MN 56304
WARNING - Alterations & Modifications
Altering or modifying parts is dangerous and will void the warranty. This DPMS/PantherArms rifle was manufactured to perform properly with the original parts as designed. It isyour duty to make sure any parts you buy are made for this rifle and are installed correctlyand that neither the replacements nor originals are altered or changed. Your DPMS/PantherArms rifle is a complex precision tool with many parts that must relate correctly to otherparts in order for proper and safe operation. Putting a rifle together wrong or with incorrector modified parts can result in a damaged rifle, serious personal injury or death to you andothers through malfunction. Always have a qualified gunsmith work on your rifle or at leastcheck any work not performed by a gunsmith.
PROBLEMS/RETURNSAlthough we go to great lengths to make a perfect product and get it to you in perfect condition, sometimes things happen! If there is a problem with our product or if shippingdamage has occurred, please call us immediately for instructions at 800-578-3767, visit ourwebsite at www.dpmsinc.com or email us at [email protected].
NOTE: It is illegal to ship a firearm with ammunition in the firearm or in the same packaging. Firearms and ammunition must be shipped separately. For more information about shipping, call DPMS/Panther Arms at (320) 258-4448.
36
AMMUNITION WARNINGDue to a number of calls and comments concerning AR-type rifles, we have incurred feeding problems with the following:
A) 1. Israeli ammunition
2. Korean ammunition
We have heard and reviewed several reports of problems with many manufacturers’ riflesusing this ammunition. The problem appears to be the bullet contour and the overall length of the cartridge, which is contacting the rifling before firing. This is creating a gasport pressure and chamber pressure higher than recommended, therefore causing feeding and extraction problems due to the increased bolt carrier velocity. In addition,there is accelerated fatigue on internal parts. There are also indications that brass may beoversized, which could create an unsafe condition.
B) 1. PMP
2. South African produced surplus
We have used this ammunition in the past for testing purposes and found that the brassis extremely soft and can “flow” into microscopic pores and grooves in the chamber,creating “sticky” extraction. This had been reported in many types of rifles, but is more prevalent in semi-automatic weapons.
C) Lacquer Coated Ammunition or Steel-cased, lacquer coated ammunition
The problem with this ammunition is the lacquer coating on the case. As the barrel heatsup, the lacquer turns to a soft, varnish substance and upon cool down, becomes very solidand difficult to remove. This effectively creates an undersized chamber and creates understandable problems.
DPMS recommends the use of high quality, domestically produced ammunition for bestresults and highest accuracy. For plinking and practice, we recommend only domestic,commercially manufactured ammunition or high quality surplus NATO specification ammunition. Please note that the use of re-loaded ammunition voids the factorywarranty as well as the use of the above-mentioned types of ammunition.
Your rifle is an investment and it only makes sense to choose quality ammunition for a quality rifle!
BARREL INFORMATIONTo achieve the best results for accuracy you should clean the chamber and bore after everyround for the first 25 rounds and then every 10 rounds up to 100 rounds. It usually takesabout 200 rounds per barrel for optimum accuracy. Please keep in mind that our barrels areproduction barrels not custom barrels. Accuracy is dependent upon many factors such asbullet weight, powder load, rifling twist, rifling lands, operator technique, etc. Our produc-tion barrels have achieved anywhere from 1/8” to 1 1/2” M.O.A. Obviously, we would hopethat every production barrel would shoot 1/8” M.O.A., but with all of the above factors, wecannot guarantee a specific group size.
37

SHOOTER NOTES
Date Notes Ammo
38

RIFLES • PARTS • ACCESSORIES
DPMS offers a complete line ofAR Rifles,
Parts and Accessories
Call for a catalog or visit usonline at www.dpmsinc.com and
download the latest version!
THANK YOU FORCHOOSING DPMS!

3312 12th Street SE, St. Cloud, MN 56304Phone 1-320-258-4448 • Fax 1-320-258-4449www.dpmsinc.com • email: [email protected]
1-800-578-DPMSOrders only please (3767)