
Operation Manual - Zoom...2 Usage and Safety Precautions Usage and Safety Precautions In this...
16
Thank you very much for purchasing a ZOOM (hereafter, " "). Please read this manual carefully to fully understand the functions of the so that you can make the most of it for many years. Keep this manual in a convenient location and refer to it as necessary. Operation Manual Contents © 2017 ZOOM CORPORATION Copying or reprinting this manual in part or in whole without permission is prohibited. Manufacturer names and product names are trademarks or registered trademarks of their respective owners. The names are used only to illustrate sonic characteristics and do not indicate any affiliation with the Zoom Corporation. Usage and Safety Precautions ………… 2 Introduction ………………………………… 3 Names of parts …………………………… 4 Connecting a guitar ……………………… 6 Connecting output devices ……………… 6 Turning the power on …………………… 7 Setting the pickup type …………………… 8 Setting the volume………………………… 8 Setting the source guitar type…………… 9 Adjusting the equalization ……………… 10 Adjusting the reverb ……………………… 10 Using the boost function ………………… 11 Using the anti-feedback function ……… 11 Using the tuner …………………………… 12 Setting the type of batteries used ……… 12 Connecting audio equipment …………… 13 Updating the firmware …………………… 14 Troubleshooting …………………………… 15 Specifications ……………………………… 15
Transcript of Operation Manual - Zoom...2 Usage and Safety Precautions Usage and Safety Precautions In this...

Thank you very much for purchasing a ZOOM (hereafter, " ").
Please read this manual carefully to fully understand the functions of the so that
you can make the most of it for many years.
Keep this manual in a convenient location and refer to it as necessary.
Operation Manual
Contents
© 2017 ZOOM CORPORATION
Copying or reprinting this manual in part or in whole without permission is prohibited.
Manufacturer names and product names are trademarks or registered trademarks of their respective owners.
The names are used only to illustrate sonic characteristics and do not indicate any affiliation with the Zoom Corporation.
Usage and Safety Precautions ………… 2
Introduction ………………………………… 3
Names of parts …………………………… 4
Connecting a guitar ……………………… 6
Connecting output devices ……………… 6
Turning the power on …………………… 7
Setting the pickup type …………………… 8
Setting the volume………………………… 8
Setting the source guitar type…………… 9
Adjusting the equalization ……………… 10
Adjusting the reverb ……………………… 10
Using the boost function ………………… 11
Using the anti-feedback function ……… 11
Using the tuner …………………………… 12
Setting the type of batteries used ……… 12
Connecting audio equipment …………… 13
Updating the firmware …………………… 14
Troubleshooting …………………………… 15
Specifications ……………………………… 15
2
Usage and S
afety Precautions
Usage and Safety Precautions
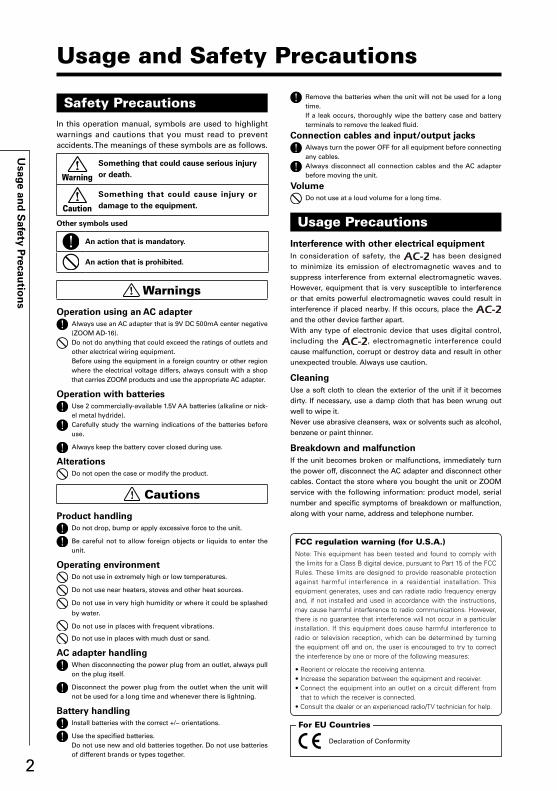
In this operation manual, symbols are used to highlight warnings and cautions that you must read to prevent accidents. The meanings of these symbols are as follows.
Warning
Something that could cause serious injury or death.
Caution
Something that could cause injury or damage to the equipment.
Other symbols used
An action that is mandatory.
An action that is prohibited.
Warnings
Operation using an AC adapter Always use an AC adapter that is 9V DC 500mA center negative (ZOOM AD-16).
Do not do anything that could exceed the ratings of outlets and other electrical wiring equipment.
Before using the equipment in a foreign country or other region where the electrical voltage differs, always consult with a shop that carries ZOOM products and use the appropriate AC adapter.
Operation with batteries Use 2 commercially-available 1.5V AA batteries (alkaline or nick-el metal hydride).
Carefully study the warning indications of the batteries before use.
Always keep the battery cover closed during use.
Alterations Do not open the case or modify the product.
Cautions
Product handling Do not drop, bump or apply excessive force to the unit.
Be careful not to allow foreign objects or liquids to enter the unit.
Operating environment Do not use in extremely high or low temperatures.
Do not use near heaters, stoves and other heat sources.
Do not use in very high humidity or where it could be splashed by water.
Do not use in places with frequent vibrations.
Do not use in places with much dust or sand.
AC adapter handling When disconnecting the power plug from an outlet, always pull on the plug itself.
Disconnect the power plug from the outlet when the unit will not be used for a long time and whenever there is lightning.
Battery handling Install batteries with the correct +/− orientations.
Use the specified batteries. Do not use new and old batteries together. Do not use batteries
of different brands or types together.
Interference with other electrical equipmentIn consideration of safety, the has been designed to minimize its emission of electromagnetic waves and to suppress interference from external electromagnetic waves. However, equipment that is very susceptible to interference or that emits powerful electromagnetic waves could result in interference if placed nearby. If this occurs, place the and the other device farther apart.With any type of electronic device that uses digital control, including the , electromagnetic interference could cause malfunction, corrupt or destroy data and result in other unexpected trouble. Always use caution.
CleaningUse a soft cloth to clean the exterior of the unit if it becomes dirty. If necessary, use a damp cloth that has been wrung out well to wipe it.Never use abrasive cleansers, wax or solvents such as alcohol, benzene or paint thinner.
Breakdown and malfunctionIf the unit becomes broken or malfunctions, immediately turn the power off, disconnect the AC adapter and disconnect other cables. Contact the store where you bought the unit or ZOOM service with the following information: product model, serial number and specific symptoms of breakdown or malfunction, along with your name, address and telephone number.
Safety Precautions
Usage Precautions
Remove the batteries when the unit will not be used for a long time.
If a leak occurs, thoroughly wipe the battery case and battery terminals to remove the leaked fluid.
Connection cables and input/output jacks Always turn the power OFF for all equipment before connecting any cables.
Always disconnect all connection cables and the AC adapter before moving the unit.
Volume Do not use at a loud volume for a long time.
Declaration of Conformity
For EU Countries
FCC regulation warning (for U.S.A.)Note: This equipment has been tested and found to comply with the limits for a Class B digital device, pursuant to Part 15 of the FCC Rules. These limits are designed to provide reasonable protection against harmful interference in a residential installation. This equipment generates, uses and can radiate radio frequency energy and, if not installed and used in accordance with the instructions, may cause harmful interference to radio communications. However, there is no guarantee that interference will not occur in a particular installation. If this equipment does cause harmful interference to radio or television reception, which can be determined by turning the equipment off and on, the user is encouraged to try to correct the interference by one or more of the following measures:
• Reorient or relocate the receiving antenna.• Increase the separation between the equipment and receiver.• Connect the equipment into an outlet on a circuit different from
that to which the receiver is connected.• Consult the dealer or an experienced radio/TV technician for help.
3
Introduction
Acoustic remodeling that restores body toneThe 16 source guitar type presets simulate the sonic characteristics of a variety of acous-tic guitars with different body shapes and material properties. By choosing a source guitar according to the guitar that you are using, you can share the original rich and beautiful tone of your acoustic guitar with audiences during live performances.
High-quality preamp that can be used with many pickupsThe preamp was designed especially for acoustic guitars and can be used with input from piezoelectric, magnetic and passive pickups. This acoustic guitar preamp provides a range of key features, including a 3-band EQ that can be used to adjust the tone accord-ing to the environment and a super-low-noise design with a 120 dB S/N ratio and a –100 dBu noise floor.
Anti-feedback function with minimal effect on tone qualityThe anti-feedback function can quickly and effectively eliminate feedback during a per-formance.
Clean boost of up to 9 dBThe boost function can reduce the volume differences of fingerpicking, strumming chords and other guitar playing techniques, as well as increase amplification during so-los.
Introduction
4
Nam
es of parts
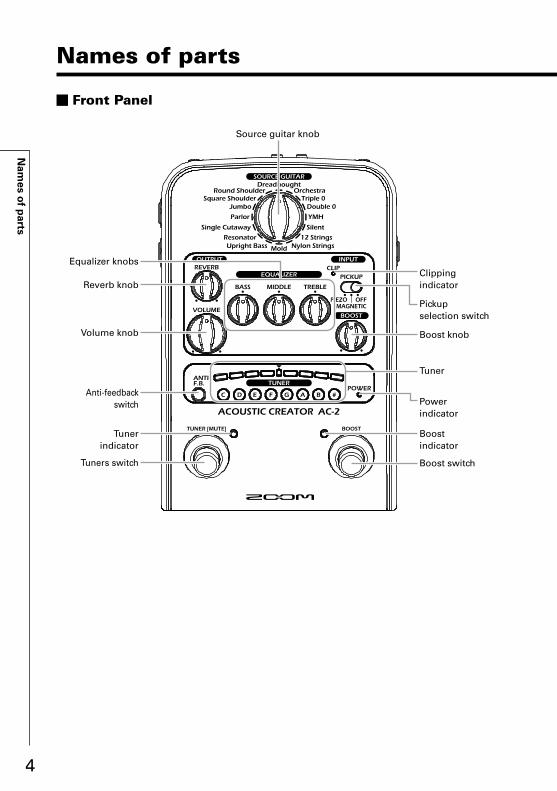
Front Panel
Names of parts
Source guitar knob
Clippingindicator
Boost knob
Pickupselection switch
Powerindicator
Boostindicator
Tunerindicator
Anti-feedback switch
Volume knob
Reverb knob
Boost switch
Tuner
Equalizer knobs
Tuners switch
5
Nam
es of parts
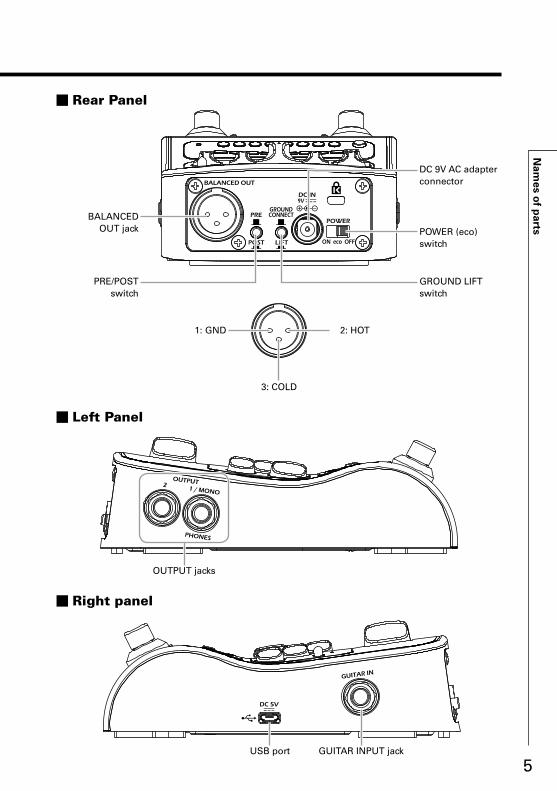
Rear Panel
Left Panel
Right panel
BALANCEDOUT jack
1: GND 2: HOT
3: COLD
OUTPUT jacks
PRE/POSTswitch
POWER (eco)switch
DC 9V AC adapter connector
GROUND LIFTswitch
USB port GUITAR INPUT jack

Acoustic guitar
PA system HeadphonesAcoustic guitar amp
6
Connecting a guitar/C
onnecting output devices
Connecting a guitar
Connecting output devices
Use a shielded cable to connect a guitar to the .
Connect the to a PA system, acoustic guitar amp or other output device. To use headphones, connect them to the 1/MONO/PHONES jack.

7
Turning the power on
Turning the power on
• Minimize the volume of the output device.
• Prepare the power source.
Using an AC adapterConnect the AD-16 adapter to the .
Using batteries Open the battery cover on the bottom of the unit and install batteries into the bat-tery compartment.
• Set the power switch to "ON" or "eco".
Power indicator(front panel)
Lit green: Remaining battery power okayLit red: Remaining battery power low
• Turn the output device on, and raise its volume.
POWER switch "eco" setting
The power will automatically turn off if unused for 10 hours.
If you want the power to stay on always, set the POWER switch to "ON".
NOTEThe power indicator lights red when the remaining battery power becomes low.Replace the batteries with new ones.
You can also use a USB cable to connect the to a computer and power it with USB bus power.
HINT
8
Setting the pickup type/S
etting the volume
Setting the pickup type
Setting the volume
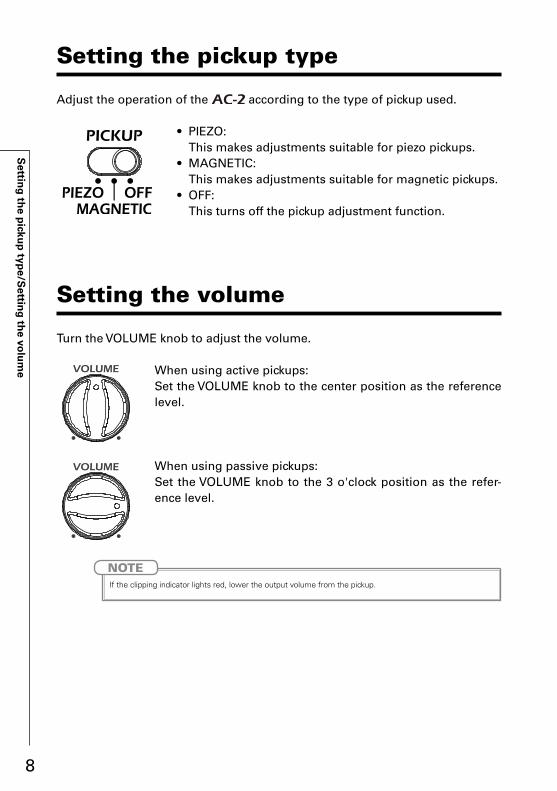
Adjust the operation of the according to the type of pickup used.
• PIEZO: This makes adjustments suitable for piezo pickups.• MAGNETIC: This makes adjustments suitable for magnetic pickups.• OFF: This turns off the pickup adjustment function.
Turn the VOLUME knob to adjust the volume.
When using active pickups:Set the VOLUME knob to the center position as the reference level.
When using passive pickups:Set the VOLUME knob to the 3 o'clock position as the refer-ence level.
NOTEIf the clipping indicator lights red, lower the output volume from the pickup.

9
Setting the source guitar type
Setting the source guitar type
By choosing a source guitar according to the guitar that you are using, body tone lost when using a pickup can be re-created, restoring the original rich and beautiful tone of your acoustic guitar.
Round Shoulder Dreadnought
Best for guitars with round shoulders, such as the Gibson J series.
Best for dreadnought guitars, such as the Martin D series.
Square Shoulder Orchestra
Best for guitars with square shoulders, such as the Gibson Hummingbird.
Best for orchestra guitars, such as the Martin OM series.
Jumbo Triple 0
Best for jumbo body guitars, such as the Gibson SJ series.
Best for 000 guitars, such as the Martin 000 series.
Parlor Double 0
Best for parlor guitars, such as the Gibson L series.
Best for 00 guitars, such as the Martin 00 series.
Single Cutaway YMH
Best for single cutaway guitars like those made by Taylor.
Best for special jumbo body guitars, such as the YAMAHA LL series.
Resonator Silent
Best for resonator guitars. Best for silent guitars that do not have resonant body cavities.
Upright Bass 12 Strings
Best for upright basses. Best for 12-string guitars.
Mold Nylon Strings
Best for molded resin guitars like those made by Ovation.
Best for classical guitars that use nylon strings.
10
Adjusting the equalization/A
djusting the reverb
Adjusting the equalization
Adjusting the reverb
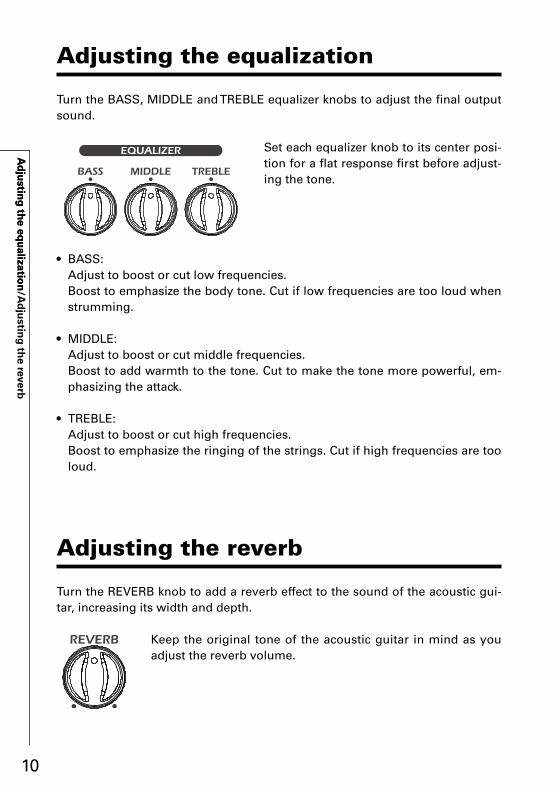
Turn the BASS, MIDDLE and TREBLE equalizer knobs to adjust the final output sound.
Set each equalizer knob to its center posi-tion for a flat response first before adjust-ing the tone.
• BASS: Adjust to boost or cut low frequencies. Boost to emphasize the body tone. Cut if low frequencies are too loud when
strumming.
• MIDDLE: Adjust to boost or cut middle frequencies. Boost to add warmth to the tone. Cut to make the tone more powerful, em-
phasizing the attack.
• TREBLE: Adjust to boost or cut high frequencies. Boost to emphasize the ringing of the strings. Cut if high frequencies are too
loud.
Turn the REVERB knob to add a reverb effect to the sound of the acoustic gui-tar, increasing its width and depth.
Keep the original tone of the acoustic guitar in mind as you adjust the reverb volume.
Adjusting the equalization

11
Using the boost function/U
sing the anti-feedback function
Using the boost function
Using the anti-feedback function
Turn the boost knob to amplify the volume during solos or to change the vol-ume when switching between strumming and fingerpicking. Use the BOOST switch to turn the boost ON and OFF.
Boost indicator (ON/OFF)
Press the anti-feedback switch to find and cut the frequency band that is caus-ing feedback to reduce it.
The feedback switch will blink while the feedback frequency band is being found. When the frequency band has been found, it will light and the anti-feedback function will become active.
OFF Finding ON
NOTEIf the sound distorts when the boost is on, turn the VOLUME knob to adjust the volume.
NOTEPress the anti-feedback switch again to turn the anti-feedback function off.

12
Using the tuner/S
etting the type of batteries used
Using the tuner
Setting the type of batteries used
Press the tuner switch to turn the tuner ON and OFF. Play the open string that you want to tune and the closest pitch name LED will light. The LED meter will show the pitch error.
Tunerindicator (ON/OFF)
When the pitch is confirmed, the LED at the center of the meter will light green and LEDs to the left and right will light red.
NOTEThe output is muted when the tuner is on. The standard pitch for middle A is fixed to 440Hz.
←Low pitch High pitch→
Set the type of battery used by the so that the remaining battery charge can be indicated accurately.
• Turn the power ON while pressing .
(The boost indicator blinks.)
• Press to set the type of battery used.
Power indicator(front panel)
• Press to confirm the setting. (The boost indicator stays lit.)
Lit green: Alkaline batteriesLit red: Nickel metal hydride batteries

13
Connecting audio equipm
ent
Connecting audio equipment
The can be connected to a mixer, recording device or other audio equip-ment that adjusts the sound balance.
Mixer
Recording device
Set when the signal is output from the BALANCED OUT jack.• PRE (button up): Output before processing by the .• POST (button down): Output after processing by the .
The BALANCED OUT jack can be connected or disconnected from the ground.• CONNECT (button up): Connect to the ground pin. • LIFT (button down): Disconnect the grounding pin from the
ground. This is effective if noise is caused by a ground loop.
14
Updating the firm
ware
Updating the firmware
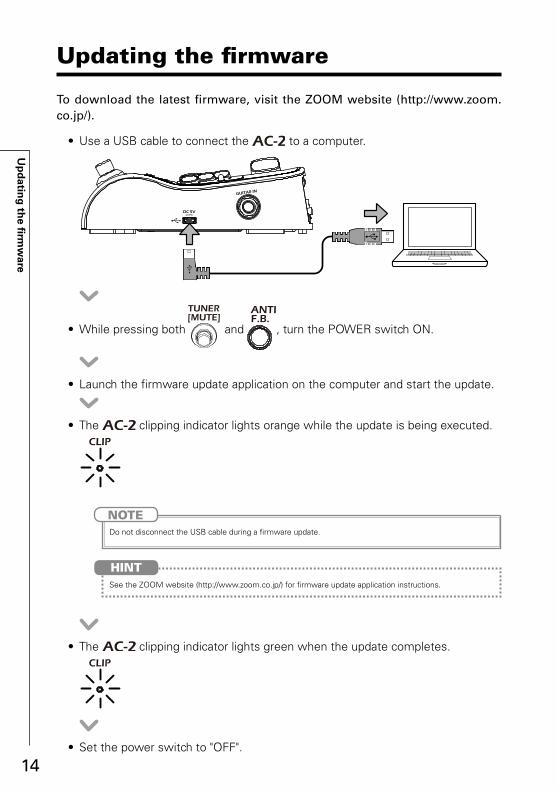
To download the latest firmware, visit the ZOOM website (http://www.zoom.co.jp/).
• Use a USB cable to connect the to a computer.
• While pressing both and , turn the POWER switch ON.
• Launch the firmware update application on the computer and start the update.
• The clipping indicator lights orange while the update is being executed.
• The clipping indicator lights green when the update completes.
• Set the power switch to "OFF".
NOTEDo not disconnect the USB cable during a firmware update.
See the ZOOM website (http://www.zoom.co.jp/) for firmware update application instructions.
HINT

15
Troubleshooting/Specifications
The unit will not power on
• Confirm that the POWER switch is set to
ON.
• If using batteries, confirm that they are
still charged.
There is no sound or output is very quiet
• Check the connections. (→ P6, P13)
• Sound will not be output in the tuner is on.
(→ P12)
There is a lot of noise
• Confirm that the shielded cable is not the
cause.
• Use a genuine ZOOM AC adapter.
The sound distorts strangely or has an odd timbre
• Adjust the amount of boost amplification.
(→ P11)
• Set the pickup selection correctly for the
type of pickup. (→ P8)
Batteries lose their charge quickly
• Confirm that you are not using manganese
batteries. Alkaline batteries should provide
about 3 hours of continuous operation.
• Confirm that the battery type setting is
correct. (→ P12)
Troubleshooting
Specifications
Source guitars 16 typesSampling frequency 44.1 kHzA/D conversion 24-bit 128× oversamplingD/A conversion 24-bit 128× oversamplingSignal processing 32-bitFrequency characteristics 20 Hz–20 kHz (+1 dB/−3 dB) (10 kΩ load)Input Standard mono phone jack
Rated input level: −20 dBu Input impedance: 10 MΩ
Outputs 1/MONO/PHONES Standard stereo phone jack (combined line/headphone) Maximum output level: Line +7 dBu (10 kΩ or more output impedance) Headphones 8 mW + 8 mW (32 Ω load)
2 Standard mono phone jack Maximum output level: Line +7 dBu (10 kΩ or more output impedance)
BALANCED OUT XLR jack Output impedance: 100 Ω (HOT-GND, COLD-GND), 200 Ω (HOT-COLD) PRE/POST (switchable) GND LIFT (switchable)
S/N (equivalent input noise) 120 dBuNoise floor (residual noise) −100 dBuPower AC adapter: 9 V DC 500 mA center negative (ZOOM AD-16)
Batteries: 2 AA (about 3 hours continuous operation time using alkaline batteries)
External dimensions 158 mm (D) × 107 mm (W) × 52 mm (H)USB USB MIDI USB Micro-BWeight 570 g (Not including batteries)
Note: 0 dBu = 0.775 V

Z2I-2968-01
ZOOM CORPORATION4-4-3 Kanda-surugadai, Chiyoda-ku, Tokyo 101-0062 Japan
http://www.zoom.co.jp


![MELSEC iQ-F FX5 User's Manual (Startup) · PDF file5 [STARTUP AND MAINTENANCE PRECAUTIONS] [OPERATION PRECAUTIONS] [DISPOSAL PRECAUTIONS] Use the battery for memory backup in conformance](https://static.fdocuments.in/doc/165x107/5ab85bac7f8b9ad13d8c709b/melsec-iq-f-fx5-users-manual-startup-5-startup-and-maintenance-precautions.jpg)