
Operation Guide - Panasonic · 2 Click “F11:Settings” ... magazine discard result, and settles...
30
VQT5E39-1 Operation Guide (Handy terminal) DATA ARCHIVER Manager Windows-compatible Thank you for adopting Panasonic DATA ARCHIVER Manager. This document describes how to use the Handy terminal function of the DATA ARCHIVER Manager.
Transcript of Operation Guide - Panasonic · 2 Click “F11:Settings” ... magazine discard result, and settles...

VQT5E39-1
Operation Guide(Handy terminal)
DATA ARCHIVER ManagerWindows-compatible
Thank you for adopting Panasonic DATA ARCHIVER Manager.
This document describes how to use the Handy terminal function of the DATA ARCHIVER Manager.

2
Overview
Overview............................................................ 3
Operations possibleusing a handy terminal .................................... 4
Getting started
Setup.................................................................. 5Handy terminal setup.............................................. 5Client PC setup....................................................... 6Pasting a one-dimensional or two-dimensionalbarcode to a shelf ................................................... 7
Basic operation
Use of Web interface ........................................ 8Web interface handy terminal menu list ................. 8
Operation of DAM Shelf Management Data Transfer ............................................................. 9
Connecting the handy terminal to the client PC ..... 9Sending the data to the handy terminal.................. 9Receiving the data from the handy terminal ......... 10Sending back the data received fromthe handy terminal ................................................ 10
Settings and management
Searching a magazine.................................... 11
Confirming a magazine barcode ................... 14
Changing a magazine storage shelf ............. 15
Magazine inventory ........................................ 18
Discarding a magazine................................... 23
Transferring a list of operators ..................... 26
FAQ Troubleshooting
FAQ.................................................................. 27
Appendix
Appendix ......................................................... 28Software operating environment........................... 28About handy terminal............................................ 29
Table of contents

Overview
Overview
The DATA ARCHIVER Manager employs a handy terminal (not supplied) for reading one-dimensional or two-dimensional codes for offline magazines and magazine storage shelves to manage them.This manual deals with the handy terminal function of the Web interface, magazine shelf management software DAM Shelf Management to be installed on the handy terminal, and data transfer software DAM Shelf Management Data Transfer for data transfer between the client PC and the handy terminal.For information on how to use the handy terminal, refer to the pertinent handy terminal manual.For information specific to models of available handy terminal, refer to “About handy terminal” ( 29).
* The shelves may be boxes, steps within a shelf or rooms. According to your use environment, interpret them asboxes, steps or rooms.
Description of this guide≥ On the subsequent pages, the product name is referred to as follows.
DATA ARCHIVER Manager DA Manager≥ mark: Refer to a pertinent description in “DATA ARCHIVER Manager Operation Guide”.
SoftwareDAM Shelf
Management Data Transfer
Client PC (for administrators)
Magazine
Web browserfor administrator
Readout of one-dimensional ortwo-dimensional codes
USB port
Handy terminal (not supplied)
SoftwareDAM Shelf
Management
Shelf*
DA Manager
File
Operation Guide
3
Overview
Operations possible using a handy terminal
The following table lists only work items using the handy terminal with respect to work items for magazine management and magazine shelf management. Install dedicated software on the client PC and the handy terminal and use it together with a Web interface menu ( 8).
≥ To use respective functions, it may be necessary in advance to perform such operations as magazine registration, shelf registration, magazine storage shelf setup, inventory title creation, and operator registration. Refer to
“Magazine Management” and “Magazine Shelf Management” and take proper action as necessary.
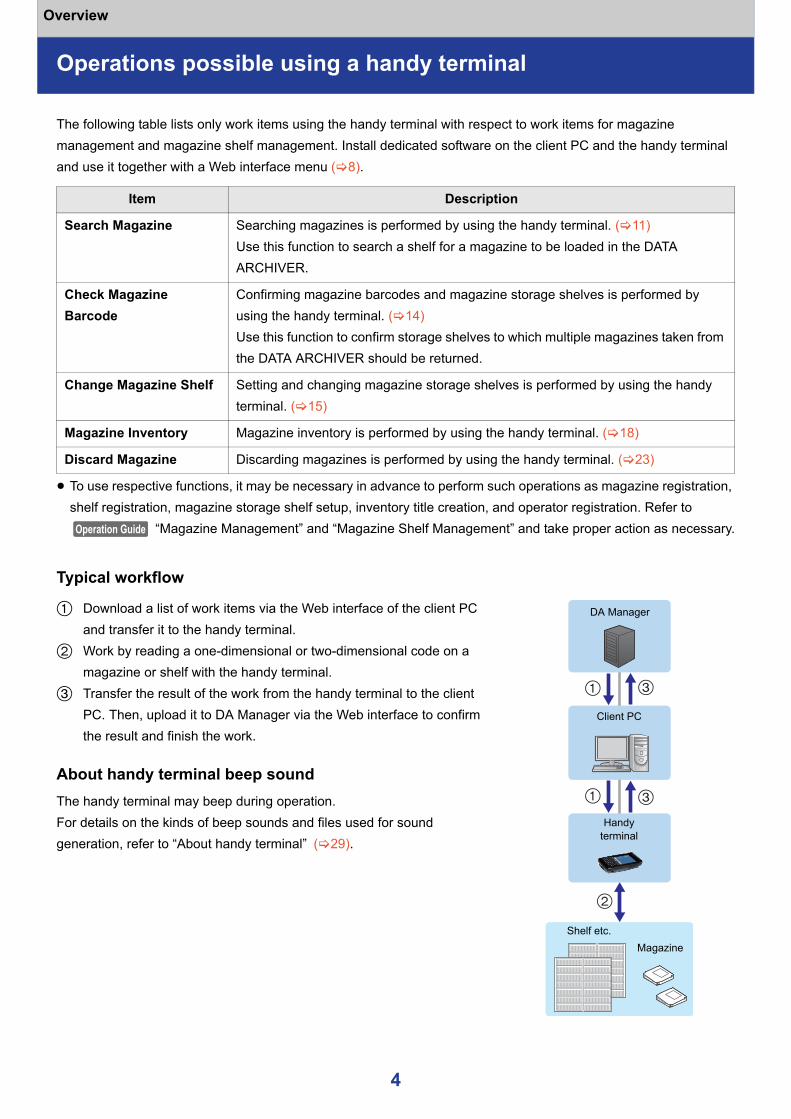
Typical workflow
1 Download a list of work items via the Web interface of the client PC and transfer it to the handy terminal.
2 Work by reading a one-dimensional or two-dimensional code on a magazine or shelf with the handy terminal.
3 Transfer the result of the work from the handy terminal to the client PC. Then, upload it to DA Manager via the Web interface to confirm the result and finish the work.
About handy terminal beep soundThe handy terminal may beep during operation.For details on the kinds of beep sounds and files used for sound generation, refer to “About handy terminal” ( 29).
Item Description
Search Magazine Searching magazines is performed by using the handy terminal. ( 11)Use this function to search a shelf for a magazine to be loaded in the DATA ARCHIVER.
Check Magazine Barcode
Confirming magazine barcodes and magazine storage shelves is performed by using the handy terminal. ( 14)Use this function to confirm storage shelves to which multiple magazines taken from the DATA ARCHIVER should be returned.
Change Magazine Shelf Setting and changing magazine storage shelves is performed by using the handy terminal. ( 15)
Magazine Inventory Magazine inventory is performed by using the handy terminal. ( 18)
Discard Magazine Discarding magazines is performed by using the handy terminal. ( 23)
Operation Guide
Client PC
Magazine
Handy terminal
Shelf etc.
DA Manager
4

Getting started
Setup
Handy terminal setupPrepare at least one handy terminal.When multiple handy terminals are used, they may be of different models.For details on the handy terminal setup operations, refer to the pertinent handy terminal manuals.
Install the magazine shelf management software DAM Shelf Management on each handy terminal for magazine search and magazine inventory, etc.
PreparationConfirm that the following applications have been installed on the client PC.≥ Microsoft ActiveSync (Windows XP) or
Microsoft Windows Mobile Device Center (Windows Vista, Windows 7)When the application has not been installed, install it on the client PC according to the OS in use.
Installation of DAM Shelf Management1 Connect the handy terminal to the client PC ( 9)2 Install .NET Compact Framework 3.5 or newer on the client PC and the handy terminal
For details on how to download and install .NET Compact Framework 3.5 or newer, refer to the Microsoft website.
3 Insert the installation medium to the client PC and expand the DAM Shelf Management file in a desired folderFor the DAM Shelf Management file, refer to “About handy terminal” ( 29).
4 Save the expanded software in the install folder of the handy terminal by using Microsoft ActiveSync or Microsoft Windows Mobile Device Center≥ For the install folder, refer to “About handy terminal” ( 29).≥Microsoft ActiveSync (Windows XP)1 Click “Explorer” on the screen of Microsoft ActiveSync2 Copy the software expanded in step 3 to the install folder
≥Microsoft Windows Mobile Device Center (Windows Vista, Windows 7)1 Select “File Management”, then click “Browse the contents of your device”2 Copy the software expanded in step 3 to the install folder
5 If necessary, make a shortcut on the desktop of the handy terminal1 Double tap “My Device” on the desktop of the handy terminal2 Double tap the install folder3 Double tap “DAMShelfManagement” folder4 Double tap “exe” folder5 Tap and select “DAMSM.exe”6 Select “File” “Send To” “Desktop as Shortcut” from the menu bar
5

Getting started Setup
Client PC setupInstall the software DAM Shelf Management Data Transfer on the client PC to transfer data to and receive it from the handy terminal.≥ DAM Shelf Management Data Transfer has been constructed using the Microsoft .NET Framework.
PreparationConfirm that the following applications have been installed on the client PC.≥ Microsoft .NET Framework 2.0, 3.0 or 3.5≥ Microsoft ActiveSync (Windows XP) or
Microsoft Windows Mobile Device Center (Windows Vista, Windows 7)When the applications have not been installed, install them on the client PC according to the OS in use.
Installation of DAM Shelf Management Data Transfer1 Insert the installation medium to the client PC2 Double click the DAM Shelf Management Data Transfer file, then click “Run”
For the DAM Shelf Management Data Transfer file, refer to “About handy terminal” ( 29).3 Follow on-screen instructions to install DAM Shelf Management Data Transfer
Upon completion of software installation, an icon appears on the desktop.
About folders for sending and receiving dataBy default, the following folders are used as those for sending and receiving data.≥ “Folder for sending data”: (My Documents folder)\DAMSMDT\Send Data≥ “Folder for receiving data”: (My Documents folder)\DAMSMDT\Receive Data
Folders are configured as follows. Note that they should be used according to the functions to be used.
Change Shelf
Check Barcode
Discard
Inventory
Operator
Search
Temp
“Change Magazine Shelf” ( 15)
“Check Magazine Barcode” ( 14)
“Discard Magazine” ( 23)
“Magazine Inventory” ( 18)
“Operator List” ( 26)
“Search Magazine” ( 11)
“Folder for sending data” This folder stores files downloaded from DA Manager for transfer to a handy terminal. The subordinate folders of this folder are classified by function. Put each file in a proper subordinate folder according to the function to be used.
“Folder for receiving data” This folder stores files downloaded from a handy terminal for transfer to DA Manager.
This folder is created as needed when DAM Shelf Management Data Transfer is being used.
6

Getting started Setup
Confirming and changing the folder for sending data or the folder for receiving data1 Start DAM Shelf Management Data Transfer
2 Click “F11:Settings”The setting screen will be displayed.
3 Set up the following itemsA Send Data Folder
Click “Send Data Folder” and select the folder for sending data. A new folder can be created and selected as necessary.
B Receive Data FolderClick “Receive Data Folder” and select the folder for receiving data. A new folder can be created and selected as necessary.
4 Click “OK”Subordinate folders are created under the folder for sending data ( 6).≥ Because files in the folder before the change are not moved, move them as necessary.
Pasting a one-dimensional or two-dimensional barcode to a shelfA one-dimensional or two-dimensional barcode pasted onto each shelf can be scanned by the handy terminal for shelf management.≥ The specifications for pasting the one-dimensional or two-dimensional barcode onto each shelf are identical to
those for pasting the one-dimensional or two-dimensional code in each magazine. For details, refer to DATA ARCHIVER operator guide.
≥ The contents of a one-dimensional or two-dimensional barcode to be pasted onto each shelf should accord with a shelf name to be registered in DA Manager. For details on how to resister a shelf in DA Manager, refer to
“Magazine shelf management Registering, changing, and deleting a shelf”.≥ Be sure to use different one-dimensional or two-dimensional codes for multiple shelves.
Operation Guide
7

Basic operation
Use of Web interface
When using a handy terminal menu of DA Manager, access the Web interface via the Web browser.For details on setting up the Web browser and accessing and using the Web interface, refer to “Use of Web interface”.
Web interface handy terminal menu list
Menu Item Description
Handy Terminal Search Magazine Downloads a list of magazines to be searched. ( 11)
Check Magazine Barcode
Downloads a list of magazines for which barcodes and storage shelf information should be confirmed. ( 14)
Change Magazine Shelf
Downloads a list of shelves, uploads a magazine shelf change result, and settles the change. ( 15, 17)
Magazine Inventory Downloads a list of magazines to be inventory checked, uploads an inventory result, and settles the inventory. ( 18, 22)
Discard Magazine Downloads a list of magazines to be discarded, uploads a magazine discard result, and settles the magazine discard processing. ( 23, 25)
Operator List Downloads a list of operators for changing a magazine storage shelf, performing magazine inventory, and discarding the magazine through the use of the handy terminal. ( 26)
Operation Guide
8

Basic operation
Operation of DAM Shelf Management Data Transfer
The application DAM Shelf Management Data Transfer is used for data transfer between the client PC and the handy terminal.This application is used to transfer a file downloaded from DA Manager to the client PC to the handy terminal or transfer a file to be uploaded to DA Manager from the handy terminal to the client PC.≥ Before transferring a data between the client PC and the handy terminal, quit DAM Shelf Management on the
handy terminal.
Connecting the handy terminal to the client PC
Windows XP1 Connect a USB port of the client PC to the handy terminal with a connection cable ( 29)
Once USB detection takes place on the client PC and the handy terminal, ActiveSync starts automatically.2 Select “No” for “Set Up a Partnership”, then click “Next”
Windows Vista, Windows 71 Connect a USB port of the client PC to the handy terminal with a connection cable
Once USB detection takes place on the client PC and the handy terminal, Windows Mobile Device Center starts automatically.
2 Click “Connect without setting up your device”
Sending the data to the handy terminal1 Start DAM Shelf Management Data Transfer
2 Select checkbox A to specify the data you wish to send to the handy terminal3 Click “F1:Send”4 Click “Yes”
Note≥ Sending data causes data deletion from a folder for sending data on the client PC.≥ Sending data results in an alarm display so long as there remains previous data on the handy terminal.
Sending data in spite of the alarm causes the previous data to be deleted.
9

Basic operation Operation of DAM Shelf Management Data Transfer
Receiving the data from the handy terminal1 Start DAM Shelf Management Data Transfer
2 Select checkbox A to specify the data you wish to receive from the handy terminal3 Click “F5:Receive”4 Click “Yes”
Sending back the data received from the handy terminal1 Start DAM Shelf Management Data Transfer2 Select checkbox A to specify the data you wish to send back to the handy terminal3 Click “F6:Send back”4 Click “Yes”
Note≥ Receiving data causes data deletion from the handy terminal.≥ Receiving data results in an alarm display so long as there remains previous data on the client PC. Receiving
data in spite of the alarm causes the previous data to be deleted.≥ If it becomes necessary to redo work on a handy terminal after data reception, send it back (refer to the
following description).
Note≥ Sending back data causes data deletion from a folder for receiving data on the client PC.≥ Sending back data results in an alarm display so long as there remains previous data on the handy terminal.
Sending back data in spite of the alarm causes the previous data to be deleted.
10

Settings and management
Searching a magazine
To search a shelf for a magazine to be loaded in the DATA ARCHIVER, you can search the magazine from the shelf by using the handy terminal.
1 Connect the handy terminal to the client PC ( 9)2 Log in to the Web interface as a magazine or system administrator3 Select “Handy Terminal” “Search Magazine” from the menu
The Search Magazine screen will be displayed.
4 Select a means for searching for a target magazine via either “Select the magazines from the Magazine Load Request List.” or “Select the magazines from the Magazine List.” and then click “Next”e.g., Search Magazine (Magazine Load Request List) screen
5 Use the search and sort features to search the desired magazine≥ For the information on list items, refer to “Magazine management Checking a request list of
magazine loading” or “Magazine management Viewing a magazine list”.6 Select checkbox of the magazine you wish to search7 Click “Download”8 Click “OK”
≥ As a file storage destination, specify “(Folder for sending data)\Search”. ( 6)9 Use the application DAM Shelf Management Data Transfer to transfer a downloaded file to the handy
terminal ( 9)≥ Specify “Magazine Search” for data to be sent.
1 Transferring the list of magazines for search to the handy terminal
Operation Guide
11

Settings and management Searching a magazine
Scan a magazine barcode with a handy terminal to do a search. Even if a magazine is searched by mistake, the searched magazine can be restored to an unsearched one.
1 Remove the handy terminal from the PC and move to the location where the magazines are stored2 Start DAM Shelf Management in the handy terminal
The menu screen will be displayed.≥ To quit DAM Shelf Management, tap the icon.
3 Select “Search” from the menu
A list of magazines to be searched (information transferred from the DA Manager) is displayed.≥ Unsearched magazines are listed under the “Unchecked” tab.≥ Searched magazines are listed under the “Checked” tab.
4 Use either of the following methods for searching magazinesSearch by barcode scanning1 Tap “Unchecked” tab, then tap “Start Scan”, and scan the magazine
barcodeA beep sound indicating scan success is generated if the magazine in the list is scanned and then be colored in green at the top of the list. Search for the magazine with this information.≥ When no list is displayed even after the beep sound indicating scan
success is generated, magazines are listed under the “Checked” tab.≥ When a scanned barcode is for other than the listed magazines, a beep sound indicating scan failure is
generated. In this case, the magazine of the scanned barcode is not displayed under the “Checked” and “Unchecked” tabs.
2 Tap the information of the magazine you foundThe confirmation screen will be displayed.
3 Tap “OK”The magazine is listed under the “Checked” tab as a searched magazine.
≥ When a barcode of another magazine is scanned by skipping operations 2 and 3, a magazine indicated in green is moved down by one in the list and its display color is restored to the previous one. To do a magazine search without fail, it is recommended to perform operations 2 and 3 each time a magazine is found by operation 1.
2 Searching the magazine by using the handy terminal
Menu screen
12

Settings and management Searching a magazine
Visual search
1 Search visually the magazine listed under the “Unchecked” tab2 Tap the information of the magazine you found
The confirmation screen will be displayed.3 Tap “OK”
The magazine is listed under the “Checked” tab as a searched magazine.5 Tap “OK” to finish searching
Restoring a searched magazine to an unsearched oneWhen a magazine is searched by mistake and should be restored to an unsearched one, perform the following steps in place of step 4.1 Tap the “Checked” tab to display a searched magazine list
≥ If necessary, tap “Start Scan” and search a magazine to be restored to an unsearched one. A beep sound indicating scan success is generated if the magazine in the list is scanned and then be colored in green at the top of the list. Search for the magazine with this information.
2 Tap information on the magazine to be restored to an unsearched oneThe confirmation screen will be displayed.
3 Tap “OK”The magazine is listed under the “Unchecked” tab as an unsearched magazine.
13

Settings and management
Confirming a magazine barcode
To confirm storage shelves to which multiple magazines taken from the DATA ARCHIVER should be returned, you can read the magazine barcode by using the handy terminal and confirm the magazine storage shelf information.
1 Connect the handy terminal to the client PC ( 9)2 Log in to the Web interface as a magazine or system administrator3 Select “Handy Terminal” “Check Magazine Barcode” from the menu
The Check Magazine Barcode screen will be displayed.4 Click “Download”5 Click “OK”
≥ As a file storage destination, specify “(Folder for sending data)\Check Barcode”. ( 6)6 Use the application DAM Shelf Management Data Transfer to transfer a downloaded file to the handy
terminal ( 9)≥ Specify “Check Barcode” for data to be sent.
1 Remove the handy terminal from the PC and move to the location where the magazines are stored2 Start DAM Shelf Management in the handy terminal
The menu screen will be displayed. ( 12)3 Select “Check Barcode” from the menu4 Tap “Start Scan” to scan the barcode of the magazine
When the magazine is on the list that was transferred from the DA Manager, the magazine ID and magazine storage shelf is displayed. When a magazine not on the list is scanned, a beep sound indicating scan failure is generated, and “Unknown” is indicated for the magazine ID and storage shelf.
5 Tap “OK” to finish confirming barcode
1 Transferring the list of magazines to the handy terminal
2 Reading the magazine barcode by using the handy terminal
14
Settings and management
Changing a magazine storage shelf
Set or change information about a magazine storage shelf with a handy terminal as follows.≥ Set a storage shelf information of the magazine for which no storage shelf information has been set even though
the magazine is stored in a shelf.≥ Change a storage shelf information of the magazine for which storage shelf information has been set.For details of how to set the magazine storage shelf without using the handy terminal and register the shelf, refer to
“Magazine shelf management Changing a magazine storage shelf” and “Magazine shelf management Registering, changing, and deleting a shelf”.
1 Connect the handy terminal to the client PC ( 9)2 Log in to the Web interface as a magazine or system administrator3 Select “Handy Terminal” “Change Magazine Shelf” from the menu
The Change Magazine Shelf screen will be displayed.
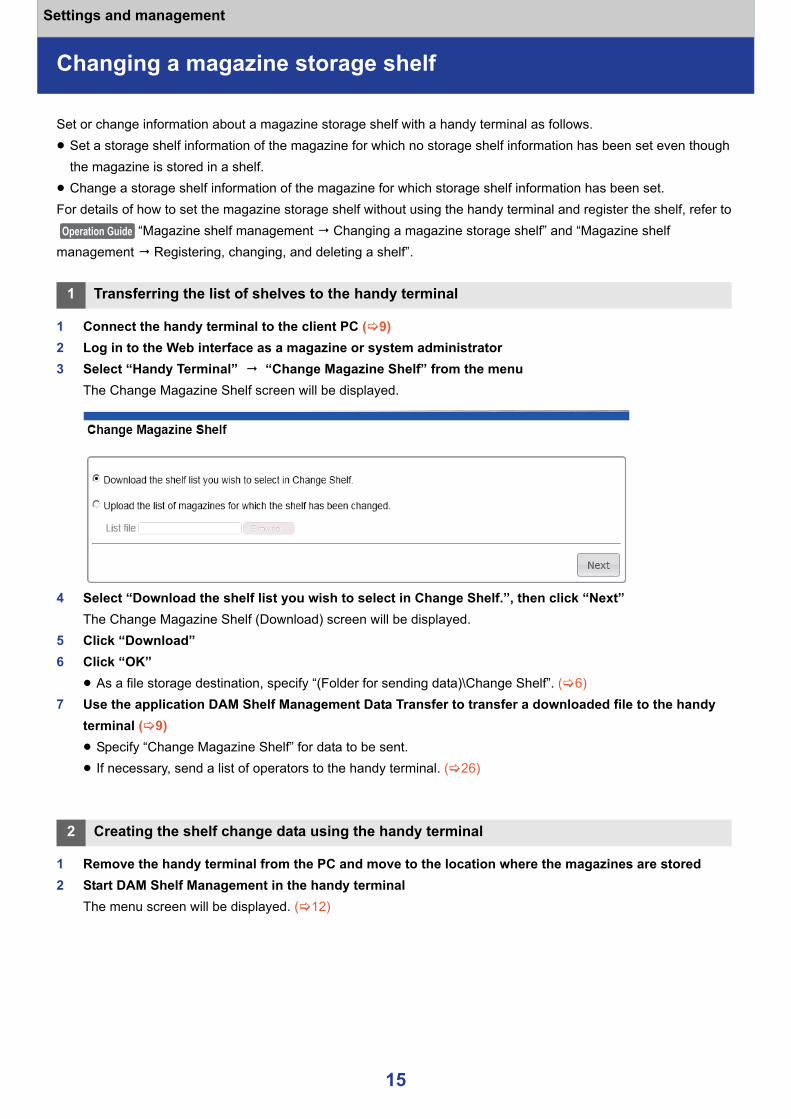
4 Select “Download the shelf list you wish to select in Change Shelf.”, then click “Next”The Change Magazine Shelf (Download) screen will be displayed.
5 Click “Download”6 Click “OK”
≥ As a file storage destination, specify “(Folder for sending data)\Change Shelf”. ( 6)7 Use the application DAM Shelf Management Data Transfer to transfer a downloaded file to the handy
terminal ( 9)≥ Specify “Change Magazine Shelf” for data to be sent.≥ If necessary, send a list of operators to the handy terminal. ( 26)
1 Remove the handy terminal from the PC and move to the location where the magazines are stored2 Start DAM Shelf Management in the handy terminal
The menu screen will be displayed. ( 12)
1 Transferring the list of shelves to the handy terminal
2 Creating the shelf change data using the handy terminal
Operation Guide
15

Settings and management Changing a magazine storage shelf
3 Select “Change Shelf” from the menu
The selecting operator screen will be displayed.A Magazine List
Use the “Magazine List” to confirm a magazine whose storage shelf has been changed. Tapping “Magazine List” causes the magazine shelf changing states of all shelves to be displayed. When there are many magazines, it is possible to tap “Start Scan” to search for the desired magazine.
4 Select the operator from the drop-down list, then tap “Change Shelf”≥ When there is no need for recording an operator, leave this field blank.
The screen for selecting a shelf as a change destination is displayed.A Clear
A shelf selected as a change destination is cleared with spaces.
5 Tap “Start Scan” to scan a barcode on a shelf set as a change destination or select a shelf as a change destination via a drop-down listThe shelf barcode will be displayed.≥ When a shelf not on the list has been scanned by mistake, a beep sound indicating
scan failure is generated and scanning is terminated. Retry scanning as necessary.≥ When clearing magazine storage shelf information, leave its shelf
information blank.6 Tap “OK”
The magazine scan screen will be displayed.7 Tap “Start Scan” to scan a barcode of a magazine whose shelf is changed
≥ When a barcode of a magazine not requiring a shelf change has been scanned by mistake, clear magazine information for the shelf change magazine according to the following procedure.1 If necessary, scan and search the magazine whose information is
cleared≥ A beep sound indicating scan success is generated if the magazine in
the list is scanned and then be colored in green at the top of the list. Search for the magazine with this information.
2 Tap magazine information to be clearedThe confirmation screen will be displayed.
3 Tap “OK”The corresponding magazine is deleted from a shelf change list and then its information is never displayed.
8 Tap “OK” to quit a shelf change operation for the current shelfThe magazine shelf change data is created.
9 Repeat the steps 5 to 8 as required to make a shelf change on each of the other shelves10 Return to the menu screen and tap the icon to quit DAM Shelf Management
16

Settings and management Changing a magazine storage shelf
1 Connect the handy terminal to the client PC ( 9)2 Receive data from the handy terminal via the application DAM Shelf Management Data Transfer ( 10)
≥ Receive “Change Magazine Shelf” data. The data received is saved as “ChangeShelfList.csv” in the “Folder for receiving data”.
3 Log in to the Web interface as a magazine or system administrator4 Select “Handy Terminal” “Change Magazine Shelf” from the menu
The Change Magazine Shelf screen will be displayed. ( 15)5 Select “Upload the list of magazines for which the shelf has been changed.” and then click “Browse”*
to select a file to be uploaded*Note that the button name varies depending on a Web browser in use.≥ Select “ChangeShelfList.csv” in the “Folder for receiving data”.
6 Click “Next”The magazine shelf change data is transferred to DA Manager, and the magazine shelf change list screen is displayed.≥ Magazines not registered in DA Manager are all ignored.
A Column heading
≥ For more information on list items other than the above, refer to “Magazine management Viewing a magazine list”.
7 When the magazines are the right ones for the storage shelf change, click “Change”8 Click “OK”
The magazine storage shelf changes in DA Manager are executed.
3 Transferring the shelf change data to the DA Manager
Date: Indicates the date and time when a storage shelf was changed. (This information is not stored in DA Manager.)
Operator: Indicates the operator who made the storage shelf change. (This information is not stored in DA Manager.)
Operation Guide
17

Settings and management
Magazine inventory
This section describes how to check the magazine inventory using the handy terminal.For details of how to check the magazine inventory without using the handy terminal, refer to
“Magazine shelf management Magazine inventory”.
1 Connect the handy terminal to the client PC ( 9)2 Log in to the Web interface as a magazine or system administrator3 Select “Handy Terminal” “Magazine Inventory” from the menu
The Magazine Inventory screen will be displayed.
4 Select “Select the magazines for an inventory check.”, then click “Next”The Magazine Inventory (Inventory Title) screen will be displayed.
PreparationRefer to “Magazine shelf management Displaying and editing an inventory title” to prepare an inventory title in advance.
1 Transferring the list of magazines to be checked to the handy terminal
Operation Guide
Operation Guide
18

Settings and management Magazine inventory
5 Click the title for which the inventory should take placeThe Check Inventory screen is displayed to display a list of magazines not subjected to an inventory.
6 Use the search and sort features to narrow down magazines for inventory checking≥ For the information on list items, refer to “Magazine shelf management Displaying and
editing an inventory title”.7 Click “Download”8 Click “OK”
A list of narrowed down magazines is downloaded.≥ As a file storage destination, specify “(Folder for sending data)\Inventory”. ( 6)
9 Use the application DAM Shelf Management Data Transfer to transfer a downloaded file to the handy terminal ( 9)≥ Specify “Magazine Inventory” for data to be sent.≥ If necessary, send a list of operators to the handy terminal. ( 26)
1 Remove the handy terminal from the PC and move to the location where the magazines are stored2 Start DAM Shelf Management in the handy terminal
The menu screen will be displayed. ( 12)3 Select “Inventory” from the menu
The selecting operator screen will be displayed.A Magazine List
Use “Magazine List” to confirm the remaining magazine not subject to inventory checking over all storage shelves for inventory or search for the magazine. Tapping “Magazine List” causes the inventory states of all shelves to be displayed. It is possible to tap “Search” to search for the desired magazine. ( 12)
2 Checking the magazine inventory using the handy terminal
Operation Guide
19

Settings and management Magazine inventory
4 Select the operator from the drop-down list, then tap “Check Inventory”≥ When there is no need for recording an operator, leave this field blank.
A screen for selecting a shelf for inventory checking is displayed.A Start Scan
Tap and scan the shelf barcode if necessary. A beep sound indicating scan success is generated if the shelf in the list is scanned and then be colored in green at the top of the list.
5 Tap a shelf for inventory checking
A list of magazines to be checked (information transferred from the DA Manager) is displayed.≥ Unchecked magazines are listed under the “Unchecked” tab.≥ Checked magazines are listed under the “Checked” tab.
6 Use either of the following methods for inventory checking≥Tap “Start Scan” to scan a barcode of a magazine
A beep sound indicating scan success is generated if the magazine in the list is scanned and the scanned magazine is indicated in a list under the “Checked” tab as an inventory checked magazine.
≥Tap information on a magazine in a list under the “Unchecked” tabThe confirmation screen will be displayed.≥ Tap “Search” to conduct a magazine search according to the selected
magazine information. ( 12)≥ Tap “Inventory” to be indicated in a list under the “Checked” tab as an inventory checked magazine.
In any of the methods, a beep sound is generated to indicate the completion of inventory checking when all the magazines listed under the “Unchecked” tab are processed.
≥ When a magazine has been checked as inventory by mistake, perform the following procedure to restore the inventory-checked magazine to an inventory-unchecked magazine.1 Tap the “Checked” tab to display an inventory checked magazine list≥ If necessary, tap “Start Scan” and scan a magazine to be restored to an unchecked one. A beep sound
indicating scan success is generated if the magazine in the list is scanned and then be colored in green at the top of the list. Search for the magazine with this information.
2 Tap information on the magazine to be restored to an unchecked oneThe confirmation screen will be displayed.
3 Tap “OK”The magazine will be indicated in a list under the “Unchecked” tab as an inventory unchecked magazine.
20

Settings and management Magazine inventory
7 Tap “OK” to quit an inventory checking operation for the current shelfThe magazine inventory data is created.
8 Repeat steps 5 to 7 as required to complete inventory checking on all shelves9 Return to the menu screen and tap the icon to quit DAM Shelf Management
When magazine information is indicated in red in a list under the “Unchecked” tabA magazine indicated in red indicates that an actual shelf for storing the magazine (shelf under inventory checking) does not match the current setting information for the magazine. If a magazine ID or a storage shelf is indicated, the magazine concerned is subject to current inventory checking. On the other hand, if “Unknown” is indicated for a magazine ID or a storage shelf, the magazine concerned is not subject to current inventory checking. Check whether the magazine should be subject to current inventory checking and perform the following procedure.
For magazines subjected to current inventory checkingDecide whether to perform inventory checking on a shelf actually storing a magazine or to move the magazine to a set storage shelf.1 Tap the magazine information shown in red
The Magazine Check screen will be displayed.≥ Tap “Search” to conduct a magazine search according to the
selected magazine information.≥ When inventory checking takes place on a shelf under inventory checking
Perform the following procedure while keeping a magazine on a shelf actually storing the magazine.2 Tap “Inventory”
A magazine is indicated in a list under the “Checked” tab as an inventory checked magazine on the current shelf.≥ To change a magazine storage shelf, run “Changing a magazine
storage shelf” ( 15).≥ When inventory checking does not take place on a shelf under inventory checking
Move the magazine to a set storage shelf and perform the following procedure.2 Tap “Clear”
The inventory checked state of a magazine is cleared and the magazine is deleted from a list under the “Unchecked” tab.
For magazines not subject to current inventory checkingPerform the following procedure, and confirm storage shelf information for the magazine concerned in DA Manager, and then move the magazine to the set storage shelf.
1 Tap the magazine information shown in redThe confirmation screen will be displayed.
2 Tap “OK”The inventory checked state of a magazine is cleared and the magazine is deleted from a list under the “Unchecked” tab.
21

Settings and management Magazine inventory
1 Connect the handy terminal to the client PC ( 9)2 Receive data from the handy terminal via the application DAM Shelf Management Data Transfer ( 10)
≥ Receive “Magazine Inventory” data. The data received is saved as “InventoryList.csv” in the “Folder for receiving data”.
3 Log in to the Web interface as a magazine or system administrator4 Select “Handy Terminal” “Magazine Inventory” from the menu
The Magazine Inventory screen will be displayed. ( 18)5 Select “Upload the list of magazines for which the inventory has been checked.” and then click
“Browse”* to select a file to be uploaded*Note that the button name varies depending on a Web browser in use.≥ Select “InventoryList.csv” in the “Folder for receiving data”.
6 Click “Next”The magazine inventory data is transferred to DA Manager, and the magazine inventory list screen is displayed.
7 Click “Inventory”8 Click “OK”
The magazines of the list changes to those subjected to an inventory in DA Manager.
If necessary, refer to “Magazine shelf management Displaying and editing an inventory title” and finish the inventory.
3 Transferring the inventory data to the DA Manager
Operation Guide
22

Settings and management
Discarding a magazine
This section describes how to discard a magazine using the handy terminal.For details of how to discard without using the handy terminal, refer to “Magazine management Discarding a magazine”.
1 Connect the handy terminal to the client PC ( 9)2 Log in to the Web interface as a magazine or system administrator3 Select “Handy Terminal” “Discard Magazine” from the menu
The Discard Magazine screen will be displayed.
4 Select “Select the magazines to be discarded”, then click “Next”The Discard Magazine (Download) screen will be displayed.
Note≥ When a magazine is discarded, the database information is all deleted and the magazine is not managed by
DA Manager.≥ When a magazine is discarded, care should be taken not to discard an incorrect one by mistake. Once a
magazine is discarded, it cannot be registered in the system again.
1 Transferring the list of magazines to be discarded to the handy terminal
Operation Guide
23

Settings and management Discarding a magazine
5 Use the search and sort features to search the desired magazine≥ For the information on list items, refer to “Magazine management Viewing a magazine list”.
6 Select checkbox of the magazine you wish to discard7 Click “Download”8 Click “OK”
≥ As a file storage destination, specify “(Folder for sending data)\Discard”. ( 6)9 Use the application DAM Shelf Management Data Transfer to transfer a downloaded file to the handy
terminal ( 9)≥ Specify “Discard Magazine” for data to be sent.≥ If necessary, send a list of operators to the handy terminal. ( 26)
You can search and discard the magazine by reading the magazine barcode with the handy terminal. In addition, when a magazine has been discarded by mistake, it can be restored to a state prior to discard processing.
1 Remove the handy terminal from the PC and move to the location where the magazines are stored2 Start DAM Shelf Management in the handy terminal
The menu screen will be displayed. ( 12)3 Select “Discard” from the menu
The selecting operator screen will be displayed.4 Select the operator from the drop-down list, then tap “OK”
≥ When there is no need for recording an operator, leave this field blank.
A list of magazines to be discarded (information transferred from the DA Manager) is displayed.≥ Unsearched magazines are listed under the “Unchecked” tab.≥ A searched magazine is listed as a magazine to be discarded under the
“Checked” tab.5 Move the magazine under the “Checked” tab by performing the step 4 of
“Searching the magazine by using the handy terminal” ( 12)6 Tap “OK” to finish discarding
The discard data is created.
Restoring a discarded magazine to a magazine prior to discard processingWhen a magazine is discarded by mistake and is restored to a magazine prior to discard processing, perform the procedure of “Restoring a searched magazine to an unsearched one” ( 13) in place of step 5. A discarded magazine can be restored by moving the magazine under the “Unchecked” tab.
7 Return to the menu screen and tap the icon to quit DAM Shelf Management
2 Searching and discarding the magazine using the handy terminal
Operation Guide
24
Settings and management Discarding a magazine
1 Connect the handy terminal to the client PC ( 9)2 Receive data from the handy terminal via the application DAM Shelf Management Data Transfer ( 10)
≥ Receive “Discard Magazine” data. The data received is saved as “DiscardList.csv” in the “Folder for receiving data”.
3 Log in to the Web interface as a magazine or system administrator4 Select “Handy Terminal” “Discard Magazine” from the menu
The Discard Magazine screen will be displayed. ( 23)5 Select “Upload the list of the discarded magazines” and then click “Browse”* to select a file to be
uploaded*Note that the button name varies depending on a Web browser in use.≥ Select “DiscardList.csv” in the “Folder for receiving data”.
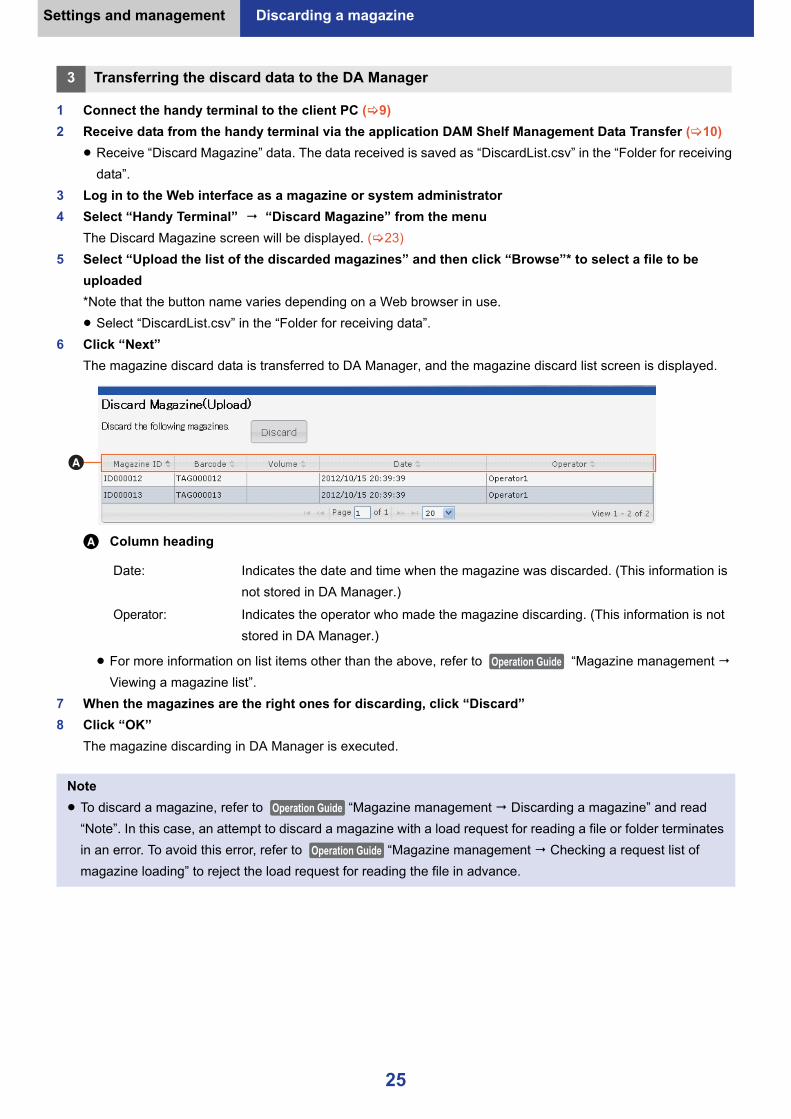
6 Click “Next”The magazine discard data is transferred to DA Manager, and the magazine discard list screen is displayed.
A Column heading
≥ For more information on list items other than the above, refer to “Magazine management Viewing a magazine list”.
7 When the magazines are the right ones for discarding, click “Discard”8 Click “OK”
The magazine discarding in DA Manager is executed.
3 Transferring the discard data to the DA Manager
Date: Indicates the date and time when the magazine was discarded. (This information is not stored in DA Manager.)
Operator: Indicates the operator who made the magazine discarding. (This information is not stored in DA Manager.)
Note≥ To discard a magazine, refer to “Magazine management Discarding a magazine” and read
“Note”. In this case, an attempt to discard a magazine with a load request for reading a file or folder terminates in an error. To avoid this error, refer to “Magazine management Checking a request list of magazine loading” to reject the load request for reading the file in advance.
Operation Guide
Operation Guide
Operation Guide
25

Settings and management
Transferring a list of operators
When a magazine shelf is changed, magazine inventory is performed, or a magazine is discarded using the handy terminal, a list of operators should be transferred to allow for operator designation.
1 Connect the handy terminal to the client PC ( 9)2 Log in to the Web interface as a magazine or system administrator3 Select “Handy Terminal” “Operator List” from the menu
The Operator List screen will be displayed.4 Click “Download”5 Click “OK”
≥ As a file storage destination, specify “(Folder for sending data)\Operator”. ( 6)6 Use the application DAM Shelf Management Data Transfer to transfer a downloaded file to the handy
terminal ( 9)≥ Specify “Operator List” for data to be sent.
PreparationIf necessary, refer to “Magazine shelf management Registering and unregistering an operator” and register the operator in advance.
Note≥ Even if a list of operators is not transferred, it is possible to change a magazine shelf, perform magazine
inventory, and discard a magazine. If necessary, transfer the list of operators.≥ When an operator has been registered or unregistered referring to “Magazine shelf management
Registering and unregistering an operator”, a list of operators should be transferred to the handy terminal.
Operation Guide
Operation Guide
26

FAQ Troubleshooting
FAQ
Check the following items to try to resolve the problem.If the problem is not resolved, please confirm your vendor for contact information.
Question Answer
For a handy terminal connection, “Yes” has been selected in “Set Up a Partnership” of ActiveSync and “Next” has been clicked.
Click “Back”, select “No”, and then click “Next”.
For a handy terminal connection, “Set up your device” has been selected in Windows Mobile Device Center.
Click “Cancel”. The display screen changes to the same display as when “Connect without setting up your device” is clicked.
DAM Shelf Management in the handy terminal has been disabled.
Refer to the pertinent handy terminal manual and restart or reset the handy terminal. Upon completion of a restart, download again the menu and operator data used for operations from the Web interface and send them to the handy terminal.
27

Appendix
Appendix
Software operating environmentThe client PC using the handy terminal function of the DATA ARCHIVER Manager must meet the following requirements.
* Successful operation is not guaranteed on all PCs with the recommended operating environment.* As for the rest, refer to “Software operating environment”.
∫For the special notes, refer to “Special notes”.
OS Windows® 7 (32-bit/64-bit) Professional/Ultimate/Enterprise SP1Windows Vista® (32-bit/64-bit) Business/Ultimate/Enterprise SP2Windows® XP (32-bit) Professional SP3* Not available under Windows® 8.
CPU To satisfy the OS requirements
Memory To satisfy the OS requirements and 50 MB
Display High Color (16-bit) or higherDisplay 1024 k 768 or higher resolution monitor
Hard disk Free disk space to install DAM Shelf Management Data Transfer: 2 MB or greater
Software Web browser
Windows® Internet Explorer® 8 to 10
Drive DVD-ROM drive — required for the installation
Interface ≥ LAN≥ USB 2.0
≥ Microsoft, Windows, Windows Server, SQL Server, Active Directory, Windows Vista, Internet Explorer and ActiveSync are either registered trademarks or trademarks of Microsoft Corporation in the United States and/or other countries.
≥ Other names of systems and products mentioned in these instructions are usually the registered trademarks or trademarks of the manufacturers who developed the system or product concerned.
This product incorporates the following software:(1) the software developed independently by or for Panasonic Corporation,(2) the software owned by third party and licensed to Panasonic Corporation,(3) the software licensed under the GNU General Public License, Version 2.0 (GPL V2.0) or Version 3.0 (GPL V3.0),(4) the software licensed under the GNU LESSER General Public License, Version 2.1 (LGPL V2.1) or Version 3.0 (LGPL V3.0), and/or(5) open source software other than the software licensed under the GPL V2.0, GPL V3.0, LGPL V2.1 and/or LGPL V3.0.
The software categorized as (3) - (5) are distributed in the hope that it will be useful, but WITHOUT ANY WARRANTY, without even the implied warranty of MERCHANTABILITY or FITNESS FOR A PARTICULAR PURPOSE. Please refer to the detailed terms and conditions thereof shown in the attached Installation Medium.
At least three (3) years (and as long as Panasonic offers spare parts or customer support for this product, with respect to the software granted under GPL V3.0 or LGPL V3.0) from delivery of this product, Panasonic will give to any third party who contacts us at the contact information provided below, for a charge no more than our cost of physically performing source code distribution, a complete machine-readable copy of the corresponding source code covered under GPL V2.0, GPL V3.0, LGPL V2.1 and LGPL V3.0 or the other licenses with the obligation to do so, as well as the respective copyright notice thereof.
Contact Information: [email protected]
Operation Guide
Operation Guide
28

Appendix Appendix
About handy terminalThe following gives handy terminal reference information. The details of reference information vary from terminal to terminal. For detailed information, refer to the pertinent handy terminal manual.
ATID AT-880≥ DAM Shelf Management Data Transfer file (in the installation medium)
\handyterminal\AT-880\DAMSMDT_EN_AT-880.msi≥ DAM Shelf Management file (in the installation medium)
\handyterminal\AT-880\DAMSM_EN_AT-880.zip≥ Install folder of DAM Shelf Management in the handy terminal
\Flash Disk\≥ Connection cable: Dedicated cable≥ The kinds of beep sounds and files used for sound generation`Sound for successful scan: \Windows\Success.wav`Sound for unsuccessful scan: \Windows\recstart.wav`Sound for inventory completion: \Windows\startup.wav
29

VQT5E39-1F1013SY1035
Panasonic CorporationKadoma, Osaka, Japan
C Panasonic Corporation 2013


![lacma MEMBERS MAGAZINE november december 20126)novdec_0.pdf · magazine’s Richard Lacayo said the exhibition “settles [Price] firmly in the canon of great American artists.”](https://static.fdocuments.in/doc/165x107/5e96ca33b4d23c39de7de1f3/lacma-members-magazine-november-december-6novdec0pdf-magazineas-richard-lacayo.jpg)


