Operating Instructions Busch-Wächter® 6848 AGM-… 220 ...
22
1473-1-8104 │ Rev. 01 │ 11.2012 Operating Instructions Busch-Wächter ® Pos: 2 /#Neustruktur#/Online-Dokumentation (+KNX)/Titelblätter/Waechter/6848 - 220 MasterLINE premium @ 28\mod_1347010115591_15.docx @ 232302 @ @ 1 6848 AGM-… 220 MasterLINE premium === Ende der Liste für Textmarke Cover ===
Transcript of Operating Instructions Busch-Wächter® 6848 AGM-… 220 ...

1473-1-8104 │ Rev. 01 │ 11.2012
Operating Instructions Busch-Wächter®
Pos: 2 /#Neustruktur#/Online-Dokumentation (+KNX)/Titelblätter/Waechter/6848 - 220 MasterLINE premium @ 28\mod_1347010115591_15.docx @ 232302 @ @ 1
6848 AGM-… 220 MasterLINE premium
=== Ende der Liste für Textmarke Cover ===
Operating Instructions
Busch-Wächter®
Operating Instructions | 1473-1-8104 — 2 —
Pos: 4 /#Neustruktur#/Online-Dokumentation (+KNX)/Inhaltsverzeichnis (--> Für alle Dokumente <--)/Inhaltsverzeichnis @ 19\mod_1320649044386_15.docx @ 109653 @ @ 1
1 Safety ....................................................................................................................................................................... 3 2 Intended use ............................................................................................................................................................ 3 3 Environment ............................................................................................................................................................. 3 4 Setup and function ................................................................................................................................................... 4
4.1 Features of function and equipment ........................................................................................................ 4 4.2 Detection ranges ..................................................................................................................................... 5 4.2.1 Overview of the detection ranges ............................................................................................................ 5 4.2.1.1 Standard coverage .................................................................................................................................. 5 4.2.1.2 Coverage with zone separation ............................................................................................................... 5 4.2.2 Limitation of the detection range ............................................................................................................. 5
5 Technical data.......................................................................................................................................................... 6 6 Installation and electrical connection ....................................................................................................................... 7
6.1 Requirements for the electrician ............................................................................................................. 7 6.2 Mounting ................................................................................................................................................. 8 6.2.1 Mounting methods .................................................................................................................................. 8 6.2.1.1 Wall mounting ......................................................................................................................................... 8 6.2.1.2 Wall mounting with gradient. ................................................................................................................... 9 6.2.1.3 Ceiling mounting ..................................................................................................................................... 9 6.2.1.4 Corner mounting ..................................................................................................................................... 9 6.2.2 Installation sites .................................................................................................................................... 10 6.2.3 Preparing the installation ....................................................................................................................... 10 6.2.4 Water drainage ..................................................................................................................................... 11 6.2.5 Mounting steps ...................................................................................................................................... 12 6.3 Electrical connection ............................................................................................................................. 14 6.3.1 Standard connection ............................................................................................................................. 14 6.3.2 Standard connection with external signal generators ............................................................................ 14 6.3.3 Standard connection with 2 circuit breakers per relay 10 A .................................................................. 14
7 Commissioning ...................................................................................................................................................... 15 7.1 Setting / limiting the coverage and the detection range ......................................................................... 15 7.2 Activation test ........................................................................................................................................ 16
8 Operation ............................................................................................................................................................... 17 8.1 Control elements ................................................................................................................................... 17 8.2 Standard operation ............................................................................................................................... 17 8.3 Standard operation (time- and brightness dependent) .......................................................................... 18 8.4 Auxiliary post operation ......................................................................................................................... 18 8.4.1 Operation with extension unit push-button ............................................................................................ 18
9 Remote control ....................................................................................................................................................... 19 9.1 Control elements of the remote control ................................................................................................. 19 9.2 Technical data of the remote control ..................................................................................................... 19 9.3 Commissioning of remote control .......................................................................................................... 20 9.4 Battery change of remote control .......................................................................................................... 20
=== Ende der Liste für Textmarke TOC ===

Operating Instructions
Busch-Wächter® Safety
Operating Instructions | 1473-1-8104 — 3 —
Pos: 6 /#Neustruktur#/Online-Dokumentation (+KNX)/Überschriften (--> Für alle Dokumente <--)/1. Ebene/S - T/Sicherheit @ 18\mod_1302612791790_15.docx @ 103357 @ 1 @ 1
1 Safety Pos: 7 /#Neustruktur#/Online-Dokumentation (+KNX)/Sicherheitshinweise und Hinweise (--> Für alle Dokumente <--)/Warnhinweise/Sicherheit - 230 V @ 18\mod_1302606816750_15.docx @ 103308 @ @ 1
Warning Electric voltage! Risk of death and fire due to electrical voltage of 230 V. – Work on the 230V supply system may only be performed by authorised electricians! – Disconnect the mains power supply prior to installation and/or disassembly!
Pos: 8 /#Neustruktur#/Online-Dokumentation (+KNX)/Überschriften (--> Für alle Dokumente <--)/1. Ebene/A - F/Bestimmungsgemäßer Gebrauch @ 18\mod_1302763321316_15.docx @ 103483 @ 1 @ 1
2 Intended use Pos: 9 /#Neustruktur#/Online-Dokumentation (+KNX)/Bestimmungsgemäßer Gebrauch (--> Für alle Dokumente <--)/Busch-Dimmer/Bestimmungsgemäßer Gebrauch @ 23\mod_1335350449857_15.docx @ 208763 @ @ 1
The device is to be used exclusively with the components that are supplied and licensed as described in chapter "Setup and function". Pos: 10.1 /#Neustruktur#/Modul-Struktur/Online-Dokumentation/Überschriften (--> Für alle Dokumente <--)/1. Ebene/U - Z/Umwelt @ 18\mod_1302614158967_15.docx @ 103383 @ 1 @ 1
3 Environment Pos: 10.2 /#Neustruktur#/Online-Dokumentation (+KNX)/Sicherheitshinweise und Hinweise (--> Für alle Dokumente <--)/Hinweise/Hinweis - Umwelt - Hinweis Elektrogeräte @ 18\mod_1302763973434_15.docx @ 103500 @ @ 1
Consider the protection of the environment! Used electric and electronic devices must not be disposed of with domestic waste. – The device contains valuable raw materials which can be recycled. Therefore, dispose of the
device at the appropriate collecting depot.
Pos: 10.3 /#Neustruktur#/Online-Dokumentation (+KNX)/Sicherheitshinweise und Hinweise (--> Für alle Dokumente <--)/Hinweise/Hinweis - Umwelt - Entsorgung Elektrogeräte @ 20\mod_1325760695972_15.docx @ 136583 @ @ 1
All packaging materials and devices bear the markings and test seals for proper disposal. Always dispose of the packaging material and electric devices and their components via the authorized collecting depots and disposal companies. The products meet the legal requirements, in particular the laws governing electronic and electrical devices and the REACH ordinance. (EU Directive 2002/96/EC WEEE and 2002/95/EC RoHS) (EU REACH ordinance and law for the implementation of the ordinance (EC) No.1907/2006) Pos: 11 /#Neustruktur#/Online-Dokumentation (+KNX)/Steuermodule - Online-Dokumentation (--> Für alle Dokumente <--)/++++++++++++ Seitenumbruch ++++++++++++ @ 9\mod_1268898668093_0.docx @ 52149 @ @ 1
Operating Instructions
Busch-Wächter® Setup and function
Operating Instructions | 1473-1-8104 — 4 —
Pos: 12 /#Neustruktur#/Online-Dokumentation (+KNX)/Überschriften (--> Für alle Dokumente <--)/1. Ebene/A - F/Aufbau und Funktion @ 11\mod_1279185435352_15.docx @ 83027 @ 111 @ 1
4 Setup and function Pos: 13 /#Neustruktur#/Online-Dokumentation (+KNX)/Aufbau und Funktion/Waechter/Funktionen - 688 220 MasterLINE premium @ 28\mod_1347449640248_15.docx @ 233029 @ 2 @ 1
The Busch-Watchdog 220 MasterLINE premium is a movement detector with a detection range of 220° and is suitable for use in the home. The Busch-Watchdogs are passive infrared movement detectors which switch loads via the KNX bus when sources of heat move within its detection range. Busch Watchdog is not an intrusion or attack alarm. Pos: 14 /#Neustruktur#/Online-Dokumentation (+KNX)/Überschriften (--> Für alle Dokumente <--)/2. Ebene/A - F/Funktions- und Ausstattungsmerkmale @ 23\mod_1336557630140_15.docx @ 209136 @ 2 @ 1
4.1 Features of function and equipment Pos: 15 /#Neustruktur#/Online-Dokumentation (+KNX)/Aufbau und Funktion/Waechter/Ausstattungsmerkmale - 6848 220 MasterLINE premium @ 29\mod_1348042547419_15.docx @ 233981 @ 1 @ 1
• 2-zone operation • Second switching output • Coverage of 16 meters • Additional, floating switch contact • Display for detection and operation mode • Integrated twilight switch • Operation with IR remote control • Setting option • Creep zone protection and activation when exiting the door • Installation of a camera Pos: 16 /#Neustruktur#/Online-Dokumentation (+KNX)/Steuermodule - Online-Dokumentation (--> Für alle Dokumente <--)/++++++++++++ Seitenumbruch ++++++++++++ @ 9\mod_1268898668093_0.docx @ 52149 @ 22 @ 1
Operating Instructions
Busch-Wächter® Setup and function
Operating Instructions | 1473-1-8104 — 5 —
Pos: 17 /#Neustruktur#/Online-Dokumentation (+KNX)/Überschriften (--> Für alle Dokumente <--)/2. Ebene/A - F/Erfassungsbereiche @ 19\mod_1320393658466_15.docx @ 109558 @ 333333 @ 1
4.2 Detection ranges Pos: 18 /#Neustruktur#/Online-Dokumentation (+KNX)/Überschriften (--> Für alle Dokumente <--)/3. Ebene/U - Z/Übersicht der Erfassungsbereiche @ 18\mod_1308563903037_15.docx @ 106965 @ 444444 @ 1
4.2.1 Overview of the detection ranges Pos: 19 /#Neustruktur#/Online-Dokumentation (+KNX)/Erfassungsbereiche/Waechter/Erfassungsbereiche - 6848 220 MasterLINE premium @ 28\mod_1347449675701_15.docx @ 233103 @ 3111114 @ 1
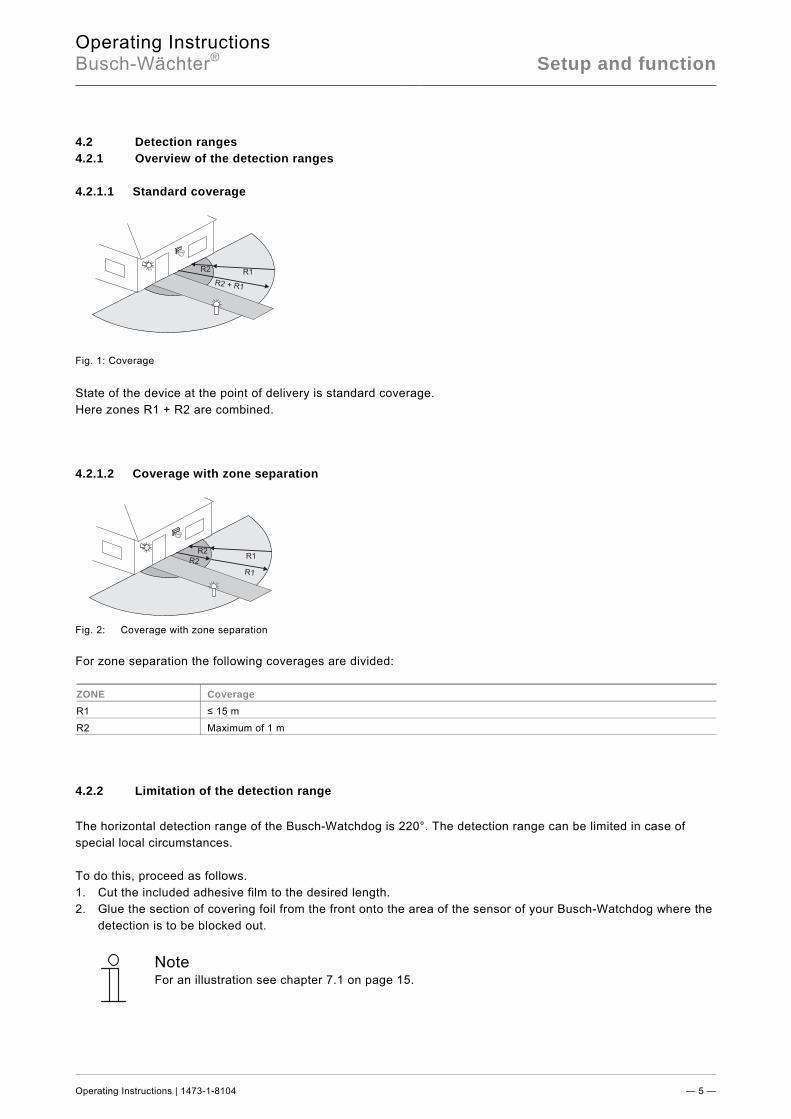
4.2.1.1 Standard coverage
Fig. 1: Coverage
State of the device at the point of delivery is standard coverage. Here zones R1 + R2 are combined. 4.2.1.2 Coverage with zone separation
Fig. 2: Coverage with zone separation For zone separation the following coverages are divided: ZONE Coverage R1 ≤ 15 m
R2 Maximum of 1 m Pos: 20 /#Neustruktur#/Online-Dokumentation (+KNX)/Überschriften (--> Für alle Dokumente <--)/3. Ebene/A - F/Erfassungsbereiche Reduzierung @ 29\mod_1347612043430_15.docx @ 233618 @ 222222 @ 1
4.2.2 Limitation of the detection range Pos: 21 /DinA4 - Anleitungen Online/Inhalt/Waechter/Erfassungsbereiche Einengung - 220° @ 28\mod_1347374980807_15.docx @ 232846 @ 2 @ 1
The horizontal detection range of the Busch-Watchdog is 220°. The detection range can be limited in case of special local circumstances. To do this, proceed as follows. 1. Cut the included adhesive film to the desired length. 2. Glue the section of covering foil from the front onto the area of the sensor of your Busch-Watchdog where the
detection is to be blocked out.
Note For an illustration see chapter 7.1 on page 15.
Pos: 22 /#Neustruktur#/Online-Dokumentation (+KNX)/Steuermodule - Online-Dokumentation (--> Für alle Dokumente <--)/++++++++++++ Seitenumbruch ++++++++++++ @ 9\mod_1268898668093_0.docx @ 52149 @ 12 @ 1
R2 R1
R2 + R1
R1
R1R2
R2

Operating Instructions
Busch-Wächter® Technical data
Operating Instructions | 1473-1-8104 — 6 —
Pos: 23 /#Neustruktur#/Online-Dokumentation (+KNX)/Überschriften (--> Für alle Dokumente <--)/1. Ebene/S - T/Technische Daten @ 11\mod_1279185386320_15.docx @ 83019 @ 222 @ 1
5 Technical data Pos: 24 /#Neustruktur#/Online-Dokumentation (+KNX)/Technische Daten/Waechter/Technische Daten - 6848 MasterLINE premium @ 28\mod_1347010450078_15.docx @ 232329 @ @ 1
Designation Value Nominal voltage 230 V AC ± 10%, 50/60 Hz
Switching capacity 3680 W/VA
Maximum switching current: 10 AX
Maximum power loss < 1 W
Horizontal detection • Busch-Watchdog 220 220°
Output zone 2 (R2)
AC 230 V AC 10 AX, 2300 W/VA 12 ... 48 V AC / DC (maximum) 10 mA ... 1A
Twilight sensor 0.5 … 300/∞ lux
Switch-off delay 10 seconds … 30 minutes
Short-time pulse
• Pulse duration 1 second • Pause time 9 seconds
• Pause time with continuous light / presence simulation:
55 seconds
Coverage (if mounted 2.5 m high)
Maximum of 16 m
Operating temperature -25°C … 55°C
Protection type IP 55
Pos: 25 /#Neustruktur#/Online-Dokumentation (+KNX)/Sicherheitshinweise und Hinweise (--> Für alle Dokumente <--)/Hinweise - Allgemein/Hinweis - Anschluss von EVG's - Herstellerangaben @ 24\mod_1338458660462_15.docx @ 214629 @ 22 @ 1
Information for the connection of ballasts Please observe the following points regarding high inrush currents for ballasts: - The ballast manufacturer’s specification determines the possible number of ballasts.
Pos: 26 /#Neustruktur#/Online-Dokumentation (+KNX)/Steuermodule - Online-Dokumentation (--> Für alle Dokumente <--)/++++++++++++ Seitenumbruch ++++++++++++ @ 9\mod_1268898668093_0.docx @ 52149 @ 3332333333 @ 1

Operating Instructions
Busch-Wächter® Installation and electricalconnection
Operating Instructions | 1473-1-8104 — 7 —
Pos: 27 /#Neustruktur#/Online-Dokumentation (+KNX)/Überschriften (--> Für alle Dokumente <--)/1. Ebene/M - O/Montage und elektrischer Anschluss @ 23\mod_1336477157864_15.docx @ 209033 @ 3333333333333 @ 1
6 Installation and electrical connection Pos: 28 /#Neustruktur#/Online-Dokumentation (+KNX)/Sicherheitshinweise und Hinweise (--> Für alle Dokumente <--)/Warnhinweise/Sicherheit - Niederspannungs- und 230 V-Leitungen @ 23\mod_1336558868201_15.docx @ 209164 @ 3111 @ 1
Warning Electric voltage! Risk of death due to electrical voltage of 230 V during short-circuit in the low-voltage line. - Low-voltage and 230 V lines must not be installed together in a flush-mounted socket!
Pos: 29 /#Neustruktur#/Online-Dokumentation (+KNX)/Sicherheitshinweise und Hinweise (--> Für alle Dokumente <--)/Warnhinweise/Sicherheit - Fachkenntnisse @ 23\mod_1336559183027_15.docx @ 209179 @ 212222222 @ 1
6.1 Requirements for the electrician
Warning Electric voltage! Install the device only if you have the necessary electrical engineering knowledge and experience. • Incorrect installation endangers your life and that of the user of the electrical system. • Incorrect installation can cause serious damage to property, e.g. due to fire. The minimum necessary expert knowledge and requirements for the installation are as follows: • Apply the "five safety rules" (DIN VDE 0105, EN 50110): 1. Disconnect from power; 2. Secure against being re-connected; 3. Ensure there is no voltage; 4. Connect to earth and short-circuit; 5. Cover or barricade adjacent live parts. • Use suitable personal protective clothing. • Use only suitable tools and measuring devices. • Check the supply network type (TN system, IT system, TT system) to secure the following
power supply conditions (classic connection to ground, protective earthing, necessary additional measures, etc.).
Pos: 30 /#Neustruktur#/Online-Dokumentation (+KNX)/Steuermodule - Online-Dokumentation (--> Für alle Dokumente <--)/++++++++++++ Seitenumbruch ++++++++++++ @ 9\mod_1268898668093_0.docx @ 52149 @ 22222 @ 1
Operating Instructions
Busch-Wächter® Installation and electricalconnection
Operating Instructions | 1473-1-8104 — 8 —
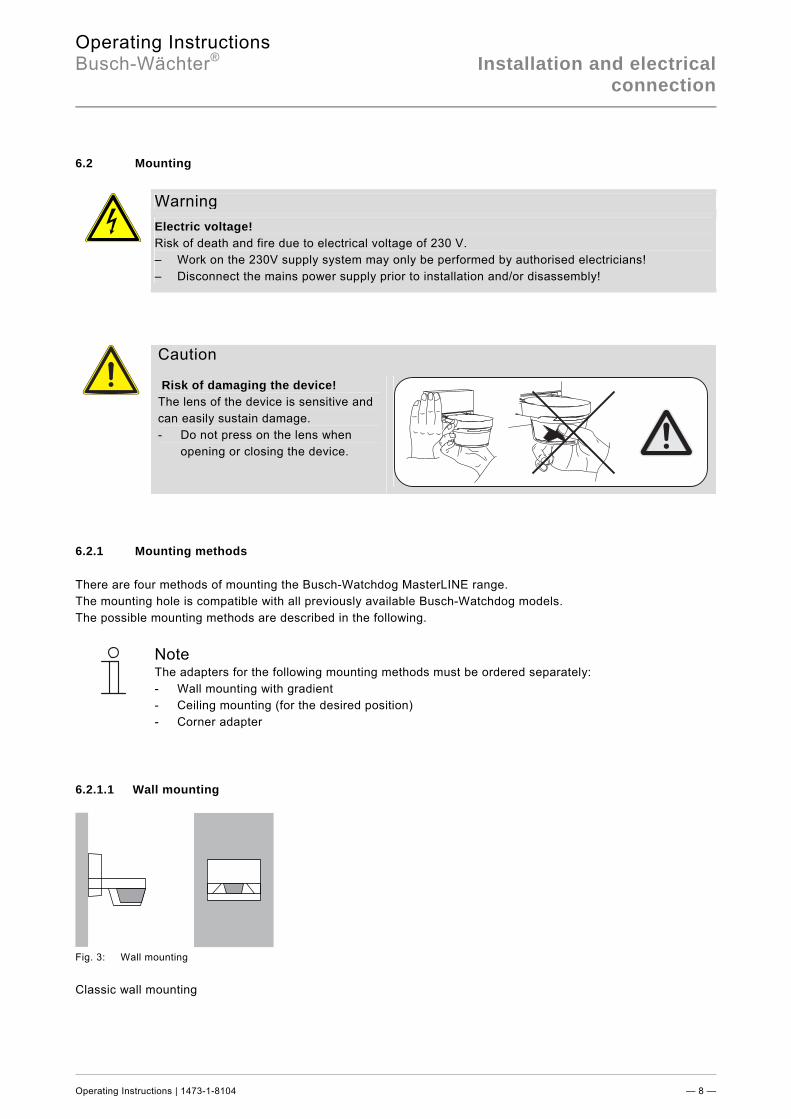
Pos: 31 /#Neustruktur#/Online-Dokumentation (+KNX)/Überschriften (--> Für alle Dokumente <--)/2. Ebene/M - O/Montage @ 18\mod_1302615960458_15.docx @ 103424 @ 13331344443333 @ 1
6.2 Mounting Pos: 32 /#Neustruktur#/Online-Dokumentation (+KNX)/Sicherheitshinweise und Hinweise (--> Für alle Dokumente <--)/Warnhinweise/Sicherheit - 230 V @ 18\mod_1302606816750_15.docx @ 103308 @ 21222 @ 1
Warning Electric voltage! Risk of death and fire due to electrical voltage of 230 V. – Work on the 230V supply system may only be performed by authorised electricians! – Disconnect the mains power supply prior to installation and/or disassembly!
Pos: 33 /#Neustruktur#/Online-Dokumentation (+KNX)/Montage/Waechter/Montage - 6848_220 MasterLINE premium @ 26\mod_1341552712050_15.docx @ 222766 @ 3332233322244243333 @ 1
Caution
Risk of damaging the device! The lens of the device is sensitive and can easily sustain damage. - Do not press on the lens when
opening or closing the device.
6.2.1 Mounting methods
There are four methods of mounting the Busch-Watchdog MasterLINE range. The mounting hole is compatible with all previously available Busch-Watchdog models. The possible mounting methods are described in the following.
Note The adapters for the following mounting methods must be ordered separately: - Wall mounting with gradient - Ceiling mounting (for the desired position) - Corner adapter
6.2.1.1 Wall mounting
Fig. 3: Wall mounting
Classic wall mounting
Operating Instructions
Busch-Wächter® Installation and electricalconnection
Operating Instructions | 1473-1-8104 — 9 —
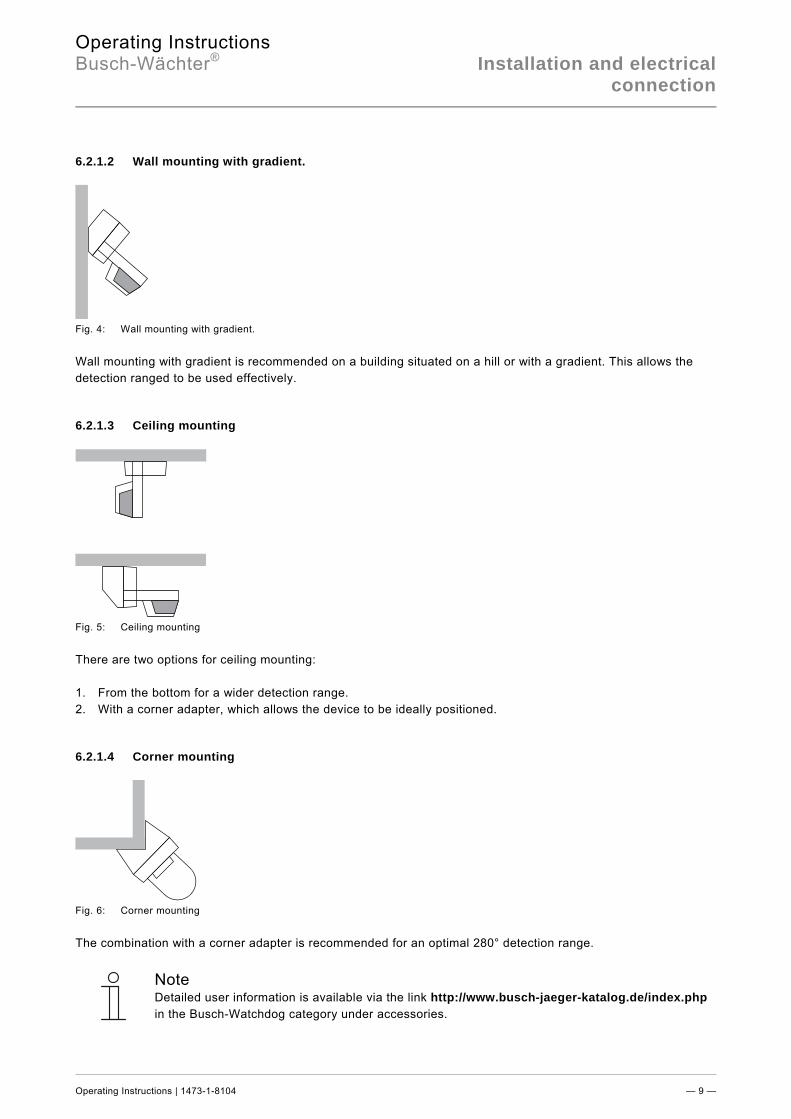
6.2.1.2 Wall mounting with gradient.
Fig. 4: Wall mounting with gradient. Wall mounting with gradient is recommended on a building situated on a hill or with a gradient. This allows the detection ranged to be used effectively. 6.2.1.3 Ceiling mounting
Fig. 5: Ceiling mounting There are two options for ceiling mounting: 1. From the bottom for a wider detection range. 2. With a corner adapter, which allows the device to be ideally positioned. 6.2.1.4 Corner mounting
Fig. 6: Corner mounting
The combination with a corner adapter is recommended for an optimal 280° detection range.
Note Detailed user information is available via the link http://www.busch-jaeger-katalog.de/index.php in the Busch-Watchdog category under accessories.
Operating Instructions
Busch-Wächter® Installation and electricalconnection
Operating Instructions | 1473-1-8104 — 10 —
6.2.2 Installation sites
Fig. 7: Installation sites
• Ceiling mounting in narrow rooms is not recommended. • The mounting height of the device should be between 1.7 m and 2.5. m. • The distance between light and movement detector should be at least 1.5 m. • For optimum detection of persons the approach into the detection range should always be offset and never
frontal. 6.2.3 Preparing the installation
To prepare the installation of the device, perform the following steps:
Fig. 8: Preparing the installation 1. Remove the locking screw (1) (if installed). 2. Press in the clamps (2 ... 5) on the sides of the housing with a suitable tool. 3. Carefully remove the front of the device.
>1,7 m
1
2 3
4
5
Operating Instructions
Busch-Wächter® Installation and electricalconnection
Operating Instructions | 1473-1-8104 — 11 —
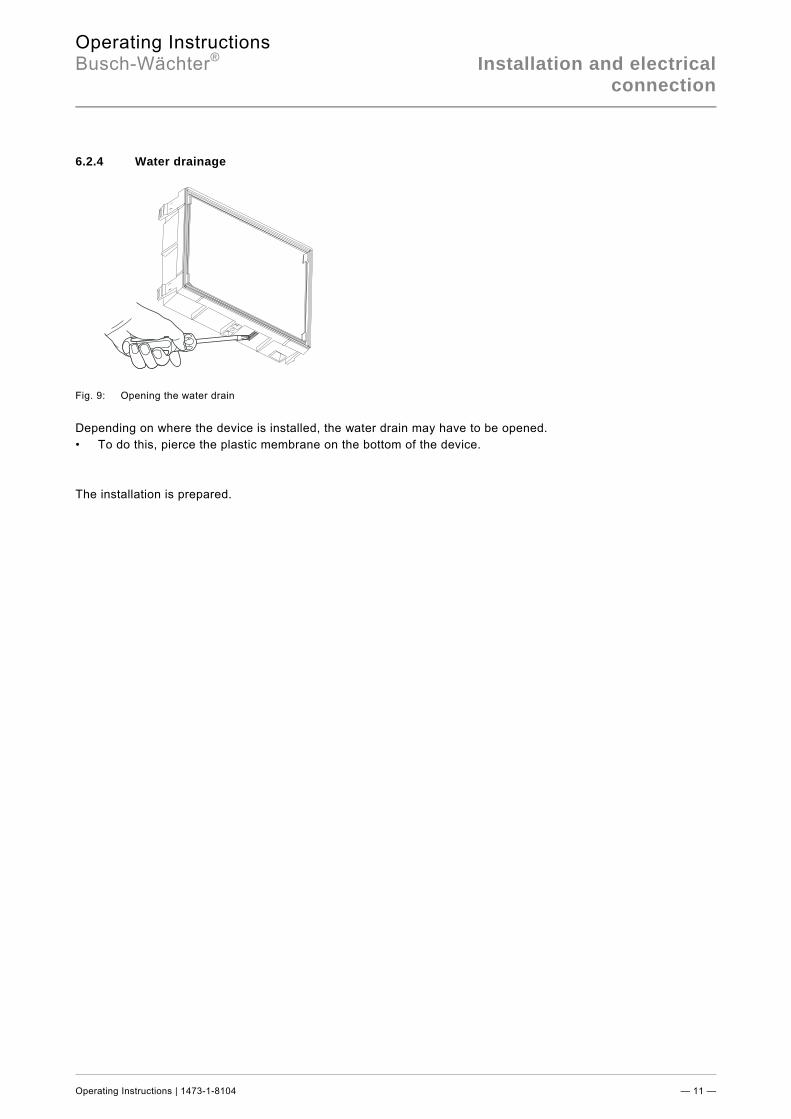
6.2.4 Water drainage
Fig. 9: Opening the water drain Depending on where the device is installed, the water drain may have to be opened. • To do this, pierce the plastic membrane on the bottom of the device. The installation is prepared.

Operating Instructions
Busch-Wächter® Installation and electricalconnection
Operating Instructions | 1473-1-8104 — 12 —
6.2.5 Mounting steps
Fig. 10: Mounting the bottom of the device No. Function 1 Potential-separated 1. Mount the device to the wall. - Do not use countersunk head screws for mounting
to the wall. - Use screws with a head diameter of 6.5 mm - 8.5
mm.
2. Connect the power to the device, see section 6.3.. - Observe the maximum admissible cable cross
sections.
1
∅6,5 mm - 8,5 mm
∅3,5 mm - 3,9 mm
mm5,41.xam
²mm5,2 -5,1

Operating Instructions
Busch-Wächter® Installation and electricalconnection
Operating Instructions | 1473-1-8104 — 13 —
- The bolting dimensions of the base may be compatible with existing bores on older versions of the Busch-Watchdog.
- Latch the upper part of the device onto the base.
3. To protect the device against unauthorized opening, the
enclosed screw can be used on the bottom of the device.
- To protect the device against unauthorized opening, screw the enclosed screw into the bottom of the device.
Pos: 34 /#Neustruktur#/Online-Dokumentation (+KNX)/Steuermodule - Online-Dokumentation (--> Für alle Dokumente <--)/++++++++++++ Seitenumbruch ++++++++++++ @ 9\mod_1268898668093_0.docx @ 52149 @ 2222332222 @ 1
Operating Instructions
Busch-Wächter® Installation and electricalconnection
Operating Instructions | 1473-1-8104 — 14 —
Pos: 35 /#Neustruktur#/Online-Dokumentation (+KNX)/Überschriften (--> Für alle Dokumente <--)/2. Ebene/A - F/Elektrischer Anschluss @ 21\mod_1328177051724_15.docx @ 138042 @ 222222 @ 1
6.3 Electrical connection Pos: 36 /#Neustruktur#/Online-Dokumentation (+KNX)/Anschluss/Waechter/Anschluss - 6848 220 MasterLINE premium @ 28\mod_1347010493362_15.docx @ 232343 @ 333222333222 @ 1
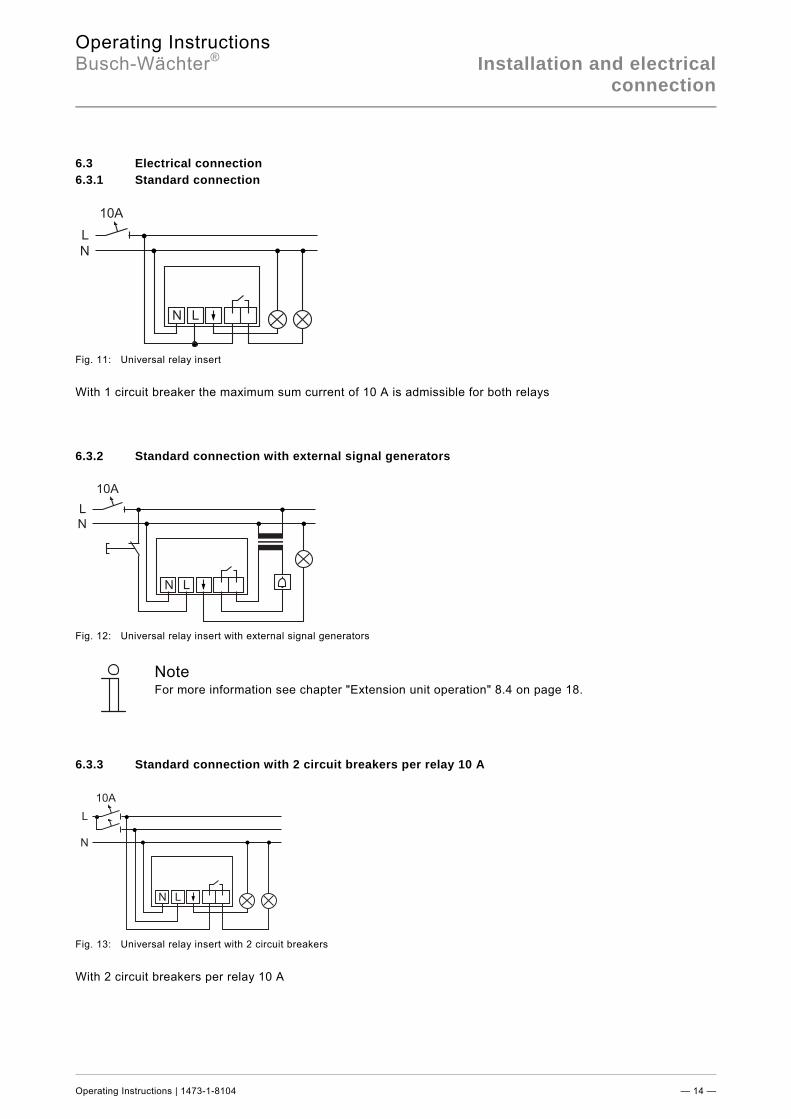
6.3.1 Standard connection
Fig. 11: Universal relay insert
With 1 circuit breaker the maximum sum current of 10 A is admissible for both relays 6.3.2 Standard connection with external signal generators
Fig. 12: Universal relay insert with external signal generators
Note For more information see chapter "Extension unit operation" 8.4 on page 18.
6.3.3 Standard connection with 2 circuit breakers per relay 10 A
Fig. 13: Universal relay insert with 2 circuit breakers With 2 circuit breakers per relay 10 A Pos: 37 /#Neustruktur#/Online-Dokumentation (+KNX)/Steuermodule - Online-Dokumentation (--> Für alle Dokumente <--)/++++++++++++ Seitenumbruch ++++++++++++ @ 9\mod_1268898668093_0.docx @ 52149 @ 2222 @ 1
N L
N
L
10A
N
L
N L
10A
N L
N
L
10A

Operating Instructions
Busch-Wächter® Commissioning
Operating Instructions | 1473-1-8104 — 15 —
Pos: 38 /#Neustruktur#/Online-Dokumentation (+KNX)/Überschriften (--> Für alle Dokumente <--)/1. Ebene/G - L/Inbetriebnahme @ 11\mod_1279185496977_15.docx @ 83035 @ 333233 @ 1
7 Commissioning Pos: 39 /#Neustruktur#/Online-Dokumentation (+KNX)/Inbetriebnahme/Waechter/Inbetriebnahme - 6848 MasterLINE premium @ 28\mod_1347010536035_15.docx @ 232357 @ 33333333333 @ 1
7.1 Setting / limiting the coverage and the detection range
Caution
Risk of damaging the device! The lens of the device is sensitive and can easily sustain damage. - Do not press on the lens when
setting the device.
Use the following steps to set the coverage and the detection range:
Fig. 14: Adjusting the lateral detection range 1. Adjust the lateral detection range by turning the head of the device.
Fig. 15: Adjusting the coverage 2. Adjust the coverage by lifting or lowering the head of the device. – The minimum coverage is 6 m.
30°

Operating Instructions
Busch-Wächter® Commissioning
Operating Instructions | 1473-1-8104 — 16 —
Fig. 16: Adjusting the detection range by masking
3. The range can be specifically limited by gluing on the enclosed foil. – Cut the enclosed foil to the size required. The coverage and the detection range are set. 7.2 Activation test
The activation test can also be triggered via the service remote control (see separate operating manual).
Fig. 17: Control element
To carry out the activation test, perform the following steps: 1. Set selector switch to T/S. - The device is now in test mode for 10 minutes (daytime operation, switch-off delay 2 sec.). In addition,
each detection is indicated by the status LED flashing quickly. - The device then switches back to standard operating mode. 2. To carry out an additional activation test, set the selector switch back to position T/S or interrupt the operating
voltage supply for more than 15 seconds. - The device is now in test mode for another 10 minutes. Test mode is exited automatically after 10 minutes
or by adjusting the brightness. The activation test has been carried out. Pos: 40 /#Neustruktur#/Online-Dokumentation (+KNX)/Steuermodule - Online-Dokumentation (--> Für alle Dokumente <--)/++++++++++++ Seitenumbruch ++++++++++++ @ 9\mod_1268898668093_0.docx @ 52149 @ 222 @ 1
T/S
0315
5
1min10 sek
Operating Instructions
Busch-Wächter® Operation
Operating Instructions | 1473-1-8104 — 17 —
Pos: 41 /#Neustruktur#/Online-Dokumentation (+KNX)/Überschriften (--> Für alle Dokumente <--)/1. Ebene/A - F/Bedienung @ 11\mod_1279185541649_15.docx @ 83043 @ 2212222 @ 1
8 Operation Pos: 42 /#Neustruktur#/Online-Dokumentation (+KNX)/Bedienung/Waechter/Bedienung - 6848 @ 28\mod_1347010420858_15.docx @ 232315 @ 32232222 @ 1
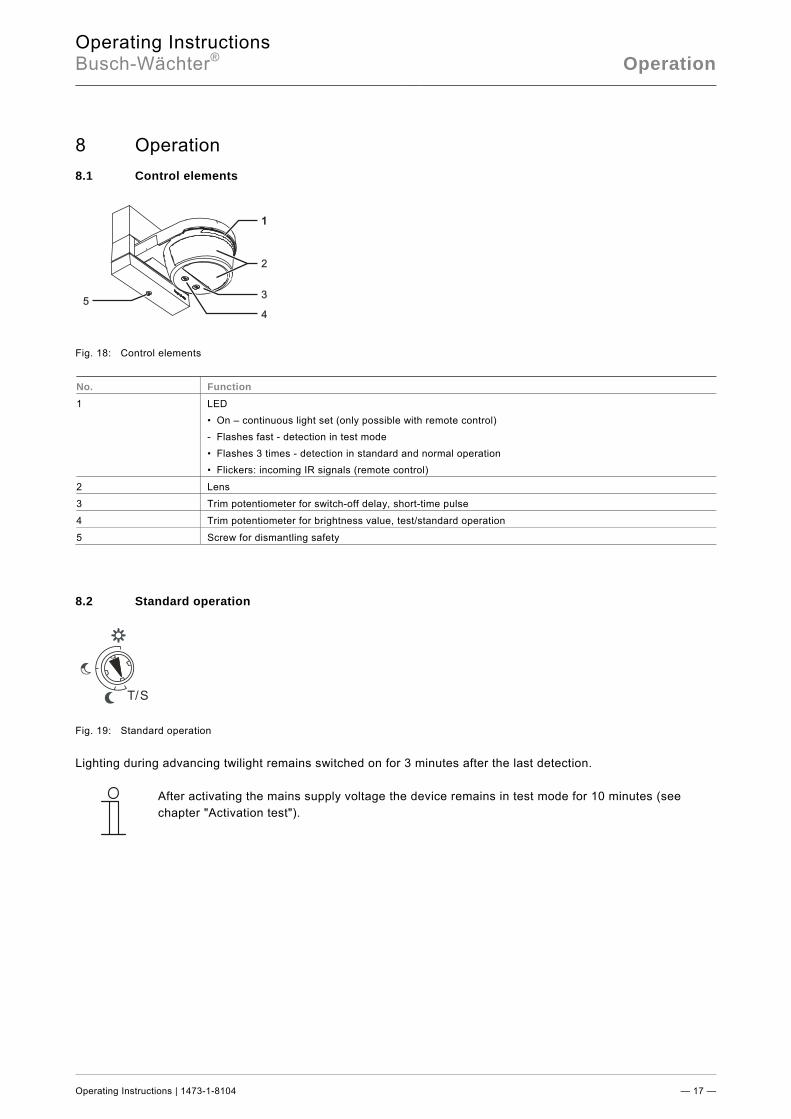
8.1 Control elements
Fig. 18: Control elements
No. Function 1 LED
• On – continuous light set (only possible with remote control) - Flashes fast - detection in test mode
• Flashes 3 times - detection in standard and normal operation • Flickers: incoming IR signals (remote control)
2 Lens
3 Trim potentiometer for switch-off delay, short-time pulse
4 Trim potentiometer for brightness value, test/standard operation
5 Screw for dismantling safety
8.2 Standard operation
Fig. 19: Standard operation
Lighting during advancing twilight remains switched on for 3 minutes after the last detection.
After activating the mains supply voltage the device remains in test mode for 10 minutes (see chapter "Activation test").
11
2
3
4
5
T/S

Operating Instructions
Busch-Wächter® Operation
Operating Instructions | 1473-1-8104 — 18 —
8.3 Standard operation (time- and brightness dependent)
Fig. 20: Normal operation Set the values for the brightness limit value and the switch-off delay (on period of the light after the last detection). Short-time pulse for activating the staircase light timer switches or door bells. Icon Function
Switching during all brightness levels
Switching during advancing twilight
Switching during darkness
Short-time pulse
Pos: 43 /#Neustruktur#/Online-Dokumentation (+KNX)/Überschriften (--> Für alle Dokumente <--)/2. Ebene/M - O/Nebenstellenbetrieb @ 18\mod_1308568178899_15.docx @ 107029 @ 2222 @ 1
8.4 Auxiliary post operation Pos: 44 /#Neustruktur#/Online-Dokumentation (+KNX)/Nebenstellenbetreib/Waechter/Nebenstellenbetrieb - 6848 -- 220 MasterLINE premium @ 28\mod_1347449705811_15.docx @ 233117 @ 33311 @ 1
8.4.1 Operation with extension unit push-button
Aside from the movement detector being triggered by the infrared radiation in the detection range, manual operation is possible via an extension unit push-button. For example, when an exit is not within the detection range of the movement detector, the extension unit push-button can be used. The lighting can there be switched on or off manually with the push-button.
Fig. 21: Operation with extension unit push-button • When operating with an extension unit push-button, the lighting for the set operating mode is switched on. Pos: 45 /#Neustruktur#/Online-Dokumentation (+KNX)/Steuermodule - Online-Dokumentation (--> Für alle Dokumente <--)/++++++++++++ Seitenumbruch ++++++++++++ @ 9\mod_1268898668093_0.docx @ 52149 @ 2222 @ 1
T/S
0315
5
1min10 sek

Operating Instructions
Busch-Wächter® Remote control
Operating Instructions | 1473-1-8104 — 19 —
Pos: 46 /#Neustruktur#/Online-Dokumentation (+KNX)/Überschriften (--> Für alle Dokumente <--)/1. Ebene/G - L/Handsender @ 24\mod_1338471401020_15.docx @ 214714 @ 211222 @ 1
9 Remote control Pos: 47 /#Neustruktur#/Online-Dokumentation (+KNX)/Sonstige/Handsender/Waechter/Handsender - 6847-6867 @ 24\mod_1338471592389_15.docx @ 214731 @ 2222 @ 1
9.1 Control elements of the remote control
Fig. 22: Control elements No. Function 1 Resetting the switch-on brightness to the settings of the potentiometers on the Busch-Watchdog.
- Press the button for at least 1 second.
2 The current brightness is set as switch-on brightness.
- Press the button for at least 1 second.
3 Deactivation of presence simulation.
4 Presence simulation activation. – Continuous light between twilight and 22:30 p.m. CET or 23:30 CEST. Followed by movement detection.
5 Light deactivation for 4 hours.
– No detection of movement.
6 Light activation for 4 hours.
– No detection of movement.
7 Resetting to automatic movement detection.
The sensitivity of the movement sensors can be adjusted to surroundings which are particularly restless or free of movement.
9.2 Technical data of the remote control
Designation Value Operating voltage: 3 V DC
Battery type: CR 2025
Battery life: Approximately 2 years
Coverage: Maximum of 6 m
Protection type: IP 40
Operating temperature: 0°C … 45°C
2
4
6
7
1
3
5

Operating Instructions
Busch-Wächter® Remote control
Operating Instructions | 1473-1-8104 — 20 —
9.3 Commissioning of remote control
Fig. 23: Removing the protective foil from the battery
Remove the protective foil from the battery before commissioning.
Fig. 24: Programming the remote control
• Press the "AUTO" button on the remote control for at least 3 seconds within the period of 10 minutes after
activating the power on the Busch-Watchdog. - The Busch-Watchdog must be de-energized beforehand for at least 30 seconds. - The remote control will then automatically connect itself to the Busch-Watchdog, and the Busch-
Watchdog will flash if the reception is correct. - Repeat these steps to program a maximum of 9 additional remote controls. 9.4 Battery change of remote control
Fig. 25: Changing the battery
1. Pull the battery holder out of the remote control. 2. Insert a new battery of type 2025. - The plus pole of the battery (+) must be on top. 3. Push the battery holder back into the device. === Ende der Liste für Textmarke Content ===
+CR 2025

Operating Instructions
Busch-Wächter® Remote control
Operating Instructions | 1473-1-8104 — 21 —

Operating Instructions
Busch-Wächter®
1473
-1-8
104
| R
ev. 0
1 |
11.
2012
Pos: 49 /#Neustruktur#/Online-Dokumentation (+KNX)/Rückseiten (--> Für alle Dokumente <--)/Rückseite - Busch-Jaeger - Allgemein @ 28\mod_1347009779995_15.docx @ 232282 @ @ 1
A member of the ABB Group Busch-Jaeger Elektro GmbH PO box 58505 Lüdenscheid Freisenbergstraße 2 58513 Lüdenscheid Germany www.BUSCH-JAEGER.com [email protected] Central sales service: Phone: +49 (0) 2351 956-1600 Fax: +49 (0) 2351 956-1700
Notice
We reserve the right to at all times make
technical changes as well as changes to the
contents of this document without prior notice.
The detailed specifications agreed to at the time
of ordering apply to all orders. ABB accepts no
responsibility for possible errors or
incompleteness in this document.
We reserve all rights to this document and the
topics and illustrations contained therein. The
document and its contents, or extracts thereof,
must not be reproduced, transmitted or reused by
third parties without prior written consent by ABB.
Copyright© 2012 Busch-Jaeger Elektro GmbH
All rights reserved
=== Ende der Liste für Textmarke Backcover ===