Operating Instructions and Parts Manual 14-inch Vertical...
36
Operating Instructions and Parts Manual 14-inch Vertical Band Saws Models: J-8201, J-8203, J-8201VS, J-8203VS JET 427 New Sanford Road LaVergne, Tennessee 37086 Part No. M-414500 Ph.: 800-274-6848 Revision E 10/2016 www.jettools.com Copyright © 2016 JET
Transcript of Operating Instructions and Parts Manual 14-inch Vertical...

Operating Instructions and Parts Manual 14-inch Vertical Band Saws Models: J-8201, J-8203, J-8201VS, J-8203VS
JET 427 New Sanford Road LaVergne, Tennessee 37086 Part No. M-414500 Ph.: 800-274-6848 Revision E 10/2016 www.jettools.com Copyright © 2016 JET
Tom Gauger
This .pdf document is bookmarked

2
Warranty and Service JET warrants every product it sells against manufacturers’ defects. If one of our tools needs service or repair, please contact Technical Service by calling 1-800-274-6846, 8AM to 5PM CST, Monday through Friday.
Warranty Period The general warranty lasts for the time period specified in the literature included with your product or on the official JET branded website.
• JET products carry a limited warranty which varies in duration based upon the product. (See chart below) • Accessories carry a limited warranty of one year from the date of receipt. • Consumable items are defined as expendable parts or accessories expected to become inoperable within a
reasonable amount of use and are covered by a 90 day limited warranty against manufacturer’s defects.
Who is Covered This warranty covers only the initial purchaser of the product from the date of delivery.
What is Covered This warranty covers any defects in workmanship or materials subject to the limitations stated below. This warranty does not cover failures due directly or indirectly to misuse, abuse, negligence or accidents, normal wear-and-tear, improper repair, alterations or lack of maintenance. JET woodworking machinery is designed to be used with Wood. Use of these machines in the processing of metal, plastics, or other materials outside recommended guidelines may void the warranty. The exceptions are acrylics and other natural items that are made specifically for wood turning.
Warranty Limitations Woodworking products with a Five Year Warranty that are used for commercial or industrial purposes default to a Two Year Warranty. Please contact Technical Service at 1-800-274-6846 for further clarification.
How to Get Technical Support Please contact Technical Service by calling 1-800-274-6846. Please note that you will be asked to provide proof of initial purchase when calling. If a product requires further inspection, the Technical Service representative will explain and assist with any additional action needed. JET has Authorized Service Centers located throughout the United States. For the name of an Authorized Service Center in your area call 1-800-274-6846 or use the Service Center Locator on the JET website.
More Information JET is constantly adding new products. For complete, up-to-date product information, check with your local distributor or visit the JET website.
How State Law Applies This warranty gives you specific legal rights, subject to applicable state law.
Limitations on This Warranty JET LIMITS ALL IMPLIED WARRANTIES TO THE PERIOD OF THE LIMITED WARRANTY FOR EACH PRODUCT. EXCEPT AS STATED HEREIN, ANY IMPLIED WARRANTIES OF MERCHANTABILITY AND FITNESS FOR A PARTICULAR PURPOSE ARE EXCLUDED. SOME STATES DO NOT ALLOW LIMITATIONS ON HOW LONG AN IMPLIED WARRANTY LASTS, SO THE ABOVE LIMITATION MAY NOT APPLY TO YOU. JET SHALL IN NO EVENT BE LIABLE FOR DEATH, INJURIES TO PERSONS OR PROPERTY, OR FOR INCIDENTAL, CONTINGENT, SPECIAL, OR CONSEQUENTIAL DAMAGES ARISING FROM THE USE OF OUR PRODUCTS. SOME STATES DO NOT ALLOW THE EXCLUSION OR LIMITATION OF INCIDENTAL OR CONSEQUENTIAL DAMAGES, SO THE ABOVE LIMITATION OR EXCLUSION MAY NOT APPLY TO YOU. JET sells through distributors only. The specifications listed in JET printed materials and on official JET website are given as general information and are not binding. JET reserves the right to effect at any time, without prior notice, those alterations to parts, fittings, and accessory equipment which they may deem necessary for any reason whatsoever. JET® branded products are not sold in Canada by JPW Industries, Inc.
Product Listing with Warranty Period 90 Days – Parts; Consumable items 1 Year – Motors; Machine Accessories 2 Year – Metalworking Machinery; Electric Hoists, Electric Hoist Accessories; Woodworking Machinery used for industrial or commercial purposes 5 Year – Woodworking Machinery Limited Lifetime – JET Parallel clamps; VOLT Series Electric Hoists; Manual Hoists; Manual Hoist Accessories; Shop Tools; Warehouse & Dock products; Hand Tools; Air Tools
NOTE: JET is a division of JPW Industries, Inc. References in this document to JET also apply to JPW Industries, Inc., or any of its successors in interest to the JET brand.

3
Table of contents Section Page Warranty and Service ............................................................................................................................................ 2 Table of contents ................................................................................................................................................... 3 Warning ................................................................................................................................................................. 4 Machinery General Safety Warnings .................................................................................................................... 4 General Electrical Cautions ................................................................................................................................... 5 Switch Padlock ...................................................................................................................................................... 5 Safety Instructions for Sawing Systems ................................................................................................................ 6 Specifications ........................................................................................................................................................ 7 Introduction ........................................................................................................................................................... 8 Band Saw Features ............................................................................................................................................... 8 Setup and Operation ............................................................................................................................................. 8
Set-up ................................................................................................................................................................ 8 Electrical ................................................................................................................................................................ 9
Connecting to 3-phase power ........................................................................................................................... 9 GROUNDING INSTRUCTIONS ........................................................................................................................ 9 Installing Optional Frame Riser ....................................................................................................................... 12 Installing Optional Rip Fence .......................................................................................................................... 12
Operating Controls .............................................................................................................................................. 13 START/STOP Switch ...................................................................................................................................... 13 Variable Speed Control (Models J-8201VS/J-8203VS) ................................................................................... 13
Operating Instructions ......................................................................................................................................... 13 Saw blades ...................................................................................................................................................... 13
Adjustments ........................................................................................................................................................ 14 Adjusting Blade Support/Guide Height ............................................................................................................ 14 Adjusting Blade Tension .................................................................................................................................. 14 Adjusting Table Angle ..................................................................................................................................... 14 Leveling Work Table ........................................................................................................................................ 14 Adjusting Miter Gauge Slot Parallelism ........................................................................................................... 15 Adjusting Blade Speed (Models J-8201/J-8203) ............................................................................................. 15 Adjusting Blade Speed (Models J-8201VS/J-8203VS) ................................................................................... 15 Changing Clutch Position ................................................................................................................................ 15 Changing Drive Belt Position ........................................................................................................................... 16 Changing Pulley-to-Belt Position ..................................................................................................................... 16 Using Miter System ......................................................................................................................................... 17 Using Rip Fence .............................................................................................................................................. 17 Using the Dust Control Chute .......................................................................................................................... 17
Maintenance ........................................................................................................................................................ 17 Changing Saw Blade ....................................................................................................................................... 17 Replacing drive wheel rubber protectors ......................................................................................................... 19 Draining and refilling the reduction gearbox .................................................................................................... 19
Periodic Maintenance .......................................................................................................................................... 19 Troubleshooting .................................................................................................................................................. 19 Periodic Maintenance .......................................................................................................................................... 20 Troubleshooting the J-8201/8203/8201VS/8203VS ............................................................................................ 21 Replacement Parts .............................................................................................................................................. 22
Exploded View and Parts List – Base – Models J-8201 and J-8203 ............................................................... 23 Exploded View and Parts List – Base – Models J-8201VS and J-8203VS ..................................................... 24 Exploded View – Saw Head – Models J-8201,J-8203,J-8201VS and J-8203VS ............................................ 25 Parts List – Saw Head – Models J-8201,J-8203,J-8201VS and J-8203VS ..................................................... 26 Exploded View – Gearbox – Models J-8201 and J-8203 ................................................................................ 28 Parts List – Gearbox – Models J-8201 and J-8203 ......................................................................................... 29 Exploded View – Gearbox – Models J-8201VS and J-8203VS ....................................................................... 30 Parts List – Gearbox – Models J-8201VS and J-8203VS ............................................................................... 31 Exploded View and Parts List – 5782181 Optional Riser Block – All Models ................................................. 32 Rip Fence Assembly (Optional Equipment) .................................................................................................... 33
Electrical Connections ......................................................................................................................................... 35

Warning - Misuse of this machine can cause serious
injury. - For safety, machine must be set up, used and
serviced properly. - Read, understand and follow instructions in
the Operating Instructions and Parts Manual which was shipped with your machine.
When setting up machine: - Always avoid using machine in damp or
poorly lighted work areas. - Always be sure the machine support is
securely anchored to the floor or the work bench.
When using machine: - Always wear safety glasses with side shields
(See ANSI Z87.1) - Never wear loose clothing or jewelry. - Never overreach—you may slip and fall.
When servicing machine: - Always disconnect the machine from its
electrical supply while servicing. - Always follow instructions in Operating
Instructions and Parts Manual when changing accessory tools or parts.
- Never modify the machine without consulting JET Tools.
You—the stationary power tool user—hold the key to safety.
Read and follow these simple rules for best results and full benefits from your machine. Used properly, JET machinery is among the best in design and safety. However, any machine used improperly can be rendered inefficient and unsafe. It is absolutely mandatory that those who use our products be properly trained in how to use them correctly. They should read and understand the Operating Instructions and Parts Manual as well as all labels affixed to the machine. Failure in following all of these warnings can cause serious injuries.
Machinery General Safety Warnings 1. KEEP GUARDS IN PLACE and in working
order.
2. REMOVE ADJUSTING KEYS AND WRENCHES. Form habit of checking to see that keys and adjusting wrenches are removed from tool before turning it on.
3. KEEP WORK AREA CLEAN. Cluttered areas and benches invite accidents.
4. DON’T USE IN DANGEROUS ENVIRONMENT. Don’t use power tools in damp or wet locations, or expose them to rain. Keep work area well lighted.
5. KEEP CHILDREN AWAY. All visitors should be kept a safe distance from work area.
6. MAKE WORKSHOP KID PROOF with padlocks, master switches, or by removing starter keys.
7. DON’T FORCE TOOL It will do the job better and safer at the rate for which it was designed.
8. USE RIGHT TOOL Don’t force tool or attachment to do a job for which it was not designed.
9. USE PROPER EXTENSION CORD. Make sure your extension cord is in good condition. When using an extension cord, be sure to use one heavy enough to carry the current your product will draw. An under-sized cord will cause a drop in line voltage resulting in loss of
power and overheating. Table 1 shows the correct size to use depending on cord length and name-plate ampere rating. If in doubt, use the next heavier gage. The smaller the gage number, the heavier the cord.
10. WEAR PROPER APPAREL Do not wear loose clothing, gloves, neckties, rings, bracelets, or other jewelry which may get caught in moving parts. Non-slip footwear is recommended. Wear protective hair covering to contain long hair.
11. WEAR EYE PROTECTION. Always use safety glasses. Also use face or dust mask if cutting operation is dusty. Everyday eyeglasses only have impact resistant lenses, they are NOT safety glasses.
12. SECURE WORK. Use clamps or a vise to hold work when practical. It’s safer than using your hand and it frees both hands to operate tool.
13. DON’T OVERREACH. Keep proper footing and balance at all times.
14. MAINTAIN TOOLS WITH CARE. Keep tools sharp and clean for best and safest performance. Follow instructions for lubricating and changing accessories.
15. DISCONNECT TOOLS before servicing; when changing accessories, such as blades, bits, cutters, and the like.

5
16. REDUCE THE RISK OF UNINTENTIONAL STARTING. Make sure switch is in off position before plugging in.
17. USE RECOMMENDED ACCESSORIES. Consult the owner’s manual for recommended accessories. The use of improper accessories may cause risk of injury to persons.
18. NEVER STAND ON TOOL. Serious injury could occur if the tool is tipped or if the cutting tool is unintentionally contacted.
19. CHECK DAMAGED PARTS. Before further use of the tool, a guard or other part that is damaged should be carefully checked to determine that it will operate properly and perform its intended function - check for alignment of moving parts, binding of moving parts, breakage of parts, mounting, and any other conditions that may affect its operation.
A guard or other part that is damaged should be properly repaired or replaced.
20. DIRECTION OF FEED. Feed work into a blade or cutter against the direction of rotation of the blade or cutter only.
21. NEVER LEAVE TOOL RUNNING UNATTENDED. TURN POWER OFF. Don’t leave tool until it comes to a complete stop.
22. DO NOT REMOVE JAMMED CUTOFF PIECES until the blade has stopped.
23. MAINTAIN PROPER ADJUSTMENT of blade tension, blade guides and thrust bearings.
24. ADJUST UPPER BLADE GUIDE TO JUST CLEARWORKPIECE.
25. HOLD WORKPIECE FIRMLY AGAINST TABLE.
General Electrical Cautions This saw should be grounded in accordance with the National Electrical Code and local codes and ordinances. This work should be done by a qualified electrician. The saw should be grounded to protect the user from electrical shock.
Caution: For circuits which are far away from the electrical service box, the wire size must be increased in order to deliver ample voltage to the motor. To minimize power losses and to prevent motor overheating and burnout, the use of wire sizes for branch circuits or electrical extension cords according to the following table is recommended.
Ampere Rating
Volts Total length of cord in feet
120 V 25 ft. 50 ft. 100 ft. 150 ft. 240 V 50 ft. 100 ft. 200 ft. 300 ft.
More than Not more than AWG minimum gage 0 6 18 16 16 14 6 10 18 16 14 12 10 12 16 16 14 12 12 16 14 12 Not recommended
Only the applicable parts of the Table need to be included. For instance, a 120-volt product need not include the 240-volt heading.
Switch Padlock To safeguard your machine from unauthorized operation and to avoid accidental starting by young children, the use of a padlock (not provided) is highly recommended.
To lock the main switch in the OFF position, remove the switch key from the switch. Place the key in a location that is inaccessible to children and others not qualified to use the tool.
1. Open the padlock (Fig. A).
2. Insert through holes in the start button (Fig. B).
3. Close the padlock.
4. Place the key in a safe place and out of reach of children.
For three phase tools without the lock-off feature, observe the following instruction: The installer shall follow local regulations and National Electrical Code, ANSI/NFPA 70 installation requirements.

Safety Instructions for Sawing Systems 1. Always wear leather gloves when handling
saw blade. The operator shall not wear gloves when operating the machine.
2. All doors shall be closed, all panels replaced, and other safety guards in place prior to the machine being started or operated.
3. Be sure that the blade is not in contact with the workpiece when the motor is started. The motor shall be started and you should allow the saw to come up to full speed before bringing the saw blade into contact with the workpiece.
4. Keep hands away from the blade area. See Figure A.
5. Remove any cut off piece carefully while keeping your hands free of the blade area.
6. Saw must be stopped and electrical supply must be cut off before any blade replacement or adjustment of blade support mechanism is done, or before any attempt is made to change the drive belts or before any periodic service or maintenance is performed on the saw.7.
7. Remove loose items and unnecessary workpieces from area before starting machine.
8. Bring adjustable saw guides and guards as close as possible to the workpiece.
9. Always wear protective eye wear when operating, servicing, or adjusting machinery. Eyewear shall be impact resistant, protective safety glasses with side shields complying with ANSIZ87.1 specifications. Use of eye wear which does not comply with ANSI Z87.1 specifications could result in severe injury from breakage of eye protection. See Figure B.
10. Nonslip footwear and safety shoes are recommended. See Figure C.
11. Wear ear protectors (plugs or muffs) during extended periods of operation. See Figure D.
12. The workpiece, or part being sawed, must be securely clamped before the saw blade enters the workpiece.
13. Remove cut off pieces carefully, keeping hands away from saw blade.
14. Saw must be stopped and electrical supply cutoff or machine unplugged before reaching into cutting area.
15. Avoid contact with coolant, especially guarding your eyes.

7
Specifications JET’s 14-inch Vertical Band Saws are specially designed to effectively cut a variety of materials including wood, plastic, bakelite, composites, ferrous and non-ferrous metals. Models J-8201 and J-8203 are wood and metal cutting band saws. JET’s Model J-8201VS and J-8203VS 14-inch Variable Speed Band Saws are ideally suited for metal cutting only with an infinitely variable speed range from116 to 334 SFPM. The variable speed drive system allows the operator to fine-tune the blade speed to the material being cut to maximize the life of today’s bi-metal blades. These versatile and dependable saws are capable of contour cutting, straight cutting and resawing, and these band saws can cut delicate curves in thick or thin stock.
Model number ............................................. J-8201K ...................... J-8203K ................. J-8201VS ................. J-8203VS Stock number ............................................... 414500 .................... 414504C ..................... 414502 ..................... 414503 Capacities: Under Guide (in.) .............................................. 6 ................................ 6 ............................... 6 ............................... 6 Under Guide with Riser Block (in.) .................. 12 ............................... 12 ............................. 12 ............................. 12 Throat Capacity (in.) .................................... 13.5 ............................ 13.5 .......................... 13.5 .......................... 13.5 Blade Width Capacity (in.) ................... 1/8 to 3/4 .................... 1/8 to 3/4 .................. 1/8 to 3/4 .................. 1/8 to 3/4 Motor: Rating .................................................. 1HP 1PH .................... 1HP 3PH .................. 1HP 1PH .................. 1HP 3PH Voltage .......................................... 115/230 VAC .............. 230/460 VAC ............ 115/230 VAC ............ 230/460 VAC (Prewired 115V) ...... (Prewired 230V) ....... (Prewired 115V) ....... (Prewired 230V) Listed Full Load Amps .............................. 10/5 A ..................... 3.6/1.8 A ....................... 10/5 A ...................3.6/1.8 A Speed ................................................ 1725 RPM .................. 1725 RPM ................ 1725 RPM ................ 1725 RPM Cutting Speeds: Wood (SFPM) ............................................. 3300 ........................... 3300 ......................... 2600 ......................... 2600 Metal (SFPM)................................. 39,57,78,107 ............. 39,57,78,107, ...................... 90-340 ...................... 90-340 142,196,278 ............... 142,196,278 ......... Variable speed ......... Variable speed Table: Size (in.) ..................................................14 x 14 ....................... 14 x 14 ..................... 14 x 14 ..................... 14 x 14 Height from Floor (in.) ..................................... 44 ............................... 44 ............................. 44 ............................. 44 Tilt to Right.............................................. 45 deg. ....................... 45 deg. ..................... 45 deg. ..................... 45 deg. Tilt to Left ................................................ 15 deg. ....................... 15 deg. ..................... 15 deg. ..................... 15 deg. Miter Gauge Groove (WxD/in.) ..............3/4 x 3/8 ..................... 3/4 x 3/8 ................... 3/4 x 3/8 ................... 3/4 x 3/8 Miter Gauge ............................................... standard ..................... standard ................... standard ................... standard Noise emission (tested @3ft from machine): Idle ............................................................. 70 dB .......................... 70 dB ........................ 70 dB ....................... 70 dB With load .................................................... 75 dB .......................... 75 dB ........................ 75 dB ....................... 75 dB Blade Dimensions (in.) ................. 3/8 x 0.025 x 93.5 ....... 3/8 x 0.025 x 93.5 .....3/8 x 0.025 x 93.5 .... 3/8 x 0.025 x 93.5 Floor Space Required (LxWxH/in.) ...... 26x18-1/2x67 ............. 26x18-1/2x67 ........... 26x18-1/2x67 ........... 26x18-1/2x67 Net Weight (lb) ................................................... 171 ............................. 155 ........................... 325 ........................... 325
The specifications in this manual were current at time of publication, but because of our policy of continuous improvement, JET reserves the right to change specifications at any time and without prior notice, without incurring obligations.

8
Introduction This manual includes operating and maintenance instructions for the JET 14-Inch Vertical Band Saws, Models J-8201, J-8203, J-8201VS, and J-8203VS. This manual also includes parts listings and illustrations of replaceable parts.
Band Saw Features Refer to Figures 1 through 3 for key features of the band saw. Refer to the Specifications section for additional information on the features and capabilities of the saw.
Figure 1: Band Saw Features - Rear View (Models J-8201/J-8203)
Figure 2: Band Saw Features – Rear View (Models J-8201VS/J-8203VS)
Figure 3: Band Saw Features – Front View (All Models
Setup and Operation
Set-up 1. The saw should be bolted securely to the shop
floor to make sure the saw is stable when sawing long, heavy or unwieldy work pieces. Always use extra support for long or heavy stock. There are lugs in the bottom of the saw base for use in bolting down of the saw. After positioning the saw, open the door in the base and mark the positions of the four lug holes. Move the saw to expose the marks. Prepare for attachment as required by the attachment method being used. Install the applicable fasteners. Install shims as required to level the saw. Tighten the fasteners to secure the saw to the floor.
2. Check belt tension (refer to Changing Drive Belt Position).
3. Check gearbox fluid level in sight gauge. If required, add lubricant to bring level halfway up the sight gauge. (Two containers of Shell Spirax 90 HD gear oil are packed with the saw. The containers have sufficient amount of lubricant to fill the gearbox.)
4. Check blade tension and support mechanism adjustment (refer to Changing Saw Blades).
5. Connect power to the saw. For 3-phase motors, follow the instructions in the Electrical section to complete the electrical hookup.

9
NOTE: Observe all electrical codes. Local codes or difficult environmental conditions may demand special electrical hook-ups. Always use a licensed electrician for any special electrical hook-up.
Electrical Models J-8201 and J-8201VS are delivered with a 115 volt single phase motor. Models J-8203 and J-8203VS are delivered with a 220/440 volt, 3-phase motor.
When the saw is a 115 volt model, it is supplied with a standard 115 volt plug and power cord which can be plugged into any suitable branch circuit.
When the saw is equipped with a 3-phase motor there will be no plug on the 4-wire cable to the saw switchbox. Instead, follow these instructions to connect the 3-phase motor to the power source:
Connecting to 3-phase power 1. Disconnect and lock out the branch circuit to
the saw before attempting electrical connections.
2. Connect the green or green-with-white-trace wire to the branch circuit ground wire.
3. Connect the remaining three wires to the power wires in the 3-phase branch circuit.
4. Reestablish power in the electrical branch.
5. Turn on power to the saw motor using the switch.
6. Observe the direction of the blade. It should be going DOWNWARD, into the slot on the table. If it is not going downward, the power wires are hooked-up incorrectly.
7. To correct hook-up, disconnect and lock out power to the branch, again. Reverse any two of the power wires on the hook-up to the saw cable.
8. Reestablish power in the branch and turn the saw on again. The blade should now be going downward into the table slot.
Note: local electrical codes or other codes may re-quire direct connection to a covered, protected junction box, or other electrical hook-up method. Especially under difficult industrial conditions, specialized electrical connections may be necessary. For special electrical hook-ups, a licensed electrician should be used to connect the saw to power.
CAUTION: KNOW AND OBSERVE ALL LOCAL AND OTHER APPROPRIATE ELECTRICAL CODES WHEN ATTACHING THIS BAND SAW TO YOUR POWER SUPPLY.
Figure 4: Wiring Diagrams
GROUNDING INSTRUCTIONS 1. All grounded, cord-connected tools:
In the event of a malfunction or breakdown, grounding provides a path of least resistance for electric current to reduce the risk of electric shock. This tool is equipped with an electric cord having an equipment-grounding conductor and a grounding plug. The plug must be plugged into a matching outlet that is properly installed and grounded in accordance with all local codes and ordinances.
Do not modify the plug provided - if it will not fit the outlet; have the proper outlet installed by a qualified electrician.
Improper connection of the equipment-grounding conductor can result in a risk of electric shock. The conductor with insulation having an outer surface that is green with or without yellow stripes is the equipment-grounding conductor. If repair or replacement of the electric cord or plug is necessary, do not connect the equipment-grounding conductor to a live terminal.
Check with a qualified electrician or service personnel if the grounding instructions are not completely understood, or if in doubt as to whether the tool is properly grounded.
Use only 3-wire extension cords that have 3-pronggrounding plugs and 3-pole receptacles that accept the tool’s plug.
Repair or replace damaged or worn cord immediately.

10
2. Grounded, cord-connected tools intended for use on a supply circuit having a nominal rating less than 150 volts:
This tool is intended for use on a circuit that has an outlet that looks like the one illustrated in Sketch A. The tool has a grounding plug that looks like the plug illustrated in Figure 5-A. A temporary adapter, which looks like the adapter illustrated in Figure 5- B and C, may be used to connect this plug to a 2-pole receptacle as shown in Sketch B if a properly grounded outlet is not available. The temporary adapter should be used only until a properly grounded outlet can be installed by a qualified electrician. (This adapter is not permitted in Canada.) The green-colored rigid ear, lug, and the like, extending from the adapter must be connected to a permanent ground such as a properly grounded outlet box.
3. Grounded, cord-connected tools intended for use on a supply circuit having a nominal rating between 150 – 250 volts, inclusive:
This tool is intended for use on a circuit that has an outlet that looks like the one illustrated in Figure 5-A. The tool has a grounding plug that looks like the plug illustrated in Sketch A. Make sure the tool is connected to an outlet having the same configuration as the plug. No adapter is available or should be used with this tool. If the tool must be reconnected for use on a different type of electric circuit, the reconnection should be made by qualified service personnel; and after reconnection, the tool should comply with all local codes and ordinances.
4. Permanently connected tools:
This tool should be connected to a grounded metal permanent wiring system; or to a system having an equipment-grounding conductor.

11
Figure 5: Grounding methods

12
Installing Optional Frame Riser NOTE: Refer to the illustrations in the Replacement Parts section for location of the parts used on the frame riser.
1. Remove the saw blade (refer to Changing Saw Blade).
2. Remove the two screws at the top and bottom of the blade guide that holds the blade guide on the frame.
WARNING: The saw must be turned off and power disconnected any time the rubber protectors are being changed.
3. Unplug the electrical cord or open the circuit breaker in the branch circuit.
4. Support the upper frame and wheel assembly with a strap attached to an overhead crane. Use additional straps to be sure the frame assembly will be held in a stable position when it is lifted off the lower frame assembly.
5. Remove the nut on the bolt that clamps the upper frame to the lower frame and remove the bolt, two washers and nut.
6. Lift the upper frame high enough off the lower frame to clear the riser casting.
7. Be certain the mating surfaces of the lower frame, riser, and upper frame are all clean and free from dirt and debris.
8. Position the riser casting over the lower frame. Make sure the locating dowels are inserted in the mating holes in the riser casting.
9. Lower the upper frame onto the riser casting. Make sure the locating dowels fit into their mating holes.
10. Put the new (longer) attaching bolt and top washer through the upper frame and riser, into the lower frame.
11. Put a washer and nut on the bolt and tighten securely.
12. Attach the bracket hooks to the top and bottom of the blade guard using self-tapping screws.
13. Attach the blade guide using the screws that held the original (shorter) guard.
14. Remove the old (shorter) blade guide post assembly from the upper frame.
15. The guide support assembly with the carbide guides and blade support bearings should be transferred to the new, longer support rod. Several other new parts are included for this component. (Refer to the parts illustrations for more detail.)
16. Install a new 105-inch blade (refer to Changing a Blade). Make sure blade tension and tracking are checked and adjusted as required.
17. Install the extension plug cable between the motor plug and switch plug.
18. Plug the electrical cord into the power source or close the circuit breaker on the branch circuit. Operate the band saw to verify blade tracking.
Installing Optional Rip Fence The rip fence slides on two rails attached at the front and rear of the work table. Install the fence mechanism as follows:
NOTE: Refer to the illustrations in the Replacement Parts section for location of the parts used on the rip fence.
1. Slide the rails into the fence.
2. Ease the fence and rails into position on the table.
3. Using the four spacers and four attachment bolts, attach the rails securely to the saw table.
4. The fence can now be adjusted and used according the instructions in Adjustment and Use of Optional Rip Fence.

13
Operating Controls
START/STOP Switch The START/STOP switch (refer to Figure 6) is used to turn on the band saw drive motor. The START switch has a molded guard which prevents inadvertent pressing of the START pushbutton.
Figure 6: START/STOP Controls
The STOP pushbutton is not guarded to allow use as an E-stop in an emergency.
Variable Speed Control (Models J-8201VS/J-8203VS) The variable speed control (refer to Figure 10) is used to change the speed of the saw blade. Refer to Adjusting Blade Speed for additional information on the use of the variable speed control.
Operating Instructions
Saw blades The JET14-inch saws accept blades from 1/8-inchwide to 3/4-inch wide. The narrower widths are used for cutting shapes or circles; the wider widths are used for straight cuts.
For straight cuts, use the widest available saw blade. A wide blade provides cutting stability, and allows for more accurate and straighter cuts. Blade speed affects the efficiency of the cut and the service life of the blade. Good shop practice requires that work-hardening materials, such as stainless steel, require the cut be completed in a single pass. Otherwise, the effect of stopping the cut can result in hardening of the cut interface.
Other materials such as wood require higher blade speeds to prevent fiber tearing. The chart in Figure 6 provides suggested blade speeds for various types of materials. The recommended speeds should be decreased 30 to 50% when using
carbon steel blades. (The chart provides speeds that are based on cutting a 4-inch thick work piece using a bi-metal blade without cutting fluid.)
The following conditions should also be consid-ered:
1. Increase speed 15% for materials 1/4-inchthick, 12% for 3/4-inch thick, 10% for 1 1/4-inch thick, and 5% for 2 1/2-inch thick.
2. Decrease speed 12% when cutting 8-inch thick material.
To avoid tooth breakage, select a blade-tooth pitch that will have two or more teeth in contact with the workpiece at all times.
Different blade materials and tooth geometry (pitch and set) permit sawing a wide range of common and exotic materials. Contact your industrial distributor for recommendations on specialized blades. Using the correct blade can save you time, trouble, and the possibility of dulling and premature discarding of the blade you normally might use. NOTE:Always use a sharp blade. SHARP BLADES ARE CHEAP INSURANCE AGAINST POOR CUTTING EFFICIENCY AND ACCELERATED MACHINE WEAR.
Figure 7: Blade Speed to Material Chart

14
Adjustments
Adjusting Blade Support/Guide Height The upper blade support and guide mechanism can be adjusted to accommodate the height of the work piece.
1. To adjust the support, loosen the knob that clamps the support rod, then move the support up or down in its holder. (Refer to Figure 3 for location of the support mechanism.)
2. Adjust the support so that there is space between the support and work piece. Space of approximately 1/8-inch is generally appropriate.
Adjusting Blade Tension Blade tension is set by a spring loaded tension mechanism on the upper drive wheel. Check the level of the tension device before cutting. The tension for various blade widths is indicated on the casting on the tension device.
Figure 8: Saw Blade Tension and Tracking Mechanism
Adjusting Table Angle (Refer to Figure 9.) The angle gauge is under the front of the table. The angle gauge shows the angle of the table relative to the saw blade. The table is mounted on trunnions that allow adjustment downward 45 degrees, and upward 10 degrees. Loosen the two trunnion lock knobs slightly to adjust the table angle and retighten the lock knobs.
Figure 9: Table Tilt Mechanism and Angle Gauge NOTE: By adjusting the positive leveling stop on the table leveling mechanism, it is possible to tilt the table upward 10 degrees. When returning to0 degrees, the table leveling mechanism must be reset after completing the sawing operation (refer to Machine Set-up).
WARNING: When cutting at an angle with a tilted table, provide a guide against which the material being cut can rest. Cutting “freehand” at an angle can result in injury, and make it difficult to maintain an accurate cut.
Leveling Work Table The table can be adjusted to level the table relative to the saw blade. Use the following method:
1. Unplug the electrical cord or open the circuit breaker in the branch circuit.
2. Move the upper blade guide assembly to the very top of its travel.
3. Make sure the blade is straight, and fully tensioned. (A damaged or worn blade may provide a poor reference surface for squaring the table.)
4. Loosen the table lock knobs and hold the table firmly against its positive leveling stop.
15
5. Using a machinist’s square, check to make sure the table is 90 degrees to the blade. USING LEATHER PROTECTIVE GLOVES, turn the upper drive wheel to check the squareness at a minimum of three points on the blade
6. If the table is not level, unlock the lock nut on the table leveling bolt.
7. Turn the leveling bolt as required to make the table square to the blade.
8. Lock the leveling bolt lock nut and recheck the table level. When the table is level.
9. Lock the table lock knobs securely and recheck for level. Adjust as necessary until the table is level while everything is tightened to working tightness.
10. With everything is locked down, look at the pointer for the angle gauge. It should be exactly on the zero mark of the gauge (Figure 13). If not, loosen the pointer screw, adjust the pointer until it is on zero, then tighten the pointer screw while holding the pointer securely in position on zero.
Adjusting Miter Gauge Slot Parallelism The miter slot should be parallel to the side of the blade. If the saw is not cutting straight when using the miter gauge, the miter slot may not be parallel.
1. Put a straight edge against the blade. Make sure to position the blade so tooth offset does not affect the straight edge.
2. Measure from both ends of the miter slot to the straight edge.
3. If the measurements are not equal at both ends of the slot, loosen six bolts securing the table to the table trunnions (see Figures 13 and 14.)
4. Adjust the table until it is parallel with the blade.
5. Tighten the trunnion attaching bolts.
Adjusting Blade Speed (Models J-8201/J-8203) Figure 7 provides blade speeds for various materials. To adjust the blade speed, change the clutch position of the clutch (in or out) and the position of the drive belt on the pulleys on the motor and reduction gearbox shafts.
Adjusting Blade Speed (Models J-8201VS/J-8203VS) See Figure 10.
1. The blade speed is controlled by an adjustment mechanism on the right end of the
saw. Speed increases or decreases as the knob is turned.
2. A placard on the drive belt guard (shown below) provides recommended speeds for various materials.
3. A speed indicator is provided on the barrel of the adjustment mechanism. In surface feet per minute; Position 0 = 334, 1 = 262, 2 = 216, 3 =171, 4 = 137, and 5 = 116.
4. Turn the speed adjustment knob to the desired setting as determined by the material being cut.
Figure 10: Variable Speed Control
Changing Clutch Position WARNING: NEVER attempt to shift the clutch mechanism while the saw is running. The saw must be turned off before clutch is shifted.
1. Turn the main switch to off.
2. Pull the door open on the pulley case.
3. Turn the clutch handle clockwise and push in, to engage the high speed pulley drive. Or, turn the clutch handle clockwise, and pull out, to engage the reduction gearbox drive.
NOTE: When pushing or pulling the clutch knob, the dogs on the clutch mechanism are being engaged. Take the time to make sure the clutch handle is all the way in, or all the
16
way out, so the clutch dogs are in full engagement when the saw is started.
4. Close the pulley case door.
5. Plug the electrical cord into the power source or close the circuit breaker on the branch circuit.
Changing Drive Belt Position WARNING: The saw must be turned off and power disconnected before changing drive belt positions.
Refer to Figure 11, below.
1. Unplug the electrical cord or open the circuit breaker in the branch circuit.
2. Open the door on the machine base and the door on the pulley case.
3. Push up on the motor to pivot the motor upward and slacken the drive belt.
4. Move the drive belt to the desired pulley position.
NOTE: Never force the belts to change pulley location without pivoting the motor to loosen the motor belt. Failure to do so can cause damage to the drive mechanism, and accelerate belt wear and possibly result in belt failure.
5. Release the weight of motor so the motor pivots downward. The weight of the motor will provide adequate belt tension.
6. Plug the electrical cord into the power source or close the circuit breaker on the branch circuit.
NOTE: Keeping both belts installed on the pulleys makes it quicker to switch between wood and metal cutting. If you cut only metal, or only wood, you may wish to remove the other belt.
Changing Pulley-to-Belt Position WARNING: NEVER attempt to change pulley shaft positions while the saw is running. The saw must be turned off and power disconnected any time pulley shaft positions are being changed.
1. Unplug the electrical cord or open the circuit breaker in the branch circuit.
2. Open the door on the machine base and the door on the pulley case.
3. Push up on the motor to pivot the motor upward and slacken the drive belt.
4. With the motor drive belt loose, remove both pulley drive belts.
5. Both of the pulleys are secured to their shafts with two set screws. These are located in the bottoms of the V-grooves on the pulleys. Using a hex wrench, loosen (but do not remove) all four set screws.
6. Pull the pulleys straight off each shaft.
7. Put the lower pulley on the upper shaft and the upper pulley on the lower shaft.
8. Push the upper pulley firmly against the reduction gearbox and tighten the two setscrews which secure it to the shaft.
9. Using a straight edge against the pulley flanges, make certain the bottom pulley is aligned with the upper pulley. Then tighten the two set screws that secure the lower pulley to the shaft.
10. Install the belts as required (refer to Figure 11).
11. Release the weight of motor so the motor pivots downward. The weight of the motor will provide adequate belt tension.
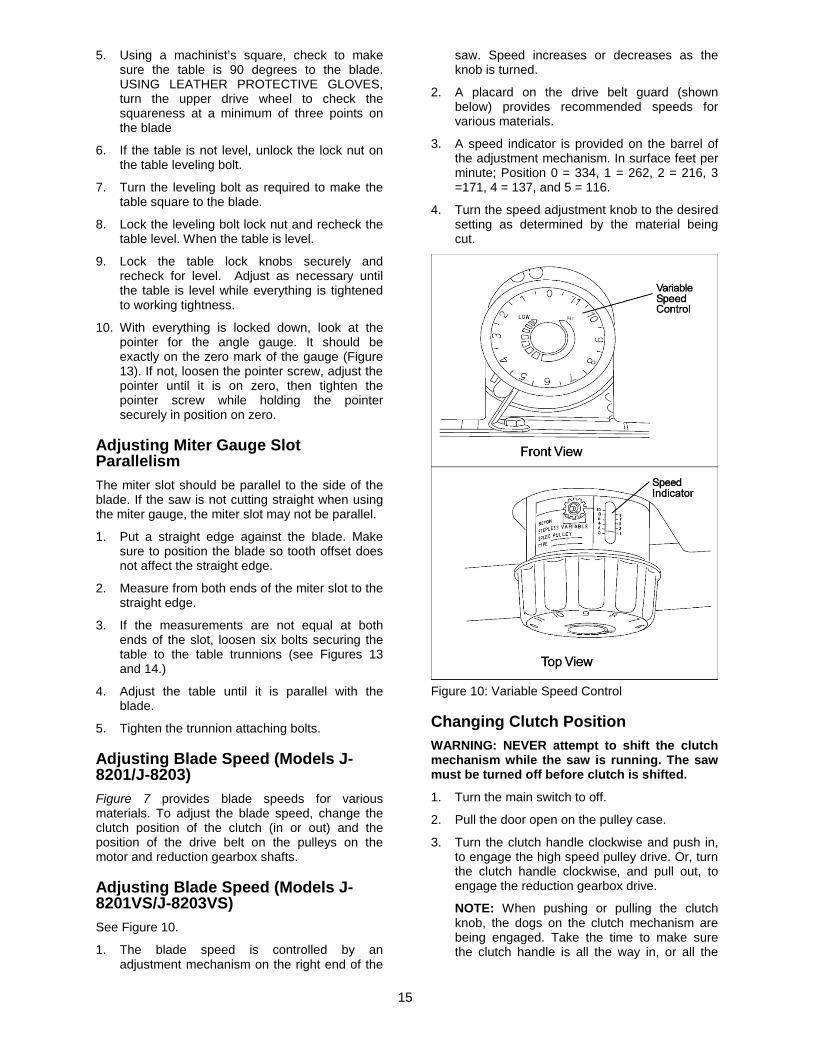
Figure 11: Clutch to Pulley Speed Settings

17
12. The weight of the motor should provide sufficient tension so the middle of the small drive belt is displaced approximately the thickness of the belt. (The high speed belt is adjusted at the same time as the smaller belt.)
13. Set the drive clutch to the desired position (IN or OUT).
14. Close the access doors.
15. Plug the electrical cord into the power source or close the circuit breaker on the branch circuit.
Using Miter System A miter gauge is provided with the band saw. The miter gauge slips into a slot in the face of the worktable. The miter gauge can be adjusted from 0 to 45 degrees. Adjust the miter gauge as follows:
1. Loosen the clamping screw on the miter gauge.
2. Adjust to desired angle.
3. Tighten the clamping screw.
Using Rip Fence 1. Unlock the fence by loosening the lock knob
and handle.
2. Slide the fence on its guides until it is the required distance from the blade.
3. Tighten the lock knob and handle, slightly.
4. Using a machinist’s square, measure the distance between the edge of the miter slot and both the front and rear of the rip fence. Adjust so both distances are equal.
5. Check the fence-to-blade gap, again. Read-just the fence, if necessary, until the blade gap is correct and the fence is parallel with the miter slot.
6. Tighten the fence firmly using the lock knob and handle.
Using the Dust Control Chute On the lower side of the table, below the cutting position of the blade, is a plastic tube which can be attached to a shop vacuum, or to a shop dust control system. The dust control chute can be seen in several of the figures used to illustrate the operation of the saw.
Maintenance This section contains periodic maintenance recommendations and maintenance procedures.
Changing Saw Blade WARNING: The saw must be turned off and power disconnected any time saw blades are being changed.
1. Unplug the electrical cord or open the circuit breaker in the branch circuit.
2. Pull open both upper and lower drive wheel guards (refer to Figure 1).
3. Release blade tension completely by turning the tension handle fully counterclockwise.
4. Remove table leveling pin. The pin has a tight push fit in its slot; it is not threaded. (Refer to Figure 14.
5. Use a screwdriver to pop out the table insert.
6. Loosen the set screws that lock the guide blocks. Move the guide blocks outward. Then turn the micro-adjusting knob to move the blade support bearing to the very rear of its travel.
7. Using a hex wrench, loosen the set screw that locks the lower blade guide and support assembly. Move the assembly to the very rear of its travel by using the micro-adjusting knob on the back side of the assembly (refer to Figure 12).
Figure 12: Upper Blade Guides
8. Using a hex wrench, loosen the carbide blade guide set screws. Open up a reasonably large gap between the guides; do this on both the upper and lower blade guides.
18
9. USING LEATHER GLOVES AND ANSI Z87.1 EYEWEAR TO PROTECT YOURSELF FROM THE CUTTING BLADE, carefully remove the blade from the drive wheels. Remove the blade out of the saw table through the table.
10. Hang the removed blade in a safe place.
NOTE: Clean out the interior of the saw with a shop vacuum. Examine the bearings and other exposed mechanisms of the saw.
11. Using protective gloves, carefully ease the replacement blade into the table slot and over the upper and lower drive wheels.
NOTE: It is possible to install the blade upside down. Make sure the teeth on the blade are pointing downward.
NOTE: The blade should be “free standing” at the cutting throat; the upper and lower blade guides should not touch the blade at any point. Also, make sure the blade is in the slot in the blade guard on the left side of the machine frame. Refer to Figure 1 to identify the blade guard.
12. Apply tension to the blade using the tension knob. The tension levels for various blade widths are shown on the markings on the tension device. Refer to Figure 3 for a view of the tension system.
13. Slowly turn the upper drive wheel by hand, while OBSERVING THE BLADE TRACKING. The blade should track, more or less, in the center of the drive wheel. If the blade does not track true, adjust the tracking to keep the blade centered.
14. Unlock the tilt adjustment knob by loosening its locking wing nut. Both the adjustment knob and wing nut are identified in Figure 8.
15. Turn the tilt adjustment knob (usually a VERY LITTLE at a time) to adjust the tilt of the upper drive wheel. Do this while turning the upper wheel by hand, and adjusting until the blade stays centered on the wheel.
16. Tighten the tilt mechanism locking wing nut.
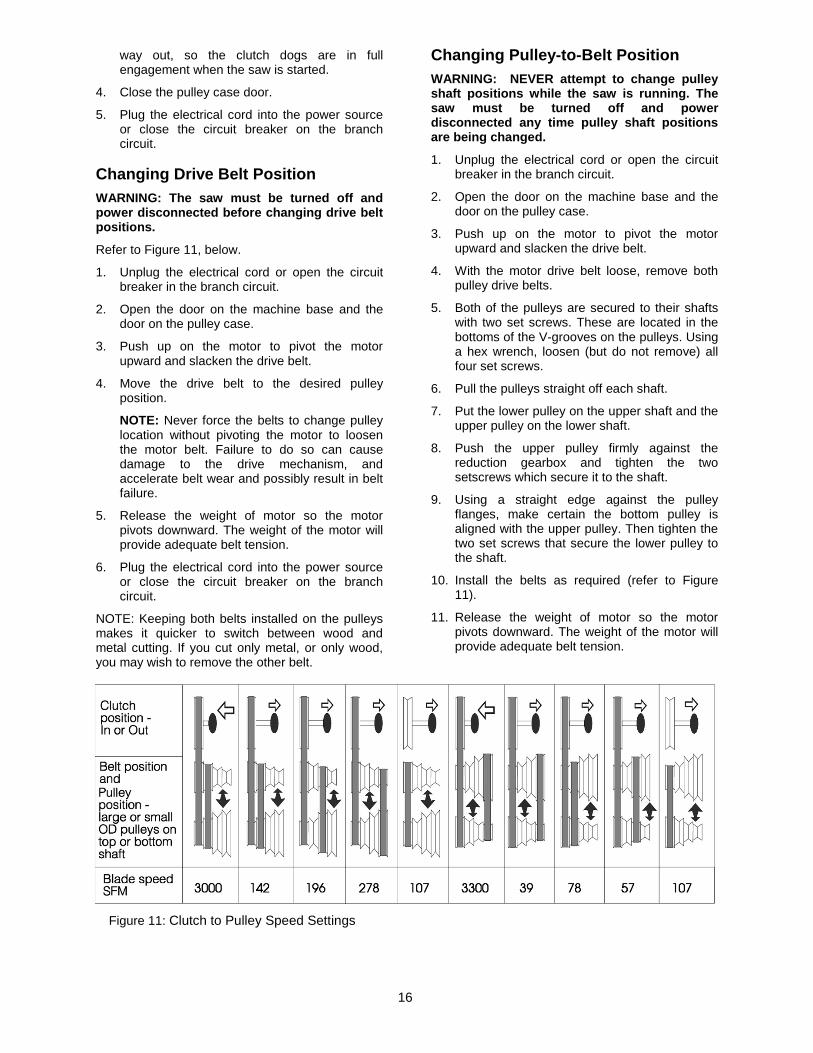
17. Using the micro-adjusting knob, move the lower blade support assembly (Refer to Figure 13) forward until the support bearing just contacts the back edge of the saw blade.
18. Adjust the lower carbide blade guides until they just contact the sides of the blade. Make sure the guides DO NOT CONTACT THE TOOTH PORTION OF THE BLADE. The guides should touch only the flat part of the blade. After correctly positioning the carbide guide blocks, tighten the set screws securely.
Figure 13: Lower Blade Guide Support – Rear
View
Figure 14: Lower Blade Guide Support – Front
View
Figure 15: Lower Blade Support Assembly

19
19. Adjust the upper support assembly so the support bearing just contacts the back edge of the saw blade.
20. Adjust the upper carbide blade guides until they just make contact with the blade BEHIND THE TOOTH AREA OF THE BLADE. Then tighten the set screws securely.
21. Replace the table insert.
22. Insert the table pin into its slot.
23. Close the drive wheel guards.
24. Plug the electrical cord into power source or close the circuit breaker on the branch circuit.
25. Turn on the power and observe the action of the blade to sure the blade is correctly adjusted.
Replacing drive wheel rubber protectors The rubber rings that cover the drive wheels are called protectors. The protectors protect the wheel from blade damage and provide a high friction drive force on the tensioned blade. Over a long period of service, the protectors wear and may require replacement.
WARNING: The saw must be turned off and power disconnected any time the rubber protectors are being changed.
1. Unplug the electrical cord or open the circuit breaker in the branch circuit.
2. Remove the blade according to the step-by-step instructions on blade replacement.
3. Remove the rubber protectors from the drive wheels. Use a flat screwdriver blade or knife blade to loosen the protectors, being careful not to nick or score the aluminum drive wheels.
4. Clean the surface of the drive wheels. Use a solvent such as mineral spirits as required to achieve a clean, dry surface for the new protectors.
5. Carefully slip the replacement protectors onto the drive wheels.
6. Replace the saw blade and return the saw to service by following the steps in Changing Saw Blades
7. Plug the electrical cord into the power source or close the circuit breaker on the branch circuit.
Draining and refilling the reduction gearbox WARNING: The saw must be turned off and power disconnected any time the gearbox lubricant is being drained or filled.
1. Unplug the electrical cord or open the circuit breaker in the branch circuit.
2. Open the door in the base.
3. Push up on the motor to loosen the drive belts.
4. Remove the pipe plug at the bottom of the gearbox. Drain the oil into a suitable container for safe and appropriate disposal.
5. Replace the drain plug.
6. Open the filler plug.
7. Add lubricant until the level is halfway up the sight gauge window (refer to Figure 16). Use Shell Spirax HD 90 gear lubricant.
8. Replace the filler plug.
9. Replace the drive belts. Allow the motor to pivot downward to apply tension to the belts.
10. Close the access door.
11. Plug the electrical cord into the power source or close the circuit breaker on the branch circuit.
Figure 16: Gearbox Oil Level Gauge
Periodic Maintenance Refer to the Periodic Maintenance chart for maintenance that should be performed at various time intervals.
Troubleshooting Refer to the Troubleshooting charts for equipment fault, probable cause and suggested remedy.

20
Periodic Maintenance Item Action Interval Maintenance
Saw blade Listen for sound of missing teeth
Whenever operating saw
Replace blade when teeth are broken
Observe cutting action for cleanness and accuracy
Whenever operating saw
Replace blade when bent — or worn — Use a wider blade for more accurate straight cuts
Listen for a poor weld; a “click” as it passes through the guide blocks
When changing blade
Use a different blade or dress the weld with a grinder.
Watch for signs of slippage on the drive wheels (blade occasionally slows or comes to a stop while sawing)
Whenever sawing Be sure you are using the correct blade tension — Check drive wheel rubber strips for cleanliness and adherence to drive wheel — replace if necessary
Lower drive wheel
Check bearing area for leakage of lubricant
Monthly Replace bearing if leakage occurs
Upper drive wheel
Check bearing area for leakage of lubricant
Monthly Replace bearing if leakage occurs
Drive wheel rubber protectors
Check for cleanliness Daily and when changing blade
Wipe or brush clean
Drive belts Check for smooth surfaces and adherence to drive wheel surface
Monthly or when blade slippage occurs
Clean when necessary — replace if damaged or excessively worn
Check for glazing Monthly, or when slippage occurs (squealing belt)
Replace a glazed belt — DO NOT USE BELT DRESSING
Reduction gearbox
Check sight glass for level – should be to halfway point on sight glass
Daily Fill up to half-way point on sight glass with Shell Spirax HD90
Annually Drain and refill with Shell Spirax HD90
Blade support bearings
Check for wear, damage or lubricant leakage
Monthly and when changing blade
Replace when necessary
Carbide blade guides
Check for excessive wear When changing blade
Replace if excessively worn

21
Troubleshooting the J-8201/8203/8201VS/8203VS Fault Probable cause Suggested remedy
Excessive blade breakage
1. Material loose in vise. 1. Clamp work securely.
2. Incorrect speed or feed. 2. Refer to Figure 7 or check Machinist’s Handbook for speed/feed appropriate for the material being cut.
3. Teeth too coarse for material. 3. Check Machinist’s Handbook for recommended blade type.
4. Incorrect blade tension. 4. Adjust blade tension to the point where the blade just does not slip on the wheel.
5. Saw blade contacts workpiece before the saw is started.
5. Start the motor before placing the saw on the workpiece.
6. Blade rubs on the wheel flange. 6. Adjust blade tracking.
7. Misaligned guides. 7. Adjust guides.
8. Cracking at weld. 8. Longer annealing cycle.
Premature blade dulling
1. Blade teeth too coarse. 1. Use a finer tooth blade.
2. Blade speed too high. 2. Try a lower blade speed.
3. Hard spots in workpiece or scale on/in workpiece.
3. Increase feed pressure (hard spots). Reduce speed, increase feed pressure (scale).
4. Work hardening of material (especially stainless steel).
4. Increase feed pressure by reducing spring tension.
5. Insufficient blade tension. 5. Increase tension to proper level.
6. Operating saw without pressure on workpiece.
6. Do not run blade at idle in/on material.
Bad cuts (out-of-square)
1. Feed pressure too fast. 1. Decrease pressure.
2. Guide bearings not adjusted properly. 2. Adjust guide bearing clearance to 0.001 inch (0.002 inch maximum).
3. Inadequate blade tension. 3. Gradually increase blade tension.
4. Dull blade. 4. Replace blade.
5. Incorrect blade speed. 5. Check blade speed (see Figure 7).
6. Blade guide assembly is loose. 6. Tighten blade guide assembly.
7. Blade guide bearing assembly loose. 7. Tighten blade guide bearing assembly.
8. Blade track too far away from wheel flanges.
8. Adjust blade tracking.
9. Guide bearing worn. 9. Replace worn bearing.
Bad cuts (rough) 1. Blade speed too high for feed pressure.
1. Reduce blade speed and feed pressure.
2. Blade is too coarse. 2. Replace with finer blade.

22
Fault Probable cause Suggested remedy
Blade is twisting 1. Blade is binding in the cut. 1. Decrease feed pressure.
2. Blade tension too high. 2. Decrease tension on blade
Unusual wear onside/back of blade
1. Blade guides worn 1. Replace blade guides.
2. Blade guide bearings not adjusted. 2. Adjust blade guide bearings.
3. Blade guide bearing bracket is loose. 3. Tighten blade guide bearing bracket.
Teeth missing/ripped from blade
1. Blade tooth pitch too coarse for workpiece.
1. Use blade with finer tooth pitch.
2. Feed too slow; feed too fast. 2. Increase feed pressure and/or blade speed.
3. Workpiece vibrating. 3. Clamp workpiece securely.
4. Gullets loading up with chips. 4a.Use blade with a coarse tooth pitch—reduce feed pressure.
4b.Brush blade to remove chips.
Motor running too hot
1. Blade tension too high. 1. Reduce tension on blade.
2. Drive belt tension too high. 2. Reduce tension on drive belt.
3. Blade too coarse for workpiece 3. Use blade with fine tooth pitch.
4. Blade too fine for workpiece 4. Use blade with coarse tooth pitch.
5. Speed reducer requires lubrication 5. Check speed reducer.
Excessive speed reducer noise/ vibration
1. V-belt is too tight. 1. Reset V-belt tension.
Replacement Parts Replacement parts are listed on the following pages. To order parts or reach our service department, call 1-800-274-6848 Monday through Friday (see our website for business hours, www.jettools.com). Having the Model Number and Serial Number of your machine available when you call will allow us to serve you quickly and accurately

23
Exploded View and Parts List – Base – Models J-8201 and J-8203
Index No Part No Description Size Qty 1 ................ J-5513834G .............. Closed Stand ........................................................... ..................................... .1 .................. J-5507565G .............. Closed Stand Assembly w/o Motor .......................... ...................................... 1 2 ................ J-5513835G .............. Door ......................................................................... ...................................... 1 3 ................ 5513836 .................... Lock ......................................................................... ...................................... 1 4 ................ 5513837 .................... Washer .................................................................... ...................................... 1 5 ................ 5513838 .................... Pan Head Bolt ......................................................... M4x5 ............................. 2 .................. 5513858 .................... Lock Assembly (includes #3,4 and 5) ...................... ...................................... 1 6 ................ 5513839 .................... Pad .......................................................................... ..................................... 2 7 ................ J-5513861G .............. Motor Bracket ......................................................... ..................................... 1 8 ................ J-5784391 ................. Motor........................................................................ 115/230V, 1Ph .............. 1 .................. J-5784411 ................. Motor........................................................................ 230/460V, 3Ph ............. 1 9 ................ IM148004 .................. Motor Cord ............................................................... 1Ph ............................... 1 .................. IM148005 .................. Motor Cord ............................................................... 3Ph 600V ...................... 1 10 .............. 5513842 .................... Strain Relief ............................................................. 6N-4,1PH ...................... 2 .................. 998630 ...................... Strain Relief ............................................................. 7P-2,3PH ...................... 2 11 .............. 5784281 .................... Strain Relief Plate .................................................... 1PH ............................... 1 .................. 612156 ...................... Strain Relief Plate .................................................... 3PH ............................... 1 12 .............. J-5513845G .............. Pulley Cover ............................................................ ...................................... 1 13 .............. 5513846 .................... Knob ........................................................................ ...................................... 1 15 .............. TS-1523011 .............. Set Screw ................................................................ M6x6 ............................. 2 16 .............. 5784682 .................... Pulley ....................................................................... ...................................... 1 17 .............. 5513859 .................... Key........................................................................... 5x5x40 .......................... 1 18 .............. TS-1540031 .............. Hex Nut .................................................................... M5 ................................. 4 19 .............. TS-2311081 .............. Hex Nut .................................................................... M8 ................................. 5 20 .............. 5513849 .................... Carriage Bolt ............................................................ M8x16 ........................... 4 21 .............. 5784331 .................... Hex Head Bolt.......................................................... M6x12 ........................... 1 22 .............. TS-1490041 .............. Hex Head Bolt.......................................................... M8x25 ........................... 2 23 .............. 5782761 .................... Pan Head Bolt ......................................................... M5x12 ........................... 6 24 .............. TS-1550031 .............. Flat Washer ............................................................. M5 ................................ 8 25 .............. 5511747 .................... Flat Washer ............................................................. M6 ................................. 1 26 .............. TS-1550061 .............. Flat Washer ............................................................. M8 ................................. 9 27 .............. 5511752 .................... Lock Washer ............................................................ M8 ................................. 6 28 .............. TS-1541031 .............. Nylon Nut ................................................................. M8 ................................. 2 29 .............. 5784683 .................... Carriage Bolt ............................................................ M8x50 ........................... 1

24
Exploded View and Parts List – Base – Models J-8201VS and J-8203VS
Index No Part No Description Size Qty 1 ................ J-5513860G .............. Closed Stand ........................................................... ...................................... 1 2 ................ J-5513835G .............. Door ......................................................................... ...................................... 1 3 ................ 5513836 .................... Lock ......................................................................... ...................................... 1 4 ................ 5513837 .................... Washer .................................................................... ...................................... 1 .................. 5513858 .................... Lock Assembly (include #3, 4 and 5) ....................... ...................................... 1 5 ................ 5513838 .................... Pan Head Bolt ......................................................... M4x5 ............................. 2 6 ................ 5513839 .................... Pad .......................................................................... ...................................... 2 7 ................ J-5784684G .............. Motor Bracket .......................................................... ...................................... 1 8 ................ J-5784391 ................. Motor........................................................................ 115/230V,1Ph ............... 1 .................. J-5784411 ................. Motor........................................................................ 230/460V,3Ph ............... 1 9 ................ IM148004 .................. Motor Cord ............................................................... 1Ph ............................... 1 .................. IM148005 .................. Motor Cord ............................................................... 3Ph 600V ...................... 1 10 .............. 5513842 .................... Strain Relief ............................................................. 6N-4 1PH ...................... 2 .................. 998630 ...................... Strain Relief ............................................................. 7P-2 3PH ...................... 2 11 .............. 5784281 .................... Strain Relief Plate .................................................... 1PH ............................... 1 .................. 5784281 .................... Strain Relief Plate .................................................... 3PH ............................... 1 12 .............. J-5784685G .............. Doorframe ................................................................ ...................................... 1 13 .............. J-5784686G .............. Cover ....................................................................... ...................................... 1 14 .............. 5784687 .................... Knob ........................................................................ M5x12 ........................... 2 15 .............. 5784688 .................... Motor VS Pulley ....................................................... ...................................... 1 16 .............. 5784689 .................... Locate Plate ............................................................. ...................................... 1 17 .............. 5513859 .................... Key........................................................................... 5x5x40 .......................... 1 18 .............. TS-1540031 .............. Hex Nut .................................................................... M5 ................................. 4 19 .............. TS-2311081 .............. Hex Nut .................................................................... M8 ............................... 12 20 .............. 5513849 .................... Carriage Bolt ............................................................ M8x16 ........................... 4 21 .............. 5784690 .................... Motor Pulley ............................................................. ...................................... 1 22 .............. TS-1490041 .............. Hex Cap Screw ........................................................ M8x25 ........................... 8 23 .............. 5782761 .................... Pan Head Bolt ......................................................... M5x12 ........................... 6 24 .............. TS-1550031 .............. Flat Washer ............................................................. M5 ................................. 8 25 .............. TS-1523031 .............. Set Screw ................................................................ M6x10 ........................... 2 26 .............. TS-1550061 .............. Flat Washer ............................................................. M8 ............................... 16 27 .............. 5511752 .................... Lock Washer ............................................................ M8 .............................. 12 28 .............. TS-1490021 .............. Hex Cap Screw ........................................................ M8x16 .......................... 1 29 .............. 5784692 .................... Rubber Foot ............................................................. ...................................... 4 30 .............. 5784693 .................... Special Washer........................................................ ...................................... 4

25
Exploded View – Saw Head – Models J-8201,J-8203,J-8201VS and J-8203VS

26
Parts List – Saw Head – Models J-8201,J-8203,J-8201VS and J-8203VS
Index No Part No Description Size Qty 1 ................ J-5782511G .............. Upper Arm, Frame ................................................... ...................................... 1 2 ................ J-5873041G .............. Base......................................................................... ...................................... 1 3 ............... 5783241 .................... Dowel Pin................................................................. ...................................... 4 4 ................ 5782521 .................... Upper Wheel Sliding Bracket ................................... ...................................... 1 5 ................ 5782591 .................... Blade Tension Adjustment Knob ............................. ...................................... 1 6 ................ 5782611 .................... Tension Spring ........................................................ ...................................... 1 7 ................ 5782571 .................... Blade Track Adjustment Knob ................................. M8x55 ........................... 1 8 ................ 5782541 .................... Pivot Pin................................................................... ...................................... 2 9 ................ 5782531 .................... Upper Wheel Hinge w/ Shaft ................................... .................................. 1 10............... J-5782631G ............... Inner Upper Wheel Guard ......................................... ...................................... 1 11 .............. 5782821 .................... Stud ......................................................................... ...................................... 2 12 .............. 5782741 .................... Fixed Bolt ................................................................. ..................................... 2 13 .............. 5782751 .................... Catch ....................................................................... ...................................... 2 14 .............. 170080 ...................... Stud Latch ............................................................... ..................................... 2 15 .............. TS-1522021 .............. Set Screw ................................................................ M5x8 ............................ 2 16 .............. 5782831 .................... Blade Guard ............................................................ ...................................... 1 17 .............. 5782841 .................... Retainer ................................................................... ..................................... 2 18 .............. J-5782891G .............. Outer Upper Wheel Guard ....................................... ...................................... 1 19 .............. 5782861 .................... Hinge (Upper) .......................................................... ...................................... 1 20 .............. 5782921 .................... Knob ........................................................................ M8 ............................... 2 21 .............. 5782661 .................... Upper Wheel ............................................................ ...................................... 1 22 .............. 5782691 .................... Wheel Protector ....................................................... ...................................... 2 24 .............. 5783161 .................... Lower Wheel ............................................................ ...................................... 1 25 .............. 141020 ...................... Saw Blade for Metal Cutting .................................... 93-1/2” x 14T/in ............. 1 .................. 170368 ...................... Saw Blade for Wood Cutting ................................... 93-1/2” x 6T/in. .............. 1 26 .............. J-5783111G .............. Lower Wheel Guard ................................................. ...................................... 1 27 .............. 5783121 .................... Dust Chute ............................................................... ...................................... 1 28 .............. 5783081 .................... Hinge (Lower) .......................................................... ...................................... 1 30 .............. 5783351 .................... Guide Post ............................................................... ...................................... 1 31 .............. 5783281 .................... Knob ........................................................................ M10x30 ......................... 1 32 .............. 5783261 .................... Spring ...................................................................... ...................................... 1 33 .............. SB-8MM .................... Steel Ball.................................................................. 8mm .............................. 1 34 .............. 5783421 .................... Upper Wheel Blade Guard ...................................... ...................................... 1 35 .............. 5783341 .................... Upper Support Bracket Post .................................... ...................................... 1 36 .............. 5783411 .................... Support Bracket ....................................................... ...................................... 2 37 .............. 5783371 .................... Micro Adjustment Nut .............................................. ..................................... 2 38 .............. 5783321 .................... Upper Spacing Sleeve ............................................. ..................................... 2 39 .............. 5783391 .................... Carbide Blade Guide .............................................. ...................................... 4 40 .............. 5783631 .................... Lower Support Bracket Post ................................... ...................................... 1 42 .............. 5783591 .................... Bracket Trunnion Support ........................................ ...................................... 1 43 .............. 5783611 .................... Point......................................................................... ...................................... 1 44 .............. J-5783451G .............. Table ........................................................................ ..................................... 1 45 .............. 5783471 .................... Table Insert .............................................................. ..................................... 1 46 .............. 5783481 .................... Table Pin.................................................................. ..................................... 1 47 .............. 5783521 .................... Trunnion................................................................... ..................................... 2 48 .............. 5783531 .................... Scale ........................................................................ ..................................... 1 49 .............. 5783491 .................... Trunnion Clamp Shoe .............................................. ..................................... 2 50 .............. 5783621 .................... Knob ........................................................................ M10 .............................. 2 53 .............. 5782641 .................... Pan Head Screw ...................................................... M5x6 ............................ 1 54 .............. 5783311 .................... Bearing .................................................................... 6200ZZ ........................ 2 55 .............. BB-6202ZZ ................ Bearing .................................................................... 6202Z ........................... 2 56 .............. 5783171 .................... Bearing .................................................................... 6204LLU ...................... 1 57 .............. 5783211 .................... Key........................................................................... 5x5x20 .......................... 2 58 .............. 5782881 .................... Flange Nut ............................................................... M5 .............................. 12 59 .............. 5783581 .................... Hex Nut .................................................................... M8 ................................ 5 60 .............. 5625361 .................... Hex Nut .................................................................... M12 .............................. 1 61 .............. 5783071 .................... Hex Nut .................................................................... M16 ............................... 1 62 .............. 5782621 .................... Square Nut .............................................................. ...................................... 1 63 .............. 5782581 .................... Wing Nut .................................................................. M8 ................................ 1 64 .............. 5783461 .................... Roll Pin ................................................................... 3x8 ............................... 1

27
Index No Part No Description Size Qty 65 .............. 5782681 .................... Retaining Ring ......................................................... R35 .............................. 2 67 .............. 5783091 .................... Flat Head Screw ...................................................... M5x10 ........................... 4 68 .............. 5625121 .................... Hex Cap Screw ........................................................ M6x10 ........................... 2 69 .............. TS-1482021 .............. Hex Cap Screw ........................................................ M6x12 ........................... 6 70 .............. TS-1482041 .............. Hex Cap Screw ........................................................ M6x20 ........................... 1 72 .............. 5782761 .................... Pan Head Screw ...................................................... M5x8 ............................. 1 73 .............. 5783141 .................... Hex Cap Bolt (Left Hand) ........................................ M8x20 ........................... 1 74 .............. TS-1490051 .............. Hex Cap Screw ........................................................ M8x30 ........................... 2 75 .............. TS-1490071 .............. Hex Cap Bolt............................................................ M8x40 ........................... 4 76 .............. 5783551 .................... Hex Cap Screw ........................................................ M8x80 ........................... 1 77 .............. TS-1491081 .............. Hex Cap Bolt............................................................ M10x50 ......................... 2 78 .............. 5783051 .................... Hex Cap Bolt............................................................ M16x55 ......................... 1 79 .............. 5782641 .................... Pan Head Screw ...................................................... M5x6 ............................. 2 80 .............. 5782871 .................... Pan Head Screw ...................................................... M5x8 ........................... 12 81 .............. 5782961 .................... Pan Head Screw ...................................................... M5x25 ........................... 3 82 .............. 5783131 .................... Pan Head Screw ...................................................... M6x8 ............................. 4 83 .............. 5783331 .................... Set Screw ................................................................ M6x10 ........................... 7 84 .............. 5783361 .................... Micro Adjustment Screw .......................................... M8x35 ........................... 2 85 .............. 5783271 .................... Set Screw ................................................................ M10x10 ......................... 1 86 .............. 6286667 .................... Self Tapping Screw.................................................. M3.5x16 ........................ 2 87 .............. 5782941 .................... Self Tapping Screw.................................................. M4x8 ............................. 2 88 .............. TS-1550041 .............. Flat Washer ............................................................. M6 ................................. 2 89 .............. TS-1550041 .............. Flat Washer ............................................................. M6 ................................. 1 90 .............. 5783231 .................... Flat Washer ............................................................. M8 ................................. 8 91 .............. 5511747 .................... Flat Washer ............................................................. M8 ................................. 1 92 .............. 5783061 .................... Flat Washer ............................................................. M16 ............................... 2 93 .............. 5511752 .................... Lock Washer ........................................................... M8 ................................ 8 94 .............. 5511752 .................... Lock Washer ........................................................... M8 ................................ 2 97 .............. J-5782931G .............. Switch Bracket ......................................................... 1PH ............................... 1 .................. 141039 ...................... Switch Bracket ......................................................... 3PH ............................... 1 98 .............. TS-1482021 .............. Hex Cap Screw ........................................................ M6x12 .......................... 1 99 .............. 5782951 .................... Switch ...................................................................... 1Ph .............................. 1 .................. 994507 ...................... Switch ...................................................................... 3Ph 480V ..................... 1 100 ............ 5782981 .................... Power Cord .............................................................. 115/230V, 1Ph ............. 1 .................. IC148005 ................... Power Cord .............................................................. 230/460V, 3Ph,600V ..... 1 102 ............ 5782971 .................... Strain Relief ............................................................. 6N-4, 1PH .................... 2 .................. 998630 ...................... Strain Relief ............................................................ 7P-2, 3PH .................... 2 103 ............ 5783021 .................... Wire Clip .................................................................. ...................................... 1 105 ............ 5782881 .................... Flange Nut ............................................................... M5 ................................ 4 106 ............ 5783431 .................... Flat Washer ............................................................. M6x13x1 ....................... 1 107 ............ AFS400-23 ................ Lock Washer, External Tooth .................................. M5 ................................. 2 112 ............ 5783671 .................... Spacing Sleeve ........................................................ ...................................... 1 113 ............ 5783641 .................... Adjusting Block ........................................................ ...................................... 1 114 ............ 5783651 .................... Guide Plate .............................................................. ..................................... 1 115 ............ 5783731 .................... Adjusting Bar ........................................................... ..................................... 1 116 ............ 5783711 .................... Adjusting Bar ........................................................... ..................................... 1 117 ............ 5783721 .................... Handle ..................................................................... ..................................... 2 118 ............ 5783681 .................... Setting Bushing ....................................................... ...................................... 2 119 ............ 5783771 .................... Spacer .................................................................... ...................................... 2 121 ............ 5783751 .................... Flange Nut ............................................................... M8 ................................ 2 122 ............ TS-1514021 .............. Flat Head Socket Screw .......................................... M6x15 ........................... 2 123 ............ 5640181 .................... Set Screw ................................................................ M5x5 ............................. 4 124 ............ 5783761 .................... Wave Washer .......................................................... 8x13 ............................. 2 125 ............ 5784695 .................... Miter Gauge Assembly ............................................ ...................................... 1 126 ............ 5517184 .................... Pan Head Screw ...................................................... M4x25 ........................... 2 .................. JET-138 ..................... JET Logo (not shown) ............................................. 138 x 57mm .................. 1

28
Exploded View – Gearbox – Models J-8201 and J-8203

29
Parts List – Gearbox – Models J-8201 and J-8203
Index No Part No Description Size Qty .................. J8201-GBG ............... Gearbox Complete (includes all items below, except #26 and 27) ................... 1 ................ J-5783831G .............. Housing Gearbox ..................................................... ...................................... 1 2 ................ 5513791 .................... Packing .................................................................... ...................................... 1 3 ................ 5783861 .................... Plug.......................................................................... ...................................... 2 4 ................ 5783911 .................... Oil Level Glass......................................................... ...................................... 1 5 ................ 5783181 .................... Shaft ........................................................................ ...................................... 1 6 ................ 5784696 .................... O-Ring ..................................................................... P15 ............................... 1 7 ................ 5784697 .................... O-Ring ..................................................................... P24 ............................... 1 8 ................ 5784061 .................... Clutch Dog ............................................................... ..................................... 2 9 ................ 5783921 .................... Gear ......................................................................... ...................................... 1 11 .............. 5513800 .................... Bearing Cover .......................................................... ...................................... 2 12 .............. 5784111 .................... Pulley ....................................................................... ...................................... 1 13 .............. 5784121 .................... Bushing .................................................................... ...................................... 1 14 .............. 5784051 .................... Oil Seal .................................................................... ...................................... 1 15 .............. 5784081 .................... Clutch Shaft ............................................................. ...................................... 1 16 .............. 5513805 .................... O-Ring ..................................................................... P9 ................................. 2 17 .............. 5784091 .................... Knob ........................................................................ ...................................... 1 18 .............. 5783981 .................... Gear ......................................................................... ...................................... 1 19 .............. 5783951 .................... Shaft (with gear) ...................................................... ...................................... 1 20 .............. 5783871 .................... Oil Seal .................................................................... 30x7 .............................. 1 21 .............. 5784141 .................... Bearing Cover .......................................................... ...................................... 1 22 .............. 5783991 .................... Shaft (with gear) ...................................................... ...................................... 1 23 .............. 5783881 .................... Oil Seal .................................................................... 17x40x7 ........................ 1 24 .............. 5784151 .................... Bearing Cover .......................................................... ...................................... 1 25 .............. 5784181 .................... Gear Box Pulley ....................................................... ...................................... 1 26 .............. 5784221 .................... V-Belt ....................................................................... A34 ............................... 1 27 .............. 5784211 .................... V-Belt ....................................................................... A51 ............................... 1 31 .............. 9100441 .................... Ball Bearing ............................................................. 6200LLU ....................... 3 32 .............. 5783851 .................... Ball Bearing ............................................................. 6203LLU ....................... 1 33 .............. 5783931 .................... Ball Bearing ............................................................. 3206ZZ ......................... 1 34 .............. 5629151 .................... Ball Bearing ............................................................. 6206LLU ....................... 1 35 .............. 5783961 .................... Key........................................................................... 5x5x18 .......................... 1 36 .............. 5784011 .................... Key........................................................................... 5x5x40 .......................... 1 37 .............. 5784031 .................... Key........................................................................... 7x7x20 .......................... 2 38 .............. 5513824 .................... Parallel Pin............................................................... 5x20 ............................. 2 39 .............. 5784071 .................... Roll Pin .................................................................... 5x30 .............................. 2 40 .............. 5783941 .................... Internal Snap Pin ..................................................... R62 .............................. 1 41 .............. 5784041 .................... Retaining Ring ......................................................... S30 .............................. 3 42 .............. 5513828 .................... Countersunk Head Bolt ........................................... M5x10 ........................... 3 43 .............. 5511817 .................... Pan Head Screw ...................................................... M5x8 ............................ 9 44 .............. 5784171 .................... Pan Head Screw ...................................................... M6x16 .......................... 8 45 .............. 5784698 .................... Hex Cap Screw w/ Air Drain .................................... M8x12 ........................... 1 46 .............. 5783331 .................... Set Screw ................................................................ M6x10 ........................... 2 47 .............. 5513833 .................... Drain Plug ................................................................ 1/8x28PT ...................... 1 48 .............. 5784699 .................... Bushing .................................................................... ..................................... 1 49 .............. 5513831 .................... Socket Head Cap Screw ......................................... M10x8 ........................... 1 50 .............. 5513805 .................... O-Ring ..................................................................... P9 ................................. 1 51 .............. 144016 ...................... Spacer ..................................................................... ...................................... 1

30
Exploded View – Gearbox – Models J-8201VS and J-8203VS

31
Parts List – Gearbox – Models J-8201VS and J-8203VS
Index No Part No Description Size Qty 1 ................ 5313790G ................. Housing Gearbox ..................................................... ...................................... 1 2 ................ 5513791 .................... Packing .................................................................... ...................................... 1 3 ................ 5783861 .................... Plug.......................................................................... ...................................... 2 4 ................ 5783911 .................... Oil Level Glass......................................................... ...................................... 1 5 ................ 5783181 .................... Shaft ........................................................................ ...................................... 1 6 ................ 5784700 .................... O-Ring ..................................................................... P15 ............................... 1 7 ................ 5784701 .................... O-Ring ..................................................................... P24 ............................... 1 8 ................ 5513797 .................... Clutch Dog ............................................................... ..................................... 2 9 ................ 5513798 .................... Gear (O)................................................................... ...................................... 1 11 .............. 5513800 .................... Bearing Cover (O).................................................... ...................................... 2 12 .............. 5513801 .................... Pulley ....................................................................... ...................................... 1 13 .............. 5784121 .................... Bushing .................................................................... ...................................... 1 14 .............. 5784051 .................... Oil Seal .................................................................... 12x22x7 ........................ 1 15 .............. 5513804 .................... Clutch Shaft ............................................................. ...................................... 1 16 .............. 5513805 .................... O-Ring ..................................................................... P9 ................................. 2 17 .............. 5784091 .................... Knob ........................................................................ M10 ............................... 1 18 .............. 5513807 .................... Helical Gear (M)....................................................... ...................................... 1 19 .............. 5783951 .................... Gear Shaft (M) ......................................................... ...................................... 1 20 .............. 5783871 .................... Oil Seal .................................................................... 30x7 .............................. 1 21 .............. 5784141 .................... Bearing Cover (M) ................................................... ...................................... 1 22 .............. 5513811 .................... Shaft (with gear) (I) .................................................. ...................................... 1 23 .............. 5783881 .................... Oil Seal .................................................................... 17x40x7 ........................ 1 24 .............. 5784151 .................... Bearing Cover (I) ..................................................... ...................................... 1 25 .............. 5513814 .................... Non-Step Speed Changer (Set)............................... ...................................... 1 26 .............. 5513815 .................... Synchronous Belt (V-Type)...................................... 17x890L ........................ 1 27 .............. 5513816 .................... V-Belt ....................................................................... A51 ............................... 1 31 .............. 9100441 .................... Ball Bearing ............................................................. 6200LLU ....................... 3 32 .............. 5783851 .................... Ball Bearing ............................................................. 6203LLU ....................... 1 33 .............. 5783931 .................... Ball Bearing ............................................................. 3206ZZ ......................... 1 34 .............. 5629151 .................... Ball Bearing ............................................................. 6206LLU ....................... 1 35 .............. 5783961 .................... Key........................................................................... 5x5x18 .......................... 1 36 .............. 5784011 .................... Key........................................................................... 5x5x40 .......................... 1 37 .............. 5784031 .................... Key........................................................................... 7x7x20 .......................... 2 38 .............. 5513824 .................... Parallel Pin............................................................... 5x20 ............................. 2 39 .............. 5784071 .................... Roll Pin .................................................................... 5x30 .............................. 2 40 .............. 5783941 .................... Retaining Ring ......................................................... R62 .............................. 1 41 .............. 5784041 .................... Stop Ring ................................................................. S30 .............................. 3 42 .............. 5513828 .................... Countersunk Head Bolt ........................................... M5x10 ........................... 3 43 .............. 5511817 .................... Pan Head Screw ...................................................... M5x8 ............................ 9 44 .............. TS-1534052 .............. Pan Head Screw ...................................................... M6x16 .......................... 8 45 .............. 5784702 .................... Hex Cap Screw w/ Air Drain .................................... M8x12 ........................... 1 46 .............. 5783331 .................... Set Screw ................................................................ M6x10 ........................... 2 47 .............. 5513833 .................... Drain Plug ................................................................ 1/8x28PT ...................... 1 48 .............. 5784703 .................... Bushing .................................................................... ..................................... 1 49 .............. 5513831 .................... Socket Head Cap Screw ......................................... M10x8 ........................... 1 50 .............. 5513805 .................... O-Ring ..................................................................... P9 ................................. 1 51 .............. 144016 ...................... Spacer ..................................................................... ...................................... 1

32
Exploded View and Parts List – 5782181 Optional Riser Block – All Models
Index No Part No Description Size Qty .................. 5782181G ................. Riser Block Assembly (includes all items below) ..... ........................................ 1 ................ J-5784511G .............. Riser Block............................................................... ..................................... 1 2 ................ 5784521G ................. Blade Guard ............................................................ ..................................... 1 3 ................ 5784551 .................... Hex Head Screw ...................................................... 5/8x8-1/2 ...................... 1 4 ................ 5784561 .................... Flat Washer ............................................................. 5/16 ............................... 1 5 ................ 5784571 .................... Hex Nut ................................................................... 5/8 ................................ 1 6 ................ 5784581 .................... Guide Post ............................................................... ..................................... 1 7 ................ 5784591 .................... Upper Wheel Blade Guard ...................................... ...................................... 1 8 ................ 5784611 .................... Blade Guard Extender ............................................. ..................................... 1 9 ................ 5784621 .................... Carriage Bolt ............................................................ M8x16 ........................... 1 10 .............. 5511747 .................... Flat Washer ............................................................. M8 ................................ 1 11 .............. 5782581 .................... Wing Nut .................................................................. M8 ................................ 1 12 .............. 5784641 .................... Saw Blade (Metal Cutting) ....................................... 105"x3/8"x14T/in ........... 1 . ................. 5784681 .................... Saw Blade (Wood Cutting) ...................................... 105"x3/8"x6T/in ............. 1 13 .............. 5784651 .................... Pin............................................................................ ...................................... 2

33
Rip Fence Assembly (Optional Equipment)

34
Parts List – Rip Fence Assembly (Optional Equipment)
Index No Part No Description Size Qty ..................5782172......................Rip Fence Assembly (includes #1-32)....................... ........................................
1 ................ 198013 ...................... Lock Handle* ........................................................... ...................................... 1 2 ................ TS-1540061 .............. Hex Nut* .................................................................. M8 ................................. 1 3 ................ SG049100 ................. Flanged Hex Cap Screw .......................................... M4*6*0.8 ....................... 1 4 ................ 198006 ...................... Leaf Spring .............................................................. ...................................... 1 5 ................ TS-2249402 .............. Socket Head Button Screw ...................................... M10*40 ......................... 1 6 ................ 136470-1 ................... Wear Pad ................................................................. 10x28x1 mm ................. 6 7 ................ SS100250 ................. Nylon Set Screw ...................................................... M10-1.5x10 ................... 2 8 ................ 198059 ...................... Pointer ..................................................................... ...................................... 1 9 ................ TS-2285502 .............. Pan Head Phillips Screw ......................................... M5x5 ............................. 1 10 .............. 198004 ...................... Fixed Block .............................................................. ...................................... 1 11 .............. F001755 .................... Lock Nut (Black) ...................................................... M10 ............................... 1 12 .............. 198140 ...................... Fence Body ............................................................. ...................................... 1 13 .............. JWBS14-F01 ............. JET Plaque .............................................................. 1-3/16 x 2-1/4” .............. 1 14 .............. F011270 .................... Pan Hd Phillips Tap Screw (Black) .......................... #6-20x1/2” ..................... 2 15 .............. 198015 ...................... Fence Cover ............................................................ ...................................... 2 16 .............. 198010 ...................... Spacer Bushing ....................................................... Ø6.5x42.5 mm .............. 4 17 .............. TS-2361061 .............. Spring Washer ......................................................... M6 ................................. 4 18 .............. TS-1503121 .............. Socket Head Cap Screw ......................................... M6x55L ......................... 4 19 .............. 100152 ...................... Screw Knob ............................................................. ...................................... 1 20 .............. 198144 ...................... Aluminum Extrusion Fence ...................................... 490L x 50H mm ............ 1 21 .............. 198142 ...................... Rear Hook................................................................ ...................................... 1 22 .............. TS-2311061 .............. Hex Nut .................................................................... M6 ................................. 1 23 .............. 198012 ...................... Adjust Screw ............................................................ M6x20 ........................... 1 24 .............. 198092 ...................... Resaw Post* ............................................................ ...................................... 1 25 .............. 8201-27G .................. Rear Rail .................................................................. ...................................... 1 26 .............. 8201-24G .................. Guide Rail ................................................................ ...................................... 1 27 .............. JWBS14-F23 ............. Scale Label .............................................................. (inches) ......................... 1 28 .............. 8201-25G .................. Front Rail ................................................................. ...................................... 1 29 .............. TS-1550041 .............. Flat Washer* ............................................................ M6xØ13 ........................ 7 30 .............. TS-1482041 .............. Hex Cap Screw* ...................................................... M6x20 ........................... 7 31 .............. TS-0720071 .............. Lock Washer* .......................................................... 1/4" ................................ 5 32 .............. 2013-285 ................... End Cap ................................................................... 25x50 mm ..................... 2 .................. JWBS14-HKN ........... Hardware Package (includes items marked with *) . ...................................... 1

35
Electrical Connections

36
427 New Sanford Road LaVergne, Tennessee 37086
Phone: 800-274-6848 www.jettools.com