Operating and Installation Instructions Induction Cooktop
64
Operating and Installation Instructions Induction Cooktop To prevent accidents and machine damage, read these instructions be‐ fore installation or use. en-US M.-Nr. 09 888 600
Transcript of Operating and Installation Instructions Induction Cooktop

Operating and Installation InstructionsInduction Cooktop
To prevent accidents and machine damage, read these instructions be‐fore installation or use.
en-US M.-Nr. 09 888 600

Contents
2
IMPORTANT SAFETY INSTRUCTIONS ................................................................. 4
Overview ............................................................................................................... 15Cooktop ................................................................................................................. 15DirectSelection controls......................................................................................... 16Cooking zone data................................................................................................. 18
Before using for the first time ............................................................................. 19Cleaning the cooktop for the first time .................................................................. 19Turning on the cooktop for the first time................................................................ 19
Induction ............................................................................................................... 20How it works .......................................................................................................... 20Noises .................................................................................................................... 21Cookware............................................................................................................... 22
Energy saving tips ............................................................................................... 23
Power setting ranges........................................................................................... 24
Operation .............................................................................................................. 25Basic operation ...................................................................................................... 25Turning the cooktop On ......................................................................................... 26Selecting/Changing the power level ...................................................................... 26Deactivating ........................................................................................................... 26Residual heat indicator .......................................................................................... 26Setting the power level - expanded setting range ................................................. 27PowerFlex cooking zone........................................................................................ 27Auto Heat-up.......................................................................................................... 28TwinBooster / Booster ........................................................................................... 29Keep warm function............................................................................................... 31
Timer ..................................................................................................................... 32Timer ...................................................................................................................... 32Turning a cooking zone off automatically .............................................................. 33Using both timer functions at the same time......................................................... 34
Additional functions ............................................................................................. 35Stop & Go function ................................................................................................ 35
Safety features ..................................................................................................... 36System lock / Safety lock ...................................................................................... 36Safety shut-off ....................................................................................................... 37Overheat protection ............................................................................................... 38

Contents
3
Cleaning and care ................................................................................................ 39
Programming ........................................................................................................ 41
Frequently asked questions ................................................................................ 44
Con@ctivity .......................................................................................................... 48
IMPORTANT SAFETY INSTRUCTIONS - INSTALLATION .................................. 49
Safety clearances................................................................................................. 50
Ventilation ............................................................................................................. 54
Instructions for installation ................................................................................. 55
Installation dimensions........................................................................................ 56
Installation ............................................................................................................ 57
Electrical connection ........................................................................................... 58
Caring for the environment ................................................................................. 60
Technical service, data plate, warranty ............................................................. 61
MieleCare.............................................................................................................. 62
IMPORTANT SAFETY INSTRUCTIONS
4
When using the cooktop, follow basic safety precautions, including the fol‐lowing:
Read all instructions before installation and use of the appliance to preventaccidents and machine damage.
This cooktop conforms to current safety requirements. Improperuse can, however, lead to personal injury and damage to property.
To avoid the risk of accidents and damage to the appliance,please read these instructions carefully before using the appliancefor the first time. They contain important notes on installation,safety, use and maintenance.Miele cannot be held liable for damage occurring as a result ofnon-compliance with these instructions.
Keep these instructions in a safe place and pass them on to anyfuture owners.

IMPORTANT SAFETY INSTRUCTIONS
5
Use
This cooktop is intended for domestic use and use in other similarenvironments.
This cooktop is not intended for outdoor use.
The cooktop is intended for domestic use only to prepare foodand keep it warm. Any other use may be dangerous.
Persons who lack physical, sensory or mental abilities, or experi‐ence with the appliance should not use it without supervision or in‐struction by a responsible person.
IMPORTANT SAFETY INSTRUCTIONS
6
Children
As with any other appliance, children must be supervised.
Do not leave children unattended: Children should not be alone orunsupervised in the area where the appliance is installed. Do not al‐low them to sit or stand on the appliance.
Children under eight years of age must be kept away from thecooktop unless they are constantly supervised.
Children ages eight and up may only use the cooktop without su‐pervision if they have been shown how to use it in a safe manner,and if they are able to recognize and understand the potential risksof improper use.
Children must not be allowed to clean the cooktop without super‐vision.
Be sure to supervise any children in the vicinity of the cooktop,and do not let them play with it.
The cooktop gets hot when in use and remains hot for some timeafter being turned off. Keep children away from the appliance until ithas cooled down and is no longer a burn hazard.
Burn hazard! Keep the spaces above and behind the cooktop clear of any itemsthat could draw the attention of children. Otherwise, they can betempted into climbing onto the appliance.
Danger of burning or scalding!Turn all handles away from the front of the cooktop so that childrencannot pull pots and pans down and burn themselves.
Danger of suffocation! Ensure that any plastic wrappings, bags,etc. are disposed of safely and kept out of the reach of children.
Activate the system lock to ensure that children cannot turn onthe appliance inadvertently. Use the safety lock when the hob is inuse to prevent children from altering the settings selected.
IMPORTANT SAFETY INSTRUCTIONS
7
Technical safety
Installation, repair and maintenance work should be performed bya Miele authorized service technician in accordance with nationaland local safety regulations and the provided installation instruc‐tions. Contact Miele’s Technical Service Department for examina‐tion, repair or adjustment. Repairs and other work by unauthorizedpersons could be dangerous and may void the warranty.
Maintenance by the user: Never repair or replace any part of theappliance unless the instructions specifically recommend doing so.Service work may only be performed by a qualified technician.
A damaged cooktop can be dangerous. Always check for visiblesigns of damage. Never use a damaged appliance.
Reliable and safe operation of the cooktop can only be guaran‐teed if it is connected to the public power supply.
Be certain your appliance is properly installed and grounded by aqualified technician. To guarantee the electrical safety of this appli‐ance, continuity must exist between the appliance and an effectivegrounding system. It is imperative that this basic safety requirementbe met. If there is any doubt, have the electrical system of the housechecked by a qualified electrician.
Proper installation: Make sure that your appliance has been instal‐led correctly and that it has been grounded by a qualified technician.
To avoid damaging the cooktop, make sure that the connectiondata (voltage and frequency) on the data plate correspond to thebuilding's power supply before connecting the appliance.When in doubt, consult a qualified electrician.
Do not connect the appliance to the electrical supply with a pow‐er bar or extension cord. These are a fire hazard and do not guaran‐tee the required safety of the appliance.
For safety reasons, the cooktop may only be used when it hasbeen fully installed.

IMPORTANT SAFETY INSTRUCTIONS
8
This appliance must not be used in a non-stationary location (e.g.on a ship).
Any contact with live connections or tampering with the electricalor mechanical components of the cooktop will endanger your safetyand may lead to appliance malfunctions.Do not open the casing of the cooktop under any circumstances.
Any repairs not performed by a Miele authorized service techni‐cian will void the warranty.
Defective components should be replaced by Miele original partsonly. Only with these parts can the manufacturer guarantee the safe‐ty of the appliance.
The appliance is not intended for use with an external timer switchor a remote control system.
Connection of the cooktop to the electrical power supply mustonly be performed by a qualified electrician (see "Electrical connec‐tion").
If the power cord is damaged, it must be replaced by a qualifiedelectrician with a special power cord, which is available from MieleService. See "Electrical connection."
The appliance must be completely disconnected from the elec‐tricity supply during installation, maintenance and repair work. En‐sure that power is not supplied to the appliance until after it hasbeen installed or until any maintenance or repair work has been car‐ried out.Disconnect by
– removing the fuse,
– "tripping" the circuit breaker, or
– unplugging the unit (if equipped with plug). Pull the plug not thecord.
IMPORTANT SAFETY INSTRUCTIONS
9
If the cooktop is fitted with a communication module, in additionto disconnecting the cooktop, this module must also be disconnect‐ed from the electrical supply during installation and maintenance ofthe cooktop as well as while any repair work is being carried out.
Risk of electric shock!If the ceramic surface of the cooktop is defective or chipped,cracked or broken in any way, immediately turn the cooktop off anddo not continue to use it. Disconnect the cooktop from the powersupply and contact Miele.
If the cooktop is installed behind a cabinet door, do not close thedoor while the cooktop is in operation. Heat and moisture can buildup behind the closed door and cause damage to the cooktop, cab‐inetry, and flooring. Do not close the door until the cooktop hascompletely cooled down.

IMPORTANT SAFETY INSTRUCTIONS
10
Proper use
The cooktop gets hot when in use and remains hot for a while af‐ter being turned off. There is a potential hazard until the residual heatindicator goes out.
When in use, the cooktop emits a significant amount of heat,which can cause objects in the vicinity to catch fire.Never use the cooktop to heat the room.
Do not leave the cooktop unattended when cooking on high pow‐er. Spilled food will begin to smoke and cause grease splatter, whichcan ignite on the cooktop.
Oil and fat can catch fire if overheated. Never leave the applianceunattended when cooking with oil and fat. If the oil or fat catchesfire, do not attempt to put the flames out with water.Turn off the cooktop and smother the flames using a lid or a suitablefire blanket.
Smother the fire or flames, or use a dry chemical extinguishingagent or foam fire extinguisher.
Storage in or on the appliance: Flammable materials should notbe stored in an oven or in the vicinity of the cooktop.
The flames could set the grease filters of a ventilation hood onfire. Do not flambé under a ventilation hood.
Spray canisters, aerosols and other inflammable substances canignite when heated. Therefore do not store such items or substancesin a drawer under the appliance. Cutlery inserts must be heat-resist‐ant.
Never heat empty cookware.
Do not heat or can food in closed containers, such as tins orsealed jars, on the cooktop, as pressure will build up in the containerand cause it to explode.

IMPORTANT SAFETY INSTRUCTIONS
11
If the cooktop is covered, there is a risk that the material of thecover will ignite, explode or melt if the range is still hot or if turned oninadvertently. Never cover the cooktop with a board, cloth or protec‐tive sheet.
If the cooktop is turned on or accidentally turned on or if it is stillhot, metal objects on the cooktop can heat up. Other items maymelt or catch fire. Damp lids can become attached to the cooktopby suction. Do not store items on the cooktop! Always turn the burn‐ers off after use!
You could burn yourself on the hot cooktop. Protect your handswith heat-resistant pot holders or gloves when handling hot potsand pans. Do not let them get wet or damp, as this causes heat totransfer through the material more quickly with the risk of scalding orburning yourself.
When using an electrical appliance, e.g. a hand mixer, near thecooktop, make sure that the power cable does not come into con‐tact with the hot cooktop. The cable's insulation could becomedamaged.
Grains of salt, sugar and sand (e.g. from cleaning vegetables) cancause scratches if they get under pan bases. Make sure that the ce‐ramic surface is clean before placing pans on it.
Even a light object can cause damage to the ceramic cooktop incertain circumstances. Do not drop anything on the ceramic surface.
Do not place hot pans on the sensor buttons and display as thiscould cause damage to the electronics underneath. Do not place hotpans on the area around the display.

IMPORTANT SAFETY INSTRUCTIONS
12
Do not allow solid or liquid sugar, or pieces of plastic or aluminumfoil to get onto the burners when they are hot, as they can damagethe ceramic surface when it cools down. If this should occur, turn offthe appliance and scrape off all the sugar, plastic or aluminum resi‐dues while still hot, using a shielded scraper blade. Wear ovengloves. Allow the burners to cool down and clean them with a suita‐ble ceramic cleaning agent.
Pans that boil dry can cause damage to the ceramic glass. Do notleave the appliance unattended while it is being used.
Pots and pans with bases with pronounced edges or ridges canscratch the ceramic burner. Only use pots and pans with smoothbases.
Lift pans into position on the cooktop. Sliding them into place cancause scuffs and scratches.
Fire hazard! Loose-fitting or hanging garments can catch fire. Besure to wear appropriately fitting clothing when cooking. Never allowloose clothing or flammable materials to come into contact with theburners while the burners are in use.
Because induction heating works so quickly, the temperature ofthe cookware bottom can quickly reach the ignition point of oils andfats. Never leave the cooktop unattended when it is on!
Do not heat oils and fats for longer than one minute, and neveruse the booster.
For people who have a heart pacemaker: Please note that thearea immediately surrounding the cooktop is electromagneticallycharged. It is very unlikely to affect a pacemaker. However, if in anydoubt, consult the manufacturer of the pacemaker or your doctor.
Objects affected by electromagnetic fields, for instance creditcards, CDs and calculators, should be kept away from the cooktopwhen it is on.

IMPORTANT SAFETY INSTRUCTIONS
13
Metal utensils stored in a drawer under the cooktop can becomehot if the appliance is used intensively for a long time. Do not storeany metal items or utensils in a drawer under the cooktop.
This cooktop is equipped with a cooling fan. If a drawer is fitteddirectly underneath the cooktop, ensure that there is sufficient spacebetween the drawer and its contents and the underside of the appli‐ance in order to ensure sufficient ventilation of the cooktop. Do notstore pointed or small items or paper in the drawer. They could getin through the ventilation slots or be sucked into the housing by thefan and damage the fan or impair cooling.
Do not use two pans on a cooking zone at the same time.
If the cookware only partially covers the cooking or roasting zone,the handle could become very hot.Make sure to place the cookware in the middle of the cooking orroasting zone.
Wet sponges or clothes can cause burns due to hot steam if theyare used to wipe spilled food off a hot burner. Some cleansers canemit hazardous vapors if they are applied to a hot surface. Be care‐ful when cleaning the cooktop.
If the burner is damaged, cleansers or spilled food can penetratethe glass surface and cause a short-circuit. Never cook on a dam‐aged burner. Contact an electrician immediately.

IMPORTANT SAFETY INSTRUCTIONS
14
Cleaning and care
Do not use a steam cleaner to clean the cooktop.The steam may reach electrical components and cause a short cir‐cuit.
If the cooktop is built in over a self cleaning oven, the cooktopshould not be used while the self cleaning process is being carriedout, as this could trigger the overheating protection mechanism onthe cooktop (see relevant section).

Overview
15
Cooktop
a Cooking zone with TwinBooster
b PowerFlex cooking zone with TwinBooster
c PowerFlex cooking zone with TwinBooster
bc can be combined to form PowerFlex cooking area
d DirectSelection controls

Overview
16
DirectSelection controls
� � �
�
�
�
�
�
�
�
��
Sensor buttons a Turning the cooktop On/Off
b Control scale
- Selecting the power setting- Setting the timer times
c Activating and deactivating the System lock/Safety lock
d Turning the booster/TwinBooster On/Off
e Selecting the cooking zone
f Turning the PowerFlex area On/Off
Overview
17
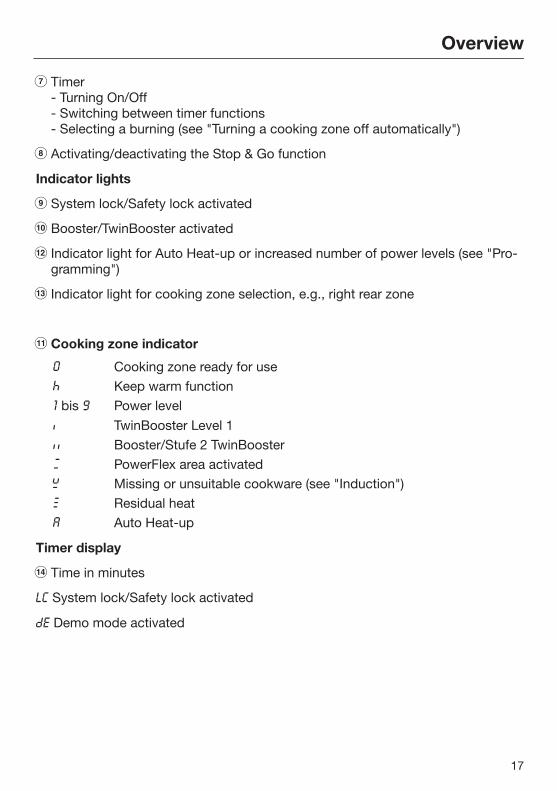
g Timer- Turning On/Off- Switching between timer functions- Selecting a burning (see "Turning a cooking zone off automatically")
h Activating/deactivating the Stop & Go function
Indicator lights i System lock/Safety lock activated
j Booster/TwinBooster activated
l Indicator light for Auto Heat-up or increased number of power levels (see "Pro‐
gramming")
m Indicator light for cooking zone selection, e.g., right rear zone
k Cooking zone indicator
Cooking zone ready for use Keep warm function bis Power level TwinBooster Level 1 Booster/Stufe 2 TwinBooster PowerFlex area activated Missing or unsuitable cookware (see "Induction") Residual heat Auto Heat-up
Timer display n Time in minutes
System lock/Safety lock activated Demo mode activated

Overview
18
Cooking zone data
Cookingzone
Diameter* Ø Output in watt**
Inches Centimeters 208 V 240 V
7 – 11 18 – 28 NormalTwinBooster, Level 1TwinBooster, Level 2
220027003350
250031003850
6 – 9 15 – 23 NormalTwinBooster, Level 1TwinBooster, Level 2
190027003350
220031003850
6 – 9 15 – 23 NormalTwinBooster, Level 1TwinBooster, Level 2
190027003350
220031003850
+ 8 ¹¹/₁₆ – 9 /6 x 9 – 9 x 15 ³/₈
22 – 23 /15 x 23 – 23 x
39
NormalTwinBooster, Level 1TwinBooster, Level 2
305043006700
355050007700
Total 6700 7700
* Cookware of any diameter may be used within the specified range.** The wattage quoted may vary depending on the size and material of the pans used.

Before using for the first time
19
Please adhere the extra data plate forthe appliance supplied with this doc‐umentation in the space provided inthe "Technical service, data plate,warranty" section of this manual.
Remove any protective foil and stick‐ers.
Cleaning the cooktop for thefirst time Before first use, wipe down the appli‐
ance with a damp cloth and dry it.
Turning on the cooktop for thefirst timeMetal components are protected by aconditioning agent. Smells and vapormay occur when the appliance is usedfor the first time. The heating of the in‐duction coils also causes odors in thefirst few hours of operation. With eachsubsequent use, the odor is reduceduntil it disappears entirely.
The smell and any vapors do not indi‐cate a faulty connection or a defectiveappliance and are not harmful to yourhealth.
Please note that the heat-up time forinduction cooktops is very muchshorter than for conventional cook‐tops.

Induction
20
How it worksAn induction coil is located under eachcooking zone. When a zone is turnedon, this coil creates a magnetic fieldthat impacts directly on the base of thepan and heats it up. The zone itself isheated up indirectly by the heat givenoff by the pan.
An induction cooking zone only workswhen a ferromagnetic pan is placed onit (see "Cookware"). The induction zoneautomatically recognizes the size of thepan.
In the cooking zone indicator, the sym‐bol will flash alternately with the se‐lected power setting:
– No cookware or unsuitable cookware(items without a magnetizable bot‐tom) is being used.
– The bottom diameter of the cook‐ware being used is too small.
– The cookware is removed from acooking zone that is on.
If suitable cookware is placed on thecooking zone within 3 minutes, the goes out, and you can continue as usu‐al.
If no cookware or if unsuitable cook‐ware is used, the cooking zone will au‐tomatically turn off after 3 minutes.
When the appliance is turned oneither inadvertently or by mistake, orwhen there is residual heat present,there is the risk of the metal itemsheating up.Danger of burns!Do not use the cooktop as a storagespace. Turn the zones off after usewith the appropriate sensor buttons.
Induction
21
NoisesWhen you use an induction cookingzone, the following noises may occur,depending on the type and shape ofthe cookware bottom:
On the higher power settings, it mightbuzz. This will decrease or cease alto‐gether when the power setting is re‐duced.
Cookware with bottoms made of differ‐ent materials (e.g. sandwich bottoms)may produce a crackling noise.
Whistling may occur if connected cook‐ing zones (see "Booster") are simulta‐neously in use and cookware with bot‐toms made of different materials are onthem.
The electronics may produce a clickingsound, especially at lower power set‐tings.
You might hear a whirring sound whenthe cooling fan turns on. It turns on toprotect the electronics when the cook‐top is being used intensively. The fanmay continue to run after the appliancehas been turned off.
Induction
22
CookwareSuitable cookware is made of:
– stainless steel with a magnetizablebottom
– enamel-coated steel
– cast iron
Unsuitable cookware is made of:
– stainless steel with a non-magnetiza‐ble bottom
– aluminum, copper
– glass, ceramics, earthenware, stone‐ware.
To test whether a pot or pan is suitablefor use on an induction cooktop, hold amagnet to the base of the pan. If themagnet sticks, the pan is suitable.If an unsuitable pan is used, the sym‐bol will flash alternately with the powerlevel set.
The composition of the pan bottom canaffect the evenness of the cooking re‐sults (e.g., when making pancakes).
– To make optimum use of the burners,choose pans with diameters largerthan the innermost markings butsmaller than the outermost markings(see "Burner data"). If the diameter ofthe pan is smaller than the innermostmarking, the pan will not be recog‐nized and will flash alternately withthe power level set.
– Pots and pans with bases with pro‐nounced edges or ridges can scratchthe ceramic burner. Only use potsand pans with smooth bases.
– Lift pans into position on the cook‐top. Sliding them into place cancause scuffs and scratches.
– Often the maximum diameter quotedby manufacturers refers to the diam‐eter of the top rim of the pot or pan.The diameter of the base (generallysmaller) is more important.

Energy saving tips
23
– Use a lid whenever possible to mini‐mize heat loss.
– For small quantities, select a smallpan. A small pan on a small burneruses less energy than a large, onlypartially filled pan on a large burner.
– Cook with as little water as possible.
– Once food has come to the boil orthe pan is hot for frying, reduce theheat to a lower power setting.
Power setting ranges
24
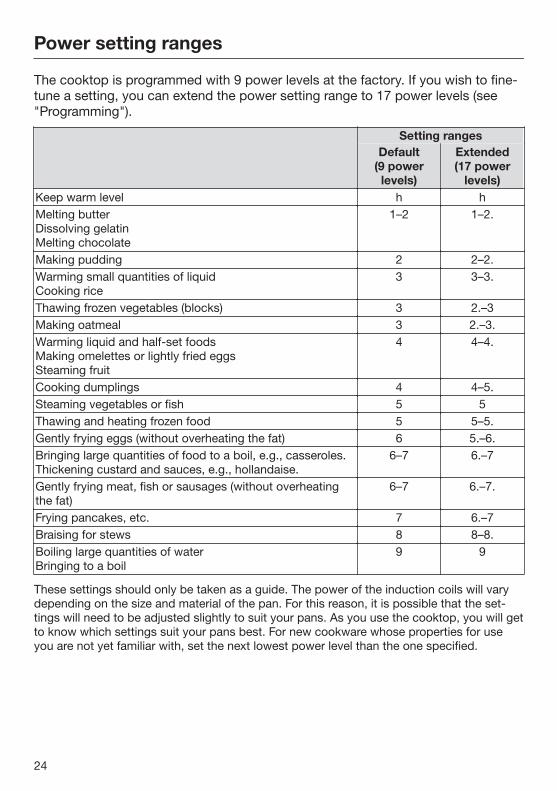
The cooktop is programmed with 9 power levels at the factory. If you wish to fine-tune a setting, you can extend the power setting range to 17 power levels (see"Programming").
Setting rangesDefault
(9 powerlevels)
Extended(17 power
levels)Keep warm level h hMelting butterDissolving gelatinMelting chocolate
1–2 1–2.
Making pudding 2 2–2.Warming small quantities of liquidCooking rice
3 3–3.
Thawing frozen vegetables (blocks) 3 2.–3Making oatmeal 3 2.–3.Warming liquid and half-set foodsMaking omelettes or lightly fried eggsSteaming fruit
4 4–4.
Cooking dumplings 4 4–5.Steaming vegetables or fish 5 5Thawing and heating frozen food 5 5–5.Gently frying eggs (without overheating the fat) 6 5.–6.Bringing large quantities of food to a boil, e.g., casseroles.Thickening custard and sauces, e.g., hollandaise.
6–7 6.–7
Gently frying meat, fish or sausages (without overheatingthe fat)
6–7 6.–7.
Frying pancakes, etc. 7 6.–7Braising for stews 8 8–8.Boiling large quantities of waterBringing to a boil
9 9
These settings should only be taken as a guide. The power of the induction coils will varydepending on the size and material of the pan. For this reason, it is possible that the set‐tings will need to be adjusted slightly to suit your pans. As you use the cooktop, you will getto know which settings suit your pans best. For new cookware whose properties for useyou are not yet familiar with, set the next lowest power level than the one specified.

Operation
25
Basic operationThe ceramic cooktop is equipped withelectronic sensor buttons that react tofinger contact. During activation, theOn/Off sensor button muss bepressed somewhat longer than the oth‐er buttons for safety reasons.Each reaction of the buttons is ac‐knowledged with an acoustic signal.
The cooking zones and the timer haveto be "active" when you want to set oradjust a power level or the duration. Toactivate the zone or the timer, tap theselection button of the correspondingzone or the timer. After the selectionbutton is tapped, the correspondingzone or timer indicator light will flash.While the indicator light is flashing, setor adjust the power level or the dura‐tion. Exception: If there is only one cookingzone in operation, you can set or adjustthe power level without activating itfirst.
Malfunction due to dirty and/or cov‐ered sensor buttonsThe sensor buttons do not react orunintentional switching proceduresresult, perhaps even the automaticdeactivation of the cook top (see"Safety switch-off"). Hot cookwareon the sensor buttons/indicatorlights can damage the connectedelectronic module.Keep the sensor buttons and indica‐tor lights clean, do not place any ob‐jects on them, and do not put hotcookware on them.

Operation
26
Fire hazard!Do not leave the cooktop unattendedduring operation!Please note that the heat-up time forinduction cooktops is shorter thanfor conventional cooktops.
Turning the cooktop On Tap the sensor button.
appears in each of the cooking zoneindicators. If no further entry is made,the cooktop will turn itself off after afew seconds for safety reasons.
Selecting/Changing the powerlevel Briefly tap the selection button for the
desired cooking zone.
In the cooking zone indicator, willflash alternately with the selected pow‐er level.
Tap the sensor button for the desiredpower level on the correspondingcontrol scale.
The set power level flashes in the indi‐cator for a few seconds and then lightsup constantly.
Deactivating Briefly tap the selection button of the
desired cooking zone twice to turn offthe zone.
To turn off the cooktop and thus allcooking zones, tap the sensorbutton.
Residual heat indicatorWhen a cooking zone is hot, the residu‐al heat indicator will light up after deac‐tivation.
The lines of the residual heat indicatorgo out one after another as the cookingzone cools down. The last horizontalline only goes out when the cookingzone is safe to touch.
The residual heat indicators will flash ifthere is a power cut during use orwhile residual heat is still present or ifyou have opened the programmingfunction while residual heat is stillpresent.
Risk of burns! Do not touch theburners while the residual heat indi‐cators are on.

Operation
27
Setting the power level - ex‐panded setting range Tap the control scale between the
sensor buttons.
The set power level flashes in the indi‐cator for a few seconds and then lightsup constantly. The intermediate levelsare shown with an illuminated pointnext to the number.
PowerFlex cooking zoneYou can combine the PowerFlex cook‐ing zones into one large cooking area(see the "Overview – Cooking zone"chapter). The settings for the cookingarea are controlled using the rear or leftPowerFlex cooking zone.
Activating
Tap the sensor button.
flashes in the cooking zone display ofthe rear or left zone. lights up in thecooking zone display of the front orright cooking zone.
Tap the corresponding sensor buttonon the control scale of the rear or leftcooking zone to set the desired pow‐er level.
Deactivating
Tap the sensor button.

Operation
28
Auto Heat-upWhen Auto Heat-up has been activat‐ed, the cooking zone turns on automat‐ically at the highest level and thenswitches to the previously selectedcontinued cooking level. The heat-uptime depends on which continuedcooking level has been chosen (seechart).
Turning on
Briefly tap the selection button for thedesired cooking zone.
Tap the sensor button of the desiredcontinued cooking level until a signalsounds and the indicator light in thecooking zone indicator to the right ofthe continued cooking level lights up.
During the Auto Heat-up time (see ta‐ble), the indicator light next to the setcontinued cooking level lights up.With extended power levels (see "Pro‐gramming"), alternatingly flashes inthe cooking zone display with the setcontinued cooking level.
When you change the continuedcooking level, you deactivate AutoHeat-up.
Deactivating
Briefly tap the selection button for thedesired cooking zone.
Tap the selected continued cookinglevel until the indicator light or goesout.
or
Select a different power level.
Continuedcooking level*
Auto Heat-uptime
[min : sec]
1 approx. 0 : 15
1. approx. 0 : 15
2 approx. 0 : 15
2. approx. 0 : 15
3 approx. 0 : 25
3. approx. 0 : 25
4 approx. 0 : 50
4. approx. 0 : 50
5 approx. 2 : 00
5. approx. 5 : 50
6 approx. 5 : 50
6. approx. 2 : 50
7 approx. 2 : 50
7. approx. 2 : 50
8 approx. 2 : 50
8. approx. 2 : 50
9 –
*The continued cooking levels with a dot areonly available if the number of power levelshas been extended (see "Programming").

Operation
29
TwinBooster / BoosterThe cooking zones are equipped with abooster or TwinBooster (see "Overview– Cooking zone"). You can use thebooster for a maximum of two cookingzones at the same time.
When activated, the power is boostedfor a maximum of 15 minutes so thatlarge quantities can be heated quickly,e.g., pasta water.
If the booster function is turned onwhen
– no power level has been selected,the cooking zone will revert automati‐cally to level 9 at the end of thebooster time or if the booster func‐tion is turned off before this.
– a power level has been selected, thecooking zone will revert automaticallyto the setting selected at the end ofthe booster time or if the boosterfunction is turned off before this.
Two cooking zones are connected sothe power for the booster can be ach‐ieved. The connected zone will operateat reduced power while the booster ison. This has one of the following ef‐fects:
– If the Auto Heat-up was previouslyactive, it will be turned off.
– The power level that is set will be re‐duced.
– The connected cooking zone will beturned off.

Operation
30
Activating the booster
Briefly tap the selection button for thedesired cooking zone.
Select a power level if required.
Tap the B I/II sensor button.
The indicator light for the booster lightsup and the cooking zone indicator starts to flash. After a few seconds, lights up constantly and the indicatorlight goes out.
TwinBooster level 1 activation
Briefly tap the selection button for thedesired cooking zone.
Select a power level if required.
Tap the B I/II sensor button.
The indicator light for the booster lightsup and the cooking zone indicator starts to flash. After a few seconds, lights up constantly and the indicatorlight goes out.
TwinBooster level 2 activation
Briefly tap the selection button for thedesired cooking zone.
Select a power level if required.
Touch the B I/II sensor button twice.
The indicator light for the booster lightsup and the cooking zone indicator starts to flash. After a few seconds, lights up constantly and the indicatorlight goes out.
Turning the Booster/TwinBoosterOn/Off
Briefly tap the selection button for thedesired cooking zone.
Tap the B I/II sensor button repeat‐edly until the booster indicator lightgoes out and the selected power lev‐el appears in the cooking zone dis‐play.
or
Briefly tap the selection button for thedesired cooking zone.
Select a different power level.

Operation
31
Keep warm function
The keep warm function is for keepingfood warm that has just been cooked,i.e., food that is still hot. It is not forreheating cold food.
If the keep warm function has been ac‐tivated, the cooking zone will turn offautomatically after a maximum of 2hours.
– Only use pans for keeping foodwarm. Cover the pan with a lid.
– It is not necessary to stir the foodwhile it is being kept warm.
– Nutrients are lost when food iscooked, and continue to diminishwhen food is kept warm. The longerfood is kept warm for, the greater theloss of nutrients. Try to ensure thatfood is kept warm for as short a timeas possible.
Setting the keep warm function
Briefly tap the selection button for thedesired cooking zone.
Tap the control scale between the 0and 1 sensor buttons.
appears in the cooking zone indicator.
Turning off the keep warm function
Briefly tap the selection button for thedesired cooking zone.
Tap the 0 sensor button.

Timer
32
The cooktop has to be turned on ifyou wish to use the timer.You can set a time up to 99 minutes.
The timer can be used for two differentfunctions:
– For setting the timer
– For turning off a cooking zone auto‐matically
Timer
Setting
Example: You want to set a time of 15minutes.
Turn the cooktop on.
Tap the sensor button.
appears in the timer display, and theright flashes.
First the tens digit is set then the onesdigit.
Tap the sensor button on the controlscale that corresponds to the tensposition (1 in this case).
The timer display will change and willstart flashing on the right.
Tap the sensor button on the controlscale that corresponds to the onesposition (5 in this case).
The timer display will change. jumpsto the left and appears on the right.
The timer starts counting down.
Changing the timer
Tap the sensor button.
Set a new time, as described above.
Deleting the timer
Touch the sensor button until appears in the timer display.

Timer
33
Turning a cooking zone off au‐tomaticallyYou can set a time after which thecooking zone will turn off automatically.This function can be used on all zonesat the same time.
If the programmed time is longer thanthe maximum time allowed, the safetyshut-off function will turn off the cook‐ing zone automatically when the maxi‐mum time has elapsed (see "safetyshut-off").
Select a power level for the cookingzone you require.
Keep tapping the sensor buttonuntil the indicator light for this cook‐ing zone starts flashing.
If several cooking zones are on, the in‐dicator lights flash in a clockwise di‐rection, starting with the left front.
Select the time you require.
If you want to set another cookingzone to turn off automatically, followthe same steps as described above.
If more than one turn-off time is pro‐grammed, the shortest time remainingwill be displayed, and the respectiveindicator light flashes. The other indi‐cator lights light up constantly.
If you want to see the other remainingtimes, keep tapping the sensorbutton until the desired indicator lightflashes.

Timer
34
Using both timer functions atthe same timeThe timer and automatic turn-off func‐tions can be used at the same time.
If you have programmed in one or moreturn-off times, and would like to use thetimer as well:
Tap the sensor button until the in‐dicator lights of the programmedcooking zones light up constantlyand appears in the timer display.
Set a new time as described above.
If you have set the timer and would liketo program one or more turn-off timesas well:
Keep tapping the sensor buttonuntil the indicator light for the desiredcooking zone starts flashing.
Set a new time as described above.
Shortly after the last touch, the shortestremaining time will come up in the timerdisplay.
If you would like to call the other re‐maining times so that they appear inthe display:
Tap the sensor button until:
– The indicator light for the desiredcooking zone starts flashing (auto‐matic turn-off).
– The timer display starts flashing.
Starting with the shortest time remain‐ing which is shown in the display, allcooking zones which are turned on andthe timer are selected clockwise.

Additional functions
35
Stop & Go functionWhen activated, the Stop & Go reducesthe power of all cooking zones in use topower level 1.The power levels of the zones and set‐ting of the timer cannot be changedand the cooktop can only be turned off.A set timer and booster time continueto run. The Auto Heat-up time and settimes for automatic turn-off are stop‐ped.
When Stop & Go is deactivated, thecooking zones will run on the powerlevel that was previously selected andthe Auto Heat-up time and automaticturn-off times start to run again.
If the Stop & Go function is not deacti‐vated, the cooktop turns off automati‐cally after 1 hour.
Activation / deactivation
Tap the sensor button.
Use this function to clean the controlsquickly or if there is a danger over boil‐ing over.

Safety features
36
System lock / Safety lock
The system lock and safety lock aredeactivated if there is a power out‐age.
Three-finger control is the default set‐ting. You can change the default toone-finger control (see "Program‐ming").
Your cooktop is equipped with a safetylock to prevent the cooktop and thecooking zones being turned on or anysettings being altered.
The system lock is activated when thecooktop is turned off. When it is acti‐vated, the cooktop cannot be turned onand the timer cannot be used. Thecooktop is programmed so that thesystem lock must be activated manual‐ly. It can be programmed to be activat‐ed automatically 5 minutes after thecooktop has been turned off if the sys‐tem lock is not manually activated first(see "Programming").
The safety lock is activated when thecooktop is turned on. When the safetylock is activated, the cooktop can beoperated only under certain conditions:
– The power levels for the cookingzones and the timer settings cannotbe changed.
– The cooking zones, entire cooktop,and the timer can be turned off, butonce turned off cannot be turned onagain.
If a locked sensor switch is touchedwhen the safety lock or the system lockis activated, the indicator light comeson and appears in the timer displayfor a few seconds.
Activating
Tap the sensor button and selec‐tion buttons of both right cookingzones until appears in the timedisplay and the indicator light of thesafety lock lights up.
The indicator light and go out aftera short while.
Deactivating
Tap the sensor button and selec‐tion buttons of both right cookingzones until goes out in the timedisplay and the indicator light of thesafety lock extinguishes.

Safety features
37
Safety shut-off
Safety shut-off with an overlongcooking time
The safety shut-off is triggered auto‐matically if a cooking zone is heated foran unusually long period of time. Thistime depends on the power level se‐lected. If it has been exceeded, thecooking zone turns off and the residualheat indicator appears. If you turn thecooking zone on and off again, it isready for operation again.
Safety shut-off if the sensors arecovered
Your cooktop will turn off automaticallyif one or several of the sensors remaincovered for longer than 10 seconds, forexample, by finger contact, food boilingover or by an object such as an ovenglove or tea towel. flashes in the timerdisplay and a buzzer sounds every30 seconds for 10 minutes.When you remove the objects or soil‐ing, extinguishes, the buzzer goes off,and the cooktop is ready for operationagain.
Safety features
38
Overheat protectionAll the induction coils and the coolingelements for the electronics are equip‐ped with an overheating protectionmechanism. To prevent the inductioncoils and cooling elements from over‐heating, the overheating protectionmechanism works on the affectedcooking zone or on the entire cooktopin the following ways:
Inductive coils
– Any booster function in operation willbe turned off.
– The power level that is set will be re‐duced.
– The cooking zone turns off automati‐cally. flashes in the timer displayalternatingly with .
You can use the cooking zones againas usual when the fault message hasgone out.
Cooling elements
– Any booster function in operation willbe turned off.
– The power level that is set will be re‐duced.
– The cooking zones turn off automati‐cally.
The affected cooking zones can only beused again if the cooling element hascooled down to a safe level.
Overheating can be caused by:
– Heating empty cookware
– Fats or oils being heated at highpower settings
– Underside of cooktop insufficientlyventilated
– A hot cooking zone being turned onafter a power outage
If, despite elimination of the cause, theoverheat protection is triggered again,contact Miele Service.

Cleaning and care
39
Burn hazard!The burners must be turned off andallowed to cool completely.
Risk of injury!The steam from a steam cleanercould reach electrical componentsand cause a short circuit.Do not use a steam cleaner to cleanthe cooktop.
All cooktop surfaces can becomediscolored or damaged if unsuitablecleaning agents are used.The outer surfaces of the cooktopare susceptible to scratching.Immediately remove any residues leftby cleaning agents.
Unsuitable cleaning agentsTo prevent damage to surfaces, avoidthe following while cleaning:
– Liquid dish soap
– Cleaners containing soda, alkaline,ammonia, thinners, or chlorides
– Descaling agents
– Stain or rust removers
– Abrasive cleaning agents, such aspowder or cream cleansers, pumicestones
– Solvent-based cleaners,
– Dishwasher detergent
– Grill and oven sprays
– Glass cleaning agents
– Hard, abrasive brushes or sponges,e.g., pot scourers, brushes or spong‐es which have been previously usedwith abrasive cleaning agents
– Eraser sponges

Cleaning and care
40
Do not clean the area between theglass-ceramic surface and the frameor the frame and the counter withsharp objects.This could cause damage to theseals.
When cleaning with dishwashing liq‐uid, not all contaminants and resi‐dues are removed.An invisible film forms, which causesdiscoloration of the ceramic. Thisdiscoloration cannot be removed.Clean the cooktop on a regular basiswith a special ceramic cleaner.
First wipe down the surface with adamp cloth to loosen soiling, then re‐move stubborn crusting with a glassscraper.
Clean the cooktop with the Miele ce‐ramic and stainless steel cleaner (see"Optional accessories") or a commer‐cial ceramic cleaner and paper towel ora clean cloth. Do not put the cleaner ona hot cooktop since this may causespotting. Please follow the manufactur‐er's instructions.
Then clean the cooktop with a dampcloth and dry it off. Cleaner residueswill burn into the cooktop during subse‐quent uses, damaging the surface.Make sure you remove all residues.
Spots from lime deposits, water, andaluminum deposits (metallic spots) canbe removed with a ceramic and stain‐less steel cleaner.
Danger of burns!Wear pot holders and use a glassscraper to remove sugar, plastic oraluminum residues from the hotcooktop.
Should any sugar, plastic or alumi‐num foil spill or fall onto a hot cookingzone while it is in use, first turn off theappliance. Then carefully scrape offthese residues from the cooktop imme‐diately while they are still hot, using ashielded scraper blade. Allow the appli‐ance to cool down, and then clean thecooktop when it has cooled down asdescribed above.

Programming
41
You can adapt the programming of thecooktop to your personal needs. Sever‐al settings can be changed in succes‐sion.
After the programming function is start‐ed, (program) and (status) will ap‐pear in the timer display. With cooktopsthat have 3 cooking zones, an addition‐al display appears at the back left.
The program is displayed in the frontleft and back left cooking zone dis‐plays.
Example:Program 03 =Front left , rear left Program 14 =Front left , rear left The status is shown in the front rightcooking zone display.
After the programming function is exit‐ed, an automatic reset is performed. Itis concluded when an indicator lightlights up briefly via the sensor but‐ton.Do not turn on the cooking zone untilthe reset is concluded.
Starting the programmingfunction When the cooking zone is turned
off, tap the and sensor buttonssimultaneously until the indicator lightfor the safety lock flashes.
Setting a program To set the ones, touch the sensor for
the back left cooking zone followedby the respective number on the set‐tings bar.
To set the tens, touch the sensor forthe front left cooking zone followedby the respective number on the set‐tings bar.
Setting the status Touch the sensor for the front right
cooking zone followed by the respec‐tive number on the settings bar.
Saving the settings Touch the sensor until the indica‐
tors go out.
How to avoid saving the set‐tings Touch the sensor until the indica‐
tors go out.

Programming
42
Program1) Status2) Settings
P00 Demo mode and default set‐tings
S0 Demo mode on3)
S1 Demo mode off
S9 Default settings reinstated
P01 Stop & Go S0 Off
S1 On
P02 Number of power levels S0 9 power levels
S1 17 power levels4)
P03 Induction buzzer tone whenthere is no or unsuitable cook‐ware.
S0 Off
S1 Quiet
S2 Medium volume
S3 Loud
P04 Tone when a sensor button istouched
S0 Off
S1 Quiet
S2 Medium volume
S3 Loud
P05 Timer buzzer tone S0 Off
S1 Quiet
S2 Medium volume
S3 Loud
P06 System lock / Safety lock S0 One-finger control with
S1 Three-finger control with simulta‐neous tapping of and the selec‐tion buttons of both right cookingzones
P07 System lock S0 Manual activation of the systemlock only
S1 Manual and automatic activationof the system lock
P08 Auto Heat-up S0 Off
S1 On
Programming
43
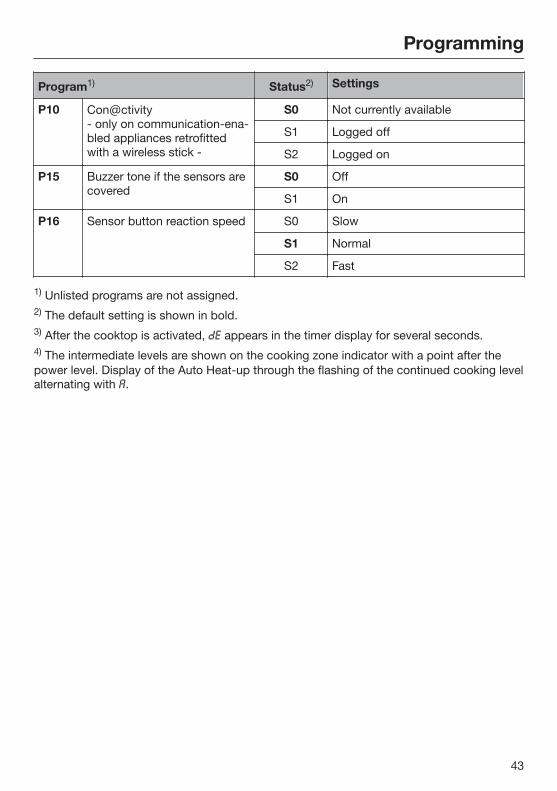
Program1) Status2) Settings
P10 Con@ctivity- only on communication-ena‐bled appliances retrofittedwith a wireless stick -
S0 Not currently available
S1 Logged off
S2 Logged on
P15 Buzzer tone if the sensors arecovered
S0 Off
S1 On
P16 Sensor button reaction speed S0 Slow
S1 Normal
S2 Fast
1) Unlisted programs are not assigned.2) The default setting is shown in bold.3) After the cooktop is activated, appears in the timer display for several seconds.4) The intermediate levels are shown on the cooking zone indicator with a point after thepower level. Display of the Auto Heat-up through the flashing of the continued cooking levelalternating with .
Frequently asked questions
44
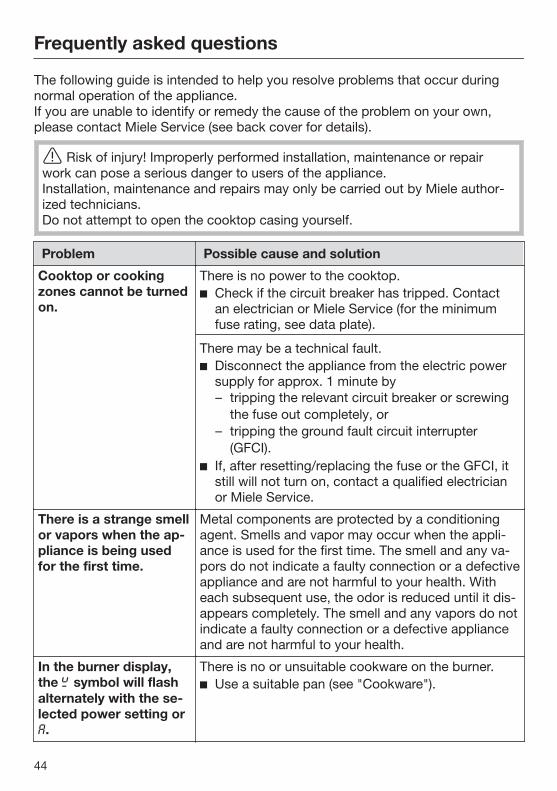
The following guide is intended to help you resolve problems that occur duringnormal operation of the appliance.If you are unable to identify or remedy the cause of the problem on your own,please contact Miele Service (see back cover for details).
Risk of injury! Improperly performed installation, maintenance or repairwork can pose a serious danger to users of the appliance.Installation, maintenance and repairs may only be carried out by Miele author‐ized technicians.Do not attempt to open the cooktop casing yourself.
Problem Possible cause and solution
Cooktop or cookingzones cannot be turnedon.
There is no power to the cooktop. Check if the circuit breaker has tripped. Contact
an electrician or Miele Service (for the minimumfuse rating, see data plate).
There may be a technical fault. Disconnect the appliance from the electric power
supply for approx. 1 minute by– tripping the relevant circuit breaker or screwing
the fuse out completely, or– tripping the ground fault circuit interrupter
(GFCI). If, after resetting/replacing the fuse or the GFCI, it
still will not turn on, contact a qualified electricianor Miele Service.
There is a strange smellor vapors when the ap‐pliance is being usedfor the first time.
Metal components are protected by a conditioningagent. Smells and vapor may occur when the appli‐ance is used for the first time. The smell and any va‐pors do not indicate a faulty connection or a defectiveappliance and are not harmful to your health. Witheach subsequent use, the odor is reduced until it dis‐appears completely. The smell and any vapors do notindicate a faulty connection or a defective applianceand are not harmful to your health.
In the burner display,the symbol will flashalternately with the se‐lected power setting or.
There is no or unsuitable cookware on the burner. Use a suitable pan (see "Cookware").

Frequently asked questions
45
Problem Possible cause and solution
After the cooktop is ac‐tivated, appears inthe timer display forseveral seconds.
The system lock or safety lock is activated. Deactivate the system lock or safety lock (see
"System lock / Safety lock").
flashes in thetimer display andthe cooktopturns off auto‐matically.
One or more of the sensor buttons are covered, forexample by fingers, food boiling over or by an object. Clean off any dirt or remove the object (see "Safe‐
ty shut-off").
After turning on thecooktop, appears inthe timer display forseveral seconds. Thecooking zones don'theat up.
The cooktop is in demo mode. Deactivate demo mode (see "Programming").
A burner switches itselfoff automatically.
A burner might have been operated for too long. You can use the burner again by switching it back
on (see "Safety switch-off").
A cooking zone or thewhole cooktop turns offautomatically.
The overheat protection was triggered. See "Overheat protection."
The booster has auto‐matically switched offearly.
The overheat protection was triggered. See "Overheat protection".
The burner is not work‐ing in the usual waywith the set power lev‐el.
The overheat protection was triggered. See "Overheat protection".
Power setting 9 is auto‐matically reduced if youselect power setting 9on two linked burnersor extended zones atthe same time.
Operating both zones at power level 9 would exceedthe permitted maximum power for the cooktop. Use another burner that is not linked.

Frequently asked questions
46
Problem Possible cause and solution
Auto Heat-up is turnedon, but the food doesnot start cooking.
Large amounts of food are being heated. Start cooking at the highest power level, then re‐
duce the power level manually.
The pan is not conducting heat properly. Use a different pan that is able to better conduct
heat on an induction cooktop.
A noise can be heardafter the appliance isturned off.
The fan will continue running until the appliance hascooled down. It will then switch itself off automatical‐ly.
One or more residualheat indicators is flash‐ing.
There was a power failure during operation or whenresidual heat was present.
You called the programming function while residualheat was still present.
The sensor buttons areover-sensitive or do notreact at all.
The sensitivity level of the sensor buttons haschanged. Ensure that the cooktop is not in direct sunlight or
strong artificial light and that the area around thecooktop is not too dark.
Make sure that there is nothing covering the sen‐sor buttons or the cooktop.Take any pans off the cooktop and wipe away anyfood deposits.
Interrupt the power supply to the cooktop for ap‐prox. 1 minute.
If the problem persists after power is restored,please contact Miele Service.
Frequently asked questions
47
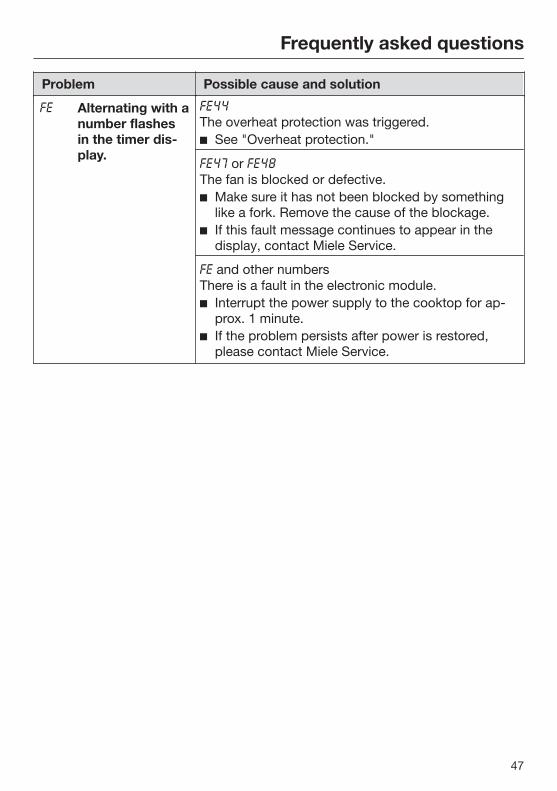
Problem Possible cause and solution
Alternating with anumber flashesin the timer dis‐play.
The overheat protection was triggered. See "Overheat protection."
or The fan is blocked or defective. Make sure it has not been blocked by something
like a fork. Remove the cause of the blockage. If this fault message continues to appear in the
display, contact Miele Service.
and other numbersThere is a fault in the electronic module. Interrupt the power supply to the cooktop for ap‐
prox. 1 minute. If the problem persists after power is restored,
please contact Miele Service.

Con@ctivity
48
Your cooktop is communication ena‐bled and can communicate with theventilation hood using the wireless USBstick included with selected ventilationhoods (Con@ctivity). The cooktopsends information on its operating sta‐tus to the ventilation hood. The opera‐tion of the ventilation hood is automati‐cally controlled by the power setting ofthe connected cooktop.
If you want to log your cooktop ontoCon@ctivity, you must first log on tothe ventilation hood.
Logging on the cooktop When the cooking zone is turned
off, tap the and sensor buttonssimultaneously until the indicator lightfor the safety lock flashes.
(program) and (status) will appear inthe timer display. With cooktops thathave 3 cooking zones, an additionaldisplay appears at the back left.
Tap the selection button for the frontleft cooking zone and then powerlevel 1 on the control scale (Set Pro‐gram 10).
Tap the selection button for the frontright cooking zone and then powerlevel 2 on the control scale (Set Sta‐tus 2 = log on).
The log-on process starts, and thenumber 2 flashes on the cooking zoneindicator. The log-on process will take afew minutes. The number 2 will light upconstantly when the process has beencompleted successfully.
To save the setting, tap the sensorbutton until the indicators go out.
Conclude the log-on on the hood/display devices (see the correspond‐ing instructions).
Logging off the cooktop When the cooking zone is turned
off, tap the and sensor buttonssimultaneously until the indicator lightfor the safety lock flashes.
(program) and (status) will appear inthe timer display. With cooktops thathave 3 cooking zones, an additionaldisplay appears at the back left.
Tap the selection button for the frontleft cooking zone and then powerlevel 1 on the control scale (Set Pro‐gram 10).
Tap the selection button for the frontright cooking zone and then powerlevel 1 on the control scale (Set Sta‐tus 1 = log off).
The log-off process starts, and thenumber 1 flashes on the cooking zoneindicator. The log-off process will take afew minutes. The number 1 will light upconstantly when the process has beencompleted successfully.
To save the setting, tap the sensorbutton until the indicators go out.
IMPORTANT SAFETY INSTRUCTIONS - INSTALLATION
49
Installation and connection ofthe cooktop to the electrical powersupply may only be performed by aqualified electrician.
Install the upper cabinets and venti‐lation hood before installing thecooktop to avoid damaging it.
Reaching over a hot cooktopto access the cabinets can resultin burns. You can reduce the riskof burns by installing a ventila‐tion hood that extends at least4 ³/₄" (12 cm) past the bottom ofthe cabinets. Do not install anycabinets above the cooktop.
The countertop must be heat-resistant (up to 212°F / 100°C),so that it does not become de‐formed or the veneer detached.The wall strips must be heat-re‐sistant as well.
The cooktop must not be in‐stalled above refrigerators/freez‐ers, dishwashers, or washer/dryers.
This cooktop may only be in‐stalled above a stove or oven ifthey have a built-in cooling fan.
Ensure that the power cordcannot be touched after thecooktop has been installed.
After the installation of thecooktop, the electrical cord maynot come into contact with anymoving kitchen parts (e.g. adrawer) or be subject to mechan‐ical stress.
Observe carefully the safetyclearances listed on the followingpages.
Safety clearances
50
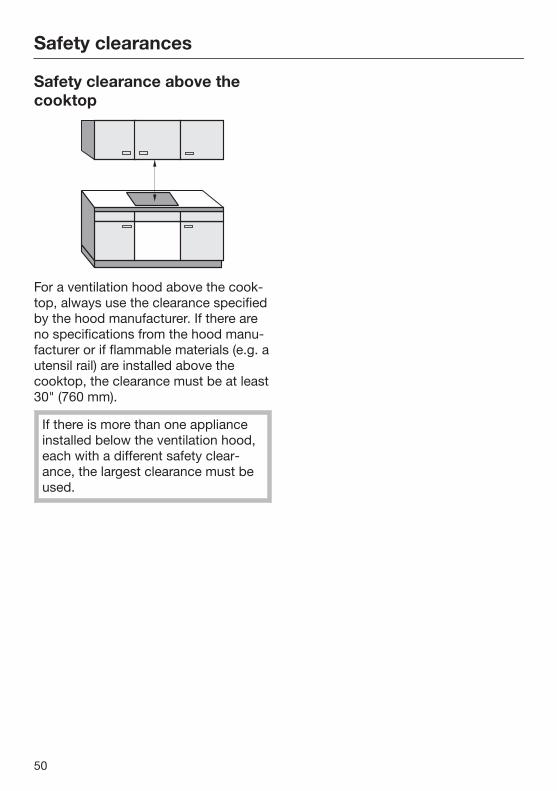
Safety clearance above thecooktop
For a ventilation hood above the cook‐top, always use the clearance specifiedby the hood manufacturer. If there areno specifications from the hood manu‐facturer or if flammable materials (e.g. autensil rail) are installed above thecooktop, the clearance must be at least30" (760 mm).
If there is more than one applianceinstalled below the ventilation hood,each with a different safety clear‐ance, the largest clearance must beused.

Safety clearances
51
Safety clearances to the sidesand back of the cooktopIn installing a cooktop there may be anoptionally high cabinet or room wallagainst the rear side and one of thesides (right or left) (see illustrations).
minimum distance between theback of the counter cut-out and therear edge of the counter:2" (50 mm)
minimum distance to the right of thecounter cut-out to the closest adjacentpiece of furniture (for instance, a highcabinet) or a room wall:2" (50 mm)
minimum distance to the left of thecounter cut-out to the closest adjacentpiece of furniture (for instance, a highcabinet) or a room wall:2" (50 mm)
Not permitted!
Highly recommended!
Not recommended!
Not recommended!
Safety clearances
52
Minimum clearance under‐neath the cooktopTo ensure proper ventilation of thecooktop, a minimum clearance is re‐quired between the appliance and anoven, protective base, or drawer.
The minimum clearance from the bot‐tom of the cooktop to
– the top of the oven must be ⁹/₁₆"(15 mm).
– the top of the protective base mustbe ⁹/₁₆" (15 mm).
– bottom of the drawer must be 3"(75 mm).
Protective baseInstallation of a protective base underthe cooktop is allowed but not required.
A gap of 3" (75 mm) at the back is re‐quired for the power supply cord. Forbetter cooling of the cooktop, we rec‐ommend a gap of 2" (50 mm) at thefront.

Safety clearances
53
Safety distance from the wall coveringIf a wall covering is installed, a minimum safety distance must be maintained be‐tween the countertop cut-out and the covering, since high temperatures can dam‐age these materials.
If the covering is made of a combustible material (such as wood), the distance be‐tween the countertop cut-out and the wall covering must be a minimum of 2"(50 mm).
For coverings made of non-combustible materials (such as metal, marble, granite,ceramic tiles) the minimum safety distance between the countertop cut-out andthe wall covering must be 2" (50 mm) minus the thickness of the covering. For ex‐ample: thickness of wall covering 2" (50 mm) - ⁹/₁₆" (15 mm) = minimum safetydistance 1 ³/₈" (35 mm).
Flush-mounted cooktops Framed cooktops
Wall frame
Wall covering dimension x = thickness of the niche cladding
Countertop
Countertop cut-out
Minimum distance for
flammable materials 2" (50 mm).
non-flammable materials 2" (50 mm) - dimension x

Ventilation
54
a Front
b Ventilation cut-out in the rear wall of the cabinetry19" x 3" (482 x 75 mm)(Slight) ventilation also takes place when the cabinet is directly against the wall.
c Protective baseThe installation of a protective base beneath the cooktop is not required, butpermitted.If a protective base is installed, the distance between the top edge of the coun‐tertop and the top edge of the base must be at least 5¹/₈" (130 mm) for properventilation of the cooktop.Leave an air gap of 3" (75 mm) at the back for the power cord.

Instructions for installation
55
Seal between cooktop andcounter
In case a disassembly is required,the appliance must not be perma‐nently sealed into the countertopwhen installed. The sealing strip un‐der the edge of the appliance pro‐vides a sufficient seal for the coun‐tertop.If the appliance is sealed into posi‐tion, the countertop or appliancecould be damaged if it needs to beremoved for maintenance or service.
Tiled countertop
The grouting and shaded area underthe appliance frame must be flat andeven so that the frame will lie evenlyand the sealing strip under the edge ofthe upper part of the appliance canprovide an adequate seal against thecountertop.

Installation dimensions
56
a Front
b Installation height
c Flexible metal hose with power cord, L = 3' 11¹/₄" (1200 mm)
d Data plate

Installation
57
Preparing the counter Create the counter cut-out as shown
in the cooktop diagram and in the de‐tailed drawing. Remember to main‐tain a minimum safety distance (see"Safety clearances").
Seal any wooden counter surfaceswith a special varnish, silicone rub‐ber, or resin to help prevent swellingfrom moisture. The sealant must betemperature resistant.
Ensure that the sealant does not geton the top surface of the countertop.
The sealing tape guarantees a non-slipping seat of the cooktop in thecut-out. The gap between the frameand counter reduces with time.
Installing the cooktop Feed the appliance power cord down
through the counter cut-out.
Center the cooktop in the cut-out.Make sure that the seal under thecooktop sits flush with the counter onall sides. This is important to ensurean effective seal.
NEVER seal the cooktop using addi‐tional sealing material such as sili‐con!
If during installation the seal aroundthe frame does not sit flush with thecountertop in the corners, the cornerradius, maximum 3/16" (4 mm), canbe carefully filed down to fit.
Connect the cooktop to the electricalpower supply.
Check that the cooktop works.
Electrical connection
58
ATTENTION:Before installation or servicing, dis‐connect the power supply by eitherremoving the fuse, shutting off themain power or manually "tripping"the circuit breaker.
Installation work and repairs shouldonly be performed by a qualifiedtechnician in accordance with all ap‐plicable codes and standards. Re‐pairs and service by unqualified per‐sons could be dangerous and themanufacturer will not be held re‐sponsible.Installation, repair, andmaintenance work should only beperformed by a Miele-authorizedservice technician. Work by unquali‐fied persons can cause considerabledanger to users. Miele cannot beheld liable for any damage arising asa result of such work.
Before connecting the appliance tothe power supply, make sure that thevoltage and frequency listed on therating label correspond with thehousehold electrical supply. This da‐ta must correspond to prevent appli‐ance damage. Consult an electrician if in doubt.
For safety reasons, the cooktop mayonly be used when it has been fullyinstalled into the countertop.
To guarantee the electrical safety ofthis appliance, continuity must existbetween the appliance and an effec‐tive grounding system. It is impera‐tive that this basic safety require‐ment be met. If there is any doubt,have the electrical system of thehouse checked by a qualified electri‐cian.Installation, repair and maintenancework should only be performed by aMiele-authorized qualified electricianin compliance with local regulationsand the ANSI National ElectricalCode / NFPA 70 in the United Statesor the Canadian Electrical Code, PartI in Canada (CSA standard C22.1).
Installer: Please leave these instructions with
the customer.
Electrical connection
59
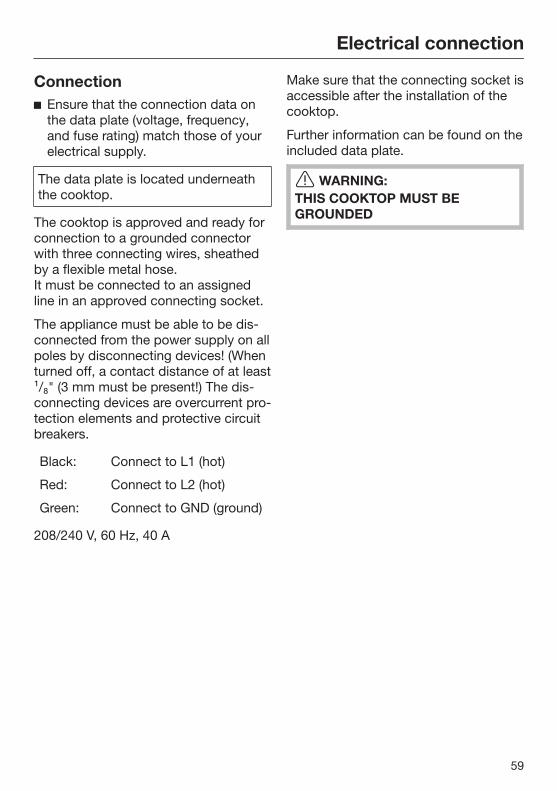
Connection Ensure that the connection data on
the data plate (voltage, frequency,and fuse rating) match those of yourelectrical supply.
The data plate is located underneaththe cooktop.
The cooktop is approved and ready forconnection to a grounded connectorwith three connecting wires, sheathedby a flexible metal hose.It must be connected to an assignedline in an approved connecting socket.
The appliance must be able to be dis‐connected from the power supply on allpoles by disconnecting devices! (Whenturned off, a contact distance of at least¹/₈" (3 mm must be present!) The dis‐connecting devices are overcurrent pro‐tection elements and protective circuitbreakers.
Black: Connect to L1 (hot)
Red: Connect to L2 (hot)
Green: Connect to GND (ground)
208/240 V, 60 Hz, 40 A
Make sure that the connecting socket isaccessible after the installation of thecooktop.
Further information can be found on theincluded data plate.
WARNING:THIS COOKTOP MUST BEGROUNDED

Caring for the environment
60
Disposal of the packing mate‐rialThe cardboard box and packing materi‐als protect the appliance during ship‐ping. They have been designed to bebiodegradable and recyclable.
Ensure that any plastic wrappings,bags, etc. are disposed of safely andkept out of the reach of children. Dan‐ger of suffocation!
Disposal of your old applianceOld electrical and electronic appliancesoften still contain valuable materials.However, they also contain harmfulsubstances that were essential for theproper functioning and safe use of theequipment. Handling these materialsimproperly or disposing of them in yourhousehold waste can be harmful toyour health and the environment.Therefore, please do not dispose ofyour old appliance with regular house‐hold waste.
Old appliances may contain materialsthat can be recycled. Please contactyour local recycling authority about thepossibility of recycling these materials.
Please be sure that your old appliancedoes not pose a danger to childrenwhile being stored for disposal.

Technical service, data plate, warranty
61
After sales serviceIn the event of a fault which you cannot easily correct yourself, please contact:
– your Miele dealer, or
– the Miele Technical Service Department.
See back cover for contact details.
Please quote the model and serial number of your appliance when contactingMiele.
Data plateAdhere the extra data plate supplied with the appliance here. Ensure that the mod‐el number is the same as the one on the back of these operating instructions.
WarrantyFor further information, please refer to your warranty booklet.

MieleCare
62
This service is available in USA only.
MieleCare, our Extended Service Con‐tract program, gives you the assuranceof knowing that your appliance invest‐ment is covered by 5 years of worryfree ownership.MieleCare is the only Extended ServiceContract in the industry that guaranteesrepairs by a Miele Authorized ServiceProvider using genuine Miele parts. On‐ly genuine Miele parts installed by fac‐tory trained professionals can guaran‐tee the safety, reliability, and longevityof your Miele appliance.
Please note that unless expressly ap‐proved in writing by Miele’s Service de‐partment, Extended Service Contractsoffered by other providers for Mieleproducts will not be recognized byMiele. Our goal is to prevent unauthor‐ized (and untrained) service personnelfrom working on your Miele products,possibly doing further damage to them,you and/or your home.
To learn more about MieleCare Extend‐ed Service Contracts, please contactyour appliance dealer or visit us onlineat:www.mieleusa.com/mielecare

9 Independence WayPrinceton, NJ 08540Phone:Fax:www.mieleusa.com
U.S.A.Miele, Inc.
National Headquarters
Please have the model and serial numberof your appliance available beforecontacting Technical Service.
CanadaImporterMiele Limited
Headquarters and Miele Centre
800-843-7231609-419-4298
Technical Service & SupportNationwidePhone:Fax:[email protected]
161 Four Valley DriveVaughan, ON L4K 4V8www.miele.ca
800-999-1360888-586-8056
Customer Care CentrePhone:
800-565-6435905-532-2272
GermanyManufacturerMiele & Cie. KGCarl-Miele-Straße 2933332 Gütersloh
63

M.-Nr. 09 888 600 / 01en-US
KM 6320