OpenStack Plugin 2.0 Implementation Guide - Extreme...
80
OpenStack Plugin 2.0 Implementation Guide 120873-00 Published June 2014
Transcript of OpenStack Plugin 2.0 Implementation Guide - Extreme...
OpenStack Plugin 2.0Implementation Guide
120873-00
Published June 2014
Copyright © 2014 Extreme Networks All rights reserved.
AccessAdapt, Alpine, Altitude, BlackDiamond, Direct Attach, EPICenter, ExtremeWorksEssentials, Ethernet Everywhere, Extreme Enabled, Extreme Ethernet Everywhere, ExtremeNetworks, Extreme Standby Router Protocol, Extreme Turbodrive, Extreme Velocity,ExtremeWare, ExtremeWorks, ExtremeXOS, Go Purple Extreme Solution, ExtremeXOSScreenPlay, ReachNXT, Ridgeline, Sentriant, ServiceWatch, Summit, SummitStack, Triumph,Unified Access Architecture, Unified Access RF Manager, UniStack, XNV, the Extreme Networkslogo, the Alpine logo, the BlackDiamond logo, the Extreme Turbodrive logo, the Summit logos,and the Powered by ExtremeXOS logo are trademarks or registered trademarks of ExtremeNetworks, Inc. or its subsidiaries in the United States and/or other countries.sFlow is the property of InMon Corporation.iBooks is property of Apple, Inc.Specifications are subject to change without notice.All other registered trademarks, trademarks, and service marks are property of their respectiveowners.For additional information on Extreme Networks trademarks, please see: http://www.extremenetworks.com/company/legal/trademarks/.
For information, contact:Extreme Networks, Inc.145 Rio RoblesSan Jose, 95134

Table of ContentsChapter 1: Prerequisites............................................................................................................ 5
Software Requirements..................................................................................................................................................... 5Hardware Requirements....................................................................................................................................................5OpenStack Requirements.................................................................................................................................................6OpenStack Environment Requirement...................................................................................................................... 6
Chapter 2: Reference Topology...............................................................................................7Reference Topology Setup.............................................................................................................................................. 7
Chapter 3: Installing Ubuntu 12.04 LTS on the Hosts......................................................... 12Installing Ubuntu 12.04 LTS on the Hosts................................................................................................................12
Chapter 4: Installing OpenStack Plugin 2.0 on the Servers.............................................. 14Downloading OpenStack Plugin 2.0.......................................................................................................................... 14Setting Up the OSController.......................................................................................................................................... 15Setting Up the OSHosts................................................................................................................................................... 17
Chapter 5: Configuring Extreme Networks Switches........................................................ 20Configuring Control and TOR Switches................................................................................................................. 20Configuring the TOR1 Switch....................................................................................................................................... 20Configuring the TOR2 Switch........................................................................................................................................21Configuring the Control 1 Switch................................................................................................................................. 21Configuring the Control 2 Switch................................................................................................................................21
Chapter 6: Running Extreme Networks OpenStack........................................................... 23Starting Up Extreme Networks OpenStack.......................................................................................................... 23Populating the Topology Database.......................................................................................................................... 23Configuring the Network Fabric—LAG/MLAG....................................................................................................30Logs...........................................................................................................................................................................................32
Chapter 7: Managing Tenants and Virtual Machines.......................................................... 33Creating Tenants................................................................................................................................................................ 33Creating Tenants Using Python Script and Configuration File (L3 Agent)...........................................33Creating Tenants Using Python Script and Configuration File (Virtual Routers).............................. 36Verifying TOR Switch Configuration after Tenant Creation (L3 Agent)................................................40Verifying TOR Switch Configuration after Tenant Creation (Virtual Routers).....................................41Creating Tenant Virtual Machine Instances...........................................................................................................43Migrating Tenant Virtual Machine Instances (Live Migration).....................................................................48Deleting Tenant Virtual Machine Instances...........................................................................................................49
Chapter 8: Deleting OpenStack Items..................................................................................50Deleting Instances, Subnets, Networks, Tenants, and Users........................................................................50Preparing for REST API Calls.........................................................................................................................................51Terminating Instances......................................................................................................................................................52Disabling DHCP................................................................................................................................................................... 54Deleting Interfaces from a Router..............................................................................................................................57Deleting Routers.................................................................................................................................................................. 61Deleting Subnets................................................................................................................................................................ 62Deleting Networks.............................................................................................................................................................64Deleting Tenants.................................................................................................................................................................67
OpenStack Plugin 2.0 Implementation Guide 3

Deleting Users......................................................................................................................................................................69
Chapter 9: OpenStack Pass-Through Command Line Interface....................................... 73Setting up the OpenStack Pass-Through Command Line Interface.........................................................73Using the OpenStack Pass-Through Command Line Interface.................................................................. 74
Appendix A: Glossary..............................................................................................................78
Table of Contents
OpenStack Plugin 2.0 Implementation Guide 4
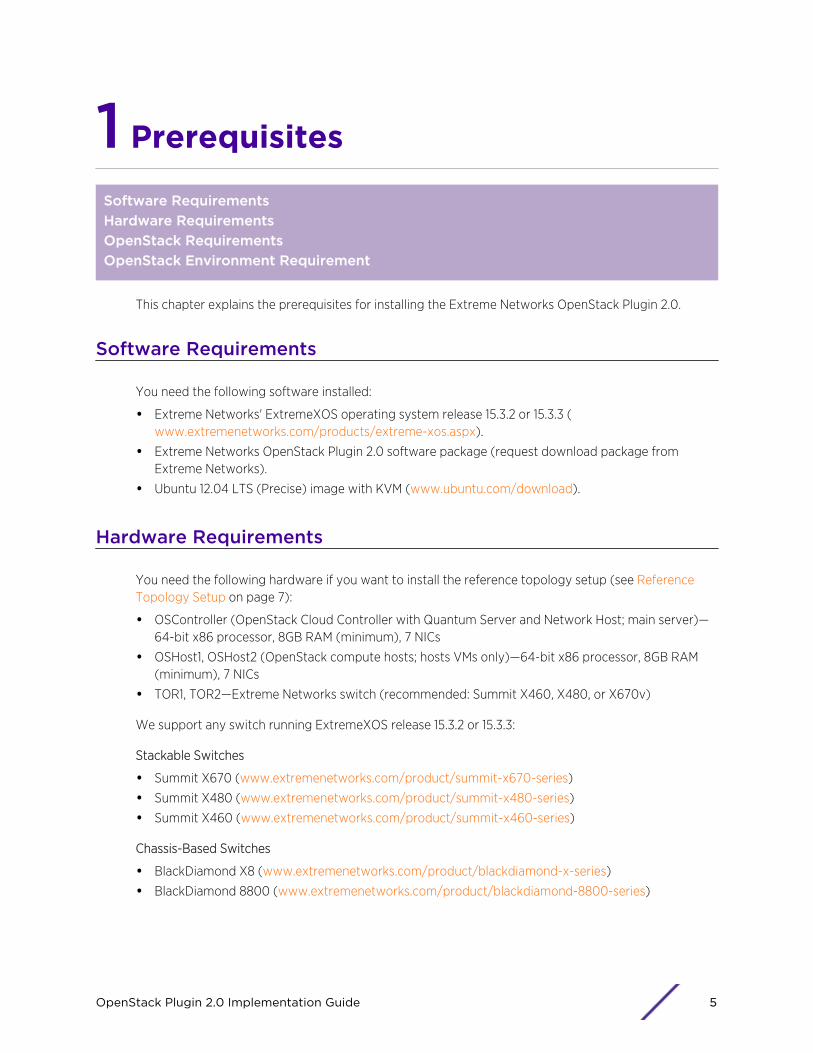
1 Prerequisites
Software RequirementsHardware RequirementsOpenStack RequirementsOpenStack Environment Requirement
This chapter explains the prerequisites for installing the Extreme Networks OpenStack Plugin 2.0.
Software Requirements
You need the following software installed:
• Extreme Networks' ExtremeXOS operating system release 15.3.2 or 15.3.3 (www.extremenetworks.com/products/extreme-xos.aspx).
• Extreme Networks OpenStack Plugin 2.0 software package (request download package fromExtreme Networks).
• Ubuntu 12.04 LTS (Precise) image with KVM (www.ubuntu.com/download).
Hardware Requirements
You need the following hardware if you want to install the reference topology setup (see ReferenceTopology Setup on page 7):
• OSController (OpenStack Cloud Controller with Quantum Server and Network Host; main server)—64-bit x86 processor, 8GB RAM (minimum), 7 NICs
• OSHost1, OSHost2 (OpenStack compute hosts; hosts VMs only)—64-bit x86 processor, 8GB RAM(minimum), 7 NICs
• TOR1, TOR2—Extreme Networks switch (recommended: Summit X460, X480, or X670v)
We support any switch running ExtremeXOS release 15.3.2 or 15.3.3:
Stackable Switches
• Summit X670 (www.extremenetworks.com/product/summit-x670-series)
• Summit X480 (www.extremenetworks.com/product/summit-x480-series)
• Summit X460 (www.extremenetworks.com/product/summit-x460-series)
Chassis-Based Switches
• BlackDiamond X8 (www.extremenetworks.com/product/blackdiamond-x-series)
• BlackDiamond 8800 (www.extremenetworks.com/product/blackdiamond-8800-series)
OpenStack Plugin 2.0 Implementation Guide 5
OpenStack Requirements
OpenStack requirements are available at:
http://docs.openstack.org/grizzly/openstack-ops/content/index.html.
OpenStack Environment Requirement
This guide assumes that an OpenStack Grizzly environment has been set up prior to attempting toinstall the Extreme Networks OpenStack Plugin 2.0.
The OpenStack Controller should have Keystone, Glance, Quantum, Nova, Cinder, Open vSwitch, andHorizon installed. The Controller will also act as a network node and host the L3 agent. The OSHosts(compute) nodes should have KVM, Open vSwitch, Quantum, and Nova installed.
The focus of this guide is on installing the Extreme Networks OpenStack Plugin 2.0 into a workingOpenStack Grizzly environment.
Prerequisites
OpenStack Plugin 2.0 Implementation Guide 6
2 Reference Topology
Reference Topology Setup
Reference Topology Setup
The reference topology setup consists of three servers: one controller (OSController) and two computenodes (OSHost1 and OSHost2); two control switches (CTRL1 and CTRL2); and two "top of rack"switches (TOR1 and TOR2).
This setup uses redundancy where possible; for the servers this means that bonding is used to connectto the TOR switches, as well as the control switches. There are distinct networks for data, storage,control, and management—each using its own set of NICs, or in the case of the management port, asingle NIC. The control network is not the management network. In the following setup, OpenStackservices are behind the control network IP.
OpenStack Plugin 2.0 Implementation Guide 7
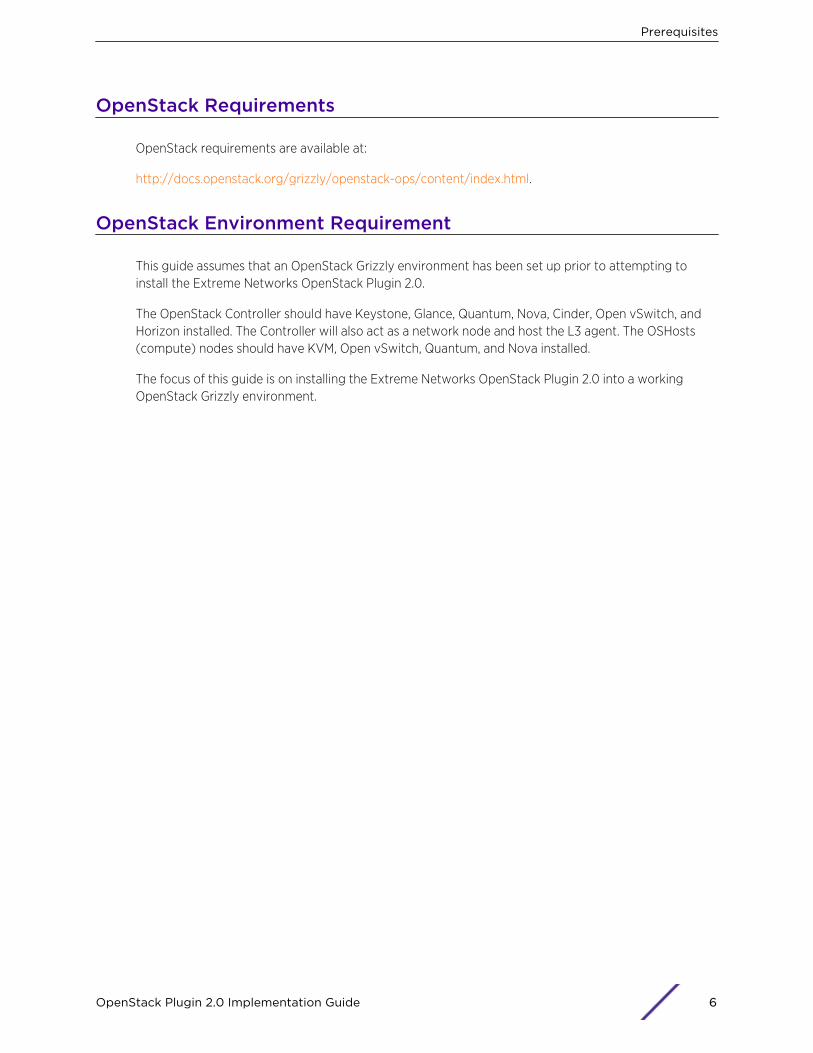
Figure 1: Complete Reference Topology Setup
NoteThe IP addresses shown are for reference only. These IP addresses appear in commands, files,etc. Substitute your actual IP addresses as needed.
Control network (in red) is used for exchanging control messages between the OpenStack components(servers) and ExtremeXOS switches.
Management network (in blue) is used for out-of-band access. It requires Internet access duringinstallation, but can run through a SNAT layer. It can use any routable subnet.
Data network (in purple) is used for data traffic from the tenant VMs on the servers. It is also used forDHCP request/reply between tenant VMs and per-tenant DHCP/NAT server on the controller. It is alsoused for tenant data traffic to/from public/external network through per-tenant gateway on thecontroller.
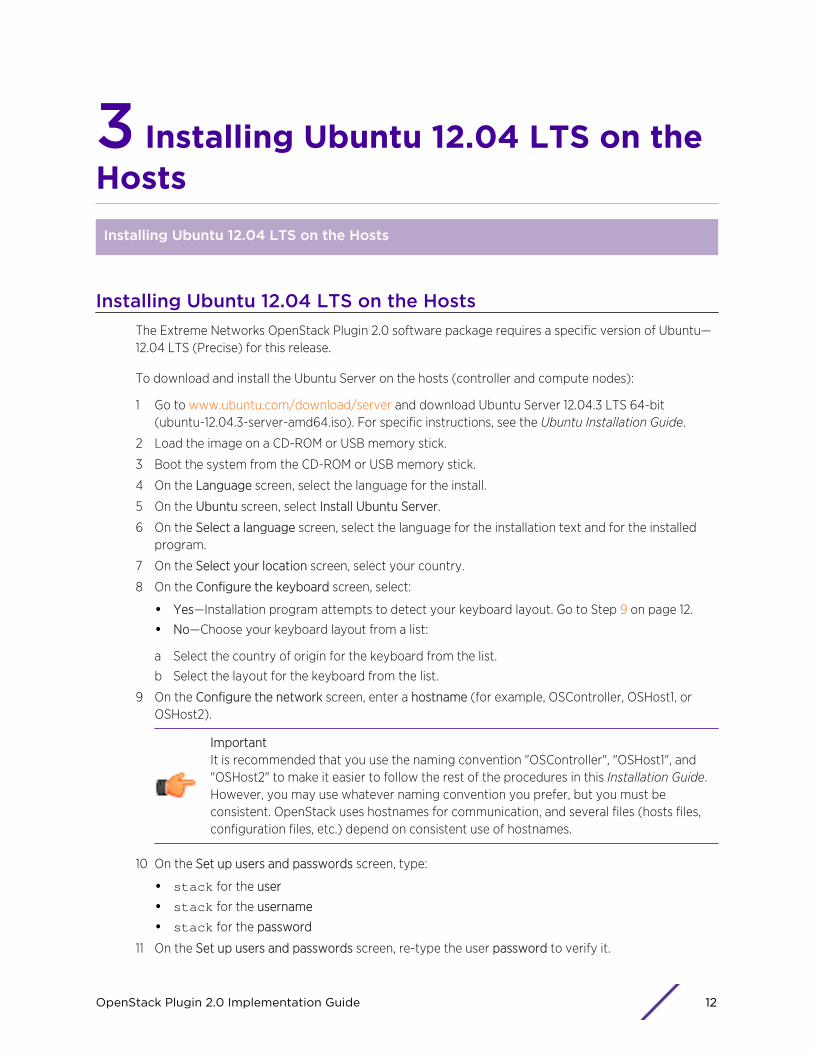
Storage network (in green) is used for storage traffic from the tenant VMs on the servers.
Reference Topology
OpenStack Plugin 2.0 Implementation Guide 8
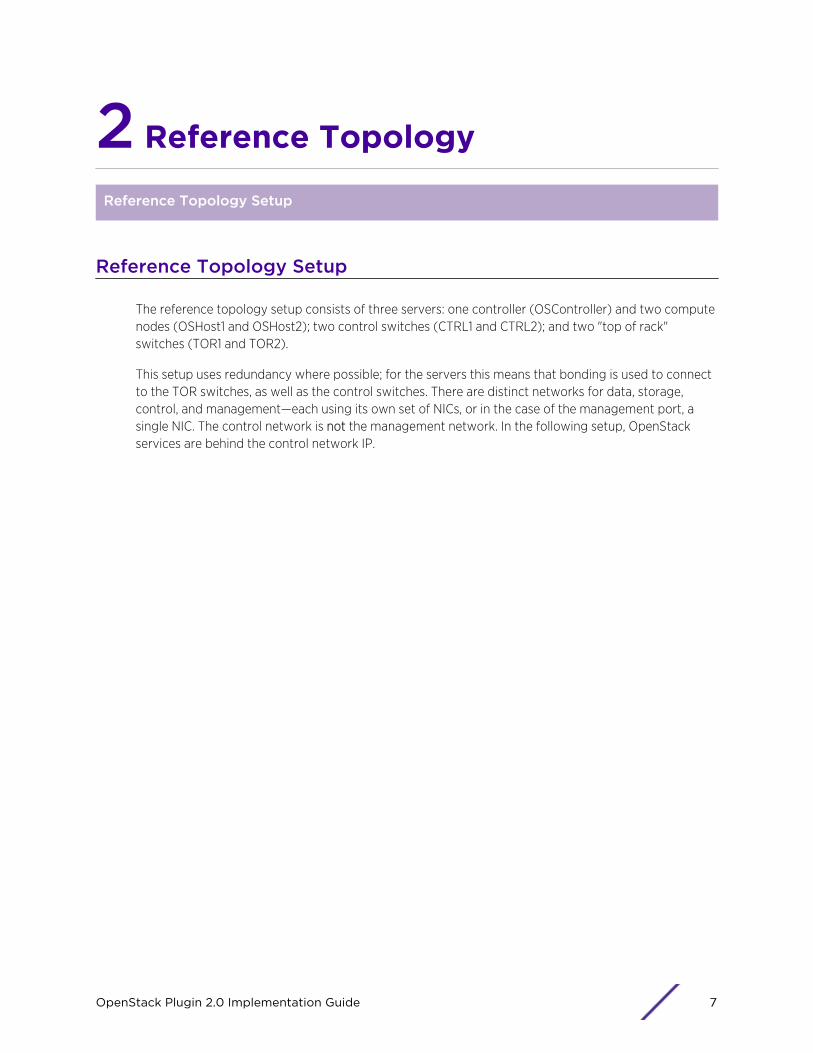
Figure 2: Complete Reference Topology Setup with Border Gateways
The following three figures show in isolation the logical networks (data, storage, and control) within thereference topology.
Reference Topology
OpenStack Plugin 2.0 Implementation Guide 9
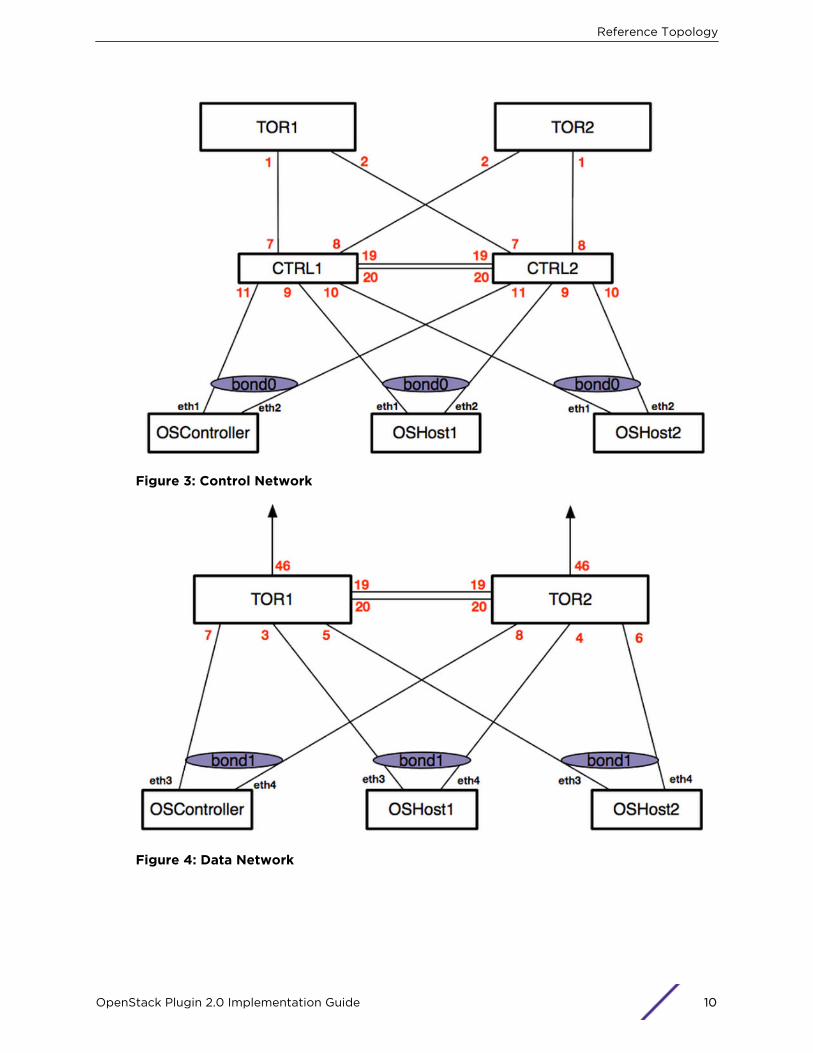
Figure 3: Control Network
Figure 4: Data Network
Reference Topology
OpenStack Plugin 2.0 Implementation Guide 10
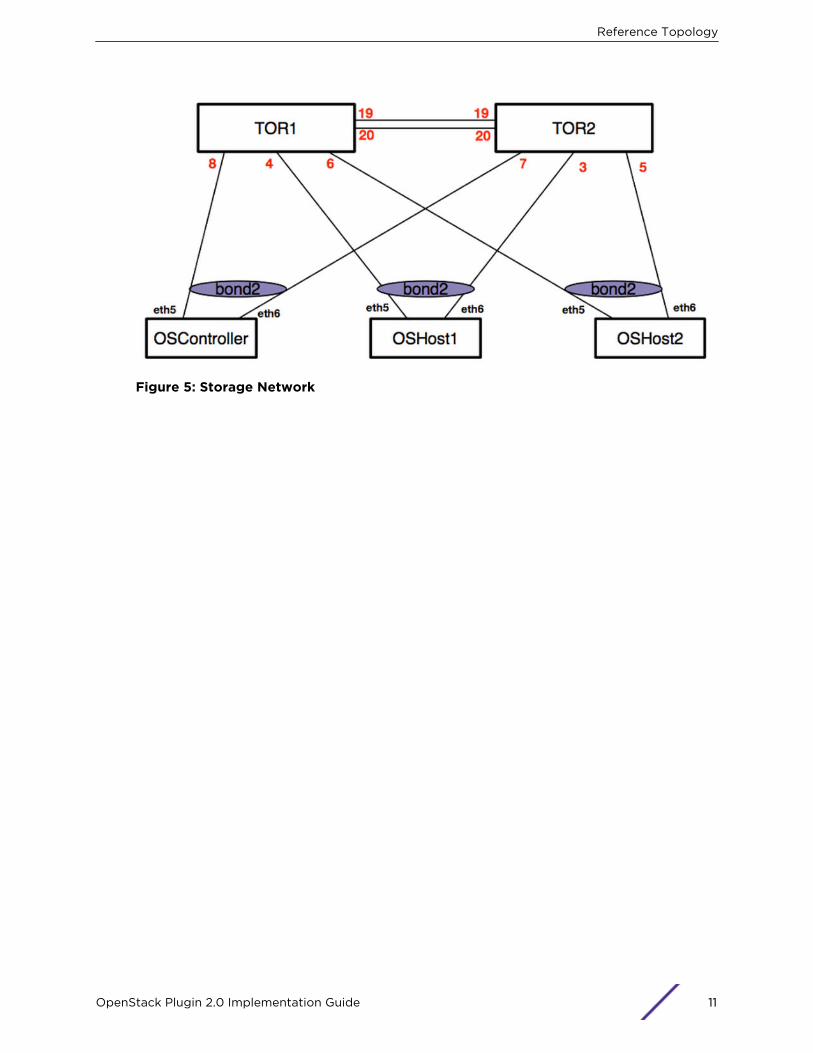
Figure 5: Storage Network
Reference Topology
OpenStack Plugin 2.0 Implementation Guide 11
3 Installing Ubuntu 12.04 LTS on theHostsInstalling Ubuntu 12.04 LTS on the Hosts
Installing Ubuntu 12.04 LTS on the HostsThe Extreme Networks OpenStack Plugin 2.0 software package requires a specific version of Ubuntu—12.04 LTS (Precise) for this release.
To download and install the Ubuntu Server on the hosts (controller and compute nodes):
1 Go to www.ubuntu.com/download/server and download Ubuntu Server 12.04.3 LTS 64-bit(ubuntu-12.04.3-server-amd64.iso). For specific instructions, see the Ubuntu Installation Guide.
2 Load the image on a CD-ROM or USB memory stick.
3 Boot the system from the CD-ROM or USB memory stick.
4 On the Language screen, select the language for the install.
5 On the Ubuntu screen, select Install Ubuntu Server.
6 On the Select a language screen, select the language for the installation text and for the installedprogram.
7 On the Select your location screen, select your country.
8 On the Configure the keyboard screen, select:
• Yes—Installation program attempts to detect your keyboard layout. Go to Step 9 on page 12.
• No—Choose your keyboard layout from a list:
a Select the country of origin for the keyboard from the list.
b Select the layout for the keyboard from the list.
9 On the Configure the network screen, enter a hostname (for example, OSController, OSHost1, orOSHost2).
ImportantIt is recommended that you use the naming convention "OSController", "OSHost1", and"OSHost2" to make it easier to follow the rest of the procedures in this Installation Guide.However, you may use whatever naming convention you prefer, but you must beconsistent. OpenStack uses hostnames for communication, and several files (hosts files,configuration files, etc.) depend on consistent use of hostnames.
10 On the Set up users and passwords screen, type:
• stack for the user
• stack for the username
• stack for the password
11 On the Set up users and passwords screen, re-type the user password to verify it.
OpenStack Plugin 2.0 Implementation Guide 12
12 On the Set up users and passwords screen, select yes when you are warned that the passwordconsists of less than eight characters.
13 On the Set up users and passwords screen, select no when prompted to encrypt your homedirectory.
14 On the Configure the clock screen, select your time zone.
15 On the Partition disks screen, select Guided - user entire disk and set up LVM.
16 On the Partition disks screen, select the disk to partition.
17 On the Partition disks screen, select yes to confirm that you want to write the changes to disk andconfigure LVM.
18 On the Partition disks screen, select Continue to accept the maximum amount for the volume groupfor guided partitioning (21.2 GB).
19 On the Partition disks screen, select yes to accept writing the changes to disk.
20 On the Configure the package manager screen, type a proxy path, if needed, in the formathttp://[[user][:pass]@]host[:port]/, and then select Continue.
21 On the Configuring tasksel screen, select No automatic updates.
22 On the Software Selection screen, select OpenSSH server, and then select Continue.
23 On the Install the GRUB boot loader on a hard disk screeen, select Yes to install the GRUB bootloader.
24 When Finish the Installation screen appears, remove the Ubuntu image CD-ROM or USB memorystick, so that the computer boots from the newly installed operating system.
25 On the Finish the Installation screen, select Continue to finish the installation.
Installing Ubuntu 12.04 LTS on the Hosts
OpenStack Plugin 2.0 Implementation Guide 13

4 Installing OpenStack Plugin 2.0 onthe ServersDownloading OpenStack Plugin 2.0Setting Up the OSControllerSetting Up the OSHosts
Downloading OpenStack Plugin 2.0
This guide assumes that an OpenStack Grizzly environment has been setup prior to attempting toinstall the Extreme Networks OpenStack Plugin 2.0.
The OpenStack Controller should have Keystone, Glance, Quantum, Nova, Cinder, Open vSwitch, andHorizon installed. The Controller will also act as a network node and host the L3 agent. The OSHosts(compute) nodes should have KVM, Open vSwitch, Quantum, and Nova installed.
The focus of this guide is on installing the Extreme Networks OpenStack Plugin 2.0 into a workingOpenstack Grizzly environment.
To download and prepare OpenStack 2.0 on all servers:
1 Download the OpenStack Plugin 2.0 software package:
NoteAfter purchasing a license from Extreme Networks, you are provided with a URL todownload the software.
2 Copy the package onto the host under the stack user's home directory (/home/stack).
3 Log in as the stack user and untar the package:
stack@OSController$ tar xf extr_openstack_v200bXX.tar.gz
Where XX is the software build number.
NoteUse sudo access when editing or moving files (or sudo su to gain root access). Some ofthe folders and files may only be editable using sudo or root.
4 Switch to the folder where the OpenStack Plugin 2.0 files were untarred and copy the files to thefollowing folder:
stack@OSController$:/home/stack# cd extr_openstack_v200XXstack@OSController$:/home/stack/extr_openstack_v200XX# cp -r extreme/ /usr/lib/python2.7/dist-packages/quantum/plugins
Where XX is the software build number.
OpenStack Plugin 2.0 Implementation Guide 14
Setting Up the OSController
Changing Settings on the OSController
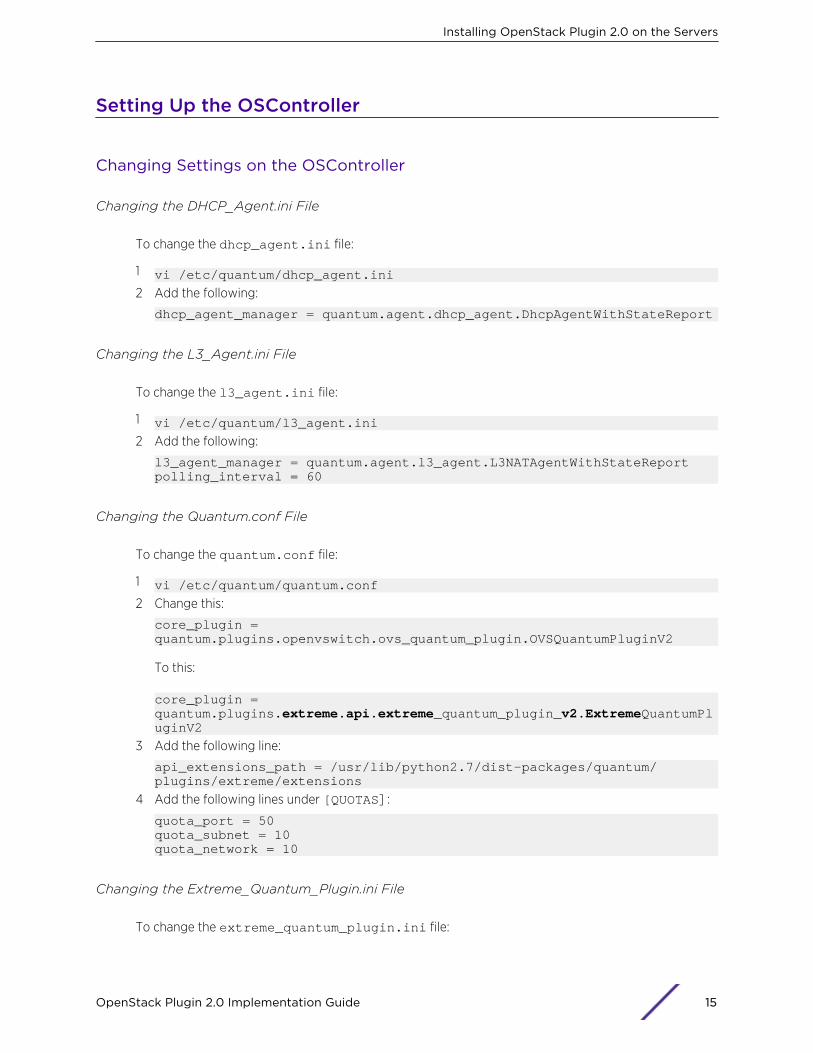
Changing the DHCP_Agent.ini File
To change the dhcp_agent.ini file:
1 vi /etc/quantum/dhcp_agent.ini
2 Add the following:
dhcp_agent_manager = quantum.agent.dhcp_agent.DhcpAgentWithStateReport
Changing the L3_Agent.ini File
To change the l3_agent.ini file:
1 vi /etc/quantum/l3_agent.ini
2 Add the following:
l3_agent_manager = quantum.agent.l3_agent.L3NATAgentWithStateReportpolling_interval = 60
Changing the Quantum.conf File
To change the quantum.conf file:
1 vi /etc/quantum/quantum.conf
2 Change this:
core_plugin = quantum.plugins.openvswitch.ovs_quantum_plugin.OVSQuantumPluginV2
To this:
core_plugin = quantum.plugins.extreme.api.extreme_quantum_plugin_v2.ExtremeQuantumPluginV2
3 Add the following line:
api_extensions_path = /usr/lib/python2.7/dist-packages/quantum/plugins/extreme/extensions
4 Add the following lines under [QUOTAS] :
quota_port = 50quota_subnet = 10quota_network = 10
Changing the Extreme_Quantum_Plugin.ini File
To change the extreme_quantum_plugin.ini file:
Installing OpenStack Plugin 2.0 on the Servers
OpenStack Plugin 2.0 Implementation Guide 15
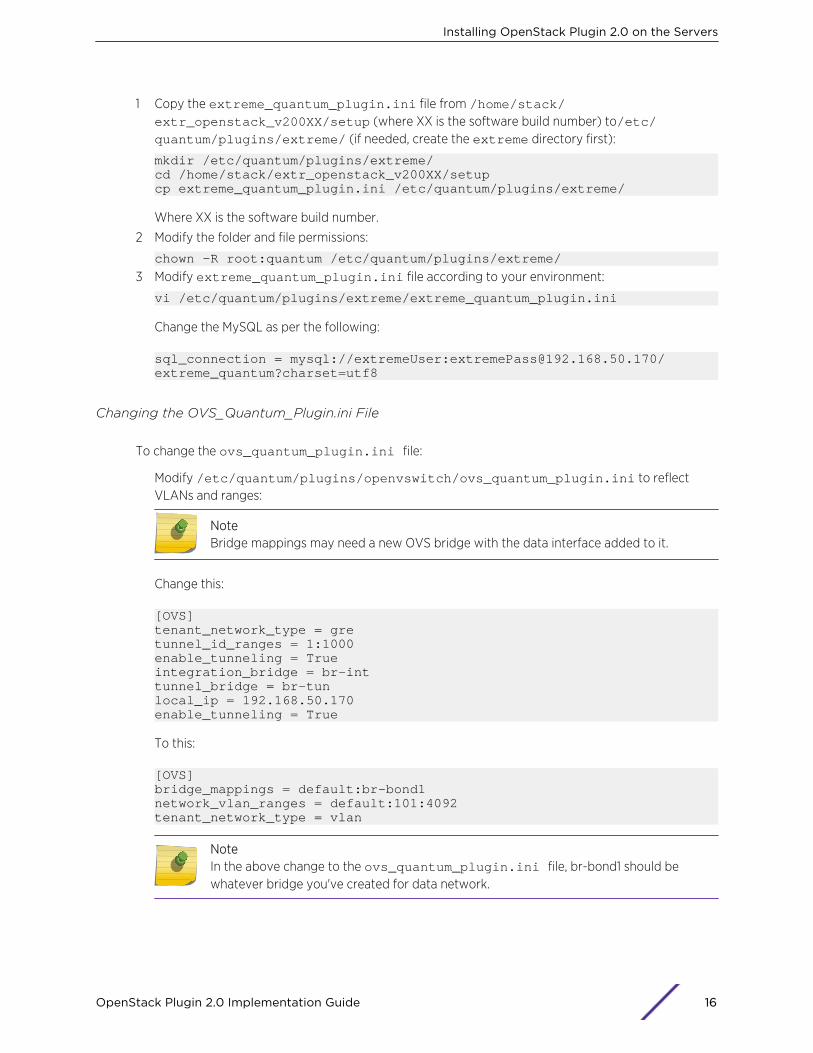
1 Copy the extreme_quantum_plugin.ini file from /home/stack/extr_openstack_v200XX/setup (where XX is the software build number) to/etc/quantum/plugins/extreme/ (if needed, create the extreme directory first):
mkdir /etc/quantum/plugins/extreme/cd /home/stack/extr_openstack_v200XX/setupcp extreme_quantum_plugin.ini /etc/quantum/plugins/extreme/
Where XX is the software build number.
2 Modify the folder and file permissions:
chown -R root:quantum /etc/quantum/plugins/extreme/
3 Modify extreme_quantum_plugin.ini file according to your environment:
vi /etc/quantum/plugins/extreme/extreme_quantum_plugin.ini
Change the MySQL as per the following:
sql_connection = mysql://extremeUser:[email protected]/extreme_quantum?charset=utf8
Changing the OVS_Quantum_Plugin.ini File
To change the ovs_quantum_plugin.ini file:
Modify /etc/quantum/plugins/openvswitch/ovs_quantum_plugin.ini to reflectVLANs and ranges:
NoteBridge mappings may need a new OVS bridge with the data interface added to it.
Change this:
[OVS]tenant_network_type = gretunnel_id_ranges = 1:1000enable_tunneling = Trueintegration_bridge = br-inttunnel_bridge = br-tunlocal_ip = 192.168.50.170enable_tunneling = True
To this:
[OVS]bridge_mappings = default:br-bond1network_vlan_ranges = default:101:4092tenant_network_type = vlan
NoteIn the above change to the ovs_quantum_plugin.ini file, br-bond1 should bewhatever bridge you've created for data network.
Installing OpenStack Plugin 2.0 on the Servers
OpenStack Plugin 2.0 Implementation Guide 16
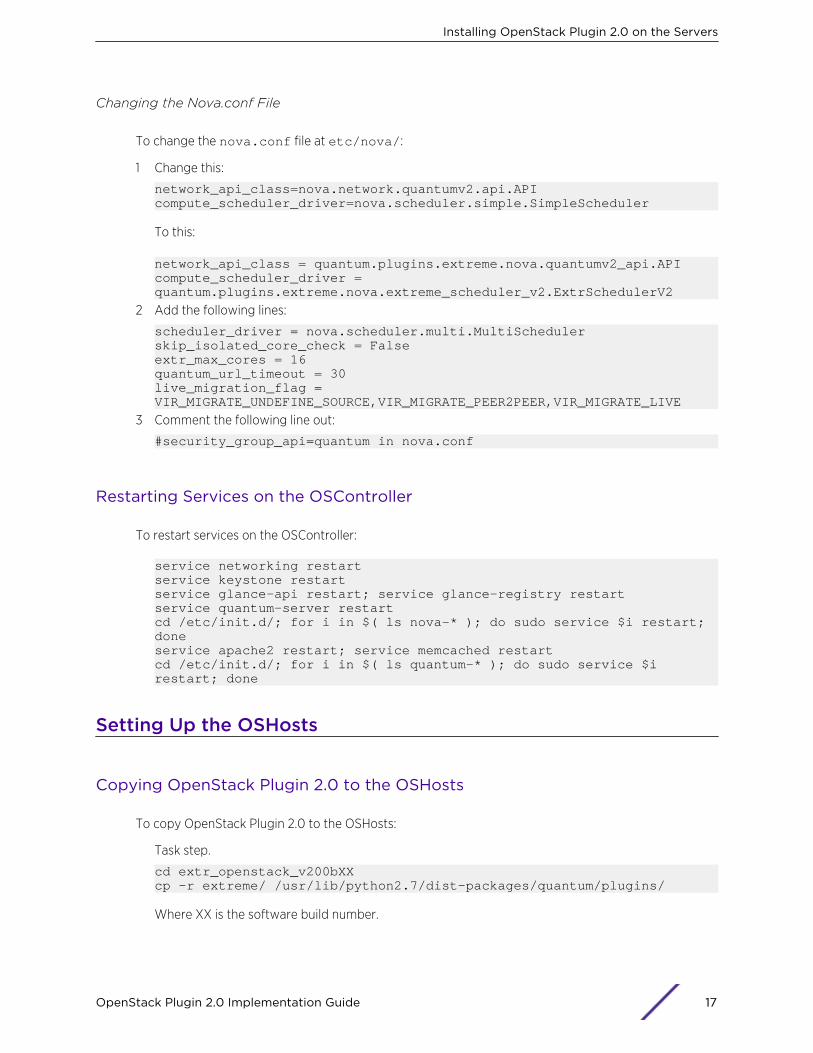
Changing the Nova.conf File
To change the nova.conf file at etc/nova/:
1 Change this:
network_api_class=nova.network.quantumv2.api.API compute_scheduler_driver=nova.scheduler.simple.SimpleScheduler
To this:
network_api_class = quantum.plugins.extreme.nova.quantumv2_api.APIcompute_scheduler_driver = quantum.plugins.extreme.nova.extreme_scheduler_v2.ExtrSchedulerV2
2 Add the following lines:
scheduler_driver = nova.scheduler.multi.MultiSchedulerskip_isolated_core_check = Falseextr_max_cores = 16quantum_url_timeout = 30live_migration_flag = VIR_MIGRATE_UNDEFINE_SOURCE,VIR_MIGRATE_PEER2PEER,VIR_MIGRATE_LIVE
3 Comment the following line out:
#security_group_api=quantum in nova.conf
Restarting Services on the OSController
To restart services on the OSController:
service networking restartservice keystone restartservice glance-api restart; service glance-registry restartservice quantum-server restartcd /etc/init.d/; for i in $( ls nova-* ); do sudo service $i restart; doneservice apache2 restart; service memcached restartcd /etc/init.d/; for i in $( ls quantum-* ); do sudo service $i restart; done
Setting Up the OSHosts
Copying OpenStack Plugin 2.0 to the OSHosts
To copy OpenStack Plugin 2.0 to the OSHosts:
Task step.
cd extr_openstack_v200bXXcp -r extreme/ /usr/lib/python2.7/dist-packages/quantum/plugins/
Where XX is the software build number.
Installing OpenStack Plugin 2.0 on the Servers
OpenStack Plugin 2.0 Implementation Guide 17
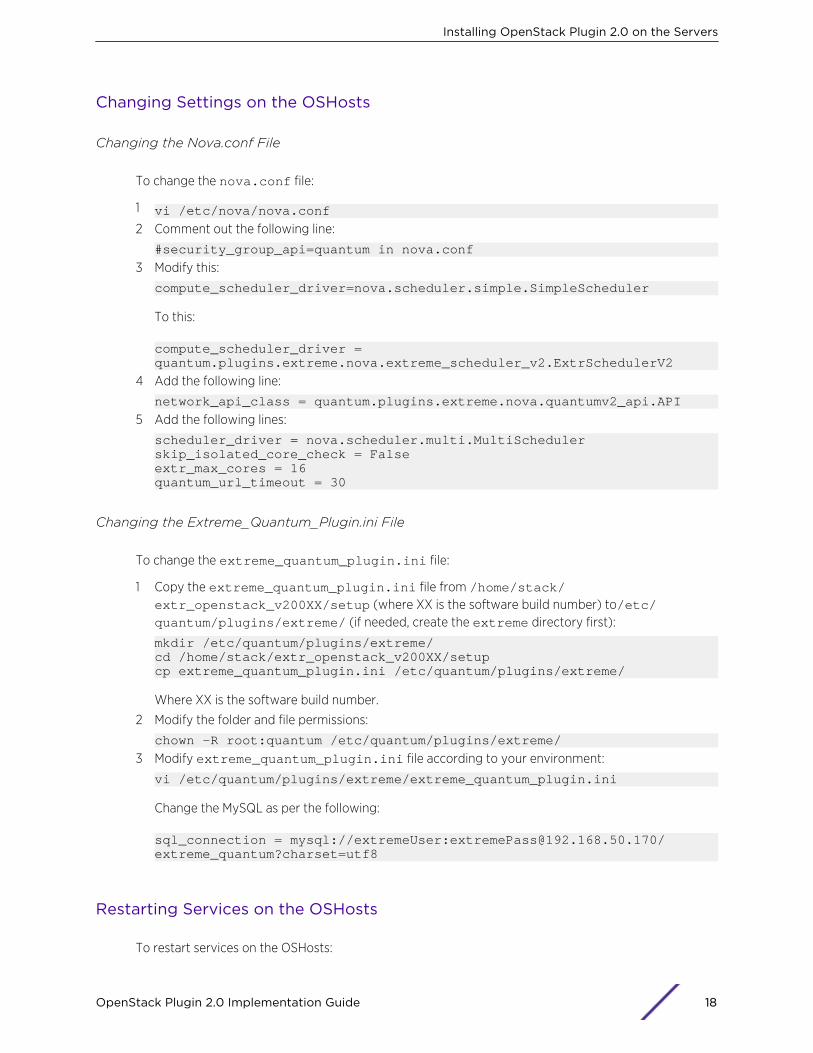
Changing Settings on the OSHosts
Changing the Nova.conf File
To change the nova.conf file:
1 vi /etc/nova/nova.conf
2 Comment out the following line:
#security_group_api=quantum in nova.conf
3 Modify this:
compute_scheduler_driver=nova.scheduler.simple.SimpleScheduler
To this:
compute_scheduler_driver = quantum.plugins.extreme.nova.extreme_scheduler_v2.ExtrSchedulerV2
4 Add the following line:
network_api_class = quantum.plugins.extreme.nova.quantumv2_api.API
5 Add the following lines:
scheduler_driver = nova.scheduler.multi.MultiSchedulerskip_isolated_core_check = Falseextr_max_cores = 16quantum_url_timeout = 30
Changing the Extreme_Quantum_Plugin.ini File
To change the extreme_quantum_plugin.ini file:
1 Copy the extreme_quantum_plugin.ini file from /home/stack/extr_openstack_v200XX/setup (where XX is the software build number) to/etc/quantum/plugins/extreme/ (if needed, create the extreme directory first):
mkdir /etc/quantum/plugins/extreme/cd /home/stack/extr_openstack_v200XX/setupcp extreme_quantum_plugin.ini /etc/quantum/plugins/extreme/
Where XX is the software build number.
2 Modify the folder and file permissions:
chown -R root:quantum /etc/quantum/plugins/extreme/
3 Modify extreme_quantum_plugin.ini file according to your environment:
vi /etc/quantum/plugins/extreme/extreme_quantum_plugin.ini
Change the MySQL as per the following:
sql_connection = mysql://extremeUser:[email protected]/extreme_quantum?charset=utf8
Restarting Services on the OSHosts
To restart services on the OSHosts:
Installing OpenStack Plugin 2.0 on the Servers
OpenStack Plugin 2.0 Implementation Guide 18

service dbus restart && service libvirt-bin restartservice quantum-plugin-openvswitch-agent restartcd /etc/init.d/; for i in $( ls nova-* ); do sudo service $i restart; done
Installing OpenStack Plugin 2.0 on the Servers
OpenStack Plugin 2.0 Implementation Guide 19
5 Configuring Extreme NetworksSwitchesConfiguring Control and TOR SwitchesConfiguring the TOR1 SwitchConfiguring the TOR2 SwitchConfiguring the Control 1 SwitchConfiguring the Control 2 Switch
Configuring Control and TOR Switches
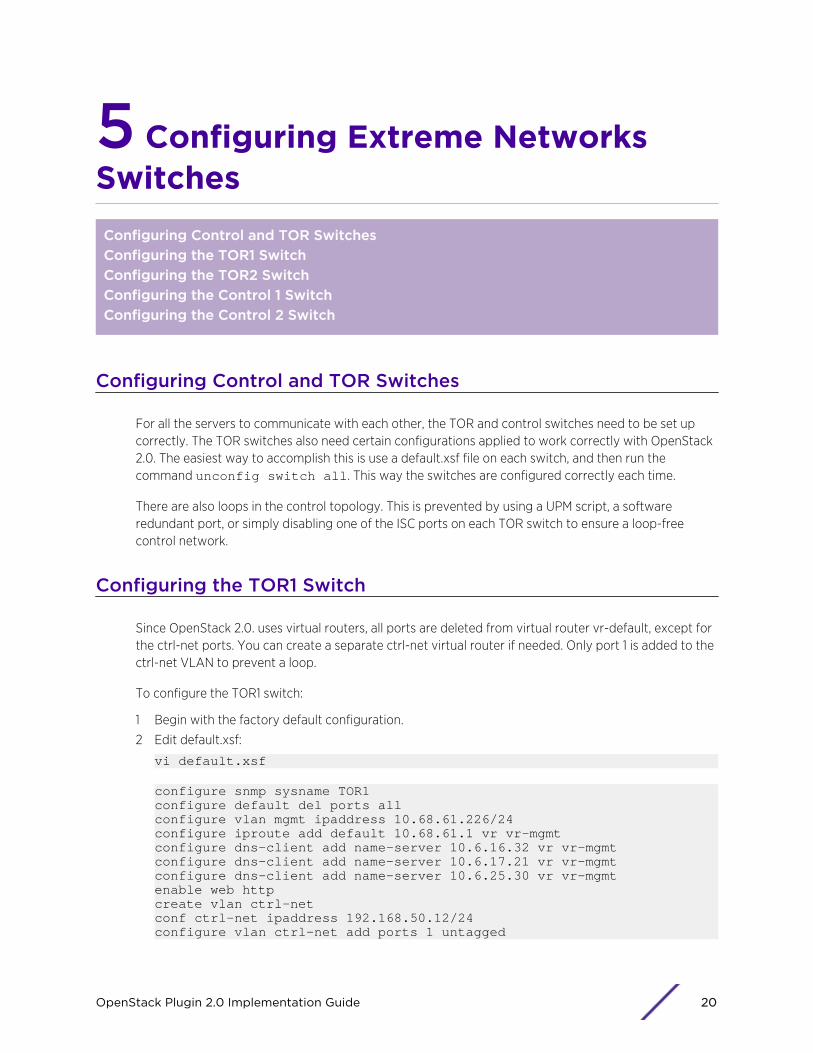
For all the servers to communicate with each other, the TOR and control switches need to be set upcorrectly. The TOR switches also need certain configurations applied to work correctly with OpenStack2.0. The easiest way to accomplish this is use a default.xsf file on each switch, and then run thecommand unconfig switch all. This way the switches are configured correctly each time.
There are also loops in the control topology. This is prevented by using a UPM script, a softwareredundant port, or simply disabling one of the ISC ports on each TOR switch to ensure a loop-freecontrol network.
Configuring the TOR1 Switch
Since OpenStack 2.0. uses virtual routers, all ports are deleted from virtual router vr-default, except forthe ctrl-net ports. You can create a separate ctrl-net virtual router if needed. Only port 1 is added to thectrl-net VLAN to prevent a loop.
To configure the TOR1 switch:
1 Begin with the factory default configuration.
2 Edit default.xsf:
vi default.xsf
configure snmp sysname TOR1configure default del ports allconfigure vlan mgmt ipaddress 10.68.61.226/24configure iproute add default 10.68.61.1 vr vr-mgmtconfigure dns-client add name-server 10.6.16.32 vr vr-mgmtconfigure dns-client add name-server 10.6.17.21 vr vr-mgmtconfigure dns-client add name-server 10.6.25.30 vr vr-mgmtenable web httpcreate vlan ctrl-netconf ctrl-net ipaddress 192.168.50.12/24configure vlan ctrl-net add ports 1 untagged
OpenStack Plugin 2.0 Implementation Guide 20

conf vr "VR-Default" del port 3 - 58disable idletimeout
Configuring the TOR2 Switch
Since OpenStack 2.0. uses virtual routers, all ports are deleted from virtual router vr-default, except forthe ctrl-net ports. You can create a separate ctrl-net vr if needed. Only port 1 is added to the ctrl-netVLAN to prevent a loop.
To configure the TOR2 switch:
1 Begin with the factory default configuration.
2 Edit default.xsf:
vi default.xsf
configure snmp sysname TOR2configure default del ports allconfigure vlan mgmt ipaddress 10.68.61.227/24configure iproute add default 10.68.61.1 vr vr-mgmtconfigure dns-client add name-server 10.6.16.32configure dns-client add name-server 10.6.17.21configure dns-client add name-server 10.6.25.30create vlan ctrl-netconf ctrl-net ipaddress 192.168.50.13/24configure vlan ctrl-net add ports 1 untaggedenable web httpconf vr "VR-Default" del port 3 - 58disable idletimeoutenable cli-config-logging
Configuring the Control 1 Switch
To configure the Control 1 switch:
1 Begin with the factory default configuration.
2 Edit default.xsf:
vi default.xsf
configure snmp sysname CTRL1configure default del ports allconfigure vlan Mgmt ipaddress 10.68.61.224/24configure iproute add default 10.68.61.1 vr VR-Mgmtcreate vlan ctrl-netconf "ctrl-net" tag 300configure vlan ctrl-net ipaddress 192.168.50.10/24enable sharing 19 grouping 19,20 algorithm address-based L2conf "ctrl-net" add port 7-11,19 untagged
Configuring the Control 2 Switch
To configure the Control 2 switch:
Configuring Extreme Networks Switches
OpenStack Plugin 2.0 Implementation Guide 21
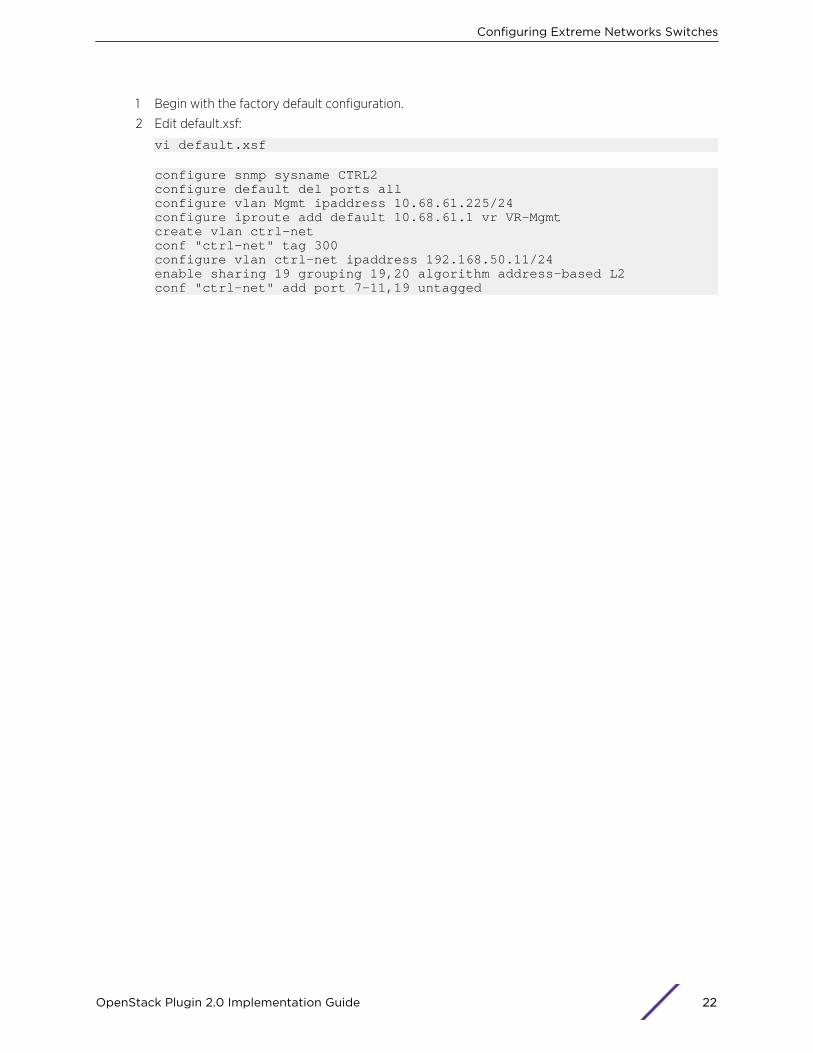
1 Begin with the factory default configuration.
2 Edit default.xsf:
vi default.xsf
configure snmp sysname CTRL2configure default del ports allconfigure vlan Mgmt ipaddress 10.68.61.225/24configure iproute add default 10.68.61.1 vr VR-Mgmtcreate vlan ctrl-netconf "ctrl-net" tag 300configure vlan ctrl-net ipaddress 192.168.50.11/24enable sharing 19 grouping 19,20 algorithm address-based L2conf "ctrl-net" add port 7-11,19 untagged
Configuring Extreme Networks Switches
OpenStack Plugin 2.0 Implementation Guide 22
6 Running Extreme NetworksOpenStackStarting Up Extreme Networks OpenStackPopulating the Topology DatabaseConfiguring the Network Fabric—LAG/MLAGLogs
Starting Up Extreme Networks OpenStack
The Extreme Networks reference topology setup (see Reference Topology Setup on page 7) withOpenStack 2.0 must be started up in a specific order:
1 Start up all of the TOR switches.
2 Start OpenStack on the controller (OSController).
3 After the controller is completely up and running, start OpenStack on the compute hosts (OSHost1and OSHost2).
4 Populate the OpenStack 2.0 topology database from the controller (see Populating the TopologyDatabase on page 23).
5 Configure the network fabric (see Configuring the Network Fabric—LAG/MLAG on page 30).
6 Create sample tenants and tenant networks from the controller (see Creating Tenants on page33).
7 Create/migrate/delete tenant VM instances (see Creating Tenant Virtual Machine Instances on page43, Migrating Tenant Virtual Machine Instances (Live Migration) on page 48, and TerminatingInstances Using Horizon on page 52).
Populating the Topology DatabaseTo use OpenStack 2.0, the topology database must be populated first with the proper topologyinformation—the actual physical topology.
The key topology information includes:
• Zones and pods information. [zone / pod]
• Hostnames of all the servers (OSController, Network and Compute) and their roles. [server_host]
• L2 devices (TOR switches) login information. [device]
• L2 device slot/port information. [dev_port]
• Inter-connection between servers and TOR switches. [server_device_connect]
• Inter-connection between TORs and other devices. [dev_interconnect]
You can create a new script or edit an existing sample script. Sample scripts are available under the /home/stack/extr_openstack_v200bXX/setup/configs directory (where XX is the build
OpenStack Plugin 2.0 Implementation Guide 23
number). Choose an example that is similar to your topology and modify it. The following procedureshows how to edit an existing script.
NoteYou must run the script on the control node after installing OpenStack Plugin 2.0 and beforecreating virtual networks.
To edit an existing sample json script to update the topology database:
1 On OSController, navigate to the folder with the sample json scripts:
cd /home/stack/extr_openstack_v200bXX/setup/configs
Where XX is the build number.
2 Copy and edit a sample json script (in this example, one_tier_two_tor.json):
stack@OSController:~/extr_openstack_v200bXX/setup/configs$ lscreate_tenant.json create_tenant_vr.json one_tier_one_tor.json one_tier_two_tor.json openstack_init.jsoncp one_tier_one_tor.json one_tier_two_tor.jsonvi one_tier_two_tor.json
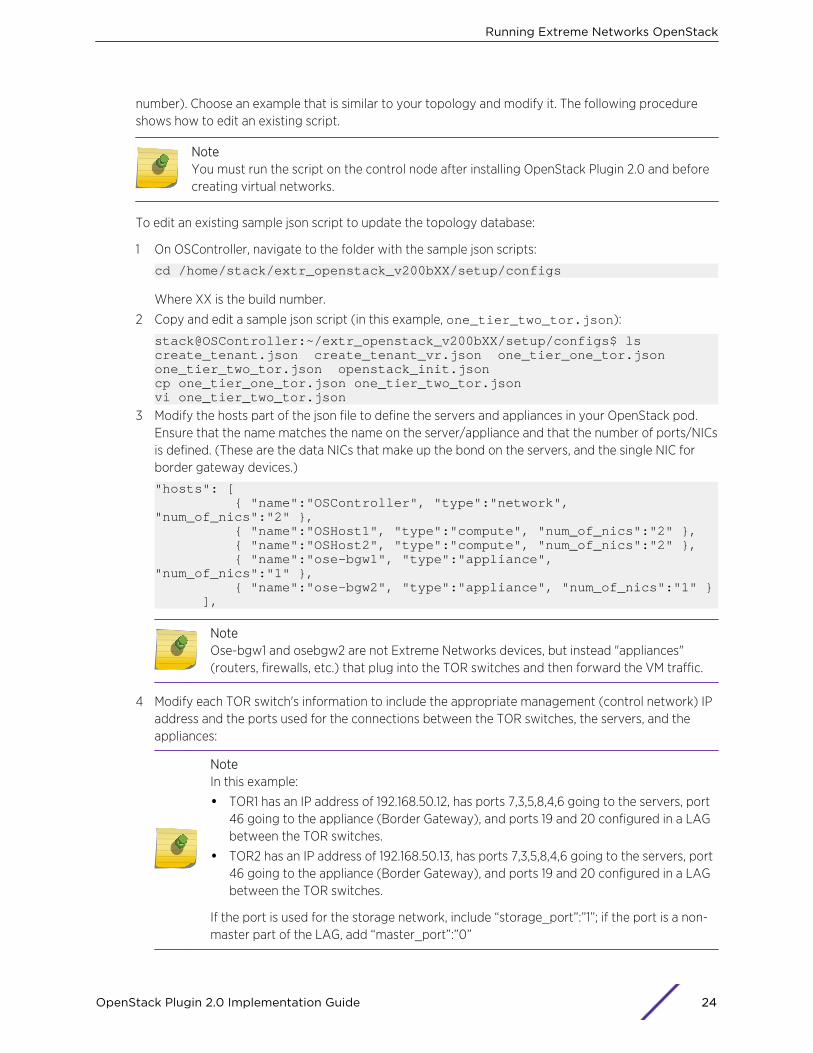
3 Modify the hosts part of the json file to define the servers and appliances in your OpenStack pod.Ensure that the name matches the name on the server/appliance and that the number of ports/NICsis defined. (These are the data NICs that make up the bond on the servers, and the single NIC forborder gateway devices.)
"hosts": [ { "name":"OSController", "type":"network", "num_of_nics":"2" }, { "name":"OSHost1", "type":"compute", "num_of_nics":"2" }, { "name":"OSHost2", "type":"compute", "num_of_nics":"2" }, { "name":"ose-bgw1", "type":"appliance", "num_of_nics":"1" }, { "name":"ose-bgw2", "type":"appliance", "num_of_nics":"1" } ],
NoteOse-bgw1 and osebgw2 are not Extreme Networks devices, but instead "appliances"(routers, firewalls, etc.) that plug into the TOR switches and then forward the VM traffic.
4 Modify each TOR switch's information to include the appropriate management (control network) IPaddress and the ports used for the connections between the TOR switches, the servers, and theappliances:
NoteIn this example:
• TOR1 has an IP address of 192.168.50.12, has ports 7,3,5,8,4,6 going to the servers, port46 going to the appliance (Border Gateway), and ports 19 and 20 configured in a LAGbetween the TOR switches.
• TOR2 has an IP address of 192.168.50.13, has ports 7,3,5,8,4,6 going to the servers, port46 going to the appliance (Border Gateway), and ports 19 and 20 configured in a LAGbetween the TOR switches.
If the port is used for the storage network, include “storage_port”:”1”; if the port is a non-master part of the LAG, add “master_port”:”0”
Running Extreme Networks OpenStack
OpenStack Plugin 2.0 Implementation Guide 24
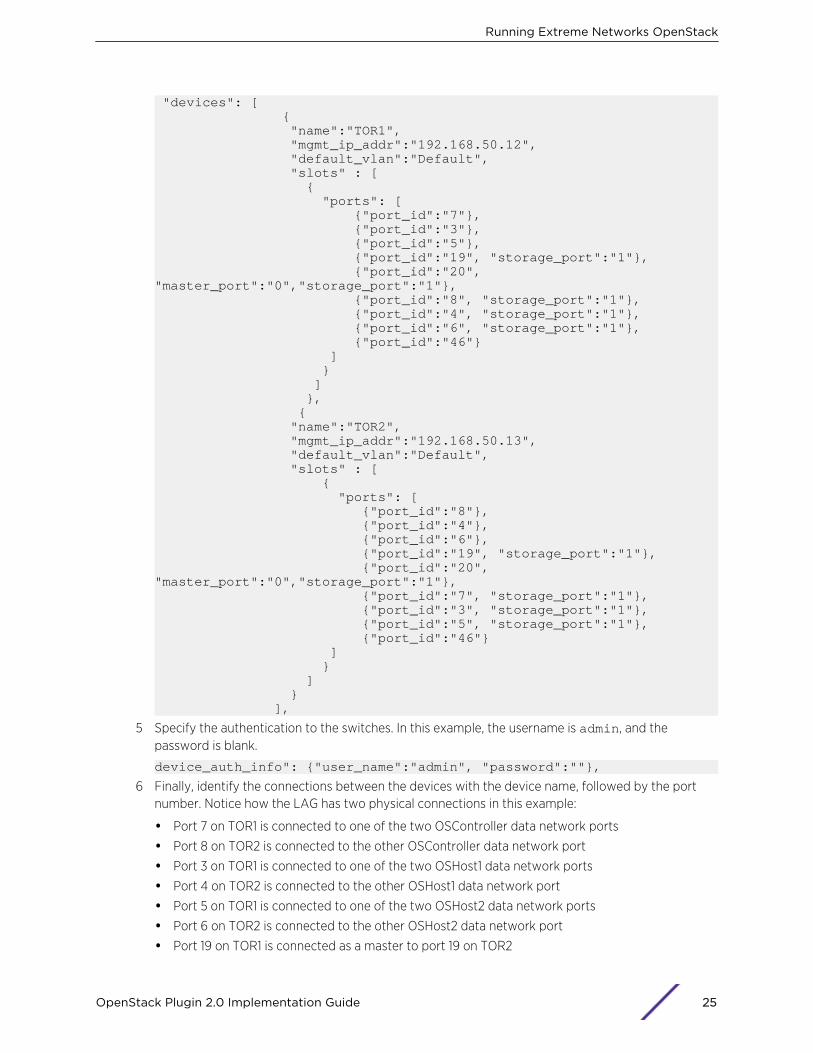
"devices": [ { "name":"TOR1", "mgmt_ip_addr":"192.168.50.12", "default_vlan":"Default", "slots" : [ { "ports": [ {"port_id":"7"}, {"port_id":"3"}, {"port_id":"5"}, {"port_id":"19", "storage_port":"1"}, {"port_id":"20", "master_port":"0","storage_port":"1"}, {"port_id":"8", "storage_port":"1"}, {"port_id":"4", "storage_port":"1"}, {"port_id":"6", "storage_port":"1"}, {"port_id":"46"} ] } ] }, { "name":"TOR2", "mgmt_ip_addr":"192.168.50.13", "default_vlan":"Default", "slots" : [ { "ports": [ {"port_id":"8"}, {"port_id":"4"}, {"port_id":"6"}, {"port_id":"19", "storage_port":"1"}, {"port_id":"20", "master_port":"0","storage_port":"1"}, {"port_id":"7", "storage_port":"1"}, {"port_id":"3", "storage_port":"1"}, {"port_id":"5", "storage_port":"1"}, {"port_id":"46"} ] } ] } ],
5 Specify the authentication to the switches. In this example, the username is admin, and thepassword is blank.
device_auth_info": {"user_name":"admin", "password":""},
6 Finally, identify the connections between the devices with the device name, followed by the portnumber. Notice how the LAG has two physical connections in this example:
• Port 7 on TOR1 is connected to one of the two OSController data network ports
• Port 8 on TOR2 is connected to the other OSController data network port
• Port 3 on TOR1 is connected to one of the two OSHost1 data network ports
• Port 4 on TOR2 is connected to the other OSHost1 data network port
• Port 5 on TOR1 is connected to one of the two OSHost2 data network ports
• Port 6 on TOR2 is connected to the other OSHost2 data network port
• Port 19 on TOR1 is connected as a master to port 19 on TOR2
Running Extreme Networks OpenStack
OpenStack Plugin 2.0 Implementation Guide 25

• Port 20 on TOR1 is connected as a slave to port 20 on TOR2
• Port 46 on TOR1 is connected to Border Gateway appliance 1
• Port 46 on TOR2 is connected to Border Gateway appliance 2
"connections": [ {"left":"device:TOR1:7","right":"host:OSController"}, {"left":"device:TOR2:8","right":"host:OSController"}, {"left":"device:TOR1:3","right":"host:OSHost1"}, {"left":"device:TOR2:4","right":"host:OSHost1"}, {"left":"device:TOR1:5","right":"host:OSHost2"}, {"left":"device:TOR2:6","right":"host:OSHost2"}, {"left":"device:TOR1:19","right":"device:TOR2:19"}, {"left":"device:TOR1:20","right":"device:TOR2:20"}, {"left":"device:TOR1:48","right":"host:ose-bgw1"}, {"left":"device:TOR2:48","right":"host:ose-bgw2"} ]
After you finish editing the file, it should resemble the following json script, which is based on thereference topology (see Reference Topology Setup on page 7):
{ "zones": [ { "name": "zone1", "pods": [ { "name": "pod1", "hosts": [ { "name": "OSController", "type": "network", "num_of_nics": "2" }, { "name": "OSHost1", "type": "compute", "num_of_nics": "2" }, { "name": "OSHost2", "type": "compute", "num_of_nics": "2" }, { "name": "ose-bgw1", "type": "appliance", "num_of_nics": "1" }, { "name": "ose-bgw2", "type": "appliance", "num_of_nics": "1" } ], "devices": [ { "name": "TOR1", "mgmt_ip_addr": "192.168.50.12", "default_vlan": "Default",
Running Extreme Networks OpenStack
OpenStack Plugin 2.0 Implementation Guide 26
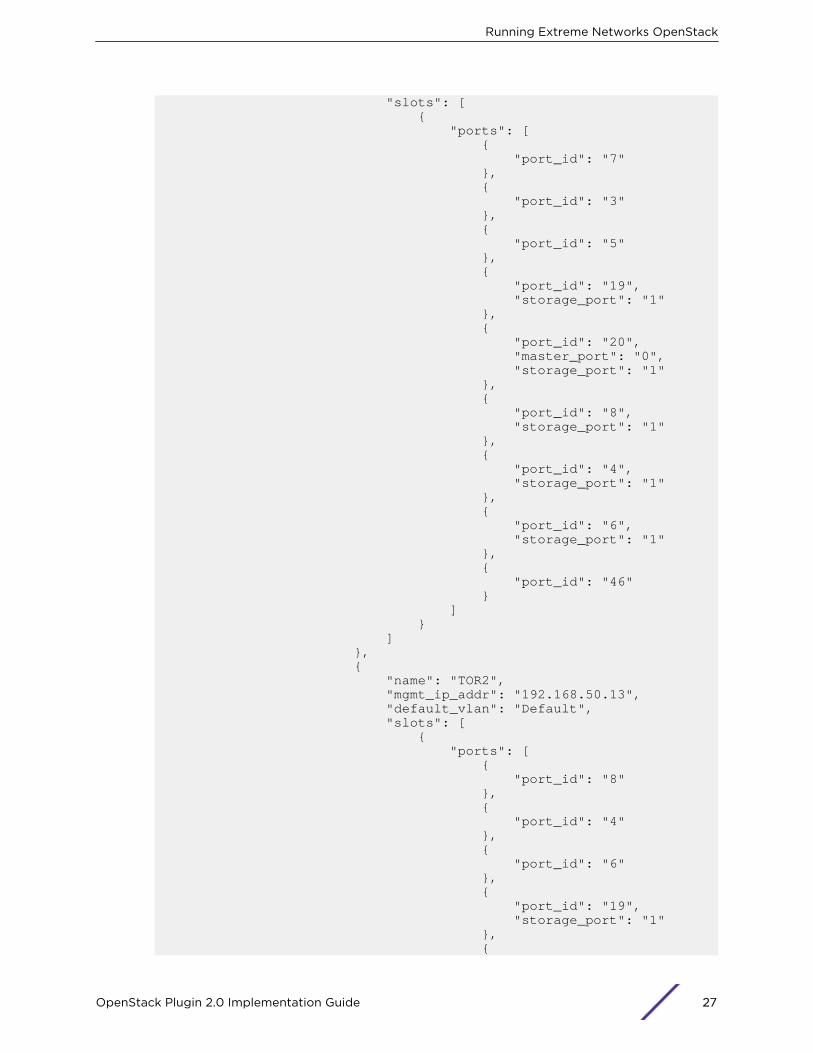
"slots": [ { "ports": [ { "port_id": "7" }, { "port_id": "3" }, { "port_id": "5" }, { "port_id": "19", "storage_port": "1" }, { "port_id": "20", "master_port": "0", "storage_port": "1" }, { "port_id": "8", "storage_port": "1" }, { "port_id": "4", "storage_port": "1" }, { "port_id": "6", "storage_port": "1" }, { "port_id": "46" } ] } ] }, { "name": "TOR2", "mgmt_ip_addr": "192.168.50.13", "default_vlan": "Default", "slots": [ { "ports": [ { "port_id": "8" }, { "port_id": "4" }, { "port_id": "6" }, { "port_id": "19", "storage_port": "1" }, {
Running Extreme Networks OpenStack
OpenStack Plugin 2.0 Implementation Guide 27
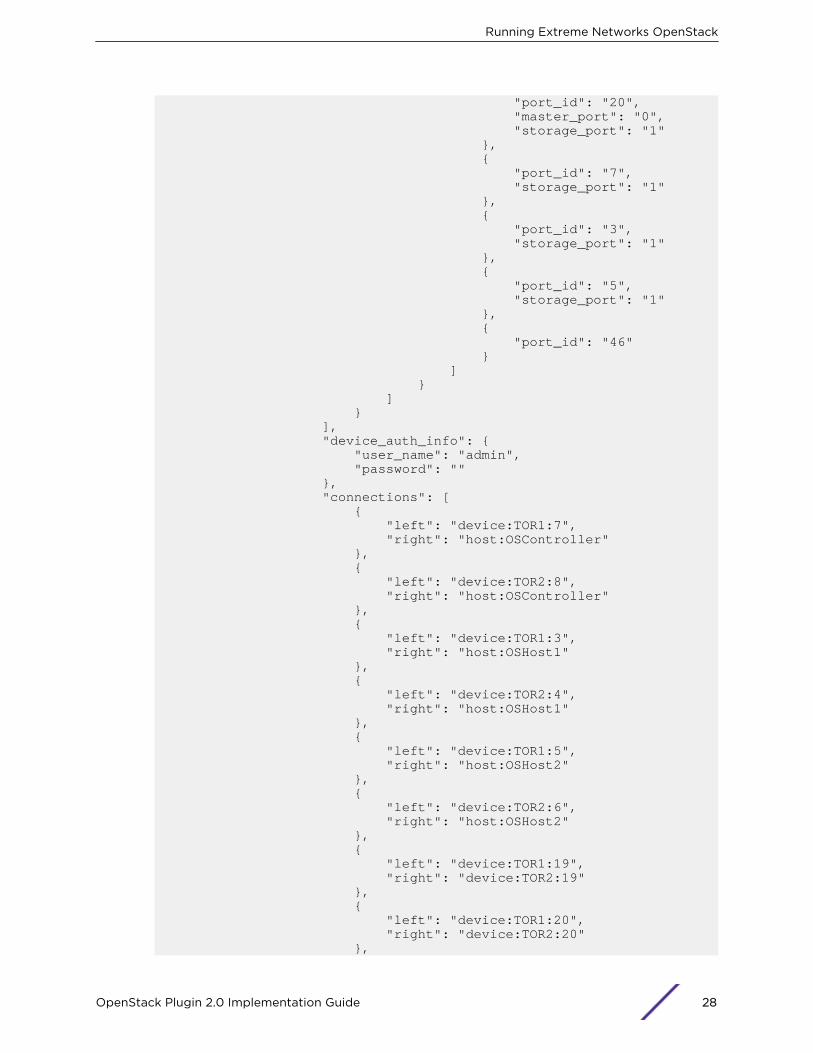
"port_id": "20", "master_port": "0", "storage_port": "1" }, { "port_id": "7", "storage_port": "1" }, { "port_id": "3", "storage_port": "1" }, { "port_id": "5", "storage_port": "1" }, { "port_id": "46" } ] } ] } ], "device_auth_info": { "user_name": "admin", "password": "" }, "connections": [ { "left": "device:TOR1:7", "right": "host:OSController" }, { "left": "device:TOR2:8", "right": "host:OSController" }, { "left": "device:TOR1:3", "right": "host:OSHost1" }, { "left": "device:TOR2:4", "right": "host:OSHost1" }, { "left": "device:TOR1:5", "right": "host:OSHost2" }, { "left": "device:TOR2:6", "right": "host:OSHost2" }, { "left": "device:TOR1:19", "right": "device:TOR2:19" }, { "left": "device:TOR1:20", "right": "device:TOR2:20" },
Running Extreme Networks OpenStack
OpenStack Plugin 2.0 Implementation Guide 28
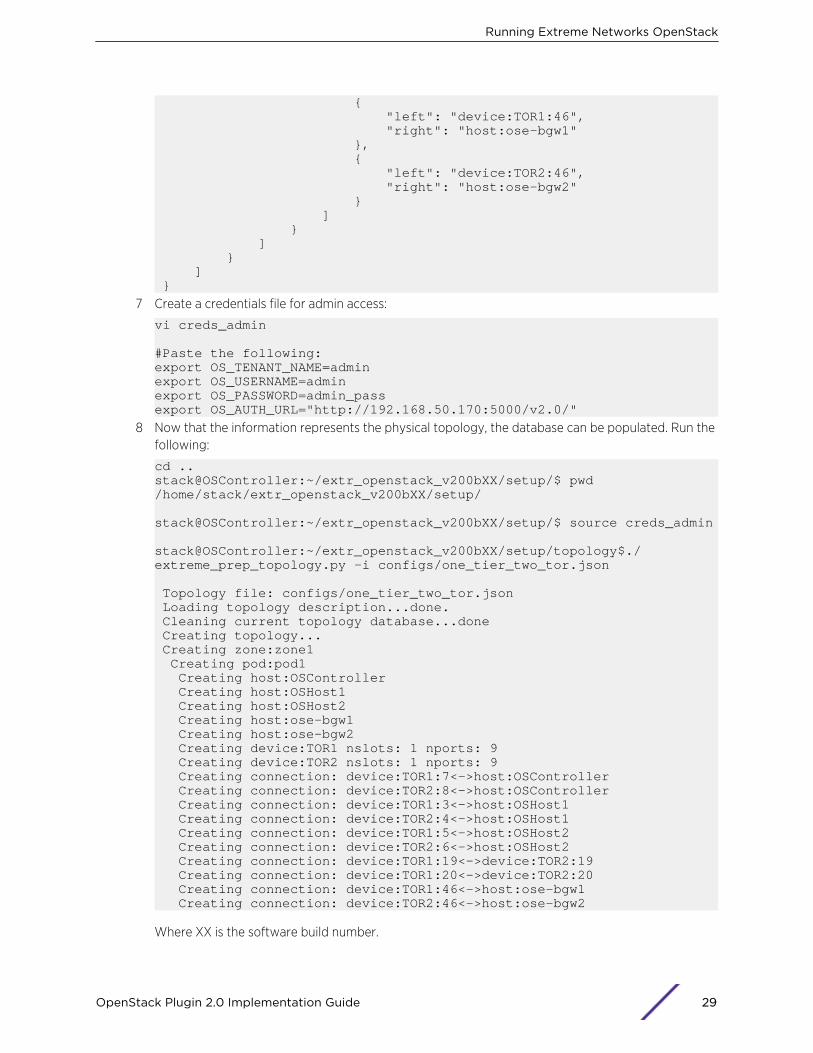
{ "left": "device:TOR1:46", "right": "host:ose-bgw1" }, { "left": "device:TOR2:46", "right": "host:ose-bgw2" } ] } ] } ] }
7 Create a credentials file for admin access:
vi creds_admin #Paste the following:export OS_TENANT_NAME=adminexport OS_USERNAME=adminexport OS_PASSWORD=admin_passexport OS_AUTH_URL="http://192.168.50.170:5000/v2.0/"
8 Now that the information represents the physical topology, the database can be populated. Run thefollowing:
cd ..stack@OSController:~/extr_openstack_v200bXX/setup/$ pwd/home/stack/extr_openstack_v200bXX/setup/ stack@OSController:~/extr_openstack_v200bXX/setup/$ source creds_admin stack@OSController:~/extr_openstack_v200bXX/setup/topology$./extreme_prep_topology.py -i configs/one_tier_two_tor.json Topology file: configs/one_tier_two_tor.json Loading topology description...done. Cleaning current topology database...done Creating topology... Creating zone:zone1 Creating pod:pod1 Creating host:OSController Creating host:OSHost1 Creating host:OSHost2 Creating host:ose-bgw1 Creating host:ose-bgw2 Creating device:TOR1 nslots: 1 nports: 9 Creating device:TOR2 nslots: 1 nports: 9 Creating connection: device:TOR1:7<->host:OSController Creating connection: device:TOR2:8<->host:OSController Creating connection: device:TOR1:3<->host:OSHost1 Creating connection: device:TOR2:4<->host:OSHost1 Creating connection: device:TOR1:5<->host:OSHost2 Creating connection: device:TOR2:6<->host:OSHost2 Creating connection: device:TOR1:19<->device:TOR2:19 Creating connection: device:TOR1:20<->device:TOR2:20 Creating connection: device:TOR1:46<->host:ose-bgw1 Creating connection: device:TOR2:46<->host:ose-bgw2
Where XX is the software build number.
Running Extreme Networks OpenStack
OpenStack Plugin 2.0 Implementation Guide 29
Configuring the Network Fabric—LAG/MLAG
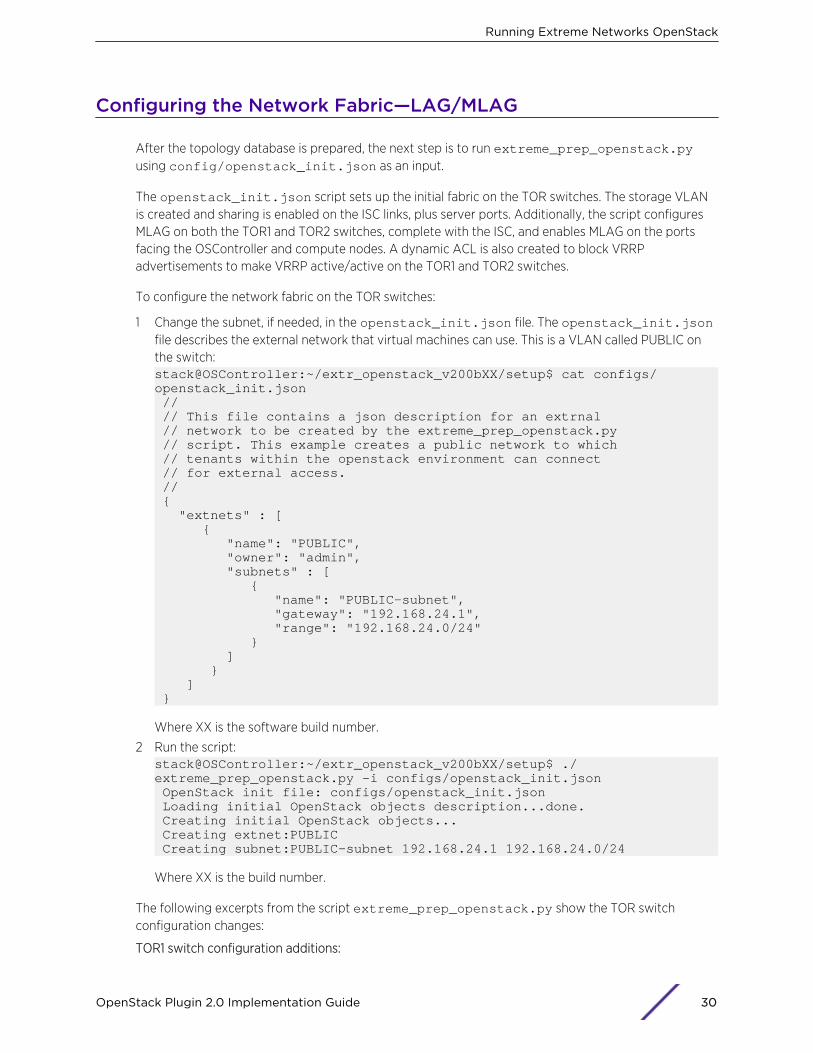
After the topology database is prepared, the next step is to run extreme_prep_openstack.pyusing config/openstack_init.json as an input.
The openstack_init.json script sets up the initial fabric on the TOR switches. The storage VLANis created and sharing is enabled on the ISC links, plus server ports. Additionally, the script configuresMLAG on both the TOR1 and TOR2 switches, complete with the ISC, and enables MLAG on the portsfacing the OSController and compute nodes. A dynamic ACL is also created to block VRRPadvertisements to make VRRP active/active on the TOR1 and TOR2 switches.
To configure the network fabric on the TOR switches:
1 Change the subnet, if needed, in the openstack_init.json file. The openstack_init.jsonfile describes the external network that virtual machines can use. This is a VLAN called PUBLIC onthe switch:stack@OSController:~/extr_openstack_v200bXX/setup$ cat configs/openstack_init.json // // This file contains a json description for an extrnal // network to be created by the extreme_prep_openstack.py // script. This example creates a public network to which // tenants within the openstack environment can connect // for external access. // { "extnets" : [ { "name": "PUBLIC", "owner": "admin", "subnets" : [ { "name": "PUBLIC-subnet", "gateway": "192.168.24.1", "range": "192.168.24.0/24" } ] } ] }
Where XX is the software build number.
2 Run the script:stack@OSController:~/extr_openstack_v200bXX/setup$ ./extreme_prep_openstack.py -i configs/openstack_init.json OpenStack init file: configs/openstack_init.json Loading initial OpenStack objects description...done. Creating initial OpenStack objects... Creating extnet:PUBLIC Creating subnet:PUBLIC-subnet 192.168.24.1 192.168.24.0/24
Where XX is the build number.
The following excerpts from the script extreme_prep_openstack.py show the TOR switchconfiguration changes:
TOR1 switch configuration additions:
Running Extreme Networks OpenStack
OpenStack Plugin 2.0 Implementation Guide 30

# # Module vlan configuration. # create vlan "isc-vlan" configure vlan isc-vlan tag 4093 create vlan "storage-vlan" configure vlan storage-vlan tag 4094 enable sharing 19 grouping 19-20 algorithm address-based L2 lacp enable sharing 7 grouping 7 algorithm address-based L2 lacp enable sharing 3 grouping 3 algorithm address-based L2 lacp enable sharing 5 grouping 5 algorithm address-based L2 lacp configure vlan isc-vlan add ports 19 tagged configure vlan storage-vlan add ports 4, 6, 8, 19 tagged configure vlan isc-vlan ipaddress 1.1.1.1 255.255.255.0 # # Module acl configuration. # create access-list NO-ISC-VRRP-TOR1 " destination-address 224.0.0.18/32 ;" " deny ;" application "Cli" configure access-list add NO-ISC-VRRP-TOR1 last priority 0 zone SYSTEM ports 19 ingress
TOR2 switch configuration additions:
# # Module vlan configuration. # create vlan "isc-vlan" configure vlan isc-vlan tag 4093 create vlan "storage-vlan" configure vlan storage-vlan tag 4094 enable sharing 19 grouping 19-20 algorithm address-based L2 lacp enable sharing 8 grouping 8 algorithm address-based L2 lacp enable sharing 4 grouping 4 algorithm address-based L2 lacp enable sharing 6 grouping 6 algorithm address-based L2 lacp configure vlan isc-vlan add ports 19 tagged configure vlan storage-vlan add ports 3, 5, 7, 19 tagged configure vlan isc-vlan ipaddress 1.1.1.2 255.255.255.0 # # Module acl configuration. # create access-list NO-ISC-VRRP-TOR2 " destination-address 224.0.0.18/32 ;" " deny ;" application "Cli" configure access-list add NO-ISC-VRRP-TOR2 last priority 0 zone SYSTEM ports 19 ingress configure access-list add NO-ISC-VRRP-TOR2 last priority 0 zone SYSTEM ports 20 ingress # # Module vsm configuration. # configure mlag ports convergence-control fast create mlag peer "TOR1" configure mlag peer "TOR1" ipaddress 1.1.1.1 vr VR-Default enable mlag port 4 peer "TOR1" id 2 enable mlag port 6 peer "TOR1" id 3 enable mlag port 8 peer "TOR1" id 1
Running Extreme Networks OpenStack
OpenStack Plugin 2.0 Implementation Guide 31

Logs
Logs files are available for each OpenStack component in /var/log/nova.
Running Extreme Networks OpenStack
OpenStack Plugin 2.0 Implementation Guide 32
7 Managing Tenants and VirtualMachinesCreating TenantsCreating Tenants Using Python Script and Configuration File (L3 Agent)Creating Tenants Using Python Script and Configuration File (Virtual Routers)Verifying TOR Switch Configuration after Tenant Creation (L3 Agent)Verifying TOR Switch Configuration after Tenant Creation (Virtual Routers)Creating Tenant Virtual Machine InstancesMigrating Tenant Virtual Machine Instances (Live Migration)Deleting Tenant Virtual Machine Instances
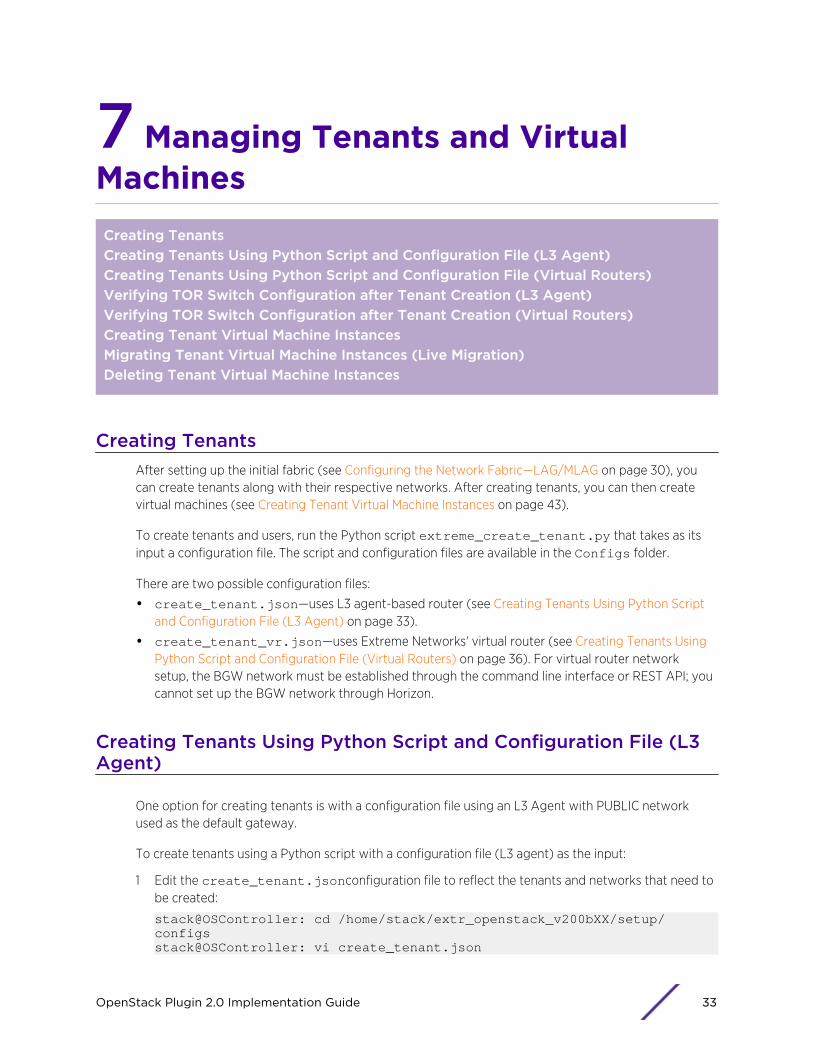
Creating TenantsAfter setting up the initial fabric (see Configuring the Network Fabric—LAG/MLAG on page 30), youcan create tenants along with their respective networks. After creating tenants, you can then createvirtual machines (see Creating Tenant Virtual Machine Instances on page 43).
To create tenants and users, run the Python script extreme_create_tenant.py that takes as itsinput a configuration file. The script and configuration files are available in the Configs folder.
There are two possible configuration files:
• create_tenant.json—uses L3 agent-based router (see Creating Tenants Using Python Scriptand Configuration File (L3 Agent) on page 33).
• create_tenant_vr.json—uses Extreme Networks' virtual router (see Creating Tenants UsingPython Script and Configuration File (Virtual Routers) on page 36). For virtual router networksetup, the BGW network must be established through the command line interface or REST API; youcannot set up the BGW network through Horizon.
Creating Tenants Using Python Script and Configuration File (L3Agent)
One option for creating tenants is with a configuration file using an L3 Agent with PUBLIC networkused as the default gateway.
To create tenants using a Python script with a configuration file (L3 agent) as the input:
1 Edit the create_tenant.jsonconfiguration file to reflect the tenants and networks that need tobe created:
stack@OSController: cd /home/stack/extr_openstack_v200bXX/setup/configsstack@OSController: vi create_tenant.json
OpenStack Plugin 2.0 Implementation Guide 33
Where XX is the build number.
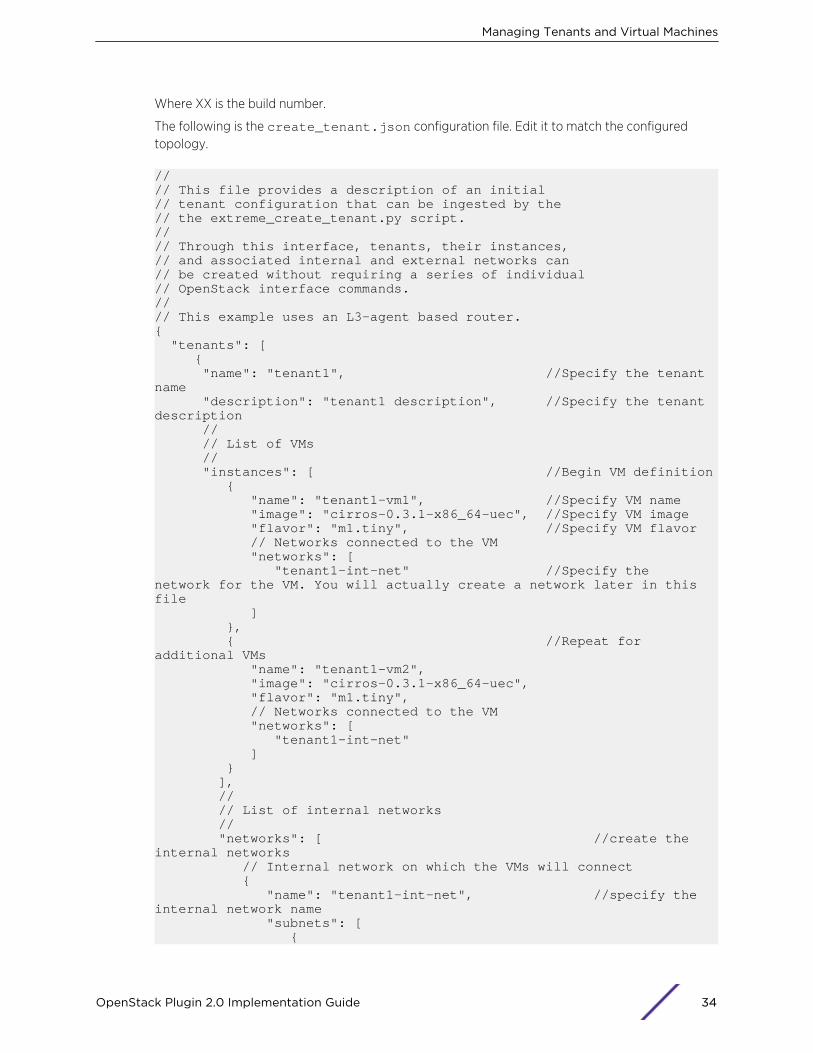
The following is the create_tenant.json configuration file. Edit it to match the configuredtopology.
//// This file provides a description of an initial// tenant configuration that can be ingested by the// the extreme_create_tenant.py script.//// Through this interface, tenants, their instances,// and associated internal and external networks can// be created without requiring a series of individual// OpenStack interface commands.//// This example uses an L3-agent based router.{ "tenants": [ { "name": "tenant1", //Specify the tenant name "description": "tenant1 description", //Specify the tenant description // // List of VMs // "instances": [ //Begin VM definition { "name": "tenant1-vm1", //Specify VM name "image": "cirros-0.3.1-x86_64-uec", //Specify VM image "flavor": "m1.tiny", //Specify VM flavor // Networks connected to the VM "networks": [ "tenant1-int-net" //Specify the network for the VM. You will actually create a network later in this file ] }, { //Repeat for additional VMs "name": "tenant1-vm2", "image": "cirros-0.3.1-x86_64-uec", "flavor": "m1.tiny", // Networks connected to the VM "networks": [ "tenant1-int-net" ] } ], // // List of internal networks // "networks": [ //create the internal networks // Internal network on which the VMs will connect { "name": "tenant1-int-net", //specify the internal network name "subnets": [ {
Managing Tenants and Virtual Machines
OpenStack Plugin 2.0 Implementation Guide 34
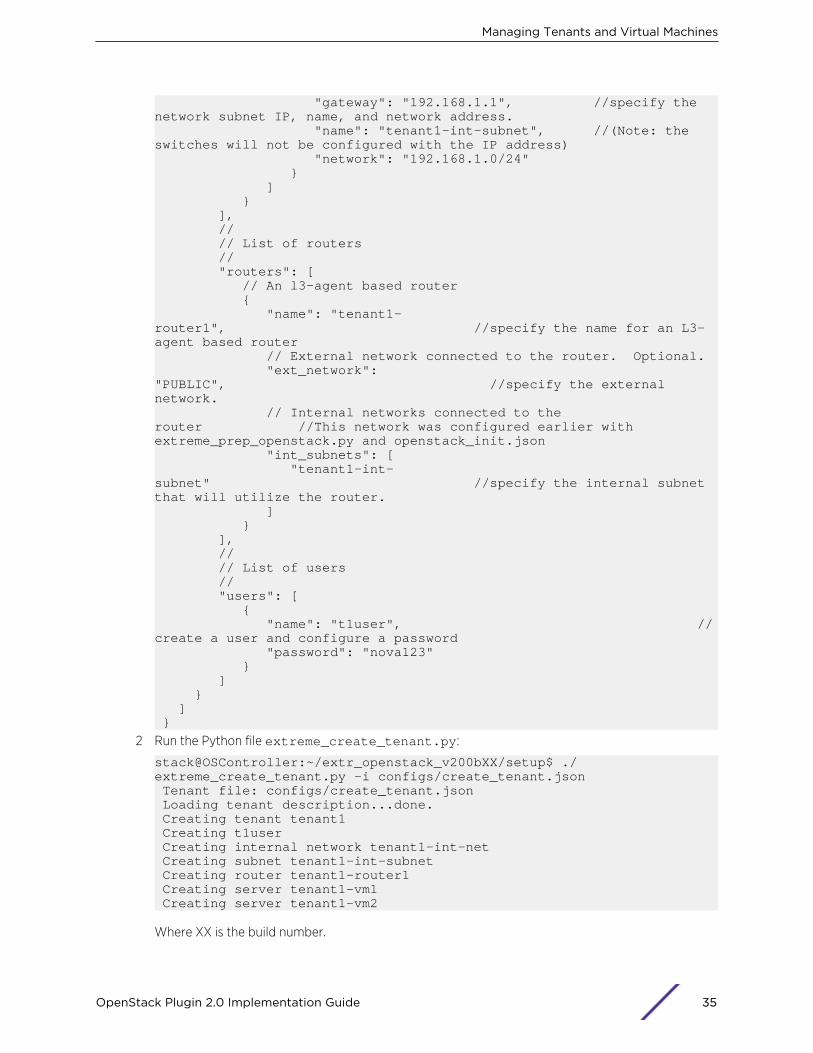
"gateway": "192.168.1.1", //specify the network subnet IP, name, and network address. "name": "tenant1-int-subnet", //(Note: the switches will not be configured with the IP address) "network": "192.168.1.0/24" } ] } ], // // List of routers // "routers": [ // An l3-agent based router { "name": "tenant1-router1", //specify the name for an L3-agent based router // External network connected to the router. Optional. "ext_network": "PUBLIC", //specify the external network. // Internal networks connected to the router //This network was configured earlier with extreme_prep_openstack.py and openstack_init.json "int_subnets": [ "tenant1-int-subnet" //specify the internal subnet that will utilize the router. ] } ], // // List of users // "users": [ { "name": "t1user", //create a user and configure a password "password": "nova123" } ] } ] }
2 Run the Python file extreme_create_tenant.py:
stack@OSController:~/extr_openstack_v200bXX/setup$ ./extreme_create_tenant.py -i configs/create_tenant.json Tenant file: configs/create_tenant.json Loading tenant description...done. Creating tenant tenant1 Creating t1user Creating internal network tenant1-int-net Creating subnet tenant1-int-subnet Creating router tenant1-router1 Creating server tenant1-vm1 Creating server tenant1-vm2
Where XX is the build number.
Managing Tenants and Virtual Machines
OpenStack Plugin 2.0 Implementation Guide 35
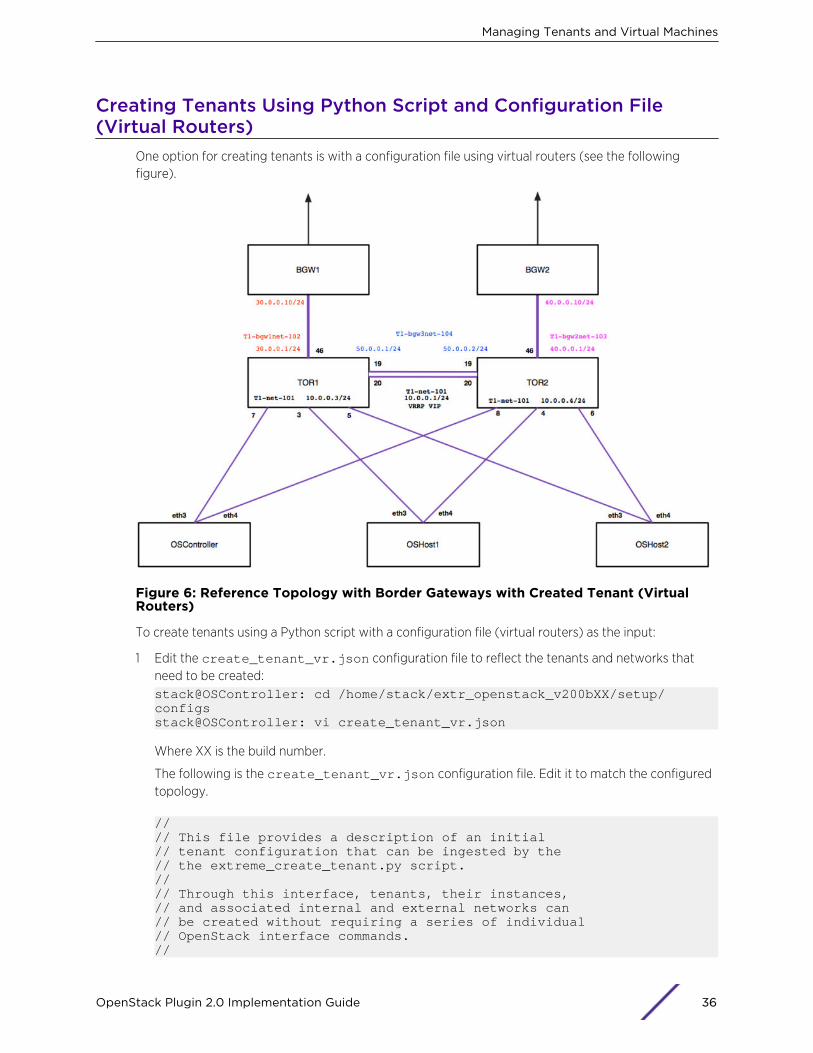
Creating Tenants Using Python Script and Configuration File(Virtual Routers)
One option for creating tenants is with a configuration file using virtual routers (see the followingfigure).
Figure 6: Reference Topology with Border Gateways with Created Tenant (VirtualRouters)
To create tenants using a Python script with a configuration file (virtual routers) as the input:
1 Edit the create_tenant_vr.json configuration file to reflect the tenants and networks thatneed to be created:stack@OSController: cd /home/stack/extr_openstack_v200bXX/setup/configsstack@OSController: vi create_tenant_vr.json
Where XX is the build number.
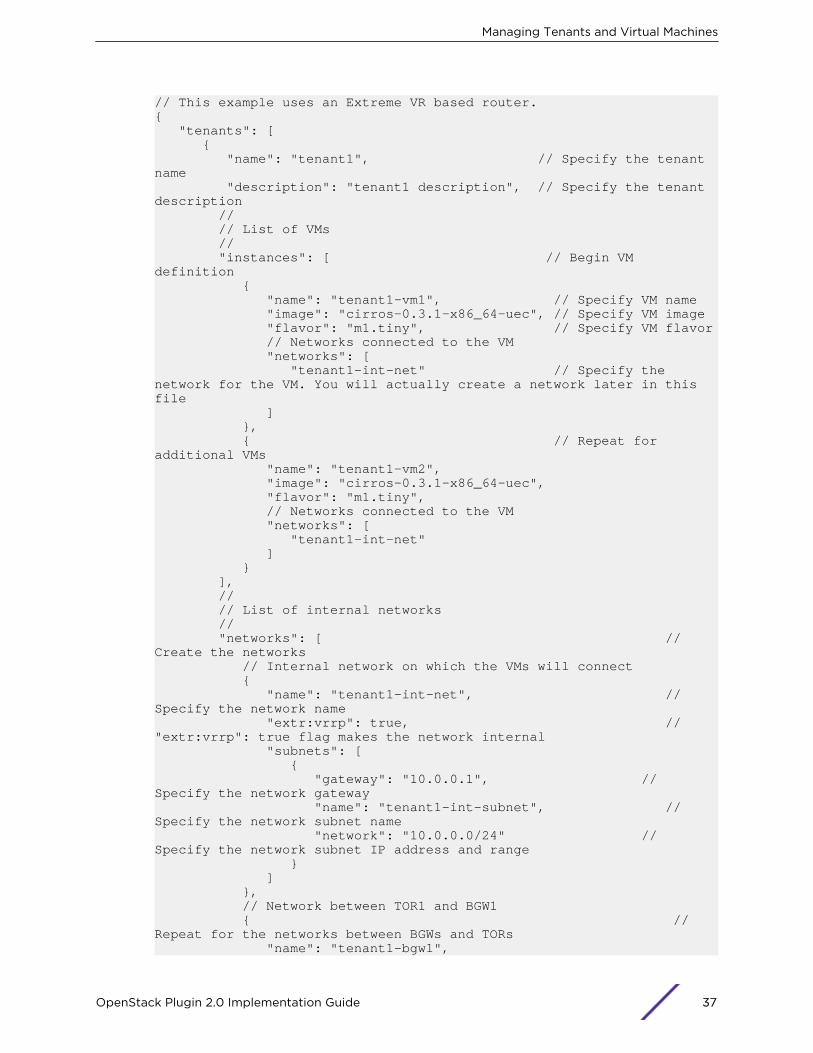
The following is the create_tenant_vr.json configuration file. Edit it to match the configuredtopology.
//// This file provides a description of an initial// tenant configuration that can be ingested by the// the extreme_create_tenant.py script.//// Through this interface, tenants, their instances,// and associated internal and external networks can// be created without requiring a series of individual// OpenStack interface commands.//
Managing Tenants and Virtual Machines
OpenStack Plugin 2.0 Implementation Guide 36
// This example uses an Extreme VR based router.{ "tenants": [ { "name": "tenant1", // Specify the tenant name "description": "tenant1 description", // Specify the tenant description // // List of VMs // "instances": [ // Begin VM definition { "name": "tenant1-vm1", // Specify VM name "image": "cirros-0.3.1-x86_64-uec", // Specify VM image "flavor": "m1.tiny", // Specify VM flavor // Networks connected to the VM "networks": [ "tenant1-int-net" // Specify the network for the VM. You will actually create a network later in this file ] }, { // Repeat for additional VMs "name": "tenant1-vm2", "image": "cirros-0.3.1-x86_64-uec", "flavor": "m1.tiny", // Networks connected to the VM "networks": [ "tenant1-int-net" ] } ], // // List of internal networks // "networks": [ // Create the networks // Internal network on which the VMs will connect { "name": "tenant1-int-net", // Specify the network name "extr:vrrp": true, // "extr:vrrp": true flag makes the network internal "subnets": [ { "gateway": "10.0.0.1", // Specify the network gateway "name": "tenant1-int-subnet", // Specify the network subnet name "network": "10.0.0.0/24" // Specify the network subnet IP address and range } ] }, // Network between TOR1 and BGW1 { // Repeat for the networks between BGWs and TORs "name": "tenant1-bgw1",
Managing Tenants and Virtual Machines
OpenStack Plugin 2.0 Implementation Guide 37
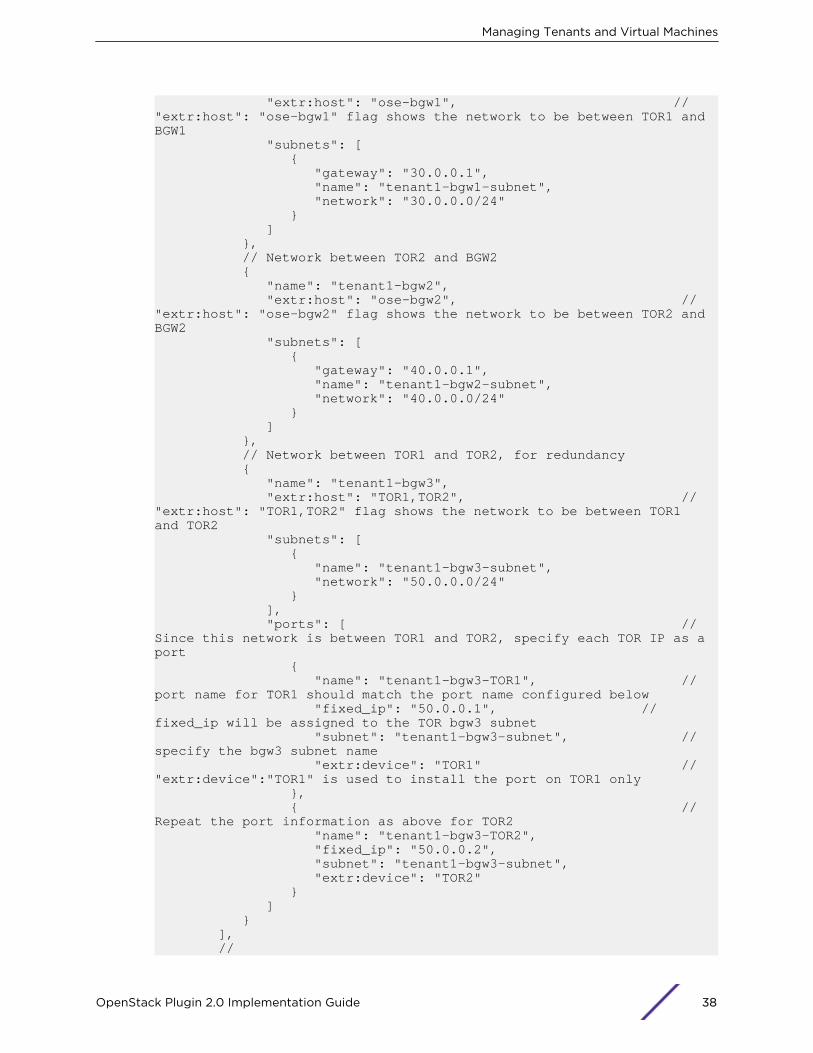
"extr:host": "ose-bgw1", // "extr:host": "ose-bgw1" flag shows the network to be between TOR1 and BGW1 "subnets": [ { "gateway": "30.0.0.1", "name": "tenant1-bgw1-subnet", "network": "30.0.0.0/24" } ] }, // Network between TOR2 and BGW2 { "name": "tenant1-bgw2", "extr:host": "ose-bgw2", // "extr:host": "ose-bgw2" flag shows the network to be between TOR2 and BGW2 "subnets": [ { "gateway": "40.0.0.1", "name": "tenant1-bgw2-subnet", "network": "40.0.0.0/24" } ] }, // Network between TOR1 and TOR2, for redundancy { "name": "tenant1-bgw3", "extr:host": "TOR1,TOR2", // "extr:host": "TOR1,TOR2" flag shows the network to be between TOR1 and TOR2 "subnets": [ { "name": "tenant1-bgw3-subnet", "network": "50.0.0.0/24" } ], "ports": [ // Since this network is between TOR1 and TOR2, specify each TOR IP as a port { "name": "tenant1-bgw3-TOR1", // port name for TOR1 should match the port name configured below "fixed_ip": "50.0.0.1", // fixed_ip will be assigned to the TOR bgw3 subnet "subnet": "tenant1-bgw3-subnet", // specify the bgw3 subnet name "extr:device": "TOR1" // "extr:device":"TOR1" is used to install the port on TOR1 only }, { // Repeat the port information as above for TOR2 "name": "tenant1-bgw3-TOR2", "fixed_ip": "50.0.0.2", "subnet": "tenant1-bgw3-subnet", "extr:device": "TOR2" } ] } ], //
Managing Tenants and Virtual Machines
OpenStack Plugin 2.0 Implementation Guide 38
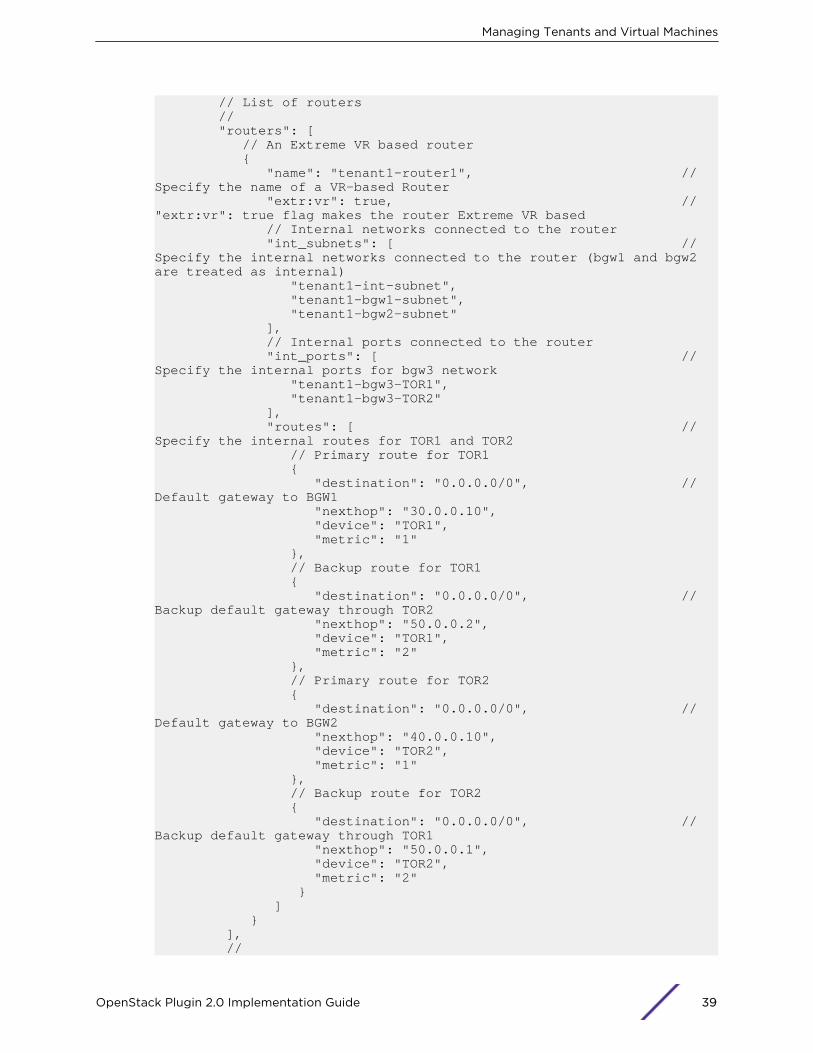
// List of routers // "routers": [ // An Extreme VR based router { "name": "tenant1-router1", // Specify the name of a VR-based Router "extr:vr": true, // "extr:vr": true flag makes the router Extreme VR based // Internal networks connected to the router "int_subnets": [ // Specify the internal networks connected to the router (bgw1 and bgw2 are treated as internal) "tenant1-int-subnet", "tenant1-bgw1-subnet", "tenant1-bgw2-subnet" ], // Internal ports connected to the router "int_ports": [ // Specify the internal ports for bgw3 network "tenant1-bgw3-TOR1", "tenant1-bgw3-TOR2" ], "routes": [ // Specify the internal routes for TOR1 and TOR2 // Primary route for TOR1 { "destination": "0.0.0.0/0", // Default gateway to BGW1 "nexthop": "30.0.0.10", "device": "TOR1", "metric": "1" }, // Backup route for TOR1 { "destination": "0.0.0.0/0", // Backup default gateway through TOR2 "nexthop": "50.0.0.2", "device": "TOR1", "metric": "2" }, // Primary route for TOR2 { "destination": "0.0.0.0/0", // Default gateway to BGW2 "nexthop": "40.0.0.10", "device": "TOR2", "metric": "1" }, // Backup route for TOR2 { "destination": "0.0.0.0/0", // Backup default gateway through TOR1 "nexthop": "50.0.0.1", "device": "TOR2", "metric": "2" } ] } ], //
Managing Tenants and Virtual Machines
OpenStack Plugin 2.0 Implementation Guide 39
// List of users // "users": [ { "name": "t1user", // Specify the username and password for the tenant "password": "nova123" } ] } ]}
2 Run the Python file extreme_create_tenant.py:
extreme_create_tenant.py -i configs/create_tenant_vr.json
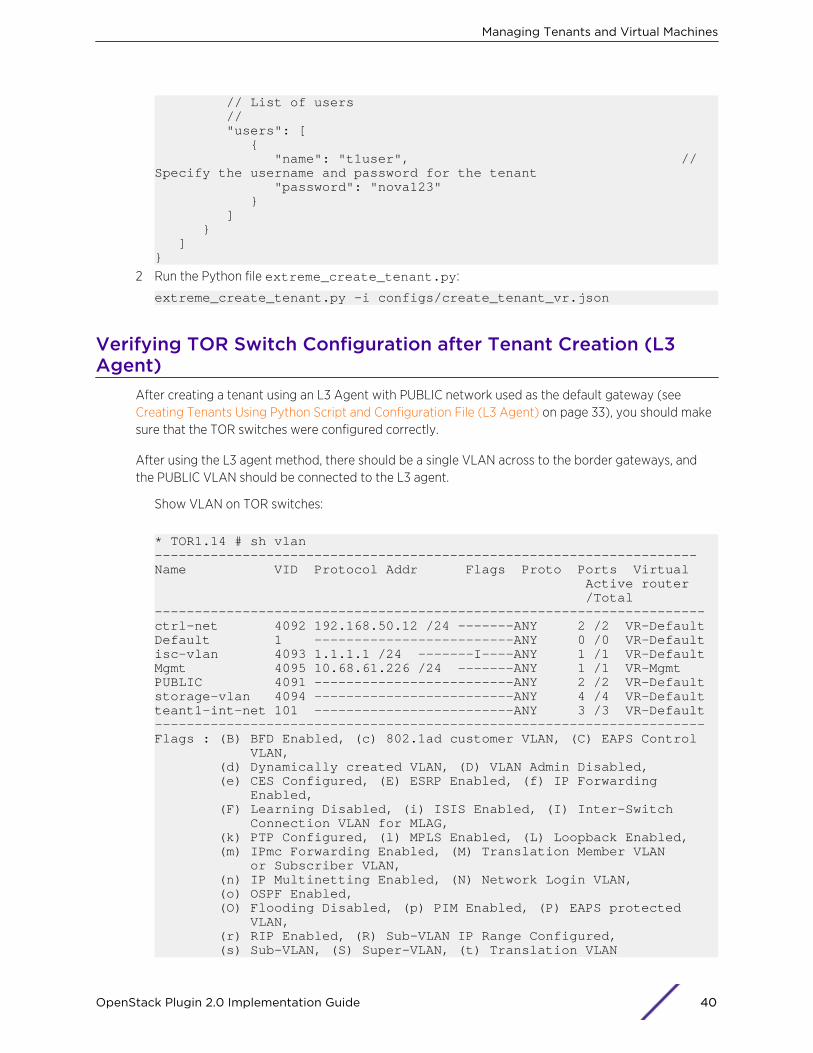
Verifying TOR Switch Configuration after Tenant Creation (L3Agent)
After creating a tenant using an L3 Agent with PUBLIC network used as the default gateway (see Creating Tenants Using Python Script and Configuration File (L3 Agent) on page 33), you should makesure that the TOR switches were configured correctly.
After using the L3 agent method, there should be a single VLAN across to the border gateways, andthe PUBLIC VLAN should be connected to the L3 agent.
Show VLAN on TOR switches:
* TOR1.14 # sh vlan--------------------------------------------------------------------Name VID Protocol Addr Flags Proto Ports Virtual Active router /Total---------------------------------------------------------------------ctrl-net 4092 192.168.50.12 /24 -------ANY 2 /2 VR-DefaultDefault 1 -------------------------ANY 0 /0 VR-Defaultisc-vlan 4093 1.1.1.1 /24 -------I----ANY 1 /1 VR-DefaultMgmt 4095 10.68.61.226 /24 -------ANY 1 /1 VR-Mgmt PUBLIC 4091 -------------------------ANY 2 /2 VR-Defaultstorage-vlan 4094 -------------------------ANY 4 /4 VR-Defaultteant1-int-net 101 -------------------------ANY 3 /3 VR-Default---------------------------------------------------------------------Flags : (B) BFD Enabled, (c) 802.1ad customer VLAN, (C) EAPS Control VLAN, (d) Dynamically created VLAN, (D) VLAN Admin Disabled, (e) CES Configured, (E) ESRP Enabled, (f) IP Forwarding Enabled, (F) Learning Disabled, (i) ISIS Enabled, (I) Inter-Switch Connection VLAN for MLAG, (k) PTP Configured, (l) MPLS Enabled, (L) Loopback Enabled, (m) IPmc Forwarding Enabled, (M) Translation Member VLAN or Subscriber VLAN, (n) IP Multinetting Enabled, (N) Network Login VLAN, (o) OSPF Enabled, (O) Flooding Disabled, (p) PIM Enabled, (P) EAPS protected VLAN, (r) RIP Enabled, (R) Sub-VLAN IP Range Configured, (s) Sub-VLAN, (S) Super-VLAN, (t) Translation VLAN
Managing Tenants and Virtual Machines
OpenStack Plugin 2.0 Implementation Guide 40
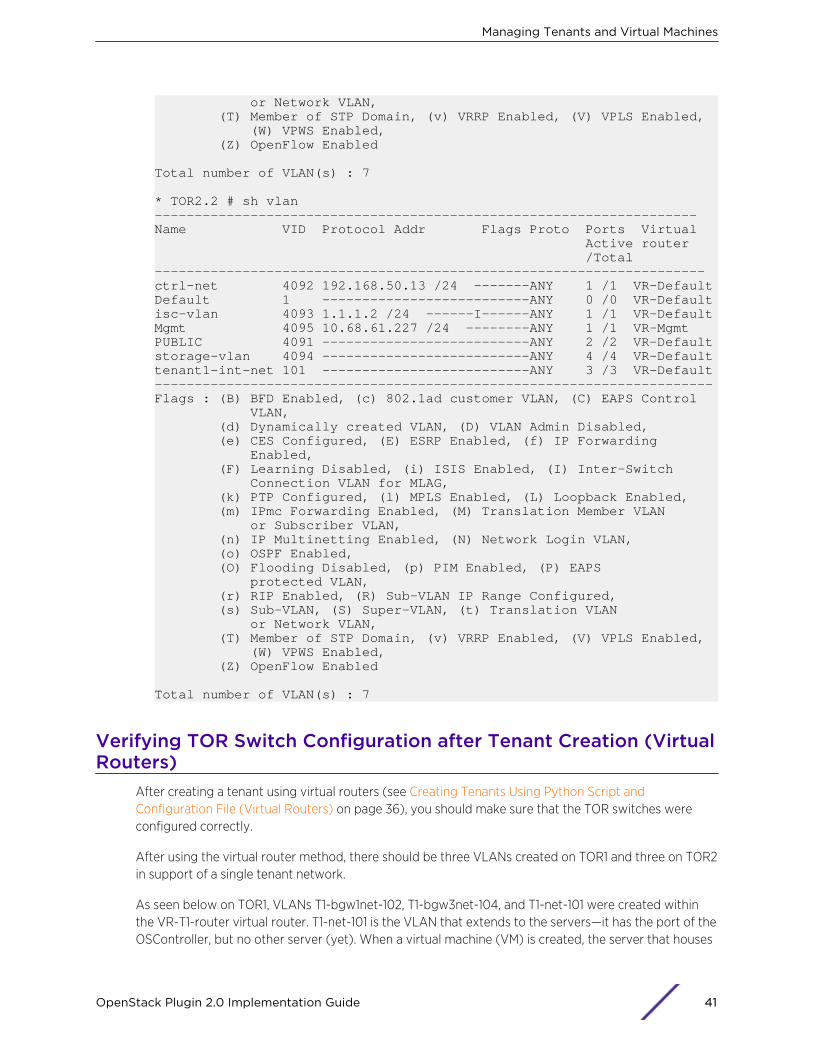
or Network VLAN, (T) Member of STP Domain, (v) VRRP Enabled, (V) VPLS Enabled, (W) VPWS Enabled, (Z) OpenFlow Enabled Total number of VLAN(s) : 7 * TOR2.2 # sh vlan--------------------------------------------------------------------Name VID Protocol Addr Flags Proto Ports Virtual Active router /Total---------------------------------------------------------------------ctrl-net 4092 192.168.50.13 /24 -------ANY 1 /1 VR-DefaultDefault 1 --------------------------ANY 0 /0 VR-Defaultisc-vlan 4093 1.1.1.2 /24 ------I------ANY 1 /1 VR-DefaultMgmt 4095 10.68.61.227 /24 --------ANY 1 /1 VR-Mgmt PUBLIC 4091 --------------------------ANY 2 /2 VR-Defaultstorage-vlan 4094 --------------------------ANY 4 /4 VR-Defaulttenant1-int-net 101 --------------------------ANY 3 /3 VR-Default----------------------------------------------------------------------Flags : (B) BFD Enabled, (c) 802.1ad customer VLAN, (C) EAPS Control VLAN, (d) Dynamically created VLAN, (D) VLAN Admin Disabled, (e) CES Configured, (E) ESRP Enabled, (f) IP Forwarding Enabled, (F) Learning Disabled, (i) ISIS Enabled, (I) Inter-Switch Connection VLAN for MLAG, (k) PTP Configured, (l) MPLS Enabled, (L) Loopback Enabled, (m) IPmc Forwarding Enabled, (M) Translation Member VLAN or Subscriber VLAN, (n) IP Multinetting Enabled, (N) Network Login VLAN, (o) OSPF Enabled, (O) Flooding Disabled, (p) PIM Enabled, (P) EAPS protected VLAN, (r) RIP Enabled, (R) Sub-VLAN IP Range Configured, (s) Sub-VLAN, (S) Super-VLAN, (t) Translation VLAN or Network VLAN, (T) Member of STP Domain, (v) VRRP Enabled, (V) VPLS Enabled, (W) VPWS Enabled, (Z) OpenFlow Enabled Total number of VLAN(s) : 7
Verifying TOR Switch Configuration after Tenant Creation (VirtualRouters)
After creating a tenant using virtual routers (see Creating Tenants Using Python Script andConfiguration File (Virtual Routers) on page 36), you should make sure that the TOR switches wereconfigured correctly.
After using the virtual router method, there should be three VLANs created on TOR1 and three on TOR2in support of a single tenant network.
As seen below on TOR1, VLANs T1-bgw1net-102, T1-bgw3net-104, and T1-net-101 were created withinthe VR-T1-router virtual router. T1-net-101 is the VLAN that extends to the servers—it has the port of theOSController, but no other server (yet). When a virtual machine (VM) is created, the server that houses
Managing Tenants and Virtual Machines
OpenStack Plugin 2.0 Implementation Guide 41
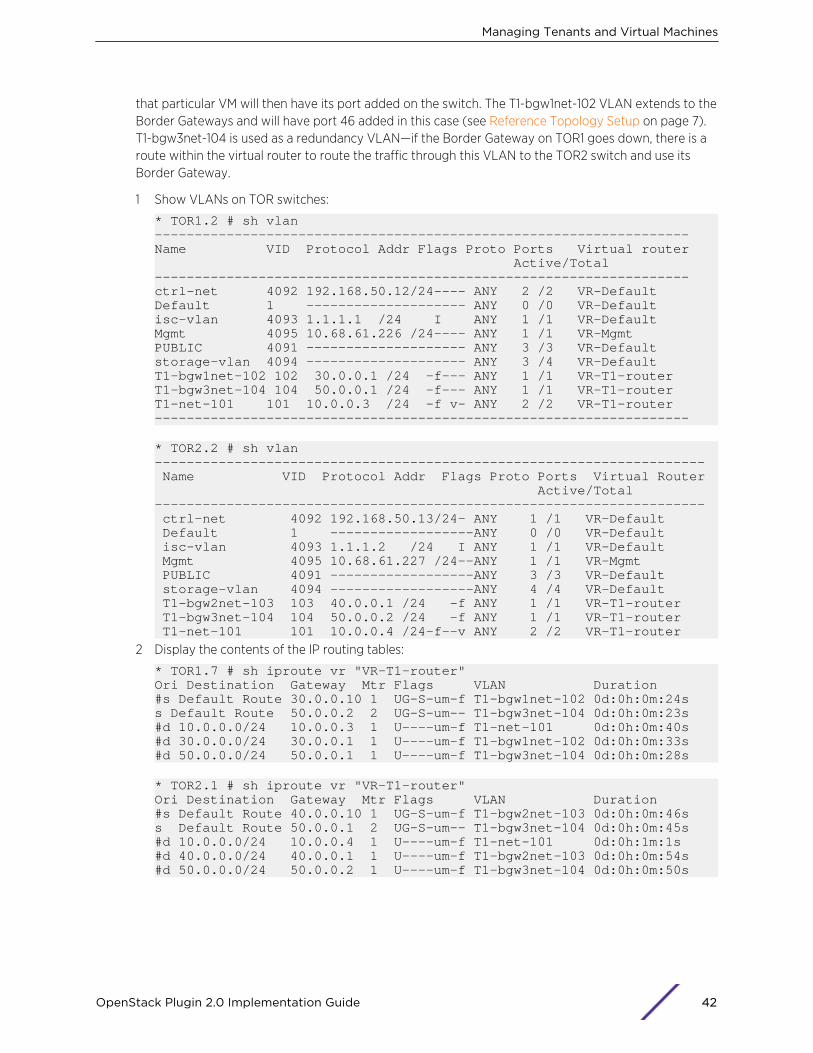
that particular VM will then have its port added on the switch. The T1-bgw1net-102 VLAN extends to theBorder Gateways and will have port 46 added in this case (see Reference Topology Setup on page 7).T1-bgw3net-104 is used as a redundancy VLAN—if the Border Gateway on TOR1 goes down, there is aroute within the virtual router to route the traffic through this VLAN to the TOR2 switch and use itsBorder Gateway.
1 Show VLANs on TOR switches:
* TOR1.2 # sh vlan-------------------------------------------------------------------Name VID Protocol Addr Flags Proto Ports Virtual router Active/Total-------------------------------------------------------------------ctrl-net 4092 192.168.50.12/24---- ANY 2 /2 VR-Default Default 1 -------------------- ANY 0 /0 VR-Default isc-vlan 4093 1.1.1.1 /24 I ANY 1 /1 VR-Default Mgmt 4095 10.68.61.226 /24---- ANY 1 /1 VR-Mgmt PUBLIC 4091 -------------------- ANY 3 /3 VR-Default storage-vlan 4094 -------------------- ANY 3 /4 VR-Default T1-bgw1net-102 102 30.0.0.1 /24 -f--- ANY 1 /1 VR-T1-router T1-bgw3net-104 104 50.0.0.1 /24 -f--- ANY 1 /1 VR-T1-router T1-net-101 101 10.0.0.3 /24 -f v- ANY 2 /2 VR-T1-router -------------------------------------------------------------------
* TOR2.2 # sh vlan--------------------------------------------------------------------- Name VID Protocol Addr Flags Proto Ports Virtual Router Active/Total--------------------------------------------------------------------- ctrl-net 4092 192.168.50.13/24- ANY 1 /1 VR-Default Default 1 ------------------ANY 0 /0 VR-Default isc-vlan 4093 1.1.1.2 /24 I ANY 1 /1 VR-Default Mgmt 4095 10.68.61.227 /24--ANY 1 /1 VR-Mgmt PUBLIC 4091 ------------------ANY 3 /3 VR-Default storage-vlan 4094 ------------------ANY 4 /4 VR-Default T1-bgw2net-103 103 40.0.0.1 /24 -f ANY 1 /1 VR-T1-router T1-bgw3net-104 104 50.0.0.2 /24 -f ANY 1 /1 VR-T1-router T1-net-101 101 10.0.0.4 /24-f--v ANY 2 /2 VR-T1-router
2 Display the contents of the IP routing tables:
* TOR1.7 # sh iproute vr "VR-T1-router" Ori Destination Gateway Mtr Flags VLAN Duration#s Default Route 30.0.0.10 1 UG-S-um-f T1-bgw1net-102 0d:0h:0m:24ss Default Route 50.0.0.2 2 UG-S-um-- T1-bgw3net-104 0d:0h:0m:23s#d 10.0.0.0/24 10.0.0.3 1 U----um-f T1-net-101 0d:0h:0m:40s#d 30.0.0.0/24 30.0.0.1 1 U----um-f T1-bgw1net-102 0d:0h:0m:33s#d 50.0.0.0/24 50.0.0.1 1 U----um-f T1-bgw3net-104 0d:0h:0m:28s
* TOR2.1 # sh iproute vr "VR-T1-router" Ori Destination Gateway Mtr Flags VLAN Duration#s Default Route 40.0.0.10 1 UG-S-um-f T1-bgw2net-103 0d:0h:0m:46ss Default Route 50.0.0.1 2 UG-S-um-- T1-bgw3net-104 0d:0h:0m:45s#d 10.0.0.0/24 10.0.0.4 1 U----um-f T1-net-101 0d:0h:1m:1s#d 40.0.0.0/24 40.0.0.1 1 U----um-f T1-bgw2net-103 0d:0h:0m:54s#d 50.0.0.0/24 50.0.0.2 1 U----um-f T1-bgw3net-104 0d:0h:0m:50s
Managing Tenants and Virtual Machines
OpenStack Plugin 2.0 Implementation Guide 42
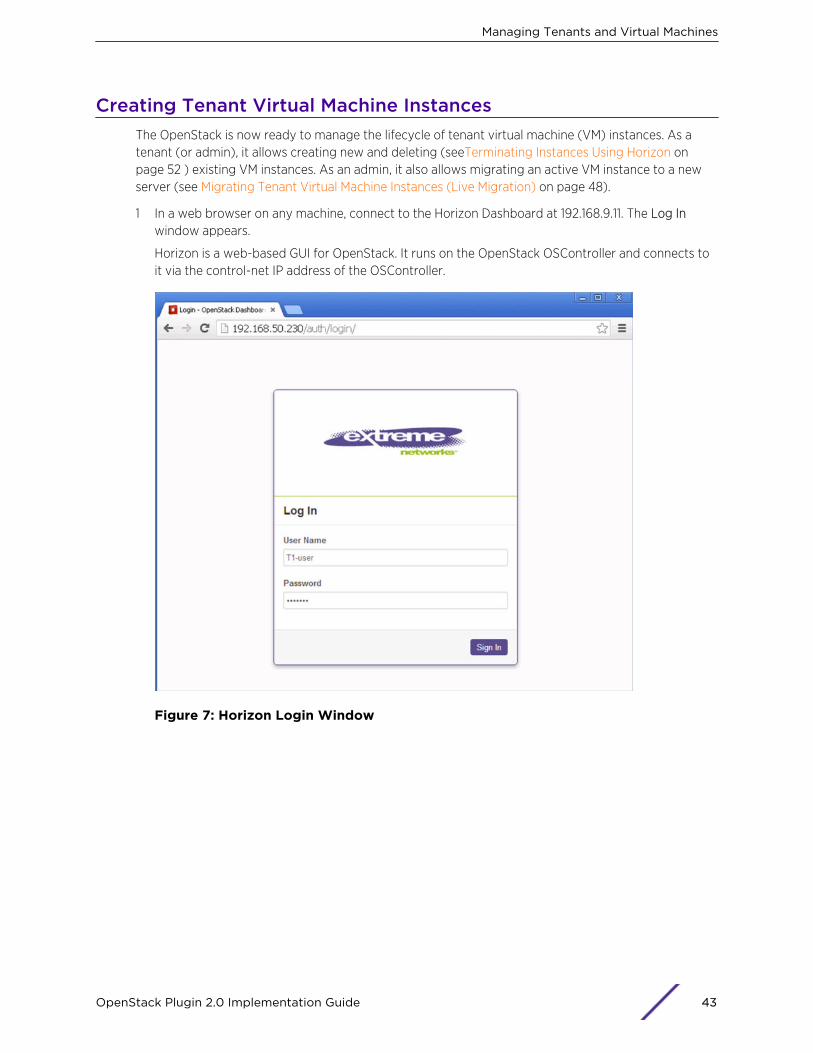
Creating Tenant Virtual Machine InstancesThe OpenStack is now ready to manage the lifecycle of tenant virtual machine (VM) instances. As atenant (or admin), it allows creating new and deleting (seeTerminating Instances Using Horizon onpage 52 ) existing VM instances. As an admin, it also allows migrating an active VM instance to a newserver (see Migrating Tenant Virtual Machine Instances (Live Migration) on page 48).
1 In a web browser on any machine, connect to the Horizon Dashboard at 192.168.9.11. The Log Inwindow appears.
Horizon is a web-based GUI for OpenStack. It runs on the OpenStack OSController and connects toit via the control-net IP address of the OSController.
Figure 7: Horizon Login Window
Managing Tenants and Virtual Machines
OpenStack Plugin 2.0 Implementation Guide 43
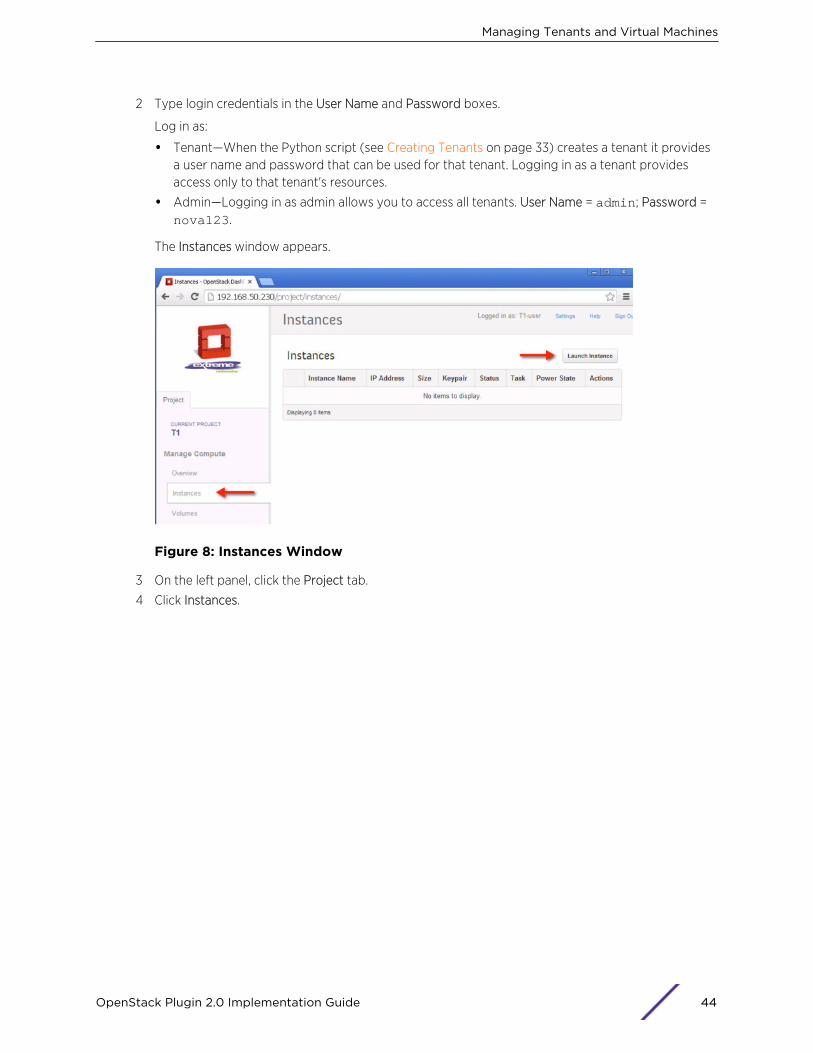
2 Type login credentials in the User Name and Password boxes.
Log in as:
• Tenant—When the Python script (see Creating Tenants on page 33) creates a tenant it providesa user name and password that can be used for that tenant. Logging in as a tenant providesaccess only to that tenant's resources.
• Admin—Logging in as admin allows you to access all tenants. User Name = admin; Password =nova123.
The Instances window appears.
Figure 8: Instances Window
3 On the left panel, click the Project tab.
4 Click Instances.
Managing Tenants and Virtual Machines
OpenStack Plugin 2.0 Implementation Guide 44
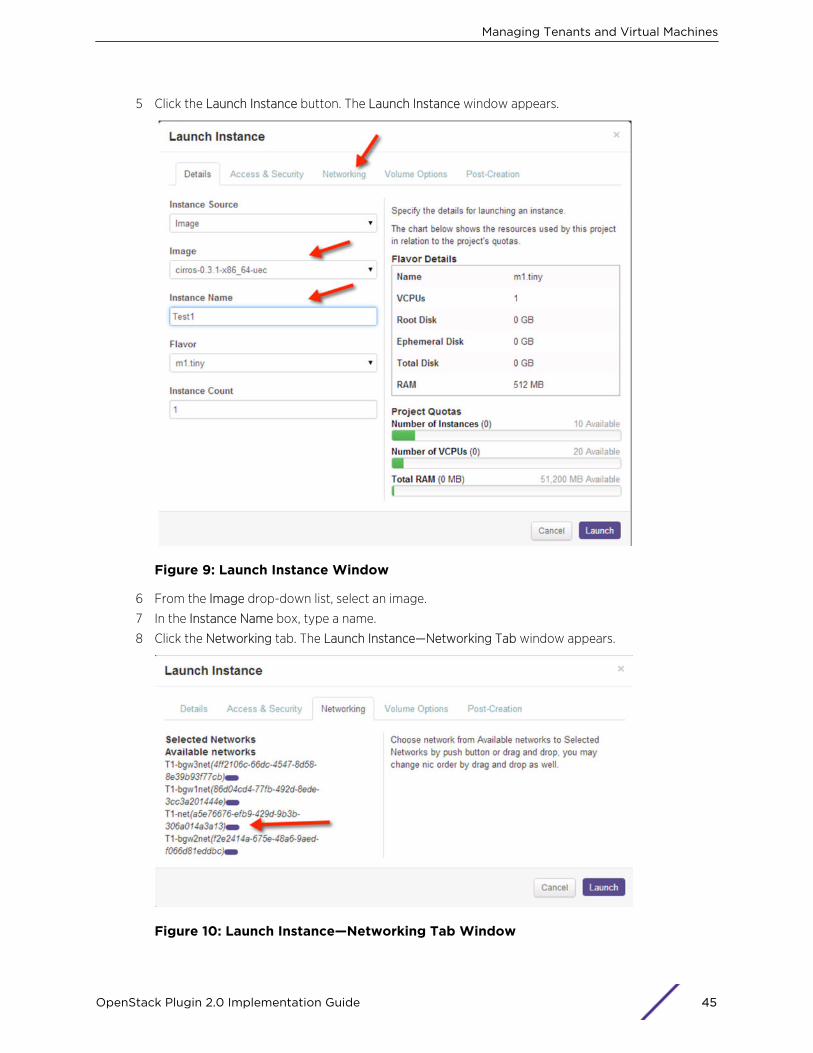
5 Click the Launch Instance button. The Launch Instance window appears.
Figure 9: Launch Instance Window
6 From the Image drop-down list, select an image.
7 In the Instance Name box, type a name.
8 Click the Networking tab. The Launch Instance—Networking Tab window appears.
Figure 10: Launch Instance—Networking Tab Window
Managing Tenants and Virtual Machines
OpenStack Plugin 2.0 Implementation Guide 45
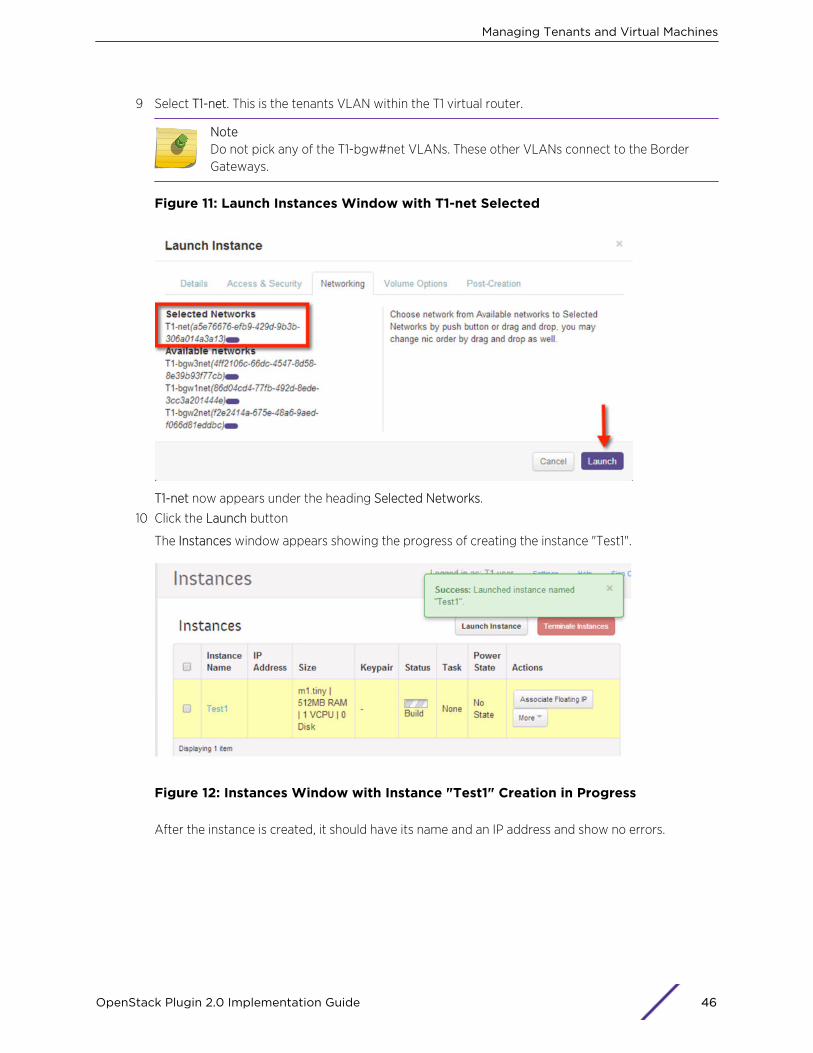
9 Select T1-net. This is the tenants VLAN within the T1 virtual router.
NoteDo not pick any of the T1-bgw#net VLANs. These other VLANs connect to the BorderGateways.
Figure 11: Launch Instances Window with T1-net Selected
T1-net now appears under the heading Selected Networks.
10 Click the Launch button
The Instances window appears showing the progress of creating the instance "Test1".
Figure 12: Instances Window with Instance "Test1" Creation in Progress
After the instance is created, it should have its name and an IP address and show no errors.
Managing Tenants and Virtual Machines
OpenStack Plugin 2.0 Implementation Guide 46
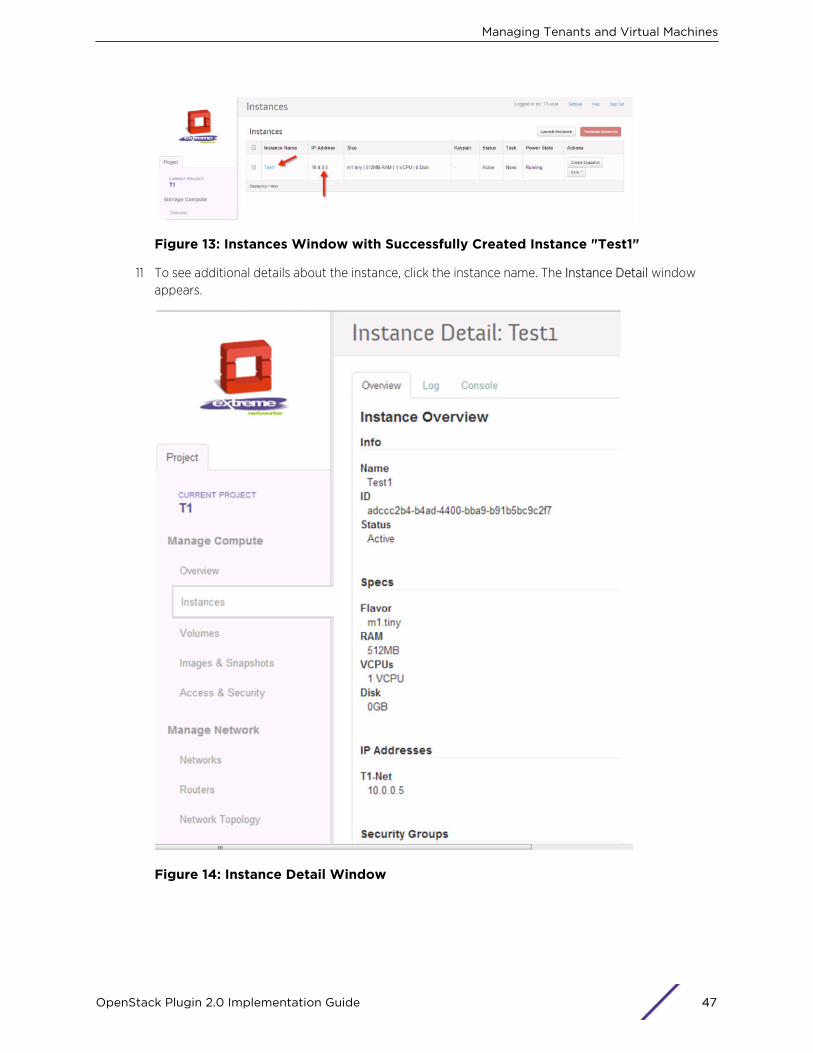
Figure 13: Instances Window with Successfully Created Instance "Test1"
11 To see additional details about the instance, click the instance name. The Instance Detail windowappears.
Figure 14: Instance Detail Window
Managing Tenants and Virtual Machines
OpenStack Plugin 2.0 Implementation Guide 47

12 Click the Console tab. The Instance Console window appears.
Figure 15: Instance Console Window
NoteIf the screen does not respond, click the gray status bar.
The VM has an IP address within the T1-net and can use the T1-virtual router and its VLANs to accessInternet.
Migrating Tenant Virtual Machine Instances (Live Migration)
A running VM instance can be migrated to a new server without any interruption to the users. Themigration command can only be done from the controller using the nova API.
NoteVM migration is only supported between servers with compatible chipsets only.
The following procedure below explains how to migrate the tenant1 VM instance t1Server1 createdearlier from OSHost1 to OSHost2 (see Creating Tenant Virtual Machine Instances on page 43).
1 Authenticate as a user “admin” of tenant “tenant1” by creating a credential file and sourcing it:
vi creds_tenant1 #Paste the following:export OS_TENANT_NAME=tenant1export OS_USERNAME=adminexport OS_PASSWORD=admin_passexport OS_AUTH_URL="http://192.168.50.170:5000/v2.0/" # Load it:source creds_tenant1
2 List all VM instances of this tenant to make sure the intended instance exists.
stack@OSController$ nova list
3 Perform the live migration.
OSController> nova live-migration t1Server1 OSHost2
Managing Tenants and Virtual Machines
OpenStack Plugin 2.0 Implementation Guide 48
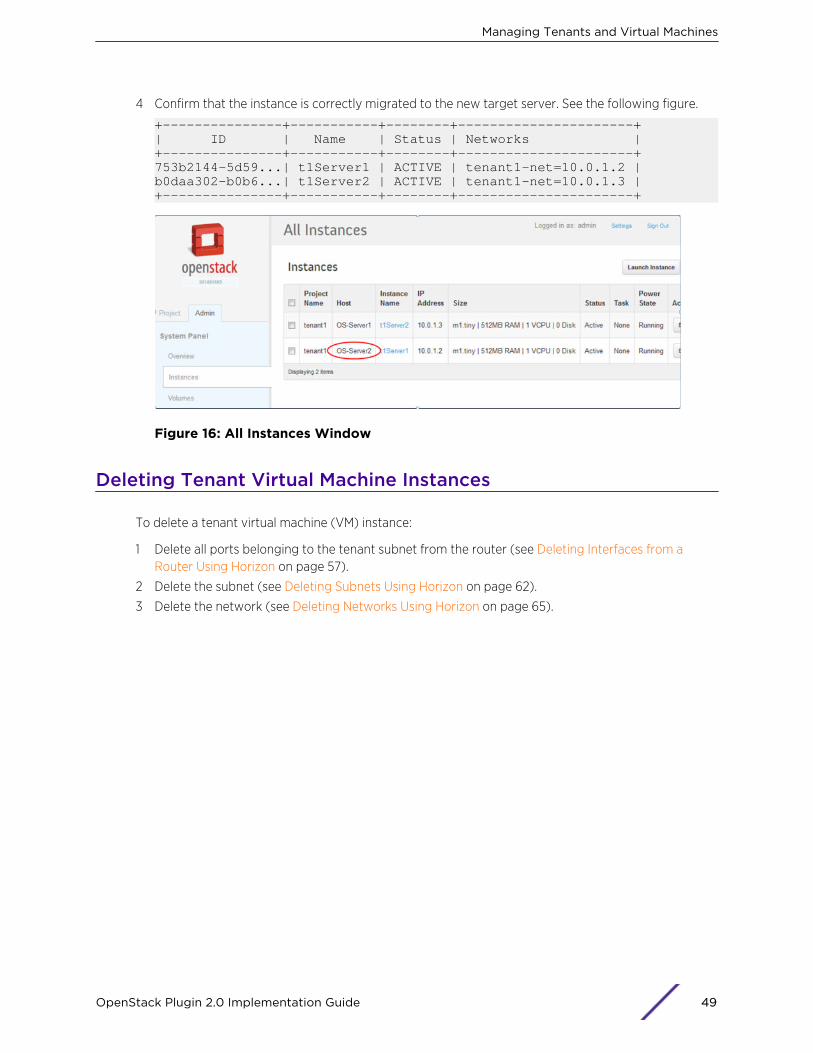
4 Confirm that the instance is correctly migrated to the new target server. See the following figure.
+---------------+-----------+--------+----------------------+| ID | Name | Status | Networks |+---------------+-----------+--------+----------------------+753b2144-5d59...| t1Server1 | ACTIVE | tenant1-net=10.0.1.2 |b0daa302-b0b6...| t1Server2 | ACTIVE | tenant1-net=10.0.1.3 |+---------------+-----------+--------+----------------------+
Figure 16: All Instances Window
Deleting Tenant Virtual Machine Instances
To delete a tenant virtual machine (VM) instance:
1 Delete all ports belonging to the tenant subnet from the router (see Deleting Interfaces from aRouter Using Horizon on page 57).
2 Delete the subnet (see Deleting Subnets Using Horizon on page 62).
3 Delete the network (see Deleting Networks Using Horizon on page 65).
Managing Tenants and Virtual Machines
OpenStack Plugin 2.0 Implementation Guide 49

8 Deleting OpenStack Items
Deleting Instances, Subnets, Networks, Tenants, and UsersPreparing for REST API CallsTerminating InstancesDisabling DHCPDeleting Interfaces from a RouterDeleting RoutersDeleting SubnetsDeleting NetworksDeleting TenantsDeleting Users
Deleting Instances, Subnets, Networks, Tenants, and Users
The use of the Extreme Networks OpenStack Plugin 2.0 precludes default deletion of certain tenantconfigurations through the Horizon GUI or OpenStack command line interface. This section describeshow to delete ports, interfaces, subnets, networks, tenants, and users using the REST API, as well aswith the Horizon GUI and OpenStack CLI, when applicable.
NoteInstructions are for any single tenant.
NoteSteps 1–6 require tenant credentials; steps 7 and 8 require administrator credentials.
To completely delete a fully functional VR-based tenant:
1 If any instances are running, terminate them.
• Terminating Instances Using Horizon on page 52
• Terminating Instances Using the Command Line Interface on page 52
• Terminating Instances Using REST API on page 53
2 If DHCP is enabled on any of the subnets, disable DHCP.
• Disabling DHCP Using Horizon on page 54
• Disabling DHCP Using the Command Line Interface on page 56
• Disabling DHCP Using REST API on page 56
3 Under the router, delete all of the interfaces for each subnet.
• Deleting Interfaces from a Router Using Horizon on page 57
• Deleting Interfaces from a Router Using the Command Line Interface on page 59
• Deleting Interfaces from a Router Using the REST API on page 59
OpenStack Plugin 2.0 Implementation Guide 50
4 Delete routers.
• Deleting Routers Using the Command Line Interface on page 61
• Deleting Routers Using the REST API on page 61
5 Delete subnets.
• Deleting Subnets Using Horizon on page 62
• Deleting Subnets Using the Command Line Interface on page 63
• Deleting Subnets Using REST API on page 64
6 Delete networks.
• Deleting Networks Using Horizon on page 65
• Deleting Networks Using the Command Line Interface on page 65
• Deleting Networks Using REST API on page 66
7 Delete tenants.
• Deleting Tenants Using Horizon on page 67
• Deleting Tenants Using the Command Line Interface on page 68
• Deleting Tenants Using REST API on page 69
8 Delete users.
• Deleting Users Using Horizon on page 69
• Deleting Users Using the Command Line Interface on page 70
• Deleting Users Using the REST API on page 71
Preparing for REST API Calls
Some deletions are only possible using the REST API only. OpenStack API uses token authentication formost of the commands.
The following is the script and instructions to generate a token and store it as an environment variablefor the session.
Create a gettoken.py python script on the controller:
#!/usr/bin/python import httplib import json import sys url = "%s:5000" % sys.argv[1] params = '{"auth": {"tenantName": "%s", "passwordCredentials": {"username": "%s", "password": "%s"}}}' % (sys.argv[4] ,sys.argv[2],sys.argv[3]) headers = {"Content-Type": "application/json"} # HTTP connection conn = httplib.HTTPConnection(url) conn.request("POST", "/v2.0/tokens", params, headers) # HTTP response response = conn.getresponse() data = response.read() dd = json.loads(data) conn.close() apitoken = dd['access']['token']['id'] print "%s" % apitoken
Deleting OpenStack Items
OpenStack Plugin 2.0 Implementation Guide 51
Execute the script to store the token as:
TOKEN=$(python gettoken.py controller_ip username password tenant_name)
Where:
• controller_ip = the IP address of the controller.
NoteIf executed on the controller, you may use localhost or 127.0.0.1.
• username = user name that the token is generated under
• password = password for the user
• tenant_name = name of the tenant (default for the admin user is admin)
Terminating Instances
Terminating Instances Using Horizon
To terminate an instance using Horizon:
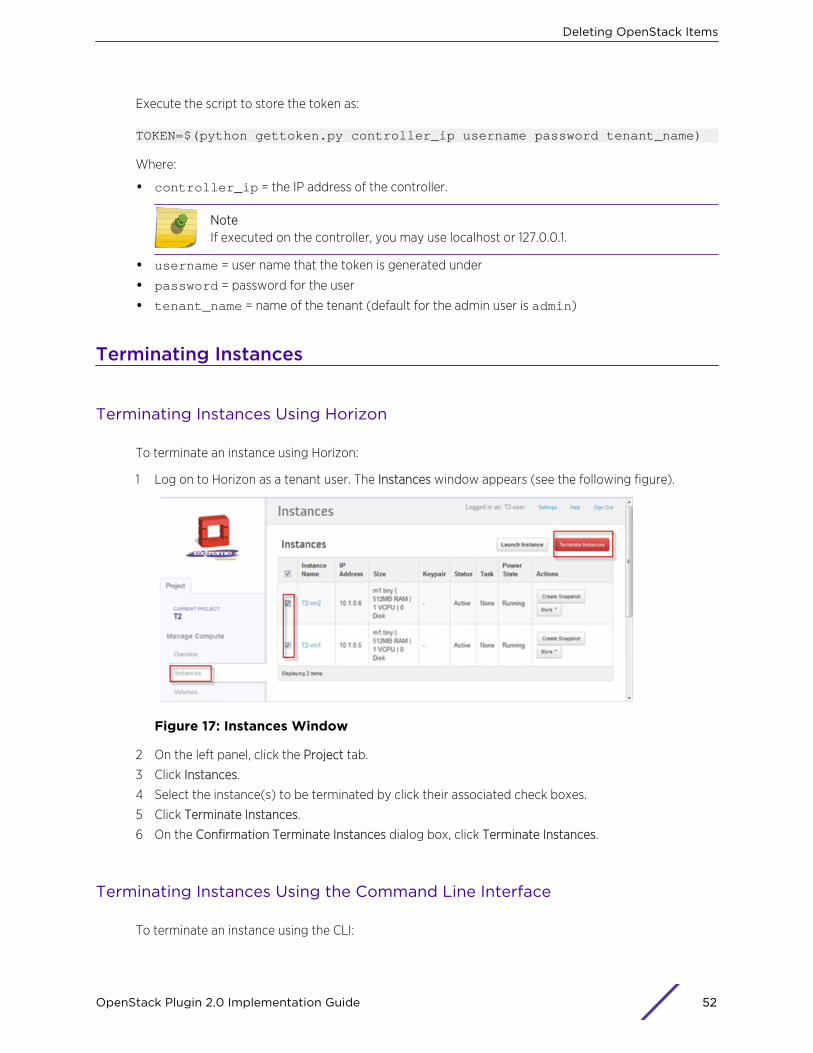
1 Log on to Horizon as a tenant user. The Instances window appears (see the following figure).
Figure 17: Instances Window
2 On the left panel, click the Project tab.
3 Click Instances.
4 Select the instance(s) to be terminated by click their associated check boxes.
5 Click Terminate Instances.
6 On the Confirmation Terminate Instances dialog box, click Terminate Instances.
Terminating Instances Using the Command Line Interface
To terminate an instance using the CLI:
Deleting OpenStack Items
OpenStack Plugin 2.0 Implementation Guide 52
1 Log in as a tenant user by creating a credential file and sourcing it:
vi creds_tenant2 #Paste the following:export OS_TENANT_NAME=T2export OS_USERNAME=T2-userexport OS_PASSWORD=admin_passexport OS_AUTH_URL="http://192.168.50.170:5000/v2.0/" # Load it:source creds_tenant2
2 List instances using the command nova list:
stack@OSController:~$ nova list+---------+--------+--------+------+---------+---------------------+ ID | Name | Status | Task | Power | Networks | | State| State | |+---------+--------+--------+------+---------+---------------------+514c3a... | T2-vm1 | ACTIVE | None | Running | T2-int-net=10.1.0.5 |8d84cc... | T2-vm2 | ACTIVE | None | Running | T2-int-net=10.1.0.6 |+---------+--------+--------+------+---------+---------------------+
3 Copy the ID of the instance that you want to terminate, and issue the command nova deleteinstance_id:
stack@OSController:~$ nova delete 8d84cc42-4d1b-4d14-ac46-e7733edbdc24
4 Confirm the termination by issuing the nova list command again:
stack@OSController:~$ nova list +---------+--------+--------+------+---------+---------------------+ ID | Name | Status | Task | Power | Networks | | State| State | |+---------+--------+--------+------+---------+---------------------+514c3a... | T2-vm1 | ACTIVE | None | Running | T2-int-net=10.1.0.5 |+---------+--------+--------+------+---------+---------------------+
Terminating Instances Using REST API
To terminate an instance using REST API:
1 Generate the token using tenant credentials:
stack@OSController:TOKEN=$(python gettoken.py localhost T2-user nova123 T2)
2 Get the tenant ID:
stack@OSController:~$ curl -i http://localhost:5000/v2.0/tenants -X GET -H "X-Auth-Token: $TOKEN" -H "Content-Type: application/json" -H "Accept: application/json" HTTP/1.1 200 OK Vary: X-Auth-Token Content-Type: application/json Content-Length: 142 Date: Tue, 11 Feb 2014 19:51:25 GMT {"tenants_links": [], "tenants": [{"description": "T2 description", "enabled": true, "id": "3c53bb6bb8de4ce080b3e5079fbcc112", "name": "T2"}]}
Deleting OpenStack Items
OpenStack Plugin 2.0 Implementation Guide 53
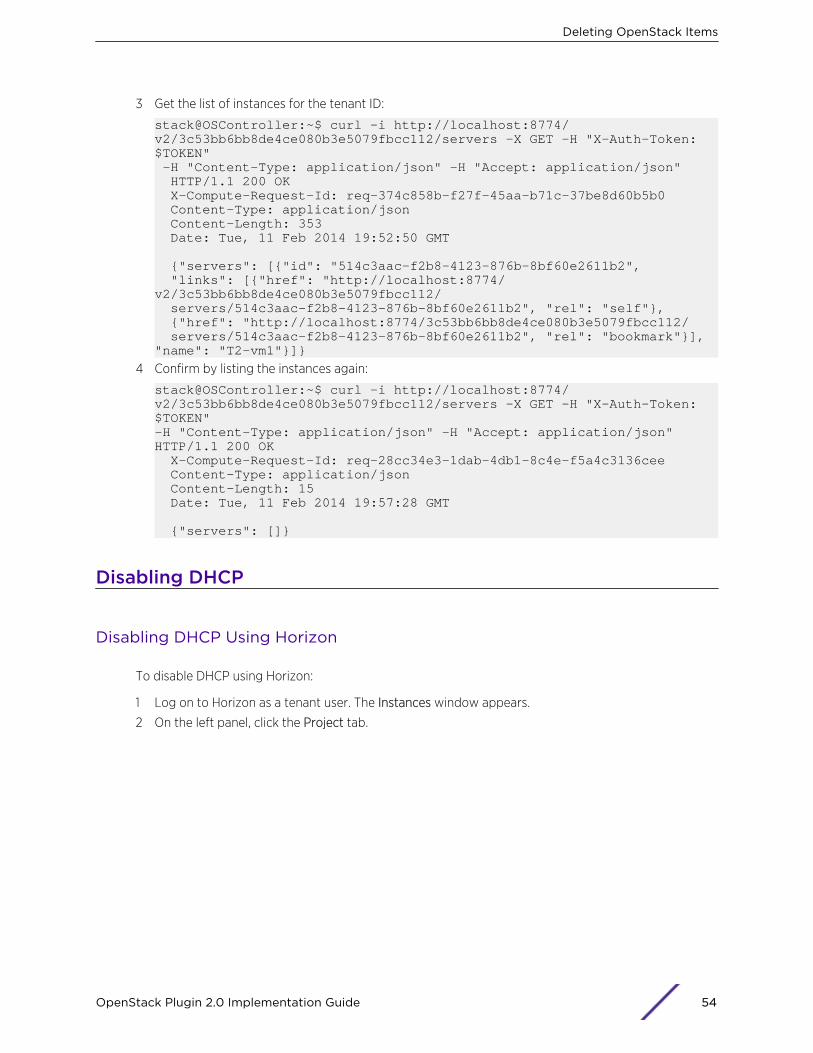
3 Get the list of instances for the tenant ID:
stack@OSController:~$ curl -i http://localhost:8774/v2/3c53bb6bb8de4ce080b3e5079fbcc112/servers -X GET -H "X-Auth-Token: $TOKEN" -H "Content-Type: application/json" -H "Accept: application/json" HTTP/1.1 200 OK X-Compute-Request-Id: req-374c858b-f27f-45aa-b71c-37be8d60b5b0 Content-Type: application/json Content-Length: 353 Date: Tue, 11 Feb 2014 19:52:50 GMT {"servers": [{"id": "514c3aac-f2b8-4123-876b-8bf60e2611b2", "links": [{"href": "http://localhost:8774/v2/3c53bb6bb8de4ce080b3e5079fbcc112/ servers/514c3aac-f2b8-4123-876b-8bf60e2611b2", "rel": "self"}, {"href": "http://localhost:8774/3c53bb6bb8de4ce080b3e5079fbcc112/ servers/514c3aac-f2b8-4123-876b-8bf60e2611b2", "rel": "bookmark"}], "name": "T2-vm1"}]}
4 Confirm by listing the instances again:
stack@OSController:~$ curl -i http://localhost:8774/v2/3c53bb6bb8de4ce080b3e5079fbcc112/servers -X GET -H "X-Auth-Token: $TOKEN" -H "Content-Type: application/json" -H "Accept: application/json" HTTP/1.1 200 OK X-Compute-Request-Id: req-28cc34e3-1dab-4db1-8c4e-f5a4c3136cee Content-Type: application/json Content-Length: 15 Date: Tue, 11 Feb 2014 19:57:28 GMT {"servers": []}
Disabling DHCP
Disabling DHCP Using Horizon
To disable DHCP using Horizon:
1 Log on to Horizon as a tenant user. The Instances window appears.
2 On the left panel, click the Project tab.
Deleting OpenStack Items
OpenStack Plugin 2.0 Implementation Guide 54
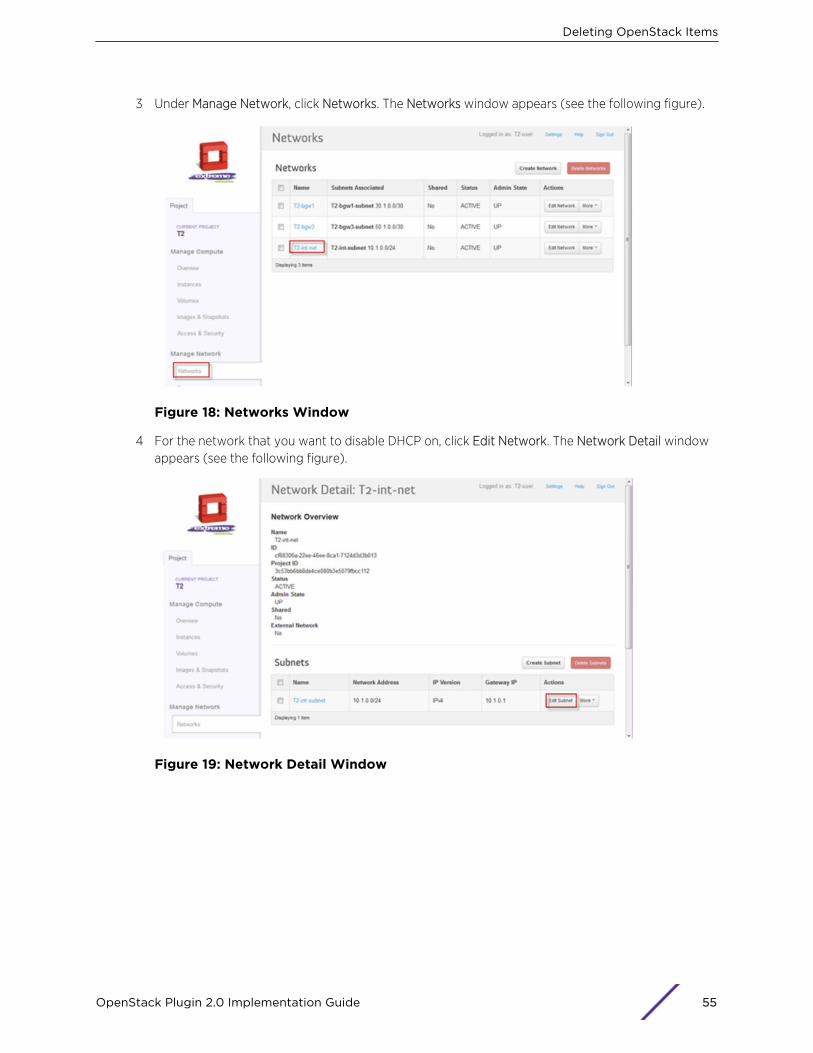
3 Under Manage Network, click Networks. The Networks window appears (see the following figure).
Figure 18: Networks Window
4 For the network that you want to disable DHCP on, click Edit Network. The Network Detail windowappears (see the following figure).
Figure 19: Network Detail Window
Deleting OpenStack Items
OpenStack Plugin 2.0 Implementation Guide 55
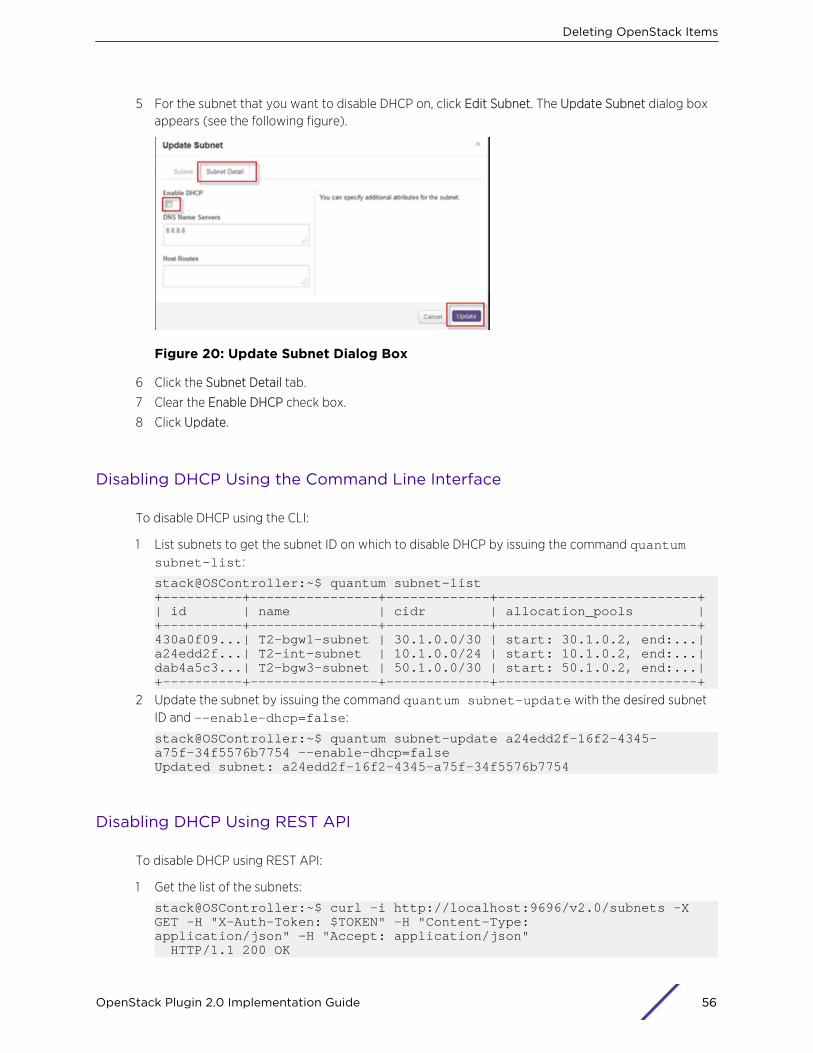
5 For the subnet that you want to disable DHCP on, click Edit Subnet. The Update Subnet dialog boxappears (see the following figure).
Figure 20: Update Subnet Dialog Box
6 Click the Subnet Detail tab.
7 Clear the Enable DHCP check box.
8 Click Update.
Disabling DHCP Using the Command Line Interface
To disable DHCP using the CLI:
1 List subnets to get the subnet ID on which to disable DHCP by issuing the command quantumsubnet-list:
stack@OSController:~$ quantum subnet-list+----------+----------------+-------------+-------------------------+| id | name | cidr | allocation_pools |+----------+----------------+-------------+-------------------------+430a0f09...| T2-bgw1-subnet | 30.1.0.0/30 | start: 30.1.0.2, end:...|a24edd2f...| T2-int-subnet | 10.1.0.0/24 | start: 10.1.0.2, end:...|dab4a5c3...| T2-bgw3-subnet | 50.1.0.0/30 | start: 50.1.0.2, end:...|+----------+----------------+-------------+-------------------------+
2 Update the subnet by issuing the command quantum subnet-update with the desired subnetID and --enable-dhcp=false:
stack@OSController:~$ quantum subnet-update a24edd2f-16f2-4345-a75f-34f5576b7754 --enable-dhcp=falseUpdated subnet: a24edd2f-16f2-4345-a75f-34f5576b7754
Disabling DHCP Using REST API
To disable DHCP using REST API:
1 Get the list of the subnets:
stack@OSController:~$ curl -i http://localhost:9696/v2.0/subnets -X GET -H "X-Auth-Token: $TOKEN" -H "Content-Type: application/json" -H "Accept: application/json" HTTP/1.1 200 OK
Deleting OpenStack Items
OpenStack Plugin 2.0 Implementation Guide 56
Content-Type: application/json; charset=UTF-8 Content-Length: 1147 Date: Tue, 11 Feb 2014 20:11:46 GMT
{"subnets": [{"name": "T2-bgw1-subnet", "enable_dhcp": false, "network_id": "2265c8eb-805b-4753-9549-f65646e239a7", "tenant_id": "3c53bb6bb8de4ce080b3e5079fbcc112", "dns_nameservers": ["8.8.8.8"], "allocation_pools": [{"start": "30.1.0.2", "end": "30.1.0.2"}], "host_routes": [], "ip_version": 4, "gateway_ip": null, "cidr": "30.1.0.0/30", "id": "430a0f09-d50e-4642-b41c-62452ec0983b"}, {"name": "T2-int-subnet", "enable_dhcp": true, "network_id": "cf88306a-22ee-46ee-8ca1-7124d3d3b013", "tenant_id": "3c53bb6bb8de4ce080b3e5079fbcc112", "dns_nameservers": ["8.8.8.8"], "allocation_pools": [{"start": "10.1.0.2", "end": "10.1.0.254"}], "host_routes": [], "ip_version": 4, "gateway_ip": "10.1.0.1", "cidr": "10.1.0.0/24", "id": "a24edd2f-16f2-4345-a75f-34f5576b7754"}, {"name": "T2-bgw3-subnet", "enable_dhcp": false, "network_id": "8447d9d7-88b4-4463-b4a7-39c4ee53a49a", "tenant_id": "3c53bb6bb8de4ce080b3e5079fbcc112", "dns_nameservers": ["8.8.8.8"], "allocation_pools": [{"start": "50.1.0.2", "end": "50.1.0.2"}], "host_routes": [], "ip_version": 4, "gateway_ip": "50.1.0.1", "cidr": "50.1.0.0/30", "id": "dab4a5c3-d121-437f-add9-c9e3f5a1bac9"}]}
2 For the subnets that have enable_dhcp: true, copy the ID and use PUT to update the body of{“subnet”:{“enable_dhcp”:false}}:
stack@OSController:~$ curl -i http://localhost:9696/v2.0/subnets/a24edd2f-16f2-4345-a75f-34f5576b7754 -X PUT -H "X-Auth-Token: $TOKEN" -H "Content-Type: application/json" -H "Accept: application/json" <spanstyle="color:#FF0000;">-d '{"subnet":{"enable_dhcp":false}}'</span> HTTP/1.1 200 OK Content-Type: application/json; charset=UTF-8 Content-Length: 391 Date: Tue, 11 Feb 2014 20:26:43 GMT {"subnet": {"name": "T2-int-subnet", "enable_dhcp": false, "network_id": "cf88306a-22ee-46ee-8ca1-7124d3d3b013", "tenant_id": "3c53bb6bb8de4ce080b3e5079fbcc112", "dns_nameservers": ["8.8.8.8"], "allocation_pools": [{"start": "10.1.0.2", "end": "10.1.0.254"}], "host_routes": [], "ip_version": 4, "gateway_ip": "10.1.0.1", "cidr": "10.1.0.0/24", "id": "a24edd2f-16f2-4345-a75f-34f5576b7754"}}
Deleting Interfaces from a Router
Deleting Interfaces from a Router Using HorizonTo delete interfaces from a router using Horizon:
1 Log on to Horizon as a tenant user. The Instances window appears.
2 On the left panel, click the Project tab.
Deleting OpenStack Items
OpenStack Plugin 2.0 Implementation Guide 57

3 Under Manage Network, click Routers. The Routers window appears (see the following figure).
Figure 21: Routers Window
4 Under the Name column, click desired router's name. The Routers Details window appears (see thefollowing figure).
Figure 22: Router Details Window
Deleting OpenStack Items
OpenStack Plugin 2.0 Implementation Guide 58
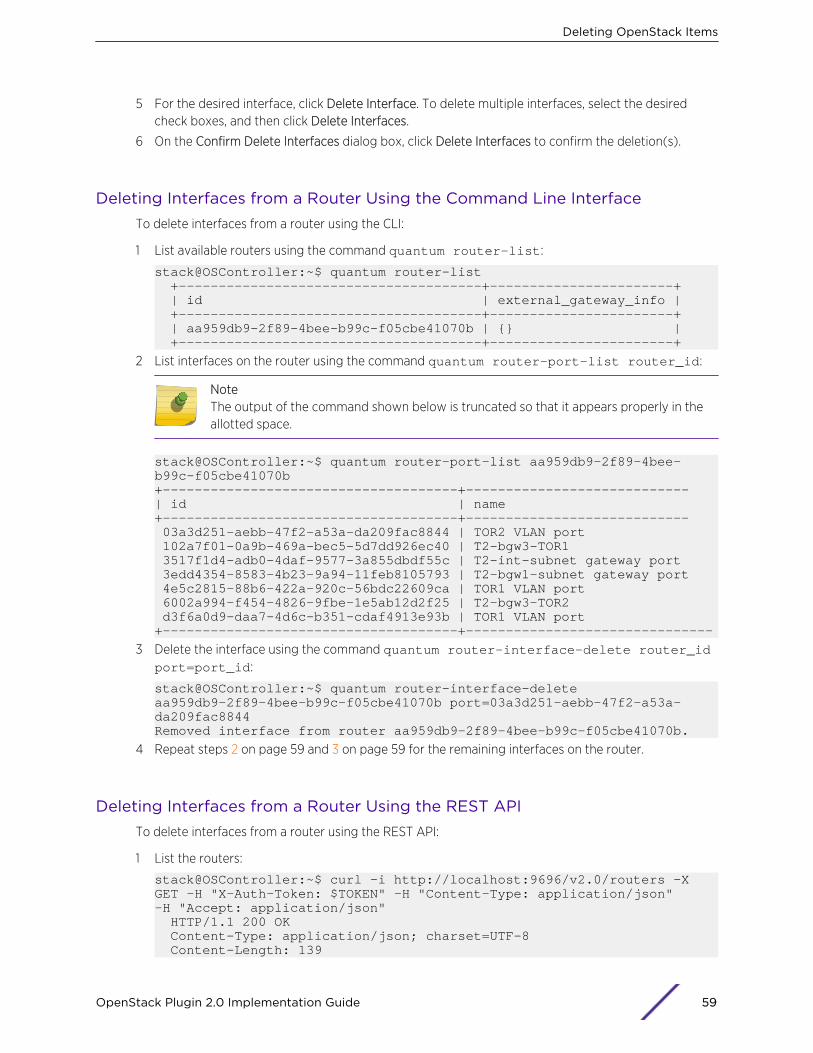
5 For the desired interface, click Delete Interface. To delete multiple interfaces, select the desiredcheck boxes, and then click Delete Interfaces.
6 On the Confirm Delete Interfaces dialog box, click Delete Interfaces to confirm the deletion(s).
Deleting Interfaces from a Router Using the Command Line InterfaceTo delete interfaces from a router using the CLI:
1 List available routers using the command quantum router-list:
stack@OSController:~$ quantum router-list +--------------------------------------+-----------------------+ | id | external_gateway_info | +--------------------------------------+-----------------------+ | aa959db9-2f89-4bee-b99c-f05cbe41070b | {} | +--------------------------------------+-----------------------+
2 List interfaces on the router using the command quantum router-port-list router_id:
NoteThe output of the command shown below is truncated so that it appears properly in theallotted space.
stack@OSController:~$ quantum router-port-list aa959db9-2f89-4bee-b99c-f05cbe41070b+-------------------------------------+----------------------------| id | name +-------------------------------------+---------------------------- 03a3d251-aebb-47f2-a53a-da209fac8844 | TOR2 VLAN port 102a7f01-0a9b-469a-bec5-5d7dd926ec40 | T2-bgw3-TOR1 3517f1d4-adb0-4daf-9577-3a855dbdf55c | T2-int-subnet gateway port 3edd4354-8583-4b23-9a94-11feb8105793 | T2-bgw1-subnet gateway port 4e5c2815-88b6-422a-920c-56bdc22609ca | TOR1 VLAN port 6002a994-f454-4826-9fbe-1e5ab12d2f25 | T2-bgw3-TOR2 d3f6a0d9-daa7-4d6c-b351-cdaf4913e93b | TOR1 VLAN port +-------------------------------------+-------------------------------
3 Delete the interface using the command quantum router-interface-delete router_idport=port_id:
stack@OSController:~$ quantum router-interface-delete aa959db9-2f89-4bee-b99c-f05cbe41070b port=03a3d251-aebb-47f2-a53a-da209fac8844Removed interface from router aa959db9-2f89-4bee-b99c-f05cbe41070b.
4 Repeat steps 2 on page 59 and 3 on page 59 for the remaining interfaces on the router.
Deleting Interfaces from a Router Using the REST APITo delete interfaces from a router using the REST API:
1 List the routers:
stack@OSController:~$ curl -i http://localhost:9696/v2.0/routers -X GET -H "X-Auth-Token: $TOKEN" -H "Content-Type: application/json" -H "Accept: application/json" HTTP/1.1 200 OK Content-Type: application/json; charset=UTF-8 Content-Length: 139
Deleting OpenStack Items
OpenStack Plugin 2.0 Implementation Guide 59
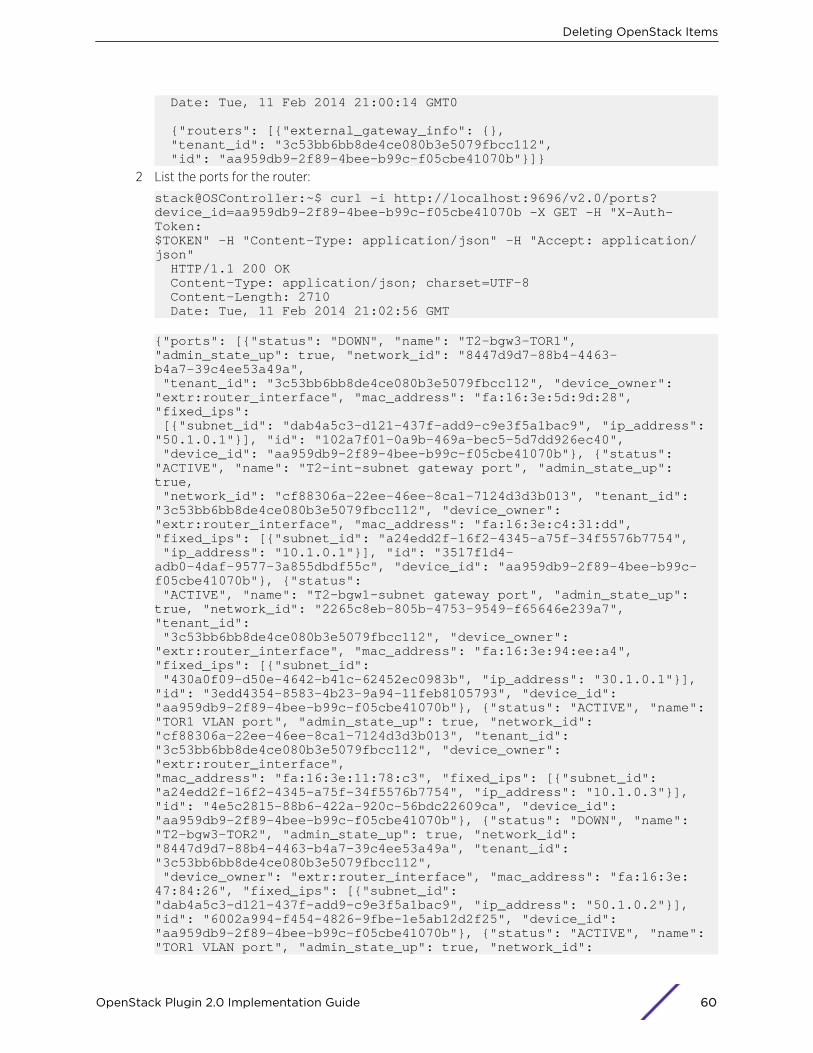
Date: Tue, 11 Feb 2014 21:00:14 GMT0 {"routers": [{"external_gateway_info": {}, "tenant_id": "3c53bb6bb8de4ce080b3e5079fbcc112", "id": "aa959db9-2f89-4bee-b99c-f05cbe41070b"}]}
2 List the ports for the router:
stack@OSController:~$ curl -i http://localhost:9696/v2.0/ports?device_id=aa959db9-2f89-4bee-b99c-f05cbe41070b -X GET -H "X-Auth-Token: $TOKEN" -H "Content-Type: application/json" -H "Accept: application/json" HTTP/1.1 200 OK Content-Type: application/json; charset=UTF-8 Content-Length: 2710 Date: Tue, 11 Feb 2014 21:02:56 GMT
{"ports": [{"status": "DOWN", "name": "T2-bgw3-TOR1", "admin_state_up": true, "network_id": "8447d9d7-88b4-4463-b4a7-39c4ee53a49a", "tenant_id": "3c53bb6bb8de4ce080b3e5079fbcc112", "device_owner": "extr:router_interface", "mac_address": "fa:16:3e:5d:9d:28", "fixed_ips": [{"subnet_id": "dab4a5c3-d121-437f-add9-c9e3f5a1bac9", "ip_address": "50.1.0.1"}], "id": "102a7f01-0a9b-469a-bec5-5d7dd926ec40", "device_id": "aa959db9-2f89-4bee-b99c-f05cbe41070b"}, {"status": "ACTIVE", "name": "T2-int-subnet gateway port", "admin_state_up": true, "network_id": "cf88306a-22ee-46ee-8ca1-7124d3d3b013", "tenant_id": "3c53bb6bb8de4ce080b3e5079fbcc112", "device_owner": "extr:router_interface", "mac_address": "fa:16:3e:c4:31:dd", "fixed_ips": [{"subnet_id": "a24edd2f-16f2-4345-a75f-34f5576b7754", "ip_address": "10.1.0.1"}], "id": "3517f1d4-adb0-4daf-9577-3a855dbdf55c", "device_id": "aa959db9-2f89-4bee-b99c-f05cbe41070b"}, {"status": "ACTIVE", "name": "T2-bgw1-subnet gateway port", "admin_state_up": true, "network_id": "2265c8eb-805b-4753-9549-f65646e239a7", "tenant_id": "3c53bb6bb8de4ce080b3e5079fbcc112", "device_owner": "extr:router_interface", "mac_address": "fa:16:3e:94:ee:a4", "fixed_ips": [{"subnet_id": "430a0f09-d50e-4642-b41c-62452ec0983b", "ip_address": "30.1.0.1"}], "id": "3edd4354-8583-4b23-9a94-11feb8105793", "device_id": "aa959db9-2f89-4bee-b99c-f05cbe41070b"}, {"status": "ACTIVE", "name": "TOR1 VLAN port", "admin_state_up": true, "network_id": "cf88306a-22ee-46ee-8ca1-7124d3d3b013", "tenant_id": "3c53bb6bb8de4ce080b3e5079fbcc112", "device_owner": "extr:router_interface", "mac_address": "fa:16:3e:11:78:c3", "fixed_ips": [{"subnet_id": "a24edd2f-16f2-4345-a75f-34f5576b7754", "ip_address": "10.1.0.3"}], "id": "4e5c2815-88b6-422a-920c-56bdc22609ca", "device_id": "aa959db9-2f89-4bee-b99c-f05cbe41070b"}, {"status": "DOWN", "name": "T2-bgw3-TOR2", "admin_state_up": true, "network_id": "8447d9d7-88b4-4463-b4a7-39c4ee53a49a", "tenant_id": "3c53bb6bb8de4ce080b3e5079fbcc112", "device_owner": "extr:router_interface", "mac_address": "fa:16:3e:47:84:26", "fixed_ips": [{"subnet_id": "dab4a5c3-d121-437f-add9-c9e3f5a1bac9", "ip_address": "50.1.0.2"}], "id": "6002a994-f454-4826-9fbe-1e5ab12d2f25", "device_id": "aa959db9-2f89-4bee-b99c-f05cbe41070b"}, {"status": "ACTIVE", "name": "TOR1 VLAN port", "admin_state_up": true, "network_id":
Deleting OpenStack Items
OpenStack Plugin 2.0 Implementation Guide 60
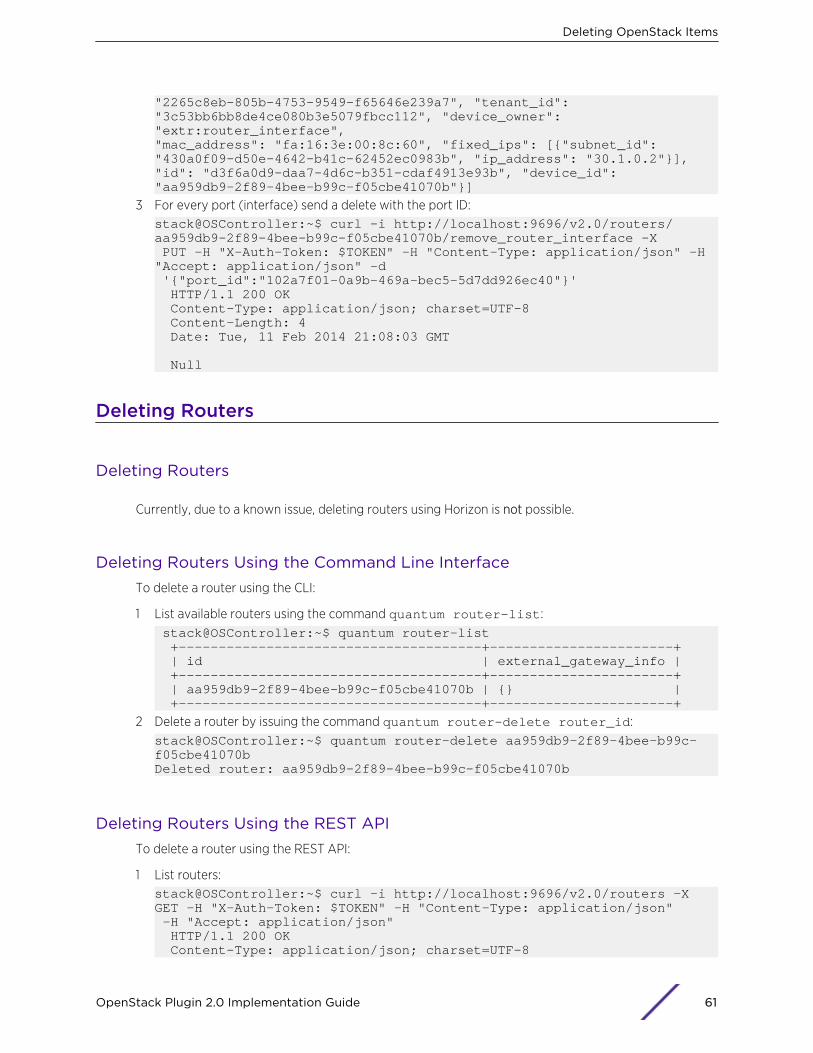
"2265c8eb-805b-4753-9549-f65646e239a7", "tenant_id": "3c53bb6bb8de4ce080b3e5079fbcc112", "device_owner": "extr:router_interface", "mac_address": "fa:16:3e:00:8c:60", "fixed_ips": [{"subnet_id": "430a0f09-d50e-4642-b41c-62452ec0983b", "ip_address": "30.1.0.2"}], "id": "d3f6a0d9-daa7-4d6c-b351-cdaf4913e93b", "device_id": "aa959db9-2f89-4bee-b99c-f05cbe41070b"}]
3 For every port (interface) send a delete with the port ID:stack@OSController:~$ curl -i http://localhost:9696/v2.0/routers/aa959db9-2f89-4bee-b99c-f05cbe41070b/remove_router_interface -X PUT -H "X-Auth-Token: $TOKEN" -H "Content-Type: application/json" -H "Accept: application/json" -d '{"port_id":"102a7f01-0a9b-469a-bec5-5d7dd926ec40"}' HTTP/1.1 200 OK Content-Type: application/json; charset=UTF-8 Content-Length: 4 Date: Tue, 11 Feb 2014 21:08:03 GMT Null
Deleting Routers
Deleting Routers
Currently, due to a known issue, deleting routers using Horizon is not possible.
Deleting Routers Using the Command Line InterfaceTo delete a router using the CLI:
1 List available routers using the command quantum router-list: stack@OSController:~$ quantum router-list +--------------------------------------+-----------------------+ | id | external_gateway_info | +--------------------------------------+-----------------------+ | aa959db9-2f89-4bee-b99c-f05cbe41070b | {} | +--------------------------------------+-----------------------+
2 Delete a router by issuing the command quantum router-delete router_id:stack@OSController:~$ quantum router-delete aa959db9-2f89-4bee-b99c-f05cbe41070bDeleted router: aa959db9-2f89-4bee-b99c-f05cbe41070b
Deleting Routers Using the REST APITo delete a router using the REST API:
1 List routers:stack@OSController:~$ curl -i http://localhost:9696/v2.0/routers -X GET -H "X-Auth-Token: $TOKEN" -H "Content-Type: application/json" -H "Accept: application/json" HTTP/1.1 200 OK Content-Type: application/json; charset=UTF-8
Deleting OpenStack Items
OpenStack Plugin 2.0 Implementation Guide 61
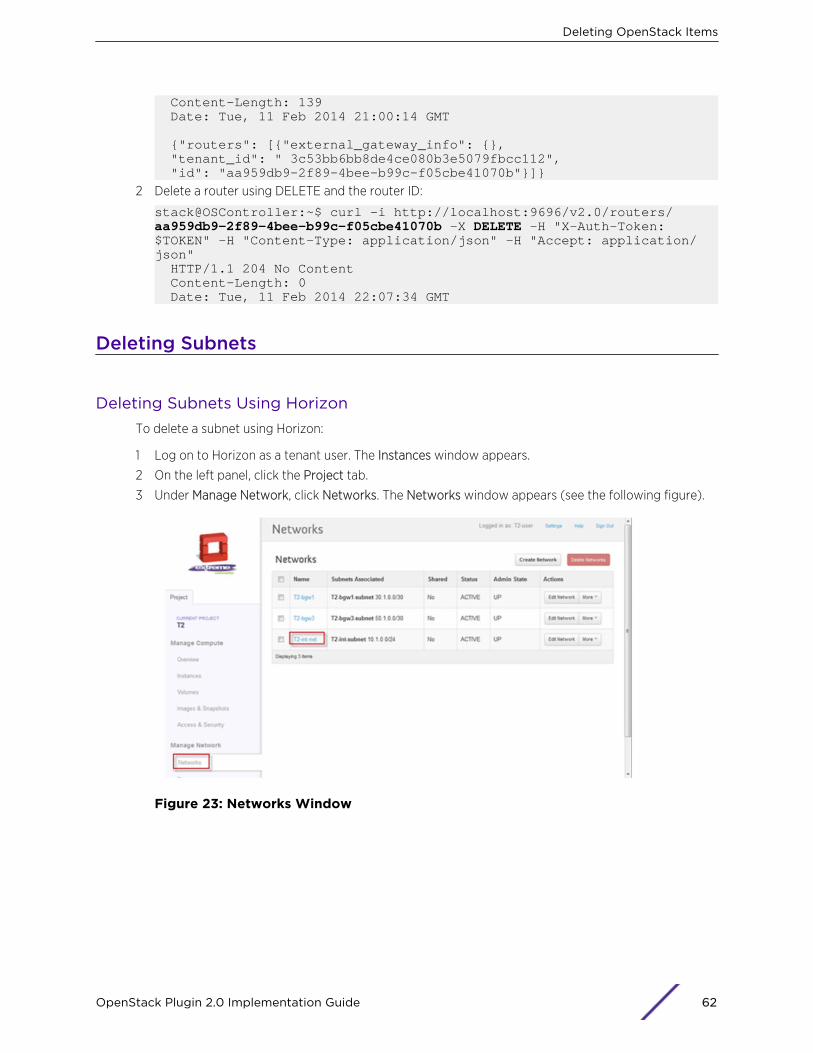
Content-Length: 139 Date: Tue, 11 Feb 2014 21:00:14 GMT {"routers": [{"external_gateway_info": {}, "tenant_id": " 3c53bb6bb8de4ce080b3e5079fbcc112", "id": "aa959db9-2f89-4bee-b99c-f05cbe41070b"}]}
2 Delete a router using DELETE and the router ID:
stack@OSController:~$ curl -i http://localhost:9696/v2.0/routers/aa959db9-2f89-4bee-b99c-f05cbe41070b -X DELETE -H "X-Auth-Token: $TOKEN" -H "Content-Type: application/json" -H "Accept: application/json" HTTP/1.1 204 No Content Content-Length: 0 Date: Tue, 11 Feb 2014 22:07:34 GMT
Deleting Subnets
Deleting Subnets Using HorizonTo delete a subnet using Horizon:
1 Log on to Horizon as a tenant user. The Instances window appears.
2 On the left panel, click the Project tab.
3 Under Manage Network, click Networks. The Networks window appears (see the following figure).
Figure 23: Networks Window
Deleting OpenStack Items
OpenStack Plugin 2.0 Implementation Guide 62
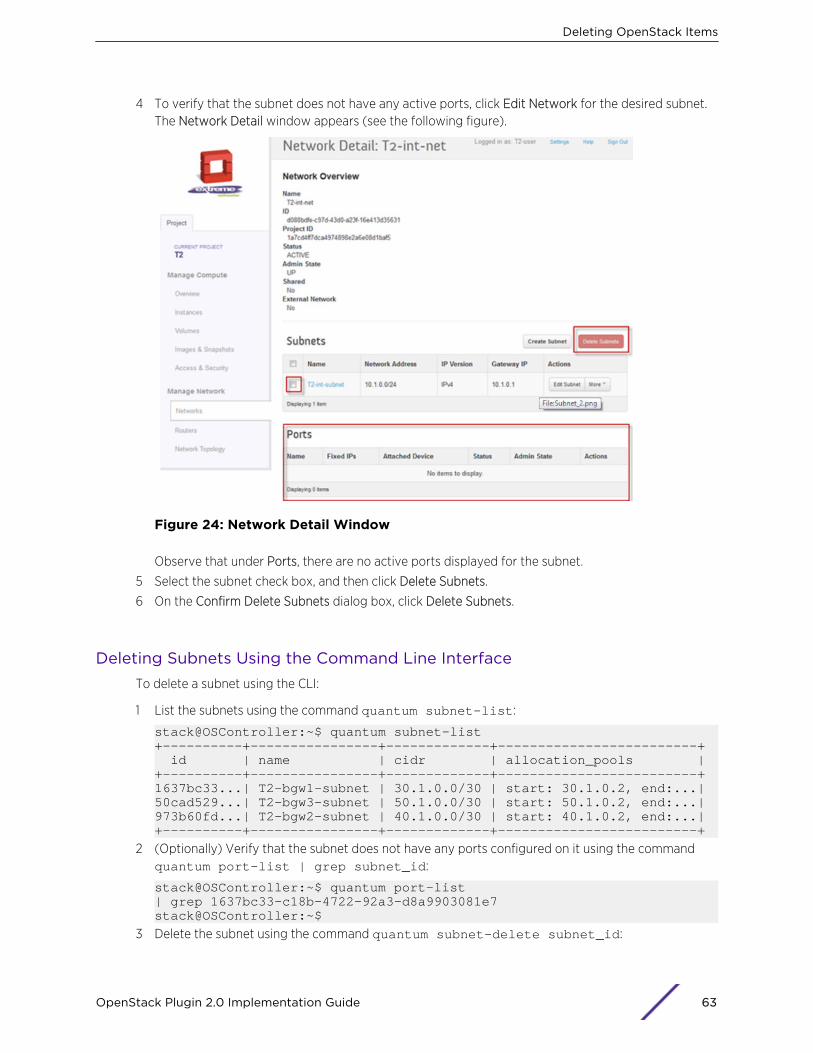
4 To verify that the subnet does not have any active ports, click Edit Network for the desired subnet.The Network Detail window appears (see the following figure).
Figure 24: Network Detail Window
Observe that under Ports, there are no active ports displayed for the subnet.
5 Select the subnet check box, and then click Delete Subnets.
6 On the Confirm Delete Subnets dialog box, click Delete Subnets.
Deleting Subnets Using the Command Line InterfaceTo delete a subnet using the CLI:
1 List the subnets using the command quantum subnet-list:
stack@OSController:~$ quantum subnet-list+----------+----------------+-------------+-------------------------+ id | name | cidr | allocation_pools |+----------+----------------+-------------+-------------------------+1637bc33...| T2-bgw1-subnet | 30.1.0.0/30 | start: 30.1.0.2, end:...|50cad529...| T2-bgw3-subnet | 50.1.0.0/30 | start: 50.1.0.2, end:...|973b60fd...| T2-bgw2-subnet | 40.1.0.0/30 | start: 40.1.0.2, end:...|+----------+----------------+-------------+-------------------------+
2 (Optionally) Verify that the subnet does not have any ports configured on it using the commandquantum port-list | grep subnet_id:
stack@OSController:~$ quantum port-list | grep 1637bc33-c18b-4722-92a3-d8a9903081e7stack@OSController:~$
3 Delete the subnet using the command quantum subnet-delete subnet_id:
Deleting OpenStack Items
OpenStack Plugin 2.0 Implementation Guide 63
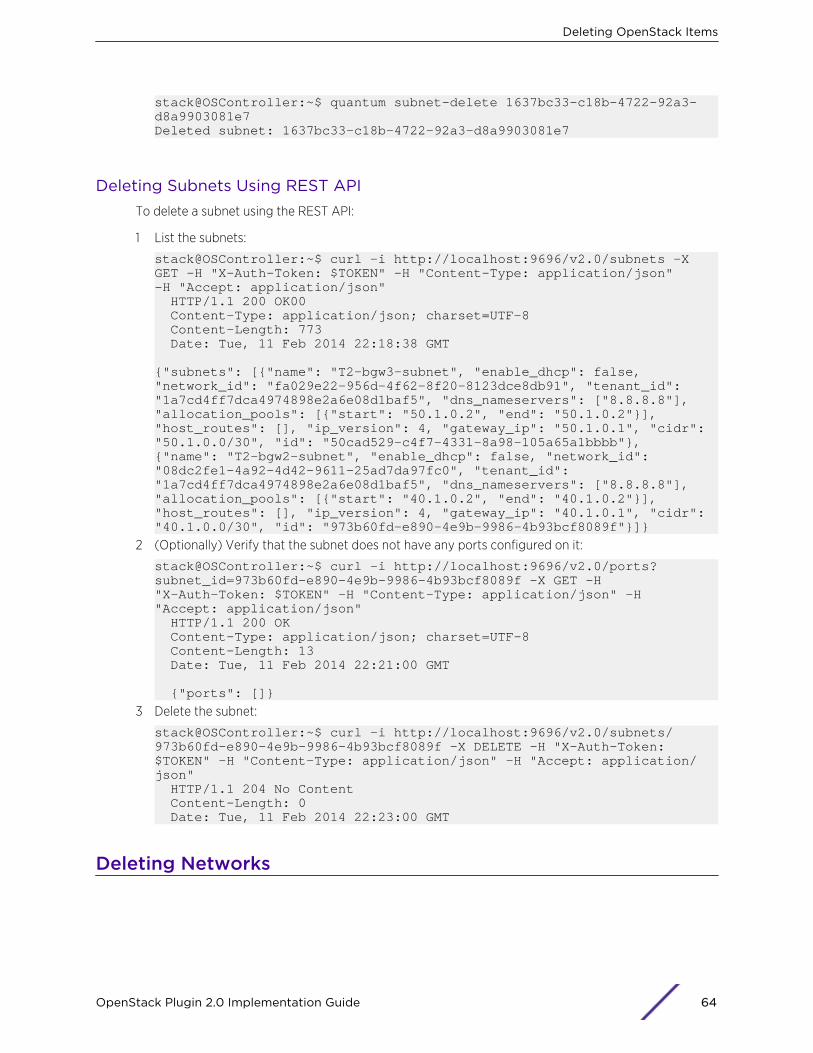
stack@OSController:~$ quantum subnet-delete 1637bc33-c18b-4722-92a3-d8a9903081e7Deleted subnet: 1637bc33-c18b-4722-92a3-d8a9903081e7
Deleting Subnets Using REST APITo delete a subnet using the REST API:
1 List the subnets:
stack@OSController:~$ curl -i http://localhost:9696/v2.0/subnets -X GET -H "X-Auth-Token: $TOKEN" -H "Content-Type: application/json" -H "Accept: application/json" HTTP/1.1 200 OK00 Content-Type: application/json; charset=UTF-8 Content-Length: 773 Date: Tue, 11 Feb 2014 22:18:38 GMT {"subnets": [{"name": "T2-bgw3-subnet", "enable_dhcp": false, "network_id": "fa029e22-956d-4f62-8f20-8123dce8db91", "tenant_id":"1a7cd4ff7dca4974898e2a6e08d1baf5", "dns_nameservers": ["8.8.8.8"], "allocation_pools": [{"start": "50.1.0.2", "end": "50.1.0.2"}], "host_routes": [], "ip_version": 4, "gateway_ip": "50.1.0.1", "cidr": "50.1.0.0/30", "id": "50cad529-c4f7-4331-8a98-105a65a1bbbb"}, {"name": "T2-bgw2-subnet", "enable_dhcp": false, "network_id": "08dc2fe1-4a92-4d42-9611-25ad7da97fc0", "tenant_id": "1a7cd4ff7dca4974898e2a6e08d1baf5", "dns_nameservers": ["8.8.8.8"], "allocation_pools": [{"start": "40.1.0.2", "end": "40.1.0.2"}], "host_routes": [], "ip_version": 4, "gateway_ip": "40.1.0.1", "cidr": "40.1.0.0/30", "id": "973b60fd-e890-4e9b-9986-4b93bcf8089f"}]}
2 (Optionally) Verify that the subnet does not have any ports configured on it:
stack@OSController:~$ curl -i http://localhost:9696/v2.0/ports?subnet_id=973b60fd-e890-4e9b-9986-4b93bcf8089f -X GET -H "X-Auth-Token: $TOKEN" -H "Content-Type: application/json" -H "Accept: application/json" HTTP/1.1 200 OK Content-Type: application/json; charset=UTF-8 Content-Length: 13 Date: Tue, 11 Feb 2014 22:21:00 GMT {"ports": []}
3 Delete the subnet:
stack@OSController:~$ curl -i http://localhost:9696/v2.0/subnets/973b60fd-e890-4e9b-9986-4b93bcf8089f -X DELETE -H "X-Auth-Token: $TOKEN" -H "Content-Type: application/json" -H "Accept: application/json" HTTP/1.1 204 No Content Content-Length: 0 Date: Tue, 11 Feb 2014 22:23:00 GMT
Deleting Networks
Deleting OpenStack Items
OpenStack Plugin 2.0 Implementation Guide 64
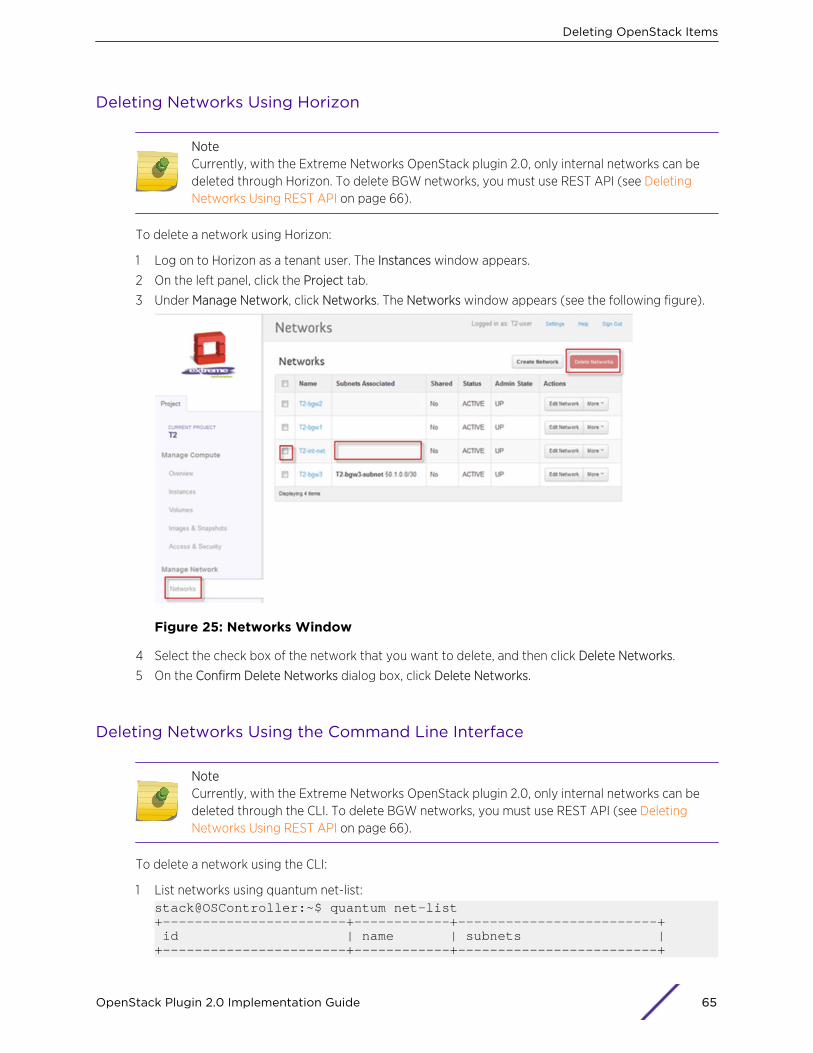
Deleting Networks Using Horizon
NoteCurrently, with the Extreme Networks OpenStack plugin 2.0, only internal networks can bedeleted through Horizon. To delete BGW networks, you must use REST API (see DeletingNetworks Using REST API on page 66).
To delete a network using Horizon:
1 Log on to Horizon as a tenant user. The Instances window appears.
2 On the left panel, click the Project tab.
3 Under Manage Network, click Networks. The Networks window appears (see the following figure).
Figure 25: Networks Window
4 Select the check box of the network that you want to delete, and then click Delete Networks.
5 On the Confirm Delete Networks dialog box, click Delete Networks.
Deleting Networks Using the Command Line Interface
NoteCurrently, with the Extreme Networks OpenStack plugin 2.0, only internal networks can bedeleted through the CLI. To delete BGW networks, you must use REST API (see DeletingNetworks Using REST API on page 66).
To delete a network using the CLI:
1 List networks using quantum net-list:stack@OSController:~$ quantum net-list+-----------------------+------------+-------------------------+ id | name | subnets |+-----------------------+------------+-------------------------+
Deleting OpenStack Items
OpenStack Plugin 2.0 Implementation Guide 65
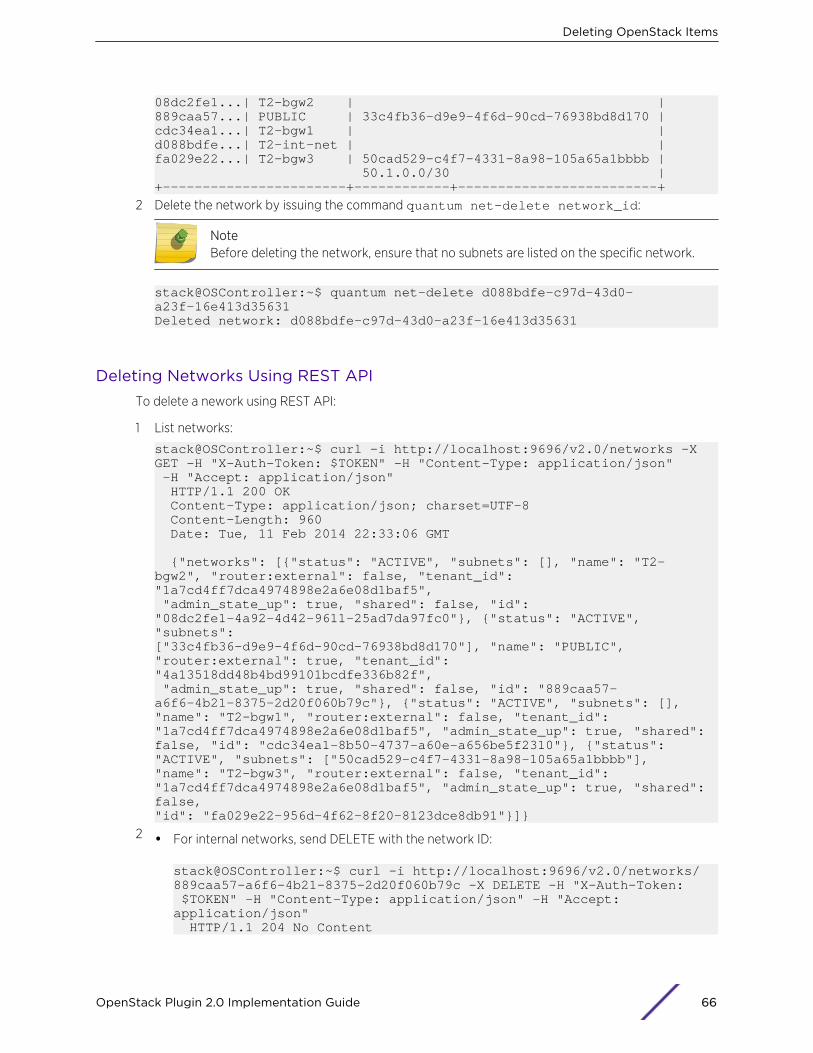
08dc2fe1...| T2-bgw2 | |889caa57...| PUBLIC | 33c4fb36-d9e9-4f6d-90cd-76938bd8d170 |cdc34ea1...| T2-bgw1 | |d088bdfe...| T2-int-net | |fa029e22...| T2-bgw3 | 50cad529-c4f7-4331-8a98-105a65a1bbbb | 50.1.0.0/30 |+-----------------------+------------+-------------------------+
2 Delete the network by issuing the command quantum net-delete network_id:
NoteBefore deleting the network, ensure that no subnets are listed on the specific network.
stack@OSController:~$ quantum net-delete d088bdfe-c97d-43d0-a23f-16e413d35631Deleted network: d088bdfe-c97d-43d0-a23f-16e413d35631
Deleting Networks Using REST APITo delete a nework using REST API:
1 List networks:
stack@OSController:~$ curl -i http://localhost:9696/v2.0/networks -X GET -H "X-Auth-Token: $TOKEN" -H "Content-Type: application/json" -H "Accept: application/json" HTTP/1.1 200 OK Content-Type: application/json; charset=UTF-8 Content-Length: 960 Date: Tue, 11 Feb 2014 22:33:06 GMT {"networks": [{"status": "ACTIVE", "subnets": [], "name": "T2-bgw2", "router:external": false, "tenant_id": "1a7cd4ff7dca4974898e2a6e08d1baf5", "admin_state_up": true, "shared": false, "id": "08dc2fe1-4a92-4d42-9611-25ad7da97fc0"}, {"status": "ACTIVE", "subnets": ["33c4fb36-d9e9-4f6d-90cd-76938bd8d170"], "name": "PUBLIC", "router:external": true, "tenant_id": "4a13518dd48b4bd99101bcdfe336b82f", "admin_state_up": true, "shared": false, "id": "889caa57-a6f6-4b21-8375-2d20f060b79c"}, {"status": "ACTIVE", "subnets": [], "name": "T2-bgw1", "router:external": false, "tenant_id": "1a7cd4ff7dca4974898e2a6e08d1baf5", "admin_state_up": true, "shared": false, "id": "cdc34ea1-8b50-4737-a60e-a656be5f2310"}, {"status": "ACTIVE", "subnets": ["50cad529-c4f7-4331-8a98-105a65a1bbbb"], "name": "T2-bgw3", "router:external": false, "tenant_id": "1a7cd4ff7dca4974898e2a6e08d1baf5", "admin_state_up": true, "shared": false, "id": "fa029e22-956d-4f62-8f20-8123dce8db91"}]}
2 • For internal networks, send DELETE with the network ID:
stack@OSController:~$ curl -i http://localhost:9696/v2.0/networks/889caa57-a6f6-4b21-8375-2d20f060b79c -X DELETE -H "X-Auth-Token: $TOKEN" -H "Content-Type: application/json" -H "Accept: application/json" HTTP/1.1 204 No Content
Deleting OpenStack Items
OpenStack Plugin 2.0 Implementation Guide 66

Content-Length: 0 Date: Tue, 11 Feb 2014 22:39:03 GMT
• For -BGW1, add -d '{"host":"ose-bgw1"}', where ose-bgw1 is the name of BGW1device specified in the topology during installation:
stack@OSController:~$ curl -i http://localhost:9696/v2.0/networks/cdc34ea1-8b50-4737-a60e-a656be5f2310 -X DELETE -H "X-Auth-Token: $TOKEN" -H "Content-Type: application/json" -H "Accept: application/json" -d '{"host":"ose-bgw1"}' HTTP/1.1 204 No Content Content-Length: 0 Date: Tue, 11 Feb 2014 22:39:03 GMT
• For –BGW2, add -d '{"host":"ose-bgw2"}', where ose-bgw2 is the name of BGW2device specified in the topology during installation:
stack@OSController:~$ curl -i http://localhost:9696/v2.0/networks/08dc2fe1-4a92-4d42-9611-25ad7da97fc0 -X DELETE -H "X-Auth-Token: $TOKEN" -H "Content-Type: application/json" -H "Accept: application/json" -d '{"host":"ose-bgw2"}' HTTP/1.1 204 No Content Content-Length: 0 Date: Tue, 11 Feb 2014 22:41:41 GMT
• For –BGW3, add -d '{"host":"TOR1,TOR2"}', where TOR1 and TOR2 are the names ofthe two switches specified in the topology during installation:
stack@OSController:~$ curl -i http://localhost:9696/v2.0/networks/fa029e22-956d-4f62-8f20-8123dce8db91 -X DELETE -H "X-Auth-Token: $TOKEN" -H "Content-Type: application/json" -H "Accept: application/json" -d '{"host":"TOR1,TOR2"}' HTTP/1.1 204 No Content Content-Length: 0 Date: Tue, 11 Feb 2014 22:43:54 GMT
Deleting Tenants
Deleting Tenants Information
Once routers, networks, subnets, ports, interfaces, and instances have been successfully deleted,tenants can be removed.
Deleting Tenants Using HorizonTo delete a tenant using Horizon:
1 Log on to Horizon as an administrator. The Instances window appears.
NoteAdministrator logon credentials: username = admin, password = nova123, by default.
2 On the left panel, click the Admin tab.
Deleting OpenStack Items
OpenStack Plugin 2.0 Implementation Guide 67
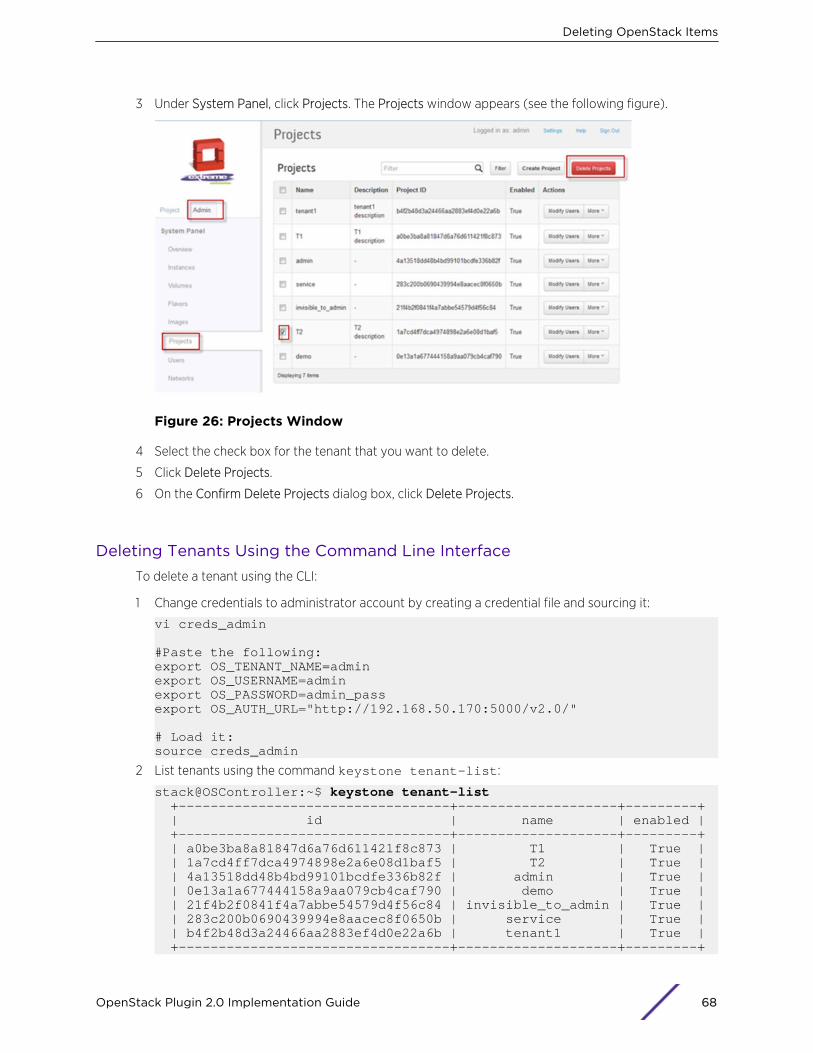
3 Under System Panel, click Projects. The Projects window appears (see the following figure).
Figure 26: Projects Window
4 Select the check box for the tenant that you want to delete.
5 Click Delete Projects.
6 On the Confirm Delete Projects dialog box, click Delete Projects.
Deleting Tenants Using the Command Line InterfaceTo delete a tenant using the CLI:
1 Change credentials to administrator account by creating a credential file and sourcing it:
vi creds_admin #Paste the following:export OS_TENANT_NAME=adminexport OS_USERNAME=adminexport OS_PASSWORD=admin_passexport OS_AUTH_URL="http://192.168.50.170:5000/v2.0/" # Load it:source creds_admin
2 List tenants using the command keystone tenant-list:
stack@OSController:~$ keystone tenant-list +----------------------------------+--------------------+---------+ | id | name | enabled | +----------------------------------+--------------------+---------+ | a0be3ba8a81847d6a76d611421f8c873 | T1 | True | | 1a7cd4ff7dca4974898e2a6e08d1baf5 | T2 | True | | 4a13518dd48b4bd99101bcdfe336b82f | admin | True | | 0e13a1a677444158a9aa079cb4caf790 | demo | True | | 21f4b2f0841f4a7abbe54579d4f56c84 | invisible_to_admin | True | | 283c200b0690439994e8aacec8f0650b | service | True | | b4f2b48d3a24466aa2883ef4d0e22a6b | tenant1 | True | +----------------------------------+--------------------+---------+
Deleting OpenStack Items
OpenStack Plugin 2.0 Implementation Guide 68
3 Delete a tenant using the command keystone tenant-delete tenant_id with the desiredtenant ID:
stack@OSController:~$ keystone tenant-delete 1a7cd4ff7dca4974898e2a6e08d1baf5
Deleting Tenants Using REST APIGet a new TOKEN with administrator credentials:
1 Get a new TOKEN with administrator credentials.
stack@OSController:~$ TOKEN=$(python gettoken.py localhost admin nova123 admin)
2 List the tenants (notice the port indicated, 35357, is the administrator port, not the user port):
stack@OSController:~$ curl -i http://localhost:35357/v2.0/tenants -X GET -H "X-Auth-Token: $TOKEN" -H "Content-Type: application/json" -H "Accept: application/json" HTTP/1.1 200 OK Vary: X-Auth-Token Content-Type: application/json Content-Length: 778 Date: Tue, 11 Feb 2014 22:59:39 GMT {"tenants_links": [], "tenants": [{"description": null, "enabled": true, "id": "0e13a1a677444158a9aa079cb4caf790", "name": "demo"},{"description": null, "enabled": true, "id": "21f4b2f0841f4a7abbe54579d4f56c84", "name": "invisible_to_admin"}, {"description": null, "enabled": true, "id": "283c200b0690439994e8aacec8f0650b", "name": "service"}, {"description": null, "enabled": true, "id": "4a13518dd48b4bd99101bcdfe336b82f", "name": "admin"}, {"description": "T2 description", "enabled": true, "id": "8a4a7e05ab3244928e0cf4e50e1695cb", "name": "T2"}, {"description": "T1 description", "enabled": true, "id": "a0be3ba8a81847d6a76d611421f8c873", "name": "T1"}, {"description": "tenant1 description", "enabled": true, "id": "b4f2b48d3a24466aa2883ef4d0e22a6b", "name": "tenant1"}]}
3 Delete the desired tenant by adding its ID to the DELETE command:
stack@OSController:~$ curl -i http://localhost:35357/v2.0/tenants/8a4a7e05ab3244928e0cf4e50e1695cb -X DELETE -H "X-Auth-Token: $TOKEN" -H "Content-Type: application/json" -H "Accept: application/json" HTTP/1.1 204 No Content Vary: X-Auth-Token Content-Length: 0 Date: Tue, 11 Feb 2014 23:05:22 GMT
Deleting Users
Deleting Users Using Horizon
To delete a user using Horizon:
Deleting OpenStack Items
OpenStack Plugin 2.0 Implementation Guide 69
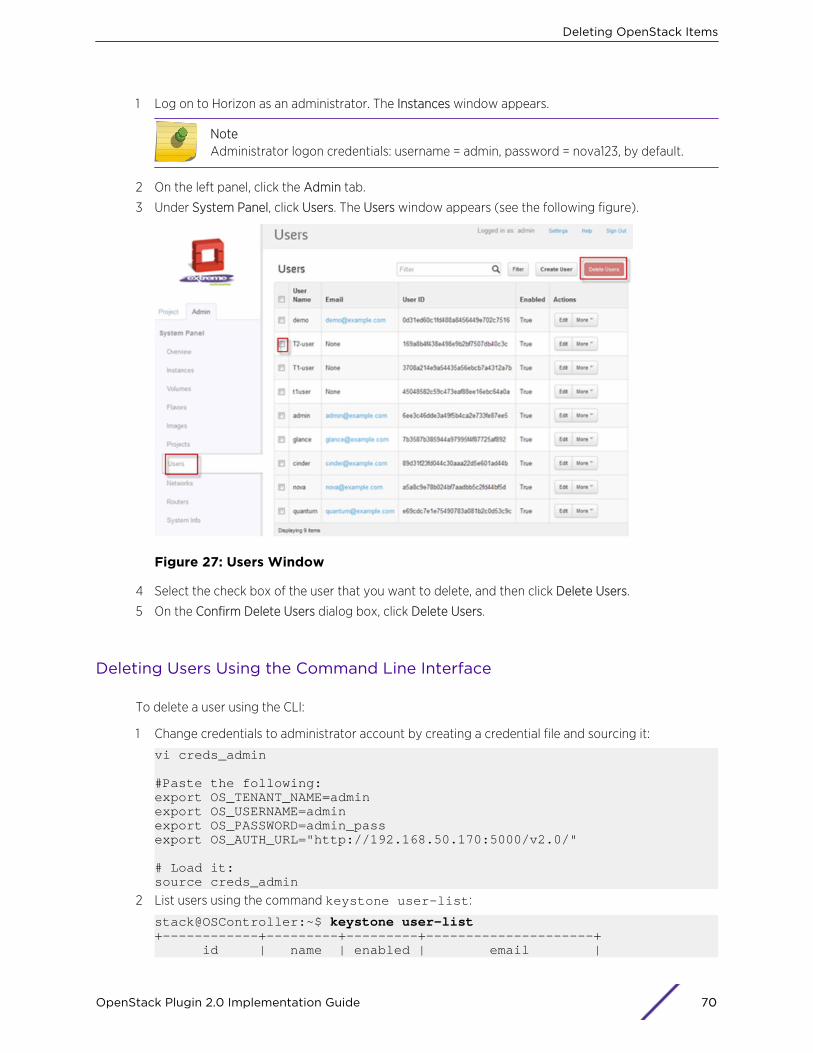
1 Log on to Horizon as an administrator. The Instances window appears.
NoteAdministrator logon credentials: username = admin, password = nova123, by default.
2 On the left panel, click the Admin tab.
3 Under System Panel, click Users. The Users window appears (see the following figure).
Figure 27: Users Window
4 Select the check box of the user that you want to delete, and then click Delete Users.
5 On the Confirm Delete Users dialog box, click Delete Users.
Deleting Users Using the Command Line Interface
To delete a user using the CLI:
1 Change credentials to administrator account by creating a credential file and sourcing it:
vi creds_admin #Paste the following:export OS_TENANT_NAME=adminexport OS_USERNAME=adminexport OS_PASSWORD=admin_passexport OS_AUTH_URL="http://192.168.50.170:5000/v2.0/" # Load it:source creds_admin
2 List users using the command keystone user-list:
stack@OSController:~$ keystone user-list+------------+---------+---------+---------------------+ id | name | enabled | email |
Deleting OpenStack Items
OpenStack Plugin 2.0 Implementation Guide 70
+------------+---------+---------+---------------------+3708a214e9...| T1-user | True | | 169a8b4f43...| T2-user | True | |6ee3c46dde...| admin | True | [email protected] |89d31f23fd...| cinder | True | [email protected] |0d31ed60c1...| demo | True | [email protected] |7b3587b385...| glance | True | [email protected] |a5a8c9e78b...| nova | True | [email protected] |e69cdc7e1e...| quantum | True | [email protected] |45048582c5...| t1user | True | |+------------+---------+---------+---------------------+
3 Delete a user using the command keystone user-delete user_id with the desired user ID:
stack@OSController:~$ keystone user-delete 169a8b4f438e498e9b2bf7507db40c3c
Deleting Users Using the REST API
To delete a user using the REST API:
1 Get a new TOKEN with administrator credentials:
stack@OSController:~$ TOKEN=$(python gettoken.py localhost admin nova123 admin)
2 List the users (notice the port indicated, 35357, is the administrator port, not the user port):
stack@OSController:~$ curl -i http://localhost:35357/v2.0/users -X GET -H "X-Auth-Token: $TOKEN" -H "Content-Type: application/json" -H "Accept: application/json" HTTP/1.1 200 OK Vary: X-Auth-Token Content-Type: application/json Content-Length: 1274 Date: Tue, 11 Feb 2014 23:01:04 GMT {"users": [{"name": "T2-user", "tenantId": "8a4a7e05ab3244928e0cf4e50e1695cb", "enabled": true, "id": "0491bb0f0e994c73a4d29c4100a9ecc9"}, {"name": "demo", "id": "0d31ed60c1fd488a8456449e702c7516", "tenantId": null, "enabled": true, "email": "[email protected]"}, {"name": "T1-user", "tenantId": "a0be3ba8a81847d6a76d611421f8c873", "enabled": true, "id": "3708a214e9a54435a56ebcb7a4312a7b"}, {"name": "t1user", "tenantId": "b4f2b48d3a24466aa2883ef4d0e22a6b", "enabled": true, "id": "45048582c59c473eaf88ee16ebc64a0a"}, {"name": "admin", "id": "6ee3c46dde3a49f5b4ca2e733fe87ee5", "tenantId": null, "enabled": true, "email": "[email protected]"}, {"name": "glance", "id": "7b3587b385944a97995f4f87725af892", "tenantId": "283c200b0690439994e8aacec8f0650b", "enabled": true, "email": "[email protected]"}, {"name": "cinder", "id": "89d31f23fd044c30aaa22d5e601ad44b", "tenantId": "283c200b0690439994e8aacec8f0650b", "enabled": true, "email": "[email protected]"}, {"name": "nova", "id": "a5a8c9e78b024bf7aadbb5c2fd44bf5d", "tenantId": "283c200b0690439994e8aacec8f0650b", "enabled": true, "email": "[email protected]"}, {"name": "quantum", "id": "e69cdc7e1e75490783a081b2c0d53c9c", "tenantId": "283c200b0690439994e8aacec8f0650b", "enabled": true, "email": "[email protected]"}]}
3 Delete the desired user by adding its ID to the DELETE command::
Deleting OpenStack Items
OpenStack Plugin 2.0 Implementation Guide 71
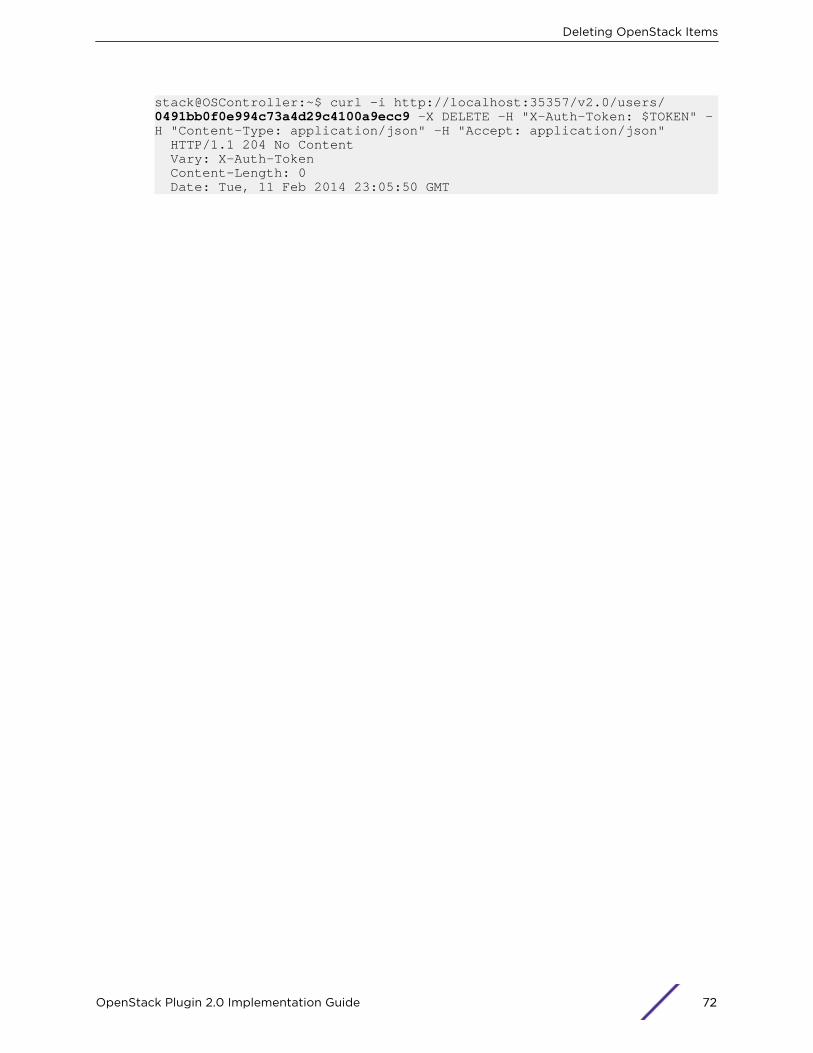
stack@OSController:~$ curl -i http://localhost:35357/v2.0/users/0491bb0f0e994c73a4d29c4100a9ecc9 -X DELETE -H "X-Auth-Token: $TOKEN" -H "Content-Type: application/json" -H "Accept: application/json" HTTP/1.1 204 No Content Vary: X-Auth-Token Content-Length: 0 Date: Tue, 11 Feb 2014 23:05:50 GMT
Deleting OpenStack Items
OpenStack Plugin 2.0 Implementation Guide 72
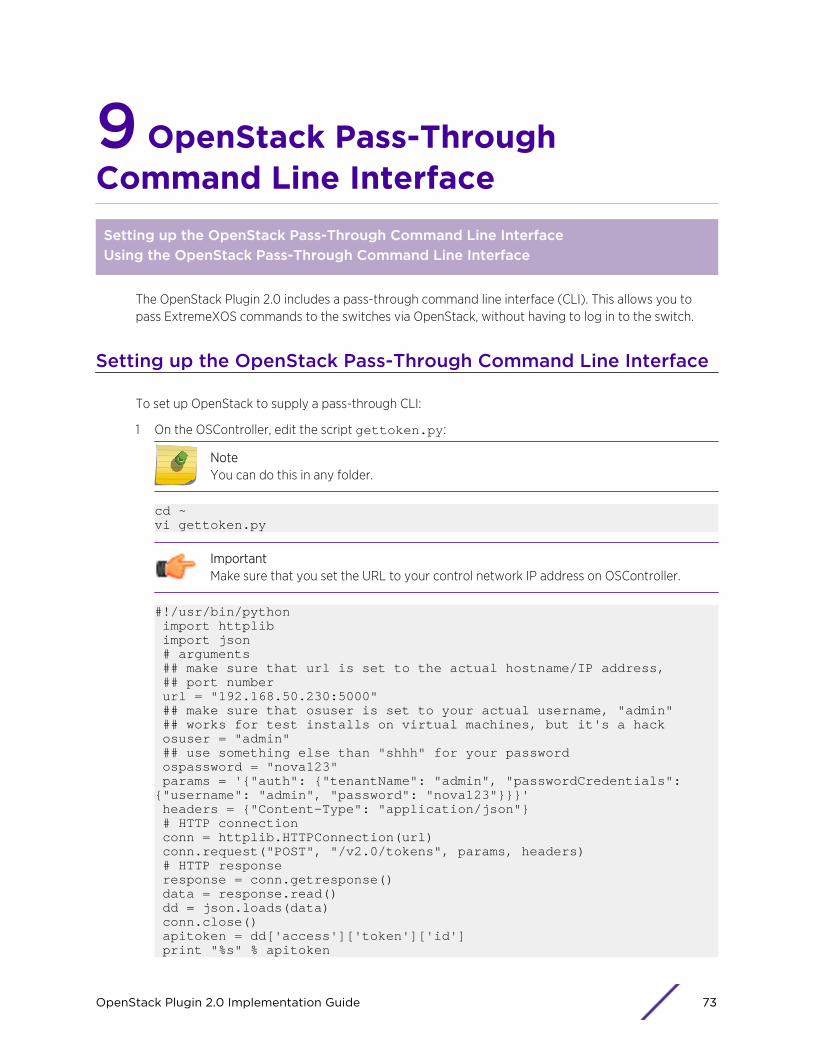
9 OpenStack Pass-ThroughCommand Line InterfaceSetting up the OpenStack Pass-Through Command Line InterfaceUsing the OpenStack Pass-Through Command Line Interface
The OpenStack Plugin 2.0 includes a pass-through command line interface (CLI). This allows you topass ExtremeXOS commands to the switches via OpenStack, without having to log in to the switch.
Setting up the OpenStack Pass-Through Command Line Interface
To set up OpenStack to supply a pass-through CLI:
1 On the OSController, edit the script gettoken.py:
NoteYou can do this in any folder.
cd ~vi gettoken.py
ImportantMake sure that you set the URL to your control network IP address on OSController.
#!/usr/bin/python import httplib import json # arguments ## make sure that url is set to the actual hostname/IP address, ## port number url = "192.168.50.230:5000" ## make sure that osuser is set to your actual username, "admin" ## works for test installs on virtual machines, but it's a hack osuser = "admin" ## use something else than "shhh" for your password ospassword = "nova123" params = '{"auth": {"tenantName": "admin", "passwordCredentials": {"username": "admin", "password": "nova123"}}}' headers = {"Content-Type": "application/json"} # HTTP connection conn = httplib.HTTPConnection(url) conn.request("POST", "/v2.0/tokens", params, headers) # HTTP response response = conn.getresponse() data = response.read() dd = json.loads(data) conn.close() apitoken = dd['access']['token']['id'] print "%s" % apitoken
OpenStack Plugin 2.0 Implementation Guide 73
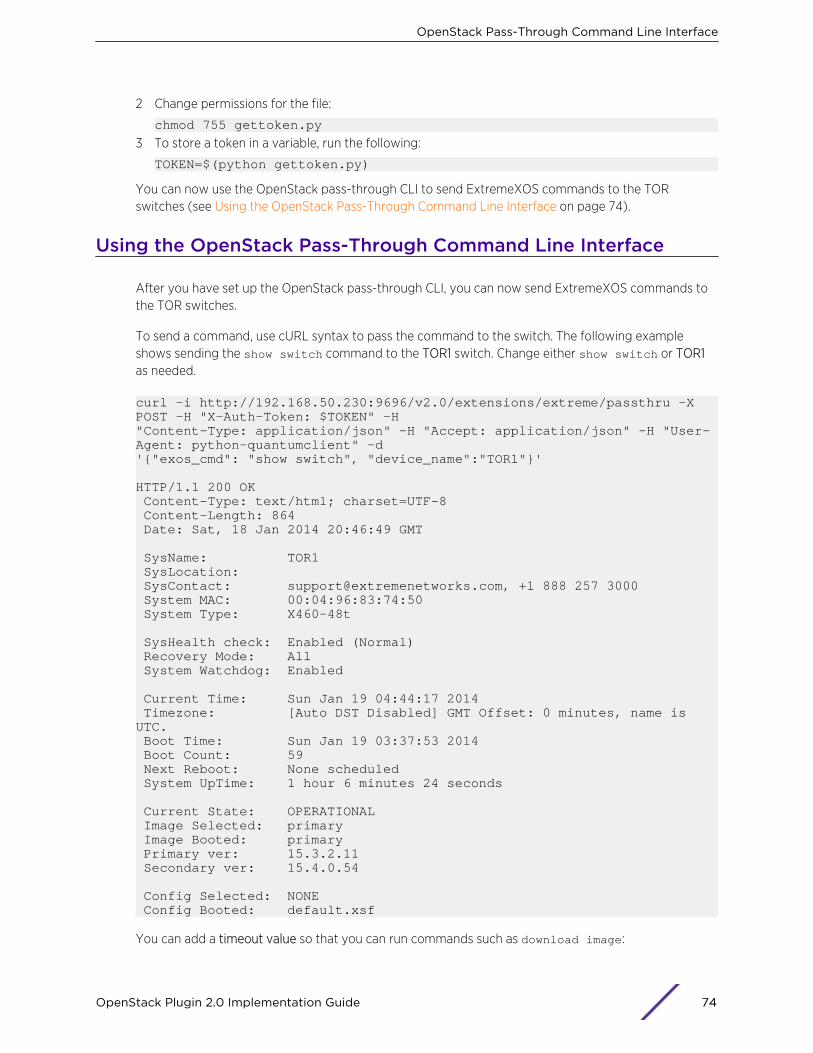
2 Change permissions for the file:
chmod 755 gettoken.py
3 To store a token in a variable, run the following:
TOKEN=$(python gettoken.py)
You can now use the OpenStack pass-through CLI to send ExtremeXOS commands to the TORswitches (see Using the OpenStack Pass-Through Command Line Interface on page 74).
Using the OpenStack Pass-Through Command Line Interface
After you have set up the OpenStack pass-through CLI, you can now send ExtremeXOS commands tothe TOR switches.
To send a command, use cURL syntax to pass the command to the switch. The following exampleshows sending the show switch command to the TOR1 switch. Change either show switch or TOR1as needed.
curl -i http://192.168.50.230:9696/v2.0/extensions/extreme/passthru -X POST -H "X-Auth-Token: $TOKEN" -H "Content-Type: application/json" -H "Accept: application/json" -H "User-Agent: python-quantumclient" -d '{"exos_cmd": "show switch", "device_name":"TOR1"}' HTTP/1.1 200 OK Content-Type: text/html; charset=UTF-8 Content-Length: 864 Date: Sat, 18 Jan 2014 20:46:49 GMT SysName: TOR1 SysLocation: SysContact: [email protected], +1 888 257 3000 System MAC: 00:04:96:83:74:50 System Type: X460-48t SysHealth check: Enabled (Normal) Recovery Mode: All System Watchdog: Enabled Current Time: Sun Jan 19 04:44:17 2014 Timezone: [Auto DST Disabled] GMT Offset: 0 minutes, name is UTC. Boot Time: Sun Jan 19 03:37:53 2014 Boot Count: 59 Next Reboot: None scheduled System UpTime: 1 hour 6 minutes 24 seconds Current State: OPERATIONAL Image Selected: primary Image Booted: primary Primary ver: 15.3.2.11 Secondary ver: 15.4.0.54 Config Selected: NONE Config Booted: default.xsf
You can add a timeout value so that you can run commands such as download image:
OpenStack Pass-Through Command Line Interface
OpenStack Plugin 2.0 Implementation Guide 74
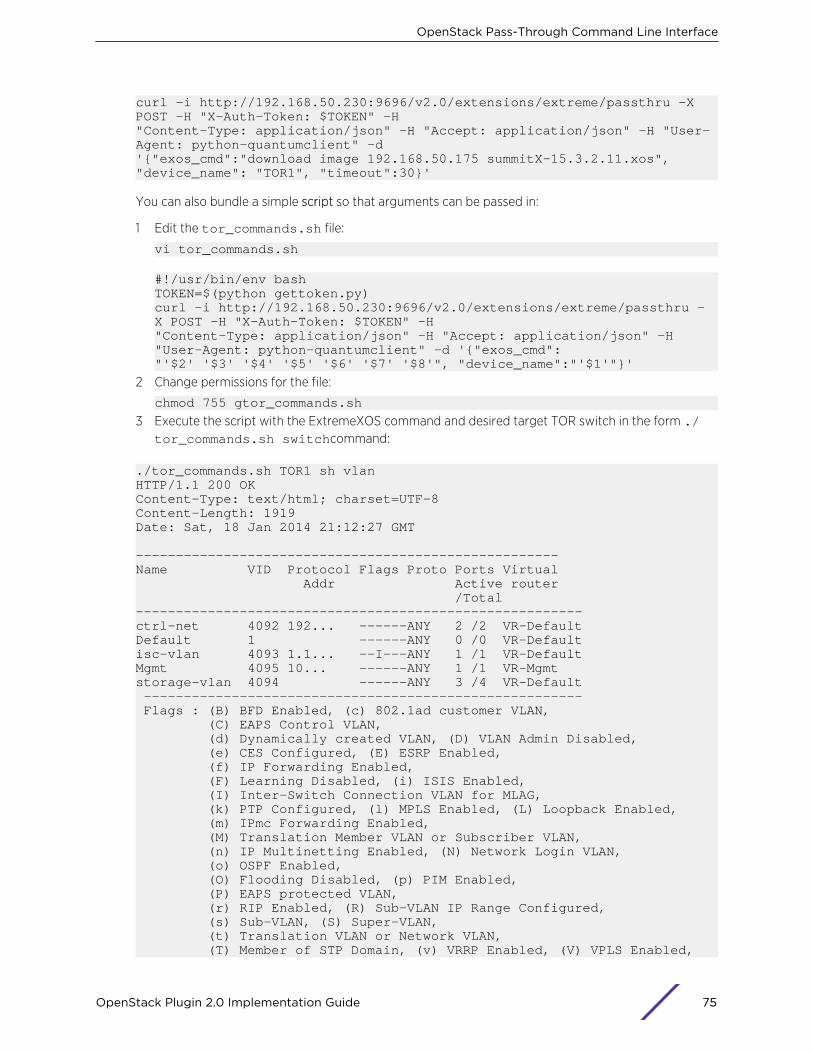
curl -i http://192.168.50.230:9696/v2.0/extensions/extreme/passthru -X POST -H "X-Auth-Token: $TOKEN" -H "Content-Type: application/json" -H "Accept: application/json" -H "User-Agent: python-quantumclient" -d '{"exos_cmd":"download image 192.168.50.175 summitX-15.3.2.11.xos", "device_name": "TOR1", "timeout":30}'
You can also bundle a simple script so that arguments can be passed in:
1 Edit the tor_commands.sh file:
vi tor_commands.sh
#!/usr/bin/env bashTOKEN=$(python gettoken.py)curl -i http://192.168.50.230:9696/v2.0/extensions/extreme/passthru -X POST -H "X-Auth-Token: $TOKEN" -H "Content-Type: application/json" -H "Accept: application/json" -H "User-Agent: python-quantumclient" -d '{"exos_cmd": "'$2' '$3' '$4' '$5' '$6' '$7' '$8'", "device_name":"'$1'"}'
2 Change permissions for the file:
chmod 755 gtor_commands.sh
3 Execute the script with the ExtremeXOS command and desired target TOR switch in the form ./tor_commands.sh switchcommand:
./tor_commands.sh TOR1 sh vlanHTTP/1.1 200 OKContent-Type: text/html; charset=UTF-8Content-Length: 1919Date: Sat, 18 Jan 2014 21:12:27 GMT -----------------------------------------------------Name VID Protocol Flags Proto Ports Virtual Addr Active router /Total--------------------------------------------------------ctrl-net 4092 192... ------ANY 2 /2 VR-Default Default 1 ------ANY 0 /0 VR-Default isc-vlan 4093 1.1... --I---ANY 1 /1 VR-Default Mgmt 4095 10... ------ANY 1 /1 VR-Mgmt storage-vlan 4094 ------ANY 3 /4 VR-Default ------------------------------------------------------- Flags : (B) BFD Enabled, (c) 802.1ad customer VLAN, (C) EAPS Control VLAN, (d) Dynamically created VLAN, (D) VLAN Admin Disabled, (e) CES Configured, (E) ESRP Enabled, (f) IP Forwarding Enabled, (F) Learning Disabled, (i) ISIS Enabled, (I) Inter-Switch Connection VLAN for MLAG, (k) PTP Configured, (l) MPLS Enabled, (L) Loopback Enabled, (m) IPmc Forwarding Enabled, (M) Translation Member VLAN or Subscriber VLAN, (n) IP Multinetting Enabled, (N) Network Login VLAN, (o) OSPF Enabled, (O) Flooding Disabled, (p) PIM Enabled, (P) EAPS protected VLAN, (r) RIP Enabled, (R) Sub-VLAN IP Range Configured, (s) Sub-VLAN, (S) Super-VLAN, (t) Translation VLAN or Network VLAN, (T) Member of STP Domain, (v) VRRP Enabled, (V) VPLS Enabled,
OpenStack Pass-Through Command Line Interface
OpenStack Plugin 2.0 Implementation Guide 75
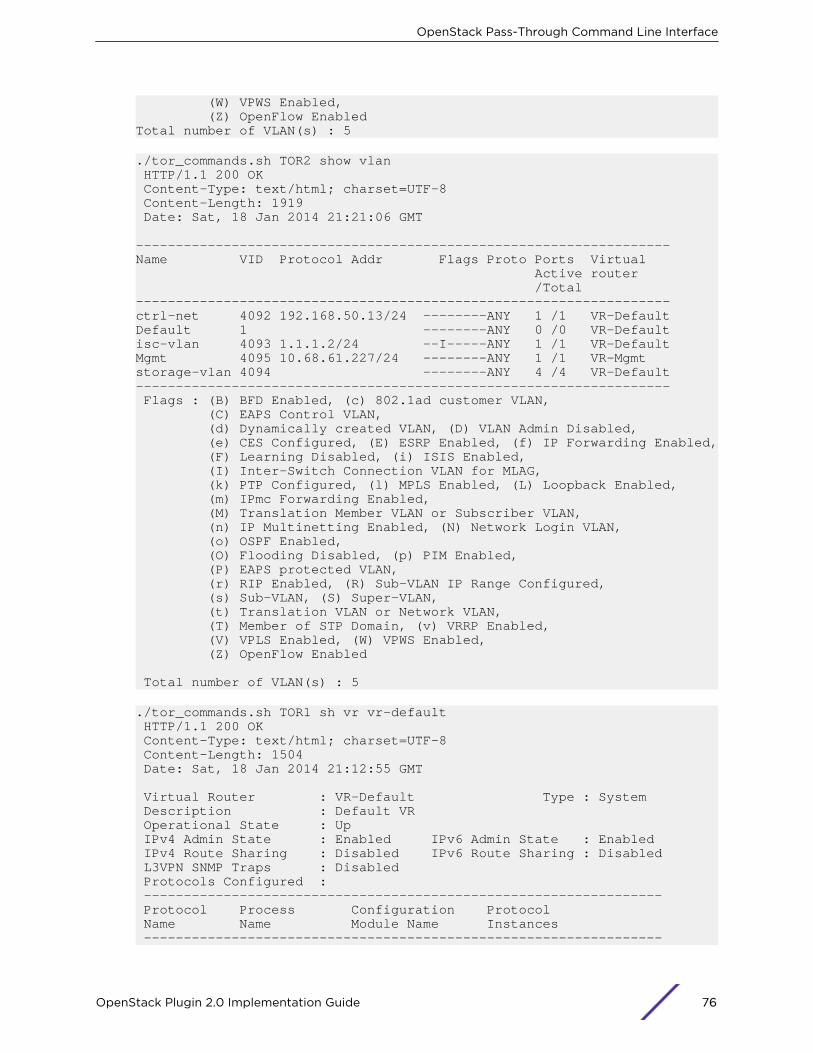
(W) VPWS Enabled, (Z) OpenFlow EnabledTotal number of VLAN(s) : 5
./tor_commands.sh TOR2 show vlan HTTP/1.1 200 OK Content-Type: text/html; charset=UTF-8 Content-Length: 1919 Date: Sat, 18 Jan 2014 21:21:06 GMT -------------------------------------------------------------------Name VID Protocol Addr Flags Proto Ports Virtual Active router /Total-------------------------------------------------------------------ctrl-net 4092 192.168.50.13/24 --------ANY 1 /1 VR-Default Default 1 --------ANY 0 /0 VR-Default isc-vlan 4093 1.1.1.2/24 --I-----ANY 1 /1 VR-Default Mgmt 4095 10.68.61.227/24 --------ANY 1 /1 VR-Mgmt storage-vlan 4094 --------ANY 4 /4 VR-Default ------------------------------------------------------------------- Flags : (B) BFD Enabled, (c) 802.1ad customer VLAN, (C) EAPS Control VLAN, (d) Dynamically created VLAN, (D) VLAN Admin Disabled, (e) CES Configured, (E) ESRP Enabled, (f) IP Forwarding Enabled, (F) Learning Disabled, (i) ISIS Enabled, (I) Inter-Switch Connection VLAN for MLAG, (k) PTP Configured, (l) MPLS Enabled, (L) Loopback Enabled, (m) IPmc Forwarding Enabled, (M) Translation Member VLAN or Subscriber VLAN, (n) IP Multinetting Enabled, (N) Network Login VLAN, (o) OSPF Enabled, (O) Flooding Disabled, (p) PIM Enabled, (P) EAPS protected VLAN, (r) RIP Enabled, (R) Sub-VLAN IP Range Configured, (s) Sub-VLAN, (S) Super-VLAN, (t) Translation VLAN or Network VLAN, (T) Member of STP Domain, (v) VRRP Enabled, (V) VPLS Enabled, (W) VPWS Enabled, (Z) OpenFlow Enabled Total number of VLAN(s) : 5
./tor_commands.sh TOR1 sh vr vr-default HTTP/1.1 200 OK Content-Type: text/html; charset=UTF-8 Content-Length: 1504 Date: Sat, 18 Jan 2014 21:12:55 GMT Virtual Router : VR-Default Type : System Description : Default VR Operational State : Up IPv4 Admin State : Enabled IPv6 Admin State : Enabled IPv4 Route Sharing : Disabled IPv6 Route Sharing : Disabled L3VPN SNMP Traps : Disabled Protocols Configured : ----------------------------------------------------------------- Protocol Process Configuration Protocol Name Name Module Name Instances -----------------------------------------------------------------
OpenStack Pass-Through Command Line Interface
OpenStack Plugin 2.0 Implementation Guide 76
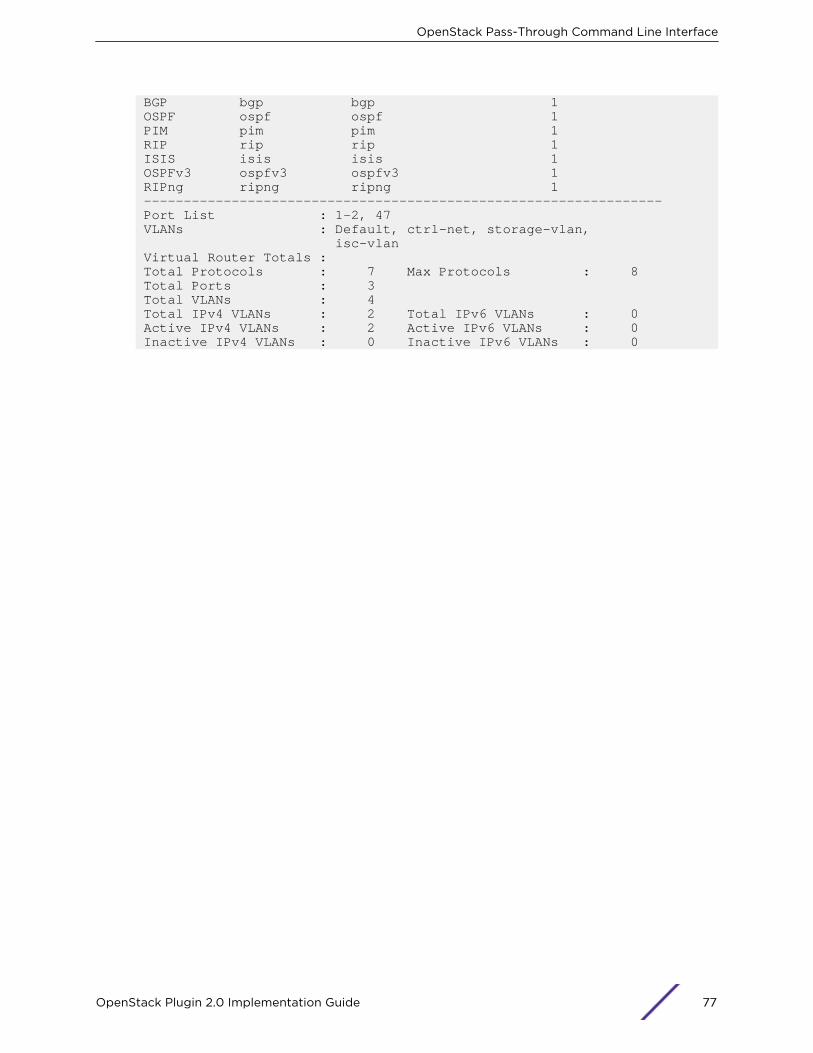
BGP bgp bgp 1 OSPF ospf ospf 1 PIM pim pim 1 RIP rip rip 1 ISIS isis isis 1 OSPFv3 ospfv3 ospfv3 1 RIPng ripng ripng 1 ----------------------------------------------------------------- Port List : 1-2, 47 VLANs : Default, ctrl-net, storage-vlan, isc-vlan Virtual Router Totals : Total Protocols : 7 Max Protocols : 8 Total Ports : 3 Total VLANs : 4 Total IPv4 VLANs : 2 Total IPv6 VLANs : 0 Active IPv4 VLANs : 2 Active IPv6 VLANs : 0 Inactive IPv4 VLANs : 0 Inactive IPv6 VLANs : 0
OpenStack Pass-Through Command Line Interface
OpenStack Plugin 2.0 Implementation Guide 77
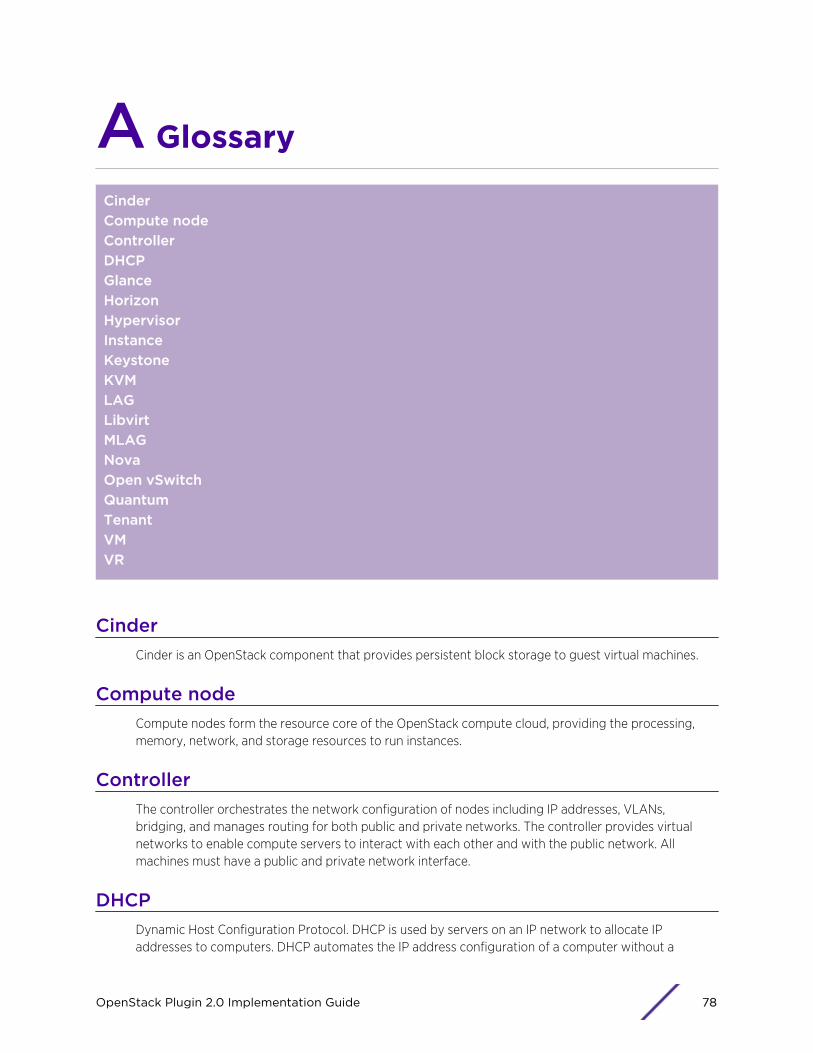
A Glossary
CinderCompute nodeControllerDHCPGlanceHorizonHypervisorInstanceKeystoneKVMLAGLibvirtMLAGNovaOpen vSwitchQuantumTenantVMVR
CinderCinder is an OpenStack component that provides persistent block storage to guest virtual machines.
Compute nodeCompute nodes form the resource core of the OpenStack compute cloud, providing the processing,memory, network, and storage resources to run instances.
ControllerThe controller orchestrates the network configuration of nodes including IP addresses, VLANs,bridging, and manages routing for both public and private networks. The controller provides virtualnetworks to enable compute servers to interact with each other and with the public network. Allmachines must have a public and private network interface.
DHCPDynamic Host Configuration Protocol. DHCP is used by servers on an IP network to allocate IPaddresses to computers. DHCP automates the IP address configuration of a computer without a
OpenStack Plugin 2.0 Implementation Guide 78
network administrator. IP addresses are typically selected from a range of assigned IP addresses storedin a database on the server and issued to a computer which requests a new IP address.
GlanceGlance is an OpenStack component that provides a catalog and repository for virtual disk images.These disk images are mostly commonly used in the OpenStack component Compute (Nova).
HorizonHorizon provides a modular Web-based user interface for all the OpenStack services. With this WebGUI, you can perform most operations on your cloud, like launching an instance, assigning IP addresses,and setting access controls.
HypervisorA hypervisor or virtual machine monitor (VMM) is a piece of computer software, firmware, or hardwarethat creates and runs virtual machines.
InstanceA running virtual machine, or a virtual machine that can be used like a hardware server.
KeystoneKeystone is an OpenStack component that provides authentication and authorization for all theOpenStack services. It also provides a service catalog of services within a particular OpenStack cloud.
KVMKernel-based virtual machine. KVM is a virtualization infrastructure for the Linux kernel that turns it intoa hypervisor. See Hypervisor on page 79.
LAGLink aggregation group. LAG is an open standards 802.3ad solution to bundle ports together for multi-path support to increase resiliency and redundancy. LAGs allow you to combine (aggregate) multiplenetwork connections in parallel to increase throughput beyond what a single connection could sustain,and allows you to provide redundancy if a links fails.
LibvirtLibvirt is an open source API, daemon, and management tool for managing platform virtualization. Itcan be used to manage virtualization technologies, such as Linux KVM. These APIs are widely used inthe orchestration layer of hypervisors in the development of a cloud-based solution. See KVM on page79 and Hypervisor on page 79.
Glossary
OpenStack Plugin 2.0 Implementation Guide 79
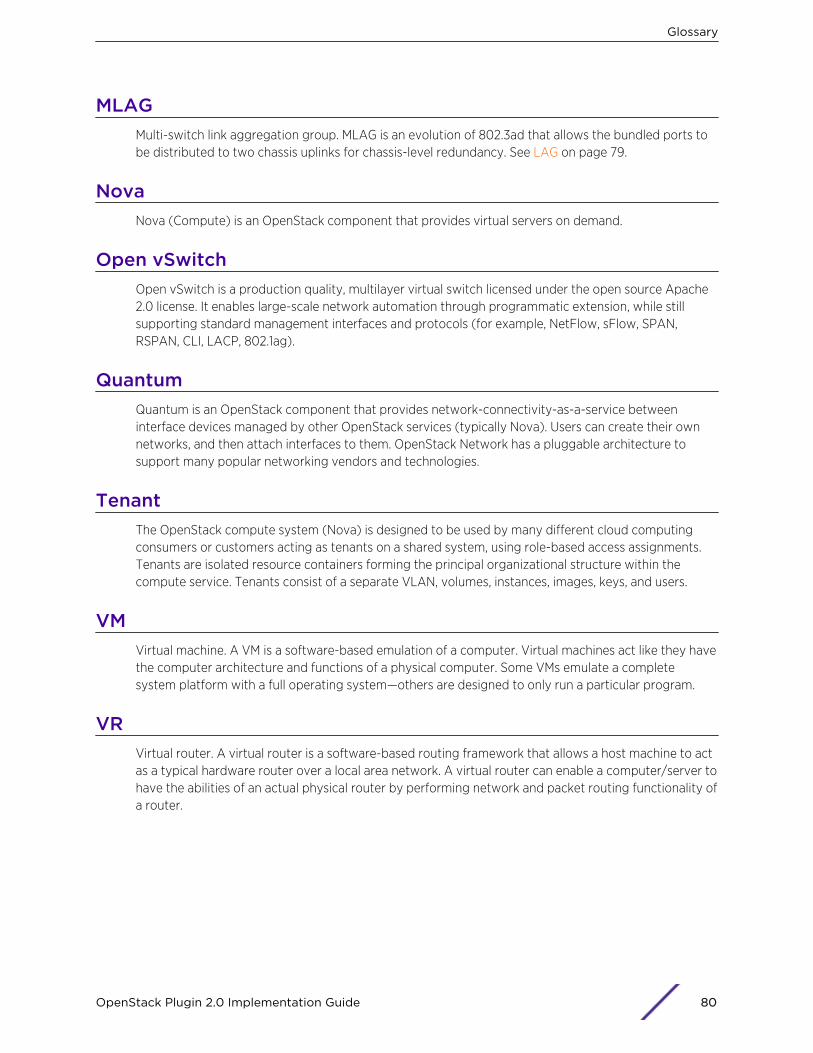
MLAGMulti-switch link aggregation group. MLAG is an evolution of 802.3ad that allows the bundled ports tobe distributed to two chassis uplinks for chassis-level redundancy. See LAG on page 79.
NovaNova (Compute) is an OpenStack component that provides virtual servers on demand.
Open vSwitchOpen vSwitch is a production quality, multilayer virtual switch licensed under the open source Apache2.0 license. It enables large-scale network automation through programmatic extension, while stillsupporting standard management interfaces and protocols (for example, NetFlow, sFlow, SPAN,RSPAN, CLI, LACP, 802.1ag).
QuantumQuantum is an OpenStack component that provides network-connectivity-as-a-service betweeninterface devices managed by other OpenStack services (typically Nova). Users can create their ownnetworks, and then attach interfaces to them. OpenStack Network has a pluggable architecture tosupport many popular networking vendors and technologies.
TenantThe OpenStack compute system (Nova) is designed to be used by many different cloud computingconsumers or customers acting as tenants on a shared system, using role-based access assignments.Tenants are isolated resource containers forming the principal organizational structure within thecompute service. Tenants consist of a separate VLAN, volumes, instances, images, keys, and users.
VMVirtual machine. A VM is a software-based emulation of a computer. Virtual machines act like they havethe computer architecture and functions of a physical computer. Some VMs emulate a completesystem platform with a full operating system—others are designed to only run a particular program.
VRVirtual router. A virtual router is a software-based routing framework that allows a host machine to actas a typical hardware router over a local area network. A virtual router can enable a computer/server tohave the abilities of an actual physical router by performing network and packet routing functionality ofa router.
Glossary
OpenStack Plugin 2.0 Implementation Guide 80


![DIALux4[1].0- · PDF filedialux 2 plugin. 1.X. plugin , plugin. luminaire selection Plugin plugin . home page, Intenet Explorer](https://static.fdocuments.in/doc/165x107/5a715aac7f8b9a98538cccda/dialux410-wwwpowerengineeringblogfacomssuacirkhadamatkarkonanarticlesbarghdialux4-learningpdfpdf.jpg)