OpenShift Enterprise 2 Deployment Guide - Red Hat Customer Portal
202
Red Hat OpenShift Documentation Team OpenShift Enterprise 2 Deployment Guide Installing and Configuring OpenShift Enterprise
Transcript of OpenShift Enterprise 2 Deployment Guide - Red Hat Customer Portal

Red Hat OpenShift DocumentationTeam
OpenShift Enterprise2Deployment Guide
Installing and Configuring OpenShift Enterprise


OpenShift Enterprise 2 Deployment Guide
Installing and Configuring OpenShift Enterprise
Red Hat OpenShift Documentation Team
Legal Notice
Copyright © 2017 Red Hat.
This document is licensed by Red Hat under the Creative Commons Attribution-ShareAlike 3.0Unported License. If you distribute this document, or a modified version of it, you must provideattribution to Red Hat, Inc. and provide a link to the original. If the document is modified, all Red Hattrademarks must be removed.
Red Hat, as the licensor of this document, waives the right to enforce, and agrees not to assert,Section 4d of CC-BY-SA to the fullest extent permitted by applicable law.
Red Hat, Red Hat Enterprise Linux, the Shadowman logo, JBoss, OpenShift, Fedora, the Infinitylogo, and RHCE are trademarks of Red Hat, Inc., registered in the United States and othercountries.
Linux ® is the registered trademark of Linus Torvalds in the United States and other countries.
Java ® is a registered trademark of Oracle and/or its affiliates.
XFS ® is a trademark of Silicon Graphics International Corp. or its subsidiaries in the United Statesand/or other countries.
MySQL ® is a registered trademark of MySQL AB in the United States, the European Union andother countries.
Node.js ® is an official trademark of Joyent. Red Hat Software Collections is not formally related toor endorsed by the official Joyent Node.js open source or commercial project.
The OpenStack ® Word Mark and OpenStack logo are either registered trademarks/service marksor trademarks/service marks of the OpenStack Foundation, in the United States and other countriesand are used with the OpenStack Foundation's permission. We are not affiliated with, endorsed orsponsored by the OpenStack Foundation, or the OpenStack community.
All other trademarks are the property of their respective owners.
AbstractThe Deployment Guide provides information on the initial installation and configuration of OpenShiftEnterprise. This document describes a typical deployment with Red Hat Enterprise Linux Server 6.6or greater as the underlying platform. Some of the configuration settings described must bemodified to suit your requirements. This document covers the following: Introductory information thatincludes hardware and software prerequisites, architecture information, upgrading from previousinstallations, and general information about the sample installation. Instructions on how to install andconfigure broker hosts and all necessary components and services. Instructions on how to installand configure node hosts and all necessary components and services. Information on how to testand validate an OpenShift Enterprise installation, and install and configure a developer workstation.This document is intended for experienced system administrators.

. . . . . . . . . . . . . . . . . . . . . . . . . . . . . . . . . . . . . . . . . . . . . . . . . . . . . . . . . . . . . . . . . . . . . . . . . . . . . . . . . . . . . . . . . . . . . . . . . . . . . . . . . . . . . . . . . . . . . . . . . . . . . . . . . . . . . . . . . . . . . . . . . . . . . . . . . . . . . . . . . . . . . . . . . . . . . . . . . . . . . . . . . . . . . . . . . . . . . . . . . . . . . . . . . . . . . . . . . . . . . . . . . . . . . . . . . . . . . . . . . . . . . . . . . . . . . . . . . . . . . . . . . . . . . . . . . . . . . . . .
. . . . . . . . . . . . . . . . . . . . . . . . . . . . . . . . . . . . . . . . . . . . . . . . . . . . . . . . . . . . . . . . . . . . . . . . . . . . . . . . . . . . . . . . . . . . . . . . . . . . . . . . . . . . . . . . . . . . . . . . . . . . . . . . . . . . . . . . . . . . . . . . . . . . . . . . . . . . . . . . . . . . . . . . . . . . . . . . . . . . . . . . . . . . . . . . . . . . . . . . . . . . . . . . . . . . . . . . . . . . . . . . . . . . . . . . . . . . . . . . . . . . . . . . . . . . . . . . . . . . . . . . . . . . . . . . . . . . . . . .
. . . . . . . . . . . . . . . . . . . . . . . . . . . . . . . . . . . . . . . . . . . . . . . . . . . . . . . . . . . . . . . . . . . . . . . . . . . . . . . . . . . . . . . . . . . . . . . . . . . . . . . . . . . . . . . . . . . . . . . . . . . . . . . . . . . . . . . . . . . . . . . . . . . . . . . . . . . . . . . . . . . . . . . . . . . . . . . . . . . . . . . . . . . . . . . . . . . . . . . . . . . . . . . . . . . . . . . . . . . . . . . . . . . . . . . . . . . . . . . . . . . . . . . . . . . . . . . . . . . . . . . . . . . . . . . . . . . . . . . .
. . . . . . . . . . . . . . . . . . . . . . . . . . . . . . . . . . . . . . . . . . . . . . . . . . . . . . . . . . . . . . . . . . . . . . . . . . . . . . . . . . . . . . . . . . . . . . . . . . . . . . . . . . . . . . . . . . . . . . . . . . . . . . . . . . . . . . . . . . . . . . . . . . . . . . . . . . . . . . . . . . . . . . . . . . . . . . . . . . . . . . . . . . . . . . . . . . . . . . . . . . . . . . . . . . . . . . . . . . . . . . . . . . . . . . . . . . . . . . . . . . . . . . . . . . . . . . . . . . . . . . . . . . . . . . . . . . . . . . . .
. . . . . . . . . . . . . . . . . . . . . . . . . . . . . . . . . . . . . . . . . . . . . . . . . . . . . . . . . . . . . . . . . . . . . . . . . . . . . . . . . . . . . . . . . . . . . . . . . . . . . . . . . . . . . . . . . . . . . . . . . . . . . . . . . . . . . . . . . . . . . . . . . . . . . . . . . . . . . . . . . . . . . . . . . . . . . . . . . . . . . . . . . . . . . . . . . . . . . . . . . . . . . . . . . . . . . . . . . . . . . . . . . . . . . . . . . . . . . . . . . . . . . . . . . . . . . . . . . . . . . . . . . . . . . . . . . . . . . . . .
. . . . . . . . . . . . . . . . . . . . . . . . . . . . . . . . . . . . . . . . . . . . . . . . . . . . . . . . . . . . . . . . . . . . . . . . . . . . . . . . . . . . . . . . . . . . . . . . . . . . . . . . . . . . . . . . . . . . . . . . . . . . . . . . . . . . . . . . . . . . . . . . . . . . . . . . . . . . . . . . . . . . . . . . . . . . . . . . . . . . . . . . . . . . . . . . . . . . . . . . . . . . . . . . . . . . . . . . . . . . . . . . . . . . . . . . . . . . . . . . . . . . . . . . . . . . . . . . . . . . . . . . . . . . . . . . . . . . . . . .
. . . . . . . . . . . . . . . . . . . . . . . . . . . . . . . . . . . . . . . . . . . . . . . . . . . . . . . . . . . . . . . . . . . . . . . . . . . . . . . . . . . . . . . . . . . . . . . . . . . . . . . . . . . . . . . . . . . . . . . . . . . . . . . . . . . . . . . . . . . . . . . . . . . . . . . . . . . . . . . . . . . . . . . . . . . . . . . . . . . . . . . . . . . . . . . . . . . . . . . . . . . . . . . . . . . . . . . . . . . . . . . . . . . . . . . . . . . . . . . . . . . . . . . . . . . . . . . . . . . . . . . . . . . . . . . . . . . . . . . .
Table of Contents
Chapter 1. Introduction to OpenShift Enterprise1.1. Product Features1.2. What's New in Current Release
Chapter 2. Prerequisites2.1. Supported Operating Systems2.2. Hardware Requirements2.3. Red Hat Subscription Requirements
Chapter 3. Architecture3.1. Communication Mechanisms3.2. State Management3.3. Redundancy3.4. Security
Chapter 4. Upgrading from Previous Versions4.1. Upgrade Tool4.2. Preparing for an Upgrade4.3. Upgrading from OpenShift Enterprise 1.2 to OpenShift Enterprise 2.04.4. Upgrading from OpenShift Enterprise 2.0 to OpenShift Enterprise 2.14.5. Upgrading from OpenShift Enterprise 2.1 to OpenShift Enterprise 2.2
Chapter 5. Host Preparation5.1. Default umask Setting5.2. Network Access
5.2.1. Custom and External Firewalls5.2.2. Manually Configuring an iptables Firewall5.2.3. IPv6 Tolerance
5.3. Configuring Time Synchronization5.4. Enabling Remote Administration
Chapter 6. Deployment Methods6.1. Using the Installation Utility6.2. Using the Installation Scripts
6.2.1. Selecting Components to Install6.2.2. Selecting a Package Source6.2.3. Selecting Password Options6.2.4. Setting Broker and Supporting Service Parameters6.2.5. Setting Node Parameters6.2.6. Deploying Sample Broker and Node Hosts Using openshift.sh6.2.7. Performing Required Post-Deployment Tasks
6.3. Using the Sample Deployment Steps6.3.1. Service Parameters6.3.2. DNS Information
Chapter 7. Manually Installing and Configuring a Broker Host7.1. Configuring Broker Host Entitlements
7.1.1. Using Red Hat Subscription Management on Broker Hosts7.1.2. Using Red Hat Network Classic on Broker Hosts
7.2. Configuring Yum on Broker Hosts7.3. Installing and Configuring BIND and DNS
7.3.1. Installing BIND and DNS Packages7.3.2. Configuring BIND and DNS
7.3.2.1. Configuring Sub-Domain Host Name Resolution
555
6666
899
1011
131313152025
3333333334353637
38384243444547484950515253
545454565658595960
Table of Contents
1
. . . . . . . . . . . . . . . . . . . . . . . . . . . . . . . . . . . . . . . . . . . . . . . . . . . . . . . . . . . . . . . . . . . . . . . . . . . . . . . . . . . . . . . . . . . . . . . . . . . . . . . . . . . . . . . . . . . . . . . . . . . . . . . . . . . . . . . . . . . . . . . . . . . . . . . . . . . . . . . . . . . . . . . . . . . . . . . . . . . . . . . . . . . . . . . . . . . . . . . . . . . . . . . . . . . . . . . . . . . . . . . . . . . . . . . . . . . . . . . . . . . . . . . . . . . . . . . . . . . . . . . . . . . . . . . . . . . . . . . .
7.3.2.1. Configuring Sub-Domain Host Name Resolution7.3.2.2. Configuring Host Name Resolution
7.3.3. Verifying the BIND Configuration7.4. Configuring DHCP and Host Name Resolution
7.4.1. Configuring the DHCP Client on the Broker Host7.4.2. Verifying the DHCP Configuration
7.5. Installing and Configuring MongoDB7.5.1. Installing MongoDB7.5.2. Configuring MongoDB7.5.3. Configuring MongoDB User Accounts
7.6. Installing and Configuring ActiveMQ7.6.1. Installing ActiveMQ7.6.2. Configuring ActiveMQ7.6.3. Verifying the ActiveMQ Configuration
7.7. Installing and Configuring MCollective Client7.7.1. Installing MCollective Client7.7.2. Configuring MCollective Client
7.8. Installing and Configuring the Broker Application7.8.1. Installing the Broker Application7.8.2. Setting Ownership and Permissions for MCollective Client Configuration File7.8.3. Modifying Broker Proxy Configuration7.8.4. Configuring the Required Services7.8.5. Configuring the Standard SELinux Boolean Variables7.8.6. Configuring the Broker Domain7.8.7. Configuring the Broker Datastore7.8.8. Configuring the Broker Plug-ins7.8.9. Configuring OpenShift Enterprise Authentication7.8.10. Configuring Bundler7.8.11. Verifying the Broker Configuration
Chapter 8. Continuing Broker Host Installation for Enterprise8.1. Installing and Configuring DNS Plug-ins
8.1.1. Installing and Configuring the Fog DNS Plug-in8.1.2. Installing and Configuring the DYN® DNS Plug-in8.1.3. Configuring the nsupdate DNS Plug-in for Compatible DNS Services
8.2. Configuring User Authentication for the Broker8.2.1. Authenticating Using htpasswd8.2.2. Authenticating Using LDAP8.2.3. Authenticating Using Kerberos8.2.4. Authenticating Using Mutual SSL8.2.5. Integrating Active Directory Authentication with Identity Management
8.3. Separating Broker Components by Host8.3.1. BIND and DNS8.3.2. MongoDB
8.4. Configuring Redundancy8.4.1. BIND and DNS8.4.2. Authentication8.4.3. MongoDB8.4.4. ActiveMQ
8.4.4.1. Configuring a Network of ActiveMQ Brokers8.4.4.2. Verifying a Network of ActiveMQ Brokers Using the ActiveMQ Console8.4.4.3. Configuring MCollective for Redundant ActiveMQ Services
8.4.5. Broker Web Application8.5. Installing and Configuring the Gear Placement Plug-in
6062636364646465656667676869707070717171727274757575767778
7979798081818282838487919192929393939697
100101102103
Deployment Guide
2

. . . . . . . . . . . . . . . . . . . . . . . . . . . . . . . . . . . . . . . . . . . . . . . . . . . . . . . . . . . . . . . . . . . . . . . . . . . . . . . . . . . . . . . . . . . . . . . . . . . . . . . . . . . . . . . . . . . . . . . . . . . . . . . . . . . . . . . . . . . . . . . . . . . . . . . . . . . . . . . . . . . . . . . . . . . . . . . . . . . . . . . . . . . . . . . . . . . . . . . . . . . . . . . . . . . . . . . . . . . . . . . . . . . . . . . . . . . . . . . . . . . . . . . . . . . . . . . . . . . . . . . . . . . . . . . . . . . . . . . .
8.5. Installing and Configuring the Gear Placement Plug-in8.5.1. Developing and Implementing a Custom Gear Placement Algorithm8.5.2. Example Gear Placement Algorithms
8.6. Using an External Routing Layer for High-Availability Applications8.6.1. Selecting an External Routing Solution8.6.2. Configuring the Sample Routing Plug-In8.6.3. Configuring a Routing Daemon or Listener8.6.4. Enabling Support for High-Availability Applications
8.7. Integrating with External Single Sign-on (SSO) Providers8.8. Backing Up Broker Host Files8.9. Management Console
8.9.1. Installing the Management Console8.9.2. Creating an SSL Certificate
8.10. Administration Console8.10.1. Installing the Administration Console8.10.2. Accessing the Administration Console8.10.3. Configuring Authentication for the Administration Console
8.11. Clearing Broker and Management Console Application Cache
Chapter 9. Manually Installing and Configuring Node Hosts9.1. Configuring Node Host Entitlements
9.1.1. Using Red Hat Subscription Management on Node Hosts9.1.2. Using Red Hat Network Classic on Node Hosts
9.2. Configuring Yum on Node Hosts9.3. Creating a Node DNS Record9.4. Configuring Node Host Name Resolution9.5. Configuring the Node Host DHCP and Host Name9.6. Installing the Core Node Host Packages9.7. Installing and Configuring MCollective on Node Hosts
9.7.1. Facter9.8. Installing Cartridges
9.8.1. Installing Web Cartridges9.8.2. Installing Add-on Cartridges9.8.3. Installing Cartridge Dependency Metapackages
9.9. Configuring SSH Keys on the Node Host9.10. Configuring Required Services on Node Hosts
9.10.1. Configuring PAM9.10.2. Configuring Cgroups9.10.3. Configuring Disk Quotas9.10.4. Configuring SELinux9.10.5. Configuring System Control Settings9.10.6. Configuring Secure Shell Access9.10.7. Configuring the Port Proxy9.10.8. Configuring Node Settings9.10.9. Updating the Facter Database
9.11. Enabling Network Isolation for Gears9.12. Configuring Node Hosts for xPaaS Cartridges9.13. Configuring Gear Profiles (Sizes)
9.13.1. Adding or Modifying Gear Profiles9.14. Configuring Districts
9.14.1. Creating a District9.14.2. Viewing a District
9.15. Importing Cartridges
103105107110111114116124126128128128129130130130132134
136136137139140142142143144144145146146147147148149150151152153154155155156157157158159160161162163163
Table of Contents
3

. . . . . . . . . . . . . . . . . . . . . . . . . . . . . . . . . . . . . . . . . . . . . . . . . . . . . . . . . . . . . . . . . . . . . . . . . . . . . . . . . . . . . . . . . . . . . . . . . . . . . . . . . . . . . . . . . . . . . . . . . . . . . . . . . . . . . . . . . . . . . . . . . . . . . . . . . . . . . . . . . . . . . . . . . . . . . . . . . . . . . . . . . . . . . . . . . . . . . . . . . . . . . . . . . . . . . . . . . . . . . . . . . . . . . . . . . . . . . . . . . . . . . . . . . . . . . . . . . . . . . . . . . . . . . . . . . . . . . . . .
. . . . . . . . . . . . . . . . . . . . . . . . . . . . . . . . . . . . . . . . . . . . . . . . . . . . . . . . . . . . . . . . . . . . . . . . . . . . . . . . . . . . . . . . . . . . . . . . . . . . . . . . . . . . . . . . . . . . . . . . . . . . . . . . . . . . . . . . . . . . . . . . . . . . . . . . . . . . . . . . . . . . . . . . . . . . . . . . . . . . . . . . . . . . . . . . . . . . . . . . . . . . . . . . . . . . . . . . . . . . . . . . . . . . . . . . . . . . . . . . . . . . . . . . . . . . . . . . . . . . . . . . . . . . . . . . . . . . . . . .
. . . . . . . . . . . . . . . . . . . . . . . . . . . . . . . . . . . . . . . . . . . . . . . . . . . . . . . . . . . . . . . . . . . . . . . . . . . . . . . . . . . . . . . . . . . . . . . . . . . . . . . . . . . . . . . . . . . . . . . . . . . . . . . . . . . . . . . . . . . . . . . . . . . . . . . . . . . . . . . . . . . . . . . . . . . . . . . . . . . . . . . . . . . . . . . . . . . . . . . . . . . . . . . . . . . . . . . . . . . . . . . . . . . . . . . . . . . . . . . . . . . . . . . . . . . . . . . . . . . . . . . . . . . . . . . . . . . . . . . .
. . . . . . . . . . . . . . . . . . . . . . . . . . . . . . . . . . . . . . . . . . . . . . . . . . . . . . . . . . . . . . . . . . . . . . . . . . . . . . . . . . . . . . . . . . . . . . . . . . . . . . . . . . . . . . . . . . . . . . . . . . . . . . . . . . . . . . . . . . . . . . . . . . . . . . . . . . . . . . . . . . . . . . . . . . . . . . . . . . . . . . . . . . . . . . . . . . . . . . . . . . . . . . . . . . . . . . . . . . . . . . . . . . . . . . . . . . . . . . . . . . . . . . . . . . . . . . . . . . . . . . . . . . . . . . . . . . . . . . . .
. . . . . . . . . . . . . . . . . . . . . . . . . . . . . . . . . . . . . . . . . . . . . . . . . . . . . . . . . . . . . . . . . . . . . . . . . . . . . . . . . . . . . . . . . . . . . . . . . . . . . . . . . . . . . . . . . . . . . . . . . . . . . . . . . . . . . . . . . . . . . . . . . . . . . . . . . . . . . . . . . . . . . . . . . . . . . . . . . . . . . . . . . . . . . . . . . . . . . . . . . . . . . . . . . . . . . . . . . . . . . . . . . . . . . . . . . . . . . . . . . . . . . . . . . . . . . . . . . . . . . . . . . . . . . . . . . . . . . . . .
. . . . . . . . . . . . . . . . . . . . . . . . . . . . . . . . . . . . . . . . . . . . . . . . . . . . . . . . . . . . . . . . . . . . . . . . . . . . . . . . . . . . . . . . . . . . . . . . . . . . . . . . . . . . . . . . . . . . . . . . . . . . . . . . . . . . . . . . . . . . . . . . . . . . . . . . . . . . . . . . . . . . . . . . . . . . . . . . . . . . . . . . . . . . . . . . . . . . . . . . . . . . . . . . . . . . . . . . . . . . . . . . . . . . . . . . . . . . . . . . . . . . . . . . . . . . . . . . . . . . . . . . . . . . . . . . . . . . . . . .
. . . . . . . . . . . . . . . . . . . . . . . . . . . . . . . . . . . . . . . . . . . . . . . . . . . . . . . . . . . . . . . . . . . . . . . . . . . . . . . . . . . . . . . . . . . . . . . . . . . . . . . . . . . . . . . . . . . . . . . . . . . . . . . . . . . . . . . . . . . . . . . . . . . . . . . . . . . . . . . . . . . . . . . . . . . . . . . . . . . . . . . . . . . . . . . . . . . . . . . . . . . . . . . . . . . . . . . . . . . . . . . . . . . . . . . . . . . . . . . . . . . . . . . . . . . . . . . . . . . . . . . . . . . . . . . . . . . . . . . .
Chapter 10. Continuing Node Host Installation for Enterprise10.1. Front-End Server Proxies
10.1.1. Configuring Front-end Server Plug-ins10.1.2. Installing and Configuring the HTTP Proxy Plug-in
10.1.2.1. Changing the Front-end HTTP Configuration for Existing Deployments10.1.3. Installing and Configuring the SNI Proxy Plug-in10.1.4. Installing and Configuring the Websocket Proxy Plug-in10.1.5. Installing and Configuring the iptables Proxy Plug-in
10.2. Enabling Seamless Gear Migration with Node Host SSH Keys10.2.1. rsync Keys10.2.2. SSH Host Keys
10.3. SSL Certificates10.3.1. Creating a Matching Certificate10.3.2. Creating a Properly Signed Certificate10.3.3. Reusing the Certificate
10.4. Idling and Overcommitment10.4.1. Manually Idling a Gear10.4.2. Automated Gear Idling10.4.3. Automatically Restoring Idled Gears
10.5. Backing Up Node Host Files
Chapter 11. Testing an OpenShift Enterprise Deployment11.1. Testing the MCollective Configuration11.2. Testing Clock Skew11.3. Testing the BIND and DNS Configuration11.4. Testing the MongoDB Configuration
Chapter 12. Configuring a Developer Workstation12.1. Configuring Workstation Entitlements12.2. Creating a User Account12.3. Installing and Configuring the Client Tools12.4. Configuring DNS on the Workstation12.5. Configuring the Client Tools on a Workstation12.6. Using Multiple OpenShift Configuration Files12.7. Switching Between Multiple OpenShift Environments12.8. Creating a Domain and Application
Chapter 13. OpenShift Enterprise by Red Hat Offline Developer Virtual Machine Image13.1. Downloading the Image13.2. Using the Image
Chapter 14. Customizing OpenShift Enterprise14.1. Creating Custom Application Templates14.2. Customizing the Management Console14.3. Configuring the Logout Destination
Chapter 15. Asynchronous Errata Updates15.1. Applying Asynchronous Errata Updates
Appendix A. Revision History
164164165165167168170170171171171173173174175175175176176176
178178178179179
181181181181182182182183183
185185185
187187188188
190191
193
Deployment Guide
4

Chapter 1. Introduction to OpenShift Enterprise
OpenShift Enterprise by Red Hat is a Platform as a Service (PaaS) that provides developers and ITorganizations with an auto-scaling, cloud application platform for deploying new applications on secure,scalable resources with minimal configuration and management overhead. OpenShift Enterprise supports awide selection of programming languages and frameworks, such as Java, Ruby, and PHP. Integrateddeveloper tools, such as Eclipse integration, JBoss Developer Studio, and Jenkins, support the application lifecycle.
Built on Red Hat Enterprise Linux, OpenShift Enterprise provides a secure and scalable multi-tenantoperating system for today's enterprise-class applications while providing integrated application runtimes andlibraries.
OpenShift Enterprise brings the OpenShift PaaS platform to customer data centers, enabling organizations toimplement a private PaaS that meets security, privacy, compliance, and governance requirements.
1.1. Product Features
OpenShift Enterprise automates hosting, configuration, deployment, and administration of application stacksin an elastic cloud environment. Both system administrators and developers benefit with an open sourcePlatform-as-a-Service solution to deliver applications.
Benefits of Platform-as-a-Service
Ease of administration With OpenShift Enterprise, system administrators no longer have tocreate development, testing, and production environments. Developerscan create their own application stacks using the OpenShift EnterpriseManagement Console, client tools, or the REST API.
Choice Developers can choose their tools, languages, frameworks, and services.Automatic scaling With OpenShift Enterprise, applications can scale out as necessary,
adjusting resources based on demand.Avoid lock-in Using standard languages and middleware runtimes means that
customers are not tied to OpenShift Enterprise, and can easily move toanother platform.
Multiple clouds OpenShift Enterprise can be deployed on physical hardware, privateclouds, public clouds, hybrid clouds, or a mixture of these, allowing fullcontrol over where applications are run.
1.2. What's New in Current Release
For a complete list of all the new features available in the current release of OpenShift Enterprise, see thecurrent edition of the OpenShift Enterprise Release Notes at https://access.redhat.com/site/documentation.New features that are available in the current release are documented in the respective sections of this book.
Chapter 1. Introduction to OpenShift Enterprise
5

Chapter 2. Prerequisites
2.1. Supported Operating Systems
A base installation of Red Hat Enterprise Linux Server 6.6 or later is required to install OpenShift Enterprise 2.Red Hat recommends a "Basic Server" configuration for the base installation, although other configurationsare sufficient as a starting point.
Note
Red Hat Enterprise Linux 6 is included with OpenShift Enterprise subscriptions. See Section 2.3, “RedHat Subscription Requirements” for more information.
Important
At this time, OpenShift Enterprise 2 is only compatible with Red Hat Enterprise Linux Server 6. Futureversions will be compatible with Red Hat Enterprise Linux Server 7.
2.2. Hardware Requirements
Although the instructions in this document have been primarily tested on Kernel-based Virtual Machines(KVMs), the instructions also apply to other environments.
The following hardware requirements apply to all hosts, whether configured as a broker or as a node. Thehardware requirements are applicable to both physical and virtual environments.
AMD64 or Intel® 64 architecture
Minimum 1 GB of memory
Minimum 8 GB of hard disk space
Network connectivity
2.3. Red Hat Subscription Requirements
To access the repositories required to install OpenShift Enterprise, your Red Hat account must have activeOpenShift Enterprise subscriptions. These subscriptions are available as supported or unsupportedevaluations, or they can be purchased by contacting Red Hat Sales. Seehttps://www.openshift.com/products/enterprise/try-enterprise for more information.
OpenShift Enterprise subscriptions include the following Red Hat products:
Red Hat Enterprise Linux 6 Server
Red Hat Software Collections 1
OpenShift Enterprise Infrastructure (broker and supporting services)
OpenShift Enterprise Application Node
Deployment Guide
6

OpenShift Enterprise Client Tools
JBoss Enterprise Web Server 2
In addition, the JBoss Enterprise Application Platform for OpenShift Enterprise add-on subscription, whichprovides the JBoss EAP premium cartridge, includes the following Red Hat products:
JBoss Enterprise Application Platform 6
Red Hat OpenShift Enterprise JBoss EAP add-on
Support for the products included in supported evaluation and purchased OpenShift Enterprise subscriptionsis provided by Red Hat Global Support Services (GSS). See the OpenShift Enterprise Support Policy athttps://access.redhat.com/support/policy/updates/openshift/policies for more information.
Note
Evaluation subscriptions may be bundled differently than purchased subscriptions. Contact Red HatSales for the latest information.
Chapter 2. Prerequisites
7

Chapter 3. Architecture
OpenShift Enterprise consists of several components. This section provides information about the primarycomponents, and the various configurations described in this guide. The diagrams in subsequent sectionsdepict elements using the following legend:
Figure 3.1. OpenShift Enterprise Components Legend
An OpenShift Enterprise deployment consists of two logical types of hosts: a broker and one or more nodes.The broker handles the creation and management of user applications, the user authentication service, andmanages communication with the appropriate nodes. The nodes run the user applications in containedenvironments called gears. The broker queries and controls nodes using a messaging service. The followingdiagram provides a simplified version of the interaction between these two types of hosts:
Figure 3.2. OpenShift Enterprise Host Types
Deployment Guide
8

Warning
The OpenShift Enterprise security model assumes that broker and node components are installed onseparate hosts. Running a broker and node on the same host is not supported.
3.1. Communication Mechanisms
Communication from external clients, such as the client tools or the Management Console, occurs through theREST API that is hosted by the broker. The broker then communicates to the nodes using the messagingservice component. MCollective queries a set of nodes and communicates securely with individual nodes.The following diagram provides a high-level description of this communication:
Figure 3.3. OpenShift Enterprise Communication Mechanisms
3.2. State Management
The broker is responsible for managing persistent data for OpenShift Enterprise using three distinct interfacesthat represent the complete state. Three interfaces are used because each data store is pluggable and eachtype of data is usually managed by a separate system. The following table describes each section ofapplication data.
Table 3.1. Sections of Application Data
Section DescriptionState This is the general application state where the data is stored using MongoDB by
default.DNS This is the dynamic DNS state where BIND handles the data by default.
Chapter 3. Architecture
9
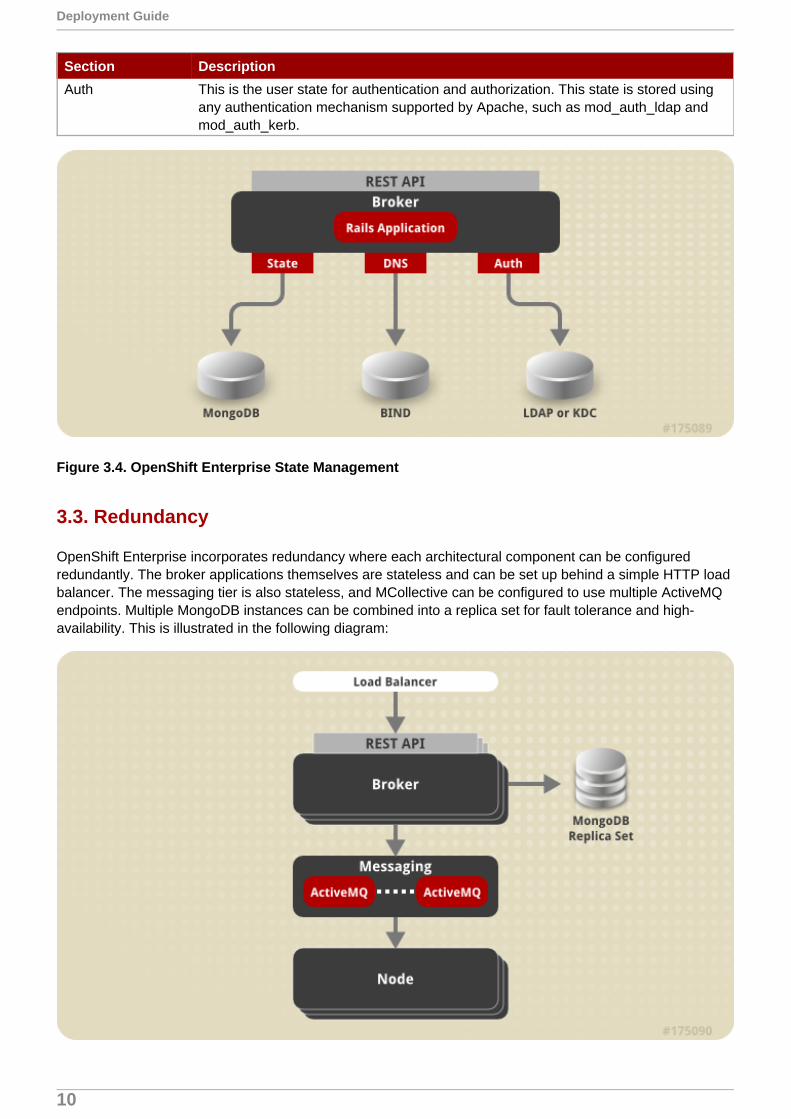
Auth This is the user state for authentication and authorization. This state is stored usingany authentication mechanism supported by Apache, such as mod_auth_ldap andmod_auth_kerb.
Section Description
Figure 3.4. OpenShift Enterprise State Management
3.3. Redundancy
OpenShift Enterprise incorporates redundancy where each architectural component can be configuredredundantly. The broker applications themselves are stateless and can be set up behind a simple HTTP loadbalancer. The messaging tier is also stateless, and MCollective can be configured to use multiple ActiveMQendpoints. Multiple MongoDB instances can be combined into a replica set for fault tolerance and high-availability. This is illustrated in the following diagram:
Deployment Guide
10

Figure 3.5. Implementing Redundancy in OpenShift Enterprise
This guide focuses on providing a functional installation, and for the sake of simplicity, does not cover how toimplement redundancy with the various components. It describes how to install the broker, data stores, andmessaging components on one system, while the node is configured on a separate system. The followingdiagram displays the resulting system topology:
Figure 3.6. Simplified OpenShift Enterprise Installation Topology
3.4. Security
The OpenShift Enterprise multi-tenancy model is based on Red Hat Enterprise Linux, and it provides asecure isolated environment that incorporates the following three security mechanisms:
SELinux
SELinux is an implementation of a mandatory access control (MAC) mechanism in the Linuxkernel. It checks for allowed operations at a level beyond what standard discretionary accesscontrols (DAC) provide. SELinux can enforce rules on files and processes, and on their actionsbased on defined policy. SELinux provides a high level of isolation between applications runningwithin OpenShift Enterprise because each gear and its contents are uniquely labeled.
Control Groups (cgroups)
Control Groups allow you to allocate processor, memory, and input and output (I/O) resourcesamong applications. They provide control of resource utilization in terms of memory consumption,storage and networking I/O utilization, and process priority. This enables the establishment ofpolicies for resource allocation, thus ensuring that no system resource consumes the entire systemand affects other gears or services.
Kernel Namespaces
Kernel namespaces separate groups of processes so that they cannot see resources in othergroups. From the perspective of a running OpenShift Enterprise application, for example, theapplication has access to a running Red Hat Enterprise Linux system, although it could be one ofmany applications running within a single instance of Red Hat Enterprise Linux.
Chapter 3. Architecture
11
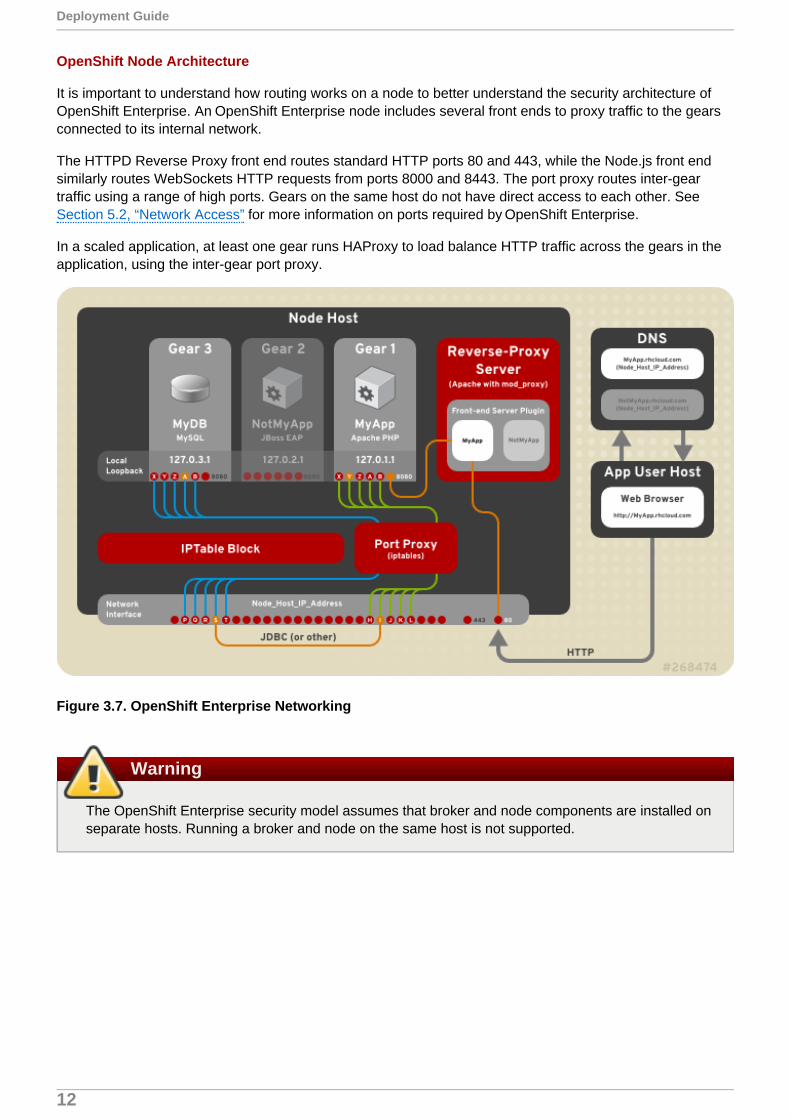
OpenShift Node Architecture
It is important to understand how routing works on a node to better understand the security architecture ofOpenShift Enterprise. An OpenShift Enterprise node includes several front ends to proxy traffic to the gearsconnected to its internal network.
The HTTPD Reverse Proxy front end routes standard HTTP ports 80 and 443, while the Node.js front endsimilarly routes WebSockets HTTP requests from ports 8000 and 8443. The port proxy routes inter-geartraffic using a range of high ports. Gears on the same host do not have direct access to each other. SeeSection 5.2, “Network Access” for more information on ports required by OpenShift Enterprise.
In a scaled application, at least one gear runs HAProxy to load balance HTTP traffic across the gears in theapplication, using the inter-gear port proxy.
Figure 3.7. OpenShift Enterprise Networking
Warning
The OpenShift Enterprise security model assumes that broker and node components are installed onseparate hosts. Running a broker and node on the same host is not supported.
Deployment Guide
12

Chapter 4. Upgrading from Previous Versions
The following sections describe how to upgrade from previous major or minor versions to the most currentsupported version of OpenShift Enterprise using the ose-upgrade tool. If you are deploying OpenShiftEnterprise for the first time, see Section 6.3, “Using the Sample Deployment Steps” for installationinstructions. If you are attempting to apply the latest errata within a minor release of OpenShift Enterprise 2(for example, updating from release 2.1.6 to 2.1.8), see Chapter 15, Asynchronous Errata Updates forspecific update instructions.
Upgrades across major or minor versions must be taken one upgrade at a time. For example, to upgradefrom 2.0 to 2.2, you must first use the ose-upgrade tool to upgrade from 2.0 to 2.1, then use the tool againto upgrade from 2.1 to 2.2.
These upgrade processes require outages:
Broker services are disabled during the upgrade.
Applications are unavailable during certain steps of the upgrade. During the outage, users can still accesstheir gears using SSH, but should be advised against performing any Git pushes. See the section on yourrelevant upgrade path for more specific outage information.
Although it may not be necessary, Red Hat recommends rebooting all hosts after an upgrade. Due to thescheduled outage, this is a good time to apply any kernel updates that are included.
The updated OpenShift Enterprise packages are distributed in new channel repositories on Red Hat Networkso that the upgrade process occurs in a prescribed order, and to avoid accidental upgrades with a yum update command.
4.1. Upgrade Tool
The upgrade process is managed as a series of steps that vary depending on the type of host, and is guidedby the ose-upgrade tool.
Each step typically consists of one or more scripts to be executed and varies depending on the type ofhost.
Upgrade steps and scripts must be executed in a given order, and are tracked by the ose-upgrade tool.The upgrade tool tracks all steps that have been executed and those that have failed. The next step orscript is not executed when a previous one has failed.
Failed steps can be reattempted after the issues are resolved. Note that only scripts that previously failedare executed again, so ensure you are aware of the impact and that the issue has been resolvedcorrectly. If necessary, use the --skip option to mark a step complete and proceed to the next step.However, only do this when absolutely required.
The ose-upgrade tool log file is stored at /var/log/openshift/upgrade.log for review if required.
At any time, use the ose-upgrade status command to list the known steps and view the next step thatmust be performed. Performing all the steps without pausing with the ose-upgrade all command is onlyrecommended for node hosts. For broker hosts, Red Hat recommends that you pause after each step tobetter understand the process, and understand the next step to be performed.
4.2. Preparing for an Upgrade
The following instructions describe how to prepare OpenShift Enterprise for an upgrade.
Chapter 4. Upgrading from Previous Versions
13

Procedure 4.1. To Prepare OpenShift Enterprise for an Upgrade:
1. Perform the required backup steps before starting with the upgrade. Only proceed to the next stepafter the backup is complete, and the relevant personnel are notified of the upcoming outage.
2. Disable any change management software that is being used to manage your OpenShift Enterpriseinstallation configuration, and update it accordingly after the upgrade.
3. If a configuration file already exists on disk during an update, the RPM package that provides the filedoes one of the following, depending on how the package is built:
Backs up the existing file with an .rpmsave extension and creates the new file.
Leaves the existing file in place and creates the new file with an .rpmnew extension.
Before updating, find any .rpm* files still on disk from previous updates using the followingcommands:
# updatedb# locate --regex '\.rpm(save|new)$'
Compare these files to the relevant configuration files currently in use and note any differences.Manually merge any desired settings into the current configuration files, then either move the .rpm*files to an archive directory or remove them.
4. Before attempting to upgrade, ensure the latest errata have been applied for the current minorversion of your OpenShift Enterprise installation. Run the yum update command, then check againfor any new configuration files that have changed:
# yum update -y# updatedb# locate --regex '\.rpm(save|new)$'
Resolve any .rpm* files found again as described in the previous step.
Additional steps may also be required depending on the errata being applied. For more informationon errata updates, see the relevant OpenShift Enterprise Release Notes athttp://access.redhat.com/site/documentation.
5. Restart any services that had their configuration files updated.
6. Run the oo-admin-chk script on a broker host:
# oo-admin-chk
This command checks the integrity of the MongoDB datastore against the actual deployment ofapplication gears on the node hosts. Resolve any issues reported by this script, if possible, prior toperforming an upgrade. For more information on using the oo-admin-chk script and fixing geardiscrepancies, see the OpenShift Enterprise Troubleshooting Guide athttp://access.redhat.com/site/documentation.
7. Run the oo-diagnostics script on all hosts:
# oo-diagnostics
Use the output of this command to compare after the upgrade is complete.
Deployment Guide
14

4.3. Upgrading from OpenShift Enterprise 1.2 to OpenShift Enterprise 2.0
The following instructions describe how to upgrade from OpenShift Enterprise 1.2 to OpenShift Enterprise2.0. The 2.0 upgrade packages are located in new channel repositories on Red Hat Network. The firstupgrade step, the begin step, adjusts the yum configurations in preparation for the upgrade. Red Hatrecommends that you perform this step in advance of the scheduled outage to ensure any subscriptionissues are resolved before you proceed with the upgrade.
Procedure 4.2. To Bootstrap the Upgrade and Perform the begin Step:
1. The openshift-enterprise-release RPM package includes the ose-upgrade tool that guides youthrough the upgrade process. Install the openshift-enterprise-release package on each host, andupdate it to the most current version.
# yum install openshift-enterprise-release
2. The begin step of the upgrade process applies to all hosts, and includes those hosts that containonly supporting services such as MongoDB and ActiveMQ. Hosts using Red Hat SubscriptionManagement (RHSM) or Red Hat Network (RHN) Classic are unsubscribed from the 1.2 channelsand subscribed to the new 2.0 channels.
Warning
This step assumes that the channel names come directly from Red Hat Network. If thepackage source is an instance of Red Hat Satellite or Subscription Asset Manager and thechannel names are remapped differently, you must change this yourself. Examine the scriptsin the /usr/lib/ruby/site_ruby/1.8/ose-upgrade/host/upgrades/2/ directoryfor use as models. You can also add your custom script to a subdirectory to be executed withthe ose-upgrade tool.
In addition to updating the channel set, modifications to the yum configuration give priority to theOpenShift Enterprise, Red Hat Enterprise Linux, and JBoss repositories. However, packages fromother sources are excluded as required to prevent certain issues with dependency management thatoccur between the various channels.
Run the begin step on each host. Note that the command output is different depending on the typeof host. The following example output is from a broker host:
# ose-upgrade begin
INFO: OpenShift broker installed.INFO: Setting host step 'begin' status to UPGRADINGINFO: Starting upgrade number 2 to version 2.0.[...]INFO: Setting host step 'begin' status to COMPLETEINFO: To continue the upgrade, install a specific upgrade package.
Procedure 4.3. To Install the Upgrade RPM Specific to a Host:
1. Depending on the host type, install the latest upgrade RPM package from the new OpenShiftEnterprise 2.0 channels. For broker hosts, install the openshift-enterprise-upgrade-broker package:
Chapter 4. Upgrading from Previous Versions
15

# yum install openshift-enterprise-upgrade-broker
For node hosts, install the openshift-enterprise-upgrade-node package:
# yum install openshift-enterprise-upgrade-node
If the package is already installed because of a previous upgrade, it still must be updated to the latestpackage version for the OpenShift Enterprise 2.0 upgrade.
2. The ose-upgrade tool guides the upgrade process by listing the necessary steps that are specific tothe upgrade scenario, and identifies the step to be performed next. The ose-upgrade statuscommand, or ose-upgrade, provides a current status report. The command output variesdepending on the type of host. The following example output is from a broker host:
# ose-upgrade status
INFO: OpenShift broker installed.Current upgrade is number 2 to version 2.0.Step sequence: begin pre outage rpms conf maintenance_mode pending_ops confirm_nodes data gears end_maintenance_mode postNext step is: pre
Procedure 4.4. To Perform the pre Step on Broker and Node Hosts:
1. The pre step manages the following actions:
Backs up OpenShift Enterprise configuration files.
Clears pending operations older than one hour. (Broker hosts only)
Performs any pre-upgrade datastore migration steps. (Broker hosts only)
Updates authorization indexes. (Broker hosts only)
Run the pre step on one broker host and each node host:
# ose-upgrade pre
When one broker host begins this step, any attempts made by other broker hosts to run the pre stepsimultaneously will fail.
2. After the pre step completes on the first broker host, run it on any remaining broker hosts.
Procedure 4.5. To Perform the outage Step on Broker and Node Hosts:
1. The outage step stops services as required depending on the type of host.
Warning
The broker enters outage mode during this upgrade step. A substantial outage also begins forapplications on the node hosts. Scaled applications are unable to contact any child gearsduring the outage. These outages last until the end_maintenance_mode step is complete.
Deployment Guide
16

Perform this step on all broker hosts first, and then on all node hosts. This begins the broker outage,and all communication between the broker host and the node hosts is stopped. Perform the outagestep with the following command:
# ose-upgrade outage
After the command completes on all hosts, node and broker hosts can be upgraded simultaneouslyuntil the upgrade steps are complete on all node hosts, and the broker host reaches the confirm_nodes step.
2. For all other hosts that are not a broker or a node host, run yum update to upgrade any servicesthat are installed, such as MongoDB or ActiveMQ:
# yum update
Procedure 4.6. To Perform the rpms Step on Broker and Node Hosts:
The rpms step updates RPM packages installed on the node host, and installs any new RPM packagesthat are required.
Run the rpms step on each host:
# ose-upgrade rpms
Procedure 4.7. To Perform the conf Step on Broker and Node Hosts:
The conf step changes the OpenShift Enterprise configuration to match the new codebase installed inthe previous step. Each modified file is first copied to a file with the same name plus a .ugsaveextension and a timestamp. This makes it easier to determine what files have changed.
Run the conf step on each host:
# ose-upgrade conf
Warning
If the configuration files have been significantly modified from the recommended configuration,manual intervention may be required to merge configuration changes so that they can be usedwith OpenShift Enterprise.
Procedure 4.8. To Perform the maintenance_mode Step on Broker and Node Hosts:
The maintenance_mode step manages the following actions:
Configures the broker to disable the API and return an outage notification to any requests. (Brokerhosts only)
Starts the broker service and, if installed, the console service in maintenance mode so that theyprovide clients with an outage notification. (Broker hosts only)
Clears the broker and console caches. (Broker hosts only)
Enables gear upgrade extensions. (Node hosts only)
Chapter 4. Upgrading from Previous Versions
17

Starts the ruby193-mcollective service. (Node hosts only)
Run the maintenance_mode step on each host:
# ose-upgrade maintenance_mode
Procedure 4.9. To Perform the pending_ops Step on a Broker Host:
1. The pending_ops step clears records of any pending application operations; the outage preventsthem from ever completing. Run the pending_ops step on one broker host. Do not run thiscommand on multiple broker hosts at the same time. When one broker host begins this step, anyattempts made by other broker hosts to run the pending_ops step simultaneously will fail:
# ose-upgrade pending_ops
2. After the pending_ops step completes on the first broker host, run the command on any remainingbroker hosts.
Procedure 4.10. To Perform the confirm_nodes Step on Broker Hosts:
1. The confirm_nodes step attempts to access all known node hosts to determine whether they haveall been upgraded before proceeding. This step fails if the maintenance_mode step has not beencompleted on all node hosts, or if MCollective cannot access any node hosts.
Run the confirm_nodes step on a broker host:
# ose-upgrade confirm_nodes
2. If this step fails due to node hosts that are no longer deployed, you may need to skip the confirm_nodes step. Ensure that all node hosts reported missing are not actually expected torespond, then skip the confirm_nodes step with the following command:
# ose-upgrade --skip confirm_nodes
Procedure 4.11. To Perform the data Step on Broker Hosts:
1. The data step runs a data migration against the shared broker datastore. Run the data step on onebroker host:
# ose-upgrade data
When one broker host begins this step, any attempts made by other broker hosts to run the datastep simultaneously will fail.
2. After the data step completes on the first broker host, run it on any remaining broker hosts.
Procedure 4.12. To Perform the gears Step on Broker Hosts:
1. The gears step runs a gear migration through the required changes so that they can be used inOpenShift Enterprise 2.0. Run the gears step on one broker host:
# ose-upgrade gears
Deployment Guide
18
When one broker host begins this step, any attempts made by other broker hosts to run the gearsstep simultaneously will fail.
2. After the gears step completes on the first broker host, run it on any remaining broker hosts.
Procedure 4.13. To Perform the test_gears_complete Step on Node Hosts:
The test_gears_complete step verifies the gear migrations are complete before proceeding. Thisstep blocks the upgrade on node hosts by waiting until the gears step has completed on an associatedbroker host. Run the test_gears_complete step on all node hosts:
# ose-upgrade test_gears_complete
Procedure 4.14. To Perform the end_maintenance_mode Step on Broker and Node Hosts:
1. The end_maintenance_mode step starts the services that were stopped in the maintenance_mode step or added in the interim. It gracefully restarts httpd to complete the nodehost upgrade, and restarts the broker service and, if installed, the console service. Complete this stepon all node hosts first before running it on the broker hosts:
# ose-upgrade end_maintenance_mode
2. Run the oo-accept-node script on each node host to verify that it is correctly configured:
# oo-accept-node
Procedure 4.15. To Perform the post Step on Broker Hosts:
1. The post step manages the following actions on the broker host:
Performs any post-upgrade datastore migration steps.
Publishes updated district UIDs to the node hosts.
Clears the broker and console caches.
Run the post step on a broker host:
# ose-upgrade post
When one broker host begins this step, any attempts made by other broker hosts to run the poststep simultaneously will fail.
2. After the post step completes on the first broker host, run it on any remaining broker hosts.
3. The upgrade is now complete for an OpenShift Enterprise installation. Run oo-diagnostics oneach host to diagnose any problems:
# oo-diagnostics
Known Upgrade Issues
Although the goal is to make the upgrade process as easy as possible, some known issues must beaddressed manually:
Chapter 4. Upgrading from Previous Versions
19

1. Because Jenkins applications cannot be migrated, follow these steps to regain functionality:
a. Save any modifications made to existing Jenkins jobs.
b. Remove the existing Jenkins application.
c. Add the Jenkins application again.
d. Add the Jenkins client cartridge as required.
e. Reapply the required modifications from the first step.
2. There are no notifications when a gear is successfully migrated but fails to start. This may not be amigration failure because there may be multiple reasons why a gear fails to start. However, Red Hatrecommends that you verify the operation of your applications after upgrading. The service openshift-gears status command may be helpful in certain situations.
4.4. Upgrading from OpenShift Enterprise 2.0 to OpenShift Enterprise 2.1
The following instructions describe how to upgrade from OpenShift Enterprise 2.0 to OpenShift Enterprise2.1. The 2.1 upgrade packages are located in distinct channel repositories on Red Hat Network. The firstupgrade step, the begin step, adjusts the yum configurations in preparation for the upgrade. Red Hatrecommends that you perform this step in advance of the scheduled outage to ensure any subscriptionissues are resolved before you proceed with the upgrade.
Procedure 4.16. To Bootstrap the Upgrade and Perform the begin Step:
1. The openshift-enterprise-release RPM package includes the ose-upgrade tool that guides youthrough the upgrade process. Install the openshift-enterprise-release package on each host, andupdate it to the most current version.
# yum install openshift-enterprise-release
2. The begin step of the upgrade process applies to all hosts, and includes those hosts that containonly supporting services such as MongoDB and ActiveMQ. Hosts using Red Hat SubscriptionManagement (RHSM) or Red Hat Network (RHN) Classic are unsubscribed from the 2.0 channelsand subscribed to the new 2.1 channels.
Warning
This step assumes that the channel names come directly from Red Hat Network. If thepackage source is an instance of Red Hat Satellite or Subscription Asset Manager and thechannel names are remapped differently, you must change this yourself. Examine the scriptsin the /usr/lib/ruby/site_ruby/1.8/ose-upgrade/host/upgrades/3/ directoryfor use as models. You can also add your custom script to a subdirectory to be executed withthe ose-upgrade tool.
In addition to updating the channel set, modifications to the yum configuration give priority to theOpenShift Enterprise, Red Hat Enterprise Linux, and JBoss repositories. However, packages fromother sources are excluded as required to prevent certain issues with dependency management thatoccur between the various channels.
Run the begin step on each host. Note that the command output is different depending on the typeof host. The following example output is from a broker host:
Deployment Guide
20

# ose-upgrade begin
INFO: OpenShift broker installed.INFO: Setting host step 'begin' status to UPGRADINGINFO: Starting upgrade number 3 to version 2.1.[...]INFO: updating /etc/openshift-enterprise-releaseINFO: Setting host step 'begin' status to COMPLETEINFO: To continue the upgrade, install a specific upgrade package.
Important
The oo-admin-yum-validator --oo-version 2.1 --fix-all command is runautomatically during the begin step. When using RHN Classic, the command does notautomatically subscribe a system to the OpenShift Enterprise 2.1 channels, but insteadreports the manual steps required. After the channels are manually subscribed, running the begin step again sets the proper yum priorities and continues as expected.
Procedure 4.17. To Install the Upgrade RPM Specific to a Host:
1. Depending on the host type, install the latest upgrade RPM package from the new OpenShiftEnterprise 2.1 channels. For broker hosts, install the openshift-enterprise-upgrade-broker package:
# yum install openshift-enterprise-upgrade-broker
For node hosts, install the openshift-enterprise-upgrade-node package:
# yum install openshift-enterprise-upgrade-node
If the package is already installed because of a previous upgrade, it still must be updated to the latestpackage version for the OpenShift Enterprise 2.1 upgrade.
2. The ose-upgrade tool guides the upgrade process by listing the necessary steps that are specific tothe upgrade scenario, and identifies the step to be performed next. The ose-upgrade statuscommand, or ose-upgrade, provides a current status report. The command output variesdepending on the type of host. The following example output is from a broker host:
# ose-upgrade status
INFO: OpenShift broker installed.Current upgrade is number 3 to version 2.1.Step sequence: begin pre outage rpms conf maintenance_mode pending_ops confirm_nodes data gears end_maintenance_mode postNext step is: pre
Procedure 4.18. To Perform the pre Step on Broker and Node Hosts:
1. The pre step manages the following actions:
Backs up OpenShift Enterprise configuration files.
Chapter 4. Upgrading from Previous Versions
21

Clears pending operations older than one hour. (Broker hosts only)
Performs any pre-upgrade datastore migration steps. (Broker hosts only)
Run the pre step on one broker host and each node host:
# ose-upgrade pre
When one broker host begins this step, any attempts made by other broker hosts to run the pre stepsimultaneously will fail.
2. After the pre step completes on the first broker host, run it on any remaining broker hosts.
Procedure 4.19. To Perform the outage Step on Broker and Node Hosts:
1. The outage step stops services as required depending on the type of host.
Warning
The broker enters outage mode during this upgrade step. A substantial outage also begins forapplications on the node hosts. Scaled applications are unable to contact any child gearsduring the outage. These outages last until the end_maintenance_mode step is complete.
Perform this step on all broker hosts first, and then on all node hosts. This begins the broker outage,and all communication between the broker host and the node hosts is stopped. Perform the outagestep with the following command:
# ose-upgrade outage
After the command completes on all hosts, node and broker hosts can be upgraded simultaneouslyuntil the upgrade steps are complete on all node hosts, and the broker host reaches the confirm_nodes step.
2. For all other hosts that are not a broker or a node host, run yum update to upgrade any servicesthat are installed, such as MongoDB or ActiveMQ:
# yum update
Procedure 4.20. To Perform the rpms Step on Broker and Node Hosts:
The rpms step updates RPM packages installed on the host, and installs any new RPM packages that arerequired. For node hosts, this includes the recommended cartridge dependency metapackages for anycartridge already installed on a node. See Section 9.8.3, “Installing Cartridge Dependency Metapackages”for more information about cartridge dependency metapackages.
Run the rpms step on each host:
# ose-upgrade rpms
Procedure 4.21. To Perform the conf Step on Broker and Node Hosts:
Deployment Guide
22

The conf step changes the OpenShift Enterprise configuration to match the new codebase installed inthe previous step. Each modified file is first copied to a file with the same name plus a .ugsaveextension and a timestamp. This makes it easier to determine what files have changed.
Run the conf step on each host:
# ose-upgrade conf
Warning
If the configuration files have been significantly modified from the recommended configuration,manual intervention may be required to merge configuration changes so that they can be usedwith OpenShift Enterprise.
Procedure 4.22. To Perform the maintenance_mode Step on Broker and Node Hosts:
The maintenance_mode step manages the following actions:
Configures the broker to disable the API and return an outage notification to any requests. (Brokerhosts only)
Starts the broker service and, if installed, the console service in maintenance mode so that theyprovide clients with an outage notification. (Broker hosts only)
Clears the broker and console caches. (Broker hosts only)
Enables gear upgrade extensions. (Node hosts only)
Saves and regenerates configurations for any apache-vhost front ends. (Node hosts only)
Stops the openshift-iptables-port-proxy service. (Node hosts only)
Starts the ruby193-mcollective service. (Node hosts only)
Run the maintenance_mode step on each host:
# ose-upgrade maintenance_mode
Procedure 4.23. To Perform the pending_ops Step on Broker Hosts:
1. The pending_ops step clears records of any pending application operations because the outageprevents them from ever completing. Run the pending_ops step on one broker host only:
# ose-upgrade pending_ops
2. On any remaining broker hosts, run the following command to skip the pending_ops step:
# ose-upgrade pending_ops --skip
Procedure 4.24. To Perform the confirm_nodes Step on Broker Hosts:
1. The confirm_nodes step attempts to access all known node hosts to determine whether they haveall been upgraded before proceeding. This step fails if the maintenance_mode step has not been
Chapter 4. Upgrading from Previous Versions
23
completed on all node hosts, or if MCollective cannot access any node hosts.
Run the confirm_nodes step on a broker host:
# ose-upgrade confirm_nodes
2. If this step fails due to node hosts that are no longer deployed, you may need to skip the confirm_nodes step. Ensure that all node hosts reported missing are not actually expected torespond, then skip the confirm_nodes step with the following command:
# ose-upgrade --skip confirm_nodes
Procedure 4.25. To Perform the data Step on Broker Hosts:
1. The data step runs a data migration against the shared broker datastore. Run the data step on onebroker host:
# ose-upgrade data
When one broker host begins this step, any attempts made by other broker hosts to run the datastep simultaneously will fail.
2. After the data step completes on the first broker host, run it on any remaining broker hosts.
Procedure 4.26. To Perform the gears Step on Broker Hosts:
1. The gears step runs a gear migration through the required changes so that they can be used inOpenShift Enterprise 2.1. Run the gears step on one broker host:
# ose-upgrade gears
When one broker host begins this step, any attempts made by other broker hosts to run the gearsstep simultaneously will fail.
2. After the gears step completes on the first broker host, run it on any remaining broker hosts.
Procedure 4.27. To Perform the test_gears_complete Step on Node Hosts:
The test_gears_complete step verifies the gear migrations are complete before proceeding. Thisstep blocks the upgrade on node hosts by waiting until the gears step has completed on an associatedbroker host. Run the test_gears_complete step on all node hosts:
# ose-upgrade test_gears_complete
Procedure 4.28. To Perform the end_maintenance_mode Step on Broker and Node Hosts:
1. The end_maintenance_mode step starts the services that were stopped in the maintenance_mode step or added in the interim. It gracefully restarts httpd to complete the nodehost upgrade, and restarts the broker service and, if installed, the console service. Complete this stepon all node hosts first before running it on the broker hosts:
# ose-upgrade end_maintenance_mode
Deployment Guide
24
2. Run the oo-accept-node script on each node host to verify that it is correctly configured:
# oo-accept-node
Procedure 4.29. To Perform the post Step on Broker Hosts:
1. The post step manages the following actions on the broker host:
Imports cartridges to the datastore.
Performs any post-upgrade datastore migration steps.
Clears the broker and console caches.
Run the post step on a broker host:
# ose-upgrade post
When one broker host begins this step, any attempts made by other broker hosts to run the poststep simultaneously will fail.
2. After the post step completes on the first broker host, run it on any remaining broker hosts.
3. The upgrade is now complete for an OpenShift Enterprise installation. Run oo-diagnostics oneach host to diagnose any problems:
# oo-diagnostics
Known Upgrade Issues
Although the goal is to make the upgrade process as easy as possible, some known issues must beaddressed manually:
1. Because Jenkins applications cannot be migrated, follow these steps to regain functionality:
a. Save any modifications made to existing Jenkins jobs.
b. Remove the existing Jenkins application.
c. Add the Jenkins application again.
d. Add the Jenkins client cartridge as required.
e. Reapply the required modifications from the first step.
2. There are no notifications when a gear is successfully migrated but fails to start. This may not be amigration failure because there may be multiple reasons why a gear fails to start. However, Red Hatrecommends that you verify the operation of your applications after upgrading. The service openshift-gears status command may be helpful in certain situations.
4.5. Upgrading from OpenShift Enterprise 2.1 to OpenShift Enterprise 2.2
The following instructions describe how to upgrade from OpenShift Enterprise 2.1 to OpenShift Enterprise2.2. The 2.2 upgrade packages are located in distinct channel repositories on Red Hat Network. The firstupgrade step, the begin step, adjusts the yum configurations in preparation for the upgrade. Red Hatrecommends that you perform this step in advance of the scheduled outage to ensure any subscription
Chapter 4. Upgrading from Previous Versions
25

issues are resolved before you proceed with the upgrade.
Procedure 4.30. To Bootstrap the Upgrade and Perform the begin Step:
1. The openshift-enterprise-release RPM package includes the ose-upgrade tool that guides youthrough the upgrade process. Install the openshift-enterprise-release package on each host, andupdate it to the most current version.
# yum install openshift-enterprise-release
2. The begin step of the upgrade process applies to all hosts, and includes those hosts that containonly supporting services such as MongoDB and ActiveMQ. Hosts using Red Hat SubscriptionManagement (RHSM) or Red Hat Network (RHN) Classic are unsubscribed from the 2.1 channelsand subscribed to the new 2.2 channels.
Warning
This step assumes that the channel names come directly from Red Hat Network. If thepackage source is an instance of Red Hat Satellite or Subscription Asset Manager and thechannel names are remapped differently, you must change this yourself. Examine the scriptsin the /usr/lib/ruby/site_ruby/1.8/ose-upgrade/host/upgrades/4/ directoryfor use as models. You can also add your custom script to a subdirectory to be executed withthe ose-upgrade tool.
In addition to updating the channel set, modifications to the yum configuration give priority to theOpenShift Enterprise, Red Hat Enterprise Linux, and JBoss repositories. However, packages fromother sources are excluded as required to prevent certain issues with dependency management thatoccur between the various channels.
Run the begin step on each host. Note that the command output is different depending on the typeof host. The following example output is from a broker host:
# ose-upgrade begin
INFO: OpenShift broker installed.INFO: Setting host step 'begin' status to UPGRADINGINFO: Starting upgrade number 4 to version 2.2.[...]INFO: updating /etc/openshift-enterprise-releaseINFO: Setting host step 'begin' status to COMPLETEINFO: To continue the upgrade, install a specific upgrade package.
Important
The oo-admin-yum-validator --oo-version 2.2 --fix-all command is runautomatically during the begin step. When using RHN Classic, the command does notautomatically subscribe a system to the OpenShift Enterprise 2.2 channels, but insteadreports the manual steps required. After the channels are manually subscribed, running the begin step again sets the proper yum priorities and continues as expected.
Deployment Guide
26

Procedure 4.31. To Install the Upgrade RPM Specific to a Host:
1. Depending on the host type, install the latest upgrade RPM package from the new OpenShiftEnterprise 2.2 channels. For broker hosts, install the openshift-enterprise-upgrade-broker package:
# yum install openshift-enterprise-upgrade-broker
For node hosts, install the openshift-enterprise-upgrade-node package:
# yum install openshift-enterprise-upgrade-node
If the package is already installed because of a previous upgrade, it still must be updated to the latestpackage version for the OpenShift Enterprise 2.2 upgrade.
2. The ose-upgrade tool guides the upgrade process by listing the necessary steps that are specific tothe upgrade scenario, and identifies the step to be performed next. The ose-upgrade statuscommand, or ose-upgrade, provides a current status report. The command output variesdepending on the type of host. The following example output is from a broker host:
# ose-upgrade status
INFO: OpenShift broker installed.Current upgrade is number 4 to version 2.2.Step sequence: begin pre outage rpms conf maintenance_mode pending_ops confirm_nodes data gears end_maintenance_mode postNext step is: pre
Procedure 4.32. To Perform the pre Step on Broker and Node Hosts:
1. The pre step manages the following actions:
Backs up OpenShift Enterprise configuration files.
Clears pending operations older than one hour. (Broker hosts only)
Performs any pre-upgrade datastore migration steps. (Broker hosts only)
Run the pre step on one broker host and each node host:
# ose-upgrade pre
When one broker host begins this step, any attempts made by other broker hosts to run the pre stepsimultaneously will fail.
2. After the pre step completes on the first broker host, run it on any remaining broker hosts.
3. After the pre step completes on all hosts, the ose-upgrade tool allows you to continue through thenode and broker host upgrade steps in parallel. On broker hosts, the tool will block the confirm_nodes step if the associated node hosts have not completed their maintenance_modestep. On node hosts, the tool blocks the test_gears_complete step if the associated broker hasnot completed the gears step.
Continue through the following procedures for instructions on each subsequent step.
Chapter 4. Upgrading from Previous Versions
27

Procedure 4.33. To Perform the rpms Step on Broker and Node Hosts:
1. The rpms step updates RPM packages installed on the host and installs any new RPM packages thatare required. For node hosts, this includes the recommended cartridge dependency metapackagesfor any cartridge already installed on a node. See Section 9.8.3, “Installing Cartridge DependencyMetapackages” for more information about cartridge dependency metapackages.
Run the rpms step on each host:
# ose-upgrade rpms
2. For all other hosts that are not a broker or a node host, run yum update to upgrade any servicesthat are installed, such as MongoDB or ActiveMQ:
# yum update
Procedure 4.34. To Perform the conf Step on Broker and Node Hosts:
The conf step changes the OpenShift Enterprise configuration to match the new codebase installed inthe previous step. Each modified file is first copied to a file with the same name plus a .ugsaveextension and a timestamp. This makes it easier to determine what files have changed.
This step also disables the SSLv3 protocol on each broker host in favor of TLS due to CVE-2014-3566.
Run the conf step on each host:
# ose-upgrade conf
Warning
If the configuration files have been significantly modified from the recommended configuration,manual intervention may be required to merge configuration changes so that they can be usedwith OpenShift Enterprise.
Procedure 4.35. To Perform the maintenance_mode Step on Broker and Node Hosts:
Warning
The broker enters maintenance mode during this upgrade step, which disables the API and returns anoutage notification to all client requests. This outage lasts until the end_maintenance_mode step iscomplete.
1. Starting with OpenShift Enterprise 2.2, the apache-mod-rewrite front-end server proxy plug-in isdeprecated. New deployments of OpenShift Enterprise 2.2 now use the apache-vhost plug-in asthe default.
Deployment Guide
28

Important
Any new nodes added to your deployment after the upgrade will use the apache-vhostplug-in by default. Note that the apache-mod-rewrite plug-in is incompatible with the apache-vhost plug-in, and the front-end server configuration on all nodes across adeployment must be consistent. See Section 10.1, “Front-End Server Proxies” for moreinformation.
The default behavior of the maintenance_mode step is to leave the apache-mod-rewrite plug-inin place, if it is installed. Do not set the OSE_UPGRADE_MIGRATE_VHOST environment variable at all,not even to false or 0, if you require this default behavior.
However, if your OpenShift Enterprise 2.1 deployment was configured to use the apache-mod-rewrite plug-in before starting the 2.2 upgrade, you can optionally allow the ose-upgrade tool tomigrate your node hosts to the newly-default apache-vhost plug-in. To enable this option, set the OSE_UPGRADE_MIGRATE_VHOST environment variable on each node host:
# export OSE_UPGRADE_MIGRATE_VHOST=true
2. The maintenance_mode step manages actions in the following order:
Configures the broker to disable the API and return an outage notification to any requests.(Broker hosts only)
Restarts the broker service and, if installed, the console service in maintenance mode so thatthey provide clients with an outage notification. (Broker hosts only)
Clears the broker and console caches. (Broker hosts only)
Stops the ruby193-mcollective service. (Node hosts only)
Saves the front-end server proxy configuration. (Node hosts only)
If the OSE_UPGRADE_MIGRATE_VHOST environment variable was set in the previous step,migrates from the apache-mod-rewrite plug-in to the apache-vhost plug-in. (Node hostsonly)
Disables the SSLv3 protocol in favor of TLS due to CVE-2014-3566. (Node hosts only)
Enables gear upgrade extensions. (Node hosts only)
Starts the ruby193-mcollective service. (Node hosts only)
Run the maintenance_mode step on each host:
# ose-upgrade maintenance_mode
Procedure 4.36. To Perform the pending_ops Step on Broker Hosts:
1. The pending_ops step clears records of any pending application operations because the outageprevents them from ever completing. Run the pending_ops step on one broker host:
# ose-upgrade pending_ops
Chapter 4. Upgrading from Previous Versions
29

When one broker host begins this step, any attempts made by other broker hosts to run the pending_ops step simultaneously will fail.
2. After the pending_ops step completes on the first broker host, run it on any remaining broker hosts.
Procedure 4.37. To Perform the confirm_nodes Step on Broker Hosts:
1. The confirm_nodes step attempts to access all known node hosts to determine whether they haveall been upgraded before proceeding. This step fails if the maintenance_mode step has not beencompleted on all node hosts, or if MCollective cannot access any node hosts.
Run the confirm_nodes step on a broker host:
# ose-upgrade confirm_nodes
2. If this step fails due to node hosts that are no longer deployed, you may need to skip the confirm_nodes step. Ensure that all node hosts reported missing are not actually expected torespond, then skip the confirm_nodes step with the following command:
# ose-upgrade --skip confirm_nodes
Procedure 4.38. To Perform the data Step on Broker Hosts:
1. The data step runs a data migration against the shared broker datastore. Run the data step on onebroker host:
# ose-upgrade data
When one broker host begins this step, any attempts made by other broker hosts to run the datastep simultaneously will fail.
2. After the data step completes on the first broker host, run it on any remaining broker hosts.
Procedure 4.39. To Perform the gears Step on Broker Hosts:
1. The gears step runs a gear migration through the required changes so that they can be used inOpenShift Enterprise 2.2. Run the gears step on one broker host:
# ose-upgrade gears
When one broker host begins this step, any attempts made by other broker hosts to run the gearsstep simultaneously will fail.
2. After the gears step completes on the first broker host, run it on any remaining broker hosts.
Procedure 4.40. To Perform the test_gears_complete Step on Node Hosts:
The test_gears_complete step verifies the gear migrations are complete before proceeding. Thisstep blocks the upgrade on node hosts by waiting until the gears step has completed on an associatedbroker host. Run the test_gears_complete step on all node hosts:
# ose-upgrade test_gears_complete
Procedure 4.41. To Perform the end_maintenance_mode Step on Broker and Node Hosts:
Deployment Guide
30

Procedure 4.41. To Perform the end_maintenance_mode Step on Broker and Node Hosts:
1. The end_maintenance_mode step restarts the following services on the node hosts:
httpd (Restarts gracefully)
ruby193-mcollective
openshift-iptables-port-proxy
openshift-node-web-proxy
openshift-sni-proxy
openshift-watchman
Complete this step on all node hosts first before running it on the broker hosts:
# ose-upgrade end_maintenance_mode
2. After the end_maintenance_mode command has completed on all node hosts, run the samecommand on the broker hosts to disable the outage notification enabled during the broker maintenance_mode step and restart the broker service and, if installed, the console service:
# ose-upgrade end_maintenance_mode
This allows the broker to respond to client requests normally again.
3. Run the oo-accept-node script on each node host to verify that it is correctly configured:
# oo-accept-node
Procedure 4.42. To Perform the post Step on Broker Hosts:
1. The post step manages the following actions on the broker host:
Imports cartridges to the datastore.
Performs any post-upgrade datastore migration steps.
Clears the broker and console caches.
Run the post step on a broker host:
# ose-upgrade post
When one broker host begins this step, any attempts made by other broker hosts to run the poststep simultaneously will fail.
2. After the post step completes on the first broker host, run it on any remaining broker hosts.
3. The upgrade is now complete for an OpenShift Enterprise installation. Run oo-diagnostics oneach host to diagnose any problems:
# oo-diagnostics
Known Upgrade Issues
Chapter 4. Upgrading from Previous Versions
31

Known Upgrade Issues
Although the goal is to make the upgrade process as easy as possible, some known issues must beaddressed manually:
1. Because Jenkins applications cannot be migrated, follow these steps to regain functionality:
a. Save any modifications made to existing Jenkins jobs.
b. Remove the existing Jenkins application.
c. Add the Jenkins application again.
d. Add the Jenkins client cartridge as required.
e. Reapply the required modifications from the first step.
2. There are no notifications when a gear is successfully migrated but fails to start. This may not be amigration failure because there may be multiple reasons why a gear fails to start. However, Red Hatrecommends that you verify the operation of your applications after upgrading. The service openshift-gears status command may be helpful in certain situations.
Deployment Guide
32

Chapter 5. Host Preparation
Before installing any broker or node components, you must prepare each host for various requirements ofOpenShift Enterprise.
5.1. Default umask Setting
OpenShift Enterprise requires that the default umask value (022) for Red Hat Enterprise Linux 6 be set on allhosts prior to installing any OpenShift Enterprise packages. If a custom umask setting is used, it is possiblefor incorrect permissions to be set during installation for many files critical to OpenShift Enterprise operation.
5.2. Network Access
The components of an OpenShift Enterprise deployment require network access to connect with one another.The deployment methods described in this guide set up a basic iptables firewall configuration by default toenable network access. If your environment requires a custom or external firewall solution, the configurationmust accommodate the port requirements of OpenShift Enterprise.
5.2.1. Custom and External Firewalls
If you use a custom firewall configuration, consult the following table for details on the ports to whichOpenShift Enterprise components require access. The table includes all ports with external interfaces orconnections between hosts. It does not include the loopback interface. Some ports are optional depending onyour OpenShift Enterprise configuration and usage.
Application developers and application users require access to ports marked public in the Directioncolumn. Ensure the firewall exposes these ports publicly.
Further details on configuring an external firewall solution for use with OpenShift Enterprise are beyond thescope of this guide. Consult your network administrator for more information.
Table 5.1. Required Ports for OpenShift Enterprise
Host Port Protocol Direction UseAll 22 TCP Inbound internal
networkRemote administration.
All 53 TCP/UDP Outbound tonameserver
Name resolution.
Broker 22 TCP Outbound to nodehosts
rsync access to gears for moving gearsbetween nodes.
Broker 80 TCP Inbound publictraffic
HTTP access. HTTP requests to port 80are redirected to HTTPS on port 443.
Broker 443 TCP Inbound publictraffic
HTTPS access to the broker REST API by rhc and Eclipse integration. HTTPSaccess to the Management Console.
Broker 27017 TCP Outbound todatastore host.
Optional if the same host has both thebroker and datastore components.
Broker 61613 TCP Outbound toActiveMQ hosts
ActiveMQ connections to communicatewith node hosts.
Chapter 5. Host Preparation
33

Node 22 TCP Inbound publictraffic
Developers running git push to theirgears. Developer remote administration ontheir gears.
Node 80 TCP Inbound publictraffic
HTTP requests to applications hosted onOpenShift Enterprise.
Node 443 TCP Inbound publictraffic
HTTPS requests to applications hosted onOpenShift Enterprise.
Node 8000 TCP Inbound publictraffic
WebSocket connections to applicationshosted on OpenShift Enterprise. Optional ifyou are not using WebSockets.
Node 8443 TCP Inbound publictraffic
Secure WebSocket connections toapplications hosted on OpenShiftEnterprise. Optional if you are not usingsecure WebSockets.
Node 2303 -2308
TCP Inbound publictraffic
Gear access through the SNI proxy.Optional if you are not using the SNI proxy.
Node 443 TCP Outbound to brokerhosts
REST API calls to broker hosts.
Node 35531 -65535
TCP Inbound publictraffic
Gear access through the port-proxyservice. Optional unless applications needto expose external ports in addition to thefront-end proxies.
Node 35531 -65535 [b]
TCP Inbound/outboundwith other nodehosts
Communications between cartridgesrunning on separate gears.
Node 61613 TCP Outbound toActiveMQ hosts
ActiveMQ connections to communicatewith broker hosts.
ActiveMQ 61613 TCP Inbound from brokerand node hosts
Broker and node host connections toActiveMQ.
ActiveMQ 61616 TCP Inbound/outboundwith other ActiveMQbrokers
Communications between ActiveMQ hosts.Optional if no redundant ActiveMQ hostsexist.
Datastore 27017 TCP Inbound from brokerhosts
Broker host connections to MongoDB.Optional if the same host has both thebroker and datastore components.
Datastore 27017 TCP Inbound/outboundwith other MongoDBhosts
Replication between datastore hosts.Optional if no redundant datastore hostsexist.
Nameserver 53 TCP/UDP Inbound from brokerhosts
Publishing DNS updates.
Nameserver 53 TCP/UDP Inbound publictraffic
Name resolution for applications hosted onOpenShift Enterprise.
Nameserver 53 TCP/UDP Outbound publictraffic
DNS forwarding. Optional unless thenameserver is recursively forwardingrequests to other nameservers.
Host Port Protocol Direction Use
5.2.2. Manually Configuring an iptables Firewall
[a]
[b]
[a] Note: The size and location of these SNI port range are configurable.[b] Note: If the value of PROXY_BEGIN in the /etc/openshift/node.conf file changes from 35531,
adjust this port range accordingly.
Deployment Guide
34

The deployment methods described in this guide set up a basic firewall configuration by default. If yourOpenShift Enterprise deployment requires additional open ports, you can use iptables commands to allowaccess on each host as needed:
Procedure 5.1. To Configure an iptables Firewall:
1. Use the following command to make any changes to an iptables configuration:
# iptables --insert Rule --in-interface Network_Interface --protocol Protocol --source IP_Address --dport Destination_Port --jump ACCEPT
Example 5.1. Allowing Broker Access to MongoDB
The following is an example set of commands for allowing a set of brokers with IP addresses10.0.0.1-3 access to the MongoDB datastore:
iptables --insert INPUT -i eth0 -p tcp --source 10.0.0.1 --dport 27017 --jump ACCEPTiptables --insert INPUT -i eth0 -p tcp --source 10.0.0.2 --dport 27017 --jump ACCEPTiptables --insert INPUT -i eth0 -p tcp --source 10.0.0.3 --dport 27017 --jump ACCEPT
Example 5.2. Allowing Public Access to the Nameserver
The following example allows inbound public DNS requests to the nameserver:
iptables --insert INPUT --protocol tcp --dport 53 -j ACCEPTiptables --insert INPUT --protocol udp --dport 53 -j ACCEPT
Note that because the command is for public access, there is no --source option.
2. Save any firewall changes to make them persistent:
# service iptables save
5.2.3. IPv6 Tolerance
OpenShift Enterprise supports a mixed IPv4 and IPv6 topology. In such a deployment, node, broker,MongoDB, and ActiveMQ hosts must have IPv6 addresses and associated AAAA resource records, and allhosts must still have IPv4 addresses and associated A resource records.
In a mixed IPv4 and IPv6 deployment, the following OpenShift Enterprise services allow communications overIPv6:
OpenShift Enterprise client tools (rhc)
OpenShift Enterprise Management Console
ActiveMQ and MCollective
Application access
Chapter 5. Host Preparation
35

In a mixed IPv4 and IPv6 deployment, the following OpenShift Enterprise services have components thateither require or may require communications over IPv4:
MongoDB can be configured to listen on IPv6 so that some client tools can connect over IPv6 if the mongo client is running version 1.10.0 or newer. However, the broker uses mongoid which currentlyrequires IPv4.
Broker DNS updates may require IPv4, however IPv6 connectivity can be used when using the nsupdateDNS plug-in.
Caveats and Known Issues for IPv6 Tolerance
Inter-gear communication relies on IPv6 to IPv4 fallback. If for some reason the application or libraryinitiating the connection does not properly handle the fallback, then the connection fails.
The OpenShift Enterprise installation script and Puppet module do not configure MongoDB to use IPv6and configures IPv4 addresses for other settings where required, for example in the nsupdate DNS plug-in configuration.
OpenShift Enterprise internals explicitly query interfaces for IPv4 addresses in multiple places.
The apache-mod-rewrite and nodejs-websocket front-end server plug-ins have been tested,however the following components have not:
The apache-vhost and haproxy-sni-proxy front-end server plug-ins.
DNS plug-ins other than nsupdate.
Routing plug-in.
Rsyslog plug-in.
Individual cartridges for full IPv6 tolerance.
Known Issue: BZ#1104337
Known Issue: BZ#1107816
5.3. Configuring Time Synchronization
OpenShift Enterprise requires NTP to synchronize the system and hardware clocks. This synchronization isnecessary for communication between the broker and node hosts; if the clocks are not synchronizedcorrectly, messages are dropped by MCollective. It is also helpful to have accurate time stamps on files andin log file entries.
On each host, use the ntpdate command to set the system clock, replacing the NTP servers to suit yourenvironment:
# ntpdate clock.redhat.com
You must also configure the /etc/ntp.conf file to keep the clock synchronized during operation.
If the error message "the NTP socket is in use, exiting" is displayed after running the ntpdatecommand, it means that the ntpd daemon is already running. However, the clock may not be synchronizeddue to a substantial time difference. In this case, run the following commands to stop the ntpd service, setthe clock, and start the service again:
Deployment Guide
36

# service ntpd stop# ntpdate clock.redhat.com# service ntpd start
If you are installing OpenShift Enterprise on physical hardware, use the hwclock command to synchronizethe hardware clock to the system clock. Skip this step if you are installing on a virtual machine, such as anAmazon EC2 instance. For a physical hardware installation, run the following command:
# hwclock --systohc
Note
If you use the kickstart or bash script, the synchronize_clock function performs these steps.
5.4. Enabling Remote Administration
Installing SSH keys for the root user enables you to access the hosts remotely from your personalworkstation. Run the following commands to ensure that the root user's SSH configuration directory exists,and it has the correct permissions on the host:
# mkdir /root/.ssh# chmod 700 /root/.ssh
On your workstation, you can either use the ssh-keygen command to generate a new key pair, or use anexisting public key. In either case, edit the /root/.ssh/authorized_keys file on the host and append thepublic key, or use the ssh-copy-id command to do the same. For example, on your local workstation, runthe following command, replacing the example IP address with the IP address of your broker host:
# ssh-copy-id [email protected]
Chapter 5. Host Preparation
37
Chapter 6. Deployment Methods
OpenShift Enterprise can be deployed using one of several methods:
The oo-install installation utility interactively gathers information about a deployment beforeautomating the installation of a OpenShift Enterprise host. This method is intended for trials of simpledeployments.
The installation scripts, available as either a kickstart or bash script, include configurable parameters thathelp automate the installation of a OpenShift Enterprise host. This method allows for increasedcustomization of the installation process for use in production deployments.
The sample deployment steps detailed later in this guide describe the various actions of the installationscripts. This method allows for a manual installation of a OpenShift Enterprise host.
Choose the deployment method that best suits your environment and requirements.
6.1. Using the Installation Utility
You can install OpenShift Enterprise using the oo-install installation utility, which is a front end to thebasic installation scripts. The installation utility provides a UI for a single- or multi-host deployment eitherfrom your workstation, or from one of the hosts to be installed.
The installation utility is provided to make the trial installation experience easier by interactively gathering thedata to run deployments. The features of this utility are planned to expand over time, but for productiondeployments, Red Hat recommends creating customized installation scripts to suit your environment.
A configuration file based on your selections is created as ~/.openshift/oo-install-cfg.yml, whichsaves your responses to the installation utility so you can use them in future installations if your initialdeployment is interrupted. After completing an initial deployment, only additional node hosts can be added tothe deployment using the utility. To add broker, message server, or DB server components to an existingdeployment, see Section 8.3, “Separating Broker Components by Host” or Section 8.4, “ConfiguringRedundancy” for more information.
See https://install.openshift.com for the latest information on this utility.
Prerequisites
Before running the installation utility, consider the following:
Do you have ruby-1.8.7 or later, curl, tar, and gzip installed on your system? If required, the installationutility offers suggestions to install RPM packages of utilities that are missing.
Does yum repolist show the correct repository setup?
Plan your host roles. Do you know which of your hosts will be the broker host and node hosts? If runningthe tool with the -a option, do you have hosts for MongoDB and ActivemQ?
Do you have password-less SSH login access into the instances where you will be running the oo-installcommand? Do your hosts have password-less SSH as well?
You can use an existing DNS server. During installation, the oo-install tool asks if you would like to installa DNS server on the same host as the broker host. Answering no results in a BIND server being set upfor you. However, answering yes requires you to input the settings of your existing DNS server. ThisBIND instance provides lookup information for applications that are created by any applicationdevelopers.
Deployment Guide
38

Using the Installation Utility
There are two methods for using the installation utility. Both are outlined in the following procedures:
Procedure 6.1. To Run the Installation Utility From the Internet:
1. You can run the installation utility directly from the Internet with the following command:
$ sh <(curl -s https://install.openshift.com/ose-2.2)
Additional options can be used with the command. These options are outlined later in this section:
$ sh <(curl -s https://install.openshift.com/ose-2.2) -s rhsm -u [email protected]
2. Follow the on-screen instructions to either deploy a new OpenShift Enterprise host, or add a nodehost to an existing deployment.
Procedure 6.2. To Download and Run the Installation Utility:
Alternatively, you can download and run the installation utility with the following procedure:
1. Download and unpack the installation utility:
$ curl -o oo-install-ose.tgz https://install.openshift.com/portable/oo-install-ose.tgz$ tar -zxf oo-install-ose.tgz
2. Execute the installation utility to interactively configure one or more hosts:
$ ./oo-install-ose
The oo-install-ose utility automatically runs the installation utility in OpenShift Enterprise mode.Additional options can be used with the command. These options are outlined later in this section:
$ ./oo-install-ose -s rhsm -u [email protected]
3. Follow the on-screen instructions to either deploy a new OpenShift Enterprise host, or add a nodehost to an existing deployment.
Deployment Scenarios
The current iteration of the installation utility enables the initial deployment and configuration of OpenShiftEnterprise according to the following scenarios:
Broker, message server (ActiveMQ), and DB server (MongoDB) components on one host, and the nodecomponents on separate hosts.
Broker, message server (ActiveMQ), DB server (MongoDB), and node components on separate hosts(using -a for advanced mode only).
All components on one host.
Chapter 6. Deployment Methods
39

Warning
While having all components on one host is an available option using the installation utility for thepurposes of a trial installation, the OpenShift Enterprise security model assumes that broker and nodecomponents are installed on separate hosts. Running a broker and node on the same host is notsupported.
Highly-available Deployments
Starting with OpenShift Enterprise 2.2, the installation utility can install a highly-available OpenShiftEnterprise deployment by configuring your defined hosts for redundancy within the installation utility prompts.By default, and without the -a option, the installation utility scales and installs ActiveMQ and MongoDBservices along with the defined broker hosts. If the -a option is used, you can define redundant services onseparate hosts as well.
For applications running on your OpenShift Enterprise deployment to achieve high-availability, you mustfurther configure your deployment with the use of an external routing layer after the installation is completed.
See the OpenShift Enterprise User Guide for more information on high-availability applications, andSection 8.6, “Using an External Routing Layer for High-Availability Applications” for instructions onimplementing an external routing layer.
Configuring Your Deployment
When you run the installation utility for the first time, you are asked a number of questions related to thecomponents of your planned OpenShift Enterprise deployment, such as the following:
User names and either the host names or IP addresses for access to hosts.
DNS configuration for hosts.
Valid gear sizes for the deployment.
Default gear capabilities for new users.
Default gear size for new applications.
User names and passwords for configured services, with an option to automatically generate passwords.
Gear size for new node hosts (profile name only).
District membership for new node hosts.
Red Hat subscription type. Note that when using the installation utility you can add multiple pool IDs byseparating each pool ID with a space. You can find the required pool IDs with the procedure outlined inSection 7.1.1, “Using Red Hat Subscription Management on Broker Hosts”.
Options for the Installation Utility
The installation utility can be used with the following options:
-a (--advanced-mode)
By default, the installation utility installs MongoDB and ActiveMQ on the system designated as thebroker host. Use the -a option to install these services on a different host.
-c (--config-file) FILE_PATH
Use the -c option with the desired filepath to specify a configuration file other than the default
[1]
Deployment Guide
40

Use the -c option with the desired filepath to specify a configuration file other than the default ~/.openshift/oo-install-cfg.yml file. If the specified file does not exist, a file will becreated with some basic settings.
-l (--list-workflows)
Before using the -w option, use the -l option to find the desired workflow ID.
-w (--workflow) WORKFLOW_ID
If you already have an OpenShift Enterprise deployment configuration file, use the install utility withthe -w option and the enterprise_deploy workflow ID to run the deployment without any userinteraction. The configuration is assessed, then deployed if no problems are found. This is usefulfor restarting after a failed deployment or for running multiple similar deployments.
-s (--subscription-type) TYPE
The -s option determines how the deployment will obtain the RPMs needed to install OpenShiftEnterprise, and overrides any method specified in the configuration file. Use the option with one ofthe following types:
rhsm Red Hat Subscription Manager is used to register and configure the OpenShiftsoftware channels according to user, password, and pool settings.
rhn RHN Classic is used to register and configure the OpenShift software channelsaccording to user, password, and optional activation key settings. RHN Classic isprimarily intended for existing, legacy systems. Red Hat strongly recommends that youuse Red Hat Subscription Manager for new installations, because RHN Classic isbeing deprecated.
yum New yum repository entries are created in the /etc/yum.repos.d/ directoryaccording to several repository URL settings. This is not a standard subscription and itis assumed you have already created or have access to these repositories in thelayout specified in the openshift.sh file.
none The default setting. Use this option when the software subscriptions on yourdeployment hosts are already configured as desired and changes are not needed.
-u (--username) USERNAME
Use the -u option to specify the user for the Red Hat Subscription Management or RHN Classicsubscription methods from the command line instead of in the configuration file.
-p (--password) PASSWORD
Similar to the -u option, use the -p option to specify the password for the Red Hat SubscriptionManagement or RHN Classic subscription methods from the command line instead of in theconfiguration file. As an alternative, the interactive UI mode also provides an option for enteringsubscription parameters for a one-time use without them being saved to the system.
-d (--debug)
When using the -d option, the installation utility prints information regarding any attempts toestablish SSH sessions as it is running. This can be useful for debugging remote deployments.
Chapter 6. Deployment Methods
41

Important
If none is used for the subscription type, either by using the -s flag or by not configuring subscriptioninformation through the interactive UI or .yml configuration file, you must manually configure thecorrect yum repositories with the proper priorities before running the installation utility. SeeSection 7.1, “Configuring Broker Host Entitlements” and Section 9.1, “Configuring Node HostEntitlements” for instructions.
Post-Install Tasks
Once the oo-install tool has completed the install without errors, you have a working OpenShift Enterpriseinstallation. Consult the following list for directions on what to do next:
See information on creating any additional users in Section 12.2, “Creating a User Account”.
See information on creating an application in the OpenShift Enterprise User Guide.
See information on adding an external routing layer in Section 8.6, “Using an External Routing Layer forHigh-Availability Applications”.
6.2. Using the Installation Scripts
You can deploy OpenShift Enterprise using the installation scripts, which include configurable parameters tohelp automate the installation of OpenShift Enterprise components on a Red Hat Enterprise Linux 6.6 system.By supplying the scripts with parameters relevant to your deployment requirements, you can get anenvironment running quickly without having to manually configure all of the required services.
For kickstarts, the openshift.ks kickstart script is available at:
https://raw.githubusercontent.com/openshift/openshift-extras/enterprise-2.2/enterprise/install-scripts/openshift.ks
Example 6.1. Downloading the openshift.ks Kickstart Script
$ curl -O https://raw.githubusercontent.com/openshift/openshift-extras/enterprise-2.2/enterprise/install-scripts/openshift.ks
For pre-installed Red Hat Enterprise Linux 6.6 systems, the openshift.sh bash script is the extracted %post section of the openshift.ks script and is available at:
https://raw.githubusercontent.com/openshift/openshift-extras/enterprise-2.2/enterprise/install-scripts/generic/openshift.sh
Example 6.2. Downloading the openshift.sh Bash Script
$ curl -O https://raw.githubusercontent.com/openshift/openshift-extras/enterprise-2.2/enterprise/install-scripts/generic/openshift.sh
Deployment Guide
42

The actions and parameters related to the installation and configuration of OpenShift Enterprise are the samebetween the two scripts. The commented notes in the header of the scripts provide extensive information ontheir usage and parameters.
Important
The sample deployment steps detailed later in this guide describe the various actions of theinstallation scripts. However, these deployment methods are independent of each other; this meansthat you can install and configure a complete broker or node host by either following the stepsmanually, or by running the scripts. The corresponding functions of the scripts are identified in therespective sample deployment steps.
Supplying Parameters to the Scripts
When using the openshift.ks script, you can supply parameters as kernel parameters during the kickstartprocess. When using the openshift.sh script, you can similarly supply parameters as command-linearguments. See the commented notes in the header of the scripts for alternative methods of supplyingparameters using the openshift.sh script.
The installation scripts are highly customizable, and as such can be used for a variety of deploymentscenarios using many different configurations. The following sections highlight some important parameters,show basic script usage, and provide examples on installing and configuring sample hosts for a simpledeployment.
Note
For the purposes of this guide, the following examples use the openshift.sh script by supplyingparameters as command-line arguments. The same parameters can be supplied as kernelparameters for kickstarts using the openshift.ks script.
6.2.1. Selecting Components to Install
If you do not supply any parameters, the scripts install all OpenShift Enterprise components on a single hostwith the default configuration. Using the install_components parameter, the scripts can be configured toinstall one or more of the following components on a single host:
Table 6.1. Options for the install_components Parameter
Options Descriptionbroker Installs the broker application and tools.
named Supporting service. Installs a BIND DNS server.
activemq Supporting service. Installs the messaging bus.
datastore Supporting service. Installs the MongoDB datastore.
node Installs node functionality, including cartridges.
Chapter 6. Deployment Methods
43

Warning
The OpenShift Enterprise security model assumes that broker and node components are installed onseparate hosts. Running a broker and node on the same host is not supported.
You can install any combination of components on a host, as long as broker and node components areinstalled on separate hosts. Any component can also be installed as a standalone host.
For example, the following command runs the openshift.sh script and installs the broker, named, activemq, and datastore components on a single host, using default values for all unspecifiedparameters:
Example 6.3. Installing the broker, named, activemq, and datastore Components Using openshift.sh
$ sudo sh openshift.sh install_components=broker,named,activemq,datastore
For another example, the following command runs the openshift.sh script and installs only the nodecomponent on a single host, using default values for all unspecified parameters:
Example 6.4. Installing the node Component Using openshift.sh
$ sudo sh openshift.sh install_components=node
6.2.2. Selecting a Package Source
If you do not supply an install_method parameter, the scripts assume that the installation source hasalready been configured to provide the required packages. Using the install_method parameter, thescripts can be configured to install packages from one of the following sources:
Table 6.2. Options for the install_method Parameter
Parameter Description Additional Related Parametersyum Configures yum based on supplied
additional parameters.rhel_repo, rhel_optional_repo, jboss_repo_base, rhscl_repo_base, ose_repo_base, ose_extra_repo_base
rhsm Uses Red Hat Subscription Management. rhn_user, rhn_pass, sm_reg_pool, rhn_reg_opts
rhn Uses RHN Classic. rhn_user, rhn_pass, rhn_reg_opts,rhn_reg_actkey
Deployment Guide
44

Note
While Red Hat Network (RHN) Classic can be used to subscribe to channels, it is primarily intendedfor existing, legacy systems. Red Hat strongly recommends that you use Red Hat SubscriptionManagement for new installations. For details on how to migrate from RHN Classic to RHSM, see theOpenShift Enterprise Administration Guide.
See the commented notes in the header of the scripts for detailed information about each of the additionalrelated parameters.
For example, the following command runs the openshift.sh script and uses Red Hat SubscriptionManagement as the package source, using default values for all unspecified parameters:
Example 6.5. Selecting a Package Source Using openshift.sh
$ sudo sh openshift.sh install_method=rhsm [email protected] rhn_pass=password sm_reg_pool=Example_3affb61f013b3ef6a5fe0b9a
6.2.3. Selecting Password Options
By default, the installation scripts generate random passwords for configured services. For example, thesepasswords include the password that the broker and node both use to authenticate with the ActiveMQservice, as well as the password for the test OpenShift user account. If you are not deploying a productioninstance, you can supply the no_scramble parameter set to true to have default, insecure passwordsused across the deployment.
You can set any password parameter manually with a unique password, which automatically overridesgenerating a random password for that parameter. When supplying a unique password, use alphanumericcharacters as other characters may cause syntax errors; if non-alphanumeric characters are required, updatethem separately after the installation completes. For multi-host deployments, set unique passwords inparameters consistently across hosts for any services you are installing.
The scripts return a list of all passwords, whether randomly generated or manually set, after the installation iscompleted. The following table describes the available user name and password parameters for configuredservices, including the default user name values and related install_component options:
Table 6.3. User Name and Password Parameters
User Name Parameter Password Parameter Descriptionmcollective_user
Default: mcollective
mcollective_password These credentials are shared andmust be the same between allbroker and nodes forcommunicating over the mcollective topic channels inActiveMQ. They must be specifiedand shared between separateActiveMQ and broker hosts.These parameters are used bythe install_componentoptions broker and node.
Chapter 6. Deployment Methods
45

mongodb_broker_user
Default: openshift
mongodb_broker_password These credentials are used by thebroker and its MongoDB plug-in toconnect to the MongoDBdatastore. They must be specifiedand shared between separateMongoDB and broker hosts, aswell as between any replicatedMongoDB hosts. Theseparameters are used by the install_component options datastore and broker.
Not available. mongodb_key This key is shared and must bethe same between any replicatedMongoDB hosts. This parameteris used by the install_component option datastore.
mongodb_admin_user
Default: admin
mongodb_admin_password The credentials for thisadministrative user created in theMongoDB datastore are not usedby OpenShift Enterprise, but anadministrative user must beadded to MongoDB so it canenforce authentication. Theseparameters are used by the install_component option datastore.
openshift_user1
Default: demo
openshift_password1 These credentials are created inthe /etc/openshift/htpasswdfile for the test OpenShiftEnterprise user account. This testuser can be removed after theinstallation is completed. Theseparameters are used by the install_component option broker.
Not available.
Default: amq
activemq_amq_user_password
The password set for theActiveMQ amq user is required byreplicated ActiveMQ hosts tocommunicate with one another.The amq user is enabled only ifreplicated hosts are specifiedusing the activemq_replicantsparameter. If set, ensure thepassword is the same between allActiveMQ hosts. Theseparameters are used by the install_component option activemq.
User Name Parameter Password Parameter Description
Deployment Guide
46
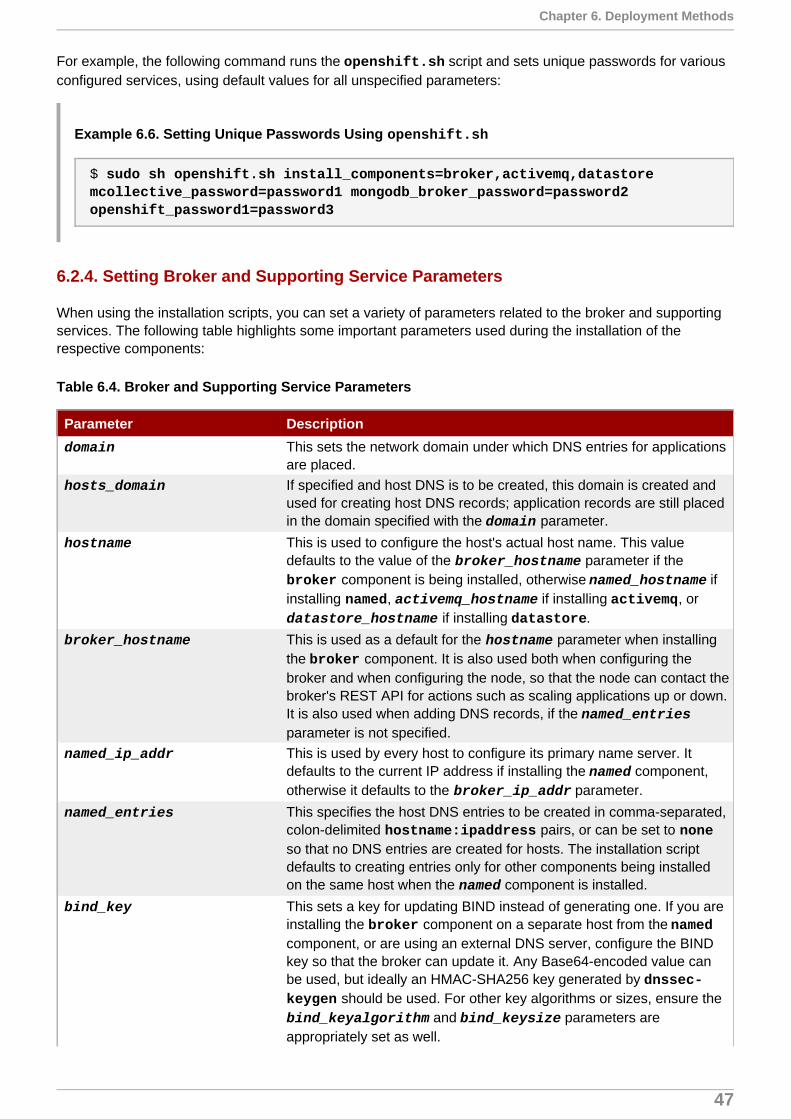
For example, the following command runs the openshift.sh script and sets unique passwords for variousconfigured services, using default values for all unspecified parameters:
Example 6.6. Setting Unique Passwords Using openshift.sh
$ sudo sh openshift.sh install_components=broker,activemq,datastore mcollective_password=password1 mongodb_broker_password=password2 openshift_password1=password3
6.2.4. Setting Broker and Supporting Service Parameters
When using the installation scripts, you can set a variety of parameters related to the broker and supportingservices. The following table highlights some important parameters used during the installation of therespective components:
Table 6.4. Broker and Supporting Service Parameters
Parameter Descriptiondomain This sets the network domain under which DNS entries for applications
are placed.hosts_domain If specified and host DNS is to be created, this domain is created and
used for creating host DNS records; application records are still placedin the domain specified with the domain parameter.
hostname This is used to configure the host's actual host name. This valuedefaults to the value of the broker_hostname parameter if the broker component is being installed, otherwise named_hostname ifinstalling named, activemq_hostname if installing activemq, or datastore_hostname if installing datastore.
broker_hostname This is used as a default for the hostname parameter when installingthe broker component. It is also used both when configuring thebroker and when configuring the node, so that the node can contact thebroker's REST API for actions such as scaling applications up or down.It is also used when adding DNS records, if the named_entriesparameter is not specified.
named_ip_addr This is used by every host to configure its primary name server. Itdefaults to the current IP address if installing the named component,otherwise it defaults to the broker_ip_addr parameter.
named_entries This specifies the host DNS entries to be created in comma-separated,colon-delimited hostname:ipaddress pairs, or can be set to noneso that no DNS entries are created for hosts. The installation scriptdefaults to creating entries only for other components being installedon the same host when the named component is installed.
bind_key This sets a key for updating BIND instead of generating one. If you areinstalling the broker component on a separate host from the namedcomponent, or are using an external DNS server, configure the BINDkey so that the broker can update it. Any Base64-encoded value canbe used, but ideally an HMAC-SHA256 key generated by dnssec-keygen should be used. For other key algorithms or sizes, ensure the bind_keyalgorithm and bind_keysize parameters areappropriately set as well.
Chapter 6. Deployment Methods
47

valid_gear_sizes This is a comma-separated list of gear sizes that are valid for use inapplications, and sets the VALID_GEAR_SIZES parameter in the /etc/openshift/broker.conf file.
default_gear_size This is the default gear size used when new gears are created, andsets the DEFAULT_GEAR_SIZE parameter in the /etc/openshift/broker.conf file.
default_gear_capabilities
This is a comma-separated list of default gear sizes allowed on a newuser account, and sets the DEFAULT_GEAR_CAPABILITIESparameter in the /etc/openshift/broker.conf file.
Parameter Description
See the OpenShift Enterprise Administration Guide for more information on the VALID_GEAR_SIZES, DEFAULT_GEAR_SIZE, and DEFAULT_GEAR_CAPABILITIES parameters in the /etc/openshift/broker.conf file.
For example, the following command runs the openshift.sh script and sets various parameters for thebroker and supporting services, using default values for all unspecified parameters:
Example 6.7. Setting Broker and Supporting Service Parameters Using openshift.sh
$ sudo sh openshift.sh install_components=broker,named,activemq,datastore domain=apps.example.com hosts_domain=hosts.example.com broker_hostname=broker.hosts.example.com named_entries=broker:192.168.0.1,activemq:192.168.0.1,node1:192.168.0.2 valid_gear_sizes=medium default_gear_size=medium default_gear_capabilities=medium
6.2.5. Setting Node Parameters
When using the installation scripts, you can set a variety of parameters related to nodes. The following tablehighlights some important parameters used during installations of the node component:
Table 6.5. Node Parameters
Parameter Descriptiondomain This sets the network domain under which DNS entries for applications
are placed.hosts_domain If specified and host DNS is to be created, this domain is created and
used for creating host DNS records; application records are still placedin the domain specified with the domain parameter.
hostname This is used to configure the host's actual host name.
node_hostname This is used as a default for the hostname parameter when installingthe node component. It is also used when adding DNS records, if the named_entries parameter is not specified.
named_ip_addr This is used by every host to configure its primary name server. Itdefaults to the current IP address if installing the named component,otherwise it defaults to the broker_ip_addr parameter.
node_ip_addr This is used by the node to provide a public IP address if different fromone on its NIC. It defaults to the current IP address when installing thenode component.
Deployment Guide
48

broker_hostname This is used by the node to record the host name of its broker, as thenode must be able to contact the broker's REST API for actions suchas scaling applications up or down.
node_profile This sets the name of the node profile, also known as a gear profile orgear size, to be used on the node being installed. The value must alsobe a member of the valid_gear_sizes parameter used by thebroker.
cartridges This is a comma-separated list of cartridges to install on the node anddefaults to standard, which installs all cartridges that do not requireadd-on subscriptions. See the commented notes in the header of thescripts for the full list of individual cartridges and more detailed usage.
Parameter Description
For example, the following command runs the openshift.sh script and sets various node parameters,using default values for all unspecified parameters:
Example 6.8. Setting Node Parameters Using openshift.sh
$ sudo sh openshift.sh install_components=node domain=apps.example.com hosts_domain=hosts.example.com node_hostname=node1.hosts.example.com broker_ip_addr=192.168.0.1 broker_hostname=broker.hosts.example.com node_profile=medium cartridges=php,ruby,postgresql,haproxy,jenkins
6.2.6. Deploying Sample Broker and Node Hosts Using openshift.sh
The examples in this section show how to install and configure sample broker and node hosts for a simpledeployment using the openshift.sh script. Whereas the preceding openshift.sh examples demonstratevarious parameters discussed in their respective sections, the examples in this section use a combination ofthe parameters discussed up to this point to demonstrate a specific deployment scenario. The broker andsupporting service components are installed on one host (Host 1), and the node component is installed on aseparate host (Host 2).
Deploying a Sample Broker Host Using openshift.sh
For Host 1, the command shown in the example runs the openshift.sh script with:
Red Hat Subscription Manager set as the package source.
The broker, named, activemq, and datastore options set as the installation components.
Unique passwords set for MCollective, ActiveMQ, MongoDB, and the test OpenShift Enterprise useraccount.
Various parameters set for the broker and supporting services.
Default values set for all unspecified parameters.
Example 6.9. Installing and Configuring a Sample Broker Host Using openshift.sh
$ sudo sh openshift.sh install_method=rhsm [email protected] rhn_pass=password sm_reg_pool=Example_3affb61f013b3ef6a5fe0b9a install_components=broker,named,activemq,datastore
Chapter 6. Deployment Methods
49

mcollective_password=password1 mongodb_broker_password=password2 openshift_password1=password3 domain=apps.example.com hosts_domain=hosts.example.com broker_hostname=broker.hosts.example.com named_entries=broker:192.168.0.1,activemq:192.168.0.1,node1:192.168.0.2 valid_gear_sizes=medium default_gear_size=medium default_gear_capabilities=medium 2>&1 | tee -a openshift.sh.log
In this example, script output is logged to the openshift.sh.log file. If a new kernel package was installedduring the installation, the host must be restarted before the new kernel is loaded.
Deploying a Sample Node Host Using openshift.sh
For Host 2, the command shown in the example runs the openshift.sh script with:
Red Hat Subscription Manager set as the package source.
The node option set as the installation component.
The same unique password set for the MCollective user account that was set during the broker hostinstallation.
Various node parameters set, including which cartridges to install.
Default values set for all unspecified parameters.
Example 6.10. Installing and Configuring a Sample Node Host Using openshift.sh
$ sudo sh openshift.sh install_method=rhsm [email protected] rhn_pass=password sm_reg_pool=Example_3affb61f013b3ef6a5fe0b9a install_components=node mcollective_password=password1 domain=apps.example.com hosts_domain=hosts.example.com node_hostname=node1.hosts.example.com broker_ip_addr=192.168.0.1 broker_hostname=broker.hosts.example.com node_profile=medium cartridges=php,ruby,postgresql,haproxy,jenkins 2>&1 | tee -a openshift.sh.log
In this example, script output is logged to the openshift.sh.log file. If a new kernel package was installedduring the installation, the host must be restarted before the new kernel is loaded.
6.2.7. Performing Required Post-Deployment Tasks
Important
Ensure that the installation has completed on both the broker and node host before continuing with theinstructions in this section.
After deploying OpenShift Enterprise hosts using the installation scripts, the following tasks must beperformed before the deployment is fully operational:
Cartridge manifests must be imported on the broker host before cartridges can be used in applications.
At least one district must be created before applications can be created.
Deployment Guide
50

If the default passwords were used for any deployment scenario, Red Hat recommends changing themmanually after the initial installation is completed as well.
Performing Post-Deployment Tasks Manually
You can perform these tasks manually on the broker host. Run the following command to import the cartridgemanifests for all cartridges installed on nodes:
# oo-admin-ctl-cartridge -c import-profile --activate --obsolete
See Section 9.14, “Configuring Districts” for instructions on creating and populating at least one district.
Performing Post-Deployment Tasks Using openshift.sh
Alternatively, you can perform these tasks using the openshift.sh script by running the post_deployaction. This action is not run by default, but by supplying the actions parameter, you can specify that it onlyrun post_deploy. When running the post_deploy action, ensure that the script is run on the broker hostusing the broker installation component.
Important
If the valid_gear_sizes, default_gear_capabilities, or default_gear_size parameterswere supplied during the initial broker host installation, ensure that the same values are suppliedagain when running the post_deploy action. Otherwise, your configured values will be overriddenby default values.
If the valid_gear_sizes parameter is supplied when running the post_deploy action, districts arecreated for each size in valid_gear_sizes with names in the format default-gear_size_name. If youdo not want these default districts created, see the instructions for manually performing these tasks.
For example, the following command for the broker host runs the post_deploy action of the openshift.sh script. It supplies the same values for the valid_gear_sizes, default_gear_capabilities, and default_gear_size used during the sample broker hostinstallation and uses default values for all unspecified parameters:
Example 6.11. Running the post_deploy Action on the Broker Host
$ sudo sh openshift.sh actions=post_deploy install_components=broker valid_gear_sizes=medium default_gear_size=medium default_gear_capabilities=medium 2>&1 | tee -a openshift.sh.log
In this example, script output is logged to the openshift.sh.log file. Cartridge manifests are imported onthe broker host, and a district named default-medium is created.
6.3. Using the Sample Deployment Steps
The installation scripts provided in Section 6.2, “Using the Installation Scripts” are also detailed as manual,sample deployment steps for hosts identified in this guide as the following:
Host 1
Chapter 6. Deployment Methods
51

The broker host detailed in Chapter 7, Manually Installing and Configuring a Broker Host.
Host 2
The node host detailed in Chapter 9, Manually Installing and Configuring Node Hosts.
The sample deployment steps are useful for understanding the various actions of the installation scripts,which enables administrators to further customize their deployments to their specifications.
Packages that are installed from third-party repositories and products such as EPEL or Puppet can adverselyaffect OpenShift Enterprise installations. This can result in issues that require additional time to troubleshoot.Therefore, Red Hat recommends that you only use packages from Red Hat Enterprise Linux Server 6 toinstall the base operating system and additional repositories when preparing OpenShift Enterprise hosts, anddisable any third-party yum repositories during installation, including the unsupported Red Hat EnterpriseLinux Server Optional channel. Proper yum configurations for OpenShift Enterprise installations are coveredin Section 7.2, “Configuring Yum on Broker Hosts” and Section 9.2, “Configuring Yum on Node Hosts”.
The sample deployment steps assume that Host 1 and Host 2 are configured with a Red Hat Enterprise LinuxServer entitlement and have Red Hat Enterprise Linux Server 6.6 or later installed with all base packagesfully updated. Most importantly, you must have the latest version of the selinux-policy package installed oneach host, as it is necessary for the correct operation of OpenShift Enterprise. Use the yum updatecommand to update all packages before installing OpenShift Enterprise.
Warning
The OpenShift Enterprise security model assumes that broker and node components are installed onseparate hosts. Running a broker and node on the same host is not supported.
6.3.1. Service Parameters
In the sample deployment steps, the broker host (Host 1) and node host (Host 2) are configured with thefollowing parameters:
Service domain example.comBroker IP address DHCPBroker host name broker.example.comNode 0 IP address DHCPNode 0 host name node.example.comDatastore service MongoDBAuthentication service Basic Authentication using httpd mod_auth_basic
DNS service BIND, configured as follows:
IP address: dynamicZone: example.com (same as Service Domain)Domain suffix: example.com (same as Service Domain)
Messaging service MCollective using ActiveMQ
All of these parameters are customizable to suit your requirements. As detailed in the instructions, thedomain and host names can be modified by editing the appropriate configuration files. The messaging,authentication, and DNS services are each implemented as plug-ins to the broker.
Deployment Guide
52
Important
DHCP is supported, and use thereof is assumed in this guide. However, dynamic reassignment of IPaddresses is not supported and can cause problems.
6.3.2. DNS Information
The sample deployment steps configure a DNS service to allow OpenShift Enterprise to dynamically publishDNS host names of applications within your chosen domain. This can only be made authoritative by anexternal authority, such as your system administrator, or Internet service provider. If the OpenShift Enterprisename server is not made authoritative by your DNS provider, application host names are visible only on theOpenShift Enterprise hosts, or any workstation configured to use the same DNS service. Alternatively,OpenShift Enterprise can publish to an existing authoritative service if given the necessary credentials for thedomain.
The process of creating an authoritative DNS service and establishing a delegation agreement with your ITdepartment are beyond the scope of this guide. Each organization has its own policies and procedures formanaging DNS services. The requirements must be discussed with the appropriate personnel for your site tomake the OpenShift Enterprise service available.
[1] https://access.redhat.com/documentation/en-US/OpenShift_Enterprise/2/html/User_Guide/chap-Applications.html#Highly-Available_Applications
Chapter 6. Deployment Methods
53

Chapter 7. Manually Installing and Configuring a Broker Host
Prerequisites:
Chapter 2, Prerequisites
Chapter 5, Host Preparation
Section 6.3, “Using the Sample Deployment Steps”
This chapter describes how to manually install and configure the OpenShift Enterprise broker host. Theexample host contains the broker application, MongoDB, ActiveMQ, and BIND. Each of these components iscovered in individual sections.
Perform all of the procedures in this section only after the base operating system is fully installed andconfigured, and before you install and configure any node hosts.
Warning
The OpenShift Enterprise security model assumes that broker and node components are installed onseparate hosts. Running a broker and node on the same host is not supported.
7.1. Configuring Broker Host Entitlements
OpenShift Enterprise requires several packages that are not available in the standard Red Hat EnterpriseLinux channels. A broker host requires a subscription for the appropriate OpenShift Enterprise channels toreceive these extra packages.
Table 7.1. OpenShift Enterprise Broker Host Channels
Channel Name Purpose Required Provided ByRed Hat OpenShiftEnterprise 2.2Infrastructure.
Base channel forOpenShift Enterprise 2.2broker hosts.
Yes. "OpenShift EnterpriseBroker Infrastructure"subscription.
Red Hat OpenShiftEnterprise 2.2 ClientTools.
Provides access to theOpenShift Enterprise 2.2client tools.
Not required for brokerfunctionality, but requiredduring installation fortesting andtroubleshootingpurposes.
"OpenShift EnterpriseBroker Infrastructure"subscription.
Red Hat SoftwareCollections 1.
Provides access to thelatest version ofprogramming languages,database servers, andrelated packages.
Yes. "OpenShift EnterpriseBroker Infrastructure"subscription.
You must register your host through either Red Hat Subscription Management (RHSM) or Red Hat Network(RHN) Classic to attach any of the above subscriptions and enable the proper channels. Instructions for eitherof these subscription methods are provided in the following sections. Choose one subscription method andfollow the relevant instructions before proceeding to Section 7.2, “Configuring Yum on Broker Hosts”.
7.1.1. Using Red Hat Subscription Management on Broker Hosts
Deployment Guide
54

For additional information on managing your subscription entitlements with Red Hat SubscriptionManagement, see the Red Hat Subscription Management guides athttp://access.redhat.com/site/documentation.
Procedure 7.1. To Configure Broker Host Entitlements with Red Hat Subscription Management:
1. On your Red Hat Enterprise Linux instance, register the system:
Example 7.1. Registering Using the Subscription Manager
# subscription-manager register Username:Password:
The system has been registered with id: 3tghj35d1-7c19-4734-b638-f24tw8eh6246
2. Locate the desired OpenShift Enterprise subscription pool IDs in the list of available subscriptions foryour account:
Example 7.2. Finding the OpenShift Enterprise Pool ID
# subscription-manager list --available +-------------------------------------------+ Available Subscriptions+-------------------------------------------+
Subscription Name: OpenShift Enterprise Broker InfrastructureSKU: SYS####Pool Id: Example_3affb61f013b3ef6a5fe0b9aQuantity: 1Service Level: LayeredService Type: L1-L3Multi-Entitlement: NoEnds: 01/01/2020System Type: Physical
3. Attach the desired subscription. Replace pool-id in the following command with your relevant PoolID value from the previous step:
# subscription-manager attach --pool pool-id
4. Enable only the Red Hat OpenShift Enterprise 2.2 Infrastructure channel:
# subscription-manager repos --enable rhel-6-server-ose-2.2-infra-rpms
5. Confirm that yum repolist displays the enabled channel:
Chapter 7. Manually Installing and Configuring a Broker Host
55

# yum repolist
repo id repo name
rhel-6-server-ose-2.2-infra-rpms Red Hat OpenShift Enterprise 2.2 Infrastructure (RPMs)
OpenShift Enterprise broker hosts require a customized yum configuration to install correctly. Forcontinued steps to correctly configure yum, see Section 7.2, “Configuring Yum on Broker Hosts”.
7.1.2. Using Red Hat Network Classic on Broker Hosts
For additional information regarding Red Hat Network (RHN) Classic, see the Red Hat SubscriptionManagement guides at http://access.redhat.com/site/documentation.
Note
While Red Hat Network (RHN) Classic can be used to subscribe to channels, it is primarily intendedfor existing, legacy systems. Red Hat strongly recommends that you use Red Hat SubscriptionManagement for new installations. For details on how to migrate from RHN Classic to RHSM, see theOpenShift Enterprise Administration Guide.
Procedure 7.2. To Configure Entitlements with Red Hat Network (RHN) Classic:
1. On your Red Hat Enterprise Linux instance, register the system. Replace username and passwordin the following command with your Red Hat Network account credentials.
# rhnreg_ks --username username --password password
2. Enable only the Red Hat OpenShift Enterprise 2.2 Infrastructure channel.
# rhn-channel -a -c rhel-x86_64-server-6-ose-2.2-infrastructure
3. Confirm that yum repolist displays the enabled channel.
# yum repolist
repo id repo name
rhel-x86_64-server-6-ose-2.2-infrastructure Red Hat OpenShift Enterprise 2.2 Infrastructure - x86_64
OpenShift Enterprise broker hosts require a customized yum configuration to install correctly. Forcontinued steps to correctly configure yum, see Section 7.2, “Configuring Yum on Broker Hosts”.
7.2. Configuring Yum on Broker Hosts
The packages required for running OpenShift Enterprise are all available from Red Hat Network (RHN).Third-party RPM repositories and even other products provided by Red Hat can create conflicts withOpenShift Enterprise during initial deployment and later when applying updates. To avoid these issues, it is
Deployment Guide
56

best to use a combination of the yum-plugin-priorities package and exclude directives in the yumconfiguration files.
The yum-plugin-priorities package helps prevent other repositories from interfering with Red Hat Networkcontent for OpenShift Enterprise. The exclude directives work around the cases that priorities will not solve.The oo-admin-yum-validator tool consolidates this yum configuration process for specified componenttypes called roles.
Using the oo-admin-yum-validator Tool
After configuring the selected subscription method as described in Section 7.1, “Configuring Broker HostEntitlements”, use the oo-admin-yum-validator tool to configure yum and prepare your host to install thebroker components. This tool reports a set of problems, provides recommendations, and halts by default sothat you can review each set of proposed changes. You then have the option to apply the changes manually,or let the tool attempt to fix the issues that have been found. This process may require you to run the toolseveral times. You also have the option of having the tool both report all found issues, and attempt to fix allissues.
Procedure 7.3. To Configure Yum on Broker Hosts:
1. Install the latest openshift-enterprise-release package:
# yum install openshift-enterprise-release
2. Run the oo-admin-yum-validator command with the -o option for version 2.2 and the -roption for the broker role. This reports the first detected set of problems, provides a set of proposedchanges, and halts.
Example 7.3. Detecting Problems
# oo-admin-yum-validator -o 2.2 -r broker Please note: --role=broker implicitly enables --role=client to ensure /usr/bin/rhc is available for testing and troubleshooting.Detected OpenShift Enterprise repository subscription managed by Red Hat Subscription Manager.
The required OpenShift Enterprise repositories are disabled: rhel-server-rhscl-6-rpms rhel-6-server-ose-2.2-rhc-rpms rhel-6-server-rpmsEnable these repositories by running these commands:# subscription-manager repos --enable=rhel-server-rhscl-6-rpms# subscription-manager repos --enable=rhel-6-server-ose-2.2-rhc-rpms# subscription-manager repos --enable=rhel-6-server-rpmsPlease re-run this tool after making any recommended repairs to this system
Alternatively, use the --report-all option to report all detected problems.
# oo-admin-yum-validator -o 2.2 -r broker --report-all
Chapter 7. Manually Installing and Configuring a Broker Host
57

3. After reviewing the reported problems and their proposed changes, either fix them manually or let thetool attempt to fix the first set of problems using the same command with the --fix option. This mayrequire several repeats of steps 2 and 3.
Example 7.4. Fixing Problems
# oo-admin-yum-validator -o 2.2 -r broker --fix
Please note: --role=broker implicitly enables --role=client to ensure /usr/bin/rhc is available for testing and troubleshooting.Detected OpenShift Enterprise repository subscription managed by Red Hat Subscription Manager.
Enabled repository rhel-server-rhscl-6-rpmsEnabled repository rhel-6-server-ose-2.2-rhc-rpmsEnabled repository rhel-6-server-rpms
Alternatively, use the --fix-all option to allow the tool to attempt to fix all of the problems that arefound.
# oo-admin-yum-validator -o 2.2 -r broker --fix-all
Note
If the host is using Red Hat Network (RHN) Classic, the --fix and --fix-all options donot automatically enable any missing OpenShift Enterprise channels as they do when the hostis using Red Hat Subscription Management. Enable the recommended channels with the rhn-channel command. Replace repo-id in the following command with the repository IDreported in the oo-admin-yum-validator command output.
# rhn-channel -a -c repo-id
Important
For either subscription method, the --fix and --fix-all options do not automaticallyinstall any packages. The tool reports if any manual steps are required.
4. Repeat steps 2 and 3 until the oo-admin-yum-validator command displays the followingmessage.
No problems could be detected!
7.3. Installing and Configuring BIND and DNS
Deployment Guide
58

This section describes how to configure BIND on the broker host, and is included primarily for completenessand to help you quickly install and configure your system. Skip this section if there are alternativearrangements for handling DNS updates from OpenShift Enterprise.
If you wish to have OpenShift Enterprise update an existing BIND server in your infrastructure, see thefollowing instructions. If you desire a different configuration, a different DNS update plug-in can be installedand configured instead. See Section 8.1, “Installing and Configuring DNS Plug-ins” for details on othersupported DNS plug-ins that are available as of OpenShift Enterprise 2.1.6 and later as well as information ondeveloping your own plug-in.
7.3.1. Installing BIND and DNS Packages
Install all the required packages:
# yum install bind bind-utils
7.3.2. Configuring BIND and DNS
Most of the instructions in this guide reference the domain name that is used to configure the sampleOpenShift Enterprise installation. Configure the $domain environment variable to simplify the process withthe following command, replacing example.com with the domain name to suit your environment:
# domain=example.com
Configure the $keyfile environment variable so that it contains the file name for a new DNSSEC key foryour domain, which is created in the subsequent step:
# keyfile=/var/named/$domain.key
Use the dnssec-keygen tool to generate the new DNSSEC key for the domain. Run the followingcommands to delete any old keys and generate a new key:
# rm -vf /var/named/K$domain*# pushd /var/named# dnssec-keygen -a HMAC-SHA256 -b 256 -n USER -r /dev/urandom $domain# KEY="$(grep Key: K$domain*.private | cut -d ' ' -f 2)"# popd
Note
The $KEY environment variable has been set to hold the newly-generated key. This key is used in alater step.
Enabling Communication Between the Broker and BIND
Ensure that a key exists so that the broker can communicate with BIND. Use the rndc-confgen commandto generate the appropriate configuration files for rndc, which is the tool that the broker uses to perform thiscommunication:
# rndc-confgen -a -r /dev/urandom
Chapter 7. Manually Installing and Configuring a Broker Host
59
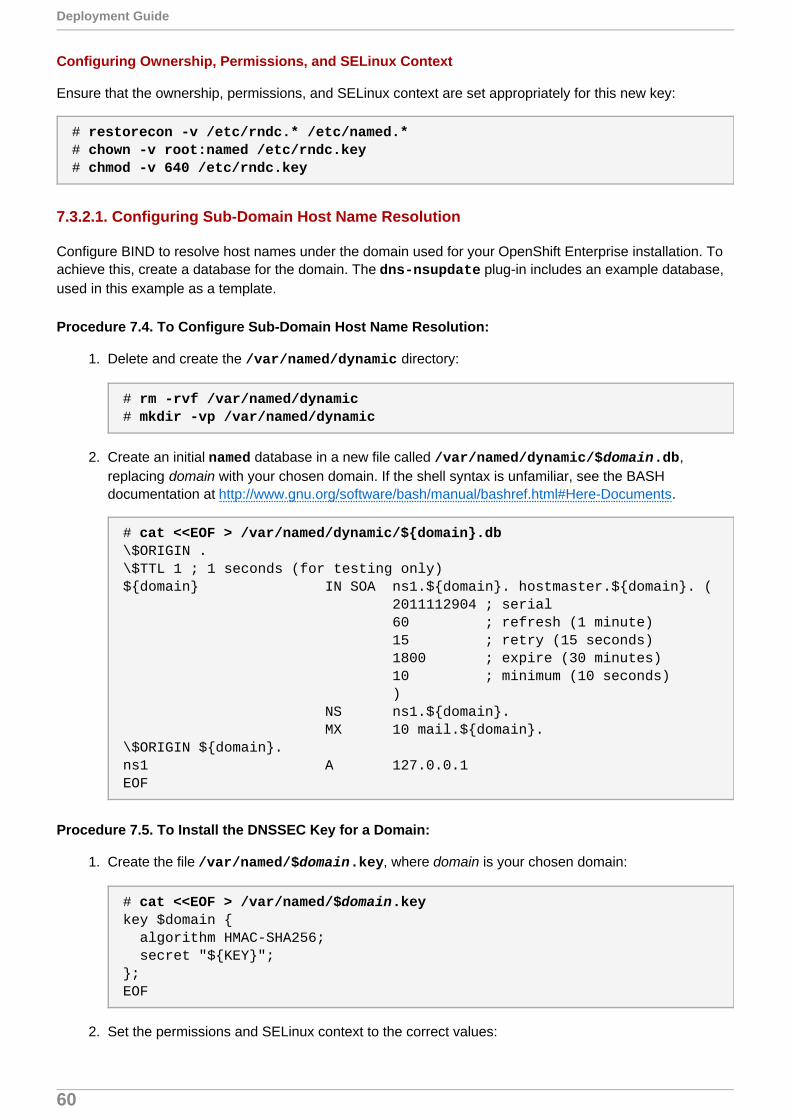
Configuring Ownership, Permissions, and SELinux Context
Ensure that the ownership, permissions, and SELinux context are set appropriately for this new key:
# restorecon -v /etc/rndc.* /etc/named.*# chown -v root:named /etc/rndc.key# chmod -v 640 /etc/rndc.key
7.3.2.1. Configuring Sub-Domain Host Name Resolution
Configure BIND to resolve host names under the domain used for your OpenShift Enterprise installation. Toachieve this, create a database for the domain. The dns-nsupdate plug-in includes an example database,used in this example as a template.
Procedure 7.4. To Configure Sub-Domain Host Name Resolution:
1. Delete and create the /var/named/dynamic directory:
# rm -rvf /var/named/dynamic# mkdir -vp /var/named/dynamic
2. Create an initial named database in a new file called /var/named/dynamic/$domain.db,replacing domain with your chosen domain. If the shell syntax is unfamiliar, see the BASHdocumentation at http://www.gnu.org/software/bash/manual/bashref.html#Here-Documents.
# cat <<EOF > /var/named/dynamic/${domain}.db\$ORIGIN .\$TTL 1 ; 1 seconds (for testing only)${domain} IN SOA ns1.${domain}. hostmaster.${domain}. ( 2011112904 ; serial 60 ; refresh (1 minute) 15 ; retry (15 seconds) 1800 ; expire (30 minutes) 10 ; minimum (10 seconds) ) NS ns1.${domain}. MX 10 mail.${domain}.\$ORIGIN ${domain}.ns1 A 127.0.0.1EOF
Procedure 7.5. To Install the DNSSEC Key for a Domain:
1. Create the file /var/named/$domain.key, where domain is your chosen domain:
# cat <<EOF > /var/named/$domain.keykey $domain { algorithm HMAC-SHA256; secret "${KEY}";};EOF
2. Set the permissions and SELinux context to the correct values:
Deployment Guide
60
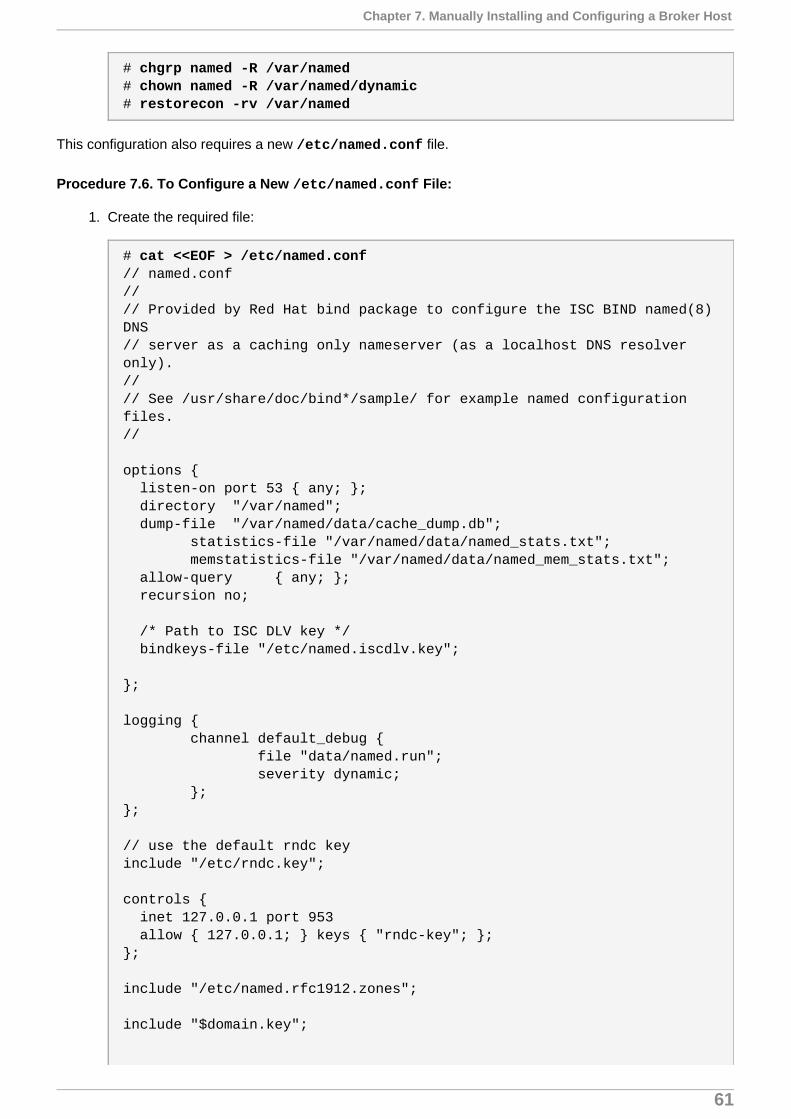
# chgrp named -R /var/named# chown named -R /var/named/dynamic# restorecon -rv /var/named
This configuration also requires a new /etc/named.conf file.
Procedure 7.6. To Configure a New /etc/named.conf File:
1. Create the required file:
# cat <<EOF > /etc/named.conf// named.conf//// Provided by Red Hat bind package to configure the ISC BIND named(8) DNS// server as a caching only nameserver (as a localhost DNS resolver only).//// See /usr/share/doc/bind*/sample/ for example named configuration files.//
options { listen-on port 53 { any; }; directory "/var/named"; dump-file "/var/named/data/cache_dump.db"; statistics-file "/var/named/data/named_stats.txt"; memstatistics-file "/var/named/data/named_mem_stats.txt"; allow-query { any; }; recursion no;
/* Path to ISC DLV key */ bindkeys-file "/etc/named.iscdlv.key";
};
logging { channel default_debug { file "data/named.run"; severity dynamic; };};
// use the default rndc keyinclude "/etc/rndc.key";
controls { inet 127.0.0.1 port 953 allow { 127.0.0.1; } keys { "rndc-key"; };};
include "/etc/named.rfc1912.zones";
include "$domain.key";
Chapter 7. Manually Installing and Configuring a Broker Host
61
zone "$domain" IN { type master; file "dynamic/$domain.db"; allow-update { key $domain ; } ;};EOF
2. Set the permissions and SELinux context to the correct values:
# chown -v root:named /etc/named.conf# restorecon /etc/named.conf
7.3.2.2. Configuring Host Name Resolution
Update the /etc/resolv.conf file on the broker host (Host 1) so that it uses the local named service. Thisallows the broker to resolve its own host name, existing node host names, and any future nodes that areadded. Also configure the firewall and named service to serve local and remote DNS requests for the domain.
Procedure 7.7. To Configure Host Name Resolution:
1. Edit the /etc/resolv.conf file on the broker host.
2. Add the following entry as the first name server:
nameserver 127.0.0.1
3. Save and close the file.
4. Open a shell and run the following commands. This allows DNS access through the firewall, andensures the named service starts on boot.
# lokkit --service=dns# chkconfig named on
5. Use the service command to start the named service (that is, BIND) for some immediate updates:
# service named start
6. Use the nsupdate command to open an interactive session to BIND and pass relevant informationabout the broker. In the following example, server, update, and send are commands to the nsupdate command.
Important
Remember to replace broker.example.com with the fully-qualified domain name, 10.0.0.1 with the IP address of your broker, and keyfile with the new key file.
Update your BIND configuration:
# nsupdate -k $keyfileserver 127.0.0.1update delete broker.example.com A
Deployment Guide
62

update add broker.example.com 180 A 10.0.0.1send
7. Press Ctrl+D to save the changes and close the session.
Note
If you use the kickstart or bash script, the configure_named and configure_dns_resolutionfunctions perform these steps.
7.3.3. Verifying the BIND Configuration
Before continuing with further configuration, ensure BIND is configured correctly so that the broker's hostname resolves.
# dig @127.0.0.1 broker.example.com
Inspect the ANSWER SECTION of the output, and ensure it contains the correct IP address.
Ensure the local BIND instance is being used by the broker:
# dig broker.example.com (An example AUTHORITY section:);; AUTHORITY SECTION:example.com. 1 IN NS ns1.example.com.
Inspect the AUTHORITY SECTION of the output to verify that it contains the broker host name. If you haveBIND configured on a separate host, verify that it returns that host name.
The BIND instance as configured will not answer questions about domains it does not own, but if you add oneor more secondary nameservers in the /etc/resolv.conf file, they can be queried for other domains.Because the dig command will only query the BIND instance by default, use the host command to testrequests for other host names.
# host icann.org
icann.org has address 192.0.43.7icann.org has IPv6 address 2001:500:88:200::7icann.org mail is handled by 10 pechora1.icann.org.
7.4. Configuring DHCP and Host Name Resolution
This section describes how to perform system-wide network configurations on the broker. Note that no newpackages are required to complete this configuration.
Chapter 7. Manually Installing and Configuring a Broker Host
63

Note
This section assumes that the broker is using the eth0 network interface. If your system uses adifferent interface, substitute that interface name in the file names in the ensuing instructions.
7.4.1. Configuring the DHCP Client on the Broker Host
For correct configuration, ensure the DHCP client uses the local BIND instance, and the correct host nameand domain name.
Use the following procedure to configure the DHCP client correctly. Remember to replace the example IPaddresses, host names, and domain names with the values to suit your environment.
Procedure 7.8. To Configure DHCP on the Broker Host:
1. Create the /etc/dhcp/dhclient-eth0.conf file:
# touch /etc/dhcp/dhclient-eth0.conf
2. Edit the file to contain the following lines:
prepend domain-name-servers 10.0.0.1;prepend domain-search "example.com";
3. Open the /etc/sysconfig/network file. Locate the line that begins with HOSTNAME= and ensureit is set to your broker host name:
HOSTNAME=broker.example.com
4. Run the following command to immediately set the host name. Remember to replace the examplevalue with the fully-qualified domain name of your broker host.
# hostname broker.example.com
Note
If you use the kickstart or bash script, the configure_dns_resolution and configure_hostname functions perform these steps.
7.4.2. Verifying the DHCP Configuration
Run the following command to verify the host name of the broker host:
# hostname
7.5. Installing and Configuring MongoDB
Deployment Guide
64

The following configuration changes are required for MongoDB so that it can be used with OpenShiftEnterprise:
Configuring authentication
Specifying the default database size
Creating an administrative user
Creating a regular user
7.5.1. Installing MongoDB
Install all of the required MongoDB packages with the following command:
# yum install mongodb-server mongodb
7.5.2. Configuring MongoDB
The MongoDB configuration consists of three main steps:
Configuring authentication
Configuring default database size
Configuring the firewall and mongod daemon
Procedure 7.9. To Configure Authentication and Default Database Size for MongoDB:
1. Open the /etc/mongodb.conf file.
2. Locate the line beginning with auth = and ensure it is set to true:
auth = true
3. Add the following line at the end of the file:
smallfiles = true
4. Ensure no other lines exist that begin with either auth = or smallfiles =.
5. Save and close the file.
Procedure 7.10. To Configure the Firewall and Mongo Daemon:
1. Ensure the mongod daemon starts on boot:
# chkconfig mongod on
2. Start the mongod daemon immediately:
# service mongod start
Chapter 7. Manually Installing and Configuring a Broker Host
65

Note
If you use the kickstart or bash script, the configure_datastore function performs these steps.
Verifying MongoDB Configuration
Before continuing with further configuration, verify that you can connect to the MongoDB database:
# mongo
This command starts a MongoDB interactive session. Press CTRL+D to leave this session and return to thecommand shell.
Important
The start and restart actions of MongoDB return before the daemon is ready to accept connections.As a result, MongoDB takes time to initialize the journal, which can take several minutes. If youreceive the message "Error: couldn't connect to server 127.0.0.1" with the mongo command, wait andtry again. When MongoDB is ready, it will write a "waiting for connections" message in the /var/log/mongodb/mongodb.log file. A connection to the MongoDB database is required for theensuing steps.
7.5.3. Configuring MongoDB User Accounts
The following instructions describe how to create an account in MongoDB for the broker host to use.
Note
The MongoDB user and password created for the broker host in this section are used when updatingthe /etc/openshift/broker.conf file later in Section 7.8.7, “Configuring the Broker Datastore”.
Procedure 7.11. To Create a MongoDB Account:
1. Open an interactive MongoDB session:
# mongo
2. At the MongoDB interactive session prompt, select the admin database:
> use admin
3. Add the admin user to the admin database. Replace password in the command with a uniquepassword:
> db.addUser("admin", "password")
Deployment Guide
66

4. Authenticate using the admin account created in the previous step. Replace password in thecommand with the appropriate password:
> db.auth("admin", "password")
5. Switch to the openshift_broker database:
> use openshift_broker
6. Add the openshift user to the openshift_broker database. Replace password in thecommand with a unique password:
> db.addUser("openshift", "password")
7. Press CTRL+D to exit the MongoDB interactive session.
Verifying MongoDB Account
The following instructions describe how to verify that the openshift account has been created.
Procedure 7.12. To Verify a MongoDB Account:
1. Open an interactive MongoDB session:
# mongo
2. Switch to the openshift_broker database:
> use openshift_broker
3. Authenticate using the openshift account. Replace password in the command with theappropriate password:
> db.auth("openshift", "password")
4. Retrieve a list of MongoDB users:
> db.system.users.find()
An entry for the openshift user is displayed.
5. Press CTRL+D to exit the MongoDB interactive session.
7.6. Installing and Configuring ActiveMQ
This section describes how to install and configure ActiveMQ as the messaging platform to aid incommunication between the broker and node hosts.
7.6.1. Installing ActiveMQ
Run the following command to install the required packages for ActiveMQ:
Chapter 7. Manually Installing and Configuring a Broker Host
67

# yum install activemq activemq-client
7.6.2. Configuring ActiveMQ
Edit the /etc/activemq/activemq.xml file to correctly configure ActiveMQ. You can download a sampleconfiguration file from https://raw.github.com/openshift/openshift-extras/enterprise-2.2/enterprise/install-scripts/activemq.xml. Copy this file into the /etc/activemq/ directory, and make the following configurationchanges:
1. Replace activemq.example.com in this file with the actual fully-qualified domain name (FQDN) ofthis host.
2. Substitute your own passwords for the example passwords provided, and use them in theMCollective configuration that follows.
Configure the firewall to allow MCollective to communicate on TCP port 61613, and set the activemqservice to start on boot:
# lokkit --port=61613:tcp# chkconfig activemq on
Start the activemq service:
# service activemq start
Note
If you use the kickstart or bash script, the configure_activemq function performs these steps.
Important
Ensure that the ActiveMQ monitor console web service requires authentication and answers only onthe localhost interface. It is important to limit access to the ActiveMQ console for security.
Procedure 7.13. To Secure the ActiveMQ Console:
1. Ensure authentication is enabled:
# sed -i -e '/name="authenticate"/s/false/true/' /etc/activemq/jetty.xml
2. For the console to answer only on the localhost interface, check the /etc/activemq/jetty.xml file. Ensure that the Connector bean has the host property with thevalue of 127.0.0.1.
Example 7.5. Connector Bean Configuration
<bean id="Connector"
Deployment Guide
68

class="org.eclipse.jetty.server.nio.SelectChannelConnector"> <!-- see the jettyPort bean --> <property name="port" value="#{systemProperties['jetty.port']}" /> <property name="host" value="127.0.0.1" /></bean>
3. Ensure that the line for the admin user in the /etc/activemq/jetty-realm.properties file isuncommented, and change the default password to a unique one. User definitions in this file take thefollowing form:
username: password [,role ...]
Example 7.6. admin User Definition
admin: password, admin
4. Restart the activemq service for the changes to take effect:
# service activemq restart
7.6.3. Verifying the ActiveMQ Configuration
MCollective can act in one of two ways: it can transport host-to-host messages, or it can broadcastmessages with the appropriate hosts responding to the broadcasting host. In the latter case, a message thatis broadcast has a "topic" that is used to indicate which hosts should respond.
After ActiveMQ has started, verify that it is listening for messages for the OpenShift Enterprise topics. It cantake 60 seconds or longer for the activemq daemon to finish initializing and start answering queries.
Verify that authentication is working, replacing password with your password:
# curl --head --user admin:password http://localhost:8161/admin/xml/topics.jsp
A 200 OK message should be displayed, followed by the remaining header lines. If you see a 401 Unauthorized message, it means your user name or password is incorrect.
Verify that the service returns a topic list, replacing password with your password:
# curl --user admin:password --silent http://localhost:8161/admin/xml/topics.jsp | grep -A 4 topic
If no results are returned, run it again without the --silent argument, and without using grep to filtermessages:
# curl http://localhost:8161/admin/xml/topics.jsp
If the following message is returned, it means that either the ActiveMQ service is not running, or it has notfinished initializing.
Chapter 7. Manually Installing and Configuring a Broker Host
69

curl: (7) couldn't connect to host
If this persists for more than 60 seconds, and the activemq daemon is running, look in the ActiveMQ log file:
# more /var/log/activemq/activemq.log
After you have verified the ActiveMQ configuration, disable the unused Jetty by commenting out the line thatloads jetty.xml. This can be done by editing activemq.xml manually or by running the followingcommand:
# sed -ie "s/\(.*import resource.*jetty.xml.*\)/<\!-- \1 -->/" /etc/activemq/activemq.xml
Restart the activemq service for the changes to take effect:
# service activemq restart
7.7. Installing and Configuring MCollective Client
The broker application on Host 1 uses the MCollective client to communicate with the node hosts. In turn, theMCollective client relies on Apache ActiveMQ. The following sections describe how to install and configurethe MCollective client.
7.7.1. Installing MCollective Client
Run the following command to install all required packages for the MCollective client on the broker host:
# yum install ruby193-mcollective-client
7.7.2. Configuring MCollective Client
Configure the MCollective client to use ActiveMQ on Host 1.
Replace the contents of the /opt/rh/ruby193/root/etc/mcollective/client.cfg file with thefollowing configuration. Change the setting for plugin.activemq.pool.1.host from localhost to theactual host name of Host 1, and use the same password for the MCollective user specified in /etc/activemq/activemq.xml. Also ensure that you set the password for the plugin.psk parameter,and the figures for the heartbeat parameters. This prevents any node failures when you install MCollectiveon a node host using Section 9.7, “Installing and Configuring MCollective on Node Hosts”. However, you canleave these as the default values:
main_collective = mcollectivecollectives = mcollectivelibdir = /opt/rh/ruby193/root/usr/libexec/mcollectivelogger_type = consoleloglevel = warndirect_addressing = 0
# Pluginssecurityprovider = pskplugin.psk = asimplething
Deployment Guide
70
connector = activemqplugin.activemq.pool.size = 1plugin.activemq.pool.1.host = localhostplugin.activemq.pool.1.port = 61613plugin.activemq.pool.1.user = mcollectiveplugin.activemq.pool.1.password = marionette
plugin.activemq.heartbeat_interval = 30plugin.activemq.max_hbread_fails = 2plugin.activemq.max_hbrlck_fails = 2
# Broker will retry ActiveMQ connection, then report errorplugin.activemq.initial_reconnect_delay = 0.1plugin.activemq.max_reconnect_attempts = 6
# Factsfactsource = yamlplugin.yaml = /opt/rh/ruby193/root/etc/mcollective/facts.yaml
Note
If you use the kickstart or bash script, the configure_mcollective_for_activemq_on_brokerfunction performs these steps.
7.8. Installing and Configuring the Broker Application
The following sections describe how to install and configure the broker Rails application that provides theREST API to the client tools.
7.8.1. Installing the Broker Application
Install the required packages for these instructions using:
# yum install openshift-origin-broker openshift-origin-broker-util rubygem-openshift-origin-auth-remote-user rubygem-openshift-origin-msg-broker-mcollective rubygem-openshift-origin-dns-nsupdate
Note
If you use the kickstart or bash script, the install_broker_pkgs function performs this step.
7.8.2. Setting Ownership and Permissions for MCollective Client Configuration File
Set the ownership and permissions for the MCollective client configuration file:
# chown apache:apache /opt/rh/ruby193/root/etc/mcollective/client.cfg# chmod 640 /opt/rh/ruby193/root/etc/mcollective/client.cfg
Chapter 7. Manually Installing and Configuring a Broker Host
71

Note
If you use the kickstart or bash script, the configure_mcollective_for_activemq_on_brokerfunction performs this step.
7.8.3. Modifying Broker Proxy Configuration
The default installation of mod_ssl includes a configuration file with a VirtualHost that can cause spuriouswarnings. In some cases, it may interfere with requests to the OpenShift Enterprise broker application.
Modify the /etc/httpd/conf.d/ssl.conf file to prevent these issues:
# sed -i '/VirtualHost/,/VirtualHost/ d' /etc/httpd/conf.d/ssl.conf
7.8.4. Configuring the Required Services
A number of services must be started for the broker Rails application when Host 1 is booted up. Start theseservices using:
# chkconfig httpd on# chkconfig network on# chkconfig ntpd on# chkconfig sshd on
Configure the firewall to allow access to these services:
# lokkit --nostart --service=ssh# lokkit --nostart --service=https# lokkit --nostart --service=http
Set the appropriate ServerName in the Apache configuration on the broker:
# sed -i -e "s/ServerName .*\$/ServerName `hostname`/" \ /etc/httpd/conf.d/000002_openshift_origin_broker_servername.conf
Note
If you use the kickstart or bash script, the enable_services_on_broker function performs thesesteps.
Configuring Inter-Host Access Keys
Generate a broker access key, which is used by Jenkins and other optional services. The access key isconfigured with the /etc/openshift/broker.conf file. This includes the expected key file locations,which are configured in the lines shown in the sample screen output. The following AUTH_PRIV_KEY_FILEand AUTH_PUB_KEY_FILE settings show the default values, which can be changed as required. The AUTH_PRIV_KEY_PASS setting can also be configured, but it is not required.
Deployment Guide
72
AUTH_PRIV_KEY_FILE="/etc/openshift/server_priv.pem"AUTH_PRIV_KEY_PASS=""AUTH_PUB_KEY_FILE="/etc/openshift/server_pub.pem"
Note
The AUTH_PRIV_KEY_FILE, AUTH_PRIV_KEY_PASS and AUTH_PUB_KEY_FILE settings mustspecify the same private key on all associated brokers for the Jenkins authentication to work.
The following commands generate the broker access key and assume the default key file locations are used.If you changed the AUTH_PRIV_KEY_FILE or AUTH_PRIV_KEY_PASS settings, replace/etc/openshift/server_priv.pem or /etc/openshift/server_pub.pem in the following commands as necessary.
# openssl genrsa -out /etc/openshift/server_priv.pem 2048# openssl rsa -in /etc/openshift/server_priv.pem -pubout > /etc/openshift/server_pub.pem# chown apache:apache /etc/openshift/server_pub.pem# chmod 640 /etc/openshift/server_pub.pem
The AUTH_SALT setting in the /etc/openshift/broker.conf file must also be set. It must be secret andset to the same value across all brokers in a cluster, or scaling and Jenkins integration will not work. Createthe random string using:
# openssl rand -base64 64
Important
If AUTH_SALT is changed after the broker is running, the broker service must be restarted:
# service openshift-broker restart
Further, if any gears are present when the value is changed again, run the oo-admin-broker-authtool to recreate the broker authentication keys. Run the following command to rekey authenticationtokens for all applicable gears:
# oo-admin-broker-auth --rekey-all
See the command's --help output and man page for additional options and more detailed usecases.
Configure the SESSION_SECRET setting in the /etc/openshift/broker.conf file to sign the Railssessions. Ensure it is the same across all brokers in a cluster. Create the random string using:
# openssl rand -hex 64
Similar to AUTH_SALT, if the SESSION_SECRET setting is changed after the broker is running, the brokerservice must be restarted. Note that all sessions are dropped when the broker service is restarted.
Chapter 7. Manually Installing and Configuring a Broker Host
73

Configure a suitable SSH key to share between the broker host and all node hosts to facilitate moving gearsbetween nodes. Create the key and copy it to the appropriate directory with:
# ssh-keygen -t rsa -b 2048 -f ~/.ssh/rsync_id_rsa# cp ~/.ssh/rsync_id_rsa* /etc/openshift/
As part of the node host configuration, copy this key to the appropriate directory on each node host. SeeSection 9.9, “Configuring SSH Keys on the Node Host” for more information.
Note
If you use the kickstart or bash script, the configure_access_keys_on_broker function performsthese steps.
7.8.5. Configuring the Standard SELinux Boolean Variables
The standard SELinux policy requires correct configuration of variables for the broker application. Configurethese variables using:
# setsebool -P httpd_unified=on httpd_execmem=on httpd_can_network_connect=on httpd_can_network_relay=on httpd_run_stickshift=on named_write_master_zones=on allow_ypbind=on
Table 7.2. SELinux Boolean Variable Options
Boolean Variable Purposehttpd_unified Allow the broker to write files in the http file context.
httpd_execmem Allow httpd processes to write to and execute the same memory.This capability is required by Passenger (used by both the broker andthe console) and by The Ruby Racer/V8 (used by the console).
httpd_can_network_connect
Allow the broker application to access the network.
httpd_can_network_relay Allow the SSL termination Apache instance to access the back-endbroker application.
httpd_run_stickshift Enable Passenger-related permissions.
named_write_master_zones Allow the broker application to configure DNS.
allow_ypbind Allow the broker application to use ypbind to communicate directlywith the name server.
Next, relabel the required files and directories with the correct SELinux contexts:
# fixfiles -R ruby193-rubygem-passenger restore# fixfiles -R ruby193-mod_passenger restore# restorecon -rv /var/run# restorecon -rv /opt
Deployment Guide
74

Note
If you use the kickstart or bash script, the configure_selinux_policy_on_broker functionperforms these steps.
7.8.6. Configuring the Broker Domain
Modify the configuration files of the broker application to suit your domain name:
# sed -i -e "s/^CLOUD_DOMAIN=.*\$/CLOUD_DOMAIN=$domain/" /etc/openshift/broker.conf
Note
If you use the kickstart or bash script, the configure_controller function performs this step.
7.8.7. Configuring the Broker Datastore
Update the broker application configuration to use the MongoDB user, password, and database name thatyou specified during the MongoDB configuration in Section 7.5.3, “Configuring MongoDB User Accounts”.Verify that the MONGO_USER, MONGO_PASSWORD, and MONGO_DB fields are configured correctly in the /etc/openshift/broker.conf file.
Example 7.7. Example MongoDB configuration in /etc/openshift/broker.conf
MONGO_USER="openshift"MONGO_PASSWORD="password"MONGO_DB="openshift_broker"
7.8.8. Configuring the Broker Plug-ins
Enable the required plug-ins for authentication, DNS, and messaging in the /etc/openshift/plugins.ddirectory. For example, the example.conf file enables the example plug-in. The contents of the example.conf file contain configuration settings in the form of lines containing key=value pairs. In somecases, the only requirement is to copy an example configuration. Other plug-ins, such as the DNS plug-in,require further configuration.
Change to the /etc/openshift/plugins.d/ directory to access the files needed for the followingconfiguration steps:
# cd /etc/openshift/plugins.d
Procedure 7.14. To Configure the Required Plug-ins:
1. Copy the example configuration file for the remote user authentication plug-in:
Chapter 7. Manually Installing and Configuring a Broker Host
75

# cp openshift-origin-auth-remote-user.conf.example openshift-origin-auth-remote-user.conf
2. Copy the example configuration file for the MCollective messaging plug-in:
# cp openshift-origin-msg-broker-mcollective.conf.example openshift-origin-msg-broker-mcollective.conf
3. Configure the dns-nsupdate plug-in:
# cat << EOF > openshift-origin-dns-nsupdate.confBIND_SERVER="127.0.0.1"BIND_PORT=53BIND_KEYNAME="$domain"BIND_KEYVALUE="$KEY"BIND_KEYALGORITHM=HMAC-SHA256BIND_ZONE="$domain"EOF
Important
Verify that $domain and $KEY are configured correctly as described in Section 7.3.2,“Configuring BIND and DNS”.
Note
If you use the kickstart or bash script, the configure_httpd_auth, configure_messaging_plugin, and configure_dns_plugin functions perform these steps.
7.8.9. Configuring OpenShift Enterprise Authentication
With the remote user authentication plug-in, the broker service relies on the httpd service to handleauthentication and pass on the authenticated user, or "remote user". Therefore, it is necessary to configureauthentication in httpd. In a production environment, you can configure httpd to use LDAP, Kerberos, oranother industrial-strength technology. This example uses Apache Basic Authentication and a htpasswd fileto configure authentication.
Procedure 7.15. To Configure Authentication for the OpenShift Enterprise Broker:
1. Copy the example file to the correct location. This configures httpd to use /etc/openshift/htpasswd for its password file.
# cp /var/www/openshift/broker/httpd/conf.d/openshift-origin-auth-remote-user-basic.conf.sample /var/www/openshift/broker/httpd/conf.d/openshift-origin-auth-remote-user.conf
Deployment Guide
76

Important
The /var/www/openshift/broker/httpd/conf.d/openshift-origin-auth-remote-user.conf file must be readable by Apache for proper authentication. Red Hatrecommends not making the file unreadable by httpd.
2. Create the htpasswd file with an initial user "demo":
# htpasswd -c /etc/openshift/htpasswd demo New password:Re-type new password:Adding password for user demo
Note
If you use the kickstart or bash script, the configure_httpd_auth function performs these steps.The script creates the demo user with a default password, which is set to changeme in OpenShiftEnterprise 2.0 and prior releases. With OpenShift Enterprise 2.1 and later, the default password israndomized and displayed after the installation completes. The demo user is intended for testing aninstallation, and must not be enabled in a production installation.
7.8.10. Configuring Bundler
Run the following command to verify that Bundler can find the necessary Ruby modules (or "gems") to run thebroker Rails application:
# cd /var/www/openshift/broker# scl enable ruby193 'bundle --local'
This command produces the following output:
Your bundle is complete! Use `bundle show [gemname]` to see where a bundled gem is installed.
Configure the broker to start when you reboot Host 1:
# chkconfig openshift-broker on
Note
If you use the kickstart or bash script, the configure_controller function performs these steps.
Start the broker immediately:
# service httpd start# service openshift-broker start
Chapter 7. Manually Installing and Configuring a Broker Host
77

7.8.11. Verifying the Broker Configuration
Use the curl command on the broker host to retrieve the REST API base as a quick test to verify yourbroker configuration:
# curl -Ik https://localhost/broker/rest/api
Verify that a 200 OK response is returned. Otherwise, try the command again without the -I option and lookfor an error message or Ruby backtrace:
# curl -k https://localhost/broker/rest/api
Deployment Guide
78

Chapter 8. Continuing Broker Host Installation for Enterprise
This section describes how to customize your broker installation for enterprise use, and provides informationbeyond the basic installation of an OpenShift Enterprise broker host.
8.1. Installing and Configuring DNS Plug-ins
OpenShift Enterprise must be able to make dynamic, real-time updates to a DNS domain to publishapplications. A DNS plug-in on the broker handles these updates by creating or deleting CNAME records.The sample broker deployment described in Chapter 7, Manually Installing and Configuring a Broker Hostinstalls and configures an nsupdate plug-in that modifies a name server according to RFC 2136 .However, you can instead define and use a different plug-in that updates a DNS service of your choice.
To implement a different DNS plug-in, you can either develop your own or install and configure one of thesupported plug-ins that are shipped with OpenShift Enterprise. If you choose to develop your own, inspect thensupdate plug-in code as an example. The location of the gem and the source files varies depending on theversion of the RPM package. Use the following command to find out the location of these files on your brokerhosts:
# rpm -ql rubygem-openshift-origin-dns-nsupdate
Then see the Gem_Location/lib/openshift/nsupdate_plugin.rb file to observe the necessaryfunctions.
If you choose to use one of the supported DNS plug-ins, see the following sections.
8.1.1. Installing and Configuring the Fog DNS Plug-in
Available starting in OpenShift Enterprise 2.2, the Fog DNS plug-in uses cloud DNS services to publishOpenShift Enterprise applications. Currently, this plug-in can only be configured for use with Rackspace®Cloud DNS.
See http://fog.io/dns for more information on Fog cloud DNS services.
See http://www.rackspace.com/cloud/dns for more information on Rackspace® Cloud DNS.
Procedure 8.1. To Install and Configure the Fog DNS Plug-in:
Perform all of the following steps on each broker host in your deployment.
1. Install the Fog DNS plug-in:
# yum install rubygem-openshift-origin-dns-fog
2. Copy the example to create the configuration file:
# cp /etc/openshift/plugins.d/openshift-origin-dns-fog.conf.example /etc/openshift/plugins.d/openshift-origin-dns-fog.conf
3. Edit the /etc/openshift/plugins.d/openshift-origin-dns-fog.conf file and set yourRackspace® Cloud DNS credentials.
Example 8.1. Fog DNS Plug-in Configuration Using Rackspace® Cloud DNS
[2]
Chapter 8. Continuing Broker Host Installation for Enterprise
79

FOG_RACKSPACE_USERNAME="racker"FOG_RACKSPACE_API_KEY="apikey"FOG_RACKSPACE_REGION="ord"
4. Disable any other DNS plug-in that may be in use by moving its configuration file from the /etc/openshift/plugins.d/ directory or renaming it so that it does not end with a .confextension.
5. Restart the broker service to reload the configuration:
# service openshift-broker restart
8.1.2. Installing and Configuring the DYN® DNS Plug-in
Available starting in OpenShift Enterprise 2.1.6, the DYN® DNS plug-in uses the DYN® Managed DNSservice to publish OpenShift Enterprise applications.
See http://dyn.com/managed-dns for more information on DYN® Managed DNS.
Procedure 8.2. To Install and Configure the DYN® DNS Plug-in:
Perform all of the following steps on each broker host in your deployment.
1. Install the DYN® DNS plug-in:
# yum install rubygem-openshift-origin-dns-dynect
2. Copy the example to create the configuration file:
# cp /etc/openshift/plugins.d/openshift-origin-dns-dynect.conf.example /etc/openshift/plugins.d/openshift-origin-dns-dynect.conf
3. Edit the /etc/openshift/plugins.d/openshift-origin-dns-dynect.conf file and setyour DYN® DNS credentials.
Example 8.2. DYN® DNS Plug-in Configuration
ZONE=Cloud_DomainDYNECT_CUSTOMER_NAME=Customer_NameDYNECT_USER_NAME=UsernameDYNECT_PASSWORD=PasswordDYNECT_URL=https://api2.dynect.net
4. Disable any other DNS plug-in that may be in use by moving its configuration file from the /etc/openshift/plugins.d/ directory or renaming it so that it does not end with a .confextension.
5. Restart the broker service to reload the configuration:
# service openshift-broker restart
Deployment Guide
80

8.1.3. Configuring the nsupdate DNS Plug-in for Compatible DNS Services
A basic installation of OpenShift Enterprise includes the default nsupdate DNS plug-in, as described inSection 7.3, “Installing and Configuring BIND and DNS”, which updates a name server according to RFC
2136 . In addition to BIND, this plug-in supports integration with other compatible DNS services as well.
Using Infoblox®
Because Infoblox® supports TSIG and GSS-TSIG updates, you can configure the nsupdate DNS plug-in touse an Infoblox® service to publish OpenShift Enterprise applications. See https://www.infoblox.com for moreinformation on Infoblox®.
Configuring your Infoblox® service with the appropriate keys is outside of the scope of this guide, but once akey has been added to your zone, the configuration requirements on your OpenShift Enterprise hosts are thesame as if you were using a BIND server.
Procedure 8.3. To Configure the nsupdate DNS Plug-in to Update an Infoblox® Service:
Perform all of the following steps on each broker host in your deployment.
1. The nsupdate DNS plug-in is installed by default during a basic installation of OpenShift Enterprise,but if it is not currently installed, install the rubygem-openshift-origin-dns-nsupdate package:
# yum install rubygem-openshift-origin-dns-nsupdate
2. Edit the /etc/openshift/plugins.d/openshift-origin-dns-nsupdate.conf file and setvalues appropriate for your Infoblox® service and zone:
BIND_SERVER="Infoblox_Name_Server"BIND_PORT=53BIND_KEYNAME="Key_Name"BIND_KEYVALUE="Key_Value"BIND_KEYALGORITHM=Key_Algorithm_TypeBIND_ZONE="Zone_Name"
3. Disable any other DNS plug-in that may be in use by moving its configuration file from the /etc/openshift/plugins.d/ directory or renaming it so that it does not end with a .confextension.
4. Restart the broker service to reload the configuration:
# service openshift-broker restart
8.2. Configuring User Authentication for the Broker
User authentication on OpenShift Enterprise with the standard remote user authentication plug-in usesApache HTTP Server authentication methods. When a user is successfully authenticated for the first time, thebroker host creates a user record in MongoDB. Therefore, a user can be added by creating the user in yourpreferred authentication repository.
OpenShift Enterprise supports any form of Apache authentication capable of setting the REMOTE_USERApache environment variable securely. The following sections provide details on configuring userauthentication on the broker for a number of popular authentication methods.
[3]
Chapter 8. Continuing Broker Host Installation for Enterprise
81

Important
The authentication configuration must be the same for both the broker application and theManagement Console. For example, if the broker application is configured to use LDAP, the sameconfiguration must be updated for the Management Console. See Section 8.9.1, “Installing theManagement Console” for more information on installing and updating the authentication configurationfor the Management Console.
8.2.1. Authenticating Using htpasswd
The basic installation of OpenShift Enterprise uses a flat /etc/openshift/htpasswd file that containshashes of user passwords. Although this simple and standard method allows access with the httpd service,it is not very manageable, nor is it scalable. It is only intended for testing and demonstration purposes.
The list of OpenShift Enterprise users is stored with each user on a separate line in the /etc/openshift/htpasswd file on the broker host. You must have administrative access to the brokerhost to create and update this file. If multiple broker hosts are used for redundancy, a copy of the /etc/openshift/htpasswd file must exist on each broker host.
User password hashes can be created with the htpasswd tool, which is available for most operating systemsfrom http://httpd.apache.org/docs/2.2/programs/htpasswd.html. For Red Hat Enterprise Linux, the htpasswdtool is part of the httpd-tools RPM.
Run htpasswd from wherever it is available to create a hash for a user password:
Example 8.3. Creating a Password Hash
# htpasswd -n bob
New password: ######Re-type new password: ######user:$apr1$IOzWzW6K$81cqXmwmZKqp6nWJPB6q31
The output can then be sent to an OpenShift Enterprise administrator, who can update the /etc/openshift/htpasswd file to provide access to users with their chosen password. Because the userpassword is a hash of the password, the user's password is not visible to the administrator.
8.2.2. Authenticating Using LDAP
Edit the /var/www/openshift/broker/httpd/conf.d/openshift-origin-auth-remote-user.conf file to configure LDAP authentication to allow OpenShift Enterprise users. The following processassumes that an Active Directory server already exists.
OpenShift Enterprise uses the Apache module mod_authnz_ldap for support in authenticating to directoryservers. Therefore, every other directory server with the same option is supported by OpenShift Enterprise.To configure the mod_authnz_ldap option, configure the openshift-origin-auth-remote-user.conf file on the broker host to allow both broker and node host access.
Alternatively, use the example configuration provided, specifying your existing LDAP service parameters.Use the following commands to locate the example configuration:
Deployment Guide
82

# cd /var/www/openshift/broker/httpd/conf.d/# cp openshift-origin-auth-remote-user-ldap.conf.sample openshift-origin-auth-remote-user.conf# vim openshift-origin-auth-remote-user.conf
Important
Note that if you have installed the OpenShift Enterprise Management Console, or plan on installing it,you must also perform the same actions with the /var/www/openshift/console/httpd/conf.d/openshift-origin-auth-remote-user.conf file.
This example file specifies an example server and query that must be modified to suit the requirements ofyour LDAP service. The most important information required is the AuthLDAPURL setting. Ensure the LDAPserver's firewall is configured to allow access by the broker hosts. See the mod_authnz_ldapdocumentation at http://httpd.apache.org/docs/2.2/mod/mod_authnz_ldap.html for more information.
Restart the broker application for the changes to take effect:
# service openshift-broker restart
Note
Using this method, user administration must be performed with your LDAP service.
8.2.3. Authenticating Using Kerberos
Configuring Kerberos authentication to authenticate OpenShift Enterprise users is beyond the scope of thisguide. Consult your IT department for more information.
However, an example configuration that can be edited is provided to specify your Kerberos serviceparameters:
# cd /var/www/openshift/broker/httpd/conf.d/# cp openshift-origin-auth-remote-user-kerberos.conf.sample openshift-origin-auth-remote-user.conf# vim openshift-origin-auth-remote-user.conf
Modify the KrbServiceName and KrbAuthRealms settings to suit the requirements of your Kerberosservice. Ensure the Kerberos server's firewall is configured to allow access by the broker hosts. See the mod_auth_kerb documentation at http://modauthkerb.sourceforge.net/configure.html for more information.
Restart the broker application for your changes to take effect:
# service openshift-broker restart
Chapter 8. Continuing Broker Host Installation for Enterprise
83

Note
Using this method, user administration must be performed with your Kerberos service.
8.2.4. Authenticating Using Mutual SSL
Mutual SSL authentication, commonly referred to as x509 or two-way authentication, allows for anapplication developer, which is the SSL client, to authenticate to an application, which is the SSL server, andvice versa. Each side has a verification certificate, which is shared upon connection. Using mutualauthentication ensures an additional level of security in your deployment, because without the approvedauthentication certificate a user is unable to connect to the SSL server.
Apache supports mutual SSL authentication natively in Red Hat Enterprise Linux 6; however, the SSLconnection for the broker in OpenShift Enterprise 2 terminates by default on a separate Apache instance fromthe one that runs the broker application. Therefore, you must take special care when modifying the defaultconfigurations to securely pass the trusted REMOTE_USER to the broker.
Ensuring mutual SSL authentication on your OpenShift Enterprise instance requires the completion of aseries of procedures, outlined below. Each procedure is for a different interaction component of yourinstallation: the broker proxy, the broker application, and, if it has been installed, the Management Console.After the broker has been configured, developers must also configure their client tools to use mutual SSL
authentication, which is covered in the OpenShift Enterprise User Guide .
Procedure 8.4. To Modify the Broker Proxy Configuration for Mutual SSL Authentication:
While it is possible to translate the following configuration changes to a proxy or load balancer of your choice,this procedure assumes that Apache is being used to terminate the SSL connection for the broker. Thedefault proxy on the broker is configured by the /etc/httpd/conf.d/000002_openshift_origin_broker_proxy.conf file.
1. Edit the /etc/httpd/conf.d/000002_openshift_origin_broker_proxy.conf file on thebroker host and add the following lines in the <VirtualHost *:443> block directly after the SSLProxyEngine directive, removing any other SSLCertificateFile, SSLCertificateKeyFile, and SSLCACertificateFile directives that may have previouslybeen set:
SSLOptions +StdEnvVarsSSLCertificateFile path/to/SSL/certificate/fileSSLCertificateKeyFile path/to/certificate/keyfileSSLCACertificateFile path/to/SSLCA/certificate/fileSSLVerifyClient optionalSSLVerifyDepth 2RequestHeader set X-Remote-User %{SSL_CLIENT_S_DN_CN}e env=SSL_CLIENT_S_DN_CN
These directives serve the following functions for the SSL virtual host:
The SSLCertificateFile, SSLCertificateKeyFile, and SSLCACertificateFiledirectives are critical, because they set the paths to the certificates.
The SSLVerifyClient directive set to optional is also critical as it accommodates certainbroker API calls that do not require authentication.
[4]
Deployment Guide
84

The SSLVerifyDepth directive can be changed based on the number of certificate authoritiesused to create the certificates.
The RequestHeader directive set to the above options allows a mostly standard broker proxy toturn the CN from the client certificate subject into an X_REMOTE_USER header that is trusted bythe back-end broker. Importantly, ensure that the traffic between the SSL termination proxy andthe broker application is trusted.
2. Restart the broker proxy:
# service httpd restart
Procedure 8.5. To Modify the Broker Application Configuration for Mutual SSL Authentication:
1. Edit the /var/www/openshift/broker/httpd/conf.d/openshift-origin-auth-remote-user.conf file on the broker host to be exactly as shown:
<Location /broker> # Broker handles auth tokens SetEnvIfNoCase Authorization Bearer passthrough
# Console traffic will hit the local port. mod_proxy will set this header automatically. SetEnvIf X-Forwarded-For "^$" passthrough=1 # Turn the Trusted header into the Apache environment variable for the broker remote-user plugin SetEnvIf X-Remote-User "(..*)" REMOTE_USER=$1 passthrough=1
# Old-style auth keys are POSTed as parameters. The deployment registration # and snapshot-save use this. BrowserMatchNoCase ^OpenShift passthrough # Older-style auth keys are POSTed in a header. The Jenkins cartridge does # this. SetEnvIf broker_auth_key "^[A-Za-z0-9+/=]+$" passthrough=1
Allow from env=passthrough
# Allow the specific requests that can passthrough and then deny everything else. The following requests can passthrough: # # * Use Bearer authentication # * Use Broker authentication tokens # * Originate from the trusted Console Order Allow,Deny</Location>
# The following APIs do not require auth:## /api# /environment# /cartridges# /quickstarts## We want to match requests in the form of:
Chapter 8. Continuing Broker Host Installation for Enterprise
85

## /api# /api.json# /api/## But not:## /api_with_auth<LocationMatch ^/broker/rest/(api|environment|cartridges|quickstarts)(\.\w+|/?|/.*)$> <IfVersion >= 2.4> Require all granted </IfVersion> <IfVersion < 2.4> Allow from all </IfVersion></LocationMatch>
2. Set the following in the /etc/openshift/plugins.d/openshift-origin-auth-remote-user.conf file:
TRUSTED_HEADER="HTTP_X_REMOTE_USER"
3. Restart the broker service for the changes to take effect:
# service openshift-broker restart
Procedure 8.6. To Modify the Management Console Configuration for Mutual SSL Authentication:
If you have installed the optional Management Console, it must be configured before mutual SSLauthentication can be used. See Section 8.9, “Management Console” first for instructions on installing theManagement Console.
1. Edit the /var/www/openshift/console/httpd/conf.d/openshift-origin-auth-remote-user.conf file on the broker host and add the following:
<Location /console> # The node->broker auth is handled in the Ruby code BrowserMatch Openshift passthrough Allow from env=passthrough
# Turn the Console output header into the Apache environment variable for the broker remote-user plugin SetEnvIf X-Remote-User "(..*)" REMOTE_USER=$1
Order Deny,Allow</Location>
2. Set the following in the /etc/openshift/console.conf file:
REMOTE_USER_HEADER=HTTP_X_REMOTE_USER
3. Restart the Management Console service for the changes to take effect:
Deployment Guide
86

# service openshift-console restart
Procedure 8.7. To Test the Mutual SSL Configuration:
1. Run the following command and ensure it returns successfully:
# curl -k https://broker.example.com/broker/rest/api
2. Run the following command and ensure it returns with a 403 Forbidden status code:
# curl -k https://broker.example.com/broker/rest/user
3. Run the following commands and ensure they return successfully:
# curl --cert path/to/certificate/file --key path/to/certificate/keyfile --cacert path/to/SSLCA/certificate/file https://broker.example.com/broker/rest/api# curl --cert path/to/certificate/file --key path/to/certificate/keyfile --cacert path/to/SSLCA/certificate/file https://broker.example.com/broker/rest/user
Note that the above commands may need to be altered with the --key option if your key andcertificate are not located in the same PEM file. This option is used to specify the key location if itdiffers from your certificate file.
To test using the client tools, each application developer must first configure them to use mutual SSL
authentication. See the OpenShift Enterprise User Guide [4]for instructions.
8.2.5. Integrating Active Directory Authentication with Identity Management
Identity Management (IdM) on Red Hat Enterprise Linux provides a simple, centralized solution to securelymanage user authentication. IdM integrates industry standard protocols and servers, such as Kerberos,LDAP, DNS, NTP, and X509 Certificates, into a secure, reliable, and scalable identity management solution.
As a system administrator, you might already source your authentication methods into one location usingIdM. IdM defines a domain, with servers and clients who share centrally-managed services, like Kerberos andDNS. OpenShift Enterprise can take advantage of the various features available with IdM. Integration withIdM is ideal, because the authorization and authentication framework in IdM easily supports protocols such asKerberos, LDAP, DNS, NTP, and x509 Authentication.
Complete the following procedures in the following order presented to integrate IdM into your OpenShiftEnterprise instance.
Note
The following steps assume Active Directory and IdM are installed in your OpenShift Enterpriseinfrastructure.
Procedure 8.8. To Configure the Firewall Ports:
Before the IdM integration can occur, ensure the IdM server can access your instance by configuring thefirewall ports. Perform the following steps on all hosts (broker, nodes, etc).
Chapter 8. Continuing Broker Host Installation for Enterprise
87
1. Save the existing firewall configuration and keep as a backup:
# cp -p /etc/sysconfig/iptables{,.pre-idm}
2. Create a new chain named ipa-client-chain. This contains the firewall rules for the ports needed byIdM:
# iptables --new-chain ipa-client-chain# iptables --insert INPUT --jump ipa-client-chain
3. Perform the following step for each required port:
# iptables --append ipa-client-chain --protocol Protocol --destination-port Port_Number --jump ACCEPT
A list of ports that may be being used in your instance are listed in Section 5.2.1, “Custom andExternal Firewalls”. The --protocol option indicates the protocol of the rule to check. The specifiedprotocol can be tcp, udp, udplite, icmp, esp, ah, or sctp, or you can use ""all" to indicate all protocols.
4. Save the new firewall configuration, restart the iptables service, then ensure the changes are setupon reboot:
# iptables-save > /etc/sysconfig/iptables# service iptables restart# chkconfig iptables on
5. For each OpenShift host, verify that the IdM server and replica are listed in the /etc/resolv.conffile. The IdM server and replica must be listed before any additional servers.
Example 8.4. Featured IdM Server and Replica in the /etc/resolv.conf File
domain broker.example.comsearch broker.example.comnameserver 10.19.140.101 nameserver 10.19.140.102nameserver 10.19.140.423
6. Now that the IdM server has been configured, configure each OpenShift host to be a IdM client, thenverify the Kerberos and IdM lookups. Install the ipa-client package on each host, then run the installtool:
# yum install ipa-client# ipa-client-install --enable-dns-updates --ssh-trust-dns --mkhomedir
The --enable-dns-updates option permits the IdM client to dynamically register its IP addresswith the DNS service on the IdM server. The --ssh-trust-dns option configures OpenSSH toallow any IdM DNS records where the host keys are stored. The --mkhomedir option automaticallycreates a home directory on the client upon the user's first login. Note that if DNS is properlyconfigured, then the install tool will detect the IdM server through autodiscovery. If the autodiscoveryfails, the install can be run with the --server option with the IdM server's FQDN.
7. Next, verify that Kerberos and IdM lookups are functioning by using the following command on eachhost, entering a password when prompted:
Deployment Guide
88

# kinit adminPassword for [email protected]: *******# klist# id admin
Then, use the same command for each user:
# id Username
Note
If the IdM server has been re-deployed since installation, the CA certificate may be out ofsync. If so, you might receive an error with your LDAP configuration. To correct the issue, listthe certificate files, re-name the certificate file, then re-run the install:
# ll /etc/ipa# mv /etc/ipa/ca.crt /etc/ipa/ca.crt.bad# ipa-client-install --enable-dns-updates --ssh-trust-dns --mkhomedir
Configuring for Application Developers
While your OpenShift Enterprise instance is now configured for IdM use, the next step is to configure anyapplication developer interaction with the broker host for use with IdM. This will allow each developer toauthenticate to the broker host.
Procedure 8.9. To Authorize Developer Interaction with the Broker Host:
1. On the IdM server, create a HTTP web server for each of your running brokers. This allows thebroker host to authenticate to the IdM server using Kerberos. Ensure to replace broker1 with thehostname of the desired broker host, and broker.example,com with the IdM server hostnameconfigured in the above procedure:
# ipa service-add HTTP/broker1.broker.example.com
2. Create a HTTP Kerberos keytab on the broker host. This will provide secure access to the brokerweb services:
# ipa-getkeytab -s idm-srv1.broker.example.com \# ipa-getkeytab -p HTTP/[email protected] \# ipa-getkeytab -k /var/www/openshift/broker/httpd/conf.d/http.keytab# chown apache:apache /var/www/openshift/broker/httpd/conf.d/http.keytab
If you have multiple brokers, copy the keyfile to the other brokers.
3. If your instance has not completed Section 8.2.3, “Authenticating Using Kerberos” in the OpenShiftEnterprise Deployment Guide, follow it now to authenticate to the broker host using Kerberos.
4. Restart the broker and Console services:
Chapter 8. Continuing Broker Host Installation for Enterprise
89

# service openshift-broker restart# service openshift-console restart
5. Create a backup of the nsupdate plug-in. The nsupdate plug-in facilitates any updates to the dynamicDNS zones without the need to edit zone files or restart the DNS server:
# cp -p /etc/openshift/plugins.d/openshift-origin-dns-nsupdate.conf{,.orig}
Then, edit the file and replace with the contents below:
BIND_SERVER="10.19.140.101"BIND_PORT=53BIND_ZONE="broker.example.com"BIND_KRB_PRINCIPAL="DNS/[email protected]"BIND_KRB_KEYTAB="/etc/dns.keytab"
Ensure that BIND_SERVER points to the IP address of the IdM server, BIND_ZONE points to thedomain name, and the BIND_KRB_PRINCIPAL is correct. The BIND_KRB_KEYTAB is configuredafter the DNS service is created and when the zones are modified for dynamic DNS.
6. Create the broker DNS service. Run the following command for each broker host:
# ipa service-add DNS/broker1.broker.example.com
7. Modify the DNS zone to allow the broker host to dynamically register applications with IdM. Performthe following on the idM server:
# ipa dnszone-mod interop.example.com --dynamic-update=true --update-policy= \ "grant DNS\047\[email protected] wildcard * ANY;\"
Ensure to repeat the second line for each broker if you have multiple broker hosts.
8. Generate DNS keytabs on the broker using the ipa-getkeytab. Repeat the following for eachbroker host:
# ipa-getkeytab -s idm-srv1.interop.example.com \# ipa-getkeytab -p DNS/broker1.broker.example.com \# ipa-getkeytab -k /etc/dns.keytab# chown apache:apache /etc/dns.keytab
9. Restart the broker service:
# service openshift-broker restart
10. The dynamic DNS is now ready for use with the client tools. Configure the client tools by running rhc setup specifying the IdM broker as the server:
# rhc setup --server=broker.broker.example.com
11. To verify the client tools, check the domain connectivity and deploy a test application:
Deployment Guide
90
# rhc domain show# rhc app create App_Name Cartridge_Name
To verify the OpenShift Enterprise broker host, run the oo-accept-broker utility from the brokerhost. Test the full environment with the oo-diagnostics utility:
# oo-accept-broker# oo-diagnostics
Additionally, you can verify the broker and Console access by obtaining a Kerberos ticket and testingthe authentication with the following command:
# kinit IdM_Server_Hostname
Then running the following commands for each broker host:
# curl -Ik --negotiate -u : https://broker1.broker.example.com/broker/rest/domains# curl -Ik --negotiate -u : https://broker1.broker.example.com/console
8.3. Separating Broker Components by Host
For the broker application to function properly, not all components must be installed on the same broker hostwhere the broker application is installed. Instead, the logical components of OpenShift Enterprise can beinstalled and configured on separate hosts. Red Hat recommends this configuration for ease of management.The necessary configuration differences from the basic installation of each component, as detailed inChapter 7, Manually Installing and Configuring a Broker Host, are described in the subsequent sections.
8.3.1. BIND and DNS
The broker application requires an update key to update a remote BIND server. This is regardless of whetheryou are using a BIND server that is delegated specifically for an OpenShift Enterprise installation by yourorganization's DNS, or if your organization provides key-based update access to an existing BIND server forthe domain used by OpenShift Enterprise.
The HMAC-SHA256 key generated by the dnssec-keygen tool in Section 7.3.2, “Configuring BIND andDNS” is saved in the /var/named/domain.key file, where domain is your chosen domain. Note the valueof the secret parameter and enter it in the CONF_BIND_KEY field in the OpenShift Enterprise install script.Alternatively, enter it directly in the BIND_KEYVALUE field of the /etc/openshift/plugins.d/openshift-origin-dns-nsupdate.conf broker host configurationfile.
The oo-register-dns command registers a node host's DNS name with BIND, and it can be used toregister a localhost or a remote name server. This command is intended as a convenience tool that canbe used with demonstrating OpenShift Enterprise installations that use standalone BIND DNS.
Red Hat recommends defining two separate domains: one to contain the fixed OpenShift Enterprise hosts,and another for the dynamic application namespace. The two domains do not have to be related. The brokerapplication only needs to update the dynamic domain. In most production installations, the oo-register-dns command is not required because existing IT processes handle host DNS. However, if the command isused for defining host DNS, the update key must be available for the domain that contains the hosts.
The oo-register-dns command requires a key file to perform updates. If you created the
Chapter 8. Continuing Broker Host Installation for Enterprise
91
/var/named/$domain.key file described in Section 7.3.2.1, “Configuring Sub-Domain Host NameResolution”, copy this to the same location on every broker host as required. Alternatively, use therandomized .key file generated directly by the dnssec-keygen command, but renamed to $domain.key.The oo-register-dns command passes the key file to nsupdate, so either format is valid.
8.3.2. MongoDB
The basic installation in Chapter 7, Manually Installing and Configuring a Broker Host demonstrates installingMongoDB where the broker host only has localhost access. Bind MongoDB to an external IP address andopen the correct port in the firewall to use a remote MongoDB with the broker application.
Modify the bind_ip setting in the /etc/mongodb.conf file to bind MongoDB to an external address. Eitheruse the specific IP address, or substitute 0.0.0.0 to make it available on all interfaces:
# sed -i -e "s/^bind_ip = .*\$/bind_ip = 0.0.0.0/" /etc/mongodb.conf
Restart the MongoDB service for the changes to take effect:
# service mongod restart
Use the lokkit command to open the MongoDB port in the firewall:
# lokkit --port=27017:tcp
Important
These instructions grant access from any host. Therefore, Red Hat recommends using iptables tospecify which hosts (in this case, all configured broker hosts) are allowed to connect. Otherwise, use anetwork topology that only allows authorized hosts to connect. Most importantly, ensure that nodehosts are not allowed to connect to MongoDB.
Note
Because MongoDB connections are not encrypted, anyone with the ability to intercept network trafficcan capture authentication and usage information in plain text. To avoid this, ensure MongoDB bindsto localhost and use an SSH tunnel from the remote broker hosts to provide access.
8.4. Configuring Redundancy
Redundancy typically provides high-availability and scaling. Because developers only interact with anOpenShift Enterprise broker host sporadically, scaling is less of a concern because a typical installation is notlarge enough to generate traffic to overwhelm even a single broker host. Therefore, this section concentrateson high-availability of your broker host through redundancy. Several options are available to configureredundancy with your OpenShift Enterprise installation.
As mentioned in Section 8.3, “Separating Broker Components by Host”, the major components of OpenShiftEnterprise can be installed and configured on separate hosts and multiplied for redundancy. Alternatively,here are some redundant topologies to consider:
Deployment Guide
92

Install broker, ActiveMQ, MongoDB, and name server on each host
Install broker, ActiveMQ, MongoDB, and name server separately on different hosts
Install broker and MongoDB together on multiple hosts, and install ActiveMQ separately on multiple hosts
Each host can then be made redundant to suit your requirements. Choose a configuration that best suits yourparticular installation.
Note
If you have multiple broker hosts configured for redundancy, ensure that each node host has the rsync_id_rsa.pub public key of each broker host. See Section 9.9, “Configuring SSH Keys on theNode Host” for more information.
8.4.1. BIND and DNS
Red Hat recommends that you configure redundancy for your BIND and DNS configuration to provide highavailability. Consult your IT department for more information on how to leverage your existing solutions toconfigure redundancy for your OpenShift Enterprise installation.
8.4.2. Authentication
Regardless of the selected authentication method for your OpenShift Enterprise installation, it is yourresponsibility to add redundancy to that method for high availability. Consult your IT department for moreinformation on how to configure redundancy for the selected authentication method.
8.4.3. MongoDB
Use replica sets to achieve redundancy with MongoDB. See the following documents on the MongoDBwebsite for more background information:
Replication - http://docs.mongodb.org/manual/replication/
Convert a Standalone to a Replica Set - http://docs.mongodb.org/manual/tutorial/convert-standalone-to-replica-set/
The following instructions describe how to create a replica set with the MongoDB package included withOpenShift Enterprise.
Procedure 8.10. To Install MongoDB on Each Host:
1. On a minimum of three hosts, install MongoDB and turn on the MongoDB service to make itpersistent:
# yum install -y mongodb-server mongodb# chkconfig mongod on
2. If you choose to install MongoDB using the basic install script provided, you must also delete theinitial data from all but one installation to make it a part of the replica set. Stop the MongoDB serviceand delete the data using:
Chapter 8. Continuing Broker Host Installation for Enterprise
93
# service mongod stop# rm -rf /var/lib/mongodb/*
Procedure 8.11. To Configure the MongoDB Service on Each Host:
1. Edit the /etc/mongodb.conf file and modify or add the following information:
bind_ip = 0.0.0.0 # allow access from all interfacesauth = truerest = truesmallfiles = truekeyFile = /etc/mongodb.keyfilereplSet = osejournal = true
The following table provides a brief description of each setting from the example above.
Table 8.1. Descriptions of /etc/mongodb.conf Settings
Setting Descriptionbind_ip This specifies the IP address MongoDB listens on for connections. Although
the value must be an external address to form a replica set, this procedurealso requires it to be reachable on the localhost interface. Specifying 0.0.0.0 binds to both.
auth This enables the MongoDB authentication system, which requires a login toaccess databases or other information.
rest This enables the simple REST API used by the replica set creation process.
replSet This names a replica set, and must be consistent among all the members forreplication to take place.
keyFile This specifies the shared authentication key for the replica set, which iscreated in the next step.
journal This enables writes to be journaled, which enables faster recoveries fromcrashes.
smallfiles This reduces the initial size of data files, limits the files to 512MB, and reducesthe size of the journal from 1GB to 128MB.
2. Create the shared key file with a secret value to synchronize the replica set. For security purposes,create a randomized value, and then copy it to all of the members of the replica set. Verify that thepermissions are set correctly:
# echo "sharedkey" > /etc/mongodb.keyfile# chown mongodb.mongodb /etc/mongodb.keyfile# chmod 400 /etc/mongodb.keyfile
3. Configure the firewall to allow MongoDB traffic on each host using the lokkit command:
# lokkit --port=27017:tcp
Red Hat Enterprise Linux provides different methods for configuring firewall ports. Alternatively, use iptables directly to configure firewall ports.
4. Start the MongoDB service on each host:
Deployment Guide
94

# service mongod start
Note
If you use the kickstart or bash script, the configure_datastore_add_replicants functionperforms the steps in the previous two procedures.
After all hosts to be included in the replica set are configured and started, use the MongoDB shell to connectto the primary instance and define the replica set. Although you might have already added data to the primaryinstance, other instances must be empty.
Procedure 8.12. To Form a Replica Set:
1. Authenticate to the admin database and initiate the ose replica set:
# mongo> use adminswitched to db admin
> db.auth("admin", "password")1
> rs.initiate(){ "info2" : "no configuration explicitly specified -- making one", "me" : "mongo1.example.com:27017", "info" : "Config now saved locally. Should come online in about a minute.", "ok" : 1}
2. Wait a few moments then press Enter until you see the ose:PRIMARY prompt. Then add newmembers to the replica set:
ose:PRIMARY> rs.add("mongo2.example.com:27017"){ "ok" : 1 }
Repeat as required for all datastore hosts, using the FQDN or any resolvable name for each host.
3. Verify the replica set members:
ose:PRIMARY> rs.status(){ "set" : "ose", "date" : ISODate("2013-12-02T21:33:43Z"), "myState" : 1, "members" : [ { "_id" : 0, "name" : "mongo1.example.com:27017", "health" : 1, "state" : 1, "stateStr" : "PRIMARY",
Chapter 8. Continuing Broker Host Installation for Enterprise
95

"uptime" : 1416, "optime" : Timestamp(1386019903, 1), "optimeDate" : ISODate("2013-12-02T21:31:43Z"), "self" : true }, { "_id" : 1, "name" : "mongo2.example.com:27017", "health" : 1, "state" : 2, "stateStr" : "SECONDARY", "uptime" : 120, "optime" : Timestamp(1386019903, 1), "optimeDate" : ISODate("2013-12-02T21:31:43Z"), "lastHeartbeat" : ISODate("2013-12-02T21:33:43Z"), "lastHeartbeatRecv" : ISODate("2013-12-02T21:33:43Z"), "pingMs" : 1, "syncingTo" : "mongo1.example.com:27017" } ], "ok" : 1}[...]
Update all broker hosts to use the new replica set.
Procedure 8.13. To Configure the Broker Application to Use a Replica Set:
1. If you have not configured a MongoDB user named openshift to allow access to the broker hostbefore forming the replica set as described in Chapter 7, Manually Installing and Configuring a BrokerHost, add it now. Database changes at this point are synchronized among all members of the replicaset.
2. Edit the /etc/openshift/broker.conf file on all broker hosts and set MONGO_HOST_PORT to theappropriate replica set members:
# For replica sets, use ',' delimiter for multiple servers# Eg: MONGO_HOST_PORT="<host1:port1>,<host2:port2>..."MONGO_HOST_PORT="mongo1.example.com:27017,mongo2.example.com:27017,mongo3.example.com:27017"MONGO_USER="openshift"MONGO_PASSWORD="password"MONGO_DB="openshift_broker"
8.4.4. ActiveMQ
ActiveMQ uses the term broker to identify an ActiveMQ server. However, this section distinguishes ActiveMQbrokers from OpenShift Enterprise broker hosts.
Because ActiveMQ services can be configured for redundancy, this section demonstrates redundancy withthree servers to configure a redundant network of ActiveMQ brokers. This configuration provides thefollowing advantages:
Distributes queues and topics among ActiveMQ brokers
Allows clients to connect to any Active MQ broker on the network
Deployment Guide
96

Failover to another ActiveMQ broker if one fails
Connecting all ActiveMQ brokers to each other achieves this redundancy. See the following ActiveMQdocumentation for more background information:
Clustering - http://activemq.apache.org/clustering.html
How do distributed queues work - http://activemq.apache.org/how-do-distributed-queues-work.html
8.4.4.1. Configuring a Network of ActiveMQ Brokers
This section describes how to configure a network of ActiveMQ brokers, and the example instructions show aconfiguration of three ActiveMQ brokers found on the following hosts:
activemq1.example.com
activemq2.example.com
activemq3.example.com
Use the same configuration for all hosts, but substitute specific information to suit the requirements of eachhost.
Networked ActiveMQ brokers are configured differently from what is described in the basic installation. Thefollowing procedure describes how to configure a network of ActiveMQ brokers.
Procedure 8.14. To Configure a Network of ActiveMQ Brokers:
1. Install ActiveMQ with:
# yum install -y activemq
2. Modify the /etc/activemq/activemq.xml configuration file. Red Hat recommends downloadingand using the sample activemq.xml file provided at https://raw.github.com/openshift/openshift-extras/enterprise-2.2/enterprise/install-scripts/activemq-network.xml as a starting point. Modify thehost names, user names, and passwords to suit your requirements.
However, if you choose to modify the default /etc/activemq/activemq.xml configuration file,use the following instructions to do so. Each change that must be made in the default /etc/activemq/activemq.xml file is described accordingly. Red Hat recommends that youcreate a backup of the default /etc/activemq/activemq.xml file before modifying it, using thefollowing command:
# cp /etc/activemq/activemq.xml{,.orig}
a. In the broker element, modify the brokerName and dataDirectory attributes, and add useJmx="true":
<broker xmlns="http://activemq.apache.org/schema/core" brokerName="activemq1.example.com" useJmx="true" dataDirectory="${activemq.base}/data">
b. Modify the destinationPolicy element:
<destinationPolicy>
Chapter 8. Continuing Broker Host Installation for Enterprise
97

<policyMap> <policyEntries> <policyEntry topic=">" producerFlowControl="false"/> <policyEntry queue="*.reply.>" gcInactiveDestinations="true" inactiveTimoutBeforeGC="300000" /> </policyEntries> </policyMap></destinationPolicy>
c. Comment out or remove the persistenceAdapter element, and replace it with the networkConnectors element. This example is for the first ActiveMQ broker.
<networkConnectors> <networkConnector name="broker1-broker2-topic" uri="static:(tcp://activemq2.example.com:61616)" userName="amquser" password="amqpass"> <excludedDestinations> <queue physicalName=">" /> </excludedDestinations> </networkConnector> <networkConnector name="broker1-broker2-queue" uri="static:(tcp://activemq2.example.com:61616)" userName="amquser" password="amqpass" conduitSubscriptions="false"> <excludedDestinations> <topic physicalName=">" /> </excludedDestinations> </networkConnector> <networkConnector name="broker1-broker3-topic" uri="static:(tcp://activemq3.example.com:61616)" userName="amquser" password="amqpass"> <excludedDestinations> <queue physicalName=">" /> </excludedDestinations> </networkConnector> <networkConnector name="broker1-broker3-queue" uri="static:(tcp://activemq3.example.com:61616)" userName="amquser" password="amqpass" conduitSubscriptions="false"> <excludedDestinations> <topic physicalName=">" /> </excludedDestinations> </networkConnector></networkConnectors>
The networkConnectors element provides one-way message paths to other ActiveMQbrokers on the network. For a fault-tolerant configuration, the networkConnector elementfor each ActiveMQ broker must point to the other ActiveMQ brokers, and is specific to eachhost. In the example above, the activemq1.example.com host is shown.
Each networkConnector element requires a unique name and ActiveMQ broker. Thenames used here are in the localhost -> remotehost format, reflecting the direction ofthe connection. For example, the first ActiveMQ broker has a networkConnector elementname prefixed with broker1-broker2, and the address corresponds to a connection to the
Deployment Guide
98

second host.
The userName and password attributes are for connections between the ActiveMQbrokers, and match the definitions described in the next step.
d. Add the plugins element to define authentication and authorization for MCollective, inter-broker connections, and administration purposes. The plugins element must be after the networkConnectors element. Substitute user names and passwords according to yourlocal IT policy.
<plugins> <statisticsBrokerPlugin/> <simpleAuthenticationPlugin> <users> <authenticationUser username="mcollective" password="marionette" groups="mcollective,everyone"/> <authenticationUser username="amquser" password="amqpass" groups="admins,everyone"/> <authenticationUser username="admin" password="password" groups="mcollective,admin,everyone"/> </users> </simpleAuthenticationPlugin> <authorizationPlugin> <map> <authorizationMap> <authorizationEntries> <authorizationEntry queue=">" write="admins" read="admins" admin="admins" /> <authorizationEntry topic=">" write="admins" read="admins" admin="admins" /> <authorizationEntry topic="mcollective.>" write="mcollective" read="mcollective" admin="mcollective" /> <authorizationEntry queue="mcollective.>" write="mcollective" read="mcollective" admin="mcollective" /> <authorizationEntry topic="ActiveMQ.Advisory.>" read="everyone" write="everyone" admin="everyone"/> </authorizationEntries> </authorizationMap> </map> </authorizationPlugin></plugins>
e. Add the stomp transportConnector (for use by MCollective) to the transportConnectors element. The openwire transportConnector is used forActiveMQ inter-broker transport, and must not be modified. Configure the transportConnectors element as shown in the following example.
<transportConnectors> <transportConnector name="openwire" uri="tcp://0.0.0.0:61616"/> <transportConnector name="stomp" uri="stomp://0.0.0.0:61613"/>
Chapter 8. Continuing Broker Host Installation for Enterprise
99
</transportConnectors>
3. Secure the ActiveMQ console by configuring Jetty, as described in the basic installation.
a. Enable authentication and restrict the console to localhost:
# cp /etc/activemq/jetty.xml{,.orig}# sed -i -e '/name="authenticate"/s/false/true/' /etc/activemq/jetty.xml
b. Change the default admin password in the /etc/activemq/jetty-realm.propertiesfile. The password is the same as the admin password in the authentication plug-in.
# cp /etc/activemq/jetty-realm.properties{,.orig}# sed -i -e '/admin:/s/admin,/password,/' /etc/activemq/jetty-realm.properties
4. Modify the firewall to allow ActiveMQ stomp and openshift traffic:
# lokkit --port=61613:tcp# lokkit --port=61616:tcp
The basic installation only opens port 61613. Here, port 61616 has also been opened to allowActiveMQ inter-broker traffic.
5. Restart the ActiveMQ service and make it persistent on boot:
# service activemq restart# chkconfig activemq on
Note
If you use the kickstart bash script, the configure_activemq function performs these steps whenmultiple members are specified with CONF_ACTIVEMQ_REPLICANTS.
8.4.4.2. Verifying a Network of ActiveMQ Brokers Using the ActiveMQ Console
Confirm that the authentication is working with the following command:
# curl --head --user admin:password http://localhost:8161/admin/xml/topics.jsp
HTTP/1.1 200 OK[...]
A response of 200 means authentication is working correctly.
As shown in the following example, a basic response is expected when requesting topics.
# curl --user admin:password --silent http://localhost:8161/admin/xml/topics.jsp
Deployment Guide
100
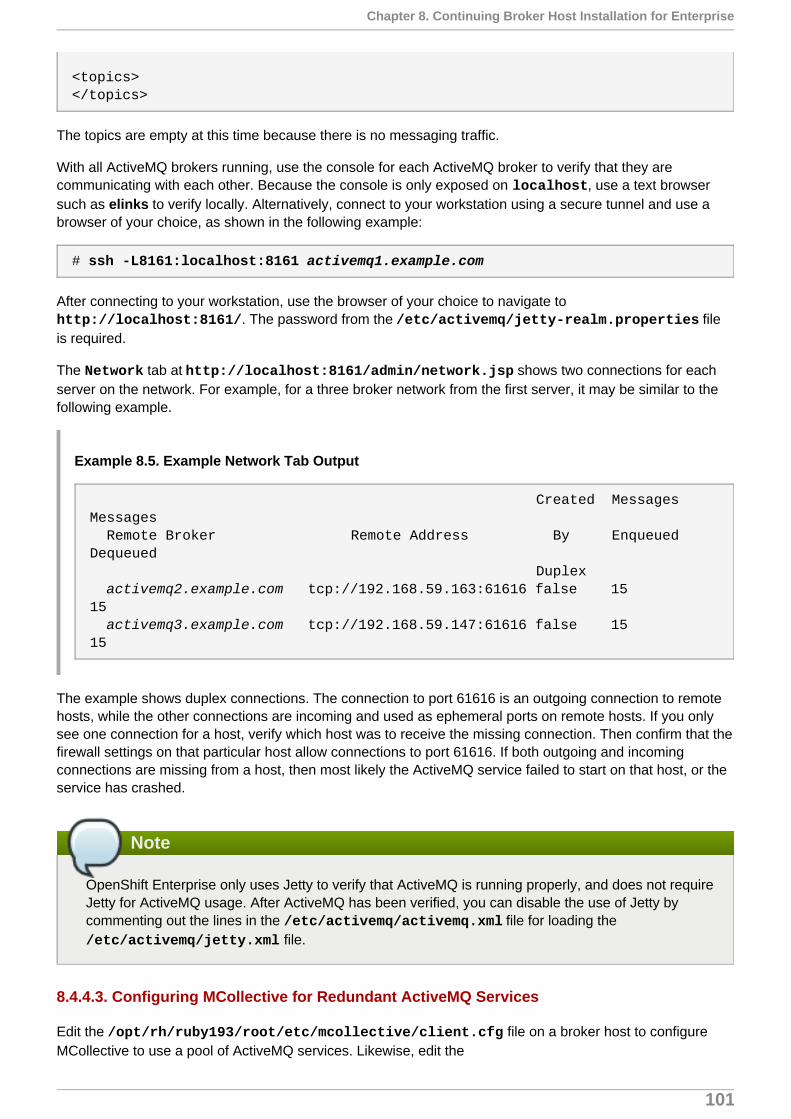
<topics></topics>
The topics are empty at this time because there is no messaging traffic.
With all ActiveMQ brokers running, use the console for each ActiveMQ broker to verify that they arecommunicating with each other. Because the console is only exposed on localhost, use a text browsersuch as elinks to verify locally. Alternatively, connect to your workstation using a secure tunnel and use abrowser of your choice, as shown in the following example:
# ssh -L8161:localhost:8161 activemq1.example.com
After connecting to your workstation, use the browser of your choice to navigate to http://localhost:8161/. The password from the /etc/activemq/jetty-realm.properties fileis required.
The Network tab at http://localhost:8161/admin/network.jsp shows two connections for eachserver on the network. For example, for a three broker network from the first server, it may be similar to thefollowing example.
Example 8.5. Example Network Tab Output
Created Messages Messages Remote Broker Remote Address By Enqueued Dequeued Duplex activemq2.example.com tcp://192.168.59.163:61616 false 15 15 activemq3.example.com tcp://192.168.59.147:61616 false 15 15
The example shows duplex connections. The connection to port 61616 is an outgoing connection to remotehosts, while the other connections are incoming and used as ephemeral ports on remote hosts. If you onlysee one connection for a host, verify which host was to receive the missing connection. Then confirm that thefirewall settings on that particular host allow connections to port 61616. If both outgoing and incomingconnections are missing from a host, then most likely the ActiveMQ service failed to start on that host, or theservice has crashed.
Note
OpenShift Enterprise only uses Jetty to verify that ActiveMQ is running properly, and does not requireJetty for ActiveMQ usage. After ActiveMQ has been verified, you can disable the use of Jetty bycommenting out the lines in the /etc/activemq/activemq.xml file for loading the /etc/activemq/jetty.xml file.
8.4.4.3. Configuring MCollective for Redundant ActiveMQ Services
Edit the /opt/rh/ruby193/root/etc/mcollective/client.cfg file on a broker host to configureMCollective to use a pool of ActiveMQ services. Likewise, edit the
Chapter 8. Continuing Broker Host Installation for Enterprise
101
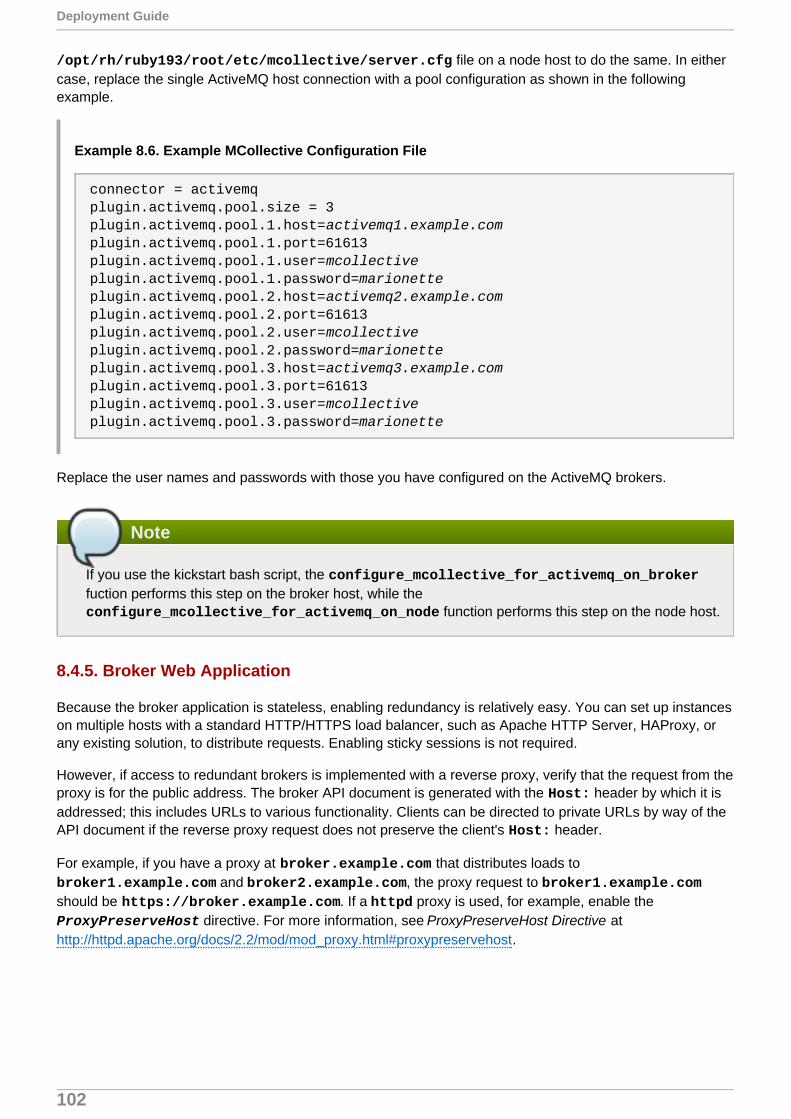
/opt/rh/ruby193/root/etc/mcollective/server.cfg file on a node host to do the same. In eithercase, replace the single ActiveMQ host connection with a pool configuration as shown in the followingexample.
Example 8.6. Example MCollective Configuration File
connector = activemq plugin.activemq.pool.size = 3plugin.activemq.pool.1.host=activemq1.example.complugin.activemq.pool.1.port=61613plugin.activemq.pool.1.user=mcollectiveplugin.activemq.pool.1.password=marionetteplugin.activemq.pool.2.host=activemq2.example.complugin.activemq.pool.2.port=61613plugin.activemq.pool.2.user=mcollectiveplugin.activemq.pool.2.password=marionetteplugin.activemq.pool.3.host=activemq3.example.complugin.activemq.pool.3.port=61613plugin.activemq.pool.3.user=mcollectiveplugin.activemq.pool.3.password=marionette
Replace the user names and passwords with those you have configured on the ActiveMQ brokers.
Note
If you use the kickstart bash script, the configure_mcollective_for_activemq_on_brokerfuction performs this step on the broker host, while the configure_mcollective_for_activemq_on_node function performs this step on the node host.
8.4.5. Broker Web Application
Because the broker application is stateless, enabling redundancy is relatively easy. You can set up instanceson multiple hosts with a standard HTTP/HTTPS load balancer, such as Apache HTTP Server, HAProxy, orany existing solution, to distribute requests. Enabling sticky sessions is not required.
However, if access to redundant brokers is implemented with a reverse proxy, verify that the request from theproxy is for the public address. The broker API document is generated with the Host: header by which it isaddressed; this includes URLs to various functionality. Clients can be directed to private URLs by way of theAPI document if the reverse proxy request does not preserve the client's Host: header.
For example, if you have a proxy at broker.example.com that distributes loads to broker1.example.com and broker2.example.com, the proxy request to broker1.example.comshould be https://broker.example.com. If a httpd proxy is used, for example, enable the ProxyPreserveHost directive. For more information, see ProxyPreserveHost Directive athttp://httpd.apache.org/docs/2.2/mod/mod_proxy.html#proxypreservehost.
Deployment Guide
102

Important
When multiple broker hosts are deployed, the authentication keys need to be the same for all brokerhosts. Update /etc/openshift/server_pub.pem and /etc/openshift/server_priv.pem,and update the AUTH_SALT setting in the/etc/openshift/broker.conf file. Failure tosynchronize these will result in authentication failures where gears make requests to a broker hostwhile using credentials created by a different broker host in scenarios such as auto-scaling, Jenkinsbuilds, and recording deployments.
8.5. Installing and Configuring the Gear Placement Plug-in
When new gears are added to an application, a gear placement algorithm is used to find an available nodeon which to place each gear. You can either use the default algorithm or implement the gear placement plug-in to use a custom algorithm; see the OpenShift Enterprise Administration Guide for more information on thedefault algorithm.
The optional gear placement plug-in allows you to control the placement of gears as they are created. Whenin use, the plug-in receives information during gear creation about the application developer, cartridges,application, current gears that are in use, and available nodes. Then, using the configured algorithm, the plug-in is expected to return a node from the list of available nodes. An error or exception thrown by the plug-inresults in the failure of the gear creation process and triggers a rollback of the operation.
You can develop a custom algorithm with a basic understanding of the Ruby programming language. Thissection describes how to install and configure the gear placement plug-in with default settings. After the plug-in is installed, see the following sections for information on developing custom algorithms and implementingthem in your installation, including examples based on some hypothetical scenarios.
Procedure 8.15. To Install and Configure the Gear Placement Plug-in:
1. Install the gear placement plug-in on each broker host:
# yum install rubygem-openshift-origin-gear-placement
This installs a gem with a Rails engine containing the GearPlacementPlugin class.
2. On each broker host, copy the /etc/openshift/plugins.d/openshift-origin-gear-placement.conf.example file to /etc/openshift/plugins.d/openshift-origin-gear-placement.conf:
# cp /etc/openshift/plugins.d/openshift-origin-gear-placement.conf.example /etc/openshift/plugins.d/openshift-origin-gear-placement.conf
As long as this configuration file with a .conf extension exists, the broker automatically loads a gemmatching the file name, and the gem can use the file to configure itself.
3. Restart the broker service:
# service openshift-broker restart
If you make further modifications to the configuration file of the gear placement plug-in, you mustrestart the broker service again after making your final changes.
Chapter 8. Continuing Broker Host Installation for Enterprise
103
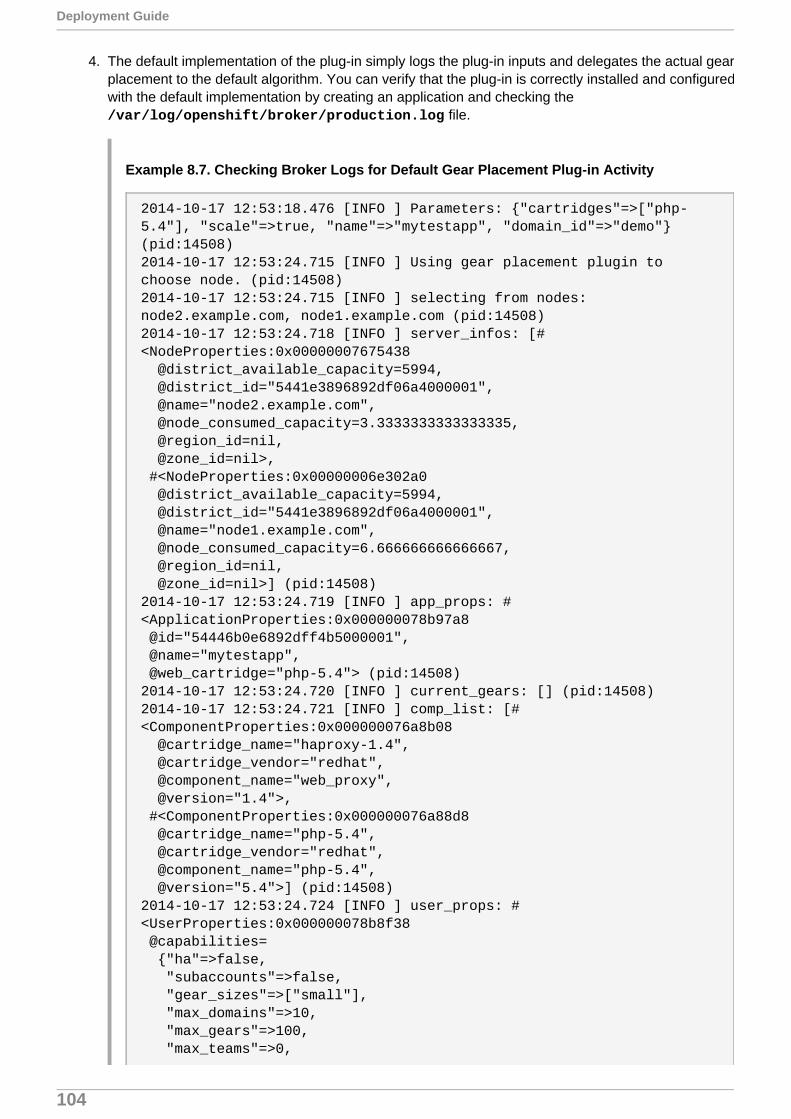
4. The default implementation of the plug-in simply logs the plug-in inputs and delegates the actual gearplacement to the default algorithm. You can verify that the plug-in is correctly installed and configuredwith the default implementation by creating an application and checking the /var/log/openshift/broker/production.log file.
Example 8.7. Checking Broker Logs for Default Gear Placement Plug-in Activity
2014-10-17 12:53:18.476 [INFO ] Parameters: {"cartridges"=>["php-5.4"], "scale"=>true, "name"=>"mytestapp", "domain_id"=>"demo"} (pid:14508)2014-10-17 12:53:24.715 [INFO ] Using gear placement plugin to choose node. (pid:14508)2014-10-17 12:53:24.715 [INFO ] selecting from nodes: node2.example.com, node1.example.com (pid:14508)2014-10-17 12:53:24.718 [INFO ] server_infos: [#<NodeProperties:0x00000007675438 @district_available_capacity=5994, @district_id="5441e3896892df06a4000001", @name="node2.example.com", @node_consumed_capacity=3.3333333333333335, @region_id=nil, @zone_id=nil>, #<NodeProperties:0x00000006e302a0 @district_available_capacity=5994, @district_id="5441e3896892df06a4000001", @name="node1.example.com", @node_consumed_capacity=6.666666666666667, @region_id=nil, @zone_id=nil>] (pid:14508)2014-10-17 12:53:24.719 [INFO ] app_props: #<ApplicationProperties:0x000000078b97a8 @id="54446b0e6892dff4b5000001", @name="mytestapp", @web_cartridge="php-5.4"> (pid:14508)2014-10-17 12:53:24.720 [INFO ] current_gears: [] (pid:14508)2014-10-17 12:53:24.721 [INFO ] comp_list: [#<ComponentProperties:0x000000076a8b08 @cartridge_name="haproxy-1.4", @cartridge_vendor="redhat", @component_name="web_proxy", @version="1.4">, #<ComponentProperties:0x000000076a88d8 @cartridge_name="php-5.4", @cartridge_vendor="redhat", @component_name="php-5.4", @version="5.4">] (pid:14508)2014-10-17 12:53:24.724 [INFO ] user_props: #<UserProperties:0x000000078b8f38 @capabilities= {"ha"=>false, "subaccounts"=>false, "gear_sizes"=>["small"], "max_domains"=>10, "max_gears"=>100, "max_teams"=>0,
Deployment Guide
104

"view_global_teams"=>false, "max_storage_per_gear"=>0}, @consumed_gears=7, @id="5441e5f26892df39e9000001", @login="demo", @plan_id=nil, @plan_state=nil> (pid:14508)2014-10-17 12:53:24.724 [INFO ] selected node: 'node2.example.com' (pid:14508)
8.5.1. Developing and Implementing a Custom Gear Placement Algorithm
Prerequisites:
Section 8.5, “Installing and Configuring the Gear Placement Plug-in”
You can develop a custom gear placement algorithm with a basic understanding of the Ruby programminglanguage. After the gear placement plug-in is installed, the plug-in's configuration files, initializers, and gearplacement algorithm source files are installed on the broker host. The location of the gem and these filesvaries depending on the version of the RPM package. Use the following command to find out the location ofthese files on your broker hosts:
# rpm -ql rubygem-openshift-origin-gear-placement
When developing a custom algorithm, you must modify the following files as required by your implementation:
Gem_Location/lib/openshift/gear_placement_plugin.rb
This contains the GearPlacementPlugin class. Modify the self.select_best_fit_node_impl method to customize the algorithm.
Gem_Location/config/initializers/openshift-origin-gear-placement.rb
This is the plug-in initializer that loads any configuration settings, if relevant.
/etc/openshift/plugins.d/openshift-origin-gear-placement.conf
This is where any relevant configuration settings for the plug-in can be defined.
Developing a Custom Algorithm
When you install the rubygem-openshift-origin-gear-placement RPM package, a gem with a Rails enginecontaining the GearPlacementPlugin class is also installed. The only method you must modify is self.select_best_fit_node_impl in the Gem_Location/lib/openshift/gear_placement_plugin.rb file, because it is the method invokedby the OpenShift::ApplicationContainerProxy class. Whenever a gear is created, the ApplicationContainerProxy.select_best_fit_node method is invoked, and if the gear placementplug-in is installed, that method invokes the plug-in.
A custom algorithm can be used for load balancing or to enforce constraints based on specified parameters.As seen in the self.select_best_fit_node_impl method signature, there are multiple data structuresavailable for use in the algorithm:
GearPlacementPlugin.select_best_fit_node_impl(server_infos, app_props, current_gears, comp_list, user_props, request_time)
Chapter 8. Continuing Broker Host Installation for Enterprise
105

Ultimately, the method must return exactly one of the entries from server_infos; it cannot be a nodeoutside of this list. The Gem_Location/lib/openshift/ directory contains several example algorithmsfor reference, which are also described in Section 8.5.2, “Example Gear Placement Algorithms”.
The following table describes each of the input data structures available to the algorithm:
Table 8.2. Input Data Structures
DataStructure
Description Properties
server_infos Array of server information: objects of classNodeProperties.
:name, :node_consumed_capacity,:district_id, :district_available_capacity,:region_id, :zone_id
app_props Properties of the application to which thegear is being added: objects of classApplicationProperties.
:id, :name, :web_cartridge
current_gears
Array of existing gears in the application:objects of class GearProperties.
:id, :name, :server, :district, :cartridges,:region, :zone
comp_list Array of components that will be present onthe new gear: objects of classComponentProperties.
:cartridge_name, :component_name,:version, :cartridge_vendor
user_props Properties of the user: object of classUserProperties.
:id, :login, :consumed_gears, :capabilities,:plan_id, :plan_state
request_time The time that the request was sent to theplug-in: Time on the OpenShift Broker host.
Time.now
The default implementation of the plug-in simply logs the plug-in inputs and delegates the actual gearplacement to the default algorithm, so you can check the example log output from the /var/log/openshift/broker/production.log file in Section 8.5, “Installing and Configuring the GearPlacement Plug-in” for examples of these inputs.
The server_infos entries provided to the algorithm are already filtered for compatibility with the gearrequest. They can be filtered by:
Specified profile.
Specified region.
Full, deactivated, or undistricted nodes.
Nodes without a region and zone, if regions and zones are in use.
Zones being used in a high-availability application, depending on the configuration.
Nodes being used in a scaled application. If this would return zero nodes, then only one is returned.
Availability of UID and other specified constraints when a gear is being moved.
While developing your algorithm, be careful to consider many scenarios, as the above filters' effects can besubtle, depending on the circumstances. Particularly in the last two of the above filters, it would not beunusual for the server_infos list presented to the algorithm to only contain one node when the developermight expect there to be plenty of other nodes from which to choose. The intent of the plug-in currently is notto enable complete flexibility of node choice, but rather to enforce custom constraints or to load balancebased on preferred parameters.
Using Configuration Settings
Deployment Guide
106

Optionally, you can implement configuration settings with the plug-in. To do so, you must:
1. Load them in the plug-in initializer in the Gem_Location/config/initializers/openshift-origin-gear-placement.rb file, and
2. Add and define the settings in the /etc/openshift/plugins.d/openshift-origin-gear-placement.conf file.
For example, the configuration settings in the default Gem_Location/config/initializers/openshift-origin-gear-placement.rb file are loadedusing the following syntax:
config.gear_placement = { :confkey1 => conf.get("CONFKEY1", "value1"), :confkey2 => conf.get("CONFKEY2", "value2"), :confkey3 => conf.get("CONFKEY3", "value3") }
Add your new configuration settings to the initializer using the same syntax as above. The Gem_Location/config/initializers/ directory contains several example initializers for use with theirrespective example algorithms described in Section 8.5.2, “Example Gear Placement Algorithms”.
Implementing a Custom Algorithm
Any changes to the Gem_Location/lib/openshift/gear_placement_plugin.rb, Gem_Location/config/initializers/openshift-origin-gear-placement.rb, or /etc/openshift/plugins.d/openshift-origin-gear-placement.conf files must be doneequally across all broker hosts in your environment. After making the desired changes to any of these files,the broker service must be restarted to load the changes:
# service openshift-broker restart
You can verify that the plug-in is correctly configured with your custom implementation by creating anapplication and checking the /var/log/openshift/broker/production.log file for the expected logs.
8.5.2. Example Gear Placement Algorithms
Prerequisites:
Section 8.5, “Installing and Configuring the Gear Placement Plug-in”
Section 8.5.1, “Developing and Implementing a Custom Gear Placement Algorithm”
The example gear placement algorithms in this section are provided as a reference to help with thedevelopment of your own custom algorithms. They are for use on brokers that have the gear placement plug-in installed and are intended for testing or development purposes.
After installing the gear placement plug-in, these examples are also installed on the broker host forconvenience. Most of the following example algorithms are located in the Gem_Location/lib/openshift/ directory, with any related example initializers and configuration fileslocated in the Gem_Location/config/initializers/ and /etc/openshift/plugins.d/ directories,respectively. See Section 8.5.1, “Developing and Implementing a Custom Gear Placement Algorithm” forinformation on implementing custom algorithms in your environment.
Administrator Constraint Examples
The following are administrator constraint example algorithms for the gear placement plug-in.
Chapter 8. Continuing Broker Host Installation for Enterprise
107
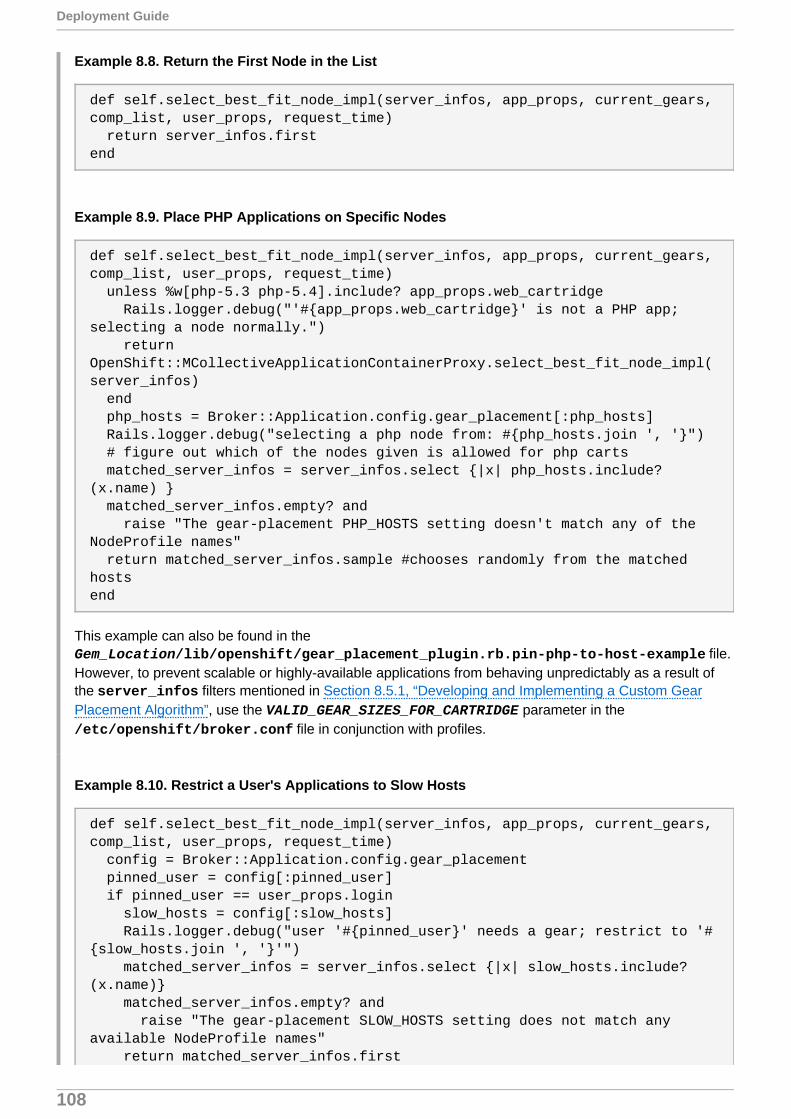
Example 8.8. Return the First Node in the List
def self.select_best_fit_node_impl(server_infos, app_props, current_gears, comp_list, user_props, request_time) return server_infos.firstend
Example 8.9. Place PHP Applications on Specific Nodes
def self.select_best_fit_node_impl(server_infos, app_props, current_gears, comp_list, user_props, request_time) unless %w[php-5.3 php-5.4].include? app_props.web_cartridge Rails.logger.debug("'#{app_props.web_cartridge}' is not a PHP app; selecting a node normally.") return OpenShift::MCollectiveApplicationContainerProxy.select_best_fit_node_impl(server_infos) end php_hosts = Broker::Application.config.gear_placement[:php_hosts] Rails.logger.debug("selecting a php node from: #{php_hosts.join ', '}") # figure out which of the nodes given is allowed for php carts matched_server_infos = server_infos.select {|x| php_hosts.include?(x.name) } matched_server_infos.empty? and raise "The gear-placement PHP_HOSTS setting doesn't match any of the NodeProfile names" return matched_server_infos.sample #chooses randomly from the matched hostsend
This example can also be found in the Gem_Location/lib/openshift/gear_placement_plugin.rb.pin-php-to-host-example file.However, to prevent scalable or highly-available applications from behaving unpredictably as a result ofthe server_infos filters mentioned in Section 8.5.1, “Developing and Implementing a Custom GearPlacement Algorithm”, use the VALID_GEAR_SIZES_FOR_CARTRIDGE parameter in the /etc/openshift/broker.conf file in conjunction with profiles.
Example 8.10. Restrict a User's Applications to Slow Hosts
def self.select_best_fit_node_impl(server_infos, app_props, current_gears, comp_list, user_props, request_time) config = Broker::Application.config.gear_placement pinned_user = config[:pinned_user] if pinned_user == user_props.login slow_hosts = config[:slow_hosts] Rails.logger.debug("user '#{pinned_user}' needs a gear; restrict to '#{slow_hosts.join ', '}'") matched_server_infos = server_infos.select {|x| slow_hosts.include?(x.name)} matched_server_infos.empty? and raise "The gear-placement SLOW_HOSTS setting does not match any available NodeProfile names" return matched_server_infos.first
Deployment Guide
108

else Rails.logger.debug("user '#{user_props.login}' is not pinned; choose a node normally") return OpenShift::MCollectiveApplicationContainerProxy.select_best_fit_node_impl(server_infos) endend
This example can also be found in the Gem_Location/lib/openshift/gear_placement_plugin.rb.pin-user-to-host-examplefile. However, this could prevent the user from scaling applications in some situations as a result of the server_infos filters mentioned in Section 8.5.1, “Developing and Implementing a Custom GearPlacement Algorithm”.
Example 8.11. Ban a Specific Vendor's Cartridges
def self.select_best_fit_node_impl(server_infos, app_props, current_gears, comp_list, user_props, request_time) Rails.logger.debug("Using blacklist gear placement plugin to choose node.") Rails.logger.debug("selecting from nodes: #{server_infos.map(:name).join ', '}") blacklisted_vendor = Broker::Application.config.gear_placement[:blacklisted_vendor] unless blacklisted_vendor.nil? comp_list.each do |comp| if blacklisted_vendor == comp.cartridge_vendor raise "Applications containing cartridges from #{blacklisted_vendor} are blacklisted" end end end Rails.logger.debug("no contraband found, choosing node as usual") return OpenShift::MCollectiveApplicationContainerProxy.select_best_fit_node_impl(server_infos)end
This example can also be found in the Gem_Location/lib/openshift/gear_placement_plugin.rb.blacklisted-vendor-examplefile.
Resource Usage Examples
The following are resource usage example algorithms for the gear placement plug-in.
Example 8.12. Place a Gear on the Node with the Most Free Memory
def self.select_best_fit_node_impl(server_infos, app_props, current_gears, comp_list, user_props, request_time) # collect memory statistic from all nodes
Chapter 8. Continuing Broker Host Installation for Enterprise
109

memhash = Hash.new(0) OpenShift::MCollectiveApplicationContainerProxy.rpc_get_fact('memoryfree') {|name,mem| memhash[name] = to_bytes(mem)} Rails.logger.debug("node memory hash: #{memhash.inspect}") # choose the one from our list with the largest value return server_infos.max_by {|server| memhash[server.name]} end
def self.to_bytes(mem) mem.to_f * case mem when /TB/; 1024 ** 4 when /GB/; 1024 ** 3 when /MB/; 1024 ** 2 when /KB/; 1024 else ; 1 endend
This example can also be found in the Gem_Location/lib/openshift/gear_placement_plugin.rb.free-memory-example file.
Example 8.13. Sort Nodes by Gear Usage (Round Robin)
def self.select_best_fit_node_impl(server_infos, app_props, current_gears, comp_list, user_props, request_time) return server_infos.sort_by {|x| x.node_consumed_capacity.to_f}.firstend
This example can also be found in the Gem_Location/lib/openshift/gear_placement_plugin.rb.round-robin-example file. Thenodes in each profile fill evenly, unless complications arise, for example due to scaled applications, gearsbeing deleted unevenly, or MCollective fact updates trailing behind. Implementing true round robinrequires writing out a state file owned by this algorithm and using that for scheduling the placementrotation.
8.6. Using an External Routing Layer for High-Availability Applications
Using an external routing layer, you can enable scalable applications to become highly available. OpenShiftEnterprise exposes the following gear events from scalable applications, which are significant because theyexpose and conceal ports on gears where web traffic is received:
Adding and deleting applications
Scaling applications up or down
Adding or removing aliases and custom certificates
You can implement a routing plug-in in OpenShift Enterprise that allows an external routing solution in yourexisting infrastructure, such as nginx, Nginx Plus®, or F5 BIG-IP LTM® (Local Traffic Manager™), tobalance web traffic loads using these exposed ports. Introducing a router that dynamically controls this trafficto gears allows an OpenShift Enterprise deployment to achieve high availability. Without this feature, the
Deployment Guide
110
DNS-based routing has a single point of failure on the scalable application's HAProxy gear. See the
OpenShift Enterprise User Guide for more information on basic routing for scalable applications when arouting layer is not being used.
You can either develop your own routing plug-in to handle these events or use the included sample routingplug-in. The sample plug-in takes the gear events and publishes corresponding messages on ActiveMQ astopic notifications. You must then configure a routing listener, which can be a script or daemon, that listensfor these notifications and programs your chosen routing solution dynamically to route the traffic to the gears.
If you are using the sample routing plug-in, starting in OpenShift Enterprise 2.2 you can configure a samplerouting daemon to be the listener, which currently is supported for use with an nginx or Nginx Plus® routingback end. Starting in OpenShift Enterprise 2.2.4, the routing daemon also supports an external LTM® version11.6.0 routing back end. Otherwise, you must develop your own routing listener based on your chosenrouting solution.
See Also:
Section 8.6.1, “Selecting an External Routing Solution”
Section 8.6.2, “Configuring the Sample Routing Plug-In”
Section 8.6.3, “Configuring a Routing Daemon or Listener”
Section 8.6.4, “Enabling Support for High-Availability Applications”
8.6.1. Selecting an External Routing Solution
If you plan to configure a routing plug-in and listener to enable scalable applications to become highlyavailable, you must first have an external routing solution, such as nginx, Nginx Plus®, or F5 BIG-IP LTM®,installed and configured in your environment to serve as the routing back end.
The following sections highlight and provide basic installation information for a few of these routing solutions.Note that currently only nginx, Nginx Plus®, and LTM® are supported for integration with the sample routingdaemon described later in Section 8.6.3, “Configuring a Routing Daemon or Listener”, but you can develop acustom routing listener based on your chosen routing solution.
Using nginx or Nginx Plus®
nginx is a web and proxy server with a focus on high concurrency, performance, and low memory usage. Itcan be installed on a Red Hat Enterprise Linux 6 host and is currently included in Red Hat SoftwareCollections 1.2. The Red Hat Software Collections version does not include the Nginx Plus® commercialfeatures. If you want to use the Nginx Plus® commercial features, install Nginx Plus® using the subscriptionmodel offered directly from http://nginx.com.
The sample routing daemon, available starting in OpenShift Enterprise 2.2, supports integration with nginx orNginx Plus® and automatically creates and manage server.conf and pool_*.conf files under theconfigured directory. After each update, the routing daemon reloads the configured nginx or Nginx Plus®service.
The routing daemon also includes configuration options that enable the use of an Nginx Plus® feature thatenabled proactive health checks for upstream group members. It is not necessary to use this feature unlessyou want to ensure a seamless transition if an upstream group member is not responding successfully.
[5]
Chapter 8. Continuing Broker Host Installation for Enterprise
111

Important
Normally HTTPS can be used to resolve application requests. However, to do so when the routingdaemon is configured to use nginx or Nginx Plus® external routing, users must first add a customdomain alias and SSL certificate to their application. For example, a user can do so by running thefollowing:
# rhc alias add App_Name Custom_Domain_Alias# rhc alias update-cert App_Name Custom_Domain_Alias --certificate Cert_File --private-key Key_File
If you configure the current version of the routing daemon to use nginx or Nginx Plus®, you mustinform users of your deployment about the above requirement. See the OpenShift Enterprise UserGuide for more information on user management of custom domains and SSL certificates.
Detailed configuration instructions for the routing daemon itself are provided later in Section 8.6.3,“Configuring a Routing Daemon or Listener”.
Procedure 8.16. To Install nginx from Red Hat Software Collections:
1. Register a Red Hat Enterprise Linux 6 host to Red Hat Network and ensure the Red Hat Enterprise Linux 6 Server and Red Hat Software Collections 1 channels areenabled. For example, after registering the host with Red Hat Subscription Management (RHSM),enable the channels with the following command:
# subscription-manager repos --enable=rhel-6-server-rpms --enable=rhel-server-rhscl-6-rpms
2. Install nginx:
# yum install nginx16
3. Enable the following SELinux Boolean:
# setsebool -P httpd_can_network_connect=true
4. Start the nginx service:
# chkconfig nginx16-nginx on# service nginx16-nginx start
See http://nginx.org/en/docs for the official nginx documentation.
Using F5 BIG-IP LTM®
Starting in OpenShift Enterprise 2.2.4, the sample routing daemon supports integration with F5 BIG-IP LTM®(Local Traffic Manager™) version 11.6.0. See the official LTM® documentation for installation instructions.
[6]
Deployment Guide
112

Important
Custom alias HTTPS termination at LTM® requires SNI configuration in LTM®. See the F5®Knowledge Base for configuration details.
To integrate with OpenShift Enterprise, you must configure your LTM® instance with two virtual servers: onefor HTTP traffic and one for HTTPS traffic. Each virtual server must be assigned at least one VIP. A default client-ssl profile must also be configured as the default SNI client-ssl profile. Although the naming ofthe default client-ssl profile is unimportant, it must be added to the HTTPS virtual server.
OpenShift Enterprise integration requires an LTM® user with the Administrator role, for example, thedefault admin account. Without this role, the user that the routing daemon authenticates will not have thecorrect privileges or configuration to use the advanced shell. Also, the LTM® admin user's Terminal Access must be set to Advanced Shell so that remote bash commands can be executed.
Procedure 8.17. To Grant a User Advanced Shell Execution:
1. On the F5® console, navigate to System->Users->User List->Username.
2. In the dropdown box labeled Terminal Access, choose the Advanced Shell option.
3. Click on the Update button.
Note
See the LTM® documentation for more information on assigning a user the Administrator role,and the different options for the Terminal Access dropdown box.
Additionally, for the remote key management commands to execute, the BIGIP_SSHKEY public key must beadded to the LTM® admin user's .ssh/authorized_keys file.
When configured for LTM®, the routing daemon automatically:
Creates pools and associated local-traffic policy rules.
Adds profiles to the virtual servers.
Adds members to the pools.
Deletes members from the pools.
Deletes empty pools and unused policy rules when appropriate.
The routing daemon names the pools after applications following the template /Common/ose-#{app_name}-#{namespace} and creates policy rules to forward requests to pools comprising the gears ofthe named application. Detailed configuration instructions for the routing daemon itself are provided later inSection 8.6.3, “Configuring a Routing Daemon or Listener”.
See Also:
Section 8.6.2, “Configuring the Sample Routing Plug-In”
Section 8.6.3, “Configuring a Routing Daemon or Listener”
Chapter 8. Continuing Broker Host Installation for Enterprise
113

8.6.2. Configuring the Sample Routing Plug-In
OpenShift Enterprise includes a sample routing plug-in for publishing routing information on an ActiveMQqueue, which allows an external routing layer to route traffic for high-availability applications. In addition toenabling the sample plug-in on the broker host, the ActiveMQ configuration must be modified.
Procedure 8.18. To Enable and Configure the Sample Routing Plug-in:
1. Add a new user, topic, and queue to ActiveMQ. On each ActiveMQ broker, edit the /etc/activemq/activemq.xml file and add the following line within the <users> section,replacing routinginfopasswd with your own password:
<authenticationUser username="routinginfo" password="routinginfopasswd" groups="routinginfo,everyone"/>
Example 8.14. Example <users> Section
<users> <authenticationUser username="mcollective" password="marionette" groups="mcollective,everyone"/> <authenticationUser username="admin" password="secret" groups="mcollective,admin,everyone"/> <authenticationUser username="routinginfo" password="routinginfopasswd" groups="routinginfo,everyone"/></users>
2. Add the following lines within the <authorizationEntries> section:
<authorizationEntry topic="routinginfo.>" write="routinginfo" read="routinginfo" admin="routinginfo" /><authorizationEntry queue="routinginfo.>" write="routinginfo" read="routinginfo" admin="routinginfo" />
Example 8.15. Example <authorizationEntries> Section
<authorizationEntries> <authorizationEntry queue=">" write="admins" read="admins" admin="admins" /> <authorizationEntry topic=">" write="admins" read="admins" admin="admins" /> <authorizationEntry topic="mcollective.>" write="mcollective" read="mcollective" admin="mcollective" /> <authorizationEntry queue="mcollective.>" write="mcollective" read="mcollective" admin="mcollective" /> <authorizationEntry topic="ActiveMQ.Advisory.>" read="everyone" write="everyone" admin="everyone"/> <authorizationEntry topic="routinginfo.>" write="routinginfo" read="routinginfo" admin="routinginfo" /> <authorizationEntry queue="routinginfo.>" write="routinginfo" read="routinginfo" admin="routinginfo" /></authorizationEntries>
Deployment Guide
114

3. Add the following lines within the <plugins> section:
<redeliveryPlugin fallbackToDeadLetter="true" sendToDlqIfMaxRetriesExceeded="true"> <redeliveryPolicyMap> <redeliveryPolicyMap> <redeliveryPolicyEntries> <redeliveryPolicy queue="routinginfo" maximumRedeliveries="4" useExponentialBackOff="true" backOffMultiplier="4" initialRedeliveryDelay="2000" /> </redeliveryPolicyEntries> </redeliveryPolicyMap> </redeliveryPolicyMap> </redeliveryPlugin>
4. Add the schedulerSupport="true" directive within the <broker> section:
<broker xmlns="http://activemq.apache.org/schema/core" brokerName="activemq.example.com" dataDirectory="${activemq.data}" schedulePeriodForDestinationPurge="60000" schedulerSupport="true" >
5. Restart the activemq service:
# service activemq restart
6. On the broker host, verify that the rubygem-openshift-origin-routing-activemq package is installed:
# yum install rubygem-openshift-origin-routing-activemq
7. Copy the /etc/openshift/plugins.d/openshift-origin-routing-activemq.conf.example file to /etc/openshift/plugins.d/openshift-origin-routing-activemq.conf:
# cp /etc/openshift/plugins.d/openshift-origin-routing-activemq.conf.example /etc/openshift/plugins.d/openshift-origin-routing-activemq.conf
8. Edit the /etc/openshift/plugins.d/openshift-origin-routing-activemq.conf fileand ensure the ACTIVEMQ_HOST and ACTIVEMQ_PORT parameters are set appropriately for yourActiveMQ broker. Set the ACTIVEMQ_PASSWORD parameter to the password chosen for the routinginfo user:
Example 8.16. Example Routing Plug-in Configuration File
ACTIVEMQ_TOPIC='/topic/routinginfo'ACTIVEMQ_USERNAME='routinginfo'
Chapter 8. Continuing Broker Host Installation for Enterprise
115

ACTIVEMQ_PASSWORD='routinginfopasswd'ACTIVEMQ_HOST='127.0.0.1'ACTIVEMQ_PORT='61613'
In OpenShift Enterprise 2.1.2 and later, you can set the ACTIVEMQ_HOST parameter as a comma-separated list of host:port pairs if you are using multiple ActiveMQ brokers:
Example 8.17. Example ACTIVEMQ_HOST Setting Using Multiple ActiveMQ Brokers
ACTIVEMQ_HOST='192.168.59.163:61613,192.168.59.147:61613'
9. You can optionally enable SSL connections per ActiveMQ host. To do so, set the MCOLLECTIVE_CONFIG parameter in the /etc/openshift/plugins.d/openshift-origin-routing-activemq.conf file to the MCollective client configuration file used by the broker:
MCOLLECTIVE_CONFIG='/opt/rh/ruby193/root/etc/mcollective/client.cfg'
Note that while setting the MCOLLECTIVE_CONFIG parameter overrides the ACTIVEMQ_HOST and ACTIVEMQ_PORT parameters in this file, the ACTIVEMQ_USERNAME and ACTIVEMQ_PASSWORDparameters in this file are still used by the routing plug-in and must be set.
10. Restart the broker service:
# service openshift-broker restart
See Also:
Section 8.6.3, “Configuring a Routing Daemon or Listener”
8.6.3. Configuring a Routing Daemon or Listener
Prerequisites:
Section 8.6.1, “Selecting an External Routing Solution”
Section 8.6.2, “Configuring the Sample Routing Plug-In”
After configuring a routing plug-in on the broker host, you must configure a routing listener, which can be ascript or daemon, that listens for notifications of application life-cycle events. The listener must program yourchosen external routing solution using the notifications to dynamically route traffic to the gears.
If you are using the sample routing plug-in described in Section 8.6.2, “Configuring the Sample Routing Plug-In”, starting in OpenShift Enterprise 2.2 you can install and configure a sample routing daemon to listen to theevent notifications published on ActiveMQ by the sample routing plug-in. The routing daemon supportsintegration with an external nginx or Nginx Plus® routing back end. Starting in OpenShift Enterprise 2.2.4,the routing daemon also supports integration with an external F5 BIG-IP LTM® (Local Traffic Manager™)version 11.6.0 routing back end. Otherwise, you must develop your own routing daemon or listener for yourchosen routing solution.
Both options, configuring the sample daemon or developing your own listener, are detailed below.
Configuring the Sample Routing Daemon
Deployment Guide
116

The following procedure assumes that you have already set up nginx, Nginx Plus®, or LTM® as a routingback end as described in Section 8.6.1, “Selecting an External Routing Solution”.
Procedure 8.19. To Install and Configure the Sample Routing Daemon:
1. The sample routing daemon is provided by the rubygem-openshift-origin-routing-daemon package.The host you are installing the routing daemon on must have the Red Hat OpenShift Enterprise 2.2 Infrastructure channel enabled to access the package. See Section 7.1,“Configuring Broker Host Entitlements” for more information.
For nginx or Nginx Plus® usage, because the routing daemon directly manages the nginxconfiguration files, you must install the package on the same host where nginx or Nginx Plus® isrunning. Nginx Plus® offers features such as a REST API and clustering, but the current version ofthe routing daemon must still be run on the same host.
For LTM® usage, you must install the package on a Red Hat Enterprise Linux 6 host that is separatefrom the host where LTM® is running. This is because the daemon manages LTM® using a SOAPor REST interface.
Install the rubygem-openshift-origin-routing-daemon package on the appropriate host:
# yum install rubygem-openshift-origin-routing-daemon
2. Edit the /etc/openshift/routing-daemon.conf file and set the ACTIVEMQ_* parameters tothe appropriate host address, credentials, and ActiveMQ topic or queue destination:
ACTIVEMQ_HOST=broker.example.comACTIVEMQ_USER=routinginfoACTIVEMQ_PASSWORD=routinginfopasswdACTIVEMQ_PORT=61613ACTIVEMQ_DESTINATION=/topic/routinginfo
In OpenShift Enterprise 2.1.2 and later, you can set the ACTIVEMQ_HOST parameter as a comma-separated list of host:port pairs if you are using multiple ActiveMQ brokers:
ACTIVEMQ_HOST='192.168.59.163:61613,192.168.59.147:61613'
3. If you optionally enabled SSL connections per ActiveMQ host in the routing plug-in, set the plugin.activemq* parameters in this file to the same values used in the /opt/rh/ruby193/root/etc/mcollective/client.cfg file on the broker:
plugin.activemq.pool.size = 1plugin.activemq.pool.1.host = activemq.example.complugin.activemq.pool.1.port = 61614plugin.activemq.pool.1.ssl = trueplugin.activemq.pool.1.ssl.ca = /etc/keys/activemq.example.com.crtplugin.activemq.pool.1.ssl.key = /etc/keys/activemq.example.com.keyplugin.activemq.pool.1.ssl.cert = /etc/keys/activemq.example.com.crt
If you have multiple pools, ensure that plugin.activemq.pool.size is set appropriately andcreate unique blocks for each pool:
plugin.activemq.pool.size = 2plugin.activemq.pool.1.host = activemq1.example.complugin.activemq.pool.1.port = 61614
Chapter 8. Continuing Broker Host Installation for Enterprise
117
plugin.activemq.pool.1.ssl = trueplugin.activemq.pool.1.ssl.ca = /etc/keys/activemq1.example.com.crtplugin.activemq.pool.1.ssl.key = /etc/keys/activemq1.example.com.keyplugin.activemq.pool.1.ssl.cert = /etc/keys/activemq1.example.com.crt
plugin.activemq.pool.2.host = activemq2.example.complugin.activemq.pool.2.port = 61614plugin.activemq.pool.2.ssl = trueplugin.activemq.pool.2.ssl.ca = /etc/keys/activemq2.example.com.crtplugin.activemq.pool.2.ssl.key = /etc/keys/activemq2.example.com.keyplugin.activemq.pool.2.ssl.cert = /etc/keys/activemq2.example.com.crt
The files set in the *ssl.ca, *ssl.key, and *ssl.cert parameters must be copied from theActiveMQ broker or brokers and placed locally for the routing daemon to use.
Note that while setting the plugin.activemq* parameters overrides the ACTIVEMQ_HOST and ACTIVEMQ_PORT parameters in this file, the ACTIVEMQ_USERNAME and ACTIVEMQ_PASSWORDparameters in this file are still used by the routing daemon and must be set.
4. Set the CLOUD_DOMAIN parameter to the domain you are using:
CLOUD_DOMAIN=example.com
5. To use a different prefix in URLs for high-availability applications, you can modify the HA_DNS_PREFIX parameter:
HA_DNS_PREFIX="ha-"
This parameter and the HA_DNS_PREFIX parameter in the /etc/openshift/broker.conf file,covered in Section 8.6.4, “Enabling Support for High-Availability Applications” , must be set to thesame value.
6. If you are using nginx or Nginx Plus®, set the LOAD_BALANCER parameter to the nginx module:
LOAD_BALANCER=nginx
If you are using LTM®, set the LOAD_BALANCER parameter to the f5 module:
LOAD_BALANCER=f5
Ensure that only one LOAD_BALANCER line is uncommented and enabled in the file.
7. If you are using nginx or Nginx Plus®, set the appropriate values for the following nginx moduleparameters if they differ from the defaults:
NGINX_CONFDIR=/opt/rh/nginx16/root/etc/nginx/conf.dNGINX_SERVICE=nginx16-nginx
If you are using Nginx Plus®, you can uncomment and set the following parameters to enable healthchecking. This enables active health checking and takes servers out of the upstream pool withouthaving a client request initiate the check.
NGINX_PLUS=trueNGINX_PLUS_HEALTH_CHECK_INTERVAL=2s
Deployment Guide
118

NGINX_PLUS_HEALTH_CHECK_FAILS=1NGINX_PLUS_HEALTH_CHECK_PASSES=5NGINX_PLUS_HEALTH_CHECK_URI=/NGINX_PLUS_HEALTH_CHECK_MATCH_STATUS=200NGINX_PLUS_HEALTH_CHECK_SHARED_MEMORY=64k
8. If you are using LTM®, set the appropriate values for the following parameters to match your LTM®configuration:
BIGIP_HOST=127.0.0.1BIGIP_USERNAME=adminBIGIP_PASSWORD=passwdBIGIP_SSHKEY=/etc/openshift/bigip.key
Set the following parameters to match the LTM® virtual server names you created:
VIRTUAL_SERVER=ose-vserverVIRTUAL_HTTPS_SERVER=https-ose-vserver
Also set the MONITOR_NAME parameter to match your LTM® configuration:
MONITOR_NAME=monitor_name
For the lbaas module, set the appropriate values for the following parameters to match your LBaaSconfiguration:
LBAAS_HOST=127.0.0.1LBAAS_TENANT=openshiftLBAAS_TIMEOUT=300LBAAS_OPEN_TIMEOUT=300LBAAS_KEYSTONE_HOST=10.0.0.1LBAAS_KEYSTONE_USERNAME=userLBAAS_KEYSTONE_PASSWORD=passwdLBAAS_KEYSTONE_TENANT=lbms
9. By default, new pools are created and named with the form pool_ose_{appname}_{namespace}_80. You can optionally override this defaults by settingappropriate value for the POOL_NAME parameter:
POOL_NAME=pool_ose_%a_%n_80
If you change this value, set it to contain the following format so each application gets its ownuniquely named pool:
%a is expanded to the name of the application.
%n is expanded to the application's namespace (domain).
10. The BIG-IP LTM back end can add an existing monitor to newly created pools. The following settingscontrol how these monitors are created:
#MONITOR_NAME=monitor_ose_%a_%n#MONITOR_PATH=/health_check.php#MONITOR_UP_CODE=1
Chapter 8. Continuing Broker Host Installation for Enterprise
119

MONITOR_TYPE=http-ecv#MONITOR_TYPE=https-ecv#MONITOR_INTERVAL=10#MONITOR_TIMEOUT=5
Set the MONITOR_NAME parameter to the name of the monitor to use, and set the MONITOR_PATHparameter to the path name to use for the monitor. Alternatively, leave either parameter unspecifiedto disable the monitor functionality.
As with the POOL_NAME and ROUTE_NAME parameters, the MONITOR_NAME and MONITOR_PATHparameters both can contain %a and %n formats, which are expanded the same way. Unlike the POOL_NAME and ROUTE_NAME parameters, however, you may or may not want to reuse the samemonitor for different applications. The routing daemon automatically creates a new monitor when theformat used from the MONITOR_NAME parameter expands a string that does not match the name ofany existing monitor.
Set the MONITOR_UP_CODE parameter to the code that indicates that a pool member is up, or leave itunspecified to use the default value of 1.
MONITOR_TYPE specifies the type of probe that the external load-balancer should use to check thehealth status of applications. The only other recognized value for MONITOR_TYPE is https-ecv,which defines the protocol to be HTTPS. All other values for MONITOR_TYPE translate to HTTP.
Note that ECV stands for “extended content verification", referring to the fact that the monitor makesan HTTP request and looks at the reply to verify that it is the expected response (meaning theapplication server is responding), as opposed to merely pinging the server to ensure it is returning anICMP ping reply (meaning the operating system is responding).
Set the MONITOR_INTERVAL parameter to the interval at which the monitor sends requests, or leaveit unspecified to use the default value of 10.
Set the MONITOR_TIMEOUT parameter to the monitor's timeout for its requests, or leave it unset touse the default value of 5.
It is expected that for each pool member, the routing solution sends a GET request to the resourceidentified on that host by the value of the MONITOR_PATH parameter for the associated monitor, andthat the host responds with the value of the MONITOR_UP_CODE parameter if the host is up or someother response if the host is not up.
11. You can change the port that nginx or Nginx Plus® listens on for HTTP or HTTPS, if required, bysetting the following parameters:
SSL_PORT=443HTTP_PORT=80
For Nginx Plus®, setting the above parameters is all that is required. For nginx 1.6 (from Red HatSoftware Collections), however, you must also modify the /opt/rh/nginx16/root/etc/nginx/nginx.conf file to listen on different ports. For examplefor HTTP, change 80 on the following line to another port:
listen 80;
In both cases (nginx 1.6 and Nginx Plus®), ensure the SSL_PORT and HTTP_PORT parameters areset to the ports you intend nginx or Nginx Plus® to listen to, and ensure your host firewallconfiguration allows ingress traffic on these ports.
Deployment Guide
120

12. Start the routing daemon:
# chkconfig openshift-routing-daemon on# service openshift-routing-daemon start
Developing a Custom Routing Listener
If you are not using the sample routing daemon, you can develop your own listener to listen to the eventnotifications published on ActiveMQ by the sample routing plug-in. The plug-in creates notification messagesfor the following events:
Table 8.3. Sample Routing Plug-in Notifications
Event Message Format Additional DetailsApplication created :action => :create_application,
:app_name => app.name,
:namespace => app.domain.namespace,
:scalable => app.scalable,
:ha => app.ha,
Application deleted :action => :delete_application,
:app_name => app.name,
:namespace => app.domain.namespace
:scalable => app.scalable,
:ha => app.ha,
Public endpoint created :action => :add_public_endpoint,
:app_name => app.name,
:namespace => app.domain.namespace,
:gear_id => gear._id.to_s,
:public_port_name => endpoint_name,
:public_address => public_ip,
:public_port => public_port.to_i,
:protocols => protocols,
:types => types,
:mappings => mappings
Values for the protocolsvariable include:
tcp, http, https, ws, wss, tls, mongodb, mysql
Values for the typesvariable include:
load_balancer, web_framework, database, plugin, other
These variables depend onvalues set in the cartridgemanifest.
Chapter 8. Continuing Broker Host Installation for Enterprise
121
Public endpoint deleted :action => :remove_public_endpoint,
:app_name => app.name,
:namespace => app.domain.namespace,
:gear_id => gear._id.to_s,
:public_address => public_ip,
:public_port => public_port.to_i
SSL certificate added :action => :add_ssl,
:app_name => app.name,
:namespace => app.domain.namespace,
:alias => fqdn,
:ssl => ssl_cert,
:private_key => pvt_key,
:pass_phrase => passphrase
SSL certificate removed :action => :remove_ssl,
:app_name => app.name,
:namespace => app.domain.namespace,
:alias => fqdn
Alias added :action => :add_alias,
:app_name => app.name,
:namespace => app.domain.namespace,
:alias => alias_str
Alias removed :action => :remove_alias,
:app_name => app.name,
:namespace => app.domain.namespace,
:alias => alias_str
Event Message Format Additional Details
Note
The add_gear and delete_gear actions have been deprecated. Use add_public_endpoint for add_gear and remove_public_endpoint for delete_gear instead.
Follow these guidelines when developing a routing listener for the sample routing plug-in:
Deployment Guide
122

Routing Listener Guidelines
1. Listen to the ActiveMQ topic routinginfo. Verify that the user credentials match those configuredin the /etc/openshift/plugins.d/openshift-origin-routing-activemq.conf file ofthe sample routing plug-in.
2. For each gear event, reload the routing table of the router.
a. Use the protocols value provided with the add_public_endpoint action to tailor yourrouting methods.
b. Use the types value to identify the type of endpoint.
c. Use the mappings value to identify URL routes. Routes that are not root may require sourceIP or SSL certificate verifications. A common use case involves administrative consoles suchas phpMyAdmin.
3. Look for actions involving SSL certificates, such as add_ssl and remove_ssl, and decide whetherto configure the router accordingly for incoming requests.
4. Look for actions involving aliases, such as add_alias and remove_alias. Aliases must always beaccommodated for during the application's life cycle.
Note
The add_public_endpoint and remove_public_endpoint actions do not correspond to theactual addition and removal of gears, but rather to the exposure and concealment of ports. One gearadded to an application may result in several exposed ports, which will all result in respective add_public_endpoint notifications at the router level.
Example 8.18. Simple Routing Listener
The following listener.rb script file is an example model for a simple routing listener. This Ruby scriptuses Nginx as the external routing solution, and the pseudo code provided is an example only. Theexample handles the following tasks:
Look for messages with an add_public_endpoint action and a load_balancer type, then edit therouter configuration file for the application.
Look for messages with a remove_public_endpoint action and a load_balancer type, then editthe router configuration file for the application.
Look for messages with a delete_application action and remove the router configuration file forthe application.
#!/usr/bin/ruby
require 'rubygems'require 'stomp'require 'yaml'
CONF_DIR='/etc/nginx/conf.d/'
def add_haproxy(appname, namespace, ip, port)
Chapter 8. Continuing Broker Host Installation for Enterprise
123

scope = "#{appname}-#{namespace}" file = File.join(CONF_DIR, "#{scope}.conf") if File.exist?(file) `sed -i 's/upstream #{scope} {/&\\n server #{ip}:#{port};/' #{file}` else # write a new one template = <<-EOF upstream #{scope} { server #{ip}:#{port}; } server { listen 8000; server_name ha-#{scope}.dev.rhcloud.com; location / { proxy_pass http://#{scope}; } }EOF File.open(file, 'w') { |f| f.write(template) } end `nginx -s reload`end
c = Stomp::Client.new("routinginfo", "routinginfopasswd", "localhost", 61613, true)c.subscribe('/topic/routinginfo') { |msg| h = YAML.load(msg.body) if h[:action] == :add_public_endpoint if h[:types].include? "load_balancer" add_haproxy(h[:app_name], h[:namespace], h[:public_address], h[:public_port]) puts "Added routing endpoint for #{h[:app_name]}-#{h[:namespace]}" end elsif h[:action] == :remove_public_endpoint # script does not actually act upon the remove_public_endpoint as written elsif h[:action] == :delete_application scope = '#{h[:app_name]}-#{h[:namespace]}' file = File.join(CONF_DIR, "#{scope}.conf") if File.exist?(file) `rm -f #{file}` `nginx -s reload` puts "Removed configuration for #{scope}" end end}c.join
8.6.4. Enabling Support for High-Availability Applications
Prerequisites:
Section 8.6.1, “Selecting an External Routing Solution”
Deployment Guide
124
Section 8.6.2, “Configuring the Sample Routing Plug-In”
Section 8.6.3, “Configuring a Routing Daemon or Listener”
If you have configured an external routing layer, either the included sample or your own, to route applicationtraffic, you must enable support for high-availability applications and configure specific DNS managementoptions before developers can take advantage of these features.
Procedure 8.20. To Enable Support for High-Availability Applications:
1. To allow scalable applications to become highly available using the configured external router, editthe /etc/openshift/broker.conf file on the broker host and set the ALLOW_HA_APPLICATIONS parameter to "true":
ALLOW_HA_APPLICATIONS="true"
Note that this parameter controls whether high-availability applications are allowed in general, butdoes not adjust user account capabilities. User account capabilities are discussed in a later step.
2. A scaled application that is not highly available uses the following URL form:
http://${APP_NAME}-${DOMAIN_NAME}.${CLOUD_DOMAIN}
When high-availability is enabled, HAproxy instances are deployed in multiple gears of theapplication, which are spread across multiple node hosts. In order to load balance user requests, ahigh-availability application requires a new high-availability DNS name that points to the externalrouting layer rather than directly to the application head gear. The routing layer then forwardsrequests directly to the application's HAproxy instances, which are then distributed to the frameworkgears. In order to create DNS entries for high-availability applications that point to the routing layer,OpenShift Enterprise adds either a prefix or suffix, or both, to the regular application name:
http://${HA_DNS_PREFIX}${APP_NAME}-${DOMAIN_NAME}${HA_DNS_SUFFIX}.${CLOUD_DOMAIN}
To change the prefix or suffix used in the high-availability URL, you can modify the HA_DNS_PREFIXor HA_DNS_SUFFIX parameters:
HA_DNS_PREFIX="ha-"HA_DNS_SUFFIX=""
If you modify the HA_DNS_PREFIX parameter and are using the sample routing daemon, ensure thisparameter and the HA_DNS_PREFIX parameter in the /etc/openshift/routing-daemon.conffile are set to the same value.
3. DNS entries for high-availability applications can either be managed by OpenShift Enterprise orexternally. By default, this parameter is set to "false", which means the entries must be createdexternally; failure to do so could prevent the application from receiving traffic through the externalrouting layer. To allow OpenShift Enterprise to create and delete these entries when applications arecreated and deleted, set the MANAGE_HA_DNS parameter to "true":
MANAGE_HA_DNS="true"
Chapter 8. Continuing Broker Host Installation for Enterprise
125

Then set the ROUTER_HOSTNAME parameter to the public hostname of the external routing layer,which the DNS entries for high-availability applications point to. Note that the routing layer host mustbe resolvable by the broker:
ROUTER_HOSTNAME="www.example.com"
4. For developers to enable high-availability support with their scalable applications, they must have theHA allowed capability enabled on their account. By default, the DEFAULT_ALLOW_HA parameter isset to "false", which means user accounts are created with the HA allowed capability initiallydisabled. To have this capability enabled by default for new user accounts, set DEFAULT_ALLOW_HAto "true":
DEFAULT_ALLOW_HA="true"
You can also adjust the HA allowed capability per user account using the oo-admin-ctl-usercommand with the --allowha option:
# oo-admin-ctl-user -l user --allowha true
5. To make any changes made to the /etc/openshift/broker.conf file take effect, restart thebroker service:
# service openshift-broker restart
Note
You can also set the ratio or the number of HAProxy cartridges for scaled applications. See the oo-admin-ctl-app section in the OpenShift Enterprise Administration Guide athttps://access.redhat.com/site/documentation for more information.
Note that this procedure only enables the support for high-availability applications. See the OpenShiftEnterprise User Guide for a procedure on how a user can make an application highly-available.
8.7. Integrating with External Single Sign-on (SSO) Providers
Developers hosting applications on your OpenShift Enterprise instance may need to integrate theirapplications with external single sign-on (SSO) providers. To enable this, starting in OpenShift Enterprise2.2.6 you can configure an SSO plug-in that broadcasts controller actions through ActiveMQ to be read andacted upon by an external SSO provider. These actions include:
Gear creation and deletion
Alias addition and removal
Environment variables addition, modification, and deletion
The external SSO provider can then listen for certain events occurring in the OpenShift Enterpriseenvironment that are critical for utilizing the external SSO solution.
Procedure 8.21. To Install and Configure the SSO Plug-in:
1. On the broker host, install the rubygem-openshift-origin-sso-activemq package:
Deployment Guide
126
# yum install rubygem-openshift-origin-sso-activemq
2. Before enabling this plug-in, you must add a new user, topic, and queue to ActiveMQ. Edit the /etc/activemq/activemq.xml file and add the following user in the appropriate section:
<authenticationUser username="ssoinfo" password="ssoinfopasswd" groups="ssoinfo,everyone"/>
Also add the following topic and queue to the appropriate sections:
<authorizationEntry topic="ssoinfo.>" write="ssoinfo" read="ssoinfo" admin="ssoinfo" /><authorizationEntry queue="ssoinfo.>" write="ssoinfo" read="ssoinfo" admin="ssoinfo" />
3. Restart ActiveMQ:
# service activemq restart
4. To enable the plug-in, copy the /etc/openshift/plugins.d/openshift-origin-sso-activemq.conf.example file to /etc/openshift/plugins.d/openshift-origin-sso-activemq.conf on the broker host:
# cp /etc/openshift/plugins.d/openshift-origin-sso-activemq.conf.example \ /etc/openshift/plugins.d/openshift-origin-sso-activemq.conf
5. In the /etc/openshift/plugins.d/openshift-origin-sso-activemq.conf file you justcreated, uncomment the last line specifying the /opt/rh/ruby193/root/etc/mcollective/client.cfg file:
MCOLLECTIVE_CONFIG="/opt/rh/ruby193/root/etc/mcollective/client.cfg"
Alternatively, edit the values for the ACTIVE_* parameters with the appropriate information for yourenvironment.
6. Restart the broker service for your changes take effect:
# service openshift-broker restart
7. Create a listener that will connect to ActiveMQ on the new topic that was added. The listener can berun on any system that can connect to the ActiveMQ server. The following is an example that simplyechoes any messages received:
#!/usr/bin/ruby
require 'rubygems'require 'stomp'require 'yaml'
c = Stomp::Client.new("ssoinfo", "ssoinfopasswd", "127.0.0.1", 61613)puts "Got stomp client, listening for messages on '/topic/ssoinfo':"c.subscribe('/topic/ssoinfo') { |msg|
Chapter 8. Continuing Broker Host Installation for Enterprise
127

h = YAML.load(msg.body) puts "Message received: " puts h.inspect}c.join
8. Save and run your listener script. For example, if the script was saved at /root/listener.rb:
# ruby /root/listener.rb
9. To verify that the plug-in and listener are working, perform several application actions with the clienttools or Management Console using a test user account. For example, create an application, add analias, remove an alias, and remove the application. You should see messages reported by thelistener script for each action performed.
8.8. Backing Up Broker Host Files
The authentication service, DNS service, and the MongoDB datastore components of the broker host containpersistent state. Consult your system administrator for advice on how to implement fault tolerance for theauthentication and DNS services you have selected for your OpenShift Enterprise installation.
See Section 8.4.3, “MongoDB” for instructions on how to configure redundancy with MongoDB. See thefollowing MongoDB documentation for more information on how to implement fault tolerance with datastorage and take regular backups:
Backup Strategies for MongoDB Systems - http://docs.mongodb.org/manual/administration/backups/
In the example installation, the MongoDB data is stored in the /var/lib/mongodb directory, which can beused as a potential mount point for fault tolerance or as a backup storage.
8.9. Management Console
The OpenShift Enterprise Management Console is a web application that is installed on the broker host, andexposes the REST API. The Management Console interacts with OpenShift Enterprise through the REST APIin a similar fashion to the client tools.
8.9.1. Installing the Management Console
This section describes how to install the Management Console on a broker host.
Procedure 8.22. To Install the OpenShift Enterprise Management Console:
1. Install the required software package:
# yum install openshift-origin-console
2. Modify the corresponding sample httpd configuration file located in the /var/www/openshift/console/httpd/conf.d directory to suit the requirements of yourauthentication model. For example, use openshift-origin-auth-remote-user-ldap.conf.sample to replace openshift-origin-auth-remote-user.conf, and modify itas necessary to suit your authentication configuration. This is similar to what was done for brokerauthentication in the /var/www/openshift/broker/httpd/conf.d/ directory.
Deployment Guide
128

3. Make the service persistent on boot, and start the service using the following commands:
# chkconfig openshift-console on# service openshift-console start
After the Management Console is installed, configure the SESSION_SECRET setting in the /etc/openshift/console.conf file, which is used for signing the Rails sessions. Run the followingcommand to create the random string:
# openssl rand -hex 64
Note
The SESSION_SECRET must be the same across all consoles in a cluster, but does not necessarilyneed to be the same as the SESSION_SECRET used in /etc/openshift/broker.conf.
Important
Ensure that the CONSOLE_SECURITY setting in the /etc/openshift/console.conf file has thedefault setting of remote_user. This is a requirement of OpenShift Enterprise and ensures properHTTP authentication.
CONSOLE_SECURITY=remote_user
Restart the Management Console to apply your changes. This is required each time the SESSION_SECRETsetting is modified. Note that all sessions are dropped.
# service openshift-console restart
Access the Management Console from https://broker.example.com/console using a web browser.Use the correct domain name according to your installation.
8.9.2. Creating an SSL Certificate
Because the Management Console is accessed with a web browser, developers are likely to receive securitywarnings if the default SSL certificate is left in place. This is because the certificate is self-assigned, and maynot match the URL. These warnings are avoided if the certificate is signed by a proper authority and reflectsthe correct URL for the site.
Both the broker application and the Management Console application are reached with the host's httpd proxy,which is what presents the secure server's certificate. The default key is /etc/pki/tls/private/localhost.key, and the default certificate is /etc/pki/tls/certs/localhost.crt. These files are created automatically when mod_ssl isinstalled. You can recreate the key and the certificate files with suitable parameters using the opensslcommand, as shown in the following example.
Chapter 8. Continuing Broker Host Installation for Enterprise
129

# openssl req -new \ -newkey rsa:2048 -keyout /etc/pki/tls/private/localhost.key \ -x509 -days 3650 \ -out /etc/pki/tls/certs/localhost.crt
The openssl command prompts for information to be entered in the certificate. The most important field is Common Name, which is the host name that developers use to browse the Management Console; forexample, broker.example.com. This way the certificate created now correctly matches the URL for theManagement Console in the browser, although it is still self-signed.
Obtain a properly signed certificate by generating a signing request with the following commands:
# openssl req -new \ -key /etc/pki/tls/private/localhost.key \ -out /etc/pki/tls/certs/localhost.csr
The openssl command prompts for information to be entered in the certificate, including Common Name.The localhost.csr signing request file must then be processed by an appropriate certificate authority togenerate a signed certificate for use with the secure server.
When you have replaced the key and the certificate, restart the httpd service to enable them for use:
# service httpd restart
8.10. Administration Console
An optional Administration Console is available for OpenShift Enterprise that allows administrators to searchand navigate entities to plan the capacity of an OpenShift Enterprise deployment. Note that the currentiteration of the Administration Console is read-only, so the settings or data cannot be modified.
8.10.1. Installing the Administration Console
The Administration Console runs as a plug-in to the OpenShift Enterprise broker application. The plug-in isloaded if the gem is installed and the configuration file is present in the default /etc/openshift/plugins.d/openshift-origin-admin-console.conf directory. Install therubygem-openshift-origin-admin-console RPM package to install both the gem and the configuration file:
# yum install rubygem-openshift-origin-admin-console
The /etc/openshift/plugins.d/openshift-origin-admin-console.conf configuration filecontains comments on the available parameters. Edit the file to suit your requirements.
After installing and configuring the plug-in, restart the broker service to load the plug-in or to reload a modifiedAdministration Console configuration file:
# service openshift-broker restart
8.10.2. Accessing the Administration Console
The Administration Console configuration file does not provide access control, and there is no concept of anOpenShift Enterprise administrative role. The current iteration of the Administration Console is informationalonly, and you must log in to an OpenShift Enterprise host to perform all administrative actions.
Deployment Guide
130

When the broker application loads the Administration Console, the standard httpd proxy configuration of theOpenShift Enterprise broker host blocks external access to the URI of the Administration Console. Refusingexternal access is a security feature to avoid exposing the Administration Console publicly by accident.
Note
The Administration Console's URI is /admin-console by default, but is configurable in /etc/openshift/plugins.d/openshift-origin-admin-console.conf.
To access the Administration Console from a system other than the broker, you can either forward the portfor local viewing or modify the proxy configuration. Choose one of the following procedures.
Procedure 8.23. To View the Administration Console Using Port Forwarding:
You can view the Administration Console without exposing it externally by forwarding its port to your localworkstation.
1. On your local workstation, replace [email protected] in the following example with yourrelevant user name and broker host:
$ ssh -f [email protected] -L 8080:localhost:8080 -N
This command uses a secure shell (SSH) to connect to [email protected] and attaches thelocal workstation port 8080 (the first number) to the broker host's local port 8080 (the secondnumber), where the broker application listens behind the host proxy.
2. Browse to http://localhost:8080/admin-console using a web browser to access theAdministration Console.
Procedure 8.24. To Enable External Access to the Administration Console:
You can configure the broker host httpd proxy to enable external access through the broker host.
1. On each broker host, edit the /etc/httpd/conf.d/000002_openshift_origin_broker_proxy.conf configuration file.Inside the <VirtualHost *:443> section, add additional ProxyPass entries for theAdministration Console and its static assets after the existing ProxyPass entry for the broker. Thecompleted <VirtualHost *:443> section looks similar to the following:
Example 8.19. Example <VirtualHost *:443> section
ProxyPass /broker http://127.0.0.1:8080/brokerProxyPass /admin-console http://127.0.0.1:8080/admin-consoleProxyPass /assets http://127.0.0.1:8080/assetsProxyPassReverse / http://127.0.0.1:8080/
2. Optionally, you can add any httpd access controls you deem necessary to prevent access to theAdministration Console. See Section 8.10.3, “Configuring Authentication for the AdministrationConsole” for examples.
3. Restart the httpd service to load the new configuration:
Chapter 8. Continuing Broker Host Installation for Enterprise
131

# service httpd restart
8.10.3. Configuring Authentication for the Administration Console
If you enable external access to the Administration Console by modifying the broker host httpd proxyconfiguration as described in Section 8.10.2, “Accessing the Administration Console”, you can also configureauthentication for the Administration Console by implementing a <Location /admin-console> section inthe same /etc/httpd/conf.d/000002_openshift_origin_broker_proxy.conf file. For example,you can configure the Administration Console to authenticate based on user credentials or client IP. See theApache HTTP Server documentation at http://httpd.apache.org/docs/2.2/howto/auth.html for more informationon available authentication methods.
Because the Administration Console runs as a plug-in to the broker application, access to the AdministrationConsole can be controlled using any of the Apache HTTP Server authentication methods described inSection 8.2, “Configuring User Authentication for the Broker”. However, while the broker application andManagement Console both validate authorization, the Administration Console does not.
Example Authentication Configurations
The following examples show how you can configure authentication for the Administration Console usingvarious methods. You can add one of the example <Location /admin-console> sections before the ProxyPass /admin-console entry inside the <VirtualHost *:443> section in the /etc/httpd/conf.d/000002_openshift_origin_broker_proxy.conf file on each broker host.Note that the httpd service must be restarted to load any configuration changes.
Example 8.20. Authenticating by Host Name or IP Address
Using the mod_authz_host Apache module, you can configure authentication for the AdministrationConsole based on the client host name or IP address.
The following section allows access for all hosts in the example.com domain and denies access for allother hosts:
<Location /admin-console> Order Deny,Allow Deny from all Allow from example.com</Location>
See the mod_authz_host documentation at http://httpd.apache.org/docs/2.2/mod/mod_authz_host.htmlfor more example usage.
Example 8.21. Authenticating Using LDAP
Using the mod_authnz_ldap Apache module, you can configure user authentication for theAdministration Console to use an LDAP directory. This example assumes that an LDAP server alreadyexists. See Section 8.2.2, “Authenticating Using LDAP” for details on how the mod_authnz_ldap moduleis used for broker user authentication.
The following section enables user authentication using an LDAP directory:
<Location /admin-console> AuthName "OpenShift Administration Console"
Deployment Guide
132
AuthType Basic AuthBasicProvider ldap AuthLDAPURL "ldap://localhost:389/ou=People,dc=my-domain,dc=com?uid?sub?(objectClass=*)" require valid-user
Order Deny,Allow Deny from all Satisfy any</Location>
The above section specifies an example server and query that must be modified to suit the requirementsof your LDAP service. The most important information required is the AuthLDAPURL setting. Ensure theLDAP server's firewall is configured to allow access by the broker hosts.
The require valid-user directive in the above section uses the mod_authz_user module andgrants access to all successfully authenticated users. You can change this to instead only allow specificusers or only members of a group. See the mod_authnz_ldap documentation athttp://httpd.apache.org/docs/2.2/mod/mod_authnz_ldap.html for more example usage.
Example 8.22. Authenticating Using Kerberos
Using the mod_auth_kerb Apache module, you can configure user authentication for the AdministrationConsole to use a Kerberos service. This example assumes that a Kerberos server already exists. SeeSection 8.2.3, “Authenticating Using Kerberos” for details on how the mod_auth_kerb module is used forbroker user authentication.
The following section enables user authentication using a Kerberos service:
<Location /admin-console> AuthName "OpenShift Administration Console" AuthType Kerberos KrbMethodNegotiate On KrbMethodK5Passwd On # The KrbLocalUserMapping enables conversion to local users, using # auth_to_local rules in /etc/krb5.conf. By default it strips the # @REALM part. See krb5.conf(5) for details how to set up specific rules. KrbLocalUserMapping On KrbServiceName HTTP/www.example.com KrbAuthRealms EXAMPLE.COM Krb5KeyTab /var/www/openshift/broker/httpd/conf.d/http.keytab require valid-user
Order Deny,Allow Deny from all Satisfy any</Location>
Modify the KrbServiceName and KrbAuthRealms settings to suit the requirements of your Kerberosservice. Ensure the Kerberos server's firewall is configured to allow access by the broker hosts.
Chapter 8. Continuing Broker Host Installation for Enterprise
133
The require valid-user directive in the above section uses the mod_authz_user module andgrants access to all successfully authenticated users. You can change this to instead only allow specificusers. See the mod_auth_kerb documentation at http://modauthkerb.sourceforge.net/configure.html formore example usage.
Example 8.23. Authenticating Using htpasswd
Using the mod_auth_basic Apache module, you can configure user authentication for the AdministrationConsole to use a flat htpasswd file. This method is only intended for testing and demonstration purposes.See Section 8.2.1, “Authenticating Using htpasswd” for details on how the /etc/openshift/htpasswdfile is used for broker user authentication by a basic installation of OpenShift Enterprise.
The following section enables user authentication using the /etc/openshift/htpasswd file:
<Location /admin-console> AuthName "OpenShift Administration Console" AuthType Basic AuthUserFile /etc/openshift/htpasswd require valid-user
Order Deny,Allow Deny from all Satisfy any</Location>
The require valid-user directive in the above section uses the mod_authz_user module andgrants access to all successfully authenticated users. You can change this to instead only allow specificusers or only members of a group. See the mod_auth_basic documentation athttp://httpd.apache.org/docs/2.2/mod/mod_auth_basic.html andhttp://httpd.apache.org/docs/2.2/howto/auth.html for more example usage.
8.11. Clearing Broker and Management Console Application Cache
In production mode, Rails caches certain values on the broker for faster retrieval. Clearing the broker andConsole cache allows the retrieval of updated values. The number of files in both caches will increase overtime, until eventually the system will run out of inodes. This can be harmful to your system.
Performing Regular Cache Maintenance
Creating a cron job to regularly clear the cache at a low-traffic time of the week is useful to prevent yourcache from reaching capacity. Add the following to the /etc/cron.d/openshift-rails-caches file toperform a weekly cron job:
# Clear rails caches once a week on Sunday at 1am0 1 * * Sun root /usr/sbin/oo-admin-broker-cache -qc0 1 * * Sun root /usr/sbin/oo-admin-console-cache -qc
Manually Clearing the Cache
Alternatively, you can manually clear each cache for an immediate refresh. Clear the broker cache with thefollowing command:
Deployment Guide
134

# oo-admin-broker-cache --clear
Clear the Management Console cache with the following command:
# oo-admin-console-cache --clear
[2] http://www.ietf.org/rfc/rfc2136.txt
[3] http://www.ietf.org/rfc/rfc2136.txt
[4] https://access.redhat.com/documentation/en-US/OpenShift_Enterprise/2/html-single/User_Guide/index.html#Mutual_SSL
[5] https://access.redhat.com/documentation/en-US/OpenShift_Enterprise/2/html-single/User_Guide/index.html#Scaled_and_Non-Scaled_Applications1
[6] https://access.redhat.com/documentation/en-US/OpenShift_Enterprise/2/html-single/User_Guide/index.html#sect-Custom_Domains_and_SSL_Certificates
Chapter 8. Continuing Broker Host Installation for Enterprise
135

Chapter 9. Manually Installing and Configuring Node Hosts
Prerequisites:
Chapter 2, Prerequisites
Chapter 5, Host Preparation
Section 6.3, “Using the Sample Deployment Steps”
The following sections describe how to manually install and configure OpenShift Enterprise node hosts.These hosts support gears which, in turn, contain applications. Many of the steps required to configure anode are similar to the steps involved in configuring a broker, so some explanatory details are omitted fromthe following process.
Perform all of the procedures in this section only after the base operating system is fully installed andconfigured.
Warning
The OpenShift Enterprise security model assumes that broker and node components are installed onseparate hosts. Running a broker and node on the same host is not supported.
9.1. Configuring Node Host Entitlements
OpenShift Enterprise requires several packages that are not available in the standard Red Hat EnterpriseLinux channels. A node host requires a subscription for the appropriate OpenShift Enterprise channels toreceive these extra packages.
Some subscriptions may be optional based on your requirements. For example, if you intend to install certainpremium cartridges, they may require access to particular channels. The following table notes channels thatare required for basic node host installation, as well as use cases for optional channels. Note that channelnames may differ slightly between the RHSM and RHN Classic subscription methods.
Table 9.1. OpenShift Enterprise Node Host Channels
Channel Name Purpose Required Provided ByRed Hat OpenShiftEnterprise 2.2Application Node (forRHSM), or
Red Hat OpenShiftEnterprise 2.2 Node (forRHN Classic).
Base channel forOpenShift Enterprise 2.2node hosts.
Yes. "OpenShift Enterprise"subscription.
Red Hat SoftwareCollections 1.
Provides access to thelatest versions ofprogramming languages,database servers, andrelated packages.
Yes. "OpenShift Enterprise"subscription.
Deployment Guide
136
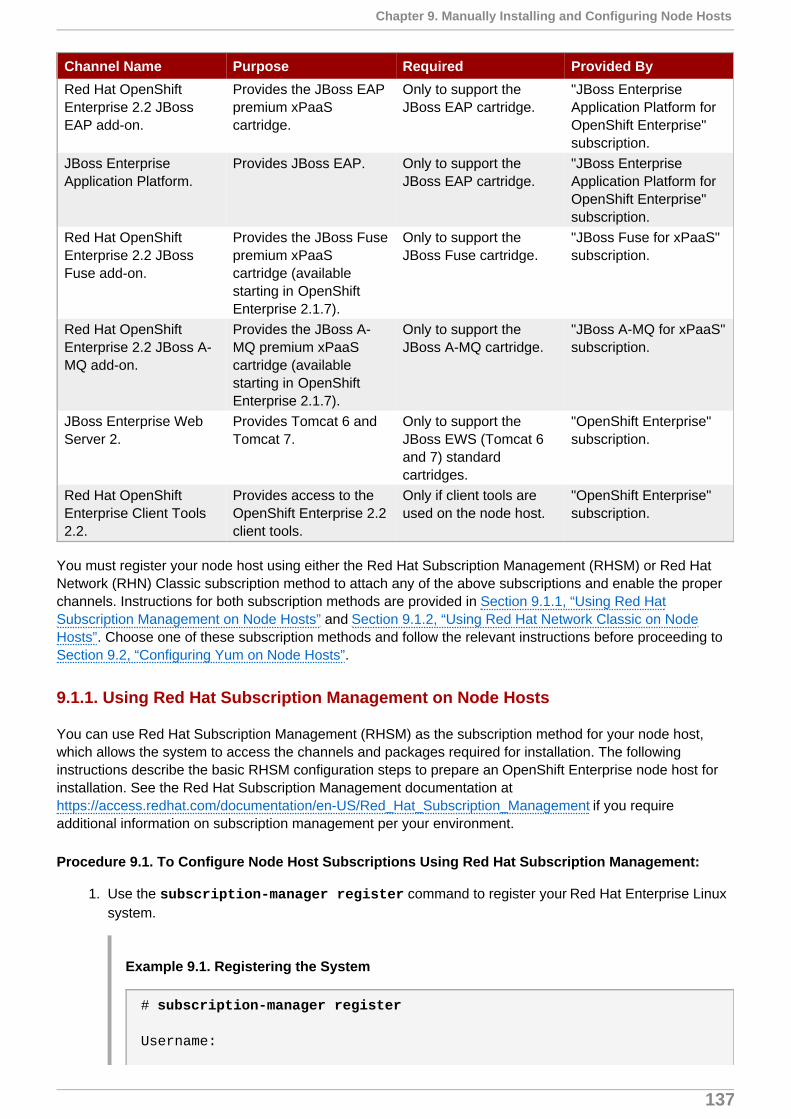
Red Hat OpenShiftEnterprise 2.2 JBossEAP add-on.
Provides the JBoss EAPpremium xPaaScartridge.
Only to support theJBoss EAP cartridge.
"JBoss EnterpriseApplication Platform forOpenShift Enterprise"subscription.
JBoss EnterpriseApplication Platform.
Provides JBoss EAP. Only to support theJBoss EAP cartridge.
"JBoss EnterpriseApplication Platform forOpenShift Enterprise"subscription.
Red Hat OpenShiftEnterprise 2.2 JBossFuse add-on.
Provides the JBoss Fusepremium xPaaScartridge (availablestarting in OpenShiftEnterprise 2.1.7).
Only to support theJBoss Fuse cartridge.
"JBoss Fuse for xPaaS"subscription.
Red Hat OpenShiftEnterprise 2.2 JBoss A-MQ add-on.
Provides the JBoss A-MQ premium xPaaScartridge (availablestarting in OpenShiftEnterprise 2.1.7).
Only to support theJBoss A-MQ cartridge.
"JBoss A-MQ for xPaaS"subscription.
JBoss Enterprise WebServer 2.
Provides Tomcat 6 andTomcat 7.
Only to support theJBoss EWS (Tomcat 6and 7) standardcartridges.
"OpenShift Enterprise"subscription.
Red Hat OpenShiftEnterprise Client Tools2.2.
Provides access to theOpenShift Enterprise 2.2client tools.
Only if client tools areused on the node host.
"OpenShift Enterprise"subscription.
Channel Name Purpose Required Provided By
You must register your node host using either the Red Hat Subscription Management (RHSM) or Red HatNetwork (RHN) Classic subscription method to attach any of the above subscriptions and enable the properchannels. Instructions for both subscription methods are provided in Section 9.1.1, “Using Red HatSubscription Management on Node Hosts” and Section 9.1.2, “Using Red Hat Network Classic on NodeHosts”. Choose one of these subscription methods and follow the relevant instructions before proceeding toSection 9.2, “Configuring Yum on Node Hosts”.
9.1.1. Using Red Hat Subscription Management on Node Hosts
You can use Red Hat Subscription Management (RHSM) as the subscription method for your node host,which allows the system to access the channels and packages required for installation. The followinginstructions describe the basic RHSM configuration steps to prepare an OpenShift Enterprise node host forinstallation. See the Red Hat Subscription Management documentation athttps://access.redhat.com/documentation/en-US/Red_Hat_Subscription_Management if you requireadditional information on subscription management per your environment.
Procedure 9.1. To Configure Node Host Subscriptions Using Red Hat Subscription Management:
1. Use the subscription-manager register command to register your Red Hat Enterprise Linuxsystem.
Example 9.1. Registering the System
# subscription-manager register
Username:
Chapter 9. Manually Installing and Configuring Node Hosts
137

Password:
The system has been registered with id: 3tghj35d1-7c19-4734-b638-f24tw8eh6246
2. Use the subscription-manager list --available command and locate any desiredOpenShift Enterprise subscription pool IDs in the output of available subscriptions on your account.
Example 9.2. Finding Subscription Pool IDs
# subscription-manager list --available +-------------------------------------------+ Available Subscriptions+-------------------------------------------+
Subscription Name: OpenShift EnterpriseSKU: MCT####Pool Id: Example_3cf49557013d418c52992690Quantity: 1Service Level: StandardService Type: L1-L3Multi-Entitlement: NoEnds: 01/01/2020System Type: Physical Subscription Name: JBoss Enterprise Application Platform for OpenShift EnterpriseSKU: SYS####Pool Id: Example_3cf49557013d418c52182681Quantity: 1Service Level: PremiumService Type: L1-L3Multi-Entitlement: NoEnds: 01/01/2020System Type: Physical
The "OpenShift Enterprise" subscription is the only subscription required for basic node operation.Additional subscriptions, detailed in Section 9.1, “Configuring Node Host Entitlements”, are optionaland only required based on your planned usage of OpenShift Enterprise. For example, locate thepool ID for the "JBoss Enterprise Application Platform for OpenShift Enterprise" subscription if youplan to install the JBoss EAP premium xPaaS cartridge.
3. Attach the desired subscription(s). Replace pool-id in the following command with your relevant Pool Id value(s) from the previous step:
# subscription-manager attach --pool pool-id --pool pool-id
4. Enable the Red Hat OpenShift Enterprise 2.2 Application Node channel:
# subscription-manager repos --enable rhel-6-server-ose-2.2-node-rpms
Deployment Guide
138

5. Verify that the yum repolist command lists the enabled channel(s).
Example 9.3. Verifying the Enabled Node Channel
# yum repolist
repo id repo name
rhel-server-6-ose-2.2-node-rpms Red Hat OpenShift Enterprise 2.2 Application Node (RPMs)
OpenShift Enterprise node hosts require a customized yum configuration to install correctly. Forcontinued steps to correctly configure yum, see Section 9.2, “Configuring Yum on Node Hosts”.
9.1.2. Using Red Hat Network Classic on Node Hosts
You can use Red Hat Network (RHN) Classic as the subscription method for your node host, which allowsthe system to access the channels and packages required for installation. The following instructions describethe basic RHN Classic configuration steps to prepare an OpenShift Enterprise node host for installation.
Note
While RHN Classic can be used to subscribe to channels, it is primarily intended for existing, legacysystems. Red Hat strongly recommends that you use Red Hat Subscription Management (RHSM) fornew installations. For details on how to migrate from RHN Classic to RHSM, see the OpenShiftEnterprise Administration Guide.
Procedure 9.2. To Configure Node Host Subscriptions Using Red Hat Network Classic:
1. Use the rhnreg_ks command to register your Red Hat Enterprise Linux system. Replace username and password in the following command with your Red Hat Network account credentials:
# rhnreg_ks --username username --password password
2. Enable the Red Hat OpenShift Enterprise 2.2 Node channel:
# rhn-channel -a -c rhel-x86_64-server-6-ose-2.2-node
3. Verify that the yum repolist command lists the enabled channel(s).
Example 9.4. Verifying the Enabled Node Channel
# yum repolist
repo id repo name
rhel-x86_64-server-6-ose-2.2-node Red Hat OpenShift Enterprise 2.2 Node - x86_64
Chapter 9. Manually Installing and Configuring Node Hosts
139

OpenShift Enterprise node hosts require a customized yum configuration to install correctly. For continuedsteps to correctly configure yum, see Section 9.2, “Configuring Yum on Node Hosts”.
9.2. Configuring Yum on Node Hosts
The packages required for running OpenShift Enterprise are all available from Red Hat Network (RHN).Third-party RPM repositories and even other products provided by Red Hat can create conflicts withOpenShift Enterprise during initial deployment and later when applying updates. To avoid these issues, it isbest to use a combination of the yum-plugin-priorities package and exclude directives in the yumconfiguration files.
The yum-plugin-priorities package helps prevent other repositories from interfering with Red Hat Networkcontent for OpenShift Enterprise. The exclude directives work around the cases that priorities will not solve.The oo-admin-yum-validator tool consolidates this yum configuration process for specified componenttypes called roles.
Using the oo-admin-yum-validator Tool
After configuring the selected subscription method as described in Section 9.1, “Configuring Node HostEntitlements”, use the oo-admin-yum-validator tool to configure yum and prepare your host to install thenode components. This tool reports a set of problems, provides recommendations, and halts by default sothat you can review each set of proposed changes. You then have the option to apply the changes manually,or let the tool attempt to fix the issues that have been found. This process may require you to run the toolseveral times. You also have the option of having the tool both report all found issues, and attempt to fix allissues.
Procedure 9.3. To Configure Yum on Node Hosts:
1. Install the latest openshift-enterprise-release package:
# yum install openshift-enterprise-release
2. Run the oo-admin-yum-validator command with the -o option for version 2.2 and the -roption for the node role.
If you intend to install one or more xPaaS premium cartridge and the relevant subscription(s) are inplace as described in Section 9.1, “Configuring Node Host Entitlements”, replace node with one ormore of the node-eap, node-amq, or node-fuse roles as needed for the respective cartridge(s). Ifyou add more than one role, use an -r option when defining each role.
The command reports the first detected set of problems, provides a set of proposed changes, andhalts.
Example 9.5. Finding Problems
# oo-admin-yum-validator -o 2.2 -r node-eap Detected OpenShift Enterprise repository subscription managed by Red Hat Subscription Manager.
The required OpenShift Enterprise repositories are disabled: jb-ews-2-for-rhel-6-server-rpms rhel-6-server-rpms
Deployment Guide
140

rhel-6-server-ose-2.2-jbosseap-rpms rhel-server-rhscl-6-rpms jb-eap-6-for-rhel-6-server-rpmsEnable these repositories by running these commands:# subscription-manager repos --enable=jb-ews-2-for-rhel-6-server-rpms# subscription-manager repos --enable=rhel-6-server-rpms# subscription-manager repos --enable=rhel-6-server-ose-2.2-jbosseap-rpms# subscription-manager repos --enable=rhel-server-rhscl-6-rpms# subscription-manager repos --enable=jb-eap-6-for-rhel-6-server-rpmsPlease re-run this tool after making any recommended repairs to this system
Alternatively, use the --report-all option to report all detected problems.
# oo-admin-yum-validator -o 2.2 -r node-eap --report-all
3. After reviewing the reported problems and their proposed changes, either fix them manually or let thetool attempt to fix the first set of problems using the same command with the --fix option. This mayrequire several repeats of steps 2 and 3.
Example 9.6. Fixing Problems
# oo-admin-yum-validator -o 2.2 -r node-eap --fix
Detected OpenShift Enterprise repository subscription managed by Red Hat Subscription Manager.
Enabled repository jb-ews-2-for-rhel-6-server-rpmsEnabled repository rhel-6-server-rpmsEnabled repository rhel-6-server-ose-2.2-jbosseap-rpmsEnabled repository rhel-server-rhscl-6-rpmsEnabled repository jb-eap-6-for-rhel-6-server-rpms
Alternatively, use the --fix-all option to allow the tool to attempt to fix all of the problems that arefound.
# oo-admin-yum-validator -o 2.2 -r node-eap --fix-all
Chapter 9. Manually Installing and Configuring Node Hosts
141

Note
If the host is using Red Hat Network (RHN) Classic, the --fix and --fix-all options donot automatically enable any missing OpenShift Enterprise channels as they do when the hostis using Red Hat Subscription Management. Enable the recommended channels with the rhn-channel command. Replace repo-id in the following command with the repository IDreported in the oo-admin-yum-validator command output.
# rhn-channel -a -c repo-id
Important
For either subscription method, the --fix and --fix-all options do not automaticallyinstall any packages. The tool reports if any manual steps are required.
4. Repeat steps 2 and 3 until the oo-admin-yum-validator command displays the followingmessage.
No problems could be detected!
9.3. Creating a Node DNS Record
For correct communication between the node host (Host 2) and the broker host (Host 1), verify that the hostname for Host 1 resolves correctly. See Section 7.3, “Installing and Configuring BIND and DNS” forinstructions on BIND server configuration.
Update the DNS records (in these instructions, the Host 1 BIND server) to resolve the host name for Host 2.
Run the following command on Host 1. Replace example.com with the chosen domain name, node withHost 2's short name, and 10.0.0.2 with Host 2's IP address:
# oo-register-dns -h node -d example.com -n 10.0.0.2
This command is provided as a convenience, equivalent to the nsupdate command demonstrated in theHost 1 configuration.
Note
This step is not performed by the kickstart or bash script, but the named_entries parameter can beused to define all hosts in advance when installing named.
9.4. Configuring Node Host Name Resolution
Deployment Guide
142
Configure Host 2 to use the named service running on the broker (Host 1). This allows Host 2 to resolve thehost names of the broker and any other broker or node hosts configured, and vice versa, so that Host 1 canresolve the host name of Host 2.
Edit the contents of /etc/resolv.conf on Host 2 and add the following entry as the first name server.Replace 10.0.0.1 with the IP address of Host 1:
nameserver 10.0.0.1
Note
If you use the kickstart or bash script, the configure_dns_resolution function performs this step.
9.5. Configuring the Node Host DHCP and Host Name
The node host (Host 2) requires general network configuration. Replace eth0 in the file names with theappropriate network interface for your system in the examples that follow.
Procedure 9.4. To Configure the DHCP Client and Host Name on the Node Host:
1. Create the /etc/dhcp/dhclient-eth0.conf file, then add the following lines to configure theDHCP client to send DNS requests to the broker (Host 1) and assume the appropriate host nameand domain name. Replace 10.0.0.1 with the actual IP address of Host 1 and example.com withthe actual domain name of Host 2. If you are using a network interface other than eth0, edit theconfiguration file for that interface instead.
prepend domain-name-servers 10.0.0.1;prepend domain-search "example.com";
2. Edit the /etc/sysconfig/network file on Host 2, and set the HOSTNAME parameter to the fully-qualified domain name (FQDN) of Host 2. Replace node.example.com in the following examplewith the host name of Host 2.
HOSTNAME=node.example.com
Important
Red Hat does not recommend changing the node host name after the initial configuration.When an application is created on a node host, application data is stored in a database. If thenode host name is modified, the data does not automatically change, which can cause theinstance to fail. The node host name cannot be changed without deleting and recreating allgears on the node host. Therefore, verify that the host name is configured correctly beforedeploying any applications on a node host.
3. Set the host name immediately:
# hostname node.example.com
Chapter 9. Manually Installing and Configuring Node Hosts
143

Note
If you use the kickstart or bash script, the configure_dns_resolution and configure_hostname functions perform these steps.
4. Run the hostname command on Host 2:
# hostname
9.6. Installing the Core Node Host Packages
Install the various packages that provide the core node host functionality with the following command:
# yum install rubygem-openshift-origin-node ruby193-rubygem-passenger-native openshift-origin-node-util policycoreutils-python rubygem-openshift-origin-container-selinux rubygem-openshift-origin-frontend-nodejs-websocket rubygem-openshift-origin-frontend-apache-mod-rewrite
Note
If you use the kickstart or bash script, the install_node_pkgs function performs this step.
9.7. Installing and Configuring MCollective on Node Hosts
The broker host uses MCollective to communicate with node hosts. MCollective on the node host must beconfigured so that the node host (Host 2) can communicate with the broker service on Host 1.
In a production environment, two or more messaging hosts would typically be configured on machinesseparate from the broker to provide high availability. This means that if one messaging host fails, the brokerand node hosts can still communicate.
Procedure 9.5. To Install and Configure MCollective on the Node Host:
1. Install all required packages for MCollective on Host 2 with the following command:
# yum install openshift-origin-msg-node-mcollective
2. Replace the contents of the /opt/rh/ruby193/root/etc/mcollective/server.cfg file withthe following configuration. Remember to change the setting for plugin.activemq.pool.1.hostfrom broker.example.com to the host name of Host 1. Use the same password for theMCollective user specified in the /etc/activemq/activemq.xml file on Host 1. Use the samepassword for the plugin.psk parameter, and the same numbers for the heartbeat parametersspecified in the /opt/rh/ruby193/root/etc/mcollective/client.cfg file on Host 1:
main_collective = mcollectivecollectives = mcollectivelibdir = /opt/rh/ruby193/root/usr/libexec/mcollectivelogfile = /var/log/openshift/node/ruby193-mcollective.log
Deployment Guide
144
loglevel = debug
daemonize = 1direct_addressing = 0
# Pluginssecurityprovider = pskplugin.psk = asimplething
connector = activemqplugin.activemq.pool.size = 1plugin.activemq.pool.1.host = broker.example.complugin.activemq.pool.1.port = 61613plugin.activemq.pool.1.user = mcollectiveplugin.activemq.pool.1.password = marionette
plugin.activemq.heartbeat_interval = 30plugin.activemq.max_hbread_fails = 2plugin.activemq.max_hbrlck_fails = 2
# Node should retry connecting to ActiveMQ foreverplugin.activemq.max_reconnect_attempts = 0plugin.activemq.initial_reconnect_delay = 0.1plugin.activemq.max_reconnect_delay = 4.0
# Factsfactsource = yamlplugin.yaml = /opt/rh/ruby193/root/etc/mcollective/facts.yaml
3. Configure the ruby193-mcollective service to start on boot:
# chkconfig ruby193-mcollective on
4. Start the ruby193-mcollective service immediately:
# service ruby193-mcollective start
Note
If you use the kickstart or bash script, the configure_mcollective_for_activemq_on_node function performs these steps.
5. Run the following command on the broker host (Host 1) to verify that Host 1 recognizes Host 2:
# oo-mco ping
9.7.1. Facter
The Facter used by MCollective is an important architectural component of OpenShift Enterprise. Facter is ascript that compiles the /opt/rh/ruby193/root/etc/mcollective/facts.yaml file, and lists the factsof interest about a node host for inspection using MCollective. Visit www.puppetlabs.com for moreinformation about how Facter is used with MCollective. There is no central registry for node hosts, so any
Chapter 9. Manually Installing and Configuring Node Hosts
145
node host listening with MCollective advertises its capabilities as compiled by the Facter.
The broker host uses the facts.yaml file to determine the capabilities of all node hosts. The broker hostissues a filtered search that includes or excludes node hosts based on entries in the facts.yaml file to finda host for a particular gear.
The Facter script runs on the node host in one minute increments, which can be modified in the /etc/cron.minutely/openshift-facts cron job file. You can also run this script manually toimmediately inspect the new facts.yaml file.
9.8. Installing Cartridges
At this point, install any web or add-on cartridge packages for your OpenShift Enterprise deployment.
Web cartridges provide support for specific types of applications to run on OpenShift Enterprise. Forexample, there is a web cartridge that supports PHP development, and another for Ruby development.
Add-on cartridges include database and management cartridges, and exist to support additional functions onwhich an application may rely. For example, cartridges exist for the MySQL and PostgreSQL databaseservers.
If a particular cartridge is not installed at this point, it can be installed later. However, a cartridge must beinstalled before developers can create applications for the supported framework or service.
Important
Administrators choose the set of installed cartridges. However, node hosts require installation of thissame set on each node host. Gear placement does not currently take into account differences in theinstalled cartridges per node host. All node hosts are assumed to have the same cartridge set, andgear creation fails on a node host that is missing cartridges required for the gear.
9.8.1. Installing Web Cartridges
The following table lists the web cartridges available for installation.
Table 9.2. Available Web Cartridges
Package Name Descriptionopenshift-origin-cartridge-amq JBoss A-MQ support
openshift-origin-cartridge-diy DIY ("do it yourself") application typeopenshift-origin-cartridge-fuse JBoss Fuse support [a]
openshift-origin-cartridge-fuse-builder JBoss Fuse Builder support [a]
openshift-origin-cartridge-haproxy HAProxy supportopenshift-origin-cartridge-jbossews JBoss EWS supportopenshift-origin-cartridge-jbosseap JBoss EAP support [a]
openshift-origin-cartridge-jenkins Jenkins server for continuous integrationopenshift-origin-cartridge-nodejs Node.js supportopenshift-origin-cartridge-ruby Ruby Rack support running on Phusion Passengeropenshift-origin-cartridge-perl mod_perl support
openshift-origin-cartridge-php PHP support
[a]
Deployment Guide
146

openshift-origin-cartridge-python Python support
Package Name Description
Install any web cartridges using the following command:
# yum install package_name
Note
If you use the kickstart or bash script, the install_cartridges function performs this step. Thisfunction currently installs all cartridges listed. Edit this function to install a different set of cartridges.
Important
If needed, administrators can choose to configure the JBoss EWS cartridge tomcat7 binary providedby the EWS 3 product to work around known security issues with the JBoss EWS-2 tomcat7 binary.See Known Issues to learn more.
9.8.2. Installing Add-on Cartridges
The following table lists the add-on cartridges available for installation.
Table 9.3. Available Add-on Cartridges
Package Name Descriptionopenshift-origin-cartridge-cron Embedded crond support.
openshift-origin-cartridge-jenkins-client Embedded Jenkins client.openshift-origin-cartridge-mysql Embedded MySQL.openshift-origin-cartridge-postgresql Embedded PostgreSQL.openshift-origin-cartridge-mongodb Embedded MongoDB. Available starting in
OpenShift Enterprise 2.1.1.
Install any add-on cartridges using the following command:
# yum install package_name
Note
If you use the kickstart or bash script, the install_cartridges function performs this step. Thisfunction currently installs all cartridges listed. Edit this function to install a different set of cartridges.
9.8.3. Installing Cartridge Dependency Metapackages
[a] Premium cartridge. If installing, see Section 9.1, “Configuring Node Host Entitlements” to ensure the correctpremium add-on subscriptions are configured.
Chapter 9. Manually Installing and Configuring Node Hosts
147

OpenShift Enterprise 2 supports the latest version of Red Hat Enterprise Linux 6, and some features providedby the base Red Hat Enterprise Linux channel are required. To avoid complications from nonessentialpackage updates in an OpenShift Enterprise environment, base cartridge packages only include packagesthat are absolutely required. For example, the base cartridge package for PHP is openshift-origin-cartridge-php.
To provide additional, nonessential packages for a cartridge, two cartridge dependency metapackages areavailable for each cartridge, allowing greater control over the installation of recommended and optionalpackages. For example, the cartridge dependency metapackages for PHP are:
openshift-origin-cartridge-dependencies-recommended-php
openshift-origin-cartridge-dependencies-optional-php
For example, certain libraries provided by a nonessential package might not be allowed in an organization.Because the package is only included in a cartridge dependency metapackage, this allows you to choosewhether or not the libraries are installed on your hosts. These metapackages also give Red Hat a way toindicate which sets of dependencies might not be supported in the future.
The following table provides further details on each type of cartridge dependency metapackage.
Table 9.4. Available Cartridge Dependency Metapackages
Type Package Name Format DescriptionRecommended openshift-origin-cartridge-
dependencies-recommended-cartridge_short_name
Provides the additional recommendedpackages for the base cartridge. Useful forcompatibility with OpenShift Online.
Optional openshift-origin-cartridge-dependencies-optional-cartridge_short_name
Provides both the additional recommended andoptional packages for the base cartridge.Useful for compatibility with OpenShift Online,however these packages might be removedfrom a future version of OpenShift Enterprise.
Install any cartridge dependency metapackages using the following command:
# yum install package_name
Note
If you use the kickstart or bash script, the install_cartridges function performs this step. Bydefault, this function currently installs the recommended cartridge dependency metapackages for allinstalled cartridges.
9.9. Configuring SSH Keys on the Node Host
Copy the appropriate SSH key from the broker host to each node host. This is necessary to move gearsbetween node hosts. The following instructions describe how to configure your SSH keys.
You can have multiple broker hosts configured for redundancy. Ensure that each node host has the rsync_id_rsa.pub public key of each broker host by repeating steps three through five of the followingprocedure for each broker host.
Procedure 9.6. To Configure SSH Keys on the Node Host:
Deployment Guide
148

1. On the node host, create a /root/.ssh directory if it does not exist:
# mkdir -p /root/.ssh
2. Configure the appropriate permissions for the /root/.ssh directory:
# chmod 700 /root/.ssh
3. Copy the SSH key from the broker host to each node host:
# scp [email protected]:/etc/openshift/rsync_id_rsa.pub /root/.ssh/
4. Supply the root user password of the broker host when prompted:
[email protected]'s password:
5. Copy the contents of the SSH key to the /root/.ssh/authorized_keys file:
# cat /root/.ssh/rsync_id_rsa.pub >> /root/.ssh/authorized_keys
6. Configure the appropriate permissions for the /root/.ssh/authorized_keys file:
# chmod 600 /root/.ssh/authorized_keys
7. Remove the SSH key:
# rm -f /root/.ssh/rsync_id_rsa.pub
Important
Ensure you have performed this procedure on all node hosts.
9.10. Configuring Required Services on Node Hosts
Node hosts must run a number of services to provide application developers with the full range of featuresand functionality that the product offers.
The sshd daemon is required to provide access to Git repositories, and the node host must also allow HTTPand HTTPS connections to the applications running within gears on the node host. The openshift-node-web-proxy daemon is required for WebSockets usage, which also requires that ports 8000 and 8443 beopened.
Further configuration steps are described in the following sections.
Run the following commands to correctly configure the firewall and ensure the required services start whenthe node boots:
# lokkit --nostart --service=ssh# lokkit --nostart --service=https
Chapter 9. Manually Installing and Configuring Node Hosts
149

# lokkit --nostart --service=http# lokkit --nostart --port=8000:tcp# lokkit --nostart --port=8443:tcp# chkconfig httpd on# chkconfig network on# chkconfig ntpd on# chkconfig sshd on# chkconfig oddjobd on# chkconfig openshift-node-web-proxy on
Note
If you use the kickstart or bash script, the enable_services_on_node function performs thesesteps.
9.10.1. Configuring PAM
OpenShift Enterprise uses a custom PAM configuration to restrict users who connect to gears using SSH.Only gear login accounts are polyinstantiated; other local users are unaffected.
Run the following commands on the node host (Host 2) to configure PAM:
# sed -i -e 's|pam_selinux|pam_openshift|g' /etc/pam.d/sshd# for f in "runuser" "runuser-l" "sshd" "su" "system-auth-ac"do t="/etc/pam.d/$f" if ! grep -q "pam_namespace.so" "$t"
then printf 'session\t\t[default=1 success=ignore]\tpam_succeed_if.so quiet shell = /usr/bin/oo-trap-user\n' >> "$t" printf 'session\t\trequired\tpam_namespace.so no_unmount_on_close\n' >> "$t" fidone
Configure the polyinstantiation settings on the node host (Host 2):
# printf '/tmp $HOME/.tmp/ user:iscript=/usr/sbin/oo-namespace-init root,adm\n' > /etc/security/namespace.d/tmp.conf printf '/dev/shm tmpfs tmpfs:mntopts=size=5M:iscript=/usr/sbin/oo-namespace-init root,adm\n' > /etc/security/namespace.d/shm.conf
Ultimately, the content for these configuration files should look similar to the following:
# cat /etc/security/namespace.d/tmp.conf/tmp $HOME/.tmp/ user:iscript=/usr/sbin/oo-namespace-init root,adm
# cat /etc/security/namespace.d/shm.conf/dev/shm tmpfs tmpfs:mntopts=size=5M:iscript=/usr/sbin/oo-namespace-init root,adm
Deployment Guide
150
Note
If you use the kickstart or bash script, the configure_pam_on_node function performs these steps.
9.10.2. Configuring Cgroups
Node hosts use Linux kernel cgroups to contain application processes and to allocate resources fairly. cgroups use two services that must both be running for cgroups containment to be in effect:
The cgconfig service provides the LVFS interface to the cgroup subsystems. Use the /etc/cgconfig.conf file to configure this service.
The cgred "rules" daemon assigns new processes to a cgroup based on matching rules. Use the /etc/cgrules.conf file to configure this service.
Run the following commands to configure cgroups:
# for f in "runuser" "runuser-l" "sshd" "system-auth-ac"do t="/etc/pam.d/$f" if ! grep -q "pam_cgroup" "$t" then printf 'session\t\toptional\tpam_cgroup.so\n' >> "$t" fidone
# cp -vf /opt/rh/ruby193/root/usr/share/gems/doc/openshift-origin-node-*/cgconfig.conf /etc/cgconfig.conf# restorecon -v /etc/cgconfig.conf# restorecon -v /etc/cgrules.conf# mkdir -p /cgroup# restorecon -rv /cgroup# chkconfig cgconfig on# chkconfig cgred on# service cgconfig restart# service cgred restart
Important
Start the cgroups services in the following order for OpenShift Enterprise to function correctly:
1. cgconfig2. cgred
Use the service service-name start command to start each of these services in order.
Note
If you use the kickstart or bash script, the configure_cgroups_on_node function performs thesesteps.
Chapter 9. Manually Installing and Configuring Node Hosts
151

Verifying the cgroups Configuration
When cgroups have been configured correctly you should see the following:
The /etc/cgconfig.conf file exists with SELinux label system_u:object_r:cgconfig_etc_t:s0.
The /etc/cgconfig.conf file mounts cpu, cpuacct, memory, and net_cls on the /cgroupdirectory.
The /cgroup directory exists, with SELinux label system_u:object_r:cgroup_t:s0.
The command service cgconfig status returns Running.
The /cgroup directory exists and contains subsystem files for cpu, cpuacct, memory, and net_cls.
When the cgred service is running correctly you should see the following:
The /etc/cgrules.conf file exists with SELinux label system_u:object_r:cgrules_etc_t:s0.
The service cgred status command shows that cgred is running.
Important
If you created the configuration files interactively as a root user, the SELinux user label would be unconfined_u and not system_u. For example, the SELinux label in /etc/cgconfig.confwould be unconfined_u:object_r:cgconfig_etc_t:s0.
9.10.3. Configuring Disk Quotas
User quotas enforce disk quotas per gear because each gear corresponds to a system user. The quotavalues are set in the /etc/openshift/resource_limits.conf file. Modify these values to suit yourrequirements.
Table 9.5. Disk Quota Configuration Options:
Option Descriptionquota_files The number of files the gear is allowed to own.
quota_blocks The amount of space the gear is allowed to consume in blocks (1 block= 1024 bytes).
Important
The minimum allowed value for the quota_blocks parameter is 1 GB.
Enable enforcement of disk quotas at the file system level.
Procedure 9.7. To Enable Disk Quotas:
1. Consult the /etc/fstab file to determine which device is mounted as /var/lib/openshift. In asimple setup, it is the root partition, but in a production system, it is more likely a RAID or NAS mountat /var/lib/openshift. The following steps in this procedure use the root partition as the
Deployment Guide
152
example mount point. Adjust these to suit your system requirements.
2. Add a usrquota option for that mount point entry in the /etc/fstab file.
Example 9.7. Example Entry in the /etc/fstab file
UUID=4f182963-5e00-4bfc-85ed-9f14149cbc79 / ext4 defaults,usrquota 1 1
3. Reboot the node host or remount the mount point:
# mount -o remount /
4. Generate user quota information for the mount point:
# quotacheck -cmug /
5. Fix the SELinux permissions on the aquota.user file located in the top directory of the mount point:
# restorecon /aquota.user
6. Re-enable quotas on the mount point:
# quotaon /
Verifying the Disk Quota Configuration
Create an application and then run the following command to verify that your disk quota is correct:
# repquota -a | grep gear-uuid
9.10.4. Configuring SELinux
Node hosts require a specific SELinux policy and context configuration to operate correctly. Run the followingcommands to set the required Boolean values:
# setsebool -P httpd_unified=on httpd_can_network_connect=on httpd_can_network_relay=on httpd_read_user_content=on httpd_enable_homedirs=on httpd_run_stickshift=on allow_polyinstantiation=on
Table 9.6. Boolean Value Options
Boolean Value Purposehttpd_unified Allow the node host to write files in the http file context.
httpd_can_network_connect
Allow the node host to access the network.
httpd_can_network_relay Allow the node host to access the network.
httpd_read_user_content Allow the node host to read application data.
httpd_enable_homedirs Allow the node host to read application data.
Chapter 9. Manually Installing and Configuring Node Hosts
153
httpd_run_stickshift Allow the node host to read application data.
allow_polyinstantiation Allow polyinstantiation for gear containment.
Boolean Value Purpose
Relabel a number of files with the correct SELinux contexts. Specify these contexts with:
# restorecon -rv /var/run# restorecon -rv /var/lib/openshift /etc/openshift/node.conf /etc/httpd/conf.d/openshift
Note
If you use the kickstart or bash script, the configure_selinux_policy_on_node functionperforms these steps.
9.10.5. Configuring System Control Settings
OpenShift Enterprise uses semaphores, ports, and connection tracking extensively. Apply the followingchanges to the default /etc/sysctl.conf file to enable this usage.
Procedure 9.8. To Configure the sysctl Settings:
1. Open the /etc/sysctl.conf file and append the following line to increase kernel semaphores toaccommodate more httpds:
kernel.sem = 250 32000 32 4096
2. Append the following line to the same file to increase the ephemeral port range to accommodateapplication proxies:
net.ipv4.ip_local_port_range = 15000 35530
3. Append the following line to the same file to increase the connection-tracking table size:
net.netfilter.nf_conntrack_max = 1048576
4. Append the following line to the same file to enable forwarding for the port proxy:
net.ipv4.ip_forward = 1
5. Append the following line to the same file to allow the port proxy to route using loopback addresses:
net.ipv4.conf.all.route_localnet = 1
6. Run the following command to reload the sysctl.conf file and activate the new settings:
# sysctl -p /etc/sysctl.conf
Deployment Guide
154

Note
If you use the kickstart or bash script, the configure_sysctl_on_node function performs thesesteps.
9.10.6. Configuring Secure Shell Access
Use the following procedure to correctly configure the sshd service on the node host:
1. Append the following line to the /etc/ssh/sshd_config file to configure the sshd daemon topass the GIT_SSH environment variable:
AcceptEnv GIT_SSH
2. The sshd daemon handles a high number of SSH connections from developers connecting to thenode host to push their changes. Increase the limits on the number of connections to the node host toaccommodate this volume:
# sed -i -e "s/^#MaxSessions .*\$/MaxSessions 40/" /etc/ssh/sshd_config# sed -i -e "s/^#MaxStartups .*\$/MaxStartups 40/" /etc/ssh/sshd_config
Note
If you use the kickstart or bash script, the configure_sshd_on_node function performs thesesteps.
9.10.7. Configuring the Port Proxy
All OpenShift Enterprise applications are contained within gears. These applications listen for connections onthe loopback interface. The node host uses iptables to listen on external-facing ports and forwardsincoming requests to the appropriate application.
Procedure 9.9. To Configure the OpenShift Port Proxy:
1. Verify that iptables is running and will start on boot.
# service iptables restart# chkconfig iptables on
2. Verify that the port proxy starts on boot:
# chkconfig openshift-iptables-port-proxy on
3. Modify the iptables rules:
# sed -i '/:OUTPUT ACCEPT \[.*\]/a :rhc-app-comm - [0:0]' /etc/sysconfig/iptables
Chapter 9. Manually Installing and Configuring Node Hosts
155
# sed -i '/-A INPUT -i lo -j ACCEPT/a -A INPUT -j rhc-app-comm' /etc/sysconfig/iptables
Warning
After you run these commands, do not run any further lokkit commands on the node host.Running lokkit commands after this point overwrites the required iptables rules andcauses the openshift-iptables-port-proxy service to fail during startup.
Restart the iptables service for the changes to take effect:
# service iptables restart
4. Start the service immediately:
# service openshift-iptables-port-proxy start
5. Run the following command so that the openshift-gears service script starts on boot. The openshift-gears service script starts gears when a node host is rebooted:
# chkconfig openshift-gears on
Note
If you use the kickstart or bash script, the configure_port_proxy function performs these steps.
9.10.8. Configuring Node Settings
The following instructions describe how to configure the settings for your chosen host names and domainname.
Procedure 9.10. To Configure the Node Host Settings:
1. Open the /etc/openshift/node.conf file and set the value of PUBLIC_IP to the IP address ofthe node host.
2. Set the value of CLOUD_DOMAIN to the domain you are using for your OpenShift Enterpriseinstallation.
3. Set the value of PUBLIC_HOSTNAME to the host name of the node host.
4. Set the value of BROKER_HOST to the host name or IP address of your broker host (Host 1).
5. Open the /etc/openshift/env/OPENSHIFT_BROKER_HOST file and enter the host name of yourbroker host (Host 1).
6. Open the /etc/openshift/env/OPENSHIFT_CLOUD_DOMAIN file and enter the domain you areusing for your OpenShift Enterprise installation.
Deployment Guide
156
7. Run the following command to set the appropriate ServerName in the node host's Apacheconfiguration:
# sed -i -e "s/ServerName .*\$/ServerName `hostname`/" \/etc/httpd/conf.d/000001_openshift_origin_node_servername.conf
Note
If you use the kickstart or bash script, the configure_node function performs these steps.
9.10.9. Updating the Facter Database
Facter generates metadata files for MCollective and is normally run by cron. Run the following commandto execute facter immediately to create the initial database, and to ensure it runs properly:
# /etc/cron.minutely/openshift-facts
Note
If you use the kickstart or bash script, the update_openshift_facts_on_node function performsthis step.
Important
Reboot the node host to apply all of the changes that have been made.
9.11. Enabling Network Isolation for Gears
Prior to OpenShift Enterprise 2.2, network isolation for gears was not applied by default. Without isolation,gears could bind and connect to localhost as well as IP addresses belonging to other gears on the node,allowing users access to unprotected network resources running in another user's gear. To prevent this,starting with OpenShift Enterprise 2.2 the oo-gear-firewall command is invoked by default at installationwhen using the oo-install installation utility or the installation scripts. It must be invoked explicitly on eachnode host during manual installations.
Note
The oo-gear-firewall command is available in OpenShift Enterprise 2.1 starting with release2.1.9.
The oo-gear-firewall command configures nodes with firewall rules using the iptables command andSELinux policies using the semanage command to prevent gears from binding or connecting on IPaddresses that belong to other gears.
Chapter 9. Manually Installing and Configuring Node Hosts
157

Gears are identified as a range of user IDs on the node host. The oo-gear-firewall command createsstatic sets of rules and policies to isolate all possible gears in the range. The UID range must be the sameacross all hosts in a gear profile. By default, the range used by the oo-gear-firewall command is takenfrom existing district settings if known, or 1000 through 6999 if unknown. The tool can be re-run to apply rulesand policies for an updated UID range if the range is changed later.
To enable network isolation for gears using the default range, run the following command on each node host:
# oo-gear-firewall -i enable -s enable
To specify the UID range:
# oo-gear-firewall -i enable -s enable -b District_Beginning_UID -e District_Ending_UID
9.12. Configuring Node Hosts for xPaaS Cartridges
Most standard cartridges provided with the base OpenShift Enterprise entitlement can run effectively on nodehosts using the default node configuration. However, some xPaaS cartridges, typically provided with premium
add-on OpenShift Enterprise entitlements , have specific configuration requirements for node hosts wheretheir gears are hosted.
This section is only relevant if you have installed or intend to install xPaaS cartridges on your node host, witheach cartridge's general requirements and recommendations outlined below. If you have not installed anyxPaaS cartridges and intend to only have standard cartridges installed on the node host, skip to Section 9.13,“Configuring Gear Profiles (Sizes)” and continue through to the end of the chapter for the remaining manualnode host installation instructions.
Configuring Node Hosts for the JBoss Fuse and JBoss A-MQ Cartridges
The JBoss Fuse and JBoss A-MQ premium xPaaS cartridges have the following configuration requirements:
All node and broker hosts must be updated to OpenShift Enterprise release 2.1.7 or later.
Because the openshift-origin-cartridge-fuse and openshift-origin-cartridge-amq cartridge RPMs are eachprovided in separate channels, the node host must have the "JBoss Fuse for xPaaS" or "JBoss A-MQ forxPaaS" add-on subscription attached to enable the relevant channel(s) before installing either cartridgeRPM. See Section 9.1, “Configuring Node Host Entitlements” for information on these subscriptions andusing the oo-admin-yum-validator tool to automatically configure the correct repositories starting inreleases 2.1.8 and 2.2.
The configuration in the /etc/openshift/resource_limits.conf.xpaas.m3.xlarge examplefile must be used as the gear profile on the node host in place of the default small gear profile.
The cartridges require 15 external ports per gear. All of these ports are not necessarily used at the sametime, but each is intended for a different purpose.
The cartridges require 10 ports on the SNI front-end server proxy.
Due to the above gear profile requirement, a new district must be created for the gear profile. Further, dueto the above 15 external ports per gear requirement, the new district's capacity must be set to a maximumof 2000 gears instead of the default 6000 gears.
[7]
Deployment Guide
158
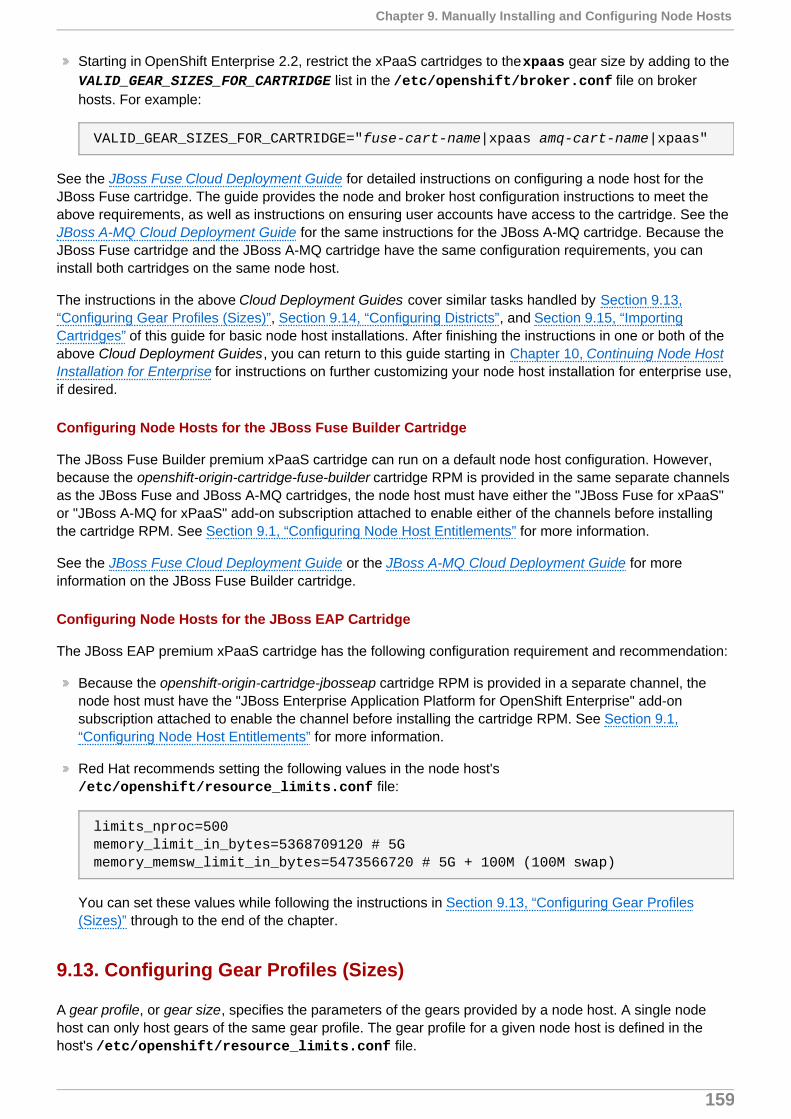
Starting in OpenShift Enterprise 2.2, restrict the xPaaS cartridges to the xpaas gear size by adding to the VALID_GEAR_SIZES_FOR_CARTRIDGE list in the /etc/openshift/broker.conf file on brokerhosts. For example:
VALID_GEAR_SIZES_FOR_CARTRIDGE="fuse-cart-name|xpaas amq-cart-name|xpaas"
See the JBoss Fuse Cloud Deployment Guide for detailed instructions on configuring a node host for theJBoss Fuse cartridge. The guide provides the node and broker host configuration instructions to meet theabove requirements, as well as instructions on ensuring user accounts have access to the cartridge. See theJBoss A-MQ Cloud Deployment Guide for the same instructions for the JBoss A-MQ cartridge. Because theJBoss Fuse cartridge and the JBoss A-MQ cartridge have the same configuration requirements, you caninstall both cartridges on the same node host.
The instructions in the above Cloud Deployment Guides cover similar tasks handled by Section 9.13,“Configuring Gear Profiles (Sizes)”, Section 9.14, “Configuring Districts”, and Section 9.15, “ImportingCartridges” of this guide for basic node host installations. After finishing the instructions in one or both of theabove Cloud Deployment Guides, you can return to this guide starting in Chapter 10, Continuing Node HostInstallation for Enterprise for instructions on further customizing your node host installation for enterprise use,if desired.
Configuring Node Hosts for the JBoss Fuse Builder Cartridge
The JBoss Fuse Builder premium xPaaS cartridge can run on a default node host configuration. However,because the openshift-origin-cartridge-fuse-builder cartridge RPM is provided in the same separate channelsas the JBoss Fuse and JBoss A-MQ cartridges, the node host must have either the "JBoss Fuse for xPaaS"or "JBoss A-MQ for xPaaS" add-on subscription attached to enable either of the channels before installingthe cartridge RPM. See Section 9.1, “Configuring Node Host Entitlements” for more information.
See the JBoss Fuse Cloud Deployment Guide or the JBoss A-MQ Cloud Deployment Guide for moreinformation on the JBoss Fuse Builder cartridge.
Configuring Node Hosts for the JBoss EAP Cartridge
The JBoss EAP premium xPaaS cartridge has the following configuration requirement and recommendation:
Because the openshift-origin-cartridge-jbosseap cartridge RPM is provided in a separate channel, thenode host must have the "JBoss Enterprise Application Platform for OpenShift Enterprise" add-onsubscription attached to enable the channel before installing the cartridge RPM. See Section 9.1,“Configuring Node Host Entitlements” for more information.
Red Hat recommends setting the following values in the node host's /etc/openshift/resource_limits.conf file:
limits_nproc=500memory_limit_in_bytes=5368709120 # 5Gmemory_memsw_limit_in_bytes=5473566720 # 5G + 100M (100M swap)
You can set these values while following the instructions in Section 9.13, “Configuring Gear Profiles(Sizes)” through to the end of the chapter.
9.13. Configuring Gear Profiles (Sizes)
A gear profile, or gear size, specifies the parameters of the gears provided by a node host. A single nodehost can only host gears of the same gear profile. The gear profile for a given node host is defined in thehost's /etc/openshift/resource_limits.conf file.
Chapter 9. Manually Installing and Configuring Node Hosts
159

Because all gears on a node host have the same gear profile, references to node profiles in this guide refer tothe gear profile on that particular node host. From the client usage perspective, the configurable parametersof a gear profile, such as RAM, CPU, and disk quota, conceptually define the size of a gear. Gear profiles aretherefore often referred to synonymously with gear sizes. However, you can specify an arbitrary name for thegear profile to distinguish node hosts for purposes that are not related to resource limits, such as ownershipand location.
All gears on the node host follow the configured gear profile's specifications. To be consistent, all node hostswith the same gear profile name should specify the same configuration, although this is not currently arequirement.
Important
Due to a bug, users of the Jenkins cartridge must define a gear profile named small. Seehttps://bugzilla.redhat.com/show_bug.cgi?id=1027390 for more details.
9.13.1. Adding or Modifying Gear Profiles
Adding or modifying gear profiles in your OpenShift Enterprise deployment requires three main tasks:
1. Define the new gear profile on the node host.
2. Update the list of valid gear sizes on the broker host.
3. Grant users access to the new gear size.
The following instructions detail how to perform these tasks.
Procedure 9.11. To Define a New Gear Profile:
The default node host installation configures a gear profile named small. Edit the /etc/openshift/resource_limits.conf file on the node host to define a new gear profile.
Note
Starting with OpenShift Enterprise 2.1.6, additional example resource_limits.conf files basedon other gear profile and host type configurations are included in the /etc/openshift/ directory onnodes. For example, files for medium and large example profiles are included, as well as an xpaasprofile for use on nodes hosting xPaaS cartridges. These files are available as a reference or can beused to copy over the existing /etc/openshift/resource_limits.conf file.
1. Edit the /etc/openshift/resource_limits.conf file on the node host and modify itsparameters to your desired specifications. See the file's commented lines for information on availableparameters.
2. Modify the node_profile parameter to set a new name for the gear profile, if desired.
3. Restart the ruby193-mcollective service on the node host:
# service ruby193-mcollective restart
Deployment Guide
160

4. If Traffic Control is enabled in the /etc/openshift/node.conf file, run the following command toapply any bandwidth setting changes:
# oo-admin-ctl-tc restart
Procedure 9.12. To Update the List of Valid Gear Sizes:
If you defined a new gear profile or modified the name of an existing gear profile, you must update the brokerhost configuration to enable administrators to create districts for the profile and to enable developers tocreate gears of that size.
1. Edit the /etc/openshift/broker.conf file on the broker host and modify the comma-separatedlist in the VALID_GEAR_SIZES parameter to include the new gear profile.
2. Consider adding the new gear profile to the comma-separated list in the DEFAULT_GEAR_CAPABILITIES parameter as well, which determines the default available gearsizes for new users.
3. Restart the broker service:
# service openshift-broker restart
4. For existing users, you must grant their accounts access to the new gear size before they can creategears of that size. Run the following command on the broker host for the relevant user name andgear size:
# oo-admin-ctl-user -l Username --addgearsize Gear_Size
5. See Section 9.14, “Configuring Districts” for more information on how to create and populate adistrict, which are required for gear deployment, using the new gear profile.
6. If gears already exist on the node host and the memory_limit_in_bytes variable has beenupdated in the resource_limits.conf, run the following command to ensure the memory limit forthe new gear profile is applied to the existing gears. Replace 512 with the new memory limit inmegabytes:
# for i in /var/lib/openshift/*/.env/OPENSHIFT_GEAR_MEMORY_MB; do echo 512 > "$i"; done
Note that the original variable from resource_limits.conf is in bytes, while the environmentvariable is actually in megabytes.
9.14. Configuring Districts
An OpenShift Enterprise district defines a set of node hosts and the resource definitions they must share toenable transparent migration of gears between hosts. Using districts, a gear can keep the same UUID (andrelated IP addresses, ports, etc.) when moved from one node host to another node host within the samedistrict. This means that applications are not disrupted during a migration. This is true even if applicationshave specific values that are hard-coded, as many do, rather than sourcing environment variables.
Districts are enabled and required by default for deploying gears. Red Hat requires that you create at leastone district before you deploy an OpenShift Enterprise installation to production. See the OpenShiftEnterprise Administration Guide for more information on resource management, including capacityplanning and using districts.
[8]
Chapter 9. Manually Installing and Configuring Node Hosts
161

9.14.1. Creating a District
All node hosts in a district must have the same gear profile, so at least one district is required for each gearprofile that is defined. At least two or more node hosts are required in each district to move gears from onenode host to another. When capacity planning, you must take into account that districts currently have a hardlimit of 6000 gears.
Districts are defined by the broker host in the MongoDB datastore. The following instructions describe how tocreate a district and add a new node host to it.
Procedure 9.13. To Create a District and Add a Node Host:
1. Create an empty district and specify the gear profile with:
# oo-admin-ctl-district -c create -n district_name -p gear_profile
2. Add an empty node host to the district. Only node hosts that do not have any gears can be added toa district, and the node host must have the same gear profile as the district:
# oo-admin-ctl-district -c add-node -n district_name -i hostname
The following example shows how to create an empty district, then add an empty node host to it.
Example 9.8. Creating an Empty District and Adding a Node Host
# oo-admin-ctl-district -c create -n small_district -p small Successfully created district: 7521a7801686477f8409e74f67b693f4
{"active_server_identities_size"=>0,"node_profile"=>"small","creation_time"=>"2012-10-24T02:14:48-04:00","name"=>"small_district","externally_reserved_uids_size"=>0,"uuid"=>"7521a7801686477f8409e74f67b693f4","max_capacity"=>6000,"available_uids"=>"<6000 uids hidden>","max_uid"=>6999,"available_capacity"=>6000,"server_identities"=>{}}
# oo-admin-ctl-district -c add-node -n small_district -i node1.example.com Success!{..."server_identities"=>{"node1.example.com"=>{"active"=>true}},"uuid"=>"7521a7801686477f8409e74f67b693f4","name"=>"small_district",...}
Deployment Guide
162

Note
The command outputs in the previous example show the JSON object representing thedistrict in the MongoDB.
9.14.2. Viewing a District
View a list of all available districts:
# oo-admin-ctl-district
View one district:
# oo-admin-ctl-district -n district_name -c list-available
Note
The command outputs above show the JSON object representing the district in the MongoDB.
9.15. Importing Cartridges
Cartridges that are installed on node hosts are available for gears to use without having to download thosecartridges. This applies to cartridges that are available with OpenShift Enterprise, and unsupported customcartridges.
Important
With the current release of OpenShift Enterprise, all node hosts must have the same cartridgesinstalled. With different cartridges installed on some node hosts, developers creating gears or addingcartridges may experience failures in certain scenarios.
Cartridge manifests must be initially imported into the broker host database from node hosts so that they canbe managed by the broker host. Import the cartridge manifests on one broker host from a node host with thefollowing command:
# oo-admin-ctl-cartridge -c import-profile --activate
[7] See Section 9.1, “Configuring Node Host Entitlements” for a table that notes the subscriptions that provide xPaaScartridges.
[8] https://access.redhat.com/documentation/en-US/OpenShift_Enterprise/2/html-single/Administration_Guide/index.html#chap-Resource_Management
Chapter 9. Manually Installing and Configuring Node Hosts
163

Chapter 10. Continuing Node Host Installation for Enterprise
This section describes how to customize your node host installation for enterprise use, and providesinformation beyond the basic installation of an OpenShift Enterprise node host.
10.1. Front-End Server Proxies
The front-end servers of OpenShift Enterprise are a collection of services that proxy external connections toOpenShift Enterprise applications. These control the public-facing application web servers, and allow accessto node host management routines through a standardized API, and provide a standard interface to manageapplication web front ends. Several server plug-ins can be bound to different ports to provide differentfeatures. For example, on OpenShift Enterprise an Apache server runs on ports 80 and 443 to providestandard HTTP proxy services to applications, while a Node.js server runs on ports 8000 and 8443 andprovides WebSocket services.
Starting with OpenShift Enterprise 2.2, the Apache Virtual Hosts front-end is the default fordeployments. However, alternate front-end servers can be installed and configured and are available as a setof plug-ins. When multiple plug-ins are used at one time, every method call for a front-end event, such ascreating or deleting a gear, becomes a method call in each loaded plug-in. The results are merged in acontextually sensitive manner. For example, each plug-in typically only records and returns the specificconnection options that it parses. In OpenShift Enterprise, connection options for all loaded plug-ins aremerged and reported as one connection with all set options from all plug-ins.
The port proxy uses iptables to listen on external-facing ports and forwards incoming requests to theappropriate application. High-range ports are reserved on node hosts for scaled applications to allow inter-node connections. See Section 9.10.7, “Configuring the Port Proxy” for information on iptables port proxy.
The HTTP proxy, SNI proxy, and Websocket proxy are plug-ins that listen on standard ports, and are sharedby the gears on a node, while the iptables proxy listens on ports that are unique to each gear.
Figure 10.1. OpenShift Enterprise Front-End Server Proxies
Deployment Guide
164

This section provides administrators, service operators, and developers information to understand how theseproxies work and the options available for OpenShift Enterprise deployments.
10.1.1. Configuring Front-end Server Plug-ins
The set of front-end plug-ins installed on the node host must be configured by installing the appropriate RPMpackages and configuring the OPENSHIFT_FRONTEND_HTTP_PLUGINS parameter in the /etc/openshift/node.conf file. The value of this parameter is a comma-separated list of names of theRuby gems that must be loaded for each plug-in. The gem name of a plug-in is found after the rubygem- inits RPM package name.
In addition to the plug-ins listed in the /etc/openshift/node.conf file, any plug-ins which are loaded intothe running environment as a dependency of those explicitly listed are also used.
Example 10.1. Front-end Server Plug-in Configuration
# Gems for managing the frontend http server# NOTE: Steps must be taken both before and after these values are changed.# Run "oo-frontend-plugin-modify --help" for more information.OPENSHIFT_FRONTEND_HTTP_PLUGINS=openshift-origin-frontend-apache-vhost,openshift-origin-frontend-nodejs-websocket,openshift-origin-frontend-haproxy-sni-proxy
10.1.2. Installing and Configuring the HTTP Proxy Plug-in
Note
With the release of OpenShift Enterprise 2.1, both the single-threaded prefork module and the multi-threaded worker module in Apache are supported. The prefork module is used by default, but forbetter performance you can change to the worker module. This can be changed in the /etc/sysconfig/httpd file:
HTTPD=/usr/sbin/httpd.worker
By default, OpenShift Enterprise uses a configured front-end HTTP service. HTTP and HTTPS connectionsare routed from the node's external interface to the application's IP address and port using the application'sfully-qualified domain name. Available Apache plug-ins include apache-vhost and apache-mod-rewrite, and both have a dependency, the apachedb plug-in, which is installed when using either.
Starting with OpenShift Enterprise 2.2, the default front-end HTTP proxy is apache-vhost, which is basedon Apache Virtual Hosts. The apache-vhost plug-in is provided by the rubygem-openshift-origin-frontend-apache-vhost RPM package. The virtual host configurations are written to .conf files in the /etc/httpd/conf.d/openshift directory, which is a symbolic link to the /var/lib/openshift/.httpd.d directory.
Alternatively, the apache-mod-rewrite plug-in provides a front end based on Apache's mod_rewritemodule, but configured by a set of Berkley DB files to route application web requests to their respectivegears. The mod_rewrite front end owns the default Apache Virtual Hosts with limited flexibility.
Chapter 10. Continuing Node Host Installation for Enterprise
165
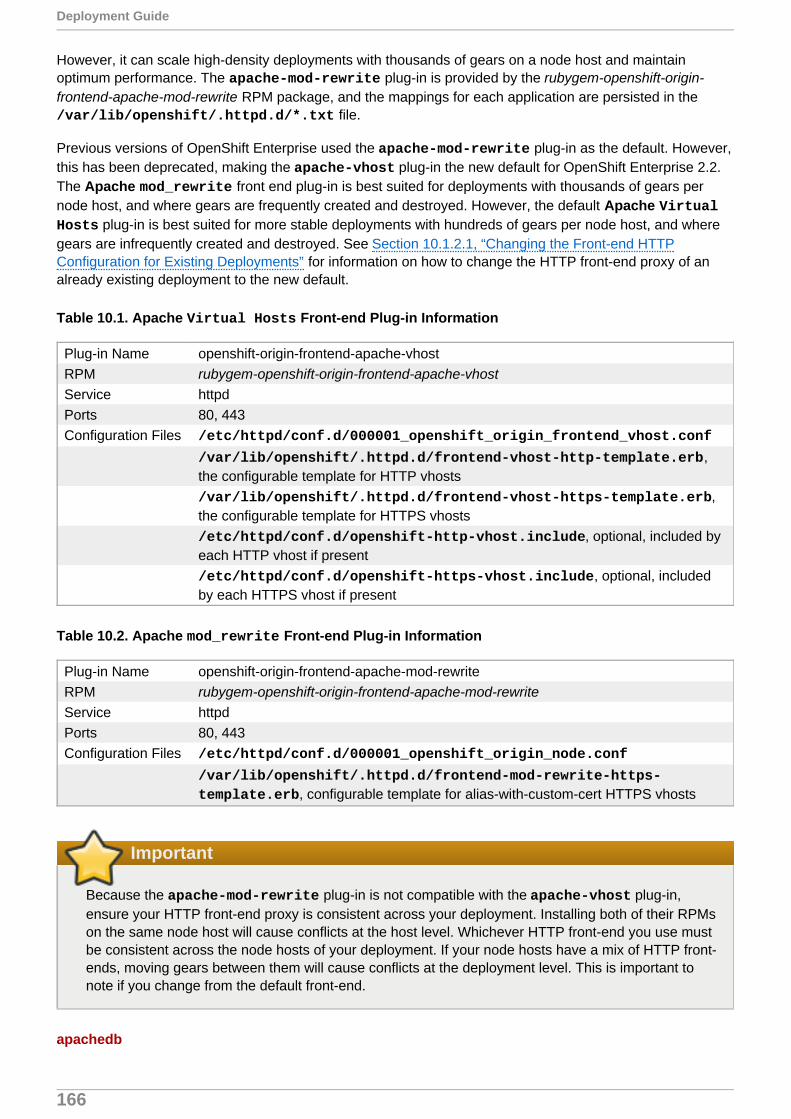
However, it can scale high-density deployments with thousands of gears on a node host and maintainoptimum performance. The apache-mod-rewrite plug-in is provided by the rubygem-openshift-origin-frontend-apache-mod-rewrite RPM package, and the mappings for each application are persisted in the /var/lib/openshift/.httpd.d/*.txt file.
Previous versions of OpenShift Enterprise used the apache-mod-rewrite plug-in as the default. However,this has been deprecated, making the apache-vhost plug-in the new default for OpenShift Enterprise 2.2.The Apache mod_rewrite front end plug-in is best suited for deployments with thousands of gears pernode host, and where gears are frequently created and destroyed. However, the default Apache Virtual Hosts plug-in is best suited for more stable deployments with hundreds of gears per node host, and wheregears are infrequently created and destroyed. See Section 10.1.2.1, “Changing the Front-end HTTPConfiguration for Existing Deployments” for information on how to change the HTTP front-end proxy of analready existing deployment to the new default.
Table 10.1. Apache Virtual Hosts Front-end Plug-in Information
Plug-in Name openshift-origin-frontend-apache-vhostRPM rubygem-openshift-origin-frontend-apache-vhostService httpdPorts 80, 443Configuration Files /etc/httpd/conf.d/000001_openshift_origin_frontend_vhost.conf
/var/lib/openshift/.httpd.d/frontend-vhost-http-template.erb,the configurable template for HTTP vhosts/var/lib/openshift/.httpd.d/frontend-vhost-https-template.erb,the configurable template for HTTPS vhosts/etc/httpd/conf.d/openshift-http-vhost.include, optional, included byeach HTTP vhost if present/etc/httpd/conf.d/openshift-https-vhost.include, optional, includedby each HTTPS vhost if present
Table 10.2. Apache mod_rewrite Front-end Plug-in Information
Plug-in Name openshift-origin-frontend-apache-mod-rewriteRPM rubygem-openshift-origin-frontend-apache-mod-rewriteService httpdPorts 80, 443Configuration Files /etc/httpd/conf.d/000001_openshift_origin_node.conf
/var/lib/openshift/.httpd.d/frontend-mod-rewrite-https-template.erb, configurable template for alias-with-custom-cert HTTPS vhosts
Important
Because the apache-mod-rewrite plug-in is not compatible with the apache-vhost plug-in,ensure your HTTP front-end proxy is consistent across your deployment. Installing both of their RPMson the same node host will cause conflicts at the host level. Whichever HTTP front-end you use mustbe consistent across the node hosts of your deployment. If your node hosts have a mix of HTTP front-ends, moving gears between them will cause conflicts at the deployment level. This is important tonote if you change from the default front-end.
apachedb
Deployment Guide
166

The apachedb plug-in is a dependency of the apache-mod-rewrite, apache-vhost, and nodejs-websocket plug-ins and provides base functionality. The GearDBPlugin plug-in provides commonbookkeeping operations and is automatically included in plug-ins that require apachedb. The apachedbplug-in is provided by the rubygem-openshift-origin-frontend-apachedb RPM package.
Note
If you are using the kickstart or bash script, the CONF_NODE_APACHE_FRONTEND parameter can bespecified to override the default HTTP front-end server configuration.
10.1.2.1. Changing the Front-end HTTP Configuration for Existing Deployments
Starting with OpenShift Enterprise 2.2, the Apache Virtual Hosts front-end HTTP proxy is the default fornew deployments. If your nodes are currently using the previous default, the Apache mod_rewrite plug-in,you can use the following procedure to change the front-end configuration of your existing deployment.
Configuring the HTTP front-end for an already-deployed OpenShift Enterprise instance after it has beenconfigured is possible, but Red Hat recommends caution when doing so. You must first prevent any front-endchanges made by the broker, such as creating or deleting application gears, on the node host containing theapplications during this configuration change. Performing a verified backup of the node host beforecommencing configuration is highly recommended.
Procedure 10.1. To Change the Front-end HTTP Configuration on an Existing Deployment:
1. To prevent the broker from making any changes to the front-end during this procedure, stop theruby193-mcollective service on the node host:
# service ruby193-mcollective stop
Then set the following environment variable to prevent each front-end change from restarting thehttpd service:
# export APACHE_HTTPD_DO_NOT_RELOAD=1
2. Back up the existing front-end configuration. You will use this backup to restore the complete state ofthe front end after the process is complete. Replace filename with your desired backup storagelocation:
# oo-frontend-plugin-modify --save > filename
3. Delete the existing front-end configuration:
# oo-frontend-plugin-modify --delete
4. Remove and install the front-end plug-in packages as necessary:
# yum remove rubygem-openshift-origin-frontend-apache-mod-rewrite# yum -y install rubygem-openshift-origin-frontend-apache-vhost
5. Replicate any Apache customizations reliant on the old plug-in onto the new plug-in, then restart thehttpd service:
Chapter 10. Continuing Node Host Installation for Enterprise
167

# service httpd restart
6. Change the OPENSHIFT_FRONTEND_HTTP_PLUGINS value in the /etc/openshift/node.conffile from openshift-origin-frontend-apache-mod-rewrite to openshift-origin-frontend-apache-vhost:
OPENSHIFT_FRONTEND_HTTP_PLUGINS="openshift-origin-frontend-apache-vhost"
7. Un-set the previous environment variable to restarting the httpd service as normal after any front-endchanges:
# export APACHE_HTTPD_DO_NOT_RELOAD=""
8. Restart the MCollective service:
# service ruby193-mcollective restart
9. Restore the HTTP front-end configuration from the backup you created in step one:
# oo-frontend-plugin-modify --restore < filename
10.1.3. Installing and Configuring the SNI Proxy Plug-in
The SNI proxy plug-in allows applications to provide services that communicate directly over a TLSconnection, but might not be HTTP-based. For example, a service can use AMQP over TLS as opposed toHTTP over SSL/TLS (HTTPS).
The SNI proxy plug-in is not installed or configured by default, but is instead supplied with the rubygem-openshift-origin-frontend-haproxy-sni-proxy RPM package. This plug-in requires HAProxy 1.5 for SNIsupport. Red Hat Enterprise Linux 6 provides HAProxy version 1.4 by default, which is used by the cartridge. HAProxy version 1.5 is provided for OpenShift by the separate haproxy15side RPM package as adependency of the SNI proxy plug-in.
By default, the SNI proxy runs on external ports 2303 to 2308, which can be configured with the PROXY_PORTS parameter in the /etc/openshift/node-plugins.d/openshift-origin-frontend-haproxy-sni-proxy.conf file. The configured ports must be exposed externally by adding a rule iniptables so that they are accessible on all node hosts where the SNI proxy is running. These ports must beavailable to all application end users. The SNI proxy also requires that a client uses TLS with the SNIextension and a URL containing either the fully-qualified domain name or OpenShift Enterprise alias of the
application. See the OpenShift Enterprise User Guide for more information on setting application aliases.
The SNI mapping for each application persists in the /var/lib/openshift/.httpd.d/sniproxy.jsonfile. These mappings must be entered during gear creation, so the SNI proxy must be enabled prior todeploying any applications that require the proxy.
Table 10.3. SNI Proxy Plug-in Information
Plug-in Name openshift-origin-frontend-haproxy-sni-proxyRPM rubygem-openshift-origin-frontend-haproxy-sni-proxyService openshift-sni-proxyPorts 2303-2308 (configurable)
[9]
Deployment Guide
168

Configuration Files /etc/openshift/node-plugins.d/openshift-origin-frontend-haproxy-sni-proxy.conf
Important
Scaled applications are not compatible with the OpenShift Enterprise SNI proxy, because all traffic isrouted to the first gear of an application.
Procedure 10.2. To Enable the SNI Front-end Plug-in:
1. Install the required RPM package:
# yum install rubygem-openshift-origin-frontend-haproxy-sni-proxy
2. Open the necessary ports in the firewall. Add the following to the /etc/sysconfig/iptables filejust before the -A INPUT -j REJECT rule:
-A INPUT -m state --state NEW -m tcp -p tcp --dport 2303:2308 -j ACCEPT
3. Restart the iptables service:
# service iptables restart
If gears have already been deployed on the node, you might need to also restart the port proxy toenable connections to the gears of scaled applications:
# service node-iptables-port-proxy restart
4. Enable and start the SNI proxy service:
# chkconfig openshift-sni-proxy on# service openshift-sni-proxy start
5. Add openshift-origin-frontend-haproxy-sni-proxy to the OPENSHIFT_FRONTEND_HTTP_PLUGINS parameter in the /etc/openshift/node.conf file:
Example 10.2. Adding the SNI Plug-in to the /etc/openshift/node.conf File
OPENSHIFT_FRONTEND_HTTP_PLUGINS=openshift-origin-frontend-apache-vhost,openshift-origin-frontend-nodejs-websocket,openshift-origin-frontend-haproxy-sni-proxy
6. Restart the MCollective service:
# service ruby193-mcollective restart
Chapter 10. Continuing Node Host Installation for Enterprise
169

Note
If you are using the kickstart or bash script, the SNI proxy is installed automatically if the CONF_ENABLE_SNI_PROXY parameter is set to "true", which is the default if the CONF_NODE_PROFILE parameter is set to "xpaas".
10.1.4. Installing and Configuring the Websocket Proxy Plug-in
The nodejs-websocket plug-in manages the Node.js proxy with Websocket support at ports 8000 and8443 by default. Requests are routed to the application according to the application's fully qualified domainname or alias. It can be installed with either of the HTTP plug-ins outlined in Section 10.1.2, “Installing andConfiguring the HTTP Proxy Plug-in”.
The nodejs-websocket plug-in is provided by the rubygem-openshift-origin-frontend-nodejs-websocketRPM package. The mapping rules of the external node address to the cartridge's listening ports are persistedin the /var/lib/openshift/.httpd.d/routes.json file. The configuration of the default ports andSSL certificates can be found in the /etc/openshift/web-proxy-config.json file.
Important
Scalable applications are not compatible with the nodejs-websocket plug-in, because all traffic isrouted to the first gear of an application.
Table 10.4. Websocket Front-end Plug-in Information
Plug-in Name nodejs-websocketRPM rubygem-openshift-origin-frontend-nodejs-websocket (required and configured by the
rubygem-openshift-origin-node RPM)Service openshift-node-web-proxyPorts 8000, 8443Configuration Files /etc/openshift/web-proxy-config.json
Note that this plug-in is automatically installed and configured when the rubygem-openshift-origin-node RPMis installed. To disable it, remove it from the list set in OPENSHIFT_FRONTEND_HTTP_PLUGINS parameter inthe node.conf file, stop and disable the service, and close the firewall ports. Any of these would disable theplug-ins, but to be consistent perform all.
10.1.5. Installing and Configuring the iptables Proxy Plug-in
The iptables port proxy is essential for scalable applications. While not exactly a plug-in like the othersoutlined above, it is a required functionality of any scalable application, and does not need to be listed in the OPENSHIFT_FRONTEND_HTTP_PLUGINS parameter in the node.conf file. The configuration steps for thisplug-in were performed earlier in Section 9.10.7, “Configuring the Port Proxy”. The iptables rulesgenerated for the port proxy are stored in the /etc/openshift/iptables.filter.rules and /etc/openshift/iptables.nat.rules files and are applied each time the service is restarted.
The iptables plug-in is intended to provide external ports that bypass the other front-end proxies. Theseports have two main uses:
Direct HTTP requests from load-balancer gears or the routing layer.
Deployment Guide
170

Exposing services (such as a database service) on one gear to the other gears in the application.
The port proxy supplies iptables rules to route a single external port to a single internal port belonging tothe corresponding gear.
Important
The PORTS_PER_USER and PORT_BEGIN parameters in the /etc/openshift/node.conf fileallow for carefully configuring the number of external ports allocated to each gear and the range ofports used by the proxy. Ensure these are consistent across all nodes in order to enable gearmovement between them.
Table 10.5. iptables Front-end Plug-in Information
RPM rubygem-openshift-origin-nodeService openshift-iptables-port-proxyPorts 35531 - 65535Configuration Files The PORTS_PER_USER and PORT_BEGIN parameters in the
/etc/openshift/node.conf file
10.2. Enabling Seamless Gear Migration with Node Host SSH Keys
There may be situations where OpenShift Enterprise administrators may wish to move an application gear toanother node host. This section addresses some concerns to make that possible.
10.2.1. rsync Keys
Gear migration on OpenShift Enterprise uses rsync from a broker host. Migrating gears requires SSH accessfrom the broker host to both the origin node host and the destination node host. If available, the /etc/openshift/rsync_id_rsa key is used for authentication, so the corresponding public key must beadded to the /root/.ssh/authorized_keys file of each node host. If you have multiple broker hosts, youcan either copy the private key to each broker host, or add the public key of every broker host to every nodehost. This enables migration without having to specify node host root passwords during the process.
10.2.2. SSH Host Keys
Another concern with gear migration is that it results in a change of the host with which developers interactfor the application. Under standard security practices, every host should generate unique host keys for SSHauthentication. This enables SSH verification of the host ID to prevent man-in-the-middle or other attacksbefore the connection is made. If the host ID changes between sessions, by default SSH generates awarning and refuses the connection.
Developers may experience issues when an application changes hosts. The following sequence of eventsdemonstrate this problem:
1. Administrator deploys OpenShift Enterprise.
2. Developer creates an OpenShift Enterprise account.
3. Developer creates an application that is deployed to node1.
Chapter 10. Continuing Node Host Installation for Enterprise
171

When an application is created, the application's Git repository is cloned using SSH. The hostname of the application is used in this case, which is a cname to the node host where it resides.
Developer verifies the host key, either manually or as defined in the SSH configuration, which isthen added to the developer's local ~/.ssh/known_hosts file for verification during futureattempts to access the application gear.
4. Administrator moves the gear to node2, which causes the application cname to change to node2.
5. Developer attempts to connect to the application gear again, either with a Git operation or directlyusing SSH. However, this time SSH generates a warning message and refuses the connection, asshown in the following example:
Example 10.3. SSH Warning Message After an Application Gear Moves
@@@@@@@@@@@@@@@@@@@@@@@@@@@@@@@@@@@@@@@@@@@@@@@@@@@@@@@@@@@@ WARNING: REMOTE HOST IDENTIFICATION HAS CHANGED! @@@@@@@@@@@@@@@@@@@@@@@@@@@@@@@@@@@@@@@@@@@@@@@@@@@@@@@@@@@@IT IS POSSIBLE THAT SOMEONE IS DOING SOMETHING NASTY!Someone could be eavesdropping on you right now (man-in-the-middle attack)!It is also possible that the RSA host key has just been changed.The fingerprint for the RSA key sent by the remote host isab:cd:ef:12:34:cd:11:10:3a:cd:1b:a2:91:cd:e5:1c.Please contact your system administrator.Add correct host key in /home/user/.ssh/known_hosts to get rid of this message.Offending key in /home/user/.ssh/known_hosts:1RSA host key for app-domain.example.com has changed and you have requested strict checking.Host key verification failed.
This is because the host ID of the application has changed, and it no longer matches what is storedin the developer's known_hosts file.
The SSH warning message shows that the host the developer is attempting to connect to has indeedchanged, and SSH has no way of distinguishing whether the new host is the correct host, or if there is anattack in progress. However, because all node hosts are presented as part of the same cloud, developersshould be shielded from needing to understand resource allocation details, such as gear migrations. TheSSH behavior in this particular case serves only to alarm and annoy developers unnecessarily, as there is nopresent security problem. In the worst case, these false alarms can teach developers to ignore the symptomsof a real attack.
Manage this situation by ensuring that all node hosts have the same SSH host keys. You can either deployall node hosts using the same base image that includes host keys, or duplicate the SSH host keys on a nodehost to all other node hosts. The following instructions describe how to duplicate SSH host keys.
Procedure 10.3. To Duplicate SSH Host Keys:
1. On each node host, back up all /etc/ssh/ssh_host_* files:
# cd /etc/ssh/# mkdir hostkeybackup# cp ssh_host_* hostkeybackup/.
Deployment Guide
172
2. From the first node, copy the /etc/ssh/ssh_host_* files to the other nodes:
# scp /etc/ssh/ssh_host_* node2:/etc/ssh/.# scp /etc/ssh/ssh_host_* node3:/etc/ssh/....
You can also manage this with a configuration management system.
3. Restart the SSH service on each node host:
# service sshd restart
If the host keys have been changed after connecting with SSH as an administrator, the same man-in-the-middle warning message shown in the previous example appears again when you attempt to SSH to a nodehost. This is because the host ID has changed. You can remove the host keys for all node hosts from your .ssh/known_hosts file as a workaround for this problem. Because all nodes have the same fingerprintnow, verifying the correct fingerprint at the next attempt to connect should be relatively easy. In fact, you maywish to publish the node host fingerprint prominently so that developers creating applications on yourOpenShift Enterprise installation can do the same.
Duplicating host keys is not essential and can be skipped if your IT policy mandates unique host keys.However, you will either need to educate developers on how to work around this problem, or avoid migratingapplication gears.
10.3. SSL Certificates
There is a single SSL certificate on each node host that is used for every application host name served bythe host httpd proxy. OpenShift Enterprise supports associating a certificate with a specific applicationalias, distinguishing them by way of the SNI extension to the SSL protocol. However, the host-wide wildcardcertificate should still be configured for use with default host names.
The certificate created by default can be used to provide an encrypted connection to applications. However, itis not properly secure and results in the following warning messages from your browser:
1. The certificate common name (CN) does not match the application URL.
2. The certificate is self-signed.
3. Assuming the end-user accepts the certificate anyway, if the application gear is migrated betweennode hosts, the new host will present a different certificate from the one the browser has acceptedpreviously.
Create a proper certificate so that application users do not receive some or all of the warning messagesdescribed above when attempting to access an application.
10.3.1. Creating a Matching Certificate
Create, or recreate, the certificate as a wildcard for the application domain so that it matches the publishedOpenShift Enterprise applications. Also create a new key because the default key is only 1024 bits in size,and a minimum size of 2048 bits is required by most certificate authorities. Use the following instructions tocreate a matching certificate.
Chapter 10. Continuing Node Host Installation for Enterprise
173

Note
If you use the kickstart script, the configure_wildcard_ssl_cert_on_node function performsthis step.
Procedure 10.4. To Create a Matching Certificate:
1. Configure the $domain environment variable to simplify the process with the following command,replacing example.com with the domain name to suit your environment:
# domain=example.com
2. Create the matching certificate using the following commands:
# cat << EOF | openssl req -new -rand /dev/urandom \-newkey rsa:2048 -nodes -keyout /etc/pki/tls/private/localhost.key \-x509 -days 3650 \-out /etc/pki/tls/certs/localhost.crt 2> /dev/nullXXSomeStateSomeCitySomeOrganizationSomeOrganizationalUnit*.$domainroot@$domainEOF
The self-signed wildcard certificate created expires after 3650 days, or approximately 10 years.
3. Restart the httpd service:
# service httpd restart
10.3.2. Creating a Properly Signed Certificate
Although the certificate created in the previous section matches the applications it is used for, it is notproperly signed by a trusted authority. You can prevent warning messages from the browser about this byrequesting a wildcard certificate signed by a Certificate Authority (CA). The CA must be authoritative for thebrowsers used by the application users.
Create a certificate signing request (CSR) by using the following command:
# openssl req -new \-key /etc/pki/tls/private/localhost.key \-out /etc/pki/tls/certs/localhost.csr
Enter the appropriate values as prompted to suit your installation. This creates a CSR in the /etc/pki/tls/certs/localhost.csr file.
Deployment Guide
174
You must then have your certificate authority sign the request. If all application users are internal to yourorganization, it may be possible to use an internal CA; otherwise, an external trusted authority must be used.The authority should supply a properly signed certificate, which you can place in the /etc/pki/tls/certs/localhost.crt file.
Next, restart the httpd service:
# restart service httpd
10.3.3. Reusing the Certificate
Whether the certificate is properly signed or not, the certificate and the key must be the same on all nodehosts. When the key and the certificate to use have been created, copy the key to /etc/pki/tls/private/localhost.key and copy the certificate to /etc/pki/tls/certs/localhost.crt on all node hosts.
Next, configure the correct permissions and context with the following commands:
# chmod 400 /etc/pki/tls/private/localhost.key /etc/pki/tls/certs/localhost.crt# chown root:root /etc/pki/tls/private/localhost.key /etc/pki/tls/certs/localhost.crt# restorecon /etc/pki/tls/private/localhost.key /etc/pki/tls/certs/localhost.crt
Restart the httpd service on each node host after modifying the key and the certificate.
10.4. Idling and Overcommitment
Most applications are not used at all times in a production environment. Therefore, administrators canmanage a host's resources efficiently by idling unused application gears, which means that you shut downinactive gears. In OpenShift Enterprise, inactive gears can be idled either manually or automatically. Gearsare restored automatically when they become active again.
The instructions in this section provide basic information on how to enable gear idling. See the OpenShiftEnterprise Administration Guide at https://access.redhat.com/site/documentation for more information.
10.4.1. Manually Idling a Gear
Use the oo-admin-ctl-gears command with the idlegear option and the specific gear ID to manuallyidle a gear:
# oo-admin-ctl-gears idlegear gear_ID
To manually reactivate an idle gear, use the unidlegear option:
# oo-admin-ctl-gears unidlegear gear_ID
Listing Idled Gears
List any idled gears with the listidle option. The output will give the gear ID of any idled gears:
Chapter 10. Continuing Node Host Installation for Enterprise
175

# oo-admin-ctl-gears listidle
10.4.2. Automated Gear Idling
Combine the oo-last-access and oo-auto-idler commands in a cron job to automatically idle inactivegears. The oo-last-access command compiles the last time each gear was accessed from the web front-end logs, excluding any access originating from the same node on which the gear is located. The oo-auto-idler command idles any gears when the associated URL has not been accessed, or the associated Gitrepository has not been updated, in the specified number of hours.
As root user, create a cron job, for example /etc/cron.hourly/auto-idler, containing the followingcontents, specifying the desired hourly interval:
(/usr/sbin/oo-last-access/usr/sbin/oo-auto-idler idle --interval 24) >> /var/log/openshift/node/auto-idler.log 2>&1
Then, make the file executable:
# chmod +x /etc/cron.hourly/auto-idler
The created job will run hourly to idle any gears that have been inactive for the designated amount of hours.However, the following exceptions apply:
Gears that have no web end point. For example, a custom message bus cartridge.
Non-primary gears in a scaled application.
Any gear with a UUID listed in /etc/openshift/node/idler_ignorelist.conf
Note
If you use the kickstart or bash script, the configure_idler_on_node function performs this step.
10.4.3. Automatically Restoring Idled Gears
The oddjobd service, a local message bus, automatically activates an idle gear that is accessed from theweb. When idling a gear, first ensure the oddjobd service is available and is running so that the gear isrestored when a web request is made:
# chkconfig messagebus on# service messagebus start# chkconfig oddjobd on# service oddjobd start
10.5. Backing Up Node Host Files
Deployment Guide
176

Backing up certain node host files can help prevent data loss. You can use standard Red Hat EnterpriseLinux software, such as tar or cpio, to perform this backup. Red Hat recommends backing up the followingnode host files and directories:
/opt/rh/ruby193/root/etc/mcollective
/etc/passwd
/var/lib/openshift
/etc/openshift
Important
Backing up the /var/lib/openshift directory is paramount to recovering a node host, includinghead gears of scaled applications, which contain data that cannot be recreated. If the file isrecoverable, then it is possible to recreate a node from the existing data. Red Hat recommends thisdirectory be backed up on a separate volume from the root file system, preferably on a Storage AreaNetwork.
If the data from these files is lost, see OpenShift Enterprise Administration Guide for instructions on how torecover a failed node host.
Stateless and Stateful Applications
Even though applications on OpenShift Enterprise are stateless by default, developers can also usepersistent storage for stateful applications by placing files in their $OPENSHIFT_DATA_DIR directory. Seethe OpenShift Enterprise User Guide for more information.
Stateless applications are more easily recovered; if an application is treated as stateless, then node hostscan easily be added to and destroyed in your deployment and you can create cron scripts to clean up thesehosts. For stateful applications, Red Hat recommends keeping the state on a separate shared storagevolume. This ensures the quick recovery of a node host in the event of a failure.
Note
Developers can also take snapshots of their applications as another way to back up and restore theirapplication data. See the OpenShift Enterprise User Guide for more information.
[9] https://access.redhat.com/documentation/en-US/OpenShift_Enterprise/2/html/User_Guide/sect-Custom_Domains_and_SSL_Certificates.html
Chapter 10. Continuing Node Host Installation for Enterprise
177

Chapter 11. Testing an OpenShift Enterprise Deployment
This chapter provides information on how to test an OpenShift Enterprise deployment, and information onhow to diagnose some problems.
11.1. Testing the MCollective Configuration
Important
Do not run the ruby193-mcollective daemon on the broker. The ruby193-mcollectivedaemon runs on node hosts and the broker runs the ruby193-mcollective client to contact nodehosts. If the ruby193-mcollective daemon is run on the broker, the broker will respond to the oo-mco ping command and behave as both a broker and a node. This results in problems whencreating applications, unless you have also run the node configuration on the broker host.
Run the following command on each node host to verify that the ruby193-mcollective service is running:
# service ruby193-mcollective status
If the service is not running, use the following command to start it:
# service ruby193-mcollective start
The command-line interface to MCollective is provided by the oo-mco command. This command can beused to perform diagnostics concerning communication between the broker and node hosts. Get a list ofavailable commands with the following command:
# oo-mco help
Use the oo-mco ping command to display all node hosts the current broker is aware of. An output similar tothe following example is displayed:
node.example.com time=100.02 ms
---- ping statistics ----1 replies max: 100.02 min: 100.02 avg: 100.02
Use the oo-mco help command to see the full list of MCollective command line options.
11.2. Testing Clock Skew
A frequently encountered problem is clock skew. Every MCollective request includes a time stamp, providedby the clock on the sending host. If the clock of a sender is substantially behind that of a recipient, therecipient drops the message. Consequently, a host will not appear in the output from the oo-mco pingcommand if its clock is substantially behind.
Inspect the /var/log/openshift/node/ruby193-mcollective.log file on node hosts to verify:
Deployment Guide
178
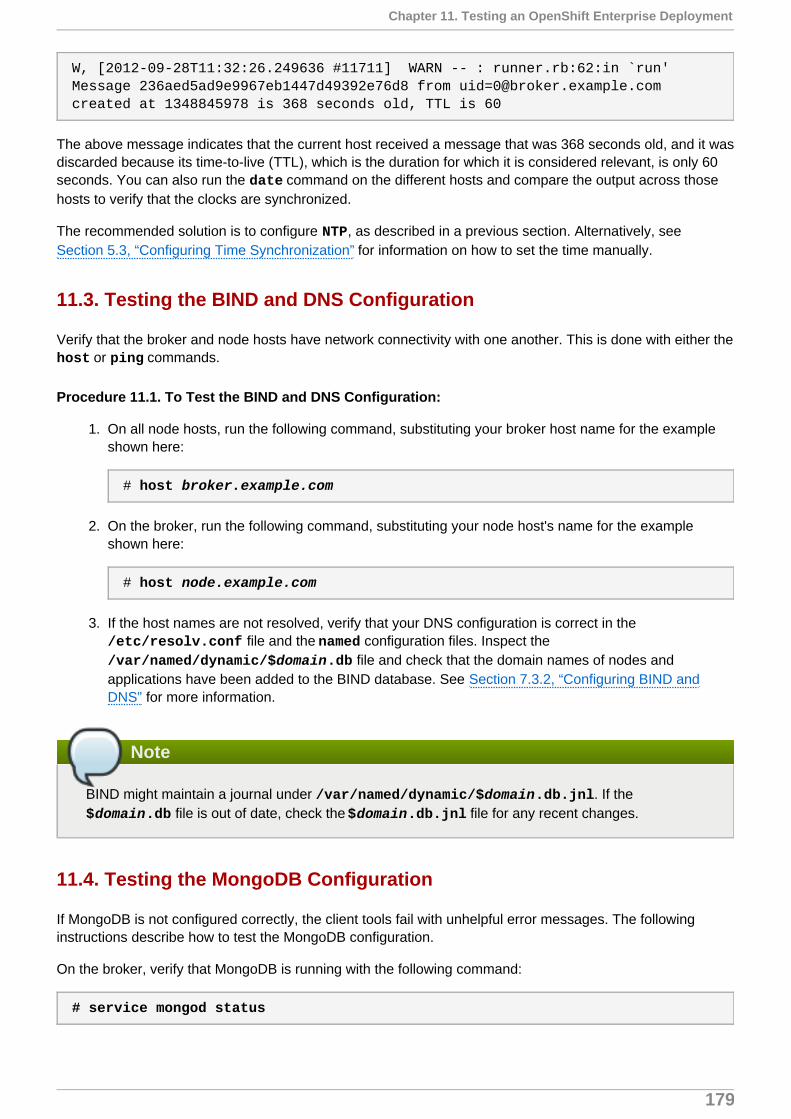
W, [2012-09-28T11:32:26.249636 #11711] WARN -- : runner.rb:62:in `run' Message 236aed5ad9e9967eb1447d49392e76d8 from [email protected] created at 1348845978 is 368 seconds old, TTL is 60
The above message indicates that the current host received a message that was 368 seconds old, and it wasdiscarded because its time-to-live (TTL), which is the duration for which it is considered relevant, is only 60seconds. You can also run the date command on the different hosts and compare the output across thosehosts to verify that the clocks are synchronized.
The recommended solution is to configure NTP, as described in a previous section. Alternatively, seeSection 5.3, “Configuring Time Synchronization” for information on how to set the time manually.
11.3. Testing the BIND and DNS Configuration
Verify that the broker and node hosts have network connectivity with one another. This is done with either the host or ping commands.
Procedure 11.1. To Test the BIND and DNS Configuration:
1. On all node hosts, run the following command, substituting your broker host name for the exampleshown here:
# host broker.example.com
2. On the broker, run the following command, substituting your node host's name for the exampleshown here:
# host node.example.com
3. If the host names are not resolved, verify that your DNS configuration is correct in the /etc/resolv.conf file and the named configuration files. Inspect the /var/named/dynamic/$domain.db file and check that the domain names of nodes andapplications have been added to the BIND database. See Section 7.3.2, “Configuring BIND andDNS” for more information.
Note
BIND might maintain a journal under /var/named/dynamic/$domain.db.jnl. If the $domain.db file is out of date, check the $domain.db.jnl file for any recent changes.
11.4. Testing the MongoDB Configuration
If MongoDB is not configured correctly, the client tools fail with unhelpful error messages. The followinginstructions describe how to test the MongoDB configuration.
On the broker, verify that MongoDB is running with the following command:
# service mongod status
Chapter 11. Testing an OpenShift Enterprise Deployment
179

If MongoDB is not running, inspect the /var/log/mongodb/mongodb.log file and look for any"multiple_occurrences" error messages. If you see this error, inspect /etc/mongodb.conf for duplicateconfiguration lines, as any duplicates may cause the startup to fail.
If the mongod service is running, try to connect to the database:
# mongo openshift_broker
This returns a command line from MongoDB.
Deployment Guide
180

Chapter 12. Configuring a Developer Workstation
This chapter explains the operation of a new OpenShift Enterprise deployment, and provides information onhow to prepare a developer workstation to create applications and domains.
12.1. Configuring Workstation Entitlements
OpenShift Enterprise requires several packages that are not available in the standard Red Hat EnterpriseLinux channels. A subscription to the appropriate OpenShift Enterprise channels is required to receive theseextra packages. For developer workstations, typically only the Red Hat OpenShift Enterprise Client Toolschannel is required.
12.2. Creating a User Account
A suitable user account is required before domains and applications can be created. The followinginstructions describe how to create a user account.
Procedure 12.1. To Create a User Account:
1. Run the following command on the broker to create a user account:
# htpasswd -c /etc/openshift/htpasswd username
This command prompts for a password for the new user account, and then creates a new /etc/openshift/htpasswd file and adds the user to that file.
2. Use the same command without the -c option when creating additional user accounts:
# htpasswd /etc/openshift/htpasswd newuser
3. Inspect the /etc/openshift/htpasswd file to verify that the accounts have been created:
# cat /etc/openshift/htpasswd
A one line entry for each user is displayed.
12.3. Installing and Configuring the Client Tools
Application developers use the client tools to create domains and applications on OpenShift Enterprise. Theinstructions for installing these client tools vary according to the operating system you are using. See theOpenShift Enterprise Client Tools Installation Guide at https://access.redhat.com/site/documentation forinstructions on how to install the client tools on supported operating systems.
Note
The OpenShift Enterprise client tools require a server entitlement in order to be used. However, theOpenShift Online client tools can be used by each application developer without using a serverentitlement. OpenShift Online features are available in the OpenShift Enterprise client tools upon eachmajor release.
Chapter 12. Configuring a Developer Workstation
181

12.4. Configuring DNS on the Workstation
You must configure developer workstations to resolve the host names used in your OpenShift Enterprisedeployment. There are two ways to do this, but both are intended for testing purposes only:
Edit the /etc/resolv.conf file on the client host, and add the DNS server from your OpenShiftEnterprise deployment to the top of the list.
Install and use the OpenShift Enterprise client tools on a host within your OpenShift Enterprisedeployment. For convenience, the kickstart script installs the client tools when installing the broker host.Otherwise, see Section 12.3, “Installing and Configuring the Client Tools” for more information.
12.5. Configuring the Client Tools on a Workstation
By default, the client tools connect to Red Hat's OpenShift Online service. Use the --server option tooverride the default server. Use the rhc setup command with the --server option to configure the defaultserver. Replace the example host name with the host name of your broker.
Note that running this command overwrites any existing configuration in the ~/.openshift/express.conf file:
# rhc setup --server=broker.example.com
12.6. Using Multiple OpenShift Configuration Files
The OpenShift Enterprise interactive setup wizard creates a new express.conf configuration file in the ~/.openshift directory with the specified user and server settings. Multiple configuration files can becreated, but you must then use the --config option with the client tools to select the appropriateconfiguration file.
Procedure 12.2. To Create a New Configuration File:
1. Run rhc setup with the --config command to create a new configuration file:
# rhc setup --config=~/.openshift/bob.conf
2. Verify that you can connect to OpenShift using different configuration files. Run an rhc commandwithout specifying the configuration file. In this example, the domain for the account configured in the express.conf file is displayed.
# rhc domain show
3. Run the rhc command with --config option. In this example, the domain for the accountconfigured in the bob.conf file is displayed.
# rhc domain show --config=~/.openshift/bob.conf
Deployment Guide
182
Note
To switch between different OpenShift environments frequently, see Section 12.7, “SwitchingBetween Multiple OpenShift Environments”.
12.7. Switching Between Multiple OpenShift Environments
The client tools now support the environment variable OPENSHIFT_CONFIG, which overrides the defaultconfiguration file that the client tools will read from. This enables specifying only once the configuration filerather than having to specify it every time using the --config option. See Section 12.6, “Using MultipleOpenShift Configuration Files”. When you define the OPENSHIFT_CONFIG setting in your environment, theclient tool will read the defined configuration file.
Procedure 12.3. To Switch Between OpenShift Environments
1. Set the OPENSHIFT_CONFIG environment variable under a bash shell using the following command:
# export OPENSHIFT_CONFIG=bob
2. Run rhc setup to create the new configuration file: ~/.openshift/bob.conf. Specify which brokerserver you want to connect to using the --server option:
# rhc setup --server broker.example.com
3. Verify that you are connected to the defined environment by running an rhc command:
# rhc domain show
4. Restore to default configuration by removing the value in OPENSHIFT_CONFIG with the followingcommand:
# export OPENSHIFT_CONFIG=
Note
Authentication tokens are stored locally based on the broker server and the username, so you do notneed to sign in again as you switch between servers.
To check which broker server you are currently configured to use, run the following command:
# rhc account
12.8. Creating a Domain and Application
Verify that you can create a new domain and a new application with the following commands on thedeveloper's workstation:
Chapter 12. Configuring a Developer Workstation
183

# rhc domain create testdom# rhc app create testapp php
These commands create a test domain called testdom and a test PHP application called testapprespectively.
If you receive any error messages, use the -d option to provide additional debugging output, and theninspect the broker's log files for hints. If you still cannot find the source of the errors, see the OpenShiftEnterprise Troubleshooting Guide at https://access.redhat.com/site/documentation for further information, orvisit the website at https://openshift.redhat.com.
Deployment Guide
184
Chapter 13. OpenShift Enterprise by Red Hat Offline DeveloperVirtual Machine Image
OpenShift Enterprise helps datacenters transform the relationships between developers and operations toallow a better continuous integration and delivery experience through a DevOps methodology. However, notall developers are connected to their datacenter at all times. For these developers, the OpenShift Enterpriseby Red Hat Offline Developer Virtual Machine Image provides a full version of OpenShift Enterprise on alaptop or spare server. The image is fully supported by Red Hat and allows developers to experience all ofthe features of OpenShift Enterprise. Using this image, a mobile developer can still be productive on theplatform when they are disconnected from the datacenter.
13.1. Downloading the Image
The OpenShift Enterprise by Red Hat Offline Developer Virtual Machine Image is available in vmdk and qcow2 file formats on the Red Hat Customer Portal at https://access.redhat.com/. The image is accessibleusing a Red Hat account with an active OpenShift Enterprise subscription.
Download the image from the Red Hat Customer Portal using the following instructions:
Procedure 13.1. To Download the Image:
1. Go to https://access.redhat.com/ and log into the Red Hat Customer Portal using your Red Hataccount credentials.
2. Go to the downloads page for the OpenShift Enterprise minor version you require:
OpenShift Enterprise 2.2: https://rhn.redhat.com/rhn/software/channel/downloads/Download.do?cid=23917
OpenShift Enterprise 2.1: https://rhn.redhat.com/rhn/software/channel/downloads/Download.do?cid=21355
These pages provide the latest available images within a minor version. Images for older releaseswithin a minor version are also provided, if available.
3. Click the download link for the image in your desired file format:
OSEoD Virtual Machine (OSEoD-Release_Version.x86_64.vmdk)
OSEoD OpenStack Virtual Machine (OSEoD-Release_Version.x86_64.qcow2)
13.2. Using the Image
Owners of OpenShift Enterprise may, as part of their subscription, use as many copies of the image asdesired. The purpose of the image is focused on demonstrations and developer enablement. The image isbuilt from the following products:
OpenShift Enterprise
Red Hat Enterprise Linux
Red Hat Software Collections
JBoss Enterprise Application Platform (EAP)
JBoss Enterprise Web Server (EWS)
Chapter 13. OpenShift Enterprise by Red Hat Offline Developer Virtual Machine Image
185

JBoss Developer Studio
However, this image is not designed to be part of a deployment of OpenShift Enterprise PaaS within thedatacenter, and does not have a separate subscription for updating it. If you choose to update the image withsecurity, enhancement, or bug fix errata using Red Hat Network subscriptions, the image requires the use ofa regular OpenShift Enterprise Infrastructure, Node, and JBoss EAP add-on subscriptions.
The vmdk image can be used on such hypervisors as VirtualBox or VMware Player. The qcow2 image canbe used on Red Hat Enterprise Linux, CentOS, and Fedora servers and workstations that leverage KVM, aswell as on OpenStack. If you need a different file format, you can use the hypervisor utility of your choice toconvert the images. Red Hat recommends running the image with at least 2 vCPUs and 2GB RAM.
When the image starts, an informative web page displays the user accounts and passwords for the image.The image defaults to leveraging a DNS configuration that is self-contained to the Red Hat Enterprise Linuximage in the virtual machine. Instructions are also displayed on how to contact it from your host laptop, ifdesired, using a remote desktop client or SSH. Because the image starts a full desktop session with Xserver, you can work completely from the image in terms of browser URLs and JBoss Developer Studio,which are also pre-installed.
Deployment Guide
186

Chapter 14. Customizing OpenShift Enterprise
With the release of OpenShift Enterprise 2.1, the Management Console and default application settings arecustomizable to suit organizational branding.
14.1. Creating Custom Application Templates
When an application is created, the default application content and Git repository is created from a templatesupplied by the application's web cartridge. You can customize these templates without creating an entirelycustom cartridge. For example, you can modify the initial content with organizational branding.
Note
Customizations only apply to newly created applications and do not apply to existing applications. Youcan also use the --from-code option when creating an application to specify a different applicationtemplate.
Procedure 14.1. To Create an Application Template:
1. Create an application using the desired cartridge, then change into the Git directory:
$ rhc app create App_Name Cart_Name$ cd App_Name
2. Make any desired changes to the default cartridge template. Templates can include more thanapplication content, such as application server configuration files.
If you are creating an application template from a JBoss EAP or JBoss EWS cartridge, you may wantto modify settings such as groupId and artifactId in the pom.xml file, as these settings areequal to the App_Name value used above. It is possible to use environment variables, such as ${env.OPENSHIFT_APP_DNS}, however it is not recommended by Red Hat because Maven willissue warnings on each subsequent build, and the ability to use environment variables might beremoved in future versions of Maven.
3. Commit the changes to the local Git repository:
$ git add .$ git commit -am "Template Customization"
You can now use this repository as an application template.
4. Place the template into a shared space that is readable by each node host. This could be on Github,an internal Git server, or a directory on each node host. Red Hat recommends creating a localdirectory named templates, then cloning the template into the new directory:
$ mkdir -p /etc/openshift/templates$ git clone --bare App_Name /etc/openshift/templates/Cart_Name.git
5. Next, edit the /etc/openshift/broker.conf file on the broker host, specifying the new templaterepository as the default location to pull from each time an application is created:
Chapter 14. Customizing OpenShift Enterprise
187

DEFAULT_APP_TEMPLATES=Cart_Name|file:///etc/openshift/templates/Cart_Name.git
Note
The broker provides the same cartridge template location to all nodes, so the templatelocation must be available on all node hosts or application creation will fail.
6. Restart the broker for the changes to take effect:
$ service openshift-broker restart
Any applications created using the specified cartridge will now draw from the customized template.
14.2. Customizing the Management Console
Starting in OpenShift Enterprise 2.2, you can customize the product logo and instance name of yourOpenShift Enterprise deployment by configuring the /etc/openshift/console.conf file on the brokerhost. This allows you to add organizational branding to your deployment.
To change the image used in the masthead of the Management Console, modify the PRODUCT_LOGOparameter to the local or remote path of your choice.
Example 14.1. Default PRODUCT_LOGO Setting
PRODUCT_LOGO=logo-enterprise-horizontal.svg
To change the instance name that appears in the browser title for the Management Console, modify the PRODUCT_TITLE to a custom name.
Example 14.2. Default PRODUCT_TITLE Setting
PRODUCT_TITLE=OpenShift Enterprise
You must restart the Management Console service to load any configuration changes:
# service openshift-console restart
Further customization is possible with custom CSS. See the Knowledgebase solution athttps://access.redhat.com/solutions/762023 on the Red Hat Customer Portal for more information.
14.3. Configuring the Logout Destination
You can enable a Sign Off link that allows application developers to log out of the Management Console byuncommenting and setting the LOGOUT_LINK parameter in the /etc/openshift/console.conf file onthe broker host:
Deployment Guide
188

LOGOUT_LINK="LOGOUT_DESTINATION_URL"
If a value is set, then the Sign Off link is visible from the Management Console. When the developer clicks it,they are logged out of the Management Console and directed to the specified URL. If no value is set, then thelink is not visible.
You must restart the console service to load any configuration changes:
# service openshift-console restart
Chapter 14. Customizing OpenShift Enterprise
189
Chapter 15. Asynchronous Errata Updates
Security, bug fix, and enhancement updates for minor versions of OpenShift Enterprise are released asasynchronous errata through the Red Hat Network. All OpenShift Enterprise 2 errata are available on the RedHat Customer Portal at https://rhn.redhat.com/errata/rhel6-rhose2-errata.html. Red Hat recommends applyingthe latest errata updates.
Cartridge Upgrades
When Red Hat releases asynchronous errata updates within a minor release, the errata can includeupgrades to shipped cartridges. After installing the updated cartridge packages using the yum command,further steps are often necessary to upgrade cartridges on existing gears to the latest available version and toapply gear-level changes that affect cartridges. The OpenShift Enterprise runtime contains a system foraccomplishing these tasks.
The oo-admin-upgrade command provides the command line interface for the upgrade system and canupgrade all gears in an OpenShift Enterprise environment, all gears on a single node, or a single gear. Thiscommand queries the OpenShift Enterprise broker to determine the locations of the gears to migrate anduses MCollective calls to trigger the upgrade for a gear. While the ose-upgrade command, outlined inChapter 4, Upgrading from Previous Versions, handles running the oo-admin-upgrade command duringmajor platform upgrades, oo-admin-upgrade must be run by an administrator when applyingasynchronous errata updates that require cartridge upgrades.
Determining Application Downtime During Cartridge Upgrades
During a cartridge upgrade, the upgrade process can be classified as either compatible or incompatible. Asmentioned in the OpenShift Enterprise Cartridge Specification Guide, to be compatible with a previouscartridge version, the code changes to be made during the cartridge upgrade must not require a restart of thecartridge or of an application using the cartridge. If the previous cartridge version is not in the Compatible-Versions list of the updated cartridge's manifest.yml file, the upgrade is handled as an incompatibleupgrade.
Incompatible upgrades must stop the gear before the upgrade begins, complete the upgrade, and then restartthe gear. This process can cause a short amount of downtime for the application. For instructions on how todetermine upgrade compatibility for all cartridges in a directory, and therefore whether any applicationdowntime would be required during an upgrade, see the Knowledgebase solution athttps://access.redhat.com/solutions/1186183 on the Red Hat Customer Portal.
Example oo-admin-upgrade Usage
Instructions for applying asynchronous errata updates are provided in Section 15.1, “Applying AsynchronousErrata Updates”; in the event that cartridge upgrades are required after installing the updated packages, the oo-admin-upgrade command syntax as provided in those instructions upgrades all gears on all nodes bydefault. Alternatively, to only upgrade a single node or gear, the following oo-admin-upgrade commandexamples are provided. Replace 2.y.z in any of the following examples with the target version.
Important
To prevent previously cached node data from interfering with the current upgrade, archive existingupgrade data with the oo-admin-upgrade archive command.
The following commands upgrade all gears on all nodes:
Deployment Guide
190

# oo-admin-upgrade archive# oo-admin-upgrade upgrade-node --version=2.y.z
The following commands upgrade all gears on a single node:
# oo-admin-upgrade archive# oo-admin-upgrade upgrade-node --upgrade-node=node1.example.com --version=2.y.z
The following commands upgrade a single gear:
# oo-admin-upgrade archive# oo-admin-upgrade upgrade-gear --app-name=testapp --login=demo --upgrade-gear=gear-UUID --version=2.y.z
15.1. Applying Asynchronous Errata Updates
The following instructions provide a general overview on how to apply asynchronous errata updates within aminor release to previously installed OpenShift Enterprise systems.
Procedure 15.1. To Apply Asynchronous Errata Updates:
1. On each host, run the following command to ensure that the yum configuration is still appropriate forthe type of host and its OpenShift Enterprise version:
# oo-admin-yum-validator
If run without any options, this command attempts to determine the type of host and its version, andreport any problems that are found. See Section 7.2, “Configuring Yum on Broker Hosts” orSection 9.2, “Configuring Yum on Node Hosts” for more information on how to use the oo-admin-yum-validator command when required.
2. Ensure all previously released errata relevant to your systems have been fully applied, includingerrata from required Red Hat Enterprise Linux channels and, if applicable, JBoss channels.
3. On each host, install the updated packages. Note that running the yum update command on a hostinstalls packages for all pending updates at once:
# yum update
4. After the yum update command is completed, verify whether there are any additional updateinstructions that apply to the releases you have just installed. These instructions are provided in the"Asynchronous Errata Updates" chapter of the OpenShift Enterprise Release Notes athttps://access.redhat.com/documentation relevant to your installed minor version.
For example, if you have OpenShift Enterprise 2.1.3 installed and are updating to release 2.1.5, youmust check for additional instructions for releases 2.1.4 and 2.1.5 in the OpenShift Enterprise 2.1Release Notes at:
https://access.redhat.com/documentation/en-US/OpenShift_Enterprise/2/html-single/2.1_Release_Notes/index.html#chap-Asynchronous_Errata_Updates
Chapter 15. Asynchronous Errata Updates
191

Guidance on aggregating steps when applying multiple updates is provided as well. Additional stepscan include restarting certain services, or using the oo-admin-upgrade command to apply certaincartridge changes. The update is complete after you have performed any additional steps that arerequired as described in the relevant OpenShift Enterprise Release Notes.
Deployment Guide
192

Appendix A. Revision History
Revision 2.2-11 Wed Nov 23 2016 Ashley HardinBZ 1394396: Updated Section 9.8.1, “Installing Web Cartridges” to add an Important box about a tomcat7known issue.
Revision 2.2-10 Thu Sep 08 2016 Ashley HardinBZ 1212040, BZ 1354609, BZ 1294966: Bug Fixes
Revision 2.2-8 Thurs Aug 20 2015 Brice Fallon-FreemanOpenShift Enterprise 2.2.7 release.BZ 1197116: Updated Section 9.10.3, “Configuring Disk Quotas” with Important box.BZ 1190885: Updated Section 7.7.2, “Configuring MCollective Client”.BZ 1210052: Update Section 8.6.1, “Selecting an External Routing Solution” with link to LTM®documentation.
Revision 2.2-7 Mon Jul 20 2015 Alex DellapentaOpenShift Enterprise 2.2.6 release.BZ 1200123: Added Section 8.7, “Integrating with External Single Sign-on (SSO) Providers” .
Revision 2.2-6 Fri Apr 10 2015 Brice Fallon-FreemanOpenShift Enterprise 2.2.5 release.BZ 1159978, BZ 1157855, BZ 1051228: Rearranged and updated Section 6.1, “Using the Installation Utility”with more information.BZ 1180532: Updated Section 8.2.2, “Authenticating Using LDAP” with Important box.BZ 1173720: Added missing step to Section 8.6.2, “Configuring the Sample Routing Plug-In”.BZ 1208556: Updated Section 8.6.3, “Configuring a Routing Daemon or Listener” to note the ACTIVEMQ_HOST setting can take an array of hosts.BZ 1124840: Updated Section 10.5, “Backing Up Node Host Files” with more detail.BZ 1118927: Updated Section 14.1, “Creating Custom Application Templates” with information on modifying pom.xml for JBoss EAP or JBoss EWS application templates.
Revision 2.2-5 Thu Feb 12 2015 Alex DellapentaOpenShift Enterprise 2.2.4 release.Updated Section 8.6, “Using an External Routing Layer for High-Availability Applications”, Section 8.6.1,“Selecting an External Routing Solution”, and Section 8.6.3, “Configuring a Routing Daemon or Listener” toadd details on F5 BIG-IP LTM® integration.
Revision 2.2-3 Wed Dec 10 2014 Timothy Poitras
Appendix A. Revision History
193
OpenShift Enterprise 2.2.2 release.BZ 1150426: Updated Section 8.4.4.1, “Configuring a Network of ActiveMQ Brokers” and Section 8.4.4.2,“Verifying a Network of ActiveMQ Brokers Using the ActiveMQ Console” with information on disabling Jetty.Added Section 9.11, “Enabling Network Isolation for Gears”.BZ 1165606: Updated Section 8.6.2, “Configuring the Sample Routing Plug-In” and Section 8.6.3,“Configuring a Routing Daemon or Listener” with information on enabling SSL connections per ActiveMQhost.BZ 1159182: Updated Section 8.6.3, “Configuring a Routing Daemon or Listener” and Section 8.6.4,“Enabling Support for High-Availability Applications” with information on setting HA_DNS_PREFIX parametersconsistently.Updated Section 13.1, “Downloading the Image” to note the downloads page for the OpenShift Enterprise 2.2version images.Updated Section 14.2, “Customizing the Management Console” for the addition of the PRODUCT_LOGO and PRODUCT_TITLE parameters.Updated Chapter 15, Asynchronous Errata Updates with details on incompatible cartridge upgrades.
Revision 2.2-2 Thu Nov 6 2014 Alex DellapentaUpdated Section 4.5, “Upgrading from OpenShift Enterprise 2.1 to OpenShift Enterprise 2.2” to clarify OSE_UPGRADE_MIGRATE_VHOST usage.Fixed minor publication issue.
Revision 2.2-1 Tue Nov 4 2014 Alex DellapentaUpdated Section 8.6, “Using an External Routing Layer for High-Availability Applications” and subsectionsregarding routing solutions supported by the sample routing daemon.Updated Section 9.12, “Configuring Node Hosts for xPaaS Cartridges” per OpenShift Enterprise 2.1.8release.
Revision 2.2-0 Tue Nov 4 2014 Alex DellapentaOpenShift Enterprise 2.2 release.Added Section 4.5, “Upgrading from OpenShift Enterprise 2.1 to OpenShift Enterprise 2.2”.Added Section 5.2.3, “IPv6 Tolerance”.Replaced the "Dynamic DNS with Non-BIND Name Servers" section with the new Section 8.1, “Installing andConfiguring DNS Plug-ins” and subsections.Added Section 8.2.4, “Authenticating Using Mutual SSL”.Added Section 8.2.5, “Integrating Active Directory Authentication with Identity Management”.Added Section 8.5, “Installing and Configuring the Gear Placement Plug-in” and subsections.Updated Section 8.6, “Using an External Routing Layer for High-Availability Applications” and all subsectionsto include information on the new sample routing daemon, and added Section 8.6.1, “Selecting an ExternalRouting Solution”.Updated Section 8.10.2, “Accessing the Administration Console” to remove the unsupported "ConfiguringHosts with Collocated Broker and Node Components" procedure.Added Section 8.10.3, “Configuring Authentication for the Administration Console”.Added Section 14.3, “Configuring the Logout Destination”.
Revision 2.1-7 Thu Oct 23 2014 Brice Fallon-Freeman
Deployment Guide
194

Updated oo-admin-ctl-cartridge commands to use import-profile.BZ 1001833: Added Section 5.1, “Default umask Setting”.BZ 1006040: Edited Section 5.2.1, “Custom and External Firewalls” and added Section 5.2.2, “ManuallyConfiguring an iptables Firewall”.BZ 1145762: Removed mention of installing using https://install.openshift.com with the -e option fromSection 6.1, “Using the Installation Utility”.BZ 1118766: Updated Section 8.6, “Using an External Routing Layer for High-Availability Applications” andsubsections with edits to wording and procedure order.Added Section 9.12, “Configuring Node Hosts for xPaaS Cartridges” and updated Section 9.1, “ConfiguringNode Host Entitlements” and Section 9.8.1, “Installing Web Cartridges” for the new JBoss A-MQ, JBossFuse, and JBoss Fuse Builder cartridges.BZ 1146706: Updated "SNI Proxy" to clarify that SNI proxy ports must be opened in the firewall.
Revision 2.1-6 Thu Sep 11 2014 Brice Fallon-FreemanOpenShift Enterprise 2.1.6 release.BZ 1135480: Updated Section 2.1, “Supported Operating Systems” with Important box.BZ 1133958: Updated Section 7.7.2, “Configuring MCollective Client” and Section 9.7, “Installing andConfiguring MCollective on Node Hosts” with ActiveMQ configuration changes.BZ 1124579: Updated Section 9.9, “Configuring SSH Keys on the Node Host” and Section 8.4, “ConfiguringRedundancy” with information on having multiple brokers.BZ 1133936: Updated Section 9.13.1, “Adding or Modifying Gear Profiles” to note new, additional example resource_limits.conf files.BZ 1133628: Updated Section 15.1, “Applying Asynchronous Errata Updates” with information on applyingmultiple updates at once.
Revision 2.1-5 Tue Aug 26 2014 Timothy PoitrasOpenShift Enterprise 2.1.5 release.Updated Section 2.1, “Supported Operating Systems” and Section 2.3, “Red Hat Subscription Requirements”to note the inclusion of Red Hat Enterprise Linux 6 with OpenShift Enterprise subscriptions.Updated Section 6.1, “Using the Installation Utility”, Section 7.1.2, “Using Red Hat Network Classic on BrokerHosts”, and Section 9.1.2, “Using Red Hat Network Classic on Node Hosts” with details regarding migratingfrom RHN to RHSM.
Revision 2.1-4 Thu Aug 7 2014 Alex DellapentaBZ 1060871: Updated "HTTP Proxies" with a note.BZ 1084617: Updated Section 10.1.2.1, “Changing the Front-end HTTP Configuration for ExistingDeployments” with correct Apache plug-in information.BZ 1119795: Fixed typo in Section 9.10.3, “Configuring Disk Quotas”.BZ 1114162: Updated steps in Section 4.3, “Upgrading from OpenShift Enterprise 1.2 to OpenShiftEnterprise 2.0” and Section 4.4, “Upgrading from OpenShift Enterprise 2.0 to OpenShift Enterprise 2.1”.
Revision 2.1-3 Tue Jun 24 2014 Alex DellapentaOpenShift Enterprise 2.1.2 release.Updated various sections to highlight OpenShift Enterprise 2.1 features.Updated Section 13.1, “Downloading the Image” to note the 2.1.1 version image and latest Red Hat CustomerPortal site navigation.BZ 1102430: Updated Section 8.6.2, “Configuring the Sample Routing Plug-In” to note the ACTIVEMQ_HOSTsetting can now take an array of hosts.BZ 1102131: Updated note in Section 7.8.9, “Configuring OpenShift Enterprise Authentication” forclarification between different OpenShift Enterprise releases.BZ 1108950: Updated the procedure in Section 9.9, “Configuring SSH Keys on the Node Host”.BZ 1111452: Updated Section 9.10.3, “Configuring Disk Quotas” with an example /etc/fstab file entry.
Revision 2.1-2 Mon Jun 9 2014 Alex Dellapenta
Appendix A. Revision History
195

Added Chapter 13, OpenShift Enterprise by Red Hat Offline Developer Virtual Machine Image.Various enhancements to Section 6.2, “Using the Installation Scripts” and subsections.BZ 1105155: Updated Section 6.1, “Using the Installation Utility” to show tar usage instead of zip, andadded an Important admonition on using the none subscription type.
Revision 2.1-1 Wed Jun 4 2014 Alex DellapentaOpenShift Enterprise 2.1.1 release.Restructured and added sections for new Chapter 6, Deployment Methods, including more detailedinformation and examples regarding the installation scripts.Restructured sections for new Chapter 5, Host Preparation.Added Warning admonitions to note that running a broker and node on the same host is not supported.Updated Section 9.8.2, “Installing Add-on Cartridges” for addition of MongoDB cartridge.Updated Section 7.6.2, “Configuring ActiveMQ” for changes to default Jetty configuration.Updated Section 8.4.5, “Broker Web Application”.BZ 1098544: Updated Section 6.2.7, “Performing Required Post-Deployment Tasks” with required post-deployment tasks.BZ 1100859: Updated Section 8.9.1, “Installing the Management Console” and Section 8.2, “Configuring UserAuthentication for the Broker”.BZ 1080163: Updated Section 8.6.4, “Enabling Support for High-Availability Applications” with a note.BZ 1099672: Updated Section 7.8.8, “Configuring the Broker Plug-ins”.
Revision 2.1-0 Fri May 16 2014 Bilhar AulakhOpenShift Enterprise 2.1 release.Added Section 4.4, “Upgrading from OpenShift Enterprise 2.0 to OpenShift Enterprise 2.1”.Added Section 7.8.2, “Setting Ownership and Permissions for MCollective Client Configuration File”.Added Section 8.11, “Clearing Broker and Management Console Application Cache”.Added Section 9.8.3, “Installing Cartridge Dependency Metapackages”.Added Chapter 14, Customizing OpenShift Enterprise and subsections.Updated default DNS key algorithm in various sections from HMAC-MD5 to HMAC-SHA256.Updated Section 6.2, “Using the Installation Scripts” and Section 6.1, “Using the Installation Utility” to includelatest installation script and utility changes.Updated Section 7.7.2, “Configuring MCollective Client” and Section 9.7, “Installing and ConfiguringMCollective on Node Hosts” to include heartbeat parameters in the sample file configuration.Updated Section 8.6.4, “Enabling Support for High-Availability Applications” with additional configurationsettings.Updated Section 9.14, “Configuring Districts”.BZ 1063859: Updated log file locations to /var/log/openshift/node/ruby193-mcollective.logBZ 1081654: Updated Chapter 15, Asynchronous Errata Updates with archiving instructions.BZ 1071375: Updated Section 7.1, “Configuring Broker Host Entitlements” and Section 9.1, “ConfiguringNode Host Entitlements” to remove deprecated subscription-manager commands.BZ 963332: Updated Section 7.7.2, “Configuring MCollective Client” with modified logging options.BZ 1079365: Updated Section 7.7.2, “Configuring MCollective Client” and Section 9.7, “Installing andConfiguring MCollective on Node Hosts” for upgrade to MCollective 2.4.BZ 1063439: Added Important box to Section 7.8.9, “Configuring OpenShift Enterprise Authentication”.BZ 1066729: Updated sample configuration in Section 8.4.4.1, “Configuring a Network of ActiveMQ Brokers”BZ 1074826: Fixed command error in Section 9.9, “Configuring SSH Keys on the Node Host”.
Revision 2.0-4 Fri Apr 11 2014 Brice Fallon-FreemanBZ 1076233: Fixed faulty images in Chapter 3.
Revision 2.0-3 Mon Feb 10 2014 Julie Wu
Deployment Guide
196

OpenShift Enterprise 2.0.3 release.BZ 1063577: Edited command in Section 6.1, “Using the Installation Utility”.BZ 1066025: Added info to Section 9.10.7, “Configuring the Port Proxy”.BZ 1009869: Added Section 12.7, “Switching Between Multiple OpenShift Environments”.BZ 1051799 and BZ 1078325: Edited Section 7.8.7, “Configuring the Broker Datastore”.BZ 1057190: Updated Section 7.6.2, “Configuring ActiveMQ”.BZ 1064417: Updated Section 9.10.2, “Configuring Cgroups”
Revision 2.0-2 Tue Jan 28 2014 Alex DellapentaOpenShift Enterprise 2.0.2 release.BZ 929182: Updated Section 8.2.2, “Authenticating Using LDAP”.BZ 1051960: Updated commands in Section 7.8.4, “Configuring the Required Services”, Section 7.8.6,“Configuring the Broker Domain”, Section 8.3.2, “MongoDB”, Section 9.10.8, “Configuring Node Settings”,Section 4.2, “Preparing for an Upgrade”, and Section 9.10.1, “Configuring PAM”.BZ 1051804: Updated Section 8.9.1, “Installing the Management Console”.Added Chapter 15, Asynchronous Errata Updates.Updated Chapter 4, Upgrading from Previous Versions.BZ 1049566: Updated Section 8.6.3, “Configuring a Routing Daemon or Listener”.
Revision 2.0-1 Tue Jan 14 2014 Bilhar AulakhOpenShift Enterprise 2.0.1 release.BZ 1043394: Updated contents of listener.rb file.BZ 1051960: Fixed various shell commands with problematic quoting.BZ 1051946: Removed problematic less-than signs in some shell commands.BZ 1042903: Removed MONGO_REPLICA_SETS from configuration file screen output.BZ 1042887: Updated suggestions for redundant topologies in Section 8.4, “Configuring Redundancy” forclarification.BZ 1043073: Updated Section 9.4, “Configuring Node Host Name Resolution” and Section 9.5, “Configuringthe Node Host DHCP and Host Name”.BZ 1042997: Updated URL to configuration template and added note for kickstart script.BZ 1042999: Added note about kickstart script for procedures.BZ 1041545 and BZ 1039744: Updated Section 6.1, “Using the Installation Utility”.BZ 1044224: Fixed and Updated Section 10.4, “Idling and Overcommitment”.BZ 1043678: Updated Section 9.15, “Importing Cartridges”.BZ 1022195: Fixed Section 9.10.8, “Configuring Node Settings”.BZ 1014294: Fixed Section 8.4.4.1, “Configuring a Network of ActiveMQ Brokers”.Added Section 4.3, “Upgrading from OpenShift Enterprise 1.2 to OpenShift Enterprise 2.0”.BZ 1040150: Fixed and updated Section 7.1, “Configuring Broker Host Entitlements”, Section 7.2,“Configuring Yum on Broker Hosts”, Section 9.1, “Configuring Node Host Entitlements”, and Section 9.2,“Configuring Yum on Node Hosts”.BZ 1039746: Fixed Section 5.4, “Enabling Remote Administration”.BZ 1040199: Fixed Section 7.4.1, “Configuring the DHCP Client on the Broker Host”.BZ 1040179: Fixed Section 7.3.2, “Configuring BIND and DNS”.
Revision 2.0-0 Tue Dec 10 2013 Alex Dellapenta
Appendix A. Revision History
197

OpenShift Enterprise 2.0 release.BZ 1000595: Added "Security" section.BZ 921793: Added "Network Access" section.Added "Installation Utility" section.Added "External Load Balancing" sections.Added "Administration Console" sections.Added "Front-end Server Plug-ins" sections.BZ 991607: Added "Adding New Gear Profiles" section.BZ 1030645: Updated installation script function names.BZ 990327: Updated "BIND and DNS" section with correct DNS configuration file.BZ 1006451: Updated "Installing Cartridges" section.BZ 1017839: Updated "Storage and Backup for Fault Tolerance" section for node hosts.BZ 998699: Typo fixes in "Creating an SSL Certificate" section.
Deployment Guide
198