OpenProj Manual
44
Buyer: Paul Thomas ([email protected]) Transaction ID: 8746548546137424A
-
Upload
japji-kaur -
Category
Documents
-
view
301 -
download
8
description
Lab Manual of OpenProj Software
Transcript of OpenProj Manual

Buyer: Paul Thomas ([email protected])Transaction ID: 8746548546137424A

2
Project Planning with
OpenProj
Project Planning with OpenProj
The Basics
Author: Jürgen Bruns & Associates.
1. English Edition April 2012
© of the English Edition Jürgen Bruns, Paul Horner,
Christopher Morris.
Internet: http://www.openprojuserguide.com/
All Rights Reserved.
No part of this work may be reproduced or processed using electronic systems, copied or distributed (print, scan, photocopy, microfilm, or any other method) without the express written permission of the Publishers
This manuscript was created with great care. Nevertheless, errors cannot be completely avoided. Editor and author cannot assume legal responsibility nor any liability for incorrect information and their consequences. This manuscript may contain links and references to third-party websites. We have no influence on the content and design of these locations.
Buyer: Paul Thomas ([email protected])Transaction ID: 8746548546137424A

3
Contents Preface ..................................................................................................................................................... 5
Project Management Basics .................................................................................................................... 6
What is a project? ............................................................................................................................... 6
What Is Project Management? ............................................................................................................ 6
Project Management Basics .................................................................................................................... 7
Project Management Terminology ..................................................................................................... 7
Using OpenProj for the first time ............................................................................................................ 8
Starting and Exiting OpenProj ............................................................................................................. 8
OpenProj Application Window ............................................................................................................ 9
Creating Your First Project .................................................................................................................... 10
Adjust the Calendar ........................................................................................................................... 10
Entering Tasks.................................................................................................................................... 12
Work Breakdown Structure ............................................................................................................... 13
Establish an outline ....................................................................................................................... 13
Inserting, Moving, Copying and Deleting Tasks............................................................................. 13
Creating a Summary Task .............................................................................................................. 13
Assigning Task Calendars ............................................................................................................... 15
Setting Dependencies ........................................................................................................................ 16
Dependency Types ........................................................................................................................ 16
Selecting Tasks with FS Linkages (default and most commonly used) .......................................... 16
Defining Other Task Dependencies (SS, FF, SF) and Creating Time-Lags or Overlapping Tasks........ 18
Critical Tasks and Scheduling Conflicts .............................................................................................. 20
Milestones and Deadlines ................................................................................................................. 21
Changing Task Information ............................................................................................................... 23
Task Constraints ............................................................................................................................... 24
The Encapsulated Project Structure ...................................................................................................... 25
Resource Planning ................................................................................................................................. 27
Entering Resources ............................................................................................................................ 27
Fundamentals for Resource Planning............................................................................................ 27
Resource Sheet Creation ............................................................................................................... 27
Resource Allocation ........................................................................................................................... 28
Assigning Resources to Tasks ........................................................................................................ 28
Resource Information .................................................................................................................... 30
Buyer: Paul Thomas ([email protected])Transaction ID: 8746548546137424A

4
Resource Calendars ....................................................................................................................... 31
Work and “Scheduling By Task Type” ................................................................................................... 32
Work & Effort .................................................................................................................................... 32
Overview of Task Types ..................................................................................................................... 34
Individual resource allocation ........................................................................................................... 35
Allocation of Staggered Resources ................................................................................................ 35
Resource Leveling .................................................................................................................................. 36
What is the Purpose of Resource Leveling? ...................................................................................... 36
Resource Leveling Strategies ............................................................................................................. 36
Viewing Resource Over-allocations ................................................................................................... 36
Project Cost Calculations in OpenProj ................................................................................................... 39
Project Cost Calculation Fundamentals ............................................................................................ 39
Cost Table .......................................................................................................................................... 39
Set Baseline ........................................................................................................................................... 40
Project Monitoring ................................................................................................................................ 41
Reports .................................................................................................................................................. 43
Standard Reports ............................................................................................................................... 43
User Defined Reports ........................................................................................................................ 43
Afterword .............................................................................................................................................. 44
Buyer: Paul Thomas ([email protected])Transaction ID: 8746548546137424A

5
Preface OpenProj is the most widely used open-source Freeware for project planning and controlling. As Java
based software, OpenProj can be used with Windows, Macintosh and Linux operating systems.
The great popularity of OpenProj is not only based on the fact that it is available for free, but also
because the look and feel of the software is very close to the market leader Microsoft Project.
OpenProj users should be able to change very quickly from OpenProj to MS Project when it becomes
necessary, perhaps due to increasing projects or the demand for multi-project management, which
cannot easily be handled with OpenProj.
Project plans created with OpenProj can be used with MS Project (up to version Project 2007) and vice
versa.
This guide is intended for new users who wish to get hands-on with the key functions of OpenProj in
the minimum amount of time. On completion of reading and understanding this guide, the user should
be able to create, track and modify relatively complex projects to achieve a higher level of work
productivity, control and efficiency.
If you do not already have OpenProj installed, please visit the official download page now at
SourceForge.net http://sourceforge.net/projects/openproj/ and proceed to follow the instructions to
install the software on your machine.
This guide applies to version 1.4 which as of April 2012 is the latest version. Other versions may have
slightly different functionality, menus or descriptions.
Buyer: Paul Thomas ([email protected])Transaction ID: 8746548546137424A

6
Project Management Basics
What is a project?
A project is a series of activities leading to defined goals and deliverables achieved in a specific
timeframe. A project always has a specific start date and a specific end date.
These activities (tasks) have to be accomplished in a distinct order by the means of allocated resources
(manpower, machines, materials, costs) so that the framework of time, costs and deliverables is met.
Generally speaking a project should have the following characteristics:
Characteristic Meaning
Time Limitation Both a start point and an endpoint must be defined for a project. Initially,
it is common for just a start date to be specified and the resultant project
plan will determine the end date.
Clear Objective The objective to be achieved by the project must be clearly defined.
For example, "Launch Product" is a clearly defined goal, whilst "Sale of the
Product" (without quantification) is not a clearly defined goal.
Process Structure The project must be split up into clearly defined tasks. It should not
represent a singular process from beginning to end, but be broken down
into distinct stages.
Organizational
Structure
Projects often require an established organizational structure with unique
skill sets to be effective, but this does depend somewhat on the scale of
the project.
What Is Project Management?
Project management is the planning and control of a project. It allows the user to resolve conflicts in a
continuously changing environment and is necessary to continuously drive towards the achievement of
the baseline project goals.
Because project management should ideally result in the fulfillment of all set targets, a significant part
of the project manager’s work is dealing with conflicts arising from unforeseen resource and task
variations.
Examples of Project Conflicts
� Because of the absence of planned staff, the project cannot be completed within the allotted
time (schedule variance). The increase of working capacity through overtime would cause
additional costs (cost variance) or a possible reduction of scope would change the project
deliverables (scope variance).
Most conflicts require the project manager to decide which goals and goal types can change and which
cannot. OpenProj can be helpful in assisting these decisions by illustrating ‘critical paths’ within the
project and allow the user to easily identify what impact any changes would have.
Buyer: Paul Thomas ([email protected])Transaction ID: 8746548546137424A

7
Project Management Basics
Project Management Terminology
Certain terminology is used throughout the OpenProj software (and this guide), so it would be useful to
familiarize yourself with some of these phrases now.
Tasks The partial activities from which the overall project is composed are called
tasks. They are the smallest units/steps in a project.
Duration The period between the start time and the finish time of a task.
Predecessors A task that must be processed before a future dependent task can be started.
Successors A task that can only be started if a previous dependent task has been processed.
Milestones Milestones are important intermediate objectives. They often define phase
transitions, critical project stages or intermediate results. They are usually
represented as tasks that have no duration.
Summary Tasks Each chunk of a project with multiple tasks should be headed by a parent task
which is known as a Summary Task. Summary tasks usually terminate with a
milestone and have a fixed result (output). Summary tasks have a duration
assigned automatically from their sub-task’s duration and dependencies.
Slack ‘Free slack’ is how much a task can delay without impacting on other tasks.
‘Total slack’ is how much a task can delay without impacting on the end date of
the project.
Critical Path The shortest path from the beginning to the end of the project. Only tasks
without slack exist on this path (critical path) and are called critical tasks. The
project end date is automatically extended if a task on the critical path slips or
has an extended duration.
Resources Resources refer to all people, time, production and materials required to deliver
the project. A mapping of required resources can be performed for each task.
Reliable cost planning is only possible when real resources and costs are
mapped to the tasks.
Forward
Scheduled
This is where a start date is set for the project and the end date is automatically
calculated from the duration of the operations and the task dependencies.
Backward
Scheduled
This is where a deadline is set for the project and the latest possible project
start is automatically calculated from the duration of the operations and the
task dependencies.
Fixed Duration
Tasks
The duration for a task is set, regardless of how many resources are assigned to
it.
Effort Driven Tasks The duration of a task is dependent on how many resources of the same type
are assigned to it. For example, a deliverable is produced in less time with three
employees than with one.
Buyer: Paul Thomas ([email protected])Transaction ID: 8746548546137424A

8
Using OpenProj for the first time
Starting and Exiting OpenProj
Having downloaded and installed the OpenProj software; start OpenProj from the start menu of
Windows or via the icon on your desktop.
After the license agreement,
OpenProj starts with a choice of
creating a new project or opening
an existing one.
Choose ‘Create Project’
New Project window.
Enter a name for the project, the
project manager’s name and a
start date (which can also be
modified later if required).
Place a check mark in the
‘Forward scheduled’ box
(otherwise it will treat the project
tasks as backward scheduled). See
terminology on pg.6 for an
explanation on the differences.
Provide a description in the Notes
section as you see fit.
Buyer: Paul Thomas ([email protected])Transaction ID: 8746548546137424A

9
OpenProj Application Window
Indicator
Column.
In this column,
symbols are displayed
to show the status of
the corresponding
tasks (see right).
Task Number
Column.
Task numbers are assigned by OpenProj automatically when data is entered. The
user does not enter information into this box.
Time Scale. In many views, OpenProj shows a timeline whose scale can be changed via the +
and - magnifying glass icon on the menu above.
Information
View Type.
The area along the left side of the window lists a number of buttons representing
the available views. Gantt, Network, Resources, WBS (work breakdown structure),
RBS (resource breakdown structure), Reports, Task Usage and Resource Usage.
The lower view buttons open a split-screen where resource mapping tables and
resource utilization as a graphic can be displayed. You can toggle views on and off
by clicking the same button repeatedly.
Table View Gantt View
Information View Type
Task Number Column
Indicator Column Time Scale
Buyer: Paul Thomas ([email protected])Transaction ID: 8746548546137424A
10
Creating Your First Project For accurate tracking of your project it is essential to first set up the OpenProj calendar to reflect the
working hours in your organization.
Adjust the Calendar
OpenProj offers three default calendars:
� Standard Calendar (Mon-Fri, 08:00 to 17:00 with 1hr lunch break at noon)
� Night Shift (Mon-Sat 23:00 to 08:00 with a 1hr break from 03:00 to 04:00)
� 24-Hour Calendar (24/7 schedule)
You can assign any one of these to be your project calendar; however none of the default calendars
contain public holidays so it is often necessary to create your own custom calendar to reflect your
company’s general working hours.
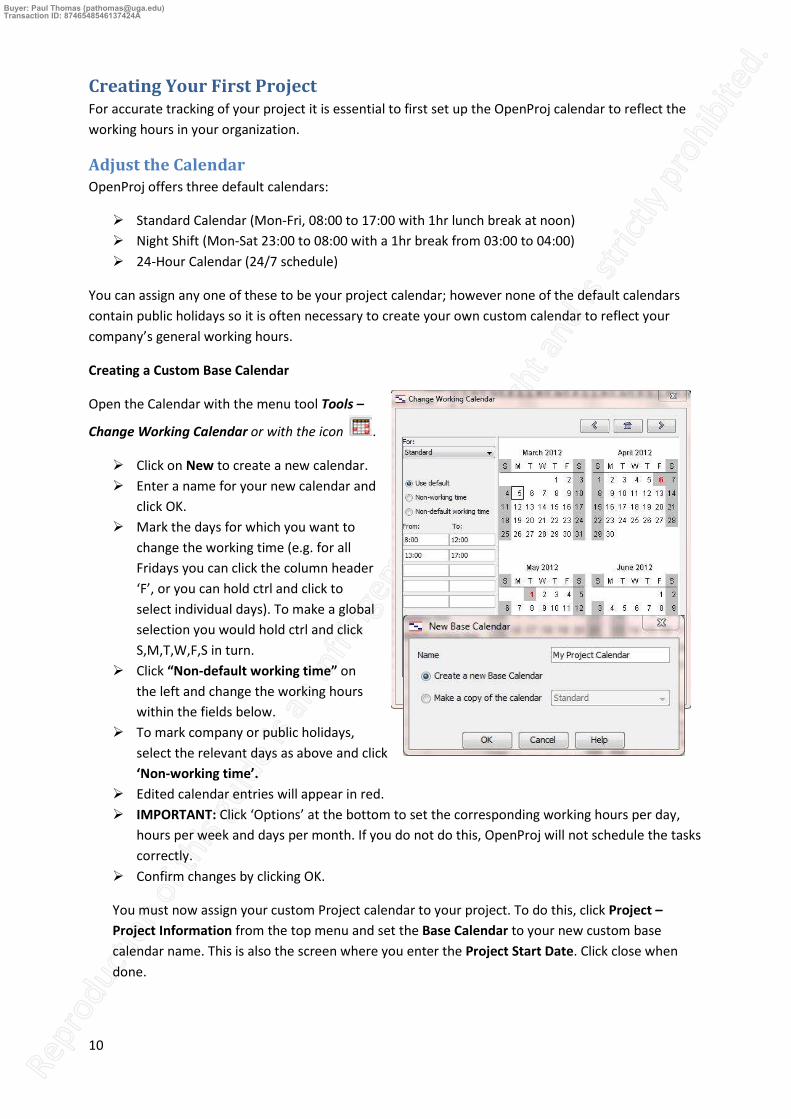
Creating a Custom Base Calendar
Open the Calendar with the menu tool Tools –
Change Working Calendar or with the icon .
� Click on New to create a new calendar.
� Enter a name for your new calendar and
click OK.
� Mark the days for which you want to
change the working time (e.g. for all
Fridays you can click the column header
‘F’, or you can hold ctrl and click to
select individual days). To make a global
selection you would hold ctrl and click
S,M,T,W,F,S in turn.
� Click “Non-default working time” on
the left and change the working hours
within the fields below.
� To mark company or public holidays,
select the relevant days as above and click
‘Non-working time’.
� Edited calendar entries will appear in red.
� IMPORTANT: Click ‘Options’ at the bottom to set the corresponding working hours per day,
hours per week and days per month. If you do not do this, OpenProj will not schedule the tasks
correctly.
� Confirm changes by clicking OK.
You must now assign your custom Project calendar to your project. To do this, click Project –
Project Information from the top menu and set the Base Calendar to your new custom base
calendar name. This is also the screen where you enter the Project Start Date. Click close when
done.
Buyer: Paul Thomas ([email protected])Transaction ID: 8746548546137424A

11
OpenProj can also associate calendars to individuals and to specific tasks. In this way you can designate
individual vacation periods or you can specify a task to follow a different schedule to the one in your
base calendar. So, in fact you can use three different types of calendars within your project:
1. Project calendar (your base calendar for the project as defined above)
2. Resource calendar (for individuals working time and vacation days)
3. Task calendar (for tasks that do not follow the regular working hours, e.g. a task cannot start
on a Friday because it would be interrupted by the weekend or maybe a task that runs
continuously for 24hrs).
Don’t worry too much about the resource and task calendar for now. We will come on to these later in
the relevant section of the guide.
The calendar is stored with the particular project file, so if you start another project it is necessary to
create the user defined calendar again.
After creating a user defined calendar, save the file as a template for all of your future
projects under a specific name, e.g. my_blank_project_template.pod
Tip
Buyer: Paul Thomas ([email protected])Transaction ID: 8746548546137424A

12
Entering Tasks
Entering Task Names
When you create a new project, OpenProj by default opens the Gantt chart view on the right pane and
the task input table on the left pane. You can drag the vertical line dividing the two panes to fit your
monitor as you desire.
Now it’s time to think about your project in terms of small chunks, or tasks. You can literally use this as
a brainstorm session as you can always edit, rearrange, insert or delete tasks later. Think about all the
distinct stages of your project and try to break them down to an appropriate level. If your gut instinct is
telling you that several people will need to work on something for several days, then look at that
activity again to see if it can be broken down further.
Try to ask yourself questions like “What work needs to be done, what or who is required to do it and
how long might it take?” the more detailed, the better. You need to identify the project deliverables
and then figure out what actions are required to produce those deliverables.
If this sounds like a lot of work, well, that is the reality. OpenProj is a powerful tool which will help you
calculate a schedule, visualize the plan and track progress but it is only as good as the data input at the
start. You have to decide what tasks are required and that is fundamental to effective project planning.
The importance of this cannot be over-emphasized.
To enter a task:
� Click in the Name column in the first
row.
� Enter a name for the task.
� Confirm the input by clicking the
mouse or pressing the tab button
which takes you to the duration entry
field.
� If you do not know the duration at this stage you do not have to input it. OpenProj enters a
default value of 1day? which you can alter at a later stage.
� If you have an estimate of the duration, then feel free to enter it into the cell. OpenProj
automatically converts the duration to days. For example, enter 1w (1 week) and OpenProj
will set the duration to 5 days. The input of 1 month would result in a display of 20 days and
1 hour would be displayed as 0.125 days (or 1/8th
of a day).
� Confirm the input by pressing Enter or clicking on the next row.
� It is important that you enter only task names and durations at this stage. Do not be
tempted to enter any other information right now. Especially not a starting date.
� It’s good practice even at this stage to enter general headings (phases) for tasks e.g “Design”
and then more specific tasks underneath, but never enter a duration for a general heading.
Buyer: Paul Thomas ([email protected])Transaction ID: 8746548546137424A

13
Work Breakdown Structure
Establish an outline
After entering the tasks (and the estimated durations) you now need to organize them into logical
groups of related tasks. These groups of tasks will eventually be headed by Summary Tasks (the general
headings that you input earlier). A Summary Task automatically adds up the time information about all
the tasks in a summary group. More about Summary Tasks in the next section, but for now insert,
move or copy your tasks around as necessary using the techniques described below:
Inserting, Moving, Copying and Deleting Tasks
To move or copy a task, the task must be selected as a whole (the entire task row in the table). Editing
is otherwise only performed on the selected cell and the cell contents. To select an entire row, click on
the numbered row header.
Entering New Tasks
� Select the row for where you want the new task to be inserted above
� Choose the Menu item: Insert – New Task/Resource, or right click New or press CTRL+K
Moving Tasks
� Select the desired task row
� Cut the task out with CTRL-X or from the Menu with Edit-Cut, or right-click with the mouse
� Paste the task to the desired position using CTRL-V (menu: Edit-Paste) or right-click for same
options.
Copying Tasks
� Select the desired task row
� Copy the task using CTRL-C (menu: Edit-Copy), or right click and copy
� Paste the task to the desired location with CTRL-V (menu: Edit-Paste).
Deleting Tasks
� Select the desired task row
� Delete with (menu: Edit-Delete) or by pressing the Delete key on your keyboard.
Creating a Summary Task
By grouping tasks under a parent task, a hierarchical structure (or phase) can be produced which can
contain several levels of detail.
In your task list, summary tasks will be automatically formatted in bold. Subtasks are displayed as
indented text. Summary tasks contain the symbols + and – as prefixes depending on whether the
individual tasks are expanded or collapsed. A summary task has a black bar on the Gantt view with
start and end points which are calculated from the duration and the dependencies of the tasks in that
phase. This is why you should never enter a duration for a summary task manually.
Buyer: Paul Thomas ([email protected])Transaction ID: 8746548546137424A

14
In order to create a Summary Task, identify the group of tasks which will come under the Summary
Tasks by selecting all the appropriate rows (drag your mouse) and indent them by pressing the “>”
icon. Below, we have selected tasks 2-6 and indented them, to make “Design” a Summary Task.
Indenting and Out-denting Tasks
� You can indent individual tasks or groups of tasks even further to create Summary Tasks within
Master Summary Tasks. Organizing tasks in this way gives your project structure which makes
it much easier to manage.
Menu icons for task level indent/outdent
Buyer: Paul Thomas ([email protected])Transaction ID: 8746548546137424A

15
Assigning Task Calendars
You remember setting your base
calendar at the beginning of your
project? We can use a similar technique
to create a Task calendar. Let’s create
one where a task can only be worked on
Monday, Tuesday and Wednesday.
Open the calendar tool using Tools –
Change Working Calendar , click New,
give it the Name MoTuWed (for
Monday, Tuesday and Wednesday). Click
the column heads for Thursday and
Friday (T & F) and click Non-working Time.
Now, to assign this Task Calendar to a Task:
� Open the Task Information box by
double-clicking on the Task name.
� Click on the Advanced Tab
� Select Task Calendar MoTuWed.
Click Close to confirm.
Now this task can only be worked on
one of the three days listed and
OpenProj will recalculate the task
accordingly, regardless of the
calculated start date.
Buyer: Paul Thomas ([email protected])Transaction ID: 8746548546137424A

16
Setting Dependencies
Dependency Types
Dependencies allow you to show the relationships between tasks and set rules for when tasks can be
started or finished.
OpenProj uses four types of dependencies:
Dependency Relationships Between Predecessors and Successors
FS (Finish-to-Start) This is the default relationship in OpenProj. It defines that one task has to
finish before the next one can start. For Example, ‘printing a document’
cannot start until ‘editing the document’ is finished.
SS (Start-to-Start) The start of a task is dependent on the start of its predecessor. In other
words, the task can only start after the predecessor task has started (or at a
later date)
FF (Finish-to-Finish) The completion of a task is dependent on the completion of its predecessor.
In other words, the task can only finish at the same time (or after) the
previous task has finished
SF (Start-to-Finish) The finish of the next task depends on the start of the previous task. In other
words, the first task begins after the second task ends – which is kind of
weird! A SF relationship is seldom used but is included in OpenProj so that all
four relationships are available.
When dependencies are created, the start and finish dates of tasks are usually affected. OpenProj
automatically edits start and finish dates so that they adhere to these new constraints. Any change to
the dependencies will update the task dates and Gantt bars automatically.
Selecting Tasks with FS Linkages (default and most commonly used)
You can link tasks in any of the three ways listed below. If you make a mistake at any time you can
undo with the menu: Edit-Undo or press Ctrl-Z.
1) By Manual Entry
� Identify the relevant task and in the predecessor column; enter the task number(s) of the
predecessor(s) which must be done before this task can start. Confirm your entry with the Enter
key. You may separate multiple predecessors with a semicolon (;).
In the example above, we have specified that for the “Design” summary task, we cannot do the
“Analysis” before we have done the “Gather Information”. We cannot do the “Present Alternative”
until we have done the “Analysis”. We cannot do the “Design Document” until we have done the
“Present Alternative” and we cannot do the “Design Complete” until we have “Design Document”.
In fact, all the tasks are dependent on their predecessors, so a quicker way to link the dependencies
would be using the By Selection method as per below:
Buyer: Paul Thomas ([email protected])Transaction ID: 8746548546137424A

17
2) By Selection
� Select the task rows in the table that are to be linked with a dependency. In the example above we
know all the tasks are dependent on each other, so we will select rows 2,3,4,5 & 6 with the mouse
and click (menu: Edit / Link) or simply click the task linking icon .
� You will see that all the tasks have now become dependent on each other with one click, rather
than typing each individual task dependency in manually.
You can select multiple or separated rows by using the CTRL-click action (for multiple selections).
3) By Dragging the Mouse
Note - tasks need to have a duration defined for mouse dragging to be effective.
� You can link two tasks together by pointing the mouse on the Gantt chart at the bar of the
predecessor task. The mouse pointer should change to a cross-hair symbol.
� Left-click and hold on the predecessor task and drag it to the successor task. The pointer should
change to a chain symbol . Release the button and the tasks should be linked together.
Caution! Be careful not to move the Gantt bars to the left or the right as it will cause the start
and end dates to change instead of the task linkages!!
You can also link individual Summary Tasks by any of the three methods, but you cannot link a
summary task to any of its own sub-tasks.
Removing Task Dependency
Linkages
You can delete dependencies by
clicking on the number in the
“predecessors” box and
deleting it with the delete key.
Alternatively you can select the linked tasks in the table and use the menu item Edit – Unlink or click
the icon or click the link line between the two tasks in the Gantt chart and select the “Remove”
option in the pop-up menu.
Buyer: Paul Thomas ([email protected])Transaction ID: 8746548546137424A

18
Defining Other Task Dependencies (SS, FF, SF) and Creating Time-Lags or
Overlapping Tasks
The dependencies entered can be differentiated even further, allowing you to specify a time gap
between two tasks or overlap tasks.
For example:
� The walls cannot be plastered until one week after the pouring of the floor screed, because the
floor screed has to dry first.
� One day before the end of the renovation work, you can begin with the cleanup activities.
Creating time lags or overlaps
Lags and overlaps are best applied by clicking the link line on the Gantt chart (assuming a link already
exists):
� Click on the link line between
two tasks in the Gantt chart.
� You can change the dependency
type in the dialog box that
appears if you wish.
� Enter the desired delay time into
the Lag: field.
� Confirm by clicking OK.
The default value of delay days is set to 0 days. By entering a positive value you create a time lag and
by entering a negative value you will create an overlap of a predecessor and successor.
Alternatively, you could apply the following procedure:
� Double-click the task for which you wish to change the dependency relationship or click on the
Task Information icon to bring up the information window.
� Open the Predecessor tab.
� Choose the dependency type and the lag duration value (positive or negative).
For even greater control, you can manually enter the link including the desired specifications into the
‘predecessors’ column as per below:
Buyer: Paul Thomas ([email protected])Transaction ID: 8746548546137424A

19
Predecessor
Column
Function
2 The task can begin only after the end of task 2. 2;3 The task can begin only after the end of tasks 2 and 3. 2SS The task can only start if task 2 has started. 2;3SS The task can only start if task 2 is completed and task 3 has started. 5FF The task cannot end before task 5 finishes. 3SS+3t The task can only start 3 days after task 3 started. 4SS+40%;3FS+3t Only when 40% (duration) of task 4 has lapsed, can the task begin. Additionally,
task 3 must have been finished for at least 3 days. 2FS-1t The task can only begin one day before the end of Task 2.
You can see in this way, highly complex dependencies can be specified.
Buyer: Paul Thomas ([email protected])Transaction ID: 8746548546137424A

20
Critical Tasks and Scheduling Conflicts
How to Identify Scheduling Conflicts
If you haven’t entered all the task durations into your project, now is the time to do it. Should the end
date calculated by OpenProj not concur with your schedule target date, then you will need to assess
and resolve the scheduling conflict by reviewing the critical tasks.
� Critical tasks are those tasks that have zero slack. A delay in any critical task will lead to the
slippage of the entire project completion date.
� Critical tasks are displayed in red in OpenProj.
� ‘Slack time’ bar indicators can be displayed by right clicking in the Gantt chart and select Bar styles
– Total slack. The hatched bars display the slack as specified. See page 21 for more on building in
slack time and buffers.
� The Critical Path displays the critical tasks in the project.
� Since the critical tasks have a direct influence on the end date, it is important for the project
manager to pay close attention to these in order to avoid slippages in the target completion date.
Possible Solutions to Scheduling Conflicts Achieved Through Changing Critical Tasks
� Assign additional project resources to the tasks (personnel, machine capacity, etc.)
� Rethink the duration of the tasks (is there hidden slack due to pessimistic estimations?)
� Apply overtime to the critical tasks.
� Review the task dependencies (don’t always use the ‘normal’ FS approach.)
� Look for opportunities to run tasks in parallel.
Filtering for Critical Tasks
OpenProj has the ability to only display the critical tasks to you by applying the filter as shown below.
Filter Critical Tasks
Buyer: Paul Thomas ([email protected])Transaction ID: 8746548546137424A

21
Milestones and Deadlines
Establishing Milestones
Milestones are important completion or decision points in a project that are often tied to a deliverable.
The start and finish of a phase should always be defined by a milestone. Milestones represent project
status (not activities); thereby, they will have date values but as a rule, they will have no duration.
Enter a new task into the schedule (e.g. Design Complete) and give this task a duration of 0 (zero). The
task will now appear in the Gantt chart as a black diamond shape.
Set the milestones of a phase to be at the same indent level as the Summary Task (not the indented
task level), and then link the milestones directly to the Summary Task. Dependencies can only be set
between elements on the same indent level.
In the next step, we will create start milestones and end milestones for each phase. We need to link
the end-milestones of the previous phase to the start milestones of the next phase.
Now the project timeline is represented by a sequence of phases. The final milestones represent the
results of each phase, the deliverable. The tasks within the phases describe the activities which are
necessary to produce the phase result or deliverable.
Buyer: Paul Thomas ([email protected])Transaction ID: 8746548546137424A

22
Note: So far we have not set any further dates other than the start date of the project. A (preliminary)
end date arises only from having a start date for the project, the duration of each activity and the
selected task dependencies.
This is the only way to make Project Planning successful!
Setting Deadlines
Deadlines are used to monitor the progress of individual tasks. A deadline set for a particular date will
trigger a notification as soon as that date slips and an icon in the indicator column is displayed.
Deadlines also appear in the Gantt chart as yellow diamonds.
To set a deadline:
� Select the task in Name column for which you’d like to apply a deadline.
� Open the task information Dialog Box by double-clicking the task name, or click the icon.
� Select the Advanced tab and enter the desired date into the Deadline: field.
� Confirm your entry and click Close.
Status indicator in the
indicator column
Yellow diamond
= deadline
Buyer: Paul Thomas ([email protected])Transaction ID: 8746548546137424A

23
Changing Task Information
Editing the Task Information
All task-related information is managed centrally via the Task Information window. For every task you
have the ability to modify information and task settings within six tabs.
It’s good practice to edit information in this menu rather than in the columns in the table view of the
spreadsheet.
Tab Content
General General task date information and percentage complete information.
Predecessors List of all predecessor tasks and dependency type settings.
Successors Information about successor tasks and dependency type settings.
Resources Shows the assigned resources and allocations for this task.
Advanced Task type and date constraint information.
Notes Allows entry of notes about the task.
We will touch upon the subject of these tabs later in the guide.
Buyer: Paul Thomas ([email protected])Transaction ID: 8746548546137424A

24
Task Constraints
Working with Task Constraints
The default task constraint setting is: As Soon As Possible
This means that the start date of a task is calculated from the project start date, the duration of
predecessor tasks and the task dependencies.
The other date constraints are self-explanatory.
The plan is still completely dynamic. A change in the project start date (Menu: Project – Project
Information) will result in a recalculation of all project task dates.
Buyer: Paul Thomas ([email protected])Transaction ID: 8746548546137424A
25
The Encapsulated Project Structure Now it’s time to give your project schedule a firmer structure; metaphorically speaking, a skeletal
frame. This will happen by encapsulating the phases and adding planned slack or buffers.
Buffers should be visibly represented and will be automatically reduced during the course of the
project if schedule variances occur. Additionally, buffers should be in place so that a date variance at
the beginning of the project doesn’t impact all phases, but rather only impacts the tasks in the relevant
phase. In this way, the project manager has the opportunity to take countermeasures so as not to
jeopardize the whole project. The very essence of good project control.
In order to achieve this, a buffer is inserted between the end milestone of a predecessor phase and the
start milestone of the next phase by setting a task constraint “must start on” to the start milestone.
The time difference between the calculated finish date of the end milestone and the fixed start
milestone of the next phase is the “planned slack or buffer”.
The duration of the buffer time depends on several factors such as the complexity, familiarity (one can
estimate more accurately the known activities vs. something that has never been done before) and the
total length of the phase. For example, a buffer period of 5 days at the end of a phase which lasts only
two weeks is probably a little exaggerated. The same slack in a phase lasting half a year is probably too
optimistic.
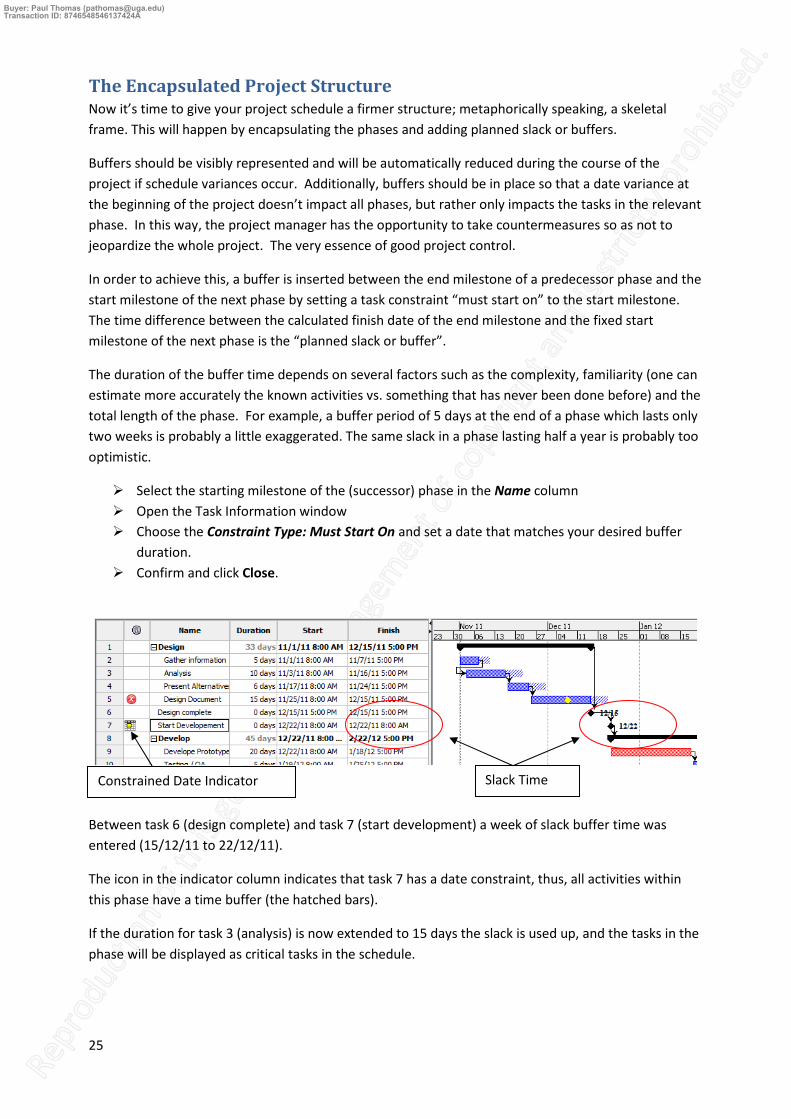
� Select the starting milestone of the (successor) phase in the Name column
� Open the Task Information window
� Choose the Constraint Type: Must Start On and set a date that matches your desired buffer
duration.
� Confirm and click Close.
Between task 6 (design complete) and task 7 (start development) a week of slack buffer time was
entered (15/12/11 to 22/12/11).
The icon in the indicator column indicates that task 7 has a date constraint, thus, all activities within
this phase have a time buffer (the hatched bars).
If the duration for task 3 (analysis) is now extended to 15 days the slack is used up, and the tasks in the
phase will be displayed as critical tasks in the schedule.
Constrained Date Indicator Slack Time
Buyer: Paul Thomas ([email protected])Transaction ID: 8746548546137424A

26
Generally, critical tasks (red bars) are cause for concern for the project manager as he must try to
maintain the scheduled project completion date through the application of other appropriate
countermeasures and can no longer rely on a buffer.
The next stage in the project plan is to allocate resources!
Buyer: Paul Thomas ([email protected])Transaction ID: 8746548546137424A

27
Resource Planning
Entering Resources
Fundamentals for Resource Planning
An important step in project planning is the allocation of resources to individual tasks.
A resource is any type of entity (persons, material, equipment and expenses) that are required to
accomplish the tasks in the plan. For example, the available project team members, external
contractors, tools and computers, leased office space, building or manufacturing materials are all
resources.
OpenProj only distinguishes between two types of resources:
Work Work resource is basically time or labor (staff, consultants, freelancers and
contractors)
Material Material resource represent items or commodities consumed to complete tasks in the
project (tons of concrete, lengths of wire, units of computers..)
Resource Sheet Creation
Before you are able to allocate resources to a task you will need to establish a resource sheet/table. In
this table you will list the available resources and additional resource information.
� Select the menu item View – Resources or choose the icon from the view button pane.
� Enter the name of the resource into the Name column in the resource table.
� Choose the resource type in the Type column.
You may also enter generic resource names (e.g. Software Programmer).
The Max. Units reflect the quantity of this generic resource available. 700% means, that you have 7
Software Programmers in your project team.
Column Description
Name Name of the resource (name, job title, machine name, material name, cost type).
Type Type of resource (Material or Work).
Material Label This column contains the unit of measurement of the material, for example, liters,
pallets, or cubic meters. Entries are only allowed for Material resources
Initials OpenProj automatically assigns the first letter as initial. You can change this name
if necessary.
Group Here you can specify group names for resources (such as Department, cost
center, etc.) It can be filtered according to this information.
Buyer: Paul Thomas ([email protected])Transaction ID: 8746548546137424A

28
Max. Units % Specifies the number of people, machines or similar in % for the total number of
available units. The default is 100% (1). This field can only be used for work
resources.
Standard-Rate Enter of the cost/unit. For example, labor cost per hour. For machines enter the
price or fee per unit of time.
Overtime Costs for work outside normal working hours.
Cost Per Use Fixed pay rate for the use of a resource. For example travel costs of external
employees, fixed price per device.
Base Calendar Select the project calendar you have created at the beginning. A resource
calendar is assignable to each resource whereby individual working hours and
holidays can be defined.
Resource Allocation
Assigning Resources to Tasks
After you have populated the Resource Sheet with resource, you have various methods available to
apply them to tasks in the plan:
1) Assigning Resources Using the Assign Resource Dialog Box
� Select the desired task in the
task table for which you
would like to add a resource.
� Choose Tools-Assign
Resources from menu bar.
� Alternatively:
� In the Assign Resources
entry Dialog Box you’ll see a
list of all assignable
resources.
� Click on the resource you
want to add and click the
Assign button.
� Close the window.
After you’ve assigned the resources you’ll see them listed next to the task bars in the Gantt view as
well as in the Resource Names column.
Buyer: Paul Thomas ([email protected])Transaction ID: 8746548546137424A

29
2) Through the Task Information Dialog Window
� Double-click on the task and then choose the Resources tab.
� Click the icon.
� The familiar resource window should open.
� Assign the desired resources and then close the Assign Resources window.
The Assign Resources window will also allow you to replace, remove, add or change % allocation to
tasks after the fact.
Buyer: Paul Thomas ([email protected])Transaction ID: 8746548546137424A

30
Resource Information
As with the Task Information window there also is a centralized resource administration feature within
the application. This feature is called Resource Information dialog box.
You can open this feature by double-clicking the resource’s name in the Resource Sheet or by clicking
the icon. You can also access it by using the menu bar item Project – Tasks/Resource Information.
The 5 tabs in this window allow you to add various details to the resources:
General Contains general resource information.
Costs Here you can modify the cost per hour as well as 5 different cost rates (e.g.
for subcontractors).
Resource Availability Here you can assign date availability of the resource as well as available
capacity (e.g. 50%).
Tasks Here you will see all tasks to which this resource has been assigned. You can
determine allocation as well as perform leveling of the resource. You can
also get to the standard rate table from here.
Notes Here you can enter additional notes and information about the resource.
Buyer: Paul Thomas ([email protected])Transaction ID: 8746548546137424A

31
Resource Calendars
Just like we can define a custom calendar for certain tasks, we can do the same for resources.
To create a Resource calendar, go to the Resource Information view by clicking View – Resources. Here
you should see a list of all resources for your project. Let us change the calendar for the resource Bob
Hunt.
� Double click on the
resource name.
� Select your Project Calendar
as the Base Calendar
� Click on the calendar icon to
the right of Base Calendar
� The resource calendar for
Bob Hunt opens (confirmed
by the name in the top left
corner).
� Mark the vacations of Bob
Hunt and click Non-Working
Time or change his individual working hours as appropriate.
Buyer: Paul Thomas ([email protected])Transaction ID: 8746548546137424A

32
Work and “Scheduling By Task Type”
Work & Effort
The ability to add one or multiple resources to a task has opened up a whole new variable in the
project. The variable of “effort”:
Effort = Duration x Resource Allocation
You should really understand this equation in order to grasp the following concepts and practical
applications of planning your project. For example, if we take a task with a duration of one day (8
hours) and we assign two resources at 100%, the total effort equates to 16 hours (and costs are
calculated accordingly). A task with a duration of two days, with one resource at 100% plus another
resource allocated at 50% will equate to 24 hours of effort. (16 hours plus 8 hours).
We can monitor the effort by inserting the Work (this is how OpenProj represents effort) column
before the Duration column. To insert this column you must right-click the column header on the Start
column and then choose the Insert Column – Work. You can start typing the word “Wor...” to quickly
get to the correct item.
There are some tasks that can be completed within a shorter duration if more resources are allocated
to it. For example, 4 brick layers will build the walls of a single family home in half the time than two.
In contrast, will a meeting finish more quickly if more people are present? Probably not.
The specific attributes of a task are controlled through the Task Type in OpenProj.
� Menu Project –
Tasks/Resource
Information
� Or the icon
� Advanced tab.
� Type field.
� Checkbox “Effort
Driven”
The default task type in OpenProj is Fixed Units – Effort Driven. This means that the resource allocation
determines the duration and effort of the task
OpenProj works with proportional changes. By doubling the units you cut the task duration by half. In
practicality, this relationship does not always hold true. Four programmers don’t necessarily develop a
program in half the time that two developers would. In that example the added cost and effort would
not necessarily be effective.
Buyer: Paul Thomas ([email protected])Transaction ID: 8746548546137424A

33
The Work (Effort) Package Is Defined by Initial Resource Allocation! It is during the initial assignment
of a resource to a task that the work package gets defined. A change in the resource allocation
(percentage-wise or through addition or reduction of a resource) will change the duration if the task
type is set to Fixed Units.
This sometimes leads to surprising but not necessarily false results. Task Duration Is Determined By
Controlling Resource.
For the calculation of a task’s end date in effort-driven planning, it is the resource that works the
longest on the task that will determine task completion (logically!) This can also be due to a part-time
resource that only has a few hours daily to commit to the task.
You can deactivate the effort-driven attribute of the task by removing the check mark in the “Effort
Driven” check box in the task information window.
The setting Fixed Duration is frequently preferred by those users who do not fully trust
the automatic calculation of OpenProj. The duration remains fixed as the project
manager planned it, regardless of how many resources are added or removed. The
project manager calculates the duration manually - he would rather do this in his head
instead of leaving that task to a machine.
As described earlier, there are compelling reasons to choose this task type: will construction of a
building finish more quickly if more supervisors are added? Does the drive from New York to Chicago
take half as long if 4 people instead of 2 sit in the car? Will a business meeting be shorter if 20
participants instead of 10 attend? OpenProj is a calculation program, which can only handle the basics
of mathematics; it has no knowledge about your tasks or the people on your team.
Here, as in many other instances- it is the experience and wisdom of the project manager that should
be predominant. The intelligence is sitting in front of the computer!
Tip
Buyer: Paul Thomas ([email protected])Transaction ID: 8746548546137424A

34
Overview of Task Types
Fixed Units
Task Type Effort Driven You Change OpenProj Calculates
Fixed Units Yes Duration Work
Fixed Units Yes Work Duration
Fixed Units Yes Resource Units Duration
Fixed Units No Duration Work
Fixed Units No Work Duration
Fixed Units No Resource Units Duration
Fixed Units No Additional resources
with other names.
Work for the task
Fixed Work
Task Type Effort Driven You Change OpenProj Calculates
Fixed Work n/a Duration Resource Units
Fixed Work n/a Work Duration
Fixed Work n/a Resource Units Duration
Fixed Work n/a Additional resources
with other names.
Duration
Fixed Duration
Task Type Effort Driven You Change OpenProj Calculates
Fixed Duration Yes Duration Work
Fixed Duration Yes Work Duration
Fixed Duration Yes Resource Units Work
Fixed Duration Yes Additional resources
with other names.
Resource Units
Fixed Duration No Duration Work
Fixed Duration No Work Resource Units
Fixed Duration No Resource Units Work for the task
Fixed Duration No Additional resources
with other names.
Work for the task
Buyer: Paul Thomas ([email protected])Transaction ID: 8746548546137424A

35
Individual resource allocation
Two resources by the name of Bob Hunt and Kerry Peters are working on a task with duration of 7.5
days. Due to the nature of the task it was required that Bob starts first as well as works throughout the
entire activity. The result of Bob’s work is the foundation for the work to be started by Kerry. Kerry is
only allocated part-time to the task. This type of allocation is called a ‘staggered order’ or ‘staggered
allocation’.
First, apply the normal resource assignments for Bob and Kerry, both at 100% allocation. Then, change
the allocation in the view called Task Usage.
The Task Usage Detail view is accessible from the menu item View-Task Usage, or also via the
icon on the view button pane.
Allocation of Staggered Resources
The newly calculated assignment duration for Bob now entails 60 hours and Kerry is allocated at 38
hours. The total work effort now requires 98 hours instead of 120 hours. Due to this staggered
allocation model we don’t seem to observe any side effects with respect to the task type or effort
allocation type. Regardless of which task type is set, it does not change the task’s duration. It only
changes the total calculated work effort.
The end result can also be viewed in the Gantt Chart.
With a right-click to the diagram you’ll be able to pull up the contextual menu and activate the Show
Assignments feature.
Buyer: Paul Thomas ([email protected])Transaction ID: 8746548546137424A
36
Resource Leveling
What is the Purpose of Resource Leveling?
So, you’ve entered all planned tasks into your project, mapped the dependencies between the tasks
and assigned resources and their allocations to the tasks. Perhaps you’ve assigned a resource to two
or more tasks at the same time in the schedule (parallel tasks), and are now faced with an over-
allocated resource. If this happens, then you will encounter a resource conflict which must be dealt
with. This process is called “resource leveling” which is a critical part of project planning.
Resource Leveling Strategies
In order to remedy a resource over-allocation, you can apply one or several of the following measures:
� Change the properties of certain tasks (delay them, interrupt them)
� Change the allocations of tasks
� Change the working times of a resource
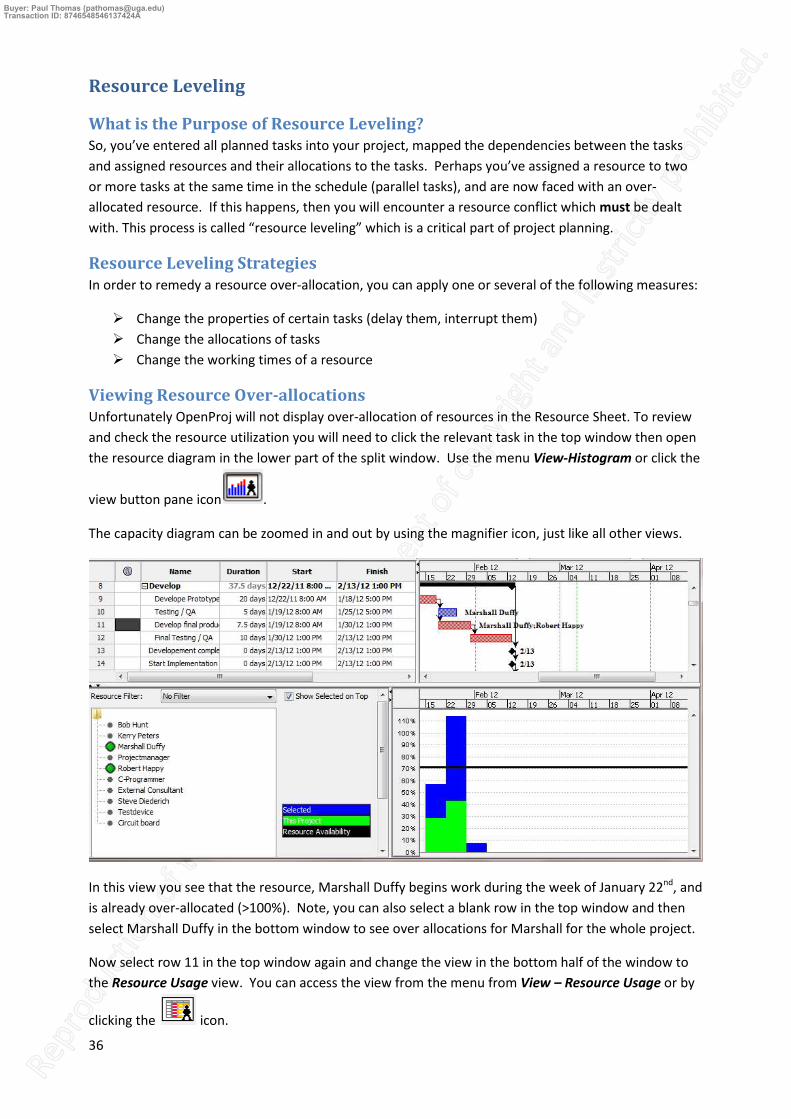
Viewing Resource Over-allocations
Unfortunately OpenProj will not display over-allocation of resources in the Resource Sheet. To review
and check the resource utilization you will need to click the relevant task in the top window then open
the resource diagram in the lower part of the split window. Use the menu View-Histogram or click the
view button pane icon .
The capacity diagram can be zoomed in and out by using the magnifier icon, just like all other views.
In this view you see that the resource, Marshall Duffy begins work during the week of January 22nd
, and
is already over-allocated (>100%). Note, you can also select a blank row in the top window and then
select Marshall Duffy in the bottom window to see over allocations for Marshall for the whole project.
Now select row 11 in the top window again and change the view in the bottom half of the window to
the Resource Usage view. You can access the view from the menu from View – Resource Usage or by
clicking the icon.
Buyer: Paul Thomas ([email protected])Transaction ID: 8746548546137424A

37
In the upper half of the split window, insert a new column called Free slack after the Duration column.
Select the task to which the over-allocation applies (Develop final product) in the Gantt chart. In the
bottom view you will see the assigned resource(s) and assigned tasks as well as the allocated work
hours. A possible solution to resource over-allocation could be to move the task “Develop final
product” to a later date. Since this task has free slack of 7.5 days we also know the maximum value for
which a move can be made without impacting other phases.
The Leveling Delay field in the Resource Utilization view serves the purpose of delaying the task for
resource leveling purposes. We will enter a value of 5 days for this task here.
Going back to the View-Histogram on the lower pane shows us that the resource is no longer
over-allocated.
Buyer: Paul Thomas ([email protected])Transaction ID: 8746548546137424A

38
Of course, we could have taken other approaches here. For example, letting the task in the Task Table
start 5 days after its predecessor (with a dependency type relationship that creates a positive delay of
5 days) or, as discussed in the previous chapter about staggering approaches, manually distributing the
work for the over-allocated resource so that it is completely leveled via over-time.
You can see that there are many methods available to level out a resource over-allocation problem.
This kind of situation is one in which the creativity and personal judgment of the project manager are
essential.
As you already know: The Intelligence ….
Buyer: Paul Thomas ([email protected])Transaction ID: 8746548546137424A
39
Project Cost Calculations in OpenProj
Project Cost Calculation Fundamentals
Frequently the success of the project isn’t just tied to the on-time delivery, but also to cost
management and cost control. With the help of OpenProj you will be able to determine and monitor
these project costs.
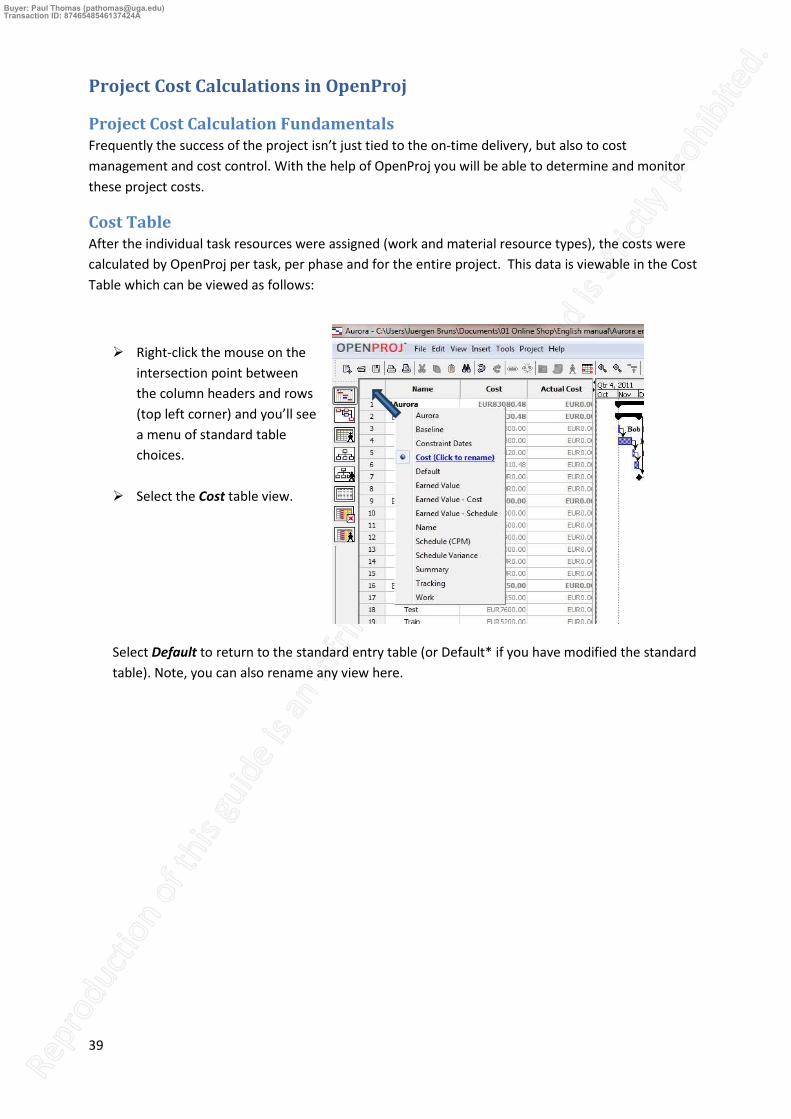
Cost Table
After the individual task resources were assigned (work and material resource types), the costs were
calculated by OpenProj per task, per phase and for the entire project. This data is viewable in the Cost
Table which can be viewed as follows:
� Right-click the mouse on the
intersection point between
the column headers and rows
(top left corner) and you’ll see
a menu of standard table
choices.
� Select the Cost table view.
Select Default to return to the standard entry table (or Default* if you have modified the standard
table). Note, you can also rename any view here.
Buyer: Paul Thomas ([email protected])Transaction ID: 8746548546137424A

40
Set Baseline You should now have a project plan that is free of scheduling conflicts and resource over-allocations.
Always try to start your project with a “clean” plan. Problems with schedule variances and over-
allocated resources will appear sooner or later all on their own, and you will have plenty of work to do
in keeping your plan under control. You should have created a cleanly encapsulated planning model
with buffer/slack built into each of the individual phases which you will be grateful for as the project
progresses.
Once the plan has been presented and approved, it is time to set you set your baseline plan. Setting a
baseline allows an illustration of how the plan was originally perceived (i.e. the baseline plan) against
how it is actually doing in practice. You tell OpenProj how the plan is progressing in practice by
inputting ‘actuals values’ against the specific tasks.
The baseline plan can be established by going to the menu and selecting Tools – Tracking – Save
Baseline.
� If a baseline plan already exists, you can still add
further tasks later by using the check box
“Selected Tasks”.
� An updated version of a baseline plan will always
overwrite the previous version. This is typically
undesirable as it changes the current actuals
values into new estimated values, and could
invalidate the original business approval
assumptions for the project.
After confirming and saving by clicking OK, you’ll notice gray bars that have now appeared in the Gantt
chart. These indicate the values of the baseline plan.
Buyer: Paul Thomas ([email protected])Transaction ID: 8746548546137424A

41
Project Monitoring Once the project is up and running, we need to let OpenProj know how the tasks are progressing in the
real world. This is called project monitoring. Monitoring means comparing the plan to the reality and
taking appropriate action where negative variances arise.
For example, if you now have a duration for task 4 (Present Alternatives) that needs to be extended to
10 days, then you’ll see a deviation between the baseline plan and the actual plan.
Since the project monitoring module for OpenProj contains several bugs we suggest
you exercise caution while making updates. Always save a backup copy under a
different filename after you’ve saved your baseline plan!
Use the Tracking entry view for the entry of actuals. (Do you remember how? Right-click on the
intersection point between the rows and column headers top left of the table).
Only enter values into the Actual Start, Actual Finish and/or Actual Duration and/or Percent Complete
fields. The other values will be automatically calculated from your entries in the actual fields.
When you enter Actual Start and Actual Finish, OpenProj will automatically calculate the Actual
Duration and place the Percent Complete value at 100% (otherwise there wouldn’t be an Actual Finish).
The Actual Work and Actual Costs will be automatically updated as well. It’s a good idea to create a
practice plan file for yourself to get acquainted with these operations.
Tip
Buyer: Paul Thomas ([email protected])Transaction ID: 8746548546137424A

42
You also have the ability to enter values for the actuals through the Task Information
window or through the menu at Tools – Tracking – Update Tasks. It is strongly advised
against this, though. As wonderful as the planning module for OpenProj is – the
monitoring module remains quite vulnerable to corruption during usage of the form
views.
The results of the entries for the actuals values can be easily discerned within the Gantt chart.
The black bars inside the task bars represent the level of completion for the activities; likewise, the
green checkmarks in the status column indicate completed tasks.
Tip
Buyer: Paul Thomas ([email protected])Transaction ID: 8746548546137424A

43
Reports
Standard Reports
OpenProj offers a number of standard reports, which you can open from the navigation pane with the
following icon:
Play with the various reporting options and determine which of them will suit your reporting
requirements. You can select from the dropdown menu in the top middle of the screen and choose
from:
� Project Details
� Resource information
� Task Information
� Who does what
Some of these selections bring up a further options box to the right which enables you to select
different types of data.
User Defined Reports
You also have the option to create your own reports, in which you can insert tables that contain the
columns and rows that are of highest importance for your needs.
In addition, you can apply filters, sorting and grouping formats to them and you can choose to print
them or store them as .pdf documents.
To do this, simply navigate to the menu and click File – Print. The print out will correspond exactly to
the view visible on your computer monitor so by moving the screen split bar to the left or right you can
view a table without a Gantt chart, or a Gantt chart without a table, or a combination of both.
Proof the print job prior to printing by using the print preview feature located at the menu and File –
Print Preview. Here you can make some additional tweaks and adjustments for the print job e.g. Print
table (spreadsheet), print diagram (Gantt).
There are almost endless options available so it’s worth experimenting for a while to see which options
produce the best result for your individual needs.
Unfortunately, OpenProj lacks the ability to store user-defined formats. You will need to recreate your
desired table/graphic again each time you return to the printing menu.
Buyer: Paul Thomas ([email protected])Transaction ID: 8746548546137424A

44
Afterword You now hopefully now have the basic operational knowledge about OpenProj. It may still take some
time for you to fully understand how to lie out and plan a complete project. Mastering a tool alone
does not necessarily mean you have mastered the methodology.
We wish you much success in the planning and implementation of your projects. Good luck!
Buyer: Paul Thomas ([email protected])Transaction ID: 8746548546137424A