ONLINE REGISTRATION SYSTEM (ORS) - CXC | Education · PDF file2013 ONLINE REGISTRATION SYSTEM...
53
2013 ONLINE REGISTRATION SYSTEM (ORS) Manual for the Centre User CCSLC® CSEC® CAPE®
Transcript of ONLINE REGISTRATION SYSTEM (ORS) - CXC | Education · PDF file2013 ONLINE REGISTRATION SYSTEM...
2013
ONLINE REGISTRATION
SYSTEM (ORS)
Manual for the Centre User
CCSLC® CSEC® CAPE®

Online Registration System User Manual
10 December 2013 2/53
TABLE OF CONTENTS
INTRODUCTION 3
Definitions 3
Online Registration System 4
Menu Options/User Privileges 5
Accessing the ORS 6
REGISTRATION MENU OPTION 8
Registering Candidates 8
Registering a New Candidate 9
Special Characters and Accents 9
Registering a Candidate from a Previous Sitting 14
Candidates Enrolling in the USAID Second Chance Programme 16
Add Candidate Subjects 17
Edit Candidate‟s Personal Details 19
Edit Candidate‟s Subjects 21
Selecting a CAPE Associate Degree 22
Querying for Candidates 23
View Candidate Details 24
Candidate Privileges 24
Batch Entry 25
Candidate Fees 27
GENERATE SEQUENCE NUMPERS OPTION 29
PROJECTIONS MENU OPTION 30
IMPORT/EXPORT MENU OPTION 31
Import Personal Data 31
Forward Registration Files to Ministry 33
Forward Amendment Files to Ministry 33
Export Database Fields 34
REPORT MENU OPTION 35
Registration-related Reports 35
SBA MENU OPTION 39
Teacher Assignment 39
SBA Data Capture/Order of Merit 40
SBA Confirmation 41
Practical Data Capture 42
Forward SBA to Ministry 42
SBA-related Reports 43
QUERIES AND REVIEWS MENU OPTION 44
Processing a Query/Review 44
Export Queries/Reviews 48
Results/Reviews/Queries-related Reports 49
MINISTRY USERS MODULE 50
Forward Registration Files to CXC 50
Set-up Cutoff Dates by Ministry 51
Tracking SBA Samples Received by Ministry 52

Online Registration System User Manual
10 December 2013 3/53
INTRODUCTION
1. The User Manual provides information on the operations of the Online Registration
System (ORS) application from the perspective of the end User. It is divided into four main
Parts A, B and C. Part A deals with Registration, Part B with School Based Assessment and
Order of Merit, and Part C with Queries and Reviews. Part D provides a synopsis from the
perspective of the User at the Ministry (Local Registrar‟s Office).
Definitions
2. For the purposes of this manual, the following definitions/acronyms are given:
i. CXC® – Caribbean Examinations Council
ii. CCSLC® – Caribbean Certificate of Secondary Level Competence
iii. CSEC® – Caribbean Secondary Education Certificate
iv. CAPE® – Caribbean Advanced Proficiency Examination
v. CPEA®
– Caribbean Primary Exit Assessment
vi. CVQ®
– Caribbean Vocational Qualification
vii. Candidate number – a 10-digit number assigned to a candidate at
each sitting. The number may vary from sitting.
viii. CVQ candidate number – a 16-digit number assigned to a candidate
on first time registration for CVQ offerings.
ix. SBA – School Based Assessment
x. ORS – Online Registration System
xi. “Resit” candidate – a candidate who is repeating a subject (Unit in
CAPE) AND is re-using the moderated SBA mark achieved in that
subject (Unit) from a previous sitting. At the time of registration, the
candidate must be registered for the “Resit” option
xii. Moderated SBA mark – the mark awarded by CXC after a review
process was undertaken of the SBA mark/sample submitted by the
school or examination Centre. The moderated mark awarded by CXC
may be higher, lower or the same as the mark awarded by the school
(Centre)
xiii. Alternative Paper – an examination paper offered to a candidate
(registered at a private examination Centre) who opts not to submit
SBA or reuse his/her moderated SBA mark achieved at a previous
sitting. At the time of registration, the candidate must be registered for
the “Alternative” option
Online Registration System User Manual
10 December 2013 4/53
xiv. Ministry – the Local Registrar‟s Office
xv. New Candidate – a candidate who is taking CXC‟s examinations for
the first time or was registered for examinations before 2004.
xvi. Former Candidate - a candidate who was registered for any of CXC‟s
offerings (CPEA, CCSLC, CSEC, CAPE, CVQ) in 2004 or
afterwards.
xvii. Private examination Centre – an examination Centre that is not
recognised by the Council as a school or full-time educational
institution
xviii. Student Portal – a website (https://ors.cxc.org/studentportal) where
candidates can view their registration records, individual timetables
and examination results
xix. Password - MUST be at least 8 characters in length and include 1
upper case, 1 lower case, 1 digit and 1 special character. Example:
JohnDA3$. Here the $ represents the special character. Other special
characters include ! @ # % & ( +.
xx. UCN – Unique Candidate Number. It is an eleven digit number: digits
1-4 represent the year in which the UCN was first issued and digits 5-ll
are randomly generated numbers
xxi. User – any person interfacing with the ORS
xxii. USAID – United States Agency for International Development
xxiii. USAID Second Chance Programme – an initiative between USAID
and CXC to encourage „At Risk Youths‟ to enroll in a programme to
gain qualifications at the CVQ level or CCSLC level.
Online Registration System Application (ORS)
3. The ORS is a web-based application that operates with browsers Internet Explorer 6
(or later versions) and Mozilla Firefox. The Google Chrome browser sometimes present
challenges when changes are made to the ORS application and its use is not recommended. It
was developed to facilitate the speedy and efficient keying and submission of candidates‟
registration data, SBA and Practical marks, and queries and reviews.
4. The data keyed in the ORS are forwarded by the Centre to CXC® via the Ministry.
The data files are then loaded by CXC into its Examining Processing System (EPS). The
processed files are copied back to the ORS and may be accessed through the various reports
available in the ORS. There may be some differences between the data keyed in the ORS by
the Centres and the data in the EPS since the data in the latter are unlikely to contain some of
the irregularities present in the ORS.
Online Registration System User Manual
10 December 2013 5/53
Menu Options/User Privileges
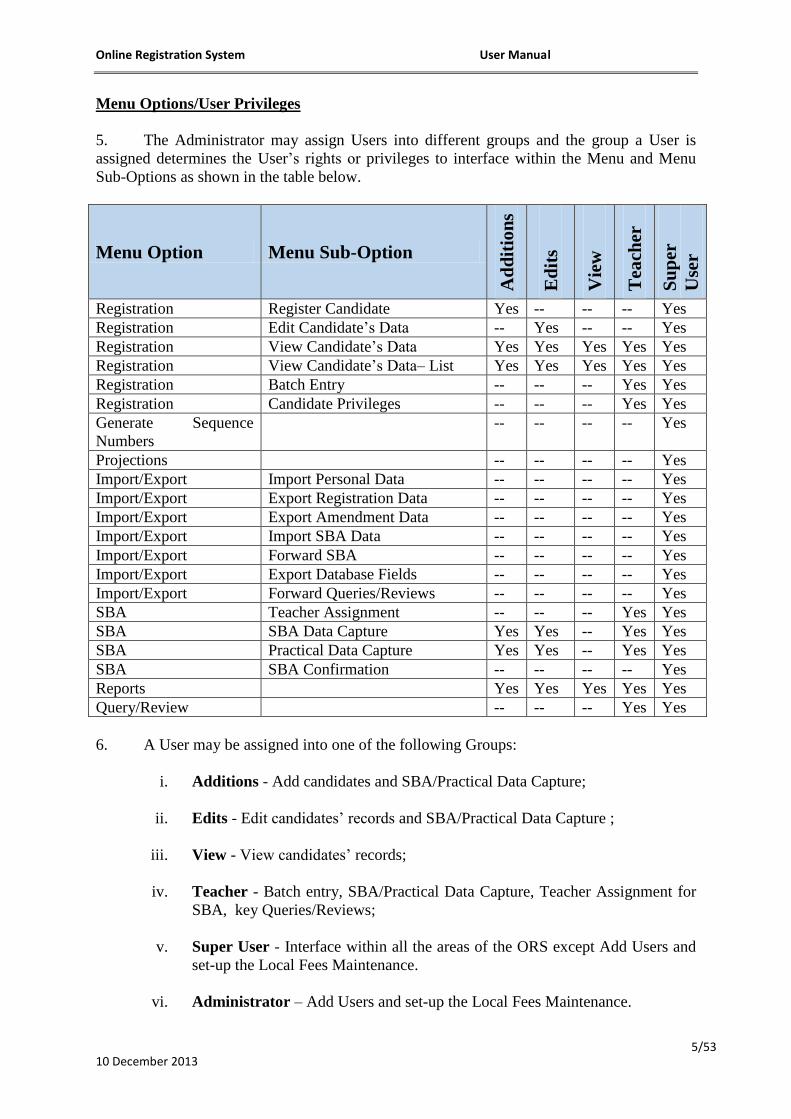
5. The Administrator may assign Users into different groups and the group a User is
assigned determines the User‟s rights or privileges to interface within the Menu and Menu
Sub-Options as shown in the table below.
Menu Option Menu Sub-Option
Ad
dit
ion
s
Ed
its
Vie
w
Tea
cher
Su
per
Use
r
Registration Register Candidate Yes -- -- -- Yes
Registration Edit Candidate‟s Data -- Yes -- -- Yes
Registration View Candidate‟s Data Yes Yes Yes Yes Yes
Registration View Candidate‟s Data– List Yes Yes Yes Yes Yes
Registration Batch Entry -- -- -- Yes Yes
Registration Candidate Privileges -- -- -- Yes Yes
Generate Sequence
Numbers
-- -- -- -- Yes
Projections -- -- -- -- Yes
Import/Export Import Personal Data -- -- -- -- Yes
Import/Export Export Registration Data -- -- -- -- Yes
Import/Export Export Amendment Data -- -- -- -- Yes
Import/Export Import SBA Data -- -- -- -- Yes
Import/Export Forward SBA -- -- -- -- Yes
Import/Export Export Database Fields -- -- -- -- Yes
Import/Export Forward Queries/Reviews -- -- -- -- Yes
SBA Teacher Assignment -- -- -- Yes Yes
SBA SBA Data Capture Yes Yes -- Yes Yes
SBA Practical Data Capture Yes Yes -- Yes Yes
SBA SBA Confirmation -- -- -- -- Yes
Reports Yes Yes Yes Yes Yes
Query/Review -- -- -- Yes Yes
6. A User may be assigned into one of the following Groups:
i. Additions - Add candidates and SBA/Practical Data Capture;
ii. Edits - Edit candidates‟ records and SBA/Practical Data Capture ;
iii. View - View candidates‟ records;
iv. Teacher - Batch entry, SBA/Practical Data Capture, Teacher Assignment for
SBA, key Queries/Reviews;
v. Super User - Interface within all the areas of the ORS except Add Users and
set-up the Local Fees Maintenance.
vi. Administrator – Add Users and set-up the Local Fees Maintenance.
Online Registration System User Manual
10 December 2013 6/53
Accessing the ORS
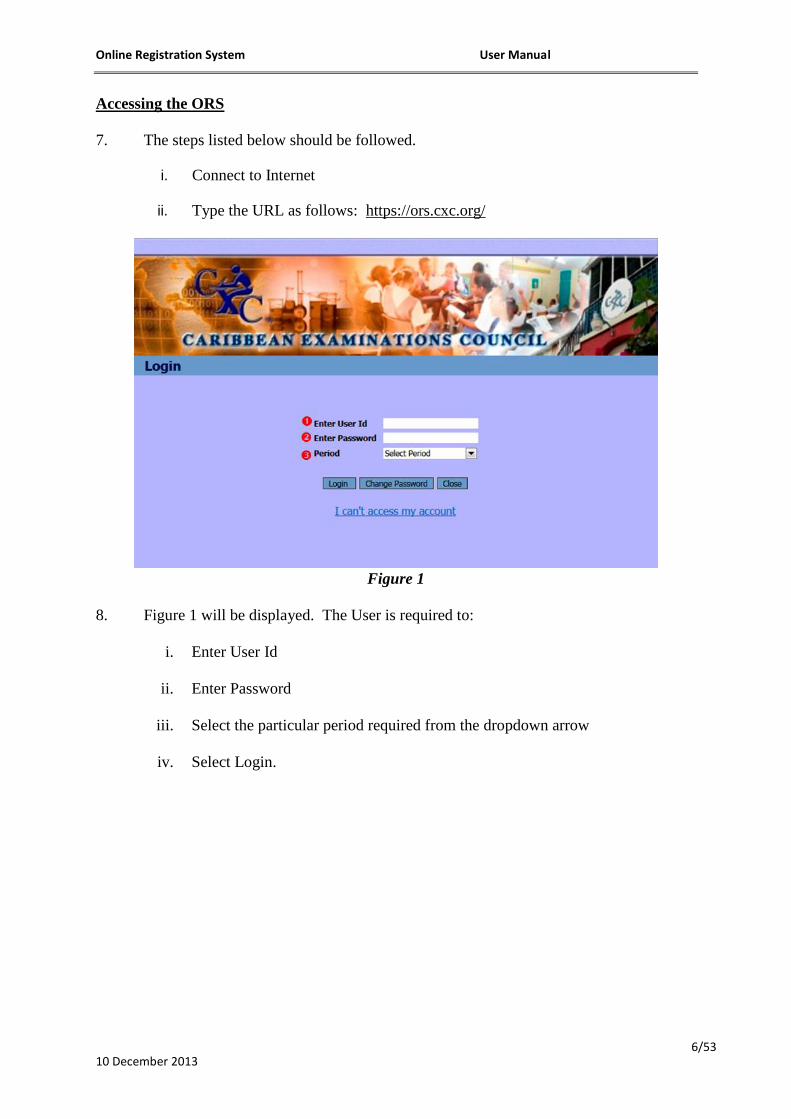
7. The steps listed below should be followed.
i. Connect to Internet
ii. Type the URL as follows: https://ors.cxc.org/
Figure 1
8. Figure 1 will be displayed. The User is required to:
i. Enter User Id
ii. Enter Password
iii. Select the particular period required from the dropdown arrow
iv. Select Login.

Online Registration System User Manual
10 December 2013 7/53
9. The Main Menu screen at Figure 2 below will be presented.
Figure 2
10. From Figure 2, the User can select from the Menu options: Registration, Generate
Sequence Numbers, Projections, Import/Export, SBA, Report, Query/Review and Logout.
Some of the named options carry sub-options as shown in the table on page 5.
11. When a User is logging into the system for the first time, the User will be required to
change the password assigned. When the password has been changed, the User is
automatically logged out and must login again with the new password.

Online Registration System User Manual
10 December 2013 8/53
PART A: REGISTRATION MODULE
REGISTRATION MENU OPTION
Registering Candidates
12. All registration data relating to any of the examinations offered by CXC must be
keyed in, and submitted through, the ORS within the time-frame set by the Ministry.
Figure 3
13. The screen at Figure 3 allows the User to register a candidate in the system. To get to
this screen, select the Registration option from the Main Menu screen then select Register
Candidate from the dropdown arrow.
14. The User is given the option of registering a New Candidate or a Former Candidate.

Online Registration System User Manual
10 December 2013 9/53
Registering a New Candidate
15. When the New Candidate radio button at Figure 3 is selected, the screen at Figure 4
appears.
Figure 4
16. When registering a New candidate, the personal details must first be completed on the
Register Candidate screen.
i. First Name – the first name of the candidate should be keyed in this field. Where
possible, avoid using initials.
ii. Middle Name – the candidate‟s middle name(s) or initial(s) should be keyed in this
field. If the candidate does not have a middle name, the field may be left blank.
iii. Last Name – the last or surname of the candidate MUST be entered in this field.
iv. Date of Birth – the date of birth must be keyed. The format of the date must be
entered as Day/Month/Year - two digits for the Day (DD), two digits for the Month
(MM) and four digits for the Year (YYYY). There is no minimum or maximum age
requirement for writing examinations offered by CXC, however, the technical
specifications in the ORS set the minimum age to nine (9) years and the maximum to
ninety-nine (99) years.
v. Gender – this compulsory field must be entered as either Male or Female.
Special Characters and Accents
17. The name fields accept only letters and the special characters such as space ( ),
apostrophe ('), dollar sign ($), number sign (#), at sign (@), accent (` ´) and tilde (~) which
may form part of some names. If one is using Windows, special character, including the
accent and tilde can be added by copying and pasting the appropriate character from the
Character Map tool. To obtain the Character Map, click on the Start Menu>All
Programs>Systems Tools>Character Map. The accent characters the system can accept are: É Ñ è ñ é ó ` ´ À Â È Á â à á Ё ё.

Online Registration System User Manual
10 December 2013 10/53
18. The screen at Figure 4 when populated looks like that at Figure 5.
Figure 5
19. When OK is clicked, the User would be presented with the screen at Figure 6.
Figure 6
20. The additional fields that may be completed are given below.
i. Form – this field is used to input the Form level (Forms 1 to 5) that the candidate is
located at school. The Form field is activated only for candidates at fulltime Centres
(schools) registering for CCSLC® examinations. Although this field is optional, the
Form level should be keyed. By allocating candidates to a particular Form level, the
User would be able to generate from the ORS the report called „Register of
Online Registration System User Manual
10 December 2013 11/53
Candidates by Class‟. This report should be used by the classroom teacher to
assist in the verification of the accuracy of candidates‟ registration data.
ii. Class – this field is used to input the Class name (number) where the candidate is
located at school. The Class field is activated for candidates at fulltime Centres
(schools) registering for CAPE® and CSEC
® examinations. Although this field is
optional, the name or number of the Class should be keyed. By allocating candidates
to a particular Class, the User would be able to generate from the ORS the report
called „Register of Candidates by Class‟. This report should be used by the
classroom teacher to assist in the verification of the accuracy of candidates‟
registration data.
iii. Comments 1, 2 and 3 – these fields are optional and can be populated by the User
with information that may be specific to the candidate/Centre or for any non-
definitive use.
iv. Cell Number and Email – these fields are optional and may be used to capture the
candidate‟s mobile phone number and email address. The phone number should
include the area code and keyed in the format given in Figure 7. The email address is
required in the event of a need to contact the candidate or verify the candidate‟s
authenticity.
v. Preview Results – this checkbox is automatically checked and allows the candidate to
view online his/her grade results. See section on Candidate Privileges at paragraphs
74-75.
vi. Preview Registration Details – this checkbox is automatically checked and allows
candidates to view online their personal and subject details (Subject Registered
Report), and individual timetables. See section on Candidate Privileges at paragraph
75.
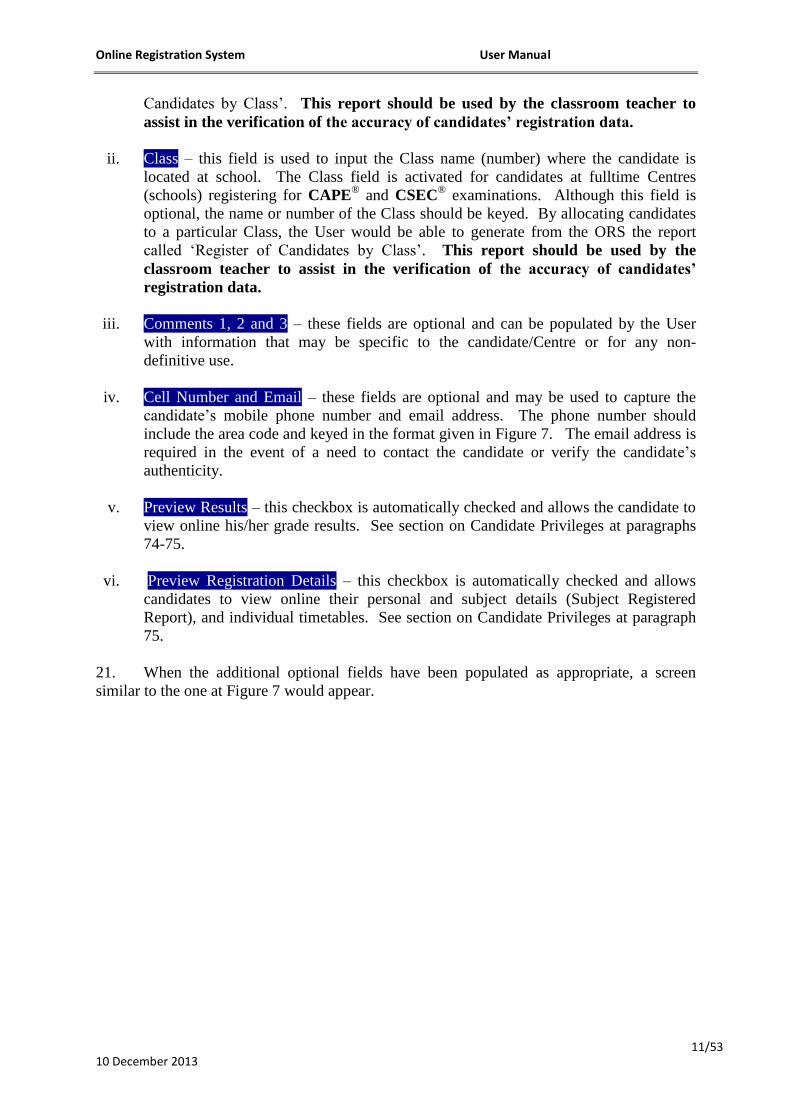
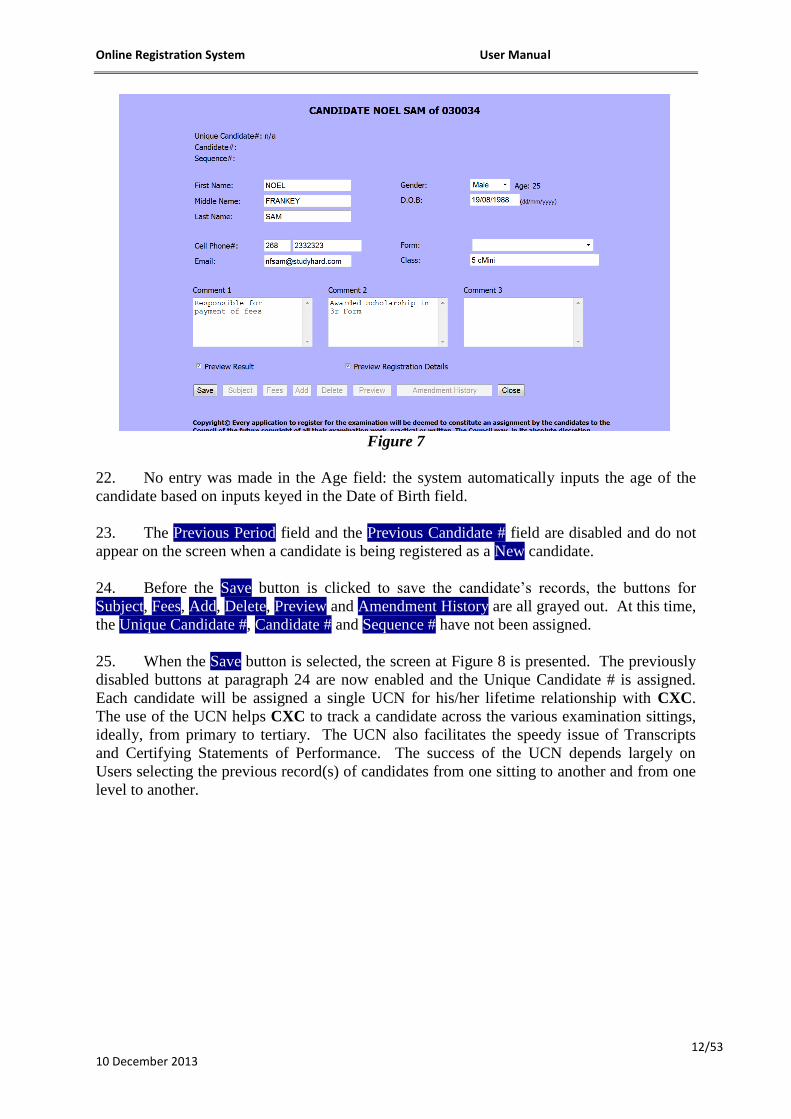
21. When the additional optional fields have been populated as appropriate, a screen
similar to the one at Figure 7 would appear.
Online Registration System User Manual
10 December 2013 12/53
Figure 7
22. No entry was made in the Age field: the system automatically inputs the age of the
candidate based on inputs keyed in the Date of Birth field.
23. The Previous Period field and the Previous Candidate # field are disabled and do not
appear on the screen when a candidate is being registered as a New candidate.
24. Before the Save button is clicked to save the candidate‟s records, the buttons for
Subject, Fees, Add, Delete, Preview and Amendment History are all grayed out. At this time,
the Unique Candidate #, Candidate # and Sequence # have not been assigned.
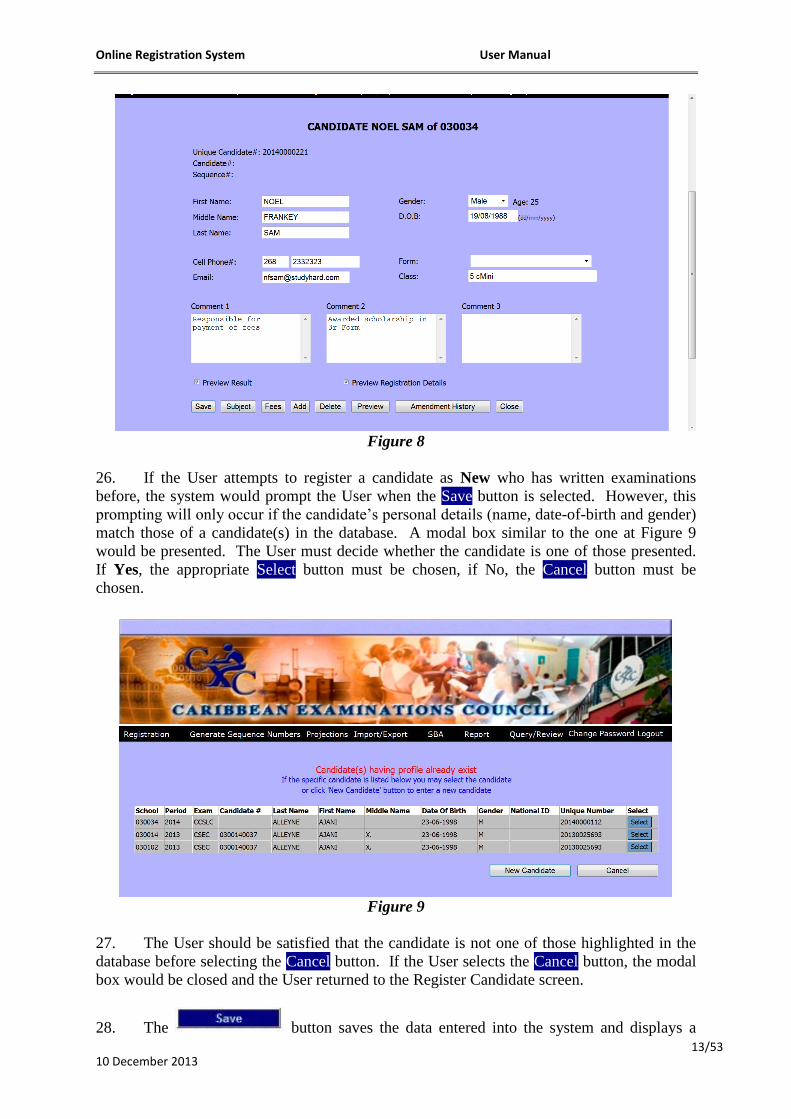
25. When the Save button is selected, the screen at Figure 8 is presented. The previously
disabled buttons at paragraph 24 are now enabled and the Unique Candidate # is assigned.
Each candidate will be assigned a single UCN for his/her lifetime relationship with CXC.
The use of the UCN helps CXC to track a candidate across the various examination sittings,
ideally, from primary to tertiary. The UCN also facilitates the speedy issue of Transcripts
and Certifying Statements of Performance. The success of the UCN depends largely on
Users selecting the previous record(s) of candidates from one sitting to another and from one
level to another.
Online Registration System User Manual
10 December 2013 13/53
Figure 8
26. If the User attempts to register a candidate as New who has written examinations
before, the system would prompt the User when the Save button is selected. However, this
prompting will only occur if the candidate‟s personal details (name, date-of-birth and gender)
match those of a candidate(s) in the database. A modal box similar to the one at Figure 9
would be presented. The User must decide whether the candidate is one of those presented.
If Yes, the appropriate Select button must be chosen, if No, the Cancel button must be
chosen.
Figure 9
27. The User should be satisfied that the candidate is not one of those highlighted in the
database before selecting the Cancel button. If the User selects the Cancel button, the modal
box would be closed and the User returned to the Register Candidate screen.
28. The button saves the data entered into the system and displays a

Online Registration System User Manual
10 December 2013 14/53
confirmation message – Candidate data have been saved!
29. The button saves the data which were entered then clears the screen,
allowing the User to add a different candidate into the system.
30. The button displays the candidate‟s subjects – more on this topic is
given in the next section of this manual.
31. The button displays the candidate‟s fees – this topic is addressed later
in this manual.
32. The button removes a candidate from the system.
33. The button exits the page or screen.
34. The Preview button displays the candidate‟s Subjects Registered Report.
35. The Amendment History button shows all the amendments that were made for a
candidate after the registration cut-off date.
Registering a Candidate from a Previous Sitting
36. When a candidate who has written CXC‟s examinations before is being registered, the
User must select Former Candidate radio button in Figure 3 above. The screen at Figure 10
appears.
Figure 10

Online Registration System User Manual
10 December 2013 15/53
The User is given the option for searching for the candidate‟s past record by using the
Candidate #, the candidate‟s personal details or a combination of candidate # and personal
details.
37. The Candidate # may be a:
i. 10-digit candidate number – this would search for ALL the candidates in the
database that were issued with this number over the years
ii. 11-digit UCN – this would search for the one (only) candidate with this number
iii. 16-digit CVQ number – this would search for the one (only) candidate with this
number.
Figure 11
38. In Figure 11, the search is being made on the candidate‟s personal details only. Once
the Search button is clicked, the results will be presented as at Figure 12.
Figure 12

Online Registration System User Manual
10 December 2013 16/53
39. A search on personal details will present ALL the candidates in the database with
matching (similar) personal details.
40. The User should decide whether to Select a candidate‟s record from the list or to
Cancel if the User believes that none of the candidates presented match the candidate being
registered. If the User chooses the Select button from one of the rows, a screen similar to
Figure 13 will be presented. CXC has integrated its entire database, from CPEA to CAPE.
For example, a candidate who wrote CCSLC®
examinations in 2012 and attempts to register
for CSEC® examinations in 2014, will be presented with the CCSLC record. The User
should select the CCSLC record as previous registration data even though the candidate
is being registered for CSEC® examinations; the same would apply for candidates
moving from one level to another. If the User chooses the Cancel button, the search criteria
could be refined or the candidate should be registered as a New candidate.
Figure 13
41. The candidate details (first name, middle name, last name, date of birth, gender)
entered during the search selection would be over-written by the registration data from the
database. In addition Candidate # field would automatically be populated with the data from
the previous examination sitting. If not automatically populated, the Previous Period field
must be selected from the dropdown arrow. The database contains data relating to the
previous periods for CAPE and CSEC from 2004 to the present period. In the case of
CCSLC® examinations, the database contains previous data from the first sitting in 2007 to
the present.
42. The User can now add or amend data in the respective fields then save the record.
Candidates Enrolling in the USAID Second Chance Programme
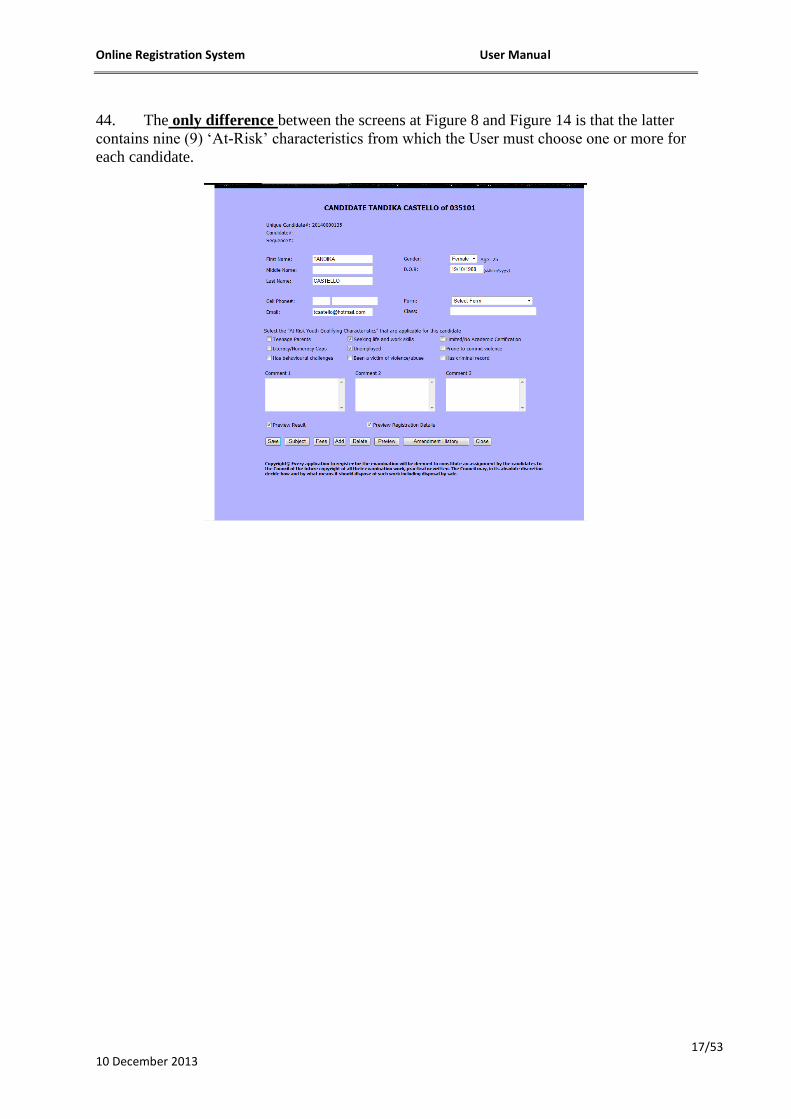
43. The User, when enrolling candidates under the USAID Second Chance Programme,
will be presented with a screen similar to the one at Figure 14. The enrolling process is
similar to registering a candidate except that subjects are NOT selected for the candidate at
the enrolment.
Online Registration System User Manual
10 December 2013 17/53
44. The only difference between the screens at Figure 8 and Figure 14 is that the latter
contains nine (9) „At-Risk‟ characteristics from which the User must choose one or more for
each candidate.

Online Registration System User Manual
10 December 2013 18/53
Figure 14
Add Candidate Subjects
Figure 15
45. The screen at Figure 15 allows the User to add a subject to a candidate‟s record. It is
generated from the Candidate Subject via the Add Subject button. There are two buttons,
ADD and CLOSE, at the bottom of the screen but are not shown in Figure 15.
46. In adding a subject to a candidate‟s record at Figure 15, the User is presented with
various fields that should be checked as appropriate.
Select – this checkbox must be checked for all subjects the candidate intends to take.
SBA – this checkbox must be checked for those candidates who will be completing
SBA work in the subject.
Resit – this checkbox is used to indicate those candidates who choose to reuse their
previously gained moderated SBA marks. It has nothing to do with the re-use of SBA
marks. This would be disabled for a NEW candidate.
Alternative – this checkbox is used to indicate those candidates who are registered at
Private centers and have chosen to take the Alternative Paper to SBA (usually referred
to as Paper 3/2). This option would be unavailable (disabled) for the fulltime Centres.

Online Registration System User Manual
10 December 2013 19/53
Repeat – this checkbox is used to indicate those candidates who have completed the
same subjects at the same level at an earlier sitting. Repeat is not the same as Resit
because candidates can Repeat non-SBA subjects. This option would be available
(enabled) only at the January session.
Self-Tutored – this checkbox is used to indicate those candidates who DID NOT
receive tuition or are undertaking self-study for the subjects checked. It is only
available at the January sitting.
Transfer from U1– this checkbox is used to indicate that the candidate has chosen to
transfer the moderated SBA marks from Unit 1 to Unit 2 at any two sittings
immediately following the first sitting. Transfer of SBA marks from one unit to
another is limited to seven subjects in CAPE.
Transfer from U2 – this checkbox is used to indicate that the candidate has chosen to
transfer the moderated SBA marks from Unit 2 to Unit 1 at any two sittings
immediately following the first sitting. The Transfer option is available for seven
CAPE subjects.
Teacher – this dropdown box shows the teachers that have candidates assigned (to be
assigned) for a particular subject. The User SHOULD select a teacher(s) so that the
report „Register of Candidates by Subject Teacher‟ can be generated out of the ORS
for verification of candidates‟ registration data.
Year – the Year can only be chosen when the Resit or Transfer option is selected.
The User should select the appropriate year.
Comments 4 and 5 – are optional fields used to store any data required by the Centre
or by the Ministry.
47. If the selected subject has options, the option drop-down list would display the
various options available. For example, Visual Arts has eight options but allows the selection
of only two because the third option, the Reflective Journal, is compulsory.
48. It is imperative that Users run the report in the ORS called „Candidates without
Subjects‟ before forwarding the registration data to the Ministry.
49. The button is used to save the information on the screen and it
displays a confirmation message „Candidate‟s subject data have been saved!‟ After the
prompt, the User is returned to the Candidate Subjects screen.
50. The button is used to first save the data then clear the subject data
so that a User could add additional subjects without leaving the screen.
51. The button exits the Candidate Subjects screen without saving any
information.
Edit Candidate‟s Personal Details

Online Registration System User Manual
10 December 2013 20/53
Figure 16
52. To edit a candidate‟s personal record, the User must first search for the candidate in
the database. This is done by highlighting the Registration option on the Main Menu screen,
then selecting Edit Candidate from the dropdown arrow. The User would be presented with
the screen at Figure 16. The User should then search in any of the opened fields such as First
Name, Last Name, et cetera for a particular candidate or search on the default ALL which
brings up all the candidates in the centre‟s database.. When the search button is activated, a
screen giving the list of candidates matching the search criteria would be presented as at
Figure 17. The User should select the appropriate candidate from the list.
Figure 17
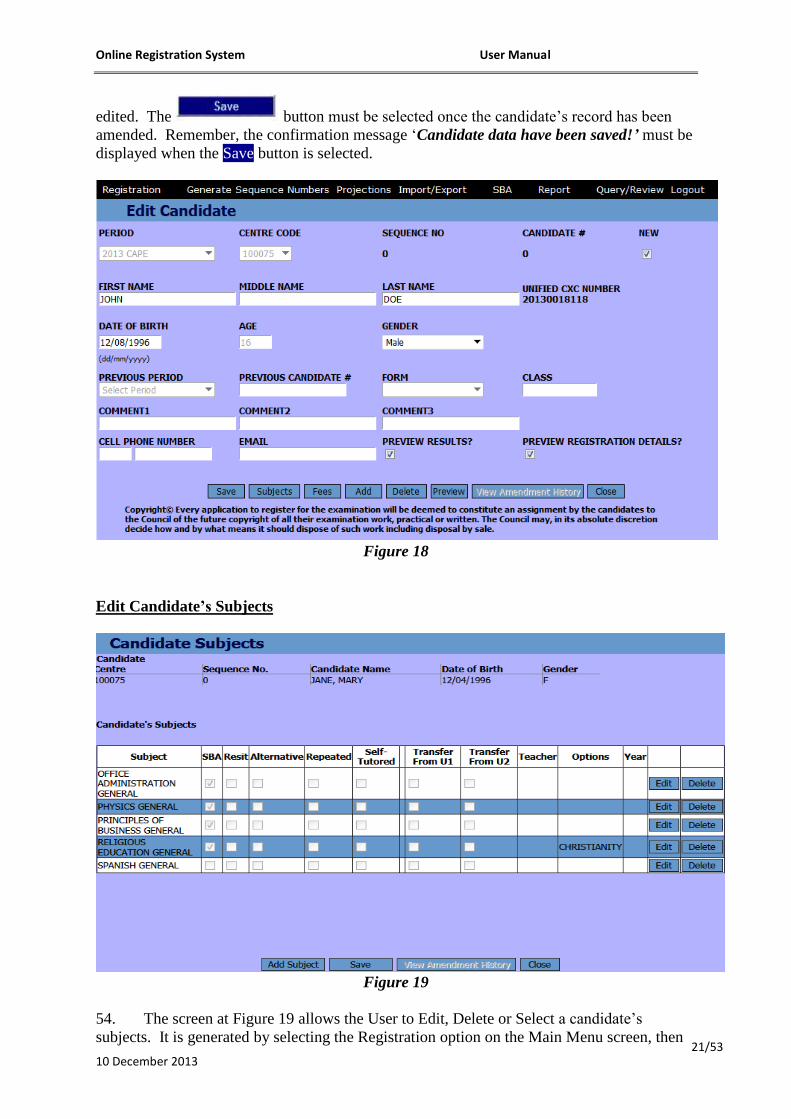
53. Once the candidate has been selected, a screen similar to Figure 18 is presented. This
screen allows the User to edit a candidate‟s record in the system. The fields such as Period
and Centre Code are locked by the system and cannot be edited; all other fields may be
Online Registration System User Manual
10 December 2013 21/53
edited. The button must be selected once the candidate‟s record has been
amended. Remember, the confirmation message „Candidate data have been saved!’ must be
displayed when the Save button is selected.
Figure 18
Edit Candidate‟s Subjects
Figure 19
54. The screen at Figure 19 allows the User to Edit, Delete or Select a candidate‟s
subjects. It is generated by selecting the Registration option on the Main Menu screen, then

Online Registration System User Manual
10 December 2013 22/53
selecting Edit Candidate from the dropdown arrow. A search for the particular candidate
must be made. When found, the button must be selected.
55. At the top of the window, a table titled „Candidate‟ is given. The columns shown
include Centre No, Sequence No., Candidate Name, Date of Birth and Gender. These fields
cannot be edited.
56. Below the Candidate table, a table called Candidate‟s Subjects is shown. The
information in this table cannot be edited unless the button is clicked and the
User is then redirected to the Edit Candidate Subjects screen.
57. On the Candidate‟s Subjects screen, there are 2 buttons which are shown side by side,
the button and the button.
58. The button is used to display the Edit Candidate Subjects screen.
59. The button is used to delete the subject from the list of subjects.
60. The button is used to display the Edit Candidate Subjects screen.
61. The button is used to save what is on the screen.
62. The button should exit the screen and return to the Candidate Details
screen.
63. The system allows the User to add only one subject at a time after the registration
cutoff date has passed.
Selecting a CAPE Associate Degree
64. In the ORS CAPE database, the Associate Degree drop-down box will be disabled
until the candidate registers for the seventh (7th
) Unit – see Figure 20 below. The box
becomes populated with the list of degrees the candidate may be eligible to receive given the
subjects he/she has been registered to take. The User should select the appropriate degree
from the list. If the candidate does not wish to receive an Associate Degree, the NONE
option should be chosen. If no option is chosen, a message box will be displayed reminding
the User to choose an Associate Degree or the NONE option.
Online Registration System User Manual
10 December 2013 23/53
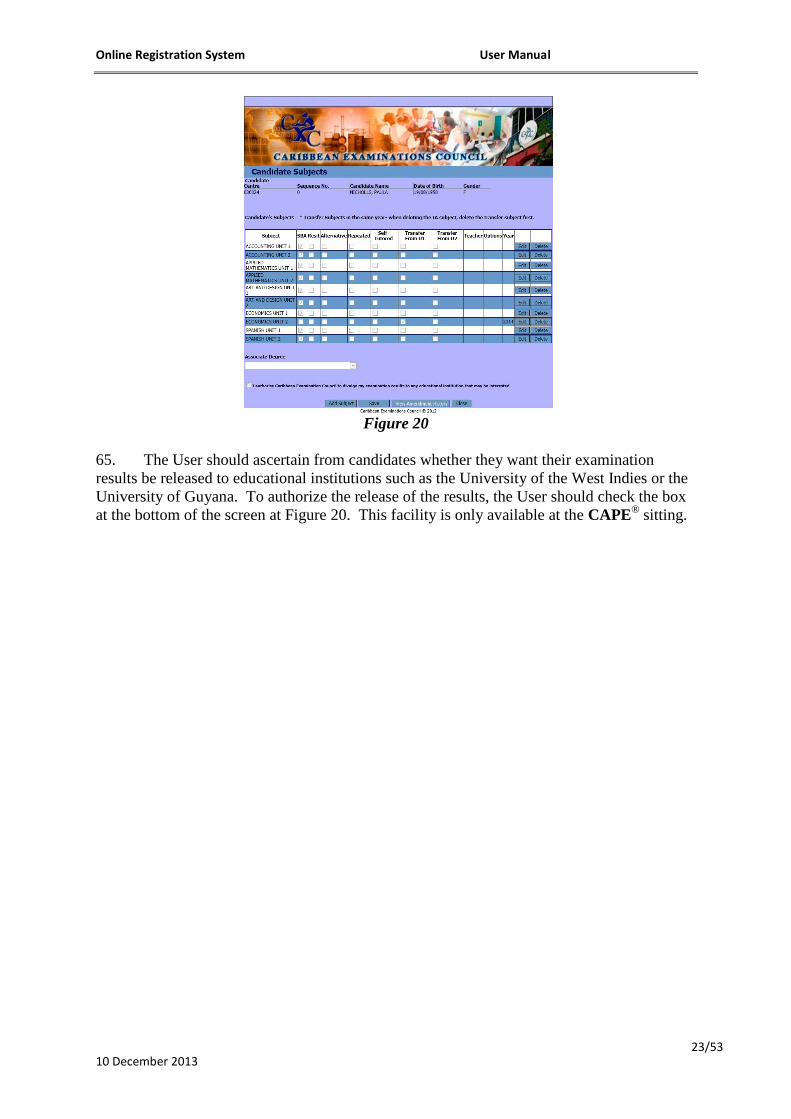
Figure 20
65. The User should ascertain from candidates whether they want their examination
results be released to educational institutions such as the University of the West Indies or the
University of Guyana. To authorize the release of the results, the User should check the box
at the bottom of the screen at Figure 20. This facility is only available at the CAPE® sitting.

Online Registration System User Manual
10 December 2013 24/53
Querying for Candidates
Figure 21
66. The screen at Figure 21 allows the User to search for candidates. The screen is
reached by selecting the Registration option on the Main Menu screen, then selecting View
Candidate. A search must then be made for the candidate(s).
67. This screen is used to perform a search for candidates based on specific input values.
The fields on the top section of the table include Period, Centre No, Form, Class, Sequence
No., New. All the fields can be populated with data EXCEPT the Period and Centre Code
fields.
68. The First Name, Last Name, Date of Birth (if available) and Gender should be entered
to make the search results more precise.
69. The result of the search in Figure 21 is a table with the following information: School,
Form, Class, Seq. No., Last Name, First Name, Middle Name, Date of Birth and Gender. The
View tab must be selected for the particular candidate.
70. The button is used to carry out the search.
71. The View button is used to select the specific candidate from the list shown. It would
take the User to the Edit Candidate Details screen.
72. The button is used to exit the screen without saving any information.
Online Registration System User Manual
10 December 2013 25/53
View Candidate Details
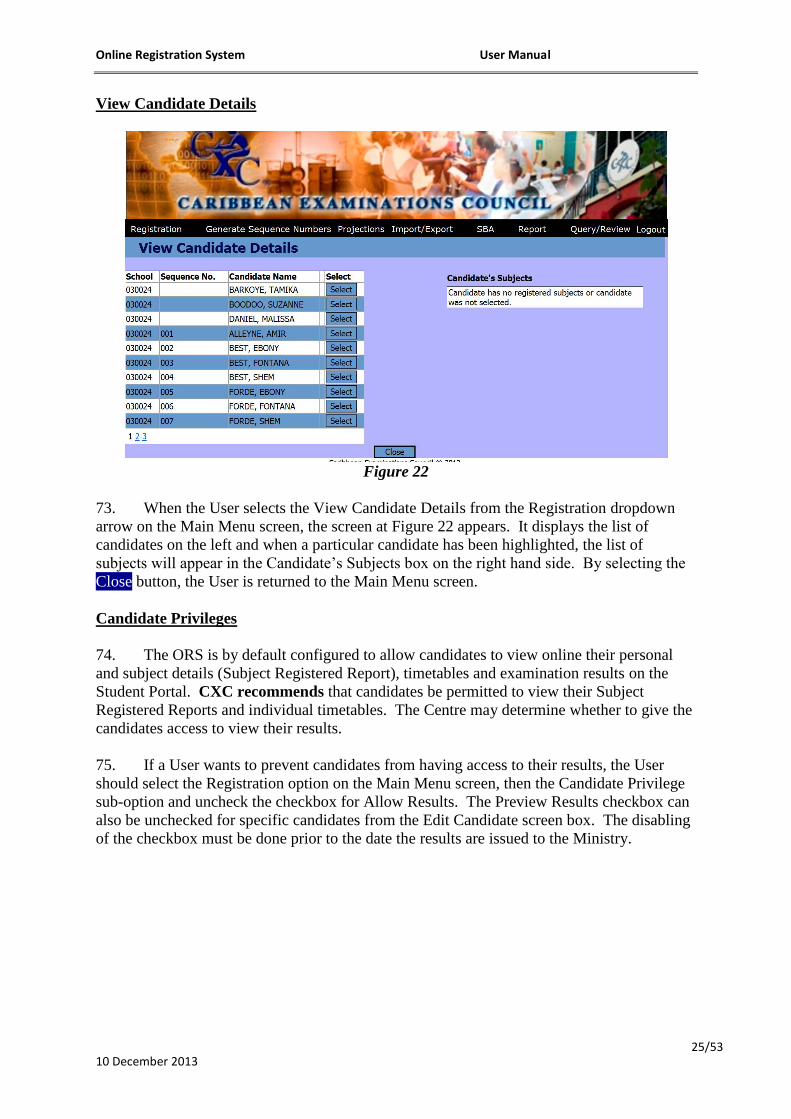
Figure 22
73. When the User selects the View Candidate Details from the Registration dropdown
arrow on the Main Menu screen, the screen at Figure 22 appears. It displays the list of
candidates on the left and when a particular candidate has been highlighted, the list of
subjects will appear in the Candidate‟s Subjects box on the right hand side. By selecting the
Close button, the User is returned to the Main Menu screen.
Candidate Privileges
74. The ORS is by default configured to allow candidates to view online their personal
and subject details (Subject Registered Report), timetables and examination results on the
Student Portal. CXC recommends that candidates be permitted to view their Subject
Registered Reports and individual timetables. The Centre may determine whether to give the
candidates access to view their results.
75. If a User wants to prevent candidates from having access to their results, the User
should select the Registration option on the Main Menu screen, then the Candidate Privilege
sub-option and uncheck the checkbox for Allow Results. The Preview Results checkbox can
also be unchecked for specific candidates from the Edit Candidate screen box. The disabling
of the checkbox must be done prior to the date the results are issued to the Ministry.

Online Registration System User Manual
10 December 2013 26/53
Batch Entry
Figure 23
76. The screen at Figure 23 allows the User to add/remove several candidates to/from a
subject at one time. Batch entry can only be done by Users assigned into the Teacher and
Super User groups.
77. This screen is divided into two distinct yet related parts. On the top left side of the
screen, there is a Subject dropdown arrow from which the User can select the particular
subject that candidates will be registered to take.
78. There is a Search tab where the User can search for candidates from a particular Class
(button not shown on screen) or by name.

Online Registration System User Manual
10 December 2013 27/53
79. The field for the Available Candidates lists candidates that have been registered but
have not yet been chosen or registered for the particular subject highlighted in the Subject
dropdown box. The display is in tabular form with the following columns in the exact order
– Last Name, First Name, Date of Birth, Gender, New, SBA, Resit, Alt, Repeat, Self-Tutored,
Transfer from U1, Transfer from U2, Year, Comment, Select.
80. The lower portion of the screen shows a table for the Registered Candidates – these
are the candidates who have already been registered (selected) for the particular subject.
81. Comment textbox maybe used to input any additional information on the candidate
for official use.
82. The button in the Available Candidates section is used to filter the list
of available candidate.
83. At the bottom of the screen, there are two buttons shown. These buttons work in
conjunction with the Select checkboxes found on each line showing the candidate‟s
information.
84. Under the Available Candidates table, the buttons shown are and
.
85. In order to add an available candidate to a Subject candidate list, check the Select
checkbox and then click the button. If the Select checkbox in the first row is
selected, all of the candidates will be selected for the subject.
86. Once the Select and Add buttons have been chosen, the candidates‟ names should be
transposed from the Available Candidates table to the Registered Candidates table lower on
the same screen.
87. Under the Registered Candidates table, the buttons shown are
.
88. In order to remove a registered candidate(s) from a Subject candidate list, check the
Select checkbox and then click the button. The candidate‟s name should be
transposed from the registered candidate table to the Available Candidates table higher on the
same page. Selecting the Select checkbox in the first row will cause all of the registered
candidates to be selected for deletion.
89. The and buttons are used to exit the screen without
saving any information.
90. After the registration cut-off date has passed, the User would not be able to use the
Batch Entry facility.

Online Registration System User Manual
10 December 2013 28/53
Candidate Fees
Figure 24
91. The screen at Figure 24 allows the User to maintain the candidates‟ fee payment
record. It is generated from the Registration option on the Main Menu screen then selecting
Edit Candidate from the dropdown arrow. A search should be undertaken for the candidate
and when found, the button should be selected.
92. A table titled „Candidate‟ is shown at the top of the screen. The columns shown
include Centre No, Sequence No., Candidate Name, Date of Birth, Gender, # Subjects, #
Orals, # SBA and # Practicals. The data shown in these fields cannot be edited.

Online Registration System User Manual
10 December 2013 29/53
93. The # Subjects shows the number of subjects that the candidate has been registered to
take.
94. The # Orals shows the number of registered subjects that has an oral component.
95. The # SBA shows the number of registered subjects that has an SBA component.
96. The # Practicals shows the number of registered subjects that has a practical
component.
97. In Figure 24, the Expected Fees column shows the fees expected from the candidate
and it is automatically generated from the number of subjects for which a candidate is
registered to take. The data in this field cannot be edited by the User. The Fees Paid can be
changed manually for each individual option, depending on when payment is made by the
candidate. The „Totals‟ row at the bottom of the table shows the total Expected Fees and the
total Fees Paid.
98. The double arrow buttons in the middle of both columns are used to transfer the full
amount from the Expected Fees column to the Fees Paid column. This is only to be used if
the Fees Paid is equal to the Expected Fees for the particular row. If the amount being paid is
less that the amount owed, the figure should be entered manually. The Fees Paid fields for
each line do not accept figures that are higher than the amount owed in that same line. For
example, if $20.00 is the Expected Fees for Orals, the User is unable to input $25.00 in the
Fees Paid text field.
99. The Total Fees Outstanding text box is not editable and shows total fees owed by the
candidate, that is, total Expected Fees less the total Paid Fees.
100. Comment 6 and Comment 7 are optional fields and maybe used to store any data
required by the Centre or the Ministry.
101. The button is used to save the information on the screen and it
displays a confirmation message „fees information has been saved‟. After Ok is clicked, the
User is returned to the Candidate Fees screen.
102. The button should exit the Candidate Fees screen without saving any
information.

Online Registration System User Manual
10 December 2013 30/53
GENERATE SEQUENCE NUMBERS MENU OPTION
Figure 25
103. The screen at Figure 25 allows the User to generate the sequence numbers for the
candidates.
104. The two fields, the Period and the Centre Code cannot be edited.
105. There are three separate boxes from which a selection must be made using the radio
buttons to narrow the results returned. The three selection boxes are: Sequencing, Grouping
and Gender. If ALL is chosen in the Grouping box, all the candidates from the Centre will be
arranged in alphabetical order. If ALL or CLASS is selected in the Grouping box, the
Gender box would be disabled.
106. Re-sequence can only be done before the registration file is forwarded to the Ministry.
After the initial export of the registration data to the Ministry, the Re-sequencing button is
disabled and only the Append button is available for adding new candidates.
107. Sequence numbers will not be generated for candidates without subjects. It is
imperative that Users run the report in the ORS called „Candidates without Sequence
Numbers‟ before forwarding the registration data to the Ministry.
108. The button is used to generate the sequence numbers for that
particular period and Centre.
109. The button is used to exit the screen without saving any information.
53. When the sequence numbers have been generated, a 10-digit candidate number is
created.

Online Registration System User Manual
10 December 2013 31/53
PROJECTIONS MENU OPTION
Figure 26
110. The screen at Figure 26 is obtained by selecting the Projections option on the Main
Menu screen. It is used to provide an estimated number of candidates expected to register for
the various subjects at the next year‟s sitting. If candidates are being registered for the 2014
session, the projections should be made for the 2015 session. Although the provision of
estimates facilitates CXC‟s planning process, the submission of estimates has not been made
compulsory.
111. The Centre field found on the top of the screen is set automatically on login and
cannot be edited. The adjoining field is the Type dropdown box consisting of three choices:
i. ALL – this shows all the subjects available at the particular sitting. Where
estimates have already been made by the Centre, it shows the subjects for which
projections have already been made and those for which projections have not
been made by the Centre.
ii. ENTERED – this shows those subjects for which estimates have already been
entered.
iii. NONE – this shows those subjects for which projections have NOT been
entered.
112. Below the Centre and Type fields, a table is generated to show the estimates made by
the User. It shows in tabular form a column for the Subject and another for the # Entries.
113. The button is used to save the estimate for each individual subject or
for the entire Centre.
114. The button is used to exit the screen without saving any information.

Online Registration System User Manual
10 December 2013 32/53
IMPORT/EXPORT MENU OPTION
Import Personal Data
Figure 27
115. The screen at Figure 27 is used to import the personal data of candidates into the ORS
database from a file(s) held elsewhere in the Centre‟s database. The screen is obtained from
the Import/Export option on the Main Menu screen and selecting Import Personal Data from
the dropdown arrow.
116. Before the file can be imported, a spreadsheet must be created to store the candidates‟
personal data. The file must be as a csv (Comma delimited or Comma Separated Values) file
with a dot (.) csv extension name, for example, 5Astudents.cvs This spreadsheet may be
created well in advance of the start of the registration phase.
117. The file must be created with 14 Columns consisting of:
FIRSTNAME, MIDDLENAME, LASTNAME, DATEOFBIRTH, GENDER, CLASS, FORM, COMMENT1
COMMENT2, COMMENT3, AREACODE, PHONENUMBER, EMAIL, NATIONALID
118. The LastName, DateofBirth and Gender columns are compulsory and must contain
data; the other columns may be left blank since they are not compulsory. The format of the
date of birth must be DD/MM/YYYY, for example, 19/08/1997 = 19 August 1997.
119. To upload a file, the User should click on the Browse button. The name and path of
the file should be selected from its location. When the file has been uploaded, a screen
similar to Figure 27 would appear. The Import Candidate Personal Information button must
be selected.
Online Registration System User Manual
10 December 2013 33/53
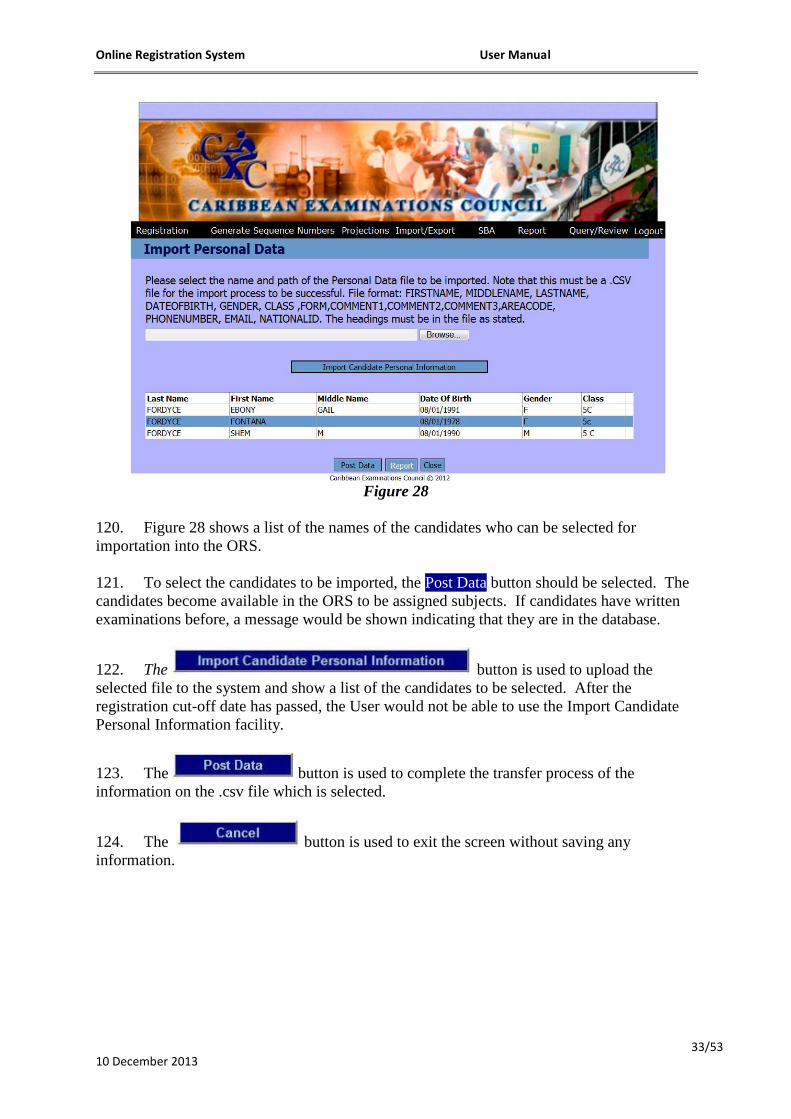
Figure 28
120. Figure 28 shows a list of the names of the candidates who can be selected for
importation into the ORS.
121. To select the candidates to be imported, the Post Data button should be selected. The
candidates become available in the ORS to be assigned subjects. If candidates have written
examinations before, a message would be shown indicating that they are in the database.
122. The button is used to upload the
selected file to the system and show a list of the candidates to be selected. After the
registration cut-off date has passed, the User would not be able to use the Import Candidate
Personal Information facility.
123. The button is used to complete the transfer process of the
information on the .csv file which is selected.
124. The button is used to exit the screen without saving any
information.
Online Registration System User Manual
10 December 2013 34/53
Forward Registration Files to Ministry
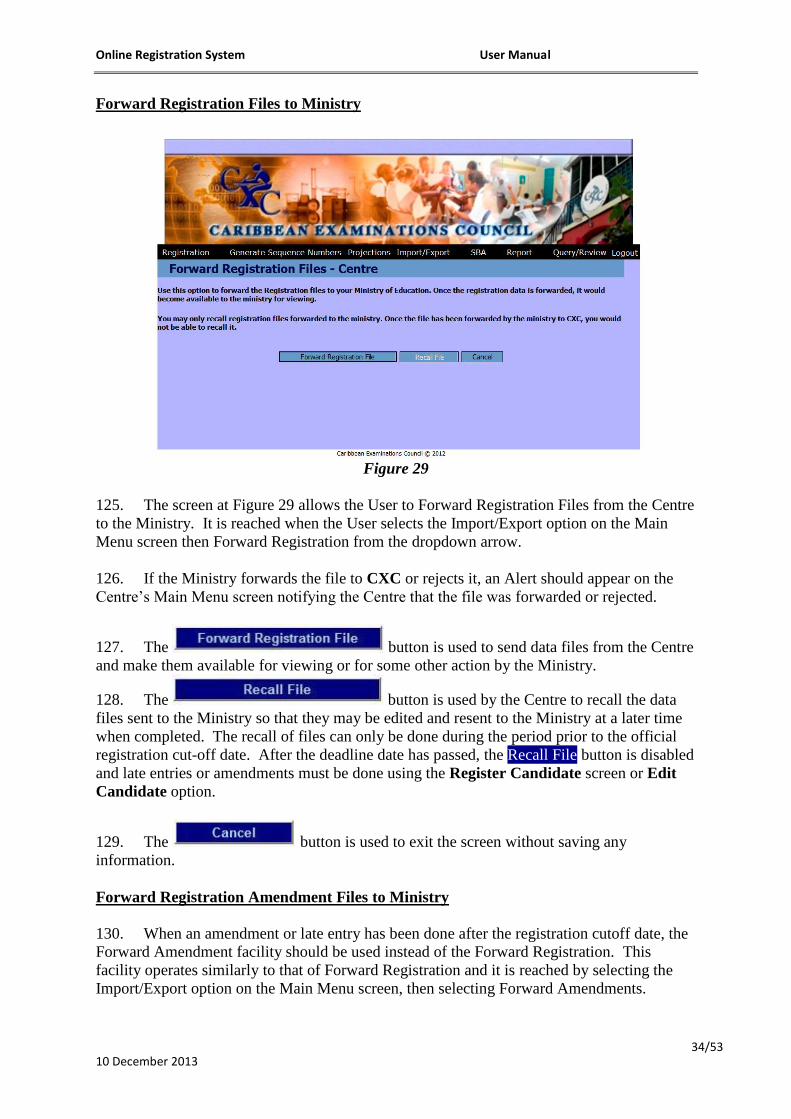
Figure 29
125. The screen at Figure 29 allows the User to Forward Registration Files from the Centre
to the Ministry. It is reached when the User selects the Import/Export option on the Main
Menu screen then Forward Registration from the dropdown arrow.
126. If the Ministry forwards the file to CXC or rejects it, an Alert should appear on the
Centre‟s Main Menu screen notifying the Centre that the file was forwarded or rejected.
127. The button is used to send data files from the Centre
and make them available for viewing or for some other action by the Ministry.
128. The button is used by the Centre to recall the data
files sent to the Ministry so that they may be edited and resent to the Ministry at a later time
when completed. The recall of files can only be done during the period prior to the official
registration cut-off date. After the deadline date has passed, the Recall File button is disabled
and late entries or amendments must be done using the Register Candidate screen or Edit
Candidate option.
129. The button is used to exit the screen without saving any
information.
Forward Registration Amendment Files to Ministry
130. When an amendment or late entry has been done after the registration cutoff date, the
Forward Amendment facility should be used instead of the Forward Registration. This
facility operates similarly to that of Forward Registration and it is reached by selecting the
Import/Export option on the Main Menu screen, then selecting Forward Amendments.

Online Registration System User Manual
10 December 2013 35/53
Export Database Fields
Figure 30
131. The purpose of this function is to permit Centres to export data from the ORS into an
Excel spreadsheet. Figure 30 is generated from the Import/Export option on the Main Menu
screen, then selecting Export Database Fields from the dropdown arrow.
132. The Candidate Subject Option Details should be selected in the Choose a Query
dropdown box. The User must select the particular fields from the Available Fields
dropdown arrow that are required in the Excel spreadsheet will be created. A single field or
multiple fields may be selected at one time to be transferred to the Selected Fields box by
using the Shift key or Ctrl key. The highlighted fields are transferred to the Selected Fields
by clicking the arrow (>). Conversely, any fields in the Selected Fields box that are not
required may be transferred to the Available Fields box by using the arrow (<) or the Clear
Fields button.
133. The information required in the spreadsheet may be further refined by using the Filter
Data button. When the button has been selected, the screen at Figure 31 appears.
Figure 31

Online Registration System User Manual
10 December 2013 36/53
134. Once the respective fields have been populated, the Export Data button should be
selected. When the Excel file has been generated, the User may Open, Save or Cancel the
file.
REPORTS MENU OPTION
Figure 32
135. Figure 32 allows the User to generate reports out of the ORS. It is obtained from the
Reports option on the Main Menu screen then selecting Report Selection from the dropdown
arrow.
136. Reports are available in two types of file formats, an Excel spreadsheet and a pdf,
from which the User may choose. Some reports are generated from data keyed directly into
the ORS by Centres and others are generated from data loaded directly out of CXC‟s
Examining Processing System (EPS). The EPS data (refined) represent data loaded out of the
ORS (raw) and „cleaned up‟ by CXC. The User is given the option to input different
parameters (Centre code, subject, sequence number, et cetera) to expand or reduce the type of
report to be generated.
137. From time to time, Reports are added to, amended or removed from, the ORS.
REGISTRATION-RELATED REPORTS
138. The registration-related reports found in the ORS are given below.
Allocation of Question Papers to Centres
139. This report shows the number of candidates at a Centre registered for each subject and
the number of question papers allocated to the Centre. The report should be generated and
reviewed Centre personnel a few weeks priors to the beginning of examinations to ensure that
an adequate number of question papers are allocated to the Centre.

Online Registration System User Manual
10 December 2013 37/53
Amendment History Detailed/ Amendment History Report by School/ Amendment
History Report by Territory
140. These reports provide a detailed listing/summary of all amendments made by the
Centre for each candidate.
Candidates Personal Details by Centre/ Candidates Personal Details by Name
141. These reports show the personal details of all candidates registered at a particular
Centre. They are particularly useful for the Local Registrar to post on the website or in a
public location so that candidates (especially private) may obtain their Centre number and
candidate number in order to gain access to the student portal to view their registration data,
timetables and results. The Candidates Personal Details by Centre report lists candidates in
candidate number order whereas the Candidates Personal Details by Name report lists
candidates in alphabetical order.
Candidate Subjects XLS/Candidate Subjects XLS 11
142. These reports give a listing of candidates and subjects in a spreadsheet format.
Candidate Timetable
143. This report generates the candidates‟ timetable for the Centre or for individual
candidates.
Candidates Registered for more than 7 Subjects
144. This report lists the candidates by candidate number whose subject count is more than
7.
Candidates with Outstanding Fees
145. This report shows the fees outstanding or payable by candidates.
Candidates without Fees
146. This report shows the candidates for whom fees have not been assigned.
Candidates without Sequence Numbers
147. This report shows the candidates for whom sequence numbers have not been
assigned. This report should be generated before the registration data file is forwarded
to the Ministry. Any anomalies must be corrected at this point.
Candidates without Subjects
148. This report lists the candidates who have been registered but have not been assigned
any subjects. This report should be generated before the registration data file is
forwarded to the Ministry. Any anomalies must be corrected at this point.

Online Registration System User Manual
10 December 2013 38/53
Centre Forward Status/Centre Forward Status (CXC to Action)/To be Forwarded
149. The Centre Forward Status report shows the date when keying of registration data
began, when or if the data files were forwarded to the Ministry and to CXC. The Centre
Forward Status (CXC to Action) report shows the Centres whose data have been forwarded
to CXC but have not been loaded in the EPS. The To Be Forwarded report lists the Centres
whose registration data files have not been forwarded to the Ministry and/or to CXC.
CXC Billing
150. This report shows the Candidate Entry Fees, Subject Fees, Late Fees and Amendment
Fees payable to CXC by the Centre. It is generated out of the CXC‟s EPS and it is the
billing that will be sent by CXC to the Ministry.
CXC Fees
151. This report shows the Candidate Entry Fees, Subject Fees, Late Fees and Amendment
Fees payable to CXC by the Centre. It is generated out of the ORS and may be different to
the CXC Billing Report.
CXC Final Register
152. This report shows all the candidates from a Centre with their personal and subject
details. It is generated out of the CXC‟s EPS.
Final Register ORS/ ORS Final Register by Centre
153. These reports show all the candidates from a Centre with their personal and subject
details. They are generated out of the ORS.
Final Register ORS – Late Candidates/ ORS Final Register – Late Entries
154. These reports list in Final Register format all candidates who registered in the ORS
after the registration cutoff date.
Late School Entries
155. This report lists the candidates registered late by school.
Candidates with Clashing Subjects
156. This report shows the candidates who have more than one subject timetabled within a
particular session for the same sitting.
Candidates with Clashing Subjects (Across CSEC® and CAPE
®)
157. This report shows the candidates who are registered at both the CSEC® and CAPE
®
sittings and have more than one subject timetabled within the same session.

Online Registration System User Manual
10 December 2013 39/53
Local Fees
158. This report shows a summary of total fees expected from each Centre.
Option Entries/ Option Entries by School
159. These reports show the options in the various subjects chosen by candidates at a
Centre(s).
Order of Merit
160. This report gives the ranking and estimated grades that candidates may achieve in
each subject.
Possible Duplicate Candidates
161. This report gives a list of candidates whose registration details might be duplicated in
the ORS. This report should be generated before the registration data file is forwarded
to the Ministry. Any anomalies must be corrected at this point.
Register of Candidates by Class
162. This report gives the list of all candidates with personal and subject details assigned to
each Class Teacher. It is very useful in the verification of candidates‟ registration records.
Register of Candidates by Subject Options
163. This report shows the options chosen by candidates in the various subjects at a Centre.
Register of Candidates by Subject Teacher
164. This report gives the list of all candidates with personal and subject details assigned to
each Subject Teacher. It is very useful in the verification of candidates‟ registration records.
School Entries/ Territory Entries/ Territory Entries – By School
165. These reports show the total number of candidate entries from each Centre/territory.
Subject Entries/ Subject Entries (XLS)/Subject Entries by School/ Subject Entries by
Subject/ Territorial Subject Entries
166. These reports give the total number of subject entries from each Centre.
Subject Registered
167. This report lists the personal and subjects details of each candidate registered at a
Centre. The Subject Registered Report should be printed and given to ALL candidates
to review and sign off on the accuracy of the data keyed on their behalf by the Centre.

Online Registration System User Manual
10 December 2013 40/53
Territory Entries – Gender and Territory Entries/Gender 2 Territory Entries – Subject
and Gender
168. These reports give a summary of the number of males and females at each Centre.
Territory Entries – Subject and School
169. The report gives a summary of the number of entries by subject by Centre-type
(School or Part-time).
User Listing/ User Listing by Centre
170. These reports list the Users that interface with the ORS at a Centre(s)
PART B: SBA AND ORDER OF MERIT MODULE
SBA
171. All Centres are required to submit SBA marks, the estimated grade and ranking
(Order of Merit) of each candidate for all subjects through the ORS within the time-frame set
by the Ministry. The programme will not permit the export of SBA marks unless this is done.
54. Before SBA marks can be forwarded, the Centre must undertake:
i. Teacher Assignment
ii. SBA Data Capture
iii. SBA Confirmation
Teacher Assignment
Figure 33

Online Registration System User Manual
10 December 2013 41/53
172. The Teacher Assignment function involves the assignment of teachers to
candidates/candidates to teachers for a particular subject. The teachers should be assigned to
the candidates they present for examinations. The Teacher Assignment function would not
be required if the teacher/candidate assignment had taken place at the time of registration.
173. The screen at Figure 33 is generated by selecting the SBA option on the Main Menu
screen, then selecting Teacher Assignment from the dropdown arrow. The Centre field is
prefilled with the name of the Centre. The User is required to select the name of the Teacher
and the relevant subject. Once this is done, the list of candidates available for assignment to
the teacher will appear as shown. The candidates taught by the teacher should be selected. If
more than one teacher is involved, each teacher should be assigned the appropriate
candidates.
SBA Data Capture
Figure 34
174. Figure 34 shows the screen used for capturing SBA marks, the Estimated Rank and
the Estimated Grade of the candidates. The User should select the SBA option on the Main
Menu screen, then select SBA Data Capture from the dropdown arrow.
175. The Centre field is prefilled. When the User selects the subject from the Subject field,
the Subject Profiles field is populated based on the particular subject. When the User selects
the Teacher, the list of candidates assigned to the teacher appears in the table at the bottom of
the screen. The User must input the Estimated Rank (the overall position the candidate is
likely achieve at the Centre), the Estimated Grade (the Grade the candidate is likely to obtain)
and the marks in each of the Profile Names. The Total mark field is automatically populated
based on the marks in the Profile fields. If the candidate did not submit SBA, the No SBA
button must be checked. 0 must NOT be keyed in the Profile fields for candidates who
did not submit SBA. When the No SBA field is checked, UNG (Ungraded) automatically
appears in the Estimated Grade field. The system does not allow the User to save marks in
the Profile field that are higher than the maximum for the particular profile.

Online Registration System User Manual
10 December 2013 42/53
176. The Estimated Rank and the Estimated Grade sections must be completed for all Non-
SBA subjects. The screen would appear similar to that shown in Figure 35.
Figure 35
SBA Confirmation
Figure 36
177. The screen at Figure 36 is generated by selecting the SBA option on the Main Menu
screen, then selecting SBA Confirmation from the dropdown arrow.
178. After the SBA data have been exported to CXC, the data are processed and re-posted
in the ORS in report form for review by the Centres. The User should generate the report
„CXC Final SBA Scores‟ and compare the marks in the report with the SBA marks contained
in the Centre‟s records. If the marks are the same, the User should select „Yes‟; if there are
Online Registration System User Manual
10 December 2013 43/53
discrepancies between the marks, the User should select „No‟. SBA Confirmation should be
done on a subject by subject basis. Any discrepancies in the marks in the ORS report and
those in the Centre‟s records should be brought to the attention of the Local Registrar.
Practical Data Capture
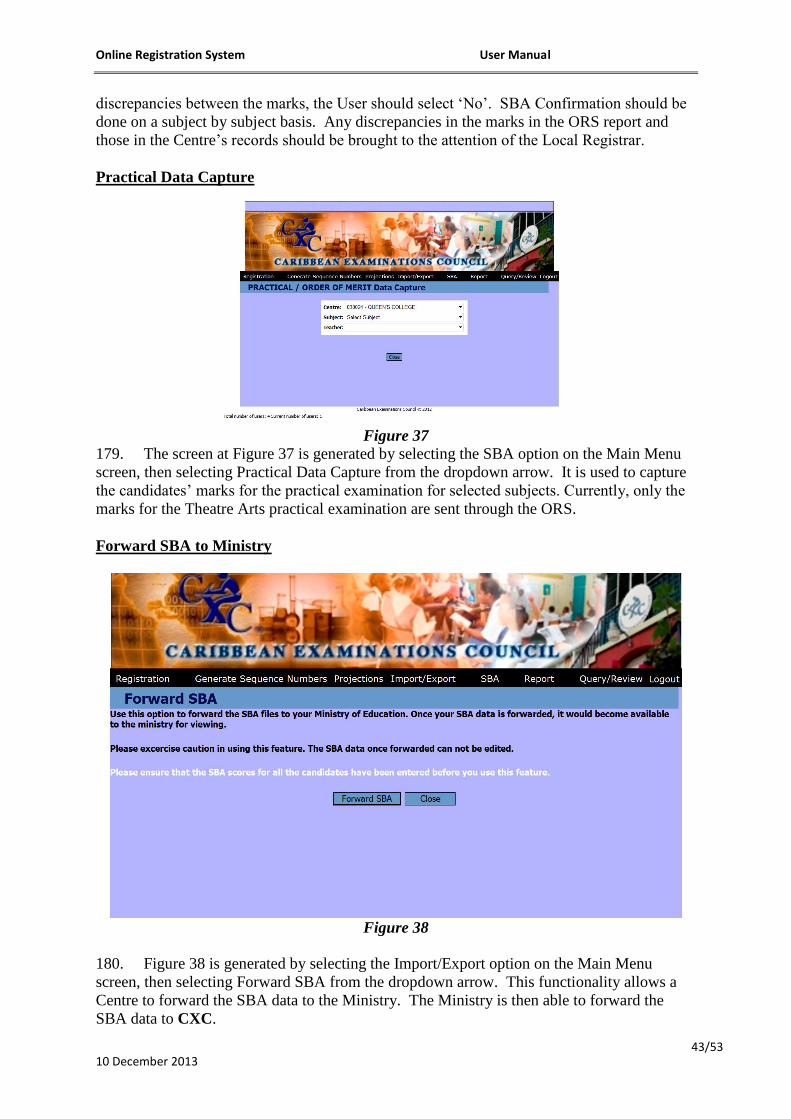
Figure 37
179. The screen at Figure 37 is generated by selecting the SBA option on the Main Menu
screen, then selecting Practical Data Capture from the dropdown arrow. It is used to capture
the candidates‟ marks for the practical examination for selected subjects. Currently, only the
marks for the Theatre Arts practical examination are sent through the ORS.
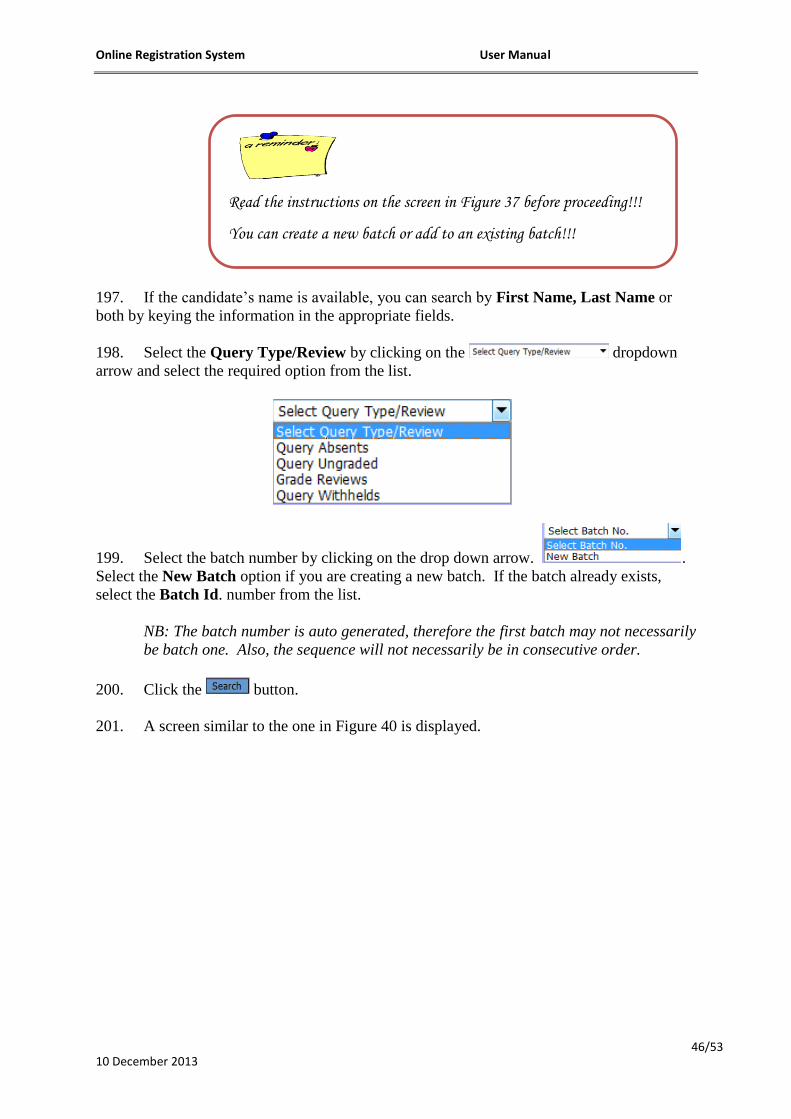
Forward SBA to Ministry
Figure 38
180. Figure 38 is generated by selecting the Import/Export option on the Main Menu
screen, then selecting Forward SBA from the dropdown arrow. This functionality allows a
Centre to forward the SBA data to the Ministry. The Ministry is then able to forward the
SBA data to CXC.

Online Registration System User Manual
10 December 2013 44/53
181. When the data file has been forwarded to Ministry, the Ministry Users would be able
to view it; when it has been forwarded to CXC, the CXC Users would be able to view the
data. Once the data file has been flagged as forwarded to Ministry, the Centre would not be
able to edit or recall it. If the Ministry rejects the SBA data file, the flag would be removed
and the Centre would be able to edit it.
182. When the Forward SBA button is clicked, the User would be prompted with the
question “You are about to forward the SBA data to the Ministry, Are you sure?” If „Yes‟ is
selected, the system will start processing the request.
183. An Alert is placed on the Centre‟s Main Menu screen informing when the SBA data
file was forwarded by the Ministry to CXC or if the file was rejected by the Ministry.
REPORT MENU OPTION
SBA-RELATED REPORTS
CXC Final SBA Scores
184. This report shows the SBA marks awarded by the Centre to the candidates. The
marks are not moderated.
Order of Merit
185. This report gives the ranking of the candidates in the class and the estimated grade
likely to be achieved by each candidate in the various subjects.
Candidates Who did not Submit SBA
186. This report provides a listing of candidates who did not submit SBA.
Candidates Without Rank or Grade
187. This report shows a list of candidates for whom a class ranking or an estimated grade
was not provided.
Candidates Without Scores
188. This report gives a list of candidates for whom SBA marks have not been submitted.
SBA Confirmation
189. This report shows whether the Centre has generated the SBA Confirmation reports.
SBA Declaration Form/SBA Declaration Form Page 2
190. These reports show the SBA Declaration Form completed by the Principal of the
Centre.

Online Registration System User Manual
10 December 2013 45/53
SBA Forward Status/SBA Forward Status – CXC to Action/SBA Forward Status – to
be Forwarded
191. These reports show the dates when SBA data-entry began, when and if the data were
forwarded to the Ministry and to CXC, and whether CXC has taken action on the data.
SBA Samples
192. This report provides the listing of candidates for whom samples have been requested.
SBA Scores/SBA Scores by Total
193. These reports show the SBA marks submitted by the Centre on behalf of the
candidates.
Subjects for which to Submit Samples
194. This report shows the list of subjects for which SBA samples should be submitted.
PART C: QUERIES AND REVIEWS MODULE
Processing a Query/Review
195. All queries and reviews relating to examination results must be done through the ORS
within the time-frame set by the Ministry. Only a User carrying the Super User or Teacher
status at the Centre can lodge queries and reviews in the ORS.
196. When the User selects the Query/Review option on the Main Menu screen, the screen
at Figure 39 is displayed:
Figure 39
Online Registration System User Manual
10 December 2013 46/53
197. If the candidate‟s name is available, you can search by First Name, Last Name or
both by keying the information in the appropriate fields.
198. Select the Query Type/Review by clicking on the dropdown
arrow and select the required option from the list.
199. Select the batch number by clicking on the drop down arrow. .
Select the New Batch option if you are creating a new batch. If the batch already exists,
select the Batch Id. number from the list.
NB: The batch number is auto generated, therefore the first batch may not necessarily
be batch one. Also, the sequence will not necessarily be in consecutive order.
200. Click the button.
201. A screen similar to the one in Figure 40 is displayed.
Read the instructions on the screen in Figure 37 before proceeding!!!
You can create a new batch or add to an existing batch!!!

Online Registration System User Manual
10 December 2013 47/53
Figure 40
202. Select the candidate from the listing to be added to the batch by clicking the
checkbox.
203. Key the nature of the query/review in the Query column.
204. Note that all candidates will not be displayed on the current page. To display the
additional candidates click on the page numbers as seen at 4 in Figure 41 below.
205. Scroll to the bottom of the screen and click the button.
Figure 41
206. On selection of the Assign button the following message is shown:
Assign the candidates to be queried or reviewed before proceeding to
the next page. Only data on the current page will be assigned.

Online Registration System User Manual
10 December 2013 48/53
207. Select OK to continue.
208. You will notice that the candidates that were assigned are now listed at the top of the
form. The number of candidates within the batch is also reported; see Figure 42 below.
Figure 42
209. If any changes are made to the Query column you need to select .
210. You can remove any candidate from the assigned list by clicking the checkbox and
then select the button.
211. You have the option to forward the Query/Reviews at this time. However, if more
queries are to be added just remember to save and you can return to this screen at a later time
and select the existing batch from the list.

Online Registration System User Manual
10 December 2013 49/53
Export Queries/Reviews
Figure 43
212. In order to forward Queries/Reviews to CXC, the User should select the
Import/Export tab on the Main Menu screen then select Forward Reviews as per Figure 43.
213. The data files forwarded by Centres will be sent directly to CXC, thus bypassing the
intervention of the Ministry.
214. The following message below is shown. Select OK to continue.
215. If no batches are selected, the following message below is shown. Select OK to
continue.
216. Once a batch has been selected and forwarded, the following message below is
shown. Select OK to continue.
217. From the main menu, select the tab to close the application.
Online Registration System User Manual
10 December 2013 50/53
REPORT MENU
RESULTS/REVIEWS/QUERIES-RELATED REPORTS
Query – Forward Status
218. This report shows the status of reviews forwarded/not forwarded to CXC.
Query – List of Batch
219. This report shows the reviews submitted by each candidate and CXC‟s response on
the outcome of the reviews.
Query – List of Batch by Date
220. This report shows all the reviews requested by date received.
Results – Broad Sheets
221. This report gives the examination results of all candidates.
Results – Centre Grade Summary by Subject
222. This report gives a summary of grades by gender. It also shows the number of
candidates that was registered for the subject and the number who wrote the examination.
Results – Centre Merit Order
223. This report gives the top 10 candidates in each subject at the centre.
Results – Centre Profile Grade Summary
224. This report gives a summary of the profile by subject.
Results – Preslips
225. This report shows the pre-slip of each candidate.
Online Registration System User Manual
10 December 2013 51/53
PART D: MINISTRY MODULE
FOR MINISTRY USERS (Only)
Forward Registration Files by Ministry to CXC
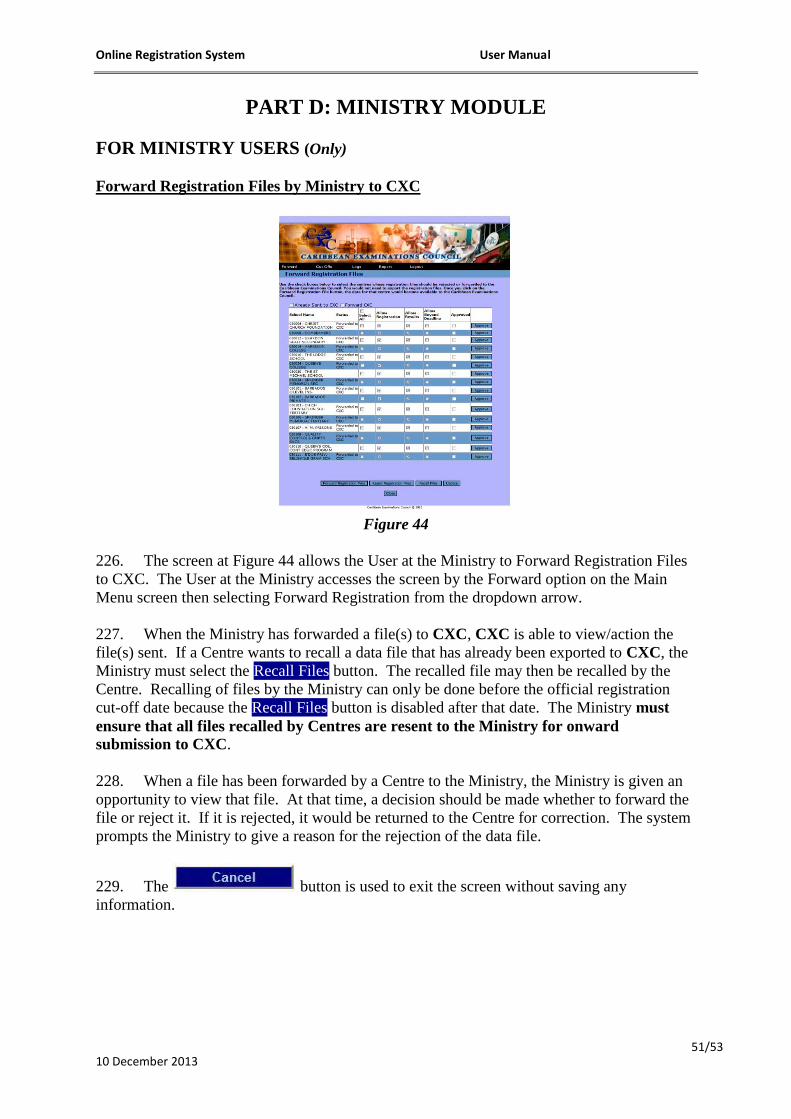
Figure 44
226. The screen at Figure 44 allows the User at the Ministry to Forward Registration Files
to CXC. The User at the Ministry accesses the screen by the Forward option on the Main
Menu screen then selecting Forward Registration from the dropdown arrow.
227. When the Ministry has forwarded a file(s) to CXC, CXC is able to view/action the
file(s) sent. If a Centre wants to recall a data file that has already been exported to CXC, the
Ministry must select the Recall Files button. The recalled file may then be recalled by the
Centre. Recalling of files by the Ministry can only be done before the official registration
cut-off date because the Recall Files button is disabled after that date. The Ministry must
ensure that all files recalled by Centres are resent to the Ministry for onward
submission to CXC.
228. When a file has been forwarded by a Centre to the Ministry, the Ministry is given an
opportunity to view that file. At that time, a decision should be made whether to forward the
file or reject it. If it is rejected, it would be returned to the Centre for correction. The system
prompts the Ministry to give a reason for the rejection of the data file.
229. The button is used to exit the screen without saving any
information.

Online Registration System User Manual
10 December 2013 52/53
Set-up Cutoff Dates by Ministry
Figure 45
230. The screen at Figure 45 allows the User at the Ministry to set up the cut off dates by
which Centres should submit data files for Registration, Amendment, SBA and
Queries/Reviews. The screen is reached from the Cut Off option on the Main Menu screen
then selecting Setup from the dropdown arrow.
231. The dates that the Ministry sets up should be dates earlier than the official deadline
dates given by CXC. The dates should allow the Ministry adequate time to receive, review
and export the files to CXC. Consideration must also be given for time needed to re-submit
data files by Centres if rejected by the Ministry.

Online Registration System User Manual
10 December 2013 53/53
Tracking SBA Samples Received by Ministry
Figure 46
232. The Ministry can track the receipt of SBA samples from centres through the use of the
Logs option on the Main Menu screen at Figure 46. The tracking is done at the centre and
subject levels, therefore, a specific centre and subject must be selected from the Centre Code
field and the Subject field, respectively. The User must indicate whether the samples from
the centre were received in the Ministry Received field. The Ministry Comment field allows
the User to key any comment relating to the samples submitted by the Centre.