Online Banking - American Savings Bank · Welcome to Online Banking with American Savings Bank,...
92
Online Banking RESOURCE GUIDE
Transcript of Online Banking - American Savings Bank · Welcome to Online Banking with American Savings Bank,...

Online Banking R E S O U R C E G U I D E

II
Published by Murphy & Company, Inc.13610 Barrett Office DrSt. Louis, MO 63021www.mcompany.com
© 2009-2019 Murphy & Company, Inc. Microsoft, Microsoft Money, Windows and Internet Explorer are registered trademarks of Microsoft Corporation. Firefox is a registered trademark of the Mozilla Foundation. Quicken is a registered trademark of Intuit, Inc. Macintosh is a registered trademark of Apple Computer, Inc. Adobe Reader is a registered trademark of Adobe Systems, Inc. © 2012 Portions of this guide were written by Q2eBanking.
DisclaimerConcepts, strategies and procedures outlined in this guide can and do change and may not be applicable to all readers. The content in this guide is not warranted to offer a particular result or benefit. Neither the author, publisher nor any other party associated with this product shall be liable for any damages arising out of the use of this guide, including but not limited to loss of profit, commercial, special, incidental or other damages. For complete product and service information, please refer to the terms, conditions and disclosures for each product and service.

3
Getting Started
Welcome to Online Banking with American Savings Bank, F.S.B.! Whether at home or at the office, from a mobile phone, tablet or laptop, we strive to make your online banking experience easy and convenient.
You can navigate this guide by clicking a topic or feature in the Table of Contents. Each section provides an overview and steps to help you during the online banking process. If you have additional questions, contact us at (800) 272-2566.

4
Table of ContentsGetting StartedNew User Enrollment ...................................................................................................7Logging In .......................................................................................................................9
Logging Off .............................................................................................................................9Resetting A Forgotten Password ...............................................................................10
Home PageHome Page Overview .................................................................................................12
Asset Summary Overview ...................................................................................................14Account Details Overview ..........................................................................................15Quick Transfer .............................................................................................................17Account Grouping .......................................................................................................18
Editing a Group Name .........................................................................................................19Deleting a Group ..................................................................................................................19
SecurityProtecting Your Information ......................................................................................20
General Guidelines ..............................................................................................................20Login ID and Password ........................................................................................................20Fraud Prevention .................................................................................................................20
Security Preferences ...................................................................................................21Change Password ................................................................................................................21Change Login ID ...................................................................................................................22
Mobile Security Preferences ......................................................................................23Enabling Touch ID or Fingerprint Login ............................................................................23Enabling Passcode Authentication ....................................................................................25Disabling Passcode Authentication, Touch ID or Fingerprint Login ..............................26Enabling Face ID ...................................................................................................................27
Alerts Overview ...........................................................................................................28Account Alerts ......................................................................................................................29History Alerts ........................................................................................................................30Online Transaction Alerts ...................................................................................................31
Security Alerts Overview ............................................................................................32Edit Delivery Preferences ....................................................................................................32
Secure Message Overview .........................................................................................33Sending a Secure Message ........................................................................................34
Transaction TypesMoving Money Overview ...........................................................................................35
5
TransactionsTransfer Money ...........................................................................................................37Adding A Personal External Account ........................................................................39Verifying A Personal External Account .....................................................................40Loan Payments ............................................................................................................41Activity Center Overview ............................................................................................43
Using Filters ..........................................................................................................................44Creating or Deleting Custom Views Using Favorites .......................................................44Canceling Transactions .......................................................................................................45
Pay A BillBill Pay Overview ........................................................................................................46
Creating a Payee ..................................................................................................................46Editing a “Pay From” Accounts ...........................................................................................48Deleting a Payee ..................................................................................................................49
Making a Single Payment ...........................................................................................50Paying Multiple Bills ....................................................................................................51Payment Activity ..........................................................................................................52
Advance Bill PayOverview ......................................................................................................................53Creating a Payee .........................................................................................................54
Known Company ..................................................................................................................54Unknown Company .............................................................................................................56Person ...................................................................................................................................58
Editing a Payee ............................................................................................................60Deleting a Payee .........................................................................................................61Editing Pending Payments .........................................................................................66Cancel Pending Payments .........................................................................................67Viewing Transaction Details .......................................................................................68
Single Transaction ................................................................................................................68Multiple Transactions ..........................................................................................................69
Creating a Reminder ...................................................................................................71Managing Reminders .................................................................................................73Editing Reminders .......................................................................................................74Deleting Reminders ....................................................................................................75Moving Payments .......................................................................................................76Editing Account Name ................................................................................................77Deleting an Account ...................................................................................................78

6
ServicesStop Payment Request ...............................................................................................79
Single Check .........................................................................................................................79Multiple Checks ...................................................................................................................82
Statements ...................................................................................................................85Account Preferences ..................................................................................................86Manage Contact Information ....................................................................................87Text Enrollment ...........................................................................................................88Statement Delivery .....................................................................................................90
LocationsBranches and ATMs ....................................................................................................91

7
Getting Started
New User Enrollment :Getting Started
If you’re new to Online Banking with American Savings Bank, you need to complete the enrollment process the first time that you log in. Once you complete these few quick steps, you’ll be on your way to banking everywhere you go!
1. Type www.asbhawaii.com into your browser and click the “Enroll” link.
2. Click the Enroll button for the type of account you want to enroll in.
3. Fill out the Online Banking Enrollment Form with the required information and click the Continue button.
New User Enrollment
Noteto your contact information in our system. If the information does not match, call us at (800) 272-2566 to update your profile.
4. A confirmation message appears. You are given a temporary password to use during your first-time login. Memorize the password and click the “Click Here” link to be redirected to the American Savings Bank Home page.
5. Enter your new login ID and click the Log In button.
6. Choose the contact method that allows American Savings Bank to reach you immediately with a Secure Access Code (SAC). This numbered code is only valid for a short time, and if it expires, you need to request a new one. If you close your browser before receiving the SAC, you can log in again and select the I already have a Secure Access Code button.
7. Enter the SAC and click the Submit button.
8. Choose whether to register your device for future logins. If you click the Register Device button, you will never need to request SACs from that device.
Noteregister your devices.

8
Getting Started: New User Enrollment
9. Review the Online Banking Services Agreement on the Disclaimers page and click the I Accept button to agree to the terms and conditions.
10. A view-only profile page appears. Review the information and click the Submit button.
11. Change your password by using your old temporary password.
12. Congratulations! You have successfully logged in to Online Banking! If you have any questions or concerns, call us at (800) 272-2566.

9
Getting Started: Logging In
Getting StartedLogging In
After your first-time enrollment, logging in is easy and only requires your login ID and password. If you are logging in using a device that you have not previously registered, you need to request a Secure Access Code (SAC).
1. Enter your login ID and password.
2. Click the Log In button.
Noteaccount will be temporarily locked. Call us at (800) 272-2566 for assistance.
Logging OffFor your security, you should always log off when you finish your online banking session. We may also log you off due to inactivity.
1. Click the Log Off tab in the navigation menu.
2. Close your internet browser.
1
2

10
Getting Started: Resetting A Forgotten Password
Getting StartedResetting A Forgotten Password
If you happen to forget your password, you can easily reestablish a new one from the American Savings Bank Home page—no need to call us!
1. Click the “Forgot Password” link.
2. Enter your login ID and click the Submit button.
3. Choose the contact method that allows American Savings Bank to reach you immediately with a 6-digit Secure Access Code (SAC).
1
Note account is locked or if you are resetting your password from an unregistered device.
2
3

11
Getting Started: Resetting A Forgotten Password
4. Enter the SAC and click the Submit button.
5. Create a new password based on our password requirements and click the Submit button when you are finished.
4
5

12
Home Page
Home Page: Home Page Overview
Home Page Overview
After logging in, you are taken directly to the Home page. This page is divided into three convenient sections to help you navigate to every feature within Online Banking. Here you can view the balances in your American Savings Bank accounts, see your account summaries and more!
NoteHome page.
A
E
B
F
G
DC

13
Home Page: Home Page Overview
A. The navigation bar appears in every view on the left side of the screen. You can navigate to Online Banking features by selecting the appropriate drop-down tab.
B. Your American Savings Bank accounts are displayed in an account card with its balance.
C. If you click an account name, you are taken to the Account Details page. You can also click the icon on the right side of an account card and select View Activity for more details.
D. The icon allows you to print a summary of current available funds in your accounts.
E. You can expand or collapse account details by clicking the icon.
F. If you click and hold an account card, you can drag and drop it to a new location to change the order in which your accounts appear.
G. The Quick Actions links in the top right corner let you quickly access different Online Banking features.

14
Home Page: Home Page Overview
D
Asset Summary OverviewIf you ever need to quickly assess how much money is in all of your accounts, you can scroll down to the Asset Summary graphic on the Home page. This interactive chart represents your total assets, represented by specific colors and percentages.
C
A. The Total Assets widget gives you the total amount of money in your accounts and breaks down those funds into percentages.
B. Each colored piece represents one of your American Savings Bank or linked accounts and displays its percentage of total funds as well as the balance.
C. Clicking "Next" or "Previous" lets you view different accounts and details.
D. You can click the "View Transactions" link for more information.
B
A

15
Home Page: Account Details Overview
Home PageAccount Details Overview
BD E
F
Selecting a American Savings Bank account on the Home page takes you to the Account Details page, where you can view every transaction pertaining to that account. From here, you can view details such as type of transaction, check images and account balances so you stay organized and on top of your finances.
A
C
H
G
I

16
Home Page: Account Details Overview
A. On the Home page, you can click on an account name to view the Account Details screen. You can also click the right side of an account card and click the View Activity button.
B. The available balance of that account is displayed in the top right corner.
C. You can find transactions within that account using the search bar.
D. Transactions can be sorted by time, type, amount or check number. Click the Filters icon for more options.
E. More information about your transactions is available by clicking the Details icon.
F. The icon lets you print a list of transactions. You can also export your transactions into a different format by clicking the icon.
G. The ee icon indicates how the Date, Description and Amount columns are sorted.
H. You can view more details about a transaction by clicking on it.
I. After clicking a transaction, the icon lets you print the transaction.

17
Home Page: Quick Transfer
Home PageQuick Transfer
1. Click the icon right side of an account card and select Quick Transfer.
2. Select the “To” drop-down and choose an account to receive the funds.
3. Enter an amount to transfer.
4. (Optional) Click the “Advanced Options” link to be redirected to the Funds Transfer feature.
5. Click the Transfer Funds button when you are finished.
4
No need to run to a branch to move money from one account to another! If you’re ever in a rush, the Quick Transfer option provides you with a simple way to do those transactions.
2
3
5

18
Home Page: Account Grouping
Home PageAccount Grouping
You can organize your accounts into groups, so the Home page appears in a way that makes sense to you. These groups can always be changed or deleted to meet your needs.
1. Create a new group by clicking and holding an account tile, then dragging and dropping it to the
y click pop-up icon.
2. Create a group nickname and click the check mark when you are finished.
2
1
1

19
Home Page: Account Grouping
Deleting a GroupAfter a group is made, you can reorganize the Home page by deleting a group without removing those accounts from the Home page.
Editing a Group NameThe names of existing groups can be edited in just two easy steps.
1. Remove all accounts from a group by clicking and holding an account tile and dragging it to another group and dropping it.
2. Click the Yes, delete button to delete the group.
2
1
12
1. Click the icon to edit your group nickname.
2. Enter a new name and click the check mark when you are finished.
20
Security
Security: Protecting Your Information
Here at American Savings Bank, we do all that we can to protect your personal information and provide you with a dependable online experience. However, we rely on you to take further precautions to assure the safety of your accounts. By following our tips, Online Banking can be a secure and efficient method for all your banking needs.
General Guidelines• Make sure your operating system and antivirus software are up-to-date.
• Always use secure wireless (WiFi) networks that require a login ID and password.
• Never leave your computer unattended while using Online Banking.
• Monitor your recent account history for unauthorized transactions.
• Always log off of Online Banking when you’re finished and close the browser.
Login ID and Password• Create strong passwords by using a mixture of upper and lowercase
letters, numbers and special characters.
• Do not create passwords containing your initials or birthday.
• Change your passwords periodically.
• Memorize your passwords instead of writing them down.
• Only register personal devices and avoid using features that save your login IDs and passwords.
Fraud Prevention• Do not open email attachments or click on links from unsolicited sources.
• Avoid giving out personal information on the phone or through email.
• Shred unwanted sensitive documents including receipts, checks, deposit slips, pre-approved credit card offers and expired cards.
• Act quickly. If you suspect your financial information is compromised, call us immediately at (800) 272-2566.
Protecting Your Information

21
Security: Security Preferences
Security
We take security very seriously at American Savings Bank. Because of this, we’ve added various tools to help you better protect your account information. You can add and manage these features in Security Preferences to strengthen your Online Banking experience.
Change PasswordWhen you need to, you can change your password within Online Banking. We recommend that you change your password regularly and follow our guidelines for creating a strong password.
Security Preferences
In the Settings tab, click Security Preferences.
1. Click the Change Password button.
2. Enter your old password.
3. Create a new password.
4. Reenter your new password.
5. Click the Change Password button when you are finished making changes.
1
2
3
4
5

22
Security: Security Preferences
Change Login IDYou can also change your login ID at any time. To ensure that you create an effective login ID, create an ID that you will remember and that follows our required guidelines.
In the Settings tab, click Security Preferences.
1. Click the Change Login ID button.
2. Enter your new login ID.
3. Click the Submit button when you are finished making changes.
2
3

23
Security: Mobile Security Preferences
Security
Within American Savings Bank’s Online Banking app, you have the ability to set up security preferences that are not available on a desktop computer. These additional preferences make signing into your Online Banking quick and easy but also adds an extra layer of security to your private information while you are on the go!
Enabling Touch ID or Fingerprint LoginTouch ID and Fingerprint Login are features that have fingerprint recognition technology that allows you to unlock your iOS or Android device, to make payments or authenticate transactions using just your fingerprint. With this feature enabled, you can now easily and securely sign in to your Online Banking using Touch ID or Fingerprint Login on our mobile app!
Sign in to American Savings Bank’s Online Banking app and tap the Menu button. In the Settings tab, tap Security Preferences.
1. Toggle the Touch ID or Fingerprint Login switch from “Off” to “On.”
2. Review the information about using fingerprint authentication and tap the Continue button.
3. Enter your login ID and password and tap the Authorize button.
Mobile Security Preferences
1
2
3
Notemobile device before enabling it through our Online Banking app.
iOS
Android

24
Security: Mobile Security Preferences
Touch ID for “ASB”
4. Scan your fingerprint
a. iOS Device: Place your finger on the Home button to enable Touch ID.
b. Android Device: Place your finger on the fingerprint scanner to enable Fingerprint Login. Location of scanner varies from device to device.
4a
4b

25
Security: Mobile Security Preferences
Enabling Passcode AuthenticationCreate a unique passode within our Online Banking app to quickly and easily sign in to your Online Banking on the go!
Sign in to American Savings Bank’s Online Banking app and tap the Menu button. In the Settings tab, tap Security Preferences.
1. Toggle the Passcode switch from “Off” to “On.”
2. Review the information about using a passcode and tap the Create Passcode button.
3. Create your 4-digit passcode using the keypad.
4. Confirm your passcode using the keypad.
5. Enter your login ID and password and tap the Authorize button.
1
2
3
4
5

26
Security: Mobile Security Preferences
Disabling Passcode Authentication, Touch ID or Fingerprint LoginYou can disable Passcode Authentication, Touch ID or Fingerprint Login if you no longer prefer to utilize them. When all features are disabled, you can sign in to your Online Banking using your login ID and password.
iOS
Android
1
2
Sign in to American Savings Bank’s Online Banking app and tap the Menu button. In the Settings tab, tap Security Preferences.
1. Toggle the Passcode, Touch ID or Fingerprint Login switch from “On” to “Off.”
2. Tap the Yes button to disable the feature.

27
Security: Mobile Security Preferences
Open American Savings Bank’s Mobile app and tap the Face ID button.
1. Review the information about using a Face ID and tap the Enroll Now button.
2. Enter your login ID and password and tap the Authorize button.
3. Face ID is now set up. During your next login, tap the Face ID button to log in using Face ID.
Enabling Face IDFace ID is a feature which utilizes facial recognition to allow you to unlock your iOS device using your face instead of a login ID and password.
Noteenabling it through our Online Banking Mobile app.
1
2
3

28
Security: Alerts Overview
Security
Having peace of mind is critical when it comes to your online banking experience. When you create an alert through Online Banking, you specify the conditions that trigger that alert, so you stay on top of what’s important to you.
Alerts Overview
B
D
Note but you can also choose to receive them by email, phone or text message.
A
In the Settings tab, click Alerts.
A. The "New Alert" drop-down lets you create a date, account, history or transaction alert.
B. The icon allows you to collapse or expand alert details for each category.
C. Toggling the "Enabled" switch turns an alert on or off without deleting it.
D. The "Edit" link lets you make changes to existing alerts.
C

29
Security: Alerts Overview
In the Settings tab, click Alerts.
1. Use the “New Alert” drop-down and select “Account Alert.”
2. Check the box next to an account name.
3. Check a box to select a field.
4. Check a box to select a comparison.
5. Enter an amount and click the Save button.
6. Select a delivery method using the drop-down.
7. Choose a frequency by checking the box next to “Every Occurrence” to repeat the alert.
8. Click the Save button when you are finished.
2 3
5
4
7
Account AlertsThere should be no surprises when it comes to your finances. Account Alerts can notify you when the balances in your accounts go above or below a number you specify.
1
6
8

30
Security: Alerts Overview
In the Settings tab, click Alerts.
1. Click the “New Alert” drop-down and select “History Alert.”
2. Check the box next to an account name.
3. Select a transaction type by checking a box.
4. Check a box to select a comparison. These options vary depending on the chosen transaction type.
5. Enter an amount or check number and click the Save button.
6. Select a delivery method using the drop-down.
7. Choose a frequency by checking the box next to “Every Occurrence” to repeat the alert.
8. Click the Save button when you are finished.
2 3 4
7
History AlertsIf you’re ever concerned about amount limits or pending checks, you can create History Alerts to contact you when a check number posts or transactions meet an amount you choose.
1
5
6
8
31
Security: Alerts Overview
In the Settings tab, click Alerts.
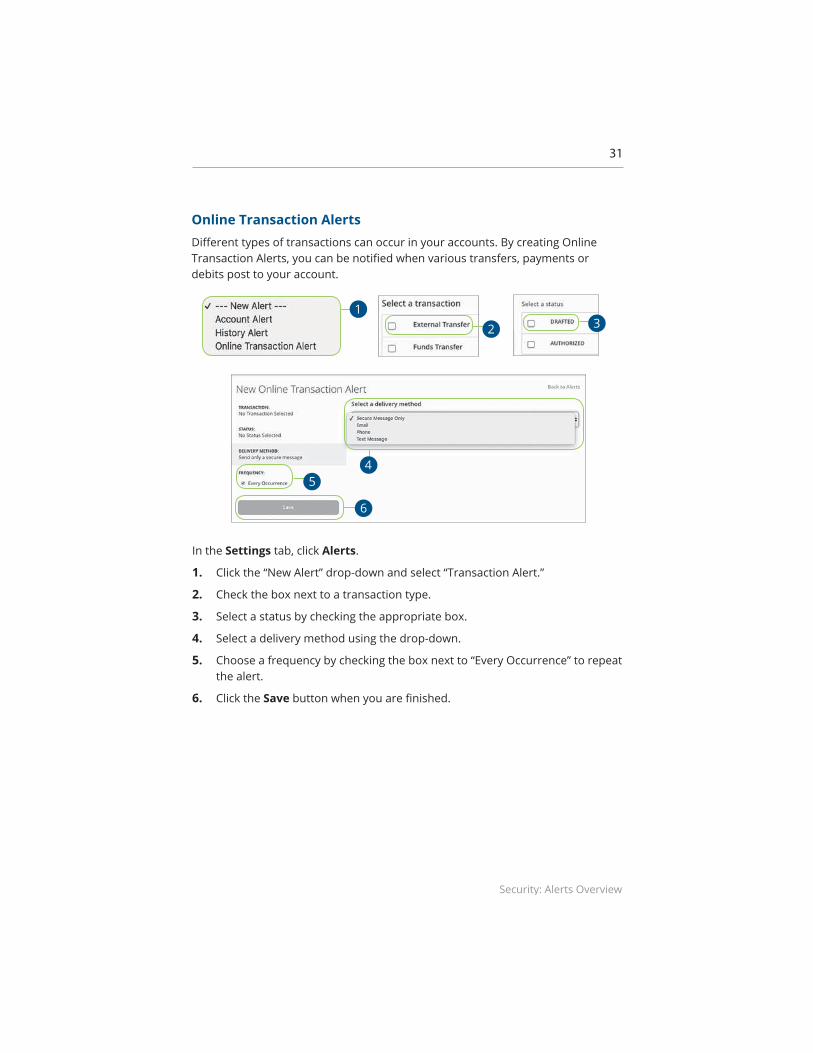
1. Click the “New Alert” drop-down and select “Transaction Alert.”
2. Check the box next to a transaction type.
3. Select a status by checking the appropriate box.
4. Select a delivery method using the drop-down.
5. Choose a frequency by checking the box next to “Every Occurrence” to repeat the alert.
6. Click the Save button when you are finished.
2 3
5
Online Transaction AlertsDifferent types of transactions can occur in your accounts. By creating Online Transaction Alerts, you can be notified when various transfers, payments or debits post to your account.
1
4
6

32
Security: Security Alerts Overview
SecuritySecurity Alerts Overview
We want you to feel confident while using Online Banking. To help you feel safe and in control, Security Alerts are implemented in your accounts to notify you immediately when security scenarios occur.
In the Settings tab, click Alerts, then Security Alerts.
A. You can turn an alert on or off by toggling the Enabled switch.
B. If an alert is grayed-out, you cannot edit or disable it.
A
B
Edit Delivery PreferencesWhen a trigger occurs, Security Alerts are always sent to you through secure messages. You can add additional delivery methods to notify you about your accounts wherever you are.
In the Settings tab, click Alerts, then Security Alerts.
1. Click the “Edit Delivery Preferences” link at the top. These changes will apply to all Security Alerts.
2. Enter the information for your preferred delivery method.
3. Click the Save button when you are finished making changes.
1
2
3
33
Security: Secure Message Overview
Security
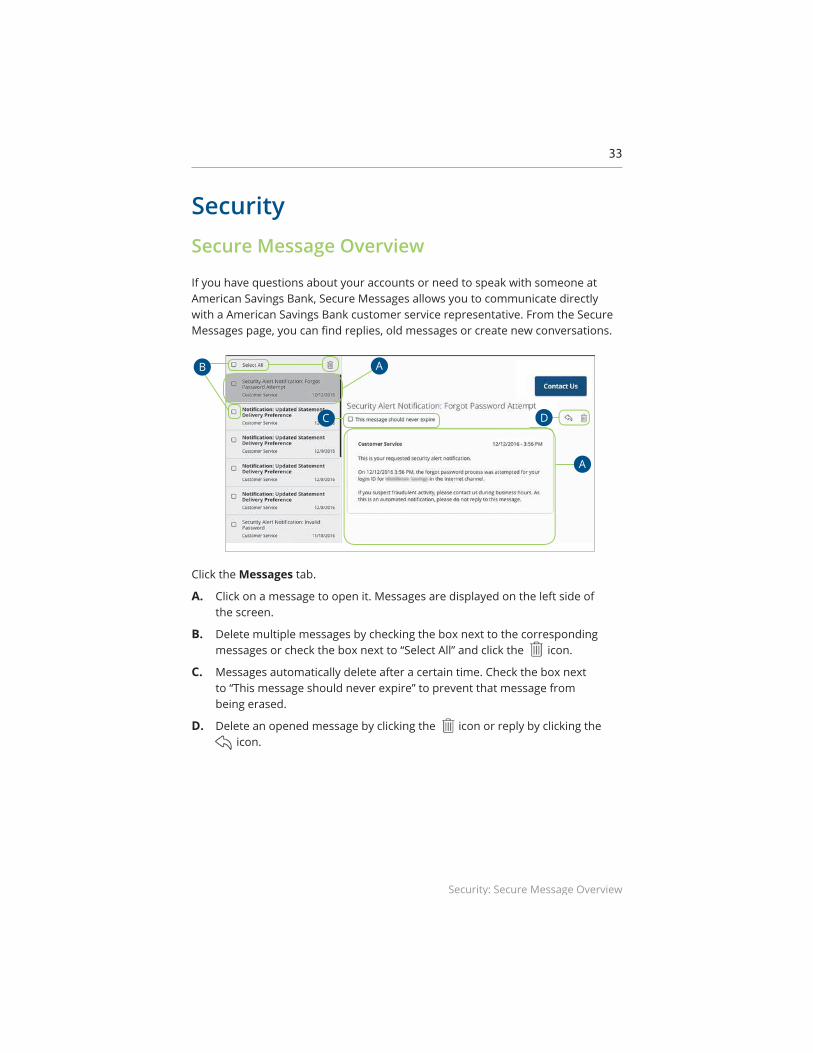
If you have questions about your accounts or need to speak with someone at American Savings Bank, Secure Messages allows you to communicate directly with a American Savings Bank customer service representative. From the Secure Messages page, you can find replies, old messages or create new conversations.
Secure Message Overview
Click the Messages tab.
A. Click on a message to open it. Messages are displayed on the left side of the screen.
B. Delete multiple messages by checking the box next to the corresponding messages or check the box next to “Select All” and click the icon.
C. Messages automatically delete after a certain time. Check the box next to “This message should never expire” to prevent that message from being erased.
D. Delete an opened message by clicking the icon or reply by clicking the icon.
A
A
B
C D

34
Security: Sending a Secure Message
Security
Starting a new conversation through Online Banking is just as effortless as sending an email. Unlike an email, you can safely include confidential personal information relating to your accounts or attach files within a new message.
Click the Messages tab.
1. Create a new message by clicking the Contact Us button in the top right corner.
2. Select the recipient from the drop-down.
3. Enter the subject.
4. (Optional) Click the “Supported Attachments” link to see if your file is supported.
5. (Optional) Attach a file by clicking the icon.
6. Enter your message.
7. Click the Send button when you are finished.
45
Sending a Secure Message
7
1
2
3
6

35
Transaction Types
Transaction Types: Moving Money Overview
Moving Money Overview
The heart of Online Banking is the ability to transfer funds on the go. Whether you are transferring money between your accounts or sending money to someone outside of American Savings Bank, there are various features that help you transfer funds in different ways.
• Transfer Money: Move money between your personal American Savings Bank accounts.
• External Transfer after adding and verifying external accounts: Move money after linking your external accounts.
36
Transaction Types: Moving Money Overview
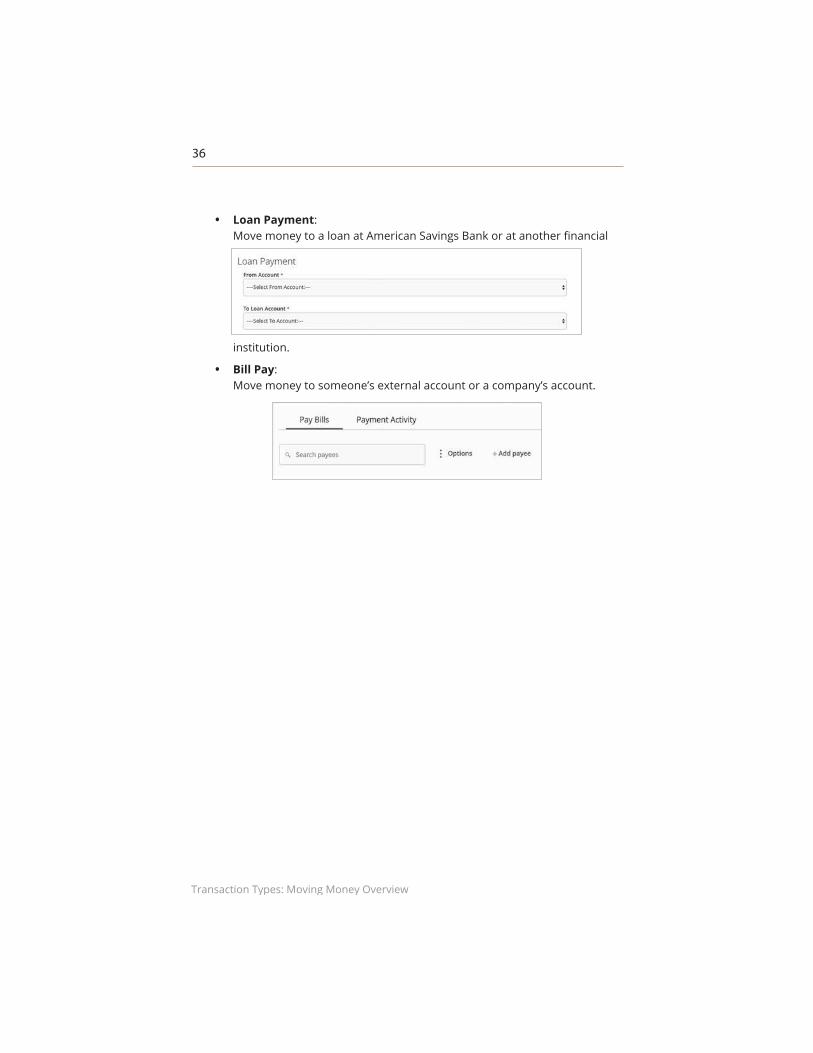
• Loan Payment: Move money to a loan at American Savings Bank or at another financial
institution.
• Bill Pay: Move money to someone’s external account or a company’s account.

37
Transactions
Transactions: Transfer Money
When you need to make a one-time or recurring transfer between your personal American Savings Bank accounts, you can use the Transfer Money feature. These transactions go through automatically, so your money is always where you need it to be.
Transfer Money
3
2
1
In the Transactions tab, click Transfer Money.
1. Select the accounts to transfer funds between using the “To” and “From” drop-downs.
2. Enter the amount to transfer.
3. (One-Time Transfer Only) Enter the date to process the transaction.

38
Transactions: Transfer Money
4a
4b
4c
4d
6
5
Notethe Recurring Transactions tab within the Activity Center.
4. If you would like to set up a recurring transfer, follow the steps below.
a. Check the box next to “Make this a recurring transaction” to repeat the transfer.
b. Use the “How often should this transfer repeat?” drop-down to specify how often the transfer should occur.
c. Enter a start and end date for this transaction using the calendar features.
d. If your transaction doesn’t have an end date, check the box next to “Repeat Forever.”
5. Enter a memo.
6. Click the Transfer Funds button when you are finished.

39
Transactions: Adding A Personal External Account
Transactions
Your private accounts at other financial institutions can be linked to Online Banking with American Savings Bank so you can transfer money between two banks without ever leaving home! When you go to add another account, you are asked to verify your ownership of that account by confirming two small deposits American Savings Bank makes into the external account.
Adding A Personal External Account
In the Transactions tab, click Add External Account.
1. Enter the account number.
2. Select the type of account using “Account Type” drop-down.
3. Enter the financial institution’s routing number. These numbers are located at the bottom of a paper check or deposit slip from your check book.
4. Click the Continue button.
In two to three business days, two micro-deposits will appear in your external account. Once you receive those deposits, go to the Verify External Account tab to add the account.
3
1 2
4

40
Transactions: Verifying A Personal External Account
Transactions
As soon as American Savings Bank makes two small deposits of less than a dollar into your external account, you are asked to verify those amounts within Online Banking. Once they are confirmed, you can begin transferring money to the outside account.
Verifying A Personal External Account
In the Transactions tab, click Verify External Account.
1. Select the account you would like to verify.
2. Enter the amounts of the two micro-deposits that have been made into your external account.
3. Click the Submit button when you are finished.
2
1
3

41
Transactions: Loan Payments
TransactionsLoan Payments
When you need to make a one-time or recurring payment to your loans with American Savings Bank or with another FI, you can use the Loan Payment feature.
In the Transactions tab, click on Loan Payments.
1. Using the “From” and “To” drop-downs, select the account the funds will be taken from and the account you wish to post the payment.
2. Select your payment type using the “Payment Type” drop-down.
3. Enter the amount of the payment.
4. (One-Time Payment Only) Enter the date to process the transaction.
4
3
1
2
42
Transactions: Loan Payments
6
7
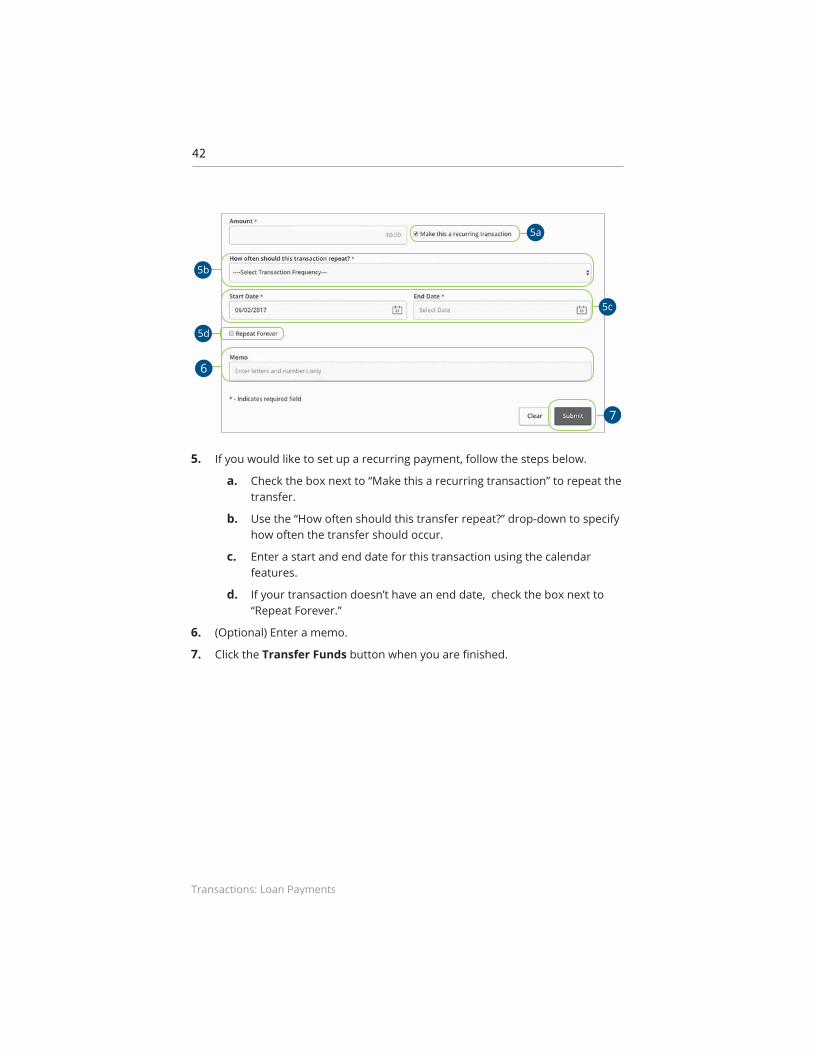
5. If you would like to set up a recurring payment, follow the steps below.
a. Check the box next to “Make this a recurring transaction” to repeat the transfer.
b. Use the “How often should this transfer repeat?” drop-down to specify how often the transfer should occur.
c. Enter a start and end date for this transaction using the calendar features.
d. If your transaction doesn’t have an end date, check the box next to “Repeat Forever.”
6. (Optional) Enter a memo.
7. Click the Transfer Funds button when you are finished.
5a
5b
5c
5d

43
Transactions: Activity Center Overview
Transactions
All transactions initiated through Online Banking or through our app appear in the Activity Center. All single and recurring transactions as well as deposited checks show in the Activity Center along with stop payments and check reorders.
Activity Center Overview
In the Transactions tab, click Activity Center.
A. Click an appropriate tab at the top to view Single Transactions, Recurring Transactions or Deposited Checks.
B. Use the search bar to find transactions within that account.
C. Print the Activity Center page by clicking the icon. Export your transactions into a different format by clicking the icon.
D. Click the e e icon next to the Created, Status, Transaction Type, Account or Amount columns to sort transactions.
E. Click on a transaction to view more details.
F. Select Actions to perform additional functions.
C
F
A
D
B
E

44
Transactions: Activity Center Overview
Using FiltersWhat appears on the Activity Center can be customized using various filters. You can also choose up to six columns to display, so you can swiftly find what you’re looking for each time.
Creating or Deleting Custom Views Using FavoritesAfter applying specific filters, you can save that view of the Activity Center to Favorites, making it easier and faster to search, print or export transactions. You can always delete Favorites if they are no longer useful.
In the Transactions tab, click Activity Center.
1. Apply filters and click the “Favorites” link.
2. Click the + icon to create a new favorite template.
3. Enter a name for your new custom view.
4. Click the Save button when you are finished.
5. Click the X icon to remove a custom view from your Favorites.
In the Transactions tab, click Activity Center.
1. Click the Filters icon to create a custom view of your transactions.
2. Create a custom list of transactions using these filters.
3. Filter the type of transaction you are looking for using the “Transaction Type” drop-down. Column names with check boxes appear. Select up to six boxes.
4. Click the Apply Filters button when you are finished.
1
4
1
3
4
52
3
2
45
Transactions: Activity Center Overview
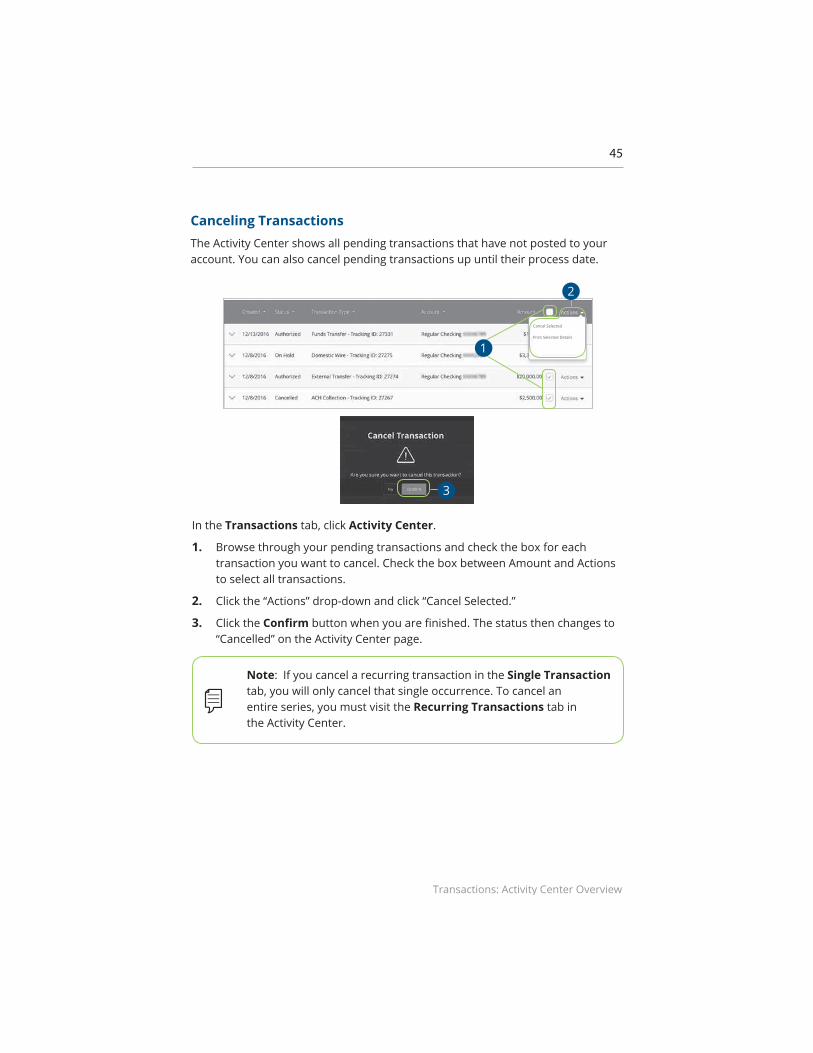
Canceling TransactionsThe Activity Center shows all pending transactions that have not posted to your account. You can also cancel pending transactions up until their process date.
Note Single Transaction tab, you will only cancel that single occurrence. To cancel an entire series, you must visit the Recurring Transactions tab in the Activity Center.
In the Transactions tab, click Activity Center.
1. Browse through your pending transactions and check the box for each transaction you want to cancel. Check the box between Amount and Actions to select all transactions.
2. Click the “Actions” drop-down and click “Cancel Selected.”
3. Click the Confirm button when you are finished. The status then changes to “Cancelled” on the Activity Center page.
Cancel Selected
Print Selected Details
3
2
1

46
Pay A Bill
Pay A Bill: Bill Pay Overview
Bill Pay Overview
Sending payments to companies and individuals has never been easier! Pay A Bill with American Savings Bank helps you stay on top of your bills, allowing you to quickly manage your payments and never miss a due date.
Note Pay A Bill tab, you need to choose an account to use within Bill Pay and to accept the terms and conditions. You cannot remove or delete this account after it is enrolled.
Creating a PayeeUsing Bill Pay can save you time with payee profiles for the companies or people you pay regular bills to. Whether it’s a one-time payment or a frequent occurrence, managing your payees lets you pay your bills on time in just a few clicks.
In the Transactions tab, click Pay A Bill.
1. Click the “Add Payee” link.
1

47
Pay A Bill: Bill Pay Overview
2
3
4
56
2. Enter the new payee’s name and add an optional nickname.
3. Enter the payee’s street address, city and zip code and choose the state using the “State” drop-down.
4. Enter the payee’s area code and phone number.
5. Enter the payee’s account number.
6. Click the Save button when you are finished.

48
Pay A Bill: Bill Pay Overview
Editing a “Pay From” AccountsYou can change which accounts are your default “Pay From” accounts.
1111
In the Transactions tab, click Pay A Bill.
1. Select which accounts you wish to pay bills with by checking the appropriate box.
2. Click the Save button when you are finished making changes.
1
2

49
Pay A Bill: Bill Pay Overview
Deleting a PayeeIf you no longer need a payee and wish to remove them from your Bill Pay, you can do so from the Bill Payment page.
In the Transactions tab, click Pay A Bill.
1. Use the “Options” drop-down and choose “Delete a Payee.”
2. Click the Delete button next to the payee you want to remove.
1
2

50
Pay A Bill: Making a Single Payment
Pay A Bill
After creating a payee, you can begin paying your bills online without the hassle of cash or checks. You can effortlessly pay a single bill or schedule payments for the future so you never miss a deadline.
Making a Single Payment
In the Transactions tab, click Pay A Bill.
1. Select a payee.
2. Enter an amount.
3. Select the account to take funds from using the drop-down.
4. Select the delivery date using the calendar feature.
5. Click the Submit Payment button.
1
2
3
4
5

51
Pay A Bill: Paying Multiple Bills
Pay A Bill
In the Transactions tab, click Pay A Bill.
1. Choose the accounts funds will be taken from using the “Pay From” drop-downs.
2. Enter amounts for each bill.
3. Select the dates to pay bills using the calendar.
4. Click the Review Payments button.
5. Review your payment information and click the Submit Payments button when you are finished.
2
6
You can schedule different payments for multiple payees at the same time, so you can pay all your bills in one go!
Paying Multiple Bills
5
1
3
4

52
Pay A Bill: Payment Activity
Pay A Bill
You can delete a scheduled payment if it has not cleared your account and is still pending. All pending and processed transactions are listed in the right sidebar for your convenience.
Payment Activity
In the Transactions tab, click Pay A Bill.
A. Click the Payment Activity tab.
B. Use the search bar to find transactions within that account.
C. Click the Filters icon to create a custom view of your transactions.
D. Print the Activity Center page by clicking the icon.
E. Click the ee icon next to the Date, Status, Payee, Pay from or Amount columns to sort transactions.
F. Click on a transaction to view more details.
Notecolumn in green.
A
BC
D
E

53
Advance Bill Pay
Advance Bill Pay: Overview
Overview
Bill Pay with American Savings Bank allows you to stay on top of your monthly finances. Having your bills linked to your bank account enables you to electronically write checks and send payments in one place.
The first time that you click the Pay A Bill tab, you are asked to choose an account to use within Bill Pay and to accept the terms and conditions.
In the Transactions tab, click on Pay A Bill. Click the “Options” drop-down and select Visit Bill Pay Site.
A. All your payees are listed on the left side of your screen.
B. All your existing reminders appear in the right side panel.
C. Your pending transactions appear in the right side panel under “Pending Payments.”
D. You can view your transaction history for the last 45 days in the right side panel under “History Payments.”
A
B
C
D

54
Advance Bill Pay: Creating a Payee
Advance Bill Pay
Click the Payment Center tab.
1. Click the Add a Company or Person button.
2. Select your company from the list.
Creating a Payee
2
1
The individual that receives your payments is known as a payee. You can pay just about any company, loan or account using our bill pay system. The information printed on your bill is all you need to set up a company as a payee. When creating your payee, there are two types of companies you can add: Known and unknown.
Known CompanyIf the company you need to pay is preloaded in our database, you have the option to sign up for eBills. For more information, visit page 62.

55
Advance Bill Pay: Creating a Payee
3. Enter the required information. Fields may vary depending on which company you are adding.
4. Click the Add button when you are finished.
3
4

56
Advance Bill Pay: Creating a Payee
Click the Payment Center tab.
1. Click the Add a Company or Person button.
2. Click the “mail a check” link.
2
1
Unknown CompanyIf you have a payee who is not in our system, no problem! You can add their contact information, but you may not be able to send a Rush Delivery or sign up for eBills.

57
Advance Bill Pay: Creating a Payee
3. Enter the company name, account number, street address and city.
4. Select the state from the drop-down.
5. Enter the zip code, phone number, mobile number and email address.
6. Click the Add button when you are finished.
3
4
5
6

58
Advance Bill Pay: Creating a Payee
Click the Payment Center tab.
1. Click the Add a Company or Person button.
2. Click the Person tab.
2
1
PersonYou can pay anyone, such as a babysitter, dog-walker or a freelance worker, by creating them as a payee in our online bill pay system.

59
Advance Bill Pay: Creating a Payee
3. Enter the payee’s first and last name.
4. Enter their street address and city.
5. Select the state from the drop-down.
6. Enter their zip code, phone number, mobile number and email address.
7. Click the Add button when you are finished.
3
4
5
7
6

60
Advance Bill Pay: Editing a Payee
Advance Bill Pay
Click the Payment Center tab.
1. Select a payee.
2. Make the necessary changes.
3. Click the Save Changes button when are you finished making changes.
3
1
2
You can make changes to an existing payee at any time. This is especially beneficial if a payee’s account number or contact information changes.
Editing a Payee
61
Advance Bill Pay: Deleting a Payee
Advance Bill Pay
1
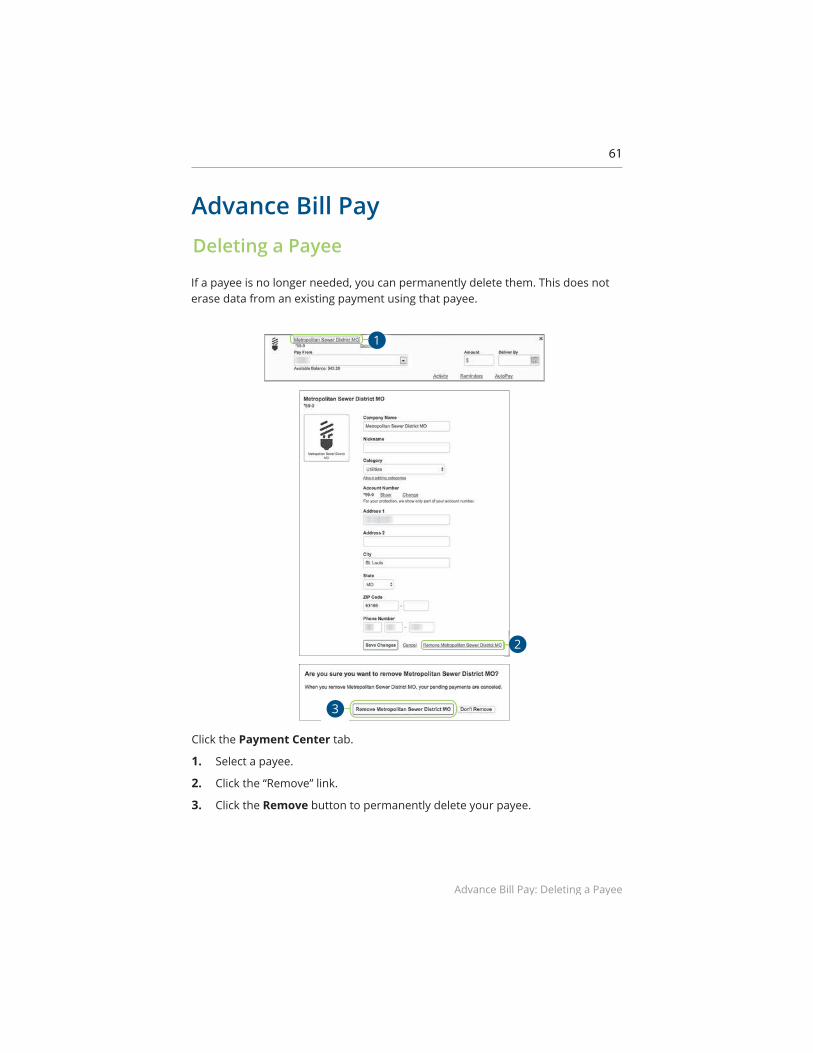
Click the Payment Center tab.
1. Select a payee.
2. Click the “Remove” link.
3. Click the Remove button to permanently delete your payee.
3
Deleting a Payee
If a payee is no longer needed, you can permanently delete them. This does not erase data from an existing payment using that payee.
2

62
Advance Bill Pay: Deleting a Payee
Advance Bill Pay
Click the Payment Center tab.
1. Click on the icon or “eBills” link.
2. Click the Add button for each biller you would like to add to eBills.
3. Click the Submit button when you are finished.
eBills
1 1
23
You can go paperless and receive your bills electronically within our bill pay system. Major credit card companies, automotive finance companies and utility companies are preloaded in our system, and these present billers can be set up as an eBill.

63
Advance Bill Pay: Deleting a Payee
Advance Bill Pay
Click the Payment Center tab.
1. Use the drop-down and select an account to withdraw from.
2. Enter the amount of your bill and use the calendar feature to select the payment due date.
3. Click the Send Money button.
4. Review the payment information.
5. Click the Submit Payments button when you are finished.
Schedule Payments
1 2
3
4
5
It is easy to pay your bills once you set up payees. When you click on the Payments tab, you will see all of the payees you have established so far. To pay a bill, simply find your payee and fill out the payment information beside their name.

64
Advance Bill Pay: Deleting a Payee
Advance Bill Pay
Click the Payment Center tab.
1. Click the “AutoPay” link
2. Click the “Set Up AutoPay” link.
Automatic Payments
2
1
Our Automatic Payments feature keeps you ahead of your repeating payments. Setting up an automatic payment takes only a few moments and saves you time by not having to reenter a payment each time it is due.

65
Advance Bill Pay: Deleting a Payee
3. Use the drop-down and select an account to withdraw from.
4. Enter the amount of your bill and use the calendar feature to select the payment due date.
5. Use the drop-down to select the frequency.
6. Select the duration of the payments using the drop-down.
7. Enter your email address.
8. Check the appropriate boxes indicating when you would like to be notified.
9. Click the Start Making Payments button when you are finished.
3
4
6
7
8
95

66
Advance Bill Pay: Editing Pending Payments
Advance Bill Pay
Click the Payment Center tab and locate the Pending Payments box.
1. Click the “Change” link.
2. Make the necessary changes.
3. Click the Save Changes button when you are finished making changes.
Editing Pending Payments
1
2
3
You can change a payment even after you schedule it. This convenient feature gives you the freedom to change the way you make your payments.

67
Advance Bill Pay: Cancel Pending Payments
Advance Bill Pay
Click the Payment Center tab and locate the Pending Payments box.
1. Click the “Cancel” link if you do not wish to process the payment.
2. Click the Cancel Payment button to permanently delete your payment.
1
2
Cancel Pending Payments
You can cancel a payment even after you schedule it. This convenient feature gives you the freedom to change the way you make your payments.
68
Advance Bill Pay: Viewing Transaction Details
Advance Bill Pay
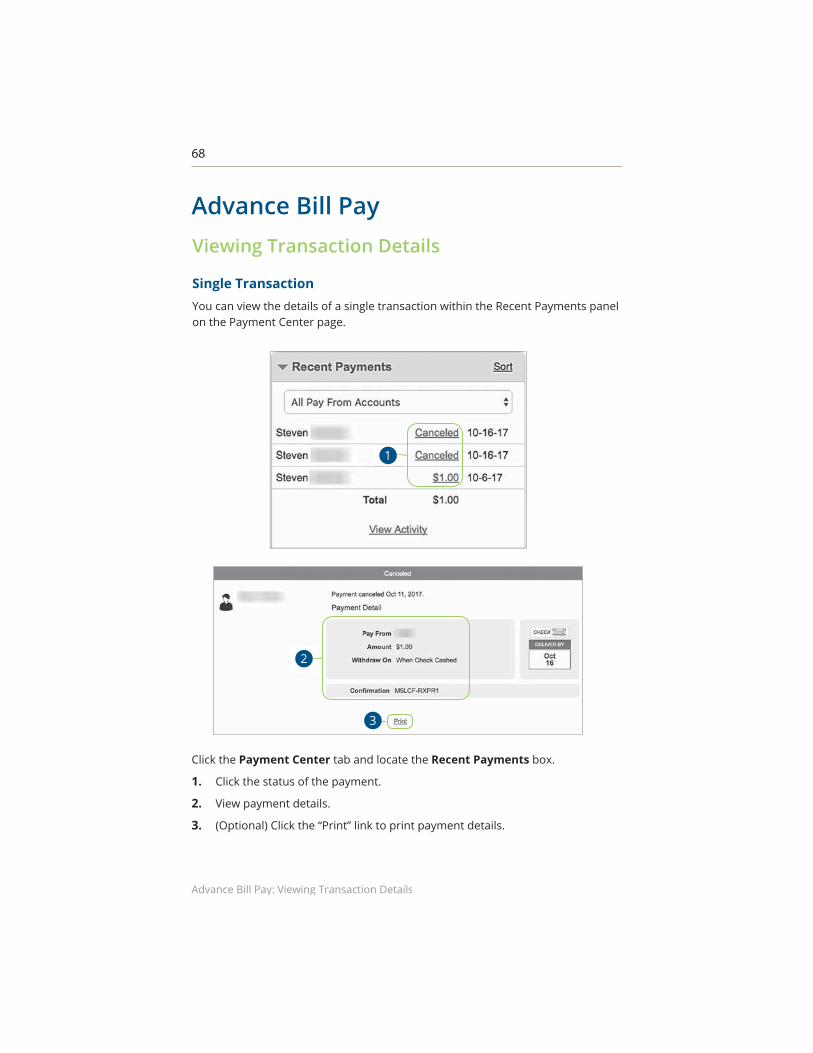
Click the Payment Center tab and locate the Recent Payments box.
1. Click the status of the payment.
2. View payment details.
3. (Optional) Click the “Print” link to print payment details.
1
2
3
Viewing Transaction Details
Single TransactionYou can view the details of a single transaction within the Recent Payments panel on the Payment Center page.
69
Advance Bill Pay: Viewing Transaction Details
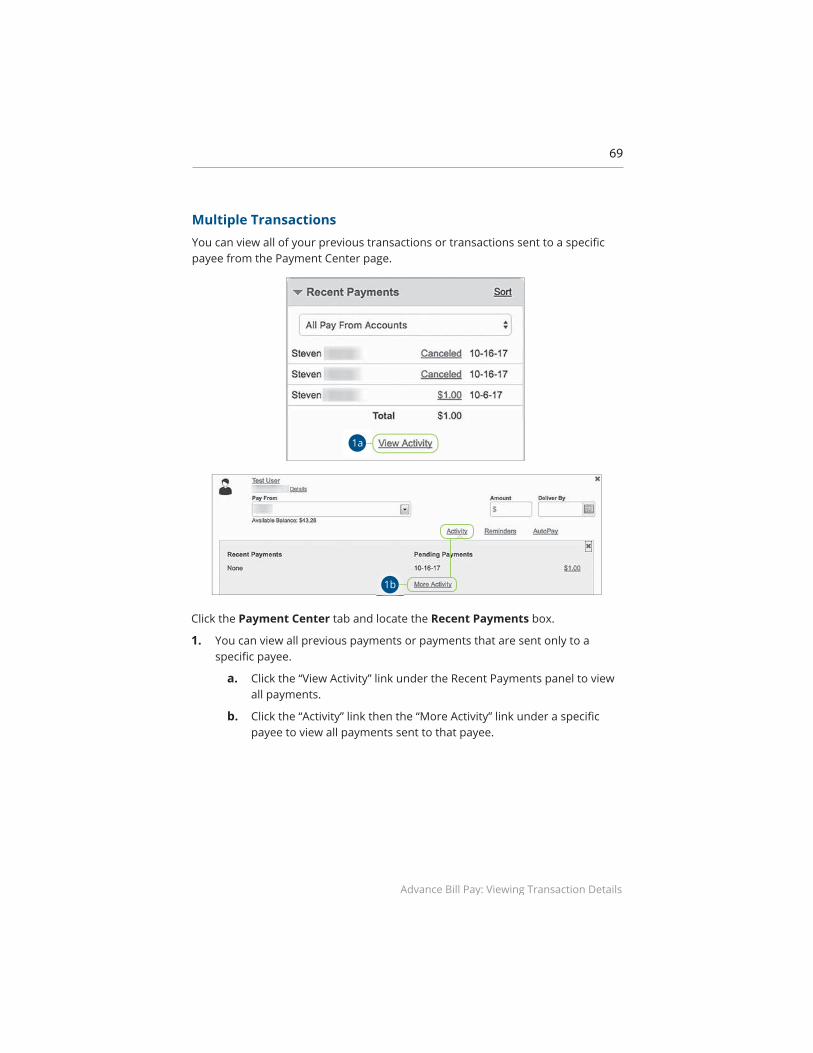
Click the Payment Center tab and locate the Recent Payments box.
1. You can view all previous payments or payments that are sent only to a specific payee.
a. Click the “View Activity” link under the Recent Payments panel to view all payments.
b. Click the “Activity” link then the “More Activity” link under a specific payee to view all payments sent to that payee.
1a
1b
Multiple TransactionsYou can view all of your previous transactions or transactions sent to a specific payee from the Payment Center page.
70
Advance Bill Pay: Viewing Transaction Details
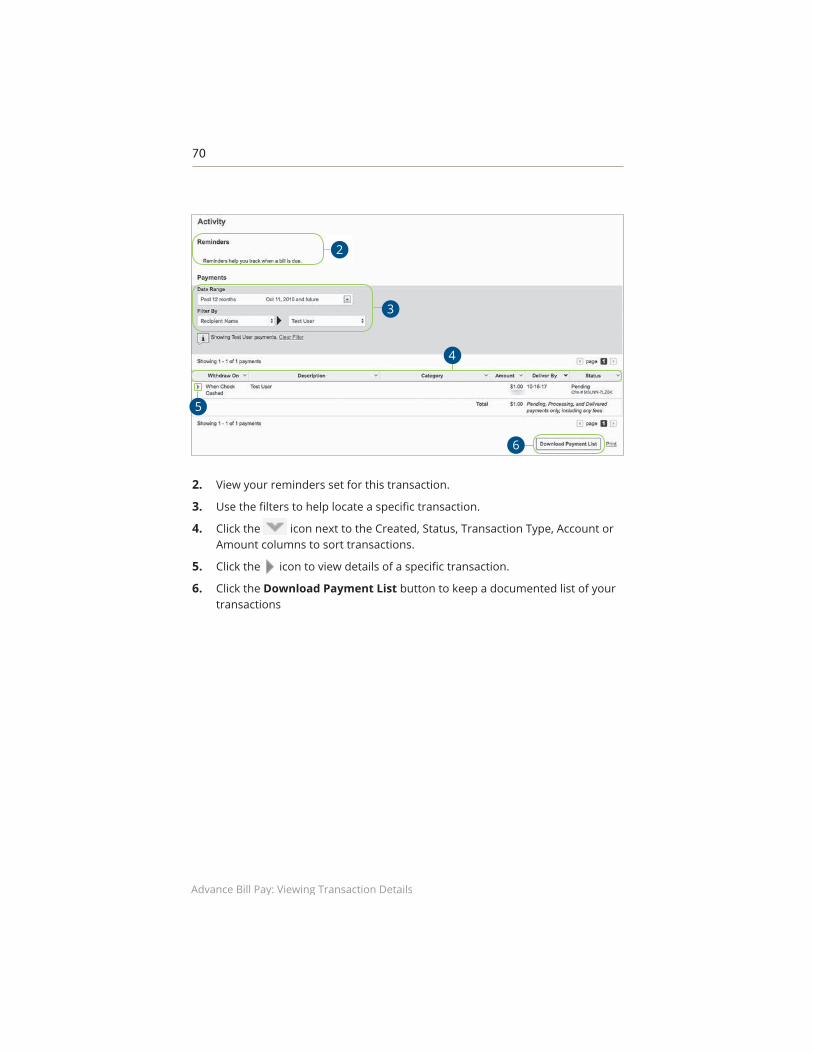
2. View your reminders set for this transaction.
3. Use the filters to help locate a specific transaction.
4. Click the icon next to the Created, Status, Transaction Type, Account or Amount columns to sort transactions.
5. Click the icon to view details of a specific transaction.
6. Click the Download Payment List button to keep a documented list of your transactions
2
3
4
5
6

71
Advance Bill Pay: Creating a Reminder
Advance Bill Pay
Click the Payment Center tab.
1. Click the “Reminders” link.
2. Click the “Set Up Reminders” link.
1
2
Creating a Reminder
Setting up a reminder within your online bill pay can help you make sure all of your bills get paid on time. You can set up reminders to let you know when an eBill is available, a recurring payment processes or when a transaction is scheduled. You can also choose if you want to receive your alerts by email or mobile.

72
Advance Bill Pay: Creating a Reminder
3. Use the calendar feature to select the typical due date and the amount due.
4. Use the “Bill Received” drop-down and select the frequency of the bill.
5. Use the drop-down and choose when to receive a notification.
6. Enter your email address.
7. Check the appropriate boxes indicating when you would like to be notified.
8. Click the Send Reminders button when you are finished.
3
4
5
6
7
8

73
Advance Bill Pay: Managing Reminders
Advance Bill Pay
Click the Payment Center tab.
1. Click the “Reminders” link.
2. Click the “Manage Email Reminders” link.
3. Make the necessary changes.
4. Click the Save Changes button when you are finished making changes.
1
2
3
4
Managing Reminders
You can manage which reminders you would like sent to your email.
74
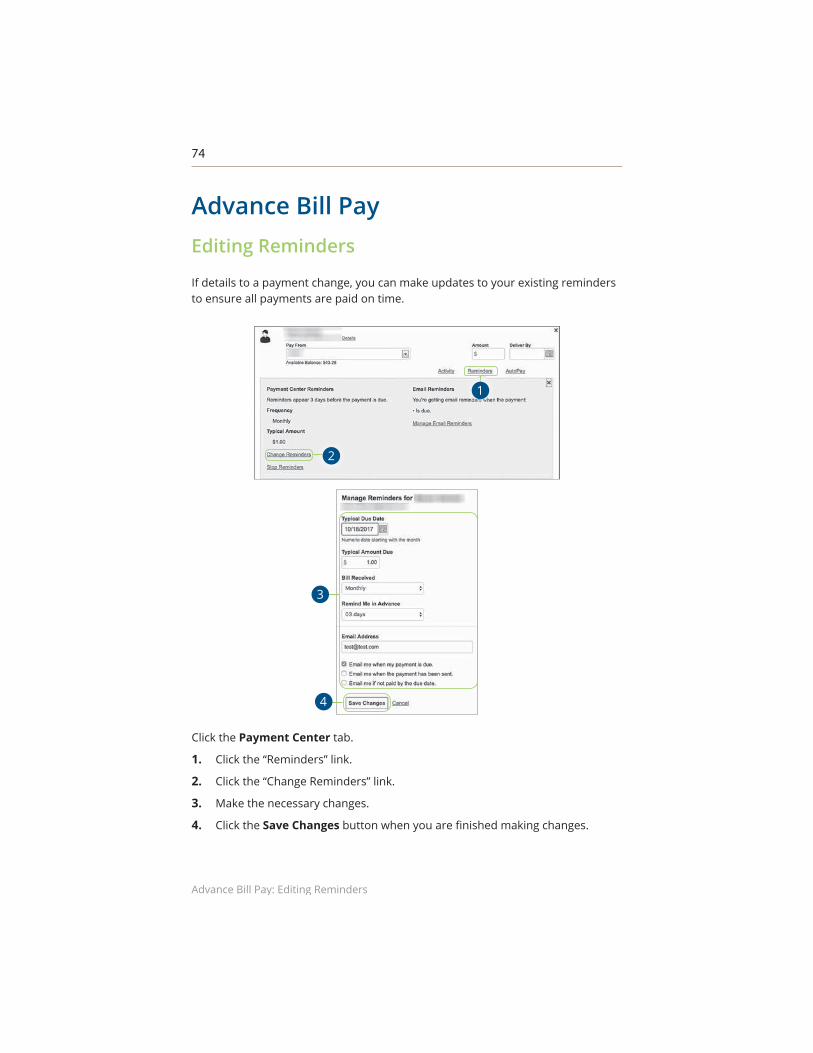
Advance Bill Pay: Editing Reminders
Advance Bill Pay
Click the Payment Center tab.
1. Click the “Reminders” link.
2. Click the “Change Reminders” link.
3. Make the necessary changes.
4. Click the Save Changes button when you are finished making changes.
1
2
3
4
Editing Reminders
If details to a payment change, you can make updates to your existing reminders to ensure all payments are paid on time.

75
Advance Bill Pay: Deleting Reminders
Advance Bill Pay
Click the Payment Center tab.
1. Click the “Reminders” link.
2. Click the “Stop Reminders” link.
3. Click the Stop Reminder button when you are finished making changes.
2
3
Deleting Reminders
You can remove an existing reminder if it is no longer needed.
1

76
Advance Bill Pay: Moving Payments
Advance Bill Pay
1
2
3
Click the Accounts tab.
1. Click the “Move Payments” link.
2. Click the Move Payments button.
3. Click the Yes, Move the Payments button to confirm.
Moving Payments
You can change the account a pending payment is applied to, if needed.

77
Advance Bill Pay: Editing Account Name
Advance Bill Pay
1
Click the Accounts tab.
1. Click the “Change Name” link.
2. Make the necessary changes.
3. Click the “Save” link when you are finished making changes.
23
Editing Account Name
Within the Account tab, you can edit an account nickname at anytime.

78
Advance Bill Pay: Deleting an Account
Advance Bill Pay
1
2
Deleting an Account
Click the Accounts tab.
1. Click the “Delete Account” link.
2. Click the Delete Account button to permanently remove an account.
If an account is no longer needed or you have a new account, you can easily delete the account, but it does not erase data from an existing payment using this account.
79
Services
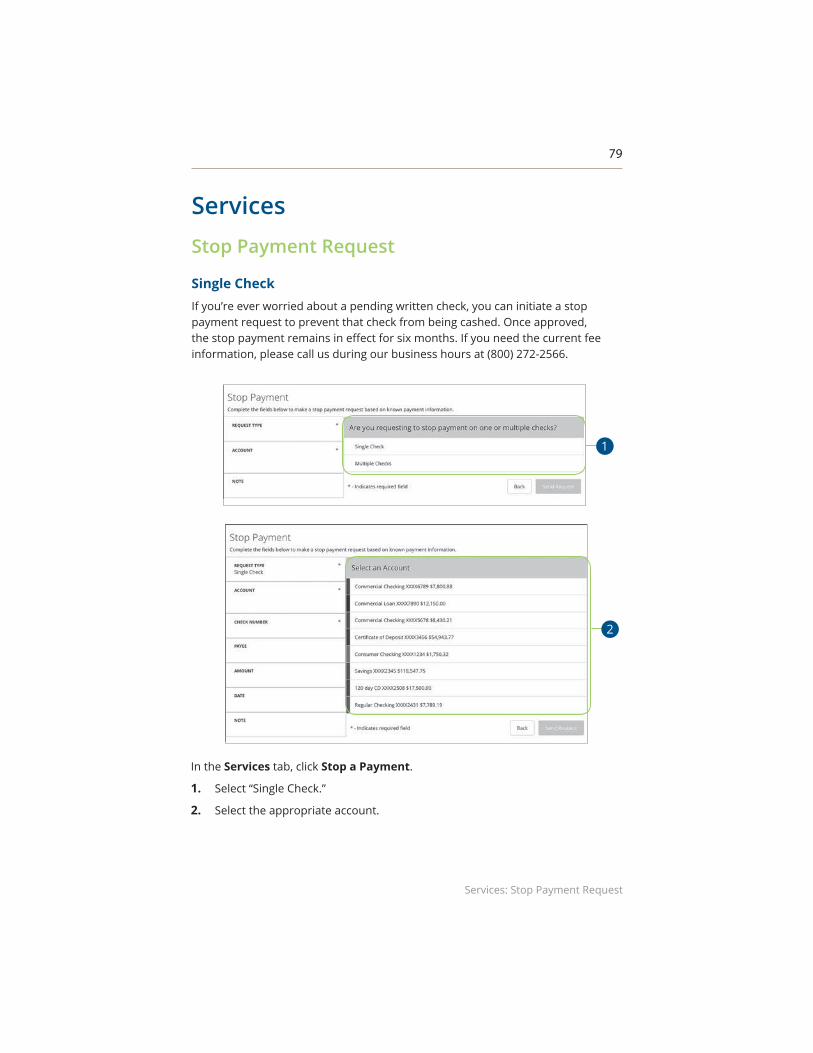
Services: Stop Payment Request
Single Check If you’re ever worried about a pending written check, you can initiate a stop payment request to prevent that check from being cashed. Once approved, the stop payment remains in effect for six months. If you need the current fee information, please call us during our business hours at (800) 272-2566.
Stop Payment Request
In the Services tab, click Stop a Payment.
1. Select “Single Check.”
2. Select the appropriate account.
1
2

80
Services: Stop Payment Request
3. Enter the check number and click the Save button.
4. (Optional) Enter the payee and click the Set button.
5. (Optional) Enter the amount and click the Save button.
3
4
5

81
Services: Stop Payment Request
6. (Optional) Enter the date of the check using the calendar.
7. (Optional) Enter a description under “Note” and click the Set button.
8. Click the Send Request button when you are finished.
NoteActivity Center.
8
7
6

82
Services: Stop Payment Request
1
In the Services tab, click Stop Payment.
1. Select “Multiple Checks.”
2. Select the appropriate account.
2
Multiple Checks If you’re ever worried about multiple pending written checks, you can initiate a stop payment request to prevent the checks from being cashed. Once approved, the stop payment remains in effect for six months. If you need the current fee information, please call us during our business hours at (800) 272-2566.

83
Services: Stop Payment Request
3. Enter the starting check number and click the Save button.
4. Enter the ending check number and click the Save button.
5. (Optional) Enter the start date of the checks using the calendar.
3
4
5

84
Services: Stop Payment Request
6. (Optional) Enter the end date of the checks using the calendar.
7. (Optional) Enter a description under “Note” and click the Set button
8. Click the Send Request button when you are finished.
6
7
8

85
Services: Statements
ServicesStatements
The Statements feature is a great virtual filing system for your bank statements, saving paper and space in your home or office. By storing your statements electronically, your account information is always readily available when you need it.
In the Services tab, click Statements.
1. Choose an account to work with using the “Account” drop-down.
2. Specify a start and end date for your statement.
3. Click the Continue button.
4. Use the “Document Type” and “Document” drop-downs to select a file format.
5. Click View Document to view your statement in a new browser window.
1
2
3
54
4

86
Settings
Services: Account Preferences
Account Preferences
The Home page and your accounts should appear in a way that is fitting for you. The names of accounts, order in which they appear on the Home page, order of account groups and names of account groups can be changed in Account Preferences to suit your needs.
In the Settings tab, click Account Preferences.
1. Select the up or down arrows on the right side to change the order that your accounts appear in.
2. Use the Visibility switch to toggle whether or not your account is visible on the Home page.
3. Click the icon to change the nickname of a group or an account. Make your changes and click the check mark to save it.
4. Click the Nickname Account button to change the Online Display Name of an account. Make your changes and click the check mark to save it.
5. Select the “Account” drop-down to change the group that account is in.
5
1
2
4
3

87
Services: Manage Contact Information
SettingsManage Contact Information
It is important to keep American Savings Bank updated with your most current personal contact information. That’s why we’ve made it so simple to edit your personal data!
In the Settings tab, click Manage Contact Information.
1. Click the + icon to access the fields for each category.
2. Update your information.
3. Click the Submit button when you are finished making changes.
1
2
3

88
Services: Text Enrollment
Settings
Text Banking allows you to manage your accounts on the go. Once enrolled, you can check balances, review account history and transfer funds from your Online Banking account using any text-enabled device.
Text Enrollment
In the Settings tab, click Text Enrollment.
1. Toggle the Text Enrollment switch from “Off” to “On.”
2. Enter your SMS text number.
3. Read the terms and conditions and check the box next to “Agree To Terms.”
4. Click the Save button when you are finished.
5. Click the Visit Preferences button to be taken to the Accounts feature.
3
1
4
2
Notetext confirmation.
5

89
Services: Text Enrollment
Commands for Text Banking
Text Command Options to 226563 for the Following Information:
BAL or BAL <account nickname> Request account balance
HIST <account nickname> Request account history
XFER <from account nickname>
<to account nickname> <amount>
Transfer funds between accounts
LIST Receive a list of keywords
HELP Receive a list of contact points for information on text banking
STOP Stop all text messages to the mobile device (for text banking and SMS alerts/notifications)
START Enable message send/receive for text banking
6. Select an account you want to enroll in text banking.
7. Click the SMS/Text tab.
8. Toggle the SMS/Text Enrollment switch from “Off” to “On.”
9. (Optional) Click the icon to change the SMS/Text Display Name. Make your changes and click the check mark to save it.
6
7
8 9
90
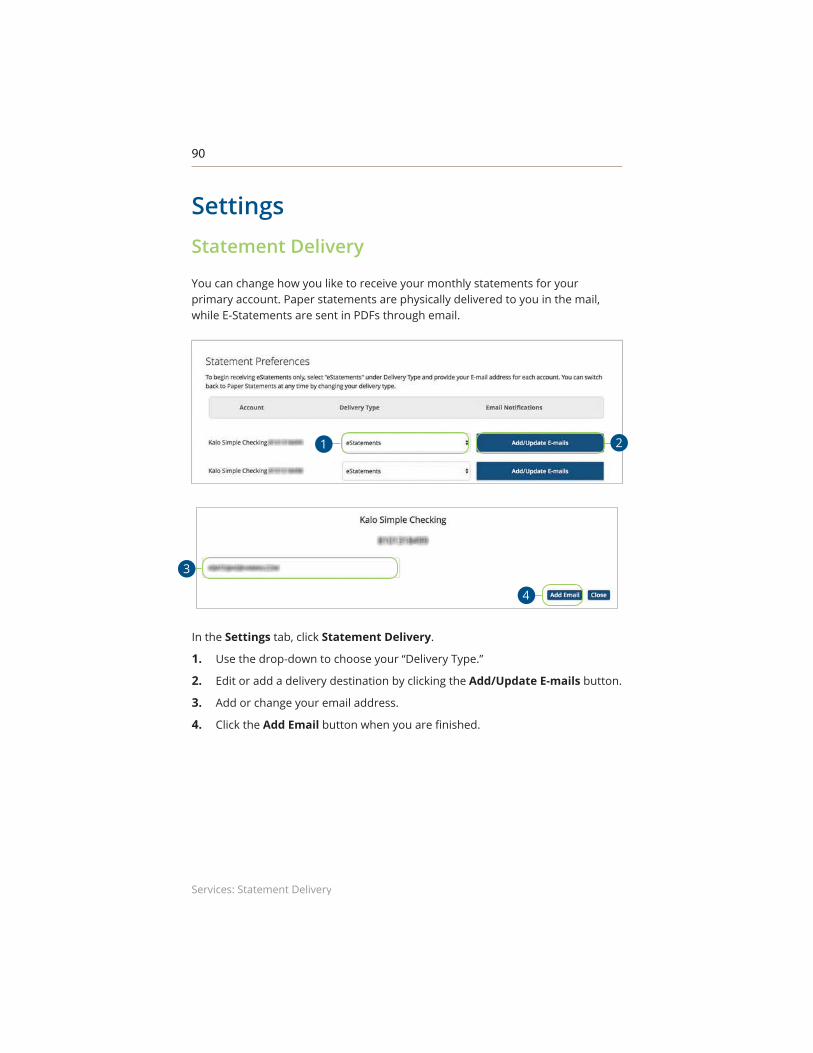
Services: Statement Delivery
SettingsStatement Delivery
You can change how you like to receive your monthly statements for your primary account. Paper statements are physically delivered to you in the mail, while E-Statements are sent in PDFs through email.
In the Settings tab, click Statement Delivery.
1. Use the drop-down to choose your “Delivery Type.”
2. Edit or add a delivery destination by clicking the Add/Update E-mails button.
3. Add or change your email address.
4. Click the Add Email button when you are finished.
1 2
3
4

91
Locations
Locations: Branches and ATMs
If you need to locate a American Savings Bank branch or ATM, the interactive map below can help you find locations nearest you. If your device’s location services feature is turned off or your location in unavailable, a general list of branches appears.
Branches and ATMs
Click on the Locations tab.
A. Details about branches or ATMs are displayed on the right-hand side.
B. You can locate a American Savings Bank branch or an ATM by clicking the appropriate button.
C. The search bar allows you to find specific American Savings Bank branches.
D. American Savings Bank locations or ATMs are marked along with your location. Click a branch for additional details such as phone numbers, directions, lobby hours and drive-thru hours.
A
B
C
D

Customer Banking Center(808) 627-6900Toll-free (800) 272-2566
asbhawaii.com