Online Application Instructions VS 17-129 in ePermits
24
1 Instructions to Importers for Completing and Submitting an Online Application in ePermits (VS 17-129) The USDA’s Animal and Plant Health Inspection Service (APHIS) is pleased to announce that ePermits is now available for public use by applicants seeking import or transit permits for live animals regulated by APHIS. Users must have a current eAuthentication Level 2 authorization to access the ePermits system. To obtain this authorization, please see this link for further instructions: http://www.eauth.egov.usda.gov/eauthCreateAccount.html An import or transit permit is required for many APHIS-regulated live animals, and their germplasm (oocytes, embryos or semen), in order to enter or move through the United States to another country. Some APHIS-regulated animals of Canadian or Mexican origin that are entering the U.S. though land border ports may not need to be accompanied by an import permit; however appointments must be made and confirmed in advance with the APHIS port veterinarians at such locations. Additional general information about live animal and germplasm import requirements may be found at: http://www.aphis.usda.gov/import_export/animals/live_animals.shtml APHIS Veterinary Services (VS) uses the ePermits system to process applications and generate import or transit permits for live animals and their germplasm. Applicants (referred to as ‘users’ in this document) must complete a VS Form 17-129 (Application for Import or In-transit Permit) in order to receive the actual permit (VS Form 17-135, Permit to Import). Users with internet access and an existing eAuthentication level 2 can now access ePermits and create, pay for, and submit a completed application for an import or transit permit for APHIS-regulated live animals (or their germplasm). To access ePermits, please click on this link: https://epermits.aphis.usda.gov/epermits At this website, users are asked to agree to certain security conditions regarding ePermits. The next screen asks users to provide their eAuthentication log-in information, consisting of a User Name and Password. Providing this information will allow users to be directed to the ePermits portal. The first page that might appear in ePermits to users is a page for any system-wide announcements (Figure 1). If this page appears, users should review any ePermits announcements that may apply (e.g. contact information for technical issues, etc.) and select the ‘Continue to ePermits’ button to be directed to the application Home Page.
Transcript of Online Application Instructions VS 17-129 in ePermits

1
Instructions to Importers for
Completing and Submitting an Online Application
in ePermits (VS 17-129)
The USDA’s Animal and Plant Health Inspection Service (APHIS) is pleased to announce that ePermits is now available for public use by applicants seeking import or transit permits for live animals regulated by APHIS. Users must have a current eAuthentication Level 2 authorization to access the ePermits system. To obtain this authorization, please see this link for further instructions: http://www.eauth.egov.usda.gov/eauthCreateAccount.html
An import or transit permit is required for many APHIS-regulated live animals, and their germplasm (oocytes, embryos or semen), in order to enter or move through the United States to another country. Some APHIS-regulated animals of Canadian or Mexican origin that are entering the U.S. though land border ports may not need to be accompanied by an import permit; however appointments must be made and confirmed in advance with the APHIS port veterinarians at such locations. Additional general information about live animal and germplasm import requirements may be found at: http://www.aphis.usda.gov/import_export/animals/live_animals.shtml
APHIS Veterinary Services (VS) uses the ePermits system to process applications and generate import or transit permits for live animals and their germplasm. Applicants (referred to as ‘users’ in this document) must complete a VS Form 17-129 (Application for Import or In-transit Permit) in order to receive the actual permit (VS Form 17-135, Permit to Import). Users with internet access and an existing eAuthentication level 2 can now access ePermits and create, pay for, and submit a completed application for an import or transit permit for APHIS-regulated live animals (or their germplasm).
To access ePermits, please click on this link: https://epermits.aphis.usda.gov/epermits
At this website, users are asked to agree to certain security conditions regarding ePermits. The next screen asks users to provide their eAuthentication log-in information, consisting of a User Name and Password. Providing this information will allow users to be directed to the ePermits portal.
The first page that might appear in ePermits to users is a page for any system-wide announcements (Figure 1). If this page appears, users should review any ePermits announcements that may apply (e.g. contact information for technical issues, etc.) and select the ‘Continue to ePermits’ button to be directed to the application Home Page.

2
Figure 1. System Announcements (if applicable)
1. Home Page
From the Home Page (Figure 2), ePermits users should navigate through the remainder of the application process using the following step-by-step instructions. The ‘Home’ link on the left-side menu of each subsequent page will re-direct a user to back to the Home Page screen at any step in the process. Users wishing to go forward from page to page should use the ‘Continue’ buttons; users wishing to go back to a previous screen can use the reverse arrow on the upper toolbar, or can right-click and select ‘Back’.
Users wishing to create and submit a new application for an import permit should select the ‘Create an Application’ link from the Home Page list on the left side in Figure 2 (see arrow). Once the application process has been started, users can log off at any point and the application will be saved in the step that was last completed. A list of submitted and unsubmitted applications will appear on the Home Page under the ‘Summary’ bar.
In addition, any previous applications that a user has completed and submitted are stored in ePermits (visible on the Home Page under the ‘My Applications’ section), and can be copied into a new application. The Copy function is useful if a user is seeking an import permit on a routine basis, where only the arrival dates or number of animals may change form shipment to shipment. See further instructions in Section 12 regarding copying existing applications.

3
Figure 2: Home Page
2. Create Application—Choose Program Office
From the next screen that appears (Figure 3), users who are applying for a live animals or germplasm import or transit permit should select the ‘Veterinary Services’ radio button and click ‘Continue’.

4
Figure 3: Create Application—Choose Program Office
3. Create Application - Choose Application Type for VS
From the next screen (Figure 4), users applying for a live animals or germplasm import/transit permit should select the ‘VS Form 17-129 Application’ radio button and click ‘Continue’.
Figure 4 : Create Application - Choose Application Type for VS
5
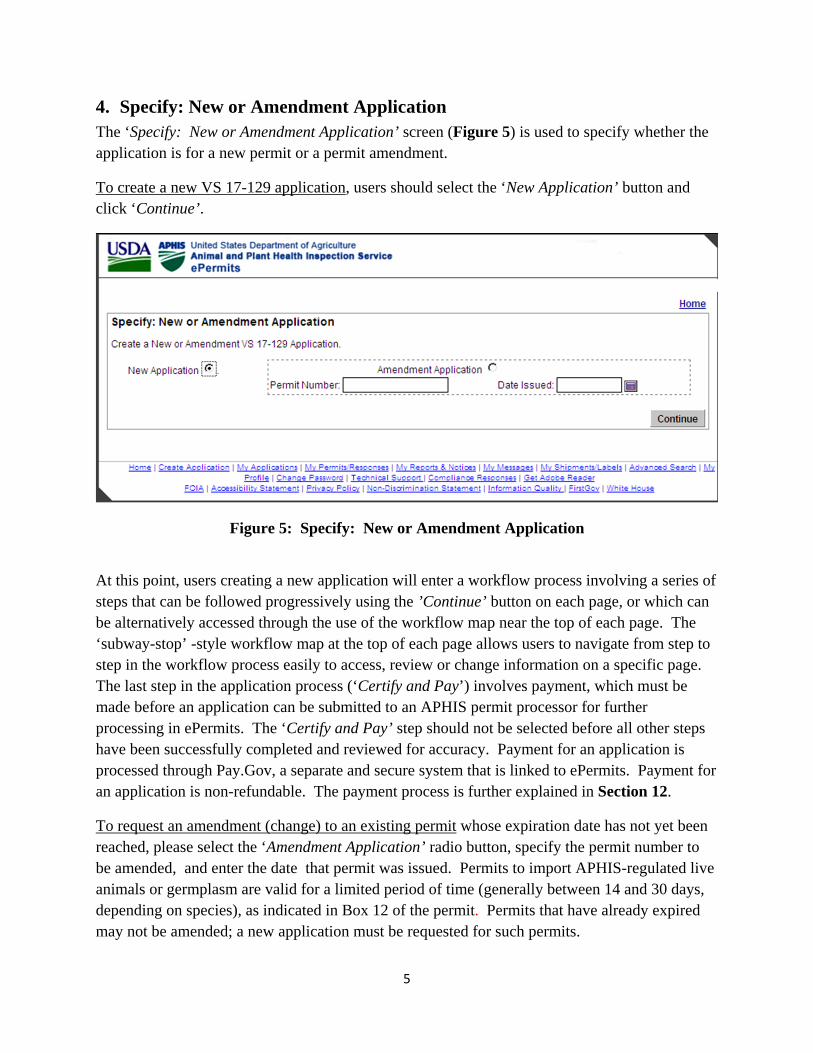
4. Specify: New or Amendment Application The ‘Specify: New or Amendment Application’ screen (Figure 5) is used to specify whether the application is for a new permit or a permit amendment.
To create a new VS 17-129 application, users should select the ‘New Application’ button and click ‘Continue’.
Figure 5: Specify: New or Amendment Application
At this point, users creating a new application will enter a workflow process involving a series of steps that can be followed progressively using the ’Continue’ button on each page, or which can be alternatively accessed through the use of the workflow map near the top of each page. The ‘subway-stop’ -style workflow map at the top of each page allows users to navigate from step to step in the workflow process easily to access, review or change information on a specific page. The last step in the application process (‘Certify and Pay’) involves payment, which must be made before an application can be submitted to an APHIS permit processor for further processing in ePermits. The ‘Certify and Pay’ step should not be selected before all other steps have been successfully completed and reviewed for accuracy. Payment for an application is processed through Pay.Gov, a separate and secure system that is linked to ePermits. Payment for an application is non-refundable. The payment process is further explained in Section 12.
To request an amendment (change) to an existing permit whose expiration date has not yet been reached, please select the ‘Amendment Application’ radio button, specify the permit number to be amended, and enter the date that permit was issued. Permits to import APHIS-regulated live animals or germplasm are valid for a limited period of time (generally between 14 and 30 days, depending on species), as indicated in Box 12 of the permit. Permits that have already expired may not be amended; a new application must be requested for such permits.

6
When amending an application, the ‘Permit Number’ and ‘Date Issued’ are required fields. If either of the required fields is not entered, or contains invalid information, an error message is displayed notifying the user of which field is missing or incorrect. Users seeking to amend an existing, unexpired permit will be directed to the screen shown in Figure 6 in the following section. Amendment fees will apply for any changes made to an existing, unexpired permit; see Section 13 for additional information on processing fees.
5. Shipper Information The ‘Shipper Information’ page (Figure 6) requires the user to enter the consignment shipper’s information. Drop-down menus are provided for some fields on this and other pages in the workflow process. The user must either enter the Shipper’s Organization or the First and Last Name of the Shipper, along with the location address. If the mailing address of the Shipper differs from the location address, this information must also be entered.
‘Address Book/Look Up’: the ePermits system doesn’t allows public users to store shipper Information to be used on future applications. Users who routinely deal with the same shippers can copy existing applications, which will transfer information for a given shipper’s information provided in a previous application. See Section 12 below for further details.

7
Figure 6: Shipper Information - Default
6. Importer Information Specific information about the Importer goes on this page. (Figure 7).

8
Figure 7: Importer Information The Importer of Record may be an organization, or an individual (who might be the applicant, or an agent or broker), but the user should enter the name and U.S. phone number of a person in the United States who may be contacted by APHIS for any questions arising with respect to the application or permit itself, or in the event of any difficulties encountered during the importation or transit process. The importer’s location address (street address should be used; not a PO Box) and a mailing address must be entered. An email address is not required, but if one is available it

9
may be entered and used for communications between APHIS and the Importer. Entering an email address also facilitates transmission of the completed permit to the designated parties wishing to receive an import permit. After this information is entered, click the ‘Continue’ button.
7. Purpose The Purpose page (Figure 8) allows the user to enter the purpose of the importation and identify whether the application is for Import (which involves entry to the United States) or In-Transit (movement through the United States to another country, without entry).
A drop-down selection list of commonly used reasons for importation (i.e., Breeding, Competition, Pet, etc…) is provided for the ‘Purpose of Importation’ field. If ‘Other’ is selected, a free-text description must be entered in the box provided. If the application is for a transit permit, select ‘Transit’ in this field.
Figure 8: Purpose - Default

10
A drop-down list of commonly used categories for import or in-transit is provided (Figure 9). The category selected in this field determines which quarantine facilities (if applicable for commodities required to undergo an import quarantine) are available for selection on the Remarks page of the application. ‘Other’ is not an available option for this field.
The ‘Returning U.S. birds’ check box on the Purpose page is an optional field that can be used for noting that U.S.-origin pet birds are returning from another country.
After the ‘Purpose’ information is entered, click ‘Continue’.
Figure 9: Partial Drop-Down list for Import or In-Transit Category
8. Mode of Transportation The transportation details, which include the mode (method) of transportation, all foreign ports or countries in which the shipment stops prior to arrival in the U.S., the proposed shipping date, and the proposed arrival date, are entered on this page (Figures 15-18). NOTE: The following fields are not populated by users: ‘Port of Embarkation’ (field 3), ‘Country From Which Shipped’ (field 4), and the ‘United States Port of Entry’. These fields are automatically populated and updated based on the entries made by the user in the ‘Route of Travel Including All Carrier Stops Enroute’ table in field 7 (see below in Figure 10).

11
For field 5 (‘Mode of Transportation’), select the most applicable option. For shipments traveling to the US by more than one mode through a given country (e.g. moving first by air to Toronto, Canada , then by truck to the US border), both ‘air’ and ‘land’ can be selected by clicking on each category while holding down the Ctrl button on the computer. Airline flight information should be entered in the appropriate box (any updated flight information can be provided by importers as part of the inspection coordination process, when confirming the arrival information with an APHIS port veterinarian 72 hours prior to arrival).
Figure 10: Mode of Transportation - Default

12
Under field 7 (‘Route of Travel’, Figure 11), users should select the intended port of presentation for entry under ‘U.S. Port’ field. In addition, all international stops along the way from the point of a shipment’s consignment until it arrives in the U.S. must be included. To add an international stop to the list, select a country from the associated drop-down list and then enter an International Port Name in the text box provided. For multiple stops along the route to the U.S., click the ‘Add Stop to Route’ button after the first port name has been entered, and repeat this step.
Figure 11: Route of Travel - Original Order
The ‘Order’ column indicates the route of travel starting with the port in the country of origin and finishing with the port of entry in the United States. The order may be changed by entering new position numbers in the ‘Sort’ column, and clicking ‘Sort’ (Figures 12 and 13). The ‘Delete’ icon enables users to delete entries (rows) from the table.
Figure 12: Route of Travel - Values Entered for Sorting Order

13
Figure 13: Route of Travel – New Sorted Order
Only valid numeric entries within the sorting range are permitted in the sort-order boxes; all other entries are ignored. An error message is displayed if mismatching (duplicate) sort-order values are entered.
The ‘Port of Embarkation’ button is used to designate the last port where the shipment will stop prior to arriving in the U.S. A foreign port is required to be entered as the Port of Embarkation. The designation as Port of Embarkation defaults to whatever foreign port is first in the list, but this should be changed by sorting/ordering as needed. If the Port of Embarkation is missing, not selected, or the port selected is not a foreign port, an error message alerting the user of the error is displayed.
For transit shipments moving through the U.S. to another country: other U.S. ports that are involved in the transportation may be selected in addition to the first port the shipment arrives at in the U.S. These should be appropriately ordered to reflect the actual route being followed while in the U.S.
9. Summary: Animals, Animal Semen, Animal Embryos, Birds, Poultry or Hatching Eggs
The animal (or other items, such as germplasm) to be imported is identified on the ‘Summary’ page (Figure 14), with the default page being blank. The user adds entries to the table by clicking the ‘Add Entry to Table’ button. This page also allows entries to be edited using the ‘Edit’ icon and deleted using the ‘Delete’ icon.

14
Figure 14: Animals Summary--Default
After clicking the ‘Add Entry to Table’ button on the Summary page, the ‘Summary: Animals, Animal Semen, Animal Embryos, Birds, Poultry or Hatching Eggs’ page is displayed (Figure 15), requiring the user to enter detailed information about the types and numbers of commodities in the shipment.

15
Figure 15: Animals, Animal Semen, Animal Embryos, Birds, Poultry or Hatching Eggs
16
Both the ‘Number (quantity)’ and ‘Unit of Measure’ are required fields. Only numeric values are accepted in the ‘Number (quantity)’ field. If an invalid value is entered in the ‘Number (quantity)’ field, an error message is displayed. The ‘Unit of Measure’ field is selected from a drop down list that includes ‘number’ (applicable for most types of live animal shipments); ‘dozen’ (applicable for hatching egg shipments); and ‘doses’ or ‘straws’, which apply for shipments of germplasm. Other quantity descriptors may be selected if applicable.
On the ‘Animals’ screen, the ‘Import or In-Transit Category’ field is automatically populated and protected from editing. The category displayed is the same that was entered on the ‘Purpose’ screen.
The ‘Species’ and ‘Breed’ are required fields, and are selected from a drop down list. The values in the ‘Species’ drop-down vary, based on the ‘Import or In-Transit Category’ selected. The values in the ‘Breed’ drop-down vary, based on the Species chosen. If the breed is not listed, ‘Other’ is selected as a default. A description for ‘other’ breeds should be entered (if applicable; this information is required only for a limited number of species or breeds, as indicated on the page) in the associated text box provided. A drop-down list is also available to enter the gender of animals in the shipment, if this is known (‘Gender’ is not a required field, unless specified in a message the user will see).
Based on the ‘Import or In-Transit Category’ selected, some of the optional fields may become required. Error messages are displayed in such situations if any required fields are not populated.
When all data has been entered, click the ‘Done with Changes’ button to save the entries and click ‘Continue’. If the user bypasses this page without making any entries by clicking the ‘Done with Changes’ button, an error message is displayed on the ‘Certify & Pay’ page indicating that no information regarding Animals, Animal Semen, Animal Embryos, Birds, Poultry or Hatching Eggs has been entered.
10. Delivery
The ‘Delivery’ page (Figure 16) requires the user to enter the name and address of the person to whom the delivery will be made. If an import quarantine is required, the delivery is made after the quarantine period. If the importer is the same person / organization to whom the delivery will be made, the user can copy the Importer information (see Step 6 above) onto the ‘Delivery’ page by clicking the appropriate check box. If the ‘Location of Place’ where the delivery will be made is the same as the ‘Delivery Address’, that information can be copied by clicking the appropriate check box.
A U.S. state name and Zip code must be provided for deliveries that are made in the U.S.
The optional ‘Premises ID’ field is for including a National Premises ID number that may have been assigned to a receiving entity (the Importer, or other entity at the location of delivery) by

17
the APHIS Veterinary Services area office. It identifies the actual location where the shipment will be delivered.
Figure 16: Delivery
11. Remarks The ‘Remarks’ page (Figure 17) provides the user an optional means of entering additional information for the APHIS staff person reviewing and further processing the application.
For animals that are required to undergo a USDA quarantine at the time of importation, the name of the quarantine facility may be selected (if known) on this page, using a drop-down list. The available values in the drop-down list for the ‘Quarantine Facility’ will vary, based on the ‘Import or In-Transit Category’ identified on the ‘Purpose’ page, as well as by species.
Additional required documents may be attached on this page. The attachment types currently accepted in ePermits are: txt, html, htm, doc, wp, wpd, xls, pdf, gif, jpeg, jpg, bmp, vsd, docx, and docm. The document type is validated by clicking the ‘Attach’ button .

18
The Remarks page can be bypassed by the user if there is no additional information to be entered.
Figure 17: Remarks
12. Copying an Existing Application into a New Application
Under the ‘My Applications’ link on the left side of the Home Page (or under that same section on the right side), users can see a list of all their applications (Figure 18) by clicking on the ‘All saved applications’ link. This link will allow users to access and continue working on uncompleted applications, or withdraw/delete applications of any status. In addition, there is a ‘Copy’ icon on the right side of this page that allows a user to select a given application and copy all of its information into a new application template. Changes can be made to dates, numbers of animals, or other fields that are different. The same process described in Section 13 below applies to certifying and paying for a copied application.

19
Figure 18: My Applications
13. Certify & Pay
The ‘Certify & Pay’ page (Figure 19) provides a means for the user to certify the application after reviewing it to be sure that the information is correct, and to pay the required processing fee.
If any required information is missing from the application, users will receive an error message saying ‘the application is incomplete’, and listing the specific sections that need to be completed or revised.
Information about the current processing fees for the VS 17-129 used for live animals or germplasm may be found at this web link: http://www.aphis.usda.gov/mrpbs/fmd/vs_import_export_fees.shtml#1304 , in a table that summarizes section 130.4 of Title 9, Code of Federal regulations. The Certify and Pay page will default to the most current fee amount that applies for either a new application or an amended one, depending on what type of application has been selected by the user.
In order for the application to be submitted, the user must agree to the terms and conditions of a resulting permit, and check the ‘’I certify’ box on the Certification screen.
In the Payment box, the system displays the ‘Request Type (New Application or Amendment Application)’, and the associated Processing Fee required by APHIS. The available payment options include Credit Card, Check, Money Order, and APHIS User Account. Because APHIS staff members also can enter information on VS 17-129 applications, the options of ‘No Charge’ or ‘Applicant Did Not Provide Payment’ are also available, but may not be selected by public users. An error message will appear if these are selected.
For payment types of ‘Mail-in-Check’, ‘Money Order’, or ‘APHIS User Account’, the corresponding check, money order or APHIS User account number are required fields. NOTE: APHIS permit processing staff will not begin reviewing a submitted application until APHIS

20
receives the payment of all required fees. For APHIS User accounts, further processing will be made by APHIS after the application has been submitted to determine that sufficient funds are available. If checks or Money Orders are submitted, users should allow appropriate time for payment to be received before further processing takes place.
Once the ‘I certify’ box has been checked, the payment type has been selected, and the associated information has been entered, the application can then be submitted. For all payment types other than credit card, the ‘Application Submitted’ page will then be displayed.
Figure 19: Certify & Pay
Credit Card Payment If the ‘Payment Type’ selected was On-Line Credit Card, the user is brought to the ‘Credit Card Payment’ screen (Figure 20). When the applicant clicks the ‘Pay Now’ button, the user is no longer in ePermits but is now in the Pay.Gov system. Pay.Gov is a secure system that allows electronic payments to be made to Federal Government Agencies.
[The current processing fee will be displayed here]

21
Figure 20: Credit Card Payment
The user should enter the required fields, as indicated by an asterisk (*) on the Pay.Gov page (Figure 21). The Account Holder Name, Payment Amount, Billing Address, City, State, and ZIP Code will be populated with the data obtained from ePermits. Users have the option of changing the Account Holder Name, Billing Address, City, State, and ZIP Code, but are not permitted to change the Payment Amount.

22
Figure 21: On-line Credit Card Payment Screen from Pay.Gov
If the payment was unsuccessful, Pay.Gov will return the applicant to the ePermits ‘Certify & Pay’ page to re-enter the payment type. If the payment was successful, Pay.Gov will return the user to the ePermits ‘Application Submitted’ page.
14. Application Submitted After all payment information has been entered and the application has been successfully submitted, users will be returned to ePermits. If payment is being made with a Check or Money Order, the ‘Application Submitted’ page (Figure 22) is displayed with instruction to print the page and include it with payment to APHIS, Veterinary Services. This page also provides the ability to view or print the submitted application by clicking the ‘View/Print Application’ link.
As noted above, APHIS permit processing staff will not begin reviewing a submitted application until APHIS receives or confirms the payment of all required fees.

23
Figure 22: Application Submitted (Check or Money Order Payment)

24
If the application is being submitted with a Credit Card payment, no additional steps are required. The ‘Application Submitted’ page for credit card payments (Figure 23) will indicate that the application has been submitted successfully, and provides a means for the user to view or print the submitted application. An APHIS 81 receipt can also be generated at this point.
Figure 23: Application Submitted (Credit Cards)
15. APHIS processing actions for submitted applications
Applications are reviewed and processed by APHIS on a prioritized basis, depending on the listed shipping and entry dates. Incomplete or erroneous applications will be returned by APHIS processing staff to a user for any further information that may be required, along with a description of any problems or issues that need resolving.
Once a VS 17-129 online application has been successfully submitted for APHIS review (meaning the application is complete, payment has been received, and no additional information is needed by an APHIS reviewer), ePermits users should allow up to 5 business days to receive a completed import permit. If specified, completed import permits will be sent electronically to the email address that is provided in the Importer Information step above.