One Way To Make Cabochons for Jewelry and Pendants Version 1
13
One Way To Make Cabochons for Jewelry and Pendants Version 1 update #2 / November 19, 2004 By Hiroyuki Kobayashi & Jeffrey Castaline of AANRAKU Stained Glass We’re going to keep this simple. Visit our messageboard at www.abasg.com if you have additional questions. We’ve been researching and testing trying to find a reasonably easy and quick way to make many uniform high quality cabochons in a short period of time. This is what we’ve come up with so far. Whenever possible we fuse base compositions that will be cut down into smaller pieces and then worked to what we want them to be. The main reason we don’t do small individual pieces is because it can be hard and frustrating to stack and fuse smaller pieces and have them fuse/slump evenly. When building small units, they very often slip to the side and become useless, a wasted attempt. By fusing larger compositions almost every cut out piece will slump evenly with little or no waste. The results are always much more fruitful and positive. We normally do a 3 or 4 layer fuse of different glasses or combination thereof to get our basic working glass block. The bottom layer is black backed iridized or dichroic glass with the 2 nd and/or 3 rd being clear dichroic, and the top layer being a compatible clear glass. We prefer to work with Bullseye glass. We only work with glass with a CTE of 90. (Coefficient of Thermal Expansion) (Many refer to the compatibility of glass as its COE.) We use more Bullseye glass than anything else.
Transcript of One Way To Make Cabochons for Jewelry and Pendants Version 1

One Way To Make Cabochons for Jewelry and Pendants
Version 1 update #2 / November 19, 2004
By Hiroyuki Kobayashi & Jeffrey Castaline of AANRAKU Stained Glass We’re going to keep this simple. Visit our messageboard at www.abasg.com if you have additional questions. We’ve been researching and testing trying to find a reasonably easy and quick way to make many uniform high quality cabochons in a short period of time. This is what we’ve come up with so far. Whenever possible we fuse base compositions that will be cut down into smaller pieces and then worked to what we want them to be. The main reason we don’t do small individual pieces is because it can be hard and frustrating to stack and fuse smaller pieces and have them fuse/slump evenly. When building small units, they very often slip to the side and become useless, a wasted attempt. By fusing larger compositions almost every cut out piece will slump evenly with little or no waste. The results are always much more fruitful and positive. We normally do a 3 or 4 layer fuse of different glasses or combination thereof to get our basic working glass block. The bottom layer is black backed iridized or dichroic glass with the 2nd and/or 3rd being clear dichroic, and the top layer being a compatible clear glass. We prefer to work with Bullseye glass. We only work with glass with a CTE of 90. (Coefficient of Thermal Expansion) (Many refer to the compatibility of glass as its COE.) We use more Bullseye glass than anything else.

Materials
Be careful when stacking one layer of glass onto another making sure the dichroic glass surfaces do not face each other. They will not bond well, if at all. We always fuse with the dichroic coating to the top, hence the clear cap on top for a smooth finish. If you use glasses that are not flat and smooth, then there will always be some air bubbles. By prefusing some sheets individually to smooth out ripples and textures and by slowly squeeze fusing the layered working block, most bubbles can be minimized to small light refracting pockets or eliminated completely. We use ‘Thinfire’ ceramic fiber paper on our kiln shelf for a quick turnover. Thinfire is 1/32” thick and is usually good for just one firing. We buy it by the roll. Kiln wash is much cheaper but more time consuming to apply. The picture below shows what will be our 3rd layer. It is a dichroic ripple glass, so we are going to cook it to smooth it out as much as we can without damaging the dichroic surface.

We will fire it as follows. Because dichroic glass is expensive, we ALWAYS use a light spray of a lead free anti-divitrification solution when doing jewelry to prevent the clouding of the surface of the glass. Ramp: 2,000 degrees / To Temp: 1,425 degrees / Hold: 20 minutes Crash to 1100 and allow to cool normally. This is a thin single sheet of glass so thermal shock should not be an issue.
The two pictures below show the same sheet before and after firing. The left sides of both photographs are before, the right sides after. Notice the change in color.

For this example we will now stack the 4 layers of glass as shown below.
Small drops of Elmer’s Glue in a 50/50 water solution can be used to keep items from moving out of position while building the working block composition.
1. Base glass (Bottom layer) 2. Stringers (2nd layer)
3. Rippled Dichroic (Pre-fused) (3rd layer) 4. Cover Glass (Smoothing top layer)

We fired a slow squeeze program. Ramp 300 to 850 degrees hold 10 minutes Ramp 70 degrees to 1,250 hold 10 minutes Ramp 2,000 degrees to 1,425 hold 30 minutes. Crash to 1,100 (or not) allow to cool to below 250 degrees before opening kiln. The finished fused composition looks like this.

Now using a tile saw with a lapidary blade, a DTI Laser 5000 glass saw, or a Taurus-3 ring saw with their mega blade, we trim the irregular edges. We save the cutoffs until we have a considerable amount, then do a Pot-Melt and create some really interesting glass combinations for future projects.
When cutting and grinding the edges of the fused composition components, remember there will be some very small air bubbles that will be cut open and exposed to open air. Grinding creates some very fine dust that when in solution with water can easily find it’s way into these air spaces. If they are allowed to dry during the process, it can be next to impossible to clean them later. However, if, as you cut and grind each piece, you drop them into a bowl of water, the dust is kept in solution, and when ready just before the final fuse/fire polish in the kiln, it is a simple matter to flush out the trapped dust by holding the glass pieces under a running faucet and occasionally using a can of compressed air to blow them clean. COSTO carries the cheapest can air we’ve found to date at about $9.95 for 4 cans.

At this point we decide on one of two steps to proceed with. Choice 1: To take the pieces we’ve cut out, smooth the edge and fire polish, or Choice 2: To full fuse the pieces again to get a gentle sloping to the top of the glass, and grind the edges to reshape to a specific design. The cabochon on the left was full fused again, ground to shape then fire polished. The one on the right had its edges smoothed and was fire polished without a second full fuse. The top of the left cabochon is gently convex while the one of the right is flat.

Choice 1: To make the right angle sided cabochon on the right, just grind the edges of the pieces already cut into shape with the saw with a 600 grit bit to smooth the edges, rinse in water, place back in the kiln and fire at max ramp to 1350 degrees and hold for 10~15 minutes. Allow to cool and you’re done. Choice 2: The first step in curving the top of the cabochon is to rinse the pieces cut from the main composition and clean out any air bubbles that were opened by the saw. Place the individual pieces in the kiln and full fuse again. The schedule is: (Don’t forget the anti-divitrification spray) Ramp MAX to 1425 degrees hold 20 minutes Crash to 1,100 (or not) allow to cool to below 250 degrees before opening kiln. The pieces are small enough that thermal shock is not an issue when fast ramping. Because of the coarse abrasive on the saw blade, the edges become slightly impregnated with dirt and glass powder. This obscures the edges with a dirty ‘ring-around-the-collar’ effect. (Items marked “A”). The display marked “B” in the below picture, before being fused, was smooth ground on the edge with a 600 Ultra Fine grit bit that smoothed the edges so a light rinsing under a water tap cleaned off all the dirt, then full fused. The edge ground with the 600 grit bit is reflective and crystal clear when viewed from the side. We don’t worry about the dirty edges when making cabochons with a convex (smoothly curving top) because we will grind off the dirty edges when shaping the pieces. The above upside down golden teardrop cabochon looked like the below A’s before grinding to shape with a regular 100 grit bit, then final smoothing the edge with the 600 grit bit. Remember, pieces are rinsed/washed after each grinding and before each firing

Another thing to keep in mind is, if you don’t mind doing a little bit more work by grinding the edges of the pieces cut with the saw with the 600 grit bit, then lightly rinsing/cleaning under the tap before firing, you can still get the full fused effect with crystal clear edges and only have to grind a bit after the firing with a 220 grit bit to make vertical sides, rinse/clean again and fire polish at 1450 for 10 minutes for an appearance like this picture below. There’s a ton of different ways to do this and they’re all fun and easy. (Just remember to keep notes.)

This is a shameless plug for one of our products, but if you want to have fun doing this, make it easy on yourself. Using a Nick’s Grinder’s Mate to hold the pieces when grinding will make you a much happier camper.

Ground edge samples
Cut by saw #220 grit #600 grit The final result you get is a factor of heat and time. In the below samples the two samples on the left are ready for firing the edges have been ground with the 600 grit bit. The center were fire polished to 1350 degrees for 10 minutes, the ones on the right to 1425 degrees for 10 minutes.
#600 Ground Fire Polished Full Fuse Polish

My personal favorite is a fire polish at 1400 for 10 minutes as seen below.
This stuff is really easy to do. A couple of things to keep in mind are
1. Keep a logbook of every firing and make notes and comments of the results. One of these days you’ll achieve the perfect whatever-it-is you’re trying to make and without a log/record of what you did……..it’ll be lost forever.
2. Don’t take all our firing information as chapter and verse. Every kiln fires differently. You’ll have to experiment to find what works best for you.
3. Have fun……….that’s what it’s all about.
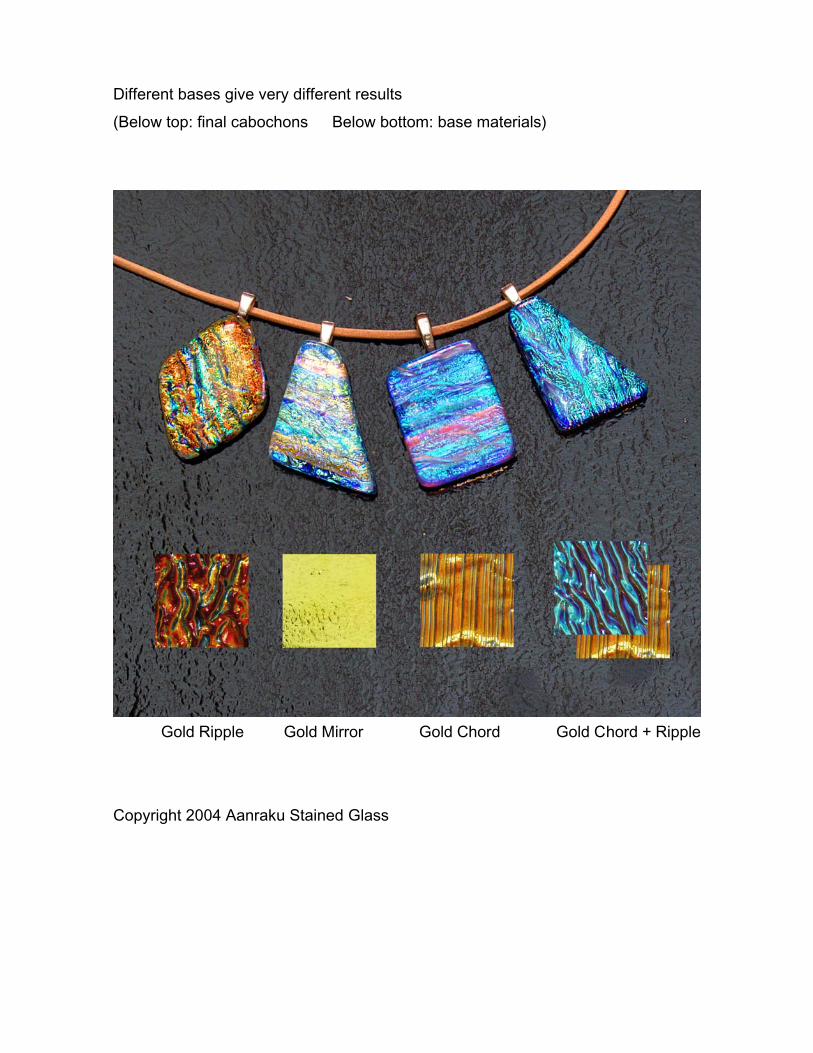
Different bases give very different results (Below top: final cabochons Below bottom: base materials)
Gold Ripple Gold Mirror Gold Chord Gold Chord + Ripple Copyright 2004 Aanraku Stained Glass