One of the Re-Mat 3 & Re-Mat 5 Systems - acoustic floor · Re-Mat 3 and Re-Mat 5 systems are...
2
DESCRIPTION & APPLICATIONS ❏ Re-Mat 3 and Re-Mat 5 systems are designed to reduce impact sound transmission through concrete floor decks and all types of floor finishes. ❏ Re-Mat systems are suitable for all types of floor finishes including ceramic tiles, stone, marble, vinyl, carpet and solid or laminate wood. systems range One of the Issue 1.2 • August 2015 Re-Mat 3 & Re-Mat 5 Systems Installation instructions IMPACT IMPROVEMENT SYSTEM FOR CONCRETE FLOORS • New build • Conversion • Refurbishment Isocheck Re-Mat 3 or Re-Mat 5 bonded to structural sub-floor. ≥300kg/m 2 hollow core concrete planks with 80kg/m 2 sand/ cement screed or 40mm proprietary screed. 75mm void formed by metal frame suspended ceiling system and ≥10kg/m 2 gypsum board ceiling or 50 x 75mm timber battens (see page 2). MADE IN THE UK TESTED BY NHBC ACOUSTIC SERVICES N R C CODE S H E1 CHANGE E1 NEWBUILD Rd ROBUST Product data Roll size: Isocheck Re-Mat 3 Isocheck Re-Mat 5 Colour: Density: 1m x 20m x 3.0mm 1m x 10m x 4.5mm 1m x 20m x 4.5mm Black or beige >350kg/m 3
Transcript of One of the Re-Mat 3 & Re-Mat 5 Systems - acoustic floor · Re-Mat 3 and Re-Mat 5 systems are...
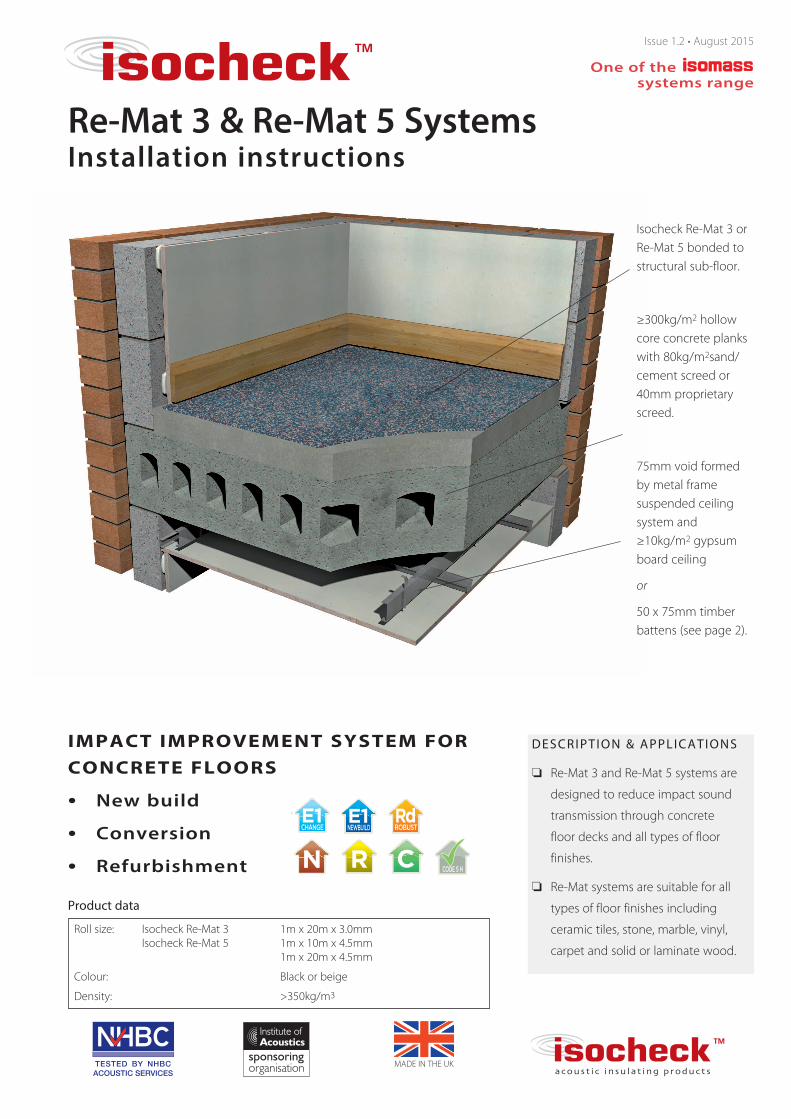
DESCRIPTION & APPLICATIONS
❏ Re-Mat 3 and Re-Mat 5 systems are
designed to reduce impact sound
transmission through concrete
floor decks and all types of floor
finishes.
❏ Re-Mat systems are suitable for all
types of floor finishes including
ceramic tiles, stone, marble, vinyl,
carpet and solid or laminate wood.
systems rangeOne of the
Issue 1.2 • August 2015
Re-Mat 3 & Re-Mat 5 SystemsInstallation instructions
IMPACT IMPROVEMENT SYSTEM FORCONCRETE FLOORS
• New build
• Conversion
• Refurbishment
Isocheck Re-Mat 3 orRe-Mat 5 bonded tostructural sub-floor.
≥300kg/m2 hollowcore concrete plankswith 80kg/m2sand/cement screed or40mm proprietaryscreed.
75mm void formedby metal framesuspended ceilingsystem and≥10kg/m2 gypsumboard ceiling
or
50 x 75mm timberbattens (see page 2).
MADE IN THE UKTESTED BY NHBCACOUSTIC SERVICES
N R CCODE S H
E1CHANGE
E1NEWBUILD
RdROBUST
Product data
Roll size: Isocheck Re-Mat 3Isocheck Re-Mat 5
Colour:
Density:
1m x 20m x 3.0mm1m x 10m x 4.5mm1m x 20m x 4.5mm
Black or beige
>350kg/m3

impact improvement system
INSTALLATION
❏ Ensure Re-Mat 3 or 5 is stored in a dry,
ventilated area.
❏ The floor surface should be swept free of all
wax, oil, grease, grit, loose debris and other
objects that could damage the Re-Mat
system. Fill holes and irregular surfaces with
levelling compound.
❏ Unroll Re-Mat and allow to rest for 24 hours
to allow the material to acclimatise before
measuring and cutting. Cut using a sharp
knife and a straight edge.
❏ Lift Re-Mat and evenly apply adhesive with a
triangular-notched trowel. Leave for
approximately 20 minutes or until the
adhesive is tacky before laying the Re-Mat.
❏ Leave a 2mm minimum gap between the
edge of the Re-Mat and the wall or skirting.
❏ Tightly butt-joint rolls of Re-Mat 3 or 5.
❏ Smooth out the surface of the Re-Mat with a
roller, pressing down firmly to remove any air
bubbles and to ensure the Re-Mat is correctly
adhered.
❏ DO NOT mechanically fix Re-Mat.
❏ Fill the gap beneath the plasterboard and the
screed with flexible sealant.
❏ Fit the timber, ceramic, stone or soft floor
finish leaving a 5mm gap between the
perimeter and the wall. If fitting ceramic or
stone tiles use water-resistant grout and seal
gap between the skirting and the tiles.
If fitting soft coverings such as carpet, the
gripper rods can be fixed through the Re-Mat
at the perimeter.
Every effort has been taken in the preperation of this sheet to ensure the accuracy of representationscontained herein. Recommendations as to the use of materials, construction details and methods ofinstallation are given in good faith and relate to typical situations. However, every site has differentcharacteristics and reliance should not be placed upon the foregoing recommendations. Advice canbe given as to specific applications of the products, upon request to isomass building products.
isocheck Re-Mat 3 or 5
Tightly butt-joint rolls of Re-Mat 3 or 5.
2mm minimum gap
www.isomass.co.ukwww.monodeck.co.uk
Alternative construction with 50 x 75mm timber battens,≥10kg/m2 gypsum board ceiling 75mm below underside ofsub-floor supported by resilient bars at 400mm centresperpendicular to the battens.
timber, ceramic, stone orsoft floor covering
5mm minimum gap
fill gap with flexible sealant
Tel: 0845 838 33 99 • Fax: 0845 838 33 89Email: [email protected] • www.isomass.co.uk
®
Isomass Limited, Units 10 & 11, Avenue Business Park,
Off Brockley Road, Elsworth, Cambridgeshire CB23 4EY


![SENSOR Sensor well Digital Floor Mat V Digital Floor Mat ... · SWC)FMV-I SWDFMV-a swsaaol swpcgooa 1 CJD- aaovAc 5BRHz 1.5ms O.BA 60Hz SENSOR Sensor well SVVP5ClC] 1700 mm mm mm](https://static.fdocuments.in/doc/165x107/5fd5787074a296443c31b8a4/sensor-sensor-well-digital-floor-mat-v-digital-floor-mat-swcfmv-i-swdfmv-a.jpg)