Omeka help file - Shenandoah University - Curiosity …(Winchester,!VAis!39,!M78.)!!...
8
Omeka: A tool for building online exhibits, archives, mapping, and “digital humanities” research Why Omeka? Omeka is an easy way to display student projects, faculty/student research, and other types of online exhibits. It is particularly useful when the project involves sets of data and maps. It handles formatting for you and provides a number of themes and templates. Getting Started Shenandoah has a Platinum license for Omeka that gives us access to all “plugins” (i.e. features) such as mapping. To see what Omeka can do, go to: http://info.omeka.net/showcase/ and preview some of the sites there. Preparation Go to http://www.omeka.net and create a basic (free) account (if you don't already have one) and use your SU email address when creating this account. To request a site, send email to [email protected] with the following information: Note that the subdomain cannot contain spaces or special characters. This is used to build the URL for your site. We will then make you owner (Super User) of the site, which will transfer the Platinum privileges to you.
Transcript of Omeka help file - Shenandoah University - Curiosity …(Winchester,!VAis!39,!M78.)!!...

Omeka: A tool for building online exhibits, archives, mapping, and “digital humanities” research
Why Omeka? Omeka is an easy way to display student projects, faculty/student research, and other types of online exhibits. It is particularly useful when the project involves sets of data and maps. It handles formatting for you and provides a number of themes and templates. Getting Started Shenandoah has a Platinum license for Omeka that gives us access to all “plugins” (i.e. features) such as mapping. To see what Omeka can do, go to: http://info.omeka.net/showcase/ and preview some of the sites there. Preparation Go to http://www.omeka.net and create a basic (free) account (if you don't already have one) and use your SU email address when creating this account. To request a site, send email to [email protected] with the following information:
Note that the sub-‐domain cannot contain spaces or special characters. This is used to build the URL for your site. We will then make you owner (Super User) of the site, which will transfer the Platinum privileges to you.

Planning your Site The best way to explain the Omeka paradigm is to think about an online museum exhibit. Each exhibit is made up of different collections, and collections are made up of “items” or artifacts. So you will need to think about what “items” (videos, images, documents, concepts, audio files, etc.) you want to display and think about how they might be organized into collections. Omeka will handle all the formatting for you. This next step will save you time. Create a list of the “items” (images, videos, documents, etc.) you wish to display and include what you need to say about each item. Think about whether you need to geolocate the items on a map. To help you see how all this works, let’s imagine a class history project in which students are asked to display and describe artifacts from ancient Mesopotamia that help us understand life in that part of the ancient world. Each student has been assigned a different area (animals, artisanry, warfare, etc.) These objects are housed in the British Museum and in the Louvre and the students have permission to use photos of the artifacts. Objects will be identified on a map of Iraq to show where they originated. You can see this site at: http://artifactsofmesopotamia.omeka.net Each student will need to perform these steps: 1) Select a theme. “Berlin” is the default theme. In this example, “Seasons” has been chosen. 2) Add any plugins they will need. (In this example, Simple Pages and Geolocation have been chosen. Simple Pages allows you to add Pages to the Navigation and Geolocation enables the mapping capability.) 3) Create a “Collection,” which will consist of a set of items. 4) Add each of the items (artifacts). For each item, students will need to describe the item using the Dublin Core Standard (see below), add metadata, upload any files, and add tags (search terms). Then, each item needs to be added to the Collection. 5) Review the site and add any additional content needed. Adding Items:
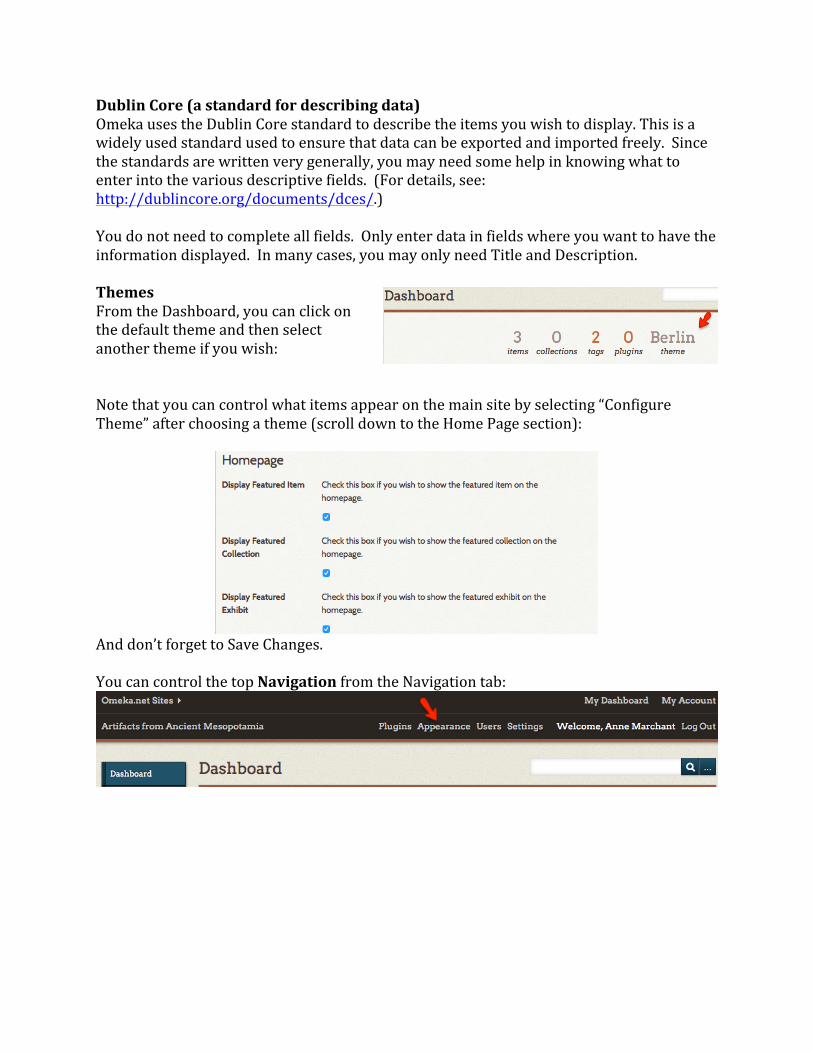
Dublin Core (a standard for describing data) Omeka uses the Dublin Core standard to describe the items you wish to display. This is a widely used standard used to ensure that data can be exported and imported freely. Since the standards are written very generally, you may need some help in knowing what to enter into the various descriptive fields. (For details, see: http://dublincore.org/documents/dces/.) You do not need to complete all fields. Only enter data in fields where you want to have the information displayed. In many cases, you may only need Title and Description. Themes From the Dashboard, you can click on the default theme and then select another theme if you wish: Note that you can control what items appear on the main site by selecting “Configure Theme” after choosing a theme (scroll down to the Home Page section):
And don’t forget to Save Changes. You can control the top Navigation from the Navigation tab:

Simply select or de-‐select items as desired. Appearance You will probably want to deselect the boxes as shown below so that empty data elements do not appear. (And then Save Changes.) Adding a Plugin Click Plugins at the top of the screen and then choose the plugin you wish to install. In this example, we will be using Geolocation (for mapping), Exhibit Builder (for adding pages to Exhibits) and Simple Pages (to add pages to the main site). Choose the Plugin you wish to add and then configure. Here is the Geolocation example (the others are simple):
Then enter the map settings.
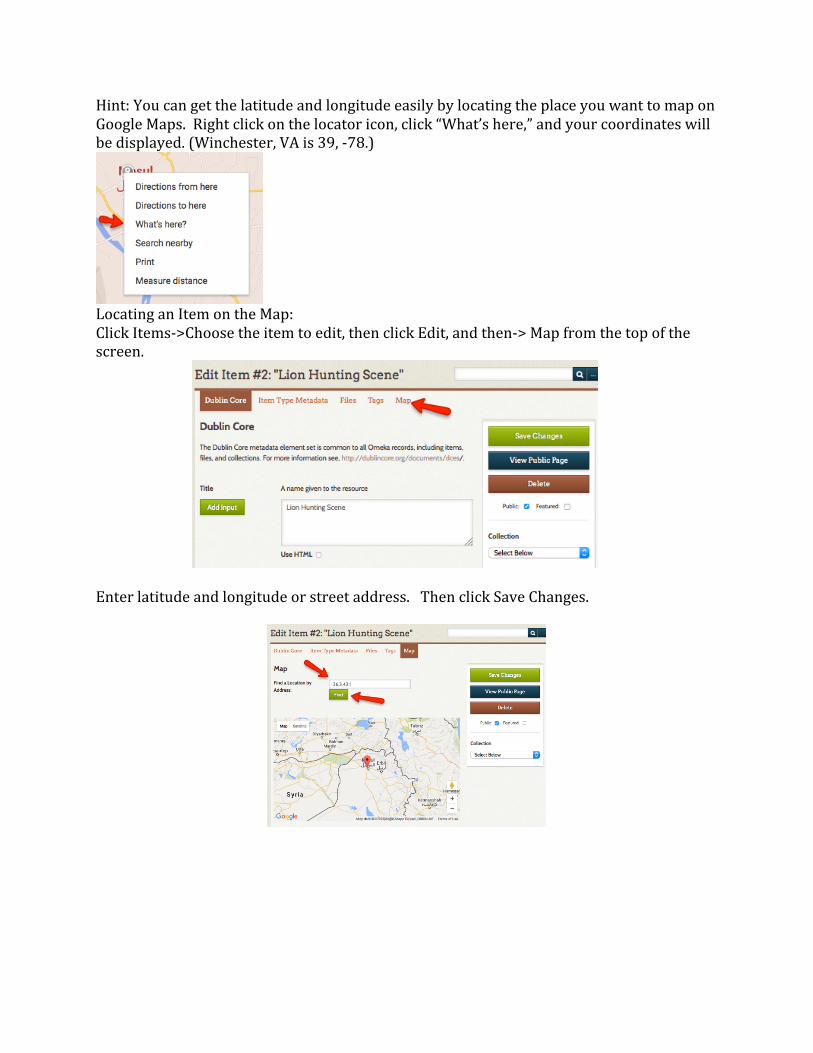
Hint: You can get the latitude and longitude easily by locating the place you want to map on Google Maps. Right click on the locator icon, click “What’s here,” and your coordinates will be displayed. (Winchester, VA is 39, -‐78.)
Locating an Item on the Map: Click Items-‐>Choose the item to edit, then click Edit, and then-‐> Map from the top of the screen.
Enter latitude and longitude or street address. Then click Save Changes.

Adding a Collection A new collection can be made from the Dashboard or Collections tab as shown below:
You’ll need to make the Collection Public when it is ready to be viewed. If you choose “Featured” this Collection will appear in the Featured Collections area of the main site.
Adding an Exhibit To add an Exhibit, click Exhibits from the left hand menu-‐>Add an Exhibit:

You can add pages to an Exhibit by editing the exhibit and clicking Add Page:
Next, choose the type of page and layout you want.
Then click the New Content Block bar to add the content.
The “slug” (see illustration below) will appear in the URL (link) to the page. If you leave this blank one will be created for you. Note that you can add additional sections with different layouts as needed.

Adding Pages to the Website The Simple Pages plugin allows you to create additional web pages for the whole website. Select Simple Pages from the left hand menu, choose Add a Page, and then complete the form as illustrated below:
In this example, the Contact Us page is being added to the Main page. If you know HTML, you can add an editor bar to add HTML code. (This is optional.) Help: http://omeka.org/codex/Screencasts or email: [email protected]