
Amateur Athletic Union Taekwondo 2015 – 2016 AAU Taekwondo ...

OLYMPIC TAEKWONDO PROGRAM
STUDENT HANDBOOK & CURRICULUM GUIDE by Shawn L Hill
CONGRATULATIONS!
You’ve decided to take the plunge, learn something new, or maybe you’re just getting back into training. Either way registering
for classes is the first step to achieving great things. Now let’s get you informed about our Olympic Taekwondo Program.
This curriculum guide / student handbook was
created to help give you a decent idea of what to
expect and what is expected within the program,
though nothing is ever written in stone when it
comes to martial arts systems. They are dynamic,
always changing, and ever improving. Taekwondo
is a good example of this dynamic change.
The best way to utilize the information in this
booklet is as a basic guide; a framework if you
will that defines the structure and outlines the
process of learning Olympic Style Taekwondo.
Techniques can be altered, movements tweaked
and requirements modified over time. Many
instructors of martial arts systems would not
even dream about giving students
documentation of any kind for curriculum. Those
systems rely solely on instruction from a teacher
or master and the student’s knowledge is gained
only through this interaction.
There is nothing wrong with that process. In fact,
that way of teaching has served a lot of people very well over the years. For this program however, in this modern age of
distraction, I feel it might serve to aid in the study for those students living truly busy life styles. Now, there is no substitute for
dedication… let’s get that out there. Anyone wanting to learn a martial arts system must dedicate time and effort to the study
and practice. Otherwise it’s not going to happen.
It’s my intention to provide you with an edge, a guide that you can reference on the go to help you practice when you have a
spare moment at hand. The next pages in this booklet will define the customs, etiquette, and basic requirements for this
program to be used as a supplemental guide on top of learning directly from the program’s instructor. If used properly, it should
help make your learning process that much better of an experience.
Not all programs and systems are run exactly the same. If you are transitioning from another school, club, program to this
program or find yourself transitioning from this program to another school, you will experience differences in curriculum,
etiquette, customs and structure. Don’t worry too much about that, the basics are the basics but each program and school tend
to become personalized by the lead instructor.
This program follows some of the basic customs and etiquette but not all and maybe not exactly the same way others do. You
will adapt quickly, trust me…

A FEW WORDS OF ADVICE BEFORE YOU BEGIN THE JOURNEY TO LEARN TAEKWONDO:
REMEMBER, this is for you so don’t cheat yourself! Always push to give 100% during training and practice. This may seem like generic advice,
but understand when folks become involved with structured programs, of any kind, they tend to become creatures of habit and may do just
enough to get by or complete a task. That’s not how it works in martial arts. You have to go beyond just getting by and beyond getting
something good enough. Techniques are learned and then tweaked and refined over years and years of practice. Remember you’re not doing
this to pass a test or to get a belt; you’re doing this to learn the art… period!
Practice at home and attend class as often as possible. The skills learned in any martial arts system need lots of attention and therefore you
need to put aside a lot of practice time. Supplement every hour of class time with at least one or more hours of practice on your own.
Honestly, for serious practitioners, one hour of class equals 4 or more hours of extra practice outside of class. DO NOT rely on classes alone.
The classes are guides much like this booklet. A skill is taught and you must practice it.
Don’t feel silly or stupid carrying out the etiquette and customs recognized by the system. You may feel odd at first saying yes sir or no
ma’am to another person, unless of course you come from a military background. It may seem goofy to bow to another individual, a room, or
to a group of people you don’t know yet, but keep in mind that the etiquette and customs are followed for the purpose of fostering a
respectful learning environment for everyone. Without this expected behavior, it would be next to impossible to run large classes where each
person can hear instruction or see how to do something. Do not mistake respect for submissiveness. When you bow to another person, you
are not pledging your obedience; you are acknowledging a respect for that individual. That’s it.
Last, but not least, READ THIS WHOLE BOOKLET!

TABLE OF CONTENTS
TAEKWONDO - KNOW YOUR ART!
VOLUNTEERING – COMMUNITY SERVICE & THIS PROGRAM
THE ETIQUETTE WE OBSERVE – WHY IT MATTERS
TENETS OF TAEKWONDO – THE FIVE CODES OF HUMAN CONDUCT
UNIFORMS – THE REASON WE WEAR THEM
BELT RANK COLORS – BEGINNER TO ADVANCED
HOW TO TIE THAT NIFTY BELT
LINING UP - BEFORE & AFTER CLASS
OPENING & CLOSING CEREMONY FOR CLASSES
TESTING & PROMOTION – ALL THOSE COOL BELT COLORS
POOMSAE – WHAT’S THAT?
SPARRING – LOOKS SCARY, DO I HAVE TO?
STEP SPARRING – BUT WHY?
SELF DEFENSE – AM I A KILLING MACHINE YET?
BREAKING – NOW WE’RE TALKING
STRETCHING – YES, IT’S A MUST!
COMPETITION – LET’S DANCE!
THE BEGINNING - 10th GEUP - WHITE BELT
TAEKWONDO - KNOW YOUR ART!
So, you’re going to be learning Olympic Style Taekwondo?
Just what is Taekwondo? Secondly, what is Olympic Style
Taekwondo? What does the word Taekwondo mean?
Where does Taekwondo originate from and how old is it?
To answer those questions and a whole lot more I grabbed
the actual description from the formal organization that
governs the style of Taekwondo taught through this
program, The World Taekwondo Federation known as The
WTF.
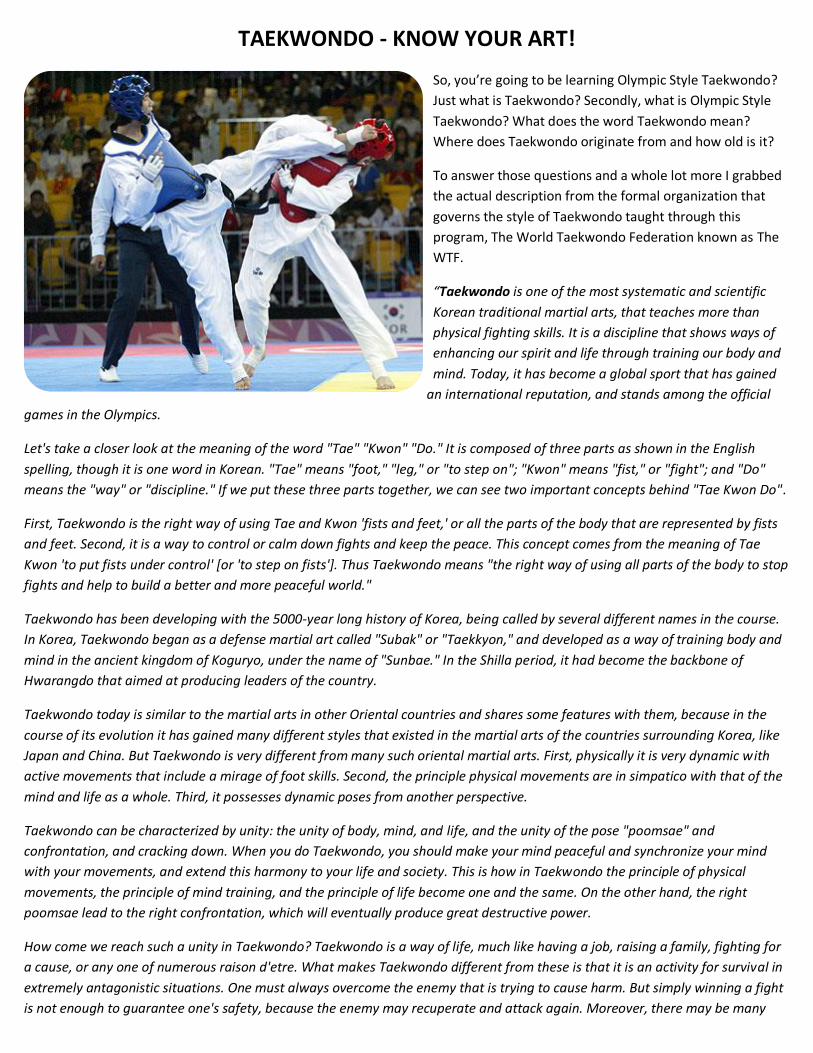
“Taekwondo is one of the most systematic and scientific
Korean traditional martial arts, that teaches more than
physical fighting skills. It is a discipline that shows ways of
enhancing our spirit and life through training our body and
mind. Today, it has become a global sport that has gained
an international reputation, and stands among the official
games in the Olympics.
Let's take a closer look at the meaning of the word "Tae" "Kwon" "Do." It is composed of three parts as shown in the English
spelling, though it is one word in Korean. "Tae" means "foot," "leg," or "to step on"; "Kwon" means "fist," or "fight"; and "Do"
means the "way" or "discipline." If we put these three parts together, we can see two important concepts behind "Tae Kwon Do".
First, Taekwondo is the right way of using Tae and Kwon 'fists and feet,' or all the parts of the body that are represented by fists
and feet. Second, it is a way to control or calm down fights and keep the peace. This concept comes from the meaning of Tae
Kwon 'to put fists under control' [or 'to step on fists']. Thus Taekwondo means "the right way of using all parts of the body to stop
fights and help to build a better and more peaceful world."
Taekwondo has been developing with the 5000-year long history of Korea, being called by several different names in the course.
In Korea, Taekwondo began as a defense martial art called "Subak" or "Taekkyon," and developed as a way of training body and
mind in the ancient kingdom of Koguryo, under the name of "Sunbae." In the Shilla period, it had become the backbone of
Hwarangdo that aimed at producing leaders of the country.
Taekwondo today is similar to the martial arts in other Oriental countries and shares some features with them, because in the
course of its evolution it has gained many different styles that existed in the martial arts of the countries surrounding Korea, like
Japan and China. But Taekwondo is very different from many such oriental martial arts. First, physically it is very dynamic with
active movements that include a mirage of foot skills. Second, the principle physical movements are in simpatico with that of the
mind and life as a whole. Third, it possesses dynamic poses from another perspective.
Taekwondo can be characterized by unity: the unity of body, mind, and life, and the unity of the pose "poomsae" and
confrontation, and cracking down. When you do Taekwondo, you should make your mind peaceful and synchronize your mind
with your movements, and extend this harmony to your life and society. This is how in Taekwondo the principle of physical
movements, the principle of mind training, and the principle of life become one and the same. On the other hand, the right
poomsae lead to the right confrontation, which will eventually produce great destructive power.
How come we reach such a unity in Taekwondo? Taekwondo is a way of life, much like having a job, raising a family, fighting for
a cause, or any one of numerous raison d'etre. What makes Taekwondo different from these is that it is an activity for survival in
extremely antagonistic situations. One must always overcome the enemy that is trying to cause harm. But simply winning a fight
is not enough to guarantee one's safety, because the enemy may recuperate and attack again. Moreover, there may be many
other enemies than the one that was just defeated. One cannot ever feel safe unless one gains permanent peace. To attain this
permanent or lasting peace, one needs unity. This is what Taekwondo aim for. Otherwise Taekwondo would be no different from
any other street-fighting skills.
Taekwondo pursues harmonious growth and improvements of life through its unique activities. This is why one could say
Taekwondo is a way of life. To ultimately enable ourselves to lead more valuable lives, we would do well by finding the guiding
principles deeply hidden in Taekwondo.”
“There are two main branches of taekwondo development, which are not necessarily mutually exclusive: "Traditional
taekwondo" typically refers to the martial art as it was established in the 1950s and 1960s in the South Korean military, and in
various civilian organizations, including schools and universities. In particular, the names and symbolism of the traditional
patterns often refer to elements of Korean history, culture and religious philosophy. Today, the Kukkiwon, or World Taekwondo
Headquarters is the traditional center for Taekwondo in Korea.
"Sport taekwondo" has developed in the decades since the 1950s and may have a somewhat different focus, especially in terms
of its emphasis on speed and competition (as in Olympic sparring). Sport taekwondo is in turn subdivided into two main styles;
one derives from Kukkiwon, the source of the sparring system, sihap gyeorugi, which is now an event at the summer Olympic
Games and which is governed by the World Taekwondo Federation (WTF). The other comes from the International Taekwon-Do
Federation (ITF).”
This program covers WTF Olympic style taekwondo with 50 percent of the curriculum geared towards gaining traditional
skillsets, (forms, self-defense, blocks, strikes, etc.), and 50 percent towards the Olympic sport training, ( kicking drills, footwork,
sparring, and competitions). This provides a good balance between the art aspects of taekwondo and what is considered the
modern sport aspect. Also, always keep in mind that within the world of martial arts there are many styles and within each art,
such as TAEKWONDO, there are many variations of that style. Not everyone learns or teaches by the same exact methods. Not
everyone teaches or learns the same exact techniques and not everyone teaches the same exact way. As we said before, the
martial arts systems are very dynamic and change or become personalized by those who oversee them.

VOLUNTEERING – COMMUNITY SERVICE & THIS PROGRAM
Volunteering is a concept that some may think of when doing a nice deed once in a while. Maybe volunteering to help a
neighbor take their trash to the curb or volunteering to picking up a friend whose car broke down. Perhaps you’ve volunteered
to let someone borrow money you’ll most likely never see again. Although those are all very nice things to do for someone and
they might fall under the category of “informal volunteering”, they don’t constitute the type of volunteering we’ll be exploring in
this guide and that will be required for this program.
Overall, volunteers play a huge role in helping to create healthy communities and in many cases volunteer involvement is crucial
for a community’s ability to exist, succeed and thrive. Without those everyday volunteers dedicating time and effort to address
needs within their own neighborhoods, towns, cities, states or even the entire country they live in, the world might be a very
different place.
So, how does volunteering relate to learning Olympic Style Taekwondo and this program? That’s easy to answer… MARTiAL YOU
is a nonprofit organization dedicated to community involvement and awareness. Our mission to promote the benefits of martial
arts goes hand in hand with promoting community responsibility through community awareness. Having students get involved
with charitable activities can help drive a sense of respect for others, the work they do, and the impact they have on the entire
community.
As part of our efforts to reach out and help give back, we have integrated volunteer requirements for those enrolling in the
martial arts program. Students who wish to test and receive promotion to the next rank must contribute a preset number of
volunteer hours to a local charitable organization before doing so.
Homes For Our Troops
Event in Bangor, ME
August 2013

MARTiAL YOU will be working to
create collaborations with local
charities in order to create a
consistent base of opportunities from
which students can choose to
dedicate their time and to make it
easier for them to get started.
However, students will not be limited
to charities working directly with
MARTiAL YOU, and may choose to
volunteer their time with any local
charity holding a 501c3 status.
Now, finding time to volunteer these days doesn’t seem to be all that easy. So many things to do, not enough time, and plenty of
distractions keep a lot of us teetering more towards the edge of “I can’t do it right now.” This is a completely understandable
train of thought, and I for one have battled with this three part balance scale of “what I need to do”, “what I should do”, and
“what I want to do.” Also, a common misconception that may discourage some is that volunteering will take up all their free
time. This of course is just not true. The time dedicated to any volunteering is completely up to you. It can be as little as thirty
minutes a month or as much as eight hours a day or anything in between. You decide.
THE IMPORTANCE AND IMPACT OF VOLUNTEERING
According to the annual Volunteering and Civic Life in America research by the Corporation for National and Community Service
and the National Conference on Citizenship, including stats from The National Bureau of Labor, it’s estimated that approximately
25.3 percent of US citizens volunteered through or for an organization at least once in 2013. That’s about 62.8 million people
who decided to give away some of their precious time for a cause. Roughly 7.7 Billion hours were donated by volunteers, and
those hours tallied up to a value of about 173 billion dollars based on the Independent Sectors estimate of the average value of
a volunteer hour.
In addition, more than 138 million Americans (62.5 percent) also engaged in “informal volunteering” in their communities,
helping neighbors with such tasks as watching each other’s children, helping with shopping, or house sitting. Other civic health
indicators from the report found that two-thirds (68.5 percent) of Americans have dinner with their family virtually every day,
while three in four (75.7 percent) see or hear from friends and family at least a few times a week, and more than a third (36.3
percent) are involved in a school, civic, recreational, religious, or other organization.
If those numbers alone don’t resonate just how much volunteering is part of and needed by our society, let me give you some
ideas about what these volunteers do.
Volunteers play a critical role in society whether they are actively donating time through formal organizations, ad hoc
organizations, or participating in “informal volunteering” by providing personal care for those close to them such as neighbors,
family, and friends, or maybe even complete strangers, in an effort to give back.
Volunteer tasks have a huge range from stuffing envelopes for an important cause to unloading a truck load of bottled water in a
disaster zone and from providing home care for the elderly to piloting a plain to make sure a needy medical patient gets to a
distant location for treatment.
Volunteers serve communities as volunteer fire fighters, man hotlines such as those for domestic violence and sexual assault
organizations; participate in search and rescue activities, aid in disaster relief by getting crucial supplies where they need to be,
deliver meals to the homeless, and they provide help to helpless.
Students and parents
volunteering time to fix-up
a run down room used for
classes. June 2013

Volunteers serve as coaches, mentors, teachers, tutors, and counselors for all age groups, the disabled and the financially
challenged. Volunteers in the medical profession donate time to free clinics and provide medical knowledge and aid for victims
of disasters all over the world. They work to help create public awareness for safety and health concerns.
Volunteers help to repair broken infrastructure, gain access to clean water, construct houses, schools and other facilities used
daily. They work to patrol neighborhoods, parks, and streets to help keep them safe, and they are out walking dogs, taking
tickets at performing arts events, giving tours at museums and organizing cultural festivals. The involvement is endless and the
importance is, well, incalculable.
Think about what the world would be like without all the volunteers who dedicate time and effort on a daily basis. What if those volunteers
all of a sudden stopped volunteering? What would happen to our neighborhoods, towns, cities, places of worship, libraries, state
parks, and schools? What basic needs would we all have to do without? What opportunities to learn, grow, and thrive as a
community, or as a whole society, would disappear?
Volunteers are all around us and whether we know it or not, we likely meet at least one every day. They are the silent
unrecognized voices, givers, and heroes that are working non-stop to make sure life is good, for all of us!
Program students become part of that important force shaping the world by giving without the thought of receiving. Each testing period,
depending on age and rank, those enrolled are required to provide between one and ten hours of volunteer time before promotion. It is our
intent to foster community awareness and involvement through these requirements and it is our hope that getting students involved with
charitable projects will result in them becoming better acquainted with their own local community and its needs, and perhaps may inspire
volunteering above and beyond the program requirements
Required volunteer hours for each rank are listed on the belt requirements page.
MARTiAL YOU’s free community Halloween Event
organized and run by volunteers. October 2013

et·i·quette (noun)
the customary code of polite behavior in society or among
members of a particular profession or group.
THE ETIQUETTE WE OBSERVE – WHY IT
MATTERS
Drawing upon multiple resources, including personal
experience, I’ve put together a quick guide and
explanation of etiquette. Because etiquette is literally the foundation upon which martial arts exists, and plays a huge role in
every aspect of human life, it’s important that I place the proper amount of emphasize on it. Let me start by quoting a good
description I was able to find regarding the meaning and purpose behind what we call etiquette.
“Etiquette or "Ye" in Korean is an essential spirit in Taekwon-
Do training. Taekwon-Do practice must begin and end with
etiquette. Ye is an abbreviation of Kyongnye. Ye denotes the
way that all human beings must follow. It’s considered the
fundamental base on which human spirit stands. That is
respect for humanity. Etiquette is an expression, through
actions, of one's mind respecting the other party's
personality, constituting a lofty and valuable basic attitude in
a person. A code of etiquette is aimed at encouraging
Taekwondoist to behave themselves like a person of
etiquette, always trying hard to cultivate a righteous and
decent character in them so that everyone throughout the
world may follow their examples. Children especially need far
more discipline and order. The child’s overflowing
enthusiasm can be tempered only through reinforced moral
education, which starts by the training of etiquette.”
“Etiquette should be based on an upright mind and modest
attitude. One should get rid of mean attitudes, showing only
modest attitudes, which is an important part of etiquette.
Decent and accurate speech, graceful conduct, upright and moderate attitudes are all the essentials of etiquette deserving a
healthy modern life. Etiquette is also the source of maintaining harmony and solidarity for community life.”
Since “the martial arts” are made up of systems that teach physical and mental skills to students, in groups, or one on one, they
need to be based on a desirable learning environment that works for both the teacher and the student. Because of this need,
these arts have developed a behavioral etiquette based around the tenants or core beliefs of each system. This governing
behavior encourages courtesy, humility, and respect through the entire process of learning and remains at the core of those
arts.
The program you have enrolled in is no different and requires etiquette to be observed and practiced. Students must be allowed
to thrive side by side, and in order to achieve this all students will be required to immerse themselves into the practice of this
etiquette. Everyone involved must address and treat each other in a courteous and respectful manor. By keeping a solid
foundation based on proper etiquette, a rewarding system is maintained that acknowledges those who work hard and helps
keep structure and order for those trying to learn. Examples describing etiquette standards can be found all over and I just
happen to have a few.

“Centuries old principles of oriental custom deem it disrespectful to sit down before one’s elder or senior sits down, or stand up
before one’s elder or senior stands up. Traditional taekwondo classes employ examples of this type of etiquette and respect
including: juniors always bowing prior to the senior bowing, juniors bowing lower than their senior does, rising up after the senior
rises up, as well as kneeling down and standing up after the senior. It’s also considered disrespectful to issue commands to one’s
senior. Therefore, the senior student only issues commands for the class to perform a particular motion after the instructor has
already completed that motion.”
The etiquette we observe begins as soon as you step into the training area or what’s called the dojang for taekwondo. To
encourage a respect for the dojang, the area where all students share challenges, work hard to improve upon themselves and
help each other achieve goals, we start by acknowledging our appreciation for the art, the training space, its contents and those
who occupy the dojang by bowing on the way in. This custom is also repeated any time a student or instructor must leave the
dojang or re-enters. Upon walking out of the training area a student will stop at the doorway, turn and face the inside of the
room and its occupants, bow, and then continue to step out.
It shouldn’t be a challenge to engage in proper etiquette because throughout the entire process of learning any martial art
everyone is working and training with one another to achieve a common goal, learning the art and becoming better at it.
Be courteous by remaining silent while another speaks, show respect by shaking hands with fellow students, provide
encouragement to those who struggle, and do your best to act in a civilized manner. Refer to instructors by their last names only
(Mr. Hill, Mr. Smith, Mrs. Johns etc.) and answer questions as Yes or No Sir/Mam. Bow to senior ranks to acknowledge mutual
respect and strive to be the best student possible.
Here are some great guidelines I was able to gather in order to give you a deeper insight into the etiquette that should be
observed while in class.
SENIOR STUDENTS
“The most senior student’s responsibility is to assist the instructor by leading the class and issuing commands to the class on
behalf of the instructor. It’s also the responsibility of the most senior colored belt students to ensure that those commands are
followed in a rapid no nonsense manner. When represented properly, students will attempt to emulate examples of etiquette and
respect set by their seniors and in a highly disciplined traditional martial arts class, this behavior is always present, and the
responsibility falling upon the senior colored belt students becomes well known and understood.”
BOWING
“We always bow to our partner before and after we practice together. We bow to the instructor at the beginning and end of the
class. We should wait until the instructor raises their head before we raise ours. We should always bow when they approach or
leave a senior. When leaving a senior grade we should bow, take three steps back and then turn. We bow when entering and
leaving the Dojang.”
NAMES
Never call a senior by their first name. Always Master, Mr., Miss or Ma’am. This applies both inside and outside of Taekwondo. If
we meet our instructor in the street we still must call them by their second name otherwise they are just empty words in the
Dojang.
SHAKING HANDS
When shaking hands with a senior place the back of the left hand under the right elbow and always wait until a senior offers to
shake your hand.
SITTING DOWN
We should always offer our seat to a senior if they are without one. Never sit down before your seniors are seated.
STANDING UP
We should always stand up when a senior enters the room or approaches us. We never stand with our hands on our hips when
in the presence of a senior.
WHEN NOT TO ASK A QUESTION
When learning in class it may become tempting to burst into a question. Refrain from doing so until the instructor asks if anyone
has a question. Interrupting or speaking out of turn is considered disrespectful. Save questions for the proper time and if needed
until after class when the instructor can address them.
NOT GETTING PERSONAL WITH THE INSTRUCTOR
One big faux pas is trying to get to know the instructor personally. Never ask what they did on the weekend, how life is or ask
about who they are dating. Try to keep all questions within the context of the art itself. The student / instructor relationship is
one of mutual respect but not personal. Becoming personal can damage this relationship.
QUICK TIPS FOR DOJANG ETIQUETTE
1. When students bow they should first stand to attention bending the elbows slightly.
2. In the dojang, while sitting in the company of senior members (senior means higher ranking TKD students or an elderly
person) one must maintain proper posture. In case of any senior member entering the room one must stand immediately and
bow. You take your seat only after the senior member has sat down.
3. When entering a dojang, bow first to the Instructor, then the assistant instructors and the flag. Even when visiting other
martial arts dojangs, students must show proper respect and observe the traits of modesty and courtesy at all times.
4. In the dojang, you should refrain from making excessive noise and attempt to build a serious training environment.
5. Keep your uniform clean and neat out of respect for the art, yourself and all who aid in your learning.
6. Keep yourself clean and neat out of respect for all those you train with and are instructed by.

As reference for you I have found the official rules of etiquette established on May 7th 1971 by the Korean Taekwondo Association. As a
courtesy I have included the entire list in this handbook so that new students and old alike can read about the formal expectations that this
organization felt strong enough about that they created the list for all students to abide by. Though the scope of this guide is only to cover
the expectations for this program and the behavior to be observed while involved, it gives a fascinating look into how etiquette should
transcend beyond the classroom. As you read through the list, ask yourself if you or you know anyone who acts in the manners described.
KOREAN TAEKWONDO ASSOCIATION RULES OF ETIQUETTE
1 THE GREETING
There are two types of greetings in TAEKWONDO; the standing greeting (bow) & the kneeling greeting. Rendering standing greetings when a
superior enters the room. Rendering kneeling greetings when after the standing greeting, if the superior sits on the floor. The standing
greeting starts with the feet together. Arms to the side, fingers curled toward the legs so that the index fingers are touching the thumbs. Back
straight, head and eyes to the front. To render a greeting with a bow: the back bent forward 15 degrees; head bent forward 45 degrees. After
the bow, return to the standing position. To render a sitting greeting: by moving to the kneeling position; knees together, move the arms to
the front & bend forward, place head on hands, then returns to the kneeling position.
2 TEACHER, STUDENT FORMALITIES DURING TRAINING
Before each training session, salute the flags with a low respectful bow. After saluting the flag, the lower ranking students must greet their
superiors in order of rank, first the school master, the teacher, & then the individuals with a higher level of proficiency than oneself. During
the training session, a student's behavior shall have control and show a high level of courtesy. Student uniforms will at all times be in
serviceable condition. Uniforms will not to be worn in public except when absolutely necessary. It is important for the student to use
discretion when speaking during the training session. Students should always use words implying respect & honor when speaking too
superior. The superiors do not have to be so careful in their selection of words when speaking to students of lesser rank. While practitioners
of TAEKWONDO are in uniform, the symbol of rank within the system takes precedence over respect for elders. However, when not in
uniform, respect for age takes precedence over rank.
3 WEARING THE UNIFORM
Uniform neatness and cleanliness are of the utmost importance. During the training session, if an individual's uniform is to become out of
place, he is to stop momentarily & turn so that others will not be able to see, then adjust the uniform. After the adjustments made, he
returns to the practice.
4 HOME & SOCIAL BEHAVIOR
While in the home, at work, or while at social functions, it is important for the student to demonstrate high moral standards, and to show
appropriate respect and consideration to others.
5 ETIQUETTE IN SPEECH
High levels of speech should always imply while speaking. The back should be straight, & the general attitude should be formal. The choice of
words is important, being words of courtesy and respect. The voice should not be loud, & abusive words are not be tolerated. The student
should be careful not to spit while speaking. The individual should not lose his integrity, wit, or sense of humor. The speaker should ensure to
use the correct title for the person he is speaking too. Listening is essential & shows respect. It is not appropriate to stare or interrupt. It is
not appropriate to touch the individual you are speaking to, & it is not correct to use hand gestures.
6 APPEARANCE
In social situations, it is important to be conscious of appearance. The type, fitting, & style of clothes should be conservative. During
ceremonies & other formal occasions, the students of TAEKWONDO should always wear the appropriate attire. The shined shoes & a well-
groomed appearance should be evident. In keeping with the rules of appearance, good habits result.
7 THE SEATING ARRANGEMENT WHILE IN CARS
The designated driver for a formal occasion always opens the car door for the superior. However, in the rear seat, the lower ranking
individual gets into the car first. So as to allow the superior to depart the vehicle first once they have reached their destination.
8 SPEAKING ON THE PHONE
When calling someone, it is appropriate to state your name first, then asks for the person “to whom you wish to speak." When answering the
telephone, state your name, then request the nature of the call. All conversations kept brief & to the point. It is important to have a note pad
near the telephone in case there is a need to copy urgent messages.

9 TABLE MANNERS
When at the dinner table, all guests wait until the senior gives the signal to begin any course by picking up their silver-ware. When in small
groups, all must be served, before eating cannot commence. However, at very large gatherings or parties, the guests began eating when
given their plates, so the food does not get cold. Keep conversation's general at a small table. At a long table, it's OK to break the
conversations up into two groups or more if feasible. At a business lunch or dinner, the guest waits for the host to start the business
discussion. Do not put elbows on the table when eating, but it is appropriate to put elbows on the table when in conversations between
courses. Sit straight in the chair and do not blow on hot food for cooling.
10 INTRODUCTIONS
Introductions governed by three basic rules, & can be implemented in most situations. Introduce a male to a female, introduce an adult to a
much older one of the same sex, & introduce the lower rank to the higher rank. Their introduction should be brief & not wordy or awkward.
The host always shakes the hands of the guests upon arrival & departure. Females always have the choice to shake hands or not. Males
should always shake hands with other males to whom being introduced, unless it is awkward to do so, for example leaning across others
while seated at the dinner table.
11 VISITING
Prior to visiting someone, an appointment should be made. Do not show up uninvited. Make it a point never to visit on holidays or Sundays,
early in the morning, late at night, at meal time or day of inclement weather, unless specifically invited. Make the visits short, remember that
you are guest, thank the host (ess) before to departing, it is a Korean custom to bring a gift when visiting someone’s home. The gift may only
be: fruit, drink, flowers, etc.., or something to show your gratitude to be an invited guest.
12 GUIDING A HIGHER RANKING PERSON
When guiding a higher ranking person, walk to the front with slightly bent forward posture; this shows respect. At meetings be attentive to
the needs of the superior, for example if he should need a pen or pad of paper. If not escorting a superior or superior's family, but are with a
superior, always walk to the rear, open doors for the superior, and be attentive to the needs as previously mentioned.
13 SEATING ARRANGEMENTS AT CEREMONIES
While at formal ceremonies: the seat of honor is to the right of the chairperson, then the next highest position is to their left. At social
gatherings, with a speaker present, the highest ranking persons have an opportunity to speak after the speaker. The highest ranking person
will leave a crowded room first when the ceremony is over, followed by the others in order of rank.
14 DRINKING AND SMOKING
It is the privilege of the individual to drink as much as he or she wants in private. Showing the effects of too much to drink in public is totally
unacceptable because in one way or another a drunk is always a problem. Never smoke in any place of worship or a religious ceremony out of
doors; while in court; during the playing of the national anthem; or during the raising or lowering of the national flag. When greeting
someone, remove cigarette from your mouth.
15 BEHAVIOR OF THE INSTRUCTORS
The TAEKWONDO instructor (s) is to set the example their students to follow. Instructors help their students to find solutions to their
problems. Instructors should refrain from speaking to their students as though giving order, but is to be humble and sincere. Instructors are
to avoid violence & the appearance of a pleasure seeker. Instructors should live a clean & productive life free of drugs & alcohol. They should
involve themselves in community functions, practice justice, and unselfishness.
16 BEHAVIOR DURING SOCIAL EVENTS
In the event of social activities seating of head table will include not just the senior belts but also spouses. Recognize spouses & parents of
senior belts with the same respect. Most Korean customs apply to most TAEKWONDO social events. If you have any questions or doubts on
proper mannerisms please contact your instructor. If you are attending a social event especially were Korean instructors are to be present,
ask questions before. Many of our norms maybe conceived in the wrong manner. As long as it seems you are making an honest effort. Most
Koreans are honored in making an on the spot correction. Bottom line is to behave with self-respect, for you represent not only yourself but
your dojang
.
“In 1972 the Korea Taekwondo Association (KTA) Central Dojang opened in Seoul in 1972; in 1973 the name was changed to Kukkiwon. Under the
sponsorship of the South Korean government's Ministry of Culture, Sports and Tourism the Kukkiwon became the new national academy for taekwondo,
thereby establishing a new "unified" style of taekwondo. In 1973 the KTA established the World Taekwondo Federation (WTF) to promote taekwondo as
a sport. The International Olympic Committee recognized the WTF and taekwondo sparring in 1980.”

TENETS OF TAEKWONDO – THE FIVE CODES OF HUMAN CONDUCT
Tenets of Taekwondo are the principle or core beliefs upheld by those who practice the art. Below are the five core tenets and
their meanings. Many students will find them easy to remember using an acronym spelled out as SPICI which corresponds to the
first letter of each tenet, Self-Control, Perseverance, Integrity, Courtesy, and Indomitable Spirit.
COURTESY (Ye-Ui) in a broader sense is kindness, humility, good manners, politeness, and respect.
INTEGRITY (Yom-Chi) generally speaking, is honesty, straight dealing, purity, moral soundness, and uprightness. To have integrity means to be
honest with everyone and with yourself at all times.
PERSEVERANCE (In-Nae) is persistence, a steadfast pursuit of and an understanding of the aim, continuation in the practice of Tae Kwon Do
regardless of the amount of obstacles, hindering circumstances, difficulties, or occasional "let downs" which are only temporary situations.
The strong will to hold on, regardless of obstacles. Loyalty.
SELF-CONTROL (Guk-Gi) is a double edged sword: on the one hand, it is the physical control with regard to motions, precision of execution,
prevention of unnecessary injuries (as opposed to acting wildly) or killing, due to lack of control. Experience is the best teacher, but all the
physical reactions are based on the psychological makeup, maturity, and moral, ethical, and religious codes. Emotions are usually involved, to
a certain degree, in the majority of situations, hence the need for emotional self-control. The degree of controlling the particularly strong
emotions such as love, hate, anger, surprise, joy, sadness, etc., show the level of achievement of each practitioner of Tae Kwon Do.
Emotions should be governed by a strong and conscious reason and aided by experience in principles. The success of application of this tenet
in practical everyday life should result in creating the indomitable spirit.
INDOMITABLE SPIRIT (Baekjul-Bool Gool) Indomitable means unconquerable, unbreakable, unquenchable. To put it simply, it means that one
has such strong unshakeable beliefs and principles that even sacrificing the most precious possession one has, one's own life, is not too high a
price to pay in defending them. The most classical example of the application of this tenet is found in ancient Greek history, in the story of
the Thermopylae, Leonidas and his 300 Spartans.

UNIFORMS - THE REASON WE WEAR THEM
The idea of a consistent dress code creates a significant distinction between individuality through appearance and individuality
through action. One of the main focuses of martial arts is to help students improve themselves, both physically and mentally,
which is expressed by their skills not by the way they dress. A consistent uniform dress code also generates an important sense
of unity among members and cohesiveness
among all program participants.
“Dobok is the uniform worn by practitioners of
Korean martial arts. Do means "way" and bok
means "clothing." The dobok is modeled on the
Japanese dōgi, used in Judo, which was
developed by Kanō Jigorō. The dobok comes in
many colors, though white or black are the
most common. The dobok may have the
reverse in a different color than the rest of the
dobok. They are made in a variety of materials,
ranging from traditional cotton to cotton-
polyester blends.
The pants of the dobok may be wider and
longer than the traditional Japanese keikogi.
Due to this, practitioners often wear a dobok
modeled after the Korean hanbok. The dobok
of World Taekwondo Federation-style
taekwondo practitioners usually have v-neck
jackets, tailored after the design of the
hanbok.” This is the style that we wear in this
program.
All junior belts, those under the rank of black
belt, wear white tops with a white colored v-neck collar, while black belt holders, 1st dan and higher, wear uniforms that include
a white top with black colored v-neck collar. There are also white tops with a Red/Black colored v-neck signifying the rank of
black belt among youth under the age of 15.
“Around the dobok a tti or dee (belt) is worn. The color of the belt denotes the rank or grade of the wearer. Colored belts are for
geup-holders, while black belts are usually worn by dan-holders. The order of belt colors may differ from school to school. Most
commonly the first belt is a white belt.”
Our belt system in order of rank beginner to advanced:
White, Orange, Yellow, Yellow with Green Tip, Green, Green with Blue Tip, Blue, Blue with Red Tip, Red, Red with Black Tip, and
Black
8th Geup
Yellow Belt
6th Geup
Green Belt

BELT RANK COLORS - BEGINNER TO ADVANCED
WTF Taekwondo Ranks Range from 10th Geup to 10th Dan
10th Geup White Belt
9th Geup Orange Belt
8th Geup Yellow Belt
7th Geup Yellow with Green Tip Belt
6th Geup Green Belt
5th Geup Green with Blue Tip Belt
4th Geup Blue Belt
3rd Geup Blue with Red Tip Belt
2nd Geup Red Belt
1st Geup Red with Black Tip Belt
1st Dan / IL Dan Black Belt
2nd Dan / Yi Dan Black Belt
3rd Dan / Sam Dan Black Belt
4th Dan (Master) / Sa Dan Black Belt
5th Dan (Master) / O Dan Black Belt

HOW TO TIE THAT NIFTY BELT
Step 1: Grab the belt!
Step 2: Find The Center
Step 3: With the belt size label facing the inside, place the center of the belt
on the front of your waist.
Step 3a: Wrap the belt around your waist and bring each end
behind you.
Step 4: Cross the end from your left over the end from your right in the
back.
Step 4a: As you bring the belt ends around you and to the front, tuck the
left end underneath.
Step 5: When you bring the two ends back to the front of your
waist, cross the right over the left
Step 6: Take the end on your left side and tuck it under all layers of
the belt and pull it upwards
Step 6a: Pull the end up and lay it forward

Step 7: At this point, take both ends and pull them forward to
measure the lengths. Make sure they are roughly the same.
Step 8: Now flip or twist the right end to the left once.
Step 9: Now take the left end and cross it over the right end you just
flipped.
Step 10: Bend the top downward and bring it behind the crossed
ends and upward
Step 10a: Push the end upward
Step 10b: As that end comes up and through, grab it and bring it up
Step 11: After grabbing both ends, pull them outward to close the
knot
Step 12: Now take both ends and flip them forward to help them lay
down
Step 13: Pull both ends in front of you and make sure they are roughly the same length! If not loosen the knot
and adjust the length till they match

LINING UP - BEFORE & AFTER CLASS
Upon entering the place where you train, after bowing of course, known as the “dojang”, you may find yourself meeting and
greeting several fellow students along with instructors in the room. Students may be engaged in stretching, practice or just
quietly chatting. This setting will soon change when class begins and the instructor or senior student calls out the command to
line up, either in English or in Korean (chung-neol). When called to line up, all students who intend of participating in class will
immediately line up in rows facing the front of the “do-jang” (training space) as quickly as possible and remain in a relaxed
position. The number of rows and the number of students in each row are determined by the shape and size of the dojang as
well as by the number of students. When facing the front of the dojang, the students line up by rank from their right to their left,
forming lines from front to back. Therefore, a student will always line up to the rear and/or left of their seniors. The instructor
will typically stand in the front of the class facing the students, and will be in the center of the front row.
The example above depicts a class where a black belt (1st Dan) student is attending and has started the first row. The next
highest ranked student in this example is a red belt (2nd Geup) who stands to the left of the senior student roughly arms-length
away. To the left of that red belt stands a blue belt with a red tip (3rd Geup) and to the left of that student is a blue belt (4th
Geup). This will continue until the first row is complete and if needed a second row is started and so on. Each new row formed
should be roughly two steps or one long step back from the first row with each person in the second row standing directly
behind a student from the first row creating even lines
When two or more students have the same rank, position is determined by age, oldest first, youngest last. If multiple students
are the same rank and same age, position amongst themselves no longer matters and they can choose who goes first. Any
student attending class without a uniform automatically forfeits their position in line and moves to the end of the last row due
to a lack of displayed rank. Students showing up late must wait for permission to join class and if permission is granted they will
always take the last position in the back of the class regardless of rank.
After lining up the instructor may deliver announcements, acknowledgements, news or review planned class activities. The
opening ceremony will come next when the instructor or senior student calls everyone to attention by yelling out “Char-yeot!”

OPENING & CLOSING CEREMONY – THAT BOWING THING WE DO
Let’s go over the formal custom of the opening and closing ceremony, (bowing into and out of class). While lined up, you will be
standing in a relaxed posture or relaxed position, known in military terms as “At Ease.” When the command for attention, “Cha-
yreot, “ is heard you will immediately transition from that relaxed position to a formal attention stance. Straighten your posture
and draw the left foot to the right while simultaneously placing your open hands on the sides of your hip. Look straight ahead
with as little movement as possible.
Once all students are recognized to be at attention, intently listening and ready for
commands, the instructor will turn towards the flags signaling the senior to say
“kukki e tae hae,”commanding the class to follow suit and turn to face the flags as
well. Typically there are at least three flags, an American flag, an Olympic Rings
flag due to the Olympic style being instructed, and a South Korean flag to honor
the country from which taekwondo has its roots. Once the entire class has turned
to the flags, the instructor will bow to the flags, signaling the senior student to say
“kyung nae,”calling for the class to bow to the flags. We do this out of respect for
our country, the art, its origin, and history.
The instructor will then turn towards the student body signaling the senior student
to say “sah bum nim kae.” calling for everyone to face the head instructor. Once
the entire class has turned to the instructor, the senior student will call for
everyone to bow, by saying “kyung nae.” The students bow first and the instructor
bows afterward to the class.
Next the instructor will turn towards the senior student signaling the second
highest ranking student standing directly to the senior student’s left to say “sun
bah nim kae,” calling for the class to face the senior student also. The same student will then call for the class to bow to the
senior student out of respect for them, their rank, and the work put into becoming senior student, by saying “kyung nae.” The
instructor will then bow to the senior student as well. After everyone rises from the last bow students should again face the
instructor and remain in attention stance awaiting direction. 90% of the time the very next command will be from the instructor
calling for the class to sit and meditate, “anj uh mook nyum.” This is a formal custom to give the class time to clear their minds,
forget about the outside world, and prepare for training. Closing ceremony after class is identical.
Relaxed
Posture
Attention
Stance

TESTING & PROMOTION – ALL THOSE COOL BELTS COLORS
First and foremost, I must say that nobody should begin learning a martial art with the thought or expectation of rank or the
ability to claim they have a black belt. Rank, belt color, and status shouldn’t even be of concern and should remain low priority
compared to actually learning the art. With that said, time has proven these belt ranks to be a positive way to break down the
system into steps or goals that students can strive to achieve. Understand also that modernized martial art systems live with the
stigma that they are all about making money rather than teaching an art. This is due to widespread abuse of the testing system
as a means to generate extra revenue rather than its intended purpose of being a scale for skill assessment.
As stated in the programs list of expectations, testing will occur at the discretion of all instructors based upon their assessment
of the student body. Rank testing is a tradition that was adopted from the Japanese by most modern martial art systems and we
carry on this tradition by having students complete a skill assessment test when it is believed they are ready to do so. A student
may pass this test and be awarded their next rank or they may not and have to retake the test again when deemed appropriate.
Instructors will do their best to make sure students are prepared for testing, but it is up to the student to practice, study, and
give 100% during testing in order to pass. If a student does not perform the belt level skills as required, chooses not to apply
themselves, or cannot complete testing for some other reason, they will not be promoted at that time. We encourage all those
who do not pass a test to work hard, practice more often, and try again!
“Taekwondo ranks are typically separated into "junior" and "senior" sections. The junior section typically consists of ten ranks
indicated by the Korean word geup (also Romanized as gup or kup). The junior ranks are usually identified by belts of various
colors, depending on the school, so these ranks are sometimes called "color belts". Geup rank may be indicated by stripes on belts
rather than by colored belts. Students begin at tenth geup (often indicated by a white belt) and advance toward first geup (often
indicated by a red belt with a black stripe).

The senior section is typically made up of nine ranks. Each rank is called a dan, also referred to as "black belt" or "degree" (as in
"third dan" or "third-degree black belt"). Black belts begin at first degree and advance to second, third, and so on. The degree is
often indicated on the belt itself with stripes, Roman numerals, or other methods, but sometimes black belts are plain and
unadorned regardless of rank.
To advance from one rank to the next, students typically complete promotion tests in which they demonstrate their proficiency in
the various aspects of the art before their teacher or a panel of judges. Promotion tests vary from school to school, but may
include such elements as the execution of patterns (also known as forms or poomsae), which combine various techniques in
specific sequences; the breaking of boards to demonstrate the ability to use techniques with both power and control; sparring
and self-defense to demonstrate the practical application and control of techniques; physical fitness usually with push-ups and
sit-ups; and answering questions on terminology, concepts, and history to demonstrate knowledge and understanding of the art.
For higher dan tests, students are sometimes required to take a written test or submit a research paper in addition to taking the
practical test.
Promotion from one geup to the next can proceed rapidly in some schools, since schools often allow geup promotions every two,
three, or four months. Students of geup rank learn the most basic techniques first, and then move on to more advanced
techniques as they approach first dan. Many of the older and more traditional schools often take longer to allow students to test
for higher ranks than newer, more contemporary schools, as they may not have the required testing intervals.
In contrast, promotion from one dan to the next can take years. The general rule is that a black belt may advance from one rank
to the next only after the number of years equivalent to their current rank. For example, a newly promoted third-degree black
belt may not be allowed to advance to fourth-degree until three years have passed. Some organizations also have age
requirements related to dan promotions, and may grant younger students poom (junior black belt) ranks rather than dan ranks
until they reach a certain age.
Black belt ranks may have titles associated with them, such as "master" and "instructor", but taekwondo organizations vary
widely in rules and standards when it comes to ranks and titles. What holds true in one organization may not hold true in
another, as is the case in many martial art systems. For example, achieving first dan ranking with three years' training might be
typical in one organization, but considered too quick in another organization, and likewise for other ranks. Similarly, the title for a
given dan rank in one organization might not be the same as the title for that dan rank in another organization.
In the International Taekwon-Do Federation, instructors holding 1st to 3rd dan are called Boosabum (assistant instructor), those
holding 4th to 6th dan are called Sabum (instructor), those holding 7th to 8th dan are called Sahyun (master), and those holding
9th dan are called Saseong (grandmaster). This system does not, however, necessarily apply to other taekwondo organizations.
In the American Taekwondo Association, instructor designations are separate from rank. Black belts may be designated as an
instructor trainee (red collar), specialty trainer (red and black collar), certified trainer (black-red-black collar) and certified
instructor (black collar). After a one-year waiting period, instructors who hold a sixth dan are eligible for the title of Master.
Seventh dan black belts are eligible for the title Senior Master and eighth dan black belts are eligible for the title Chief Master.
There is only one active ninth dan in the American Taekwondo Association at any given time. He is given the title Grand Master.
In the World Taekwondo Federation, Students holding 1st-3rd dan are considered an Instructor, but generally have much to
learn. Students who hold a 4th - 6th dan are considered Masters and must be at least 18 years old. Masters who hold a 7th - 9th
dan are considered a Grand-Master. This rank also holds an age requirement of 40+ (age requirement for this belt is not 100%
certain). To find out more go to the next paragraph.”
Note about rank and youth as quoted from the USAT governing body’s dan promotion guidelines.
“8.6 When 1, 2, 3 Poom holder, 15 years of age or above, wants to be promoted to the next higher Dan, he or she can apply for a
Dan promotion test. However, a 3rd Poom holder at least 18 years of age can apply for 4th Dan and less than 18 years of age can
only apply for 4th Poom “

TESTING ETIQUETTE & PROCEDURES
1. Wait to be invited to test. Never just assume you’re testing every so many months and never ever ask to be tested. Testing should
be your last concern and the first concern should always be perfecting the skills you are learning.
2. Once invited to test, note the date and make sure to show up at least 20-25 minutes early so you will have plenty of time to change
into your uniform and prepare for testing.
3. Testing is always a formal event and therefore etiquette is at an extreme. Having students display their skills to be assessed by
instructors and possibly a master is of the utmost importance and all who participate should be shown proper respect. Upon
entering the dojang make sure you stop at the door and bow before taking more than 2 steps.
4. Remain silent throughout the entire process except to answer questions and to Kiup. Talking during a test is considered extremely
disrespectful to everyone attending.
5. After changing into your uniform and removing your shoes and socks, find a spot at the back of the dojang, sit silently, legs crossed,
and wait for the testing instructor to provide direction. Never lie down.
6. When it is time to test, all students will be called to line up. You will hear the command “chung neol.” Do so in a quick and expedient
manner as you would for any class. Once in position remain in your relaxed stance silently.
7. Depending on circumstances there may be several black belts sitting at or standing by a table in the front of the dojang or it may
only be your instructor. This is the testing board. The testing board is there to watch your skills and determine if they are at a level
appropriate for promotion. This determination is based on the system and the standards put in place by those testing you.
8. The black belt in charge of running the test, usually your main instructor, will then if warranted introduce the board members
including any master instructor, make announcements, give extra direction on how to act or behave during the test and may give
advice to those testing before beginning.
9. The opening ceremony comes next and is very similar to the opening ceremony before and after a typical class. It will begin at the
call for attention by the black belt who is running the test. “Charyeot” will be spoken loudly. The black belt will then call for the
students and testing board to face the flags by saying “kukki e tae hae.” Then the command to bow is called out, “kyung nae.” Next
the command to face the testing board, and finally the command to bow “kyung nae.”
10. If made up of more than one black belt, the testing board may sit at this point while the instructor running the test assigns students
who are testing their warm-up exercises. You will be given a list of exercises, matched to your belt level, with a preset number of
pushups, sit-ups, plyometrics, bag kicks, shadow boxing, etc. Do not complain or sigh as if it is too much. The idea of the warm-up is
to not only warm you up, but wear you down a little in order to see how determined you are to succeed and to find out if your
techniques are second nature enough to do while tired.
11. Do not ask questions during a test. You either know your stuff or you do not. The test is not a class and should not be treated as
such.
12. If you are asked to approach the board members, such as to answer questions about terminology, when excused you will take at
least two steps backward before turning to walk away. Turning your back to an instructor or master while very close is considered
disrespectful.
13. If your belt comes loose during testing place it aside until you’re excused and can retie it.
14. Anytime you must adjust your uniform, typically because the top half lifts above the belt during movement, causing the uniform to
become out of place, leave it as it is until you are excused or given permission to fix it. If told to fix the uniform while demonstrating
techniques, turn away from the board, adjust the uniform and then turn back. When told, this is a time when it’s okay to turn away
from the higher ranks.
15. Put 100% effort in to everything you are asked to demonstrate during testing, perseverance and spirit weigh heavily on your
outcome. I dare say more than perfect technique.
16. When multiple belt levels or ranks are testing its very common for the instructor to call students with similar ranks to the front, as a
group, to demonstrate certain skills or techniques such as one steps, self-defense, forms, or basic strikes and kicks., while the
remaining students testing continue their warm-up exercises, sit silently in the back, or if given permission, stretch.
17. Most tests are broken down into sections starting with basic stances, blocks, strikes, footwork, and kicks. Then one steps, self-
defense, and poomsae or forms. Sparring next and breaking last. After the breaking is complete you will again be called to line up.
You must stand in line patiently while the board completes their assessments and have all exam papers completed. When they
finish, announcements will follow, and those who did well enough to pass will be promoted while those who did not are advised to
re-test at a later date. Never become emotional if you do not pass, this is an opportunity to work hard and try again. If everything
was easy there would be no reward in life at all.
18. The closing ceremony will follow exactly as the opening ceremony.

POOMSAE – WHAT’S THAT?
POOMSAE
Poomsae, also known as forms or patterns in English and called Kata when referring to Karate, are groups of movements, in a
series, depicting offense and defense techniques which can be practice either with or without the presence of an instructor.
They are designed to allow a student to practice and refine simplistic to complex fighting techniques in an organized way.
Poomsae are mostly performed along an imaginary line on which the trainee moves while practicing both defensive techniques
and offensive techniques against an imaginary opponent.
DEFINITION OF POOMSAE FROM THE WORLD TAEKWONDO FEDERATION
“Each poom of the poomsae has been inherited through a long history of about 5,000 years, finally as a product of scientific
technique formulated on the basis of the traditional national spirit and practical experiments. From the technical viewpoint, the
poomsae itself is Taekwondo, and the basic movements are no more than the preliminary actions to reach the poomsae. The
Kyorugi is a practical application of the poomsae and the Taekwondo spirit is manifested not in an abstract mental philosophy
expressed in the documents but in the actions of poomsae. Then, what is the Taekwondo poomsae? The poomsae is the style of
conduct which expresses directly or indirectly mental and physical refinements as well as the principles of offense and defense
resulting from cultivation of Taekwondo spirit and techniques.”
ORIGIN OF POOMSAE
Research tells us that poomsae originates from a Chinese oracle
called, the "I Ching". The I Ching has 64 hexagrams, a
combination of two sets of three lines, closed or broken and
these sets of three lines are called trigrams. The closed lines
represent Yang, the open lines Yin. In the Chinese language, the
unity of Yin and Yang is called 'tai-chi'. In the Korean language,
the unity is called Tae-guk. This explains the term Poomsae
Taegeuk. The eight trigrams together are called Pal-gwe as in
Poomsae Palgwe.
It’s the Taegeuk series of poomsae or patterns however that’s
recognized by the WTF or World Taekwondo Federation for rank
promotion. Those who study and practice Olympic Style
Taekwondo typically learn the TaeGeuk series of poomsae. This is
the same series taught within this program, and though this
series is somewhat standard, you will find the exact techniques
performed can vary quite a bit depending upon the school or the
instructor that teaches them. In fact you can visit multiple Taekwondo schools in the same city and find each teaching the same
poomsae a little bit different.

TAEGEUK SERIES OF POOMSAE
Taegeuk can be loosely translated as meaning Great Eternity or Eternal Greatness. The
idealisms represented by Taegeuk are: pacifism, unity, creative spirit, future spirit, and
eternity. The Taegeuk has the same symbolism as the Palgwe and can be said to
integrate the methods of attack, defense, forward movement and retreat, control of
the speed of movements, and the intensity of the actions. The directions and lines of
movement are represented by the eight symbols of 'Palgwe.'
Each poomsae needs to be practiced many times so that it can be performed without
having to think of what the next move, direction, or stance would be. Only after
practicing a form, hundreds of times, will a student begin to understand the
movements performed and the intended meaning.
Though the poomsae is not something a student would directly use to defend
themselves while being attacked in real life, they help to teach each practitioner the
fundamentals of basic techniques and how to perform them efficiently. There is much
symbolism behind the patterns and those who choose to learn them should
understand the meaning behind each one. Poomsae can also help students to control
breathing that is to be synchronized while executing techniques requiring great speed.
EXPLAINTIONS OF POOMSAE FROM THE WORLD TAEKWONDO FEDERATION
“Taegeuk 1 Jang (9th Geup Poomsae) represents the symbol of “Keon”, one of the 8 Kwaes (divination
signs), which means the heaven and “yang”. As the “Keon” symbolizes the beginning of the creation of
all things in the universe, so does the Taegeuk 1 jang in the training of Taekwondo. This poomsae is
charaterized by its easiness in practicing, largely consisting of alking and basic actions, such as arae-
makki, momtong-makki, momtong-jireugi, and ap-chagi.”
“Taegeuk 2 Jang (8th Geup Poomsae) symbolizes the "Tae", one of the 8 divination signs, which signifies
the inner firmness and the outer softness. An introduction of the olguljireugi is a new development of
Taegeuk poomsae. The apchagi actions appear more frequently than in Taegeuk 1 Jang.”
“Taegeuk 3 Jang (7th Geup Poomsae) symbolizes the "Ree", one of the 8 divination signs, which
represents "hot and bright". This is to encou-rage the trainees to harbor a sense of justice and ardor for
training. A successful accomplishment of this poomsae will give the trainees a promotion to a blue belter.
New actions are sonnal mokchigi, sonnal makki and the dwitkubi stance.This poomsae is characterized
by successive makki and jireugi, chagi and continued jireugi. Emphasis is laid on the counterattacks
against the opponent's attack.”
“Taegeuk 4 Jang (6th Geup Poomsae) symbolizes the "Jin", one of the 8 divination signs, which represents
the thunder meaning great power and dignity. New techniques are sonnal momtongmakki,
pyonsonkkeuttzireugi, jebipoom mokchigi, yopchagi, momtong bakkatmakki, deungjumeok olgulapchigi,
It is characterized by various movements in preparation for the kyorugi and lots of dwitkubi seogi cases.”

“Taegeuk 5 Jang (5th Geup Poomsae) symbolizes the "Son", one of the 8 divination signs, which
represents the wind, meaning both mighty force and calmness according to its strength and weakness.
New movements are mejumeok naeryochigi, palkup dollyo-chigi, palkup pyojeokchigi and such stances
as kkoaseogi, wenseogi and oreunseogi. This is characterized by the successive makki such as araemakki
and momtongmakki and also the chigi by tumbling after jumping.”
“Taegeuk 6 Jang (4th Geup Poomsae) symbolizes the "Kam", one of the 8 divination signs, which
represents water, meaning incessant flow and softness. New movements are hansonnal olgul bitureo
makki, dollyo-chagi, olgul bakkat-makki, arae hecho makki, and batangson momtong-makki.
One should be careful to make the kicking foot land on the ground correctly after dollyo-chagi and to
lower the hand by a palm's length at the time of delivering a batangson momtong-makki lower than in
the palmok-makki.”
“Taegeuk 7 Jang (3rd Geup Poomsae) symbolizes the "Kan", one of the 8 divination signs, which represents
the mountain, meaning ponderosity and firmness. New movements are sonnal araemakki, batangson
kodureomakki, bojumeok kawimakki, mureupchigi, momtong hechomakki, dujumeok jeocho jireugi, arae
otkoreo makki, deungjumeok bakkat chigi, pyojeok-chagi, yop-jireugi and such stances as beomseogi and
juchumseogi. Smooth connection of movement is important for training.”
“Taegeuk 8 Jang (2nd Geup Poomsae) symbolizes the "Kon", one of the 8 divination signs, which
represents "Yin" and earth, meaning the root and settlement and also the begining and the end. This is
the last of the 8 Taegeuk poomsaes, which may enable the trainees to undergo the Dan(black belt)
promotion test. New movements are dubal dangseong apchagi, momtong kodureo bakkatmakki, arae
kodureo makki, twiochagi, and palkup dollyochigi. Emphasis must be laid on the accuracy of stepping
and the difference between jumping-over kick and dubal-dangsong (alternate jumping kick in the air).”
Poomsae for Taekwondo has been transformed greatly by competition and instructor personal preference. The need or desire to
be flashy or add flare to a pattern in order to make it look nice or to score points has left us with a wide variety of
interpretations. For example, some kicks originally intended to strike the middle section of your imaginary opponent are now
performed, by most, as kicks to someone floating in the sky, while other techniques are intentionally slowed down and turned in
to what are call tension moves.
Purchase three books on Taekwondo poomsae and you will find each explains the same pattern with different footwork and
with variation on striking or blocking technique. So, it's best to keep an open mind regarding the practice of forms and
understand the influence that various teachers and competitions, in this wonderful art, have had on them.
Try not to waste your time attempting to make forms look nice while doing them. Simply practice each technique and
movement individually and then you will find when you combine the pieces the forms will naturally look good all on their own.

BLACK BELT POOMSAE DEFINITIONS FROM THE WORLD TAEKWONDO FEDERATION
Koryo (Learned as 1st Geup but 1st Dan poomsae), symbolizes
"seonbae", which means a learned man, who is characterized
by a strong martial spirit as well as a righteous learned man's
spirit. The spirit had been inherited through the ages of
Koguryo, Palhae and down to Koryo, which is the background
of organizing the Koryo poomsae.
The new techniques appearing in this poomsae are kodeup-
chagi, sonnal bakkat-chigi, hansonnal arae-makki, khaljaebi,
mureup kkukki, momtong hecho-makki, jumeok pyojeok-
jireugi, pyonsonkkeut jeocho-tzireugi, batangson nullo-makki,
palkup yop-chagi, mejumeok arae pyojeok-chigi, etc, which
only black-belters can practice.
The junbi-seogi is the tongmilgi which requires mental
concentration by positioning the hand in between the upper
abdomen and the lower abdomen where "sin"(divine) and
"jeong"(spirit) converge. The line of poomsae represents the
Chinese letter which means "seonbae" or "seonbi", a learned
man or a man of virtue in the Korean language.
Keumgang (2nd Dan poomsae), meaning diamond, has the
significance of "hardness" and "ponderosity". The Mt.
Keumgang on the Korean peninsula, which is regraded as the
center of national spirit, and the "Keumgang yoksa" (Kumgang
warrior) as named by Buddha, who represents a mightiest
warrior, are the background of denominating this poomsae.
New techniques introd-uced in this poomsae are batangson teokchigi, hansonnal momtong anmakki, Keumgangmakki, santeulmakki, kheun
doltzeogi (large hinge), etc., and the hakdariseogi.
The poomsae line symbolizes a mountain displayed by the Chinese letter. The movements should be powerful and well-balanced so as to befit
black-belter's dignity.
Taebaek (3rd Dan poomsae), is the name of a mountain with the meaning of "bright mountain", where Tangun, the founder of the nation of
Korean people, and the bright mountain symbolizes sacredness of soul and Tangun's thought of "hongik ingan"(human-itarian ideal).
There are numerous sites known as Taeback, but Mt. Paektu, which has been typically known as the cradle of Korean people, is the
background of naming the Taebaek poomsae. New technigues introduced in this poomsae are sonnal arae hechomakki, sonnal opeojapki
(grabbing), japhin sonmokppaegi (pulling out the caught wrist), Keumgang momtong-makki, doltzeogi(hinge), etc.
The line of poomsae is like a Chinese letter, which symbolizes the bridge between the Heaven and the earth, signifying human beings founded
a nation by the Heaven's order. The poomsae movements are largely composed of momtongmakki and chigi.
Pyongwon (4th Dan poomsae), means a plain which is a vast stretched-out land. It is the source of life for all the creatures and the field where
the human beings live their life.
The poomsae Pyongwon was based on the idea of peace and struggle resulting from the principles of origin and use. The new techniques
introduced in this poomsae are palkup ollyochigi, olgul kodureo yop-makki, dangkyo teokchigi, meongyechigi, hechosanteulmakki, etc.
The junbiseogi is the moaseogi wenkyopson (left overlapping hands), which requires concentration of force in the lower abdomen, the source
of body strength, as the land is the begining and source of human life. The line of poomsae means the origin and transformation of the plain.
Sipjin (5th Dan poomsae) The word "Sipjin" was derived from the thought of 10 longevity, which advocates there are ten creatures of long life,
namely, sun, moon, mountain, water, stone, pine tree, herb of eternal youth, tortoise, deer, and crane. They are two heavenly bodies, 3
natural resources, two plants and 3 animals, all giving human beings faith, hope and love.

The poom-sae Sipjin symbolizes those things. The new techniques introduced in this poomsae are hwangso-makki, sonbadak kodureo makki,
bawimilgi (rock pushing), sonnaldeung momtong hechomakki, kklyeolligi (lifting up), chetdarijireugi (fork shape jireugi), sonnal otkoreo
araemakki, sonnaldeung momtongmakki, which counts 10. The Chinese letter meaning ten is form of the poomsae line, which signifies an
infinite numbering of the decimal system and ceaseless development.
Jitae (6th Dan poomsae) The word "Jitae" means a man standing on the ground with the two feet, looking over the sky. A man on the earth
repre-sents the way of struggling for human life, such as kicking, treading and jumping on the ground.
Therefore, the poomsae symbolizes various aspects occurring in the course of human being's struggle for existence. The new techniques
introduced in this poomsae are hansonnal olgul-makki, keumgang momtong-jireugi, anpalmok kodureo makki and mejumeok yop pyojeok-
chigi only, and the poomsae line signifies a man standing on the earth to spring up toward the heaven.
Chonkwon (7th
Dan poomsae) The word "Chonkwon" means the Heaven's Great Mighty, which is the origin of all the creature and itself the
cosmos.
Its infinite competence signifies the creation, change and completion. Human beings have used the name of Heaven for all principal earthly
shapes and meanings because they felt afraid of the Heaven's mighty. Over 9,000 years ago, the founder of the Korean people, "Chonkwon",
was meant by the heavenly king. He settled down in the heavenly town as the capital near the heavenly sea and heavenly mountain, where
the Han people as the heavenly race gave birth to the proper thought and actions from which Taekwondo was originated.
The new techniques introduced in this poomsae are nalgae pyogi (wing opening), sosumjumeok sosumchigi (knuckle protruding fist springing
chigi), hwidullomakki (swinging-makki), hwidullo jabadangkigi (swing and drawing), sonnaldeung wesanteul makki, keumgang yopjireugi,
taesan-milgi, etc., and a crouched walking manner. The characteristics of movements are large actions and arm actions forming gentle curves,
thus symbolizing the greatness of Chonkwon thought.
The poomsae line "T" symbolizes a man coming down from the heaven, submitting to the will of Heaven, being endowed power by the Heaven
and worshipping the Heaven, which means the oneness between the Heaven and a human being.
Hansu (8th Dan poomsae) The word "hansu" means water which is the source of substance preserving the life and growing all the creatures.
Hansu symbolizes birth of a life and growth, strongness and weakness, magnanimity, harmony, and adaptablity. Especially, "han" has the
various meanings, namely, the name of a country, numerousness, largeness, evenness, long-ness, even the heaven, and the root of everyting
among others. Above all, the nature of water characterized by unbre-akability and flexibility, in addition to all of the above significances, is the
background of organizing this poomsae.
The new techiniques introduced in this poomsae are sonnaldeung momtong hecho-makki, mejumeok yangyopkuri (both flanks) chigi, kodureo
khaljaebi, anpalmok arae pyojeok-makki, sonnal keumgang-makki, etc., and also modumbal as a stance. Actions should be practiced softly
like water but continuously like a drop of water gathering to make the ocean.
The poomsae line symbolizes the Chinese letter which means water.
Ilyeo (9th
Dan poomsae) "Ilyeo" means the thought of a great Buddhist priest of Silla Dynasty, Saint Wonhyo, which is characterized by the
philo-sophy of oneness of mind (spirit) and body (material). It teaches that a point, a line or a circle ends up after all in one.
Therefore, the poomsae Ilyeo represents the harmonization of spirit and body, which is the essence of martial art, after a long training of
various types of techniques and spiritual cultivation for completion of Taekwondo practice.
The new techniques introduced in this poomsae are sonnal (olgul) makki, wesanteul yopchagi, dusonpyo (two opened hands) bitureo
jabadangkigi(twisting and pulling), tiwo yopchagi and the first stance of ogeum (knee back) hakdariseogi.
Junbiseogi is the bojumeok moaseogi (wrapped-up fist moa-seogi), in which, as the last step of poomsae training, two wrapped-up fists are
placed in front of the chin, which has the significance of unification and moderation, so that the spiritual energy can flow freely into the body
as well as the two hands.
The line of poomsae symbolizes the Buddhist mark (swastika), in commemoration of Saint Wonhyo, which means a state of perfect
selflessness in Buddhism where origin, substance and service come into congruity.
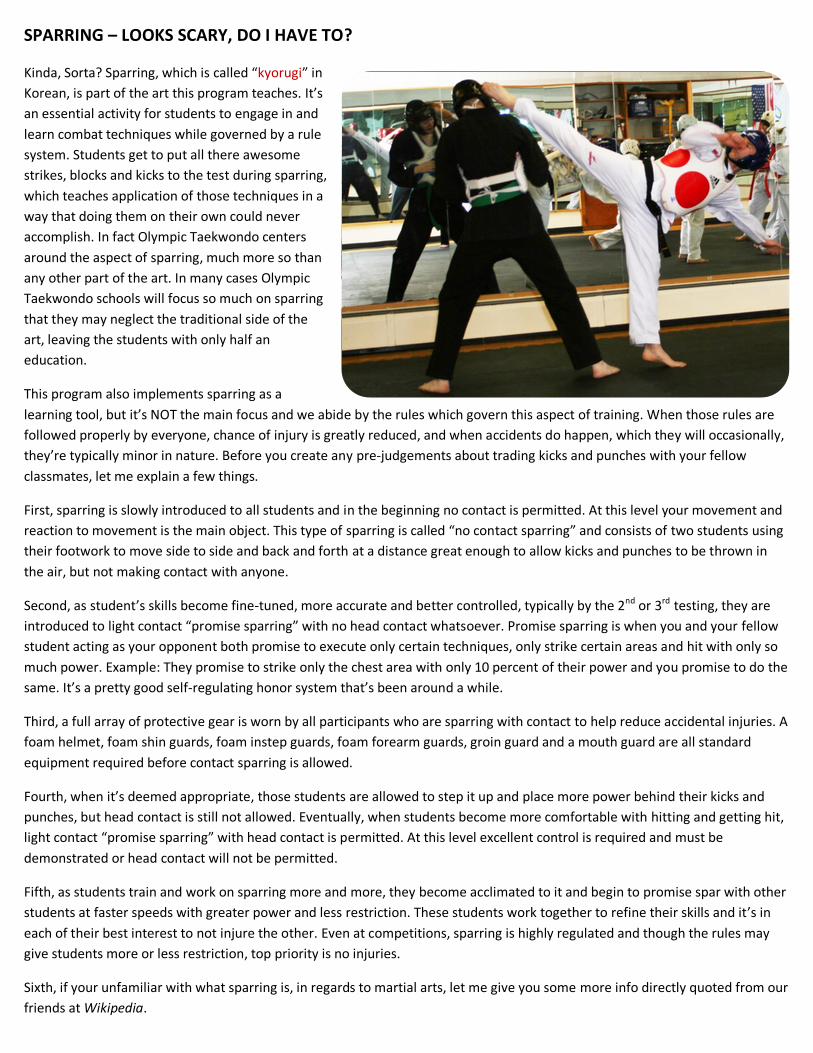
SPARRING – LOOKS SCARY, DO I HAVE TO?
Kinda, Sorta? Sparring, which is called “kyorugi” in
Korean, is part of the art this program teaches. It’s
an essential activity for students to engage in and
learn combat techniques while governed by a rule
system. Students get to put all there awesome
strikes, blocks and kicks to the test during sparring,
which teaches application of those techniques in a
way that doing them on their own could never
accomplish. In fact Olympic Taekwondo centers
around the aspect of sparring, much more so than
any other part of the art. In many cases Olympic
Taekwondo schools will focus so much on sparring
that they may neglect the traditional side of the
art, leaving the students with only half an
education.
This program also implements sparring as a
learning tool, but it’s NOT the main focus and we abide by the rules which govern this aspect of training. When those rules are
followed properly by everyone, chance of injury is greatly reduced, and when accidents do happen, which they will occasionally,
they’re typically minor in nature. Before you create any pre-judgements about trading kicks and punches with your fellow
classmates, let me explain a few things.
First, sparring is slowly introduced to all students and in the beginning no contact is permitted. At this level your movement and
reaction to movement is the main object. This type of sparring is called “no contact sparring” and consists of two students using
their footwork to move side to side and back and forth at a distance great enough to allow kicks and punches to be thrown in
the air, but not making contact with anyone.
Second, as student’s skills become fine-tuned, more accurate and better controlled, typically by the 2nd or 3rd testing, they are
introduced to light contact “promise sparring” with no head contact whatsoever. Promise sparring is when you and your fellow
student acting as your opponent both promise to execute only certain techniques, only strike certain areas and hit with only so
much power. Example: They promise to strike only the chest area with only 10 percent of their power and you promise to do the
same. It’s a pretty good self-regulating honor system that’s been around a while.
Third, a full array of protective gear is worn by all participants who are sparring with contact to help reduce accidental injuries. A
foam helmet, foam shin guards, foam instep guards, foam forearm guards, groin guard and a mouth guard are all standard
equipment required before contact sparring is allowed.
Fourth, when it’s deemed appropriate, those students are allowed to step it up and place more power behind their kicks and
punches, but head contact is still not allowed. Eventually, when students become more comfortable with hitting and getting hit,
light contact “promise sparring” with head contact is permitted. At this level excellent control is required and must be
demonstrated or head contact will not be permitted.
Fifth, as students train and work on sparring more and more, they become acclimated to it and begin to promise spar with other
students at faster speeds with greater power and less restriction. These students work together to refine their skills and it’s in
each of their best interest to not injure the other. Even at competitions, sparring is highly regulated and though the rules may
give students more or less restriction, top priority is no injuries.
Sixth, if your unfamiliar with what sparring is, in regards to martial arts, let me give you some more info directly quoted from our
friends at Wikipedia.
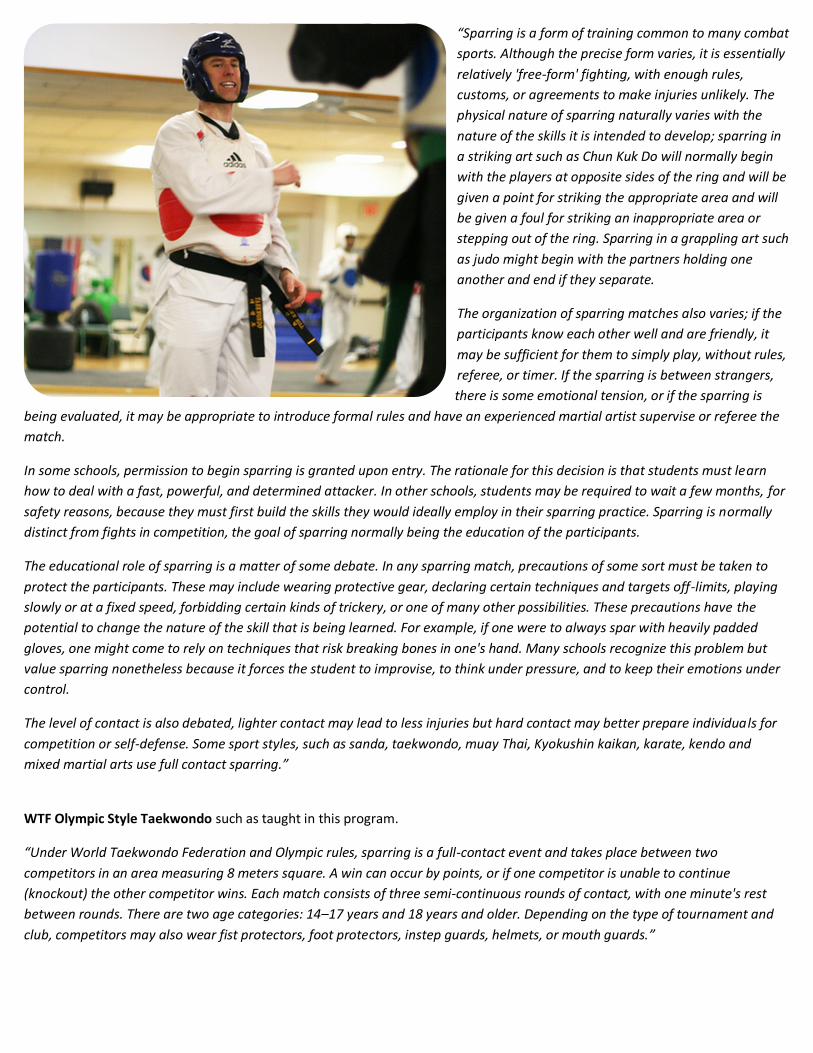
“Sparring is a form of training common to many combat
sports. Although the precise form varies, it is essentially
relatively 'free-form' fighting, with enough rules,
customs, or agreements to make injuries unlikely. The
physical nature of sparring naturally varies with the
nature of the skills it is intended to develop; sparring in
a striking art such as Chun Kuk Do will normally begin
with the players at opposite sides of the ring and will be
given a point for striking the appropriate area and will
be given a foul for striking an inappropriate area or
stepping out of the ring. Sparring in a grappling art such
as judo might begin with the partners holding one
another and end if they separate.
The organization of sparring matches also varies; if the
participants know each other well and are friendly, it
may be sufficient for them to simply play, without rules,
referee, or timer. If the sparring is between strangers,
there is some emotional tension, or if the sparring is
being evaluated, it may be appropriate to introduce formal rules and have an experienced martial artist supervise or referee the
match.
In some schools, permission to begin sparring is granted upon entry. The rationale for this decision is that students must learn
how to deal with a fast, powerful, and determined attacker. In other schools, students may be required to wait a few months, for
safety reasons, because they must first build the skills they would ideally employ in their sparring practice. Sparring is normally
distinct from fights in competition, the goal of sparring normally being the education of the participants.
The educational role of sparring is a matter of some debate. In any sparring match, precautions of some sort must be taken to
protect the participants. These may include wearing protective gear, declaring certain techniques and targets off-limits, playing
slowly or at a fixed speed, forbidding certain kinds of trickery, or one of many other possibilities. These precautions have the
potential to change the nature of the skill that is being learned. For example, if one were to always spar with heavily padded
gloves, one might come to rely on techniques that risk breaking bones in one's hand. Many schools recognize this problem but
value sparring nonetheless because it forces the student to improvise, to think under pressure, and to keep their emotions under
control.
The level of contact is also debated, lighter contact may lead to less injuries but hard contact may better prepare individuals for
competition or self-defense. Some sport styles, such as sanda, taekwondo, muay Thai, Kyokushin kaikan, karate, kendo and
mixed martial arts use full contact sparring.”
WTF Olympic Style Taekwondo such as taught in this program.
“Under World Taekwondo Federation and Olympic rules, sparring is a full-contact event and takes place between two
competitors in an area measuring 8 meters square. A win can occur by points, or if one competitor is unable to continue
(knockout) the other competitor wins. Each match consists of three semi-continuous rounds of contact, with one minute's rest
between rounds. There are two age categories: 14–17 years and 18 years and older. Depending on the type of tournament and
club, competitors may also wear fist protectors, foot protectors, instep guards, helmets, or mouth guards.”

“Points are awarded for permitted, accurate, and powerful
techniques delivered to the legal scoring areas; light contact
does not score any points. The only techniques allowed are
kicks (delivering a strike using an area of the foot below the
ankle) and punches (delivering a strike using the closed fist).
In most competitions, points are awarded by three corner
judges using electronic scoring tallies. Several A-Class
tournaments, however, are now experimenting with
electronic scoring equipment contained within the
competitors' body protectors. This limits corner judges to
scoring only attacks to the head. Some believe that the new
electronic scoring system will help to reduce controversy
concerning judging decisions, but this technology is still not
universally accepted.
Beginning in 2009, a kick or punch that makes contact with
the opponent's hogu (the body guard that functions as a
scoring target) scores one point. (The trunk protector is
referred to as a momtong pohodae or trunk guard in the
WTF rules.) If a kick to the hogu involves a technique that
includes fully turning the attacking competitor's body, so
that the back is fully exposed to the targeted competitor
during execution of the technique (spinning kick), an
additional point is awarded. A kick to the head scores three
points; as of October 2010 an additional point is awarded if a turning kick was used to execute this attack. Punches to the head
are not allowed. As of March 2010, no additional points are awarded for knocking down an opponent (beyond the normal points
awarded for legal strikes).
The referee can give penalties at any time for rule-breaking, such as hitting an area not recognized as a target, usually the legs or
neck. Penalties are divided into "Kyong-go" (warning penalty) and "Gam-jeom" (deduction penalty). Two "Kyong-go" are counted
as an addition of one point for the opposing contestant. However, the final odd-numbered "Kyong-go" is not counted in the
grand total.
At the end of three rounds, the competitor with most points wins the match. In the event of a tie, a fourth "sudden death"
overtime round, sometimes called a "Golden Point," is held to determine the winner after a one-minute rest period. In this round,
the first competitor to score a point wins the match. If there is no score in the additional round, the winner is decided by
superiority, as determined by the refereeing officials.
Until 2008, if one competitor gained a 7-point lead over the other, or if one competitor reached a total of 12 points, then that
competitor was immediately declared the winner and the match ended. These rules were abolished by the WTF at the start of
2009. In October 2010 the WTF reintroduced a point-gap rule, stating that if a competitor has a 12-point lead at the end of the
second round or achieves a 12-point lead at any point in the third round, then the match is over and that competitor is declared
the winner.”
In the end, you should not fear or be afraid to engage in some form of sparring. Without sparring you will never know how to
actually kick an opponent, avoid a strike or counter and attack. It’s essential and regulated with rules to prevent participants
from getting hurt.
Italian Taekwondo Championships 2013 in Bari
Courtesy of Renano / Wikipedia

STEP SPARRING – BUT WHY?
Step sparring is a type of choreographed drill
practitioners of taekwondo use, with a partner, to
work on and improve basic stances, blocks,
strikes and kicks. Since step sparring drills use
prearranged movements, they’re a great way for
students to try and perfect basic techniques with
repetitious practice. These types of drills help you
learn to gauge and control distance, timing, and
accuracy as well as increasing your own self-
control.
Though step sparring can include one, two, three,
or more steps, this program currently
incorporates only the “one step sparring” drills.
The “one” in “one step” indicates that your
partner will step forward with an attack, typically a reverse punch, only one time during the entire sequence of moves, allowing
you to counter attack after only one defensive motion. A two step sparring drill would mean that your partner would step
forward two times, executing a predetermined strike each step, causing you to defend twice before counter attacking.
In the beginning, you might find yourself being matched up only with partners that are very similar in height, weight, and reach
as you; basically a mirror image of you. This makes it easy to concentrate on technique and timing more so than distance control
since our partner has leg and arm lengths about equal to our own. As you progress, you’ll want to and most likely will get
partnered with those whose height, weight, and reach are not the same, to help you react and adapt to those differences. A
taller or shorter person will change everything, causing you to adjust your footwork, blocks, and counter strikes accordingly. This
better emulates real world experience. If you do run into a mirror image of yourself, your twin, congratulations!
TRADITIONAL STEP SPARRING
To practice traditional one step sparring, you and your partner will first face each other at a distance equal to your combined
arm reach. Typically I‘ll have students gauge
distance by holding their arms out in front of them
and moving towards each other until their fingers
or knuckles touch. This is a good starting point but
not always perfect.
Through the magic and wonder of photoshop, we’ll
use my mirror image to demonstrate the basics on
a simple one step sparring drill. On your left is a
picture of me and my mirror image, a partner just
like me in every way.
Once we have measured our distance, both of us
will transition into attention stance, bow to each
other, and then enter ready stance with a loud
kiup. At this point we should already know who will
be the attacker and who will be defending. When
both of us are ready to start the drill, the attacking
partner will step back with the right foot into a left
forward stance while executing a left low block, 1. Step sparring from ready
stance.
Junior belts demonstrating one steps during testing.
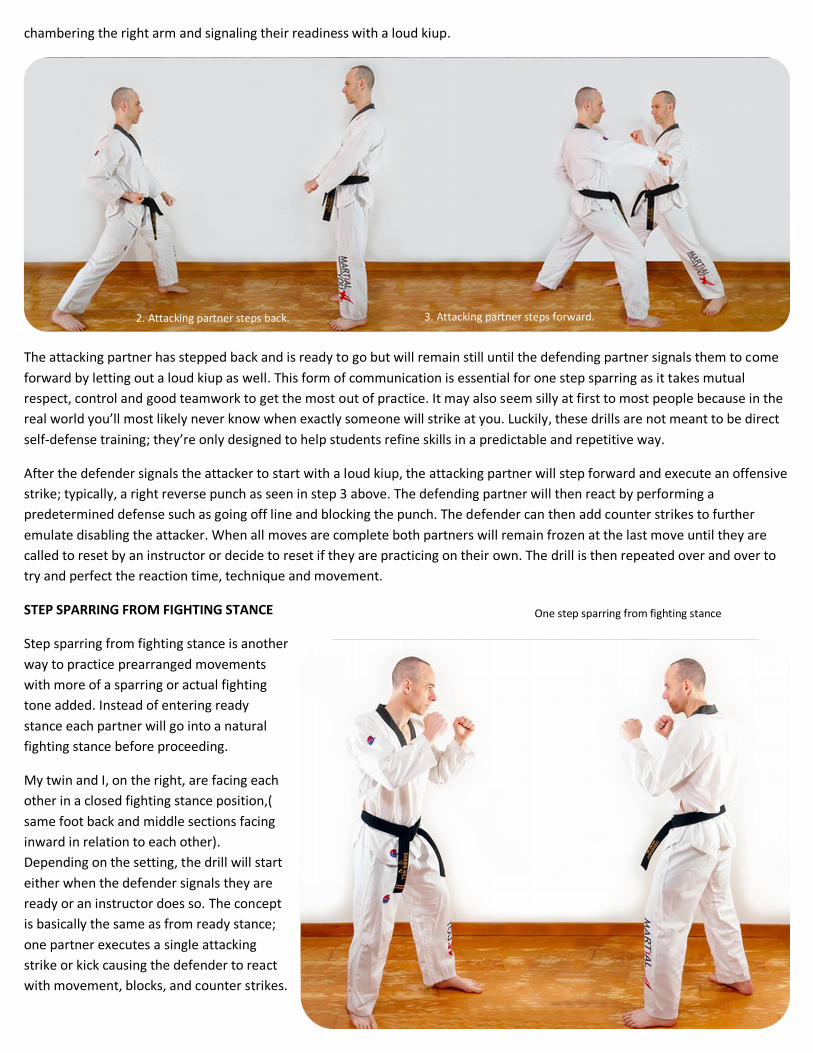
chambering the right arm and signaling their readiness with a loud kiup.
The attacking partner has stepped back and is ready to go but will remain still until the defending partner signals them to come
forward by letting out a loud kiup as well. This form of communication is essential for one step sparring as it takes mutual
respect, control and good teamwork to get the most out of practice. It may also seem silly at first to most people because in the
real world you’ll most likely never know when exactly someone will strike at you. Luckily, these drills are not meant to be direct
self-defense training; they’re only designed to help students refine skills in a predictable and repetitive way.
After the defender signals the attacker to start with a loud kiup, the attacking partner will step forward and execute an offensive
strike; typically, a right reverse punch as seen in step 3 above. The defending partner will then react by performing a
predetermined defense such as going off line and blocking the punch. The defender can then add counter strikes to further
emulate disabling the attacker. When all moves are complete both partners will remain frozen at the last move until they are
called to reset by an instructor or decide to reset if they are practicing on their own. The drill is then repeated over and over to
try and perfect the reaction time, technique and movement.
STEP SPARRING FROM FIGHTING STANCE
Step sparring from fighting stance is another
way to practice prearranged movements
with more of a sparring or actual fighting
tone added. Instead of entering ready
stance each partner will go into a natural
fighting stance before proceeding.
My twin and I, on the right, are facing each
other in a closed fighting stance position,(
same foot back and middle sections facing
inward in relation to each other).
Depending on the setting, the drill will start
either when the defender signals they are
ready or an instructor does so. The concept
is basically the same as from ready stance;
one partner executes a single attacking
strike or kick causing the defender to react
with movement, blocks, and counter strikes.
2. Attacking partner steps back. 3. Attacking partner steps forward.
One step sparring from fighting stance
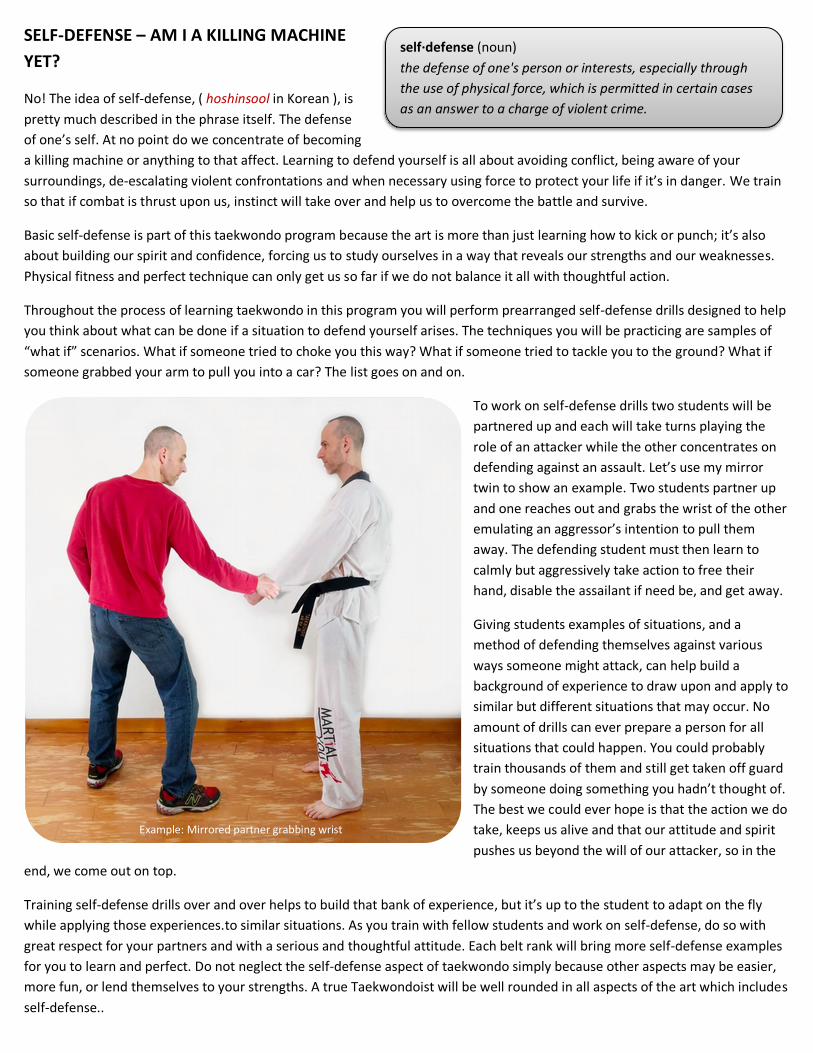
self·defense (noun)
the defense of one's person or interests, especially through
the use of physical force, which is permitted in certain cases
as an answer to a charge of violent crime.
SELF-DEFENSE – AM I A KILLING MACHINE
YET?
No! The idea of self-defense, ( hoshinsool in Korean ), is
pretty much described in the phrase itself. The defense
of one’s self. At no point do we concentrate of becoming
a killing machine or anything to that affect. Learning to defend yourself is all about avoiding conflict, being aware of your
surroundings, de-escalating violent confrontations and when necessary using force to protect your life if it’s in danger. We train
so that if combat is thrust upon us, instinct will take over and help us to overcome the battle and survive.
Basic self-defense is part of this taekwondo program because the art is more than just learning how to kick or punch; it’s also
about building our spirit and confidence, forcing us to study ourselves in a way that reveals our strengths and our weaknesses.
Physical fitness and perfect technique can only get us so far if we do not balance it all with thoughtful action.
Throughout the process of learning taekwondo in this program you will perform prearranged self-defense drills designed to help
you think about what can be done if a situation to defend yourself arises. The techniques you will be practicing are samples of
“what if” scenarios. What if someone tried to choke you this way? What if someone tried to tackle you to the ground? What if
someone grabbed your arm to pull you into a car? The list goes on and on.
To work on self-defense drills two students will be
partnered up and each will take turns playing the
role of an attacker while the other concentrates on
defending against an assault. Let’s use my mirror
twin to show an example. Two students partner up
and one reaches out and grabs the wrist of the other
emulating an aggressor’s intention to pull them
away. The defending student must then learn to
calmly but aggressively take action to free their
hand, disable the assailant if need be, and get away.
Giving students examples of situations, and a
method of defending themselves against various
ways someone might attack, can help build a
background of experience to draw upon and apply to
similar but different situations that may occur. No
amount of drills can ever prepare a person for all
situations that could happen. You could probably
train thousands of them and still get taken off guard
by someone doing something you hadn’t thought of.
The best we could ever hope is that the action we do
take, keeps us alive and that our attitude and spirit
pushes us beyond the will of our attacker, so in the
end, we come out on top.
Training self-defense drills over and over helps to build that bank of experience, but it’s up to the student to adapt on the fly
while applying those experiences.to similar situations. As you train with fellow students and work on self-defense, do so with
great respect for your partners and with a serious and thoughtful attitude. Each belt rank will bring more self-defense examples
for you to learn and perfect. Do not neglect the self-defense aspect of taekwondo simply because other aspects may be easier,
more fun, or lend themselves to your strengths. A true Taekwondoist will be well rounded in all aspects of the art which includes
self-defense..
Example: Mirrored partner grabbing wrist
to pull

BREAKING – NOW WE’RE TALKIN’
Some schools or programs that instruct folks in a martial art
may or may not spend much time on the skill of breaking. For
taekwondo practitioners, breaking is typically introduced early
on and done while testing for promotion, at the very end, to
showcase how a student has developed their skills enough to
apply the techniques to… well, breaking a board, or a concrete
patio block. Yes, I said concrete patio block.
The general idea behind why breaking exists in martial arts is
due to its use to gauge the force someone can apply to an
object with a finely tuned skill such as a kick, punch or elbow
strike. Today breaking is seen more as a spectacle during
martial arts demonstrations but the principles of training to
break something, like a pine board or cement block, have
some serious validity.
Our bodies adapt and change through stresses that are applied
by the world around us. We have stress internally and externally. The external stresses, that are physical in nature, like running
for your life!, cause us to build up stamina to run long distances or to sprint really fast. Weight training forces our bodies to
adapt to lifting heavy objects, and plyometrics train our nervous system to contract muscles fibers quickly. Breaking, stresses the
skin to build calluses, the bone to build density, and the muscles to build strength and contraction speed. This is called
“progressive resistance training.”
For breaking boards and concrete blocks as well as ice blocks, the principles are such: the bones respond as found in Wolff's law,
which states that the skeletal system will, after healing, be stronger if injury is put to it. As the bone gets stressed and micro
injuries occur do to this stress, it heals more dense and stronger than before allowing you to increase the stress load even more.
There are two basic types of breaks you’ll typically get exposed to during taekwondo training, testing, and competitions: speed
breaks and power breaks. Other types such as soft breaks (snapping break or wave break).exist, but are rarely done throughout
the promotion process. Power breaks and speed breaks are the most command, leaving the soft breaks as a lesser applied type
with regard to Olympic Style Taekwondo. In fact, I never even tried a soft break until after becoming a black belt in the system.
A beginner’s first break will be a power break which is
required during lower rank testing. In this style of
break one or more pine boards will be held in place on
both ends by another person. This lets the student
striking it concentrate on putting power behind the
technique. The very first break for all white belts, 10th
geup ranks, is usually a reverse punch. Breaking a
board with a punch requires good technique and the
ability to apply enough power to the impact that the
board will split in two along the grain line.
At later ranks such as 1st Dan or Black Belt, skills and
technique are likely refined enough to break a patio
block from your friendly neighborhood home
improvement store. In general students testing for black belt are required to break a single patio block during testing. It takes a
while to build up the confidence to strike a concrete object but it isn’t as scary as it sounds. As a martial artist, you must know
Downward elbow power
break with 2 concrete
patio blocks.
Reverse punch power break
with 10”x12”x1” pine board..

your breaks inside and out. It’s up
to you to understand the physics
involved in breaking and
properties of the materials your
striking. Martial arts are about
attaining knowledge and using that
knowledge to your advantage.
Speed breaks are usually
attempted after a student has
really refined a strike’s accuracy
and can now concentrate on
applying higher velocity instead of
power to the technique. The board
or object the student attempts to
break is not held in place on both
ends, so it will only give in when
the strike speed reaches a velocity
that overcomes the materials
structural bond before the impact
overcomes the inertia of its mass.
WHAT?
In other words you have to hit the thing so fast that it breaks before flying across the room, still intact.
A good way to understand speed breaks is comparing the speed of a bullet and the speed at which you can move your finger.
Take a piece of letter size paper and hold it with one hand. Point the index finger of your other hand straight at the center of the
paper and as fast as you can, strike it with your finger to see if you can poke a hole through it.
If you get it on the first try, I will be calling you master from this point on, if not, you probably noticed that no matter how fast
you poke at the paper, your finger won’t go through it before the paper itself bends and moves back. You’re not generating
enough speed to break through the paper’s material bond before the inertia of its mass is overcome. We all pretty much know
that a bullet or really any object traveling at a high rate of speed, and same diameter as your finger, will poke a hole through the
paper before it moves much. You could probably throw a rock or marble fast enough to go through it, but getting your arm to
move fast enough to push your finger through is another story.
Jump Spinning Hook
Kick Speed Break with
12”x12”x1” pine board.
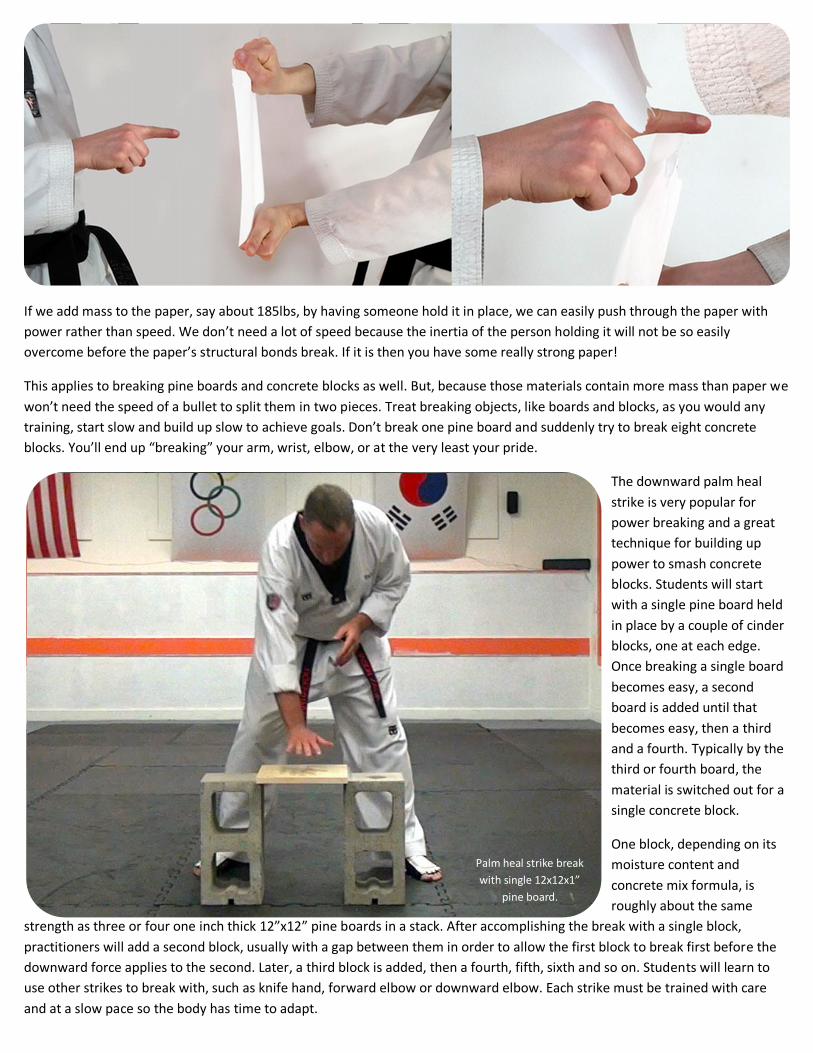
If we add mass to the paper, say about 185lbs, by having someone hold it in place, we can easily push through the paper with
power rather than speed. We don’t need a lot of speed because the inertia of the person holding it will not be so easily
overcome before the paper’s structural bonds break. If it is then you have some really strong paper!
This applies to breaking pine boards and concrete blocks as well. But, because those materials contain more mass than paper we
won’t need the speed of a bullet to split them in two pieces. Treat breaking objects, like boards and blocks, as you would any
training, start slow and build up slow to achieve goals. Don’t break one pine board and suddenly try to break eight concrete
blocks. You’ll end up “breaking” your arm, wrist, elbow, or at the very least your pride.
The downward palm heal
strike is very popular for
power breaking and a great
technique for building up
power to smash concrete
blocks. Students will start
with a single pine board held
in place by a couple of cinder
blocks, one at each edge.
Once breaking a single board
becomes easy, a second
board is added until that
becomes easy, then a third
and a fourth. Typically by the
third or fourth board, the
material is switched out for a
single concrete block.
One block, depending on its
moisture content and
concrete mix formula, is
roughly about the same
strength as three or four one inch thick 12”x12” pine boards in a stack. After accomplishing the break with a single block,
practitioners will add a second block, usually with a gap between them in order to allow the first block to break first before the
downward force applies to the second. Later, a third block is added, then a fourth, fifth, sixth and so on. Students will learn to
use other strikes to break with, such as knife hand, forward elbow or downward elbow. Each strike must be trained with care
and at a slow pace so the body has time to adapt.
Palm heal strike break
with single 12x12x1”
pine board.
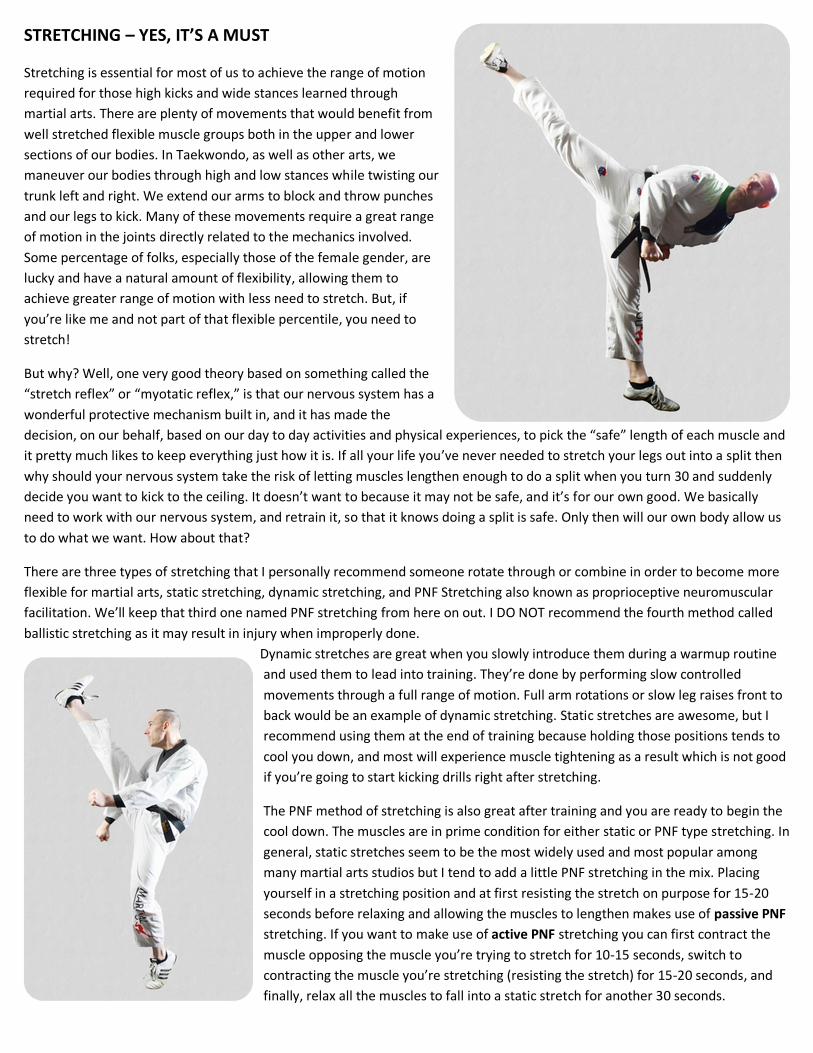
STRETCHING – YES, IT’S A MUST
Stretching is essential for most of us to achieve the range of motion
required for those high kicks and wide stances learned through
martial arts. There are plenty of movements that would benefit from
well stretched flexible muscle groups both in the upper and lower
sections of our bodies. In Taekwondo, as well as other arts, we
maneuver our bodies through high and low stances while twisting our
trunk left and right. We extend our arms to block and throw punches
and our legs to kick. Many of these movements require a great range
of motion in the joints directly related to the mechanics involved.
Some percentage of folks, especially those of the female gender, are
lucky and have a natural amount of flexibility, allowing them to
achieve greater range of motion with less need to stretch. But, if
you’re like me and not part of that flexible percentile, you need to
stretch!
But why? Well, one very good theory based on something called the
“stretch reflex” or “myotatic reflex,” is that our nervous system has a
wonderful protective mechanism built in, and it has made the
decision, on our behalf, based on our day to day activities and physical experiences, to pick the “safe” length of each muscle and
it pretty much likes to keep everything just how it is. If all your life you’ve never needed to stretch your legs out into a split then
why should your nervous system take the risk of letting muscles lengthen enough to do a split when you turn 30 and suddenly
decide you want to kick to the ceiling. It doesn’t want to because it may not be safe, and it’s for our own good. We basically
need to work with our nervous system, and retrain it, so that it knows doing a split is safe. Only then will our own body allow us
to do what we want. How about that?
There are three types of stretching that I personally recommend someone rotate through or combine in order to become more
flexible for martial arts, static stretching, dynamic stretching, and PNF Stretching also known as proprioceptive neuromuscular
facilitation. We’ll keep that third one named PNF stretching from here on out. I DO NOT recommend the fourth method called
ballistic stretching as it may result in injury when improperly done.
Dynamic stretches are great when you slowly introduce them during a warmup routine
and used them to lead into training. They’re done by performing slow controlled
movements through a full range of motion. Full arm rotations or slow leg raises front to
back would be an example of dynamic stretching. Static stretches are awesome, but I
recommend using them at the end of training because holding those positions tends to
cool you down, and most will experience muscle tightening as a result which is not good
if you’re going to start kicking drills right after stretching.
The PNF method of stretching is also great after training and you are ready to begin the
cool down. The muscles are in prime condition for either static or PNF type stretching. In
general, static stretches seem to be the most widely used and most popular among
many martial arts studios but I tend to add a little PNF stretching in the mix. Placing
yourself in a stretching position and at first resisting the stretch on purpose for 15-20
seconds before relaxing and allowing the muscles to lengthen makes use of passive PNF
stretching. If you want to make use of active PNF stretching you can first contract the
muscle opposing the muscle you’re trying to stretch for 10-15 seconds, switch to
contracting the muscle you’re stretching (resisting the stretch) for 15-20 seconds, and
finally, relax all the muscles to fall into a static stretch for another 30 seconds.

SOME BASIC STRETCHES FOR FLEXIBILITY
Here are some popular basic stretches for achieving a good overall flexibility for taekwondo training. Begin with the upper body
stretches because they are nice to start with and can ease you into lower body stretches in a natural progression as you go.

Work through the lower body and stretch all the muscle groups needed to achieve those wide stances and high kicks. Make sure
you ease into each stretch and stop if you feel joint pain rather than muscle tension. Begin the stretches with slight tension and
breathe slowly exhaling as you increase the stretch. It’s extremely important to breathe calmly and relax your body and mind
because your nervous system responds to stresses by tightening your muscles. The more relaxed you are and the more you
assure your nervous system everything is okay, the getter your gains with be.
Butterfly stretch seen to the upper left is especially good when done PNF style. Hold your ankles while using the elbows to press
downward on your knees while at the same time resist the downward force by trying to bring the knees up and closer together.
After about 15 seconds slowly relax and let the downward force of your elbows press the knees further apart.
Straddle split shown on the upper right is another good stretch used to help gain height in side kicks, hook kicks, spinning hook
kicks and pretty much any kick requiring you to kick high while turned sideways. A common issue people have with this stretch is
the feeling of pain while doing it. Typically this is because it’s done improperly and the joints are being stressed along with
connective tissue rather than muscle being stretched. Start by placing your hands behind your body and on the floor behind you.
Straighten your posture while seated and roll your hip forward while pointing the toes up to the ceiling. Slowly increase this
stretch without feeling joint pain until you can reach in front of your body.
Front splits, shown on the upper left, are extremely important stretches for all kicking techniques. Having a good range of
motion in this direction affects just about every kick in the taekwondo toolbox. I recommend everyone really work often to
increase flexibility in this direction. If you are kicking and feel your non kicking leg being pulled out from under you, chances are
you need to add more front split stretch time. This is another stretch that is easy to apply PNF to. In fact you may do it without
realizing as much. Simply resist allowing the legs to move apart for about 15 seconds and then slowly relax and let your body
weight move them further away.
If you’re unable to reach the floor at first, do the stretch in between to chairs with the seats facing you. Place your hands on the
chairs seat and hold yourself in place that way. Work your way down and eventually you will not need the chairs anymore.

COMPETITION – LET’S DANCE!
Martial arts competitions are fairly common and are a
fantastic way to gauge your skills against opponents
you’ve never worked with before. Sometimes we get
used to our fellow students in classes and learn to
predict behavior and timing because we work with them
all the time. This can lead us to a false sense of ability,
and a feeling that we might have it all figured out, since
we do pretty well in class against fellow students. It’s
good to compete with those you don’t train with on a
regular basis in order to get a sense of your skill level
outside the dojang.
Although traditional martial arts tournaments are not as
abundant as they once were back in the early 2000s,
there’s still a few that students can attend to test
themselves. Traditional martial arts, especially Olympic
Taekwondo, experienced a rapid demise in competitions
right around 2004, leaving many schools with no place to bring students who wanted to compete. The growth of Mixed Martial
Arts along with the popularity of the Ultimate Fighter Competitions has also taken much of the focus away from tournament
circuits run for individual styles of traditional martial arts. This of course has not impeded some dedicated to traditional styles
from organizing and running competitions which usually occur annually.
Cost to enter these competitions varies but is usually around $50 to $75 per entry and will include one or more events in which
an athlete can participate. Taekwondo tournaments typically involve three main areas of competition, sparring, forms and
breaking. Most recently breaking events have declined and the main to categories remain sparring and forms (or poomsae).
Forms competition usually involves multiple competitors performing the exact same form simultaneously or one at a time in
front of two or more judges not from their own school. High scores are awarded to those showing greater competence and
proficiency in movement, technique, power and style while performing the poomsae.
You’ll likely run into two forms of sparring while competing; one known as Olympic style, where all strikes are usually full contact
in black belt divisions and the round clock continues as points are scored, the other is called point style, where most strikes are
light contact and the round clock stops each time a point is scored so the competitors can reset to their original positions. As you
may have guessed this program trains students for Olympic Style type sparring which requires students to have a full array of
safety gear.
Sparring divisions are normally divided up by rank as well as weight class and age. This assures competitors are challenging each
other within an expected skill range. Depending on the number of entries, an athlete may have to compete against just one
opponent or may have to engage in multiple matches before winning their division.
Breaking involves a demonstration of power, speed, agility, or all three combined while splitting pine boards or concrete blocks
to outclass those competing against you. Commonly, those breaking concrete or pine boards get pitted against only those
breaking the same type of materials, but, it’s not uncommon to group everyone together when there’s a limited amount of
people signed up for breaking. Score is based on the difficulty and complexity of the break, the ability of the athlete to have
success in only one try and really the overall impressiveness of the feat itself.
I recommend that all students enter into at least one competition if nor more during their training. The experience is well worth
it!

AVERAGE STUDY TIME NEEDED BEFORE TESTING Classes With Home Study Without Home Study 5 Per Week 3 Months 3 Months 4 Per Week 3 Months 3-3 ½ Months 3 Per Week 3 ½-4 Months 4-5 Months 2 Per Week 4-5 months 5-7 Months 1 Per Week 6-9 Months 7-10 Months
10th GEUP - WHITE BELT
As a white belt you have chosen to
begin a transforming process which will forever alter your life. Deciding to learn any martial art can be an easy decision but
requires dedication, self-discipline, and commitment to truly appreciate the benefits. While you train and study side by side with
your fellow students and instructors, always remember that learning these skills from another is a privilege and not an
entitlement. It is an honor to be allowed to participate in these studies and should never be viewed as anything else. Respect all
you train with and all who instruct you, always!
Before you can run you should walk and before you can become proficient at Taekwondo you need to learn the basics as a
foundation. What follows is a list of basic skills that will become your foundation as a beginner and that you are required to
learn, practice and perform with a decent amount of competence in order to pass your first test and be promoted to the rank of
9th Geup, (Orange Belt). But where do you start? Follow the sections in order to begin. Learn the techniques first then add
movement second.
THESE ARE THE SKILLSETS YOU NEED TO CONCENTRATE ON.
DOJANG ETIQUETTE As a beginner, you should familiarize yourself with “dojang” etiquette as much as possible.
TENETS OF TAEKWONDO Self-Control Perseverance Indomitable Spirit Courtesy Integrity TYING YOUR BELT Learn to tie that belt correctly!
BASIC STANCES Relaxed Position Attention Stance Ready Stance Horse Riding Stance Walking Stance Forward Stance Back Stance Tiger Stance Cross Stance Parallel Stance Fighting Stance
BASIC BLOCKS Low Block High Block Outer Forearm Outside Block Inward Forearm Block BREAK Straight Punch
BASIC STRIKES Chambered Punch Jab Punch Straight/Cross Punch Hook Punch Uppercut Punch
BASIC KICKS Rear Leg Groin Kick Rear Leg Front Snap Kick Rear Leg Push Kick Rear Leg Side Kick Rear Round House Kick Spinning Back Kick
FOOTWORK Stepping Forward Stepping Backwards Cross Step Forward (Chain Step) Cross Step Backwards (Chain Step) Quick Step Forward Quick Step Backwards Offline Step Offensive Offline Step Defensive Slicing Forward Slicing Backwards Switching Stance 90 Degree Turn Forward 90 Degree Turn Backwards 180 Degree Spin Forward 180 Degree Spin Backwards
TERMINOLOGY Taekwondo –Meaning? The place where one practices the way. - dojang Uniform – dobok Belt – dhee or tti Bow – kyung nae Line Up – chung Neol Face The Flags - kukki e tae hae Face The Instructor – sah bum nim kae Attention – charyeot Ready - joonbe Sit – anj uh Meditate - mook nyum Dismissed - hazon

BASIC STANCES (SECTION 1)
Stances are important key positions taken from important transitions that apply to important movements and techniques
practiced within the art you’re learning. They are also a great beginning point for practicing some basics, because you need to
know what position your body will be taking at key moments. Stances are the body’s weight distribution, foot orientation and
positioning adopted when attacking, defending, advancing or retreating. It’s a great starting place! Without a good idea of body
position in relation to directing force, distributing weight, and altering direction, all other
techniques, skills, and movements will suffer.
Stances, stances and more stances. Learning these positions for a martial art is of great
significance when creating an understanding of transition. What I mean by that is… most stances
are simply snapshots of a single moment when the body is transitioning from one position to
another. Over time, the idea of what a stance is has been lost because it’s either not explained or
assumptions are made about what the purpose of learning a bunch of static positions is. Think
about your body shifting from one position to another. Take a look at the picture on the left. This
is a stance I am going to call… Sit Stance. Sit stance you say? Yes, imagine the act of sitting down
in a chair. Seems simple enough right? Well, it becomes a little more complex when we start to
break up the act of sitting in a chair into moments in time when you’re transitioning from one
position to another before the final position of actually sitting.
What does everyone do just before they sit down in a chair? For one, you have get to the chair.
Let’s assume you walk over to it. Next you have to stop at the chair or at least slow your motion
down a little. Then, you need to turn your body and face away from the chair so that it’s behind
you. Next, you will begin to bend your legs while pointing your rear end in the direction of the
seat. Next, if the chair has arm rests you may begin to reach back in preparation to grab those
armrests. Next, you begin to squat downward. Next, you will shift all of your body’s weight onto
the surface of the seat while perhaps using the armrests to slow your momentum. Next, you will
adjust your body weight again until you are in a position you want to be. Next, you might lean
back and again shift your body weight. Finally, you could be sitting down. Lots of movement
going on there just to sit in a chair. Makes me tired just thinking about it. Kind of makes me want
to sit down.
What’s the point of all this? Well, it’s to demonstrate how a stance is just a snapshot
of transition. Now, imagine you have never ever sat down in a chair before. Ever!
We meet and I tell you I am going to prepare you for sitting in a chair for the first
time by making you practice this thing called sit stance. You might think I’m crazy,
and you may not even understand fully how this sit stance thing gets you sitting
down into a chair. Doing this one static position doesn’t get you all the way across a
room, turned around and sitting down, but it does give you an important position
that’s key among all those movements required in the act of sitting down in that
chair. After I make you practice this stance for an hour, I make you walk across an
empty room, have you “about face” halfway in, turn around, and perform the sit
stance. I’ll have you do this 15-20 times or until I believe you’ve got it just about
right. Now I bring a chair into that room and place it right in the center with the seat
open toward you. Go! I tell you, do what you just did 20 times before. You walk over
to the chair, turn 180 degrees and position yourself into this sit stance you’ve been
practicing for 2 hours. At this point I’m laughing because I brought you a chair with
wheels on it to be the first one you ever try and sit in, but you can see by the picture
on the right that it wouldn’t take much more to get you in that seat.
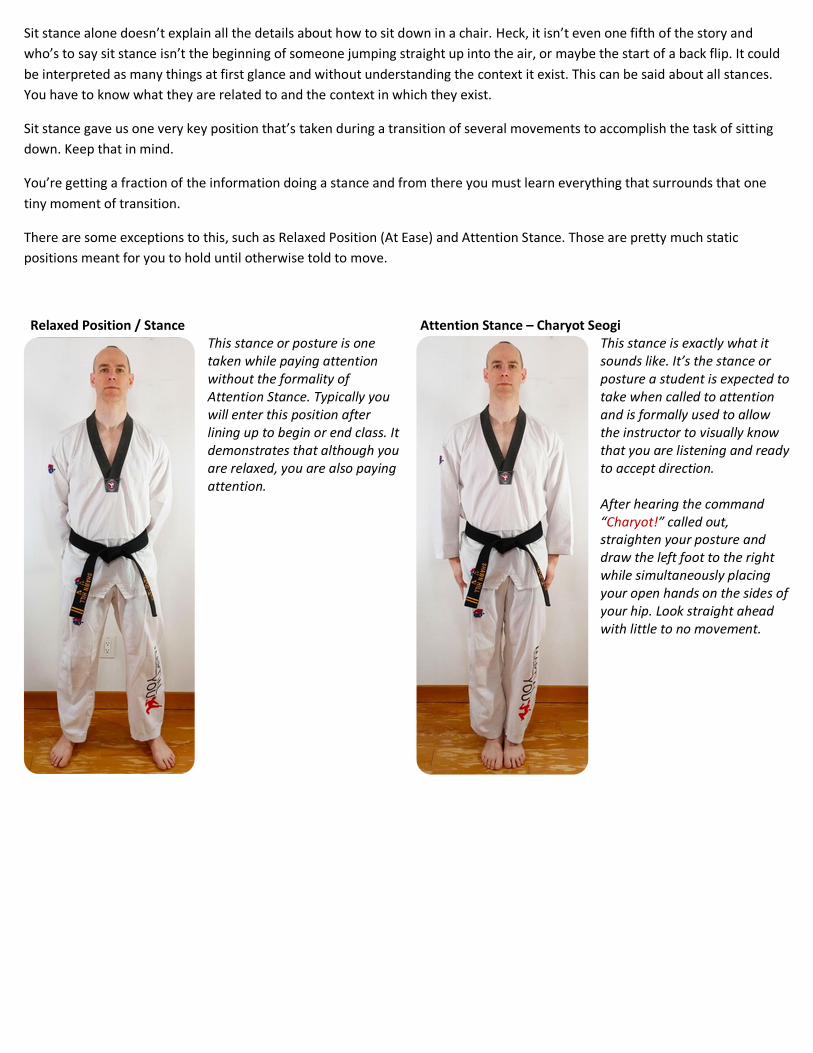
Sit stance alone doesn’t explain all the details about how to sit down in a chair. Heck, it isn’t even one fifth of the story and
who’s to say sit stance isn’t the beginning of someone jumping straight up into the air, or maybe the start of a back flip. It could
be interpreted as many things at first glance and without understanding the context it exist. This can be said about all stances.
You have to know what they are related to and the context in which they exist.
Sit stance gave us one very key position that’s taken during a transition of several movements to accomplish the task of sitting
down. Keep that in mind.
You’re getting a fraction of the information doing a stance and from there you must learn everything that surrounds that one
tiny moment of transition.
There are some exceptions to this, such as Relaxed Position (At Ease) and Attention Stance. Those are pretty much static
positions meant for you to hold until otherwise told to move.
Relaxed Position / Stance This stance or posture is one taken while paying attention without the formality of Attention Stance. Typically you will enter this position after lining up to begin or end class. It demonstrates that although you are relaxed, you are also paying attention.
Attention Stance – Charyot Seogi This stance is exactly what it sounds like. It’s the stance or posture a student is expected to take when called to attention and is formally used to allow the instructor to visually know that you are listening and ready to accept direction. After hearing the command “Charyot!” called out, straighten your posture and draw the left foot to the right while simultaneously placing your open hands on the sides of your hip. Look straight ahead with little to no movement.

Ready Stance – Joonbe Seogi
Ready Stance is performed by standing with the feet one shoulder length apart, measured from the outside edge of the feet, with arms slightly bent and loosely held fists about one fist size apart just below the navel and the fists should be a fist size away from the body. Muscles are relaxed to promote movement speed from this position. More often than not you will enter into a ready stance from an attention stance. Start by picking up your left foot while simultaneously drawing both open hands upward in front of your chest. At the same time, drop you left foot to the ground and shoot both hands downward in front of you body, fisted. Keep a slight bend in your arms and look straight ahead with little to no body movement.
Start Horse Riding Stance – Juchoom Seogi
Start
Finish
This stance is an important posture in martial arts and takes its name from the position assumed when riding a horse. It can be integrated into fighting techniques, exercises and forms (Poomsae). It’s most commonly used for the practice of hand blocking and striking techniques from a static position or to strengthen the legs and back. Typically you will enter this stance from a Ready Stance position. Start by simultaneously lifting your left foot and bringing it closer to the right without dropping it while reaching forward with both hands as if grabbing the rains of a horse. Draw both hands back to your hip in a chambered position as you move your left foot back out to the left dropping it to the ground with a loud kiup.
Finish
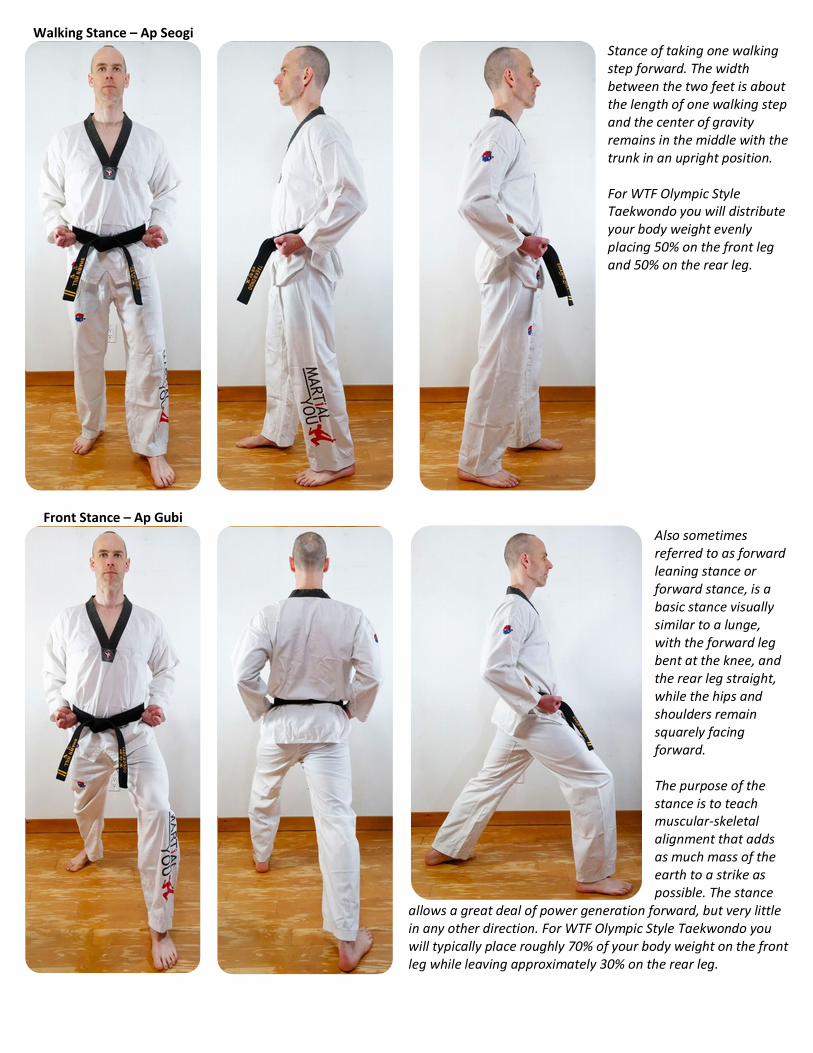
Walking Stance – Ap Seogi
Stance of taking one walking step forward. The width between the two feet is about the length of one walking step and the center of gravity remains in the middle with the trunk in an upright position. For WTF Olympic Style Taekwondo you will distribute your body weight evenly placing 50% on the front leg and 50% on the rear leg.
Front Stance – Ap Gubi
Also sometimes referred to as forward leaning stance or forward stance, is a basic stance visually similar to a lunge, with the forward leg bent at the knee, and the rear leg straight, while the hips and shoulders remain squarely facing forward. The purpose of the stance is to teach muscular-skeletal alignment that adds as much mass of the earth to a strike as possible. The stance
allows a great deal of power generation forward, but very little in any other direction. For WTF Olympic Style Taekwondo you will typically place roughly 70% of your body weight on the front leg while leaving approximately 30% on the rear leg.
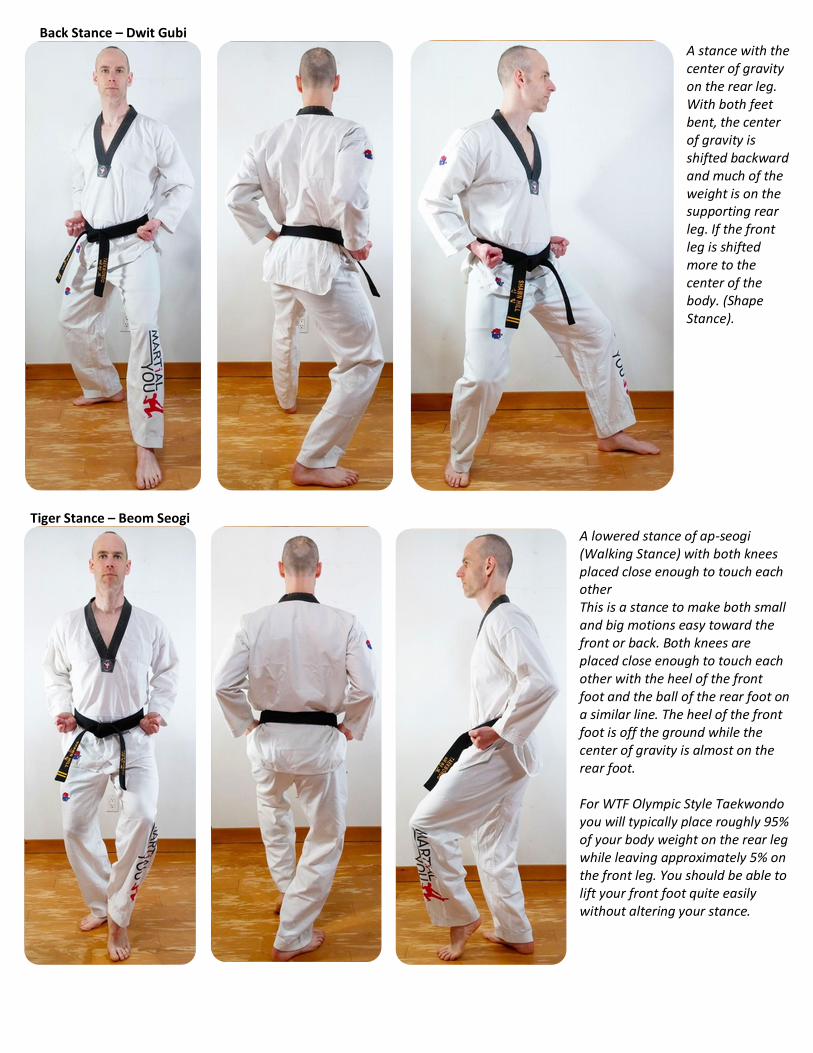
Back Stance – Dwit Gubi
A stance with the center of gravity on the rear leg. With both feet bent, the center of gravity is shifted backward and much of the weight is on the supporting rear leg. If the front leg is shifted more to the center of the body. (Shape Stance).
Tiger Stance – Beom Seogi
A lowered stance of ap-seogi (Walking Stance) with both knees placed close enough to touch each other This is a stance to make both small and big motions easy toward the front or back. Both knees are placed close enough to touch each other with the heel of the front foot and the ball of the rear foot on a similar line. The heel of the front foot is off the ground while the center of gravity is almost on the rear foot. For WTF Olympic Style Taekwondo you will typically place roughly 95% of your body weight on the rear leg while leaving approximately 5% on the front leg. You should be able to lift your front foot quite easily without altering your stance.

Cross Stance - Kkoa-seogi
A stance with both feet crossing each other when moving or making a turn to the front, back or side. In the state of lowering the center of gravity, this is a posture used when shifting the performer’s body to the front, back or side. When the moving foot is shifted to the front of the supporting foot, it is called ap-kkoa-seogi (Front Cross Stance). When shifted to the back of the foot, dwi-kkoa-seogi (Rear Cross Stance).
Parallel Stance - Narani-seogi
A stance where both feet are parallel to each other This is a stance with both knees straightened, the center of gravity kept in the middle and the inside edges of both feet facing together. When the end of toes face inward, it is called anjjong-seogi (Inward Stance) and when they face outward, pyeoni-seogi (At Ease Stance)
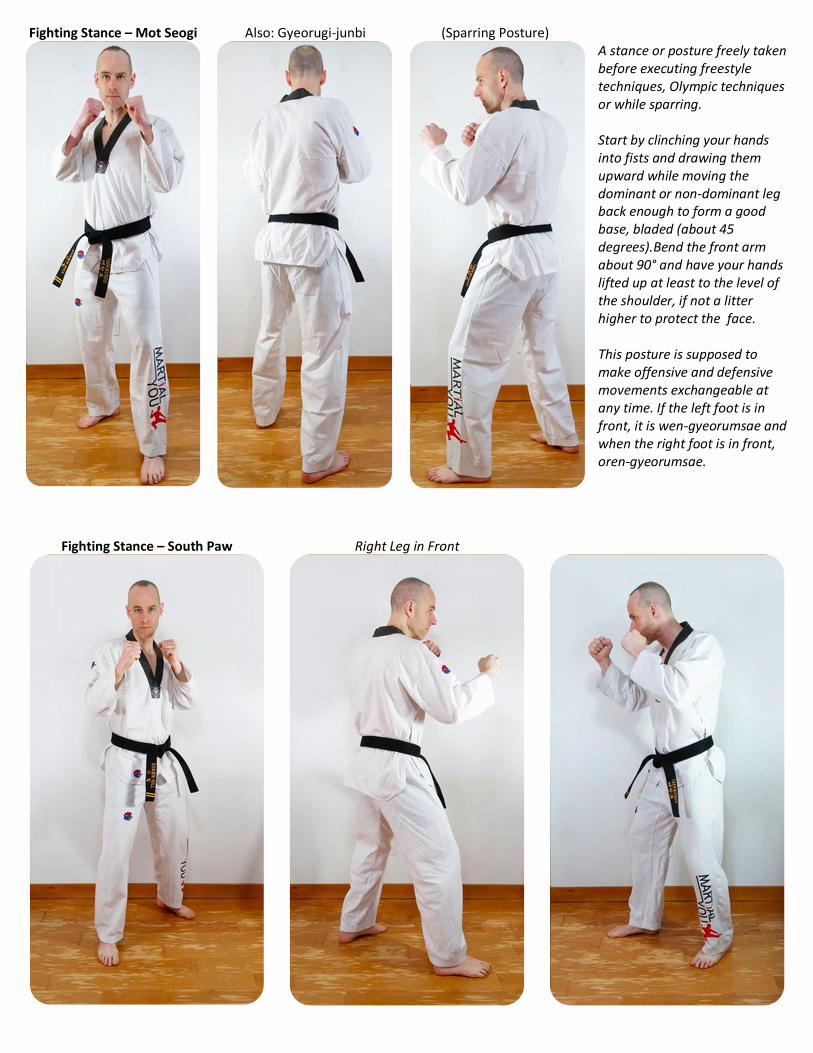
Fighting Stance – Mot Seogi
Also: Gyeorugi-junbi
(Sparring Posture) A stance or posture freely taken before executing freestyle techniques, Olympic techniques or while sparring. Start by clinching your hands into fists and drawing them upward while moving the dominant or non-dominant leg back enough to form a good base, bladed (about 45 degrees).Bend the front arm about 90° and have your hands lifted up at least to the level of the shoulder, if not a litter higher to protect the face. This posture is supposed to make offensive and defensive movements exchangeable at any time. If the left foot is in front, it is wen-gyeorumsae and when the right foot is in front, oren-gyeorumsae.
Fighting Stance – South Paw
Right Leg in Front

BASIC BLOCKS (SECTION 2)
Low Block – Ahrae Mahki
or Naeryeo-mahki
A technique of blocking an opponent’s attack downward from top to bottom. This is a skill of blocking downward when the opponent attacks the defender’s stomach or genitals. One may use bakkatpalmok (Outside Wrist), batangson (Palm Heel), sonnal (Hand Blade), etc. to block from the chest level to the groin area. For this particular version of downward or low block, employ an outward hammer fist which travels from your opposite shoulder in a downward circular path so that the fist and arm deflect any attack coming towards your body to the side.
High Block – Agool Mahki
or Cho Kyo Mahki
A technique of blocking an opponent’s attack upward. The defender can use the Outside Wrist, Hand Blade or Palm Heel to block upward from the lower to the upper position. For this particular version of upward or rising block, employ an upward hammer fist and make sure you thrust your arm upward enough to protect the head from contact. Keep a bend in your block arm to deflect any downward attack away from your body.

Inward Block - Ahn Mahki
A technique of blocking from the outside to the inside of the defender’s body with the hand, foot, arm or leg. When the assailant attacks from the front, the blocking surfaces such as ‘Outside Wrist’ (outside edge of the wrist), ‘Knife Hand’ (the outside edge of hand), ‘Palm Heel’ (heel of the palm) and ‘Reverse Foot Blade’ (inside edge of the foot) are employed to block it from the outside of defender’s body to the inside.
Outer Forearm Outside Block
Bahkat Mahki
A technique of blocking the assailant’s attack from the inside to the outside of the defender’s body with the outer part of the forearm. This is a blocking skill with a motion from the inside to the outside of defender’s body using baggatpalmok (Outside Wrist), anpalmok (Inside Wrist), sonnal (Hand Blade), gupinsonmok (Bent Wrist), etc. when the assailant attacks from the outside or front side of the defender.

BASIC HAND STRIKES (SECTION 3)
Chambered Punch
Also: Traditional Reverse Punch
Example is For Mid-Section Strike
#1 Jab Punch – Pun Dae Chirugi
Performed From Fighting Stance
Punch With Arm Above Lead Foot

#2 Reverse Punch – Bandae Chirugi
Performed From Fighting Stance
A.K.A. Straight or (Cross) Rear Arm Punch
#3 Front Hook Punch – Gullgi Chirugi
Performed From Fighting Stance
Punch With Arm Above Lead Foot
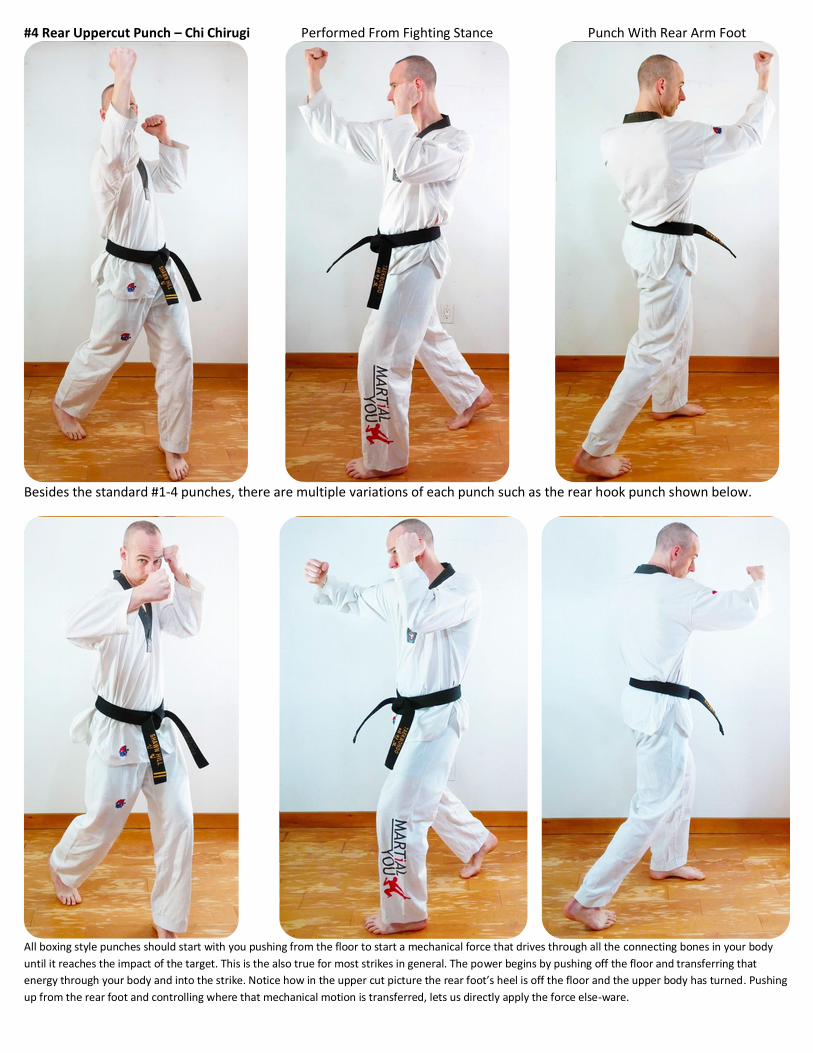
#4 Rear Uppercut Punch – Chi Chirugi
Performed From Fighting Stance
Punch With Rear Arm Foot
Besides the standard #1-4 punches, there are multiple variations of each punch such as the rear hook punch shown below.
All boxing style punches should start with you pushing from the floor to start a mechanical force that drives through all the connecting bones in your body
until it reaches the impact of the target. This is the also true for most strikes in general. The power begins by pushing off the floor and transferring that
energy through your body and into the strike. Notice how in the upper cut picture the rear foot’s heel is off the floor and the upper body has turned. Pushing
up from the rear foot and controlling where that mechanical motion is transferred, lets us directly apply the force else-ware.

BASIC KICKS (SECTION 4)
Rear Leg Groin Kick
STEP 3. Continuing the momentum of the upward chamber, keep your toes pointed forward and quickly extend your kicking leg to drive the instep or shin up and into the target from below. Depending on the desired impact and position of the target, you may choose to continue raising your entire leg in an upward direction, while extended, to apply more force, or you may choose to retract immediately after impact to generate more of a snapping strike.
STEP 2. Drive your kicking knee upward in a straight line towards the direction of the target as if you were going to throw a knee strike instead of a front kick while at the same time pushing your toes forward. For groin kick, chambering and extension may become one motion much sooner than other techniques. The force applied to the chamber sets the tone for the entire kick. A slower chamber requires you to apply more muscular energy during the extension of the kick and a fast chamber requires less energy during the extension.
STEP 1. Prepare yourself for the kick! Position your body into a balanced fighting stance suitable for the situation and the technique. Just before executing the kick you may choose to shift some of your body weight onto the kicking leg in order to push off the floor with it instead of just lifting it upward.
STEP 5. Immediately after retracting your leg, you should recover as soon as possible. Do this by quickly dropping the kicking foot to the ground and right into another fighting stance. Depending on your desired outcome, you might want to drop the kicking leg in front and into an opposite fighting stance or retract the kicking leg all the way back behind you and into your original fighting stance position.
STEP 4 After impact with the target you will want to recover as quickly as possible in order to execute a follow up technique. Do this by retracting your kicking leg after the desired force has been delivered to the target. Based on circumstances, you may want to retract your leg back, all the way towards your body or just slightly, before lowering it to the floor and preparing yourself for another technique.
3 2 1
5 4

Rear Leg Front Snap Kick – Ahp Chagi
STEP 3. Extend your kicking leg towards the target zone without lowering your knee and just before impact, pull your toes back towards your body and drive the ball of your foot forward and into the target. Depending on the desired impact and position of the target, you may choose to continue raising your leg upward while extending it, or after it has been fully extended. This will allow you to strike up and through a higher point. You may also choose instead to push the kicking leg forward with your hip in order to impact a lower point and drive through it. Either way it’s important to concentrate on striking with the ball of the foot and not the toes.
STEP 2. Drive your kicking knee upward in a straight line towards the direction of the target as if you were going to throw a knee strike instead of a side kick. The force applied to the chamber sets the tone for the entire kick. A slower chamber requires you to apply more muscular energy during the pivot and loading phase of the kick and a fast chamber requires less energy to pivot and load up. Simple physics. Apply it now or later, it’s up to you.
STEP 1. Prepare yourself for the kick! Position your body into a balanced fighting stance suitable for the situation and the technique. Just before executing the kick you may choose to shift some of your body weight onto the kicking leg in order to push off the floor with it instead of just lifting it upward.
STEP 5. Immediately after retracting your leg, you should recover as soon as possible. Do this by quickly dropping the kicking foot to the ground and right into another fighting stance. Depending on your desired outcome, you might want to drop the kicking leg in front and into an opposite fighting stance or retract the kicking leg all the way back behind you and into your original fighting stance position.
STEP 4 After impact with the target you will want to recover as quickly as possible in order to execute a follow up technique. Do this by retracting your kicking leg after the desired force has been delivered to the target. Based on circumstances, you may want to retract your leg back, all the way towards your body or just slightly, before lowering it to the floor and preparing yourself for another technique.
5 4
3 2 1
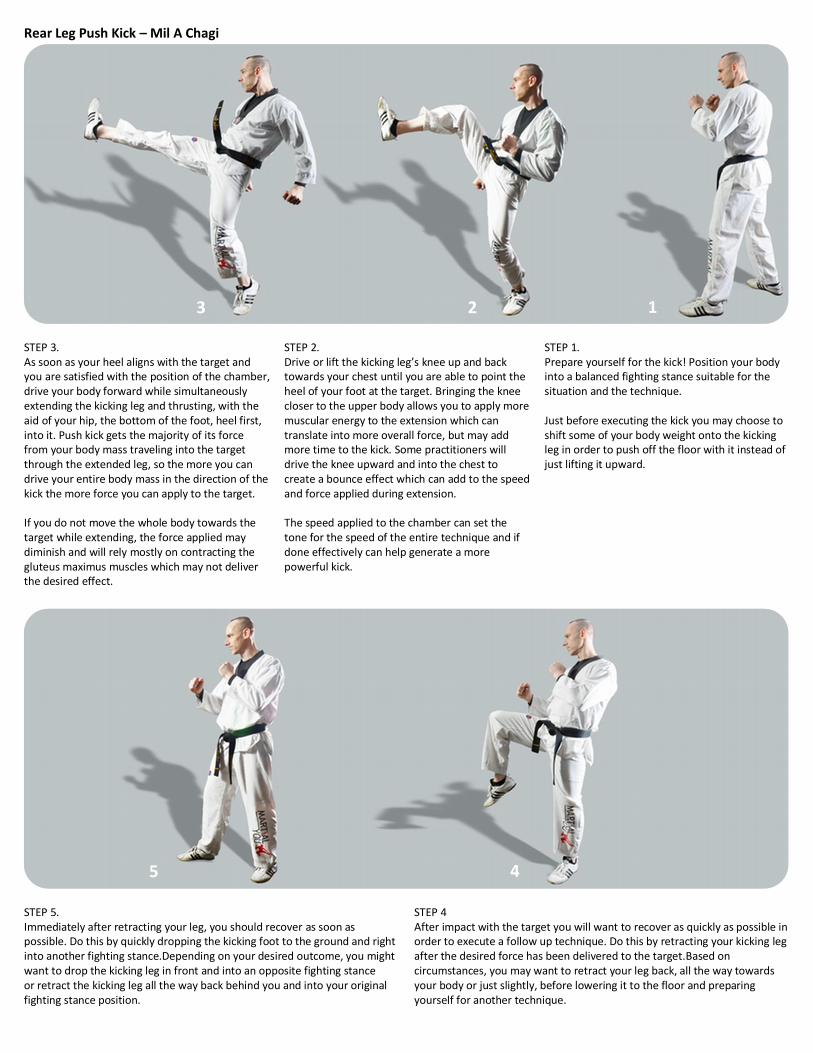
Rear Leg Push Kick – Mil A Chagi
STEP 3. As soon as your heel aligns with the target and you are satisfied with the position of the chamber, drive your body forward while simultaneously extending the kicking leg and thrusting, with the aid of your hip, the bottom of the foot, heel first, into it. Push kick gets the majority of its force from your body mass traveling into the target through the extended leg, so the more you can drive your entire body mass in the direction of the kick the more force you can apply to the target. If you do not move the whole body towards the target while extending, the force applied may diminish and will rely mostly on contracting the gluteus maximus muscles which may not deliver the desired effect.
STEP 2. Drive or lift the kicking leg’s knee up and back towards your chest until you are able to point the heel of your foot at the target. Bringing the knee closer to the upper body allows you to apply more muscular energy to the extension which can translate into more overall force, but may add more time to the kick. Some practitioners will drive the knee upward and into the chest to create a bounce effect which can add to the speed and force applied during extension. The speed applied to the chamber can set the tone for the speed of the entire technique and if done effectively can help generate a more powerful kick.
STEP 1. Prepare yourself for the kick! Position your body into a balanced fighting stance suitable for the situation and the technique. Just before executing the kick you may choose to shift some of your body weight onto the kicking leg in order to push off the floor with it instead of just lifting it upward.
STEP 5. Immediately after retracting your leg, you should recover as soon as possible. Do this by quickly dropping the kicking foot to the ground and right into another fighting stance. Depending on your desired outcome, you might want to drop the kicking leg in front and into an opposite fighting stance or retract the kicking leg all the way back behind you and into your original fighting stance position.
STEP 4 After impact with the target you will want to recover as quickly as possible in order to execute a follow up technique. Do this by retracting your kicking leg after the desired force has been delivered to the target. Based on circumstances, you may want to retract your leg back, all the way towards your body or just slightly, before lowering it to the floor and preparing yourself for another technique.
5 4
3 2 1

Side Kick – Yup Chagi
STEP 3. Lift your grounded heel slightly and pivot your hip (and body) sideways, in relation to the target, using the upward momentum of the chamber. Keeping your leg bent at the knee, continue to pivot while looking at the target until you can point your kicking foot’s heel where you want to strike. Control how much you pivot by driving your elbow on the same side as the kicking leg, in the opposite direction of the kick. By doing this, you can use your torso to counter the pivot and adjust it. You have loaded your side kick.
STEP 2. Drive your kicking knee upward in a straight line towards the direction of the target as if you were going to throw a knee strike instead of a side kick. The force applied to the chamber sets the tone for the entire kick. A slower chamber requires you to apply more muscular energy during the pivot and loading phase of the kick and a fast chamber requires less energy to pivot and load up. Simple physics. Apply it now or later, it’s up to you.
STEP 1. Prepare yourself for the kick! Position your body into a balanced fighting stance suitable for the situation and the technique. Just before executing the kick you may choose to shift some of your body weight onto the kicking leg in order to push off the floor with it instead of just lifting it upward.
STEP 6. Immediately after retracting your leg, you should recover to another fighting stance as soon as possible. Do this by quickly dropping the kicking foot to the ground and right into another fighting stance. Depending on your desired outcome, you might want to drop the kicking leg in front and into an opposite fighting stance or retract the kicking leg all the way back behind you and into the original fighting stance.
STEP 5. After impact with the target you will want to recover as quickly as possible in order to execute a follow up technique. Do this by retracting your kicking leg after the desired force has been delivered to the target. Based on circumstances, you may want to retract your leg back, all the way towards your body or just slightly, before lowering it to the floor and preparing yourself for another technique.
STEP 4. From your pivot position, begin to shift your body weight towards the target while simultaneously extending your kicking leg to drive your heel into it. As you extend and thrust your leg, turn your hip downward to employ the powerful gluteus maximus muscles. Keep your heel lined up and drive straight through the target. If you do not shift your body weight in the direction of the kick, you may not achieve the maximum force possible and your body may be thrown back upon impact.
6 5 4
3 2 1
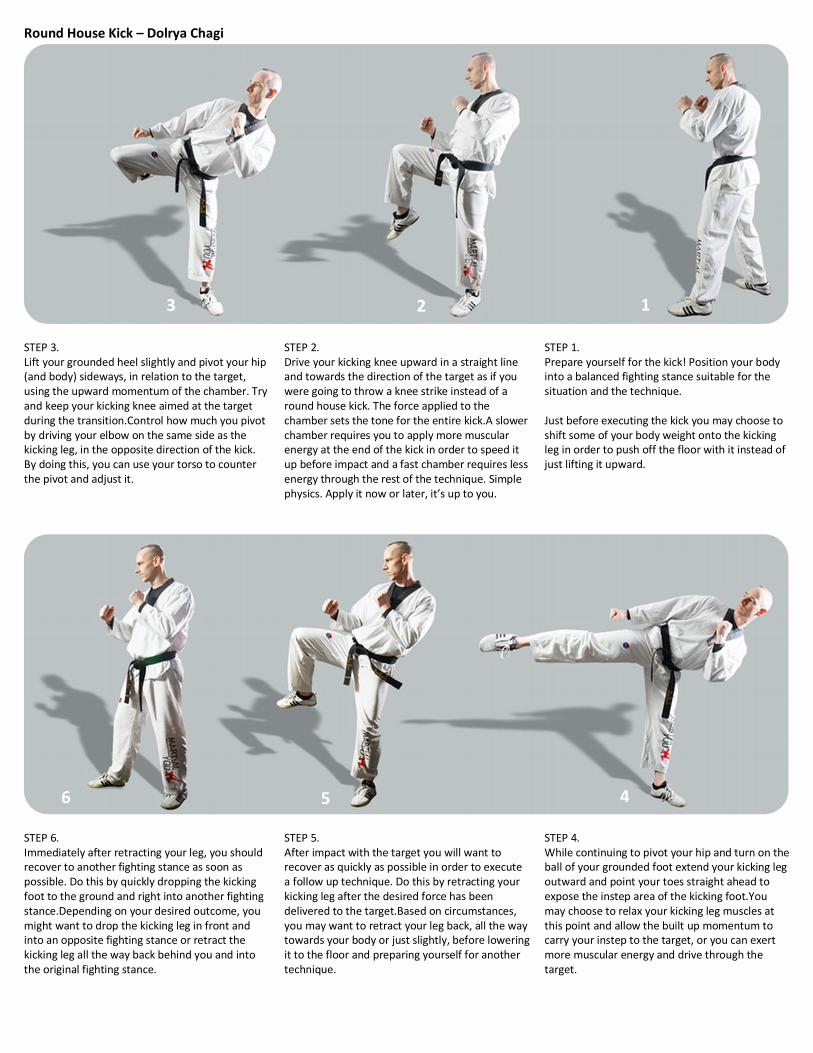
Round House Kick – Dolrya Chagi
STEP 3. Lift your grounded heel slightly and pivot your hip (and body) sideways, in relation to the target, using the upward momentum of the chamber. Try and keep your kicking knee aimed at the target during the transition. Control how much you pivot by driving your elbow on the same side as the kicking leg, in the opposite direction of the kick. By doing this, you can use your torso to counter the pivot and adjust it.
STEP 2. Drive your kicking knee upward in a straight line and towards the direction of the target as if you were going to throw a knee strike instead of a round house kick. The force applied to the chamber sets the tone for the entire kick. A slower chamber requires you to apply more muscular energy at the end of the kick in order to speed it up before impact and a fast chamber requires less energy through the rest of the technique. Simple physics. Apply it now or later, it’s up to you.
STEP 1. Prepare yourself for the kick! Position your body into a balanced fighting stance suitable for the situation and the technique. Just before executing the kick you may choose to shift some of your body weight onto the kicking leg in order to push off the floor with it instead of just lifting it upward.
STEP 6. Immediately after retracting your leg, you should recover to another fighting stance as soon as possible. Do this by quickly dropping the kicking foot to the ground and right into another fighting stance. Depending on your desired outcome, you might want to drop the kicking leg in front and into an opposite fighting stance or retract the kicking leg all the way back behind you and into the original fighting stance.
STEP 5. After impact with the target you will want to recover as quickly as possible in order to execute a follow up technique. Do this by retracting your kicking leg after the desired force has been delivered to the target. Based on circumstances, you may want to retract your leg back, all the way towards your body or just slightly, before lowering it to the floor and preparing yourself for another technique.
STEP 4. While continuing to pivot your hip and turn on the ball of your grounded foot extend your kicking leg outward and point your toes straight ahead to expose the instep area of the kicking foot. You may choose to relax your kicking leg muscles at this point and allow the built up momentum to carry your instep to the target, or you can exert more muscular energy and drive through the target.
3 2 1
6 5 4

Back Kick – Dwi Chagi
STEP 3. Carrying the momentum of your spinning chamber, begin to shift your weight in the direction of the kick. Keep your eyes on the target and extend your kicking leg behind you to drive your heel into it. It’s important to extend with our body facing away from the target so that we can use the powerful Gluteus maximus muscle to help increase the force of impact. The more you can drive your entire body mass in the direction of the kick the more force you can apply to the target. Also, if you spin too much, allowing your body to turns towards the target, the spinning back kick might become a spinning side kick and may not deliver the desired effect.
STEP 2. Spin your entire body 180 degrees, so that the rear leg travels behind the front leg, using the ball or your front foot as a pivot point. While spinning, raise your rear leg’s knee and position your kicking foot near the pivoting leg’s knee and point your heel towards the target area. At this point you should be looking over your kicking side shoulder in order to maintain a general perception of where the target is and make adjustments to guide your foot to it. The more speed and power you apply to the spinning chamber the more speed and power you can add to this kick.
STEP 1. Prepare yourself for the kick! Position your body into a balanced fighting stance suitable for the situation and the technique. Just before executing the kick you may choose to shift some of your body weight onto the kicking leg in order to push off the floor with it instead of just lifting it upward.
STEP 5. Immediately after retracting your leg, you should recover as soon as possible. Do this by quickly dropping the kicking foot to the ground and right into another fighting stance. Depending on your desired outcome, you might want to drop the kicking leg in front and into an opposite fighting stance or retract the kicking leg all the way back behind you and into your original fighting stance position.
STEP 4. After impact with the target you will want to recover as quickly as possible in order to execute a follow up technique. Retract your kicking leg while turning your body towards the target after the desired force has been applied. Based on circumstances, you may want to retract your leg back, all the way towards your body or just slightly, before lowering it to the floor and preparing yourself for another technique.
3 2 1
5 4

FOOTWORK (SECTION 5)
Once you’ve learned some of the basic stances, blocks, strikes and kicks for Taekwondo, it’s time to add movement before,
during, and after executing those techniques. Footwork is the one of the most important foundations of any martial art. Without
good footwork you won’t be able to efficiently move your body, position your blocks, deliver your strikes, or successfully land
kicks while in motion. This is your next focus. Learn to move and learn to move well. Taekwondo footwork can be broken down
into four parts allowing you to work on each area separately before combining them together.
Let’s go over the four parts which can be defined as the four Ss. Stepping, Slicing, Switching and Spinning.
STEPPING
These are the movements you perform by literally stepping forward, backwards, sideways, diagonally or any variation of
direction. Step movements can be short or long, can be combined to cover large distances, or left minimal to move only inches
at a time. Becoming proficient at step movements in all directions will give you a great base in which to get your body where you
want to go. It’s recommended you start with stepping first.
1. Step Forward – Ilbow Trungen
Seems simple enough to step forward right? Well, in the
Ilbow Trungen or Step Forward for Taekwondo is done as
fast as possible in order to get closer to an opponent or to
step into an attacking strike, block or kick. Starting from a
fighting stance, push off the floor with the rear leg to
begin the transition and drive your body forward. While in
motion quickly pull the rear leg to the front and plant the
foot onto the ground for a stable stance.
Practice stepping forward until you can move at a fast
pace without losing your balance. Try to maintain a good
fighting stance at the beginning and end of the step. Later
you will be asked to execute strikes, blocks and kicks
immediately after stepping.
2. Step Backward – Ilbow Hoogen
Ilbow Hoogen or Step Back for Taekwondo is also done as
fast as possible in order to create distance between you
and an opponent or to step back into a defensive counter
strike, block or kick. Starting from a fighting stance, push
off the floor with the front leg to begin the transition and
drive your body backwards. While in motion quickly pull
the front leg to the back and plant the foot onto the
ground for a stable stance.
Practice stepping backwards until you can move at a fast
pace without losing your balance. Try to maintain a good
fighting stance at the beginning and end of the step. Later
you will be asked to execute strikes, blocks and kicks
immediately after stepping.
3 2 1
1 2 3

3. Cross Step Forward (Chain Step)
Cross step , also referred to as
chain step by some, is a quick
transition which maintains your
original stance and keeps your
upper body’s orientation pretty
much the same throughout the
movement. Cross stepping
forward can get you closer to your
opponent fast while allowing you
to strike, block, or kick without
changing stances.
To cross step forward, push off
the floor with the rear leg to
begin the transition and drive
your body forward. Instead of
turning your body as you would
with a normal step, simply
maintain your posture and quickly
move the rear foot in a straight
line forward and past the front leg until you place it on the ground in front of you and shift your weight onto it.
Continuing your forward momentum, quickly pull the leg previously in front back to its original position and you will not
only have moved forward but will now be in the same fighting stance as before.
4. Cross Step Backwards (Chain Step)
Cross stepping backwards can
help you avoid an attack quickly
while allowing you to counter
strike, block, or kick without
changing stances.
To cross step back, push off the
floor with the front leg to begin
the transition and drive your body
backwards. Instead of turning
your body as you would with a
normal step, simply maintain your
posture and quickly move the
front foot, in a straight line, back
and past the rear leg until you
place it on the ground in back of
you and shift your weight onto it.
Continuing your backwards
momentum, quickly pull the leg
previously behind you back to its
original position and you will not only have moved back but will now be in the same fighting stance as before
Practice cross stepping forward and backwards until you can move at a fast pace without losing your balance. Try to
maintain a good fighting stance at the beginning and end of the step. Try combining multiple steps together in a “chain”
to move further and further. Later you will be asked to execute strikes, blocks and kicks immediately after stepping.
3 2 1
1 2 3

5. Quick Step Forward
Quick step is a great movement
when you want to move forward
or backwards, but you don’t
need cover a huge amount of
distance either way.
To quick step forward from a
fighting stance (#1), begin by
shifting your body weight
towards the front leg, and in a
fast motion, draw the back foot
up to the front foot (#2). As soon
as the rear foot is directly behind
the front foot, begin to shift your
body weight to the rear leg while
simultaneously moving the front
foot forward to form a stable
fighting stance once again (#3).
6. Quick Step Backwards
To quick step backwards from a
fighting stance (#1), begin by
shifting your body weight
towards the rear leg, and in a
fast motion, draw the front foot
back to the rear foot (#2). As
soon as the front foot is directly
in front of the rear foot, begin to
shift your body weight to the
front leg while simultaneously
moving the back foot behind you
to form a stable fighting stance
once again (#3).
3 2 1
1 2 3

7. Offline Step Forward (Offensive Yup)
Stepping offline is a great way to
avoid an attack or to strategically
maneuver around your opponent
in order change your angle of
attack. To step offline while
moving forward, start by shifting
your body weight towards the
front leg (#1). Draw the rear foot
up to the front foot and while
keeping all your weight on the
front leg, begin to spin your body,
pivoting on the front foot, in the
direction of the front leg (#2).
Push backwards with the front
foot when you have turned
roughly 90 degrees, bringing the
rear leg back out behind you to
form a stable fighting stance (#3).
8. Offline Step Backwards (Defensive Yup)
To step offline while moving
backwards, start by shifting your
body weight towards the rear leg
(#1). Draw the front foot back to
the rear foot and shift your body
onto the front leg as you begin to
spin your body, pivoting on the
front foot, in the direction of the
front leg (#2). Push backwards
with the front foot when you
have turned roughly 90 degrees,
bringing the rear leg out behind
you to form a stable fighting
stance (#3).
3
2
1
3
2
1

SLICING
These are the movements you will perform by pushing your body with one foot, without stepping, from one direction to
another. Slicing allows us to change direction and move our body with limited “visible movement.” With almost no effort we can
quickly shift some or all of our body weight from one leg to the other making it difficult for an opponent to read our intentions,
and we can limit the amount of mechanical energy that gets used. Becoming efficient at slicing will increase your ability to move
quickly and give the appearance of gliding across the floor.
1. Slice Forward – Trungen
To slice or trungen forward from a
fighting stance, start by slightly
shifting your body weight towards
the rear leg (#1). Then, in a quick
motion, push forward by driving off
the floor with the rear foot while
simultaneously lifting the front foot
just enough to keep it in front of you
while moving in a forward direction
(#2). Once you have moved the
desired amount, plant both feet back
to the floor again to stabilize your
fighting stance and prepare for
another movement (#3).
2. Slice Backwards – Hoogen
To slice or hoogen backwards from a
fighting stance, start by slightly
shifting your body weight towards
the front leg (#1). Then, in a quick
motion, push back by driving off the
floor with the front foot while
simultaneously lifting the back foot
just enough to keep behind you
while moving in a backwards
direction (#2). Once you have moved
the desired amount, plant both feet
back to the floor again to stabilize
your fighting stance and prepare for
another movement (#3).
3 2 1
3 2
1

SWITCHING
Simply put, anytime you change stance, you are switching. It’s the transition from one stance to another that places this skill into
the footwork category. In Taekwondo, the ability to quickly change from one stance to another, freely and effectively, gives you
a great advantage. A notable attribute for any practitioner of Taekwondo is the fact that they are able to effectively move, block,
strike, and kick from any stance. You should practice transitioning from one stance to another often in order to make this skill
second nature. The switch most referenced or most thought of when talking about switching stance is the swapping of a fighting
stance’s lead leg. Going from standard (left leg in front) to what’s called “south paw” (right leg in front) or vice versa.
Example: As depicted above, from a fighting stance, (# 1), you will simultaneously pull the front foot behind you while bringing
the rear foot in front, (# 2). To do this, you must learn to shift your entire body weight upward, not so much that you jump up,
but just enough to take the weight off your feet so you can freely cross them front to back at the same time. If the environment
suits it, you may even glide your feet along the ground to make the switch or if too much traction exists, you may have to slightly
hop before swapping stance. As soon as you change the position of both feet, plant them to the ground to stabilize your fighting
posture, (# 3).
3 2 1

SPINNING & TURNING
Another skill that Taekwondo really does a great job at emphasizing is that of spinning and turning. Taekwondo is known for
flashy spinning techniques, and those quickly executed spins come from a good foundation of footwork. Spinning allows us to
add momentum to almost any technique such as elbow strikes, back fists, outward blocks, and heel kicks. The act of spinning
gives us greater velocity and can increase the power we deliver to a target. It also makes it more difficult for an opponent to
accurately strike a particular part of our body because the target areas are literally spinning. Spinning also adds a little trickery,
cover, and camouflage to our intentions. It’s also important not to over use spinning techniques because they are much slower
than quick steps or slicing, and they can leave you vulnerable to counter attacks.
1. 90 Degree Forward Turn
The 90 degree turn is a fast
transition to alter your direction
when tracking an opponent,
planning a strike, or mounting a
counter attack. Practice this shift
in direction often as it will become
quite valuable in all movement.
To turn 90 degrees forward
practice pushing off the rear foot
as if you were going to sprint
forward, (# 2), but instead turn
you entire body to the left from a
standard fighting stance or to the
right from a south paw fighting
stance. As soon as your turn is
complete, plant both feet and
stabilize your posture, (# 3).
2. 90 Degree Backward Turn
To turn 90 degrees backward,
practice pushing off the floor
with the rear leg just as you turn
your upper body back away from
the lead leg. From a standard
fighting stance as depicted in the
picture, you would start to spin
your upper body to the right
while at the same time pushing
to the right with the back foot,
(#2).
These two 90 degree turns will let
you switch direction (left or right)
from a single fighting stance.
posture.
3
2
1
3 2 1

3. 180 Degree “In Place” Backward Spin
Now and then you may want to
spin away from or towards an
opponent. To avoid a strike,
create confusion, setup an attack,
counter or for a myriad of other
reasons. The 180 degree spin can
be a quick way to gain or create
distance or it can be a great tool
for getting an opponent to react.
To spin backwards, and create
distance, start by turning your
body towards the rear leg, drive
off the floor with the front foot
as if you were going to turn and
run away from your opponent (#
2), and keep the back foot where
it is, pivoting on it, until you are again facing your opponent in the opposite fighting stance (# 3). The rear leg will now be
in front. Do not over use this spin as it will be slower than stepping back or switching stances without spinning and will
leave you predictable.
4. 180 Degree “In Place” Forward Spin
To spin forward, and reduce
distance, start by turning your
upper body towards the rear leg,
drive off the floor with the rear
foot to increase the momentum
of your spin and keep the front
foot where it is, pivoting on it (#
2), until you are again facing
your opponent in the opposite
fighting stance (# 3).
The rear leg will now be in front.
As stated above, do not over use
this spin as it will be slower than
switching stances or stepping
forward and will leave you
predictable.
5. 180 Degree “Traveling” Backward Spin
Adding a step backwards before spinning 180 degrees can create a lot of space for you to escape danger.
6. 180 Degree “Traveling” Forward Spin
Adding a step forward before spinning 180 degrees can gain you a lot of distance or add to the momentum of the spin.
Adding a step before and after the forward 180 creates something known as the Hurricane Step.
3
2
1
1
2
3


