OLI Chemistry Wizard 9.5 User Guide Guides/OLI Chemistry Wizard 9.5 User...1 Users of Aspen Plus and...
23
OLI Systems, Inc. OLI Chemistry Wizard 3.0 User Guide Page 1 OLI Chemistry Wizard 9.5 User Guide Updated August 17, 2017 OLI Chemistry Wizard is a Windows wizard-style application that leads you through the process of creating an OLI chemistry model file and associated model database file for use with any other OLI product or custom solution that incorporates OLI Engine. Chemistry Wizard includes both the aqueous and mixed solvent electrolyte (MSE) databanks. This manual is intended to give you a quick introduction to the Chemistry Wizard and lead you through the process of creating your first set of chemistry model files. Contents 1 Disclaimer ............................................................................................................................................. 2 2 A Quick Start ........................................................................................................................................ 2 2.1 Welcome ....................................................................................................................................... 3 2.2 Databank Selection ....................................................................................................................... 5 2.3 Component Selection .................................................................................................................... 6 2.4 Redox, Assay and Pseudo component Selection......................................................................... 10 2.5 Phase Selection ........................................................................................................................... 11 2.6 Summary ..................................................................................................................................... 12 2.7 Generating Model Files............................................................................................................... 13 3 Details ................................................................................................................................................. 13 3.1 Location of Databanks ................................................................................................................ 13 3.2 Redox Selection .......................................................................................................................... 15 3.3 Assays and Pseudocomponents ................................................................................................... 17 4 Aspen Plus Users ................................................................................................................................ 21 4.1 OLI systems for Aspen Plus........................................................................................................ 21
Transcript of OLI Chemistry Wizard 9.5 User Guide Guides/OLI Chemistry Wizard 9.5 User...1 Users of Aspen Plus and...
OLI Systems, Inc. OLI Chemistry Wizard 3.0 User Guide Page 1
OLI Chemistry Wizard 9.5 User Guide Updated August 17, 2017
OLI Chemistry Wizard is a Windows wizard-style application that leads you through the process of creating an OLI chemistry model file and associated model database file for use with any other OLI product or custom solution that incorporates OLI Engine. Chemistry Wizard includes both the aqueous and mixed solvent electrolyte (MSE) databanks. This manual is intended to give you a quick introduction to the Chemistry Wizard and lead you through the process of creating your first set of chemistry model files.
Contents 1 Disclaimer ............................................................................................................................................. 2 2 A Quick Start ........................................................................................................................................ 2
2.1 Welcome ....................................................................................................................................... 3 2.2 Databank Selection ....................................................................................................................... 5 2.3 Component Selection .................................................................................................................... 6 2.4 Redox, Assay and Pseudo component Selection ......................................................................... 10 2.5 Phase Selection ........................................................................................................................... 11 2.6 Summary ..................................................................................................................................... 12 2.7 Generating Model Files ............................................................................................................... 13
3 Details ................................................................................................................................................. 13 3.1 Location of Databanks ................................................................................................................ 13 3.2 Redox Selection .......................................................................................................................... 15 3.3 Assays and Pseudocomponents ................................................................................................... 17
4 Aspen Plus Users ................................................................................................................................ 21 4.1 OLI systems for Aspen Plus ........................................................................................................ 21
OLI Systems, Inc. OLI Chemistry Wizard 3.0 User Guide Page 2
1 Disclaimer The OLI Chemistry Wizard document was created with version 9.5.3 of the software and images and values are subject to change as the software progresses. This document was created on August 17, 2017. The product names of Aspen, Aspen Plus are registered trademarks of Aspen Technology.
2 A Quick Start
To launch Chemistry Wizard, double-click on the OLI Chemistry Wizard 9.5 icon on your desktop or, use your mouse to navigate to the Chemistry Wizard 9.5 menu entry in the Windows program menu: Start ‐> Programs ‐> OLI Systems ‐> Chemistry Wizard 9.5 Use a single left mouse button click on the Chemistry Wizard 9.5 menu entry to start the application. For the programs Aspen Plus and ProII, you can find the path to the Chemistry Wizard in the following paths:
2.1.1 Aspen Plus Start > Programs > OLI Systems > OLI Engine 9.5 for Aspen Plus
2.1.2 ProII Start > Programs > OLI Systems > OLI Engine 9.5 for ProII
OLI Systems, Inc. OLI Chemistry Wizard 3.0 User Guide Page 3
2.2 Welcome
Figure 1 Splash screen
OLI Systems, Inc. OLI Chemistry Wizard 3.0 User Guide Page 4
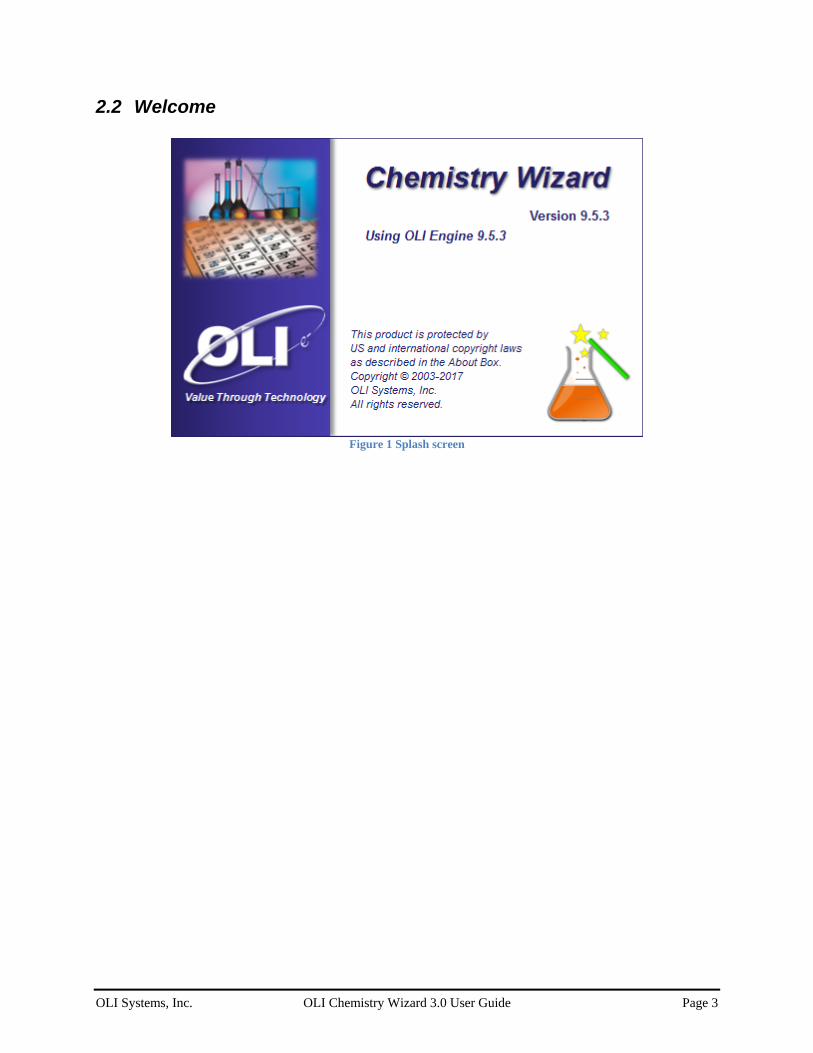
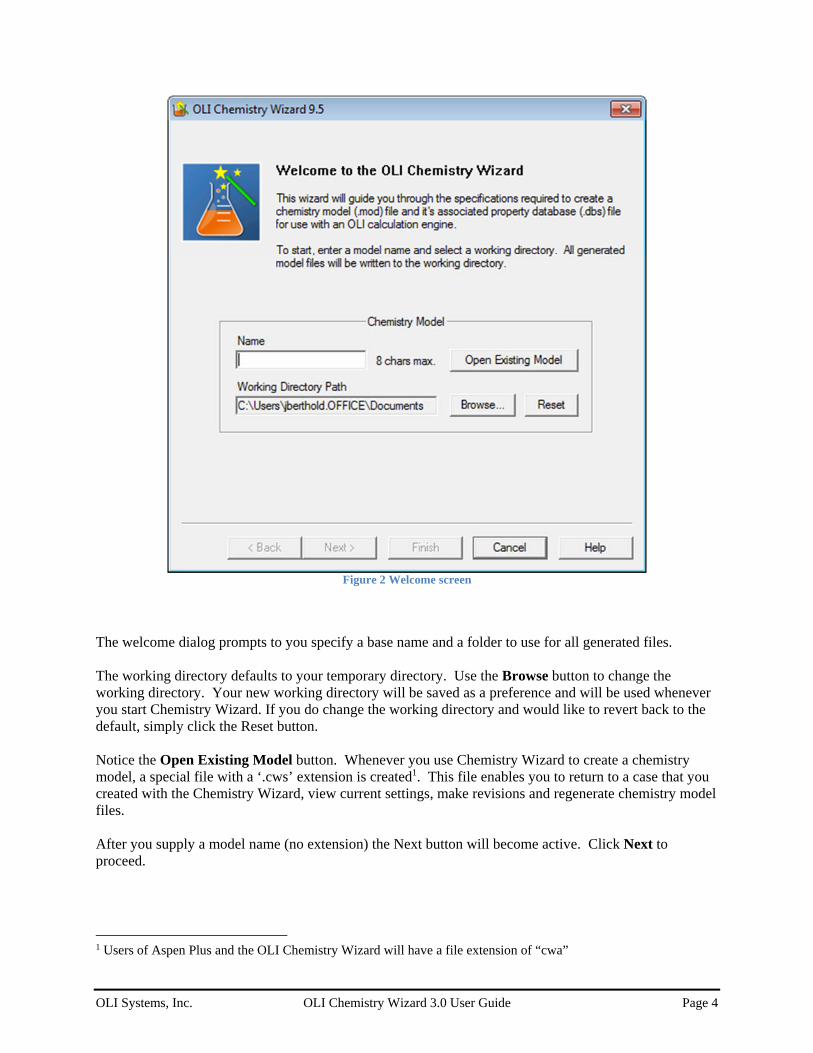
Figure 2 Welcome screen
The welcome dialog prompts to you specify a base name and a folder to use for all generated files. The working directory defaults to your temporary directory. Use the Browse button to change the working directory. Your new working directory will be saved as a preference and will be used whenever you start Chemistry Wizard. If you do change the working directory and would like to revert back to the default, simply click the Reset button. Notice the Open Existing Model button. Whenever you use Chemistry Wizard to create a chemistry model, a special file with a ‘.cws’ extension is created1. This file enables you to return to a case that you created with the Chemistry Wizard, view current settings, make revisions and regenerate chemistry model files. After you supply a model name (no extension) the Next button will become active. Click Next to proceed.
1 Users of Aspen Plus and the OLI Chemistry Wizard will have a file extension of “cwa”
OLI Systems, Inc. OLI Chemistry Wizard 3.0 User Guide Page 5
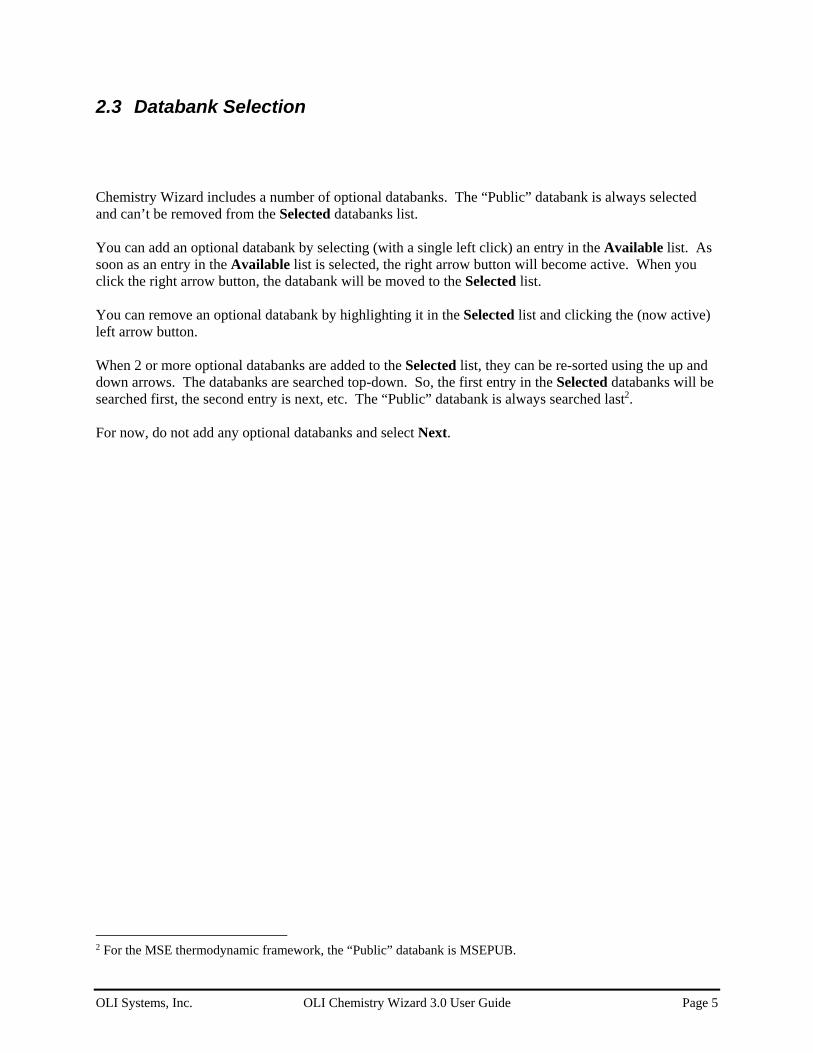
2.3 Databank Selection
Chemistry Wizard includes a number of optional databanks. The “Public” databank is always selected and can’t be removed from the Selected databanks list. You can add an optional databank by selecting (with a single left click) an entry in the Available list. As soon as an entry in the Available list is selected, the right arrow button will become active. When you click the right arrow button, the databank will be moved to the Selected list. You can remove an optional databank by highlighting it in the Selected list and clicking the (now active) left arrow button. When 2 or more optional databanks are added to the Selected list, they can be re-sorted using the up and down arrows. The databanks are searched top-down. So, the first entry in the Selected databanks will be searched first, the second entry is next, etc. The “Public” databank is always searched last2. For now, do not add any optional databanks and select Next.
2 For the MSE thermodynamic framework, the “Public” databank is MSEPUB.
OLI Systems, Inc. OLI Chemistry Wizard 3.0 User Guide Page 6
Figure 3 Selected Databanks
2.4 Component Selection
OLI Systems, Inc. OLI Chemistry Wizard 3.0 User Guide Page 7
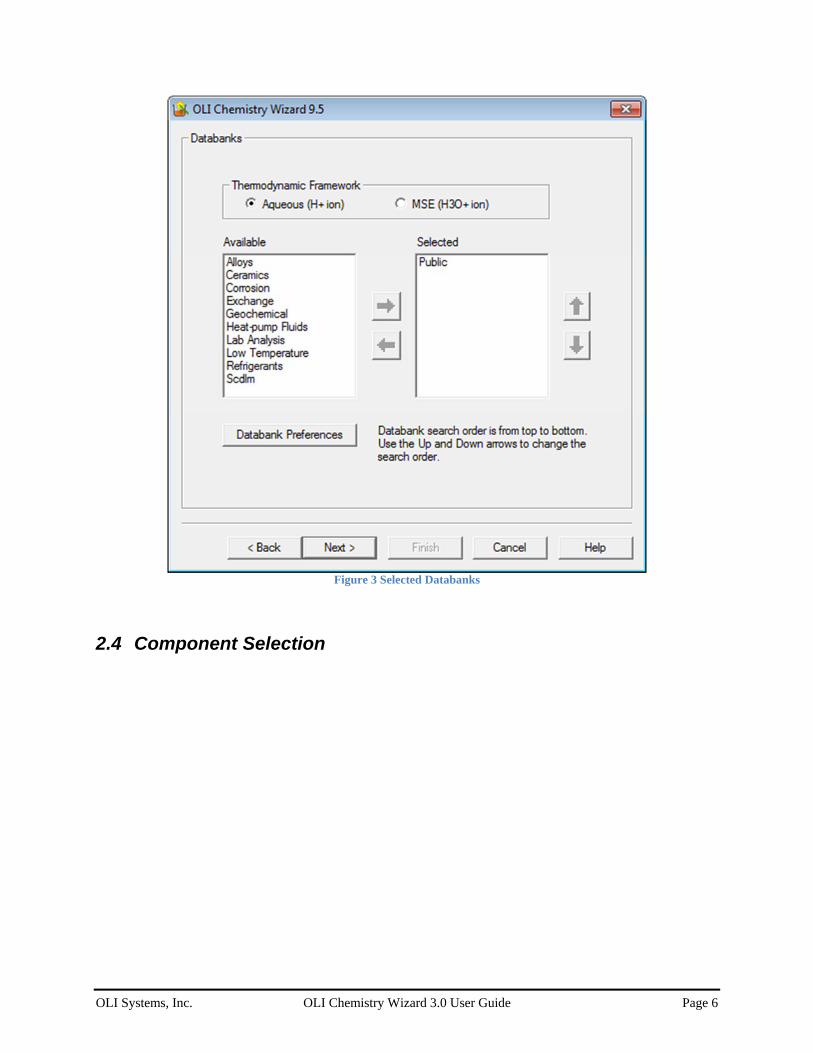
Figure 4 Component Addition
This page shows the Selected Components for this case. By default, water is always included. More components can be selected by clicking the Add button in the top-right corner:
OLI Systems, Inc. OLI Chemistry Wizard 3.0 User Guide Page 8
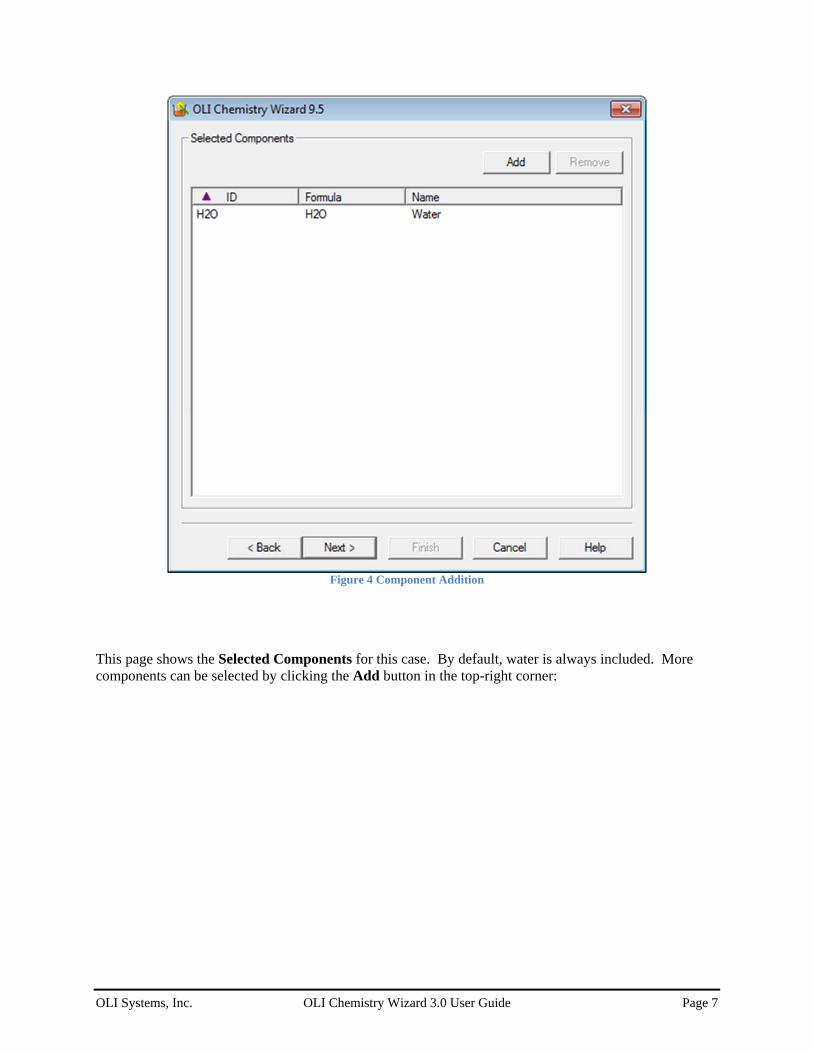
Figure 5 Searching components
The Add Component dialog let’s you scroll or search for components in the OLI databanks by ID, Formula or Name. The column being searched has a plum colored arrow pointing up (ascending sort order) or down (descending sort order). To find and highlight NaCl, type “NaCl” in the Search by ID field. If you press ENTER or click the Add button, the highlighted component will be added to your list of selected components. Do not close this dialog yet. Type “CO2” and press ENTER. Type “H2S” and press ENTER. Now, close the dialog by clicking the “Close” button.

OLI Systems, Inc. OLI Chemistry Wizard 3.0 User Guide Page 9
Your “Selected Components” page should now look like this:
Figure 6 Selected Components
Notice that you can sort selected components by ID, Formula or Name. Click Next to proceed.

OLI Systems, Inc. OLI Chemistry Wizard 3.0 User Guide Page 10
2.5 Redox, Assay and Pseudo component Selection
Figure 7 Redox Selection (off by default)
This dialog allows inclusion of reduction/oxidation chemistry as well as assays and pseudocomponents in the chemistry model. For the purpose of this tutorial, we will ignore redox, assays and pseudocomponents. If you would like to consider these components in your models, please refer to Sections 3.2 and 3.3 for a detailed description. For now, click Next to proceed.
OLI Systems, Inc. OLI Chemistry Wizard 3.0 User Guide Page 11
2.6 Phase Selection
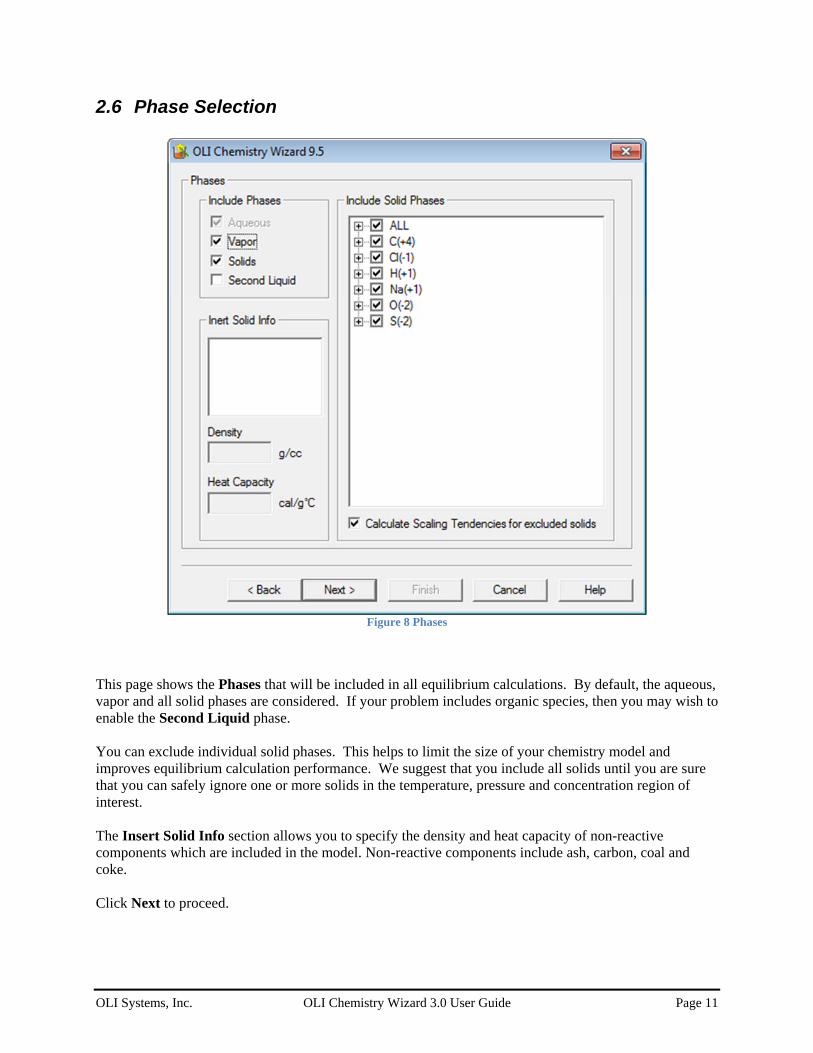
Figure 8 Phases
This page shows the Phases that will be included in all equilibrium calculations. By default, the aqueous, vapor and all solid phases are considered. If your problem includes organic species, then you may wish to enable the Second Liquid phase. You can exclude individual solid phases. This helps to limit the size of your chemistry model and improves equilibrium calculation performance. We suggest that you include all solids until you are sure that you can safely ignore one or more solids in the temperature, pressure and concentration region of interest. The Insert Solid Info section allows you to specify the density and heat capacity of non-reactive components which are included in the model. Non-reactive components include ash, carbon, coal and coke. Click Next to proceed.
OLI Systems, Inc. OLI Chemistry Wizard 3.0 User Guide Page 12
2.7 Summary
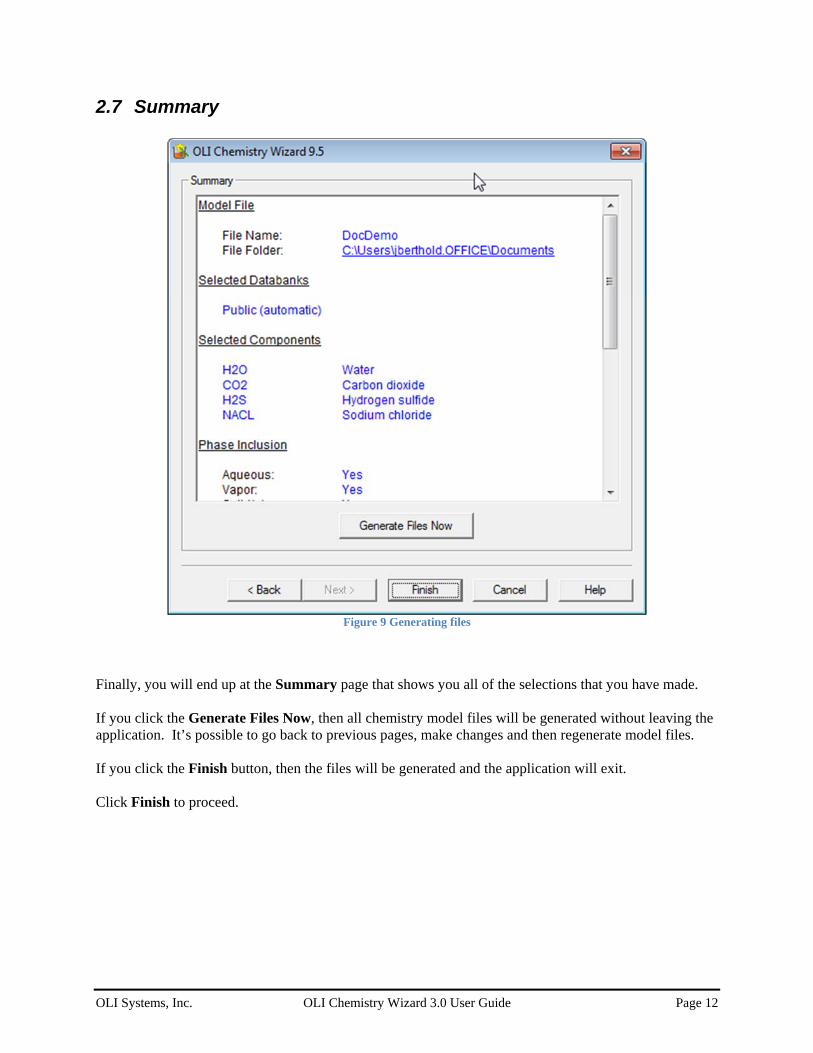
Figure 9 Generating files
Finally, you will end up at the Summary page that shows you all of the selections that you have made. If you click the Generate Files Now, then all chemistry model files will be generated without leaving the application. It’s possible to go back to previous pages, make changes and then regenerate model files. If you click the Finish button, then the files will be generated and the application will exit. Click Finish to proceed.
OLI Systems, Inc. OLI Chemistry Wizard 3.0 User Guide Page 13
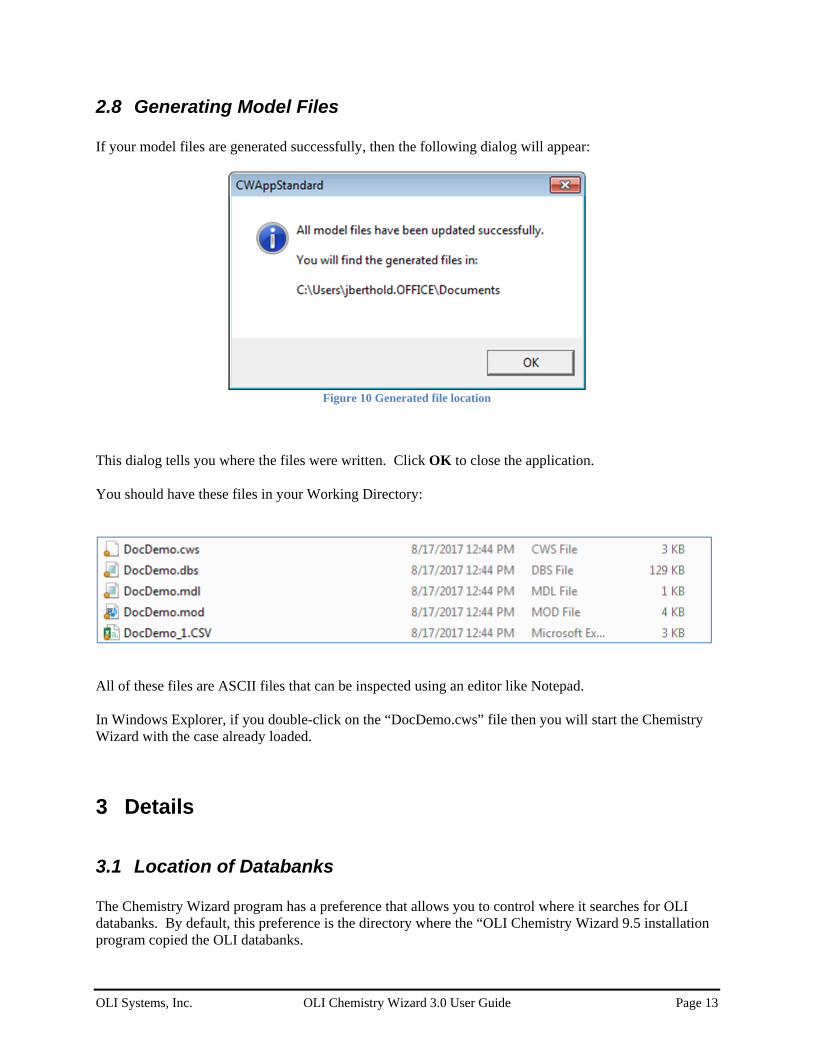
2.8 Generating Model Files If your model files are generated successfully, then the following dialog will appear:
Figure 10 Generated file location
This dialog tells you where the files were written. Click OK to close the application. You should have these files in your Working Directory:
All of these files are ASCII files that can be inspected using an editor like Notepad. In Windows Explorer, if you double-click on the “DocDemo.cws” file then you will start the Chemistry Wizard with the case already loaded.
3 Details
3.1 Location of Databanks The Chemistry Wizard program has a preference that allows you to control where it searches for OLI databanks. By default, this preference is the directory where the “OLI Chemistry Wizard 9.5 installation program copied the OLI databanks.
OLI Systems, Inc. OLI Chemistry Wizard 3.0 User Guide Page 14
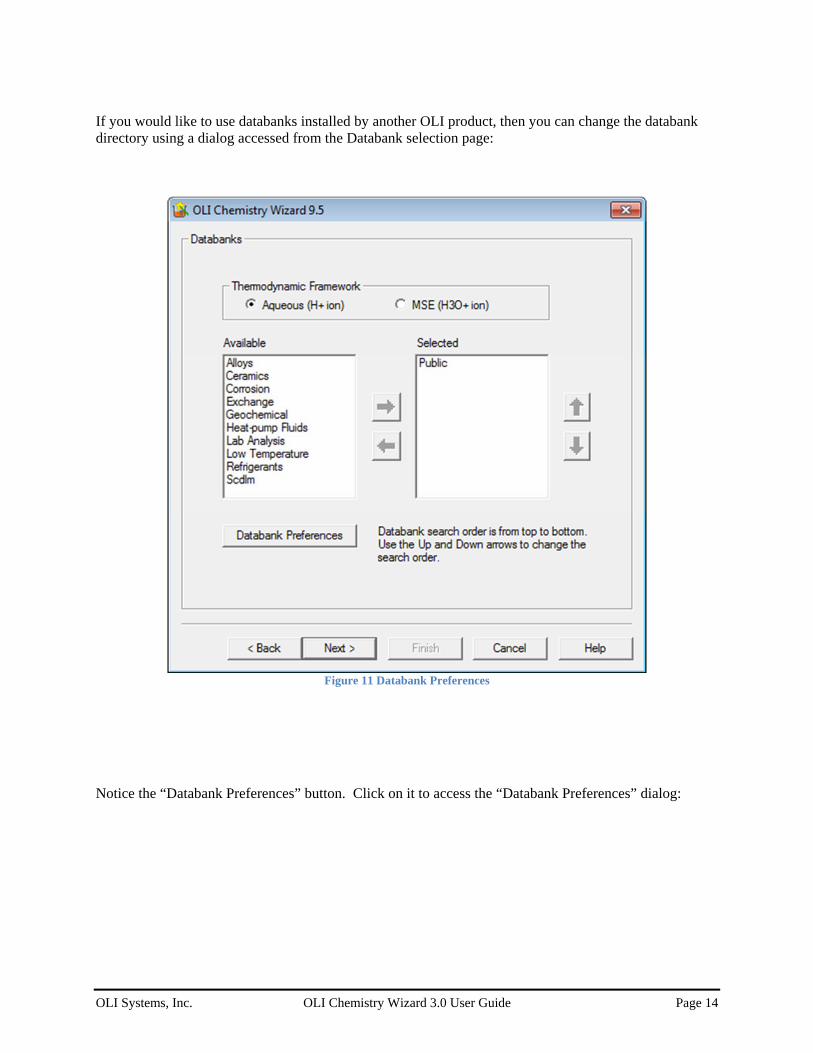
If you would like to use databanks installed by another OLI product, then you can change the databank directory using a dialog accessed from the Databank selection page:
Figure 11 Databank Preferences
Notice the “Databank Preferences” button. Click on it to access the “Databank Preferences” dialog:
OLI Systems, Inc. OLI Chemistry Wizard 3.0 User Guide Page 15
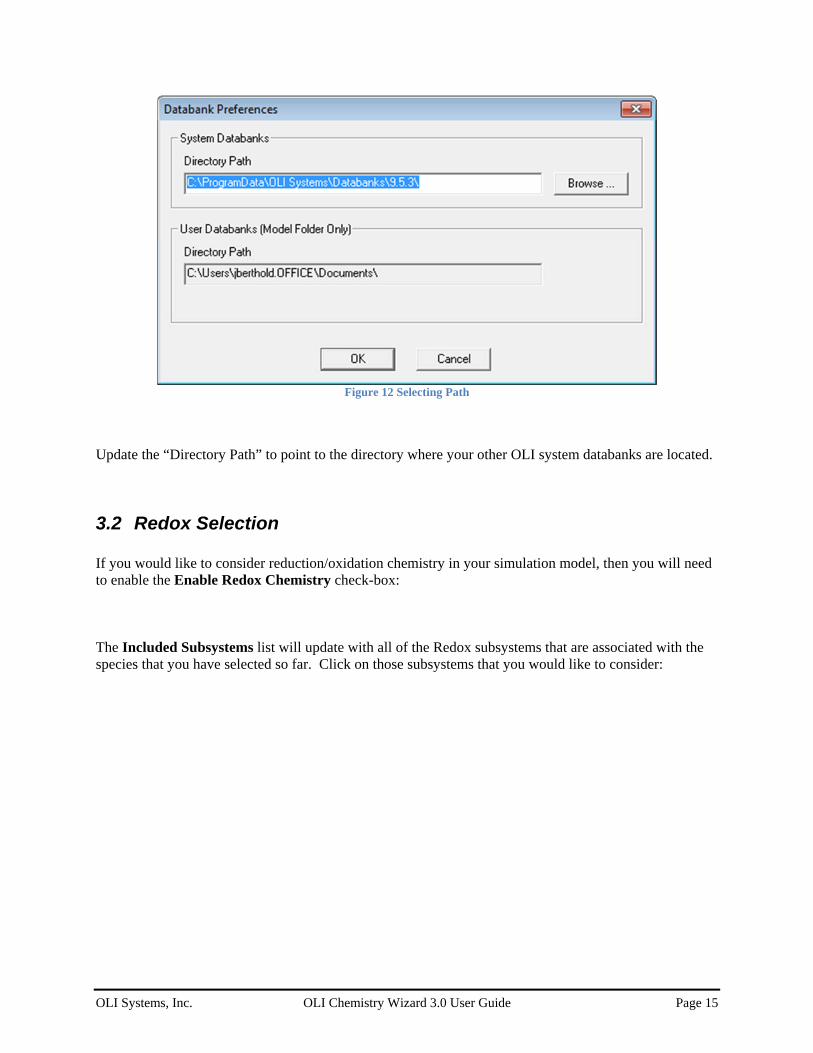
Figure 12 Selecting Path
Update the “Directory Path” to point to the directory where your other OLI system databanks are located.
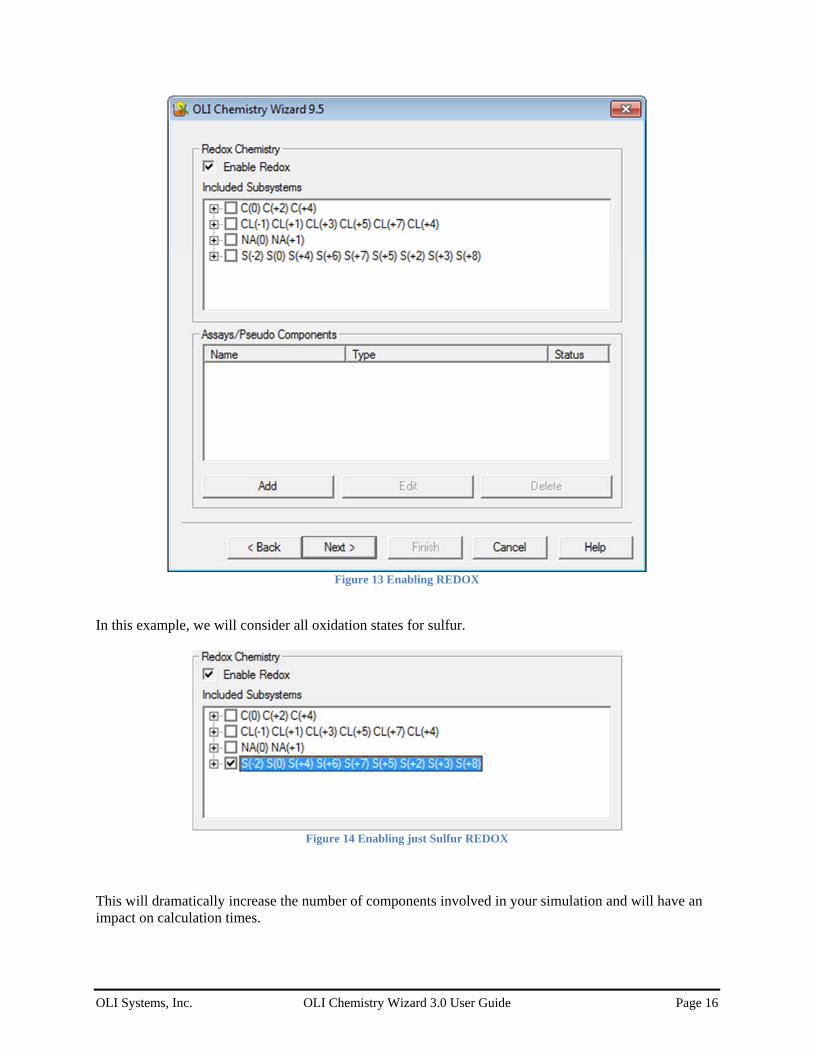
3.2 Redox Selection If you would like to consider reduction/oxidation chemistry in your simulation model, then you will need to enable the Enable Redox Chemistry check-box:
The Included Subsystems list will update with all of the Redox subsystems that are associated with the species that you have selected so far. Click on those subsystems that you would like to consider:
OLI Systems, Inc. OLI Chemistry Wizard 3.0 User Guide Page 16
Figure 13 Enabling REDOX
In this example, we will consider all oxidation states for sulfur.
Figure 14 Enabling just Sulfur REDOX
This will dramatically increase the number of components involved in your simulation and will have an impact on calculation times.
OLI Systems, Inc. OLI Chemistry Wizard 3.0 User Guide Page 17
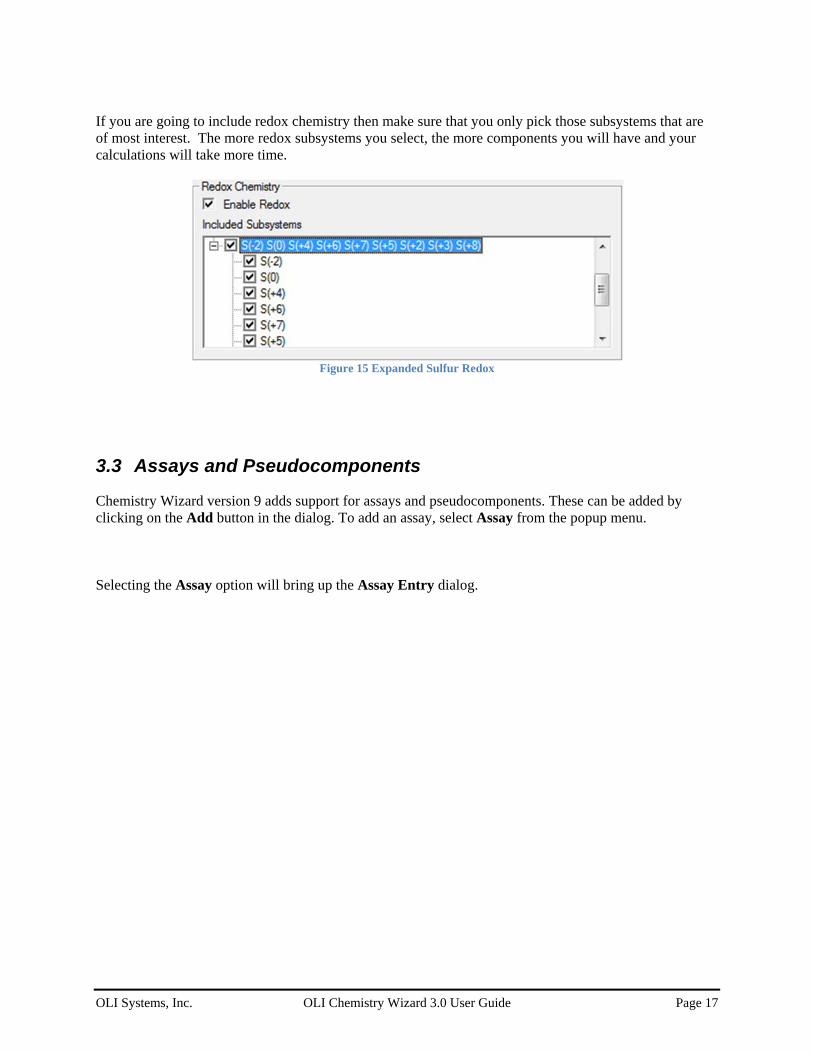
If you are going to include redox chemistry then make sure that you only pick those subsystems that are of most interest. The more redox subsystems you select, the more components you will have and your calculations will take more time.
Figure 15 Expanded Sulfur Redox
3.3 Assays and Pseudocomponents
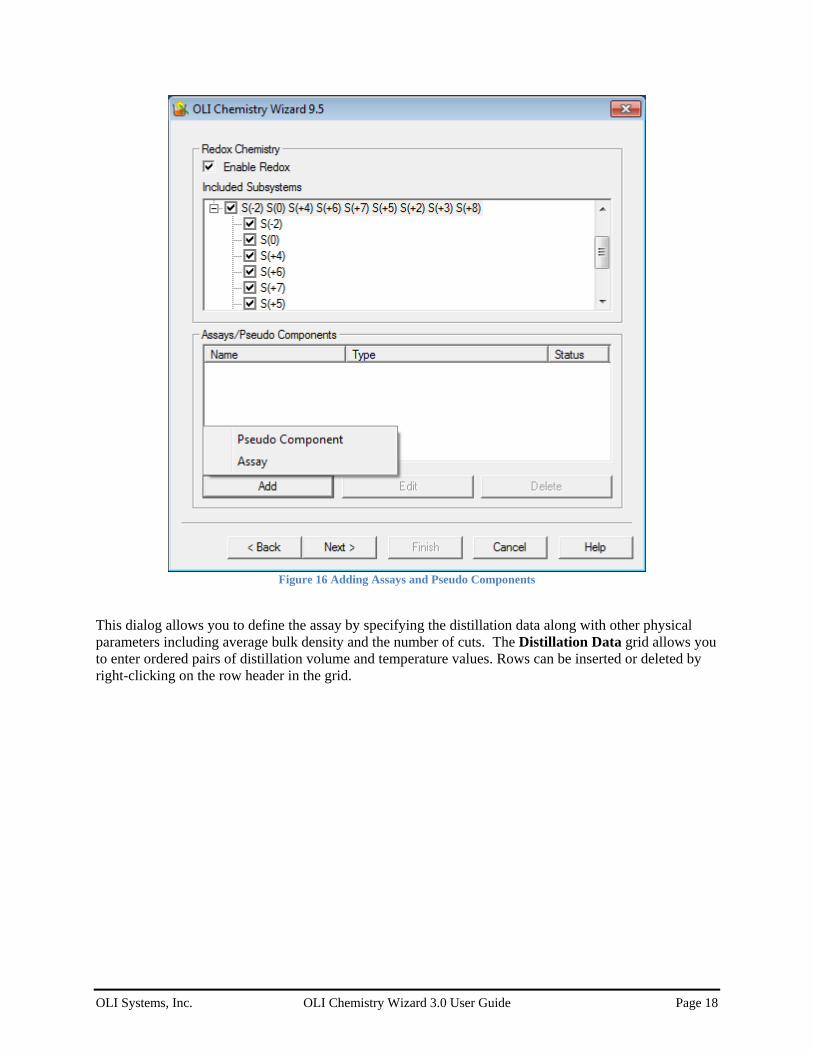
Chemistry Wizard version 9 adds support for assays and pseudocomponents. These can be added by clicking on the Add button in the dialog. To add an assay, select Assay from the popup menu.
Selecting the Assay option will bring up the Assay Entry dialog.
OLI Systems, Inc. OLI Chemistry Wizard 3.0 User Guide Page 18
Figure 16 Adding Assays and Pseudo Components
This dialog allows you to define the assay by specifying the distillation data along with other physical parameters including average bulk density and the number of cuts. The Distillation Data grid allows you to enter ordered pairs of distillation volume and temperature values. Rows can be inserted or deleted by right-clicking on the row header in the grid.
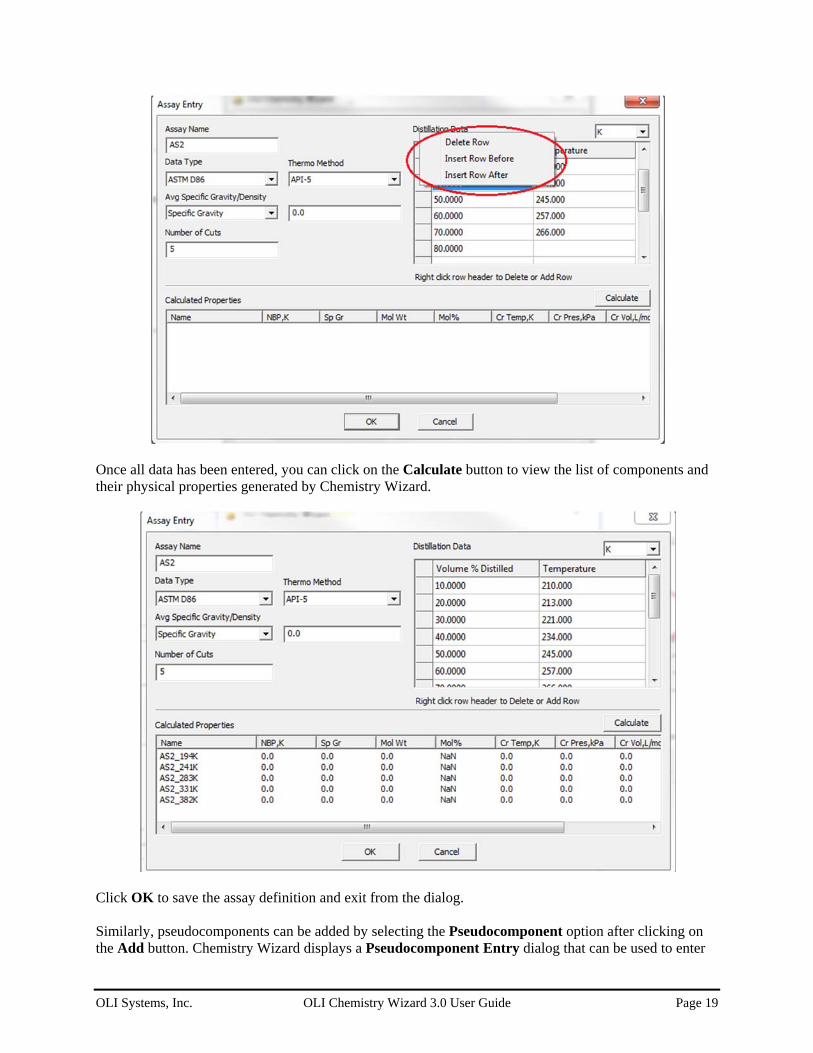
OLI Systems, Inc. OLI Chemistry Wizard 3.0 User Guide Page 19
Once all data has been entered, you can click on the Calculate button to view the list of components and their physical properties generated by Chemistry Wizard.
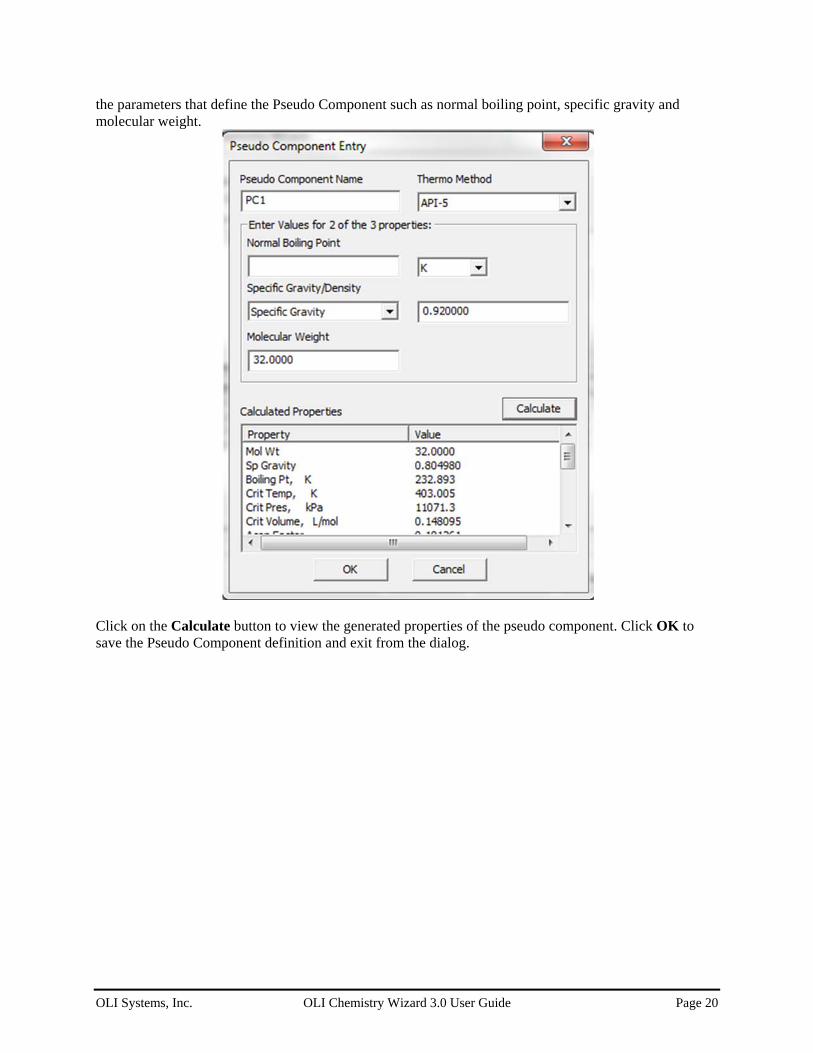
Click OK to save the assay definition and exit from the dialog. Similarly, pseudocomponents can be added by selecting the Pseudocomponent option after clicking on the Add button. Chemistry Wizard displays a Pseudocomponent Entry dialog that can be used to enter
OLI Systems, Inc. OLI Chemistry Wizard 3.0 User Guide Page 20
the parameters that define the Pseudo Component such as normal boiling point, specific gravity and molecular weight.
Click on the Calculate button to view the generated properties of the pseudo component. Click OK to save the Pseudo Component definition and exit from the dialog.
OLI Systems, Inc. OLI Chemistry Wizard 3.0 User Guide Page 21
4 Aspen Plus Users
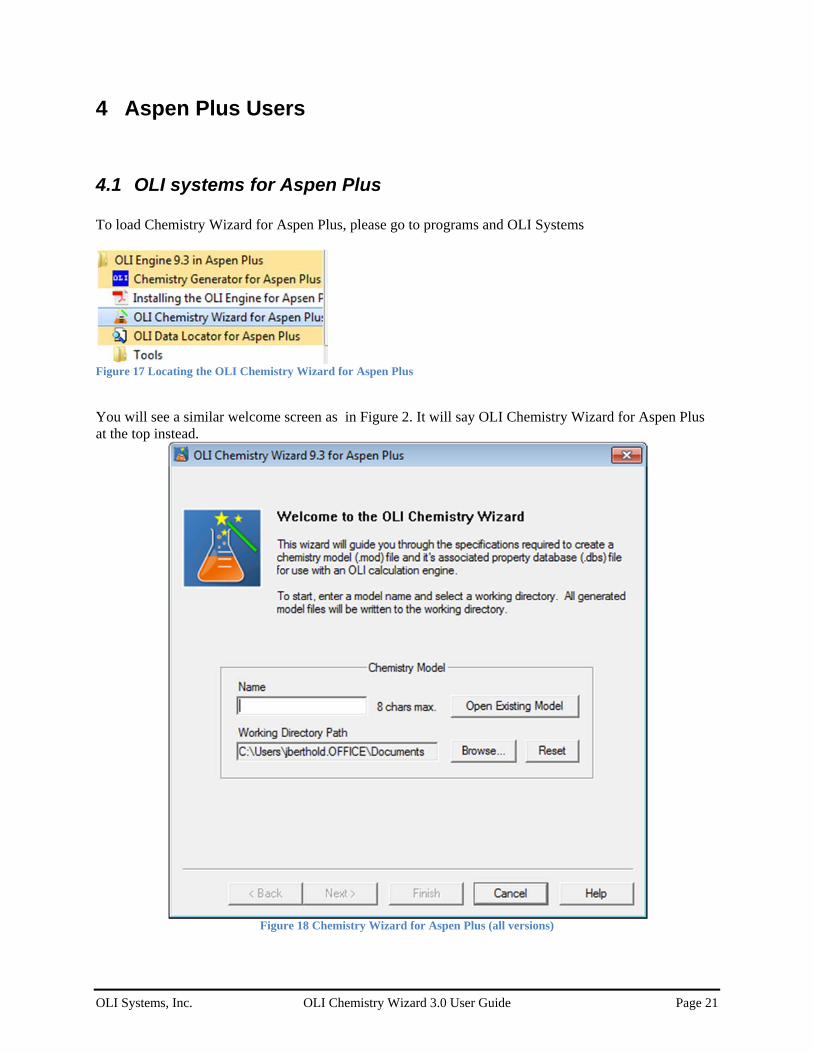
4.1 OLI systems for Aspen Plus To load Chemistry Wizard for Aspen Plus, please go to programs and OLI Systems
Figure 17 Locating the OLI Chemistry Wizard for Aspen Plus
You will see a similar welcome screen as in Figure 2. It will say OLI Chemistry Wizard for Aspen Plus at the top instead.
Figure 18 Chemistry Wizard for Aspen Plus (all versions)
OLI Systems, Inc. OLI Chemistry Wizard 3.0 User Guide Page 22
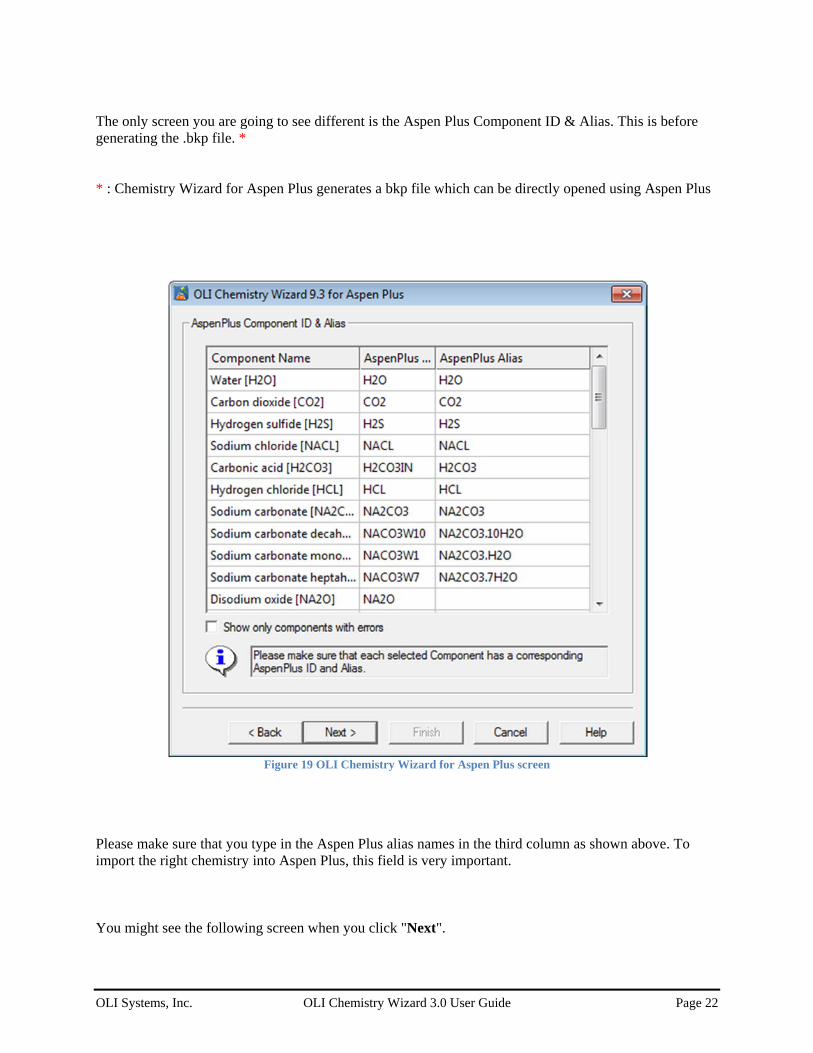
The only screen you are going to see different is the Aspen Plus Component ID & Alias. This is before generating the .bkp file. * * : Chemistry Wizard for Aspen Plus generates a bkp file which can be directly opened using Aspen Plus
Figure 19 OLI Chemistry Wizard for Aspen Plus screen
Please make sure that you type in the Aspen Plus alias names in the third column as shown above. To import the right chemistry into Aspen Plus, this field is very important. You might see the following screen when you click "Next".
OLI Systems, Inc. OLI Chemistry Wizard 3.0 User Guide Page 23
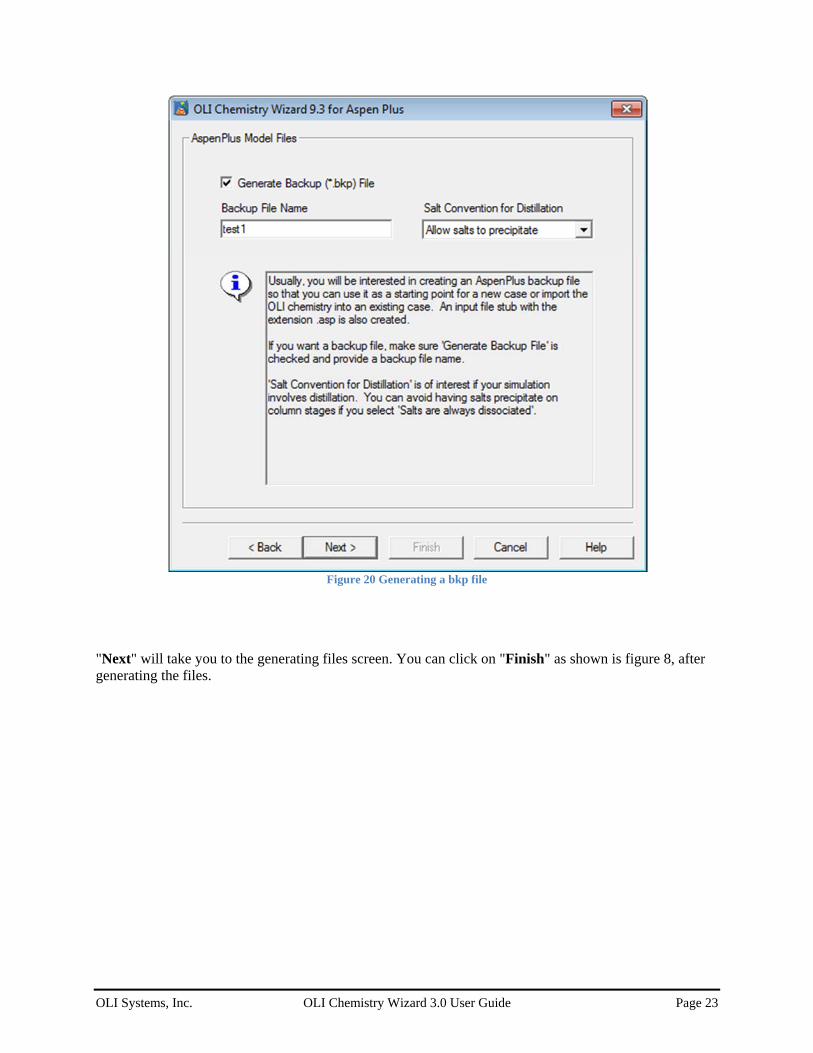
Figure 20 Generating a bkp file
"Next" will take you to the generating files screen. You can click on "Finish" as shown is figure 8, after generating the files.