
„Olga Palais“ - Second Life
31
Transcript of „Olga Palais“ - Second Life


„Olga Palais“ Module 1, 2 & 3 (west wing)(Sub-Module 1.0, 1.1, 1.2, 2.0, 3.0, 3.1, 3.2, 3.3)
Dear buyers!
Congratulations on your purchase of this exquisite building from the production of Fin's Corporation, which is currently the most magnificent, palatial building commercially available in Second Life.
Fin's Corporation stands for products of exceptional quality, and we present with our residential buildings most luxurious living culture. We have set ourselves the goal to meet the satisfaction of our customers' highest requirements in terms of design and construction, and therefore we offer you with each module of the "Olga-Palais" a product that can withstand any comparison.
We placed during construction of this prestigious building, the highest value in the best possible precision in the texturing and detail, as it was in terms of memory consumption just acceptable. Three-dimensional textures, representing building structures are used by us only in places where they would find use in the real world. A considerable part of the textures used on the interior and exterior of the house was manufactured by us especially for this building, and is therefore only mounted here.
We can offer you, dear buyer, so to say with a clear conscience that you have acquired with the purchase of this extraordinary palace, not only a masterpiece of European architecture, but also own a building, causing with its uniqueness and beauty the kindness and amazement of your visitors - without a doubt.
Therefore we are very confident that you will be satisfied with this palace in all respects.
Sincerely!
H.I.H. Findbhair McConaughtGrand Princess of The Most Honourable Order of Art and Morality,
CEO of Fin's Corporation

The building - architectural style and interior design Over its entire construction the Olga-Palais follows the Russian architecture of the late 18th Century. This is well known for its great richness and generous spatial design, and is characterized (contrary to all classicistic influences of Europe) by its typical decor and eastern coolness and distance mediating material choice in the interior. Even today, Russian palaces are among the most magnificent buildings of our time and they still bear witness to the power and wealth of its former builder.
Floor plan and exterior facade of the Olga-Palais are based mostly on the model of the Alexander Palace in Tsarskoye Selo (now Pushkin), a suburb of St. Petersburg. The neoclassical Alexander Palace was built by Catherine the Great for her favorite grandson, the future Czar Alexander I, on the occasion of his marriage with Louise of Baden in 1793, adjacent to the Catherine Palace, and was also the favorite residence of the last Russian Tsar Nicholas II.
In the interior of the Olga-Palais, we also follow the Russian palace architecture of this era, but leave the model of the Alexander Palace in favor of a coherent collection of various state rooms of different origins, coupled with our own additions and modifications. In this way, dear buyers, we can provide you, on the one hand a functional building and on the other a prestigious residence.
The construction of such a large building is a time-and labor-consuming business, so we decided to divide the house into several modules. These additional modules we will progressively offer for sale after their completion. In this way it was possible for us to offer a fully functional building of small dimensions for our customers today. And to you, it is possible to purchase just as much Olga Palais, as you plan to use on your demands, needs and possibilities.
H.I.H. Gr. Princess Olga Nikolaevna Romanova

Module 1 - Grand Hall (throne room)
The great hall (or the throne room) forms the central part of the left wing of the palace, and it follows in its interior broadly the example of the throne room of the St. Petersburg Hermitage.
Its internal dimensions are 35.07 meters long and 19.37 meters wide, with an interior height of 10.24 meters. This corresponds to a volume of 6956 m³. Presumably it represents the second largest hall in the entire palace. Without additional add-on modules the hall covers with its external dimensions 40 meters in length, 24 meters in width and 17.65 meters high, an area of 960 sqm.
The primcount varies between 795 primitives (minimum) and 881 primitives (maximum) including the bundled sub-modules 1.1 and 1.2.
It is therefore still possible to build this module on a 1/16 sim; although we do not want to recommend this. Because neither for the exterior design, nor for the necessary interior would remain a sufficient primcount.
The complete working of scripts on the relevant plot is indispensable for the setup of all sub-modules (for the period of installation)!
If necessary, ask the landowner for support.

Module 1 - Delivery and Installation (incl. Sub-Module 1.1 & 1.2)
The module is delivered in a transport box, shown in Fig.1 in the background. It consists of three sub-modules with the item numbers 1.0, 1.1 and 1.2, which can be seen in the foreground of Fig.1.
Sub-module 1.0 is the complete hall. The also delivered two sub-modules 1.1 and 1.2 are the add-on modules for the chandeliers above the entrance doors and the sun rays in the interior.
The setup is easy, and you will be supported in the best way to avoid classical building mistakes, through the sophisticated script technology of our company. For this purpose it is necessary to comply with the following assembly instructions step by step.
Before we are starting, we would ask you urgently:
Make a copy of the delivery box!
Well, after you have made this copy, we can start now!
Unpacking delivery box & set up Sub-Module 1.0
1.) Rez the just copied delivery box on your property. Simply drag it by "drag and drop" from your inventory folder onto the ground of your property in front of you.
(If you have trouble, check your rez-rights, and maybe the activated group.)
Figure 1: Scope of delivery

2.) Click with the left mouse button on the delivery box, and transfer its contents from the window that opens with the help of the available buttons in your inventory. You will receive a new inventory folder with the name:"[BOX] Fins Olga Palais Module 1 (copy)SALE"
This folder contains the three sub-modules:
✔ [PACKAGE] Fins - Olga Palais - Modul 1.0 - Grand Hall (copy)✔ [PACKAGE] Fins - Olga Palais - Modul 1.1 - Grand Hall (copy)✔ [PACKAGE] Fins - Olga Palais - Modul 1.2 - Grand Hall (copy)
along with some landmarks and a notecard with the short version of this manual.
3.) Now delete the delivery box on your property before we proceed. 4.) Now go to the planned location of the building and rez the sub-module 1.0 from the newly
received inventory folder (see Fig. 2).
It appears the white module box that is shown in figure 2, and at the same time a menu will open in your viewer. Furthermore, you will immediately notice the two red bars, which are mounted in a cross at the module box. These indicate the maximum footprint of the house, and this will help to determine the suitable location of the module box. At the same time, these bars show also the height of the floor of the hall. It is exactly one meter above the bottom edge of the base of the house, agreeing with the lower edge of the box.
Note: For the further expansion of the palace it is of great advantage to build this module totally horizontal. For this reason, this module box helps you with a spatial position control script, which makes it impossible to place this box not horizontally. Of course you can turn the building in any desired horizontally direction.
5.) Select the desired location under the building assessment scale based on the red bars, and by moving the box. At this time it is not recommended to raise or lower the box in the vertical direction.
Figure 2: Sub-module 1.0

6.) If you have found the desired location, select the menu item "Rez" and wait until the building has been completely constructed. This process should be completed within a few seconds. Difficulties can occur only if the proposed location is too close to the property line. In this case it is advisable to set up the building at a greater distance to the border, and to move in a second step (see next item).
7.) The finished building is constructed entirely from foundation to roof and all parts are functioning (Fig. 3 & 4). The house can be corrected in its spatial position by rotating or moving the box located in its interior. The building will follow any change in the position of the box automatically.
Figure 3: Module 1 (Grand Hall) - exterior
Figure 4: Module 1 (Grand Hall) – interior with module box

8.) If the final place for the building has been found and everything is to your satisfaction, select in the open menu the item "Save". This fixes all components in their final position. (Should the menu not be open, click on the box.)
9.) As a final point, please remove the box inside the building.
The construction of sub-module 1.0 is now complete. The building can now be used. If you also plan to install the two additional modules 1.1 and 1.2, so please follow the steps in the following section.
Sub-Module 1.1 & 1.2 – set up
1.) The complete working of scripts on the relevant plot is indispensable for the setup of all sub-modules (for the period of installation)! If necessary, ask the landowner for support.
2.) If point 1 is guaranteed, rez the box of the desired sub-module at any location inside the newly constructed module 1.0 (Grand Hall) or in a radius of max 96 meters measured from the center of the hall. The box has a reddish hue (Fig. 5). At the same time, a menu appears on your monitor screen.
3.) For the correct set up the sub-module box moves automatically to the necessary location with assistance of the automated module positioning system developed by the Fin's Corporation; and after its successful orientation in space, the color will change from reddish to greenish (Fig. 6).
If this should not work: Delete the box and try a second or third time. A large delay (lag) in Second Life can complicate this process. If the automatical positioning still does not work, and during the rezing there was no menu, so please check whether the execution of scripts is allowed on your property, whether you have selected the right group, and set briefly these necessary rights, or ask the landlord to do this for you.
Figure 5: expansions sub-module box – not positioned

If you get a menu, but the automatical positioning still does not work (extremely unlikely event), so you can position the module box of the sub-module 1.1 or 1.2 manually in the exact middle of the hall. The box must be exactly on the floor, and its narrow sides must be located parallel to the longitudinal sides of the room.
4.) Now select in the open menu the item "Rez" and wait until the expansion module has been fully rezzed. (Should not be open the menu, click on the box.)
5.) Now select in the open menu the item "Save". This fixes the component in place. (Should not be open the menu, click on the box.)
6.) Now remove the box, and the construction of the extension module is finished.
Proceed with additional modules in the same way.
Figure 6: expansions sub-module box - after automatical positioning

Module 2 – Portal & Stairs (west wing)
The staircase forms the end part of the left wing of the Olga-Palais.
A large two-winged, golden-studded door greets the visitors in the six pillars decorated portal of the west wing of the palace, and leads their way into the reception room. There, two other doors leading their way into the two staircases. Downright the door into the great staircase, and to the right hand the door to the upper floor and the west portal chamber. If we choose the way in the great staircase, so visitors are greeted by a magnificent staircase in one of white marble and gold dominated hall. The beauty of this staircase prepares all visitors to the throne room directly below.
The inside dimensions of the graet staircase are: length 29.46 meters, 19.75 meters wide, and an interior height of 14.45 meters. The module has a footprint of 983 sqm. The outer dimensions are 45.12 meters long, 21.77 meters wide and 17.65 meters high.
The length of the building inclusive the necessary module 1 are 82.17 meters.The footprint of the building (module 1+2) are 1950 sqm.
The Primcount of module 2 is 936 primitives, and 1658 primitives inclusive the module 1.
It is therefore still possible to build this building on a 1/8 sim; although we do not want to recommend this. Because neither for the exterior design, nor for the necessary interior would remain a sufficient primcount.
The complete working of scripts on the relevant plot is indispensable for the setup of all sub-modules (for the period of installation)!
If necessary, ask the landowner for support.

Module 2 - Delivery and Installation (Sub-Module 2.0)
The module is delivered in a transport box, shown in Fig.7 in the background. It consists of one sub-module with the item numbers 2.0, which can be seen in the foreground of Fig.7.
Sub-module 2.0 is the complete south end of the west wing of the Olga Palais.
The setup is easy, and you will be supported in the best way to avoid classical building mistakes, through the sophisticated script technology of our company. For this purpose it is necessary to comply with the following assembly instructions step by step.
Before we are starting, we would ask you urgently:
Make a copy of the delivery box!
Well, after you have made this copy, we can start now!
Unpacking delivery box & set up Sub-Module 2.0
1.) Rez the just copied delivery box on your property. Simply drag it by "drag and drop" from your inventory folder onto the ground of your property in front of you.
(If you have trouble, check your rez-rights, and maybe the activated group.)
Figure 7: Scope of delivery
2.) Click with the left mouse button on the delivery box, and transfer its contents from thewindow that opens with the help of the available buttons in your inventory. You will receive a new inventory folder with the name:
"[BOX] Fins Olga Palais Module 2 (copy)SALE"This folder contains the sub-module:
➢ [PACKAGE] Fins - Olga Palais - Module 2.0 (copy)along with some landmarks and a notecard with the short version of this manual.
3.) Now delete the delivery box on your property before we proceed.
4.) The complete working of scripts on the relevant plot is indispensable for the setup of all sub-modules (for the period of installation)! If necessary, ask the landowner for support.
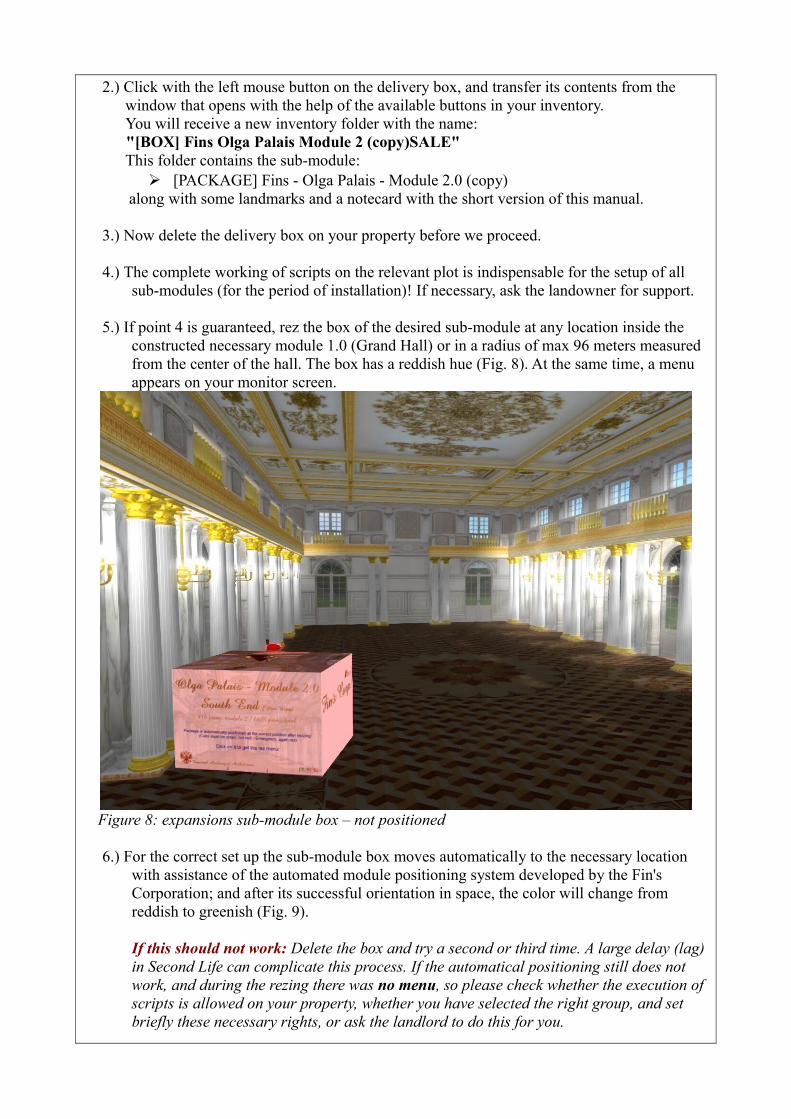
5.) If point 4 is guaranteed, rez the box of the desired sub-module at any location inside the constructed necessary module 1.0 (Grand Hall) or in a radius of max 96 meters measured from the center of the hall. The box has a reddish hue (Fig. 8). At the same time, a menu appears on your monitor screen.
6.) For the correct set up the sub-module box moves automatically to the necessary location with assistance of the automated module positioning system developed by the Fin's Corporation; and after its successful orientation in space, the color will change from reddish to greenish (Fig. 9).
If this should not work: Delete the box and try a second or third time. A large delay (lag) in Second Life can complicate this process. If the automatical positioning still does not work, and during the rezing there was no menu, so please check whether the execution of scripts is allowed on your property, whether you have selected the right group, and set briefly these necessary rights, or ask the landlord to do this for you.
Figure 8: expansions sub-module box – not positioned

If you get a menu, but the automatical positioning still does not work (extremely unlikely event), so you can position the module box of the sub-module 2.0 manually in the exact middle of the hall. The box must be exactly on the floor, and its narrow sides must be located parallel to the longitudinal sides of the room and the red-white arrow on the box must point to the wall called “Fins - Olga Palais - Grand Hall (Part 2 - south gable)”.
Figure 9: expansions sub-module box - after automatical positioning
Figure 10: This arrow points to the gable wall to be deleted.

7.) Now delete the gable wall of module 1 called “Fins - Olga Palais - Grand Hall (Part 2 - south gable)”, marked by the red-white arrow on the module box (Fig. 10, 11, 12).
Figure 11: Module 1 with the deleted gable wall – internal view
Figure 12: Module 1 with the deleted gable wall – external view

8.) Now delete the roof of module 1 called “Fins - Olga Palais - Grand Hall (Part 6 – roof)”(Fig. 13). Note: Delete not the ceiling, only the green roof!
9.) Now select in the open menu the item "Rez" and wait until the expansion module has beenfully rezzed. (Should not be open the menu, click on the box.)
Figure 13: Module 1 with the deleted gable wall and roof
Figure 14: Olga Palais – Module 1 and 2 with view of the eastern wall of the west wing.

10.) Now select in the open menu the item "Save". This fixes the components in place. (Should not be open the menu, click on the box.)
11.) Now remove the module box, and the construction of the extension module is finished.
Figure 15: Olga Palais – Module 1 and 2 with view of the west wing portal
Figure 16: Olga Palais – Module 2 - the main staircase

Module 3 – North End (west wing)
Module 3 forms the other end of the left wing of the Olga-Palais.The main entrance of the west wing is under a huge porch for protection from the weather. Massive columns and arches form the impressive main entrance of the palace on the west side, and the path leads behind the golden door in the equally magnificent Raphael loggia, a worthy reception for each royal guest. The road splits at the end of the beautifully decorated loggia in the anteroom of the throne room to the left hand (glamorously staterooms as well), and the first royal living quarters on the upper floor just to. Up there, the guest must use the full of gold and precious wood crafted staircase of this house section. More than 200 prims were used to make this magnificent staircase to a memorable experience for every visitor, crowned by a wooden coffered ceiling with cross-shaped vault, built of ornate gold panels. The upper floor welcomes the guests with a winding corridor to the gallerie of the throne room, three private rooms, and the small palace chapel. A classic double room suite is located to the right hand, and to the left is a larger study and the chapel behind it.
The external dimensions of module 3 are: length 59.83 meters, 40.68 meters wide, and an exterior height of 17.62 meters. Module 3 has a footprint of 2434 sqm and a primcount of 1070 primitives. The dimensions of the building including the necessary module 1 are: length 69.53 meters, wide 42.50 meters, with a footprint of 2955 sqm and a primcount of 1831 prims (reducible to 1688 without sub-modules 3.1 – 3.2). The dimensions of the complet west wing (Module 1-3) are: length 112.58 meters, wide 42.50 meters, with a footprint of 4785 sqm, and a primcount of 2611 prims (reducible to 2477).
It is therefore still possible to build this building on a 1/4 sim; although we do not want to recommend this. Because neither for the exterior design, nor for the necessary interior would remain a sufficient primcount.
The complete working of scripts on the relevant plot is indispensable for the setup of all sub-modules (for the period of installation)!
If necessary, ask the landowner for support.

Module 3 - Delivery and Installation (Sub-Module 3.0, 3.1, 3.2 & 3.3)
The module is delivered in a transport box, shown in Fig.17 in the background. It consists of four sub-modules with the item numbers 3.0, 3.1, 3.2, 3.3, which can be seen in the foreground of Fig.17.
Sub-module 3.0 is the complete north end of the west wing of the Olga Palais, the optional Sub-modules 3.1 - 3.3 include curtains and sun rays of specific rooms of the upper floor.
The setup is easy, and you will be supported in the best way to avoid classical building mistakes, through the sophisticated script technology of our company. For this purpose it is necessary to comply with the following assembly instructions step by step.
Before we are starting, we would ask you urgently:
Make a copy of the delivery box!
Well, after you have made this copy, we can start now!
Figure 17: Scope of delivery
Unpacking delivery box & set up Sub-Module 3.0
1.) Rez the just copied delivery box on your property. Simply drag it by "drag and drop" from your inventory folder onto the ground of your property in front of you.
(If you have trouble, check your rez-rights, and maybe the activated group.)
2.) Click with the left mouse button on the delivery box, and transfer its contents from thewindow that opens with the help of the available buttons in your inventory. You will receive a new inventory folder with the name:
"[BOX] Fins Olga Palais Module 3 (copy)SALE"This folder contains the sub-modules:
➢ [PACKAGE] Fins - Olga Palais - Module 3.0 (copy)➢ [PACKAGE] Fins - Olga Palais - Module 3.1 (copy)➢ [PACKAGE] Fins - Olga Palais - Module 3.2 (copy)➢ [PACKAGE] Fins - Olga Palais - Module 3.3 (copy)
along with some landmarks and notecards with the short version of this manual.
3.) Now delete the delivery box on your property before we proceed.
4.) The complete working of scripts on the relevant plot is indispensable for the setup of all sub-modules (for the period of installation)! If necessary, ask the landowner for support.
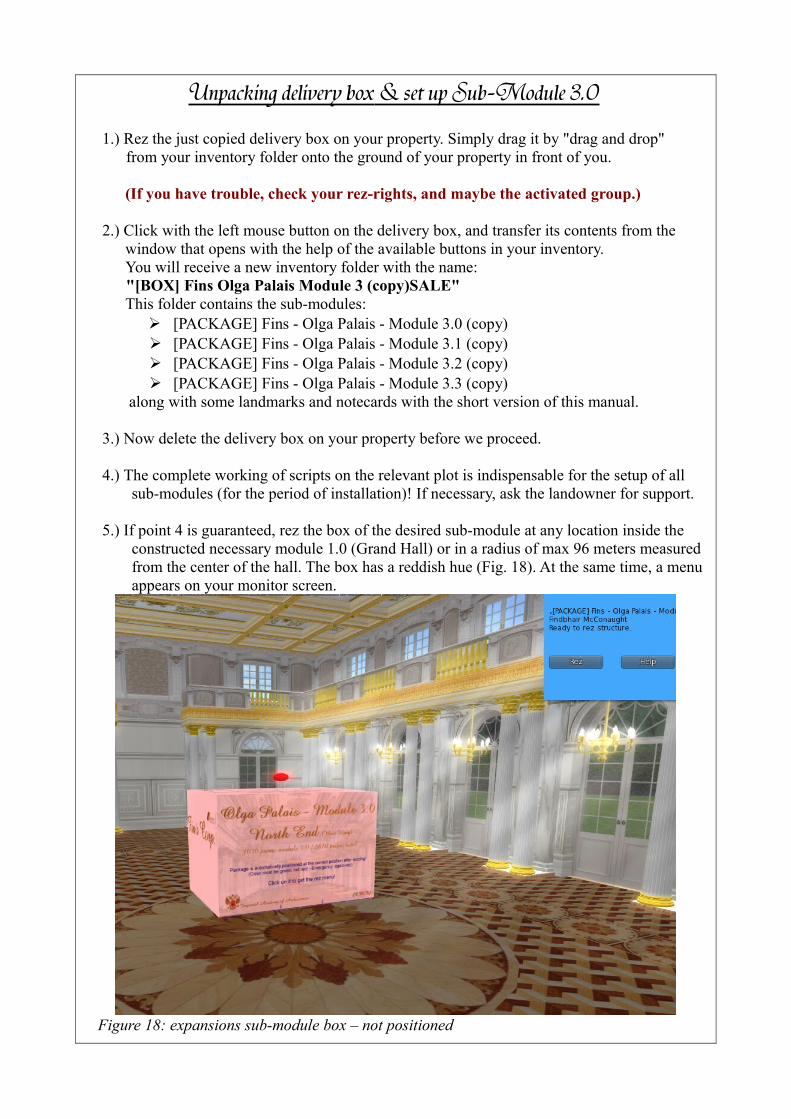
5.) If point 4 is guaranteed, rez the box of the desired sub-module at any location inside the constructed necessary module 1.0 (Grand Hall) or in a radius of max 96 meters measured from the center of the hall. The box has a reddish hue (Fig. 18). At the same time, a menu appears on your monitor screen.
Figure 18: expansions sub-module box – not positioned

6.) For the correct set up the sub-module box moves automatically to the necessary location with assistance of the automated module positioning system developed by the Fin's Corporation; and after its successful orientation in space, the color will change from reddish to greenish (Fig. 19).
If this should not work: Delete the box and try a second or third time. A large delay (lag) in Second Life can complicate this process. If the automatical positioning still does not work, and during the rezing there was no menu, so please check whether the execution of scripts is allowed on your property, whether you have selected the right group, and set briefly these necessary rights, or ask the landlord to do this for you.
If you get a menu, but the automatical positioning still does not work (extremely unlikely event), so you can position the module box of the sub-module 2.0 manually in the exact middle of the hall. The box must be exactly on the floor, and its narrow sides must be located parallel to the longitudinal sides of the room and the red-white arrow on the box must point to the wall called “Fins - Olga Palais - Grand Hall (Part 4 - north gable)”.
7.) Now delete the gable wall of Module 1 (throne room) called “Fins - Olga Palais - Grand Hall (Part 4 - north gable)”, marked by the red-white arrow on the top on Sub-module 3.0 called [PACKAGE] Fins - Olga Palais - Module 3.0 (copy). (Fig. 20, 21, 22).
Figure 19: expansions sub-module box - after automatical positioning

Figure 20: This arrow points to the gable wall to be deleted. Figure 21: Module 1 with the deleted gable wall – internal view
Figure 20: This arrow points to the gable wall to be deleted.

8.) Now select in the open menu the item "Rez" and wait until the expansion module has beenfully rezzed. (Should not be open the menu, click on the box.)
9.) Now select in the open menu the item "Save". This fixes the components in place. (Should not be open the menu, click on the box.)
Figure 22: Module 1 with the deleted gable wall – external view
Figure 23: Olga Palais – Modules 1 and 3 - view of the north-west corner.
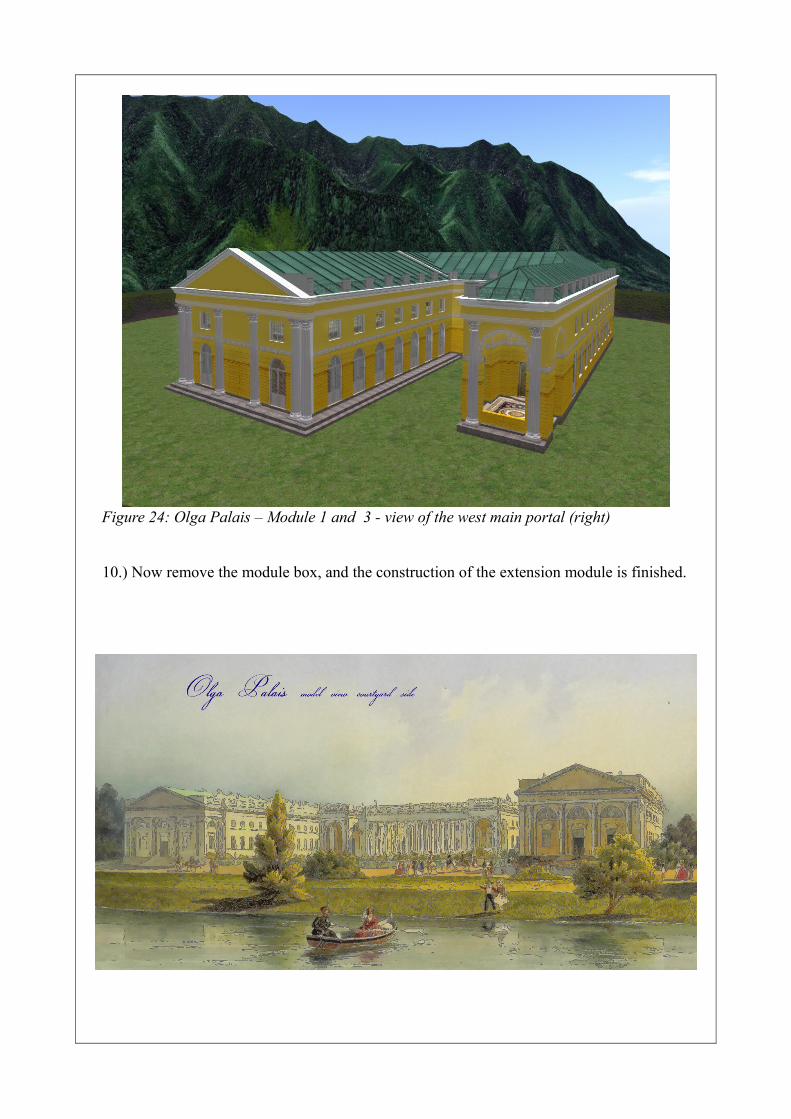
10.) Now remove the module box, and the construction of the extension module is finished.
Figure 24: Olga Palais – Module 1 and 3 - view of the west main portal (right)

Sub-Module 3.1 & 3.2 & 3.3 – set up
1.) The complete working of scripts on the relevant plot is indispensable for the setup of all sub-modules (for the period of installation)! If necessary, ask the landowner for support.
2.) If point 1 is guaranteed, rez the box of the desired sub-module at any location inside the constructed module 1.0 (Grand Hall) or in a radius of max 96 meters measured from the center of the hall. The box has a reddish hue (Fig. 25). At the same time, a menu appears on your monitor screen.
3.) For the correct set up the sub-module box moves automatically to the necessary location with assistance of the automated module positioning system developed by the Fin's Corporation; and after its successful orientation in space, the color will change from reddish to greenish (Fig. 26).
If this should not work: Delete the box and try a second or third time. A large delay (lag) in Second Life can complicate this process. If the automatical positioning still does not work, and during the rezing there was no menu, so please check whether the execution of scripts is allowed on your property, whether you have selected the right group, and set briefly these necessary rights, or ask the landlord to do this for you.
If you get a menu, but the automatical positioning still does not work (extremely unlikely event), so you can position the module box of the sub-module 3.1, 3.2 or 3.3 manually in the exact middle of the hall. The box must be exactly on the floor, and its narrow sides must be located parallel to the longitudinal sides of the room.
Figure 25: expansions sub-module box – not positioned
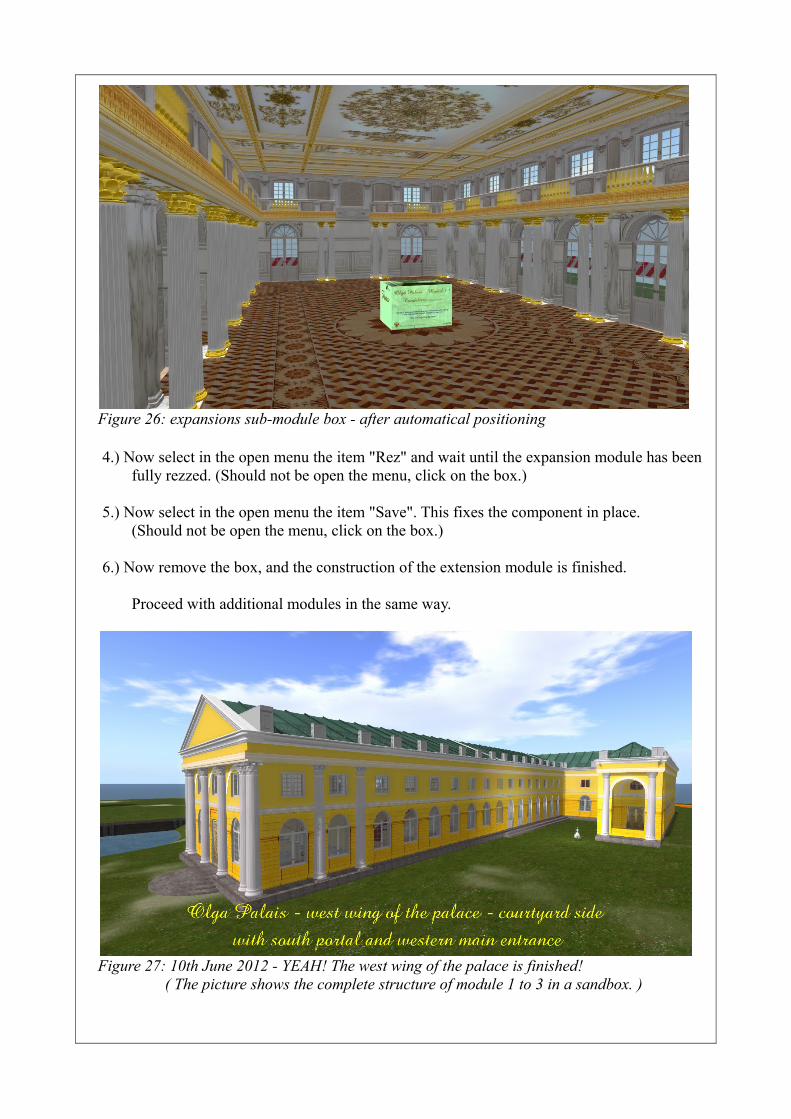
4.) Now select in the open menu the item "Rez" and wait until the expansion module has been fully rezzed. (Should not be open the menu, click on the box.)
5.) Now select in the open menu the item "Save". This fixes the component in place. (Should not be open the menu, click on the box.)
6.) Now remove the box, and the construction of the extension module is finished.
Proceed with additional modules in the same way.
Figure 26: expansions sub-module box - after automatical positioning
Figure 27: 10th June 2012 - YEAH! The west wing of the palace is finished! ( The picture shows the complete structure of module 1 to 3 in a sandbox. )

Views of Module 3 – North End (west wing)
Figure 28: Module 3 brings the first living rooms of the palace
Figure 29: The Raphael's Loggia, the royal way to welcome guests

Figure 30: You can also wait more uncomfortable.
Figure 31: Maybe, the bedroom of a queen? (on the ceiling painting 'Eos and Cephalus' )

Figure 33: Stars and Stripes in russian folk art – a symbol of the entire universe
Figure 32: Each room has a unique design, each wall has its own custom texture.

Figure 34: Only one door to the throne, and the rising dawn (Eos) shows the way
Figure 35: The art of woodworking, millennia-old tradition of mankind

Figure 36: Work and reflection, under the gaze of the Blessed Virgin Mary
Figure 37: the new portal of the throne room, behind the door is the antechamber (Fig.34)
Thanks and look forward to the future
We wish you much joy with your purchased building, and we hope to welcome you in the future as our customer.
Special thanks
Mr. Kaya Angelfor perpetual and free access to the building site resources
Mr. Maximilian Nikolaidesfor good criticism and scientific advice (architecture)
The Rose Familyfor the moral support
Extension module 4 is coming soon!
It will be the whole main wing of the palace, including the colonnade and the main courtyard.
With many thanks!
Berlin on the 10th June 2012
Findbhair McConaught~


![Palais -- Italie - BnF · [Recueil. Cartes postales de Florence. Palais] (1880) Palermo. Pal. della Cuba (1880) [Recueil. Cartes postales de Palerme. Palais] (1880) [Recueil. Cartes](https://static.fdocuments.in/doc/165x107/60579bb42bca9f46c936a7f4/palais-italie-bnf-recueil-cartes-postales-de-florence-palais-1880-palermo.jpg)
