OKLAHOMA EMPLOYMENT SECURITY COMMISSION EZ TAX …
92
OKLAHOMA EMPLOYMENT SECURITY COMMISSION EZ TAX EXPRESS INSTRUCTION GUIDE
Transcript of OKLAHOMA EMPLOYMENT SECURITY COMMISSION EZ TAX …

OKLAHOMA EMPLOYMENT SECURITY COMMISSION
EZ TAX EXPRESS INSTRUCTION GUIDE

- 1 -
Contents 1.0 Manage User ........................................................................................................................ - 3 -
1.1 New User ......................................................................................................................... - 3 -
1.1.1 Create New Administrator....................................................................................... - 3 -
1.1.2 Create New User (under the Employer Administrator) ............................................. - 5 -
1.2 Manage Users.................................................................................................................... - 6 -
1.2.1 Manage User Roles .................................................................................................... - 6 -
1.2.2 Manage Existing Users .............................................................................................. - 7 -
1.3 Manage TPA Relationship ................................................................................................ - 9 -
1.3.1 Associate TPA Relationship ...................................................................................... - 9 -
1.3.2 Remove TPA Relationship ...................................................................................... - 11 -
1.4 Manage TPA Permissions ............................................................................................... - 12 -
1.4.1 Associate TPA User to an Employer ....................................................................... - 12 -
1.4.2 Update TPA User’s Access Rights for an Employer ............................................... - 15 -
1.4.3 Remove TPA User’s Access Rights for an Employer ............................................. - 16 -
1.4.4 Search Employers Associated to the TPA ............................................................... - 17 -
1.4.5 Search Employers Associated to a TPA User .......................................................... - 18 -
2.0 Login ................................................................................................................................... - 19 -
2.1 Existing User Login ........................................................................................................ - 19 -
3.0 Employers Quarterly Contribution Report .......................................................................... - 22 -
3.1.1 Submit Employers Quarterly Contribution Report ...................................................... - 23 -
3.1.2 View/Print Report and Payment Voucher................................................................ - 29 -
3.1.3 Print Copy of OES-3 ................................................................................................ - 29 -
3.2 File Upload of Quarterly Wages ..................................................................................... - 29 -
3.2.1 Upload File................................................................................................................... - 29 -
3.2.1.1 File Upload – Reports Ready to be Submitted...................................................... - 34 -
3.2.1.2 File Upload – Processing Failed ........................................................................... - 37 -
3.2.1.3 File Upload – Cancel a File Upload ...................................................................... - 38 -
3.3 View Payment Confirmation Report (file upload only) ..................................................... - 39 -
3.4 View Quarterly Contribution Reports ......................................................................... - 40 -
3.4.1 Print Employers Quarterly Contribution Report ...................................................... - 41 -
4.0 Employer Account Management ........................................................................................ - 42 -
4.1 Submit Status Report (OES-1) ........................................................................................ - 42 -
4.1.1 Submit Status Report ............................................................................................... - 42 -

- 2 -
4.2 View and Print Status Report (OES-1) ........................................................................... - 47 -
4.3 Update Employer Information ........................................................................................ - 49 -
4.3.1 View and Update Employer Addresses ................................................................ - 49 -
4.3.2 Manage Business Locations ..................................................................................... - 50 -
4.3.3 Account Maintenance History ................................................................................. - 50 -
4.4 Terminate Account (OES-24) ......................................................................................... - 51 -
4.5 View Current Benefit Wage Charges ............................................................................. - 54 -
4.6 View Historical Benefit Wage Charges .......................................................................... - 54 -
4.7 View Employer Contribution Rates ................................................................................ - 55 -
4.8 View Employer Contribution Rate Notice ...................................................................... - 55 -
4.9 View Benefit Wage Charge Appeals .............................................................................. - 56 -
4.10 View Tax Appeals......................................................................................................... - 56 -
4.11 View Account Balance ................................................................................................. - 56 -
4.12 View Tax Payments ...................................................................................................... - 57 -
4.13 View Tax Refunds ........................................................................................................ - 57 -
4.14 View Tax Warrants ....................................................................................................... - 57 -
4.15 View IRS FUTA Certification ...................................................................................... - 58 -
5.0 EFT Payment ...................................................................................................................... - 59 -
5.1 Submit Payment for Single Employer ............................................................................ - 59 -
5.2 Submit Single Bank Payment for Multi-Employers ....................................................... - 63 -
5.3 Submit Multiple Bank Payments for Multi-Employers .................................................. - 67 -
5.4 Create a Payment Summary Report ................................................................................ - 71 -
5.5.1 Edit or Delete a Payment ............................................................................................. - 73 -
5.5.1.1 Edit a Scheduled Payment .................................................................................... - 74 -
5.5.1.2 Delete a Scheduled Payment ................................................................................. - 76 -
6.0 Credit Card Payment ........................................................................................................... - 78 -
6.1 Submit Credit Card Payment .......................................................................................... - 78 -
6.2 Cancel Credit Card Payment ........................................................................................... - 85 -
7.0 Pre-file Separation Documents ........................................................................................... - 86 -
7.1 Upload File...................................................................................................................... - 86 -
7.2 Pre-file History................................................................................................................ - 89 -
8.0 Contact Information ............................................................................................................ - 91 -
8.1 EZ Tax Express Inquiries................................................................................................ - 91 -
8.2 OESC General Inquiries ................................................................................................. - 91 -

- 3 -
1.0 Manage User
This section illustrates the functionality to create an administrator and to manage the various users’ associated with the account. It also describes the approach to take when the user updates Profile information.
1.1 New User
1.1.1 Create New Administrator From the Login screen (prior to logging in), click the link Create New User ID from the navigation panel on the left of the screen.
Choose the type of account.
Select either Create an Employer Account or Create a Third Party Administrator (TPA) Account.

- 4 -
Enter the appropriate information, and click Continue.
Enter the information, and click I accept. You will then be redirected to the Login page. If you are the first to create an EZ Tax Express account, you will be noted as the account administrator. For future access to the EZ Tax Express your User ID and Password will remain the same. If you do not have an OESC account number, you may use EZ Tax Express to submit an OES-1, Status Report and receive an OESC account number in the mail. If you create a User login prior to receiving your unemployment account number it will be necessary to create a new User ID with your assigned unemployment account number.

- 5 -
1.1.2 Create New User (under the Employer Administrator)
After you have an account and you have logged in, click on Create New User.
Input the required information, choose the access role (user, administrator, view only), and click Create.
A message will appear on the top of the screen stating that the new user has been created. The user will be added to the existing users.

- 6 -
1.2 Manage Users
1.2.1 Manage User Roles
Click on Manage User Roles.
In order to update the user’s Access Role, select an option from the drop down, and click Update. Different Access Roles are displayed depending on whether the user is an Employer or a Third Party Administrator (TPA).

- 7 -
1.2.2 Manage Existing Users
Click on Manage Existing Users.
On this screen, a password can be reset by clicking the Reset Password link next to the user whose password you wish to change. Also, here the Administrator can delete a user by selecting the Delete User link. The following screen is displayed for an Employer:

- 8 -
The following screen is displayed for a TPA and is similar to what is displayed for an Employer; however, TPAs have the option to manage TPA users’ permissions.

- 9 -
1.3 Manage TPA Relationship
1.3.1 Associate TPA Relationship
Click on the Manage TPA Relationships link.
Enter at least one of the Search criteria in order to find the TPA to whom you wish to grant access.
After deciding which TPA would be best suited for you, click the Grant Access link.

- 10 -
Once the grant access box appears, select the proper Access Permission from the dropdown box.
After you have clicked the Grant Access button, permissions will be granted and you will see the TPA in the My TPAs table and the below acknowledgement will be displayed.

- 11 -
1.3.2 Remove TPA Relationship
Click on the Manage TPA Relationships link.
You will see a list of the TPAs associated with your account in the My TPAs table. In the table, you can select to either Edit or Remove the established TPA relationship. Click on the Remove link to delete the relationship and on the Edit link to change the Access Permission.

- 12 -
1.4 Manage TPA Permissions
1.4.1 Associate TPA User to an Employer
As the TPA account administrator, login (to the TPA account) and select the employer account you want to grant access to the TPA user. Click on Manage Existing Users.
On this screen, a user previously created by the Third Party Administrator (TPA) can be given permission to work with an Employer’s account after having been granted permission to the TPA by the Employer. Click the Manage Permissions link.
- 13 -
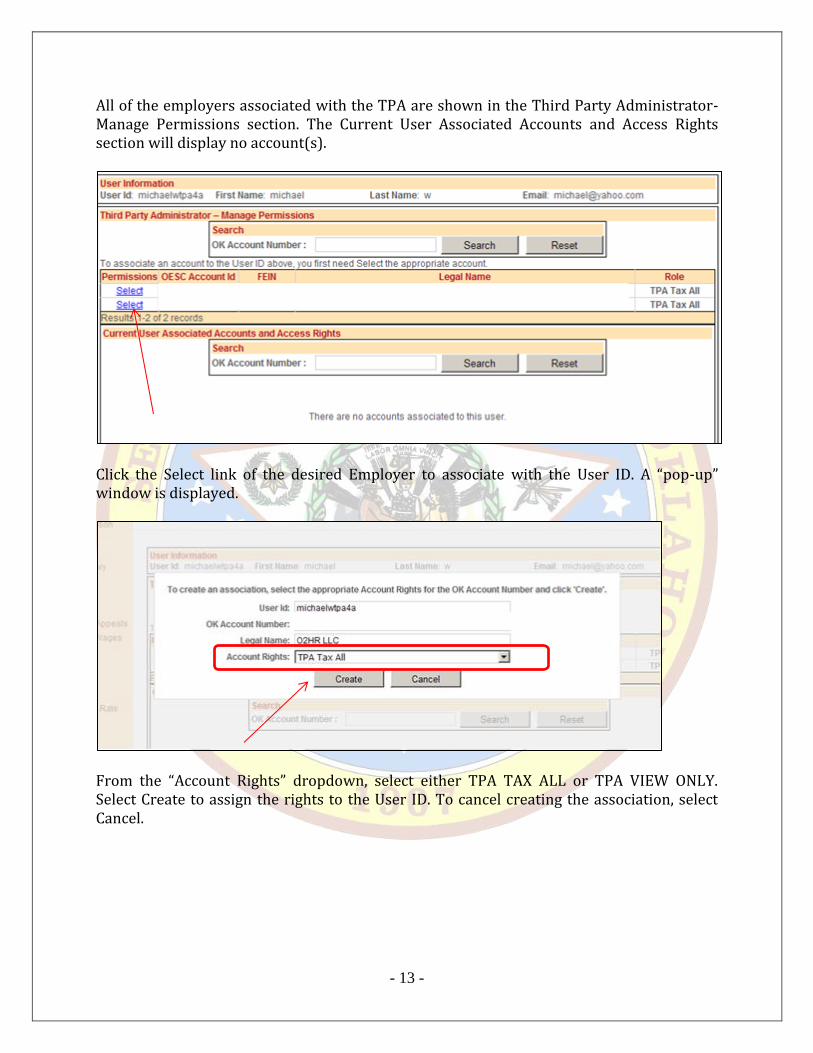
All of the employers associated with the TPA are shown in the Third Party Administrator-Manage Permissions section. The Current User Associated Accounts and Access Rights section will display no account(s).
Click the Select link of the desired Employer to associate with the User ID. A “pop-up” window is displayed.
From the “Account Rights” dropdown, select either TPA TAX ALL or TPA VIEW ONLY. Select Create to assign the rights to the User ID. To cancel creating the association, select Cancel.

- 14 -
The employer will now appear in the Current User Associated Accounts and Access Rights section.
The TPA user will only have access rights to the employers displayed in this section. The user will not have any access rights to employers listed in the Third Party Administrator – Manage Permissions section. Moreover, the access right designated by the employer supersedes the access rights the TPA grants to a TPA user.

- 15 -
1.4.2 Update TPA User’s Access Rights for an Employer
Select the Update link of the desired employer in the Current User Associated Accounts and Access Rights section. A “pop-up” window is displayed.
From the “Account Rights” dropdown, select a new value. Select Update to update the access rights for the User ID. To cancel the update and return to the existing value, select Cancel. Once the update is completed, the Role is updated in the Current User Associated Accounts and Access Rights.

- 16 -
1.4.3 Remove TPA User’s Access Rights for an Employer
Select the Delete link of the desired employer in the Current User Associated Accounts and Access Rights section. A “pop-up” window is displayed.
Select Delete to remove the access rights for the User ID to this employer. To cancel the removal of the access rights, select Cancel. Once the removal is completed, the employer is no longer listed in the Current User Associated Accounts and Access Rights section and is now displayed in the Third Party Administrator – Manage Permissions section.

- 17 -
1.4.4 Search Employers Associated to the TPA
In the Third Party Administrator – Manage Permissions section, enter a valid OK Account Number that exists in this section, then select Search.
The employer with the OK Account Number entered will be the only employer listed in the Third Party Administrator section. All other employers will not be displayed. Select Reset to eliminate the search criteria and display all employers associated to the TPA.

- 18 -
1.4.5 Search Employers Associated to a TPA User
In the Current Users Associated Accounts and Access Rights section, enter a valid OK Account Number that exists in this section then select Search.
The employer with the OK Account Number entered will be the only employer listed in the Current User Associated Accounts and Access Rights section. All other employers will not be displayed.
Select Reset to eliminate the search criteria and display all employers associated to the TPA user.
01-23456789 73-12345678 Employer Name

- 19 -
2.0 Login
2.1 Existing User Login
In the EZ Tax Express, enter the appropriate User ID and Password. Click the Login button.
The EZ Tax Express will require the user to reset the password.
Create a new password. Password must have one number and one letter. It must contain a minimum of 8 characters and a maximum of 15 characters. Passwords are case sensitive. Passwords cannot have blank spaces, special characters, punctuation, and cannot be the same as the user id. Click the Reset Password button to apply this new password. If there is Profile information missing, you will be prompted to enter in the missing information. Otherwise you can update this information by clicking the Profile Update link.

- 20 -
Click the Update button when you have made the adjustments.

- 21 -
If there is more than one account associated with the User ID entered, you will need to select the appropriate account.
If you have forgotten your User ID and/or password and you have stored an email address within your Profile, then you will be able to select Retrieve User ID or Reset Password respectively. Follow the prompts on the screen to receive a temporary password and/or your User ID in an email. For Retrieve User Id, if you do not remember your email, by entering an FEIN or an Account Number, you will be directed to contact your administrator. For Reset Password, if you do not remember your email, by entering a User Id and correctly answering the challenge questions, an email will be sent to you. If you answer the challenge question incorrectly, you will be directed to contact your administrator.

- 22 -
3.0 Employers Quarterly Contribution Report Submission Methods and File Formats The Oklahoma Employment Security Commission (OESC) Employer Portal allows employers and agents to submit Employers Quarterly Contribution Reports using the following methods: Submit Employers Quarterly Contribution Report: You will need the following information to complete this process: Employee Social Security Number (SSN) Employee First, Middle Initial and Last Name Employee Total Wages Paid this Quarter Employee Taxable Wages Paid this Quarter Upload Employers Quarterly Contribution Report: You must have the following information to complete this process: Employer Oklahoma Account Number Employer Federal Identification Number Employer Experience Rate for this reporting period Employee Social Security Number (SSN) Employee First, Middle Initial and Last Name Employee Total Wages Paid this Quarter Employee Taxable Wages Paid this Quarter The File Upload Specifications are published on the OESC Website: www.ok.gov/oesc_web Once at the OESC Website (www.ok.gov/oesc_web) select ‘Employer Information & Forms’. Then click on ‘Quarterly Wage Filing Options’. If the user cannot format his or her file to comply with the file upload specifications, the user must use the ‘Submit Contribution Report’ link in the EZ Tax Express Portal, to submit the Quarterly Contribution Report.

- 23 -
3.1.1 Submit Employers Quarterly Contribution Report
Click Submit Contribution Report from the navigation panel.
Step 1 of 6: Select Quarter and Year: Select the Quarter and Year to be filed, and click Start Quarterly Contribution Report Application.
Step 2 of 6: Contribution Report Questionnaire: Answer questions 1-4. System edits will depend on how the questions are answered. Question 1: If yes, the portal will take you through the entire reporting process. If No, the portal will take you through the process for filing a zero wage report. Question 2: If yes, the portal will not calculate the taxable limitation for each employee. If No, the portal will calculate the taxable limitation for each employee if prior quarters for the year have been filed. Question 3a: If yes, the portal will populate the Taxable Wages with amount from Total Wages for each employee.

- 24 -
Question 3b: If yes, the portal will populate the Taxable Wages with zero for each employee. Question 4: Enter the number of all full and part-time employees who worked or received pay subject to unemployment insurance for the payroll period that includes the 12th of each month. If Question 1 is answered No, the portal will populate with zeros. After answering the questions click Continue.
Step 3 of 6: Add Employees: Enter employee and wage information. Click Add Employee.

- 25 -
The portal automatically saves the entered information once the Add Employees button is clicked. The portal will also provide blank text boxes to continue adding employee information if there are more employees to report.
To delete an employee, use the mouse to put a check in the box, click Delete at the top of the column. To edit employee name information, click Edit. Wage amounts can be changed directly in the grid box. Use the Records Per Page drop down box to choose how many records to view per page (10, 25, 50, or 100). Search by Employee SSN and/or Last Name by entering a value for these fields and clicking Search. You can reset the search filter by clicking View All to display all employees. To sort by Employee SSN or Last Name click on the 1. Employee SSN or 2. Last Name header.

- 26 -
Employers Quarterly Contribution Report button functionality:
Add Employee – Must be selected in order to add employees to the report. Back – Saves the information on the screen and returns the user to step 2 of 6. Quit – Saves the information on the screen and navigates the user to step 1 of 6 (first page of the Submit Contribution Report application). Save – Saves the information on the screen (clicking save does not complete the report process) Cancel – You will receive a warning message as follows: “WARNING: Selecting Cancel will remove the entire report. Do you want to Save your work and come back later?”
OK saves the information and navigates the user to the portal homepage Cancel removes the entire report and navigates the user to the portal homepage.
Continue –Advances the user to step 4 of 6 (Saves the information on the screen as well).

- 27 -
Step 4 of 6: Review Summary Totals:
Review the information and click Continue to advance to Step 5 of 6, the signature screen. Step 5 of 6: Signature Page: Put a check mark in the I certify this report by using the mouse to click inside the check box. Enter Contact Name, Title, and Contact Phone. Click Continue to submit your report.

- 28 -
Step 6 is the confirmation page seen below.

- 29 -
3.1.2 View/Print Report and Payment Voucher
Payment Options 1. Pay On-line – To complete this process, have your bank routing number and
account number available and click Pay-Online.
2. Pay by Check a. Print the payment voucher Print Payment Voucher b. Make check payable to OESC. c. Include Oklahoma Account Number and Quarter on the check. d. Mail Payment Voucher and Check to:
OESC Attn: Cashier PO Box 52004 Oklahoma City, OK 73152-2004
DO NOT mail a copy of the Employers Quarterly Contribution Report with payment.
3.1.3 Print Copy of OES-3
Click Print Employers Quarterly Contribution Report link to print a copy of the Quarterly Contribution Report.
3.2 File Upload of Quarterly Wages This process allows Employers and TPAs to upload one or multiple Employers Quarterly Contribution Reports via the OESC Employer Portal.
3.2.1 Upload File
Select File Upload from the navigation panel.

- 30 -
Step 1 of 7: Select the Quarter and Year and click Start File Upload.
Step 2 of 7: Select File: Click Browse to search for the file to be uploaded.

- 31 -
Choose the file and click Open.
Click Upload to upload the file.

- 32 -
The portal will display a progress bar during the file upload process to indicate to the Employer/TPA the progress of the file upload. DO NOT close your browser during this process. Closing the browser aborts the upload process.
The system displays Step 3 of 7.
Step 3 of 7 informs the user the file uploaded. Caution, the file still has to go through a validation process to make sure the file is error free, and you still have to submit the file for processing. You can choose to close your browser from this screen, but you must return and submit the file for processing. If you close the browser, select the File Upload Library link from the navigation panel, to finish submitting the report. To view the file details and submit the file for processing, click the here link on step 3 of 7 or select the File Upload Library link from the navigation panel, to finish submitting the report.

- 33 -
Step 4 of 7: File Upload Library.
This page displays all the files uploaded for the user’s account, the last file uploaded displays on top of the list. If no errors are encountered in the file, the file upload Status will go from Processing Pending, to Validating File Data, to Data Validation Completed. The file status changes often occur rapidly. You may not actually view each change. Search by File Status and/or File Name by entering a value for these fields and click Search. You can reset the search filter by clicking Reset to display all files. Select the Reset button to refresh the page. Once the Status is equal to Data Validation Completed, click on the Open link to navigate to the file details. Click the Open link to view the Quarterly Contributions report(s) included in the file. Step 5 of 7 Uploaded File Details.
A Success Report indicates only that the file has passed data validation and is now ready to be submitted. You MUST select continue to complete the filing process.

- 34 -
3.2.1.1 File Upload – Reports Ready to be Submitted
Click on the File Upload Library from the navigation panel.
Step 4 of 7: File Upload Library
Click the Open link to view the Quarterly Contributions report(s) included in the file.
This page allows users to view the quarterly contribution report(s) included within the uploaded file. This page displays both reports ready to be submitted (no errors found), and/or reports that failed validation. Refer to section 3.2.1.2 for file uploads that failed validation. You can abort or cancel the uploaded file by selecting the Cancel button. Selecting Cancel removes the entire file. Review the information and click Continue to advance to step 6 of 7: Signature page.

- 35 -
Step 6 of 7: Signature Page.
Click the I certify this report check box. Enter Contact Name, Title, and Contact Phone. Click Continue to submit the report(s) for processing. Step 7 of 7: Upload Employers Quarterly Contribution Report.

- 36 -
Payment Options 1. Pay On-line – To complete this process, have your bank routing number and
account number available and click Pay-Online.
2. Pay by Check a. Print the payment voucher Print Payment Voucher b. Make check payable to OESC. c. Include Oklahoma Account Number and Quarter on the check. d. Mail Payment Voucher and Check to:
OESC Attn: Cashier PO Box 52004 Oklahoma City, OK 73152-2004
Click Print Payment Voucher link to print a hard copy of the payment voucher report. The payment voucher is sent to OESC when paying by check. To print the Confirmation Report of the Quarterly Contribution Report(s) processed in the file upload: Click the File Upload Library link on the navigation panel and select the Confirmation report in the file library.

- 37 -
3.2.1.2 File Upload – Processing Failed
The example below depicts a file that failed validation. The ‘Status’ of the file will display as ‘Processing Failed’. These records cannot be processed and must be corrected, re-uploaded, and submitted in a separate file.
Click the Open link under the Error Report column to view the error(s) in the file. The system displays the error report.
The file upload error report displays the exact line in the file where the error occurred. In the example above and below, the error report indicates that on the ninth line of the file the employee last name is missing. Files with errors must be corrected and re-submitted in a separate file.

- 38 -
3.2.1.3 File Upload – Cancel a File Upload Select the File Upload Library link from the navigation panel.
The system displays step 4 of 7: File Upload Library.
To Cancel a File Upload, select the Open link in the Details column. The system displays step 5 of 7: Uploaded File Details.
On step 5 of 7: Select the Cancel button to cancel the file upload. Selecting Cancel aborts the file upload process for this file. To re-upload a file, see the File Upload of Quarterly Wages section.

- 39 -
3.3 View Payment Confirmation Report (file upload only)
When an online payment is made after a File Upload for multiple employers, a payment confirmation report can be generated once the payments are submitted and validated. When submitting an Online Payment the responsibility of ensuring that the correct banking information is entered rests with you. If you schedule and submit a payment online, a confirmation number will be assigned. A confirmation number confirms only that a payment was scheduled to be processed. A confirmation number does NOT confirm that your bank has successfully processed the scheduled payment. If the bank does not process the scheduled payment, the OESC may charge a Return Check fee. Select the File Upload Library link.
Locate the appropriate File Upload. If the payment is confirmed, a Payment Confirmation link is displayed next to the File Name. Select the Payment Confirmation link.

- 40 -
3.4 View Quarterly Contribution Reports
Select View Contribution Report from the navigation panel.
To view the report, click on the ‘Report Type’ hyperlink.
This screen displays the Employers Quarterly Contribution Reports originally filed through the portal. Any subsequent amendments or changes to the original submitted by way of the Employers Quarterly Adjustment Reports will not be reflected on this original report.

- 41 -
3.4.1 Print Employers Quarterly Contribution Report
After selecting View Contribution Report from the navigation panel click the Original hyperlink for the Quarter & Year to view Employers Quarterly Contribution report filed through the portal. The system displays the report.
Click Print Employers Quarterly Contribution Report to print a copy of the report.

- 42 -
4.0 Employer Account Management
4.1 Submit Status Report (OES-1)
4.1.1 Submit Status Report
This process provides the user the ability to apply for a new Unemployment Insurance Tax account with the Oklahoma Employment Security Commission. A liability determination will be made. An Oklahoma account number will be assigned and notification sent if subject to UI Tax. Select the Submit Status Report link on the Navigation Panel.
Read the Registration Overview and Instructions and select Continue.

- 43 -
Complete the Business Information, and select Continue.
Choose the Type of Organization. Complete the owner information and select ‘Add Owner’. Then, click Continue.
If you have acquired a business or a portion thereof, complete the Acquisition Information, and select Continue.

- 44 -
Complete the FUTA and Non-Profit Information, and select Continue.
If you have previously had an Oklahoma account complete the information and select Continue.
Complete the Business Locations Information, click ‘Add Physical Location’, and then select Continue.

- 45 -
Complete the Payroll and Number of Weeks worked History Information, and select Continue.
If you are using an Employee Leasing Company, complete the information below, and select Continue.
If you are using Contract Labor, complete the Independent Contractor Information, click ‘Add Contractor’, and then select Continue.

- 46 -
Review the Summarized Employer Status Report, and select Continue.

- 47 -
Complete the Employer Status Report Certification, and select Submit.
Record the Confirmation number for your records. Select the here hyperlink to print a copy of the status report.
4.2 View and Print Status Report (OES-1)
Select the Status Report link on the Navigation Panel.

- 48 -
Click the Select hyperlink and then the Print button on the View Status Report screen.
The Status Report will open in a PDF document where the user may select to print and/or save the document to their computer.

- 49 -
4.3 Update Employer Information
This process allows the User to maintain their address, phone numbers, and locations. The user can change their business phone and fax numbers, locations, and the following addresses: business mailing address; OES-617, separating employer notice mailing address; and OES-502, benefit wage notice mailing address. The user can also view the history of address changes made in the portal.
4.3.1 View and Update Employer Addresses
Select the Mailing Address link on the Navigation Panel to view the Mailing Address, OES-502, Benefit Wage Notice Mailing Address, and OES-617, Separating Employer Notice Mailing Address.
To update the address, input the new address information and select the Save button.

- 50 -
4.3.2 Manage Business Locations
Select the Business Locations link on the Navigation Panel to view or add business locations to an employer account.
To add a business location, enter the new location information, and select the Add Location button.
4.3.3 Account Maintenance History
Select the Address Change History link on the Navigation Panel to view the history of the employer’s address changes.

- 51 -
4.4 Terminate Account (OES-24)
Select the Terminate Account link on the Navigation Panel.
Read the Overview and Instructions, and select Continue.
Complete the Termination of Business in Whole or Part, and select Continue.

- 52 -
Complete the New Owner Information, and select Continue.
If you are using an Employee Leasing Company, complete the information below, and select Continue.
If you are using Contract Labor, complete the Independent Contractor Information, select the ‘Add Contractor’ button, and then select Continue.

- 53 -
Review the Summarized Termination Report, and select Continue.
Complete the Certification page, and select Submit.
Select the Print hyperlink to print a copy of the Termination Report.

- 54 -
4.5 View Current Benefit Wage Charges
Select the 502 Notice of Benefit Wages link on the Navigation Panel.
Select “60 Days or fewer” from the Select Charges to View Pull-Down Menu. You may also search by Employee SSN.
4.6 View Historical Benefit Wage Charges
Select the 502 Notice of Benefit Wages link on the Navigation Panel.
Select “More than 60 days” from the Select Charges to View Pull-Down Menu. You may also search by Employee SSN.

- 55 -
4.7 View Employer Contribution Rates
To display the Tax Rate, select the Employer Contribution Rate link on the Navigation Panel.
4.8 View Employer Contribution Rate Notice
To display the Tax Rate, select the Employer Contribution Rate link on the Navigation Panel.
To display the Rate Notice, select the Effective Date link in the Tax Rate Table.

- 56 -
4.9 View Benefit Wage Charge Appeals To display the benefit wage charges appealed by the employer, select the Benefit Wage Charge Appeals link on the Navigation Panel:
4.10 View Tax Appeals
To display the tax appeals made by the employer, select the Tax Appeals link on the Navigation Panel:
4.11 View Account Balance To display the employer’s account balance, select the Account Balance link on the Navigation Panel:

- 57 -
4.12 View Tax Payments
To display the tax payments made by the employer, select the Tax Payments link on the Navigation Panel:
4.13 View Tax Refunds
To display the tax refunds submitted by the employer, select the Tax Refunds link on the Navigation Panel:
4.14 View Tax Warrants
This process allows a user to view the tax warrants that have been applied to the employer account. To display the tax warrants applied to the employer, select the Tax Warrants link on the Navigation Panel:

- 58 -
4.15 View IRS FUTA Certification To display the IRS FUTA Certification for the employer, select the IRS FUTA Certification link on the Navigation Panel:
Enter the “Year” and select Search to view the IRS FUTA Certification.

- 59 -
5.0 EFT Payment
5.1 Submit Payment for Single Employer
When submitting an Online Payment the responsibility of ensuring that the correct banking information is entered rests with you. If you schedule and submit a payment online, a confirmation number will be assigned. A confirmation number confirms only that a payment was scheduled to be processed. A confirmation number does NOT confirm that your bank has successfully processed the scheduled payment. If the bank does not process the scheduled payment, the OESC may charge a Return Check fee. Select the Make Payment link on the Navigation Panel.
The ‘Submit Online Payment’ Screen will appear.

- 60 -
Enter Bank Account Number · The bank account number can be up to 17 digits. · Enter the number from left to right and leave any unused space blank. · The bank account number is generally the second number listed at the bottom of a
check. (Do not include the check number) Enter Bank Routing Number
· The bank routing number is generally the first number listed at the bottom of a check
· The first two digits must be 01 through 12 or 21 through 32. · Do not include the check number
Select Account Type: Checking or Saving Payment Due
· If you have arrived at the Submit Online Payment screen by clicking the ‘Pay Online’ from the Submit Contribution Report Confirmation screen (step 6 of 6)
· The amount displayed as the Payment Due, on the Submit Online Payment screen, is the amount due with the report just submitted plus any amounts due from previous quarters.
· If you have arrived at the Submit Online Payment screen by clicking ‘Make Payment’
from the Navigation Panel:
· The amount displayed as the Payment Due, on the Submit Online Payment screen, is the amount posted to the tax account at the time of this inquiry. This Payment Due amount may not include a report that was filed today and has not posted to the tax account.
Enter Payment Amount
· Click inside the Payment Amount box and manually enter the Payment Amount to be paid in dollars and cents. Use a decimal. Example: 342.78 or 0.77

- 61 -
Total Payment · This is the amount that will be deducted from the bank account and will be
automatically adjusted by amounts entered into the Payment Amount box. Enter Payment Quarter
· This is the quarter and year to which to apply the payment. NOTE: This is the first quarter to which your payment will be applied. Any remaining payment will be applied to the earliest quarter in which there is a payment due.
· If paying more than one quarter, enter the earliest (oldest) quarter and year. Schedule Payment Date.
· Payments cannot be scheduled for a date greater than 30 days into the future, starting from the day the payment transaction is scheduled (30 days from the day you enter the payment information and select ‘submit’. Example: If today were September 15th, the furthest future date the payment could be scheduled for is October 15th).
Select Continue to confirm the payment.

- 62 -
Select Submit to complete the payment transaction. The Online Payment Confirmation screen will appear. Select the ‘Display Printer-Friendly Version’ to print or save a copy of the Online Payment Confirmation.

- 63 -
5.2 Submit Single Bank Payment for Multi-Employers After the user has uploaded and submitted their Quarterly Contribution report: Select the File Upload Library link on the Navigation Panel.
In the File Upload Library select the Open link in the details column.
Select the Payment button.

- 64 -
Select the Single Payment link.
If the online payment information was not included in the details of the File Upload, enter the appropriate banking information and select Continue. Enter Bank Account Number
· The bank account number can be up to 17 digits. · Enter the number from left to right and leave any unused space blank. · The bank account number is generally the second number listed at the bottom of a
check. (Do not include the check number) Enter Bank Routing Number
· The bank routing number is generally the first number listed at the bottom of a check
· The first two digits must be 01 through 12 or 21 through 32. · Do not include the check number
Select Account Type: Checking or Saving
Payment Due · If you have arrived at the Submit Online Payment screen by clicking the ‘Single
Payment’ from the File Upload Confirmation screen (step 7 of 7) the amount displayed as the Payment Due, on the Submit Online Payment screen, is the amount due with the report(s) just submitted plus any amounts due from previous quarters.
Enter Payment Amount
· Click inside the Payment Amount box and manually enter the Payment Amount to be paid in dollars and cents. Use a decimal. Example: 342.78 or 0.77
Total Payment · This is the amount that will be deducted from the bank account and will be
automatically adjusted by amounts entered into the Payment Amount box.

- 65 -
Enter Payment Quarter · This is the quarter and year to which to apply the payment. NOTE: This is the first
quarter to which your payment will be applied. Any remaining payment will be applied to the earliest quarter in which there is a payment due.
· If paying more than one quarter, enter the earliest (oldest) quarter and year. Schedule Payment Date.
· Payments cannot be scheduled for a date greater than 30 days into the future, starting from the day the payment transaction is scheduled (30 days from the day you enter the payment information and select ‘submit’. Example: If today were September 15th, the furthest future date the payment could be scheduled for is October 15th).
Rather than making a single bank payment in favor of submitting payments with multiple bank accounts for the employers, select Multi Payment.
To cancel submitting the online payment entirely and return to the Home Page, select Cancel.
Select Continue to confirm the payment.

- 66 -
Select Submit to complete the payment transaction. The Online Payment Confirmation screen will appear. Select the ‘Display Printer-Friendly Version’ to print or save a copy of the Online Payment Confirmation.

- 67 -
5.3 Submit Multiple Bank Payments for Multi-Employers
After the user has uploaded and submitted their Quarterly Contribution report: Select the File Upload Library link on the Navigation Panel.
In the File Upload Library select the Open link in the details column.
Select the Payment button.

- 68 -
Select the Multi Payment link.
If the online payment information was submitted using the ‘P-record(s)’ in the File Upload: The bank information is only stored until the end of the same business day as the File Upload being submitted. Should the payment process be started the following business day, all bank information needs to be re-entered. To not make a payment for an employer submitted in the File Upload process, ensure the Payment Amount for this employer is zero ($0.00). If any bank information needs to be modified, select the Edit link next to the appropriate employer. Upon selecting the edit link the Bank Account Owner, Bank Account Number, Bank Routing Number, Account Type, and Payment Amount become editable fields. After selecting the Edit link, only the last three digits of the Bank Account Number are displayed for security reasons. Should the Bank Account Number need modifications, enter the new, complete Bank Account Number. If modifications other than the Bank Account Number are needed, DO NOT MODIFY the three digits displayed for the Bank Account Number. Upon entering a new valid amount, select the Update link. To cancel the modification of the bank and/or payment information, select the Cancel link. Total Payment amount will be automatically adjusted by the Payment Amounts entered into the individual employer amounts. Once all bank information and payment amounts are complete, select Continue to confirm the payment. If the online payment information was not included in the ‘P-record(s)’ of the File Upload: Enter the banking information as required on the payment screen.

- 69 -
Select Continue to confirm the payment.
Select Submit to complete the payment transaction.

- 70 -
The Online Payment Confirmation screen will appear. Select the ‘Display Printer-Friendly Version’ to print or save a copy of the Online Payment Confirmation.
Upon selecting Submit, a timestamp is provided to indicate when the submission was made. Once payments are made for all the employers, select the File Upload Library link to obtain the confirmation information.

- 71 -
5.4 Create a Payment Summary Report
A Payment Summary Report can be generated outlining payment details before the payment is actually submitted. When making a single bank payment for multiple employers, select Print Payment Summary.
A new window appears with a PDF version of the Payment Summary Report. This report can either be printed or saved to a computer.

- 72 -
When making a multiple bank payment for multiple employers, select Print Payment Summary.
A new window appears with a PDF version of the Payment Summary Report. This report can either be printed or saved to a computer.

- 73 -
5.5.1 Edit or Delete a Payment
When making a single bank payment for an employer, select Payment History to view those payments that have been submitted and/or are scheduled to be processed online.
When submitting a single bank payment for an employer, the user can edit or delete the payment up to 8:00 pm of the day the payment is scheduled to be processed. Please see both of the examples below: This scheduled payment (picture directly below) is pending but cannot be edited or deleted. The Edit/Delete column is blank.

- 74 -
In the example below, there will be an Edit and Delete hyperlink next to the scheduled payment because this payment is editable.
5.5.1.1 Edit a Scheduled Payment
Use the Edit hyperlink next to the scheduled payment to change the payment amount.

- 75 -
After selecting Edit hyperlink the Payment Update screen will appear as seen below.
Once Payment Update screen appears select the Edit link on the payment update screen as seen above.
After selecting the Edit link, click inside the Payment Amount box and manually enter the Payment Amount to be paid in dollars and cents, (Use a decimal. Example: 342.78 or 0.77) and select Update to approve the change. Select Continue to advance to the Confirm Payment screen.
On the Confirm Payment Screen:
· Select Submit if you want to confirm the payment adjustment
· Select Cancel if you want to cancel the payment adjustment

- 76 -
A confirmation message will display as follows: ‘The payment has been updated.
5.5.1.2 Delete a Scheduled Payment
Use the Delete hyperlink next to the scheduled payment to delete the payment.

- 77 -
A message box will appear on the Online Payment History Screen. See below.
When the message box appears on the Online Payment History Screen:
· Select the Cancel button if you do not want to delete the payment
· Select the OK button if you do want to delete the payment
A confirmation message will display as follows: ‘Payment has been deleted’. The entry will be deleted from the Online Payment History screen entirely.

- 78 -
6.0 Credit Card Payment
6.1 Submit Credit Card Payment
The Employment Security Commission’s Third Party Credit Card processing vendor charges a three percent (3%) service fee for each credit card transaction. Here are some examples of the calculation of the 3% fee: Total Payment to the OESC is $10.00. The 3% vendor service fee would be $0.30 Total Payment to the OESC is $100.00. The 3% vendor service fee would be $3.00 Total Payment to the OESC is $1000.00. The 3% vendor service fee would be $30.00 The 3% service fee will be calculated by the Third Party Credit Card processing vendor. The 3% service fee is paid directly to the Third Party Credit Card processing vendor. The Employment Security Commission does not receive any portion of the 3% service fee. The 3% service fee will not apply to the employer’s contributions due in any way. When submitting an Online Payment the responsibility of ensuring that the correct Credit Card information is entered rests with you. If you submit a Credit Card payment online, a confirmation number will be assigned. A confirmation number confirms only that a payment was scheduled to be processed. A confirmation number does NOT confirm that your Credit Card has successfully processed the scheduled payment. If the scheduled credit card payment is not honored the OESC may charge a return fee. Additionally, if the Credit Card does not process the Third Party Credit Card processing vendor may charge a return fee. To submit a Credit Card payment select the Make Payment link on the Navigation Panel.

- 79 -
The Submit Online Payment will appear. First type the Payment Amount into the Submit Online Payment screen. Second select the highlighted box indicating CLICK HERE.
The 3% service fee will be calculated by the Third Party Credit Card processing vendor. The 3% service fee is paid directly to the Third Party Credit Card processing vendor. The Employment Security Commission does not receive any portion of the 3% service fee. The 3% service fee will not apply to the employer’s contributions due in any way.

- 80 -
Enter the customer information and select Next.

- 81 -
Select the credit card type. Then input the credit card information and select Next.

- 82 -
A read only review screen will appear. When submitting an Online Payment the responsibility of ensuring that the correct Credit Card information is entered rests with you.
After ensuring the credit card information is accurate click Submit Payment.

- 83 -
While the payment is processing do not close your internet tab or window, and please do not use
your browser’s Back button.

- 84 -
When the payment is processed the Payment Receipt Confirmation will appear. A print-friendly
confirmation is available by clicking the green “print” button.
After viewing and/or printing the Payment Receipt Confirmation select Continue.

- 85 -
The Employment Security Commission’s website EZ Tax Express will display the Online
Payment Confirmation page as well. The EZ Tax Express is acknowledging the credit card
payment has been scheduled.
6.2 Cancel Credit Card Payment
Click cancel at any time while scheduling the credit card payment to end and/or cancel the credit
card payment process.
The Credit Card payment cannot be cancelled after it has been scheduled.

- 86 -
7.0 Pre-file Separation Documents
7.1 Upload File
Select the Upload File link on the navigation panel.
Read the overview and instructions and then select continue.

- 87 -
Next, the Application for Filing Employer Protest & Documents Related to Employee Discharge or Separation screen will appear. Select the Browse button to upload a document(s) related to employee discharge or separation.
Choose the file related to employee discharge or separation and select Open.

- 88 -
After choosing the file enter the Social Security Number (SSN) and/or First and Last Name
related to the documents for the employee discharge or separation.
Once the file has been chosen and the SSN or First and Last Name have been input select Upload File from the bottom left of the screen. You may upload as many as ten (10) documents.

- 89 -
Files successfully uploaded will appear at the bottom of the screen. If more files are required then repeat as needed.
7.2 Pre-file History
Select the Pre-file History link on the navigation panel.
Then select Continue to advance to the Pre-file History page.

- 90 -
Enter the SSN or First and Last Name and select Search.
You may choose to sort by the SSN or Name. The list can be provided in ascending and descending order. Select the Clear Search button to begin a new search.

- 91 -
Click on the Back to EZ Tax Express link to return to the homepage of the EZ Tax Express portal.
8.0 Contact Information
8.1 EZ Tax Express Inquiries
EZ Tax Help Desk Phone Number: (405) 557-5452 EZ Tax Help Desk Fax Number: (405) 962-4655 EZ Tax Help Desk Email Address: [email protected]
8.2 OESC General Inquiries
Physical Address: Oklahoma Employment Security Commission Will Rogers Memorial Office Building 2401 North Lincoln Boulevard Oklahoma City, OK 73105 Mailing Address: Oklahoma Employment Security Commission PO Box 52003 Oklahoma City, OK 73152-2003 Phone Number: General Information/Switchboard: (405) 557-7100 TDD Telecommunications for the Deaf: (405) 208-4022