OFFICE OF IMMIGRANT HEALTH MARYLAND … documents/MIRIS...OFFICE OF IMMIGRANT HEALTH MARYLAND...
22
OFFICE OF IMMIGRANT HEALTH MARYLAND REFUGEE HEALTH PROGRAM Maryland Immigrant & Refugee Information System (MIRIS) User Guide
-
Upload
phungquynh -
Category
Documents
-
view
220 -
download
2
Transcript of OFFICE OF IMMIGRANT HEALTH MARYLAND … documents/MIRIS...OFFICE OF IMMIGRANT HEALTH MARYLAND...
OFFICE OF IMMIGRANT HEALTH
MARYLAND REFUGEE HEALTH PROGRAM
Maryland Immigrant & Refugee Information System
(MIRIS)
User Guide

1
MIRIS User Guide-Table of Contents
Contents Page #
Introduction ……..………………………………………………………………………… 1
Getting Started
Connecting to the DHMH Server ……………………………………………………… 2
Logging into MIRIS …………………………………………………………………… 2
MIRIS Main Menu ……………………………………………………………………. 3
Disabled/Enabled Command Buttons ………………………………………………... 3-4
Command Buttons, Navigation Buttons, and Warnings ………………………………... 5
Searching for Records
Alien Number Search ……………………………………………………………….…... 6
Last Name or Last/First Name Search …………………………………………………. 6-7
Date of Birth or Arrival Date Search …………………………………………………... 7
Add New Records ………………………………………………………….…………........ 8
Edit Existing Records
Admin Info ............….…………………………………………………………… 9-10
General Health …...…………………………………………………………………….. 11
Tuberculosis …...……………………………………………………………………….. 12
Blood Lead …...………………………………………………………………………… 13
Immunizations ………………………………………………………………………… 13
Hepatitis B ……………………………………………………………………………... 14
STDs …………………………………………………………………………………… 15
Parasites ……………………………………………………………………………….. 16
Referrals ……………………………………………………………………………….. 17
Mental Health ………………….………………………………………………………. 17
Other Command Buttons …………………………………………………………………. 18
MIRIS Reports ……………………………………………………………………………. 18
DHMH Contacts ………………………………………………………………………….. 19
2
MIRIS User Guide
Introduction
What does MIRIS stand for?
Maryland Immigrant and Refugee Information System
What is MIRIS?
MIRIS is a server-based Microsoft Access database, where local health departments (LHDs) will
have the ability to input data from the Refugee Health Assessment Form (DHMH Form #4391),
and view it real-time as well as run various reports. The MIRIS system also provides the ability
to transfer records to other jurisdictions.
Where does MIRIS reside?
MIRIS resides on a DHMH server.
How will DHMH notify me of new arrivals?
The Centers for Disease Control and Prevention (CDC) sends electronic records to DHMH on a
daily basis. DHMH initiates the record in MIRIS and new entries are automatically added to the
MIRIS notification list. The Notification List can be accessed from the MIRIS main menu. LHDs
and clinic users will use the information from the notification list to look up individual records in
the CDC’s Electronic Disease Notification (EDN) system. LHDs and clinic users can print the
overseas health records from EDN. If a LHD does not have access to EDN, DHMH will mail the
overseas medical records to the LHD. In some instances DHMH may not have overseas records,
particularly for Special Immigrant Visas (SIVs), secondary arrivals migrating from other states,
and also for those that receive asylum after arriving in the U.S.

2
Getting Started
To access the DHMH server, the user will need a Remote Desktop Connection.
The Remote Desktop Log On screen will be displayed. Enter your OAS Active Directory
username and password when prompted. The DHMH OIT Helpdesk can provide you with this
username and password. If you forget your OAS Active Directory username and password or
become locked out of the server, you will need to contact the OIT Helpdesk at 410-767-6534.
The Office of Immigrant Health cannot reset this password or connection.
When the page opens, the MIRIS “Logon” form will be displayed. Enter your MIRIS User
Name and Password. The first two characters of the User Name are the county’s abbreviation.
This restricts the user’s ability of adding, editing and deleting data to only their county. The
Office of Immigrant Health can assist with the MIRIS username and password if there are any
problems.

3
Getting Started
The MIRIS main menu will be displayed.
Choose the option “Health Assessment Form” to view/edit an existing record or to add a new
record.
MIRIS Data Entry screen will be displayed.
Add, Edit, Save, Undo, Delete command buttons are disabled when the client is not a resident of
the user’s county.

4
Getting Started
Add, Edit, Save, Undo, Delete command buttons are enabled when the client is a resident of the
user’s county.

5
Getting Started
Screen Parts
1. Command Buttons
Add – allows entry of new record
Edit – allows modification of an existing record
Save – saves addition/modification of record
Undo – omits last modification of record
Delete – deletes current existing record
Mine – displays only the records of user’s county
All – displays all records
Print – prints copy of client record
Search – starts Search Function
Close – closes form and returns to Main Menu
2. Navigation Buttons
Displays the number of records in the database
Displays the record number of the current record
Allows user to navigate forward/backward, one record at a time
Allows user to navigate to the first/last record with one click
3. Final Screening Warning
Displays a warning that client has been in the USA more than 90 days and screening is incomplete
4. Search All Dropdown
Displays Alien Number and Name of all clients in the database in alphabetical order and allows the user to
select a client from the list.
2. Navigation Buttons
1. Command Buttons
3. Final Screening Warning
4. Search All Dropdown
6
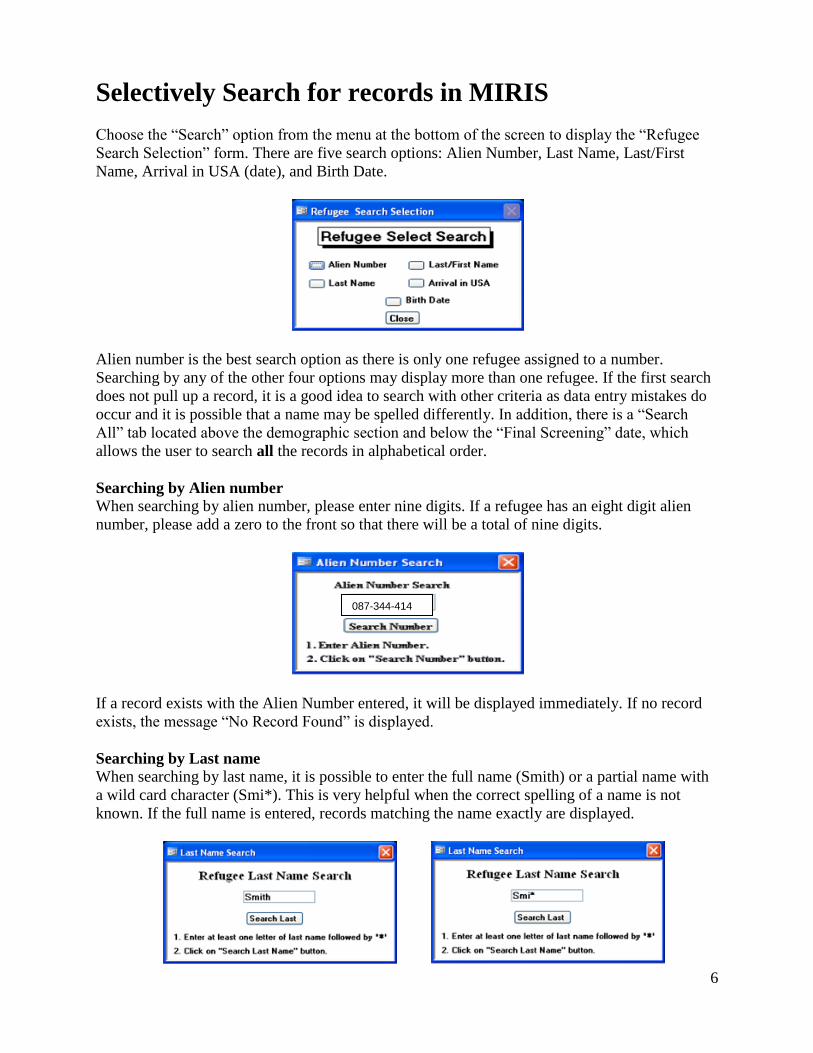
Selectively Search for records in MIRIS
Choose the “Search” option from the menu at the bottom of the screen to display the “Refugee
Search Selection” form. There are five search options: Alien Number, Last Name, Last/First
Name, Arrival in USA (date), and Birth Date.
Alien number is the best search option as there is only one refugee assigned to a number.
Searching by any of the other four options may display more than one refugee. If the first search
does not pull up a record, it is a good idea to search with other criteria as data entry mistakes do
occur and it is possible that a name may be spelled differently. In addition, there is a “Search
All” tab located above the demographic section and below the “Final Screening” date, which
allows the user to search all the records in alphabetical order.
Searching by Alien number
When searching by alien number, please enter nine digits. If a refugee has an eight digit alien
number, please add a zero to the front so that there will be a total of nine digits.
If a record exists with the Alien Number entered, it will be displayed immediately. If no record
exists, the message “No Record Found” is displayed.
Searching by Last name
When searching by last name, it is possible to enter the full name (Smith) or a partial name with
a wild card character (Smi*). This is very helpful when the correct spelling of a name is not
known. If the full name is entered, records matching the name exactly are displayed.
087-344-414
7
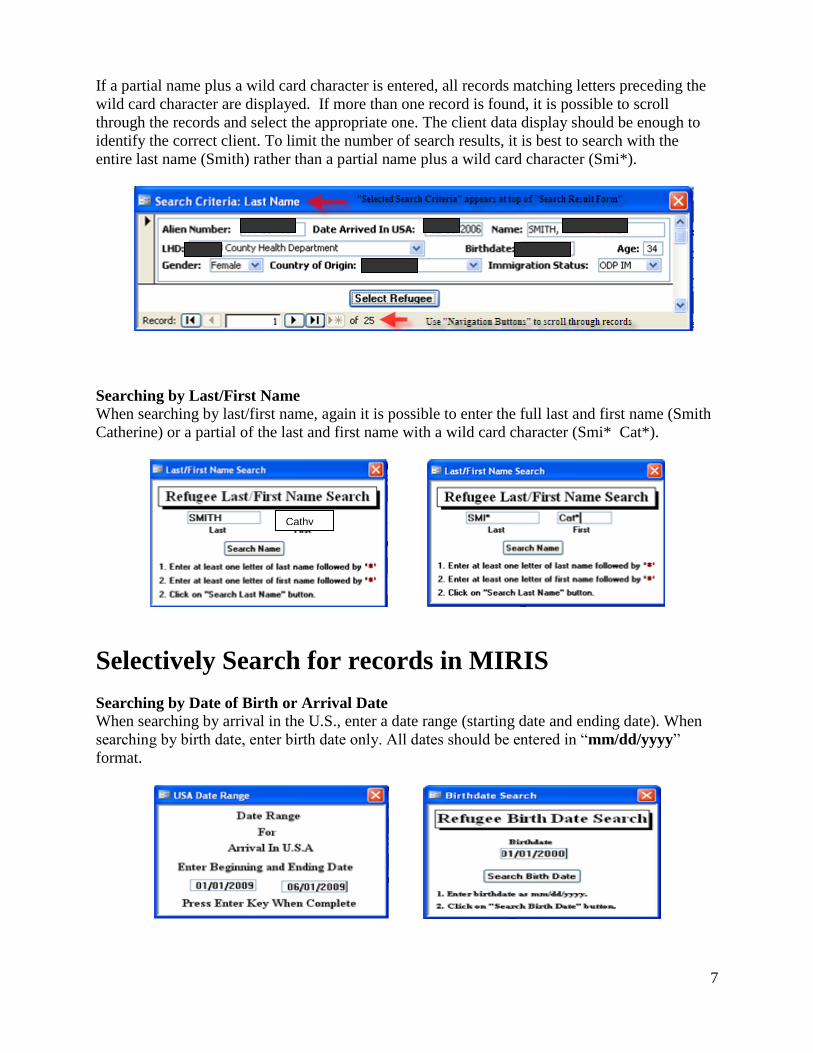
If a partial name plus a wild card character is entered, all records matching letters preceding the
wild card character are displayed. If more than one record is found, it is possible to scroll
through the records and select the appropriate one. The client data display should be enough to
identify the correct client. To limit the number of search results, it is best to search with the
entire last name (Smith) rather than a partial name plus a wild card character (Smi*).
Searching by Last/First Name
When searching by last/first name, again it is possible to enter the full last and first name (Smith
Catherine) or a partial of the last and first name with a wild card character (Smi* Cat*).
Selectively Search for records in MIRIS
Searching by Date of Birth or Arrival Date
When searching by arrival in the U.S., enter a date range (starting date and ending date). When
searching by birth date, enter birth date only. All dates should be entered in “mm/dd/yyyy”
format.
Cathy
8
Using “Mine” or “All” The “Mine” and “All” options are located on the menu at the bottom of the screen. Local health
departments can choose between viewing/searching their own records “Mine” or they can
view/search “All” and see any record. LHDs are not able to edit records belonging to other
jurisdictions, but they may view them. LHDs may also find that the “Mine” function allows them
to filter records and only scroll through those in their jurisdiction. If a LHD screens a patient and
the individual is already entered into MIRIS under a different jurisdiction, the LHD should
contact the DHMH Refugee Health Program so that a MIRIS administrator can change the
jurisdiction in the database.
Add New Record
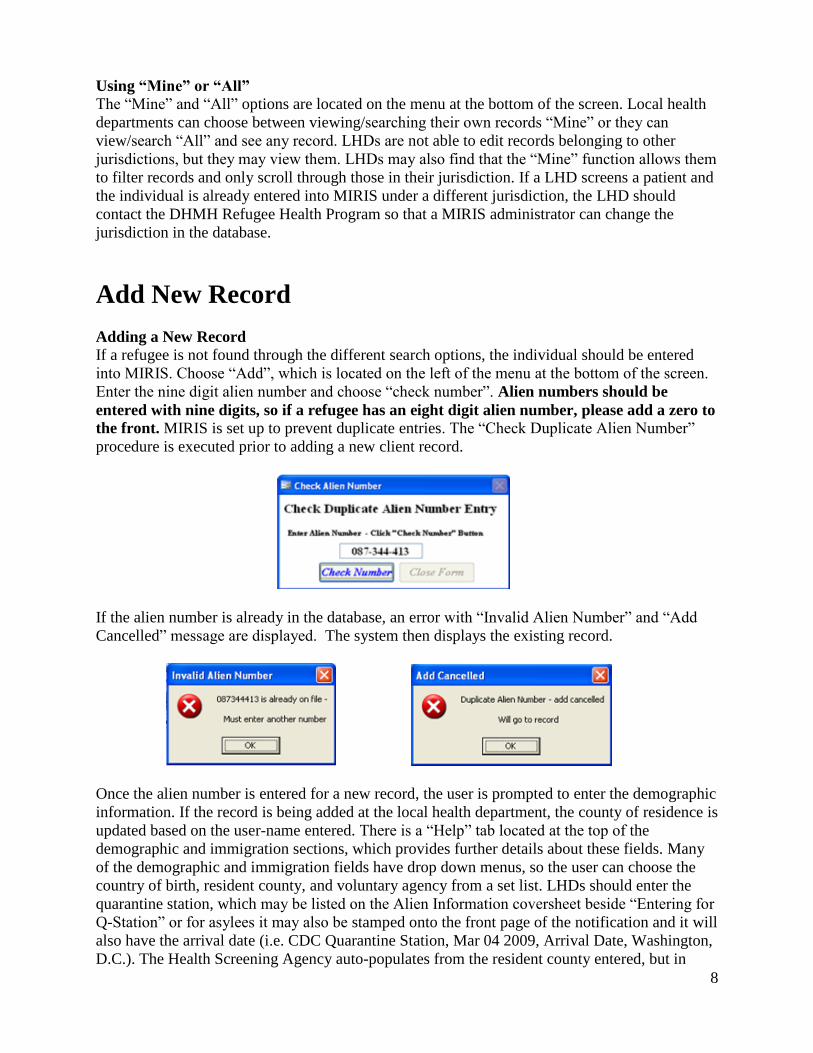
Adding a New Record
If a refugee is not found through the different search options, the individual should be entered
into MIRIS. Choose “Add”, which is located on the left of the menu at the bottom of the screen.
Enter the nine digit alien number and choose “check number”. Alien numbers should be
entered with nine digits, so if a refugee has an eight digit alien number, please add a zero to
the front. MIRIS is set up to prevent duplicate entries. The “Check Duplicate Alien Number”
procedure is executed prior to adding a new client record.
If the alien number is already in the database, an error with “Invalid Alien Number” and “Add
Cancelled” message are displayed. The system then displays the existing record.
Once the alien number is entered for a new record, the user is prompted to enter the demographic
information. If the record is being added at the local health department, the county of residence is
updated based on the user-name entered. There is a “Help” tab located at the top of the
demographic and immigration sections, which provides further details about these fields. Many
of the demographic and immigration fields have drop down menus, so the user can choose the
country of birth, resident county, and voluntary agency from a set list. LHDs should enter the
quarantine station, which may be listed on the Alien Information coversheet beside “Entering for
Q-Station” or for asylees it may also be stamped onto the front page of the notification and it will
also have the arrival date (i.e. CDC Quarantine Station, Mar 04 2009, Arrival Date, Washington,
D.C.). The Health Screening Agency auto-populates from the resident county entered, but in
9
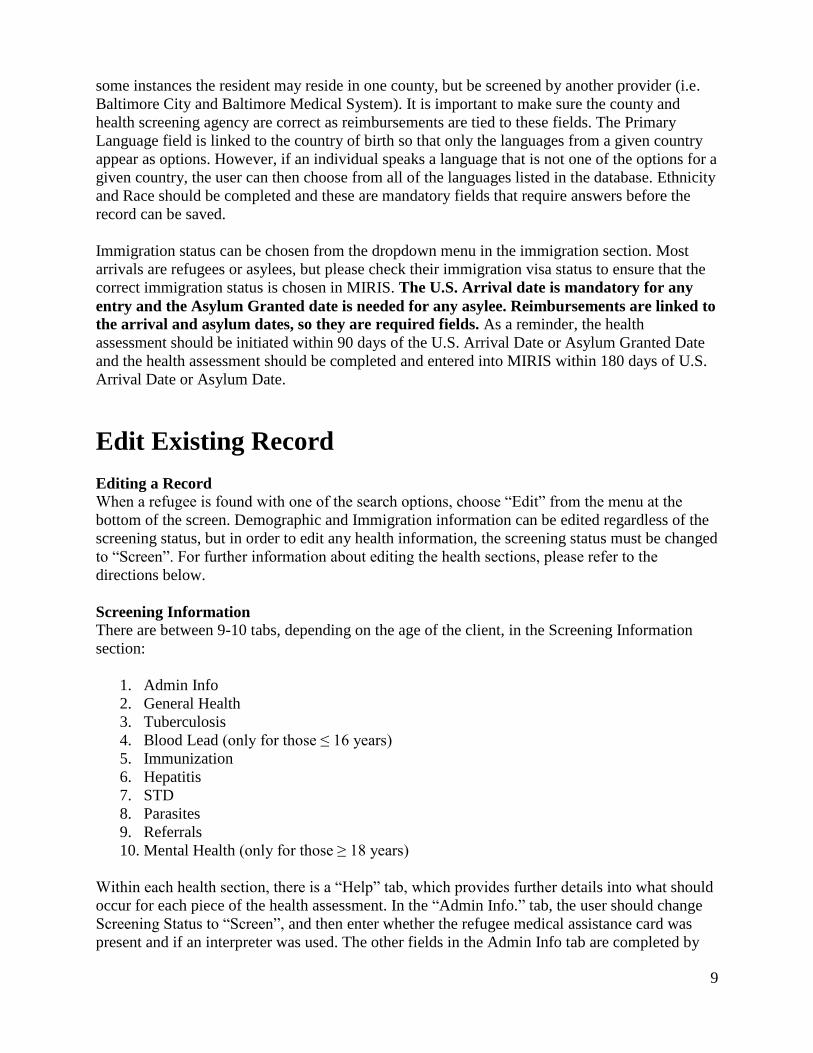
some instances the resident may reside in one county, but be screened by another provider (i.e.
Baltimore City and Baltimore Medical System). It is important to make sure the county and
health screening agency are correct as reimbursements are tied to these fields. The Primary
Language field is linked to the country of birth so that only the languages from a given country
appear as options. However, if an individual speaks a language that is not one of the options for a
given country, the user can then choose from all of the languages listed in the database. Ethnicity
and Race should be completed and these are mandatory fields that require answers before the
record can be saved.
Immigration status can be chosen from the dropdown menu in the immigration section. Most
arrivals are refugees or asylees, but please check their immigration visa status to ensure that the
correct immigration status is chosen in MIRIS. The U.S. Arrival date is mandatory for any
entry and the Asylum Granted date is needed for any asylee. Reimbursements are linked to
the arrival and asylum dates, so they are required fields. As a reminder, the health
assessment should be initiated within 90 days of the U.S. Arrival Date or Asylum Granted Date
and the health assessment should be completed and entered into MIRIS within 180 days of U.S.
Arrival Date or Asylum Date.
Edit Existing Record
Editing a Record
When a refugee is found with one of the search options, choose “Edit” from the menu at the
bottom of the screen. Demographic and Immigration information can be edited regardless of the
screening status, but in order to edit any health information, the screening status must be changed
to “Screen”. For further information about editing the health sections, please refer to the
directions below.
Screening Information
There are between 9-10 tabs, depending on the age of the client, in the Screening Information
section:
1. Admin Info
2. General Health
3. Tuberculosis
4. Blood Lead (only for those ≤ 16 years)
5. Immunization
6. Hepatitis
7. STD
8. Parasites
9. Referrals
10. Mental Health (only for those ≥ 18 years)
Within each health section, there is a “Help” tab, which provides further details into what should
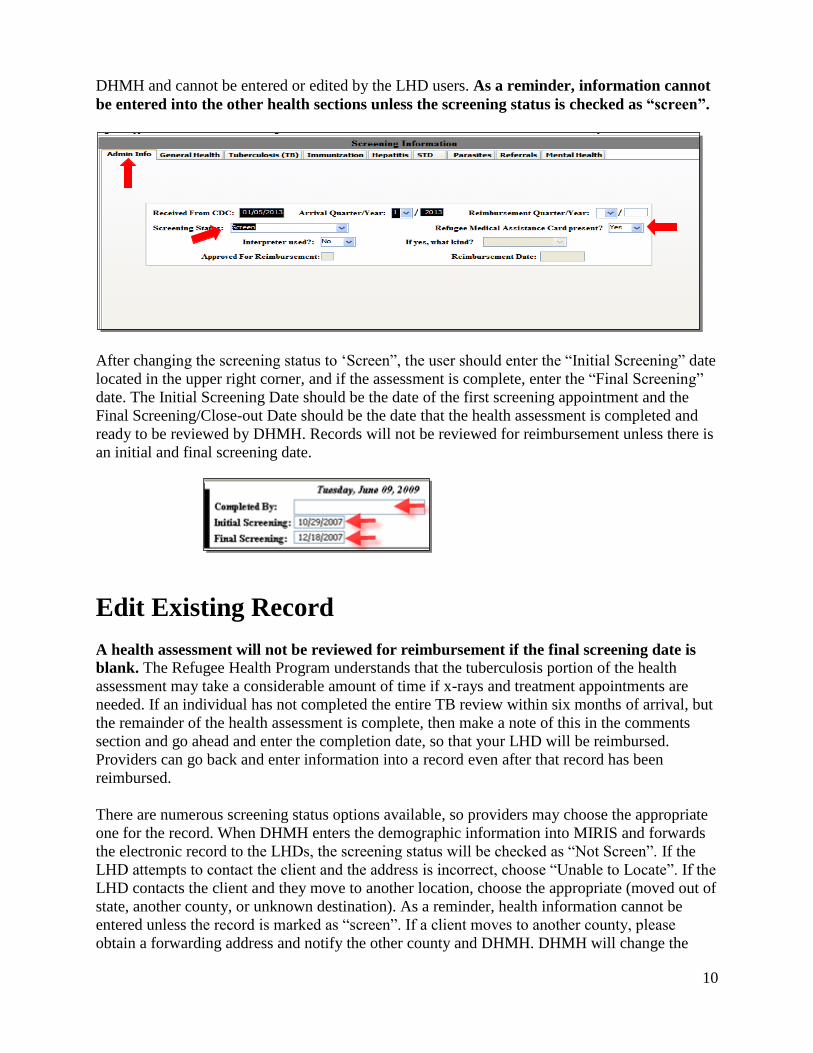
occur for each piece of the health assessment. In the “Admin Info.” tab, the user should change
Screening Status to “Screen”, and then enter whether the refugee medical assistance card was
present and if an interpreter was used. The other fields in the Admin Info tab are completed by
10
DHMH and cannot be entered or edited by the LHD users. As a reminder, information cannot
be entered into the other health sections unless the screening status is checked as “screen”.
After changing the screening status to ‘Screen”, the user should enter the “Initial Screening” date
located in the upper right corner, and if the assessment is complete, enter the “Final Screening”
date. The Initial Screening Date should be the date of the first screening appointment and the
Final Screening/Close-out Date should be the date that the health assessment is completed and
ready to be reviewed by DHMH. Records will not be reviewed for reimbursement unless there is
an initial and final screening date.
Edit Existing Record
A health assessment will not be reviewed for reimbursement if the final screening date is
blank. The Refugee Health Program understands that the tuberculosis portion of the health
assessment may take a considerable amount of time if x-rays and treatment appointments are
needed. If an individual has not completed the entire TB review within six months of arrival, but
the remainder of the health assessment is complete, then make a note of this in the comments
section and go ahead and enter the completion date, so that your LHD will be reimbursed.
Providers can go back and enter information into a record even after that record has been
reimbursed.
There are numerous screening status options available, so providers may choose the appropriate
one for the record. When DHMH enters the demographic information into MIRIS and forwards
the electronic record to the LHDs, the screening status will be checked as “Not Screen”. If the
LHD attempts to contact the client and the address is incorrect, choose “Unable to Locate”. If the
LHD contacts the client and they move to another location, choose the appropriate (moved out of
state, another county, or unknown destination). As a reminder, health information cannot be
entered unless the record is marked as “screen”. If a client moves to another county, please
obtain a forwarding address and notify the other county and DHMH. DHMH will change the
11
jurisdiction in MIRIS so the new county can enter screening results.
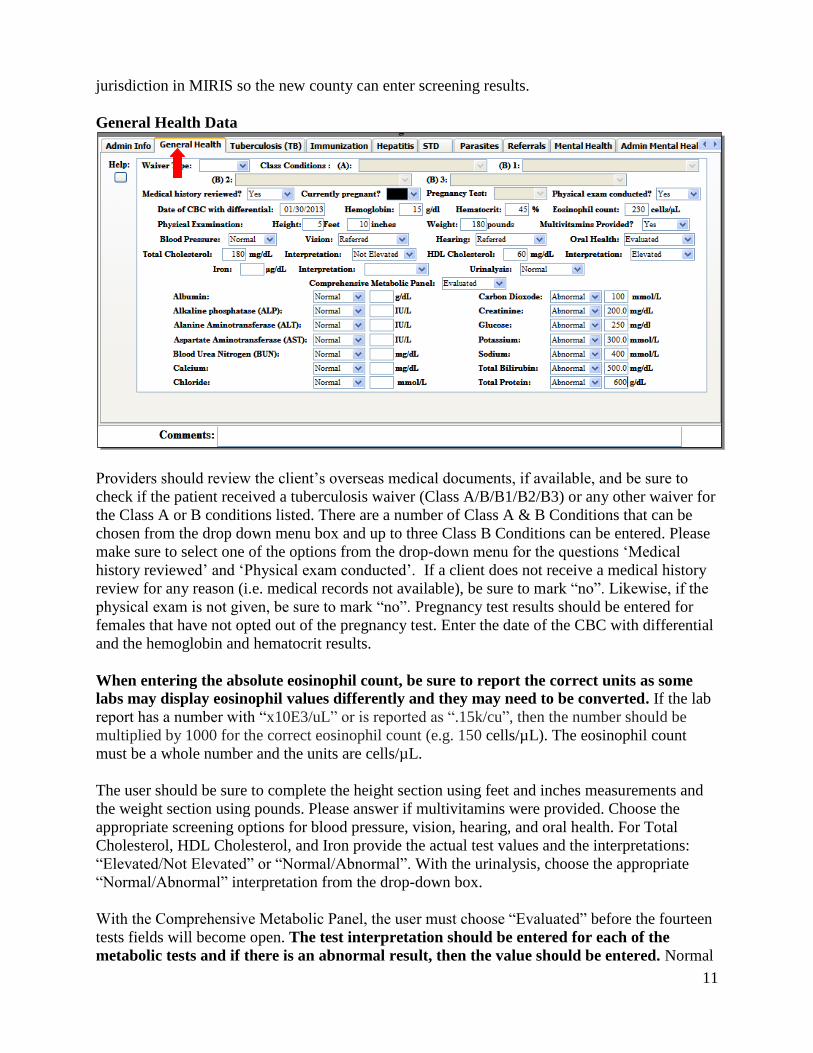
General Health Data
Providers should review the client’s overseas medical documents, if available, and be sure to
check if the patient received a tuberculosis waiver (Class A/B/B1/B2/B3) or any other waiver for
the Class A or B conditions listed. There are a number of Class A & B Conditions that can be
chosen from the drop down menu box and up to three Class B Conditions can be entered. Please
make sure to select one of the options from the drop-down menu for the questions ‘Medical
history reviewed’ and ‘Physical exam conducted’. If a client does not receive a medical history
review for any reason (i.e. medical records not available), be sure to mark “no”. Likewise, if the
physical exam is not given, be sure to mark “no”. Pregnancy test results should be entered for
females that have not opted out of the pregnancy test. Enter the date of the CBC with differential
and the hemoglobin and hematocrit results.
When entering the absolute eosinophil count, be sure to report the correct units as some
labs may display eosinophil values differently and they may need to be converted. If the lab
report has a number with “x10E3/uL” or is reported as “.15k/cu”, then the number should be
multiplied by 1000 for the correct eosinophil count (e.g. 150 cells/µL). The eosinophil count
must be a whole number and the units are cells/µL.
The user should be sure to complete the height section using feet and inches measurements and
the weight section using pounds. Please answer if multivitamins were provided. Choose the
appropriate screening options for blood pressure, vision, hearing, and oral health. For Total
Cholesterol, HDL Cholesterol, and Iron provide the actual test values and the interpretations:
“Elevated/Not Elevated” or “Normal/Abnormal”. With the urinalysis, choose the appropriate
“Normal/Abnormal” interpretation from the drop-down box.
With the Comprehensive Metabolic Panel, the user must choose “Evaluated” before the fourteen
tests fields will become open. The test interpretation should be entered for each of the
metabolic tests and if there is an abnormal result, then the value should be entered. Normal

12
test values do not have to be entered. Also, please be sure that the correct units are being reported
and note that mEq/L is equivalent to mmol/L.
Edit Existing Record
Tuberculosis
Providers should choose from the drop down menu options to answer the TB fields. All clients
should have the following fields answered: Skin Test or Blood Assay Test done, Chest X-
ray given, and TB status.
If a client is given a TST, and the result is less than 10mm or if the IGRA test is negative,
then answer “not applicable” for Chest X-Ray taken in the U.S. and “Tb not identified” for
TB Status. A client with a positive TST (≥ 10mm) or IGRA should receive a chest x-ray, so
choose from the X-ray drop down menu and then choose the result options. The Chest x-ray
results field will not be accessible unless “yes” is chosen for Chest x-ray taken in U.S. Once the
X-ray results are entered, choose the TB Status and depending on the status, the TB therapy
options can be chosen and a TB therapy date can be entered where applicable. The TB Therapy
field will not be accessible if TB Status is marked as “TB not identified” or “Unknown”.
TB Status for clients with positive TSTs or IGRAs cannot be determined without X-ray
results, so if results are pending or further evaluation is required, then the “TB Status”
should be listed as “unknown” until results are available. Providers should choose the
appropriate Chest x-ray option if x-rays have not yet been taken or results are pending. Providers
should update the TB Status when the chest x-ray results are available.
If a client is non-compliant and misses appointments for the Chest X-ray, please choose
“declined” and TB status would be entered as “unknown”. If a client requires treatment for
active or latent TB infection, but treatment is not given, then choose “No TB or LTBI
Treatment” and pick the reason from the drop down menu box. If the client is non-compliant
and misses the therapy appointments, choose “refused”. When treatment is not indicated by
the provider, please document this as “Not recommended”.

13
Edit Existing Record
Blood Lead
The Blood Lead Tab is only viewable for clients that are ≤ 16 years of age. Blood lead testing is
required for those ≤ 16 years of age. The testing status, test date, and lead level should be
entered. DHMH recommends follow-up blood lead testing 3-6 months after the initial test.
Please coordinate follow-up testing as well as communication of results with your local
Childhood Lead Testing Coordinators. The follow-up results should be entered into MIRIS as
well. When a client has not received a blood lead level test or a follow-up test, MIRIS has a
built-in reminder that appears as a pair of binoculars above the demographics section of the
record. If the user clicks on the binoculars, they will automatically be taken to the blood lead
section. In addition, if the client is ≤ 16 years of age and not tested or the field is left blank, a
reminder message will appear when the user tries to save the record.
Edit Existing Record
Immunizations
Providers should check the appropriate box: “Immunization records available and reviewed” or
“Immunization records not available”. This is a required field and users will not be able to save
14
the record without answering this question. For measles, mumps, rubella, varicella, and hepatitis
B, providers should test and document lab evidence of immunity. Please note that if it is
reported in the Hepatitis section that an individual has a negative Hepatitis B antibody
result, then do not check the lab evidence of immunity box for Hepatitis B in the
Immunizations section. Immunizations are not needed for diseases where there is lab evidence
of immunity. For all other immunizations, providers should update the series or begin the
primary series if no previous immunization dates are documented. Immunization dates should be
entered chronologically from left to right. For any immunizations provided overseas, please
abstract the dates from the overseas paperwork and enter into MIRIS. Additional immunizations
can be entered into the “Other” category along with the immunization dates.
Edit Existing Record
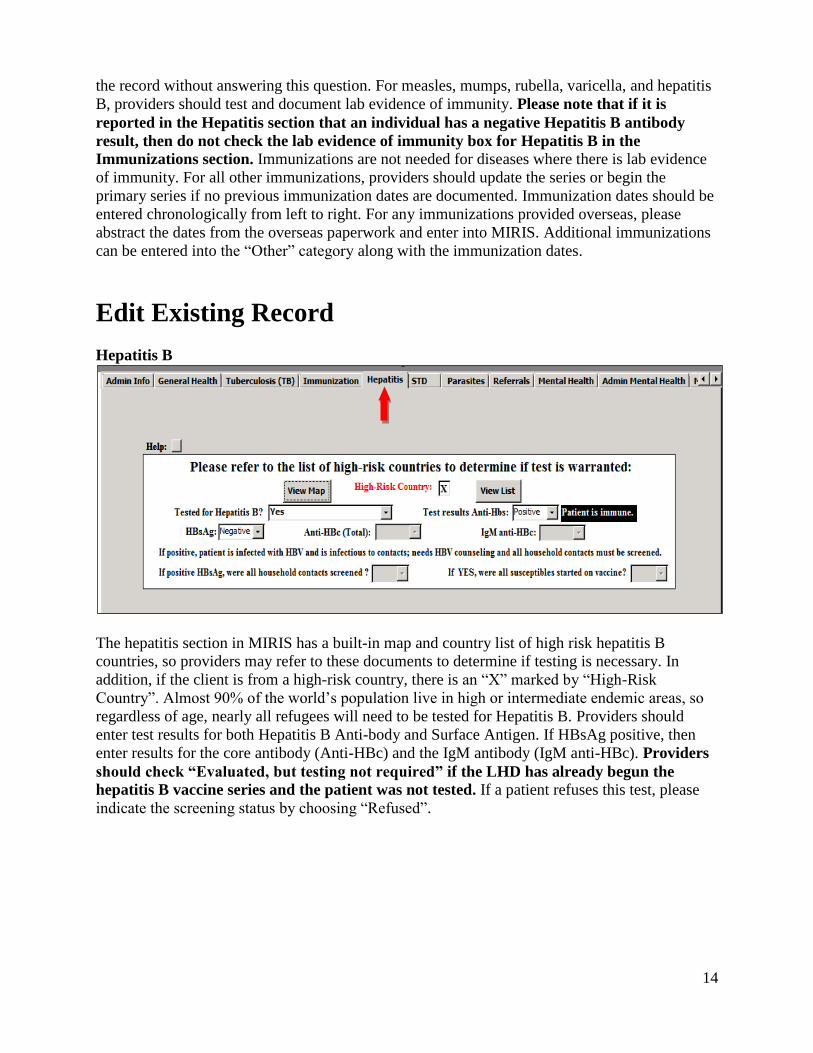
Hepatitis B
The hepatitis section in MIRIS has a built-in map and country list of high risk hepatitis B
countries, so providers may refer to these documents to determine if testing is necessary. In
addition, if the client is from a high-risk country, there is an “X” marked by “High-Risk
Country”. Almost 90% of the world’s population live in high or intermediate endemic areas, so
regardless of age, nearly all refugees will need to be tested for Hepatitis B. Providers should
enter test results for both Hepatitis B Anti-body and Surface Antigen. If HBsAg positive, then
enter results for the core antibody (Anti-HBc) and the IgM antibody (IgM anti-HBc). Providers
should check “Evaluated, but testing not required” if the LHD has already begun the
hepatitis B vaccine series and the patient was not tested. If a patient refuses this test, please
indicate the screening status by choosing “Refused”.
15
Edit Existing Record
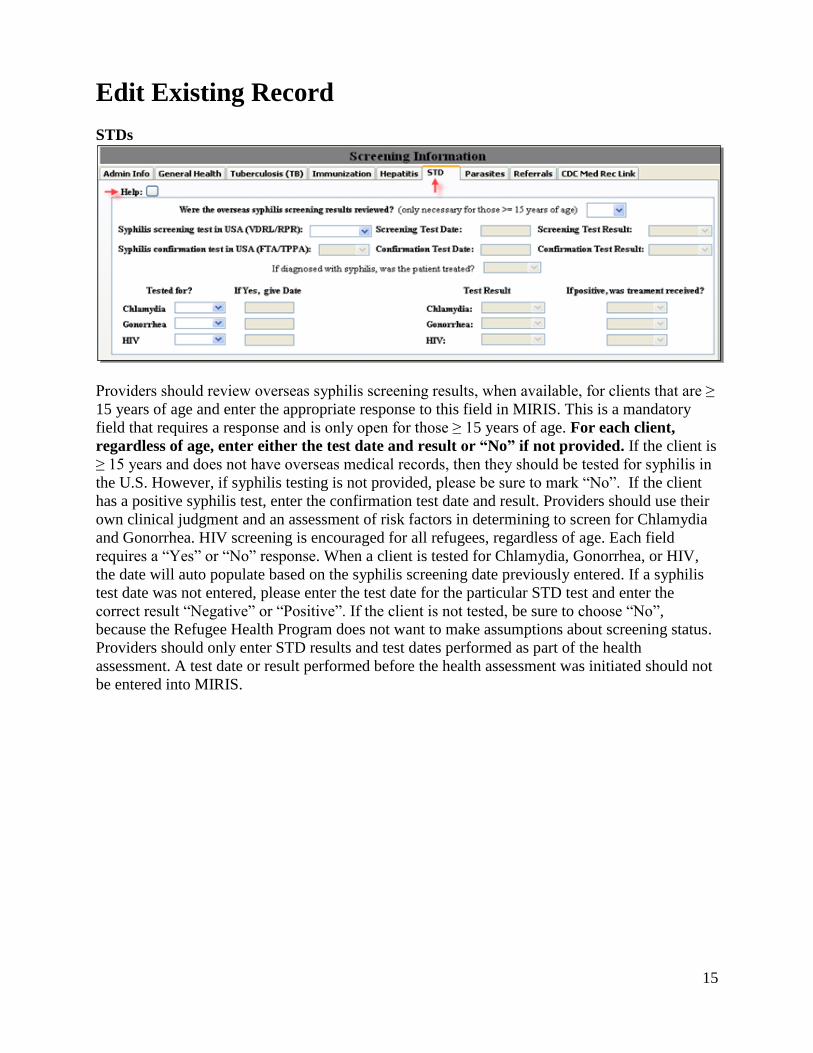
STDs
Providers should review overseas syphilis screening results, when available, for clients that are ≥
15 years of age and enter the appropriate response to this field in MIRIS. This is a mandatory
field that requires a response and is only open for those ≥ 15 years of age. For each client,
regardless of age, enter either the test date and result or “No” if not provided. If the client is
≥ 15 years and does not have overseas medical records, then they should be tested for syphilis in
the U.S. However, if syphilis testing is not provided, please be sure to mark “No”. If the client
has a positive syphilis test, enter the confirmation test date and result. Providers should use their
own clinical judgment and an assessment of risk factors in determining to screen for Chlamydia
and Gonorrhea. HIV screening is encouraged for all refugees, regardless of age. Each field
requires a “Yes” or “No” response. When a client is tested for Chlamydia, Gonorrhea, or HIV,
the date will auto populate based on the syphilis screening date previously entered. If a syphilis
test date was not entered, please enter the test date for the particular STD test and enter the
correct result “Negative” or “Positive”. If the client is not tested, be sure to choose “No”,
because the Refugee Health Program does not want to make assumptions about screening status.
Providers should only enter STD results and test dates performed as part of the health
assessment. A test date or result performed before the health assessment was initiated should not
be entered into MIRIS.

16
Edit Existing Record
Parasites
Providers should enter the correct response from the dropdown menu for parasite screening.
DHMH recommends that all refugees be tested for parasites. Providers should respond “Not
required” only when a client is from a country with low prevalence of pathogenic parasites. If a
provider chooses not to test a client based on lack of symptoms, then choose “Not Tested”. If a
client is given a stool kit, but does not return the kit, then choose “Kit Not Returned”. If a
parasite is identified, check the appropriate parasite and provide the treatment status. If the
parasite is not one of the pathogenic parasites listed, choose “Other” and enter the parasite name
and treatment status. Up to five “other” parasites can be entered and only the actual parasite
name is needed. The stage of the parasite should not be included (trophozoites, cysts, or
eggs). Some parasitic infections do not require treatment, so it is important for providers to
distinguish between those not being treated and those infections not requiring treatment.
Documentation of pre-departure presumptive treatment for strongyloidiasis, schistosomiasis, and
soil-transmitted helminths should be answered. If an individual received pre-departure treatment
it will be documented on the Pre-departure Medical Screening (PDMS) form, which is included
with the overseas medical record. If the PDMS form is not included with the overseas medical
record, then choose “No” when reporting “Documented Pre-departure Presumptive Treatment”.
The following drugs may be listed for pre-departure presumptive treatment: Albendazole for
soil-transmitted helminths and/or Strongyloides, Ivermectin for Strongyloides, and Praziquantel
for Schistosomiasis. Please note that not all refugees will receive pre-departure presumptive
treatment and currently no asylees receive the treatment. Furthermore, overseas presumptive
treatment for schistosomiasis is not needed or provided for refugees from certain areas (Asia,
Middle East, North Africa, Latin America, and Caribbean), so praziquantel will not be listed on
the PDMS form for refugees from these areas. Enter the appropriate response for post-arrival
presumptive treatment given for strongyloidiasis, schistosomiasis, and helminths.
17
Edit Existing Record
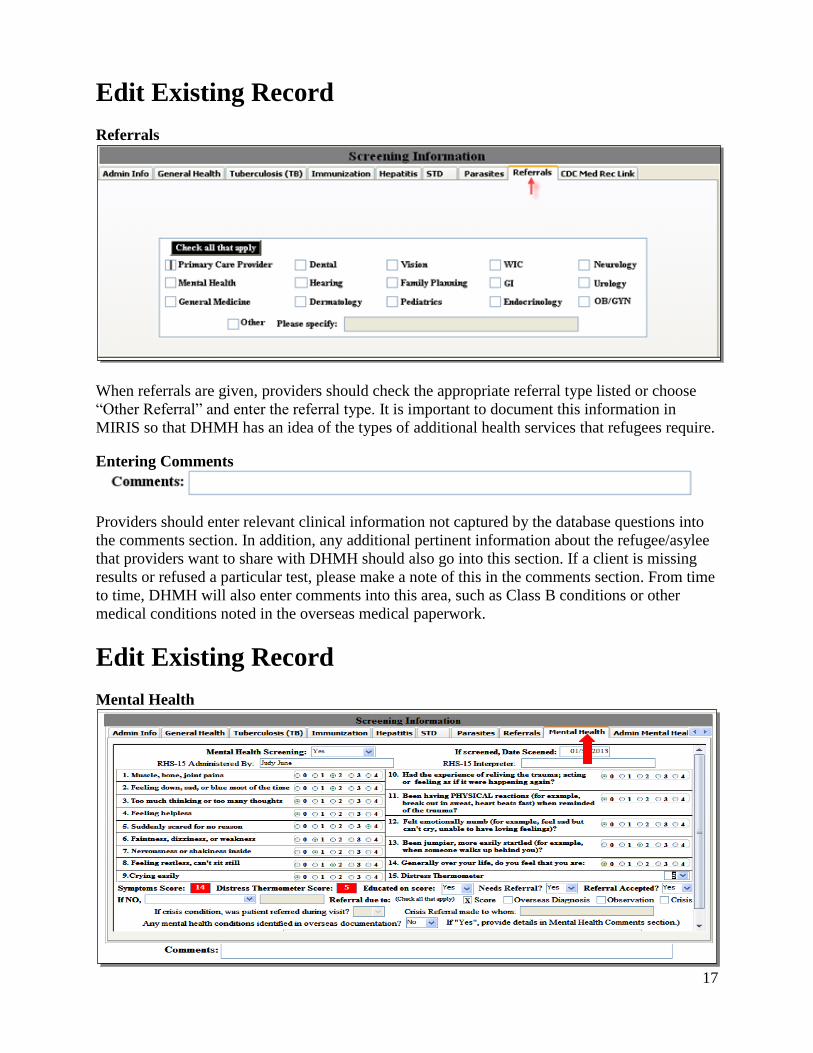
Referrals
When referrals are given, providers should check the appropriate referral type listed or choose
“Other Referral” and enter the referral type. It is important to document this information in
MIRIS so that DHMH has an idea of the types of additional health services that refugees require.
Entering Comments
Providers should enter relevant clinical information not captured by the database questions into
the comments section. In addition, any additional pertinent information about the refugee/asylee
that providers want to share with DHMH should also go into this section. If a client is missing
results or refused a particular test, please make a note of this in the comments section. From time
to time, DHMH will also enter comments into this area, such as Class B conditions or other
medical conditions noted in the overseas medical paperwork.
Edit Existing Record
Mental Health
18
For those receiving mental health screening, providers should enter the results of the RHS-15
mental health screening tool. Please enter the name of the person administering the RHS-15 and
the interpreter. When the 15 screening questions are answered, MIRIS will automatically total
the symptoms score as well as the distress thermometer score. If the total symptom score or
distress thermometer score is positive, it will appear in red. Please answer the appropriate fields
regarding referrals and be sure to document in the comments section if any mental health
conditions were identified in the overseas health papers.
Other Command Buttons
Save, Undo, or Delete
After a record is entered or edited in MIRIS, providers should choose to save the record. “Save”
is located on the menu at the bottom of the screen. Once the user chooses to “Save”, another
message will appear asking “Want to save add/edit to table?” and the user should choose “yes”
for the final save. The user may also wish to undo a change that was made or delete the entire
record. “Undo” and “Delete” are both located on the menu at the bottom of the page. Providers
are not able to save, undo, or delete records from other jurisdictions.
The “Print” option, located in the bottom menu, allows providers to actually print the health
assessment record entered in MIRIS. This print-out will mirror the paper health assessment form
layout and the data entered into MIRIS will be populated on the print-out. Providers may wish to
print the record with the demographic and immigration details and use it during the health
assessment or they may simply want to print a copy after the health assessment is complete and
all of the information is entered.
Close
The “Close” option closes the health assessment entry page and returns to the Main Menu. The
user may choose the “Exit System” option on the Main Menu page.
MIRIS Reports
From the main MIRIS page, the user can choose “Reports Menu” and find a variety of reports
available. Most reports will provide a line list of clients and their screening status or respective
testing status (TB, Lead, Hepatitis B, Parasites) along with the total number of positives or
negatives at the bottom. When choosing a report for a specific test, (e.g. TB), the user will be
prompted to enter a date range, which is based on the initial screening date. For the Arrival
Screening Status report, the user will be prompted to enter a date range based on the U.S. Arrival
or Asylum Date. The Arrival Screening Status report can be used to keep track of the number of
arrivals within a time period and their screening and reimbursement status.

19
DHMH Contacts
Adam Palmer, Refugee Health Epidemiologist & MIRIS Data Manager: (410) 767-0584,
e-mail: [email protected]
Alan Price, Database Specialist and MIRIS Designer: (410) 767-6761,
e-mail: [email protected]
Dipti Shah, Chief, Office of Immigrant Health and State Refugee Health Coordinator:
(410) 767-6664, e-mail: [email protected]
Amy Greensfelder, Refugee Mental Health Program Coordinator: (410) 767-1850, e-mail:
Evelyn Sharkey, Global Migration Epidemiologist: (410) 767-5488,
e-mail: [email protected]
DHMH Office of Information Technology (OIT) Helpdesk: (410) 767-6534

20