Oculus Mobile Software Development Kit (SDK)...
33
Oculus Mobile Software Development Kit (SDK) Device and Environment Setup Guide v. 0.4 I. Introduction Welcome to the Oculus VR Mobile Software Development Kit! This SDK will demonstrate how to implement highperformance, highquality and fullyimmersive Virtual Reality applications for Samsung Gear VR.. If you are new to the SDK, this document contains all of the information you need to get started. If you have already created a project with a previous version of the SDK, please see the document titled SDK Migration Guide for additional information specific to project migration. Application signing is a necessary aspect of fully realizing VR development with our SDK. Please be sure to read the “Initial SDK Setup” section beginning on page 4 below, which covers this important topic in this document. Questions? Visit our developer support forums at https://developer.oculus.com . Our Support Center can be accessed at https://support.oculus.com . I.1 System and Hardware Requirements Please begin by making sure that you are using supported hardware and devices for this release of the Oculus Mobile SDK v1.0.0. Operating System Requirements The Oculus Mobile SDK currently supports Windows 7, Mac OS X and Linux. 1
Transcript of Oculus Mobile Software Development Kit (SDK)...

Oculus Mobile Software Development Kit (SDK) Device and Environment Setup Guide
v. 0.4
I. Introduction
Welcome to the Oculus VR Mobile Software Development Kit! This SDK will demonstrate how to implement highperformance, highquality and fullyimmersive Virtual Reality applications for Samsung Gear VR..
If you are new to the SDK, this document contains all of the information you need to get started.
If you have already created a project with a previous version of the SDK, please see the document titled SDK Migration Guide for additional information specific to project migration.
Application signing is a necessary aspect of fully realizing VR development with our SDK. Please be sure to read the “Initial SDK Setup” section beginning on page 4 below, which covers this important topic in this document.
Questions?
Visit our developer support forums at https://developer.oculus.com.
Our Support Center can be accessed at https://support.oculus.com.
I.1 System and Hardware Requirements
Please begin by making sure that you are using supported hardware and devices for this release of the Oculus Mobile SDK v1.0.0.
Operating System Requirements The Oculus Mobile SDK currently supports Windows 7, Mac OS X and Linux.
1

Minimum System Requirements The following computer system requirements for the Oculus Mobile SDK are based on the Android SDK system requirements:
● Windows: 7● Mac OS: 10.6+ (x86 only)● Linux: Ubuntu 12.04 LTS
○ GNU C Library (glibc) 2.7 or later is required○ 64bit distributions capable of running 32bit applications
● 2.0+ GHz processor● 2 GB system RAM
Supported Devices ● Samsung Note 4● Samsung Gear VR
Target Device Requirements ● API level
○ 19 (Android 4.4.2)● VR Hardware
○ See “Supported Devices” above.○ 3.0 Class 2 Bluetooth gamepad (see below)
Bluetooth Gamepad A Bluetooth gamepad (3.0 Class 2) is necessary for testing the sample applications which come with this release. You may use the Samsung ElGP20 gamepad or a Moga Pro.
For more information about the Samsung ElGP20, including specifications and key bindings, see the following: http://developer.samsung.com/sconsole.
Bluetooth Keyboard It is useful (but not required) to have a Bluetooth keyboard during development. The Logitech K810 is known to function well.
Note: Please refer to your device product manual for additional information.
2
I.2 Getting Started To become acquainted with the Oculus Home VR environment and with using Gear VR, we suggest starting with the Samsung SMR320 User Manual and Gamepad User Manual (bundled with the device contents). To dive into the SDK set up and configure your development environment, refer to Section III. Device Setup and Section IV. Android Development Environment Setup in this guide. Once your development environment and devices are set up, we recommend reviewing the following directories of the SDK documentation. There you will find some basic guidelines and recommendations for design and implementation. The key is to be innovative without sacrificing performance, and to be conservative from the start.
● Guidelines and Performance ● Asset Creation
You can also find Gear VR submission information and other helpful documents at https://developer.oculus.com/.
Ready to start developing? If you are primarily interested in developing a Native Mobile VR Application, start with the Native SDK Overview, in the Native folder. If you are primarily interested in developing a Unity Mobile VR Application, start with the Integration Guide and Unity Performance Best Practices documents in the Unity folder. For both Native and Unity development, we also recommend:
● Android Debugging in the Android folder ● Performance Analysis and Performance Guidelines documents in the Performance
folder ● The various documents in the Technical Notes folder.
Thank you for joining us at the forefront of Virtual Reality!
3
II. SDK Overview
II.1 Initial SDK Setup
II.1.1 Install the SDK
The mobile SDK is composed of a compressed archive in .zip format which contains both source and media files: ovr_mobile_sdk_yyyymmdd.zip.
Once downloaded, extract the .zip file into a directory of your choice (e.g., C:\Oculus\Mobile).
II.1.2 What’s Included
Included with this SDK, you will find the following: ● VrLib, the native framework for building highperformance VR Applications.● Unity Standalone Integration for adding the VR framework to your Unity project.● Example Native and Unity Projects with source to provide a basis for creating your own
VR applications.● Several prebuilt sample applications, some implemented in native and some in Unity.
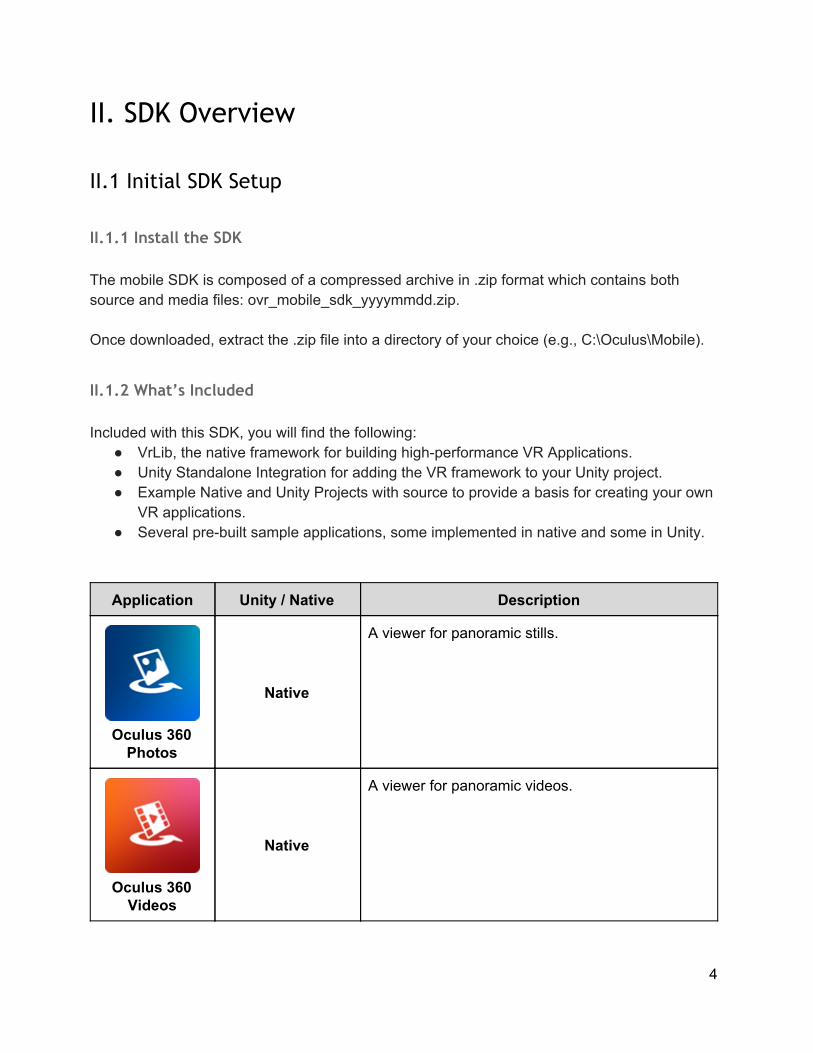
Application Unity / Native Description
Oculus 360 Photos
Native
A viewer for panoramic stills.
Oculus 360 Videos
Native
A viewer for panoramic videos.
4

Oculus Cinema
Native
Plays 2D & 3D movies in a virtual movie theatre.
VrScene
Native
Loads a scene which can be navigated using a gamepad.
BlockSplosion
Unity
A simple game example in which blocks can be thrown to knock over structures and collect stars.
Shadowgun by Madfinger Games
Unity
An example app that renders a scene and character from Shadowgun by Madfinger Games.
Note: The sample applications included with the SDK are provided as a convenience for development purposes. Some of these apps also have similar versions downloadable from our app store. Due to the potential for conflict with these versions, we do not recommend running these sample apps on the same device on which you have installed your retail Gear VR Innovator experience. Please take care to secure the retail media content bundled with the SMR320. It will be difficult if not impossible to replace.
For the Mobile SDK, we have limited preloaded media. Please add your own media by consulting the following table and media creation guidelines for compatibility:
Application Path for Media on the SD Card
Oculus Cinema 2D Movie Movies\ DCIM\ Oculus\Movies\My Videos
Oculus Cinema 3D Movie Movies\3D DCIM\3D Oculus\Movies\My Videos\3D
5

Oculus 360 Video 360 degree Panoramic video
Oculus\360Videos
Oculus 360 Photo (360 degree static photos) Note: non360 degree photos will not render properly.
Oculus\360Photos
II.1.3 What You Need To Run Your Own App - Oculus Signature file
Application signing is an important step in this process. In order to access the full functionality of the VR APIs, your app will require a temporary Oculus Signature file (osig).
When your app is ready for publication we will take care of this signing process for you. However, in order to test your app prior to store submission, you will need to generate a temporary developer signature file that is unique to your device. Please note that your app will not run properly unless it is built with the inclusion of this signature file.
Always check our developer portal for the latest developments regarding app submission and guidelines at https://developer.oculus.com. We will continue to streamline this process to help simplify development with our SDK.
6
Follow the link below to access our online Oculus Signature file generation tool.
Note that you may include multiple signature files in a single application in order to support multiple devices within your organization. When submitting builds for publication, please ensure that these signature files have been removed.
https://developer.oculus.com/tools/debug/

III. Device Setup
This section will provide information on how to setup your supported device and gamepad for running, debugging, and testing your Gear VR application.
Please review the Supported Devices above for the list of supported devices for this SDK release.
Note: This information is accurate at the time of publication of this document. Unfortunately, we cannot guarantee the consistency or reliability of any of the thirdparty applications discussed in these pages, nor can we offer support for any of the thirdparty applications we describe.
III.1 Setting up your System to Detect your Android Device
To run, debug, and test your application on an Android device, you must set up your system to detect your Android device over USB. If the device is not automatically detected by your system when connected over USB, update the drivers manually. More information can be found in the “Using Hardware Devices” section at http://developer.android.com/tools/device.html.
Windows
If you are developing on Windows, you need to install a USB driver for adb. For an installation guide and links to OEM drivers, see the OEM USB Drivers document.
Samsung Android drivers may be found on their developer site: http://developer.samsung.com/android/toolssdks/SamsungAndroidUSBDriverforWindows
Windows may automatically detect the correct device and install the appropriate drivers when you connect your device to a USB port on your computer. However, if Windows is unable to detect your device, you may still need to update the drivers through the Windows Device Manager, even if your device was automatically detected.
Access the Device Manager through the Windows Control Panel. If the device was automatically detected, it will show up under Portable Devices in the Device Manager. Otherwise, look under Other Devices in the Device Manager and select the device to manually update the driver.
7

To verify that the driver successfully recognized the device, open a command prompt and type the command:
adb devices
Note: You will need to successfully setup your Android development environment in order to use this command. See the next section: Android Development Environment Setup
If the device does not show up, verify that the device is turned on with enough battery power, and that the driver is installed properly.
Mac OS
If you're developing on Mac OS X, you do not need to install USB drivers. Your Samsung device may display a notification recommending you install Android File Transfer. A handy application for transferring files between OS X and Android.
Linux
If you're developing on Ubuntu Linux, you need to add a udev rules file that contains a USBconfiguration for each type of device you want to use for development. In the rules file, each device manufacturer is identified by a unique vendor ID, as specified by the ATTR{idVendor} property. For a list of vendor IDs, see USB Vendor IDs. To set up device detection on Ubuntu Linux:
1. Log in as root and create this file: /etc/udev/rules.d/51android.rules.2. Use this format to add each vendor to the file:
SUBSYSTEM=="usb", ATTR{idVendor}=="04e8", MODE="0666", GROUP="plugdev"
3. Now execute: chmod a+r /etc/udev/rules.d/51android.rules
In this example, the vendor ID is for Samsung. The MODE assignment specifies read/write permissions, and GROUP defines which Unix group owns the device node.
Note: The rule syntax may vary slightly depending on your environment. Consult the udev documentation for your system as needed. For an overview of rule syntax, see this guide to writing udev rules.
8

III.2 Configuring your Android Device for Debugging
In order to test and debug applications on your Android device, you will need to enable specific developer options on the device.
III.2.1 Note 4 Developer Options
Developer options may be found under: Home > All Apps > Settings > System > Developer options
Developer options may be hidden by default. If so, you can expose these options with the following steps:
1. Go to Home > All Apps > Settings > System > About device.2. Scroll down to Build number.3. Press Build number 7 times.
You should be informed that Developer options has been enabled.
Once you have found Developer options, enable the following:
USB Debugging: This will allow the tools to install and launch deployed apps over USB.
You should see the screen shown on the left.
Note: If the above screen does not appear, ensure that your system recognizes the device and toggle “USB Debugging” off then back on.
Check Always allow this computer and hit OK.
To purge the authorized whitelist for USB Debugging, press Revoke USB debugging authorizations from the Developer options menu and press OK.
Allow mock locations: This will allow you to send mock location information to the device (convenient for apps which use Location Based Services).
9

Verify apps via USB: This will check installed apps from ADB/ADT for harmful behavior.
III.2.2 Display Options
The following display options are found in: Home > Apps > Settings > Sound and Display
Lock screen/Screen Security/Screen lock: When set to None the Home screen is instantly available, without swipe or password. Useful to quickly get in and out of the phone.
Display/Screen timeout: Set the time to your desired duration. Useful if you are not actively accessing the device but wish to keep the screen awake longer than the default 30 seconds.
See Android Debugging for more information.
10

IV. Android Development Environment SetupThis section describes setup and configuration of the Android Development Environment necessary for building Oculus Android mobile applications.
Note: this section describes installation and configuration of thirdparty systems that are undergoing development. Whenever possible, we strongly recommend installing only the versions specified or recommended by the documentation, as unanticipated changes may break compatibility.
IV.1 Android Development Software Setup for Windows
In order to develop Android applications, you must have the following software installed on your system:
1. Java Development Kit (JDK)2. Android Development Tools (ADT) Bundle3. Android NDK4. Apache Ant
IV.1.1 Java Development Kit
The Java Development Kit (JDK) is a prerequisite for the Android Eclipse IDE (which comes with the ADT Bundle) as well as Apache Ant.
The latest version which has been tested with this release is JDK 8u11. You may download the appropriate version for your OS from the following location: http://www.oracle.com/technetwork/java/javase/downloads/jdk8downloads2133151.html
Note: As of October 2014, the Windows x86 version of the JDK appears to be incompatible with Eclipse and cannot be used.
Once downloaded and installed, add the environment variable JAVA_HOME, which should be set to the JDK install location, e.g.: C:\Program Files\Java\jdk1.8.0_11 if you have installed the x64 version or C:\Program Files (x86)\Java\jdk1.8.0_11 if you have installed the x86 version.
11

Make sure your JAVA_HOME variable does not include quotation marks. If you use set fromthe command line, the correct syntax is:
set JAVA_HOME=C:\Program Files (x86)\Java\jdk1.8.0_11
Do not use quotes with the ‘set’ command, even though the path has a space in it. Also, please verify your installation path this example is based on the default installation of Java SE 8u11.
IV.1.2 Android Development Tools Bundle
The Android Development Tools (ADT) Bundle includes everything needed to begin developing Java Android Apps:
● Android SDK Tools● Android Platform Tools● Latest Android Platform● Eclipse with integrated ADT Plugin● Latest System Image for Emulator
The ADT bundle comes in either a 32bit or 64bit version. This must match the JDK option you selected above. The latest version of the ADT Bundle is available for download at the following location: http://developer.android.com/sdk/index.html#download
Once downloaded, unpack the zip file and save to your Android development folder, e.g.: C:\Dev\Android\adtbundle<os_platform>\
Add the ADT SDK tools and platformtools to your PATH, e.g.: C:\Dev\Android\android_adt_bundle_20140702\sdk\tools C:\Dev\Android\android_adt_bundle_20140702\sdk\platformtools
Add the environment variable ANDROID_HOME which should be set to your Android SDK location, e.g.: C:\Dev\Android\android_adt_bundle_20140702\sdk
setANDROID_HOME=C:\Dev\Android\adtbundlewindowsx8620140702\sdk
12
IV.1.3 Installing Additional Packages and Tools
The Android SDK does not include everything you will need for development by default. You will need to download additional packages via the SDK Manager before you begin.
Note: Before launching the SDK Manager, make sure you have installed the JDK as outlined in Section IV.1.1 of this document. SDK Manager may fail to launch if it has not been installed.
1. Launch the Android SDK Manager located at:C:/Dev/Android/adtbundle<os_platform>/SDKManager.exe
You may also launch it via Eclipse by selecting the SDK Manager in the toolbar.
2. Under the Tools section within Packages, select the following (if they are unselected):
Android SDK Tools Rev. 23.0.5 Android SDK Platformtools Rev. 21 Android SDK Buildtools Rev. 20
3. Our current Android build target is Android 4.4.2 (API 19). Select at least the following underthe API 19 section:
SDK Platform ARM EABI v7a System Image
Additionally, you may also wish to install Sources for Android SDK, which is invaluable for dealing with the Android API.
4. Finally, under Extras at the bottom, select the following:
Android Support Library Rev. 21.0.1 Google USB Driver Rev. 11
13

5. Open Android 4.4.2 (API 19) and select the items for SDK Platform and ARM EABI v7aSystem Image. Note that Oculus Mobile SDK projects use API level 19.
14

6. Click Install X Packages, where X is the number of selected packages (it may vary based onwhat needs to be updated).
7. On the next dialog, choose Accept License.
8. Click Install to install and update packages.
You may install additional packages above API 19 if you wish. Android SDK Tools 23.0.2, Android SDK Platformtools 20 and Android SDK Buildtools 20 have all been verified to work correctly with the SDK.
If you have problems compiling after an update, close the Android SDK Manager and reopen it to make sure you have everything required for the installed packages. In some cases you may get the warning “Could not load definitions from resource emma_ant.properties”. This is usually due to missing components in the install or improper file permissions. If the problem persists after verifying everything is up to date, try deleting the local.properties files from your project folders and updating them in each project folder with the command:
android update project p .
and then rebuild.
IV.1.4 Verify Eclipse Configuration
You should verify that Eclipse has the proper location for your Android Development Tools.
Launch the Eclipse executable which came with the ADT bundle, e.g.: C:\Dev\Android\android_adt_bundle_20140702\eclipse\eclipse.exe.
1. In the Eclipse menu go to Window > Preferences > Android
2. The Android Preferences SDK Location should be set to the location where you installed theADT bundle SDK in the previous section, e.g.: C:\Dev\Android\android_adt_bundle_20140702\sdk.
IV.1.5 Android Native Development Kit
The Android Native Development Kit (NDK) is a toolset that allows you to implement parts of your app using nativecode languages such as C and C++. It is used extensively by the sample applications which come with this release.
15

The latest version of NDK is available for download at the following location: https://developer.android.com/tools/sdk/ndk/index.html
Once downloaded, install NDK to your Android development folder, e.g.: C:\Dev\Android\androidndkr10c\.
Add the NDK location to your PATH, e.g.: C:\Dev\Android\androidndkr10c\.
Add the environment variable ANDROID_NDK which should be set to your Android NDK location, e.g.: C:\Dev\Android\androidndkr10c.
set ANDROID_NDK=C:\Dev\Android\androidndkr10c
Configure Eclipse for NDK Usage
1. Start Eclipse from the location it was installed to, e.g.:C:\Dev\Android\adtbundlewindowsx86_6420140702\eclipse\eclipse.exe.
2. Download and install the Eclipse ADT Plugin.(a) In the Eclipse menu go to: Help > Install New Software. (b) Click Add in the topright corner. (c) In the Add Repository dialog that appears, enter “ADT Plugin” for the Name and the following URL:
https://dlssl.google.com/android/eclipse
(d) Click OK. (e) In the Available Software dialog, select the checkbox for Developer Tools and click Next. (f) Click OK. (g) In the next window, you’ll see a list of tools to be download. Click Next. (h) Read and accept the license agreements, then click Finish. Click OK if you get any prompts regarding the security and authenticity of the software. (i) When the installation completes, restart Eclipse.
3. Configure the NDK path:(a) In the Eclipse menu go to: Window > Preferences > Android. (b) Under Android select NDK. (c) Set the NDK Location field to the directory where the NDK is installed.
16
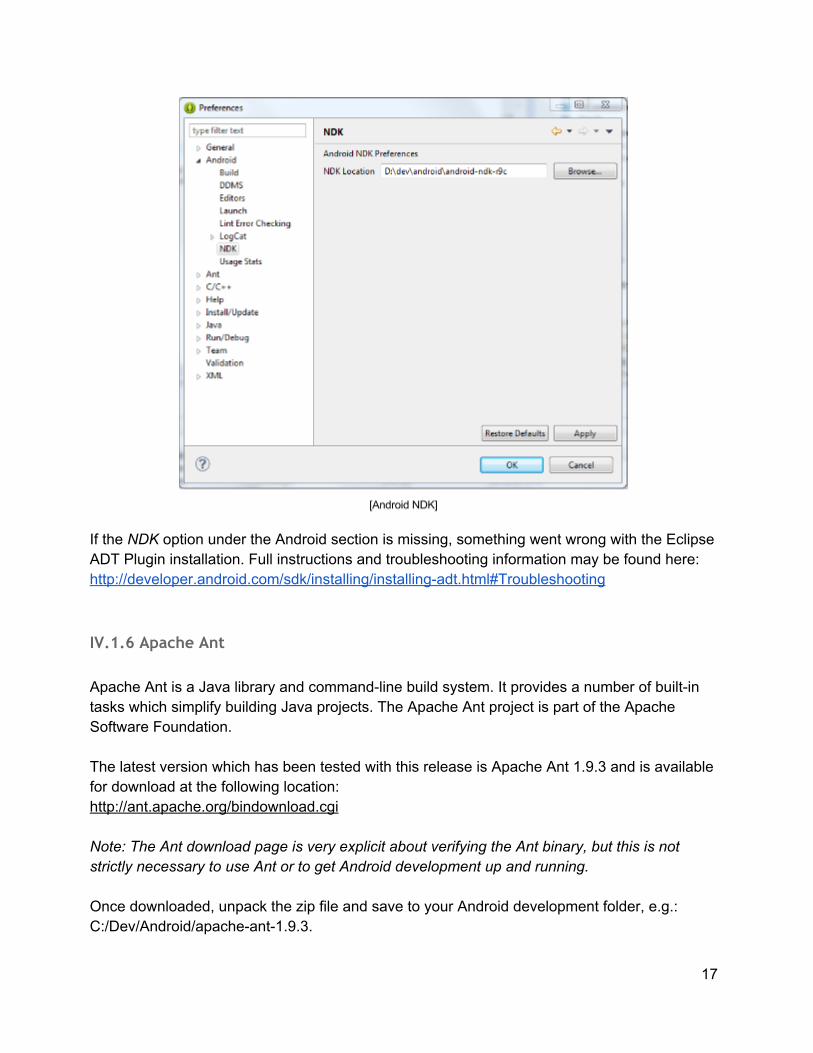
If the NDK option under the Android section is missing, something went wrong with the Eclipse ADT Plugin installation. Full instructions and troubleshooting information may be found here: http://developer.android.com/sdk/installing/installingadt.html#Troubleshooting
IV.1.6 Apache Ant
Apache Ant is a Java library and commandline build system. It provides a number of builtin tasks which simplify building Java projects. The Apache Ant project is part of the Apache Software Foundation.
The latest version which has been tested with this release is Apache Ant 1.9.3 and is available for download at the following location: http://ant.apache.org/bindownload.cgi
Note: The Ant download page is very explicit about verifying the Ant binary, but this is not strictly necessary to use Ant or to get Android development up and running.
Once downloaded, unpack the zip file and save to your Android development folder, e.g.: C:/Dev/Android/apacheant1.9.3.
17

Next, add the Ant bin folder to your PATH, e.g.: C:\Dev\Android\apacheant1.9.3\bin.
For more information on using Ant to automate building Android Apps, see: http://www.androidengineer.com/2010/06/usinganttoautomatebuildingandroid.html
IV.2 Android Development Software Setup for OS X
IV.2.1 Xcode
Before installing any Android development tools, you must install Xcode. Once Xcode is installed, some of the following steps (such as installing Apache Ant or the JDK) may be unnecessary some versions of OS X (10.5 and higher) include Apache Ant, and some do not. On Mavericks 10.9, Ant does not appear to be installed by default or included with Xcode 5.0.2.
IV.2.2 Java Development Kit
The Java Development Kit (JDK 8) is a prerequisite for the Android Eclipse IDE (included with the ADT Bundle) as well as Apache Ant.
Install the JDK if it is not already present on your system. If you already installed Xcode, this step may be unnecessary.
The latest version tested with this release is JDK 8 it may be downloaded at the following location: http://www.oracle.com/technetwork/java/javase/downloads/jdk8downloads2133151.html
IV.2.3 Android Development Tools Bundle
The Android Development Tools ADT Bundle includes almost everything needed to begin developing Android Apps:
● Android SDK Tools● Android Platform Tools● Latest Android Platform● Eclipse with integrated ADT Plugin● Latest System Image for Emulator
The latest version of the ADT is available for download at the following location: http://developer.android.com/sdk/index.html#download
18

The architecture selected for the JDK above must be the same as the ADT (i.e., both must be either 32bit or 64bit).
Note: The tilde character followed by a forward slash (~/) is shorthand for the current user’s home folder. It is used throughout this section.
In your home folder, create a new folder named “dev”. To get to home folder in OS X, open Finder and press CMD+Shift+H.
Once downloaded, unzip the ADT archive (if necessary) and save to your “dev” folder.
Browse to ~/dev/adtbundle<version>/eclipse and doubleclick the Eclipse icon. You may receive a warning like the following:
Note: Please refer to Apple’s knowledge base regarding this security feature and safeguards for apps downloaded and installed from the internet.
To remedy this, right click the Eclipse icon and choose Open. You will get a warning again, but it will now present an Open option:
19
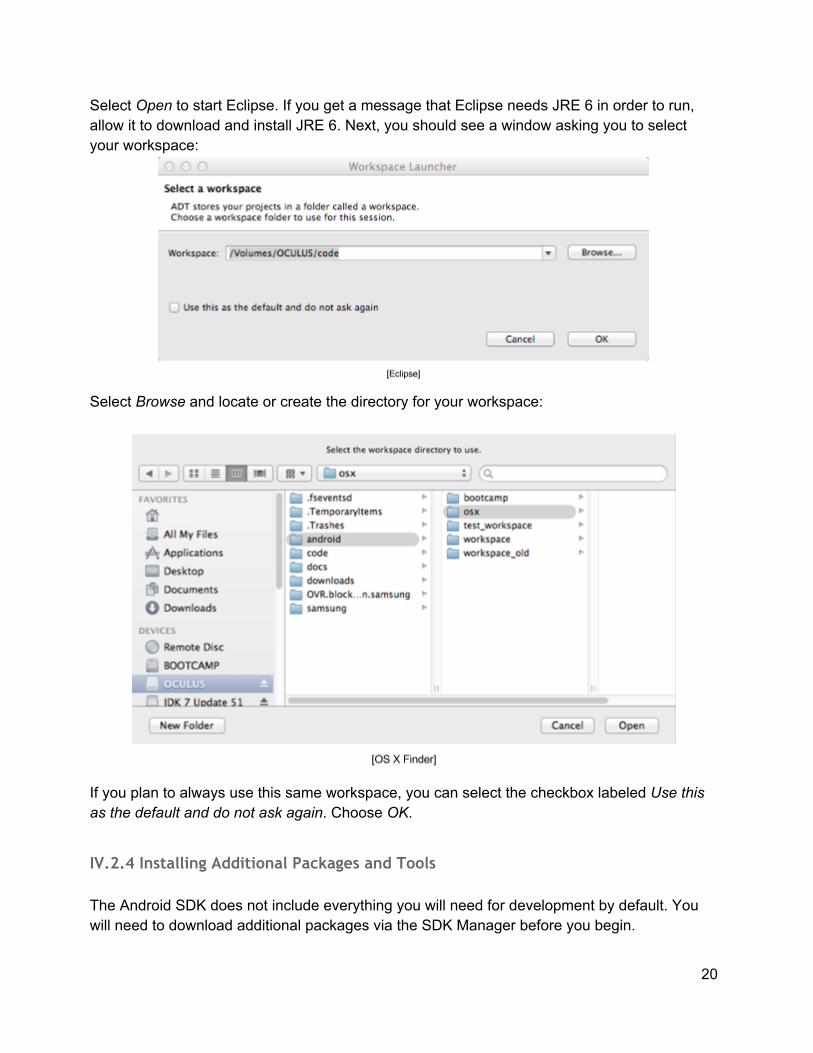
Select Open to start Eclipse. If you get a message that Eclipse needs JRE 6 in order to run, allow it to download and install JRE 6. Next, you should see a window asking you to select your workspace:
Select Browse and locate or create the directory for your workspace:
If you plan to always use this same workspace, you can select the checkbox labeled Use this as the default and do not ask again. Choose OK.
IV.2.4 Installing Additional Packages and Tools
The Android SDK does not include everything you will need for development by default. You will need to download additional packages via the SDK Manager before you begin.
20

1. In Eclipse go to Window > Android SDK Manager to open a window similar to thefollowing:
1. Note that some packages are already selected for installation by default. Leave theseprojects selected.
2. If not already selected under Tools, select Android SDK Tools, Android SDKPlatformtools, and Android SDK Buildtools.
3. Open Android 4.4.2 (API 19) and select the items for SDK Platform and ARM EABI v7aSystem Image under it.
4. Click Install X Packages, where X is the number of selected packages (it may varybased on what needs to be updated).
5. On the next dialog, choose Accept License.6. Click Install to install and update packages.
21

You may install additional packages above API 19 if you wish. Android SDK Tools 23.0.2, Android SDK Platformtools 20 and Android SDK Buildtools 20 have all been verified to work correctly with the SDK.
IV.2.5 Android Native Development Kit
The 2.4 Android Native Development Kit (NDK) is a toolset that allows you to implement parts of your app using nativecode languages such as C and C++. It is used extensively by the sample applications which come with this release.
The latest version which has been tested with this release is NDK 10 it is available for download at the following location: https://developer.android.com/tools/sdk/ndk/index.html
Once downloaded, extract the NDK to your home/dev folder (~/dev). Your dev folder should look something like the following:
Note that the ADT bundle and the NDK are extracted into their own folders within the Dev folder (in this case, folders that were in the root of their archive). The names of the folders, where the ADT bundle and the NDK reside, are not vitally important. As long as they are in separate folders and are not extracted directly into the Dev folder, any conflict between the two
22

packages can be avoided. It is recommended you use the above naming scheme so that there is no question which version of the ADT bundle and the NDK are installed.
You can read more about installation and use of the NDK here: http://developer.android.com/tools/sdk/ndk/index.html#installing
Configure Eclipse for NDK Usage
Launch Eclipse and go to the ADT > Preferences window.
Under Android, verify that Eclipse knows the location of the Android Development Tools. If the NDK option is missing in the Preferences > Android section, update the Eclipse ADT Plugin as follows:
1. Download and install the Eclipse ADT Plugin.(a) In the Eclipse menu go to: Help>Install New Software. (b) Click Add in the topright corner. (c) In the Add Repository dialog that appears, enter “ADT Plugin” for the Name and the following URL:
https://dlssl.google.com/android/eclipse
(d) Click OK. (e) In the Available Software dialog, select the checkbox for Developer Tools and click Next. (f) Click OK. (g) In the next window, you’ll see a list of tools to be download. Click Next. (h) Read and accept the license agreements, then click Finish. Click OK if you get any prompts regarding the security and authenticity of the software. (i) When the installation completes, restart Eclipse.
2. Configure the NDK path:(a) In the Eclipse menu go to: Window > Preferences > Android. (b) Under Android select NDK. (c) Set the NDK Location field to the directory where the NDK is installed.
23

Under Android > NDK set the NDK folder to the location where you installed the NDK:
24

To set environment variables specifying the locations of Android SDK and NDK on your system, and to add Android tools to your global path:
1. Launch a terminal.2. At the prompt type the following three lines:
echo ‘export ANDROID_HOME=~/dev/adtbundlemacx86_6420140702/sdk’ >> ~/.profile echo ‘export ANDROID_NDK=~/dev/androidndkr9c’ >> ~/.profile echo ‘export PATH=$PATH:$ANDROID_HOME/tools:$ANDROID_HOME/platformtools:$ ANDROID_NDK’ >> ~/.profile
To verify that the Android NDK environment is set up correctly, launch a new terminal and go to the samples/hellojni folder in the Android NDK. Execute the command ndkbuild, which will compile the sample hellojni application if everything is set upcorrectly.
IV.2.6 Apache Ant
Apache Ant is a Java library and commandline build system. It provides a number of builtin tasks which simplify building Java projects. The Apache Ant project is part of the Apache Software Foundation.
If you have already installed Xcode you may be able to skip this step.
The latest version, which has been tested with this release, is Apache Ant 1.9.3 and is available for download at the following location: http://ant.apache.org/bindownload.cgi
Once downloaded, unzip Ant (or copy / move it if your web browser autoexpands .zip files for you) into your Dev folder alongside the ADT bundle and the NDK. As with the other packages, Ant should be in its own folder within Dev.
To set environment variables to specify the locations of JRE and ADT on your system, and to add Ant to your path:
1. Launch a terminal2. Type the following three lines at the prompt:
echo ‘export ANT_HOME=~/dev/apacheant1.9.3’ >> ~/.profile echo ‘export JAVA_HOME=$(/usr/libexec/java_home)’ >>~/.profile echo 'export PATH="$PATH":~/dev/apacheant1.9.3/bin' >> ~/.profile
25

For additional information about the JAVA_HOME folder and how to determine its location, see: http://stackoverflow.com/questions/18144660/whatispathofjdkonmac http://www.mkyong.com/java/howtosetjava_homeenvironmentvariableonmacosx/
To verify the $PATH variable and *_HOME variables are set correctly:
1. Launch a new terminal window (from Terminal, press Cmd+N). BE SURE to do thisfrom a new Terminal window. The original Terminal window where you set theenvironment variables will not have an updated version of the environment variables,because it hasn’t rerun ~/.profile.
2. At the prompt type:
echo $PATH
1. You should see the full path with your Ant bin folder at the end.2. At the same terminal window prompt, type:
echo $ANT_HOME
1. Verify the Ant home path is the folder you installed it to. This particular path shouldNOT have /bin on the end.
2. To ensure the Ant binaries are accessible through the path, type ant version3. You should see the Ant version information output as in the screen capture below.
If you receive any errors, verify that the paths are all correct. If you have to correct anything, you can edit the ~/.profile file from Terminal using the following command:
sudo nano ~/.profile
26
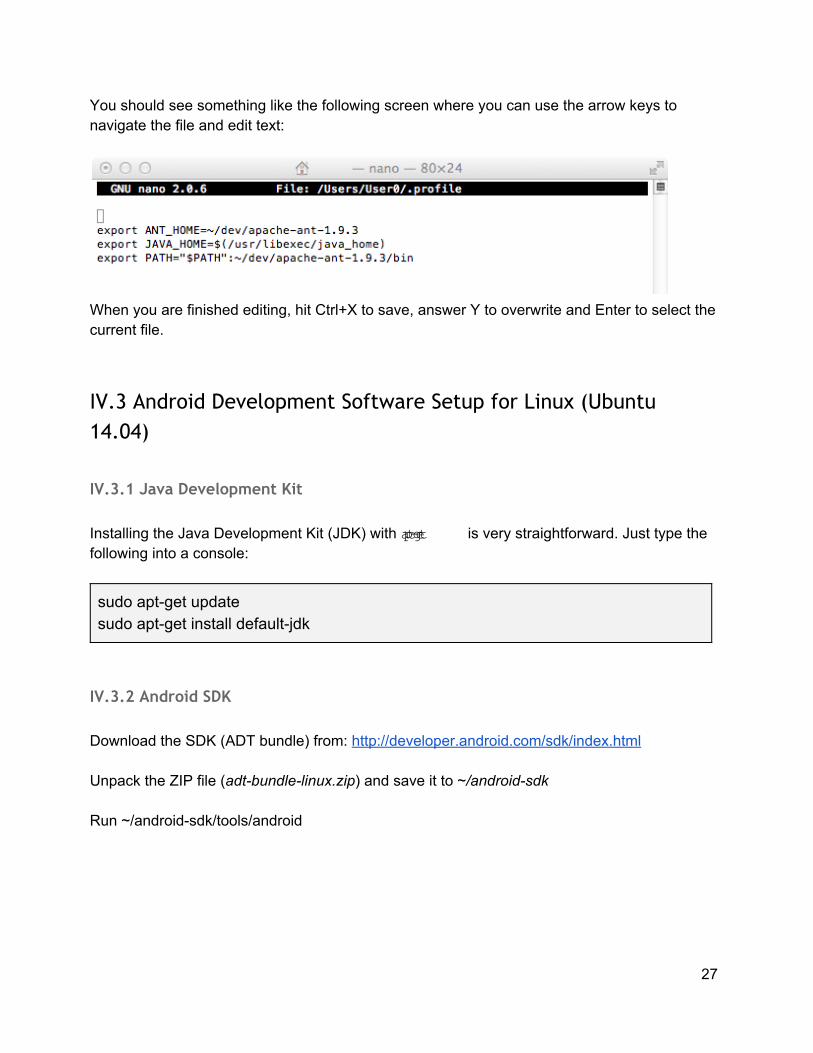
You should see something like the following screen where you can use the arrow keys to navigate the file and edit text:
When you are finished editing, hit Ctrl+X to save, answer Y to overwrite and Enter to select the current file.
IV.3 Android Development Software Setup for Linux (Ubuntu 14.04)
IV.3.1 Java Development Kit
Installing the Java Development Kit (JDK) with aptget is very straightforward. Just type thefollowing into a console:
sudo aptget update sudo aptget install defaultjdk
IV.3.2 Android SDK
Download the SDK (ADT bundle) from: http://developer.android.com/sdk/index.html
Unpack the ZIP file (adtbundlelinux.zip) and save it to ~/androidsdk
Run ~/androidsdk/tools/android
27

1. Note that some packages are already selected for installation by default. Leave theseprojects selected.
2. Check Android 4.4.2 (API 19).3. Click the Install X Packages button, where X is the number of selected packages (it
may vary based on what needs to be updated).4. On the next dialog, choose Accept License.5. Click Install to install and update packages.6. Some examples may use an older API version than 19. You may need to download
other API versions if you have trouble building a particular project.
Edit your ~/.bashrc and put this at the top of the file:
export PATH=${PATH}:~/androidsdk/tools export PATH=${PATH}:~/androidsdk/platformtools
IV.3.3 Android NDK
Download the Linux NDK from: https://developer.android.com/tools/sdk/ndk/index.html#download
Unpack the .tar.bz2 to ~/ndk.
28

V. Troubleshooting
V.1 Device Troubleshooting
V.1.1 View is tilted
If the headset view is tilted to the left or right, there is probably an issue with sensor calibration. Take off the headset and place it face down on a flat surface for around 5 seconds to prompt the device to reorient the sensors. When you put the device back on your head, the view should be level.
V.1.2 Device not (or no longer) recognized
Even if a device worked fine previously, it may enter a state in which it is no longer recognized. When using Windows you may get the following dialog:
In most cases, rebooting the device should be sufficient.
29

Windows appears to sometimes autoupdate or autorollback the correct Samsung USB driver when the phone is reconnected. If this occurs, you should see a Windows notification that it is installing a driver when you connect your phone via USB. Should this happen, reinstall the correct driver.
V.1.3 Device regularly reconnects
The device may enter a state in which it reconnects regularly, or in the middle of sessions.
In Eclipse you may get the following message:
[<data> <time> DeviceMonitor] Adb connection Error: An existing connection was forcibly closed by the remote host
Solution: reboot the device.
V.1.4 I need to run my app outside of the Gear VR headset
Running a VR application with the vr_only manifest tag currently requires placing the phoneinto the Gear VR headset. This can be a time consuming process for making iterative changes to applications. We are working to resolve this in order to streamline the development process.
As a workaround, the vr_only tag can be changed to vr_dual in order to view your appoutside of Gear VR. Unfortunately, this requires a recompile.
Be sure to set this back to vr_only when analyzing app performance:
<metadata android:name="com.samsung.android.vr.application.mode" android:value="vr_only"/>
V.2 Android Environment Troubleshooting
V.2.1 Ant build failure
When building your project using the Ant build tools, you may run into build.xml errors such as the following:
C:\Dev\Android\android_adt_bundle_20140702\sdk\tools\ant\build.xml:653: The following error occurred while executing this line:
30

C:\Dev\Android\android_adt_bundle_20140702\sdk\tools\ant\build.xml:698: null returned: 1
If you add the verbose option to the Ant build, you will see an error such as:
invalid resource directory name: C:\Dev\Android\VrTestApp\bin\res/crunch
This appears to happen for projects which refer to library projects there is currently no explanation why it occurs. To fix the problem, delete the bin/res/crunch folders that are generated in VrLib/ and VrTestApp/.
V.2.2 Eclipse Problems
Spaces in Android tool paths. Make sure there are NO SPACES in any of your Android tool paths. If there are, follow all of the installation instructions from the start without spaces in any paths. The exception is the Java Development Kit on Windows, which by default installs to “C:\Program Files (x86)” for 32bit or “C:\Program Files” for 64bit. Those paths are acceptable as long as JAVA_HOME is set appropriately (without quotes see the note in the section IV.1.1).
Build/clean error due to missing NDK path. Eclipse sometimes loses the NDK path even though you set the path during the software installation process. When this happens you may get a build/clean error similar to the one below:
**** Cleanonly build of configuration Default for project VrExperiments **** sh ndkbuild clean Error: Cannot run program "sh": Launching failed **** Build Finished ****
Solution: set the NDK path at: Menu > Window > Preferences > Android > NDK.
Unable to launch due to errors Although you just successfully built your application, you get a message that the project contains errors that need to be fixed before you can launch the application.
Solution: go to the Problems tab (typically at the bottom) and delete all the errors.
Compatibility Warnings When Starting Eclipse
31

If you already have an existing installation of the Android Development Tools prior to 23.0.2, you may see compatibility errors when starting Eclipse depending on which packages you downloaded from the SDK Manager. In some cases you may be able to fix these compatibility issues by going to Eclipse > Help > Install New Software. Add the URL https://dl-ssl.google.com/android/eclipse/ in the Work with: field and select Add. Name the repository “Eclipse”, select the packages that appear under Developer Tools and choose Next. If you receive installation errors, you can try to resolve these (you should be offered some resolution steps) or try installing one package at a time. If you continue to receive errors, try the steps below.
Make sure you have downloaded the latest ADT bundle and verify that all of the required environment variables (including PATH) point to the location of the new bundle. Launch the SDK Manager from the new ADT bundle installation and download the required packages as indicated in section IV. Launch Eclipse from the new bundle, go to Window > Preferences and verify that the SDK Location field there points to the location where you installed the new version of the ADT bundle. Reverify that all paths in Eclipse and all system environment variables are correct and reboot.
Missing NDK Option in Android Menu At this point you should verify that the NDK path is set correctly in the Eclipse Settings as shown in section IV.1.5 (Windows), IV.2.5 (OS X), or IV.3.3. (Ubuntu). If NDK does not appear under Preferences > Android, make sure you have all of the latest development tools installed.
In Eclipse, go to Help > Install New Software. In some versions of ADT the existing links for Android Development Tools Update Site appear to be broken (the https is paired with the wrong URL). If any of the predefined links for Work with: field do not allow proper installation, click Add..., input "eclipse" for Name: and in the Location field type: https://dl-ssl.google.com/android/eclipse/
Download all of the packages under Development Tools and complete the installation steps.
Java Build Errors The SDK currently uses some deprecated Java interfaces. If you see build errors (listed under Errors and preceded by a red X icon) related to Java deprecation, such as “The type ActivityGroup is deprecated”, then set deprecation errors to warnings. Go to Window > Preferences > Java > Compiler > Errors/Warnings and scroll down to the Deprecated and Restricted API section. Next to Deprecated API, change Error to Warning or Ignore as shown below:
32

33
Last Update: Nov 10, 2014
OCULUS VR is a registered trademark of Oculus VR, LLC. (C) Oculus VR, LLC. All rights reserved. All other trademarks are the property of their respective owners.