OCTOBER - Romsey Modellers … · OCTOBER 2010 THIS MONTH I ... memorabilia, the history of...
27
Transcript of OCTOBER - Romsey Modellers … · OCTOBER 2010 THIS MONTH I ... memorabilia, the history of...


OCTOBER 2010
THIS MONTH
I have been overwhelmed by the number and variety of contributions to this month’s magazine; we have articles from a record seven contributors covering aircraft, ships, figures, bikes and armour. Thank you to everybody who have taken the time to tell us a bit more about our hobby.
I have just performed an audit on the size of my loft lagging and found that I now have 102 models on my forward build list. Since I have only been modelling 5 years I calculate that at this rate I could have over 800 by the time I shrug off my moral coil, I hope there is plenty of space in my care home!
Tony…
Contents
October 2010 .......................................................................................................................................................... 2
This Month ......................................................................................................................................................... 2 Club News ........................................................................................................................................................... 3 Club Visit Ideas for 2011 by Paul Adams ............................................................................................................ 4 Hornet Build by Richard Stewart ........................................................................................................................ 6 Wot I dun this mumf’ by Steve Edwards ............................................................................................................ 8 Tamiya 1/32 Supermarine Spitfire Mk IXc by Tony Adams .............................................................................. 10 Airfix 1/72 Spitfire Mk1a by Pat Camp ............................................................................................................. 14 Tamiya 1/48 M8 Greyhound Build by Russell Eden .......................................................................................... 16 Kit Review: Tamiya 2009 Fiat Yamaha YZR M1 by Paul Adams ........................................................................ 19 Cold War Hot Summer by Brian Sampson ........................................................................................................ 21 Masterbox 1/32nd “Famous Pilots of WWII” Kit1 (MB 3201). By Pat Camp ..................................................... 24 Nashorn build part 2 by Russell Eden ............................................................................................................... 25 Club Diary ......................................................................................................................................................... 27 Contact Info ...................................................................................................................................................... 27
This is the newsletter of Romsey Modellers a group of plastic modellers based in Southern Hampshire. We cater for all modelling genres and skill levels from beginners to well seasoned gurus.
We meet on the 3rd Wednesday of the month from 8pm to 10pm in Ampfield, Hampshire, where we often run workshops and club competitions but more importantly have a good chat about our hobby. We also attend most of the local model shows, where we exhibit our member’s completed projects.
We have an open door policy so if you want to sample how we can help you get more out of your hobby or just come and have a friendly discussion (tea and biscuits provided) please feel free to turn up – see the last page for details or visit our web site
www.romseymodellers.co.uk

3
CLUB NEWS
IPMS FARNBOROUGH SHOW 18TH SEPTEMBER 2010 BY STEVE EDWARDS
Right, this is the first time I have written an article for any magazine so my apologies if the style is somewhat amateur!
We arrived at about 9.15 at the college and were allowed to park right outside which made unloading very easy. With some of the show regulars away, it was down to Dale, Russ, Tascha and myself to man the stand. We had 18 foot of table space which afforded us a decent amount of room, and as Dale had not brought any models the rest of us could stretch out quite nicely, a refreshing change after the crush of Salisbury.
The tables were arranged at right angles and with Phil’s Phantoms on the table behind us and so it was all very cosy!
The Romsey Modellers and Phil’s Phantom Sig stand at the Farnborough Show
With Russ’s Itasha cars, Tascha’s Ork Warbuggy, all three of us showing armour, my Type VII U‐Boat and figures, I think we made a very presentable display.
Tony and Caitlin turned up during the day, Caitlin doing her usual trick of winning on the tombola. She won me a Revell Sherman Firefly that I made the next day, sat in front of the television, ready to practice my weathering on!
It was a fairly small show and there was no competition, however as always, the standard of models that were there was very high. The traders too were of good quality with plenty of bargains to be had, including one seller offering 3 kits for the price of 2. Dale came away with some car kits as a result.
Unfortunately my camera went on the blink after half a dozen pictures so I am afraid the photos probably don’t do it justice.
I hope you enjoy the following pictures though, with some of my favourite models from the show.

4
MODEL SHOWS
Our next show is the Fleet Air Arm Museum autumn show at Yeovilton on Saturday 23rd October. We have our normal 24ft of table space, so need a reasonable number of volunteers to fill it. As at the FAA spring show free entry for exhibitors will be limited. We will discuss travel arrangements at the next club meeting.
CLUB VISIT IDEAS FOR 2011 BY PAUL ADAMS
At last month’s meeting we discussed briefly some good ideas for club visits next year. At this stage they are just proposals, so if you have something in mind the club may be interested in, please keep those ideas coming in.
First off is the History on Wheels Museum at Eton Wick, Windsor. A collection of pre war and WWII vehicles are on display complete with galleries of motoring memorabilia, the history of military uniforms and there’s even all hall with a Princess Diana collection. We could have lunch in the air raid shelter!! Check out the website at; http://www.thehistoryonwheelsmuseum.co.uk

5
Next up is the Haynes Motor Museum, Sparkford, Yeovil. Firstly, not too far away however, this one’s for the petrolheads or those that’ll enjoy drooling over cars they can only dream of!! With over 400 cars and bikes on display including 50 exotics in the Red Room it promises plenty to see. Includes a kid’s playroom, cinema and Haynes shop where you could pick up a manual for your car! See more information at the Haynes website; http://www.haynesmotormuseum.com/home/index.html
And lastly we have the Brooklands Museum, Weybride, Surrey. The museum has exhibits featuring motoring history from 1907‐1939, WWI, WWII and post war aircraft, a cycling
exhibition from the 1930’s and a chance to get up close and personal in the cockpit of Concorde. A splendid mix of interests at this museum means it gets my vote. The museum holds regular events so if we time it right we could see something extra for our hard earned cash. For more info see the website (includes full list of exhibits if your looking for something specific) here; http://www.brooklandsmuseum.com/
Thanks to Russell for these ideas. If you have an opinion, comment or another idea for a club visit, please let Tony, Paul or Vic know. We’ll discuss our next visit at a future club meeting.

6
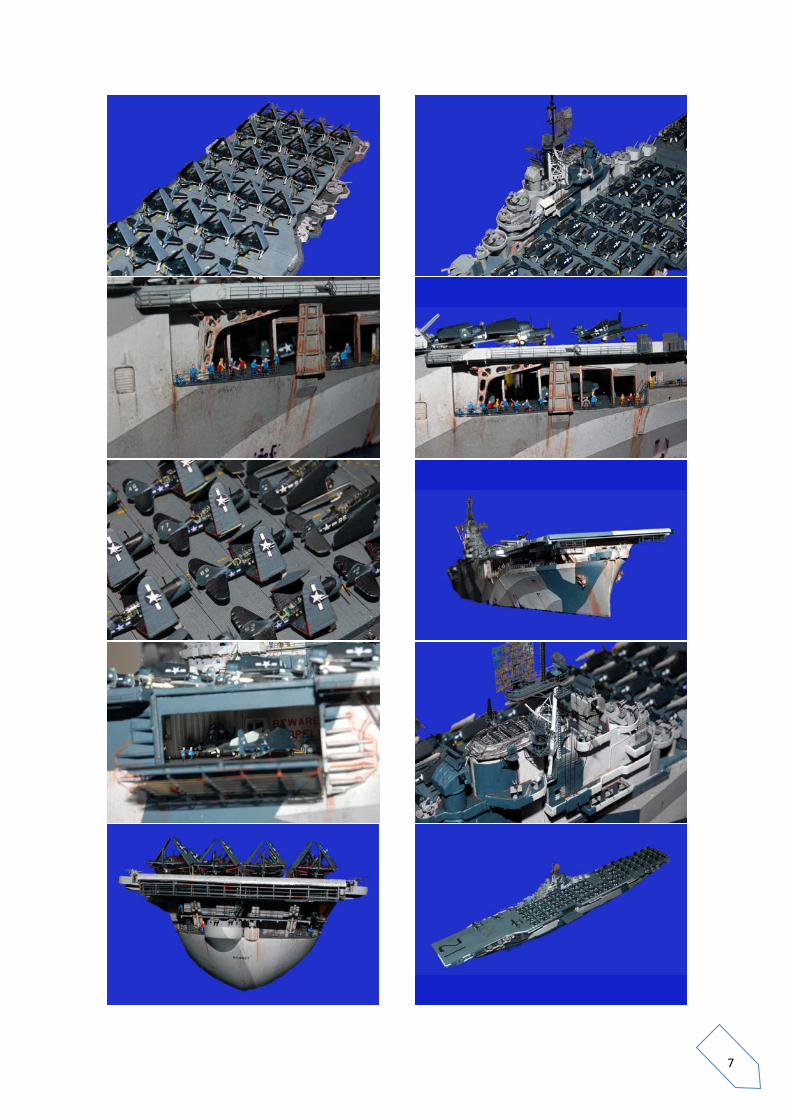
HORNET BUILD BY RICHARD STEWART
Well with my office now in a condition to start work again. I’ve attacked it with gusto!
What a joy with the hardest thing was to remember where I left off. On my list was to fit the girders to the underside of the side elevator which after about 30 minutes armed with my trusty tube of super glue, took shape and was a snug fit into the elevator runners.
After that I test fitted the main armament, for this I used L’ arsenal resin ones which provides a higher level of refinement than the ones in the kit. Once these were cleaned up I painted them with the corresponding camouflage scheme and put them to one side to concentrate on the bridge radar sets. I pre made these prior to the ‘ships hibernation’ so it was just a job of positioning these on the correct mask. This still took some time with superglue taking seconds to stick to my figures but an eternity to adhere to the model!
The wooden base has now received a coat of Halford’s midnight blue which I’ve lightened in areas to provide a sense of depth. I will cover this with clear acrylic base to give the look of a moderate sea.
There is still a bit to go before I can say I’m ready to start the Battle Class Destroy but it is now starting to look like a ‘Business Machine’
7
8
WOT I DUN THIS MUMF’ BY STEVE EDWARDS
SEPTEMBER ‘10
Hi Guys,
Hopefully this will become a regular feature regaling you with stories of my adventures in the land of modelling, a place where I spend far more time than is probably good for me.
Of course we have had build a model day and Farnborough, but I shall concentrate on my own little world and hope it brings a small measure of entertainment.
I apologise in advance that my articles will mainly be centred around Airfix and will not contain a large amount of aviation, but at least you will all be able to laugh at me behind my back – assuming you don’t already of course!
When I decided to start modelling again after a ten year break I expected to be building aircraft, in particular WW1 aircraft with a smattering of WW2 RAF and FAA. I was therefore surprised to find that 54mm figures got my juices going, especially as, although I made some of Airfix’s offerings as a kid I was never really impressed by them at the time. This may have been because you couldn’t play with them perhaps?
Anyway, 54mm it is then, or 1/32nd if you prefer, though I know some argue that 54mm is 1/35th – I am not getting involved in that, Airfix reckon it’s 1/32nd and that is good enough for me.
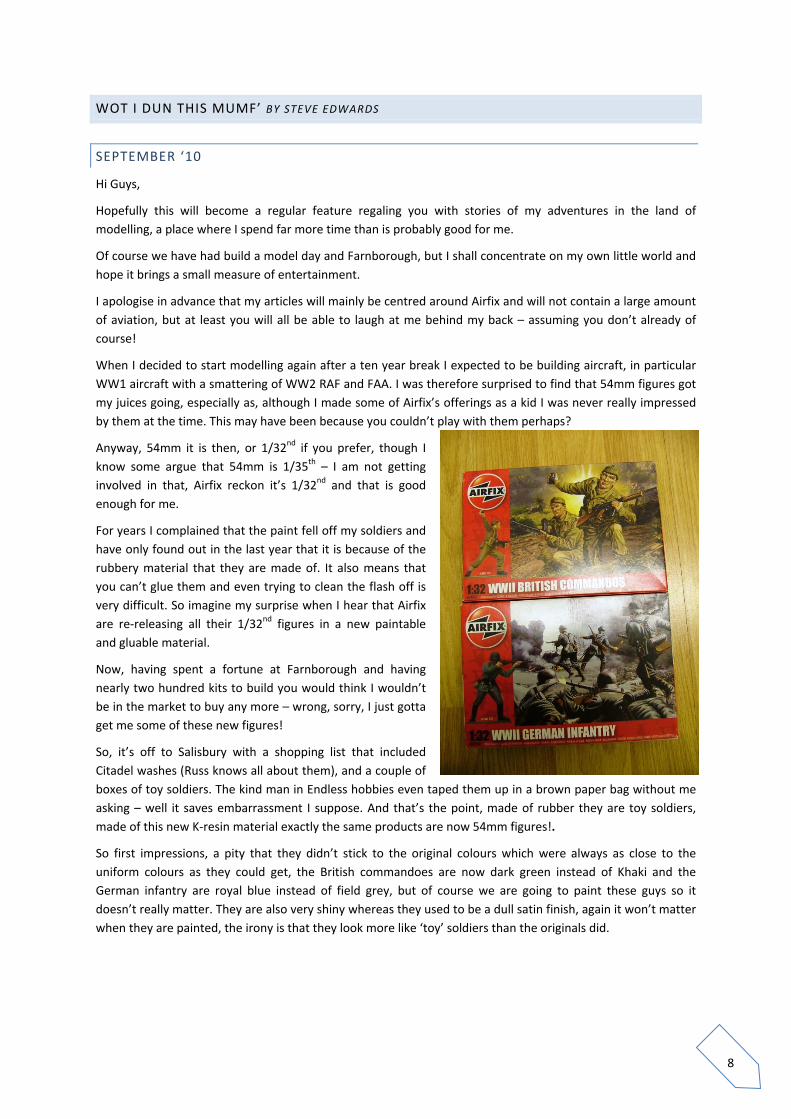
For years I complained that the paint fell off my soldiers and have only found out in the last year that it is because of the rubbery material that they are made of. It also means that you can’t glue them and even trying to clean the flash off is very difficult. So imagine my surprise when I hear that Airfix are re‐releasing all their 1/32nd figures in a new paintable and gluable material.
Now, having spent a fortune at Farnborough and having nearly two hundred kits to build you would think I wouldn’t be in the market to buy any more – wrong, sorry, I just gotta get me some of these new figures!
So, it’s off to Salisbury with a shopping list that included Citadel washes (Russ knows all about them), and a couple of boxes of toy soldiers. The kind man in Endless hobbies even taped them up in a brown paper bag without me asking – well it saves embarrassment I suppose. And that’s the point, made of rubber they are toy soldiers, made of this new K‐resin material exactly the same products are now 54mm figures!.
So first impressions, a pity that they didn’t stick to the original colours which were always as close to the uniform colours as they could get, the British commandoes are now dark green instead of Khaki and the German infantry are royal blue instead of field grey, but of course we are going to paint these guys so it doesn’t really matter. They are also very shiny whereas they used to be a dull satin finish, again it won’t matter when they are painted, the irony is that they look more like ‘toy’ soldiers than the originals did.
9
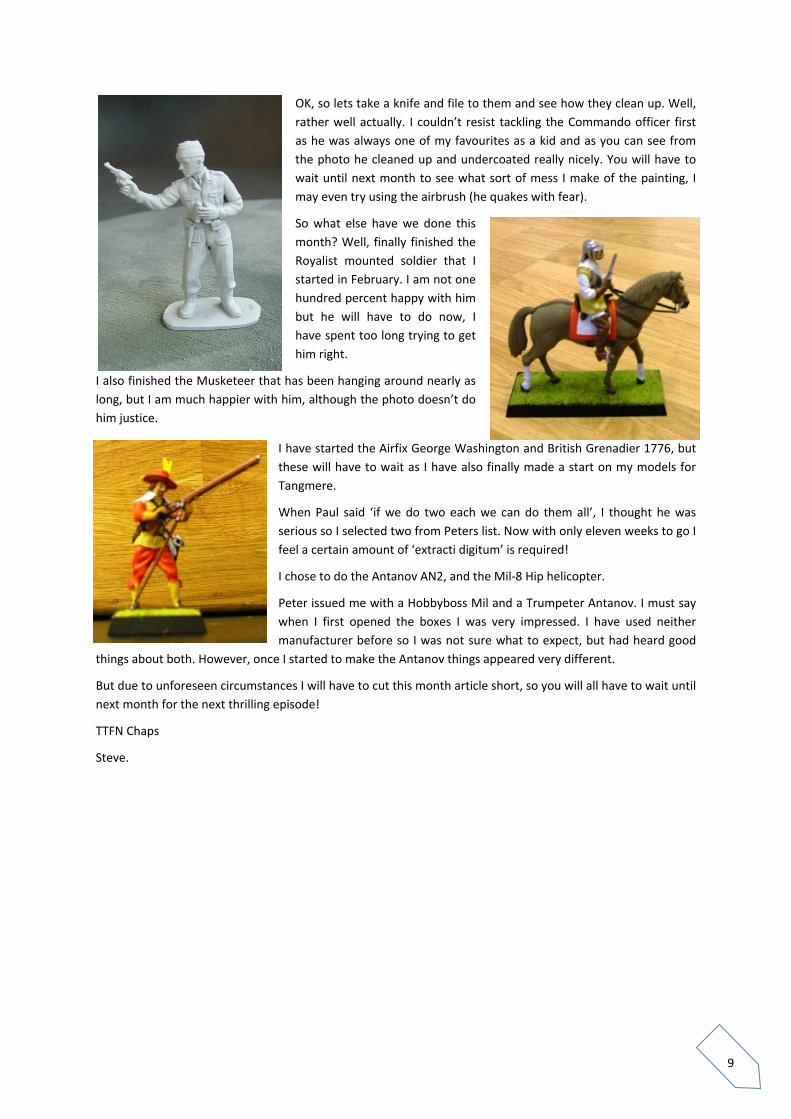
OK, so lets take a knife and file to them and see how they clean up. Well, rather well actually. I couldn’t resist tackling the Commando officer first as he was always one of my favourites as a kid and as you can see from the photo he cleaned up and undercoated really nicely. You will have to wait until next month to see what sort of mess I make of the painting, I may even try using the airbrush (he quakes with fear).
So what else have we done this month? Well, finally finished the Royalist mounted soldier that I started in February. I am not one hundred percent happy with him but he will have to do now, I have spent too long trying to get him right.
I also finished the Musketeer that has been hanging around nearly as long, but I am much happier with him, although the photo doesn’t do him justice.
I have started the Airfix George Washington and British Grenadier 1776, but these will have to wait as I have also finally made a start on my models for Tangmere.
When Paul said ‘if we do two each we can do them all’, I thought he was serious so I selected two from Peters list. Now with only eleven weeks to go I feel a certain amount of ‘extracti digitum’ is required!
I chose to do the Antanov AN2, and the Mil‐8 Hip helicopter.
Peter issued me with a Hobbyboss Mil and a Trumpeter Antanov. I must say when I first opened the boxes I was very impressed. I have used neither manufacturer before so I was not sure what to expect, but had heard good
things about both. However, once I started to make the Antanov things appeared very different.
But due to unforeseen circumstances I will have to cut this month article short, so you will all have to wait until next month for the next thrilling episode!
TTFN Chaps
Steve.

10
TAMIYA 1/32 SUPERMARINE SPITFIRE Mk IXc BY TONY ADAMS
I have had this kit for over 6 months now and have been itching to start since I got it, however other projects and work commitments have got in the way. The delay has allowed me to consider what I want to do with the model and gather together reference source as and build articles of other modeller’s builds of this fantastic kit.
On the reference side I purchased The How to Build Tamiya’s 1/32 Spitfire by Brett Green , and Haynes excellent guide to the Spitfire , which has some
fantastic shots of the interior of the BBMF machines.
I have purchased a Eduard Big Ed etch IX set (Early)– to add plenty of bling, milled brass cannon barrels and a Eagle decal set which gives me the choice of two Grey / Green aircraft and a Desert machine.
My current plan is to model aircraft No MK636 flown by Sqn Leader Wally McLeod DSO, DFC and Bar 443 Sqn RCAF in June 1944 (which means I can add invasion stripes). Wallace McLeod achieved a total of 21 enemy aircraft destroyed, three probably destroyed, and 11 damaged, and one shared damaged. McLeod scored 13 of kills during the Battle of Malta, earning the nickname "The Eagle of Malta". He was killed on 27 September 1944, after being shot down by a ME109
I reviewed the kit in the May edition of this magazine, so I won’t repeat that here, suffice to repeat that this is easily the best quality model I have ever seen – WOW WOW WOW. Right after mopping my brow on with the build…
PART 1: THE ENGINE
I remember building the Airfix 1/24 Spitfire 1a with “real propeller action” when I was a kid and inspired by Brian Boot’s club talk I decided that I would attempt to motorise this kit. I purchased a Solarbotics GM15 25:1 Geared Motor [1] on Ebay for around £15. This promises to spin at 2000 RPM when run from a 3V battery which is close to the speed a real machine’s propeller. As the success of the motorisation will influence the rest of the build I started the engine assembly first. I am considering displaying the aircraft in flight with the pilot figure in situ, however it’ll depend on my currently poor figure painting abilities improving so I’m not holding my breath.
To get the motor to fit would require quite major surgery , which as the first step on a £100 kit was quite scary. The first step was to cut a slot out of the gearbox casing at the front of the engine and locate the motor, I drilled a hole in the prop shaft to accommodate the motor rotor and carefully attached them together with cyano. Further space was created in the crankcase with a razor saw to take the motor body [2,3] and a piece was cur out of the inside of each cylinder block. Once the parts were brought together the motor fitted snugly and was invisible from the out side. I drilled a couple of small holes in the bottom of the crankcase for the motor wires to exit. [4]. I now started to build up the engine in the conventional manor, and continued to be amazed how well it all fitted together. Small magnets had to be inserted in places that are used to hold on the cowling panels [5]. Although the detail is impressive there is always a bit more that can be added which is
[1] The 3V geared motor is impressively small

11
where the Eduard etch comes in. In particular the Rolls Royce placards that fit on the rocker covers add that little je ne sais quoi.
[2] Motor and hacked engine [3] The fit with the gearbox was snug
[4]Now it looks like a Merlin [5]Don’t forget to add the magnet to the intercooler
Once all of the subassemblies were assembled, I painted the engine X18 semi gloss black [6] before dry brushing with light grey and silver to bring out the detail [7]. The magnetos were painted with Alclad aluminium before making them a little “dirty” with Promodellers wash.
[6] Base coat applied ready for dry brushing [7] Engine assembled , note the Rolls Royce placards
The oil tank and coolant tank, along with the long air filter (specific for the aircraft I was modelling) were painted gloss black before Alclad Airframe Aluminium [8,9].
I now started on the engine firewall and support frame. This was to be painted Cockpit Green however Tamiya X‐71 seems far too dark compared with my reference sources, so I lightened it considerably with white and a little yellow saving a batch in a jar ready for the cockpit itself. There are numerous small tanks, pumps and other paraphernalia located on the firewall, requiring a number of different colours.

12
[8] Air filer and tanks sprayed gloss black [9] Then Alclad Aluminium
[10] Almost looks like the real thing
[11] Firewall before and after washing [12] Frame built including etch rivets
Once complete, Pro Modellers wash produced an authentic oily looking finish.[11]. The engine frame along with numerous pipes where then put together, along with some very impressive looking etch rivet detail. I am a little worried about adding too much etch detail as the tolerances are so tight the cowlings may not fit later.

13
I now had most of the engine components assembled and painted, etch plug leads were added which look good now but I don’t think will be very visible when the engine is mounted. Look at my references there were still bits missing so it was time for some scratch building. There a number of fuel and oil pipes that have corrugated coving. I wrapped single core wire wrap wire (0.05mm) around a 0.8mm plastic rod and placed them in various locations according to my references.
[13] Corrugated fuel pipes created with wire‐ wrap wire around a plastic rod
[14] Pipe in place along with additional fuel pipe
This is as far as I have got so far with the engine, there are a number of other bits and pieces to add to the engine (such as the exhaust manifolds) but I have now made a start on the cockpit which is going pretty well , but you will have to wait until next month for that.

14
AIRFIX 1/72 SPITFIRE Mk1a BY PAT CAMP
[1] Airfix 1/72nd Spitfire Mk1a
Here is a first look at the Airfix 1/72 Spitfire MkIa, kit AO1017A [1] and a comparison with their MkIX reviewed in last January's Romsey Modeller.
The first difference you will notice is that the box is smaller, lighter and is end opening – not nearly as nice as the packaging for the MkIX. Opening up the box you find all the parts in a sealed polythene bag. The cockpit transparency is inside and within its own small bag.
There are markings for just one aircraft, DW‐K of 610 Squadron, 13 Group, Biggin Hill, July 1940. This has Dark Earth and Dark Green over Sky in the "B" scheme camouflage. From introduction of this scheme on the first Spitfire off the production line in May 1938 until mid January 1941, Spitfires were painted in camouflage patterns "A" and "B", one being a mirror image of the other, typically having aircraft with even numbers in "A" scheme, but not always so. All aircraft bore the "A" scheme subsequently.
The colour scheme is given on the underside of the box, rather than on a separate coloured sheet as for the MkIX. The aircraft has neither a fuselage band nor yellow wing outer leading edges at this time in the war and so this should make painting and masking far easier.
The instruction sheet is nicely done, comprising four sides of A4. It shows a display base with a big question mark against it, and this was precisely my reaction when I couldn't find it in the bag of parts nor anything else about it, such as a part number. It looks as though it is designed to hold two models in flight.
If I sound a tad negative about the single marking option and packaging for the kit, this is more than compensated for by the kit parts. Way, way more.
There are two opaque[2] and one transparent sprues. I really like the moulding and although the panel lines are overdone for this scale, they are not soft like on earlier Airfix releases including the MkIX [3]. There are some raised fastenings over the ammunition panels that look a bit Wallace & Grommit, but this is a simple thing to rectify. And the wheel wells are nicely detailed, unlike the simple holes there are in the MkIX. And would you believe it ‐ you get weighted wheels as well! The undercarriage is moulded integrally with the covers and this is a feature I like by Airfix. The attachment of the tailplanes to the fuselage is also different from the norm: the slots on the fuselage are very wide and the tailplanes have a fillet moulded into them. If this works, it should make alignment a whole lot easier.
I compared the main parts against drawings in the very first issue of Scale Models, October 1969 (oh, such memories!). The fuselage sides matched the drawings exactly ‐ amazingly so. So did the wings.
The cockpit is excellent. Unlike the MkIX, this time you get a separate moulding for the forward frame and instrument panel to which you affix an instrument panel decal. The frame behind the seat is also a separate

15
part. The MkIX lacks these parts and I had to add pieces of plastic inside the fuselage to spread the sides open to get a good fit with the wing. The frames may mean this will not be needed for the Mk1 ‐ we'll have to see. This kit also has a nicely detailed pedal bar and floor framework. The insides of the fuselage are also detailed. The kit includes a pilot that is of the correct size, unlike the way‐undersized one in the MkIX kit.
[2] The main sprues of the kit. [3] I like the panel line engraving.
The cockpit canopy looks perfectly shaped to me, with the correct angle of framing (unlike that of the MkIX) and flat sided, round topped hood. It has the external armoured windscreen and a pip moulded on the top to represent the mirror. The only downside is that it is a single, quite thick moulding and will not be easy to cut apart to depict the hood being open unless you buy some vac‐formed replacements (as I have done ‐ Squadron part 9123).
The decal sheet looks very nicely printed and includes lots of stencil markings. I suspect the red centres of the roundels are not bright enough and look more like the dull red used from 1942 onwards. I also purchased Xtradecal sheet X72‐117 which includes Battle of Britain Spitfires and the red on those decals is even duller, so I guess I must be mistaken about the brightness of the red at that time of the war.
So, how do I summarise this little offering from Airfix? It is a gem. Absolutely first class. Well done Airfix!
[4] Kit decal sheet.

16
TAMIYA 1/48 M8 GREYHOUND BUILD BY RUSSELL EDEN
With the armoured car nearly complete it was onto the stowage. The main set came with the snow chained wheels. After playing with the placement I decided not to use the front stowage and just use the rear set. This consisted of several rolled tarpaulins, an ammunition crate and a kit bag all moulded in one block. This was primed previously and then painted a variety of military style colours for variation, given various washes and dry brushed. Once I was happy with it I used matt varnish to glue it to the engine deck. To this I also added 2 more rolled tarps and some .50cal ammo boxes. I did want to add a jerry can but wondered if it would have been wise to carry a fuel can on an engine deck…..? The rest of the stowage came from the British stowage set I bought previously for the replacement .50cal machine gun.
With these in place I moved onto the mud. Dale kindly supplied me with a jar of dark earth from Tamiya on the proviso that I did a review of it ‐ http://www.tamiya.com/english/products/87109dark_earth/index.htm
With the wheels still not fitted I used it to muddy the underside of the greyhound – it is very thick and quite solid. This suited clumping it under the mudguards really well. I’d use old brushes only when using it too. The grains might be considered a bit over scale (I think it’s designed more for 1/35 scale dioramas) but with the addition of some water and MIG pigments it appeared less grainy and varied more in colour. Once dry I used some lighter MIG pigments thinned and painted it where I wanted dried mud. Dried mud is lighter than wet so the lighter shades should be done first and then built up to the darker shades. Mixing in a bit of acrylic semi gloss varnish to the MIG pigments made the mud thicker and will gave it a wet look. I used this technique on the wheels as the Tamiya mud did work very well on these. I think I’ll stick to using it on big areas only. This was the end of the first stage of mud application. On a separate note I used it on my Panther tank and it was brilliant for muddying the tracks and hull – highly recommended for the muddy look.
Mud application in progress
Onto the base; I was going to use one of my usual cases as they fit 1/48 armour so well. With a newly machined wooden base (thanks to Pete at work – it’s amazing what he’ll do for some custard creams!) I sat down with Malcolm and had a brainstorming session. After several cups of tea and numerous biscuits we decided to have the Greyhound driving down a muddy track with a ditch to one side. Using some heavy duty antistatic foam I sliced it, roughly, into shape. It was glued to the base with glass glue and once dry a coating of filler liberally applied over it. Thanks to Malcolm for showing me how to mix it properly – finally I know! We added some tyre tracks next and left it to dry over night. The next day I decided the ruts weren’t deep enough so added more filler and laid some deeper tracks into it. I drove the Greyhound into it to get the correct tyre patterns – one reason why I didn’t glue the wheels in place. After carefully removing it and washing the wheels the base was left to dry overnight. Next morning I painted it with the Tamiya mud and gave it few coats of various MIG pigments to blend the mud. I glued the Greyhound into the ruts with my trusty glass glue, making
17
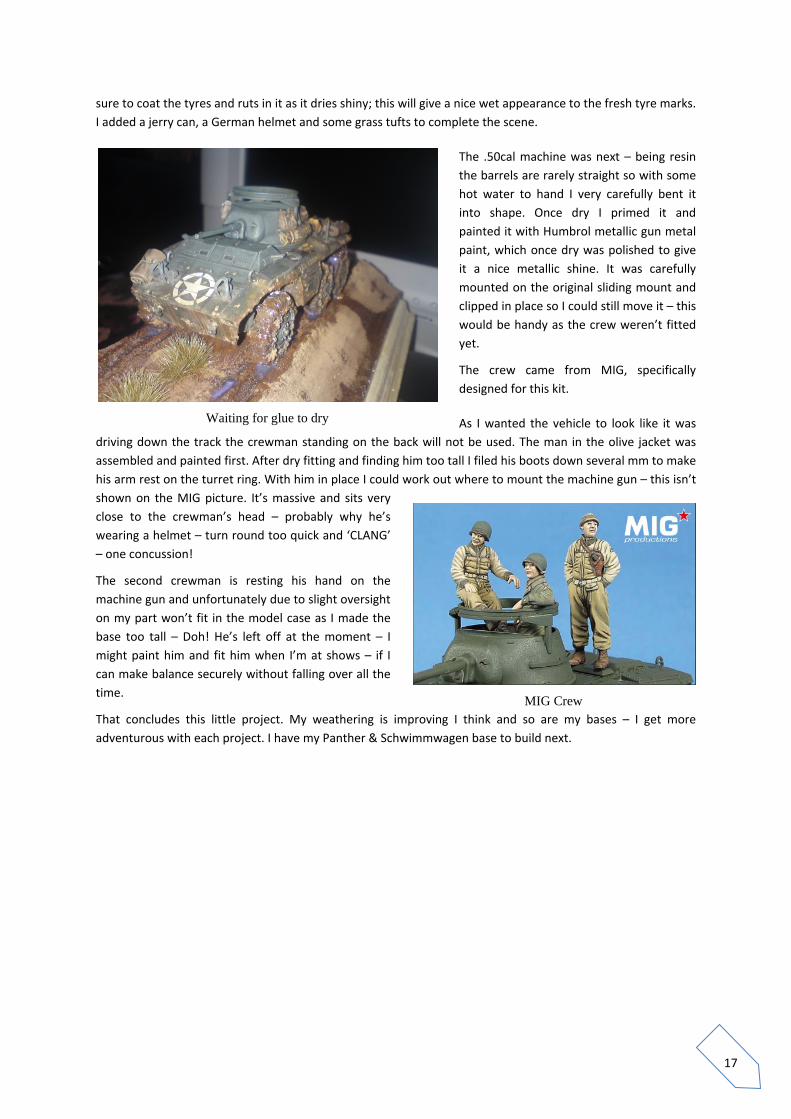
sure to coat the tyres and ruts in it as it dries shiny; this will give a nice wet appearance to the fresh tyre marks. I added a jerry can, a German helmet and some grass tufts to complete the scene.
The .50cal machine was next – being resin the barrels are rarely straight so with some hot water to hand I very carefully bent it into shape. Once dry I primed it and painted it with Humbrol metallic gun metal paint, which once dry was polished to give it a nice metallic shine. It was carefully mounted on the original sliding mount and clipped in place so I could still move it – this would be handy as the crew weren’t fitted yet.
The crew came from MIG, specifically designed for this kit.
As I wanted the vehicle to look like it was driving down the track the crewman standing on the back will not be used. The man in the olive jacket was assembled and painted first. After dry fitting and finding him too tall I filed his boots down several mm to make his arm rest on the turret ring. With him in place I could work out where to mount the machine gun – this isn’t shown on the MIG picture. It’s massive and sits very close to the crewman’s head – probably why he’s wearing a helmet – turn round too quick and ‘CLANG’ – one concussion!
The second crewman is resting his hand on the machine gun and unfortunately due to slight oversight on my part won’t fit in the model case as I made the base too tall – Doh! He’s left off at the moment – I might paint him and fit him when I’m at shows – if I can make balance securely without falling over all the time.
That concludes this little project. My weathering is improving I think and so are my bases – I get more adventurous with each project. I have my Panther & Schwimmwagen base to build next.
Waiting for glue to dry
MIG Crew

18

19
KIT REVIEW: TAMIYA 2009 FIAT YAMAHA YZR M1 BY PAUL ADAMS
Well, it appears the madness continues! No this is not another ‘oh, here he’s goes on about Rossi kits again’ piece – but a genuine attempt at an impartial kit review!!! It just happens that it’s another kit featuring that well known Italian bike racer….
Tamiya’s release of this kit comes as a welcome surprise and an interesting one. You see this is the first bike kit from any manufacturer of the modern 800cc era of MotoGP. Sure there have been a stack of resin kits about, but nothing like this in terms of accuracy. One exception perhaps is the Top Studio 2008 and 2009 Yamaha super detail transkits, but at £160 a pop, they are out of reach of most pockets. It comes at the end of the 800cc era too – with just one more season to go before the bikes become 1000cc beasts for the 2012 season. A bit late I think!!
Still, it’s all good news if you want to build something up‐to‐date and don’t want to convert a 990cc 2005 M1 kit (as I did for the 2007 Assen bike) and, you’ll not have to remortgage the house to do it. Retailing around £40 in the UK, the kit is not bad value for money.
SO WHAT’S IN THE BOX?
Tamiya’s bike kits are now familiar to many and this kit holds no surprises in term of innovation. I was hoping for something new, just like we saw on the Honda RC166 kit but to no avail. However what we’ve got is a full, newly tooled kit and no carry over parts from the 2005 M1. Outwardly the machines look very similar, but it’s when you start to notice the details it was clear Tamiya had to retool the kit.
Gone is the 990 engine and we’re treated to an accurate 800cc unit complete with new plumbing, clutch and radiator. Also new is the revised frame complete with additional crossbrace between the
engine spars. One big addition for this kit is an under tank electrical unit which forms part of the airbox. They’ve done this because the dummy tank cover is now in two pieces, just like the real machine. To show this off properly it needs detailing with wires and connectors, otherwise the reveal would be an anti‐climax!

20
There of course the expected updated features of the 2009 bike – all new cowlings (the side cowlings are exquisite!) rear and front mudguards, new exhaust, revised spiral design Marchenesi wheels, an up‐to‐date stand (very nice), a proper shroud for the smaller clock pod (previously inaccurate on any M1 kit post 2004) and intriguingly separate front and rear sprockets suggesting a chain set is on its way from Tamiya. One other new item is the seat mounted carbon fibre camera, beautifully done.
Tamiya have announced they plan to release a rider figure in November to further enhance this model. The kit tips its hat to that promise in the form of two types of fork stanchion, one featuring the bikes normal ride height, the second lowers the front in cornering mode indicating the bike is ‘braking’ – another clever addition. One concern for me is always the decal sheet and Tamiya don’t disappoint – correct fluorescent race numbers are incorporated, including many of the small personal decals correctly done. A sheet of masks are present to help the modeller mask off for the blue sections of the paint scheme. Here’s my impartial bit….decals for Jorge
Lorenzo are there too, in case you’d want to build the #99 machine. And who wouldn’t...
There are faults with the kit. Tamiya persist in using tiny screws to fasten the wheels, swingarm, engine and cowlings in place. This may have been acceptable 10 years ago, but not anymore. Hasegawa’s new series of bike kits features no screws at all judging by the new pictures from the All Japan Hobby Show. Furthermore the out of scale tubing is employed for the throttle, brake and clutch cables. I would have thought the clever engineers at Tamiya could come up with a better solution than the same idea they’ve been trotting out for many years now. Must try harder Tamiya!!
Overall of course this is a great addition to one’s motorcycle kit collection and the chance to build a Lorenzo Rossi bike fills me with enough excitement to rival a 5 year kid at Christmas!! Zero paints have already produced at pearl white and blue paint set for it the Fiat sponsored kit and Tamiya have announced a second M1 kit, the Yamaha satellite team, Tech 3’s lovely black and yellow Monster energy drinks sponsored version. There’s also a simultaneous release of the obligatory machined fork set which comes complete with etch radiator covers. So, more expense and kits in the to‐do pile. The madness continues!!!
I’m looking forward to getting to grips with this kit soon. 9/10
Tamiya Fiat Yamaha http://www.tamiya.com/english/products/14117yzr2009/index.htm
Tamiya Monster Tech 3 Yamaha http://www.hlj.com/product/TAM14119
Zero Fiat Yamaha Team paints ‐ http://www.hiroboy.com/catalog/product_info.php?products_id=3701&osCsid=8d751d9c1a867a735508179660f58ed8

21
COLD WAR HOT SUMMER BY BRIAN SAMPSON
Having missed some of the club meetings during the early part of this year due to work commitments I kept up to date through the club magazine The Romsey Modeller. It came to my attention that we had been approached by a friend of Tangmere Aviation Museum to the effect that they were about to revamp some of there displays in our case it was to be the Cold War section. The models were to be supplied by Peter Lloyd all we had to do was to select an aircraft and build it by the November competition, not to difficult it would seem.
My choice was to be the IL‐28 Beagle a twin engine jet medium bomber and being a non camouflage type gave me the excuse to use my air‐
brush and one of the Alclad lacquer finishes.
The kit arrived, made by Trumpeter and from what I had heard in the past it should be good.
First impressions were a box full of kit and the detail looks good so we dry run the large parts and discard items not required, which in my case would be the bomb bay and bombs plus a couple of strap‐on rockets for assisted take off
On the right, stage one or major components, having reached this stage I should now point out the following, the bomb bay is closed, tabs had to be added inside for support and the cockpit didn’t locate at all well this was annoying!!!!!!
The detail you see on the engine nacelle can’t be seen so forget it. There is no detail in the rear gun mount so I added some only to find that once it is in place it disappears.
The two air splitters ( held by croc clips ) have a right way up this is not clear in the instructions, I inserted mine after gluing the engine covers together, this can be very fiddly refer to any pictures you may have at this point.
I am now going to leave this alone and dive into my PC just to see how others may have approached this kit.
My research leads to the fact that this is or was previously marketed by Bildek and possibly before that Italeri both companies produced this version and the trainer so we don’t have a full blooded Trumpeter kit on the table.
Enough research back to the build, before you get carried away (not literally) don’t forget the nose weight that’s the one not mentioned on the drawing. Beneath the nose is a bulge housing the radar you can get a small fishing weight snugly into this space then test for balance‐OK good at least you now have the confidence to glue the two halves together and we mustn’t forget that those engine cowls are well forward of the centre this will also aid the forward balance.
22
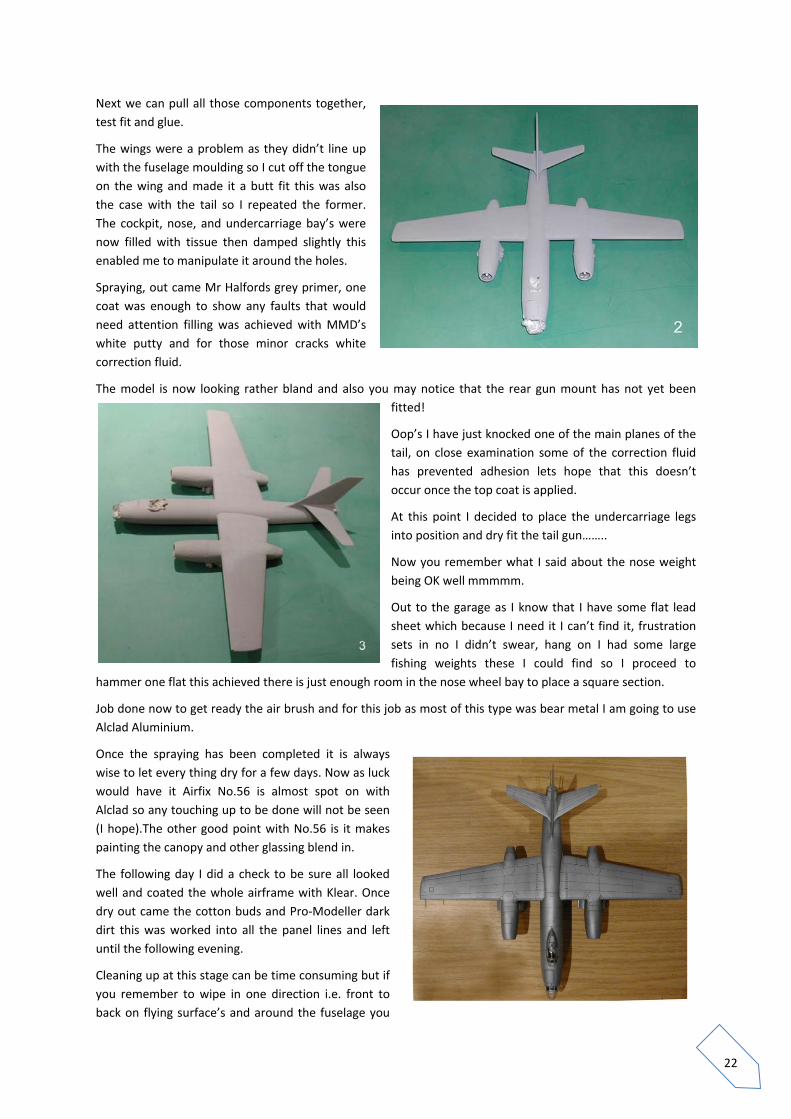
Next we can pull all those components together, test fit and glue.
The wings were a problem as they didn’t line up with the fuselage moulding so I cut off the tongue on the wing and made it a butt fit this was also the case with the tail so I repeated the former. The cockpit, nose, and undercarriage bay’s were now filled with tissue then damped slightly this enabled me to manipulate it around the holes.
Spraying, out came Mr Halfords grey primer, one coat was enough to show any faults that would need attention filling was achieved with MMD’s white putty and for those minor cracks white correction fluid.
The model is now looking rather bland and also you may notice that the rear gun mount has not yet been fitted!
Oop’s I have just knocked one of the main planes of the tail, on close examination some of the correction fluid has prevented adhesion lets hope that this doesn’t occur once the top coat is applied.
At this point I decided to place the undercarriage legs into position and dry fit the tail gun……..
Now you remember what I said about the nose weight being OK well mmmmm.
Out to the garage as I know that I have some flat lead sheet which because I need it I can’t find it, frustration sets in no I didn’t swear, hang on I had some large fishing weights these I could find so I proceed to
hammer one flat this achieved there is just enough room in the nose wheel bay to place a square section.
Job done now to get ready the air brush and for this job as most of this type was bear metal I am going to use Alclad Aluminium.
Once the spraying has been completed it is always wise to let every thing dry for a few days. Now as luck would have it Airfix No.56 is almost spot on with Alclad so any touching up to be done will not be seen (I hope).The other good point with No.56 is it makes painting the canopy and other glassing blend in.
The following day I did a check to be sure all looked well and coated the whole airframe with Klear. Once dry out came the cotton buds and Pro‐Modeller dark dirt this was worked into all the panel lines and left until the following evening.
Cleaning up at this stage can be time consuming but if you remember to wipe in one direction i.e. front to back on flying surface’s and around the fuselage you

23
should be happy with the end result.
Last but not least the decals, there’s are not a lot I can say about these as all you get are the six position stars plus the 08 aircraft number in four positions all of which followed the model contours very well with the aid of Micro Sol red.

24
MASTERBOX 1/32ND “FAMOUS PILOTS OF WWII” KIT1 (MB 3201). BY PAT CAMP
With the Tamiya Spitfire very much in mind, I saw an excellent figure on the cover of Masterbox's 1/32 "Famous Pilots of WWII". This set contains six figures injection moulded on a single sprue. The figure that caught my attention was of "Johnnie" Johnson with his black Labrador.
Masterbox MB 3201 “Famous Pilots of WWII”.
On receipt of the kit my initial reaction was disappointment ‐ JJ is nothing like as depicted on the box art and seems to have changed uniform to the USAAF ‐ I guess Hollywood have been involved in producing this kit !
However, having now examined the single sprue which comes in the kit, my initial disappointment has gone. This kit is very well detailed and moulded. The figures depicted are Lily Litviak (USSR), Saburo Sakai (Japan), Dick Bong (USA), Werner Mölders (Germany), Johnnie Johnson (Britain) and Albert Marcel (France). There is a booklet containing brief biographies of each person: I have read the first about Lily Litviak and was completely knocked out ‐ I am going to enjoy reading about the others.
Saburo Sakai comes with the choice of two heads – I presume one for before his head wound and the other for after – the instructions don’t say.
The box is labelled as Kit 1 and future releases are given on the Hannants website. I will definitely buy them, but will not look too
closely at the box art next time! I'm building up quite a collection of (unbuilt) 1/32 pilots now, so it would make an interesting theme for my figurine painting. I have assembled the Saburo Sakai and Werner Mölders figures and they went together well. I’ll let you know what they come out like when painted. In fact, I am building them alongside metal and resin versions of similar figures to let you know which seem to be the best.
Figures assembled for painting. Saburo Sakai with the choice of two heads, and Werner Mölders (sans tête). I have added some straps from lead foil.

25
NASHORN BUILD PART 2 BY RUSSELL EDEN
After a bit of thinking and research into what I’d need to make my Nashorn look like it should I had 2 choices when it came to the tracks. I wasn’t going to use the original rubber ones so it was either buy a Tamiya Panzer IV and use its tracks or get a set of resin ones. Both options would cost the same so with my ill‐gotten gains from winning the Build a Model in Day competition I visited Just Add Imagination with my vouchers and came away with a Panzer IV. This will be built at a later date with a set of resin winterketten – the wide snow tracks used on the eastern front.
Ok, back to the Nashorn ‐ first job – the rear of the hull. According to this kit I was meant to mount a huge exhaust system here. After going through my photo collection I found this was mainly used on the Hummel, the artillery version of the Nashorn, and the Nashorn had side pipes. The Nashorn carried 2 spare wheels on the rear so after filling in the exhaust mounting holes and liberating a spare wheel from the Panzer IV kit I set about making the brackets from wire. After several attempts I had a sort of matching pair – not a problem as I was only going to have one spare wheel. To this I added the rear step, tow hitch and filled in the main tow bracket which had a cut‐out in on the kit. I might add the U‐bracket as seen in the photo at a later date. That was the hull rear completed, not bad for a couple of hours work.
With this done it was onto the road wheels. Apart from lots of flash to remove these weren’t too bad. The return rollers are a bit of a loose fit but lined up eventually as the glue dried ‐ more on them later. The rear wheels were awful – the spokes on the two halves would line up at the top but not line up on the bottom – eek – how awful is this kit??
With them roughly lined up I glued them in place. That just left the drive sprockets. I didn’t glue them in place as I wanted to test fit the Tamiya track sections first. Just as well I did. As you can see from the photo below the gap between the teeth in the Bandai sprocket was larger than the Tamiya one which meant the links won’t link together.

26
This meant I either scratch‐build all the teeth or find an alternative sprocket. As luck would have it I had my first 1/48 scale kit lying around – a Stug G which I built when first returning to the hobby about 5 yrs ago. Unluckily for the Stug it has now volunteered its drive sprockets and numerous other bits. I removed the original sprocket mounts and lined up the new ones whilst gluing more track sections to them to make sure everything went on straight. It did, sort of, nothing too noticeable luckily. The top sections of track wouldn’t fit properly as the return rollers were too thick in the middle, guide, section so after a bit of filing they soon did! The same applied to the rear wheels. As much as I like the Tamiya tracks being in sections I always end up in a bit of a panic as the glue dries and links don’t line up or don’t quite fit so they always get fitted in a rush. Still, they’re on now and there’s nothing I can do about it, even it they aren’t quite straight in places.
The completed hull rear was then added and then it was onto the exhaust pipes. These exit the hull on each side and work their way down the hull until they meet up with the huge muffler on the back. As I was no longer using the muffler I cut the ends off, rotated them 180degrees and drilled out them out. These match most of the photos I have of Nashorns – they might be a bit long but from all my research it looks like there was no real standard design.
The spare track from my scavenged Stug was added to the front and that is the bottom of the hull finished, next the upper hull and fighting compartment – this might take me a bit longer…

27
CLUB DIARY
October 20th Club Night October 23rd Yeovilton Autumn Show
November 17th Annual Competition
December 15th Xmas Night
January 19th Club Night
February 16th Club Night Yeovilton Spring Show
March 16th Club Night
April 20th Club Night
Next Meeting: Wednesday October 20th (8pm to 10pm)
Ampfield Village Hall Morleys Lane Romsey Hampshire SO51 9BJ
Thank you to this month’s contributors to this publication
Paul Adams Russell Eden Brian Sampson Pat Camp
Richard Stewart Tony Adams Steve Edwards
CONTACT INFO
Web Site wwww.romseymodellers.co.uk
Editor Tony Adams Tel: 01794 519153 email: [email protected] Competitions Paul Adams Tel: 02380 398858 Treasurer Vic Short Tel: 01794 511843


