OCEAN User Guide User Guide.pdf · Login To access OCEAN system use your Internet browser to go to...
87
________________________________________________________________ ________________________________________________________________ Ohio Community & Energy Assistance Network OCEAN User Guide ________________________________________________________________ ________________________________________________________________
-
Upload
truongthuan -
Category
Documents
-
view
217 -
download
0
Transcript of OCEAN User Guide User Guide.pdf · Login To access OCEAN system use your Internet browser to go to...

________________________________________________________________ ________________________________________________________________
Ohio Community
& Energy
Assistance Network
OCEAN User Guide ________________________________________________________________ ________________________________________________________________

Table of Contents
Page
Login ..... ............................................................................................... 4 Forgotten Password .............................................................. 6 Forgotten User Name ............................................................ 7 Welcome .............................................................................................. 8 Client Search.......................................................................................... 9 Client Search – SSN Only ...................................................... 10 Client Search – Client Number Only ..................................... 11 Client Search - Other ............................................................ 12 Client Search Results ............................................................ 13 Client Search Results - No Matches ..................................... 14 Client Details ......................................................................................... 15 Personal Information ............................................................. 16 Client Profile .......................................................................... 18 Addresses ............................................................................. 20 Phone Numbers .................................................................... 25 Email Addresses ................................................................... 28 Programs ............................................................................... 30 Client Associations ................................................................................ 32 Associated Clients.................................................................. 33 Income Sources .................................................................................... 38 Household Setup (Combined Application).............................................. 43 Application Details (Combined Application)............................................ 45 Energy Source(s) ................................................................... 46 E-HEAP Details...................................................................... 47 HEAP Details ......................................................................... 47 PIPP Details ........................................................................... 48 Determination ........................................................................ 53 Application History ................................................................................. 56 Household Members section.................................................. 56 Household Income section ..................................................... 56 Energy Sources section ......................................................... 56 Determinations section........................................................... 57 Payments section................................................................... 57 Events section........................................................................ 57 Letters section........................................................................ 57
Comments section ................................................................. 59 Home Energy Assistance Program (HEAP) .......................................... 60 HEAP Application Details ....................................................... 62 HEAP Energy Sources........................................................... 63 HEAP Program Details .......................................................... 66 HEAP Details ........................................................................ 66
2

Winter Crisis Program (WCP) ................................................................ 68 WCP Household Setup........................................................... 69 WCP Application Details......................................................... 71 Percentage of Income Payment Program (PIPP) ................................... 76 PIPP Application Details......................................................... 78 PIPP Energy Sources............................................................. 79 PIPP Details Section .............................................................. 82 OCEAN System – System-Wide Options ............................................... 83 Comments .............................................................................. 83 Page Navigation ..................................................................... 83 User Preferences.................................................................................... 84 Browser Appearance .............................................................. 84 HEAP Settings........................................................................ 84 Screen Appearance................................................................ 84 Search Settings ...................................................................... 84 Changing User Password....................................................................... 86
3
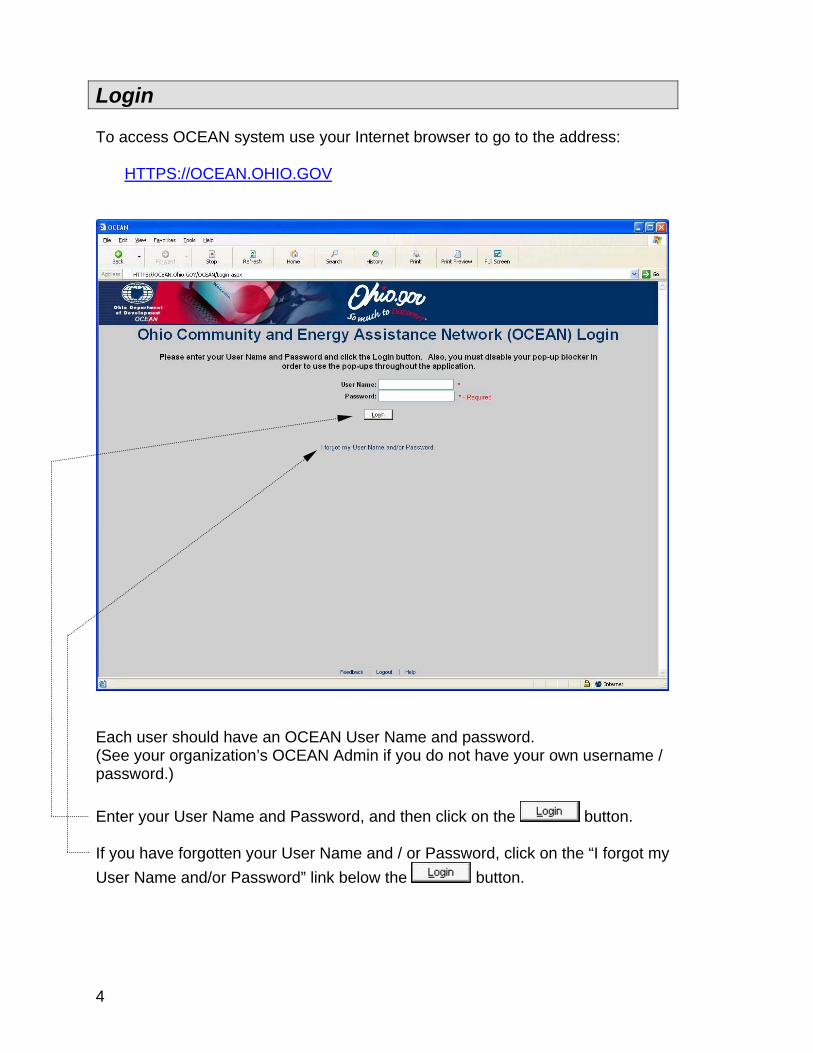
Login To access OCEAN system use your Internet browser to go to the address:
HTTPS://OCEAN.OHIO.GOV
Each user should have an OCEAN User Name and password. (See your organization’s OCEAN Admin if you do not have your own username / password.) Enter your User Name and Password, and then click on the button. If you have forgotten your User Name and / or Password, click on the “I forgot my User Name and/or Password” link below the button.
4

If the User Name / Password entered are valid, the system will take you to the Welcome page.
5

Forgotten Password
If you have forgotten your password, enter your User Name and then click the
button. A new password will be generated for you and sent in an e-mail to the address that your administrator has configured to receive it. Once you have received the new password and successfully logged into the OCEAN system, you will be able to change the password.
6

Forgotten User Name
If you have forgotten your User Name, click on the “Forgot User Name ?” checkbox and enter the requested information. If the information entered matches a valid OCEAN User account, the system will send an email with the corresponding User Name (and a new password will be generated) to the address that your administrator has configured to receive it.
For User Name (User Name), the new OCEAN password is: (Password) Please do not reply to this message.
If the information entered does NOT match a valid OCEAN User account, the system will display the following message:
The credentials you have submitted are not registered in the system. Your password has not been sent. Please see your organization administrator.
Once you have received the correct User Name / new password and successfully logged into the OCEAN system, you will be able to change the password.
7

Welcome
The Welcome page provides the user with some useful login information:
Date and time of last successful login Date and time of last unsuccessful login Days until password expires.
8

Client Search
From the Welcome page, select the “Search” menu pad in the upper left corner of the page and the select “Client Search.” Depending on which Client Search is set for the user’s default in the user system preferences, the Client Search page will display one of three search pages. Client Search - SSN Only Client Search - Client Number Only Client Search - Other
9

Client Search - SSN Only
The only information needed on this search page to find and display a client’s record(s) is the client SSN (Social Security Number). The entire 9-digit SSN is required for the search to run on this page. The user should use the SSN search field on the Client Search – Other page if the entire 9-digits SSN is not known. Enter the Client’s SSN and click the button.
10

Client Search – Client Number Only
The only information needed on this search page to find and display a client’s record(s) is the Client Number. Enter the Client’s Client Number (the user can skip entering the leading zeros) and click the button.
11

Client Search - Other
On this page, the user may enter one or more search criteria (partial or complete). Enter the search criteria and click the button.
12
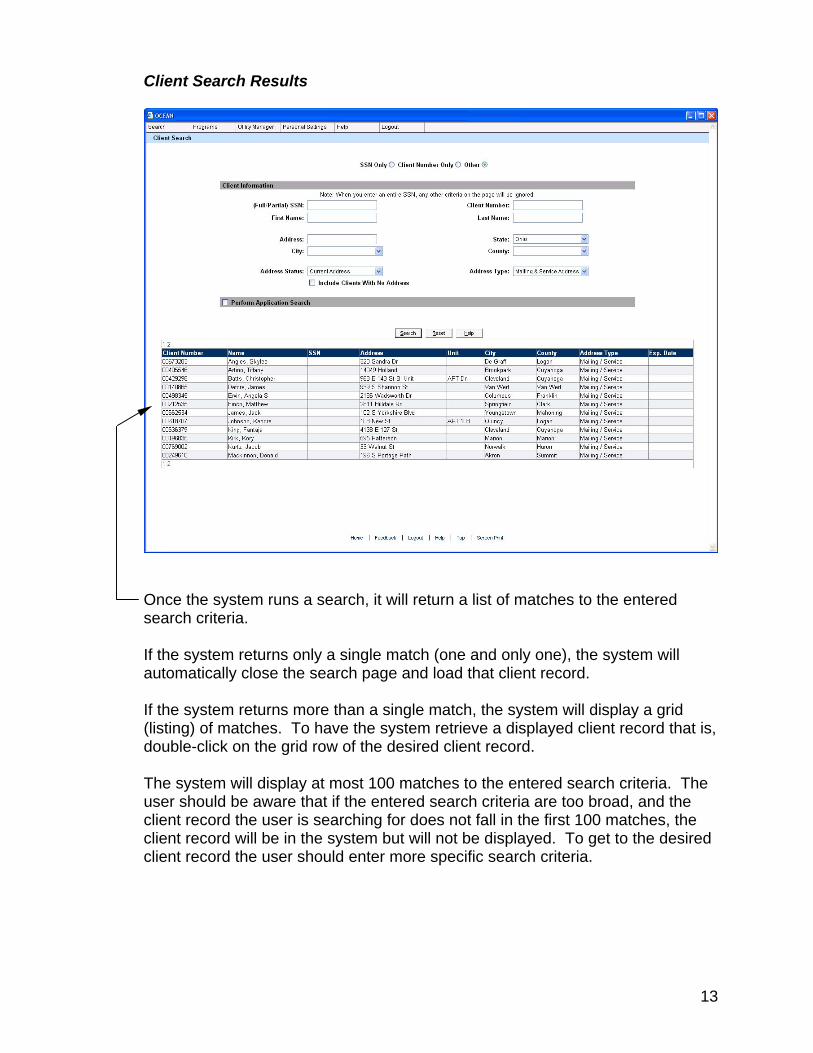
Client Search Results
Once the system runs a search, it will return a list of matches to the entered search criteria. If the system returns only a single match (one and only one), the system will automatically close the search page and load that client record. If the system returns more than a single match, the system will display a grid (listing) of matches. To have the system retrieve a displayed client record that is, double-click on the grid row of the desired client record. The system will display at most 100 matches to the entered search criteria. The user should be aware that if the entered search criteria are too broad, and the client record the user is searching for does not fall in the first 100 matches, the client record will be in the system but will not be displayed. To get to the desired client record the user should enter more specific search criteria.
13

Client Search Results – No Matches
If a valid search is run and no records are returned, the system will prompt to add a new client. If you would like to create a new client record, click the button. The system will then take you to the Client Details page.
14

Client Details
To complete the application for benefits, there are 4 pages / sections that have to be completed.
Client Details Client Associations Income Sources Program Details
The Client Details page is the first page to be completed.
15
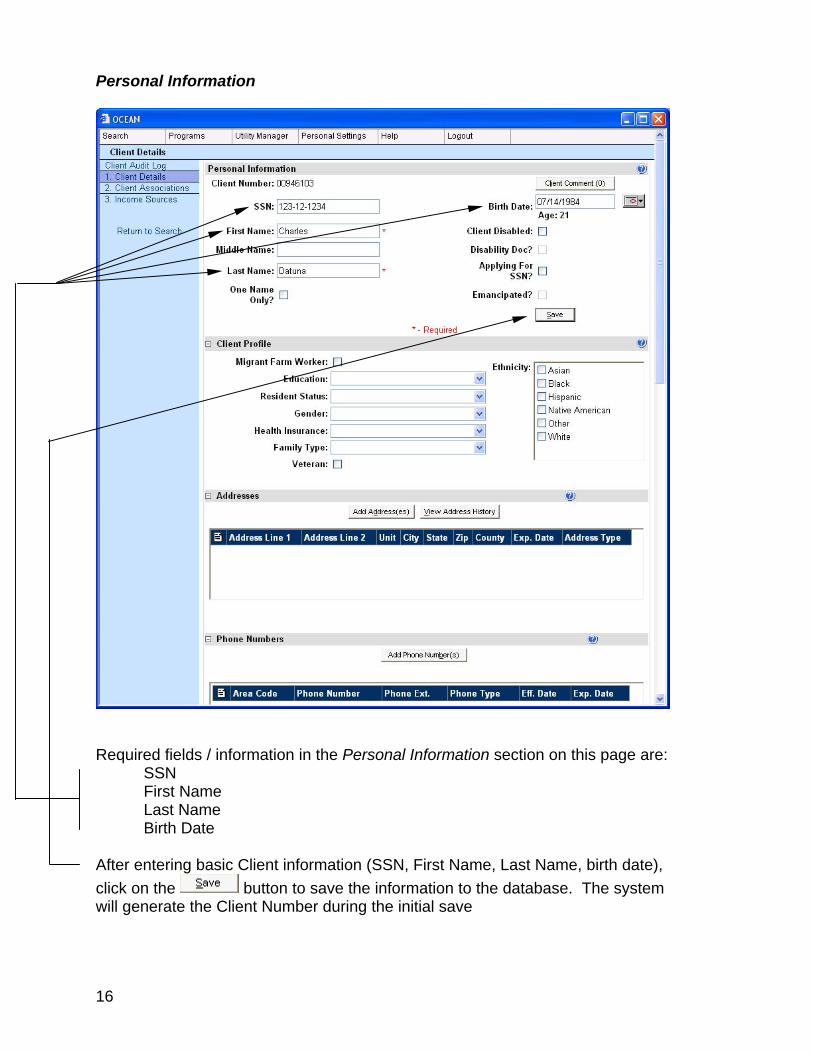
Personal Information
Required fields / information in the Personal Information section on this page are: SSN First Name Last Name Birth Date After entering basic Client information (SSN, First Name, Last Name, birth date), click on the button to save the information to the database. The system will generate the Client Number during the initial save
16

“One Name Only” checkbox is used when the Client has only one name (“Cher”). The “Client Disabled” checkbox should be used when the Client is disabled. Disabled is defined as a “documented significant impairment that interferes with or prevents normal achievement." The types of documentation include: benefit letters confirming receipt of SSI, SSDI, Workers’ Compensation, or Veterans’ Disability; or a signed statement from a doctor confirming the disability. The “Disability Doc” checkbox should be checked when the Client has presented documentation of their disability. “Applying For SSN: is to be checked when the Client does not currently have an SSN but has applied to get one. “Emancipated” is to be checked when the primary applicant is under the age of 18 and has been emancipated. They must be emancipated to be considered as the primary applicant and head of household.
17

Client Profile
Listed below are the data items and options for the Client Profile section of the page: Migrant Farm Worker Yes (checked box) No (unchecked box) Education 0 - 8 9-12 12+ College Grad HS Grad/OED Unknown
18

Resident Status Foreign Citizen / Permanent US Resident Foreign Citizen / Temporary US Citizen US Only Citizen Gender Female Male Health Insurance Medicaid Medicare None Other Private Self-Insured Family Type Single parent/female Single parent/male\ Two-parent household Single person Two adults/no children Other Veteran Yes (checked box) No (unchecked box) Ethnicity Asian Black Hispanic Native American Other White In the next section, Address(es), click on the button to bring up the Add Address(es) page.
19
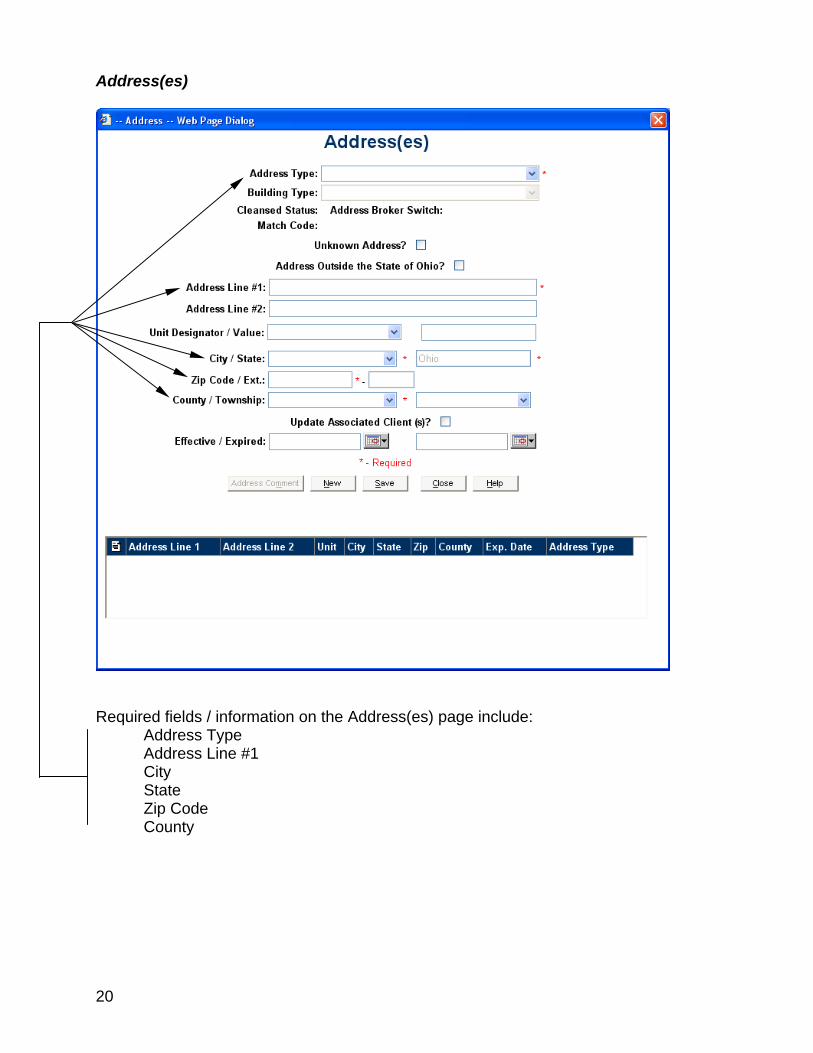
Address(es)
Required fields / information on the Address(es) page include: Address Type Address Line #1 City State Zip Code County
20

“Address Type” – In the OCEAN System there are 3 kinds of Address Types:
- Mailing - Service - Mailing / Service
“Mailing” address type is the address that US Mail is received (but not the address where the Client lives). “Service” address type is the address where the Client lives (but not the address where US Mail is received). “Mailing / Service” address type refers to the address where the Client lives and the address where the Client receives US Mail are the same address. There are 2 types of address changes possible: “Update” and “Change of Address.” In an “Update,” current information is changed and prior information is not saved. (A correction needs to be made to already entered address information)
21

In a “Change of Address” new information is entered and saved as a new address record. Prior address information is given an expiration date (the current date) and then saved, (The Client moved to a new address.) The “Update Associated Client(s) ?” checkbox will change all addresses for all Associated Clients in the application. After entering the requested information, click on the button to save / create the address record.
22

During the prior save process, the address information is compared to an existing list of valid addresses. If the address information matches an existing valid address, “Cleansed Status” will show “Valid.” If the address information does not match, it will show “Invalid.” “Address Broker Switch” is either “On” or “Off.” If it is “On,” address cleansing / verification occurs. If it is “Off”, no address cleansing happens. (This is not changeable by the User.) “Match Code” is the information describing what the address cleansing utility (Address Broker) did during processing. The “Update Associated Client(s) ?” checkbox will change all addresses for all Associated Clients in the application. Click on the button to return to the Client Details page.
23

In the Phone Numbers section, click on the button to enter Client phone number(s) information.
24

Phone Number(s)
Required fields / information on the Phone Number(s) page are: Area Code Phone Number Phone Type The Phone Types available on the system are: Home Work Cell Other Click on the button to create the Client phone number record(s).
25

Click on the button after completing Client phone number(s) entry to return to the Client Details page.
26

Next, click on the button to enter Client email information.
27

Email Address(es)
Required fields / information on the Email Address(es) page are: Email Address Email Type The email types available on the system are:
Home Work
Click on the button to create Client email address record(s).
28

Click on the button after completing the Email Address(es) entry to return to the Client Details page.
29

Programs
In the Programs section, click on the programs the Client is applying for. Clicking the “Check All” checkbox will create application for all programs. Clicking / applying for “WCP” (Winter Crisis Program) will automatically create an application for the HEAP program. Clicking / applying for “PIPP” (Percentage of Income Payment) will automatically create a HEAP application for the same Client.
30

Click on the button at the bottom of the page to go to the next section, Client Associations.
31

Client Associations
Click on the button to add a relation to the client record. In the OCEAN system, a relation is the “connection or association of the primary client to the client being created / edited.”
32

Associated Client(s)
Required fields / information on this careen are: First Name Last Name Enter requested information in the Personal Information section and click on the
button to have the system search for a matching / existing record.
33

If a matching / existing record is not found, enter the remaining requested information on the page. In the Personal Information section: One Name Only” checkbox is used when the Client has only one name (“Cher”). The “Client Disabled” checkbox is used when the Client is disabled. Disabled is defined as a “documented significant impairment that interferes with or prevents normal achievement." The types of documentation include: benefit letters confirming receipt of SSI, SSDI, Workers’ Compensation, or Veterans’ Disability; or a signed statement from a doctor confirming the disability. The “Disability Doc” checkbox should be checked when the Client has presented documentation of their disability. “Applying For SSN: is to be checked when the Client does not currently have an SSN but has applied to get one. “Emancipated” is to be checked when the primary applicant is under the age of 18 and has been emancipated. They must be emancipated to be considered as the primary applicant and head of household.
34

I nformation / Options in the Client Profile section:
Migrant Farm Worker Yes (checked box)
No (unchecked box)
Education 0 - 8 9-12 12+ College Grad HS Grad/OED
Unknown
Resident Status Foreign Citizen / Permanent US Resident Foreign Citizen / Temporary US Citizen
US Only Citizen
Gender Female
Male
Health Insurance Medicaid Medicare None Other Private
Self-Insured
Family Type Single parent/female Single parent/male\ Two-parent household Single person Two adults/no children
Other
Veteran Yes (checked box) No (unchecked box) Ethnicity Asian Black Hispanic Native American Other White In the Relationship section: Select the correct relationship between the primary Client and the associated Client being added. The “Assign Addresses of (Primary Client) to the New Client” checkbox allows automatic addressing of the new Client being added to be the same as the Primary Client.
35

Click on the button to create the record. If needed, click on the button to add more Associated Clients / Relations. When all Associated Clients / Relations are saved, click on the button to return to the Client Associations page.
36

Click on the button to go to the next section, Income Sources.
37

Income Sources
To enter Client income sources, click on the button.
38
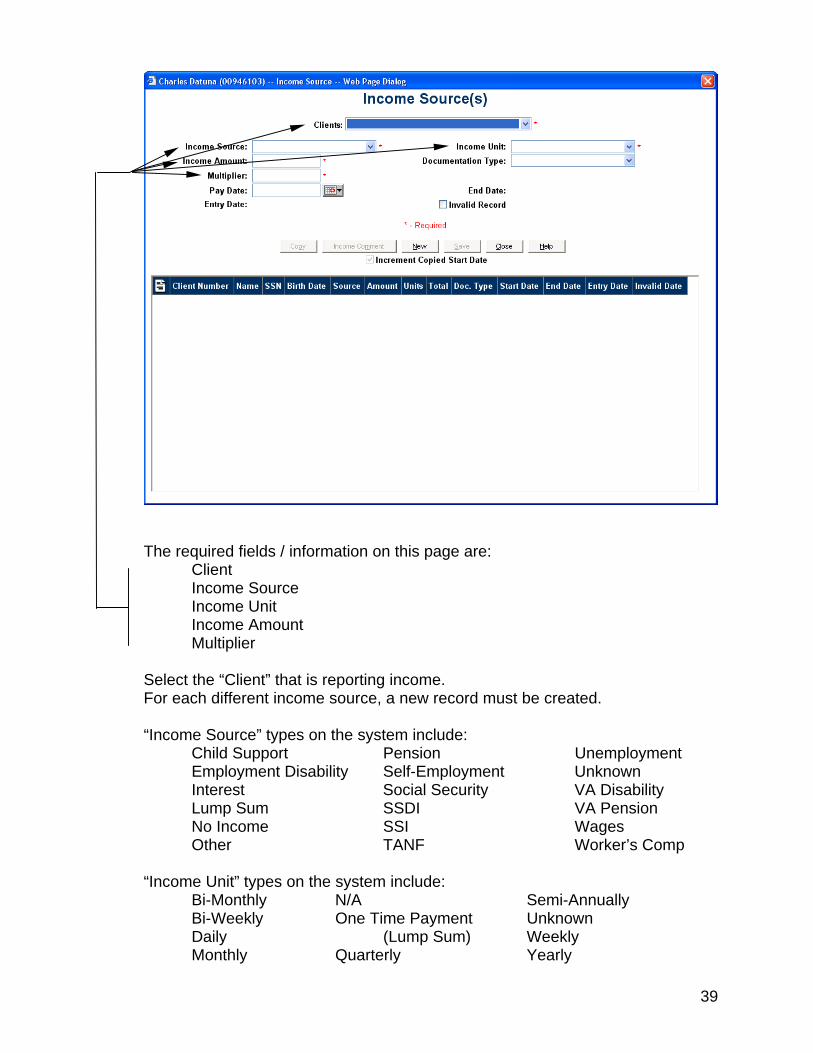
The required fields / information on this page are: Client Income Source Income Unit Income Amount Multiplier Select the “Client” that is reporting income. For each different income source, a new record must be created. “Income Source” types on the system include:
Child Support Pension Unemployment Employment Disability Self-Employment Unknown Interest Social Security VA Disability Lump Sum SSDI VA Pension No Income SSI Wages Other TANF Worker’s Comp “Income Unit” types on the system include: Bi-Monthly N/A Semi-Annually Bi-Weekly One Time Payment Unknown Daily (Lump Sum) Weekly Monthly Quarterly Yearly
39

“Documentation Type” types on the system include: Attached Documents SS or SSI Only From SSI Renewal App Other On Last Year’s File Self Declaration Phone Calls Agency Import After completing the fields on the Income Source(s) page, click the button to save the record / information for each income source.
40
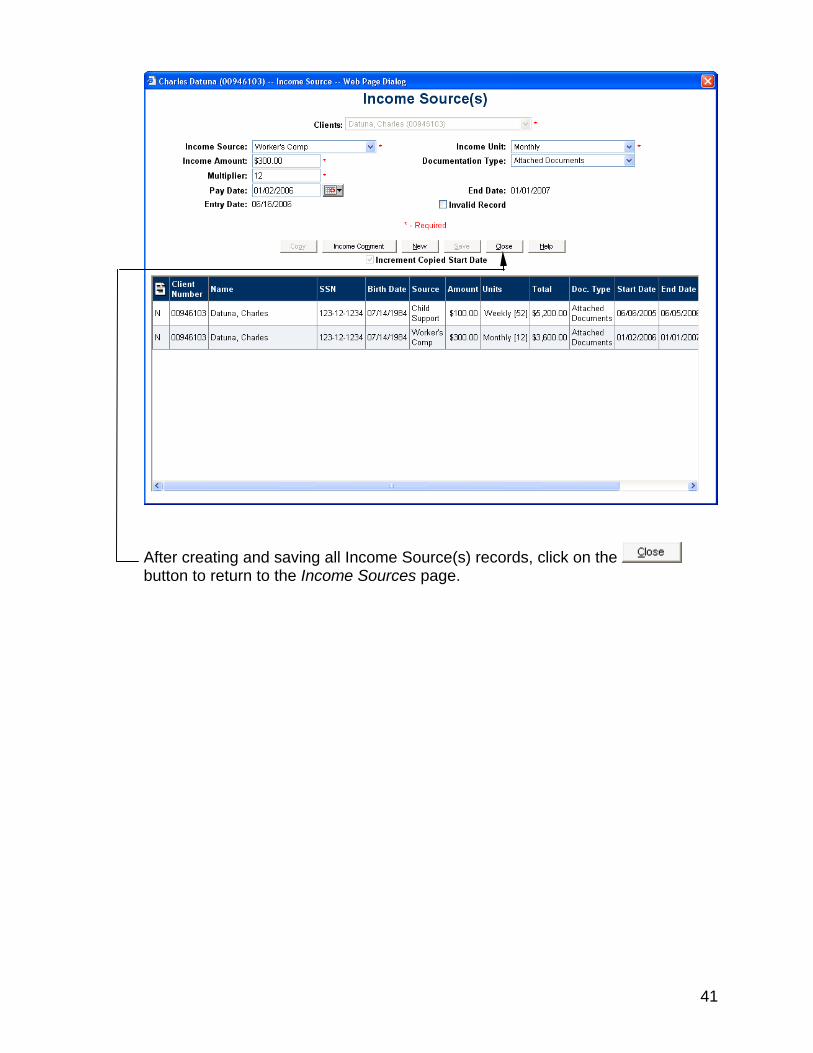
After creating and saving all Income Source(s) records, click on the button to return to the Income Sources page.
41

More items are now available on the menu on the upper left (since this is a combined application). Click on the button to go to the Household Setup page.
42

Household Setup (Combined Application)
Some items / problems have appeared in the Validation section that will be corrected in the following pages. In the Household Members section, click on the button.
43

Notice that the validation errors on this page have been fixed / removed by confirming the household information. Verify the Household Income data displayed. Click the button to go to the Application Details page.
44

Application Details (Combined Application)
Data items missing and needed to complete the Application Details page are displayed in the Validation section. Click the button to go to the Add Energy Source(s) page.
45

Energy Source(s)
Required fields / information on the Energy Source(s) page are: Energy Type Energy Source Energy types include: Main Electric Energy Source types include: Natural Gas Propane / Bottle Gas Fuel Oil / Kerosene Coal or Wood Electric Select the Client’s utility provider in the Utility drop-down box. This list is filtered using the data entered in the “Energy Source” drop-down box. Enter the Client’s utility account number in the “Acct. #” textbox. Verify that the “Billing Name for Utility” is correct.
46

E-HEAP Details Select the current utility connection status in the “Utility Connection Status” box and enter the “Disconnect Date” if the Client’s has received a disconnect notice. Document Types include: Attached Documents Last Year’s File
Phone Calls Utility Verification Agency Import The “Arrearage Amount” is the full amount that the Client owes to the utility company. The “Default Amount” is the amount the Client is past due on their PIPP plan. HEAP Details Select the “Document Type.” These types are the same types in the E-HEAP Document Type above:
47

PIPP Details Select the type of PIPP processing. These types include: Enrollment Reverification Drop Waive None – Benefit not applied Click the button to save the record / information.
48

Once all energy sources have been recorded and saved, click the button to return to the Application Details page.
49

Notice that some validation errors have been fixed / removed from the list and some still remain. In the E-HEAP Details section, click on the “Application Signed ?” checkbox if / when the Client has signed the application.
50

In the HEAP Details section, click on the “Application Signed ?” checkbox if / when the Client has signed the application. Verify the information in the PIPP Details section.
51

When all Validation errors have been removed and the applications are ready, the button will be enabled. Click on the button to have the system process a real-time determination for the client. The determination process takes a few moments to complete.
52

Determination
When the process is complete, the page will refresh and “Real Time Determination Results” will be displayed at the top of the page.
53

This is the lower part of Application Details page.
54

If any errors / problems are found by the system in the determination process, the program application will be placed in “Case Review.” This information / status will also be displayed in the Determination Results section. See the page above for an error example. In the HEAP section, the system found that the Utility account number matched another account number existing in the system. (“Duplicate Utility Account information”) and the application was given a status of “Case Review.” In “Case Review” situations, the Office of Community Services (OCS) will examine the application and make a determination. After the determination examination is completed, OCS will notify the Client of the status of the application.
55
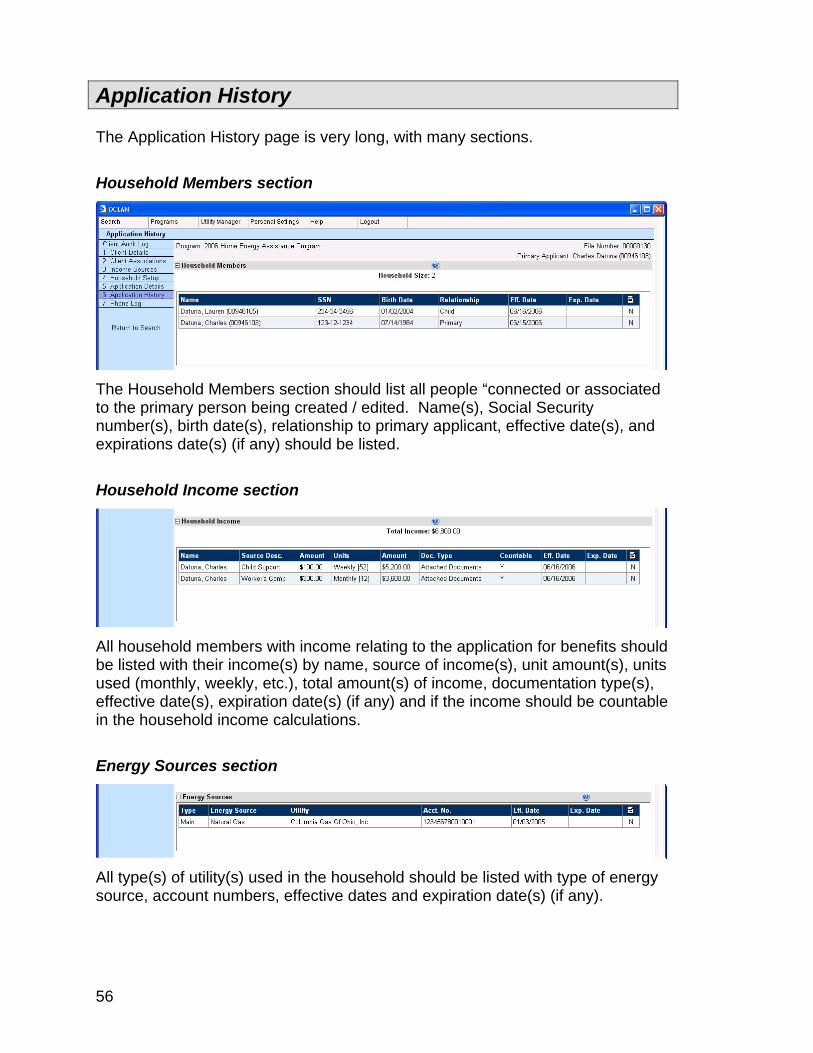
Application History The Application History page is very long, with many sections. H
ousehold Members section
The Household Members section should list all people “connected or associated to the primary person being created / edited. Name(s), Social Security number(s), birth date(s), relationship to primary applicant, effective date(s), and expirations date(s) (if any) should be listed. H
ousehold Income section
All household members with income relating to the application for benefits should be listed with their income(s) by name, source of income(s), unit amount(s), units used (monthly, weekly, etc.), total amount(s) of income, documentation type(s), effective date(s), expiration date(s) (if any) and if the income should be countable in the household income calculations. E
nergy Sources section
All type(s) of utility(s) used in the household should be listed with type of energy source, account numbers, effective dates and expiration date(s) (if any).
56

D
eterminations section
The Determinations section should list all OCEAN determinations. Program(s), Determination type(s), real-time, status, status date(s), create date(s), last event and last event date information are listed. P
ayments section
All OCEAN payments should be listed in the Payments section. Payment number(s), status, date(s), type(s), amount(s) along with request, issue, and reconciliation date(s) information are listed. E
vents section
All OCEAN related events (system and user generated) should be listed in the Events section along with Event Type(s), Event Date(s), User name and Organization, Process and Process number. To narrow down the list of events, select an event type from the drop down box at the top of the section. L
etters section
Letters from the OCEAN system to the Applicant should be listed in the Letters section. The Letter Description, Create, Queue and Print date(s) along with the Reprint Count, Print Job number are also listed. The option to Reprint a letter is available at the end of each letter record. To reprint a letter, check the “Reprint?”
57

checkbox and the click the button at the top of the section. The Letter will be printed and mailed from the OCS Mail room. If a letter comes back with an undeliverable address, click on the button to mark the letter as ndeliverable. A pop-up window will appear similar to the following: u
Select reason(s) the letter was undeliverable from the list and click the button. The list of Reasons a letter was undeliverable include: Moved and Left No Address (MLNA) No Such Street (NSS) Forward Order Expired (FOE) Attempted Not Known (ANK) Insufficient Address (IA) No Mail Receptacle (NMR) Not Deliverable as Addressed (NDA) Other (O) No Such Number (NSN) Withdrawn Application (WA)
58

C
omments section
All comments entered into the OCEAN system for the application(s) should be listed. The user name(s) that created the comment, creation date(s), Changed On date(s), comment type(s) along with the comment should also be listed.
59

Home Energy Assistance Program (HEAP)
To begin work on the HEAP application, double-click on the “Home Energy Assistance Program” line in the Programs section on the Client Details page. This will bring up the Household Setup page.
60

Verify the following: 1.. The primary applicant’s name is displayed in the “Primary Applicant” textbox. 2. The “Household size” data is correct (this information should be carried over from the Client Associations page). 3. The date is correct in the “Application Date” textbox. 4. The names listed in the Household Members section are correct. Click on the button to confirm the data is correct. Verify that the “Household Income” that was entered on the Income Sources page is displayed in the Household Income section. Click on the button to save the data / information on this page. Click on the button to go to the Application Details page.
61

HEAP Application Details
The User should always pay attention to any items listed in the Validation section of the top of the page. The validation items listed on this page will be corrected in upcoming pages / sections. In the Utility Information section, click on the button.
62

HEAP Energy Sources
The required fields / information on this page are: Energy Type Energy Source Select the Client’s “Energy Type” from the drop-down box. These types include:
Main (Gas) Electric
Click on the “Energy Included in rent ?” checkbox if the Client’s rent includes an energy payment. Select the Client’s “Energy Source” from the drop-down box. These types include:
Natural Gas Propane / Bottle Gas Fuel Oil / Kerosene, Coal or Wood Electric
Click on the “Is the meter shared ?” checkbox if the Client is living in a house that has a shared utility meter.
63

Select the Client’s Utility from the drop-down list, verify that the primary applicant’s name is in the “Billing Name for Utility” box, and enter their utility Account number (Acct #). Click on the “Cash Only Customer” checkbox if the Client must pay their utility bills with cash. In the HEAP Details section, select the “Document Type” from the drop-down list. These types include: Attached Documents Last Year’s File Phone Calls Utility Verification Agency Import Click on the “Utility Verification” checkbox once the utility information has been verified. Click on the button to save the Utility Source record / information.
64

Once all energy sources have been recorded and saved, click on the button to return to the Application Details page.
65

Notice that the energy source validation problem has been removed from the list.) Program Details If the Client is receiving public assistance, click on the “Do you receive public assistance?” checkbox and enter the case number related to the public assistance. If the Client is receiving Food Stamps, click the “Do you receive Food Stamps?” checkbox. If the Client is renting their home, click on the “Do you rent your home?” checkbox. Clicking this box will activate the checkboxes for “Do you rent a room in someone else’s home ?” and “Do you receive Rental assistance from the government ?.” This will also activate the Landlord Information textboxes for Name, Organization, Address, and Phone. HEAP Details If anyone in the Client’s household is a foreign citizen, click the “Is anyone in the household a citizen of a country other than the United States ?” checkbox. This will enable the radio buttons for permanent and temporary resident status’. Check the appropriate radio button for their status.
66

Enter the number of Native Americans, migrant farm workers, and disabled people in the household in the appropriate textboxes. If the household has received weatherization services, click the checkbox. If the Client would like to apply for weatherization services, click the checkbox next to “Would you like to apply for weatherization services ?” If the application has been signed, check the “Application Signed” checkbox. This will remove the “Application not signed” line in the Validation section. If the button is enabled, click on it to run the Determination. If the button is not enabled at this point, check for any remaining Validation errors in the Validation section.
67

Winter Crisis Program (WCP)
To begin work on the WCP application, double-click on the “Winter Crisis Program” line in the Programs section on the Client Details page. This will bring up the Household Setup page.
68

WCP Household Setup
Notice the error for this page listed in the Validation section. To fix this error, click on the button in the Household Members section.
69

The Validation error previously listed has been fixed. Click on the button to save the record / information. Click on the button to go to the Application Details page.
70

WCP Application Details
Notice the errors for this page listed in the Validation section. In the E-HEAP Details section, click on the “Application Signed ?” checkbox if / when the Client has signed the application.
71

When all Validation errors have been removed and the applications are ready, the button at the bottom of the page will be enabled.
72

Click on the button to have the system process a real-time determination for the client. The determination process takes a few moments to complete.
73

When the process is complete, the page will refresh and “Real Time Determination Results” will be displayed at the top of the page.
74

This is the lower part of Application Details page.
75

Percentage of Income Payment Program (PIPP)
To begin work on the PIPP application, double-click on the “Percentage of Income Payment” line in the Programs section on the Client Details page. This will bring up the Household Setup page.
76

Verify the following: 1. The primary applicant’s name is displayed in the “Primary Applicant” textbox. 2. The “Household size” data is correct (this information should be carried over from the Client Associations page). 3. The date is correct in the “Application Date” textbox. The information shown next to the “2006 Percentage of Income Payment Income,” “Relative Dates,” and “Max Income Based on Household Size” are carried over from the Income Sources page. Verify that the names listed in the Household Members section are correct. Click on the button to confirm the data is correct. Verify that the household income that was entered on the Income Sources page is displayed in the Household Income section. Click on the button to save the data / information on this page. Click on the button to go to the Application Details page.
77

PIPP Application Details
In the Utility Information section, click on the button.
78

PIPP Energy Sources
The required fields / information on this page are: Energy Type Energy Source Select the Client’s “Energy Type” from the drop-down box. These types include:
Main (Gas) Electric
Select the Client’s “Energy Source” from the drop-down box. These types include:
Natural Gas Propane / Bottle Gas Fuel Oil / Kerosene, Coal or Wood Electric
Click on the “Energy Included in rent ?” checkbox if applicable. Click on the “Is the meter shared ?” checkbox if applicable.
79

Select the Client’s Utility from the drop-down list, verify that the primary applicant’s name is in the “Billing Name for Utility” box, and enter their utility Account number (Acct #). Click on the “Cash Only Customer” checkbox if applicable. In the HEAP Details section, select the “Document Type” from the drop-down list. These types include: Attached Documents Last Year’s File Phone Calls Utility Verification Agency Import Click on the “Utility Verification” checkbox once the utility information has been verified. Click on the button to create a Utility Source record / information.
80

Once all energy sources have been recorded and saved, click on the button to return to the Application Details page.
81

If the Client is receiving public assistance, click on the “Do you receive public assistance?” checkbox and enter the case number related to the public assistance. If the Client is receiving Food Stamps, click the “Do you receive Food Stamps?” checkbox. If the Client is renting their home, click on the “Do you rent your home?” checkbox. Clicking this box will activate the checkboxes for “Do you rent a room in someone else’s home ?” and “Do you receive Rental assistance from the government ?.” It will also activate the Landlord Information textboxes for Name, Organization, Address, and Phone. PIPP Details Section Verify the information displayed and if the “Application Status” is “Ready for Determination and if the button is enabled, click on it to run the Determination. If the button is not enabled at this point, check for any remaining Validation errors in the Validation section.
82

OCEAN System – System-Wide Options Throughout the OCEAN System, the User has options / choices that are available on most screens. Comments The User can create comments in most of the OCEAN System’s web pages. These comments can be used to record Page Navigation The User can move though the system using the menu items on the upper left side of the screen or by using the or buttons.
83
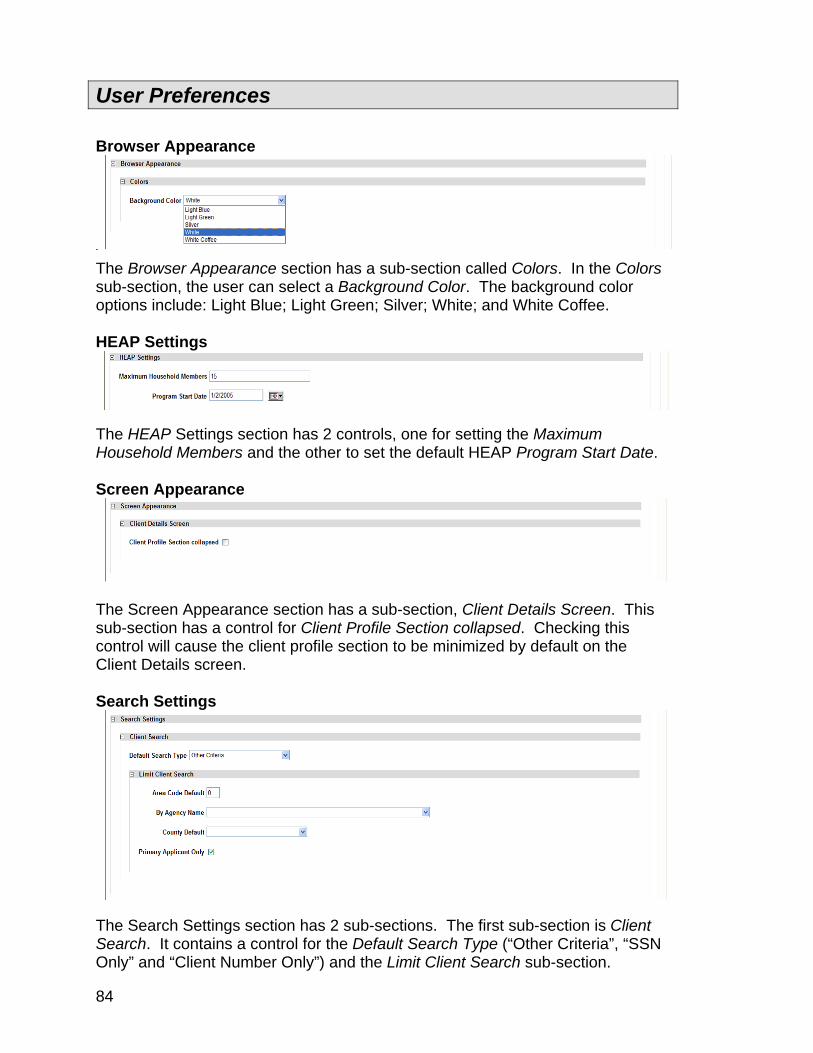
User Preferences Browser Appearance
The Browser Appearance section has a sub-section called Colors. In the Colors sub-section, the user can select a Background Color. The background color options include: Light Blue; Light Green; Silver; White; and White Coffee. HEAP Settings
The HEAP Settings section has 2 controls, one for setting the Maximum Household Members and the other to set the default HEAP Program Start Date. Screen Appearance
The Screen Appearance section has a sub-section, Client Details Screen. This sub-section has a control for Client Profile Section collapsed. Checking this control will cause the client profile section to be minimized by default on the Client Details screen. Search Settings
The Search Settings section has 2 sub-sections. The first sub-section is Client Search. It contains a control for the Default Search Type (“Other Criteria”, “SSN Only” and “Client Number Only”) and the Limit Client Search sub-section.
84

Selecting a default search type would make the system show the selected search type when the user selects the Client Search from the menu. This control only sets the search type the User will see first. The other search types are still available by selecting them. Inside the Limit Client Search sub-section there are controls for Area Code Default; By Agency Name; County Default; and Primary Applicant Only. Setting the Area Code Default would limit the search results to a single default area code. Selecting an agency from the By Agency Name drop-down box would limit the search results to applications only from the selected agency. Selecting a county in the Count Default drop-down box would limit the search results to applications only from the selected county.
85

Changing User Password To access the Change Password screen, from the Personal Settings menu heading, select the Change Password menu item.
The system should display the following screen:
To change a User password: Enter the current password
Enter the new password Re-enter the new password
Then click on the button.
86

If the User password has been successfully changed, the User should see the following pop-up window”
If the User password has not been successfully changed, the User should see an error message describing the problem on the screen.
87


![[MS-IPHTTPS]: IP over HTTPS (IP-HTTPS) Tunneling Protocol€¦ · IP over HTTPS (IP-HTTPS) Tunneling Protocol Intellectual Property Rights Notice for Open Specifications Documentation](https://static.fdocuments.in/doc/165x107/5f5d18b22a82be0e3640e86d/ms-iphttps-ip-over-https-ip-https-tunneling-protocol-ip-over-https-ip-https.jpg)