
OAM Rigid Lumbar - Össur Rigid Lumbar Instructions... · 3 ENGLISH INDICATIONS FOR USE OAM Rigid...
8
Instructions for use OAM Rigid Lumbar
Transcript of OAM Rigid Lumbar - Össur Rigid Lumbar Instructions... · 3 ENGLISH INDICATIONS FOR USE OAM Rigid...
I n s t r u c t i o n s f o r u s e
OAM Rigid Lumbar
1
1 2
3 4
5
2
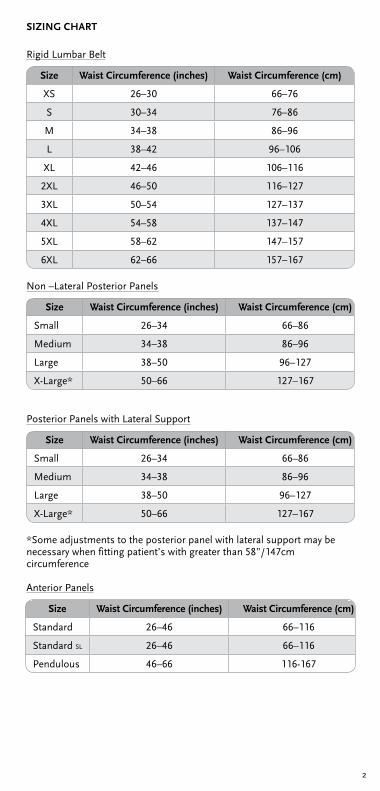
SIZING CHART
Rigid Lumbar Belt
Size Waist Circumference (inches) Waist Circumference (cm)
XS 26–30 66–76
S 30–34 76–86
M 34–38 86–96
L 38–42 96–106
XL 42–46 106–116
2XL 46–50 116–127
3XL 50–54 127–137
4XL 54–58 137–147
5XL 58–62 147–157
6XL 62–66 157–167
Non –Lateral Posterior Panels
Size Waist Circumference (inches) Waist Circumference (cm)
Small 26–34 66–86
Medium 34–38 86–96
Large 38–50 96–127
X-Large* 50–66 127–167
Posterior Panels with Lateral Support
Size Waist Circumference (inches) Waist Circumference (cm)
Small 26–34 66–86
Medium 34–38 86–96
Large 38–50 96–127
X-Large* 50–66 127–167
*Some adjustments to the posterior panel with lateral support may be necessary when fitting patient’s with greater than 58”/147cm circumference
Anterior Panels
Size Waist Circumference (inches) Waist Circumference (cm)
Standard 26–46 66–116
Standard SL 26–46 66–116
Pendulous 46–66 116-167
3
ENGLISH
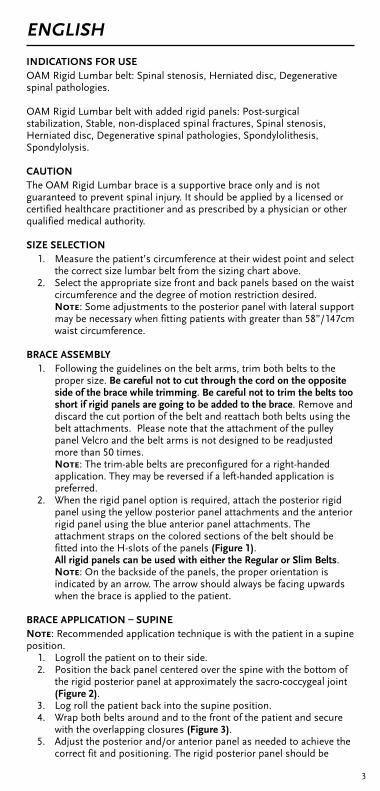
INDICATIONS FOR USEOAM Rigid Lumbar belt: Spinal stenosis, Herniated disc, Degenerative spinal pathologies.
OAM Rigid Lumbar belt with added rigid panels: Post-surgical stabilization, Stable, non-displaced spinal fractures, Spinal stenosis, Herniated disc, Degenerative spinal pathologies, Spondylolithesis, Spondylolysis.
CAUTIONThe OAM Rigid Lumbar brace is a supportive brace only and is not guaranteed to prevent spinal injury. It should be applied by a licensed or certified healthcare practitioner and as prescribed by a physician or other qualified medical authority.
SIZE SELECTION1. Measure the patient’s circumference at their widest point and select
the correct size lumbar belt from the sizing chart above.2. Select the appropriate size front and back panels based on the waist
circumference and the degree of motion restriction desired. Note: Some adjustments to the posterior panel with lateral support may be necessary when fitting patients with greater than 58”/147cm waist circumference.
BRACE ASSEMBLY1. Following the guidelines on the belt arms, trim both belts to the
proper size. Be careful not to cut through the cord on the opposite side of the brace while trimming. Be careful not to trim the belts too short if rigid panels are going to be added to the brace. Remove and discard the cut portion of the belt and reattach both belts using the belt attachments. Please note that the attachment of the pulley panel Velcro and the belt arms is not designed to be readjusted more than 50 times. Note: The trim-able belts are preconfigured for a right-handed application. They may be reversed if a left-handed application is preferred.
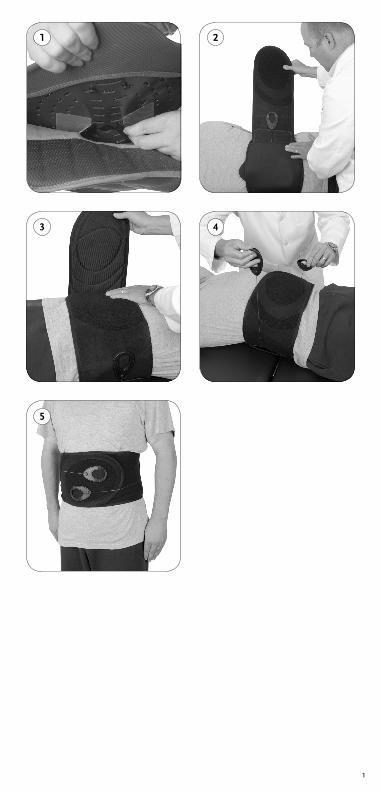
2. When the rigid panel option is required, attach the posterior rigid panel using the yellow posterior panel attachments and the anterior rigid panel using the blue anterior panel attachments. The attachment straps on the colored sections of the belt should be fitted into the H-slots of the panels (Figure 1). All rigid panels can be used with either the Regular or Slim Belts. Note: On the backside of the panels, the proper orientation is indicated by an arrow. The arrow should always be facing upwards when the brace is applied to the patient.
BRACE APPLICATION – SUPINENote: Recommended application technique is with the patient in a supine position.
1. Logroll the patient on to their side.2. Position the back panel centered over the spine with the bottom of
the rigid posterior panel at approximately the sacro-coccygeal joint (Figure 2).
3. Log roll the patient back into the supine position.4. Wrap both belts around and to the front of the patient and secure
with the overlapping closures (Figure 3).5. Adjust the posterior and/or anterior panel as needed to achieve the
correct fit and positioning. The rigid posterior panel should be
4
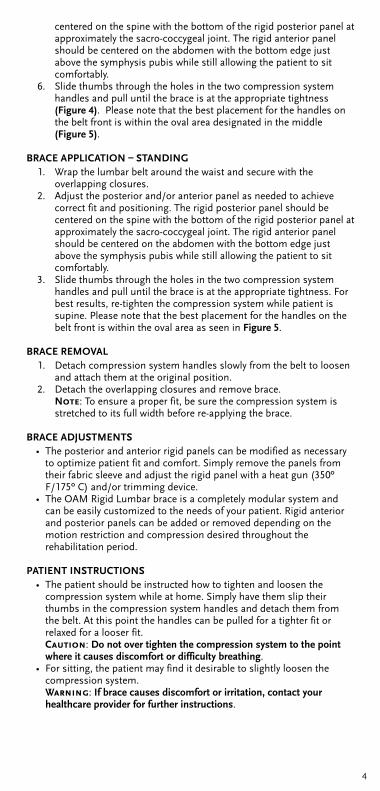
centered on the spine with the bottom of the rigid posterior panel at approximately the sacro-coccygeal joint. The rigid anterior panel should be centered on the abdomen with the bottom edge just above the symphysis pubis while still allowing the patient to sit comfortably.
6. Slide thumbs through the holes in the two compression system handles and pull until the brace is at the appropriate tightness (Figure 4). Please note that the best placement for the handles on the belt front is within the oval area designated in the middle (Figure 5).
BRACE APPLICATION – STANDING1. Wrap the lumbar belt around the waist and secure with the
overlapping closures.2. Adjust the posterior and/or anterior panel as needed to achieve
correct fit and positioning. The rigid posterior panel should be centered on the spine with the bottom of the rigid posterior panel at approximately the sacro-coccygeal joint. The rigid anterior panel should be centered on the abdomen with the bottom edge just above the symphysis pubis while still allowing the patient to sit comfortably.
3. Slide thumbs through the holes in the two compression system handles and pull until the brace is at the appropriate tightness. For best results, re-tighten the compression system while patient is supine. Please note that the best placement for the handles on the belt front is within the oval area as seen in Figure 5.
BRACE REMOVAL1. Detach compression system handles slowly from the belt to loosen
and attach them at the original position. 2. Detach the overlapping closures and remove brace.
Note: To ensure a proper fit, be sure the compression system is stretched to its full width before re-applying the brace.
BRACE ADJUSTMENTS• The posterior and anterior rigid panels can be modified as necessary
to optimize patient fit and comfort. Simply remove the panels from their fabric sleeve and adjust the rigid panel with a heat gun (350º F/175º C) and/or trimming device.
• The OAM Rigid Lumbar brace is a completely modular system and can be easily customized to the needs of your patient. Rigid anterior and posterior panels can be added or removed depending on the motion restriction and compression desired throughout the rehabilitation period.
PATIENT INSTRUCTIONS• The patient should be instructed how to tighten and loosen the
compression system while at home. Simply have them slip their thumbs in the compression system handles and detach them from the belt. At this point the handles can be pulled for a tighter fit or relaxed for a looser fit. Caution: Do not over tighten the compression system to the point where it causes discomfort or difficulty breathing.
• For sitting, the patient may find it desirable to slightly loosen the compression system. Warning: If brace causes discomfort or irritation, contact your healthcare provider for further instructions.

5
BRACE MAINTENANCEThe OAM Rigid Lumbar brace is designed for minimum maintenance and care. The padded covers may be removed from the rigid panels for washing.• Hand-wash using mild soap and rinse thoroughly.• Air dry flat.• Do not machine wash or place in tumble dryer.

EN – Caution: This product has been designed and tested based on single patient usage and is not recommended for multiple patient use. If any problems occur with the use of this product, immediately contact your medical professional.
www.ossur.com ©Copyright Össur 2013 IFU0600 Rev. 1
Össur Head OfficeGrjótháls 5110 Reykjavík, IcelandTel: +354 515 1300Fax: +354 515 [email protected]
Össur Americas 27051 Towne Centre DriveFoothill Ranch, CA 92610USATel: +1 (949) 382 3883Tel: +1 800 233 6263Fax: +1 800 831 [email protected]
Össur Canada 120-11231 Dyke RoadRichmond, BCV7A OA1, CanadaTel: +1 604 241 8152Fax: +1 604 241 8153
Össur EuropeEkkersrijt 4106-4114P.O. Box 1205690 AC Son en BreugelThe NetherlandsTel: +800 3539 3668Tel: +31 499 462840Fax: +31 499 [email protected]
Össur Europe BVKundenservice Deutschland Augustinusstrasse 11A 50226 Frechen Deutschland Tel: +49 (0) 2234 6039 102Fax. +49 (0) 2234 6039 [email protected]
Össur Nordic P.O. Box 67751 03 Uppsala, SwedenTel: +46 1818 2200Fax: +46 1818 [email protected]
Össur UK Building 3000Manchester Business ParkAviator WayManchester M22 5TG, UKTel: +44 161 490 8500Fax: +44 161 490 [email protected]
Össur Iberia S.A.Parque EuropolisCalle Edimburgo n°1428232 Las Rozas(Madrid) SpainTel: +34 91 636 06 93Fax: +34 91 637 21 [email protected]
Össur Asia上海虹梅路1801号W16B 棟2楼邮政编号:200233电话:+86 21 6127 1700传真:+86 21 6127 [email protected]
Össur Asia-Pacific26 Ross StreetNorth ParramattaSydney NSW 2152 Australia Tel: +61 2 88382800 Fax: +61 2 96305310 [email protected]


