NYSIF.com Online Account User Guide MEDICAL PROVIDERS
25
August 20, 2021 1 Contents About this Guide ................................................................................................................................. 1 Create an Account ............................................................................................................................. 2 Enhanced Security (Multi-Factor Authentication)................................................................... 3 Online Account Administration ..................................................................................................... 6 Account Management................................................................................................................................. 6 User Management (add/delete an authorized user)......................................................................... 7 Recertifying Authorized Users ............................................................................................................. 8 Add (or remove) a Third-Party Biller ................................................................................................... 10 Claim Search ..................................................................................................................................... 12 Search Payments by Claim Number ..................................................................................................... 12 Search Payments by Check Number .................................................................................................... 15 Find a Claim Number (Associated) ....................................................................................................... 16 Find a Claim Number (Not Associated) ................................................................................................ 17 Direct Deposit Enrollment............................................................................................................. 18 Contact Information ................................................................................................................................. 18 Financial Institution Information for Medical Providers ............................................................... 20 DocuSign for Medical Providers ............................................................................................................ 21 Managing Your Direct Deposit Account .................................................................................... 24 Update Direct Deposit Information...................................................................................................... 24 Unsubscribe Direct Deposit .................................................................................................................... 25 About this Guide To safeguard the privileged information of both you and the NYSIF claimant, obtaining explanation of benefits (EOB) and bill payment information requires a secure login and two-step authentication procedure. This will allow authorized medical providers and/or their authorized representatives, access to bill status and payment information related to their submitted bills. NYSIF.com Online Account User Guide MEDICAL PROVIDERS August 20, 2021
Transcript of NYSIF.com Online Account User Guide MEDICAL PROVIDERS

August 20, 2021 1
Contents
About this Guide ................................................................................................................................. 1
Create an Account ............................................................................................................................. 2
Enhanced Security (Multi-Factor Authentication) ................................................................... 3
Online Account Administration ..................................................................................................... 6 Account Management ................................................................................................................................. 6 User Management (add/delete an authorized user)......................................................................... 7
Recertifying Authorized Users ............................................................................................................. 8 Add (or remove) a Third-Party Biller ................................................................................................... 10
Claim Search ..................................................................................................................................... 12 Search Payments by Claim Number ..................................................................................................... 12 Search Payments by Check Number .................................................................................................... 15 Find a Claim Number (Associated) ....................................................................................................... 16 Find a Claim Number (Not Associated) ................................................................................................ 17
Direct Deposit Enrollment............................................................................................................. 18 Contact Information ................................................................................................................................. 18 Financial Institution Information for Medical Providers ............................................................... 20 DocuSign for Medical Providers ............................................................................................................ 21
Managing Your Direct Deposit Account .................................................................................... 24 Update Direct Deposit Information ...................................................................................................... 24 Unsubscribe Direct Deposit .................................................................................................................... 25
About this Guide To safeguard the privileged information of both you and the NYSIF claimant, obtaining explanation of benefits (EOB) and bill payment information requires a secure login and two-step authentication procedure. This will allow authorized medical providers and/or their authorized representatives, access to bill status and payment information related to their submitted bills.
NYSIF.com Online Account User Guide
MEDICAL PROVIDERS August 20, 2021

August 20, 2021 2
Create an Account
• Visit nysif.com, choose “Login” at the top and click “Create an Account” from the dropdown menu.
• You will need a recent check received from NYSIF (within the last 45 days) and will be asked to enter the following: check number, check date, check amount and zip code.

August 20, 2021 3
Enhanced Security (Multi-Factor Authentication)
NYSIF takes your privacy seriously. To protect the personal information of its customers, including health records, NYSIF has implemented an enhanced security feature (also known as multi-factor authentication) for all NYSIF online account holders. Enhanced security allows NYSIF to identify you as the true owner of your online account by adding a layer of protection against unauthorized access. We do this by sending you a one-time passcode, in addition to requesting your username and password.
Please see the following screen shots for more information on how your account will be enrolled in enhanced security.
LOGIN 1. Visit nysif.com. Click Login in the upper right corner. 2. Enter your username and password.

August 20, 2021 4
Passcode The first time you log into your NYSIF online account following implementation of enhanced security, you will be prompted to enter a passcode to verify your identity. The passcode will be sent to the email address associated with your NYSIF online account. At this time, you can only retrieve this passcode via email.
The passcode will expire after 20 minutes. The email will appear in your inbox from the sender “On behalf of NYSIF.”

August 20, 2021 5
Enter the passcode in the field provided. Click “Verify.” If authenticated, users will receive confirmation before being directed to their customer landing page or the application they were trying to reach.
Authentication Each time you log into nysif.com, NYSIF’s systems will perform a risk assessment of your login details. If the assessment identifies a probability of fraud, you will be asked to authenticate via passcode as shown above, sent to the email address associated with your online account.
Examples of information that might trigger an enhanced security login include:
• Frequent password changes • Different user location or time zone • Different user IP address • Different browser or version • Different or new device/computer • New mobile login
Forgot Password or Username:
Choose “Forgot Password” from the login page. Enter your Username in the field provided. A temporary password will be sent to the email address associated with the online account.
Choose “Forgot Username.” Enter your email address. Our system will send the username associated with that email address to the email address.

August 20, 2021 6
Online Account Administration
Account Management To manage your online account, select Account Management from the dropdown menu under your username at the top right of the page.
Choosing “Account Management” will bring you to your “Administration Console Home” page, where you can update your profile or password and add authorized users.

August 20, 2021 7
User Management (add/delete an authorized user) Select “Manage Users” under User Management to add, edit or delete an authorized user account.
These authorized users inherit the permissions of the master account and will be able to see all of the billing and payment information for that provider. This feature may be useful in cases where multiple people are associated with the same provider, such as the management, accounting, or clerical staff from a particular office.
Each employee should have his or her own account to access the portal. The first account to register for a provider will be the “master” account; subsequent accounts will be “authorized user” accounts.
Only the master account holder can add or delete authorized users.
For edits to an existing user, choose Edit, make any changes and click Submit.
Choose “Add New User” to add a new user account. Complete all required fields.
When adding a new user, in addition to contact information, you will be asked to choose a username and password for this individual. This person will receive a notification email from NYSIF advising him/her to obtain the username and password from you. The user will be prompted to change the password upon first login. The user must also accept NYSIF’s Terms & Conditions before gaining access to the online account.

August 20, 2021 8
The master account holder will also receive a confirmation email:
Recertifying Authorized Users NYSIF has established a recertification process for authorized user accounts. The master account holder is required to recertify each authorized user account annually.
Master Account Holder If a master account holder has accounts that must be recertified, the user will encounter this pop-up window upon login. The link will take the user directly to the Account Management page.
The master account holder will receive an email notification of upcoming recertifications 30 days from expiration, 15 days from expiration and the day of expiration. To extend access, log in and:
1. At the top right of your landing page, select “Account Management” from the dropdown menu under your username.
2. Under "User Management,” select "Manage Users." 3. Click “Extend Access” on the authorized user whose access is scheduled to expire (or whose access
has already expired) to recertify the user.
Please note that any authorized user added to this online customer account will inherit nearly all* permissions of the master manager account. This may include
access to policy and claims information for both NYSIF workers’ compensation and disability benefits clients. Please ensure that all authorized users understand the
legal obligation to handle this sensitive and confidential information appropriately.
*Authorized user account holders cannot create other authorized user accounts or edit/delete user accounts.

August 20, 2021 9
PLEASE NOTE: The master account holder can recertify any user at any time. For example, if the master account logs in to recertify Child1 because that user’s access will be expiring first, the user can also recertify Child2 and Child3 at the same time. This is an added convenience for the user.
Once the user recertifies, the access expiration date will be updated to one year in the future. (There is no confirmation screen.) For example, the master account holder in the previous screen shot recertified Child1. The page now reflects:
If a user’s access expires before recertification, the User Management page will reflect:
The master account holder can choose “Extend Access” to certify the expired user. Authorized User Account Holder The authorized user will receive an email notification of upcoming recertification 30 days from expiration, 15 days from expiration and one day from expiration. If the authorized user’s access expires, the user will be presented with the following message upon login. Please note that only the master account holder can recertify an authorized user; NYSIF cannot provide this authorization.
August 20, 2021 10
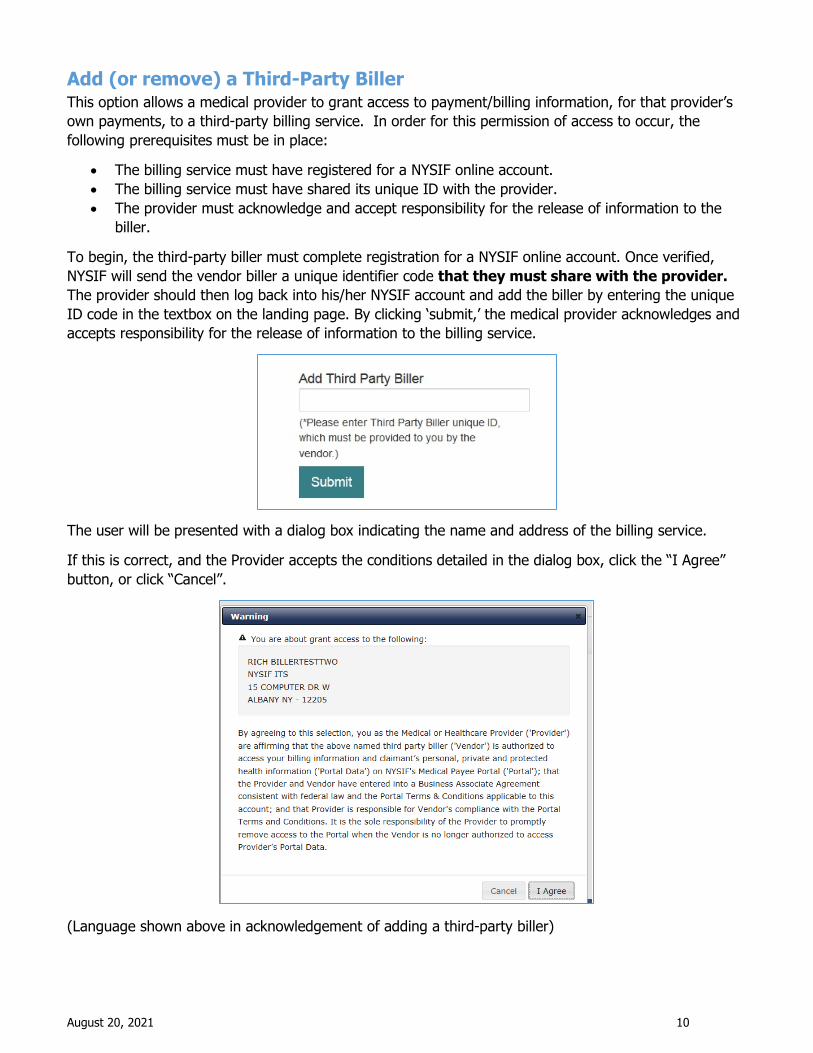
Add (or remove) a Third-Party Biller This option allows a medical provider to grant access to payment/billing information, for that provider’s own payments, to a third-party billing service. In order for this permission of access to occur, the following prerequisites must be in place:
• The billing service must have registered for a NYSIF online account. • The billing service must have shared its unique ID with the provider. • The provider must acknowledge and accept responsibility for the release of information to the
biller.
To begin, the third-party biller must complete registration for a NYSIF online account. Once verified, NYSIF will send the vendor biller a unique identifier code that they must share with the provider. The provider should then log back into his/her NYSIF account and add the biller by entering the unique ID code in the textbox on the landing page. By clicking ‘submit,’ the medical provider acknowledges and accepts responsibility for the release of information to the billing service.
The user will be presented with a dialog box indicating the name and address of the billing service.
If this is correct, and the Provider accepts the conditions detailed in the dialog box, click the “I Agree” button, or click “Cancel”.
(Language shown above in acknowledgement of adding a third-party biller)

August 20, 2021 11
By agreeing to this selection, you as the Medical or Healthcare Provider ('Provider') are affirming that the above named third party biller ('Vendor') is authorized to access your billing information and claimant’s personal, private and protected health information ('Portal Data') on NYSIF's Medical Payee Portal ('Portal'); that the Provider and Vendor have entered into a Business Associate Agreement consistent with federal law and the Portal Terms & Conditions applicable to this account; and that Provider is responsible for Vendor's compliance with the Portal Terms and Conditions. It is the sole responsibility of the Provider to promptly remove access to the Portal when the Vendor is no longer authorized to access Provider’s Portal Data.
After agreement, the Medical Provider landing page will include those billers who currently have permissions to view the provider’s billing and payment information.
This biller can now, and until such time as access is revoked, view all billing and payment information associated with this provider. Some additional notes:
• A single provider can grant access to more than one billing service. • A single billing service can view bills for more than one provider – but only for one at a time. • A billing service cannot grant or obtain permission to view a provider’s information, nor can
NYSIF personnel issue such grants. These permissions must come from the provider. • A provider can revoke permissions from any billing service at any time.
To revoke permissions from a billing service, click the “Delete” link corresponding to the service in question.
A confirmation dialog will display. Click the “OK” button, and this biller will no longer have access to information about this provider. The service will disappear from the list.
Please note again that this unique ID must be provided by the biller to the provider through direct communication. NYSIF cannot provide this
information, nor play an active role in granting these permissions. Please note that only the master account for the medical provider can add/authorize a third-party biller. Authorized user child accounts set up by the provider do
not have permission to grant authorization.

August 20, 2021 12
Claim Search
From your landing page, you can click on one of the following options from the menu:
• Search Payments by Claim Number • Search Payments by Check Number
(Direct deposit participants should use the draft number provided in the payment notification email.) • Find a Claim Number • Add or delete a Third-Party Biller • Enroll in direct deposit
Search Payments by Claim Number From your landing page, select “Search Payments by Claim Number.” Note on this page that the user’s (NYSIF-generated, internal) Payee ID and business name are displayed. For any searches performed by these applications, only information specifically associated with payments to a single provider, over a specific time period, will be displayed.
Enter the claim number. You may search by claim number for any date of service in the last five years. Drag the date range fields to reposition the slider or narrow the range. The maximum range for a single search is 180 days.
Click “Submit.”

August 20, 2021 13
TIP: Place your cursor on the blue slider and reposition the date range in six-month increments.
TIP: Drag the right or left end-point to narrow your date range.
The system will return information about the claim – specifically the claimant last name, date of birth, and accident date. The NYSIF case manager’s name and email address are also available. If more than one payment was made during the search period, the search will return all payments.

August 20, 2021 14
Click the “plus” sign to expand details about the payment. Click “Bill Details” for further information.
In the table there will be a record for each bill stored for this claimant, for services billed by this provider, during the service date range submitted. For each record, the following fields, if applicable, are displayed:
• NYSIF Bill Number • Billed Amount • Last Date of Service • Paid Amount (for this specific bill) • Check Number (if payment was issued) • Check Amount (can and will often differ from billed amount/paid amount, due to repricing and
the combination of multiple bills on a single check) • Check Date • Bill Status Message • Document Link (Documents related to Objections and Repricing on the bill) • Service Dates covered by the payment • Codes, charges and paid amount for each service date.
The text in the “Document Link” field describes the type of each available document: “OBJ” (Objection Letter), “Repricing EOR” (Explanation of Review from repricing service), or “C-8-4” (NYSIF generated C-8.4 document). Clicking on one of these document links will open a new web page that displays the requested document.
Note: All documents available for display are images of documents already sent to the Provider.
Note: If there are no bills associated with the submitted claim/service date range and this Provider, no information will be returned.

August 20, 2021 15
Search Payments by Check Number Clicking the “Search Payments by Check Number” link on the landing page will bring up a check-specific search. Enter a check number, and click the “Submit” button. If the check number entered does not match that of a check issued to the Provider being queried, no information will be returned.
If you are enrolled in direct deposit, please use the draft number provided to you in the payment notification email to "Search Payments by Check Number."
Hover over the claim number for case manager information. Hover over the claimant name for accident date and date of birth.
The document links in the far-right column function in the same way as described for “Search by Claim.”

August 20, 2021 16
Find a Claim Number (Associated) In some cases, the user may not know the claim number that is required for a billing/payment search. “Find a Claim Number” requires certain claimant information and returns a claim number meeting the submitted criteria.
If the provider has previously submitted a bill to NYSIF for this claimant, choose “Yes” and complete the fields required. The provider must provide the claimant’s exact date of birth, an accident date that falls within three days of the date stored by NYSIF, and the first two letters of the claimant’s last name. As with the “Search Payments by Claim Number” function, use the slider to select and narrow the service date range. The search will return the claim number and full last name of the claimant.
If there are no bills associated with the submitted claim/service date range and this provider, no information will be returned.
Other conditions resulting in “No records” would include a mismatch on last name, an accident date out of range, or no billing information for this provider during the range submitted. Only claimants that fit the provided identification information AND were provided billed services by this provider, during the specific service date range in question, will be returned.
August 20, 2021 17
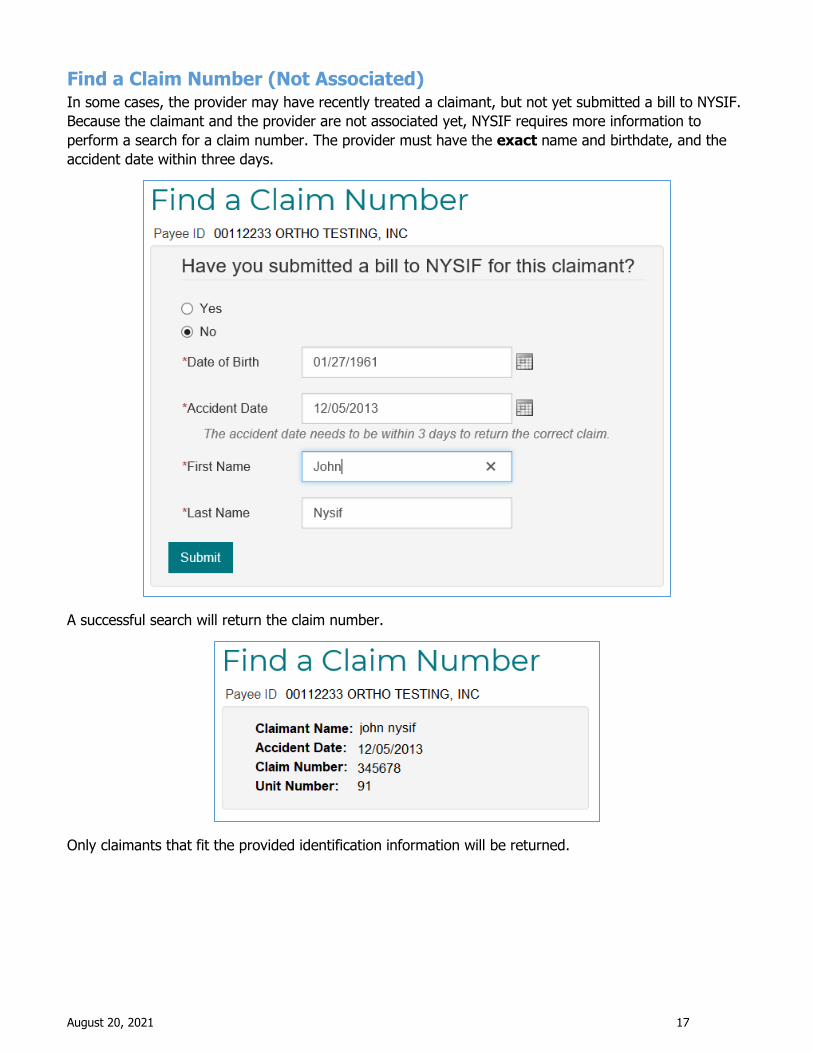
Find a Claim Number (Not Associated) In some cases, the provider may have recently treated a claimant, but not yet submitted a bill to NYSIF. Because the claimant and the provider are not associated yet, NYSIF requires more information to perform a search for a claim number. The provider must have the exact name and birthdate, and the accident date within three days.
A successful search will return the claim number.
Only claimants that fit the provided identification information will be returned.

August 20, 2021 18
Direct Deposit Enrollment Note: • Only the master account holder can enroll in direct deposit for a medical provider. • The master account holder will be asked for their home address, which will be used to verify their
identity when submitting. NYSIF will transmit the application to our eSignature vendor, DocuSign, to validate the master account holder’s information. Please note this is for verification purposes only and will not change the mailing address NYSIF has on file for the medical payee.
• Medical providers outside the U.S. must mail a paper application (available on the enrollment page). • Medical providers that utilize a bank outside of the US banking system are not eligible for NYSIF’s
direct deposit. Choose “Enroll/Manage Direct Deposit” from your landing page.
Contact Information On the Sign Up screen, the master account holder’s name & the medical provider’s payee number will be pre-populated from account creation. These fields will be read-only. All other required fields must be completed to proceed. • Title reflects the user
completing enrollment. • Address Line 1 must be the
HOME address of the user completing enrollment. This will be used to verify your identity during the electronic signing process. The field will not accept PO boxes.
• Email Address will be used to provide notifications of payments deposited. You may enter an email address of your choosing; if you do not provide an alternate address, notifications will be sent to the master account email address. Only the email address entered here will receive payment notifications.
• Click Submit. A pop-up box with authorizations and understandings for the medical provider will appear. Please review these carefully and choose “I Agree” to move forward with direct deposit.

August 20, 2021 19
To reconcile EOBs, please use the draft number provided to you in the payment notification email to "Search Payments by Check Number."

August 20, 2021 20
Financial Institution Information for Medical Providers After all information is successfully entered on the Direct Deposit Sign Up – Contact Information page, the Direct Deposit Sign Up – Financial Institution Information page will be displayed. The Direct Deposit Sign Up page contains Account Type, Bank Name, Routing Number and Account Number. All fields are required. • The Account Type is a
drop-down selectable menu with options of either Checking or Savings.
• Name of Financial Institution is the bank where the user has the related account.
• The Account Number must be between 4 and 16 characters and must be all numeric.
• The Routing Number is a nine-digit number that will appear on the bottom of all checks. The Routing Number identifies the financial institution.
At the bottom of the Financial Institution Information page is Depositor/Payee Certification & Authorization language. The user is agreeing to this disclaimer by clicking the “Electronic Signing” button.

August 20, 2021 21
DocuSign for Medical Providers After choosing the Electronic Signing button, a pop-up message will notify the user that they are being redirected to DocuSign. Click OK.
After clicking OK on the pop-up message, the user will be sent to DocuSign. Once the user is in DocuSign the ID Check – Identification Questions page will display. This page will present the user with a series of identifying questions based on the specific individual logged in and signing up for direct deposit.

August 20, 2021 22
After successfully answering the questions on the ID Check, the user will advance through DocuSign.
To the right of the CONTINUE button is an OTHER ACTIONS menu which includes options to Help & Support, Finish Later, Print & Sign, or Decline to Sign. The user has the option to print the application, hand sign the printed document and mail the signed application to NYSIF for completion of processing. After selecting Continue, the document will be clearly visible. Click on START or the Sign box.

August 20, 2021 23
The screen will again gray out the document, and a pop-up box will open. The user must enter their full name in the corresponding field. DocuSign will convert the name into a signature. There is also an option to create a free-hand signature by selecting the Draw option. Once a signature has been created the user must click on ADOPT AND SIGN to electronically sign the document. DocuSign will insert the signature into the application document.
After the electronic signature appears on the image of the application, and all other information appears to be correct, the user must click the yellow FINISH button at the top.
Once DocuSign is completed and accepted, a confirmation message will be displayed. No further action is required from the user at this time. The user may click the Go Back button to return to Direct Deposit Account Management.

August 20, 2021 24
Managing Your Direct Deposit Account Whether a user signed up for direct deposit electronically or by paper, they will have the ability to manage their direct deposit information by logging into their online account. Online, users will be able to update bank account information, unsubscribe or reinstate their direct deposit.
Please note if an application is mailed to NYSIF, the changes will not become effective until the application is both received and processed by NYSIF staff. Payments will continue to be sent to the bank account on file in the interim. To stop payments from being sent to the previous bank account on file, users should complete the Unsubscribe process. Update Direct Deposit Information To update the mailing address, notification email address or bank account information for a provider enrolled in direct deposit, choose “Enroll/Manage Direct Deposit” from the Medical Provider home page.
Click Manage Account on NYSIF’s Online Direct Deposit – Account Management page.
This will bring the user to NYSIF’s Online Direct Deposit – Update Account Information page. You can update your mailing address, email address for payment notifications or bank account information. Please note any changes to bank account information will require another signed application. Changes will not be saved until an electronic signature is provided or a paper application is mailed to NYSIF. Clicking Submit will bring the user to DocuSign. After the submitted updates have been electronically signed in DocuSign, the user will see a confirmation message and receive a confirmation email.

August 20, 2021 25
Unsubscribe Direct Deposit To remove your provider payments from direct deposit, click the Unsubscribe button from NYSIF’s Online Direct Deposit – Account Management page.
This will bring the user to NYSIF’s Online Direct Deposit – Unsubscribe page. Verify the user and provider information. Click Submit.
After the unsubscribe process has been completed, a confirmation message will display, and an email will be sent to the master account holder.