
NXI5_SitePlan
122
NX I-DEAS 5 Site Planning and Implementation Guide for NX I-DEAS 5 A guide for planning the implementation of an NX I-DEAS ® 5 installation at your site. This guide applies to the supported UNIX and Microsoft® Windows® platforms.
description
NXI5_SitePlan
Transcript of NXI5_SitePlan

NX I-DEAS 5
Site Planning and Implementation Guide for NX I-DEAS 5
A guide for planning the implementation of an NX I-DEAS® 5 installation at your site. This guide applies to the supported UNIX and Microsoft® Windows® platforms.

Proprietary & Restricted Rights Notice
© 2007 UGS Corp. All Rights Reserved. This software and related documentation are proprietary to UGS Corp. LIMITATIONS TO U.S. GOVERNMENT RIGHTS. UNPUBLISHED - RIGHTS RESERVED UNDER THE COPYRIGHT LAWS OF THE UNITED STATES. This computer software and related computer software documentation have been developed exclusively at private expense and are provided subject to the following rights: If this computer software and computer software documentation qualify as "commercial items" (as that term is defined in FAR 2.101), their use, duplication or disclosure by the U.S. Government is subject to the protections and restrictions as set forth in the UGS Corp. commercial license for the software and/or documentation, as prescribed in FAR 12.212 and FAR 27.405(b)(2)(i) (for civilian agencies) and in DFARS 227.7202-1(a) and DFARS 227.7202-3(a) (for the Department of Defense), or any successor or similar regulation, as applicable or as amended from time to time. If this computer software and computer documentation do not qualify as "commercial items," then they are "restricted computer software" and are provided with "restrictive rights," and their use, duplication or disclosure by the U.S. Government is subject to the protections and restrictions as set forth in FAR 27.404(b) and FAR 52-227-14 (for civilian agencies), and DFARS 227.7203-5(c) and DFARS 252.227-7014 (for the Department of Defense), or any successor or similar regulation, as applicable or as amended from time to time. UGS Corp., 5800 Granite Parkway, Suite 600, Plano, Texas 75024.
I-DEAS is a registered trademark of UGS Corp.
All other trademarks belong to their respective holders.

Contents
iii
Introduction 1
Chapter 1 Best Practices for Site Planning 5
Best Practices for Site Planning 6
Chapter 2 Planning for Migration 7
Migration Process 8 Perform the Migration in Phases 9 Don’t Skip the Preparation Phase 9 Test the Migration 10
Migrating to a Different Platform Type 13 Merging Team Data Installations Using File, Import/Export 14
Chapter 3 I-DEAS Installation Configurations 15
Configuration Considerations 16 Hardware Platforms 16 Number of I-DEAS Users 16 Geographic Distribution of Development Sites 16 Team Collaboration 16
Example Configurations 18 Standalone Workstation Configuration 18 Distributed Configurations 19

iv
Performance Optimization Guidelines 25 Workstation Recommendations 25 Recommendations for Clients 26 Server Recommendations 26
Chapter 4 I-DEAS Data Management Setup 29
I-DEAS Data Management 30 I-DEAS Data Installations 30 I-DEAS Projects 30 Project structure 31
Data Installation Setup 37 Components of the Data Installation 37 I-DEAS Parameter File 38 Data Installation Setup Structure 40 I-DEAS Parameter Settings 41 User Parameter Files 44 Team Parameters Table 45
Multiple Team Data Installations Setup 46 Single-User Data Installation Setup 46 Manually Configure a Team Data Installation 47
Chapter 5 Site Planning Considerations 49
Disk Space Requirements 50 Backup Strategy 50
Backup Schedule 51 File Security 52
SFAM Levels 52 SFAM Guidelines 53
License System 54 How the License System Works 54 License Server Setup 54
Chapter 6 Designing the Installation Configuration 57
Design Considerations 58 Installation Recommendations 59
Operating System Environment 59 I-DEAS Software Installation 60 I-DEAS License Manager Service 60 Team Data Installations 61
Data Management Setup 61 Data Flow Evaluation 61

v
Data Management Practices 63 Data Organization 63
Define Your Installation Configuration 65 Implementation Guidelines 66
Chapter 7 Site Planning for Heterogeneous Team 67
Heterogeneous Team Considerations 68 Performance Degradation 68 Complexity of Data Management 68 Complexity of I-DEAS Setup and Administration 69
Heterogeneous Team Site Planning Strategy 70 Heterogeneous Team - Business Solutions 71
Increase Data Security on Microsoft Windows 71 Facilitate Implementation of Hardware Migration Strategy 72 Enhance Interoperability across Workgroups 73
Heterogeneous Team - Standard Configuration 74 Standard HT Configuration 74
Heterogeneous Team - Setup Requirements 75 Team Server Setup 75 UNIX File (Code) Server Setup 76 UNIX Global Parameter File 77 Microsoft Windows Client Setup 77 UNIX Client Setup 78
Designing the Heterogeneous Team Environment 79 Develop a Process Map of your Product Development Cycle 80 Expand the Process Map to Illustrate Data Sharing Points 81 Use the Process Map as a Design Aid 82 HT Hardware Configuration and Data Sharing Strategies 83 Define the HT Setup Components for your Site 85
Chapter 8 Heterogeneous Team Setup 87
System Requirements 88 Process Overview 89
HT Setup Process during Initial I-DEAS Installation 89 HT Setup Process after I-DEAS Installation 90
Setup Tasks 90 Plan the Heterogeneous Team Configuration 90 Special Considerations for Windows XP 92 Install I-DEAS on the UNIX Heterogeneous Team Server 92 Install and Configure a Validated Connectivity Solution 93 Prepare the Microsoft Windows Client Workstations for HT Setup 93 Install I-DEAS on Microsoft Windows Client Workstations 93
vi
Migrate to a Single License Server (if necessary) 97 Configure Microsoft Windows Client Workstations 98 Set Up SFAM for HT 98 Configure I-DEAS 100 Configure User Workstations 104 Catalog I-DEAS Data Products (if necessary) 105 Verify the HT Installation 106 Multiple Heterogeneous Team Data Installations 107
Troubleshooting 108 Component-based SFAM Diagnostics 109
Connectivity Solution Appendixes
Appendix A Network Appliance Connectivity Solution for Heterogeneous Team A-1
System Requirements A-2 Configuration for I-DEAS HT A-2 Troubleshooting A-2 Customer Support A-2
Appendix B EMC Connectivity Solutions for HT B-1 System Requirements B-2 Configuration for I-DEAS HT B-2 Troubleshooting B-4 Customer Support B-4

1
Introduction I-DEAS is a powerful software tool used as an integral part of product development in a wide range of business environments. Because of this, there is a range of methods available to implement I-DEAS.
Whether this is a first-time installation of I-DEAS or you’re migrating from a previous software version, it’s important to plan the implementation method for your site.
Purpose
The goal of site planning is to design an I-DEAS installation configuration that’s efficient to implement and maintain, and that reflects the product development environment at your company.
The purpose of this guide is to inform you of the options and considerations in designing the I-DEAS installation configuration that’s suitable for your site.
2
How to Use this Guide
Use the information in this guide prior to installing I-DEAS to determine the appropriate I-DEAS installation configuration to implement at your site.
The following topics are covered in this guide:
• Best Practices for Site Planning
• Planning for Migration
• Installation Configurations
• I-DEAS Data Management Setup
• Site Planning Considerations
• Installation Configuration and Guidelines
• Site Planning for Heterogeneous Team
• Heterogeneous Team Setup
You’ll use the last two sections of this guide only if your company is considering the implementation of heterogeneous team. Heterogeneous team is described in the Installation Configurations section as one of the I-DEAS configuration options.
UNIX and Microsoft Windows Syntax
This guide is designed for both UNIX and Microsoft Windows operating system environments. If the syntax used does not match your installation platform, convert the syntax, as necessary, according to the following guidelines:
• UNIX uses a forward slash (/) between directory levels; Microsoft Windows uses a back slash (\).
• For certain files, UNIX precedes a filename with a dot (.) to hide the file and provide a level of security; Microsoft Windows does not.
• Microsoft Windows uses a three-character extension on some filenames; UNIX does not.
• Microsoft Windows may use uppercase characters in filenames; UNIX does not.
• In most cases, I-DEAS environmental variable names are the same across platforms, such as SDRC_INSTL and IDEAS_PARAMX.
Note: The X in the names of some directories, files, and environment variables referred to throughout this documentation represents the current I-DEAS software release number. For NX I-DEAS 5, for example, the IDEAS_PARAMX environment variable translates to IDEAS_PARAM13
• For environment variable syntax, UNIX uses a preceding $, such as $HOME. Microsoft Windows uses surrounding %, such as %HOMEPATH%.

Introduction 3
Customer Support
For support on installing, configuring, or using the I-DEAS software, go to the Global Technical Access Center (GTAC) site at the following URL:
http://support.ugs.com/
If you have a current maintenance contract you can submit a support request via the web or contact the support center directly using the toll free number provided.
You’ll need a WebKey account to file a support request via the web. Information on obtaining a WebKey account can be found in the following document at that site:
http://support.ugs.com/webkey_faq.pdf
For assistance during normal business hours, you can call 1-800-955-0000 to speak to a Customer Account Analyst. Outside the United States and Canada, please contact your local support office.

4
Other Sources of Information Other sources of information that can be useful in site planning include the following:
Installation Guide There are separate versions of the installation guide, one for UNIX and one for Microsoft Windows.
The installation guide takes up where the Site Planning and Implementation Guide leaves off. For example, planning for migration is covered in the site planning guide, and the migration procedures are provided in the installation guide. Also, installation guidelines are covered in this site planning guide, but the installation procedures are in the installation guide.
For a complete understanding of the I-DEAS setup requirements, it’s important to use this guide together with the installation guide for your platform.
The installation guides are delivered as .pdf files on the I-DEAS installation CD, in the Readme directory.
Release Notes The Release Notes supplement the I-DEAS product information and include any last minute information you may need to know.
The Release Notes document is delivered as a .pdf file on the I-DEAS installation CD, in the Readme directory.
Readme Files Readme files are installed with the I-DEAS product (in the Readme directory) and provide information on technical topics that may not be covered elsewhere in the I-DEAS documentation. Information found in readme files is generally considered supplemental information.
I-DEAS Online Help Library I-DEAS online help can be accessed directly from the I-DEAS Help Library CD or installed and accessed from an I-DEAS server or client workstation. Review the information in the General I-DEAS Administration and Data Management Guides, accessible from the Online Help Bookshelf. Learning the information in those sections of the online help is important for effective use of I-DEAS data management capabilities and ongoing maintenance of I-DEAS software.

Chapter 1
5
Best Practices for Site Planning The goal of site planning is to design an I-DEAS installation configuration that’s efficient to implement and maintain, and that reflects the product development environment at your company.
The time your company dedicates to site planning will be directly proportional to the size and complexity of the I-DEAS installation at your site.
The best practices for site planning are outlined on the following page. Use these practices to achieve an I-DEAS installation design that meets the performance and organizational goals for product development at your site.

6
Best Practices for Site Planning Best practices for site planning include the following:
• Assign a team to participate in the site planning process.
I-DEAS administrators, project managers, and end users should participate on the site planning team during the appropriate phases of the site planning process.
• Develop and follow a site planning process.
A recommended site planning process would include the following tasks:
- Learn about the I-DEAS installation configuration options and setup requirements.
Do this by studying the I-DEAS Installation Configurations chapter of this guide.
- Learn about the I-DEAS data management options and setup requirements.
Do this by studying the I-DEAS Data Management Setup chapter.
- Design the optimum I-DEAS installation configuration for your site.
The optimum configuration design is based on an analysis of the hardware configuration and data management requirements at your site.
Guidelines for this are provided in the Site Planning Considerations chapter.
- Determine the appropriate process for implementing the I-DEAS installation configuration you’ve designed for your site.
Guidelines for this are provided in the Installation Guidelines chapter.
• Document the key information gathered, and the decisions and recommendations made during the site planning process.
• Plan and schedule the implementation of I-DEAS at your site.

Chapter 2
7
Planning for Migration Migration refers to upgrading the I-DEAS software and the existing I-DEAS data installation for use with the most current version of I-DEAS. Sometimes migration involves moving the installation from one platform type to another.
Depending on the configuration and size of the I-DEAS data installation(s) at your site, you may want to phase-in or test the migration of I-DEAS data installation(s).
This section provides information and guidelines to help you develop a plan for migrating data from a previous version of I-DEAS.
Note: The existing data installation must be migrated, using the I-DEAS 12 version of the dmadmin utility as described below, before the NX I-DEAS 5 software can be started.
CAUTION: After data is migrated to NX I-DEAS 5, it cannot be accessed by a previous version of I-DEAS.

8
Migration Process Following are the tasks involved in the migration process:
Prepare for Migration
1. Run a full backup of the entire data installation.
Note: Creating a backup of the data installation before it’s migrated is important because I-DEAS data is not backward-compatible. After the data is migrated, it cannot be accessed by a previous version of I-DEAS.
2. Back up the previous version parameter files, security files, and any files created or modified for site-specific purposes, such as program files.
3. Have users check model file items into libraries.
4. Have users delete any model files they no longer need.
5. Check and clean the data installation and project files. This is accomplished using dmadmin commands, as described in the Installation Guide.
Note: For this, you should use the version of dmadmin from your current I-DEAS release (not the NX I-DEAS 5 version).
Note: If you’re migrating a data installation in a Heterogeneous Team (HT) environment, run dmadmin on the platform type compatible with the .imd and .pmd files in your installation.
6. Run the idfvfy utility to verify the structural hierarchy integrity of the I-DEAS data installation.
Note: If you’re migrating a data installation in an HT environment, verify that no “incompatible database type” errors occur on the .pmd files. If they do, run the HDS convert utility on those .pmd files.
For information on using the HDS utility, see the Data Sharing Administration article under I-DEAS General Administration in the I-DEAS online help.
7. Run another full backup of the entire data installation.
Migrate the Software Installation
8. Verify that all users have exited I-DEAS.
9. Uninstall the previous version of I-DEAS (including the Orbix installation).
10. Install NX I-DEAS 5 using the process described in this guide and the procedures described in the Installation Guide.

Planning for Migration 9
Migrate the Data Installation
11. Run the dmadmin MIG;MG option to migrate the data installation.
This migrates the data installation in place. See the Test the Migration section below for instructions on how to migrate a copy of the data installation.
Note: This utility migrates the installation .imd and project .pmd files only. The library and model file data is automatically migrated the first time it’s accessed in NX I-DEAS 5.
Verify the Migration
12. Verify the success of the migration as follows:
- Review the migration log file created in the Team.MasterDirectory location.
- If the log file includes a warning message that indicates errors in project migration, contact customer support.
- If the log file indicates a succesful migration (no warnings), run NX I-DEAS 5 and perform the following verification operations:
- Browse the libraries using the Manage Libraries form to verify that the libraries you migrated exist in the installation.
- Perform some simple check in and check out operations to verify that interaction with the libraries is operational.
- If some model files were included in the migrated data, open a sampling of the model files to verify that the expected relationships between project and model file and model file items exist.
Perform the Migration in Phases
Depending on the size of your I-DEAS installation, you may want to complete the migration process in phases. You could, for example, begin performing the tasks in the preparation phase a few weeks prior to implementing the other migration phases.
Don’t Skip the Preparation Phase
The most time-consuming phase of the migration process is the preparation phase. Taking the time to perform the tasks in the preparation phase is, however, highly recommended. The benefit is a full backup of the pre-migrated data and a clean data environment that’s efficient to migrate and maintain. If you skip the preparation tasks, the actual data migration could take longer and the migrated data environment may be more prone to errors.
Note: Checking model file items into libraries and removing model files that are no longer needed (tasks 3 and 4) have the most impact on reducing the time required to migrate the data installation using the dmadmin, MIG;MG command.

10
Performing the tasks listed in the preparation phase is also recommended as an ongoing practice for maintaining the integrity of your I-DEAS data installation(s). It’s recommended that you include those tasks in your standard maintenance practices.
Test the Migration
To ensure success, and develop the most efficient migration implementation plan for your site, you may want to perform a test migration. By performing a test migration, you can gain experience and gather information to use in designing your migration implementation plan.
This procedure could also be used as a part of the migration phase-in process. You could test-migrate a copy of each data installation to verify a successful migration before migrating the data installation in your production environment.
During the test, you’ll be working with a copy of the .imd and .pmd files. Following is the procedure for testing the migration of a data installation to NX I-DEAS 5:
1. Install NX I-DEAS 5 on a disk and directory that’s NOT visible (mapped or mounted) to the I-DEAS installation (production environment) you’re migrating from.
Note: See the NX I-DEAS 5 Installation Guide for UNIX or Windows for installation procedures.
a. During the team data installation portion of the installation process, use the method that allows you to enter the Team Master ID for the data installation.
On UNIX, this is the default method. On Microsoft Windows platforms, this is the Create a custom configuration option.
b. Enter the Team Master ID value assigned to the data installation for which you’re performing the test migration. (It’s defined in the I-DEAS parameter file.)
2. Place a copy of the .imd file from the previous version data installation you want to test-migrate in the Team Master Directory you defined during the NX I-DEAS 5 installation.
This will overwrite the .imd file generated during the NX I-DEAS 5 data installation setup.
3. Place a copy of the .pmd files from the previous version data installation you want to test-migrate in the Team Projects Directory you defined during the NX I-DEAS 5 installation.
4. Verify that the I-DEAS production environment you’re migrating from cannot be accessed from your NX I-DEAS 5 installation environment.
5. Run dmadmin MIG;MG.
The dmadmin tool is located in the bin subdirectory of the I-DEAS upper level installation directory. Following is the default location for NX I-DEAS 5, by platform:
UNIX
<server>->/ugs/ideas13/bin/dmadmin
Microsoft Windows

Planning for Migration 11
<drive>:\UGS\I-DEAS13\bin\dmadmin
a. If the location of the test .pmd files is different than what’s defined in the .imd file (since you’re working with copies), a prompt for the location of the .pmd files displays. Enter the directory path to your test .pmd files. This is the Team Projects Directory you defined during the NX I-DEAS 5 installation.
6. Verify that the test migration was successful.
- Review the migration log file created in the Team.MasterDirectory location.
- If the log file includes a warning message that indicates errors in project migration, contact I-DEAS customer support.
- If the log file indicates a succesful migration (no warnings), run NX I-DEAS 5 and perform the following verification operations:
- Browse the libraries using the Manage Libraries form to verify that the libraries you migrated exist in the installation.
- Perform some simple check in and check out operations to verify that interaction with the libraries is operational.
7. Record any pertinent information for your migration planning. This could include:
• a list of the migration preparation tasks that were performed on the data installation prior to the test
• the size (in MB) of the data installation
• the migration processing time
• a copy of the migration log file
This information is most important if you have multiple data installations to migrate. An evaluation of the information you gather during testing could be used in defining the migration plan and schedule to implement for your site.
Migration Testing for Multiple Data Installations
You could use one of the following methods if you have multiple data installations to test-migrate.
Overwrite Test Files Method After you’re done with one test migration, as described above, you can overwrite those .imd and .pmd files with the .imd and .pmd files from the next data installation you want to test-migrate.
If you want to retain a copy of the previously test-migrated .imd and .pmd files, copy them to another location before overwriting them with a copy of the next data installation .imd and .pmd files to test-migrate.
When you use this method, you’ll need to modify the TeamMasterID parameter in the NX I-DEAS 5 parameter file. Enter the correct value for the Team Master ID of the data installation you’re going to test-migrate.

12
Following is the default location of the NX I-DEAS 5 parameter file, by platform:
UNIX
<server>->/ugs/ideas13/ideas/.ideas_param13
Microsoft Windows
<drive>:\Team\Master\Config\ideas_param13.dat
Create Multiple Test Locations Method After you’re done with the first test migration, as described above, you can create a different Team Master and Team Projects directory location for each data installation you want to test-migrate.
If you use this method, you’ll need to create a separate copy of the NX I-DEAS 5 parameter file for each data installation you test-migrate.
The following procedure uses a data installation with the Team Master ID of 2 as the example:
1. Create separate directories for the .imd and .pmd files, /team2/test/ and /team2/test/projects, for example.
2. Place a copy of the .imd file from data installation 2 in the directory you defined for the .imd, /team2/test, for example.
3. Place a copy of the .pmd files from data installation 2 in the directory you defined for the .pmd files, /team2/test/projects, for example.
4. Locate a copy of the NX I-DEAS 5 parameter file within that test directory structure, /team2/test/param13, for example.
5. Modify the NX I-DEAS 5 parameter file for the following:
- Set the Team Master ID parameter to the correct value for the data installation, 2 in this example.
- Set the Team Master Directory parameter to the location of the .imd file, /team2/test/ in this example.
6. Set the IDEAS_PARAM 13 environment variable to point to the team2 test parameter file location. Following is example syntax, by platform:
UNIX
IDEAS_PARAM13=/team2/test/param13; export IDEAS_PARAM13
Microsoft Windows
set IDEAS_PARAM13=\team2\test\param13

Planning for Migration 13
7. Follow the procedures in the Test the Migration section above, beginning with step 4, to complete the migration test for the data installation.
Migrating to a Different Platform Type Use the guidelines in this section when migrating a data installation from one platform type to another.
UNIX to UNIX
I-DEAS data installations are fully compatible between UNIX platform types. Migration is therefore not an issue if you’re moving from one UNIX platform type to another.
UNIX to Microsoft Windows or Microsoft Windows to UNIX
If you plan to migrate a data installation from one homogeneous team environment to another, from UNIX to Micorsoft Windows, for example, contact customer support or Implementation Services for assistance.
UNIX and Microsoft Windows
If you plan to begin working in a heterogeneous team (HT) environment where a data installation is accessed by both UNIX and Microsoft Windows platforms, use the following migration process:
1. Plan your HT environment as defined in the HT Site Planning chapter.
2. Perform the migration process described above in your current homogeneous environment.
3. Perform the HT setup and data migration processes described in the HT Setup chapter.
Merging Team Data Installations Using File, Import/Export Use the File, Import/Export function to merge shared data from one team data installation to another before migrating the data installation to NX I-DEAS 5.
This method should be used if you want to migrate shared data from Artisan to I-DEAS, from Microsoft Windows to UNIX (for heterogeneous team), or simply combine shared data from one data installation to another.
The basic process for this method is:
1. Use File, Export, I-DEAS Library Data to create package files of the shared data from one installation that you want to add to another data installation.
2. Use File, Import, I-DEAS Library Data to import the package files into the desired data installation.
3. Perform the migration process (as described in the previous sections) on the merged data installation.
Note: HT does not automatically run HDS conversion on a package file at import. It converts the item files at library checkout.

14
If you know the predominant platform type the items in the package file will be used on, you could manually run the HDS utility on that platform type before import. This improves performance because the need for HT conversion at library checkout is eliminated for the library items imported from the package file by the predominant platform type.
For information on using the HDS utility, see the Data Sharing Administration article under I-DEAS General Administration in the I-DEAS online help.
For information on using File, Import/Export, see the Sharing Library Items with Other Installations section of the Project Management User's Guide in the I-DEAS online help.

Chapter 3
15
I-DEAS Installation Configurations An I-DEAS installation consists of the following:
• I-DEAS license manager
• Resource locking manager
• I-DEAS software
• I-DEAS data installation(s)
This chapter provides examples of I-DEAS installation configurations and their design intent. Use the information in this chapter as an aid in determining the appropriate installation configuration at your site.

16
Configuration Considerations Following are the key components that influence the design of an I-DEAS installation configuration:
• Hardware platform(s) to be used
• Number of I-DEAS users
• Geographic distribution of product development sites
• Team collaboration requirements
Hardware Platforms
I-DEAS runs on several hardware platform types including various Microsoft Windows and various UNIX platforms. An I-DEAS installation can be configured with one or more of these hardware platform types. I-DEAS data and licenses can be shared across platform types. This is illustrated in the example configurations later in this chapter.
The latest information on I-DEAS system requirements can be found on the Global Technical Access (GTAC) web site at:
http://support.ugs.com/
Number of I-DEAS Users
The number of users needing access to the I-DEAS software and data has a direct impact on the design of your I-DEAS installation configuration. It will influence whether you implement I-DEAS as a standalone or distributed installation and, if distributed, the number of servers in the environment. This is illustrated and discussed in the example configurations later in this chapter.
Geographic Distribution of Development Sites
If the sites where I-DEAS is used for collaborative product development are geographically disbursed, you may want to set up a Wide Area Network (WAN) configuration. This is discussed in the example configurations later in this chapter.
Team Collaboration
Team collaboration and data sharing requirements will impact the design of your installation configuration.
I-DEAS data management (IDM) supports team- and project-based product development.
This chapter provides an overview of IDM so you can understand the I-DEAS data installation setup options shown in the configuration examples.
See Chapter 4, I-DEAS Data Management Setup, for a detailed description of the IDM components and setup structure.

I-DEAS Installation Configurations 17
I-DEAS Data Management (IDM) Overview
An I-DEAS installation may include one or more data installations, with one being the default. One data installation can support any number of projects. To support concurrent engineering, data can be shared within and across data installations.
I-DEAS Data is Organized in Projects I-DEAS data is organized in projects. Project data can be divided into two basic types, private (user) data and shared (team) data. User data is private, work-in-progress data that has not yet been released to the shared environment. Team data is data that has been released to the shared environment.
I-DEAS uses the following containers to store project data:
• model files
• libraries
• catalogs
Model files are used to store private (user) data. Shared (team) data is stored in libraries and catalogs.
I-DEAS Data Management is Scalable IDM is scalable to provide the level of data sharing necessary to support the product development practices at your site. You can choose between two methods of IDM, base and advanced.
Both methods use the same data installation setup structure and provide data sharing capability. The data sharing capability provided by advanced IDM is more extensive than base IDM.
Data sharing in base IDM is restricted to one library per project. Any number of libraries can be created within a project in advanced IDM. This is necessary for the organization requirements of large projects.
An example of when base IDM could be implemented is if your engineers do all of their own modeling, drafting, and analysis for their parts and assemblies. Data sharing requirements in this situation are minimal.
In situations where engineers work in a team environment and collaborate on development of parts and assemblies, data sharing is critical. In this case, advanced IDM should be implemented.

18
Example Configurations I-DEAS installation configurations range from a standalone workstation to a wide variety of possible configurations in a distributed installation environment.
Some possible configurations are described in this section.
Standalone Workstation Configuration
I-DEAS can be installed and run on a standalone workstation. This configuration requires that all components of the I-DEAS installation, the software, license manager, resource locking manager, and data installation are installed on one machine.
A standalone workstation configuration could be included in a distributed installation environment and act as an independent workstation for I-DEAS.
This configuration would be appropriate in the following situations:
• sites where designers work on separate projects and rarely, if ever, share data
• mobile workstations, such as laptops, which may be periodically disconnected from the distributed installation environment
You could use base IDM in this configuration and, when necessary, share team data using the I-DEAS File, Export/Import capability.
Standalone WorkstationConfiguration
OrbixI-DEAS License Manager Software Team Data

I-DEAS Installation Configurations 19
Distributed Configurations
In a distributed configuration, the components of an I-DEAS installation can be distributed across multiple workstations.
Distributed configurations enable seamless data sharing among I-DEAS users and enhance the efficiency of software license management at sites where many users will access the I-DEAS software applications.
The actual configuration of a distributed environment varies from site to site. Factors such as data sharing requirements, number and geographic location of users, available hardware, and system performance requirements will influence the configuration design for your site.
Typical distributed configurations are described and illustrated on the following pages. Typical distributed configurations include:
• Workgroup Configuration
• Standard Configuration for Microsoft Windows
• Standard Configuration for UNIX
• Multi-server Configurations
• Heterogeneous Team Configuration
• Wide Area Network Configuration

20
Workgroup Configuration
The workgroup configuration might be used at I-DEAS sites where there are only a few I-DEAS users accessing I-DEAS software applications and sharing team data.
This configuration is typical in a Microsoft Windows environment, not UNIX.
In this configuration, I-DEAS is being run locally from all workstations, including the server workstation.
Running I-DEAS on the same workstation that’s used to serve licenses and team data to clients can degrade I-DEAS performance across the distributed environment. Therefore, this configuration is not recommended for workgroups with more than a few I-DEAS users.
Base IDM could be used successfully in this configuration. The shared library could be located on the server workstation shared disk.
local diskI-DEASsoftware
user data
local diskI-DEASsoftware
user data
Workgroup Configuration
user data
license manager service
team data
I-DEAS softwarelocal disk
shared disk
I-DEAS Help Library
Server Workstation
Client Workstation A Client Workstation B

I-DEAS Installation Configurations 21
Standard Configuration for Microsoft Windows
This configuration is recommended for most sites using I-DEAS in a Microsoft Windows environment. Although this configuration is more typical in a Microsoft Windows environment, it’s also valid as a distributed UNIX configuration.
license manager service team data
local diskI-DEASsoftware
user data
local disk I-DEASsoftware
user data
Standard Configuration for Microsoft Windows
I-DEAS Help Library
Server Workstation
server disk
Client Workstation A Client Workstation B
resource locking
This configuration includes one server workstation and multiple client workstations.
• Dedicating the server workstation to serving I-DEAS licenses and team data can enhance I-DEAS performance across the distributed environment.
• Locating the I-DEAS software on the local client disks further optimizes performance.
• Base IDM could be used successfully in this configuration. The shared library would be located on the server disk.
• Storing the I-DEAS Help Library on the server disk for remote access would save disk space on the client workstations.

22
Standard Configuration for UNIX
This configuration is implemented at many sites using I-DEAS in a UNIX environment. It’s less suited for a Microsoft Windows environment because of the increased load on the network and the server related to serving software across a network.
This also illustrates the Microsoft Windows distributed configuration using network clients.
This configuration includes one server workstation and multiple client workstations.
• The server is used to manage licensing and resource locking, serve team data, and store and serve the I-DEAS software and online Help Library.
• The client machines are used as workstations.
• User data is stored on the local client disk.
This configuration is suitable for small to medium sized I-DEAS installations. The network and server disk space must be monitored to ensure the capacity is sufficient for efficient I-DEAS processing and file service to the installation’s user base.
local disk
user data
Standard Configuration for UNIX
local disk
Client Workstation A
I-DEAS License &RL Service
Team Directories
I-DEAS Software
I-DEAS Online Help
Server
Client Workstation B
user data

I-DEAS Installation Configurations 23
Multi-server Configuration
A multi-server configuration would be used only for I-DEAS sites with a large number of users (50 or more) running I-DEAS.
In these large distributed configurations, it’s best to dedicate a single, stable workstation as the license server. A separate workstation can be set up to serve team data.
Software “Code” Server
Some multi-server configurations include one or more I-DEAS software servers, also known as “code servers.” Running I-DEAS software across the network will increase network activity thereby reducing software performance. If you’re considering including a code server in your multi-server configuration, be sure your network can handle the increased traffic.
local disk
licensemanager
local disk
team data
server diskserver disk
Multi-server Configuration – License and Team Servers
I-DEASsoftware
user data
I-DEASsoftware
user data
I-DEAS Help Library
License ServerWorkstation
Team ServerWorkstation
Client Workstation A Client Workstation B

24
Heterogeneous Team Configuration
A heterogeneous team configuration would be used for I-DEAS sites that plan to share I-DEAS data across heterogeneous platform types. This is referred to as a heterogeneous team (HT) environment.
* Accessible by all workstations (the SFAM/TDM owner account).
In an HT environment, the I-DEAS team data installation is shared across multiple workstations of different platform types. The team server must be a UNIX machine.
The configuration shown above would be appropriate for a large I-DEAS installation. Additional HT configurations are illustrated in the Site Planning for Heterogeneous Team chapter of this guide.
If you’re considering implementing HT at your company, read the Site Planning for Heterogeneous Team chapter. Information in that chapter will help you determine whether implementation of HT is appropriate for your site.
Heterogeneous License Sharing
I-DEAS licenses can also be shared across platform types. For example, a UNIX license manager service can manage I-DEAS licensing and resource locking on Microsoft Windows. This is required in an HT environment and could also be implemented outside an HT environment.
local disk
user data
Heterogeneous Team Configuration
local disk UNIX/WindowsConnectivity Solution
Client Workstation A Windows
Domain account*User Files
I-DEAS Software
I-DEAS License &RL Service
Team Directories
Shared Files
Global Parameter File(Windows version)MPM File
License & Team Server (UNIX)
UNIX File Server
I-DEAS Software
I-DEAS Online Help Global Parameter File (UNIX version)
Client Workstation BUNIXI-DEAS Online
Help

I-DEAS Installation Configurations 25
Wide Area Network Configuration
A wide area network (WAN) configuration can be used to distribute I-DEAS resource locking across a wide geographic region.
The resource locking server runs as a separate FLEXlm-based daemon process to manage resource locks on data access in team data manager (TDM). Configuring the resource locking server daemon is a separate procedure from configuring the license daemon.
Performance Optimization Guidelines Use the following guidelines to optimize performance of your I-DEAS installation configuration.
Workstation Recommendations
The hardware configuration you choose for a workstation depends on:
• the I-DEAS product or products which will be used at the workstation
• the size and complexity of the drawings or models created or used at the workstation
• the amount of disk space required for local software and data
On Microsoft Windows workstations, SCSI disks are recommended for increased performance of 3D and Simulation applications.
The latest information on I-DEAS system requirements can be found on the Global Technical Access (GTAC) web site at:
http://support.ugs.com/

26
Recommendations for Clients
The following are recommendations for clients:
• Use local (not remote) operating system, scratch space, and swap/pagefile space.
• Avoid network overload by minimizing the number of workstations per subnet and putting non-I-DEAS systems on a separate network from I-DEAS.
• TCP/IP and NETBIOS are required for I-DEAS. Avoid loading the NETBEUI protocol because it tends to send “chatter” on the network and is not required for I-DEAS.
Server Recommendations
When I-DEAS responds to user requests for access to team data, it relies on the performance of the server to respond to the disk access requests. The following are important considerations for servers:
Disk Access:
The following are recommended to optimize the performance of disk access:
• High speed disk access using non-volatile write cache.
• High speed bus access to and from the disk devices.
• High speed network connection.
• A dedicated network attachment to your main network backbone or to your isolated I-DEAS network (if you have one).
Memory:
• RAM needs are based on the number of clients and shared disks on the network.
• Disk caching is based on the amount of RAM available to the OS.
• Don’t put client swap/pagefile or scratch space on the server.
Network Load:
• Use multiple subnets with multiple network connections to the server.
• Disable interactive logins to the server.
• Don’t run I-DEAS on the server.
Disk Management:
Attempt to balance the load across all server disks and disk controllers (RAID, etc.).

I-DEAS Installation Configurations 27
Filesystem Types:
Use NFS (UNIX) or NTFS (Microsoft Windows) for disk sharing. FAT is not supported.
Server Class Machine:
A server class machine should be used for any server in an I-DEAS distributed configuration. This includes the NX license server, the I-deas resource lock server, team server, and code server.

28

Chapter 4
29
I-DEAS Data Management Setup This chapter describes how I-DEAS data management works and how it can be used to organize data within a product development environment. It also describes the I-DEAS data installation setup structure.
I-DEAS data management setup is the most important aspect of I-DEAS site planning. It goes beyond the data installation setup structure to how I-DEAS users will organize their product development environment within I-DEAS to collaborate within and across teams.

30
I-DEAS Data Management This section describes I-DEAS data management (IDM) and some possible scenarios for working within the I-DEAS data management environment.
I-DEAS Data Installations
I-DEAS Data Management Installations are often referred to as data installations. We’ll use the term data installation within this guide.
By default, I-DEAS is configured for one data installation. You can, however, add data installations and share library data between them.
The data in an I-DEAS data installation is organized within projects.
I-DEAS Projects
An I-DEAS project is a user-defined “top level organization” method for managing all data created or accessed by the I-DEAS software. When you start the I-DEAS software you must specify a project to work in. Once a project is set up, all users in a data installation can access the project, unless access privileges are restricted through project configuration. The I-DEAS project configuration capability is described in the Configuring Projects section later in this chapter.
Within a project, the following containers are used to store data:
• model file
• library
• catalog (usually in a dedicated project)
Model file
A model file is used to store private user data. Private user data is either work-in-progress data, not yet released to the shared environment, or application data that cannot be stored in a library (such as manufacturing data).
A model file is made up of a workbench and any number of bins.
• The workbench is where you create and modify data.
• Bins within a model file organize and hold data in temporary storage.

I-DEAS Data Management Setup 31
Library
A library is used to organize and manage team shared data. Shared data may include parts, assemblies, drawings, and finite element models.
Data sharing is accomplished by the ability to check out, reference, and copy specific versions of shared data items from a library into the user’s model file. Depending on the check out status, the user can modify the item in their model file then check a new version back into the library so it’s available to the team.
Catalog
A catalog is used to store standard parts, features, and materials. Only data that is not likely to change should be placed in a catalog.
Pre-defined catalogs, such as Features, Fasteners, and Materials, are available.
Project structure
The following figure shows the typical structure of projects within a data installation. Note that each project can have any number and combination of containers within it for storing data.
Project BProject A
I-DEAS Data Installation
Standard Parts
Material Data Base
- Catalog
- Library
- Model File or other data file

32
Organizing Projects
Since I-DEAS data management is organized around private user data and team shared data, consider using a combination of “user” projects and “team” projects.
• User projects can be used for early development and ongoing work.
• Team projects can be used to store parts, assemblies, and other files shared by the team in product development and production efforts.
User1_project User2_project User3_project
Team Project1 Team Project 2
User projectsare for early
and ongoingwork
Team projects arefor parts, assemblies,
development
and project files usedby the team inproduction efforts
Following are some examples of how working within user and team projects can be organized:
• User Projects: Everyone works in their own project. There are no team projects or data sharing.
• User and Team Project: Everyone works in their own project until they want to finalize a part, then they move it into the team project.
• User and Many Team Projects: This is the same as the user and team project except there are a number of team projects.
The best data management performance can be achieved by using a combination of user and team projects.
Keep your I-DEAS project sizes reasonable in terms of the number of parts, assemblies, libraries, and other shared data stored in the project. For example, a product with four subassemblies could be organized in a single project. A better solution might be to create four projects, one for each assembly. A fifth project could be used for integrating the assemblies to create the entire product.
Design the I-DEAS project environment to complement the process you use for product development at your site.

I-DEAS Data Management Setup 33
Grouping Projects
Related projects can be organized by adding a group or sub-group name as a prefix to the project name when the project is created. This can be done by separating the group and project names with a period (.), or other delimiter character that’s defined in the I-DEAS parameter file.
• Grouping projects affects only the organization of how projects are displayed on I-DEAS screens and reports.
• The top level project(s) in a project group or sub-group may contain no data and be used only to define the project organization.
Note: The I-DEAS administrator must activate this functionality using the DataMgmt.HierarchySeparator parameter in the I-DEAS parameter file. See the Data Installation Setup section of this chapter for more information on the I-DEAS parameter file.
Configuring Projects
Configuring projects adds a level of security and organization to the development and maintenance of your I-DEAS data. You can use the I-DEAS configure projects capability to create a project structure that represents the product development cycle at your site.
The procedure for configuring projects is provided in the Project Management User’s Guide in the I-DEAS online Help Library. A general description of configured projects is provided here so you can consider use of configured projects at your site.
In a configured project, you can control who has access to the project, their role within the project, and when they have access to specific data as it moves through the product development cycle. When you configure a project, you’ll define the following attribues:
• Members: the people assigned to work in the project.
• Roles: member’s assignment(s) within the project. Designer, analyst, drafter, reviewer, and project manager are all examples of roles.
• States: the stages a product moves through within the product development cycle. Design, analysis, notation, review, and release are all examples of states.
• Item Access: the privileges members have to access items in a particular state. This is managed through role assignments and permissions set for the role and state.

34
Additional characteristics unique to configured projects include:
• Only the user assigned the role of project manager can create libraries and catalogs within the project. This enables strict adherence to the project organization.
• The project manager can control user attributes for the project.
• Directories can be created and assigned for the project.
• Project members can reserve items (part, assembly, etc.) within the project.
• E-mail notification for tracking changes to project data is available.
• The Change Control task within the I-DEAS Management application is available. This provides a change order tracking mechanism like ECR or ECO.
Note: The Notification.Tracking parameter in the I-DEAS parameter file must be set to ON for e-mail notification to work. E-mail notification tracking is OFF by default. See the Data Installation Setup section of this chapter for more information on the I-DEAS parameter file.
The following diagram illustrates the setup of a configured project used to manage access control:
Start designor design change
noComplete?
yes Approve toreleased
state

I-DEAS Data Management Setup 35
Within the I-DEAS software, the form that lists item access on a file as a function of data states and roles might show something like the following:
ROLE
STATE
ALL STATESINITIAL
TEAM MEMBER WORLD MANAGER
RWCDA
RWCDA
RWCDA
RWCDA
RWCDARELEASED R C
As indicated by this diagram, the read (R), write (W), copy (C), delete (D), and approve (A) abilities are assigned based on the individual’s role.
There are many benefits to using configured projects. Their use provides a means of ensuring that design changes follow the proper channels in your organization and that ISO9000 requirements are met. It also presents an opportunity to evaluate your current design process and map your product development strategy to I-DEAS data management.
Before configuring projects, evaluate and diagram the product development cycle, design process, and data life cycle models at your organization. Flow chart diagrams are suitable for this purpose.
During this evaluation, you’ll probably identify some tasks within your cycle as paper (or documentation) only. These tasks do not translate into a configured project state in I-DEAS. A product data management (PDM) system is needed to track and manage paperwork online.
Multiple Data Installations
Another method of organizing I-DEAS data is using multiple data installations. Multiple data installations would be beneficial in the following situations:
• Large sites with hundreds of users and many projects
• Secure environments where projects must be strictly isolated
• Training environments kept separate from the production environment
See the Data Installation Setup section of this chapter for guidelines on how to set up multiple data installations.

36
Sharing Data across Installations I-DEAS library data can be shared across data installations using the Import/Export options available from the I-DEAS File menu. This capability retains associativity between the data items and allows for sharing data across heterogeneous platform types.
Data ManagementInstallation 1
Data ManagementInstallation 2
Data ManagementInstallation 3
Export/Import
Additional information on sharing data between installations is provided in the following articles in the I-DEAS online Help Library:
• Data Sharing Administration in the General I-DEAS Administration guide
• Sharing Library Items with Other I-DEAS Installations in the Project Management User’s Guide
Data Installation Setup This section describes the components and structure of an I-DEAS data installation.
You’ll need this information for setup and maintenance of your data installation environment.
Components of the Data Installation
An I-DEAS data installation is defined by the following files:
• I-DEAS Parameter File
• Installation Metadata File

I-DEAS Data Management Setup 37
• Project Metadata Files
The I-DEAS parameter file controls the configuration of the data installation for an I-DEAS site and provides default data management preferences for the installation.
The installation metadata file is the master database file for the I-DEAS data installation. It includes the following four pieces of information:
• the list of projects in the installation
• the location of the project metadata file associated with each project
• members of each project
• model files in each project
The project metadata files contain a wide range of information on all the items and item relationships associated with each project.
The following graphic shows how these files work together.
Note: The directory locations and filenames shown below are for UNIX.
Team.MasterID=xxxTeam.MasterDirectory= \team\...
\team\master\
z_masterxxx.imd
ProjectA \team\projects\proja.pmdProjectB \team\projects\projb.pmd
projb.pmd
ITEM
Model FileLibraryPart
Test1MFNewPartsPart1
TYPE PARENT ACCESS
NAME PATH
projbprojbTest1MF
zzzyyyxxx
\team\projects\
Team.ProjectsDirectory=\team\...
ParameterFiles
Installation Metadata File
ProjectMetadata
File
\team\master\username_param
\t \ t \id X d t
I-DEAS Parameter File
The I-DEAS parameter file controls the configuration of the data installation.
Following is the default location of the I-DEAS parameter file, by platform:

38
Microsoft Windows
<drive>:\Team\Master\Config\ideas_paramX.dat.
UNIX
$SDRC_INSTL/ideas/.ideas_paramX.
Many parameters are contained in this file, but only a few are directly related to the definition of the data installation. These are referred to as the “team” parameters. The key team parameters include:
• Team.MasterID
• Team.MasterDirectory
• Team.ProjectsDirectory
• Team.ScratchDirectory
• Team.SharedDirectory.
• DataMgmt.UserDirectory
• DataMgmt.ScratchDirectory
The settings for these parameters are defined during I-DEAS installation. You can use the default settings, or customize the settings based on the configuration you design for the I-DEAS data installation at your site. This topic will be expanded upon in the Site Planning Considerations and Installation Guidelines chapters.
I-DEAS Data Management Setup 39
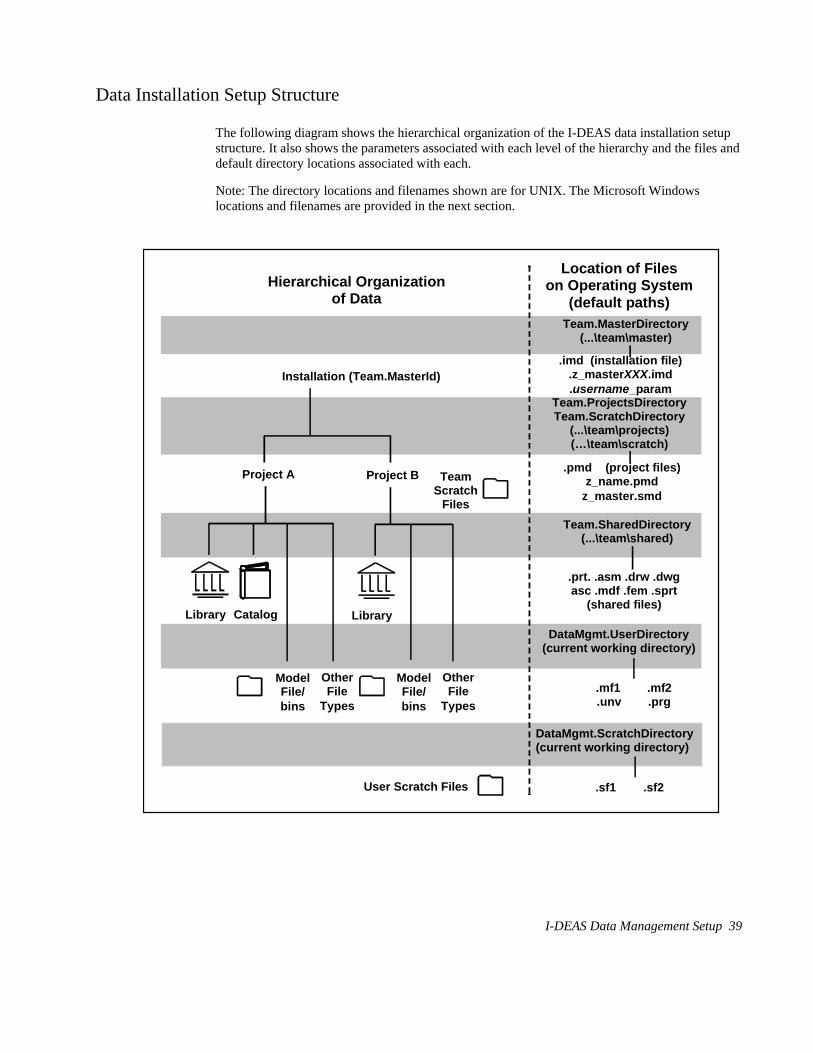
Data Installation Setup Structure
The following diagram shows the hierarchical organization of the I-DEAS data installation setup structure. It also shows the parameters associated with each level of the hierarchy and the files and default directory locations associated with each.
Note: The directory locations and filenames shown are for UNIX. The Microsoft Windows locations and filenames are provided in the next section.
Installation (Team.MasterId)
Project A
Library
ModelFile/bins
Catalog
OtherFile
Types
Project B
Library
ModelFile/bins
OtherFile
Types
Team.ProjectsDirectoryTeam.ScratchDirectory
(...\team\projects)(…\team\scratch)
Team.SharedDirectory(...\team\shared)
DataMgmt.UserDirectory(current working directory)
Hierarchical Organizationof Data
Location of Fileson Operating System
(default paths)
.prt. .asm .drw .dwgasc .mdf .fem .sprt
(shared files)
.sf1 .sf2
.imd (installation file).z_masterXXX.imd.username_param
.pmd (project files)z_name.pmd
z_master.smd
Team.MasterDirectory(...\team\master)
DataMgmt.ScratchDirectory(current working directory)
User Scratch Files
TeamScratch
Files
.mf1 .mf2.unv .prg

40
I-DEAS Parameter Settings
This section describes the key team parameters and their default settings.
Team.MasterId - Master Identifier The Team.MasterId parameter setting identifies a data installation to the resource-locking daemon. It has the following characteristics:
• By default, the installation program sets the Team.MasterId parameter to 0 (zero) and all users access the same data installation.
• This parameter value should not be modified unless there is a need to create multiple data management installations or a single-user data installation.
• A Team.MasterId set to a positive integer or zero indicates a team data installation that can be accessed by many users.
• A Team.MasterId set to a negative integer indicates a single user data installation. (The first person to access the installation using I-DEAS or the dmadmin utility owns it and there is no data sharing.)
• If there is more than one data installation in your I-DEAS environment, each data installation must have a different Team.MasterId. Otherwise, item name collisions and lockout situations can occur.
For guidelines on creating multiple data installations and single-user data installations, see the Multiple Team Data Installations Setup and Single-user Data Installation Setup sections later in this chapter.
Team.MasterDirectory - Installation Metadata File Location The Team.MasterDirectory parameter setting specifies the location of the installation metadata file, z_masterXXX.imd. The XXX in the filename represents the value of the Team.MasterId.
Note: If the Team.MasterId is zero (the default value) the filename is z_master.imd.
For users to access the data installation at all, the installation metadata file (z_master.imd) must exist on a common (server) disk. Following is the default location of this file, by platform:
Microsoft Windows
<drive>:\Team\Master\
UNIX
$SDRC_INSTL/team/master/
Note: The user parameter files are also located in the Team.MasterDirectory location, by default. See the User Parameter Files section for more information on the user parameter files.
Team.ProjectsDirectory - Project Metadata Files Location The Team.ProjectsDirectory specifies the location where project metadata files, z_projname.pmd, are placed when they’re created. There is one .pmd file for every project in the installation.
I-DEAS Data Management Setup 41
For users to share project items, the project metadata files (z_projname.pmd) must exist on a common (server) disk. Following is the default location for these files, by platform:
Microsoft Windows
<drive>:\Team\Scratch\
UNIX
$SDRC_INSTL/team/projects/
Team.ScratchDirectory The Team.ScratchDirectory contains the project shadow files, z_projname.smd. Shadow files are essentially backup copies of the .pmd files.
For data integrity, it’s recommended that you locate the scratch directory on a server, outside the I-DEAS installation path. This directory should be common to all I-DEAS users.
Following is the default location for these files, by platform:
Microsoft Windows
<drive>:\Team\Projects\
UNIX
$SDRC_INSTL/team/scratch/
Team.SharedDirectory - Shared Data Files location The Team.SharedDirectory specifies where new library items are created. It contains the items that are checked into libraries and catalogs. There is a file for every version of the item created. Shared files include library and catalog parts, assemblies, drawings, and finite element models.
For users to share library and catalog data, the shared directory must be located on a common (server) disk.
42
Following is the default location of these files, by platform:
Microsoft Windows
<drive>:\Team\Shared\
UNIX
$SDRC_INSTL/team/shared /
The administrator should monitor the growth of shared data. If you run low on disk space in your shared directory, change this parameter value to another location. Any new library or catalog items will be created in the new location. Any existing library and catalog items can remain in their original location, which is tracked by the project metadata, .pmd file.
See the Data Installation Maintenance article in the General I-DEAS Administration section of the I-DEAS Help Library for more information on moving I-DEAS data locations.
DataMgmt.UserDirectory - User Data Files Location The DataMgmt.UserDirectory contains the non-shared user files including model files and interface files.
Model files are stored as a set, mfname.mf1 and mfname.mf2.
Interface files include universal files, IGES files, and program files, among others.
The default location is the I-DEAS startup directory. The user files location can be modified using the I-DEAS Options, Preferences, Data Management command. The location defined using this method is stored in the user’s parameter file. See the User Parameter Files section for more information on the user parameter files.
It’s recommended that these files reside on a local directory, but never in a temporary directory such as the /tmp directory on UNIX.
DataMgmt.ScratchDirectory The DataMgmt.ScratchDirectory contains the temporary files created by I-DEAS. These include the model file shadow files, *.sf1, *.sf2 and I-DEAS run-time files, *.app, and *.dsp.
The default location is the I-DEAS startup directory. The location can be modified using the I-DEAS Options, Preferences, Data Management command.
The model file shadow files are important for data recovery. If you suffer a system crash, restart I-DEAS on the same machine using the same project, model file, and scratch directory as when the crash occurred. Recovery should be automatic and without problems. Don’t remove the shadow files until after the model file recovery.
It’s recommended that these files reside on a local directory, but never in a temporary directory such as the /tmp directory on UNIX.

I-DEAS Data Management Setup 43
User Parameter Files
User parameter files are created automatically for each user the first time they run I-DEAS.
User parameter files are located in the directory defined by the Team.MasterDirectory parameter in the I-DEAS site parameter file.
Following is the default location and filename for the user parameter files, by platform:
Microsoft Windows
<drive>:\Team\Master\username_param
UNIX
$SDRC_INSTL/team/master/.username_param
A subset of the parameters in the I-DEAS site parameter file are valid in the user parameter file.
The I-DEAS site parameter file is read by I-DEAS first, then the user parameter file is read. Settings in the user parameter file take precedence over the settings in the site parameter file, for that user.
The user parameter file is also referred to as the user preferences file because the parameters are set using the Options, Preferences pick inside I-DEAS. Manual editing of the user preferences file is not recommended.

44
Team Parameters Table
The following table shows the key team parameters and their default settings:
Parameter Default Purpose
Team.MasterID 0 Sets unique ID for a data installation.
Team.MasterDirectory \team\master\ Defines location of the installation .imd file.
Team.ProjectsDirectory \team\projects\ Defines location of the project .pmd files.
Team.SharedDirectory \team\shared\ Defines location of the shared (library) files.
Team.ScratchDirectory Team.ProjectsDirectory (always on team server)
Defines location of the .smd project shadow files. Recommend setting the location to \team\scratch.
Team.MasterName None Defines a name for the data installation.
Team.HierarchySeparator None Defines project hierarchy separator symbol.
Team.TransactionRetries 30 Defines number of tries to access database.
Team.ExportPrivilege General User Controls ability to export library items.
Team.ImportPrivilege General User Controls ability to import library items.
Team.AdoptDirectPrivilege General User Controls ability to adopt items.
DataMgmt.UserDirectory Present working directory
Defines where user files are written.
DataMgmt.ScratchDirectory Present working directory
Defines location of user scratch files. (Should be on a local disk.)

I-DEAS Data Management Setup 45
Multiple Team Data Installations Setup An I-DEAS installation environment with multiple team data installations includes a separate I-DEAS parameter file for each team data installation. The location of the parameter file associated with the team data installation a user is assigned to work in is specified by a user environment variable, IDEAS_PARAMX.
The administration tasks involved in creating and maintaining multiple data management installations include:
♦ assigning and managing team data locations
♦ assigning and managing the Team Master ID values
♦ defining the data installation users’ IDEAS_PARAMX environment variable
When a team data management installation is created using the I-DEAS installation setup program, the I-DEAS parameter file is created under the Team.MasterDirectory location being created.
At startup, I-DEAS accesses the parameter file in the location defined by the user’s IDEAS_PARAMX environment variable. If the variable does not exist for a user, I-DEAS accesses the parameter file defined in the SDRC_INSTL\bin\setup_varbs.cmd file.
If a parameter setting in the I-DEAS parameter file is changed for a site with multiple data installations, you’ll need to change the parameter setting in the I-DEAS parameter file for each data installation.
See the I-DEAS Help Library for information on how to share data between team data installations using I-DEAS data sharing.

46
Single-User Data Installation Setup Use the following procedure to create a completely isolated single-user data installation:
1. Define the data installation setup.
2. Set the Team.MasterID parameter in the installation’s I-DEAS parameter file to a unique NEGATIVE integer.
3. Set the user’s definition of the IDEAS_PARAMX environment variable to point to the parameter file for the data installation.
As soon as the user accesses the data installation (based on the user’s definition of the IDEAS_PARAMX environment variable), the installation is owned by that user alone. The installation is accessible only to the first user to access it, for the life of the installation.

I-DEAS Data Management Setup 47
Manually Configure a Team Data Installation After the installation process is complete, use the following guidelines as a checklist of the tasks necessary to manually configure a team data installation:
1. Create the team directories on a fixed disk, local to the server machine:
• Team.MasterDirectory
• Team.ProjectsDirectory
• Team.SharedDirectory.
2 Edit the I-DEAS parameter file to:
♦ Specify the team directories defined in task 1.
♦ Enter a unique Team.MasterId for the data installation.
♦ Customize any other parameter settings.
3 Edit the %SDRC_INSTL%\bin\setup_varbs.cmd (Microsoft Windows) or the $SDRC_INSTL/bin/setup_varbs (UNIX) file to:
♦ Specify the path to the I-DEAS parameter file in the IDEAS_PARAMX environment variable setting.
4 Use the dmadmin utility, or start I-DEAS, to create the team data installation database.
See the previous sections of this chapter for information on the team directories, Team.MasterId, and parameter file settings.

48

Chapter 5
49
Site Planning Considerations Additional site planning considerations you need to be aware of when designing your I-DEAS installation configuration are presented in this chapter. The considerations include:
• Disk space requirements
• Backup strategy
• File security
• License system
• Resource locking

50
Disk Space Requirements The amount of disk space you’ll need for the I-DEAS installation will depend on the software products (licensed and optional) you load and the amount of shared data your site will generate over time.
A typical installation of the software requires approximately 1.5 gigabytes.
If you expect rapid growth in team shared data (as is typical), locate the team data installation on a disk with room for data growth.
Data storage savings and data management performance increases can be realized if you purge obsolete versions of parts and assemblies as they are updated. Use the Purge option on the Manage Libraries form to purge obsolete versions of parts and assemblies. This is an important guideline to establish for I-DEAS users.
Backup Strategy The associativity inherent to concurrent engineering becomes a challenge when backup, archive and restore requirements are considered.
Whenever restoration of data from backup is required, the retention of data associativity requires that the data be restored at the project or even installation level.
• Associativity of items within a project may be lost if less than the entire project is restored.
• Associativity between projects can be lost if less than the entire installation is restored.
• The only way to ensure maintenance of associativity between projects is to restore the entire data installation.
With this in mind, plan each I-DEAS data installation so its size never exceeds your backup capabilities.
Site Planning Considerations 51
Backup Schedule
Back up the following team directories at least once daily:
• Team.ProjectsDirectory
• Team.MasterDirectory
• Team.SharedDirectory
• Team.ScratchDirectory
• Explicitly assigned library, catalog, and project directory locations
Back up user data at least once daily.
• Locate user directories in a central, or consistent location to facilitate easier backup and restoration through an automated process.
Back up assemblies or subassemblies when completed.
• You can archive completed assemblies or subassemblies as they’re completed using the I-DEAS File, Export capability. This can be useful for grouping all parts and drawings related to an assembly or subassembly in one file, referred to as a library “package” file. The package file can be archived for future use.
For additional information on using I-DEAS File, Export capability, see the Export (I-DEAS Library Data) article in the Data Management guide in I-DEAS online help.
For additional information on backing up I-DEAS data, see the Data Installation Maintenance article in the General I-DEAS Administration guide in I-DEAS online help.

52
File Security As you consider the file security setup at your site, keep in mind that your file security system is only as good as its weakest link. Good security begins with users having secret, hard-to-guess passwords that are not shared with other users.
I-DEAS software is installed using an I-DEAS administrator account (usually ideasadm) and is therefore owned by the administrator.
The security of I-DEAS data files is governed by the Secured File Access Model (SFAM) level you set during installation, using the I-DEAS installation software.
Use the information in this section to determine the SFAM level to set for your site.
SFAM Levels
There are three levels of SFAM security. All three levels are available for UNIX. Only levels one and two are available for Microsoft Windows.
Level 1
This option, the most open at the operating system level, gives users the greatest control of their own data.
Level 1 is the default setting for I-DEAS on Microsoft Windows and is also available on UNIX.
With level 1, the team directories are owned by the I-DEAS administrator. Shared files are created with read and write access for all user, group, and world accounts. This means the shared files can be deleted at the operating system level, by any user.
Non-shared user and scratch data is created with each user’s default permission mask (umask) for writing files. This enables each user to determine access permissions to their private files.
Level 2
This level increases the security of I-DEAS shared data, protecting it from being overwritten or deleted at the operating system level.
Level 2 is the default setting for I-DEAS on UNIX. SFAM level 2 is available on Microsoft Windows only in a heterogeneous team (HT) environment. See the Site Planning for Heterogeneous Team and Heterogeneous Team Setup chapters of this guide for more information on HT.
With level 2, the team directories and shared files are owned by the I-DEAS administrator. Individual users can’t access these files from the operating system. They can, of course, still access the shared files using I-DEAS.
As with level 1, non-shared user and scratch data is created with each user’s default permission mask (umask) for writing files. This enables each user to determine access permissions to their private files.

Site Planning Considerations 53
Level 3
This option provides the highest level of security by protecting I-DEAS team files and user files from being overwritten or deleted at the operating system level.
Level 3 is available on UNIX only.
This option is designed for companies that need to ensure the security access of I-DEAS user data at the operating system. As with any high security system, this model requires additional monitoring and support by the I-DEAS administrator.
With level 3, the I-DEAS administrator owns the team shared, team scratch, and user files and directories. Individual users can’t access these files from the operating system. They can, of course, still access the team shared files and their own user files using I-DEAS.
Interface files, user scratch files, and runtime files are created with each user’s default permission mask (umask) for writing files.
SFAM Guidelines
Use the following guidelines to determine which of the SFAM levels to set up during I-DEAS installation at your site:
• Use level 1 if your site has only a few users and your security and data sharing needs are minimal, or if your users must have control over all files they create.
• Use level 2 if you want to secure shared files at the operating system level but still allow users operating system privileges on non-shared user and scratch files.
• Use level 3 only if your site has very high security requirements and you and your users are willing to work with severely restricted file access permissions.
Note: It is possible to change the SFAM level for your site after installation. As users create more and more data, however, the challenge of changing the directory and file permissions to the new level increases.

54
License System This section provides background and critical information on the license system and license server configuration for I-DEAS software licensing and data management resource locking.
How the License System Works
The I-DEAS software uses the Flexible License Manager (NX FLEXlm) for license management. DFLEXLM is used for resource locking.
The license system uses two daemons (executables) and a license data file to control access to applications and to enforce data management resource locking.
• The license manager daemon, lmgrd, communicates with the vendor daemon. It starts and restarts the vendor daemon and manages the number of I-DEAS users.
• The vendor daemon, uglmd, communicates with I-DEAS software applications and issues license requests to the license manager daemon.
• The license data file, ugnxX.lic, is generated by the I-DEAS installation software. This file contains licensing data and the location of the vendor daemon.
The license system supports resource locking through application operation calls to the vendor daemon to place locks on the data installation (.imd) and project (.pmd) metadata files.
License Server Setup
Use the installation program for intial setup of the license server. See the Installation Guidelines chapter for the setup process and the I-DEAS Installation Guides for detailed instructions.
License Server Recommendations
For sites with one data installation in their I-DEAS configuration, a single server machine used as the license and team data server is probably sufficient.
For sites with multiple data installations and a large number of I-DEAS users, performance may be improved by dedicating a server machine as the license server.
License System Setup Constraints
Consider the following license system constraints when designing your I-DEAS installation configuration:
• Only one copy of the vendor daemon can be run on a workstation at a time.
Therefore, don’t run multiple versions of I-DEAS on one machine.
• A single data installation must never be accessed by more than one license daemon or data corruption will eventually occur.

Site Planning Considerations 55
Therefore, avoid installing the license management system on more than one machine in a distributed I-DEAS configuration.
Distributed Resource Locking Option
Distributed resource locking (DFLEXlm) is the only resource locking type available in NX I-DEAS 5. Unlike previous releases, NX I-DEAS 5 no longer requires the Special Daemon Configuration product for WAN licensing.
WARNING: All workstations in an installation must use DFLEXlm. Combining resource locking types in an installation can cause extensive, sometimes unrecoverable, data corruption
Distributed Resource Locking Setup
Distributed resource locking is set up automatically when you install I-DEAS, or you can set it up manually after NX I-DEAS 5 is installed.
See the I-DEAS Installation Guide for your platform type for instructions on how to use the I-DEAS installation software to set up distributed resource locking.
There are also manual procedures for setting up distributed resource locking. See the Setup for DFLEXlm Resource Locking article in the General I-DEAS Administration book in the I-DEAS online Help Library for instructions.

56

Chapter 6
57
Designing the Installation Configuration In the previous chapters, you’ve learned about the basic components of an I-DEAS configuration including alternative hardware configurations and data installation setup options.
With that background, and the considerations presented in the previous chapter, you can begin to design the I-DEAS installation configuration for your site.

58
Design Considerations When designing your I-DEAS installation configuration, you need to consider both the hardware configuration and the data installation setup.
Considerations for data installation setup include ease of administration, data sharing requirements, disk space requirements, and backup strategy.
Considerations for hardware configuration include ease of administration, system requirements, performance, and costs.
• A system that’s configured for ease of administration is efficient to install and maintain.
• Your hardware configuration must meet the system requirements for I-DEAS.
• To achieve the best I-DEAS performance, you may need to exceed the minimum system requirements and make some tradeoffs between ease of I-DEAS administration and performance.
• There are hardware costs associated with achieving the best possible software performance. You may need to sacrifice performance to stay within your hardware budget.
With this in mind, use the guidelines in this chapter as an aid to designing the optimum I-DEAS installation configuration for your site.

Designing the Installation Configuration 59
Installation Recommendations The overall installation consists of the following interrelated parts:
• Operating system environment
• I-DEAS software installation
• I-DEAS license manager service
• I-DEAS data management installation
Operating System Environment
The operating system environment considerations include:
• disk availability
Is there enough disk space on each of the client workstations to store I-DEAS software and user data?
• shared disk availability
Which of your disks will you use to house the team data installation(s) and the online Help Library?
• network capabilities and traffic
How much intranet/Internet traffic does your site experience?
Can your network support the kind of file I/O resulting from I-DEAS team data (and possibly software) being installed on a remote server?
• user account setup
Do users have home directories identified? Are user and group accounts consistent across the distributed configuration?
Recommendations
1. Set up your networks with physical segments that have no more than 7–10 nodes per segment.
2. Create the team directories for your data installation on a stable, high-quality storage device(s) with lots of room to grow.
3. Optimize and monitor your network.
Consider installing the I-DEAS applications software and online Help Library locally. Monitor collision rates and network utilization.

60
I-DEAS Software Installation
The software installation considerations include:
• location of the I-DEAS software executable files
Local installation versus remote server-based installation for I-DEAS application code
• Online Help Library location
Options include all on CD, all on remote server disk, or all on local disk.
Recommendations
1. Install the I-DEAS software executables locally, if possible.
Running I-DEAS software over a network will increase network activity and slow the software performance.
2. Install the I-DEAS online Help Library databases at the same location you install I-DEAS software.
3. Use consistent drive letter and path name conventions for the I-DEAS software installation on each client.
I-DEAS License Manager Service
The issue here is: in a distributed installation configuration, which workstation will be used to serve the I-DEAS licenses?
Recommendations
Following are the recommendations for license server installation setup:
• In a standard distributed installation, install the license manager service on the same machine that has your team directory structure on it (single point of failure, rather than two points of failure).
• In a large distributed installation (more than 50 users), dedicate a single, stable workstation as the license server. A separate workstation can be used to serve team data.
• Install the license manager service on the server’s local, fixed (non-mapped/non-mounted) drive.

Designing the Installation Configuration 61
Team Data Installations
The team data installation considerations include:
• need for simultaneous access to (contention for) installation and project metadata files
• ease of backup and restoration
• length of drive and directory path
Recommendations
Following are the recommendations for team data installation setup:
• Plan and manage your installations so that they stay within the bounds of your computing environment’s ability to function efficiently.
• Use consistent team drive mappings across clients running I-DEAS.
• Use a concise directory path for the team data location.
The entire pathname to an I-DEAS item, including the item name, must not exceed 80 characters.
• Don’t locate the team data installation on a boot drive.
Data Management Setup It’s recommended that you sketch a diagram to illustrate the current flow and organization of product development engineering data at your site. First, you’ll need to do some background work. This could take some time, but it’s critical to a successful implementation of I-DEAS data management at your site.
Data Flow Evaluation
To begin your evaluation of the product development data flow at your site, research the following:
• the names, locations, and file access privileges of the directories used for your engineering data
• the method used to distinguish between versions of parts and drawings
• the management method used to control the release cycle
• the types of data files you exchange (drawing files, universal files, etc.)
• what prompts the movement of a file or prompts one user to access another user’s file
• how you find out who has the latest data
62
• how people get updated data
• what problems occur in the current system of data exchange
Data Flow Diagram
Create a diagram to illustrate the current flow of data at your site.
Somewhere on the diagram, note the following data gathered during your research:
• the names, locations, and file access privileges of the directories used for your engineering data
• the method used to distinguish between versions of parts and drawings
• the method used to control the release cycle
Make the diagram as complete and clean as possible. You’ll be adding to it after you complete the data organization evaluation. The following example may be helpful.
Following is an example of how you might illustrate your current data flow practice:
\initial \pre-release \release
Serverdisks/directories
user
shared disks
workstations
directories

Designing the Installation Configuration 63
Data Management Practices
To further clarify the data flow, write a textual description of the data management practices within the data flow. Append this description to the data flow diagram. Following are the types of practices you’ll want to document:
• users work in local directories on a local disk
• as work becomes “official” quality, it is moved to a shared disk
• files move from user-owned directories to manager-owned directories with access permissions appropriate to your process
• movement to shared disk is accompanied by a sign-off procedure based on paper drawings
• version and change management depend on a rule-based naming scheme
Include as much detail as possible in the description of data management practices. Specify disk letters, directory paths, and references to other detailed documentation that may already exist for your formal data management practices.
Data Organization
Data organization is the logical model that represents how people share data at your site.
Review your data flow diagram and data management practices description. Begin to develop an organization for your product development work and data, in terms of I-DEAS data management projects, libraries, and catalogs.
For example, you may already have distinctions between what is “shared” data (company-wide, project-wide, or team data) versus what is “private” user data. You may have a commonly accessible server disk with separate directories for preliminary work, work out for review, and final (released) work. Or you may have a policy of giving copies of design data to others only on an “as-needed” basis.
Consider the following:
• how people share data files that comprise distinct project deliverables (models, drawings, etc.)
• where that data resides on your system and how long it’s likely to be there
• how people share reusable data such as standard parts and features
Update your data flow diagram and data management practices with information pertinent to the design of your data organization.

64
Project Planning
The goal here is to map your current project structure into I-DEAS projects, libraries, and catalogs.
The following graphic shows one possible project scenario for a product consisting of a few simple subassemblies:
Other FilesLibraries
Project Libraries (parts, etc.)
product_xyz subassembly_x
subassembly_y
subassembly_z
Shared Disks
...\team\projects
\projects\product_xyz
In the preceding example, libraries are used to contain all the parts of the various subassemblies. Alternatively, each subassembly could be a project, with yet another project created to assemble the whole product. Catalog parts are stored in a separate, “neutral” project.
Create a diagram or flowchart showing the ways you might set up projects for your site. Consider the following:
• What projects you’ll need to get started. By default, user projects are created as users begin working in I-DEAS. Determine the team projects you’ll need to create for product development.
• What libraries and catalogs will you create to support the product development within the project?
• Do you want to create configured projects to define the data flow for the product development cycle within projects?

Designing the Installation Configuration 65
Define Your Installation Configuration You’re now prepared to design the I-DEAS installation configuration for your site. Create a diagram or flowchart of your installation configuration.
Include the following on the diagram:
• location of I-DEAS license manager service
• location of team data management installations
• location of I-DEAS online Help Library files
• number of users per team data installation
• location of workstations where users will run I-DEAS
Distributed Configuration Setup Guidelines
Use the following checklist when defining the setup of a distributed installation configuration:
• The I-DEAS license manager service must be installed on the server’s local, fixed (non-mapped/non-mounted) drive.
This ensures that the license manager is available for automatic startup when the system is booted.
• I-DEAS software should be installed on a local disk to ensure optimum performance of the I-DEAS applications software.
Note: If you do plan to run I-DEAS software from a server, be sure your network can handle the increased traffic.
• Use consistent drive letter and path name conventions for the I-DEAS software installation on each client.
This is recommended for easier system administration, but is not required.
• Use a consistent team drive letter across clients running I-DEAS.
This is required for team data sharing.
• Don’t locate the team data installation on a boot drive.
It’s undesirable to share a boot drive because the amount of disk I/O caused by data reads and writes can:
• degrade the performance of the OS
• fragment the OS drive
• degrade the speed of I-DEAS data read/write activity.
• Map or mount the appropriate drive letter from the clients to the server machine prior to running the I-DEAS installation software to set up your I-DEAS installation configuration.

66
This is necessary for both team and software (code) servers.
Label the configuration diagram with the pertinent information you’ve defined from the checklist.
Implementation Guidelines
Review the next chapter, Installation Guidelines, to determine the appropriate process for implementing the configuration using the I-DEAS installation software.
Label each workstation in the configuration diagram with the appropriate installation setup type (for Microsoft Windows) or the installation option (for UNIX) to use on that workstation during setup. Using this method, you can develop a process for efficient implementation of the I-DEAS installation configuration you’ve designed.
Following is an example diagram for a standard I-DEAS installation configuration in a Microsoft Windows operating system environment:
Server
localdisk
serverdisk
user data
I-DEAS
A
I-DEAS Help Library
B
license manager service
Client Workstation Client Workstation
Workstation
LicenseServer
and TeamSetup Type
Team Data Installation (5 users)
localdisk
Software Installation OnlySetup Type
Software Installation OnlySetup Type
user data
I-DEASsoftware
software

Chapter 7
67
Site Planning for Heterogeneous Team Heterogeneous team (HT) allows I-DEAS users on binary incompatible platforms, Microsoft Windows and UNIX, to work in a single team data installation and share I-DEAS library items. In previous releases of I-DEAS, users on heterogeneous platforms had to work in separate team data installations and share library data using the File, Import/Export, Library Data functionality.
In addition to the ability to share library data between heterogeneous platforms, companies may choose to use HT to:
• take advantage of the increased level of I-DEAS data security that HT makes available on Microsoft Windows
• facilitate the implementation of a corporate strategy to migrate from one platform type to another
Along with the benefits of HT, there are some costs. Your company will need to perform a cost and benefits analysis to evaluate whether to implement HT.
Use the information in this chapter to help determine whether implementation of HT at your company is appropriate and, once decided, to design the optimum heterogeneous team configuration for your site.

68
Heterogeneous Team Considerations Heterogeneous team (HT) provides a transparent method of sharing I-DEAS data between users on heterogeneous platforms in a single team data installation. Along with the flexibility introduced by heterogeneous team, there are some costs, including:
• Performance degradation during access of non-native shared data
• Increased complexity of I-DEAS data management
• Increased complexity of I-DEAS setup and administration
Performance Degradation
The HT capability allows I-DEAS users on Microsoft Windows and UNIX hardware platforms to work in a single team data installation and share I-DEAS library items.
A data format conversion occurs when non-native data items are retrieved from a library. This data conversion is transparent to the user but does increase the time it takes to retrieve a library item to the user's model file.
Site planning for HT should include an analysis of the hardware configuration and data sharing strategies that could be used to reduce the amount of data conversion that occurs in your HT environment overall.
See the HT articles in the I-DEAS Help Library and the Designing the Heterogeneous Team Environment section of this chapter for a description of some of these strategies.
Complexity of Data Management
Use of HT introduces an additional level of complexity to I-DEAS data management for I-DEAS users and administrators. The level of complexity increases because not all I-DEAS data can be used heterogeneously. Users and administrators must maintain, and synchronize across platforms, duplicate versions of the non-heterogeneous data used in their HT environment.
Site planning for HT should include developing guidelines to use for maintaining synchronization of non-heterogeneous data and files.
See the HT articles in the I-DEAS Help Library for guidelines on synchronization of non-heterogeneous data and files.

Site Planning for Heterogeneous Team 69
Complexity of I-DEAS Setup and Administration
In an HT environment, an I-DEAS team data installation is distributed across multiple platforms and workstations. Connectivity between the Microsoft Windows and UNIX platforms must be established and maintained. This introduces additional complexity to the setup and administration of the I-DEAS installation.
Due to this complexity, only experienced UNIX and Microsoft Windows system administrators can be expected to set up and administer HT successfully.
See the remainder of this guide and the HT Administration article for more information on setup and administration of HT.

70
Heterogeneous Team Site Planning Strategy Site planning is very important when implementing a heterogeneous team (HT) environment. The recommended strategy for HT site planning is the following:
1. Determine whether there's a business requirement for implementing HT.
2. Assign a team to evaluate the feasibility of implementing HT. The evaluation team should include I-DEAS administrators, project managers, and end users.
3. Learn about the HT capabilities and setup requirements. To do this, the evaluation team members should review this chapter and the Heterogeneous Team Setup chapter in this guide.
Note: For additional information on HT, see the following articles in the I-DEAS online Help Library:
• Data Management for Heterogeneous Team
• Project Management for Heterogeneous Team
• Heterogeneous Team Administration
4. Perform a cost/benefits analysis to determine whether to implement HT.
5. If you decide to implement HT at your company, design the optimum HT environment for your site.
See the Designing the Heterogeneous Team Environment section in this chapter for guidelines on how to design the optimum HT environment for your site.

Site Planning for Heterogeneous Team 71
Heterogeneous Team - Business Solutions Your company can increase data security, facilitate their hardware migration strategy, and enhance interoperability between workgroups using HT. The following diagrams show example HT configurations to implement these business solutions.
Increase Data Security on Microsoft Windows
The following HT configuration can be used to increase the security of I-DEAS shared data created using Microsoft Windows. Implementing HT enables use of SFAM 2 (Secured File Access Model, level 2). This level of security protects team directories and files from being overwritten at the operating system.
UNIX HT Server
Windows Client Windows Client
Windows Client Windows Client

72
Facilitate Implementation of Hardware Migration Strategy
The following example shows an HT configuration used to facilitate the implementation of a corporate hardware migration strategy. This example shows the first two phases in a strategy to migrate from UNIX to Microsoft Windows workstations.
UNIX HT Server
Phase 1
Drafting TeamWindows
Windows Client Windows Client
Windows Client Windows Client
Design Team UNIX
UNIX Client UNIX Client
UNIX Client UNIX Client
AnalystUNIX
UNIX HT Server
Phase 2
AnalystUNIX
Design Team Windows
Windows Client Windows Client
Windows Client Windows Client
Drafting TeamWindows
Windows Client Windows Client
Windows Client Windows Client

Site Planning for Heterogeneous Team 73
Enhance Interoperability across Workgroups
The following example shows how the implementation of HT can enhance the efficiency of interoperability across workgroups:
UNIX ServerHT Installation
Drafting GroupWindows
& UNIX
Windows Client Windows Client
Design GroupWindows
& UNIX
Windows Client Windows Client
Windows Team Server Installation A
Drafting GroupWindows
Windows Client Windows Client
Windows Client Windows Client
Design GroupWindows
Windows Client Windows Client
Windows Client Windows Client
UNIX Team Server Installation B
File Import/Export (HDS)
UNIX Client UNIX Client
UNIX Client UNIX Client
Design GroupUNIX
UNIX Client UNIX Client
UNIX Client UNIX Client
Drafting Group UNIX
UNIX Client UNIX Client
UNIX Client UNIX Client
Before HT After HT

74
Heterogeneous Team - Standard Configuration The HT environment consists of the following major components:
• License and team server (The team server must be a UNIX machine. If the license server is a separate machine, it may be either UNIX or Microsoft Windows.)
• UNIX file (code) server(s)
• Microsoft Windows client workstations
• UNIX client workstations
These components are combined to create the standard HT configuration.
Standard HT Configuration
The following diagram illustrates the standard HT configuration.
In a very large distributed configuration (50 users or more running I-DEAS) it's best to dedicate a single, stable machine as the license server. An additional server would be dedicated as the team server. The team server must be a UNIX machine.
local disk
user data
Standard HT Configuration
local disk UNIX/Windows Connectivity Solution
Client Workstation A Windows
User Files
I-DEAS Software Set:
— I-DEAS Code— I-DEAS Online Help
I-DEAS License &RL Service
Team Directories
Shared Files
Global Parameter File(Windows version)MPM File
License & Team Server (UNIX)
UNIX File Server
I-DEAS Software Code I-DEAS Online Help Global Parameter File (UNIX version)
Client Workstation BUNIX
Domain account accessible by all workstations
.

Site Planning for Heterogeneous Team 75
Heterogeneous Team - Setup Requirements There are specific setup requirements for each of the major components in a standard HT configuration. These requirements are described in this section.
Note: The parameter settings in the multiple versions of the global parameter files must be synchronized to implement HT and enable data sharing in the HT environment.
See the Heterogeneous Team Setup chapter in this guide and the HT Administration article in the I-DEAS online Help Library for specific parameter setting requirements for HT.
Team Server Setup
In an HT environment, the team directories and shared data must reside on a UNIX team server. The directories and files required for the HT data installation setup structure are shown below:
../team/master/
../team/master/config/ideas_param13.dat
(Microsoft Windows global parameter file)
../team/master/mpm#.dat (file created by UNIX install)
(HT mount point mapping file. This file must exist before HT is set up on the Microsoft Windows clients.)
../team/projects
../team/shared
../team/scratch
Two components within the team server setup are unique to HT, the mount point mapping file (mpm#.dat) and the Microsoft Windows global parameter file, located on the UNIX team server.

76
Mount Point Mapping File
The mount point mapping (MPM) file is used to map the team directories on the team server (UNIX) to the associated Microsoft Windows drive letter(s). A common drive letter must be used across all Microsoft Windows workstations per UNIX team directory.
As a part of HT site planning, the I-DEAS administrator for HT must define the team directory structure and the common Microsoft Windows drive letters to use for HT.
See the Heterogeneous Team Setup chapter in this guide and the HT Administration article in the I-DEAS Help Library for information on the format of the MPM file.
Microsoft Windows Global Parameter File
The Microsoft Windows global parameter file, ideas_param13.dat, must be located on the team server in the …/team/master/config/ directory. The IDEAS_PARAM13 environment variable should be defined to point to this file.
The IDEAS_PARAM13 environment variable should be defined in the custom_varbs.cmd file located in the %SDRC_INSTL%\bin directory, on the Microsoft Windows client workstation. This is a customer-created file.
UNIX File (Code) Server Setup
A UNIX file (code) server must be set up for each UNIX platform type within the HT environment. The components of the UNIX code server setup are shown below:
../usg/ideas13/*
../usg/ideas13/ideas/.ideas_param13
(UNIX global parameter file)
../ugs/ideas13/bin/ideascust.sh (customer-created file)
IDEAS_PARAM13 environment variable should be set in the $SDRC_INSTL/bin/ideascust.sh file to point to the directory in which the UNIX global parameter file resides.
The UNIX global parameter file for HT is located on the UNIX code server.

Site Planning for Heterogeneous Team 77
UNIX Global Parameter File
Internationally, the UNIX operating system is not 100% compatible between UNIX platforms. Therefore, a platform-specific version of the global I-DEAS parameter file should exist on each UNIX code server. To differentiate between the I-DEAS installations for each UNIX platform type, include the platform name in the I-DEAS installation upper level directory. This can be specified during installation of I-DEAS. You might use the following path name for the Sun UNIX platform type, for example:
…/ugs/Sun/ideas13/
The UNIX global parameter file, .ideas_param13, should be located in a directory on the UNIX code server. The IDEAS_PARAM13 environment variable must be defined to point to the directory where the parameter file resides.
The IDEAS_PARAM13 environment variable should be defined in the ideascust.sh file located in the $SDRC_INSTL/bin directory, on the UNIX code server. This is a customer-created file.
Microsoft Windows Client Setup
I-DEAS software must be local to each Microsoft Windows client. The components of the Microsoft Windows client setup are shown below:
..\UGS\I-DEAS13\*
..\UGS\I-DEAS13\bin\custom_varbs.cmd (customer-created)
I-DEAS_PARAM13 environment variable should be set in %SDRC_INSTL%\bin\ custom_varbs.cmd file to point to the directory where the Microsoft Windows global parameter file resides on the team server.

78
SFAM Level 2 for HT
To enable security for SFAM Level 2, each Windows client must also be configured with component-based SFAM and a UNIX to Microsoft Windows connectivity solution.
A benefit of component-based SFAM is that it allows more than one I-DEAS executable to operate at the same time on a Windows machine, for example, you can run I-DEAS and dmadmin at the same time.
Note: In NX I-DEAS 5, SFAM Level 2 uses only component-based SFAM. In I-DEAS 11, SFAM Level 2 used either component-based SFAM or a dedicated Windows service. However, the service-based SFAM is no longer available in NX I-DEAS 5.
See the Heterogeneous Team Setup chapter for specific instructions on how to configure Microsoft Windows clients for HT.
UNIX to Microsoft Windows Connectivity Solution
A UNIX to Microsoft Windows connectivity solution allows file sharing between heterogeneous platform types, enabling HT data sharing. A connectivity solution is not provided with I-DEAS.
As a part of HT site planning, you must select a connectivity solution for use in your HT environment. The solution must provide connectivity while maintaining I-DEAS data integrity. Several solutions have been validated for use with I-DEAS.
See the appendixes in this guide for information on the connectivity solutions validated for I-DEAS, including how to install and configure them for HT.
For information on additional connectivity solutions that may have been validated since this writing, see the Global Technical Access (GTAC) web site at http://support.ugs.com.
WARNING: Contact GTAC before attempting to use any connectivity solution that's not listed as validated for I-DEAS. Some connectivity solutions failed to meet the validation criteria. Use of those solutions could result in extensive corruption of I-DEAS data.
UNIX Client Setup
The UNIX client setup is simple. I-DEAS software is mounted remotely from the UNIX file (code) server to the UNIX client, and user data resides locally on the client.

Site Planning for Heterogeneous Team 79
Designing the Heterogeneous Team Environment Once you decide to implement HT, work with the HT evaluation team to design your HT environment.
The actual configuration of a heterogeneous team environment will vary from site to site. Factors such as number of users, workflow, available hardware, and system performance requirements will help you determine the optimum configuration for your site.
When designing your HT environment, organize your configuration according to workflow, workgroups within that flow, and team data sharing requirements within and across workgroups.
Use the following process to design your HT environment:
1. Develop a process map. The process map illustrates the product development cycle within your organization or workgroup, and the workflow within that cycle.
2. Expand the process map to illustrate the data sharing points within the product development cycle and the frequency of the data sharing at each point of data interaction.
3. Using the process map as an aid, the HT information provided in this guide, and the I-DEAS Help Library, design the hardware configuration and data sharing strategies for your HT environment.
4. Once you've designed your HT environment, define the components to use during setup of your HT environment.
The remaining sections of this chapter provide further explanation of this design process.

80
Develop a Process Map of your Product Development Cycle
In the first phase of the design process, analyze the product development cycle and create a workflow diagram. A workflow diagram shows the stages of the product development cycle, the workgroups within that cycle, and the data flow within and across workgroups. Following is an example of a workflow diagram.
Process Map, Phase 1 - Product Development Cycle, Workflow Diagram
Part Design
Part Design
Part Design
Suppliers
Post Processing
Manufacturing
Engine
Assembly
Design
Drafting Assembly
Design
Drafting
Chassis
Assembly
Design
Drafting
Body
Simulation
GenerativeMachining
Engineering
Top Level Assembly
Analysis

Site Planning for Heterogeneous Team 81
Expand the Process Map to Illustrate Data Sharing Points
In phase two of the design process, evaluate where data sharing occurs within and across workgroups. Also evaluate the frequency of data sharing at each point of data interaction. Add this information to the process map, as shown in the following example:
Process Map, Phase 2 - Data Interaction Points and Frequency
Engine
Assembly
Design
Drafting Assembly
Design
Drafting
Chassis
Assembly
Design
Drafting
Body
Simulation
Engineering
Top Level Assembly
Analysis
Part Design
Part Design
Suppliers
>>>>>>>>
Manufacturing
GenerativeMachining
Post Processing
>>>>>>>>
\\\\\\\\\ \\\\\\\\\
Legend
High frequency data sharing
Medium frequency data sharing
Low frequency data sharing
Periodic data sharing
\\\\\\\\\
>>>>>
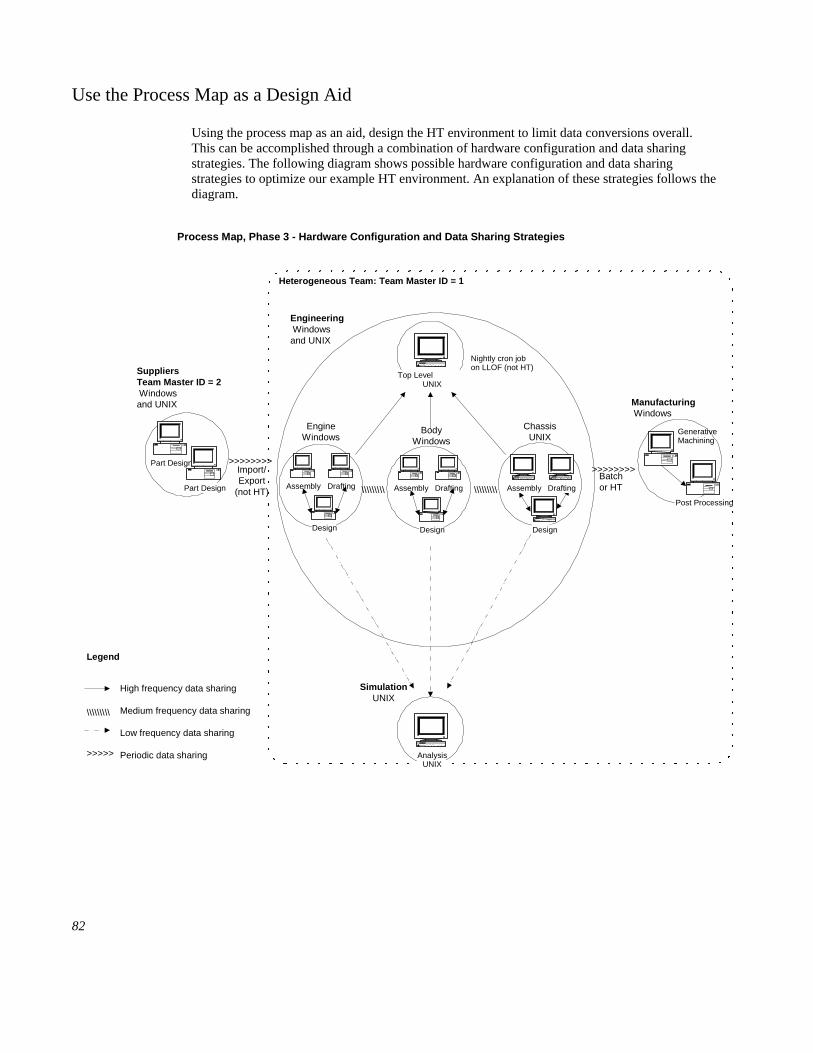
82
Use the Process Map as a Design Aid
Using the process map as an aid, design the HT environment to limit data conversions overall. This can be accomplished through a combination of hardware configuration and data sharing strategies. The following diagram shows possible hardware configuration and data sharing strategies to optimize our example HT environment. An explanation of these strategies follows the diagram.
Process Map, Phase 3 - Hardware Configuration and Data Sharing Strategies
Engine Windows
Assembly
Design
Drafting
ChassisUNIX
Assembly
Design
Drafting
SimulationUNIX
Engineering Windowsand UNIX
Part Design Part Design
Suppliers Team Master ID = 2 Windows and UNIX
>>>>>>>>
Manufacturing Windows
GenerativeMachining
Post Processing
>>>>>>>> \\\\\\\\\ \\\\\\\\\
Heterogeneous Team: Team Master ID = 1
Import/ Export
(not HT)
Body Windows
Nightly cron jobon LLOF (not HT)
Batch or HT
Legend
High frequency data sharing Medium frequency data sharing Low frequency data sharing Periodic data sharing
\\\\\\\\\
>>>>>
Top Level A blUNIX
Assembly Drafting
Design
AnalysisUNIX

Site Planning for Heterogeneous Team 83
HT Hardware Configuration and Data Sharing Strategies
In an HT environment, design hardware configuration and data sharing strategies to limit data conversions overall.
Hardware Configuration
When designing the hardware configuration, attempt to maintain a homogeneous platform configuration for workgroups where parts are shared frequently between members of the group. In our example, a homogeneous platform configuration is maintained within the subassembly groups in engineering.
Where parts are shared less frequently, heterogeneous hardware platforms may be acceptable. This would be the case between the engineering and simulation groups in our example.
Data Sharing Strategies
Data sharing strategies can be used to supplement the HT hardware configuration and further enhance performance in the HT environment.
In our example configuration, there are two potential points where effective data sharing strategies could further enhance performance. The two areas are between the engineering and manufacturing disciplines and between the top-level assembly and the three sub-assembly groups within engineering.
Batch Sharing Various strategies could be used for data sharing between the engineering and manufacturing disciplines illustrated in our example HT environment. If manufacturing needs to retain associativity with the library items retrieved from engineering, use of HT and the Reference Latest or Copy with Notification checkout options would be appropriate.
If retaining associativity is not a concern, and data is shared periodically in batches, use of File, Import/Export together with the HDS utility might be more efficient. This would be the case if a large enough percentage of the engineering data to be accessed for use in manufacturing is in a non-native data format. Use of this strategy could improve performance by eliminating the need for HT conversion of non-native library data on the manufacturing workstations at library checkout.
Note: This strategy requires that engineering and manufacturing work in separate HT data installations.
Following is the basic procedure for batch sharing in our example:
1. On an engineering workstation, export the library items you want to send to manufacturing.
2. Copy the exported package (.pkg) files to a manufacturing workstation using binary ftp.
3. On a manufacturing (Microsoft Windows) workstation, run the HDS utility on the package files.

84
This will convert all the non-native parts in the package file to the data format native to the platform where the HDS utility is being run.
4. Import the package files to the manufacturing HT data installation.
For information on using the HDS utility, see the Data Sharing Administration article under I-DEAS General Administration in the I-DEAS Help Library.
For information on File, Import/Export, see the Sharing Library Items with Other Installations article in the Project Management User's Guide under the Data Management User's Guide in the I-DEAS Help Library.
For information on the setup of multiple HT data installations, see the Multiple Heterogeneous Team Data Installation section in the Heterogeneous Team Setup chapter of this guide.
Library Location of Files (LLOF) In our example, shared data interaction is frequent between the subassembly and top-level assembly engineering groups. The top-level assembly is created on a UNIX machine whereas much of the subassembly data is originally checked in as the Microsoft Windows format. A data sharing strategy could be implemented here to enhance performance.
An effective data sharing strategy to use between the engineering sub-assembly and top-level assembly groups is library location of files (LLOF) together with the HDS utility.
Use LLOF to define the location of a specific "release library" to be used to check in parts ready for release from the sub-assembly groups to the top-level assembly group. In I-DEAS, use the Detail option on the Manage Libraries form to define the LLOF.
A cron job could then be set up to run the HDS utility nightly in the release library directory. The HDS utility converts all the part, drawing, and package files in the directory to the data format on which the utility is run, in this case, UNIX. The result is, the files in that directory are converted to UNIX format.
Since the top-level assembly is created on a UNIX client, no HT data conversion occurs when the parts are accessed from the release library because they've already been converted to UNIX format by the HDS utility. This greatly enhances performance for the top-level assembly, thereby enhancing performance in the HT environment overall.
Note: The LLOF setting is permanent. The library location of files setting cannot be removed, but the location can be redefined.
Other Data Sharing Strategies
For additional data sharing strategies, see the HT articles in the I-DEAS online Help Library.
Define the HT Setup Components for your Site
Following is a checklist of the setup components to define for your HT environment:
The UNIX machine to use as the server.

Site Planning for Heterogeneous Team 85
Note: The team server must be a UNIX machine or a server hardware connectivity solution validated for use with I-DEAS HT. The team server cannot be a Microsoft Windows machine. If the license server is a separate machine, it may be UNIX or Microsoft Windows.
See the appendixes in this guide or the I-DEAS web site for more information on server hardware connectivity solutions validated for use with I-DEAS HT.
The HT data installation location to define on the team server.
The common drive letter(s) available on Microsoft Windows clients to map to the HT data installation.
Choose, and if necessary, acquire the UNIX to Microsoft Windows connectivity solution.
See the appendixes in this guide and the I-DEAS web site for information on connectivity solutions validated for I-DEAS HT.
Determine whether you want to create a new team data installation or migrate an existing installation to HT.
If you intend to migrate an existing team data installation, determine which existing team data installation to migrate. It probably should be the data installation in which the greatest amount of data to be used in the HT environment resides.
Determine if any shared data that exists in other team data installations should be merged with the HT data installation using the I-DEAS File, Import/Export capability.
Note: Multiple HT data installations can be used in an HT environment.

86

Chapter 8
87
Heterogeneous Team Setup This chapter provides information on how to set up a heterogeneous team (HT) environment. It covers the following topics:
• System Requirements
• Process Overview
• Setup Tasks
• Troubleshooting
Due to its complexity, only experienced UNIX and Microsoft Windows system administrators can be expected to set up and administer heterogeneous team successfully. Experience with network administration is also necessary in the setup and administration of HT.
See the Heterogeneous Team Administration article in the I-DEAS online Help Library for information on maintaining a heterogeneous team data installation.
See the I-DEAS Installation guides for information on maintaining the I-DEAS installation.

88
System Requirements The following system requirements must be met for setup of a heterogeneous team environment:
• UNIX Network File System (NFS) machine for the team data installation. In a heterogeneous team environment, the team data installation must be located on a UNIX server.
• NX I-DEAS 5 installed on all UNIX file servers.
• NX I-DEAS 5 installed on all client workstations where I-DEAS is run.
• UNIX to Microsoft Windows connectivity solution which has been validated to establish communications between the UNIX team server and Microsoft Windows client machines AND maintain I-DEAS data integrity in an HT environment.
See the appendixes in this guide for information on connectivity solutions validated for use with I-DEAS HT. See the GTAC web site at http://support.ugs.com for an update on any additional validated connectivity solutions for HT.
• Disk space sufficient for storage of duplicate sets of data products (one set for UNIX and one for Microsoft Windows). Data products include standard catalogs, material databases, libraries, and parts and assemblies used in the online tutorials. The additional space is required only if your company plans to use I-DEAS data products.
• Additional RAM (possibly) for both UNIX and Microsoft Windows workstations to enhance the speed of converting heterogeneous data.
The parameter setting for the Inline Converter Cache defaults to an additional 8 MB memory requirement for HT data conversions.

Heterogeneous Team Setup 89
Process Overview You may decide to set up the HT environment at your site during the initial installation of NX I-DEAS 5, or later, after NX I-DEAS 5 has been in use for a while.
The process for setting up an HT environment is different during the initial installation of NX I-DEAS 5 than it is after NX I-DEAS 5 has been in use for a while.
HT Setup Process during Initial NX I-DEAS 5 Installation
1. Plan the heterogeneous team configuration.
2. Install NX I-DEAS 5 on the UNIX team server and configure it for HT.
3. Install and configure a connectivity solution validated for use with I-DEAS HT.
4. Prepare the Microsoft Windows client workstations for HT setup.
5. Install NX I-DEAS 5 on Microsoft Windows clients and configure it for HT.
6. If necessary, catalog I-DEAS data products.
7. Verify the heterogeneous team environment.
In NX I-DEAS 5, SFAM Level 2 uses only component-based SFAM. In I-DEAS 11, SFAM Level 2 used either component-based SFAM or a dedicated Windows service. The service-based SFAM is no longer available for NX I-DEAS 5.
90
HT Setup Process after NX I-DEAS 5 Installation
Use the following process to migrate to an HT environment from homogeneous installations of NX I-DEAS 5 on UNIX and Microsoft Windows:
1. Plan the heterogeneous team configuration.
2. If necessary, migrate to a single license server.
3. Install and configure a connectivity solution validated for use with I-DEAS HT.
4. Install the file security mechanism.
5. Configure I-DEAS.
6. Configure the user workstations.
7. If necessary, catalog I-DEAS data products.
8. Verify the heterogeneous team environment.
Setup Tasks The procedures for completing the tasks in the setup processes defined above are described in this section. Complete the tasks for the setup process you’re using at your site.
Plan the Heterogeneous Team Configuration
Planning the heterogeneous team configuration is very important to the successful implementation of the heterogeneous team environment.
Use the Site Planning for Heterogeneous Team section of this guide as an aid in this planning process. It's best to work with the project managers and some team members to determine the optimum configuration for their working environment.
Following are the key pieces of information to determine during the planning process for an HT setup:
• the UNIX machine to use as the team server
• the machine to use as the license and resource locking (RL) server
• the location of the HT data installation on the UNIX team server
• the UNIX to Microsoft Windows connectivity solution
• whether to create a new, or migrate an existing, team data installation for HT
• whether to merge library data from multiple team data installations to the HT data installation.
In addition, gather the following information:

Heterogeneous Team Setup 91
• the common drive letter(s) on Microsoft Windows clients to map to the HT data installation.
The same drive letters on the Microsoft Windows clients must map to the same file system/directories. You can conserve drive letters by mapping to higher levels in the directory structure (for your site) within a team server or file system. For example, if the entire team was on a single file system on one server, you could map to /team, instead of /team/shared1 and /team/shared2.
• the user’s login accounts
All users in the HT environment must have the same login name for their UNIX account (workstation and team server) and Microsoft Windows account (workstation).
• the I-DEAS administrator account name and password. In an HT environment, this must be the same on UNIX and Microsoft Windows.
Note: Throughout this document, the I-DEAS administrator account is referred to as the ideasadm account, although the account can have any name.
• whether separate license files are being used for the existing UNIX and Microsoft Windows team data installations
A team data installation must be controlled by only one I-DEAS license server. If client workstations access multiple license servers and use the same data installation, the data in that installation will eventually become corrupt.
See the Migrate to a Single License Server section later in this chapter for more information.
• whether your company uses I-DEAS data products
I-DEAS data products are not managed heterogeneously. If your company uses data products, two sets of data products must be installed for HT, one for UNIX and the other for Microsoft Windows.
See the Catalog I-DEAS Data Products section later in this chapter for more information.
Use the following guidelines to establish a heterogeneous team environment that's efficient to install, maintain, and troubleshoot:
• Follow the conventions for naming directories, establishing user accounts, setting system parameters, and so on, which are specified in this guide.
• Use consistent drive letters and path names for team data directories, user home directories, and I-DEAS software locations.

92
Special Considerations for Windows XP
The SFAM mechanism attempts to synchronize the I-DEAS user’s mapped drive letters to the environment used by the account running security. In Windows XP, each user session has its own complete environment, which isn’t shared with other user sessions. Therefore, to support SFAM Level 2, the user’s environment must be synchronized with the component-based SFAM.
For scenarios specific to Windows XP, see “Heterogeneous Team Administration” in the online Administration User’s Guide.
Install NX I-DEAS 5 on the UNIX Heterogeneous Team Server
This task should only be performed if you’re setting up HT during the initial installation of NX I-DEAS 5.
You perform these steps using the I-DEAS installation software. Refer to the Installation Guide for detailed instructions on using the installation software.
Following is the NX I-DEAS 5 installation procedure for heterogeneous team setup:
1. Install NX I-DEAS 5 according to the installation guidelines for your installation configuration.
2. When you perform the setup for the data installation portion, select the Create Custom Data Installation option.
3. Use the General Settings tab to define the Team Master ID, directory locations, and SFAM level for the heterogeneous team installation.
You must include a directory above /team in the team directory location on UNIX. The directory above /team will be mapped on the UNIX side of the MPM file.
Following is an example of the MPM file where the UNIX team directory location is defined as /team_data/team and the Microsoft Windows drive letter is t:
/team_data t:\
Note: To implement SFAM level 3, use the dmadmin utility after I-DEAS is installed. See An Overview of the dmadmin Utility article in I-DEAS online help for more information.
4. Use the Heterogeneous Team tab to activate HT.
• Set the Multiple Platform Data Installation toggle on.
• In the NT Mount Point field, enter the Microsoft Windows drive letter to map to the HT data installation.
This is used to set up the mount point mapping (MPM) file. You may edit the MPM file to add more than one directory level, if desired. See step 5 in the Configure I-DEAS section later in this chapter for information on customizing the MPM file.

Heterogeneous Team Setup 93
Entries in the other fields on this tab are optional and explained in the Installation Guide.
5. After the installation is complete, copy the UNIX parameter file to the /team/master directory on the UNIX team server. For example: cp $SDRC_INSTL/ideas/.ideas_param13 /team/master/
Install and Configure a Validated Connectivity Solution
Install a connectivity solution that enables Microsoft Windows to access the UNIX team server.
See the appendixes in this guide for instructions on how to install and configure connectivity solutions that have been validated. See the I-DEAS system requirements document on the GTAC web site at http://support.ugs.com for an update on any additional connectivity solutions that may have been validated for HT.
CAUTION: Only use a solution that's been validated for use with I-DEAS HT, or risk corruption of I-DEAS data.
Prepare the Microsoft Windows Client Workstations for HT Setup
This task should only be performed if you’re setting up HT during the initial installation of NX I-DEAS 5.
The following tasks must be performed prior to installing NX I-DEAS 5 on the Microsoft Windows workstations:
1. Create the user accounts according to the guidelines in the I-DEAS Installation Guide for Microsoft Windows.
The user account names must be the same on UNIX and Microsoft Windows.
2. Map the team drive letter you’ve designated for the HT data installation to the HT drive on the UNIX team server.
Install NX I-DEAS 5 on Microsoft Windows Client Workstations
This task should only be performed if you’re setting up HT during the initial installation of NX I-DEAS 5.
Most of the steps are performed using the I-DEAS installation software. Refer to the Installation Guide for detailed instructions on using the installation software.
Use the procedure in this section to set up the first Microsoft Windows client workstation. This creates the Microsoft Windows global parameter file for HT.
Setup must be performed as the same account used to install I-DEAS on the UNIX team server. This account is typically ideasadm.
Following is the NX I-DEAS 5 installation procedure for heterogeneous team setup:
1. Install NX I-DEAS 5 according to the installation guidelines for your installation configuration.

94
2. When you perform the setup for the team data installation portion, select the Use an existing team data installation parameter file option.
3. Click in the Parameter File field and select the ellipsis button.
The Select parameter file to import window displays.
4. Click the Advanced button.
5. In the Account and Password fields, enter the account and password used to install the I-DEAS data installation on the UNIX team server for HT.
6. Select the I-DEAS Parameter Files (UNIX) option from the Files of type: pull-down menu.
7. Use the Look in: field to navigate to the UNIX parameter file, .ideas_paramX, which you copied to the /team/master directory in step 5 of the procedure to Install NX I-DEAS 5 on the UNIX Heterogeneous Team Server.
8. Select the parameter file and click Open.
The Select parameter file to import window redisplays.
9. Click Next and continue with the software installation process.
Note: The Microsoft Windows version of the parameter file, ideas_paramX.dat, is created in the /team/master/config/ directory. The parameter settings created in the file are based on the settings in the UNIX parameter file you selected in steps 7 and 8.
Note: The UNIX and Microsoft Windows versions of the I-DEAS parameter file are not interchangeable. Therefore, do not copy a UNIX version of the parameter file to the Microsoft Windows parameter file location, or vice versa.
10. When the installation is complete, verify that the SFAM level settings and the resource locking server type parameters are compatible in the UNIX and Microsoft Windows versions of the I-DEAS parameter files for HT.
- Verify that the Team.ServerType parameter is set to the same type in both versions of the parameter file.
- Verify that the Team.SecFileAccessLevel parameter is set according to the following guidelines:
UNIX: Level 2 or Level 3; Microsoft Windows: Level 2
UNIX: Level 1; Microsoft Windows: Level 1
11. Finally, remove the copy of the UNIX version of the I-DEAS parameter file you copied to the /team/master directory in step 5 of the procedure to Install NX I-DEAS 5 on the UNIX Heterogeneous Team Server.

Heterogeneous Team Setup 95
Set Up Additional Microsoft Windows Clients
The procedure for installing additional Microsoft Windows clients in an HT environment is slightly different than the procedure for installing the first Microsoft Windows workstation. This is because installing the first Microsoft Windows client workstation creates the Microsoft Windows global parameter file for HT. When additional Microsoft Windows clients are set up for HT, you’ll point to the existing Microsoft Windows parameter file for HT rather than the UNIX parameter file.
Use the following procedure to set up additional Microsoft Windows clients in the HT environment:
1. Install NX I-DEAS 5 according to the installation guidelines for your installation configuration.
2. When you perform the setup for the team data installation portion, select the Use an existing team data installation parameter file option.
3. Click in the Parameter File field and select the ellipsis button.
The Select parameter file to import window displays.
4. Click the Advanced button.
5. In the Account and Password fields, enter the account and password used to install the I-DEAS data installation on the UNIX team server for HT.
6. Select the I-DEAS Parameter Files option from the Files of type: pull-down menu.
7. Use the Look in: field to navigate to the Microsoft Windows global parameter file for the HT data installation.
Note: The Microsoft Windows global parameter file is located in the /team/master/Config/ directory on the HT team server.
8. Select the parameter file and click Open.
The Select parameter file to import window redisplays.
9. Click Next and continue with the software installation process.
96
Modify the I-DEAS Team SFAM Account (if necessary)
Perform this task only if you change the account and/or password defined in step 5 of the previous section, Install NX I-DEAS 5 on Microsoft Windows Client Workstations.
Use the following procedure to change the identiry under which the SFAM component runs on the Microsoft Windows clients:
Note: You must have administrator privileges to change the identity under which the SFAM component runs.
Option 1
1. Choose Start->Settings->Control Panel->Administrative Tools->Component Services.
2. In the Component Services window, select Component Services->Computers->My Computer->Com+ Applications.
3. Right-click SFAM component and choose Properties, then click the Identity tab.
Option 2
1. At a command prompt, type dcomcnfg and press Enter.
2. Choose Computers->My Computer->Com+ Applications.
3. Right-click SFAM component and choose Properties, then click the Identity tab.

Heterogeneous Team Setup 97
Migrate to a Single License Server (if necessary)
If only one license server currently controls the licensing for your I-DEAS installations on both UNIX and Microsoft Windows client workstations, you can skip this task. However, if separate license servers currently control the UNIX and Microsoft Windows I-DEAS installations that you intend to migrate to HT, you must migrate to a single license server.
Note: The number of license servers is determined by each individual I-DEAS installation within your environment. If you have multiple customer ID numbers (installation numbers), then you have multiple license servers.
CAUTION: It is critical that a team data installation be controlled by only one I-DEAS license server. If client workstations access multiple license servers and use the same data installation, the data in that installation will eventually become corrupt.
To migrate to a single license server, you must transfer licensing from one server to another, where the license files are merged. To merge license files you must contact GTAC for support.
Following is the basic process:
1. Identify the installation number you want to transfer licensing from (Microsoft Windows license server).
2. Identify the installation number you want to transfer licensing to (UNIX license server).
3. Contact GTAC and request license transfer paperwork.
4. Complete and sign the license transfer agreement.
5. Return the signed agreement to the password center at least one business day before you intend to reconfigure the I-DEAS license file.
6. Once the transfer agreement has been processed, (in approximately one business day) you'll receive a new password from GTAC.
7. Use the NX I-DEAS 5 installation software to configure the I-DEAS license using this new password.
The new password configures your license file as a combination of the products and number of licenses defined in the two license files you've selected to merge.
8. Modify the value of the UGII_LICENSE_FILE environment variable to point to the location of the license file for the HT installation.
The UGII_LICENSE_FILE variable can be set in the custom_varbs.cmd file (for Microsoft Windows) and the ideascust.sh file (for UNIX). The file is customer-created and needs to be located in the I-DEAS bin directory.

98
Configure Microsoft Windows Client Workstations
This task must be performed on all client workstations in the HT environment.
Complete the following steps to configure each Microsoft Windows client workstation.
Note: Depending on which Microsoft Windows platform you’re running, the steps to configure client workstations could be slightly different than those provided here. If you have any problems setting up user rights, please contact Microsoft for support.
1. Log in to the Microsoft Windows workstation using the system administrator account.
Note: Change the default password behavior for ideasadm as follows. This helps ensure that the I-DEAS team SFAM service starts properly.
• Toggle off User must change password at next login
• Toggle on Password never expires
2. Enable SFAM 2 security.
a. Log in to the Microsoft Windows workstation using the system administrator account.
b. Create a local users group for I-DEAS SFAM users.
1. Invoke User Manager from the Microsoft Windows Start menu.
Select Start, Programs, Administrative Tools, User Manager.
2. Select User, New Local Group.
Enter "IDEAS SFAM USERS" as the group name, and pick OK.
3. Grant privileges to the group as follows:
(a) Select IDEAS SFAM USERS in the Groups list.
(b) Select Policies, User Rights. Pick Show Advanced User Rights at the bottom of the screen.
(c) The only right that is needed is “Impersonate a client after authentication” for XP.
(d) Select the correct option in the List Names From drop-down list. Select your local machine.
(e) Select IDEAS SFAM from the Names list. Pick Add.
(f) Pick OK. IDEAS SFAM is now listed in the Grant To list on the User Rights Policy screen.
(g) Pick OK. The privilege is added to IDEAS SFAM USERS.
(h) Repeat steps (a) through (g) adding Increase Quotas at step (c).

Heterogeneous Team Setup 99
4. Add the HT users groups or users to the IDEAS SFAM USERS group.
• Go to the Groups lower pane and double-click the IDEAS SFAM USERS group
• Add the user groups at your site that will use HT to the I-DEAS SFAM USERS group.
Set Up SFAM for HT
This task should be performed if you’re setting up HT after NX I-DEAS 5 has been used in a homogeneous environment and you’re migrating to an HT environment.
To enable SFAM Level 2 for a team data installation, each Microsoft Windows client that connects to the team data installation must have component-based SFAM installed and configured.

100
Installing I-DEAS Component-based SFAM
In NX I-DEAS 5, the only SFAM available is component-based.
Manual Installation of I-DEAS Component-based SFAM
To manually install I-DEAS component-based SFAM, you can:
• Run the install program directly or
• Enter the command at a command prompt
You run the install program directly from:
%SDRC_INSTL%\install\SFAM\setup.exe
You then manually modify the user account that the component runs as by modifying the properties for the SFAM component in the component services applet.
To view the properties of the SFAM component:
1. In the control panel, select “Administrative Tools,” then the Component Services applet.
2. With the applet displayed, select “Component Services\Computers\My Computer\COM+ Applications.”
3. Right-click on SFAM and select properties. When the property pages display, select the Identity tab.
You can also install I-DEAS component-based SFAM at the command prompt. To do this, you run the following command:
Msiexec /I “%SDRC_INSTL%\Install\SFAM\I-DEAS SFAM Component.msi” USERNAME=<domain\username>PASSWORD=<Password>
The Windows Installer will install the I-DEAS SFAM component.
Configure I-DEAS
This task should only be performed if you’re setting up HT after NX I-DEAS 5 has been used in a homogeneous environment and you’re migrating to an HT environment.
Complete the following tasks to configure I-DEAS for heterogeneous team.
Note: The first four tasks in this process can be performed while users are running I-DEAS. For the remaining tasks, I-DEAS must be shut down.
1. Create the team data installation setup structure on the UNIX team server.
2. If you're migrating existing Microsoft Windows team data, refer to Chapter 2, Planning for Migration, for guidelines.

Heterogeneous Team Setup 101
3. Use ftp or copy the Microsoft Windows global parameter file from the current Microsoft Windows team server (<drive>:\team\master\config\ideas_param13.dat) to the UNIX team server, under the Team.MasterDirectory location.
Note: The UNIX global parameter file (…/ugs/ideas13/ideas/.ideas_param13) is located on the UNIX code server. If multiple UNIX platform types are used in the HT installation, a separate version of the UNIX parameter file must exist on the I-DEAS code server for each UNIX platform type.
4. Modify the following parameters in the UNIX and Microsoft Windows parameter files.
Note: This can be done either manually or using the I-DEAS installation program.
• Multi-Platform Installation – uncomment and set to 1
Team.MultiPlatform: 1
• SFAM Level – for UNIX, run dmadmin to change. For Microsoft Windows, modify the setting in the parameter file.
Recommended matching settings:
UNIX: LEV2 or LEV3; Microsoft Windows: LEV2
UNIX: LEV1; Microsoft Windows: LEV1
Team.SecFileAccessLevel: LEV? (as applicable to your site)
• Note: Ensure the DataMgmt.UserDirectory on Microsoft Windows points to a directory where the users have read/write privileges.
• Master database identifier – set to the same designation
Team.MasterID: (as applicable to your site)
• TDM locations – set to appropriate path
Team.MasterDirectory: (path applicable to platform)
Team.ProjectsDirectory: (path applicable to platform)
Team.ScratchDirectory: (path applicable to platform)
Team.SharedDirectory: (path applicable to platform)
File Compression: The gzip file compression utility is used beginning with MS7m1. Refer to the I-DEAS parameter file for the description of the gzip utility and corresponding parameter entries.
Note: The options entered for each parameter are specifically set to work with I-DEAS and should not be changed.
• Team compress using the old compression utility – set to off
Team.Compress: OFF
• Team compress (using the gzip utility) – to enable manual compress functionality in dmadmin
Team.CompressCommand: $SDRC_INSTL/prl/gzip-124.exe –f –S .Z
• Team decompress (using the gzip utility)– for decompression of compressed files

102
Team.DecompressCommand: $SDRC_INSTL/prl/gzip-124.exe –df
• Team compress file extension – to use a different file extension for gzip files. The standard gzip extension is .gz, I-DEAS must use .Z.
Team.CompressFileExtension: .Z
Memory: A new memory parameter is used beginning with MS7m1. This parameter speeds up conversion of non-native library items in an HT environment. Refer to the I-DEAS parameter file for a description of the parameter and corresponding entries. You can update the I-DEAS parameter file with the following parameter entry:
• Memory allocation for HT conversions – to allocate memory for conversion of files
Memory.IdfCacheInlineConverter: (amount in MB applicable to your site; default is 8)
Note: The default value is 8 MB. If you work with very large models at your site, you may want to set this value higher.
5. Create the mount point mapping (MPM) file on the UNIX team server:
a) Create a .dat file in the Team.MasterDirectory. Name the file mpm# (where # is the value for the Team.MasterID; e.g., if the Team.MasterID is 3, name the file mpm3.dat). Give the file ideasadm ownership.
b) Map the UNIX directory path to the Microsoft Windows drive letter for each mapped drive. The format is UNIX path, white space, Microsoft Windows drive letter. Enter one mapped drive per line. Comment lines can be used starting with a ! or # character. For example:
!data installation number 1 map
/team/data_installation1/ m:\
The left side of the mapping, /team/data_installation1/, is the directory level above /team, for the team directory location defined on the UNIX team server during installation. The actual team directory this map file points to is /team/data_installation1/team.
The right side of the mapping, m:\, is the Microsoft Windows drive letter being used to map to the team directory location on the UNIX team server.
NOTES on the MPM file:
• All of the I-DEAS team files (.imd, .pmd, .prt, etc.) must be visible to both UNIX and Microsoft Windows. (Installation of the connectivity solution, as discussed in the Install and Configure a Validated Connectivity Solution section of this chapter, allows for this.)
• You can edit the MPM file from either a UNIX or Microsoft Windows platform.
• The file can have any number of mappings.
• All lines must contain fewer than 1,000 characters.
• A UNIX directory or Microsoft Windows drive can only be listed once.
• UNC is not supported.

Heterogeneous Team Setup 103
• Comments can be placed at the end of the line after the Microsoft Windows path.
• UNIX paths must match case exactly.
• When adding a platform to an existing installation, all new mounts should be less than or equal in length to the corresponding old mount to ensure file name path length does not change. An I-DEAS filename path is 80 characters or less.
Note: If you’re running close to the 80 character file limit on your file name paths, you need to be aware of mount lengths in your MPM file.
For example, if you’re adding Microsoft Windows workstations to an existing UNIX installation, there will probably not be any constraints. Microsoft Windows mounts are drive letters (three characters, e.g., d:\) and the UNIX directory path is probably a minimum of three characters.
If you’re adding UNIX workstations to an existing Microsoft Windows installation, there could be potential problems with the 80 character file name path limit. UNIX mounts will probably have to be three characters to match the Microsoft Windows mounts. You may have to use a naming convention, such as /1a, /1b, /1c.
6. Modify the value of the IDEAS_PARAM13 environment variable to point to the parameter files location for the HT installation.
Note: The IDEAS_PARAM13 variable is set in the custom_varbs.cmd file (for Microsoft Windows) and the ideascust.sh file (for UNIX). The file is customer-created and must be located in the I-DEAS bin directory.

104
Configure User Workstations
This task should only be performed if you’re setting up HT after NX I-DEAS 5 has been used in a homogeneous environment and you’re migrating to an HT environment.
Following are the setup requirements to configure user workstations for HT:
• Each user on a Microsoft Windows workstation must map the team drive to the HT installation team directory at login. A script can be created to accomplish this automatically at login, or the user can check the Reconnect at Logon option when mapping the drive. Users should use their own login account to map the team drives. (A user must be assigned the same login name on both UNIX and Microsoft Windows.) Users should not use the ideasadm account when mapping the team drive.
• The location defined in the DataMgmt.ScratchDirectory parameter in the I-DEAS parameter file must have read/write permissions set for both the user and ideasadm account. The HT temporary conversion shadow files will be placed into this directory. Verify the permissions set for this directory on both UNIX and Microsoft Windows workstations. By default, this is the user’s current working directory. If necessary, adjust the permissions (security) setting.

Heterogeneous Team Setup 105
Catalog I-DEAS Data Products (if necessary)
If your company uses data products, you'll need to install data products for HT.
Data products are not heterogeneous. Therefore, two sets of data products must be installed for HT, one for UNIX and one for Microsoft Windows, if you are using data products on both platforms.
The data products within each set are named so the users know which data product to access for their platform type. Once they are installed using NX I-DEAS 5 on both platforms, the data products named with an "NT" prefix are the Microsoft Windows version. The data products named with a "UNIX" prefix are the UNIX version.
To make a data product accessible in the data management installation, the data product must be installed and copied to the shared directory. This process is called “cataloging” the data product.
NOTE: To ensure consistency of data product ownership, only the I-DEAS installation account should install and catalog data products. Otherwise, you may encounter problems when adding new versions of products or updating existing products.
To install data products, use the dmadmin utility. Following are instructions on how to install data products.
Note: If data products currently exist for a previous version of I-DEAS, they should be removed (PROJ, DE in dmadmin) before data products for HT are installed to avoid confusion.
1. At a command prompt, CD to the I-DEAS upper level directory.
Note: Don’t run dmadmin from the bin directory.
2. Enter the command bin/dmadmin.
3. Enter INST for installation.
4. Enter IN for installing data products.
5. Enter the corresponding number for the data products you want loaded.
6. Enter 0 when done.
The selected data products are cataloged.
7. Enter EXIT to exit dmadmin.
Note: For additional information on the dmadmin utility, refer to the General I-DEAS Administration section of the I-DEAS online Help Library.

106
Verify the HT Installation
Verify the HT working environment as follows:
1. Before running I-DEAS, check the UNIX and Microsoft Windows versions of the I-DEAS global parameter files to verify that the resource locking type is consistent and the SFAM settings are compatible.
- Verify that the Team.ServerType parameter is set to the same type in both versions of the parameter file.
- Verify that the Team.SecFileAccessLevel parameter is set according to the following guidelines:
UNIX: LEV2 or LEV3; Microsoft Windows: LEV2
UNIX: LEV1; Microsoft Windows: LEV1
2. Check the UGII_LICENSE_FILE environment variable setting to verify that a common license server is used for the data installation.
- See the SDRC_INSTL\bin\setup_varbs.cmd file or custom_varbs.cmd file for the Microsoft Windows setting.
- See the SDRC_INSTL/sec/sec.com file or the SDRC_INSTL/bin/ideascust.sh file for the UNIX setting.
Note: SDRC_INSTL represents the I-DEAS upper-level installation directory.
3. Verify the syntax of the MPM file as follows:
- Change to the team directory and team drive location specified in the MPM file for UNIX and Microsoft Windows, respectively.
- List the contents of the drive and directory.
You should see the same items in each listing. If the HT data installation directories are listed, the syntax is correct. If not, adjust the MPM file contents.
4. Start I-DEAS on a Microsoft Windows client, create some simple geometry, and check it into a library.
5. Start I-DEAS on a UNIX client (if applicable), check out the part created on the Microsoft Windows workstation and put it on your workbench.
6. On each workstation platform type, access a part from a migrated team data installation (if applicable) and put it on your workbench.
7. If data products are installed, access a cataloged data product of the correct platform type and put it on your workbench.
See the Troubleshooting section later in this chapter for guidelines on resolving any problems you may encounter when verifying the HT installation.

Heterogeneous Team Setup 107
Multiple Heterogeneous Team Data Installations
Some companies use multiple team data installations within their I-DEAS working environment. There are additional tasks/issues you need to be aware of for multiple team data installations.
• For each user, define the IDEAS_PARAM13 variable to point to the installation the user will work in.
• For each user, map the common drives to the installation the user will work in.
• Use a single ideasadm account name and password across all of the team data installations. Both the component-based SFAM and the connectivity solution require the ideasadm password to gain access to files that are under SFAM protection. Using the same password permits users to access data in a part or assembly from multiple team data installations.
• The UNIX UID must be the same for the authentication server and the UNIX team servers.

108
Troubleshooting This section describes some installation problems and their recommended solutions.
Symptom:
Team projects are not listed on the I-DEAS startup window on Microsoft Windows.
Possible solutions:
The team drive is not mapped. Map the UNIX HT installation directory location to the Microsoft Windows team drive.
The IDEAS_PARAM13 environment variable has not been set. Update the variable in the custom_varbs.cmd file in the I-DEAS bin directory. The variable should point to the parameter file location for the HT installation.
Note: The custom_varbs.cmd file is a customer-created file.
Symptom:
At I-DEAS startup, you get a message that the Team.MasterDirectory could not be found, but it can be found for other users.
Solution:
The configuration for I-DEAS administrator access is not set correctly in the connectivity solution or the SFAM mechanism is not set correctly on the Microsoft Windows client.
The SFAM mechanism requires the same account and password to gain access to the shared I-DEAS files (under SFAM protection).
The I-DEAS administrator account and password must be the same on UNIX and Microsoft Windows.
Note: If you change the I-DEAS administrator account password, you'll need to update the SFAM installation on every Microsoft Windows client in the HT environment. If the connectivity solution you use is client-based, you'll also need to update that setup for every Microsoft Windows client in the HT environment.
Symptom:
Check in a file with uppercase in the name on Microsoft Windows, then you need to reconnect on UNIX because it couldn’t find it.
Solution:
The connectivity solution configuration is not set correctly for case. Configure the connectivity solution to preserve case.

Heterogeneous Team Setup 109
Symptom:
Receive message that you have an invalid file specification or that the directory does not exist (read problem). Get a crash when you try to convert a file from one platform format to another (write problem).
Solution:
DataMgmt.ScratchDirectory (for UNIX and Microsoft Windows) must have read/write permissions set for the user and ideasadm accounts.
Symptom:
Receive error message: I-DEAS cannot access the data. The file format is not compatible with the current hardware platform.
Solution:
The Team.MultiPlatform parameter in the parameter files must be set to 1.
Component-based SFAM Diagnostics
All severe SFAM errors are logged by default. To receive all messages, set the Registry Key HKLM\SOFTWARE\EDS\SFAM\Diagnostic Level with a DWORD value of 5.

110

Appendix A
A-1
Network Appliance Connectivity Solution for Heterogeneous Team
The Network Appliance file server with operating system 6.4.1 or higher has been validated for use with I-DEAS heterogeneous team (HT).
This file server is specifically designed to allow writing to the server disk by both UNIX and Microsoft Windows platform types. Files are served using CIFS protocol for Microsoft Windows and NFS for UNIX.
Using this Network Appliance system as the connectivity solution for I-DEAS HT capability is efficient for both setup and administration of the HT environment.
Simply install the Network Appliance equipment and use it as the HT team server. See Chapter 9, Heterogeneous Team Setup, for team server setup guidelines.
To learn more about Network Appliance products, visit their web site at http://www.netapp.com.

A-2
System Requirements
System requirements for Network Appliance equipment used with I-DEAS HT are:
• Operating system 6.4.1 or higher
Network Appliance Model 3020, 940 and 840 were used to perform the validation tests.
Although Network Appliance models 3020, 940 and 840 were used in validation testing, the following models are also supported for use with I-DEAS HT:
,F840, FAS250, FAS270, FAS940, FAS960, FAS980, FAS3020
Also, firmware and operating system versions released later than those listed above are expected, based on Network Appliance claims, to support I-DEAS HT.
Configuration for I-DEAS HT To support running SFAM level 2 on Microsoft Windows, the Microsoft Windows clients must be in the same domain as the Network Appliance server.
Troubleshooting
This section describes some symptoms and the recommended solutions for problems that may be related to the Network Appliance configuration for HT.
Symptom:
Team directory access is denied.
Solution:
Microsoft Windows clients must be in the same domain as the Network Appliance server. This is required to support SFAM level 2.
See the Troubleshooting section of Chapter 9, Heterogeneous Team Setup, for additional troubleshooting guidelines.
Customer Support
Please contact Network Appliance, Inc., if you need help with their product.

Appendix B
B-1
EMC Connectivity Solutions for Heterogeneous Team
The EMC file servers that have been validated for use with I-DEAS heterogeneous team (HT) include the Celerra File Server, Celerra SE, and NS600. The CLARiiON IP4700 System is also supported, but was not validated at UGS PLM Solutions.
These file servers are specifically designed to allow writing to the server disk by both UNIX and Microsoft Windows platform types. Files are served using CIFS protocol for Microsoft Windows and NFS for UNIX.
Using a validated EMC server as the connectivity solution for the I-DEAS HT capability is efficient for both setup and administration of the HT environment.
Simply install the EMC equipment, configure it for I-DEAS HT, and use it as the HT team server. See Chapter 9, Heterogeneous Team Setup, for team server setup guidelines.
To learn more about EMC products, visit their web site at http://www.emc.com.

B-2
System Requirements
System requirements for EMC equipment used with I-DEAS HT are:
• Operating system (minimum kernel level) version 2.2.16-0.EMC.2 on i686
• Operating system (minimum kernel level) version 2.4.9-34.8.EMC #1
• Network Attached Storage (NAS) version 2.2.25-6
• Network Attached Storage (NAS) code version 5.1.18.8
The EMC Celerra File Server, Celerra SE, and NS600 were used to perform the validation tests for I-DEAS HT. Although CLARiiON IP4700 was not used to perform the validation tests, it is also supported for use with I-DEAS HT.
Configuration for I-DEAS HT This section describes the settings used to configure EMC servers for I-DEAS HT during validation testing.
SFAM Support
To support running SFAM level 2 on Microsoft Windows, the Microsoft Windows clients must be in the same domain as the EMC server.
Kernel Level
The minimum kernel level on Celerra is 2.2.16-0.EMC.2 on an i686.
Mount Options
The following mount option settings were used on the I-DEAS team directory:
fs2 on /team uxfs, perm, rw, rwlock, accesspolicy=SECURE
When using the accesspolicy=SECURE setting you must have both the Microsoft Windows and UNIX access permissions set so you can read and/or write data. If permissions on either platform type are either “no read” or “no write,” read and write access permissions are denied on both platform types.
The rwlock setting enforces all CIFS locking modes with NFS users.

EMC Connectivity Solutions for HT-B-3
Export and Share Settings
The following export and share settings were used during validation testing:
• share “ntteam” “/team”
• export “/team”
CIFS Settings
CIFS should be configured with the following settings:
• CIFS threads started = 32
• Security mode = NT
• Max protocol = NT1
• I18N mode = ASCII
• Home directory shares = DISABLED
B-4
Troubleshooting
This section describes some symptoms and the recommended solutions for problems that may be related to the EMC configuration for HT.
Symptom:
Team directory or data access is denied.
Solution:
Verify the following configuration requirements are met:
• Microsoft Windows clients must be in the same domain as the EMC server. This is required to support SFAM level 2.
• Data access permissions on both the Microsoft Windows and UNIX systems in the HT environment must be set to read and/or write data. If data access permissions on either platform type are set to “no read” or “no write” data access on both platform types is denied. The accesspolicy=SECURE mount option setting enables this behavior.
See the Troubleshooting section of Chapter 9, Heterogeneous Team Setup, for additional troubleshooting guidelines.
Customer Support
Please contact EMC Customer Service if you need help with their product. You can access EMC Customer Service contact information by selecting Customer Service from the Services menu at their web site, http://www.emc.com/.


