NW 6.5 SP8: Apache Web Server Administration Guide · Novell ® novdocx (en) 17 September 2009...
106
Novell® www.novell.com novdocx (en) 17 September 2009 AUTHORIZED DOCUMENTATION NW 6.5 SP8: Apache Web Server Administration Guide NetWare® 6.5 SP8 November 9, 2009 Apache Web Server Administration Guide
Transcript of NW 6.5 SP8: Apache Web Server Administration Guide · Novell ® novdocx (en) 17 September 2009...

Novell®
novdocx (en) 17 Septem
ber 2009
AUTHORIZED DOCUMENTATION
NW 6.5 SP8: Apache Web Server Administration Guide
www.novell.com
NetWare®
6.5 SP8November 9, 2009
Apache Web Server Administration Guide
novdocx (en) 17 Septem
ber 2009
Legal Notices
Novell, Inc., makes no representations or warranties with respect to the contents or use of this documentation, and specifically disclaims any express or implied warranties of merchantability or fitness for any particular purpose. Further, Novell, Inc., reserves the right to revise this publication and to make changes to its content, at any time, without obligation to notify any person or entity of such revisions or changes.
Further, Novell, Inc., makes no representations or warranties with respect to any software, and specifically disclaims any express or implied warranties of merchantability or fitness for any particular purpose. Further, Novell, Inc., reserves the right to make changes to any and all parts of Novell software, at any time, without any obligation to notify any person or entity of such changes.
Any products or technical information provided under this Agreement may be subject to U.S. export controls and the trade laws of other countries. You agree to comply with all export control regulations and to obtain any required licenses or classification to export, re-export or import deliverables. You agree not to export or re-export to entities on the current U.S. export exclusion lists or to any embargoed or terrorist countries as specified in the U.S. export laws. You agree to not use deliverables for prohibited nuclear, missile, or chemical biological weaponry end uses. See the Novell International Trade Services Web page (http://www.novell.com/info/exports/) for more information on exporting Novell software. Novell assumes no responsibility for your failure to obtain any necessary export approvals.
Copyright © 2005–2009 Novell, Inc. All rights reserved. No part of this publication may be reproduced, photocopied, stored on a retrieval system, or transmitted without the express written consent of the publisher.
Novell, Inc., has intellectual property rights relating to technology embodied in the product that is described in this document. In particular, and without limitation, these intellectual property rights may include one or more of the U.S. patents listed on the Novell Legal Patents Web page (http://www.novell.com/company/legal/patents/) and one or more additional patents or pending patent applications in the U.S. and in other countries.
Novell, Inc.404 Wyman Street, Suite 500Waltham, MA 02451U.S.A.www.novell.com
Online Documentation: To access the online documentation for this and other Novell products, see the Novell Documentation Web page (http://www.novell.com/documentation).

novdocx (en) 17 Septem
ber 2009
Novell Trademarks
For Novell trademarks, see the Novell Trademark and Service Mark list (http://www.novell.com/company/legal/trademarks/tmlist.html).
Third-Party Materials
All third-party trademarks are the property of their respective owners.

4 NW 6.
novdocx (en) 17 Septem
ber 2009
5 SP8: Apache Web Server Administration Guide

Contents
novdocx (en) 17 Septem
ber 2009
About This Guide 9
1 Apache Web Server Overview 111.1 Web Server Basics. . . . . . . . . . . . . . . . . . . . . . . . . . . . . . . . . . . . . . . . . . . . . . . . . . . . . . . . . . 11
1.1.1 Web Site Hosting . . . . . . . . . . . . . . . . . . . . . . . . . . . . . . . . . . . . . . . . . . . . . . . . . . . . 111.1.2 Servlets . . . . . . . . . . . . . . . . . . . . . . . . . . . . . . . . . . . . . . . . . . . . . . . . . . . . . . . . . . . 121.1.3 Web Services and Applications . . . . . . . . . . . . . . . . . . . . . . . . . . . . . . . . . . . . . . . . . 12
1.2 Benefits of Running Apache on NetWare . . . . . . . . . . . . . . . . . . . . . . . . . . . . . . . . . . . . . . . . 131.3 Administration Instance vs. Public Instance of Apache on NetWare . . . . . . . . . . . . . . . . . . . . 14
1.3.1 Using Apache As a NetWare Administration Server . . . . . . . . . . . . . . . . . . . . . . . . . 141.3.2 Using Apache As a Dedicated Web Server . . . . . . . . . . . . . . . . . . . . . . . . . . . . . . . . 14
1.4 What's Different about Apache on NetWare . . . . . . . . . . . . . . . . . . . . . . . . . . . . . . . . . . . . . . 151.4.1 eDirectory Integration . . . . . . . . . . . . . . . . . . . . . . . . . . . . . . . . . . . . . . . . . . . . . . . . 151.4.2 Multi-Threading . . . . . . . . . . . . . . . . . . . . . . . . . . . . . . . . . . . . . . . . . . . . . . . . . . . . . 161.4.3 Pathname Syntax . . . . . . . . . . . . . . . . . . . . . . . . . . . . . . . . . . . . . . . . . . . . . . . . . . . 161.4.4 Loading Modules at Runtime . . . . . . . . . . . . . . . . . . . . . . . . . . . . . . . . . . . . . . . . . . . 16
1.5 Apache Manager: A Web-Based Administration Tool . . . . . . . . . . . . . . . . . . . . . . . . . . . . . . . 171.6 What's Next . . . . . . . . . . . . . . . . . . . . . . . . . . . . . . . . . . . . . . . . . . . . . . . . . . . . . . . . . . . . . . . 18
2 Apache Installation and Configuration 192.1 Deciding How to Install Apache on NetWare . . . . . . . . . . . . . . . . . . . . . . . . . . . . . . . . . . . . . . 19
2.1.1 NetWare AMP (Apache, MySQL, PHP, Perl) Server . . . . . . . . . . . . . . . . . . . . . . . . . 202.1.2 Apache/Tomcat Server . . . . . . . . . . . . . . . . . . . . . . . . . . . . . . . . . . . . . . . . . . . . . . . 202.1.3 Apache 2 Web Server and Tomcat 4 Servlet Container Components . . . . . . . . . . . 21
2.2 Configuring and Managing Apache on NetWare . . . . . . . . . . . . . . . . . . . . . . . . . . . . . . . . . . . 222.3 Using Apache Manager in Your Web Browser. . . . . . . . . . . . . . . . . . . . . . . . . . . . . . . . . . . . . 22
2.3.1 Using Apache Manager's Single Server Administration Interface . . . . . . . . . . . . . . . 232.3.2 Using Apache Manager's Multiple Server Administration . . . . . . . . . . . . . . . . . . . . . 272.3.3 Saving Configuration Changes and Restarting Apache in Apache Manager . . . . . . 29
2.4 Using Apache in a Cluster for High Availability . . . . . . . . . . . . . . . . . . . . . . . . . . . . . . . . . . . . 292.5 What's Next . . . . . . . . . . . . . . . . . . . . . . . . . . . . . . . . . . . . . . . . . . . . . . . . . . . . . . . . . . . . . . . 30
3 Managing Apache Web Server Preferences 313.1 Starting and Stopping Apache . . . . . . . . . . . . . . . . . . . . . . . . . . . . . . . . . . . . . . . . . . . . . . . . . 31
3.1.1 Starting and Stopping Apache in Apache Manager. . . . . . . . . . . . . . . . . . . . . . . . . . 323.1.2 Starting and Stopping Apache at the Server Console . . . . . . . . . . . . . . . . . . . . . . . . 32
3.2 Viewing Configuration Settings . . . . . . . . . . . . . . . . . . . . . . . . . . . . . . . . . . . . . . . . . . . . . . . . 353.3 Restoring Configuration Settings . . . . . . . . . . . . . . . . . . . . . . . . . . . . . . . . . . . . . . . . . . . . . . . 353.4 Performance Tuning. . . . . . . . . . . . . . . . . . . . . . . . . . . . . . . . . . . . . . . . . . . . . . . . . . . . . . . . . 36
3.4.1 Adjusting Thread Settings . . . . . . . . . . . . . . . . . . . . . . . . . . . . . . . . . . . . . . . . . . . . . 373.4.2 Adjusting Keep Alive Settings . . . . . . . . . . . . . . . . . . . . . . . . . . . . . . . . . . . . . . . . . . 393.4.3 Using DNS . . . . . . . . . . . . . . . . . . . . . . . . . . . . . . . . . . . . . . . . . . . . . . . . . . . . . . . . . 403.4.4 Additional Performance Tuning Information . . . . . . . . . . . . . . . . . . . . . . . . . . . . . . . 40
3.5 Managing MIME Types . . . . . . . . . . . . . . . . . . . . . . . . . . . . . . . . . . . . . . . . . . . . . . . . . . . . . . 403.5.1 Default MIME Types . . . . . . . . . . . . . . . . . . . . . . . . . . . . . . . . . . . . . . . . . . . . . . . . . 42
3.6 Specifying an Administrator E-Mail Address for Inclusion in Error Messages . . . . . . . . . . . . . 423.7 Setting Up Server-Side Includes . . . . . . . . . . . . . . . . . . . . . . . . . . . . . . . . . . . . . . . . . . . . . . . 43
Contents 5
6 NW 6.
novdocx (en) 17 Septem
ber 2009
3.8 Managing Listen Ports . . . . . . . . . . . . . . . . . . . . . . . . . . . . . . . . . . . . . . . . . . . . . . . . . . . . . . . 433.9 Managing Error Responses . . . . . . . . . . . . . . . . . . . . . . . . . . . . . . . . . . . . . . . . . . . . . . . . . . . 453.10 Working with Server Logs . . . . . . . . . . . . . . . . . . . . . . . . . . . . . . . . . . . . . . . . . . . . . . . . . . . . 45
3.10.1 Viewing the Access Log. . . . . . . . . . . . . . . . . . . . . . . . . . . . . . . . . . . . . . . . . . . . . . . 463.10.2 Viewing the Error Log . . . . . . . . . . . . . . . . . . . . . . . . . . . . . . . . . . . . . . . . . . . . . . . . 473.10.3 Filtering Access and Error Log Data . . . . . . . . . . . . . . . . . . . . . . . . . . . . . . . . . . . . . 473.10.4 Setting Access Log Preferences . . . . . . . . . . . . . . . . . . . . . . . . . . . . . . . . . . . . . . . . 473.10.5 Setting Error Preferences . . . . . . . . . . . . . . . . . . . . . . . . . . . . . . . . . . . . . . . . . . . . . 50
3.11 What's Next . . . . . . . . . . . . . . . . . . . . . . . . . . . . . . . . . . . . . . . . . . . . . . . . . . . . . . . . . . . . . . . 52
4 Managing Web Server Content 534.1 Changing the Primary Document Directory . . . . . . . . . . . . . . . . . . . . . . . . . . . . . . . . . . . . . . . 534.2 Setting Up Additional Document Directories . . . . . . . . . . . . . . . . . . . . . . . . . . . . . . . . . . . . . . 54
4.2.1 Adding or Deleting a Document Directory . . . . . . . . . . . . . . . . . . . . . . . . . . . . . . . . . 554.2.2 Configuring Options for an Additional Document Directory . . . . . . . . . . . . . . . . . . . . 564.2.3 Controlling Access to Document Directories . . . . . . . . . . . . . . . . . . . . . . . . . . . . . . . 58
4.3 Configuring User Home Directories . . . . . . . . . . . . . . . . . . . . . . . . . . . . . . . . . . . . . . . . . . . . . 604.3.1 Creating Home Directories for Users. . . . . . . . . . . . . . . . . . . . . . . . . . . . . . . . . . . . . 614.3.2 Creating public_html Directories in Home Directories . . . . . . . . . . . . . . . . . . . . . . . . 614.3.3 Selecting a Method for Accessing eDirectory . . . . . . . . . . . . . . . . . . . . . . . . . . . . . . 614.3.4 Enabling User Home Directories on Apache . . . . . . . . . . . . . . . . . . . . . . . . . . . . . . . 62
4.4 Changing the Default Index Filename . . . . . . . . . . . . . . . . . . . . . . . . . . . . . . . . . . . . . . . . . . . 634.5 Redirecting Visitors to an Alternate URL . . . . . . . . . . . . . . . . . . . . . . . . . . . . . . . . . . . . . . . . . 644.6 Configuring CGI Extensions. . . . . . . . . . . . . . . . . . . . . . . . . . . . . . . . . . . . . . . . . . . . . . . . . . . 654.7 Creating Virtual Hosts . . . . . . . . . . . . . . . . . . . . . . . . . . . . . . . . . . . . . . . . . . . . . . . . . . . . . . . 674.8 Creating Your Own Web Site . . . . . . . . . . . . . . . . . . . . . . . . . . . . . . . . . . . . . . . . . . . . . . . . . . 68
4.8.1 Accessing Your Web Site . . . . . . . . . . . . . . . . . . . . . . . . . . . . . . . . . . . . . . . . . . . . . 684.8.2 Adding Content to Your Web Site . . . . . . . . . . . . . . . . . . . . . . . . . . . . . . . . . . . . . . . 69
4.9 What's Next . . . . . . . . . . . . . . . . . . . . . . . . . . . . . . . . . . . . . . . . . . . . . . . . . . . . . . . . . . . . . . . 69
5 Managing Apache Modules 715.1 Understanding Apache Modules . . . . . . . . . . . . . . . . . . . . . . . . . . . . . . . . . . . . . . . . . . . . . . . 715.2 Enabling Scripting Modules . . . . . . . . . . . . . . . . . . . . . . . . . . . . . . . . . . . . . . . . . . . . . . . . . . . 725.3 Enabling and Configuring the Caching Module . . . . . . . . . . . . . . . . . . . . . . . . . . . . . . . . . . . . 725.4 Using the mod_edir Module to Connect to eDirectory . . . . . . . . . . . . . . . . . . . . . . . . . . . . . . . 74
5.4.1 mod_edir Modes . . . . . . . . . . . . . . . . . . . . . . . . . . . . . . . . . . . . . . . . . . . . . . . . . . . . 745.4.2 mod_edir Directives . . . . . . . . . . . . . . . . . . . . . . . . . . . . . . . . . . . . . . . . . . . . . . . . . . 765.4.3 Combining mod_edir with mod_auth_ldap: An Example . . . . . . . . . . . . . . . . . . . . . . 79
5.5 What's Next . . . . . . . . . . . . . . . . . . . . . . . . . . . . . . . . . . . . . . . . . . . . . . . . . . . . . . . . . . . . . . . 80
6 Managing Multiple Apache Web Servers 816.1 About Multiple Server Administration . . . . . . . . . . . . . . . . . . . . . . . . . . . . . . . . . . . . . . . . . . . . 81
6.1.1 eDirectory . . . . . . . . . . . . . . . . . . . . . . . . . . . . . . . . . . . . . . . . . . . . . . . . . . . . . . . . . 826.1.2 Configuration Daemon. . . . . . . . . . . . . . . . . . . . . . . . . . . . . . . . . . . . . . . . . . . . . . . . 83
6.2 Using the Multiple Server Administration Interface . . . . . . . . . . . . . . . . . . . . . . . . . . . . . . . . . 856.3 Starting Multiple Server Administration . . . . . . . . . . . . . . . . . . . . . . . . . . . . . . . . . . . . . . . . . . 866.4 Creating Server Groups . . . . . . . . . . . . . . . . . . . . . . . . . . . . . . . . . . . . . . . . . . . . . . . . . . . . . . 876.5 Adding or Removing Servers to or from a Server Group . . . . . . . . . . . . . . . . . . . . . . . . . . . . . 876.6 Adding an Apache Module to a Server or Group Object . . . . . . . . . . . . . . . . . . . . . . . . . . . . . 896.7 Adding, Editing, or Removing Apache Blocks . . . . . . . . . . . . . . . . . . . . . . . . . . . . . . . . . . . . . 896.8 Adding, Editing, or Removing a Virtual Host . . . . . . . . . . . . . . . . . . . . . . . . . . . . . . . . . . . . . . 90
5 SP8: Apache Web Server Administration Guide

novdocx (en) 17 Septem
ber 2009
6.9 Checking the Status of Each Web Server . . . . . . . . . . . . . . . . . . . . . . . . . . . . . . . . . . . . . . . . 916.10 Viewing and Editing an Object's Configuration . . . . . . . . . . . . . . . . . . . . . . . . . . . . . . . . . . . . 92
6.10.1 Disinheriting Directives . . . . . . . . . . . . . . . . . . . . . . . . . . . . . . . . . . . . . . . . . . . . . . . 936.10.2 Disabling Inherited Objects . . . . . . . . . . . . . . . . . . . . . . . . . . . . . . . . . . . . . . . . . . . . 93
6.11 What's Next . . . . . . . . . . . . . . . . . . . . . . . . . . . . . . . . . . . . . . . . . . . . . . . . . . . . . . . . . . . . . . . 94
A Apache Coexistence and Migration Issues 95A.1 Web Server Coexistence on Multiple Platforms and Versions. . . . . . . . . . . . . . . . . . . . . . . . . 95A.2 Upgrading from the NetWare Enterprise Web Server on NetWare 6 to Apache 2.0 on NetWare
6.5 . . . . . . . . . . . . . . . . . . . . . . . . . . . . . . . . . . . . . . . . . . . . . . . . . . . . . . . . . . . . . . . . . . . . . . 96A.2.1 Understanding the Migration Tool . . . . . . . . . . . . . . . . . . . . . . . . . . . . . . . . . . . . . . . 96A.2.2 Manually Migrating Settings. . . . . . . . . . . . . . . . . . . . . . . . . . . . . . . . . . . . . . . . . . . . 96A.2.3 Updating the Welcome Page . . . . . . . . . . . . . . . . . . . . . . . . . . . . . . . . . . . . . . . . . . . 96
A.3 Upgrading from Apache 1.03 on NetWare 6 to Apache 2.0 on NetWare 6.5 SP3 or Later . . . 97A.4 Migrating Your Web Server from NetWare to Linux. . . . . . . . . . . . . . . . . . . . . . . . . . . . . . . . . 97
A.4.1 Administrative Differences . . . . . . . . . . . . . . . . . . . . . . . . . . . . . . . . . . . . . . . . . . . . . 97A.4.2 Migrating Virtual Hosts. . . . . . . . . . . . . . . . . . . . . . . . . . . . . . . . . . . . . . . . . . . . . . . . 97A.4.3 Copying Web Pages . . . . . . . . . . . . . . . . . . . . . . . . . . . . . . . . . . . . . . . . . . . . . . . . . 98A.4.4 Copying Log Files . . . . . . . . . . . . . . . . . . . . . . . . . . . . . . . . . . . . . . . . . . . . . . . . . . . 98A.4.5 Adding Modules . . . . . . . . . . . . . . . . . . . . . . . . . . . . . . . . . . . . . . . . . . . . . . . . . . . . . 98
B Installing the Apache Manager Daemon on Linux and Windows 99B.1 Downloading the Daemon Install File. . . . . . . . . . . . . . . . . . . . . . . . . . . . . . . . . . . . . . . . . . . . 99B.2 Meeting Installation Prerequisites . . . . . . . . . . . . . . . . . . . . . . . . . . . . . . . . . . . . . . . . . . . . . . 99B.3 Installing the Daemon on Linux . . . . . . . . . . . . . . . . . . . . . . . . . . . . . . . . . . . . . . . . . . . . . . . . 99B.4 Installing the Daemon on Windows . . . . . . . . . . . . . . . . . . . . . . . . . . . . . . . . . . . . . . . . . . . . 101B.5 Troubleshooting the LDAP Connection . . . . . . . . . . . . . . . . . . . . . . . . . . . . . . . . . . . . . . . . . 103
C Documentation Updates 105C.1 November 9, 2009 . . . . . . . . . . . . . . . . . . . . . . . . . . . . . . . . . . . . . . . . . . . . . . . . . . . . . . . . . 105
Contents 7

8 NW 6.
novdocx (en) 17 Septem
ber 2009
5 SP8: Apache Web Server Administration Guide

novdocx (en) 17 Septem
ber 2009
About This Guide
This guide describes how to install, configure, and manage the Apache Web server using Apache Manager on NetWare® 6.5 SP8.
This guide is divided into the following sections:
Chapter 1, “Apache Web Server Overview,” on page 11Chapter 2, “Apache Installation and Configuration,” on page 19Chapter 3, “Managing Apache Web Server Preferences,” on page 31Chapter 4, “Managing Web Server Content,” on page 53Chapter 5, “Managing Apache Modules,” on page 71Chapter 6, “Managing Multiple Apache Web Servers,” on page 81Appendix A, “Apache Coexistence and Migration Issues,” on page 95Appendix B, “Installing the Apache Manager Daemon on Linux and Windows,” on page 99
Audience
It is intended for Web or network administrators who install, configure, and manage the Apache Web server on NetWare (not Linux*). NetWare developers might also find the information to be helpful.
If you are already familiar with the Apache Web server and prefer to manage it by manually modifying Apache directives in the httpd.conf file, refer to the official Apache HTTP Server Version 2.2 Documentation (http://httpd.apache.org/docs/2.2/) on the Apache Web site. However, if you are managing multiple installations of Apache across multiple platforms, you can use Apache Manager to manage them all from a single administration point, saving you time and effort. For more information about Apache Manager, see Section 2.3, “Using Apache Manager in Your Web Browser,” on page 22.
Because Apache Manager uses all of the same Apache directives you use when manually editing the httpd.conf configuration file, hypertext links to the official online Apache documentation set are included throughout this guide. These links are intended to lead you to additional information about Apache directives, including how and why each directive is used. This information can help you understand the effects of the changes you make using Apache Manager.
Feedback
We want to hear your comments and suggestions about this guide and the other documentation included with this product. Please use the User Comment feature at the bottom of each page of the online documentation.
Documentation Updates
The most recent documentation is available on the NetWare 6.5 SP8 Documentation Web site (http://www.novell.com/documentation/nw65).
About This Guide 9

10 NW 6.
novdocx (en) 17 Septem
ber 2009
Additional Documentation
Refer to the following online resources for official Apache documentation and related information:
Apache 2.2 Documentation (http://httpd.apache.org/docs/2.2/)Apache Quick Reference Card (http://www.refcards.com)
Also, a copy of the official Apache documentation set is installed to your server in the volume:\apache2\manual directory. You can access it using a Web browser after you have installed NetWare. Use your server's URL with /manual at the end of it. For example,
http://myserver.mycompany.com/manual
Documentation Conventions
In this documentation, a greater-than symbol (>) is used to separate actions within a step and items within a cross-reference path.
A trademark symbol (®, ™, etc.) denotes a Novell® trademark. An asterisk (*) denotes a third-party trademark.
When a single pathname can be written with a backslash for some platforms or a forward slash for other platforms, the pathname is presented with a backslash. Users of platforms that require a forward slash, such as Linux or UNIX*, should use forward slashes as required by your software.
5 SP8: Apache Web Server Administration Guide

1novdocx (en) 17 S
eptember 2009
1Apache Web Server Overview
The Apache Web server is the Web server of choice for more than two thirds of Web servers being used on the World Wide Web today. Its popularity comes from the fact that it is the most reliable and secure Web server available. It is an open source software, created by the Apache Foundation (http://www.apache.org), a conglomerate of technical professionals from all over the world.
Apache runs on all major platforms and is capable of hosting even the most complex Web sites and can scale to handle thousands of simultaneous connections. This guide describes the Apache Web server for NetWare®.
This overview includes the following topics:
Section 1.1, “Web Server Basics,” on page 11Section 1.2, “Benefits of Running Apache on NetWare,” on page 13Section 1.3, “Administration Instance vs. Public Instance of Apache on NetWare,” on page 14Section 1.4, “What's Different about Apache on NetWare,” on page 15Section 1.5, “Apache Manager: A Web-Based Administration Tool,” on page 17Section 1.6, “What's Next,” on page 18
1.1 Web Server BasicsThose who are familiar with Web servers in general and Apache in particular can start directly from Section 1.2, “Benefits of Running Apache on NetWare,” on page 13. Those who are new to the world of Web servers can gain helpful background information in the following topics:
Section 1.1.1, “Web Site Hosting,” on page 11Section 1.1.2, “Servlets,” on page 12Section 1.1.3, “Web Services and Applications,” on page 12
1.1.1 Web Site HostingWeb sites are not all created equal. Some are simple collections of HTML pages that contain static information, such as company background information. Even though some scripting, such as JavaScript*, might be used for creating navigation effects like rollover buttons, a simple Web site largely consists of static files. When the files are updated, it is usually by hand. Little or no processing of data is done at the server.
Conversely, a dynamic Web site is one in which information is created dynamically as it is requested either from a user or another computer. Building dynamic Web sites involves the use of servlets or Web applications, and might also involve databases (such as MySQL*) and scripting languages (such as PHP or Perl). If you are integrating legacy applications or creating business-to-business solutions, you might also need to use SOAP, UDDI, and WSDL. NetWare includes all of these open source solutions.
Web sites where products or services are bought or sold, such as Amazon.com, are examples of dynamic Web sites. Other dynamic Web sites are not seen by users, but are used as part of a supply chain process between businesses.
Apache Web Server Overview 11

12 NW 6.
novdocx (en) 17 Septem
ber 2009
Regardless of the complexity of your Web site, Apache is designed to be fast and reliable.
Although the main purpose of having a Web server is to host a Web site, you can also use Apache as the HTTP server in a partnership with an application server, such as the Novell® exteNd™ Application Server. For more information, see Section 1.1.3, “Web Services and Applications,” on page 12.
1.1.2 ServletsServlets are like small Web applications and are often used to accomplish less robust processing. They can be used to save time and money by processing information very quickly, in ways that users cannot.
For example, Novell QuickFinder™ Server is used to index file and Web content, allowing users to search for and find specific information from within large collections of information stored on one or more Web or file servers. QuickFinder Server consists of several servlets. The Highlighter servlet marks up the content of search results, highlighting all instances of the keyword that a user is searching for. For more information about QuickFinder Server and its servlets, see NW 6.5 SP8 Novell QuickFinder Server 5.0 Administration Guide.
Other types of servlets might include online calculators, shopping carts, or calendars.
Because NetWare is J2EE* compliant, servlets created to run on other J2EE compliant platforms also run on NetWare without the need for customization or rewriting any code. Simply copy the servlets to NetWare and they run.
To run servlets, you must use Tomcat, a key component of J2EE which is included with NetWare. Also created by the Apache Foundation, Tomcat is a servlet container that processes servlet requests. Apache on NetWare is preconfigured to run with Tomcat.
1.1.3 Web Services and ApplicationsNetWare offers a reliable, high-performance J2EE environment for the development and deployment of Java* based Web applications and services. In addition to the open source products included with NetWare (Apache Web server, Tomcat, and MySQL), NetWare also includes the new Novell exteNd Application Server.
Using the exteNd Application Server, you can
Integrate legacy applications, breaking down information silos that bog down the exchange of information between the organizations within your companyInteract with the business systems of other companies, such as partners and clients, by building in Web services functionality (SOAP, UDDI, and WSDL)
For more information about the exteNd Application Server and building Web applications and services, visit Novell exteNd Application Server Product page (http://www.novell.com/documentation/extend52/Docs/Start_AppServer_Help.html).
5 SP8: Apache Web Server Administration Guide

novdocx (en) 17 Septem
ber 2009
1.2 Benefits of Running Apache on NetWareApache provides many business benefits to your NetWare network that increase productivity, improve communication between departments and employees and, when used in conjunction with the Novell exteNd Application Server, turn your legacy applications and processes into integrated solutions that speed up your business.
TIP: If you install Apache as part of the Novell AMP (Apache, MySQL, PHP, Perl) preconfigured server installation option, you can choose from thousands of ready-to-run applications available from the World Wide Web from such Web sites as hotscripts.com. For more information about AMP, see NW 6.5 SP8: Web and Application Services Overview.
Here are some of the key uses and benefits of using Apache on NetWare:
Provides a highly reliable and fast Web server for hosting simple or complex Web sites, which can be used as
A method for securely sharing department-wide or company-wide information for use by employees and business partners, regardless of where they are locatedA corporate Web server for hosting your company Web site on the World Wide WebA method for sharing project information and improving team collaborationA method for sharing company policies and procedures
Offers tight integration with Novell eDirectory™ and Secure Sockets Layer (SSL) through the use of a customized NetWare-specific Apache module (mod_edir), providing a highly secure method for sharing sensitive company information over the InternetHas an easy-to-use graphical user interface that lets you
Configure and manage the Apache Web serverManage all Apache Web servers in your network from one interfaceExecute common Apache directives without manually changing the httpd.conf file, which can introduce errors
Provides a Web container for the J2EE environment included with NetWare, letting you create and host money-saving and time-saving Web services, such as:
Integration of existing incompatible legacy software applicationsInteraction of business systems between two or more companies to improve efficiencies of information exchange
Is preconfigured to work with Jakarta-Tomcat, the servlet container created by the Apache Foundation, which can be used to host servlets for automating business processesIs compatible with the new Novell exteNd Application Server for deploying Web applications and Web servicesIs ideal for Web application development and testing
Apache Web Server Overview 13

14 NW 6.
novdocx (en) 17 Septem
ber 2009
1.3 Administration Instance vs. Public Instance of Apache on NetWareThe Apache Web server is used on NetWare in two ways:
An administration server for Novell services (the administration instance), which is a required part of your NetWare installationA dedicated Web server (the public instance), which is an option during your NetWare installation if you want to install a Web server
To accomplish this, two instances of Apache are configured on your server. If, during the NetWare installation, you do not choose to install a Web server, only the required administration instance of Apache is installed.
1.3.1 Using Apache As a NetWare Administration ServerApache is used as a NetWare administration server for several products including Novell iFolder® and iManager. Some products, such as NetWare Remote Manager (NRM), do not depend on Apache because they have their own HTTP stacks.
For example, when you use iManager, which is accessible from any Web browser (including the new Web browser now available from the NetWare GUI), it is the administration instance of the Apache Web server that is serving up the data between the Web browser and NetWare. Novell products that rely on the administration instance of Apache include:
iManagerNovell eGuide™Virtual OfficeGroupWise® WebAccessiPrintiFolderQuickFinder
For this reason, the administration instance of Apache is installed by default, even if you do not choose it as your Web server. The administration instance of Apache is created in its own directory (sys:\adminsrv).
1.3.2 Using Apache As a Dedicated Web ServerWhen you choose Apache as your Web server, a second instance is installed in the operating system address space, where you can use it as a dedicated Web server. Whether you need it for hosting a simple department intranet site or for use in hosting more complex Web services or business-to-business solutions, Apache provides very fast and reliable HTTP services.
This public instance of Apache is installed in the standard location for Apache software (sys:\apache2). It contains the subdirectories described in the following figure.
5 SP8: Apache Web Server Administration Guide

novdocx (en) 17 Septem
ber 2009
Figure 1-1 Apache Subdirectories
1.4 What's Different about Apache on NetWareIf you are already familiar with the Apache Web server running on other platforms, you will find almost no differences on the NetWare platform. All of the same modules available on other platforms are available on NetWare, with a few additional modules such as mod_edir and mod_auth_ldap. The mod_edir module enables Web pages to be served up from a user's home directory and provides remote file system access and authentication services. The mod_auth_ldap module enables LDAP authentication to LDAP directories including Novell eDirectory.
The key differences are:
Section 1.4.1, “eDirectory Integration,” on page 15Section 1.4.2, “Multi-Threading,” on page 16Section 1.4.3, “Pathname Syntax,” on page 16Section 1.4.4, “Loading Modules at Runtime,” on page 16
IMPORTANT: One thing that is not different about Apache on NetWare is the need for good security. The same security measures should be taken with Apache on NetWare as you would take on any other platform, as described in Apache Security Tips (http://httpd.apache.org/docs/2.2/misc/security_tips.html).
1.4.1 eDirectory IntegrationRunning Apache on NetWare provides one of the industry's most secure Web servers. This is because of NetWare's tight integration with eDirectory through the mod_edir module and the built-in services of SSL that run at the core of the NetWare operating system.
Together, eDirectory and SSL keep your business information safe from intruders yet accessible from anywhere by people who have the proper access rights.
Root directory where the Public instance of Apache is installed.
Directory where the httpd.confconfiguration file is stored.
Root Web directory where Webcontent is stored.
Contains a snapshot of the officialApache documentation. Visithttp://httpd.apache.org/docs-2.0/for the latest documentation.
Contains Apache modules.
Apache Web Server Overview 15

16 NW 6.
novdocx (en) 17 Septem
ber 2009
1.4.2 Multi-ThreadingBecause Apache on NetWare is multi-threaded, it does not use a separate process for each request, as Apache does in some Linux and UNIX implementations. Instead, multiple threads run simultaneously: a single parent thread, plus multiple worker threads that handle the requests.
Because of this, the directives used for managing processes are used differently on NetWare, as described in the following table:
Table 1-1 Process Directives
The information in the this table overrides the corresponding information provided in the Apache Directive Index (http://httpd.apache.org/docs/2.2/mod/directives.html) when the directives are used on NetWare.
1.4.3 Pathname SyntaxDirectives that accept filenames as arguments must use fully qualified NetWare pathnames, including the volume name. For example, sys:/apache2/htdocs. If the volume name is not specified, Apache defaults to the sys: volume.
Also, because Apache uses Linux/UNIX style pathnames internally, you must use forward slashes (/) in directive arguments rather than the backslashes (\) typically used in NetWare pathnames.
1.4.4 Loading Modules at RuntimeApache on NetWare has the ability to load modules at runtime, without recompiling the server.
A number of external modules can be loaded from the \apache2\modules directory. To activate these, or other modules, the LoadModule directive must be used. For example, to activate the status module, use the following (in addition to the status-activating directives in access.conf):
Directive Usage on NetWare
MaxRequestsPerChild As on Linux and UNIX, this directive controls how many requests a worker thread serves before exiting. The default setting of 0 (zero) causes the thread to continue servicing requests indefinitely and is recommended on NetWare.
MaxSpareThreads Instructs the server to begin terminating worker threads if the number of idle threads ever exceeds this value. The default setting of 75 is recommended on NetWare.
MaxThreads Limits the total number of worker threads to a maximum value. The default setting of 250 is recommended on NetWare.
MinSpareThreads Instructs the server to spawn additional worker threads if the number of idle threads ever falls below this value.The default setting of 10 is recommended on NetWare.
StartThreads Specifies how many threads the server should start with. The default setting of 50 is recommended on NetWare.
ThreadStackSize Specifies the stack size of each worker thread. The default setting of 65536 is recommended on NetWare.
5 SP8: Apache Web Server Administration Guide

novdocx (en) 17 Septem
ber 2009
LoadModule status_module modules/status.nlm
See Apache Module mod_so (http://httpd.apache.org/docs/2.2/mod/mod_so.html) for more information about creating loadable modules.
When configuring Apache manually, refer to the Apache 2.2 documentation (http://httpd.apache.org/docs/2.2/).
1.5 Apache Manager: A Web-Based Administration ToolOther platforms require you to manually edit configuration files to configure Apache, but NetWare includes a simple, Web-based graphical user interface named Apache Manager that updates the configuration files for you.
If you have multiple instances of Apache running on various platforms in your network—sometimes called a server farm—you can control all of them from the Multiple Server Administration pages of Apache Manager, giving you single-point access to, and control over, all of your Web servers.
Figure 1-2 Apache Manager
If you are already familiar with Apache and are comfortable configuring it manually, you can continue to manage it manually on NetWare. However, a single typographical error in the context of the configuration file can render its content inaccessible or even shut down the Apache Web server.
Apache Web Server Overview 17
18 NW 6.
novdocx (en) 17 Septem
ber 2009
Using Apache Manager decreases the potential for human error, saving you and your customers time and unnecessary frustration. Also, Apache Manager lets you control Apache from anywhere that you have Internet access, even from remote locations, provided you have access rights to connect through your company firewall.
For more information about Apache Manager, see Section 2.2, “Configuring and Managing Apache on NetWare,” on page 22.
1.6 What's NextIf you have not yet installed Apache as your Web server, see Chapter 2, “Apache Installation and Configuration,” on page 19.If you have already installed Apache and want to begin managing it, see Chapter 3, “Managing Apache Web Server Preferences,” on page 31.For an overview of J2EE and Web services, see NW 6.5 SP8: Web and Application Services Overview.
5 SP8: Apache Web Server Administration Guide

2novdocx (en) 17 S
eptember 2009
2Apache Installation and Configuration
Apache Web Server 2.0 or later is automatically installed during the NetWare® 6.5 or later installation process. This instance of Apache is used by NetWare features and products, acting as an administration server. For more information, see Section 1.3, “Administration Instance vs. Public Instance of Apache on NetWare,” on page 14.
In addition, you can choose to install a public instance of Apache for your own use in hosting Web sites. You can also install Apache with the Tomcat Servlet Container and host servlets and JavaServer* Pages (JSPs). If you want to host a database application, you can also select the AMP (Apache, MySQL, PHP, Perl) Server from the list of preconfigured servers available during the NetWare installation.
IMPORTANT: If you have one or more existing Web servers already running in your system, see Appendix A, “Apache Coexistence and Migration Issues,” on page 95 before starting to install Apache.
This section includes the following topics:
Section 2.1, “Deciding How to Install Apache on NetWare,” on page 19Section 2.2, “Configuring and Managing Apache on NetWare,” on page 22Section 2.3, “Using Apache Manager in Your Web Browser,” on page 22Section 2.4, “Using Apache in a Cluster for High Availability,” on page 29Section 2.5, “What's Next,” on page 30
In addition to the product documentation, you might benefit from the detailed, step-by-step instructions in the following NetWare Cool Solutions articles as you install Apache:
Netware 6.5 Web Components Part 1: Fresh Install (http://www.novell.com/coolsolutions/feature/428.html)Netware 6.5 Web Components Part 2: Upgrade (http://www.novell.com/coolsolutions/feature/440.html)
2.1 Deciding How to Install Apache on NetWareYou can install the public instance of Apache during or after the NetWare installation. (The administration instance of Apache is installed by default.) During the initial installation process, you can include Apache in your NetWare installation in three different configurations:
Section 2.1.1, “NetWare AMP (Apache, MySQL, PHP, Perl) Server,” on page 20Section 2.1.2, “Apache/Tomcat Server,” on page 20Section 2.1.3, “Apache 2 Web Server and Tomcat 4 Servlet Container Components,” on page 21
Apache Installation and Configuration 19

20 NW 6.
novdocx (en) 17 Septem
ber 2009
After you have decided which installation option to use, see NW65 SP8: Installation Guide for detailed installation instructions.
NOTE: After the initial NetWare installation, you can use the NetWare post-install program from the NetWare GUI console to add additional products to your NetWare server. For instructions, see NW65 SP8: Installation Guide.
2.1.1 NetWare AMP (Apache, MySQL, PHP, Perl) ServerIn the Choose a Pattern dialog box of the NetWare Installation program, select NetWare AMP (Apache, MySQL, PGP, Perl) Server. Select this option if you want to dedicate a NetWare server to hosting full-featured Web sites.
Figure 2-1 Choose NetWare AMP
This option installs Apache Web Server 2.0, MySQL 4.0, and the PHP and Perl scripting engines. It does not install Tomcat.
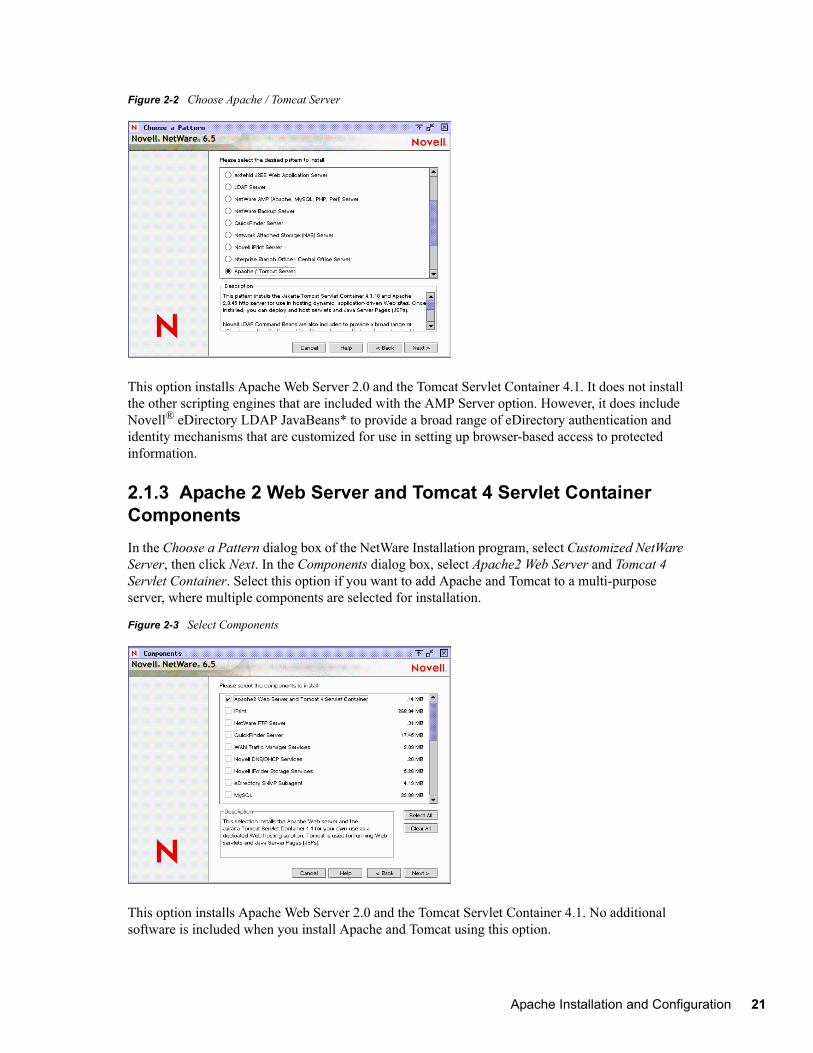
2.1.2 Apache/Tomcat ServerIn the Choose a Pattern dialog box of the NetWare Installation program, select Apache/Tomcat Server. Select this option if you wanted to dedicate a NetWare server to hosting Web sites that can be easily integrated with eDirectory™, and deploying and hosting servlets and JSPs.
5 SP8: Apache Web Server Administration Guide
novdocx (en) 17 Septem
ber 2009
Figure 2-2 Choose Apache / Tomcat Server
This option installs Apache Web Server 2.0 and the Tomcat Servlet Container 4.1. It does not install the other scripting engines that are included with the AMP Server option. However, it does include Novell® eDirectory LDAP JavaBeans* to provide a broad range of eDirectory authentication and identity mechanisms that are customized for use in setting up browser-based access to protected information.
2.1.3 Apache 2 Web Server and Tomcat 4 Servlet Container ComponentsIn the Choose a Pattern dialog box of the NetWare Installation program, select Customized NetWare Server, then click Next. In the Components dialog box, select Apache2 Web Server and Tomcat 4 Servlet Container. Select this option if you want to add Apache and Tomcat to a multi-purpose server, where multiple components are selected for installation.
Figure 2-3 Select Components
This option installs Apache Web Server 2.0 and the Tomcat Servlet Container 4.1. No additional software is included when you install Apache and Tomcat using this option.
Apache Installation and Configuration 21

22 NW 6.
novdocx (en) 17 Septem
ber 2009
Installing the Administration Instance of Apache
As mentioned earlier, the administration instance of the Apache Web server is automatically installed during the NetWare installation. However, if for any reason you need to install it after you have installed NetWare, you can do so by running the NetWare post-installation program from the NetWare GUI console or the NetWare Deployment Manager and then selecting Apache2 Admin Server.
For detailed information about installing products after installing NetWare, see NW 6.5 SP8: Web and Application Services Overview.
IMPORTANT: If you change the default port number (2200) of the administration instance of the Apache Web server, you must restart both NetWare Web Manager (the administration instance of the Apache Web server) and the Tomcat Servlet Container for the change to take effect. To restart Apache, enter admsrvdn at the NetWare system console, then enter admsrvup. To restart Tomcat, enter tcadmdn, then enter tomcat4.
2.2 Configuring and Managing Apache on NetWareThe Apache Web server is configured primarily through the use of Apache directives, which are commands with values assigned to them in the apache2/conf/httpd.conf file. Apache reads this file at startup (and periodically thereafter) and runs according to the specified values.
The Apache configuration file is a simple text file containing all of the directives necessary to configure the Web server and any additional modules that might be loaded. These directives and modules are well documented on the Apache Web site, making it relatively easy to configure and manage your server.
However, when manually editing the httpd.conf file, it is easy to introduce errors by incorrectly typing the name of a directive or omitting other necessary components of the syntax. A single typographical error or incorrect syntax can cause problems for your server and interrupt the services you provide. In addition, if you are managing several installations of Apache, keeping all of their httpd.conf files synchronized can waste time and cause additional problems.
Apache Manager, the Web-based administration tool included with NetWare, offers a simple GUI alternative to the httpd.conf file, making it easier to manage Apache. You can also use the Multiple Server Administration mode to manage multiple installations of Apache running on multiple servers in your network. In addition, because Apache Manager is a Java application, it is platform independent.
2.3 Using Apache Manager in Your Web BrowserApache Manager offers many advantages over manually configuring Apache:
Changes to directives are done electronically, reducing the risk of errors.You do not need to know all of the Apache directives or modules in order to configure Apache.You can manage multiple installations of the Apache Web server from a single interface.
5 SP8: Apache Web Server Administration Guide

novdocx (en) 17 Septem
ber 2009
You do not need to edit and maintain multiple configuration files where many of the same directives are being used on each Apache Web server.It includes a thorough help system that includes hypertext links to this manual (NW 65 SP8: Apache Web Server Administration Guide), and to specific topics within the official Apache documentation set created by the Apache Foundation (http://www.apache.org).
Apache Manager includes two interfaces: Single Server Administration and Multiple Server Administration. The first interface is used to manage a single instance of the Apache Web server at a time. The second interface is best used if you are running multiple instances of Apache and want to consolidate the configuration changes you make.
Figure 2-4 Apache Manager
Section 2.3.1, “Using Apache Manager's Single Server Administration Interface,” on page 23Section 2.3.2, “Using Apache Manager's Multiple Server Administration,” on page 27Section 2.3.3, “Saving Configuration Changes and Restarting Apache in Apache Manager,” on page 29
NOTE: You can also install and use Apache Manager on Linux and Windows*. For instructions, see Appendix B, “Installing the Apache Manager Daemon on Linux and Windows,” on page 99.
2.3.1 Using Apache Manager's Single Server Administration InterfaceIf you are configuring a single Apache Web server, use the Single Server Administration interface of Apache Manager. It is designed to let you manage one Apache Web server at a time.
Apache Installation and Configuration 23

24 NW 6.
novdocx (en) 17 Septem
ber 2009
The Single Server Administration interface lets you:
Manage server preferences, such as adjusting the thread stack size, modifying network settings, and configuring MIME typesView access and error logs and adjust log settingsManage content settings, such as setting up additional document or user home directories, configuring URL forwarding or CGI extensions, and setting up virtual hostsEnable or disable Apache modules (mod_php, mod_perl, mod_nsn, and mod_cache)Change Apache configuration administration modes (file mode or eDirectory mode), which specifies where the Apache configuration is be stored, as described in “Switching between File Mode and eDirectory Mode” on page 25.
To access Apache Manager's Single Server Administration interface:
1 Using a Web browser, open the secure version of the NetWare Welcome Web site using your server's URL. For example:
https://myserver.mycompany.com:2200
or
https://172.16.5.18:2200
Apache uses Secure Sockets Layer (SSL) to keep your Web administration information secure, hence the https instead of http in the URL.
2 When prompted, enter your administrator username and password, then click Login.
5 SP8: Apache Web Server Administration Guide

novdocx (en) 17 Septem
ber 2009
3 In the left frame of the NetWare Welcome Web site home page, click next to Open Source. 4 Click Apache 2.0.
5 Under Apache 2.0 Links, click Administer Single Apache Server.
6 Use the Administer Single Apache Server interface to manage each of your Apache servers independently, as described in the following sections:
“Switching between File Mode and eDirectory Mode” on page 25“Managing Apache Web Server Preferences” on page 31“Managing Web Server Content” on page 53“Managing Apache Modules” on page 71
Switching between File Mode and eDirectory Mode
The Single Server Administration interface lets you choose where Apache's configuration is stored. Configurations can be stored in one of two places:
In a file (httpd.conf) on the same server that is running Apache Manager, referred to as file modeIn eDirectory, referred to as eDirectory mode
When using file mode, the configuration changes you make using Apache Manager are made directly to the httpd.conf configuration file stored by default in the volume:\\apache2\conf directory.
Apache Installation and Configuration 25

26 NW 6.
novdocx (en) 17 Septem
ber 2009
Use file mode if you are running a single instance of the Apache Web server. There is no added value to using eDirectory mode if you are using only one or two instances of Apache running on the same server. However, if you are running multiple installations of Apache across multiple servers, you should consider using eDirectory mode.
When using eDirectory mode, a Java daemon, referred to as the configuration daemon, imports the contents of the Apache configuration file (httpd.conf) from each Web server into eDirectory, where it is stored and managed. The configuration daemon constantly checks for changes to httpd.conf and updates the configurations stored in eDirectory. It then restarts the Web server so that the changes can take effect.
To switch Apache Manager to eDirectory mode:
1 At the NetWare system console, enter ap2webman to run the configuration daemon.2 From a Web browser running on a client in your network, open the Single Server
Administration interface of Apache Manager.3 Click Administration Mode.4 Select eDirectory.5 Click Save > Save to save your changes.
orClick Save > Save and Apply to save your changes and restart Apache so your changes are immediately put into effect.
When the configuration daemon is started, it automatically imports your Web server's configuration into eDirectory. The Apache configuration for each instance of the Apache Web server that is installed on the server where you run the configuration daemon is imported into eDirectory. When you have finished running the daemon and changed the administration mode to directory, a list of all of your Web servers is returned in your Web browser. You can then click any one of them to administer it.
For more information about the configuration daemon and how the directory is used, see Chapter 6, “Managing Multiple Apache Web Servers,” on page 81.
To switch back to file mode from eDirectory mode:
1 Open the Single Server Administration interface of Apache Manager.2 Click Administration Mode.3 Select File.4 Click Save > Save to save your changes.
orClick Save > Save and Apply to save your changes and restart Apache so your changes are immediately put into effect.
5 SP8: Apache Web Server Administration Guide

novdocx (en) 17 Septem
ber 2009
2.3.2 Using Apache Manager's Multiple Server AdministrationIf you are configuring multiple installations of Apache, you can use the Multiple Server Administration mode of Apache Manager. The Multiple Server Administration interface of Apache Manager stores Apache configurations in Novell eDirectory so that a change to one Web server's configuration can be inherited by all other servers defined in a Server Group. The Multiple Server Administration interface always functions in eDirectory mode.
IMPORTANT: This mode of Apache Manager requires that you have a good understanding of Apache directives. You will be required to type directives and to know the correct syntax. If you are familiar with Apache directives, then you should be able to use the Multiple Server Administration mode.
When using the Multiple Apache Administration interface, a special daemon is used to record Apache configuration changes using eDirectory. Understanding how this works and how eDirectory makes it possible to share configurations between different Apache servers can help you understand how to take advantage of the Multiple Server Administration interface.
For detailed information about using this version of Apache Manager, see Chapter 6, “Managing Multiple Apache Web Servers,” on page 81.
To start Apache Manager's Multiple Server Administration interface:
1 Using a Web browser, open the secure version of the NetWare Welcome Web site using your server's URL. For example:
https://myserver.mycompany.com:2200
or
https://172.16.5.18:2200
Apache uses Secure Sockets Layer (SSL) to keep your Web administration information secure, hence the https instead of http in the URL.
2 When prompted, enter your administrator username and password, then click Login.
Apache Installation and Configuration 27

28 NW 6.
novdocx (en) 17 Septem
ber 2009
3 In the left frame of the NetWare Welcome Web site home page, click next to Open Source. 4 Click Apache 2.0.
5 Under Apache 2.0 Links, click Administer Multiple Apache Servers.
5 SP8: Apache Web Server Administration Guide

novdocx (en) 17 Septem
ber 2009
6 Use the Administer Multiple Apache Server interface to manage groups of Apache servers, as described in Chapter 6, “Managing Multiple Apache Web Servers,” on page 81
2.3.3 Saving Configuration Changes and Restarting Apache in Apache ManagerIn Apache Manager, whenever you change Apache configuration settings and click Save, you are offered the following choices:
When you save your changes, the httpd.conf file is updated if you are running Apache Single Server Administration in file mode. If you are running in eDirectory mode, the changes are saved in eDirectory. However, simply saving the modified configuration settings does not change the current behavior of Apache. For information about the alternative modes, see “Switching between File Mode and eDirectory Mode” on page 25.
When you save and apply your changes, Apache is restarted so that your changes are put into effect.
2.4 Using Apache in a Cluster for High AvailabilityApache can be used with Novell Cluster Services™ to provide high availability support to the customers you service. This means that if one server goes down, another server takes over and customers never experience an interruption to the services you provide.
Apache Installation and Configuration 29

30 NW 6.
novdocx (en) 17 Septem
ber 2009
Using Apache in a cluster requires that you first successfully install and configure Novell Cluster Services and then set up Apache to work in the clustering environment. For information about how to set up Apache in a cluster, see NW6.5 SP8: Novell Cluster Services 1.8.5 Administration Guide.
2.5 What's NextAfter you have installed Apache, choose from the following for configuration and management information:
Chapter 3, “Managing Apache Web Server Preferences,” on page 31Chapter 4, “Managing Web Server Content,” on page 53Chapter 5, “Managing Apache Modules,” on page 71Chapter 6, “Managing Multiple Apache Web Servers,” on page 81Apache Performance Tuning (http://httpd.apache.org/docs/2.2/misc/perf-tuning.html)Developer Documentation for Apache 2.0 (http://httpd.apache.org/docs/2.2/developer/)
5 SP8: Apache Web Server Administration Guide

3novdocx (en) 17 S
eptember 2009
3Managing Apache Web Server Preferences
From the Preferences tab of Apache Manager's Single Server Administration, you can perform many tasks, including starting and stopping the Web server, adjusting thread stack sizes for performance tuning purposes, and managing listen ports.
Section 3.1, “Starting and Stopping Apache,” on page 31Section 3.2, “Viewing Configuration Settings,” on page 35Section 3.3, “Restoring Configuration Settings,” on page 35Section 3.4, “Performance Tuning,” on page 36Section 3.5, “Managing MIME Types,” on page 40Section 3.6, “Specifying an Administrator E-Mail Address for Inclusion in Error Messages,” on page 42Section 3.7, “Setting Up Server-Side Includes,” on page 43Section 3.8, “Managing Listen Ports,” on page 43Section 3.9, “Managing Error Responses,” on page 45Section 3.10, “Working with Server Logs,” on page 45Section 3.11, “What's Next,” on page 52
3.1 Starting and Stopping ApacheAfter it is installed, Apache runs constantly, listening for and accepting requests. It starts automatically each time you restart the server.
When you stop Apache, all threads that are currently running are allowed to finish. Therefore, it might take a few seconds for Apache to complete its shutdown process and for the status to change to Down.The apache.nlm itself does not shut down, just the worker threads, so Apache restarts very quickly.
You can start and stop Apache using Apache Manager or the NetWare® system console.
Section 3.1.1, “Starting and Stopping Apache in Apache Manager,” on page 32“Starting and Stopping Apache at the Server Console” on page 32
Managing Apache Web Server Preferences 31
32 NW 6.
novdocx (en) 17 Septem
ber 2009
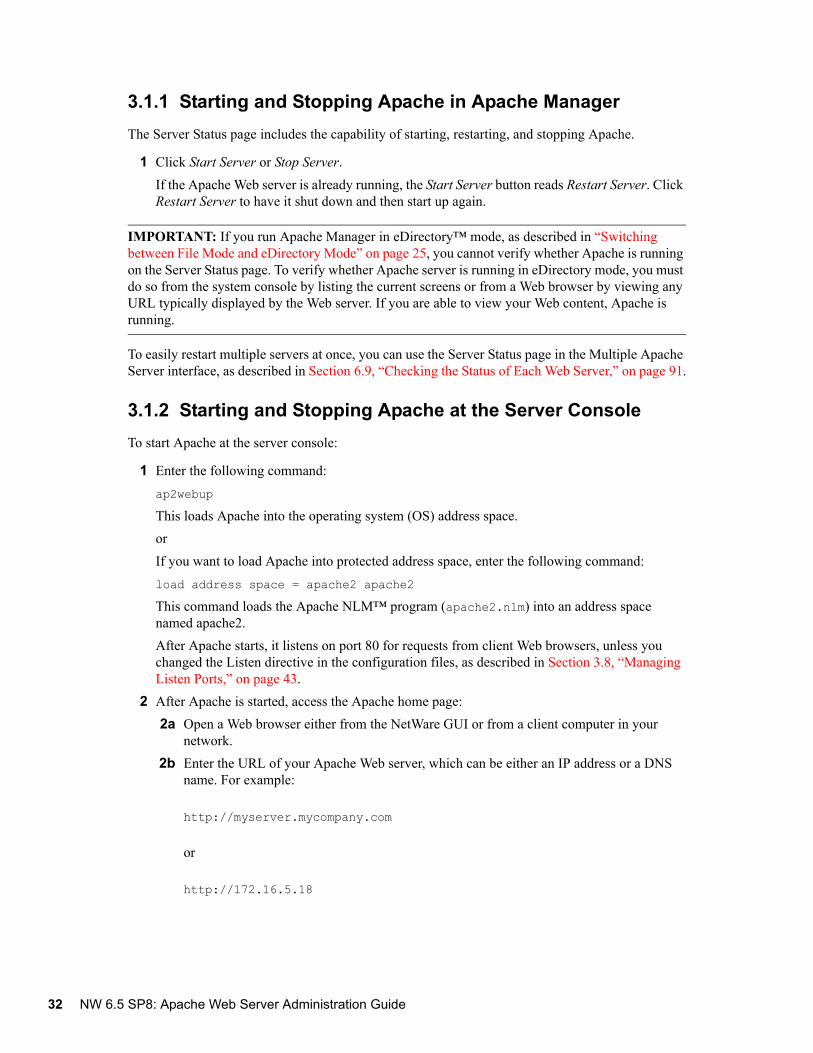
3.1.1 Starting and Stopping Apache in Apache ManagerThe Server Status page includes the capability of starting, restarting, and stopping Apache.
1 Click Start Server or Stop Server.If the Apache Web server is already running, the Start Server button reads Restart Server. Click Restart Server to have it shut down and then start up again.
IMPORTANT: If you run Apache Manager in eDirectory™ mode, as described in “Switching between File Mode and eDirectory Mode” on page 25, you cannot verify whether Apache is running on the Server Status page. To verify whether Apache server is running in eDirectory mode, you must do so from the system console by listing the current screens or from a Web browser by viewing any URL typically displayed by the Web server. If you are able to view your Web content, Apache is running.
To easily restart multiple servers at once, you can use the Server Status page in the Multiple Apache Server interface, as described in Section 6.9, “Checking the Status of Each Web Server,” on page 91.
3.1.2 Starting and Stopping Apache at the Server ConsoleTo start Apache at the server console:
1 Enter the following command:ap2webup
This loads Apache into the operating system (OS) address space.orIf you want to load Apache into protected address space, enter the following command: load address space = apache2 apache2
This command loads the Apache NLM™ program (apache2.nlm) into an address space named apache2. After Apache starts, it listens on port 80 for requests from client Web browsers, unless you changed the Listen directive in the configuration files, as described in Section 3.8, “Managing Listen Ports,” on page 43.
2 After Apache is started, access the Apache home page:2a Open a Web browser either from the NetWare GUI or from a client computer in your
network.2b Enter the URL of your Apache Web server, which can be either an IP address or a DNS
name. For example:
http://myserver.mycompany.com
or
http://172.16.5.18
5 SP8: Apache Web Server Administration Guide

novdocx (en) 17 Septem
ber 2009
By default, Apache displays the index.html file in the volume:/apache2/htdocs directory, which is the directory defined by default as the root Web directory. When NetWare is first installed, the index.html file redirects you to the OES Welcome page.
If the index.html file is not found, Apache next tries to display a file named index.html.language_code, where language_code is a two-letter extension. If there is no response from Apache, look in the volume:/apache2/logs/error_log file for details.
3 Replace the content in the index.html file or language-specific version with your own home page content.After Apache is running correctly, you can make changes to its default configuration by editing the files in the /apache2/conf directory if you prefer editing text files to using Apache Manager.
To stop Apache at the server console:
1 To unload Apache running in the OS address space, enter the following command:ap2webdn
orIf Apache is running in a protected address space, specify the address space in the unload statement. For example:unload address space = apache2 apache2
apache2 shutdown -p apache2
Using either of these commands unloads the Apache NLM program (apache2.nlm) from an address space named apache2.
To display a list of command line options for the apache2 command, enter apache2 help when Apache is running. When Apache is not running, enter apache2 -h.
Managing Apache Web Server Preferences 33
34 NW 6.
novdocx (en) 17 Septem
ber 2009
Running Additional Instances of Apache Simultaneously
You can run multiple instances of Apache concurrently on NetWare by loading each additional instance into its own protected address space.
To do so, each additional instance must have its own address space name. For example:
load address space = apache3 apache2
load address space = apache4 apache2
Using the examples above would create two additional instances of Apache with the unique address space names of apache3 and apache4.
However, each instance of Apache must have its own separate httpd.conf file where unique ports, error and access log filenames can be specified. Using the same configuration file for multiple instances of Apaches causes various errors, including port conflicts. Therefore, the load command must include the full pathname of the httpd.conf file for each instance:
load address space = instance apache2 -f \directory\httpd.conf
where instance represents either apache3 or apache4 from the previous example and directory represents the full path to the httpd.conf file.
Starting or Stopping the Administration Instance of Apache
To start the Apache Admin server, enter admsrvup at the system console. To stop the Apache Admin server, enter admsrvdn.
Verifying Server Status from the NetWare Console
The following command line directives can be used at the system console to modify or display information about Apache:
Table 3-1 Display Apache Information
Directive Effect
DIRECTIVES Displays a list of all available directives.
MODULES Displays a list of loaded modules, both built-in and external.
RESTART Instructs Apache to terminate all running worker threads as they become idle, reread the configuration file, then restart each worker thread based on the new configuration.
SETTINGS Enables or disables the thread status display on the console. When enabled, the number of threads currently running is displayed along with the status of each thread.
SHUTDOWN Terminates the running instance of the Apache Web server.
5 SP8: Apache Web Server Administration Guide

novdocx (en) 17 Septem
ber 2009
IMPORTANT: At the NetWare console prompt, each directive must be preceded by apache2, as in servername:apache2 directive. Also, Apache must be running. (See “Starting and Stopping Apache at the Server Console” on page 32.)
3.2 Viewing Configuration SettingsThe View Configuration page of Apache Manager lists all Apache directives and lets you configure them by clicking a directive.
Figure 3-1 Apache Configuration View
The settings are stored in the /apache2/conf/httpd.conf file. For more information about Apache configuration files, see Configuration Files (http://httpd.apache.org/docs/2.2/configuring.html) in the Apache documentation.
The server's content settings depend on its configuration. Common server content settings include the server's document directory, its index filenames, name and location of its access log, and default MIME type.
3.3 Restoring Configuration SettingsEach time you change a configuration setting in Apache Manager, the previous version of the httpd.conf file is saved as a backup copy (up to 999 copies). The Restore Configuration page in Apache Manager lists each change you have made.
VERSION Displays version information about the currently running instance of Apache.
Directive Effect
Managing Apache Web Server Preferences 35

36 NW 6.
novdocx (en) 17 Septem
ber 2009
Figure 3-2 Apache Restore Configuration
If you change a configuration setting and the results are not what you expect, you can easily return to the previous httpd.conf file by clicking Restore in the change list on the Restore Configuration page.
When Apache Manager is running in eDirectory mode, it depends on a separate daemon to communicate with eDirectory. There could be a slight delay after you click Save and Apply. If, after a few minutes, Apache Manager does not indicate that the restore has taken place, make sure that the daemon is running by entering ap2webman at the NetWare system console, as described in “Switching between File Mode and eDirectory Mode” on page 25.
3.4 Performance TuningApache 2.0 includes performance enhancements that increase throughput and scalability. Most of these are enabled by default. In addition, on the Performance Tuning page in Apache Manager, you can change the configuration of Apache to best serve the needs for which you are using it.
Figure 3-3 Apache Performance Tuning
5 SP8: Apache Web Server Administration Guide

novdocx (en) 17 Septem
ber 2009
For example, you can increase the maximum number of threads allowed to run simultaneously if your Web server is getting a larger number of client visits. You can also disable the Keep Alive feature to restrict persistent connections, which some Web clients request when they connect to your server.
“Adjusting Thread Settings” on page 37“Adjusting Keep Alive Settings” on page 39“Using DNS” on page 40“Additional Performance Tuning Information” on page 40
3.4.1 Adjusting Thread SettingsBecause Apache is very self-regulating, most sites do not need to adjust the default values of any of the thread directives. However, if you need to make changes to any of the thread settings, continue reading.
“Modifying the Thread Stack Size” on page 37“Modifying the Number of Start Threads” on page 38“Modifying Minimum Spare Threads” on page 38“Modifying Maximum Spare Threads” on page 39“Modifying Maximum Total Threads” on page 39
For more information about thread directives, see ThreadStackSize (http://httpd.apache.org/docs/2.2/mod/mpm_common.html#threadstacksize) directive on the Apache Web site.
NOTE: Because Apache for NetWare is multi-threaded, it does not use a separate process for each request, as Apache does in some Linux/UNIX implementations. Apache for NetWare uses a parent thread and multiple child threads, which handle all requests.
Modifying the Thread Stack Size
A thread stack is a piece of scratch memory that a thread uses to store information temporarily. If there is not enough stack space and the thread requires more in order to continue, the server abends. Intensive applications usually require more stack space. Modules such as mod_perl or mod_php might require a thread to yield more stack space. However, 65,536 bytes is typically large enough.
Keep in mind that increasing the stack size consumes more system resources because each thread requires a certain amount of space. Therefore, increasing the stack size should be done only after considering what is required based on the applications and modules that are being used.
The ThreadStackSize (http://httpd.apache.org/docs/2.2/mod/mpm_common.html#threadstacksize) directive tells the server what stack size to use for each running thread. If a stack overflow occurs, you need to increase this number.
1 On the Performance Tuning page, specify a numerical value in the Thread Stack Size field. The default is 65536.
2 Click Save > Save to save your changes.or
Managing Apache Web Server Preferences 37
38 NW 6.
novdocx (en) 17 Septem
ber 2009
Click Save > Save and Apply to save your changes and restart Apache so your changes are immediately put into effect.For information about where configuration information is stored, see Section 2.3.3, “Saving Configuration Changes and Restarting Apache in Apache Manager,” on page 29.
Modifying the Number of Start Threads
The StartThreads (http://httpd.apache.org/docs/2.2/mod/mpm_common.html#startthreads) directive specifies the number of child server processes that are to be created when the Web server is started. Because the number of processes is dynamically controlled according to system load, there is usually little reason to adjust this parameter.
1 On the Performance Tuning page, specify a numerical value in the Start Threads field. The default is 50.
2 Click Save > Save to save your changes.orClick Save > Save and Apply to save your changes and restart Apache so your changes are immediately put into effect.For information about where configuration information is stored, see Section 2.3.3, “Saving Configuration Changes and Restarting Apache in Apache Manager,” on page 29.
Modifying Minimum Spare Threads
The MinSpareThreads (http://httpd.apache.org/docs/2.2/mod/mpm_common.html#minsparethreads) directive defines the minimum number of idle threads set aside to process surges in client requests to the Web server.
Different multiprocessing modules (MPMs) deal with this directive differently. On NetWare, the mpm_netware module is used to control all of the threading directives and functionality.
1 On the Performance Tuning page, specify a numerical value in the Minimum Spare Threads field.The default is 10.
2 Click Save > Save to save your changes.orClick Save > Save and Apply to save your changes and restart Apache so your changes are immediately put into effect.For information about where configuration information is stored, see Section 2.3.3, “Saving Configuration Changes and Restarting Apache in Apache Manager,” on page 29.
5 SP8: Apache Web Server Administration Guide
novdocx (en) 17 Septem
ber 2009
Modifying Maximum Spare Threads
The MaxSpareThreads (http://httpd.apache.org/docs/2.2/mod/mpm_common.html#maxsparethreads) directive lets you define the maximum number of idle threads allowed. Again, different MPMs deal with this directive differently. On NetWare, the mpm_netware module is used. Therefore, this directive tracks the minimum spare threads value on a server-wide basis.
1 On the Performance Tuning page, specify a numerical value in the Maximum Spare Threads field.The default is 75.
2 Click Save > Save to save your changes.orClick Save > Save and Apply to save your changes and restart Apache so your changes are immediately put into effect.For information about where configuration information is stored, see Section 2.3.3, “Saving Configuration Changes and Restarting Apache in Apache Manager,” on page 29.
Modifying Maximum Total Threads
The MaxThreads (http://httpd.apache.org/docs/2.2/mod/mpm_netware.html#maxthreads) directive specifies the maximum number of worker threads allowed.
1 On the Performance Tuning page, specify a numerical value in the Maximum Total Threads field.The default is 250.
2 Click Save > Save to save your changes.orClick Save > Save and Apply to save your changes and restart Apache so your changes are immediately put into effect.For information about where configuration information is stored, see Section 2.3.3, “Saving Configuration Changes and Restarting Apache in Apache Manager,” on page 29.
3.4.2 Adjusting Keep Alive SettingsKeep Alive provides live HTTP sessions that allow multiple requests to be sent over the same TCP connection. In some cases this has been shown to result in an almost 50% increase in latency times for HTML documents with many images.
To modify Keep Alive settings:
1 On the Performance Tuning page, click Yes for Enable Keep Alive, then adjust the following settings as needed:Maximum Keep Alive Requests: When Keep Alive is enabled, it limits the number of requests allowed per connection. The default setting is 100. For maximum server performance, increase this setting until desired performance is reached.Entering 0 (zero) in the Maximum Keep Alive Requests field allows an unlimited amount of connections. (See MaxKeepAliveRequests (http://httpd.apache.org/docs/2.2/mod/core.html#maxkeepaliverequests) directive on the Apache Web site.
Managing Apache Web Server Preferences 39
40 NW 6.
novdocx (en) 17 Septem
ber 2009
Keep Alive Timeout: The KeepAliveTimeout (http://httpd.apache.org/docs/2.2/mod/core.html#keepalivetimeout) directive lets you specify (in seconds) how long Apache waits for a subsequent request before closing a TCP connection. After a request has been received, the timeout value specified by this directive applies.Setting Keep Alive Timeout to a high value can cause performance problems for heavily loaded servers. The higher the timeout, the more server processes are kept busy waiting on connections with idle clients.orClick No.
2 Click Save > Save to save your changes.orClick Save > Save and Apply to save your changes and restart Apache so your changes are immediately put into effect.For information about where configuration information is stored, see Section 2.3.3, “Saving Configuration Changes and Restarting Apache in Apache Manager,” on page 29.
3.4.3 Using DNSWhen enabled, the HostnameLookups (http://httpd.apache.org/docs/2.2/mod/core.html#hostnamelookups) directive records the names of clients or their IP addresses, for example www.apache.org (when on, or enabled) or 172.16.5.18 (when off, or disabled).
The default is set to Off. This is because when this directive enabled, every client request would result in at least one lookup request to the nameserver, causing unnecessary congestion on DNS servers and the Internet.
For additional information about DNS issues on Apache, see Issues Regarding DNS and Apache (http://httpd.apache.org/docs/2.2/dns-caveats.html) on the Apache Web site.
3.4.4 Additional Performance Tuning InformationYou can also adjust the settings of the Mod_Cache module. For more information about Mod_Cache, see Chapter 5, “Managing Apache Modules,” on page 71.
For additional information about performance tuning, see Apache Performance Tuning (http://httpd.apache.org/docs/2.2/misc/perf-tuning.html) on the Apache Web site.
3.5 Managing MIME TypesMultipurpose Internet Mail Extension (MIME) is a specification used to identify a file type by its extension so that when Apache receives a request for a file, it knows how to handle the file. A list of MIME types that Apache already knows about is included in the conf/mime.types file.
The Global MIME Types page saves you the trouble of manually entering a new MIME type or modifying an existing one. MIME types created on the Global MIME Types page are not added to the conf/mime.types file, but are listed in the httpd.conf file under the AddType (http://httpd.apache.org/docs/2.2/mod/mod_mime.html#addtype) directive.
5 SP8: Apache Web Server Administration Guide

novdocx (en) 17 Septem
ber 2009
Figure 3-4 Apache Global Mime Types
MIME types added to the httpd.conf file override MIME types of the same name that already exist in the mime.types file.
Files can have more than one extension and their order does not usually matter. For example, if the extension .rus maps to Russian and HTML maps to HTML, then the files text.rus.html and text.html.rus are treated alike.
However, unrecognized extensions, such as .xyz, wipe out all extensions to their left. Therefore, text.rus.xyz.html is treated as HTML but not as Russian.
TIP: If you will be downloading NetWare Loadable Module™ (NLM™) applications to your Web server, you might want to add NLM as a MIME type. If you do, use application/octet-stream as the content type and .nlm as the suffix.
To create a new MIME type:
1 From the MIME Types page in Apache Manager, specify a name in the Content Type field that describes the new MIME type.
2 Specify the character extension in the Suffix field, by typing a period, followed by letters or numbers.
3 Click New Type.
To edit an existing MIME type:
1 From the MIME Types page in Apache Manager, locate the MIME type to be edited or removed.
2 Click Edit and make the required changes to the Content Type and Suffix fields.3 Click Edit Type.4 Click Save > Save to save your changes.
orClick Save > Save and Apply to save your changes and restart Apache so your changes are immediately put into effect.For information about where configuration information is stored, see Section 2.3.3, “Saving Configuration Changes and Restarting Apache in Apache Manager,” on page 29.
Managing Apache Web Server Preferences 41

42 NW 6.
novdocx (en) 17 Septem
ber 2009
3.5.1 Default MIME TypesWhen a document is sent to a client, the server includes a section that identifies the document's type, so the client can present the document in the correct way. However, sometimes the server can't determine the proper type for the document because the document's extension is not defined for the server. In those cases, a default value is sent.
The default is usually Text/Plain, but you should set it to the type of file most commonly stored on your server. Some common MIME types include the following:
For more information about MIME types, see Content Negotiation (http://httpd.apache.org/docs/2.2/content-negotiation.html) on the Apache Web site.
3.6 Specifying an Administrator E-Mail Address for Inclusion in Error MessagesIf users receive an error message, such as a 404 Not Found error, you can include the e-mail address of the Apache administrator as a means of providing customers with a method of notifying you about problems on your Web site or with your Web applications.
For example, if you specified [email protected] as the value of the ServerAdmin directive and a user received a 404 Not Found error, a text message would include [email protected] as the administrator to contact for further assistance.
The ServerAdmin (http://httpd.apache.org/docs/2.2/mod/core.html#serveradmin) directive sets the e-mail address that the server includes in any error messages it returns to the client.
On the Network Settings page:
1 Specify a valid e-mail address users should contact about error messages.2 Click Save > Save to save your changes.
orClick Save > Save and Apply to save your changes and restart Apache so your changes are immediately put into effect.For information about where configuration information is stored, see Section 2.3.3, “Saving Configuration Changes and Restarting Apache in Apache Manager,” on page 29.
For information about customizing the error messages themselves, see Section 3.9, “Managing Error Responses,” on page 45.
text/plain text/html
text/richtext image/tiff
image/jpeg image/gif
application/x-tar application/postscript
application/x-gzip audio/basic
5 SP8: Apache Web Server Administration Guide
novdocx (en) 17 Septem
ber 2009
3.7 Setting Up Server-Side IncludesServer-side includes (SSIs) provide a means of adding dynamic content to existing HTML documents without the use of a CGI program or other dynamic technology.
SSIs are directives placed in HTML pages and evaluated on the server while the pages are being served. Wherever you add SSI directives within an HTML page, that is where the results of the SSI code show up. For example, you could embed the current date or time into a Web page by adding the following code to an existing HTML file:
<!--#echo var="DATE_LOCAL" -->
SSI code appears like an HTML comment. However, if SSI is configured properly, Apache processes it as SSI code and in this sample, the current date appears on your Web page.
Before SSI codes are recognized by Apache, you must first enable it. You must also specify the file extension to use for files containing SSI directives. This helps Apache identify which files contain SSI.
On the Network Settings page:
1 Click On next to Server-Side Includes.2 Specify the file extension to be used by files containing SSI directives.
Typically, this is shtml, but you can specify any file extension you want, including simply html.
3 Click Save > Save to save your changes.orClick Save > Save and Apply to save your changes and restart Apache so your changes are immediately put into effect.For information about where configuration information is stored, see Section 2.3.3, “Saving Configuration Changes and Restarting Apache in Apache Manager,” on page 29.
For a more extensive discussion of SSI, see Apache Tutorial: Introduction to Server-Side Includes (http://httpd.apache.org/docs/2.2/howto/ssi.html) on the Apache Web site.
3.8 Managing Listen PortsYou can direct Apache to listen to only specific IP addresses or ports; by default it responds to requests on all IP addresses. This directive is required. If it is not in the httpd.conf file, the server fails to start.
You can specify multiple ports. If you do so, Apache responds to requests from any of the listed addresses and ports.
Managing Apache Web Server Preferences 43

44 NW 6.
novdocx (en) 17 Septem
ber 2009
Figure 3-5 Apache Add Listen Port
To specify a new port number:
1 On the Listen Ports page, specify the IP address, followed by a colon (:), followed by a port number.For example:
172.16.5.18:2003
IMPORTANT: Be sure to verify that the port number you use is not already in use by another service. One way to verify what ports are in use is through NetWare Remote Manager. You can access it through the administrator's version of the NetWare Welcome Web site. At the site, click Remote Manager under Server Management. When Remote Manager starts, click IP Address Management under Manage Server.
2 Under Encryption, click On if you want to use Secure Sockets Layer (SSL) with the newly specified port number.
3 If necessary, select an alternate server certificate from the Server Certificates drop-down list. 4 Click Save > Save to save your changes.
orClick Save > Save and Apply to save your changes and restart Apache so your changes are immediately put into effect.For information about where configuration information is stored, see Section 2.3.3, “Saving Configuration Changes and Restarting Apache in Apache Manager,” on page 29.
To edit a port:
1 On the Listen Ports page, click Edit in the row of the Current Listen Ports table of the port you want to edit.
2 Modify the port information in the fields above the table.
5 SP8: Apache Web Server Administration Guide

novdocx (en) 17 Septem
ber 2009
3 Click Save > Save to save your changes.orClick Save > Save and Apply to save your changes and restart Apache so your changes are immediately put into effect.For information about where configuration information is stored, see Section 2.3.3, “Saving Configuration Changes and Restarting Apache in Apache Manager,” on page 29.
To remove a port:
1 On the Listen Ports page, click Remove in the row of the Current Listen Ports table of the port you want to remove.
2 Click Save > Save to save your changes.orClick Save > Save and Apply to save your changes and restart Apache so your changes are immediately put into effect.For information about where configuration information is stored, see Section 2.3.3, “Saving Configuration Changes and Restarting Apache in Apache Manager,” on page 29.
For more information, see the Listen (http://httpd.apache.org/docs/2.2/mod/mpm_common.html#listen) directive on the Apache Web site.
3.9 Managing Error ResponsesIn the event of a problem or error, Apache can be configured to do one of four things:
Output a simple hard-coded error messageOutput a customized messageRedirect to a local URL path to handle the errorRedirect to an external URL to handle the error
The first option is the default, while the remaining options are configured using the ErrorDocument (http://httpd.apache.org/docs/2.2/mod/core.html#errordocument) directive, which is followed by the HTTP response code and a URL or a message. Apache sometimes offers additional information regarding the problem or error.
The Error Responses page lets you customize Apache's response to the following errors:
Unauthorized (401)Forbidden (403)Not found (404)Server error (500)
3.10 Working with Server LogsTo effectively manage a Web server, it is necessary to get feedback about the activity and performance of the server as well as any problems that might be occurring. Apache provides very comprehensive and flexible logging capabilities.
Managing Apache Web Server Preferences 45

46 NW 6.
novdocx (en) 17 Septem
ber 2009
Access logging, which records client access to the Web server, is enabled on Apache by default. If your Web server experiences a high volume of traffic, you should consider either disabling it or configuring it so that the log files cannot grow larger than your server's hard drive capacity.
Error logging, which records problems with Web server functioning, is always enabled, but you can control the severity (and therefore the amount) of errors that are recorded.
To work with server logs in Apache Manager, click the Server Logs tab.
Figure 3-6 Apache View Access Log
“Viewing the Access Log” on page 46“Viewing the Error Log” on page 47“Filtering Access and Error Log Data” on page 47“Setting Access Log Preferences” on page 47“Enabling Log Rotation” on page 48“Specifying a Log File Format” on page 49Section 3.10.5, “Setting Error Preferences,” on page 50
For more information about access and error logging on the Apache Web server, see Log Files (http://httpd.apache.org/docs/2.2/logs.html) on the Apache Web site.
3.10.1 Viewing the Access LogThe access log records information about clients who access your Web server, such as their IP addresses and the date and time when they accessed the Web server.
This information can be very useful. Here are a few examples:
Tracking advertising success: Identifies the success of banner ads by viewing how often a banner ad has been clicked.Tracking visibility to search engines: Identifies which search engines are indexing your site.Tracking efficiency of a purchase system: Identifies how long customers are spending in your electronic purchasing process.
The type of information displayed depends on the settings of the Log Preferences page. A typical log shows an IP address, date, time, and the requested URL. For example:
5 SP8: Apache Web Server Administration Guide

novdocx (en) 17 Septem
ber 2009
172.16.5.18 - [27/Oct/2002:22:40:05 -0700] 200 - "GET HTTP/1.1" "http://www.digitalairlines.com/"
To configure the amount of access logging that you want to take place, see “Setting Access Log Preferences” on page 47.
3.10.2 Viewing the Error LogThe View Error Log page in Apache Manager displays the contents of Apache's error log, which is the most important of the log files. The error log file is where the Apache httpd sends diagnostic information and where any errors related to processing requests are recorded.
Because the error log data can be viewed through Apache Manager, you can view it from anywhere you have Web access.
The error log is the first place to look when a problem occurs with starting the server or with the operation of the server, because it often contains details of what went wrong and how to fix it.
For more information about the error log, see Log Files (http://httpd.apache.org/docs/2.2/logs.html) on Apache.org.
To configure the amount of error logging that you want to take place, see Section 3.10.5, “Setting Error Preferences,” on page 50.
3.10.3 Filtering Access and Error Log DataYou can filter log data by specifying the maximum number of entries to be returned at one time. You can also filter the access log so that only entries containing specific information is returned, such as a specific IP address or date.
To filter the number of access log entries displayed:
1 In the Number of Entries field, specify the number of log entries you want displayed at one time. This can be any number between 1 and 500.
2 Click OK.
To filter log entries containing specific alphanumeric information:
1 In the Only Show Entries With field, specify an alphanumeric string. For example, 22/Aug/2003.
2 Click OK.
3.10.4 Setting Access Log PreferencesThe Log Preferences page in Apache Manager lets you enable or disable access logging, log rotations, the location of access log files, and the type of data to capture in the access log.
Managing Apache Web Server Preferences 47

48 NW 6.
novdocx (en) 17 Septem
ber 2009
Figure 3-7 Apache Log Preferences
To enable (or disable) access logging:
1 On the Log Preferences page, click Yes.2 In the Log File field, specify the path to the access log file.
The default path is /apache2/logs/access_log.3 Click Save > Save to save your changes.
orClick Save > Save and Apply to save your changes and restart Apache so your changes are immediately put into effect.For information about where configuration information is stored, see Section 2.3.3, “Saving Configuration Changes and Restarting Apache in Apache Manager,” on page 29.
4 After enabling access logging, continue with:Enabling Log RotationSpecifying a Log File Format
Enabling Log Rotation
Even on a moderately busy server, the quantity of information stored in log files is very large. The access log file typically grows 1 MB or more per 10,000 requests. To manage growing log files, Apache can be directed to create a new log file when the initial log file reaches a certain size, or after a specified number of minutes has passed.
However, as an administrator, you must periodically delete or move the log files to prevent them from taking over your server's disk space. You can do this manually or by creating a batch file to delete them for you. Either way, you must manage the log files yourself.
Deleting or moving the log files cannot be done while the server is running, because Apache continues writing to the old log file as long as the file remains open. Instead, the server must be restarted after the log files are moved or deleted so that it can open new log files.
5 SP8: Apache Web Server Administration Guide

novdocx (en) 17 Septem
ber 2009
To enable the rotation of log files based on log file size:
1 From the Log Preferences page, select the By Size option to have the logs switched when a specific size (in megabytes) is reached in the first log file.
2 Click the MB drop-down list and select the number of megabytes at which the logs should be rotated.
3 Click Save > Save to save your changes.orClick Save > Save and Apply to save your changes and restart Apache so your changes are immediately put into effect.For information about where configuration information is stored, see Section 2.3.3, “Saving Configuration Changes and Restarting Apache in Apache Manager,” on page 29.
To enable the rotation of log files based on a specified time period:
1 From the Log Preferences page, select the By Time option to have the logs switched when a specified period of time (in minutes) has elapsed.
2 In the Minutes field, specify the number of minutes between each log file rotation.3 Click Save > Save to save your changes.
orClick Save > Save and Apply to save your changes and restart Apache so your changes are immediately put into effect.For information about where configuration information is stored, see Section 2.3.3, “Saving Configuration Changes and Restarting Apache in Apache Manager,” on page 29.
To disable log file rotation:
1 From the Log Preferences page, select the Do Not Rotate option to disable log rotation.When this option is selected, a single log file is used. If your Web site supports a high volume of traffic, do not disable log file rotation.
2 Click Save > Save to save your changes.orClick Save > Save and Apply to save your changes and restart Apache so your changes are immediately put into effect.For information about where configuration information is stored, see Section 2.3.3, “Saving Configuration Changes and Restarting Apache in Apache Manager,” on page 29.
Specifying a Log File Format
Common Log Format (CLF) is required by many off-the-shelf log analyzers such as wusage or ANALOG. If you will be using one of these tools to analyze your log files, select CLF.
The CLF format is:
host ident authuser date request status bytes
Managing Apache Web Server Preferences 49

50 NW 6.
novdocx (en) 17 Septem
ber 2009
Alternately, you can select from the list of data types that you want Apache to log by checking one or more of the items in the Only Log list on the Log Preferences page in Apache Manager.
To specify the common log file format:
1 On the Log Preferences page, click Use Common Log File Format.2 Click Save > Save to save your changes.
orClick Save > Save and Apply to save your changes and restart Apache so your changes are immediately put into effect.For information about where configuration information is stored, see Section 2.3.3, “Saving Configuration Changes and Restarting Apache in Apache Manager,” on page 29.
To customize the log file format:
1 On the Log Preferences page, click Only Log.2 Select each of the items you want Apache to log.3 Click Save > Save to save your changes.
orClick Save > Save and Apply to save your changes and restart Apache so your changes are immediately put into effect.For information about where configuration information is stored, see Section 2.3.3, “Saving Configuration Changes and Restarting Apache in Apache Manager,” on page 29.
For more information about logging, see the LogFormat (http://httpd.apache.org/docs/2.2/mod/mod_log_config.html#logformat) directive on the Apache Web site.
3.10.5 Setting Error PreferencesThe Error Preferences page in Apache Manager lets you control and archive error logs.
“Controlling Error Logs” on page 50“Archiving Error Logs” on page 51
Controlling Error Logs
Options under the Error Log Settings heading on the Error Preferences page let you control the error logging process.
5 SP8: Apache Web Server Administration Guide

novdocx (en) 17 Septem
ber 2009
Figure 3-8 Apache Error Log Preferences
1 In the Log File field, specify the name of the Apache Web server error log file.By default, the error log file (error_log) is stored in the sys:/aspache2/logs directory.
2 In the Rotate Error Log field, select whether you want error logs rotated after a specified file size has been reached or after a specified period of time has passed.For more information about log file rotation, see “Enabling Log Rotation” on page 48, where the subject is discussed in the context of access log files.
3 In the Log Level field, select the type of errors you want to log:EmergencyAlertCritErrorWarnNoticeInfoDebug
When you select a log level, that level of error and those of greater importance are recorded. Therefore, if you select a log level that is high on the list, fewer errors are recorded. If you select a log level that is lower on the list, more errors are recorded. Typically, a level of at least crit is appropriate for a smoothly running Web server.
4 To manage the error log files that accumulate due to error log rotation, continue with Archiving Error Logs.
Archiving Error Logs
To conserve disk space, you can compress, move, or deleted older error log files that are no longer in use.
Managing Apache Web Server Preferences 51
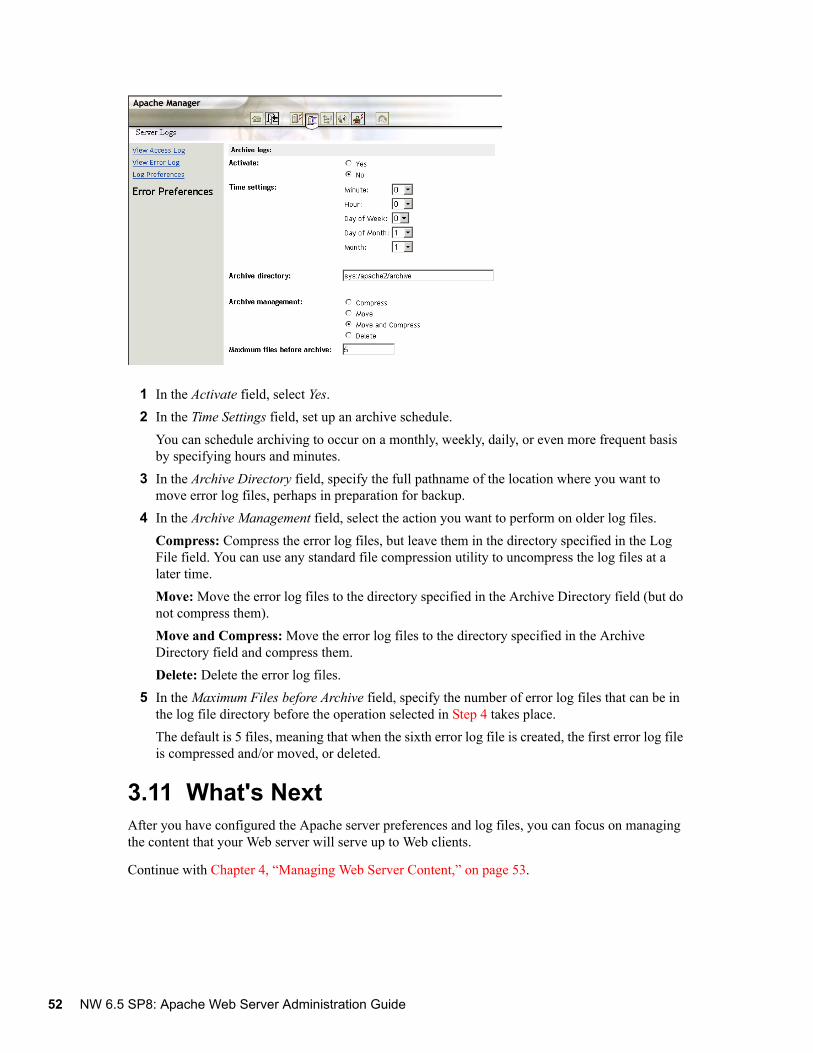
52 NW 6.
novdocx (en) 17 Septem
ber 2009
1 In the Activate field, select Yes.2 In the Time Settings field, set up an archive schedule.
You can schedule archiving to occur on a monthly, weekly, daily, or even more frequent basis by specifying hours and minutes.
3 In the Archive Directory field, specify the full pathname of the location where you want to move error log files, perhaps in preparation for backup.
4 In the Archive Management field, select the action you want to perform on older log files.Compress: Compress the error log files, but leave them in the directory specified in the Log File field. You can use any standard file compression utility to uncompress the log files at a later time.Move: Move the error log files to the directory specified in the Archive Directory field (but do not compress them).Move and Compress: Move the error log files to the directory specified in the Archive Directory field and compress them.Delete: Delete the error log files.
5 In the Maximum Files before Archive field, specify the number of error log files that can be in the log file directory before the operation selected in Step 4 takes place.The default is 5 files, meaning that when the sixth error log file is created, the first error log file is compressed and/or moved, or deleted.
3.11 What's NextAfter you have configured the Apache server preferences and log files, you can focus on managing the content that your Web server will serve up to Web clients.
Continue with Chapter 4, “Managing Web Server Content,” on page 53.
5 SP8: Apache Web Server Administration Guide

4novdocx (en) 17 S
eptember 2009
4Managing Web Server Content
You can use Novell® Apache Manager to help manage Web server content. You can create HTML pages and other files such as graphics or text and then store those files on your server. When users connect to your server, they can view your files if they have access.
This section contains the following topics:
Section 4.1, “Changing the Primary Document Directory,” on page 53Section 4.2, “Setting Up Additional Document Directories,” on page 54Section 4.3, “Configuring User Home Directories,” on page 60Section 4.4, “Changing the Default Index Filename,” on page 63Section 4.5, “Redirecting Visitors to an Alternate URL,” on page 64Section 4.6, “Configuring CGI Extensions,” on page 65Section 4.7, “Creating Virtual Hosts,” on page 67Section 4.8, “Creating Your Own Web Site,” on page 68Section 4.9, “What's Next,” on page 69
4.1 Changing the Primary Document DirectoryYou probably don't want to make all the files on your file system available to remote clients. An easy way to restrict access is to keep all of your server's documents in a central location, known as the document root or primary document directory.
Another benefit of the document directory is that you can move your documents to a new directory (perhaps on a different disk, for example, if you are moving your Web site to a new server) without changing any of your URLs, because the paths specified in the URLs are relative to the primary document directory.
For example, if your document directory is sys:/apache2/htdocs, a request such as http://www.digitalairlines.com/products/info.html tells the server to look for the file info.html in sys:/apache2/htdocs/products/info.html.
If you change the location where documents are stored (by moving all the files and subdirectories), you only have to specify the new primary document directory that the server is using, instead of mapping all URLs to the new directory or telling users to look in the new directory.
By default, the primary document directory is set to the volume:/apache2/htdocs/ directory using the DocumentRoot (http://httpd.apache.org/docs/2.2/mod/core.html#documentroot) directive. The primary document directory is the directory from which Apache serves files.
It is unlikely that you will need to change the default primary document directory. However, if you do, keep in mind that the deeper into a file structure Apache needs to go, the longer it takes Apache to examine the directories. To optimize performance, keep the primary document directory as close to the root of your server's volume as possible.
To work with server content in Apache Manager, use the Content Management tab.
Managing Web Server Content 53
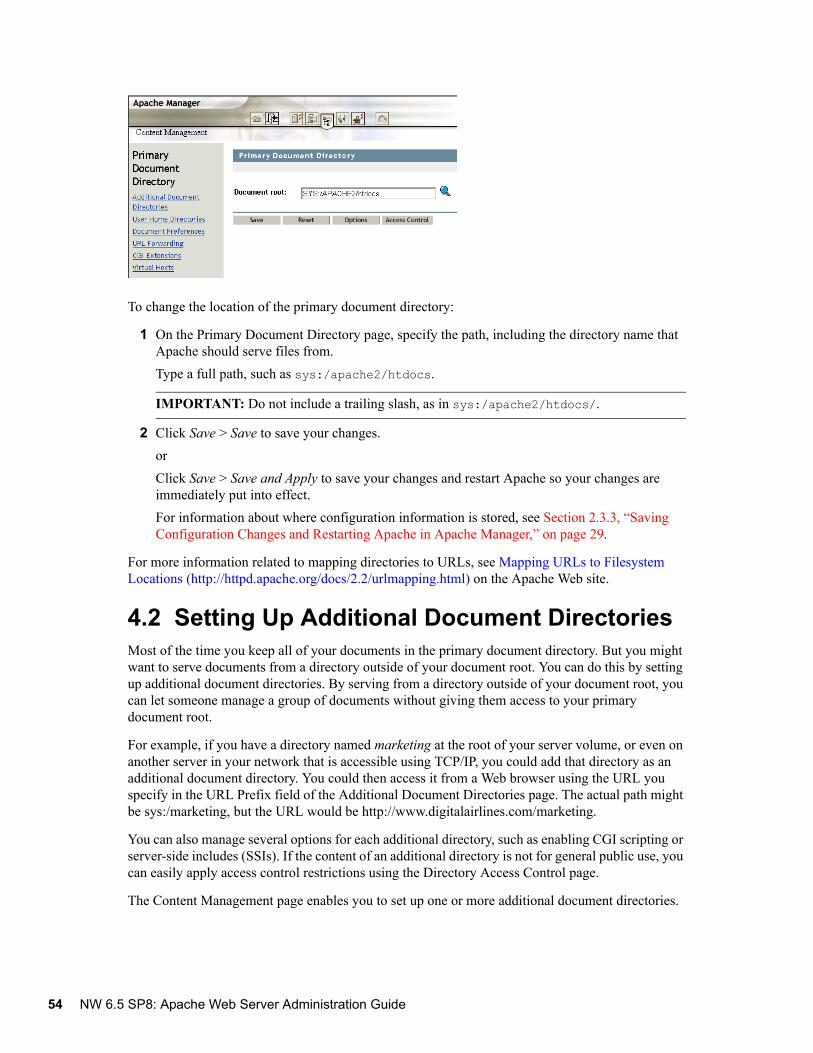
54 NW 6.
novdocx (en) 17 Septem
ber 2009
To change the location of the primary document directory:
1 On the Primary Document Directory page, specify the path, including the directory name that Apache should serve files from.Type a full path, such as sys:/apache2/htdocs.
IMPORTANT: Do not include a trailing slash, as in sys:/apache2/htdocs/.
2 Click Save > Save to save your changes.orClick Save > Save and Apply to save your changes and restart Apache so your changes are immediately put into effect.For information about where configuration information is stored, see Section 2.3.3, “Saving Configuration Changes and Restarting Apache in Apache Manager,” on page 29.
For more information related to mapping directories to URLs, see Mapping URLs to Filesystem Locations (http://httpd.apache.org/docs/2.2/urlmapping.html) on the Apache Web site.
4.2 Setting Up Additional Document DirectoriesMost of the time you keep all of your documents in the primary document directory. But you might want to serve documents from a directory outside of your document root. You can do this by setting up additional document directories. By serving from a directory outside of your document root, you can let someone manage a group of documents without giving them access to your primary document root.
For example, if you have a directory named marketing at the root of your server volume, or even on another server in your network that is accessible using TCP/IP, you could add that directory as an additional document directory. You could then access it from a Web browser using the URL you specify in the URL Prefix field of the Additional Document Directories page. The actual path might be sys:/marketing, but the URL would be http://www.digitalairlines.com/marketing.
You can also manage several options for each additional directory, such as enabling CGI scripting or server-side includes (SSIs). If the content of an additional directory is not for general public use, you can easily apply access control restrictions using the Directory Access Control page.
The Content Management page enables you to set up one or more additional document directories.
5 SP8: Apache Web Server Administration Guide

novdocx (en) 17 Septem
ber 2009
Figure 4-1 Apache Additional Document Directories
“Adding or Deleting a Document Directory” on page 55“Configuring Options for an Additional Document Directory” on page 56“Controlling Access to Document Directories” on page 58
4.2.1 Adding or Deleting a Document DirectoryAfter you have created directories on your server, you must identify them as additional document directories so that Apache knows where they are. You can then add new directories using the Additional Document Directories page of Apache Manager.
To add an additional document directory:
1 On the Additional Document Directories page, specify a name for the directory in the URL Prefix field.
2 Specify the path to the directory on your server.You can use either a relative path, or a fully qualified path. For example:/marketing
orsys:/marketing
3 Click Save > Save to save your changes.orClick Save > Save and Apply to save your changes and restart Apache so your changes are immediately put into effect.For information about where configuration information is stored, see Section 2.3.3, “Saving Configuration Changes and Restarting Apache in Apache Manager,” on page 29.
After the directory as been added, open a Web browser and enter the URL prefix you specified. If you have enabled indexing, a list of files currently held in the directory is displayed. For information about how to enable indexing, see “Directory Indexing” on page 57.
Managing Web Server Content 55

56 NW 6.
novdocx (en) 17 Septem
ber 2009
To delete an additional document directory:
1 From the Additional Document Directories page under Content Management, click Remove in the row of the document directory that you want deleted.
2 Click OK, then save the change.See Section 2.3.3, “Saving Configuration Changes and Restarting Apache in Apache Manager,” on page 29.
4.2.2 Configuring Options for an Additional Document DirectoryFor each document directory listed on the Additional Document Directory page, you can configure the behavior of documents in the directory.
1 On the Additional Document Directories page, click Options in the row of the additional directory that you want to configure.
2 Make the needed changes on the Directory Configuration Options page:CGI ExecutionSymbolic LinksServer-Side IncludesDirectory IndexingMultiple Views
3 Click Save > Save to save your changes.orClick Save > Save and Apply to save your changes and restart Apache so your changes are immediately put into effect.For information about where configuration information is stored, see Section 2.3.3, “Saving Configuration Changes and Restarting Apache in Apache Manager,” on page 29.
CGI Execution
When enabled, CGI scripts contained in the additional directory can be executed. If this feature is not enabled, it is not possible to execute CGI from within an additional directory.
For more information about using CGI, see Apache Tutorial: Dynamic Content with CGI (http://httpd.apache.org/docs/2.2/howto/cgi.html) on the apache.org Web site.
Symbolic Links
If you create hard links to a file, such as marketing.html, and then someone deletes the file and replaces it with another one of a different name, your hard link no longer works.
To prevent this from happening, some platforms allow you to enable symbolic links, sometimes called soft links, which have the ability to keep the link accurate, even in the above scenario.
NOTE: Symbolic linking is not currently available on the NetWare® platform. However, because Apache Manager can be used to configure Apache running on other platforms such as Linux in your network, it is included on the Directory Configuration Options page of Apache Manager.
5 SP8: Apache Web Server Administration Guide
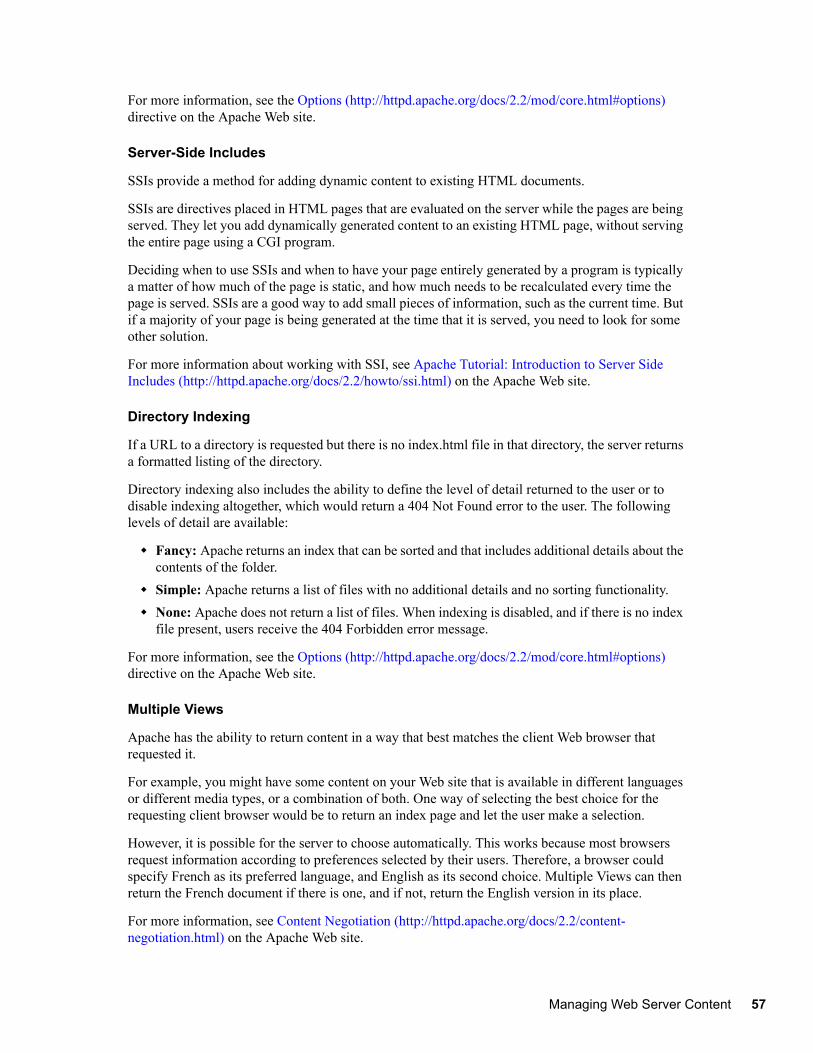
novdocx (en) 17 Septem
ber 2009
For more information, see the Options (http://httpd.apache.org/docs/2.2/mod/core.html#options) directive on the Apache Web site.
Server-Side Includes
SSIs provide a method for adding dynamic content to existing HTML documents.
SSIs are directives placed in HTML pages that are evaluated on the server while the pages are being served. They let you add dynamically generated content to an existing HTML page, without serving the entire page using a CGI program.
Deciding when to use SSIs and when to have your page entirely generated by a program is typically a matter of how much of the page is static, and how much needs to be recalculated every time the page is served. SSIs are a good way to add small pieces of information, such as the current time. But if a majority of your page is being generated at the time that it is served, you need to look for some other solution.
For more information about working with SSI, see Apache Tutorial: Introduction to Server Side Includes (http://httpd.apache.org/docs/2.2/howto/ssi.html) on the Apache Web site.
Directory Indexing
If a URL to a directory is requested but there is no index.html file in that directory, the server returns a formatted listing of the directory.
Directory indexing also includes the ability to define the level of detail returned to the user or to disable indexing altogether, which would return a 404 Not Found error to the user. The following levels of detail are available:
Fancy: Apache returns an index that can be sorted and that includes additional details about the contents of the folder.Simple: Apache returns a list of files with no additional details and no sorting functionality.None: Apache does not return a list of files. When indexing is disabled, and if there is no index file present, users receive the 404 Forbidden error message.
For more information, see the Options (http://httpd.apache.org/docs/2.2/mod/core.html#options) directive on the Apache Web site.
Multiple Views
Apache has the ability to return content in a way that best matches the client Web browser that requested it.
For example, you might have some content on your Web site that is available in different languages or different media types, or a combination of both. One way of selecting the best choice for the requesting client browser would be to return an index page and let the user make a selection.
However, it is possible for the server to choose automatically. This works because most browsers request information according to preferences selected by their users. Therefore, a browser could specify French as its preferred language, and English as its second choice. Multiple Views can then return the French document if there is one, and if not, return the English version in its place.
For more information, see Content Negotiation (http://httpd.apache.org/docs/2.2/content-negotiation.html) on the Apache Web site.
Managing Web Server Content 57

58 NW 6.
novdocx (en) 17 Septem
ber 2009
4.2.3 Controlling Access to Document DirectoriesIf you have information on your Web site that is sensitive or intended for only a small group of people, you can use authentication to control who has access to specific directories.
TIP: Before you can configure access for a particular directory, you must first create the directory. For more information, see “Adding or Deleting a Document Directory” on page 55.
Authentication is any process by which you verify that someone is who they claim they are. Authorization is also any process by which someone is allowed to be where they want to go, or to have information that they want to have.
Using Apache Manager, you can configure the Apache authorization module to control who has access to specific directories on your Apache Web server. Documents placed in a controlled directory can only be accessed by users who have been given rights to that directory.
For each document directory listed on the Additional Document Directory page, you can configure user access to documents in the directory.
To configure access control to a specific directory:
1 On the Additional Document Directories page, click Access Control in the row of the document directory that you want to configure.
2 From the Access Control Type drop-down list, select the type of user authentication you want used for the document directory you are configuring.
Public Access: Select this option if you want to allow general access to the directory by any user who can visit your Web site.Auth LDAP Mode: (Recommended) Select this option if you want to use your LDAP server to authenticate specified users to the document directory. Users or groups should be specified under the Access Control fields. (For more information, see the mod_auth_ldap (http://httpd.apache.org/docs/2.2/mod/mod_authnz_ldap.html) documentation on the apache.org Web site.)
5 SP8: Apache Web Server Administration Guide

novdocx (en) 17 Septem
ber 2009
Auth Module: Select this option if you want to use password files you create using Apache's htpasswd utility. For information, see Authentication (http://httpd.apache.org/docs-2.0/howto/auth.html) in the Apache documentation. (For more information, see the mod_auth (http://httpd.apache.org/docs-2.0/mod/mod_auth.html) documentation on the apache.org Web site.)Auth DBM Module: Similar to Auth Module but uses a simple database rather than flat files. If you don't want to use LDAP and you have a large number of users that you want to grant access rights to, use this option. (For more information, see the mod_auth_dbm (http://httpd.apache.org/docs/2.2/mod/mod_authn_dbm.html) documentation on the apache.org Web site.)
3 Specify the level and method of access control.Any Valid User: Select this option to allow any valid user to access the document directory you are configuring. A valid user is anyone who can log in to the server.User/Group List: Select this option if you want to specify individual usernames or group names to whom access should be given. When typing multiple usernames or group names, separate each entry with a blank space.Use eDirectory Rights: Verifies directory and file access rights in addition to verifying user credentials. User accounts must include specific rights to the directory for a user to have access to it. When running Apache on NetWare, no additional configuration is required on Apache.
4 (Conditional) If you selected Auth Module or Auth DBM Module as your access control type in Step 2, type the absolute path to the password file in the User File field and the group password in the Group File field (if you created one).For more information about using password files, see Authentication, Authorization, and Access Control (http://httpd.apache.org/docs/2.2/howto/auth.html) on the apache.org Web site.Under the Auth LDAP Module heading on the Directory Access Control page:
5 In the Base DN for Search field, type the context in the directory where the search for user rights should begin.For example, o=employees.
TIP: For more information about this step and the following three steps, see the AuthLDAPUrl (http://httpd.apache.org/docs/2.2/mod/mod_authnz_ldap.html#authldapurl) directive on the apache.org Web site.
6 Select which attribute should be searched for by clicking either UID or CN.
Managing Web Server Content 59

60 NW 6.
novdocx (en) 17 Septem
ber 2009
UID is the recommended context on which a search should be performed. 7 Select the scope of the search by selecting either Subtree or Container Only.
If you know your users are stored in a specific container, select Container Only, especially if your tree is large. This searches the container you specified in the Base DN for Search field. Otherwise, select Subtree.
8 Select Yes to enable Secure LDAP as a method of protecting usernames and passwords from being intercepted.If you do not want to enable secure LDAP, click No. For more information about securing LDAP, see the LDAPTrustedCA (http://httpd.apache.org/docs/2.2/mod/mod_ldap.html#ldapsharedcachesize) directive on the apache.org Web site.
9 Type the full path to the server certificate.For example,
sys:\system\RootCert.der
10 From the Certificate Type drop-down box, select the type of certificate that is on your server. On NetWare, the default certificate type is Der File.
11 Click Save > Save to save your changes.orClick Save > Save and Apply to save your changes and restart Apache so your changes are immediately put into effect.For information about where configuration information is stored, see Section 2.3.3, “Saving Configuration Changes and Restarting Apache in Apache Manager,” on page 29.
For more information about authentication to directories on your Apache Web server, see Authentication, Authorization, and Access Control (http://httpd.apache.org/docs/2.2/howto/auth.html) in the Apache documentation.
4.3 Configuring User Home DirectoriesUser home directories on the Web server enable users to access their own files using a Web browser. In addition, they can share information with the Web community by moving content into their own public_html directory. The public_html directory serves as the user's own primary document directory.
Complete the following tasks for each user who requires a home directory:
“Creating Home Directories for Users” on page 61“Creating public_html Directories in Home Directories” on page 61“Selecting a Method for Accessing eDirectory” on page 61“Enabling User Home Directories on Apache” on page 62
5 SP8: Apache Web Server Administration Guide

novdocx (en) 17 Septem
ber 2009
4.3.1 Creating Home Directories for UsersA home directory is simply a directory that has been created and named after the user for whom it was created. Typically, home directories are created on a volume of the server dedicated for this purpose. You can create each user home directory using iManager or ConsoleOne®. This can be done either when you create each user object, or it can be enabled later on.
After each home directory is created, you must specify the path to it within each User object in the directory. You might have already done this when you first created the directory.
For information about creating user home directories, see Consoleone 1.3.x User Guide (http://www.novell.com/documentation/consol13/index.html?page=/documentation/consol13/c1_enu/data/hk42s9ot.html).
4.3.2 Creating public_html Directories in Home DirectoriesThe public_html directory is the user's personal primary document directory. Whatever is placed in the public_html directory is typically visible to all other users.
Create the public_html directory as a subdirectory within each of the users' home directories. To help your users, you could create a default index.html file and place it in their public directories. Users then see some contents when they point their Web browsers at the new directory for the first time, which could prevent support calls.
4.3.3 Selecting a Method for Accessing eDirectoryIn order for Apache to authenticate to eDirectory™, use one of the following two methods for assigning rights and attributes:
Use the Public User Object: If you want to use the public user object, make sure you assign the required rights and attributes listed below to the container where your public user object is stored.Create a New Generic User Object: Using iManager or ConsoleOne, create a User object, such as hdiruser, in a container in your Novell eDirectory tree. It doesn't matter where you create the object, as long as you assign the required rights and attributes listed below to the container where you create the User object.
Regardless of which method you choose, you must then assign the following rights and attributes to the container where the user object is stored:
Home Directory RightsHost Resource NameHost Server
You can assign these rights and attributes at either the context or individual user levels, but assigning them at the context level simplifies administration.
After you have chosen which user object to use and assigned proper attributes to the container where the user object resides, you are ready to enable user home directories on Apache.
Managing Web Server Content 61

62 NW 6.
novdocx (en) 17 Septem
ber 2009
4.3.4 Enabling User Home Directories on ApacheBefore a user home directory can work, you must first enable it. After it is enabled, a user can view the content of the user home directory by typing the domain name, followed by a slash (/), followed by ~usersname.
The User Home Directories page in Apache Manager enables you to set up a home directory for each of your users.
Figure 4-2 Apache User Home Directories
1 On the User Home Directories page, click On.2 In the User URL Prefix field, specify the character to be used to indicate to Apache that the text
that follows is referring to a user home directory. The default character is ~ because it is the most expected character in use today for home directories. However, you can specify any character or number.
3 In the Subdirectory field, type the name of the directory you created for each user as the primary document directory. The default name is public_html, although it can be whatever name you used when you created the public directory within the user home directory.
4 In the User Search Contexts field, specify the search context where your user objects are stored.Because this is done using LDAP, you must specify the user contexts using LDAP syntax, which requires commas rather than periods for separating multiple contexts, and no leading periods. For example,
ou=provo,ou=novell
The search begins in the specified context and searches all subcontexts until the user is found.5 Under Configuration Option, select which method (Assign Public Rights or Username and
Password) to use for logging Apache in to eDirectory: For more information, see “Selecting a Method for Accessing eDirectory” on page 61.
5 SP8: Apache Web Server Administration Guide

novdocx (en) 17 Septem
ber 2009
IMPORTANT: Using this option places the username and password in Apache’s httpd.conf configuration file. If a user can access this file, they could identify the username and password and thereby have access to eDirectory. However, if you have assigned the proper read-only attributes to the generic user, the user would only be allowed to browse user directories.
6 (Conditional) If you selected Username and Password as your configuration option, specify the username and password of the user object you created in eDirectory.
7 Click Save > Save to save your changes.orClick Save > Save and Apply to save your changes and restart Apache so your changes are immediately put into effect.For information about where configuration information is stored, see Section 2.3.3, “Saving Configuration Changes and Restarting Apache in Apache Manager,” on page 29.
4.4 Changing the Default Index FilenameIf a document name is not specified in a URL, Apache looks for a specific filename such as index.html and returns it to the Web browser. The filename the Web Server looks for can be configured from the Document Preferences page under Content Management. If the specified filename cannot be found, the Web browser displays a listing of files and folders located at the URL.
By default, Apache defines index.html as the default home page filename, but you can set this to whatever filename you choose on the Document Preferences page.
If more than one name is specified, the server searches in the order in which the names appear in this field until one is found. For example, if your index filenames are index.html and home.html, the server first searches for index.html and, if it doesn't find it, the server then searches for home.html.
If Apache can't find a filename that matches the default index filename, and if the requested directory has directory indexing enabled (see “Directory Indexing” on page 57), Apache generates its own index file that lists the contents of the directory.
For example, a request for http://myserver/docs/ would return http://myserver/docs/index.html if it exists, or would list the directory if it did not.
Managing Web Server Content 63

64 NW 6.
novdocx (en) 17 Septem
ber 2009
Keep in mind that the default index file does not need to be relative to the directory. For example, any of the following would work:
index.html
index.txt
/cgi-bin/index.pl
Including three of these in order would cause the /cgi-bin/index.pl CGI script to be executed if neither index.html or index.txt existed in a directory.
To change the current default index filename:
1 On the Document Preferences page, type a filename in the Index File Name field.2 Click Save > Save to save your changes.
orClick Save > Save and Apply to save your changes and restart Apache so your changes are immediately put into effect.For information about where configuration information is stored, see Section 2.3.3, “Saving Configuration Changes and Restarting Apache in Apache Manager,” on page 29.
For more information, see the DirectoryIndex (http://httpd.apache.org/docs/2.2/mod/mod_dir.html#directoryindex) directive on the Apache Web site.
4.5 Redirecting Visitors to an Alternate URLURL forwarding is a method for the Web server to tell a user that a URL has changed—for example, if you have moved files to another directory or server. You can also use redirection to send a person who requests a document on one server to a document on another server.
To map a URL to another server, you must first specify the prefix of the URL you want the server to redirect. Then, you need to choose which URL to redirect to. You can redirect to a URL prefix if the directory on the new server is the same as in the mapped URL; you can also redirect to a fixed URL (hostname, directory, and filename).
The URL Forwarding page in Apache Manager enables you to set up a home directory for each of your users.
5 SP8: Apache Web Server Administration Guide

novdocx (en) 17 Septem
ber 2009
Figure 4-3 Apache URL Forwarding
1 In the URL Prefix field, type the portion of the old URL to be forwarded.2 In the Forward Requests To field, type the URL where requests should be forwarded to. 3 Click Save > Save to save your changes.
orClick Save > Save and Apply to save your changes and restart Apache so your changes are immediately put into effect.For information about where configuration information is stored, see Section 2.3.3, “Saving Configuration Changes and Restarting Apache in Apache Manager,” on page 29.
If you forward to a URL prefix, the forwarding keeps the full pathname and substitutes one prefix for another. For example, if you forward http://www.digitalairlines.com/info/docs to a prefix cambridge.com, the URL http://www.digitalairlines.com/info/docs redirects to http://cambridge.com/info/docs.
However, if the directory structure on the new server is not the same as in the mapped URL, you could forward the URL to a fixed URL. For example, you could forward http://www.digitalairlines.com/info/docs to http://cambridge.com/new-files/info/docs.
Sometimes you might want to redirect requests for all the documents in one subdirectory to a specific URL. For example, if you removed a directory because it was causing too much traffic or because the documents were no longer to be served for any reason, you could direct a request for any one of the documents to a page explaining why the documents were no longer available. For example, a prefix on /info/docs could be redirected to http://www.digitalairlines.com/explain.html.
For more information, see the Redirect (http://httpd.apache.org/docs/2.2/mod/mod_alias.html#redirect) and Alias (http://httpd.apache.org/docs/2.2/mod/mod_alias.html#alias) directives on the Apache Web site.
Also, for more information about general issues surrounding URL redirection, see the URL Rewriting Guide (http://httpd.apache.org/docs/2.2/misc/rewriteguide.html) on the Apache Web site.
4.6 Configuring CGI ExtensionsCommon Gateway Interface (CGI) provides a method for Web servers to interact with external content-generating programs, which are often referred to as CGI programs or CGI scripts. It is the one of the simplest methods for adding dynamic content to your Web site.
Managing Web Server Content 65

66 NW 6.
novdocx (en) 17 Septem
ber 2009
Using Apache Manager, you can control how Apache finds the interpreter used to run CGI scripts. For example, if you specify sys:\foo.nlm as the path and .foo as the extension, all CGI script files with a .foo extension are passed to the foo interpreter (foo.nlm).
The CGI Extensions page in Apache Manager enables you add CGI extensions to your Web server.
Figure 4-4 Apache CGI Extensions
To define CGI extensions:
1 In the CGI Path field, specify the complete path to an interpreter used to run CGI scripts.On NetWare, you need to create an NLM™ that can serve as your CGI interpreter. Writing an NLM requires programming knowledge. If you are a developer, visit the Novell Developer Web site at http://developer.novell.com (http://developer.novell.com).
2 In the Extension column, type the extension Apache should recognize as a CGI file. The default extension is .cgi.
3 Click Add.4 Click Save > Save to save your changes.
orClick Save > Save and Apply to save your changes and restart Apache so your changes are immediately put into effect.For information about where configuration information is stored, see Section 2.3.3, “Saving Configuration Changes and Restarting Apache in Apache Manager,” on page 29.
To edit a defined CGI path and extension:
1 Click Edit in the row of the CGI extension you want to modify.If there are no CGI extensions listed below the Add CGI Extension section, none have yet been defined. Define one following the instructions above.
2 Change the extension as needed.3 Click Save > Save to save your changes.
orClick Save > Save and Apply to save your changes and restart Apache so your changes are immediately put into effect.For information about where configuration information is stored, see Section 2.3.3, “Saving Configuration Changes and Restarting Apache in Apache Manager,” on page 29.
5 SP8: Apache Web Server Administration Guide
novdocx (en) 17 Septem
ber 2009
To remove a CGI extension:
1 Click Remove in the row of the CGI extension that you want deleted.2 Click Remove.3 Click Save > Save to save your changes.
orClick Save > Save and Apply to save your changes and restart Apache so your changes are immediately put into effect.For information about where configuration information is stored, see Section 2.3.3, “Saving Configuration Changes and Restarting Apache in Apache Manager,” on page 29.
For a more thorough discussion of CGI on Apache, see Apache Tutorial: Dynamic Content with CGI (http://httpd.apache.org/docs/2.2/howto/cgi.html) on the Apache.org Web site.
4.7 Creating Virtual HostsThe term virtual host, sometimes called a virtual server, refers to the practice of running more than one Web site on a single computer (such as www.company1.com and www.company2.com). Virtual hosts can be IP-based, meaning that you have a different IP address for every Web site, or name-based, meaning that you have multiple DNS names assigned to a single IP address. Visitors to the Web sites are unaware that both sites are running on the same physical server.
The Virtual Hosts page in Apache Manager enables you to set up virtual hosts.
Figure 4-5 Apache Virtual Hosts
1 Specify the IP address of your server, followed by a colon and the port number you want to use.For example:
172.16.5.18:80
If you do not include a port number, Apache assumes port 80.
Managing Web Server Content 67

68 NW 6.
novdocx (en) 17 Septem
ber 2009
IMPORTANT: If you are setting up a name-based virtual host and assigning an alternate port number, you must first configure Apache to listen to the port number you assign. See Section 3.8, “Managing Listen Ports,” on page 43.
2 (Optional) To instruct Apache to also listen on a secure port, press the spacebar, then add the same IP address followed by the secure port number. For example: 172.16.5.18:443.
3 In the Server Name field, type a hostname for your server, such as www.mycompany.com.4 Select the Host Type to be used.
If you are going to use one virtual host per IP/port combination, then you should select IP-based virtual hosting. Otherwise, select name-based virtual hosting.
5 Click Save > Save to save your changes.orClick Save > Save and Apply to save your changes and restart Apache so your changes are immediately put into effect.For information about where configuration information is stored, see Section 2.3.3, “Saving Configuration Changes and Restarting Apache in Apache Manager,” on page 29.
For more information about IP-based virtual hosting, see Apache IP-based Virtual Host Support (http://httpd.apache.org/docs/2.2/vhosts/ip-based.html). For more information about when and how to use name-based virtual hosting, see Name-based Virtual Host Support (http://httpd.apache.org/docs/2.2/vhosts/name-based.html).
4.8 Creating Your Own Web SiteYou can use any HTML editor to create a Web site, although most functional corporate Web sites are created by professional designers. But depending on your needs and resources, your implementation tool can range from any of the readily available Web site creation programs (some of which are free) to a team of programmers. Another avenue is to out-source the creation of your Web site.
Creating personal and departmental Web sites can be simple, requiring only minutes to assemble. You can use any HTML editor to create the pages of your Web site.
When you create your home page, save the file as index.htm or index.html. That is the default file that automatically appears whenever your Web site is accessed. You can then create links to other pages and graphics with any filenames you choose.
TIP: You can configure the Apache to recognize a specific filename and extension so that when a user enters your Web server's URL, it automatically displays your home page. See Section 4.1, “Changing the Primary Document Directory,” on page 53.
4.8.1 Accessing Your Web SiteIf you have already successfully installed NetWare and the Apache Web server, you can access it right now. A sample Web page has been included. You can remove these pages and replace them with your own content.
To view the sample Web site, open a client Web browser on a workstation in your network and enter your NetWare server's IP address or DNS name. For example: http://server_IP_address or http://domain_name.
5 SP8: Apache Web Server Administration Guide

novdocx (en) 17 Septem
ber 2009
4.8.2 Adding Content to Your Web SiteApache has a document root or primary document directory. By default, the path to the primary document directory is volume:/apache2/htdocs. This is where the temporary index page is stored and where you will place your home page.
All content placed in this folder is visible to your Web site audience. If necessary, you can easily specify another directory as the primary document root directory. (See Section 4.1, “Changing the Primary Document Directory,” on page 53.)
When Apache is running, you can start posting content for the world (or your department or company) to see by placing files in Apache's primary document directory. You can also create additional document directories, which is a good idea if departments want to publish their own content to the company Web site but you don't want to give users control of the primary document directory. (See “Adding or Deleting a Document Directory” on page 55.)
4.9 What's NextAfter you've created content and configured the server to run optimally, you might want to learn more about Apache modules and how to enable the mod_php, mod_perl, mod_nsn, and mod_cache modules for use in hosting dynamic content. See Chapter 5, “Managing Apache Modules,” on page 71.
Managing Web Server Content 69

70 NW 6.
novdocx (en) 17 Septem
ber 2009
5 SP8: Apache Web Server Administration Guide

5novdocx (en) 17 S
eptember 2009
5Managing Apache Modules
One of the strengths of Apache is its ability to extend the power of the Web server through the use of modules. In fact, most of the functionality that exists in the Apache Web server is provided by modules.
Using Apache Manager, you can enable or disable specialized modules that provide technologies such as scripting, caching, and eDirectory access on Apache. This section provides instructions on how to enable these modules and then discusses some of the Apache modules that are unique to NetWare®.
Section 5.1, “Understanding Apache Modules,” on page 71Section 5.2, “Enabling Scripting Modules,” on page 72Section 5.3, “Enabling and Configuring the Caching Module,” on page 72Section 5.4, “Using the mod_edir Module to Connect to eDirectory,” on page 74
5.1 Understanding Apache ModulesApache can run with either external or internal modules.
External: An external module contains a set of functions that are wrapped up into a separate executable file. Having a module as a separate file allows the administrator to add, replace, or remove the module as needed. If a newer version of a module becomes available, the administrator can simply copy the new executable file into the volume:\apache2\modules directory and restart the server. On NetWare, an executable file has an NLM™ extension. For example, mod_cache.nlm.Internal (or built-in): Like an external module, an internal module also contains a set of functions. However, those functions are compiled into the Apache executable when it is compiled from the Apache source code.
TIP: An external module can be compiled directly into the Apache executable by simply including the source as part of the core Apache code.
Except for the compilation difference, internal and external modules function the same in your Apache Web server.
Requests received by the Apache Web server must pass through a series of stages in order for them to be completely handled. The architecture of Apache allows a module to insert itself into any one or more of these stages. Three of these stages deal with Web server security: access control, authentication, and authorization. There are currently various Apache modules available that supply handlers for one or more of these stages in order to give the Apache Web server a certain level of security.
For more information about security on Apache, see Authentication, Authorization and Access Control (http://httpd.apache.org/docs/2.2/howto/auth.html) on the Apache.org Web site.
Managing Apache Modules 71

72 NW 6.
novdocx (en) 17 Septem
ber 2009
5.2 Enabling Scripting ModulesTo use Perl, Novell Scripting, or PHP, you must first enable each module from the Modules page of Apache Manager.
Figure 5-1 Apache Mod PHP Configuration
To enable the PHP, Perl, or NSN modules:
1 On the Modules page, click the module name of the scripting language you want enabled.2 Click Yes.3 Click Save > Save to save your changes.
orClick Save > Save and Apply to save your changes and restart Apache so your changes are immediately put into effect.For information about where configuration information is stored, see Section 2.3.3, “Saving Configuration Changes and Restarting Apache in Apache Manager,” on page 29.
For more information about any of these scripting languages, visit the Novell Developer Kit (http://developer.novell.com/ndk) Web site.
5.3 Enabling and Configuring the Caching ModuleYou can also enable mod_cache, which implements an RFC 2616-compliant HTTP content cache that can be used to cache either local content or content available through a proxy. This caching module is disabled by default.
1 From the Modules page, click Mod_Cache.2 Click On.3 Click Save > Save to save your changes.
orClick Save > Save and Apply to save your changes and restart Apache so your changes are immediately put into effect.For information about where configuration information is stored, see Section 2.3.3, “Saving Configuration Changes and Restarting Apache in Apache Manager,” on page 29.After the caching module has been enabled, configuration options are available on the Mod Cache page.
5 SP8: Apache Web Server Administration Guide

novdocx (en) 17 Septem
ber 2009
4 In the Default Cache Expiration field, specify a default time, in seconds, to cache a document if neither an expiry date nor last-modified date are provided with the document.The value specified in the Maximum Cache Expiration field does not override this setting.
5 In the Maximum Cache Expiration field, specify the maximum number of seconds that HTTP documents, capable of being cached, are retained without checking the origin server. This means that cached documents are never older than the number of seconds you specify here. This maximum value is enforced even if an expiry date was supplied with the document.
6 (Optional) Next to Ignore Cache Control, select Yes if you want Apache to cache documents that contain a no-cache or no-store header value. Some Web documents might contain a no-cache or no-store header value, which means that the Web server won't store them in the server's cache. Ignore Cache Control overrides these header values by telling the server to cache documents even if they contain these header values. Documents requiring authorization are never cached.
7 In the Cache Size field, specify the maximum amount of memory to be used by the cache, in kilobytes (1024-byte units).If a new object needs to be inserted in the cache and the size of the object is greater than the remaining memory, objects are removed until the new object can be cached. The object to be removed is selected using the algorithm specified by the MCacheRemovalAlgorithm directive.See the MCacheRemovalAlgorithm Directive (http://httpd.apache.org/docs/2.2/mod/mod_mem_cache.html#mcacheremovalalgorithm) documentation on Apache.org for more information.
8 In the Maximum Object Count field, specify the maximum number of objects that can be cached. This value is used to create the open hash table. If a new object needs to be inserted in the cache and the maximum number of objects has been reached, an object is removed to allow the new object to be cached. The object to be removed is selected using the algorithm specified by the MCacheRemovalAlgorithm directive.See the MCacheRemovalAlgorithm Directive (http://httpd.apache.org/docs/2.2/mod/mod_mem_cache.html#mcacheremovalalgorithm) documentation on Apache.org for more information.
Managing Apache Modules 73

74 NW 6.
novdocx (en) 17 Septem
ber 2009
9 In the Minimum Object Size field, specify the minimum size (in bytes) a document must be in order for it to be cached.
10 In the Maximum Object Size field, specify the maximum size (in bytes) a document can be in order for it to be cached.
For more information about the mod_cache module, see Apache Module mod_cache (http://httpd.apache.org/docs/2.2/mod/mod_cache.html) on the Apache.org Web site.
5.4 Using the mod_edir Module to Connect to eDirectoryThe mod_edir module adds authorization services to the mod_auth_ldap authentication module that is native to Apache. The mod_edir module requires that mod_auth_ldap be loaded first because it relies on mod_auth_ldap for the authentication services. In addition, mod_edir also provides support for access to Novell® eDirectory™ based user home directories and remote file systems.
This module can only be used on NetWare and relies on eDirectory and the NetWare file system for file rights enforcement.
“mod_edir Modes” on page 74Section 5.4.2, “mod_edir Directives,” on page 76“Combining mod_edir with mod_auth_ldap: An Example” on page 79
5.4.1 mod_edir ModesThe mod_edir module has the ability to provide authorization, home directory access, and remote file access functionality. In order to provide this functionality, mod_edir must be able to make a connection to eDirectory as well as to remote servers. There are two modes in which mod_edir can make these connections. The basic difference between the two modes is whether mod_edir accesses the information in eDirectory or in remote file systems through public rights (anonymous mode) or uses a special user ID and password to log in (authenticated mode).
“Anonymous Mode” on page 74“Authenticated Mode” on page 75
Anonymous Mode
When mod_edir is configured in anonymous mode, it does not need to use a user ID or password to login before extracting information from eDirectory or a remote file system. In order for anonymous mode to work correctly, the administrator must allow public access to certain attributes within eDirectory. The most important attribute required by mod_edir is the Home Directory attribute of each user object. This attribute stores the server, volume, and path to each user's home directory.
Two requirements must be satisfied before anonymous mode works correctly. The first requirement has to do with allowing access to the Home Directory attribute of each user object within eDirectory. The second requirement deals with allowing access to a remote server’s file system.
When a request is made to retrieve a Web page from a user home directory, the URL should contain the home directory tag followed by a user ID (such as http://myserver.com/~mpalu/index.html). Then mod_edir makes an anonymous request through LDAP to retrieve the value of the Home Directory attribute of the specified user. If the home directory attribute has not been assigned public
5 SP8: Apache Web Server Administration Guide

novdocx (en) 17 Septem
ber 2009
access rights, the anonymous request fails to extract the required information. This means that the [PUBLIC] object within eDirectory must be allowed to read this attribute. In order to allow access to a remote server's file system, the Apache server must be able to log in as server to the remote file server. Being able to log in as server requires that the NetWare server that is running the Apache Web server must have a local eDirectory replica, and the server object within eDirectory must have must have file scan and read right on the remote server's file system.
Advantages:
Does not require that the administrator stores a user ID and password on the file system in the clear.Configuring the remote directory and home directory support in the Apache configuration file is much easier and requires fewer directives.User home directory availability can be controlled by allowing or disallowing public access to the attribute for any given user object.
Disadvantages:
Requires that the administrator gives public access rights to either the entire eDirectory tree or to the Home Directory attribute of each individual user that is allowed home directory functionality.Requires administrator intervention before a new user is able to access his or her home directory through the Web.A local replica of the eDirectory tree must exist on the NetWare server that is running the Apache Web server.The server object of the NetWare server that is running the Apache Web server must be given rights to all remote file systems it intends to access.
Authenticated Mode
Configuring mod_edir in authenticated mode allows it free access to all of the required information both in eDirectory as well as remote file systems without assigning public access rights. However, authenticated mode requires that a user ID and password be stored in an Apache configuration file. It also requires that a user object for the Apache Web server be created within eDirectory and assigned all of the necessary rights to allow it to access the Home Directory attribute of all user objects and File Scan and Read rights to all remote file systems that it intends to access.
We suggest that the user ID and password not be stored in the Apache httpd.conf configuration file or any other primary configuration file, but instead they should be stored in a separate file that can be secured through additional file system rights. In other words, you create an addition.conf file that holds only the directives for specifying the user ID and password to the Apache user object. Then you should either place the additional.conf file in a secure location on the file system or assign sufficient rights to the file so that only an administrator can view it. Then, from within the httpd.conf file, simply include the additional.conf file wherever necessary. Also, for additional security, you might want to assign only administrator rights to the httpd.conf file.
Advantages:
Does not require administrator intervention before a user is able to access the home directory through the Web.
Managing Apache Modules 75

76 NW 6.
novdocx (en) 17 Septem
ber 2009
Allows the Apache module to bind directly to LDAP rather than depending on public rights granted through eDirectory.Allows the Apache server to acquire the Home Directory attribute information from any LDAP server rather than requiring a local replica of eDirectory.All access to home directories and remote file systems can be controlled through a single Apache user object within eDirectory.
Disadvantages:
Requires that a password be stored on the file system of the NetWare server.Requires the administrator to create an Apache User object and grant it the appropriate read and file scan rights for both the user objects and the remote server file systems before home directory and remote directory functionality is available.
5.4.2 mod_edir DirectivesThe following directives can be used with mod_edir:
eDirServereDirUserAccounteDirPasswordeDirCacheTimeouthDirUserTaghDirUserSubDirectoryhDirSearchContextsHomeDirEnabledRemoteDirEnabledRequire edir-user
eDirServer
Specifies the server that will be used to log in and extract eDirectory information. This directive is only required if running in authenticated mode. (See “mod_edir Modes” on page 74.)
Description: Specifies the eDirectory server to access through LDAP.
Syntax: eDirServer server_name
Context: server config, virtual host
Status: Extended
Module: mod_edir
eDirUserAccount
Specifies the user ID of the eDirectory User object that has been granted rights to access eDirectory information such as the Home Directory attribute of each User object and any remote file system to access from the Apache server. For more information, see “mod_edir Modes” on page 74.
5 SP8: Apache Web Server Administration Guide

novdocx (en) 17 Septem
ber 2009
Description: Specifies a user ID for logging in to eDirectory.
Syntax: eDirUserAccount user_ID
Context: server config, virtual host
Status: Extended
Module: mod_edir
eDirPassword
Specifies the password that corresponds to the user ID defined by eDirUserAccount. For more information, see “mod_edir Modes” on page 74.
Description: Specifies the password the eDirectory user account password.
Syntax: eDirPassword password
Context: server config, virtual host
Status: Extended
Module: mod_edir
eDirCacheTimeout
Specifies the number of seconds each cache entry remains in the cache before timing out. The default value if no timeout value has been specified is 300 seconds. A cache timeout value of 0 disables the cache.
Description: Specifies the number of seconds before a cache entry times out.
Syntax: eDirCacheTimeout seconds
Context: server config, virtual host
Status: Extended
Module: mod_edir
hDirUserTag
Changes the tag used on in the URL to indicate that the following name specifies a user. The mod_edir uses the username to look up that user's home directory in eDirectory and then attempts to serve the requested Web page from that location. The default is a tilde character (~).
Description: Specifies the URL tag used to indicate a user home directory.
Syntax: hDirUserTag tag
Context: server config, virtual host
Status: Extended
Module: mod_edir
Managing Apache Modules 77

78 NW 6.
novdocx (en) 17 Septem
ber 2009
hDirUserSubDirectory
Specifies the default subdirectory where mod_edir attempts to access the requested Web page. After mod_edir has extracted the user home directory from eDirectory, it appends the name of the subdirectory specified by hDirUserSubDirectory and then attempts to access the requested Web page from that location. The default location for any user would be public_html (meaning the server/volume:/home_directory/public_html directory).
Description: Specifies the subdirectory name within a user home directory.
Syntax: hDirUserSubDirectory subdirectory
Context: server config, virtual host
Status: Extended
Module: mod_edir
hDirSearchContexts
Specifies the list of contexts to search in order to resolve a user ID to a user home directory. By default, each context and all subcontexts are searched until a matching user ID is found. The mod_edir module stops searching as soon as it finds a matching user ID. Therefore, all user IDs must be unique within the search contexts specified.
Description: Specifies a list of search contexts.
Syntax: hDirSearchContexts context, context, ...
Context: server config, virtual host
Status: Extended
Module: mod_edir
HomeDirEnabled
Enables or disables user home directory support in mod_edir. The default is to enable home directory support.
Description: Enables or disables user home directory support.
Syntax: HomeDirEnabled On | Off
Context: server config, virtual host
Status: Extended
Module: mod_edir
RemoteDirEnabled
Enables or disables the remote file system access support in mod_edir. The default is to enable remote file system support.
Description: Enables or disables remote directory support
Syntax: RemoteDirEnabled On | Off
5 SP8: Apache Web Server Administration Guide

novdocx (en) 17 Septem
ber 2009
Context: server config, virtual host
Status: Extended
Module: mod_edir
Require edir-user
The Require edir-user directive must be accompanied by AuthName, AuthType, and AuthLDAPURL in order to work correctly, as illustrated in “Combining mod_edir with mod_auth_ldap: An Example” on page 79.
Access controls that are applied in this way are effective for all methods. This is what is normally desired. If you want to apply access controls only to specific methods, while leaving other methods unprotected, then place the Require statement into a <Limit> section.
For more information, see the mod_auth_ldap (http://httpd.apache.org/docs/2.2/mod/mod_authnz_ldap.html) documentation on the Apache.org Web site.
Description: Specifies that only an eDirectory user has access a resource.
Syntax: Require edir-user
Context: directory, .htaccess
Override: AuthConfig
Status: Extended
Module: mod_edir
5.4.3 Combining mod_edir with mod_auth_ldap: An ExampleThe example below shows how mod_edir can be combined with mod_auth_ldap to provide both authentication and authorization services:
LoadModule ldap_module modules/utilldap.nlm<IfModule util_ldap.c> LoadModule auth_ldap_module modules/authldap.nlm LoadModule edir_module modules/mod_edir.nlm Alias /secure sys:/webpages/secure <Directory sys:/webpages/secure> Order deny,allow Allow from all AuthType Basic AuthName LDAP_Protected_Site AuthLDAPURL ldap://my.ldap.server/o=my_context require edir-user </Directory></IfModule>
The following is an example that shows an anonymous mode configuration of mod_edir for home directory and remote directory support:
Managing Apache Modules 79

80 NW 6.
novdocx (en) 17 Septem
ber 2009
LoadModule edir_module modules/mod_edir.nlm <IfModule mod_edir.c> hDirSearchContexts o=users Alias /rdocs "remotesrv/data:/webpages/remote" <Directory "data:/webpages/remote"> Options Indexes MultiViews Order allow,deny Allow from all </Directory></IfModule>
The next example shows an authenticated mode configuration of mod_edir (in httpd.conf):
LoadModule edir_module modules/mod_edir.nlm <IfModule mod_edir.c> include edirauth.conf hDirSearchContexts o=users Alias /rdocs "remotesrv/data:/webpages/remote" <Directory "data:/webpages/remote"> Options Indexes MultiViews Order allow,deny Allow from all </Directory></IfModule>
The following is in the edirauth.conf file:
<IfModule mod_edir.c> eDirServer MY_SERVER eDirUserAccount cn=apache_server.o=admin_objects eDirPassword secret</IfModule>
5.5 What's NextFor more information about Apache modules, see the Module Index (http://httpd.apache.org/docs/2.2/mod/) on the Apache.org Web site.
5 SP8: Apache Web Server Administration Guide

6novdocx (en) 17 S
eptember 2009
6Managing Multiple Apache Web Servers
If you have several Apache Web servers running anywhere in your network, on any platform, they can all be configured at one time from the Multiple Server Administration interface of Apache Manager.
Multiple Server Administration uses a special configuration daemon to communicate with Novell® eDirectoryTM, where portions of the httpd.conf Apache configuration file are stored as inheritable objects. These objects can then be shared between Web servers, letting you synchronize and share common configuration settings across all of your Web servers. This is ideal for managing a collection of Web servers, sometimes referred to as a Web farm.
IMPORTANT: This mode of Apache Manager requires that you have a good understanding of Apache directives and how to use them. You will be required to type directives and to know the correct syntax. Also, a basic understanding of the object hierarchy used by eDirectory is helpful, though not required.
This section contains the following topics:
Section 6.1, “About Multiple Server Administration,” on page 81Section 6.2, “Using the Multiple Server Administration Interface,” on page 85Section 6.3, “Starting Multiple Server Administration,” on page 86Section 6.4, “Creating Server Groups,” on page 87Section 6.5, “Adding or Removing Servers to or from a Server Group,” on page 87Section 6.6, “Adding an Apache Module to a Server or Group Object,” on page 89Section 6.7, “Adding, Editing, or Removing Apache Blocks,” on page 89Section 6.8, “Adding, Editing, or Removing a Virtual Host,” on page 90Section 6.9, “Checking the Status of Each Web Server,” on page 91Section 6.10, “Viewing and Editing an Object's Configuration,” on page 92Section 6.11, “What's Next,” on page 94
6.1 About Multiple Server AdministrationThe Multiple Server Administration interface of Apache Manager stores Apache configurations in eDirectory so that a change to one Web server's configuration can be inherited by all other servers defined in a Server Group. This makes server management and configuration faster, easier, and more accurate.
Managing Multiple Apache Web Servers 81

82 NW 6.
novdocx (en) 17 Septem
ber 2009
To do this, Apache Manager uses two key components: eDirectory and a configuration daemon. A basic understanding of these two components can help you to better understand and use the Multiple Server Administration interface.
“eDirectory” on page 82“Configuration Daemon” on page 83
6.1.1 eDirectoryeDirectory is used by Apache Manager in two ways: first, as a database where Apache configuration directives are stored, and second, as an environment that allows Apache configuration objects to be shared and inherited.
Apache Manager divides the Apache configuration file ( httpd.conf) into a hierarchy of configuration objects and then stores them in eDirectory. By storing directives in a hierarchy of objects, they can be applied to a single server, a group of servers, or to an entire Web farm.
Some blocks are unique from others, such as virtual host or Apache module blocks, because they utilize directives unique to them. Therefore, they appear as unique and separate objects.
The httpd.conf file is divided into a set of five object classes: server group, server, virtual host, module, and block. These object classes are defined in the following table.
Table 6-1 eDirectory Object Classes and Definitions
Object Class Definition
Server Group Represents a set of Apache configuration directives common to all server objects contained in a group. It can contain any number of server groups, servers, modules, and blocks.
Server Represents a single Apache server. It contains standard attributes such as Server Name. It is used to define any single server and serves as an anchor point for each server's configuration. It can contain any number of virtual hosts, modules, and blocks.
Virtual Host Represents a virtual host within an instance of an Apache server. It contains the necessary attributes to create a VirtualHost block in the Apache configuration file. It must be contained within a server object and can itself contain any number of block objects.
Module Represents an Apache module. It defines the LoadModule directive and the IfModule tag within a configuration file. A module can be defined at any level of the hierarchy so that it can be inherited by one or more server configurations. This allows the module to be loaded and configured in exactly the same way by multiple Web servers without redefining the module for each server. It can contain any number of block objects.
5 SP8: Apache Web Server Administration Guide

novdocx (en) 17 Septem
ber 2009
By defining a server object within a directory and combining the object with one or more virtual host, module, and block objects, an entire configuration for an Apache Web server can be stored, manipulated, and shared.
Each object class contains a set of attributes that store the data that is required to produce a portion of the configuration in a complete httpd.conf file. Additionally, each object class can store any number of directives that you might want defined at that level of the object hierarchy.
6.1.2 Configuration DaemonThe configuration daemon is a small Java application that runs along with the Apache server software. It serves as a conduit between each Web server's actual configuration file and the directory service that holds Apache's configuration objects.
The configuration daemon extracts Apache directives from directory server objects, assembles them, and then creates a new httpd.conf configuration file. After the configuration file is created, the daemon restarts Apache so that new changes can be read by the Apache Web server.
TIP: When Apache Manager is started, so is the configuration daemon. However, if you need to start the daemon manually, type ap2webman at the NetWare® system console. Also, using this command automatically imports your current Apache Web server configurations, including any virtual hosts. For more information, see Section 6.5, “Adding or Removing Servers to or from a Server Group,” on page 87.
The first time the daemon is run for a specific instance of the Apache Web server, it creates a server object in the object hierarchy and ensures that the configuration stored in the directory matches the current configuration file. The daemon then continues to monitor the directory for any changes made to a particular server. If you manually change the configuration file stored on the server's hard drive, the daemon detects the change and imports it into the server configuration that was previously stored in the directory.
Block Literally, blocks are specific directives used to enclose a set of configurations. A block object represents a Directory, Location, or File block, or any of their derivatives. A block object defines the Directory|Location|File tags within a configuration file. It can be defined at any level of the hierarchy so that one or more server configurations can inherit it. This allows the block definition to be applied in exactly the same way by multiple Web servers without redefining the block for each instance. A block cannot contain any other objects.
Object Class Definition
Managing Multiple Apache Web Servers 83

84 NW 6.
novdocx (en) 17 Septem
ber 2009
This process ensures that the configuration file used to configure a specific instance of Apache remains synchronized with the shared configuration objects in the directory. If a change is detected, it updates the configuration file and notifies Apache that it is time to reload the configuration file. If a configuration has not yet been created in the directory, the daemon imports the current configuration file.
Configuration Daemon Properties File
The startup.properties file stored in volume:\apache2\conf\daemon is used to configure the daemon. By default, it contains the following configurations:
# NWConfVersion = 2
InitialContextFactory = com.sun.jndi.ldap.LdapCtxFactory
ProviderURL = airport.newyork.digitalairlines.com
#Port = 389
Port = 636
UseSSL = yes
SecurityAuthentication = simple
UserID = cn=admin,o=cents
#Password = <Your-Password>
ServerDN = cn=airport,cn=NetWare Group,cn=Apache Group,o=cents
ServerName = airport.newyork.digitalairlines.com
ConfigFile = sys:/apache2/conf/httpd.conf
BackupDir = sys:/apache2/conf/backup/
StartApacheCmd = sys:/system/ap2webup.ncf
RestartApacheCmd = sys:/system/ap2webrs.ncf
Apache Web server
13
2
4
ConfigurationFile
eDirectory
5
6
ConfigurationDaemon
1 Configuration daemon is started
2 New configuration data is extracted from the directory
3 Configuration data is written toa configuration file on the local file system
4 Apache Web server is started and restarted
5 Apache reads the configuration file
6 Configuration daemon waits forchanges in the directory and restarts from step 2 when necessary
5 SP8: Apache Web Server Administration Guide

novdocx (en) 17 Septem
ber 2009
StopApacheCmd = sys:/system/ap2webdn.ncf
RestartDelay = 10000
StartupErrorLog=sys:/apache2/logs/startup.err
StorageMode = FILE
Depending on changes you might make to your server, you might need to modify some of the paths. Most critically, you might have to make changes to UserID and ServerDN, making sure that if you move your administrator user object, you must specify the new location in this file.
6.2 Using the Multiple Server Administration InterfaceThe Multiple Server Administration interface displays the current configuration for each Apache server as it is stored in the directory and lets the you manipulate each configuration object.
Figure 6-1 Apache Multiple Server Administration
ObjectList
ServerGroup
Directives Frame
Server
VirtualHost
Module
Block
Add/Remove/Edit Objects
Add/Remove/Edit Directives View Configuration File
Managing Multiple Apache Web Servers 85

86 NW 6.
novdocx (en) 17 Septem
ber 2009
The Multiple Server Administration interface is divided into two main areas:
The Objects Frame: The Objects frame on the left provides a view of the Apache configuration objects that are currently stored in the directory and lets the administrator navigate the hierarchy.
By default, the object hierarchy begins with a server group object called Apache Group. You can then define additional groups. Server groups can be organized in whatever way you choose. You might organize them according to platform (such as NetWare, Linux, or UNIX) or by deployment (such as a Novell iFolder® group and an iPrint group).The Directives Frame: The Directives frame—the frame to the right of the Objects frame—displays the configuration contents held by the currently selected object. This frame lets you manage the directives that are contained in the currently selected object. You can add child objects or alter the attribute values of the object itself. When working with server objects, the Directives frame also lets you preview the server's configuration file as it will be created by the configuration daemon. In the Configuration File view, which you can see by clicking Configuration File, all directives are linked back to the object where they were first defined, making it easier to find an object that holds a specific directive without knowing where the directive came from.
6.3 Starting Multiple Server AdministrationWhen you understand how the Apache Manager's Multiple Server Administration interface works with eDirectory and the configuration daemon, you can begin creating and defining your server groups.
To start Apache Manager's Multiple Server Administration:
1 Using a Web browser, open the secure version of the NetWare Welcome Web site using your server's URL. For example, https://myserver.mycompany.com:2200 or https://172.16.5.18:2200.
2 When prompted, specify your administrator username and password and click Login. 3 In the left frame of the NetWare Welcome Web site home page, click next to Open Source. 4 Click Apache 2.0. 5 Under Apache 2.0 Links, click Administer Multiple Apache Servers.
5 SP8: Apache Web Server Administration Guide

novdocx (en) 17 Septem
ber 2009
The first time you start Administer Multiple Apache Servers, only the server where you are accessing Apache Manager is listed. As you add server groups, those servers are added to the list.If you return to the Single Server Administration interface in Apache Manager, the information displayed there is for the server where you are accessing Apache Manager. To use the Single Server Administration interface for another other server listed in the Multiple Apache Server interface, you must access Apache Manager on that server, using that server's IP address or hostname.
6.4 Creating Server GroupsServer groups are created to hold Apache servers that use common directives. This allows you to modify directives from one location that are automatically applied to all servers in the group.
For example, directives for Apache running on NetWare have different values than Apache running on Linux. If you were running Apache on both NetWare and Linux, you might create a NetWare server group and a Linux server group.
1 From the Multiple Server Administration home page, or the first page you see after logging in, click Apache Group if you want to create the new server group under the Apache Group. orIf you want to create the new server group on the same level as the Apache Group, skip this step and proceed to Step 2.
2 In the Choose Action drop-down list, select Add Server Group, then click . 3 In the Add Server Group dialog box, type a name for your server group in the Common Name
field. This can be any name you choose. Keep in mind that it is the name that will appear in the Objects list.
4 Click OK.
Repeat this procedure for each server group you want to create. After you have created your server groups, you can create additional server groups within them by following the same procedure, or you can begin adding servers to each server group.
6.5 Adding or Removing Servers to or from a Server GroupAfter a server group is created, you then add Apache Web server objects to it. A server object contains all configurations specific to a single Apache server. However, server objects inherit configurations from objects above them in the Objects list unless you specifically disinherit them, as described in Section 6.10, “Viewing and Editing an Object's Configuration,” on page 92.
You can manually add a server to a server group, or you can import it along with all of its configuration settings using the ap2webman command at the server console. Importing a server is much faster and more accurate.
To automatically import a server and its settings:
1 At the NetWare console of the server that is running the Apache Web server that you want to import, go to the system console prompt.
Managing Multiple Apache Web Servers 87

88 NW 6.
novdocx (en) 17 Septem
ber 2009
2 Enter ap2webman to run the configuration daemon. 3 When prompted, type your administrator password, then press Enter. 4 When prompted, press Y to import the server and its configurations.
Repeat this procedure on each server that you want imported.
If you want to import Apache Web server configurations from Linux or Windows, you can download the configuration daemon from the Novell Developer Kit (NDK) and run it on those servers as well. You can also download LDIF files for use in adding Windows and Linux groups to eDirectory. For instructions, see Appendix B, “Installing the Apache Manager Daemon on Linux and Windows,” on page 99.
To manually add a server to a server group:
1 In the Objects list, click a server group name to display its information, select Add Server from the Choose Action drop-down list, then click .
2 In the Add Server dialog box, type a name for your server in the Common Name field. 3 In the Server Name field, type the full DNS name of your server. For example:
www.myserver.com
If you don't know the DNS name of your server, contact a network administrator who manages your DNS server. If you simply want to test your server and have not yet registered with a DNS server, you can edit the hosts files on both NetWare and your client computer, which lets you see your server from any client where you have correctly modified the hosts file.On NetWare, the hosts file is in the volume:\etc directory. On Windows, search for the hosts file, which on Windows XP is typically in the drive:\\winnt\system32\drivers\etc folder. For both hosts files, add the IP address, port number, and a temporary DNS name at the end of each file. For example: 172.16.5.18 myserver.mycompany.com
4 Click OK.
When you add a server manually, you must add all of the necessary Apache directives. Begin by clicking the server in the Objects list and then typing (or copying and pasting) the directives directly into the Directives frame.
To remove a server from a server group:
1 In the Objects list, click a server group that contains the server you want to remove. 2 Click the server you want removed, select Remove Object in the Choose Action drop-down list,
then click .
IMPORTANT: After you remove a server, the only way to get it back is to re-create it either manually or by importing it again using the ap2webman command.
3 Click OK in the Remove Server dialog box.
5 SP8: Apache Web Server Administration Guide

novdocx (en) 17 Septem
ber 2009
6.6 Adding an Apache Module to a Server or Group ObjectModule objects create an IfModule mod_name .c block in the configuration file. Adding a module to a server group makes it available to all other servers in and below the current object's group. For more information about Apache modules, including those that are unique to NetWare, see Chapter 5, “Managing Apache Modules,” on page 71.
When you add a module, you must know the name of its executable file and its module identifier. Before you add a module, refer to its documentation on the Apache Web site. See Module Index (http://httpd.apache.org/docs/2.2/mod/) on the Apache.org Web site.
1 In the Objects list, click the server group that you want to add the module to. 2 In the Choose Action drop-down list, select Add Module, then click . 3 In the Add Module dialog box, type a name for the Apache module in the Common Name field. 4 In the Source File field, type the name of the file that contains the code of the module you are
adding. For example: mod_auth_ldap.c. 5 In the Object File field, type the relative path to the module's executable file, which by default
is in the volume:\\apache2\modules directory. For example, type: modules/authldap.nlm. 6 In the Module Identifier field, type the string that identifies the module you are adding.
Each Apache module has a module identifier assigned to it. To find out which module identifier to use, look up the module name in the Apache documentation. See Module Index (http://httpd.apache.org/docs/2.2/mod/)on the Apache.org Web site.
7 (Optional) To disable the module, select Disable Module. When you select Disable Module, the LoadModule statement is not added to the httpd.conf configuration file.
8 Click OK.
6.7 Adding, Editing, or Removing Apache BlocksApache blocks are directives used to enclose a set of configurations. For example, the Directory directive is used to enclose a group of directives that apply only to a directory (and its sub-directories) specified within the enclosure. For example:
<Directory sys:\apache2\htdocs>
Options Indexes FollowSymLinks
</Directory>
In this example, the directives included between the Directory tags (comparable to standard HTML tag syntax) are all applied as part of the Apache block.
A block can be defined at any level in the object's hierarchy so that one or more server configurations can inherit it. This allows the block definition to be applied in exactly the same way by multiple Web servers without redefining the block for each server. A block cannot contain any other objects.
Managing Multiple Apache Web Servers 89

90 NW 6.
novdocx (en) 17 Septem
ber 2009
Before adding a block, you might want to look at the documentation for its directives in the Directive Quick Reference (http://httpd.apache.org/docs/2.2/mod/quickreference.html) on the Apache.org Web site.
To add a new block:
1 From the Objects list, click a server group, server name, or virtual host object where you want to add the block object.
2 In the Choose Action drop-down list, select Add Block, then click . 3 In the Add Block dialog box, type a name for the block object in the Common Name field. 4 In the Scope field, type the file path used in the block's open statement.
Scope refers to the file path specified in the open statement of a block. For example, if the block type is Directory, the block's open statement might be: <Directory sys:\apache2\htdocs>
In this case, you would type sys:\apache2\htdocs in the Scope field. 5 Click the Block Type drop-down list and select the type of block being defined.
Because each block type is an actual directive, you can look up the directive in the Apache documentation for more information about each block type. See the Directive Quick Reference (http://httpd.apache.org/docs/2.2/mod/quickreference.html) on the Apache.org Web site.
6 Click OK.
To edit a block:
1 In the Objects list, click a server group, server name, module, or virtual host object that contains the block you want to edit.
2 Click the block that you want to edit, select Edit Object from the Choose Action drop-down list, then click .
3 In the Edit Block dialog box, make the necessary changes.4 Click OK.
To remove a block:
1 In the Objects list, click a server group, server name, module, or virtual host object that contains the block you want to remove.
2 Click the block that you want removed, select Remove Object from the Choose Actions drop-down list, then click .
IMPORTANT: After you remove a block, there is no way to retrieve it. You must create it again.
3 Click OK.
6.8 Adding, Editing, or Removing a Virtual HostBefore you can add a virtual host, you must first create it. For information about creating virtual hosts on Apache, see Section 4.7, “Creating Virtual Hosts,” on page 67.
When you add a virtual host object to the Objects list, a VirtualHost ip:port block is created in the configuration file that references the virtual server you are adding.
5 SP8: Apache Web Server Administration Guide

novdocx (en) 17 Septem
ber 2009
To add a virtual host:
1 In the Objects list, click a server group, then click the name of the server where you want to add a virtual host.
2 In the Choose Action drop-down list, select Add Virtual Host, then click . 3 In the Add Virtual Server dialog box, type a name for the virtual host in the Common Name
field. 4 In the Server Name field, type the full DNS name of the virtual server. For example:
myserver.mycompany.com
5 In the IP Address:Port Combinations field, specify the IP address and port number assigned to your virtual host. For example: 172.16.5.18:80
6 Click OK.
To edit a virtual host:
1 In the Objects list, click the virtual host that you want to edit. 2 From the Choose Action drop-down list, select Edit Object, then click . 3 In the Edit Virtual Server dialog box, modify the server name or IP address and port
information. 4 Click OK.
To remove a virtual host:
1 From the Objects list, click the virtual host that you want to remove. 2 From the Choose Action drop-down list, select Remove Object, then click . 3 In the Remove Virtual Server dialog box, click OK.
6.9 Checking the Status of Each Web ServerYou can verify the health of each individual Web server and you can restart each one individually, from the Server Status table.
Figure 6-2 Web Server Status
In the Server Status table, a indicates that Apache is currently responding to the daemon and the current configuration is valid. A indicates that Apache is down. Apache might be down at the request of an administrator.
Managing Multiple Apache Web Servers 91

92 NW 6.
novdocx (en) 17 Septem
ber 2009
The Last Configuration Update column indicates the date of the last configuration update by the Apache daemon. If the configuration file has been manually modified, this field reads MOD_BY_HAND.
To restart one or more Apache Web servers from the Server Status list:
1 In the Directives frame of Multiple Server Administration, scroll down if necessary to the Server Status table.
2 Select the check boxes in the Restart column in the row of each server that you want to restart. 3 Click Restart Servers.
6.10 Viewing and Editing an Object's ConfigurationThe Directives frame displays the configuration of the current object, or the object you most recently selected from the Objects list. The directives shown are those that are unique to the currently selected object. Additional directives are inherited from objects higher up in the Objects list and are typically not visible (unless you click Configuration File, which lets you view all directives being applied to the current object).
For example, if you created a server called Tycoon in a server group called NetWare Servers and selected it from the Objects list, the Directives frame would display the following list of directives, or the current configuration for Tycoon:
StartThreads 25
-StartThreads 50
MaxSpareThreads 50
-MaxSpareThreads 65
MaxThreads 1024
-MaxThreads 250
Listen 82
ServerAdmin [email protected]
DirectoryIndex index.html index.html.var index.php index.pl
-DirectoryIndex index.html index.html.var
Include "SYS:/adminsrv/webapps/welcome/web-inf/welcome-apache.conf"
Include sys:/tomcat/4/conf/tomcatdocs-apache.conf
Include sys:/tomcat/4/conf/tomcatadmin-apache.conf
Include sys:/tomcat/4/conf/tomcatmanager-apache.conf
Include sys:/apache2/conf/mod_nsn.conf
Include sys:/apache2/conf/mod_perl.conf
Include sys:/apache2/conf/mod_php.conf
NameVirtualHost 111.222.33.44:80
5 SP8: Apache Web Server Administration Guide

novdocx (en) 17 Septem
ber 2009
Notice that the StartThreads directive appears twice. The first StartThreads directive sets Tycoon's total number of starting threads to 25. The second StartThreads directive is inherited from the configuration settings of the NetWare Group. Because Tycoon's own configuration already contains a StartThreads directive, Apache Manager disinherited the second StartThreads directive by adding a minus sign (-) at the start of the directive.
If you clicked the server group object NetWare Group to which Tycoon belongs, the directives frame would display the following list of directives, or the current configuration for the NetWare Group:
ServerRoot "SYS:/APACHE2"
ThreadStackSize 65536
StartThreads 50
MinSpareThreads 10
MaxSpareThreads 65
MaxThreads 250
MaxRequestsPerChild 0
SecureListen 443 "SSL CertificateDNS"
DocumentRoot "SYS:/APACHE2/htdocs"
ErrorLog "|SYS:/APACHE2/bin/rotlogs.nlm sys:/apache2/logs/error_log 5M"
CustomLog "|sys:/apache2/bin/rotlogs.nlm sys:/apache2/logs/access_log 5M" common
Alias /icons/ "SYS:/APACHE2/icons/"
Alias /manual "SYS:/APACHE2/manual"
Alias /error/ "SYS:/APACHE2/error/"
ScriptAlias /cgi-bin/ "SYS:/APACHE2/cgi-bin/"
These directives are inherited by Tycoon and by all other objects below NetWare Group.
6.10.1 Disinheriting DirectivesDirectives that have been inherited from objects higher up in the Objects list can be disinherited. This allows common configurations to be shared among all Apache Web servers but also lets you customize each Web server's configuration.
1 Select the server group, server name, virtual host, module, or block that you want to modify.2 In the Directives frame,type a minus sign (-) before each directive that you want disinherited.3 Click Save.
6.10.2 Disabling Inherited ObjectsYou can disable inherited objects that the current Apache server (the one you last clicked in the Objects list) might inherit for its configuration. Doing so removes them from the configuration of the current server.
Managing Multiple Apache Web Servers 93

94 NW 6.
novdocx (en) 17 Septem
ber 2009
Inherited objects are inherited from objects one or more levels above the object that you want to modify.
To disable a server's inherited objects:
1 Select the server that is inheriting objects that you want disabled.2 Click Disable Objects. 3 On the Disable Objects For Server: server_name page, select each object from the list of
objects by selecting their check boxes. Objects that are not selected remain inherited.
4 Click Save.
6.11 What's NextRefer to the following resources for more information about managing the Apache Web server:
To learn more about how to improve the overall performance of Apache, see Apache Performance Tuning (http://httpd.apache.org/docs/2.2/misc/perf-tuning.html). If you are a developer and need more information about the inner workings of Apache, see Developer Documentation for Apache 2.2 (http://httpd.apache.org/docs/2.2/developer/). For the complete Apache 2.2 documentation, see Apache HTTP Server Version 2.2 Documentation (http://httpd.apache.org/docs/2.2/).
5 SP8: Apache Web Server Administration Guide

Anovdocx (en) 17 S
eptember 2009
AApache Coexistence and Migration Issues
One of the top priorities in designing Novell® Open Enterprise Server (OES) was to ensure that new OES components, running on either NetWare® or Linux, can be introduced into an existing network environment without disrupting any of the products and services that are in place. It was also deemed important that there be a clear migration path for moving existing products or services and related data onto the OES platform.
This section discusses the issues involved in the coexistence and migration of Apache in OES. It is divided into the following topics:
Section A.1, “Web Server Coexistence on Multiple Platforms and Versions,” on page 95Section A.2, “Upgrading from the NetWare Enterprise Web Server on NetWare 6 to Apache 2.0 on NetWare 6.5,” on page 96Section A.3, “Upgrading from Apache 1.03 on NetWare 6 to Apache 2.0 on NetWare 6.5 SP3 or Later,” on page 97Section A.4, “Migrating Your Web Server from NetWare to Linux,” on page 97
For a general discussion of coexistence and migration issues in OES, see OES 2: Migration Tools Administration Guide (http://www.novell.com/documentation/migtools/mig_tools_lx/index.html?page=/documentation/migtools/mig_tools_lx/data/bookinfo.html).
A.1 Web Server Coexistence on Multiple Platforms and VersionsThis section provides information regarding the coexistence of the OES version of Apache with existing NetWare or Linux networks, and with previous versions of the product. This information can help you feel confident as you install new OES components into your current network.
The following table summarizes the compatibility of Apache version 2.0 and later with various network operating systems and directory services versions, along with any dependencies on other products or services. See the Support Pack versions for version support information.
For NetWare 6.5, Apache is the primary Web server and is configured during NetWare installation. For NetWare 6, Apache is available with NetWare but is not configured during NetWare installation. For NetWare 5.1, Apache is not included with NetWare and must be downloaded from the Apache for NetWare Binaries page (http://www.apache.org/dist/httpd/binaries/netware).
NetWare Operating System NetWare 6.5 or later
NetWare 6.0
NetWare 5.1
Linux Operating System SUSE® LINUX Enterprise Server 9 SP1 or later
Directory Services eDirectory™ 8.7.3 or later
Apache Coexistence and Migration Issues 95

96 NW 6.
novdocx (en) 17 Septem
ber 2009
For Linux, Apache is the primary Web server and is configured during server installation.
A.2 Upgrading from the NetWare Enterprise Web Server on NetWare 6 to Apache 2.0 on NetWare 6.5If you are upgrading to NetWare 6.5 SP3 or later and your existing server uses the NetWare Enterprise Web Server, you must upgrade to Apache. A special migration tool has been created to handle the upgrade for you.
Section A.2.1, “Understanding the Migration Tool,” on page 96Section A.2.2, “Manually Migrating Settings,” on page 96Section A.2.3, “Updating the Welcome Page,” on page 96
A.2.1 Understanding the Migration ToolDuring the installation process, the migration tool leaves your Web content and related files intact, in the same directory structure that is already in place, which in most cases is novonyx/suitespot/docs. This path could be different if you had configured an alternate root directory. Apache is then configured to recognize this path so that your content is still accessible.
A copy of the previous Apache configuration is then saved to httpd.conf.001. A new Apache configuration file is created and named httpd.conf. It contains directives based on settings in your Enterprise configuration files.
A.2.2 Manually Migrating SettingsThe migration tool does not automatically migrate all settings. Some final adjustments require manual configuration changes by editing the httpd.conf file or by using Apache Manager. For more information, see Section 2.2, “Configuring and Managing Apache on NetWare,” on page 22.
Settings that are not migrated from the NetWare Enterprise Web Server to Apache include the following:
NSAPI plug-insTomcatLCGIsMIME typesAuthentication settings Authorization settings
A.2.3 Updating the Welcome PageIf you have been using the default Welcome page provided with the NetWare Enterprise Web Server, that Web page still appears after you have upgraded to Apache because no Web content is changed by the upgrade. To display the new Apache Welcome page instead, change the document root
5 SP8: Apache Web Server Administration Guide
novdocx (en) 17 Septem
ber 2009
directory to sys:/apache2/htdocs in Apache Manager, as described in Section 4.1, “Changing the Primary Document Directory,” on page 53. You can also make the change by editing the sys:/apache2/conf/httpd.conf file.
A.3 Upgrading from Apache 1.03 on NetWare 6 to Apache 2.0 on NetWare 6.5 SP3 or LaterWhen upgrading a NetWare server that is running Apache 1.03, NetWare 6.5 SP3 or later disables version 1.03. If Apache 2.0 is selected during the install, the install transitions Novell software that is dependent on Apache to use Apache 2.0.
If you have other programs configured to use Apache 1.03, you must manually reconfigure them to use Apache 2.
A.4 Migrating Your Web Server from NetWare to LinuxThis section provides information on how to migrate a previous installation of Apache on NetWare to a Linux Web server.
Section A.4.1, “Administrative Differences,” on page 97Section A.4.2, “Migrating Virtual Hosts,” on page 97Section A.4.3, “Copying Web Pages,” on page 98Section A.4.4, “Copying Log Files,” on page 98Section A.4.5, “Adding Modules,” on page 98
A.4.1 Administrative DifferencesWith Apache on NetWare, most of your administrative tasks are performed in Apache Manager, as described in Section 2.3, “Using Apache Manager in Your Web Browser,” on page 22. This simplified Web interface makes it easy to administer your Web site configuration. However, with Linux, most of your administration tasks are performed from the command line using a text editor.
A.4.2 Migrating Virtual HostsOn NetWare, virtual hosts are added by either editing the httpd.conf file by hand or using Apache Manager to create a new virtual host, as described in Section 4.7, “Creating Virtual Hosts,” on page 67. On Linux, you need to edit the /etc/apache2/vhost.d/vhost.conf file. There is a vhost.template file in the same directory that you can use as an example to create a vhost.conf file.
Copy the virtual host information from the NetWare /apache2/conf/httpd.conf file to the new /etc/apache2/vhost.d/vhost.conf file. Then, in the new vhost.conf file, change the IP address, the directory paths for the document root, log file locations, and script alias (cgi-bin location) locations. Make any other additional settings for the virtual host in the virtual host block.
Perform these tasks for each virtual server that is migrating to Linux.
Apache Coexistence and Migration Issues 97

98 NW 6.
novdocx (en) 17 Septem
ber 2009
A.4.3 Copying Web PagesOne of the first tasks that needs to be performed to migrate your Web site from NetWare to Linux is to move your Web pages to the new Linux Web server. The Web pages are generally stored in the document root. (By default, the document root for on NetWare is /apache2/htdocs. By default, the document root on Linux is /srv/www/htdocs/.)
Map a drive to both NetWare and Linux on a Windows workstation. Browse to the /apache2/htdocs directory on NetWare, then copy all the files and folders in that directory to the /srv/www/htdocs directory on the Linux Web server.
Copying Virtual Host Pages
After you have finished copying the files for the document root, you need to perform the same task for each virtual host on the Web server. The default location for virtual hosts on Linux is /srv/www/vhosts/.
Copying Scripting Files
If you are running any script languages such as PHP or Perl, you need to copy your Perl and PHP files to the proper directories. If you are using the cgi-bin as the script alias for these files, copy the files to the /srv/www/cgi-bin directory. The default location for the cgi-bin on NetWare /apache2/cgi-bin directory. You can use the mapped drives to copy the script files to the Linux cgi-bin directory. Remember to verify you are in the correct directory on both servers before copying the script files.
A.4.4 Copying Log FilesIf you want to keep your log files from your NetWare Web server, you need to move them to your Linux Web server. On NetWare, the default location for log files is /sys/apache2/logs. On Linux, the default location for log files is /var/log/apache2.
You can use the mapped drives to copy the log files from the NetWare server to the Linux server. Remember to verify you are in the correct directory on both servers before copying the log files.
A.4.5 Adding ModulesModules are handled similarly for on NetWare and Linux. If you need to add additional modules to your Linux Web server, use YaST to install the module on the server. After installing the module, add the module's configuration file to the /etc/apache2/conf.d/ directory. The apache2 executable automatically loads any configuration files located in this directory.
5 SP8: Apache Web Server Administration Guide

Bnovdocx (en) 17 S
eptember 2009
BInstalling the Apache Manager Daemon on Linux and Windows
Novell® Apache Manager is a browser-based tool used for configuring the Apache Web server. It provides a graphical user interface to most of the Apache directives, making it easier to quickly (and more accurately) configure and manage Apache’s behavior and performance. Apache Manager also lets you manage multiple installations of Apache in your network, regardless of what other platforms they are running on.
Apache Manager is automatically installed as part of a NetWare installation. If you are running Apache on Linux or Windows, you can manually add Apache Manager to your Apache installation on those platforms. This section provides instructions for installing the Apache Manager Daemon on Linux or Windows:
Section B.1, “Downloading the Daemon Install File,” on page 99Section B.2, “Meeting Installation Prerequisites,” on page 99Section B.3, “Installing the Daemon on Linux,” on page 99Section B.4, “Installing the Daemon on Windows,” on page 101Section B.5, “Troubleshooting the LDAP Connection,” on page 103
B.1 Downloading the Daemon Install FileThe Apache Manager Daemon can be downloaded from the Novell Forge Web site (http://forge.novell.com/modules/news). Novell Forge is a collaboration tool for research and development of open-source products and solutions.
Visit http://forge.novell.com/modules/xfmod/project/?apache_manager (http://forge.novell.com/modules/xfmod/project/?apache_manager) to download the install.exe (for Windows) or install.bin (for Linux) file to the computer where you will install the daemon.
B.2 Meeting Installation PrerequisitesBefore installing the Apache Manager daemon on either Linux or Windows, verify the following on the computer where you will be installing the daemon:
Java 2 version 1.3.1 or later is installed, and the java.exe is in the path environment variable if installing to Linux, or in the Windows path on a Windows-based computer. The LDAP server is running and is accepting connections.Apache Web Server 2.0 or later is installed and running.
B.3 Installing the Daemon on Linux1 From the Linux prompt, run the install file. For example, enter
sh install.bin
Installing the Apache Manager Daemon on Linux and Windows 99

100 NW 6.
novdocx (en) 17 Septem
ber 2009
2 Click Next on the Introduction page.3 In the Choose Install Folder dialog box, type the location where the daemon files should be
installed. For example, /usr/local/apache2.The install program creates a directory called apacheadmin at the location you specify.
4 Type the username the daemon should use to authenticate to the directory.The user you specify must be a member of the apchadmn-Administrators group on the LDAP server. The username is stored in the startup.properties file.
5 Type the password for the user you specified, then click Next.Although the password is used to authenticate the user, it is not stored in a file. However, each time the daemon is started, you are prompted to enter the password.
6 In the LDAP Server Port field, specify the LDAP server's port number.7 If the port number you specified is secure (uses SSL), select Yes, then click Next.8 In the Path to Apachectl Script field, type the path to the Apache executable file.
The daemon must be able to start, stop, and restart the Apache server. Typically, the apache executable is found in the /apache2/bin directory where Apache was installed.
9 In the Path to Apache Configuration File field, type the path to Apache's primary configuration file, then click Next.The Apache configuration file is typically found in the directory where Apache was installed.
10 In the Choose Apache Server Group dialog box, select an Apache server group where the Apache server should be placed, then click Next.
IMPORTANT: If you receive a message in place of this dialog box indicating that no group exists in the directory for the platform you are running on, click Yes to have a new group created. If neither of these dialog boxes appears, the install was unable to connect to the LDAP directory. You can exit the install and troubleshoot or you can manually enter this information in the next step and troubleshoot the LDAP connection when you run the daemon. For more information, see Section B.5, “Troubleshooting the LDAP Connection,” on page 103.
11 If you were able to specify a server group in the previous step, the first field in the Apache Server Object Information dialog box should already contain the information it needs. Otherwise, you must specify the group server information manually.
5 SP8: Apache Web Server Administration Guide

novdocx (en) 17 Septem
ber 2009
12 In the Apache Server Object Name field, type the name of your Apache Web server.13 In the Apache Primary DNS or IP Address field, type your Web server's DNS name or IP
address. For example, www.mycompany.com.14 In the Pre-Installation Summary dialog box, review the information to ensure that it is correct
and then click Install.15 When installation is complete, click Done.
To run the daemon, run Ap2webman.bat located in the apacheadmin directory.
For more information about the Apache Manager daemon and how it is used, see Chapter 6, “Managing Multiple Apache Web Servers,” on page 81.
B.4 Installing the Daemon on Windows1 Run the install.exe file.2 Click Next on the Introduction page.3 In the Choose Install Folder dialog box, type a path to where the daemon files should be
installed, then click Next.A new directory called apacheadmin is created at the location you specify.
4 In the User Object FDN field, type the username the daemon should use to authenticate to the directory.The user you specify must be a member of the apchadmn-Administrators group on the LDAP server. The username is stored in the startup.properties file.
5 Type the password for the user you specified, then click Next.Although the password is used to authenticate the user, it is not stored in a file. However, each time the daemon is started, you are prompted to enter this password.
6 In the LDAP Server Name field, type the DNS name or IP address of the LDAP server where the daemon should store the configuration file.
7 In the LDAP Server Port field, specify the LDAP server's port number.
Installing the Apache Manager Daemon on Linux and Windows 101

102 NW 6.
novdocx (en) 17 Septem
ber 2009
8 If the port number you specified is secure (uses SSL), select Yes, then click Next.9 In the Path to Apache.exe field of the Current Apache Path Information dialog box, type the
path to the Apache executable file.The daemon must be able to start, stop, and restart the Apache server. Typically, apache.exe is found in the \apache2\bin directory where Apache was installed.
10 In the Path to Apache Configuration File field, type the path to Apache's primary configuration file, then click Next.The Apache configuration file is typically found in the directory where Apache was installed.
11 In the Choose Apache Server Group dialog box, select an Apache server group where the Apache server should be placed, then click Next.
IMPORTANT: If you receive a message in place of this dialog box indicating that no group exists in the directory for the platform you are running on, click Yes to have a new group created. If neither of these dialog boxes appears, the install was unable to connect to the LDAP directory. You can exit the install and troubleshoot or you can manually enter this information in the next step and troubleshoot the LDAP connection when you run the daemon. For more information, see Section B.5, “Troubleshooting the LDAP Connection,” on page 103.
12 If you were able to specify a server group in the previous step, the first field in the Apache Server Object Information dialog box should already contain the information it needs. Otherwise, you must specify the group server information manually.
5 SP8: Apache Web Server Administration Guide

novdocx (en) 17 Septem
ber 2009
13 In the Apache Server Object Name field, type the name of your Apache Web server.14 In the Apache Primary DNS or IP Address field, type your Web server's DNS name or IP
address. For example, www.mycompany.com.15 In the Pre-Installation Summary dialog box, review the information to ensure that it is correct,
then click Install.16 When installation is complete, click Done.
To run the daemon, run Ap2webman.bat located in the apacheadmin directory.
For more information about the Apache Manager daemon and how it is used, see Chapter 6, “Managing Multiple Apache Web Servers,” on page 81.
B.5 Troubleshooting the LDAP ConnectionIf the Apache Manager Daemon Install or the Apache Manager daemon is having trouble connecting to the LDAP server, check each of the following possible causes:
Verify that the JVM* is installed correctly. You must use Java 2, version 1.3.1 or later, and the path to the java.exe needs to be correctly identified.Verify that the LDAP server is running.If the daemon is producing a certificate exception, you might need to run the Key Import Wizard. To do so, open the apacheadmin\lib\KeyImport.bat batch file in a text editor and verify that the last line in the file includes the correct name of your LDAP server and the secure port used by it. Then run the batch file.The Key Import Wizard imports the LDAP server's certificate into Java's default key store. The Apache Manager daemon can then make a secure connection to the LDAP directory.Open the apacheadmin\conf\startup.properties file and verify that the LDAP server and LDAP port information is correct. Also, verify that the administrator username and all other settings are correct.
Installing the Apache Manager Daemon on Linux and Windows 103

104 NW 6.
novdocx (en) 17 Septem
ber 2009
5 SP8: Apache Web Server Administration Guide

Cnovdocx (en) 17 S
eptember 2009
CDocumentation Updates
This section contains information about documentation content changes made to the Apache Web Server Administration Guide since the initial release of NetWare® 6.5 SP7. If you are an existing user, review the change entries to readily identify modified content. If you are a new user, simply read the guide in its current state.
This document was updated on the following dates:
Section C.1, “November 9, 2009,” on page 105
C.1 November 9, 2009This guide has been modified for publication on the NetWare 6.5 SP8 Documentation Web site.
Documentation Updates 105

106 NW 6.
novdocx (en) 17 Septem
ber 2009
5 SP8: Apache Web Server Administration Guide