NT1D-CE-091B NT1D Operating Manual V1.7 - sinamedel.comsinamedel.com/images/products/NT1D-CE-091B...
61
NT1D Vital Signs Monitor Operating Manual
Transcript of NT1D-CE-091B NT1D Operating Manual V1.7 - sinamedel.comsinamedel.com/images/products/NT1D-CE-091B...

NT1D Vital Signs Monitor
Operating Manual

Table of Contents
i
Table of Contents 1. Safety ................................................................................................................ 1-1
1.1 Safety Information....................................................................................... 1-1 1.2 Product Label .............................................................................................. 1-3
2. Introduction ....................................................................................................... 2-1 2.1 Product Introduction.................................................................................... 2-1 2.2 Features ....................................................................................................... 2-1 2.3 Basic Theory of Operation .......................................................................... 2-1 2.4 Terminology ................................................................................................ 2-2
3. Unpacking and Installing .................................................................................. 3-1 3.1 Unpacking ................................................................................................... 3-1 3.2 Installing Batteries....................................................................................... 3-1 3.3 Installing Power Adapter ............................................................................. 3-3 3.4 Installing Base ............................................................................................. 3-4 3.5 Installing Wireless USB Adapter................................................................. 3-4 3.6 Sensor Placement ........................................................................................ 3-5
4. Powering Up...................................................................................................... 4-1 4.1 Main Structure............................................................................................. 4-1 4.2 General Description..................................................................................... 4-1 4.3 Basic Operation ........................................................................................... 4-2
4.3.1 Buttons ................................................................................................. 4-3 4.3.2 Powering Up......................................................................................... 4-3 4.3.3 SpO2 and CO2 Monitoring.................................................................... 4-4 4.3.4 Information Bar .................................................................................... 4-5 4.3.5 Status Bar ............................................................................................. 4-5 4.3.6 Pulse Tone Volume ............................................................................... 4-5 4.3.7 Battery Capacity Indicator and Recharge............................................. 4-6 4.3.8 Powering off ......................................................................................... 4-7
4.4 Device Storage ............................................................................................ 4-8 4.5 Environmental Protection............................................................................ 4-8 4.6 Performance-related Factors........................................................................ 4-8
5. Displays and Functions ..................................................................................... 5-1 5.1 Main Monitoring Screen ............................................................................. 5-1 5.2 Big Chart Screen ......................................................................................... 5-1

Table of Contents
ii
5.3 Real-time Trend Screen............................................................................... 5-2 5.3.1 Trend Graph Screen.............................................................................. 5-2 5.3.2 Trend Table Screen............................................................................... 5-3 5.3.3 History Trend........................................................................................ 5-4
5.4 Event Table Screen...................................................................................... 5-4 5.5 Menu Options.............................................................................................. 5-4
5.5.1 Setting Alarm........................................................................................ 5-5 5.5.2 Setting SpO2 ......................................................................................... 5-6 5.5.3 Setting CO2........................................................................................... 5-7 5.5.4 Set Patient Information......................................................................... 5-7 5.5.5 Adjust Volume ...................................................................................... 5-8 5.5.6 Setting Date and Time .......................................................................... 5-9 5.5.7 Setting Language.................................................................................. 5-3 5.5.8 Setting Trend ........................................................................................ 5-9 5.5.9 Data Output ........................................................................................ 5-10 5.5.10 Module Options................................................................................ 5-10 5.5.11 Resume Settings ............................................................................... 5-10 5.5.12 System Information .......................................................................... 5-10
5.6 Audible and Visual Indications.................................................................. 5-11 6. Monitoring SpO2 ............................................................................................... 6-1
6.1 General ........................................................................................................ 6-1 6.2 Theory of Measurement .............................................................................. 6-1 6.3 Abnormal Conditions of SpO2 Measurement .............................................. 6-2 6.4 Applying SpO2 Sensor ................................................................................. 6-2 6.5 Measurement Restrictions ........................................................................... 6-3
7. Monitoring CO2................................................................................................. 7-1 7.1 General Description..................................................................................... 7-1 7.2 Theory of Measurement .............................................................................. 7-1 7.3 Applying the CO2 Sensor............................................................................. 7-1 7.4 CO2 Sensor Adapter Zeroing....................................................................... 7-2
8. Data Output ....................................................................................................... 8-1 8.1 Driver Installation and Copy of Data Analysis Software ............................ 8-1
8.1.1 USB Driver Installation........................................................................ 8-1 8.1.2 Copy the Folder “History Data Viewer”............................................... 8-1

Table of Contents
iii
8.2 Data Transmission and Deletion.................................................................. 8-2 9. Configuration and Accessories.......................................................................... 9-1
9.1 Maximum Configuration of NT1D ............................................................. 9-1 9.2 Optional Accessories for NT1D .................................................................. 9-1
10. Troubleshooting and Maintenance ................................................................ 10-1 10.1 Errors and Solutions ................................................................................ 10-1 10.2 Technical Assistance................................................................................ 10-2 10.3 Factory Default Values ............................................................................ 10-2 10.4 Product Return......................................................................................... 10-2 10.5 Maintenance and Cleaning ...................................................................... 10-2 10.6 Periodic Safety Checks............................................................................ 10-4 10.7 Guarantee ................................................................................................ 10-5
Appendix A: Specifications.................................................................................. A-1 Appendix B: EMC (Electro-Magnetic Compatibility) ......................................... B-1

Service Information
iv
Service Information Intellectual Property Information contained in this manual is the property of Shenzhen Newtech, Inc. It should not be copied, reproduced, disseminated, or distributed without prior written permission from Shenzhen Newtech, Inc.
Copyright reserved by Shenzhen Newtech, Inc. Statement Newtech, Inc. reserves all rights for the final interpretation of this user manual. Newtech, Inc. is responsible for product safety, reliability and performance when all below conditions are met:
Product installation, update, improvement and repair are all performed by authorized personnel of Newtech, Inc.
Related electronic devices are in compliance with national standards. This user manual has been followed when operating the device.
Guarantee Free Service
All products within warranty period enjoy free service. Service Fee
Newtech charges service fees for any product that is out of warranty. Newtech charges service fees for below service even though the product is within warranty period: man-made damages, improper operation, voltage over limit, natural calamities, replacement of components and repairs without Newtech permission.
Return To return a defective product to Newtech, a Return Material Authorization (RMA) number from our service group is required. This RMA number, together with product model and serial number(s) should appear on outer transportation carton. Any return with the serial number not recognizable will not be accepted. The customer should bear the freight (including customs declaration fee) for repair. Service Contact Shenzhen Newtech, Inc. 6th Industrial Road,NO.1Chuangye Dasha, Buildings C, Nanshan District,Shenzhen Guangdong 518067, P. R. China 3/F Zhongjian Industrial Building #1(302),18 Shekou Yanshan Road, Nanshan
District, Shenzhen Guangdong 518067, P.R China

Service Information
v
Tel: +86 755 26546717
+86 755 26525910 +86 755 26546704
Fax: +86 755 26525912 E-mail: [email protected] Http://www.sznewtech.com Authorized EU Representative Shanghai International Holding Corp. GmbH (Europe) Eiffestrasse 80, 20537 Hamburg Germany Tel: +49 40 2513175 Fax: +49 40 255726 Product information
Product model: NT1D Product name: Vital Signs Monitor
Version information
This version is subject to change or upgrade without notice. Version: 1.7 Issue date: 2012-5 File Number: NT1D-CE-091B

Preface
vi
Preface This operating manual introduces the monitor’s performance, operation methods and safety information. This manual is intended for professional healthcare personnel and those who have experience in operating monitoring equipment. NT1D Series Vital Signs Monitor provides:
SpO2 monitoring Pulse rate (PR) monitoring End tidal carbon dioxide (EtCO2) monitoring Respiration rate (RR) monitoring CO2 and SpO2 waveform display Audible and visual physiological and technical alarms Trend graph and trend table review Alarm event records review History data storage Rechargeable batteries External power supply and charger Wireless data transmission Wireless USB Adapter and PC software
The monitor is intended for monitoring adult and pediatric patients in clinical environments where healthcare is provided by healthcare professionals.
This manual is for all possible configurations. The monitor you use may not have all parameters as above mentioned.
United States Federal Law restricts this device to sale, distribution and use by or on the order of a physician.
Explanation of Symbols
Symbols Description
Attention! Consult accompanying documents (This manual))
BF Type Defibrillation
Complies with the European Medical Device Directive 93/42/EEC Collect Separately
Date of Manufacture
Manufacturer
Serial number
Electrostatic sensitive device IPX1 Drip proof
Alarm general RX ONLY Prescriptive device, operated by qualified personnel only!

Safety
1-1
1. Safety
1.1 Safety Information This chapter includes warnings, cautions, and basic safety information of NT1D Vital Signs Monitor (hereinafter referred to as “monitor”). In addition, the manual includes significant information relevant to the monitor display and operating instructions. Important! Read carefully before using. All notes and precautions of important information are highlighted in the manual.
“Warning”: Advice against certain actions or situations that could result in personal injury or death.
“Caution”: Advice against actions or situations that could damage the equipment, produce inaccurate data, or invalidate a procedure.
“Note”: Provides useful information that may be neglected.
Electric Shock Hazard. The cover should be removed only by qualified service personnel. There are no user-serviceable parts inside.
The monitor is a prescription device and is to be operated by qualified healthcare personnel only.
When alarms happen, the exact date and time on event table depends on the precision of date and time that the user has set in the monitor.
Explosion hazard. The monitor is not suitable for use in the presence of flammable anesthetic mixture with air, oxygen or nitrous oxide.
Contacting the chemical substance from a cracked LCD display can cause poisoning. Please handle with caution when the display is broken.
Please check the patient periodically to ensure that the monitor is working well and the correct positioning of SpO2 and CO2 sensors.
CO2 readings, respiratory rate, pulse oximetry readings, and pulse signal can be affected by certain ambient environmental conditions, sensor application errors, and certain patient conditions.
The use of unspecified accessories, transducers, sensors and cables may result in increased emission and/or decreased immunity of the equipment.
DO NOT silence the audible alarm if patient safety may be compromised. Make sure that the speaker is not covered by any slipcover; otherwise the alarm may not be heard.
Always respond immediately to a system alarm since the patient may not be monitored during certain alarm conditions.
Before using the monitor, verify that the alarm limits are appropriate for the patient to be monitored.
To ensure accurate performance and prevent device failure, do not expose the monitor to extreme moisture, such as rain.
The SpO2 sensor must be moved to a new site at least every 4 hours. Due to the fact that Individual skin conditions may affect the ability to tolerate sensor placement, it may be necessary to change the sensor site more frequently for some patients. If the skin integrity changes, move the sensor to another site.

Safety
1-2
DO NOT use the monitor during magnetic resonance imaging (MRI) scanning. Inducted current could cause burns. The monitor may affect the MRI image and the MRI unit may affect the accuracy of monitor’s measurements.
The monitor has no defibrillation synchronization, so it cannot be connected to defibrillators.
Follow precautions for electrostatic discharge (ESD) and electromagnetic interference (EMI) to and from other equipment.
To ensure patient electrical isolation, connect only to other equipment with circuits that are electrically isolated.
If the accuracy of any measurement appears questionable, check the patient’s vital signs by alternate means, and then make sure the monitor is functioning correctly.
This monitor can save current patient’s data only when it is shut down normally or in low voltage, therefore: (1) When using internal power supply, shut down the monitor normally or when in low voltage. Do not take batteries out abruptly when the monitor is working or in the process of shutting down to avoid data loss. (2) When using external an AC adapter or a charging base for power supply, if there are four Ni-MH batteries, you can take batteries out when the monitor is working or in the process of shutting down. If there are no batteries, you can only unplug the adapter or take the base away only after the monitor is shut down normally. You can not unplug the adapter or take the base away when it is working to avoid data loss.
Using SpO2 sensor incorrectly may do harm to patient’s skin. Check whether the SpO2 sensor is applied correctly according to the sensors instructions for use.
Loss of pulse signal can occur if a blood pressure cuff is inflated on the same extremity as the one to which a SpO2 sensor is attached.
DO NOT alter or modify SpO2 and CO2 sensor. Alterations or modifications may affect performance or accuracy.
Using the SpO2 sensor in the presence of excessive illumination may result in inaccurate measurements. In such cases, cover the sensor site with an opaque material.
DO NOT use SpO2 and CO2 sensor if the sensor or the sensor cable appears damaged.
DO NOT lift the monitor by SpO2 sensor or CO2 sensor cable as they could disconnect from the monitor, causing the monitor to fall on the patient.
To ensure patient safety, do not place the monitor in any position that might cause it to fall on the patient.
Carefully route patient cabling (SpO2 sensor and CO2 sensor) to reduce the possibility of patient entanglement or strangulation.
Be sure to follow local regulations and recycling instructions regarding disposal or recycling of batteries.
This monitor’s electrical isolation part is centralized in AC adapter. When using external power supply or charging the batteries, please use only the medical grade AC adapter provided by the manufacturer. If the integrity of the main supply connection appears questionable, operate the monitor from its internal battery pack.
Reuse, disassemble, cleaning, disinfecting or sterilizing the single patient use CO2 airway adapters may compromise functionality and system performance leading to user or patient hazards. Performance is not guaranteed if a disposable single patient use sensor is reused.
If the SpO2 and CO2 Sensor fails to respond as described in this manual, DO NOT use it until it’s approved for use by qualified personnel.

Safety
1-3
The CO2 Sensor is not patient isolated. Use of the sensor does not require direct patient contact. If isolation is desired or required, it is the responsibility of the Host system to provide necessary isolation.
The monitor is intended only as an adjunct in patient assessment. It must be used in conjunction with clinical signs and symptoms.
Do not reuse disposable accessories. Do not cross use SpO2 and CO2 sensors between epidemical and unepidemical patients before sterilization.
Do not connect the monitor, sensor, AC adapter and base to any other equipment.
All equipment connected to the monitor must comply with IEC 60601-1. Use only recommended SpO2 and CO2 sensors and cables. Other sensors or cables may cause improper monitor performance.
Changes or modifications not approved by the manufacturer could void the user’s rights to operate the equipment.
Ambient light, movement, electromagnetic interference, artifacts, dysfunctional hemoglobin, and intravascular dyes, etc. may cause inaccurate SpO2 measurements.
Do not sterilize any sensor by irradiation steam, or ethylene oxide. Do not immerse cables or sensors completely in liquid or cleaning solutions.
1.2 Product Label
Figure1-1: Product label

Introduction
2-1
2. Introduction
2.1 Product Introduction NT1D is a handheld vital signs monitor that continuously monitors end tidal carbon dioxide (EtCO2), respiratory rate (RR), oxygen saturation (SpO2), and pulse rate. The unit is intended for monitoring only and must be used in the continuous presence of a qualified healthcare provider. The unit transfers history data to PC through a USB adapter. It is for use in any environment where continuous, noninvasive monitoring of these parameters is desired, including hospital and hospital-type facilities. The monitor is intended for use on adult and pediatric patients.
The product is composed of monitor, SpO2 sensor, Mainstream/Sidestream CO2 sensor, charging base, wireless USB Adapter and PC software. The product has input and output ports: Input: SpO2 sensor port, CO2 sensor port; Output: Transfer data to USB adapter wirelessly.
Using the monitor with excessive movement may cause inaccurate saturation measurements.
2.2 Features
SpO2 monitoring Pulse rate (PR) monitoring EtCO2 monitoring Respiration rate (RR) monitoring CO2 and SpO2 waveforms display Audible and visual physiological and technical alarms Trend graph ad trend table review Alarm event records review History data storage English language interface Internal batteries External power supply and charger Wireless history data transmission wireless USB adapter and PC software
2.3 Basic Theory of Operation
SpO2 theory of operation Pulse oximetry is based on two principles: 1) oxyhemoglobin and deoxyhemoglobin, which differ in their absorption of red and infrared light (spectrophotometry), and 2) changes in the volume of arterial blood in tissue during the pulse cycle (plethysmography), and hence, light absorption by that blood.

Introduction
2-2
A pulse oximeter determines SpO2 by passing red and infrared light into an arteriolar bed and measures changes in light absorption during the pulsatile cycle. Red and infrared low power light-emitting diodes (LEDs) in the oximetry sensor serve as light sources; a photodiode serves as the photodetector. Because oxyhemoglobin and deoxyhemoglobin differ in light absorption, the amount of red and infrared light absorbed by blood is related to hemoglobin oxygen saturation. To identify the oxygen saturation of arterial hemoglobin, the monitor uses the pulsatile nature of arterial flow.
During systole, a new pulse of arterial blood enters the vascular bed and blood volume and light absorption increase. During diastole, blood volume and light absorption reach their lowest point.The monitor bases its SpO2 measurements on the difference between maximum and minimum absorption (measurements at systole and diastole). The focus of light absorption by pulsatile arterial blood eliminates the effects of nonpulsatile absorbers such as tissue, bone, and venous blood.
CO2 theory of operation The CO2 Sensor is used for continuous measurement of CO2 and respiratory rate. The sensor measures CO2 by using the infrared absorption technique. The principle is based on the fact that CO2 molecules absorb infrared (IR) light energy of specific wavelengths, with the amount of energy absorbed being directly related to the CO2 concentration. When an IR beam is passed through a gas sample containing CO2, the electronic signal from the photo detector (which measures the remaining light energy) is measured. This signal is then compared to the energy of the IR source and adjusted to accurately reflect CO2 concentration in the sample. The CO2 Sensor’s response to a known concentration of CO2 is stored at the factory in the sensor’s memory. A reference channel accounts for optical changes in the sensor, allowing the system to remain in calibration without user intervention.
Working theory of monitor
Signals from a patient are checked and magnified through various sensors and then transferred by extended cable to parameter module for data processing, and then communicate with monitor’s control board to show the result of measurement. The result will be displayed on the screen in the form of a waveform and figures. It can save up to 72 hours per parameter for up to 99 patients, and it transfers data to a PC wirelessly.
Pulse oximetry readings and pulse signals can be affected by certain ambient environmental conditions, probe application errors, and certain patient conditions.
Specific information about ambient environmental conditions, probe applications, and patient conditions, is contained throughout this manual. 2.4 Terminology
SpO2 Oxygen saturation value PR Pulse Rate Pleth Blood dimension RR Respiration rate
EtCO2 End tidal carbon dioxide value

Unpacking and Installing
3-1
3. Unpacking and Installing 3.1 Unpacking Open the package according to the marks on the box. Remove the monitor and accessories carefully.
Check the accessories according to the packing list. Check the monitor and accessories for any damage.
If any problem is detected, contact your local representative immediately. Friendly Reminder: The packing material should be saved for future transportation and storage.
Keep the packaging materials from children. Follow local regulations or hospital policies to dispose packaging materials.
The equipment may be infected by microorganism during transportation. Check the packaging before using the monitor. Do not use it if damaged is present.
3.2 Installing Batteries
Figure: 3-1 Installing Batteries
1. Slide downward to open the battery compartment.
The battery cover visible battery warning label,see Figure 3-2
Figure: 3-2 Battery Warning Label
2. Install the four batteries into the monitor oriented as shown in figure 3-1. Put the battery cover back.

Unpacking and Installing
3-2
This monitor can use both Ni-MH batteries as well as alkaline batteries. When using Ni-MH Batteries, you can use an external AC adapter or the charging base. But when using alkaline batteries, you CANNOT use any external AC adapter or the charging base to recharging.
Never operate the device without the battery cover in place. Use 4 “AA” size Ni-MH Batteries or alkaline batteries. DO NOT use any other batteries without recommendation.
When using alkaline batteries, DO NOT use any external AC adapter or the charging base for recharging.
DO NOT mix Ni-MH Batteries and alkaline batteries! Do not rechange alkaline (non-rechargeable) batteries. Do not mix use of alkaline and 2400mah Ni-MH batteries. Unplug power to docking prior to using alkaline batteries. Rechargeable Ni-MH batteries must be 2400mah.
Use of Ni-MH Batteries Do not immerse the battery pack in liquid; Only recharge the battery pack in the monitor, provided by your local representative, to avoid possible overheating, burning or rupture of the battery pack.
Storage of Ni-MH Batteries Short-term storage (within one month): The battery pack has an automatic discharge feature. Check the battery capacity periodically.
Long-term storage (6 months or more): The battery pack must be stored in a cool, dry area. The battery capacity decreases over time. To restore the battery pack to full power, recharge and discharge it three times before use. Long-term storage without charging may degrade the battery capacity.
Disposal of Ni-MH Batteries Do not dispose the battery pack in fire; or it may explode. Be sure to follow local regulations and recycling instructions regarding disposal or recycling of batteries.
The monitor is not suitable for use in the presence of flammable anesthetic mixtures with air, oxygen or nitrous oxide.
DO NOT recharge alkaline batteries. To ensure patient electrical isolation, connect only to authorized AC adapters that provide patient electrical isolation. Do not use unauthorized AC adapters.
To ensure patient safety, do not place the monitor in any position that might cause it to fall on the patient.
If any batteries have any leakage, stop using these batteries and follow local regulations and recycling instructions for disposal or recycling of batteries.

Unpacking and Installing
3-3
Carefully route cables to reduce the possibility of patient entanglement or strangulation.
To ensure accurate performance and prevent device failure, do not expose the monitor to extreme moisture, such as rain.
DO NOT mix use Ni-MH batteries and alkaline batteries. When changing batteries, replace all batteries with fresh ones.
Use accompanying batteries only!
Check the batteries periodically for corrosion. Replace batteries if corrosion is present, otherwise it may cause damages to the monitor.
Insert the (-) terminal of each battery first. Compress the battery terminal spring until the (+) terminal clears the positive spring. Press the battery downward into place.
To remove the batteries, reverse the installation process: remove the positive end of each battery first.
To avoid corrosion of the contacts, remove batteries from the battery compartment, if you do not intend to use the monitor for an extended period of time.
3.3 Installing Power Adapter
Use the appointed power adapter or charging base to charge Ni-MH Batteries. DO NOT use any other power adapter or charging base.
Figure 3-3: Installing Power Adapter
1. Plug the AC adapter into the charging connector on the bottom of the monitor. 2. Connect the AC adapter to the monitor power socket. 3. If the monitor is off, Press the On button ,it will start up and display the charging
screen. Press the On button again to start monitoring. 4. If the monitor is working, the battery icon will flash.

Unpacking and Installing
3-4
3.4 Installing Base
Figure: 3-4 Installing Base
1. Plug the AC adapter into the connector at the rear of the base. 2. Put the monitor into the base in the right direction to ensure the contact of the metal
points. 3. Connect the AC adapter to the electrical outlet. 4. If the monitor is off, Press the On button ,it will start up and display the charging
screen. Press the On button again to enter normal operating mode. 5. If the monitor is working, the battery icon will flash.
Do not plug the monitor into the base in the wrong direction. Make sure that Ni-MH batteries are in use while charging, DO NOT charge alkaline batteries or any other type of batteries. DO NOT mix use different batteries!
When there are no batteries in the monitor and use the base as external power, it is possible to lose data. Make sure to turn off the monitor before disconnecting from the base.
3.5 Installing Wireless USB Adapter This equipment has been tested and found to comply with the limits for a class B digital device, pursuant to part 15 of the FCC Rules. These limits are designed to provide reasonable protection against harmful interference in a residential installation. This equipment may generate radiation. If not installed and used in accordance with the instructions. It may cause harmful interference. However, there is no guarantee that interference will occur in a particular situation. If this equipment does cause harmful interference to radio or television reception, which can be determined by turning the equipment off and on, the user is encouraged to try to correct the interference by one or more of the following measures: 1. Reorient or relocate the main device. 2. Increase the distance between the equipment and receiver. 3. Consult the dealer or an experienced technician for help.

Unpacking and Installing
3-5
Figure 3-5: Installing Wireless USB Adapter
Installing steps: 1. Install driver software on PC. 2. Plug the wireless USB Adapter into PC. The USB Adapter receives data from
monitor wirelessly, as shown in Figure 3-5. 3. Place the monitor within 2 meters to PC, and the monitor will send the data to USB
Adapter wirelessly. 4. Press MENU button to select “Sending Data” option. 5. Choose “Connect” button to start software. 6. After a successful connection, in the side column, the software will display patient
history data that have been stored in the monitor.
In order to ensure the quality of the transmission signal, keep the monitor as close to the USB wireless adapter as possible. Make sure there is no barrier between them.
This monitor complies with Part 15 of the FCC Rules. Operation is subject to the following two conditions: (1) This device may not cause harmful interference. (2) This device must accept any interference received, including interference that
may cause undesired operation. The monitor should be placed at least 20cm away from all persons when used to transmit data.
3.6 Sensor Placement
Read the sensor instructions before use, including warnings, cautions, and instructions.
Do not use a damaged sensor. Do not immerse or wet the sensor in liquid. Do not use a sensor with exposed electronic components.
Use only recommended sensors and cables for SpO2 and CO2 measurements. Other

Unpacking and Installing
3-6
sensors may cause inaccuracy. Do not lift the monitor by the sensor cable or it may cause the monitor to fall on the patient.
Use the appointed SpO2 and CO2 sensors to ensure the monitor’ working conditions. Do not connect anything other than a SpO2 sensor to the SpO2 sensor socket (for example, do not attempt to connect a PC to the monitor through SpO2 sensor socket).
Do not connect anything other than a CO2 sensor to the CO2 sensor socket.
Figure 3-6: Installing sensors
Installing the SpO2 sensor
1. Select an appropriate sensor for the patient. 2. Refer to Figure 3-6, Connect the sensor to the monitor socket. 3. Attach the finger probe with the light to the patient. Be sure to fully insert the
patient’s finger into the probe. 4. Apply the sensor following the instructions supplied with the sensor.
Installing CO2 sensor
1. Insert the CO2 Sensor into the monitor socket. To remove the sensor, grasp the connector and pull back.
2. Figure 3.7 shows how to connect mainstream or Sidestream CO2 sensor.
Figure 3-7: Installing Mainstream or Sidestream CO2 sensor
3. For starting CO2, monitoring, refer to chapter 5 for more information. Note: Do not remove the sensor by pulling the cable.

Powering Up
4-1
4. Powering Up
4.1 Main Structure The monitor is composed of main unit, SpO2 Sensor, CO2 Sensor and the base. 4.2 General Description Figures 4-1 to 4-4 are the pictures of the monitor, front panel, display screen, charging base and rear/top views of the monitor.
Figure 4-1: Front Panel
Number Description Function 1 SpO2 Socket Connects to SpO2 Sensor 2 CO2 Socket Connects to CO2 Sensor 3 Power Indicator Indicates the monitor is power on 4 Display Window Displays measurements 5 Button Operation buttons 6 Front Cover Protects the internal components
Figure 4-2:Base View

Powering Up
4-2
Figure 4-3:Rear/top View
Number Description Function 1 Speaker For pulse tone and alarm sound 2 Rear Panel Protects inner components 3 Battery Door Opens/closes to install or unload batteries 4 Power Socket Connects to AC power 5 Base Connector Connects to the charging base 6 On/Off Button Turns on/off the monitor 7 CO2 Sensor Socket Connects to CO2 Sensor 8 SpO2 Sensor Socket Connects to SpO2 Sensor
4.3 Basic Operation
The monitor is a prescription device and is to be operated by qualified personnel only.
Do not lift the monitor by the cable because it might disconnect from the monitor, causing the monitor to drop on the patient.
Prior to using the monitor, carefully read the manual and accessory directions for use, all highlighted precaution information and all specifications.
The monitor is intended to use only as an adjunct in patient assessment. It must be used in conjunction with clinical signs and symptoms.
Before using the monitor, remove the plastic protective film that covers the screen. This film is to protect the screen during transportation. Keeping it on during monitoring can make it difficult to read measurement results.
Powering Up
4-3
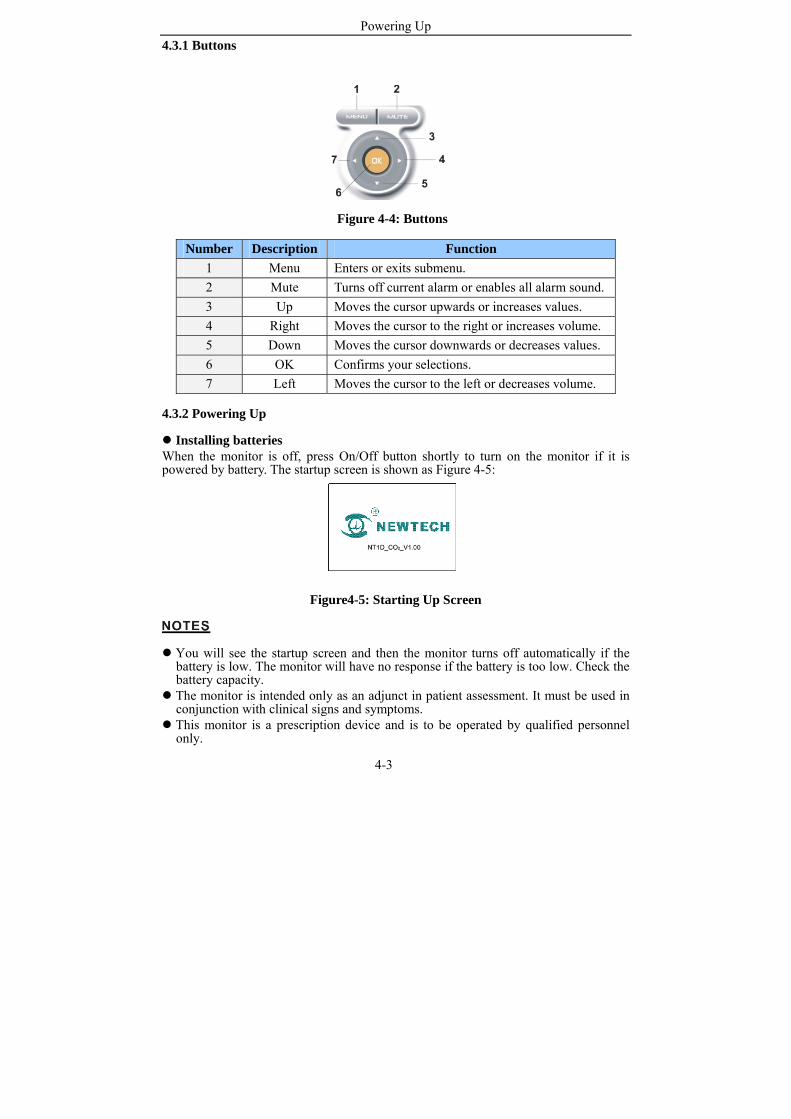
4.3.1 Buttons
Figure 4-4: Buttons
Number Description Function 1 Menu Enters or exits submenu. 2 Mute Turns off current alarm or enables all alarm sound. 3 Up Moves the cursor upwards or increases values. 4 Right Moves the cursor to the right or increases volume. 5 Down Moves the cursor downwards or decreases values. 6 OK Confirms your selections. 7 Left Moves the cursor to the left or decreases volume.
4.3.2 Powering Up
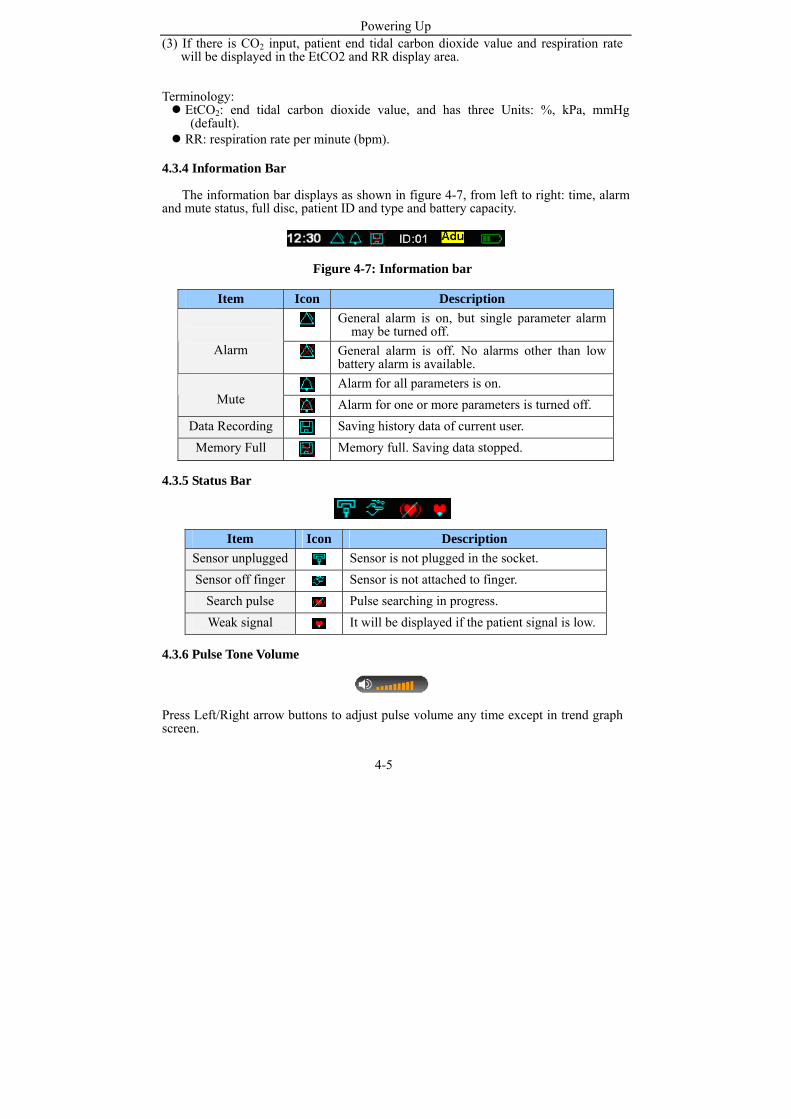
Installing batteries When the monitor is off, press On/Off button shortly to turn on the monitor if it is powered by battery. The startup screen is shown as Figure 4-5:
Figure4-5: Starting Up Screen
You will see the startup screen and then the monitor turns off automatically if the battery is low. The monitor will have no response if the battery is too low. Check the battery capacity.
The monitor is intended only as an adjunct in patient assessment. It must be used in conjunction with clinical signs and symptoms.
This monitor is a prescription device and is to be operated by qualified personnel only.

Powering Up
4-4
Self Test
The power indicator is on if the monitor is turned on. It will conduct self test during startup and display below contents: (1) Software version. (2) Self test in progress showing status check of the disk, power indicator and speaker
below the software version number. (3) If you hear “dee” sound and the power light is on, the self test is completed
successfully. If not, do not continue to use this monitor, contact your representative or manufacturer.
There is a pop-up screen to set up system time manually if there is no time set up in the system or the time is lost. See Figure 4-6.
Figure 4-6: Setting System Time
Make sure that you can hear “dee” sound and the power light is on. If not, do not use this monitor.
Do not lift the monitor by the sensor cable because the cable could disconnect from the monitor, causing the monitor to drop on the patient.
Make sure that the speaker is not blocked or covered. Otherwise, you may not hear alarm sound.
4.3.3 SpO2 and CO2 Monitoring SpO2 measuring is initiated automatically after turning on the monitor. Follow below procedures to start monitoring: (1) Apply SpO2 sensor correctly and place patient’s finger in position. (2) The monitor will search pulse for 10 seconds. (3) If pulse search is successful, values of %SpO2 and PR will display in % SpO2 and
PR areas. Pulse indicator will change together with the pulse. Speaker will generate "dee dee" sound with the pulse.
Terminology:
% SpO2: Percent oxygen saturation PR: Pulse beats per minute (bpm)
Initiating CO2 monitoring: (1) Connect the CO2 sensor to the monitor and adapter correctly. (2) Press MENU to enter the setup option and turn on CO2 switch. “- - -” will appear
in EtCO2 and RR display area if CO2 sensor has already been connected without CO2 input.
Powering Up
4-5
(3) If there is CO2 input, patient end tidal carbon dioxide value and respiration rate will be displayed in the EtCO2 and RR display area.
Terminology:
EtCO2: end tidal carbon dioxide value, and has three Units: %, kPa, mmHg (default).
RR: respiration rate per minute (bpm).
4.3.4 Information Bar
The information bar displays as shown in figure 4-7, from left to right: time, alarm and mute status, full disc, patient ID and type and battery capacity.
Figure 4-7: Information bar
Item Icon Description
General alarm is on, but single parameter alarm may be turned off.
Alarm General alarm is off. No alarms other than low battery alarm is available.
Alarm for all parameters is on. Mute
Alarm for one or more parameters is turned off. Data Recording Saving history data of current user.
Memory Full Memory full. Saving data stopped. 4.3.5 Status Bar
Item Icon Description Sensor unplugged Sensor is not plugged in the socket. Sensor off finger Sensor is not attached to finger.
Search pulse Pulse searching in progress. Weak signal It will be displayed if the patient signal is low.
4.3.6 Pulse Tone Volume
Press Left/Right arrow buttons to adjust pulse volume any time except in trend graph screen.

Powering Up
4-6
4.3.7 Battery Capacity Indicator and Recharge
Be sure to follow local regulations and recycling instructions regarding disposal or recycling of batteries.
Do not recharge alkaline batteries. Low battery alarm is high priority alarm which cannot be disabled.
The remaining battery time is estimated according to battery types. This indicator icon will display when the battery capacity is less than 15 minutes. Remaining battery time may differ from different types of batteries.
Check the batteries periodically for corrosion. Remove all batteries if you don’t intend to use the monitor for more than three months.
Battery Capacity Indicator
The battery icon in the information bar indicates the remaining battery capacity in a working mode. It will flash and the low battery alarm will be on if the remaining battery time is less than 15 minutes. See Figure 4-8.
Figure 4-8: Low Battery Icon
If the battery is too low, the monitor will pop up a warning message and the monitor will turn off itself as shown in Figure 4-9.
Figure 4-9: Low Battery Warning Message
Recharge
If the monitor is connected to a power cable or the charging base when the monitor is off, Press the On button ,it will start up automatically and display charging screen with the battery icon flashing. The battery icon will appear full after the charging is completed. Press on/off button to enter real-time monitoring screen. If you unplug the power cable or disconnect the charging base when the monitor is off, the monitor turns off automatically. See Figure 4-10.
Figure 4-10: Charging Screen

Powering Up
4-7
If the monitor is connected to a power cable or the charging base when it is working, the bars inside the battery icon will flash. Four full bars mean the battery is fully charged. You may continue to use the monitor after you disconnect the power cable or the charging base.
4.3.8 Powering off
(1)Normal shutdown
Press and hold On/Off button until the progress bar is full to turn off the monitor. The message below displays shutdown in progress. Figure 4-11.
Figure 4-11: Normal Shutdown
(2) Shutdown in Low Battery The monitor turns itself off automatically when batteries are depleted.
The system enters into the state of low voltage status at least 15 minutes before shutdown. The battery icon will flash and history data of current ID will be saved. Change or recharge batteries after normal shutdown.
NOTE: No more data will be saved when the battery icon is flashing.
The monitor pops up a message during low battery shutdown, see Figure 4-9, and the shutdown progress can not be terminated.
You can not terminate shutdown progress in low battery status. The low battery capacity is estimated by alkaline battery. There is some difference for Ni-MH battery, but will not affect operation.
Press On/Off button with AC adapter in use, the monitor will enter standby mode after the progress bar is full.
In order to keep optimal performance of the equipment, re-start the monitor at least 30 seconds after the last shutdown or power off.
The history data can be saved only once when the battery icon is flashing. After that the data won’t be saved again even if the monitor is normally shut down.

Powering Up
4-8
4.4 Device Storage Remove the batteries from the monitor before long-term storage, or if the device won't be used for more than 6 months. This will protect the device from any damage due to possible battery leaking acid. Keep the device in the original shipping carton and packing materials to protect it from any damage during storage. 4.5 Environmental Protection To ensure minimum environmental pollution, make sure to dispose the batteries appropriately in accordance with your local regulations, ROHS(2002/95/EC)and WEEE(2002/96/EC.
4.6 Performance-related Factors
Inaccurate SpO2 measurements can be caused by:
Excessive patient movement; Anaemia; Venous pulsations; Intravascular dyes, such as indocyaninegreen or methylene blue; Significant levels of dysfunctional hemoglobins; Defibrillation.
The description of electromagnetic interference on oximetry reading is discussed in the Troubleshooting and Maintenance of this manual.
Inaccurate CO2 measurements can be caused by:
Filter line entanglement or strangulation. Reuse, disassemble, cleaning, disinfecting or sterilizing the single patient use CO2 airway adapters
Air flow adapter is damaged. CO2 sensor is damaged. CO2 sensor is wet or has exterior condensation. Nitrous oxide, elevated levels of oxygen, helium and halogenated hydrocarbons can influence the CO2 measurement.
Air flow adapter windows are dirty. CO2 Sensor windows are dirty. Patient’s discharges. CO2 sensor has not been zeroed for airway adapter. Environment configuration has not been set up for the CO2 sensor
Environmental conditions and sensor application errors may affect SpO2 and CO2 measurements and readings. Refer Sensor Application of the manual, as well as Sensor Application Guidance.

Displays and Functions
5-1
5. Displays and Functions
5.1 Main Monitoring Screen After turning on the monitor, you will enter the main monitoring screen. Its basic function is to display parameters of the patient’s vital signals. See Figure 5-1.
(a) Double Waveform Screen (b) SpO2 Only Module (c) CO2 Only Module
Figure 5-1: Main Monitoring Screen
Item Description Function
1 SpO2 Value Displays current SpO2 value. Or displays “- - -” without SpO2 measurement.
2 PR Value Displays current PR value. Or displays”- - -“without PR measurement.
3 EtCO2 Value Displays current EtCO2 value. Or displays”- - -“without EtCO2 measurement.
4 RR Value Displays current RR value. Or displays “- - -” without RR measurement.
5 SpO2 waveform Displays SpO2 waveform. Or displays a straight line without SpO2 measurement.
6 EtCO2 waveform Displays EtCO2 waveform. Or displays a straight line without EtCO2 measurement.
7 Pulse graph Displays the strength of pulse. 8 Alarm Limits Upper and lower limits of current parameter. 9 Alarm Switch The alarm of current parameter is off if the icon is
displayed. Note: Press the Up/Down key to switch among the main monitoring screen, the big
chart screen, the trend graph screen, and the trend table and event table. 5.2 Big Chart Screen Press the Down button to enter real-time big chart screen, see Figure 5-2.

Displays and Functions
5-2
(a) SpO2 and CO2 Module (b) SpO2 Only (c) CO2 Only
Figure 5-2: Big Chart Mode
In the monitoring screen, press MUTE button to disable current alarm or enable all alarms.
5.3 Real-time Trend Screen 5.3.1 Trend Graph Screen Press the Down button to enter real-time trend graph screen, displaying parameters trend graph of SpO2, PR, EtCO2 and RR. It records 1 event every 10 seconds, 30 minutes per page and a total 6 pages. To shut down the monitor, modify ID, change time and interval will clear any current data and the new real-time trend graph will display. See Figure 5-3. Press Right/Left buttons to select single parameter trend graph screen.
(a) SpO2 and CO2 (b) SpO2 Only (c) CO2 Only
Figure 5-3: Trend Graph Screen
Item Description Function
1 SpO2 scale bar Marks the range of SpO2 trend graph alarm limits. 2 SpO2 trend graph Draws SpO2 trend graph of a time span according to
history data for analysis. 3 PR scale bar Marks the range of PR trend graph alarm limits. 4 PR trend graph Draws PR trend of a time span according to PR
history data for analysis. 5 EtCO2 scale bar Marks the range of EtCO2 trend graph alarm limits.

Displays and Functions
5-3
Item Description Function 6 EtCO2 trend
graph Draws EtCO2 trend in a time span according to EtCO2 history data for analysis.
7 RR scale bar Marks the range of RR trend graph alarm limits. 8 RR trend graph Draws RR trend in a time span according to RR
history data for analysis. 9 Time span Marks the time span according to setup.
10 Page Up/Down Selects the page of trend required. 11 Marker button Marks on the trend graph, Maximum 2 marks.
In the trend graph screen, press OK key to enter operation mode. Press Right/Left buttons to move the cursor. Press MENU to exit:
Page Up/Down: Move the cursor on it and press OK. Press Right/Left buttons to select the desired page.. Press OK key to exit.
Marker Button: Move the cursor on it and press OK to place a mark of current time on trend graph. The mark will move leftward at the trend graph with time.
The real-time trend data will be cleared when you start up the monitor or change patient ID every time. Graphs are protracted step by step from the right side of the screen to the left until it fills the screen and then the waveform will move leftward. If there is no monitored patient, the trend graph still moves leftward.
The time span of the current trend is different according to different interval setup. The maximum span can be18 hours. The history trends will be covered by a new trend if the monitoring time exceeds the limits.
Shutting down the monitor will cause the real-time trend data to be cleared.
5.3.2 Trend Table Screen
Press Down button to enter trend table screen. See Figure 5-4:
(a) SpO2 and CO2 (b) SpO2 Only (c) CO2 Only
Figure 5-4: Trend Table Screen Operations: 1. Press Right/Left buttons to turn the pages after pressing OK when the cursor is on

Displays and Functions
5-4
the page up/down frame. Press OK again to exit. 5.3.3 History Trend History trend will be stored in three ways as below:
No data will be stored in disk if patient ID is 00. The latest 72-hour data will be stored if patient ID is from 01 to 99. If the disk is full, the full disk icon will display in the status bar and no more data will be recorded.
The history data is saved every 10 seconds. The recorded data includes the values of SpO2, PR, CO2 and RR.
History trend data will be saved if the monitor shuts down normally. But if the batteries are taken out without powering off first during data recording, it may cause data loss or disk damage.
History trend data will be saved during shutdown process. History trend data will be saved if there is a low voltage alarm. Then the monitor enters the low voltage status. Replace batteries immediately. No data will be stored in low voltage status, even if the monitor is turned off normally.
5.4 Event Table Screen Press the Down button to enter event table screen. The event table displays alarm records of SpO2, PR or EtCO2, RR or all these parameters. Refer to figure 5-5.
Figure 5-5: Event Table
Operations: 1. Press Right/Left buttons to turn the pages after pressing OK when the cursor is on the selective frame. Press OK again to exit.
The event table will only record alarms of recent 10 pages.
5.5 Menu Options
Press MENU key to access menu options, as shown in figure 5-6.

Displays and Functions
5-5
(a) SpO2 and CO2 (b) SpO2 Only (c) CO2 Only
Figure 5-6: Menu Screen
Operations: 1. Use Up and Down keys to scroll through different options. Note: You may scroll
past the options shown to reach additional options. 2. Press OK to select your option. 3. Press MENU to exit. 5.5.1 Setting Alarm
The monitor alarm function will be affected by environmental light, EMC, noise, etc. The alarm sound and data flashing on the screen must be audible and visual to the operator.
(a) SpO2 and CO2 (b) SpO2 Only (c) CO2 Only
Figure 5-7: Set Alarm limits
Operations: 1. Use Up, Down, Right and Left buttons to move the cursor. When the cursor is on
OK or Cancel, press OK on device to save or cancel, and exit. You may also press MENU to exit.
2. Press OK button to edit the fields you wish to change. Use Up/Right buttons to increase the value. Use Left/Down buttons to decrease the value. Press OK to save and exit.
3. When the cursor moves to CO2 option, press OK button to switch to set alarm limit of EtCO2 and RR. (Only for SpO2 and CO2 module).
Displays and Functions
5-6
If the alarm limits are different from default values, there is a dot displaying next to the limit values. The dot will not disappear until the limits are resumed to default.
No one other than trained personnel shall set up alarm limits. Upper limits should not be lower than lower limits.
The alarm system will be invalid if you set alarm upper/lower limits out of the range of alarm limits.
If the patient needs special care, improper alarm limits setting will cause the delay or invalidation of alarm signals.
Make sure that the default alarm settings are appropriate for the specific patient being monitored.
5.5.2 Setting SpO2 In the setting menu, you can choose “Set SpO2” option, as shown in Figure 5-8.
Figure 5-8: Set SpO2 (Not valid for CO2 only module)
Operations: 1. Use Up, Down, Right or Left buttons to move the cursor. When the cursor is on OK
or Cancel button, press OK to save or cancel, and exit. Alternatively, you may press MENU to exit.
2. Move the cursor to “Pleth Speed”, “Averaging Time” or “Pleth Visual Alert”, press OK button first and then use Up/Down buttons to change the values. Press OK to confirm your setting.
No. Name Option 1 Pleth Speed High, Low
2
Averaging Time 4, 8, 16. This is the dynamic window of time used to collect the values that are averaged to provide the value displayed on the screen.
3
Pleth Visual Alert
1s, 10s, 30s. This setting determines how quickly the color of the waveform changes during an alarm condition to provide a visual alert. (Red for high priority alarm and yellow for middle priority alarm.)

Displays and Functions
5-7
5.5.3 Setting CO2 In the setting menu, you can choose “Set CO2” option which is the same for both mainstream and sidestream CO2.
Operations: 1. Connect CO2 sensor to the monitor first. (See Chapter 3 for details) 2. Press MENU and select “Set CO2”. Press OK to see the following:
Figure 5-9: Set CO2 (Not valid for SpO2 only module)
Note: The parameters shown in this screen are factory default values. 3. Press OK to activate CO2. The main screen will show message saying “CO2
Opening”, “CO2 Warm Up” and “CO2 need compensation”. 4. Press MENU again to select “Set CO2”. Press OK to change CO2 waveform speed
and CO2 configuration parameters according to operating environment (i.e. air pressure, temperature).
5. Use Up, Down, Right or Left buttons to move the cursor. When the cursor is on OK or Cancel, press OK to save or cancel and exit. Pressing MENU button will also exit the screen.
6. Calibration: The unit will perform auto calibration with the data put in. When the operating environment changes, the current carbon dioxide value needs to be entered through the following:
(1) Input the barometric pressure to the “Press” field, the unit is kPa; (2) Input the room temperature to the “Temp” field, the unit is ℃; (3) O2 Compensation Range: 0 to 100%, Resolution: 1%, Default: 16%. (4) Balance Gas is Air. No. Parameter Description No. Parameter Description 1 Press barometric pressure 4 O2 O2 compensation 2 Temp gas temperature 5 Bgas balance gas 3 Unit current CO2 units 6 Ane anesthetic agent
5.5.4 Set Patient Information In the setting menu, you can choose “Patient Info” menu to set patient ID, gender and type, as shown in Figure 5-10.
Displays and Functions
5-8
Figure 5-10: Set Patient Information
Operations: 1. Use Up, Down, Right, or Left buttons to move the cursor. When the cursor is on
OK or Cancel button, press OK to save or cancel, and exit. Pressing MENU will also let you exit the screen.
2. You can set up patient ID from 0 to 99, patient gender, and patient types (Adult or Pediatric).
3. When you choose the New button, the system will auto-generate a new ID. The New button is not valid if there is no available ID.
4. If you choose an ID that has never been used, pressing OK button will change ID number and then exit. If the ID you choose is in use, it will remind you to substitute the former ID or cancel your operation.
5. If you choose to substitute the ID, the historical data of this ID will be cleared. If you choose to cancel, you will return to setting ID screen.
5.5.5 Adjust Volume
Do not pause an audible alarm or decrease its volume if it could compromise patient safety.
Figure 5-11: Adjust Volume
Note: When the device is in operation, you may change the volume of the audible pulse beep simply by pressing the Right (increase) or Left (decrease) buttons. The steps below allow you to change the default setting that will be in place upon power-up.
Operations: 1. Use Up, Down, Right, or Left buttons to move the cursor. When the cursor is on OK or Cancel, press OK to save or Cancel, and exit. You may also press MENU to exit. 2. Adjust the volume with the Right and Left button. Press the Up or Down key to move the cursor, and then press OK to confirm. Note: Monitor will power-up with the last confirmed alarm volume setting.

Displays and Functions
5-9
5.5.6 Setting Date and Time
Figure 5-12: Set Date and Time
Note: Date format is yyyy-mm-dd.
Operations: 1. Use Right and Left buttons to move the cursor. Press OK to change values. Press OK again to exit. 2. When the cursor is on OK or Cancel button, press OK to save or cancel and exit. 5.5.7 Setting Trend Select the “Set Trend “submenu in the setting menu and you can adjust the trend record steps, as shown in Figure 5-13.
If you change the steps, the saved data will be lost.
Figure 5-13: Set Trend
Operations: 1. Use Up, Down, Right, or Left buttons to move the cursor. When the cursor is on OK or Cancel, press OK to save or cancel and exit. Pressing MENU can also exit. 2. Move the cursor to step, press the Up/Down key to change the step value. The default value is 10 seconds.
Item Name Option 1 Runtime Trend Step 1s, 5s, 10s, 30s, 60s. It means the trend data
saving intervals in the monitor. 2 History Trend Step 1s, 5s, 10s, 30s, 60s. It means the trend data
saving intervals you can watch on a PC.

Displays and Functions
5-10
Note: Any adjustment of trend intervals or date/time will cause the current run time trend date being collected to be erased. 5.5.8 Data Output In the setting menu, choose “Data Output” option to enter data output screen, as shown in Figure 5-14.
Figure 5-14: Data Output
Operations: 1. Select “Data Output ”in the setting menu. 2. Plug wireless USB Adapter into USB port on PC. Run the history data analysis
software. Choose “Connect to Device” on PC. 3. If the device is found, the software will remind you to choose the patient ID whose
data you want to upload to PC. You can upload patient data to PC or delete patient data.
4. During the process of data transmission, you can press Stop button to stop and exit. 5.5.9 Module Options
Figure 5-15: Set Module
There are three modules: SpO2 and CO2, SpO2 Only and CO2 Only. You can choose any of these to run after entering “Set Module” submenu. 5.5.10 Resume Settings Enter “Reset Setting “submenu to resume all settings you have changed, as shown in Figure 5-16.
Figure 5-16: Resume Settings
5.5.11System Information System information includes the information of hardware and software, see Figure 5-17.

Displays and Functions
5-11
Figure 5-17: System Information
5.6 Audible and Visual Indications The following audible indications do not change with symbols, key board or visual indication:
No. Description Visual indication Audible indication
1 Startup During self test, the indicator light will flash red, yellow and green.
“dee”
2 Pulse Sound / “dee”
3 Sensor Unplugged
The red light will blink and the icon will be displayed.
Dee dee dee - dee dee Dee dee dee - dee dee Every 10s
4 Sensor Off The red light will blink and the icon will be displayed.
Dee dee dee - dee dee Dee dee dee - dee dee Every 10s
5 No Pulse The red light will blink and the icon will be displayed.
Dee dee dee - dee dee Dee dee dee - dee dee Every 10s
6 Poor Signal The icon will be displayed.
Dee dee dee - dee dee Dee dee dee - dee dee Every 10s
7 Low Voltage
The red light and the icon will blink.
Dee dee dee - dee dee Dee dee dee - dee dee Every 10s
8 Alarm Sound
The red light blinks in high priority. The yellow light blinks in medium priority. The related parameter values will blink at the same time.
Dee dee dee Every 10s for high priority; Every 25s for medium priority
Monitoring SpO2
6-1
6. Monitoring SpO2
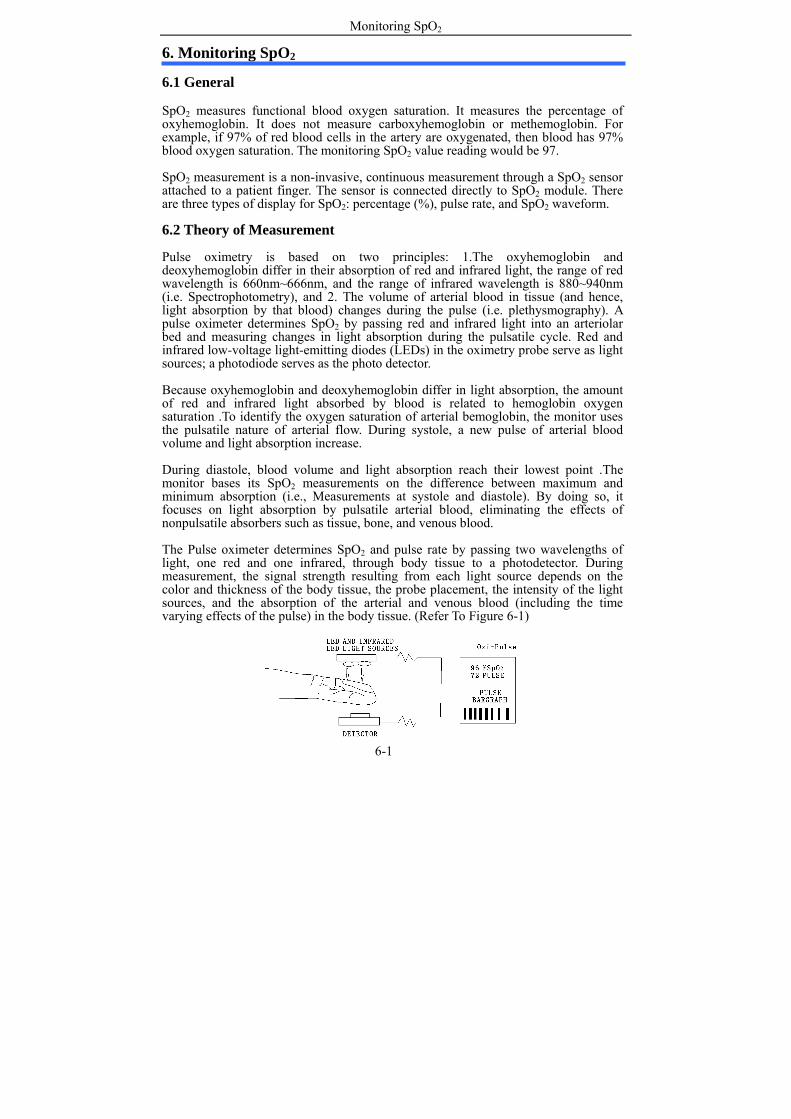
6.1 General SpO2 measures functional blood oxygen saturation. It measures the percentage of oxyhemoglobin. It does not measure carboxyhemoglobin or methemoglobin. For example, if 97% of red blood cells in the artery are oxygenated, then blood has 97% blood oxygen saturation. The monitoring SpO2 value reading would be 97. SpO2 measurement is a non-invasive, continuous measurement through a SpO2 sensor attached to a patient finger. The sensor is connected directly to SpO2 module. There are three types of display for SpO2: percentage (%), pulse rate, and SpO2 waveform. 6.2 Theory of Measurement Pulse oximetry is based on two principles: 1.The oxyhemoglobin and deoxyhemoglobin differ in their absorption of red and infrared light, the range of red wavelength is 660nm~666nm, and the range of infrared wavelength is 880~940nm (i.e. Spectrophotometry), and 2. The volume of arterial blood in tissue (and hence, light absorption by that blood) changes during the pulse (i.e. plethysmography). A pulse oximeter determines SpO2 by passing red and infrared light into an arteriolar bed and measuring changes in light absorption during the pulsatile cycle. Red and infrared low-voltage light-emitting diodes (LEDs) in the oximetry probe serve as light sources; a photodiode serves as the photo detector. Because oxyhemoglobin and deoxyhemoglobin differ in light absorption, the amount of red and infrared light absorbed by blood is related to hemoglobin oxygen saturation .To identify the oxygen saturation of arterial bemoglobin, the monitor uses the pulsatile nature of arterial flow. During systole, a new pulse of arterial blood volume and light absorption increase. During diastole, blood volume and light absorption reach their lowest point .The monitor bases its SpO2 measurements on the difference between maximum and minimum absorption (i.e., Measurements at systole and diastole). By doing so, it focuses on light absorption by pulsatile arterial blood, eliminating the effects of nonpulsatile absorbers such as tissue, bone, and venous blood. The Pulse oximeter determines SpO2 and pulse rate by passing two wavelengths of light, one red and one infrared, through body tissue to a photodetector. During measurement, the signal strength resulting from each light source depends on the color and thickness of the body tissue, the probe placement, the intensity of the light sources, and the absorption of the arterial and venous blood (including the time varying effects of the pulse) in the body tissue. (Refer To Figure 6-1)
Monitoring SpO2
6-2
Figure 6-1: SpO2 Theory of Operation
The Pulse Oximeter processes these signals, separating the time invariant parameters (tissue thickness, skin color, light intensity, and venous blood) from the time variant parameters (arterial volume and SpO2) to identify the pulse rate and calculateoxygen saturation. Oxygen saturation calculations can be performed because oxygen saturated blood predictably absorbs less red light than oxygen depleted blood. 6.3 Abnormal Conditions of SpO2 Measurement After turning on the monitor, the following may occur due to the wrong sensor placement or other operations: (1) Sensor off Finger: The SpO2 sensor has already been inserted into the monitor, but
not attached to the finger, the icon “ ” will blink and “- - -” will display in SpO2 and PR area with high priority alarm sound every 10 seconds.
(2) Pulse search mode: If the patient is connected with the sensor, the monitor attempts to search pulse. The icon “ ” will blink. At the same time, “- - -” will display in %SpO2 and PR areas. Normally the search lasts approximately 10 seconds. If the pulse search fails, the monitor generates high priority alarm.
(3) Sensor unplugged. The icon “ ” will display. (4) Weak signal. The icon “ ” will display. 6.4 Applying SpO2 Sensor SpO2 sensors and a SpO2 saturation module are the components to monitor blood oxygen level of saturation (SpO2) and/or the pulse rate (PR) and other physiological parameters of patients. The device is for use in (but not limited to) specialized medical facilities, patient wards, operation rooms, first-aid rooms, emergency rooms and observation rooms.
The sensor is not suitable for continuous and long term SpO2 monitoring which may cause skin to become irritated, reddening, blistering or necrosis.
The SpO2 sensor has passed biological compatibility tests such as cytotoxic test, intracutaneous stimulation and scratch test.
Procedures: (1) Place an index finger over the sensor window with finger tip against the stop (A).
The sensor should be oriented in such a way that the cable is positioned along the top of the hand (B). If an index finger cannot be positioned correctly, or is not available, other fingers can be used.

Monitoring SpO2
6-3
Figure 6-2: Placement of the Sensor
(2) Insert the patient index finger into the sensor until the finger tip touches the end of the sensor. Adjust the finger to be placed evenly on the middle base of the sensor (C).
(3) Plug the sensor into the monitor and verify proper operation as described in the monitor operating manual.
(4) Inspect the monitoring site every 4 hours for skin integrity. (5) Before each use, clean the surface of the sensor and cable with a soft gauze pad by
saturating it with a solution such as 70% isopropyl alcohol. If low-level disinfection is required, use a 1:10 bleach solution.
Do not sterilize by irradiation steam or ethylene oxide. Do not use a blood pressure cuff or arterial blood pressure measurement device on the same limb to which the sensor is applied.
6.5 Measurement Restrictions 6.5.1 Inaccurate SpO2 measurements may be caused by:
High frequency electrosurgical interference from a monitor or ambient electrical instruments connected to the system.
Excessive patient movement. Inductive current generated from MRI may cause burn. Outside light radiation. Incorrect sensor application or use. Sensor temperature (suitable temperature range should be28 ℃ - 41 )℃ The same limb is used for sensor, NTBP cuff, artery tube or infusion tube. Presence of COHb, MetHb and dyestuff. Weak signal. Bad perfusion on sensor site. Coma, anemia, low temperature and insufficient blood flow caused by drugs.
Monitoring SpO2
6-4
The maximum time duration for one sensor site in use should be less than 4 hours. The sensor surface temperature should not be higher than 41ºC, or it may cause burn.
During continuous monitoring, sensor site should be cleaned at least every 12 hours. Otherwise it may cause inaccurate measurements.
6.5.2 Inaccurate measurements can also be caused by:
Incorrect application of the sensor; Patient’s finger is too big or poor blood circulation; Failure to cover the sensor site with opaque material in high or ambient light conditions;
prolonged and/or excessive patient movement; Intravascular dyes, such as indocyaninegreen or methylene blue; Interavascular dyes or externally applied coloring, such as nail polish or pigmented cream;
Venous pulsations; Significant levels of dysfunctional hemoglobins Insufficient blood supply.
6.5.3 Loss-of-pulse signal can occur with any of the following:
The sensor is too tight; Defibrillation; A blood pressure cuff is inflated on the same extremity as the one to which an SpO2 sensor is attached;
There is arterial occlusion next to the sensor; Peripheral insufficient blood supply; Loss of pulse or heart arrest.
Select an appropriate sensor, apply it as directed, and read all warnings and cautions presented in the directions for use of the sensor. Clean and remove any substances such as nail polish from the application site. Periodically check to ensure that the sensor remains properly positioned on the patient. High ambient light sources such as surgical lamps (especially those with a xenon light source), bilirubin lamps, fluorescent lights, infrared heating lamps, and direct sunlight can interfere with the performance of a SpO2 sensor. To prevent interference from ambient light, ensure that the sensor is properly applied, and cover the sensor site with opaque material. If patient movement presents a problem, try one or more of the following remedies:
Ensure that the sensor is properly and securely applied; Move the sensor to another site; Use an adhesive sensor that tolerates some patient motion; Use a new sensor with fresh adhesive backing; Try to keep patient quiet.

Monitoring SpO2
6-5
Failure to cover the sensor site with opaque material in high ambient light conditions may result in inaccurate measurements.
You can select sensor types to determine how to deal with patient and environment. Do not sterilize by irradiation steam, or ethylene oxide. Wipe the monitor with cloth dampened with soft suds and wipe the surface dry. Wipe the sensor with cloth with alcohol if necessary. Note: Do not spray or pour any liquid directly onto the monitor, accessories or consumables.
Pulse oximetry readings and pulse signal can be affected by certain ambient environmental conditions, sensor application errors, and patient conditions.
Tissue damage can be caused by incorrect application or inappropriate continuous measurement of SpO2. Inspect the sensor site as directed in the sensor Directions for Use.
Inspect the monitoring site every 4 hours for skin integrity.

Monitoring CO2
7-1
7. Monitoring CO2 7.1 General Description The CO2 Sensor is used for continuous measurement of CO2 and respiratory rate. The sensor measures CO2 by using the infrared absorption technique. The principle is CO2 molecules absorb infrared (IR) light energy of specific wavelengths, with the amount of energy absorbed being directly related to the CO2 concentration. When an IR beam is passed through a gas sample containing CO2, the electronic signal from the photo detector (which measures the remaining light energy) is measured. This signal is then compared to the energy of the IR source and adjusted to accurately reflect CO2 concentration in the sample. The CO2 Sensor’s response to a known concentration of CO2 is stored at the factory in the sensor’s memory. A reference channel accounts for optical changes in the sensor, allowing the system to remain in calibration without user intervention. 7.2 Theory of Measurement CO2 monitoring is to monitor the respiration of a patient by detecting the concentration of CO2 generated during respiration. The maximum concentration of CO2 at the end of exhalation is called End-Tide CO2 (EtCO2). The minimum concentration of CO2 at the end of inspiration is called Inspiration CO2 (FiCO2). CO2 is generated by cells in the body during metabolizing, and is breathed out via breathing system. The concentration of CO2 breathed out from the lung reflects directly the situation of metabolizing and breathing system. If the concentration of CO2 is high, it means that metabolism is over active, such as blood poisoning or acute fever. If the concentration of CO2 is low, it is commonly due to a weak output ability of the heart, or the heartbeat stopped, or insufficient blood flow with less oxygen. Monitoring CO2 is used to warn the doctor of the abnormal breathing and metabolizing during anaesthesia. The measurement value of CO2 is represented by a pressure level, with the unit:”mmHg” or “%”. Generally, the maximum acceptable value is 38mmHg (5%) when air pressure is 760mmHg. The concentration of CO2 varies rapidly from 0% to 5%. To detect the concentration of CO2 accurately, the monitor needs to be very sensitive. The monitor is used to measure EtCO2 and respiration rate of adult and pediatric patients. 7.3 Applying the CO2 Sensor
The CO2 Sensor is used to continuously monitor carbon dioxide and report ETCO2, inspired CO2 and respiratory rate of intubated and non-intubated adult and pediatric patients.
The CO2 Sensor is intended for use in, but not limited to, intensive care units, anesthesia/medical/surgical units, LTAC units, emergency rooms, sleep labs, intra-hospital and inter-hospital transportation.
For use in monitoring patients in respiratory distress, respiratory arrest asthma, COPD or other disorders where the patient’s ETCO2 and capnogram will be helpful in the treatment of the patient.
For use in monitoring patients pre- and post intubation.
Monitoring CO2
7-2
To assist the patient in the management of “mechanical” ventilator. 7.4 CO2 Sensor Adapter Zeroing The sensor is compatible only with appointed CO2 airway adapters. Each airway adapter has its own optical characteristics. The adapter zeroing allows the CAPNOSTAT to adjust to the optical characteristics of each different adapter types. Zeroing request may occur for the first time when a particular CO2 Sensor is connected to a particular Host or pluged in/off , or if a change is detected by CO2 Sensor. Procedures of Adapter Zeroing: (1) Connect the CO2 Sensor to the Monitor. (2) Turn on the monitor. If it is the first time you switch on CO2, place the CO2 adapter
into a clean and dry CO2 sensor that is exposed to air and away from the sources of CO2, including ventilator, patient and your own breath. Do not operate within 20 seconds.
(3) Press MENU and select “Set CO2” option. Set “On” for “CO2 Switch”. (4) Choose “Clear” and CO2 information column will display “CO2 Zeroing” and
“CO2 Zero OK”. In the process of zeroing, do not make any operation (e.g. breathing or key-pressing). Otherwise, the zeroing operation will fail. The time for zeroing is 15-20 seconds. CO2 information note field will disappear after Completing Zeroing, “setup CO2”shows operational status, it means zeroing process is completed.Press “MENU”key turn back to main window.
Main window “CO2 waveform” will change to thick lines when occur following: 1) Check CO2 adaptor 2) CO2 need compensation 3) CO2 warm-up 4) NO breath detected 5) During zeroing process Completing above process, CO2 waveform will turn back to original baseline
For optimal performance, connect CO2 Sensor to an adapter and wait for 20 seconds before the Adapter Zeroing procedure.
Unplug adaptor,this monitor main window will hint checking CO2 adaptor and occur high level alarm.
CO2 readings and respiration rate can be affected by certain ambient environmental conditions, sensor application errors, and patient conditions.
Check whether the CO2 adapter is damaged or not. Do not use damaged CO2 adapters.
If CO2 waveform (Capnograph) appears abnormal. Inspect the CO2 airway adapters and replace if necessary.
Replace CO2 airway adapters if excessive discharge is observed. Monitor CO2 waveform (Capnograph) for elevated baseline. Elevated baseline can be caused by sensor or patient.

Data Output
8-1
8. Data Output 8.1 Driver Installation and Copy of Data Analysis Software Install the driver “F32x Express USB Driver” and copy the folder “History Data Viewer” from the enclosed CD to PC before data transmission from monitor to PC. 8.1.1 USB Driver Installation F32x Express USB Driver is a USB adapter driver. Following below steps to install: (1) Insert the enclosed CD into your PC. (2) Plug the USB adapter into USB port on PC, and you will see an automatic popup
window “Welcome to the Found New Hardware Wizard”. Choose “Install from a list or specific location”. Note: If there is no automatic window, you may double left click the icon on the bottom right corner of the desktop.
(3) Click “Next” and see “Hardware Update Wizard” window as below.
(4) Click “Browse” and choose the path G:\Driver\ F32x Express USB Driver. Click
“Next” and start installation.

Data Output
8-2
(5) After installation is completed, you will see the window “Completing the Found
New Hardware Wizard”.
Click “Finish” to complete the installation of F32x Express USB Driver. Once the driver is installed on PC, there is no need to install for the second time. 8.1.2 Copy the Folder “History Data Viewer” The software in this folder has functions of data output, data analysis and report printing. Copy the folder “History Data Viewer” from CD to PC and double-click the icon “ ” to open the main screen of the History Data Viewer software. Click “OK” to start.
8.2 Data Transmission and Deletion
In the process of data transmission or deletion, do not close History Data View software or remove the USB adapter, otherwise the process will fail.
After data transmission or deletion, remove the USB adapter first, then close the History Data View software.
(1) Place the monitor within 2 meters around the PC, and turn it on.

Data Output
8-3
(2) Press the MENU and select “Data Output”. The monitor will stay in below dialogue as shown in the following figure:
(3) Open history data viewer software and click “ ” at the top left corner to connect
the monitor to PC wirelessly. After successful connection, patient history data which have been stored in the monitor will be displayed on the left side column of the monitoring software. Select one patient ID, right click and select “Transmit data” or “Delete data” to send data of this ID to PC or delete the stored trend data of the ID in monitor, as shown below:

Configuration and Accessories
9-1
9. Configuration and Accessories 9.1 Maximum Configuration of NT1D No. Model Description Quantity Unit 1 NT1D Monitor 1 pc 2 D400AL-160108 SpO2 Sensor 1 pc 3 Capnostat 5 or
LoFlo Mainstream CO2 Sensor
Or Sidestream CO2 Sensor 1 pc
4 NT1D-PEL1 Charging Base 1 pc 5 GP, 250AAHC Rechargeable Batteries 4 pc 6 NT-CHR1 AC Adapter 1 pc 7 NT1D-USB1 Wireless USB Adapter 1 pc 8 / Protective Jacket 1 pc 9 / CD Driver 1 pc
10 NT1D-CE-091B Operating Manual 1 pc 11 / Maintenance Card 1 pc Note: This maximum configuration is just suitable for the SpO2 and CO2 Module, not for SpO2 only module or CO2 only Module. 9.2 Optional Accessories for NT1D
No. Model Description Manufacturer
1 Digital One Patient Use SpO2 Sensor- Adult D400A-160108
2 Digital One Patient Use SpO2 Sensor- Adult (Large) D400AL-160108
3 Digital One Patient Use SpO2 Sensor-Pediatric D400P-160108
4 Digital Y-type SpO2 Sensor- Neonatal Y400N -160108
5 Digital Finger SpO2 Sensor-Adult S400A-160108
6 Digital Finger SpO2 Sensor-Pediatric S400P-160108
7 Digital Soft-Finger SpO2 Sensor-Adult T400A-160108
8 Digital Soft-Finger SpO2 Sensor-Pediatric T400P-160108
9 Digital Wrap SpO2 Sensor-Neonate/Adult W400AN-160108
Solaris
10 Digital Wrap SpO2Sensor- Pediatric / Infant WP400PI-160108 Solaris
11 Sidestream CO2 Sensor LoFlo Respironics
12 Mainstream CO2 Sensor Capnostat 5 Respironics

Troubleshooting and Maintenance
10-1
10. Troubleshooting and Maintenance
If accuracy of any measurement does not seem reasonable, first check the patient’s vital signs by alternative means and then with this monitor to make sure it is working properly.
The cover should be removed only by qualified service personnel. There are no user-serviceable parts inside.
Do not spray or pour any liquid directly onto the monitor, accessories or consumables. Otherwise it may cause damage to the monitor.
If you discover a problem while using the monitor, do not continue to use or try to fix it. Contact qualified service personnel or representative. The monitor service manual, which is for use by qualified service personnel, provides additional troubleshooting information. 10.1 Errors and Solutions 1. Monitor does not turn on after pressing the power switch.
Check power cable connection. Replace or recharge the battery pack, or connect to AC power. Be sure the battery pack is in the monitor and inserted properly.
2. One or more displayed parameters or indicator icons do not light up during self test. Do not use the monitor and contact technical service department.
3. Indicator icon of searching pulse is blinking more than 10 seconds. Check if the sensor is suitable or connected correctly following sensor directions for use. Check the sensor and its cable connection. Try this sensor on another person. Try another sensor or another extension cable.
Blood insufficient supply may cause failure of detecting pulse. Check the patient or try the monitor on yourself. Replace the sensor or try another sensor.
Interference from patient movement may affect pulse searching. Keep the patient quiet. Check the sensor placement. Replace the sensor if necessary or move the sensor to a new site.
The probe may be placed too tight. Ambient light may also affect monitoring. A blood pressure cuff is inflated on the same extremity as the one with the sensor attached, Replace sensors if necessary.
Remove disturbing equipment.
4. No pulse shown on the indicator bar. Check sensor connections with the patient cable as well as the monitor. Replace the sensor. Try a new sensor or contact your local service group for help.

Troubleshooting and Maintenance
10-2
5. PR, SpO2, EtCO2, RR, or Pulse rate is erratic, intermittent, or incorrect. (May caused by EMI)
Reposition the SpO2 and CO2 sensor. Patient must remain still to obtain an accurate measurement. Power off nearby equipment and then power up again to locate the interfering equipment.
Change the orientation and position of the interfering equipment. Keep the interfering equipment far away from this monitor.
6. Sudden shutdown of the monitor. Replace or recharge batteries. Check power cable connection. If the above remedies are not effective, contact authorized service representative.
7. Instrument halts or has no response for the monitor. Remove the batteries. Reinstall the batteries and start it manually . If the above remedies are not effective, contact authorized service representative.
10.2 Technical Assistance If you need technical information and support or to order accessories and operating manuals, please contact your local representative, and specify the software’s version number and the serial number of this monitor. 10.3 Factory Default Values
Default upper alarm limit Default lower alarm limit Alarm parameter (unit) Adult Pediatric Adult Pediatric
EtCO2 (mmHg) 60 60 0 0 RR (BPM) 150 150 3 12 SpO2 (%) 100 95 85 80 PR (BPM) 100 200 55 100
10.4 Product Return For return or repair of the monitor, call the local representative for a RMA number and shipping instructions. To pack the monitor for return, disconnect all cables. It is not necessary to return accessories. Pack the monitor to be returned in its original shipping carton, if available. If not, use a suitable carton with appropriate packing materials to protect the monitor during transportation. 10.5 Maintenance and Cleaning

Troubleshooting and Maintenance
10-3
Covers should be removed only by qualified service personnel. There are no user-serviceable parts inside.
Turn the monitor off before cleaning. Do not spray or pour any liquid directly onto the monitor or accessories. Otherwise it will cause damage.
Do not immerse the monitor in liquid or use caustic or abrasive cleaners. If disinfection is required, wipe the monitor surface with a soft cloth moistened with commercial nonabrasive cleaner. Do not allow any liquid to enter any of the monitor's openings.
Do not touch or rub the display window with abrasive apparatus, brush, shaggy material or any other stuff that may cause damage to the display screen.
If there are any internal parts of the monitor exposed, please contact qualified service personnel. Follow your local regulations regarding disposal of hospital waste.
Dispose or recycle of batteries and retired sensors and the monitor accessories according to standard operating procedures or local regulations for the disposal of contaminated medical waste.
This monitor cannot use disabled batteries. Install new ones. You can clean and disinfect the surface of the monitor and sensor. (Sensor is the only part that contacts to a patient, so you should clean it after each use.) 10.5.1 Cleaning and Disinfecting the Monitor
To clean the monitor’s surface: Dampen a soft cloth with a commercial, non-corrosive cleaner or 70% alcohol, and wipe the top, bottom, and front panels lightly.
To disinfect the monitor: Use a cloth dampened with 10% aqueous solution of hypochlorite (bleach).
10.5.2 Cleaning and Disinfecting SpO2 Sensor
You can use a soft cloth dampened with 70% alcohol to wipe the SpO2 sensor, and then dry it completely with dry cloth. The same for cleaning SpO2 sensor LED and receiver. Clean and disinfect reusable SpO2 sensor. Read SpO2 sensor directions carefully before cleaning. Every type of SpO2 sensor has its own way to clean.
If low-level disinfection is required, use a 1:10 bleach solution. 10.5.3 Disinfecting Cable
Clean and disinfect cables with 3% hydrogen peroxide, or 70% isopropyl alcohol. 10.5.4 Cleaning and Disinfecting CO2 Sensor and Adapter A. Cleaning and Disinfecting CO2 Sensor
Use a cloth dampened with isopropyl 70% alcohol, 10% aqueous solution of sodium hypochlorite (bleach), disinfectant spray cleaner such as Steris Coverage® Spray HB, ammonia, or mild soap.
Wipe down with a clean water-dampened cloth to rinse and dry before use. Make certain that the sensor connector is cleaned and dried before reuse.

Troubleshooting and Maintenance
10-4
B. Cleaning Adapter Reusable adapters (Before reusing the adapter, ensure the windows are dry and residue free and that the adapter has not been damaged during handling or the cleaning/disinfecting procedures.):
Clean by rinsing in a warm soapy solution followed by soaking in a liquid disinfectant such as 70% isopropyl alcohol, a 10% aqueous solution of sodium hypochlorite (bleach), a 2.4% luteraldehyde solution such as Cidex®, Steris System 1® or ammonia. It should be rinsed out with sterile water and dried.
Can be disinfected by means listed below: (1) Steam Autoclave - adult adapter only; (2) Immerse and soak in Cidex® or equivalent 2.4 glutaraldehyde solution for
10-hour soak. (3) Immerse and soak in Perasafe® or equivalent 26% peracetic acid solution for a
10-minute soak. (4) Cidex® OPA - follow the manufacturer instructions for use.
Disposable adapter: Treat all single patient use airway adapters in accordance with institutional protocol for single patient use items.
DO NOT insert any object, such as a brush, into the CO2 airway adapter. Irreparable damage may occur to the CO2 windows.
C. Maintenance Schedule CO2 Sensor should be compared against calibration gas every 12 months. NOTE: Accuracy is affected by temperature and barometric pressure. D. CO2 Accuracy Check The following procedures are recommended to be performed as part of a periodic maintenance schedule to check CO2 accuracy of the sensor. (1) Zeroing. Refer to chapter 7.4 CO2 Sensor Adapter Zeroing. (2) Calibration. Open the MENU and select “Set CO2”. Set up values of all parameters
(pressure, temperature, unit, oxygen compensation, etc.) according to the actual environment. Press OK key to confirm your calibration.
Do not autoclave, ethylene oxide sterilize, or immerse the monitor and its accessories in liquid.
Turn off the monitor before cleaning. Do not immerse SpO2 and CO2 sensors in liquid.
If there is any internal part of the SpO2 and CO2 sensor exposed, please contact qualified service personnel for disposal.

Troubleshooting and Maintenance
10-5
10.6 Periodic Safety Checks The following safety checks should be performed every 24 months by qualified personnel who have adequate training, knowledge, and practical experience to perform these tests.
Inspect the equipment for mechanical and functional performance, e.g. speaker, indicator light, button response.
Inspect the safety relevant labels for legibility. Verify that the device functions properly as described in this operator's manual.
If the monitor is not functioning properly or fails any of the above tests, do not attempt to repair the monitor. Please return the monitor to the manufacturer or to your distributor for any required repairs. 10.7 Guarantee The manufacture provides one-year-warranty for the monitor and CO2 sensor and three-month quality warranty for SpO2 sensor. The warranty does not cover the followings:
The monitor label of serial number is torn off or can not be recognized. Monitor damage caused by misconnection with other devices. Monitor damage caused by accidents. Changes performed by users without prior written authorization of the manufacturer.

Appendix A
A-1
Appendix A: Specifications
A.1 Basic parameters SpO2, PR, EtCO2, RR.
A.2 Mean Time Between Failures ≥1000 hours
A.3 Normal Working Environment a. Environment temperature range: (0~40) ℃, b. Relative Humidity: ≤ 95 %, c. Atmospheric Pressure: (700~1060) hPa, d. Power Voltage: AC 100V-240V, e. Power Frequency: 50/60 Hz, f. Battery type: 4xAA size Ni-MH rechargeable battery or alkaline battery (forbid
to charge alkaline battery).
A.4 Safety Requirements and Classifications a. Electric shock type: Type II equipment with internal power supply. b. Electric shock degree: All application parts are BF type. c. Harmful liquid material proof degree: Liquid proof IPX1. d. Disinfection: Follow manufacturer’s recommended methods. e. Safety on flammable gas: Not suitable to use where flammable gas is present. f. The monitor has applicable parts. g. Power supply:
Internal power supply: 4.4~6.0V (4xAA size batteries), II type power adapter: Input AC100-240V, 50/60Hz, Output DC 9V, (operation power) and 6.0V (Recharging power).
h. The monitor has signal input and output parts, i.e., buttons, LCD, wireless interface.
i. When using external power supply, the monitor is a continuous working system. When using batteries, working time is about 2 hours for SpO2 and CO2.
A.5 Trend Data Transfer
(1) Support real-time wireless transmission: Wireless, via USB Adapters for PC (2) RF frequency: 2.440GHz (3) Modulate mode: GFSK (4) Effective transfer distance: ≤1m (5) Transfer speed: ≤ 40kbps (6) Transfer time: ≤ 40secs per ID (7) Power consumption: Rx or Tx Peak ≤13mA
A.6 SpO2 ■ Measurement range: (0-100)%. ■Measurement accuracy: (70-100)%, ±2%,
(0-69)%, not required

Appendix A
A-2
A.7 PR ■ Measurement range: (30~250)bpm ■ Measurement accuracy: 1 bpm or ±2%, whichever is greater.
A.8 EtCO2 ■ Measurement range: 0~150mmHg. ■Resolution: 0.1mmHg (0~69mmHg),
0.25mmHg (70~150mmHg). ■ Measurement accuracy: ±2 mmHg (0~40mmHg) ±5% (41~70mmHg)
±8% (71~100mmHg) ±10% (101~150mmHg)
A.9 RR
■ Measurement range: 0~150 bpm ■ Measurement accuracy: ±1 bpm
A.10 Alarms
■ Alarm Priorities: Priority Alarms High Medium
Technical alarm Low voltage, Loss of pulse, Sensor off, Cable off, CO2 sampling line off, No breath.
/
Physiological alarm Parameter’s value exceeds limits(The priority can be adjusted to high or medium)
Audible alarm Dee,Dee,Dee -Dee,Dee Every 10s
Dee,Dee,Dee Every 25s
Figures Displays “- - -’’ with related icon indication. Refers to chapter 5.1.
Numeric blinking Frequency 0.625Hz
Indicator light Blinking, Red Frequency 2Hz
Blinking, Yellow Frequency 0. 5Hz
Event Record the event, such as the date, time, parameters, etc.
■ Alarm Types: Physiological alarm: Patient’s physiological parameters exceed limits. Technical alarm: System failure to lead wrong results, i.e., sensor off. General alarm: No harm to patient health but needs attention, i.e. Battery low voltage.
A.11 Factory Default Values of Alarm Parameter

Appendix A
A-3
Default Upper Alarm Limit Default Lower Alarm Limit Alarm Parameter
(unit) Adult Pediatric Adult Pediatric EtCO(mmHg) 60 60 0 0
RR(BPM) 150 150 3 12 SpO2(%) 100 95 85 80 PR(BPM) 100 200 55 100
A.12 Limits Setting and Tolerance of Upper/Lower Limits
A.13 Continuous Working Time Power supply: Internal 4xAA alkaline or Ni-MH batteries or external power source. The monitor switches to external power source immediately when connected to AC power (DO NOT charge alkaline batteries). Internal power continuous working time: SpO2 & CO2 about 2 hours A.14 Trend Data Storage
■ Memory of trend data: Up to 99 patient IDs, 72h trend data per ID ■ Stored parameters of trend data: SpO2, PR, EtCO2, RR, Time etc.
A.15 Dimensions and Weight
Item Dimensions
Lx W x H (mm) Net Weight
(kg) Gross Weight (kg)
Monitor 125x73x23 0.137 0.23 (with batteries) Wireless USB
Adapter 61.8x18.2x9.0 0.0075 -
Charging Adapter 79x49x31 0.115 - A.16 Packing, Transportation and Storage
■ Packing Place the monitor in a plastic bag, and place it in a corrugated carton filled with foam or other fillers. Seal the carton.
■ Transportation The monitor can be transported by airplane, train or automobile. Prevent fierce collision during transportation. Do not keep it with perishables. The transportation environment should be:
Alarm Parameter Range of Upper Limit Range of Lower Limit SpO2 21%~100% 20%~99% PR 35 bpm~250 bpm 30 bpm~245bpm
EtCO2 5~100mmHg 0~99mmHg RR 1~150bpm 0~149bpm

Appendix A
A-4
a. Environment temperature range: -20℃~+70℃; b. Relative humidity range: ≤95%; c. Air pressure range: 500hPa~1060hPa.
■ Storage The monitor should be stored indoors with a temperature range: -10℃~+40℃, relative humidity ≤ 80%, no corrosive gas, and with good ventilation. A.17 Explanations of Interface
Connector type Description Wireless
(PC end) Connects to PC via wireless USB Adapter(2.440GHz ISM band)
Wireless (handheld end)
Built-in RF to communicate with wireless USB Adapter, with data rate up to 40kbps.(2.440GHz ISM band)
DB9 SpO2 Connector Standard DB9-F Connector DB9 CO2 Connector Standard DB9-F Connector
A.18 Compliance Standards
Applied Standards of NT1D Requirement CE (MDD 93/42/EEC)
EN60601-1:2006 Medical electrical equipment-Part1: General requirements for basic safety and essential performance
General Safety EN60601-2-49:2006 Particular requirements for the safety of multifunction Patient monitoring equipment
EMC conformity
EN60601-1-2:2007 Medical equipment-Part1-2: General requirements for safety-Collateral standard: Electromagnetic compatibility-Requirements and tests
Usability requirement
EN 60601-1-6:2007
Medical electrical equipment Part 1-6: general requirements for basic safety and essential performance collateral standard: usability
Software requirement EN62304:2007 Medical device software-Software lift cycle processes
Alarm conformity
IEC60601-1-8:2007
Medical electrical equipment - Part 1-8:General requirements for safety-Collateral Standard: General requirements, tests and guidance for alarm systems in medical electrical equipment and medical systems in medical electrical equipment and medical electrical systems
SpO2 Particular standard
EN ISO9919:2009
Medical electrical equipment - Particular requirements for the basic safety and essential performance of pulse oximeter equipment for medical use
CO2 Particular standard
EN ISO 21647:2004
Medical electrical equipment — Particular requirements for the basic safety and essential performance of respiratory gas monitors

Appendix A
A-5
Biological compatible requirement
ISO 10993-1: 2009 Biological evaluation of medical devices part-1:Evaluation and testing ISO 10993-1
Risk management requirement
ISO 14971:2007 Medical devices-Application of risk management to medical devices
Label and symbol EN:980:2008
Graphical symbols for use in the label of medical devices
Information supplied by the manufacturer
EN 1041:2008 Information supplied by the manufacturer with medical devices
EN ISO 14155-1:2009
Clinical investigation of medical devices for human subjects –General requirements
ENISO 14155-2:2009
Clinical investigation of medical devices for human subjects –Clinical investigation plans
Clinical requirement
Guidance of clinical evaluation Med dev 2.7.1V3
Evaluation of clinical data: a guide for manufacturers and notified bodies

Appendix B
B-1
Appendix B: EMC (Electro-Magnetic Compatibility) Caution: The monitor complies with the limits for medical devices to EN60601-1-2: 2007, Medical Device Directive 93/42/EEC, and this monitor has been tested for CISPR 11 class A.
Guidance & Manufacturer’s Declaration-Electromagnetic Emissions for All EQUIPMENT and SYSTEMS
Guidance and Manufacturer’s Declaration-Electromagnetic Emission
The NT1D is intended for use in the electromagnetic environment specified below. The user of NT1D should assure that it is used in such an environment.
Emission test
Compliance Electromagnetic environment-guidance
RF emissions CISPR 11
Group 1
The NT1D uses RF energy only for its internal function. Therefore its RF emissions are very low and are not likely to cause any interference in nearby electronic equipment.
RF emissionCISPR 11
Class A
The NT1D is suitable for use in all establishments other than domestic, and those directly connected to a low voltage power supply network which supplies buildings used for domestic purposes.
Guidance and Manufacture’s Declaration-Electromagnetic Immunity for All EQUIPMENT and SYSTEMS
Guidance and Manufacturer’s Declaration-Electromagnetic Immunity
The NT1D is intended for use in the electromagnetic environment specified below. The user of NT1D should assure that it is used in such an environment.
Immunity test IEC 60601 test level
Compliance level
Electromagnetic environment-guidance
Electrostatic discharge(ESD)IEC 61000-4-2
±6 kV contact
±8 kV air
±6 kV contact
±8 kV air
Floors should be wood, concrete or ceramic tile. If floors are covered with synthetic material, the relative humidity should be at least 30%.
Power frequency (50Hz) magnetic field IEC 61000-4-8
3A/m
3A/m
Power frequency magnetic fields should be at levels characteristic of a typical location in atypical commercial or hospital environment.

Appendix B
B-2
Guidance and Manufacturer’s Declaration-Electromagnetic Immunity for
EQUIPMENT and SYSTEMS that are not LIFE-SUPPORTING
Guidance and Manufacturer’s Declaration-Electromagnetic Immunity The NT1D is intended for use in the electromagnetic environment specified below. The user of NT1D should assure that it is used in such an environment.
Immunity test Conducted RF IEC 61000-4-6 Radiated RF IEC 61000-4-3 IEC 60601 test level 3 Vrms 150 kHz to 80 MHz 3 V/m 80 MHz to 2.5 GHz
Compliance level 3 Vrms 3 V/m
Electromagnetic environment –
guidance
Portable and mobile RF communications equipment should be used no closer to any part of the NT1D including cables than the recommended separation distance calculated from the equation applicable to the frequency of the transmitter.Recommended separation distance:
d = ⎥⎦⎤
⎢⎣⎡
15.3
V P ;
d = ⎥⎦⎤
⎢⎣⎡
15.3
E P 80 MHz to 800 MHz;
d = ⎥⎦⎤
⎢⎣⎡
17E P 800 MHz to 2.5 GHz.
Where p is the maximum output power rating of the transmitter in watts (W) according to the transmitter manufacturer and d is the recommended separation distance in metres (m). Field strengths from fixed RF transmitter as determined by an electromagnetic site survey a should be less than the compliance level in each frequency range b. Interference may occur in the vicinity of equipment marked with the following symbol:
NOTE1 At 80 MHz. the higher frequency range applies. NOTE2 These guidelines may not apply in all situations. Electromagnetic propagation is
affected by absorption and reflection from structures, objects and people. a. Field strengths from fixed transmitters, such as base stations for radio (cellular/cordless)
telephones and land mobile radios, amateur radio, AM and FM radio broadcast and TV broadcast cannot be predicted theoretically with accuracy. To assess the electromagnetic environment due to fixed RF transmitters. An electromagnetic site survey should be considered. If the measured field strength in the location in which the NT1D is used exceeds the applicable RF compliance level above, the monitor should be observed to verify normal operation. If abnormal performance is observed, additional measures may be necessary, such as reorienting or relocating the NT1D.
b. Over the frequency range 150 kHz to 80MHz. Field strengths should be less than 3 V/m.
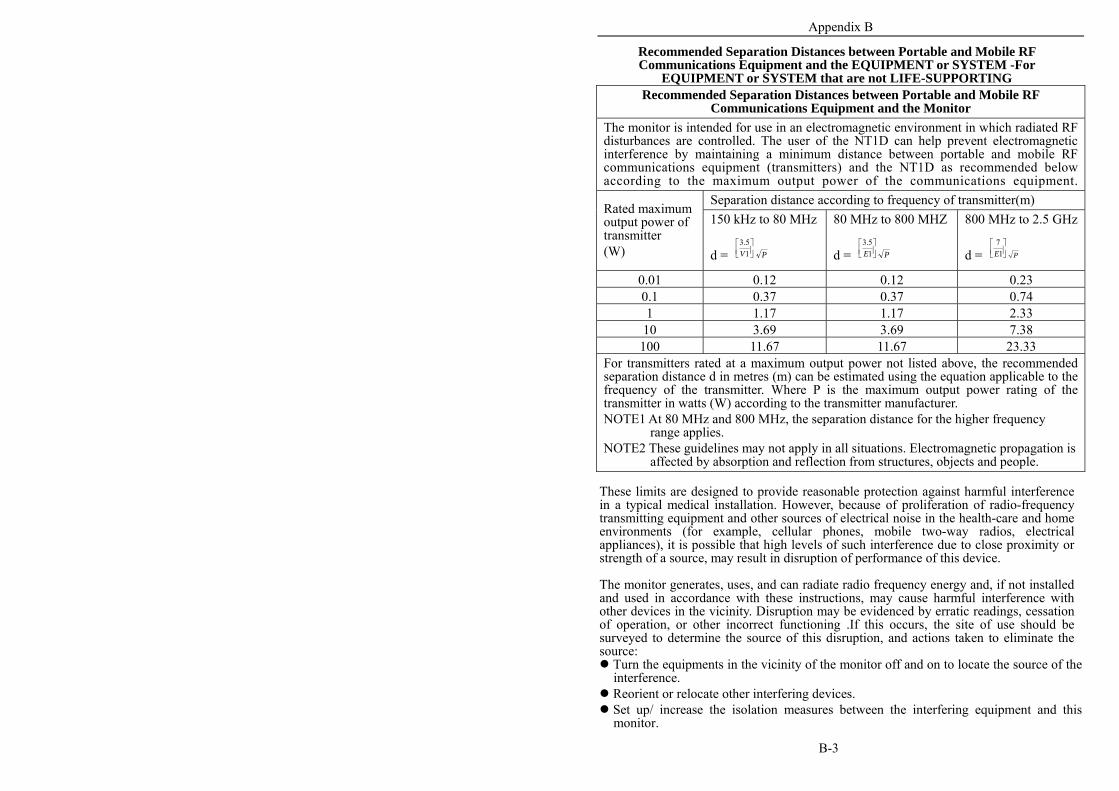
Appendix B
B-3
Recommended Separation Distances between Portable and Mobile RF Communications Equipment and the EQUIPMENT or SYSTEM -For
EQUIPMENT or SYSTEM that are not LIFE-SUPPORTING Recommended Separation Distances between Portable and Mobile RF
Communications Equipment and the Monitor The monitor is intended for use in an electromagnetic environment in which radiated RF disturbances are controlled. The user of the NT1D can help prevent electromagnetic interference by maintaining a minimum distance between portable and mobile RF communications equipment (transmitters) and the NT1D as recommended below according to the maximum output power of the communications equipment.
Separation distance according to frequency of transmitter(m) Rated maximum output power of transmitter (W)
150 kHz to 80 MHz
d = ⎥⎦⎤
⎢⎣⎡
15.3
V P
80 MHz to 800 MHZ
d = ⎥⎦⎤
⎢⎣⎡
15.3
E P
800 MHz to 2.5 GHz
d = ⎥⎦⎤
⎢⎣⎡
17E P
0.01 0.12 0.12 0.23 0.1 0.37 0.37 0.74 1 1.17 1.17 2.33
10 3.69 3.69 7.38 100 11.67 11.67 23.33
For transmitters rated at a maximum output power not listed above, the recommended separation distance d in metres (m) can be estimated using the equation applicable to the frequency of the transmitter. Where P is the maximum output power rating of the transmitter in watts (W) according to the transmitter manufacturer. NOTE1 At 80 MHz and 800 MHz, the separation distance for the higher frequency
range applies. NOTE2 These guidelines may not apply in all situations. Electromagnetic propagation is
affected by absorption and reflection from structures, objects and people. These limits are designed to provide reasonable protection against harmful interference in a typical medical installation. However, because of proliferation of radio-frequency transmitting equipment and other sources of electrical noise in the health-care and home environments (for example, cellular phones, mobile two-way radios, electrical appliances), it is possible that high levels of such interference due to close proximity or strength of a source, may result in disruption of performance of this device. The monitor generates, uses, and can radiate radio frequency energy and, if not installed and used in accordance with these instructions, may cause harmful interference with other devices in the vicinity. Disruption may be evidenced by erratic readings, cessation of operation, or other incorrect functioning .If this occurs, the site of use should be surveyed to determine the source of this disruption, and actions taken to eliminate the source:
Turn the equipments in the vicinity of the monitor off and on to locate the source of the interference.
Reorient or relocate other interfering devices. Set up/ increase the isolation measures between the interfering equipment and this monitor.