
Novtel Hospitality Manual V3 v3.01 - 15... · Novtel Hospitality is a ... T ick the- b o x"E n alD...
103
Transcript of Novtel Hospitality Manual V3 v3.01 - 15... · Novtel Hospitality is a ... T ick the- b o x"E n alD...


Novtel Hospitality Manual V3.012
Copyright © 2015 Novtel ® Louise Janse van Vuuren
Table of Contents
Part I Introduction 3
Part II Step 1 - Setup Company 4
Part III Step 2 - Setup Users and Passwords 12
Part IV Step 3 - Setting up Seasons 16
Part V Step 4 - Creating Guest Tariffs 18
Part VI Step 5 - Creating Rooms 21
Part VII Step 6 - Creating Charges 28
Part VIII Step 7 - Creating Customers andSuppliers 33
Part IX Step 8 - Opening a Shift 41
Part X Step 9 - Making Reservations and RaisingDeposits 43
Part XI Step 10 - Receiving Deposits 50
Part XII Step 11 - Guest Check-in 54
................................................................................................................................... 561 Invoicing upon Departure
................................................................................................................................... 592 Reservation Payment
Part XIII Step 12 - Cash-Up 63
Part XIV Step 13 - Reports 71
Part XV Step 14 - POS Packages (New Feature) 82
................................................................................................................................... 871 Package Month End Procedure
................................................................................................................................... 892 POS Transactions
Part XVI Step 15 - Vouchers Explained 90
................................................................................................................................... 941 Creating a Voucher
................................................................................................................................... 972 Redeeming a Voucher

Introduction 3
Copyright © 2015 Novtel ® Louise Janse van Vuuren
1 Introduction
Novtel Hospitality is a powerful, yet extremely easy to use central reservations management system. The keyaspects of the reservations system are as follows:
1. Fully automated seasons and rate structures calculated when reservations are made
2. Powerful grid view of reservations for 5 years
3. Powerful group reservations features
4. Automated holding deposit management
5. Fully automated refundable breakage deposit management
6. Automated commission management system
7. Move, extend and shorten bookings with a click of the mouse, with ease in seconds
8. Integrated forms designer to customize stationary of all printed documents
9. Night audit allows complete audit trail of all transactions
10. Automated booking current color coded status tracking as follows:
Canceled – (Bookings can be canceled but cannot ever be deleted)
Provisional – (Auto pop-up when deposit payment is overdue)
Confirmed – (Automatic when deposit is paid)
In-House – (Deposit automatically applied to Guest account on arrival)
Departed – (Guest departed but amounts are still due on booking)
Fully Paid – (Guest departed and booking is fully paid)
Non-Rev – (No charge for the booking made)
11. Powerful Integration In-House charge management and accounting key aspects:
Novtel’s Own Products
Novtel Restaurant Point of Sale fully Integrated
Novtel Shop Retail Point of Sale fully Integrated
Novtel Access Control systems fully Integrated
Novtel Relations Management fully Integrated 3rd Party Products
Pastel Accounting – Partner and Express Fully integrated
Pastel BOM Manufacturing (Food Cost) – Fully integrated
Pastel Multi-Stores Management – Fully Integrated
Pastel Inventory Management – Fully Integrated
3rd Party Products
Microsoft Word – Novtel database available as bookmarks in Word. Document printing in word fromeach booking in seconds
Microsoft Excel – Dump grid in Excel with all reports in it with just one click
Automated Online Bookings with various options to choose from
Please note that the Novtel Point of Sale manual, and the Restaurant Point of Sale manual are availableseparately
Novtel Hospitality Manual V3.014
Copyright © 2015 Novtel ® Louise Janse van Vuuren
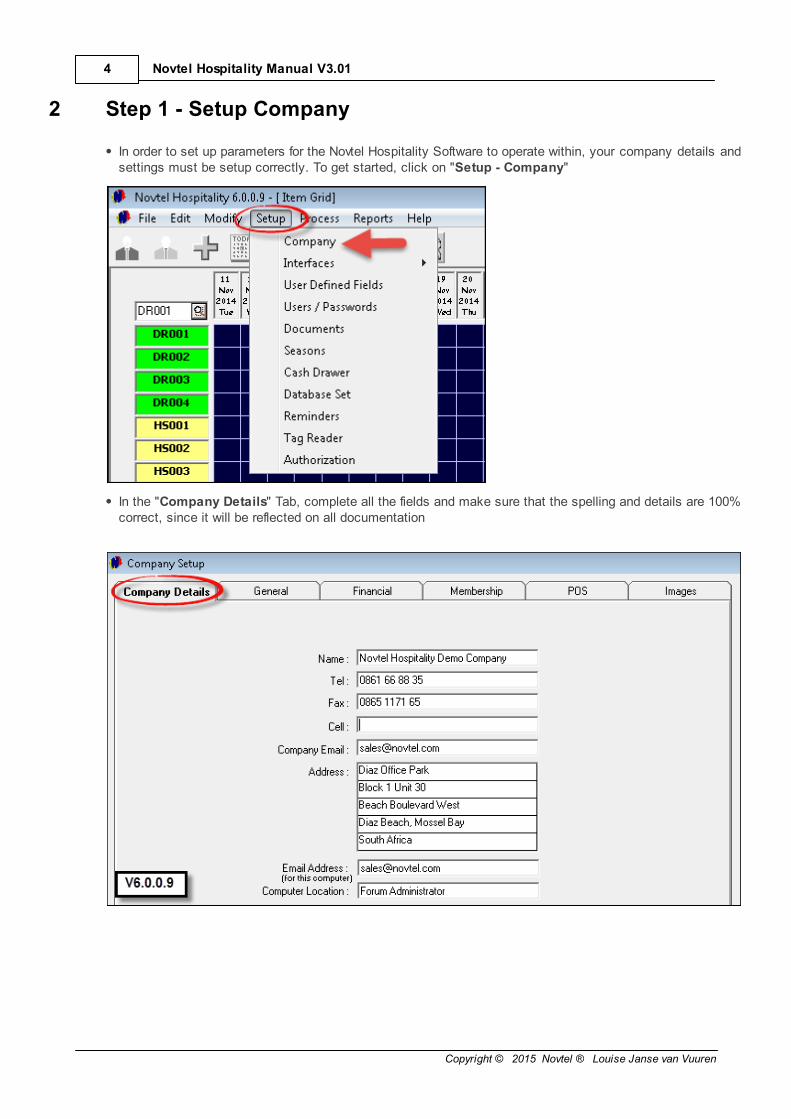
2 Step 1 - Setup Company
In order to set up parameters for the Novtel Hospitality Software to operate within, your company details andsettings must be setup correctly. To get started, click on "Setup - Company"
In the "Company Details" Tab, complete all the fields and make sure that the spelling and details are 100%correct, since it will be reflected on all documentation

Step 1 - Setup Company 5
Copyright © 2015 Novtel ® Louise Janse van Vuuren
The following are to be set up in the "General" Tab:
1. "Automatic Refresh Interval" - we have set the interval at 60 seconds, which means that the systemwill "Refresh" often enough to reflect changes made, without manually "Refreshing" the system -although you can manually "Refresh" as often as you like, directly on the Grid
2. The number of rows on the Grid represent the number of rooms/units to be viewed at once. Werecommend 15 to 18 rows in order to enable a full screen view of all the necessary functionsincorporated in Novtel Hospitality. Please note that this will only come into effect when the rooms arecreated
3. The number of columns on the Grid represent the number of days to be viewed in advance - we alwaysselect 45 days, but you can set your own number to accommodate your preferences
4. It may happen that a unit is rented out on a monthly basis, and then the billing will be done differentlythan "Short Stay" billing. In order to activate monthly billing for this purpose, select "Yes"
5. Novtel incorporates a full "Access Control" system (Using Tags for room and facility entry), whichintegrates with all other Novtel products. Should you make use of this system as well, activation for"Access Control" is done here
6. If you make use of rental agents, you can "Activate Agent Commission" in this screen
7. Set the default times for guest arrival and departure
8. Overlapping of reservations are not recommended, but you can set it to the number of days that youwish
9. The "Grace Period" will allow the guest to delay departure for the time setup here - usually an hour.However, should the guest exceed the "Grace Period", he or she will automatically be billed for anextra day
10.When the "Unique Rate Description" option is ticked, you will not be allowed to create a code ordescription more than once. The system will instantly warn you that the code or description is in usealready
11.Select the applicable options in the rest of the "General Tab" as you wish. Remember that you canalways go back to change settings to fit your company's specific needs

Novtel Hospitality Manual V3.016
Copyright © 2015 Novtel ® Louise Janse van Vuuren
In the "Financial" Tab, there are 5 different fields to be set up:
1. VAT / GST / Sales Tax - Select whether or not to use Tax; Enter your company's Tax Number andselect the standard percentage for the tax rate
2. Service Charge - The "Charge Code" for the "Service Charge" is setup in "Edit - Charges", andthen entered here by clicking on the magnifying glass and selecting the "Charge" from the list. Tick thecheck-box to set tax on the "Service Charge", or alternatively leave it blank for no tax. Set thestandard percentage for the "Service Charge". The "Service Charge" will automatically be added toevery reservation when you select the option to "Include Service Charge in Charge Total". Forexample: On a invoice total of R1000.00, the "Service Charge" will amount to R30.00 for a total ofR1030.00 payable by the guest
3. "Update Customer Invoices and Credit Notes" - Select the format for the documents
4. "Update Selling Prices" - Select the automatic "Rounding" number in transactions, and if you wantto set a "Default Mark-up Percentage" you can enter the percentage here (Leave the percentage atzero if you choose to have different mark-up percentages on different products)
5. "Season Processing" - Seasons are used in the Hospitality Industry, and rates are connected to theapplicable season. Tick the check-box to "Allow Seasons", and to activate the option in the "SetupMenu"

Step 1 - Setup Company 7
Copyright © 2015 Novtel ® Louise Janse van Vuuren
In the "Membership" Tab, a cash account can be selected for "Members" to the facility. The account iscreated in "Edit - Customers"
In order to insert the "Membership Cash Account", click on the magnifying glass in the "Company Setup- Membership Tab"; browse for the correct account; click on it and then on "Select"

Novtel Hospitality Manual V3.018
Copyright © 2015 Novtel ® Louise Janse van Vuuren
The setup in the "POS" tab is extremely important:
Front Desk / Shop
1. Tick the check-box to "Enable Discount" if you want to utilize this option, and enter the "MaximumDiscount Percentage" allowed to be allocated by any "System User" in these departments
2. "Footnotes" are created in "Setup - Documents". Tick the respective check-boxes to display thesefootnotes on the "Front Desk and Shop Documents"
3. There are 2 POS systems to choose from. If the "Use Default POS Shop" option is selected, the followingscreen will be displayed when "Front Desk and Shop" sales are performed:
Also note that the check-box to "Show Inventory Details" are selected in the setup screen. This meansthat the "Inventory" in Pastel will be displayed directly in the POS screen

Step 1 - Setup Company 9
Copyright © 2015 Novtel ® Louise Janse van Vuuren
For demonstration purposes, we have now un-ticked the "Use Default POS Shop" and "Show InventoryDetails". The "Pastel Inventory Details" are not displayed, and the "Combination POS" screen is in usefor all POS transactions at the "Front Desk" as well as the "Shop"

Novtel Hospitality Manual V3.0110
Copyright © 2015 Novtel ® Louise Janse van Vuuren
1. As soon as the option is selected to "Enable Quick Scan", the "Setup Scale" field is activated. Thisfeature was developed for companies using scales for items to be charged according to weight. The"Barcode" is generated according to the settings entered here, and the weight and rate is calculated byNovtel. Please note that the detailed explanation on the "Setup Scale" feature is not part of this tutorial. ANovtel Specialist will assist in setting up the scale itself, and training will be available on how to utilize thisoption
2. To enable a "System User" to "Remove an Item without Supervisor Permission" in the POS windowwhen a "Charge" was inserted wrongly, tick the check-box to activate the function. If un-checked, a"Supervisor" will need to enter their password in order for the "User" to proceed with the transaction
In-House Charge section
Charge Codes for In-house Restaurant/Bar Charges; POS/Shop Charges and POS/Shop PayoutCharges are created in "Edit - Charges". Enter the Codes by clicking on the magnifying glass;browse for the code, and select it
Restaurant / Bar section
Novtel Hospitality incorporates a full Restaurant and Bar Point of Sale System. This is not part of
this tutorial. For more information, please refer to the Restaurant POS Manual, or register on the
Novtel Forum for detailed discussions on the subject: http://www.novtel.com/forum/index.php)
General section
Select the options that will suit your company's needs best

Step 1 - Setup Company 11
Copyright © 2015 Novtel ® Louise Janse van Vuuren
In the "Images" tab, insert the path for the "Room Images" - When you take pictures of the units or roomswith a digital camera, the images can be stored in this location
Click "Accept" to save the changes in all the tabs

Novtel Hospitality Manual V3.0112
Copyright © 2015 Novtel ® Louise Janse van Vuuren
3 Step 2 - Setup Users and Passwords
It is very important to set up "Users and Passwords" in order to:
Keep track of each "User's" activity
Permissions are set for each "User" according to the area of work. For example: If Stella is working inthe Restaurant, her password will only grant her access to the "Restaurant POS" system. The samegoes for James who is working at the Front Desk of the Hotel - his permissions are set to only accessthe part of the system pertaining to his job
Each "User" is responsible for the "Daily Takings" during his / her shift, and the totals must balance -therefor it is of utmost importance that the passwords are kept secret
"Supervisors" must also be created as "Users" in order to open and close shifts and perform the cash-up that sends the data from Novtel to Pastel
Click on "Setup - Users / Passwords" and click "Add"

Step 2 - Setup Users and Passwords 13
Copyright © 2015 Novtel ® Louise Janse van Vuuren
In the "General" tab, enter the User Name; Unique Password; The User's First and Last Name. If you makeuse of "Tags" (when Novtel Access Control is used in conjunction with Hospitality) enter the "Tag Code"which will serve as an access key
Proceed to the "Permissions" Tab, and select the "Permission Type" - in this case James is the"Administrator" who will have access to all the functions listed under the "Item Grid" - excluding theRestaurant, Bar, Supervisor Cash-up and the Shop

Novtel Hospitality Manual V3.0114
Copyright © 2015 Novtel ® Louise Janse van Vuuren
In the "Pastel" Tab, you can select the specific "Multi-Store" in Pastel to which the data is sent for thisUser - provided that the "Multi-Store Module" is installed in Pastel. If not, the "Default Store" will beselected
If James is set up as a user in Pastel, you can select him in order to "Import Customer and SupplierDocuments to him as a Pastel User"
Tick the check-box: "Link to Pastel Database", and click "Accept" to save all the details

Step 2 - Setup Users and Passwords 15
Copyright © 2015 Novtel ® Louise Janse van Vuuren
Set up all "Users" for all sectors as shown in the image below. When you click on a name, the permissionsfor this user will reflect in the field beneath it. Please note that for "Restaurant Users", an extra tab isactivated where a specific "Gratuity Charge" per "User" is selected - after being created in "Edit -Charges". However, this is explained in the manual: Restaurant Point of Sale
Whenever you need to make changes to a "User", click on the name; click "Edit"; make the changes and"Accept" to save
To remove a User from the system, click on the name, and then "Delete"

Novtel Hospitality Manual V3.0116
Copyright © 2015 Novtel ® Louise Janse van Vuuren
4 Step 3 - Setting up Seasons
In "Setup - Company - Financial Tab" we have activated the option to use "Seasons". Many companies inthe Hospitality Industry setup the "Seasons" two years in advance
Click on "Setup - Seasons", and click on "New Season"

Step 3 - Setting up Seasons 17
Copyright © 2015 Novtel ® Louise Janse van Vuuren
As you will notice - the last "Season" that has been setup, was "Low Season" for the period of 2016/06/01to 2016/11/30. Therefor, the "Start" date for the next "Season" will automatically be selected by thesystem, and cannot be changed
Click in the "Description" field, and enter "High Season"
Click on the arrow beneath the "End Date" in order to open the calendar. Select the month and date for the"Season" to end
When you are sure that the details and dates are correct, click on "Apply" in order to save the "Season"
To enter more "Seasons", click on "New Season" again and repeat the steps. When you are done, click"Close"

Novtel Hospitality Manual V3.0118
Copyright © 2015 Novtel ® Louise Janse van Vuuren
5 Step 4 - Creating Guest Tariffs
In order to link a tariff to a room and also to a season, it needs to be setup in a specific way. Keep in mindthat different size rooms are found in a hotel, and different units in a resort can accommodate a differentnumber of people. Therefor the rates will differ according to the type of room. This could give you an idea ofhow to create "Guest Tariff Codes":
SR001 - Single Room Low Season
SR002 - Single Room High Season
DR001 - Double Room Low Season
DR002 - Double Room High Season
HS001 - Hotel Suite Low Season
HS002 - Hotel Suite High Season
GR001 - Group Per Person Low Season
GR002 - Group Per Person High Season
GR003 - Group Single Low Season (A Single Room is always more expensive since it can accommodateonly one person - even in a "Group" setting)
GR004 - Group Single High Season
Camping Sites may also be part of the facility. Create "Guest Tariffs" per "Site" (Room), or per person pernight, for every "Season"
Click on "Edit - Guest Tariffs" and click "Add New"

Step 4 - Creating Guest Tariffs 19
Copyright © 2015 Novtel ® Louise Janse van Vuuren
Enter the "Tariff Code" (DR001), and then the Description - in this case: "Double Room Low Season"
Enter any "Detailed Notes" pertaining to the specific room in the field provided
If you enter the tariff in the "Rental Room Incl" field, it means that the rate is for the room, VAT inclusive.We will show you how this is managed by the system when making a reservation
If you enter the tariff in the "Rental Person Incl" field, it means that the rate is per person, VAT inclusive
Click "Accept" to save the "Tariff"

Novtel Hospitality Manual V3.0120
Copyright © 2015 Novtel ® Louise Janse van Vuuren
Click "Add New" and repeat the steps until all "Tariffs" are entered according to your criteria. Please notethat the number of "Tariffs" are unlimited. You may have as many or as little "Tariffs" as you wish
In order to make changes to a "Tariff", click on it; then on "Edit"; make the changes and "Accept" whenyou are done

Step 5 - Creating Rooms 21
Copyright © 2015 Novtel ® Louise Janse van Vuuren
6 Step 5 - Creating Rooms
There are different rooms and units in a hotel or resort. Every unit must be created separately, and coded ina logical manner. This is an example of how to create room codes:
SR001 Single - Room Nr 1
SR002 Single - Room Nr 2
DR001 Double - Room Nr 3
DR002 Double - Room Nr 4
HS001 2 Bedroom Suite - Nr 5
HS002 2 Bedroom Suite - Nr 6
Camping Sites must also be created as "Rooms". Depending on the number of "Sites", it can be coded asfollow:
CAM001
CAM002
CAM015
Click on "Edit - Rooms" and then "Add New"

Novtel Hospitality Manual V3.0122
Copyright © 2015 Novtel ® Louise Janse van Vuuren
Enter the "Code" and "Description" for the room
Tick the check-box to "Create Room in Pastel" - it will then automatically be imported to Pastel. If theoption is not selected, you will have to create the room manually in Pastel
In the "General" Tab, select the "Branch" this room belongs to. (Setup is done in "Edit - Branches", andthe function is to group the room types together on the Grid according to the color assigned to the"Branch". Please register on the Novtel Forum for more info pertaining to the subject)
Tick the check-boxes to:
Show on Grid
Show on Web (For internet bookings in conjunction with Nightsbridge)
One Day Booking (Room allocated for "Short Stay")
Monthly Billed Item (Room allocated for "Long Term" rental only) - Either select this option OR "OneDay Booking", but not both
Leave the "Guest Tariff" field blank. When the "Seasons and Rates" are linked to the room, the applicablerate will automatically be selected by the system when making reservations (Explained in Step 9)

Step 5 - Creating Rooms 23
Copyright © 2015 Novtel ® Louise Janse van Vuuren
In the "Details" tab, enter all details pertaining to the room in the field provided
Enter the number of beds in the room - in this case it is a "Single" room: It contains 1 single bed, andaccommodates 1 person

Novtel Hospitality Manual V3.0124
Copyright © 2015 Novtel ® Louise Janse van Vuuren
Remember that we have set up "Guest Tariffs" according to "Seasons" in Step 4? It is in the "Financial"Tab of creating a room, where the linking of the "Season" to the tariff and room will be done
See how the "Seasons" that have been set up in Step 3 already display in the window, but no "Rates" arelinked to it. In order to do the linking, simply double click on the first "Season" in the window
The "Guest Tariff" window will open. Select the "Single Room Low Season" tariff

Step 5 - Creating Rooms 25
Copyright © 2015 Novtel ® Louise Janse van Vuuren
The "Season" is now linked to the "Rate" and the "Room". Follow the same steps in order to link all the"Seasons" according to it's "High" and "Low" Status
Enter the "Accommodation Tax Rate" and also select the "Default Charge to be Used" - either "PerRoom" or "Per Person" (Single rooms' tariffs have been setup "Per Room")

Novtel Hospitality Manual V3.0126
Copyright © 2015 Novtel ® Louise Janse van Vuuren
All "Seasons" and "Guest Tariffs" for this room have been linked as shown in the image below. Click"Accept" to save
In order to import the room into Pastel, select "Services" for the "Inventory Group", and then select"Service Item" before clicking "Accept"

Step 5 - Creating Rooms 27
Copyright © 2015 Novtel ® Louise Janse van Vuuren
This is how the rooms display on the Grid - alphabetically and according to the "Branch" colors

Novtel Hospitality Manual V3.0128
Copyright © 2015 Novtel ® Louise Janse van Vuuren
7 Step 6 - Creating Charges
In the Hospitality Industry, there may be a Hotel, Resort, Restaurant, Bar and Shop on the same premises,and charges are to be created for all of them. Charges can include the following:
A Service Charge
Every Item sold in the Shop such as Ice Cream; Cold Drinks; Chips, Chocolates; Sun screen; Toiletries;Clothing and Specialist products etc.
Menu items for the Restaurant and Bar, and it can be linked to a "Menu Category" (This is not part of thistutorial - please see our manual for "POS Restaurant")
Because there is such a vast range of charges that can be created, the codes and descriptions must beplanned very meticulously. It would be a good idea to plan it on paper first before attempting to create it inNovtel. This way it would make sense to all using the system, and to avoid duplication and confusion.
In order to create "Charges" in Novtel, click on "Edit - Charges"
Click on "Add New"

Step 6 - Creating Charges 29
Copyright © 2015 Novtel ® Louise Janse van Vuuren
1. For demonstration purposes, we are creating a fictional "Item" and price
2. Enter the Product's "Description"
3. Do not enter a "Barcode" here if "Packages" are going to be created (explained in Step 14). The systemwill generate the barcode according to the combination of information that will be entered by the "User".Alternatively, enter the barcode on the "Charge Master file" if the "Packages" feature are not going to beused
4. Tick the check-boxes to:
Create the Item in Pastel (When this check-box is not selected, the "Charge" will have to be createdmanually in Pastel)
Display on Invoice
Physical Item
5. In the "General" tab, tick the check-box to "Allow Tax" in the case of the company being Tax registered,and select the "Tax Rate" - in South-Africa it is 14%
6. Enter the "Item's" cost price excluding tax - this is the price the company is buying the "Item" for from thesupplier
7. Enter the "Item's" selling price next to "Rate Including". This is the price your Customers will be payingfor it, and the price is inclusive of tax
8. The system will automatically calculate the "Markup %" and the "Charge's selling price excluding tax"

Novtel Hospitality Manual V3.0130
Copyright © 2015 Novtel ® Louise Janse van Vuuren
Proceed to the "Properties" tab and tick the check-boxes to classify this "Charge" as a "POS and ShopItem"
The "Voucher" tab is only used when creating a "Charge" to be sold as a "Voucher" - which can beredeemed in the specific department as selected. Please see "Step 15" for information on this subject
Please note that the "Pastel Inventory Code" has not been entered yet, since the "Import to Pastel" willonly happen after clicking "Accept"
The "Code and Description" as entered in Novtel has been inserted automatically for the Pastel "Codeand Description"
The "Inventory Group" is "Inventory Goods"
The selling price excluding tax has been inserted as calculated in the "General" tab
Select the "Physical Item" option and click "Accept"

Step 6 - Creating Charges 31
Copyright © 2015 Novtel ® Louise Janse van Vuuren
Returning to the "Charge" just created, the "Pastel Inventory Code" has been inserted
When we proceed to Pastel, the "Charge" has been created, and the "Cost Price" has been inserted in the"Details" tab

Novtel Hospitality Manual V3.0132
Copyright © 2015 Novtel ® Louise Janse van Vuuren
Go ahead and create all other "Charges" in the same manner
Step 7 - Creating Customers and Suppliers 33
Copyright © 2015 Novtel ® Louise Janse van Vuuren
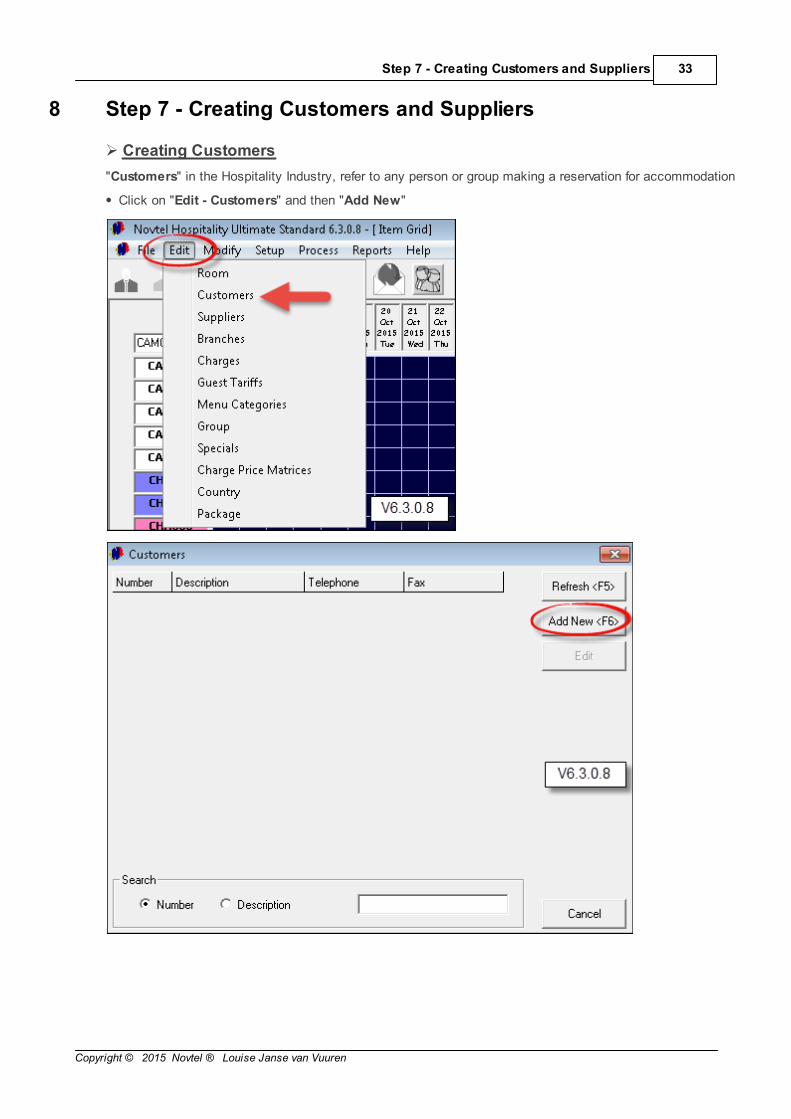
8 Step 7 - Creating Customers and Suppliers
Creating Customers
"Customers" in the Hospitality Industry, refer to any person or group making a reservation for accommodation
Click on "Edit - Customers" and then "Add New"

Novtel Hospitality Manual V3.0134
Copyright © 2015 Novtel ® Louise Janse van Vuuren
1. Tick the check-box to "Use Customer Auto Number". This function will enable you to only type the 3 letteralpha-code for the "Customer", (In this case it is Mr West, and we have typed only "WES") and the systemwill automatically insert the 3 digit numeric code - which means that whenever you have two customers withthe same "Alpha Code", the system will automatically use the next available numeric code without youhaving to check the system for the next available code
2. Enter the "Description" for the Customer
3. Select the "Category" the Customer belongs to - In this case it is "Short Stay"
4. Tick the check-box to classify the "Customer" as a "Corporate Customer" - if applicable. Please alsoensure that the "Tax Reference" is entered in the "General" tab to enable the "Customer" to benefit fromthe tax implication
5. The "Monthly Customer" check-box is ONLY selected in the event where a room or unit is rented on amonthly basis. It is then also billed in a different manner than "Short Stay" reservations
6. "Tour Operators" are also created as "Customers". In this case, the "Tour Operator" check-box isselected - which will activate the "Tour Operator Discount" tab. Please note that discount percentages forthe "Tour Operator" can be set in this tab for:
Single Day Reservations
Multiple Day Reservations
Discount on specifically selected "Charges"

Step 7 - Creating Customers and Suppliers 35
Copyright © 2015 Novtel ® Louise Janse van Vuuren
1. Select the "Country" the "Customer" is from
2. In the "General" Tab, enter the Postal Address; Contact Numbers; E-mail Address
3. Set the Credit Limit for this "Customer". When this limit is reached for accumulated "Charges", no in-house transactions can be done before the account has been settled
1. Enter the "Customer's" physical address in the "Delivery Address" tab
2. "User Defined Fields" are created in "Setup - User Defined Fields - Customers tab". The functionality ofthis is to create customized fields where additional information - not covered by the system - can be enteredhere
3. In the future, this "Customer's" In-house Point of Sale documents can be viewed in this tab
4. The "Tour Operator Discount" tab are disabled since the "Tour Operator" check-box was not selected forMr West

Novtel Hospitality Manual V3.0136
Copyright © 2015 Novtel ® Louise Janse van Vuuren
In the "Email Contacts" tab, additional e-mail addresses can be entered for this "Customer". Click on"Add"
In the "Contact Details" field, enter the name and e-mail address and click "Accept Changes"

Step 7 - Creating Customers and Suppliers 37
Copyright © 2015 Novtel ® Louise Janse van Vuuren
1. The additional e-mail address has been added. Click "Add" again to enter another e-mail address
2. In order to make changes to an entry, click on it and then "Edit". Make the changes and click "AcceptChanges"
3. To delete an entry, click on it and then "Remove"
4. Click "Accept" to save the "Customer" to the system
Now Mr West's account displays in the "Customer" window. In order to add more "Customers", simplyclick on "Add New"

Novtel Hospitality Manual V3.0138
Copyright © 2015 Novtel ® Louise Janse van Vuuren
Creating Suppliers
"Suppliers" refer to any person or company rendering a service (such as Electricians, Garden Services andPlumbers), as well as companies supplying goods such as linen; raw products to be used in the restaurant tocreate meals; drinks etc.
Click on "Edit - Suppliers" and then "Add New"

Step 7 - Creating Customers and Suppliers 39
Copyright © 2015 Novtel ® Louise Janse van Vuuren
In the "General" tab, enter the Postal Address, Contact Numbers and E-mail Address, and in the "DeliveryAddresses" Tab, enter the physical address of the "Supplier"
Click "Save" in order to add the "Supplier" to the system
In order to add the next "Supplier" click on "Add New"

Novtel Hospitality Manual V3.0140
Copyright © 2015 Novtel ® Louise Janse van Vuuren

Step 8 - Opening a Shift 41
Copyright © 2015 Novtel ® Louise Janse van Vuuren
9 Step 8 - Opening a Shift
Only a Supervisor can open a shift - without an open shift, no transactions can be done. The "User" must logout of the system in order for the Supervisor to log in
Click on "Supervisor Open Shift"

Novtel Hospitality Manual V3.0142
Copyright © 2015 Novtel ® Louise Janse van Vuuren
Click on the "User" who's shift is to be opened, and click on the arrow pointing to the right
The "User" will now display in the right hand block of the window. When all applicable "Users" have beenselected, click "Accept"
Click "Close" in order for the Supervisor to log out. The "User" can now log in for his / her shift

Step 9 - Making Reservations and Raising Deposits 43
Copyright © 2015 Novtel ® Louise Janse van Vuuren
10 Step 9 - Making Reservations and Raising Deposits
All reservations are made directly on the Grid
Click on the Grid next to the room where the reservation is to be made on the start date; hold the mousebutton down; drag the mouse to the end date, and release

Novtel Hospitality Manual V3.0144
Copyright © 2015 Novtel ® Louise Janse van Vuuren
The "Reservation Details" screen, and "Customer" Screen will open. Either select an existing "Customer"by clicking on the account and then "Select", or click on "Add New" to add a "Customer" (Refer to Step 7on "Creating Customers"). We are using an existing "Customer" for demonstration purposes

Step 9 - Making Reservations and Raising Deposits 45
Copyright © 2015 Novtel ® Louise Janse van Vuuren
1. In the "General" Tab the room number and the color of the "Branch" the room belongs to, is displayed atthe top
2. Leave the "Guest Tariff" field blank - you will see how it fits together with the "Seasons" created and linkedfor this room
3. Any special "Housekeeping Notes" can be entered in the field provided, such as: Fresh Towels Daily; NoRoom Service before 10am, etc.
4. If the guest has provided the Vehicle Registration Number and the Vehicle Description in advance, enter it
5. Any special note pertaining to the guest's arrival can be entered in the "Arrival Memo" field
6. Enter the number of Adults and Children for this booking - In this case it is a Single Room and it canaccommodate 1 Adult
7. The default Arrival and Departure Dates and Times will be entered automatically
8. Enter the "Payment Method" for this booking: Credit Card / Cash / Cheque / On Account or DirectDeposit, and enter the applicable details for the chosen option
9. In Novtel Hospitality, "Statuses" which is color-coded and has a specific meaning:
Provisional (The reservation was made, but no deposit was received yet) - Purple
Confirmed (A deposit was paid, and the booking confirmed) - Aqua
In-House (The guest has checked in) - Red
Departed (The guest has checked out) - Pink
Fully Paid - Green
Non Rev (No charges for this reservation) - Yellow

Novtel Hospitality Manual V3.0146
Copyright © 2015 Novtel ® Louise Janse van Vuuren
1. In the "Financial" tab, see that the option to "Use Price Per Room" is selected, because we have createdthe "Single Rooms" to be billed per room
2. The "Duration Charged" is 6 days
3. 1 Person is going to occupy this room
4. The check-box to "Apply Service Charge" is not ticked, otherwise the 3% service charge will be addedonto the account - as set up in "Setup - Company"
5. Click on the "Details" button

Step 9 - Making Reservations and Raising Deposits 47
Copyright © 2015 Novtel ® Louise Janse van Vuuren
Should the reservation have been made overlapping from one "Season" into another, it would have shownhow many days are charged in both "Seasons" at the different rates, and the total would have beencalculated automatically. Here it shows only the one "Season" since it falls within one "Season's" period.This total amount as shown here, is displayed in the "Financial" tab
1. In the "Deposits" tab, a deposit can be raised on this reservation. (Notice that the Shift Number and User isdisplayed in the window, since a shift was opened by the Supervisor - if a shift is not open, you will not beallowed to raise the deposit)
2. Enter the amount you want the guest to pay and click on the check-box next to "Deposit Raised"

Novtel Hospitality Manual V3.0148
Copyright © 2015 Novtel ® Louise Janse van Vuuren
The deposit is now raised. You can "Receive" the deposit directly in this screen by clicking on "PayDeposit" - provided that you have prove of payment from the guest. The till will not balance if the money wasnot received. We are not going to receive payment now, and will show you how to receive the deposit inStep 10. However, take note that this option is available
Click on the "Quick View" tab - The total reservation amount is displayed, as well as the deposit we havejust raised. Click "Accept" to save the reservation

Step 9 - Making Reservations and Raising Deposits 49
Copyright © 2015 Novtel ® Louise Janse van Vuuren
Returning to the Grid the reservation is made, and in the blue and black blocks a quick view for thisreservation is visible. Whenever you move the mouse over a reservation on the grid, that reservation's detailswill be displayed as below

Novtel Hospitality Manual V3.0150
Copyright © 2015 Novtel ® Louise Janse van Vuuren
11 Step 10 - Receiving Deposits
Novtel Hospitality incorporates a full Point of Sale System, and is used for all transactions. We will only showyou how to receive Deposits here. For more information on the subject, please refer to our Hospitality POS
Manual, or register on Novtel's Forum at http://www.novtel.com/forum/index.php
In order to receive the deposit raised in Step 9 for Mr Andrews, click on the arrow next to the POS Icon andselect "Deposits" (Specifically note the color for the reservation on the Grid before receiving the deposit)
Click on the magnifying glass beneath "Reservation Number" in order to open the window containing allreservations

Step 10 - Receiving Deposits 51
Copyright © 2015 Novtel ® Louise Janse van Vuuren
Browse for and select the correct reservation for which the deposit is being received. In this case, we havemade only one reservation and it will be the only one displayed in the window. Click on the reservation, andthen "Accept"
1. The selected "Customer" has been inserted, and the system will automatically enter the "Payment Due"amount. (It will match the amount you have entered when the deposit was raised)
2. Enter the "Payment Received" amount
3. Select the applicable "Payment Type" from the list (Cash / Credit Card / Bank Transfer...)
4. Click "Accept" in order to finalize the transaction and close the window

Novtel Hospitality Manual V3.0152
Copyright © 2015 Novtel ® Louise Janse van Vuuren
1. On the Grid, the reservation's color has changed to "Aqua" - the color of the "Confirmed Status"
2. See how the deposit reflects in the blue and black block. It has been deducted from the total amount ofR1800.00
3. The "Reservation Balance" payable by Mr Andrews, is now R1200.00
When Mr Andrews' reservation on the Grid is double clicked, the "Reservation Details" screen will open.Click on the "Financial" tab, and see how the "Receipt" is allocated to Mr Andrews

Step 10 - Receiving Deposits 53
Copyright © 2015 Novtel ® Louise Janse van Vuuren
In the "Deposits" tab, the "Deposit Paid" field is the corresponding color of the "Confirmed" status on theGrid

Novtel Hospitality Manual V3.0154
Copyright © 2015 Novtel ® Louise Janse van Vuuren
12 Step 11 - Guest Check-in
The process of checking in a Guest on the system, is extremely easy. Simply right-click on the reservation;move the mouse over status and select "In-House"

Step 11 - Guest Check-in 55
Copyright © 2015 Novtel ® Louise Janse van Vuuren
The system will immediately inform you that the status can only be changed to "In-House" if the depositthat has been raised and received, is applied to the account. Click "Yes" to confirm the action
The status on the Grid is now red, which means that the Guest is "In-House"
Now when you double-click on Mr Andrews' booking on the Grid, and then on the "Deposits" tab in the"Reservation Details" screen, you will see the deposit has been "Applied"

Novtel Hospitality Manual V3.0156
Copyright © 2015 Novtel ® Louise Janse van Vuuren
12.1 Invoicing upon Departure
When the Guest is checking out, right click on the reservation on the Grid, move the mouse over"Documents" and select "Reservation Statement"

Step 11 - Guest Check-in 57
Copyright © 2015 Novtel ® Louise Janse van Vuuren
All details pertaining to his or her reservation is displayed:
Accommodation
Restaurant, Bar and Shop Charges accumulated on his account (Explained in Restaurant POS Manual)
Receipts

Novtel Hospitality Manual V3.0158
Copyright © 2015 Novtel ® Louise Janse van Vuuren
In order to print an Invoice, select the "Documents - Invoice" option when right-clicking on the reservation

Step 11 - Guest Check-in 59
Copyright © 2015 Novtel ® Louise Janse van Vuuren
12.2 Reservation Payment
Click on the arrow next to the POS Icon, and select "Reservation Payments"
Select "All" at the top of the screen, and click on the magnifying glass beneath "Reservation Number" inorder to open the screen with all outstanding reservation balances
Select the correct "Account" by clicking on it, and then on "Accept"

Novtel Hospitality Manual V3.0160
Copyright © 2015 Novtel ® Louise Janse van Vuuren
1. All transactions for this account is entered in the left-hand side of the "Reservation Payment" window. The"Payment Due" amount is in bold letters in the right-hand bottom corner of the window
2. Select the "Payment Type", and enter all relevant info pertaining to the payment (In this case it is a creditcard payment, and the card number and card type must be entered)
3. The guest is checking out, and the check-box to set the status as "Departed" is ticked
4. The "Payment Received" amount is entered, and all that is needed to conclude the transaction, is to click"Accept"

Step 11 - Guest Check-in 61
Copyright © 2015 Novtel ® Louise Janse van Vuuren
The status of the reservation on the Grid is now "Departed", and the color has changed. And since thepayment has been made, the "Reservation Balance" for Mr Black is now zero
Right-click on Mr Black's reservation, and select "Update Invoice - Customer". The system will ask you toconfirm the action. Click "Yes" in order for the invoice to be sent to Pastel

Novtel Hospitality Manual V3.0162
Copyright © 2015 Novtel ® Louise Janse van Vuuren
The color of Mr Black's reservation is now green, which means that the account is fully paid. When youmove the mouse over the reservation, the invoice number is displayed along with the reservation status

Step 12 - Cash-Up 63
Copyright © 2015 Novtel ® Louise Janse van Vuuren
13 Step 12 - Cash-Up
The "Cash-Up" procedure after each shift is as follows:
Click on the arrow next to the POS Icon, and select "Shift Cash-Up"
See how the shift status is "Open" at this point. Also; the "Shift Total" is R35 578.00, which means thatthis is the amount received by James during his shift. Now click on "Money Count"

Novtel Hospitality Manual V3.0164
Copyright © 2015 Novtel ® Louise Janse van Vuuren
Enter the number of notes and coins next to each unit, and the system will automatically calculate themonetary value in the "Cash" field. Calculate all credit card and bank transfer transactions, and enter thecombined total for each in the fields provided
Enter the "Float" amount which will be deducted from the "Physical" amount. The system will indicate ifthere are shortages / surplus amounts for the shift. Now click on "Report" and after printing it, click"Accept"

Step 12 - Cash-Up 65
Copyright © 2015 Novtel ® Louise Janse van Vuuren

Novtel Hospitality Manual V3.0166
Copyright © 2015 Novtel ® Louise Janse van Vuuren
Click on "Shift Summary" in order to view all "Transaction Types" such as totals for "ReservationPayments"; Deposits; "In-House Charges" etc.

Step 12 - Cash-Up 67
Copyright © 2015 Novtel ® Louise Janse van Vuuren
When you select "Detailed report", the specific transaction amounts for each individual customer account,will be displayed

Novtel Hospitality Manual V3.0168
Copyright © 2015 Novtel ® Louise Janse van Vuuren
Selecting the "Daily Takings" option, will display all Cash / Credit Card / Bank Transfer receipts andamounts separately, as well as the type of transaction that was done
Click on "Cash-Up"

Step 12 - Cash-Up 69
Copyright © 2015 Novtel ® Louise Janse van Vuuren
The "Shift Status" is now "Closed". Click "Close" to exit the window
The "Supervisor" must log in for the "Cash-up" to be completed. Click on the "User" - in this case it isJames. See how all James' transactions are displayed in the left-hand side of the window. Now click on"Supervisor Shift Cash-up"

Novtel Hospitality Manual V3.0170
Copyright © 2015 Novtel ® Louise Janse van Vuuren
The "Cash-up" is complete, and the data sent to Pastel

Step 13 - Reports 71
Copyright © 2015 Novtel ® Louise Janse van Vuuren
14 Step 13 - Reports
There are quite a few reports to be viewed in Novtel Hospitality, and we will only show you a few fordemonstration purposes. Feel free to have a look at all the other reports as well.
The Gate Arrival List
The "Gate Arrival List" is printed specifically in order for the personnel at the facility entrance to keep track ofall expected arrivals for the day
Click on "Reports - Arrivals and Departures - Gate Arrival List"
The current date will be automatically selected. When you click "Accept", the report will be displayed inHTML format and minimized to your internet browser. In order to print the report, click on "File - Print"

Novtel Hospitality Manual V3.0172
Copyright © 2015 Novtel ® Louise Janse van Vuuren
The Daily Activity Report
This report gives an overview of Guests arriving and departing on a daily basis, and which rooms are involved
Click on "Reports - Activity - Daily Activity Report"
Select the dates and "Statuses" to be viewed, and click "Accept"

Step 13 - Reports 73
Copyright © 2015 Novtel ® Louise Janse van Vuuren

Novtel Hospitality Manual V3.0174
Copyright © 2015 Novtel ® Louise Janse van Vuuren
The Utilization Report
This report will indicate how well the rooms in the facility are utilized for the dates selected, and occupancy ismeasured percentage wise
Click on "Reports - Utilization"

Step 13 - Reports 75
Copyright © 2015 Novtel ® Louise Janse van Vuuren
Select the dates to be viewed as well as the option to view the report by:
Guest Tariffs - Select either "All Guest Tariffs", or "Selected" (If you choose the latter option, selectthe specific tariffs to be viewed in the report)
Rooms (We have selected the "All Rooms" option)
As soon "Accept" is clicked, the report will be created in HTML format, and minimized to your internetbrowser

Novtel Hospitality Manual V3.0176
Copyright © 2015 Novtel ® Louise Janse van Vuuren
The Charges Report
When you click on "Reports - List", there are different sub-reports to be viewed as shown below. The reportwe are going to view, is for all the "Charges" in the system

Step 13 - Reports 77
Copyright © 2015 Novtel ® Louise Janse van Vuuren

Novtel Hospitality Manual V3.0178
Copyright © 2015 Novtel ® Louise Janse van Vuuren
The Income Projection Report
An "Income Projection" Report can be printed in order to view the possible income for reservations made inadvance
Click on "Reports - Income To"
Select the dates to be viewed - in this case it is the month of November. Select the specific "Statuses" tobe included in the report

Step 13 - Reports 79
Copyright © 2015 Novtel ® Louise Janse van Vuuren
As soon as you click "Accept", the report will be created

Novtel Hospitality Manual V3.0180
Copyright © 2015 Novtel ® Louise Janse van Vuuren
The Housekeeping Report
In order for the Housekeeping staff to see special notes regarding the occupied rooms, this report can beprinted. These notes are entered in the "Reservation Details Screen - General" tab
Click on "Reports - Housekeeping Report"

Step 13 - Reports 81
Copyright © 2015 Novtel ® Louise Janse van Vuuren
The current date will already be entered. Simply click "Accept" to display the report
Please have a look at all the other reports as well

Novtel Hospitality Manual V3.0182
Copyright © 2015 Novtel ® Louise Janse van Vuuren
15 Step 14 - POS Packages (New Feature)
The "Package" feature was developed specifically for Avon, using the Novtel Hospitality system - primarilyfor the Point of Sale part of the program. The need for the "Package" feature arouse because this companyis part of a "Franchise Group" which uses a monthly catalogue to advertise the nation-wide specials for thespecific month. In order to administrate the "Special Prices" without changing the selling prices on every"Charge Master File" each month, "Packages" are created for the "Items" on special ONLY.
In this manual, we will demonstrate exactly how "Charges" and "Price lists" in Pastel and Novtel are linkedand updated when the "Package Month-End" procedure is performed
In order to create "Charges" in Novtel, click on "Edit - Charges - Add New"
1. For demonstration purposes, we are creating a fictional "Item" and price. In this case, all "Item Codes" inthe franchise's catalogue consists of 5 numbers, and this will be applied to the "Item's Inventory Code"
2. The "Description" will also be entered exactly the same as in the catalogue
3. Do not enter a "Barcode" here. When a "Package" is created, the system will generate the barcodeaccording to the combination of information that will be entered by the "User"
4. Tick the check-boxes to:
Create the Item in Pastel (When this check-box is not selected, the "Charge" will have to be createdmanually in Pastel)
Display on Invoice
Physical Item
5. In the "General" tab, tick the check-box to "Allow Tax" in the case of the company being Tax registered,and select the "Tax Rate" - in South-Africa it is 14%
6. Enter the "Item's" cost price excluding tax - this is the price the company is buying the "Item" for from thesupplier
7. Enter the "Item's" selling price next to "Rate Including". This is the price your Customers will be payingfor it, and the price is inclusive of tax
8. The system will automatically calculate the "Markup %" and the "Charge's selling price excluding tax"
Proceed to the "Properties" tab and tick the check-boxes to classify this "Charge" as a "POS and ShopItem"
The "Voucher" tab is not applicable here. Please see "Step 15" for a detailed explanation on the subject
Click "Accept" to save the "Charge", and import it to Pastel as a "Physical Item"

Step 14 - POS Packages (New Feature) 83
Copyright © 2015 Novtel ® Louise Janse van Vuuren
Creating Packages
As explained previously, a "Package" is created for each "Item" on special for the month. Please note thatthe "Packages" must have been created before the starting date for the special, since it will be updated to thesystem on the last day of the previous month when the "Package Month End" procedure is performed.
Click on "Edit - Package"
The window containing all previous "Packages" in the system will open. Or in the case where the first"Package" is being created, the window will be blank. Click on "Add Package"

Novtel Hospitality Manual V3.0184
Copyright © 2015 Novtel ® Louise Janse van Vuuren
Firstly, we need to explain how the "Package Code" works:
Point 1 to 4 combined creates the "Package Code" as follows:
55393 is the "Charge Code" for the item: "Deep Cleansing Cloths"
15 is short for 2015 - the year during which the special is active
10 is the month of October
115 is the page number where the special is to be found in the catalogue. If the page number is 1, it willbe entered as 001
Now click on "Copy Package to Barcode" to create the "barcode" with the combined characters. Whenthe "barcode" is scanned at the POS station, the price we are creating in this "Package", will be charged

Step 14 - POS Packages (New Feature) 85
Copyright © 2015 Novtel ® Louise Janse van Vuuren
1. The "Description" has been entered according to the "Charge Description" connected to the "ChargeCode"
2. The "Barcode" has been copied from the "Package Code"
3. The "Start and End Dates" was inserted according to the month and year entered in the "Package Code"
4. The "Charge's" cost price from the supplier has been inserted as entered on the "Charge" itself
5. The same goes for the "Selling Price Including Tax" - This is the normal selling price
6. The "Package Price Including Tax" is the special price as advertised in the monthly catalogue
7. The "Page Number" is inserted as entered in the "Package Code"
8. Click "Accept" to save this "Package"

Novtel Hospitality Manual V3.0186
Copyright © 2015 Novtel ® Louise Janse van Vuuren
In order to view all "Packages" for the month of October 2015, select "Start" from the drop-down menubeneath the "Search By" field; enter "15" in the "Search For" field and scroll to the bottom of the list

Step 14 - POS Packages (New Feature) 87
Copyright © 2015 Novtel ® Louise Janse van Vuuren
15.1 Package Month End Procedure
It is essential to perform this procedure at the end of the last day of the month in order to reset the pricelists. The prices of "Items" that have been on special the previous month will reset to the regular sellingprice if the "Items" are not on special again this month. All "Package Prices" created for the next monthwill then come into effect
Click on "Process - Package Month End"
1. Select the month and year of the current month. Remember that this must be done on the last day of themonth - Therefor we have selected September 2015
2. Select the "Inventory Goods" option for the "Inventory Group"
3. Tick the check-box to "Update the Cost Price"
4. Select the "POS Items" option in the "Selection" field
5. Click "Select All" in order to update all the "Packages", and then click "Update"

Novtel Hospitality Manual V3.0188
Copyright © 2015 Novtel ® Louise Janse van Vuuren
Click "Yes" to proceed
Please be patient since the update takes a few minutes to be completed
Click "OK" when the update was successful, and then "Close" to exit the window
After the "Package Month End" procedure, the "Item Prices" created as "Packages" for the new monthwill come into effect, and all "Package" prices for the previous month will revert to the normal selling pricesas entered on the "Charges" itself in "Edit - Charges - General Tab" - provided that it is not connected toa new "Package" in the current month

Step 14 - POS Packages (New Feature) 89
Copyright © 2015 Novtel ® Louise Janse van Vuuren
15.2 POS Transactions
In order to demonstrate how the "Package" prices for October 2015 have now come into effect, click on thearrow next to the "POS Icon", and select "Sales (POS)"
Either scan the "Item" with the bar-code scanner, or enter the bar-code manually. The "Items" we havecreated as "Packages", now all display the "Special price"
The "Packages" set up for October 2015

Novtel Hospitality Manual V3.0190
Copyright © 2015 Novtel ® Louise Janse van Vuuren
16 Step 15 - Vouchers Explained
Creating a Voucher Charge
The "Voucher" feature was developed in Version 6.3.0.6, which was released on 2015/09/23. This featureenables any guest to purchase "Vouchers" for the Restaurant, Bar, Take Aways and Deliveries at present.(October 2015)
In the future, the options for Accommodation and POS Shop Vouchers will be enabled, and the principal willbe exactly the same as described in this tutorial
Please note that a "Voucher" can be purchased by anyone - either for themselves; for somebody else or fora "Group". The person in possession of the "Voucher" will be able to redeem it at the relevant departmentas selected on the "Charge" itself
The very first step in setting up "Vouchers", is to create a "Charge Code" which will be used when the"Voucher" is sold. Click on "Edit - Charges" in order to create this "Charge"
Click "Add New"

Step 15 - Vouchers Explained 91
Copyright © 2015 Novtel ® Louise Janse van Vuuren
1. The "Charge Code" can be created as an abbreviation of the Restaurant's name. For example: CAS001
2. The "Description" can be entered as "Casidy Voucher"
3. Tick the check-boxes to:
Create Item in Pastel
Display on Invoice
4. In the "General" tab, select the option to "Allow Tax", and select the standard tax percentage
5. Enter the "Charge Including Tax" amount, or alternatively, leave it blank in order for the "User" to enter acustom amount when the voucher is sold. The system will automatically enter the "Charge ExcludingTax" amount
In the "Properties" tab, select the options to classify this "Charge" as a "POS and Shop Item"

Novtel Hospitality Manual V3.0192
Copyright © 2015 Novtel ® Louise Janse van Vuuren
Proceed to the "Voucher" tab and tick the check-box to activate this "Charge" as a "Voucher Item"
1. Enter the "Voucher Description"
2. In this case the "Voucher" will be valid from the day it was created, and only for the duration of that day. Inorder to extend the number of days this type of "Voucher" are to be valid, enter the number as 30, 60 etc inthe "Valid End Days" field.
3. Select only the specific area - or select multiple areas where "Vouchers" created with this "Charge Code",can be redeemed
4. Click "Accept" and import the "Charge" to Pastel as a "Service Item"

Step 15 - Vouchers Explained 93
Copyright © 2015 Novtel ® Louise Janse van Vuuren
If attempted to redeem a "Voucher" on any other date than the allowed one day - as set up in the previousscreen shot - the system will not accept the "Voucher" as valid, and the guest will be liable for payment ofthe entire bill. This "Voucher" will now be invalid
1. In order to adjust the "End Date" number of days this type of "Voucher" will be valid for in the future, clickon "Edit - Charges"; double click on the specific "Charge"; Proceed to the "Voucher" tab, and change thenumber to whatever it should be
2. Please note that specific dates cannot be selected at present. But for information purposes: in the futurethe function will be activated where specific start and end dates can be entered
3. Click "Accept" to save the changes
It is important to know that there are no limit on the number of "Charges" to be classified as "VoucherCharges"

Novtel Hospitality Manual V3.0194
Copyright © 2015 Novtel ® Louise Janse van Vuuren
16.1 Creating a Voucher
In order to create a "Voucher", it must actually be sold by means of the POS system. Please ensure that ashift was opened for the "User" to enable them to perform transactions
Search for the "Charge" and double click on it in order to be selected

Step 15 - Vouchers Explained 95
Copyright © 2015 Novtel ® Louise Janse van Vuuren
Should the guest require a "Voucher" to the value of a specific amount, double click on the "PriceIncluding" amount, and enter the custom amount. The "Payment Due" amount has been adjustedaccordingly
Click on "Transaction Cashup"
Enter the amount in the field of the payment type - In this case we are receiving the cash amount ofR180.00
Click "Drawer" to open the cash drawer, and then "Accept" in order to print the receipt

Novtel Hospitality Manual V3.0196
Copyright © 2015 Novtel ® Louise Janse van Vuuren
At the bottom of the receipt, the "Voucher Number" has been generated as NV000002. This receipt mustbe safe guarded by the guest since this will be the only copy containing the "Voucher Number". Ifattempted to reprint the receipt, it will print, but WITHOUT the "Voucher Number"
For demonstration purposes: This is how the "Voucher" sale will display on the "Shift Detailed Report"when the cash-up is done at the "Front Desk"

Step 15 - Vouchers Explained 97
Copyright © 2015 Novtel ® Louise Janse van Vuuren
16.2 Redeeming a Voucher
This is an example of the bill this guest accumulated in the restaurant. For demonstration purposes, theguest entered the gratuity as R37.00, and are ready to make the payment

Novtel Hospitality Manual V3.0198
Copyright © 2015 Novtel ® Louise Janse van Vuuren
This is how the payment will be administrated:
1. Enter the "Gratuity" amount. The total payment amount due is now R300.00
2. Click "Redeem Voucher"

Step 15 - Vouchers Explained 99
Copyright © 2015 Novtel ® Louise Janse van Vuuren
Now enter the "Voucher Number" as displayed on the receipt, and click "Accept"

Novtel Hospitality Manual V3.01100
Copyright © 2015 Novtel ® Louise Janse van Vuuren
The amount of R180.00 will be recognized by the system since it is linked to the "Voucher Number". It willbe inserted in the "Refund" field, and the amount is entered as "Payment Received"

Step 15 - Vouchers Explained 101
Copyright © 2015 Novtel ® Louise Janse van Vuuren
The guest is liable for the outstanding amount of R120.00 - which is the difference between R300.00 andR180.00. Enter the payment amount in the relevant payment field, and click "Accept"
The "Voucher" should be placed in the till as proof of "Payment" - although it is not an actual exchange ofmoney at this point, since payment was already received when the "Voucher" as purchased

Novtel Hospitality Manual V3.01102
Copyright © 2015 Novtel ® Louise Janse van Vuuren
When the money count is done at the end of the shift, the "Voucher Amount" must be entered next to"Vouchers", otherwise this amount will be seen as a "Shortage"
This concludes the Novtel Hospitality Basic Manual. For more information on Hospitality Point of Sale, as wellas the Restaurant Point of Sale System:
Download the PDF Manuals from our website at www.novtel.co.za
Register on Novtel's Forum by following this link: http://www.novtel.com/forum/index.php


![Documented Code for Glossaries v3.01 [Nicola L.C. Talbot] [School of Computing Sciences, University of East Anglia] [12!04!2011]](https://static.fdocuments.in/doc/165x107/55721000497959fc0b8ca38f/documented-code-for-glossaries-v301-nicola-lc-talbot-school-of-computing-sciences-university-of-east-anglia-12042011.jpg)


