Novell Small Business Suite 6 · 2005-07-05 · Novell Novell Confidential Manual (ENU) 21...
270
Novell www.novell.com Small Business Suite 6.6 June 27, 2005 OVERVIEW AND INSTALLATION GUIDE
Transcript of Novell Small Business Suite 6 · 2005-07-05 · Novell Novell Confidential Manual (ENU) 21...

Novell
m
Novell Confidential Manual (ENU) 21 December 2004
w w w . n o v e l l . c o
Small Business Suite 6.6
J u n e 2 7 , 2 0 0 5
O V E R V I E W A N D I N S TA L L A T I O N G U I D E
Novell Confidential Manual (ENU) 21 December 2004
Legal NoticesNovell, Inc. makes no representations or warranties with respect to the contents or use of this documentation, and specifically disclaims any express or implied warranties of merchantability or fitness for any particular purpose. Further, Novell, Inc. reserves the right to revise this publication and to make changes to its content, at any time, without obligation to notify any person or entity of such revisions or changes.
Further, Novell, Inc. makes no representations or warranties with respect to any software, and specifically disclaims any express or implied warranties of merchantability or fitness for any particular purpose. Further, Novell, Inc. reserves the right to make changes to any and all parts of Novell software, at any time, without any obligation to notify any person or entity of such changes.
You may not use, export, or re-export this product in violation of any applicable laws or regulations including, without limitation, U.S. export regulations or the laws of the country in which you reside.
Copyright © 2001-2005 Novell, Inc. All rights reserved. No part of this publication may be reproduced, photocopied, stored on a retrieval system, or transmitted without the express written consent of the publisher.
Novell, Inc. has intellectual property rights relating to technology embodied in the product that is described in this document. In particular, and without limitation, these intellectual property rights may include one or more of the U.S. patents listed at http://www.novell.com/company/legal/patents/ and one or more additional patents or pending patent applications in the U.S. and in other countries.
Novell, Inc.404 Wyman Street, Suite 500Waltham, MA 02451U.S.A.
www.novell.com
Novell Small Business Suite 6.6 Overview and Installation GuideJune 27, 2005
Online Documentation: To access the online documentation for this and other Novell products, and to get updates, see www.novell.com/documentation.
Novell Confidential Manual (ENU) 21 December 2004
Novell TrademarksBorderManager is a registered trademark of Novell, Inc. in the United States and other countries.ConsoleOne is a registered trademark of Novell, Inc. in the United States and other countries.DeFrame is a trademark of Novell, Inc.DirXML is a registered trademark of Novell, Inc. in the United States and other countries.eDirectory is a trademark of Novell, Inc.exteNd is a trademark of Novell, Inc.exteNd Composer is a trademark of Novell, Inc.exteNd Director is a trademark of Novell, Inc.exteNd Workbench is a trademark of Novell, Inc.GroupWise is a registered trademark of Novell, Inc., in the United States and other countries.IntraNetWare is a trademark of Novell, Inc.Internetwork Packet Exchange and IPX are trademarks of Novell, Inc.NetWare is a registered trademark of Novell, Inc. in the United States and other countries.NetWare Core Protocol and NCP are trademarks of Novell, Inc.NetWare Loadable Module and NLM are trademarks of Novell, Inc.NetWare Storage Management Services and SMS are trademarks of Novell, Inc.Ngage is a servicemark of Novell, Inc.Novell is a registered trademark of Novell, Inc. in the United States and other countries.Novell Application Launcher is a trademark of Novell, Inc.Novell Certificate Server is a trademark of Novell, Inc.Novell Client is a trademark of Novell, Inc.Novell Cluster Services is a trademark of Novell, Inc.Novell Directory Services and NDS are registered trademarks of Novell, Inc. in the United States and other countries.Novell Distributed Print Services is a trademark and NDPS is a registered trademark of Novell, Inc. in the United States and other countries.Novell iFolder is a registered trademark of Novell, Inc. in the United States and other countries.NMAS is a trademark of Novell, Inc.Nsure is a trademark of Novell, Inc.Nterprise is a trademark of Novell, Inc.Nterprise Branch Office is a trademark of Novell, Inc.Storage Management Services is a trademark of Novell, Inc.SuSE is a registered trademark of Novell, Inc. in the United States and other countries.ZENworks is a registered trademark of Novell, Inc. in the United States and other countries.
Third-Party MaterialsAll third-party trademarks are the property of their respective owners.

Novell Confidential Manual (ENU) 21 December 2004
4 Novell Small Business Suite 6.6 Overview and Installation Guide
Novell Confidential Manual (ENU) 21 December 2004
Contents
About This Guide 11
Part I What’s NewUpdated Products in the Suite . . . . . . . . . . . . . . . . . . . . . . . . . . . . . . . . . . . . . . . . . . . . . . 13Server Installation Changes . . . . . . . . . . . . . . . . . . . . . . . . . . . . . . . . . . . . . . . . . . . . . . . 14Small Business Setup in iManager . . . . . . . . . . . . . . . . . . . . . . . . . . . . . . . . . . . . . . . . . . . . 15Functionality Provided Elsewhere . . . . . . . . . . . . . . . . . . . . . . . . . . . . . . . . . . . . . . . . . . . . 15Licensing . . . . . . . . . . . . . . . . . . . . . . . . . . . . . . . . . . . . . . . . . . . . . . . . . . . . . . . . . 16
Part II Overview
1 Novell Small Business Suite 6.6 Benefits 19OES NetWare 6.5: Reliable Networking Foundation . . . . . . . . . . . . . . . . . . . . . . . . . . . . . . . . . . . 21
Productivity-Enhancing Services . . . . . . . . . . . . . . . . . . . . . . . . . . . . . . . . . . . . . . . . . . . 21Business Continuity Services . . . . . . . . . . . . . . . . . . . . . . . . . . . . . . . . . . . . . . . . . . . . . 22Open Source Services . . . . . . . . . . . . . . . . . . . . . . . . . . . . . . . . . . . . . . . . . . . . . . . . 22Additional Information . . . . . . . . . . . . . . . . . . . . . . . . . . . . . . . . . . . . . . . . . . . . . . . . . 22
GroupWise 6.5: Powerful Communication and Collaboration tools. . . . . . . . . . . . . . . . . . . . . . . . . . . . 23Essential Communication and Collaboration Services . . . . . . . . . . . . . . . . . . . . . . . . . . . . . . . . 23Available Anytime . . . . . . . . . . . . . . . . . . . . . . . . . . . . . . . . . . . . . . . . . . . . . . . . . . . 23Accessible Anywhere . . . . . . . . . . . . . . . . . . . . . . . . . . . . . . . . . . . . . . . . . . . . . . . . . 24Always Secure . . . . . . . . . . . . . . . . . . . . . . . . . . . . . . . . . . . . . . . . . . . . . . . . . . . . 24Additional Information . . . . . . . . . . . . . . . . . . . . . . . . . . . . . . . . . . . . . . . . . . . . . . . . . 24
BorderManager 3.8: Secure Connection to the Internet . . . . . . . . . . . . . . . . . . . . . . . . . . . . . . . . . 25Additional Information . . . . . . . . . . . . . . . . . . . . . . . . . . . . . . . . . . . . . . . . . . . . . . . . . 26
ZENworks 6.5 Desktop Management: Flexible Desktop Management . . . . . . . . . . . . . . . . . . . . . . . . . . 26Automatic Workstation Import and Removal . . . . . . . . . . . . . . . . . . . . . . . . . . . . . . . . . . . . . 26Workstation Management . . . . . . . . . . . . . . . . . . . . . . . . . . . . . . . . . . . . . . . . . . . . . . . 26Application Management . . . . . . . . . . . . . . . . . . . . . . . . . . . . . . . . . . . . . . . . . . . . . . . 27Workstation Imaging . . . . . . . . . . . . . . . . . . . . . . . . . . . . . . . . . . . . . . . . . . . . . . . . . 28Remote Management . . . . . . . . . . . . . . . . . . . . . . . . . . . . . . . . . . . . . . . . . . . . . . . . . 28Workstation Inventory . . . . . . . . . . . . . . . . . . . . . . . . . . . . . . . . . . . . . . . . . . . . . . . . . 29Additional Information . . . . . . . . . . . . . . . . . . . . . . . . . . . . . . . . . . . . . . . . . . . . . . . . . 29
2 Product Components 31
3 Technical Support 33
4 Partner Solutions 35Vendor List . . . . . . . . . . . . . . . . . . . . . . . . . . . . . . . . . . . . . . . . . . . . . . . . . . . . . . . . 35Third-Party Drivers List . . . . . . . . . . . . . . . . . . . . . . . . . . . . . . . . . . . . . . . . . . . . . . . . . . 35
5 Additional Information 37
6 What’s Next 39
Part III Installing Novell Small Business Suite Components
Contents 5

Novell Confidential Manual (ENU) 21 December 2004
7 Planning Your Deployment 43
8 Installing a New Novell Small Business Suite Server 47Meeting Conditions for Installing Novell Small Business Suite . . . . . . . . . . . . . . . . . . . . . . . . . . . . . . 48Anticipating Installation Issues . . . . . . . . . . . . . . . . . . . . . . . . . . . . . . . . . . . . . . . . . . . . . . 48Meeting System and Software Requirements . . . . . . . . . . . . . . . . . . . . . . . . . . . . . . . . . . . . . . . 49
NetWare Only System Requirements . . . . . . . . . . . . . . . . . . . . . . . . . . . . . . . . . . . . . . . . . 49NetWare and GroupWise Recommended System Requirements . . . . . . . . . . . . . . . . . . . . . . . . . . . 50NetWare and BorderManager Recommended System Requirements . . . . . . . . . . . . . . . . . . . . . . . . 51NetWare and ZENworks Desktop Management Recommended System Requirements . . . . . . . . . . . . . . . 51NetWare, GroupWise, BorderManager and ZENworks Recommended System Requirements. . . . . . . . . . . . 52Software and Other Requirements. . . . . . . . . . . . . . . . . . . . . . . . . . . . . . . . . . . . . . . . . . . 53
Preparing the Network with Deployment Manager . . . . . . . . . . . . . . . . . . . . . . . . . . . . . . . . . . . . 54Preparing the Computer . . . . . . . . . . . . . . . . . . . . . . . . . . . . . . . . . . . . . . . . . . . . . . . . . . 57Accessing the Installation Files . . . . . . . . . . . . . . . . . . . . . . . . . . . . . . . . . . . . . . . . . . . . . . 58Navigating in the Character-Based Screens . . . . . . . . . . . . . . . . . . . . . . . . . . . . . . . . . . . . . . . 60Installing the Software . . . . . . . . . . . . . . . . . . . . . . . . . . . . . . . . . . . . . . . . . . . . . . . . . . . 60
Beginning the Installation . . . . . . . . . . . . . . . . . . . . . . . . . . . . . . . . . . . . . . . . . . . . . . . 61Selecting the Initial Installation Settings . . . . . . . . . . . . . . . . . . . . . . . . . . . . . . . . . . . . . . . . 61Copying System Files . . . . . . . . . . . . . . . . . . . . . . . . . . . . . . . . . . . . . . . . . . . . . . . . . 64Choosing a Server Pattern. . . . . . . . . . . . . . . . . . . . . . . . . . . . . . . . . . . . . . . . . . . . . . . 64Verifying Products to Install . . . . . . . . . . . . . . . . . . . . . . . . . . . . . . . . . . . . . . . . . . . . . . 83Verifying Pattern Selection. . . . . . . . . . . . . . . . . . . . . . . . . . . . . . . . . . . . . . . . . . . . . . . 83Naming the Server . . . . . . . . . . . . . . . . . . . . . . . . . . . . . . . . . . . . . . . . . . . . . . . . . . . 84Installing Networking Protocols . . . . . . . . . . . . . . . . . . . . . . . . . . . . . . . . . . . . . . . . . . . . 85Specifying Hostnames . . . . . . . . . . . . . . . . . . . . . . . . . . . . . . . . . . . . . . . . . . . . . . . . . 88Setting Up Domain Name Service . . . . . . . . . . . . . . . . . . . . . . . . . . . . . . . . . . . . . . . . . . . 88Setting the Server Time Zone and Time Synchronization Method. . . . . . . . . . . . . . . . . . . . . . . . . . . 89Setting Up Novell eDirectory . . . . . . . . . . . . . . . . . . . . . . . . . . . . . . . . . . . . . . . . . . . . . . 90Licensing the Server . . . . . . . . . . . . . . . . . . . . . . . . . . . . . . . . . . . . . . . . . . . . . . . . . . 92Configuring LDAP . . . . . . . . . . . . . . . . . . . . . . . . . . . . . . . . . . . . . . . . . . . . . . . . . . . 92Selecting the Login Method . . . . . . . . . . . . . . . . . . . . . . . . . . . . . . . . . . . . . . . . . . . . . . 93Installing DNS/DHCP (Conditional) . . . . . . . . . . . . . . . . . . . . . . . . . . . . . . . . . . . . . . . . . . 93Modifying iFolder Server Options (Conditional) . . . . . . . . . . . . . . . . . . . . . . . . . . . . . . . . . . . . 94Modifying MySQL Options (Conditional) . . . . . . . . . . . . . . . . . . . . . . . . . . . . . . . . . . . . . . . 94Modifying exteNd Application Server - Details (Conditional). . . . . . . . . . . . . . . . . . . . . . . . . . . . . . 95Modifying exteNd Application Server - Database Options (Conditional). . . . . . . . . . . . . . . . . . . . . . . . 96Modifying Novell Nsure Audit Starter Pack - Component Selection (Conditional) . . . . . . . . . . . . . . . . . . . 96Modifying Novell Nsure Audit Starter Pack - Database Options (Conditional). . . . . . . . . . . . . . . . . . . . . 97Installing NetStorage (Conditional) . . . . . . . . . . . . . . . . . . . . . . . . . . . . . . . . . . . . . . . . . . 98
Completing the Server Installation. . . . . . . . . . . . . . . . . . . . . . . . . . . . . . . . . . . . . . . . . . . . . 98NetWare Installation with Existing Volumes . . . . . . . . . . . . . . . . . . . . . . . . . . . . . . . . . . . . . . 99
What’s Next . . . . . . . . . . . . . . . . . . . . . . . . . . . . . . . . . . . . . . . . . . . . . . . . . . . . . . . 100
9 Setting Up a Workstation for Administration 101Prerequisites . . . . . . . . . . . . . . . . . . . . . . . . . . . . . . . . . . . . . . . . . . . . . . . . . . . . . . 101Installing Novell Client Software. . . . . . . . . . . . . . . . . . . . . . . . . . . . . . . . . . . . . . . . . . . . . 101Accessing Network Setup and Administrative Tools . . . . . . . . . . . . . . . . . . . . . . . . . . . . . . . . . . 102
Accessing ConsoleOne . . . . . . . . . . . . . . . . . . . . . . . . . . . . . . . . . . . . . . . . . . . . . . . 102Accessing NetWare Administrator . . . . . . . . . . . . . . . . . . . . . . . . . . . . . . . . . . . . . . . . . . 102
What’s Next . . . . . . . . . . . . . . . . . . . . . . . . . . . . . . . . . . . . . . . . . . . . . . . . . . . . . . . 103
10 Setting Up Internet Connectivity 105
11 Setting Up DNS 109
12 Setting Up DHCP 111
6 Novell Small Business Suite 6.6 Overview and Installation Guide
Novell Confidential Manual (ENU) 21 December 2004
13 Setting Up Printing 113iPrint Overview . . . . . . . . . . . . . . . . . . . . . . . . . . . . . . . . . . . . . . . . . . . . . . . . . . . . . 113Prerequisites . . . . . . . . . . . . . . . . . . . . . . . . . . . . . . . . . . . . . . . . . . . . . . . . . . . . . . 114Setting Up and Managing Printing Using iManager . . . . . . . . . . . . . . . . . . . . . . . . . . . . . . . . . . 114
Adding a Printer . . . . . . . . . . . . . . . . . . . . . . . . . . . . . . . . . . . . . . . . . . . . . . . . . . . 115Modifying a Printer . . . . . . . . . . . . . . . . . . . . . . . . . . . . . . . . . . . . . . . . . . . . . . . . . 116Deleting a Printer . . . . . . . . . . . . . . . . . . . . . . . . . . . . . . . . . . . . . . . . . . . . . . . . . . 116Installing Printers on a Workstation . . . . . . . . . . . . . . . . . . . . . . . . . . . . . . . . . . . . . . . . . 116Creating Custom Maps of Printer Locations . . . . . . . . . . . . . . . . . . . . . . . . . . . . . . . . . . . . 117
Additional Information . . . . . . . . . . . . . . . . . . . . . . . . . . . . . . . . . . . . . . . . . . . . . . . . . 118
14 Installing and Setting Up E-mail 119Setting Up Your Initial GroupWise System . . . . . . . . . . . . . . . . . . . . . . . . . . . . . . . . . . . . . . . 119
Creating Your GroupWise System . . . . . . . . . . . . . . . . . . . . . . . . . . . . . . . . . . . . . . . . . 120Creating GroupWise Accounts for Users . . . . . . . . . . . . . . . . . . . . . . . . . . . . . . . . . . . . . . 122Accessing GroupWise Mailboxes . . . . . . . . . . . . . . . . . . . . . . . . . . . . . . . . . . . . . . . . . . 123Setting Up Common Mailbox Forwarding with the POP Forwarding Agent. . . . . . . . . . . . . . . . . . . . . 127Sending and Receiving Instant Messages . . . . . . . . . . . . . . . . . . . . . . . . . . . . . . . . . . . . . 129
Managing Your GroupWise System . . . . . . . . . . . . . . . . . . . . . . . . . . . . . . . . . . . . . . . . . . 129Using ConsoleOne to Administer Your GroupWise System . . . . . . . . . . . . . . . . . . . . . . . . . . . . 130Creating GroupWise Accounts Manually . . . . . . . . . . . . . . . . . . . . . . . . . . . . . . . . . . . . . . 131Disabling LDAP Password Changing . . . . . . . . . . . . . . . . . . . . . . . . . . . . . . . . . . . . . . . . 132Assigning a Postmaster . . . . . . . . . . . . . . . . . . . . . . . . . . . . . . . . . . . . . . . . . . . . . . . 132Adding Post Offices to Your Initial Domain . . . . . . . . . . . . . . . . . . . . . . . . . . . . . . . . . . . . . 133Adding Additional Domains . . . . . . . . . . . . . . . . . . . . . . . . . . . . . . . . . . . . . . . . . . . . . 134Maintaining Your GroupWise System. . . . . . . . . . . . . . . . . . . . . . . . . . . . . . . . . . . . . . . . 135Managing the Small Business Agent . . . . . . . . . . . . . . . . . . . . . . . . . . . . . . . . . . . . . . . . 136Managing the POP Forwarding Agent . . . . . . . . . . . . . . . . . . . . . . . . . . . . . . . . . . . . . . . 137Changing the Common Mailbox for Your Company . . . . . . . . . . . . . . . . . . . . . . . . . . . . . . . . 142Forwarding Personal E-Mail into Your GroupWise System . . . . . . . . . . . . . . . . . . . . . . . . . . . . . 142Handling Multiple Domain Names. . . . . . . . . . . . . . . . . . . . . . . . . . . . . . . . . . . . . . . . . . 143
Troubleshooting the PFA . . . . . . . . . . . . . . . . . . . . . . . . . . . . . . . . . . . . . . . . . . . . . . . . 144Updating an Existing GroupWise System . . . . . . . . . . . . . . . . . . . . . . . . . . . . . . . . . . . . . . . 145
15 Setting Up Workstations for Users 147Installing the Novell Client on User Workstations. . . . . . . . . . . . . . . . . . . . . . . . . . . . . . . . . . . . 147Installing the iPrint Client . . . . . . . . . . . . . . . . . . . . . . . . . . . . . . . . . . . . . . . . . . . . . . . . 148Access the Network Using Novell Native File Access Protocols . . . . . . . . . . . . . . . . . . . . . . . . . . . . 149Accessing the Server Using Novell Remote Manager . . . . . . . . . . . . . . . . . . . . . . . . . . . . . . . . . 149Accessing the Server Using OpenSSH Clients . . . . . . . . . . . . . . . . . . . . . . . . . . . . . . . . . . . . . 150Using Other Client Utilities . . . . . . . . . . . . . . . . . . . . . . . . . . . . . . . . . . . . . . . . . . . . . . . 150Installing the ZENworks Desktop Management Agent on User Workstations . . . . . . . . . . . . . . . . . . . . . 151
16 Installing BorderManager 153Prerequisites for Installing Novell BorderManager 3.8 . . . . . . . . . . . . . . . . . . . . . . . . . . . . . . . . . 153Installing Novell BorderManager 3.8 . . . . . . . . . . . . . . . . . . . . . . . . . . . . . . . . . . . . . . . . . . 154Moving from Trial to Production Version . . . . . . . . . . . . . . . . . . . . . . . . . . . . . . . . . . . . . . . . 159Installing iManager 2.5 Plug-ins . . . . . . . . . . . . . . . . . . . . . . . . . . . . . . . . . . . . . . . . . . . . 159Setting Up Login Policies . . . . . . . . . . . . . . . . . . . . . . . . . . . . . . . . . . . . . . . . . . . . . . . . 160Using Identity Management . . . . . . . . . . . . . . . . . . . . . . . . . . . . . . . . . . . . . . . . . . . . . . 161Installing Novell BorderManager Support Pack 3. . . . . . . . . . . . . . . . . . . . . . . . . . . . . . . . . . . . 161What’s Next . . . . . . . . . . . . . . . . . . . . . . . . . . . . . . . . . . . . . . . . . . . . . . . . . . . . . . . 162
Contents 7
Novell Confidential Manual (ENU) 21 December 2004
17 Installing ZENworks Desktop Management 163ZENworks 6.5 Desktop Management Basic Installation and Setup . . . . . . . . . . . . . . . . . . . . . . . . . . . 165
Installation Prerequisites for Servers and Workstations . . . . . . . . . . . . . . . . . . . . . . . . . . . . . . . 166Installing the Desktop Management Agent on User Workstations . . . . . . . . . . . . . . . . . . . . . . . . . . 169Installing the Middle Tier Server . . . . . . . . . . . . . . . . . . . . . . . . . . . . . . . . . . . . . . . . . . . 169Installing the ZENworks Desktop Management Server . . . . . . . . . . . . . . . . . . . . . . . . . . . . . . . 170Setting Up Automatic Workstation Import . . . . . . . . . . . . . . . . . . . . . . . . . . . . . . . . . . . . . . 170What’s Next . . . . . . . . . . . . . . . . . . . . . . . . . . . . . . . . . . . . . . . . . . . . . . . . . . . . . 171
ZENworks 6.5 Desktop Management Application Management . . . . . . . . . . . . . . . . . . . . . . . . . . . . 171What Operations Can Be Performed with Application Management? . . . . . . . . . . . . . . . . . . . . . . . . 171Installing Application Management . . . . . . . . . . . . . . . . . . . . . . . . . . . . . . . . . . . . . . . . . 173
ZENworks 6.5 Desktop Management Workstation Management . . . . . . . . . . . . . . . . . . . . . . . . . . . . 173What Operations Can Be Performed with Workstation Management? . . . . . . . . . . . . . . . . . . . . . . . 174Installing Workstation Management . . . . . . . . . . . . . . . . . . . . . . . . . . . . . . . . . . . . . . . . . 174
ZENworks 6.5 Desktop Management Workstation Imaging. . . . . . . . . . . . . . . . . . . . . . . . . . . . . . . 175What Operations Can Be Performed with Workstation Imaging? . . . . . . . . . . . . . . . . . . . . . . . . . . 175Installing Workstation Imaging . . . . . . . . . . . . . . . . . . . . . . . . . . . . . . . . . . . . . . . . . . . . 175
ZENworks for Desktops Remote Management . . . . . . . . . . . . . . . . . . . . . . . . . . . . . . . . . . . . . 176What Operations Can Be Performed with Remote Management? . . . . . . . . . . . . . . . . . . . . . . . . . 176Installing Remote Management . . . . . . . . . . . . . . . . . . . . . . . . . . . . . . . . . . . . . . . . . . . 177
ZENworks Desktop Management Workstation Inventory and Sybase . . . . . . . . . . . . . . . . . . . . . . . . . 178What Operations Can Be Performed with Workstation Inventory? . . . . . . . . . . . . . . . . . . . . . . . . . 178Installing Workstation Inventory . . . . . . . . . . . . . . . . . . . . . . . . . . . . . . . . . . . . . . . . . . . 178
18 Installing Additional Bundled Products 181Installing Clustering . . . . . . . . . . . . . . . . . . . . . . . . . . . . . . . . . . . . . . . . . . . . . . . . . . . 181Installing iSCSI for NetWare. . . . . . . . . . . . . . . . . . . . . . . . . . . . . . . . . . . . . . . . . . . . . . . 181Installing DirXML Starter Pack. . . . . . . . . . . . . . . . . . . . . . . . . . . . . . . . . . . . . . . . . . . . . . 181Enabling FatPipe Internet . . . . . . . . . . . . . . . . . . . . . . . . . . . . . . . . . . . . . . . . . . . . . . . . 182
Features . . . . . . . . . . . . . . . . . . . . . . . . . . . . . . . . . . . . . . . . . . . . . . . . . . . . . . . 182Instructions for Getting Started . . . . . . . . . . . . . . . . . . . . . . . . . . . . . . . . . . . . . . . . . . . 183For More Information . . . . . . . . . . . . . . . . . . . . . . . . . . . . . . . . . . . . . . . . . . . . . . . . 183
19 Installing Product Updates 185
Part IV Upgrading the Server and Other Products in the Suite
20 Upgrading the Operating System to Novell Small Business Suite 6.6 189Meeting System and Software Requirements . . . . . . . . . . . . . . . . . . . . . . . . . . . . . . . . . . . . . . 190
System Requirements . . . . . . . . . . . . . . . . . . . . . . . . . . . . . . . . . . . . . . . . . . . . . . . . 190Software and Other Requirements. . . . . . . . . . . . . . . . . . . . . . . . . . . . . . . . . . . . . . . . . . 191What’s Next . . . . . . . . . . . . . . . . . . . . . . . . . . . . . . . . . . . . . . . . . . . . . . . . . . . . . 192
Preparing the Network with Deployment Manager . . . . . . . . . . . . . . . . . . . . . . . . . . . . . . . . . . . 192Preparing the Computer . . . . . . . . . . . . . . . . . . . . . . . . . . . . . . . . . . . . . . . . . . . . . . . . . 195
Backing Up the NetWare Server Files . . . . . . . . . . . . . . . . . . . . . . . . . . . . . . . . . . . . . . . . 195Logging Out Users before Upgrading . . . . . . . . . . . . . . . . . . . . . . . . . . . . . . . . . . . . . . . . 195Preparing Application Files before Upgrading . . . . . . . . . . . . . . . . . . . . . . . . . . . . . . . . . . . . 196Verifying a Valid DOS Partition . . . . . . . . . . . . . . . . . . . . . . . . . . . . . . . . . . . . . . . . . . . 196
Performing an Operating System Upgrade . . . . . . . . . . . . . . . . . . . . . . . . . . . . . . . . . . . . . . . 196Starting the Upgrade Locally. . . . . . . . . . . . . . . . . . . . . . . . . . . . . . . . . . . . . . . . . . . . . 197Starting the Upgrade Remotely . . . . . . . . . . . . . . . . . . . . . . . . . . . . . . . . . . . . . . . . . . . 197Accepting the License Agreements . . . . . . . . . . . . . . . . . . . . . . . . . . . . . . . . . . . . . . . . . 199Viewing the Health Check Summary. . . . . . . . . . . . . . . . . . . . . . . . . . . . . . . . . . . . . . . . . 199Backing Up Server Files . . . . . . . . . . . . . . . . . . . . . . . . . . . . . . . . . . . . . . . . . . . . . . . 199Installing Additional Components . . . . . . . . . . . . . . . . . . . . . . . . . . . . . . . . . . . . . . . . . . 199Selecting the Login Method . . . . . . . . . . . . . . . . . . . . . . . . . . . . . . . . . . . . . . . . . . . . . 201
8 Novell Small Business Suite 6.6 Overview and Installation Guide
Novell Confidential Manual (ENU) 21 December 2004
Completing the Server Upgrade . . . . . . . . . . . . . . . . . . . . . . . . . . . . . . . . . . . . . . . . . . 201Upgrading Downed Servers . . . . . . . . . . . . . . . . . . . . . . . . . . . . . . . . . . . . . . . . . . . . . . 201Updating NSS Volumes . . . . . . . . . . . . . . . . . . . . . . . . . . . . . . . . . . . . . . . . . . . . . . . . 202Copying and Upgrading Legacy Volumes with Volume Copy Upgrade . . . . . . . . . . . . . . . . . . . . . . . . 202
Understanding Volume Copy Upgrade . . . . . . . . . . . . . . . . . . . . . . . . . . . . . . . . . . . . . . . 203Using VCU from the Command Line . . . . . . . . . . . . . . . . . . . . . . . . . . . . . . . . . . . . . . . . 204Using VCU from a Java Application. . . . . . . . . . . . . . . . . . . . . . . . . . . . . . . . . . . . . . . . . 205After the Volume Copy or Volume Upgrade. . . . . . . . . . . . . . . . . . . . . . . . . . . . . . . . . . . . . 208
What’s Next . . . . . . . . . . . . . . . . . . . . . . . . . . . . . . . . . . . . . . . . . . . . . . . . . . . . . . . 208
21 Updating GroupWise 211
22 Upgrading BorderManager 213Upgrading VPN Services . . . . . . . . . . . . . . . . . . . . . . . . . . . . . . . . . . . . . . . . . . . . . . . . 213
23 Upgrading ZENworks 215
Part V Administration
24 Administration Utilities Overview 219About Administration Utilities . . . . . . . . . . . . . . . . . . . . . . . . . . . . . . . . . . . . . . . . . . . . . . 219About the Welcome Web Site . . . . . . . . . . . . . . . . . . . . . . . . . . . . . . . . . . . . . . . . . . . . . 219What’s Next . . . . . . . . . . . . . . . . . . . . . . . . . . . . . . . . . . . . . . . . . . . . . . . . . . . . . . . 220
25 Welcome Web Site 221About the Welcome Web Site . . . . . . . . . . . . . . . . . . . . . . . . . . . . . . . . . . . . . . . . . . . . . 221
For Administrators . . . . . . . . . . . . . . . . . . . . . . . . . . . . . . . . . . . . . . . . . . . . . . . . . 222For End Users. . . . . . . . . . . . . . . . . . . . . . . . . . . . . . . . . . . . . . . . . . . . . . . . . . . . 222
Accessing the Welcome Web Site . . . . . . . . . . . . . . . . . . . . . . . . . . . . . . . . . . . . . . . . . . . 223Accessing the Administrator Site: . . . . . . . . . . . . . . . . . . . . . . . . . . . . . . . . . . . . . . . . . . 223Accessing the End User Site: . . . . . . . . . . . . . . . . . . . . . . . . . . . . . . . . . . . . . . . . . . . . 224
Getting Around the Welcome Web Site. . . . . . . . . . . . . . . . . . . . . . . . . . . . . . . . . . . . . . . . . 224Navigating the Welcome Web Site . . . . . . . . . . . . . . . . . . . . . . . . . . . . . . . . . . . . . . . . . 224Viewing Product Details and Accessing Web-based Administration Utilities . . . . . . . . . . . . . . . . . . . . 224
Modifying Preferences . . . . . . . . . . . . . . . . . . . . . . . . . . . . . . . . . . . . . . . . . . . . . . . . . 224Specifying an Alternate Default Home Page . . . . . . . . . . . . . . . . . . . . . . . . . . . . . . . . . . . . . . 225What’s Next . . . . . . . . . . . . . . . . . . . . . . . . . . . . . . . . . . . . . . . . . . . . . . . . . . . . . . . 226
26 NetWare Administration Utilities 227iManager . . . . . . . . . . . . . . . . . . . . . . . . . . . . . . . . . . . . . . . . . . . . . . . . . . . . . . . . 227ConsoleOne . . . . . . . . . . . . . . . . . . . . . . . . . . . . . . . . . . . . . . . . . . . . . . . . . . . . . . 228Novell Remote Manager . . . . . . . . . . . . . . . . . . . . . . . . . . . . . . . . . . . . . . . . . . . . . . . . 229Remote Server Management (RConsoleJ) . . . . . . . . . . . . . . . . . . . . . . . . . . . . . . . . . . . . . . . 230OpenSSH . . . . . . . . . . . . . . . . . . . . . . . . . . . . . . . . . . . . . . . . . . . . . . . . . . . . . . . . 231Apache Manager . . . . . . . . . . . . . . . . . . . . . . . . . . . . . . . . . . . . . . . . . . . . . . . . . . . . 232What’s Next . . . . . . . . . . . . . . . . . . . . . . . . . . . . . . . . . . . . . . . . . . . . . . . . . . . . . . . 233
27 Common Administrative Tasks 235Common Administrative Tasks . . . . . . . . . . . . . . . . . . . . . . . . . . . . . . . . . . . . . . . . . . . . . 235
28 Supported Web Browsers 249Testing Information . . . . . . . . . . . . . . . . . . . . . . . . . . . . . . . . . . . . . . . . . . . . . . . . . . . 249How to Read the Tables . . . . . . . . . . . . . . . . . . . . . . . . . . . . . . . . . . . . . . . . . . . . . . . . 249End User Components . . . . . . . . . . . . . . . . . . . . . . . . . . . . . . . . . . . . . . . . . . . . . . . . . 250Administration Components . . . . . . . . . . . . . . . . . . . . . . . . . . . . . . . . . . . . . . . . . . . . . . 252Novell Remote Manager Features . . . . . . . . . . . . . . . . . . . . . . . . . . . . . . . . . . . . . . . . . . . 253iManager Features . . . . . . . . . . . . . . . . . . . . . . . . . . . . . . . . . . . . . . . . . . . . . . . . . . . 253
Contents 9
Novell Confidential Manual (ENU) 21 December 2004
Part VI Appendixes
A Keyboard Commands 259
B Configuring Multiple Dialup Modems 261Binding Numbered Single Point-to-Point . . . . . . . . . . . . . . . . . . . . . . . . . . . . . . . . . . . . . . . . 264Binding Unnumbered Single Point-to-Point . . . . . . . . . . . . . . . . . . . . . . . . . . . . . . . . . . . . . . . 265Binding Dynamic IP Addresses . . . . . . . . . . . . . . . . . . . . . . . . . . . . . . . . . . . . . . . . . . . . . 265Testing the Configuration . . . . . . . . . . . . . . . . . . . . . . . . . . . . . . . . . . . . . . . . . . . . . . . . 266More Information . . . . . . . . . . . . . . . . . . . . . . . . . . . . . . . . . . . . . . . . . . . . . . . . . . . . 267
C Documentation Updates 269June 27, 2005 (Novell Small Business Suite 6.6 Release) . . . . . . . . . . . . . . . . . . . . . . . . . . . . . . . 269June 30, 2004 . . . . . . . . . . . . . . . . . . . . . . . . . . . . . . . . . . . . . . . . . . . . . . . . . . . . . . 270
10 Novell Small Business Suite 6.6 Overview and Installation Guide
Novell Confidential Manual (ENU) 21 December 2004
About This Guide
This guide provides an overview of Novell® Small Business Suite 6.6 product and describes how to plan your deployment, install it, or upgrade to it. The guide is intended for resellers that install or upgrade this product for business. This guide also includes a brief introduction for network administrators about the management utilities that they might need to use. This guide is divided into the following parts:
“What’s New” on page 13
“Overview” on page 17
“Installing Novell Small Business Suite Components” on page 41
“Upgrading the Operating System to Novell Small Business Suite 6.6” on page 189
“Administration” on page 217
“Appendixes” on page 257
Documentation Updates
For the most recent version of the Novell Small Business Suite 6.6 Overview and Installation Guide, see the Novell Small Business Suite 6.6/6.5 product documentation Web site (http://www.novell.com/documentation/nsbs65).
Documentation Conventions
In this documentation, a greater-than symbol (>) is used to separate actions within a step and items in a cross-reference path.
A trademark symbol (®, TM, etc.) denotes a Novell trademark. An asterisk (*) denotes a third-party trademark.
When a single pathname can be written with a backslash for some platforms or a forward slash for other platforms, the pathname is presented with a backslash. Users of platforms that require a forward slash, such as Linux or UNIX*, should use forward slashes as required by your software.
User Comments
We want to hear your comments and suggestions about this manual and other documentation included with Novell Small Business Suite. To contact us, use the User Comments feature at the bottom of any page in the online documentation.
About This Guide 11

Novell Confidential Manual (ENU) 21 December 2004
12 Novell Small Business Suite 6.6 Overview and Installation Guide
Novell Confidential Manual (ENU) 21 December 2004
I What’s New
This part describes the new features included in Novell® Small Business Suite 6.5 and 6.6.
Updated Products in the SuiteThe initial release of Novell Small Business Suite 6.5 included the following products:
NetWare® 6.5 Support Pack 1 that includes many new benefits and features. The following might be of interest for implementation for small businesses:
Virtual Office
Clustering with two nodes enabled
iSCSI for NetWare
NterpriseTM Branch OfficeTM
OpenSSH ported to NetWare
GroupWise® 6.5 Support Pack 1 with an integrated installation
Novell BorderManager® 3.8
ZENworks® for Desktops 4.0.1 that includes support for NetWare 6.5
DirXML® StarterPack with licensed synchronization of information held in NT Domains, Active Directory, and eDirectoryTM. These drivers are preactivated.
With the release of Novell Small Business Suite 6.6 the following products have been updated:
Open Enterprise Server (OES) NetWare 6.5 with the following important changes that might be of interest to small business implementations:
Virtual Office 1.5 (installation and management is no longer integrated with iManager)
iManager 2.5
OES NetWare 6.5 (NetWare Support Pack 3 is integrated)
Novell QuickFinderTM Server 4.0 replaces WebSearch
OpenWBEM
Nterprise Branch Office (NBO) is not available as part of the NetWare installation. You can upgrade an existing NBO Central Office Server, but you cannot install a new one.
Novell Nsure® UDDI Server was installed with exteNd J2EE Web Application Server, Apache/Tomcat SErver, and Novell Nsure Audit Starter Pack Server patterns. This UDDI Server component has been removed from these patterns.
What’s New 13
Novell Confidential Manual (ENU) 21 December 2004
GroupWise 6.5 Support Pack 4 with an integrated installation
Novell BorderManager 3.8, Support Pack 3 files are also included on the CD but the installation is not integrated.
ZENworks 6.5 Desktop Management.
DirXML StarterPack software is available on ZENworks 6.5 Companion CD 2 rather than on its own CD.
Server Installation ChangesThe server installation matches the NetWare installation. The NetWare installation has three major server pattern options to choose from plus an option to install servers preconfigured for a specific setup.
Preconfigured Server Patterns Options
In the Preconfigured Server Patterns options, we have added two options to the existing options offered by NetWare.
Novell Small Business Collaboration Server with Virtual Office: This pattern installs all components for setting up and managing a Novell Small Business server plus components for GroupWise and Virtual Office.
This pattern allows both client-based and Web-based access to file, print, directory, and e-mail services. Local users can access collaboration services through GroupWise and Novell clients; remote users can access those same services through a Virtual Office Web interface.
For more information, see “Novell Small Business Collaboration Server with Virtual Office (Recommended)” on page 70.
Novell Small Business Collaboration Server: This pattern installs all components for setting up and managing a Novell Small Business server with GroupWise.
This pattern allows GroupWise and Novell client-based access to files, printing, and e-mail (both local and Internet).
For more information, see “Novell Small Business Collaboration Server” on page 71.
Customized NetWare Server Pattern
The Customized NetWare Server pattern gives you the flexibility to install any of the NetWare components and GroupWise files needed for setting up a server. If you select this pattern, see “Customized NetWare Server” on page 65 for recommended components to install.
Other Suite Product Installations
The BorderManager and ZENworks file copies, installations, and configurations must still be performed after installing NetWare.
14 Novell Small Business Suite 6.6 Overview and Installation Guide
Novell Confidential Manual (ENU) 21 December 2004
Small Business Setup in iManagerThe Small Business Setup tasks in iManager replace some of the setup functionality that was included in the Novell Easy Administration Tool (NEAT) and the Novell Internet Connection Expert (NICE) found in previous versions of Novell Small Business Suite and also adds some new functionality. The new Small Business Setup tasks in iManager include configuring the following:
Internet connectivity via broadband methods, phone dial-up, and ISDN.
Basic DNS setup.
DHCP setup.
Basic setup of e-mail, instant messaging, and collaboration.
Printing, including local printer support.
Using these tasks helps you to get your network set up quickly and gives you the flexibility to perform more advanced configurations with the additional utilities provided in NetWare and GroupWise.
Functionality Provided ElsewhereUser and Group Management
If you were used to using NEAT to manage users and groups, you can now easily perform these tasks using iManager.
Storage Services
OES NetWare 6.5 provides
Local file sharing for UNIX, Linux, Windows*, and Macintosh*.
Cluster services and iSCSI for NetWare
Internet file sharing with Novell iFolder® and NetStorage.
Backup provided by Storage Management ServicesTM (SMS) and the SBCON utility.
For more information about the features in OES NetWare 6.5, see “OES NetWare 6.5: Reliable Networking Foundation” on page 21.
Firewall, VPN, Proxy Caching
Novell BorderManager 3.8 provides the firewall. For more information about the features in BorderManager, see “BorderManager 3.8: Secure Connection to the Internet” on page 25.
Fax, Virus Protection, Backup, Line of Business Applications
You can download fax software, virus protection software, third-party backup solutions, and other lines of business applications that work well with Novell Small Business Suite. For a list of recommended solutions, see the Novell Small Business Suite Application Partner Portal Web site (http://www.novell.com/products/smallbiz/app.html).
What’s New 15
Novell Confidential Manual (ENU) 21 December 2004
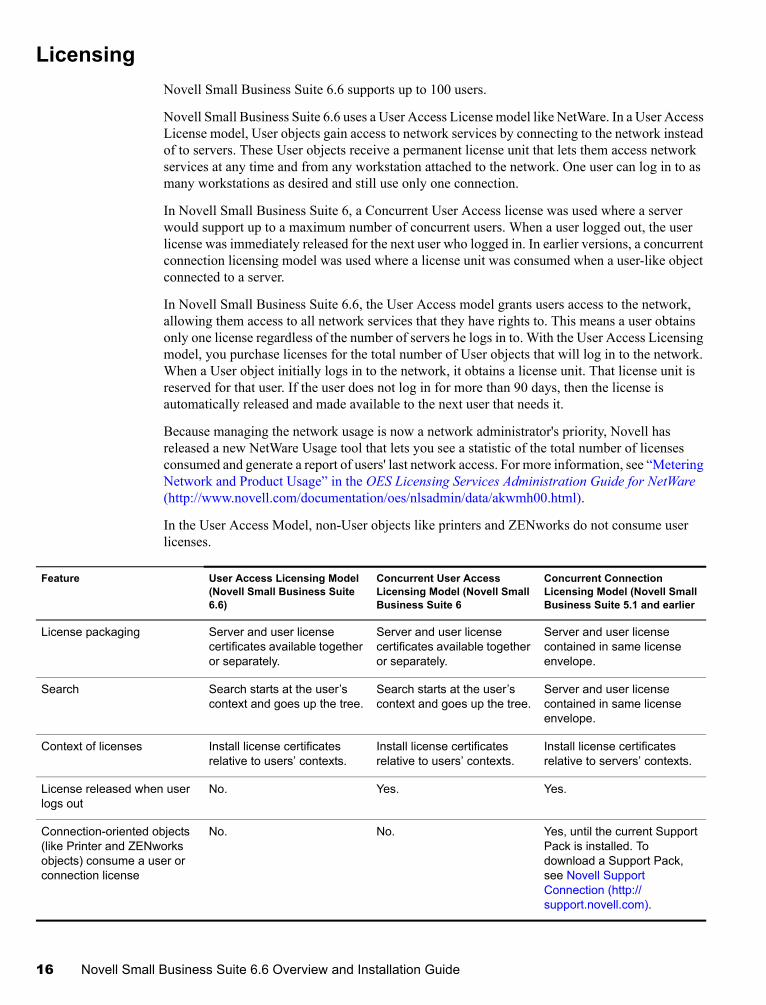
LicensingNovell Small Business Suite 6.6 supports up to 100 users.
Novell Small Business Suite 6.6 uses a User Access License model like NetWare. In a User Access License model, User objects gain access to network services by connecting to the network instead of to servers. These User objects receive a permanent license unit that lets them access network services at any time and from any workstation attached to the network. One user can log in to as many workstations as desired and still use only one connection.
In Novell Small Business Suite 6, a Concurrent User Access license was used where a server would support up to a maximum number of concurrent users. When a user logged out, the user license was immediately released for the next user who logged in. In earlier versions, a concurrent connection licensing model was used where a license unit was consumed when a user-like object connected to a server.
In Novell Small Business Suite 6.6, the User Access model grants users access to the network, allowing them access to all network services that they have rights to. This means a user obtains only one license regardless of the number of servers he logs in to. With the User Access Licensing model, you purchase licenses for the total number of User objects that will log in to the network. When a User object initially logs in to the network, it obtains a license unit. That license unit is reserved for that user. If the user does not log in for more than 90 days, then the license is automatically released and made available to the next user that needs it.
Because managing the network usage is now a network administrator's priority, Novell has released a new NetWare Usage tool that lets you see a statistic of the total number of licenses consumed and generate a report of users' last network access. For more information, see “Metering Network and Product Usage” in the OES Licensing Services Administration Guide for NetWare (http://www.novell.com/documentation/oes/nlsadmin/data/akwmh00.html).
In the User Access Model, non-User objects like printers and ZENworks do not consume user licenses.
Feature User Access Licensing Model (Novell Small Business Suite 6.6)
Concurrent User Access Licensing Model (Novell Small Business Suite 6
Concurrent Connection Licensing Model (Novell Small Business Suite 5.1 and earlier
License packaging Server and user license certificates available together or separately.
Server and user license certificates available together or separately.
Server and user license contained in same license envelope.
Search Search starts at the user’s context and goes up the tree.
Search starts at the user’s context and goes up the tree.
Server and user license contained in same license envelope.
Context of licenses Install license certificates relative to users’ contexts.
Install license certificates relative to users’ contexts.
Install license certificates relative to servers’ contexts.
License released when user logs out
No. Yes. Yes.
Connection-oriented objects (like Printer and ZENworks objects) consume a user or connection license
No. No. Yes, until the current Support Pack is installed. To download a Support Pack, see Novell Support Connection (http://support.novell.com).
16 Novell Small Business Suite 6.6 Overview and Installation Guide
Novell Confidential Manual (ENU) 21 December 2004
II Overview
Novell® Small Business Suite is the most cost-effective suite of networking products provided for small business today. This full-service bundle of software tools—including OES NetWare®, GroupWise® 6.5 SP4, Novell BorderManager® 3.8, and ZENworks® 6.5 Desktop Management— offers the resources needed to turn your small business into a fully networked business enterprise. By harnessing the power of the Internet, your small business can become more responsive to the needs of customers, partners, and employees. When paired with the Internet, Small Business Suite 6.6 offers unmatched flexibility: your users can access company data from anywhere and you can swiftly capitalize on new business opportunities.
Novell Small Business Suite 6.6 supports up to 100 users across multiple servers.
The following sections provide information about the features and benefits of Novell Small Business Suite:
“Novell Small Business Suite 6.6 Benefits” on page 19
“Product Components” on page 31
“Technical Support” on page 33
“Partner Solutions” on page 35
“Additional Information” on page 37
“What’s Next” on page 39
Overview 17

Novell Confidential Manual (ENU) 21 December 2004
18 Novell Small Business Suite 6.6 Overview and Installation Guide
Novell Confidential Manual (ENU) 21 December 2004
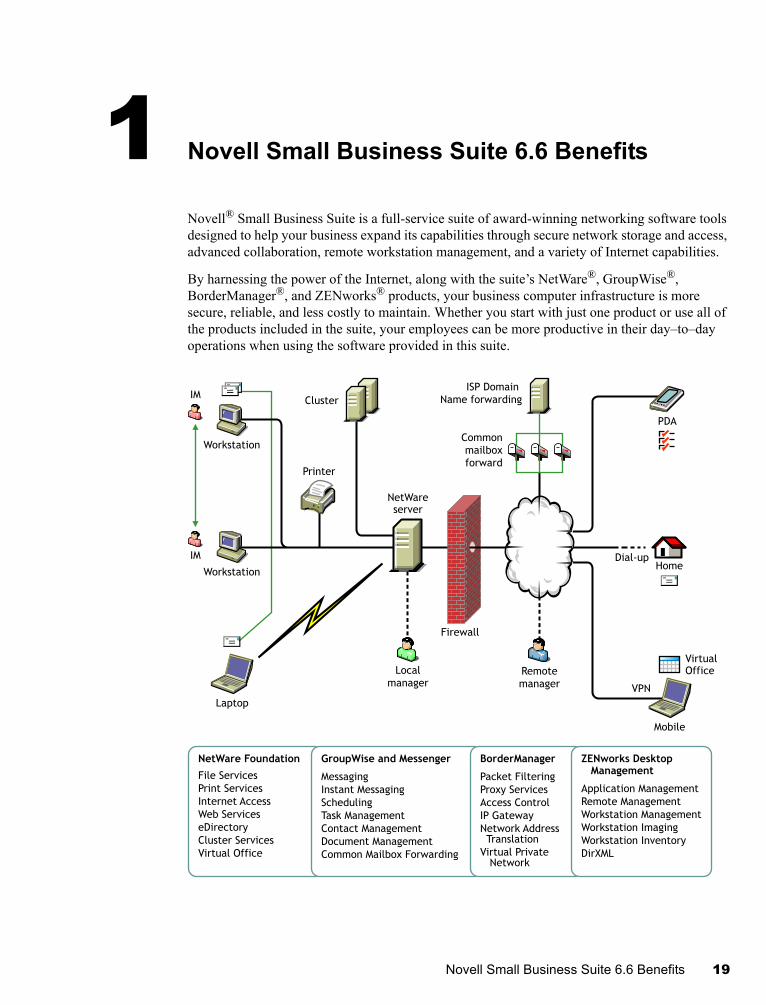
1 Novell Small Business Suite 6.6 Benefits
Novell® Small Business Suite is a full-service suite of award-winning networking software tools designed to help your business expand its capabilities through secure network storage and access, advanced collaboration, remote workstation management, and a variety of Internet capabilities.
By harnessing the power of the Internet, along with the suite’s NetWare®, GroupWise®, BorderManager®, and ZENworks® products, your business computer infrastructure is more secure, reliable, and less costly to maintain. Whether you start with just one product or use all of the products included in the suite, your employees can be more productive in their day–to–day operations when using the software provided in this suite.
Cluster
Workstation
NetWareserver
Workstation
Laptop
Printer
Mobile
Home
Remote
manager
ISP Domain
Name forwardingIM
IM
Common
mailbox
forward
Firewall
Dial-up
Local
managerVPN
File Services
Print Services
Internet Access
Web Services
eDirectory
Cluster Services
Virtual Office
NetWare Foundation
Messaging
Instant Messaging
Scheduling
Task Management
Contact Management
Document Management
Common Mailbox Forwarding
GroupWise and Messenger
Packet Filtering
Proxy Services
Access Control
IP Gateway
Network Address Translation
Virtual Private Network
BorderManager ZENworks Desktop Management
Application Management
Remote Management
Workstation Management
Workstation Imaging
Workstation Inventory
DirXML
VirtualOffice
PDA
Novell Small Business Suite 6.6 Benefits 19

Novell Confidential Manual (ENU) 21 December 2004
The following are brief summaries of the products included in Novell Small Business Suite and the benefits that they provides for your business.
OES NetWare 6.5—Reliable networking foundation: An important part of Novell Small Business Suite 6.6 is OES NetWare 6.5. NetWare offers you secure, nonstop access to your networked information. With NetWare you can securely access files, printers, directories, e-mail, and databases from your local network and over the Internet. NetWare includes Novell eDirectory™, Novell's premier directory service, allowing you to easily manage your network from virtually any Web-enabled wireless device or traditional desktop computer. NetWare also supports open Internet standards and includes innovative, browser-based Net services such as Novell iFolder® for file synchronization across your network or the Internet and Novell iPrint for simple printer installation and use. For more information, see “OES NetWare 6.5: Reliable Networking Foundation” on page 21.
GroupWise 6.5—Powerful communication and collaboration tools: Small Business Suite 6.6 includes GroupWise 6.5 Support Pack 4 to provide your organization with enhanced communication and collaboration capabilities. GroupWise 6.5 is a secure, dynamic collaboration solution that gives your traditional and remote users access to e-mail, calendar, and tasking tools over intranets, extranets, and the Internet. GroupWise 6.5 eliminates repetitive administrative tasks, such as user e-mail configurations, by supporting standard e-mail protocols such as Internet Message Access Protocol (IMAP) 4, Simple Message Transfer Protocol (SMTP), and Post Office Protocol (POP) 3. For more information, see “GroupWise 6.5: Powerful Communication and Collaboration tools” on page 23
BorderManager 3.8—Secure connection to the Internet: To enhance security for your small business, Small Business Suite 6.6 includes BorderManager 3.8, a suite of network services that provides a firewall to protect network resources, VPN services to safeguard remote access, support for Internet access control and content filtering, and forward-proxy technology to accelerate Web content. For more information, see “BorderManager 3.8: Secure Connection to the Internet” on page 25.
ZENworks Desktop Management—Flexible desktop management: You can easily manage your networked computers with ZENworks Desktop Management, Novell’s policy-based desktop management tool that simplifies network administration by leveraging eDirectory to automate and streamline software distribution, software repair, desktop configuration, workstation imaging, remote management, and workstation inventory. For more information, see “ZENworks 6.5 Desktop Management: Flexible Desktop Management” on page 26.
20 Novell Small Business Suite 6.6 Overview and Installation Guide

Novell Confidential Manual (ENU) 21 December 2004
OES NetWare 6.5: Reliable Networking FoundationOES NetWare 6.5 is the most reliable, cost-effective platform for delivering secure, nonstop access to network and information resources and is engineered to host business-critical, open source-enabled services. NetWare gives you choice and flexibility, creating greater application interoperability, continuous availability, and tools that deliver new levels of productivity in the following services:
Productivity-Enhancing Services (page 21)
Business Continuity Services (page 22)
Open Source Services (page 22)
Additional Information (page 22)
Productivity-Enhancing ServicesBoost productivity by giving users secure and timely access to the right information and tools.
Novell Virtual Office provides a simple yet powerful work environment that enables secure and timely access to the information and tools users need—whenever and wherever they need them. Self-help features eliminate help desk calls and new collaboration capabilities enhance teamwork.
Novell Small Business provides an additional pattern installation that integrates the collaboration of GroupWise and Virtual Office to get these services installed and configured quickly.
Productivity-enhancing services in Virtual Office include
Novell iPrint: Gives users secure, global access to printers. Using a standard Web browser, users simply click the printer they want to install and iPrint does the rest. Users can install printers from a customized list, or administrators can create custom maps to help users find the closest printers.
Novell eGuide: Lets users locate names, addresses, fax numbers, and e-mail addresses stored in Novell eDirectory or in other data sources across the Web. Users can connect with different user groups and other employees to exchange ideas and information via secure directories and databases.
Novell iFolder: Gives users access to critical information from any location, with any Web-enabled device. Novell iFolder automatically backs up, synchronizes, and securely stores personal files to ensure information integrity and protection.
Virtual Teams: Lets users from any location create teams, organize projects, and share information through enhanced collaboration and real-time interaction. Employees can conduct meetings, connect with key team members, and keep business moving—regardless of their location.
File Versioning: Lets users find and restore previous versions of their files without involving IT resources.
Novell Small Business Suite 6.6 Benefits 21
Novell Confidential Manual (ENU) 21 December 2004
Business Continuity ServicesKeeps critical systems running with cost-effective disaster recovery, resource consolidation, dependable branch office backups, and secure remote management.
OES NetWare 6.5 offers tightly integrated capabilities for server consolidation, branch office support, backup, and availability. These are made possible by an advanced management system that lets you install, upgrade, and maintain systems from any place at any time using a Web browser.
OES NetWare 6.5 supports your business continuity needs by enabling you to
Create a centralized, highly available storage area network that leverages lower-cost iSCSI standards over standard Ethernet or on standard fibre channel arrays.
Establish a disaster recovery system that ensures a complete geo-site failover, minimizing business risks.
Slash connection and management costs associated with running satellite offices while giving remote users the same performance and services that users at headquarters enjoy.
Protect critical information with centralized backup and restore.
Open Source ServicesCapitalize on the many advantages of open source technologies and solutions.
You can take advantage of open source services without reducing system availability or increasing management costs. OES NetWare 6.5 can host the best solutions available from the open source community. As a result, you’ll realize the significant cost benefits associated with these solutions running on the industry’s most scalable, reliable, secure platform.
OES NetWare 6.5 supports open source solutions in a variety of ways:
Open source services such as Apache, MySQL*, OpenSSH, OpenWBEM, BASH, Perl, PHP, and Tomcat are integrated with NetWare.
You can seamlessly manage open source projects through the OES NetWare 6.5 browser-based interface, making it easy to orchestrate processes across the entire organization and have them appear as a single, integrated business solution.
Additional InformationFor additional information on the benefits provided by OES NetWare 6.5, see “An Overview of Novell Open Enterprise Server” in the Novell OES Planning and Implementation Guide (http://www.novell.com/documentation/oes/implgde/data/bowwjdq.html).
For planning and installation information, continue with “Installing Novell Small Business Suite Components” on page 41.
22 Novell Small Business Suite 6.6 Overview and Installation Guide
Novell Confidential Manual (ENU) 21 December 2004
GroupWise 6.5: Powerful Communication and Collaboration toolsGroupWise provides communication and collaboration services that are secure, highly available, and easily accessible, as explained in the following sections:
“Essential Communication and Collaboration Services” on page 23
“Available Anytime” on page 23
“Accessible Anywhere” on page 24
“Always Secure” on page 24
Essential Communication and Collaboration ServicesGroupWise provides a variety of tools to enable users to work together and work smarter.
Messaging: Send and receive mail messages, phone messages, and reminder notes. A mail message is for general correspondence. A phone message is designed for those who take phone messages for others. A reminder note includes a start date and, when accepted by the recipient, is posted to the recipient’s Calendar.
Instant Messaging: Communicate in real time with other GroupWise users through GroupWise Messenger. GroupWise Messenger lets you know when other users are online, busy, or away from their desks. It also allows you to save conversations.
Scheduling: Schedule both appointments and tasks. When you schedule an appointment, you can search other users’ Calendars to find free times for the appointment. When you schedule a task, you can assign a priority and due date to the task. If the recipient accepts an appointment or task, it is automatically added to his or her Calendar.
Calendaring: View and manage your appointments, tasks, and reminder notes in a Calendar view.
Task Management: Accept or decline the tasks you are sent, and track accepted tasks through to completion. You can also turn any message into a task by adding it to your Checklist folder.
Contact Management: Manage information for your contacts, groups, resources, and organizations, including being able to view, update, delete, and add information to the contacts in your address book. In addition, you can view a history of messages sent to and received from individual contacts.
Document Management: Store documents in GroupWise libraries. In a library, documents are compressed to save disk space and encrypted to maintain security. With document management, you can check in, check out, share, and version documents.
Available AnytimeGroupWise ensures that your essential communication tools are always available.
Caching: The GroupWise client includes a Caching mode that allows you to cache GroupWise information to your local drive and continue to work even when you aren’t logged in to your network mailbox.
LDAP Pooling: If you are using LDAP authentication for GroupWise mailbox authentication, LDAP pooling ensures that there is always an LDAP server to perform authentication.
Novell Small Business Suite 6.6 Benefits 23
Novell Confidential Manual (ENU) 21 December 2004
Clustering: To ensure that GroupWise data is always available and GroupWise components are always running, you can install GroupWise into a Novell Cluster ServicesTM environment or a Microsoft* Clustering Services environment.
Accessible AnywhereGroupWise lets you communicate and collaborate with other people using the device that is most convenient.
Personal Computers: To access your mailbox, you can run the GroupWise client for Windows on any workstation that uses Windows 98 or later.
Web Browsers and Wireless Devices: With GroupWise WebAccess installed, you can also access your mailbox through a Web browser, a cellular phone, or wireless PDAs (personal digital assistants) such as PalmPilot* and Pocket PC*. GroupWise information is formatted to best accommodate the type of device it is being displayed on.
Other E-mail Clients: GroupWise enables you to access your mailbox with any POP3 and IMAP4 e-mail clients.
Always SecureGroupWise provides extensive security measures to protect your information.
Encryption: Protects your information as it is stored in the various GroupWise databases and moved across the network. GroupWise encrypts each piece of information differently through the use of randomly generated encryption keys.
Open Security Standards: To further ensure that your information is secure while moving across your internal network or across the Internet, GroupWise supports open security standards such as Secure Socket Layer (SSL), Secure Multipurpose Internet Mail Extension (S/MIME), Public Key Infrastructure (PKI), and Transport Layer Security (TSL).
Spam Protection: To protect you from seeing unwanted messages, the GroupWise client includes a Junk Mail Handling feature that lets you control unwanted Internet e-mail messages. In addition, you can configure the Internet Agent (the GroupWise component responsible for sending and receiving Internet e-mail messages) to reject messages from known open relay hosts and spam hosts. GroupWise also works with partner products that provide additional anti-spam solutions.
Virus Protection: GroupWise works with partner products to provide solutions that detect and eliminate viruses.
For information about additional security solutions available for GroupWise through GroupWise partners, see the GroupWise Partners Web site (http://www.novell.com/products/groupwise/partners).
Additional InformationFor additional information on the benefits provided by GroupWise 6.5, see the Upgrading Your Business to Novell GroupWise 6.5 product information on the Web (http://www.novell.com/collateral/4820813/4820813.html).
For planning and installation information, continue with “Installing and Setting Up E-mail” on page 119.
24 Novell Small Business Suite 6.6 Overview and Installation Guide
Novell Confidential Manual (ENU) 21 December 2004
BorderManager 3.8: Secure Connection to the InternetNovell BorderManager 3.8 includes premier firewall and VPN technologies that safeguard your network and help you build a secure identity management solution. With the powerful directory-integrated features in Novell BorderManager, you can monitor users' Internet activities and control their remote access to corporate resources.
Moreover, Novell BorderManager provides Internet access control and supports numerous content-filtering solutions. These features protect your network from undesirable Internet content, including programs that destroy or steal data, games that waste users' time, and Web pages that expose your company to legal liability.
Packet Filtering: This provides Network-layer security to control the types of information sent between networks and hosts. Novell BorderManager 3.8 supports Routing Information Protocol (RIP) filters and packet forwarding filters to control the service and route information for the common protocol suites, including Internetwork Packet ExchangeTM (IPXTM) software and TCP/IP.
Proxy Services: This uses caching to accelerate Internet performance and optimize WAN bandwidth use. Proxy Services also allows protocol filtering and improves security by hiding private network domain names and addresses and sending all requests through a single gateway.
Access Control: This is the process by which user access to Internet and intranet services is regulated and monitored. Specifically, the BorderManager access control software allows or denies access requests made through the Novell IP Gateway or Proxy Services.
Novell IP Gateway: The Novell IP Gateway, which consists of two circuit-level gateways (the IPX/IP gateway and the IP/IP gateway), enables Windows IPX and IP clients on your local network to access the Internet without requiring you to assign globally unique IP addresses to each local system. The Novell IP Gateway also supports SOCKS clients. In addition, the Novell IP Gateway enables you to hide the IP addresses of your local network from the Internet and implement access control for local clients.
Network Address Translation (NAT): Like the Novell IP Gateway, NAT allows IP clients on your local network to access the Internet without requiring you to assign globally unique IP addresses to each system. In addition, NAT acts as a filter, allowing only certain outbound connections and guaranteeing that inbound connections cannot be initiated from the public network.
Virtual Private Network (VPN): This is used to transfer sensitive information across the Internet in a secure fashion by encapsulating and encrypting the data. A VPN can also be deployed in intranets where data security is required between departments.
Novell BorderManager 3.8 Alert: This monitors server performance and security, and reports potential or existing server problems that affect the performance of configured Novell BorderManager 3.8 services.
Novell BorderManager 3.8 Authentication Services: This enables remote users to dial in to NetWare networks and access network information and resources. These services maintain security by requiring users to authenticate using the Remote Authentication Dial-In User Service (RADIUS) protocol.
Novell Small Business Suite 6.6 Benefits 25

Novell Confidential Manual (ENU) 21 December 2004
Additional InformationFor additional information on the benefits provided by BorderManager 3.8, see Novell BorderManager product information on the Web (http://www.novell.com/products/bordermanager/quicklook.html).
For planning and installation information, continue with “Installing BorderManager” on page 153.
ZENworks 6.5 Desktop Management: Flexible Desktop Management
With ZENworks Desktop Management, it is easier than ever to deploy applications and manage workstation profiles from anywhere in your organization using the following components:
Automatic Workstation Import and Removal (page 26)
Workstation Management (page 26)
Application Management (page 27)
Workstation Imaging (page 28)
Remote Management (page 28)
Workstation Inventory (page 29)
Automatic Workstation Import and RemovalThe Automatic Workstation Import and Removal services provide simplified, hands-off management of users’ workstations.
Automatic Workstation Import imports workstations into eDirectory and integrates them automatically. The Workstation objects created by Automatic Workstation Import provide you with a way to push software and computer settings down to the workstations by using the Novell Application LauncherTM (NAL) and ZENworks Desktop Management policies.
Automatic Workstation Removal removes obsolete workstation data from the directory and from the Inventory database.
Workstation ManagementWorkstation Management helps you reduce the overall cost and complexity of configuring and maintaining workstation desktops in your network. ZENworks policies provide you with automatic management of server, user, and workstation configurations, processes, and behaviors—which means that you do not need to visit each workstation in your site to configure user settings and workstations.
Using Workstation Management, you can
Enable roaming profiles and set default desktop preferences for users.
Use extensible policies to control any application function that is configured in the Windows* registry.
Set group policies for Windows 2000/XP workstations and users.
Set parameters for remotely managing users’ workstations, including remote control, remote view, diagnostics, file transfer, remote execute, and Wake-on-LAN.
26 Novell Small Business Suite 6.6 Overview and Installation Guide
Novell Confidential Manual (ENU) 21 December 2004
Set parameters for imaging workstations.
Set parameters to specify what inventory information to collect.
Set parameters to automatically import new workstations into the eDirectory tree.
Set user parameters for using Novell iPrint, which lets users use a Web browser to install printers on their workstations.
Configure users’ terminal server connections.
Application ManagementApplication Management helps you manage the distribution of applications to users on Windows workstations. Using Application Management, you can
Distribute traditional Windows applications and Microsoft Windows Installer applications.
Traditional Windows applications include their own installation programs. Windows Installer applications utilize the Windows Installer and a .msi file for installation.
Distribute applications from the network (while connected to eDirectory) or from removable media, such as a CD, Jaz* drive, or Zip* drive (while disconnected from eDirectory).
Determine which users to distribute an application to.
You must associate an application with a user through eDirectory before the application is available for distribution to the user. You can also associate applications with workstations so that they are available on the workstation regardless of which user is logged in.
Create application dependencies.
Through application dependencies, you can require that Application B is installed and running before Application A can be launched.
Determine how distributed applications are presented to users on their workstations.
For a user to receive applications you’ve configured in eDirectory and associated with him or her, Novell Application Launcher must be running on the user’s workstation. Novell Application Launcher accesses eDirectory to know which applications are associated with the user and performs all distribution processes (including installing and uninstalling) for the applications.
Novell Application Launcher provides three views through which applications can be presented:
Application Window, a standalone window that displays icons for the distributed applications.
Application Explorer, a component that includes a standalone window like the Application Window and also includes Windows Explorer integration so distributed application icons can be displayed on the Windows desktop, the Start menu, the status area, and the Quick Launch toolbar.
Application Browser, a Web browser view that displays icons for the distributed applications.
Distribute applications to newly imaged workstations as part of the imaging process.
Novell Small Business Suite 6.6 Benefits 27
Novell Confidential Manual (ENU) 21 December 2004
Control which nondistributed applications can be run on a workstation.
For example, if you don’t want users to be able to launch the Microsoft Calculator because you want them to use a calculator application you’ve distributed to them, you can disable their ability to launch the Calculator even though it was not distributed through Novell Application Launcher.
Uninstall any distributed applications.
The uninstall includes the deletion of all nonshared files, .ini entries, and registry entries associated with the distribution of the application.
Workstation ImagingUsing Workstation Imaging, you can perform the following imaging operations:
Take an image of a workstation and store it on the same workstation (locally) or on an imaging (proxy) server.
Create an “add-on” image of selected files.
Customize an image.
Compress an image to minimize storage space.
Retrieve an image that has been saved to a workstation (locally) or an imaging (proxy) server and restore it to a workstation.
You can do this manually at each workstation or automatically from ConsoleOne®.
Use a workstation or server policy to define imaging operations.
Create a script to customize and automate how you perform imaging operations.
Restore an image to many workstations simultaneously in a multicast session.
View information about the partitions and storage devices on a workstation.
Create, delete, and activate partitions.
Remote ManagementRemote Management lets you remotely manage workstations (called managed workstations) from the remote management console. Remote Management lets you do the following:
Remotely wake up a powered-off managed workstation
Remotely control the managed workstation
Remotely view the managed workstation
Execute files found on the managed workstation
Transfer files between the remote management console and the managed workstation
Display diagnostic problems on the managed workstation
Log audit record information about the Remote Management sessions running on the managed workstation
28 Novell Small Business Suite 6.6 Overview and Installation Guide
Novell Confidential Manual (ENU) 21 December 2004
Blank the managed workstation screen during a remote control session
Lock the keyboard and mouse controls at the managed workstation during a Remote Control session
IMPORTANT: You cannot use ZENworks 6.5 Desktop Management to obtain Remote Management functionality on the servers.
Workstation InventoryZENworks Desktop Management lets you gather and administer complete hardware and software information for all workstations connected to your network. From ConsoleOne, you can view the complete hardware and software inventory of the workstations. You can also query the centralized database of the workstations and generate reports.
You can use the information in the Novell ZENworks 6.5 Desktop Management Installation Guide to set up a pilot system so that you can better understand Workstation Inventory. The pilot system consists of a management console, an Inventory server, an Inventory database running Sybase*, and one or more inventoried workstations.
Additional InformationFor additional information on the benefits provided by ZENworks Desktop Management, see ZENworks Desktop Management Features and Benefits information on the Web (http://www.novell.com/products/zenworks/desktops/features.html).
For planning and installation information, continue with Chapter 17, “Installing ZENworks Desktop Management,” on page 163.
Novell Small Business Suite 6.6 Benefits 29

Novell Confidential Manual (ENU) 21 December 2004
30 Novell Small Business Suite 6.6 Overview and Installation Guide

Novell Confidential Manual (ENU) 21 December 2004
2 Product Components
The Novell® Small Business Suite 6.6 product package includes the following diskette and CDs:
Novell Small Business Suite License diskette
Novell Small Business Suite 6.6 NetWare 6.5 CD 1 Operating System with SP3 (includes OES NetWare 6.5 with Support Pack 3 integrated, plus Small Business additions)
Novell Small Business Suite 6.6 NetWare 6.5 CD 2 Products with SP3 (includes OES NetWare 6.5 with Support Pack 3, plus Small Business additions)
GroupWise 6.5.4 (NetWare) Admin (Web download on CD, includes integrated Support Pack 4)
GroupWise 6.5.4 Windows Client (Web download on CD, includes integrated Support Pack 4)
GroupWise 6.5.4 Messenger (Web download on CD, includes integrated Support Pack 4)
Novell BorderManager 3.8 with SP3 (product Web download on CD, and Support Pack 3 web download on CD)
ZENworks 6.5 Desktop Management (Web download on CD)
ZENworks 6.5 Personality Migration (Web download on CD)
ZENworks 6.5 Software Packaging (Web download on CD)
ZENworks 6.5 Companion CD 1 (Web download on CD)
ZENworks 6.5 Companion CD 2 (Web download on CD)
Novell Client Software (June 2005) that includes the following (Web download on CD):
Novell ClientTM 4.9.1 for Windows NT/2000/XP
Novell Client 3.4 for Windows 95/98
Novell NetDrive Client 4.1
Client NICI 2.6.6 for Windows
NetIdentity Client 1.2.3
Product Components 31

Novell Confidential Manual (ENU) 21 December 2004
32 Novell Small Business Suite 6.6 Overview and Installation Guide
Novell Confidential Manual (ENU) 21 December 2004
3 Technical Support
Technical support for Novell® Small Business Suite 6.6 includes five free incidents valid for 60 calendar days. This free support is available to both Novell customers and Novell resellers during normal business hours. The 60-day timer starts from the first support call. Any incidents of the five not used within the 60 days will expire. The incidents are intended to cover general installation and configuration issues for all the products and components included in the suite.
Support beyond the levels indicated above will incur support charges. For information on technical support options with Novell including Premium Service, visit the Novell Support Web site (http://support.novell.com).
When you call for this technical support, you need to provide your product serial number. This number is printed on the Novell Small Business Suite License diskette; or if downloaded, it is the license filename.
This support applies only to the Novell Small Business Suite 6.6 and the Novell Small Business Suite 6.6 Expansion pack. It does not apply to the Novell Small Business Suite Starter Pack.
Contact Novell Technical Support:
U.S. and Canada: 1-800-858-4000
Latin America
Argentina: 0-800-888-668355 (0-800-888-novell), 800-228-8478, and by e-mail [email protected]
Belize: 800-321-2356
Bolivia: 800-321-2296
Brazil: 800-858-4000
Chile: 800-858-4000
Columbia: 800-858-4000
Costa Rica: 800-858-4000
Ecuador: 800-321-2297
El Salvador: 800-633-4175
Guatemala: 800-858-4000
Guyana: 800-321-2364
Honduras: 800-321-2312
Mexico: 800-858-4000
Nicaragua: 800-321-2317
Paraguay: 800-228-2832
Technical Support 33
Novell Confidential Manual (ENU) 21 December 2004
Peru: 800-633-4179
Uruguay: 800-633-4185
All other Spanish-speaking countries 1-800-858-4000 or USA Direct 801-861-4000
APAC:
Novell Premium and Channel partners: use your assigned toll numbers
All others: + 61 2 9925-3133
Europe:
Austria +49 211 5632 1800
Belgium +31 10 286 47 41
Denmark +31 10 286 47 42
France +31 10 286 47 43
Germany +49 211 5632 1800
Italy +31 10 286 47 44
Netherlands +31 10 286 47 41
Norway +31 10 286 47 42
Sweden +31 10 286 47 42
Switzerland +49 211 5632 1800
Spain +31 10 286 47 45
U.K. +31 10 286 47 46
For any country not listed above, call the U.K. number
Fax +31 10 286 43 33
34 Novell Small Business Suite 6.6 Overview and Installation Guide
Novell Confidential Manual (ENU) 21 December 2004
4 Partner Solutions
This section includes information about business solutions and resources that might be available from third-party vendors including:
Vendor List (page 35)
Third-Party Drivers List (page 35)
Vendor ListNovell® Small Business Suite 6.6 has a broad range of support from most key systems and software vendors. The Novell Small Business Suite Partner Solutions Web site (http://www.novell.com/products/smallbiz/app.html) provides information about these systems and vendors.
The OES NetWare Partners Web site (http://www.novell.com/partnerguide/section/677.html) also provides the latest information on YES, Tested and Approved certified products, the latest news on Novell and partner solutions, and additional collateral to assist you in purchasing third-party solutions.
Third-Party Drivers ListNovell Small Business Suite ships with a number of third-party drivers. These are located at the root of Novell Small Business Suite 6.6 NetWare 6.5 CD 1 Operating System with SP3 CD in the driver directory. There you will find subdirectories for the CIOS, LAN, PSM, SBD, and Storage drivers. If you need support for any of these drivers, go to the YES, Tested and Approved Web site (http://developer.novell.com/yessearch/Search.jsp) or contact the driver vendor directly.
Partner Solutions 35

Novell Confidential Manual (ENU) 21 December 2004
36 Novell Small Business Suite 6.6 Overview and Installation Guide
Novell Confidential Manual (ENU) 21 December 2004
5 Additional Information
For additional information about Novell® Small Business Suite 6.6, other Novell products included in the suite, and other Novell services, see the following areas of the Novell Web site:
Small Business
Novell Small Business Suite Product Page (http://www.novell.com/products/smallbiz)
Novell Small Business Suite Partner Solutions (http://www.novell.com/products/smallbiz/app.html)
Small Business Suite Cool Solutions (http://www.novell.com/coolsolutions/smallbiz)
NetWare
OES NetWare® Product Page (http://www.novell.com/products/openenterpriseserver/index.html?sourceidint=productscatmenu_oes)
NetWare Partners (http://www.novell.com/partnerguide/section/677.html)
OES NetWare 6.5 Product Documentation (http://www.novell.com/documentation/oes/oes_home/data/front.html)
NetWare Cool Solutions (http://www.novell.com/coolsolutions/netware)
GroupWise
GroupWise® Product Page (http://www.novell.com/products/groupwise)
GroupWise Partners (http://www.novell.com/products/groupwise/partners)
GroupWise 6.5 Product Documentation (http://www.novell.com/documentation/gw65)
GroupWise Cool Solutions (http://www.novell.com/coolsolutions/gwmag)
BorderManager
BorderManager® Product Page (http://www.novell.com/products/bordermanager)
BorderManager 3.8 Product Documentation (http://www.novell.com/documentation/nbm38/index.html)
BorderManager Cool Solutions (http://www.novell.com/coolsolutions/bordermag)
ZENworks
ZENworks® Product Page (http://www.novell.com/products/zenworks)
ZENworks 6.5 Product Documentation (http://www.novell.com/documentation/zenworks65/index.html)
Additional Information 37
Novell Confidential Manual (ENU) 21 December 2004
Small Business Suite bundles only the Desktop Management software, so not all the documentation on the ZENworks 6.5 Web site applies to Novell Small Business Suite 6.6. We recommend reviewing the following information:
Readmes (General, Desktop Management, and Support Pack)
Getting Started (http://www.novell.com/documentation/zenworks65/gettingstarted/data/al01cr9.html)
Desktop Management Installation (http://www.novell.com/documentation/zenworks65/dminstall/data/front.html)
Desktop Management Upgrade (http://www.novell.com/documentation/zenworks65/dminstall/data/bpmw4h6.html)
Desktop Management Administration (http://www.novell.com/documentation/zenworks65/dmadmin/data/a20gkue.html)
Desktop Management Interoperability with Other Novell Products (http://www.novell.com/documentation/zenworks65/dminstall/data/br0mte8.html#br0mte8)
Desktop Management Troubleshooting (http://www.novell.com/documentation/zenworks65/dmtrouble/data/a20gkue.html)
ZENworks Cool Solutions (http://www.novell.com/coolsolutions/zenworks)
Other
Novell Support (http://support.novell.com)
Novell User Forums (http://support.novell.com/forums)
Updates and Patches (http://support.novell.com/filefinder)
Novell Education (http://www.novell.com/training)
Novell KnowledgeBase (http://support.novell.com/search)
Novell Partners (http://www.novell.com/partners/)
Novell Developer Support (http://developer.novell.com)
38 Novell Small Business Suite 6.6 Overview and Installation Guide

Novell Confidential Manual (ENU) 21 December 2004
6 What’s Next
To make sure you can get the most from your product, see Chapter 7, “Planning Your Deployment,” on page 43.
To take immediate advantage of the benefits offered by Novell® Small Business Suite 6.6, start by installing or upgrading your network. See Chapter 8, “Installing a New Novell Small Business Suite Server,” on page 47 or Chapter 20, “Upgrading the Operating System to Novell Small Business Suite 6.6,” on page 189.
What’s Next 39

Novell Confidential Manual (ENU) 21 December 2004
40 Novell Small Business Suite 6.6 Overview and Installation Guide
Novell Confidential Manual (ENU) 21 December 2004
III Installing Novell Small Business Suite Components
This information helps you perform the following tasks:
Plan your deployment
Install a new Novell® Small Business Suite server
Install the following component products or perform additional setup tasks:
Set up a workstation for administration. See Chapter 9, “Setting Up a Workstation for Administration,” on page 101.
Set up additional workstations for users. See Chapter 15, “Setting Up Workstations for Users,” on page 149.
Set up Internet connectivity. See Chapter 10, “Setting Up Internet Connectivity,” on page 105.
Set up DNS. See Chapter 11, “Setting Up DNS,” on page 109.
Set up DHCP. See Chapter 12, “Setting Up DHCP,” on page 111.
Set up printing. See Chapter 13, “Setting Up Printing,” on page 113.
Install and set up e-mail and messaging. See Chapter 14, “Installing and Setting Up E-mail,” on page 119.
Set up firewall or VPN services. See Chapter 16, “Installing BorderManager,” on page 155.
Set up application and workstation management. See Chapter 17, “Installing ZENworks Desktop Management,” on page 165.
Set up other bundled products. See Chapter 18, “Installing Additional Bundled Products,” on page 183.
Installing Novell Small Business Suite Components 41

Novell Confidential Manual (ENU) 21 December 2004
42 Novell Small Business Suite 6.6 Overview and Installation Guide
Novell Confidential Manual (ENU) 21 December 2004
7 Planning Your Deployment
When planning your deployment of Novell® Small Business Suite, you need to consider the following:
Business needs
Applications to be run
Hardware costs
Management strategies
If you need to upgrade the server or any of the other products on the server, see “Upgrading the Server and Other Products in the Suite” on page 187.
If you have purchased new hardware and need to migrate an old server to the new hardware and software, see the NetWare Migration Wizard 8.0 Administration Guide in the OES NetWare online documentation.
If you want to consolidate servers, see the Novell Server Consolidation Utility 4.0 Administration Guide in the OES NetWare online documentation.
If you are familiar with previous versions of Novell products, Novell Small Business Suite gives you complete flexibility to use the product components the way you always have.
If you are unfamiliar with one or more Novell products or you want a quicker setup method, Small Business provides some setup tasks to help you get a network up and running quickly.
The following table lists some basic decision points and explains where to start.
If You Need Then Install Where to Start
Domain Name Services (DNS)
NetWare 6.5 with DNS/DHCP services
See Chapter 8, “Installing a New Novell Small Business Suite Server,” on page 47.
Make sure to select the DNS components in a Customized Server type or select the DNS/DHCP preconfigured server option.
Then use the Set Up DNS task in the Small Business Setup role of iManager.
For more information, see Chapter 11, “Setting Up DNS,” on page 109.
Planning Your Deployment 43
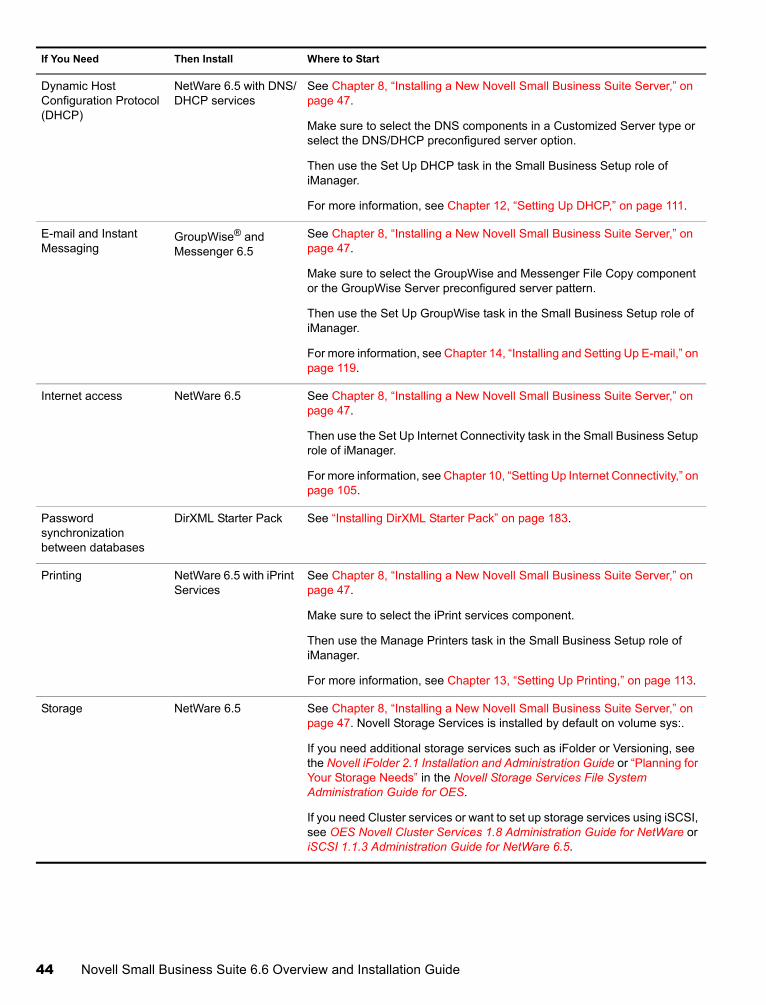
Novell Confidential Manual (ENU) 21 December 2004
Dynamic Host Configuration Protocol (DHCP)
NetWare 6.5 with DNS/DHCP services
See Chapter 8, “Installing a New Novell Small Business Suite Server,” on page 47.
Make sure to select the DNS components in a Customized Server type or select the DNS/DHCP preconfigured server option.
Then use the Set Up DHCP task in the Small Business Setup role of iManager.
For more information, see Chapter 12, “Setting Up DHCP,” on page 111.
E-mail and Instant Messaging
GroupWise® and Messenger 6.5
See Chapter 8, “Installing a New Novell Small Business Suite Server,” on page 47.
Make sure to select the GroupWise and Messenger File Copy component or the GroupWise Server preconfigured server pattern.
Then use the Set Up GroupWise task in the Small Business Setup role of iManager.
For more information, see Chapter 14, “Installing and Setting Up E-mail,” on page 119.
Internet access NetWare 6.5 See Chapter 8, “Installing a New Novell Small Business Suite Server,” on page 47.
Then use the Set Up Internet Connectivity task in the Small Business Setup role of iManager.
For more information, see Chapter 10, “Setting Up Internet Connectivity,” on page 105.
Password synchronization between databases
DirXML Starter Pack See “Installing DirXML Starter Pack” on page 183.
Printing NetWare 6.5 with iPrint Services
See Chapter 8, “Installing a New Novell Small Business Suite Server,” on page 47.
Make sure to select the iPrint services component.
Then use the Manage Printers task in the Small Business Setup role of iManager.
For more information, see Chapter 13, “Setting Up Printing,” on page 113.
Storage NetWare 6.5 See Chapter 8, “Installing a New Novell Small Business Suite Server,” on page 47. Novell Storage Services is installed by default on volume sys:.
If you need additional storage services such as iFolder or Versioning, see the Novell iFolder 2.1 Installation and Administration Guide or “Planning for Your Storage Needs” in the Novell Storage Services File System Administration Guide for OES.
If you need Cluster services or want to set up storage services using iSCSI, see OES Novell Cluster Services 1.8 Administration Guide for NetWare or iSCSI 1.1.3 Administration Guide for NetWare 6.5.
If You Need Then Install Where to Start
44 Novell Small Business Suite 6.6 Overview and Installation Guide
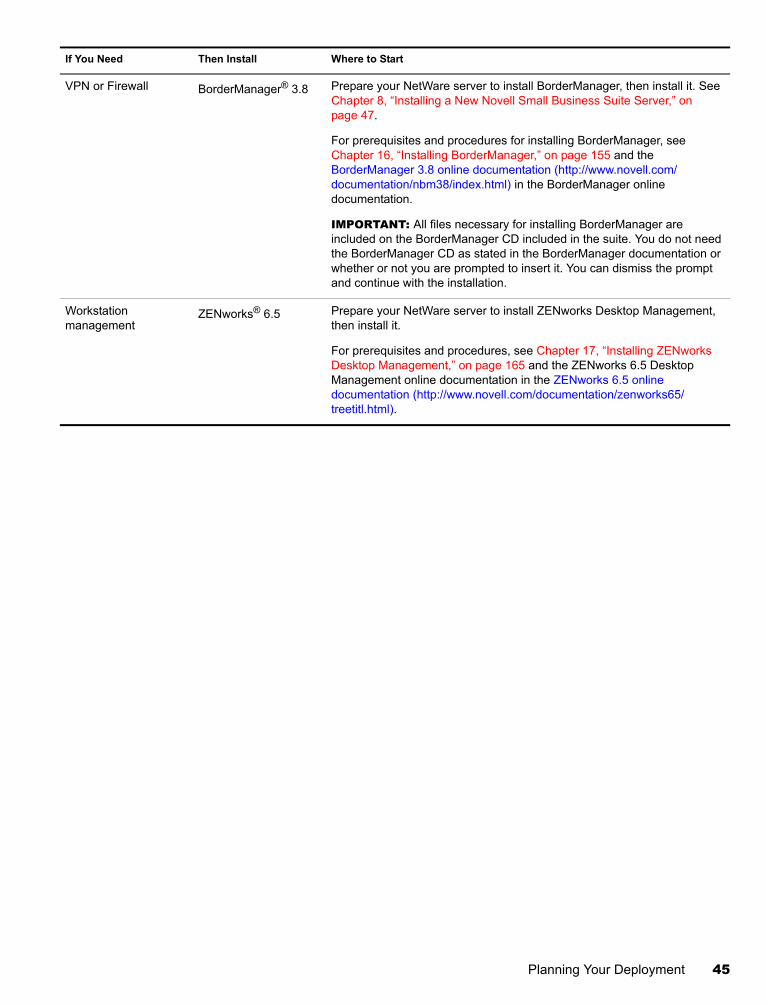
Novell Confidential Manual (ENU) 21 December 2004
VPN or Firewall BorderManager® 3.8 Prepare your NetWare server to install BorderManager, then install it. See Chapter 8, “Installing a New Novell Small Business Suite Server,” on page 47.
For prerequisites and procedures for installing BorderManager, see Chapter 16, “Installing BorderManager,” on page 155 and the BorderManager 3.8 online documentation (http://www.novell.com/documentation/nbm38/index.html) in the BorderManager online documentation.
IMPORTANT: All files necessary for installing BorderManager are included on the BorderManager CD included in the suite. You do not need the BorderManager CD as stated in the BorderManager documentation or whether or not you are prompted to insert it. You can dismiss the prompt and continue with the installation.
Workstation management
ZENworks® 6.5 Prepare your NetWare server to install ZENworks Desktop Management, then install it.
For prerequisites and procedures, see Chapter 17, “Installing ZENworks Desktop Management,” on page 165 and the ZENworks 6.5 Desktop Management online documentation in the ZENworks 6.5 online documentation (http://www.novell.com/documentation/zenworks65/treetitl.html).
If You Need Then Install Where to Start
Planning Your Deployment 45

Novell Confidential Manual (ENU) 21 December 2004
46 Novell Small Business Suite 6.6 Overview and Installation Guide
Novell Confidential Manual (ENU) 21 December 2004
8 Installing a New Novell Small Business Suite Server
Novell® Small Business Suite includes a full range of products. If you are installing a new server, you must start with installing or upgrading the operating system. OES NetWare® 6.5 is the operating system that is included in this suite.
Installing a Novell Small Business Suite server is very similar to installing a NetWare 6.5 server with the following additions:
The Novell Small Business specific files are copied to the server with any of the selected server types. These files provide the functionality for some of the special configurations provided in the Small Business Suite.
You have two additional server types patterns to choose from. For details, see “Novell Small Business Collaboration Server with Virtual Office (Recommended)” on page 70 and “Novell Small Business Collaboration Server” on page 71.
With the customized server option, you can choose to copy specific files and components. For details and recommendations, see “Customized NetWare Server” on page 65.
This chapter describes how to install a new Novell Small Business Suite 6.6 server. If you are upgrading from a previous version of Novell Small Business Suite or NetWare, see Chapter 20, “Upgrading the Operating System to Novell Small Business Suite 6.6,” on page 189.
To help you gather all the information that you might need to during the server installation and post configurations, print the “Small Business Server Configuration Worksheet” from the “Small Business Suite” Quick Start.
Installing a new server includes the following tasks:
1. Meeting Conditions for Installing Novell Small Business Suite (page 48)
2. Anticipating Installation Issues (page 48)
3. Meeting System and Software Requirements (page 49)
4. Preparing the Network with Deployment Manager (page 54)
5. Preparing the Computer (page 57)
6. Accessing the Installation Files (page 58)
7. Installing the Software (page 60)
8. Completing the Server Installation (page 98)
Installing a New Novell Small Business Suite Server 47
Novell Confidential Manual (ENU) 21 December 2004
Meeting Conditions for Installing Novell Small Business SuiteThe Novell Small Business Suite installation is supported only under the following conditions:
Install onto a clean, error-free disk drive.
Remove files from any previous installation, then run the SCANDISK or CHKDSK DOS utilities to verify the integrity of the DOS partition.
Install into a tree that has Novell eDirectoryTM 8.7 or later.
Installing into a tree with a version earlier than eDirectory 8 can make User objects unmanageable when using management utilities other than those that ship with Novell Small Business Suite.
Do not install in to a tree that contains NetWare 4.10 servers. All servers in the tree must be NetWare 4.11 or later.
So that Licensing works properly, ensure that all NetWare 4 and 5 servers in your tree are at the following minimum Support Pack level:
NetWare 4.11 and 4.2 servers must be at Support Pack 6a or laterNetWare 5.0 servers must be at Support Pack 4 or laterNetWare 5.1 servers must be at Support Pack 3 or later
We recommend installing the latest available Support Packs on all NetWare servers in your tree.
Before installing into an existing network, run the Novell Deployment Manager to update the network. For more information, see “Preparing the Network with Deployment Manager” on page 54.IMPORTANT: The Deployment Manager included with this version of Novell Small Business Suite can be run only on an Internet Explorer 5 or 6 browser.
Anticipating Installation IssuesIf a problem occurs (critical errors, installation fails, etc.) during the installation procedure before the file copy and the OS installation is complete, you must start the installation again from the beginning.
If a problem occurs after the file copy and the OS installation is complete, the installation will finish. Errors will be generated telling you which individual product installation failed, but the remaining products will install normally.
For a complete list of known issues in this release of Novell Small Business Suite 6.6, see the “Known Issues” section of the Novell Small Business Suite 6.6 Readme (http://www.novell.com/documentation/nsbs65/readme/data/nsbs65readme.html#an8smc6).
48 Novell Small Business Suite 6.6 Overview and Installation Guide
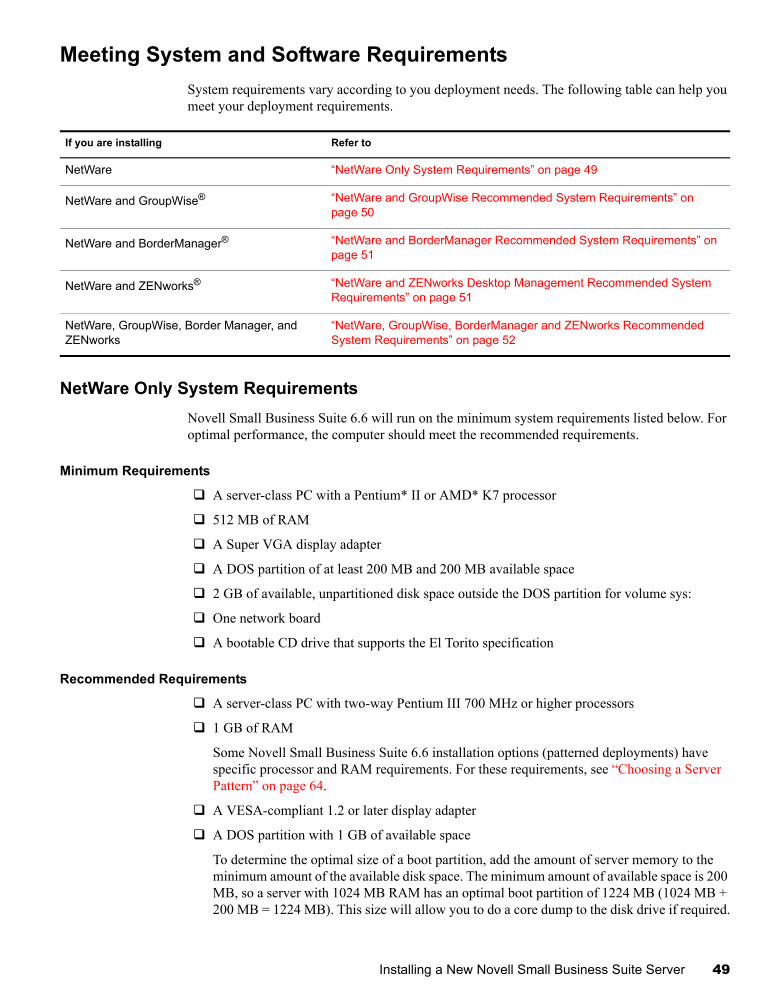
Novell Confidential Manual (ENU) 21 December 2004
Meeting System and Software RequirementsSystem requirements vary according to you deployment needs. The following table can help you meet your deployment requirements.
NetWare Only System RequirementsNovell Small Business Suite 6.6 will run on the minimum system requirements listed below. For optimal performance, the computer should meet the recommended requirements.
Minimum Requirements
A server-class PC with a Pentium* II or AMD* K7 processor
512 MB of RAM
A Super VGA display adapter
A DOS partition of at least 200 MB and 200 MB available space
2 GB of available, unpartitioned disk space outside the DOS partition for volume sys:
One network board
A bootable CD drive that supports the El Torito specification
Recommended Requirements
A server-class PC with two-way Pentium III 700 MHz or higher processors
1 GB of RAM
Some Novell Small Business Suite 6.6 installation options (patterned deployments) have specific processor and RAM requirements. For these requirements, see “Choosing a Server Pattern” on page 64.
A VESA-compliant 1.2 or later display adapter
A DOS partition with 1 GB of available space
To determine the optimal size of a boot partition, add the amount of server memory to the minimum amount of the available disk space. The minimum amount of available space is 200 MB, so a server with 1024 MB RAM has an optimal boot partition of 1224 MB (1024 MB + 200 MB = 1224 MB). This size will allow you to do a core dump to the disk drive if required.
If you are installing Refer to
NetWare “NetWare Only System Requirements” on page 49
NetWare and GroupWise® “NetWare and GroupWise Recommended System Requirements” on page 50
NetWare and BorderManager® “NetWare and BorderManager Recommended System Requirements” on page 51
NetWare and ZENworks® “NetWare and ZENworks Desktop Management Recommended System Requirements” on page 51
NetWare, GroupWise, Border Manager, and ZENworks
“NetWare, GroupWise, BorderManager and ZENworks Recommended System Requirements” on page 52
Installing a New Novell Small Business Suite Server 49

Novell Confidential Manual (ENU) 21 December 2004
10 GB of available, unpartitioned disk space outside the DOS partition for volume sys:
One or more network boards
A bootable CD drive that supports the El Torito specification
A USB or PS/2 mouse
NetWare and GroupWise Recommended System RequirementsFor optimal performance, the computer should meet the following recommended requirements for running NetWare and GroupWise® on the same server.
A server-class PC with two-way Pentium III 700 MHz or higher processors
One or more network boards
A bootable CD drive that supports the El Torito specification
A USB or PS/2 mouse
A VESA-compliant 1.2 or later display adapter
1 GB of RAM
A DOS partition with 1 GB of available space
To determine the optimal size of a boot partition, add the amount of server memory to the minimum amount of the available disk space. The minimum amount of available space is 200 MB, so a server with 1024 MB RAM has an optimal boot partition of 1224 MB (1024 MB + 200 MB = 1224 MB). This size will allow you to do a core dump to the disk drive if required.
10 GB of available, unpartitioned disk space outside the DOS partition for volume sys:
2 GB of disk space for GroupWise files and the following directories:
The GroupWise and Messenger File Copy requires approximately 959 MB. This component is used by both of the Small Business patterns.
The GroupWise Installation creates the following directories and uses the following amounts of disk space:
Directory or Agent Space Required (based on 100 users)
Software Distribution directory 500 MB
Domain directory 10 MB
Post Office directory 10 MB disk space per user and disk space as needed for library documents
Agents
NetWare (MTA and POA) = 21 MB
GroupWise Monitor (140 MB), GroupWise Web Access (215 MB), shared (110 MB) = 244
GroupWise Internet Agent (GWIA) =37 MB
Messenger Agents for NetWare = 8 MB
300 MB
Total 1810 MB
50 Novell Small Business Suite 6.6 Overview and Installation Guide
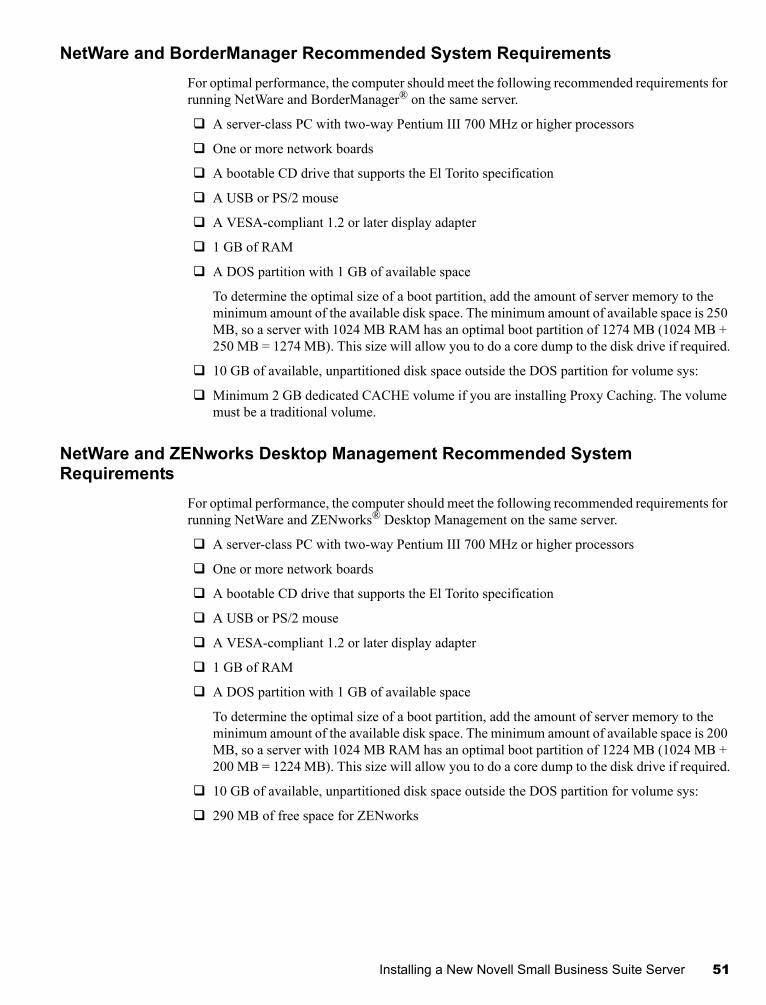
Novell Confidential Manual (ENU) 21 December 2004
NetWare and BorderManager Recommended System RequirementsFor optimal performance, the computer should meet the following recommended requirements for running NetWare and BorderManager® on the same server.
A server-class PC with two-way Pentium III 700 MHz or higher processors
One or more network boards
A bootable CD drive that supports the El Torito specification
A USB or PS/2 mouse
A VESA-compliant 1.2 or later display adapter
1 GB of RAM
A DOS partition with 1 GB of available space
To determine the optimal size of a boot partition, add the amount of server memory to the minimum amount of the available disk space. The minimum amount of available space is 250 MB, so a server with 1024 MB RAM has an optimal boot partition of 1274 MB (1024 MB + 250 MB = 1274 MB). This size will allow you to do a core dump to the disk drive if required.
10 GB of available, unpartitioned disk space outside the DOS partition for volume sys:
Minimum 2 GB dedicated CACHE volume if you are installing Proxy Caching. The volume must be a traditional volume.
NetWare and ZENworks Desktop Management Recommended System Requirements
For optimal performance, the computer should meet the following recommended requirements for running NetWare and ZENworks® Desktop Management on the same server.
A server-class PC with two-way Pentium III 700 MHz or higher processors
One or more network boards
A bootable CD drive that supports the El Torito specification
A USB or PS/2 mouse
A VESA-compliant 1.2 or later display adapter
1 GB of RAM
A DOS partition with 1 GB of available space
To determine the optimal size of a boot partition, add the amount of server memory to the minimum amount of the available disk space. The minimum amount of available space is 200 MB, so a server with 1024 MB RAM has an optimal boot partition of 1224 MB (1024 MB + 200 MB = 1224 MB). This size will allow you to do a core dump to the disk drive if required.
10 GB of available, unpartitioned disk space outside the DOS partition for volume sys:
290 MB of free space for ZENworks
Installing a New Novell Small Business Suite Server 51
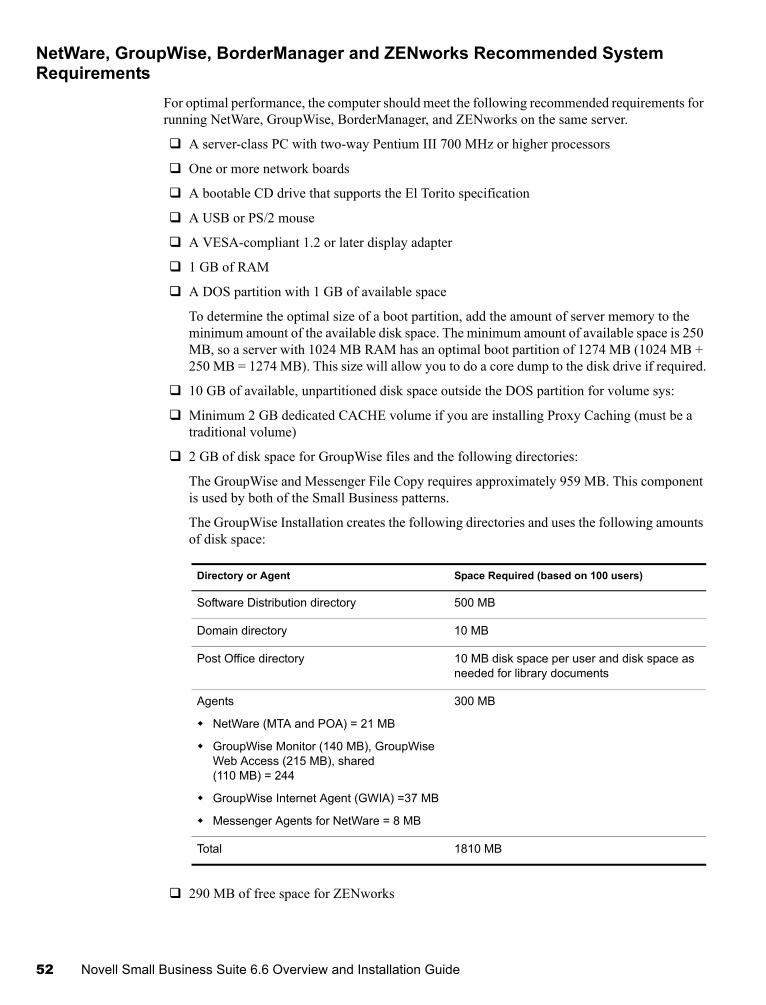
Novell Confidential Manual (ENU) 21 December 2004
NetWare, GroupWise, BorderManager and ZENworks Recommended System Requirements
For optimal performance, the computer should meet the following recommended requirements for running NetWare, GroupWise, BorderManager, and ZENworks on the same server.
A server-class PC with two-way Pentium III 700 MHz or higher processors
One or more network boards
A bootable CD drive that supports the El Torito specification
A USB or PS/2 mouse
A VESA-compliant 1.2 or later display adapter
1 GB of RAM
A DOS partition with 1 GB of available space
To determine the optimal size of a boot partition, add the amount of server memory to the minimum amount of the available disk space. The minimum amount of available space is 250 MB, so a server with 1024 MB RAM has an optimal boot partition of 1274 MB (1024 MB + 250 MB = 1274 MB). This size will allow you to do a core dump to the disk drive if required.
10 GB of available, unpartitioned disk space outside the DOS partition for volume sys:
Minimum 2 GB dedicated CACHE volume if you are installing Proxy Caching (must be a traditional volume)
2 GB of disk space for GroupWise files and the following directories:
The GroupWise and Messenger File Copy requires approximately 959 MB. This component is used by both of the Small Business patterns.
The GroupWise Installation creates the following directories and uses the following amounts of disk space:
290 MB of free space for ZENworks
Directory or Agent Space Required (based on 100 users)
Software Distribution directory 500 MB
Domain directory 10 MB
Post Office directory 10 MB disk space per user and disk space as needed for library documents
Agents
NetWare (MTA and POA) = 21 MB
GroupWise Monitor (140 MB), GroupWise Web Access (215 MB), shared (110 MB) = 244
GroupWise Internet Agent (GWIA) =37 MB
Messenger Agents for NetWare = 8 MB
300 MB
Total 1810 MB
52 Novell Small Business Suite 6.6 Overview and Installation Guide

Novell Confidential Manual (ENU) 21 December 2004
Software and Other RequirementsDepending on the network configuration, you might need one or all of the following:
Novell Small Business Suite 6.6 NetWare 6.5 CD 1 Operating System with SP3 CD
Novell Small Business Suite 6.6 NetWare 6.5 CD 2 Products with SP3 CD
Novell Small Business Suite License diskette
GroupWise 6.5.4 (NetWare) Admin CD (required only when copying GroupWise files)
GroupWise 6.5.4 Windows Client CD (required only when copying GroupWise files)
GroupWise 6.5.4 Messenger CD (required only when copying GroupWise files)
Novell Client Software CD (required only if performing a network installation)
Supervisor right at the [Root] of the eDirectory tree for the first Novell Small Business Suite 6.6 server installed in the tree
Supervisor right to the container where the server will be installed
Read right to the Security container object for the eDirectory tree
A subcontainer administrator can install a Novell Small Business Suite 6.6 server into the tree under the following conditions:
If the server to be installed will receive a copy of the replica, then the administrator with the Supervisor right at the [Root] of the tree must first install three other new servers into the tree.
If the server to be installed will not receive a copy of the replica, then the administrator with the Supervisor right at the [Root] of the tree must first install one new server into the tree.
The subcontainer administrator must have the Read right to the NDSPKI:Private Key Attribute on the Organizational CA’s object. The CA’s object is located in the Security container.
The subcontainer administrator must have the Supervisor right to the W0 object located inside the KAP object in the Security container.
These rights can be granted by placing all administrative users in a Group or Role, then assigning the rights to the Group or Role.
Client connection utilities (optional, for installing from a network):
Novell ClientTM for DOS and Windows 3.1x (for installing from a Novell Small Business Suite server running IPXTM)
IP Server Connection Utility (for installing from a Novell Small Business Suite server running IP only)
For instructions, see products\serverinst\ipconn.txt on the Novell Client Software CD.
IP address and domain names (optional, for connecting to the Internet):
An IP address
The IP address of a domain name server
The name of your domain
Network board and storage device properties, such as the interrupt and port address (required if not included in Novell Small Business Suite)
Installing a New Novell Small Business Suite Server 53
Novell Confidential Manual (ENU) 21 December 2004
For more information, contact your computer hardware manufacturer.
Preparing the Network with Deployment ManagerBefore you introduce a Novell Small Business Suite 6.6 server into an existing network, you must run the Novell Deployment Manager to update the network.IMPORTANT: The browser-based version of Deployment Manager can be run only in an Internet Explorer 5 or 6 browser.
1 On a Windows NT*/2000 or Windows XP Professional Edition workstation that has the latest Novell client installed on it, log in to your existing network as a user with the Supervisor right.
If you are prompted to log in again while running the Novell Deployment Manager, you can specify the IP address of the server by clicking Details.
2 Insert the Novell Small Business Suite 6.6 NetWare 6.5 CD 1 Operating System with SP3 CD and go to the root of the CD.
3 If you want to run the browser-based version of Deployment Manager and you have Internet Explorer 5 or 6 browser installed, run nwdeploy.exe located at the root of the CD.
If you prefer to run a standalone version of Deployment Manager that does not require a browser, or you do not want to use the ActiveX Control included with the browser-based version, run nwdeploynobrowser.exe located at the root of the CD.
4 Under the Network Preparation heading on the left side of the browser window, click the Overview link to see the tasks that you need to perform.
Back Up Data, see Step 5 on page 54
Search Tree for eDirectory/NDS versions, see Step 6 on page 54
Prepare for New eDirectory, see Step 7 on page 55
(Conditional) Generate GUIDs on servers running NetWare 4, see Step 8 on page 55
Prepare for a server upgrade, see Step 9 on page 55
(Conditional) Prepare Cluster for Upgrade, see Step 10 on page 55
Update the Certificate Authority (CA) Objects, see Step 11 on page 56
(Conditional) Prepare for Universal Password, see Step 12 on page 56
(Conditional) Prepare for CIFS/AFP, see Step 13 on page 56
(Conditional) Verify NICI Keys, see Step 14 on page 56
(Optional) Schema Update, see Step 15 on page 56
5 (Optional but Recommended) Under the Network Preparation heading on the left side of the browser, click the Back Up Data link and follow the instructions that display to back up any server data and Novell eDirectory data.
Backing up your data is an optional step, but one that we recommend you complete.
6 Under the Network Preparation heading on the left side of the browser, click the Search Tree for eDirectory/NDS Versions link to update eDirectory in your tree to a level that is compatible with the version of NDS® or eDirectory installed by Novell Small Business Suite 6.6.IMPORTANT: If the tree is using NDS or eDirectory, a compatible version of NDS or eDirectory must be running on all servers in the tree.
54 Novell Small Business Suite 6.6 Overview and Installation Guide
Novell Confidential Manual (ENU) 21 December 2004
This task checks the NetWare and NDS versions of all servers and updates NetWare 4/NDS 6 and NetWare 5/NDS 7 servers to be compatible with eDirectory. It does not update NetWare servers already running eDirectory.
7 Under the Network Preparation heading on the left side of the browser, click the Prepare for New eDirectory link and follow the displayed instructions to extend the network schema.
This ensures that the new Novell Small Business Suite 6.6 server can communicate with an existing NDS/eDirectory tree.
This step requires that you have already updated NetWare 4/NDS 6 and NetWare 5/NDS 7 servers to be compatible with eDirectory as described in Step 6. It also requires access to a server with a Read/Write replica of the Root partition.
8 (Conditional) If you have NetWare 4.11 or 4.2/NDS 6 servers in your tree, under the Network Preparation heading on the left side of the browser, click the Generate GUIDs on NetWare 4 Servers link and follow the instructions to generate the necessary GUIDs.IMPORTANT: The GUID generator in Deployment Manager does not work with NetWare 4.10 servers, only with 4.11 or 4.2 servers. If there is a NetWare 4.10 server in your tree, it must be removed or you cannot install a new Novell Small Business Suite 6.6 server.
This step requires you to update NetWare 4.11 or 4.2/NDS 6 servers to be compatible with eDirectory and to extend the core schema of your tree, as described in Step 6 and Step 7. Step 6 copied a new ds.nlm and a new sguid.nlm that support GUID generation to each selected NetWare 4 server. With these updated files in place, and with the core schema extended and synchronized, when ds.nlm is restarted on a NetWare 4.11 or 4.2/NDS 6 server, it automatically generates GUIDs for objects in master replicas on that server.
Even though the new GUID generator for NetWare 4 helps to avoid GUID compatibility issues, problems can still occur. Always back up all file system trustees before any upgrade or migration to Novell Small Business Suite 6.6. If a problem does occur, see TID# 10078892 - Trustee Assignments Appear to No Longer Work After NetWare 4x to NetWare 6x Upgrade (http://support.novell.com/cgi-bin/search/searchtid.cgi?/10078892.htm) for more information.
9 (Conditional) Under the Network Preparation heading on the left side of the browser, click the Prepare a Server for Upgrade link and follow the displayed instructions to run a health check on the server that you are upgrading to OES NetWare.
This task runs a health check utility on an existing NetWare server to ensure that there is enough memory, a sys: volume is in place, and the server meets the minimum requirements for the upgrade. The utility reports if problems are detected that could cause the upgrade to fail.
10 (Conditional) If you are upgrading Novell Cluster Services from NetWare 5.1 and your cluster has shared storage, you must prepare your NetWare 5.1 cluster servers before upgrading them to OES NetWare and before upgrading Novell Cluster Services. under the Network Preparation heading on the left side of the browser, click the Prepare Cluster for Upgrade link to follow the instructions to run the Prepare a Novell Cluster for Upgrade program.
This preparation is necessary to ensure existing shared-volume trustee assignments can be used after the upgrade.
This task is necessary only if you are upgrading from a NetWare 5.1 cluster to OES NetWare, not if you are upgrading from a NetWare 6.0 cluster.
Installing a New Novell Small Business Suite Server 55
Novell Confidential Manual (ENU) 21 December 2004
11 Under the Network Preparation heading on the left side of the browser, click the Update Certificate Authority Objects link and follow the instructions displayed to create or update a Security container object and a Certificate Authority (CA) object.
Novell Certificate ServerTM is an integrated Public Key Infrastructure (PKI) built in to eDirectory. The NetWare installation process uses Novell Certificate Server to create an Organizational Certificate Authority and to issue certificates for applications that consume Secure Socket Layer (SSL) services.
Novell delivered a base-level PKI with NetWare 5.0. Because your network might be configured with the NetWare 5.0 PKI, you should follow the steps outlined here to properly upgrade from the NetWare 5.0 PKI and to correctly configure your network for Novell Certificate Server.
12 (Optional) Under the Network Preparation heading on the left side of the browser, click the Prepare for Universal Password link, read the explanation of the Universal Password feature of NetWare 6.5, click the Universal Password Deployment Guide link, then follow the step-by-step instructions in the deployment guide for setting up the Universal Password feature.
13 (Conditional) Under the Network Preparation heading on the left side of the browser, click the Prepare for CIFS/AFP link and follow the instructions displayed to prepare your new NetWare 6.5 server so CIFS (Microsoft Windows native networking workstations) and AFP (Apple* Macintosh native networking workstations) users can log in to it.
14 (Conditional) Under the Network Preparation heading on the left side of the browser, click the Verify NICI Keys link and follow the displayed instructions to check your eDirectory tree for SDI key consistency.
If you have updated eDirectory, Novell recommends that you check your tree for SDI key consistency. If the tree contains invalid SDI keys, then CIFS, AFP, Nsure Identity Manager, and Universal Password might not work after installing OES NetWare.
If any invalid keys exist, they should be fixed by running SDIDIAG at the server console.
15 (Optional) Under the Network Preparation heading on the left side of the browser, click the Schema Update link to extend the eDirectory schema for the products you plan to install on your OES NetWare servers.
This optional task extends the eDirectory schema for all of the products and services that are bundled with OES NetWare. Doing so eliminates the need for future server installers to have administrative rights to the root of the tree.
16 After you have completed the Network Preparation section of Novell Deployment Manager, click the Overview link located under the Install/Upgrade Options heading to help you choose the install option that best meets your needs.
17 (Optional) If you have a new computer that you want to install Novell Small Business Suite 6.6 on, or if you are adding a Novell Small Business Suite 6.6 server to your existing network, click the Install NetWare 6.5 link under the Install/Upgrade Options heading for instructions.
18 (Optional) To automate the Novell Small Business Suite 6.6 installation using a response file and to access the Response File Generator utility which assists you in creating response files, click the Automate an Installation link under the Install/Upgrade Options heading for instructions.
56 Novell Small Business Suite 6.6 Overview and Installation Guide
Novell Confidential Manual (ENU) 21 December 2004
After completing the Novell Small Business Suite 6.6 installation, run the Deployment Manager again and click the links under the Post-Install Tasks heading for information on the following:
Creating additional volumes
Migrating to new hardware using the Novell Migration Wizard Utility
Consolidating servers with the Novell Server Consolidation Utility
Doing a post-install of products either locally or remotely
Using DSREPAIR
Upgrading a cluster after the Novell Small Business Suite 6.6 installation
After deciding on an installation or upgrade option, exit the Novell Deployment Manager and prepare the computer to be a Novell Small Business Suite 6.6 server (see “Preparing the Computer” on page 57).
Installing a NetWare 6.5 Server into a Pure NetWare 4.x eDirectory Tree
To install a NetWare 6.5 server into a pure NetWare 4 tree, run the Novell Deployment Manager utility and follow the directions to copy updated NetWare 4 NDS files to the network, generate GUIDs, and update the schema.
After running the Deployment Manager, but before attempting to install the NetWare 6.5 server, do the following.NOTE: These steps are necessary only in a pure NetWare 4 tree. If any NetWare 5.1 or NetWare 6.0 servers already exist in the tree, this procedure is not necessary.
1 Run DSRepair on a server that holds a writable copy of the Root partition.
2 Select Advanced Options Menu > Global Schema Operations.
3 Log in as the Admin, if necessary, then run the Post NetWare 5 Schema Update.
4 Return to the main menu and select Advanced Options Menu > Repair Local DS Database.
5 Set the Rebuild Operational Schema option to Yes.
6 Run the local database repair.
Preparing the ComputerTo prepare your computer for Novell Small Business Suite 6.6:
1 Install computer and networking hardware.
Follow the manufacturer’s instructions to install and connect the network board and network cabling to your computer. Make sure that all storage devices are properly attached to storage adapters.
2 Create and format a boot partition
NetWare requires a boot partition in standard FAT format to start the computer and load NetWare. The boot partition contains the Novell Small Business Suite and NetWare startup and server files. If a boot partition already exists on your computer, skip to “Accessing the Installation Files” on page 58.IMPORTANT: You should increase the size of your boot partition to accommodate your specific configuration requirements. See “Meeting System and Software Requirements” on page 49.
Installing a New Novell Small Business Suite Server 57
Novell Confidential Manual (ENU) 21 December 2004
To create and format a DOS boot partition:
2a Back up any desired data to another computer or offline storage media.
2b Insert Novell Small Business Suite 6.6 NetWare 6.5 CD 1 Operating System with SP3 CD and boot the computer.
2c Complete one of the following:
If the computer boots from the CD, follow the on-screen prompts then skip to “Selecting the Initial Installation Settings” on page 61. During the Default or Manual installation types you have the options to create or change the existing DOS partition.
If you will be installing from files located on another server, continue with Step 2d.
If the computer does not boot from the CD, continue with Step 2d.
2d Boot your computer with DOS 3.3 or later.
2e (Conditional) If the computer already has an operating system installed, such as Windows or NetWare, completely remove the partitions and the operating system.
You can use FDISK to remove partitions, or the partitions can be deleted at the Prepare Boot Partition screen during the server installation.
2f (Optional) If you want to use FDISK to create an active DOS partition, enter FDISK at the DOS prompt.
Create a primary DOS partition and make it the active partition. For minimum requirements, see “Meeting System and Software Requirements” on page 49.
The computer will restart.
2g Format and transfer DOS system files to the partition by changing to drive A: and entering FORMAT C: /S at the DOS prompt.
2h In the config.sys file, set FILES=50.
2i Run SCANDISK or CHKDSK /F (depending on the machine’s version of DOS) on the C: drive before beginning the installation procedure.
Your computer should now have an active DOS partition that meets or exceeds the minimum requirements. Continue the installation by accessing the installation files.
Accessing the Installation FilesNovell Small Business Suite 6.6 can be installed from the server’s local CD drive or from installation files located on the network.
1 Insert the Novell Small Business Suite 6.6 NetWare 6.5 CD 1 Operating System with SP3 CD and boot the computer.
58 Novell Small Business Suite 6.6 Overview and Installation Guide
Novell Confidential Manual (ENU) 21 December 2004
2 Do one of the following:
If the computer boots from the CD, follow the on-screen prompts and skip to “Selecting the Initial Installation Settings” on page 61.
Starting in NetWare 6.5 SP1, Novell added an option during a new server install to use NetWare as the Boot OS instead of Caldera DOS (overlay install only). This option allows you to proceed with the OES NetWare Install program directly without having to boot DOS first. To use this option, make sure your computer is set up to boot from the CD drive before the hard drive. Skip to “Selecting the Initial Installation Settings” on page 61.
If the computer does not boot from the CD, continue with Step 3.
3 Boot your computer with DOS 3.3 or later.
4 Access the Novell Small Business Suite 6.6 NetWare 6.5 CD 1 Operating System with SP3 CD.
If you installed CD drivers in to the disk drive, make sure that the logical filename of your CD drive (specified in config.sys and autoexec.bat) is not CDROM, CDINST, or CDDVD.
5 (Optional) To install from Novell Small Business Suite 6.6 files located on a network, do the following:
5a Make sure that the DOS config.sys file contains the FILES=50 and BUFFERS=30 commands.
5b Install the Novell Client for DOS and Windows 3.1x or IP Server Connection Utility software located on the Novell Client Software CD.
5c Copy the contents of both the Novell Small Business Suite 6.6 NetWare 6.5 CD 1 Operating System with SP3 CD and the Novell Small Business Suite 6.6 NetWare 6.5 CD 2 Products with SP3 CD to the same directory on your network.
5d (Conditional) If you want to copy the GroupWise and Messenger software as part of the installation, you must also copy the contents of the following CDs to the same directory on your network:
GroupWise 6.5.4 (NetWare) Admin CD
GroupWise 6.5.4 Windows Client CD
GroupWise 6.5.4 Messenger CD
In copying these CDs to the network, you might see messages regarding duplicate files. This is because some of the files for Novell Small Business Suite are placed on both CDs. Proceed past the duplicate file messages and continue the copy to the network.
TIP: If you attempt to install a new server into your tree at the same time that you upgrade another server in the tree to NetWare, you might have difficulty logging in to the server being upgraded until the other server’s installation is complete. Install only one server at time.
Using Updated Files during the Installation
The c:\nwupdate directory structure for NetWare mirrors the directory structure of the install image. Updated files should be placed in the c:\nwupdate subdirectory that corresponds to where they are located in the install image.
Installing a New Novell Small Business Suite Server 59
Novell Confidential Manual (ENU) 21 December 2004
There are two notable exceptions to this rule:
1. Install scripts (sys_inst.ils, dos_inst.ils, defpre.ils, defcopy.ils, etc.) should be placed in the c:\nwupdate directory.NOTE: Defpre.ils and defcopy.ils are dummy scripts called from dos_inst.ils (the first C-Worthy copy) and sys_inst.ils (the second C-Worthy copy), respectively, and are intended to be modified for OEM use. These scripts are also used in NetWare 6.0.
2. The subdirectories of the c:\nwupdate\drivers directory (\storage, \lan, \psm, \sbd, \cios) have been eliminated. Their files and subdirectories should be placed in the c:\nwupdate\drivers directory.
There is a blackout period during the install when access to the DOS drives (C:, D:, etc.) is prohibited. This occurs during the time that platform support and storage drivers (PSMs, HAMs, SBDs, and CDMs) are detected and loaded. However, they can be loaded from a floppy disk instead.
Navigating in the Character-Based ScreensThe initial screens of the installation program display in text-based mode. Auto-detected and default settings appear on each screen.
To accept the detected and default settings:
1 Use the arrow keys to select Continue in the Options box.
2 Press Enter.
To modify the settings to meet the needs of your networking environment:
1 Use the arrow keys to select Modify in the Options box, then press Enter.
2 Select the field to be modified, then press Enter.
3 Select or type the appropriate value.
Some screens require additional keystrokes in order to navigate through the interface. Information about screen navigation appears at the bottom of each screen.
Installing the SoftwareInstalling the software requires you to complete the following steps:
1. Beginning the Installation (page 61)
2. Selecting the Initial Installation Settings (page 61)
3. Copying System Files (page 64)
4. Choosing a Server Pattern (page 64)
5. Verifying Products to Install (page 83)
6. Verifying Pattern Selection (page 83)
7. Naming the Server (page 84)
8. Installing Networking Protocols (page 85)
9. Specifying Hostnames (page 88)
10. Setting Up Domain Name Service (page 88)
60 Novell Small Business Suite 6.6 Overview and Installation Guide
Novell Confidential Manual (ENU) 21 December 2004
11. Setting the Server Time Zone and Time Synchronization Method (page 89)
12. Licensing the Server (page 92)
13. Configuring LDAP (page 92)
14. Selecting the Login Method (page 93)
15. Installing DNS/DHCP (Conditional) (page 93)
16. Modifying iFolder Server Options (Conditional) (page 94)
17. Modifying MySQL Options (Conditional) (page 94)
18. Modifying exteNd Application Server - Details (Conditional) (page 95)
19. Modifying exteNd Application Server - Database Options (Conditional) (page 96)
20. Modifying Novell Nsure Audit Starter Pack - Component Selection (Conditional) (page 96)
21. Modifying Novell Nsure Audit Starter Pack - Database Options (Conditional) (page 97)
22. Installing NetStorage (Conditional) (page 98)
Beginning the InstallationTo start the server installation program, complete any of the following:
To use the bootable NetWare option, insert the Novell Small Business Suite 6.6 NetWare 6.5 CD 1 Operating System with SP3 CD and boot the computer. Unless you press a key to interrupt the installation preparation, the Installation program launches automatically.
If you want to specify additional installation parameters, press any key before the installation program begins, press P, and then enter the parameters using this syntax:
[INST: parameter1 parameter2 parameter3 ...]
For more information, press H to view the online help.
To start the installation program on the CD from DOS, change to the CD drive letter and enter install.
Log in to the network to access the installation files on the network.To run the installation program from a network drive, log in to the network, access the directory where you copied the installation files, and enter install.
Selecting the Initial Installation SettingsSelecting the initial installation settings requires the following tasks:
1 Selecting the Language and Regional Settings (page 61)
2 Accepting the License Agreement (page 62)
3 Selecting the Type of Installation (page 62)
Selecting the Language and Regional Settings
The installation program is available in several languages. You can install other language options (such as the language for the users or the operating system) later during the installation.
1 Select the language, then press Enter.
The next screen allows you to modify the regional settings. The default settings are shown.
Installing a New Novell Small Business Suite Server 61
Novell Confidential Manual (ENU) 21 December 2004
2 Do one of the following:
Accept the defaults by selecting Continue and then pressing Enter.
Change the settings by selecting Modify, pressing Enter, making the changes, pressing Enter, selecting Continue and then pressing Enter.
Accepting the License Agreement
Accepting each License Agreement means that you have read and agreed to the terms and conditions contained in the License Agreement.
1 Press F10 to accept the Novell Software License Agreement.
2 Press F10 to accept the JReport Runtime License Agreement.
Selecting the Type of Installation
You can select either a Default Installation or a Manual Installation.
Default Installation
The Default Installation automatically detects drivers and installs the Novell Small Business Suite 6.6 server with default settings. The settings include the following:
8 GB volume sys: (remaining disk space left is used for a second volume named Data)
LAN and disk drivers auto-discovered and loaded
SVGA Plug N Play video modes
Mouse auto-discovered and loaded
If you have an existing boot partition on the server, but the installation determines that it is not big enough for the install to continue, you will now see the Prepare Boot Partition screen.
The Prepare Boot Partition screen displays the default settings for the DOS partition, NetWare partition, and free space.NOTE: If you select a Default Installation, you will still have the chance later in the installation to select the individual products that you want to install.
To accept the default settings, select Continue and then press Enter.
Then continue with “Copying System Files” on page 64.
Manual Installation
The Manual Installation allows you to modify detected drivers and choose specific configuration options for your networking environment. It also allows for the manual configuration of the default settings used in the Default Installation. You must choose Manual Installation to create volumes other than the sys: volume during the install.
To perform a manual installation type:
1 Select Manual.
2 Select Continue, then press Enter.
The Prepare Boot Partition screen displays the default settings for the DOS partition, NetWare partition, and free space.
62 Novell Small Business Suite 6.6 Overview and Installation Guide
Novell Confidential Manual (ENU) 21 December 2004
3 Prepare the boot partition by doing the following
Accept the default settings by selecting Continue and pressing Enter.
Modify the default settings by selecting Modify, pressing Enter, making the desired changes, selecting Continue, then pressing Enter.
4 Verify the server settings by doing one of the following:
Accept the default settings by selecting Continue and pressing Enter.
Modify the default settings or edit the Set parameters by selecting Modify, pressing Enter, making the desired changes, selecting Continue, then pressing Enter.
The following defaults are set:
A server ID number is provided
The option to load the server at reboot is set to Yes
If you don’t want to automatically restart the NetWare server after a reboot, change the setting to No.
The option to modify the boot sector is set to DOS
If NetWare is selected and DOS is the OS that normally boots when the system comes up, then the installation modifies the boot sector to load NetWare instead of DOS.
If DOS is selected and NetWare is the normal boot OS, then the installation will restore the DOS boot sector.
The option to allow unsupported drivers is set to No.
If Yes is selected, then drivers that have not been tested and approved for NetWare are automatically selected and loaded if no other drivers are available.
SVGA Plug N Play is listed as the default for video.
If you choose to edit the server SET parameters, a screen will display where you can specify new SET parameters or other commands (LOAD, etc.). SET parameters specified here are saved and run from the server’s registry. All other commands specified here are saved and run from the startup.ncf file.
A file copy procedure begins.
During the file copy, the device drivers are detected and you are presented with a screen or screens where you can modify the settings. If no known drivers are selected for any of these devices, such as your network board, you must modify the setting with a valid driver before you can continue.
5 (Conditional) Verify device driver settings by doing one of the following:
Accept the default settings by selecting Continue and then pressing Enter.
Modify the default settings by selecting Modify, pressing Enter, making the desired changes, selecting Continue, then pressing Enter.
The NSS Management Utility (nssmu.nlm) now displays.
NSSMU is a console-based utility for managing storage devices on a server. NSSMU is the interface you use to set up at least your basic storage solution during the installation of the operating system.
Installing a New Novell Small Business Suite Server 63
Novell Confidential Manual (ENU) 21 December 2004
6 (Conditional) If an existing NetWare partition or volume is discovered on the server, NSSMU indicates this. You are given two options: remove only the NetWare sys: volume and pool/partitions or remove all NetWare volumes and partitions.
6a Select the desired option.
6b Press Enter.
You now see the Create SYS Volume screen.
7 On the Create SYS Volume screen, do the following to create volume sys:.
7a Select the desired option then press Enter.
7b Select the sys: volume size option.
The default for volume sys: is 8 GB.
7c Specify the desired size of the sys: volume in MB.
7d Press Enter to select the Create option > Enter.
You now see the NSSMU Main Menu screen.
From this screen, you can create or modify devices, partitions, pools, raid devices, and volumes. At this point, the only volumes you create are NSS pool or volumes; if needed, you can create Traditional volume using Novell Remote Manager after the installation.
8 From the NSSMU Main Menu create or modify any of the options presented, select the desired option, then press Enter. Follow the on-screen prompts, then return to the Main Menu when finished.
For more information, see “NSSMU” (http://www.novell.com/documentation/oes/utlrfenu/data/alce3ue.html#btnb3u5) in the Utilities Reference for OES.
9 Select the Continue Installation option, then press Enter.
Continue with the next section, Copying System Files.
Copying System FilesThe Novell Small Business Suite 6.6 and NetWare system files are copied to volume sys:. The file copy process takes several minutes.
If you are installing from the network, you are prompted to reconnect to the network. To continue the installation, type the password for the user that originally logged in. The file copy process continues for a few minutes, then the NetWare installation program then continues in graphical display mode.
Although a mouse is recommended, you can use keyboard commands to navigate through the installation program. For more information on keyboard commands, see “Keyboard Commands” on page 259 for a table listing the graphical mode keyboard actions.
The next sections explain how to complete the server installation.
Choosing a Server PatternAfter the file copy is complete, the Choose a Pattern page displays and you are given the opportunity to select a server pattern complete the server installation. Placing your cursor over the name of the pattern displays a description of that server in the Description window.
64 Novell Small Business Suite 6.6 Overview and Installation Guide
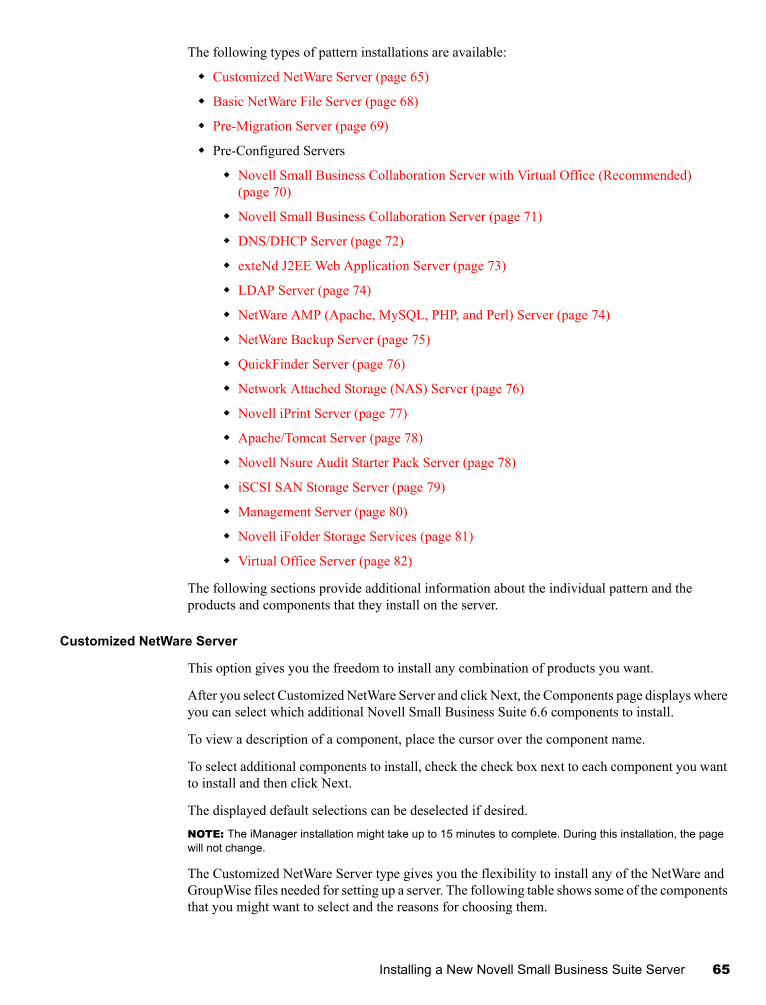
Novell Confidential Manual (ENU) 21 December 2004
The following types of pattern installations are available:
Customized NetWare Server (page 65)
Basic NetWare File Server (page 68)
Pre-Migration Server (page 69)
Pre-Configured Servers
Novell Small Business Collaboration Server with Virtual Office (Recommended) (page 70)
Novell Small Business Collaboration Server (page 71)
DNS/DHCP Server (page 72)
exteNd J2EE Web Application Server (page 73)
LDAP Server (page 74)
NetWare AMP (Apache, MySQL, PHP, and Perl) Server (page 74)
NetWare Backup Server (page 75)
QuickFinder Server (page 76)
Network Attached Storage (NAS) Server (page 76)
Novell iPrint Server (page 77)
Apache/Tomcat Server (page 78)
Novell Nsure Audit Starter Pack Server (page 78)
iSCSI SAN Storage Server (page 79)
Management Server (page 80)
Novell iFolder Storage Services (page 81)
Virtual Office Server (page 82)
The following sections provide additional information about the individual pattern and the products and components that they install on the server.
Customized NetWare Server
This option gives you the freedom to install any combination of products you want.
After you select Customized NetWare Server and click Next, the Components page displays where you can select which additional Novell Small Business Suite 6.6 components to install.
To view a description of a component, place the cursor over the component name.
To select additional components to install, check the check box next to each component you want to install and then click Next.
The displayed default selections can be deselected if desired.NOTE: The iManager installation might take up to 15 minutes to complete. During this installation, the page will not change.
The Customized NetWare Server type gives you the flexibility to install any of the NetWare and GroupWise files needed for setting up a server. The following table shows some of the components that you might want to select and the reasons for choosing them.
Installing a New Novell Small Business Suite Server 65
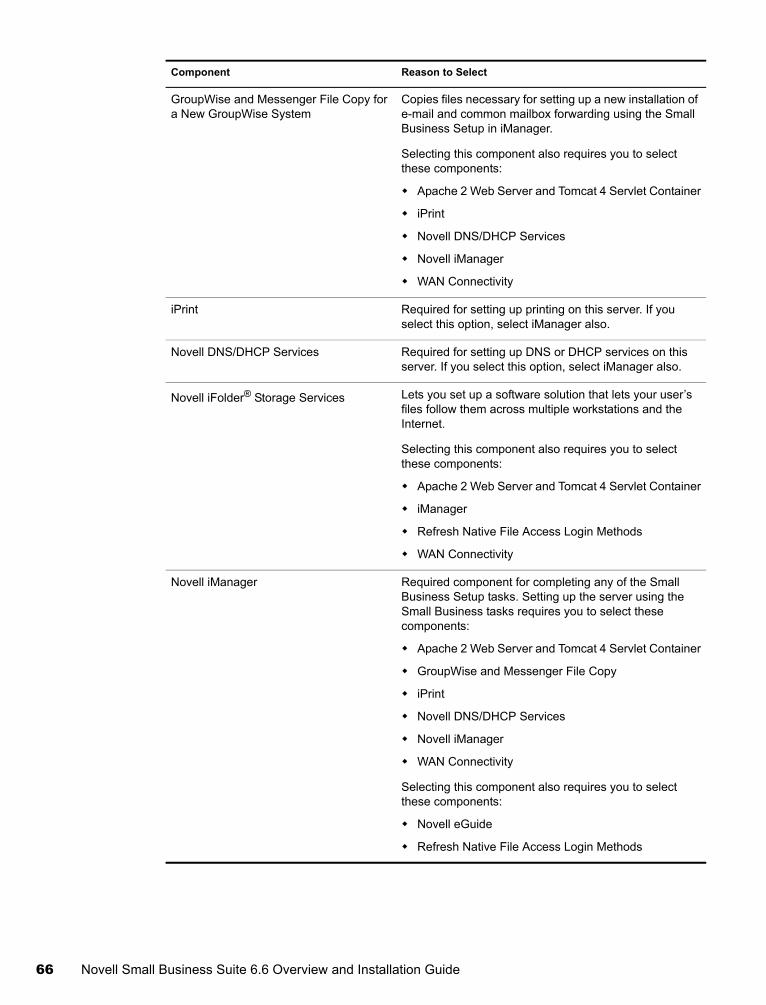
Novell Confidential Manual (ENU) 21 December 2004
Component Reason to Select
GroupWise and Messenger File Copy for a New GroupWise System
Copies files necessary for setting up a new installation of e-mail and common mailbox forwarding using the Small Business Setup in iManager.
Selecting this component also requires you to select these components:
Apache 2 Web Server and Tomcat 4 Servlet Container
iPrint
Novell DNS/DHCP Services
Novell iManager
WAN Connectivity
iPrint Required for setting up printing on this server. If you select this option, select iManager also.
Novell DNS/DHCP Services Required for setting up DNS or DHCP services on this server. If you select this option, select iManager also.
Novell iFolder® Storage Services Lets you set up a software solution that lets your user’s files follow them across multiple workstations and the Internet.
Selecting this component also requires you to select these components:
Apache 2 Web Server and Tomcat 4 Servlet Container
iManager
Refresh Native File Access Login Methods
WAN Connectivity
Novell iManager Required component for completing any of the Small Business Setup tasks. Setting up the server using the Small Business tasks requires you to select these components:
Apache 2 Web Server and Tomcat 4 Servlet Container
GroupWise and Messenger File Copy
iPrint
Novell DNS/DHCP Services
Novell iManager
WAN Connectivity
Selecting this component also requires you to select these components:
Novell eGuide
Refresh Native File Access Login Methods
66 Novell Small Business Suite 6.6 Overview and Installation Guide
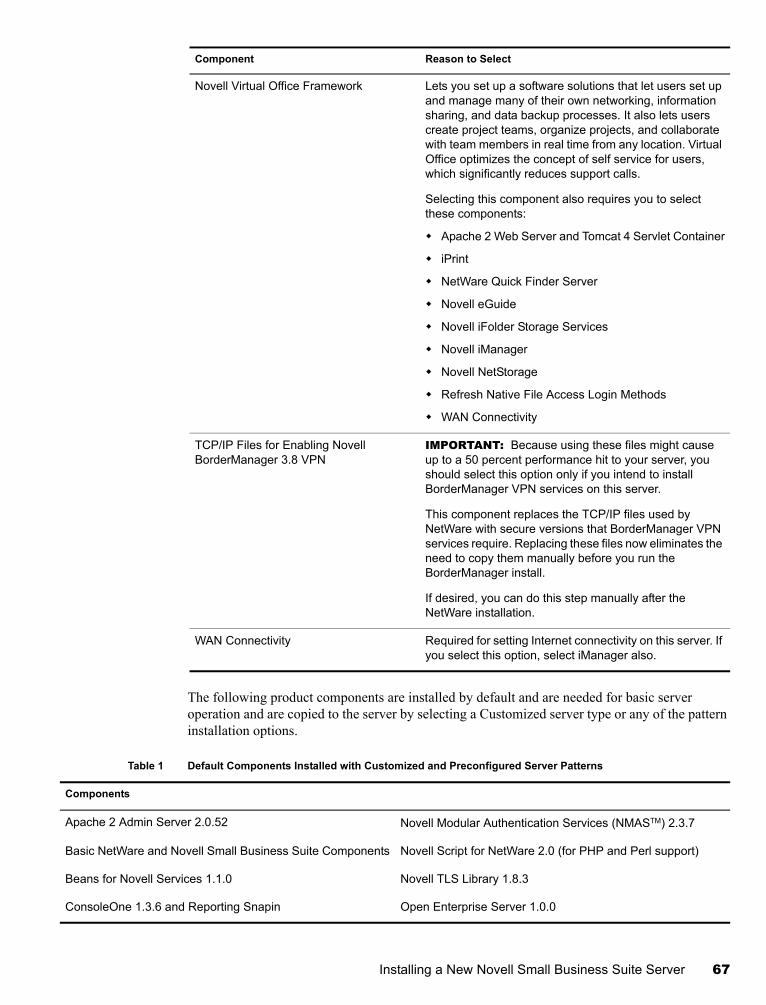
Novell Confidential Manual (ENU) 21 December 2004
The following product components are installed by default and are needed for basic server operation and are copied to the server by selecting a Customized server type or any of the pattern installation options.
Table 1 Default Components Installed with Customized and Preconfigured Server Patterns
Novell Virtual Office Framework Lets you set up a software solutions that let users set up and manage many of their own networking, information sharing, and data backup processes. It also lets users create project teams, organize projects, and collaborate with team members in real time from any location. Virtual Office optimizes the concept of self service for users, which significantly reduces support calls.
Selecting this component also requires you to select these components:
Apache 2 Web Server and Tomcat 4 Servlet Container
iPrint
NetWare Quick Finder Server
Novell eGuide
Novell iFolder Storage Services
Novell iManager
Novell NetStorage
Refresh Native File Access Login Methods
WAN Connectivity
TCP/IP Files for Enabling Novell BorderManager 3.8 VPN
IMPORTANT: Because using these files might cause up to a 50 percent performance hit to your server, you should select this option only if you intend to install BorderManager VPN services on this server.
This component replaces the TCP/IP files used by NetWare with secure versions that BorderManager VPN services require. Replacing these files now eliminates the need to copy them manually before you run the BorderManager install.
If desired, you can do this step manually after the NetWare installation.
WAN Connectivity Required for setting Internet connectivity on this server. If you select this option, select iManager also.
Components
Apache 2 Admin Server 2.0.52 Novell Modular Authentication Services (NMASTM) 2.3.7
Basic NetWare and Novell Small Business Suite Components Novell Script for NetWare 2.0 (for PHP and Perl support)
Beans for Novell Services 1.1.0 Novell TLS Library 1.8.3
ConsoleOne 1.3.6 and Reporting Snapin Open Enterprise Server 1.0.0
Component Reason to Select
Installing a New Novell Small Business Suite Server 67
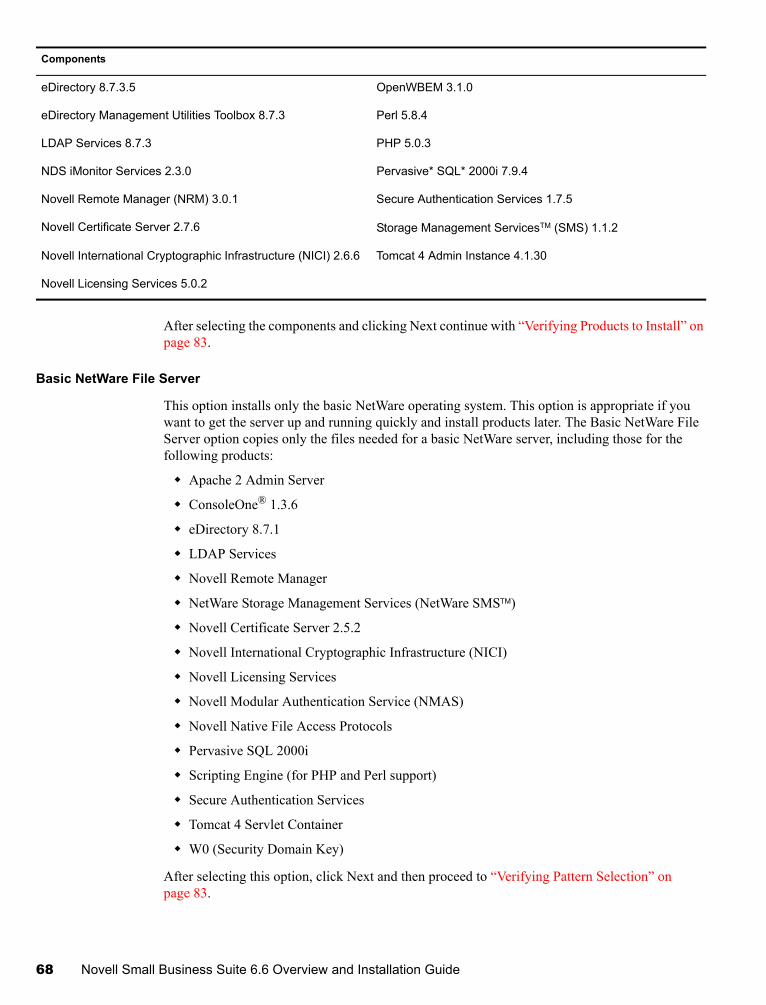
Novell Confidential Manual (ENU) 21 December 2004
After selecting the components and clicking Next continue with “Verifying Products to Install” on page 83.
Basic NetWare File Server
This option installs only the basic NetWare operating system. This option is appropriate if you want to get the server up and running quickly and install products later. The Basic NetWare File Server option copies only the files needed for a basic NetWare server, including those for the following products:
Apache 2 Admin Server
ConsoleOne® 1.3.6
eDirectory 8.7.1
LDAP Services
Novell Remote Manager
NetWare Storage Management Services (NetWare SMSTM)
Novell Certificate Server 2.5.2
Novell International Cryptographic Infrastructure (NICI)
Novell Licensing Services
Novell Modular Authentication Service (NMAS)
Novell Native File Access Protocols
Pervasive SQL 2000i
Scripting Engine (for PHP and Perl support)
Secure Authentication Services
Tomcat 4 Servlet Container
W0 (Security Domain Key)
After selecting this option, click Next and then proceed to “Verifying Pattern Selection” on page 83.
eDirectory 8.7.3.5 OpenWBEM 3.1.0
eDirectory Management Utilities Toolbox 8.7.3 Perl 5.8.4
LDAP Services 8.7.3 PHP 5.0.3
NDS iMonitor Services 2.3.0 Pervasive* SQL* 2000i 7.9.4
Novell Remote Manager (NRM) 3.0.1 Secure Authentication Services 1.7.5
Novell Certificate Server 2.7.6 Storage Management ServicesTM (SMS) 1.1.2
Novell International Cryptographic Infrastructure (NICI) 2.6.6 Tomcat 4 Admin Instance 4.1.30
Novell Licensing Services 5.0.2
Components
68 Novell Small Business Suite 6.6 Overview and Installation Guide
Novell Confidential Manual (ENU) 21 December 2004
Pre-Migration Server
This option installs a NetWare server that an existing server will be migrated to at a later time using the NetWare Migration Wizard Utility. The Migration Wizard Utility connects the servers involved in a migration using one of two methods, SLP or the sys:\etc\hosts file.
Minimum System Requirements
Single processor
Server-class PC with a Pentium III 550 MHz or AMD K7 processor
512 MB RAM
Recommended System Requirements
Dual processor
Server-class PC with a Pentium III 550 MHz or AMD K7 processor
1 GB RAM
The Pre-Migration Server option copies only the files needed for a Pre-Migration server, including those for the following products:
eDirectoryNDS iMonitor ServicesNovell Remote ManagerNovell Certificate Server Novell International Cryptographic Infrastructure (NICI)Novell Licensing ServicesNovell Modular Authentication Services (NMAS)Novell Script for NetWare (for PHP and Perl support)Secure Authentication ServicesStorage Management Services (SMS)
In order to successfully complete a migration, either SLP must be configured on the Pre-Migration Server or the sys:\etc\hosts file on the Pre-Migration Server must contain the IP address and server name of the source server involved in the migration.
For instructions on how to configure SLP on this server, see “Installing IP and IPX” on page 86.
After completing the Pre-Migration Server installation, to modify the sys:\etc\hosts file on the Pre-Migration Server:
1 On the Pre-Migration Server’s server console, enter edit.
2 Press Insert.
3 Select sys:, then press Enter.
4 Select etc, then press Enter.
5 Select hosts, then press Enter > Enter.
6 Add the IP address and server name of the source server involved in the migration project.
Type the IP address and server name as xxx.xxx.xxx.xxx Server_Name.
7 Save the file.
8 Run the migration project.
Installing a New Novell Small Business Suite Server 69
Novell Confidential Manual (ENU) 21 December 2004
After selecting this option, click Next and then proceed to “Verifying Pattern Selection” on page 83.
Novell Small Business Collaboration Server with Virtual Office (Recommended)
This option installs all components for setting up and managing a Novell Small Business server plus components for GroupWise and Virtual Office. If you want a complete collaboration solution, select this pattern.
It allows both client-based and Web-based access to file, print, directory, and e-mail services. Local users can access collaboration services through GroupWise and Novell clients; remote users can access these same services through a Virtual Office Web interface.
After the server installation is complete, you can access the Small Business Setup Role in iManager to help you simplify your configuration of Internet Connectivity, GroupWise and Messenger, DNS/DHCP, and iPrint.TIP: To see the individual products selected in this pattern, select it and click Next. Then click Back and select the Customize option. All the products will display individually with the pattern defaults checked.
Minimum System Requirements
Single processor
Server-class PC with a Pentium III 550 MHz or AMD K7 processor
512 MB RAM
Recommended System Requirements
Dual processor
Server-class PC with a Pentium III 550 MHz or AMD K7 processor
1 GB RAM
IDS/SCSI
The Novell Small Business Collaboration Server with Virtual Office option is created by copying only the files needed including the following components:
GroupWise and Messenger File Copy for a New GroupWise System that copies files necessary to install and configure a new GroupWise system and GroupWise Messenger.
For information about configuring GroupWise after the installation, go to the Small Business Setup > Set Up GroupWise task in iManager.
Virtual Office components that include:
NetWare Quick Finder ServerNovell eGuideNovell iFolder Storage ServicesNovell NetStorageNovell Virtual Office FrameworkRefresh Native File Access Login Methods (NFAP)
70 Novell Small Business Suite 6.6 Overview and Installation Guide

Novell Confidential Manual (ENU) 21 December 2004
Small Business Server components that include:
Apache 2 Web Server and Tomcat 4 Servlet ContaineriPrintNovell DNS/DHCP ServicesNovell iManager 2.5WAN Connectivity
Files installed by default. See Table 1, “Default Components Installed with Customized and Preconfigured Server Patterns,” on page 67.
After selecting this option, click Next and then proceed to “Verifying Pattern Selection” on page 83.
Novell Small Business Collaboration Server
This option installs all components for setting up and managing a Novell Small Business server with GroupWise.
This pattern allows GroupWise and Novell client-based access to files, printing, and e-mail (both local and Internet.)
After the server installation is complete, you can access the Small Business Setup Role in iManager to help you simplify your configuration of Internet Connectivity, GroupWise and Messenger, DNS/DHCP, and iPrint.TIP: To see the individual products selected in this pattern, select it and click Next. Then click Back and select the Customize option. All the products will display individually with the pattern defaults checked.
Minimum System Requirements
Single processor
Server-class PC with a Pentium III 550 MHz or AMD K7 processor
512 MB RAM
Recommended System Requirements
Dual processor
Server-class PC with a Pentium III 550 MHz or AMD K7 processor
1 GB RAM
IDS/SCSI
4 GB
The Novell Small Business Collaboration Server option is created by copying only the files needed, including those for the following products:
GroupWise and Messenger File Copy for a New GroupWise System that copies files necessary to install and configure a new GroupWise system and GroupWise Messenger.
For information about configuring a GroupWise Server after the installation, go to the Small Business Setup > Set Up GroupWise task in iManager.
Apache 2 Web Server and Tomcat 4 Servlet Container
iPrint
Novell DNS/DHCP Services
Installing a New Novell Small Business Suite Server 71
Novell Confidential Manual (ENU) 21 December 2004
Novell iManager 2.5
WAN Connectivity
Files installed by default. See Table 1, “Default Components Installed with Customized and Preconfigured Server Patterns,” on page 67.
After selecting this option, click Next and then proceed to “Verifying Pattern Selection” on page 83.
DNS/DHCP Server
This option integrates the Domain Name System (DNS) and Dynamic Host Configuration Protocol (DHCP) into the eDirectory database. Integrating these services into eDirectory provides centralized administration and enterprise-wide management of network (IP) addresses, configuration, and hostnames.
Minimum System Requirements
Single processor
Server-class PC with a Pentium III 550 MHz or AMD K7 processor
512 MB RAM
Recommended System Requirements
Dual processor
Server-class PC with a Pentium III 550 MHz or AMD K7 processor
1 GB RAM
The DNS/DHCP Server option extends the schema for DNS/DHCP and creates a dedicated DNS/DHCP server by copying only the files needed, including those for the following products:
Apache 2 Web Server and Tomcat 4 Servlet Container
Novell DNS/DHCP Services
Novell iManager 2.5
Files installed by default. See Table 1, “Default Components Installed with Customized and Preconfigured Server Patterns,” on page 67.
For information about configuring DNS/DHCP after the installation, see the Novell DNS/DHCP Services for NetWare Administration Guide for OES in the NetWare OES online documentation.
After selecting this option, click Next and then proceed to “Verifying Pattern Selection” on page 83.
72 Novell Small Business Suite 6.6 Overview and Installation Guide
Novell Confidential Manual (ENU) 21 December 2004
exteNd J2EE Web Application Server
This option installs a highly optimized configuration of the Novell exteNd Application Server (Enterprise Edition). It is a comprehensive J2EE server for deploying enterprise-class Web applications. It supports the full Java 2 Enterprise Edition standard: JavaServer* Pages (JSP pages), Enterprise JavaBeans* (EJBs), and all other J2EE 1.3 components and technologies. The Novell exteNdTM Application Server provides high performance, scalability, and reliability; support for rapid application development; application deployment facilities; and server management facilities.
Minimum System Requirements
Single processor
Server-class PC with a Pentium III 550 MHz or AMD K7 processor
512 MB RAM
Recommended System Requirements
Dual processor
Server-class PC with a Pentium III 550 MHz or AMD K7 processor
1 GB RAM
The exteNd J2EE Web Application Server option creates a J2EE and Web Services server by copying only the files needed, including those for the following products:
Apache 2 Web Server and Tomcat 4 Servlet Container
eGuide
exteNd J2EE Web Application Server
MySQL
Novell iManager 2.5
Novell NsureTM UDDI Server
Refresh Native File Access Login Methods
WAN Connectivity
WAN Traffic Manager Services
Files installed by default. See Table 1, “Default Components Installed with Customized and Preconfigured Server Patterns,” on page 67.
For information about configuring an exteNd J2EE Web Application Server after the installation, see the Novell exteNd Application Server help.
If you selected the exteNd J2EE Web Application Server option, click Next and then proceed to “Verifying Pattern Selection” on page 83.
Installing a New Novell Small Business Suite Server 73
Novell Confidential Manual (ENU) 21 December 2004
LDAP Server
This option installs Lightweight Directory Access Protocol (LDAP) Services for Novell eDirectory. This is a server application that lets LDAP clients (for example, Netscape* Communicator, Internet Explorer, or the Novell Import Conversion Export utility) access information stored in eDirectory. LDAP Services includes access to the following eDirectory features through LDAP: provisioning, account management, authentication, authorization, identity management, notification, reporting, qualification, and segmentation.
Minimum System Requirements
Single processor
Server-class PC with a Pentium III 550 MHz or AMD K7 processor
512 MB RAM
Recommended System Requirements
Dual processor
Server-class PC with a Pentium III 550 MHz or AMD K7 processor
1 GB RAM
The LDAP Server option creates an LDAP server by copying only the files needed, including those for the following products:
Refresh Native File Access Login Methods
Files installed by default. See Table 1, “Default Components Installed with Customized and Preconfigured Server Patterns,” on page 67.
For information about configuring LDAP after the installation, see the ““Configuring LDAP Services for Novell eDirectory”” chapter of the Novell eDirectory 8.7.3 Administration Guide in the OES NetWare online documentation.
After selecting this option, click Next and then proceed to “Verifying Pattern Selection” on page 83.
NetWare AMP (Apache, MySQL, PHP, and Perl) Server
This option lets you host Web database applications on your NetWare server. Available from the opensource community, Web database applications can be downloaded from the World Wide Web and easily deployed to your NetWare AMP server. Additionally, if you are familiar with the structured query language (SQL) and PHP or Perl scripting languages, you can develop and host your own Web database applications.
Minimum System Requirements
Single processor
Server-class PC with a Pentium III 550 MHz or AMD K7 processor
512 MB RAM
74 Novell Small Business Suite 6.6 Overview and Installation Guide
Novell Confidential Manual (ENU) 21 December 2004
Recommended System Requirements
Dual processor
Server-class PC with a Pentium III 550 MHz or AMD K7 processor
1 GB RAM
The NetWare AMP (Apache, MySQL, PHP, and Perl) Server option creates a NetWare AMP server by copying only the files needed, including those for the following products:
Apache 2 Web Server and Tomcat 4 Servlet Container
MySQL
NetWare FTP Server
Files installed by default. See Table 1, “Default Components Installed with Customized and Preconfigured Server Patterns,” on page 67.
After selecting this option, click Next and then proceed to “Verifying Pattern Selection” on page 83.
NetWare Backup Server
This option provides the infrastructure for backup and restore services on the NetWare platform. It lets you back up targets such as the file system, Novell eDirectory, and GroupWise to removable tape media for offsite storage. The NetWare Backup Server has been designed to scale with optimized hardware configurations.
Minimum System Requirements
Single processor
Server-class PC with a Pentium III 550 MHz or AMD K7 processor
512 MB RAM
Recommended System Requirements
Dual processor
Server-class PC with a Pentium III 550 MHz or AMD K7 processor
1 GB RAM
This option extends the schema for SMS and creates a dedicated NetWare Backup Server by copying only the files needed, including those for the following products:
Apache 2 Web Server and Tomcat 4 Servlet Container
Novell iManager 2.5
Files installed by default. See Table 1, “Default Components Installed with Customized and Preconfigured Server Patterns,” on page 67.
For information about configuring SMS after the installation, see the Storage Management Services Administration Guide in the OES NetWare online documentation.
After selecting this option, click Next and then proceed to “Verifying Pattern Selection” on page 83.
Installing a New Novell Small Business Suite Server 75
Novell Confidential Manual (ENU) 21 December 2004
QuickFinder Server
This option installs the QuickFinder server, a search engine capable of indexing Web site and file server content. QuickFinder lets you easily add search functionality to your Web sites.
Minimum System Requirements
Single processor
Server-class PC with a Pentium III 550 MHz or AMD K7 processor
512 MB RAM
Recommended System Requirements
Dual processor
Server-class PC with a Pentium III 550 MHz or AMD K7 processor
1 GB RAM
The QuickFinder Server option creates a QuickFinder server by copying only the files needed, including those for the following products:
Apache 2 Web Server and Tomcat 4 Servlet Container
QuickFinder Server 4.0
Files installed by default. See Table 1, “Default Components Installed with Customized and Preconfigured Server Patterns,” on page 67.
For information about configuring QuickFinder after the installation, see the “QuickFinder Server 4.0 Administration Guide” in the OES NetWare online documentation.
After selecting this option, click Next and then proceed to “Verifying Pattern Selection” on page 83.
Network Attached Storage (NAS) Server
This option gives you multiple file protocol storage for your network. NetWare supports Native File Access protocols, including Windows networking (CIFS), Novell Networking (NCPTM), UNIX/Linux Networking (NFS), Macintosh networking (AFP), and Web storage (HTTP, HTTPS, FTP, and WebDAV). Multiplatform clients and application servers can access storage using their native protocols. This deployment includes NetStorage, which allows for Web-based sharing of and access to files. From any Web client, or through WebDAV for sharing, all your data is securely accessible. NetWare is able to drop into and integrate with any of these environments seamlessly, as well as bridge these environments together.
Minimum System Requirements
Single processor
Server-class PC with a Pentium III 550 MHz or AMD K7 processor
512 MB RAM
Recommended System Requirements
Dual processor
Server-class PC with a Pentium III 550 MHz or AMD K7 processor
1 GB RAM
76 Novell Small Business Suite 6.6 Overview and Installation Guide
Novell Confidential Manual (ENU) 21 December 2004
The Network Attached Storage (NAS) Server option creates a NAS server by copying only the files needed, including those for the following products:
Apache 2 Web Server and Tomcat 4 Servlet Container
NetWare FTP Server
Novell NetStorage
For information about configuring NetStorage after the installation, see the OES NetStorage Administration Guide for NetWare in the OES NetWare online documentation.
Refresh Native File Access Login Methods
Files installed by default. See Table 1, “Default Components Installed with Customized and Preconfigured Server Patterns,” on page 67.
After selecting this option, click Next and then proceed to “Verifying Pattern Selection” on page 83.
Novell iPrint Server
This option installs our recommended print solution. Novell iPrint lets users install printers and manage print jobs using an existing Internet connection and a Web browser. iPrint generates a Web page containing a list of available printers and lets administrators create maps with printer locations that aid users in finding the printer closest to them.
Minimum System Requirements
Single processor
Server-class PC with a Pentium III 550 MHz or AMD K7 processor
512 MB RAM
Recommended System Requirements
Dual processor
Server-class PC with a Pentium III 550 MHz or AMD K7 processor
1 GB RAM
The Novell iPrint Server option installs and creates a dedicated iPrint server by copying only the files needed, including those for the following products:
Apache 2 Web Server and Tomcat 4 Servlet Container
iPrint
For information about configuring iPrint after the installation, see the OES iPrint Administration Guide for NetWare in the OES NetWare online documentation.
Novell iManager 2.5
Files installed by default. See Table 1, “Default Components Installed with Customized and Preconfigured Server Patterns,” on page 67.
After selecting this option, click Next and then proceed to “Verifying Pattern Selection” on page 83.
Installing a New Novell Small Business Suite Server 77
Novell Confidential Manual (ENU) 21 December 2004
Apache/Tomcat Server
This option lets you deploy and host servlets and Java Server Pages (JSPs). It installs Apache Web Server 2.0 and the Jakarta-Tomcat Servlet Container 4.1 for use in hosting dynamic, application-driven Web sites. Novell eDirectory Java LDAP beans are also included to provide a broad range of eDirectory authentication and identity mechanisms that are customized for use in setting up browser-based access to protected information.
If you need more functionality than you can get from servlets and JSPs, consider installing the exteNd J2EE Web Application Server pattern instead.
Minimum System Requirements
Single processor
Server-class PC with a Pentium III 550 MHz or AMD K7 processor
512 MB RAM
Recommended System Requirements
Dual processor
Server-class PC with a Pentium III 550 MHz or AMD K7 processor
1 GB RAM
The Apache/Tomcat Server option creates an Apache/Tomcat server by copying only the files needed, including those for the following products:
Apache 2 Web Server and Tomcat 4 Servlet Container
MySQL
Novell eGuide
Novell iManager 2.5
Files installed by default. See Table 1, “Default Components Installed with Customized and Preconfigured Server Patterns,” on page 67.
For information about configuring the Apache Web Server after the installation, see the Apache Web Server for NetWare Administration Guide for OES.
For information about configuring Tomcat after the installation, see the Tomcat for NetWare Administration Guide for OES.
After selecting this option, click Next and then proceed to “Verifying Pattern Selection” on page 83.
Novell Nsure Audit Starter Pack Server
This option installs the centralized auditing service that is built into NetWare 6.5. The auditing service collects security and system event data, filters the collected information to trigger real-time e-mail notifications, and enables centralized logging to a single data store.
Minimum System Requirements
Single processor
Server-class PC with a Pentium III 550 MHz or AMD K7 processor
512 MB RAM
78 Novell Small Business Suite 6.6 Overview and Installation Guide
Novell Confidential Manual (ENU) 21 December 2004
Recommended System Requirements
Dual processor
Server-class PC with a Pentium III 550 MHz or AMD K7 processor
1 GB RAM
The Novell Nsure Audit Starter Pack Server option creates a dedicated auditing server by copying only the files needed, including those for the following products:
Apache 2 Web Server and Tomcat 4 Servlet Container
MySQL
Novell eGuide
Novell iManager 2.5
Novell Nsure Audit Starter Pack Server
Files installed by default. See Table 1, “Default Components Installed with Customized and Preconfigured Server Patterns,” on page 67.
For information about configuring the Novell Nsure Audit Starter Pack Server after the installation, see the Novell Nsure Audit 1.0.3 Administration Guide.
After selecting this option, click Next and then proceed to “Verifying Pattern Selection” on page 83.
iSCSI SAN Storage Server
The option creates an iSCSI Storage Server (also known as an iSCSI Target) out of a NetWare server. The NetWare iSCSI Storage Server includes LDAP access control so you can limit the servers on the iSCSI SAN that can access the storage on the iSCSI Storage Server.
iSCSI is an industry standard that lets you build low-cost, fully functional Storage Area Networks (SANs) using commodity LAN (Ethernet) hardware.TIP: Improved storage system performance is possible with Gigabit Ethernet hardware.
With iSCSI, existing direct-attached or SAN-attached servers can be redeployed as iSCSI Storage Servers. This lets you improve the manageability and deployment of your storage while also adding high availability with Novell Cluster ServicesTM, which Novell’s iSCSI Storage Server fully supports.
Minimum System Requirements
Single processor
Server-class PC with a Pentium III 550 MHz or AMD K7 processor
512 MB RAM
Recommended System Requirements
Dual processor
Server-class PC with a Pentium III 550 MHz or AMD K7 processor
1 GB RAM
Installing a New Novell Small Business Suite Server 79
Novell Confidential Manual (ENU) 21 December 2004
The iSCSI SAN Storage Server option creates a dedicated iSCSI SAN Storage server by copying only the files needed, including those for the following products:
iSCSI Target
Files installed by default. See Table 1, “Default Components Installed with Customized and Preconfigured Server Patterns,” on page 67.
For information about configuring the iSCSI SAN Storage Server after the installation, see the iSCSI 1.1.3 Administration Guide for NetWare 6.5.
After selecting this option, click Next and then proceed to “Verifying Pattern Selection” on page 83.
Management Server
The Management Server option installs Novell iManager 2.5 and Novell ConsoleOne 1.3.6 network administration software. Both products together provide a complete management solution for your NetWare server environment.
Novell iManager 2.5 provides a single Web-based management console for the administration of Novell products on NetWare. iManager standardizes all Novell Web-based administration utilities on a single management framework. iManager also provides a best-of-breed architecture for easy development of Web-based administration and management modules through open standard application interfaces.
Novell ConsoleOne 1.3.6 is the latest version of Novell's Java-based, GUI network management application.
Minimum System Requirements
Single processor
Server-class PC with a Pentium III 800 MHz processor
512 MB RAM
IDE/SCSI
4 GB hard drive
Recommended System Requirements
Dual processor
Server-class PC with a Pentium III 1000 MHz processor
1 GB RAM
SCSI
The Management Server option has the following large configuration recommendations:
Xeon Quad processor
4 GB RAM
Fibre Channel/iSCSI
80 Novell Small Business Suite 6.6 Overview and Installation Guide
Novell Confidential Manual (ENU) 21 December 2004
The Management Server option creates a dedicated iManager server by copying only the files needed, including those for the following products:
Apache 2 Web Server and Tomcat 4 Servlet Container
Novell eGuide
Novell iManager 2.5
Refresh Native File Access Login Methods
Files installed by default. See Table 1, “Default Components Installed with Customized and Preconfigured Server Patterns,” on page 67.
For information about configuring iManager after the installation, see the Novell iManager 2.5 Administration Guide in the OES NetWare online documentation.
After selecting this option, click Next and then proceed to “Verifying Pattern Selection” on page 83.
Novell iFolder Storage Services
This option installs iFolder the Novell Net services software solution that lets your user’s files follow them across multiple workstations and the Internet. With iFolder, each user has a single virtual work folder that provides convenient and secure access to the most recent version of his or her documents. All the user needs is an active Internet connection and the iFolder client or a Web browser. The iFolder server helps guard against local data loss by automatically backing up user’s local files to the iFolder server, making them available for regularly scheduled data backup.
Minimum System Requirements
Single processor
Server-class PC with a Pentium III 550 MHz or AMD K7 processor
512 MB RAM
Recommended System Requirements
Dual processor
Server-class PC with a Pentium III 550 MHz or AMD K7 processor
1 GB RAM
The Novell iFolder Storage Services option extends the eDirectory schema for iFolder and creates a dedicated iFolder server by copying only the files needed, including those for the following products:
Apache 2 Web Server and Tomcat 4 Servlet Container
Novell iFolder Storage Services
Refresh Native File Access Login Methods
WAN Connectivity
Files installed by default. See Table 1, “Default Components Installed with Customized and Preconfigured Server Patterns,” on page 67.
For information about configuring Novell iFolder 2.1 after the installation, see the Novell iFolder 2.1 Installation and Administration Guide in the NetWare 6.5 online documentation.
Installing a New Novell Small Business Suite Server 81
Novell Confidential Manual (ENU) 21 December 2004
After selecting this option, click Next and then proceed to “Verifying Pattern Selection” on page 83.
Virtual Office Server
The option addresses the need for users to be self sufficient with their IT needs. Virtual Office lets users set up and manage many of their own networking, information sharing, and data backup processes. It also lets users create project teams, organize projects, and collaborate with team members in real time from any location. Virtual Office optimizes the concept of self service for users, which significantly reduces support calls.
Minimum System Requirements
Single processor
Server-class PC with a Pentium III 550 MHz or AMD K7 processor
512 MB RAM
Recommended System Requirements
Dual processor
Server-class PC with a Pentium III 550 MHz or AMD K7 processor
1 GB RAM
The Virtual Office Server option creates a Virtual Office server by copying only the files needed, including those for the following products:
Apache 2 Web Server and Tomcat 4 Servlet Container
iPrint
QuickFinder Server
Novell eGuide
Novell iFolder Storage Services
Novell iManager 2.5
Novell NetStorage
Novell Virtual Office Framework
QuickFinder Server 4.0
Refresh Native File Access Login Methods
WAN Connectivity
Files installed by default. See Table 1, “Default Components Installed with Customized and Preconfigured Server Patterns,” on page 67.
For information about configuring Virtual Office after the installation, see the Novell Virtual Office Configuration Guide.
After selecting this option, click Next and then proceed to “Verifying Pattern Selection” on page 83.
82 Novell Small Business Suite 6.6 Overview and Installation Guide
Novell Confidential Manual (ENU) 21 December 2004
Verifying Products to InstallAfter selecting the components that you want to install from the Components page, a Summary page appears displaying the names of the selected products and the disk space (in MB) required to install them.
If you want to change your product selection, click Back and make the necessary changes. After verifying the product names and space requirements, click Copy Files.
If you are installing from CD, remove the Novell Small Business Suite 6.6 NetWare 6.5 CD 1 Operating System with SP3 CD when prompted, insert the following CDs when prompted:
GroupWise 6.5.4 (NetWare) Admin CD
GroupWise 6.5.4 Windows Client CD
GroupWise 6.5.4 Messenger CD
The GroupWise CDs are required only when you select the “GroupWise and Messenger File Copy for a New GroupWise System” component or one of the Small Business server patterns.
Novell Small Business Suite 6.6 NetWare 6.5 CD 2 Products with SP3 CD
Click OK, then continue with “Naming the Server” on page 84.
Verifying Pattern SelectionAfter selecting the special purpose server (preconfigured server) that you want to install, a Details page appears displaying a description of the selected pattern and the system requirements needed to successfully deploy it.
If you want to change your pattern selection, click Back and make the necessary changes. After verifying the description and system requirements for your selected pattern, click Copy Files.
If you are installing from CD, remove the Novell Small Business Suite 6.6 NetWare 6.5 CD 1 Operating System with SP3 CD when prompted, insert the following CDs when prompted:
GroupWise 6.5.4 (NetWare) Admin CD
GroupWise 6.5.4 Windows Client CD
GroupWise 6.5.4 Messenger CD
The GroupWise CDs are required only when you select the “GroupWise and Messenger File Copy for a New GroupWise System” component or one of the Small Business server patterns.
Novell Small Business Suite 6.6 NetWare 6.5 CD 2 Products with SP3 CD
Click OK, then continue with the next section, Naming the Server.
Installing a New Novell Small Business Suite Server 83
Novell Confidential Manual (ENU) 21 December 2004
Naming the ServerThe Novell Small Business Suite 6.6 server name must be unique from all other servers on the eDirectory tree. The name can be between 2 and 47 alphanumeric characters and can contain underscores (_) and hyphens (-), but no spaces. The first character cannot be a period (.).IMPORTANT: The server name must be different from the name that you plan to use for the eDirectory tree.
1 On the Server Properties page, type the server name in the field provided.
At this stage of the installation, you can make changes or additions to the server’s config.sys file.
2 (Optional) Edit the config.sys file.
2a On the Server Properties page, click Advanced.
2b Click the Edit Config.sys tab.
2c Type the desired information into the config.sys field on the right side of the screen.
2d Click OK.
3 (Optional) Edit the autoexec.bat file.
At this stage of the installation, you can make changes or additions to the server’s autoexec.bat file.
3a On the Server Properties page, click Advanced.
3b Click the Edit Autoexec.bat tab.
3c Type the desired information into the autoexec.bat field on the right side of the screen.
3d Click OK.
4 (Optional) Specify the server’s ID number.
The server requires a unique identification number. Changing the server ID number during this portion of the installation places the new server ID number in the autoexec.ncf file. The new server ID number takes effect after you reboot the server.
4a On the Server Properties page, click Advanced.
4b Click the Server Properties tab.
4c Type the desired server ID number into the field provided.
4d Click OK.
5 Select language options
Novell Small Business Suite 6.6 can be customized to function in several languages.
5a On the Server Properties page, click Advanced.
5b Click the Language tab.
5c Select the desired server language from the drop-down list.
The server language determines which language the server console and error messages appear in.
5d Select the desired admin language from the drop-down list.
The admin language determines which language the network administrator User object uses to log in to the network. When additional eDirectory objects are created by the administrator, they use the same language as the admin language.
84 Novell Small Business Suite 6.6 Overview and Installation Guide
Novell Confidential Manual (ENU) 21 December 2004
5e Under Additional Server Languages, check the check boxes next to the languages you want to install.
You can use NetWare server and client utilities in other languages, if the additional language is installed on the server.
5f Click OK.
5g On the Server Properties page, click Next.
Installing Networking ProtocolsNovell Small Business Suite 6.6 can process IP (Internet Protocol) network packets and traditional IPXTM (Internetwork Packet ExchangeTM) packets. Both protocols can be assigned to a single network board, which allows the server to communicate using IP and IPX. Installing with IP only is recommended.
About the Internet Protocol (IP) (page 85)
About IPX (page 86)
Using Both IP and IPX (page 86)
Installing IP and IPX (page 86)
About the Internet Protocol (IP)
The Internet protocol (IP) lets your network share data with other IP networks, including the Internet. Using IP requires a unique IP address, a subnet, and a router or gateway address.
IP Address: Identifies each device on the network. The address consists of 32 bits, which are represented as decimal values separated by periods, such as 192.48.67.89.
If your server will connect to the Internet, you must obtain a unique IP address. For information on receiving an IP address, contact your Internet service provider (ISP).
Subnet Mask: Lets you break up your network into smaller networks. Your network might have too many nodes or might be too geographically dispersed to manage as a single network.
Dividing your network into smaller networks allows the network routers to filter and reduce the network activity seen by any of the nodes. However, dividing your network and using several network addresses might not be appropriate on a large network that needs to appear to network administrators as a single network.
Router (Gateway): The address of the router that connects two different environments, such as a LAN and the Internet.
You can specify a specific router (gateway) address or you can rely on the network to automatically find the nearest router. If you specify the address, remember that the router must exist on your network segment.
Installing IP will automatically bind to the Ethernet_II frame type.
When IP is selected, passive support for IPX is also provided. If an IPX request arrives at the server, NetWare will process the IPX request. This passive support for IPX is called Compatibility Mode and is automatically enabled to provide service for applications that require IPX.TIP: You can disable Compatibility Mode by removing the LOAD SCMD command from the server’s autoexec.ncf file. When IPX Compatibility Mode is disabled, the server processes only IP packets and applications that require IPX do not function properly.
Installing a New Novell Small Business Suite Server 85
Novell Confidential Manual (ENU) 21 December 2004
About IPX
Novell’s traditional protocol, Internetwork Packet Exchange (IPX), lets you continue using IPX-based applications. If IPX, but not IP, is installed on your server, it will actively process IPX packets and ignore packets using other protocols, such as IP.
During the installation program, existing IPX frame types will be detected. The installation program will detect one of the following conditions:
A single IPX frame type: If detected, it will be installed.
Multiple IPX frame types: If detected, you will be prompted to choose the frame types that you want to install.
No IPX frame types: If no frame types are detected, Ethernet_802.2 will be installed by default.
Using Both IP and IPX
If you have network clients or applications that require IPX and IP, you can install both protocols. Both protocols can be bound to a single network board. When selected, both IP and IPX protocols are actively supported. The server will process IP requests using IP, and it will broadcast and reply to IPX requests using IPX.
Installing IP and IPX
1 On the Protocols page, select a network board.
2 Check the IP check box.
3 Type the required IP information for the selected network board.
4 If you are installing IPX on the selected network board, check the IPX check box.
If you choose to install IP and not IPX, the SERVERID reference is not used and is removed from autoexec.ncf. You can add IPX after the server installation by adding the SERVERID 8_digit_number command after the SERVERNAME command in autoexec.ncf.
5 Repeat Step 1 though Step 4 for each network board in the server.
Configuring SLP (Optional)
Service Location Protocol (SLP) is an IETF standard for enabling network-based applications to automatically discover the location, including the address or domain name and other configuration information, of a required service. Using SLP, clients can connect with and make use of services on an IP network. Without SLP, network resources must be manually configured or specified in a separate configuration file.
SLP should be configured properly if the server is going to be a part of a migration using the NetWare Migration Wizard utility.
1 On the Protocols page, click Advanced.
2 Click the SLP tab.
3 Either specify the IP addresses of the Directory Agents on your network or, if no Directory Agents exist on your network, check the Configure This Server As a DA check box.
4 (Optional) To enable multicasting, check the Enable Multicast Routing on This Server check box.
5 Click OK.
86 Novell Small Business Suite 6.6 Overview and Installation Guide

Novell Confidential Manual (ENU) 21 December 2004
Configuring SNMP (Optional)
Network management utilities use Simple Network Management Protocol (SNMP) to record and communicate information about network devices. Using an SNMP-compatible utility, you can set and monitor threshold levels and specific events such as packets per second or error rates. The information is then sent to the destination address of the workstation running the SNMP-compatible management utility.
1 On the Protocols page, click Advanced.
2 Click the SNMP tab.
3 (Optional) Type a hardware description, server location, and administrator in the fields provided.
4 Type the IPX and IP destination addresses of the devices that will receive the SNMP information in the fields provided.
5 Click OK.
Configuring IPX Compatibility (Optional)
When enabled, IPX compatibility provides passive support for IPX-based applications without binding IPX. Although the server does not broadcast services using RIP and SAP, NetWare processes any IPX request that arrives at the server.
1 On the Protocols page, click Advanced.
2 Click the IPX Compatibility tab.
3 (Conditional) If you did not check the IPX box in “Installing IP and IPX” on page 86, do the following:
3a Check the Load IPX Compatibility check box.
3b Type the eight-digit hexadecimal compatibility mode network number in the field provided or accept the default shown.
3c Select the preferred IP address from the drop-down list.
4 (Conditional) If you checked the IPX box in “Installing IP and IPX” on page 86, do the following:
4a Check the Load the Migration Agent on This Server check box.
NetWare regulates IP and IPX protocols using a Migration Agent. A Migration Agent regulates the protocol function on different network segments. If a Migration Agent is not enabled, packets are not forwarded onto network segments communicating with a different protocol. For more information, see the online help file associated with this screen.
4b Type the eight-digit hexadecimal compatibility mode network number in the field provided or accept the default shown.
4c Select the preferred IP address from the drop-down list.
5 Click OK.
6 On the Protocols page, click Next.
Installing a New Novell Small Business Suite Server 87
Novell Confidential Manual (ENU) 21 December 2004
Specifying HostnamesIf you bound two different IP addresses to two or more network boards, the hostnames page will display.
If you have only one network board, or you bound two or more network boards with the same IP address, go to “Setting Up Domain Name Service” on page 88.
If you have a hostname, specify it.
You must specify a hostname for each of the IP addresses that were bound in “Installing Networking Protocols” on page 85. The hostname is the name of the DNS server that will resolve to your IP address. If you do not know the hostname, contact your network administrator.
You must also determine which IP address will be the Primary IP address. The Primary IP address will be the default IP address for all TCP/IP services. If you have two network boards, choose the external network board as the Primary IP address. The primary address is used for generating server certificates. You can avoid hostname warnings when accessing Web services from the Internet when the certificates match the external address of the server.
1 Type a hostname in the field provided for each IP address.
2 Select Primary next to the IP address you want to specify as the Primary IP address.
3 Click Next.
Setting Up Domain Name ServiceThe IP protocol identifies computers and systems by their assigned IP addresses, such as 192.48.37.89. Domain Name Service (DNS) allows a specific server on the network to maintain a list of simple, readable names that match IP addresses. Applications (or protocols) that require IP addresses rather than names can use a DNS server to translate from one form to another.TIP: If this server will not be available to the Internet, you can skip this screen and ignore any associated error messages.
1 (Optional) To make this server available to the Internet, provide the following information on the Domain Name Service page:
Host Name: The simple, readable name on the DNS server that matches this Novell Small Business Suite 6.6 server’s name (or the name that you have bound to the network board).
You can set up the host computer name on the DNS server to use the NetWare server name.NOTE: If you bound two different IP addresses to two or more network boards in “Installing Networking Protocols” on page 85, the Host Name field will not display on this screen. This is because you specified the hostname in Step 1 in the “Specifying Hostnames” on page 88 section. The remainder of this screen remains the same.
Domain Name: The hierarchical name that represents the organization of your network, such as acme.com.
Domain Name Server: The IP address of the DNS server that maintains the list containing this Novell Small Business Suite 6.6 server’s simple, readable name and IP address. For more information, contact your Internet service provider.
2 (Optional) To have the install verify the domain name service information for you, check the Verify the DNS Information check box, then click Next.
88 Novell Small Business Suite 6.6 Overview and Installation Guide
Novell Confidential Manual (ENU) 21 December 2004
Setting the Server Time Zone and Time Synchronization MethodKeeping accurate time is a critical function for servers in an eDirectory tree. The reported time must be synchronized across the network in order to provide expiration dates and time stamps to establish the order of events taking place in eDirectory.
Setting the Server Time Zone
Follow these steps to set the server’s time zone:
1 On the Time Zone page, select the correct time zone setting from the available list.
2 (Optional) If you want the system to adjust automatically for Daylight Savings Time, check that check box.
By default, the NetWare installation synchronizes time automatically with the first server in the tree. However, you might want to set up a different time synchronization scheme or synchronize with an external time source using Network Time Protocol (NTP).
To change the default time synchronization settings, continue with the following time synchronization configuration instructions. Otherwise, skip to “Setting Up Novell eDirectory” on page 90.
Configuring Time Synchronization (Optional)
Follow these steps to select and configure the server's time synchronization method:
1 On the Time Zone page, click Advanced.
2 On the Time Synchronization page, select time protocol that you want.
Select NTPv3 to use Network Time Protocol for synchronizing time on your network. (The xntpd.nlm that provides NTP time packets is also capable of providing Timesync packets for servers that require them, such as NetWare 5.0 and 4.2 servers.)
If you select this option, further configuration might be required to fully implement your time server hierarchy. For more information, see the Novell Network Time Protocol Administration Guide for OES.
Select Timesync to use the legacy time synchronization mechanism built in to NetWare. (The timesync.nlm that provides Timesync packets is also capable of providing NTP packets for interoperability with other time servers.)
3 If you selected Timesync, select the time server type that you want.
NetWare distinguishes four types of time servers. Three of these provide network time: Single Reference, Reference, and Primary. All other servers are called Secondary time servers because they receive their time from the time providers.
The first NetWare server installed in a network is automatically set up as a Single Reference time server. All subsequent NetWare servers are automatically set up as Secondary time servers. This default configuration works well for most small networks. If your network requires a different time synchronization configuration, you can change the time server type. (For more information, see the Novell Network Time Protocol Administration Guide for OES.)
Installing a New Novell Small Business Suite Server 89
Novell Confidential Manual (ENU) 21 December 2004
4 (Optional) If you do not want to accept the defaults, configure Timesync time sources.
4a Check the Use Timesync Configured Sources check box.
4b Type the time sources (up to three) in the fields provided.
Timesync time sources can be specified in one of three different formats:
IP address
DNS name
Server name (IPX required)
4c (Conditional) If your time source uses Network Time Protocol (NTP), check the NTP check box to the right of the time source.
5 Click OK.
After completing the previous, optional steps, you will now be back at the Time Zone page.
6 On the Time Zone page, click Next.
Setting Up Novell eDirectoryNovell eDirectory provides global access to all networking resources. eDirectory allows users with the proper access rights to log in to the network and view and access network resources.
Network resources such as servers and printers are presented hierarchically in an eDirectory tree. Users log in to the eDirectory tree with a single login name and password instead of logging in to specific servers.
Before completing this task, you should understand the concepts relating to eDirectory trees, containers, and context.
Tree Name: The top level of the available network resources. It must be unique from other eDirectory tree names on the network.
Containers: Much like subdirectories, containers contain network objects. The server can be installed into two types of container objects: Organization (O) and Organizational Unit (OU).
Context: The context, much like DOS directory paths, denotes the full path of a network object in the eDirectory tree. For example, if a NetWare server were installed into an Organizational Unit (OU) named Sales under the Organization (O) named Acme, its context would be denoted as OU=Sales.O=Acme or Sales.Acme.
Selecting the Type of eDirectory Installation
1 Select the eDirectory option you want.
Creating a New eDirectory Tree (page 91)
Installing the Server into an Existing eDirectory Tree (page 91)
2 Click Next.
90 Novell Small Business Suite 6.6 Overview and Installation Guide
Novell Confidential Manual (ENU) 21 December 2004
Creating a New eDirectory Tree
If you are creating a new network or if this server requires a separate eDirectory tree, we recommend creating a new tree. The resources available on the new tree are available only to users logged in to the new tree.
1 Type a tree name.
Each eDirectory tree must have a name unique from other eDirectory trees on the network.
2 Type the context for the Server object in the field provided or browse to the context by clicking the Browse button.TIP: If you click the Browse button, you will be able to add or delete containers in your tree.
3 Type the context for the default Admin user.
4 Type a password for the Admin user.
5 Retype the password for the Admin user.
6 Click Next.
Installing the Server into an Existing eDirectory Tree
Installing your server into an existing eDirectory tree incorporates the server into your network.
The server can be installed in any Organization (O) or Organizational Unit (OU) container in the eDirectory tree where you have the Supervisor right. You can create containers during the installation program.
1 Type the tree name in the field provided.
2 Type the context for the Server object in the field provided.
3 Click Next.
4 Type the full eDirectory context for the Admin object.
5 Type the password for the Admin object.
6 Click OK.IMPORTANT: If this is the first Novell Small Business Suite 6.6 server to be installed into an existing eDirectory tree, you are asked if you have run the Deployment Manager as described in “Preparing the Network with Deployment Manager” on page 54.
If you have not run the Deployment Manager, you can run it on a workstation, return to the server console, and then click Yes. Or you can click No, cancel the installation, run Deployment Manager, then restart the installation. Novell Deployment Manager (nwdeploy.exe) is located on the Novell Small Business Suite 6.6 NetWare 6.5 CD 1 Operating System with SP3 CD and is run from a Windows workstation.
If you have updated the eDirectory tree on all servers but have not yet prepared the network for NDS 8, you will be prompted to modify the schema. When prompted, you must provide the administrator name and password for the entire eDirectory tree.
Installing a New Novell Small Business Suite Server 91
Novell Confidential Manual (ENU) 21 December 2004
Verifying eDirectory Summary
The eDirectory Summary screen is now displayed. Now that you have created a new eDirectory tree or installed the server into an existing eDirectory tree, the NetWare Server object and Volume objects will be installed in the container you specified.
If you have created a new eDirectory tree, a user (default name Admin) with the Supervisor right to the eDirectory tree is created in the same eDirectory container as the NetWare Server object.
1 Verify that the information on the eDirectory Summary screen is accurate.
2 Record the Admin password and any other relevant information before proceeding.
3 Click Next.
Licensing the ServerEvery Novell Small Business Suite 6.6 server must have a valid license in order to function as a server. You can install the license from the Novell Small Business Suite License diskette or browse to a directory that contains Novell Small Business Suite 6.6 licenses.IMPORTANT: Although the server can be installed without a license, an unlicensed server allows only two user connections. After installation, you can use the Novell iManager utility to install additional licenses.
1 On the Licenses page, click the Browse button and browse to the license directory on the Novell Small Business Suite License diskette.
2 Select the .nlf file.
3 Click OK.
4 (Optional) To install Novell Small Business Suite without licenses, check the Install Without Licenses check box.
5 Click Next.
6 If prompted, select where in the tree you want to install the license, then click Next.
Configuring LDAPIf you selected Manual Installation at the beginning of the Novell Small Business Suite 6.6 installation (see “Selecting the Type of Installation” on page 62), you now see the LDAP Configuration page where you can configure LDAP on the server.
If you are not performing a manual install, go to “Selecting the Login Method” on page 93.
1 (Optional) Specify the ports for Clear Text and SSL/TLS, or accept the defaults provided.
2 If you want the TLS feature activated, check the Require TLS for Simple Bind with Password check box.
3 Click Next.
92 Novell Small Business Suite 6.6 Overview and Installation Guide
Novell Confidential Manual (ENU) 21 December 2004
Selecting the Login MethodIMPORTANT: The NMAS client software must be installed on each client workstation you want to use the NMAS login methods. The latest Novell Client software must be installed on the client workstation before you install the NMAS client software. The NMAS client software is included in the default client installation on the Novell Client Software CD.
NMAS server components are installed automatically when you run the Novell Small Business Suite installation program. You need to select the login methods you want to install.
Select the login methods that you want to install into eDirectory by checking the appropriate check boxes on the Novell Modular Authentication Service screen. When you select a login method, a description of the component appears in the Description box. For more information on login methods, see “Managing Login and Post-Login Methods and Sequences” in the Novell Modular Authentication Services (NMAS) 2.3 Administration Guide in the OES NetWare online documentation.
1 On the Novell Modular Authentication Service page, select the login methods you want to use from the options provided.
If you want to install all the login methods into eDirectory, click Select All. If you want to clear all selections, click Select Clear All.
NDS and Challenge Response login methods are installed by default and cannot be cleared.
2 Click Next.
Installing DNS/DHCP (Conditional)If you selected to install DNS/DHCP on the Components page, or if you selected a pattern installation that installs DNS/DHCP, you now see the DNS/DHCP Installation page.
If you did not select DNS/DHCP on the Components page, skip to “Modifying iFolder Server Options (Conditional)” on page 94.IMPORTANT: Installing DNS/DHCP does not configure the server as a DNS or DHCP server. For more information on configuring DNS/DHCP, see Novell DNS/DHCP Services for NetWare Administration Guide for OES in the OES NetWare online documentation.
You must specify the NDS context of three different items on this page:
DNS/DHCP Locator object
DNS/DHCP Group object
RootSrvr zone
All three fields are populated with a default NDS context. To change the context from the default in any or all of these three fields, do the following:
1 Click the Tree button to the right of the field.
2 Browse to and select the NDS context that you want.
3 Click OK > Next.
Installing a New Novell Small Business Suite Server 93

Novell Confidential Manual (ENU) 21 December 2004
Modifying iFolder Server Options (Conditional)If you selected to install Novell iFolder Storage Services on the Components page, or if you selected a pattern installation that installs iFolder, you now see the iFolder Server Options page.
If you did not select Novell iFolder Storage Services on the Components page, skip to “Modifying MySQL Options (Conditional)” on page 94.
There are six fields on this page that have values that can be modified:
LDAP Host Name or IP: The DNS name or IP address of the server that acts as your eDirectory LDAP server.
LDAP Port, 389 (Clear Text) 636 (SSL): The LDAP port type that you want to use, based on your security needs, for data exchanges between your LDAP server and your iFolder server.
LDAP Context for Admins: The LDAP context of the container where your iFolder Admin User objects are located.
iFolder Server Host Name or IP: The DNS name or IP address of your iFolder server. The DNS name or IP address you provide must enable the iFolder server to be accessed from the users’ computers.
iFolder Admin Names: The default user ID for the iFolder administrator for this iFolder server. You can assign more than one user ID to be an iFolder administrator. If you are specifying more than one name, separate them with semicolons (;) and with no spaces for example: admin;bsmith;gdoe All entries cannot exceed 256 characters, including the semicolons.
User Database Path: The path to the directory on the iFolder server where user data for all the iFolder accounts will be stored.
Modify any of the server options for iFolder that are displayed on the page or accept the default settings that are provided. Then click Next.
Modifying MySQL Options (Conditional) If you selected to install MySQL on the Components page, or if you selected a pattern installation that installs MySQL, you now see the MySQL Options page.
If you did not select MySQL on the Components page, skip to “Modifying exteNd Application Server - Details (Conditional)” on page 95.
1 Click the Browse icon to browse to the directory where you want the MySQL databases to be stored.
The database must reside on an NSS volume. The default location is sys:\mysql\data. You might want to change this path to the data: volume.
2 Type the Root password in the field provided.
The MySQL Root user is created as a supervisor who can do anything. Specifying a password for the MySQL Root user is recommended. If the root password field is left empty, anyone can connect as Root without a password and be granted all privileges.
3 Confirm the Root password in the field provided.
This password must match the password specified in the previous field.
94 Novell Small Business Suite 6.6 Overview and Installation Guide
Novell Confidential Manual (ENU) 21 December 2004
4 (Optional) If you want secure installation enabled, check the Secure Installation check box.
By default, the Root user can connect either from the local host or remotely. An Anonymous user is also created that can connect from the local host or remotely and do anything with databases that have a name of test or starting with test_. This means any local user can connect without a password and be treated as the Anonymous user. A test database is also created.
If this box is checked, the Root user is allowed to connect only from the local host, a Root password is required, and the Anonymous user and the test database are not created.
5 Click Next.
Continue with the next section, “Modifying exteNd Application Server - Database Options (Conditional).”
Modifying exteNd Application Server - Details (Conditional)If you selected to install the exteNd Application Server on the Components page, or if you selected a pattern installation that installs exteNd, you now see the exteNd Application Server - Details page. This page specifies some basic settings about the application server’s configuration.
If you did not select exteNd Application Server on the Components page, skip to “Modifying Novell Nsure Audit Starter Pack - Component Selection (Conditional)” on page 96.
1 Type the user name for the application server’s administration account in the field provided.
The install will create a user with this name and assign Locksmith privileges to it. To better secure the application server, specify a username other than the default (Admin).
2 Type the password for the Admin name in the field provided.
To better secure the application server, specify a password other than the default (Admin).
3 Confirm the password in the field provided.
4 Type the HTTP port number that the application server will listen on in the field provided.
By default, port 80 is used by the Apache HTTP Server installed with NetWare. However, when the application server’s Web Server Integration (WSI) module for Apache is in use, it redirects requests from the Apache server (listening on port 80) to the application server (port 83).
5 (Optional) To initially configure the application server to restrict user access, check the Restrict Access check box.
For more information on restricting access, click the Help button.
6 Click Next.
Continue with the next section, “Modifying exteNd Application Server - Database Options (Conditional).”
Installing a New Novell Small Business Suite Server 95
Novell Confidential Manual (ENU) 21 December 2004
Modifying exteNd Application Server - Database Options (Conditional)After completing the exteNd Application Server - Details page, you now see the exteNd Application Server - Database Options page. This page specifies settings for configuring the MySQL database to be used as the application server’s SilverMaster.
If you did not select exteNd Application Server on the Components page, skip to “Modifying Novell Nsure Audit Starter Pack - Component Selection (Conditional)” on page 96.
1 Type the name of the machine hosting the MySQL database in the field provided.
Localhost is the default.
2 Type the port number for the MySQL database on the host machine in the field provided.
3306 is the default.
3 Type the MySQL username to be used by the application server when logging in to the database.
The install will create a user with this name in the MySQL database and grant that user rights to the SilverMaster system tables needed by the application server. To better secure the MySQL database, specify a username other than the default (appserver).
4 Type the password for the database username in the field provided.
To better secure the MySQL database, specify a password other than the default (appserver).
5 Confirm the password in the field provided.
6 Type the name of the MySQL database in the SilverMaster Name field provided.
SilverMaster50 is the default.
7 (Optional) To populate the MySQL database with the SilverMaster system tables needed by the application server, check the Execute SilverMasterInit check box.
The default state of this option is checked. Keep the SilverMasterInit setting checked unless this install is for a secondary application server in a cluster.
8 Click Next.
Continue with the next section, Modifying Novell Nsure Audit Starter Pack - Component Selection (Conditional).
Modifying Novell Nsure Audit Starter Pack - Component Selection (Conditional)If you selected to install Novell Nsure Audit Starter Pack on the Components page, or if you selected a pattern installation that installs the Novell Nsure Audit Starter Pack, you now see the Component Selection page. This page allows you to select which Nsure Audit components you want to install to the current server.
If you did not select Novell Nsure Audit Starter Pack on the Components page, skip to “Installing NetStorage (Conditional)” on page 98.
1 (Optional) Check the Install Secure Logging Server check box.
This installs the Secure Logging Server (lengine.nlm), mdb.nlm, and the channel drivers (lgd*.nlm) on the current server.
This also creates a Logging Server object in the Logging Services container.
96 Novell Small Business Suite 6.6 Overview and Installation Guide
Novell Confidential Manual (ENU) 21 December 2004
2 (Optional) Check the Autoconfigure MySQL check box.
This creates the MySQL Channel object in the Logging Services’ Channel container.
3 (Optional) Check the Install Platform Agent check box.
This installs the Platform Agent (logevent.nlm), the Caching Module (lcache.nlm), and the NetWare and eDirectory instrumentations (auditNW.nlm and auditDS.nlm, respectively).
4 Specify the IP address or hostname of the Secure Logging Server that the Platform Agent will connect to.
5 Click Next.
Continue with the next section, “Modifying Novell Nsure Audit Starter Pack - Database Options (Conditional).”
Modifying Novell Nsure Audit Starter Pack - Database Options (Conditional)If you checked the Autoconfigure MySQL check box in “Modifying Novell Nsure Audit Starter Pack - Component Selection (Conditional)” on page 96, the Database Options page displays. The options on this page are used to define the MySQL Channel object.
If you did not check the Autoconfigure MySQL check box, skip to “Installing NetStorage (Conditional)” on page 98.
1 Type the IP address or hostname of the MySQL database server in the field provided.
If a hostname is specified, only the first address associated with that name is used.
2 Type the MySQL port number where the Secure Logging Server will connect to the database server in the field provided.
If this field is left blank, the Secure Logging Server uses the default MySQL port assignment, 3306.
3 Type the user account name that the Secure Logging Server uses to log in to the database in the field provided.
This account has all privileges to the default database and can log in from any IP address.
The default username for the data store is auditusr. IMPORTANT: MySQL installs in Secure Mode. In Secure Mode, the default MySQL the administrative account, Root, has rights to log in only at the database server. Therefore, if you want the logging server to use the Root account to log in to the database, MySQL and the Secure Logging Server must be located on the same server and you must specify a loopback address (127.0.0.1 or localhost) in the MySQL Database Host field.
4 Type the password the logging server uses to authenticate to the database in the field provided.
The default password for the data store is auditpwd.
5 Confirm the password in the password confirmation field provided.
6 Type the name of the database that the logging server writes events to in the field provided.
The default database name is naudit.
The MySQL driver, lgdmsql.nlm, automatically creates this database when the logging server first loads the MySQL Channel object configuration in memory.
Installing a New Novell Small Business Suite Server 97
Novell Confidential Manual (ENU) 21 December 2004
7 Type the name of the database table that the logging server writes events to in the field provided.
The default table is log.
The MySQL driver, lgdmsql.nlm, automatically creates this table when the logging server first loads the MySQL Channel object configuration in memory.
8 Click Next.
Continue with the next section, Installing NetStorage (Conditional).
Installing NetStorage (Conditional)If you selected to install Novell NetStorage on the Components page, or if you selected a pattern installation that installs NetStorage, you now see the NetStorage Install page. NetStorage provides simple access to file storage on a Novell network from any Internet-enabled machine.
If you did not select Novell NetStorage on the Components page, skip to “Completing the Server Installation” on page 98.
1 Type the IP address or DNS name of a server in your eDirectory tree that has the master replica or a read/write replica of eDirectory in the field provided.
2 (Optional) Type the IP addresses or DNS names of servers in other eDirectory trees that have at least read/write eDirectory replicas, or specify the same IP address or DNS name you used for the primary eDirectory server but with a different context.
You can add two alternate eDirectory server URL and context settings. These alternate settings are used to allow NetStorage to find User objects that exist in contexts other than what you specified for the primary eDirectory server. The alternate settings also allow NetStorage to find User objects with the same name in different eDirectory trees. The alternate URL and context settings are optional, but can help provide users with an additional level of access to NetStorage.
3 (Optional) Type the IP address or DNS name and the port number that you assigned to Novell iFolder in the fields provided.
The iFolder DNS name or IP address and the port number are optional but, if specified, will allow NetStorage users to access and manipulate files and directories on the iFolder server.
4 Click Next.
Continue with the next section, Completing the Server Installation.
Completing the Server InstallationAfter the installation is finished, remove the Novell Small Business Suite 6.6 NetWare 6.5 CD 2 Products with SP3 CD and click Yes to restart the server.
If you selected to load the server on reboot, the Novell Small Business Suite server software automatically loads when the computer reboots.
If you selected to not load the server on reboot, you can load it manually. To load the server manually, reboot the computer by clicking Yes when prompted to reboot the computer. When the computer reboots, change to the startup directory containing the NetWare server files (c:\nwserver) and enter SERVER.
The Novell Small Business Suite server installation is now complete.
98 Novell Small Business Suite 6.6 Overview and Installation Guide
Novell Confidential Manual (ENU) 21 December 2004
In addition to installing the products necessary for your server to run as designed, three volumes were created on the server: volume sys:, volume: _admin, and volume data. Volume sys: and volume: _admin are required for the server to function and must not be deleted.
Volume data was created for your convenience and can be rename or deleted as desired
NetWare Installation with Existing VolumesIf you installed NetWare on a server with existing NSS or traditional NetWare volumes, the install did not create eDirectory objects in the tree for the existing volumes. You must mount the pre-existing volumes, then create an eDirectory object for each volume.
To create an eDirectory object for an NSS volume using iManager:
1
Launch iManager on your workstation.
2 In the left-hand navigation frame, click the Plus sign (+) next to the Storage heading.
3 Click the Volumes link under the Storage heading.
The existing volumes for the server are displayed in the Volume Management frame of the iManager screen.
4 Select the volume you want to create an eDirectory object for.
5 Click the Mount link in the Volume Management frame of iManager.
6 Click the Update eDirectory link in the Volume Management frame of iManager.
To create an eDirectory object for an NSS volume using NSSMU:
1 Enter load nssmu at the server console.
2 Select Volumes, then press Enter.
3 Select the Volume that needs to have an eDirectory object created for it.
4 To update eDirectory with the new Volume object, press F8 > Alt+F8.
To create an eDirectory object for a traditional volume using Novell Remote Manager:
1 Launch Novell Remote Manager on your workstation.
2 In the left-hand navigation frame, click the Partition Disks link under the Manage Server heading.
3 In the right-hand frame of the browser window, locate the volume you want to create.
4 Click the Create eDir Object link next to the desired volume.
5 The Create eDir Object link disappears after the object is created.
Installing a New Novell Small Business Suite Server 99
Novell Confidential Manual (ENU) 21 December 2004
What’s NextThe Welcome Web site provides helpful information for getting the most out of your new Novell Small Business Suite 6.6 server. To access the Welcome Web site, open a browser on a workstation with access to the new Novell Small Business Suite 6.6 server and go to http://xxx.xxx.xxx.xxx, where xxx.xxx.xxx.xxx is the new server’s IP address or domain name. If you selected a pattern that installed Virtual Office, the Virtual Office page is the default page at this URL. If this is the case, you can go to http://ip_address or DNS_name:2200 to access the Welcome Web site.
For more information on the management of your server’s operating system, see the “Administration” on page 217 and the Server Operating System for NetWare Administration Guide for OES in the OES NetWare online documentation.
For information on managing your network using Novell iManager 2.5, see the Novell iManager 2.5 Administration Guide in the OES NetWare online documentation.
After installing the server operating system, you should set up a workstation for managing the network and workstations to access the server. Additionally, you should complete the server setup by completing the tasks in one or more the following sections:
Setting Up a Workstation for Administration (page 101)
Setting Up Internet Connectivity (page 105)
Setting Up DNS (page 109)
Setting Up DHCP (page 111)
Setting Up Printing (page 113)
Installing and Setting Up E-mail (page 119)
Setting Up Workstations for Users (page 149)
Installing BorderManager (page 155) to set up firewall, VPN or Proxy Caching services
Installing ZENworks Desktop Management (page 165) to set up workstation management
Installing Additional Bundled Products (page 183) to set up clustering, FatPipe, or DirXML Starter Pack
Installing Product Updates (page 187)
100 Novell Small Business Suite 6.6 Overview and Installation Guide
Novell Confidential Manual (ENU) 21 December 2004
9 Setting Up a Workstation for Administration
We recommend that you set up a workstation and an environment for administration before you set up user accounts or complete other setup procedures.
PrerequisitesMake sure the workstation is running Windows 95/98 or Windows NT/2000/XP (recommended) and has a working CD-ROM drive.
A special workstation is not required for administration; however, some of the tools (utilities) that are used for administration will run only on the Windows platforms specified.IMPORTANT: If the workstation is running Windows 95, it must have Internet Explorer 5.5 or later installed in order to use Novell iManager.
Make sure that you know what network board is installed in the workstation and what its settings are.
Make sure that the workstation is on and that Windows is running.
Locate your Windows operating system CD. You might need it during the client installation.
Installing Novell Client Software1 Insert the Novell Client Software CD into the workstation CD-ROM drive.
This CD will auto-launch if your system is set up for auto-launch. Otherwise, run winsetup.exe from the root of the CD.
2 Select a platform for the installation.
3 Click the language the you want the Novell Client software installed in.
4 Verify that Typical Installation is selected, then click Install.
5 Follow the on-screen prompts to complete the installation.
IMPORTANT: If prompted to keep a newer Novell® ClientTM file than what is being installed, click No in order to keep a matched set of client files. Using an unmatched set of files could cause compatibility problems.
6 When prompted, log in to the network as a user with the Supervisor right to the tree (usually user Admin).
During the server installation, the administrative user is given the default name Admin and the password you specified during the login.
If you have problems with the login or need help understanding what the login expects, access the online help for the applicable Novell Client software.
Setting Up a Workstation for Administration 101
Novell Confidential Manual (ENU) 21 December 2004
Accessing Network Setup and Administrative ToolsNovell Small Business Suite includes several administration utilities that let you manage everything in your network from configuring and managing Novell eDirectory to setting up network services and open source software such as Apache and Tomcat.
For a brief overview and instructions on how to access most of the utilities that you need while managing your network, see Chapter 24, “Administration Utilities Overview,” on page 219.
For a quick access lists, see “Accessing Administration Utilities” in the “Small Business Suite” QuickStart Card.
Accessing ConsoleOneTo create a shortcut to ConsoleOne on the server, do the following:
1 In Windows Explorer, find the mapped or shared drive (usually Z:) that represents the server volume where ConsoleOne is installed > browse to the folder where ConsoleOne is installed.
By default, this is sys:public\mgmt\consoleone\1.2IMPORTANT: You must browse for ConsoleOne on a drive that is mapped to a letter, not a UNC path.
2 In the BIN subfolder, double-click consoleone.exe.
3 (Optional) For future use, create a shortcut on your desktop to the remote consoleone.exe file.
For help with navigating and performing basic tasks in ConsoleOne, see Administration Basics (http://www.novell.com/documentation/consol13/c1_enu/data/a31acig.html).
If you encounter problems starting or using ConsoleOne, see Troubleshooting (http://www.novell.com/documentation/consol13/c1_enu/data/hlgnvvum.html) in the ConsoleOne 1.3.x User Guide.
Accessing NetWare AdministratorIf you installed BorderManager 3.8 and want to set up Proxy Services, you need to access NetWare Administrator for completing the setup and managing proxy filters. Other features of BorderManager can be managed using iManager or ConsoleOne. The software and snap-ins for NetWare Administrator are installed during the BorderManager installation.
To access and run NetWare Administrator, from a workstation map a network drive to sys:public\win32\nwadmn32.exe. Run nwadmn32.exe.
102 Novell Small Business Suite 6.6 Overview and Installation Guide
Novell Confidential Manual (ENU) 21 December 2004
What’s NextAfter setting up the workstation for administration, you can perform one or more of the following tasks in Small Business Setup Task role in Novell iManager to complete the configuration of the server and network.
Configure Internet connectivity via broadband methods, phone dial-up, and ISDN. See Chapter 10, “Setting Up Internet Connectivity,” on page 105.
Configure a basic DNS setup, see Chapter 11, “Setting Up DNS,” on page 109.
Configure a DHCP setup. See Chapter 12, “Setting Up DHCP,” on page 111.
Configure a basic setup of e-mail, instant messaging, and collaboration. See Chapter 14, “Installing and Setting Up E-mail,” on page 119.
Configure and manage printing, including local printer support. See Chapter 13, “Setting Up Printing,” on page 113.
Setting Up a Workstation for Administration 103

Novell Confidential Manual (ENU) 21 December 2004
104 Novell Small Business Suite 6.6 Overview and Installation Guide
Novell Confidential Manual (ENU) 21 December 2004
10 Setting Up Internet Connectivity
If you have selected one of the Novell® Small Business preconfigured server patterns or installed iManager and WAN Connectivity, you can use the Novell Small Business Setup Role in iManager to help set up Internet Connectivity. Using this tool, you can specify the setup requirements from a browser dialog, and then the setup tool interfaces with inetcfg.nlm to run all the required screens on the server.
This Internet Connectivity task helps you configure the external network interface that goes to the Internet. During the interaction of the utility, you choose whether or not to enable Network Address Translation (NAT). We recommend that you enable this option so that internal packets from the workstations are masqueraded to appear as if they come from the server and packets originating from the Internet to the workstations are rejected unless the connection was first initiated by the workstation. This provides a minimal level of security to your internal network. An exception to this rule is if you are using an external gateway router (or modem) to get to the Internet. If this is the case, you can choose to enable NAT in the gateway and you will not need to enable NAT on the server. Eventually, you will probably want to configure BorderManager® on this server to add packet filtering and proxying capabilities to further protect your internal network.
This Internet Connectivity task collects the information you provide on the Web pages and feeds keystrokes to the server console utility, inetcfg.nlm. You might want to watch the server console as it completes the configuration to see which dialog boxes are being invoked in case you are not familiar with inetcfg.nlm and want to manually make changes on your own later. Also, the configuration might occasionally fail; if it does, you must manually unload inetcfg.nlm, clear the Internet Service Provider Configuration screen, and rerun the utility.
To use the setup task in iManager, open iManager, click Small Business Setup > Set Up Internet Connectivity, and then follow the on-screen prompts.
If you need to modify the settings, you can rerun the setup task or use inetcfg.nlm or the Web-based TCP/IP Configuration utility to make further modifications to your TCP/IP configuration.
The Set Up Internet Connectivity task supports the following connection types:
Telephone Dial-up: NetWare® supports external dial-up modems through the serial port interface. NetWare also supports a variety of internal dial-up modems. However, it doesn't support all modems. For example, it doesn't support WinModems or USB modems.
To see a list of supported modems, select Dial-Up. If your server's internal modem is not on the list, you might need to buy an external modem or a supported internal one.
If you cannot find your modem type in the list, try using “Hayes compatible.”
Whichever modem you use, make sure you know the modem type and the settings, including the ISP dial-up number, username, and password. You must also know the name server IP address and default domain name.
Setting Up Internet Connectivity 105
Novell Confidential Manual (ENU) 21 December 2004
DSL (Digital Subscriber Line): If you have a DSL connection to the Internet, it must be an external DSL modem rather than a card that plugs into the server. NetWare doesn't support internal or USB-connected modem hardware. If either of those is what you have, contact your ISP and request an external modem with an Ethernet interface.IMPORTANT: Also, if your DSL provider requires PPPoE (point-to-point protocol over Ethernet), you must have a gateway modem or router that supports PPPoE because NetWare doesn't support this protocol.
The NetWare server must have an Ethernet board that communicates with the gateway router or the external DSL modem.
You must know the following:
Ethernet board name
IP address
Subnet mask
Default gateway IP address
Name server IP addresses
Default domain nameTIP: Normally, you will want to configure your DSL modem in bridge mode so that the server interface is assigned a public IP address. Alternatively, you can use IP address or port forwarding mode so that the server has an external presence.
Cable modem: If you have cable modem, it must be an external cable modem that has an Ethernet interface. NetWare doesn't support internal or USB-connected modem hardware. If either of those is what you have, contact your ISP and request an external modem with an Ethernet interface.
Also, if your cable provider requires PPPoE (point-to-point protocol over Ethernet), you need to have a gateway modem/router that supports PPPoE because NetWare doesn't support this protocol.
You must have an Ethernet board in the NetWare server that communicates with the gateway router or the external cable modem.
You must know the following:
Ethernet board name
IP address
Subnet mask
Default gateway IP address
Name server IP address
Default domain name
ISDN: The set of supported internal ISDN modems is very small. To see a list of supported modems, select ISDN. If your modem is not on the list, get an external ISDN modem. Even then, only the drivers known at the time of this release are included in this release. Instead, we recommend that you get the drivers from your vendor and follow their instructions for installing them.
106 Novell Small Business Suite 6.6 Overview and Installation Guide
Novell Confidential Manual (ENU) 21 December 2004
You must know the following:
IP address
Subnet mask
Default gateway IP address
Name server IP address
Default domain name
All other configurations: All other configurations must be converted through a modem or gateway router into a standard Ethernet interface.
Install an Ethernet board in the server with an appropriate hub or direct connection to the modem or router. When the server boots, it will try to load and bind to the new hardware. Follow the prompts to get the driver loaded and bound.
You must know the following:
Ethernet board name
IP address
Subnet mask
Default gateway IP address
Name server IP address
Default domain name
Whichever Internet connection mechanism you use, we recommend that you configure your server with two network interfaces, an external and an internal. These interfaces can consist of two LAN cards, or one dialup/ISDN modem and one LAN card, etc. The external interface is connected or routed to the ISP. The internal interface is typically a LAN interface that is connected to a hub attached to the workstations. The external interface is typically assigned a public IP address (or receives a dynamic address from the ISP), and the internal interface is typically assigned a nonroutable address you provide. For the internal interface, we recommend 192.168.xxx.xxx address numbers. For example, 192.168.1.2 is a good number for the server's internal interface.
In this dual-interface topology, the server acts as a router, firewall, and proxy for the workstations to access the Internet. Packets from the workstations do not go directly to the Internet, but instead must pass through the server. This allows client workstations to use server services such as DNS, DHCP, file sharing, printing, and e-mail without routing to the Internet. This also protects the workstations from security threats that might exist on the Internet.
For more information, see the Novell Netware TCP/ IP Administration Guide for OES (http://www.novell.com/documentation/oes/tcpipenu/data/front.html) in the OES NetWare online documentation.
Setting Up Internet Connectivity 107

Novell Confidential Manual (ENU) 21 December 2004
108 Novell Small Business Suite 6.6 Overview and Installation Guide
Novell Confidential Manual (ENU) 21 December 2004
11 Setting Up DNS
Domain Name System (DNS) is a distributed database system that provides hostname-to-IP resource mapping (usually the IP address) and other information for computers on a network. A computer on the network or Internet can use a DNS server to locate any other computer by name. For example, if a user enters http://www.novell.com in an Internet browser, DNS is used to map www.novell.com to IP address 130.57.4.70 and the browser then makes the HTTP request to address 130.57.4.70.
If the server is configured for DNS with a local domain, the server can handle local name resolution (particularly the name of the server) and forward requests for names it doesn't know to the DNS server at your ISP. This recommended configuration lets your network function either disconnected from or connected to the Internet.
If you have selected one of the Novell® Small Business preconfigured server patterns or installed iManager, you can use the Novell Small Business Setup Role in iManager to help set up DNS quickly rather than using the DNS/DHCP Configuration utility or the DNS role in iManager. Using this tool, you can specify the setup requirements, and then the setup tool modifies all the required files to set up DNS.
This tool creates objects in the same eDirectoryTM context where the server object is located. It automatically creates a Locator object DNS-DHCP. It creates a DNS_server name object and an object for each DNS domain in the directory.
To use the setup task in iManager, open iManager, click Small Business Setup > Set Up DNS, and then follow the on-screen prompts.
If you need to modify the settings, you can rerun the setup task or use the DNS/DHCP Configuration utility or the DNS role in iManager to make further modifications to your DNS configuration. This utility does not create PTR or reverse-lookup records. To do so, use the DNS role in iManager.
For more information, see the Novell DNS/DHCP Services for NetWare Administration Guide for OES (http://www.novell.com/documentation/oes/dhcp_enu/data/front.html#bktitle) in the OES NetWare online documentation.
Setting Up DNS 109

Novell Confidential Manual (ENU) 21 December 2004
110 Novell Small Business Suite 6.6 Overview and Installation Guide
Novell Confidential Manual (ENU) 21 December 2004
12 Setting Up DHCP
Dynamic Host Configuration Protocol (DHCP) uses a client/server protocol to provide configuration parameters to workstations (hosts), usually on the same private subnet as the server. It also includes a mechanism to allocate network addresses. DHCP also provides host-specific configuration parameters from a DHCP server (or collection of DHCP servers) to a workstation.
If the server is configured for DHCP, the server allocates a range of IP addresses for workstations that use the DHCP protocol. When a workstation boots, it requests an IP address assignment and the server provide it. In addition, if the server is configured for DHCP, a client can be informed of its default gateway address and the address of one or more name servers (often including the server's own address) to handle name resolution. If you have configured your server as a router to the Internet with an internal and an external network interface, DHCP configuration applies specifically to the server internal network interface and subnet.
If you have selected one of the Novell® Small Business preconfigured server patterns or installed iManager, you can use the Novell Small Business Setup Role in iManager to help set up DHCP services quickly rather than using the DNS/DHCP Configuration utility or the DHCP role in iManager. Using this tool, you can specify the setup requirements, and then the setup tool modifies all the required files to set up DHCP.
This task helps you set up DHCP services on the server so local workstations can connect and automatically receive IP address, mask, default gateway, and name server addresses.
This task creates objects in the same eDirectoryTM context where the server object is located. It automatically creates a Locator object (DNS/DHCP). If DHCP is chosen, it creates a DHCP_server name object and a DHCP_server name_subnet object.
If you plan to configure DNS, run the Set Up DNS task first so name server information will be defaulted correctly.
To use the setup task in iManager, open iManager, click Small Business Setup > Set Up DHCP, and then follow the on-screen prompts. Make sure the server and printer static IP addresses are not in the range of address allocated for DHCP.
If you need to modify the settings, you can rerun the setup task or use the DNS/DHCP Configuration utility or the DHCP role in iManager to make further modifications to your DHCP configuration.
For more information, see the Novell DNS/DHCP Services for NetWare Administration Guide for OES (http://www.novell.com/documentation/oes/dhcp_enu/data/front.html#bktitle) in the OES NetWare online documentation.
Setting Up DHCP 111

Novell Confidential Manual (ENU) 21 December 2004
112 Novell Small Business Suite 6.6 Overview and Installation Guide
Novell Confidential Manual (ENU) 21 December 2004
13 Setting Up Printing
This chapter introduces you to iPrint and helps you quickly set up iPrint printers and install them on workstations in less than an hour.
“iPrint Overview” on page 113
“Prerequisites” on page 114
“Setting Up and Managing Printing Using iManager” on page 114
“Additional Information” on page 118
iPrint OverviewiPrint lets mobile employees, business partners, and customers access printers from a variety of remote locations using existing Internet connections. Whether users are located in an office building, telecommuting from home, or attending a sales meeting in another country, iPrint ensures that they can print documents quickly, easily, and reliably.
Using a Web browser, users point to a Web page that displays the available printers. By clicking a printer, the iPrint client is installed (if not installed previously), the printer’s driver is downloaded, and a printer is created in the user’s Printer folder, enabling the user to send documents to the printer from any application on the desktop.
iPrint is comprised of the following components:
Broker: Handles the Resource Management Service that is a database of print drivers. When a user installs a printer, the print driver is automatically downloaded to the user’s workstation and installed.
Print Manager: Holds information about each printer and manages the communication between workstations and printers.
Printers: Represented as Printer objects in eDirectoryTM and as printer agents in the print manager. The printer agent holds the information you specify about the printer (printer name, location, description, etc.), which helps users know which printer they should print to.
iPrint Client: Required by the user workstation to communicate with the print manager. The iPrint client is a set of browser plug-ins that lets users find and install printers using their Web browsers.
iPrint Printer List: An auto-generated Web page that lists the printers that have been created. From this list you can install printers and view printer information including print job information.
iPrint Map Designer: A tool that lets you use a background image of your office layout to create an interactive Web page that your users can install printers from.
Setting Up Printing 113
Novell Confidential Manual (ENU) 21 December 2004
The print broker, print manager, and all Printer objects are created in the same e-Directory parent container as the Server object. The name of the broker is PrintBroker and the name of the manager is PrintManager. The manager and broker are automatically created the first time you add a printer.WARNING: If you change the name of the print manager or broker, the Small Business Setup assumes it doesn’t exist and creates a new one with the name above.
PrerequisitesBefore you can install, set up, or manage printers on your server, you must copy the iPrint files to the server. You can do this during the NetWare installation by doing one of the following:
Select iPrint as a component of the Customized NetWare pattern
Select one of the Small Business Suite Server preconfigured server options
Select the iPrint server option
Install iPrint as a product after the NetWare installation is complete
If you chose to install iPrint, Novell® Small Business Suite provides a setup tool in iManager to help set up and manage printing services quickly rather than using the iPrint role in Novell iManager. Using this tool, you can specify the setup requirements, and then the setup tool modifies all the required files to set up printing. However, you can use either tool.
Setting Up and Managing Printing Using iManagerThe following sections cover procedures for setting up and managing printing using the Small Business Setup role and Manage Printing task in iManager. If you click Small Business Setup > Manage Printers in iManager, this following page is displayed.
114 Novell Small Business Suite 6.6 Overview and Installation Guide
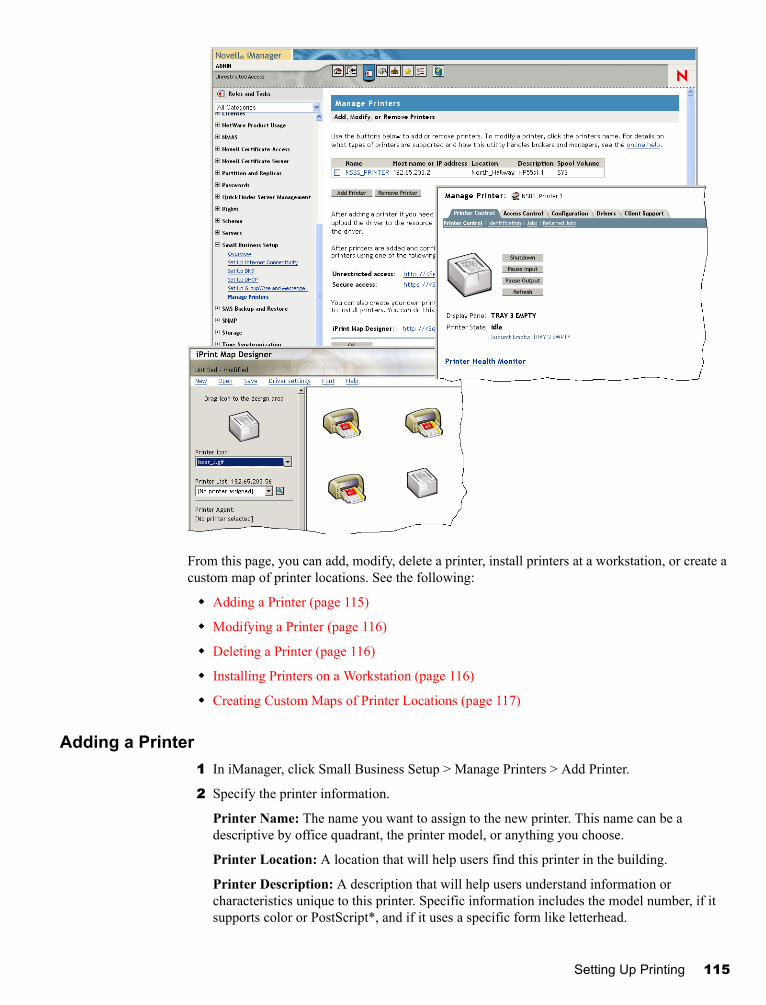
Novell Confidential Manual (ENU) 21 December 2004
From this page, you can add, modify, delete a printer, install printers at a workstation, or create a custom map of printer locations. See the following:
Adding a Printer (page 115)
Modifying a Printer (page 116)
Deleting a Printer (page 116)
Installing Printers on a Workstation (page 116)
Creating Custom Maps of Printer Locations (page 117)
Adding a Printer1 In iManager, click Small Business Setup > Manage Printers > Add Printer.
2 Specify the printer information.
Printer Name: The name you want to assign to the new printer. This name can be a descriptive by office quadrant, the printer model, or anything you choose.
Printer Location: A location that will help users find this printer in the building.
Printer Description: A description that will help users understand information or characteristics unique to this printer. Specific information includes the model number, if it supports color or PostScript*, and if it uses a specific form like letterhead.
Setting Up Printing 115
Novell Confidential Manual (ENU) 21 December 2004
Printer Spool Volume: The volume where print jobs are to be spooled.
Server-Attached Parallel Printer/Network Printer: The type of printer you are setting up. For network printers, you must also specify the IP address.
The printer must be a network-attached printer or connected to the parallel port of the server. Printers cannot be connected to the server using a USB interface. Although network printers perform better than server-attached printers, they are usually more expensive. Network adapters can be purchased to convert a server- or workstation-attached printer to a network printer.
3 Select the default print driver to be installed for this printer for each Windows platform.
You can specify only one print driver for each client operating system.
If a print driver is not in the list, click Add Driver to add the driver to the list. Drivers can be added from an .inf file or from the Windows workstation that you are running iManager from. When adding drivers from the system, you can add print drivers only to the same Windows platform that you are running iManager on.
For example, if you are running iManager from a Windows 2000 workstation, you can add only Windows 2000 print drivers. To add a print driver for Windows XP, you will need to go to a Windows XP workstation after creating the printer and click the “here” link on the iManager Printer page to upload the driver to the resource manager, then click the printer name to add the driver. See Modifying a Printer.
4 Click OK.
Modifying a Printer1 In Novell iManager, click Small Business Setup > Manage Printers.
2 Click the printer name.
A new browser window opens and the Manage Printer task in the standard iPrint management task is displayed for the printer selected. Use the tabs to perform management tasks for this printer. For more information, see “Managing Printers”in the OES iPrint Administration Guide for NetWare in the OES NetWare online documentation.
Deleting a Printer1 In Novell iManager, click Small Business Setup > Manage Printers.
2 Check the check box next to the printer you want to delete, then click Delete Printer.
All references to the printer are removed. If you used the printer on a map, the link to install the printer is invalid. You need to modify the map and remove the printer link.
Installing Printers on a WorkstationBefore you can install a printer on a workstation, the iPrint Client must be installed. When you access the Printer List Web page, you are automatically prompted to install the client. If you created a map, when you attempt to install your first printer, you are prompted to install the iPrint client first.
116 Novell Small Business Suite 6.6 Overview and Installation Guide
Novell Confidential Manual (ENU) 21 December 2004
To access the default page, enter one of the following URLs in your Web browser:
http://server_IP_address_or_dns_name/ipp (unsecure access)
https://server_IP_address_or_dns_name/ipps (secure access)
For example, if the DNS name for printing is printing.mycompany.com, then the user would access iPrint from one of the following URLs:
http://printing.mycompany.com/ipp
https://printing.mycompany.com/ipp
If Virtual Office is set up, clicking the printer button on the Virtual Office page also lets you access the page to install printers.
If you have a custom print map, the URL is on the print map. See Creating Custom Maps of Printer Locations.
Creating Custom Maps of Printer LocationsUsing the iPrint Map Designer, you can create a map showing printer locations instead of having to use the iPrint Printer List to locate a printer.
1 In Novell iManager, click Small Business Setup > Manage Printers.
2 Click the iPrint Map Designer link.
3 (Optional) Create a gif or jpg of a map of your office and put it into the sys:apache2\htdocs\ippdocs\images\maps directory.
4 Add a printer to the map.
4a Click the Printer icon and drag the printer to the desired location on the map.
4b From the printer icon field, select the type of printer and size.
4c Next to the Printer List field, click the Browse icon and type the IP address or DNS name of the server where the Print Manager is running.
4d From the printer list, select the printer agent you want associated with this printer icon.
If the printer is not listed, then you have not enabled IPP for the printer. See “Enabling/Disabling iPrint on Individual Printers” in the OES iPrint Administration Guide for NetWare in the OES NetWare online documentation.
The Printer URL and Mouse Over Text fields are automatically filled in with the printer agent information.
Printer URL: The URL created for the printer when IPP is enabled for the printer. WARNING: If you want to access the printer from the Internet, make sure the DNS name or IP address corresponds to the external interface of the server.
Mouse Over Text: By default, displays the printer agent's name. You can override this information by typing the text you want to display when a user moves the mouse over the Printer icon.
4e (Optional) In the Printer Caption field, type the information to display, using Enter to parse the information onto multiple lines.
Setting Up Printing 117

Novell Confidential Manual (ENU) 21 December 2004
4f (Optional) On the menu bar, click Driver Settings to set the installed driver settings for this printer.
These settings included paper size, orientation, copies, duplex, color, collate, and removing the printer when the workstation is rebooted.
If you delete a Printer icon or change the printer agent assignment for a Printer icon, any driver settings are cleared for that icon.
4g (Optional) On the menu bar, click Font to change the base font, color, and size of text on the map.
5 (Optional) Edit a printer's information by clicking the desired Printer icon and then editing the printer information fields.
To deselect a Printer icon while in the map, click anywhere in the design area.
6 Click Save and save the map to sys:\apache2\htdocs\ippdocs.
If you click Refresh or exit Internet Explorer without saving the map, all changes made since the last time the map was saved will be lost.
To retrieve and modify an existing map file, click Open and browse to the directory where the map is located (sys:\apache2\htdocs\ippdocs).
To make the new print map visible from Virtual Office,
1 Open iManager.
2 Click Virtual Office Management > iPrint.
3 Select Enter a Custom URL to Launch iPrint.
4 Type http:server_IP_address or DNS_name\ippdoc\map_name.html
5 Click OK.
For more information on using the iPrint Map Designer, see “Creating a Map for Printing” in the OES iPrint Administration Guide for NetWare in the OES NetWare online documentation.
Additional InformationFor additional information about advanced iPrint management tasks available in iManager or conceptual information about your iPrint system, see the OES iPrint Administration Guide for NetWare in the OES NetWare online documentation.
118 Novell Small Business Suite 6.6 Overview and Installation Guide
Novell Confidential Manual (ENU) 21 December 2004
14 Installing and Setting Up E-mail
In Novell® Small Business Suite 6.6, we have integrated the GroupWise® and Messenger 6.5 installation with the NetWare® installation so that you can easily set up e-mail on the same server where you install NetWare. During installation of the Small Business Suite, you have four alternatives for installing the GroupWise and Messenger files:
Select Preconfigured Servers, then use the Novell Small Business Collaboration Server option to set up a Small Business server specifically for GroupWise and Messenger.
Select Preconfigured Servers, then use the Novell Small Business Collaboration Server with Virtual Office option to set up a Small Business server that includes Virtual Office along with GroupWise and Messenger along.
Select Customized NetWare Server, then use the GroupWise and Messenger File Copy option to include the GroupWise and Messenger files on your Small Business server along with whatever other products you choose to install.
Install any Small Business server, then do a post-installation to add GroupWise and Messenger to the existing Small Business server.
After you have run the Small Business installation, there are additional tasks to perform in order to set up your initial GroupWise system and to manage it over time. You can use Novell iManager to set up your initial GroupWise system. Thereafter, you will use ConsoleOne® to manage your GroupWise system.
“Setting Up Your Initial GroupWise System” on page 119
“Managing Your GroupWise System” on page 130
“Updating an Existing GroupWise System” on page 148
Setting Up Your Initial GroupWise SystemThe Small Business Suite provides an easy process for getting e-mail up and running quickly.
“Creating Your GroupWise System” on page 120
“Creating GroupWise Accounts for Users” on page 122
“Accessing GroupWise Mailboxes” on page 123
“Setting Up Common Mailbox Forwarding with the POP Forwarding Agent” on page 128
“Sending and Receiving Instant Messages” on page 129
Installing and Setting Up E-mail 119
Novell Confidential Manual (ENU) 21 December 2004
Creating Your GroupWise SystemIf you are setting up GroupWise on a single server, using the Set Up GroupWise and Messenger task in iManager rather than the GroupWise CDs to perform the installation cuts the setup time from 30 minutes to about five minutes and still gives you most of the control that you would have during a custom GroupWise installation. However, if you have a multiserver environment or if you would prefer to use the GroupWise CDs to perform a standard GroupWise installation, follow the instructions in the GroupWise 6.5 Installation Guide available in the GroupWise 6.5 Documentation Web page. (http://www.novell.com/documentation/gw65/index.html).
Prerequisites
To create your initial GroupWise system using iManager, you must have the following information on hand:
The admin name and password for your Small Business serverIMPORTANT: If your Small Business system does not have a static external IP address, review “Setting Up Common Mailbox Forwarding with the POP Forwarding Agent” on page 128 for background information that applies only to this particular configuration. If at all possible, you should configure your Small Business system with a static external IP address.
The volume where you want the GroupWise domain and post office to be created
The Internet domain name where you want to receive e-mail if e-mail connectivity to the Internet is desired
The components you want to install:
Basic GroupWise system (one domain with its Message Transfer Agent and one post office with its Post Office Agent)
The domain functions as the main administrative unit for your GroupWise system. The post office serves as an administrative unit for a group of users and contains users’ mailboxes. Each GroupWise user has an address that consists of a user ID, the user's post office name, the GroupWise domain name and, optionally, an Internet domain name.
Automatic creation of GroupWise users and groups based on Novell eDirectoryTM (Small Business Agent)
The Small Business Agent automatically creates GroupWise user accounts for all eDirectory users when you set up your GroupWise system. It also automatically creates GroupWise distribution lists for all eDirectory groups. Thereafter, it adds or deletes GroupWise user accounts and distribution lists whenever you add or delete eDirectory users and groups.
E-mail connectivity to the Internet (Internet Agent)
The Internet Agent allows communication between GroupWise users and users of other messaging systems who use the Internet to send e-mail. It also allows users to user POP and IMAP e-mail clients to access their GroupWise mailboxes.
Browser-based access to mailboxes (WebAccess)
WebAccess enables access to GroupWise mailboxes through Web browsers, WAP-enabled wireless telephones, Palm OS* devices, and Windows CE devices. WebAccess, when used on a computer's Web browser, provides most of the functionality available in the GroupWise client for Windows. Functionality on other devices is more limited.
120 Novell Small Business Suite 6.6 Overview and Installation Guide
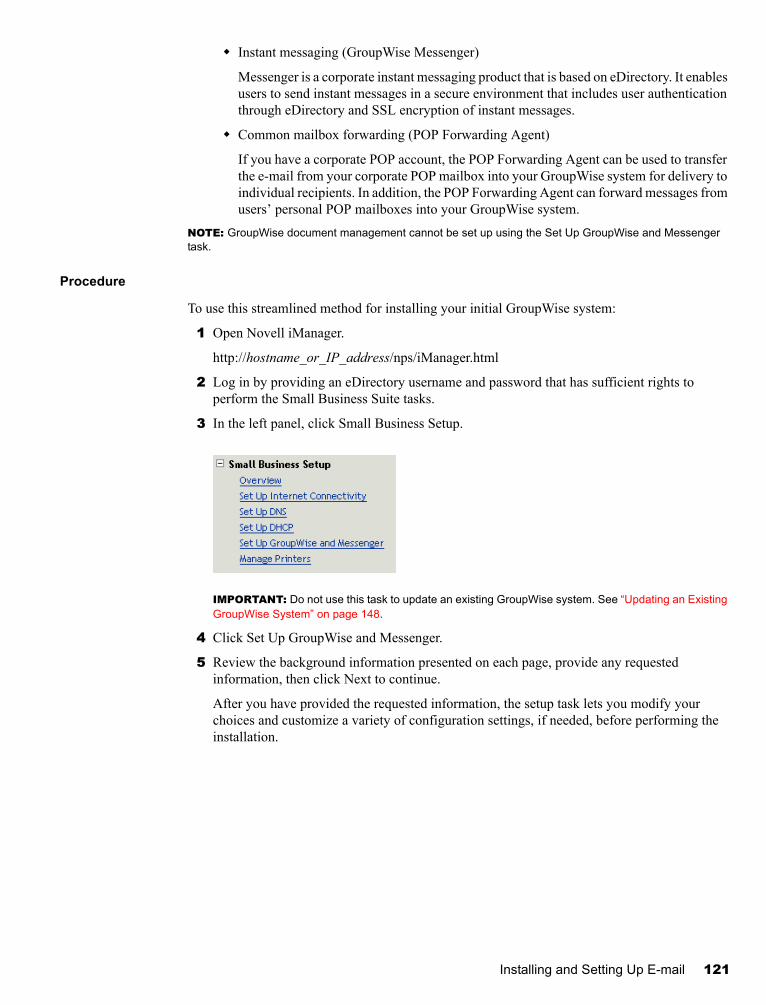
Novell Confidential Manual (ENU) 21 December 2004
Instant messaging (GroupWise Messenger)
Messenger is a corporate instant messaging product that is based on eDirectory. It enables users to send instant messages in a secure environment that includes user authentication through eDirectory and SSL encryption of instant messages.
Common mailbox forwarding (POP Forwarding Agent)
If you have a corporate POP account, the POP Forwarding Agent can be used to transfer the e-mail from your corporate POP mailbox into your GroupWise system for delivery to individual recipients. In addition, the POP Forwarding Agent can forward messages from users’ personal POP mailboxes into your GroupWise system.
NOTE: GroupWise document management cannot be set up using the Set Up GroupWise and Messenger task.
Procedure
To use this streamlined method for installing your initial GroupWise system:
1 Open Novell iManager.
http://hostname_or_IP_address/nps/iManager.html
2 Log in by providing an eDirectory username and password that has sufficient rights to perform the Small Business Suite tasks.
3 In the left panel, click Small Business Setup.
IMPORTANT: Do not use this task to update an existing GroupWise system. See “Updating an Existing GroupWise System” on page 148.
4 Click Set Up GroupWise and Messenger.
5 Review the background information presented on each page, provide any requested information, then click Next to continue.
After you have provided the requested information, the setup task lets you modify your choices and customize a variety of configuration settings, if needed, before performing the installation.
Installing and Setting Up E-mail 121
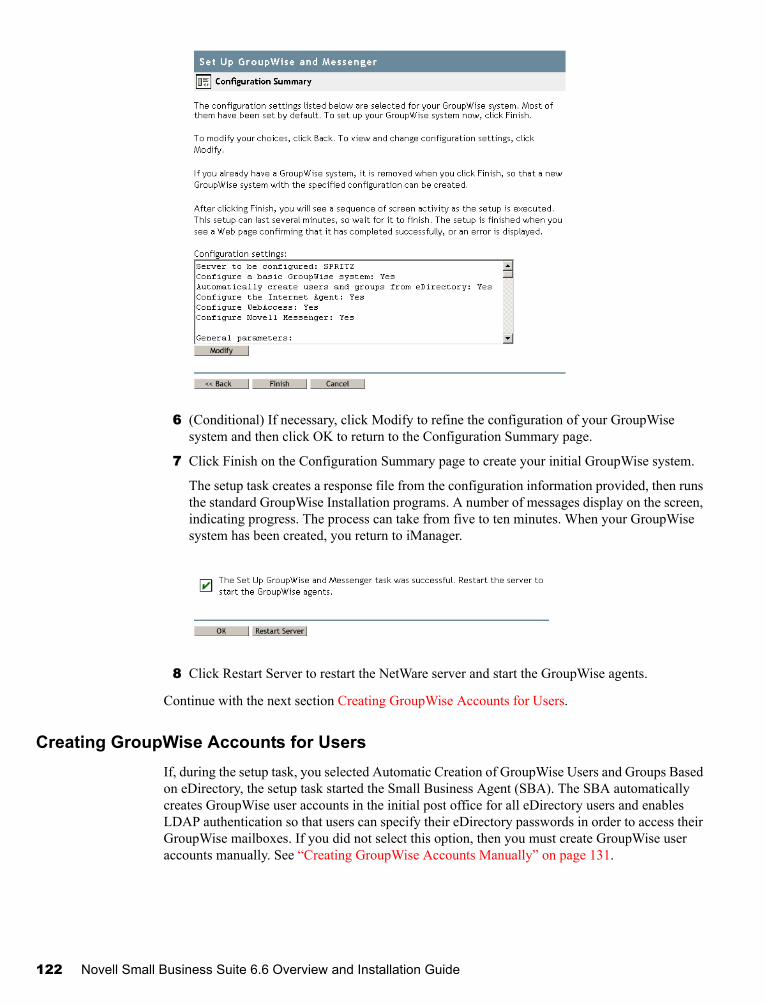
Novell Confidential Manual (ENU) 21 December 2004
6 (Conditional) If necessary, click Modify to refine the configuration of your GroupWise system and then click OK to return to the Configuration Summary page.
7 Click Finish on the Configuration Summary page to create your initial GroupWise system.
The setup task creates a response file from the configuration information provided, then runs the standard GroupWise Installation programs. A number of messages display on the screen, indicating progress. The process can take from five to ten minutes. When your GroupWise system has been created, you return to iManager.
8 Click Restart Server to restart the NetWare server and start the GroupWise agents.
Continue with the next section Creating GroupWise Accounts for Users.
Creating GroupWise Accounts for UsersIf, during the setup task, you selected Automatic Creation of GroupWise Users and Groups Based on eDirectory, the setup task started the Small Business Agent (SBA). The SBA automatically creates GroupWise user accounts in the initial post office for all eDirectory users and enables LDAP authentication so that users can specify their eDirectory passwords in order to access their GroupWise mailboxes. If you did not select this option, then you must create GroupWise user accounts manually. See “Creating GroupWise Accounts Manually” on page 131.
122 Novell Small Business Suite 6.6 Overview and Installation Guide
Novell Confidential Manual (ENU) 21 December 2004
The SBA displays an agent console on the NetWare server where it runs. At the SBA console, the SBA displays messages informing you of the GroupWise accounts it is creating and other activities it is performing. By default, the SBA scans eDirectory every five minutes for new eDirectory User objects that need accompanying GroupWise accounts and for Group objects that need corresponding distribution lists. To cause it to scan immediately, press F4 at the SBA console. The SBA also automatically creates GroupWise distribution lists for all eDirectory groups. For more information about the SBA, see “Managing the Small Business Agent” on page 137.
When you create new eDirectory users or groups in iManager and you rely on the SBA to create the corresponding GroupWise accounts or distribution lists, it might take up to five minutes for the GroupWise accounts or distribution lists to be available. At the SBA console, press F4 to create the GroupWise accounts or distribution lists immediately.
When your users all have GroupWise accounts, continue with the next section, “Accessing GroupWise Mailboxes.”
Accessing GroupWise MailboxesAfter the GroupWise agents are running and users have GroupWise accounts set up, users can access their GroupWise mailboxes in a variety of ways:
Using the GroupWise Windows Client (page 123)
Using the GroupWise WebAccess Client (page 124)
Using Virtual Office (page 124)
Using a Third-Party E-mail Client (page 125)
Using Microsoft Outlook (page 127)
Using the GroupWise Windows Client
The GroupWise Windows client is ideal for e-mail, calendaring, scheduling, and much more in the office environment. The GroupWise Windows client software must be installed on each user’s workstation. You have several options for distributing the GroupWise client software to users:
Make copies of the GroupWise 6.5.4 Windows Client CD and give them to users. The client Installation program is located at the root of the CD.
Have users map a drive to sys:\grpwise\software\client\win32 directory on your Small Business server. The client Installation program is located in the win32 directory.
Use one of the more sophisticated installation methods described in the Client section of the GroupWise 6.5 Administration Guide in the GroupWise 6.5 online documentation (http://www.novell.com/documentation/gw65/index.htm).
The following procedure assumes that users have the GroupWise 6.5.4 Windows Client CDs or have mapped a drive.
1 Make sure you are logged in as yourself on your workstation.
2 Click Start > Run, browse to the location of setup.exe on the GroupWise 6.5.4 Windows Client CD or mapped drive, select setup.exe, then click OK.
3 Follow the instructions in the Setup Wizard to install the Windows client software on your workstation.
Installing and Setting Up E-mail 123
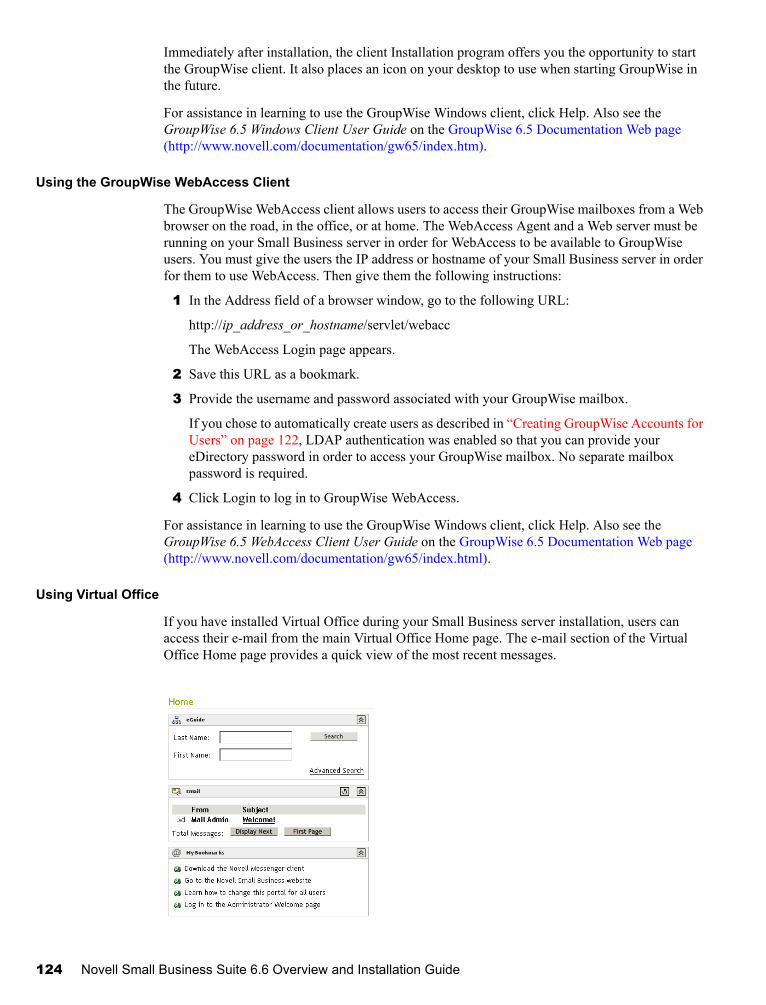
Novell Confidential Manual (ENU) 21 December 2004
Immediately after installation, the client Installation program offers you the opportunity to start the GroupWise client. It also places an icon on your desktop to use when starting GroupWise in the future.
For assistance in learning to use the GroupWise Windows client, click Help. Also see the GroupWise 6.5 Windows Client User Guide on the GroupWise 6.5 Documentation Web page (http://www.novell.com/documentation/gw65/index.htm).
Using the GroupWise WebAccess Client
The GroupWise WebAccess client allows users to access their GroupWise mailboxes from a Web browser on the road, in the office, or at home. The WebAccess Agent and a Web server must be running on your Small Business server in order for WebAccess to be available to GroupWise users. You must give the users the IP address or hostname of your Small Business server in order for them to use WebAccess. Then give them the following instructions:
1 In the Address field of a browser window, go to the following URL:
http://ip_address_or_hostname/servlet/webacc
The WebAccess Login page appears.
2 Save this URL as a bookmark.
3 Provide the username and password associated with your GroupWise mailbox.
If you chose to automatically create users as described in “Creating GroupWise Accounts for Users” on page 122, LDAP authentication was enabled so that you can provide your eDirectory password in order to access your GroupWise mailbox. No separate mailbox password is required.
4 Click Login to log in to GroupWise WebAccess.
For assistance in learning to use the GroupWise Windows client, click Help. Also see the GroupWise 6.5 WebAccess Client User Guide on the GroupWise 6.5 Documentation Web page (http://www.novell.com/documentation/gw65/index.html).
Using Virtual Office
If you have installed Virtual Office during your Small Business server installation, users can access their e-mail from the main Virtual Office Home page. The e-mail section of the Virtual Office Home page provides a quick view of the most recent messages.
124 Novell Small Business Suite 6.6 Overview and Installation Guide
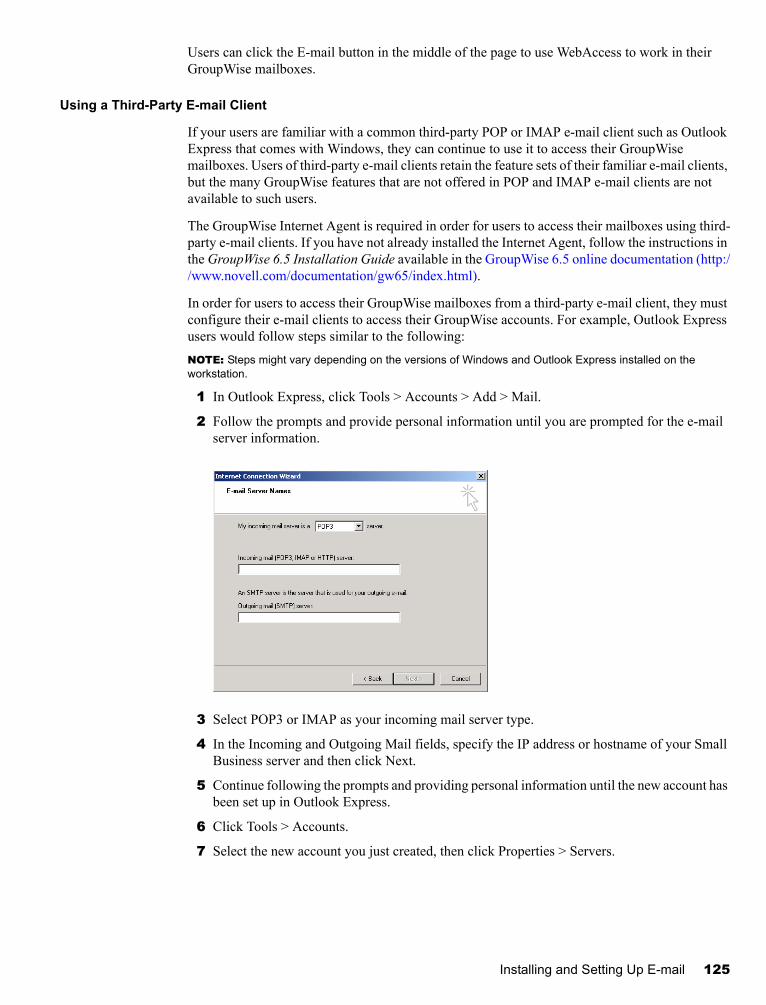
Novell Confidential Manual (ENU) 21 December 2004
Users can click the E-mail button in the middle of the page to use WebAccess to work in their GroupWise mailboxes.
Using a Third-Party E-mail Client
If your users are familiar with a common third-party POP or IMAP e-mail client such as Outlook Express that comes with Windows, they can continue to use it to access their GroupWise mailboxes. Users of third-party e-mail clients retain the feature sets of their familiar e-mail clients, but the many GroupWise features that are not offered in POP and IMAP e-mail clients are not available to such users.
The GroupWise Internet Agent is required in order for users to access their mailboxes using third-party e-mail clients. If you have not already installed the Internet Agent, follow the instructions in the GroupWise 6.5 Installation Guide available in the GroupWise 6.5 online documentation (http://www.novell.com/documentation/gw65/index.html).
In order for users to access their GroupWise mailboxes from a third-party e-mail client, they must configure their e-mail clients to access their GroupWise accounts. For example, Outlook Express users would follow steps similar to the following:NOTE: Steps might vary depending on the versions of Windows and Outlook Express installed on the workstation.
1 In Outlook Express, click Tools > Accounts > Add > Mail.
2 Follow the prompts and provide personal information until you are prompted for the e-mail server information.
3 Select POP3 or IMAP as your incoming mail server type.
4 In the Incoming and Outgoing Mail fields, specify the IP address or hostname of your Small Business server and then click Next.
5 Continue following the prompts and providing personal information until the new account has been set up in Outlook Express.
6 Click Tools > Accounts.
7 Select the new account you just created, then click Properties > Servers.
Installing and Setting Up E-mail 125
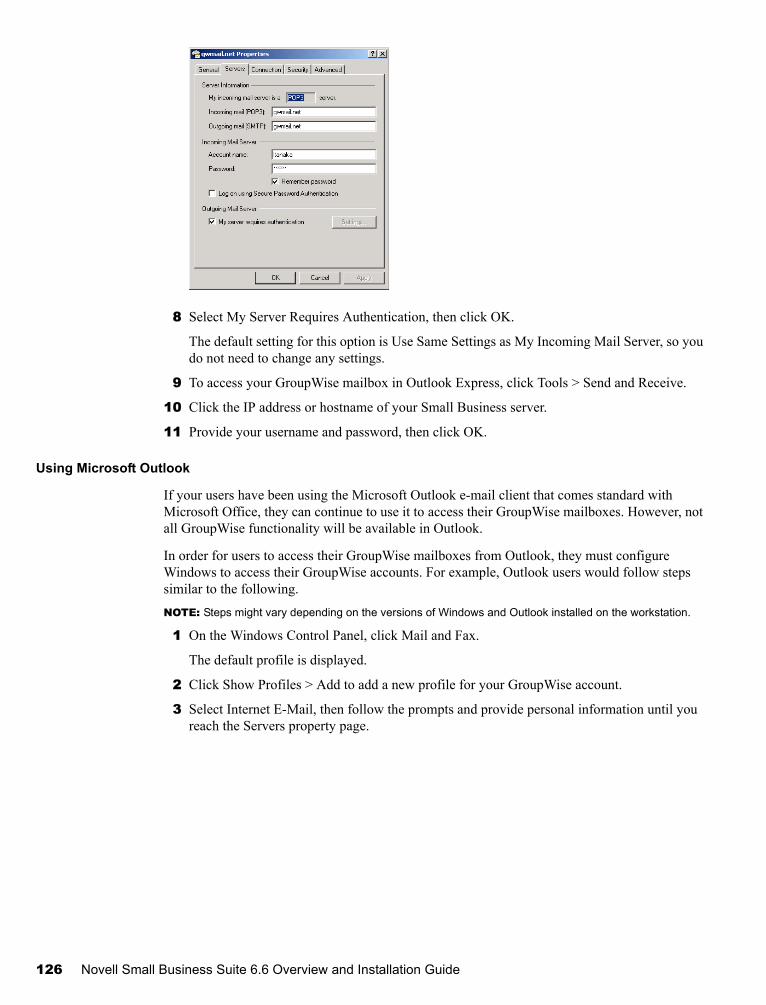
Novell Confidential Manual (ENU) 21 December 2004
8 Select My Server Requires Authentication, then click OK.
The default setting for this option is Use Same Settings as My Incoming Mail Server, so you do not need to change any settings.
9 To access your GroupWise mailbox in Outlook Express, click Tools > Send and Receive.
10 Click the IP address or hostname of your Small Business server.
11 Provide your username and password, then click OK.
Using Microsoft Outlook
If your users have been using the Microsoft Outlook e-mail client that comes standard with Microsoft Office, they can continue to use it to access their GroupWise mailboxes. However, not all GroupWise functionality will be available in Outlook.
In order for users to access their GroupWise mailboxes from Outlook, they must configure Windows to access their GroupWise accounts. For example, Outlook users would follow steps similar to the following.NOTE: Steps might vary depending on the versions of Windows and Outlook installed on the workstation.
1 On the Windows Control Panel, click Mail and Fax.
The default profile is displayed.
2 Click Show Profiles > Add to add a new profile for your GroupWise account.
3 Select Internet E-Mail, then follow the prompts and provide personal information until you reach the Servers property page.
126 Novell Small Business Suite 6.6 Overview and Installation Guide
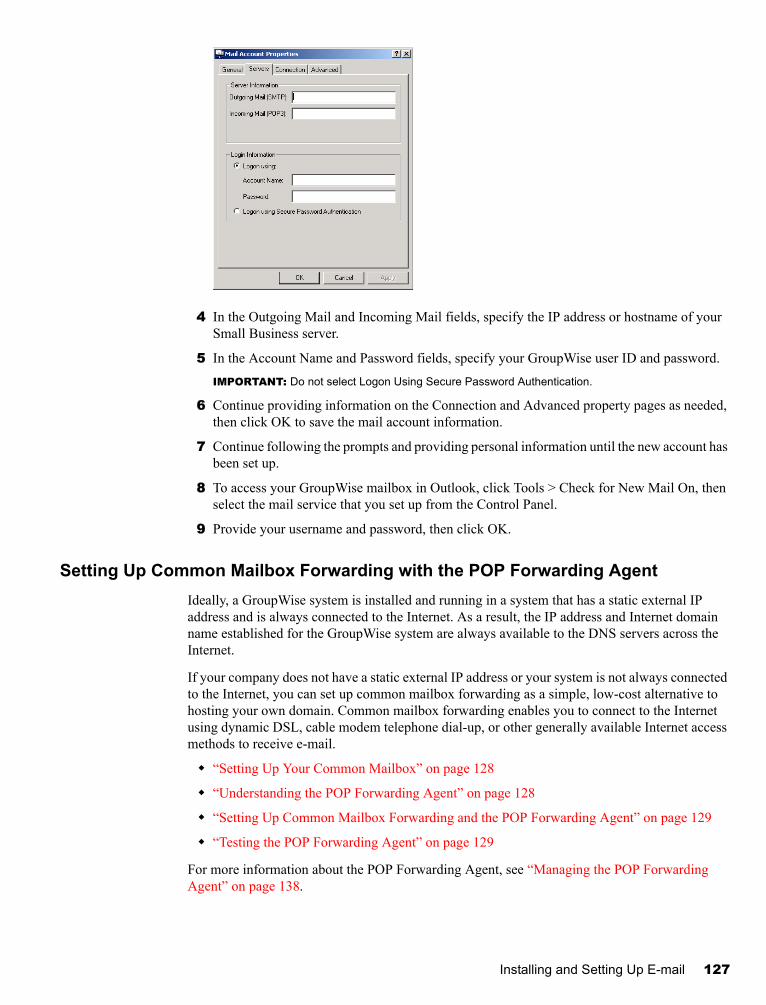
Novell Confidential Manual (ENU) 21 December 2004
4 In the Outgoing Mail and Incoming Mail fields, specify the IP address or hostname of your Small Business server.
5 In the Account Name and Password fields, specify your GroupWise user ID and password.IMPORTANT: Do not select Logon Using Secure Password Authentication.
6 Continue providing information on the Connection and Advanced property pages as needed, then click OK to save the mail account information.
7 Continue following the prompts and providing personal information until the new account has been set up.
8 To access your GroupWise mailbox in Outlook, click Tools > Check for New Mail On, then select the mail service that you set up from the Control Panel.
9 Provide your username and password, then click OK.
Setting Up Common Mailbox Forwarding with the POP Forwarding AgentIdeally, a GroupWise system is installed and running in a system that has a static external IP address and is always connected to the Internet. As a result, the IP address and Internet domain name established for the GroupWise system are always available to the DNS servers across the Internet.
If your company does not have a static external IP address or your system is not always connected to the Internet, you can set up common mailbox forwarding as a simple, low-cost alternative to hosting your own domain. Common mailbox forwarding enables you to connect to the Internet using dynamic DSL, cable modem telephone dial-up, or other generally available Internet access methods to receive e-mail.
“Setting Up Your Common Mailbox” on page 128
“Understanding the POP Forwarding Agent” on page 128
“Setting Up Common Mailbox Forwarding and the POP Forwarding Agent” on page 129
“Testing the POP Forwarding Agent” on page 129
For more information about the POP Forwarding Agent, see “Managing the POP Forwarding Agent” on page 138.
Installing and Setting Up E-mail 127
Novell Confidential Manual (ENU) 21 December 2004
Setting Up Your Common Mailbox
1 Obtain a POP e-mail account.
Typically, a POP account is part of the basic Internet connectivity offered by your Internet Service Provider (ISP). You might want to have your ISP host not only your e-mail but also your company Web site. Before configuring your system for common mailbox forwarding, verify that your service agreement with your ISP authorizes such use of your Internet connection.
2 Register an Internet domain name.
A large number of Internet domain registry services are available that can, for a small fee, register the domain name of your choosing and allow you to redirect HTTP and e-mail requests to your ISP Web sit and e-mail account.
3 Configure e-mail forwarding.
You domain service must be configured so that e-mail addressed to any user at your domain name goes into your common mailbox established in Step 1.
4 Configure common mailbox forwarding.
Step 1 through Step 3 were performed by other organizations. The final step must be performed by you on your Small Business server by completing the instructions in the following sections.
Understanding the POP Forwarding Agent
When you perform the Set Up GroupWise and Messenger task in iManager and Select Common Mailbox Forwarding, you choose to have the POP Forwarding Agent (PFA) installed and started for you. The PFA periodically checks the corporate POP mailbox that your ISP set up and downloads any waiting e-mail into your GroupWise system. The PFA also removes downloaded e-mail from the common mailbox. The GroupWise Internet Agent then processes the incoming e-mail, routing messages to GroupWise mailboxes based on the specific recipient information for each message. By default, e-mail is retrieved every 30 minutes; you can adjust the interval as needed, as described in “Viewing or Changing the PFA Schedule” on page 143.
The PFA retrieves e-mail from the common POP mailbox, but it does not send e-mail. Outgoing e-mail always goes through the Internet Agent. Using the Set Up GroupWise and Messenger task in iManager, you provide the Internet domain name for the Internet Agent to use. The Internet Agent must be configured with the same domain name as you are using for domain name forwarding so that replies to messages you send arrive in the common POP mailbox.
The PFA is not part of the GroupWise product but is integrated with it to perform common mailbox forwarding in environments where a static IP address and uninterrupted Internet connectivity are not available.
Setting Up Common Mailbox Forwarding and the POP Forwarding Agent
You can use the Set Up GroupWise and Messenger task in iManager to install the PFA, even if you have already installed your GroupWise system in iManager or by using the GroupWise CDs.
1 Open iManager and select the Set Up GroupWise and Messenger task. For more information, see “Creating Your GroupWise System” on page 120.
2 On the GroupWise and Messenger System Configuration page, select Enable Common Mailbox Forwarding (POP Forwarding Agent) and Set Up E-Mail Connectivity to the Internet (Internet Agent).
128 Novell Small Business Suite 6.6 Overview and Installation Guide
Novell Confidential Manual (ENU) 21 December 2004
3 Deselect all other components.
4 Continue through the task as prompted.
5 When installation is complete, reboot your Small Business server.
The PFA starts when your server restarts.
Continue with “Testing the POP Forwarding Agent” on page 129.
Testing the POP Forwarding Agent
After you have set up the PFA to forward mail into the GroupWise system, send messages to any of the POP accounts and domain names that you have set up. The messages should arrive in the GroupWise mailboxes of the recipients they are addressed to. Undeliverable messages are automatically sent to the Postmaster for the Internet Agent. If you have not yet set up a Postmaster, see “Assigning a Postmaster” on page 133.
Sending and Receiving Instant MessagesIn order for users to send instant messages, they must install GroupWise Messenger on their workstations.
1 Access the Novell Messenger Welcome page by entering the following URL in your browser address field:
http://ip_address_or_hostname:8300
2 Click the Novell Messenger link, then continue following the instructions on the Welcome page to install and start Messenger.
3 Click Help for assistance in learning to use the Messenger client.
See also Sending Instant Messages in the GroupWise 6.5 Windows Client User Guide in the GroupWise 6.5 online documentation (http://www.novell.com/documentation/gw65/gw65_userwin/data/ab32nt1.html).
For administrative information about your Messenger system, see the Messenger 1.0 Administration Guide in the GroupWise 6.5 online documentation (http://www.novell.com/documentation/nm1/nm1_admin/data/front.html).
Managing Your GroupWise SystemThe Set Up GroupWise and Messenger task in Novell iManager helped you create your initial GroupWise system. The Small Business Agent continues to help you automatically add GroupWise accounts for new eDirectory users. But long-term management and growth of your GroupWise system require that you use ConsoleOne.
“Using ConsoleOne to Administer Your GroupWise System” on page 130
“Creating GroupWise Accounts Manually” on page 131
“Disabling LDAP Password Changing” on page 132
“Assigning a Postmaster” on page 133
“Adding Post Offices to Your Initial Domain” on page 133
“Adding Additional Domains” on page 134
“Maintaining Your GroupWise System” on page 136
Installing and Setting Up E-mail 129
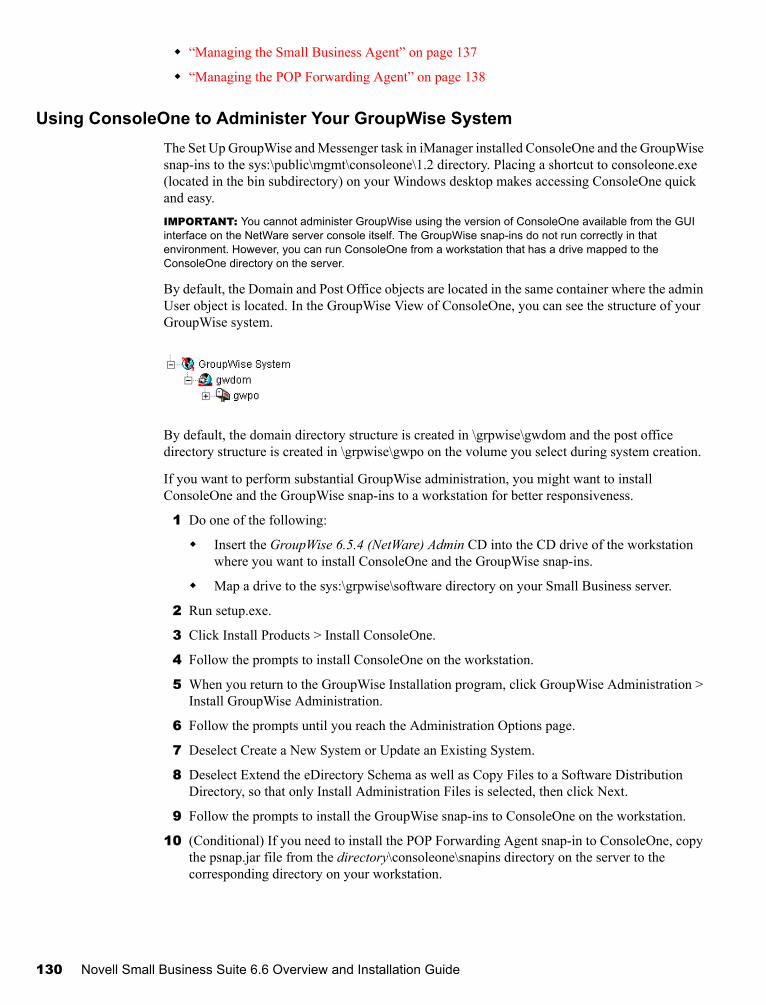
Novell Confidential Manual (ENU) 21 December 2004
“Managing the Small Business Agent” on page 137
“Managing the POP Forwarding Agent” on page 138
Using ConsoleOne to Administer Your GroupWise SystemThe Set Up GroupWise and Messenger task in iManager installed ConsoleOne and the GroupWise snap-ins to the sys:\public\mgmt\consoleone\1.2 directory. Placing a shortcut to consoleone.exe (located in the bin subdirectory) on your Windows desktop makes accessing ConsoleOne quick and easy.IMPORTANT: You cannot administer GroupWise using the version of ConsoleOne available from the GUI interface on the NetWare server console itself. The GroupWise snap-ins do not run correctly in that environment. However, you can run ConsoleOne from a workstation that has a drive mapped to the ConsoleOne directory on the server.
By default, the Domain and Post Office objects are located in the same container where the admin User object is located. In the GroupWise View of ConsoleOne, you can see the structure of your GroupWise system.
By default, the domain directory structure is created in \grpwise\gwdom and the post office directory structure is created in \grpwise\gwpo on the volume you select during system creation.
If you want to perform substantial GroupWise administration, you might want to install ConsoleOne and the GroupWise snap-ins to a workstation for better responsiveness.
1 Do one of the following:
Insert the GroupWise 6.5.4 (NetWare) Admin CD into the CD drive of the workstation where you want to install ConsoleOne and the GroupWise snap-ins.
Map a drive to the sys:\grpwise\software directory on your Small Business server.
2 Run setup.exe.
3 Click Install Products > Install ConsoleOne.
4 Follow the prompts to install ConsoleOne on the workstation.
5 When you return to the GroupWise Installation program, click GroupWise Administration > Install GroupWise Administration.
6 Follow the prompts until you reach the Administration Options page.
7 Deselect Create a New System or Update an Existing System.
8 Deselect Extend the eDirectory Schema as well as Copy Files to a Software Distribution Directory, so that only Install Administration Files is selected, then click Next.
9 Follow the prompts to install the GroupWise snap-ins to ConsoleOne on the workstation.
10 (Conditional) If you need to install the POP Forwarding Agent snap-in to ConsoleOne, copy the psnap.jar file from the directory\consoleone\snapins directory on the server to the corresponding directory on your workstation.
130 Novell Small Business Suite 6.6 Overview and Installation Guide
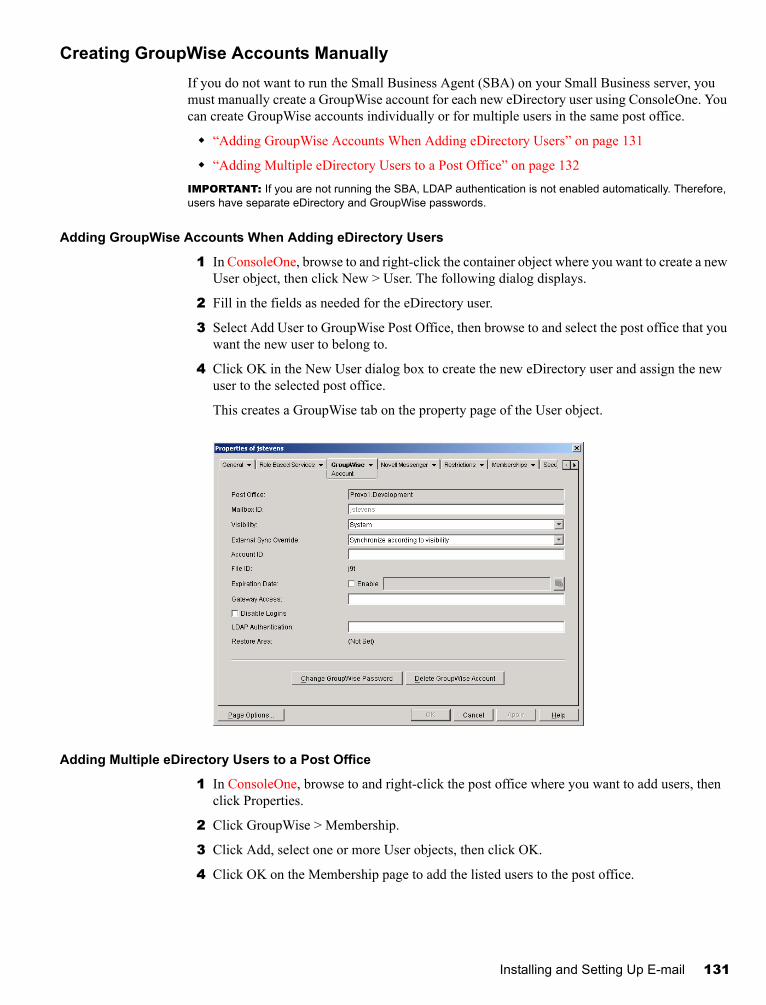
Novell Confidential Manual (ENU) 21 December 2004
Creating GroupWise Accounts ManuallyIf you do not want to run the Small Business Agent (SBA) on your Small Business server, you must manually create a GroupWise account for each new eDirectory user using ConsoleOne. You can create GroupWise accounts individually or for multiple users in the same post office.
“Adding GroupWise Accounts When Adding eDirectory Users” on page 131
“Adding Multiple eDirectory Users to a Post Office” on page 132IMPORTANT: If you are not running the SBA, LDAP authentication is not enabled automatically. Therefore, users have separate eDirectory and GroupWise passwords.
Adding GroupWise Accounts When Adding eDirectory Users
1 In ConsoleOne, browse to and right-click the container object where you want to create a new User object, then click New > User. The following dialog displays.
2 Fill in the fields as needed for the eDirectory user.
3 Select Add User to GroupWise Post Office, then browse to and select the post office that you want the new user to belong to.
4 Click OK in the New User dialog box to create the new eDirectory user and assign the new user to the selected post office.
This creates a GroupWise tab on the property page of the User object.
Adding Multiple eDirectory Users to a Post Office
1 In ConsoleOne, browse to and right-click the post office where you want to add users, then click Properties.
2 Click GroupWise > Membership.
3 Click Add, select one or more User objects, then click OK.
4 Click OK on the Membership page to add the listed users to the post office.
Installing and Setting Up E-mail 131
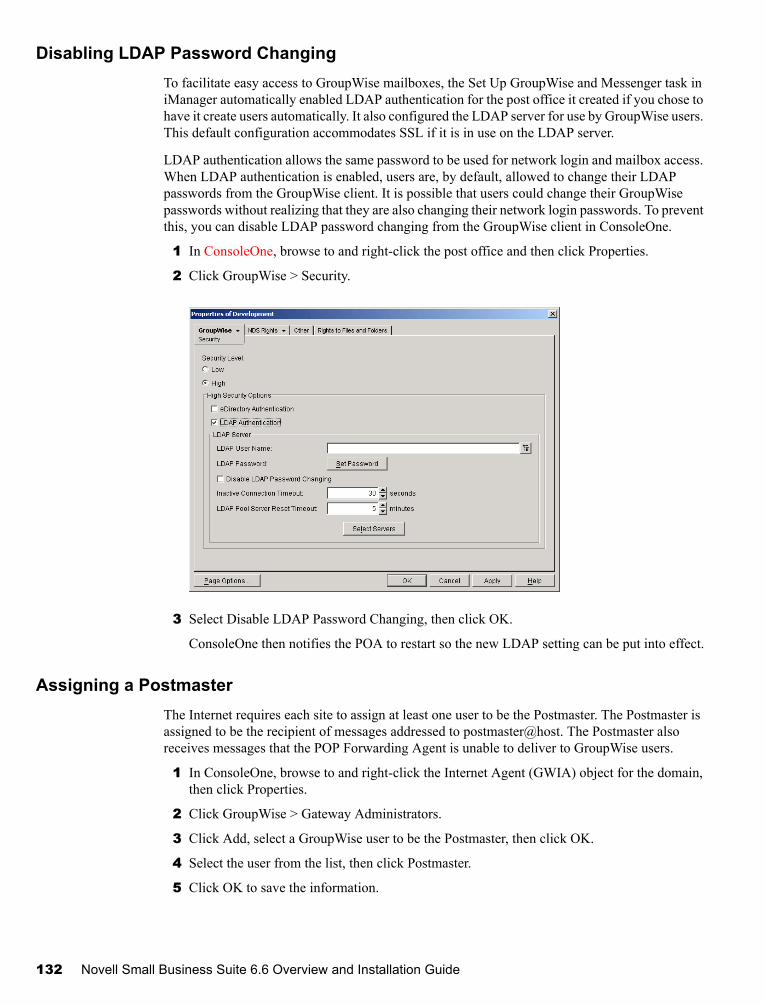
Novell Confidential Manual (ENU) 21 December 2004
Disabling LDAP Password ChangingTo facilitate easy access to GroupWise mailboxes, the Set Up GroupWise and Messenger task in iManager automatically enabled LDAP authentication for the post office it created if you chose to have it create users automatically. It also configured the LDAP server for use by GroupWise users. This default configuration accommodates SSL if it is in use on the LDAP server.
LDAP authentication allows the same password to be used for network login and mailbox access. When LDAP authentication is enabled, users are, by default, allowed to change their LDAP passwords from the GroupWise client. It is possible that users could change their GroupWise passwords without realizing that they are also changing their network login passwords. To prevent this, you can disable LDAP password changing from the GroupWise client in ConsoleOne.
1 In ConsoleOne, browse to and right-click the post office and then click Properties.
2 Click GroupWise > Security.
3 Select Disable LDAP Password Changing, then click OK.
ConsoleOne then notifies the POA to restart so the new LDAP setting can be put into effect.
Assigning a PostmasterThe Internet requires each site to assign at least one user to be the Postmaster. The Postmaster is assigned to be the recipient of messages addressed to postmaster@host. The Postmaster also receives messages that the POP Forwarding Agent is unable to deliver to GroupWise users.
1 In ConsoleOne, browse to and right-click the Internet Agent (GWIA) object for the domain, then click Properties.
2 Click GroupWise > Gateway Administrators.
3 Click Add, select a GroupWise user to be the Postmaster, then click OK.
4 Select the user from the list, then click Postmaster.
5 Click OK to save the information.
132 Novell Small Business Suite 6.6 Overview and Installation Guide

Novell Confidential Manual (ENU) 21 December 2004
ConsoleOne then notifies the Internet Agent to restart so that applicable messages are sent to the Postmaster as needed.
Adding Post Offices to Your Initial DomainA GroupWise post office serves as an administrative unit for a group of users and is used for addressing messages. Each GroupWise user has an address that consists of a user ID, the user's post office name, the GroupWise domain name and, optionally, an Internet domain name.
Your Small Business license grants you 100 users. This number of users can fit comfortably on a single post office, but you might consider creating multiple post offices for the following reasons:
Physical Organization: If your network spans several sites, you might want to create post offices (if not domains) at each physical location. This will reduce the demands on long- distance network links.
Logical Organization: Processing messages within a post office is faster and typically generates less network traffic than messages traveling between different post offices. As you expand GroupWise, you might find it useful to add post offices in order to group users who frequently send mail to each other. For example, some employees might work in corporate functions like accounting and human resources. Other employees might be involved in sales and marketing and frequently attend meetings together, requiring frequent busy searches. Some areas—for example, the production floor—might not need a workstation or user account for each individual.
Number of Users: Although a post office can service many more than 1000 users, there are some advantages of setting up multiple, smaller post offices. The impact of a server being down is minimized. The processing times for post office and mailbox maintenance activities including backups is lessened for each post office individually, compared with one large post office. And each post office has room to grow while maintaining best performance.
If you decide to create multiple post offices, each post office should be created on a separate server. There is little advantage to creating multiple post offices on a single server.
1 In ConsoleOne, browse to and select the container where you want to create the new Post Office object, then click New > Object.
2 Select GroupWise Post Office, then click OK.
3 Provide a one-word name for the new post office, browse to and select the location where you want the post office directory structure to be created, then click OK.
4 Click Next to accept the default of a TCP/IP link to the domain, provide the IP address or hostname of the server where the post office will be located, then click Finish.
You have now created a new Post Office object and Post Office Agent (POA) object in eDirectory, provided configuration information for these objects, and created the post office directory structure on the server where you want the post office to reside. Now you must install the POA on the server.
5 Do one of the following:
Insert the GroupWise 6.5.4 (NetWare) Admin CD into the CD drive of your Windows workstation.
Map a drive to the sys:\grpwise\software directory on your original Small Business server.
6 Run setup.exe.
Installing and Setting Up E-mail 133
Novell Confidential Manual (ENU) 21 December 2004
7 Select Install Products > GroupWise Agents > Install GroupWise Agents.
8 Follow the prompts to install the GroupWise agents on the server.
9 On the Domains / Post Offices page, add the new post office.
10 Continue following the prompts to install the GroupWise agents.
At the end of the installation, the Installation program can start the POA for you.
For more detailed instructions, see “Post Office” (http://www.novell.com/documentation/gw65/gw65_admin/data/a7q4wsn.html) and “Post Office Agents” in the GroupWise 6.5 Administration Guide in the GroupWise 6.5 online documentation (http://www.novell.com/documentation/gw65/gw65_admin/data/a84jmbe.html).
Adding Additional DomainsA GroupWise domain functions as the main administrative unit for your GroupWise system. Each GroupWise system has one primary domain, which was created when you first installed GroupWise. All other domains that you add will be secondary domains. The domain serves as a logical grouping of one or more post offices and is used for addressing and routing messages.
Although a single domain can contain as many post offices and users as you want to add, there are some conditions that indicate the need for a new domain:
Administrative Convenience: To spread out the administrative workload, you can create one or more new domains with their own administrators. Each new domain can be managed by a different administrator as long as each administrator has sufficient rights to connect to it and write to the domain directory.
Remote Sites: If communication between servers is slow, or if you have remote sites, you can add a new domain to minimize mail traffic between the servers. For example, if you have locations in three separate cities, you might have an organization that represents each location. You could then create a domain in each organization. You could administer all of the domains from one location or you could assign a different administrator for each one.
If you decide to create multiple domains, each domain should be created on a separate server. There is no advantage to creating multiple domains on a single server.
1 In ConsoleOne, browse to and select the container where you want to create the new Domain object, then click New > Object.
2 Select GroupWise Domain, then click OK.
3 Provide a one-word name for the new domain, browse to and select the location where you want the domain directory structure to be created, then click OK.
4 Click Next to accept the default of a TCP/IP link to the domain, provide the IP address or hostname of the server where the domain will be located, then click Finish.
You have now created a new Domain object and Message Transfer Agent (MTA) object in eDirectory, provided configuration information for these objects, and created the domain directory structure on the server where you want the domain to reside. Now you must install the MTA on the server.
134 Novell Small Business Suite 6.6 Overview and Installation Guide
Novell Confidential Manual (ENU) 21 December 2004
5 Do one of the following:
Insert the GroupWise 6.5.4 (NetWare) Admin CD into the CD drive of your Windows workstation.
Map a drive to the sys:\grpwise\software directory on your original Small Business server.
6 Run setup.exe.
7 Select Install Products > GroupWise Agents > Install GroupWise Agents.
8 Follow the prompts to install the GroupWise agents on the server.
9 On the Domains / Post Offices page, add the domain.
10 Continue following the prompts to install the GroupWise agents.
At the end of the installation, the Installation program can start the MTA for you.
For more detailed instructions, see “Domains” (http://www.novell.com/documentation/gw65/gw65_admin/data/a7q4vpv.html) and “Message Transfer Agent” in the GroupWise 6.5 Administration Guide in the GroupWise 6.5 online documentation (http://www.novell.com/documentation/gw65/gw65_admin/data/a7q4zpk.html).
Maintaining Your GroupWise SystemDepending on the importance and volume of e-mail generated by your users, a number of maintenance tasks might need to be performed to keep your GroupWise system running smoothly. The GroupWise 6.5 Administration Guide in the GroupWise 6.5 online documentation (http://www.novell.com/documentation/gw65/gw65_admin/data/a2zvyc4.html) can help you learn to perform the tasks your system needs. The table below summarizes the most common tasks and where they are described.
Guide Section Task
System Using the GroupWise View in ConsoleOne
Customizing the GroupWise Address Book
Domains Moving a domain
Post Offices Moving a post office
Managing disk space usage
Users Renaming users
Moving users
Resources Creating schedulable resources for meeting rooms, company equipment, etc.
Distribution Lists Creating public groups of e-mail users in addition to eDirectory groups
Libraries and Documents
Creating a library to store and manage documents
Importing documents into the library
Installing and Setting Up E-mail 135
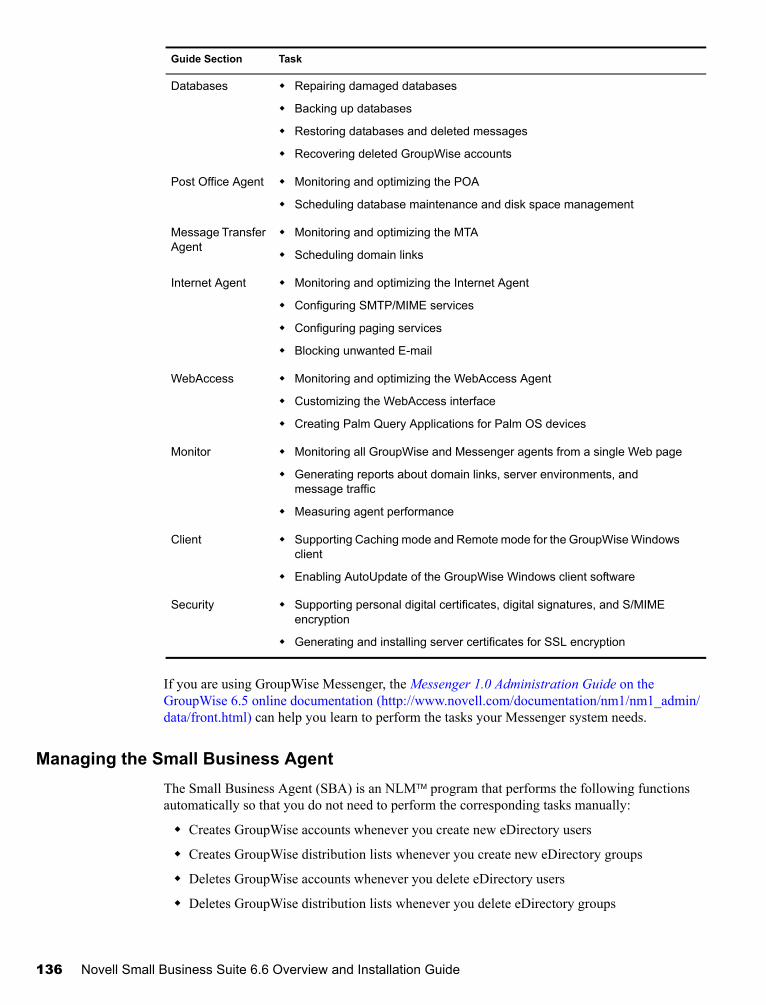
Novell Confidential Manual (ENU) 21 December 2004
If you are using GroupWise Messenger, the Messenger 1.0 Administration Guide on the GroupWise 6.5 online documentation (http://www.novell.com/documentation/nm1/nm1_admin/data/front.html) can help you learn to perform the tasks your Messenger system needs.
Managing the Small Business AgentThe Small Business Agent (SBA) is an NLMTM program that performs the following functions automatically so that you do not need to perform the corresponding tasks manually:
Creates GroupWise accounts whenever you create new eDirectory users
Creates GroupWise distribution lists whenever you create new eDirectory groups
Deletes GroupWise accounts whenever you delete eDirectory users
Deletes GroupWise distribution lists whenever you delete eDirectory groups
Databases Repairing damaged databases
Backing up databases
Restoring databases and deleted messages
Recovering deleted GroupWise accounts
Post Office Agent Monitoring and optimizing the POA
Scheduling database maintenance and disk space management
Message Transfer Agent
Monitoring and optimizing the MTA
Scheduling domain links
Internet Agent Monitoring and optimizing the Internet Agent
Configuring SMTP/MIME services
Configuring paging services
Blocking unwanted E-mail
WebAccess Monitoring and optimizing the WebAccess Agent
Customizing the WebAccess interface
Creating Palm Query Applications for Palm OS devices
Monitor Monitoring all GroupWise and Messenger agents from a single Web page
Generating reports about domain links, server environments, and message traffic
Measuring agent performance
Client Supporting Caching mode and Remote mode for the GroupWise Windows client
Enabling AutoUpdate of the GroupWise Windows client software
Security Supporting personal digital certificates, digital signatures, and S/MIME encryption
Generating and installing server certificates for SSL encryption
Guide Section Task
136 Novell Small Business Suite 6.6 Overview and Installation Guide
Novell Confidential Manual (ENU) 21 December 2004
This is especially helpful if you prefer to use Novell iManager for administration rather than ConsoleOne, the administration tool required by GroupWise.
If, during the Set Up GroupWise and Messenger task in iManager, you selected Automatic Creation of GroupWise Users and Groups Based on eDirectory, the setup task started the SBA and also added the following line to the autoexec.ncf file of your Small Business server:
gwsba /home-\\server\volume\domain_directory /scan-5
This line starts the SBA each time the server restarts. The /scan-5 switch indicates that the SBA scans eDirectory for new users and groups every five minutes. This means that, when you create a new eDirectory user, it could take as much as five minutes for the corresponding GroupWise account to be created. You can increase or decrease this interval as needed. At the SBA console, you can press F4 to cause the scan to take place immediately. If you do not want to run the SBA, comment out this line in the autoexec.ncf file.
The SBA console on the NetWare server displays messages about the SBA’s activities. These messages are also recorded in log files for future reference. You can configure certain aspects of logging at the SBA console. You can also configure logging and other functionality of the SBA using startup switches. To see what startup switches are available, type the following command at the System Console prompt:
gwsba /help
Managing the POP Forwarding AgentAfter the PFA is configured and successfully bringing e-mail into your GroupWise system, as described in “Setting Up Common Mailbox Forwarding with the POP Forwarding Agent” on page 128, it is easy to manage.
“Starting the PFA” on page 138
“Monitoring and Controlling the PFA” on page 139
“Using PFA Log Files” on page 142
“Viewing or Changing the PFA Schedule” on page 143
“Changing the Common Mailbox for Your Company” on page 144
“Forwarding Personal E-Mail into Your GroupWise System” on page 144
“Handling Multiple Domain Names” on page 146
“Troubleshooting the PFA” on page 147
Starting the PFA
To start the PFA manually at the server console, type the following command:
pfa
To make sure that the PFA starts each time the server restarts, add the same command to the sys:\system\autoexec.ncf file.
Installing and Setting Up E-mail 137
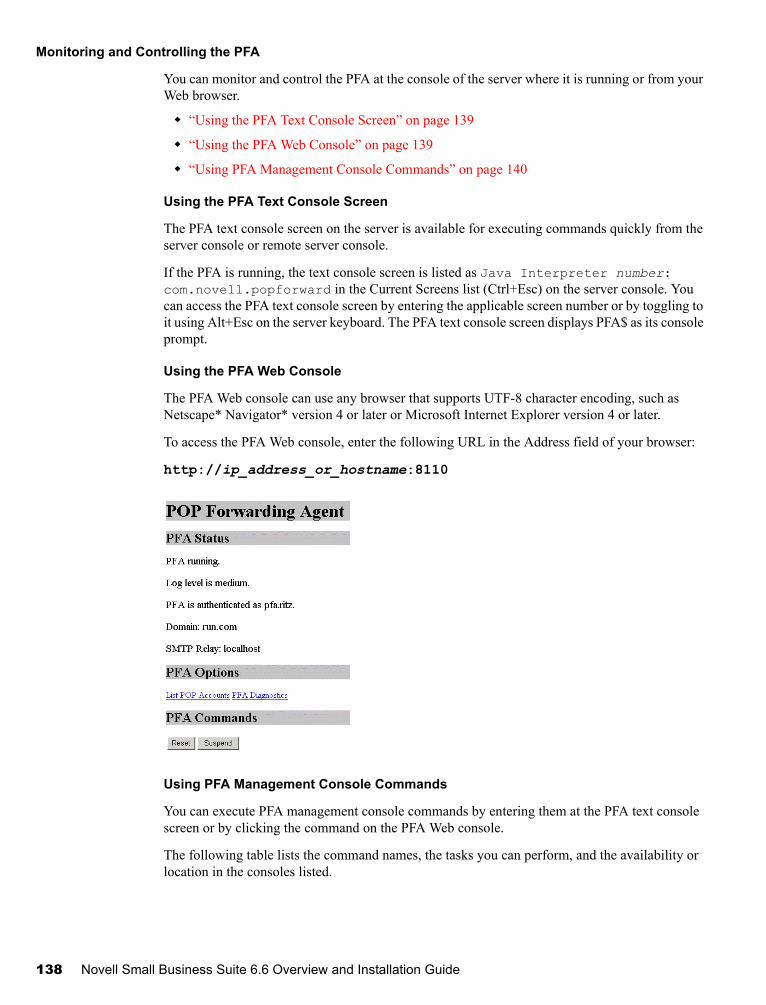
Novell Confidential Manual (ENU) 21 December 2004
Monitoring and Controlling the PFA
You can monitor and control the PFA at the console of the server where it is running or from your Web browser.
“Using the PFA Text Console Screen” on page 139
“Using the PFA Web Console” on page 139
“Using PFA Management Console Commands” on page 140
Using the PFA Text Console Screen
The PFA text console screen on the server is available for executing commands quickly from the server console or remote server console.
If the PFA is running, the text console screen is listed as Java Interpreter number: com.novell.popforward in the Current Screens list (Ctrl+Esc) on the server console. You can access the PFA text console screen by entering the applicable screen number or by toggling to it using Alt+Esc on the server keyboard. The PFA text console screen displays PFA$ as its console prompt.
Using the PFA Web Console
The PFA Web console can use any browser that supports UTF-8 character encoding, such as Netscape* Navigator* version 4 or later or Microsoft Internet Explorer version 4 or later.
To access the PFA Web console, enter the following URL in the Address field of your browser:
http://ip_address_or_hostname:8110
Using PFA Management Console Commands
You can execute PFA management console commands by entering them at the PFA text console screen or by clicking the command on the PFA Web console.
The following table lists the command names, the tasks you can perform, and the availability or location in the consoles listed.
138 Novell Small Business Suite 6.6 Overview and Installation Guide
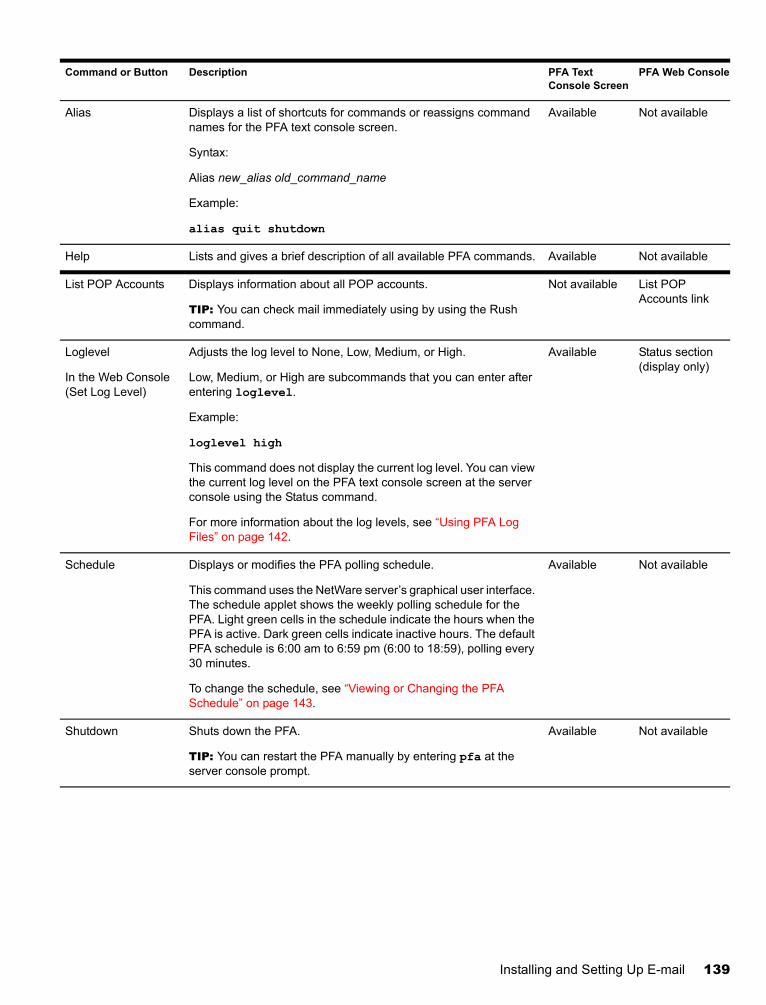
Novell Confidential Manual (ENU) 21 December 2004
Command or Button Description PFA Text Console Screen
PFA Web Console
Alias Displays a list of shortcuts for commands or reassigns command names for the PFA text console screen.
Syntax:
Alias new_alias old_command_name
Example:
alias quit shutdown
Available Not available
Help Lists and gives a brief description of all available PFA commands. Available Not available
List POP Accounts Displays information about all POP accounts.
TIP: You can check mail immediately using by using the Rush command.
Not available List POP Accounts link
Loglevel
In the Web Console (Set Log Level)
Adjusts the log level to None, Low, Medium, or High.
Low, Medium, or High are subcommands that you can enter after entering loglevel.
Example:
loglevel high
This command does not display the current log level. You can view the current log level on the PFA text console screen at the server console using the Status command.
For more information about the log levels, see “Using PFA Log Files” on page 142.
Available Status section (display only)
Schedule Displays or modifies the PFA polling schedule.
This command uses the NetWare server’s graphical user interface. The schedule applet shows the weekly polling schedule for the PFA. Light green cells in the schedule indicate the hours when the PFA is active. Dark green cells indicate inactive hours. The default PFA schedule is 6:00 am to 6:59 pm (6:00 to 18:59), polling every 30 minutes.
To change the schedule, see “Viewing or Changing the PFA Schedule” on page 143.
Available Not available
Shutdown Shuts down the PFA.
TIP: You can restart the PFA manually by entering pfa at the server console prompt.
Available Not available
Installing and Setting Up E-mail 139
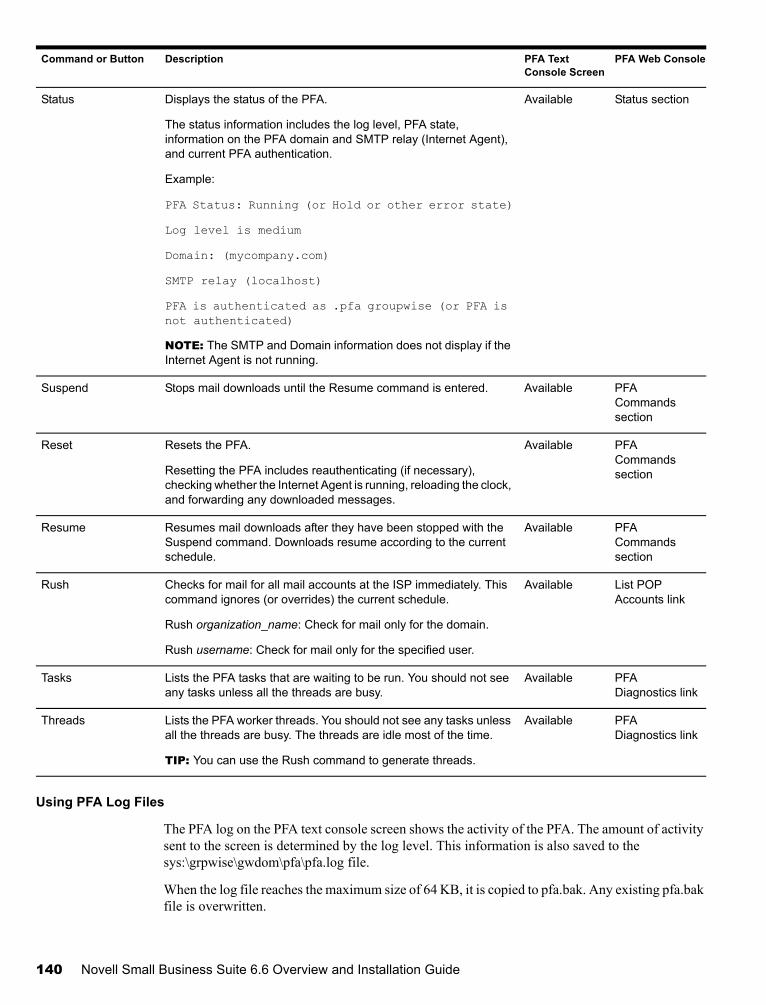
Novell Confidential Manual (ENU) 21 December 2004
Using PFA Log Files
The PFA log on the PFA text console screen shows the activity of the PFA. The amount of activity sent to the screen is determined by the log level. This information is also saved to the sys:\grpwise\gwdom\pfa\pfa.log file.
When the log file reaches the maximum size of 64 KB, it is copied to pfa.bak. Any existing pfa.bak file is overwritten.
Status Displays the status of the PFA.
The status information includes the log level, PFA state, information on the PFA domain and SMTP relay (Internet Agent), and current PFA authentication.
Example:
PFA Status: Running (or Hold or other error state)
Log level is medium
Domain: (mycompany.com)
SMTP relay (localhost)
PFA is authenticated as .pfa groupwise (or PFA is not authenticated)
NOTE: The SMTP and Domain information does not display if the Internet Agent is not running.
Available Status section
Suspend Stops mail downloads until the Resume command is entered. Available PFA Commands section
Reset Resets the PFA.
Resetting the PFA includes reauthenticating (if necessary), checking whether the Internet Agent is running, reloading the clock, and forwarding any downloaded messages.
Available PFA Commands section
Resume Resumes mail downloads after they have been stopped with the Suspend command. Downloads resume according to the current schedule.
Available PFA Commands section
Rush Checks for mail for all mail accounts at the ISP immediately. This command ignores (or overrides) the current schedule.
Rush organization_name: Check for mail only for the domain.
Rush username: Check for mail only for the specified user.
Available List POP Accounts link
Tasks Lists the PFA tasks that are waiting to be run. You should not see any tasks unless all the threads are busy.
Available PFA Diagnostics link
Threads Lists the PFA worker threads. You should not see any tasks unless all the threads are busy. The threads are idle most of the time.
TIP: You can use the Rush command to generate threads.
Available PFA Diagnostics link
Command or Button Description PFA Text Console Screen
PFA Web Console
140 Novell Small Business Suite 6.6 Overview and Installation Guide
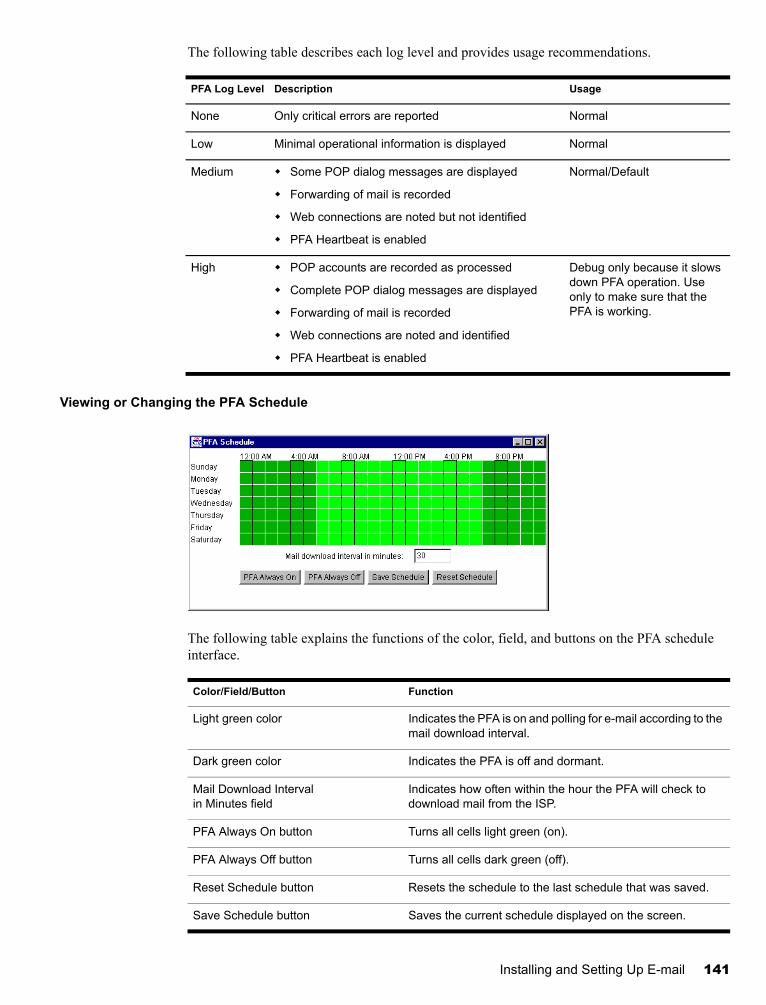
Novell Confidential Manual (ENU) 21 December 2004
The following table describes each log level and provides usage recommendations.
Viewing or Changing the PFA Schedule
The following table explains the functions of the color, field, and buttons on the PFA schedule interface.
PFA Log Level Description Usage
None Only critical errors are reported Normal
Low Minimal operational information is displayed Normal
Medium Some POP dialog messages are displayed
Forwarding of mail is recorded
Web connections are noted but not identified
PFA Heartbeat is enabled
Normal/Default
High POP accounts are recorded as processed
Complete POP dialog messages are displayed
Forwarding of mail is recorded
Web connections are noted and identified
PFA Heartbeat is enabled
Debug only because it slows down PFA operation. Use only to make sure that the PFA is working.
Color/Field/Button Function
Light green color Indicates the PFA is on and polling for e-mail according to the mail download interval.
Dark green color Indicates the PFA is off and dormant.
Mail Download Interval in Minutes field
Indicates how often within the hour the PFA will check to download mail from the ISP.
PFA Always On button Turns all cells light green (on).
PFA Always Off button Turns all cells dark green (off).
Reset Schedule button Resets the schedule to the last schedule that was saved.
Save Schedule button Saves the current schedule displayed on the screen.
Installing and Setting Up E-mail 141
Novell Confidential Manual (ENU) 21 December 2004
Using the default schedule, the PFA checks for e-mail at the ISP every 30 minutes from 6:00 a.m. to 6:59 p.m. each day. You can adjust the PFA polling schedule to meet your specific needs.
You can view or adjust the PFA polling schedule using the PFA text screen console. For information about accessing the schedule from this console, see “Schedule” on page 141.
To change the polling schedule:
1 Access the schedule.
2 Click a block of cells to turn the PFA on or off for the hours and days indicated by the block.
When the PFA is on, it polls for waiting e-mail according to the mail download interval. When the PFA is off, it is dormant and not polling.
3 Enter a value in the Mail Download Interval in Minutes field.
4 Click Save Schedule.
Changing the Common Mailbox for Your CompanyEvents like changing ISPs or changing your company name can make it necessary to change the information about the common mailbox that the PFA accesses.
1 In ConsoleOne, browse to and right-click the Organization object where your Small Business server is located, then click Properties.
2 Click POP Account.
3 Modify the following fields as needed:
POP Host: The name of the mail server at your ISP (for example, mail.myisp.com).
POP User Name: The corporate POP mailbox name at your ISP (for example, ABCorp).
Password: The password for your company’s mailbox at your ISP.
4 Click OK to save the new POP account information.
Follow the instructions in “Testing the POP Forwarding Agent” on page 129 to ensure that the new configuration is forwarding e-mail successfully.
Forwarding Personal E-Mail into Your GroupWise SystemIf users want to receive e-mail from their personal POP accounts in their GroupWise mailboxes, you can configure the PFA to retrieve messages from multiple POP accounts.
1 In ConsoleOne, browse to and right-click a User object, then click Properties.
2 Click POP Account.
3 Fill in the following fields:
POP Host: The name of the mail server at the user’s ISP (for example, mail.myrealbox.com).
POP User Name: The user’s POP username (for example, LTanaka).
Password: The user’s password.
4 Click OK to save the POP account information.
142 Novell Small Business Suite 6.6 Overview and Installation Guide

Novell Confidential Manual (ENU) 21 December 2004
5 If the user has more than one POP account, add the other accounts.
5a Right-click the User object again, then click Properties.
5b Click Other.
5c Select the POP Account attribute, then click Add.
5d Enter the POP host, POP username, and password, separated by colons (:); for example:
mail.mailstar.net:SJones:thunder
5e Click Apply.
5f Repeat Step 5c through Step 5e for each additional POP account.
5g When you are finished adding accounts, click OK.
Follow the instructions in “Testing the POP Forwarding Agent” on page 129 to ensure that the new configuration is forwarding e-mail successfully.
Handling Multiple Domain NamesTypically, you would specify POP account information for only one Organization object in eDirectory, and that Organization object would have only one corporate POP account associated with it. However, you can configure the PFA to handle more complex situations. For example, you might have multiple POP accounts or even multiple ISPs to accommodate multiple domain names in use by your company.
You specified your main Internet domain name when you performed the Set Up GroupWise and Messenger task in iManager. This information was stored in the Foreign ID field of the Internet Agent (GWIA) object. To accommodate different domain names, you must configure both the PFA and the Internet Agent to handle them.
1 On your Small Business server, edit the sys:\system\pfa.ncf file.
2 On the java line, in front of the -classpath information, add the following parameter:
-Ddomain="domain1,domain2,etc"
The resulting line would look similar to the following example:
java ... -Ddomain="novell.com,gw.novell.com,gwia.novell.com" -classpath ...
3 Save the file and exit the text editor.
4 In ConsoleOne, browse to and right-click the Internet Agent (GWIA) object for the domain, then click Properties.
5 Click GroupWise.
6 In the Foreign ID field, add the additional domain names after the main domain name, separating domain names with a space:
For example:
novell.com gw.novell.com gwia.novell.com
7 Click OK to save the multiple domain names.
ConsoleOne then notifies the Internet Agent to restart so that the multiple domain names are accepted by the Internet Agent.
8 Restart the PFA.
Installing and Setting Up E-mail 143
Novell Confidential Manual (ENU) 21 December 2004
Troubleshooting the PFAThe following sections describe how to solve some of the common problems you might encounter when setting up or using the PFA.
“The PFA does not start” on page 147.
“The PFA is sending all the e-mail to the postmaster or the PFA status screen is listing the wrong domain” on page 147
“The PFA is not delivering mail” on page 148.
“The PFA is not finding the POP accounts that are set up” on page 148.
“The PFA Web console won’t come up in the Web browser” on page 148.
The PFA does not start
Problem: When you tried to start the PFA at the server console prompt, an error message stated
PFA login was unsuccessful. Check the username and password in the PFA.NCF. PFA is unable to locate GroupWise. Install GroupWise before running the PFA.
Possible Cause: GroupWise and the Internet Agent are not installed.
Action: Complete the following steps:
1 Install GroupWise and the Internet Agent at the server.
See “Setting Up Your Initial GroupWise System” on page 119.
2 At the server console prompt, enter pfa.
Possible Cause: The PFA could not communicate with the Internet Agent.
Action: Make sure the Internet Agent is running.
Possible Cause: The PFA user does not exist.
Action: Create the PFA user and make sure that it has the necessary rights. See “Setting Up Common Mailbox Forwarding and the POP Forwarding Agent” on page 129.
Problem: When the PFA was started at the console prompt, an error message stated
PFA login was unsuccessful. Check the username and password in the pfa.ncf.
Possible Cause: The password for the PFA User object in eDirectory does not match the password in the pfa.ncf file.
Action: Change the password in the sys:\system\pfa.ncf file.
The PFA is sending all the e-mail to the postmaster or the PFA status screen is listing the wrong domain
Possible Cause: The GroupWise Internet Agent is not set up correctly.
Action: Change the Internet Agent foreign ID. See “Handling Multiple Domain Names” on page 146.
Installing and Setting Up E-mail 144
Novell Confidential Manual (ENU) 21 December 2004
The PFA is not delivering mail
Problem: E-mail is downloaded to the server but it is not delivered to the corporate or personal mailboxes.
Possible Cause: The Internet Agent is not running.
Action: At the server console, enter gwia to start the Internet Agent.
Possible Cause: The Internet Agent is not set up correctly.
Action: If the SMTP relay line on the PFA text console screen does not show your domain name, check the foreign ID on the Internet Agent object. (See “Handling Multiple Domain Names” on page 146). If you need to change the domain name information on the Internet Agent object, restart the PFA afterwards.
The PFA is not finding the POP accounts that are set up
Possible Cause: The PFA User object does not exist.
Action: Create the PFA User object and give it the necessary rights. (See “Setting Up Common Mailbox Forwarding and the POP Forwarding Agent” on page 129.)
Possible Cause: The PFA User object does not have the necessary rights.
Action: Make sure the PFA User object has the rights it needs. See “Setting Up Common Mailbox Forwarding and the POP Forwarding Agent” on page 129.
The PFA Web console won’t come up in the Web browser
Possible Cause: You are using Internet Explorer (IE) as your Web browser and entered only ip_address_or_hostname:8110 rather than the full URL in the Address field. Internet Explorer interprets this entry as a protocol rather than a URL.
Action: Enter the complete URL (http://ip_address_or_hostname:8110) in the browser Address field.
Updating an Existing GroupWise SystemDo not use the Set Up GroupWise and Messenger task in iManager if you want to update an existing GroupWise system with the GroupWise software in the Small Business Suite. The Set Up GroupWise and Messenger task creates a new GroupWise system—and if one already exists, it deletes it. If you want to update an existing GroupWise system, see Chapter 21, “Updating GroupWise,” on page 211.
Installing and Setting Up E-mail 145

Novell Confidential Manual (ENU) 21 December 2004
146 Novell Small Business Suite 6.6 Overview and Installation Guide
Novell Confidential Manual (ENU) 21 December 2004
15 Setting Up Workstations for Users
Setting up workstations to access the network can vary depending on the services that you want available on them. Traditionally, we have recommended connecting to the server through the Novell® ClientTM software. This software is available for Window 95/98 and Windows NT/XP/2000. With the advanced file services available in NetWare today, other options are also available, such as connecting using the Novell Native File Access Protocols, Virtual Office, OpenSSH, or NetWare® Remote Manager. Users can also use the VPN client available through BorderManager® to access many of the services from remote locations whether at home or traveling.
Additional tasks might include setting up iPrint clients, iFolder® clients, making sure the users are familiar with the functionality of virtual office, and so forth.
This section includes instructions for and information about
Installing the Novell Client on User Workstations (page 149)
Installing the iPrint Client (page 150)
Access the Network Using Novell Native File Access Protocols (page 151)
Accessing the Server Using Novell Remote Manager (page 151)
Accessing the Server Using OpenSSH Clients (page 152)
Installing the ZENworks Desktop Management Agent on User Workstations (page 153)
Installing the Novell Client on User WorkstationsIf you plan to install Novell Client software on a small number of workstations, or if the workstations are not yet connected to a network, install from the Novell Client Software CD.
To install Novell Client on a workstation, the logged-in user must be an administrator on the workstation. Users without administrator rights to the workstation cannot install new software.
In this version of Novell Client, NICI Client 2.6 and NMASTM Client 2.2 (NDS® method only) are installed by default on Windows NT/XP/2000. If they are already installed, they are updated automatically. You can control both the installation and use of NMAS by installing the Novell Client using a platform-specific unattend file. If you uncheck the Install NICI and NMAS check box on the Installation > Setup page, NICI and NMAS will not be installed. If you uncheck the NMAS Authentication check box on the Client > Advanced Login page, Novell Client will not use NMAS during authentication even if the component is installed. If the component is not installed and this box is checked, Novell Client login skips the NMAS authentication and authentication continues.
Setting Up Workstations for Users 147
Novell Confidential Manual (ENU) 21 December 2004
In Windows 95/98, you must install NICI and NMAS after you have completed the Novell Client installation in order to use the new password methods. You must restart your workstation before installing NICI and NMAS. If you already have NICI and NMAS installed, they are not updated during the Novell Client install on Windows 95/98 but you do not need to update them in order to work with the new login methods.
The Novell Client Setup utility installs Novell Client software on workstations running Windows. This utility lets you select the client that you want to install from a list of available clients. Administrative options are also available.TIP: The Typical Install option installs only the basic Novell Client components. If you want to install additional services such as NDPS®, use the Custom Installation option. If you are upgrading Novell Client software, the same custom components are installed unless you choose different ones.
ZENworks® for Desktops Remote Management requires that you install Workstation Manager components during the Novell Client installation.
To install Novell Client software on a workstation:
1 Insert the Novell Client Software CD.
If the Novell Client Setup utility does not automatically launch, run winsetup.exe from the root of the CD.
There are several customized parameters that you can use during the installation by running the installation from the command line. These include special accessibility settings, status logging, automatic client upgrade, and others.
2 Click the software you want to install.
3 Follow the on-screen instructions.
For more specific instructions, including the steps necessary to configure the Novell Client or to install the Novell Client to multiple workstations, see the Novell Client online documentation (http://www.novell.com/documentation/noclienu/treetitl.html).
Installing the iPrint ClientAfter setting up printing at the server (See Chapter 13, “Setting Up Printing,” on page 113), your users can install printers to their workstations.
Before you can install a printer on a workstation, printing must be set up and the iPrint Client must be installed.
To access install the iPrint client, access the Printer List Web page by entering one of the following URLs in the Web browser at the workstation and then click the Install iPrint client link.
http://server_IP_address_or_dns_name/ipp (unsecure access)
https://server_IP_address_or_dns_name/ipps (secure access)
For example, if the DNS name for printing is printing.mycompany.com, then the user would access iPrint from one of the following URLs:
http://printing.mycompany.com/ipp
https://printing.mycompany.com/ipp
148 Novell Small Business Suite 6.6 Overview and Installation Guide
Novell Confidential Manual (ENU) 21 December 2004
Access the Network Using Novell Native File Access ProtocolsNovell Native File Access Protocols lets Macintosh, Windows, and UNIX workstations access and store files on NetWare servers without having to install any additional software, such as the Novell Client. The software is installed only on the NetWare server and provides “out of the box” network access. Just connect the network cable, start the computer, and you have access to servers on your network. No client software installation or configuration is required.
Novell Native File Access Protocols software enables the NetWare server to use the same protocol (referred to as native) as the client workstation to copy, delete, move, save, and open files. Windows workstations perform these tasks using the native Common Internet File System (CIFS) protocol, Macintosh workstations use the native Apple Filing Protocol (AFP), and UNIX computers use the Network File System (NFS) protocol.
For more information about Novell Native File Access Protocols, see the online OES Native File Access Protocols Guide (http://www.novell.com/documentation/oes/native/data/h9izvdye.html#bktitle) in the OES NetWare online documentation.
Accessing the Server Using Novell Remote ManagerNovell Remote Manager is installed by default on the server. Users can access any directories and files that they have eDirectory rights to using a browser.
1 Open a Web browser at your workstation.
2 Point the browser to the URL of the server you want to access by typing the following in the address (URL) field:
http://server’s_TCP/IP_address:8008 [or other_configured_port_number]
For example:
http://172.16.123.11:8008
The default alternate port number is 8008. If you have changed this value on the Configuration page, make sure you specify the same value for the port number here.
If you have Domain Name Services (DNS) installed on your network for server name-to-IP address resolution, you can also specify the server’s DNS name instead of the IP address.
If you want to access Novell Remote Manager from the outside of a firewall and the server's private address is unreachable except through Network Address Translation (NAT) or by proxy, do the following:
Ensure that DNS is configured on your server.
Change the load line for loading the httpstk.nlm to the following in the autoexec.ncf file:
load httpstk.nlm /hostids:1 /SSL /keyfile:“SSL CertificateIP”
3 Accept the SSL certificate.IMPORTANT: You must have SSL 2.0 and SSL 3.0 (where available) enabled for your browser. Otherwise, the browser will display an error indicating that the page cannot be displayed.
Setting Up Workstations for Users 149
Novell Confidential Manual (ENU) 21 December 2004
4 When the Login dialog box appears, provide the required information.
To have access to all pages necessary to manage your server remotely, log in as a user with the Supervisor right to the Server object, usually user Admin or a user with equivalent rights.
If the Set Bindery Context = line has been removed from the autoexec.ncf file, specify the full context of the user you are logging in as.
If you log in as a user without the Supervisor right to the Server object, you will see only pages that display the volumes, directories, and files that you have access to. You can view files (where you have read access) and upload files into directories where you have write access. You will not be able to see or do any of the management functions with the exception of being able to set a Simple Password for NFAP on the NFAP Simple Password Management page (if this is set up on the server). You can access this page by clicking the User Tools icon in the header frame, then clicking the NFAP Security link in the navigation frame.
Accessing the Server Using OpenSSH ClientsIf you have installed OpenSSH on the server, the users on the network can access files using ssh commands from any workstation that has a supported SSH-compliant client installed.
You can get these clients from any open source on the Internet.
Some SSH-compliant clients that you could run:
PuTTy (tested with OES NetWare 6.5)
MindTerm
Absolute Telnet
Red Hat* Linux* open ssh clients (tested with OES NetWare 6.5)
In any of the clients, change the Window Row setting from the default to a value greater than 25.
For more information, see the OpenSSH Administration Guide for NetWare for OES (http://www.novell.com/documentation/oes/openssh/data/front.html#bktitle) in the OES NetWare 6.5 online documentation.
Using Other Client UtilitiesThe following clients are available to access the server or perform collaboration tasks based on what has been set up at the server.
Utility Description To Use
iFolder client Synchronize files and folder on all computers or handheld devices
Install and log in. For more information, see the online help associated with the application and the Novell iFolder 2.1 User Guide (http://www.novell.com/documentation/ifolder21/enduser/data/a2iii88.html#bktitle).
150 Novell Small Business Suite 6.6 Overview and Installation Guide
Novell Confidential Manual (ENU) 21 December 2004
Installing the ZENworks Desktop Management Agent on User Workstations
Even though you might not be using the ZENworks Desktop Management Agent to authenticate through the ZENworks Middle Tier Server, if you want to use ZENworks to manage updates to the Novell Client or other applications, you need to install the Desktop Management Agent on your workstations because its files include updates that the Novell Client uses with ZENworks Desktop Management.
For detailed information about how the Desktop Management Agent works, see “Understanding the Desktops Management Agent” in the Novell ZENworks 6.5 Desktop Management Administration Guide (http://www.novell.com/documentation/zenworks65/dmadmin/data/afprpzt.html#afprpzt).
For more information about installing the Desktop Management Agent, see “Installing and Configuring the Desktop Management Agent” in the Novell ZENworks 6.5 Desktop Management Installation Guide (http://www.novell.com/documentation/zenworks65/dminstall/data/bouhbmb.html).
GroupWise client Receive e-mail from other users locally or from the Internet.
Install and log in. For more information, see the online help associated with the application and the GroupWise 6.5 Windows Client User Guide in the GroupWise 6.5 online documentation (http://www.novell.com/documentation/gw65/gw65_userwin/data/ab32nt1.html).
GroupWise Messenger client Send and receive instant messages in a secure environment to other users in your corporation.
Install and log in. For more information, see the online help associated with the application.
VPN client Access a private network securely and use its services as if you were an onsite user.
Install and log in. For more information, see Virtual Private Networks Client in the Novell BorderManager 3.8 Installation Guide in the BorderManager online documentation (http://www.novell.com/documentation/nbm38/inst_admin/data/anv9usz.html).
Virtual Office Access information and tools need for collaboration when and where you need to.
Log in. For more information, see the online help for the application.
Utility Description To Use
Setting Up Workstations for Users 151

Novell Confidential Manual (ENU) 21 December 2004
152 Novell Small Business Suite 6.6 Overview and Installation Guide
Novell Confidential Manual (ENU) 21 December 2004
16 Installing BorderManager
Novell® Small Business Suite includes the Novell BorderManager® 3.8 product; however, the installation is not integrated into the server installation. You must complete the BorderManager installation after the server has been installed. Setting up Internet Connectivity is also recommended before installing BorderManager.
The following instructions for installing BorderManager on a Novell Small Business Suite 6.6 server are included in this chapter:
“Prerequisites for Installing Novell BorderManager 3.8” on page 155
“Installing Novell BorderManager 3.8” on page 156
“Moving from Trial to Production Version” on page 161
“Installing iManager 2.5 Plug-ins” on page 161
“What’s Next” on page 164
“Setting Up Login Policies” on page 162
“Using Identity Management” on page 163
For complete installation prerequisites and procedures, see the documentation in the documents directory at the root of the Novell BorderManager 3.8 with SP3 CD.
All the BorderManager 3.8 documentation references a Web download to obtain the product. However, all the files you need for the BorderManager installation are provided on the Novell BorderManager 3.8 with SP3 CD in this suite.
For updated documentation, see the BorderManager 3.8 online documentation (http://www.novell.com/documentation/nbm38/index.html).
Prerequisites for Installing Novell BorderManager 3.8If you selected the TCP/IP Files for Enabling Novell BorderManager 3.8 VPN component during the server installation, the files you need are installed on the server. The additional files mentioned in the Novell BorderManager 3.8 documentation are installed by default when you installed or upgrade the server to Novell Small Business Suite 6.6.
If you did not select this component during the server installation, these TCP/IP files can be installed now by doing the following:
1 Insert the Novell Small Business Suite 6.6 NetWare 6.5 CD 2 Products with SP3 CD in the server’s CD-ROM drive.
2 At the X-Server graphical console, click Install > Add.
3 Browse to and select the postinst.ni file on the Novell Small Business Suite 6.6 NetWare 6.5 CD 2 Products with SP3 CD
Installing BorderManager 153
Novell Confidential Manual (ENU) 21 December 2004
4 Select the TCP/IP Files for Enabling Novell BorderManager 3.8 VPN component > Next > Copy Files.
5 Restart the server.
Installing Novell BorderManager 3.81 If not previously run, run INETCFG on the server to transfer all the LAN driver, protocols,
and remote access commands to INETCFG and restart the server.
2 Insert the Novell BorderManager 3.8 with SP3 CD into the server’s CD-ROM drive.
3 On the X-Server Graphical Console screen, click Novell > Install.
If the X-Server Graphical Console is not loaded, enter STARTX at the server console.
If STARTX is already loaded, press Ctrl+Esc and select the option for X-Server Graphical Console.
4 Click Add, then browse to the root of the Novell BorderManager 3.8 with SP3 CD (NBM38wSP3), and then select product.ni, which is displayed in the right panel and click OK > OK.
File copying should begin.
5 On the Welcome to Novell BorderManager 3.8 Install page, click Next.
6 Read the license agreement and click I Accept to accept the terms of the agreement.
The next page shows the Novell BorderManager 3.8 services that will get installed. The services are:
Novell BorderManager Firewall/Caching Services
Novell BorderManager VPN Services
Novell Modular Authentication Services (NMAS). This will be installed by default.
7 In the Enter a license location path field, select Shipping License, or check the Skip License Install check box and click Next so that the licenses can be installed later.
Trial Licence is selected by default. Trial and shipping licenses are located in the licences folder in the root of the CD. You can install the system files without installing the license; however, Novell BorderManager 3.8 services will not load until a valid license is installed. NOTE: You can install trial license only once per tree.
8 On the Minimum Requirements Check screen, check the Results column to verify whether the minimum system requirements are met or not. Then click Next.
154 Novell Small Business Suite 6.6 Overview and Installation Guide
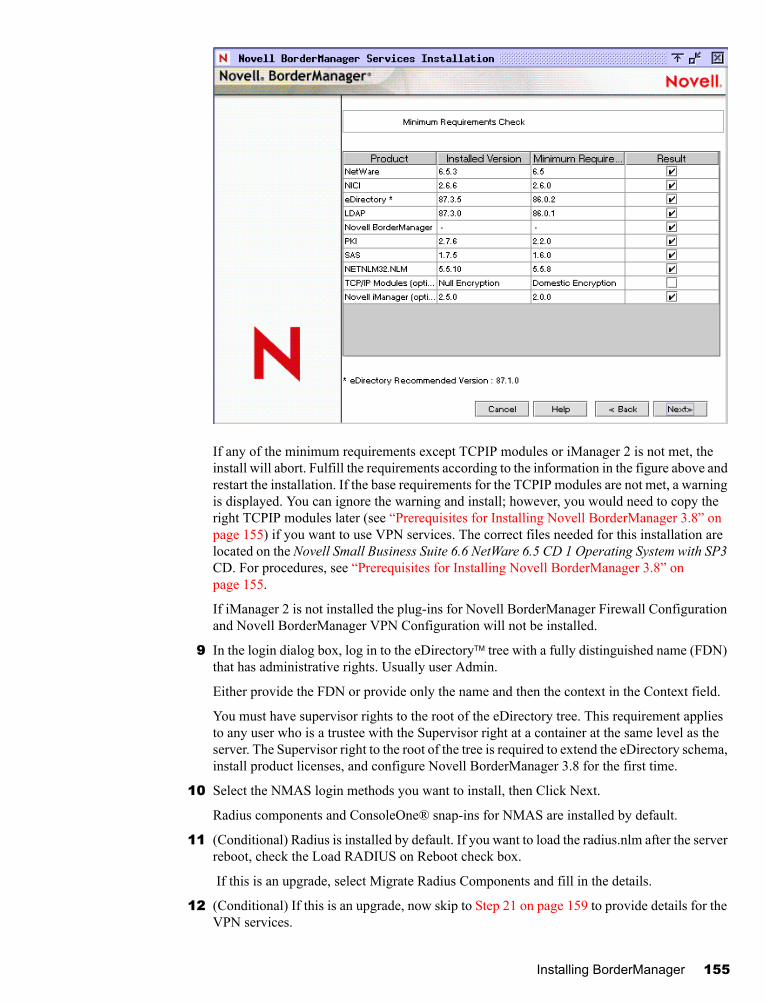
Novell Confidential Manual (ENU) 21 December 2004
If any of the minimum requirements except TCPIP modules or iManager 2 is not met, the install will abort. Fulfill the requirements according to the information in the figure above and restart the installation. If the base requirements for the TCPIP modules are not met, a warning is displayed. You can ignore the warning and install; however, you would need to copy the right TCPIP modules later (see “Prerequisites for Installing Novell BorderManager 3.8” on page 155) if you want to use VPN services. The correct files needed for this installation are located on the Novell Small Business Suite 6.6 NetWare 6.5 CD 1 Operating System with SP3 CD. For procedures, see “Prerequisites for Installing Novell BorderManager 3.8” on page 155.
If iManager 2 is not installed the plug-ins for Novell BorderManager Firewall Configuration and Novell BorderManager VPN Configuration will not be installed.
9 In the login dialog box, log in to the eDirectoryTM tree with a fully distinguished name (FDN) that has administrative rights. Usually user Admin.
Either provide the FDN or provide only the name and then the context in the Context field.
You must have supervisor rights to the root of the eDirectory tree. This requirement applies to any user who is a trustee with the Supervisor right at a container at the same level as the server. The Supervisor right to the root of the tree is required to extend the eDirectory schema, install product licenses, and configure Novell BorderManager 3.8 for the first time.
10 Select the NMAS login methods you want to install, then Click Next.
Radius components and ConsoleOne® snap-ins for NMAS are installed by default.
11 (Conditional) Radius is installed by default. If you want to load the radius.nlm after the server reboot, check the Load RADIUS on Reboot check box.
If this is an upgrade, select Migrate Radius Components and fill in the details.
12 (Conditional) If this is an upgrade, now skip to Step 21 on page 159 to provide details for the VPN services.
Installing BorderManager 155
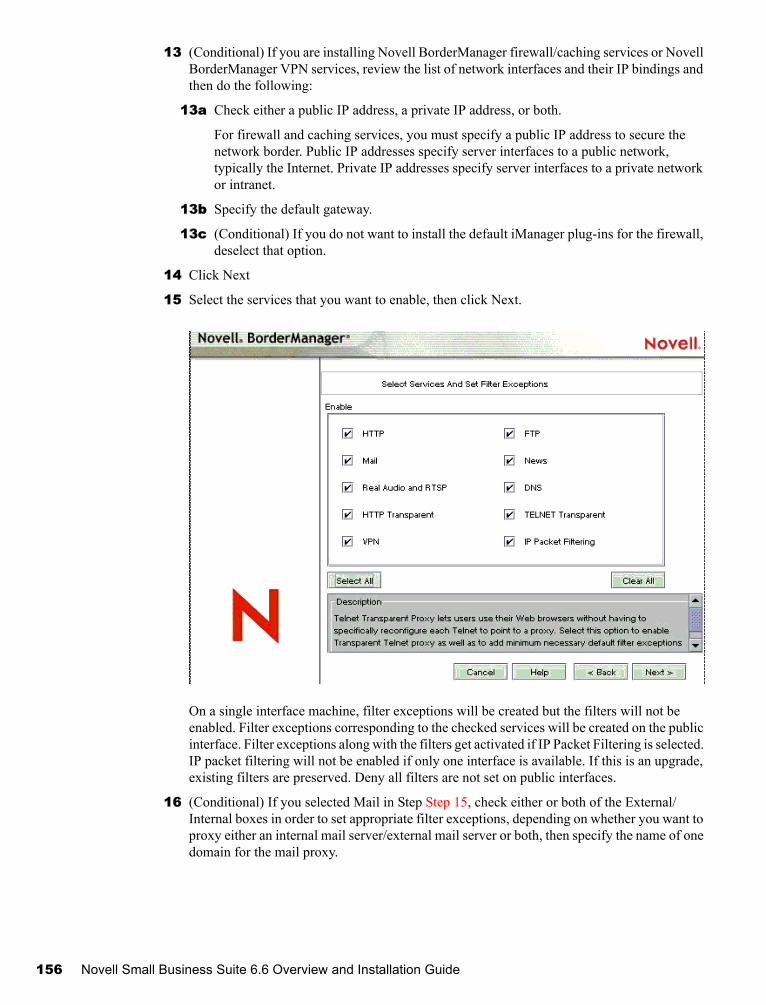
Novell Confidential Manual (ENU) 21 December 2004
13 (Conditional) If you are installing Novell BorderManager firewall/caching services or Novell BorderManager VPN services, review the list of network interfaces and their IP bindings and then do the following:
13a Check either a public IP address, a private IP address, or both.
For firewall and caching services, you must specify a public IP address to secure the network border. Public IP addresses specify server interfaces to a public network, typically the Internet. Private IP addresses specify server interfaces to a private network or intranet.
13b Specify the default gateway.
13c (Conditional) If you do not want to install the default iManager plug-ins for the firewall, deselect that option.
14 Click Next
15 Select the services that you want to enable, then click Next.
On a single interface machine, filter exceptions will be created but the filters will not be enabled. Filter exceptions corresponding to the checked services will be created on the public interface. Filter exceptions along with the filters get activated if IP Packet Filtering is selected. IP packet filtering will not be enabled if only one interface is available. If this is an upgrade, existing filters are preserved. Deny all filters are not set on public interfaces.
16 (Conditional) If you selected Mail in Step Step 15, check either or both of the External/Internal boxes in order to set appropriate filter exceptions, depending on whether you want to proxy either an internal mail server/external mail server or both, then specify the name of one domain for the mail proxy.
156 Novell Small Business Suite 6.6 Overview and Installation Guide
Novell Confidential Manual (ENU) 21 December 2004
17 (Conditional) If HTTP, FTP, or HTTP Transparent are selected in Step 15, click Create Volume and provide the required details in the pop-up screen to create traditional volumes for caching.
You can also use existing traditional volumes for caching.
If you do not create a volume or select a traditional volume for caching, the sys:etc\proxy\cache directory will be used for caching.
18 (Conditional) Accept the Access Control default.
Access control enforces additional security by denying all proxy services traffic. Access control rules can be set using the NetWare Administrator utility. They are used to allow or deny access from any source or to any destination. This option is available only if you select Proxy Services.
19 Specify a unique DNS domain name for your network, then click Next.
20 (Optional) Click Add to specify one to three DNS server IP addresses.
By default the existing DNS entry is used.
21 (Conditional) If you selected VPN in Step 15 on page 158, do one of the following:
Select the Allow Clear Text Password and then browse to or type the proxy username so the VPN schema extension can use Clear Text Passwords.
To enable Clear Text Passwords, log in to ConsoleOne, double-click the context of the server on which you are installing Novell BorderManager 3.8, then select LDAP Group Object and right-click > Properties. As applicable, either check the Allow Clear Text Password box (for eDirectory 8.6.2) or uncheck the Required TLS for Simple Bind with Password (for eDirectory 8.7.1).
Select the Use SSL for Schema Extension option to encrypt your password.
To use SSL: For Schema Extension to succeed in this mode, you must have a valid Server Trusted Certificate, usually a DER file present in the sys:\public directory of your server. Browse to the file or enter its name in the box.
Installing BorderManager 157
Novell Confidential Manual (ENU) 21 December 2004
22 (Conditional) Uncheck the iManager plug-ins check box for VPN box if you do not want the plug-ins to be installed.
23 If the install is an upgrade from BMEE 3.6 or Novell BorderManager 3.7 and the option Migrate VPN Configuration is checked. Uncheck this option if you do not want to migrate the VPN configuration.
24 Do not change the Port that LDAP is listening on unless LDAP is listening on a nonstandard port.
25 (Conditional) If nldap.nlm is not loaded, a prompt will appear asking you to configure the LDAP server.
26 Click Finish.
Click Back to return to previous windows and modify your selections.
27 Do one of the following:
To load Novell BorderManager 3.8 services, click Reboot.
To complete the installation and return to the GUI screen; click close.
To view the Readme, click ReadMe.
The install summary is available in sys:\ni\data\nbm_instlog.csv. The Readme is available at the root of the CD under Documents > ReadMes > enu.NOTE: Novell BorderManager 3.8 provides the option to recover from a failed install. Install pops up an option after the Login dialog box (Step 9 on page 157). To recover from a failed install, select the Fresh Install option or the Upgrade option. Continuing with the Fresh Install option with a working Novell BorderManager 3.8 server might give unexpected results, particularly with existing filter exceptions. After using this option, review your NetWare Administrator settings and filter exceptions.
158 Novell Small Business Suite 6.6 Overview and Installation Guide
Novell Confidential Manual (ENU) 21 December 2004
Moving from Trial to Production VersionIf you want to move from the trial Novell BorderManager 3.8 product to the actual production version, you need not reinstall Novell BorderManager 3.8. Follow these steps:
1 Install the Production License from the licenses\regular directory in the Novell BorderManager 3.8 with SP3 CD using NetWare Administrator or iManager.
2 Uninstall the trial VPN Client, then install the production version of VPN Client from the Novell BorderManager 3.8 with SP3 CD (cl_inst\vpn\exes\setupex.exe).
3 Uninstall the trial NCF, then install the production version of NCF (Novell Client Firewall) from the Novell BorderManager 3.8 with SP3 CD (cl_inst\ncf\ncfinstall.exe).
Installing iManager 2.5 Plug-ins iManager is a browser-based configuration utility that helps you configure Virtual Private Networks (VPNs) and filters on Novell BorderManager 3.8 servers. You need to do some configuration to get the iManager plug-ins.
Novell Small Business Suite 6.6 comes with iManager 2.5 by default. To work with Novell BorderManager 3.8, you must manually install the plug-ins.
1 Launch iManager 2.5 by entering the specific IP address of the server (https://ip_address/nps/iManager.html) in the Address field of your browser.
2 Click the Configure icon at the top of the iManager interface.
3 In the left panel, click Module Installation > Available Novell-Plug-in Modules.
A window similar to the following appears:
4 Select each plug-in that you want to install, then click Install.
5 Restart Tomcat on the server.
To stop Tomcat, enter tcadmdn at the System Console prompt.
To start Tomcat, enter tomcat4 at the System Console prompt.
Installing BorderManager 159

Novell Confidential Manual (ENU) 21 December 2004
Setting Up Login PoliciesAll users logging in to services through Novell BorderManager 3.8 must be authenticated. The type of authentication required for a user to log in and access network services through Novell BorderManager 3.8 is stored in Novell eDirectory in a Login Policy object. Because of this, you must set up a generic login policy to enable users to access Novell BorderManager 3.8 services. Until a policy is set up, no user access is allowed. There can be only one Login Policy object in an eDirectory tree. This object holds the login policies for all Novell BorderManager 3.8 servers and services in the tree. NOTE: The policies stored in the Login Policy object apply only to Novell BorderManager 3.8 services. Previous versions of Novell BorderManager 3.8 use hard-coded default policies.To manage login polices for all Novell BorderManager 3.8 services using the Login Policy object, you must upgrade previous versions of BorderManager to Novell BorderManager 3.8.
To create a Login Policy object and set up generic policy rules that allow users to access network services through each of the various Novell BorderManager 3.8 services with an eDirectory password, complete the following steps:
1 In NetWare Administrator, select the Security container object in your eDirectory tree.
The Login Policy object can be created only in the Security container object.
2 From the Object menu, select Create > Login Policy.
3 Click OK.
4 (Optional) To configure a login policy rule, click Rules > Add.
5 (Optional) To configure a rule for Novell BorderManager 3.8 Authentication Services, select the object name in the Service Type dialog box, browse to select the Dial Access System object associated with that service, check the Enabled check box.
6 (Conditional) If this is a new installation of Novell BorderManager 3.8 Authentication Services, you need to create a Dial Access System object. See
7 Select the Users tab, then click Add, browse to select the user, group, or container objects to enable access.
8 Click the Methods tab, then click Add and check the Login Method Enabled check box.
9 In the Method Types dialog box, check Novell eDirectory Passwords.
10 In the Method Enforcement dialog box, check Mandatory and then click OK > Add.
11 (Optional) Configure any or all of the available rules in the Service Type dialog box.
11a Select Predefined.
11b Select any or all of the services (Proxy, SOCKS, VPN).
11c Check the Enabled check box.
Because NDS or eDirectory passwords are always required for VPN authentication, you need to define additional method types and enforcement policies only if you want users to be authenticated by additional means such as token devices.
12 Exit the utility.
160 Novell Small Business Suite 6.6 Overview and Installation Guide
Novell Confidential Manual (ENU) 21 December 2004
Using Identity ManagementNovell BorderManager features such as VPNs and Proxy Services are dependent upon sound identity management. Many organizations today store identity data in multiple directories. For example, your organization might keep user account information in one tree for authentication purposes and in another tree to reflect organizational structures. In this case, you face the challenge of ensuring that data synchronization is both timely and accurate. An identity management solution can help ensure the integrity of user data by automating data synchronization. Additionally, an identity management solution can also automate the provisioning of resources and data access based on policy.
Novell DirXML® is an identity management solution that distributes new and updated information across directories, databases, and critical applications on the network and across firewalls to partner systems. Based on business rules you define, DirXML can ensure that when a new employee is hired or a new partner is brought onto a team, that person will have immediate access to necessary resources.
For example, using DirXML, you could define rules that provide immediate eDirectory account creation in both your authentication tree and your hierarchical tree when employee data is entered into your Human Resources database. Based on certain attributes, such as the value of a job title or department, you also could provide access to data held in various internal Web sites while preventing access to data held on other sites. Finally, when this employee or partner leaves the organization, data access would be revoked immediately.
For more information about how DirXML can help you address identity management challenges, refer to the DirXML Product Page (http://www.novell.com/products/dirxml).
Installing Novell BorderManager Support Pack 3The Support Pack 3 files for Novell BorderManager 3.8 are included on the Novell BorderManager 3.8 with SP3 CD included with this suite. To install these files on the server, do the following:
1 Complete the initial installation of Novell BorderManager.
2 If not already inserted, insert the Novell BorderManager 3.8 with SP3 CD into the server’s CD-ROM drive.
3 At the System Console prompt, enter load nwconfig.
4 In the Configuration Options menu, select Product Options and then press Enter.
5 From the Other Installation Actions menu, select Install a Product Not Listed and then press Enter.
6 Press F3.
7 In the Specify a directory path field, type NBM38WSP3:SP3 and then press Enter.
8 Either accept the preselected (marked) file groups by pressing F10 or deselect a file group that has been previously selected by pressing Enter on that group.
The following file groups are selected (marked) by default:
Novell BorderManager 3.8 Support Pack 3
Backup files replaced by Novell BorderManager 3.8 Support Pack 3
9 When the file copy is complete, press Enter.
Installing BorderManager 161
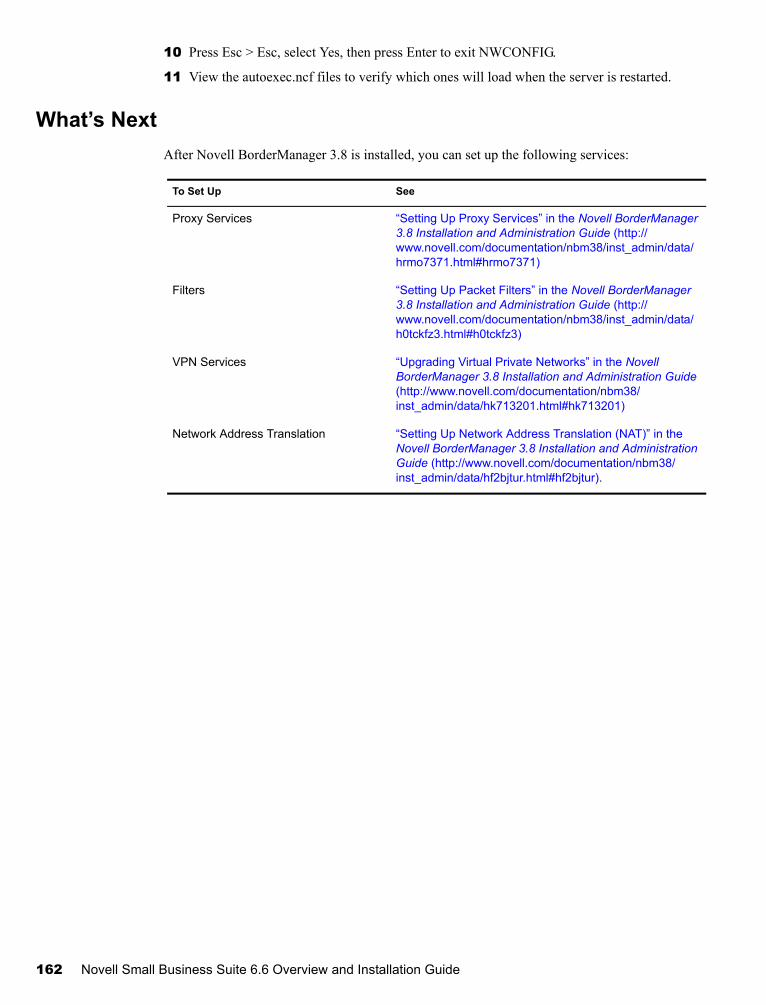
Novell Confidential Manual (ENU) 21 December 2004
10 Press Esc > Esc, select Yes, then press Enter to exit NWCONFIG.
11 View the autoexec.ncf files to verify which ones will load when the server is restarted.
What’s NextAfter Novell BorderManager 3.8 is installed, you can set up the following services:
To Set Up See
Proxy Services “Setting Up Proxy Services” in the Novell BorderManager 3.8 Installation and Administration Guide (http://www.novell.com/documentation/nbm38/inst_admin/data/hrmo7371.html#hrmo7371)
Filters “Setting Up Packet Filters” in the Novell BorderManager 3.8 Installation and Administration Guide (http://www.novell.com/documentation/nbm38/inst_admin/data/h0tckfz3.html#h0tckfz3)
VPN Services “Upgrading Virtual Private Networks” in the Novell BorderManager 3.8 Installation and Administration Guide (http://www.novell.com/documentation/nbm38/inst_admin/data/hk713201.html#hk713201)
Network Address Translation “Setting Up Network Address Translation (NAT)” in the Novell BorderManager 3.8 Installation and Administration Guide (http://www.novell.com/documentation/nbm38/inst_admin/data/hf2bjtur.html#hf2bjtur).
162 Novell Small Business Suite 6.6 Overview and Installation Guide
Novell Confidential Manual (ENU) 21 December 2004
17 Installing ZENworks Desktop Management
Novell® ZENworks® 6.5 Desktop Management is one of the core components of the ZENworks 6.5 Suite. It uses Policy-Driven Automation to reduce and, in some cases, eliminate desktop management tasks such as software distribution, software repair, desktop configuration, workstation imaging, remote management, and workstation inventory throughout the life cycle of the device.
As the network administrator for a small business consisting of perhaps 100 employees or less, you probably want to know
A simple, step-by-step list of instructions explaining how to install and use Desktop Management components.
The reasons for implementing Desktop Management components inside a small network, with a sample scenario demonstrating how a component can increase user and administrator efficiency.
An assessment of the relative difficulty of implementing Desktop Management components, including preparations needed for your network server or user workstations, where to obtain any necessary prerequisite software, installation and compatibility issues, etc.
This chapter provides ZENworks 6.5 Desktop Management information in a component-by-component format. It is up to you to determine which of the Desktop Management components you want to install, configure, and use in your unique business network to address unique user needs. The information includes the following:
ZENworks 6.5 Desktop Management Basic Installation and Setup (page 166)
ZENworks 6.5 Desktop Management Application Management (page 173)
ZENworks 6.5 Desktop Management Workstation Management (page 175)
ZENworks 6.5 Desktop Management Workstation Imaging (page 177)
ZENworks for Desktops Remote Management (page 178)
ZENworks Desktop Management Workstation Inventory and Sybase (page 180)
Upgrading ZENworks (page 215)NOTE: Although ZENworks 6.5 Desktop Management components can be installed on network servers using NetWare® 5.1, NetWare 6.0, Windows NT 4, or Windows 2000, the scenarios documented describe an installation on a Novell Small Business Suite 6.6 server only. NetWare 6.5 Support Pack 3 is included as part of the Novell Small Business Suite 6.6 software.
For detailed information about installing ZENwork 6.5 Desktop Management components on older NetWare servers or on Windows servers, or for information about upgrading from an older version of ZENworks for Desktops to ZENwork 6.5 Desktop Management, see the Novell ZENworks 6.5 Desktop Management Installation Guide (http://www.novell.com/documentation/zenworks65/dminstall/data/front.html)..
Installing ZENworks Desktop Management 163
Novell Confidential Manual (ENU) 21 December 2004
ZENworks 6.5 Desktop Management Software
The information in this chapter assumes that you will be using ZENworks 6.5 Desktop Management software as shipped in the Novell Small Business Suite 6.6. This version includes five CDs that contains the image for the Desktop Management, Companion CD 1, Companion CD 2, Personality Migration, and Software Packaging. For descriptions of the contents of these CDs, see “ZENworks CD Organization” in the ZENworks 6.5 Getting Started Guide (http://www.novell.com/documentation/zenworks65/gettingstarted/data/al14dig.html#al14dig)
Additional Documentation
For detailed information about the installing, planning, setting up, and testing processes that Novell Small Business Suite 6.6 customers might typically encounter while implementing this product, see the Novell ZENworks 6.5 Desktop Management Installation Guide (http://www.novell.com/documentation/zenworks65/dminstall/data/front.html).
For information about upgrading ZENworks for Desktops 3.x to work in a Desktop Management 6.5 environment, see “Upgrade” in the ZENworks 6.5 Desktop Management Installation Guide (http://www.novell.com/documentation/zenworks65/dminstall/data/bpmw4h6.html#bpmw4h6).
For comprehensive, conceptual information that you can use as you configure and use ZENworks 6.5 Desktop Management components, see “Overview” in the ZENworks 6.5 Desktop Management Installation Guide (http://www.novell.com/documentation/zenworks65/dminstall/data/bol64uc.html#bol64uc).
For information about setting up Terminal Server Application Support, a component that provides directory-enabled management and delivery of thin-client applications through Novell Application LauncherTM, see “Setting Up Terminal Server Application Support” in the ZENworks 6.5 Desktop Management Installation Guide (http://www.novell.com/documentation/zenworks65/dminstall/data/bpouujq.html).
For information about installing, deploying, and administering ZENworks Preboot Services, a component that finds imaging work specified for a workstation and provides the workstation with the files necessary to boot to the ZENworks for Desktops imaging environment, see the “Overview,” “Preparation,” and “Installation” in the ZENworks 6.5 Desktop Management Installation Guide (http://www.novell.com/documentation/zenworks65/dminstall/data/front.html) and “Using ZENworks Desktop Management Preboot Services” in the Novell ZENworks 6.5 Desktop Management Administration Guide. (http://www.novell.com/documentation/zenworks65/dmadmin/data/amoqzg4.html#amoqzg4).
For additional workstation imaging solutions, see “Workstation Imaging” in the Novell ZENworks 6.5 Desktop Management Administration Guide (http://www.novell.com/documentation/zenworks65/dmadmin/data/a74bm8u.html#a74bm8u).
For information about installing, configuring, and testing ZENworks 6.5 Desktop Management in a Novell Cluster Services environment, see “Installing in a Novell Cluster Services Environment” in the ZENworks 6.5 Desktop Management Installation Guide (http://www.novell.com/documentation/zenworks65/dminstall/data/bq7do8t.html#bq7do8t).
For troubleshooting strategies that you can use and error messages that might be displayed for problems that could occur as you use ZENworks 6.5 Desktop Management in your production environment, see the ZENworks 6.5 Desktop Management Troubleshooting Guide (http://www.novell.com/documentation/zenworks65/dmtrouble/data/a20gkue.html).
164 Novell Small Business Suite 6.6 Overview and Installation Guide
Novell Confidential Manual (ENU) 21 December 2004
ZENworks 6.5 Desktop Management Basic Installation and SetupAlthough the Novell Small Business Suite 6.6 includes a lot of software, you need to be concerned only with the following CDs in regard to ZENworks Desktop Management:
Novell Small Business Suite 6.6 NetWare 6.5 CD 1 Operating System with SP3
Novell Small Business Suite 6.6 NetWare 6.5 CD 2 Products with SP3
Novell Client Software
ZENworks 6.5 Desktop Management
ZENworks 6.5 Companion CD 1
ZENworks 6.5 Companion CD 2
ZENworks 6.5 Personality Migration
ZENworks 6.5 Software Packaging
Because OES NetWare 6.5 ships with the suite, the focus of this documentation is the setup and operation of Desktop Management in a NetWare 6.5 network environment.
ZENworks 6.5 Desktop Management also works in an all-Windows or a mixed NetWare/Windows environment. For more information about this environment, see “Understanding ZENworks 6.5 Desktop Management” in the Novell ZENworks 6.5 Desktop Management Administration Guide (http://www.novell.com/documentation/zenworks65/dmadmin/data/afpdhwj.html#afpdhwj).
In addition to the physical media listed above, you might need to download and apply the latest patches for ZENwork 6.5 Desktop Management. To locate these updates, go to the Novell Support > Download > Patches Web site (http://support.novell.com/filefinder/?sourceidint=suplnav3_patches).
A basic installation and setup of ZENworks Desktop Management requires the following:
Installing ZENworks Server software on a Novell Small Business Suite 6.6 server
Installing Novell ClientTM (June 2005 or later) and the Desktop Management Agent software on user workstations
Importing workstations to Novell eDirectoryTM
When these basic elements of the product are installed, you can decide which components of the product you want to use:
ZENworks 6.5 Desktop Management Application Management (page 173)
ZENworks 6.5 Desktop Management Workstation Management (page 175)
ZENworks 6.5 Desktop Management Workstation Imaging (page 177)
ZENworks for Desktops Remote Management (page 178)
ZENworks Desktop Management Workstation Inventory and Sybase (page 180)
ZENworks 6.5 Desktop Management also gives you the option of not using the Novell Client to authenticate to eDirectory to receive policies and applications at a desktop. With the Desktop Management Agent installed on their workstations, users can securely log in from outside a company’s network firewall or from inside that firewall without seeing any Novell product.
Installing ZENworks Desktop Management 165
Novell Confidential Manual (ENU) 21 December 2004
This topic includes the following information:
Installation Prerequisites for Servers and Workstations (page 168)
Installing the Desktop Management Agent on User Workstations (page 171)
Installing the Middle Tier Server (page 171)
Installing the ZENworks Desktop Management Server (page 172)
Setting Up Automatic Workstation Import (page 172)
What’s Next (page 173)
Installation Prerequisites for Servers and WorkstationsBefore you can begin to install ZENworks 6.5 Desktop Management, you need to make sure that the server where you will install the product meets the supported software and hardware configuration as outlined in the following sections:
“Installation Workstation Software Requirements” on page 168
“Server Hardware Requirements” on page 169
“Server Software Requirements” on page 169
“User Workstation Hardware Requirements” on page 170
“User Workstation Software Requirements” on page 170
Installation Workstation Software Requirements
The following are the software requirements for the workstation you use as you install ZENworks Server software on a network server.
ZENworks Component to Install
Software Requirement for the Installing Workstation
Desktop Management Services
Windows 2000 Professional SP4 workstation, Windows XP SP1 workstation, Windows 2000 Server SP4, or Windows Server 2003 (Standard & Enterprise).
Novell Client 4.9 SP1a or later installed.
Internet Explorer 5.5 SP2 or later installed.
If you intend to install ZENworks snap-ins to the local workstation, ConsoleOne® 1.3.6 must already be installed on this workstation. For more information, see Step 8 of “Performing the Full Installation (Including Schema Extension)” in the ZENworks 6.5 Desktop Management Installation Guide (http://www.novell.com/documentation/zenworks65/dminstall/data/bouho7k.html#ae37icj).
Not Supported: The following software configurations are not supported for Desktop Management Server software installation:
Installing from a Windows 95/98/ME/NT 4 workstation.
Installing from one side of a firewall, such as a Network Address Translation (NAT) configuration, to the other side of a firewall.
166 Novell Small Business Suite 6.6 Overview and Installation Guide
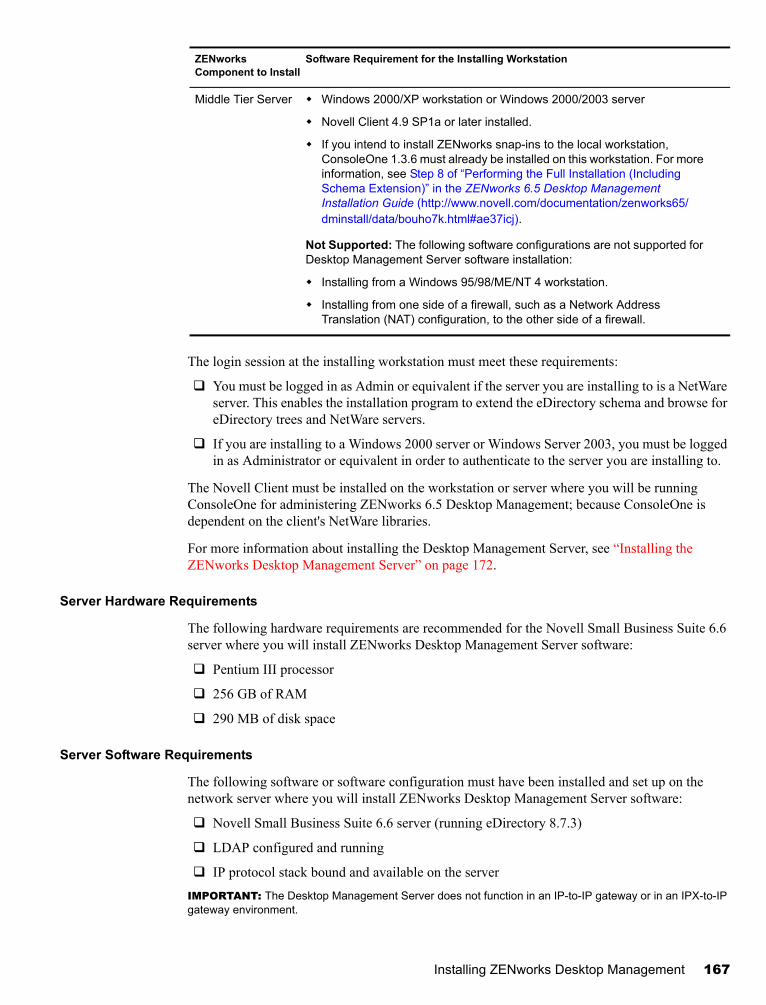
Novell Confidential Manual (ENU) 21 December 2004
The login session at the installing workstation must meet these requirements:
You must be logged in as Admin or equivalent if the server you are installing to is a NetWare server. This enables the installation program to extend the eDirectory schema and browse for eDirectory trees and NetWare servers.
If you are installing to a Windows 2000 server or Windows Server 2003, you must be logged in as Administrator or equivalent in order to authenticate to the server you are installing to.
The Novell Client must be installed on the workstation or server where you will be running ConsoleOne for administering ZENworks 6.5 Desktop Management; because ConsoleOne is dependent on the client's NetWare libraries.
For more information about installing the Desktop Management Server, see “Installing the ZENworks Desktop Management Server” on page 172.
Server Hardware Requirements
The following hardware requirements are recommended for the Novell Small Business Suite 6.6 server where you will install ZENworks Desktop Management Server software:
Pentium III processor
256 GB of RAM
290 MB of disk space
Server Software Requirements
The following software or software configuration must have been installed and set up on the network server where you will install ZENworks Desktop Management Server software:
Novell Small Business Suite 6.6 server (running eDirectory 8.7.3)
LDAP configured and running
IP protocol stack bound and available on the serverIMPORTANT: The Desktop Management Server does not function in an IP-to-IP gateway or in an IPX-to-IP gateway environment.
Middle Tier Server Windows 2000/XP workstation or Windows 2000/2003 server
Novell Client 4.9 SP1a or later installed.
If you intend to install ZENworks snap-ins to the local workstation, ConsoleOne 1.3.6 must already be installed on this workstation. For more information, see Step 8 of “Performing the Full Installation (Including Schema Extension)” in the ZENworks 6.5 Desktop Management Installation Guide (http://www.novell.com/documentation/zenworks65/dminstall/data/bouho7k.html#ae37icj).
Not Supported: The following software configurations are not supported for Desktop Management Server software installation:
Installing from a Windows 95/98/ME/NT 4 workstation.
Installing from one side of a firewall, such as a Network Address Translation (NAT) configuration, to the other side of a firewall.
ZENworks Component to Install
Software Requirement for the Installing Workstation
Installing ZENworks Desktop Management 167
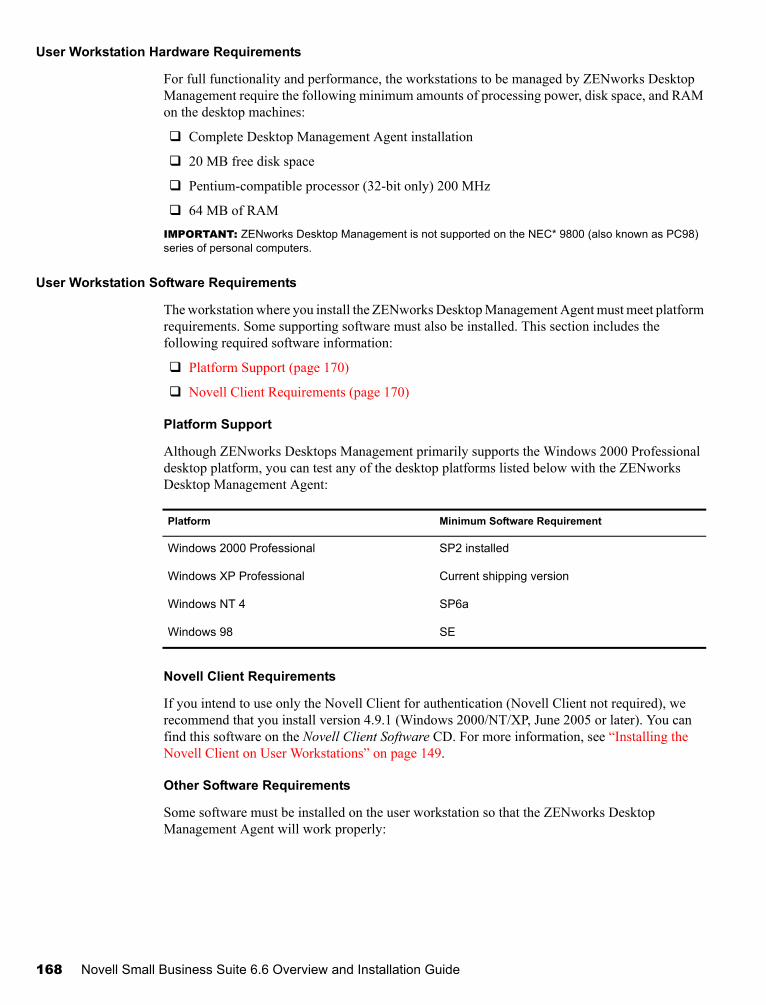
Novell Confidential Manual (ENU) 21 December 2004
User Workstation Hardware Requirements
For full functionality and performance, the workstations to be managed by ZENworks Desktop Management require the following minimum amounts of processing power, disk space, and RAM on the desktop machines:
Complete Desktop Management Agent installation
20 MB free disk space
Pentium-compatible processor (32-bit only) 200 MHz
64 MB of RAMIMPORTANT: ZENworks Desktop Management is not supported on the NEC* 9800 (also known as PC98) series of personal computers.
User Workstation Software Requirements
The workstation where you install the ZENworks Desktop Management Agent must meet platform requirements. Some supporting software must also be installed. This section includes the following required software information:
Platform Support (page 170)
Novell Client Requirements (page 170)
Platform Support
Although ZENworks Desktops Management primarily supports the Windows 2000 Professional desktop platform, you can test any of the desktop platforms listed below with the ZENworks Desktop Management Agent:
Novell Client Requirements
If you intend to use only the Novell Client for authentication (Novell Client not required), we recommend that you install version 4.9.1 (Windows 2000/NT/XP, June 2005 or later). You can find this software on the Novell Client Software CD. For more information, see “Installing the Novell Client on User Workstations” on page 149.
Other Software Requirements
Some software must be installed on the user workstation so that the ZENworks Desktop Management Agent will work properly:
Platform Minimum Software Requirement
Windows 2000 Professional SP2 installed
Windows XP Professional Current shipping version
Windows NT 4 SP6a
Windows 98 SE
168 Novell Small Business Suite 6.6 Overview and Installation Guide
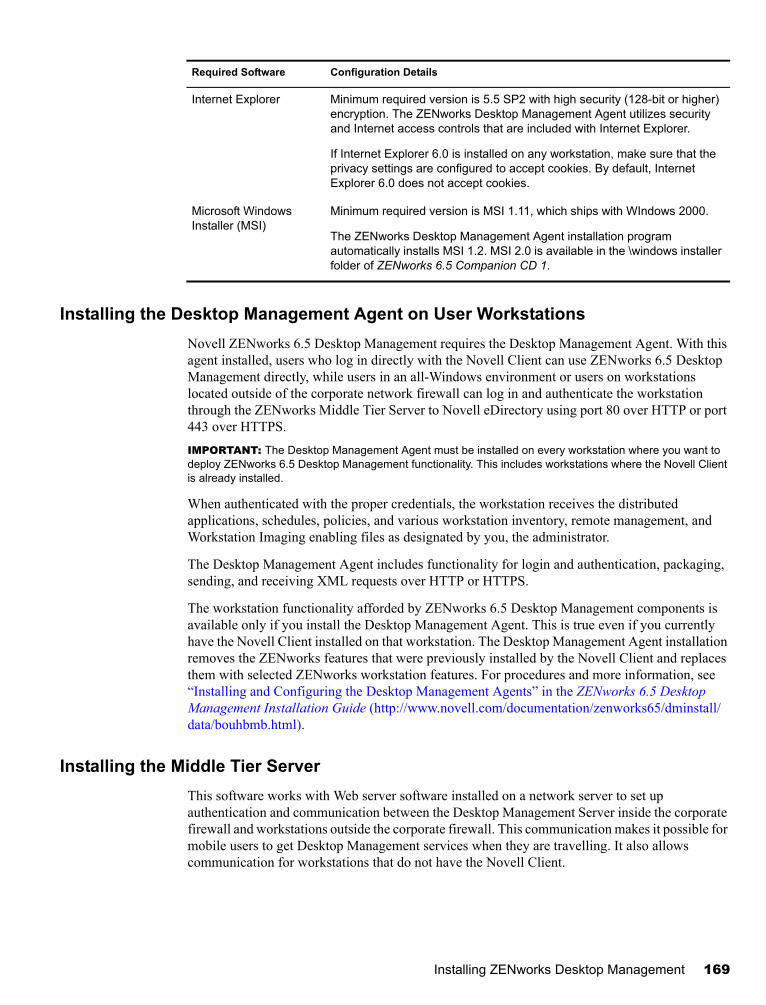
Novell Confidential Manual (ENU) 21 December 2004
Installing the Desktop Management Agent on User WorkstationsNovell ZENworks 6.5 Desktop Management requires the Desktop Management Agent. With this agent installed, users who log in directly with the Novell Client can use ZENworks 6.5 Desktop Management directly, while users in an all-Windows environment or users on workstations located outside of the corporate network firewall can log in and authenticate the workstation through the ZENworks Middle Tier Server to Novell eDirectory using port 80 over HTTP or port 443 over HTTPS.IMPORTANT: The Desktop Management Agent must be installed on every workstation where you want to deploy ZENworks 6.5 Desktop Management functionality. This includes workstations where the Novell Client is already installed.
When authenticated with the proper credentials, the workstation receives the distributed applications, schedules, policies, and various workstation inventory, remote management, and Workstation Imaging enabling files as designated by you, the administrator.
The Desktop Management Agent includes functionality for login and authentication, packaging, sending, and receiving XML requests over HTTP or HTTPS.
The workstation functionality afforded by ZENworks 6.5 Desktop Management components is available only if you install the Desktop Management Agent. This is true even if you currently have the Novell Client installed on that workstation. The Desktop Management Agent installation removes the ZENworks features that were previously installed by the Novell Client and replaces them with selected ZENworks workstation features. For procedures and more information, see “Installing and Configuring the Desktop Management Agents” in the ZENworks 6.5 Desktop Management Installation Guide (http://www.novell.com/documentation/zenworks65/dminstall/data/bouhbmb.html).
Installing the Middle Tier ServerThis software works with Web server software installed on a network server to set up authentication and communication between the Desktop Management Server inside the corporate firewall and workstations outside the corporate firewall. This communication makes it possible for mobile users to get Desktop Management services when they are travelling. It also allows communication for workstations that do not have the Novell Client.
Required Software Configuration Details
Internet Explorer Minimum required version is 5.5 SP2 with high security (128-bit or higher) encryption. The ZENworks Desktop Management Agent utilizes security and Internet access controls that are included with Internet Explorer.
If Internet Explorer 6.0 is installed on any workstation, make sure that the privacy settings are configured to accept cookies. By default, Internet Explorer 6.0 does not accept cookies.
Microsoft Windows Installer (MSI)
Minimum required version is MSI 1.11, which ships with WIndows 2000.
The ZENworks Desktop Management Agent installation program automatically installs MSI 1.2. MSI 2.0 is available in the \windows installer folder of ZENworks 6.5 Companion CD 1.
Installing ZENworks Desktop Management 169

Novell Confidential Manual (ENU) 21 December 2004
The modules of the Middle Tier Server plug in to the Web server software and act as a Web service. The Middle Tier Server allows access to Novell eDirectory and the Windows file system (if running on a Windows server) or the NetWare file system (if running on a NetWare server) for the users and workstations inside or outside the firewall.
Using ZENworks Desktop Management through the Desktop Management Agent and the Middle Tier Server, users can access their applications and policies through a Web server interface. For diagrams showing how the Middle Tier Server works, see “Process Flow in ZENworks Desktop Management” in the ZENworks 6.5 Desktop Management Installation Guide (http://www.novell.com/documentation/zenworks65/dmadmin/data/ai8erv4.html#ai8erv4).
For detailed steps for installing the Middle Tier Server, see “ZENworks Middle Tier Server Installation Procedure” in the Novell ZENworks 6.5 Desktop Management Installation Guide (http://www.novell.com/documentation/zenworks65/dminstall/data/bouhf7o.html).
Installing the ZENworks Desktop Management ServerThe ZENworks Desktop Management Server software lets you centrally create and manage policies and profiles for users and workstations on a network. These policies and profiles enable you to distribute, manage, and update applications, perform advanced inventory and remote management functions, and automatically install operating systems on the Windows workstations in your network.
The installation program installs selected .jar files to the servers you select. These .jar files are the ZENworks Desktop Management plug-ins that you use to manage the ZENworks Desktop Management objects in a directory tree. These plug-ins are a large part of what is sometimes referred to as the back end of the ZENworks Desktop Management setup. The back end also includes eDirectory, ZENworks policy and application files, various ZENworks services, and designated NetWare or Windows servers that are members of the same eDirectory tree where the ZENworks files are located.
For detailed steps for installing ZENworks Desktop Management Server software, configuring the Sybase* database object, determining whether the eDirectory Schema has been extended, setting up the required desktop polices and the Workstation Import policy, and installing the ODBC Drivers, see “Desktop Management Server Installation Procedure” in the Novell ZENworks 6.5 Desktop Management Installation Guide (http://www.novell.com/documentation/zenworks65/dminstall/data/bouho7k.html#bouho7k).
Setting Up Automatic Workstation ImportAutomatic Workstation Import imports workstations into eDirectory and integrates them automatically. The Workstation objects created by Automatic Workstation Import provide you with a way to push application software and computer settings (such as policies) down to the workstations by using the Novell Application Launcher. This is something we suggest you do even with a basic ZENworks Desktop Management setup.
Detailed steps that explain how to set up Automatic Workstation Import are available in “Setting Up Automatic Workstation Import” in the Novell ZENworks 6.5 Desktop Management Installation Guide (http://www.novell.com/documentation/zenworks65/dminstall/data/bouiocu.html).
170 Novell Small Business Suite 6.6 Overview and Installation Guide
Novell Confidential Manual (ENU) 21 December 2004
What’s NextAs you set up user workstations to be managed by ZENworks Desktop Management and as you prepare to install ZENworks Desktop Management Server software on the network server, you might want to know more about the components available for installation, how each component can be used effectively in a small business environment, and other information that might help save time and money in your company’s network operations. The following sections are included in this guide to provide such information:
“ZENworks 6.5 Desktop Management Application Management” on page 173
“ZENworks 6.5 Desktop Management Workstation Management” on page 175
“ZENworks 6.5 Desktop Management Workstation Imaging” on page 177
“ZENworks for Desktops Remote Management” on page 178
“ZENworks Desktop Management Workstation Inventory and Sybase” on page 180
If your business has been using ZENworks for Desktops 3.2 or ZENworks 4.01 and you want to upgrade to ZENworks 6.5 Desktop Management, you can find upgrade information in Chapter 23, “Upgrading ZENworks,” on page 215.
ZENworks 6.5 Desktop Management Application ManagementApplication Management is the most popular component of Novell ZENworks Desktop Management. Thousands of network administrators use Application Management every day to provide workstation applications to their network users. You, as the network administrator, can use ZENworks Desktop Management to manage these applications so that your users won’t have to. When individuals don’t have to spend their time installing new applications or asking your help in doing so, your company saves time and money.
This section contains the following information:
What Operations Can Be Performed with Application Management? (page 173)
Installing Application Management (page 175)
What Operations Can Be Performed with Application Management?ZENworks for Desktops Application Management uses the Novell Application Launcher program as the means of providing your users access to workstation applications. Application Management is extremely flexible. Using Application objects that you create in Novell eDirectory and configure in Novell ConsoleOne, you can manage application software for your users in a variety of ways:
Distribute traditional Windows applications and Microsoft Windows Installer applications to the users on your network
Traditional Windows applications include their own installation programs. Windows Installer applications utilize the Windows Installer and a .msi file for installation.
The distribution can occur when users are connected to eDirectory and the application files are distributed from the network, or it can occur when users are disconnected from eDirectory and the application files are access from removable media, such as a CD, Jaz* drive, or Zip* drive.
Distribute Web applications
Installing ZENworks Desktop Management 171
Novell Confidential Manual (ENU) 21 December 2004
Web applications run on a Web server, so the distribution typically involves making the URL available to the user.
Determine which users an application is distributed to
You must associate an application with a user through eDirectory before the application can be available for distribution to the user. You can also associate applications with workstations so that they are available on the workstation regardless of which user is logged in.
Create application dependencies
Through application dependencies, you can require that Application B is installed and running before Application A can be launched.
Determine how distributed applications are presented to users on their workstations
For a user to receive applications you’ve configured in eDirectory and associated with him or her, Novell Application Launcher (NAL) must be running on the user’s workstation. NAL accesses eDirectory to know which applications are associated with the user and performs all distribution processes (including installing and uninstalling) for the applications.
NAL provides three views that applications can be presented through:
Application Window: a standalone window that displays icons for the distributed applications
Application Explorer: a component that includes a standalone window like the Application Window and also includes Windows Explorer integration so distributed application icons can be displayed on the Windows desktop, the Start menu, the status area, and the Quick Launch toolbar
Application Browser: a Web browser view that displays icons for the distributed applications.
All three views are made available to users when NAL is installed.
For more information, see “Novell Application Launcher: Components Overview” in the Novell ZENworks 6.5 Desktop Management Administration Guide (http://www.novell.com/documentation/zenworks65/dmadmin/data/acpsmx1.html#acpsmx1).
Distribute applications to newly imaged workstations as part of the imaging process
Control which nondistributed applications can be run on a workstation
For example, if you don’t want users to be able to launch the Microsoft Calculator because you want them to use a calculator application you’ve distributed to them, you can disable their ability to launch Calculator even though it was not distributed through Application Launcher.
Uninstall any distributed applications
The uninstall includes the deletion of all nonshared files, .ini entries, and registry entries associated with the distribution of the application.
Although it is easy to use Application Management, it has great versatility. For more information about this component, see “Application Management” in the Novell ZENworks 6.5 Desktop Management Administration Guide (http://www.novell.com/documentation/zenworks65/dmadmin/data/a6ttaq3.html).
172 Novell Small Business Suite 6.6 Overview and Installation Guide

Novell Confidential Manual (ENU) 21 December 2004
Installing Application ManagementZENworks Desktop Management Application Management requires elements installed on both the ZENworks Desktop Management Server and user workstations. This section provides links to more information where you can learn about both.
Installing on the Back End
Application Management is installed on a network server when you install the ZENworks Desktop Management Services software. You need to choose the Application Management option in the installation wizard to install this component.
For more information, see “Desktop Management Server Installation Procedure” in the Novell ZENworks 6.5 Desktop Management Installation Guide (http://www.novell.com/documentation/zenworks65/dminstall/data/bouho7k.html#bouho7k).
Installing on Workstations
Application Management is installed on a user workstation when you install the Novell Client and subsequently update it with the Desktop Management Agent installation.NOTE: The agent installation updates Application Management files even if the Application Management component is unselected in the Agent installation wizard.
For detailed prerequisites and instructions for installing the Novell Client, see “Installing Novell Clients” in the Novell Client for Windows Installation and Administration Guide (http://www.novell.com/documentation/noclienu/index.html?page=/documentation/noclienu/noclienu/data/hgcbnee7.html).
For more information about installing the Desktop Management Agent, see “Installing and Configuring the Desktop Management Agent” in the Novell ZENworks 6.5 Desktop Management Installation Guide (http://www.novell.com/documentation/zenworks65/dminstall/data/bouhbmb.html).
ZENworks 6.5 Desktop Management Workstation ManagementThe Workstation Management component of Novell ZENworks for Desktops can help you reduce the overall cost and complexity of configuring and maintaining user workstations in your network.
Each workstation that authenticates to Novell eDirectory can be managed by the ZENworks Workstation Manager, which distributes ZENworks for Desktops policies to workstations. You do not need to visit each workstation at your site to configure user settings and workstations. ZENworks Desktop Management policies let you automatically manage user and workstation configurations, processes, and behaviors. You set up and administer these policies using Novell ConsoleOne, which means that you can administer workstations in your network from a central location.
This section includes the following information:
What Operations Can Be Performed with Workstation Management? (page 176)
Installing Workstation Management (page 176)
Installing ZENworks Desktop Management 173
Novell Confidential Manual (ENU) 21 December 2004
What Operations Can Be Performed with Workstation Management?Using Workstation Management, you can
Enable roaming profiles and set default desktop preferences for users.
Use extensible policies to control any application function that is configured in the Windows registry.
Set group policies for Windows 2000/XP workstations and users.
Set parameters for remotely managing users’ workstations, including remote control, remote view, diagnostics, file transfer, remote execute, and Wake-on-LAN.
Set parameters for imaging workstations.
Set parameters to specify the inventory information you want to collect.
Set parameters to automatically import new workstations into the Novell eDirectory tree.
Set user parameters for using Novell iPrint, which lets users use a Web browser to install printers on their workstations.
Configure user’s terminal server connections
For more information about the Workstation Management component of ZENworks 6.5 Desktop Management, see “Workstation Management” in the ZENworks 6.5 Desktop Management Administration Guide (http://www.novell.com/documentation/zenworks65/dmadmin/data/a6oqj95.html).
Installing Workstation ManagementWorkstation Management requires elements installed on both the ZENworks Server and user workstations. This section provides links to more information where you can learn about both.
Installing on the Back End
The ZENworks Workstation Manager is installed on a network server when you install the ZENworks Desktop Management Services software. You need to choose the Workstation Management option in the installation wizard to install this component.
For more information, see “Desktop Management Server Installation Procedure” in the Novell ZENworks 6.5 Desktop Management Installation Guide (http://www.novell.com/documentation/zenworks65/dminstall/data/bouho7k.html#bouho7k).
Installing on Workstations
Workstation Management components are installed on a user workstation when you install the Novell Client and subsequently update it with the Desktop Management Agent installation.
For detailed prerequisites and instructions for installing the Novell Client, see “Installing Novell Clients” in the Novell Client for Windows Installation and Administration Guide (http://www.novell.com/documentation/noclienu/index.html?page=/documentation/noclienu/noclienu/data/hgcbnee7.html).
For more information about installing the Desktop Management Agent, see “Installing and Configuring the Desktop Management Agent” in the Novell ZENworks 6.5 Desktop Management Installation Guide (http://www.novell.com/documentation/zenworks65/dminstall/data/bouhbmb.html).
174 Novell Small Business Suite 6.6 Overview and Installation Guide
Novell Confidential Manual (ENU) 21 December 2004
ZENworks 6.5 Desktop Management Workstation ImagingThe Workstation Imaging component allows, you as the administrator, to create and deploy images of workstations throughout your network. Using this component, you can take an image of a well-configured and efficient workstation and then apply that image to any workstation in the network. You can use Workstation Imaging for initial setup of new workstations or to restore a workstation to properly functioning status.
ZENworks Desktop Management also ships with ZENworks Preboot Services which, when installed, allows workstations to implement the Preboot Execution Environment (PXE). Using PXE, a workstation can boot, request, and run the Preboot Services client. When running the PXE client, the workstation, even if unattended, can request and load the ZENworks Workstation Imaging environment, which is based on the Linux kernel and, subsequently, poll the ZENworks Imaging Server for imaging work.
This section contains the following information:
What Operations Can Be Performed with Workstation Imaging? (page 177)
Installing Workstation Imaging (page 177)
What Operations Can Be Performed with Workstation Imaging?Using Workstation Imaging, you can:
Take an image of a workstation and store it on the same workstation (locally) or on an imaging (proxy) server.
Create an “add-on” image of selected files.
Customize an image.
Compress an image to minimize storage space.
Retrieve an image that has been saved to a workstation (locally) or an imaging (proxy) server and restore it to a workstation. You can do this manually at each workstation or automatically from ConsoleOne.
Use a workstation or server policy to define imaging operations.
Create a script to customize and automate how you perform imaging operations.
Restore an image to many workstations simultaneously in a multicast session.
View information about the partitions and storage devices on a workstation.
Create, delete, and activate partitions.
Installing Workstation ImagingZENworks Workstation Imaging requires elements installed both on the network server and on user workstations. This section provides links to more information where you can learn about both.
Installing on the Back End
Workstation Imaging is installed on a network server you install the ZENworks Desktop Management Services software and choose the Imaging Server and PXE Server options in the installation wizard. This installs the ZENworks Imaging Server and PXE server.
Installing ZENworks Desktop Management 175
Novell Confidential Manual (ENU) 21 December 2004
For more information, see “Desktop Management Server Installation Procedure” in the Novell ZENworks 6.5 Desktop Management Installation Guide (http://www.novell.com/documentation/zenworks65/dminstall/data/bouho7k.html#bouho7k).
Installing on Workstations
Workstation Imaging files and programs are installed on a user workstation when you install the Novell Client and subsequently update it with the Desktop Management Agent installation. You must select the Workstation Imaging component during the installation of the agent.
For detailed prerequisites and instructions for installing the Novell Client, see “Installing Novell Clients” in the Novell Client for Windows Installation and Administration Guide (http://www.novell.com/documentation/noclienu/index.html?page=/documentation/noclienu/noclienu/data/hgcbnee7.html).
For more information about installing the Desktop Management Agent, see “Installing and Configuring the Desktop Management Agent” in the Novell ZENworks 6.5 Desktop Management Installation Guide (http://www.novell.com/documentation/zenworks65/dminstall/data/bouhbmb.html).
The Desktop Management imaging engine that performs the actual imaging of a workstation is a Linux application. Therefore, the workstation must be temporarily booted to Linux while the imaging is performed. This can be accomplished by setting up a Linux partition on the workstation by using Linux boot disks or boot CDs or by using Preboot Services (PXE), which will download the Linux boot environment from a previously installed PXE server.
For information on setting up a workstation for imagining, see “Setting Up Workstations for Imaging” in the Novell ZENworks 6.5 Desktop Management Administration Guide (http://www.novell.com/documentation/zenworks65/dmadmin/data/a70j1e8.html#a70j1e8).
For more information about setting up Preboot Services on workstations, see “Using ZENworks Desktop Management Preboot Services” in the Novell ZENworks 6.5 Desktop Management Administration Guide (http://www.novell.com/documentation/zenworks65/dmadmin/data/amoqzg4.html#amoqzg4).
ZENworks for Desktops Remote ManagementRemote Management lets you remotely manage workstations (called managed workstations) from the remote management console.
This section contains the following information:
What Operations Can Be Performed with Remote Management? (page 178)
Installing Remote Management (page 179)
What Operations Can Be Performed with Remote Management?Remote Management lets you
Remotely wake up a powered-off managed workstation
Remotely control the managed workstation
Remotely view the managed workstation
Execute files found on the managed workstation
176 Novell Small Business Suite 6.6 Overview and Installation Guide
Novell Confidential Manual (ENU) 21 December 2004
Transfer files between the remote management console and the managed workstation
Display diagnostic problems on the managed workstation
Log audit record information about the Remote Management sessions running on the managed workstation
Blank the managed workstation screen during a remote control session
Lock the keyboard and mouse controls at the managed workstation during a remote control session
Installing Remote ManagementRemote Management requires elements installed on both the ZENworks Server and user workstations. This section provides links to more information where you can learn about both.
Installing on the Back End
Remote Management files and programs are installed on a network server when you install the ZENworks Desktop Management software. You need to choose the Remote Management in the installation wizard to install this component.
For more information, see “Desktop Management Server Installation Procedure” in the Novell ZENworks 6.5 Desktop Management Installation Guide (http://www.novell.com/documentation/zenworks65/dminstall/data/bouho7k.html#bouho7k).
Installing on Workstations
Remote Management is installed on a user workstation when you install the Novell Client with Remote Management options selected. The component is then appropriately updated when you install it with the Desktop Management Agent installation program, selecting the Remote Management feature.TIP: You can also install the Mirror Driver option if you want to provide video adapter independence and coexistence with other remote control solutions.
Installing Remote Management on the workstation puts the Remote Management Agent in place, making remote operations possible when the managed workstation reboots.
For detailed prerequisites and instructions for installing the Novell Client, see “Installing Novell Clients” in the Novell Client for Windows Installation and Administration Guide (http://www.novell.com/documentation/noclienu/index.html?page=/documentation/noclienu/noclienu/data/hgcbnee7.html).
For more information about installing the Desktop Management Agent, see “Installing and Configuring the Desktop Management Agent” in the Novell ZENworks 6.5 Desktop Management Installation Guide (http://www.novell.com/documentation/zenworks65/dminstall/data/bouhbmb.html).
Installing ZENworks Desktop Management 177
Novell Confidential Manual (ENU) 21 December 2004
ZENworks Desktop Management Workstation Inventory and Sybase
Novell ZENworks Desktop Management Workstation Inventory lets you gather and analyze complete hardware and software information for all of the workstations connected to your network. From ConsoleOne, you can view the complete hardware and software inventory of the workstations. You can also query the centralized database of the workstations and generate reports.
Sybase Adaptive Server* Anywhere (ASA) is a network database server bundled with ZENworks Desktop Management. Desktop Management lets you install Sybase ASA as the database platform for mounting Workstation Inventory and Novell Application Launcher databases on NetWare and Windows. You can generate inventory reports from this database.
Hardware and software inventory information can help you make business decisions on how to manage workstations. You might find it useful to have some of the following information when you analyze costs and work assignments in your business:
Workstations that need new applications
Workstations that need updated hardware and drivers
Workstations that should receive an application object
Workstations that run on the corporate software standard
Workstations that conform to the corporate hardware standard
This section contains the following information:
What Operations Can Be Performed with Workstation Inventory? (page 180)
Installing Workstation Inventory (page 180)
What Operations Can Be Performed with Workstation Inventory?Workstation Inventory lets you:
Set up an Inventory Policy to scan a variety of workstations
Scan workstations that are connected or disconnected from the network
Roll up inventory data across more than one server or eDirectory tree
Set up the Inventory Database for use with a variety of database platforms
Export inventory information in a variety of formats (including formats compatible with Crystal Reports)
Installing Workstation InventoryZENworks Desktop Management requires elements installed on both the ZENworks Server and user workstations. This section provides links to more information where you can learn about both.
Installing on the Back End
Workstation Inventory files and programs are installed on a network server when you install the ZENworks Desktop Management software if you choose the Inventory Server option in the installation wizard.
178 Novell Small Business Suite 6.6 Overview and Installation Guide
Novell Confidential Manual (ENU) 21 December 2004
The files for the Sybase database platform are installed on a network server when you install the ZENworks Desktop Management software if you choose the Inventory Database option in the installation Wizard.
For more information about installing Workstation Inventory and Sybase, see “Installing the ZENworks Desktop Management Server” in the Novell ZENworks 6.5 Desktop Management Installation Guide (http://www.novell.com/documentation/zenworks65/dminstall/data/bol68dz.html).
Installing on Workstations
Workstation Inventory agent and scan utilities are installed on a user workstation when you install the Novell Client with Workstation Inventory options selected. The component is then appropriately updated when you install it with the Desktop Management Agent installation program, selecting the Workstation Inventory feature.
For detailed prerequisites and instructions for installing the Novell Client, see “Installing Novell Clients” in the Novell Client for Windows Installation and Administration Guide (http://www.novell.com/documentation/noclienu/index.html?page=/documentation/noclienu/noclienu/data/hgcbnee7.html).
For more information about installing the Desktop Management Agent, see “Installing and Configuring the Desktop Management Agent” in the Novell ZENworks 6.5 Desktop Management Installation Guide (http://www.novell.com/documentation/zenworks65/dminstall/data/bouhbmb.html).
Installing ZENworks Desktop Management 179

Novell Confidential Manual (ENU) 21 December 2004
180 Novell Small Business Suite 6.6 Overview and Installation Guide
Novell Confidential Manual (ENU) 21 December 2004
18 Installing Additional Bundled Products
Novell® Small Business Suite 6.6 has the following additional products bundled with it.
“Installing Clustering” on page 183
“Installing iSCSI for NetWare” on page 183
“Enabling FatPipe Internet” on page 184
“Installing DirXML Starter Pack” on page 183
Installing ClusteringNovell Small Business Suite includes a two-node version of Novell Cluster ServicesTM. For complete information regarding setting up and configuring additional resources to work with clustering, see OES Novell Cluster Services 1.8 Administration Guide for NetWare (http://www.novell.com/documentation/oes/cluster_admin/data/h4hgu4hs.html#bktitle).
Installing iSCSI for NetWareiSCSI is an emerging standard for SCSI block storage protocols networked over high-speed TCP/IP networks. iSCSI lets you create a low-cost Storage Area Network (SAN) using commodity high-speed Ethernet hardware. iSCSI provides significant cost savings when compared to the costs required to create a fibre channel SAN.
For complete information regarding setting up and configuring additional resources to work with iSCSI, see iSCSI 1.1.3 Administration Guide for NetWare 6.5 (http://www.novell.com/documentation/iscsi1_nak/iscsi/data/h4hgu4hs.html#bktitle).
Installing DirXML Starter PackThe DirXML solution included with Novell Small Business Suite 6.6 provides licensed synchronization of information held in NT Domains, Active Directory, and eDirectory.
Evaluation drivers for several other systems (including PeopleSoft*, GroupWise®, and Lotus* Notes*, are included to allow you to explore data synchronization for your other systems.
Documentation for installing the DirXML Starter Pack software is located in the DirXML StarterPack documentation on the Web (http://www.novell.com/documentation/dirxmlstarterpack/treetitl.html). This documentation set includes the following guides:
DirXML Starter Pack Installation Guide for NetWare 6.5
DirXML Starter Pack Lab Guide for Novell Nterprise Linux Services
You can use either guide. The instructions in the Lab Guide for Novell Nterprise Linux Services are more recent and contain more generic examples that might help you with your deployment.
Both guides reference procedures for activation; however, the DirXML software included with Novell Small Business Suite 6.6 (on the ZENworks 6.5 Companion CD 2 CD) contains the credentials for activation and does not require you to perform these steps. You need to perform activation steps only when you purchase additional evaluation drivers.
Installing Additional Bundled Products 181
Novell Confidential Manual (ENU) 21 December 2004
Enabling FatPipe InternetFatPipe* Internet is routing software that enables several computers on a LAN to share multiple dial-up connections. Utilizing multiple modems over multiple telephone and other high-speed connections, FatPipe Internet software automatically and transparently coordinates and controls rapid data flow, boosting normal Internet access speeds by two to four times the speed of traditional single-line connections for all workstations on the LAN. It has the following advantages:
Ease of installation and use
Support for up to two simultaneous communication lines for NetWare 4 or later
High-speed remote Internet/intranet access
Support for modem-based compression
Protocols supported: HTTP 1.0/1.1, PPP, TCP/IP, UDP, PAP, and CHAP
Applications supported: Web browsers, e-mail, FTP, news, chat, etc.
FatPipe Internet technology utilizes the current telephone infrastructure to create high-speed data communication links for virtually any workstation. All you need is to install Novell Small Business Suite 6.6, set up Internet connectivity, ensure that the server has multiple dialing capabilities, load the FatPipe modules at the server, and configure the workstations. FatPipe Internet works with any standard modem technology. The software does not require any setup change or special configuration at your ISP.
In addition to offering higher speed at a lower cost for all workstations on your LAN compared to existing connection-sharing solutions, FatPipe Internet requires only minimal technical setup and support for successful operation. It is a highly flexible product that works integrally with, yet independently from, other technologies.
FeaturesThis version of FatPipe software for NetWare allows users to dial out on two lines to the Internet from the server for a 2X speed connection to the Internet. The basic features include:
Two-line connection to the Internet
Configuration and management from the administrator’s workstation
Speed meter
Speed chart
Auto-dial
Auto-hangup on inactivity
Persistent connection
182 Novell Small Business Suite 6.6 Overview and Installation Guide
Novell Confidential Manual (ENU) 21 December 2004
Instructions for Getting StartedThe FatPipe Internet software is automatically installed when you install Novell Small Business Suite 6.6. From this point, you need to
1 Set up a connection to the Internet with two modems configured. For instructions, see Appendix B, “Configuring Multiple Dialup Modems,” on page 261.
2 Load rsload.nlm.
The rsload.nlm loads all the other NLMTM programs required to run FatPipe software on the server.
3 Complete the workstation configuration as described in online help sys:\public\win32\nls\language\rsdial.hlp file.
For More InformationYou can obtain 24-hour electronic technical support for FatPipe Internet, version 1.00, from Ragula, Inc., on the Web (http://www.fatpipeinc.com). This site contains a list of Frequently Asked Technical Questions and an electronic e-mail form for submitting technical support questions. You can also contact Ragula, Inc., for support information using any of the following methods:
Web: http://www.fatpipeinc.com
E-mail: [email protected]
Telephone:1-800-724-8521 ext 2237
If you require technical support, Ragula can answer your questions more effectively if you have the following information available:
Your system configuration: operating system version, network software or configuration, RAM, etc.
Details about your modems: configuration and connection information
Details of the problem
Installing Additional Bundled Products 183

Novell Confidential Manual (ENU) 21 December 2004
184 Novell Small Business Suite 6.6 Overview and Installation Guide

Novell Confidential Manual (ENU) 21 December 2004
19 Installing Product Updates
For best performance, you should download and install the latest updates available at Novell Support > Downloads (http://download.novell.com/index.jsp).
Installing Product Updates 185

Novell Confidential Manual (ENU) 21 December 2004
186 Novell Small Business Suite 6.6 Overview and Installation Guide
Novell Confidential Manual (ENU) 21 December 2004
IV Upgrading the Server and Other Products in the Suite
With Novell® Small Business Suite 6.6, you can upgrade one or more parts of the server. We strongly recommend that you review all the upgrade and interoperability information before starting the upgrade so you will not compromise your existing network and data.
This part covers the following information:
Chapter 20, “Upgrading the Operating System to Novell Small Business Suite 6.6,” on page 189
Chapter 21, “Updating GroupWise,” on page 211
Chapter 22, “Upgrading BorderManager,” on page 213
Chapter 23, “Upgrading ZENworks,” on page 215
Interoperability information is located in the “Novell Small Business Suite 6.6 Readme”.
Upgrading the Server and Other Products in the Suite 187

Novell Confidential Manual (ENU) 21 December 2004
188 Novell Small Business Suite 6.6 Overview and Installation Guide
Novell Confidential Manual (ENU) 21 December 2004
20 Upgrading the Operating System to Novell Small Business Suite 6.6
With Novell® Small Business Suite 6.6, you have two options for upgrading the server operating system:
In-place upgrade: Involves upgrading a previous version of Novell Small Business Suite software on an existing machine. This option supports upgrading the server software from these versions of Novell Small Business Suite:
Novell Small Business Suite 5.1 with NetWare® 5.1 Support Pack 6 or later and eDirectory 8.6 or later
Novell Small Business Suite 6.0 with NetWare 6 Support Pack 4 or later
Novell Small Business Suite 6.5
Migration: Involves installing Novell Small Business Suite 6.6 software on a new computer and migrating previous versions of Small Business Suite data to this new server computer.
If you have these previous versions of software produced by Novell for Small Business, you need to install a target Novell Small Business Suite 6.6 premigration server and then migrate the data from these servers:
Novell Small Business Suite 4.2
Novell Small Business Suite 5.0
Novell Small Business Suite 6.0
To migrate a Novell Small Business Suite 6.0 server, perform an in-place upgrade and then migrate it as a 6.6 server.
intraNetWareTM for Small Business
For procedures, see the NetWare Migration Wizard 8.0 Administration Guide in the OES NetWare online documentation.
Upgrading a server to Novell Small Business Suite 6.6 includes the following tasks:
Meeting System and Software Requirements (page 190)
Preparing the Network with Deployment Manager (page 192)
Preparing the Computer (page 195)
Performing an Operating System Upgrade (page 196)
(Conditional) Upgrading Downed Servers (page 201)
After performing the upgrade, “What’s Next” on page 209 leads you to the next steps you might want to perform.
Upgrading the Operating System to Novell Small Business Suite 6.6 189
Novell Confidential Manual (ENU) 21 December 2004
When you run the upgrade program, the server operating system is upgraded to Novell Small Business Suite 6.6 and the following tasks are automatically performed:
Device drivers and LAN drivers for the Novell Small Business Suite 6.6 operating system are loaded. Outdated drivers are matched with and replaced by new drivers included with Novell Small Business Suite 6.6.
eDirectoryTM is upgraded to version 8.7.3.
Novell Small Business Suite 6.6 information is added to autoexec.ncf and startup.ncf.
Novell Small Business Suite 6.6 files are copied to the server.
Upgrades to Novell Small Business Suite 6.6 are performed on a running NetWare server. For information on performing an upgrade to Novell Small Business Suite 6.6 on a downed server, see “Upgrading Downed Servers” on page 201.
Meeting System and Software RequirementsTo upgrade to Novell Small Business Suite 6.6, your system must meet the minimum requirements listed below.
System RequirementsThe server to be upgraded must be running one of the following with the latest support pack:
Novell Small Business Suite 5.1 with Support Pack 6 or later
Novell Small Business Suite 6.0 with Support Pack 4 or later
Novell Small Business Suite 6.5 (FCS, Support Pack 1.1, Support Pack 2, or Support Pack 3)
The server to be upgraded cannot be in a tree that contains NetWare 4.10 servers
All servers in the tree must be NetWare 4.11 or later.
A server-class PC with a Pentium II or AMD K7 processor
RAM 512 MB (minimum) 1 GB (recommended)
A Super VGA display adapter
One network board
A CD drive
A USB or PS/2 mouse (recommended but not required)
A DOS partition of at least 200 MB and 200 MB available space
2 GB of available disk space outside the DOS partition for volume sys:
190 Novell Small Business Suite 6.6 Overview and Installation Guide
Novell Confidential Manual (ENU) 21 December 2004
Software and Other RequirementsDepending on the network configuration, you might need one or all of the following:
The following media:
Novell Small Business Suite 6.6 NetWare 6.5 CD 1 Operating System with SP3 CD
Novell Small Business Suite NetWare 6.5 CD 2 Products with SP3 CD
Novell Small Business Suite License diskette
Novell Client Software CD
The following rights:
Supervisor right to the [Root] of the eDirectory tree
Supervisor right to the container where the Server object resides
Read right to the Security container object for the eDirectory tree
A subcontainer administrator can install a Novell Small Business Suite 6.6 server into the tree under the following conditions:
If the server to be installed will receive a copy of the replica, then the administrator with the Supervisor right to the [Root] of the tree must first install three other new servers into the tree.
If the server to be installed will not receive a copy of the replica, then the administrator with the Supervisor right to the [Root] of the tree must first install one new server into the tree.
The subcontainer administrator must have the Read right to the NDSPKI:Private Key Attribute on the Organizational CA’s object. The CA’s object is located in the Security container.
The subcontainer administrator must have the Supervisor right to the W0 object located inside the KAP object in the Security container.
These rights are typically granted by placing all administrative users in a Group or Role, and then assigning the above rights to the Group or Role.
CD drivers (required to access the CD)
Client connection utilities (optional, for upgrading from another server):
Novell ClientTM for DOS and Windows 3.1x (optional, for upgrading from a NetWare server running IPXTM)
IP Server Connection Utility (optional, for installing from a NetWare server running IP only)
For instructions, see products\serverinst\ipconn.txt on the Novell Client Software CD.
IP address and domain names (required for connecting to the Internet):
An IP address
An IP address of a domain name server or servers
The name of your domain
For IP addresses and domain names, contact your network administrator and Internet Service Provider.
Upgrading the Operating System to Novell Small Business Suite 6.6 191
Novell Confidential Manual (ENU) 21 December 2004
Network board and storage device properties such as the interrupt and port address (required if not included in NetWare)
For more information, contact your computer hardware manufacturer.
What’s NextPrepare the network for the Novell Small Business Suite 6.6 server. See the next section, Preparing the Network with Deployment Manager (page 192).
If this server is not part of an existing network, you can skip to “Preparing the Computer” on page 195.
Preparing the Network with Deployment ManagerBefore you introduce a Novell Small Business Suite 6.6 server into an existing network, you must run the Novell Deployment Manager to update the network.IMPORTANT: The Novell Deployment Manager can be run only in an Internet Explorer 5 or 6 browser.
1 On a Windows NT/2000 or Windows XP Professional Edition workstation that has the latest Novell client installed on it, log in to your existing network as a user with the Supervisor right (usually user Admin or equivalent).
If you are prompted to log in again while running the Novell Deployment Manager, you can specify the IP address of the server by clicking Details.
2 Insert the Novell Small Business Suite 6.6 NetWare 6.5 CD 1 Operating System with SP3 CD and run the Novell Deployment Manager (nwdeploy.exe) located at the root of the CD.
3 If you want to run the browser-based version of Deployment Manager and you have Internet Explorer 5 or 6 browser installed, run nwdeploy.exe located at the root of the CD.
If you prefer to run a standalone version of Deployment Manager that does not require a browser, or you do not want to use the ActiveX Control included with the browser-based version, run nwdeploynobrowser.exe located at the root of the CD.
4 Under the Network Preparation heading in the left pane of the browser window, click the Overview link to review the following tasks you need to perform:
Back Up Data (Optional)
Search Tree for eDirectory/NDS® versions
Prepare for New eDirectory
(Conditional) Generate GUIDs on NetWare 4 Servers
Prepare a Server for Upgrade
(Conditional) Prepare a Novell Cluster for Upgrade
Update the Certificate Authority (CA) Object
Prepare for Universal Password
Prepare for CIFS/AFP
Verify NICI Keys
Perform a Schema Update (Optional)
192 Novell Small Business Suite 6.6 Overview and Installation Guide
Novell Confidential Manual (ENU) 21 December 2004
5 (Optional but recommended) Under the Network Preparation heading in the left pane of the browser window, click the Back Up Data link and follow the instructions that display to back up any server data and Novell eDirectory data.
Backing up your data is an optional step, but one that we recommend you complete.
6 Under the Network Preparation heading in the left pane of the browser window, click the Search Tree for eDirectory/NDS Versions link to update NDS in your tree to a level that is compatible with the version of eDirectory installed by Novell Small Business Suite 6.6.IMPORTANT: If the tree is using NDS or eDirectory, a compatible version of NDS or eDirectory must be running on all servers in the tree.
This task checks the NetWare and NDS versions of all servers and updates NetWare 4/NDS 6 and NetWare 5/NDS 7 servers to be compatible with eDirectory. It does not update NetWare servers already running eDirectory.
7 Under the Network Preparation heading in the left pane of the browser window, click the Prepare for New eDirectory link and follow the instructions to extend the network schema.
This ensures that the new Novell Small Business Suite 6.6 server can communicate with an existing NDS/eDirectory tree.
This step requires that you have already updated NetWare 4/NDS 6 and NetWare 5/NDS 7 servers to be compatible with eDirectory as described in Step 6. It also requires access to a server with a Read/Write replica of the Root partition.
8 (Conditional) If you have NetWare 4.11 or 4.2/NDS 6 servers in your tree, under the Network Preparation heading in the left pane of the browser window, click the Generate GUIDs on NetWare 4 Servers link and follow the instructions to generate the necessary GUIDs.IMPORTANT: The GUID generator in Deployment Manager does not work with NetWare 4.10 servers, only with 4.11 or 4.2 servers. If there is a NetWare 4.10 server in your tree, it must be removed or you cannot upgrade to Novell Small Business Suite 6.6.
This step requires you to update NetWare 4.11 or 4.2/NDS 6 servers to be compatible with eDirectory and to extend the core schema of your tree, as described in Step 6 and Step 7. Step 6 copied a new ds.nlm and a new sguid.nlm file that support GUID generation to each selected NetWare 4 server. With these updated files in place, and with the core schema extended and synchronized, when ds.nlm is restarted on a NetWare 4.11 or 4.2/NDS 6 server it automatically generates GUIDs for objects in master replicas on that server.
Even though the new GUID generator for NetWare 4 helps to avoid GUID compatibility issues, problems can still occur. Always back up all file system trustees before any upgrade or migration to Novell Small Business Suite 6.6. If a problem does occur, see TID# 10078892 - Trustee Assignments Appear to No Longer Work After NetWare 4x to NetWare 6x Upgrade (http://support.novell.com/cgi-bin/search/searchtid.cgi?/10078892.htm) for more information.
9 (Conditional) Under the Network Preparation heading on the left side of the browser, click the Prepare a Server for Upgrade link and follow the displayed instructions to run a health check on the server that you are upgrading to OES NetWare.
This task runs a health check utility on an existing NetWare server to ensure that there is enough memory, a sys: volume is in place, and the server meets the minimum requirements for the upgrade. The utility reports if problems are detected that could cause the upgrade to fail.
Upgrading the Operating System to Novell Small Business Suite 6.6 193
Novell Confidential Manual (ENU) 21 December 2004
10 (Conditional) If you are upgrading Novell Cluster Services from NetWare 5.1 and your cluster has shared storage, you must prepare your NetWare 5.1 cluster servers before upgrading them to OES NetWare and before upgrading Novell Cluster Services. under the Network Preparation heading on the left side of the browser, click the Prepare Cluster for Upgrade link to follow the instructions to run the Prepare a Novell Cluster for Upgrade program.
This preparation is necessary to ensure existing shared-volume trustee assignments can be used after the upgrade.
This task is necessary only if you are upgrading from a NetWare 5.1 cluster to OES NetWare, not if you are upgrading from a NetWare 6.0 cluster.
11 Under the Network Preparation heading in the left pane of the browser window, click the Update Certificate Authority Objects link and follow the instructions to create or update a Security container object and a Certificate Authority (CA) object.
Novell Certificate ServerTM is an integrated Public Key Infrastructure (PKI) built in to eDirectory. The NetWare installation process uses Novell Certificate Server to create an Organizational Certificate Authority and to issue certificates for applications that consume Secure Socket Layer (SSL) services.
Novell delivered a base-level PKI with NetWare 5.0. Because your network might be configured with the NetWare 5.0 PKI, you should follow the steps outlined here to properly upgrade from the NetWare 5.0 PKI and to correctly configure your network for Novell Certificate Server.
12 Under the Network Preparation heading in the left pane of the browser window, click the Prepare for Universal Password link, read the explanation of the Universal Password feature of NetWare 6.5, click the Universal Password Deployment Guide link, then follow the step-by-step instructions in the deployment guide for setting up the Universal Password feature.
13 (Conditional) Under the Network Preparation heading in the left pane of the browser window, click the Prepare for CIFS/AFP link and follow the instructions to prepare your new NetWare 6.5 server so CIFS (Microsoft Windows native networking workstations) and AFP (Apple Macintosh native networking workstations) users can log in to it.
14 (Conditional) Under the Network Preparation heading on the left side of the browser, click the Verify NICI Keys link and follow the displayed instructions to check your eDirectory tree for SDI key consistency.
If you have updated eDirectory, Novell recommends that you check your tree for SDI key consistency. If the tree contains invalid SDI keys, then CIFS, AFP, Nsure Identity Manager, and Universal Password might not work after installing OES NetWare.
If any invalid keys exist, they should be fixed by running SDIDIAG at the server console.
15 (Optional) Under the Network Preparation heading on the left side of the browser, click the Schema Update link to extend the eDirectory schema for the products you plan to install on your OES NetWare servers.
This optional task extends the eDirectory schema for all of the products and services that are bundled with OES NetWare. Doing so eliminates the need for future server installers to have administrative rights to the root of the tree.
16 After you have completed the Network Preparation section of Novell Deployment Manager, click the Overview link located under the Install/Upgrade Options heading to help you choose the install option that best meets your needs.
194 Novell Small Business Suite 6.6 Overview and Installation Guide
Novell Confidential Manual (ENU) 21 December 2004
17 (Optional) If you have a new computer that you want to install Novell Small Business Suite 6.6 on, or if you are adding a Novell Small Business Suite 6.6 server to your existing network, click the Install NetWare 6.5 link under the Install/Upgrade Options heading for instructions.
18 (Optional) To automate the server installation using a response file and to access the Response File Generator utility which assists you in creating response files, click the Automate an Installation link under the Install/Upgrade Options heading for instructions.
After completing the Novell Small Business Suite 6.6 installation, run the Deployment Manager again and click the links under the Post-Install Tasks heading for information on the following:
Creating additional volumes
Migrating to new hardware using the NetWare Migration Wizard Utility
Consolidating server with the Novell Server Consolidation Utility
Doing a post-install of products either locally or remotely
Using DSREPAIR
Upgrading a cluster after the NetWare installation
After deciding on an installation or upgrade option, exit the Novell Deployment Manager and prepare the computer to be a Novell Small Business Suite 6.6 server (see “Preparing the Computer” on page 195.)
Preparing the ComputerTo prepare your existing server for the Novell Small Business Suite 6.6 operating system, complete the following tasks:
Backing Up the NetWare Server Files (page 195)
Logging Out Users before Upgrading (page 195)
Preparing Application Files before Upgrading (page 196)
Verifying a Valid DOS Partition (page 196)
Backing Up the NetWare Server FilesMake at least one backup of your NetWare server files, including files on the DOS partition. Do not attempt an upgrade without a backup.
Logging Out Users before UpgradingWe recommend that you log all users off the server before upgrading it.
Upgrading the Operating System to Novell Small Business Suite 6.6 195
Novell Confidential Manual (ENU) 21 December 2004
Preparing Application Files before UpgradingSome applications require that you perform certain actions before upgrading the server to Novell Small Business Suite 6.6.
1 (Conditional) If the server is running ZENworks® for Servers 2, you must install ZENworks for Servers 3.
2 (Conditional) If the server is running BorderManager 3.6, upgrade to BorderManager Support Pack 2 or later before upgrading the server operating system to Novell Small Business Suite 6.6.
3 Turn off applications and services.
Before beginning the upgrade procedure, shut down any applications, products, or services (virus scan software, backup software, etc.) running on the server to be upgraded.
Verifying a Valid DOS PartitionYour NetWare server uses the DOS partition to start the computer and load NetWare. Many of the existing NetWare startup files will be replaced with new Novell Small Business Suite 6.6 files. In addition, the DOS partition must exceed the minimum amount of available space to accommodate new Novell Small Business Suite 6.6 files.
If the DOS partition does not have enough available space, you cannot upgrade the server. You must create a new DOS partition and install a new server. See Step 2 on page 57.TIP: If your computer does not meet the minimum requirements, you might try using the Novell Migration Wizard utility to migrate data to another computer. For more information, see the NetWare Migration Wizard 7.0 online documentation (http://www.novell.com/documentation/lg/migwiz70/index.html).
Performing an Operating System UpgradeWhen you upgrade to Novell Small Business Suite 6.6, both the operating system and eDirectory are upgraded. In addition, only the NetWare products or components that are currently installed are upgraded. Other Novell products that you might have installed separately (for example GroupWise®, BorderManager®, or ZENworks) are not upgraded.
Additionally, the Enterprise server is migrated to the Apache 2 Web server when you upgrade to Novell Small Business Suite 6.6. During the upgrade, the existence of the Enterprise server is verified and, if it exists, information in the Enterprise server’s configuration files is migrated to the Apache 2 server’s configuration files. After the Apache 2 Web server is installed, the Enterprise server is automatically removed.IMPORTANT: When upgrading a Novell Small Business Suite 5.1 or 6.0 server with the Novonyx Web Server to Novell Small Business Suite 6.6, the document root for the Novonyx Web Server is preserved and not updated to the Apache 2 Web Server document root. Some Novell Small Business Suite 6.6 Web services might not work correctly. To resolve this, review and edit the Apache configuration file, sys:\apache2\conf\httpd.conf. Replace any instances of sys:\novonyx\suitespot\docs with sys:\apache2\htdocs. The sys:\apache2\htdocs directory is the root document directory for Apache on NetWare.
If you are performing an upgrade, several components are already selected. These are the components currently installed on the server. Leaving the installed components checked reinstalls the products. Unchecking an installed component does not uninstall the product.
When you upgrade a server, you can do it at the server or remotely from a workstation.
196 Novell Small Business Suite 6.6 Overview and Installation Guide
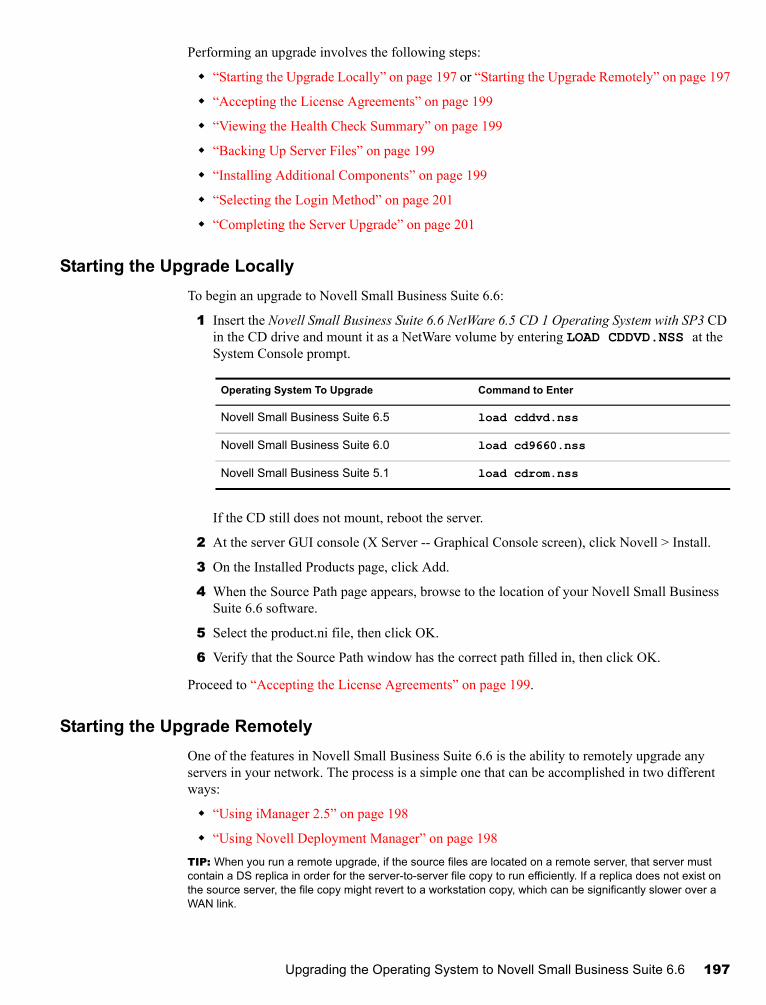
Novell Confidential Manual (ENU) 21 December 2004
Performing an upgrade involves the following steps:
“Starting the Upgrade Locally” on page 197 or “Starting the Upgrade Remotely” on page 197
“Accepting the License Agreements” on page 199
“Viewing the Health Check Summary” on page 199
“Backing Up Server Files” on page 199
“Installing Additional Components” on page 199
“Selecting the Login Method” on page 201
“Completing the Server Upgrade” on page 201
Starting the Upgrade LocallyTo begin an upgrade to Novell Small Business Suite 6.6:
1 Insert the Novell Small Business Suite 6.6 NetWare 6.5 CD 1 Operating System with SP3 CD in the CD drive and mount it as a NetWare volume by entering LOAD CDDVD.NSS at the System Console prompt.
If the CD still does not mount, reboot the server.
2 At the server GUI console (X Server -- Graphical Console screen), click Novell > Install.
3 On the Installed Products page, click Add.
4 When the Source Path page appears, browse to the location of your Novell Small Business Suite 6.6 software.
5 Select the product.ni file, then click OK.
6 Verify that the Source Path window has the correct path filled in, then click OK.
Proceed to “Accepting the License Agreements” on page 199.
Starting the Upgrade RemotelyOne of the features in Novell Small Business Suite 6.6 is the ability to remotely upgrade any servers in your network. The process is a simple one that can be accomplished in two different ways:
“Using iManager 2.5” on page 198
“Using Novell Deployment Manager” on page 198TIP: When you run a remote upgrade, if the source files are located on a remote server, that server must contain a DS replica in order for the server-to-server file copy to run efficiently. If a replica does not exist on the source server, the file copy might revert to a workstation copy, which can be significantly slower over a WAN link.
Operating System To Upgrade Command to Enter
Novell Small Business Suite 6.5 load cddvd.nss
Novell Small Business Suite 6.0 load cd9660.nss
Novell Small Business Suite 5.1 load cdrom.nss
Upgrading the Operating System to Novell Small Business Suite 6.6 197
Novell Confidential Manual (ENU) 21 December 2004
Using iManager 2.5
To perform remote upgrades successfully using this iManager 2.5, it must be installed and configured. For information on installing and configuring iManager 2.5, see the Novell iManager 2.5 Administration Guide in the online documentation.
After iManager 2.5 is installed and configured, complete the following tasks:
1 Click the Install and Upgrade link on the left side of the iManager main page.
2 Click the Upgrade to NetWare 6.5 link.
3 In the right pane, click the Upgrade a Server Remotely link.
4 Click Browse and browse to the root of the Novell Small Business Suite 6.6 build or the Novell Small Business Suite 6.6 NetWare 6.5 CD 1 Operating System with SP3 CD.
The path selected will include nw65os. In Novell Small Business Suite 6.6, the path expects a mapped drive and does not support UNC paths.
If you are not prompted for your source media, it is because you have run an upgrade from Deployment Manager in the past and it will launch the upgrade from that same source. If you do not want to use this previous location, delete the program files\common files\novell\ni\data\browserlaunch.rsp file.
5 Click OK.
6 Follow the on-screen instructions to complete the remote upgrade.
Proceed to “Accepting the License Agreements” on page 199.
After the initial reboot during a remote upgrade, a login screen might display requiring you to log in to the server being upgraded. If this occurs, provide the login information, click Details, type the IP address of the server being upgraded, then click OK.
If Installation/Upgrade tasks fail to run from iManager, you might need to change your security settings.
1 In Internet Explorer, click Tools > Internet Options.
2 Click Security > Custom Level.
3 Under Initialize and Script ActiveX Controls Not Marked as Safe, select Enable.
4 Click OK.
Using Novell Deployment Manager
1 On a Windows NT/2000 or Windows XP Professional Edition workstation that has the latest Novell Client installed on it, log in to your existing network as a user with the Supervisor right.
If you are prompted to log in again while running the Novell Deployment Manager, you can specify the IP address of the server by clicking Details.
2 Insert the Novell Small Business Suite 6.6 NetWare 6.5 CD 1 Operating System with SP3 CD and run Novell Deployment Manager (nwdeploy.exe) located at the root of the CD.
3 Click the Upgrade to NetWare 6.5 link on the left navigation bar of the Deployment Manager.
4 In the right frame of the browser window, click the Upgrade a Server Remotely link.
5 Follow the on-screen instructions to complete the remote upgrade.
198 Novell Small Business Suite 6.6 Overview and Installation Guide
Novell Confidential Manual (ENU) 21 December 2004
Proceed to “Accepting the License Agreements” on page 199.
Accepting the License AgreementsClicking I Accept for both license agreements means that you have read and agreed to the terms and conditions contained in the license agreements.
Viewing the Health Check SummaryNovell Small Business Suite performs a health check on your server to determine if an upgrade can proceed without problems. A summary of the checks that were run is displayed including a Success, Warning, or Failure state for each check that was run.
If the health check completes without any Warning or Failure states, the health check summary page does not display. If that is the case, proceed to the next section “Backing Up Server Files” on page 199.
A Success or Warning state allows the upgrade to continue. A Failure state stops the upgrade until the problem is resolved.
1 To view the detailed health check log, click View Log.
2 Click Next.
Backing Up Server FilesThis window lets you specify whether to back up your server files. It also lets you select whether to automatically reboot the server after the file copy is complete and gives you the option of a Default or Manual installation.
1 Select Yes or No depending on whether you want to back up the server files.
2 (Conditional) If you selected Yes, specify the location for the backup files.IMPORTANT: Make sure that the drive you specify as the location for the backup is a valid drive on the server.
3 If you want the server to automatically reboot after the file copy, click Yes. Otherwise, click No.
4 Select either a Default or Manual upgrade.
The Default upgrade automatically detects drivers and upgrades the server to Novell Small Business Suite 6.6 with default settings.
The Manual upgrade lets you manually configure your drivers and the default settings used in the Default upgrade.
5 Click Next.
Installing Additional ComponentsAfter the file copy is complete, the Components page displays and you can choose which additional Novell Small Business Suite components to install.
Upgrading the Operating System to Novell Small Business Suite 6.6 199
Novell Confidential Manual (ENU) 21 December 2004
To see a description of a component, place the cursor over the component name.TIP: Because you are performing an upgrade, several components are already selected. These are the components currently installed on the server. Leaving the installed components checked reinstalls the products. Unchecking an installed component does not uninstall the product.
To select additional components to install:
1 Select the components you want to install, then click Next.
Default selections can be deselected if desired.
After selecting the components that you want to install from the Components page, a Summary screen appears displaying the names of the selected products and the disk space (in MB) required to install them.WARNING: Selecting the GroupWise and Messenger File Copy component overwrites important system files but does not replace or update all files for an existing GroupWise system. If you are updating GroupWise do not select this option; instead follow the procedures specified in the GroupWise Installation (http://www.novell.com/documentation/lg/gw65/gw65_install/data/a8t9nzp.html) manual.
2 (Optional) To change your product selection, click Back and make the necessary changes.
3 After verifying the product names and space requirements, click Copy Files.
4 (Conditional) If installing from CD, remove the Novell Small Business Suite NetWare 6.5 CD 1 Operating System with SP3 CD when prompted, insert the Novell Small Business Suite 6.6 NetWare 6.5 CD 2 Products with SP3 CD, and then click OK.
The iManager installation might take up to 15 minutes to complete. During this installation, the page will not change.
5 (Conditional) If you see a message stating that there is a file conflict, select the file overwrite option that you prefer and click OK.
The system will now proceed to copy files for a few minutes, then it will reboot.
If you selected Manual during Step 4 on page 199, then your device drivers will be detected and you will be presented with screens where you can modify these settings.
If you do not want to modify the settings, select Continue and press Enter.
If you want to modify the settings:
1 Select Modify, then press Enter.
2 Make any desired changes.
3 Select Continue, then press Enter.
If you selected Default during Step 4 on page 199, the system will continue to copy files following the reboot. TIP: If you are performing a remote upgrade and you are unable to reconnect to the server after it reboots, you can complete the upgrade locally by entering FINISHUP.NCF at the System Console prompt.
When the post-reboot file copy completes, a GUI screen appears and you need to log in to eDirectory.
1 Type your name and password in the fields provided.
2 Click OK.
The eDirectory Summary page displays.
3 Verify that the information on the eDirectory Summary page is accurate.
200 Novell Small Business Suite 6.6 Overview and Installation Guide
Novell Confidential Manual (ENU) 21 December 2004
4 Record the Admin password and any other relevant information before proceeding.
5 Click Next.
Selecting the Login MethodNMASTM server components are installed automatically when you run the Novell Small Business Suite 6.6 installation program. You will need to select the login methods you want to install.IMPORTANT: The NMAS client software must be installed on each client workstation where you want to use the NMAS login methods. The NMAS client software is part of the Windows Client installation included on the Novell Client Software CD.
Select the login methods that you want to install into eDirectory by checking the appropriate check boxes on the Novell Modular Authentication Service page. When you select a login method, a description of the component appears in the Description box. For more information on login methods, see “Managing Login and Post-Login Methods and Sequences” in the Novell Modular Authentication Services (NMAS) 2.3 Administration Guide in the Novell Modular Authentication Services online documentation.
The NDS login method is installed by default.
1 On the Novell Modular Authentication Service page, select the login methods you want to use from the options provided.
If you want to install all the login methods into eDirectory, click Select All.
If you want to clear all selections, click Select Clear All.
2 Click Next.
Completing the Server UpgradeAfter the upgrade is finished, remove the Novell Small Business Suite 6.6 NetWare 6.5 CD 2 Products with SP3 CD and click Yes to reboot the server.
If you selected to load the server on reboot, the Novell Small Business Suite server software will automatically load when the computer reboots.
If you selected to not load the server on reboot, you can load it manually by clicking Yes when prompted to reboot the computer. When the computer reboots, change to the startup directory containing the NetWare server files (c:\nwserver) and enter SERVER.
Proceed to “What’s Next” on page 209.
Upgrading Downed ServersUpgrades to Novell Small Business Suite 6.6 are performed on a running server from the server GUI console. Down server upgrades of Novell Small Business Suite servers running NetWare 4.2 are no longer supported.
Upgrading the Operating System to Novell Small Business Suite 6.6 201
Novell Confidential Manual (ENU) 21 December 2004
In certain situations, you can work with Novell Technical Services to complete a down-server upgrade. For example, this might be necessary if:
An in-place or remote upgrade on a running server fails at some point after the Viewing the Health Check Summary (page 199) step completes.
After the failure, the upgrade cannot be restarted.
If you need to complete an upgrade on a downed server, contact Novell Technical Services for assistance.
Updating NSS VolumesIf you upgraded the operating system of a Novell Small Business Suite 5.1 server to a Novell Small Business Suite 6.6 server, the NSS volumes are not automatically upgraded and will not function until you upgrade them. If you upgrade your server from Novell Small Business Suite 6 to Novell Small Business Suite 6.6, no NSS upgrade is necessary.
To upgrade nss volumes, you must complete the following procedure to update NSS volumes.
1 When prompted at the end of the upgrade, reboot the computer.
2 Make sure that all processes relating to the Novell Small Business Suite 6.6 upgrade have completed.
3 At the System Console prompt, enter the following command:
NSS /ZLSSVOLUMEUPGRADE=ALL
The NSS volumes can now be mounted on the Novell Small Business Suite 6.6 server.
For more detailed information, see “Upgrading Legacy NSS Volumes” in the Novell Storage Services File System Administration Guide for OES.
Copying and Upgrading Legacy Volumes with Volume Copy Upgrade
When upgrading from previous versions of the operating system, traditional volumes are not upgraded to NSS volumes. Certain components such as CIFS/AFP and MySQL require NSS volumes.
Volume Copy Upgrade (VCU) is a volume conversion utility that lets you copy metadata and user data from legacy NetWare Traditional volumes and NSS volumes to OES NetWare NSS volumes. You can also use VCU to copy NSS volumes. Volume copy upgrade moves the volume to the NSS pool and all of the volume’s file and directory attributes remain the same. Copying the data to the new location can take several hours, depending on the size of the volume. You can run VCU from the server command line or from a GUI application that runs on the server or on a workstation.
“Understanding Volume Copy Upgrade” on page 203
“Using VCU from the Command Line” on page 204
“Using VCU from a Java Application” on page 205
“After the Volume Copy or Volume Upgrade” on page 208
202 Novell Small Business Suite 6.6 Overview and Installation Guide
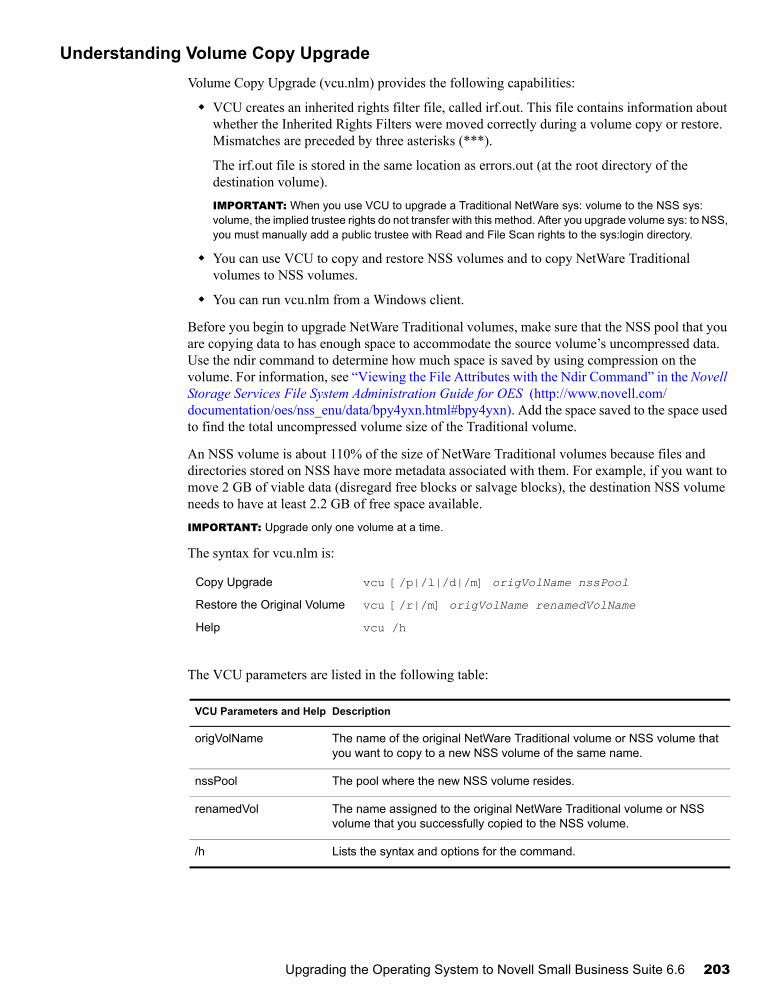
Novell Confidential Manual (ENU) 21 December 2004
Understanding Volume Copy UpgradeVolume Copy Upgrade (vcu.nlm) provides the following capabilities:
VCU creates an inherited rights filter file, called irf.out. This file contains information about whether the Inherited Rights Filters were moved correctly during a volume copy or restore. Mismatches are preceded by three asterisks (***).
The irf.out file is stored in the same location as errors.out (at the root directory of the destination volume). IMPORTANT: When you use VCU to upgrade a Traditional NetWare sys: volume to the NSS sys: volume, the implied trustee rights do not transfer with this method. After you upgrade volume sys: to NSS, you must manually add a public trustee with Read and File Scan rights to the sys:login directory.
You can use VCU to copy and restore NSS volumes and to copy NetWare Traditional volumes to NSS volumes.
You can run vcu.nlm from a Windows client.
Before you begin to upgrade NetWare Traditional volumes, make sure that the NSS pool that you are copying data to has enough space to accommodate the source volume’s uncompressed data. Use the ndir command to determine how much space is saved by using compression on the volume. For information, see “Viewing the File Attributes with the Ndir Command” in the Novell Storage Services File System Administration Guide for OES (http://www.novell.com/documentation/oes/nss_enu/data/bpy4yxn.html#bpy4yxn). Add the space saved to the space used to find the total uncompressed volume size of the Traditional volume.
An NSS volume is about 110% of the size of NetWare Traditional volumes because files and directories stored on NSS have more metadata associated with them. For example, if you want to move 2 GB of viable data (disregard free blocks or salvage blocks), the destination NSS volume needs to have at least 2.2 GB of free space available. IMPORTANT: Upgrade only one volume at a time.
The syntax for vcu.nlm is:
The VCU parameters are listed in the following table:
Copy Upgrade vcu [/p|/l|/d|/m] origVolName nssPool
Restore the Original Volume vcu [/r|/m] origVolName renamedVolName
Help vcu /h
VCU Parameters and Help Description
origVolName The name of the original NetWare Traditional volume or NSS volume that you want to copy to a new NSS volume of the same name.
nssPool The pool where the new NSS volume resides.
renamedVol The name assigned to the original NetWare Traditional volume or NSS volume that you successfully copied to the NSS volume.
/h Lists the syntax and options for the command.
Upgrading the Operating System to Novell Small Business Suite 6.6 203
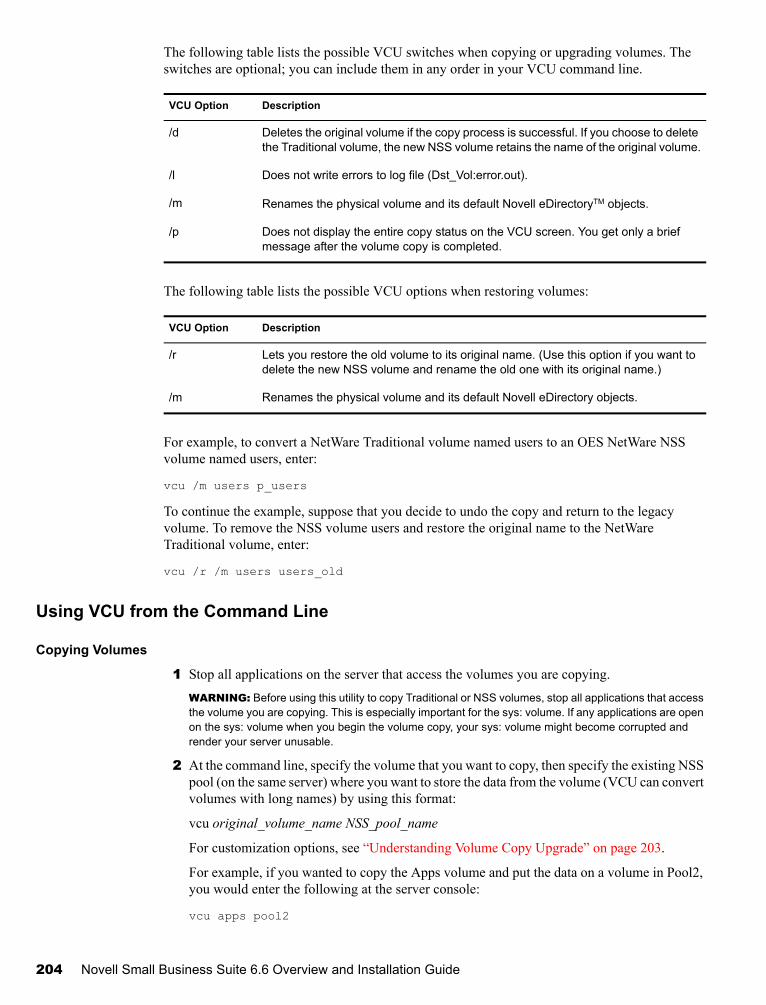
Novell Confidential Manual (ENU) 21 December 2004
The following table lists the possible VCU switches when copying or upgrading volumes. The switches are optional; you can include them in any order in your VCU command line.
The following table lists the possible VCU options when restoring volumes:
For example, to convert a NetWare Traditional volume named users to an OES NetWare NSS volume named users, enter:
vcu /m users p_users
To continue the example, suppose that you decide to undo the copy and return to the legacy volume. To remove the NSS volume users and restore the original name to the NetWare Traditional volume, enter:
vcu /r /m users users_old
Using VCU from the Command Line
Copying Volumes
1 Stop all applications on the server that access the volumes you are copying.WARNING: Before using this utility to copy Traditional or NSS volumes, stop all applications that access the volume you are copying. This is especially important for the sys: volume. If any applications are open on the sys: volume when you begin the volume copy, your sys: volume might become corrupted and render your server unusable.
2 At the command line, specify the volume that you want to copy, then specify the existing NSS pool (on the same server) where you want to store the data from the volume (VCU can convert volumes with long names) by using this format:
vcu original_volume_name NSS_pool_name
For customization options, see “Understanding Volume Copy Upgrade” on page 203.
For example, if you wanted to copy the Apps volume and put the data on a volume in Pool2, you would enter the following at the server console:
vcu apps pool2
VCU Option Description
/d Deletes the original volume if the copy process is successful. If you choose to delete the Traditional volume, the new NSS volume retains the name of the original volume.
/l Does not write errors to log file (Dst_Vol:error.out).
/m Renames the physical volume and its default Novell eDirectoryTM objects.
/p Does not display the entire copy status on the VCU screen. You get only a brief message after the volume copy is completed.
VCU Option Description
/r Lets you restore the old volume to its original name. (Use this option if you want to delete the new NSS volume and rename the old one with its original name.)
/m Renames the physical volume and its default Novell eDirectory objects.
204 Novell Small Business Suite 6.6 Overview and Installation Guide
Novell Confidential Manual (ENU) 21 December 2004
In this example, VCU copies the data in the volume apps and places it in a volume on Pool2, named apps_new.
When volumes are copied using VCU, a new NSS volume named originalvolumename_new is automatically created for you in the specified pool. If the original volume name is longer than 10 characters, or if the newly created NSS volume name conflicts with another existing volumes, the new NSS volume will be named vcuxxxx_new, where the xxxx is a random number generated by NSS.
3 Select Yes to rename your volumes.
After the volume copy is finished, VCU asks you if you want to rename your volumes. If you select Yes, VCU renames your original volume to originalvolumename_old and the new NSS volume from originalvolumename_new back to the name of the original volume. If you select No, you must manually rename the new volume later.NOTE: By using the /m switch, VCU also lets you rename the volume’s default eDirectory object for both NSS and Traditional volumes (except for the sys: volume).
4 Review the information in “After the Volume Copy or Volume Upgrade” on page 208 and perform any required follow-up actions.
Restoring Volumes
At the server console, enter
vcu /r VCUTargetVolName VCUTargetVOlName_old
For example, if you want to restore Vol2, you would enter the following:
vcu /r Vol2_new Vol2_old
VCU would delete Vol2_new, then rename Vol2_old back to its original name of Vol2.TIP: To rename the volume’s default eDirectory object, insert the /m switch into the command line.
Using VCU from a Java ApplicationYou can also upgrade volumes using the VCU Java application called vcuApp.jar. You can access the VCU GUI application from a server or a workstation.
Accessing VCU from the Server
1 Use one of the following methods:
At the server console, enter
vcux
At the GUI console, click Novell > Utilities > Volume Copy Upgrade.
Accessing VCU from a Workstation
1 Make sure that Java 1.4 or later is installed on your workstation.
2 Map a drive to the _Admin volume.
Upgrading the Operating System to Novell Small Business Suite 6.6 205
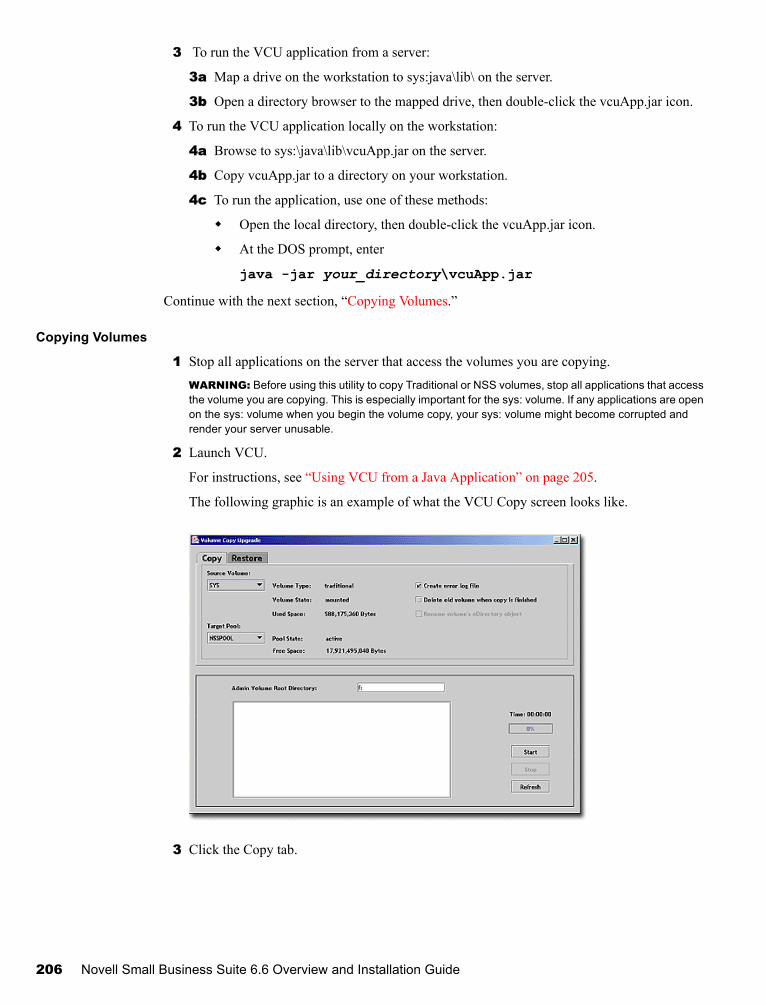
Novell Confidential Manual (ENU) 21 December 2004
3 To run the VCU application from a server:
3a Map a drive on the workstation to sys:java\lib\ on the server.
3b Open a directory browser to the mapped drive, then double-click the vcuApp.jar icon.
4 To run the VCU application locally on the workstation:
4a Browse to sys:\java\lib\vcuApp.jar on the server.
4b Copy vcuApp.jar to a directory on your workstation.
4c To run the application, use one of these methods:
Open the local directory, then double-click the vcuApp.jar icon.
At the DOS prompt, enter
java -jar your_directory\vcuApp.jar
Continue with the next section, “Copying Volumes.”
Copying Volumes
1 Stop all applications on the server that access the volumes you are copying.WARNING: Before using this utility to copy Traditional or NSS volumes, stop all applications that access the volume you are copying. This is especially important for the sys: volume. If any applications are open on the sys: volume when you begin the volume copy, your sys: volume might become corrupted and render your server unusable.
2 Launch VCU.
For instructions, see “Using VCU from a Java Application” on page 205.
The following graphic is an example of what the VCU Copy screen looks like.
3 Click the Copy tab.
206 Novell Small Business Suite 6.6 Overview and Installation Guide
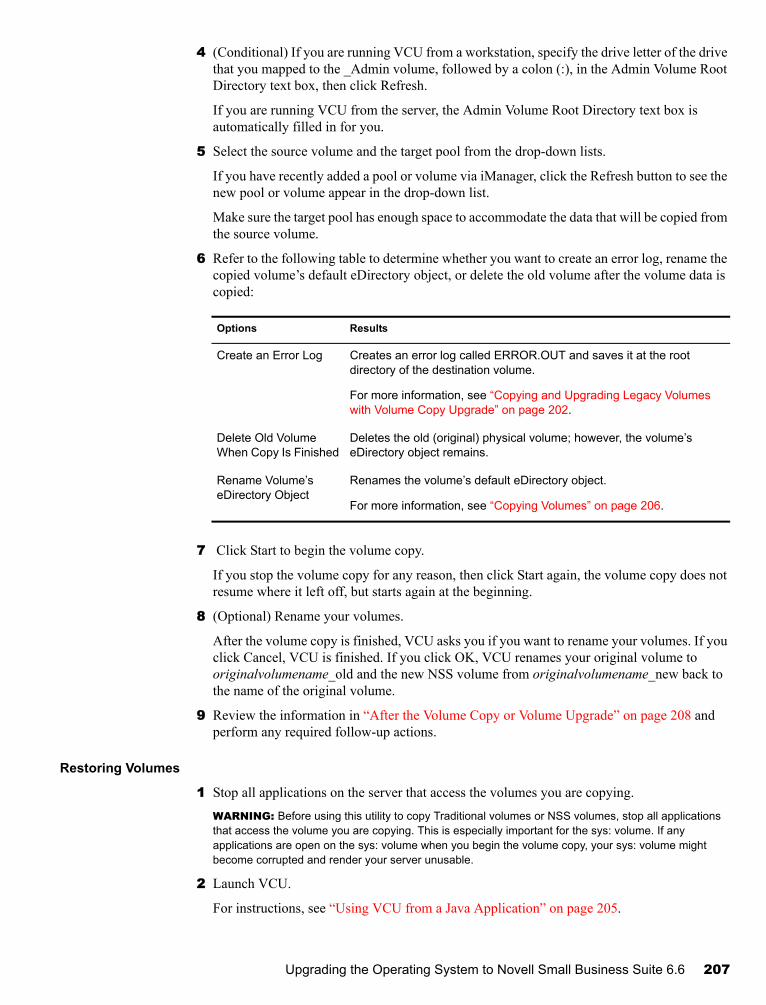
Novell Confidential Manual (ENU) 21 December 2004
4 (Conditional) If you are running VCU from a workstation, specify the drive letter of the drive that you mapped to the _Admin volume, followed by a colon (:), in the Admin Volume Root Directory text box, then click Refresh.
If you are running VCU from the server, the Admin Volume Root Directory text box is automatically filled in for you.
5 Select the source volume and the target pool from the drop-down lists.
If you have recently added a pool or volume via iManager, click the Refresh button to see the new pool or volume appear in the drop-down list.
Make sure the target pool has enough space to accommodate the data that will be copied from the source volume.
6 Refer to the following table to determine whether you want to create an error log, rename the copied volume’s default eDirectory object, or delete the old volume after the volume data is copied:
7 Click Start to begin the volume copy.
If you stop the volume copy for any reason, then click Start again, the volume copy does not resume where it left off, but starts again at the beginning.
8 (Optional) Rename your volumes.
After the volume copy is finished, VCU asks you if you want to rename your volumes. If you click Cancel, VCU is finished. If you click OK, VCU renames your original volume to originalvolumename_old and the new NSS volume from originalvolumename_new back to the name of the original volume.
9 Review the information in “After the Volume Copy or Volume Upgrade” on page 208 and perform any required follow-up actions.
Restoring Volumes
1 Stop all applications on the server that access the volumes you are copying.WARNING: Before using this utility to copy Traditional volumes or NSS volumes, stop all applications that access the volume you are copying. This is especially important for the sys: volume. If any applications are open on the sys: volume when you begin the volume copy, your sys: volume might become corrupted and render your server unusable.
2 Launch VCU.
For instructions, see “Using VCU from a Java Application” on page 205.
Options Results
Create an Error Log Creates an error log called ERROR.OUT and saves it at the root directory of the destination volume.
For more information, see “Copying and Upgrading Legacy Volumes with Volume Copy Upgrade” on page 202.
Delete Old Volume When Copy Is Finished
Deletes the old (original) physical volume; however, the volume’s eDirectory object remains.
Rename Volume’s eDirectory Object
Renames the volume’s default eDirectory object.
For more information, see “Copying Volumes” on page 206.
Upgrading the Operating System to Novell Small Business Suite 6.6 207
Novell Confidential Manual (ENU) 21 December 2004
The following graphic is an example of the VCU Restore dialog box.
3 Click the Restore tab.
4 (Conditional) If you are running VCU from a workstation, specify the drive letter of the drive that you mapped to the _Admin volume, followed by a colon (:), in the Admin Volume Root Directory text box, then click Refresh.
If you are running VCU from the server, the Admin Volume Root Directory text box is automatically filled in for you.
5 From the drop-down list, select the volume that you want to delete and restore.
If you have recently added a pool or volume via iManager, click the Refresh button to see the new pool or volume appear in the drop-down list.
6 Determine if you want to rename the volume’s default eDirectory object.
7 Click Start.
When you click Start, the volume that you are restoring is automatically renamed to the name of the volume that you are deleting.
After the Volume Copy or Volume UpgradeRestart the server if you are upgrading the sys: volume to ensure that the volume copied properly.
Verify that the volume data was copied successfully. IMPORTANT: After you copy Traditional volume data to an NSS volume, you cannot access the new NSS volume from NetWare 5.1. You need to either retain the data in the Traditional volume, or copy the data back to the Traditional volume.
What’s NextAfter rebooting the server, you might want to access the Welcome Web site. It provides helpful information for getting the most out of your new Novell Small Business Suite 6.6 server.
208 Novell Small Business Suite 6.6 Overview and Installation Guide
Novell Confidential Manual (ENU) 21 December 2004
To access the Welcome Web site, open a browser on a workstation with access to the new Novell Small Business Suite 6.6 server and go to http://xxx.xxx.xxx.xxx, where xxx.xxx.xxx.xxx is the new server’s IP address or domain name.
After upgrading the server operating system, you should complete the server setup by completing the tasks in one or more the following sections:
Updating GroupWise (page 211)
Upgrading BorderManager (page 213)
Upgrading BorderManager (page 213)
Upgrading ZENworks (page 215)
Installing Product Updates (page 185)
Upgrading the Operating System to Novell Small Business Suite 6.6 209

Novell Confidential Manual (ENU) 21 December 2004
210 Novell Small Business Suite 6.6 Overview and Installation Guide
Novell Confidential Manual (ENU) 21 December 2004
21 Updating GroupWise
You can update a Novell® GroupWise® 5.x or GroupWise 6.x system to GroupWise 6.5. To update a GroupWise 4.x system to GroupWise 6.5, you need to first update the system to GroupWise 5.x.IMPORTANT: When updating GroupWise, use the software and process outlined in the GroupWise documentation. Do not use the file copy or installation patterns provided in Novell Small Business Suite for new installations of GroupWise.
Before you begin updating your GroupWise system to GroupWise 6.5, you should review the following sections under Updating GroupWise in the GroupWise 6.5 Installation Guide (http://www.novell.com/documentation/gw65/gw65_install/data/a8t9nzp.html) These sections, which describe the process to follow when updating, help you plan and implement a successful update strategy:
Extending the Novell eDirectory Schema
Installing the GroupWise Software
Updating GroupWise Domain and Post Office Databases
Updating the GroupWise Client
Updating the GroupWise Internet Agent
Updating GroupWise WebAccess
Using GroupWise Gateways
For a list of enhancements and new features in GroupWise 6.5, see “What's New” in GroupWise 6.5 in the GroupWise 6.5 Installation Guide (http://www.novell.com/documentation/gw65/gw65_install/data/aady5l3.html#aady5l3).
In some cases, you might need to maintain a mixed-version environment as you roll out GroupWise 6.5. For a table showing which GroupWise 5.x and 6.x components can be used together, see the “GroupWise Version Compatibility Matrix” in the GroupWise 6.5 Installation Guide (http://www.novell.com/documentation/gw65/gw65_install/data/a4dx2sf.html#a4dx2sf).
Updating GroupWise 211

Novell Confidential Manual (ENU) 21 December 2004
212 Novell Small Business Suite 6.6 Overview and Installation Guide
Novell Confidential Manual (ENU) 21 December 2004
22 Upgrading BorderManager
Novell® Small Business Suite 6.6 includes Novell BorderManager® 3.8. To run BorderManager on Novell Small Business Suite 6.6, you must use BorderManager 3.8 or later. Previous versions of BorderManager will not run on Novell Small Business Suite 6.6.
If you want to upgrade from a previously installed version, you must first upgrade to BorderManager 3.6.2 or later before upgrading the server to Novell Small Business Suite 6.6.
If you are upgrading from BorderManager 3.6, you must apply BorderManager Support Pack 2 or later to the server before upgrading the server to Novell Small Business Suite 6.6.
If you upgrade the server before upgrading BorderManager, you cannot use the upgrade process but must uninstall the current version of BorderManager and then install a new version of BorderManager 3.8.IMPORTANT: If you are upgrading BorderManager from an earlier version of the product, stop all running BorderManager services before installing Novell BorderManager 3.8.
For complete procedures, see “Installing Novell BorderManager” in the Novell BorderManager 3.8 Installation and Administration Guide in the BorderManager online documentation (http://www.novell.com/documentation/nbm38/inst_admin/data/ao24swv.html).
Upgrading VPN ServicesEarlier versions of BorderManager VPN servers use SKIP for key management. They also use VPNCFG and NetWare Administrator for configuration. Novell BorderManager 3.8 supports industry-standard IKE for key management but also supports backward compatibility with Novell BorderManager 3.7 in SKIP mode. If you want to migrate the VPN configuration before upgrading to Novell BorderManager 3.8, make sure that VPN is configured.
For a detailed explanation on Novell BorderManager 3.8 upgrades for VPN Services, see “Upgrading Virtual Private Networks” in the Novell BorderManager 3.8 Installation and Administration Guide in the BorderManager online documentation (http://www.novell.com/documentation/nbm38/inst_admin/data/hk713201.html).
Upgrading BorderManager 213

Novell Confidential Manual (ENU) 21 December 2004
214 Novell Small Business Suite 6.6 Overview and Installation Guide
Novell Confidential Manual (ENU) 21 December 2004
23 Upgrading ZENworks
If you want to deploy Novell® ZENworks® 6.5 Desktop Management in a network environment where ZENworks for Desktops 3.2 or ZENworks for Desktop 4.01 is already installed and functioning, you need to understand how the features of these releases compare and how to upgrade from one version to another.
To understand what’s new in ZENworks 6.5 Desktop Management compared to older versions of ZENworks, see “What's New In ZENworks 6.5 Desktop Management” in the Novell ZENworks 6.5 Desktop Management Installation Guide (http://www.novell.com/documentation/zenworks65/dminstall/data/bq8bbvi.html).
For procedures on upgrading from ZENworks for Desktops 3.2, see “Upgrading from ZENworks for Desktops 3.2 SP3” in the Novell ZENworks 6.5 Desktop Management Installation Guide (http://www.novell.com/documentation/zenworks65/dminstall/data/bqek9v5.html#bqek9v5).
This information includes the following procedures:
Meeting the ZENworks 6.5 Installation Prerequisites
Checking eDirectoryTM
Extending the eDirectory Schema
Upgrading ConsoleOne®
Upgrading ZENworks for Desktops 3.2 SP3 Servers
Installing the ZENworks 6.5 Middle Tier Server
Upgrading Managed Workstations
For procedures on upgrading from ZENworks for Desktops 4.01, see “Upgrading from ZENworks for Desktops 4.x” in the Novell ZENworks 6.5 Desktop Management Installation Guide (http://www.novell.com/documentation/zenworks65/dminstall/data/bpmxeo9.html).
This information includes the following procedures:
Meeting the ZENworks 6.5 Installation Prerequisites
Checking eDirectory
Extending the eDirectory Schema
Upgrading ConsoleOne
Upgrading ZENworks for Desktops 4.x Servers
Upgrading the Middle Tier Server
Upgrading Workstations
After the initial installation or upgrade, you might want to download and install ZENworks 6.5 Support Pack 1. For information about and procedures for upgrading to Support Pack 1, see “Upgrading to ZENworks 6.5 Desktop Management Support Pack 1” in the Novell ZENworks 6.5 Desktop Management Installation Guide (http://www.novell.com/documentation/zenworks65/dminstall/data/bttmixq.html).
Upgrading ZENworks 215
Novell Confidential Manual (ENU) 21 December 2004
If you need more assistance while upgrading ZENworks, you can consult the following resources:
ZENworks Cool Solutions community at http://www.novell.com/coolsolutions/zenworks (http://www.novell.com/coolsolutions/zenworks)
Novell Support Knowledgebase at http://support.novell.com (http://support.novell.com).
Novell NgageSM Consulting at http://www.novell.com/solutions/ngage/consulting.html (http://www.novell.com/solutions/ngage/consulting.html)
216 Novell Small Business Suite 6.6 Overview and Installation Guide
Novell Confidential Manual (ENU) 21 December 2004
V Administration
The administration section of this documentation includes the following information:
Chapter 24, “Administration Utilities Overview,” on page 219
Chapter 25, “Welcome Web Site,” on page 221
Chapter 27, “Common Administrative Tasks,” on page 237
Chapter 28, “Supported Web Browsers,” on page 251
Administration 217

Novell Confidential Manual (ENU) 21 December 2004
218 Novell Small Business Suite 6.6 Overview and Installation Guide
Novell Confidential Manual (ENU) 21 December 2004
24 Administration Utilities Overview
Novell® Small Business Suite includes several administration utilities that let you manage everything in your network from configuring and managing Novell eDirectoryTM to setting up network services and open source software such as Apache and Tomcat.
To help you get started, the Welcome Web site includes information about many of these administration utilities and the software they manage. An end user version of the Welcome Web site, available on the unsecure port 80, describes many of the Novell products available to them and offers links to documentation. An administrator version (available on the secure port 2200) also describes the products, but includes active links to many of the administration utilities.
This chapter contains the following topics:
“About Administration Utilities” on page 219
“About the Welcome Web Site” on page 221
“What’s Next” on page 220
About Administration UtilitiesSome administration utilities, such as ConsoleOne®, are applications that rely on their own set of APIs and can be run on specified platforms. Other utilities are Web based and require the use of a Web browser. Not all of these utilities run on all Web browsers. For more information, see Chapter 28, “Supported Web Browsers,” on page 251.
The purpose of the Web-based administration utilities is the flexibility inherent in using a Web browser—namely, that you can manage your software from remote locations and that tasks can be performed from many different platforms, provided those platforms support the correct Web browsers.
Some tasks can be performed only using a specific utility, while other tasks can be performed using one of several utilities. For detailed information about which tools are recommended for various tasks, see Chapter 27, “Common Administrative Tasks,” on page 237.
For a quick reference list, see the “Accessing Administration Utilities” in the “Small Business Suite” QuickStart Card.
About the Welcome Web SiteThe Welcome Web site is a collection of Web pages installed to your server that contain information about each of the products included with NetWare and provides access to Web-based management tools, product information, and documentation.
Administration Utilities Overview 219
Novell Confidential Manual (ENU) 21 December 2004
The purpose of the Welcome Web site is to save you time and effort by introducing each NetWare product and providing easy access to all Web-based administration utilities, such as iManager and Novell Remote Manager.
For more information about how to access and use the Welcome Web site, see Chapter 25, “Welcome Web Site,” on page 221.
What’s NextThe quickest way to become oriented to NetWare is to access the Welcome Web site. For an overview, see Chapter 25, “Welcome Web Site,” on page 221.
If you want to learn how to access one of the more common administration utilities, such as Novell Remote Manager or iManager, see Chapter 26, “NetWare Administration Utilities,” on page 229.
If you have specific tasks that you need to get to work on and you’re not sure which utility to use, see Chapter 27, “Common Administrative Tasks,” on page 237.
For information about which administration utilities or features run on which combinations of platforms and Web browsers, see Chapter 28, “Supported Web Browsers,” on page 251.
220 Novell Small Business Suite 6.6 Overview and Installation Guide
Novell Confidential Manual (ENU) 21 December 2004
25 Welcome Web Site
The Welcome Web site is a collection of Web pages installed to your server that contains information about each of the products included with NetWare® and provides access to Web-based management tools, product information, and documentation. The purpose of the Welcome Web site is to save you time and effort by introducing each NetWare product and providing easy access to all Web-based administration utilities, such as iManager and Novell Remote Manager.
“About Administration Utilities” on page 219
“Accessing the Welcome Web Site” on page 223
“Getting Around the Welcome Web Site” on page 225
“Modifying Preferences” on page 225
“Specifying an Alternate Default Home Page” on page 226
“What’s Next” on page 227
About the Welcome Web SiteThe Welcome Web site is for both administrators and end users. Administrators log in to the Welcome Web site and have access to additional features that end users do not.
The Welcome Web site provides the following benefits:
Overview information about each NetWare product
Access to additional product information on www.novell.com
Access to product documentation on www.novell.com/documentation
Access to Web-based administration utilities (administrators only)
Welcome Web Site 221
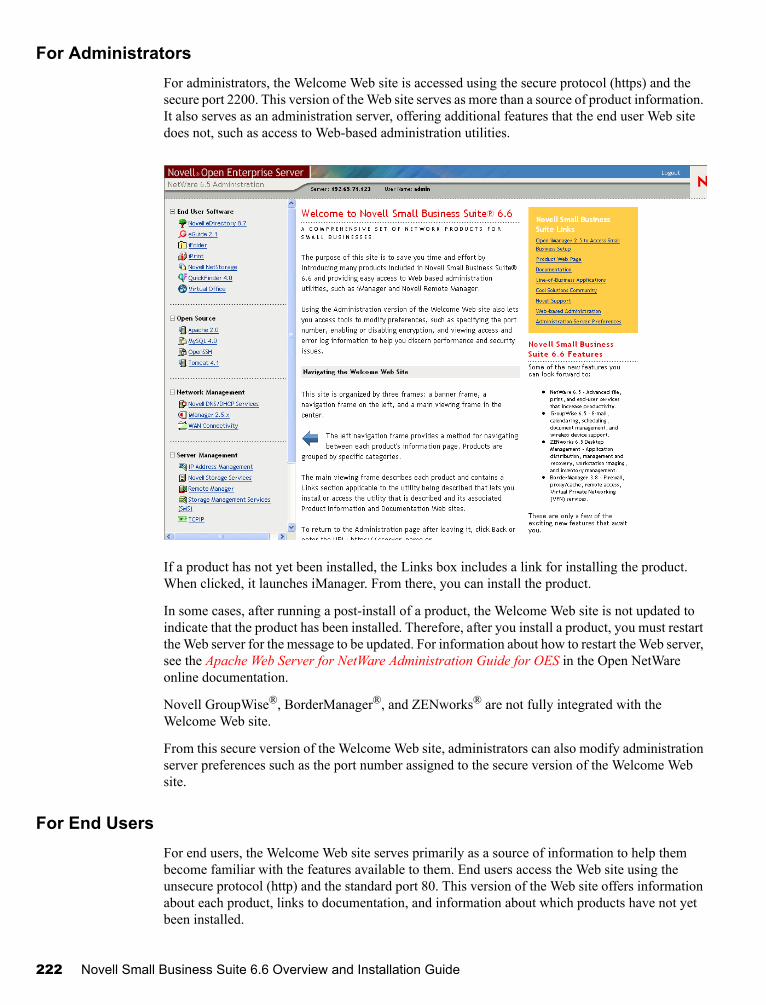
Novell Confidential Manual (ENU) 21 December 2004
For AdministratorsFor administrators, the Welcome Web site is accessed using the secure protocol (https) and the secure port 2200. This version of the Web site serves as more than a source of product information. It also serves as an administration server, offering additional features that the end user Web site does not, such as access to Web-based administration utilities.
If a product has not yet been installed, the Links box includes a link for installing the product. When clicked, it launches iManager. From there, you can install the product.
In some cases, after running a post-install of a product, the Welcome Web site is not updated to indicate that the product has been installed. Therefore, after you install a product, you must restart the Web server for the message to be updated. For information about how to restart the Web server, see the Apache Web Server for NetWare Administration Guide for OES in the Open NetWare online documentation.
Novell GroupWise®, BorderManager®, and ZENworks® are not fully integrated with the Welcome Web site.
From this secure version of the Welcome Web site, administrators can also modify administration server preferences such as the port number assigned to the secure version of the Welcome Web site.
For End UsersFor end users, the Welcome Web site serves primarily as a source of information to help them become familiar with the features available to them. End users access the Web site using the unsecure protocol (http) and the standard port 80. This version of the Web site offers information about each product, links to documentation, and information about which products have not yet been installed.
222 Novell Small Business Suite 6.6 Overview and Installation Guide
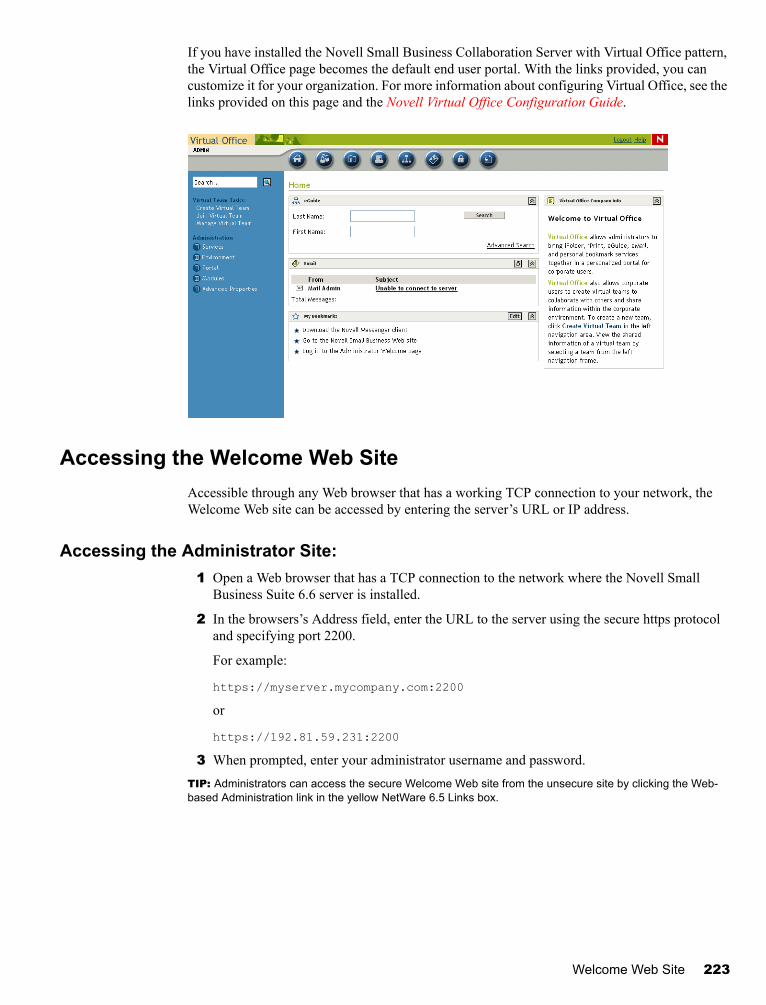
Novell Confidential Manual (ENU) 21 December 2004
If you have installed the Novell Small Business Collaboration Server with Virtual Office pattern, the Virtual Office page becomes the default end user portal. With the links provided, you can customize it for your organization. For more information about configuring Virtual Office, see the links provided on this page and the Novell Virtual Office Configuration Guide.
Accessing the Welcome Web SiteAccessible through any Web browser that has a working TCP connection to your network, the Welcome Web site can be accessed by entering the server’s URL or IP address.
Accessing the Administrator Site:1 Open a Web browser that has a TCP connection to the network where the Novell Small
Business Suite 6.6 server is installed.
2 In the browsers’s Address field, enter the URL to the server using the secure https protocol and specifying port 2200.
For example:
https://myserver.mycompany.com:2200
or
https://192.81.59.231:2200
3 When prompted, enter your administrator username and password.TIP: Administrators can access the secure Welcome Web site from the unsecure site by clicking the Web-based Administration link in the yellow NetWare 6.5 Links box.
Welcome Web Site 223
Novell Confidential Manual (ENU) 21 December 2004
Accessing the End User Site:1 Open a Web browser that has a TCP connection to the network where the Novell Small
Business Suite 6.6 server is installed.
2 Enter the URL to the server using the standard http protocol. For example:
http://myserver.mycompany.com
or
http://192.81.59.231
Because the end user Web site uses the standard port 80, there is no need to specify the port number.
Getting Around the Welcome Web SiteThe Welcome Web site’s home page is organized into three frames: a banner frame, a navigation frame on the left, and a main viewing frame in the center.
Navigating the Welcome Web SiteThe left frame of the Welcome Web site provides a method for navigating between each product’s Welcome page. Products are grouped by specific categories. For example, the second category, Open Source, contains links to each of the open source products included with NetWare 6.5: Apache, MySQL, OpenSSH, and Tomcat.
To view a specific product’s Welcome page, click a product link in the left frame to view the corresponding product Welcome page in the main frame.
Viewing Product Details and Accessing Web-based Administration UtilitiesThe main frame provides product overview information and the sidebar includes product highlights. The NetWare 6.5 Links box in the upper right corner provides links to additional product information, product documentation, and Web-based administration utilities (available on the administration version of the Welcome Web site only).
Modifying PreferencesUsing the administrator version of the Welcome Web site, administrators can modify preferences such as specifying the port number, enabling or disabling encryption, and viewing access and error log information to help them discern performance and security issues.
To access preferences:
1 Using a Web browser, access the administrator’s (secure) Welcome Web site.
2 In the NetWare 6.5 Links box in the upper-right corner of the page, click Administration Server Preferences.
224 Novell Small Business Suite 6.6 Overview and Installation Guide
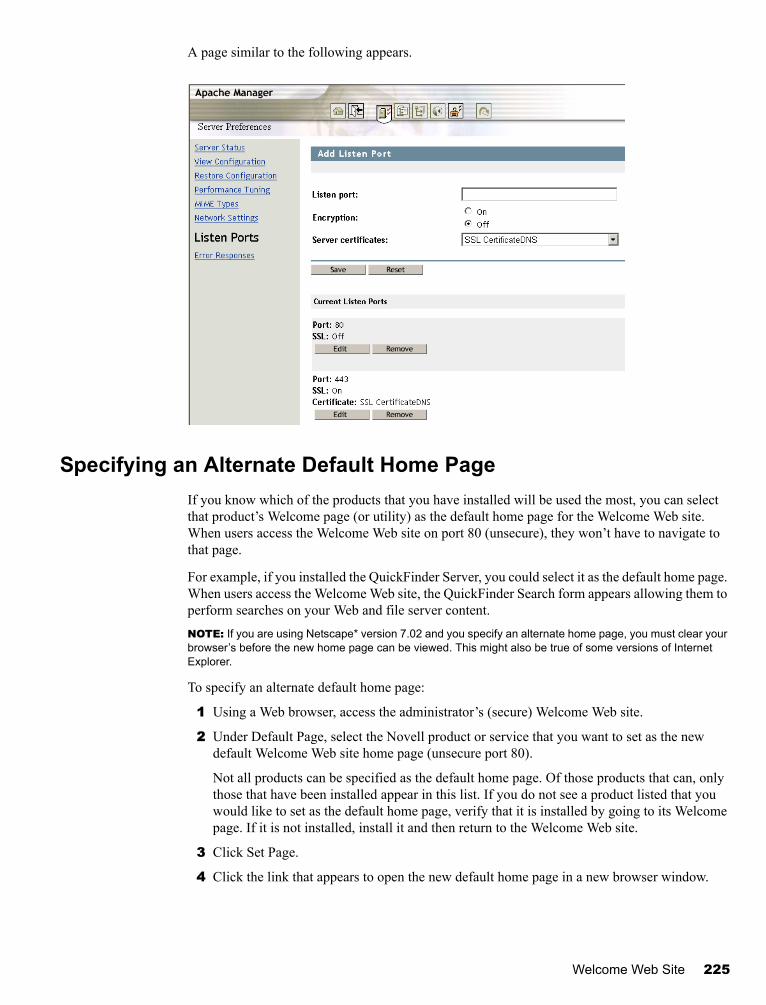
Novell Confidential Manual (ENU) 21 December 2004
A page similar to the following appears.
Specifying an Alternate Default Home PageIf you know which of the products that you have installed will be used the most, you can select that product’s Welcome page (or utility) as the default home page for the Welcome Web site. When users access the Welcome Web site on port 80 (unsecure), they won’t have to navigate to that page.
For example, if you installed the QuickFinder Server, you could select it as the default home page. When users access the Welcome Web site, the QuickFinder Search form appears allowing them to perform searches on your Web and file server content.NOTE: If you are using Netscape* version 7.02 and you specify an alternate home page, you must clear your browser’s before the new home page can be viewed. This might also be true of some versions of Internet Explorer.
To specify an alternate default home page:
1 Using a Web browser, access the administrator’s (secure) Welcome Web site.
2 Under Default Page, select the Novell product or service that you want to set as the new default Welcome Web site home page (unsecure port 80).
Not all products can be specified as the default home page. Of those products that can, only those that have been installed appear in this list. If you do not see a product listed that you would like to set as the default home page, verify that it is installed by going to its Welcome page. If it is not installed, install it and then return to the Welcome Web site.
3 Click Set Page.
4 Click the link that appears to open the new default home page in a new browser window.
Welcome Web Site 225

Novell Confidential Manual (ENU) 21 December 2004
What’s NextFor an introduction to some of the key Web-based administration utilities, see Chapter 26, “NetWare Administration Utilities,” on page 229.
For information about which Web-based administration tool to use for specific administrative tasks, see Chapter 27, “Common Administrative Tasks,” on page 237.
226 Novell Small Business Suite 6.6 Overview and Installation Guide
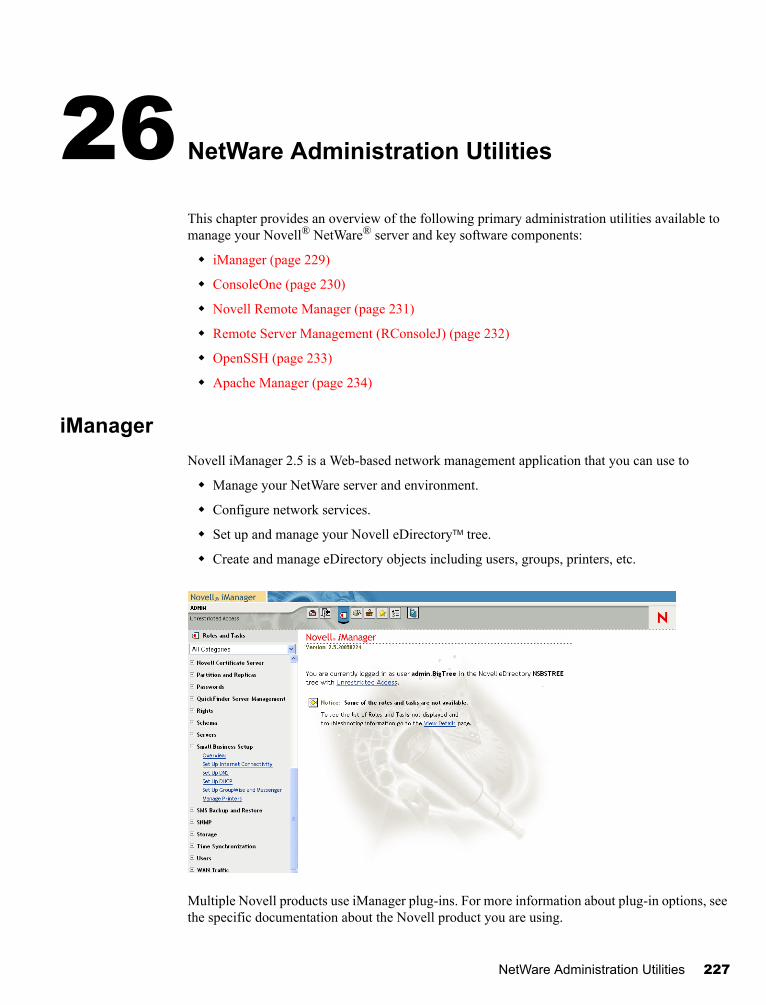
Novell Confidential Manual (ENU) 21 December 2004
26 NetWare Administration Utilities
This chapter provides an overview of the following primary administration utilities available to manage your Novell® NetWare® server and key software components:
iManager (page 229)
ConsoleOne (page 230)
Novell Remote Manager (page 231)
Remote Server Management (RConsoleJ) (page 232)
OpenSSH (page 233)
Apache Manager (page 234)
iManagerNovell iManager 2.5 is a Web-based network management application that you can use to
Manage your NetWare server and environment.
Configure network services.
Set up and manage your Novell eDirectoryTM tree.
Create and manage eDirectory objects including users, groups, printers, etc.
Multiple Novell products use iManager plug-ins. For more information about plug-in options, see the specific documentation about the Novell product you are using.
NetWare Administration Utilities 227
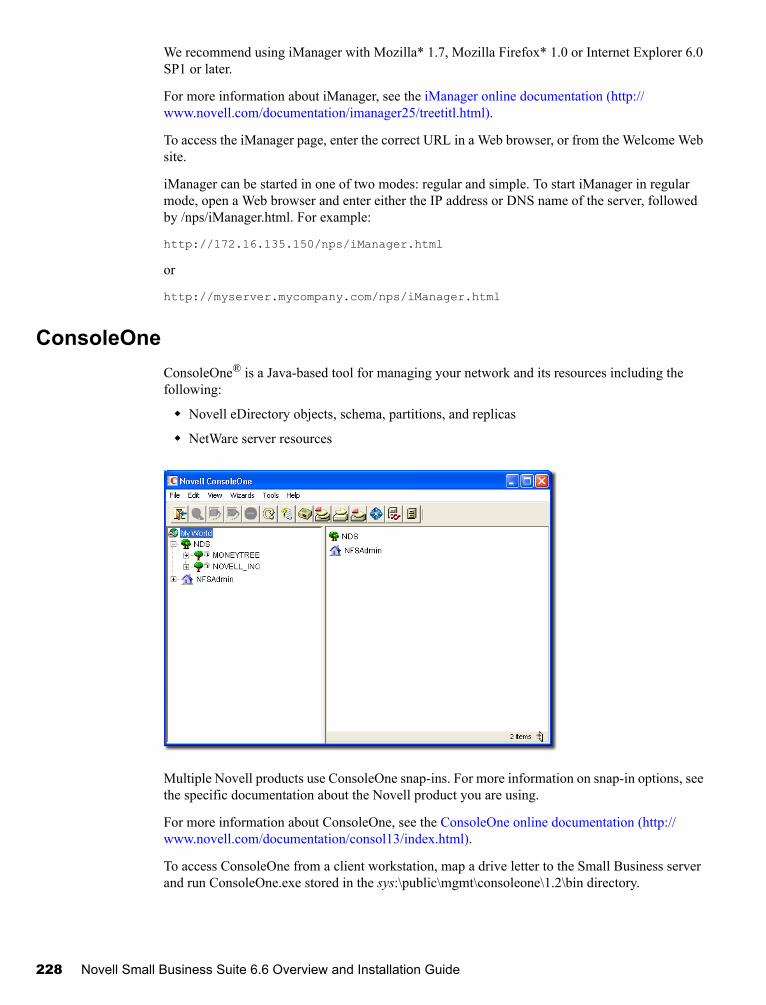
Novell Confidential Manual (ENU) 21 December 2004
We recommend using iManager with Mozilla* 1.7, Mozilla Firefox* 1.0 or Internet Explorer 6.0 SP1 or later.
For more information about iManager, see the iManager online documentation (http://www.novell.com/documentation/imanager25/treetitl.html).
To access the iManager page, enter the correct URL in a Web browser, or from the Welcome Web site.
iManager can be started in one of two modes: regular and simple. To start iManager in regular mode, open a Web browser and enter either the IP address or DNS name of the server, followed by /nps/iManager.html. For example:
http://172.16.135.150/nps/iManager.html
or
http://myserver.mycompany.com/nps/iManager.html
ConsoleOneConsoleOne® is a Java-based tool for managing your network and its resources including the following:
Novell eDirectory objects, schema, partitions, and replicas
NetWare server resources
Multiple Novell products use ConsoleOne snap-ins. For more information on snap-in options, see the specific documentation about the Novell product you are using.
For more information about ConsoleOne, see the ConsoleOne online documentation (http://www.novell.com/documentation/consol13/index.html).
To access ConsoleOne from a client workstation, map a drive letter to the Small Business server and run ConsoleOne.exe stored in the sys:\public\mgmt\consoleone\1.2\bin directory.
228 Novell Small Business Suite 6.6 Overview and Installation Guide
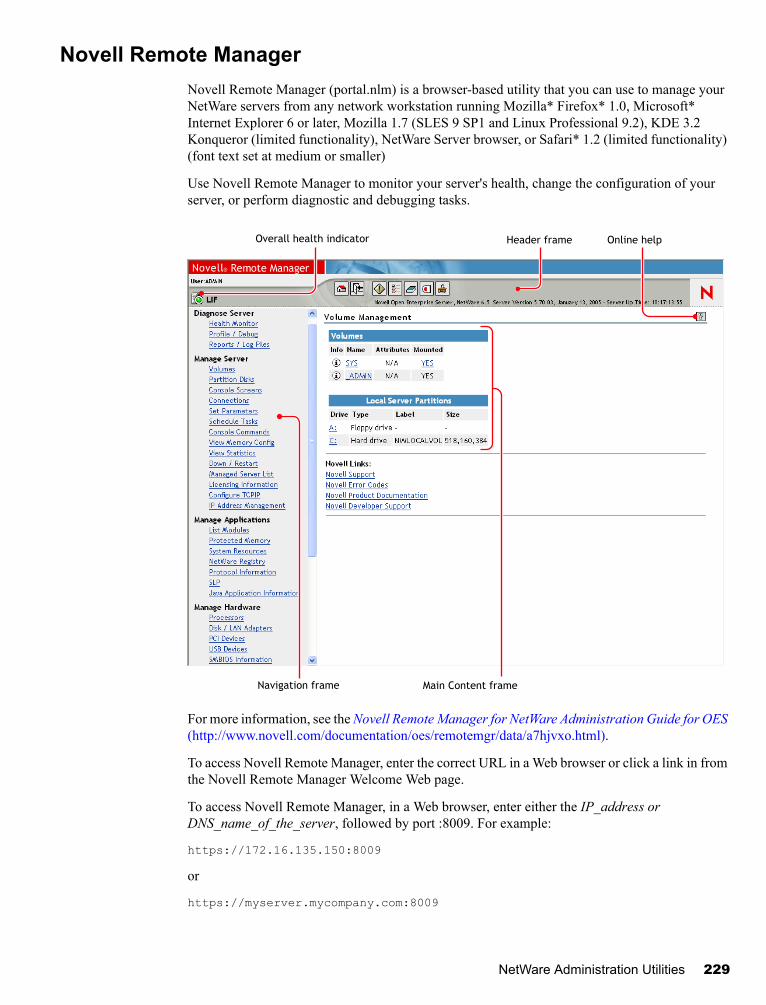
Novell Confidential Manual (ENU) 21 December 2004
Novell Remote ManagerNovell Remote Manager (portal.nlm) is a browser-based utility that you can use to manage your NetWare servers from any network workstation running Mozilla* Firefox* 1.0, Microsoft* Internet Explorer 6 or later, Mozilla 1.7 (SLES 9 SP1 and Linux Professional 9.2), KDE 3.2 Konqueror (limited functionality), NetWare Server browser, or Safari* 1.2 (limited functionality) (font text set at medium or smaller)
Use Novell Remote Manager to monitor your server's health, change the configuration of your server, or perform diagnostic and debugging tasks.
For more information, see the Novell Remote Manager for NetWare Administration Guide for OES (http://www.novell.com/documentation/oes/remotemgr/data/a7hjvxo.html).
To access Novell Remote Manager, enter the correct URL in a Web browser or click a link in from the Novell Remote Manager Welcome Web page.
To access Novell Remote Manager, in a Web browser, enter either the IP_address or DNS_name_of_the_server, followed by port :8009. For example:
https://172.16.135.150:8009
or
https://myserver.mycompany.com:8009
Online help
Main Content frame
Header frame
Navigation frame
Overall health indicator
NetWare Administration Utilities 229

Novell Confidential Manual (ENU) 21 December 2004
If you want to have Novell Remote Manager respond on multiple IP addresses, enter the following command at the System Console prompt:
httpbind ip address or server’s DNS name /keyfile:"SSL certificate name for the specified server"
Make sure there are no spaces between the parameter keyfile and the Certificate name string.
For example:
httpbind 192.168.1.2 /keyfile:"SSL CertificateIP"
If you want to make the change without worrying about syntax, do the following:
1 Open Novell Remote Manager.
2 Click the Config icon, then click the HTTP IP Address and Port Setup link.
3 Click Open Port.
4 Select the IP address that you want to respond to Novell Remote Manager, then click Next.
5 Type the port number that you want to open, then click Next.
6 On the Enable SSL page, select the Enable check box to make the port secure and request a login.
7 Click Next > OK > Done.
Remote Server Management (RConsoleJ)RConsoleJ lets you use a network workstation to control and manage a remote NetWare server. You can lock servers in a safe place, remove keyboards and monitors, and then start a remote control session from a workstation whenever you need to access a server's console.
For more information, see the Remote Server Management for NetWare Administration Guide for OES in the OES NetWare 6.5 online documentation (http://www.novell.com/documentation/oes/sman_enu/data/hw63v9ob.html#bktitle).
230 Novell Small Business Suite 6.6 Overview and Installation Guide

Novell Confidential Manual (ENU) 21 December 2004
To access RConsoleJ from a client workstation, map a drive letter to the Small Business server and run rconj.exe stored in the volume:\public\mgmt\consoleone\1.2 directory.
When prompted, enter your server’s IP address or DNS name (with no leading http or https) and your administrator password, and then click Connect.
OpenSSHOpenSSH is an open source technology that has been integrated with NetWare. It provides a secure shell that uses encryption provided by Novell International Cryptographic Infrastructure (NICI) technology rather than SSL to implement 128-bit (and stronger) encryption and it contains fewer software import liabilities.
OpenSSH encrypts all traffic (including passwords) to effectively eliminate eavesdropping, connection hijacking, and other network-level attacks. Additionally, OpenSSH provides a myriad of secure tunneling capabilities.
To Access OpenSSH:
1 Make sure OpenSSH is installed.
2 Load sshd.nlm at the System Console prompt.
NetWare Administration Utilities 231
Novell Confidential Manual (ENU) 21 December 2004
3 Download, install, and run an SSH-compliant client on a workstation in your network.
These can be downloaded from the World Wide Web. Some SSH-compliant clients include the following:
PuTTy* (tested with NetWare 6.5)
MindTerm
AbsoluteTelnet*
Red Hat Linux OpenSSH clients (tested with NetWare 6.5)
You need to know your server’s IP address or DNS name as well as your server administrator’s username and password.
For more information, see “Setting Up SSH at Workstations” in the OpenSSH Administration Guide (http://www.novell.com/documentation/oes/openssh/data/ajpc4nl.html#ajpc4nl).
Apache ManagerWhereas other platforms require you to manually edit configuration files to configure Apache, NetWare includes a simple, Web-based graphical user interface that updates the configuration files for you: Apache Manager.
If you have multiple instances of Apache running on various platforms in your network—sometimes called a server farm—you can control them all from the Multiple Server Administration pages of Apache Manager, giving you single-point access to, and control over, all of your Web servers.
Apache Manager offers many advantages over manually configuring Apache:
Changes to directives are done electronically, reducing the risk of errors.
You don’t have to know all of the Apache directives or modules to configure Apache.
You can manage multiple installations of the Apache Web server from a single interface.
232 Novell Small Business Suite 6.6 Overview and Installation Guide
Novell Confidential Manual (ENU) 21 December 2004
Apache Manager eliminates the need to edit and maintain a large number of configuration files where many of the same directives are being used on each Apache Web server.
You are provided with a thorough help system that includes hypertext links to the manual (Apache Web Server for NetWare Administration Guide for OES), and to specific topics within the official Apache documentation set (on apache.org).
To access Apache Manager from the secure Welcome Web site:
1 Open the secure version of the Welcome Web site using your server’s URL.
For example,
https://myserver.mycompany.com:2200
or
https://192.56.89.100:2200
2 When prompted, enter your administrator username and password and then click Login.
3 In the left frame of the Welcome Web site home page, click the expand iocn next to Open Source and then click Apache 2.0.
4 After the Apache 2.0 Welcome page loads, click Administer Single Apache Server in the Apache 2.0 Links box in the upper-right corner of the main frame.
What’s NextFor a comprehensive list of the documentation for all OES NetWare products, utilities, and services, see the OES NetWare online documentation (http://www.novell.com/documentation/oes/index.html?page=/documentation/oes/oes_home/data/front.html).
NetWare Administration Utilities 233

Novell Confidential Manual (ENU) 21 December 2004
234 Novell Small Business Suite 6.6 Overview and Installation Guide
Novell Confidential Manual (ENU) 21 December 2004
27 Common Administrative Tasks
The following table shows some of the common items that you could manage in your network when using OES NetWare® from Novell Small Business 6.5 and the tasks associated with the item. The table also shows the utility that Novell® recommends to perform the task and where you can get more information about the tasks and utilities.
If you have further questions about a utility or the purpose of a NetWare Loadable ModuleTM (NLMTM), see the Utilities Reference for OES and NLM Reference for NetWare for OES in the Open Enterprise Server (OES) online documentation.
Common Administrative Tasks
Item to Manage Task Recommended Utility For More Information, See
Novell eDirectoryTM - Users Create, delete, or modify a User
Enable or disable a user account.
iManager 2.5 > Users “Managing Objects” in the Novell eDirectory 8.7.3 Administration Guide
Novell eDirectory - Groups Create, delete, or modify a Group
iManager 2.5 > Groups
or
ConsoleOne® 1.3.6 or later
“Managing Objects” in the Novell eDirectory 8.7.3 Administration Guide
Novell eDirectory - Dynamic Groups
Create, delete, or modify a Dynamic Group
Create Extended Object
iManager 2.5 > Dynamic Groups
Command-line commands
Appnote article "How to Manage and Use Dynamic Groups in Novell eDirectory" (http://developer.novell.com/research/appnotes/2002/april/05/a020405.htm)
Novell eDirectory - Objects Copy, create, delete, modify, move, rename an eDirectory object
iManager 2.5 > eDirectory Administration
“Managing Objects” in the Novell eDirectory 8.7.3 Administration Guide
Novell eDirectory - LDAP objects
Create or delete LDAP objects
View the LDAP overview
iManager 2.5 > LDAP
or
ConsoleOne 1.3.6 or later
“Understanding LDAP Services for Novell eDirectory”“Configuring LDAP Services for Novell eDirectory” in the Novell eDirectory 8.7.3 Administration Guide
Common Administrative Tasks 235
Novell Confidential Manual (ENU) 21 December 2004
Novell eDirectory - Partition and Replicas
Create partition
Merge partition
Move partition
View a replica
View partition information
Run the Filtered Replica Wizard
iManager 2.5 > Partition and Replicas
ConsoleOne 1.3.6 or later
“Managing Partitions and Replicas” in the Novell eDirectory 8.7.3 Administration Guide
Novell eDirectory - Rights Modify Inherited Rights Filter
Modify trustees
Manage rights to other Objects
View Effective rights
iManager 2.5 > Rights iManager 2.5 Online help and “Administering Rights” in the ConsoleOne 1.3.x User Guide
Novell eDirectory - Schema Add attribute
Manage attribute information
Manage class information
Create attribute
Create class
Delete attribute
Delete class
Manage object extensions
iManager 2.5 > Schema
or Schema Manager in ConsoleOne 1.3.6
“Managing the Schema” in the Novell eDirectory 8.7.3 Administration Guide
Novell eDirectory - WAN Traffic
Create LAN area
Delete LAN area
Manage WAN Traffic Management schema
View WAN Traffic Manager Overview
WANMAN Plug-in for iManager 2.5 > WAN Traffic
WANMAN Snap-in for ConsoleOne 1.3.6 or later
“WAN Traffic Manager” in the Novell eDirectory 8.7.3 Administration Guide
Novell eDirectory - Simple Network Management Protocol (SNMP)
Create object
Delete object
iManager 2.5 > SNMP “Monitoring eDirectory Using SNMP” in the Novell eDirectory 8.7.3 Administration Guide
Configure traps The dssnmpsa utility present in the sys:\etc\ directory.
“Monitoring eDirectory Using SNMP” in the Novell eDirectory 8.7.3 Administration Guide
Configure Master agents inetcfg.nlm “Installing and Configuring SNMP Services for eDirectory” in the Novell eDirectory 8.7.3 Administration Guide
Item to Manage Task Recommended Utility For More Information, See
236 Novell Small Business Suite 6.6 Overview and Installation Guide
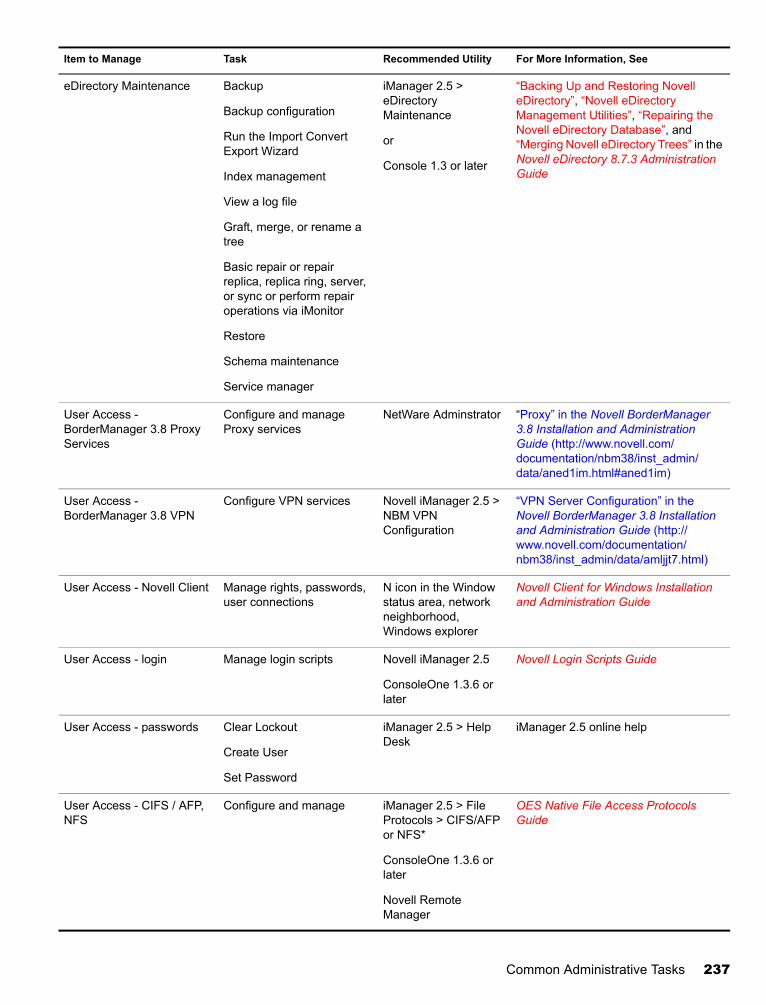
Novell Confidential Manual (ENU) 21 December 2004
eDirectory Maintenance Backup
Backup configuration
Run the Import Convert Export Wizard
Index management
View a log file
Graft, merge, or rename a tree
Basic repair or repair replica, replica ring, server, or sync or perform repair operations via iMonitor
Restore
Schema maintenance
Service manager
iManager 2.5 > eDirectory Maintenance
or
Console 1.3 or later
“Backing Up and Restoring Novell eDirectory”, “Novell eDirectory Management Utilities”, “Repairing the Novell eDirectory Database”, and “Merging Novell eDirectory Trees” in the Novell eDirectory 8.7.3 Administration Guide
User Access - BorderManager 3.8 Proxy Services
Configure and manage Proxy services
NetWare Adminstrator “Proxy” in the Novell BorderManager 3.8 Installation and Administration Guide (http://www.novell.com/documentation/nbm38/inst_admin/data/aned1im.html#aned1im)
User Access - BorderManager 3.8 VPN
Configure VPN services Novell iManager 2.5 > NBM VPN Configuration
“VPN Server Configuration” in the Novell BorderManager 3.8 Installation and Administration Guide (http://www.novell.com/documentation/nbm38/inst_admin/data/amljjt7.html)
User Access - Novell Client Manage rights, passwords, user connections
N icon in the Window status area, network neighborhood, Windows explorer
Novell Client for Windows Installation and Administration Guide
User Access - login Manage login scripts Novell iManager 2.5
ConsoleOne 1.3.6 or later
Novell Login Scripts Guide
User Access - passwords Clear Lockout
Create User
Set Password
iManager 2.5 > Help Desk
iManager 2.5 online help
User Access - CIFS / AFP, NFS
Configure and manage iManager 2.5 > File Protocols > CIFS/AFP or NFS*
ConsoleOne 1.3.6 or later
Novell Remote Manager
OES Native File Access Protocols Guide
Item to Manage Task Recommended Utility For More Information, See
Common Administrative Tasks 237
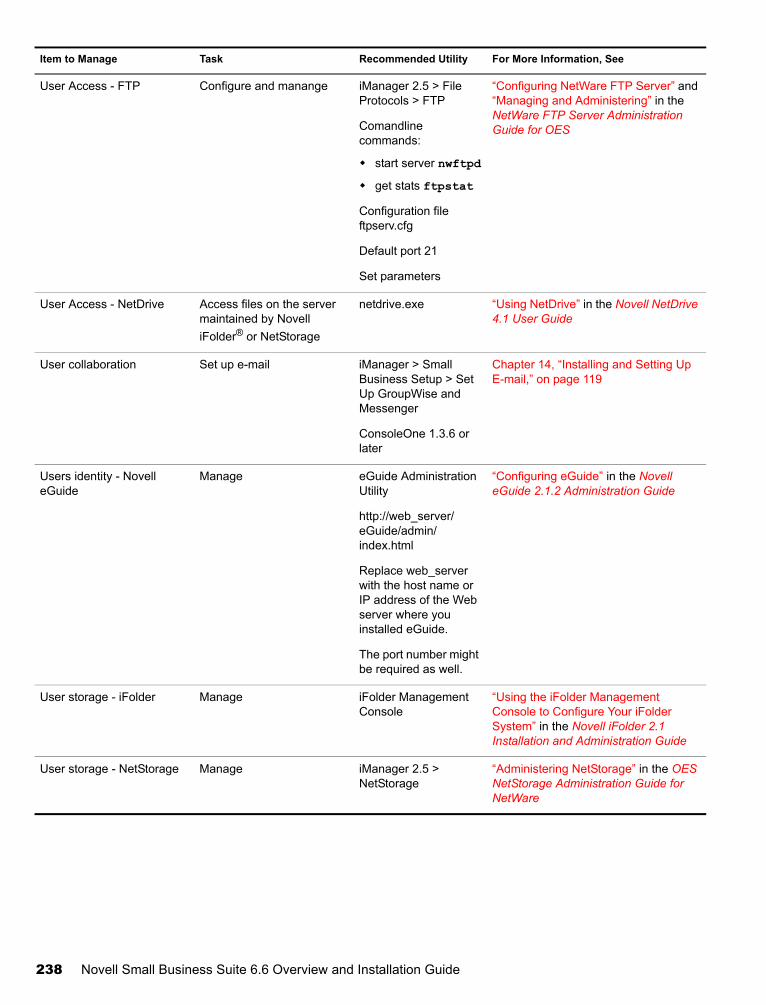
Novell Confidential Manual (ENU) 21 December 2004
User Access - FTP Configure and manange iManager 2.5 > File Protocols > FTP
Comandline commands:
start server nwftpd
get stats ftpstat
Configuration file ftpserv.cfg
Default port 21
Set parameters
“Configuring NetWare FTP Server” and “Managing and Administering” in the NetWare FTP Server Administration Guide for OES
User Access - NetDrive Access files on the server maintained by Novell iFolder® or NetStorage
netdrive.exe “Using NetDrive” in the Novell NetDrive 4.1 User Guide
User collaboration Set up e-mail iManager > Small Business Setup > Set Up GroupWise and Messenger
ConsoleOne 1.3.6 or later
Chapter 14, “Installing and Setting Up E-mail,” on page 119
Users identity - Novell eGuide
Manage eGuide Administration Utility
http://web_server/eGuide/admin/index.html
Replace web_server with the host name or IP address of the Web server where you installed eGuide.
The port number might be required as well.
“Configuring eGuide” in the Novell eGuide 2.1.2 Administration Guide
User storage - iFolder Manage iFolder Management Console
“Using the iFolder Management Console to Configure Your iFolder System” in the Novell iFolder 2.1 Installation and Administration Guide
User storage - NetStorage Manage iManager 2.5 > NetStorage
“Administering NetStorage” in the OES NetStorage Administration Guide for NetWare
Item to Manage Task Recommended Utility For More Information, See
238 Novell Small Business Suite 6.6 Overview and Installation Guide
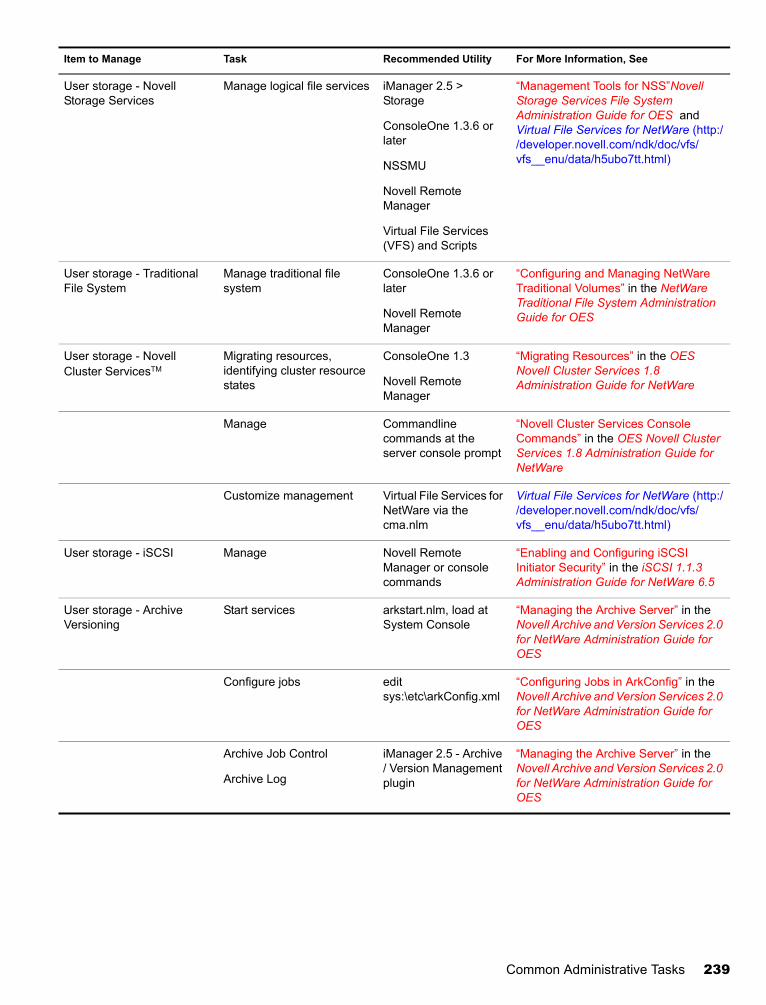
Novell Confidential Manual (ENU) 21 December 2004
User storage - Novell Storage Services
Manage logical file services iManager 2.5 > Storage
ConsoleOne 1.3.6 or later
NSSMU
Novell Remote Manager
Virtual File Services (VFS) and Scripts
“Management Tools for NSS”Novell Storage Services File System Administration Guide for OES and Virtual File Services for NetWare (http://developer.novell.com/ndk/doc/vfs/vfs__enu/data/h5ubo7tt.html)
User storage - Traditional File System
Manage traditional file system
ConsoleOne 1.3.6 or later
Novell Remote Manager
“Configuring and Managing NetWare Traditional Volumes” in the NetWare Traditional File System Administration Guide for OES
User storage - Novell Cluster ServicesTM
Migrating resources, identifying cluster resource states
ConsoleOne 1.3
Novell Remote Manager
“Migrating Resources” in the OES Novell Cluster Services 1.8 Administration Guide for NetWare
Manage Commandline commands at the server console prompt
“Novell Cluster Services Console Commands” in the OES Novell Cluster Services 1.8 Administration Guide for NetWare
Customize management Virtual File Services for NetWare via the cma.nlm
Virtual File Services for NetWare (http://developer.novell.com/ndk/doc/vfs/vfs__enu/data/h5ubo7tt.html)
User storage - iSCSI Manage Novell Remote Manager or console commands
“Enabling and Configuring iSCSI Initiator Security” in the iSCSI 1.1.3 Administration Guide for NetWare 6.5
User storage - Archive Versioning
Start services arkstart.nlm, load at System Console
“Managing the Archive Server” in the Novell Archive and Version Services 2.0 for NetWare Administration Guide for OES
Configure jobs edit sys:\etc\arkConfig.xml
“Configuring Jobs in ArkConfig” in the Novell Archive and Version Services 2.0 for NetWare Administration Guide for OES
Archive Job Control
Archive Log
iManager 2.5 - Archive / Version Management plugin
“Managing the Archive Server” in the Novell Archive and Version Services 2.0 for NetWare Administration Guide for OES
Item to Manage Task Recommended Utility For More Information, See
Common Administrative Tasks 239
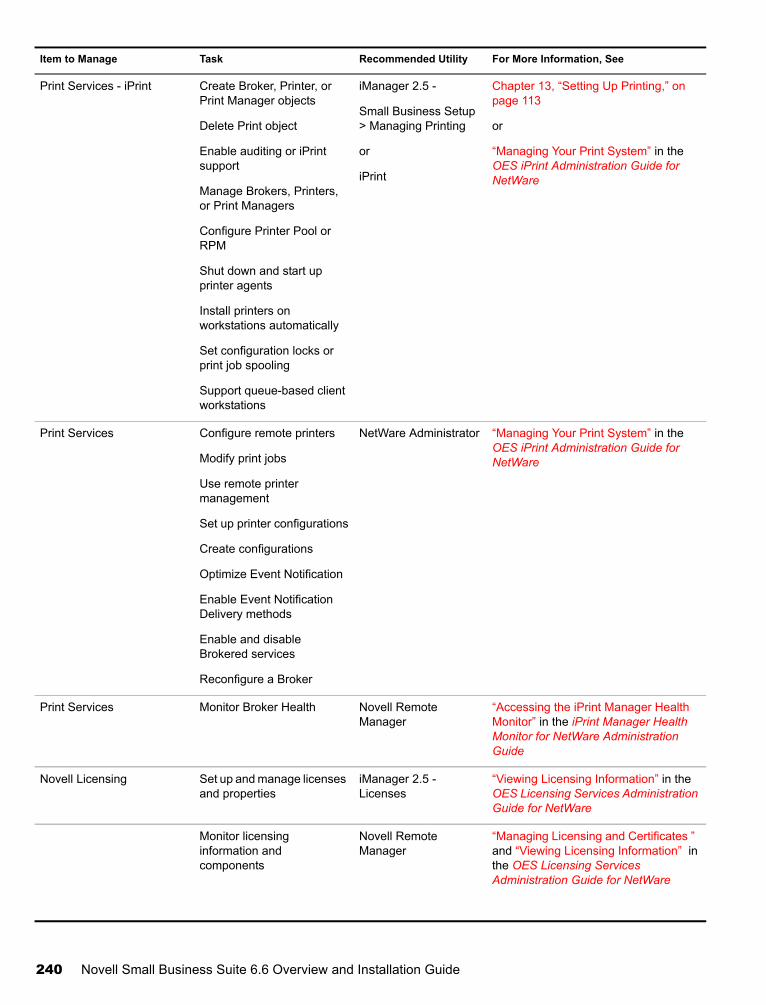
Novell Confidential Manual (ENU) 21 December 2004
Print Services - iPrint Create Broker, Printer, or Print Manager objects
Delete Print object
Enable auditing or iPrint support
Manage Brokers, Printers, or Print Managers
Configure Printer Pool or RPM
Shut down and start up printer agents
Install printers on workstations automatically
Set configuration locks or print job spooling
Support queue-based client workstations
iManager 2.5 -
Small Business Setup > Managing Printing
or
iPrint
Chapter 13, “Setting Up Printing,” on page 113
or
“Managing Your Print System” in the OES iPrint Administration Guide for NetWare
Print Services Configure remote printers
Modify print jobs
Use remote printer management
Set up printer configurations
Create configurations
Optimize Event Notification
Enable Event Notification Delivery methods
Enable and disable Brokered services
Reconfigure a Broker
NetWare Administrator “Managing Your Print System” in the OES iPrint Administration Guide for NetWare
Print Services Monitor Broker Health Novell Remote Manager
“Accessing the iPrint Manager Health Monitor” in the iPrint Manager Health Monitor for NetWare Administration Guide
Novell Licensing Set up and manage licenses and properties
iManager 2.5 - Licenses
“Viewing Licensing Information” in the OES Licensing Services Administration Guide for NetWare
Monitor licensing information and components
Novell Remote Manager
“Managing Licensing and Certificates ” and “Viewing Licensing Information” in the OES Licensing Services Administration Guide for NetWare
Item to Manage Task Recommended Utility For More Information, See
240 Novell Small Business Suite 6.6 Overview and Installation Guide
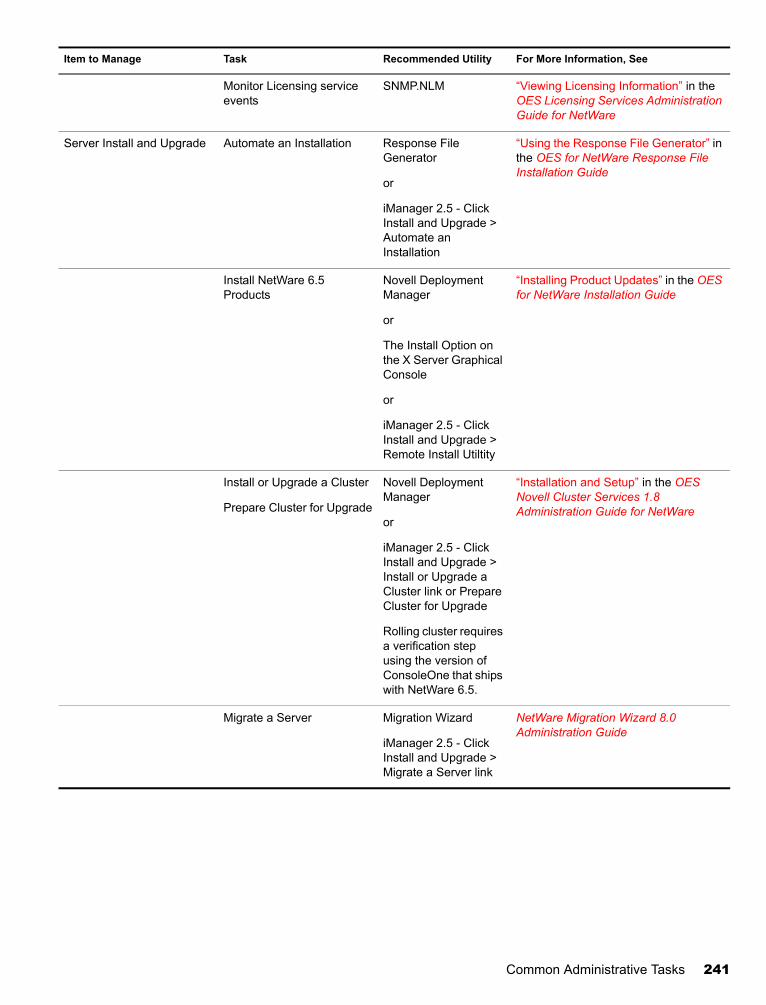
Novell Confidential Manual (ENU) 21 December 2004
Monitor Licensing service events
SNMP.NLM “Viewing Licensing Information” in the OES Licensing Services Administration Guide for NetWare
Server Install and Upgrade Automate an Installation Response File Generator
or
iManager 2.5 - Click Install and Upgrade > Automate an Installation
“Using the Response File Generator” in the OES for NetWare Response File Installation Guide
Install NetWare 6.5 Products
Novell Deployment Manager
or
The Install Option on the X Server Graphical Console
or
iManager 2.5 - Click Install and Upgrade > Remote Install Utiltity
“Installing Product Updates” in the OES for NetWare Installation Guide
Install or Upgrade a Cluster
Prepare Cluster for Upgrade
Novell Deployment Manager
or
iManager 2.5 - Click Install and Upgrade > Install or Upgrade a Cluster link or Prepare Cluster for Upgrade
Rolling cluster requires a verification step using the version of ConsoleOne that ships with NetWare 6.5.
“Installation and Setup” in the OES Novell Cluster Services 1.8 Administration Guide for NetWare
Migrate a Server Migration Wizard
iManager 2.5 - Click Install and Upgrade > Migrate a Server link
NetWare Migration Wizard 8.0 Administration Guide
Item to Manage Task Recommended Utility For More Information, See
Common Administrative Tasks 241
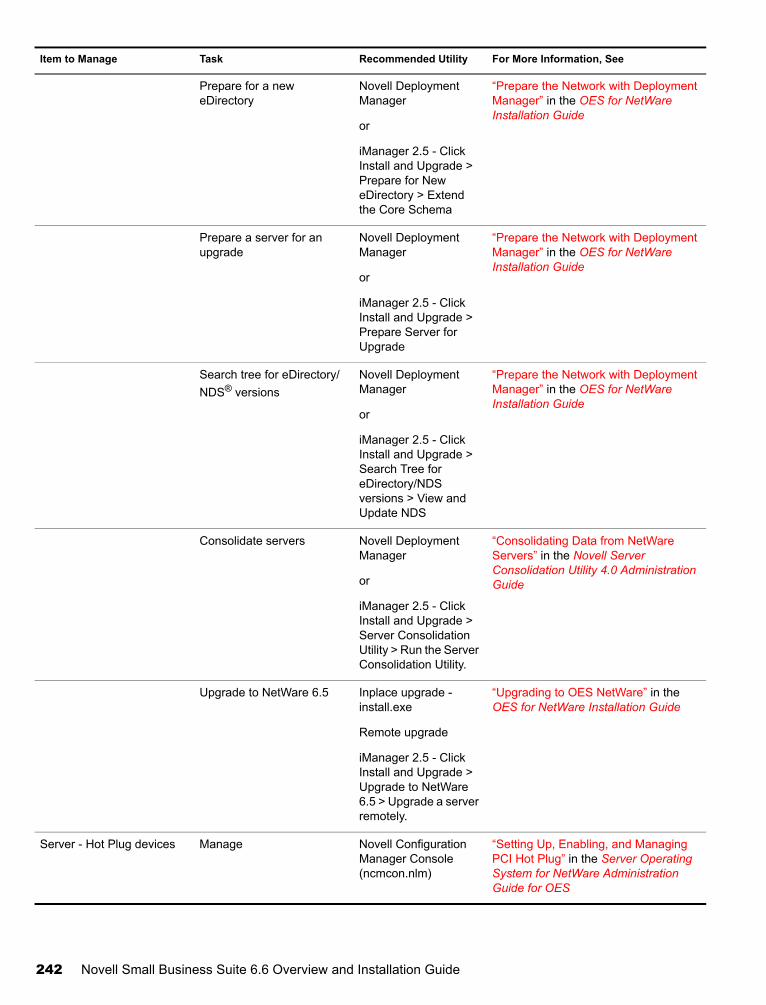
Novell Confidential Manual (ENU) 21 December 2004
Prepare for a new eDirectory
Novell Deployment Manager
or
iManager 2.5 - Click Install and Upgrade > Prepare for New eDirectory > Extend the Core Schema
“Prepare the Network with Deployment Manager” in the OES for NetWare Installation Guide
Prepare a server for an upgrade
Novell Deployment Manager
or
iManager 2.5 - Click Install and Upgrade > Prepare Server for Upgrade
“Prepare the Network with Deployment Manager” in the OES for NetWare Installation Guide
Search tree for eDirectory/NDS® versions
Novell Deployment Manager
or
iManager 2.5 - Click Install and Upgrade > Search Tree for eDirectory/NDS versions > View and Update NDS
“Prepare the Network with Deployment Manager” in the OES for NetWare Installation Guide
Consolidate servers Novell Deployment Manager
or
iManager 2.5 - Click Install and Upgrade > Server Consolidation Utility > Run the Server Consolidation Utility.
“Consolidating Data from NetWare Servers” in the Novell Server Consolidation Utility 4.0 Administration Guide
Upgrade to NetWare 6.5 Inplace upgrade - install.exe
Remote upgrade
iManager 2.5 - Click Install and Upgrade > Upgrade to NetWare 6.5 > Upgrade a server remotely.
“Upgrading to OES NetWare” in the OES for NetWare Installation Guide
Server - Hot Plug devices Manage Novell Configuration Manager Console (ncmcon.nlm)
“Setting Up, Enabling, and Managing PCI Hot Plug” in the Server Operating System for NetWare Administration Guide for OES
Item to Manage Task Recommended Utility For More Information, See
242 Novell Small Business Suite 6.6 Overview and Installation Guide
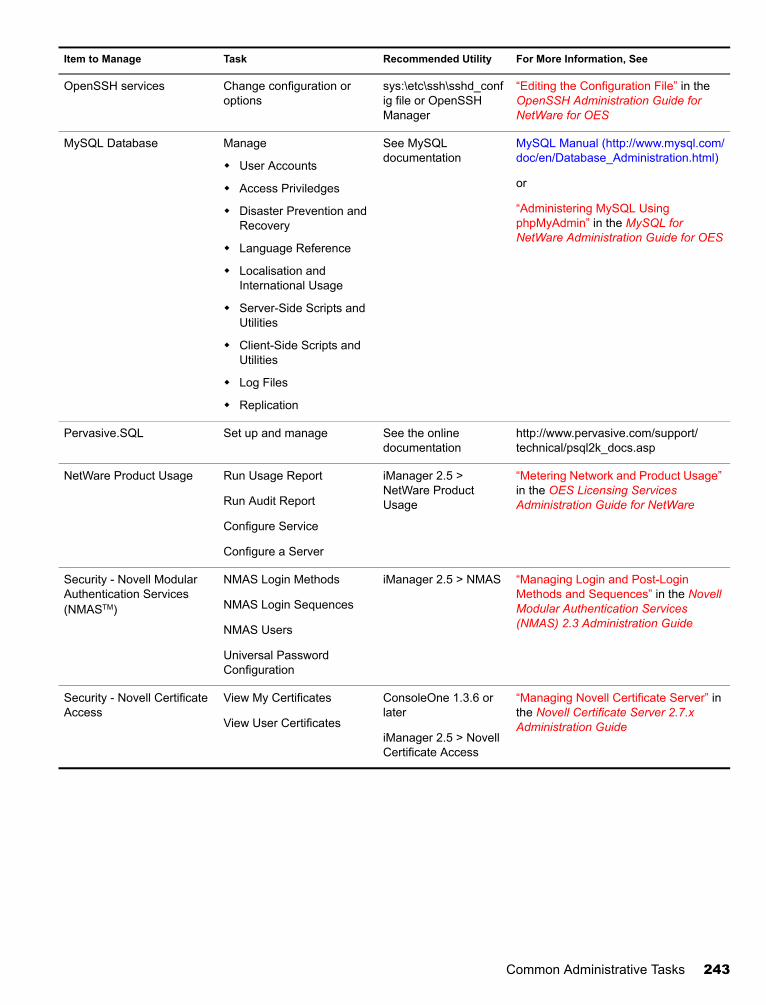
Novell Confidential Manual (ENU) 21 December 2004
OpenSSH services Change configuration or options
sys:\etc\ssh\sshd_config file or OpenSSH Manager
“Editing the Configuration File” in the OpenSSH Administration Guide for NetWare for OES
MySQL Database Manage
User Accounts
Access Priviledges
Disaster Prevention and Recovery
Language Reference
Localisation and International Usage
Server-Side Scripts and Utilities
Client-Side Scripts and Utilities
Log Files
Replication
See MySQL documentation
MySQL Manual (http://www.mysql.com/doc/en/Database_Administration.html)
or
“Administering MySQL Using phpMyAdmin” in the MySQL for NetWare Administration Guide for OES
Pervasive.SQL Set up and manage See the online documentation
http://www.pervasive.com/support/technical/psql2k_docs.asp
NetWare Product Usage Run Usage Report
Run Audit Report
Configure Service
Configure a Server
iManager 2.5 > NetWare Product Usage
“Metering Network and Product Usage” in the OES Licensing Services Administration Guide for NetWare
Security - Novell Modular Authentication Services (NMASTM)
NMAS Login Methods
NMAS Login Sequences
NMAS Users
Universal Password Configuration
iManager 2.5 > NMAS “Managing Login and Post-Login Methods and Sequences” in the Novell Modular Authentication Services (NMAS) 2.3 Administration Guide
Security - Novell Certificate Access
View My Certificates
View User Certificates
ConsoleOne 1.3.6 or later
iManager 2.5 > Novell Certificate Access
“Managing Novell Certificate Server” in the Novell Certificate Server 2.7.x Administration Guide
Item to Manage Task Recommended Utility For More Information, See
Common Administrative Tasks 243
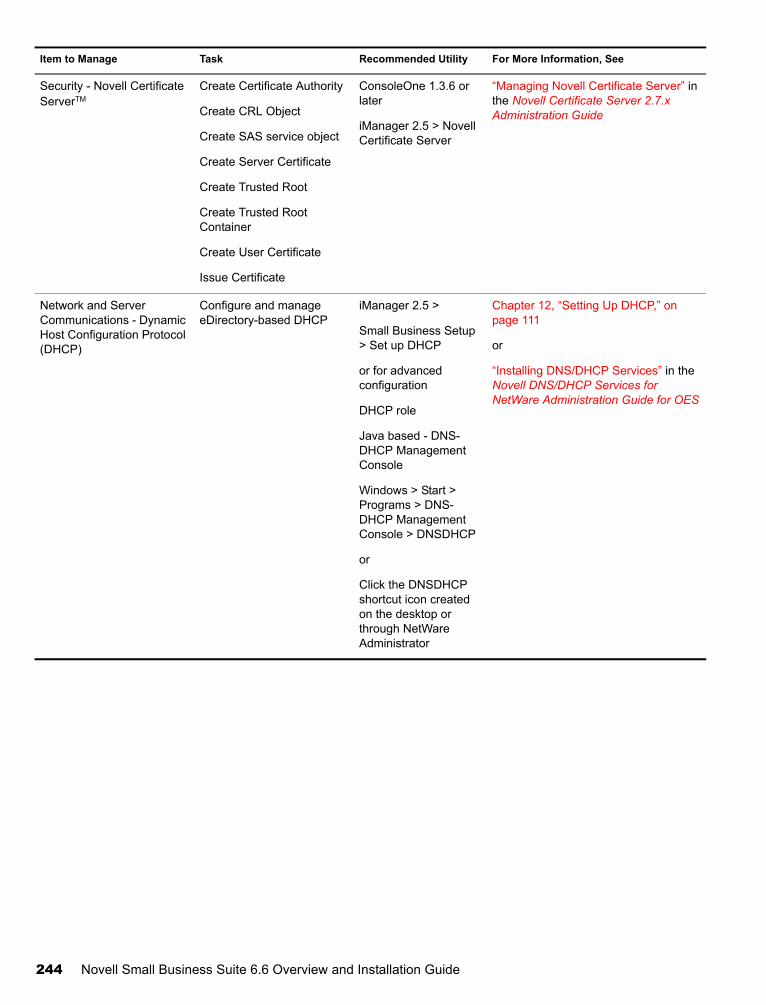
Novell Confidential Manual (ENU) 21 December 2004
Security - Novell Certificate ServerTM
Create Certificate Authority
Create CRL Object
Create SAS service object
Create Server Certificate
Create Trusted Root
Create Trusted Root Container
Create User Certificate
Issue Certificate
ConsoleOne 1.3.6 or later
iManager 2.5 > Novell Certificate Server
“Managing Novell Certificate Server” in the Novell Certificate Server 2.7.x Administration Guide
Network and Server Communications - Dynamic Host Configuration Protocol (DHCP)
Configure and manage eDirectory-based DHCP
iManager 2.5 >
Small Business Setup > Set up DHCP
or for advanced configuration
DHCP role
Java based - DNS-DHCP Management Console
Windows > Start > Programs > DNS-DHCP Management Console > DNSDHCP
or
Click the DNSDHCP shortcut icon created on the desktop or through NetWare Administrator
Chapter 12, “Setting Up DHCP,” on page 111
or
“Installing DNS/DHCP Services” in the Novell DNS/DHCP Services for NetWare Administration Guide for OES
Item to Manage Task Recommended Utility For More Information, See
244 Novell Small Business Suite 6.6 Overview and Installation Guide
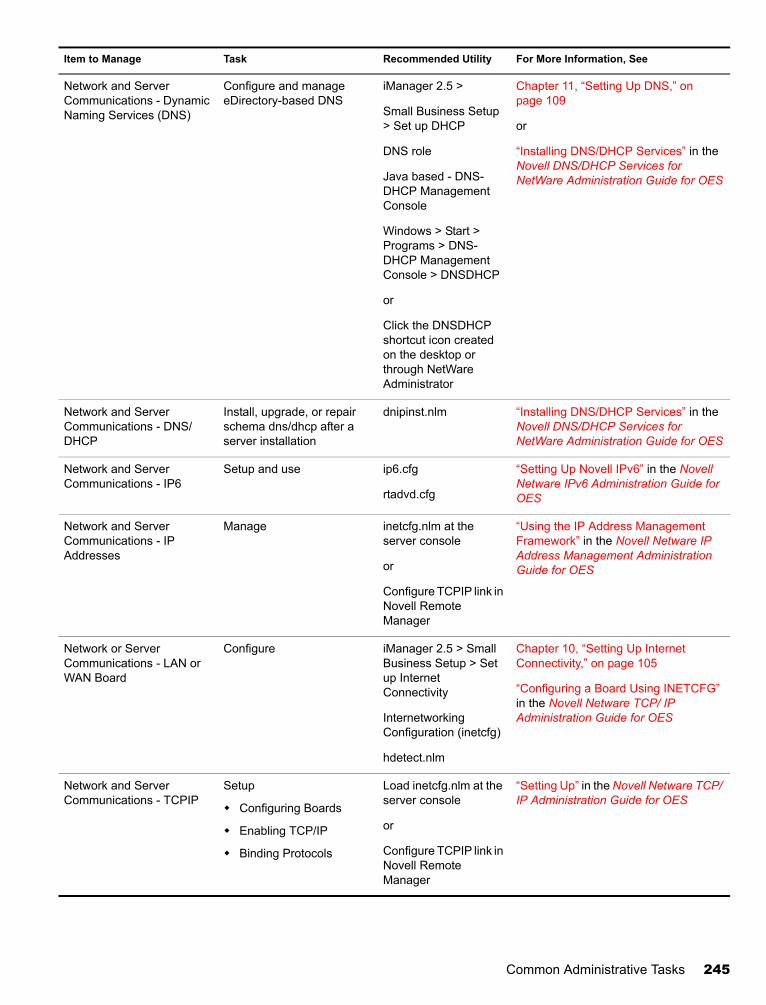
Novell Confidential Manual (ENU) 21 December 2004
Network and Server Communications - Dynamic Naming Services (DNS)
Configure and manage eDirectory-based DNS
iManager 2.5 >
Small Business Setup > Set up DHCP
DNS role
Java based - DNS-DHCP Management Console
Windows > Start > Programs > DNS-DHCP Management Console > DNSDHCP
or
Click the DNSDHCP shortcut icon created on the desktop or through NetWare Administrator
Chapter 11, “Setting Up DNS,” on page 109
or
“Installing DNS/DHCP Services” in the Novell DNS/DHCP Services for NetWare Administration Guide for OES
Network and Server Communications - DNS/DHCP
Install, upgrade, or repair schema dns/dhcp after a server installation
dnipinst.nlm “Installing DNS/DHCP Services” in the Novell DNS/DHCP Services for NetWare Administration Guide for OES
Network and Server Communications - IP6
Setup and use ip6.cfg
rtadvd.cfg
“Setting Up Novell IPv6” in the Novell Netware IPv6 Administration Guide for OES
Network and Server Communications - IP Addresses
Manage inetcfg.nlm at the server console
or
Configure TCPIP link in Novell Remote Manager
“Using the IP Address Management Framework” in the Novell Netware IP Address Management Administration Guide for OES
Network or Server Communications - LAN or WAN Board
Configure iManager 2.5 > Small Business Setup > Set up Internet Connectivity
Internetworking Configuration (inetcfg)
hdetect.nlm
Chapter 10, “Setting Up Internet Connectivity,” on page 105
“Configuring a Board Using INETCFG” in the Novell Netware TCP/ IP Administration Guide for OES
Network and Server Communications - TCPIP
Setup
Configuring Boards
Enabling TCP/IP
Binding Protocols
Load inetcfg.nlm at the server console
or
Configure TCPIP link in Novell Remote Manager
“Setting Up” in the Novell Netware TCP/ IP Administration Guide for OES
Item to Manage Task Recommended Utility For More Information, See
Common Administrative Tasks 245
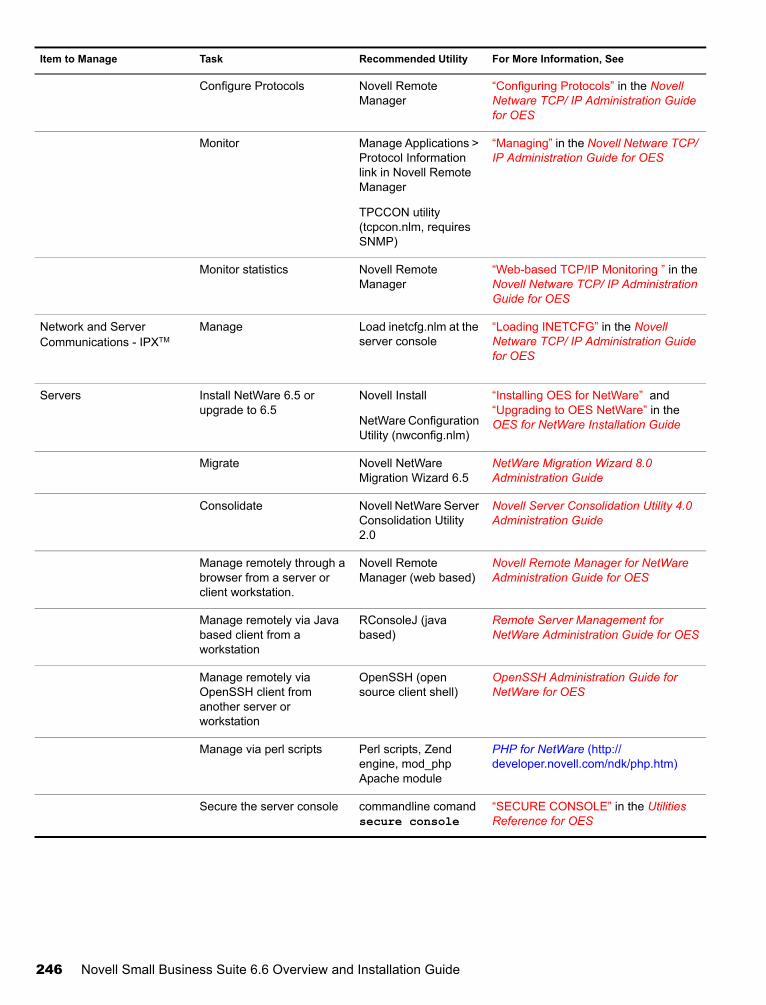
Novell Confidential Manual (ENU) 21 December 2004
Configure Protocols Novell Remote Manager
“Configuring Protocols” in the Novell Netware TCP/ IP Administration Guide for OES
Monitor Manage Applications > Protocol Information link in Novell Remote Manager
TPCCON utility (tcpcon.nlm, requires SNMP)
“Managing” in the Novell Netware TCP/ IP Administration Guide for OES
Monitor statistics Novell Remote Manager
“Web-based TCP/IP Monitoring ” in the Novell Netware TCP/ IP Administration Guide for OES
Network and Server Communications - IPXTM
Manage Load inetcfg.nlm at the server console
“Loading INETCFG” in the Novell Netware TCP/ IP Administration Guide for OES
Servers Install NetWare 6.5 or upgrade to 6.5
Novell Install
NetWare Configuration Utility (nwconfig.nlm)
“Installing OES for NetWare” and “Upgrading to OES NetWare” in the OES for NetWare Installation Guide
Migrate Novell NetWare Migration Wizard 6.5
NetWare Migration Wizard 8.0 Administration Guide
Consolidate Novell NetWare Server Consolidation Utility 2.0
Novell Server Consolidation Utility 4.0 Administration Guide
Manage remotely through a browser from a server or client workstation.
Novell Remote Manager (web based)
Novell Remote Manager for NetWare Administration Guide for OES
Manage remotely via Java based client from a workstation
RConsoleJ (java based)
Remote Server Management for NetWare Administration Guide for OES
Manage remotely via OpenSSH client from another server or workstation
OpenSSH (open source client shell)
OpenSSH Administration Guide for NetWare for OES
Manage via perl scripts Perl scripts, Zend engine, mod_php Apache module
PHP for NetWare (http://developer.novell.com/ndk/php.htm)
Secure the server console commandline comand secure console
“SECURE CONSOLE” in the Utilities Reference for OES
Item to Manage Task Recommended Utility For More Information, See
246 Novell Small Business Suite 6.6 Overview and Installation Guide
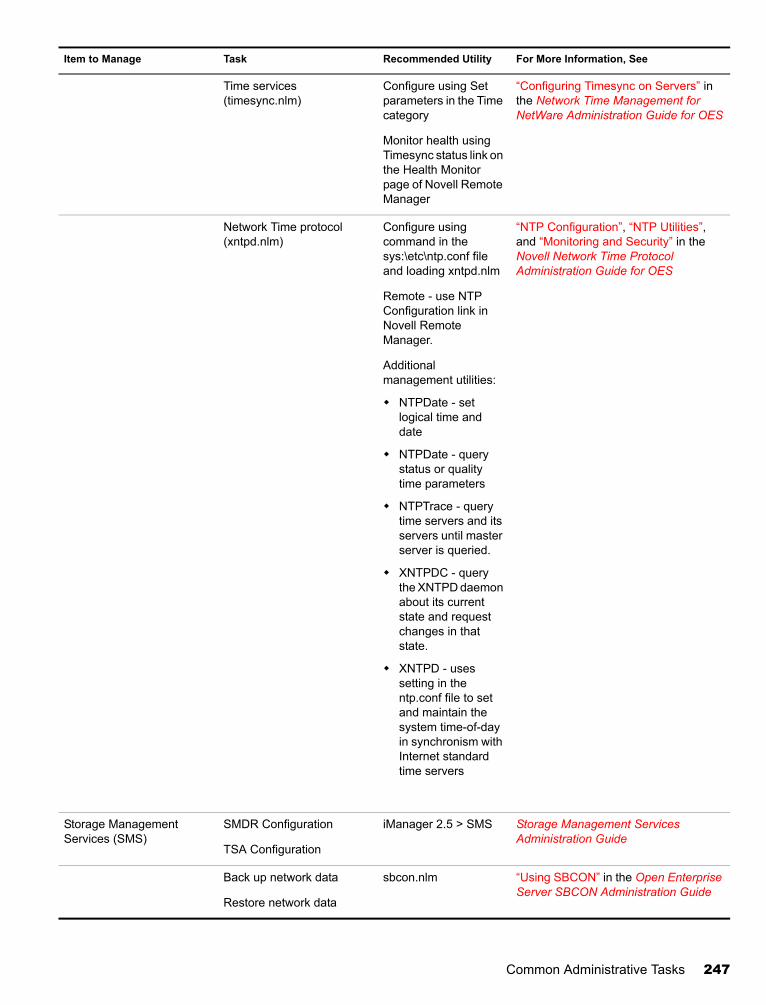
Novell Confidential Manual (ENU) 21 December 2004
Time services (timesync.nlm)
Configure using Set parameters in the Time category
Monitor health using Timesync status link on the Health Monitor page of Novell Remote Manager
“Configuring Timesync on Servers” in the Network Time Management for NetWare Administration Guide for OES
Network Time protocol (xntpd.nlm)
Configure using command in the sys:\etc\ntp.conf file and loading xntpd.nlm
Remote - use NTP Configuration link in Novell Remote Manager.
Additional management utilities:
NTPDate - set logical time and date
NTPDate - query status or quality time parameters
NTPTrace - query time servers and its servers until master server is queried.
XNTPDC - query the XNTPD daemon about its current state and request changes in that state.
XNTPD - uses setting in the ntp.conf file to set and maintain the system time-of-day in synchronism with Internet standard time servers
“NTP Configuration”, “NTP Utilities”, and “Monitoring and Security” in the Novell Network Time Protocol Administration Guide for OES
Storage Management Services (SMS)
SMDR Configuration
TSA Configuration
iManager 2.5 > SMS Storage Management Services Administration Guide
Back up network data
Restore network data
sbcon.nlm “Using SBCON” in the Open Enterprise Server SBCON Administration Guide
Item to Manage Task Recommended Utility For More Information, See
Common Administrative Tasks 247
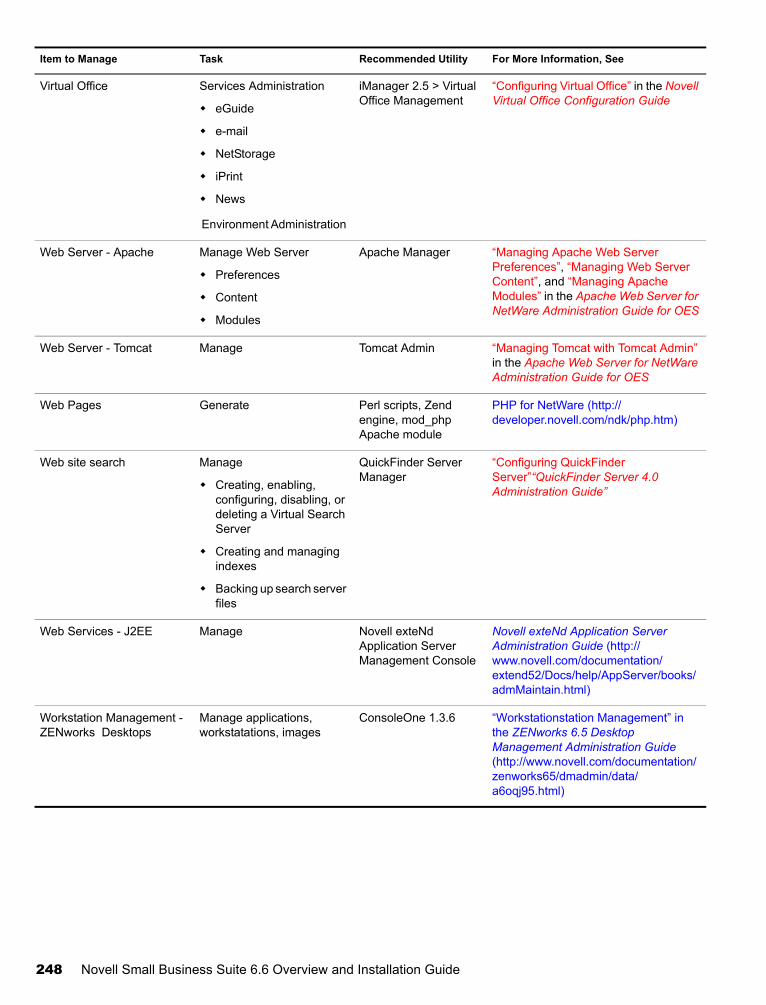
Novell Confidential Manual (ENU) 21 December 2004
Virtual Office Services Administration
eGuide
NetStorage
iPrint
News
Environment Administration
iManager 2.5 > Virtual Office Management
“Configuring Virtual Office” in the Novell Virtual Office Configuration Guide
Web Server - Apache Manage Web Server
Preferences
Content
Modules
Apache Manager “Managing Apache Web Server Preferences”, “Managing Web Server Content”, and “Managing Apache Modules” in the Apache Web Server for NetWare Administration Guide for OES
Web Server - Tomcat Manage Tomcat Admin “Managing Tomcat with Tomcat Admin” in the Apache Web Server for NetWare Administration Guide for OES
Web Pages Generate Perl scripts, Zend engine, mod_php Apache module
PHP for NetWare (http://developer.novell.com/ndk/php.htm)
Web site search Manage
Creating, enabling, configuring, disabling, or deleting a Virtual Search Server
Creating and managing indexes
Backing up search server files
QuickFinder Server Manager
“Configuring QuickFinder Server”“QuickFinder Server 4.0 Administration Guide”
Web Services - J2EE Manage Novell exteNd Application Server Management Console
Novell exteNd Application Server Administration Guide (http://www.novell.com/documentation/extend52/Docs/help/AppServer/books/admMaintain.html)
Workstation Management -ZENworks Desktops
Manage applications, workstatations, images
ConsoleOne 1.3.6 “Workstationstation Management” in the ZENworks 6.5 Desktop Management Administration Guide (http://www.novell.com/documentation/zenworks65/dmadmin/data/a6oqj95.html)
Item to Manage Task Recommended Utility For More Information, See
248 Novell Small Business Suite 6.6 Overview and Installation Guide
Novell Confidential Manual (ENU) 21 December 2004
28 Supported Web Browsers
Novell Small Business Suite includes enhanced support for browser-based administration utilities that provide administrators with greater management flexibility in administering Novell® services.
However, there are many varieties and versions of Web browsers running on many different client desktop platforms. Each Web browser (and the platforms on which they run) offer varying degrees of capability and functionality. Because of the many varieties of Web browsers and platforms, Novell has had to select which of these browsers and platforms it will support.
This chapter includes tables that indicate which Novell administration utilities and features are supported on which platforms and Web browsers. It includes the following topics:
“Testing Information” on page 251
“How to Read the Tables” on page 252
“End User Components” on page 252
“Administration Components” on page 254
“Novell Remote Manager Features” on page 255
“iManager Features” on page 255
Testing InformationThe tables below indicate the platforms and Web browsers on which Novell has tested its browser-based administration utilities and features.
Windows 2000 or XP running Internet Explorer version 6 is the primary platform on which all Novell Web interfaces in NetWare are guaranteed to work as designed.
Other platforms tested are RedHat Linux, Suse Linux, NetWare Server Browser, and Macintosh*.
As a general note, none of the administration utilities are supported on Macintosh at this time. This is due to deficiencies in Internet Explorer for Macintosh in handling security certificates for secure connections, as well as deficiencies in Netscape browsers for Macintosh in supporting Web user interfaces. The Apple* Safari Web browser is being tested and might become available in the future.
Also, end-user interfaces are not supported on the NetWare server browser.
Upcoming support packs and software releases will include increased support for the many platforms and Web browsers available today. Also, as browser and platform vendors continue to improve their products, Novell will take advantage of their improvements to make your experience with Novell’s Web-based utilities even better.
How to Read the TablesA in the row and column of an administration utility (or feature) indicates that Novell has both tested the utility on the specified platform and Web browser, and will support the utility where it is used on the indicated platform and browser.
Supported Web Browsers 249
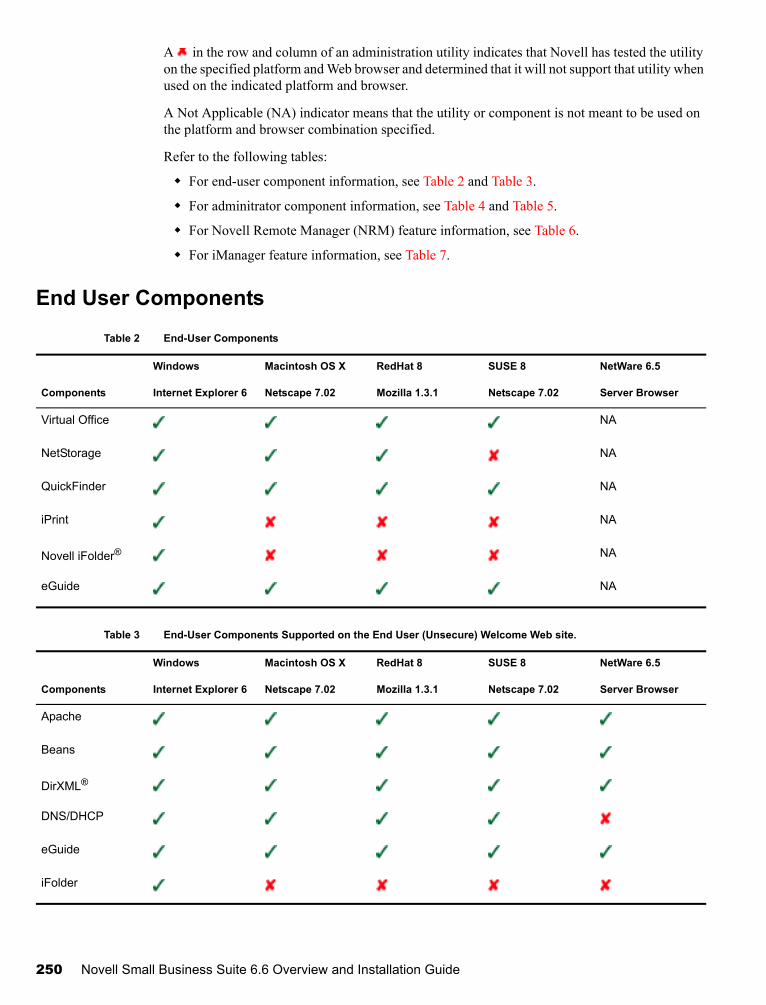
Novell Confidential Manual (ENU) 21 December 2004
A in the row and column of an administration utility indicates that Novell has tested the utility on the specified platform and Web browser and determined that it will not support that utility when used on the indicated platform and browser.
A Not Applicable (NA) indicator means that the utility or component is not meant to be used on the platform and browser combination specified.
Refer to the following tables:
For end-user component information, see Table 2 and Table 3.
For adminitrator component information, see Table 4 and Table 5.
For Novell Remote Manager (NRM) feature information, see Table 6.
For iManager feature information, see Table 7.
End User Components
Table 2 End-User Components
Table 3 End-User Components Supported on the End User (Unsecure) Welcome Web site.
Windows Macintosh OS X RedHat 8 SUSE 8 NetWare 6.5
Components Internet Explorer 6 Netscape 7.02 Mozilla 1.3.1 Netscape 7.02 Server Browser
Virtual Office NA
NetStorage NA
QuickFinder NA
iPrint NA
Novell iFolder® NA
eGuide NA
Windows Macintosh OS X RedHat 8 SUSE 8 NetWare 6.5
Components Internet Explorer 6 Netscape 7.02 Mozilla 1.3.1 Netscape 7.02 Server Browser
Apache
Beans
DirXML®
DNS/DHCP
eGuide
iFolder
250 Novell Small Business Suite 6.6 Overview and Installation Guide
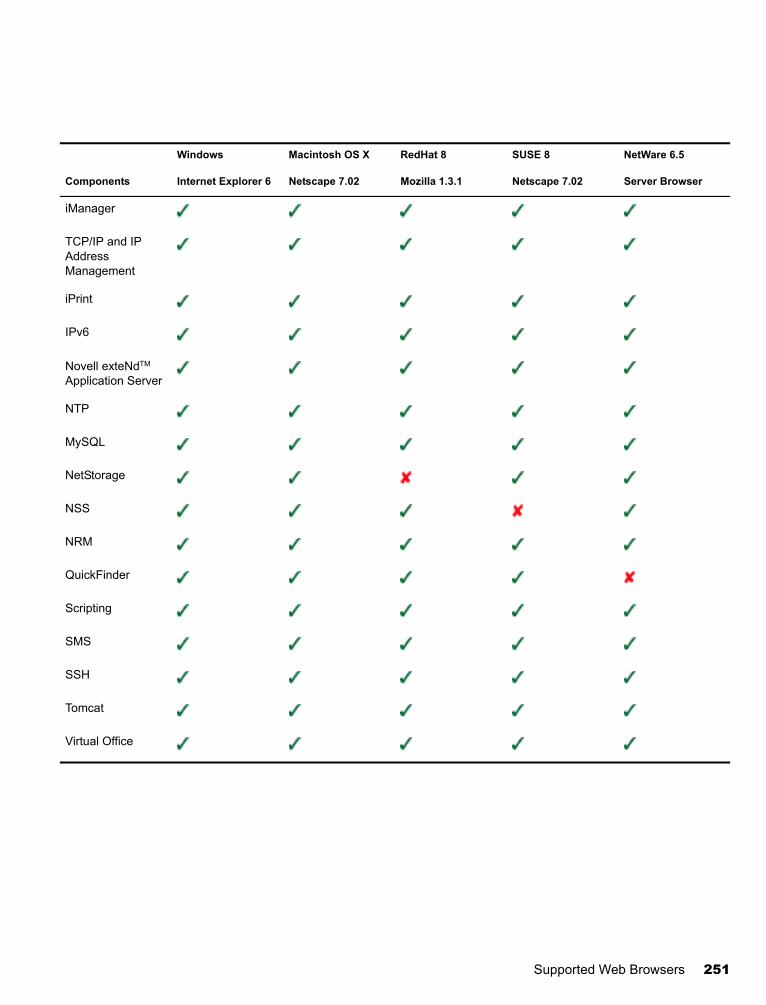
Novell Confidential Manual (ENU) 21 December 2004
iManager
TCP/IP and IP Address Management
iPrint
IPv6
Novell exteNdTM Application Server
NTP
MySQL
NetStorage
NSS
NRM
QuickFinder
Scripting
SMS
SSH
Tomcat
Virtual Office
Windows Macintosh OS X RedHat 8 SUSE 8 NetWare 6.5
Components Internet Explorer 6 Netscape 7.02 Mozilla 1.3.1 Netscape 7.02 Server Browser
Supported Web Browsers 251
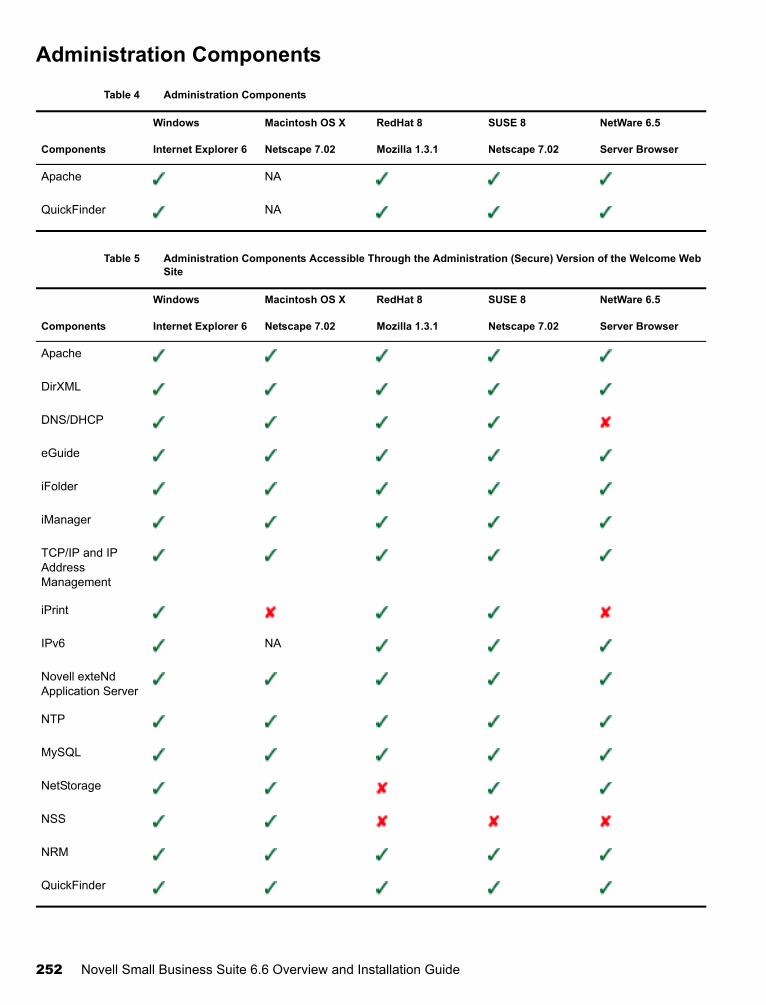
Novell Confidential Manual (ENU) 21 December 2004
Administration Components
Table 4 Administration Components
Table 5 Administration Components Accessible Through the Administration (Secure) Version of the Welcome Web Site
Windows Macintosh OS X RedHat 8 SUSE 8 NetWare 6.5
Components Internet Explorer 6 Netscape 7.02 Mozilla 1.3.1 Netscape 7.02 Server Browser
Apache NA
QuickFinder NA
Windows Macintosh OS X RedHat 8 SUSE 8 NetWare 6.5
Components Internet Explorer 6 Netscape 7.02 Mozilla 1.3.1 Netscape 7.02 Server Browser
Apache
DirXML
DNS/DHCP
eGuide
iFolder
iManager
TCP/IP and IP Address Management
iPrint
IPv6 NA
Novell exteNd Application Server
NTP
MySQL
NetStorage
NSS
NRM
QuickFinder
252 Novell Small Business Suite 6.6 Overview and Installation Guide
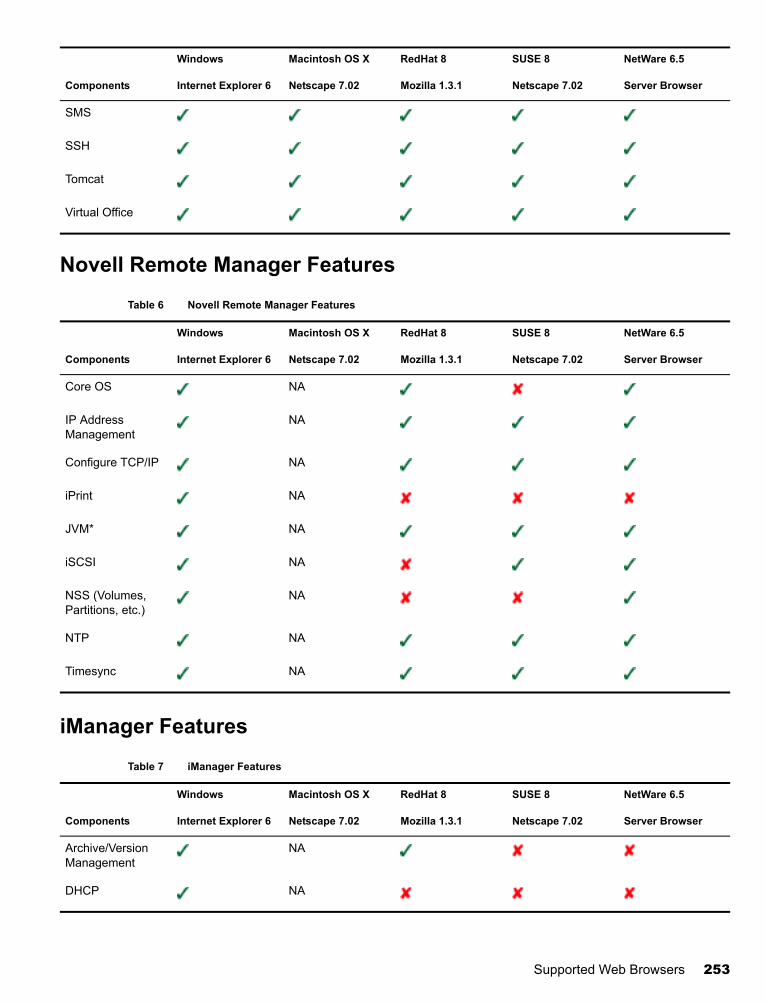
Novell Confidential Manual (ENU) 21 December 2004
Novell Remote Manager Features
Table 6 Novell Remote Manager Features
iManager Features
Table 7 iManager Features
SMS
SSH
Tomcat
Virtual Office
Windows Macintosh OS X RedHat 8 SUSE 8 NetWare 6.5
Components Internet Explorer 6 Netscape 7.02 Mozilla 1.3.1 Netscape 7.02 Server Browser
Core OS NA
IP Address Management
NA
Configure TCP/IP NA
iPrint NA
JVM* NA
iSCSI NA
NSS (Volumes, Partitions, etc.)
NA
NTP NA
Timesync NA
Windows Macintosh OS X RedHat 8 SUSE 8 NetWare 6.5
Components Internet Explorer 6 Netscape 7.02 Mozilla 1.3.1 Netscape 7.02 Server Browser
Archive/Version Management
NA
DHCP NA
Windows Macintosh OS X RedHat 8 SUSE 8 NetWare 6.5
Components Internet Explorer 6 Netscape 7.02 Mozilla 1.3.1 Netscape 7.02 Server Browser
Supported Web Browsers 253
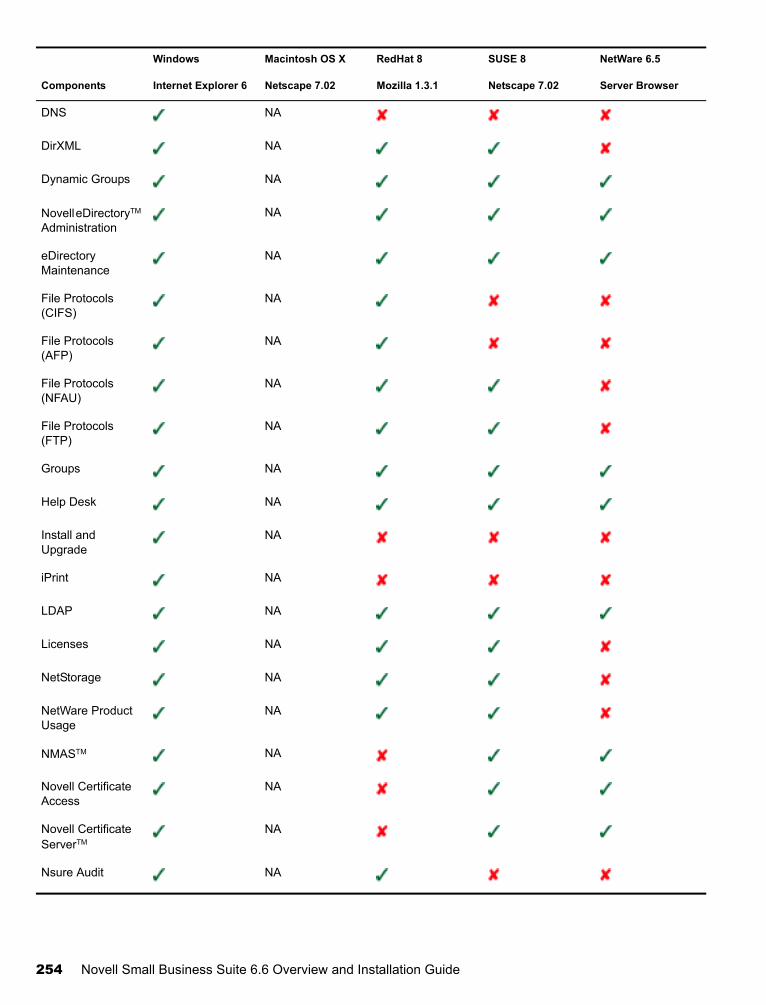
Novell Confidential Manual (ENU) 21 December 2004
DNS NA
DirXML NA
Dynamic Groups NA
Novell eDirectoryTM Administration
NA
eDirectory Maintenance
NA
File Protocols (CIFS)
NA
File Protocols (AFP)
NA
File Protocols (NFAU)
NA
File Protocols (FTP)
NA
Groups NA
Help Desk NA
Install and Upgrade
NA
iPrint NA
LDAP NA
Licenses NA
NetStorage NA
NetWare Product Usage
NA
NMASTM NA
Novell Certificate Access
NA
Novell Certificate ServerTM
NA
Nsure Audit NA
Windows Macintosh OS X RedHat 8 SUSE 8 NetWare 6.5
Components Internet Explorer 6 Netscape 7.02 Mozilla 1.3.1 Netscape 7.02 Server Browser
254 Novell Small Business Suite 6.6 Overview and Installation Guide
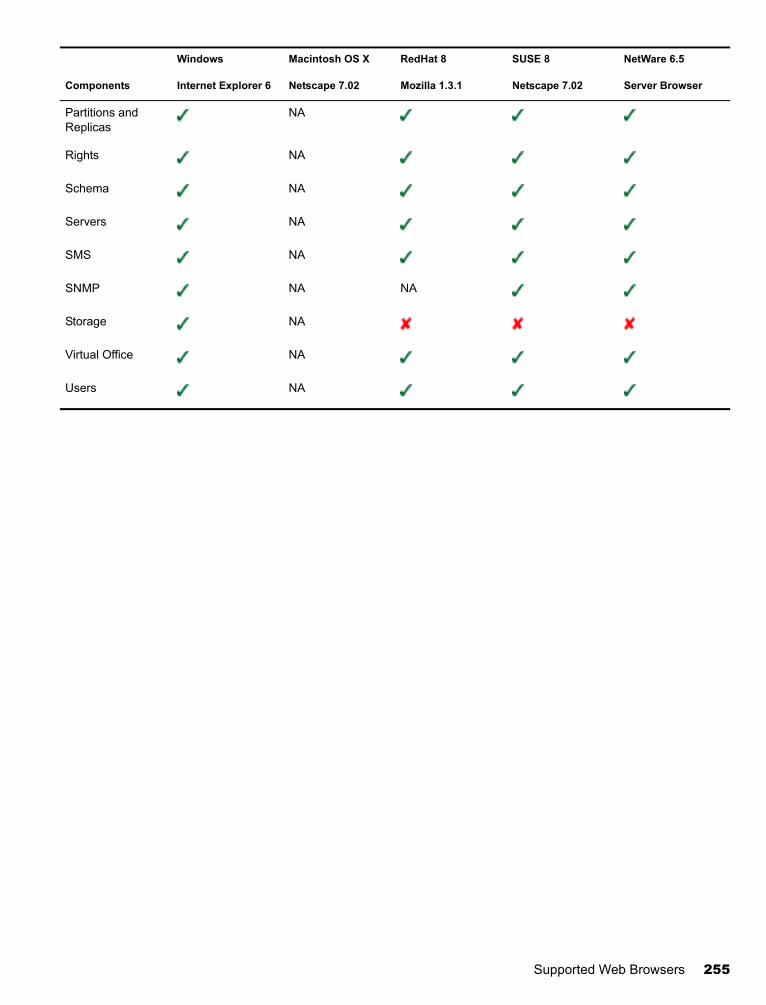
Novell Confidential Manual (ENU) 21 December 2004
Partitions and Replicas
NA
Rights NA
Schema NA
Servers NA
SMS NA
SNMP NA NA
Storage NA
Virtual Office NA
Users NA
Windows Macintosh OS X RedHat 8 SUSE 8 NetWare 6.5
Components Internet Explorer 6 Netscape 7.02 Mozilla 1.3.1 Netscape 7.02 Server Browser
Supported Web Browsers 255

Novell Confidential Manual (ENU) 21 December 2004
256 Novell Small Business Suite 6.6 Overview and Installation Guide

Novell Confidential Manual (ENU) 21 December 2004
VI Appendixes
These appendixes include the following:
Keyboard Commands (page 259)
Configuring Multiple Dialup Modems (page 261)
Documentation Updates (page 269)
Appendixes 257

Novell Confidential Manual (ENU) 21 December 2004
258 Novell Small Business Suite 6.6 Overview and Installation Guide
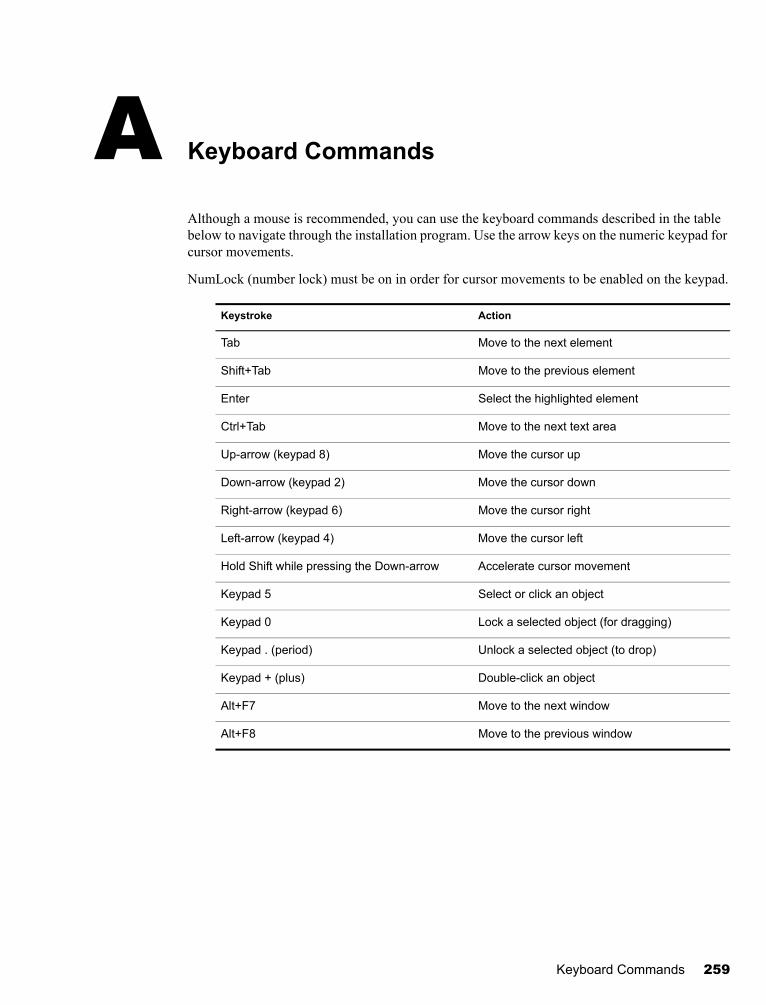
Novell Confidential Manual (ENU) 21 December 2004
A Keyboard Commands
Although a mouse is recommended, you can use the keyboard commands described in the table below to navigate through the installation program. Use the arrow keys on the numeric keypad for cursor movements.
NumLock (number lock) must be on in order for cursor movements to be enabled on the keypad.
Keystroke Action
Tab Move to the next element
Shift+Tab Move to the previous element
Enter Select the highlighted element
Ctrl+Tab Move to the next text area
Up-arrow (keypad 8) Move the cursor up
Down-arrow (keypad 2) Move the cursor down
Right-arrow (keypad 6) Move the cursor right
Left-arrow (keypad 4) Move the cursor left
Hold Shift while pressing the Down-arrow Accelerate cursor movement
Keypad 5 Select or click an object
Keypad 0 Lock a selected object (for dragging)
Keypad . (period) Unlock a selected object (to drop)
Keypad + (plus) Double-click an object
Alt+F7 Move to the next window
Alt+F8 Move to the previous window
Keyboard Commands 259

Novell Confidential Manual (ENU) 21 December 2004
260 Novell Small Business Suite 6.6 Overview and Installation Guide
Novell Confidential Manual (ENU) 21 December 2004
B Configuring Multiple Dialup Modems
When using FatPipe, you must configure multiple modems to connect to the Internet. You can use the procedures in Chapter 10, “Setting Up Internet Connectivity,” on page 105 to configure your first modem. To configure another modem, you must use the Internetworking Configuration utility (inetcfg.nlm).
To configure a modem, do the following.
1 At the server console, load inetcfg.nlm.TIP: If you want to do this procedure remotely, you can access the server console screen using Novell Remote Manager and use inetcfg remotely. See “Novell Remote Manager” on page 229.
If you are prompted to import the drivers from the autoexec.ncf file, select Yes and press Enter.
If you are prompted to choose a Fast setup method, select No, Use the Standard Method and press Enter.
2 In the Internetworking Configuration utility, select Boards.
3 Press Insert.
4 Create the WAN interface by doing the following:
4a Select the WHSMAIO driver, then press Enter.TIP: Pressing W quickly takes you to the W driver listing.
4b Specify a board name such as com1, com2, or modem1, then press Enter.
4c At the AIO Board Options field, press Enter, select Yes, then press Enter again to allow inetcfg.nlm to automatically load the AIO driver.
4d Select the AIOCOMX Serial Port (Comx) driver, then press Enter.
4e Select I/O Base, press Enter, select a setting, then press Enter.
3F8 for COM1 and 2F8 for COM2 are recommended selections.
4f Select Interrupt, press Enter, select a setting, then press Enter.
Using 4 for COM1 and 3 for COM2 is recommended.
4g Select Speed Rating, press Enter, select the setting, then press Enter.
Using a speed above 38,400 is not recommended.
4h Press Esc twice, select Yes, then press Enter to save the changes.
4i Press Esc to return to the main Internetworking Configuration menu.
Configuring Multiple Dialup Modems 261
Novell Confidential Manual (ENU) 21 December 2004
5 Configure the modem for the PPP routing by doing the following:
5a At the main Internetworking Configuration menu, select Network Interfaces, then press Enter.
5b Select the board you want to configure, then press Enter.
5c Select a medium, then press Enter.
You only have one choice, PPP Routing.
5d Select Modem/DCE Type, then press Enter.
In the PPP Modem/DCE Device Type list, select your modem type, then press Enter. If it is not listed, use a selection close to yours. Winmodems does not work.
5e Select Local Telephone Number, press Enter, specify the number for your ISP, then press Enter.
5f Select Authentication Options, then press Enter.
Press Esc to use the defaults. If the modem dials the ISP, connects, and then disconnects after a few seconds, the password might not be recognized. Try using CHAP or PAP as your authentication option.
5g Select Negotiation Options, then press Enter.
Press Esc to use the defaults. If your connection has problems, you might want reduce the MRU Minimum Size setting to 572 bytes. To do so, select the field, specify the new value, Enter, then press Esc.
5h Press Esc, select Yes, then press Enter to save the changes.
5i Press Esc to return to the main Internetworking Configuration menu.
6 Configure the Call Destination by doing the following:
6a At the main Internetworking Configuration menu, select WAN Call Directory, then press Enter.
6b Press Insert.
6c In the Call Destination field, specify the name of your ISP, then press Enter.
If you have more than one ISP, you must set up more than one name in this field, with one used as the primary and the others used as backup.
6d In the Choose a Supported Wide Area Medium menu, select the PPP Routing option, then press Enter.
6e (Conditional) If you want to change the connection from being a continuous connection, select the Call Type field, change the selection from Permanent to On Demand, then press Enter.
6f Select Interface Name, press Enter, select the serial port, then press Enter.
6g Select Telephone Number, press Enter, specify the telephone number for your ISP, then press Enter.
6h (Conditional) Accept the defaults in the Outbound Authentication field by pressing Enter.
Change the setting from the default setting of Either PAP or CHAP only if you cannot get authenticated to the ISP.
If you are configuring a permanent link, this field is optional.
262 Novell Small Business Suite 6.6 Overview and Installation Guide
Novell Confidential Manual (ENU) 21 December 2004
6i Select Local ID, press Enter, specify the username from your ISP, then press Enter.
This value is case sensitive, so make sure to enter it exactly as the ISP requires.
If prompted to convert it to uppercase, select No, then press Enter.
6j Select Password, press Enter, specify the password for the dial-up that was determined by the ISP, then press Enter.
6k Select Remote ID, press Enter, press Insert, specify the name of your ISP, then press Enter.
6l Press Esc, select Yes, then press Enter to save the changes.
6m Press Esc to return to the main Internetworking Configuration menu.
7 Configure the Protocol for the port by doing the following:
7a In the main Internetworking Configuration menu, select Protocols, then press Enter.
7b In the Protocols Configuration menu, select TCP/IP, then press Enter.
7c Select IP Packet Forwarding, press Enter, select the Enable (“Router”) option, then press Enter.
7d Select DNS Resolver Configuration, then press Enter.
In the Domain name field, leave the name field blank or specify your own DNS domain name, then press Enter.
If you specify a DNS name, also specify the IP Address for at least two DNS servers on the Internet in the name server fields. Use the addresses assigned by your ISP.
7e Press Esc, select Yes, then press Enter to update the configuration.
7f Press Esc to return to the main Internetworking Configuration menu.
8 Create the binding for the interface as follows.
8a In the main Internetworking Configuration menu, select Bindings, then press Enter.
8b Press Insert to create a new binding for your interface.
8c Select TCP/IP from the list of configured protocols, then press Enter.
8d From the Bind To menu, select A Network Interface, then press Enter.
8e Select the network interface you created earlier, then press Enter.
The next screen gives you three options for configuration. The option you choose depends on the information you received from your ISP.
ISP Information Procedures
If your ISP gave you a local IP address for the WAN link (with subnet mask), the address of their remote link (with subnet mask), and a block of addresses for your network (with subnet mask)
Complete the procedures in “Binding Numbered Single Point-to-Point” on page 264.
If your ISP gave you the address of their remote link (with subnet mask) and a block of addresses for your network (with subnet mask) but no local IP address for the WAN link
Complete the procedures in “Binding Unnumbered Single Point-to-Point” on page 265.
Configuring Multiple Dialup Modems 263
Novell Confidential Manual (ENU) 21 December 2004
9 At the main Internetworking Configuration menu, select Reinitialize System to make all the changes effective.
10 Follow the instructions in “Testing the Configuration” on page 266 to make sure the connection works.
Binding Numbered Single Point-to-PointTo perform a numbered single point-to-point binding:
1 Select Remote Router will Dynamically Assign the IP Address, press Enter, select No, then Press Enter.
2 Select WAN Network Mode, press Enter, select Numbered Single Point-to-Point, then press Enter.
3 Select Local IP Address, press Enter, type the address assigned by the ISP for the WAN link, then press Enter.
4 Select Subnet Mask of Connected Network, press Enter, type the subnet mask assigned by your ISP, then press Enter.
5 Select WAN Call Destinations, then press Enter.
6 Press Insert at the Configured WAN Call Destinations window.
7 Select WAN Call Destination, press Enter, select the WAN Call Destination you defined earlier, then press Enter.
8 Select Remote IP Address, press Enter, specify the address of your ISP system, then press Enter.
9 Select Static Routing Table, then press Enter.
10 Press Insert to create a new static route.
11 Select Route Type, press Enter, select Network, then press Enter.
12 Select IP address of the Network/Host, press Enter, type 0.0.0.0, then press Enter.
13 Press Esc twice. Select Yes at the Update Database prompt, then press Enter.
14 Press Esc to return to the Configured WAN Call Destinations window.
15 Press Esc, select Yes at the Update Database prompt, then press Enter.
16 Press Esc, select Yes at the Update TCP/IP Configuration prompt, then press Enter.
17 Press Esc to return to the Internetworking Configuration menu.
The block of addresses provided by your ISP for your network should be assigned to the network board in your server and the workstations on your LAN.
If your ISP uses dynamic instead of static addressing
Complete the procedures in “Binding Dynamic IP Addresses” on page 265.
ISP Information Procedures
264 Novell Small Business Suite 6.6 Overview and Installation Guide
Novell Confidential Manual (ENU) 21 December 2004
Binding Unnumbered Single Point-to-PointTo perform an unnumbered single point-to-point binding:
1 Select Remote Router will Dynamically Assign the IP Address, press Enter, select No, then press Enter.
2 Select WAN Network Mode, press Enter, select Unnumbered Point-to-Point, then press Enter.
3 Select WAN Call Destinations, then press Enter.
4 Press Insert at the Configured WAN Call Destinations window.
5 Select WAN Call Destination, press Enter, select the WAN Call Destination you defined earlier, then press Enter.
6 Select Static Routing Table, then press Enter.
7 Press Insert to create a new static route.
8 Select Route Type, press Enter, select Network, then press Enter.
9 Select IP address of the Network/Host, press Enter, type 0.0.0.0, then press Enter.
10 Press Esc twice, select Yes at the Update Database prompt, then press Enter.
11 Press Esc to return to the Configured WAN Call Destinations window.
12 Press Esc, select Yes at the Update Database prompt, then press Enter.
13 Press Esc, select Yes at the Update TCP/IP Configuration prompt, then press Enter.
14 Press Esc to return to the Internetworking Configuration menu.
The block of addresses provided by your ISP for your network should be assigned to the network board in your server and the workstations on your LAN.
Binding Dynamic IP AddressesTo perform a dynamic binding:
1 Select Remote Router Will Dynamically Assign the IP Address, press Enter, select Yes, then press Enter.
2 Select WAN Call Destinations, then press Enter.
3 Press Insert at the Configured WAN Call Destinations window.
4 Select WAN Call Destination, press Enter, select the WAN Call Destination you defined earlier, then press Enter.
5 Select Static Routing Table, then press Enter.
6 Press Insert to create a new static route.
7 Select Route Type, press Enter, select Network, then press Enter.
8 Select IP address of the Network/Host, press Enter, type 0.0.0.0, then press Enter.
9 Press Esc twice, select Yes at the Update Database prompt, then press Enter.
10 Press Esc to return to the Configured WAN Call Destinations window.
11 Press Esc, select Yes at the Update Database prompt, then press Enter.
Configuring Multiple Dialup Modems 265
Novell Confidential Manual (ENU) 21 December 2004
12 Press Esc, select Yes at the Update TCP/IP Configuration prompt, then press Enter.
13 Press Esc to return to the Internetworking Configuration menu.
Testing the ConfigurationAfter reinitializing the system, you can use the following information to test your configuration.
At the System Console prompt, type load callmgr, then press Enter.
If you configured your interface for a permanent link, the call should display automatically. If you configured a dynamic link, press Insert then select the WAN Call Destination you just configured as well as the IP protocol. The status column in the Call Connection Manager should display Out-Connecting and the modem should immediately begin dialing. If you press Alt+Esc to go back to the server console window, you should see a message stating that the call connection was established.
To make sure the connection is live on the Internet:
1 At the System Console prompt, type load ping, then press Enter.
2 In the Host name field, type the IP address of a known server.
First, try the IP address of your ISP.
3 Press ESC.
The Ping utility will begin pinging. You should see packets being sent and received.
4 Press Insert and type another address outside your ISP’s network such as Novell’s DNS server (137.65.1.1).
You should see packets being sent and received from this destination as well.
Viewing the PPP traffic between your server and your ISP using the PPPTRACE utility at the server can also help you debug the connection. This utility lets you look at, capture, and playback PPP sessions.
To view the PPP traffic between your server and your ISP:
1 At the System Console prompt, type load ppptrace, then press Enter.
2 From the Available Options menu, select Real-Time Monitor, then press Enter.
Real-Time Monitor can tell you the following:
Whether you are sending valid commands to the modem
Whether the modem is responding to the commands
Whether the modem is replying with an error message
Whether a connection is established
Depending on the setup strings sent to the modem, the connection speed
Password problems
If you see three instances of a PAP or CHAP packets being sent from the ISP to you, it is an indication that your password was not accepted. This might be an indication that you need to reconfigure the setting to use CHAP, or PAP. A typical indication is that the connection is made, packets are exchanged, and then the ISP sends packets to the modem that get no response. After about 30 seconds, the connection is dropped by the ISP.
266 Novell Small Business Suite 6.6 Overview and Installation Guide
Novell Confidential Manual (ENU) 21 December 2004
To determine whether you have routing issues, enter the following command at the System Console prompt:
set tcp ip debug=1
This command displays the IP packets.
To see what the assigned addresses are, enter the following command at the System Console prompt:
config
This information lets you see whether the connection was successfully established to the point that the ISP assigned you an IP address at the modem.
More InformationFor additional tips on setting up modem connections to the Internet, see the following sources:
Using the Novell Internet Access Server (NIAS) and a Modem to Connect Your NetWare Server to an ISP (http://developer.novell.com/research/appnotes/1998/april/04/a980404_.pdf)
Craig Johnson’s Web site (http://www.craigjconsulting.com). See Tip 37, Configuring a Server to Connect to an ISP with a Standard Analog Modem.
Configuring Multiple Dialup Modems 267

Novell Confidential Manual (ENU) 21 December 2004
268 Novell Small Business Suite 6.6 Overview and Installation Guide
Novell Confidential Manual (ENU) 21 December 2004
C Documentation Updates
This section lists updates to the Installation Guide that have been made since the initial release of Novell Small Business Suite 6.5. The information helps you to keep current on documentation updates and, in some cases, software updates (such as a Support Pack release).
The information is grouped according to the date when the Installation Guide was republished. Within each dated section, the updates are listed by the section title.
The Novell Small Business Suite has been updated on the following dates:
“June 27, 2005 (Novell Small Business Suite 6.6 Release)” on page 269
“June 30, 2004” on page 270
June 27, 2005 (Novell Small Business Suite 6.6 Release)
Location Change
Entire manual Updated entire content to match the Novell® Small Business Suite 6.6 release. Specific items include:
Changing references from NetWare® 6.5 documentation to OES NetWare 6.5 documentation collection.
Updating installation and upgrade procedures to match OES NetWare 6.5.
Changing all references from Novell Small Business Suite 6.5 to version 6.6.
Changing references from iManager 2.0 to version 2.5.
Change references from NetWare Remote Manager to Novell Remote Manager.
Change references from NetWare Deployment Manager to Novell Deployment Manager.
Removing procedures for NterpriseTM Branch OfficeTM, UDDI server, and rsync.
Replacing references to WebSearch with Quickfinder.
Changing all references and procedures for ZENworks® for Desktops 4.01 to ZENworks 6.5 Desktop Management.
Updating instructions for installing iManager plug-ins.
Adding information for installing Novell BorderManager® Support Pack 3.
Updated the list of CDs shipped with the product.
Updated screen shot images to current software.
Documentation Updates 269
Novell Confidential Manual (ENU) 21 December 2004
June 30, 2004
Location Change
“Novell Small Business Collaboration Server with Virtual Office (Recommended)” on page 70
Removed OpenSSH in the list of files installed by the Novell Small Business Collaboration with Virtual Office pattern and by the Virtual Office pattern.
“Specifying Hostnames” on page 88 Changed recommendation from choosing the internal network board to choosing the external network board as the Primary IP address in cases where you are setting up a server to bind to multiple network boards.
“Novell Remote Manager” on page 229
Added information for opening Novell Remote Manager (NetWare Remote Manager) on more than one IP address.
270 Novell Small Business Suite 6.6 Overview and Installation Guide