Notes: The Art of Stargazing Month 4: May - June 2013 · -6-The Art of Stargazing – Month 4...
64
Copyright © 2013 Mintaka Publishing Inc. www.oneminuteastronomer.com Notes: The Art of Stargazing Month 4: May - June 2013
Transcript of Notes: The Art of Stargazing Month 4: May - June 2013 · -6-The Art of Stargazing – Month 4...

Copyright © 2013 Mintaka Publishing Inc. www.oneminuteastronomer.com
Notes: The Art of Stargazing
Month 4: May - June 2013

-2-
The Art of Stargazing – Month 4
Contents – The Art of Stargazing (Month 3)
What You Will Learn This Month .................................................................................................. 4
Science of Astronomy – Stars, Part II ............................................................................................. 4
Overview ..................................................................................................................................... 4
How Stars Form .......................................................................................................................... 5
The Structure of a Star ................................................................................................................ 8
Star Colors and Temperatures ..................................................................................................... 9
Stellar Classification ................................................................................................................. 13
The HR Diagram ....................................................................................................................... 14
Tour of the Night Sky – Virgo, Corvus, Crater, Hercules ............................................................ 17
Overview ................................................................................................................................... 17
The Constellation Virgo ............................................................................................................ 18
The Constellations Corvus and Crater ...................................................................................... 20
The Constellation Libra ............................................................................................................ 20
The Constellation Hercules ....................................................................................................... 21
The Constellation Draco ........................................................................................................... 23
Observing Techniques – Telescopes ............................................................................................. 24
Overview ................................................................................................................................... 24
General Guidelines.................................................................................................................... 25
Refracting Telescopes ............................................................................................................... 26
Apochromatic and ED Refractors ............................................................................................. 29
Newtonian Reflecting Telescopes (and Dobsonian Telescopes) .............................................. 31
Schmidt-Cassegrain Telescopes................................................................................................ 34
Maksutov-Cassegrain Telescopes ............................................................................................. 36
Summary of Telescope Pros and Cons ..................................................................................... 39
Solar System Observing – Saturn ................................................................................................. 40
Overview ................................................................................................................................... 40
Structure and Composition ....................................................................................................... 41
The Ring System ....................................................................................................................... 44
Moons ....................................................................................................................................... 45

-3-
The Art of Stargazing – Month 4
Observing Tips for Saturn ......................................................................................................... 48
The Deep Sky This Month ............................................................................................................ 50
Overview ................................................................................................................................... 50
Porrima ...................................................................................................................................... 51
M104 (“Sombrero Galaxy”) ..................................................................................................... 51
M87 ........................................................................................................................................... 53
Markarian’s Chain .................................................................................................................... 55
NGC 4216 ................................................................................................................................. 57
M13 (“Great Cluster in Hercules”) ........................................................................................... 57
M92 ........................................................................................................................................... 59
Alpha Herculis .......................................................................................................................... 60
NGC 6543 (“Cat’s Eye Nebula”) .............................................................................................. 61
What You Have Learned This Month ........................................................................................... 63

-4-
The Art of Stargazing – Month 4
What You Will Learn This Month In this fourth month of The Art of Stargazing, we continue to look at the workings of stars.
We’ll look at the overall structure and composition of stars and how they form from tenuous and
massive clouds of cold gas and dust. Then we’ll discover how astronomers analyze this light to
figure out the temperature and size of stars. And since astronomers, like all scientists, love to
classify things, we’ll learn about the basic stellar classification system and how it’s linked to
temperature and color. After you go through this section, you’ll be able to look at any star in the
sky and estimate its temperature, mass, and state of evolution.
In the sky tours this month, we continue our tour of the relatively star-sparse constellations of
northern spring. We’ll look at the zodiacal constellations Virgo and Libra, as well as the tiny
constellations Corvus and Crater. And we’ll look at the majestic constellations Hercules and
Draco. As for the deep sky, we continue with a few of the finest galaxies visible in a small
scope, as well as two excellent globular clusters and a young planetary nebula. Where possible,
you’ll see images that will help you know what you’ll see visually in a small telescope.
And speaking of telescopes… this month we take a detailed look at the main configurations of
telescopes available to amateur astronomers. This section will help when choosing a telescope,
or when simply following ads and articles about telescopes in the astronomy magazines. You’ll
also know the strengths and weaknesses of each telescope design, and you’ll be able to choose
the best telescope to suit your personal situation.
We also take a detailed look at the planet Saturn. The ringed planet is still well positioned for
viewing through June and July this year, so now is the time to examine the planet closely. You
will learn how to use a telescope to see this planet, a planet which turns many casual stargazers
into dedicated amateur astronomers.
Let’s get into it!
Science of Astronomy – Stars, Part II
Overview
Last month, you journeyed briefly into the world of nuclear physics to learn the answer to the
ancient mystery of why stars shine. You learned about nuclear fusion, the amazingly efficient
process by which hydrogen is transmuted into helium in the core of a star, and how it releases
energy according to Einstein’s famous equation: E=mc2. And you learned that our Sun, a mid-
sized star, has enough hydrogen to shine for some 10 billion years.
This month, we continue our look at the science of stars to pick up practical details of why stars
shine with different colors and have vastly different lifetimes. And you’ll learn about a powerful

-5-
The Art of Stargazing – Month 4
tool astronomers use to classify stars according to their mass, temperature and age. Once you
work through this material, you will see stars in a new way, with a clear understanding of how
they work and some of their key properties. Rather than taking the fun and mystery out of
stargazing, this knowledge will help you enjoy it that much more.
How Stars Form
In our galaxy, the interstellar medium—the space between stars— contains billowing clouds of
gas and dust that drift and rotate around the galactic center. The concentration of gas and dust in
the interstellar medium (ISM) is very low, more than a hundred trillion times less dense that
Earth’s atmosphere. But since the galaxy is so large, there is billions of Suns worth of mass in
the space between the stars.
A dark cloud of cold gas and dust which harbors new star formation
The gravity from passing stars and star clusters causes pressure waves to move through the gas
of the ISM, which results in denser clouds of gas in some regions compared to others. These
dense regions themselves, because they contain more mass, have more gravity. So they slowly
pull in more gas over the course of millions of years and grow denser and more massive still.
These growing gas clouds start out cold, but they begin to heat up as the gas particles move
faster under the influence of the cloud’s increasing gravity. In this way, gravitational energy is
turned into heat.
The gas clouds which come together in this way have enough mass to form thousands of stars
and span hundreds of light years. Within the cloud, however, smaller regions about a light-year
across and with the mass of 10-100 sun-like stars themselves collapse, grow denser, and heat up.
These smaller regions are called Bok globules. In time, the centers of these globules can grow to
temperatures of thousands, then millions, of degrees. If a globule has enough mass, its core gets
hot enough to begin the process of nuclear fusion. An enormous amount of energy is then
released, enough to push back against the force of gravity. The cloud stops collapsing and

-6-
The Art of Stargazing – Month 4
instead begins to radiate infrared and visible light, and pushes away much of the remaining gas
and dust. During this stage, which lasts perhaps 100,000 years, the nascent star is called a
protostar. In many cases, a disk of cooler gas and dust remains around the star. Planets,
asteroids, and comets may form within this disk. At first, as star’s nuclear furnace settles down,
the star’s brightness may vary. But over hundreds of thousands to millions of years, the star
settles down into an adult stage where it burns its nuclear fuel steadily.
Astronomers have shown with computer models that these globules of collapsing gas and dust
which form stars may break into two or three associated clouds, each of which forms a separate
star. This explains why the majority stars in the Milky Way are paired or in groups of multiple
stars.
Bok globules within an emission nebula
In many cases, a gas cloud collapses but contains insufficient mass to generate heat for nuclear
fusion. The result is a failed star. Lower-mass clouds instead form planets of one to up to
thirteen times Jupiter’s mass. Such planets are gas giants and radiate more energy than they
receive. But they are not stars. Slightly more massive objects, which again radiate energy but do
not sustain nuclear fusion, are called brown dwarfs. Such objects were considered by
astronomers since the 1960’s, but were only first observed in 1994. Brown dwarfs live in the no-
man’s land between planets and stars. None are visible in amateur telescopes.

-7-
The Art of Stargazing – Month 4
A simplified view of star formation (credit: HowStuffWorks.com)
As little pockets of stars form, their energy sets gas in the larger cloud aglow. Light from the
stars knocks away the electrons from the protons in the hydrogen atoms in the larger cloud. As
the electrons cool down and recombine with the protons, they radiate light at characteristic
wavelengths, especially at 656 nm (red light) and 486 nm (blue-green light). We see this pink
and green light from the large glowing clouds of forming stars. The Orion Nebula is one of the
most famous examples of a gas cloud set aglow by new stars forming within. These clouds are
called emission nebulae because they emit light at a characteristic wavelength. They are also
sometimes called by a more evocative name: stellar nurseries. In time, as the newly formed
stars in the gas cloud push away the remaining gas and dust, a group of dozens or hundreds of
young stars remain behind as an open star cluster. The Beehive and Hyades, which you have
met already, are examples.
An emission nebula in which hundreds of newly formed stars cause hydrogen gas to glow

-8-
The Art of Stargazing – Month 4
The Structure of a Star
Most of the energy production through nuclear fusion in a star occurs in its core. This central
region has a radius of 1/20 to 1/10 of the star’s total radius. The core has a temperature of 10-20
million K or more and is more than ten times as dense as lead, so we can’t see it directly. Nor
can we see the blazing hot radiative region around the core which is full of hot protons and
electrons and light. The interior of a star is so dense, in fact, that it takes light more than 50
million years of bouncing around inside a star before it makes it to the surface and escapes into
space. The energy from the Sun falling onto your vegetable garden was produced in the core of
the Sun millions of years ago!
In some stars, the radiative region is surrounded by a convective region which churns material
from deep in the star out towards the surface. In the outer regions of the convective zone, the
temperature and pressure of the hot gas drops enough for light to quickly escape into space. The
thin outer skin of glowing gas in all stars is called the photosphere, and it’s the part of a star we
can see directly. The pressure is lower in the photosphere and so is the temperature. While the
interior of a star has a temperature of millions of degrees, the photosphere of a star is typically
between 4,000 K and 20,000 K. The photosphere of our Sun has an average temperature of
about 5,700 K.
(Note: The symbol “K” refers to Kelvin, which is the scale astronomers use to measure
temperature. A difference in temperature of 1 K is the same as the difference of 1 oC. But in the
Kelvin scale, water freezes at 273 K, which is 0 oC. Absolute zero, when matter is as cold as it
can ever get, is at 0 K or -273 oC. At high temperatures, Kelvin and Celsius are about the same:
1,000,273 K is the same as 1,000,000 oC, for example).
The structure of a Sun-like star

-9-
The Art of Stargazing – Month 4
Star Colors and Temperatures
Last month, you read about the great prediction of August Comte, who said in 1835 that the
composition of stars in an example of knowledge forever beyond our reach. By the 1860’s, he
was proven wrong, as astronomers began to analyze the light from stars at a range of different
colors by, for example, passing a star’s light through a prism. This is the science of spectroscopy.
Almost everything we know about stars comes from measuring their spectra, which is a measure
of how much light of each color comes out of a star.
In the late 19th
and early 20th
centuries, at the same time astronomers were measuring the spectra
of stars, physicists were learning about the spectra of glowing bodies of solid matter in the
laboratory. They found the temperature of a glowing lump of material in the lab was related to
its temperature. Hotter material glowed at shorter wavelengths than cooler material. Material
that glowed mostly red for example, was cooler than material that glowed yellow, which in turn
was cooler than material that glowed white when heated. And material heated to glow at blue
wavelengths was the hottest of all. In time, physicists could link the spectrum of glowing
material in the lab with its temperature. The image below gives you an idea of how this all
works. Glowing material of temperature 7000 K has a spectrum that peaks at about 450 nm
(blue). Material of temperature 5,000 K peaks at about 550 nm (yellow). And material of
temperature 3,000 K peaks at infrared wavelengths of about 1000 nm. Infrared is light that is
beyond the red, so it has wavelengths longer than red light.
Don’t be too confused by these ideas. They are probably familiar to you to some extent. A
glowing piece of iron can be “red hot”, for example, when heated in a forge. If it gets even
hotter, it can be “white hot”. If it could get hotter still, it would be “blue hot”, though most
metals will vaporize before they start glowing blue.
Examples of how much light is emitted from heated material at four temperatures.
-10-
The Art of Stargazing – Month 4
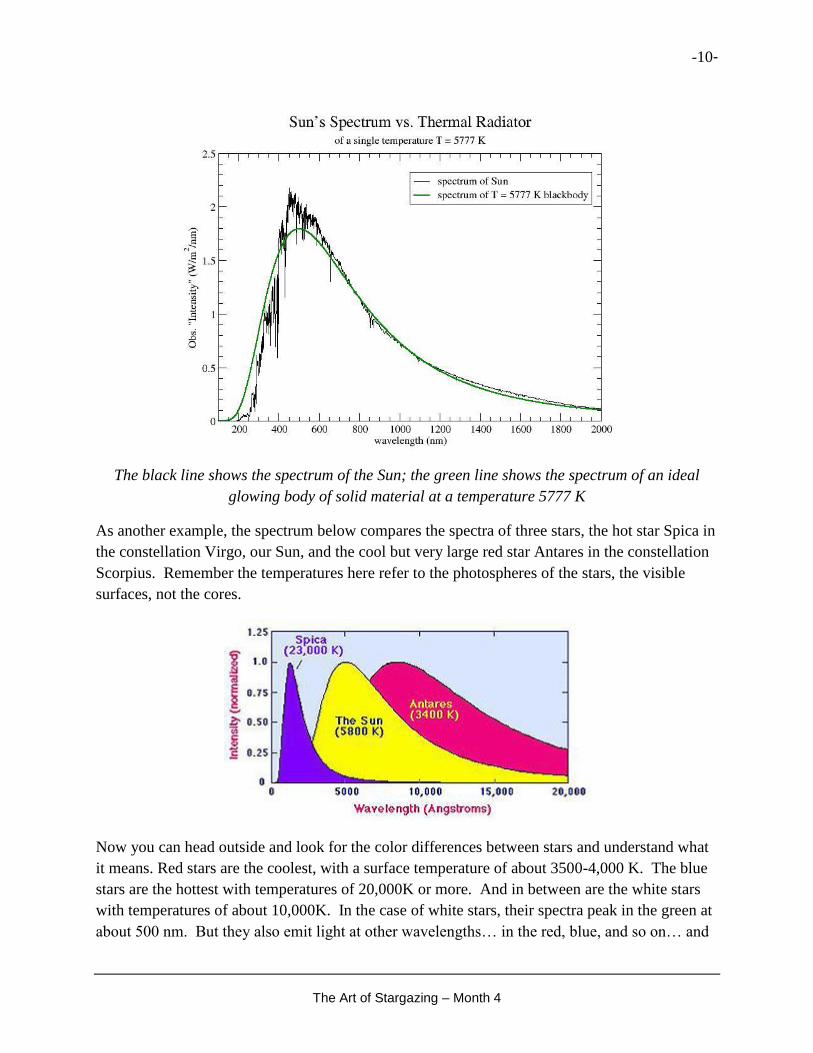
The black line shows the spectrum of the Sun; the green line shows the spectrum of an ideal
glowing body of solid material at a temperature 5777 K
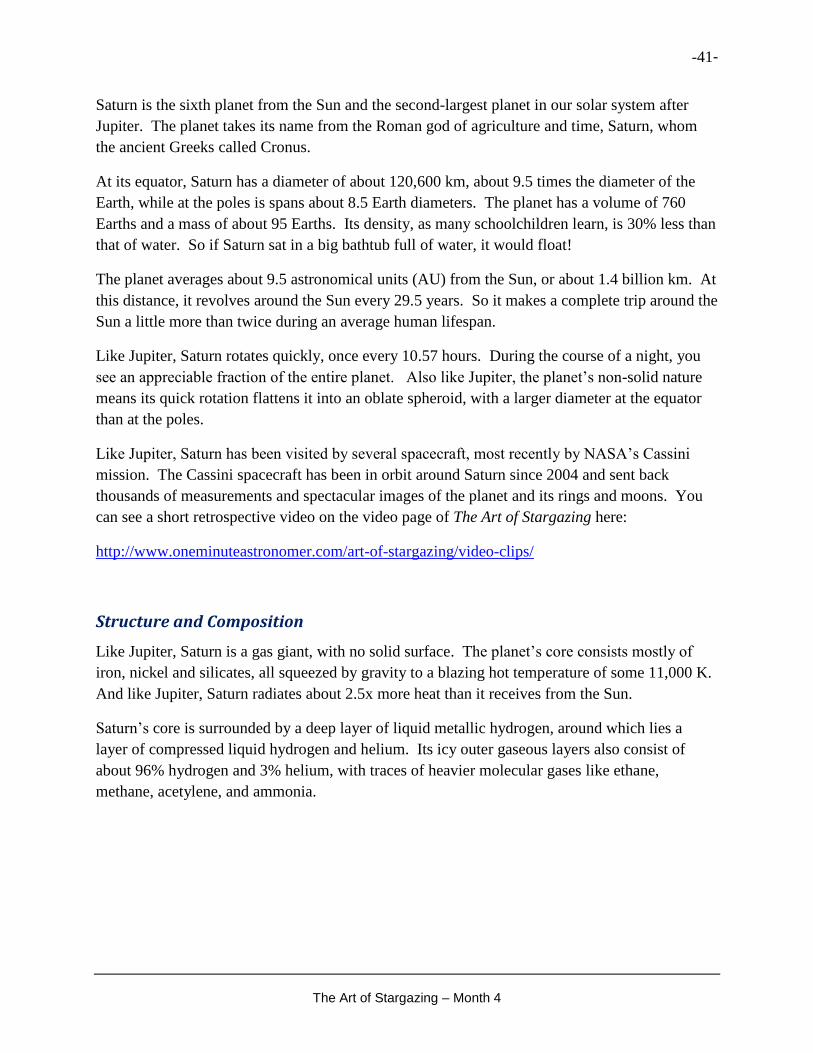
As another example, the spectrum below compares the spectra of three stars, the hot star Spica in
the constellation Virgo, our Sun, and the cool but very large red star Antares in the constellation
Scorpius. Remember the temperatures here refer to the photospheres of the stars, the visible
surfaces, not the cores.
Now you can head outside and look for the color differences between stars and understand what
it means. Red stars are the coolest, with a surface temperature of about 3500-4,000 K. The blue
stars are the hottest with temperatures of 20,000K or more. And in between are the white stars
with temperatures of about 10,000K. In the case of white stars, their spectra peak in the green at
about 500 nm. But they also emit light at other wavelengths… in the red, blue, and so on… and

-11-
The Art of Stargazing – Month 4
their combined light appears white to our eyes. So there are stars that emit a lot of green light,
but you need a spectroscope to separate the green from the other colors.
So that’s how astronomers use spectroscopy to reveal the temperature of stars. But spectroscopy
can also reveal the chemical composition of stars. Here’s how…
As you’ve seen already, solid objects, or very dense balls of hot gas like stars, will emit light
continuously at a range of wavelengths (see images above). The brightness of the light changes
over wavelength depending on the temperature of the material, but there are no gaps in the
spectrum… it is continuous. All hot dense objects of the same temperature emit the same kind of
light. It’s impossible to tell the composition of the material by looking at the spectrum.
With cooler and more tenuous gases, it is different. The great German scientists Gustav Kirchoff
and Robert Bunsen (of Bunsen-burner fame) discovered that when tenuous gases are heated (in a
flame, for example) they emit light only at very specific wavelengths that are completely unique
to the type of material in the gas. They also discovered that when continuous light passes
through cooler gas, the gas absorbs light at very specific wavelengths that are completely unique
to the type of material in the gas, and at the same wavelengths at which the gas emits light when
heated or burned in a flame. The image below shows you the three situations: solid hot body,
solid hot body shining through cooler less dense gas, and cooler gas emitting light itself.
Continuous spectrum from a hot solid body (top); specific wavelengths emitted by a cooler
glowing gas (middle); and specific wavelengths absorbed by a cooler gas (bottom)
Here’s an example of emission spectra of five elements. Each element always sends out the
same wavelengths.

-12-
The Art of Stargazing – Month 4
Light emitted by hydrogen, sodium, helium, neon, and mercury gas
And here’s absorption and emission spectra of hydrogen… see how the wavelengths of emitted
light and absorbed light are the same? This is the “fingerprint” of hydrogen. Each element has
its own spectral fingerprint.
Absorption and emission spectrum of hydrogen gas
Once again, these lab-based measurements in the 1860’s and 1870’s were timely, because
astronomers were measuring spectra of the Sun, stars, and even some nebulae. What they found
was amazing... these celestial objects had the same spectral “fingerprints” as Earthbound
elements, especially hydrogen, with traces of iron, sodium, and so on. They even found a new
element that was not yet identified on Earth. It was named helium, after the Sun, and it wasn’t
discovered on Earth until 1895.
Here’s a simplified version of the spectrum of the Sun, with identification of each of the spectral
“fingerprints”. As you can see, while the Sun and most stars are made mostly of hydrogen, there
are traces of heavier elements such as iron, oxygen, and sodium.

-13-
The Art of Stargazing – Month 4
The spectrum of the Sun, with absorption lines from heavier elements identified
Stellar Classification
As astronomers measured more and more spectra of stars, they started to notice some similarities
and differences. Some stars had very strong signatures of hydrogen, some not. Some had lots of
heavier elements like iron, magnesium, some not. And so on.
Scientists love to classify things, so they began to classify stars by the strength by which
hydrogen gas absorbed light at particular wavelengths. A group of astronomers at Harvard
University in the first years of the 20th
century developed a system in which stars were labeled
consecutively from type A to N in order of decreasing hydrogen absorption.
As astronomers and physicists learned more about atoms through the 1920’s and 1930’s, they
discovered the Harvard classification system really just described the temperature of a star’s
atmosphere. They discovered the O-type stars are hotter than B-type stars, and B-type stars are
hotter than A-type stars, and so on. So they reordered and simplified their star classification
system to, in order of hotter to cooler: O, B, A, F, G, K, and M. This is the Harvard spectral
classification system, which is still used today. Here’s a summary of the classification system
according to temperature and spectrum…
Spectral Type Temperature (K) Color H Absorption Examples
O 30,000-60,000 blue weak Alnitak, Mintaka
B 10,000-30,000 blue-white medium Rigel, Spica
A 7,500-10,000 White strong Vega, Sirius
F 6,000-7,500 white medium Procyon, Canopus
G 5,300-6,000 yellow-
white
weak Capella, Sun
K 4,000-5,300 yellow-
orange
very weak Arcturus
M 2,500-4,000 orange-red very weak Barnard’s star, Antares

-14-
The Art of Stargazing – Month 4
For your interest, the image below shows you sample spectra of each type of star. You don’t
need to remember these, but it gives you an idea of what’s going on with the strengths of the
hydrogen absorption.
Absorption spectra of each main type of star
Within each type, there are finer subdivisions from 0-9. So there are G5-type stars, O9-type
stars, M2-type stars, and so on. As we move through the tours of the night sky, you will start to
hear the spectral types of each star so you can understand the nature of these stars.
It may seem like a lot to remember. But there is a famous mnemonic astronomy students have
used for years to remember O-B-A-F-G-K-M in order of hotter to cooler. It is “Oh Be A Fine
Girl (or Guy), Kiss Me”. Or my personal favorite alternative: Only Bored Astronomers Find
Gratification Knowing Mnemonics. Try it… it works!
The HR Diagram
Now let’s look at perhaps the most famous tool used by astronomers to understand the stars.
Around 1911-1913, the Danish astronomer Ejnar Hertzsprung and American Henry Norris
Russell were studying star clusters in which all the stars are roughly the same age and distance,
and they noticed a clear and surprising relationship between the brightness and
temperature/color/spectral class of the stars in the clusters. When they plotted the brightness and

-15-
The Art of Stargazing – Month 4
temperature of each star on a graph, Hertzsprung and Russell came up with something that looks
like this:
As you can see, the stars are not randomly scattered here. Most stars lie on a narrow band from
upper left to lower right, which means there is a very strong relationship between the brightness
and color (or temperature and spectral class) of many stars. Brighter stars tend to be bluer and
hotter, while fainter stars were redder and cooler. There were a few stragglers that defy this
relationship, but most stars lie along this band, which is called the main sequence.
Although Hertzsprung and Russell didn’t know it at the time, stars on the main sequence are
stars in their youth and middle age during which they burn hydrogen in their cores. All stars
spend most of their lives on the main sequence. At one time, astronomers believed stars evolved
along the main sequence, moving from hotter to cooler as they expelled energy over their
lifetimes. But this is not how it works. Once a star “turns on” by burning hydrogen through
nuclear fusion, it settles onto a particular spot on the main sequence and stays there until the
hydrogen runs out.
This famous diagram is now called the “Hertzsprung-Russell diagram” or simply the “H-R
diagram” after its inventors.

-16-
The Art of Stargazing – Month 4
Here’s a more graphical version of the HR diagram that includes many well-known stars,
including our Sun. The spectral types are across the bottom axis, and the brightness of the stars
is on the vertical axis along the left side. In this version of the diagram, brightness is spelled out
such that our Sun has a brightness of 1.0, and the spectral types are according to O-B-A… etc.
as well as temperature. Brightness can also be expressed in terms of absolute magnitude (which
you learned about in Month 3). As you can see, our Sun is a G-type star on the main sequence,
the star Bellatrix in Orion is a B-type star, and the star Sirius is an A-type star, also both on the
main sequence. Bellatrix has a brightness some 6,000 times that of our Sun.
Another view of the HR diagram showing many well-known stars
What causes a star to be at a particular place on the main sequence on the HR diagram?

-17-
The Art of Stargazing – Month 4
In a word… mass. The mass of a star when it first turns on governs the temperature of the core
and how fast it burns its fuel. More massive stars have hotter cores and so burn their fuel much
faster than less massive stars. Although they have more mass to burn, the burn rate is even
greater, so the most massive stars have relatively short lives. If you have 10x more money than
your neighbor, for example, but you spend it 100x faster, you will run out of money before he
does. The bright blue star B-type Bellatrix has 8x the mass of our G-type Sun, but it will only
live for about 100 million years, about 100x less than the expected lifetime of our Sun. Smaller
M-type stars have perhaps 1/10 as much mass as our Sun, but astronomers calculate they may
burn for 200 billion years!
Now as you can see from both H diagrams above, there are stars that are red but also extremely
bright. They are not on the main sequence. That’s where it gets interesting. These stars are
evolved stars, stars which have stopped burning hydrogen in their cores and which are now
burning heavier elements like helium, carbon, and so on. They are also called late-stage stars
because they are late in their lifecycles and are on the way to their demise. These stars have also
swollen in physical size as they burn heavier elements, and for that reason, they are called giants
or even supergiants. Next month, we’ll have a look at these stars and examine how all stars
move towards the end of their lives.
But now, let’s apply the understanding you’ve gained by having a look at some interesting stars
in the night sky this month.
Tour of the Night Sky – Virgo, Corvus, Crater, Hercules
Overview
Let’s continue a look at the relatively sparse skies of northern-hemisphere spring. Leo, which
you met last month, moves past the meridian by nightfall in late May and June. Böotes and
Corona Borealis are nearly overhead, as is the grand dipper-shape of Ursa Major. The faint stars
of Hydra snake across the sky low in the south. And for observers south of 35oN latitude, a few
of the stars of the far-southern constellation Centaurus show themselves just above the southern
horizon.
This month, we look eastward to the large but dim constellation Virgo, below which lie the two
smaller constellations Corvus and Crater. And you get a first look at the northern summer
constellations Libra, Hercules, and Draco. While none of these constellations have many bright
stars, they do hold a number of excellent deep-sky objects for a small telescope, so it helps to
know how to navigate this part of the sky.

-18-
The Art of Stargazing – Month 4
The Constellation Virgo
The constellation Virgo lies to the south and east of Leo. It contains a few interesting foreground
stars. But it’s mostly known for what lies beyond these stars, namely, galaxies. There are
dozens of relatively bright galaxies in Virgo, and hundreds more visible in large amateur
telescopes. Unlike Orion or its neighbor Leo, Virgo is not a bright constellation. But it’s big…
the second largest in the sky by area. Only Hydra is larger.
The constellation is usually associated with Dike, the Greek goddess of justice, daughter of Zeus
and Themis. She lived in the early days of the Olympian gods, when Zeus’s father Cronos ruled.
It was a golden age of mankind, a time before sickness and war, winter and death.
When Zeus wrested power from Cronos, things went downhill. The seasons grew extreme, and
mankind grew restless and warlike and failed to honor the gods. Dike warned mortals that things
would get worse (she was right) and she turned her back on man and became a recluse in the
hills of Greece. When she could stand no more of the world’s troubles, she cast herself into the
sky in the zodiac next to Libra, the Scales (of justice).
Other ancient legends associate Virgo with Persephone, the daughter of Demeter, the goddess of
the harvest. Because the stars of Virgo appear before sunrise late in the northern summer, many
other cultures, including the Babylonians link Virgo with crops and fertility. In India Virgo was
called Kauni, mother of the great god Krishna.
The constellation Virgo lies in the direction of the north galactic pole, far from the starry band of
the Milky Way, so there are only a few bright stars here. Spica, a blue-white beauty of a star, is
the brightest in the constellation. From the northern hemisphere, you can easily find Spica by
following the arc of the handle of the Big Dipper first to Arcturus, then on to Spica, also known
as α (alpha) Virginis.
Spica is the 15th
brightest star in the sky. At a distance of 280 light years, the star is intrinsically
bright at a magnitude of -3.4. Spica is actually two stars, each very bright B-type stars, that
revolve around each other every four days. They are too close to separate directly in any
telescope. The brighter of the pair is some 12,000x brighter than our Sun and eight times
brighter than its companion. Still on the main sequence or close to it, the brighter star lies far to
the upper left of the HR diagram. Spica is one of the closest stars that will one day explode at
the end of its life as a supernova, one of the biggest explosions in the universe. When this
happens millions of years from now, the star will grow to become as bright as a quarter Moon in
our skies for several weeks. Before it becomes a supernova, Spica will swell to become an
enormous red supergiant star much like the star Betelgeuse in Orion. More about this next
month…
Other stars in Virgo include:

-19-
The Art of Stargazing – Month 4
Zavijava – A white main sequence star not much larger than the Sun.
Vindemiatrix – Epsilon (ε) Virginis is also known as the “grape gatherer because the first
appearance of the star before sunrise in August marks the beginning of the vintage. This star may
be physically associated with the Hyades star cluster in Taurus.
Porrima – Also known as γ (gamma) Virginis, this is a lovely double star just 39 light years
away. The pair of F-type main sequence stars revolves about each other in 169 years, which
means you can see, in a good backyard telescope, the motion of the stars over the course of a
decade or so. Until 1995, the stars split easily in a small scope. Then by 2005, they moved too
close together to resolve in a small scope. They’ve now begun to separate again. This month,
and over the next few years, try to resolve them in your own telescope at high magnification.
They are separated by a little less than 2”.
The constellations Virgo, Corvus, and Crater, south and east of Leo

-20-
The Art of Stargazing – Month 4
While Virgo lacks bright stars, it holds no shortage of galaxies. Within the “arms” of the
maiden, especially between the stars Vindemiatrix and Denebola in Leo, you can find dozens of
galaxies with a small telescope. Most belong to the massive Virgo Cluster, the nearest large
galaxy cluster to the Milky Way. We’ll visit a few of these galaxies shortly.
The Constellations Corvus and Crater
Look next just south of Virgo at Corvus and Crater, the Crow and the Cup, two smaller
constellations with distinctive shapes. You will find that the stars δ (Delta, or Gienah) and η
(Eta), in the upper left-hand corner of the quadrilateral figure of Corvus, make a striking
appearance. The little star zeta (ζ) is a very pretty double for binoculars. There is a very faint pair
of stars close below and to the right of Beta (β) Corvi. This pair is a good test for binoculars.
The stars γ and δ Corvi point the way to Spica. Corvus is a constellation where the stars are not
labeled according to order of brightness. Its brightest star is γ Corvi (Achiba), a blue-white B8-
type star.
Crater means “cup” in Latin, and the constellation represents the cup of the great god Apollo.
Unlike Corvus, this group at least resembles its namesake. This small star group is worth
sweeping over for the pretty combinations of stars to be found in it. The brightest star, Alkes or
α Crateris, is an orange K-type star just evolving off the main sequence.
One of many legends associated with these two constellations tells of a crow stopping on his way
to fetch water for Apollo to accompany his snack of figs. The lazy crow refused to get the water,
telling Apollo that a snake, Hydra, kept him from the water, even taking the effort to capture a
snake in his talons for proof. Apollo caught the lie, however, and flung the crow (Corvus), cup
(Crater), and the snake (Hydra) into the sky. He further punished the lazy bird by making sure
that it would forever be thirsty, both in real life and in the heavens, by placing the Cup just out of
reach.
Both Corvus and Crater are ancient constellations and took their place among Ptolemy’s original
48.
The Constellation Libra
The constellation Libra, lying east of Virgo, does not contain much to attract your attention. Its
two main stars, β Librae (Zubeneschamali) and α Librae (Zubenelgenubi), may be readily
recognized as an irregular quadrilateral east of Spica and west of a line of three stars which make
up the claws of the constellation Scorpius. The upper of the two, Zubeneschamali (“zoo-BEN-
esh-ah-MAL-ee”), has a singular blue-white tint, while the lower one, Zubenelgenubi (“zoo-
BEN-el-je-NEW-bee”), is a very pretty double star for binoculars.
The constellation of Libra appears to have been added later than the other eleven members of the
zodiac. Its two chief stars at one time marked the extended claws of Scorpius, which were

-21-
The Art of Stargazing – Month 4
afterward cut off (perhaps because the monster proved too horrible even for its inventors) to
form Libra. The name of the stars Zubeneschamali and Zubenelgenubi derive from the Arabic
names for “northern claw” and “southern claw”.
As its name signifies, Libra represents a balance, or scale, and this fact seems to refer to the
invention of the constellation at least three hundred years B.C., when the September equinox
occurred at the moment when the sun was just crossing the western border of the constellation.
The equal length of days and nights at that season suggests the idea of a balance. Because of the
precession of the Earth’s polar axis, the September equinox now lies in Virgo, and in the year
2439, it will move into Leo.
The constellation Libra
The Constellation Hercules
Now let’s visit the celestial incarnation of the greatest of classical heroes, Hercules. With the
famous “Keystone” of four stars and a pair of splendid globular clusters, the constellation
Hercules is a regular stop for even casual stargazers from June through August. Hercules lies
high overhead in the north and well over the northern horizon in the southern hemisphere, so its
sights are accessible to stargazers all over the world.

-22-
The Art of Stargazing – Month 4
Hercules is one of Ptolemy’s original 48 constellations. But this star group was known earlier,
much earlier than even classical Greek civilization. The Greeks first knew these stars as
Engonasin, the “kneeling one”, and indeed these stars do suggest the form of a kneeling man
bent by toil and fatigue.
Eratosthenes first linked this tired kneeling celestial figure to Hercules. And why not? Hercules,
though blessed with immortality and unmatched strength, was burdened with the famous Twelve
Labors he undertook as penance for slaying his own sons in a fit of delusional rage set upon him
by Hera, who constantly blighted the life of the mighty hero. Hera hated Hercules because he
was the offspring of her husband, Zeus, and the wise and beautiful mortal Alcmene.
Hercules ranks as the 5th largest constellation in the sky, yet it has no bright stars. But that
doesn’t mean it’s hard to find. It lies between the semicircular shape of Corona Borealis and the
small parallelogram shape of Lyra and its brilliant blue-white star Vega. Look for the four-sided
Keystone asterism formed by pi (π) , eta (η) , zeta (ζ) , and epsilon (ε) Herculis.
Now trace out the rest of the constellation. The stars beta (β) and delta (δ) Herculis mark the
shoulders of the hero, and his arms extend towards Lyra. His left knee and shin, which are
pressed on the head of Draco, the Dragon, are marked by theta (θ) and iota (ι) Herculis.
The constellation Hercules

-23-
The Art of Stargazing – Month 4
The constellation’s brightest star is called Rasalgethi (“rah-sell-GAYTH-ee”). It’s a 3rd-
magnitude red-giant star found in the south end of the group, right next to 2nd-magnitude
Rasalhague, the brightest star in the constellation Ophiuchus. Rasalgethi is a superb double star
for a small telescope, and you’ll meet it up close shortly. As you will the famous Hercules
Globular Cluster, also known as M13 and its only slightly more modest neighbor M92, the other
bright globular cluster in Hercules.
The constellation Hercules also lends its name to a galaxy cluster. The Hercules Cluster lies
some 500 million light years away, and is one component of the even larger Hercules
Supercluster. You’ll need a big scope to glimpse any of these distant galaxies.
The Constellation Draco
Finally this month we look to the long and winding constellation Draco. This group winds
between the Big and Little Dippers. The tip of its tail lies just above the bowl of the Big Dipper,
while the small quadrilateral of its head lies near one of the feet of Hercules.
Which is fitting, since Draco is linked with the myth of the Twelve Labors of Heracles (the
Greek name for Hercules). In the myth, Draco represents the dragon Ladon, which guarded the
golden apples in the gardens of the Hesperides, the daughters of the Titan Atlas. The golden
apple tree was given as a wedding present to Hera when she married Zeus. Hera placed Ladon
around the tree so the Hesperides would not pick its apples.
So as part of his Labors, Heracles was asked to pick golden apples from the tree. He killed Ladon
with poisoned arrows and took the apples. Saddened by the dragon’s death, Hera placed him in
the sky. Draco is usually depicted coiled around the North Pole, with one foot of Heracles on its
head.
The Romans had a different story in which Draco was one of the Giant Titans who battled with
the Olympian gods for ten years. Draco was killed in battle by the goddess Minerva and placed
into the sky, where it froze around the North Pole.
To follow Draco, find the tip of the tail marked by the red-orange M-type Giausar (“JAW-sahr”)
by following the star Merak through Dubhe (in the bowl of the Big Dippter) about a distance
equal to the spacing between these two stars. Then follow the body of Draco to Thuban, to
Edasich (“ED-a-sick”) , then to a series of stars under the bowl of the Little Dipper. The head of
the beast consists of the stars Grumium, Eltanin (γ Draconis), Rastaban (β Draconis), and ν (nu)
Draconis.
The orange K-type star Eltanin is the brightest star in the constellation, but Thuban is the most
famous. It was once the North Star from around 2,800 B.C. to 1,900 B.C. As the Earth’s axis
slowly precessed (see Month 2), the north celestial pole moved closer to Kochab in Ursa Minor
and, in time, to Polaris.

-24-
The Art of Stargazing – Month 4
The winding constellation Draco
Observing Techniques – Telescopes
Overview
Last month in The Art of Stargazing, you learned about the basics of binoculars, essential tools
that every stargazer should understand and use from time to time. Some stargazers rely
completely on binoculars for their observations and enjoyment of the night sky. But most
amateur astronomers eventually consider the purchase and use of at least one telescope. So this
month we survey the types of telescopes available to amateur stargazers, and make some
recommendations of which telescopes to consider.
Many beginners believe the main purpose of a telescope is magnify objects, to make them
bigger, and that more magnification is better. This is not true. The main purpose of a telescope
is to collect light and bring this light a focus. Of course, this focused light can be magnified and

-25-
The Art of Stargazing – Month 4
seen with your eyes. Or it can be sliced and diced with a spectroscope, or cast onto film or its
electronic equivalent to make images, or measured and counted with photometers. The more
light a telescope collects, the brighter the image it can make, and the more useful it is to an
astronomer. But larger telescopes are bigger, more expensive, and more difficult to manufacture
and maintain than smaller instruments. This is the basic tradeoff to consider with a telescope,
either for professional or amateur use.
Here’s some good news: this is the best time in history to buy a telescope for amateur astronomy.
In the past 30 years, the market has made available an enormous selection of good-quality
instrumentation at relatively affordable prices. While a good telescope may not appear
inexpensive, in real terms the prices of telescopes are as low as they have ever been. An
excellent scope and mount can be purchased for the same price as a laptop computer. And while
the computer is designed to last for just a few years, a good telescope can last a lifetime.
Now here’s the bad news. As with breakfast cereals at a supermarket, the wide range of choices
of the sizes and types of telescopes has led to confusion and overwhelm for amateur stargazers
looking to invest in an instrument. But here’s something that will take the pressure of any
purchasing decision: there is no single type of telescope that’s best for all observers and for all
types of observing. Every telescope has benefits and drawbacks, as you are about to learn. It’s
simply a matter of understanding the pros and cons of each type of telescope, and matching it to
your personal interests and situation.
General Guidelines
Picking a telescope is a big decision. Before we get into the pros and cons of each type of
telescope, here are some rules of thumb to keep in mind so you get the best equipment to fit your
needs.
First of all, don’t buy a cheap department-store telescope that advertises amazingly-high
magnification (>300x), and which is mounted on a spidery tripod that causes the image of any
object to shake and wobble until you feel woozy. You will regret such a purchase… guaranteed.
You can spend a few hundred dollars on a good scope, or a few thousand on a great scope. But
as a guideline, you shouldn’t buy a telescope that costs less than $300. You’ll be disappointed
with the results. If you can’t afford that much, save a few more dollars, or stick with binoculars
for now.
Don’t worry about magnification. A telescope’s most important feature is aperture… the
diameter of its light-collecting lens or mirror. A telescope with a larger aperture collects more
light, gives you a brighter image, and lets you see finer detail. It’s the laws of physics. I suggest
your first scope should have an aperture of at least 80-90 mm. Otherwise, the images you see
will be too dim and fuzzy.

-26-
The Art of Stargazing – Month 4
Bigger aperture means higher cost and a bulkier telescope. I’ll leave budgeting up to you. But
keep in mind the size and weight of a telescope, and how far you have to move it to your main
observing site. Some excellent beginner scopes might be 4-5 feet long, 8-9 inches wide, and
have two main parts, each of which weighs 30 lbs or so. Can you store and move all that? If
not, consider a more compact telescope. You might give up some aperture, and smaller scopes
can be more expensive, inch-per-inch of aperture. But a big scope isn’t any good if you can’t use
it.
Now let’s get to some specifics…
Refracting Telescopes
The first type of telescope devised was the refracting telescope, or more simply, the refractor.
Refractors, which are perhaps the most recognizable form of telescope, use a lens mounted at the
front of a long tube to collect light and bend (or refract) it to a focus. While simple glass lenses
for magnification date back to ancient Egypt, and eyeglasses were used widely by the 13th
century A.D., it was not until the late 1500’s that Dutchman Hans Lippershey looked through
two lenses at once and found they caused distant objects to appear larger. This was the first
refracting telescope.
Lippershey’s telescope magnified 3 times (or 3x). The earliest refractors were used by mariners
and other terrestrial observers. In 1609, Galileo built a telescope that magnified 30x and became
the first to turn such a device to the sky. Refractors were the only type of telescope until Isaac
Newton invented the reflecting telescope in the late 17th
century.
An early refracting telescope
Every refractor has two main parts: a large lens to collect and focus light from a distant object
and a second smaller lens to magnify the image of the first lens. As with all telescopes, the light-
collecting ability of a refractor increases as the square of the diameter of the objective. A

-27-
The Art of Stargazing – Month 4
refractor with an objective lens of diameter 100 mm, for example, collects four times as much
light as a refractor with a 50 mm lens.
The length over which an objective lens focuses light to a point is called the focal length, shown
below as F. And the focal ratio of a refractor (or any telescope) is simply the focal length
divided by the diameter of the objective lens. A refractor with a lens of 100 mm diameter and a
focal length of 700 mm has a focal ratio of f/7. (Note: These definitions hold for all types of
telescopes, reflecting or refracting).
A second lens is used to magnify the image of the objective lens. This second, smaller lens is
usually called an eyepiece. Most eyepieces today are actually several lenses mounted together in
a small barrel. The eyepiece also has a focal length, shown in the image above as f. The
magnification of the telescope of focal length F with an eyepiece of focal length f is simply F/f.
So a refractor with focal length 700 mm and an eyepiece of focal length 10 mm will give a
magnification of 70x. Again, this relation is true for all types of telescopes.
The first refractors had a single objective lens ground to a convex shape and with a spherical
curvature. Such simple lenses cause a lot of image distortion. And they focus red, green, and
blue light rays at different planes, a problem called “chromatic aberration”, which looks like
rings of color around bright objects. To minimize these problems, early telescopes needed large
focal ratios, which meant even telescopes with small objective lenses were enormously long…
ten to twenty feet or more with just a 2” lens as the objective! In the mid-1750s, lawyer and
amateur telescope maker Chester Moore invented a refractor with a two-lens objective, each of
which was made from a different kind of glass to partially correct for chromatic aberration.
These types of objective lenses are called achromatic. Today, all refractors have at least two
lenses in the objective to correct for spherical and chromatic aberration.

-28-
The Art of Stargazing – Month 4
The light path of a refracting telescope
Achromatic refractors still have some chromatic aberration. This means when you look at the
Moon and brighter stars and planets, you will see an aura of blue or purple around the object,
which tends to detract from the view. The problem is especially obvious at focal ratios smaller
than f/10. It also worsens with larger apertures. That’s why achromatic refractors tend to have
smaller apertures of less than 100mm to 150 mm and focal ratios of f/8 or larger, so such
telescopes tend to be quite long for the aperture. A 100 mm refractor of focal ratio f/12 is more
than 1200 mm long, which can be unwieldy to mount, transport, and store. Worst of all, an
aperture of 100 mm (4 inches) is quite small by today’s standards, so faint celestial objects are
quite dim in such a telescope if they can be seen at all.
Unlike reflecting telescopes, refractors have the great advantage of having no central obstruction.
This results in very sharp images and high contrast. Also unlike reflectors, refractors are
mechanically simple and quite robust and need very infrequent optical adjustment and alignment.
So they are simple and easy to use compared to many reflectors.
A good achromatic refractor with focal ratio of f/10 to f/15 can give very sharp images and large
images of the Moon and planets and double stars. Such telescopes are less useful for observing
large, spread-out objects like star clusters and rich star fields along the Milky Way.
A two-element achromatic telescope objective lens

-29-
The Art of Stargazing – Month 4
Another tip for choosing refractors… you should avoid “short tube” achromats… so called “grab
and go” achromatic refractor telescopes with less focal ratios of less than f/8. They are small and
inexpensive, but they tend to give appalling amounts of false color when looking at bright
objects.
When choosing an achromatic refractor, look for instruments with at least 70 mm aperture and
focal ratio longer than f/10. With smaller apertures, the images will appear too dim. An aperture
of 90-100 mm is preferable, but these instruments tend to get longer and heavier.
A good achromatic refractor used to be quite expensive in real terms back in the 1950’s through
1970’s. Today, with modern manufacturing methods in Asian factories, prices for decent
refractors from Orion, Celestron, and Meade are as low as they have ever been. Still, if you pay
anything less than US$200-$300, you are likely wasting your money. New telescopes that cost
less are available, but tend to have poor optics and shaky mounts. In North America, a good 90
mm achromatic refractor on a passable mount costs a little less than $300. This is considered a
respectable beginner telescope.
An achromatic refractor with an aperture of 100 mm
Apochromatic and ED Refractors
In the past 25 years, telescope makers have learned to use new types of glass based on fluorite
and other compounds to create objective lenses that almost completely correct for any false color
and chromatic aberration, even at focal ratios of f/6 or f/7. Telescopes that use these lenses are

-30-
The Art of Stargazing – Month 4
called“apochromatic refractors”. The prefix “apo” is from Greek meaning “away from” for
“separate from”.
Apochromatic refractors, or “apos” as they are sometimes called, are fantastic telescopes which
give razor sharp images and superb contrast. They are favored by astrophotographers and visual
observers of the moon, planets, and wide-angle star fields of the Milky Way. Manufacturers of
high-quality apos include Televue, TMB, Vixen, Takahashi, and Astro-Physics.
But apos have a downside… cost. Top-notch apochromats are shockingly expensive, up to
$1000 per inch of aperture, and that’s just for the optical tube without a mount or finder. And of
course, even if you spend $4,000 on a 4” apochromatic refractor, you still only have a 4”
telescope, which means fainter objects remain beyond reach for visual use. But these telescopes
are renowned not for light-gathering capability, but for rendering crisp, clear, high-contrast
views of stars, star clusters, brighter nebulae, and the Moon and planets. For $4,000, for
example, you can get an 18” reflecting telescope that will show you thousands more deep-sky
objects, especially faint galaxies and galaxy clusters. But of course, an 18” telescope is large and
difficult to use, and it will easily fill up half a small garage, while you can carry many 80 mm to
100 mm apos as luggage on an airplane. So it all depends on what you’re after.
The most expensive apos use three or four elements in the objective lenses to deliver the best
images for astrophotography. As an example, the Telvue NP-101 has a 101 mm 4-element
objective lens, with two more corrective lenses near the eyepiece. It is a favorite of
astrophotographers and comes with a price tag of close to $4,000 (which does not include a
finderscope or eyepiece or mount). Similar telescopes from Takahashi and Astrophysics are
even more expensive.
In the past few years, however, telescope makers have developed simpler objective lenses that
are nearly apochromatic. These lenses are often called “ED”, for extra-low dispersion. The cost
of telescopes made with ED lenses tends to be far more reasonable than pure apos. For example,
you can get a decent 4-inch ED refractor (optical tube only) that gives you tack-sharp images of
planets and wonderful contrast on binary stars and stunning wide-field views of the Milky Way.
The cost? Just $1200, roughly, in North America. Such telescopes are available from Orion,
Astro-Tech, Williams Optics, and Stellarvue, for example. At this price, the objective lenses
have just two elements, but that works fine for visual use. Scopes with three-element ED
objectives, which work better for astrophotography, are available for about $2,200 (for a 100 mm
objective), still far less than a pure apo. Two and three-element ED scopes with 80-90 mm
objectives are also available at slightly lower costs.

-31-
The Art of Stargazing – Month 4
A Televue 85 mm apochromatic refractor and carrying case
If you are considering a refractor and can afford an apo or ED, they are highly recommended.
They are just as easy to use as their less-expensive achromatic brethren, but they give far better
images. I have two small ED refractors (66 mm and 102 mm objectives) and I turn to them often
for pleasing wide-field views of star clusters, star fields, and larger nebulae. With good short-
focal length eyepieces, these scopes also give sharp views of the Moon and planets, so they are
quite versatile. Unlike true apochromats, ED refractors do give a little false color (the blue and
purple aura around brighter objects), but it is far better than simpler achromatic refractors.
Many apos come without mounts, so you will need to select a mount separately. We will discuss
telescope mounts next month.
Newtonian Reflecting Telescopes (and Dobsonian Telescopes)
Now let’s turn to the other major type of telescope, the reflecting telescope, which uses a
carefully-shaped mirror to bring light to a focal point. The telescope with the most light-
collecting power for your money is the venerable Newtonian reflector, invented by Sir Isaac
Newton himself in 1689. If you love to see the fainter deep-sky objects, as well as the Moon and
planets, then this may be the scope for you.
The idea behind a Newtonian reflector is simple. Light falls on a curved primary mirror held at
the bottom of a long tube. The mirror focuses the light back to a point at the top of the tube
where a small flat secondary mirror directs the light towards an eyepiece at the side of the
telescope. This way, the observer’s head won’t get in the way of the starlight falling on the
mirror. For beginners, this arrangement is a little non-intuitive at first.
Newtonian reflectors are far less expensive than refractors of the same aperture because only one
optical surface needs to be ground and figured. In a refractor with a two-element objective, four
surfaces need to be figured, and this takes more time and adds cost.

-32-
The Art of Stargazing – Month 4
The light path of a Newtonian reflector telescope.
The main practical drawback with a Newtonian is size and weight. A 12” Newtonian optical tube
is more than 5 feet long and weighs 80 lbs (without the mount). For some, that is too much to
handle and transport, especially if you live in an apartment or have to transport the telescope
long distances to dark sky.
Newtonians also need frequent adjustment, or collimation, of the secondary mirror. This simple
procedure takes a few extra minutes at the beginning of each observing session once you get the
hang of it. But it can be a little intimidating the first few times you try it.
Less expensive and smaller Newtonians used to have mirrors with a spherical curvature. Today,
most such scopes have the superior parabolic curvatures which bring objects to a focus across the
entire field of view. But because there are no additional lenses or mirrors to correct the image in
a Newtonian, so you may detect an optical aberration called coma. This makes stars appear
wedge-shaped at the edge of the field of view. But it’s not a big deal if the focal ratio is bigger
than f/6 or so.
The classic 8” Newt on a bulky equatorial mount was a staple of serious stargazers in the 1960’s
and 1970’s. These scopes were big and heavy and hard to set up, and they were largely replaced
by the much more convenient Schmidt-Cassegrain in the 1980’s (see next section). But
Newtonians came back into style in a big way in the 1980’s when telescope makers
commercialized a design by the former monk and astronomy popularizer John Dobson. The
“Dobsonian” telescope is just an inexpensive large-aperture Newtonian on a simple altazimuth
mount. Dobsonians can’t be beat for purely visual deep-space observing. With huge mirrors (up

-33-
The Art of Stargazing – Month 4
to 36” in diameter) these new-age Newtonians are called “light buckets” because of their
immense light-collecting ability.
Because of its simple design a Dobsonian is the least expensive telescope per inch of aperture. A
quality 12” telescope on an altazimuth mount sells for less than $1000, while a good 8” sells for
about $500 in North America, including electronics in the mount to help you find celestial
objects. Orion, Meade, and Skywatcher make good mass-market Dobsonians from 4” to 16” and
beyond. Higher-end boutique manufacturers like Obsession make more expensive Dobsonians
with high-quality mounts and optics. Obsession scopes start at 12” and go as large as 25”
aperture. These are big scopes.
For serious beginners on a budget, a Dobsonian reflector with 6” or 8” aperture is perhaps the
best all-around telescope for under $500. With these scopes, you can see objects as faint as 13th
magnitude, yet you can also get good high-magnification views of brighter objects like the
Moon, planets, and double stars. The only caveat… these telescopes are not small or light. The
optical tube of an 8” (200 mm) Dob will be about 4 feet long and weigh about 40 lbs. The mount
will add another 30-40 lbs. Before you invest in such an instrument, make sure you are
comfortable moving and storing it. Not just once or twice, but night after night. A nice big
scope won’t do you much good if you don’t use it!
An 8” Dobsonian from Orion Telescopes.
One more thing… to get the most out of a large reflector on faint deep-sky objects, you need
dark sky. In a big city, the brightness of the background sky may exceed the surface brightness
of the objects you want to see. In that case, the biggest telescope in the world won’t help you.

-34-
The Art of Stargazing – Month 4
But the larger aperture and longer focal length of Newtonians do help in achieving higher
magnification, which helps in darkening the background sky. So don’t give up on Newtonians if
you have to endure light pollution. Simply remember that you may only get the most out of such
a telescope when you leave the city.
Schmidt-Cassegrain Telescopes
A Newtonian telescope has a big drawback: its simple optical system uses a curved mirror and a
flat diagonal mirror to direct light to an eyepiece. That means the length of Newtonian is roughly
equal to the focal length, so you get a long and heavy telescope with a big and awkward mount,
even with relatively modest apertures.
But there are other kinds of reflecting telescopes. Shortly after Newton developed his reflector,
an obscure French Catholic priest named Laurent Cassegrain invented a reflector that used two
mirrors to fold a long optical path into a shorter tube. Many amateur reflectors, and nearly all
professional telescopes, now use a variation of the Cassegrain design.
Long after Cassegrain, in 1930, the optician Bernard Schmidt added a new twist to Cassegrain’s
design. Instead of a parabolically-figure mirror, Schmidt used a simple spherical mirror, which
was easier to make, but which induced “spherical aberration” that made it impossible to achieve
a tight focus. Then Schmidt added a specially-figured lens at the front of the tube to correct for
spherical aberration and regain the ability to achieve a good focus. At the focal plane, on the
back side of the corrector lens, he placed a piece of film. This layout is a Schmidt camera, and
it’s still used for imaging wide-field views of the sky.
Finally, in 1946, an architect and artist named Roger Hayward replaced the film with a convex
mirror behind the corrector lens to send light out the back of the tube to an eyepiece or a camera.
This is what we now call a Schmidt-Cassegrain telescope (SCT). A company called Celestron
built on this design and developed manufacturing techniques to produce SCT’s in large
quantities that revolutionized amateur astronomy starting in the 1970’s.
SCT’s have the advantage of large apertures and long focal lengths, but the light path is folded
into a much smaller physical length because of the design of the primary and curved secondary
mirrors. An 8-inch SCT like those sold by Celestron have a focal length of 80 inches (2000 mm)
packed tube less than 18-inches (450 mm) long. The tube weighs about 12 lbs. It’s pretty
impressive.

-35-
The Art of Stargazing – Month 4
Optical path of a Schmidt-Cassegrain telescope
Schmidt-Cassegrains have something for everyone. Telescope manufacturers love them because
the spherical mirrors and corrector lenses are easy to make compared to parabolic mirrors for
Newtonians. Casual observers love them because they are portable AND they have a relatively
large aperture to help see faint deep-sky objects. And astrophotographers love them because
they’re easy to mount and guide, they lend themselves to narrow field imaging and, with
additional telecompressing optics, to wide field imaging.
A Schmidt-Cassegrain telescope from Celestron
SCT’s are not perfect at anything but they’re pretty good at everything. Their biggest advantage
is portability… an SCT packs a lot of aperture into a small package. However, it has a narrow

-36-
The Art of Stargazing – Month 4
field of view… a big drawback if you like rich-field views of star clouds. Because of the large
secondary mirror, you won’t get the same sharp contrast on the Moon and planets with an SCT
as you would with a refractor. And an SCT is twice the price of a Newtonian of the same
aperture.
Celestron was the first to market with SCT’s in the early 1970’s. Meade followed a few years
later. Today, the product line of Celestron especially has expanded to include basic SCT’s on
one-arm mounts for casual visual observing. This is the NexStar series (see above). An 8”
NexStar runs for about $1,200 in North America. The Celestron CPC series has a heavier two-
arm mount which makes for better observing at high magnification. An 8” CPC runs about
$2,000 in North America. For serious observers and astrophotographers, there is the CGEM
version which includes equatorial mounts for $2,200. And there’s the new Edge-series of SCT’s
from Celestron that are intended for astrophotographers only. An 8” SCT Edge and mount goes
for $2,500.
Meade has similar product lines. Their LS-6 and LS-8 series SCT’s are particularly interesting
as they include a computer, software, and GPS that aligns the telescope to the night sky without
any user input. The simplest version of the LS-6 goes for about $1000 in North America. Meade
also has systems with equatorial mounts and advanced optical design to compete with the
Celestron Edge.
All price estimations for the models mentioned above include a mount, tripod, electronics, and
motors to move the telescope to selected celestial objects. In addition to the popular and useful
8” aperture, there are also 6”, 10”, 11”, 12”, and even 14” and 16” SCT’s available from
Celestron and Meade.
While Dobsonian’s are simple and inexpensive, and often appeal to stargazers on a budget,
SCT’s are more versatile and are easier to store and transport. They are an excellent choice for
stargazers with larger budgets or who need more portability. Also, because of the location of the
eyepiece at the end of a short tube, SCT’s are usually easier to look through compared to
Dobsonians or Newtonians, which often require bending over and contorting one’s neck at
uncomfortable angles. Older observers often prefer SCT’s to Dobs and Newtonians for this
reason.
Maksutov-Cassegrain Telescopes
In the mid-20th
century, the Russian optician Dmitri Maksutov invented another variation of the
Cassegrain design. The so-called Maksutov-Cassegrain is a robust and useful design for small-
aperture telescopes. They are a godsend for urban observers who need a compact scope with a
go-to mount and good optics.

-37-
The Art of Stargazing – Month 4
Modern Maks are much like Schmidt-Cassegrains. They have a spherical mirror to collect light
and a curved lens up front to correct for aberrations. But the corrector lens on a Mak has a simple
spherical curve which is easy to manufacture. And the secondary mirror is simply a thin layer of
aluminum deposited on the back of the lens. This mirror cannot be adjusted, so unlike a
Newtonian or Schmidt, a Mak requires no alignment.
The optical path of a Maksutov-Cassegrain telescope
The downside of the Mak’s optics? To keep aberrations small, Maks are made with long focal
ratios… typically f/12 to f/15. That means you get a higher magnification with a particular
eyepiece and a narrower field of view than with an f/10 Schmidt or f/6 Newtonian. So Maks
aren’t great if you want wide, sweeping views of the Milky Way. They’re much better for small
objects that require high magnification like planets, the Moon, double stars, globular clusters,
and planetary nebulae. Many observers choose Mak-Cass telescopes instead of achromatic
refractors because they provide a long focal length and sharp image, but are more compact and
do not show chromatic aberration.
A Maksutov-Cassegrain optical tube, showing the mirror on the back of the front corrector lens

-38-
The Art of Stargazing – Month 4
Maks are great for urban observers for two reasons. They are compact and easy to transport. And
the higher magnification will darken the washed-out city sky and bring out more contrast in a
deep-sky object. The corrector lens on a Mak is quite thick, which means Maks get heavy at
higher apertures because the lenses become massive. That’s why you won’t find commercially-
made Maks with apertures larger than 7 inches. Because they’re rugged and robust, Maksutov-
Cassegrains are used in harsh environments in industrial and military applications. And more
than a few field photographs in National Geographic have been made with Maks.
The most famous (and expensive) Makustov telescope is the Questar. First made in 1954, a
Questar is like a fine Swiss watch. These scopes have superb mechanics and razor-sharp optics
almost without aberration. Questars are widely used for terrestrial observing and nature
photography. And NASA used Questar telescopes on its early space missions. Questars with
aperture of 3.5” and 7” are still sold today, and cost from between $4,500 and $10,000.
But you absolutely don’t need to spend that much. Maks made a comeback about 20 years ago
largely because of the success of Meade’s ETX-90 and ETX-125 telescopes. The ETX-125 had
an aperture of 125 mm and sold with mount and tripod for about $1000. This telescope is no
longer sold in the 125 mm aperture, but the 90 mm aperture is still available for about $500.
Celestron has a 4” NexStar version also available for about $500.
Orion also sells 90 mm and 127 mm Mak-Cass scopes for less than $500 (optical tube only), as
well as a more serious version with a 180 mm (6”) aperture (see images above and below). The
180 mm version goes for about $1,300 in North America for the optical tube only. It has a focal
ratio of f/15 and a focal length of 2700 mm (106”) in a tube only 560 mm (22”) long.
One last word about a term you should know. Dioptrics is a fancy name for optical instruments
that use lenses; catoptrics is a term for instruments that use mirrors. Both Schmidt-Cassegrain
and Maksutov-Cassegrain telescopes use curved mirrors and lenses to bring starlight to a focus,
so they are sometimes called catadioptric telescopes.

-39-
The Art of Stargazing – Month 4
The same 180 mm Mak-Cass telescope shown above, but on an equatorial mount
Summary of Telescope Pros and Cons
We’ve covered a lot about telescopes, yet it is only an introduction to the wide range of options
available to stargazers today. The table below sums up the main points about each type of
telescope.
Type Objective
Type
Typical
Apertures
(mm)
Pros Cons
Starting
Price
(with
mount)
Comments
Achromatic
refractor
Lens 70 – 150 Low cost; easy to use;
rugged
Chromatic
aberration at f/8 or
lower
$300 Good small beginner scope, but a
small Dob is a better bet if the
extra size can be accomodated
Apochromatic
and ED
refractors
Lens 60 – 127 Excellent image
sharpness and contrast;
little chromatic
aberration
High cost limits
aperture
$2,000 Superb instruments; a small ED
on a solid mount is an excellent
complement to a larger telescope
Newtonian/Dob Mirror 100-400 Low cost; ease of
mounting (Dob);
versatile
Large; requires
collimation;
awkward viewing position
$300 Excellent value and versatility; an
8” Dob with a computer will last
new stargazers for many years if they can handle the large size
Schmidt
Cassegrain
Catadioptric 100-400 Compact and versatile;
good for imaging
Large secondary
mirror
$1000 Good all around telescope; better
choice than Dobs if portability is a must
Maksutov
Cassegrain
Catadioptric 90-180 Compact; sharp images Narrow field of
view; takes a long
time to cool down
$500 Portable, but do not offer a wide
field of view; not as versatile as
SCT

-40-
The Art of Stargazing – Month 4
Solar System Observing – Saturn
Overview
The planet Saturn reached opposition on April 26 and remains low in the southeastern sky in the
mid-evening hours. The planet is still well-positioned for viewing with a small telescope over
the next month or two. So let’s have a closer look at this fascinating and beautiful planet.
Saturn
Saturn’s position on June 10, 2013. The planet lies in the constellation Libra.
-41-
The Art of Stargazing – Month 4
Saturn is the sixth planet from the Sun and the second-largest planet in our solar system after
Jupiter. The planet takes its name from the Roman god of agriculture and time, Saturn, whom
the ancient Greeks called Cronus.
At its equator, Saturn has a diameter of about 120,600 km, about 9.5 times the diameter of the
Earth, while at the poles is spans about 8.5 Earth diameters. The planet has a volume of 760
Earths and a mass of about 95 Earths. Its density, as many schoolchildren learn, is 30% less than
that of water. So if Saturn sat in a big bathtub full of water, it would float!
The planet averages about 9.5 astronomical units (AU) from the Sun, or about 1.4 billion km. At
this distance, it revolves around the Sun every 29.5 years. So it makes a complete trip around the
Sun a little more than twice during an average human lifespan.
Like Jupiter, Saturn rotates quickly, once every 10.57 hours. During the course of a night, you
see an appreciable fraction of the entire planet. Also like Jupiter, the planet’s non-solid nature
means its quick rotation flattens it into an oblate spheroid, with a larger diameter at the equator
than at the poles.
Like Jupiter, Saturn has been visited by several spacecraft, most recently by NASA’s Cassini
mission. The Cassini spacecraft has been in orbit around Saturn since 2004 and sent back
thousands of measurements and spectacular images of the planet and its rings and moons. You
can see a short retrospective video on the video page of The Art of Stargazing here:
http://www.oneminuteastronomer.com/art-of-stargazing/video-clips/
Structure and Composition
Like Jupiter, Saturn is a gas giant, with no solid surface. The planet’s core consists mostly of
iron, nickel and silicates, all squeezed by gravity to a blazing hot temperature of some 11,000 K.
And like Jupiter, Saturn radiates about 2.5x more heat than it receives from the Sun.
Saturn’s core is surrounded by a deep layer of liquid metallic hydrogen, around which lies a
layer of compressed liquid hydrogen and helium. Its icy outer gaseous layers also consist of
about 96% hydrogen and 3% helium, with traces of heavier molecular gases like ethane,
methane, acetylene, and ammonia.

-42-
The Art of Stargazing – Month 4
The belts of Saturn
The clouds of Saturn, the part we see directly from Earth, have a pale sand color and are far less
colorful than Jupiter’s cloud layers. The color is caused by frozen crystals of ammonia in the
upper atmosphere and ammonium hydrosulfide in the lower layers. The temperature in the upper
reaches of the clouds is as low at 100 K (-173 oC). The planet’s faint bands, the belts and zones,
have a nomenclature very similar to those of Jupiter (see image below). North on Saturn is the
side that faces the north celestial pole as seen from Earth.
Basic nomenclature of Saturn’s belts and zones
The wind speeds in the outer atmosphere reach up to 1,800 km/h, faster than on Jupiter, and
these winds stir up some interesting phenomena including many fascinating and transient
features that pop up from time to time in its upper atmosphere, and many puzzling permanent

-43-
The Art of Stargazing – Month 4
features. In 1990, amateur and professional astronomers watched a white oval well up from deep
in the planet’s atmosphere and float to the surface, then dissipate slowly over the course of many
weeks. This short-lived storm seems to happen approximately once every Saturnian year when
summer peaks in the planet’s northern hemisphere. A similar storm was observed in 1903, 1933,
and 1960. If the pattern holds, the next storm will occur around the year 2020. The cause of this
phenomenon is unknown.
Another unrelated storm welled up in Saturn’s atmosphere in 2010. It started as a small white
spot, then spread out across the planet as it caught the high differential winds in the upper
atmosphere. The storm was imaged by the Cassini spacecraft (see below) and by Earthbound
professional and amateur observers for many months. It was even visible visually to observers
with small telescopes and steady skies.
The dispersal of a white “storm” cloud on Saturn in 2010-2011
Saturn also has a very strange hexagonal feature in its atmosphere near its north pole. It was first
discovered by the Voyager spacecraft, but it can now be seen in detailed images from amateur
telescopes. The hexagonal spans about 14,000 km on side, bigger than Earth, and seems to rotate
with the planet’s magnetic field.

-44-
The Art of Stargazing – Month 4
The hexagonal cloud patter near Saturn’s north pole, as image from Cassini
The Hubble Space Telescope and the Cassini spacecraft have imaged a hurricane-like vortex
near the planet’s south pole. The storm has a clearly-defined eye, a feature which is not
observed in vortices on Jupiter, for example. This “south pole vortex”, which is larger than
Earth, may also be a permanent feature.
The south polar vortex in Saturn’s atmosphere
The Ring System
Saturn is perhaps most famous for its splendid system of rings. Jupiter and Uranus also have
rings, but Saturn’s system is by far the brightest and most intricate. The rings extend from about
7,000 km to 120,000 km above the equator, yet are only about 20 meters thick. They consist

-45-
The Art of Stargazing – Month 4
mostly of small particles of water ice and bits of frozen organic compounds. The particles range
in size from fine dust-like grains to boulder-sized pieces no more than 10 meters in diameter.
The origin of Saturn’s rings is unknown. They may be been formed by material left over from
Saturn’s formation some 4.5 billion years ago. Or they may be the remnants of a small moon
destroyed by tidal forces when it wandered too close to the planet. In this case, the rings may be
quite new.
The ring system is amazingly complex. There are dozens of tiny “shepherd” moons among the
rings which split the rings into bands and finer subrings that astronomers are still sorting out. But
from our perspective as backyard stargazers, the rings are split into three main sections: the outer
A-ring, the middle B-ring, and the darker inner C-ring. Between the A and B rings lies the dark
gap called the Cassini division named after the 17th
-century astronomer who first noticed it. This
division is frequently visible in small telescopes. The smaller Encke division in the outer reaches
of the A-ring is a much more challenging sight.
Detail in the rings of Saturn. The A, B, and C ring and the Cassini and Encke divisions are
visible in amateur telescopes.
Moons
Saturn has more than 200 moons, 62 of which have well-determined orbits. The remainder are
small bodies… moonlets… that bob and weave through the planet’s elaborate ring system.
The 62 moons of Saturn are a fascinating mix of objects, ranging from tiny bodies discovered by
close-in spacecraft to the enormous moon Titan, which you can see in a pair of binoculars from
your backyard. Fifty-three of Saturn’s moons are named, and thirteen have a diameter larger

-46-
The Art of Stargazing – Month 4
than 50 km. Just seven of Saturn’s moons are large enough to pull themselves into a spherical
shape.
The largest moons of Saturn, shown in relative size
Of this large collection of moons, nine were discovered with telescopes before the age of
spaceflight. They are, in increasing distance from Saturn: Mimas, Enceladus, Tethys, Dione,
Rhea, Titan, Hyperion, Iapetus, and Phoebe. The moons were named after the Titans of ancient
Greek legend.
Titan is by far the largest of Saturn’s moons, making up nearly 96% of the mass of all bodies
orbiting Saturn, including the rings. Titan is the second-largest moon in the solar system after
Jupiter’s Ganymede, with twice the mass of Earths’ moon. Titan is larger than the planet
Mercury.
Titan is also the only Moon with a substantial atmosphere, which is made mostly of nitrogen
along with traces of methane and other organic molecules. Titan also has lakes of liquid
hydrocarbons; the presence of organic molecules suggests Titan may have the right chemistry for
simple forms of life to develop. Like Earth’s moon, Titan is tidally locked to Saturn such that
its rotational period of 15 days and 22 hours is the same as its orbital period.
You can easily see Titan in binoculars or small telescope. Larger scopes resolve the planet into a
disk and reveal the orange color of the moon’s dense atmosphere.

-47-
The Art of Stargazing – Month 4
Saturn’s largest moon Titan
Each of Saturn’s smaller moons has its own story. Iapetus is one of the most unusual of Saturn’s
moons. One hemisphere of the moon is dark as soot while the other is more reflective. The
moon varies in brightness by a factor of six as it orbits Saturn, and you can see this effect in a
modest telescope.
Mimas, the closest of the larger moons, is just 400 km across. It sports a baleful impact crater
nearly a third of the moon’s diameter, which suggests Mimas was nearly shattered upon collision
with another small moon.
Mimas
Enceladus, the sixth-largest moon of Saturn, is also an intriguing satellite. It is geologically
active and ejects plumes of water into orbit around Saturn. These plumes may be the source of
the innermost ring of Saturn. Enceladus also has liquid water under its southern polar region.

-48-
The Art of Stargazing – Month 4
Saturn eclipsing the Sun as seen from NASA’s Cassini spacecraft.
Observing Tips for Saturn
Many casual observers get hooked on amateur astronomy after a first look at Saturn through a
telescope. More than a few have looked through my small refractor on a night of good seeing
and asked of Saturn, “Is it real?”
Oh yes, it’s real. And incredibly beautiful… the color, the proportions, the apparent 3D
perspective of this grand icy world. It is arguably the finest sight accessible with a small
telescope.
But Saturn can also frustrate many new stargazers. The visual image of the planet in a telescope
is often small. And if the atmosphere is not steady, the image tends to ripple and blur the
delicate details in the clouds and the rings, so it’s never as clear as you see in professional
images. Here’s some hard-won expertise about how to get the best view of this grand planet…
There are four aspects you need to consider to get the best views of Saturn: your optics, the
atmosphere, your observing skill, and your expectations.
Binoculars of 10-12x will show Saturn as a tiny, slightly non-circular disk, and they show Titan
as a tiny point. But that’s about it. To clearly see the rings of Saturn, you will need a telescope.
Which telescope? Really, any telescope will give you a good view of the planet. As mentioned
in the section this month on telescopes, refractors of longer focal length tend to give larger high-
contrast images of planets. Reflectors tend to have a little less contrast because of the central
obstruction of the secondary mirror. But if they are well collimated, reflectors do a fine job with
planets. Most of the best amateur planet imagers, for example, use SCT’s and Newtonians
because these telescopes are available in higher apertures, and higher apertures enable higher
resolution.

-49-
The Art of Stargazing – Month 4
First, before you get started, make sure your telescope is aligned and cooled down to ambient
temperature. If you just take it from a warm house into a cool night, there will be eddies of air in
the telescope tube and movement of the mirror surface that will badly degrade the view until the
temperature of the scope equlibriates with the rest of its surroundings. It will take between 20-60
minutes for the scope to settle down, depending on the size of the mirror and lenses and so on.
Also, it helps to wait until Saturn is as high in the sky as possible before you observe. This year
and for the next decade, Saturn is south of the ecliptic and will never rise very high for northern-
hemisphere observers.
Don’t expect a Hubble-like image. Despite its beauty, Saturn appears quite small in a telescope.
The disk is only 20″ across, about 1/3 the apparent size of Jupiter at its closest. The rings extend
farther, about 45-50”, which makes the planet appear larger but even with the rings it’s never
larger than Jupiter at opposition. You can never see Saturn through a telescope quite as well as
you would like to.
Once you get the planet in view, pop a low-power eyepiece in your scope. At 25x, you’ll see
Saturn as non-circular, and 50-60x should reveal the rings and the planet’s disk.
Now move to at least 100x and take in the view. The image will appear larger but a little fainter
and possibly a little fuzzier. But keep moving to higher magnification until the image gets too
fuzzy or faint. The optimum magnification depends on your telescope and seeing conditions. In
steady sky with a high-quality scope at 300-400x, the sight of Saturn is, in the words of one
amateur astronomer, “pretty enough to make a grown man cry”. But it’s not often you can use
that much magnification. You need to experiment each night to determine the optimum
magnification that will give you the best trade-off between image size, sharpness, and brightness.
And yet you can see a lot of detail on Saturn, even though it may be frustratingly small. Even
nights when the air isn’t so steady, wait for moments of good seeing when the image will
suddenly sharpen and jump out at you like a tiny hologram. It’s darned impressive.
More than most planets, Saturn displays a striking 3-D effect caused by the darkened edges of
the disk and, when you can see them, the shadows cast by the rings on the planet. The rings are
about 17o from edge-on this year and cast a striking shadow towards the side of the planet
opposite the Sun.
The rings are the main attraction of course. At 100-150x, look for the Cassini division, the dark
gap between the A and B rings. It will be visible in reasonably steady sky. Now, can you
discern the difference in brightness between the two rings? Most observers agree the outer ‘A’
ring is fainter than the inner ‘B’ ring. If you have rock-steady sky and an 8-inch scope, look for
the elusive Encke division, another gap near the outer edge of the A-ring. At least 300x will be
needed to see this faint gap.

-50-
The Art of Stargazing – Month 4
Like Jupiter, Saturn has a complex system of cloud bands visible with a small scope. The image
above shows how they’re labeled. These pale whitish-yellow bands are by no means as obvious
as Jupiter’s, but they are visible through most scopes. A yellow filter threaded into the back of
your eyepiece may help bring them out a little.
And there are the moons of Saturn. The brightest is Titan, as mentioned, which you can see with
binoculars. A 6-inch or larger scope may show the color of the dense yellow-orange clouds on
this massive moon. The clouds hide the entire surface of Titan. Which is too bad, because lakes
of liquid hydrocarbons are spread across this planet-like world. With a telescope of 4-inch
aperture, and dark sky, you can also find the moons Iapetus, Rhea, Dione, and Tethys, all of
which are approximately magnitude 10-11. It’s hard to tell one from the another. Here’s a link
for an online javascript tool at Sky and Telescope to help you find which moon is which:
http://www.skyandtelescope.com/observing/objects/javascript/saturn_moons
Simply enter your date, and it will render a small diagram to help you find which moon is in
which position around the planet.
Sky and Telescope also has apps for the iPhone and iPad to help you track Saturn’s moons.
Saturn and its largest moon Titan as they appear in a small telescope at 150x or so.
The Deep Sky This Month
Overview
This month we look at a good range of objects: faint galaxies, resplendent star clusters, two
superb double stars, and a fine planetary nebula. Compared to last month, most of these objects
are quite easy to see. And they are favorites of most experienced stargazers. As you master the
art of stargazing, you will return to these objects year after year.

-51-
The Art of Stargazing – Month 4
Porrima
Astronomers best know the sprawling constellation Virgo for its rich trove of distant galaxies.
But Virgo holds a much closer object, the fine binary star Porrima, one of the few stars close
enough to show detectable motion during the brief span of a human lifetime.
Porrima, also known as γ (gamma) Virginis, lies at the southern end of a large arc of stars which
starts at Vindemiatrix, then swoops south to delta Virginis, then Porrima itself, then to Zaniah
and Zavijava (see map below). This arc of stars represents the “arms of the maiden” Virgo.
Porrima lies just 39 light years away. The stars revolve about each other in 169 years, which
means you can see, in a good backyard telescope, the motion of the stars over the course of a
decade or so. Until 1995, the stars split easily in a small scope. Then they moved too close
together to resolve. Since 2010, the stars have slowly begun to separate once again. In 2013, the
stars moved to a separation of 1.7”, enough to resolve in most telescopes, but only on nights of
very steady seeing. Try 150x or more to glimpse this challenging pair. It’s a good test of your
optics and your observing ability.
Each star in the Porrima system is about magnitude 3.6, and each is a white F-type main
sequence star just a little bigger and brighter and hotter than our Sun.
See the map below to locate Porrima and the next target, M104.
M104 (“Sombrero Galaxy”)
Striking in photographs, the Sombrero galaxy offers a fine, if unusual, example of an edge-on
spiral that looks like the classical Mexican headwear worn by members of a mariachi band. This
is a lovely object, a little like NGC 4565 in Coma Berenices but with a huge and brilliant central
bulge, likely caused by the machinations of a massive black hole in the center.
At magnitude 9.0, the Sombrero Galaxy is located 11.5° west of Spica and 5.5° northeast of eta
Corvi. The galaxy lies 20o from the main Virgo Cluster, but it’s likely an outlier of the cluster.
M104 is visible in 7x50 binoculars in good sky. In a 3” or 4” scope at low power, the galaxy
presents itself as a small oval glow with a star-like core. Increase to 75-100x to get a much better
view and get a glimpse of the dark dust lane that runs through the middle and splits the galaxy
into two unequal sections.
Charles Messier included M104 as an addendum to his famous list of 103 non-stellar objects in a
handwritten note. But it was not officially included in his famous list until 1921.

-52-
The Art of Stargazing – Month 4
M104 was the first galaxy in which rotational motion was measured. By looking at the differing
redshifts of stars at each edge of the galaxy, it was shown that one edge turns towards us and
another turns away.
Location of double star Porrima and the Sombrero Galaxy (M104) in Virgo
Less than a hundred years ago, astronomers were uncertain about the nature of M104 and other
spiral “nebulae” as they then called them. Some thought they were relatively closeby objects in
our own galaxy. Others thought they were separate star systems in their own right. Working at
Lowell Observatory in 1912, the astronomer Vesto Slipher made the astonishing discovery that
the Sombrero was hurtling away from Earth at 700 miles per second, faster than anything in our
galaxy. This supported the view that these “nebulae” were outside our own galaxy, a view
confirmed in 1923 when the distance to the Andromeda galaxy was determined by Edwin
Hubble.

-53-
The Art of Stargazing – Month 4
M104, the “Sombrero Galaxy” in Virgo
M87
The region between the star Denebola in Leo and Vindemiatrix in Virgo is packed with the
galaxies of the so-called Virgo Cluster, the nearest major galaxy cluster to the Milky Way.
There are some 2,000 galaxies here accessible to professional telescopes, and perhaps a hundred
visible in a 6-inch scope in dark sky. M87 is perhaps the dominant galaxy of the Virgo Cluster
and lies close to the center of mass of the mighty cluster. There’s nothing subtle about the giant
elliptical galaxy… no faint spiral structure or dust lanes to see at all. The excitement lies in
contemplating the stupendous size of M87 and the scope of the violent physical processes going
on in its core.
M87 is close by two other bright elliptical galaxies, M84 and M86. These three ellipticals are
the brightest fuzzy objects in this patch of sky. M87 lies just 1.5o east-southeast of M84 and
M86 at the tip of Markarian’s Chain (see the next section). The map below helps you get
located.
M87 is brighter and all by itself, while M86 and M84 lie side by side. A larger telescope gives a
brighter view of these galaxies but reveals no more detail. At magnitude 8.8, M87 is visible in
binoculars or the smallest telescope. This giant galaxy spans a diameter of 120,000 light years,
about the same as the Milky Way. But M87 is a spheroid, not a flat spiral. So it contains far more
stars… as many as 2.7 trillion solar masses by some estimates.
Aside from its immensity, M87 is known for a needle-like jet that’s blasted 5,000 light years into
intergalactic space, presumably by a disturbance caused by a black hole in its core. The central
black hole is monstrous… with an estimated mass of 2-3 billion suns! Radio astronomers see the
active center of M87 as a strong radio source called “Virgo A”. Keen observers under perfect
seeing conditions can see the jet in very large scopes of 20” to 30” aperture.

-54-
The Art of Stargazing – Month 4
M87 and the galaxies of Markarian’s Chain
M87 also boasts a spectacular collection of globular clusters, up to 15,000, compared to the
Milky Way’s count of 200 or so. However, none are visible with backyard scopes.
If you have dark sky, look for another galaxy just 9’ (less than 1/6 of a degree) southwest of the
center of M87. This is 11th-magnitude NGC 4478, a small companion galaxy to the supergiant
M87. The pair lie about 53 million light years away.

-55-
The Art of Stargazing – Month 4
Elliptical galaxy M87, and the associated group known as Markarian’s Chain
Markarian’s Chain as it might appear in a 4”-6” telescope at 50-80x. M86 and M84 are at
lower right. M87 is not in this image; it lies off image to the lower left
Markarian’s Chain
Finding galaxies between Denebola and Vindemiatrix is a little easier if you use a faint T-shaped
group of stars about 1/3 of the way from Denebola to Vindemiatrix. See the map above for the
location of this “T”, which spans about 2o. The brightest star in this group is 5th-magnitude 6
Comae Berenices, which is visible to the unaided eye in dark sky. Some 1.5o southeast of the

-56-
The Art of Stargazing – Month 4
southern tip of the vertical bar of this “T” lie the two 9th
-magnitude galaxies, M84 and M86,
mentioned above. They mark the western end of a graceful arc of galaxies called “Markarian’s
Chain”, which arcs northeastward from M84 for 1.5o from Virgo into Coma Berenices, and
which includes at least seven galaxies. The group takes its name from astronomer Benjamin E.
Markarian who in 1961 published a paper that described his investigations of the dynamics of the
Virgo Cluster.
The chain looks best at lowest magnification in a large wide-field telescope like a 10” or 12”
Dobsonian. But a 4” scope at 50-75x in dark sky shows most of the chain, though you need to
look carefully for the fainter members. The brightest (and westernmost) members of the chain
are the side-by-side pair of elliptical galaxies M84 and M86. The pair lies almost exactly halfway
between Denebola and Vindemiatrix. M84 presents a 9th-magnitude oval glow, extended
slightly northwest to southeast, and a bright core. It’s an easy sight in a 3” or 4” scope.
M86 is just 1/4 degree to the east of M84. It’s about the same brightness. It’s slightly more
elongated in the same direction as M84, though its nucleus appears even brighter. Directly north
of M86 by 1/10 of a degree is the challenging 12th-magnitude galaxy NGC 4402. You’ll need at
least a 6” or 8” scope to pick it out of the background.
Turn your glance eastward along the chain to the two galaxies known as “The Eyes”. The
brighter and larger of the two is NGC 4438, just north of which is NGC 4435. These galaxies are
easily seen in a 4” scope in good sky. Recent observations of adjacent hot gas at X-ray
wavelengths suggest these galaxies collided 100 million years ago.
Now look 1/3 of a degree northeast of The Eyes to spot lenticular galaxy NGC 4461 and the
fainter elongated spiral galaxy NGC 4458. The pair is a challenge in a 4” scope, but pop out
nicely in a larger scope.
The last step in Markarian’s Chain takes you over the border into Coma Berenices to the
respectably bright galaxies NGC 4473 and NGC 4477. The former is an elliptical galaxy
extended into an east-west oval. The latter is a barred spiral galaxy, though you’ll see no
indication of this in a backyard scope. Both are about 10th magnitude and easy to see in a 4”
scope.
Most of the galaxies in Markarian’s Chain lie about 50 million light years away and are
gravitationally related and move together through space.
This chain is the most difficult sight on this month’s tour, but once you find M84 and M86, you
will at least have a starting point to find this famous group. Keep at it… if you have a 4”-6”
scope and dark sky, you will eventually succeed in seeing most of its members. Averted vision
and good dark adaptation are a must! A 4” scope of f/8 or slower at low magnification will show
all Markarian’s chain and M87 in the same field of view.

-57-
The Art of Stargazing – Month 4
NGC 4216
Now to a lesser observed galaxy, the beautiful spiral NGC 4216 just 2o due south of 6 Comae
Berenices, the brightest star in our “T” guidepost mentioned above. This spiral is just a few
degrees from edge-on, but that’s enough for long-exposure images to reveal much detail,
including a bright central nucleus, spiral arms, and hints of a dust lane.
NGC 4216 (middle) as it appears in an 8” telescope. Fainter galaxies NGC 4222 (upper left)
and NGC 4206 (lower right) may be visible under optimum conditions in a 12” or larger scope.
In the late 19th century, this galaxy was of interest to astronomers who were trying to determine
the nature of these “spiral nebulae” as they were called. They photographed the spiral arms of
this galaxy and others to directly detect rotational motion. None was detected. The galaxies do
rotate, but they are much farther away than 19th-century astronomers could imagine, so such
rotation is hard to see directly. Astronomers now detect rotation in the arms of spiral galaxies by
observing the Doppler shifts of spectral lines from the stars within the arms.
In a 4” to 6” scope at 75x the galaxy is a slender white sliver about 5’ long. It has a bright core
and sharp edge, at least with averted vision. The dust lanes are very difficult to see with a 6”
scope. More aperture is needed. While the galaxy appears small, it’s actually as large as our
Milky Way, with a diameter of 95,000 light years and a mass of about 200 billion suns. The
galaxy lies about 55 million light years away.
M13 (“Great Cluster in Hercules”)
Now let’s leave galaxies behind for a while and get a first look at the fine objects coming into
view during the northern summer months. The most famous of all globular cluster north of the

-58-
The Art of Stargazing – Month 4
celestial equator lies here in the constellation Hercules. Cataloged as Messier 13, it’s sometimes
simply called the “Great Cluster” or the “Great Cluster in Hercules”.
Globular cluster Messier 13 in Hercules. Galaxy NGC 6207 is visible at lower left.
M13 competes with M5 in Serpens as the brightest globular cluster north of the celestial equator.
(You will see M5 next month). To many, M13 has a finer appearance in a small telescope, likely
as a result of its looser arrangement of stars. It’s also fairly easy to find, located between the stars
eta (η) and zeta (ζ) Herculis on the western side of the “Keystone” of Hercules.
At magnitude 5.8, the cluster is easily visible in binoculars or finder as a distinctly un-starlike
smudge. In dark sky the cluster is visible without optics. In a 4” scope at 100x or so, the cluster
resolves into a halo of stars about 20’ across, with a gradual brightening towards the core. An 8”
scope resolves the cluster all the way to the core, revealing an amazing arrangement of tiny
pinprick white and yellow stars of 11th and 12th magnitude. Take a quick glance to the side with
averted vision, and hundreds more stars snap into view in an almost shocking manner.
The cluster contains some 500,000 stars with an age of 13 billion years, not much younger than
the universe itself.
Like most globulars, M13 lies out of the plane of the Milky Way. So we’re looking here into
deep intergalactic space… all the individual stars are foreground stars in our own galaxy. The
spiral galaxy in NGC 6207, an 11th
-magnitude object some 45 million light years away, lies
about one degree to the northeast of M13. It may be visible in a 10-inch or larger scope. In very
detailed images of M13, you can see dozens more galaxies in the background.

-59-
The Art of Stargazing – Month 4
While M13 lies a distant 25,000 light years from Earth, author Kurt Vonnegut wrote, accurately,
“Every passing hour brings the Solar System forty-three thousand miles closer to Globular
Cluster M13 in Hercules — and still there are some misfits who insist that there is no such thing
as progress.”
M92
Hercules has another excellent globular cluster. But M92 is overshadowed by its beautiful and
famous sister M13 and it sits alone and nearly forgotten in the northern reaches of Hercules.
A comparative view of M13 (left) and M92 (right) as they appear in a 6” scope at 120x
If M92 were in most other constellations, it would rank as a showpiece object. This is a splendid
cluster in a small scope. At moderate magnification in a 4” scope, it easily resolves into
individual stars in the halo, and a larger scope reveals a core of fine diamond dust. The cluster
appears somewhat oval compared to M13, and perhaps slightly more concentrated near the
center. M92 is about the same distance away as M13, so its slightly smaller apparent size is a
consequence of its truly smaller diameter. The cluster is located north of the Keystone, about 7o
north of pi (π) Herc. It forms a nearly equilateral triangle with pi and eta with each side
measuring 7o or so. In very dark and clear sky, those with keen eyesight may see the magnitude
6.5 cluster without optical aid.
The image above shows M13 and M92 captured with the same telescope and same conditions.
As you can see, M92 holds up well to its more famous neighbor.

-60-
The Art of Stargazing – Month 4
The location of M92, M13, and double star alpha Herc, or Rasalgethi (bottom) in the
constellation Hercules
Alpha Herculis
Down at the bottom of Hercules, which is actually the great hero’s arms, lies the star alpha
Herculis. If you’re trying to learn your Flamsteed designations, the star is also known at 64
Herculis. This star’s proper name is Rasalgethi (“rah-sell-GAYTH-ee”), which means “Head of
the Kneeler”. This is a splendid star for visual observation. The components have a stirring color
contrast of orange and blue-green… a very pretty sight.
You’ll need a scope at 100x to resolve these two: they’re separated by about 4.6” (arc-seconds),
which is fairly tight. These stars take nearly 3,600 years to revolve around each other.

-61-
The Art of Stargazing – Month 4
The brighter star of alpha Herculis is an enormous M-type red giant that’s 400 times the diameter
of the Sun and some 800 times as bright. The pair have magnitudes of 3.5 and 5.4 roughly, and
are some 380 light-years away. The fainter G-type star is itself a closely-space double with an
invisible white dwarf companion. You might recall that G-type stars are yellow-white, but the
visual contrast of this star with its orange-red companion makes it appear greenish-blue to many
observers. What do you see?
Rasalgethi (alpha Herculi)
NGC 6543 (“Cat’s Eye Nebula”)
Now look up, way up, to the winding constellation Draco. There are many fine sights in this
constellation, but let’s pick the most famous, the excellent though small planetary nebula NGC
6543. Because of its appearance in detailed photographs, this nebula is sometimes called the
“Cat’s Eye Nebula”.
The Cat’s Eye is a tiny planetary. It appears star-like at 20x, though its greenish-blue appearance
may distinguish it from the surrounding stars. Increase magnification to 75x or more and the disk
of the nebula is resolved. The central star of NGC 6543, the star that’s throwing off the nebula, is
fairly bright, and most telescopes reveal it easily with modest magnification. At 125x or more,
the nebula shows some texture, including a somewhat darker inner region and a brighter ring
around the outside. The shape is slightly oval, and the color is quite pleasing compared to the
white stars in the background. Like most small planetary nebulae, the Cat’s Eye responds well to
high magnification if the sky is steady.

-62-
The Art of Stargazing – Month 4
The red circle marks the position of NGC 6543, the Cat’s Eye, about halfway between delta (δ)
and zeta (ζ) Draconis
The Cat’s Eye played an important role in astronomical history. It was the first to be examined in
a spectroscope by English amateur William Huggins in 1864. Huggins was shocked to find the
nebula had a totally different spectrum from any star. Its spectrum displayed a very small number
of emission lines at about 500 nm... the blue-green region of the visible spectrum. This led
Huggins to conclude the nebula was composed of a glowing gas, but he could not associate the
spectrum with any Earthly element. So the mysterious element was named “nebulium”. It turns
out the blue-green spectral lines are indeed from an Earthly element-- doubly ionized oxygen, or
OIII-- but it took some time for laboratory-based spectroscopists to figure this out because
oxygen must be in an extremely rarified state to emit light at this wavelength.

-63-
The Art of Stargazing – Month 4
A detailed view of the Cat’s Eye Nebula (NGC 6543)
What You Have Learned This Month Once you work through the notes and tours of The Art of Stargazing this month, you will have
learned:
Sky Tours
The legends, layout, and position of the constellations Virgo, Libra, Corvus, Crater,
Hercules, and Draco
The bright stars Spica, Porrima, and Vindemiatrix; the stars Zubenalgenubi and
Zubenalschemali in Libra, and the star Thuban in Draco, which was once the North Star
Science of Astronomy
How stars form out of large, massive, but very tenuous and cold gas clouds
Why stars have different colors, and how the color of a star is related to temperature
How astronomers classify stars according to their temperature and spectrum, and the
basic types of stars which are, from hottest to coldest, O-B-A-F-G-K-M.
The H-R diagram, the most important tool for stellar astronomers to understand and
classify stars
Observing Techniques
A detailed look at the design and the pros and cons of the major types of telescopes
available to amateur astronomers: refractors (achromatic and apochromatic); Newtonian
and Dobsonian reflectors; Schmidt-Cassegrain reflectors; and Maksutov-Cassegrain
reflectors

-64-
The Art of Stargazing – Month 4
Deep-Sky Objects
More galaxies in and around the Virgo Galaxy Cluster, including M87, M104, NGC
4216, and Markarian’s Chain; the very fine globular clusters in Hercules, M13 and M92;
the double stars Porrima and Rasalgethi; the planetary nebula NGC 6543 (the “Cat’s
Eye’)
Solar System Tour
A detailed look at the planet Saturn: its structure and composition, its ring systems, and
its moons
How to observe Saturn with a small telescope