NORTH LONDON SKYDIVING CENTRE LTD. ACCELERATED FREEFALL ... · NORTH LONDON SKYDIVING CENTRE LTD...
26
NORTH LONDON SKYDIVING CENTRE LTD. ACCELERATED FREEFALL TRAINING MANUAL NAME: NORTH LONDON SKYDIVING CENTRE LTD, CHATTERIS AIRFIELD, STONEA, NR MARCH, CAMBRIDGESHIRE TEL: 01354 699 088 [email protected] [email protected]
Transcript of NORTH LONDON SKYDIVING CENTRE LTD. ACCELERATED FREEFALL ... · NORTH LONDON SKYDIVING CENTRE LTD...
NORTH LONDON SKYDIVING CENTRE LTD.
ACCELERATED FREEFALL TRAINING MANUAL
NAME:
NORTH LONDON SKYDIVING CENTRE LTD,
CHATTERIS AIRFIELD, STONEA,
NR MARCH, CAMBRIDGESHIRE
TEL: 01354 699 088
Dear AFF Student, Thank you for choosing North London Skydiving Centre ltd (NLSC). We hope you will
enjoy the course and your time with us. To start with, let us tell you a few facts about skydiving in the UK and how it is controlled. The Civil Aviation Authority (CAA) controls all parachuting in Great Britain. The British Parachute Association (BPA) is the governing body responsible to the CAA for the safe conduct and control of parachuting. North London Skydiving Centre trains students in accordance with the British Parachute Association operations manual. Before jumping you will need to become a member of Skydive Chatteris Club Ltd (SCCL) which is included with your course. SCCL provide parachuting flights at Chatteris airfield with all club parachuting activity controlled by its Chief Instructor. The centre operates six days a week, from Tuesday to Sunday (summer time).Wednesday to Sunday (winter time). This manual is intended to give you an insight into the course, and what is expected of you during the training, and after graduating. It will also act as aide memoir during training. Your AFF Instructors will be happy to answer any questions you have during your course and tell you about the options available to you after you have graduated. Blue skies and happy landings,
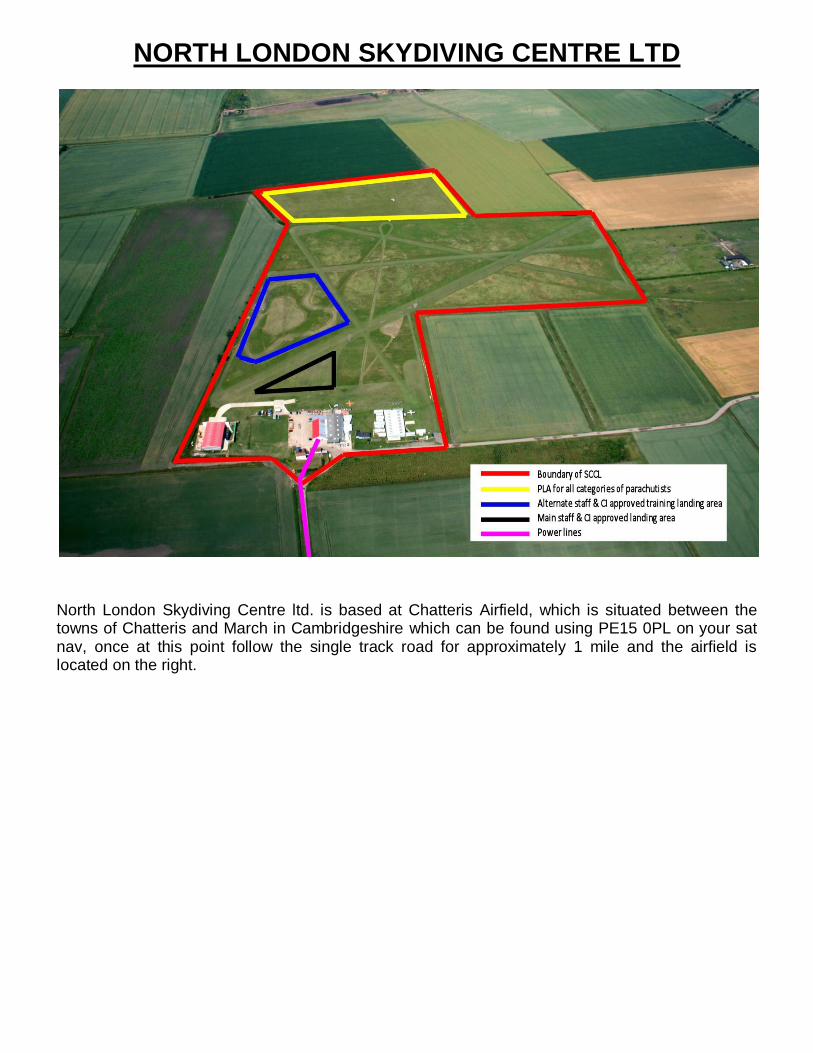
NORTH LONDON SKYDIVING CENTRE LTD
North London Skydiving Centre ltd. is based at Chatteris Airfield, which is situated between the towns of Chatteris and March in Cambridgeshire which can be found using PE15 0PL on your sat nav, once at this point follow the single track road for approximately 1 mile and the airfield is located on the right.
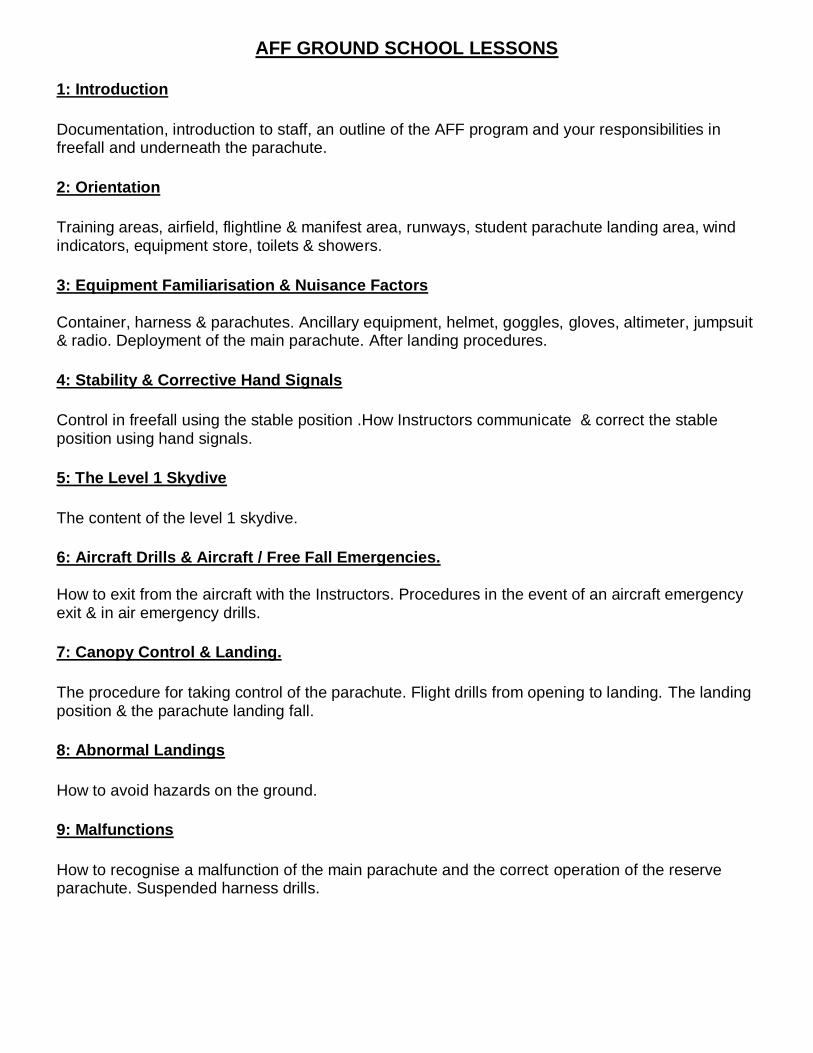
AFF GROUND SCHOOL LESSONS 1: Introduction
Documentation, introduction to staff, an outline of the AFF program and your responsibilities in freefall and underneath the parachute.
2: Orientation
Training areas, airfield, flightline & manifest area, runways, student parachute landing area, wind indicators, equipment store, toilets & showers.
3: Equipment Familiarisation & Nuisance Factors Container, harness & parachutes. Ancillary equipment, helmet, goggles, gloves, altimeter, jumpsuit & radio. Deployment of the main parachute. After landing procedures.
4: Stability & Corrective Hand Signals
Control in freefall using the stable position .How Instructors communicate & correct the stable position using hand signals. 5: The Level 1 Skydive
The content of the level 1 skydive. 6: Aircraft Drills & Aircraft / Free Fall Emergencies.
How to exit from the aircraft with the Instructors. Procedures in the event of an aircraft emergency exit & in air emergency drills.
7: Canopy Control & Landing.
The procedure for taking control of the parachute. Flight drills from opening to landing. The landing position & the parachute landing fall.
8: Abnormal Landings
How to avoid hazards on the ground.
9: Malfunctions
How to recognise a malfunction of the main parachute and the correct operation of the reserve parachute. Suspended harness drills.
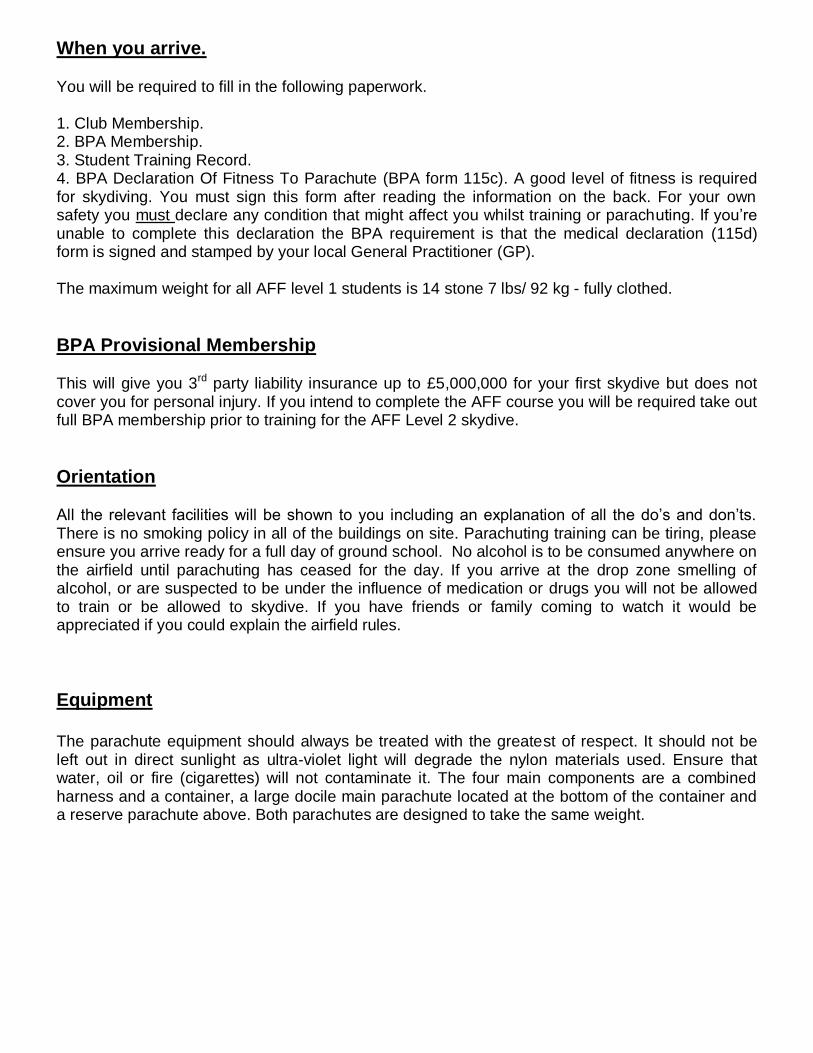
When you arrive. You will be required to fill in the following paperwork. 1. Club Membership. 2. BPA Membership. 3. Student Training Record. 4. BPA Declaration Of Fitness To Parachute (BPA form 115c). A good level of fitness is required for skydiving. You must sign this form after reading the information on the back. For your own safety you must declare any condition that might affect you whilst training or parachuting. If you’re unable to complete this declaration the BPA requirement is that the medical declaration (115d) form is signed and stamped by your local General Practitioner (GP).
The maximum weight for all AFF level 1 students is 14 stone 7 lbs/ 92 kg - fully clothed.
BPA Provisional Membership
This will give you 3rd party liability insurance up to £5,000,000 for your first skydive but does not cover you for personal injury. If you intend to complete the AFF course you will be required take out full BPA membership prior to training for the AFF Level 2 skydive.
Orientation All the relevant facilities will be shown to you including an explanation of all the do’s and don’ts. There is no smoking policy in all of the buildings on site. Parachuting training can be tiring, please ensure you arrive ready for a full day of ground school. No alcohol is to be consumed anywhere on the airfield until parachuting has ceased for the day. If you arrive at the drop zone smelling of alcohol, or are suspected to be under the influence of medication or drugs you will not be allowed to train or be allowed to skydive. If you have friends or family coming to watch it would be appreciated if you could explain the airfield rules.
Equipment
The parachute equipment should always be treated with the greatest of respect. It should not be left out in direct sunlight as ultra-violet light will degrade the nylon materials used. Ensure that water, oil or fire (cigarettes) will not contaminate it. The four main components are a combined harness and a container, a large docile main parachute located at the bottom of the container and a reserve parachute above. Both parachutes are designed to take the same weight.
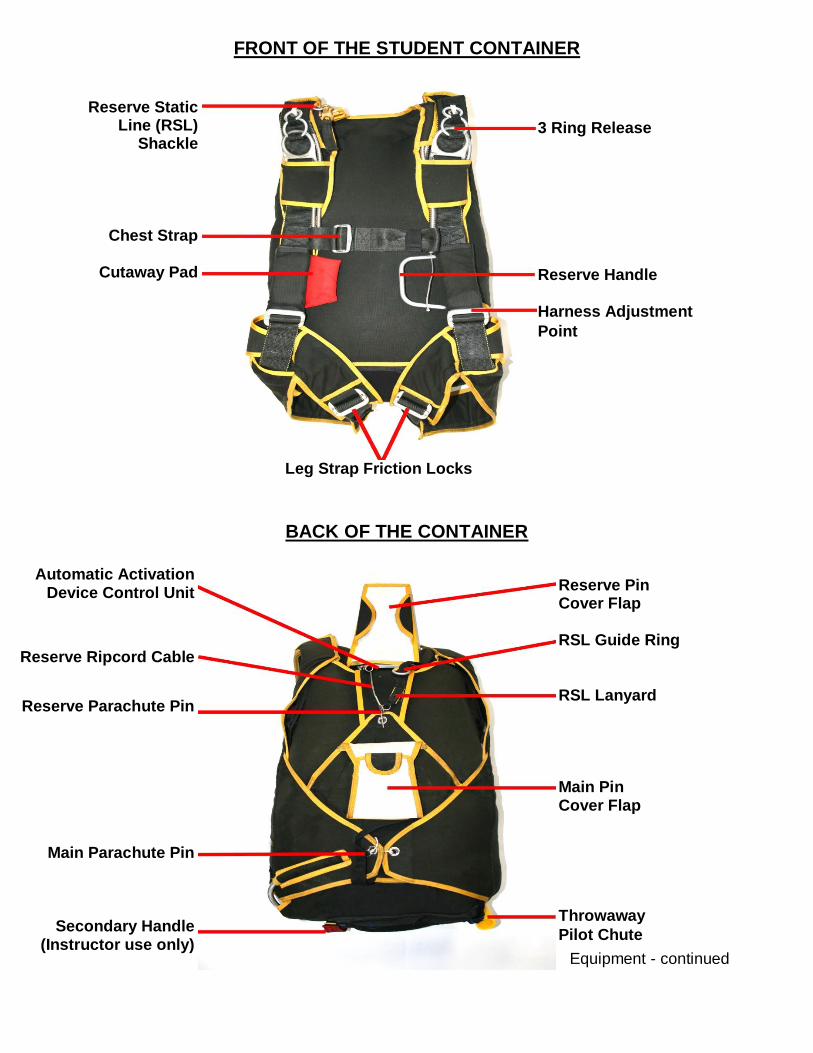
Automatic Activation
Device Control Unit
Reserve Ripcord Cable
Reserve Parachute Pin
Main Parachute Pin
Secondary Handle (Instructor use only)
Reserve Static Line (RSL)
Shackle
Chest Strap
Cutaway Pad
3 Ring Release Reserve Handle Harness Adjustment
Point
Leg Strap Friction Locks
Reserve Pin Cover Flap RSL Guide Ring RSL Lanyard Main Pin Cover Flap Throwaway
Pilot Chute
FRONT OF THE STUDENT CONTAINER
BACK OF THE CONTAINER
Equipment - continued
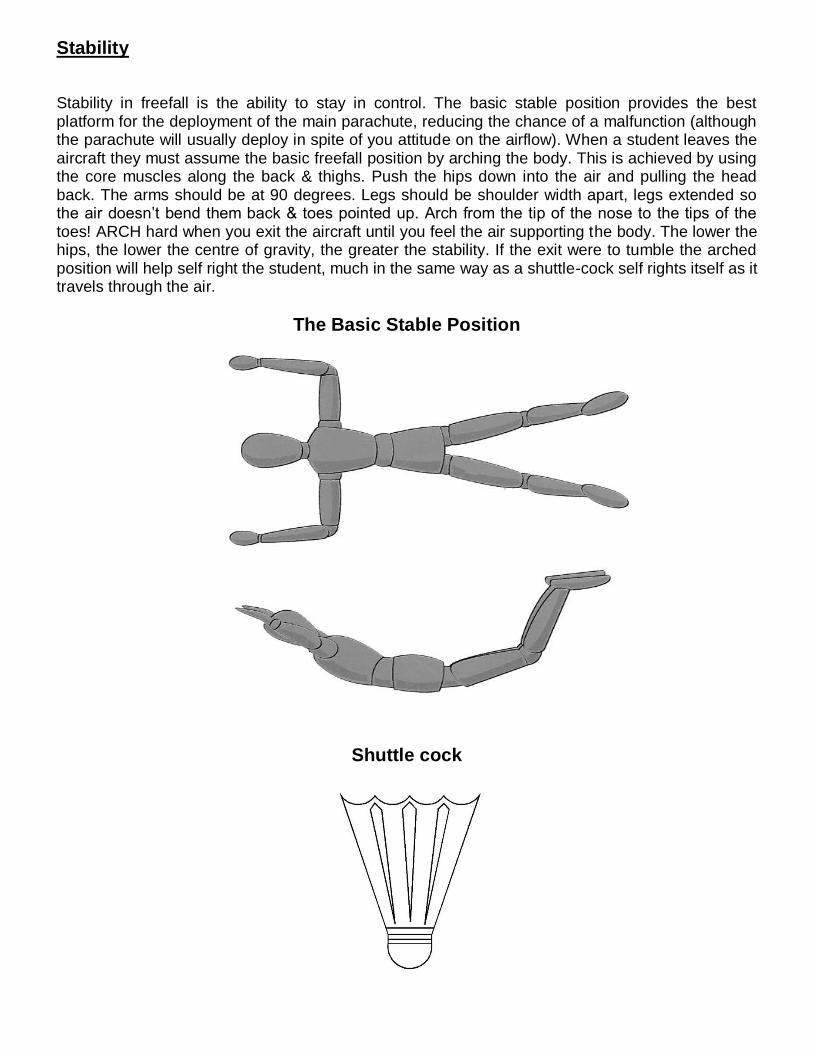
Stability
Stability in freefall is the ability to stay in control. The basic stable position provides the best platform for the deployment of the main parachute, reducing the chance of a malfunction (although the parachute will usually deploy in spite of you attitude on the airflow). When a student leaves the aircraft they must assume the basic freefall position by arching the body. This is achieved by using the core muscles along the back & thighs. Push the hips down into the air and pulling the head back. The arms should be at 90 degrees. Legs should be shoulder width apart, legs extended so the air doesn’t bend them back & toes pointed up. Arch from the tip of the nose to the tips of the toes! ARCH hard when you exit the aircraft until you feel the air supporting the body. The lower the hips, the lower the centre of gravity, the greater the stability. If the exit were to tumble the arched position will help self right the student, much in the same way as a shuttle-cock self rights itself as it travels through the air.
The Basic Stable Position
Shuttle cock
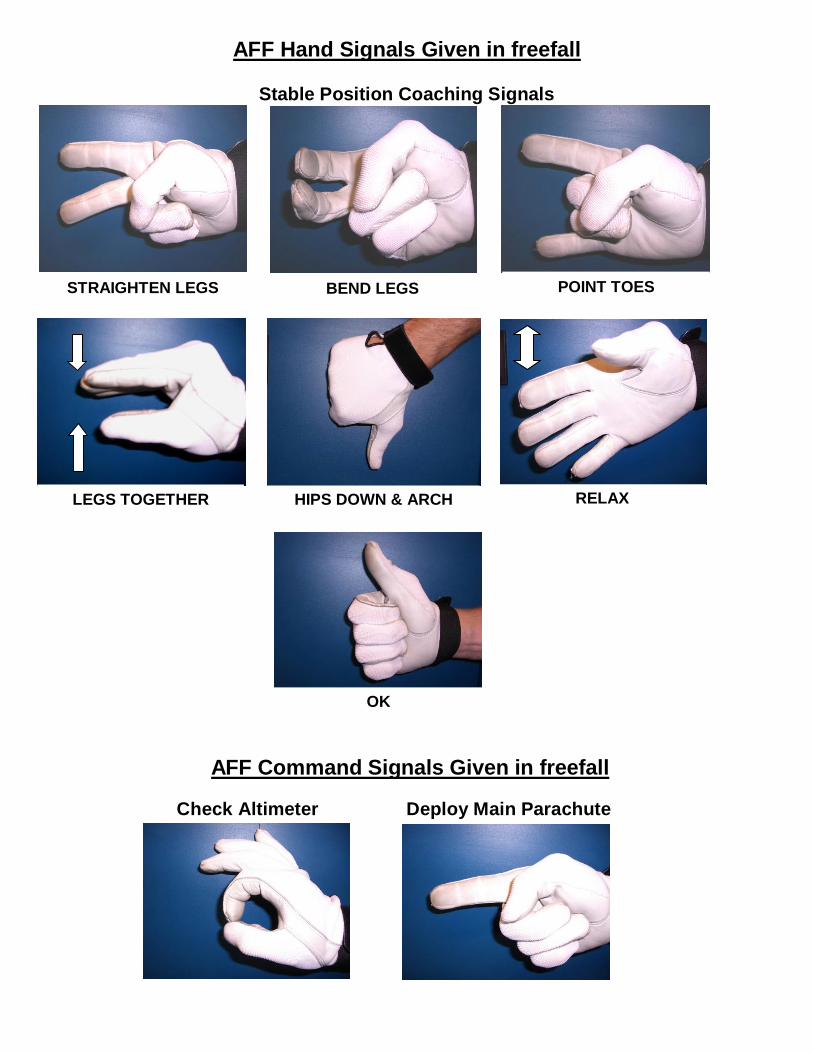
AFF Hand Signals Given in freefall
Stable Position Coaching Signals
AFF Command Signals Given in freefall
Check Altimeter Deploy Main Parachute
POINT TOES STRAIGHTEN LEGS BEND LEGS
LEGS TOGETHER HIPS DOWN & ARCH
OK
RELAX
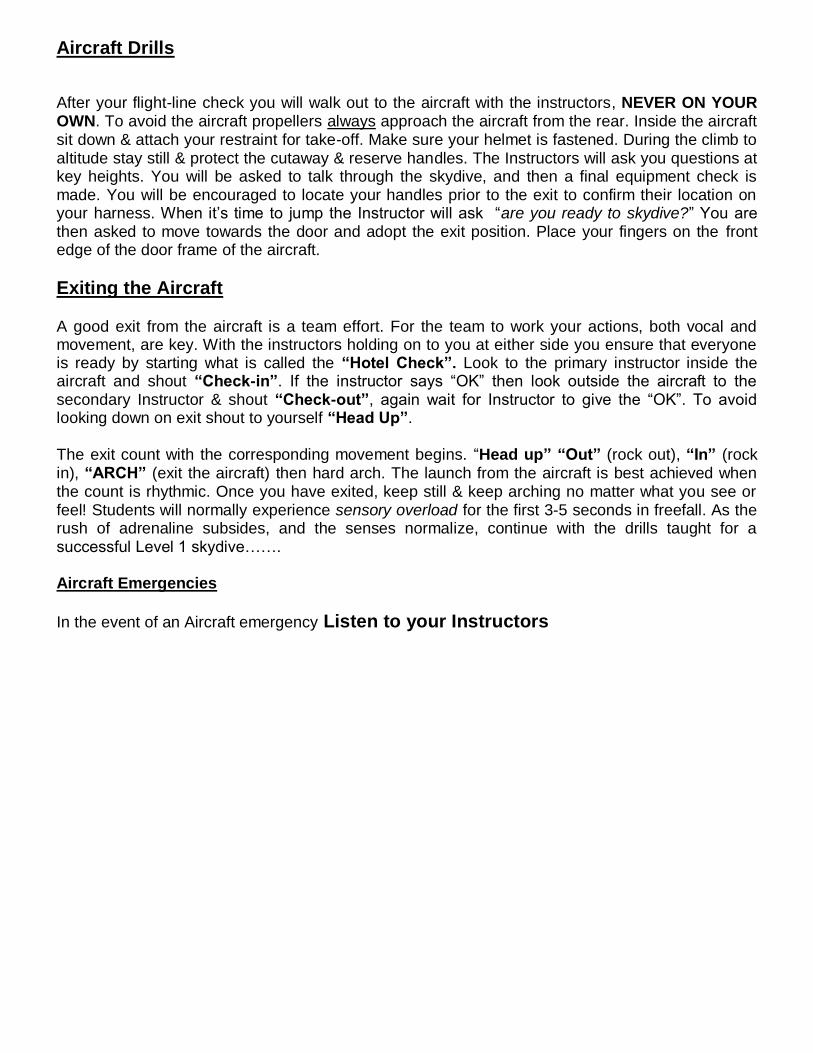
Aircraft Drills
After your flight-line check you will walk out to the aircraft with the instructors, NEVER ON YOUR OWN. To avoid the aircraft propellers always approach the aircraft from the rear. Inside the aircraft sit down & attach your restraint for take-off. Make sure your helmet is fastened. During the climb to altitude stay still & protect the cutaway & reserve handles. The Instructors will ask you questions at key heights. You will be asked to talk through the skydive, and then a final equipment check is made. You will be encouraged to locate your handles prior to the exit to confirm their location on your harness. When it’s time to jump the Instructor will ask “are you ready to skydive?” You are then asked to move towards the door and adopt the exit position. Place your fingers on the front edge of the door frame of the aircraft.
Exiting the Aircraft A good exit from the aircraft is a team effort. For the team to work your actions, both vocal and movement, are key. With the instructors holding on to you at either side you ensure that everyone is ready by starting what is called the “Hotel Check”. Look to the primary instructor inside the aircraft and shout “Check-in”. If the instructor says “OK” then look outside the aircraft to the secondary Instructor & shout “Check-out”, again wait for Instructor to give the “OK”. To avoid looking down on exit shout to yourself “Head Up”.
The exit count with the corresponding movement begins. “Head up” “Out” (rock out), “In” (rock in), “ARCH” (exit the aircraft) then hard arch. The launch from the aircraft is best achieved when the count is rhythmic. Once you have exited, keep still & keep arching no matter what you see or feel! Students will normally experience sensory overload for the first 3-5 seconds in freefall. As the rush of adrenaline subsides, and the senses normalize, continue with the drills taught for a successful Level 1 skydive……. Aircraft Emergencies
In the event of an Aircraft emergency Listen to your Instructors
The Level 1 Skydive
Exit followed with the H.A.S.P. Heading Look at the horizon. Altimeter Check your altimeter, absorb the height information it is telling you. Secondary Look under your left arm, report the altitude to the secondary instructor & react to any
hand signals. Wait for the thumbs up signal. Primary Look under your right arm, report the altitude to the primary instructor & react to any
hand signals. Wait for the thumbs up signal. Three Practice Pulls - “Arch Locate Recover”
The right hand moves to the toggle located at the bottom of the main parachute container. Locate the main parachute handle & grasp it each time. The instructor may try to assist your right hand if necessary. If you feel the instructors hand on yours, relax your arm as they are only trying to help you locate the main handle. The left hand is moved forward of the head to ensure symmetry of the body position. Fluid movement is required, rushing or making quick jerky movements will only result in a less stable body position. Keep the head back & keep pushing out with the legs & toes. Free Time The altitude you finish the 3 Practice Pulls at will determine how much free time you have. Monitor your heading & altitude until the deployment height of 6000 feet. During free time keep thinking about the body position and respond to any hand signals given to you by the instructors. On average it takes 5 seconds to fall a 1000 feet. If you read 8000 feet on the altimeter you’ll have around 10 seconds of free time. Maintain altitude awareness & respond to any hand signals given BEGIN DEPLOYMENT OF THE MAIN PARACHUTE AT 6000 FEET Wave-off
Cross the hands in front of the face and return them to the stable position. This indicates to the instructor that you are about to deploy the main parachute. Arch Locate – main parachute toggle Throw
Throw the main pilot-chute into the clear air at the side of the body. Safety count: - gives the main parachute time to deploy One Thousand Two Thousand Three Thousand Four Thousand Check Canopy. Memorise the drills. It always helps to say them aloud whilst practising, and in freefall.
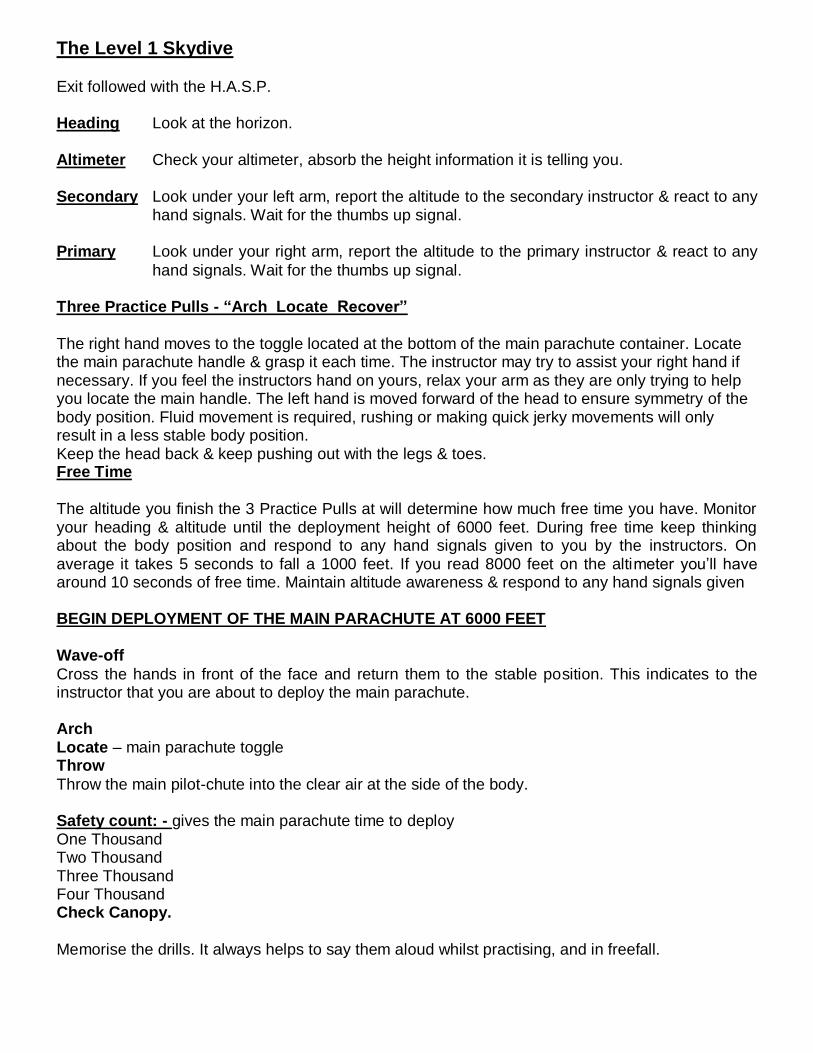
Freefall emergencies
If after leaving the aircraft you realise you are unstable – HARD ARCH!
In order to help the instructors, you must lift your head and arch the body as much as you can. If the exit remains unstable one of instructors may let go allowing the remaining instructor to right the student more easily. If at any time during the skydive you lose sight of one instructor, carry on with the skydive as normal with the remaining instructor. If for any reason you lose both Instructors, you must deploy the main parachute immediately. If during the freefall you realised your altimeter was not working, or if you loose altitude awareness for whatever reason you must deploy the main parachute immediately. You are not experienced enough to gauge your altitude without one.
Priorities on every skydive
Deploy the parachute. Deploy the parachute- at the correct altitude. Deploy the parachute- at the correct altitude- in a stable position. Deployment
Deployment of the parachute is initiated when the throwaway pilot-chute is released by the skydiver. This acts as an anchor in the air and extracts the deployment bag as the skydiver continues to fall.
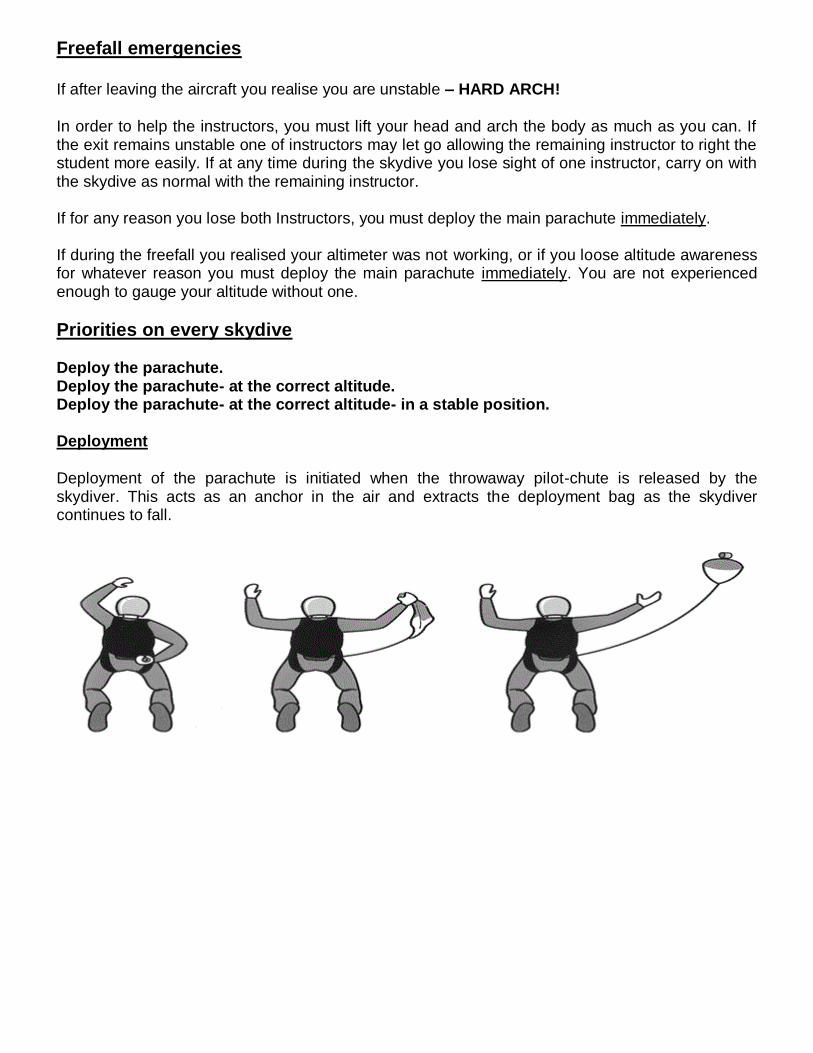
Stabiliser Steering Line
Cascade
End Cell
Slider Risers
Steering
Toggle
Line Groups
Centre Cell
THE 9 CELL RAM-AIR CANOPY
Introduction
The square parachute is an aerodynamically stiffened airfoil that generates lift due to its forward flight through the air. Brakes The steering lines (brakes) are set during deployment. To ensure that the skydiver has complete control of the parachute pull down twice on the yellow steering toggles after each deployment Nuisance factors may be encountered which are discussed later in this manual.
Steering
The yellow steering toggles are connected directly to the trailing edge at either side of the parachute. Pulling down on one steering toggle produces drag on the trailing edge resulting in a turn in that direction. Landing
When close to the ground keep the parachute trimmed into the wind with gentle input of the steering toggles. The forward speed of the parachute can be converted into lift by pulling down both the steering toggles. This is called the ‘flare’ The flare is timed so that the maximum amount
of lift is generated just before the feet touch the ground. “Your hands should be down when your feet touch the ground”. If you flare too high it is important to keep the hands down & stay flared.
Flight Drills & Canopy Control You are the Pilot not a passenger of the parachute. Take control & plan your descent into a safe landing area. After the four second safety count and check canopy start your flight drills: Check canopy
Ask 3 questions Big, Rectangular, Sound Take control Nuisance factors
• Twists (Check canopy, pull apart risers, kick out) Do not remove toggles
• Slider stuck up
• End-cell closure
• Pilot chute over nose – gentle inputs
All round observation - At all times
• If see another canopy, steer away shortest route to avoid it -Rule of right
• 90 degree left & right turns
• Lower canopy has right of way
Locate DZ / PLA
• Look down, could be in any direction including under feet.
Move to Holding Area Landing (clearing Hazards en-route)
• 1000’ head to PLA – Downwind leg
• 500’ – min 300’ turn - Into wind leg – keep canopy trimmed – maintain straight line –
gentle trim turns
• 10ft FLARE for landing– if not landed immediately keep toggles down
Landing Priorities
1. Under a flat and level canopy (not turning).
2. Land in a hazard-free area.
3. Land into wind if possible, but not at the expense of the above.

Nuisance Factors During any normal parachute deployment you may encounter what are termed as nuisance factors. These minor problems can be cleared easily, but if not corrected will restrict the deployment or performance of the parachute. Twists - It is very important look past the twists and check the canopy before reacting to them. You may find during deployment that the lines have twisted. If you look up to ‘check canopy’ and you have a good canopy grasp the risers and pull them apart, kicking the legs will also help. You must not release the brakes or use the steering toggles until you have cleared the twists.
Twists
End Cell Closed/Slider stuck up- It is very important to ignore the end cell closure and the check canopy. If the canopy is OK the end cell(s) can be inflated by pulling down on both steering
toggles down slowly. When the cell(s) inflate(s) and the slider comes down let the toggles back up.
Slider Up / End Cell Closed
LANDINGS Normal landing
Full flare for landing Remember if you have flared too high, keep the steering toggles down. Your feet should be together for landing in case you need to roll. Un Happy landing
Full flare for landing if your un happy carry out a Parachute landing fall ABNORMAL LANDINGS
Obstacles & hazards can be avoided with safe canopy handling at altitude. If for any reason you think you may be heading towards a hazard Look away steer away. You can accept a crosswind or downwind landing into a hazard free area if necessary but your first priority is to land with a level canopy above your head, even if this means landing on the hazard.
REMBER LOOK AWAY STEER AWAY
Parachute landing priorities
LAND UNDER A FLAT AND LEVEL CANOPY no low radical turns into wind. LAND IN A HAZARD FREE AREA but not at the expense of the above. LAND INTO WIND not at the expense of both of the above
MALFUNCTIONS “A malfunction is any failure of the equipment that will not provide you with full control over the parachute or a safe rate of descent to the ground.” Parachutes used by students are large & docile. Their purpose is to get you down slowly and as safely as possible. They are reliable and are well maintained. Malfunctions are rare, with modern equipment you may go through your whole skydiving career without ever having one. However skydivers always practice their emergency drills & as a student you will revise them at the beginning of each day. Check Canopy Ask yourself these three questions: IS IT BIG? IS IT RECTANGULAR? SOUND? If the answer is NO to any question carry out the following emergency drill. MALFUNCTION – (trigger word) LOOK – Look down at the cutaway pad and reserve handles on the front of the harness.
LOCATE – Grasp the cutaway pad on the right side of the harness. Then grasp the reserve handle on the left side of the harness, place the thumb through the handle.
CUT-AWAY – (two actions) Peel the cut away pad off the Velcro “CUT”. Now pull it towards the groin until the arm is fully extended “AWAY”.
RESERVE – Punch the reserve handle to the groin until the arm is also fully extended.
ARCH – Recover to the basic stable position.
If you have a malfunction it’s your responsibility is to carry out the drills IMMEDIATELY.
NB. The reserve parachute is controlled in the same way as the main parachute. The steering toggles are located on the rear risers and are Red. Take control by releasing the brakes & pumping down twice and fly It as normal. Flare the parachute as normal whilst in the landing position.
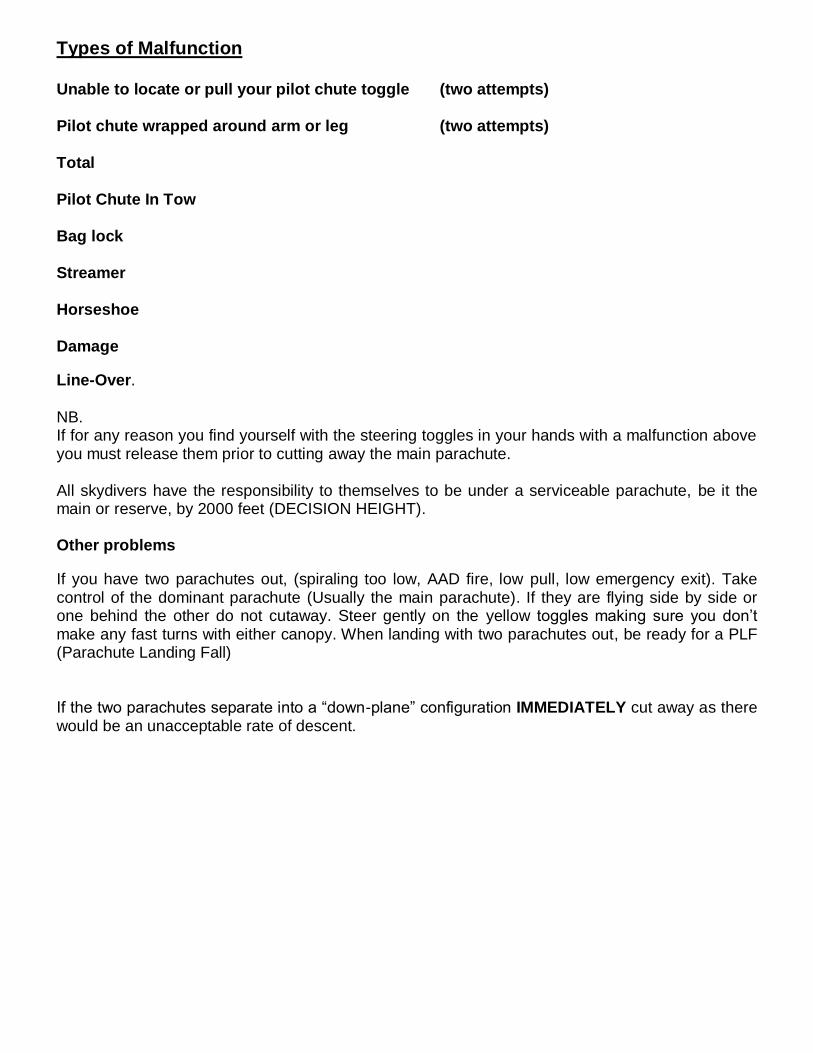
Types of Malfunction Unable to locate or pull your pilot chute toggle (two attempts) Pilot chute wrapped around arm or leg (two attempts) Total
Pilot Chute In Tow
Bag lock
Streamer
Horseshoe
Damage
Line-Over. NB. If for any reason you find yourself with the steering toggles in your hands with a malfunction above you must release them prior to cutting away the main parachute. All skydivers have the responsibility to themselves to be under a serviceable parachute, be it the main or reserve, by 2000 feet (DECISION HEIGHT). Other problems
If you have two parachutes out, (spiraling too low, AAD fire, low pull, low emergency exit). Take control of the dominant parachute (Usually the main parachute). If they are flying side by side or one behind the other do not cutaway. Steer gently on the yellow toggles making sure you don’t make any fast turns with either canopy. When landing with two parachutes out, be ready for a PLF (Parachute Landing Fall) If the two parachutes separate into a “down-plane” configuration IMMEDIATELY cut away as there would be an unacceptable rate of descent.
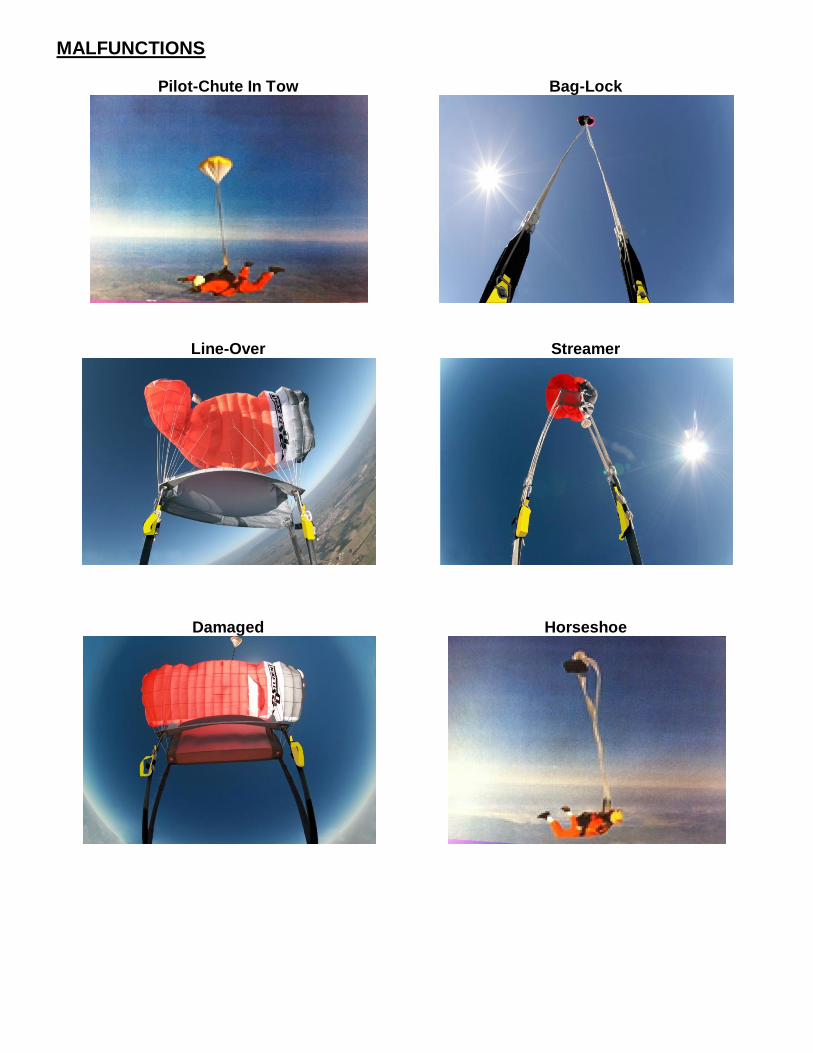
MALFUNCTIONS
Pilot-Chute In Tow
Bag-Lock
Line-Over
Streamer
Damaged
Horseshoe
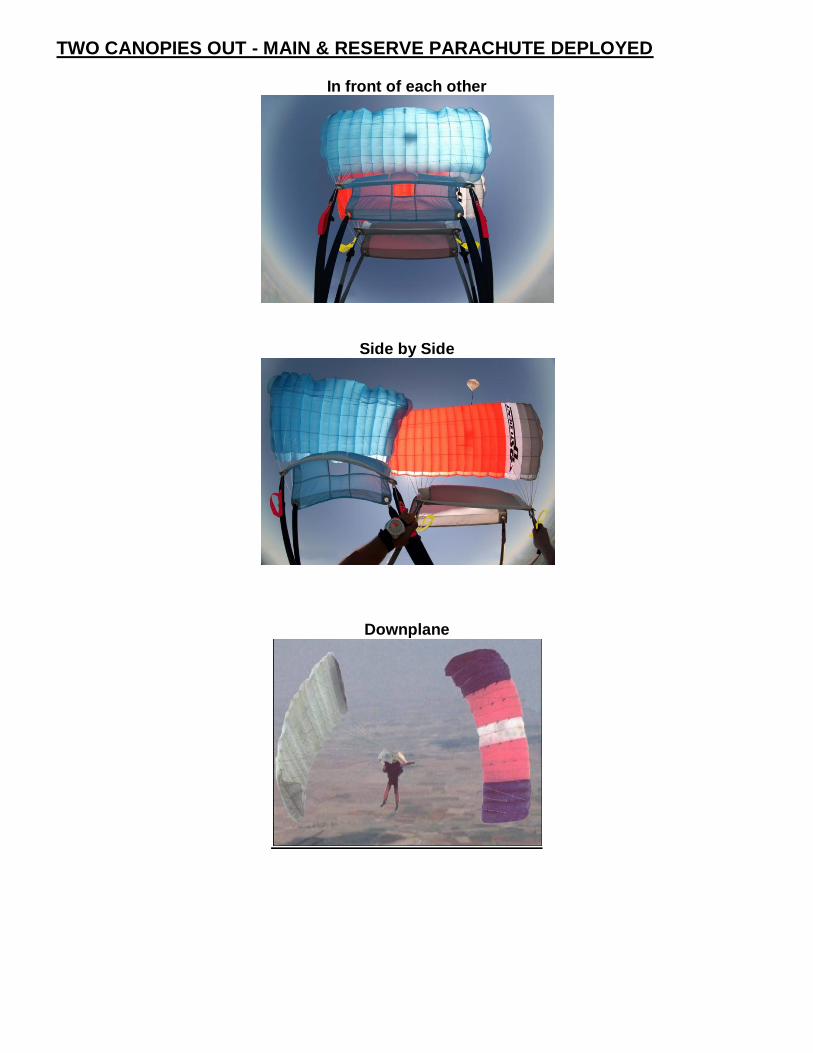
TWO CANOPIES OUT - MAIN & RESERVE PARACHUTE DEPLOYED
In front of each other
Side by Side
Downplane
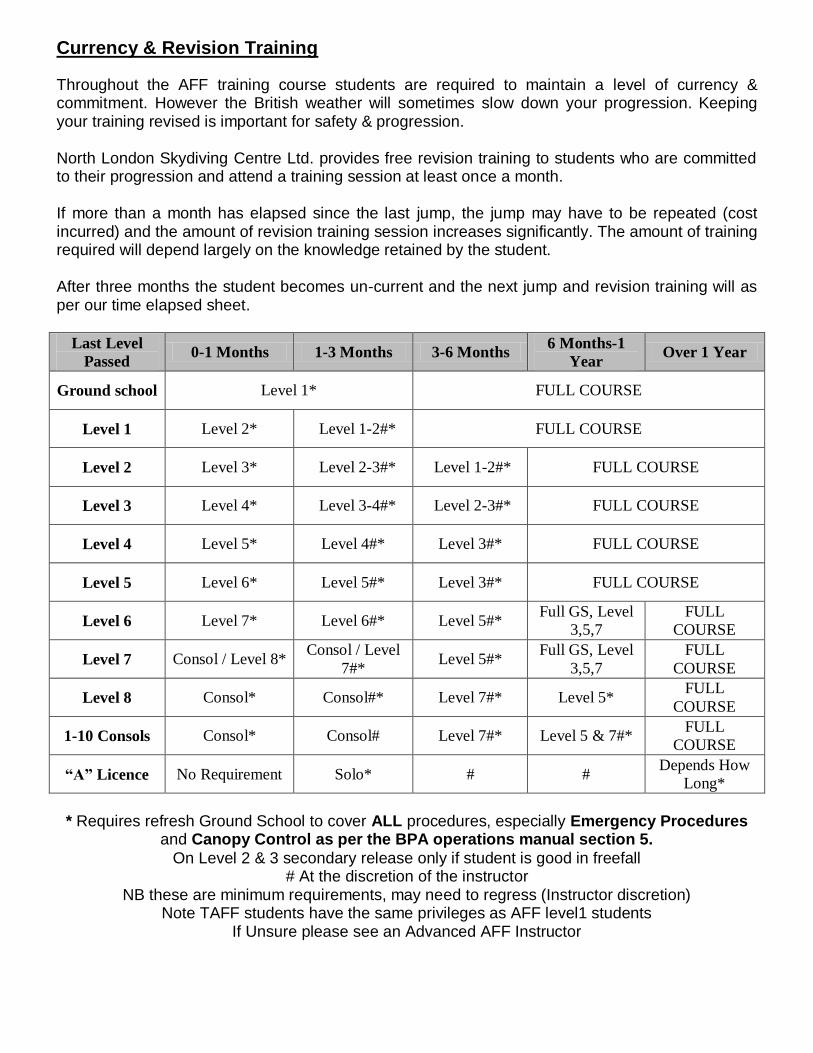
Currency & Revision Training
Throughout the AFF training course students are required to maintain a level of currency & commitment. However the British weather will sometimes slow down your progression. Keeping your training revised is important for safety & progression. North London Skydiving Centre Ltd. provides free revision training to students who are committed to their progression and attend a training session at least once a month. If more than a month has elapsed since the last jump, the jump may have to be repeated (cost incurred) and the amount of revision training session increases significantly. The amount of training required will depend largely on the knowledge retained by the student.
After three months the student becomes un-current and the next jump and revision training will as per our time elapsed sheet.
Last Level
Passed 0-1 Months 1-3 Months 3-6 Months
6 Months-1
Year Over 1 Year
Ground school Level 1* FULL COURSE
Level 1 Level 2* Level 1-2#* FULL COURSE
Level 2 Level 3* Level 2-3#* Level 1-2#* FULL COURSE
Level 3 Level 4* Level 3-4#* Level 2-3#* FULL COURSE
Level 4 Level 5* Level 4#* Level 3#* FULL COURSE
Level 5 Level 6* Level 5#* Level 3#* FULL COURSE
Level 6 Level 7* Level 6#* Level 5#* Full GS, Level
3,5,7
FULL
COURSE
Level 7 Consol / Level 8* Consol / Level
7#* Level 5#*
Full GS, Level
3,5,7
FULL
COURSE
Level 8 Consol* Consol#* Level 7#* Level 5* FULL
COURSE
1-10 Consols Consol* Consol# Level 7#* Level 5 & 7#* FULL
COURSE
“A” Licence No Requirement Solo* # # Depends How
Long*
* Requires refresh Ground School to cover ALL procedures, especially Emergency Procedures
and Canopy Control as per the BPA operations manual section 5.
On Level 2 & 3 secondary release only if student is good in freefall # At the discretion of the instructor
NB these are minimum requirements, may need to regress (Instructor discretion) Note TAFF students have the same privileges as AFF level1 students
If Unsure please see an Advanced AFF Instructor
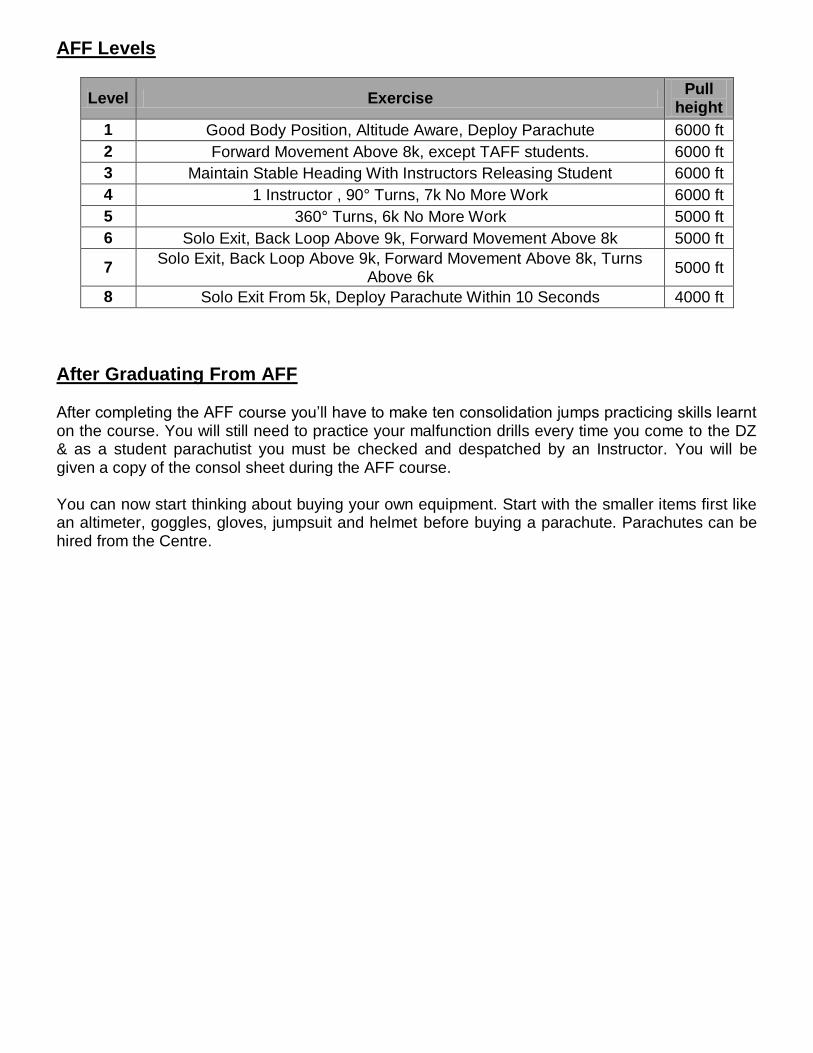
AFF Levels
Level Exercise Pull
height
1 Good Body Position, Altitude Aware, Deploy Parachute 6000 ft
2 Forward Movement Above 8k, except TAFF students. 6000 ft
3 Maintain Stable Heading With Instructors Releasing Student 6000 ft
4 1 Instructor , 90° Turns, 7k No More Work 6000 ft
5 360° Turns, 6k No More Work 5000 ft
6 Solo Exit, Back Loop Above 9k, Forward Movement Above 8k 5000 ft
7 Solo Exit, Back Loop Above 9k, Forward Movement Above 8k, Turns
Above 6k 5000 ft
8 Solo Exit From 5k, Deploy Parachute Within 10 Seconds 4000 ft
After Graduating From AFF After completing the AFF course you’ll have to make ten consolidation jumps practicing skills learnt on the course. You will still need to practice your malfunction drills every time you come to the DZ & as a student parachutist you must be checked and despatched by an Instructor. You will be given a copy of the consol sheet during the AFF course. You can now start thinking about buying your own equipment. Start with the smaller items first like an altimeter, goggles, gloves, jumpsuit and helmet before buying a parachute. Parachutes can be hired from the Centre.
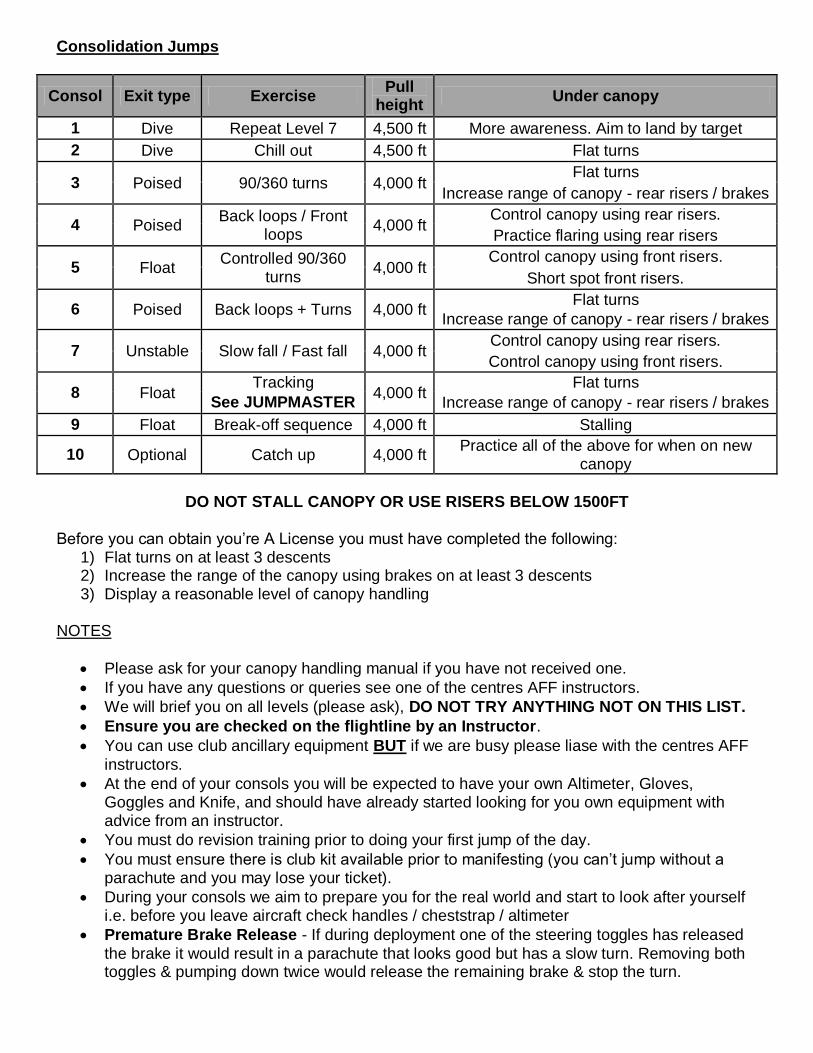
Consolidation Jumps
Consol Exit type Exercise Pull
height Under canopy
1 Dive Repeat Level 7 4,500 ft More awareness. Aim to land by target
2 Dive Chill out 4,500 ft Flat turns
3 Poised 90/360 turns 4,000 ft Flat turns
Increase range of canopy - rear risers / brakes
4 Poised Back loops / Front
loops 4,000 ft
Control canopy using rear risers.
Practice flaring using rear risers
5 Float Controlled 90/360
turns 4,000 ft
Control canopy using front risers.
Short spot front risers.
6 Poised Back loops + Turns 4,000 ft Flat turns
Increase range of canopy - rear risers / brakes
7 Unstable Slow fall / Fast fall 4,000 ft Control canopy using rear risers.
Control canopy using front risers.
8 Float Tracking
4,000 ft Flat turns
See JUMPMASTER Increase range of canopy - rear risers / brakes
9 Float Break-off sequence 4,000 ft Stalling
10 Optional Catch up 4,000 ft Practice all of the above for when on new
canopy
DO NOT STALL CANOPY OR USE RISERS BELOW 1500FT
Before you can obtain you’re A License you must have completed the following:
1) Flat turns on at least 3 descents 2) Increase the range of the canopy using brakes on at least 3 descents 3) Display a reasonable level of canopy handling
NOTES
Please ask for your canopy handling manual if you have not received one.
If you have any questions or queries see one of the centres AFF instructors.
We will brief you on all levels (please ask), DO NOT TRY ANYTHING NOT ON THIS LIST.
Ensure you are checked on the flightline by an Instructor.
You can use club ancillary equipment BUT if we are busy please liase with the centres AFF
instructors.
At the end of your consols you will be expected to have your own Altimeter, Gloves, Goggles and Knife, and should have already started looking for you own equipment with advice from an instructor.
You must do revision training prior to doing your first jump of the day.
You must ensure there is club kit available prior to manifesting (you can’t jump without a parachute and you may lose your ticket).
During your consols we aim to prepare you for the real world and start to look after yourself i.e. before you leave aircraft check handles / cheststrap / altimeter
Premature Brake Release - If during deployment one of the steering toggles has released
the brake it would result in a parachute that looks good but has a slow turn. Removing both toggles & pumping down twice would release the remaining brake & stop the turn.
Aircraft Emergencies – Consol Students Only
Below 1000ft stay on board unless catastrophic aircraft failure
Between 1000ft and 3000ft out on reserve
Above 3000ft out on main If unsure above 1000ft and told nothing by the instructor, exit the aircraft and deploy reserve THIS DOES NOT OVERIDE THE DESCISION OF THE INSTRUCTOR ON THE AIRCRAFT
Returning for your AFF jumps
Please use this as a guide for deciding when to return for jumps. It is not a 100% guarantee but by following this advice you should minimise the risk of a wasted journey.
Opening times We are open from the following times, to help you complete your jumps. Wednesday, weekends and bank holidays 7.30am and 8.30am all other times. Summer time (April-October) Tuesday to Sunday. Wintertime (November-March) Wednesday to Sunday.
Booking in
You must email [email protected] or phone and book your place, as spaces are limited, and remember to bring your AFF Level card (Airfield phone number 01354 699 088 option 2). N.B the centre closes for about 6 weeks from the middle of December to the end of January for staff holidays and Aircraft maintenance. Refresher training You have done all the hard work now, so stay current. The training for the first jump is valid for 3 months from the date of your original course. If you do go over this period, phone the instructors at the airfield & they will discuss your options. This may involve you having to attend another course. If we are closed for any time during this period that time will be taken into account. Be here early so we can refresher train you before a parachuting program starts, you will complete refresher training each time you turn up. This doesn’t take very long if you have been practicing. Please arrive at our opening times for your refresher training. If you turn up later this could affect your chances of jumping as instructors may not be available until later in the day.

The weather is a major factor when deciding to return for jumps…
Our advice to you is to make yourself available. Look on our website www.ukskydiving.com/weather
What you are looking for…
Minimum Sunny intervals (cloud and sun) & forecast wind speed of no more than 15mph (no gusts). Please remember that the instructors are not weather experts. However, if you contact the airfield the previous morning, they will try to give you an honest idea of the forecast. However, even the met office gets it wrong sometimes! In Short
1. Chase the weather 2. Turn up early 3. Remember your training 4. Skydiving is an all day activity
Any problems call the instructors at the airfield on 01354 699 088 (option 2) But remember we
take many calls each day & we are very busy, especially during the summer period. This guide is fairly comprehensive so please heed our advice. Help us to help you