Nortel CallPilot Multimedia Messaging User...
52
Nortel CallPilot Multimedia Messaging User Guide 5.0 NN44200-106, 01.05 August 2010
Transcript of Nortel CallPilot Multimedia Messaging User...
Nortel CallPilot Multimedia MessagingUser Guide
5.0NN44200-106, 01.05
August 2010
© 2010 Avaya Inc.
All Rights Reserved.
Notice
While reasonable efforts have been made to ensure that theinformation in this document is complete and accurate at the time ofprinting, Avaya assumes no liability for any errors. Avaya reserves theright to make changes and corrections to the information in thisdocument without the obligation to notify any person or organization ofsuch changes.
Documentation disclaimer
Avaya shall not be responsible for any modifications, additions, ordeletions to the original published version of this documentation unlesssuch modifications, additions, or deletions were performed by Avaya.End User agree to indemnify and hold harmless Avaya, Avaya's agents,servants and employees against all claims, lawsuits, demands andjudgments arising out of, or in connection with, subsequentmodifications, additions or deletions to this documentation, to theextent made by End User.
Link disclaimer
Avaya is not responsible for the contents or reliability of any linked Websites referenced within this site or documentation(s) provided by Avaya.Avaya is not responsible for the accuracy of any information, statementor content provided on these sites and does not necessarily endorsethe products, services, or information described or offered within them.Avaya does not guarantee that these links will work all the time and hasno control over the availability of the linked pages.
Warranty
Avaya provides a limited warranty on this product. Refer to your salesagreement to establish the terms of the limited warranty. In addition,Avaya’s standard warranty language, as well as information regardingsupport for this product, while under warranty, is available to Avayacustomers and other parties through the Avaya Support Web site: http://www.avaya.com/support. Please note that if you acquired theproduct from an authorized Avaya reseller outside of the United Statesand Canada, the warranty is provided to you by said Avaya reseller andnot by Avaya.
Licenses
THE SOFTWARE LICENSE TERMS AVAILABLE ON THE AVAYAWEBSITE, HTTP://SUPPORT.AVAYA.COM/LICENSEINFO/ AREAPPLICABLE TO ANYONE WHO DOWNLOADS, USES AND/ORINSTALLS AVAYA SOFTWARE, PURCHASED FROM AVAYA INC.,ANY AVAYA AFFILIATE, OR AN AUTHORIZED AVAYA RESELLER(AS APPLICABLE) UNDER A COMMERCIAL AGREEMENT WITHAVAYA OR AN AUTHORIZED AVAYA RESELLER. UNLESSOTHERWISE AGREED TO BY AVAYA IN WRITING, AVAYA DOESNOT EXTEND THIS LICENSE IF THE SOFTWARE WAS OBTAINEDFROM ANYONE OTHER THAN AVAYA, AN AVAYA AFFILIATE OR ANAVAYA AUTHORIZED RESELLER, AND AVAYA RESERVES THERIGHT TO TAKE LEGAL ACTION AGAINST YOU AND ANYONEELSE USING OR SELLING THE SOFTWARE WITHOUT A LICENSE.BY INSTALLING, DOWNLOADING OR USING THE SOFTWARE, ORAUTHORIZING OTHERS TO DO SO, YOU, ON BEHALF OFYOURSELF AND THE ENTITY FOR WHOM YOU ARE INSTALLING,DOWNLOADING OR USING THE SOFTWARE (HEREINAFTERREFERRED TO INTERCHANGEABLY AS “YOU” AND “END USER”),AGREE TO THESE TERMS AND CONDITIONS AND CREATE ABINDING CONTRACT BETWEEN YOU AND AVAYA INC. OR THEAPPLICABLE AVAYA AFFILIATE (“AVAYA”).
Copyright
Except where expressly stated otherwise, no use should be made ofmaterials on this site, the Documentation(s) and Product(s) providedby Avaya. All content on this site, the documentation(s) and theproduct(s) provided by Avaya including the selection, arrangement anddesign of the content is owned either by Avaya or its licensors and is
protected by copyright and other intellectual property laws including thesui generis rights relating to the protection of databases. You may notmodify, copy, reproduce, republish, upload, post, transmit or distributein any way any content, in whole or in part, including any code andsoftware. Unauthorized reproduction, transmission, dissemination,storage, and or use without the express written consent of Avaya canbe a criminal, as well as a civil, offense under the applicable law.
Third-party components
Certain software programs or portions thereof included in the Productmay contain software distributed under third party agreements (“ThirdParty Components”), which may contain terms that expand or limitrights to use certain portions of the Product (“Third Party Terms”).Information regarding distributed Linux OS source code (for thoseProducts that have distributed the Linux OS source code), andidentifying the copyright holders of the Third Party Components and theThird Party Terms that apply to them is available on the Avaya SupportWeb site: http://www.avaya.com/support/Copyright/.
Trademarks
The trademarks, logos and service marks (“Marks”) displayed in thissite, the documentation(s) and product(s) provided by Avaya are theregistered or unregistered Marks of Avaya, its affiliates, or other thirdparties. Users are not permitted to use such Marks without prior writtenconsent from Avaya or such third party which may own the Mark.Nothing contained in this site, the documentation(s) and product(s)should be construed as granting, by implication, estoppel, or otherwise,any license or right in and to the Marks without the express writtenpermission of Avaya or the applicable third party.
Avaya is a registered trademark of Avaya Inc.
All other trademarks are the property of their respective owners.
Downloading documents
For the most current versions of documentation, see the Avaya SupportWeb site: http://www.avaya.com/support
Contact Avaya Support
Avaya provides a telephone number for you to use to report problemsor to ask questions about your product. The support telephone numberis 1-800-242-2121 in the United States. For additional supporttelephone numbers, see the Avaya Web site: http://www.avaya.com/support
2 Nortel CallPilot Multimedia Messaging User Guide August 2010
Contents
Chapter 1: How to get help.......................................................................................................7Getting help from the Nortel Web site...............................................................................................................7Getting help over the phone from a Nortel Solutions Center............................................................................7Getting help from a specialist by using an Express Routing Code...................................................................8Getting help through a Nortel distributor or reseller..........................................................................................8
Chapter 2: Using CallPilot multimedia messaging.................................................................9Working with CallPilot........................................................................................................................................9How to use this guide........................................................................................................................................9CallPilot terms.................................................................................................................................................10Access numbers..............................................................................................................................................10Mailbox............................................................................................................................................................10Password........................................................................................................................................................10Help sources...................................................................................................................................................10Voice prompts.................................................................................................................................................10Context-sensitive help.....................................................................................................................................11My CallPilot......................................................................................................................................................11Printed help.....................................................................................................................................................11CallPilot keypad commands............................................................................................................................12Using standard commands.............................................................................................................................12Playing and recording.....................................................................................................................................13Message commands and mailbox commands................................................................................................13Always available..............................................................................................................................................13Logging on to your mailbox.............................................................................................................................14To log on for the first time................................................................................................................................14To log on..........................................................................................................................................................14To log on from a faxphone...............................................................................................................................14To log on using Autologin................................................................................................................................15To disconnect..................................................................................................................................................15Changing your password................................................................................................................................15To change your password...............................................................................................................................15Choosing a secure password..........................................................................................................................16Recording your name......................................................................................................................................16To record a personal verification.....................................................................................................................16To play, delete, or re-record your personal verification....................................................................................16To return to your messages.............................................................................................................................17Recording greetings........................................................................................................................................17To record your greeting...................................................................................................................................17To play, delete, or re-record your greeting.......................................................................................................18To set the expiry date for your temporary greeting..........................................................................................18To return to your messages.............................................................................................................................18Assigning a custom operator...........................................................................................................................18To review and assign your custom operator number......................................................................................19Blocking messages.........................................................................................................................................19To block your messages and set options........................................................................................................19Turning Autologin on or off..............................................................................................................................20Returning to speech commands.....................................................................................................................20Playing your messages...................................................................................................................................20
Nortel CallPilot Multimedia Messaging User Guide August 2010 3

To play your messages...................................................................................................................................21To review and respond to your messages.......................................................................................................21Changing message speed..............................................................................................................................22To play a message slower or faster.................................................................................................................22Changing message volume.............................................................................................................................22To increase or decrease message volume......................................................................................................22Deleting and restoring messages....................................................................................................................23To delete a message.......................................................................................................................................23To restore a message......................................................................................................................................23Message storage.............................................................................................................................................23Printing fax messages.....................................................................................................................................23To print fax messages.....................................................................................................................................24To print at the faxphone you are calling from..................................................................................................24Listening to your e-mail messages..................................................................................................................25To review your e-mail messages.....................................................................................................................25To change your e-mail account settings for CallPilot......................................................................................26Calling the sender of a message.....................................................................................................................26To call the sender............................................................................................................................................26Replying to the sender....................................................................................................................................27To record a reply to the sender.......................................................................................................................27Replying to the sender and all recipients........................................................................................................27To record a reply to the sender and all recipients of a message.....................................................................27Forwarding a message....................................................................................................................................28To forward a message.....................................................................................................................................28To forward a fax...............................................................................................................................................29Composing a message...................................................................................................................................29To address, record, and send a message.......................................................................................................29To cancel an address entry.............................................................................................................................30Addressing a message....................................................................................................................................30To address a message to a local mailbox.......................................................................................................30To address a message to a distribution list.....................................................................................................31To address a message to a mailbox at another network site..........................................................................31To address a message to an open network mailbox.......................................................................................31To address a message to an Internet user......................................................................................................31To address a message to a telephone or faxphone........................................................................................31Addressing by name.......................................................................................................................................32To address by name........................................................................................................................................32Checking and editing your message...............................................................................................................32Adding message options.................................................................................................................................33To add an Urgent option..................................................................................................................................33To add an Economy option..............................................................................................................................33To add a Private option...................................................................................................................................34To request an acknowledgment to your message...........................................................................................34To set a specific time for delivering a message...............................................................................................34Adding message attachments.........................................................................................................................35To add an attachment to a message...............................................................................................................35To add a fax message attachment at a faxphone...........................................................................................35Express messaging.........................................................................................................................................36To send a voice message without logging in...................................................................................................36To send a fax message without logging in......................................................................................................38Thru-dialing.....................................................................................................................................................38
4 Nortel CallPilot Multimedia Messaging User Guide August 2010
To place a call while logged in.........................................................................................................................39To place a call while logged in using name dialing..........................................................................................39To reach your custom operator number while logged in.................................................................................39Personal distribution lists................................................................................................................................39To create a personal distribution list................................................................................................................40To play, edit, or delete a personal distribution list............................................................................................40Remote Notification.........................................................................................................................................41To set up Remote Notification the first time.....................................................................................................41To turn Remote Notification on and off............................................................................................................42To return to your messages.............................................................................................................................42Working in Remote Notification setup.............................................................................................................42Remote Notification Planner...........................................................................................................................43To change your notification message type......................................................................................................44To change your notification days.....................................................................................................................44To change your notification times....................................................................................................................44Turning message forwarding on or off.............................................................................................................45To enable or disable message forwarding.......................................................................................................46Changing fax options......................................................................................................................................46To change your fax options.............................................................................................................................46To turn Autoprinting on or off...........................................................................................................................47To change the default printer...........................................................................................................................47To turn fax separator page printing on or off...................................................................................................47When you are the caller..................................................................................................................................48Interrupting greetings......................................................................................................................................48Connecting to the custom operator.................................................................................................................48Thru-dialing to another number.......................................................................................................................49Editing your recorded messages.....................................................................................................................49Adding options to your recorded messages....................................................................................................49Adding a fax attachment to your recorded message.......................................................................................49To log on after leaving a message..................................................................................................................49Your CallPilot numbers....................................................................................................................................50Login numbers................................................................................................................................................50Service numbers.............................................................................................................................................50Addressing prefixes.........................................................................................................................................50Password change service...............................................................................................................................51
Nortel CallPilot Multimedia Messaging User Guide August 2010 5

6 Nortel CallPilot Multimedia Messaging User Guide August 2010
Chapter 1: How to get help
This section explains how to get help for Nortel products and services.
Getting help from the Nortel Web siteThe best way to get technical support for Nortel products is from the Nortel Technical SupportWeb site:
http://www.nortel.com/support
This site provides quick access to software, documentation, bulletins, and tools to addressissues with Nortel products. More specifically, the site enables you to:
• download software, documentation, and product bulletins
• search the Technical Support Web site and the Nortel Knowledge Base for answers totechnical issues
• sign up for automatic notification of new software and documentation for Nortel equipment
• open and manage technical support cases
Getting help over the phone from a Nortel Solutions CenterIf you do not find the information you require on the Nortel Technical Support Web site, andhave a Nortel support contract, you can also get help over the phone from a Nortel SolutionsCenter.
In North America, call 1-800-4NORTEL (1-800-466-7835).
Outside North America, go to the following Web site to obtain the phone number for your region:
http://www.nortel.com/callus
Nortel CallPilot Multimedia Messaging User Guide August 2010 7
Getting help from a specialist by using an Express RoutingCode
To access some Nortel Technical Solutions Centers, you can use an Express Routing Code(ERC) to quickly route your call to a specialist in your Nortel product or service. To locate theERC for your product or service, go to:
http://www.nortel.com/erc
Getting help through a Nortel distributor or resellerIf you purchased a service contract for your Nortel product from a distributor or authorizedreseller, contact the technical support staff for that distributor or reseller.
How to get help
8 Nortel CallPilot Multimedia Messaging User Guide August 2010
Chapter 2: Using CallPilot multimediamessaging
CallPilot* from Nortel is an advanced business communications system that offers exceptional flexibilityfor managing your messaging needs.
You can work with CallPilot from your telephone or your computer. Here are some of the many CallPilotfeatures you can use by entering commands on the keypad of your touchtone telephone:
• Play your messages.
• Forward and reply to messages.
• Compose, edit, and send messages.
• Dial and address by name or by number.
• Add message options such as urgent, private, and timed delivery.
• Create personalized distribution lists for sending messages.
• Receive remote notification of incoming messages.
• Receive, print, and send fax messages.
• Listen to your e-mail messages.
• Turn message forwarding on or off.
Some features, such as fax messaging and listening to e-mail, are options. Ask your administrator if thesefeatures are available to you.
Working with CallPilot
How to use this guideThis guide explains in detail how to work with CallPilot from the keypad of your touchtonetelephone. If you want to use a feature or service described in this guide but you cannot accessit, check with your administrator.
Nortel CallPilot Multimedia Messaging User Guide August 2010 9
CallPilot terms
Access numbersYour administrator gives you the access numbers you need for CallPilot. Keep a handy recordof these numbers in Your CallPilot numbers on page 50.
MailboxYour CallPilot mailbox stores your messages, recorded greetings, distribution lists, and otherpersonal settings. You can log on to your mailbox at any time to play your messages and use allof the available CallPilot features and services. Your administrator assigns you a mailboxnumber, which is usually your extension number.
PasswordYour personal password provides security for your mailbox and its contents. All of yourinteraction with CallPilot is confidential. No one else can access your mailbox.
Help sources
Voice promptsOn your telephone, CallPilot guides you with voice prompts at each step. The prompts tell youwhat to do next, or what options are available, so you do not have to remember every step.You can interrupt a prompt by pressing the key for the next step.
Using CallPilot multimedia messaging
10 Nortel CallPilot Multimedia Messaging User Guide August 2010
Context-sensitive helpOn your telephone, you can press the star key (*) for help at any time while you are loggedin to your mailbox. You hear the options that are available for your next step.
My CallPilotOn your computer, Web-based My CallPilot provides a Useful Information page specific to themailbox options, features, and services that are available to you.
Printed helpIn addition to this user guide, a printed Quick Reference Card and a printed Wallet Card areavailable. Keep them near your telephone or take them with you when you travel.
Context-sensitive help
Nortel CallPilot Multimedia Messaging User Guide August 2010 11

CallPilot keypad commands
Using standard commandsCallPilot has many standard commands that are common to all features, so you do not needa main menu. For example, Play is always 2, Record is always 5, and help is always *. If you
Using CallPilot multimedia messaging
12 Nortel CallPilot Multimedia Messaging User Guide August 2010
learn these standard commands, you can use all CallPilot features without memorizing everystep.
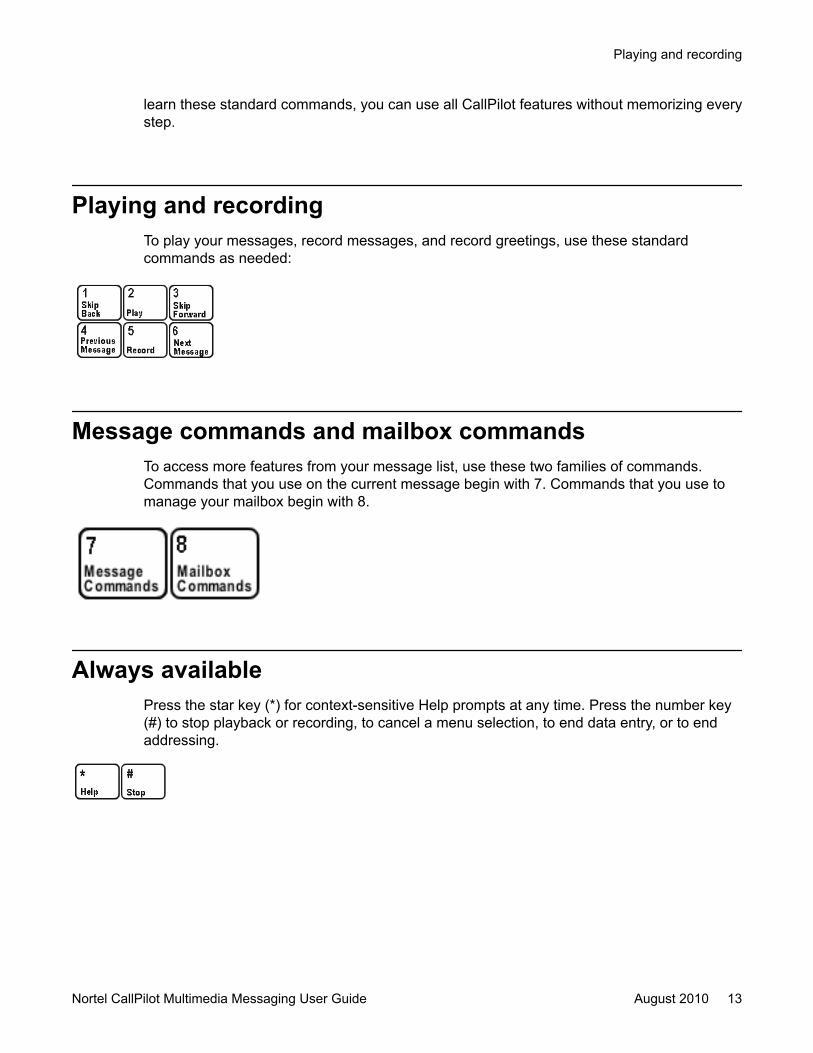
Playing and recordingTo play your messages, record messages, and record greetings, use these standardcommands as needed:
Message commands and mailbox commandsTo access more features from your message list, use these two families of commands.Commands that you use on the current message begin with 7. Commands that you use tomanage your mailbox begin with 8.
Always availablePress the star key (*) for context-sensitive Help prompts at any time. Press the number key(#) to stop playback or recording, to cancel a menu selection, to end data entry, or to endaddressing.
Playing and recording
Nortel CallPilot Multimedia Messaging User Guide August 2010 13
Logging on to your mailboxTo log on to your CallPilot mailbox, you need the CallPilot multimedia messaging accessnumber, and your own mailbox number and password.
Your administrator gives you these numbers and any other numbers you need for CallPilotfeatures and services. Keep a handy record of these numbers in Your CallPilot numbers onpage 50.
To log on for the first timeYour administrator gives you a temporary password that you change the first time you log on.
1. Decide on a new password. See Changing your password on page 15.
2. Follow the login steps below, using your temporary password.
3. When you are asked to enter a new password, follow the prompts. See Changingyour password on page 15.
To log onYou can log on to your mailbox from any touchtone telephone. When logging on from your owntelephone, you may be able to press a message key instead of dialing the access number.
1. Dial the CallPilot multimedia messaging access number, or press the message keyon your telephone.
2. Enter your mailbox number, then press #. Or, at your own telephone, just press #.
3. Enter your password, then press #.
You are now in your mailbox and can use all the message list commands.
To log on from a faxphoneYou can log on to your mailbox from a faxphone using the faxphone access number. Followthe steps for logging in, as described above. For details on printing at a faxphone, see Printingfax messages on page 23.
Using CallPilot multimedia messaging
14 Nortel CallPilot Multimedia Messaging User Guide August 2010
To log on using AutologinAutologin is an option that makes login easier because you do not have to enter your mailboxand password. Your administrator can allow secure numbers, such as your office or hometelephone, for Autologin. See Turning Autologin on or off on page 20.
To access your mailbox when Autologin is turned on, dial the CallPilot access number or pressthe message key at one of your specified Autologin numbers.
To disconnectWhen you have finished your CallPilot session, press 8 3 to disconnect, or hang up.
Changing your password
When you log on for the first time, you must change your password from the one you were firstassigned. After that, you can change your password as often as required. Your administratorsets the minimum length for a password.
To change your password1. While logged in to your mailbox, press 8 4.
2. Enter your current password, then press #.
Note:You may see dashes instead of numbers if you have a display phone.
3. Enter your new password, then press #.
4. Enter your new password again, then press #.
If your password expires, follow the steps for changing a password.
To log on using Autologin
Nortel CallPilot Multimedia Messaging User Guide August 2010 15
If you forget your password, your administrator can assign you a temporary password. Log onwith the temporary password, then change it immediately.
Choosing a secure passwordCallPilot prevents you from using some passwords if they are too short or too simple, or if youhave used the same one recently. Also, CallPilot requires that you change your password ona regular schedule set by your administrator.
Keep your mailbox secure by choosing passwords that are not easily discovered. Decide ona system for choosing passwords that is easy for you to remember but hard for anyone elseto guess. For example, you can create a unique and easy-to-remember password bycombining letters and numbers on your telephone keypad.
Recording your name
Your personal verification is used in your greetings and addressed messages, and in expressmessaging, name dialing, and remote notification announcements.
To record a personal verification1. While logged in to your mailbox, press 8 2 for Greetings, then 9 to record your name.
2. At the prompt, enter your mailbox number, and then press #.
You hear your current recorded name, if there is one.
3. Press 5 to record. Wait for the tone, then record your name.
4. Press # to end the recording.
To play, delete, or re-record your personal verificationYou can play, delete, or re-record your personal verification the same way as your greetings.See Recording greetings on page 17. If you delete your personal verification, your callershear just your mailbox number or your name spelled one letter at a time.
Using CallPilot multimedia messaging
16 Nortel CallPilot Multimedia Messaging User Guide August 2010
To return to your messagesWhen you have finished recording your personal verification, press 4.
Recording greetings
You can record external, internal, and temporary greetings. Callers from outside yourorganization hear your external greeting; callers within your organization hear your internalgreeting. If you do not record an internal greeting, all callers hear your external greeting.
You can record a temporary greeting to tell your callers that you are away from the office. Allcallers hear your temporary greeting if you record one. Tell your callers the times or dates ofyour absence, and when you will retrieve your messages. You can set up your mailbox to refusemessages while you are away. See Blocking messages on page 19.
Keep your greetings brief and informative, and speak clearly. Check your greetings by callingyour number from external and internal telephones.
To record your greeting1. While logged in to your mailbox, press 8 2.
2. Press 1 for external greeting, 2 for internal greeting, or 3 for temporary greeting.
3. Press 5 to record. Wait for the tone, then record your greeting.
4. Press # to end the recording.
To return to your messages
Nortel CallPilot Multimedia Messaging User Guide August 2010 17
To play, delete, or re-record your greetingWhile at your greeting, you can play, delete, or re-record it.
• To play your greeting, press 2.
• To delete your greeting, press 7 6.
• To re-record your greeting or add to it, press 5 at the point in the greeting where youwant to start. Record the new greeting, then press #.
To set the expiry date for your temporary greetingYou can set an expiry month, day, and time for your temporary greeting. When the temporarygreeting expires, your callers hear your external or internal greeting.
1. While at your temporary greeting, press 9 to set the expiry date.
2. Enter the month, day, and time, pressing # after each entry.
• For the current month or day, press # only.
• For a time setting of 9:00, press 9 0 0 #. For a.m., press 1; for p.m., press 2.Expiry time will be 9:00 in the time zone at your mailbox location.
• For the standard expiry time of one minute after midnight on the date youspecified, press # for time.
• For no expiry, press ###.
If you do not set an expiry date, or if you press # for month, day, and time, your temporarygreeting will remain in effect until you delete it.
To return to your messagesWhen you have finished recording your greetings, press 4.
Assigning a custom operator
You can offer your callers the option of leaving a message or speaking to one of your assistantsor colleagues. In your greeting, tell callers to press 0 if they wish to speak to this person in your
Using CallPilot multimedia messaging
18 Nortel CallPilot Multimedia Messaging User Guide August 2010
absence. The custom operator number is the number your callers reach when they press 0.Ask your administrator if this feature is available to you.
To review and assign your custom operator number1. While logged in to your mailbox, press 8 0 for mailbox options, then 1 to review the
custom operator number.
A prompt tells you the current custom operator number.
2. Enter the new custom operator number, and then press #.
Blocking messages
You can temporarily prevent your callers from leaving messages in your mailbox. You canchoose to transfer callers to an operator, or disconnect them. As a courtesy to your callerswhile message blocking is turned on, you should record a temporary greeting that providesdetails of your absence and tells callers what to do. Ask your administrator if message blockingis available to you.
To block your messages and set options1. Press 8 0 for mailbox options, then 7 for message blocking.
2. Turn message blocking on or off:
• To turn message blocking on at all times, press 1.
• To turn message blocking off, press 2.
• To block your messages only when a temporary greeting is in effect, press 3.
3. To allow callers to speak to the custom operator you assigned, press 1. Or, to havecallers disconnected after your greeting, press 2.
To review and assign your custom operator number
Nortel CallPilot Multimedia Messaging User Guide August 2010 19
Turning Autologin on or off
Ask your administrator if Autologin is available to you. See To log on using Autologin onpage 15.
1. While logged in to your mailbox, press 8 0 for mailbox options, then 4 for Autologin.
2. Press 1 to turn Autologin on, or press 2 to turn it off.
Returning to speech commands
If you are logged in to your mailbox through speech activated messaging and temporarilyswitch to keypad commands, you can easily return to speech commands.
Press 8 5 for CallPilot Tools, then 4 to return to speech activated messaging.
Playing your messages
CallPilot lets you know when you have new messages. Your telephone may have a messagewaiting light, or you may hear a special dial tone when you pick up the handset. Messages canbe voice, fax, voice and fax, or e-mail. E-mail messages are in a separate list; see Listeningto your e-mail messages on page 25. Ask your administrator if the fax and e-mail options areavailable to you.
Your mailbox summary tells you the number of new voice and fax messages in your messagelist and if any of them are urgent. The summary also tells you if any recorded messages areunsent and if fax messages have been printed.
Each message header tells you the sender's name, and the date and time that the messagewas received at your mailbox. Faxes have an ID and a print status.
Using CallPilot multimedia messaging
20 Nortel CallPilot Multimedia Messaging User Guide August 2010
To play your messagesWhen you log on to CallPilot, you hear the mailbox summary, then the header for your first newmessage. The order of your messages is set by your administrator or by you in CallPilot.
(If Autoplay is enabled, your messages play automatically.)
1. While you are in your message list, you can go to any message and play it.
• To play the current message, press 2.
• To go to the next message, press 6; to go to the previous message, press 4.
• To go to a specific message, press 8 6, enter the message number, then press#.
• To start over at the first message from the end of your message list, press 6.
2. When you have played your messages, press 8 3 to disconnect from CallPilot, orhang up. Or, you can remain logged in to use other messaging features.
To review and respond to your messagesWhile you are playing a message, you can use these message commands:
• To skip back five seconds in the message, press 1; to skip forward five seconds in themessage, press 3.
• To pause, press #; to continue, press 2.
• To slow down a message, press 2 1; to speed it up, press 2 3. You can increase the speedthree times above normal, and decrease it two times below normal.
• To decrease message volume, press 2 4; to increase message volume, press 2 6. Youcan increase the volume three times above normal, and decrease it two times belownormal. The next time you log on, message volume will be normal.
Before, during, or after playing a message, you can use these message commands:
• To play the message envelope, press 7 2.
• To mark the message for deletion at logout and move to the next message, press 7 6. Torestore the deleted message (before disconnecting), return to the message and press 7 6.
• To print a fax message, press 7 7. See Printing fax messages on page 23.
To play your messages
Nortel CallPilot Multimedia Messaging User Guide August 2010 21
• To respond to the message, see Calling the sender of a message on page 26, Replyingto the sender on page 27, Replying to the sender and all recipients on page 27, and Forwarding a message on page 28.
• Press 7 * for Help on message commands.
Changing message speed
You can change the speed of a message while playing it. For example, if your caller spokevery fast, you can slow down the message.
To play a message slower or fasterWhile you are playing a message, press 2 1 to slow it down, or press 2 3 to speed it up. Youcan increase the speed three times above normal, and decrease it two times below normal.
Changing message volume
You can change the volume of a message while playing it. For example, if you are playing yourmessages in a noisy environment, you can increase the volume to hear better. While you arelogged in to CallPilot, all your messages play at the volume you set unless you change thesetting. The next time you log on, message volume will be normal.
To increase or decrease message volumeWhile you are playing a message, press 2 4 to decrease the volume, or press 2 6 to increase thevolume. You can increase the volume three times above normal, and decrease it two timesbelow normal.
Using CallPilot multimedia messaging
22 Nortel CallPilot Multimedia Messaging User Guide August 2010
Deleting and restoring messages
You can delete and restore (undelete) messages before, during, or after playing the message.Deleted messages are removed from your mailbox at the end of your CallPilot session. Youcannot restore a message after you disconnect.
Note:Your administrator can configure CallPilot to automatically delete unread messages after adefined time. Check with your administrator for more information.
To delete a messageWhile at a message, press 7 6 to mark it for deletion at logout and move to the next message.
To restore a messageBefore disconnecting, return to the message marked for deletion and press 7 6 to restore it.
Message storageYour played messages are automatically deleted on a schedule set by your administrator. Youcan review auto-deleted messages and restore them. To restore an auto-deleted message,when prompted, press 7 6. Ask your administrator if this feature is available to you.
Printing fax messages
In CallPilot, you can receive a fax message in your mailbox and print the fax at a selected faxnumber. A fax message can be a fax only, or a fax attached to a voice message. A voice
Deleting and restoring messages
Nortel CallPilot Multimedia Messaging User Guide August 2010 23
message can have more than one fax attachment. Ask your administrator if the fax option isavailable to you.
See Changing fax options on page 46, to set a default fax number or to select Autoprinting.
To print fax messagesYou can print a specific fax message, or you can print all your faxes.
1. While at a message that is a fax or has a fax attachment, press 7 7 for Print.
• To print this fax only, press 1.
• To print all unprinted faxes after playing your messages, press 2.
• To print all faxes in your mailbox, press 3.
2. Tell CallPilot where to print the fax.
• Enter the fax number for printing, then press #.
• Or, press # to print at the default fax number. See Changing fax options onpage 46.
3. When CallPilot confirms your selection, press #.
To print at the faxphone you are calling fromYou can print at the faxphone you are calling from by logging in to your mailbox from thefaxphone using the faxphone access number. Print faxes at the end of your mailbox session.CallPilot disconnects when fax printing starts.
1. Log in from a faxphone using the faxphone access number.
2. While at a message that is a fax or has a fax attachment, press 7 7 for Print.
• To print this fax only, press 1.
• To print all unprinted faxes after playing your messages, press 2.
• To print all faxes in your mailbox, press 3.
3. Press 0 # when prompted to enter the fax number.
4. Press Send or Start on the faxphone.
Using CallPilot multimedia messaging
24 Nortel CallPilot Multimedia Messaging User Guide August 2010
Listening to your e-mail messages
While you are logged in to CallPilot, you can check to see if you have any new e-mail messages.You can quickly scan through your e-mail list to hear the sender and subject of each e-mail.You can listen to the text content of an e-mail, and you can print the e-mail at a fax machine.Ask your administrator if this feature is available to you.
To review your e-mail messages1. While logged in to CallPilot, press 8 9 to switch from your voice message list to your
e-mail message list. CallPilot starts to retrieve any new e-mail messages in yourInbox.
2. While you wait, you can press 8 9 to return to your voice messages. Press 8 9 againto switch to your e-mail messages. When your e-mail messages are ready, CallPilottells you how many new e-mail messages you have.
3. Listen to the header information of your first new e-mail. You hear the sender'sname, the subject, the date and time when the message was retrieved. You canlisten to the message or press 6 to go to the next new e-mail.
4. Press 2 to listen to the text content of the message.
• Use the standard playback commands to pause, skip back or forward, andchange speed and volume. See Playing your messages on page 20.
• To mark the message for deletion when you log off, press 7 6.
• To print an e-mail message at a fax machine, press 7 7. Enter the fax number,then press #, or press # to print at the default fax number. If you are callingfrom a faxphone, press 0 # when prompted to enter the fax number, then pressSend or Start on the faxphone.
5. When you have finished reviewing your e-mail, press 8 9 to return to your voicemessages.
Note:The header information may not play if the e-mail was sent in a language that is not encodedfor translation to your specified language preference.
Listening to your e-mail messages
Nortel CallPilot Multimedia Messaging User Guide August 2010 25
Note:To forward or reply to your e-mail messages, and compose new e-mail messages, you mustaccess your e-mail from your computer, either by logging in to your e-mail application, or byclicking the e-mail tab in My CallPilot.
To change your e-mail account settings for CallPilotYou tell CallPilot how to handle your e-mail messages by changing the settings in My CallPilot.Whenever you change your e-mail password, you must update it in My CallPilot. You can selecta male or female voice to read your messages.
Calling the sender of a message
You can place a call to the sender of a message, if CallPilot can address the sender.
To call the sender1. After listening to a message or while it is playing, press 9 to call the sender.
2. Speak to the sender or leave a message.
3. When you have finished your call, hang up.
You may be able to return to your messages without hanging up and logging inagain.
Note:You can finish the session by returning to the message, then hanging up the telephone. Ifyou do not return to the message before hanging up, the session ends after 2.5 minutes.
Using CallPilot multimedia messaging
26 Nortel CallPilot Multimedia Messaging User Guide August 2010
Replying to the sender
You can record a reply to the sender of a message, if CallPilot can address the sender.
To record a reply to the sender1. After listening to a message or while it is playing, press 7 1 to reply to the sender.
Your reply is addressed automatically. You do not have to enter a name or number.
2. Press 5 to record your reply. Wait for the tone, then begin recording.
3. Press # to end recording your reply.
• To review your message, see Checking and editing your message onpage 32.
• To add options, see Adding message options on page 33.
• To add attachments, see Adding message attachments on page 35.
4. Press 7 9 to send the message.
Replying to the sender and all recipients
You can record a reply to the sender and all the recipients of a message, if CallPilot can addressthe numbers.
To record a reply to the sender and all recipients of amessage
1. After listening to a message or while it is playing, press 7 4 to reply to the senderand all recipients of the message.
Replying to the sender
Nortel CallPilot Multimedia Messaging User Guide August 2010 27

Your reply is addressed automatically. You do not have to enter names or numbers.
To play the list of recipients to whom your reply will be sent, press 7 2.
2. Press 5 to record your reply. Wait for the tone, then begin recording.
3. Press # to end recording your reply.
• To review your message, see Checking and editing your message onpage 32.
• To add options, see Adding message options on page 33.
• To add attachments, see Adding message attachments on page 35.
4. Press 7 9 to send the message.
Forwarding a message
You can forward a message to another mailbox, to a distribution list, or to a telephone number.You can also record an introduction to the original message. You cannot forward a messagemarked Private.
To forward a message1. After listening to a message or while it is playing, press 7 3 to forward the message.
2. Enter the number to which you want to forward the message, then press #. Repeatthis step for each additional number to which you want to forward the message.
• For details on addressing your message, see Addressing a message onpage 30, and Addressing by name on page 32.
• If you need to cancel an address, see To cancel an address entry on page 30.
3. When you have finished entering addresses, press # again to end the list.
4. Press 5 if you want to record an introduction. Wait for the tone, then begin recording.
5. Press # to end recording your introduction.
• To review your message, see Checking and editing your message onpage 32.
• To add options, see Adding message options on page 33.
Using CallPilot multimedia messaging
28 Nortel CallPilot Multimedia Messaging User Guide August 2010
• To add attachments, see Adding message attachments on page 35.
6. Press 7 9 to send the message.
To forward a faxYou can forward a fax the same way as you forward a voice message, including recording anintroduction. The recipients must have the fax option at their mailbox to receive a fax message.CallPilot tells you if your fax message was not delivered.
Follow the same steps as above. When you send the fax, CallPilot sends a fax forward headerpage showing the new recipient and your name or number as the sender.
Composing a message
To compose a message, you address it first, then record your message and send it. You canaddress a message to one or more people, distribution lists, telephone or fax phone numbers.Before you send a message, you can edit it and add message options. You can also attachother messages, including faxes, to your new message and send them together.
To address, record, and send a messageYou address a message to one or more recipients before you start recording. An address istypically a mailbox number or a distribution list number. You can also address messages toother numbers or, by spelling a person's name.
1. While logged in to your mailbox, press 7 5.
2. Enter the first address, then press #.
3. Continue to enter addresses followed by #.
• See Addressing a message on page 30, and Addressing by name onpage 32.
• If you need to cancel an address, see To cancel an address entry, below.
4. When you have finished entering addresses, press # again to end the list.
5. Press 5 to record your message. Wait for the tone, then start recording.
To forward a fax
Nortel CallPilot Multimedia Messaging User Guide August 2010 29

6. Press # to end the recording.
• To review your message, see Checking and editing your message onpage 32.
• To add options, see Adding message options on page 33.
• To add attachments, see Adding message attachments on page 35.
7. Press 7 9 to send the message.
To cancel an address entryYou can cancel an address you entered while you are at step 2, above. After you have pressedthe final # at the end of the list, you cannot cancel any entries. If you cancel a distribution listnumber, the entire distribution list is deleted from your address list.
1. Press 0 # to cancel the last address you entered in the list.
2. Repeat this step for each address you want to cancel, erasing entries one at a timefrom the end of the list.
3. Return to step 3, above.
Addressing a messageYou can address your messages to local mailboxes and distribution lists. You may also be ableto address messages to mailboxes at other sites (networks), to other voice mail systems (opennetworks), to Internet users, and to recipients at telephones or faxphones with no voice mail.For the required prefixes, press * for Help when addressing, or ask your administrator. Keepa record of these prefixes in Your CallPilot numbers on page 50.
When CallPilot prompts you for a mailbox number, enter the appropriate prefix if required, thenthe number. When you have entered all the required addresses, return to step 3 in To address,record, and send a message on page 29.
To address a message to a local mailboxEnter the mailbox number, then press #.
Using CallPilot multimedia messaging
30 Nortel CallPilot Multimedia Messaging User Guide August 2010
To address a message to a distribution listEnter the distribution list number, then press #.
To address a message to a mailbox at another network siteEnter the network prefix followed by the mailbox number, then press #.
To address a message to an open network mailboxEnter the open network prefix followed by the system access telephone number (using thesame prefixes you use for a local or long-distance call from your telephone), then press #.Enter the mailbox number, then press #.
To address a message to an Internet userEnter the Simple Mail Transfer Protocol (SMTP) prefix and the recipient's number as onecontinuous string of digits, then press #.
To address a message to a telephone or faxphoneYou can address and send a recorded message to a telephone, and you can send a faxmessage to a faxphone.
Enter the prefix if required, followed by the recipient's telephone or fax number, then press #.
When you send a message to a person at a telephone number, CallPilot calls the person'stelephone and states that there is a message from you. The system tells the recipient whichkey to press to hear the message, or the message plays automatically. The recipient canrespond by recording a reply.
If you send a mixed voice and fax message, CallPilot delivers the voice or fax portion, or both,depending on the type of messages the recipient can receive. CallPilot tells you if either thevoice or fax portion of the message was not delivered.
To address a message to a distribution list
Nortel CallPilot Multimedia Messaging User Guide August 2010 31
Addressing by nameYou can enter an address by spelling a person's name on your telephone keypad instead ofentering a number. You can use name addressing for addressing a message, creating adistribution list, express messaging, and thru-dialing.
When you have entered all the required addresses, return to step 3 in To address, record, andsend a message on page 29.
To address by name1. When CallPilot prompts you for a mailbox number, enter the name addressing
prefix.
If you do not know the prefix, press *.
2. Spell the last name, then the first name.
• For Q, press 7; for Z, press 9. For example, to reach Quinn, Bob, dial78466262.
• If you do not know the complete name, enter the first few letters, then press #.Select from the list of possible matches for the name.
3. You can stop spelling the name as soon as the system announces a match. You donot have to press #. The message is automatically addressed with the mailboxnumber for this name.
4. If the name is part of a list of addresses, continue to enter addresses. When youare finished, press # to end the list.
Checking and editing your messageAfter you have recorded your message, you can review it before sending it. To play or changethe message, use any of these standard commands:
• To play the message, press 2.
• To skip back five seconds in the message, press 1; to skip forward five seconds in themessage, press 3.
• To pause, press #; to continue, press 2.
Using CallPilot multimedia messaging
32 Nortel CallPilot Multimedia Messaging User Guide August 2010
• To play the message envelope, including the list of recipients, press 7 2.
• To slow down a message, press 2 1; to speed it up, press 2 3. You can increase the speedthree times above normal, and decrease it two times below normal.
• To decrease message volume, press 2 4; to increase message volume, press 2 6. Youcan increase the volume three times above normal, and decrease it two times belownormal. The next time you log on, the message volume will be normal.
• To mark the message for deletion at logout and move to the next message, press 7 6. Torestore the deleted message (before disconnecting), return to the message and press 7 6.
• To re-record the message or add to it, press 5 at the point in the message where you wantto start. Record the new message, and end by pressing #.
• The new recording erases the old one from the point where you start to re-record.
Adding message options
When you create a message, you can indicate that you want it handled in a special way. Themessage options are Urgent, Economy, Private, Acknowledgment, and Timed Delivery. Amessage cannot be tagged both Urgent and Economy. Before sending the message, you cancheck the options by pressing 7 2 to play the message envelope.
To add an Urgent optionWhen you send a message marked Urgent, the recipient is notified in the mailbox summaryand in the message header that the message is urgent.
Before or after recording a message, press 7 0, then 1 to add the Urgent option.
To cancel an Urgent option for a message, press 7 0, then 1 again.
To add an Economy optionYou can use the Economy option for messages sent to other networks. Your organization sendsEconomy messages at a lower overnight rate.
Adding message options
Nortel CallPilot Multimedia Messaging User Guide August 2010 33

Before or after recording a message, press 7 0, then 3 to add the Economy option.
To cancel an Economy option for a message, press 7 0, then 3 again.
To add a Private optionWhen you send a message marked Private, recipients in your organization cannot forward itor attach it to another message. Be aware that recipients in other organizations may not betold your message is Private, and they may be able to forward it.
Before or after recording a message, press 7 0, then 4 to add the Private option.
To cancel a Private option for a message, press 7 0, then 4 again.
To request an acknowledgment to your messageWhen you send a message marked Acknowledgment, CallPilot automatically deposits aseparate acknowledgment message in your mailbox after each recipient has read yourmessage. Some other networks may only acknowledge that your message has been receivedby the system, not read by the recipients.
Before or after recording a message, press 7 0, then 5 for Acknowledgment.
To cancel an Acknowledgment request for a message, press 7 0, then 5 again.
To set a specific time for delivering a messageYou can compose a message to be delivered to the recipients at a future date and time.
1. Before or after recording a message, press 7 0, then 6 for Timed Delivery.
2. Enter the month, day, and time, pressing # after each entry.
• For a time setting of 9:00, press 9 0 0 #. For a.m., press 1; for p.m., press 2.Delivery will be 9:00 in each recipient's time zone.
• For the current month or day, press # only.
• For delivery one minute after midnight on the date you specified, press # fortime.
• To cancel Timed Delivery for a message, press # for month, day, and time.
Using CallPilot multimedia messaging
34 Nortel CallPilot Multimedia Messaging User Guide August 2010
Adding message attachments
To add an attachment to a messageYou can attach one or more voice, fax, or mixed voice and fax messages currently in yourmailbox to your message before sending it. You cannot attach a message marked Private.
1. Before or after recording a message, press 7 0 for Message Options, then 7 for AddAttachment.
2. Enter the message number or fax ID of the message that you want to attach to yourunsent message, then press #.
• If you enter a number for a voice/fax message, both voice and fax are attached.
• If you enter an ID number for a fax, just the fax is attached.
To add a fax message attachment at a faxphoneYou can send a fax by logging in to your mailbox from a faxphone using the faxphone accessnumber. This method allows you to send a fax that is not currently in your mailbox to othermailboxes or addresses. Place your document in the fax feeder first.
When you are logged in at a faxphone, print faxes at the end of your mailbox session. CallPilotdisconnects when fax printing starts.
1. Log in to your mailbox from a faxphone using the faxphone access number.
2. Press 7 5, then address your message, then:
• Record a message if required.
• Or select an unsent message from your mailbox.
3. Press 7 0 for Message Options, then 7 for Add Attachment.
4. Press 0 # when prompted for the fax number.
5. Tell CallPilot when to send the message:
• Press 1 to send the message as soon as the fax is received.
Adding message attachments
Nortel CallPilot Multimedia Messaging User Guide August 2010 35
• Or press 2 to save it in your mailbox until you manually send it.
6. Press Send or Start on the faxphone.
Express messagingExpress messaging is a fast way to send a message to another mailbox without logging in toyour own mailbox to compose and send the message. You may also be able to send a fax byexpress fax messaging. Ask your administrator for the express messaging number and ifexpress fax messaging is available.
To send a voice message without logging in1. Dial the CallPilot express messaging number.
2. Enter the mailbox number of the person for whom you are leaving the message,then press #. To address your message by name, see Addressing by name onpage 32.
3. Wait for the tone, then record your message.
Note:For an explanation of the prompts you hear before the tone, see the tablesfollowing this procedure.
• To review your message, see Checking and editing your message on page 32.
• To add options, see Adding message options on page 33.
• To add attachments, see Adding message attachments on page 35.
4. Hang up.
There are two ways to set up the express voice messaging service. The service can be setup to dial express voice messaging directly or indirectly through an Application Builderapplication. Depending on how the recipient’s mailbox is set up, you hear different prompts,as shown in the following two tables:
Table 1: Prompts for direct express voice messaging
PersonalVerificationrecorded
User’s Greetingrecorded
Prompt
Using CallPilot multimedia messaging
36 Nortel CallPilot Multimedia Messaging User Guide August 2010
No No <user's mailbox number> Please leave a messageafter the tone <beep>
Yes No <user's personal verification> Please leave amessage after the tone <beep>
Yes Yes <user's personal verification> Please leave amessage after the tone <beep>
No Yes <user's mailbox number> <user's greeting> <beep>
Table 2: Prompts for indirect express voice messaging (through and Application Builderapplication)
PersonalVerificationrecorded
User’s Greetingrecorded
Prompt
No No <user's mailbox number> Please leave a messageafter the tone <beep>
Yes No <user's personal verification> Please leave amessage after the tone <beep>
Yes Yes <user's personal verification> <user's greeting><beep>
No Yes <user's mailbox number> <user's greeting> <beep>
Note:If you record a temporary greeting, the system plays the temporary greeting in place of thegreeting.
Note:If you access Express Messaging Service through Application Builder and you haverecorded a personal verification and a temporary greeting, the system plays both yourpersonal verification and your temporary greeting.
Note:You can log on to a mailbox after sending a message by using express voice or faxmessaging.
To send a voice message without logging in
Nortel CallPilot Multimedia Messaging User Guide August 2010 37

To send a fax message without logging in1. Dial the CallPilot express messaging number.
2. Enter the mailbox number, then press #. To address your message by name, see Addressing by name on page 32.
3. At the tone, begin fax transmission by using the appropriate button on your faxmachine.
Note:For an explanation of the prompts you hear before the tone, see the tablefollowing this procedure
Depending on how the recipient’s mailbox is set up, you hear one of the following prompts:
Table 3: Prompts for express fax messaging
PersonalVerificationrecorded
User’s Greetingrecorded
Prompt
No No <user's mailbox number> Please begin transmittingthe fax now <beep>
Yes No <user's personal verification> Please begintransmitting the fax now <beep>
Yes Yes <user's personal verification> <user's greeting>Please begin transmitting the fax now <beep>
No Yes <user's mailbox number> <user's greeting> Pleasebegin transmitting the fax now <beep>
Thru-dialingWhile you are using CallPilot, you can make a call without hanging up. Ask your administrator ifthru-dial is available to you.
Note:Restriction Permission Lists (RPLs) can affect this feature. For more information on RPLs,see the Administrator Guide NN44200-601.
Using CallPilot multimedia messaging
38 Nortel CallPilot Multimedia Messaging User Guide August 2010
To place a call while logged inWhile logged in to your mailbox, press 0, followed immediately by the telephone number youwant to call, then press #. Do not pause for more than two seconds while you are entering thenumber.
To place a call while logged in using name dialingWhen you enter a name instead of a number with thru-dial, CallPilot places the call as soonas it finds a match for the name.
1. While logged in to your mailbox, press 0, then enter the name dialing prefix.
If you do not know the number, press *.
2. Enter the last name, then the first, until your call is placed.
For instructions on entering the name, see Addressing by name on page 32.
To reach your custom operator number while logged inYour custom operator number is the number your callers reach when they press 0.
While logged in to your mailbox, press 0, then wait for the call to be answered.
Personal distribution lists
A distribution list saves you time when you send messages to the same group of addresses.You can create up to 99 personal distribution lists, and record a name to identify each list. Eachpersonal distribution list can contain up to 200 entries. You can also use shared distributionlists supplied by your administrator.
To place a call while logged in
Nortel CallPilot Multimedia Messaging User Guide August 2010 39
To create a personal distribution listA personal distribution list can contain all of the same types of addresses to which you cansend a composed message, except other personal distribution lists. An entry can be a mailboxnumber, shared distribution list number, network mailbox, open network mailbox, Internet user,or telephone number. See Addressing a message on page 30. You can also add an entry byspelling a person's name. See Addressing by name on page 32.
1. While logged in to your mailbox, press 8 5 for CallPilot Tools, then 5 to createdistribution lists.
To play a summary of all your lists, press *.
2. Enter a number from 1 to 99, then press #.
3. Press 9 if you want to record a name to help you identify this list in the future. At theprompt, press 5, record the list name, then press # to stop recording.
4. Press # again to return to the main menu.
5. Press 5 to start entering addresses into the list.
6. Enter the first address, then press # in the same way you address a message.
7. Continue to enter addresses, pressing # after each one.
To cancel the last number you entered in the list, press 0 #.
8. When the list is complete, press #.
9. When you are finished, press 4 to return to your messages.
To play, edit, or delete a personal distribution listAfter you create a personal distribution list, you can play it to hear all the addresses, add to it,delete it, and search for addresses in the list.
1. While logged in to your mailbox, press 8 5, then 5.
2. Enter the distribution list number, then press #. If you do not remember the number,press * to hear a summary of your personal distribution lists.
• To play the contents of the list, press 2.
• To add addresses to the list, press 5. Enter each address, then press #. Whenthe list is complete, press #.
• To delete the entire list, press 7 6. You can restore the list by pressing 7 6immediately after deleting it.
Using CallPilot multimedia messaging
40 Nortel CallPilot Multimedia Messaging User Guide August 2010
• To search for an address in the list so you can add it or delete it, press 6. Enterthe address, then press #. CallPilot tells you if the address is in the list. If theaddress is not in the list, you can add it by pressing 5. If the address is in thelist, you can delete it by pressing 7 6.
3. When you are finished, press 4 to return to your messages.
Remote Notification
CallPilot can notify you of new messages at a remote telephone or pager. Instead of callingin to your mailbox to retrieve your messages, you can specify a number, day, and time forRemote Notification. You can change these settings easily, and turn Remote Notification on oroff as needed. Messages can be voice, fax, or mixed voice and fax. Ask your administrator ifthis option is available to you.
CallPilot can also notify you of new messages at a wireless e-mail device using Remote TextNotification. This feature can only be set up from My CallPilot, not from your telephone. Seethe Desktop Messaging User Guide for My CallPilot (NN44200-109).
You can have the two types of notification turned on simultaneously. For each type, you canset up two time periods for notification, and tell CallPilot whether you want to be notified of allmessages or urgent messages only.
To set up Remote Notification the first timeAll you need to do the first time you set up Remote Notification is enter your remote numberand select telephone or pager. You can change the message types, notification days, andnotification times now, or use the standard settings.
1. While logged in to your mailbox, press 8 5 for CallPilot Tools, then 2 for RemoteNotification.
2. Press 5 to set up Remote Notification.
3. At the prompt, enter the number of the telephone or pager at which you want toreceive notification, then press #.
If you enter the wrong number, press #, then press 5 and re-enter the number.
4. Press 1 if the remote number is a telephone; press 2 if the number is a pager.
To change your Remote Notification settings, see the following pages.
Remote Notification
Nortel CallPilot Multimedia Messaging User Guide August 2010 41
To turn Remote Notification on and offAfter you have set up Remote Notification for the first time, you can turn it on or off as needed,and change the setup at any time.
1. While logged in to your mailbox, press 8 5 for CallPilot Tools, then 2 for RemoteNotification.
2. If Remote Notification is off, press 1 to turn it on.
or
If Remote Notification is on, press 2 to turn it off.
To return to your messagesWhen you have finished working in Remote Notification, press 4.
Working in Remote Notification setupThere are four main settings in Remote Notification: telephone or pager number, messagenotification types, notification days, and notification times. At each setting, CallPilot tells youthe current setting and allows you to keep the setting or change it. For detailed explanationsof each setting, see the following pages.
This is how to go from one setting to the next:
1. While logged in to your mailbox, press 8 5 for CallPilot Tools, then 2 for RemoteNotification.
2. Press 5 to review your current settings.
3. Press 5 again to change the first setting.
4. At each setting, change it if required, or press # to leave a setting without changing it.Press 3 to go to the next setting, or press 1 to go to the previous setting.
5. Press 6 to exit Remote Notification setup change.
Use the Remote Notification Planner below to decide how you want to set up your notificationday and time periods.
Using CallPilot multimedia messaging
42 Nortel CallPilot Multimedia Messaging User Guide August 2010

Remote Notification Planner
Remote phone/pager number _____________ Notification type: Any ___ Urgent ___Monday Tuesday Wednesday Thursday Friday Saturday Sunday
Note:You cannot use the same target twice in the same schedule period. For example, you cannotselect two instances of phone in the time schedule period.
You can set one number at which you will be notified of new messages on all the days andtimes you specify. The remote number you specify must be a number allowed by CallPilot. Askyour administrator if you can use this number for remote notification. Your administrator mayhave to configure your mailbox for the pager or pager service you are using.
1. In Remote Notification setup change, press 5 when prompted for telephone or pagernumber change. You can press # to leave this setting without changing it, orcontinue.
2. At the prompt, enter the number of the telephone or pager at which you want toreceive notification, then press #.
If you enter the wrong number, press #, then press 5 and re-enter the number.
3. Press 1 if the remote number is a telephone, or press 2 if the number is a pager.
4. If you selected pager, specify the pager type:
• To select tone only pager, press 1.
• To select tone and voice pager, press 2.
• To select digital or numeric pager, press 3. You can then enter a callbacknumber followed by #, or just press # to use your organization's standardcallback number.
• To select a paging service, press 4. At the prompt, enter your PagerIdentification Number (PIN), then press #.
• To select an alphanumeric pager, press 5. At the prompt, enter your PagerIdentification Number (PIN), then press #.
5. Press 3 to go to the next setting.
Remote Notification Planner
Nortel CallPilot Multimedia Messaging User Guide August 2010 43
To change your notification message typeYou can select one of two notification message types. This message type applies to all daysand times you specify. If you select Any, the standard setting, you receive notification of all newmessages. If you select Urgent, you receive notification only about messages that were markedurgent by the sender. Notification is for voice and fax messages.
1. In Remote Notification setup change, press 5 when prompted for message type.You can press # to leave this setting without changing it, or continue.
2. At the prompt, press 1 for Any, or press 2 for Urgent.
3. Press 3 to go to the next setting, or press 1 to go to the previous setting.
To change your notification daysYou can set the days of the week on which you want to receive message notification remotely.The standard setup is Monday to Friday. You select each of the seven days individually, andyou can omit some days. For example, you can select Monday, Wednesday, and Friday forremote notification. You can listen to a summary of your current selections by pressing * forHelp.
1. In Remote Notification setup change, press 5 when prompted for notification days.You can press # to leave this setting without changing it, or continue.
2. Select each notification day by pressing the number corresponding to that day ofthe week. For example, to select Monday, press 1; to select Sunday, press 7. Eachday is assumed to be off until you select it, regardless of any previous settings.
To deselect a day, press its number again.
3. When you have finished selecting days, press #.
To change your selections, press 5.
4. Press 3 to go to the next setting, or press 1 to go to the previous setting.
To change your notification timesYou can set the times of the day at which you want to receive remote notification of messages.The standard time is all day. You can set two non-overlapping time periods within a 24-hour
Using CallPilot multimedia messaging
44 Nortel CallPilot Multimedia Messaging User Guide August 2010
day; both periods apply to the one sequence of notification days that you selected above. Hereare some tips for setting times:
• Time settings include minutes, and each setting must end with #. For a time setting of9:00, press 9 0 0 #. For a.m., press 1; for p.m., press 2. Time setting is for the time zone atyour mailbox location.
• Ask your administrator if your mailbox can be set up so that you receive notification whennew messages are waiting at the start of your notification time period.
• You can enter times that span midnight by entering an end time that is earlier than thestart time; the end time is assumed to be on the next day. Select only the first day as anotification day.
For example, if you select Monday as your only notification day, and you set up the timeperiod for 11 p.m. to 7 a.m., you will receive notification from 11 p.m. Monday to 7 a.m.Tuesday.
1. In Remote Notification setup change, press 5 when prompted for notification times.
2. At the prompt for start time, enter a new time, or press # to keep the current time.
3. At the prompt for end time, enter a new time, or press # to keep the current time.
• If a second time period already exists, you hear the times currently set. Todelete the second time period, press 7 6. To change the times, press 5.
• If a second time period does not exist and you want to add one, press 5.
4. At the prompt for start time, enter a new time, or press # to keep the current time.
5. At the prompt for end time, enter a new time, or press # to keep the current time.
6. Press 6 to exit Remote Notification setup change.
Turning message forwarding on or off
Using the telephone, you can enable and disable message forwarding for your CallPilotmessages. Before you can enable or disable message forwarding, you or your CallPilotadministrator must configure a message forwarding rule for your mailbox, which forwards yourCallPilot messages to another CallPilot mailbox or to an external e-mail address. For securityreasons, you must enable and disable it yourself.
In certain circumstances, the system might automatically disable your message forwardingrule, for example, if the administrator modified it for you or if there is a message deliveryproblem. You can use the telephone to enable it again.
Turning message forwarding on or off
Nortel CallPilot Multimedia Messaging User Guide August 2010 45
The following procedures explain the telephone commands you use to enable and disablemessage forwarding once it is configured. For more information about configuring a messageforwarding rule, see the Desktop Messaging User Guide for My CallPilot (NN44200-109).
Note:You can also enable and disable message forwarding using My CallPilot or DesktopMessaging, if you have access.
To enable or disable message forwarding
1. While logged in to your mailbox, press 8 5 for CallPilot Tools, then 1 for the MessageForwarding Rule service.
Note:If you do not have a message forwarding rule configured, this option is notavailable to you.
2. Respond to the prompts to enable or disable message forwarding.
Changing fax options
If your CallPilot mailbox has fax messaging capability, you can receive a fax message in yourmailbox and print the fax at a selected fax number. You can set options for Autoprinting, defaultfax number, and print cover page.
To change your fax options1. While logged in to your mailbox, press 8 0 for mailbox options, then 3 for fax options.
2. Change fax options as described below.
3. When you are finished, exit fax options by pressing #.
Using CallPilot multimedia messaging
46 Nortel CallPilot Multimedia Messaging User Guide August 2010

To turn Autoprinting on or offWhen Autoprinting is turned on, any faxes that arrive at your mailbox are automatically printedat a specified default fax number. A message that has been autoprinted remains in yourmailbox so that you can reprint it or forward it. Your printed faxes may be automatically deletedfrom your mailbox on a schedule set by your administrator.
Autoprinting is the most convenient way to handle fax messages while you are in one location. Ifyou are away from your office, you can turn Autoprinting off and print your faxes at another faxnumber.
1. While in fax options, press 1 to select Autoprinting.
CallPilot tells you whether Autoprinting is on or off.
2. If Autoprinting is turned off, press 1 to turn it on.
If you turn Autoprinting on, you must set a default fax number.
3. Or, if Autoprinting is turned on, press 2 to turn it off.
You hear your change confirmed and you return to fax options.
To change the default printerIf you turn Autoprinting on, you must set a default fax number. Even if you are not usingAutoprinting, a default fax number is the simplest way to print. The default number can be anyfax number that CallPilot can dial, including any normally required prefixes.
1. While in fax options, press 2 to set the default fax number.
You hear the current default fax number.
2. Enter a new default fax number, then press #.
You hear the number or its spoken name confirmed.
3. To exit without changing the setting, just press #.
You return to fax options.
To turn fax separator page printing on or offYou can select whether to print a fax separator page when you print a fax message. A separatorpage identifies you and gives details of the print job, such as the number of pages. Separator
To turn Autoprinting on or off
Nortel CallPilot Multimedia Messaging User Guide August 2010 47

pages are useful if you receive faxes without cover pages. If the sender of the fax includes aheader page with the fax, the header page also prints.
1. While in fax options, press 7 to turn separator page printing on or off.
You hear the current separator page printing status.
2. Change the separator page printing status, or exit without change.
• To print with a separator page, press 1.
• To print without a separator page, press 2.
You hear your change confirmed.
• To exit without changing the setting, just press #.
You return to fax options.
When you are the callerWhen you are calling another person's CallPilot mailbox, you can use many of the messagingcommands described in this guide. You can also tell callers from outside your organization howto use these commands. Here are some convenient and time-saving tips.
Interrupting greetingsWhile you are listening to a person's greeting, you can stop the greeting at any time by pressing# and then recording your message. This saves time when you call the same person frequentlyand do not need to hear the greeting.
If you call a person who has recorded a temporary absence greeting, you hear a warning whenyou try to stop the greeting. This allows you to continue listening if you want to, or to startrecording.
Connecting to the custom operatorWhile you are listening to a person's greeting, you can press 0 to transfer to the custom operatornumber assigned for that mailbox.
Using CallPilot multimedia messaging
48 Nortel CallPilot Multimedia Messaging User Guide August 2010
Thru-dialing to another numberYou may be able to transfer to another person in the same organization by pressing 0, followedimmediately by the person's extension number. See Thru-dialing on page 38. You may be ableto use name dialing if you do not know the extension number. Ask your administrator if theseoptions are available to you.
Editing your recorded messagesWhen you record a message to leave in another person's mailbox, you can play it, delete it, orre-record it just as you do when you compose a message in CallPilot. Use the commandsdescribed in Checking and editing your message on page 32.
Adding options to your recorded messagesWhen you record a message to leave in another person's mailbox, you can add options such asUrgent and Private just as you do when you compose a message in CallPilot. Use thecommands described in Adding message options on page 33.
Adding a fax attachment to your recorded messageIf you are calling from a faxphone and the recipient's mailbox has fax capability, you can adda fax attachment to your voice message. When you have finished recording your voicemessage, press 7 0 7, then press 0# to attach the fax. Press Send or Start on your faxphone.Ask your administrator for details on using this option.
To log on after leaving a messageAfter you have left a message in another person's mailbox, you may be able to log on againto your CallPilot mailbox without hanging up. This is useful if you are using a pay phone or acredit card. Ask your administrator if this option is available.
Thru-dialing to another number
Nortel CallPilot Multimedia Messaging User Guide August 2010 49
To log on after leaving a message in another person's mailbox, press # then 8 1, and followthe usual steps for logging in.
Your CallPilot numbersKeep a record of your CallPilot user numbers here. Do not show your password.
Mailbox number _____________________________________________
Login numbersMultimedia Messaging access number ___________________________
Multimedia Messaging faxphone access number __________________
Speech Activated Messaging access number _____________________
___________________________________________________________
Service numbersExpress Messaging number ___________________________________
Express Fax Messaging number ________________________________
Custom commands number ____________________________________
Addressing prefixesName Dialing/Name Addressing prefix ___________________________
Open network prefix __________________________________________
Telephone addressing prefix ___________________________________
Prefixes for other network sites ________________________________
___________________________________________________________
___________________________________________________________
Using CallPilot multimedia messaging
50 Nortel CallPilot Multimedia Messaging User Guide August 2010
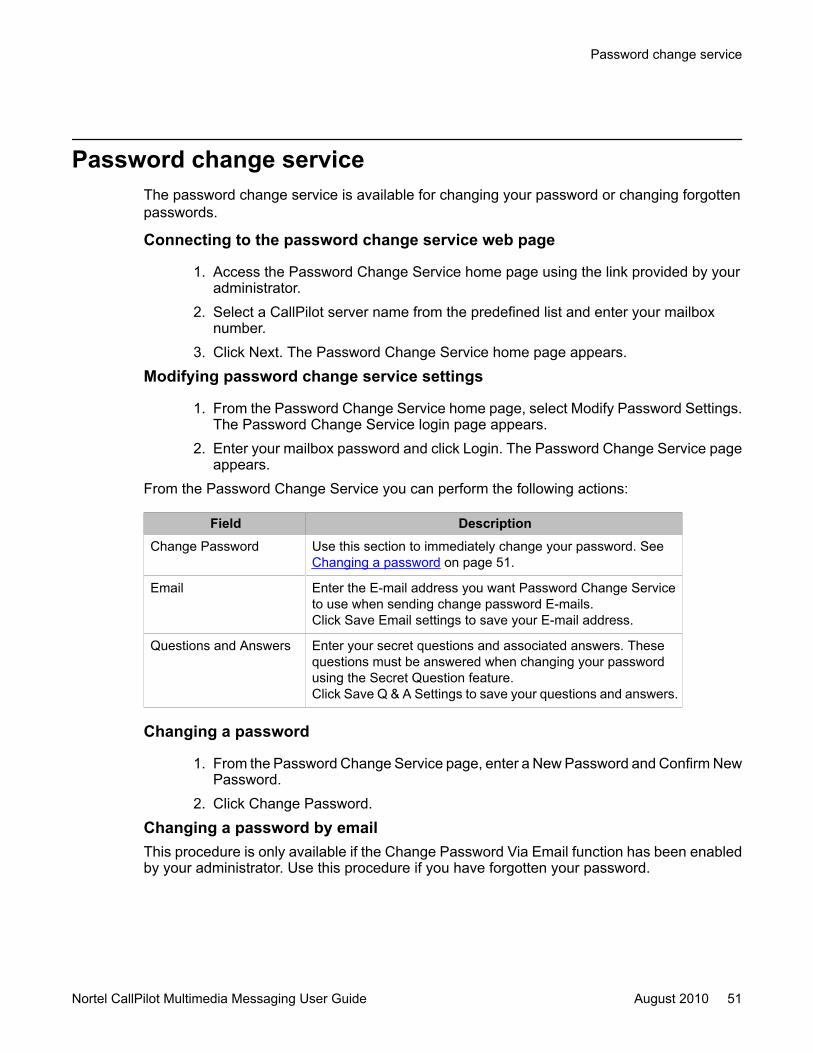
Password change serviceThe password change service is available for changing your password or changing forgottenpasswords.
Connecting to the password change service web page
1. Access the Password Change Service home page using the link provided by youradministrator.
2. Select a CallPilot server name from the predefined list and enter your mailboxnumber.
3. Click Next. The Password Change Service home page appears.
Modifying password change service settings
1. From the Password Change Service home page, select Modify Password Settings.The Password Change Service login page appears.
2. Enter your mailbox password and click Login. The Password Change Service pageappears.
From the Password Change Service you can perform the following actions:
Field DescriptionChange Password Use this section to immediately change your password. See
Changing a password on page 51.
Email Enter the E-mail address you want Password Change Serviceto use when sending change password E-mails.Click Save Email settings to save your E-mail address.
Questions and Answers Enter your secret questions and associated answers. Thesequestions must be answered when changing your passwordusing the Secret Question feature.Click Save Q & A Settings to save your questions and answers.
Changing a password
1. From the Password Change Service page, enter a New Password and Confirm NewPassword.
2. Click Change Password.
Changing a password by emailThis procedure is only available if the Change Password Via Email function has been enabledby your administrator. Use this procedure if you have forgotten your password.
Password change service
Nortel CallPilot Multimedia Messaging User Guide August 2010 51
1. Access the Password Change Service home page.2. Click Change Password Via Email. A message appears informing you that an email
has been sent to your assigned E-mail address. The link within the E-mail will remainvalid for one hour.
3. Click Close.4. When you receive the E-mail, click the link provided in the body of the E-mail. The
Mailbox Password Change page opens.5. Enter a New Password and Confirm New Password.6. Click Save. Your password has been changed.
Changing a password by secret questionThis procedure is only available if the Change Password Via Secret Questions function hasbeen enabled by your administrator. Use this procedure if you have forgotten your password.
1. Access the Password Change Service home page.2. Click Change Password Via Secret Questions. A page opens showing your
previously defined questions.3. Answer both questions and enter a New Password and Confirm New Password.4. Click Save. If both answers are correct, a pop-up message informs you that your
password has been successfully changed.
Using CallPilot multimedia messaging
52 Nortel CallPilot Multimedia Messaging User Guide August 2010