


Node.js in Practice
426
Alex Young Marc Harter F OREWORD BY Ben Noordhuis MANNING I NCLUDES 115 TECHNIQUES www.it-ebooks.info
-
Upload
felipe-ramos -
Category
Documents
-
view
26 -
download
0
Transcript of Node.js in Practice

Alex YoungMarc Harter
FOREWORD BY Ben Noordhuis
M A N N I N G
INCLUDES 115 TECHNIQUES
www.it-ebooks.info

Node.js in Practice
ALEX YOUNGMARC HARTER
M A N N I N GSHELTER ISLAND
www.it-ebooks.info

For online information and ordering of this and other Manning books, please visitwww.manning.com. The publisher offers discounts on this book when ordered in quantity. For more information, please contact
Special Sales DepartmentManning Publications Co.20 Baldwin RoadPO Box 761Shelter Island, NY 11964Email: [email protected]
©2015 by Manning Publications Co. All rights reserved.
No part of this publication may be reproduced, stored in a retrieval system, or transmitted, in any form or by means electronic, mechanical, photocopying, or otherwise, without prior written permission of the publisher.
Many of the designations used by manufacturers and sellers to distinguish their products are claimed as trademarks. Where those designations appear in the book, and Manning Publications was aware of a trademark claim, the designations have been printed in initial caps or all caps.
Recognizing the importance of preserving what has been written, it is Manning’s policy to have the books we publish printed on acid-free paper, and we exert our best efforts to that end.Recognizing also our responsibility to conserve the resources of our planet, Manning books are printed on paper that is at least 15 percent recycled and processed without the use of elemental chlorine.
Manning Publications Co. Development editor: Cynthia Kane20 Baldwin Road Technical development editor: Jose Maria Alvarez RodriguezPO Box 761 Copyeditor: Benjamin BergShelter Island, NY 11964 Proofreader: Katie Tennant
Typesetter: Gordan SalinovicCover designer: Marija Tudor
ISBN 9781617290930Printed in the United States of America1 2 3 4 5 6 7 8 9 10 – EBM – 19 18 17 16 15 14
www.it-ebooks.info

iii
brief contentsPART 1 NODE FUNDAMENTALS .......................................................1
1 ■ Getting started 3
2 ■ Globals: Node’s environment 15
3 ■ Buffers: Working with bits, bytes, and encodings 39
4 ■ Events: Mastering EventEmitter and beyond 64
5 ■ Streams: Node’s most powerful and misunderstood feature 82
6 ■ File system: Synchronous and asynchronous approachesto files 114
7 ■ Networking: Node’s true “Hello, World” 136
8 ■ Child processes: Integrating external applications with Node 174
PART 2 REAL-WORLD RECIPES ....................................................197
9 ■ The Web: Build leaner and meaner web applications 199
10 ■ Tests: The key to confident code 260
www.it-ebooks.info

BRIEF CONTENTSiv
11 ■ Debugging: Designing for introspection and resolving issues 293
12 ■ Node in production: Deploying applications safely 326
PART 3 WRITING MODULES .......................................................359
13 ■ Writing modules: Mastering what Node is all about 361
www.it-ebooks.info

v
contentsforeword xiiipreface xvacknowledgments xviabout this book xviiiabout the cover illustration xx
PART 1 NODE FUNDAMENTALS...........................................1
1 Getting started 31.1 Getting to know Node 4
Why Node? 4 ■ Node’s main features 6
1.2 Building a Node application 8Creating a new Node project 9 ■ Making a stream class 9Using a stream 10 ■ Writing a test 12
1.3 Summary 13
2 Globals: Node’s environment 152.1 Modules 16
TECHNIQUE 1 Installing and loading modules 16TECHNIQUE 2 Creating and managing modules 17
www.it-ebooks.info

CONTENTSvi
TECHNIQUE 3 Loading a group of related modules 19TECHNIQUE 4 Working with paths 21
2.2 Standard I/O and the console object 22TECHNIQUE 5 Reading and writing to standard I/O 22TECHNIQUE 6 Logging messages 24TECHNIQUE 7 Benchmarking a program 25
2.3 Operating system and command-line integration 27TECHNIQUE 8 Getting platform information 27TECHNIQUE 9 Passing command-line arguments 28TECHNIQUE 10 Exiting a program 29TECHNIQUE 11 Responding to signals 31
2.4 Delaying execution with timers 32TECHNIQUE 12 Executing functions after a delay with
setTimeout 32TECHNIQUE 13 Running callbacks periodically with
timers 34TECHNIQUE 14 Safely managing asynchronous APIs 35
2.5 Summary 38
3 Buffers: Working with bits, bytes, and encodings 393.1 Changing data encodings 40
TECHNIQUE 15 Converting buffers into other formats 40TECHNIQUE 16 Changing string encodings using buffers 41
3.2 Converting binary files to JSON 44TECHNIQUE 17 Using buffers to convert raw data 44
3.3 Creating your own binary protocol 58TECHNIQUE 18 Creating your own network protocol 58
3.4 Summary 63
4 Events: Mastering EventEmitter and beyond 644.1 Basic usage 65
TECHNIQUE 19 Inheriting from EventEmitter 65TECHNIQUE 20 Mixing in EventEmitter 68
4.2 Error handling 69TECHNIQUE 21 Managing errors 69TECHNIQUE 22 Managing errors with domains 71
4.3 Advanced patterns 73TECHNIQUE 23 Reflection 73TECHNIQUE 24 Detecting and exploiting EventEmitter 75TECHNIQUE 25 Categorizing event names 77
www.it-ebooks.info

CONTENTS vii
4.4 Third-party modules and extensions 78TECHNIQUE 26 Alternatives to EventEmitter 78
4.5 Summary 80
5 Streams: Node’s most powerful and misunderstood feature 825.1 Introduction to streams 83
Types of streams 83 ■ When to use streams 84 ■ History 85Streams in third-party modules 85 ■ Streams inherit from EventEmitter 87
5.2 Built-in streams 88TECHNIQUE 27 Using built-in streams to make a static
web server 88TECHNIQUE 28 Stream error handling 90
5.3 Third-party modules and streams 91TECHNIQUE 29 Using streams from third-party modules 91
5.4 Using the stream base classes 94TECHNIQUE 30 Correctly inheriting from the stream
base classes 94TECHNIQUE 31 Implementing a readable stream 96TECHNIQUE 32 Implementing a writable stream 99TECHNIQUE 33 Transmitting and receiving data with duplex
streams 101TECHNIQUE 34 Parsing data with transform streams 103
5.5 Advanced patterns and optimization 105TECHNIQUE 35 Optimizing streams 105TECHNIQUE 36 Using the old streams API 108TECHNIQUE 37 Adapting streams based on their
destination 109TECHNIQUE 38 Testing streams 111
5.6 Summary 113
6 File system: Synchronous and asynchronous approachesto files 114
6.1 An overview of the fs module 115POSIX file I/O wrappers 115 ■ Streaming 117 ■ Bulk file I/O 117File watching 118 ■ Synchronous alternatives 118
TECHNIQUE 39 Loading configuration files 119TECHNIQUE 40 Using file descriptors 120TECHNIQUE 41 Working with file locking 121TECHNIQUE 42 Recursive file operations 125
www.it-ebooks.info

CONTENTSviii
TECHNIQUE 43 Writing a file database 128TECHNIQUE 44 Watching files and directories 132
6.2 Summary 134
7 Networking: Node’s true “Hello, World” 1367.1 Networking in Node 137
Networking terminology 137 ■ Node’s networking modules 141Non-blocking networking and thread pools 142
7.2 TCP clients and servers 143TECHNIQUE 45 Creating a TCP server and tracking
clients 143TECHNIQUE 46 Testing TCP servers with clients 145TECHNIQUE 47 Improve low-latency applications 147
7.3 UDP clients and servers 149TECHNIQUE 48 Transferring a file with UDP 149TECHNIQUE 49 UDP client server applications 153
7.4 HTTP clients and servers 156TECHNIQUE 50 HTTP servers 156TECHNIQUE 51 Following redirects 158TECHNIQUE 52 HTTP proxies 162
7.5 Making DNS requests 165TECHNIQUE 53 Making a DNS request 165
7.6 Encryption 167TECHNIQUE 54 A TCP server that uses encryption 167TECHNIQUE 55 Encrypted web servers and clients 170
7.7 Summary 173
8 Child processes: Integrating external applications with Node 174
8.1 Executing external applications 175TECHNIQUE 56 Executing external applications 176
Paths and the PATH environment variable 176 ■ Errors when executing external applications 177
TECHNIQUE 57 Streaming and external applications 178Stringing external applications together 179
TECHNIQUE 58 Executing commands in a shell 180Security and shell command execution 181
www.it-ebooks.info

CONTENTS ix
TECHNIQUE 59 Detaching a child process 182Handing I/O between the child and parent processes 183 ■ Reference counting and child processes 184
8.2 Executing Node programs 185TECHNIQUE 60 Executing Node programs 185TECHNIQUE 61 Forking Node modules 186TECHNIQUE 62 Running jobs 188
Job pooling 190 ■ Using the pooler module 191
8.3 Working synchronously 192TECHNIQUE 63 Synchronous child processes 192
8.4 Summary 194
PART 2 REAL-WORLD RECIPES........................................197
9 The Web: Build leaner and meaner web applications 1999.1 Front-end techniques 200
TECHNIQUE 64 Quick servers for static sites 200TECHNIQUE 65 Using the DOM in Node 204TECHNIQUE 66 Using Node modules in the browser 207
9.2 Server-side techniques 209TECHNIQUE 67 Express route separation 209TECHNIQUE 68 Automatically restarting the server 212TECHNIQUE 69 Configuring web applications 215TECHNIQUE 70 Elegant error handling 219TECHNIQUE 71 RESTful web applications 222TECHNIQUE 72 Using custom middleware 231TECHNIQUE 73 Using events to decouple functionality 236TECHNIQUE 74 Using sessions with WebSockets 238TECHNIQUE 75 Migrating Express 3 applications
to Express 4 2429.3 Testing web applications 246
TECHNIQUE 76 Testing authenticated routes 246TECHNIQUE 77 Creating seams for middleware
injection 248TECHNIQUE 78 Testing applications that depend on
remote services 250
9.4 Full stack frameworks 256
9.5 Real-time services 257
9.6 Summary 258
www.it-ebooks.info

CONTENTSx
10 Tests: The key to confident code 26010.1 Introduction to testing with Node 261
10.2 Writing simple tests with assertions 262TECHNIQUE 79 Writing tests with built-in modules 263TECHNIQUE 80 Testing for errors 265TECHNIQUE 81 Creating custom assertions 268
10.3 Test harnesses 270TECHNIQUE 82 Organizing tests with a test harness 270
10.4 Test frameworks 273TECHNIQUE 83 Writing tests with Mocha 273TECHNIQUE 84 Testing web applications with Mocha 276TECHNIQUE 85 The Test Anything Protocol 280
10.5 Tools for tests 282TECHNIQUE 86 Continuous integration 283TECHNIQUE 87 Database fixtures 285
10.6 Further reading 291
10.7 Summary 292
11 Debugging: Designing for introspection and resolving issues 29311.1 Designing for introspection 294
Explicit exceptions 294 ■ Implicit exceptions 295 ■ The error event 295 ■ The error argument 296
TECHNIQUE 88 Handling uncaught exceptions 296TECHNIQUE 89 Linting Node applications 299
11.2 Debugging issues 300TECHNIQUE 90 Using Node’s built-in debugger 300TECHNIQUE 91 Using Node Inspector 306TECHNIQUE 92 Profiling Node applications 308TECHNIQUE 93 Debugging memory leaks 311TECHNIQUE 94 Inspecting a running program with
a REPL 316TECHNIQUE 95 Tracing system calls 322
11.3 Summary 325
12 Node in production: Deploying applications safely 32612.1 Deployment 327
TECHNIQUE 96 Deploying Node applications to the cloud 327
TECHNIQUE 97 Using Node with Apache and nginx 332
www.it-ebooks.info

CONTENTS xi
TECHNIQUE 98 Safely running Node on port 80 335TECHNIQUE 99 Keeping Node processes running 336TECHNIQUE 100 Using WebSockets in production 338
12.2 Caching and scaling 342TECHNIQUE 101 HTTP caching 342TECHNIQUE 102 Using a Node proxy for routing and
scaling 344TECHNIQUE 103 Scaling and resiliency with cluster 347
12.3 Maintenance 351TECHNIQUE 104 Package optimization 351TECHNIQUE 105 Logging and logging services 353
12.4 Further notes on scaling and resiliency 356
12.5 Summary 357
PART 3 WRITING MODULES...........................................359
13 Writing modules: Mastering what Node is all about 36113.1 Brainstorming 363
A faster Fibonacci module 363
TECHNIQUE 106 Planning for our module 363TECHNIQUE 107 Proving our module idea 366
13.2 Building out the package.json file 370TECHNIQUE 108 Setting up a package.json file 370TECHNIQUE 109 Working with dependencies 373TECHNIQUE 110 Semantic versioning 377
13.3 The end user experience 379TECHNIQUE 111 Adding executable scripts 379TECHNIQUE 112 Trying out a module 381TECHNIQUE 113 Testing across multiple Node versions 383
13.4 Publishing 385TECHNIQUE 114 Publishing modules 385TECHNIQUE 115 Keeping modules private 387
13.5 Summary 388
appendix Community 391index 395
www.it-ebooks.info

xiii
forewordYou have in your hands a book that will take you on an in-depth tour of Node.js. In thepages to come, Alex Young and Marc Harter will help you grasp Node’s core in a deepway: from modules to real, networked applications.
Networked applications are, of course, an area where Node.js shines. You, dearreader, are likely well aware of that; I daresay it is your main reason for purchasing thistome! For the few of you who actually read the foreword, let me tell you the story ofhow it all began.
In the beginning, there was the C10K problem. And the C10K problem raised thisquestion: if you want to handle 10,000 concurrent network connections on contempo-rary hardware, how do you go about that?
You see, for the longest time operating systems were terrible at dealing with largenumbers of network connections. The hardware was terrible in many ways, the softwarewas terrible in other ways, and when it came to the interaction between hardware andsoftware … linguists had a field day coming up with proper neologisms; plain terribledoesn’t do it justice. Fortunately, technology is a story of progress; hardware gets better,software saner. Operating systems improved at managing large numbers of networkconnections, as did user software.
We conquered the C10K problem a long time ago, moved the goal posts, and nowwe’ve set our sights on the C100K, C500K, and C1M problems. Once we’ve comfortablycrossed those frontiers, I fully expect that the C10M problem will be next.
www.it-ebooks.info

FOREWORDxiv
Node.js is part of this story of ever-increasing concurrency, and its future is bright:we live in an increasingly connected world and that world needs a power tool to con-nect everything. I believe Node.js is that power tool, and I hope that, after reading thisbook, you will feel the same way.
BEN NOORDHUIS
COFOUNDER, STRONGLOOP, INC.
www.it-ebooks.info

xv
prefaceWhen Node.js arrived in 2009, we knew something was different. JavaScript on the serverwasn’t anything new. In fact, server-side JavaScript has existed almost as long as client-side JavaScript. With Node, the speed of the JavaScript runtimes, coupled with the event-based parallelism that many JavaScript programmers were already familiar with, wereindeed compelling. And not just for client-side JavaScript developers, which was ourbackground—Node attracted developers from the systems level to various server-sidebackgrounds, PHP to Ruby to Java. We all found ourselves inside this movement.
At that time, Node was changing a lot, but we stuck with it and learned a whole lotin the process. From the start, Node focused on making a small, low-level core librarythat would provide enough functionality for a large, diverse user space to grow.Thankfully, this large and diverse user space exists today because of these design deci-sions early on. Node is a lot more stable now and used in production for numerousstartups as well as established enterprises.
When Manning approached us about writing an intermediate-level book on Node,we looked at the lessons we had learned as well as common pitfalls and struggles wesaw in the Node community. Although we loved the huge number of truly excellentthird-party modules available to developers, we noticed many developers were gettingless and less education on the core foundations of Node. So we set out to write Node inPractice to journey into the roots and foundations of Node in a deep and thoroughmanner, as well as tackle many issues we personally have faced and have seen otherswrestle with.
www.it-ebooks.info
xvi
acknowledgments We have many people to thank, without whose help and support this book would nothave been possible.
Thanks to the Manning Early Access Program (MEAP) readers who posted com-ments and corrections in the Author Online forum.
Thanks to the technical reviewers who provided invaluable feedback on themanuscript at various stages of its development: Alex Garrett, Brian Falk, ChrisJoakim, Christoph Walcher, Daniel Bretoi, Dominic Pettifer, Dylan Scott, FernandoMonteiro Kobayashi, Gavin Whyte, Gregor Zurowski, Haytham Samad, JT Marshall,Kevin Baister, Luis Gutierrez, Michael Piscatello, Philippe Charrière, Rock Lee, ShijuVarghese, and Todd Williams.
Thanks to the entire Manning team for helping us every step of the way, especiallyour development editor Cynthia Kane, our copyeditor Benjamin Berg, our proof-reader Katie Tennant, and everyone else who worked behind the scenes.
Special thanks to Ben Noordhuis for writing the foreword to our book, and toValentin Crettaz and Michael Levin for their careful technical proofread of the bookshortly before it went into production.
Alex YoungI couldn’t have written this book without the encouragement and support of the DailyJScommunity. Thanks to everyone who has shared modules and libraries with me over thelast few years: keeping up to date with the Node.js community would have been impos-sible without you. Thank you also to my colleagues at Papers who have allowed me to
www.it-ebooks.info

ACKNOWLEDGMENTS xvii
use my Node.js skills in production. Finally, thanks to Yuka for making me believe I cando crazy things like start companies and write books.
Marc HarterI would like thank Ben Noordhuis, Isaac Schlueter, and Timothy Fontaine for all theIRC talks over Node; you know the underlying systems that support Node in such adeep way that learning from you makes Node even richer. Also, I want to thank mycoauthor Alex; it seems rare to have such a similar approach to writing a book as I didwith Alex, plus it was fun for a Midwestern US guy to talk shop with an English chap.Ultimately my heart goes out to my wife, who really made this whole thing possible, ifI’m honest. Hannah, you are loved; thank you.
www.it-ebooks.info
xviii
about this bookNode.js in Practice exists to provide readers a deeper understanding of Node’s coremodules and packaging system. We believe this is foundational to being a productiveand confident Node developer. Unfortunately, this small core is easily missed for thehuge and vibrant third-party ecosystem with modules prebuilt for almost any task. Inthis book we go beyond regurgitating the official Node documentation in order to getpractical and thorough. We want the reader to be able to dissect the inner workings ofthe third-party modules they include as well as the projects they write.
This book is not an entry-level Node book. For that, we recommend reading Man-ning’s Node.js In Action. This book is targeted at readers who already have experienceworking with Node and are looking to take it up a notch. Intermediate knowledge ofJavaScript is recommended. Familiarity with the Windows, OS X, or Linux commandline is also recommended.
In addition, we’re aware that many Node developers have come from a client-sideJavaScript background. For that reason, we spend some time explaining less-familiarconcepts such as working with binary data, how underlying networking and file sys-tems work, and interacting with the host operating system—all using Node as a teach-ing guide.
Chapter roadmapThis book is organized into three parts.
Part 1 covers Node’s core fundamentals, where we focus our attention on what’spossible using only Node’s core modules (no third-party modules). Chapter 1 recaps
www.it-ebooks.info
ABOUT THIS BOOK xix
Node.js’s purpose and function. Then chapters 2 through 8 each cover in depth a dif-ferent core aspect of Node from buffers to streams, networking to child processes.
Part 2 focuses on real-world development recipes. Chapters 9 through 12 will helpyou master four highly applicable skills—testing, web development, debugging, andrunning Node in production. In addition to Node core modules, these sectionsinclude the use of various third-party modules.
Part 3 guides you through creating your own Node modules in a straightforwardmanner that ties in all kinds of ways to use npm commands for packaging, running,testing, benchmarking, and sharing modules. It also includes helpful tips on version-ing projects effectively.
There are 115 techniques in the book, each module covering a specific Node.jstopic or task, and each divided into practical Problem/Solution/Discussion sections.
Code conventions and downloadsAll source code in the book is in a fixed-width font like this, which sets it off fromthe surrounding text. In many listings, the code is annotated to point out the key con-cepts, and numbered bullets are sometimes used in the text to provide additionalinformation about the code.
This book’s coding style is based on the Google JavaScript Style Guide.1 Thatmeans we’ve put var statements on their own lines, used camelCase to format func-tion and variable names, and we always use semicolons. Our style is a composite of thevarious JavaScript styles used in the Node community.
Most of the code shown in the book can be found in various forms in the samplesource code that accompanies it. The sample code can be downloaded free of chargefrom the Manning website at www.manning.com/Node.jsinPractice, as well as fromGitHub at the following link: https://github.com/alexyoung/nodeinpractice.
Author Online forumPurchase of Node.js in Practice includes free access to a private web forum run by Man-ning Publications where you can make comments about the book, ask technical ques-tions, and receive help from the authors and from other users. To access the forumand subscribe to it, point your web browser to www.manning.com/Node.jsinPractice.This page provides information on how to get on the forum once you’re registered,what kind of help is available, and the rules of conduct on the forum.
The Author Online forum and the archives of previous discussions will be accessi-ble from the publisher’s website as long as the book is in print.
You can also contact the authors at the following Google Group URL: https://groups.google.com/forum/#!forum/nodejsinpractice.
1 https://google-styleguide.googlecode.com/svn/trunk/javascriptguide.xml
www.it-ebooks.info

xx
about the cover illustrationThe caption for the illustration on the cover of Node.js in Practice is “Young Man fromAyvalik,” a town in Turkey on the Aegean Coast. The illustration is taken from a collec-tion of costumes of the Ottoman Empire published on January 1, 1802, by WilliamMiller of Old Bond Street, London. The title page is missing from the collection andwe have been unable to track it down to date. The book’s table of contents identifiesthe figures in both English and French, and each illustration bears the names of twoartists who worked on it, both of whom would no doubt be surprised to find their artgracing the front cover of a computer programming book ... two hundred years later.
The collection was purchased by a Manning editor at an antiquarian flea market inthe “Garage” on West 26th Street in Manhattan. The seller was an American based inAnkara, Turkey, and the transaction took place just as he was packing up his stand for theday. The Manning editor didn’t have on his person the substantial amount of cash thatwas required for the purchase, and a credit card and check were both politely turneddown. With the seller flying back to Ankara that evening, the situation was getting hope-less. What was the solution? It turned out to be nothing more than an old-fashioned ver-bal agreement sealed with a handshake. The seller simply proposed that the money betransferred to him by wire, and the editor walked out with the bank information on apiece of paper and the portfolio of images under his arm. Needless to say, we transferredthe funds the next day, and we remain grateful and impressed by this unknown person’strust in one of us. It recalls something that might have happened a long time ago.
We at Manning celebrate the inventiveness, the initiative, and, yes, the fun of thecomputer business with book covers based on the rich diversity of regional life of twocenturies ago‚ brought back to life by the pictures from this collection.
www.it-ebooks.info

Part 1
Node fundamentals
Node has an extremely small standard library intended to provide thelowest-level API for module developers to build on. Even though it’s relativelyeasy to find third-party modules, many tasks can be accomplished without them.In the chapters to follow, we’ll take a deep dive into a number of core modulesand explore how to put them to practical use.
By strengthening your understanding of these modules, you’ll in turnbecome a more well-rounded Node programmer. You’ll also be able to dissectthird-party modules with more confidence and understanding.
www.it-ebooks.info

3
Getting started
Node has quickly become established as a viable and indeed efficient web develop-ment platform. Before Node, not only was JavaScript on the server a novelty, butnon-blocking I/O was something that required special libraries for other scriptinglanguages. With Node, this has all changed.
The combination of non-blocking I/O and JavaScript is immensely powerful: wecan handle reading and writing files, network sockets, and more, all asynchronouslyin the same process, with the natural and expressive features of JavaScript callbacks.
This book is geared toward intermediate Node developers, so this chapter is aquick refresher. If you want a thorough treatment of Node’s basics, then see ourcompanion book, Node.js in Action (by Mike Cantelon, Marc Harter, TJ Holoway-chuk, and Nathan Rajlich; Manning Publications, 2013).
In this chapter we’ll introduce Node, what it is, how it works, and why it’s some-thing you can’t live without. In chapter 2 you’ll get to try out some techniques bylooking at Node’s globals—the objects and methods available to every Node process.
This chapter covers■ Why Node?■ Node’s main features■ Building a Node application
www.it-ebooks.info
4 CHAPTER 1 Getting started
1.1 Getting to know NodeNode is a platform for developing network applications. It’s built on V8, Google’sJavaScript runtime engine. Node isn’t just V8, though. An important part of the Nodeplatform is its core library. This encompasses everything from TCP servers to asynchro-nous and synchronous file management. This book will teach you how to use thesemodules properly.
But first: why use Node, and when should you use it? Let’s look into that questionby seeing what kinds of scenarios Node excels at.
1.1.1 Why Node?
Let’s say you’re building an advertising server and distributing millions of adverts perminute. Node’s non-blocking I/O would be an extremely cost-effective solution forthis, because the server could make the best use of available I/O without you needingto write special low-level code. Also, if you already have a web team that can writeJavaScript, then they should be able to contribute to the Node project. A typical,heavier web platform wouldn’t have these advantages, which is why companies likeMicrosoft are contributing to Node despite having excellent technology stacks like.NET. Visual Studio users can install Node-specific tools1 that add support for Intelli-Sense, profiling, and even npm. Microsoft also developed WebMatrix (http://www.microsoft.com/web/webmatrix/), which directly supports Node and can also beused to deploy Node projects.
Node embraces non-blocking I/O as a way to improve performance in certaintypes of applications. JavaScript’s traditional event-based implementation means it hasa relatively convenient and well-understood syntax that suits asynchronous program-ming. In a typical programming language, an I/O operation blocks execution until itcompletes. Node’s asynchronous file and network APIs mean processing can still occurwhile these relatively slow I/O operations finish. Figure 1.1 illustrates how differenttasks can be performed using asynchronous network and file system APIs.
In figure 1.1, a new HTTP request has been received and parsed by Node’s httpmodule B. The ad server’s application code then makes a database query, using anasynchronous API—a callback passed to a database read function C. While Nodewaits for this to finish, the ad server is able to read a template file from the disk D.
1 See https://nodejstools.codeplex.com/.
Preflight checkNode In Practice is a recipe-style book, aimed at intermediate and advanced Nodedevelopers. Although this chapter covers some introductory material, later chaptersadvance quickly. For a beginner’s introduction to Node, see our companion book,Node.js in Action.
www.it-ebooks.info

5Getting to know Node
This template will be used to display a suitable web page. Once the database requesthas finished, the template and database results are used to render the response E.
While this is happening, other requests could also be hitting the ad server, and they’llbe handled based on the available resources F. Without having to think about threadswhen developing the ad server, you’re able to push Node to use the server’s I/Oresources very efficiently, just by using standard JavaScript programming techniques.
Other scenarios where Node excels are web APIs and web scraping. If you’re down-loading and extracting content from web pages, then Node is perfect because it canbe coaxed into simulating the DOM and running client-side JavaScript. Again, Nodehas a performance benefit here, because scrapers and web spiders are costly in termsof network and file I/O.
If you’re producing or consuming JSON APIs, Node is an excellent choice becauseit makes working with JavaScript objects easy. Node’s web frameworks (like Express,http://expressjs.com) make creating JSON APIs fast and friendly. We have full detailson this in chapter 9.
Node isn’t limited to web development. You can create any kind of TCP/IP serverthat you like. For example, a network game server that broadcasts the game’s state to
1
2
5
3
4
HTTP server runsyour callback
Asynchronous responsefrom the database
Web page rendered basedon database values
HTTPrequest
Wait:database I/O
Wait:database I/O
HTTPrequest
Access disk
HTTPrequest
HTTPrequest
1 An HTTP request is received froma browser.
3 While the query callback waits to run, someof your other code reads from an HTML template file.
4 The web page is then rendered based on thetemplate and database values.
5 Meanwhile, other requests can behandled as well.
2 After Node parses the request, your codeexecutes a database query.
Figure 1.1 An advertising server built with Node
www.it-ebooks.info

6 CHAPTER 1 Getting started
various players over TCP/IP sockets can perform background tasks, perhaps maintain-ing the game world, while it sends data to the players. Chapter 7 explores Node’s net-working APIs.
1.1.2 Node’s main features
Node’s main features are its standard library, module system, and npm. Of course,there’s more to it than that, but in this book we’ll focus on teaching you how to usethese parts of Node. We’ll use third-party libraries where it’s considered best practice,but you’ll see a lot of Node’s built-in features.
In fact, Node’s strongest and most powerful feature is its standard library. This isreally two parts: a set of binary libraries and the core modules. The binary librariesinclude libuv, which provides a fast run loop and non-blocking I/O for networkingand the file system. It also has an HTTP library, so you can be sure your HTTP clientsand servers are fast.
Figure 1.2 is a high-level overview of Node’s internals that shows how everythingfits into place.
Node’s core modules are mostly written in JavaScript. That means if there’s any-thing you either don’t understand or want to understand in more detail, then you canread Node’s source code. This includes features like networking, high-level file systemoperations, the module system, and streams. It also includes Node-specific featureslike running multiple Node processes at once with the cluster module, and wrappingsections of code in event-based error handlers, known as domains.
The next few sections focus on each core module in more detail, starting with theevents API.
When to use NodeTo get you thinking like a true Nodeist, the table below has examples of applicationswhere Node is a good fit.
Node’s strengths
Scenario Node’s strengths
Advertising distribution
■ Efficiently distributes small pieces of information
■ Handles potentially slow network connections
■ Easily scales up to multiple processors or servers
Game server ■ Uses the accessible language of JavaScript to model business logic
■ Programs a server catering to specific networking requirements withoutusing C
Content manage-ment system, blog
■ Good for a team with client-side JavaScript experience
■ Easy to make RESTful JSON APIs
■ Lightweight server, complex browser JavaScript
www.it-ebooks.info

7Getting to know Node
EVENTEMITTER: AN API FOR EVENTS
Sooner or later every Node developer runs into EventEmitter. At first it seems likesomething only library authors would need to use, but it’s actually the basis for most ofNode’s core modules. The streams, networking, and file system APIs derive from it.
You can inherit from EventEmitter to make your own event-based APIs. Let’s sayyou’re working on a PayPal payment-processing module. You could make it event-based, so instances of Payment objects emit events like paid and refund. By designingthe class this way, you decouple it from your application logic, so you can reuse it inmore than one project.
We have a whole chapter dedicated to events: see chapter 4 for more. Anotherinteresting part of EventEmitter is that it’s used as the basis for the stream module.
STREAM: THE BASIS FOR SCALABLE I/O
Streams inherit from EventEmitter and can be used to model data with unpredict-able throughput—like a network connection where data speeds can vary dependingon what other users on the network are doing. Using Node’s stream API allows you tocreate an object that receives events about the connection: data for when new datacomes in, end when there’s no more data, and error when errors occur.
Rather than passing lots of callbacks to a readable stream constructor function,which would be messy, you subscribe to the events you’re interested in. Streams can bepiped together, so you could have one stream class that reads data from the networkand then pipe it to a stream that transforms the data into something else. This couldbe data from an XML API that’s transformed into JSON, making it easier to work within JavaScript.
We love streams, so we’ve dedicated a whole chapter to them. Skip to chapter 5 todive right in. You might think that events and streams sound abstract, and thoughthat’s true, it’s also interesting to note that they’re used as a basis for I/O modules, likefs and net.
Core modules
C++ bindings
C-Ares
V8
The operating system
libuv http
app.js
Figure 1.2 Node’s key parts in context
www.it-ebooks.info

8 CHAPTER 1 Getting started
FS: WORKING WITH FILES
Node’s file system module is capable of reading and writing files using non-blockingI/O, but it also has synchronous methods. You can get information about files withfs.stat, and the synchronous equivalent is fs.statSync.
If you want to use streams to process the contents of a file in a super-efficient man-ner, then use fs.createReadStream to return a ReadableStream object. There’s moreabout this in chapter 6.
NET: CREATE NETWORK CLIENTS AND SERVERS
The networking module is the basis for the http module and can be used to creategeneralized network clients and servers. Although Node development is typicallythought of as web-based, chapter 7 shows you how to create TCP and UDP servers,which means you’re not limited to HTTP.
GLOBAL OBJECTS AND OTHER MODULES
If you have some experience making web applications with Node, perhaps with theExpress framework, then you’ve already been using the http, net, and fs core mod-ules without necessarily realizing it. Other built-in features aren’t headline-grabbing,but are critical to creating programs with Node.
One example is the idea of global objects and methods. The process object, forexample, allows you to pipe data into and out of a Node program by accessing thestandard I/O streams. Much like Unix and Windows scripting, you can cat data to aNode program. The ubiquitous console object, beloved by JavaScript developerseverywhere, is also considered a global object.
Node’s module system is also part of this global functionality. Chapter 2 is packedwith techniques that show you how to use these features.
Now that you’ve seen some of the core modules, it’s time to see them in action.The example will use the stream module to generate statistics on streams of text, andyou’ll be able to use it with files and HTTP connections. If you want to learn moreabout the basics behind streams or HTTP in Node, refer to Node.js in Action.
1.2 Building a Node applicationInstead of wading through more theory, we’ll show you how to build a Node applica-tion. It’s not just any application, though: it uses some of Node’s key features, likemodules and streams. This will be a fast and intense tour of Node, so start up yourfavorite text editor and terminal and get ready.
Here’s what you’ll learn over the next 10 minutes:
■ How to create a new Node project■ How to write your own stream class■ How to write a simple test and run it
Streams are great for processing data, whether you’re reading, writing, or transform-ing it. Imagine you want to convert data from a database into another format, like CSV.You could create a stream class that accepts input from a database and outputs it as a
www.it-ebooks.info

9Building a Node application
stream of CSV. The output of this new CSV stream could be connected to an HTTPrequest, so you could stream CSV directly to a browser. The same class could even beconnected to a writable file stream—you could even fork the stream to create a fileand send it to a web browser.
In this example, the stream class will accept text input, count word matches basedon a regular expression, and then emit the results in an event when the stream has fin-ished being sent. You could use this to count word matches in a text file, or pipe datafrom a web page and count the number of paragraph tags—it’s up to you. First weneed to create a new project.
1.2.1 Creating a new Node project
You might be wondering how a professional Node developer creates a new project.This is a straightforward process, thanks to npm. Though you could create aJavaScript file and run node file.js, we’ll use npm init to make a new project with apackage.json file. Create a new directory B, cd C into it, and then run npm init D:
mkdir first-projectcd first-projectnpm init
Get used to typing these commands: you’ll be doing it often! You can press Returnto accept the defaults when prompted by npm. Before you’ve written a line ofJavaScript, you’ve already seen how cool one of Node’s major features—npm—is. It’snot just for installing modules, but also for managing projects.
Now it’s time to write some JavaScript. In the next section you’ll create a newJavaScript file that implements a stream.
1.2.2 Making a stream class
Create a new file called countstream.js and use util.inherits to derive fromstream.Writable and implement the required _write method. Too fast? Let’s slowdown. The full source is in the following listing.
Create a new directory.
BChange into it.
C
Create the project’s manifest file.D
When to use a package.json fileYou may have an idea for a small script, and may be wondering if a package.json fileis really necessary. It isn’t always necessary, but in general you should create themas often as possible.
Node developers prefer small modules, and expressing dependencies in package.json means your project, no matter how small, is super-easy to install in the future,or on another person’s machine.
www.it-ebooks.info

10 CHAPTER 1 Getting started
var Writable = require('stream').Writable;var util = require('util');
module.exports = CountStream;
util.inherits(CountStream, Writable);
function CountStream(matchText, options) {Writable.call(this, options);this.count = 0;this.matcher = new RegExp(matchText, 'ig');
}
CountStream.prototype._write = function(chunk, encoding, cb) {var matches = chunk.toString().match(this.matcher);if (matches) {this.count += matches.length;
}cb();
};
CountStream.prototype.end = function() {this.emit('total', this.count);
};
This example illustrates how subsequent examples in this book work. We present asnippet of code, annotated with hints on the underlying code. For example, the firstpart of the class uses the util.inherits method to inherit from the Writable baseclass B. This example won’t be fully fleshed-out here—for more on writing your ownstreams, see technique 30 in chapter 5. For now, just focus on how regular expressionsare passed to the constructor C and used to count text as it flows into instances of theclass D. Node’s Writable class calls _write for us, so we don’t need to worry aboutthat yet.
STREAMS AND EVENTS In listing 1.1 there was an event, total. This is one wemade up—you can make up your own as well. Streams inherit fromEventEmitter, so they have the same emit and on methods.
Node’s Writable base class will also call end when there’s no more data E. Thisstream can be instantiated and piped as required. In the next section you’ll see how toconnect it using pipe.
1.2.3 Using a stream
Now that you’ve seen how to make a stream class, you’re probably dying to try it out.Make another file, index.js, and add the code shown in the next listing.
Listing 1.1 A writable stream that counts
Inherit from the Writable stream.
B
Create a RegExp object that matches globally and ignores case.
C
Convert the current chunk of input into a string and use it to count matches.D
When the stream has ended, “publish” the total number of matches.E
www.it-ebooks.info

11Building a Node application
var CountStream = require('./countstream');var countStream = new CountStream('book');var http = require('http');
http.get('http://www.manning.com', function(res) {res.pipe(countStream);
});
countStream.on('total', function(count) {console.log('Total matches:', count);
});
You can run this example by typing node index.js. It should display something likeTotal matches: 24. You can experiment with it by changing the URL that it fetches.
This example loads the module from listing 1.1 B and then instantiates it with thetext 'book' C. It also downloads the text from a website using Node’s standard httpmodule D and then pipes the result through our CountStream class E.
The significant thing here is res.pipe(countStream). When you pipe data, itdoesn’t matter how big it is or if the network is slow: the CountStream class will duti-fully count matches until the data has been processed. This Node program does notdownload the entire file first! It takes the file—piece by piece—and processes it.That’s the big thing here, and a critical aspect to Node development.
To recap, figure 1.3 summarizes what you’ve done so far to create a new Node proj-ect. First you created a new directory, and ran npm init B, then you created someJavaScript files C, and finally you ran the code D.
Another important part of Node development is testing. The next section wrapsup this example by testing CountStream.
Listing 1.2 Using the CountStream class
Load the countstream.js file.B
Instantiate a CountStream class that counts text matching “book.” C
Download www.manning.com. D
Pipe the data from the website to countStream, thereby counting the text E
index.js
$ mkdir new-project$ cd new-project$ npm init
$ node index.js$ npm start
1 Create a new directory,and run npm init.
3 Run the code.2 Create a JavaScript file.
Figure 1.3 The three steps to creating a new Node project
www.it-ebooks.info

12 CHAPTER 1 Getting started
1.2.4 Writing a test
We can write a short test for CountStream without using any third-party modules.Node comes with a built-in assert module, so we can use that for a quick test. Opentest.js and add the code shown next.
var assert = require('assert');var CountStream = require('./countstream');var countStream = new CountStream('example');var fs = require('fs');var passed = 0;
countStream.on('total', function(count) {assert.equal(count, 1);passed++;
});
fs.createReadStream(__filename).pipe(countStream);
process.on('exit', function() {console.log('Assertions passed:', passed);
});
This test can be run with node test.js, and you should see Assertions passed: 1printed in the console. The test actually reads the current file and passes the datathrough CountStream. It might invoke Ouroboros, but it’s a useful example because itgives us content that we know something about—we can always be sure there is onematch for the word example.
ASSERTIONS Node comes with an assertion library called assert. A basic testcan be made by calling the module directly -- assert(expression).
The first thing the test does is listen for the total event, which is emitted by instancesof CountStream B. This is a good place to assert that the number of matches shouldbe the same as what is expected C. A readable stream that represents the current fileis opened and piped through our class D. Just before the end of the program, weprint out how many assertions were hit E.
This is important because if the total event never fires, then assert.equalwon’t run at all. We have no way of knowing whether tests in callbacks are run, so asimple counter has been used to illustrate how Node programming can require pat-terns from the other programming languages and platforms that you might be famil-iar with.
If you’re getting tired, you can rest here, but there’s a bit of sugar to finish off ourproject. Node developers like to run tests and other scripts using npm on the com-mand line. Open package.json and change the "test" property to look like this:
Listing 1.3 Using the CountStream class
The 'total' event will be emitted when the stream is finished.
B
Assert the count is the expected amount.
C
Just before the program is about to exit, display how many assertions have been run.E
Create a readable stream of the current file, and pipethe data through CountStream.
D
www.it-ebooks.info

13Summary
"scripts": {"test": "node test.js"
},
Now you can run tests just by typing npm test. This comes in handy when you have lotsof tests and running them is more complicated. Running tests, test runners, and asyn-chronous testing issues are all covered in chapter 10.
Depending on your previous experience with Node, this example might have beenintense, but it captures how Node developers think and take advantage of the power-ful resources that come with Node.
Now that you’ve seen how a Node project is put together, we’re done with therefresher course on Node. The next chapter introduces our first set of techniques,which is the bulk of this book’s format. It covers ways of working with the global fea-tures that are available to all Node programs.
1.3 SummaryIn this chapter you’ve learned about Node.js in Practice—what it covers and how itfocuses on Node’s impressive built-in core modules like the networking module andfile system modules.
You’ve also learned about what makes Node tick, and how to use it. Some of themain points we covered were
■ When to use Node, and how Node builds on non-blocking I/O, allowing you towrite standard JavaScript but get great performance benefits.
■ Node’s standard library is referred to as its core modules.■ What the core modules do—I/O tasks like network protocols, and work with
files and more generic features like streams.■ How to quickly start a new Node project, complete with a package.json file so
dependencies and scripts can be added.■ How to use Node’s powerful stream API to process data.■ Streams inherit from EventEmitter, so you can emit and respond to any events
that you want to use in your application.■ How to write small tests just by using npm and the assert module—you can test
out ideas without installing any third-party libraries.
npm scriptsThe npm test and npm start commands can be configured by editing package.json.You can also run arbitrary commands, which are invoked with npm run command. Allyou need to do is set a property under scripts, just like listing 1.4.
This is useful for specific types of tests or housekeeping routines—for example npmrun integration-tests, or maybe even npm run seed-data.
www.it-ebooks.info

14 CHAPTER 1 Getting started
Finally, we hope you learned something from our introductory application. Using event-based APIs, non-blocking I/O, and streams is really what Node is all about, but it’s alsoimportant to take advantage of Node’s unique tools like the package.json file and npm.
Now it’s time for techniques. The next chapter introduces the features that youdon’t even have to load to use: the global objects.
www.it-ebooks.info

15
Globals:Node’s environment
Global objects are available in all modules. They’re universal. Whether you’re writ-ing network programs, command-line scripts, or web applications, your programwill have access to these objects. That means you can always depend on features likeconsole.log and __dirname—both are explained in detail in this chapter.
The goal of this chapter is to introduce Node’s global objects and methods tohelp you learn what functionality is available to all Node processes. This will helpyou better understand Node and its relationship to the operating system, and howit compares with other JavaScript environments like browsers.
Node provides some important functionality out of the box, even without loadingany modules. In addition to the features provided by the ECMAScript language, Nodehas several host objects—objects supplied by Node to help programs to execute.
This chapter covers■ Using modules■ What you can do without requiring a single module■ The process and console objects■ Timers
www.it-ebooks.info

16 CHAPTER 2 Globals: Node’s environment
A key global object is process, which is used to communicate with the operatingsystem. Unix programmers will be familiar with standard I/O streams, and these areaccessible through the process object using Node’s streaming API.
Another important global is the Buffer class. This is included because JavaScripthas traditionally lacked support for binary data. As the ECMAScript standards evolve,this is being addressed, but for now most Node developers rely on the Buffer class.For more about buffers, see chapter 3.
Some globals are a separate instance for each module. For example, module isavailable in every Node program, but is local to the current module. Since Node pro-grams may consist of several modules, that means a given program has several differ-ent module objects—they behave like globals, but are in module scope.
In the next section you’ll learn how to load modules. The objects and methodsrelating to modules are globals, and as such are always available and ready to be used.
2.1 ModulesModules can be used to organize larger programs and distribute Node projects, so it’simportant to be familiar with the basic techniques required to install and create them.
TECHNIQUE 1 Installing and loading modules
Whether you’re using a core module provided by Node or a third-party module fromnpm, support for modules is baked right into Node and is always available.
■ ProblemYou want to load a third-party module from npm.
■ SolutionInstall the module with the command-line tool, npm, and then load the module usingrequire. The following listing shows an example of installing the express module.
$ npm search expressexpress Sinatra inspired web development framework$ npm install [email protected] ./node_modules/express
[email protected](Several more dependencies appear here)
$ node> var express = require('express');> typeof express'function'
■ DiscussionThe npm command-line tool is distributed with Node, and can be used to search,install, and manage packages. The website https://npmjs.org provides another inter-face for searching modules, and each module has its own page that displays the associ-ated readme file and dependencies.
Listing 2.1 Using npm
Search for a module based on keywords. B
Load the module using the require method.
C
www.it-ebooks.info

17TECHNIQUE 2 Creating and managing modules
Once you know the name of a module, installation is easy: type npm install module-name B and it will be installed into ./node_modules. Modules can also be “globally”installed—running npm install -g module_name will install it into a global folder. Thisis usually /usr/local/lib/node_modules on Unix systems. In Windows it should bewherever the node.exe binary is located.
After a module has been installed, it can be loaded with require('module-name')C. The require method usually returns an object or a method, depending on howthe module has been set up.
The question of whether to install a module globally is critical to developing maintain-able projects. If other people need to work on your project, then you should consideradding modules as dependencies to your project’s package.json file. Keeping projectdependencies tightly managed will make it easier to maintain them in the future whennew versions of dependencies are released.
TECHNIQUE 2 Creating and managing modules
In addition to installing and distributing open source modules, “local” modules canbe used to organize projects.
■ ProblemYou want to break a project up into separate files.
■ SolutionUse the exports object.
■ DiscussionNode’s module system provides a solution to splitting code across multiple files. It’svery different from include in C, or even require in Ruby and Python. The main dif-ference is that require in Node returns an object rather than loading code into thecurrent namespace, as would occur with a C preprocessor.
In technique 1 you saw how npm can be used to install modules, and how requireis used to load them. npm isn’t the only thing that manages modules, though—Nodehas a built-in module system based on the CommonJS Modules/1.1 specification(http://wiki.commonjs.org/wiki/Modules/1.1).
Searching npmBy default, npm searches across several fields in each module’s package.json file.This includes the module’s name, description, maintainers, URL, and keywords. Thatmeans a simple search like npm search express yields hundreds of results.
You can reduce the number of matches by searching with a regular expression. Wrapa search term in slashes to trigger npm’s regular expression matching: npm search/^express$/
However, this is still limited. Fortunately, there are open source modules that improveon the built-in search command. For example, npmsearch by Gorgi Kosev will orderresults using its own relevance rankings.
www.it-ebooks.info

18 CHAPTER 2 Globals: Node’s environment
This allows objects, functions, and variables to be exported from a file and usedelsewhere. The exports object is always present and, although this chapter specificallyexplores global objects, it’s not really a global. It’s more accurate to say that theexports object is in module scope.
When a module is focused around a single class, then users of the module will pre-fer to type var MyClass = require('myclass'); rather than var MyClass =require('myclass').MyClass, so you should use modules.export. Listing 2.2 showshow this works. This is different from using the exports object, which requires thatyou set a property to export something.
function MyClass() {}
MyClass.prototype = {method: function() {return 'Hello';
}};
var myClass = new MyClass();
module.exports = myClass;
Listing 2.3 shows how to export multiple objects, methods, or values, a technique thatwould typically be used for utility libraries that export multiple things.
exports.method = function() {return 'Hello';
};
exports.method2 = function() {return 'Hello again';
};
Finally, listing 2.4 shows how to load these modules with require, and how to use thefunctionality they provide.
var myClass = require('./myclass');var module2 = require('./module-2');
console.log(myClass.method());console.log(module2.method());console.log(module2.method2());
Listing 2.2 Exporting modules
Listing 2.3 Exporting multiple objects, methods, and values
Listing 2.4 Loading modules with require
Objects can be exported, including other objects, methods, and properties.
Load myclass.js.B
Load module-2.js.C
www.it-ebooks.info

19TECHNIQUE 3 Loading a group of related modules
Note that loading a local module always requires a path name—in these examples thepath is just ./. Without it, Node will attempt to find a matching module in $NODE_PATH, and then ./node_modules, $HOME/.node_modules, $HOME/.node_libraries,or $PREFIX/lib/node.
In listing 2.4 notice that ./myclass is automatically expanded to ./myclass.js B,and ./module-2 is expanded to ./module-2.js c.
The output from this program would be as follows:
HelloHelloHello again
Once a module is loaded, it’ll be cached. That means that loading it multiple timeswill return the cached copy. This is generally efficient, and helps you heavily reusemodules within a project without worrying about incurring an overhead when usingrequire. Rather than centrally loading all of the dependencies, you can safely callrequire on the same module.
In the next technique you’ll learn how to group related modules together and loadthem in one go.
TECHNIQUE 3 Loading a group of related modules
Node can treat directories as modules, offering opportunities for logically groupingrelated modules together.
■ ProblemYou want to group related files together under a directory, and only have to load itwith one call to require.
Which module?To determine the exact module Node will load, use require.resolve(id). This willreturn a fully expanded filename.
Unloading modulesAlthough automatically caching modules fits many use cases in Node development,there may be rare occasions when you want to unload a module. The require.cacheobject makes this possible.
To remove a module from the cache, use the delete keyword. The full path of themodule is required, which you can obtain with require.resolve. For example:
delete require.cache[require.resolve('./myclass')];
This should return true, which means the module was unloaded.
www.it-ebooks.info

20 CHAPTER 2 Globals: Node’s environment
■ SolutionCreate a file called index.js to load each module and export them as a group, or add apackage.json file to the directory.
■ DiscussionSometimes a module is logically self-contained, but it still makes sense to separate itinto several files. Most of the modules you’ll find on npm will be written this way.Node’s module system supports this by allowing directories to act as modules. The eas-iest way to do this is to create a file called index.js that has a require statement to loadeach file. The following listing demonstrates how this works.
module.exports = {one: require('./one'),two: require('./two')
};
The group/one.js and group/two.js files can then export values or methods B asrequired. The next listing shows an example of such a file.
module.exports = function() {console.log('one');
};
Code that needs to use a folder as a module can then use a single require statementto load everything in one go. The following listing demonstrates this.
var group = require('./group');
group.one();group.two();
The output of listing 2.7 should look like this:
onetwo
This approach is often used as an architectural technique to structure web applica-tions. Related items, like controllers, models, and views, can be kept in separate fold-ers to help separate concerns within the application. Figure 2.1 shows how tostructure applications following this style.
Node also offers an alternative technique that supports this pattern. Adding apackage.json file to a directory can help the module system figure out how to load allof the files in the directory at once. The JSON file should include a main property topoint to a JavaScript file. This is actually the default file Node looks for when loading
Listing 2.5 The group/index.js file
Listing 2.6 The group/one.js file
Listing 2.7 A file loading the group of modules
A module is exported that points to each file in the directory.B
The call to require doesn’t need any special handling to work with a directory of modules.
www.it-ebooks.info

21TECHNIQUE 4 Working with paths
modules—if no package.json is present, it’ll then look for index.js. The next listingshows an example of a package.json file.
{ "name" : "group","main" : "./index.js" }
The require API provides many ways to manage files. But what about when you wantto load something relative to the current module, or the directory where the moduleis saved? Read on for an explanation in technique 4.
TECHNIQUE 4 Working with paths
Sometimes you need to open files based on the relative location. Node provides toolsfor determining the path to the current file, directory, and module.1
■ ProblemYou want to access a file that isn’t handled by the module system.
Listing 2.8 A package.json file for a directory containing a module
1 See http://nodejs.org/api/globals.html#globals_require_extensions.
module.exports = { assets: require('./assets'), documents: require('./documents'), users: require('./users')};
var routes = require('./routes');
routes.users.methodName();
index.js
routes/ App.js
assets.jsdocuments.js
users.js
Figure 2.1 Folders as modules
This could point to any file.
File extensionsWhen loading a file, Node is configured to search for files with the .js, .json, and.node extensions. The require.extensions array can be used to tell require toload files with other extensions. Node’s module system will take this into accountwhen treating directories as modules, as well.
This feature is marked as deprecated in Node’s documentation, but the modulesystem is also marked as “locked” so it shouldn’t go away. If you want to use it,you should check Node’s documentation first.1 If you’re just trying to load aJavaScript file from a legacy system that has an unusual extension, then it might besuitable for experimentation.
www.it-ebooks.info

22 CHAPTER 2 Globals: Node’s environment
■ SolutionUse __dirname or __filename to determine the location of the file.
■ DiscussionSometimes you need to load data from a file that clearly shouldn’t be handled byNode’s module system, but you need to take the path of the current script intoaccount—for example, a template in a web application. The __dirname and__filename variables are extremely useful in such cases.
Running the following listing will print the output of these values.
console.log('__dirname:', __dirname);console.log('__filename:', __filename);
Most developers join these variables with path fragments using simple string concate-nation: var view = __dirname + '/views/view.html';. This works with both Windowsand Unix—the Windows APIs are clever enough to automatically switch the slashes tothe native format, so you don’t need special handling to support both operating systems.
If you really want to ensure paths are joined correctly, you can use the path.joinmethod from Node’s path module: path.join(__dirname, 'views', 'view.html');.
Apart from module management, there are globally available objects for writing tothe standard I/O streams. The next set of techniques explores process.stdout andthe console object.
2.2 Standard I/O and the console objectText can be piped to a Node process by using command-line tools in Unix orWindows. This section includes techniques for working with these standard I/Ostreams, and also how to correctly use the console object for a wide range of logging-related tasks.
TECHNIQUE 5 Reading and writing to standard I/O
Whenever you need to get data into and out of a program, one useful technique isusing the process object to read and write to standard I/O streams.
■ ProblemYou want to pipe data to and from a Node program.
■ SolutionUse process.stdout and process.stdin.
■ DiscussionThe process.stdout object is a writable stream to stdout. We’ll look at streams inmore detail in chapter 5, but for now you just need to know it’s part of the processobject that every Node program has access to, and is helpful for displaying and receiv-ing text input.
Listing 2.9 Path variables
These variables point to the fully resolved locations of the current script.
www.it-ebooks.info

23TECHNIQUE 5 Reading and writing to standard I/O
The next listing shows how to pipe text from another command, process it, andoutput it again.
// Run with:// cat file.txt | node process.js
process.stdin.resume();process.stdin.setEncoding('utf8');
process.stdin.on('data', function(text) {process.stdout.write(text.toUpperCase());
});
Every time a chunk of text is read from the input stream, it’ll be transformed withtoUpperCase() and then written to the output stream. Figure 2.2 shows how dataflows from one operating system process, through your Node program, and then outthrough another program. In the terminal, these programs would be linked togetherwith the pipe (|) symbol.
This pipe-based approach works well when dealing with input in Unix, becausemany other commands are designed to work this way. That brings a LEGO-like modu-larity to Node programs that facilitates reuse.
If you just want to print out messages or errors, Node provides an easier API specif-ically tailored for this purpose through the console object. The next techniqueexplains how to use it, and some of its less obvious features.
Listing 2.10 Path variables
Tell the stream we’re ready to start reading.
This callback transforms the data in chunks when they’re available.
cat file.txt
process.stdout
process.stdin
Node processOS process
wc –1
OS process
process.stdin.on('data', function(d) { process.stdout.write(d);});
Figure 2.2 Data flows in a simple program that uses stdio.
www.it-ebooks.info

24 CHAPTER 2 Globals: Node’s environment
TECHNIQUE 6 Logging messages
The easiest way to log information and errors from a program is by using the consoleobject.
■ ProblemYou want to log different types of messages to the console.
■ SolutionUse console.log, console.info, console.error, and console.warn. Be sure to takeadvantage of the built-in formatting facilities provided by these methods.
■ DiscussionThe console object has several methods that can be used to output different types ofmessages. They’ll be written to the relevant output stream, which means you can pipethem accordingly on a Unix system.
Although the basic usage is console.log('message'), more functionality ispacked in. Variables can be interpolated, or simply appended alongside string literals.This makes it extremely easy to log messages that display the contents of primitive val-ues or objects. The following listing demonstrates these features.
var name = 'alex';var user = { name: 'alex' };
console.log('Hello');console.log('Hello %s', name);console.log('Hello:', name);console.log('Hello:', user);
console.error('Error, bad user:', user);
The output of listing 2.11 looks like this:
HelloHello alexHello: alexHello: { name: "alex" } //Error, bad user: { name: 'alex' }
When message strings are formatted, util.format is used. Table 2.1 shows the sup-ported formatting placeholders.
Listing 2.11 Path variables
Table 2.1 Formatting placeholders
Placeholder Type Example
%s String '%s', 'value'
%d Number '%f', 3.14
%j JSON '%j', { name: 'alex' }
Simple variable interpolation can be used with strings or numbers.
A space will automatically be added after the colon.
The user object is internally formatted using util.inspect.
www.it-ebooks.info

25TECHNIQUE 7 Benchmarking a program
These formatting placeholders are convenient, but just being able to simply includeobjects in console.log messages without manually appending strings is a handy wayto log messages.
The info and warn methods are synonyms for log and error. The differencebetween log and error is the output stream used. In technique 5, you saw how Nodemakes standard input and output streams available to all programs. It also exposes thestandard error stream through process.stderr. The console.error method willwrite to this stream, rather than process.stdout. This means you can redirect a Nodeprocess’s error messages in the terminal or in a shell script.
If you ran the previous listing with 2> error-file.log, the error messages wouldbe redirected to error-file.log. The other messages would be printed to the con-sole as usual:
node listings/globals/console-1.js 2> errors-file.log
The 2 handle refers to the error stream; 1 is standard output. That means you couldredirect errors to a log file without having to open files within your Node program, oruse a specific logging module. Good old-fashioned shell redirection is good enoughfor many projects.
Stack tracesAnother feature of the console object is console.trace(). This method generates astack trace at the current point of execution. The generated stack trace includes linenumbers for the code that invokes asynchronous callbacks, which can help whenreporting errors that would otherwise be difficult to track down. For example, a tracegenerated inside an event listener will show where the event was triggered from. Tech-nique 28 in chapter 5 explores this in more detail.
Another slightly more advanced use of console is its benchmarking feature. Con-tinue reading for a detailed look.
TECHNIQUE 7 Benchmarking a program
Node makes it possible to benchmark programs without any additional tools.
■ ProblemYou need to benchmark a slow operation.
Standard streamsStandard streams come in three flavors: stdin, stdout, and stderr. In Unix terminals,these are referred to with numbers. 0 is used for standard input, 1 is standard output,and 2 is standard error.
The same applies to Windows: running a program from the command prompt and add-ing 2> errors-file.log will send the error messages to errors-file.log, justlike Unix.
www.it-ebooks.info
26 CHAPTER 2 Globals: Node’s environment
■ SolutionUse console.time() and console.timeEnd().
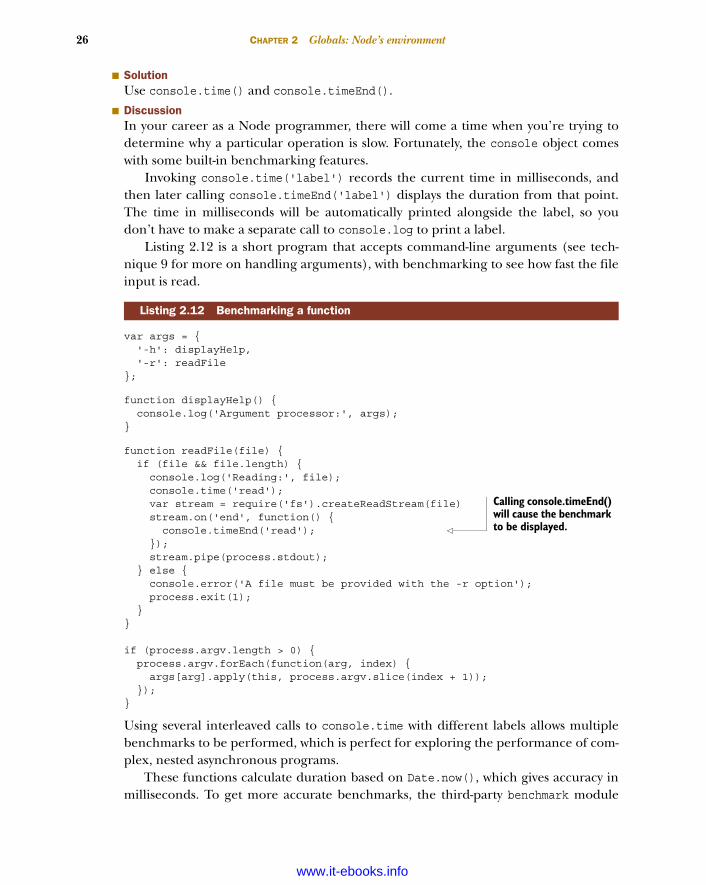
■ DiscussionIn your career as a Node programmer, there will come a time when you’re trying todetermine why a particular operation is slow. Fortunately, the console object comeswith some built-in benchmarking features.
Invoking console.time('label') records the current time in milliseconds, andthen later calling console.timeEnd('label') displays the duration from that point.The time in milliseconds will be automatically printed alongside the label, so youdon’t have to make a separate call to console.log to print a label.
Listing 2.12 is a short program that accepts command-line arguments (see tech-nique 9 for more on handling arguments), with benchmarking to see how fast the fileinput is read.
var args = {'-h': displayHelp,'-r': readFile
};
function displayHelp() {console.log('Argument processor:', args);
}
function readFile(file) {if (file && file.length) {console.log('Reading:', file);console.time('read');var stream = require('fs').createReadStream(file)stream.on('end', function() {
console.timeEnd('read');});stream.pipe(process.stdout);
} else {console.error('A file must be provided with the -r option');process.exit(1);
}}
if (process.argv.length > 0) {process.argv.forEach(function(arg, index) {args[arg].apply(this, process.argv.slice(index + 1));
});}
Using several interleaved calls to console.time with different labels allows multiplebenchmarks to be performed, which is perfect for exploring the performance of com-plex, nested asynchronous programs.
These functions calculate duration based on Date.now(), which gives accuracy inmilliseconds. To get more accurate benchmarks, the third-party benchmark module
Listing 2.12 Benchmarking a function
Calling console.timeEnd() will cause the benchmark to be displayed.
www.it-ebooks.info

27TECHNIQUE 8 Getting platform information
(https://npmjs.org/package/benchmark) can be used in conjunction with micro-time (https://npmjs.org/package/microtime).
The process object is used for working with standard I/O streams, and used cor-rectly, console handles many of the tasks that the uninitiated may tackle with third-party modules. In the next section we’ll further explore the process object to look athow it helps integrate with the wider operating system.
2.3 Operating system and command-line integrationThe process object can be used to obtain information about the operating system,and also communicate with other processes using exit codes and signal listeners. Thissection contains some more-advanced techniques for using these features.
TECHNIQUE 8 Getting platform information
Node has some built-in methods for querying operating system functionality.
■ ProblemYou need to run platform-specific code based on the operating system or processorarchitecture.
■ SolutionUse the process.arch and process.platform properties.
■ DiscussionNode JavaScript is generally portable, so it’s unlikely that you’ll need to branch basedon the operating system or process architecture. But you may want to tailor projects totake advantage of operating system–specific features, or simply collect statistics onwhat systems a script is executing on. Certain Windows-based modules that includebindings to binary libraries could switch between running a 32- or 64-bit version of abinary. The next listing shows how this could be supported.
switch (process.arch) {case 'x64':require('./lib.x64.node');break;
case 'ia32':require('./lib.Win32.node');break;
default:throw new Error('Unsupported process.arch:', process.arch);
}
Other information from the system can also be gleaned through the process module.One such method is process.memoryUsage()—it returns an object with three proper-ties that describe the process’s current memory usage:
■ rss—The resident set size, which is the portion of the process’s memory that isheld in RAM
Listing 2.13 Branching based on architecture
www.it-ebooks.info

28 CHAPTER 2 Globals: Node’s environment
■ heapTotal—Available memory for dynamic allocations■ heapUsed—Amount of heap used
The next technique explores handling command-line arguments in more detail.
TECHNIQUE 9 Passing command-line arguments
Node provides a simple API to command-line arguments that you can use to passoptions to programs.
■ ProblemYou’re writing a program that needs to receive simple arguments from the commandline.
■ SolutionUse process.argv.
■ DiscussionThe process.argv array allows you to check if any arguments were passed to yourscript. Because it’s an array, you can use it to see how many arguments were passed, ifany. The first two arguments are node and the name of the script.
Listing 2.14 shows just one way of working with process.argv. This example loopsover process.argv and then slices it to “parse” argument flags with options. Youcould run this script with node arguments.js -r arguments.js and it would print outits own source.
var args = {'-h': displayHelp,'-r': readFile
};
function displayHelp() {console.log('Argument processor:', args);
}
function readFile(file) {console.log('Reading:', file);require('fs').createReadStream(file).pipe(process.stdout);
}
if (process.argv.length > 0) {process.argv.forEach(function(arg, index) {args[arg].apply(this, process.argv.slice(index + 1));
});}
The args object B holds each switch that the script supports. Then createReadStreamis used C to pipe the file to the standard output stream. Finally, the function referencedby the command-line switch in args is executed using Function.prototype.apply D.
Listing 2.14 Manipulating command-line arguments
This is a simple object used to model the valid arguments.B
Pipe out a file through the standard output stream.
C
Call a matching method from the arg parameter model, and slice the full list of arguments to effectively support passing options from command-line flags.D
www.it-ebooks.info

29TECHNIQUE 10 Exiting a program
Although this is a toy example, it illustrates how handy process.argv can be with-out relying on a third-party module. Since it’s a JavaScript Array, it’s extremely easy towork with: you can use methods like map, forEach, and slice to process argumentswith little effort.
Good Unix programs handle arguments when needed, and they also exit by returninga suitable status code. The next technique presents how and when to use pro-cess.exit to signal the successful—or unsuccessful—completion of a program.
TECHNIQUE 10 Exiting a program
Node allows you to specify an exit code when a program terminates.
■ ProblemYour Node program needs to exit with specific status codes.
■ SolutionUse process.exit().
■ DiscussionExit status codes are significant in both Windows and Unix. Other programs willexamine the exit status to determine whether a program ran correctly. This becomesmore important when writing Node programs that take part in larger systems, andhelps with monitoring and debugging later on.
By default, a Node program returns a 0 exit status. This means the program ranand terminated correctly. Any non-zero status is considered an error. In Unix, this sta-tus code is generally accessed by using $? in a shell. The Windows equivalent is%errorlevel%.
Listing 2.15 shows a modification to listing 2.14 that causes the program to exitcleanly with a relevant status code when no filename is specified with the -r option.
var args = {'-h': displayHelp,'-r': readFile
};
function displayHelp() {
Listing 2.15 Returning meaningful exit status codes
Complex argumentsFor more complex programs, use an option parsing module. The two most popularare optimist (https://npmjs.org/package/optimist) and commander (https://npmjs.org/package/commander). optimist converts arguments into an Object,which makes them easier to manipulate. It also supports default values, automaticusage generation, and simple validation to ensure certain arguments have been pro-vided. commander is slightly different: it uses an abstracted notion of a program thatallows you to specify your program’s accepted arguments using a chainable API.
www.it-ebooks.info

30 CHAPTER 2 Globals: Node’s environment
console.log('Argument processor:', args);}
function readFile(file) {if (file && file.length) {console.log('Reading:', file);require('fs').createReadStream(file).pipe(process.stdout);
} else {console.error('A file must be provided with the -r option');process.exit(1);
}}
if (process.argv.length > 0) {process.argv.forEach(function(arg, index) {args[arg].apply(this, process.argv.slice(index + 1));
});}
After running listing 2.15, typing echo $? in a Unix terminal will display 1. Also notethat console.error B is used to output an error message. This will cause the messageto be written to process.stderr, which allows users of the script to easily pipe errormessages somewhere.
Because many Node programs are asynchronous, there are times when you may needto specifically call process.exit() or close down an I/O connection to cause theNode process to end gracefully. For example, scripts that use the Mongoose databaselibrary (http://mongoosejs.com/) need to call mongoose.connection.close()
before the Node process will be able to exit. You may need to track the number of pending asynchronous operations in order
to determine when it’s safe to call mongoose.connection.close(), or the equivalentfor another database module. Most people do this using a simple counter variable,incrementing it just before asynchronous operations start, and then decrementing itonce their callbacks fire. Once it reaches 0, it’ll be safe to close the connection.
Another important facet to developing correct programs is creating signal han-dlers. Continue reading to learn how Node implements signal handlers and when touse them.
Both console.error and process.exit are used to correctly indicate an error occurred.B
Exit codes with special meaningsIn the Advanced Bash-Scripting Guide (http://tldp.org/LDP/abs/html/index.html), apage is dedicated to status codes called Exit Codes With Special Meanings (http://tldp.org/LDP/abs/html/exitcodes.html). This attempts to generalize error codes, al-though there’s no standard list of status codes for scripting languages, outside ofnon-zero indicating an error occurred.
www.it-ebooks.info

31TECHNIQUE 11 Responding to signals
TECHNIQUE 11 Responding to signals
Node programs can respond to signals sent by other processes.
■ ProblemYou need to respond to signals sent by other processes.
■ SolutionUse the signal events that are sent to the process object.
■ DiscussionMost modern operating systems use signals as a way of sending a simple message to a pro-gram. Signal handlers are typically used in programs that run in the background,because it might be the only way of communicating with them. There are other caseswhere they can be useful in the kinds of programs you’re most likely write—consider aweb application that cleanly closes its connection to a database when it receives SIGTERM.
The process object is an EventEmitter, which means you can add event listenersto it. Adding a listener for a POSIX signal name should work—on a Unix system, youcan type man sigaction to see the names of all of the signals.
Signal listeners enable you to cater to the expected behavior of Unix programs.For example, many servers and daemons will reload configuration files when theyreceive a SIGHUP signal. The next listing shows how to attach a listener to SIGHUP.
process.stdin.resume();process.on('SIGHUP', function () {
console.log('Reloading configuration...');});
console.log('PID:', process.pid);
Before doing anything with standard input, resume should be called B to preventNode from exiting straight away. Next, a listener is added to the SIGHUP event on theprocess object C. Finally, the PID is displayed for the current process D.
Once the program in listing 2.16 is running, it’ll display the process’s PID. The PIDcan be used with the kill command to send the process signals. For example, kill-HUP 94962 will send the HUP signal to PID 94962. If you send another signal, or justtype kill 94962, then the process will exit.
It’s important to realize that signals can be sent from any process to any other, per-missions notwithstanding. Your Node process can send another process a signal byusing process.kill(pid, [signal])—in this case kill doesn’t mean the process willbe “killed,” but simply sent a given signal. The method is named kill after the C stan-dard library function in signal.h.
Figure 2.3 shows a broad overview of how signals originate from any process in anoperating system and can be received by your Node processes.
Listing 2.16 Adding a listener for a POSIX signal
Read from stdin so the program will run until CTRL-C is pressed or it’s killed.B
Binding a listener to the SIGHUP signal. C
The PID is displayed so you can use it to send signals using the kill command.D
www.it-ebooks.info

32 CHAPTER 2 Globals: Node’s environment
You don’t have to respond to signals in your Node programs, but if you’re writing along-running network server, then signal listeners can be extremely useful. Support-ing signals like SIGHUP will make your program fit into existing systems more naturally.
A large part of Node’s appeal is its asynchronous APIs and non-blocking I/O fea-tures. Sometimes it’s desirable to fake this behavior—perhaps in automated tests—orsimply to just force code to execute later on. In the next section we’ll look at howNode implements JavaScript timers, which support this type of functionality.
2.4 Delaying execution with timersNode implements the JavaScript timer functions setTimeout, setInterval, clear-Timeout, and clearInterval. These functions are globally available. Although they’repart of JavaScript as defined by Mozilla, they’re not defined in the ECMAScript standard.Instead, timers are part of the HTML DOM Level 0 specification.
TECHNIQUE 12 Executing functions after a delay with setTimeout
It’s possible to run code once after a delay using Node’s setTimeout global method.
■ ProblemYou want to execute a function after a delay.
■ SolutionUse setTimeout, and use Function.prototype.bind if necessary.
■ DiscussionThe most basic usage of setTimeout is simple: pass it a function to execute and a delayin milliseconds:
setTimeout(function() {console.log('Hello from the past!');
}, 1000);
Node process
SIGHUP
OS
process.on('SIGHUP', function() { // Listener});
Process 1
Process 2
Process 3
Process 4
Process 5
Process 6
Figure 2.3 Signals originate from a process, and are handled with an event listener.
www.it-ebooks.info

33TECHNIQUE 12 Executing functions after a delay with setTimeout
This seems simple and contrived, but you’ll see it used most commonly in tests whereasynchronous APIs are being tested and a small delay is necessary to simulate real-world behavior. Node supports JavaScript timers for just such cases.
Methods can also easily be passed to setTimeout by using Function.prototype.bind. This can be used to bind the first argument to this, or more often the object thatthe method belongs to. The following listing shows how bind can be used with a simpleobject.
function Bomb() {this.message = 'Boom!';
}
Bomb.prototype.explode = function() {console.log(this.message);
};
var bomb = new Bomb();
setTimeout(bomb.explode.bind(bomb), 1000);
Binding ensures that the code inside the method can access the object’s internal prop-erties. Otherwise, setTimeout would cause the method to run with this bound to theglobal object. Binding a method can be more readable than creating a new anony-mous function.
To cancel scheduled functions, retain a reference to the timeoutId returned bysetTimeout and then call clearTimeout(timeoutId)B. The next listing demon-strates clearTimeout.
function Bomb() {this.message = 'Boom!';
}
Bomb.prototype.explode = function() {console.log(this.message);
};
var bomb = new Bomb();
var timeoutId = setTimeout(bomb.explode.bind(bomb), 1000);
clearTimeout(timeoutId);
Listing 2.17 Combining setTimeout with Function.prototype.bind
Listing 2.18 Using clearTimeout to prevent scheduled functions
Call .bind to ensure the method is bound correctly so it can access internal properties.
Defuse the bomb by calling clearTimeout to prevent bomb.expode from running.
B
When exactly does the callback run?Although you can specify when a callback runs in milliseconds, Node isn’t quite thatprecise. It can guarantee that the callback will run after the specified time, but it maybe slightly late.
www.it-ebooks.info

34 CHAPTER 2 Globals: Node’s environment
As well as delaying execution, you can also call functions periodically. The next tech-nique discusses how to achieve this by using setInterval.
TECHNIQUE 13 Running callbacks periodically with timers
Node can also run callbacks at regular intervals using setInterval, which works in afashion similar to setTimeout.
■ ProblemYou want to run a callback at a regular interval.
■ SolutionUse setInterval, and clearInterval to stop the timer.
■ DiscussionThe setInterval method has been around for years in browsers, and it behaves inNode much like the client-side counterparts. The callback will be executed on or justafter the specified delay, and will run in the event loop just after I/O (and any calls tosetImmediate, as detailed in technique 14).
The next listing shows how to combine setInterval with setTimeout to scheduletwo functions to execute in a sequence.
function tick() {console.log('tick:', Date.now());
}
function tock() {console.log('tock:', Date.now());
}
setInterval(tick, 1000);
setTimeout(function() {setInterval(tock, 1000);
}, 500);
The setInterval method itself returns a reference to the timer, which can bestopped by calling clearInterval and passing the reference. Listing 2.19 uses a sec-ond call to setTimeout B to trigger a second interval timer that runs 500 millisec-onds after the first.
Because setInterval prevents a program from exiting, there are cases where youmight want to exit a program if it isn’t doing anything else. For example, let’s sayyou’re running a program that should exit when a complex operation has finished,and you’d like to monitor it at regular intervals using setInterval. Once the complexoperation has finished, you don’t want to monitor it any more.
Rather than calling clearInterval, Node 0.10 allows you to call timerRef.unref() at any time before the complex operation has finished. This means you canuse setTimeout or setInterval with operations that don’t signal their completion.
Listing 2.19 Using setInterval and setTimeout together
Run another setInterval after the first one.
B
www.it-ebooks.info

35TECHNIQUE 14 Safely managing asynchronous APIs
Listing 2.20 uses setTimeout to simulate a long-running operation that will keepthe program running while the timer displays the process’s memory usage. Once thetimeout’s delay has been reached, the program will exit without calling clearTimeout.
function monitor() {console.log(process.memoryUsage());
}
var id = setInterval(monitor, 1000);id.unref();
setTimeout(function() {console.log('Done!');
}, 5000);
This is extremely useful in situations where there isn’t a good place to call clear-Interval.
Once you’ve mastered timers, you’ll encounter cases where it’s useful to run a call-back after the briefest possible delay. Using setTimeout with a delay of zero isn’t theoptimum solution, even though it seems like the obvious strategy. In the next tech-nique you’ll see how to do this correctly in Node by using process.nextTick.
TECHNIQUE 14 Safely managing asynchronous APIs
Sometimes you want to delay an operation just slightly. In traditional JavaScript, itmight be acceptable to use setTimeout with a small delay value. Node provides a moreefficient solution: process.nextTick.
■ ProblemYou want to write a method that returns an instance of EventEmitter or accepts a call-back that sometimes makes an asynchronous API call, but not in all cases.
■ SolutionUse process.nextTick to wrap the synchronous operation.
■ DiscussionThe process.nextTick method allows you to place a callback at the head of the nextcycle of the run loop. That means it’s a way of slightly delaying something, and as aresult it’s more efficient than just using setTimeout with a zero delay argument.
It can be difficult to visualize why this is useful, but consider the following exam-ple. Listing 2.21 shows a function that returns an EventEmitter. The idea is to providean event-oriented API, allowing users of the API to subscribe to events as needed, whilebeing able to run asynchronous calls internally.
var EventEmitter = require('events').EventEmitter;
function complexOperations() {
Listing 2.20 Keeping a timer alive until the program cleanly exits
Listing 2.21 Incorrectly triggering asynchronous methods with events
Tell Node to stop the interval when the program has finished the long-running operation.
www.it-ebooks.info

36 CHAPTER 2 Globals: Node’s environment
var events = new EventEmitter();
events.emit('success'); 1((callout-globals-nexttick-1))
return events;}
complexOperations().on('success', function() {console.log('success!');
});
Running this example will fail to trigger the success listener B at the end of theexample. Why is this the case? Well, the event is emitted before the listener has beensubscribed. In most cases, events would be emitted inside callbacks for some asynchro-nous operation or another, but there are times when it makes sense to emit eventsearly—perhaps in cases where arguments are validated and found to contain errors,so error can be emitted very quickly.
To correct this subtle flaw, any sections of code that emit events can be wrapped inprocess.nextTick. The following listing demonstrates this by using a function thatreturns an instance of EventEmitter, and then emits an event.
var EventEmitter = require('events').EventEmitter;
function complexOperations() {var events = new EventEmitter();
process.nextTick(function() {events.emit('success');
});
return events;}
complexOperations().on('success', function() {console.log('success!');
});
Node’s documentation recommends that APIs should always be 100% asynchronousor synchronous. That means if you have a method that accepts a callback and may callit asynchronously, then you should wrap the synchronous case in process.nextTickso users can rely on the order of execution.
Listing 2.23 uses an asynchronous call to read a file from the disk. Once it hasread the file, it’ll keep a cached version in memory. Subsequent calls will return thecached version. When returning the cached version, process.nextTick is used sothe API still behaves asynchronously. That makes the output in the terminal read inthe expected order.
Listing 2.22 Triggering events inside process.nextTick
This is an event that is triggered outside of any asynchronous callbacks.
B
The event will now be emitted when the listener is ready.
www.it-ebooks.info
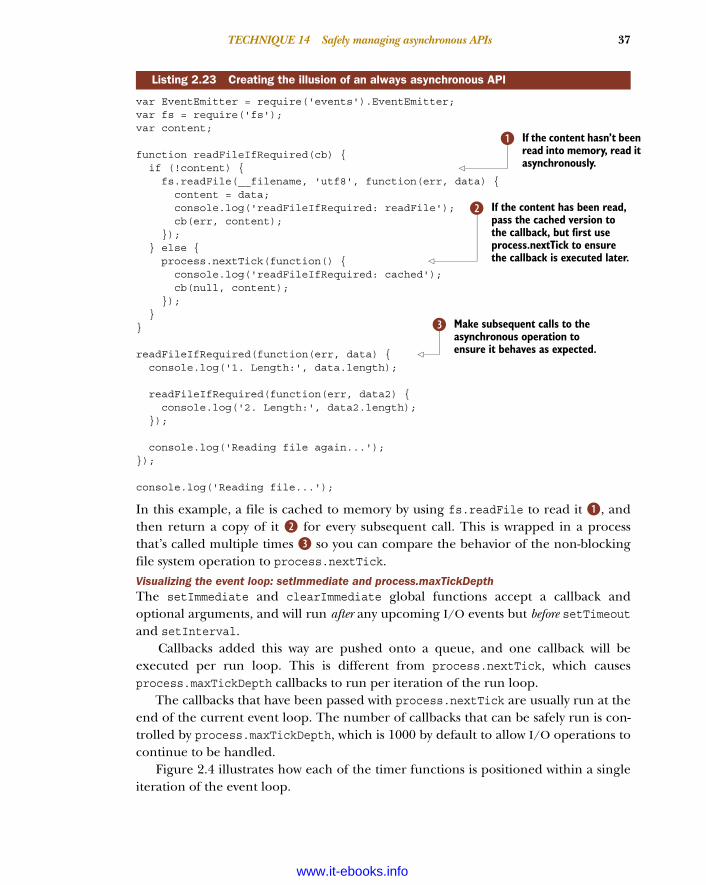
37TECHNIQUE 14 Safely managing asynchronous APIs
var EventEmitter = require('events').EventEmitter;var fs = require('fs');var content;
function readFileIfRequired(cb) {if (!content) {fs.readFile(__filename, 'utf8', function(err, data) {
content = data;console.log('readFileIfRequired: readFile');cb(err, content);
});} else {process.nextTick(function() {
console.log('readFileIfRequired: cached');cb(null, content);
});}
}
readFileIfRequired(function(err, data) {console.log('1. Length:', data.length);
readFileIfRequired(function(err, data2) {console.log('2. Length:', data2.length);
});
console.log('Reading file again...');});
console.log('Reading file...');
In this example, a file is cached to memory by using fs.readFile to read it B, andthen return a copy of it C for every subsequent call. This is wrapped in a processthat’s called multiple times D so you can compare the behavior of the non-blockingfile system operation to process.nextTick.
Visualizing the event loop: setImmediate and process.maxTickDepthThe setImmediate and clearImmediate global functions accept a callback andoptional arguments, and will run after any upcoming I/O events but before setTimeoutand setInterval.
Callbacks added this way are pushed onto a queue, and one callback will beexecuted per run loop. This is different from process.nextTick, which causesprocess.maxTickDepth callbacks to run per iteration of the run loop.
The callbacks that have been passed with process.nextTick are usually run at theend of the current event loop. The number of callbacks that can be safely run is con-trolled by process.maxTickDepth, which is 1000 by default to allow I/O operations tocontinue to be handled.
Figure 2.4 illustrates how each of the timer functions is positioned within a singleiteration of the event loop.
Listing 2.23 Creating the illusion of an always asynchronous API
If the content hasn’t been read into memory, read it asynchronously.
B
If the content has been read, pass the cached version to the callback, but first use process.nextTick to ensure the callback is executed later.
C
Make subsequent calls to the asynchronous operation to ensure it behaves as expected.
D
www.it-ebooks.info

38 CHAPTER 2 Globals: Node’s environment
When you’re creating your own classes and methods that behave asynchronously,keep behavior consistent and predictable by using process.nextTick.
Node’s implementation of the standard browser-based JavaScript timers fits in wellwith its event loop and non-blocking I/O. Although these functions are typically used fortesting asynchronous code, a deep understanding of when setTimeout, setImmediate,and process.nextTick will be executed provides mastery over the event loop.
2.5 SummaryIn this chapter you’ve seen some of the surprisingly powerful things that are built intoNode programs without going to the trouble of loading a module. The next time youwant to group related modules together, you can create an index.js file, as describedin technique 3. And if you need to read standard input, you can use the processobject’s stdin property (technique 5).
In addition to the process object, there’s also the often overlooked consoleobject, which will help you debug and maintain programs (technique 6).
In the next chapter you’ll learn about buffers. Buffers are great for working withbinary data, which has traditionally been seen as a weakness of JavaScript. Buffers alsounderpin some of Node’s powerful features such as streams.
Event loop iteration
I/O events
setInterval
setImmediate
process.nextTick
Figure 2.4 Scheduling nextTick on the event loop
www.it-ebooks.info

39
Buffers: Working with bits, bytes, and encodings
JavaScript has historically had subpar binary support. Typically, parsing binary datawould involve various tricks with strings to extract the data you want. Not having agood mechanism to work with raw memory in JavaScript was one of the problemsNode core developers had to tackle when the project started getting traction. Thiswas mostly for performance reasons. All of the raw memory accumulated in theBuffer data type.
Buffers are raw allocations of the heap, exposed to JavaScript in an array-likemanner. They’re exposed globally and therefore don’t need to be required, andcan be thought of as just another JavaScript type (like String or Number):
This chapter covers■ Introduction to the Buffer data type■ Changing data encodings■ Converting binary files to JSON■ Creating your own binary protocol
www.it-ebooks.info

40 CHAPTER 3 Buffers: Working with bits, bytes, and encodings
var buf = new Buffer(255);buf[0] = 23;
If you haven’t worked much with binary data, don’t worry; this chapter is designed tobe friendly to newcomers but also equip those who are more familiar with the con-cept. We’ll cover simple and more advanced techniques:
■ Converting a Buffer to different encodings■ Using the Buffer API to transform a binary file to JSON■ Encoding and decoding your own binary protocol
Let’s look first at changing encodings for buffers.
3.1 Changing data encodingsIf no encoding is given, file operations and many network operations will return dataas a Buffer. Take this fs.readFile as an example:
var fs = require('fs');fs.readFile('./names.txt', function (er, buf) {
Buffer.isBuffer(buf); // true});
But many times you already know a file’s encoding, and it’s more useful to get the dataas an encoded string instead. We’ll look at converting between Buffers and other for-mats in this section.
TECHNIQUE 15 Converting buffers into other formats
By default, Node’s core APIs return a buffer unless an encoding is specified. But buf-fers easily convert to other formats. In this next technique we’ll look at how to convertbuffers.
■ ProblemYou want to turn a Buffer into plain text.
■ SolutionThe Buffer API allows you to convert a Buffer into a string value.
■ DiscussionLet’s say we have a file that we know is just plain text. For our purposes we’ll call thisfile names.txt and it will include a person’s name on each line of the file:
JanetWookieAlexMarc
If we were to load the file using a method from the file system (fs) API, we’d get aBuffer (buf) by default
var fs = require('fs');fs.readFile('./names.txt', function (er, buf) {
console.log(buf);});
Allocate 255 bytes.Write integer 23 to the first byte.
isBuffer returns true if it’s a Buffer.
www.it-ebooks.info

41TECHNIQUE 16 Changing string encodings using buffers
which, when logged out, is shown as a list of octets (using hex notation):
<Buffer 4a 61 6e 65 74 0a 57 6f 6f 6b 69 65 0a 41 6c 65 78 0a4d 61 72 63 0a>
This isn’t very useful since we know that the file is plain text. The Buffer class pro-vides a method called toString to convert our data into a UTF-8 encoded string:
var fs = require('fs');fs.readFile('./names.txt', function (er, buf) {
console.log(buf.toString());});
This will yield the same output as our original file:
JanetWookieAlexMarc
But since we know that this data is only comprised of ASCII characters,1 we could alsoget a performance benefit by changing the encoding to ASCII rather than UTF-8. Todo this, we provide the type of encoding as the first argument for toString:
var fs = require('fs');fs.readFile('./names.txt', function (er, buf) {
console.log(buf.toString('ascii'));});
The Buffer API provides other encodings such as utf16le, base64, and hex, whichyou can learn more about by viewing the Buffer API online documentation.2
TECHNIQUE 16 Changing string encodings using buffers
In addition to converting buffers, you can also utilize buffers to turn one string encod-ing into another.
■ ProblemYou want to change from one string encoding to another.
■ SolutionThe Node Buffer API provides a mechanism to change encodings.
■ DiscussionExample 1: Creating a Basic authentication headerSometimes it’s helpful to build a string of data and then change its encoding. Forexample, if you wanted to request data from a server that uses Basic authentication,3
you’d need to send the username and password encoded using Base64:
Authorization: Basic am9obm55OmMtYmFk
1 See http://en.wikipedia.org/wiki/ASCII.2 See http://nodejs.org/api/buffer.html.3 See http://en.wikipedia.org/wiki/Basic_access_authentication.
toString by default will convert data into a UTF-8 encoded string.
toString accepts an encoding as the first argument.
am9obm55OmMtYmFk is encoded credentials
www.it-ebooks.info

42 CHAPTER 3 Buffers: Working with bits, bytes, and encodings
Before Base64 encoding is applied, Basic authentication credentials combine theusername and password, separating the two using a : (colon). For our example, we’lluse johnny as the username and c-bad as the password:
var user = 'johnny';var pass = 'c-bad';var authstring = user + ':' + pass;
Now we have to convert this into a Buffer in order to change it into another encod-ing. Buffers can be allocated by bytes, as we’ve seen already by simply passing in anumber (for example, new Buffer(255)). They also can be allocated by passing instring data:
var buf = new Buffer(authstring);
Now that we have our data as a Buffer, we can turn it back into a Base64-encodedstring by using toString('base64'):
var encoded = buf.toString('base64');
This process can be compacted as well, since instance methods can be called on thereturned Buffer instance right away and the new keyword can be omitted:
var encoded = Buffer(user + ':' + pass).toString('base64');
Example 2: Working with data URIsData URIs4 are another example of when using the Buffer API can be helpful. Data URIsallow a resource to be embedded inline on a web page using the following scheme:
data:[MIME-type][;charset=<encoding>[;base64],<data>
For example, this PNG image of a monkey can be represented as a data URI:
data:image/png;base64,iVBORw0KGgoAAAANSUhEUgAAACsAAAAoCAYAAABny...
And when read in the browser, the data URI will display our pri-mate as shown in figure 3.1.
Let’s look at how we can create a data URI using the Buf-fer API. In our primate example, we were using a PNG imagethat has the MIME type of image/png:
var mime = 'image/png';
4 See http://en.wikipedia.org/wiki/Data_URI_scheme.
username and password are separated using colon
String data converted to a Buffer
Specifying an encodingWhen strings are used to allocate a Buffer, they’re assumed to be UTF-8 strings,which is typically what you want. But you can specify the encoding of the incomingdata using a second, optional, encoding argument:
new Buffer('am9obm55OmMtYmFk', 'base64')
Result: am9obm55OmMtYmFk
Figure 3.1 Data URI read in a browser displays the monkey as an image
www.it-ebooks.info
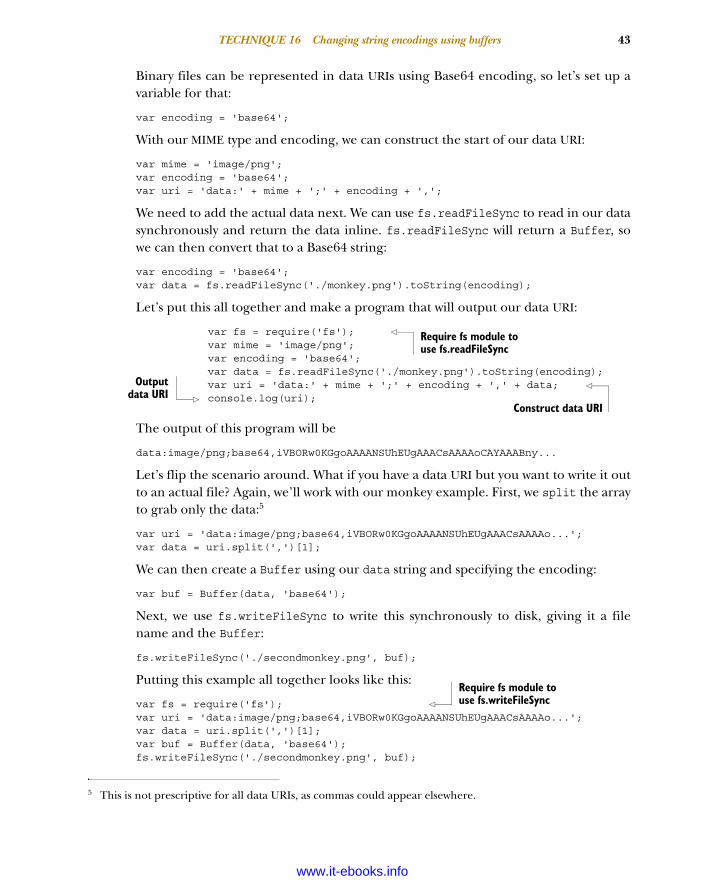
43TECHNIQUE 16 Changing string encodings using buffers
Binary files can be represented in data URIs using Base64 encoding, so let’s set up avariable for that:
var encoding = 'base64';
With our MIME type and encoding, we can construct the start of our data URI:
var mime = 'image/png';var encoding = 'base64';var uri = 'data:' + mime + ';' + encoding + ',';
We need to add the actual data next. We can use fs.readFileSync to read in our datasynchronously and return the data inline. fs.readFileSync will return a Buffer, sowe can then convert that to a Base64 string:
var encoding = 'base64';var data = fs.readFileSync('./monkey.png').toString(encoding);
Let’s put this all together and make a program that will output our data URI:
var fs = require('fs');var mime = 'image/png';var encoding = 'base64';var data = fs.readFileSync('./monkey.png').toString(encoding);var uri = 'data:' + mime + ';' + encoding + ',' + data;console.log(uri);
The output of this program will be
data:image/png;base64,iVBORw0KGgoAAAANSUhEUgAAACsAAAAoCAYAAABny...
Let’s flip the scenario around. What if you have a data URI but you want to write it outto an actual file? Again, we’ll work with our monkey example. First, we split the arrayto grab only the data:5
var uri = 'data:image/png;base64,iVBORw0KGgoAAAANSUhEUgAAACsAAAAo...';var data = uri.split(',')[1];
We can then create a Buffer using our data string and specifying the encoding:
var buf = Buffer(data, 'base64');
Next, we use fs.writeFileSync to write this synchronously to disk, giving it a filename and the Buffer:
fs.writeFileSync('./secondmonkey.png', buf);
Putting this example all together looks like this:
var fs = require('fs');var uri = 'data:image/png;base64,iVBORw0KGgoAAAANSUhEUgAAACsAAAAo...';var data = uri.split(',')[1];var buf = Buffer(data, 'base64');fs.writeFileSync('./secondmonkey.png', buf);
5 This is not prescriptive for all data URIs, as commas could appear elsewhere.
Require fs module to use fs.readFileSync
Construct data URI
Outputdata URI
Require fs module to use fs.writeFileSync
www.it-ebooks.info

44 CHAPTER 3 Buffers: Working with bits, bytes, and encodings
When opened in our default imageviewer, this gives us our monkey, as shownin figure 3.2.
Most of the time, when you deal withBuffer objects in Node, it will be to con-vert them to other formats, and some-times you’ll change encodings. But youmay find yourself having to deal with abinary file format, and the Buffer API—which we’ll look at next—provides a richset of tools to work with that as well.
3.2 Converting binary files to JSONWorking with binary data is kind of likesolving a puzzle. You’re given clues byreading a specification of what the data means and then you have to go out and turnthat data into something usable in your application.
TECHNIQUE 17 Using buffers to convert raw data
What if you could utilize a binary format to do something useful in your Node pro-gram? In this technique we’ll cover, in depth, working with binary data to convert acommon file format into JSON.
■ ProblemYou want to convert a binary file into a more usable format.
■ SolutionThe Node API extends JavaScript with a Buffer class, exposing an API for raw binarydata access and tools for dealing more easily with binary data.
■ DiscussionFor the purposes of our example, namely, file conversion, you can think of the processin terms of figure 3.3.
Binary data is read, processed, and written out in a more usable format using thebinary specification as a guide and the binary API as the mechanism for accomplishingthe transformation. This is not the only use of binary data. For example, you could doprocessing on a binary protocol to pass messages back and forth and the diagramwould look different.
For our technique, the binary file format we’ll work with is DBase 5.0 (.dbf). Thatformat may sound obscure, but (to put it into context) it was a popular databaseformat that’s still heavily in use for attribution of geospatial data. You could thinkof it as a simplified Excel spreadsheet. The sample we’ll work with is located atbuffers/world.dbf.
Figure 3.2 Generated secondmonkey.png file from a data URI
www.it-ebooks.info

45TECHNIQUE 17 Using buffers to convert raw data
The file contains geospatial information for the countries of the world. Unfortunately,if you were to open it in your text editor, it wouldn’t be very useful.
WHY ARE WE COVERING IN DEPTH A BINARY FORMAT THAT I MAY NEVER USE? Althoughwe could’ve picked a number of binary formats, DBase 5.0 is one that will teachyou a lot of different ways of approaching problems with reading binary files thatare common to many other formats. In addition, binary formats are unfamiliarto many coming from a web development background, so we’re taking sometime to focus on reading binary specifications. Please feel free to skim if you’realready familiar.
Since we want to use it in our Node application, JSON would be a good format choicebecause it can be natively parsed in JavaScript and resembles native JavaScript objects.This is illustrated in figure 3.4.
Figure 3.5 shows an example of the transformation we want to make: on the left isthe raw binary opened in a text editor, and on the right is the converted JSON format.
The headerBefore we can start tackling this problem, we’ll need to do some research to find outthe specification for the binary format we want to deal with. In our case, a number ofsimilar specifications were found online from search engine queries. For DBase 5.0,the primary specification we’ll use for this example is found at http://mng.bz/i7K4.
The raw binarydata.
The spec is the guide on howto parse the binary file.
The API has the tools toparse the binary file.
A usable format forour application.
Usableformat
010100101010010010101001
100010101010001010110100
Binary fileBinary processing(the actual code)
I/O read
Binaryspecification
I/O writeBinary API
Figure 3.3 The transformation of binary data into a more usable/programmable format
www.it-ebooks.info

46 CHAPTER 3 Buffers: Working with bits, bytes, and encodings
The raw DBase5.0 binary file.
DBase 5.0 specification gives usa guide to parse the binary file.
The Node API extends JavaScript with a Bufferclass exposing an API for raw binary data access and
tools for dealing more easily with that data.
JSON can be natively parsedin JavaScript and resembles native
JavaScript objects.
JSON
010100101010010010101001
100010101010001010110100
world.dbfBinary processing
with Node.js(the actual code)
fs.readFile
DBase 5.0specification
console.logNode
Buffer API
Figure 3.4 Binary data is read using FileSystem API into Node.js, transformed using the Buffer API into an easier-to-use JSON format.
The original world.dbfbinary file
The output JSON usingthe Node Buffer API
Figure 3.5 Final result of our transformation
www.it-ebooks.info

47TECHNIQUE 17 Using buffers to convert raw data
The first portion of the specification is called the header. Many binary formats will use aheader as a place to store metadata about the file; table 3.1 shows what the specifica-tion looks like for DBase 5.0.
Let’s take a peek at the first row.
This row tells us the byte located at position 0 contains the information specified inthe description. So how do we access the byte at position 0? Thankfully, this is reallysimple with buffers.
In Node, unless you specify a particular encoding for the data you’re reading in, you’llget back a Node Buffer, as seen in this example:
var fs = require('fs');
fs.readFile('./world.dbf', function (er, buf) {Buffer.isBuffer(buf); // true
});
fs.readFile isn’t the only way to get back a buffer but, for the sake of simplicity, we’lluse that method so we get the entire buffer back as an object after it’s read. This methodmay not be ideal for large binary files where you wouldn’t want to load the whole bufferinto memory at once. In that case, you could stream the data with fs.createRead-Stream or manually read in parts of the file at a time with fs.read. It should also benoted that buffers aren’t available only for files; they exist pretty much anywhere youcan get streams of data (for example, post data on an HTTP request).
Table 3.1 DBase 5.0 header specification
Byte Contents Description
0 1 byte Valid dBASE for Windows table file; bits 0-2 indicate version number ...
1-3 3 bytes Date of last update; in YYMMDD format
4-7 32-bit number Number of records in the table
8-9 16-bit number Number of bytes in the header
10-11 16-bit number Number of bytes in the record
... ... ...
32-n each 32 bytes Field descriptor array
n+1 1 byte 0Dh stored as the field terminator
Byte Contents Description
0 1 byte Valid dBASE for Windows table file; bits 0-2 indicate version number ...
www.it-ebooks.info

48 CHAPTER 3 Buffers: Working with bits, bytes, and encodings
If you wanted to view a string representation of a buffer, a simple buf.toString()call would suffice (this defaults to UTF-8 encoding). This is nice if you’re pulling indata that you know is just text:
var fs = require('fs');
fs.readFile('./world.dbf', function (er, buf) {console.log(buf.toString());
});
In our case, buf.toString() would be just as bad as opening up the world.dbf file in atext editor: unusable. We need to make sense of the binary data first.
NOTE From here forward, whenever you see our variable buf, it refers to aninstance of a Buffer, therefore part of the Node Buffer API.
In the table we talked about byte position 0. Buffers in Node act very similar toJavaScript arrays but the indices are byte positions in memory. So byte position 0 is buf[0].In Buffer syntax, buf[0] is synonymous with the byte, the octet, the unsigned 8-bitinteger, or positive signed 8-bit integer at position 0.
For this example, we don’t really care about storing information about this particu-lar byte. Let’s move on to the next byte definition.
Here’s something interesting: the date of the last update. But this spec doesn’t tell usanything more than that it’s 3 bytes and in YYMMDD format. All this is to say that youmay not find all you’re looking for in one spot. Subsequent web searches landed thisinformation:
Each byte contains the number as a binary. YY is added to a base of 1900 decimal todetermine the actual year. Therefore, YY has possible values from 0x00-0xFF, whichallows for a range from 1900-2155.6
That’s more helpful. Let’s look at parsing this in Node:
var header = {};
var date = new Date();date.setUTCFullYear(1900 + buf[1]);date.setUTCMonth(buf[2]);date.setUTCDate(buf[3]);header.lastUpdated = date.toUTCString();
Here we use a JavaScript Date object and set its year to 1900 plus the integer we pulledout of buf[1]. We use integers at positions 2 and 3 to set the month and date. SinceJSON doesn’t store JavaScript Date types, we’ll store it as a UTC Date string.
Byte Contents Description
1-3 3 bytes Date of last update; in YYMMDD format
6 See http://www.dbase.com/Knowledgebase/INT/db7_file_fmt.htm.
Returns a UTF-8 string by default
Result: “Sat Aug 26 1995 ...”
www.it-ebooks.info

49TECHNIQUE 17 Using buffers to convert raw data
Let’s pause to recap. “Sat Aug 26 1995...” as shown here is the result of parsing aportion of world.dbf binary data into a JavaScript string. We’ll see more examples ofthis as we continue.
This next definition gives us two clues. We know the byte starts at offset 4 and it’s a 32-bit number with the least significant byte first. Since we know the number shouldn’tbe negative, we can assume either a positive signed integer or an unsigned integer.Both are accessed the same way in the Buffer API:
header.totalRecords = buf.readUInt32LE(4);
buf.readUInt32LE will read an unsigned 32-bit integer with little-endian format fromthe offset of 4, which matches our description from earlier.
The next two definitions follow a similar pattern except they’re 16-bit integers. Fol-lowing are their definitions.
And here’s the corresponding code:
header.bytesInHeader = buf.readUInt16LE(8);header.bytesPerRecord = buf.readUInt16LE(10);
The transformation that has taken place between the specification and the code forthis header section is illustrated in figure 3.6.
The field descriptor arrayOnly one more relevant piece of information for this example remains in the headerof the world.dbf file. It’s the definitions for the fields, including type and name infor-mation, seen in the following lines.
From this we know that each field description is stored as 32 bytes of information.Since this database could have one or more fields for data, we’ll know it’s finished
Byte Contents Description
4-7 32-bit number Number of records in the table
Byte Contents Description
8-9 16-bit number Number of bytes in the header
10-11 16-bit number Number of bytes in the record
Byte Contents Description
32-n each 32 bytes Field descriptor array
n+1 1 byte 0Dh stored as the field terminator
Result: 246
Result: 385
Result: 424
www.it-ebooks.info

50 CHAPTER 3 Buffers: Working with bits, bytes, and encodings
when we hit the 1 byte field terminator (0Dh) shown in the second row. Let’s write astructure to handle this:
var fields = [];var fieldOffset = 32;var fieldTerminator = 0x0D;
while (buf[fieldOffset] != fieldTerminator) {// here is where we parse each fieldfieldOffset += 32;
}
Here we loop through the buffer 32 bytes at a time until we hit the fieldTerminator,which is represented in hexadecimal notation.
Declare an emptyobject to store the
header information.
Pull out the year,month, and date bytes
at positions 1, 2, 3to create date.
Pull out unsigned32-bit integer, little endian,
at position 4.
Pull out unsigned16-bit integer, little endian,
at position 8.
header = {"lastUpdated": "Sat Aug 26 1995 ...", "totalRecords": 246, "bytesInHeader": 385, "bytesPerRecord": 424}
Result oftransformation
Pull out unsigned16-bit integer, little endian,
at position 10.
1-3 3 bytes Date of last update; in YYMMDD format.
4-7 32-bitnumber
16-bitnumber
16-bitnumber
Number of records in the table.
The Header
var header = {};
header.totalRecords = buf.readUInt32LE(4);
header.bytesInHeader = buf.readUInt16LE(8);
var date = new Date();date.setUTCFullYear(1900 + buf[1]);date.setUTCMonth(buf[2]);date.setUTCDate(buf[3]);header.lastUpdated = date.toUTCString();
8-9 Number of bytes in the header.
10-11 Number of bytes in the header.
header.bytesPerRecord = buf.readUInt16LE(10);
Figure 3.6 The header: transformation from the specification to code using the Node Buffer API
JavaScript hex literal notation to represent 0Dh
www.it-ebooks.info
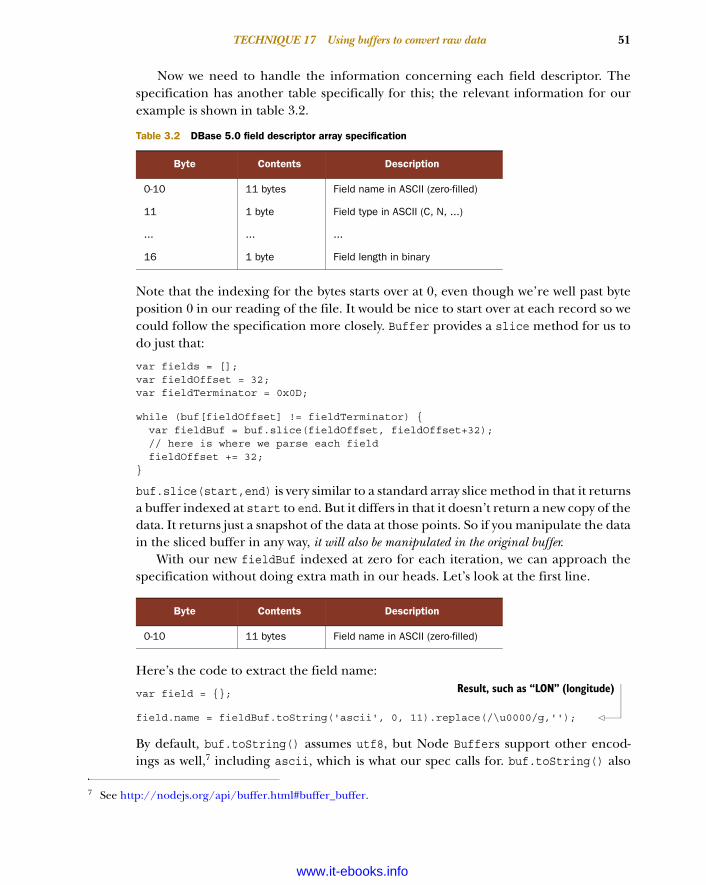
51TECHNIQUE 17 Using buffers to convert raw data
Now we need to handle the information concerning each field descriptor. Thespecification has another table specifically for this; the relevant information for ourexample is shown in table 3.2.
Note that the indexing for the bytes starts over at 0, even though we’re well past byteposition 0 in our reading of the file. It would be nice to start over at each record so wecould follow the specification more closely. Buffer provides a slice method for us todo just that:
var fields = [];var fieldOffset = 32;var fieldTerminator = 0x0D;
while (buf[fieldOffset] != fieldTerminator) {var fieldBuf = buf.slice(fieldOffset, fieldOffset+32);// here is where we parse each fieldfieldOffset += 32;
}
buf.slice(start,end) is very similar to a standard array slice method in that it returnsa buffer indexed at start to end. But it differs in that it doesn’t return a new copy of thedata. It returns just a snapshot of the data at those points. So if you manipulate the datain the sliced buffer in any way, it will also be manipulated in the original buffer.
With our new fieldBuf indexed at zero for each iteration, we can approach thespecification without doing extra math in our heads. Let’s look at the first line.
Here’s the code to extract the field name:
var field = {};
field.name = fieldBuf.toString('ascii', 0, 11).replace(/\u0000/g,'');
By default, buf.toString() assumes utf8, but Node Buffers support other encod-ings as well,7 including ascii, which is what our spec calls for. buf.toString() also
Table 3.2 DBase 5.0 field descriptor array specification
Byte Contents Description
0-10 11 bytes Field name in ASCII (zero-filled)
11 1 byte Field type in ASCII (C, N, ...)
... ... ...
16 1 byte Field length in binary
Byte Contents Description
0-10 11 bytes Field name in ASCII (zero-filled)
7 See http://nodejs.org/api/buffer.html#buffer_buffer.
Result, such as “LON” (longitude)
www.it-ebooks.info

52 CHAPTER 3 Buffers: Working with bits, bytes, and encodings
allows you to pass in the range that you want converted. We also have to replace()the zero-filled characters with empty strings if the field was shorter than 11 bytes sowe don’t end up with zero-filled characters (\u0000) in our names.
The next relevant field is a field data type.
But the characters C and N don’t really mean anything to us yet. Further down thespecification, we get definitions for these types, as shown in table 3.3.
It would be nice to convert this data to relevant types for our application. JavaScriptdoesn’t use the language character or numeric, but it does have String and Number; let’skeep that in mind when we parse the actual records. For now we can store this in a lit-tle lookup object to do the conversion later:
var FIELD_TYPES = {C: 'Character',N: 'Numeric'
}
Now that we have a lookup table, we can pull out the relevant information as we con-tinue converting the binary data:
field.type = FIELD_TYPES[fieldBuf.toString('ascii', 11, 12)];
buf.toString() will give us our one ASCII character that we then look up in the hashto get the full type name.
There’s only one other bit of information we need to parse the remaining file fromeach field description—the field size.
We write this now-familiar code:
field.length = fieldBuf[16];
The transformation that has taken place between the specification and the code forthis field descriptor array section is illustrated in figure 3.7.
Byte Contents Description
11 1 byte Field type in ASCII (C, N, ...)
Table 3.3 Field types specification
Data type Data input
C (Character) All OEM code page characters
N (Numeric) - . 0 1 2 3 4 5 6 7 8 9
Byte Contents Description
16 1 byte Field length in binary
Result: will be “Character or “Numeric”
Result, such as 435
www.it-ebooks.info

53TECHNIQUE 17 Using buffers to convert raw data
The recordsNow that we’ve parsed the header, including the field descriptors, we have one morepart to process: the actual record data. The specification tells us this:
Set up loop to grabfields, slicing to start
at position 0 each time,and stopping at
terminator.
Set up an object tostore each field.
Grab ascii charactersfrom 0 to 10, removing
any zeros.
Grab single asciicharacter type from
position 11 and look upfull type name inFIELD_TYPES.
Grab field length asinteger from position16 and push field into
fields array.
The Header32-neach
n+1
32 bytes Field descriptor array
0-10 11 bytes Field name in ASCII (zero-filled)
11 1 byte Field type in ASCII (C, N, ...)
1 byte 0Dh stored as the field terminator
var fields = [];var fieldOffset = 32;var fieldTerminator = 0x0D;var FIELD_TYPES = { 'n': 'Numeric', 'c': 'Character' };
while (buf[fieldOffset] != fieldTerminator) { var fieldBuf = buf.slice(fieldOffset, fieldOffset+32); fieldOffset += 32;}
The Field Descriptor
var field = {}
field.name = fieldBuf.toString('ascii', 0, 10) .replace(/\u0000/g,'');
16 1 byte Field length in binary
field.type = FIELD_TYPES[ fieldBuf.toString('ascii', 11, 12)];
field.length = fieldBuf[16];fields.push(field);
field = {"name": "LON", "type": "Numeric", "length": 385}
Result of singlefield transformation
Figure 3.7 The field descriptor array: transformation from the specification to code using the Node Buffer API
www.it-ebooks.info

54 CHAPTER 3 Buffers: Working with bits, bytes, and encodings
The records follow the header in the table file. Data records are preceded by one byte, thatis, a space (20h) if the record is not deleted, an asterisk (2Ah) if the record is deleted.Fields are packed into records without field separators or record terminators. The end ofthe file is marked by a single byte, with the end-of-file marker, an OEM code pagecharacter value of 26 (1Ah).
Let’s break this down for discussion:
The records follow the header in the table file.
Although we could’ve kept track of the byte position after the fieldOffset, theheader had a field for number of bytes in the header, which we stored asheader.bytesInHeader. So we know we need to start there:
var startingRecordOffset = header.bytesInHeader;
We also learned a couple other things from our parsing of the header. The first is howmany records exist in the data, which we stored as header.totalRecords. The secondis how many bytes are allocated for each record, which was stored as header.bytes-PerRecord. Knowing where to start, how many to iterate, and how much of a jump periteration helps us set up a nice for loop for handling each record:
for (var i = 0; i < header.totalRecords; i++) {var recordOffset = startingRecordOffset +
(i * header.bytesPerRecord);// here is where we parse each record
}
Now, at the beginning of each iteration, we know the byte position we want to start atis stored as recordOffset. Let’s continue reading the specification:
Data records are preceded by one byte, that is, a space (20h) if the record is not deleted,an asterisk (2Ah) if the record is deleted.
Next we have to check that first byte to see if the record was deleted:
var record = {};record._isDel = buf.readUInt8(recordOffset) == 0x2A;recordOffset++;
Similar to when we tested for the fieldTerminator in our header file, here we test tosee if the integer matches 0x2A or the ASCII “asterisk” character. Let’s continue reading:
Fields are packed into records without field separators or record terminators.
Lastly, we can pull in the actual record data. This pulls in the information we learnedfrom parsing the field descriptor array. We stored a field.type, field.name, andfield.length (in bytes) for each field. We want to store the name as a key in therecord where the value is the data for that length of bytes converted to the correcttype. Let’s look at it in simple pseudo code:
record[name] = cast type for (characters from length)e.g.record['pop2005'] = Number("13119679")
Note: We could’ve also used buf[recordOffset]
www.it-ebooks.info
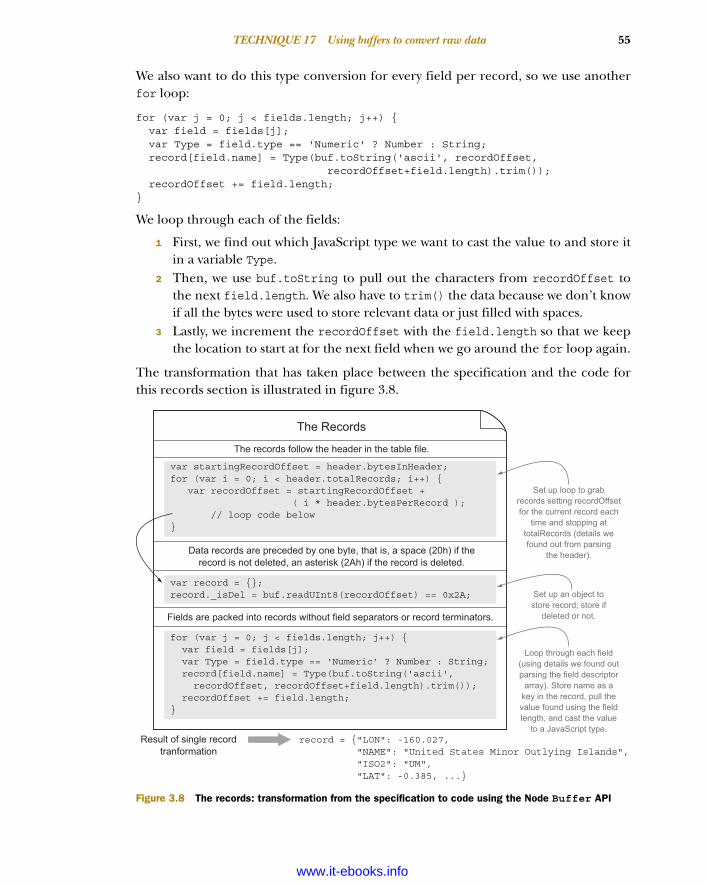
55TECHNIQUE 17 Using buffers to convert raw data
We also want to do this type conversion for every field per record, so we use anotherfor loop:
for (var j = 0; j < fields.length; j++) {var field = fields[j];var Type = field.type == 'Numeric' ? Number : String;record[field.name] = Type(buf.toString('ascii', recordOffset,
recordOffset+field.length).trim());recordOffset += field.length;
}
We loop through each of the fields:
1 First, we find out which JavaScript type we want to cast the value to and store itin a variable Type.
2 Then, we use buf.toString to pull out the characters from recordOffset tothe next field.length. We also have to trim() the data because we don’t knowif all the bytes were used to store relevant data or just filled with spaces.
3 Lastly, we increment the recordOffset with the field.length so that we keepthe location to start at for the next field when we go around the for loop again.
The transformation that has taken place between the specification and the code forthis records section is illustrated in figure 3.8.
Set up loop to grabrecords setting recordOffsetfor the current record each
time and stopping attotalRecords (details wefound out from parsing
the header).
Set up an object tostore record; store if
deleted or not.
Loop through each field(using details we found outparsing the field descriptor
array). Store name as akey in the record, pull thevalue found using the fieldlength, and cast the value
to a JavaScript type.record = {"LON": -160.027, "NAME": "United States Minor Outlying Islands", "ISO2": "UM", "LAT": -0.385, ...}
Result of single recordtranformation
The records follow the header in the table file.
Data records are preceded by one byte, that is, a space (20h) if therecord is not deleted, an asterisk (2Ah) if the record is deleted.
Fields are packed into records without field separators or record terminators.
The Records
var startingRecordOffset = header.bytesInHeader;for (var i = 0; i < header.totalRecords; i++) { var recordOffset = startingRecordOffset + ( i * header.bytesPerRecord ); // loop code below}
for (var j = 0; j < fields.length; j++) { var field = fields[j]; var Type = field.type == ‘Numeric’ ? Number : String; record[field.name] = Type(buf.toString('ascii', recordOffset, recordOffset+field.length).trim()); recordOffset += field.length;}
var record = {};record._isDel = buf.readUInt8(recordOffset) == 0x2A;
Figure 3.8 The records: transformation from the specification to code using the Node Buffer API
www.it-ebooks.info

56 CHAPTER 3 Buffers: Working with bits, bytes, and encodings
Still with me? I hope so. The complete code sample is shown in figure 3.9.
var fs = require('fs');
fs.readFile('./world.dbf', function (err, buf) { var header = {};
var date = new Date(); date.setFullYear(1900 + buf[1]); date.setMonth(buf[2]); date.setDate(buf[3]); header.lastUpdated = date.toString();
header.totalRecords = buf.readUInt32LE(4); header.bytesInHeader = buf.readUInt16LE(8); header.bytesPerRecord = buf.readUInt16LE(10);
var fields = []; var fieldOffset = 32; var fieldTerminator = 0x0D;
var FIELD_TYPES = { C: 'Character', N: 'Numeric' };
while (buf[fieldOffset] != fieldTerminator) { var fieldBuf = buf.slice(fieldOffset, fieldOffset+32); var field = {}; field.name = fieldBuf.toString('ascii', 0, 11).replace(/\u0000/g,''); field.type = FIELD_TYPES[fieldBuf.toString('ascii', 11, 12)]; field.length = fieldBuf[16];
fields.push(field); fieldOffset += 32; }
var startingRecordOffset = header.bytesInHeader; var records = [];
for (var i = 0; i < header.totalRecords; i++) { var recordOffset = startingRecordOffset + (i * header.bytesPerRecord); var record = {};
record._isDel = buf.readUInt8(recordOffset) == 0x2A; recordOffset++;
for (var j = 0; j < fields.length; j++) { field = fields[j]; var Type = field.type === 'Numeric' ? Number : String; record[field.name] = Type(buf.toString('utf8',recordOffset, recordOffset+field.length).trim()); recordOffset += field.length; }
records.push(record); }
console.log({ header: header, fields: fields, records: records });})
Reading in world.dbfand receiving a
buffer object
The Header(metadata onhow to read
the file)
The FieldDescriptor Array
(part of theheader that
deals with fieldmetadata)
The Records(read frominformation
learned fromparsing
metadata)
Writing out JSONdata to console
(STDOUT)
Figure 3.9 The full set of code for parsing a DBF file into JSON
www.it-ebooks.info

57TECHNIQUE 17 Using buffers to convert raw data
Using the Node Buffer API, we were able to turn a binary file into a usable JSON for-mat. The output of running this application is shown next:
{ header:{ lastUpdated: 'Sat Aug 26 1995 21:55:03 GMT-0500 (CDT)',totalRecords: 246,bytesInHeader: 385,bytesPerRecord: 424 },
fields:[ { name: 'LON', type: 'Numeric', length: 24 },{ name: 'NAME', type: 'Character', length: 80 },{ name: 'ISO2', type: 'Character', length: 80 },{ name: 'UN', type: 'Numeric', length: 11 },{ name: 'ISO3', type: 'Character', length: 80 },{ name: 'AREA', type: 'Numeric', length: 11 },{ name: 'LAT', type: 'Numeric', length: 24 },{ name: 'SUBREGION', type: 'Numeric', length: 11 },{ name: 'REGION', type: 'Numeric', length: 11 },{ name: 'POP2005', type: 'Numeric', length: 11 },{ name: 'FIPS', type: 'Character', length: 80 } ],
records:[ { _isDel: false,
LON: -160.027,NAME: 'United States Minor Outlying Islands',ISO2: 'UM',UN: 581,ISO3: 'UMI',AREA: 0,LAT: -0.385,SUBREGION: 0,REGION: 0,POP2005: 0,FIPS: '' },
{ _isDel: false,LON: 35.278,NAME: 'Palestine',ISO2: 'PS',UN: 275,ISO3: 'PSE',AREA: 0,LAT: 32.037,SUBREGION: 145,REGION: 142,POP2005: 3762005,FIPS: '' },...
}
And almost magically a binary file that wasn’t human-readable is turned into, not onlya readable format, but also a usable data format to work with and do more transforma-tions with. Of course, it isn’t magic, but rather investing the time to learn a binary for-mat and using the tools available to do a conversion. The Buffer API provides goodtools to do this.
www.it-ebooks.info

58 CHAPTER 3 Buffers: Working with bits, bytes, and encodings
Binary file formats can be a lot of fun to crack. Another fun but practical use for Buf-fers is working binary protocols, which we’ll tackle next.
3.3 Creating your own binary protocolIt feels like you’ve cracked a code when you read a binary file and make sense out of it.It can be just as fun to write your own puzzles and decode them. Of course, this isn’tjust for fun. Using a well-defined binary protocol can be a compact and efficient wayto transfer data.
TECHNIQUE 18 Creating your own network protocol
In this technique we’ll cover some additional aspects of working with binary data, likebit masks and protocol design. We’ll also look into compressing binary data.
■ ProblemYou want create an efficient transport of messages across the network or in process.
■ SolutionJavaScript and the Node Buffer API give you tools to create your own binary protocol.
■ DiscussionTo create a binary protocol, you first have to define what kind of information you wantto send across the wire and how you’ll represent that information. Like you learned inthe last technique, a specification provides a good roadmap for this.
For this technique, we’ll develop a simple and compact database protocol. Ourprotocol will involve
■ Using a bitmask to determine which database(s) to store the message in■ Writing data to a particular key that will be an unsigned integer between 0-255
(one byte)■ Storing a message that is compressed data of any length using zlib
Table 3.4 shows how we could write the specification.
Using fs methodsWe could’ve also chosen to write the resulting code out to a file using fs.writeFileand friends.a Just like most APIs in Node can read in a buffer object, most also canwrite out a buffer object. In our case we didn’t end up with a buffer but rather a JSONobject, so we could’ve used JSON.stringify in conjunction with fs.writeFile towrite that data out:
fs.writeFile('world.json', JSON.stringify(result), ...a
a.See http://nodejs.org/api/fs.html.
www.it-ebooks.info

59TECHNIQUE 18 Creating your own network protocol
Playing with bits to select databasesOur protocol states that the first byte will be used to represent which databases shouldrecord the information transferred. On the receiving end, our main database will be asimple multidimensional array that will hold spots for eight databases (since there areeight bits in a byte). This can be simply represented using array literals in JavaScript:
var database = [ [], [], [], [], [], [], [], [] ];
Whatever bits are turned on will indicate which database or databases will store themessage received. For example, the number 8 is represented as 00001000 in binary. Inthis case we’d store the information in database 4, since the fourth bit is on (bits areread from right to left).
ZERO-INDEXED ARRAYS Arrays are zero-indexed in JavaScript, so database 4 isin array position 3, but to avoid complicating things, we’re intentionally call-ing our databases 1 through 8 instead of 0 through 7 to match our languagemore closely when talking about bits in a byte.
If you’re ever curious about a number’s binary representation in JavaScript, you canuse the built-in toString method, giving it a base 2 as the first argument:
8..toString(2) // '1000'
Numbers can have more than one bit turned on as well; for example, 20 is 00010100in binary, and for our application that would mean we wanted to store the message indatabases 3 and 5.
So how do we test to see which bits are turned on for any given number? To solvethis, we can use a bitmask. A bitmask represents the bit pattern we’re interested in test-ing. For example, if we were interested in finding out whether we should store somedata in database 5, we could create a bitmask that has the fifth bit turned on. In binary,this would look like 00010000, which is the number 32 (or 0x20 in hex notation).
We then have to test our bitmask against a value, and JavaScript includes variousbitwise operators8 to do this. One is the & (bitwise AND) operator. The & operator
Table 3.4 Simple key-value database protocol
Byte Contents Description
0 1 byte Determines which database(s) to write the data to based on which bits are toggled on. Each bit position represents a database from 1–8.
1 1 byte An unsigned integer of one byte (0–255) used as the database key to store the data in.
2-n 0-n bytes The data to store, which can be any amount of bytes that have been compressed using deflate (zlib).
8 See https://developer.mozilla.org/en-US/docs/JavaScript/Reference/Operators/Bitwise_Operators.
Two dots (..) are needed to call a method on a number, since the first is parsed as a decimal point.
www.it-ebooks.info

60 CHAPTER 3 Buffers: Working with bits, bytes, and encodings
behaves similarly to the && operator, but instead of testing for two conditions to betrue, it tests for two bits to be on (have ones and not zeros) and keeps the bits on (orone) where that’s the case:
000101000& 000100000-----------
000100000
Bit position 5 was on for both values, so it remains when using &. Armed with thisknowledge, we can see that a value compared with the bitmask will be the bitmask if ithas the same bit or bits turned on. With this information, we can set up a simple con-ditional to test:
if ( (value & bitmask) === bitmask) { .. }
It’s important that the & expression be surrounded by parentheses; otherwise, theequality of the bitmasks would be checked first because of operator precedence.9
To test the first byte received in our binary protocol, we’ll want to set up a list ofbitmasks that correspond with the indexes of our databases. If the bitmask matches,we know the database at that index will need the data written to it. The “on” bits forevery position are an array
var bitmasks = [ 1, 2, 4, 8, 16, 32, 64, 128 ]
which corresponds to this:
1 2 4 8 16 32 64 128-----------------------------------------------------------------------00000001 00000010 00000100 00001000 00010000 00100000 01000000 10000000
Now we know that if a byte matches 1 in our bitmasks array, it will match database 1 orarray position 0. We can set up a simple loop to test each bitmask against the value ofthe first byte:
var database = [ [], [], [], [], [], [], [], [] ];var bitmasks = [ 1, 2, 4, 8, 16, 32, 64, 128 ];
function store (buf) {var db = buf[0];bitmasks.forEach(function (bitmask, index) {if ( (db & bitmask) === bitmask) {
// found a match for database[index]}
});}
Working with bits can be tricky at first, but once you understand more about how theywork, they become more manageable. So far all of what we’ve covered is available notonly in Node, but in browser JavaScript too. We’ve made it far enough to determine
9 See https://developer.mozilla.org/en-US/docs/JavaScript/Reference/Operators/Operator_Precedence.
Grabbing the byte from position 0
www.it-ebooks.info

61TECHNIQUE 18 Creating your own network protocol
which database we should put our incoming data in; we still have to find out which keyto store the data in.
Looking up the key to store the dataThis is the easiest part of our example, because you’ve already learned this from theprevious technique. Before we begin, let’s look at the relevant part of the specificationdefined earlier in table 3.4.
We know we’ll be receiving at byte position 1 an unsigned integer of one byte (0-255)that will be used as a database key to store the data in. We purposely set up the data-base to be a multidimensional array where the first dimension is the databases. Nowwe can use the second dimension as a place to store the keys and values, and since thekeys are numbers, an array will work.10 Let’s illustrate to make this more concrete.Here’s what storing the value 'foo' inside the first and third databases at key 0 wouldlook like:
[['foo'],[],['foo'],[],[],[],[],[]
]
To get the key value out of position 1, we can use the hopefully now familiarreadUInt8 method:
var key = buf.readUInt8(1);
Let’s add that to our previous main code sample we’re building:
var database = [ [], [], [], [], [], [], [], [] ];var bitmasks = [ 1, 2, 4, 8, 16, 32, 64, 128 ];
function store (buf) {var db = buf[0];var key = buf.readUInt8(1);
bitmasks.forEach(function (bitmask, index) {if ( (db & bitmask) === bitmask) {
Byte Contents Description
1 1 byte An unsigned integer of one byte (0–255) used as the database key to store the data in.
10 Although there are more-ideal alternatives coming in ECMAScript 6.
Note that buf[1] does the same thing
www.it-ebooks.info

62 CHAPTER 3 Buffers: Working with bits, bytes, and encodings
database[index][key] = 'some data';}
});}
Now that we’re able to parse the database(s) and the keys within those database(s), wecan get to parsing the actual data to store.
Inflating data with zlibIt’s a smart idea to compress string/ASCII/UTF-8 data when sending it across the wire,as compression can really cut down on bandwidth usage. In our simple database pro-tocol, we assume that the data we get to store has been compressed; let’s look at thespecification to see the relevant description.
Node includes a built-in zlib module that exposes deflate (compress) andinflate (uncompress) methods. It also includes gzip compression. To avoid gettingmalformed messages, we can check that the received message was indeed properlycompressed, and if not, we’ll refuse to inflate it. Typically, the first byte of zlib“deflated” data is 0x78,11 so we can test for that accordingly:
if (buf[2] === 0x78) { .. }
Now that we know that we’re most likely dealing with deflated data, we can inflate itusing zlib.inflate. We’ll also need to use buf.slice() to get just the data portionof our message (since leaving the first two bytes would cause an error):
var zlib = require('zlib');...if (buf[2] === 0x78) {
zlib.inflate(buf.slice(2), function (er, inflatedBuf) {if (er) return console.error(er);
var data = inflatedBuf.toString();})
}
We have everything we need to store some data in our database using our simple data-base protocol. Let’s put all the components together:
var zlib = require('zlib');var database = [ [], [], [], [], [], [], [], [] ];var bitmasks = [ 1, 2, 4, 8, 16, 32, 64, 128 ];
function store (buf) {var db = buf[0];var key = buf.readUInt8(1);
if (buf[2] === 0x78) {zlib.inflate(buf.slice(2), function (er, inflatedBuf) {
if (er) return console.error(er);
11 A more robust implementation should do more checks; see http://tools.ietf.org/html/rfc6713.
‘some data’ is a placeholder for now.
Remember, we start at byte position 2 because the previous were the key (1) and the database byte (0) we covered earlier.
Even though we checked, something else could have failed; if so, we log it out and don’t continue.
zlib.inflatereturns abuffer, so
we convertit into a
UTF-8 stringto store.
www.it-ebooks.info

63Summary
var data = inflatedBuf.toString();
bitmasks.forEach(function (bitmask, index) {if ( (db & bitmask) === bitmask) {
database[index][key] = data;}
});});
}}
Now we have the code in place to store some data. We could generate a message byusing the following:
var zlib = require('zlib');var header = new Buffer(2);
header[0] = 8;header[1] = 0;
zlib.deflate('my message', function (er, deflateBuf) {if (er) return console.error(er);var message = Buffer.concat([header, deflateBuf]);store(message);
})
We could write an example that sends messages over TCP and do more error han-dling. But let’s leave that as an exercise for you to tackle as you learn about network-ing in Node in a later chapter.
3.4 SummaryIn this chapter you learned about buffers and how to turn buffers into differentencoded strings using the toString method. We dove into the complicated task ofturning a binary file into something more usable using the Buffer API. Lastly, we hadsome fun creating our own protocol and learning about bitmasks and compression.
We covered some common uses of buffers in Node, varying in difficulty to hope-fully make you more comfortable using them and making the most of them. Go forthand tackle a binary format conversion and publish your work on NPM, or maybe a pro-tocol that better fits your business needs is waiting to be written.
In the next chapter we’ll look at another core part of Node—events.
The actual data is stored in the key of every database that matched.
Store in database 4 (8 = 00001000)Store in
key 0
Deflate the data ‘my message’
Concat headerand data intoone message
Store message
www.it-ebooks.info

64
Events: Mastering EventEmitter and beyond
Node’s events module currently includes just a single class: EventEmitter. Thisclass is used throughout both Node’s built-in modules and third-party modules. Itcontributes to the overall architecture of many Node programs. Therefore it’simportant to understand EventEmitter and how to use it.
It’s a simple class, and if you’re familiar with DOM or jQuery events, then youshouldn’t have much trouble understanding it. The major consideration whenusing Node is in error handling, and we’ll look at this in technique 21.
EventEmitter can be used in various ways—it’s generally used as a base class forsolving a wide range of problems, from building network servers to architecting
This chapter covers■ Using Node’s EventEmitter module■ Managing errors■ How third-party modules use EventEmitter■ How to use domains with events■ Alternatives to EventEmitter
www.it-ebooks.info

65TECHNIQUE 19 Inheriting from EventEmitter
application logic. In view of the fact that it’s used as the basis for key classes in popularNode modules like Express, learning how it works can be useful for writing idiomaticcode that plays well alongside existing modules.
In this chapter you’ll learn how to use EventEmitter to make custom classes, andhow it’s used within Node and open source modules. You’ll also learn how to solveproblems found when using EventEmitter, and see some alternatives to it.
4.1 Basic usageTo use EventEmitter, the base class must be inherited from. This section includestechniques for inheriting from EventEmitter and mixing it into other classes thatalready inherit from another base class.
TECHNIQUE 19 Inheriting from EventEmitter
This technique demonstrates how to create custom classes based on EventEmitter. Byunderstanding the principles in this technique, you’ll learn how to use EventEmitter,and how to better use modules that are built with it.
■ ProblemYou want to use an event-based approach to solve a problem. You have a class thatyou’d like to operate when asynchronous events occur.
Web, desktop, and mobile user interfaces have one thing in common: they’reevent-based. Events are a great paradigm for dealing with something inherently asyn-chronous: the input from human beings. To show how EventEmitter works, we’ll usea music player as an example. It won’t really play music, but the underlying concept isa great way to learn how to use events.
■ SolutionThe canonical example of using events in Node is inheriting from EventEmitter. Thiscan be done by using a simple prototype class—just remember to call EventEmitter’sconstructor from within your new constructor.
The first listing shows how to inherit from EventEmitter.
var util = require('util');var events = require('events');
function MusicPlayer() {events.EventEmitter.call(this);
}
util.inherits(MusicPlayer, events.EventEmitter);
■ DiscussionThe combination of a simple constructor function and util.inherits is the easiestand most common way to create customized event-based classes. The next listingextends the previous listing to show how to emit and bind listeners using on.
Listing 4.1 Inheriting from EventEmitter
Using util.inherits is the idiomatic Node way to inherit from prototype classes.
www.it-ebooks.info

66 CHAPTER 4 Events: Mastering EventEmitter and beyond
var util = require('util');var events = require('events');var AudioDevice = {
play: function(track) {// Stub: Trigger playback through iTunes, mpg123, etc.
},
stop: function() {}
};
function MusicPlayer() {this.playing = false;events.EventEmitter.call(this);
}
util.inherits(MusicPlayer, events.EventEmitter);
var musicPlayer = new MusicPlayer();
musicPlayer.on('play', function(track) {this.playing = true;AudioDevice.play(track);
});
musicPlayer.on('stop', function() {this.playing = false;AudioDevice.stop();
});
musicPlayer.emit('play', 'The Roots - The Fire');
setTimeout(function() {musicPlayer.emit('stop');
}, 1000);
This might not seem like much, but suppose we need to do something else when playis triggered—perhaps the user interface needs to be updated. This can be supportedsimply by adding another listener to the play event. The following listing shows howto add more listeners.
var util = require('util');var events = require('events');
function MusicPlayer() {this.playing = false;events.EventEmitter.call(this);
}
util.inherits(MusicPlayer, events.EventEmitter);
Listing 4.2 Inheriting from EventEmitter
Listing 4.3 Adding multiple listeners
The class’s state can be configured, and then EventEmitter’s constructor can be called as required.
The inherits method copies the methods from one prototype into another—this is the general pattern for creating classes based on EventEmitter.
The emit method is used to trigger events.
www.it-ebooks.info

67TECHNIQUE 19 Inheriting from EventEmitter
var musicPlayer = new MusicPlayer();
musicPlayer.on('play', function(track) {this.playing = true;
});
musicPlayer.on('stop', function() {this.playing = false;
});
musicPlayer.on('play', function(track) {console.log('Track now playing:', track);
});
musicPlayer.emit('play', 'The Roots - The Fire');
setTimeout(function() {musicPlayer.emit('stop');
}, 1000);
Listeners can be removed as well. emitter.removeListener removes a listener for aspecific event, whereas emitter.removeAllListeners removes all of them. You’llneed to store the listener in a variable to be able to reference it when removing a spe-cific listener, which is similar to removing timers with clearTimeout. The next listingshows this in action.
function play(track) {this.playing = true;
}
musicPlayer.on('play', play);
musicPlayer.removeListener('play', play);
util.inherits works by wrapping around the ES5 method Object.create, whichinherits the properties from one prototype into another. Node’s implementation alsosets the superconstructor in the super_ property. This makes accessing the originalconstructor a lot easier—after using util.inherits, your prototype class will haveaccess to EventEmitter through YourClass.super_.
You can also respond to an event once, rather than every time it fires. To do that,attach a listener with the once method. This is useful where an event can be emittedmultiple times, but you only care about it happening a single time. For example, youcould update listing 4.3 to track if the play event has ever been triggered:
musicPlayer.once('play', {this.audioFirstStarted = new Date();
});
Listing 4.4 Removing listeners
New listeners can be added as needed.
A reference to the listener is required to be able to remove it.
www.it-ebooks.info

68 CHAPTER 4 Events: Mastering EventEmitter and beyond
When inheriting from EventEmitter, it’s a good idea to use events.EventEmitter.call(this) in your constructor to run EventEmitter’s constructor. The reason forthis is because it’ll attach the instance to a domain if domains are being used. To learnmore about domains, see technique 22.
The methods we’ve covered here—on, emit, and removeListener—are fundamen-tal to Node development. Once you’ve mastered EventEmitter, you’ll find it croppingup everywhere: in Node’s built-in modules and beyond. Creating TCP/IP servers withnet.createServer will return a server based on EventEmitter, and even the processglobal object is an instance of EventEmitter. In addition, popular modules likeExpress are based around EventEmitter—you can actually create an Express appobject and call app.emit to send messages around an Express project.
TECHNIQUE 20 Mixing in EventEmitter
Sometimes inheritance isn’t the right way to use EventEmitter. In these cases, mixingin EventEmitter may work.
■ ProblemThis is an alternative option to technique 19. Rather than using EventEmitter as abase class, it’s possible to copy its methods into another class. This is useful when youhave an existing class and can’t easily rework it to inherit directly from EventEmitter.
■ SolutionUsing a for-in loop is sufficient for copying the properties from one prototype toanother. In this way you can copy the necessary properties from EventEmitter.
■ DiscussionThis example might seem a little contrived, but sometimes it really is useful to copyEventEmitter’s properties rather than inherit from it in the usual way. This approachis more akin to a mixin, or multiple inheritance; see this demonstrated in the follow-ing listing.
var EventEmitter = require('events').EventEmitter;
function MusicPlayer(track) {this.track = track;this.playing = false;
for (var methodName in EventEmitter.prototype) {this[methodName] = EventEmitter.prototype[methodName];
}}
MusicPlayer.prototype = {toString: function() {if (this.playing) {
return 'Now playing: ' + this.track;} else {
return 'Stopped';
Listing 4.5 Mixing in EventEmitter
This is the for-in loop that copies the relevant properties.
www.it-ebooks.info

69TECHNIQUE 21 Managing errors
}}
};
var musicPlayer = new MusicPlayer('Girl Talk - Still Here');
musicPlayer.on('play', function() {this.playing = true;console.log(this.toString());
});
musicPlayer.emit('play');
One example of multiple inheritance in the wild is the Connect framework.1 Thecore Server class inherits from multiple sources, and in this case the Connectauthors have decided to make their own property copying method, shown in the nextlisting.
exports.merge = function(a, b){if (a && b) {for (var key in b) {
a[key] = b[key];}
}return a;
};
This technique may be useful when you already have a well-established class that couldbenefit from events, but can’t easily be a direct descendant of EventEmitter.
Once you’ve inherited from EventEmitter you’ll need to handle errors. The nextsection explores techniques for handling errors generated by EventEmitter classes.
4.2 Error handlingAlthough most events are treated equally, error events are a special case and aretherefore treated differently. This section looks at two ways of handling errors: oneattaches a listener to the error event, and the other uses domains to collect errorsfrom groups of EventEmitter instances.
TECHNIQUE 21 Managing errors
Error handling with EventEmitter has its own special rules that must be adhered to.This technique explains how error handling works.
■ ProblemYou’re using an EventEmitter and want to gracefully handle when errors occur, but itkeeps raising exceptions.
1 See http://www.senchalabs.org/connect/.
Listing 4.6 utils.merge from Connect
www.it-ebooks.info

70 CHAPTER 4 Events: Mastering EventEmitter and beyond
■ SolutionTo prevent EventEmitter from throwing exceptions whenever an error event is emit-ted, add a listener to the error event. This can be done with custom classes or anystandard class that inherits from EventEmitter.
■ DiscussionTo handle errors, bind a listener to the error event. The following listing demon-strates this by building on the music player example.
var util = require('util');var events = require('events');
function MusicPlayer() {events.EventEmitter.call(this);
}
util.inherits(MusicPlayer, events.EventEmitter);
var musicPlayer = new MusicPlayer();
musicPlayer.on('play', function(track) {this.emit('error', 'unable to play!');
});
musicPlayer.on('error', function(err) {console.error('Error:', err);
});
setTimeout(function() {musicPlayer.emit('play', 'Little Comets - Jennifer');
}, 1000);
This example is perhaps simple, but it’s useful because it should help you realize howEventEmitter handles errors. It feels like a special case, and that’s because it is. Thefollowing excerpt is from the Node documentation:
When an EventEmitter instance experiences an error, the typical action is to emit anerror event. Error events are treated as a special case in Node. If there is no listener forit, then the default action is to print a stack trace and exit the program.
You can try this out by removing the 'error' handler from listing 4.7. A stack traceshould be displayed in the console.
This makes sense semantically—otherwise the absence of an error handler wouldlead to potentially dangerous activity going unnoticed. The event name, or type as it’sreferred to internally, has to appear exactly as error—extra spaces, punctuation, oruppercase letters won’t be considered an error event.
This convention means there’s a great deal of consistency across event-based error-handling code. It might be a special case, but it’s one worth paying attention to.
Listing 4.7 Event-based errors
Listening for an error event
www.it-ebooks.info

71TECHNIQUE 22 Managing errors with domains
TECHNIQUE 22 Managing errors with domains
Dealing with errors from multiple instances of EventEmitter can feel like hard work... unless domains are used!
■ ProblemYou’re dealing with multiple non-blocking APIs, but are struggling to effectively han-dle errors.
■ SolutionNode’s domain module can be used to centralize error handling for a set of asynchro-nous operations, and this includes EventEmitter instances that emit unhandlederror events.
■ DiscussionNode’s domain API provides a way of wrapping existing non-blocking APIs and excep-tions with error handlers. This helps centralize error handling, and is particularly use-ful in cases where multiple interdependent I/O operations are being used.
Listing 4.8 builds on the music player example by using two EventEmitter descen-dants to show how a single error handler can be used to handle errors for separateobjects.
var util = require('util');var domain = require('domain');var events = require('events');var audioDomain = domain.create();
function AudioDevice() {events.EventEmitter.call(this);this.on('play', this.play.bind(this));
}
util.inherits(AudioDevice, events.EventEmitter);
AudioDevice.prototype.play = function() {this.emit('error', 'not implemented yet');
};
function MusicPlayer() {events.EventEmitter.call(this);
this.audioDevice = new AudioDevice();this.on('play', this.play.bind(this));
this.emit('error', 'No audio tracks are available');}
util.inherits(MusicPlayer, events.EventEmitter);
Listing 4.8 Managing errors with domain
The Domain module must be loaded, and then a suitable instance created with the create method.
This error and any other errors will be caught by the same error handler.
www.it-ebooks.info

72 CHAPTER 4 Events: Mastering EventEmitter and beyond
MusicPlayer.prototype.play = function() {this.audioDevice.emit('play');console.log('Now playing');
};
audioDomain.on('error', function(err) {console.log('audioDomain error:', err);
});
audioDomain.run(function() {var musicPlayer = new MusicPlayer();musicPlayer.play();
});
Domains can be used with EventEmitter descendants, networking code, and also theasynchronous file system methods.
To visualize how domains work, imagine that the domain.run callback wrapsaround your code, even when the code inside the callback triggers events that occuroutside of it. Any errors that are thrown will still be caught by the domain. Figure 4.1illustrates this process.
Without a domain, any errors raised using throw could potentially place the inter-preter in an unknown state. Domains avoid this and help you handle errors moregracefully.
Now that you know how to inherit from EventEmitter and handle errors, youshould be starting to see all kinds of useful ways that it can be used. The next sectionbroadens these techniques by introducing some advanced usage patterns and higher-level solutions to program structure issues relating to events.
Any code that raises errors inside this callback will be covered by the domain.
Domain eventlistener: 'error'
fs.open callback
if error?
throw error
domain.run callback
Figure 4.1 Domains help catch errors and handle them with an EventEmitter-style API.
www.it-ebooks.info

73TECHNIQUE 23 Reflection
4.3 Advanced patternsThis section offers some best practice techniques for solving structural issues foundwhen using EventEmitter.
TECHNIQUE 23 Reflection
Sometimes you need to dynamically respond to changes to an instance of anEventEmitter, or query its listeners. This technique explains how to do this.
■ ProblemYou need to either catch when a listener has been added to an emitter, or query theexisting listeners.
■ SolutionTo track when listeners are added, EventEmitter emits a special event called new-Listener. Listeners added to this event will receive the event name and the listenerfunction.
■ DiscussionIn some ways, the difference between writing good Node code and great Node codecomes down to a deep understanding of EventEmitter. Being able to correctly reflecton EventEmitter objects gives rise to a whole range of opportunities for creatingmore flexible and intuitive APIs. One dynamic way of doing this is through the new-Listener event, emitted when listeners are added using the on method. Interestingly,this event is emitted by using EventEmitter itself—it’s implemented by using emit.
The next listing shows how to track newListener events.
var util = require('util');var events = require('events');
function EventTracker() {events.EventEmitter.call(this);
}
util.inherits(EventTracker, events.EventEmitter);
var eventTracker = new EventTracker();
eventTracker.on('newListener', function(name, listener) {console.log('Event name added:', name);
});
eventTracker.on('a listener', function() {// This will cause 'newListener' to fire
});
Even though 'a listener' is never explicitly emitted in this example, the newLis-tener event will still fire. Since the listener’s callback function is passed as well as theevent name, this is a great way to create simplified public APIs for things that require
Listing 4.9 Keeping tabs on new listeners
Track whenever new listeners are added.
www.it-ebooks.info

74 CHAPTER 4 Events: Mastering EventEmitter and beyond
access to the original listener function. Listing 4.10 demonstrates this concept by auto-matically starting a timer when listeners for pulse events are added.
var util = require('util');var events = require('events');
function Pulsar(speed, times) {events.EventEmitter.call(this);
var self = this;this.speed = speed;this.times = times;
this.on('newListener', function(eventName, listener) {if (eventName === 'pulse') {
self.start();}
});}
util.inherits(Pulsar, events.EventEmitter);
Pulsar.prototype.start = function() {var self = this;var id = setInterval(function() {self.emit('pulse');self.times--;if (self.times === 0) {
clearInterval(id);}
}, this.speed);};
var pulsar = new Pulsar(500, 5);
pulsar.on('pulse', function() {console.log('.');
});
We can go a step further and query EventEmitter objects about their listeners by call-ing emitter.listeners(event). A list of all listeners can’t be returned in one go,though. The entire list is technically available within the this._events object, but thisproperty should be considered private. The listeners method currently returns anArray instance. This could be used to iterate over multiple listeners if several havebeen added to a given event—perhaps to remove them at the end of an asynchronousprocess, or simply to check if any listeners have been added.
In cases where an array of events is available, the listeners method will effectivelyreturn this._events[type].slice(0). Calling slice on an array is a JavaScript short-cut for creating a copy of an array. The documentation states that this behavior may
Listing 4.10 Automatically triggering events based on new listeners
Display a dot for each pulse.
www.it-ebooks.info

75TECHNIQUE 24 Detecting and exploiting EventEmitter
change in the future, so if you really want to create a copy of attached listeners, thencall slice yourself to ensure you really get a copy and not a reference to a data struc-ture within the emitter instance.
Listing 4.11 adds a stop method to the Pulsar class. When stop is called, it checksto see if there are any listeners; otherwise, it raises an error. Checking for listeners is agood way to prevent incorrect usage, but you don’t have to do this in your own code.
Pulsar.prototype.stop = function() {if (this.listeners('pulse').length === 0) {throw new Error('No listeners have been added!');
}};
var pulsar = new Pulsar(500, 5);
pulsar.stop();
TECHNIQUE 24 Detecting and exploiting EventEmitter
A lot of successful open source Node modules are built on EventEmitter. It’s useful tospot where EventEmitter is being used and to know how to take advantage of it.
■ ProblemYou’re working on a large project with several components and want to communicatebetween them.
■ SolutionLook for the emit and on methods whenever you’re using either Node’s standardmodules or open source libraries. For example, the Express app object has thesemethods, and they’re great for sending messages within an application.
■ DiscussionUsually when you’re working on a large project, there’s a major component that’s cen-tral to your problem domain. If you’re building a web application with Express, thenthe app object is one such component. A quick check of the source shows that thisobject mixes in EventEmitter, so you can take advantage of events to communicatebetween the disparate components within your project.
Listing 4.12 shows an Express-based example where a listener is bound to an event,and then the event is emitted when a specific route is accessed.
var express = require('express');var app = express();
app.on('hello-alert', function() {console.warn('Warning!');
});
Listing 4.11 Querying listeners
Listing 4.12 Reusing EventEmitter in Express
www.it-ebooks.info

76 CHAPTER 4 Events: Mastering EventEmitter and beyond
app.get('/', function(req, res){res.app.emit('hello-alert');res.send('hello world');
});
app.listen(3000);
This might seem contrived, but what if the route were defined in another file? In thiscase, you wouldn’t have access to the app object, unless it was defined as a global.
Another example of a popular project built on EventEmitter is the Node Redis cli-ent (https://npmjs.org/package/redis). Instances of RedisClient inherit fromEventEmitter. This allows you to hook into useful events, like the error event, asshown in the next listing.
var redis = require('redis'),var client = redis.createClient();
client.on('error', function(err) {console.error('Error:', err);
});
client.on('monitor', function(timestamp, args) {console.log('Time:', timestamp, 'arguments:', args);
});
client.on('ready', function() {// Start app here
});
In cases where the route separation technique has been used to store routes in severalfiles, you can actually send events by calling res.app.emit(event). This allows routehandlers to communicate back to the app object itself.
This might seem like a highly specific Express example, but other popular opensource modules are also built on EventEmitter—just look for the emit and on methods.Remember that Node’s internal modules like the process object and net.create-Server inherit from EventEmitter, and well-written open source modules tend toinherit from these modules as well. This means there’s a huge amount of scope for event-based solutions to architectural problems.
This example also highlights another benefit of building projects aroundEventEmitter—asynchronous processes can respond as soon as possible. If thehello-alert event performs a very slow operation like sending an email, the per-son browsing the page might not want to wait for this process to finish. In this case,you can render the requested page while effectively performing a slower operationin the background.
The Node Redis client makes excellent use of EventEmitter and the author haswritten documentation for what each of the methods do. This is a good idea—if
Listing 4.13 Reusing EventEmitter in the redis module
The app object is also available in res.app.
The monitor event emitted by the redis module for tracking when various internal activities occur
www.it-ebooks.info

77TECHNIQUE 25 Categorizing event names
somebody joins your project, they may find it hard to get an overall picture of theevents that are being used.
TECHNIQUE 25 Categorizing event names
Some projects just have too many events. This technique shows how to deal with bugscaused by mistyped event names.
■ ProblemYou’re losing track of the events in your program, and are concerned that it may betoo easy to write an incorrect event name somewhere causing a difficult-to-track bug.
■ SolutionThe easiest way to solve this problem is to use an object to act as a central dictionary forall of the event names. This creates a centralized location of each event in the project.
■ DiscussionIt’s hard to keep track of event names littered throughout a project. One way to man-age this is to keep each event name in one place. Listing 4.14 demonstrates using anobject to categorize event names, based on the previous examples in this chapter.
var util = require('util');var events = require('events');
function MusicPlayer() {events.EventEmitter.call(this);this.on(MusicPlayer.events.play, this.play.bind(this));
}
var e = MusicPlayer.events = {play: 'play',pause: 'pause',stop: 'stop',ff: 'ff',rw: 'rw',addTrack: 'add-track'
};
util.inherits(MusicPlayer, events.EventEmitter);
MusicPlayer.prototype.play = function() {this.playing = true;
};
var musicPlayer = new MusicPlayer();
musicPlayer.on(e.play, function() {console.log('Now playing');
});
musicPlayer.emit(e.play);
Listing 4.14 Categorizing event names using an object
The object used to store the event list is aliased for convenience.
When adding new listeners, users of the class can refer to the events list rather than writing the event names as strings.
www.it-ebooks.info

78 CHAPTER 4 Events: Mastering EventEmitter and beyond
Although EventEmitter is an integral part of Node’s standard library, and an elegantsolution to many problems, it can be the source of a lot of bugs in larger projectswhere people may forget the name of a given event. One way around this is to avoidwriting events as strings. Instead, an object can be used with properties that refer tothe event name strings.
If you’re writing a reusable, open source module, you should consider making thispart of the public API so it’s easy for people to get a centralized list of event names.
There are other observer pattern implementations that avoid using string eventnames to effectively type check events. In the next technique we’ll look at a few thatare available through npm.
Although EventEmitter provides a wide array of solutions when working on Nodeprojects, there are alternative implementations out there. The next section includessome popular alternatives.
4.4 Third-party modules and extensionsEventEmitter is essentially an observer pattern implementation. There are other inter-pretations of this pattern, which can help scale Node programs to run across severalprocesses or over a network. The next technique introduces some of the more popu-lar alternatives created by the Node community.
TECHNIQUE 26 Alternatives to EventEmitter
EventEmitter has a great API and works well in Node programs, but sometimes aproblem requires a slightly different solution. This technique explores some alterna-tives to EventEmitter.
■ ProblemYou’re trying to solve a problem that doesn’t quite fit EventEmitter.
■ SolutionDepending on the exact nature of the problem you’re trying to solve, there are severalalternatives to EventEmitter: publish/subscribe, AMQP, and js-signals are somepopular alternatives with good support in Node.
■ DiscussionThe EventEmitter class is an implementation of the observer pattern. A related patternis publish/subscribe, where publishers send messages that are characterized intoclasses to subscribers without knowing the details of the subscribers themselves.
The publish/subscribe pattern is often useful in cases where horizontal scaling isrequired. If you need to run multiple Node processes on multiple servers, then tech-nologies like AMQP and ØMQ can help implement this. They’re both specificallydesigned to solve this class of problem, but may not be as convenient as using theRedis publish/subscribe API if you’re already using Redis.
If you need to horizontally scale across a distributed cluster, then an AMQP imple-mentation like RabbitMQ (http://www.rabbitmq.com/) will work well. The rabbitmq-nodejs-client (https://github.com/adrai/rabbitmq-nodejs-client) module has a
www.it-ebooks.info

79TECHNIQUE 26 Alternatives to EventEmitter
publish/subscribe API. The following listing shows a simple example of RabbitMQin Node.
var rabbitHub = require('rabbitmq-nodejs-client');var subHub = rabbitHub.create( { task: 'sub', channel: 'myChannel' } );var pubHub = rabbitHub.create( { task: 'pub', channel: 'myChannel' } );
subHub.on('connection', function(hub) {hub.on('message', function(msg) {console.log(msg);
}.bind(this));});subHub.connect();
pubHub.on('connection', function(hub) {hub.send('Hello World!');
});pubHub.connect();
ØMQ (http://www.zeromq.org/) is more popular in the Node community. Justin Tullossand TJ Holowaychuk’s zeromq.node module (https://github.com/JustinTulloss/zeromq.node) is a popular binding. The next listing shows just how simple this API is.
var zmq = require('zmq');var push = zmq.socket('push');var pull = zmq.socket('pull');
push.bindSync('tcp://127.0.0.1:3000');pull.connect('tcp://127.0.0.1:3000');console.log('Producer bound to port 3000');
setInterval(function() {console.log('sending work');push.send('some work');
}, 500);
pull.on('message', function(msg) {console.log('work: %s', msg.toString());
});
If you’re already using Redis with Node, then it’s worth trying out the Pub/Sub API(http://redis.io/topics/pubsub). Listing 4.17 shows an example of this using theNode Redis client (https://github.com/mranney/node_redis).
var redis = require('redis');var client1 = redis.createClient();var client2 = redis.createClient();
Listing 4.15 Using RabbitMQ with Node
Listing 4.16 Using ØMQ with Node
Listing 4.17 Using Redis Pub/Sub with Node
Print the message when it’s received.
www.it-ebooks.info

80 CHAPTER 4 Events: Mastering EventEmitter and beyond
var msg_count = 0;
client1.on('subscribe', function(channel, count) {client2.publish('channel', 'Hello world.');
});
client1.on('message', function(channel, message) {console.log('client1 channel ' + channel + ': ' + message);client1.unsubscribe();client1.end();client2.end();
});
client1.subscribe('channel');
Finally, if publish/subscribe isn’t what you’re looking for, then you may want to take alook at js-signals (https://github.com/millermedeiros/js-signals). This module is amessaging system that doesn’t use strings for the signal names, and dispatching or lis-tening to events that don’t yet exist will raise errors.
Listing 4.18 shows how js-signals sends and receives messages. Notice how sig-nals are properties of an object, rather than strings, and that listeners can receive anarbitrary number of arguments.
var signals = require('signals');var myObject = {
started: new signals.Signal()};
function onStarted(param1, param2){console.log(param1, param2);
}
myObject.started.add(onStarted);myObject.started.dispatch('hello', 'world');
js-signals provides a way of using properties for signal names, as mentioned in tech-nique 25, but in this case the module will raise an error if an unregistered listener isdispatched or bound to. This approach is more like “strongly typed” events, and isvery different from most publish/subscribe and event observer implementations.
4.5 SummaryIn this chapter you’ve learned how EventEmitter is used through inheritance andmultiple inheritance, and how to manage errors with and without domains. You’vealso seen how to centralize event names, how open source modules build onEventEmitter, and some alternative solutions.
What you should take away from this chapter is that although EventEmitter is usuallyused as a base class for inheritance, it’s also possible to mix it into existing classes. Also,although EventEmitter is a great solution to many problems and used throughout
Listing 4.18 Using Redis Pub/Sub with Node
Be sure to close client connections when using the Redis module.
Binding alistener to thestarted signal
Dispatching the signal using two parameters
www.it-ebooks.info

81Summary
Node’s internals, sometimes other solutions are more optimal. For example, if you’reusing Redis, then you can take advantage of its publish/subscribe implementation.Finally, EventEmitter isn’t without its problems; managing large amounts of eventnames can cause bugs, and now you know how to avoid this by using an object with prop-erties that act as event names.
In the next chapter we’ll look at a related topic: streams. Streams are built aroundan event-based API, so you’ll be able to use some of these EventEmitter techniquesthere as well.
www.it-ebooks.info

82
Streams: Node’s most powerful and
misunderstood feature
Streams are an event-based API for managing and modeling data, and are wonder-fully efficient. By leveraging EventEmitter and Node’s non-blocking I/O libraries,the stream module allows data to be dynamically processed when it’s available, andthen released when it’s no longer needed.
This chapter covers■ What streams are and how to use them■ How to use Node’s built-in streaming APIs■ The stream API used in Node 0.8 and below■ The stream primitive classes bundled since
Node 0.10■ Strategies for testing streams
www.it-ebooks.info

83Introduction to streams
The idea of a stream of data isn’t new, but it’s an important concept and integral toNode. After chapter 4, mastering streams is the next step on the path to becomingtruly competent at Node development.
The stream core module provides abstract tools for building event-based streamclasses. It’s likely that you’ll use modules that implement streams, rather than creatingyour own. But to exploit streams to their fullest, it’s important to understand how theyreally work. This chapter has been designed with that goal in mind: understandingstreams, working with Node’s built-in streaming APIs, and finally creating and testingyour own streams. Despite the conceptually abstract nature of the stream module, onceyou’ve mastered the major concepts, you’ll start to see uses for streams everywhere.
The next section provides a high-level overview of streams and addresses the twoAPIs that Node supports as of Node 0.10.
5.1 Introduction to streamsIn Node, streams are an abstract interface adhered to by several different objects. Whenwe talk about streams, we’re referring to a way of doing things—in a sense, they’re aprotocol. Streams can be readable or writable, and are implemented with instances ofEventEmitter—see chapter 4 for more on events. Streams provide the means for cre-ating data flows between objects, and can be composed with LEGO-like modularity.
5.1.1 Types of streams
Streams always involve I/O of some kind, and they can be classified into groups basedon the type of I/O they deal with. The following types of streams were taken from JamesHalliday’s stream-handbook (https://github.com/substack/stream-handbook/), andwill give you an idea of the wide array of things you can do with streams:
■ Built-in—Many of Node’s core modules implement streaming interfaces; forexample, fs.createReadStream.
■ HTTP—Although technically network streams, there are streaming modulesdesigned to work with various web technologies.
■ Parsers—Historically parsers have been implemented using streams. Popularthird-party modules for Node include XML and JSON parsers.
■ Browser—Node’s event-based streams have been extended to work in browsers,offering some unique opportunities for interfacing with client-side code.
■ Audio—James Halliday has written some novel audio modules that have stream-able interfaces.
■ RPC (Remote Procedure Call)—Sending streams over the network is a useful way toimplement interprocess communication.
■ Test—There are stream-friendly test libraries, and tools for testing streamsthemselves.
■ Control, meta, and state—There are also more abstract uses of streams, and mod-ules designed purely for manipulating and managing other streams.
www.it-ebooks.info

84 CHAPTER 5 Streams: Node’s most powerful and misunderstood feature
The best way to understand why streams are important is to first consider what hap-pens when data is processed without them. Let’s look at this in more detail by compar-ing Node’s asynchronous, synchronous, and stream-based APIs.
5.1.2 When to use streams
When reading a file synchronously with fs.readFileSync, the program will block,and all of the data will be read to memory. Using fs.readFile will prevent the pro-gram from blocking because it’s an asynchronous method, but it’ll still read the entirefile into memory.
What if there were a way to tell fs.readFile to read a chunk of data into memory,process it, and then ask for more data? That’s where streams come in.
Memory becomes an issue when working with large files—compressed backuparchives, media files, large log files, and so on. Instead of reading the entire file intomemory, you could use fs.read with a suitable buffer, reading in a specific length at atime. Or, preferably, you could use the streams API provided by fs.createReadStream.Figure 5.1 illustrates how only a chunk of a file is read at a time with fs.createRead-Stream, compared to the entire file with fs.readFile.
Streams are asynchronous by design. Rather than reading that entire file intomemory, a buffer’s worth will be read, the desired operations will be performed, andthen the result will be written to the output stream. This approach is as close to idiom-atic Node as you can get. What’s more, streams are implemented with plain oldJavaScript. Take fs.createReadStream—it offers a more scalable solution, but ulti-mately just wraps simple file system operations with a better API.
Node’s streaming APIs feel idiomatic, yet streams have been around in computerscience for a long time. This history is examined briefly in the next section to give yousome background on where streams come from and where they’re used.
File MemoryCallback
fs.readFile
File MemoryCallback
1 2 nStream
Figure 5.1 Using streamable APIs means I/O operations potentially use less memory.
www.it-ebooks.info

85Introduction to streams
5.1.3 History
So where did streams originate? Historically, streams in computer science have beenused to solve problems similar to streams in Node. For example, in C the standard wayto represent a file is by using a stream. When a C program starts, it has access to thestandard I/O streams. The standard I/O streams are also available in Node, and canbe used to allow programs to work well with large amounts of data in the shell.
Traditionally, streams have been used to implement efficient parsers. This has alsobeen the case in Node: the node-formidable module (https://github.com/felixge/node-formidable) is used by Connect to efficiently parse form data with streams, anddatabase modules like the Node redis module (https://npmjs.org/package/redis)use streams to represent the connection to the server and respond by parsingon demand.
If you’re familiar with Unix, you’re probably already aware of streams. If you’veused pipes or I/O redirection, then you’ve used streams. You can literally think aboutNode streams as you would Unix pipes—except data is filtered through functionsinstead of command-line programs. The next section explains how streams haveevolved in Node, up until version 0.10 when they changed significantly.
STREAMS OLD AND NEW
Streams are part of Node’s core modules, and as such remain backward compatiblewith earlier versions. As of this writing, Node is at version 0.10, which has seen signifi-cant changes in the streams API. Though it remains backward compatible, the newstreams syntax is in some ways stricter than earlier versions, yet ultimately more flexi-ble. This boils down to the behavior of pipe—pipes must now originate from a Read-able stream and end at a Writable stream. The util.pump method, found in earlierversions of Node, has now been deprecated in favor of the new pipe semantics.
The evolution of streams in Node came from a desire to use the event-based APIsto solve non-blocking I/O problems in an efficient way. Older solutions like util.pumpsought to find efficiency in intelligent uses of “drain” events—this is emitted when awritable stream has emptied and it’s safe to write again. This sounds a lot like pausinga stream, and the handling of paused streams was something the pre-0.10 streams APIcouldn’t handle effectively.
Now Node has reached a point where the core developers have seen the types ofproblems people are tackling with streams, so the new API is richer thanks to thenew stream primitive classes. Table 5.1 shows a summary of the classes available fromNode 0.10 onward.
Learning to take advantage of streams will pay dividends when it comes to workingwith third-party modules that implement streams. In the next section, a selection ofpopular stream-oriented modules is examined.
5.1.4 Streams in third-party modules
The main use of streams in Node is for creating event-based APIs for I/O-like sources;parsers, network protocols, and database modules are the key examples. A network
www.it-ebooks.info

86 CHAPTER 5 Streams: Node’s most powerful and misunderstood feature
protocol implemented with streams can be convenient when composition is desired—think about how easy it would be to add data compression to a network protocol if thedata could be passed through the gzip module with a single call to pipe.
Similarly, database libraries that stream data can handle large result sets more effi-ciently; rather than collecting all results into an array, a single item at a time can bestreamed.
The Mongoose MongoDB module (http://mongoosejs.com/) has an object calledQueryStream that can be used to stream documents. The mysql module (https://npmjs.org/package/mysql) can alsostream query results, although this imple-mentation doesn’t currently implementthe stream.Readable class.
You can also find more creative uses ofstreams out there. The baudio module(see figure 5.2) by James Halliday can beused to generate audio streams thatbehave just like any other stream—audiodata can be routed to other streams withpipe, and recorded for playback by stan-dard audio software:
var baudio = require('baudio');
var n = 0;var b = baudio(function (t) {
var x = Math.sin(t * 262 + Math.sin(n));n += Math.sin(t);return x;
});b.play();
Table 5.1 A summary of the classes available in streams2
Name User methods Description
stream.Readable _read(size) Used for I/O sources that generate data
stream.Writable _write(chunk, encoding, callback)
Used to write to an underlying output destination
stream.Duplex _read(size), _write(chunk, encoding, callback)
A readable and writable stream, like a network connection
stream.Transform _flush(size), _transform(chunk, encoding, callback)
A duplex stream that changes data in some way, with no lim-itation on matching input data size with the output
Figure 5.2 The baudio module by James Halliday (substack) supports the generation of audio streams (from https://github.com/substack/baudio).
www.it-ebooks.info

87Introduction to streams
When selecting a network or database library for your Node projects, we strongly rec-ommend ensuring it has a streamable API, because it’ll help you write more elegantcode while also potentially offering performance benefits.
One thing all stream classes have in common is they inherit from EventEmitter.The significance of this is investigated in the next section.
5.1.5 Streams inherit from EventEmitter
Each of the stream module base classes emits various events, which depend onwhether the base class is readable, writable, or both. The fact that streams inherit fromEventEmitter means you can bind to various standard events to manage streams, orcreate your own custom events to represent more domain-specific behavior.
When working with stream.Readable instances (see table 5.2 for guidance onselecting a stream base class), the readable event is important because it signifies thatthe stream is ready for calls to stream.read().
Attaching a listener to data will cause the stream to behave like the old streamsAPI, where data is passed to data listeners when it’s available, rather than throughcalls to stream.read().
The error event is covered in detail in technique 28. It’ll be emitted if the streamencounters an error when receiving data.
The end event signifies that the stream has received an equivalent of the end-of-filecharacter, and won’t receive more data. There’s also a close event that represents thecase where the underlying resource has been closed, which is distinct from end, andthe Node API documentation notes that not all streams will emit this event, so a rule ofthumb is to bind to end.
The stream.Writable class changes the semantics for signifying the end of a streamto close and finish. The distinction between the two is that finish is emitted whenwritable.end() is called, whereas close means the underlying I/O resource has beenclosed, which isn’t always required, depending on the nature of the underlying stream.
The pipe and unpipe events are emitted when passing a stream to thestream.Readable.prototype.pipe method. This can be used to adapt the way astream behaves when it’s piped. The listener receives the destination stream as thefirst argument, so this value could be inspected to change the behavior of the stream.This is a more advanced technique that’s covered in technique 37.
About the techniques in this chapterThe techniques in this chapter all use the streams2 API. This is the nickname of thenewer API style found in Node 0.10 and 0.12. If you’re using Node 0.8, forward com-patibility is supported through the readable-stream module (https://github.com/isaacs/readable-stream).
www.it-ebooks.info

88 CHAPTER 5 Streams: Node’s most powerful and misunderstood feature
In the next section you’ll learn how to solve real-world problems using streams. Firstwe’ll discuss some of Node’s built-in streams, and then we’ll move on to creatingentirely new streams and testing them.
5.2 Built-in streamsNode’s core modules themselves are implemented using the stream module, so it’s easyto start using streams without having to build your own classes. The next techniqueintroduces some of this functionality through file system and network streaming APIs.
TECHNIQUE 27 Using built-in streams to make a static web server
Node’s core modules often have streamable interfaces. They can be used to solvemany problems more efficiently than their synchronous alternatives.
■ ProblemYou want to send a file from a web server to a client in an efficient manner that willscale up to large files.
■ SolutionUse fs.createReadStream to open a file and stream it to the client. Optionally, pipethe resulting stream.Readable through another stream to handle features likecompression.
■ DiscussionNode’s core modules for file system and network operations, fs and net, both providestreamable interfaces. The fs module has helper methods to automatically createinstances of the streamable classes. This makes using streams for some I/O-basedproblems fairly straightforward.
To understand why streams are important and compare them to nonstreamingcode, consider the following example of a simple static file web server made withNode’s core modules:
var http = require('http');var fs = require('fs');
http.createServer(function(req, res) {fs.readFile(__dirname + '/index.html', function(err, data) { //
if (err) {res.statusCode = 500;res.end(String(err));
} else {res.end(data);
}});
}).listen(8000);
Even though this code uses the fs.readFile method, which is non-blocking, it caneasily be improved on by using fs.createReadStream. The reason is because it’ll readthe entire file into memory. This might seem acceptable with small files, but what ifyou don’t know how large the file is? Static web servers often have to serve up poten-tially large binary assets, so a more adaptable solution is desirable.
www.it-ebooks.info

89TECHNIQUE 27 Using built-in streams to make a static web server
The following listing demonstrates a streaming static web server.
var http = require('http');var fs = require('fs');
http.createServer(function(req, res) {fs.createReadStream(__dirname + '/index.html').pipe(res);
}).listen(8000);
This example uses less code than the first version, and improves its efficiency. Nowinstead of reading the entire file into memory, a buffer’s worth will be read at a timeand sent to the client. If the client is on a slow connection, the network stream will sig-nal this by requesting that the I/O source pauses until the client is ready for moredata. This is known as backpressure, and is one of the additional benefits using streamsbrings to your Node programs.
We can take this example a step further. Streams aren’t just efficient and poten-tially more syntactically elegant, they’re also extensible. Static web servers often com-press files with gzip. The next listing adds that to the previous example, using streams.
var http = require('http');var fs = require('fs');var zlib = require('zlib');
http.createServer(function(req, res) {res.writeHead(200, { 'content-encoding': 'gzip' });fs.createReadStream(__dirname + '/index.html').pipe(zlib.createGzip()).pipe(res);
}).listen(8000);
Now if you open http://localhost:8000 in a browser and use its debugging tools tolook at the network operations, you should see that the content was transferred usinggzip. Figure 5.3 shows what our browser reported after running the example.
This could be expanded in several other ways—you can use as many calls to pipeas required. For example, the file could be piped through an HTML templatingengine and then compressed. Just remember that the general pattern is read-able.pipe(writable).
Note that this example is simplified to illustrate how streams work and isn’t suffi-cient for implementing a production HTTP asset server.
Now that you’ve seen a fleshed-out example of how streams are used to solve acommon problem, it’s time to look at another piece of the puzzle: error handling.
Listing 5.1 A simple static web server that uses streams
Listing 5.2 A static web server with gzip
Data is piped from a file toNode’s HTTP Response object.
Set the header so the browser knows gzip compression has been used.
Use two calls to pipe, compress, and stream the file back to the client.
www.it-ebooks.info

90 CHAPTER 5 Streams: Node’s most powerful and misunderstood feature
TECHNIQUE 28 Stream error handling
The stream classes inherit from EventEmitter, which means sane error handlingcomes as standard. This technique explains how to handle errors generated by astream.
■ ProblemYou want to catch errors generated by a stream.
■ SolutionAdd an error listener.
■ DiscussionThe standard behavior of EventEmitter is to throw an exception when an error eventis emitted—unless there’s a listener attached to the error event. The first argument tothe listener will be the error that was raised, a descendent of the Error object.
The following listing shows an example of an intentionally generated error with asuitable error listener.
Figure 5.3 The network inspector confirms the content was compressed.
www.it-ebooks.info

91TECHNIQUE 29 Using streams from third-party modules
var fs = require('fs');var stream = fs.createReadStream('not-found');
stream.on('error', function(err) {console.trace();console.error('Stack:', err.stack);console.error('The error raised was:', err);
});
Here we attempt to open a file that doesn’t exist B, causing an 'error' event to betriggered. The error object passed to the handler C will usually have extra informa-tion to aid in tracking down the error. For example, the stack property may have linenumber information, and console.trace() can be called to generate a full stacktrace. In listing 5.3 console.trace() will show a trace up to the ReadStream imple-mentation in Node’s events.js core module. That means you can see exactly wherethe error was originally emitted.
Now that you’ve seen how some of Node’s core modules use streams, the next sec-tion explores how third-party modules use them.
5.3 Third-party modules and streamsStreams are about as idiomatic Node as you can get, so it’s no surprise that streamableinterfaces crop up all over the open source Node landscape. In the next techniqueyou’ll learn how to use streamable interfaces found in some popular Node modules.
TECHNIQUE 29 Using streams from third-party modules
Many open source developers have recognized the importance of streams and incor-porated streamable interfaces into their modules. In this technique you’ll learn howto identify such implementations and use them to solve problems more efficiently.
■ ProblemYou want to know how to use streams with a popular third-party module that you’vedownloaded with npm.
■ SolutionLook at the module’s documentation or source code to figure out if it implements astreamable API, and if so, how to use it.
■ DiscussionWe’ve picked three popular modules as examples of third-party modules that imple-ment streamable interfaces. This guided tour of streams in the wild should give you agood idea of how developers are using streams, and how you can exploit streams inyour own projects.
In the next section you’ll discover some key ways to use streams with the popularweb framework, Express.
Using streams with ExpressThe Express web framework (http://expressjs.com/) actually provides a relativelylightweight wrapper around Node’s core HTTP module. This includes the Request
Listing 5.3 Catching errors during streaming
Cause an errorto be generated
by trying toopen a file that
doesn’t exist. B
Use the events API to attach an error handler.C
www.it-ebooks.info

92 CHAPTER 5 Streams: Node’s most powerful and misunderstood feature
and Response objects. Express decorates these objects with some of its own methodsand values, but the underlying objects are the same. That means everything youlearned about streaming data to browsers in technique 27 can be reused here.
A simple example of an Express route—a callback that runs for a given HTTPmethod and URL—uses res.send to respond with some data:
var express = require('express');var app = express();
app.get('/', function(req, res) {res.send('hello world');
});
app.listen(3000);
The res object is actually a response object, and inherits from Node’s http.Server-Response. In technique 27 you saw that HTTP requests can be streamed to by usingthe pipe method. Express is built in a way that allows buffers and objects to work withthe res.send method, and for streams you can still use the pipe method.
Listing 5.4 is an Express web application that will run with Express 3 and streamscontent from a custom-readable stream by using pipe.
var stream = require('stream');var util = require('util');var express = require('express');var app = express();
util.inherits(StatStream, stream.Readable);
function StatStream(limit) {stream.Readable.call(this);this.limit = limit;
}
StatStream.prototype._read = function(size) {if (this.limit === 0) {// Donethis.push();
} else {this.push(util.inspect(process.memoryUsage()));this.push('n');this.limit--;
}};
app.get('/', function(req, res) {var statStream = new StatStream(10);statStream.pipe(res);
});
app.listen(3000);
Listing 5.4 An Express application that uses streams
Create a readable stream by inheriting from stream.Readable and calling the parent’s constructor.
B
Respond with some data—this sends a string representation of the Node process’s memory usage.
C
Use the standard readable.pipe(writable) pattern to send data back to the browser.
D
www.it-ebooks.info

93TECHNIQUE 29 Using streams from third-party modules
Our custom readable stream, StatStream, inherits from stream.Readable B andimplements the _read method, which just sends memory usage data C. The _readmethod must be implemented whenever you want to make a readable stream. Whensending the response back to the browser, the stream can be piped to the res object Dprovided by Express without any extra work.
The implementation of the send module that comes with Express 3 usesfs.createReadStream, as described in technique 27. The following sample code istaken from the source to send:
SendStream.prototype.stream = function(path, options){TODO: this is all lame, refactor meeeevar self = this;var res = this.res;var req = this.req;
pipevar stream = fs.createReadStream(path, options);this.emit('stream', stream);stream.pipe(res);
It takes a lot more work to correctly deal with things like HTTP Content-Range head-ers, but this snippet demonstrates that leveraging the built-in streaming APIs likefs.createReadStream can lead to solutions powerful enough to underpin majoropen source projects.
Using streams with MongooseThe Mongoose module (http://mongoosejs.com/) for the MongoDB database server(http://www.mongodb.org/) has an interface called QueryStream that providesNode 0.8-style streams for query results. This class is used internally to allow queryresults to be streamed using the stream method. The following code shows aquery that has its results piped through a hypothetical writable stream:
User.where('role').equals('admin').stream().pipe(writeStream);
This pattern—using a class to wrap an external I/O source’s streamable behavior, andthen exposing streams through simple method calls—is the style employed by Node’score modules, and is popular with third-party module authors. This has been madeclearer by the streams2 API’s use of simple abstract classes that can be inherited from.
Using streams with MySQLThe third-party mysql module (https://npmjs.org/package/mysql) is often seen byNode developers as something low-level that should be built on with more complexlibraries, like the Sequelize (http://www.sequelizejs.com/) object-relational mapper(ORM). But the mysql module itself shouldn’t be underestimated, and supportsstreaming results with pause and resume. Here’s an example of the basic API style:
www.it-ebooks.info

94 CHAPTER 5 Streams: Node’s most powerful and misunderstood feature
var query = connection.query('SELECT * FROM posts');query.on('result', function(row) {
connection.pause();processRow(row, function() {connection.resume();
});});
This streaming API uses domain-specific event names—there’s also a 'fields' event.To pause the result stream, connection.pause must be called. This signals to theunderlying connection to MySQL that results should stop briefly until the receiver isready for more data.
■ SummaryIn this technique you’ve seen how some popular third-party modules use streams.They’re all characterized by the fact they deal with I/O—both HTTP and database con-nections are network- or file-based protocols, and both can involve network connec-tions and file system operations. In general, it’s a good idea to look for Node networkand database modules that implement streamable interfaces, because they help scaleprograms and also write them in a readable, idiomatic style.
Now that you’ve seen how to use streams, you’re probably itching to learn how tocreate your own. The next section has a technique for using each base stream class,and also shows how to correctly inherit from them.
5.4 Using the stream base classesNode’s base stream classes provide templates for solving the kinds of problems thatstreams are best at. For example, stream.Transform is great for parsing data, andstream.Readable is perfect for wrapping lower-level APIs with a streamable interface.
The next technique explains how to inherit from the stream base classes, and thenfurther techniques go into detail about how to use each base class.
TECHNIQUE 30 Correctly inheriting from the stream base classes
Node’s base classes for streams can be used as a starting point for new modules andsubclasses. It’s important to understand what problems each solves, and how to cor-rectly inherit from them.
■ ProblemYou want to solve a problem by creating a streamable API, but you’re not sure whichbase class to use and how to use it.
■ SolutionDecide on which base class closely matches the problem at hand, and inherit from itusing Object.prototype.call and util.inherits.
■ DiscussionNode’s base classes for streams, already summarized in table 5.1, should be used as thebasis for your own streamable classes or modules. They’re abstract classes, which means
www.it-ebooks.info

95TECHNIQUE 30 Correctly inheriting from the stream base classes
they’re methods that you must implement before they can be used. This is usuallydone through inheritance.
All of the stream base classes are found in the stream core module. The five baseclasses are Readable, Writable, Duplex, Transform, and PassThrough. Fundamen-tally, streams are either readable or writable, but Duplex streams are both. This makessense if you consider the behavior of I/O interfaces—a network connection can beboth readable and writable. It wouldn’t be particularly useful, for example, if ssh wereonly able to send data.
Transform streams build on Duplex streams, but also change the data in some way.Some of Node’s built-in modules use Transform streams, so they’re fundamentallyimportant. An example of this is the crypto module.
Table 5.2 offers some hints to help you choose which base class to use.
Inheriting from the base classesIf you’ve learned about inheritance in JavaScript, you might be tempted to inherit fromthe stream base classes by using MyStream.prototype = new stream.Readable();. Thisis considered bad practice, and it’s better to use the ECMAScript 5 Object.create pat-tern instead. Also, the base class’s constructor must be run, because it provides essentialsetup code. The pattern for this is shown next.
var Readable = require('stream').Readable;
function MyStream(options) {Readable.call(this, options);
}
MyStream.prototype = Object.create(Readable.prototype, {constructor: { value: MyStream }
});
Node includes a utility method called util.inherits that can be used instead ofObject.create, but both approaches are widely used by Node developers. This exampleuses the Object.create method B instead so you can see what util.inherits does.
Table 5.2 Selecting a streams base class
Problem Solution
You want to wrap around an underlying I/O source with a streamable API. Readable
You want to get output from a program to use elsewhere, or send data elsewhere within a program.
Writable
You want to change data in some way by parsing it. Transform
You want to wrap a data source that can also receive messages. Duplex
You want to extract data from streams without changing it, from testing to analysis. PassThrough
Listing 5.5 Inheriting from the stream.Readable base class
Call the parent constructor, and be sure to pass any options to it as well.
B
Use Object.create to correctly set up the prototype chain.C
www.it-ebooks.info

96 CHAPTER 5 Streams: Node’s most powerful and misunderstood feature
Note that in listing 5.5 the options argument C is passed to the original Readableconstructor. This is important because there’s a standard set of options that Node sup-ports for configuring streams. In the case of Readable, the options are as follows:
■ highWaterMark—The number of bytes to store in the internal buffer beforepausing reading from the underlying data source.
■ encoding—Causes the buffer to be automatically decoded. Possible valuesinclude utf8 and ascii.
■ objectMode—Allows the stream to behave as a stream of objects, rather thanbytes.
The objectMode option allows JavaScript objects to be handled by streams. An exam-ple of this has been provided in technique 31.
■ SummaryIn this technique you’ve seen how to use Node’s stream base classes to create yourown stream implementations. This involves using util.inherits to set up the class,and then .call to call the original constructor. We also covered some of the optionsthat these base classes use.
Properly inheriting from the base classes is one thing, but what about actuallyimplementing a stream class? Technique 31 explains this in more detail for the Read-able base class, but in that specific case it involves implementing a method called_read to read data from the underlying data source and push it onto an internalqueue managed by the base class itself.
TECHNIQUE 31 Implementing a readable stream
Readable streams can be used to provide a flexible API around I/O sources, and canalso act as parsers.
■ ProblemYou’d like to wrap an I/O source with a streamable API that provides a higher-levelinterface than would otherwise be possible with the underlying data.
■ SolutionImplement a readable stream by inheriting from the stream.Readable class and creat-ing a _read(size) method.
■ DiscussionImplementing a custom stream.Readable class can be useful when a higher level ofabstraction around an underlying data source is required. For example, I (Alex) wasworking on a project where the client had sent in JSON files that contained millions ofrecords separated by newlines. I decided to write a quick stream.Readable class thatread a buffer’s worth of data, and whenever a newline was encountered, JSON.parsewas used to parse the record.
One way of using stream.Readable to parse newline-separated JSON records isshown next.
www.it-ebooks.info

97TECHNIQUE 31 Implementing a readable stream
var stream = require('stream');var util = require('util');var fs = require('fs');
function JSONLineReader(source) {stream.Readable.call(this);this._source = source;this._foundLineEnd = false;this._buffer = '';
source.on('readable', function() {this.read();
}.bind(this));}
util.inherits(JSONLineReader, stream.Readable);
JSONLineReader.prototype._read = function(size) {var chunk;var line;var lineIndex;var result;
if (this._buffer.length === 0) {chunk = this._source.read();this._buffer += chunk;
}
lineIndex = this._buffer.indexOf('n');
if (lineIndex !== -1) {line = this._buffer.slice(0, lineIndex);if (line) {
result = JSON.parse(line);this._buffer = this._buffer.slice(lineIndex + 1);this.emit('object', result);this.push(util.inspect(result));
} else {this._buffer = this._buffer.slice(1);
}}
};
var input = fs.createReadStream(__dirname + '/json-lines.txt', {encoding: 'utf8'
});var jsonLineReader = new JSONLineReader(input);
jsonLineReader.on('object', function(obj) {console.log('pos:', obj.position, '- letter:', obj.letter);
});
Listing 5.6 A JSON line parser
Always ensure the constructor’s parent is called.
B
Call read() when the source is ready to trigger subsequent reads.
C
Inherit from stream.Readable to create a new class that can be customized.
D
All custom stream.Readable classes must implement the _read() method.E
When the class is ready for more data, call read() on the source.F
Slice from the start of the buffer to the first newline to grab some text to parse.
G
Emitting an “object” event whenever a JSON record has been parsed is unique to this class and isn’t necessarily required.H
Send theparsed
JSON backto the
internalqueue. I
Create an instance of JSONLineReader and give it a file stream to process.J
www.it-ebooks.info

98 CHAPTER 5 Streams: Node’s most powerful and misunderstood feature
Listing 5.6 uses a constructor function, JSONLineReader B, that inherits fromstream.Readable D to read and parse lines of JSON from a file. The source for JSON-LineReader will be a readable stream as well, so a listener for the readable event isbound to, so instances of JSONLineReader know when to start reading data C.
The _read method E checks whether the buffer is empty F and, if so, readsmore data from the source and adds it to the internal buffer. Then the current lineindex is incremented, and if a line ending is found, the first line is sliced from thebuffer G. Once a complete line has been found, it’s parsed and emitted using theobject event H—users of the class can bind to this event to receive each line ofJSON that’s found in the source stream.
When this example is run, data from a file will flow through an instance of theclass. Internally, data will be queued. Whenever source.read is executed, the latest“chunk” of data will be returned, so it can be processed when JSONLineReader is readyfor it. Once enough data has been read and a newline has been found, the data will besplit up to the first newline, and then the result will be collected by calling this.push I.
Once this.push is called, stream.Readable will queue the result and forward iton to a consuming stream. This allows the stream to be further processed by a writablestream using pipe. In this example JSON objects are emitted using a custom objectevent. The last few lines of this example attach an event listener for this event and pro-cess the results J.
The size argument to Readable.prototype._read is advisory. That means theunderlying implementation can use it to know how much data to fetch—this isn’talways needed so you don’t always implement it. In the previous example we parsedthe entire line, but some data formats could be parsed in chunks, in which case thesize argument would be useful.
In the original code that I based this example on, I used the resulting JSON objectsto populate a database. The data was also redirected and gzipped into another file.Using streams made this both easy to write and easy to read in the final project.
The example in listing 5.6 used strings, but what about objects? Most streams thatdeal directly with I/O—files, network protocols, and so on—will use raw bytes orstrings of characters. But sometimes it’s useful to create streams of JavaScript objects.Listing 5.7 shows how to safely inherit from stream.Readable and pass the object-Mode option to set up a stream that deals with JavaScript objects.
var stream = require('stream');var util = require('util');
util.inherits(MemoryStream, stream.Readable);
function MemoryStream(options) {options = options || {};options.objectMode = true;stream.Readable.call(this, options);
}
Listing 5.7 A stream configured to use objectMode
This stream should always use objectMode, so set it here and pass the rest of the options to the stream.Readable constructor.
B
www.it-ebooks.info

99TECHNIQUE 32 Implementing a writable stream
MemoryStream.prototype._read = function(size) {this.push(process.memoryUsage());
};
var memoryStream = new MemoryStream();memoryStream.on('readable', function() {
var output = memoryStream.read();console.log('Type: %s, value: %j', typeof output, output);
});
The MemoryStream example in listing 5.7 uses objects for data, so objectMode is passedto the Readable constructor as an option B. Then process.memoryUsage is used to gen-erate some suitable data C. When an instance of this class emits readable D, indicatingthat it’s ready to be read from, then the memory usage data is logged to the console.
When using objectMode, the underlying behavior of the stream is changed toremove the internal buffer merge and length checks, and to ignore the size argumentwhen reading and writing.
TECHNIQUE 32 Implementing a writable stream
Writable streams can be used to output data to underlying I/O sinks.■ Problem
You want to output data from a program using an I/O destination that you want towrap with a streamable interface.
■ SolutionInherit from stream.Writable and implement a _write method to send data to theunderlying resource.
■ DiscussionAs you saw in technique 29, many third-party modules offer streamable interfaces fornetwork services and databases. Following this trend is advantageous because it allowsyour classes to be used with the pipe API, which helps keep chunks of code reusableand decoupled.
You might be simply looking to implement a writable stream to act as the destina-tion of a pipe chain, or to implement an unsupported I/O resource. In general, allyou need to do is correctly inherit from stream.Writable—for more on the recom-mended way to do this, see technique 30—and then add a _write method.
All the _write method needs to do is call a supplied callback when the data hasbeen written. The following code shows the method’s arguments and the overall struc-ture of a sample _write implementation:
MyWritable.prototype._write = function(chunk, encoding, callback) {this.customWriteOperation(chunk, function(err) {callback(err); //
});};
Generate an object by calling Node’s built-in process.memoryUsage() method.
C
Attach a listener to readable to track when the stream is ready to output data; then call stream.read() to fetch recent values.D
The chunkargument isan instanceof Buffer or
a String. B
C
customWriteOperation is your class’s custom write operation. It can be asynchronous, so the callback can be safely called later.
The callback provided by Node’s internal code is called with an error if one was generated.D
www.it-ebooks.info
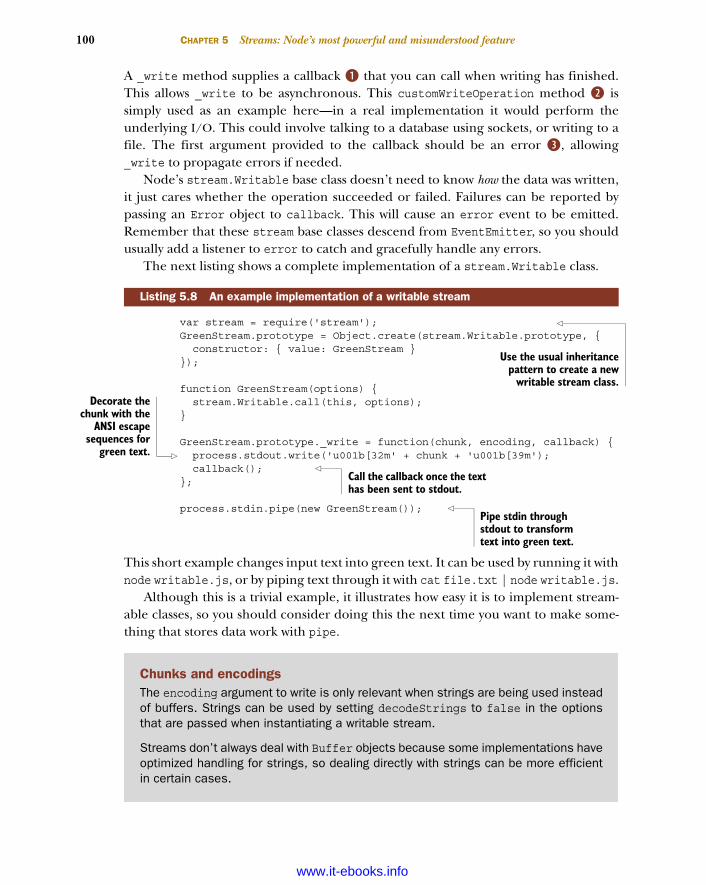
100 CHAPTER 5 Streams: Node’s most powerful and misunderstood feature
A _write method supplies a callback B that you can call when writing has finished.This allows _write to be asynchronous. This customWriteOperation method C issimply used as an example here—in a real implementation it would perform theunderlying I/O. This could involve talking to a database using sockets, or writing to afile. The first argument provided to the callback should be an error D, allowing_write to propagate errors if needed.
Node’s stream.Writable base class doesn’t need to know how the data was written,it just cares whether the operation succeeded or failed. Failures can be reported bypassing an Error object to callback. This will cause an error event to be emitted.Remember that these stream base classes descend from EventEmitter, so you shouldusually add a listener to error to catch and gracefully handle any errors.
The next listing shows a complete implementation of a stream.Writable class.
var stream = require('stream');GreenStream.prototype = Object.create(stream.Writable.prototype, {
constructor: { value: GreenStream }});
function GreenStream(options) {stream.Writable.call(this, options);
}
GreenStream.prototype._write = function(chunk, encoding, callback) {process.stdout.write('u001b[32m' + chunk + 'u001b[39m');callback();
};
process.stdin.pipe(new GreenStream());
This short example changes input text into green text. It can be used by running it withnode writable.js, or by piping text through it with cat file.txt | node writable.js.
Although this is a trivial example, it illustrates how easy it is to implement stream-able classes, so you should consider doing this the next time you want to make some-thing that stores data work with pipe.
Listing 5.8 An example implementation of a writable stream
Use the usual inheritancepattern to create a new
writable stream class.
Decorate thechunk with the
ANSI escapesequences for
green text.
Call the callback once the text has been sent to stdout.
Pipe stdin through stdout to transform text into green text.
Chunks and encodingsThe encoding argument to write is only relevant when strings are being used insteadof buffers. Strings can be used by setting decodeStrings to false in the optionsthat are passed when instantiating a writable stream.
Streams don’t always deal with Buffer objects because some implementations haveoptimized handling for strings, so dealing directly with strings can be more efficientin certain cases.
www.it-ebooks.info

101TECHNIQUE 33 Transmitting and receiving data with duplex streams
TECHNIQUE 33 Transmitting and receiving data with duplex streams
Duplex streams allow data to be transmitted and received. This technique shows youhow to create your own duplex streams.
■ ProblemYou want to create a streamable interface to an I/O source that needs to be both read-able and writable.
■ SolutionInherit from stream.Duplex and implement _read and _write methods.
■ DiscussionDuplex streams are a combination of the Writable and Readable streams, which areexplained in techniques 31 and 32. As such, Duplex streams require inheriting fromstream.Duplex and implementations for the _read and _write methods. Refer totechnique 30 for an explanation of how to inherit from the stream base classes.
Listing 5.9 shows a small stream.Duplex class that reads and writes data fromstdin and stdout. It prompts for data and then writes it back out with ANSI escapecodes for colors.
var stream = require('stream');
HungryStream.prototype = Object.create(stream.Duplex.prototype, {constructor: { value: HungryStream }
});
function HungryStream(options) {stream.Duplex.call(this, options);this.waiting = false;
}
HungryStream.prototype._write = function(chunk, encoding, callback) {this.waiting = false;this.push('u001b[32m' + chunk + 'u001b[39m');callback();
};
HungryStream.prototype._read = function(size) {if (!this.waiting) {this.push('Feed me data! > ');this.waiting = true;
}};
var hungryStream = new HungryStream();process.stdin.pipe(hungryStream).pipe(process.stdout);
Listing 5.9 A duplex stream
This property tracks if the prompt is being displayed.
B
This _write implementation pushes data onto the internal queue and then calls the supplied callback.
C
Display a prompt when waiting for data.D
Pipe the standard input through the duplex stream, and then back out to standard output.E
www.it-ebooks.info

102 CHAPTER 5 Streams: Node’s most powerful and misunderstood feature
The HungryStream class in listing 5.9 will display a prompt, wait for input, and thenreturn the input with ANSI color codes. To track the state of the prompt, an internalproperty called waiting B is used. The _write method, which will be called by Nodeautomatically, sets the waiting property to false, indicating that input has beenreceived, and then the data is pushed to the internal buffer with color codes attached.Finally, the callback that gets automatically passed to _write is executed C.
When the class is waiting for data, the _read method pushes a message that acts asthe prompt D. This can be made interactive by piping the standard input streamthrough an instance of HungryStream and then back out through the standard outputstream E.
The great thing about duplex streams is they can sit in the middle of pipes. A sim-pler way to do this is to use the stream.PassThrough base class, which only relays data,allowing you to plug into the middle of a pipe and track data as it flows through it.The diagram in figure 5.4 shows how chunks of data flow through the duplex streamobject, from the input to the output stream.
Several stream.Duplex implementations in the wild implement a _write methodbut keep the _read method as a blank stub. This is purely to take advantage of duplexstreams as something that can enhance the behavior of other streams through pipes.For example, hiccup by Naomi Kyoto (https://github.com/naomik/hiccup) can beused to simulate slow or sporadic behavior of underlying I/O sources. This novel useof streams comes in handy when you’re writing automated tests.
Duplex streams are useful for piping readable streams to writable streams and ana-lyzing the data. Transform streams are specifically designed for changing data; thenext technique introduces stream.Transform and the _transform method.
_readDuplex stream
_write
process.stdoutprocess.stdin
Figure 5.4 A duplex stream
www.it-ebooks.info

103TECHNIQUE 34 Parsing data with transform streams
TECHNIQUE 34 Parsing data with transform streams
Streams have long been used as a way to create efficient parsers. The stream.Transformbase class can be used to do this in Node.
■ ProblemYou want to use streams to change data into another format in a memory-efficientmanner.
■ SolutionInherit from stream.Transform and implement the _transform method.
■ DiscussionOn the surface, transform streams sound a little bit like duplex streams. They can alsosit in the middle of a pipe chain. The difference is that they’re expected to transformdata, and they’re implemented by writing a _transform method. This method’s signa-ture is similar to _write—it takes three arguments, chunk, encoding, and callback.The callback should be executed when the data has been transformed, which allowstransform streams to parse data asynchronously.
Listing 5.10 shows a transform stream that parses (albeit simplified) CSV data. TheCSV is expected to contain comma-separated values without extra spaces or quotes,and should use Unix line endings.
var fs = require('fs');var stream = require('stream');
CSVParser.prototype = Object.create(stream.Transform.prototype, {constructor: { value: CSVParser }
});
function CSVParser(options) {stream.Transform.call(this, options);
this.value = '';this.headers = [];this.values = [];this.line = 0;
}
CSVParser.prototype._transform = function(chunk, encoding, done) {var c;var i;
chunk = chunk.toString();
for (i = 0; i < chunk.length; i++) {c = chunk.charAt(i);
if (c === ',') {this.addValue();
Listing 5.10 A CSV parser implemented using a transform stream
These properties are used to track the state of the parser.B The _transform
implementation. C
The input data is turned into a string and then iterated over, character by character.
D
If the character is a comma, add the previously collected data to the internal list of headers or values.
E
www.it-ebooks.info

104 CHAPTER 5 Streams: Node’s most powerful and misunderstood feature
} else if (c === 'n') {this.addValue();if (this.line > 0) {
this.push(JSON.stringify(this.toObject()));}this.values = [];this.line++;
} else {this.value += c;
}}
done();};
CSVParser.prototype.toObject = function() {var i;var obj = {};for (i = 0; i < this.headers.length; i++) {obj[this.headers[i]] = this.values[i];
}return obj;
};
CSVParser.prototype.addValue = function() {if (this.line === 0) {this.headers.push(this.value);
} else {this.values.push(this.value);
}this.value = '';
};
var parser = new CSVParser();fs.createReadStream(__dirname + '/sample.csv')
.pipe(parser)
.pipe(process.stdout);
Parsing CSV involves tracking several variables—the current value, the headers for thefile, and the current line number B. To do this, a stream.Transform descendent withsuitable properties can be used. The _transform implementation C is the most com-plex part of this example. It receives a chunk of data, which is iterated over one char-acter at a time using a for loop D. If the character is a comma, the current value issaved E (if there is one). If the current character is a newline, the line is transformedinto a JSON representation F. This example is synchronous, so it’s safe to execute thecallback supplied to _transform at the end of the method G. A toObject method hasbeen included to make it easier to change the internal representation of the headersand values into a JavaScript object H.
The last line in the example creates a readable file stream of CSV data and pipes itthrough the CSV parser, and that output is piped again back through stdout so theresults can be viewed I. This could also be piped through a compression module to
If the character is a line ending, record the previously collected header or field, and then use push to send a JSON version of the data fields to the internal queue.F
When processing has finished, call the callback provided by Node.
G
Convert the internal array of headers and the most recent line of fields into an object that can be converted to JSON.
H
Headers are assumed to be on the first line; otherwise the most recently collected data is assumed to be a data value.I
www.it-ebooks.info

105TECHNIQUE 35 Optimizing streams
directly support compressed CSV files, or anything else you can think of doing withpipe and streams.
This example doesn’t implement all of the things real-world CSV files can contain,but it does show that building streaming parsers with stream.Transform isn’t toocomplicated, depending on the file format or protocol.
Now that you’ve learned how to use the base classes, you’re probably wonderingwhat the options argument in listing 5.10 was used for. The next section includessome details on how to use options to optimize stream throughput, and details somemore advanced techniques.
5.5 Advanced patterns and optimizationThe stream base classes accept various options for tailoring their behavior, and someof these options can be used to tune performance. This section has techniques foroptimizing streams, using the older streams API, adapting streams based on input, andtesting streams.
TECHNIQUE 35 Optimizing streams
Built-in streams and the classes used to build custom streams allow the internal buffersize to be configured. It’s useful to know how to optimize this value to attain thedesired performance characteristics.
■ ProblemYou want to read data from a file, but are concerned about either speed or memoryperformance.
■ SolutionOptimize the stream’s buffer size to suit your application’s requirements.
■ DiscussionThe built-in stream functions take a buffer size parameter, which allows the perfor-mance characteristics to be tailored to a given application. The fs.createReadStreammethod takes an options argument that can include a bufferSize property. Thisoption is passed to stream.Readable, so it’ll control the internal buffer used to tem-porarily store file data before it’s used elsewhere.
The stream created by zlib.createGzip is an instance of streams.Transform, andthe Zlib class creates its own internal buffer object for storing data. Controlling thesize of this buffer is also possible, but this time the options property is chunkSize.Node’s documentation has a section on optimizing the memory usage of zlib,1 basedon the documentation in the zlib/zconf.h header file, which is part of the low-levelsource code used to implement zlib itself.
In practice it’s quite difficult to push Node’s streams to exhibit different CPU per-formance characteristics based on buffer size. But to illustrate the concept, we’veincluded a small benchmarking script that includes some interesting ideas about mea-suring stream performance. The next listing attempts to gather statistics on memoryand elapsed time.
1 See “Memory Usage Tuning”—http://nodejs.org/docs/latest/api/all.html#all_process_memoryusage.
www.it-ebooks.info

106 CHAPTER 5 Streams: Node’s most powerful and misunderstood feature
var fs = require('fs');var zlib = require('zlib');
function benchStream(inSize, outSize) {var time = process.hrtime();var watermark = process.memoryUsage().rss;var input = fs.createReadStream('/usr/share/dict/words', {bufferSize: inSize
});var gzip = zlib.createGzip({ chunkSize: outSize });var output = fs.createWriteStream('out.gz', { bufferSize: inSize });
var memoryCheck = setInterval(function() {var rss = process.memoryUsage().rss;
if (rss > watermark) {watermark = rss;
}}, 50);
input.on('end', function() {var memoryEnd = process.memoryUsage();clearInterval(memoryCheck);
var diff = process.hrtime(time);console.log([
inSize,outSize,(diff[0] * 1e9 + diff[1]) / 1000000,watermark / 1024].join(', ')
);});
input.pipe(gzip).pipe(output);
return input;}
console.log('file size, gzip size, ms, RSS');
var fileSize = 128;var zipSize = 5024;
function run(times) {benchStream(fileSize, zipSize).on('end', function() {times--;fileSize *= 2;zipSize *= 2;
if (times > 0) {run(times);
}});
Listing 5.11 Benchmarking streams
hrtime is used to get precise nanosecond measurements of the current time.
B
A timer callback is used to periodically check on memory usage and record the highest usage for the current benchmark.C
When the input has ended, gather the statistics.D
Log the results of the memory usage and time, converting the nanosecond measurements into milliseconds.
E
Stream the input file through the gzip instance and back out to a file.F
A callback that will run when each benchmark finishes.
G
Recursively call the benchmark function.H
www.it-ebooks.info

107TECHNIQUE 35 Optimizing streams
}
run(10); 8((callout-streams-buffer-size-8))
This is a long example, but it just uses some of Node’s built-in functionality to gathermemory statistics over time for streams designed to use different buffer sizes. The bench-Stream function performs most of the work and is executed several times. It records thecurrent time using hrtime B, which returns more precise measurements thanDate.now() would. The input stream is the Unix dictionary file, which is piped througha gzip stream and then out to a file F. Then benchStream uses setInterval to run a peri-odic check on the memory usage C. When the input stream ends D, the memory usageis calculated based on the values before and after the input file was gzipped.
The run function doubles the input file’s buffer and gzip buffer G to show theimpact on memory and the time taken to read the streams over time. When the read-ing of the input file completes, the memory usage and elapsed time will be printed E.The input file is returned by the benchStream function so run can easily be calledwhen benchmarking has finished. The run function will be called repeatedly H,depending on the first argument passed to it I.
Note that process.hrtime has been used to accurately benchmark the elapsedtime. This method can be used for benchmarking because it’s precise, and alsoaccepts a time argument for automatically calculating the elapsed time.
I (Alex) ran this program with a 20 MB file to try to generate more interesting resultsthan /usr/share/dict/words, and I’ve included a graph of the results in figure 5.5.
Initially call the benchmark function with the number of times we want it to run.I
80,000
Effects of buffer size on memory and time
60,000
40,000
20,000
Buffer size
0
Time (ms) RSS
Figure 5.5 A graphical representation of the mem-ory usage of streams
www.it-ebooks.info

108 CHAPTER 5 Streams: Node’s most powerful and misunderstood feature
I found when I experimented with various files that the results indicated that elapsedtime was far less affected than the memory usage. That indicates that it’s generallydesirable to use smaller buffers and be more conservative about memory usage,although this test should be repeated with a load-testing benchmark to really see howlong it takes Node to process those buffers.
Node had an older API for streams that had different semantics for pausing astream. Although the newer API should be used where possible, it’s possible to use theolder API alongside the newer one. The next technique demonstrates how to usemodules written with the older API.
TECHNIQUE 36 Using the old streams API
Before Node 0.10 (and technically 0.9.4), streams had a different API. Code writtenusing that API can be used with the newer APIs by wrapping it to behave like the newerstream.Readable class.
■ ProblemYou want to use a module that implements the old-style streaming API with classes thatuse the newer APIs.
■ SolutionUse Readable.prototype.wrap.
■ DiscussionThe older stream API had readable and writable streams, but pausing a stream was“advisory” only. This led to a different API design that wasn’t based around the newerstreams2 classes. As people gradually realized how useful streamable classes are, awealth of modules appeared on npm. Although the newer API solves key problemswith the older design, there are still useful modules that haven’t been updated.
Fortunately, older classes can be wrapped using the Readable.prototype.wrapmethod provided by the stream module. It literally wraps the older interface to makeit behave like the newer stream.Readable class—it effectively creates a Readableinstance that uses the older class as its data source.
Listing 5.12 shows an example of a stream implemented with the older API that hasbeen wrapped with the newer Readable class.
var stream = require('stream');var Readable = stream.Readable;var util = require('util');
util.inherits(MemoryStream, stream);
function MemoryStream(interval) {this.readable = true;
setInterval(function() {var data = process.memoryUsage();data.date = new Date();this.emit('data', JSON.stringify(data) + 'n');
Listing 5.12 An old-style stream that has been wrapped
The older APIrequired that
classes inheritedfrom the streammodule and set
the readableproperty to true.
B
The data event is emittedwith some example values.Make sure strings or Buffer
instances are used.
C
www.it-ebooks.info
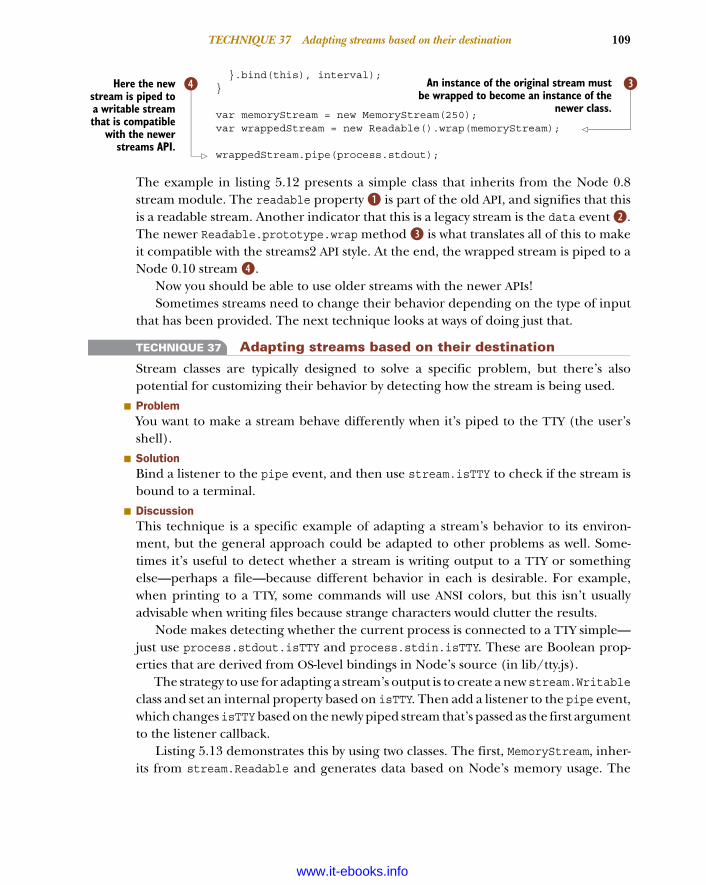
109TECHNIQUE 37 Adapting streams based on their destination
}.bind(this), interval);}
var memoryStream = new MemoryStream(250);var wrappedStream = new Readable().wrap(memoryStream);
wrappedStream.pipe(process.stdout);
The example in listing 5.12 presents a simple class that inherits from the Node 0.8stream module. The readable property B is part of the old API, and signifies that thisis a readable stream. Another indicator that this is a legacy stream is the data event C.The newer Readable.prototype.wrap method D is what translates all of this to makeit compatible with the streams2 API style. At the end, the wrapped stream is piped to aNode 0.10 stream E.
Now you should be able to use older streams with the newer APIs! Sometimes streams need to change their behavior depending on the type of input
that has been provided. The next technique looks at ways of doing just that.
TECHNIQUE 37 Adapting streams based on their destination
Stream classes are typically designed to solve a specific problem, but there’s alsopotential for customizing their behavior by detecting how the stream is being used.
■ ProblemYou want to make a stream behave differently when it’s piped to the TTY (the user’sshell).
■ SolutionBind a listener to the pipe event, and then use stream.isTTY to check if the stream isbound to a terminal.
■ DiscussionThis technique is a specific example of adapting a stream’s behavior to its environ-ment, but the general approach could be adapted to other problems as well. Some-times it’s useful to detect whether a stream is writing output to a TTY or somethingelse—perhaps a file—because different behavior in each is desirable. For example,when printing to a TTY, some commands will use ANSI colors, but this isn’t usuallyadvisable when writing files because strange characters would clutter the results.
Node makes detecting whether the current process is connected to a TTY simple—just use process.stdout.isTTY and process.stdin.isTTY. These are Boolean prop-erties that are derived from OS-level bindings in Node’s source (in lib/tty.js).
The strategy to use for adapting a stream’s output is to create a new stream.Writableclass and set an internal property based on isTTY. Then add a listener to the pipe event,which changes isTTY based on the newly piped stream that’s passed as the first argumentto the listener callback.
Listing 5.13 demonstrates this by using two classes. The first, MemoryStream, inher-its from stream.Readable and generates data based on Node’s memory usage. The
An instance of the original stream mustbe wrapped to become an instance of the
newer class.
DHere the newstream is piped toa writable streamthat is compatible
with the newerstreams API.
E
www.it-ebooks.info

110 CHAPTER 5 Streams: Node’s most powerful and misunderstood feature
second, OutputStream, monitors the stream it’s bound to so it can tell the readablestream about what kind of output it expects.
var stream = require('stream');var util = require('util');
util.inherits(MemoryStream, stream.Readable);util.inherits(OutputStream, stream.Writable);
function MemoryStream() {this.isTTY = process.stdout.isTTY;stream.Readable.call(this);
}
MemoryStream.prototype._read = function() {var text = JSON.stringify(process.memoryUsage()) + 'n';if (this.isTTY) {this.push('u001b[32m' + text + 'u001b[39m');
} else {this.push(text);
}};
// A simple writable streamfunction OutputStream() {
stream.Writable.call(this);this.on('pipe', function(dest) {dest.isTTY = this.isTTY;
}.bind(this));}
OutputStream.prototype._write = function(chunk, encoding, cb) {util.print(chunk.toString());cb();
};
var memoryStream = new MemoryStream();
// Switch the desired output stream by commenting one of these lines://memoryStream.pipe(new OutputStream);memoryStream.pipe(process.stdout);
Internally, Node uses isTTY to adapt the behavior of the repl module and the readlineinterface. The example in listing 5.13 tracks the state of process.stdout.isTTY B todetermine what the original output stream was, and then copies that value to subse-quent destinations D. When the terminal is a TTY, colors are used C; otherwise plaintext is output instead.
Streams, like anything else, should be tested. The next technique presents amethod for writing unit tests for your own stream classes.
Listing 5.13 Using isTTY to adapt stream behavior
Set an internal flag to record what kind of output is expected.
B
Use ANSI colors when printing to a terminal.C
When the writable stream is bound with a pipe, change the destination’s isTTY state.
D
www.it-ebooks.info

111TECHNIQUE 38 Testing streams
TECHNIQUE 38 Testing streams
Just like anything else you write, it’s strongly recommended that you test your streams.This technique explains how to use Node’s built-in assert module to test a class thatinherits from stream.Readable.
■ ProblemYou’ve written your own stream class and you want to write a unit test for it.
■ SolutionUse some suitable sample data to drive your stream class, and then call read() orwrite() to gather the results and compare them to the expected output.
■ DiscussionThe common pattern for testing streams, used in Node’s source itself and by manyopen source developers, is to drive the stream being tested using sample data andthen compare the end results against expected values.
The most difficult part of this can be coming up with suitable data to test. Some-times it’s easy to create a text file, or a fixture in testing nomenclature, that can be usedto drive the stream by piping it. If you’re testing a network-oriented stream, then youshould consider using Node’s net or http modules to create “mock” servers that gen-erate suitable test data.
Listing 5.14 is a modified version of the CSV parser from technique 34; it has beenturned into a module so we can easily test it. Listing 5.15 is the associated test that cre-ates an instance of CSVParser and then pushes some values through it.
var stream = require('stream');
module.exports = CSVParser;
CSVParser.prototype = Object.create(stream.Transform.prototype, {constructor: { value: CSVParser }
});
function CSVParser(options) {options = options || {};options.objectMode = true;stream.Transform.call(this, options);
this.value = '';this.headers = [];this.values = [];this.line = 0;
}
CSVParser.prototype._transform = function(chunk, encoding, done) {var c;var i;
Listing 5.14 The CSVParser stream
Export the class so it can be easily tested.
B
We can test this method by calling.push() on an instance of the class.
C
www.it-ebooks.info

112 CHAPTER 5 Streams: Node’s most powerful and misunderstood feature
chunk = chunk.toString();
for (i = 0; i < chunk.length; i++) {c = chunk.charAt(i);
if (c === ',') {this.addValue();
} else if (c === 'n') {this.addValue();if (this.line > 0) {
this.push(this.toObject());}this.values = [];this.line++;
} else {this.value += c;
}}
done();};
CSVParser.prototype.toObject = function() {var i;var obj = {};for (i = 0; i < this.headers.length; i++) {obj[this.headers[i]] = this.values[i];
}return obj;
};
CSVParser.prototype.addValue = function() {if (this.line === 0) {this.headers.push(this.value);
} else {this.values.push(this.value);
}this.value = '';
};
The CSVParser class is exported using module.exports so it can be loaded by the unittest B. The _transform method C will run later when push is called on an instanceof this class. Next up is a simple unit test for this class.
var assert = require('assert');var fs = require('fs');var CSVParser = require('./csvparser');
var parser = new CSVParser();var actual = [];
fs.createReadStream(__dirname + '/sample.csv')
Listing 5.15 Testing the CSVParser stream
www.it-ebooks.info

113Summary
.pipe(parser);
process.on('exit', function() {actual.push(parser.read());actual.push(parser.read());actual.push(parser.read());
var expected = [{ name: 'Alex', location: 'UK', role: 'admin' },{ name: 'Sam', location: 'France', role: 'user' },{ name: 'John', location: 'Canada', role: 'user' }
];
assert.deepEqual(expected, actual);});
A fixture file, sample.csv, has been used to pipe data to the CSVParser instance. Thenthe assert.deepEqual method has been used to make it easy to compare theexpected array with the actual array.
A listener is attached to exit B because we want to wait for the streams to finishprocessing the data before running the assertion. Then data is read C from theparser and pushed to an array to examine with assertions E—the expected values aredefined first D. This pattern is used in Node’s own streams tests, and is a lightweightversion of what test frameworks like Mocha and node-tap provide.
5.6 SummaryIn this chapter you’ve seen how the built-in streamable APIs work, how to create newand novel streams using the base classes provided by Node, and how to use some moreadvanced techniques to structure programs with streams. As you saw in technique 36,building new streams starts with correctly inheriting from the base classes—and don’tforget to test those streams! For more on testing, refer back to technique 38.
As you saw, there are some novel uses of streams, like substack’s baudio module(https://github.com/substack/baudio) that speaks in streams of sound waves. Thereare also two streams APIs: the original Node 0.8 and below API, and the newer streams2API. Forward compatibility is supported through the readable-stream module(https://github.com/isaacs/readable-stream), and backward compatibility is madepossible by wrapping streams (technique 36).
A big part of working with streams is handling files. In the next chapter we’ll lookat Node’s file system handling in detail.
Attach a listener to the exitevent to run the tests when
the streams have finished.
B
Call the stream’s read() method to collect data.
C
Create an array that holds the expected values.
D
Use assert.deepEqual to correctly compare the executed and actual values.E
www.it-ebooks.info

114
File system: Synchronous and asynchronous approaches to files
As we’ve noted in previous chapters, Node’s core modules typically stick to a low-level API. This allows for various (even competing) ideas and implementations ofhigher-level concepts like web frameworks, file parsers, and command-line tools toexist as third-party modules. The fs (or file system) module is no different.
This chapter covers■ Understanding the fs module and its components■ Working with configuration files and file descriptors■ Using file-locking techniques ■ Recursive file operations ■ Writing a file database ■ Watching files and directories
www.it-ebooks.info

115An overview of the fs module
The fs module allows the developer to interact with the file system by providing
■ POSIX file I/O primitives ■ File streaming ■ Bulk file I/O ■ File watching
The fs module is unique compared with other I/O modules (like net and http) inthat it has both asynchronous and synchronous APIs. That means that it provides amechanism to perform blocking I/O. The reason the file system also has a synchro-nous API is largely because of the internal workings of Node itself, namely, the modulesystem and the synchronous behavior of require.
The goal of this chapter is to show you a number of techniques, of varying com-plexity, to use when working with the file system module. We’ll look at
■ Asynchronous and synchronous approaches for loading configuration files■ Working with the file descriptors■ Advisory file-locking techniques■ Recursive file operations■ Writing a file database■ Watching for file and directory changes
But before we get to the techniques, let’s first take a high-level view of all you can dowith the file system API in order to capture the functionality and provide some insightinto what tool may be the best for the job.
6.1 An overview of the fs moduleThe fs module includes wrappers for common POSIX file operations, as well as bulk,stream, and watching operations. It also has synchronous APIs for many of the opera-tions. Let’s take a high-level walk through the different components.
6.1.1 POSIX file I/O wrappers
At a bird’s-eye view, the majority of methods in the file system API are wrappersaround standard POSIX file I/O calls (http://mng.bz/7EKM). These methods willhave a similar name. For example, the readdir call (http://linux.die.net/man/3/readdir) has an fs.readdir counterpart in Node:
var fs = require('fs');fs.readdir('/path/to/dir', function (err, files) {
console.log(files); // [ 'fileA', 'fileB', 'fileC', 'dirA', 'etc' ]});
Table 6.1 shows a list of the supported POSIX file methods in Node, including adescription of their functionality.
www.it-ebooks.info

116 CHAPTER 6 File system: Synchronous and asynchronous approaches to files
Table 6.1 Supported POSIX file methods in Node
POSIX method fs method Description
rename(2) fs.rename Changes the name of a file
truncate(2) fs.truncate Truncates or extends a file to a specified length
ftruncate(2) fs.ftruncate Same as truncate but takes a file descriptor
chown(2) fs.chown Changes file owner and group
fchown(2) fs.fchown Same as chown but takes a file descriptor
lchown(2) fs.lchown Same as chown but doesn’t follow symbolic links
chmod(2) fs.chmod Changes file permissions
fchmod(2) fs.fchmod Same as chmod but takes a file descriptor
lchmod(2) fs.lchmod Same as chmod but doesn’t follow symbolic links
stat(2) fs.stat Gets file status
lstat(2) fs.lstat Same as stat but returns information about link if provided rather than what the link points to
fstat(2) fs.fstat Same as stat but takes a file descriptor
link(2) fs.link Makes a hard file link
symlink(2) fs.symlink Makes a symbolic link to a file
readlink(2) fs.readlink Reads value of a symbolic link
realpath(2) fs.realpath Returns the canonicalized absolute pathname
unlink(2) fs.unlink Removes directory entry
rmdir(2) fs.rmdir Removes directory
mkdir(2) fs.mkdir Makes directory
readdir(2) fs.readdir Reads contents of a directory
close(2) fs.close Deletes a file descriptor
open(2) fs.open Opens or creates a file for reading or writing
utimes(2) fs.utimes Sets file access and modification times
futimes(2) fs.futimes Same as utimes but takes a file descriptor
fsync(2) fs.fsync Synchronizes file data with disk
write(2) fs.write Writes data to a file
read(2) fs.read Reads data from a file
www.it-ebooks.info

117An overview of the fs module
The POSIX methods provide a low-level API to many common file operations. Forexample, here we use a number of synchronous POSIX methods to write data to a fileand then retrieve that data:
var fs = require('fs');var assert = require('assert');
var fd = fs.openSync('./file.txt', 'w+');var writeBuf = new Buffer('some data to write');fs.writeSync(fd, writeBuf, 0, writeBuf.length, 0);
var readBuf = new Buffer(writeBuf.length);fs.readSync(fd, readBuf, 0, writeBuf.length, 0);assert.equal(writeBuf.toString(), readBuf.toString());
fs.closeSync(fd);
When it comes to reading and writing files, typically you won’t need a level this low,but rather can use a streaming or bulk approach.
6.1.2 Streaming
The fs module provides a streaming API with fs.createReadStream and fs.create-WriteStream. fs.createReadStream is a Readable stream, whereas fs.createWrit-eStream is a Writeable. The streaming APIs can connect to other streams with pipe.For example, here’s a simple application that copies a file using streams:
var fs = require('fs');var readable = fs.createReadStream('./original.txt');var writeable = fs.createWriteStream('./copy.txt');readable.pipe(writeable);
File streaming is beneficial when you want to deal with bits and pieces of data at a timeor want to chain data sources together. For a more in-depth look at streams, check outchapter 5.
6.1.3 Bulk file I/O
The file system API also includes a few bulk methods for reading (fs.readFile), writ-ing (fs.writeFile), or appending (fs.appendFile).
The bulk methods are good when you want to load a file into memory or write oneout completely in one shot:
var fs = require('fs');fs.readFile('/path/to/file', function (err, buf) {
console.log(buf.toString());});
Open or create file.txt for writing and reading (w+).Create a
buffer withdata to write.
Write thebuffer tothe file.
Create an empty read buffer the same size as what was written.
Fill the readbuffer with thedata stored in
the file.
Assert the writtenand read data areindeed the same.
Close the file.
Open original.txt tostart reading.Create or
overwritecopy.txt with
new data.
While reading in original.txt, write it out to copy.txt.
Entire file is buffered and provided in the buf variable
www.it-ebooks.info

118 CHAPTER 6 File system: Synchronous and asynchronous approaches to files
6.1.4 File watching
The fs module also provides a couple of mechanisms for watching files (fs.watchand fs.watchFile). This is useful when you want to know if a file has changed insome way. fs.watch uses the underlying operating system’s notifications, making itvery efficient. But fs.watch can be finicky or simply not work on network drives. Forthose situations, the less-efficient fs.watchFile method, which uses stat polling, canbe used.
We’ll look more at file watching later on in this chapter.
6.1.5 Synchronous alternatives
Node’s synchronous file system API sticks out like a sore thumb. With a big Synctacked onto the end of each synchronous method, it’s hard to miss its purpose. Syn-chronous methods are available for all the POSIX and bulk API calls. Some examplesinclude readFileSync, statSync, and readdirSync. Sync tells you that this methodwill block your single-threaded Node process until it has finished. As a general rule,synchronous methods should be used when first setting up your application, and notwithin a callback:
var fs = require('fs');var http = require('http');fs.readFileSync('./output.dat');
http.createServer(function (req, res) {fs.readFileSync('./output.dat');
}).listen(3000);
Of course there are exceptions to the rule, but what’s important is understanding theperformance implications of using synchronous methods.
With our quick overview out of the way, we’re now ready to get into some of the tech-niques you’ll use when working with the file system.
A good spot for a synchronous method, top level, gets called on initialization of the application
A bad spot for a synchronous method, halts the server until the file is read on every request
Testing server performanceHow do we know synchronous execution within the request handling of a web serveris slower? A great way to test this is using ApacheBench (http://en.wikipedia.org/wiki/ApacheBench). Our earlier example showed a ~2x drop in performance whenserving a 10 MB file synchronously on every request rather than cached during appli-cation setup. Here’s the command used in this test:
ab -n 1000 -c 100 "http://localhost:3000"
www.it-ebooks.info

119TECHNIQUE 39 Loading configuration files
TECHNIQUE 39 Loading configuration files
Keeping configuration in a separate file can be handy, especially for applications thatrun in multiple environments (like development, staging, and production). In thistechnique, you’ll learn the ins and outs of how to load configuration files.
■ ProblemYour application stores configuration in a separate file and it depends on having thatconfiguration when it starts up.
■ SolutionUse a synchronous file system method to pull in the configuration on initial setup ofyour application.
■ DiscussionA common use of synchronous APIs is for loading configuration or other data used inthe application on startup. Let’s say we have a simple configuration file stored as JSONthat looks like the following:
{"site title": "My Site","site base url": "http://mysite.com","google maps key": "92asdfase8230232138asdfasd","site aliases": [ "http://www.mysite.com", "http://mysite.net" ]
}
Let’s first look at how we could do this asynchronously so you can see the difference.For example, say doThisThing depends on information from our configuration file.Asynchronously we could write it this way:
var fs = require('fs');fs.readFile('./config.json', function (err, buf) {
if (err) throw er;var config = JSON.parse(buf.toString());doThisThing(config);
})
This will work and may be desirable for some setups, but will also have the effect ofhaving everything that depends on the configuration nested in one level. This can getugly. By using a synchronous version, we can handle things more succinctly:
var fs = require('fs');var config = JSON.parse(fs.readFileSync('./config.json').toString());doThisThing(config);
One of the characteristics of using Sync methods is that whenever an error occurs, itwill be thrown:
var fs = require('fs');try {
fs.readFileSync('./some-file');
Since the application can’t run without this config file, we’ll just throw the error so the Node process will exit with a stack trace.
We get a Buffer back, convert to a string, and then parse the JSON.
Synchronous methods willautomatically throw if there’s an error.
Synchronous errors can be caught using a standard try/catch block.
www.it-ebooks.info

120 CHAPTER 6 File system: Synchronous and asynchronous approaches to files
}catch (err) {
console.error(err);}
This is different from asynchronous methods, which use an error argument as the firstparameter of the callback:
fs.readFile('./some-file', function (err, data) {if (err) {console.error(err);
}});
In our example of loading a configuration file, we prefer to crash the applicationsince it can’t function without that file, but sometimes you may want to handle syn-chronous errors.
TECHNIQUE 40 Using file descriptors
Working with file descriptors can be confusing at first if you haven’t dealt with them.This technique serves as an introduction and shows some examples of how you usethem in Node.
■ ProblemYou want to access a file descriptor to do writes or reads.
■ SolutionUse Node’s fs file descriptor methods.
■ DiscussionFile descriptors (FDs) are integers (indexes) associated with open files within a processmanaged by the operating system. As a process opens files, the operating system keepstrack of these open files by assigning each a unique integer that it can then use to lookup more information about the file.
Although it has file in the name, it covers more than just regular files. File descrip-tors can point to directories, pipes, network sockets, and regular files, to name a few.
Handle the error.
A note about requireWe can require JSON files as modules in Node, so our code could even be short-ened further:
var config = require('./config.json');doThisThing(config);
But there’s one caveat with this approach. Modules are cached globally in Node, soif we have another file that also requires config.json and we modify it, it’s modifiedeverywhere that module is used in our application. Therefore, using readFileSyncis recommended when you want to tamper with the objects. If you choose to userequire instead, treat the object as frozen (read-only); otherwise you can end up withhard-to-track bugs. You can explicitly freeze an object by using Object.freeze.
Asynchronous errors are handled as the first parameter in the callback function.Handle
the error.
www.it-ebooks.info

121TECHNIQUE 41 Working with file locking
Node can get at these low-level bits. Most processes have a standard set of file descrip-tors, as shown in table 6.2.
In Node, we typically are used to the console.log sugar when we want to write to stdout:
console.log('Logging to stdout')
If we use the stream objects available on the process global, we can accomplish thesame thing more explicitly:
process.stdout.write('Logging to stdout')
But there’s another, far less used way to write to stdout using the fs module. The fsmodule contains a number of methods that take an FD as its first argument. We canwrite to file descriptor 1 (or stdout) using fs.writeSync:
fs.writeSync(1, 'Logging to stdout')
SYNCHRONOUS LOGGING console.log and process.stdout.write are actu-ally synchronous methods under the hood, provided the TTY is a file stream
A file descriptor is returned from the open and openSync calls as a number:
var fd = fs.openSync('myfile','a');console.log(typeof fd == 'number');
There are a variety of methods that deal with file descriptors specified in the file sys-tem documentation.
Typically more interesting uses of file descriptors happen when you’re inheritingfrom a parent process or spawning a child process where descriptors are shared orpassed. We’ll discuss this more when we look at child processes in a later chapter.
TECHNIQUE 41 Working with file locking
File locking is helpful when cooperating processes need access to a common filewhere the integrity of the file is maintained and data isn’t lost. In this technique, we’llexplore how to write your own file locking module.
■ ProblemYou want to lock a file to prevent processes from tampering with it.
■ SolutionSet up a file-locking mechanism using Node’s built-ins.
Table 6.2 Common file descriptors
Stream File descriptor Description
stdin 0 Standard input
stdout 1 Standard output
stderr 2 Standard error
Returns true
www.it-ebooks.info

122 CHAPTER 6 File system: Synchronous and asynchronous approaches to files
■ DiscussionIn a single-threaded Node process, file locking is typically something you won’t needto worry about. But you may have situations where other processes are accessing thesame file, or a cluster of Node processes are accessing the same file.
In these cases, there’s the possibility that races and data loss may occur (more aboutthis at http://mng.bz/yTLV). Most operating systems provide mandatory locks (thoseenforced at a kernel level) and advisory locks (not enforced; these only work if processesinvolved subscribe to the same locking scheme). Advisory locks are generally preferred ifpossible, as mandatory locks are heavy handed and may be difficult to unlock (https://kernel.org/doc/Documentation/filesystems/mandatory-locking.txt).
FILE LOCKING WITH THIRD-PARTY MODULES Node has no built-in support forlocking a file directly (either mandatory or advisory). But advisory locking offiles can be done using syscalls such as flock (http://linux.die.net/man/2/flock), which is available in a third-party module (http://github.com/baudehlo/node-fs-ext).
Instead of locking a file directly with something like flock, you can use a lockfile. Lock-files are ordinary files or directories whose existence indicates some other resource iscurrently in use and not to be tampered with. The creation of a lockfile needs to beatomic (no races) to avoid collisions. Being advisory, all the participating processeswould have to play by the same rules agreed on when the lockfile is present. This isillustrated in figure 6.1.
Let’s say we had a file called config.json that could potentially be updated by anynumber of processes at any time. To avoid data loss or corruption, a config.lock filecould be created by the process making the updates and removed when the process isfinished. Each process would agree to check for the existence of the lockfile beforemaking any updates.
1
1
2
3
2
3 Process A tries to create alockfile and is successful.
Process A, having obtained thelock, modifies the sharedresource.
Process B tries to create a lockfileand is not successful, does notmodify shared resource.
Process A Process B
Lockfile
Resource
Figure 6.1 Advisory locking using a lockfile between cooperating processes
www.it-ebooks.info

123TECHNIQUE 41 Working with file locking
Node provides a few ways to perform this out of the box. We’ll look at a couple of options:
■ Creating a lockfile using the exclusive flag■ Creating a lockfile using mkdir
Let’s look at using the exclusive flag first.
Creating lockfiles using the exclusive flagThe fs module provides an x flag for any methods that involve opening a file (likefs.writeFile, fs.createWriteStream, and fs.open). This flag tells the operatingsystem the file should be opened in an exclusive mode (O_EXCL). When used, the filewill fail to open if it already exists:
fs.open('config.lock', 'wx', function (err) {if (err) return console.error(err);
});
FLAG COMBINATIONS WHEN OPENING FILES There are a variety of flag combina-tions you can pass when opening files; for a list of all of them consult thefs.open documentation: http://nodejs.org/api/fs.html#fs_fs_open_path_flags_mode_callback.
We want to fail if another process has already created a lockfile. We fail because we don’twant to tamper with the resource behind the lockfile while another process is using it.Thus, having the exclusive flag mechanism turns out to be useful in our case. Butinstead of writing an empty file, it’s a good idea to throw the PID (process ID) inside ofthis file so if something bad happens, we’ll know what process had the lock last:
fs.writeFile('config.lock', process.pid, { flags: 'wx' },function (err) {
if (err) return console.error(err);
});
Creating lockfiles with mkdirExclusive mode may not work well if the lockfile exists on a network drive, sincesome systems don’t honor the O_EXCL flag on network drives. To circumvent this,another strategy is creating a lockfile as a directory. mkdir is an atomic operation (noraces), has excellent cross-platform support, and works well with network drives.mkdir will fail if a directory exists. In this case, the PID could be stored as a file insideof that directory:
fs.mkdir('config.lock', function (err) {if (err) return console.error(err);fs.writeFile('config.lock/'+process.pid, function (err) {if (err) return console.error(err);
});});
Open in an exclusive write mode.
Any failure including if file exists.Safely modify
config.json.
Write PID to lockfile if it doesn’t exist.
Any failureincluding iffile exists.
Safely modify config.json.
Unable to create directory.
Indicate which PID has the lock for debugging.
Safely modify config.json.
www.it-ebooks.info

124 CHAPTER 6 File system: Synchronous and asynchronous approaches to files
Making a lockfile moduleSo far we’ve discussed a couple ways to create lockfiles. We also need a mechanism toremove them when we’re done. In addition, to be good lockfile citizens, we shouldremove any lockfiles created whenever our process exits. A lot of this functionality canbe wrapped up in a simple module:
var fs = require('fs');var hasLock = false;var lockDir = 'config.lock';
exports.lock = function (cb) {if (hasLock) return cb();
fs.mkdir(lockDir, function (err) {if (err) return cb(err);fs.writeFile(lockDir+'/'+process.pid, function (err) {if (err) console.error(err);hasLock = true;return cb();
});});
}
exports.unlock = function (cb) {if (!hasLock) return cb();
fs.unlink(lockDir+'/'+process.pid, function (err) {if (err) return cb(err);fs.rmdir(lockDir, function (err) {if (err) return cb(err);hasLock = false;cb();
});});
}
process.on('exit', function () {if (hasLock) {
fs.unlinkSync(lockDir+'/'+process.pid);fs.rmdirSync(lockDir);console.log('removed lock');
}});
Here’s an example usage:
var locker = require('./locker');
locker.lock(function (err) {if (err) throw err;
locker.unlock(function () { });})
Define a method for obtaining a lock.
A lock isalready
obtained.
Unable to create a lock.
Write PID indirectory for
debugging.
If unable to write PID, not the end of the world: log and keep going.
Lockcreated.
Define a method for releasing a lock.No lock to
unlock.
If we still have a lock, remove it synchronously before exit.
Try to attain a lock.
Do modifications here.
Release lock when finished.
www.it-ebooks.info

125TECHNIQUE 42 Recursive file operations
For a more full-featured implementation using exclusive mode, check out the lockfilethird-party module (https://github.com/isaacs/lockfile).
TECHNIQUE 42 Recursive file operations
Ever need to remove a directory and all subdirectories (akin to rm -rf)? Create adirectory and any intermediate directories given a path? Search a directory tree for aparticular file? Recursive file operations are helpful and hard to get right, especiallywhen done asynchronously. But understanding how to perform them is a good exer-cise in mastering evented programming with Node. In this technique, we’ll dive intorecursive file operations by creating a module for searching a directory tree.
■ ProblemYou want to search for a file within a directory tree.
■ SolutionUse recursion and combine file system primitives.
■ DiscussionWhen a task spans multiple directories, things become more interesting, especially inan asynchronous world. You can mimic the command-line functionality of mkdir witha single call to fs.mkdir, but for fancier things like mkdir -p (helpful for creating inter-mediate directories), you have to think recursively. This means the solution to our prob-lem will depend on “solutions to smaller instances of the same problem” (“Recursion(computer science)”: http://en.wikipedia.org/wiki/Recursion_(computer_science)).
In our example we’ll write a finder module. Our finder module will recursivelylook for matching files at a given start path (akin to find /start/path -name='file-in-question') and provide the paths to those files in an array.
Let’s say we had the following directory tree:
rootdir-a
dir-bdir-c
file-e.pngfile-c.jsfile-d.txt
file-a.jsfile-b.txt
A search for the pattern /file.*/ from the root would give us the following:
[ 'dir-a/dir-b/dir-c/file-e.png','dir-a/dir-b/file-c.js','dir-a/dir-b/file-d.txt','dir-a/file-a.js','dir-a/file-b.txt' ]
So how do we build this? To start, the fs module gives us some primitives we’ll need:
www.it-ebooks.info

126 CHAPTER 6 File system: Synchronous and asynchronous approaches to files
■ fs.readdir/fs.readdirSync—List all the files (including directories), given apath.
■ fs.stat/fs.statSync—Give us information about a file at the specified path,including whether the path is a directory.
Our module will expose synchronous (findSync) and asynchronous (find) imple-mentations. findSync will block execution like other Sync methods, will be slightlyfaster than its asynchronous counterpart, and may fail on excessively large directorytrees (since JavaScript doesn’t have proper tail calls yet: https://people.mozilla.org/~jorendorff/es6-draft.html#sec-tail-position-calls).
On the other hand, find will be slightly slower, but won’t fail on large trees (since thestack is regularly cleared due to the calls being asynchronous). find won’t blockexecution.
Let’s take a look at the code for findSync first:
var fs = require('fs');var join = require('path').join;
exports.findSync = function (nameRe, startPath) {var results = [];
function finder (path) {var files = fs.readdirSync(path);
for (var i = 0; i < files.length; i++) {var fpath = join(path,files[i]);var stats = fs.statSync(fpath);
if (stats.isDirectory()) finder(fpath);if (stats.isFile() && nameRe.test(files[i])) results.push(fpath);
}}
finder(startPath);return results;
}
Why are synchronous functions slightly faster?Synchronous functions aren’t deferred until later, even though the asynchronouscounterparts happen very quickly. Synchronous functions happen right away whileyou’re already on the CPU and you’re guaranteed to wait only exactly as long as nec-essary for the I/O to complete. But synchronous functions will block other things fromhappening during the wait period.
Takes a regular expression for the file we’re searching for and a starting path.
Collectionto store
matches.
Read a list of files (including directories).
Get pathto current
file. Get stats for current file
If it’s a directory,call finder again
with the new path.If it’s a file and matchessearch, add it to results.
Start initialfile lookup. Return results.
www.it-ebooks.info

127TECHNIQUE 42 Recursive file operations
Since everything is synchronous, we can use return at the end to get all our results, asit’ll never reach there until all the recursion has finished. The first error to occur wouldthrow and could be caught, if desired, in a try/catch block. Let’s look at a sample usage:
var finder = require('./finder');try {
var results = finder.findSync(/file.*/, '/path/to/root');console.log(results);
} catch (err) {console.error(err);
}
Let’s switch now and take a look at how to tackle this problem asynchronously with thefind implementation:
var fs = require('fs');var join = require('path').join;
exports.find = function (nameRe, startPath, cb) {var results = [];var asyncOps = 0;var errored = false;
function error (err) {if (!errored) cb(err);errored = true;
}
function finder (path) {asyncOps++;fs.readdir(path, function (err, files) {
if (err) return error(err);
files.forEach(function (file) {var fpath = join(path,file);
asyncOps++;fs.stat(fpath, function (err, stats) {
if (err) return error(err);
if (stats.isDirectory()) finder(fpath);if (stats.isFile() && nameRe.test(file)) results.push(fpath);
asyncOps--;if (asyncOps == 0) cb(null, results);
})})
asyncOps--;if (asyncOps == 0) cb(null, results);
});}
finder(startPath);}
Success!List files
found.Oh no! Something bad happened; log error.
Find now takes a third callback parameter.
In order toknow when
we’ve completedour traversal,
we’ll need acounter.
In order to avoid multiple error calls if we’re unsuccessful, we’ll track when an error occurs.Error handler to
ensure callbackis only called
once if multipleerrors. Increment counter before each
asynchronous operation.
Need a closure here so we don’t lose our file reference later on.
Decrementcounter after an
asynchronousoperation has
completed.
If we’re back to zero, we’re done and had no errors, and can call back with the results.
www.it-ebooks.info

128 CHAPTER 6 File system: Synchronous and asynchronous approaches to files
We can’t just return our results, like in the synchronous version; we need to call backwith them when we know we’re finished. To know that we’re finished, we use a coun-ter (asyncOps). We also have to be aware whenever we have callbacks to ensure wehave a closure around any variables we expect to have around when any asynchronouscall completes (this is why we switched from a standard for loop to a forEach call—more about this at http://mng.bz/rqEA).
Our counter (asyncOps) increments right before we do an asynchronous opera-tion (like fs.readdir or fs.stat). The counter decrements in the callback for theasynchronous operation. Specifically it decrements after any other asynchronous callshave been made (otherwise we’ll get back to 0 too soon). In a successful scenario,asyncOps will reach 0 when all the recursive asynchronous work has completed, andwe can call back with the results (if (asyncOps == 0) cb(null, results)). In a failurescenario, asyncOps will never reach 0, and one of the error handlers would’ve beentriggered and have already called back with the error.
Also, in our example, we can’t be sure that fs.stat will be the last thing to becalled, since we may have a directory with no files in our chain, so we check at bothspots. We also have a simple error wrapper to ensure we never call back with morethan one error. If your asynchronous operation returns one value like in our exampleor one error, it’s important to ensure you’ll never call the callback more than once, asit leads to hard-to-track bugs later down the road.
ALTERNATIVES TO COUNTERS The counter isn’t the only mechanism that cantrack the completion of a set of asynchronous operations. Depending on therequirements of the application, recursively passing the original callbackcould work. For an example look at the third-party mkdirp module (https://github.com/substack/node-mkdirp).
Now we have an asynchronous version (find) and can handle the result of that opera-tion with the standard Node-style callback signature:
var finder = require('./finder');finder.find(/file*/, '/path/to/root', function (err, results) {
if (err) return console.error(err);console.log(results);
});
THIRD-PARTY SOLUTIONS TO PARALLEL OPERATIONS Parallel operations can behard to keep track of, and can easily become bug-prone, so you may want touse a third-party library like async (https://github.com/caolan/async) tohelp. Another alternative is using a promises library like Q (https://github.com/kriskowal/q).
TECHNIQUE 43 Writing a file database
Node’s core fs module gives you the tools to build complexity like the recursive oper-ations you saw in the last technique. It also enables you to do other complex tasks such
www.it-ebooks.info

129TECHNIQUE 43 Writing a file database
as creating a file database. In this technique we’ll write a file database in order to lookat other pieces in the fs module, including streaming, working together.
■ ProblemYou want a simple and fast data storage structure with some consistency guarantees.
■ SolutionUse an in-memory database with append-only journaling.
■ DiscussionWe’ll write a simple key/value database module. The database will provide in-memoryaccess to the current state for speed and use an append-only storage format on diskfor persistence. Using append-only storage will provide us the following:
■ Efficient disk I/O performance—We’re always writing to the end of the file.■ Durability—The previous state of the file is never changed in any way.■ A simple way to create backups—We can just copy the file at any point to get the
state of the database at that point.
Each line in the file is a record. The record is simply a JSON object with two proper-ties, a key and a value. A key is a string representing a lookup for the value. Thevalue can be anything JSON-serializable, which includes strings and numbers. Let’slook at some sample records:
{"key":"a","value":23}{"key":"b","value":["a","list","of","things"]}{"key":"c","value":{"an":"object"}}{"key":"d","value":"a string"}
If a record is updated, a new version of the record will be found later in the file withthe same key:
{"key":"d","value":"an updated string"}
If a record has been removed, it’ll also be found later in the file with a null value:
{"key":"b","value":null}
When the database is loaded, the journal will be streamed in from top to bottom,building the current state of the database in memory. Remember, data isn’t deleted,so it’s possible to store the following data:
{"key":"c","value":"my first value"}...{"key":"c","value":null}...{"key":"c","value":{"my":"object"}}
In this case, at some point we saved "my first value" as the key c. Later on we deletedthe key. Then, most recently, we set the key to be {"my":"object"}. The most recententry will be loaded in memory, as it represents the current state of the database.
We talked about how data will be persisted to the file system. Let’s talk about theAPI we’ll expose next:
www.it-ebooks.info

130 CHAPTER 6 File system: Synchronous and asynchronous approaches to files
var Database = require('./database');var client = new Database('./test.db');
client.on('load', function () {var foo = client.get('foo');
client.set('bar', 'my sweet value', function (err) {if (err) return console.error(err);console.log('write successful');
});
client.del('baz');});
Let’s dive into the code to start putting this together. We’ll write a Database module tostore our logic. It’ll inherit from EventEmitter so we can emit events back to the con-sumer (like when the database has loaded all its data and we can start using it):
var fs = require('fs')var EventEmitter = require('events').EventEmitter
var Database = function (path) {this.path = path
this._records = Object.create(null)this._writeStream = fs.createWriteStream(this.path, {
encoding: 'utf8',flags: 'a'
})
this._load()}
Database.prototype = Object.create(EventEmitter.prototype)
We want to stream the data stored and emit a “load” event when that’s completed.Streaming will enable us to handle data as it’s being read in. Streaming also is asynchro-nous, allowing the host application to do other things while the data is being loaded:
Database.prototype._load = function () {var stream = fs.createReadStream(this.path, { encoding: 'utf8' });var database = this;
var data = '';stream.on('readable', function () {data += stream.read();var records = data.split('\n');data = records.pop();
Load ourDatabase module. Provide the path to
the database file we want to load and/or create.
Load istriggered whendata is loadedinto memory.
Get thevalue stored
at key foo.
Set a value for key bar.
An error occurred when persisting to disk.
Delete key baz; optionally take afterWrite callback.
Set the path tothe database
storage. Create an internal mapping of all the records in memory.
Create a write stream inappend-only mode tohandle writes to disk.Load the
database.
Inherit fromEventEmitter.
Read the available data.
Splitrecords on
newlines.Pop the last record as it may be incomplete.
www.it-ebooks.info

131TECHNIQUE 43 Writing a file database
for (var i = 0; i < records.length; i++) {try {
var record = JSON.parse(records[i]);if (record.value == null)
delete database._records[record.key];else
database._records[record.key] = record.value;} catch (e) { database.emit('error', 'found invalid record:', records[i]);}
}});stream.on('end', function () {
database.emit('load');});
}
As we read in data from the file, we find all the complete records that exist.
STRUCTURING OUR WRITES TO STRUCTURE OUR READS What do we do with thedata we just pop()ed the last time a readable event is triggered? The lastrecord turns out to always be an empty string ('') because we end each linewith a newline (\n) character.
Once we’ve loaded the data and emitted the load event, a client can start interactingwith the data. Let’s look at those methods next, starting with the simplest—the getmethod:
Database.prototype.get = function (key) {return this._records[key] || null;
}
Let’s look at storing updates next:
Database.prototype.set = function (key, value, cb) {var toWrite = JSON.stringify({ key: key, value: value }); + '\n'
if (value == null)delete this._records[key];
elsethis._records[key] = value;
this._writeStream.write(toWrite, cb);}
Now we add some sugar for deleting a key:
Database.prototype.del = function (key, cb) {return this.set(key, null, cb);
}
If the record has a null value, delete the record if stored.
Otherwise, for allnon-null values,store the value
for that key.
Emit an error if aninvalid record was
found.
Emit a load event when data is ready to be used.
Return value for key or null if no key exists.
If deleting, removerecord from in-memory
storage.
Stringify JSONstorage object,
and then addnewline.
Otherwise, setkey to value in
memory.Write out record to disk with callback if provided.
Call set for key with null as its value (storing a delete record).
www.it-ebooks.info

132 CHAPTER 6 File system: Synchronous and asynchronous approaches to files
There we have a simple database module. Last thing: we need to export the constructor:
module.exports = Database;
There are various improvements that could be made on this module, like flushingwrites (http://mng.bz/2g19) or retrying on failure. For examples of more full-featuredNode-based database modules, check out node-dirty (https://github.com/felixge/node-dirty) or nstore (https://github.com/creationix/nstore).
TECHNIQUE 44 Watching files and directories
Ever need to process a file when a client adds one to a directory (through FTP, forinstance) or reload a web server after a file is modified? You can do both by watchingfor file changes.
Node has two implementations for file watching. We’ll talk about both in this tech-nique in order to understand when to use one or the other. But at the core, theyenable the same thing: watching files (and directories).
■ ProblemYou want to watch a file or directory and perform an action when a change is made.
■ SolutionUse fs.watch and fs.watchFile.
■ DiscussionIt’s rare to see multiple implementations for the same purpose in Node core. Node’sdocumentation recommends that you prefer fs.watch over fs.watchFile if possible,as it’s considered more reliable. But fs.watch isn’t consistent across operating sys-tems, whereas fs.watchFile is. Why the madness?
The story about fs.watchNode’s event loop taps into the operating system in order to juggle asynchronous I/Oin its single-threaded environment. This also provides a performance benefit, as theOS can let the process know immediately when some new piece of I/O is ready to behandled. Operating systems have different ways of notifying a process about events(that’s why we have libuv). The culmination of that work for file watching is thefs.watch method.
fs.watch combines all these different types of event systems into one method witha common API to provide the following:
■ A more reliable implementation in terms of file change events always getting fired■ A faster implementation, as notifications get passed to Node immediately when
they occur
Let’s look at the older method next.
The story about fs.watchFileThere’s another, older implementation of file watching called fs.watchFile. Itdoesn’t tap into the notification system but instead polls on an interval to see ifchanges have occurred.
www.it-ebooks.info

133TECHNIQUE 44 Watching files and directories
fs.watchFile isn’t as full-fledged in the changes it can detect, nor as fast. But theadvantage of using fs.watchFile is that it’s consistent across platforms and it worksmore reliably on network file systems (like SMB and NFS).
Which one is right for me?The preferred is fs.watch, but since it’s inconsistent across platforms, it’s a good ideato test whether it does what you want (and better to have a test suite).
Let’s write a program to help us play around file watching and see what each APIprovides. First, create a file called watcher.js with the following contents:
var fs = require('fs');fs.watch('./watchdir', console.log);fs.watchFile('./watchdir', console.log);
Now create a directory called watchdir in the same directory as your watcher.js file:
mkdir watchdir
Then, open a couple terminals. In the first terminal, run
node watcher
and in the second terminal, change to watchdir:
cd watchdir
With your two terminals open (preferably side by side), we’ll make changes in watch-dir and see Node pick them up. Let’s create a new file:
touch file.js
We can see the Node output:
rename file.jschange file.js{ dev: 64512,
mode: 16893,nlink: 2,... } { dev: 64512,mode: 16893,nlink: 2,... }
All right, so now we have a file created; let’s update its modification time with thesame command:
touch file.js
Now when we look at our Node output, we see that only fs.watch picked up thischange:
change file.js
So if using touch to update a file when watching a directory is important to your appli-cation, fs.watch has support.
A couple of fs.watch events come quickly (rename and change). These are the only two events fs.watch will emit. The second argument, file.js, is the file that received the event.
The fs.watchFile event comes later and has a different response. It includes two fs.Stats objects for the current and previous state of the file. They’re the same here because the file was just created.
www.it-ebooks.info

134 CHAPTER 6 File system: Synchronous and asynchronous approaches to files
FS.WATCHFILE AND DIRECTORIES Many updates to files while watching a direc-tory won’t be picked up by fs.watchFile. If you want to get this behaviorwith fs.watchFile, watch the individual file.
Let’s try moving our file:
mv file.js moved.js
In our Node terminal, we see the following output indicating both APIs picked up thechange:
rename file.jsrename moved.js{ dev: 64512,
mode: 16893,nlink: 2,... } { dev: 64512,mode: 16893,nlink: 2,... }
The main point here is to test the APIs using the exact use case you want to utilize. Hope-fully, this API will get more stable in the future. Read the documentation to get the latestdevelopment (http://nodejs.org/api/fs.html#fs_fs_watch_filename_options_listener).Here are some tips to help navigate:
■ Run your test case, preferring fs.watch. Are events getting triggered as youexpect them to be?
■ If you intend to watch a single file, don’t watch the directory it’s in; you may endup with more events being triggered.
■ If comparing file stats is important between changes, fs.watchFile providesthat out of the box. Otherwise, you’ll need to manage stats manually usingfs.watch.
■ Just because fs.watch works on your Mac doesn’t mean it will work exactly thesame way on your Linux server. Ensure development and production environ-ments are tested for the desired functionality.
Go forth and watch wisely!
6.2 SummaryIn this chapter we talked through a number of techniques using the fs module. Wecovered asynchronous and synchronous usage while looking at configuration fileloading and recursive file handling. We also looked at file descriptors and file locking.Lastly we implemented a file database.
Hopefully this has expanded your understanding of some of the concepts possiblewith using the fs module. Here are a few takeaways:
fs.watch reports two rename events from the old to the new name.
fs.watchFile indicates the file was modified.
www.it-ebooks.info

135Summary
■ Synchronous methods can be a nicer, simpler way to do things over their asyn-chronous counterparts, but beware of the performance issues, especially ifyou’re writing a server.
■ Advisory file locking is a helpful mechanism for resources shared across multi-ple processes as long as all processes follow the same contract.
■ Parallel asynchronous operations that require some sort of response after com-pletion need to be tracked. Although it’s helpful to understand how to usecounters or recursive techniques, consider using a well-tested third-party mod-ule like async.
■ Look at how you’ll use a particular file to determine which course of action tofollow. If it’s a large file or can be dealt with in chunks, consider using a stream-ing approach. If it’s a smaller file or something you can’t use until you have theentire file loaded, consider a bulk method. If you want to change a particularpart of a file, you probably want to stick with the POSIX file methods.
In the next chapter we’ll look at the other main form of I/O in Node: networking.
www.it-ebooks.info

136
Networking: Node’s true “Hello, World”
The Node.js platform itself is billed as a solution for writing fast and scalable net-work applications. To write network-oriented software, you need to understandhow networking technologies and protocols interrelate. Over the course of thenext section, we explain how networks have been designed around technologystacks with clear boundaries; and furthermore, how Node implements these proto-cols and what their APIs look like.
In this chapter you’ll learn about how Node’s networking modules work. Thisincludes the dgram, dns, http, and net modules. If you’re unsure about networkterminology like socket, packet, and protocol, then don’t worry: we also introduce keynetworking concepts to give you a solid foundation in network programming.
This chapter covers■ Networking concepts and how they relate to Node■ TCP, UDP, and HTTP clients and servers■ DNS■ Network encryption
www.it-ebooks.info

137Networking in Node
7.1 Networking in NodeThis section is an introduction to networking. You’ll learn about network layers, pack-ets, sockets—all of the stuff that networks are made of. These ideas are critical tounderstanding Node’s networking APIs.
7.1.1 Networking terminology
Networking jargon can quickly become overwhelming. To get everyone on the samepage, we’ve included table 7.1, which summarizes the main concepts that will formthe basis of this chapter.
To understand Node’s networking APIs, it’s crucial to learn about layers, packets,sockets, and all the other things that networks are made of. If you don’t learn aboutthe difference between TCP (Transmission Control Protocol) and UDP (User Data-gram Protocol), then it would be difficult for you to know when to use these proto-cols. In this section we introduce the terms you need to know and then explore theconcepts a bit more so you leave the section with a solid foundation.
If you’re responsible for implementing high-level protocols that run on top of HTTPor even low-latency game code that uses UDP, then you should understand each ofthese concepts. We break each of these concepts down into more detail over the nextfew sections.
LAYERS
The stack of protocols and standards that make up the internet and internet technol-ogy in general can be modeled as layers. The lowest layers represent physical media—Ethernet, Bluetooth, fiber optics—the world of pins, voltages, and network adapters.
Table 7.1 Networking concepts
Term Description
Layer A slice of related networking protocols that represents a logical group. The application layer, where we work, is the highest level; physical is the lowest.
HTTP Hypertext Transfer Protocol—An application-layer client-server protocol built on TCP.
TCP Transmission Control Protocol—Allows communication in both directions from the client to the server, and is built on to create application-layer protocols like HTTP.
UDP User Datagram Protocol—A lightweight protocol, typically chosen where speed is desired over reliability.
Socket The combination of an IP address and a port number is generally referred to as a socket.
Packet TCP packets are also known as segments—the combination of a chunk of data along with a header.
Datagram The UDP equivalent of a packet.
MTU Maximum Transmission Unit—The largest size of a protocol data unit. Each layer can have an MTU: IPv4 is at least 68 bytes, and Ethernet v2 is 1,500 bytes.
www.it-ebooks.info
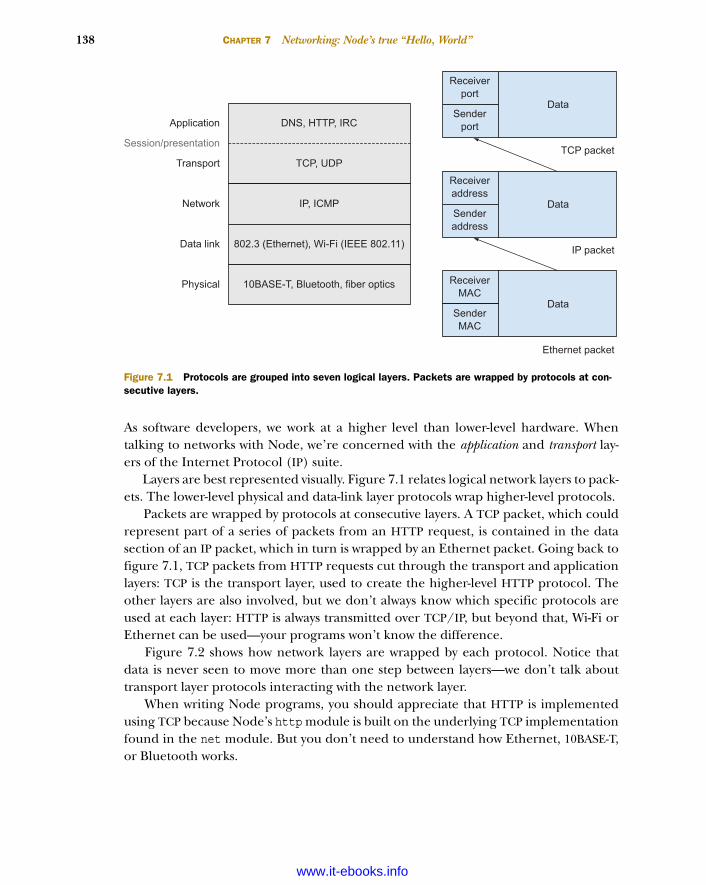
138 CHAPTER 7 Networking: Node’s true “Hello, World”
As software developers, we work at a higher level than lower-level hardware. Whentalking to networks with Node, we’re concerned with the application and transport lay-ers of the Internet Protocol (IP) suite.
Layers are best represented visually. Figure 7.1 relates logical network layers to pack-ets. The lower-level physical and data-link layer protocols wrap higher-level protocols.
Packets are wrapped by protocols at consecutive layers. A TCP packet, which couldrepresent part of a series of packets from an HTTP request, is contained in the datasection of an IP packet, which in turn is wrapped by an Ethernet packet. Going back tofigure 7.1, TCP packets from HTTP requests cut through the transport and applicationlayers: TCP is the transport layer, used to create the higher-level HTTP protocol. Theother layers are also involved, but we don’t always know which specific protocols areused at each layer: HTTP is always transmitted over TCP/IP, but beyond that, Wi-Fi orEthernet can be used—your programs won’t know the difference.
Figure 7.2 shows how network layers are wrapped by each protocol. Notice thatdata is never seen to move more than one step between layers—we don’t talk abouttransport layer protocols interacting with the network layer.
When writing Node programs, you should appreciate that HTTP is implementedusing TCP because Node’s http module is built on the underlying TCP implementationfound in the net module. But you don’t need to understand how Ethernet, 10BASE-T,or Bluetooth works.
DNS, HTTP, IRC
TCP, UDP
IP, ICMP
Data
Receiverport
Senderport
Data
Receiveraddress
Senderaddress
Data
ReceiverMAC
SenderMAC
802.3 (Ethernet), Wi-Fi (IEEE 802.11)
10BASE-T, Bluetooth, fiber optics
Application
Transport
Network
Data link
Physical
Session/presentation
IP packet
Ethernet packet
TCP packet
Figure 7.1 Protocols are grouped into seven logical layers. Packets are wrapped by protocols at con-secutive layers.
www.it-ebooks.info

139Networking in Node
TCP/IP
You’ve probably heard of TCP/IP—this is what we call the Internet Protocol suite becausethe Transmission Control Protocol (TCP) and the Internet Protocol (IP) are the mostimportant and earliest protocols defined by this standard.
In Internet Protocol, a host is identified by an IP address. In IPv4, addresses are 32-bit, which limits the available address space. IP has been at the center of controversyover the last decade because addresses are running out. To fix this, a new version ofthe protocol known as IPv6 was developed.
You can make TCP connections with Node by using the net module. This allowsyou to implement application layer protocols that aren’t supported by the core mod-ules: IRC, POP, and even FTP could be implemented with Node’s core modules. If youfind yourself needing to talk to nonstandard TCP protocols, perhaps something usedinternally in your company, then net.Socket and net.createConnection will makelight work of it.
Node supports both IPv4 and IPv6 in several ways: the dns module can query IPv4 andIPv6 records, and the net module can transmit and receive data to hosts on IPv4 and IPv6networks.
The interesting thing about IP is it doesn’t guarantee data integrity or delivery. Forreliable communication, we need a transport layer protocol like TCP. There are alsotimes when delivery isn’t always required, although of course it’s preferred—in thesesituations a lighter protocol is needed, and that’s where UDP comes in. The next sec-tion examines TCP and UDP in more detail.
UDP AND HOW IT COMPARES TO TCP
Datagrams are the basic unit of communication in UDP. These messages are self-contained, holding a source, destination, and some user data. UDP doesn’t guarantee
Application layer:HTTP, HTTPS, SSH
Transport layer:TCP or UDP
Internet protocol:Addressing and routing
Link layer:Ethernet, Wi-Fi
Application layer:HTTP, HTTPS, SSH
Transport layer:TCP or UDP
Internet protocol:Addressing and routing
Link layer:Ethernet, Wi-Fi
Source Destination
Messages or streams
TCP or UDP
IP datagrams
Physical data transfer
Figure 7.2 Network layer wrapping
www.it-ebooks.info

140 CHAPTER 7 Networking: Node’s true “Hello, World”
delivery or message order, or offer protection against duplicated data. Most protocolsyou’ll use with Node programs will be built on TCP, but there are times when UDP isuseful. If delivery isn’t critical, but performance is desired, then UDP may be a betterchoice. One example is a streaming video service, where occasional glitches are anacceptable trade-off to gain more throughput.
TCP and UDP both use the same network layer—IP. Both provide services to appli-cation layer protocols. But they’re very different. TCP is a connect-oriented and reli-able byte stream service, whereas UDP is based around datagrams, and doesn’tguarantee the delivery of data.
Contrast this to TCP, which is a full-duplex1 connection-oriented protocol. In TCP,there are only ever two endpoints for a given connection. The basic unit of informa-tion passed between endpoints is known as a segment—the combination of a chunk ofdata along with a header. When you hear the term packet, a TCP segment is generallybeing referred to.
Although UDP packets include checksums that help detect corruption, which canoccur as a datagram travels across the internet, there’s no automatic retransmission ofcorrupt packets—it’s up to your application to handle this if required. Packets withinvalid data will be effectively silently discarded.
Every packet, whether it’s TCP or UDP, has an origin and destination address. Butthe source and destination programs are also important. When your Node programconnects to a DNS server or accepts incoming HTTP connections, there has to be a wayto map between the packets traveling along the network and the programs that gener-ated them. To fully describe a connection, you need an extra piece of information.This is known as a port number—the combination of a port number and an address isknown as a socket. Read on to learn more about ports and how they relate to sockets.
SOCKETS
The basic unit of a network, from a programmer’s perspective, is the socket. A socketis the combination of an IP address and a port number—and there are both TCP andUDP sockets. As you saw in the previous section, a TCP connection is full-duplex—opening a connection to a given host allows communication to flow to and from thathost. Although the term socket is correct, historically “socket” meant the Berkeley Sock-ets API.
THE BERKELEY SOCKETS API Berkeley Sockets, released in 1983, was an API forworking with internet sockets. This is the original API for the TCP/IP suite.Although the origins lie in Unix, Microsoft Windows includes a networkingstack that closely follows Berkeley Sockets.
There are well-known port numbers for standard TCP/IP services. They include DNS,HTTP, SSH, and more. These port numbers are usually odd numbers due to historicalreasons. TCP and UDP ports are distinct so they can overlap. If an application layer
1 Full-duplex: messages can be sent and received in the same connection.
www.it-ebooks.info

141Networking in Node
protocol requires both TCP and UDP connections, then the convention is to use thesame port number for both connections. An example of a protocol that uses bothUDP and TCP is DNS.
In Node, you can create TCP sockets with the net module, and UDP is supported bythe dgram module. Other networking protocols are also supported—DNS is a goodexample.
The following sections look at the application layer protocols included in Node’score modules.
7.1.2 Node’s networking modules
Node has a suite of networking modules that allows you to build web and other serverapplications. Over the next few sections we’ll cover DNS, TCP, HTTP, and encryption.
DNS
The Domain Name System (DNS) is the naming system for addressing resources con-nected to the internet (or even a private network). Node has a core module called dnsfor looking up and resolving addresses. Like other core modules, dns has asynchro-nous APIs. In this case, the implementation is also asynchronous, apart from certainmethods that are backed by a thread pool. This means DNS queries in Node are fast,but also have a friendly API that is easy to learn.
You don’t often have to use this module, but we’ve included techniques becauseit’s a powerful API that can come in handy for network programming. Most applica-tion layer protocols, HTTP included, accept hostnames rather than IP addresses.
Node also provides modules for networking protocols that we’re more familiarwith—for example, HTTP.
HTTP
HTTP is important to most Node developers. Whether you’re building web applica-tions or calling web services, you’re probably interacting with HTTP in some way.Node’s http core module is built on the net, stream, buffer, and events modules.It’s low-level, but can be used to create simple HTTP servers and clients without toomuch effort.
Due to the importance of the web to Node development, we’ve included severaltechniques that explore Node’s http module. Also, when we’re working with HTTP weoften need to use encryption—Node also supports encryption through the cryptoand tls modules.
ENCRYPTION
You should know the term SSL—Secure Sockets Layer—because it’s how secure webpages are served to web browsers. Not just HTTP traffic gets encrypted, though—otherservices, like email, encrypt messages as well. Encrypted TCP connections use TLS:Transport Layer Security. Node’s tls module is implemented using OpenSSL.
This type of encryption is called public key cryptography. Both clients and serversmust have private keys. The server can then make its public key available so clients can
www.it-ebooks.info

142 CHAPTER 7 Networking: Node’s true “Hello, World”
encrypt messages. To decrypt these messages, access to the server’s private key isrequired.
Node supports TLS by allowing TCP servers to be created that support severalciphers. The TCP server itself inherits from net.Server—once you’ve got your headaround TCP clients and servers in Node, encrypted connections are just an extensionof these principles.
A solid understanding of TLS is important if you want to deploy web applications withNode. People are increasingly concerned with security and privacy, and unfortunatelySSL/TLS is designed in such a way that programmer error can cause security weaknesses.
There’s one final aspect of networking in Node that we’d like to introduce beforewe move on to the techniques for this chapter: how Node is able to give you asynchro-nous APIs to networking technologies that are sometimes blocking at the system level.
7.1.3 Non-blocking networking and thread pools
This section delves into Node’s lower-level implementation to explore how network-ing works under the hood. If you’re confused about what exactly “asynchronous”means in the context of networking, then read on for some background informationon what makes Node’s networking APIs tick.
Remember that in Node, APIs are said to be asynchronous when they accept a call-back and return immediately. At the operating system level, I/O operations can alsobe asynchronous, or they can be synchronous and wrapped with threads to appearasynchronous.
Node employs several techniques to provide asynchronous network APIs. The mainones are non-blocking system calls and thread pools to wrap around blocking systemcalls.
Behind the scenes, most of Node’s networking code is written in C and C++—theJavaScript code in Node’s source gives you an asynchronous binding to features pro-vided by libuv and c-ares.
Figure 7.3 shows Apple’s Instruments tool recording the activity of a Node pro-gram that makes 50 HTTP requests. HTTP requests are non-blocking—each takesplace using callbacks that are run on the main thread. The BSD sockets library, whichis used by libuv, can make non-blocking TCP and UDP connections.
For HTTP and other TCP connections, Node is able to access the network using asystem-level non-blocking API.
When writing networking or file system code, the Node code looks asynchronous:you pass a function to a method that will execute the function when the I/O operationhas reached the desired state. But for file operations, the underlying implementationis not asynchronous: thread pools are used instead.
When dealing with I/O operations, understanding the difference between non-blocking I/O, thread pools, and asynchronous APIs is important if you want to trulyunderstand how Node works.
www.it-ebooks.info

143TECHNIQUE 45 Creating a TCP server and tracking clients
For those interested in reading more about libuv and networking, the freely availablebook, An Introduction to libuv (http://nikhilm.github.io/uvbook/networking.html#tcp)has a section on networking that covers TCP, DNS, and UDP.
Now on to the first set of networking techniques: TCP clients and servers.
7.2 TCP clients and serversNode has a simple API for creating TCP connections and servers. Most of the lowest-level classes and methods can be found in the net module. In the next technique,you’ll learn how to create a TCP server and track the clients that connect to it. Thecool thing about this is that higher-level protocols like HTTP are built on top of theTCP API, so once you’ve got the hang of TCP clients and servers, you can really start toexploit some of the more subtle features of the HTTP API as well.
TECHNIQUE 45 Creating a TCP server and tracking clients
The net module forms the foundation of many of Node’s networking features. Thistechnique demonstrates how to create a TCP server.
■ ProblemYou want to start your own TCP server, bind to a port, and send data over the network.
■ SolutionUse net.createServer to create a server, and then call server.listen to bind it to aport. To connect to the server, either use the command-line tool telnet or create anin-process client connection with its client counterpart, net.connect.
■ DiscussionThe net.createServer method returns an object that can be used to listen on a givenTCP port for incoming connections. When a client makes a new connection, the callback
Figure 7.3 Node’s threads when making HTTP requests
www.it-ebooks.info

144 CHAPTER 7 Networking: Node’s true “Hello, World”
passed to net.createServer will run. This callback receives a connection object whichextends EventEmitter.
The server object itself is an instance of net.Server, which is just a wrapperaround the net.Socket class. It’s interesting to note that net.Socket is implementedusing a duplex stream—for more on streams, see chapter 5.
Before going into more theory, let’s look at an example that you can run and con-nect to with telnet. The following listing shows a simple TCP server that accepts con-nections and echoes data back to the client.
var net = require('net');var clients = 0;
var server = net.createServer(function(client) {clients++;var clientId = clients;console.log('Client connected:', clientId);
client.on('end', function() {console.log('Client disconnected:', clientId);
});
client.write('Welcome client: ' + clientId + 'rn');client.pipe(client);
});
server.listen(8000, function() {console.log('Server started on port 8000');
});
To try out this example, run node server.js to start a server, and then run telnetlocalhost 8000 to connect to it with telnet. You can connect several times to see theID incremented. If you disconnect, a message should be printed that contains the cor-rect client ID.
Most programs that use TCP clients and servers load the net module B. Once ithas been loaded, TCP servers can be created using net.createServer, which is actu-ally just a shortcut for new net.Server with a listener event listener. After a serverhas been instantiated, it can be set to listen for connections on a given port usingserver.listen H.
To echo back data sent by the client, pipe is used G. Sockets are streams, so youcan use the standard stream API methods with them as you saw in chapter 5.
In this example, we track each client that has connected using a numerical ID byincrementing a “global” value C that tracks the number of clients D. The total number
Listing 7.1 A simple TCP server
Load netmodule.
BCreate ID to reference each client that connects.
CIncrement
ID whenever aclient
connects, andstore a local
client ID value. D Track whenever clients disconnect by binding to end event.
E
Greet each client with their client ID.
F
Pipe data sent bythe client back to
the client. GBind to port 8000 to start accepting new connections.H
www.it-ebooks.info

145TECHNIQUE 46 Testing TCP servers with clients
of connected clients is stored in the callback’s scope by creating a local variable in theconnection callback called clientId.
This value is displayed whenever a client connects F or disconnects E. The clientargument passed to the server’s callback is actually a socket—you can write to it withclient.write and data will be sent over the network.
The important thing to note is any event listener added to the socket in theserver’s callback will share the same scope—it will create closures around any variablesinside this callback. That means the client ID is unique to each connection, and youcan also store other values that clients might need. This forms a common patternemployed by client-server applications in Node.
The next technique builds on this example by adding client connections in thesame process.
TECHNIQUE 46 Testing TCP servers with clients
Node makes creating TCP servers and clients in the same process a breeze—it’s anapproach particularly useful for testing your network programs. In this techniqueyou’ll learn how to make TCP clients, and use them to test a server.
■ ProblemYou want to test a TCP server.
■ SolutionUse net.connect to connect to the server’s port.
■ DiscussionDue to how TCP and UDP ports work, it’s entirely possible to create multiple serversand clients in the same process. For example, a Node HTTP server could also run asimple TCP server on another port that allows telnet connections for remote admin-istration.
In technique 45, we demonstrated a TCP server that can track client connectionsby issuing each client a unique ID. Let’s write a test to ensure this worked correctly.
Listing 7.2 shows how to create client connections to an in-process server, and thenrun assertions on the data sent over the network by the server. Of course, technicallythis isn’t running over a real network because it all happens in the same process, but itcould easily be adapted to work that way; just copy the program to a server and specifyits IP address or hostname in the client.
var assert = require('assert');var net = require('net');var clients = 0;var expectedAssertions = 2;
var server = net.createServer(function(client) {clients++;var clientId = clients;console.log('Client connected:', clientId);
Listing 7.2 Creating TCP clients to test servers
www.it-ebooks.info

146 CHAPTER 7 Networking: Node’s true “Hello, World”
client.on('end', function() {console.log('Client disconnected:', clientId);
});
client.write('Welcome client: ' + clientId + '\r\n');client.pipe(client);
});
server.listen(8000, function() {console.log('Server started on port 8000');
runTest(1, function() {runTest(2, function() {console.log('Tests finished');assert.equal(0, expectedAssertions);server.close();
});});
});
function runTest(expectedId, done) {var client = net.connect(8000);
client.on('data', function(data) {var expected = 'Welcome client: ' + expectedId + '\r\n';assert.equal(data.toString(), expected);expectedAssertions--;client.end();
});
client.on('end', done);}
This is a long example, but it centers around a relatively simple method: net.connect.This method accepts some optional arguments to describe the remote host. Herewe’ve just specified a port number, but the second argument can be a hostname or IPaddress—localhost is the default F. It also accepts a callback, which can be used towrite data to the other end once the client has connected. Remember that TCP serversare full-duplex, so both ends can receive and send data.
The runTest function in this example will run once the server has started listen-ing B. It accepts an expected client ID, and a callback called done E. The callbackwill be triggered once the client has connected, received some data by subscribing tothe data event G, and then disconnected.
Whenever clients are disconnected, the end event will be emitted. We bind thedone callback to this event I. When the test has finished in the data callback, we callclient.end to disconnect the socket manually, but end events will be triggered whenservers close connections, as well.
runTest function accepts a callback so additional tests can be scheduled.
BAfter tests
have finished,a counter is
checked to seeif tests were
executed.
C
Once tests and assertions have run, server can be closed.DrunTest function
connects to server,checks that it
displays expectedclient ID, and then
disconnects.
E
net.connect is used to connect to server; it returns an EventEmitter object that can be used to listen for events.F
Client’s data eventis used to grab themessage the server
displays after theclient connects. G Disconnect client when
data has been sent.H
When client has finished sending data, run callback.I
www.it-ebooks.info

147TECHNIQUE 47 Improve low-latency applications
The data event is where the main test is performed H. The expected message ispassed to assert.equal with the data passed to the event listener. The data is a buffer,so toString is called for the assertion to work. Once the test has finished, and the endevent has been triggered H, the callback passed to runTest will be executed.
We’ve used two calls to runTest here by calling one inside the callback. Once bothhave run, the number of expected assertions is checked C, and the server is shutdown D.
This example highlights two important things: clients and servers can be runtogether in-process, and Node TCP clients and servers are easy to unit test. If the serverin this example were a remote service that we had no control over, then we could createa “mock” server for the express purpose of testing our client code. This forms the basisof how most developers write tests for web applications written with Node.
In the next technique we’ll dig deeper into TCP networking by looking at Nagle’salgorithm and how it can affect the performance characteristics of network traffic.
TECHNIQUE 47 Improve low-latency applications
Although Node’s net module is relatively high-level, it does provide access to somelow-level functionality. One example of this is control over the TCP_NODELAY flag,which determines whether Nagle’s algorithm is used. This technique explains whatNagle’s algorithm is, when you should use it, and how to turn it off for specific sockets.
■ ProblemYou want to improve connection latency in a real-time application.
■ SolutionUse socket.setNoDelay() to enable TCP_NODELAY.
■ DiscussionSometimes it’s more efficient to move batches of things together, rather than sepa-rately. Every day millions of products are shipped around the globe, but they’re notcarried one at a time—instead they’re grouped together in shipping containers, based
Error handlingIf you need to collect errors generated by TCP connections, just subscribe to the errorevent on the EventEmitter objects returned by net.connect. If you don’t, an excep-tion will be raised; this is standard behavior in Node.
Unfortunately, this isn’t easy to work with when dealing with sets of distinct networkconnections. In such cases, a better technique is to use the domain module. Creat-ing a new domain with domain.create() will cause error events to be sent to thedomain; you can then handle them in a centralized error handler by subscribing toerror events on the domain.
For more about domains, refer to technique 21.
www.it-ebooks.info

148 CHAPTER 7 Networking: Node’s true “Hello, World”
on their final destination. TCP works exactly the same way, and this feature is madepossible by Nagle’s algorithm.
Nagle’s algorithm says that when a connection has data that hasn’t yet beenacknowledged, small segments should be retained. These small segments will bebatched into larger segments that can be transmitted when sufficient data has beenacknowledged by the recipient.
In networks where many small packets are transmitted, it can be desirable to reducecongestion by combining small outgoing messages, and sending them together. Butsometimes latency is desired over all else, so transmitting small packets is important.
This is particularly true for interactive applications, like ssh, or the X Window Sys-tem. In these applications, small messages should be delivered without delay to createa sense of real-time feedback. Figure 7.4 illustrates the concept.
Certain classes of Node programs benefit from turning off Nagle’s algorithm. Forexample, you may have created a REPL that transmits a single character at a time asthe user types messages, or a game that transmits location data of players. The nextlisting shows a program that disables Nagle’s algorithm.
var net = require('net');var server = net.createServer(function(c) {
c.setNoDelay(true);c.write('377375042377373001', 'binary');console.log('server connected');c.on('end', function() {
console.log('server disconnected');server.unref();
});c.on('data', function(data) {
process.stdout.write(data.toString());c.write(data.toString());
Listing 7.3 Turning off Nagle’s algorithm
Server
Client
Buffer
4-byte packets
16-byte packet
Figure 7.4 When Nagle’s algorithm is used, smaller packets are collected into a larger payload.
Turn off Nagle’s algorithm.
BForce client touse character
mode.
C
Call unref() so that when last client disconnects, program exits.
DPrint out
charactersfrom client to
the server’sterminal.
E
www.it-ebooks.info

149TECHNIQUE 48 Transferring a file with UDP
});});server.listen(8000, function() {
console.log('server bound');});
To use this example, run the program in a terminal with node nagle.js, and then con-nect to it with telnet 8000. The server turns off Nagle’s algorithm B, and then forcesthe client to use character mode C. Character mode is part of the Telnet Protocol(RFC 854), and will cause the Telnet client to send a packet whenever a key is pressed.
Next, unref is used D to cause the program to exit when there are no more clientconnections. Finally, the data event is used to capture characters sent by the clientand print them to the server’s terminal E.
This technique could form the basis for creating low-latency applications wheredata integrity is important, which therefore excludes UDP. If you really want to getmore control over the transmission of data, then read on for some techniques that useUDP.
7.3 UDP clients and serversCompared to TCP, UDP is a much simpler protocol. That can mean more work foryou: rather than being able to rely on data being sent and received, you have to caterto UDP’s more volatile nature. UDP is suitable for query-response protocols, which iswhy it’s used for the Domain Name System (DNS). It’s also stateless—if you want totransfer data and you value lower latency over data integrity, then UDP is a goodchoice. That might sound unusual, but there are applications that fit these character-istics: media streaming protocols and online games generally use UDP.
If you wanted to build a video streaming service, you could transfer video over TCP,but each packet would have a lot of overhead for ensuring delivery. With UDP, it wouldbe possible for data to be lost with no simple means of discovery, but with video youdon’t care about occasional glitches—you just want data as fast as possible. In fact,some video and image formats can survive a small amount of data loss: the JPEG for-mat is resilient to corrupt bytes to a certain extent.
The next technique combines Node’s file streams with UDP to create a simpleserver that can be used to transfer files. Although this can potentially result in dataloss, it can be useful when you care about speed over all else.
TECHNIQUE 48 Transferring a file with UDP
This technique is really about sending data from a stream to a UDP server rather thancreating a generalized file transfer mechanism. You can use it to learn the basics ofNode’s datagram API.
■ ProblemYou want to transfer data from a client to a server using datagrams.
■ SolutionUse the dgram module to create datagram sockets, and then send data with socket.send.
www.it-ebooks.info

150 CHAPTER 7 Networking: Node’s true “Hello, World”
■ DiscussionSending datagrams is similar to using TCP sockets, but the API is slightly different, anddatagrams have their own rules that reflect the actual structure of UDP packets. To setup a server, use the following snippet:
var dgram = require('dgram');var socket = dgram.createSocket('udp4');socket.bind(4000);
This example creates a socket that will act as the server B, and then binds it to a portC. The port can be anything you want, but in both TCP and UDP the first 1,023 portsare privileged.
The client API is different from TCP sockets because UDP is a stateless protocol. Youmust write data a packet at a time, and packets (datagrams) must be relatively small—under 65,507 bytes. The maximum size of a datagram depends on the MaximumTransmission Unit (MTU) of the network. 64 KB is the upper limit, but isn’t usuallyused because large datagrams may be silently dropped by the network.
Creating a client socket is the same as servers—use dgram.createSocket. Sendinga datagram requires a buffer for the payload, an offset to indicate where in the bufferthe message starts, the message length, the server port, the remote IP, and an optionalcallback that will be triggered when the message has been sent:
var message = 'Sample message';socket.send(new Buffer(message), 0, message.length, port, remoteIP);
Listing 7.4 combines a client and a server into a single program. To run it, you mustissue two commands: node udp-client-server.js server to run the server, andthen node udp-client-server.js client remoteIP to start a client. The remoteIPoption can be omitted if you run both locally; we designed this example to be a singlefile so you can easily copy it to another computer to test sending things over the inter-net or a local network.
var dgram = require('dgram');var fs = require('fs');var port = 41230;var defaultSize = 16;
function Client(remoteIP) {var inStream = fs.createReadStream(__filename);var socket = dgram.createSocket('udp4');
inStream.on('readable', function() {sendData();
});
function sendData() {var message = inStream.read(defaultSize);
Listing 7.4 A UDP client and server
Create UDP socket
B
Bind it to a portC
Create a readable stream for current file
BMake a newdatagramsocket to
use as client
C
When readable stream is ready, start sending its data to the server
DUse
stream.read(size) toread chunks of data
E
www.it-ebooks.info

151TECHNIQUE 48 Transferring a file with UDP
if (!message) {return socket.unref();
}
socket.send(message, 0, message.length, port, remoteIP,function(err, bytes) {
sendData();}
);}
}
function Server() {var socket = dgram.createSocket('udp4');
socket.on('message', function(msg, rinfo) {process.stdout.write(msg.toString());
});
socket.on('listening', function() {console.log('Server ready:', socket.address());
});
socket.bind(port);}
if (process.argv[2] === 'client') {new Client(process.argv[3]);
} else {new Server();
}
When you run this example, it starts by checking the command-line options to see ifthe client or server is required 1). It also accepts an optional argument for clients soyou can connect to remote servers 1!.
If the client was specified, then a new client will be created by making a new data-gram socket C. This involves using a read stream from the fs module so we havesome data to send to the server B—we’ve used __filename to make it read the cur-rent file, but you could make it send any file.
Before sending any data, we need to make sure the file has been opened and isready for reading, so the readable event is subscribed to D. The callback for thisevent executes the sendData function. This will be called repeatedly for each chunk ofthe file—files are read in small chunks at a time using inStream.read E, becauseUDP packets can be silently dropped if they’re too large. The socket.send method isused to push the data to the server G. The message object returned when reading thefile is an instance of Buffer, and it can be passed straight to socket.send.
When all of the data has been read, the last chunk is set to null. Thesocket.unref F method is called to cause the program to exit when the socket is nolonger required—in this case, once it has sent the last message.
When client has finished, call unref to safely close it when no longer needed
F
Otherwise,send datato server G
Create a socket to use for server
HWhen amessage event
is emitted, printdata to terminal
I
Indicate server is ready for clients by printing message
J
Check forcommand-line
options todetermine if
client or servershould be run
1)
Accept optional setting for connecting to remote IP addresses
1!
www.it-ebooks.info

152 CHAPTER 7 Networking: Node’s true “Hello, World”
The server is simpler than the client. It sets up a socket in the same way H, and thensubscribes to two events. The first event is message, which is emitted when a datagramis received I. The data is written to the terminal by using process.stdout.write.This looks better than using console.log because it won’t automatically add newlines.
The listening event is emitted when the server is ready to accept connections J.A message is displayed to indicate this so you know it’s safe to try connecting a client.
Even though this is a simple example, it’s immediately obvious how UDP is differ-ent from TCP—you need to pay attention to the size of the messages you send, andrealize that it’s possible for messages to get lost. Although datagrams have a check-sum, lost or damaged packets aren’t reported to the application layer, which meansdata loss is possible. It’s generally best to use UDP for sending data where assuredintegrity is second place to low latency and throughput.
In the next technique you’ll see how to build on this example by sending messagesback to the client, essentially setting up bidirectional communication channels withUDP.
Datagram packet layout and datagram sizeUDP packets are comparatively simple. They’re composed of a source port, the des-tination port, datagram length, checksum, and the payload data. The length is the to-tal size of the packet—the header size added to the payload’s size. When decidingon your application’s buffer size for UDP packets, you should remember that thelength passed to socket.send is only for the buffer (payload), and the overall packetsize must be under the MTU on the network. The structure of a datagram looks likethe following.
8 bytes
Source port
0 15 16 31
Payload
UDP length UDP checksum
Destination port
The UDP header is 8 bytes, fol-lowed by an optional payload of up to 65,507 bytes for IPv4 and 65,527 bytes for IPv6.
www.it-ebooks.info

153TECHNIQUE 49 UDP client server applications
TECHNIQUE 49 UDP client server applications
UDP is often used for query-response protocols, like DNS and DHCP. This techniquedemonstrates how to send messages back to the client.
■ ProblemYou’ve created a UDP server that responds to requests, but you want to send messagesback to the client.
■ SolutionOnce you’ve created a server and it has received a message, create a datagram connec-tion back to the client based on the rinfo argument that’s passed to message events.Optionally create a unique reference by combining the client port and IP address tosend subsequent messages.
■ DiscussionChat servers are the classic network programming example for new Node program-mers, but this one has a twist—it uses UDP instead of TCP or HTTP.
TCP connections are different from UDP, and this is apparent in the design of Node’snetworking API. TCP connections are represented as a stream of bidirectional events, sosending a message back to the sender is straightforward—once a client has connectedyou can write messages to it at any time using client.write. UDP, on the other hand,is connectionless—messages are received without an active connection to the client.
There are some protocol-level similarities that enable you to respond to messagesfrom clients, however. Both TCP and UDP connections use source and destinationports. Given a suitable network setup, it’s possible to open a connection back to theclient based on this information. In Node the rinfo object that’s included with everymessage event contains the relevant details. Figure 7.5 shows how messages flowbetween two clients using this scheme.
Listing 7.5 presents a client-server program that allows clients to connect to a cen-tral server over UDP and message each other. The server keeps details of each client in
Port 5012
Port 5013
Port 4096
Port 4097
Client A Client B
Figure 7.5 Even though UDP isn’t full-duplex, it’s possible to create con-nections in two direc-tions given a port number at both sides.
www.it-ebooks.info

154 CHAPTER 7 Networking: Node’s true “Hello, World”
an array, so it can refer to each one uniquely. By storing the client’s address and port,you can even run multiple clients on the same machine—it’s safe to run this programseveral times on the same computer.
var assert = require('assert');var dgram = require('dgram');var fs = require('fs');var defaultSize = 16;var port = 41234;
function Client(remoteIP) {var socket = dgram.createSocket('udp4');var readline = require('readline');var rl = readline.createInterface(process.stdin, process.stdout);
socket.send(new Buffer('<JOIN>'), 0, 6, port, remoteIP);
rl.setPrompt('Message> ');rl.prompt();
rl.on('line', function(line) {sendData(line);
}).on('close', function() {process.exit(0);
});
socket.on('message', function(msg, rinfo) {console.log('\n<' + rinfo.address + '>', msg.toString());rl.prompt();
});
function sendData(message) {socket.send(new Buffer(message), 0, message.length, port, remoteIP,
function(err, bytes) {console.log('Sent:', message);rl.prompt();
});
}}
function Server() {var clients = [];var server = dgram.createSocket('udp4');
server.on('message', function(msg, rinfo) {var clientId = rinfo.address + ':' + rinfo.port;
msg = msg.toString();
if (!clients[clientId]) {clients[clientId] = rinfo;
Listing 7.5 Sending messages back to clients
Use readline module to handle user input.
BWhenever a
client firstjoins, sendspecial join
message.
C
Send messages to server when the user types a message and presses Return.
D
Listen for messages from other users.
E
Take user’s message and create a new buffer that can then be sent as UDP message to server.F
Listen for new
messagesfrom
clients.
G
Combine client’s port and address to make a unique reference to it.
H
If client hasn’t been seen before, keep a record of its connection details.
I
www.it-ebooks.info

155TECHNIQUE 49 UDP client server applications
}
if (msg.match(/^</)) {console.log('Control message:', msg);return;
}
for (var client in clients) {if (client !== clientId) {
client = clients[client];server.send(
new Buffer(msg), 0,msg.length, client.port, client.address,function(err, bytes) {
if (err) console.error(err);console.log('Bytes sent:', bytes);
});
}}
});
server.on('listening', function() {console.log('Server ready:', server.address());
});
server.bind(port);}
module.exports = {Client: Client,Server: Server
};
if (!module.parent) {switch (process.argv[2]) {case 'client':
new Client(process.argv[3]);break;
case 'server':new Server();break;
default:console.log('Unknown option');
}}
This example builds on technique 48—you can run it in a similar way. Type nodeudp-chat.js server to start a server, and then node udp-chat.js client to con-nect a client. You should run more than one client for it to work; otherwise mes-sages won’t get routed anywhere.
If message is wrapped in angled brackets, treat it as a control message.J
Send message to every other client.1)
www.it-ebooks.info

156 CHAPTER 7 Networking: Node’s true “Hello, World”
The readline module has been used to capture user input in a friendly mannerB. Like most of the other core modules you’ve seen, this one is event-based. It’ll emitthe line event whenever a line of text is entered D.
Before messages can be sent by the user, an initial join message is sent C. This isjust to let the server know it has connected—the server code uses it to store a uniquereference to the client I.
The Client constructor wraps socket.send inside a function called sendData F.This is so messages can be easily sent whenever a line of text is typed. Also, when a cli-ent itself receives a message, it’ll print it to the console and create a new prompt E
Messages received by the server G are used to create a unique reference to the cli-ent by combining the port and remote address H. We get all of this information fromthe rinfo object, and it’s safe to run multiple clients on the same machine becausethe port will be the client’s port rather than the port the server listens on (whichdoesn’t change). To understand how this is possible, recall that UDP headers include asource and destination port, much like TCP.
Finally, whenever a message is seen that isn’t a control message J, each client isiterated over and sent the message 1). The client that has sent the message won’treceive a copy. Because we’ve stored references to each rinfo object in the clientsarray, messages can be sent back to clients.
Client-server networking is the basis of HTTP. Even though HTTP uses TCP connec-tions, it’s slightly different from the type of protocols you’ve seen so far: it’s stateless.That means you need different patterns to model it. The next section has more detailson how to make HTTP clients and servers.
7.4 HTTP clients and serversToday most of us work with HTTP—whether we’re producing or consuming web ser-vices, or building web applications. The HTTP protocol is stateless and built on TCP,and Node’s HTTP module is similarly built on top of its TCP module.
You could, of course, use your own protocol built with TCP. After all, HTTP is builton top of TCP. But due to the prevalence of web browsers and tools for working withweb-based services, HTTP is a natural fit for many problems that involve communicat-ing between remote systems.
In the next section you’ll learn how to write a basic HTTP server using Node’s coremodules.
TECHNIQUE 50 HTTP servers
In this technique you’ll learn how to create HTTP servers with Node’s http module.Although this is more work than using a web framework built on top of Node, popularweb frameworks generally use the same techniques internally, and the objects theyexpose are derived from Node’s standard classes. Understanding the underlying mod-ules and classes is therefore useful for working extensively with HTTP.
www.it-ebooks.info

157TECHNIQUE 50 HTTP servers
■ ProblemYou want to run HTTP servers and test them.
■ SolutionUse http.createServer and http.createClient.
■ DiscussionThe http.createServer method is a shortcut for creating a new http.Server objectthat descends from net.Server. The HTTP server is extended to handle various ele-ments of the HTTP protocol—parsing headers, dealing with response codes, and set-ting up various events on sockets. The major focus in Node’s HTTP handling code isparsing; a C++ wrapper around Joyent’s own C parser library is used. This library canextract header fields and values, Content-Length, request method, response statuscode, and more.
The following listing shows a small “Hello World” web server that uses the httpmodule.
var assert = require('assert');var http = require('http');
var server = http.createServer(function(req, res) {res.writeHead(200, { 'Content-Type': 'text/plain' });res.write('Hello, world.\r\n');res.end();
});
server.listen(8000, function() {console.log('Listening on port 8000');
});
var req = http.request({port: 8000
}, function(res) {console.log('HTTP headers:', res.headers);res.on('data', function(data) {
console.log('Body:', data.toString());assert.equal('Hello, world.\r\n', data.toString());assert.equal(200, res.statusCode);server.unref();
});});
req.end();
The http module contains both Node’s client and server HTTP classes B. Thehttp.createServer creates a new server object and returns it. The argument is a call-back that receives req and res objects—request and response, respectively C. Youmay be familiar with these objects if you’ve used higher-level Node web frameworkslike Express and restify.
Listing 7.6 A simple HTTP server
Load HTTP moduleBCreate new
HTTP server andpass a callback
that will runwhen there’s a
new request CWrite some sensible
headers for text-based response D
Write messageback to the client E
Set server to listen on port 8000F
Make request using
http.request G
Add listener to the data eventand make sure response is
what was expected H
www.it-ebooks.info

158 CHAPTER 7 Networking: Node’s true “Hello, World”
The interesting thing about the listener callback passed to http.createServer isthat it behaves much like the listener passed to net.createServer. Indeed, the mech-anism is the same—we’re creating TCP sockets, but layering HTTP on top. The mainconceptual difference between the HTTP protocol and TCP socket communication is aquestion of state: HTTP is a stateless protocol. It’s perfectly acceptable and in fact typi-cal to create and tear down TCP sockets per request. This partly explains why Node’sunderlying HTTP implementation is low-level C++ and C: it needs to be fast and use aslittle memory as possible.
In listing 7.6, the listener runs for every request. In the TCP example from tech-nique 45, the server kept a connection open as long as the client was connected.Because HTTP connections are just TCP sockets, we can use res and req like thesockets in listing 7.6: res.write will write to the socket E, and headers can be writ-ten back with res.writeHead D, which is where the socket connection and HTTPAPIs visibly diverge—the underlying socket will be closed as soon as the response hasbeen written.
After the server has been set up, we can set it to listen on a port with server.listen F.
Now that we can create servers, let’s look at creating HTTP requests. Thehttp.request method will create new connections G, and accepts an options argu-ment object and a callback that will be run when a connection is made. This means westill need to attach a data listener to the response passed to the callback to slurp downany sent data.
The data callback ensures the response from the server has the expected format:the body content and status code H are checked. The server is told to stop listeningfor connections when the last client has disconnected by calling server.unref, whichmeans the script exits cleanly. This makes it easy to see if any errors were encountered.
One small feature of the HTTP module is the http.STATUS_CODES object. Thisallows human-readable messages to be generated by looking up the integer statuscode: http.STATUS_CODES[302] will evaluate to Moved Temporarily.
Now that you’ve seen how to create HTTP servers, in the next technique we’ll lookat the role state plays in HTTP clients—despite HTTP being a stateless protocol—byimplementing HTTP redirects.
TECHNIQUE 51 Following redirects
Node’s http module provides a convenient API for handling HTTP requests. But itdoesn’t follow redirects, and because redirects are so common on the web, it’s animportant technique to master. You could use a popular third-party module thathandles redirection, like the popular request module by Mikeal Rogers,2 but you’lllearn much more about Node by looking at how it can be implemented with thecore modules.
2 https://npmjs.org/package/request
www.it-ebooks.info

159TECHNIQUE 51 Following redirects
In this technique we’ll look at how to use straightforward JavaScript to maintainstate across several requests. This allows a redirect to be followed correctly without cre-ating redirect loops or other issues.
■ ProblemYou want to download pages and follow redirects if necessary.
■ SolutionHandling redirection is fairly straightforward once the basics of the protocol areunderstood. The HTTP standard defines status codes that denote when redirectionhas occurred, and it also states that clients should detect infinite redirect loops. To sat-isfy these requirements, we’ll use a simple prototype class to retain the state of eachrequest, redirecting if needed and detecting redirect loops.
■ DiscussionIn this example we’ll use Node’s core http module to make a GET request to a URL thatwe know will generate a redirection. To determine if a given response is a redirect, weneed to check whether the returned status code begins with a 3. All of the status codesin the 3xx family of responses indicate that a redirect of some kind has occurred.
According to the specification, this is the full set of status codes that we need todeal with:
■ 300—Multiple choices ■ 301—Moved permanently■ 302—Found■ 303—See other■ 304—Not modified■ 305—See proxy■ 307—Temporary redirect
Exactly how each of these status codes is handled depends on the application. Forexample, it might be extremely important for a search engine to identify responsesthat return a 301, because it means the search engine’s list of URLs should be perma-nently updated. For this technique we simply need to follow redirects, which means asingle statement is sufficient to check whether the request is being redirected: if(response.statusCode >= 300 && response.statusCode < 400).
Testing for redirection loops is more involved. A request can no longer exist in iso-lation—we need to track the state of several requests. The easiest way to model this isby using a class that includes an instance variable for counting how many redirectshave occurred. When the counter reaches a limit, an error is raised. Figure 7.6 showshow HTTP redirects are handled.
Before writing any code, it’s important to consider what kind of API we need. Sincewe’ve already determined a “class” should be used to manage state, then users of ourmodule will need to instantiate an instance of this class. Node’s http module is asyn-chronous, and our code should be as well. That means that to get a result back, we’llhave to pass a callback to a method.
www.it-ebooks.info

160 CHAPTER 7 Networking: Node’s true “Hello, World”
The signature for this callback should use the same format as Node’s core modules,where an error variable is the first parameter. Designing the API in this way has theadvantage of making error handling straightforward. Making an HTTP request canresult in several errors, so it’s important to handle them correctly.
The following listing puts all of this together to successfully follow redirects
var http = require('http');var https = require('https');var url = require('url');var request;
function Request() {this.maxRedirects = 10;this.redirects = 0;
}
Request.prototype.get = function(href, callback) {var uri = url.parse(href);var options = { host: uri.host, path: uri.path };var httpGet = uri.protocol === 'http:' ? http.get : https.get;
console.log('GET:', href);
function processResponse(response) {if (response.statusCode >= 300 && response.statusCode < 400) {
if (this.redirects >= this.maxRedirects) {this.error = new Error('Too many redirects for: ' + href);
} else {this.redirects++;href = url.resolve(options.host, response.headers.location);
Listing 7.7 Making an HTTP GET request that follows redirects
Make request
Server
Get request
Response: 302 redirect
Savedpage
Is status3xx?
Is status2xx?
Figure 7.6 Redirection is cyclical, and requests will be made until a 200 status is encountered.
url module has useful methods for parsing URLsB
Define constructor to manage request stateC Parse URLs into format
used by Node’s http module, and determine if HTTPS should be used
D
Check to see if statusCode is in the range for HTTP redirects
EIncrement
redirectioncounter, and
use url.resolveto ensure
relative URLsare expanded
to absoluteURLs
F
www.it-ebooks.info

161TECHNIQUE 51 Following redirects
return this.get(href, callback);}
}
response.url = href;response.redirects = this.redirects;
console.log('Redirected:', href);
function end() {console.log('Connection ended');callback(this.error, response);
}
response.on('data', function(data) {console.log('Got data, length:', data.length);
});
response.on('end', end.bind(this));}
httpGet(options, processResponse.bind(this)).on('error', function(err) {callback(err);
});};
request = new Request();request.get('http://google.com/', function(err, res) {
if (err) {console.error(err);
} else {console.log('Fetched URL:', res.url,'with', res.redirects, 'redirects');
process.exit();}
});
Running this code will display the last-fetched URL, and the number of times therequest was redirected. Try it with a few URLs to see what happens: even nonexistentURLs that result in DNS errors should cause error information to be printed tostderr.
After loading the necessary modules B, the Request C constructor function isused to create an object that models the lifetime of a request. Using a class in this waykeeps implementation details neatly encapsulated from the user. Meanwhile, theRequest.prototype.get method does most of the work. It sets up a standard HTTPrequest, or HTTPS if necessary, and then calls itself recursively whenever a redirect isencountered. Note that the URL has to be parsed D into an object that we use to cre-ate the options object that is compatible with Node’s http module.
The request protocol (HTTP or HTTPS) is checked to ensure we use the rightmethod from Node’s http or https module. Some servers are configured to always
Use Fuction.prototype.bind to bind callback to Request instance so this points to correct object
G
Instantiate Request and fetch a URL
H
www.it-ebooks.info

162 CHAPTER 7 Networking: Node’s true “Hello, World”
redirect HTTP traffic to HTTPS. Without checking for the protocol, this method wouldrepeatedly fetch the original HTTP URL until maxRedirects is hit—this is a trivial mis-take that’s easily avoided.
Once the response has been received, the statusCode is checked E. The numberof redirects is incremented as long as maxRedirects hasn’t been reached F. This pro-cess is repeated until there’s no longer a status in the 300 range, or too many redirectshave been encountered.
When the final request has finished (or the first if there were no redirects), theuser-supplied callback function is run. The standard Node API signature of error,result has been used here to stay consistent with Node’s core modules. An error isgenerated when maxRedirects is reached, or when creating the HTTP request by lis-tening for an error event.
The user-supplied callback runs after the last request has finished, allowing thecallback to access the requested resource. This is handled by running the callbackafter the end event for the last request has been triggered, and by binding the eventhandler to the current Request instance G. Binding the event handler means it’llhave access to any useful instance variables that the user might need—includingerrors that are stored in this.error.
Lastly, we create an instance of Request H to try out the class. You can use it withother URLs if you like.
This technique illustrates an important point: state is important, even thoughHTTP is technically a stateless protocol. Some misconfigured web applications andservers can create redirect loops, which would cause a client to fetch URLs foreveruntil it’s forcibly stopped.
Though listing 7.7 showcases some of Node’s HTTP- and URL-handling features, itisn’t a complete solution. For a more advanced HTTP API, take a look at Request byMikeal Rogers (https://github.com/mikeal/request), a widely used simplified NodeHTTP API.
In the next technique we’ll dissect a simple HTTP proxy. This expands on the cli-ent and server techniques discussed here, and could be expanded to create numeroususeful applications.
TECHNIQUE 52 HTTP proxies
HTTP proxies are used more often than you might expect—ISPs use transparent proxiesto make networks more efficient, corporate systems administrators use caching proxiesto reduce bandwidth, and web application DevOps use them to improve the perfor-mance of their apps. This technique only scratches the surface of proxies—it catchesHTTP requests and responses, and then mirrors them to their intended destinations.
■ ProblemYou want to capture and retransmit HTTP requests.
■ SolutionUse Node’s built-in HTTP module to act as a simple HTTP proxy.
www.it-ebooks.info

163TECHNIQUE 52 HTTP proxies
■ DiscussionA proxy server offers a level of redirection, which facilitates a variety of useful applica-tions: caching, logging, and security-related software. This technique explores how touse the core http module to create HTTP proxies. Fundamentally all that’s required isan HTTP server that catches requests, and then an HTTP client to clone them.
The http.createServer and http.request methods can catch and retransmitrequests. We’ll also need to interpret the original request so we can safely copy it—theurl core module has an ideal URL-parsing method that can help do this.
The next listing shows how simple it is to create a working proxy in Node.
var http = require('http');var url = require('url');
http.createServer(function(req, res) {console.log('start request:', req.url);var options = url.parse(req.url);options.headers = req.headers;var proxyRequest = http.request(options, function(proxyResponse) {proxyResponse.on('data', function(chunk) {
console.log('proxyResponse length:', chunk.length);res.write(chunk, 'binary');
});
proxyResponse.on('end', function() {console.log('proxied request ended');res.end();
});
res.writeHead(proxyResponse.statusCode, proxyResponse.headers);});
req.on('data', function(chunk) {console.log('in request length:', chunk.length);proxyRequest.write(chunk, 'binary');
});
req.on('end', function() {console.log('original request ended');proxyRequest.end();
});}).listen(8080);
To use this example, your computer will need a bit of configuration. Find your sys-tem’s internet options, and then look for HTTP proxies. From there you should beable to enter localhost:8080 as the proxy. Alternatively, add the proxy in a browser’ssettings if possible. Some browsers don’t support this; Google Chrome will open thesystem proxy dialog.
Listing 7.8 Using the http module to create a proxy
Create standard HTTP server instance
B
Create request that copiesthe original request
C
Listen for data; then write it back to browserD
Track when proxied request has finishedE
Send headersto the browser F
Capture data sent from browser to the serverG
Track when original request endsH
Listen for connections from local browsersI
www.it-ebooks.info

164 CHAPTER 7 Networking: Node’s true “Hello, World”
Figure 7.7 shows how to configure the proxy on a Mac. Make sure you click OK andthen Apply in the main Network dialog to save the setting. And remember to disablethe proxy once you’re done!
Once your system is set up to use the proxy, start the Node process up with nodelistings/network/proxy.js in a shell. Now when you visit web pages, you should seethe successive requests and responses logged to the console.
This example works by first creating a server B using the http module. The call-back will be triggered when a browser makes a request. We’ve used url.parse (url isanother core module) to separate out the URL’s various parts so they can be passed asarguments to http.request. The parsed URL object is compatible with the argumentsthat http.request expects, so this is convenient C.
From within the request’s callback, we can subscribe to events that need to berepeated back to the browser. The data event is useful because it allows us to capturethe response from the server and pass it back to the client with res.write D. We alsorespond to the end of the server’s connection by closing the connection to the
Figure 7.7 To use the Node proxy we’ve created, set localhost:8080 as the Web Proxy Server.
www.it-ebooks.info

165TECHNIQUE 53 Making a DNS request
browser E. The status code is also written back to the client based on the server’sresponse F.
Any data sent by the client is also proxied to the remote server by subscribing tothe browser’s data events G. Similarly, the browser’s original request is watched for anend event so it can be reflected back to the proxied request H.
Finally, the HTTP server used as the proxy is set up to listen on port 8080 I. This example creates a special server that sits between the browser and the server
the browser wants to talk to. It could be extended to do lots of interesting things. Forexample, you could cache image files and compress them based on the remote client,sending mobile browsers heavily compressed images. You could even strip out certaincontent based on rules; some ad-blocking and parental filters work this way.
We’ve been using the DNS so far without really thinking about it too much. DNSuses TCP and UDP for its request/response-based protocol. Fortunately, Node hidesthis complexity for us with a slick asynchronous DNS module. The next section dem-onstrates how to make DNS requests using Node’s dns module.
7.5 Making DNS requestsNode’s DNS module lives outside of the net module, in dns. When the http or netmodules are used to connect to remote servers, Node will look up IP addresses usingdns.lookup internally.
TECHNIQUE 53 Making a DNS request
Node has multiple methods for making DNS requests. In this technique you’ll learnhow and why you should use each to resolve a domain name to an IP address.
When you query a DNS record, the results may include answers for different recordtypes. The DNS is a distributed database, so it isn’t used purely for resolving IPaddresses—some records like TXT are used to build features off the back of the DNS itself.
Table 7.2 includes a list of each type along with the associated dns module method.
Table 7.2 DNS record types
Type Method Description
A dns.resolve An A record stores the IP address. It can have an associated time-to-live (TTL) field to indicate how often the record should be updated.
TXT dns.resolveTxt Text values that can be used by other services for additional fea-tures built on top of DNS.
SRV dns.resolveSrv Service records define “location” data for a service; this usually includes the port number and hostname.
NS dns.resolveNs Used for name servers themselves.
CNAME dns.resolveCname Canonical name records. These are set to domain names rather than IP addresses.
www.it-ebooks.info

166 CHAPTER 7 Networking: Node’s true “Hello, World”
■ ProblemYou want to look up a single or multiple domain names quickly.
■ SolutionThe dns.lookup method can be used to look up either IPv4 or IPv6 addresses. Whenlooking up multiple addresses, it can be faster to use dns.resolve instead.
■ DiscussionAccording to Node’s documentation, dns.lookup is backed by a thread pool, whereasdns.resolve uses the c-ares library, which is faster. The dns.lookup API is a littlefriendlier—it uses getaddrinfo, which is more consistent with the other programs onyour system. Indeed, the Socket.prototype.connect method, and any of Node’score modules that inherit from the objects in the net module, all use dns.lookupfor consistency:
var dns = require('dns');
dns.lookup('www.manning.com', function(err, address) {
if (err) {console.error('Error:', err);
}console.log('Addresses:', address);
});
This example loads the dns module B, and then looks up the IP address usingdns.lookup C. The API is asynchronous, so we have to pass a callback to receive the IPaddress and any errors that were raised when looking up the address. Note that thedomain name has to be provided, rather than a URL—don’t include http:// here.
If everything runs correctly, then you should see 68.180.151.75 printed as the IPaddress. Conversely, if the previous example is run when you’re offline, then a ratherinteresting error should be printed instead:
Error: {[Error: getaddrinfo ENOTFOUND]code: 'ENOTFOUND',errno: 'ENOTFOUND',syscall: 'getaddrinfo'
}
The error object includes a standard error code B alongside the system call thatraised the error C. You can use the error code in your programs to detect when thiskind of error was raised and handle it appropriately. The syscall property, mean-while, is useful to us as programmers: it shows that the error was generated by a serviceoutside of our Node code that is provided by the operating system.
Now compare this to the version that uses dns.resolve:
var dns = require('dns');
dns.resolve('www.manning.com', function(err, addresses) {if (err) {
Load dns moduleB
Look up IP address of the given domainC
Error codeB
System call where the error originatedC
Resolve domain name asynchronously.
B
www.it-ebooks.info

167TECHNIQUE 54 A TCP server that uses encryption
console.error(err);}
console.log('Addresses:', addresses);});
The API looks similar to the previous example, apart from dns.resolve B. You’ll stillsee an error object that includes ECONNREFUSED if the DNS server couldn’t be reached,but this time the result is different: we receive an array of addresses instead of a singleresult. In this example you should see [ '68.180.151.75' ], but some servers mayreturn more than one address.
Node’s dns module is flexible, friendly, and fast. It can scale up well from infre-quent single requests to making batches of requests.
The last part of Node’s networking suite left to look at is perhaps the hardest tolearn, yet paradoxically the most important to get right: encryption. The next sectionintroduces SSL/TLS with the tls and https modules.
7.6 EncryptionNode’s encryption module, tls, uses OpenSSL Transport Layer Security/SecureSocket Layer (TLS/SSL). This is a public key system, where each client and server bothhave a private key. The server makes its public key available so clients can encrypt sub-sequent communications in a way that only that server can decrypt again.
The tls module is used as the basis for the https module—this allows HTTP serv-ers and clients to communicate over TLS/SSL. Unfortunately, TLS/SSL is a world ofpotential pitfalls. Node potentially supports different cyphers based on what versionof OpenSSL it has been linked against. You can specify what cyphers you want to usewhen creating servers with tls.createServer, but we recommend using the defaultsunless you have specific expertise in this area.
In the following technique you’ll learn how to start a TCP server that uses SSL anda self-signed certificate. After that, we end the chapter with a technique that showshow encrypting web server communication works in Node.
TECHNIQUE 54 A TCP server that uses encryption
TLS can be used to encrypt servers made with net.createServer. This techniquedemonstrates how to do this by first creating the necessary certificates and then start-ing a client and server.
■ ProblemYou want to encrypt communication sent and received over a TCP connection.
■ SolutionUse the tls module to start a client and server. Set up the required certificate filesusing OpenSSL.
■ DiscussionThe main thing to master when working with encryption, whether it’s web servers, mailservers, or any TCP-based protocol, is how to properly set up the key and certificate files.
www.it-ebooks.info

168 CHAPTER 7 Networking: Node’s true “Hello, World”
Public key cryptography is dependent on public-private key pairs—a pair is required forboth clients and servers. But an additional file is needed: the public key of the CertificateAuthority (CA).
Our goal in this technique is to create a TLS client and server that both reportauthorized after the TLS handshake. This state is reported when both parties have ver-ified each other’s identity. When working with web server certificates, your CA will bethe well-known organizations that commercially distribute certificates. But for the pur-poses of testing, you can become your own CA and sign certificates. This is also usefulfor secure communication between your own systems that don’t need publicly verifi-able certificates.
That means before you can run any Node examples, you’ll need certificates. TheOpenSSL command-line tools are required for this. If you don’t have them, youshould be able to install them with your operating system’s package manager, or by vis-iting www.openssl.org.
The openssl tool takes a command as the first argument, and then options as sub-sequent arguments. For example, openssl req is used for X.509 Certificate SigningRequest (CSR) management. To make a certificate signed by an authority you control,you’ll need to issue the following commands:
■ genrsa—Generate an RSA certificate; this is our private key.■ req—Create a CSR.■ x509—Sign the private key with the CSR to produce a public key.
When the process is broken down like this, it’s fairly easy to understand: certificatesrequire an authority and must be signed, and we need a public and private key. The pro-cess is similar when creating a public and private key signed against a commercial certif-icate authority, which you’ll do if you want to buy certificates to use with public web servers.
The full command list for creating a public and private key is as follows:
openssl genrsa -out server.pem 1024openssl req -new -key server.pem -out server-csr.pemopenssl x509 -req -in server-csr.pem -signkey server.pem \-out server-cert.pem
openssl genrsa -out client.pem 1024openssl req -new -key client.pem -out client-csr.pemopenssl x509 -req -in client-csr.pem -signkey client.pem \-out client-cert.pem
After creating a private key B, you’ll create a CSR. When prompted for the “CommonName” C, enter your computer’s hostname, which you can find by typing hostname in
Create server’s private key using 1024 bits
BCreate
CSR—this iswhere youenter yourhostname
C
Sign server’sprivate key
Create client’s private key
Create CSR for theclient—remember
to enter yourhostname here as
well
Sign client’s private key and output a public key
www.it-ebooks.info

169TECHNIQUE 54 A TCP server that uses encryption
the terminal on a Unix system. This is important, because when your code sends orreceives certificates, it’ll check the name value against the servername propertypassed to the tls.connect method.
The next listing reads the server’s keys and starts a server running usingtls.createServer.
var fs = require('fs');var tls = require('tls');
var options = {key: fs.readFileSync('server.pem'),cert: fs.readFileSync('server-cert.pem'),ca: [ fs.readFileSync('client-cert.pem') ],requestCert: true
};
var server = tls.createServer(options, function(cleartextStream) {var authorized = cleartextStream.authorized ?
'authorized' : 'unauthorized';console.log('Connected:', authorized);cleartextStream.write('Welcome!\n');cleartextStream.setEncoding('utf8');cleartextStream.pipe(cleartextStream);
});
server.listen(8000, function() {console.log('Server listening');
});
The network code in listing 7.9 is very similar to the net.createServer method—that’s because the tls module inherits from it. The rest of the code is concerned withmanaging certificates, and unfortunately this process is left to us to handle and isoften the cause of programmer errors, which can compromise security. First we loadthe private B and public C keys, passing them to tls.createServer. We also loadthe client’s public key as a certificate authority D—when using a commerciallyobtained certificate, this stage isn’t usually required.
When clients connect, we want to send them some data, but for the purposes ofthis example we really just want to see if the client was authorized F. Client authoriza-tion has been forced by setting the requestCert option E.
This server can be run with node tls.js—but there’s something missing: a client!The next listing contains a client that can connect to this server.
var fs = require('fs');var os = require('os');var tls = require('tls');
var options = {
Listing 7.9 A TCP server that uses TLS for encryption
Listing 7.10 A TCP client that uses TLS
Private keyBPublic key C
Client as a certificate authorityDEnsure client
certificates arealways checked E
Whenever a client connects, show if server was able to verify the certificatesF
www.it-ebooks.info

170 CHAPTER 7 Networking: Node’s true “Hello, World”
key: fs.readFileSync('client.pem'),cert: fs.readFileSync('client-cert.pem'),ca: [ fs.readFileSync('server-cert.pem') ],servername: os.hostname()
};
var cleartextStream = tls.connect(8000, options, function() {var authorized = cleartextStream.authorized ?
'authorized' : 'unauthorized';console.log('Connected:', authorized);process.stdin.pipe(cleartextStream);
});
cleartextStream.setEncoding('utf8');
cleartextStream.on('data', function(data) {console.log(data);
});
The client is similar to the server: the private B and public keys C are loaded, andthis time the server is treated as the CA D. The server’s name is set to the same valueas the Common Name in the CSR by using os.hostname E—you could type in thename manually if you set it to something else. After that the client connects, displayswhether it was able to authorize the certificates, and then reads data sent by the serverand pipes it to the standard output F.
An instance of tls.Server is instantiated when you call tls.createServer. This con-structor calls net.Server—there’s a clear inheritance chain between each networkingmodule. That means the events emitted by net.Server are the same for TLS servers.
In the next technique you’ll see how to use HTTPS, and how this is also related tothe tls and net modules.
TECHNIQUE 55 Encrypted web servers and clients
Though it’s possible to host Node applications behind other web servers like Apacheand nginx, there are times when you’ll want to run your own HTTPS servers. This tech-nique introduces the https module and shows how it’s related to the tls module.
Load private keyBLoad public key C
Treat server as a certificate authorityDSet hostname
as the servername E
Read data from server and print it outF
Testing SSL/TLSWhen testing secure certificates, it can be hard to tell whether the problem lies inyour code or elsewhere. One way around this is to use the openssl command-linetool to simulate a client or server. The following command will start a client that con-nects to a server with the given certificate file:
openssl s_client -connect 127.0.0.1:8000 \
➥ -CAfile ./server-cert.pem
The openssl tool will display a lot of extra information about the connection. Whenwe wrote the example in this technique, we used it to figure out that the certificatewe’d generated had the wrong value for its Common Name.
www.it-ebooks.info

171TECHNIQUE 55 Encrypted web servers and clients
■ ProblemYou want to run a server that supports SSL/TLS.
■ SolutionUse the https module and https.createServer.
■ DiscussionTo run the examples in this technique, you’ll need to have followed the steps to createsuitable self-signed certificates, as found in technique 54. Once you’ve set up somepublic and private keys, you’ll be able to run the examples.
The following listing shows an HTTPS server.
var fs = require('fs');var https = require('https');
var options = {key: fs.readFileSync('server.pem'),cert: fs.readFileSync('server-cert.pem'),ca: [ fs.readFileSync('client-cert.pem') ],requestCert: true
};
var server = https.createServer(options, function(req, res) {var authorized = req.socket.authorized
? 'authorized' : 'unauthorized';res.writeHead(200);res.write('Welcome! You are ' + authorized + '\n');res.end();
});
server.listen(8000, function() {console.log('Server listening');
});
The server in listing 7.11 is basically the same as the one in technique 54. Again, theprivate B and public C keys are loaded and passed to https.createServer.
When browsers request a page, we check the req.socket.authorized property tosee if the request was authorized. This status is returned to the browser. If you want totry this out with a browser, ensure you type https:// into the address bar; otherwise itwon’t work. You’ll see a warning message because the browser won’t be able to verifythe server’s certificate—that’s OK; you know what’s going on because you created theserver. The server will respond saying that you’re unauthorized because it won’t be ableto authorize you, either.
To make a client that can connect to this server, follow the code shown next.
var fs = require('fs');var https = require('https');var os = require('os');
Listing 7.11 A basic HTTP server that uses TLS for encryption
Listing 7.12 An example HTTPS client
Private keyBPublic key C
Ensure client certificates are always checked
When a browserrequests a page,
show if serverwas able to
verify thecertificates
www.it-ebooks.info

172 CHAPTER 7 Networking: Node’s true “Hello, World”
var options = {key: fs.readFileSync('client.pem'),cert: fs.readFileSync('client-cert.pem'),ca: [ fs.readFileSync('server-cert.pem') ],hostname: os.hostname(),port: 8000,path: '/',method: 'GET'
};
var req = https.request(options, function(res) {res.on('data', function(d) {
process.stdout.write(d);});
});req.end();
req.on('error', function(e) {console.error(e);
});
This example sets the private B and public C keys for the client, which is what yourbrowser does transparently when making secure requests. It also sets the server as acertificate authority D, which wouldn’t usually be required. The hostname used forthe HTTP request is the machine’s current hostname E.
Once all of this setup is done, the HTTPS request can be made. This is done usinghttps.request F. The API is identical to the http module. In this example the serverwill ensure the SSL/TLS authorization procedure was valid, so the server will returntext to indicate if the connection was fully authorized.
In real HTTPS code, you probably wouldn’t make your own CA. This can be usefulif you have internal systems that you want to communicate with using HTTPS—per-haps for testing or for API requests over the internet. When making HTTPS requestsagainst public web servers, Node will be able to verify the server’s certificates for you,so you won’t need to set the key, cert, and ca options.
The https module has some other features—there’s an https.get conveniencemethod for making GET requests more easily. Otherwise, that wraps up our set of tech-niques on encryption in Node.
Load private keyBLoad public key C
Load server’s certificate as a CAD
Set hostname asthe machine’s
hostname E
Make HTTPS request using https.requestF
Secure pairsBefore moving off encryption for greener pastures, there’s one patch of delicious turfleft to chew: SecurePair. This is a class in the tls module that can be used tocreate a secure pair of streams: one reads and writes encrypted data, and the otherreads and writes clear text. This potentially allows you to stream anything to anencrypted output.
There’s a convenience method for this: tls.createSecurePair. When a SecurePairestablishes a secure connection, it’ll emit a secure event, but you’ll still need to checkfor cleartext.authorized to ensure the certificates were properly authorized.
www.it-ebooks.info

173Summary
7.7 SummaryThis chapter has been long, but that’s because networking in Node is important.Node is built on excellent foundations for network programming; buffers, streams,and asynchronous I/O all contribute to an environment that is perfect for writing thenext generation of network-oriented programs.
With this chapter you should be able to appreciate how Node fits into the widerworld of network software. Whether you’re developing Unix daemons, Windows-based game servers, or the next big web app, you should now know where to start.
It goes without saying that networking and encryption are closely related. WithNode’s tls and https modules, you should be able to write network clients and serv-ers that can talk to other systems without fear of eavesdroppers.
The next chapter is the last on Node’s core modules, child_process, and looks attechniques for interfacing with other command-line programs.
www.it-ebooks.info

174
Child processes: Integrating external
applications with Node
No platform is an island. Although it would be fun to write everything in JavaScript,we’d miss out on valuable applications that already exist in other platforms. TakeGraphicsMagick, for instance (http://www.graphicsmagick.org/): a full-featuredimage manipulation tool, great for resizing that massively large profile photo thatwas just uploaded. Or take wkhtmltopdf (http://wkhtmltopdf.org/), a headlesswebkit PDF generator, perfect for turning that HTML report into a PDF download.
This chapter covers■ Executing external applications■ Detaching a child process■ Interprocess communication between Node processes■ Making Node programs executable■ Creating job pools■ Synchronous child processes
www.it-ebooks.info

175Executing external applications
In Node, the child_process module allows us to execute these applications and oth-ers (including Node applications) to use with our programs. Thankfully, we don’thave to re-invent the wheel.
The child_process module provides four different methods for executing exter-nal applications. All methods are asynchronous. The right method will depend onwhat you need, as shown in figure 8.1.
■ execFile—Execute an external application, given a set of arguments, and call-back with the buffered output after the process exits.
■ spawn—Execute an external application, given a set of arguments, and providea streaming interface for I/O and events for when the process exits.
■ exec—Execute one or more commands inside a shell and callback with thebuffered output after the process exits.
■ fork—Execute a Node module as a separate process, given a set of arguments,provide a streaming and evented interface like spawn, and also set up an inter-process communication (IPC) channel between the parent and child process.
Throughout this chapter we’ll dive into how to get the most out of these methods, giv-ing practical examples of where you’d want to use each. Later on, we’ll look into someother techniques to use when working with child processes: detaching processes,interprocess communication, file descriptors, and pooling.
8.1 Executing external applicationsIn this first section, we will look at all the ways you can work asynchronously with anexternal program.
External app
Non-Node Node
Streaming
YesNo No
Streaming
No
spawn execFile exec fork
Buffered (callback)
Method to use:
Use a subshell?
Type of interface?
Type of application?
Figure 8.1 Choosing the right method
www.it-ebooks.info

176 CHAPTER 8 Child processes: Integrating external applications with Node
TECHNIQUE 56 Executing external applications
Wouldn’t it be great to run some image processing on a user’s uploaded photo withImageMagick, or validate an XML file with xmllint? Node makes it easy to executeexternal applications.
■ ProblemYou want to execute an external application and get the output.
■ SolutionUse execFile (see figure 8.2).
■ DiscussionIf you want to run an external application and get the result, using execFile makes itsimple and straightforward. It’ll buffer the output for you and provide the results andany errors in a callback. Let’s say we want to run the echo program given the parame-ters hello world. With execFile, we would do the following:
var cp = require('child_process');
cp.execFile('echo', ['hello', 'world'],function (err, stdout, stderr) {if (err) console.error(err);
console.log('stdout', stdout); console.log('stderr', stderr);
});
How does Node know where to find the external application? To answer that, we needto look at how paths work in the underlying operating system.
8.1.1 Paths and the PATH environment variable
Windows/UNIX has a PATH environment variable (envvar: http://en.wikipedia.org/wiki/PATH_(variable)). PATH contains a list of directories where executable programsexist. If a program exists in one of the listed directories, it can be located withoutneeding an absolute or relative path to the application.
execFile
External app
stdout
stderr
Callback
Execute our external app asynchronously.
The output fromour external app isbuffered internally.
When our external appexits, our callback is called
with the output.
Figure 8.2 The execFile method buffers the result and provides a callback interface.
Provide command as first parameter and any command arguments as an array for second parameter
Callback includes any error executing the command and buffered output from stdout and stderr
www.it-ebooks.info

177TECHNIQUE 56 Executing external applications
Node, using execvp behind the scenes, will search for applications using PATH when noabsolute or relative location is provided. We can see this in our earlier example, sincedirectories to common system applications like echo usually exist in PATH already.
If the directory containing the application isn’t in PATH, you’ll need to provide thelocation explicitly like you would on the command line:
cp.execFile('./app-in-this-directory' ...cp.execFile('/absolute/path/to/app' ...cp.execFile('../relative/path/to/app' ...
To see what directories are listed in PATH, you can run a simple one-liner in the NodeREPL:
$ node> console.log(process.env.PATH.split(':').join('\n'))/usr/local/bin/usr/bin/bin…
If you want to avoid including the location to external applications not in PATH, oneoption is to add any new directories to PATH inside your Node application. Just addthis line before any execFile calls:
process.env.PATH += ':/a/new/path/to/executables';
Now any applications in that new directory will be accessible without providing a pathto execFile.
8.1.2 Errors when executing external applications
If your external application doesn’t exist, you’ll get an ENOENT error. Often this isdue to a typo in the application name or path with the result that Node can’t find theapplication, as shown in figure 8.3.
If the external application does exist but Node can’t access it (typically due toinsufficient permissions), you’ll get an EACCES or EPERM error. This can often be mit-igated by either running your Node program as a user with sufficient permissions orchanging the external application permissions themselves to allow access.
execFile
ENOENT
The application wasnot found.
External application
execFile
EPERM EACCES
Insufficient permissions toexecute application.
External application
Nonexistent path orname provided.
Path to lockedapplication provided.
Figure 8.3 Common child process errors
www.it-ebooks.info

178 CHAPTER 8 Child processes: Integrating external applications with Node
You’ll also get an error if the external application has a non-zero exit status (http://mng.bz/MLXP), which is used to indicate that an application couldn’t perform the taskit was given (on both UNIX and Windows). Node will provide the exit status as part ofthe error object and will also provide any data that was written to stdout or stderr:
var cp = require('child_process');cp.execFile('ls', ['non-existent-directory-to-list'],
function (err, stdout, stderr) {console.log(err.code);console.log(stderr);
});
Having execFile is great for when you want to just execute an application and get theoutput (or discard it), for example, if you want to run an image-processing commandwith ImageMagick and only care if it succeeds or not. But if an application has a lot ofoutput or you want to do more real-time analysis of the data returned, using streams isa better approach.
TECHNIQUE 57 Streaming and external applications
Imagine a web application that uses the output from an external application. As thatdata is being made available, you can at the same time be pushing it out to the client.Streaming enables you to tap into the data from a child process as it’s being output-ted, versus having the data buffered and then provided. This is good if you expect theexternal application to output large amounts of data. Why? Buffering a large set ofdata can take up a lot of memory. Also, this enables data to be consumed as it’s beingmade available, which improves responsiveness.
■ ProblemYou want to execute an external application and stream the output.
■ SolutionUse spawn (see figure 8.4).
Output exit code, which is 1 in this case, indicating command failed
Output error details stored in stderr
spawn
External app
ChildProcess
stdout
stderr
Execute our external app asynchronously.
Return aChildProcess
object.
ChildProcesscontains Readablestreams for stdout
and stderr.
Figure 8.4 The spawn method returns a streaming interface for I/O.
www.it-ebooks.info

179TECHNIQUE 57 Streaming and external applications
■ DiscussionThe spawn method has a function signature similar to execFile:
cp.execFile('echo', ['hello', 'world'], ...);cp.spawn('echo', ['hello', 'world'], ...);
The application is the first argument, and an array of parameters/flags for the appli-cation is the second. But instead of taking a callback providing the output alreadybuffered, spawn relies on streams:
var cp = require('child_process');
var child = cp.spawn('echo', ['hello', 'world']);child.on('error', console.error);child.stdout.pipe(process.stdout);child.stderr.pipe(process.stderr);
Since spawn is stream-based, it’s great for handling large outputs or working with dataas it’s read in. All other benefits of streams apply as well. For example, child.stdin isa Writeable stream, so you can hook that up to any Readable stream to get data. Thereverse is true for child.stdout and child.stderr, which are Readable streams thatcan be hooked into any Writeable stream.
API SYMMETRY The ChildProcess API (child.stdin, child.stdout,child.stderr) share a nice symmetry with the parent process streams (pro-cess.stdin, process.stdout, process.stderr).
8.1.3 Stringing external applications together
A large part of UNIX philosophy is building applications that do one thing and do itwell, and then communicating between those applications with a common interface(that being plain text).
Let’s make a Node program that exemplifies this by taking three simple applica-tions that deal with text streams and sticking them together using spawn. The catapplication will read a file and output its contents. The sort application will take inthe file as input and provide the lines sorted as output. The uniq application will takethe sorted file as input, and output the sorted file with all the duplicate lines removed.This is illustrated in figure 8.5.
Let’s look at how we can do this with spawn and streams:
var cp = require('child_process');var cat = cp.spawn('cat', ['messy.txt']);var sort = cp.spawn('sort');var uniq = cp.spawn('uniq');
cat.stdout.pipe(sort.stdin);sort.stdout.pipe(uniq.stdin);uniq.stdout.pipe(process.stdout);
Spawn method returns a ChildProcess object containing stdin,
stdout, and stderr stream objectsErrors areemitted onerror event
Output from stdout and stderr can be read as it’s available
Call spawn for each command we want to chain together
Output of each command becomes input for next command
Stream result tothe console with
process.stdout
www.it-ebooks.info

180 CHAPTER 8 Child processes: Integrating external applications with Node
Using spawn’s streaming interfaces allows a seamless way to work with any streamobjects in Node, including stringing external applications together. But sometimes weneed the facilities of our underlying shell to do powerful composition of externalapplications. For that, we can use exec.
APPLYING WHAT YOU’VE LEARNED Can you think of a way to avoid using thecat program based on what you learned with the fs module and streaming inchapter 6?
TECHNIQUE 58 Executing commands in a shell
Shell programming is a common way to build utility scripts or command-line applica-tions. You could whip up a Bash or Python script, but with Node, you can useJavaScript. Although you could execute a subshell manually using execFile or spawn,Node provides a convenient, cross-platform method for you.
■ ProblemYou need to use the underlying shell facilities (like pipes, redirects, file blobs) to exe-cute commands and get the output.
■ SolutionUse exec (see figure 8.6).
■ DiscussionIf you need to execute commands in a shell, you can use exec. The exec method runsthe commands with /bin/sh or cmd.exe (on Windows). Running commands in a shellmeans you have access to all the functionality provided by your particular shell (likepipes, redirects, and backgrounding).
cat
messy.txt
sort uniq stdout
1
1 2 3 4
cat outputs the contentsof messy.txt.
2 sort takes contents andoutputs sorted lines.
3 uniq takes sorted lines andremoves duplicates in output.
4 process.stdout takes de-dupedsorted lines and prints them tothe console.
RalphAlexMarcRalph
AlexMarcRalphRalph
AlexMarcRalph
Figure 8.5 Stringing external applications together with spawn
www.it-ebooks.info

181TECHNIQUE 58 Executing commands in a shell
A SINGLE COMMAND ARGUMENT Unlike execFile and spawn, the exec methoddoesn’t have a separate argument for command parameters/flags, since youcan run more than one command on a shell.
As an example, let’s pipe together the same three applications we did in the last tech-nique to generate a sorted, unique list of names. But this time, we’ll use commonUNIX shell facilities rather than streams:
cp.exec('cat messy.txt | sort | uniq',function (err, stdout, stderr) {console.log(stdout);
});
ABOUT SHELLS UNIX users should keep in mind that Node uses whatever ismapped to /bin/sh for execution. This typically will be Bash on most modernoperating systems, but you have the option to remap it to another shell ofyour liking. Windows users who need a piping facility can use streams andspawn as discussed in technique 57.
8.1.4 Security and shell command execution
Having access to a shell is powerful and convenient, but it should be used cautiously,especially with a user’s input.
Let’s say we’re using xmllint (http://xmlsoft.org/xmllint.html) to parse anddetect errors in a user’s uploaded XML file where the user provides a schema to vali-date against:
cp.exec('xmllint --schema '+req.query.schema+' the.xml');
If a user provided “http://site.com/schema.xsd,” it would be replaced and the follow-ing command would run:
xmllint --schema http://site.com/schema.xsd the.xml
exec
Shell
Commands stderr
stderr
Execute our commands asynchronously in a subshell.
The output from thesubshell is buffered
internally.
When subshell exits,our callback is called
with the output.
Callback
Figure 8.6 The exec method runs our commands in a subshell.
Pipe cat, sort, and uniq together like we would on command line
If successful, stdoutwill contain sorted,de-duped version of
messy.txt
www.it-ebooks.info

182 CHAPTER 8 Child processes: Integrating external applications with Node
But since the argument has user input, it can easily fall prey to command (or shell) injec-tion attacks (https://golemtechnologies.com/articles/shell-injection)—for example,a malicious user provides “; rm -rf / ;” causing the following comment to run (please don’trun this in your terminal!):
xmllint --schema ; rm -rf / ; the.xml
If you haven’t guessed already, this says, “Start new command (;), remove forcibly andrecursively all files/directories at root of the file system (rm -rf /), and end the com-mand (;) in case something follows it.”
In other words, this injection could potentially delete all the files the Node processhas permission to access on the entire operating system! And that’s just one of thecommands that can be run. Anything your process user has access to (files, com-mands, and so on) can be exploited.
If you need to run an application and don’t need shell facilities, it’s safer (andslightly faster) to use execFile instead:
cp.execFile('xmllint', ['--schema', req.query.schema, 'the.xml']);
Here this malicious injection attack would fail since it’s not run in a shell and the exter-nal application likely wouldn’t understand the argument and would raise an error.
TECHNIQUE 59 Detaching a child process
Node can be used to kick off external applications and then allow them to run ontheir own. For example, let’s say you have an administrative web application in Nodethat allows you to kick off a long-running synchronization process with your cloudprovider. If that Node application were to crash, your synchronization process wouldbe halted. To avoid this, you detach your external application so it’ll be unaffected.
■ ProblemYou have a long-running external application that you want Node to start but then beable to exit with the child process still running.
■ SolutionDetach a spawned child process (see figure 8.7).
Node.js
Attached child processexits when Node exits.
Child process
Attached child process
Processgroup
Processleader
Node.js
Detached child processis process leader and lives
independent of Node.
Child process
Detached child process
Figure 8.7 Detached child process exists independent of the Node process
www.it-ebooks.info

183TECHNIQUE 59 Detaching a child process
■ DiscussionNormally, any child process will be terminated when the parent Node process is termi-nated. Child processes are said to be attached to the parent process. But the spawnmethod includes the ability to detach a child process and promote it to be a processgroup leader. In this scenario, if the parent is terminated, the child process will con-tinue until finished.
This scenario is useful when you want Node to set up the execution of a long-running external process and you don’t need Node to babysit it after it starts.
This is the detached option, configurable as part of a third options parameter tospawn:
var child = cp.spawn('./longrun', [], { detached: true });
In this example, longrun will be promoted to a process group leader. If you were torun this Node program and forcibly terminate it (Ctrl-C), longrun would continueexecuting until finished.
If you didn’t forcibly terminate, you’d notice that the parent stays alive until thechild has completed. This is because I/O of the child process is connected to the par-ent. In order to disconnect the I/O, you have to configure the stdio option.
8.1.5 Handing I/O between the child and parent processes
The stdio option defines where the I/O from a child process will be redirected. Ittakes either an array or a string as a value. The string values are simply shorthands thatwill expand to common array configurations.
The array is structured such that the indexes correspond to file descriptors in thechild process and the values indicate where the I/O for the particular file descriptor(FD) should be redirected.
WHAT ARE FILE DESCRIPTORS? If you’re confused about file descriptors, checkout technique 40 in chapter 6 for an introduction.
By default, stdio is configured as
stdio: 'pipe'
which is a shorthand for the following array values:
stdio: [ 'pipe', 'pipe', 'pipe' ]
This means that file descriptors 0-2 will be made accessible on the ChildProcess objectas streams (child.stdio[0], child.stdio[1], child.stdio[2]). But since FDs 0-2often refer to stdin, stdout, and stderr, they’re also made available as the now familiarchild.stdin, child.stdout, and child.stderr streams.
The pipe value connects the parent and child processes because these streams stayopen, waiting to write or read data. But for this technique, we want to disconnect thetwo in order to exit the Node process. A brute-force approach would be to simplydestroy all the streams created:
www.it-ebooks.info

184 CHAPTER 8 Child processes: Integrating external applications with Node
child.stdin.destroy();child.stdout.destroy();child.stderr.destroy();
Although this would work, given our intent to not use them, it’s better to not createthe streams in the first place. Instead, we can assign a file descriptor if we want todirect the I/O elsewhere or use ignore to discard it completely.
Let’s look at a solution that uses both options. We want to ignore FD 0 (stdin)since we won’t be providing any input to the child process. But let’s capture any out-put from FDs 1 and 2 (stdout, stderr) just in case we need to do some debugginglater on. Here’s how we can accomplish that:
var fs = require('fs');var cp = require('child_process');
var outFd = fs.openSync('./longrun.out', 'a');var errFd = fs.openSync('./longrun.err', 'a');
var child = cp.spawn('./longrun', [], {detached: true,stdio: [ 'ignore', outFd, errFd ]
});
This will disconnect the I/O between the child and parent processes. If we run thisapplication, the output from the child process will end up in the log files.
8.1.6 Reference counting and child processes
We’re almost there. The child process will live on because it’s detached and the I/O isdisconnected from the parent. But the parent still has an internal reference to thechild process and won’t exit until the child process has finished and the reference hasbeen removed.
You can use the child.unref() method to tell Node not to include this child pro-cess reference in its count. The following complete application will now exit afterspawning the child process:
var fs = require('fs');var cp = require('child_process');
var outFd = fs.openSync('./longrun.out', 'a');var errFd = fs.openSync('./longrun.err', 'a');
var child = cp.spawn('./longrun', [], {detached: true,stdio: [ 'ignore', outFd, errFd ]
});
child.unref();
To review, detaching a process requires three things:
Open two log files, one for stdout and one for stderr
Ignore FD 0; redirect output from FDs 1 and 2 to the log files
Remove reference of child in the parent process
www.it-ebooks.info

185TECHNIQUE 60 Executing Node programs
■ The detached option must be set to true so the child becomes its own processleader.
■ The stdio option must be configured so the parent and child are disconnected. ■ The reference to the child must be severed in the parent using child.unref().
8.2 Executing Node programsAny of the prior techniques can be used to execute Node applications. However, in thetechniques to follow, we will focus on making the most out of Node child processes.
TECHNIQUE 60 Executing Node programs
When writing shell scripts, utilities, or other command-line applications in Node, it’soften handy to make executables out of them for ease of use and portability. If youpublish command-line applications to npm, this also comes in handy.
■ ProblemYou want to make a Node program an executable script.
■ SolutionSet up the file to be executable by your underlying platform.
■ DiscussionA Node program can be run as a child process with any of the means we’ve alreadydescribed by simply using the node executable:
var cp = require('child_process');cp.execFile('node', ['myapp.js', 'myarg1', 'myarg2' ], ...
But there are many cases where having a standalone executable is more convenient,where you can instead use your app like this:
myapp myarg1 myarg2
The process for making an executable will vary depending on whether you’re on Win-dows or UNIX.
Executables on WindowsLet’s say we have a simple one-liner hello.js program that echoes the first argumentpassed:
console.log('hello', process.argv[2]);
To run this program, we type
$ node hello.js martyhello marty
To make a Windows executable, we can make a simple batch script calling the Nodeprogram. For consistency, let’s call it hello.bat:
@echo offnode "hello.js" %*
Don’t echo commands to stdout
Call node executable,passing in any additional
parameters (%*)
www.it-ebooks.info

186 CHAPTER 8 Child processes: Integrating external applications with Node
Now we can execute our hello.js program by simply running the following:
$ hello tomhello tom
Running it as a child process requires the .bat extension:
var cp = require('child_process');cp.execFile('hello.bat', ['billy'], function (err, stdout) {
console.log(stdout); // hello billy});
Executables on UNIXTo turn a Node program into an executable script on most UNIX systems, we don’tneed a separate batch file like in Windows; we simply modify hello.js itself by addingthe following to the top of the file:
#!/usr/bin/env nodeconsole.log('hello', process.argv[2]);
Then to actually make the file executable, we run the following command:
$ chmod +x hello.js
We can then run the command like this:
$ ./hello.js jimhello jim
The file can be renamed as well to look more like a standalone program:
$ mv hello.js hello$ ./hello janehello jane
Executing this program as a child process will look the same as its command-linecounterpart:
var cp = require('child_process');cp.execFile('./hello', ['bono'], function (err, stdout) {
console.log(stdout); // hello bono});
PUBLISHING EXECUTABLE FILES IN NPM For publishing packages that containexecutable files, use the UNIX conventions, and npm will make the properadjustments for Windows.
TECHNIQUE 61 Forking Node modules
Web workers (http://mng.bz/UG63) provide the browser and JavaScript an elegantway to run computationally intense tasks off the main thread with a built-in commu-nication stream between the parent and worker. This removes the painful work ofbreaking up computation into pieces in order to not upset the user experience. InNode, we have the same concept, with a slightly different API with fork. This helps
Execute node command wherever it’s found in user’s environment
www.it-ebooks.info

187TECHNIQUE 61 Forking Node modules
us break out any heavy lifting into a separate process, keeping our event loop run-ning smoothly.
■ ProblemYou want to manage separate Node processes.
■ SolutionUse fork (see figure 8.8).
■ DiscussionSometimes it’s useful to have separate Node processes. One such case is computation.Since Node is single-threaded, computational tasks directly affect the performance ofthe whole process. This may be acceptable for certain jobs, but when it comes to networkprogramming, it’ll severely affect performance since requests can’t be serviced whenthe process is tied up. Running these types of tasks in a forked process allows the mainapplication to stay responsive. Another use of forking is for sharing file descriptors,where a child can accept an incoming connection received by the parent process.
Node provides a nice way to communicate between other Node programs. Underthe hood, it sets up the following stdio configuration:
stdio: [ 0, 1, 2, 'ipc' ]
This means that, by default, all output and input are directly inherited from the par-ent; there’s no child.stdin, child.stdout, or child.stderr:
var cp = require('child_process');var child = cp.fork('./myChild');
If you want to provide an I/O configuration that behaves like the spawn defaults(meaning you get a child.stdin, and so on), you can use the silent option:
var cp = require('child_process');var child = cp.fork('./myChild', { silent: true });
INTERNALS OF INTERPROCESS COMMUNICATION Although a number of mecha-nisms exist to provide interprocess communication (IPC; see http://mng.bz/LGKD), Node IPC channels will use either a UNIX domain socket (http://mng.bz/1189) or a Windows named pipe (http://mng.bz/262Q).
fork
Node module
ChildProcess
Execute our Node module as a separate process.
IPC channel set up betweenparent and child.
ChildProcess sharesI/O of parent.
Figure 8.8 The fork command runs a Node module in a separate process and sets up a communi-cations channel.
www.it-ebooks.info

188 CHAPTER 8 Child processes: Integrating external applications with Node
Communicating with forked Node modulesThe fork method opens up an IPC channel that allows message passing between Nodeprocesses. On the child side, it exposes process.on('message') and process.send()as mechanisms for receiving and sending messages. On the parent side, it provideschild.on('message') and child.send().
Let’s make a simple echo module that sends back any message received from theparent:
process.on('message', function (msg) {process.send(msg);
});
An application can now consume this module using fork:
var cp = require('child_process');var child = cp.fork('./child');child.on('message', function (msg) {
console.log('got a message from child', msg);});child.send('sending a string');
Sending data between the processes maintains the type information, which means youcan send any valid JSON value over the wire and it retains the type:
child.send(230);child.send('a string');child.send(true);child.send(null);child.send({ an: 'object' });
Disconnecting from forked Node modulesSince we’re opening an IPC channel between the parent and child, both stay aliveuntil the child is disconnected (or exits some other way). If you need to disconnectthe IPC channel, you can do that explicitly from the parent process:
child.disconnect();
TECHNIQUE 62 Running jobs
When you need to run routine computational jobs, forking processes on demand willquickly eat up your CPU resources. It’s better to keep a job pool of available Node pro-cesses ready for work. This technique takes a look at that.
■ ProblemYou have routine jobs that you don’t want to run on the main event loop.
■ SolutionUse fork and manage a pool of workers.
■ DiscussionWe can use the IPC channel built into fork to create a pattern for handling computa-tionally intensive tasks (or jobs). It builds upon our last technique, but adds an important
When child receives a message, this handler will be calledSend message
back to parent
When parent receives a message, this handler will be called
Log outechoed
message
Send message to child process
www.it-ebooks.info

189TECHNIQUE 62 Running jobs
constraint: when the parent sends a task to the child, it expects to receive exactly oneresult. Here’s how this works in the parent process:
function doWork (job, cb) {var child = cp.fork('./worker');child.send(job);child.once('message', function (result) {
cb(null, result);});
}
But receiving a result is only one of the possible outcomes. To build resilience into ourdoWork function, we’ll account for
■ The child exiting for any reason■ Unexpected errors (like a closed IPC channel or failure to fork)
Handling those in code will involve a couple more listeners:
child.once('error', function (err) {cb(err);child.kill();
});child.once('exit', function (code, signal) {
cb(new Error('Child exited with code: ' + code));});
This is a good start, but we run the risk of calling our callback more than once in thecase where the worker finished the job but then later exited or had an error. Let’s addsome state and clean things up a bit:
function doWork (job, cb) {var child = cp.fork('./worker');var cbTriggered = false;
child.once('error', function (err) {
if (!cbTriggered) {cb(err);cbTriggered = true;
}child.kill();
}).once('exit', function (code, signal) {
if (!cbTriggered)cb(new Error('Child exited with code: ' + code));
}).once('message', function (result) {
cb(null, result);cbTriggered = true;
}).send(job);
}
Send job to the child process
Expect child to respond with exactly one message providing the result
Unexpected error; kill the process as it’s likely unusable
Track if callback was called
Message will never be triggered if an error or exit happens, so we don’t need cbTriggered check
www.it-ebooks.info

190 CHAPTER 8 Child processes: Integrating external applications with Node
So far we’ve only looked at the parent process. The child worker takes in a job, andsends exactly one message back to the parent when completed:
process.on('message', function (job) {// do workprocess.send(result);
});
8.2.1 Job pooling
Currently, our doWork function will spin up a new child process every time we need todo some work. This isn’t free, as the Node documentation states:
These child Nodes are still whole new instances of V8. Assume at least 30ms startupand 10mb memory for each new Node. That is, you cannot create many thousandsof them.
A performant way to work around this is not to spin off a new process whenever youwant to do something computationally expensive, but rather to maintain a pool oflong-running processes that can handle the load.
Let’s expand our doWork function, creating a module for handling a worker pool.Here are some additional constraints we’ll add:
■ Only fork up to as many worker processes as CPUs on the machine. ■ Ensure new work gets an available worker process and not one that’s currently
in-process. ■ When no worker processes are available, maintain a queue of tasks to execute as
processes become available. ■ Fork processes on demand.
Let’s take a look at the code to implement this:
var cp = require('child_process');var cpus = require('os').cpus().length; )
module.exports = function (workModule) {var awaiting = [];var readyPool = [];var poolSize = 0;
return function doWork (job, cb) {if (!readyPool.length && poolSize > cpus)
return awaiting.push([ doWork, job, cb ]);
var child = readyPool.length? readyPool.shift(): (poolSize++, cp.fork(workModule));
var cbTriggered = false;
child
Grab numberof CPUs Keep list of tasks that are
queued to run when all processes are in use
Keep list of worker processes that are ready for work
Keep track of how many worker processes exist
If no worker processes are available and we’ve reached our limit, queue work to be run later
Grab next available child, or fork a new process (incrementing the poolSize)
www.it-ebooks.info

191TECHNIQUE 62 Running jobs
.removeAllListeners()
.once('error', function (err) {if (!cbTriggered) {
cb(err);cbTriggered = true;
}child.kill();
}).once('exit', function () {
if (!cbTriggered)cb(new Error('Child exited with code: ' + code));
poolSize--;var childIdx = readyPool.indexOf(child);if (childIdx > -1) readyPool.splice(childIdx, 1);
}).once('message', function (msg) {
cb(null, msg);cbTriggered = true;readyPool.push(child);if (awaiting.length) setImmediate.apply(null, awaiting.shift());
}).send(job);
}}
APPLYING WHAT YOU’VE LEARNED Other constraints may apply depending onthe needs of the pool, for example, retrying jobs on failure or killing long-running jobs. How would you implement a retry or timeout using the preced-ing example?
8.2.2 Using the pooler module
Let’s say we want to run a computationally intensive task based on a user’s request toour server. First, let’s expand our child worker process to simulate an intensive task:
process.on('message', function (job) {for (var i = 0; i < 1000000000; i++);process.send('finished: ' + job);
});
Now that we have a sample child process to run, let’s put this all together with a simpleapplication that uses the pooler module and worker modules:
var http = require('http');var makePool = require('./pooler');var runJob = makePool('./worker');
http.createServer(function (req, res) {runJob('some dummy job', function (er, data) {
Remove any listeners that exist on child, ensuring that a child process will always have only one listener attached for each event at a time
If child exits for any reason, ensureit’s removed from the readyPool
Child is ready again; add back to readyPool and run next awaiting task (if any)
Receive task from the parent
Actual work happenshere; in our case, we’llsimply generate a CPU
load on the child
Send result of task back to the parent
Include pooler module to make job pools
Create jobpool aroundthe worker
moduleRun job on every request to the server, responding with the result
www.it-ebooks.info

192 CHAPTER 8 Child processes: Integrating external applications with Node
if (er) return res.end('got an error:' + er.message);res.end(data);
});}).listen(3000);
Pooling saves the overhead of spinning up and destroying child processes. It makesuse of the communications channels built into fork and allows Node to be used effec-tively for managing jobs across a set of child processes.
GOING FURTHER To further investigate job pools, check out the third-partycompute-cluster module (https://github.com/lloyd/node-compute-cluster).
We’ve discussed asynchronous child process execution, which is when you need to jug-gle multiple points of I/O, like servers. But sometimes you just want to execute com-mands one after another without the overhead. Let’s look at that next.
8.3 Working synchronouslyNon-blocking I/O is important for keeping the event loop humming along withouthaving to wait for an unwieldy child process to finish. However, it has extra codingoverhead that isn’t pleasant when you want things to block. A good example of this iswriting shell scripts. Thankfully, synchronous child processes are also available.
TECHNIQUE 63 Synchronous child processes
Synchronous child process methods are recent additions to the Node scene. Theywere first introduced in Node 0.12 to address a very real problem in a performant andfamiliar manner: shell scripting. Before Node 0.12, clever but nonperformant hackswere used to get synchronous-like behavior. Now, synchronous methods are a first-class citizen.
In this technique we’ll cover all the synchronous methods available in the childprocess modules.
■ ProblemYou want to execute commands synchronously.
■ SolutionUse execFileSync, spawnSync, and execFile.
■ DiscussionBy now, we hope these synchronous methods look extremely familiar. In fact, they’rethe same in their function signatures and purpose as we’ve discussed previously in thischapter, with one important distinction—they block and run to completion when called.
If you just want to execute a single command and get output synchronously, useexecFileSync:
var ex = require('child_process').execFileSync;var stdout = ex('echo', ['hello']).toString();console.log(stdout);
Extract execFileSync method as ex for a shorthand way to refer to it
execFileSync returns a Buffer of the output, which is then converted to a UTF-8 string and assigned to stdout
Outputs“hello”
www.it-ebooks.info

193TECHNIQUE 63 Synchronous child processes
If you want to execute multiple commands synchronously and programmaticallywhere the input of one depends on the output of another, use spawnSync:
var sp = require('child_process').spawnSync;var ps = sp('ps', ['aux']);var grep = sp('grep', ['node'], {
input: ps.stdout,encoding: 'utf8'
});console.log(grep);
The resulting synchronous child process contains a lot of detail of what happened,which is another advantage of using spawnSync:
{ status: 0,signal: null,output:
[ null,'wavded 4376 ... 9:03PM 0:00.00 (node)\nwavded 4400 ... 9:11PM 0:00.10 node spawnSync.js\n',
'' ],pid: 4403,stdout: 'wavded ... 9:03PM 0:00.00 (node)\n
wavded 4400 ... 9:11PM 0:00.10 node spawnSync.js\n',stderr: '',envPairs:
[ 'USER=wavded','EDITOR=vim','NODE_PATH=/Users/wavded/.nvm/v0.11.12/lib/node_modules:',... ],
options:{ input: <Buffer 55 53 45 52 20 20 20 ... >, encoding: 'utf8', file: 'grep', args: [ 'grep', 'node' ], stdio: [ [Object], [Object], [Object] ] }, args: [ 'grep', 'node' ],file: 'grep' } [
Lastly, there’s execSync, which executes a subshell synchronously and runs the com-mands given. This can be handy when writing shell scripts in JavaScript:
var ex = require('child_process').execSync;var stdout = ex('ps aux | grep').toString();console.log(stdout);
Extract spawnSync method as sp for a shorthand way to refer to it
Run ps auxand grep nodesynchronously
Pass stdout Buffer from ps aux as input to grep node
Indicate allresulting stdio
should be in UTF-8
Exit status ofthe process
Signal usedto end the
process
Output of all the stdio streams used in the child process; we can see that index 1 (stdout) has data
PID of theprocess stdout output
for the process
stderroutput for
the process Environment variables present when the process ran
Options used tocreate the process;
we can see ourinput buffer from
ps aux here
Arguments used toexecute the process Executable file
Extract execSyncmethod as ex fora shorthand way
to refer to it
Execute shell command synchronously and return the output as a string
www.it-ebooks.info

194 CHAPTER 8 Child processes: Integrating external applications with Node
This will output the following:
wavded 4425 29.7 0.2 ... 0:00.10 node execSync.jswavded 4427 1.5 0.0 ... /bin/sh -c ps aux | grep nodewavded 4429 0.5 0.0 ... grep nodewavded 4376 0.0 0.0 ... (node)
Error handing with synchronous child process methodsIf a non-zero exit status is returned in execSync or execFileSync, an exception will bethrown. The error object will include everything we saw returned using spawnExec.We’ll have access to important things like the status code and stderr stream:
var ex = require('child-process').execFileSync;try {
ex('cd', ['non-existent-dir'], {encoding: 'utf8'
});} catch (err) {
console.error('exit status was', err.status);console.error('stderr', err.stderr);
}
This program yields the following output:
exit status was 1stderr /usr/bin/cd: line 4:cd:
non-existent-dir: No such file or directory
We talked errors in execFile and execFileSync. What about spawnSync? SincespawnSync returns everything that happens when running the process, it doesn’tthrow an exception. Therefore, you’re responsible to check the success or failure.
8.4 SummaryIn this chapter you learned to integrate different uses of external applications inNode by using the child_process module. Here are some tips in summary:
■ Use execFile in cases where you just need to execute an external application.It’s fast, simple, and safer when dealing with user input.
■ Use spawn when you want to do something more with the I/O of the child pro-cess, or when you expect the process to have a large amount of output. It pro-vides a nice streamable interface, and is also safer when dealing with user input.
■ Use exec when you want to access your shell’s facilities (pipes, redirects, blobs).Many shells allow running multiple applications in one go. Be careful with userinput though, as it’s never a good idea to put untrusted input into an exec call.
■ Use fork when you want to run a Node module as a separate process. Thisenables computation and file descriptor handling (like an incoming socket) tobe handled off the main Node process.
Output shows we’re executing a subshell with execSync
Executing cd on nonexistent directory gives non-zero exit status
Although more verbose than toString(), setting encoding to UTF-8 here will set it for all our stdio streams when we handle the error
www.it-ebooks.info

195Summary
■ Detach spawned processes you want to survive after a Node process dies. Thisallows Node to be used to set up long-running processes and let them live ontheir own.
■ Pool a cluster of Node processes and use the built-in IPC channel to save theoverhead of starting and destroying processes on every fork. This is useful forbuilding computational clusters of Node processes.
This concludes our dive into Node fundamentals. We focused on specific core modulefunctionality, focusing on idiomatic Node principals. In the next section, our focuswill expand beyond core concepts into real-world development recipes.
www.it-ebooks.info

Part 2
Real-world recipes
In the first section of this book, we took a deep dive into Node’s standardlibrary. Now we’ll take a broader look at real-world recipes many Node programsencounter. Node is most famously known for writing fast network-based pro-grams (high-performance HTTP parsing, ease-of-use frameworks like Express),so we devoted a whole chapter to web development.
In addition, there are chapters to help you grasp what a Node program is doingpreemptively with tests, and post-mortem with debugging. In closing, we set youup for success when deploying your applications to production environments.
www.it-ebooks.info

199
The Web: Build leaner and
meaner web applications
The purpose of this chapter is to bring together the things you’ve learned aboutnetworking, buffers, streams, and testing to write better web applications withNode. There are practical techniques for browser-based JavaScript, server-sidecode, and testing.
Node can help you to write better web applications, no matter what your back-ground is. If you’re a client-side developer, then you’ll find it can help you work
This chapter covers■ Using Node for client-side development■ Node in the browser■ Server-side techniques and WebSockets■ Migrating Express 3 applications to Express 4■ Testing web applications■ Full-stack frameworks and real-time services
www.it-ebooks.info

200 CHAPTER 9 The Web: Build leaner and meaner web applications
more efficiently. You can use it for preprocessing client-side assets and for managingclient-side workflows. If you’ve ever wanted to quickly spin up an HTTP server thatbuilds your CSS or CoffeeScript for a single-page web app, or even just a website, thenNode is a great choice.
The previous book in this series, Node.js in Action, has a detailed introduction toweb development with Connect and Express, and also templating languages like Jadeand EJS. In this chapter we’ll build on some of these ideas, so if you’re completely newto Node, we recommend reading Node.js in Action as well. If you’re already usingExpress, then we hope you’ll find something new in this chapter; we’ve included tech-niques for structuring Express applications to make them easier to scale as your proj-ects grow and mature.
The first section in this chapter has some techniques that focus on the browser. Ifyou’re a perplexed front-end developer who’s been using Node because your client-side libraries need it, then you should start here. If you’re a server-side developer whowants to bring Node to the browser, then skip ahead to technique 66 to see how to useNode modules in the browser.
9.1 Front-end techniquesThis section is all about Node and its relationship to client-side technology. You’ll seehow to use the DOM in Node and Node in the DOM, and run your own local develop-ment servers. If you’ve come to Node from a web design background, then thesetechniques should help you get into the swing of things before we dive in to deeperserver-side examples. But if you’re from a server-side background, then you mightlike to see how Node can help automate front-end chores.
The first technique shows you how to create a quick, static server for simple web-sites or single-page web applications.
TECHNIQUE 64 Quick servers for static sites
Sometimes you just want to start a web server to work on a static site, or a single-pageweb application. Node’s a good choice for this, because it’s easy to get a web server run-ning. It can also neatly encapsulate client-side workflows, making it easier to collaboratewith others. Rather than manually running programs over your client-side JavaScriptand CSS, you can write Node programs that you can share with other people.
This technique introduces three solutions for starting up a web server: a short Con-nect script, a command-line web server, and a mini–build system that uses Grunt.
■ ProblemYou want to quickly start a web server so you can develop a static site, or a single-pageapplication.
■ SolutionUse Connect, a command-line web server, or a client-side workflow tool like Grunt.
www.it-ebooks.info

201TECHNIQUE 64 Quick servers for static sites
■ DiscussionPlain old HTML, JavaScript, CSS, and images can be viewed in a browser without aserver. But because most web development tasks end up with files on a server some-where, you often need a server just to make a static site. It’s a chore, but it doesn’tneed to be! The power of browsers also means you can create sophisticated web appli-cations by contacting external web APIs: single-page web applications, or so-calledserverless apps.
In the case of serverless web applications, you can work more efficiently by usingbuild tools to preprocess and package client-side assets. This technique will show youhow to start a web server for developing static sites, and also how to use tools likeGrunt to get a small project going without too much trouble.
Although you could use Node’s built in http module to serve static sites, it’s a lot ofwork. You’ll need to do things like detect the content type of each file to send theright HTTP headers. While the http core module is a solid foundation, you can savetime by using a third-party module.
First, let’s look at how to start a web server with Connect, the HTTP middlewaremodule used to create the popular Express web framework. The first listing demon-strates just how simple this is.
var connect = require('connect');
connect.createServer(connect.static(__dirname)
).listen(8080);
To use the example in listing 9.1, you’ll need to install Connect. You can do that byrunning npm install connect, but it’s a better idea to create a package.json file soit’s easier for other people to see how your project works. Even if your project is a sim-ple static site, creating a package.json file will help your project to grow in the future.All you need to do is memorize these commands: npm init and npm install --saveconnect. The first command creates a manifest file for the current directory, and thesecond will install Connect and save it to the list of dependencies in the new pack-age.json file. Learn these and you’ll be creating new Node projects in no time.
The createServer method B is derived from Node’s http.createServer, but it’swrapped with a few things that Connect adds behind the scenes. The static servermiddleware component C is used to serve files from the current directory(__dirname with two underscores means “current directory”), but you can change thedirectory if you like. For example, if you have client-side assets in public/, then youcan use connect.static(__dirname + '/public') instead.
Finally, the server is set to listen on port 8080 D. That means if you run this scriptand visit http://localhost:8080/file.html in a browser, you should see file.html.
Listing 9.1 A quick static web server
Create web server based on Node’s standard HTTP server
BServefiles from
currentdirectory
C
Listen on port 8080D
www.it-ebooks.info

202 CHAPTER 9 The Web: Build leaner and meaner web applications
If you’ve been sent a bunch of HTML files from a designer, and you want to use aserver to view them because they make use of paths to images and CSS files with a leadingforward slash (/), then you can also use a command-line web server. There are many ofthese available on npm, and they all support different options. One example is glanceby Jesse Keane. You can find it on GitHub at https://github.com/jarofghosts/glance,and on npm as glance.
To use glance on the command line, navigate to a directory where you have someHTML files that you want to look at. Then install glance systemwide with npm install--global glance, and type glance. Now go to http://localhost:61403/file, where fileis a file you want to look at, and you should see it in your browser.
glance can be configured in various ways—you can change the port from 61403 tosomething else with --port, and specify the directory to be served with --dir. Type--help to get a list of options. It also has some nice defaults for things like 404s—figure 9.1 shows what a 404 looks like.
The third way of running a web server is to use a task runner like Grunt. Thisallows you to automate your client-side tasks in a way that others can replicate. UsingGrunt is a bit like a combination of the previous two approaches: it requires a webserver module like Connect, and a command-line tool.
To use Grunt for a client-side project you’ll need to do three things:
1 Install the grunt-cli module.2 Make a package.json to manage the dependencies for your project.3 Use a Grunt plugin that runs a web server.
Figure 9.1 Glance has built-in pages for errors.
www.it-ebooks.info

203TECHNIQUE 64 Quick servers for static sites
The first step is easy: install grunt-cli as a global module with npm install -g grunt-cli. Now you can run Grunt tasks from any project that includes them by typing grunt.
Next, make a new directory for your project. Change to this new directory and typenpm init—you can press Return to accept each of the defaults. Now you need toinstall a web server module: npm install --save-dev grunt grunt-contrib-connectwill do the job.
The previous command also installed grunt as a development dependency. Thereason for this is it locks Grunt to the current version—if you look at package.jsonyou’ll see something like "grunt": "~0.4.2", which means Grunt was installed firstat 0.4.2, but newer versions on the 0.4 branch will be used in the future. The popu-larity of modules like Grunt forced npm to support something known as peer dependen-cies. Peer dependencies allow Grunt plugins to express a dependency on a specificversion of Grunt, so the Connect module we’ll use actually has a peerDependenciesproperty in its package.json file. The benefit of this is you can be sure plugins willwork as Grunt changes—otherwise, as Grunt’s API changes, plugins might just breakwith no obvious cause.
ALTERNATIVES TO GRUNT At the time of writing, Grunt was the most popularbuild system for Node. But new alternatives have appeared and are rapidlygaining adoption. One example is Gulp (http://gulpjs.com/), which takesadvantage of Node’s streaming APIs and has a light syntax that is easy to learn.
In case all this is new to you, we’ve included a screenshot of what your project shouldlook like in figure 9.2.
Figure 9.2 Projects that use Grunt typically have a package.json and a Gruntfile.js.
www.it-ebooks.info

204 CHAPTER 9 The Web: Build leaner and meaner web applications
Now that we have a fresh project set up, the final thing to do is create a file calledGruntfile.js. This file contains a list of tasks that grunt will run for you. The next list-ing shows an example that uses the grunt-contrib-connect module.
module.exports = function(grunt) {grunt.loadNpmTasks('grunt-contrib-connect');
grunt.initConfig({connect: {server: {
options: {port: 8080,base: 'public',keepalive: true
}}
}});
grunt.registerTask('default', ['connect:server']);};
You should also create a directory called public with an index.html file—the HTMLfile can contain anything you like. After that, type grunt connect from the samedirectory as your Gruntfile.js, and the server should start. You can also type grunt byitself, because we set the default task to connect:server E.
Gruntfiles use Node’s standard module system, and receive an object called gruntB that can be used to define tasks. Plugins are loaded with grunt.loadNpmTasks,allowing you to reference modules installed with npm C. Most plugins have differentoptions, and these are set by passing objects to grunt.initConfig—we’ve defined aserver port and base path, which you can change by modifying the base property D.
Using Grunt to start a web server is more work than writing a tiny Connect scriptor running glance, but if you take a look at Grunt’s plugin list (http://gruntjs.com/plugins), you’ll see over 2,000 entries that cover everything from building optimizedCSS files to Amazon S3 integration. If you’ve ever needed to concatenate client-sideJavaScript or generate image sprites, then chances are there’s a plugin that will helpyou automate it.
In the next technique you’ll learn how to reuse client-side code in Node. We’ll alsoshow you how to render web content inside Node processes.
TECHNIQUE 65 Using the DOM in Node
With a bit of work, it’s possible to simulate a browser in Node. This is useful if youwant to make web scrapers—programs that convert web pages into structured con-tent. This is technically rather more complicated than it may seem. Browsers don’t justprovide JavaScript runtimes; they also have Document Object Model (DOM) APIs thatdon’t exist in Node.
Listing 9.2 A Gruntfile for serving static files
All Gruntfilesexport afunction B
This loads Connect pluginC
The base path for static filesD
Defaultcommand isaliased here
E
www.it-ebooks.info

205TECHNIQUE 65 Using the DOM in Node
Such a rich collection of libraries has evolved around the DOM that it’s sometimeshard to imagine solving problems without them. If only there were a way to run librar-ies like jQuery inside Node! In this technique you’ll learn how to do this by usingbrowser JavaScript in a Node program.
■ ProblemYou want to reuse client-side code that depends on the DOM in Node, or render entireweb pages.
■ SolutionUse a third-party module that provides a DOM layer.
■ DiscussionThe W3C DOM is a well-defined standard. When designers struggle with browserincompatibilities, they’re often dealing with the fact that standards require a degreeof interpretation, and browser manufacturers have naturally interpreted the standardsslightly differently. If your goal is just to run JavaScript that depends on the JavaScriptDOM APIs, then you’re in luck: these standards can be re-created well enough that youcan run popular client-side libraries in Node.
One early solution to this problem was jsdom (https://github.com/tmpvar/jsdom). This module accepts an environment specification and then provides a windowobject. If you install it with npm install -g jsdom, you should be able to run the fol-lowing example:
var jsdom = require('jsdom');jsdom.env(
'<p class="intro">Welcome to Node in Practice</p>',['http://code.jquery.com/jquery.js'],function(errors, window) { console.log('Intro:', window.$('.intro').text());
});
This example takes in HTML B, fetches some remote scripts C, and then gives you awindow object that looks a lot like a browser window object D. It’s good enough thatyou can use jQuery to manipulate the HTML snippet—jQuery works as if it’s runningin a browser. This is useful because now you can write scripts that process HTML doc-uments in the way you’re probably used to: rather than using a parser, you can queryand manipulate HTML using the tools you’re familiar with. This is amazing for writ-ing succinct code for tasks like web scraping, which would otherwise be frustratingand tedious.
Others have iterated on jsdom’s approach, simplifying the underlying dependen-cies. If you really just want to process HTML in a jQuery-like way, then you could usecheerio (https://npmjs.org/package/cheerio). This module is more suited to webscraping, so if you’re writing something that downloads, processes, and indexesHTML, then cheerio is a good choice.
HTML you wantto process
BExternal
JavaScriptlibraries
jsdom willfetch C
Access to $() fromjQuery now possible D
www.it-ebooks.info

206 CHAPTER 9 The Web: Build leaner and meaner web applications
In the following example, you’ll see how to use cheerio to process HTML from areal web page. The actual HTML is from manning.com/index.html, but as designschange frequently, we’ve kept a copy of the page we used in our code samples. Youcan find it in cheerio-manning/index.html. The following listing opens the HTML fileand queries it using a CSS selector, courtesy of cheerio.
var cheerio = require('cheerio');var fs = require('fs');
fs.readFile('./index.html', 'utf8', function(err, html) {var $ = cheerio.load(html);var releases = $('.Releases a strong');
releases.each(function(i) {console.log('New release:', this.text());
});});
The HTML is loaded with fs.readFile. If you were doing this for real then you’dprobably want to download the page using HTTP—feel free to replace fs.readFilewith http.get to fetch Manning’s index page over the network. We have a detailedexample of http.get in chapter 7, technique 51, “Following redirects.”
Once the HTML has been fetched, it’s passed to cheerio.load B. Setting theresult as a variable called $ is just a convention that will make your code easier to readif you’re used to jQuery, but you could name it something else.
Now that everything is set up, you can query the HTML; $('.Releases a strong')is used C to query the document for the latest books that have been released. They’rein a div with a class of Releases, as anchor tags.
Each element is iterated over using releases.each, just like in jQuery. The call-back’s context is changed to be the current element, so this.text() is called to getthe text contained by the node D.
Because Node has such a wide collection of third-party modules, you could takethis example and make all sorts of amazing things with it. Add Redis for caching andqueueing websites to process, then scrape the results and throw it at Elasticsearch, andyou’ve got your own search engine!
Now you’ve seen how to run JavaScript intended for browsers in Node, but whatabout the opposite? You might have some Node code that you want to reuse client-side, or you might want to just use Node’s module system to organize your client-sidecode. Much like we can simulate the DOM in Node, we can do the same in thebrowser. In the next technique you’ll learn how to do this by running your Nodescripts in browsers.
Listing 9.3 Scraping a web page with cheerio
Load HTMLcontent
B
Query it using CSS selectorC
Extract the textD
www.it-ebooks.info

207TECHNIQUE 66 Using Node modules in the browser
TECHNIQUE 66 Using Node modules in the browser
One of Node’s selling points for JavaScript is that you can reuse your existing browserprogramming skills on servers. But what about reusing Node code in browsers withoutany changes? Wouldn’t that be cool? Here’s an example: you’ve defined data modelsin Node that do things like data validation, and you want to reuse them in the browserto automatically display error messages when data is invalid.
This is almost possible, but not quite: unfortunately browsers have quirks that mustbe ironed out. Also, important features like require don’t exist in client-sideJavaScript. In this technique you’ll see how you can take code intended for Node, andconvert it to work with most web browsers.
■ ProblemYou want to use require() to structure your client-side code, or reuse entire Nodemodules in the browser.
■ SolutionUse a program like Browserify that is capable of converting Node JavaScript intobrowser-friendly code.
■ DiscussionIn this technique we’ll use Browserify (http://browserify.org/) to convert Node mod-ules into browser-friendly code. Other solutions also exist, but at this point Browserifyis one of the more mature and popular solutions. It doesn’t just patch in support forrequire(), though: it can convert code that relies on Node’s stream and networkAPIs. You can even use it to recursively convert modules from npm.
To see how it works, we’ll first look at a short self-contained example. To getstarted, install Browserify with npm: npm install -g browserify. Once you’ve gotBrowserify installed, you can convert your Node modules into Browser scripts withbrowserify index.js -o bundle.js. Any require statements will cause the files to beincluded in bundle.js, so you shouldn’t change this file. Instead, overwrite it wheneveryour original files have changed.
Listing 9.4 shows a sample Node program that uses EventEmitter andutils.inherit to make the basis of a small messaging class.
var EventEmitter = require('events').EventEmitter;var util = require('util');
function MessageBus(options) {EventEmitter.call(this, options);this.on('message', this.messageReceived.bind(this));
}
util.inherits(MessageBus, EventEmitter);
MessageBus.prototype.messageReceived = function(message) {console.log('RX:', message);
Listing 9.4 Node modules in the browser
Load modules with require() as you usually would.B
EventEmitter can be inherited using util.inherits.C
www.it-ebooks.info

208 CHAPTER 9 The Web: Build leaner and meaner web applications
};
var messageBus = new MessageBus();messageBus.emit('message', 'Hello world!');
Running Browserify on this script generates a bundle that’s about 1,000 lines long!But we can use require as we would in any Node program B, and the Node moduleswe know and love will work, as you can see in listing 9.4 by the use of util.inheritsand EventEmitter C.
With Browserify, you can also use require and module.exports, which is better thanhaving to juggle <script> tags. The previous example can be extended to do just that.In listing 9.5, Browserify is used to make a client-side script that can load MessageBusand jQuery with require, and then modify the DOM when messages are emitted.
var MessageBus = require('./messagebus');var messageBus = new MessageBus();var $ = require('jquery')(window);
messageBus.on('message', function(msg) {$('#messages').append('<p>' + msg + '</p>');
});
$(function() {messageBus.emit('message', 'Hello from example 2');
});
By creating a package.json file with jquery as a dependency, you can load jQueryusing Browserify B. Here we’ve used it to attach a DOMContentLoaded listener C andappend paragraphs to a container element when messages are received.
To make this work, all you need to do is add module.exports = MessageBus to theexample from listing 9.4, and then generate the bundle with browserify index.js -obundle.js, where index.js is listing 9.5. Browserify will dutifully follow the requirestatements from index.js to pull in jQuery from ./node_modules and the MessageBusclass from messagebus.js.
Listing 9.5 Node modules in the browser
jQuery can be loaded with Browserify!
B
jQuery’s DOM ready function can be used.
C
Source mapsIf the JavaScript files you generate with Browserify raise errors, then it can be hardto untangle the line numbers in stack traces, because they refer to line numbers inthe monolithic bundle. If you include the --debug flag when building the bundle, thenBrowserify will generate mappings that point to the original files and line numbers.
These mappings require a compatible debugger—you’ll also need to tell yourbrowser’s debugging tools to use them. In Chrome you’ll need to select Enable sourcemaps, under the options in Chrome’s DevTools.
www.it-ebooks.info

209TECHNIQUE 67 Express route separation
Because people might forget how to build the script, you can add a scripts entryto your package.json file, like this: "build": "browserify index.js -o bundle.js".The downloadable code samples for this book include both a sample package.json fileand a suitable HTML file for running the entire example in a browser.
There’s another way to build bundles with Browserify: by using Browserify as amodule in a Node program. To use it, you need to create a Browserify instance Band then tell it what files you want to build C:
var browserify = require('browserify');var b = browserify();b.add('./index.js');b.bundle().pipe(process.stdout);
You could use this as part of a more complex build process, or put in a Grunt task toautomate your build process. Now that you’ve seen how to use Node modules in thebrowser and how to simulate the browser in Node, it’s time to learn how to improveyour server-side web applications.
9.2 Server-side techniquesThis section includes general techniques for building web applications. If you’realready using Express, then you’ll be able to use these techniques to improve howyour Express programs are organized. Express aims to be simple, which makes it flexi-ble, but sometimes it’s not easy to see how to use it in the best way. The patterns andsolutions we’ve created have come from using Express to build commercial and opensource web applications over the last few years. We hope they’ll help you to write bet-ter web applications.
EXPRESS 3 AND 4 The techniques in this section refer to Express 3. Most willwork with Express 4, or may require minor modifications. For more aboutmigrating to Express 4, see technique 75.
TECHNIQUE 67 Express route separation
The documentation and popular tutorials for Express usually organize all the code ina single file. In real projects, this eventually becomes unmanageable. This techniqueuses Node’s module system to separate related routes into files, and also includes waysto get around the Express app object being in a different file.
■ ProblemYour main Express application file has become extremely large, and you want a betterway to organize all of those routes.
■ SolutionUse route separation to split related routes into modules.
■ DiscussionExpress is a minimalist framework, so it doesn’t hold your hand when it comes toorganizing projects. Projects that start simple can become unwieldy if you don’t pay
Create Browserify instance
BSpecify files youwant to bundle
C
www.it-ebooks.info

210 CHAPTER 9 The Web: Build leaner and meaner web applications
attention. The secret to successfully organizing larger projects is to embrace Node’smodule system.
The first avenue of attack is routes, but you can apply this technique to every facetof development with Express. You can even treat applications as self-contained Nodemodules, and mount them within other applications.
Here’s a typical example of some Express routes:
app.get('/notes', function(req, res, next) {db.notes.findAll(function(err, notes) {if (err) return next(err);res.send(notes);
});});
app.post('/notes', function(req, res, next) {db.notes.create(req.body.note, function(err, note) {if (err) return next(err);res.send(note);
});});
The full example project can be found in listings/web/route_separation/app_monolithic.js. It contains a set of CRUD routes for creating, finding, and updatingnotes. An application like this would have other CRUD routes as well: perhaps notescan be organized into notebooks, and there will definitely be some user account man-agement, and extra features like setting reminders. Once you have about four or fiveof these sets of routes, the application file could be hundreds of lines of code.
If you wrote this project as a single, large file, then it would be prone to many prob-lems. It would be easy to make mistakes where variables are accidentally global insteadof local, so dangerous side effects can be encountered under certain conditions. Nodehas a built-in solution which can be applied to Express and other web frameworks:directories as modules.
To refactor your routes using modules, first create a directory called routes, orcontrollers if you prefer. Then create a file called index.js. In our case it’ll be a sim-ple three-line file that exports the notes routes:
module.exports = {notes: require('./notes')
};
Here we have just one routing module, which can be loaded with require and a rela-tive path B. Next, copy and paste the entire set of routes into routes/notes.js. Thendelete the route definition part—for example, app.get('/notes',, and replace itwith an export: module.exports.index = function(req, res) {.
The refactored files should look like the next listing.
This route displays a list of notes.
This route is used to create notes.
Export each routing module like this
B
www.it-ebooks.info
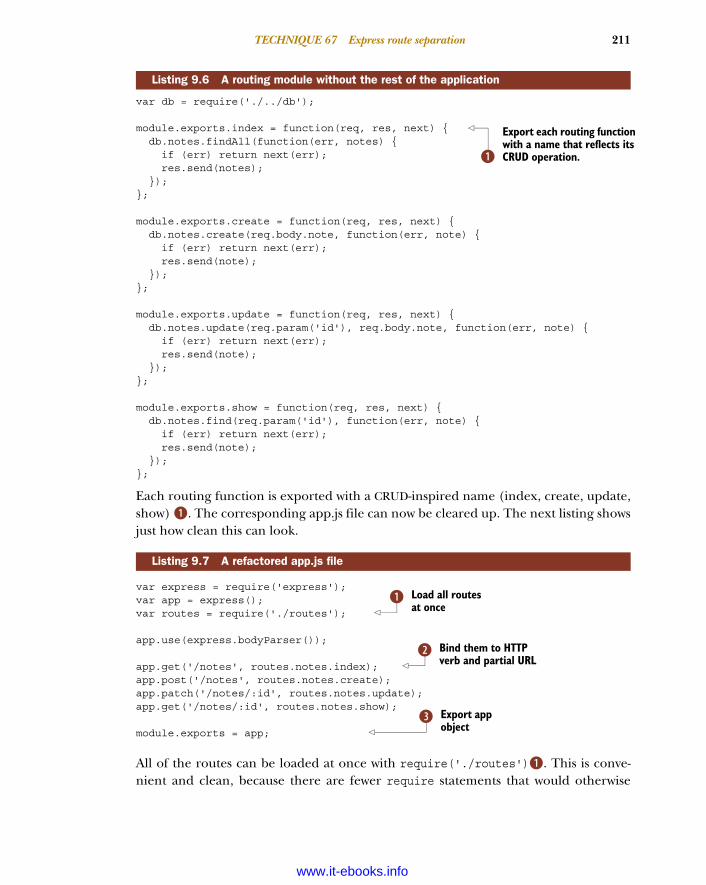
211TECHNIQUE 67 Express route separation
var db = require('./../db');
module.exports.index = function(req, res, next) {db.notes.findAll(function(err, notes) {if (err) return next(err);res.send(notes);
});};
module.exports.create = function(req, res, next) {db.notes.create(req.body.note, function(err, note) {if (err) return next(err);res.send(note);
});};
module.exports.update = function(req, res, next) {db.notes.update(req.param('id'), req.body.note, function(err, note) {if (err) return next(err);res.send(note);
});};
module.exports.show = function(req, res, next) {db.notes.find(req.param('id'), function(err, note) {if (err) return next(err);res.send(note);
});};
Each routing function is exported with a CRUD-inspired name (index, create, update,show) B. The corresponding app.js file can now be cleared up. The next listing showsjust how clean this can look.
var express = require('express');var app = express();var routes = require('./routes');
app.use(express.bodyParser());
app.get('/notes', routes.notes.index);app.post('/notes', routes.notes.create);app.patch('/notes/:id', routes.notes.update);app.get('/notes/:id', routes.notes.show);
module.exports = app;
All of the routes can be loaded at once with require('./routes')B. This is conve-nient and clean, because there are fewer require statements that would otherwise
Listing 9.6 A routing module without the rest of the application
Listing 9.7 A refactored app.js file
Export each routing function with a name that reflects its CRUD operation.B
Load all routes at once
B
Bind them to HTTP verb and partial URL
C
Export app object
D
www.it-ebooks.info

212 CHAPTER 9 The Web: Build leaner and meaner web applications
clutter app.js. All you need to do is remove the old route callbacks and add in refer-ences to each routing function C.
Don’t put an app.listen call in this file; export app instead D. This makes it eas-ier to test the application. Another advantage of exporting the app object is that youcan easily load the app.js module from anywhere within the application. Expressallows you to get and set configuration values, so making app accessible can be usefulif you want to refer to these settings in places outside the routes. Also note thatres.app is available from within routes, so you don’t need to pass the app objectaround too often.
If you want to easily load app.js without creating a server, then name the applica-tion file app.js, and have a separate server.js file that calls app.listen. You can set upthe server property in package.json to use node server.js, which allows people tostart the application with npm start—you can also leave out the server property,because node server.js is the default, but it’s better to define it so people know howyou intend them to use it.
The full example for this technique can be found in listings/web/route-separation,and it includes sample tests in case you want to unit test your own projects.
Properly organizing your Express projects is important, but there are also workflowissues that can slow down development. For example, when you’re working on a webapplication, you’ll typically make many small changes and then refresh the browser tosee the results. Most Node frameworks require the process to be restarted before see-ing the changes take effect, so the next technique explores how this works and how toefficiently solve this problem.
TECHNIQUE 68 Automatically restarting the server
Although Node comes with tools for monitoring changes to files, it can be a lot ofwork to use them productively. This technique looks at fs.watch, and introduces apopular third-party tool for automatically restarting web applications as files areedited.
■ ProblemYou need to restart your Node web application every time you edit files.
Directories as modulesThis technique puts all of the routes in a directory, and then exports them with anindex.js file so they can be loaded in one go with require('./routes').
This pattern can be reused in other places. It’s great for organizing middleware,database modules, and configuration files.
For an example of using directories as modules to organize configuration files, seetechnique 69.
www.it-ebooks.info

213TECHNIQUE 68 Automatically restarting the server
■ SolutionUse a file watcher to restart the application automatically.
■ DiscussionIf you’re used to languages like PHP or ASP, Node’s in-process server-based modelmight seem unusual. One of the big differences about Node’s model is that you needto restart the process when files change. If you think about how require and V8 work,then this makes sense—files are generally loaded and interpreted once.
One way to get around this is to detect when files change, and then restart theapplication. Node makes good use of non-blocking I/O, and one of the properties ofnon-blocking file system APIs is that listeners can be used to wait for specific events. Tosolve this problem, you could set up file system event handlers for all of the files inyour project. Then, when files change, your event handler can restart the project.
Node provides an API for this in the fs module called fs.watch. At the time ofwriting, this API is unstable—that means it may be changed in subsequent versions ofNode. This method has been covered in chapter 6, section 6.1.4. Let’s look at how itcould be used with a web application. Figure 9.8 shows a program that can watch andreload a simple web server.
var fs = require('fs');var exec = require('child_process').exec;
function watch() {var child = exec('node server.js');var watcher = fs.watch(__dirname + '/server.js', function(event) {console.log('File changed, reloading.');child.kill();watcher.close();watch();
});}
watch();
Watching a file for changes with fs.watch is slightly convoluted, but you can usefs.watchFile, which is based on file polling instead of I/O events. The way listing 9.8works is to start a child process—in this case node server.js B—and then watch thatfile for changes C. Starting and stopping processes is managed with the child_processcore module, and the kill method is used to stop the child process D.
On Mac OS we found it’s best to also stop watching the file with watcher.close E,although Node’s documentation indicates that fs.watch should be “persistent.” Once allof that is done, the watch function is called recursively to launch the web server again F.
This example could be run with a server.js file like this:
var http = require('http');var server = http.createServer(function(req, res) {
res.writeHead(200, { 'Content-Type': 'text/plain' });
Listing 9.8 Reloading a Node process
Start web server process
BUse fs.watchto watch for
changes tofile
C
When file has changed, kill web serverDClose
watcher ERecursively call watcher function to start web server up againF
www.it-ebooks.info

214 CHAPTER 9 The Web: Build leaner and meaner web applications
res.end('This is a super basic web application');});
server.listen(8080);
This works, but it’s not exactly elegant. And it’s not complete, either. Most Node webapplications consist of multiple files, so the file-watching logic will become more com-plicated. It’s not enough to recurse over the parent directories, because there are lotsof files that you don’t want to watch—you don’t want to watch the files in .git, and ifyou’re writing an Express application you probably don’t want to watch view tem-plates, because they’re loaded on demand without caching in development mode.
Suddenly automatically restarting Node programs seems less trivial, and that’swhere third-party modules can help. One of the most widely used modules that solvesthis problem is Remy Sharp’s nodemon (http://nodemon.io/). It works well for watch-ing Express applications out of the box, and you can even use it to automaticallyrestart any kind of program, whether it’s written in Node or Python, Ruby, and so on.
To try it out, type npm install -g nodemon, and then navigate to a directory thatcontains a Node web application. If you want to use a small sample script, you can useour example from listings/web/watch/server.js.
Start running and watching server.js by typing nodemon server.js, and you’ll findyou can edit the text in res.end and the change will be reflected the next time youload http://localhost:8080/.
You might notice a small delay before changes are visible—that’s just Nodemonsetting up fs.watch, or fs.watchFile if it’s not available on your OS. You can force itto reload by typing rs and pressing Return.
Nodemon has some other features that will help you work on web applications.Typing nodemon --help will show a list of command-line options, but you can getgreater, VCS-friendly control by creating a nodemon.json file. This allows you to spec-ify an array of files to ignore, and you can also map file extensions to program namesby using the execMap setting. Nodemon’s documentation includes a sample file thatillustrates each of the features.
The next listing is an example Nodemon configuration that you can adapt for yourown projects.
{"ignore": [".git","node_modulesnode_modules"
],"execMap": {"js": "node --harmony"
},"watch": ["test/fixtures/",
Listing 9.9 Nodemon’s configuration file
A list of paths to ignoreB
Automatically map .js files to use node with harmony flag
C
Specify paths to watchD
www.it-ebooks.info

215TECHNIQUE 69 Configuring web applications
"test/samples/"],"env": {"NODE_ENV": "development"
},"ext": "js json"
}
The basic options allow you to ignore specific paths B, and list multiple paths towatch D. This example uses execMap to automatically run node with the --harmonyflag1 for all JavaScript files C. Nodemon can also set environmental variables—justadd some values to the env property E.
Once your workflow is streamlined thanks to Nodemon, the next thing to do is toimprove how your project is configured. Most projects need some level of configura-tion—examples include the database connection details and authorization credentialsfor remote APIs. The next technique looks at ways to configure your web applicationso you can easily deploy it to multiple environments, run it in test mode, and eventweak how it behaves during local development.
TECHNIQUE 69 Configuring web applications
This technique looks at the common patterns for configuring Node web applications.We’ll include examples for Express, but you can use these patterns with other webframeworks as well.
■ ProblemYou have configuration options that change between development, testing, andproduction.
■ SolutionUse JSON configuration files, environmental variables, or a module for managingsettings.
■ DiscussionMost web applications require some configuration values to operate correctly: data-base connection strings, cache settings, and email server credentials are typical. Thereare many ways to store application settings, but before you install a third-party moduleto do it, consider your requirements:
■ Is it acceptable to leave database credentials in your version control repository?■ Do you really need configuration files, or can you embed settings into the
application?■ How can configuration values be accessed in different parts of the application?■ Does your deployment environment offer a way to store configuration values?
The first point depends on your project or organization’s policies. If you’re building anopen source web application, you don’t want to leave database accounts in the publicrepository, so configuration files might not be the best solution. You want people to
1 --harmony is used to enable all of the newer ECMAScript features available to Node.
List environmental variablesE
www.it-ebooks.info

216 CHAPTER 9 The Web: Build leaner and meaner web applications
install your application quickly and easily, but you don’t want to accidentally leak yourpasswords. Similarly, if you work in a large organization with database administrators,they might not be comfortable about letting everyone have direct access to databases.
In such cases, you can set configuration values as part of the deployment environ-ment. Environmental variables are a standard way to configure the behavior of Unixand Windows programs, and you can access them with process.env. The basic exam-ple of this is switching between deployment environments, using the NODE_ENV setting.The following listing shows the pattern Express uses for storing configuration values.
var express = require('express');var app = express();
app.set('port', process.env.PORT || 3000);
app.configure('development', function() {app.set('db', 'localhost/development');
});
app.configure('production', function() {app.set('db', 'db.example.com/production');
});
app.listen(app.get('port'), function() {console.log('Using database:', app.get('db'));console.log('Listening on port:', app.get('port'));
});
Express has a small API for setting application configuration values: app.set, app.getE, and app.configure. You can also use app.enable and app.disable to toggle Bool-ean values, and app.enabled and app.disabled to query them. The app.configureblocks are equivalent to if (process.env.NODE_ENV === 'development') C and if(process.env.NODE_ENV === 'production')D, so you don’t really need to useapp.configure if you don’t want to. It will be removed in Express 4. If you’re not usingExpress, you can just query process.env.
The NODE_ENV environmental variable is controlled by the shell. If you want to runlisting 9.10 in production mode, you can type NODE_ENV=production node config.js,and you should see it print the production database string. You could also type exportNODE_ENV=production, which will cause the application to always run in productionmode while the current shell is running.
The reason we’ve used PORT B to set the port is because that’s the default nameHeroku uses. This allows Heroku’s internal HTTP routers to override the port yourapplication listens on.
You could use process.env throughout your code instead of app.get, but using theapp object feels cleaner. You don’t need to pass app around—if you’ve used the routeseparation pattern from technique 67, then you’ll be able to access it through res.app.
Listing 9.10 Configuring an Express application
Use 3000 if the environmental variable PORT is not set.
BThis callbackwill only runif NODE_ENV
is set todevelopment.
C
This callback will only run if NODE_ENV is set to production.
D
Use app.get()to accesssettings.
E
www.it-ebooks.info

217TECHNIQUE 69 Configuring web applications
If you’d rather use configuration files, the easiest and quickest way is to use thefolder as a module technique with JSON files. Create a folder called config/, and thencreate an index.js file, and a JSON file for each environment. The next listing showswhat the index.js file should look like.
var config = {development: require('./development.json'),production: require('./production.json'),test: require('./test.json')
};
module.exports = config[process.env.NODE_ENV || 'development'];
Node’s module system allows you to load a JSON file with require B, so you can loadeach environment’s configuration file and then export the relevant one usingNODE_ENV C. Then whenever you need to access settings, just use var config =require('./config')—you’ll get a plain old JavaScript object that contains the set-tings for the current environment. The next listing shows an example Express applica-tion that uses this technique.
var express = require('express');var app = express();var config = require('./config');
app.listen(config.port, function() {console.log('Using database:', config.db);console.log('Listening on port:', config.port);
});
This is so easy it almost feels like cheating! All you have to do is call require('./config') and you’ve got your settings. Node’s module system should cache thefile as well, so once you’ve called require it shouldn’t need to evaluate the JSON filesagain. You can repeatedly call require('./config') throughout your application.
This technique takes advantage of JavaScript’s lightweight syntax for setting andaccessing values on objects, as well as Node’s module system. It works well for lots oftypes of projects.
There’s one more approach to configuration: using a third-party module. After thelast technique, you might think this is overkill, but third-party modules can offer a lotof functionality, including command-line option parsing. It might be that you oftenneed to switch between different options, so overriding application settings withcommand-line options is attractive.
Listing 9.11 A JSON configuration file loader
Listing 9.12 Loading the configuration directory
Load a JSON file with require()B
Check NODE_ENV tosee which file to use C
Load settings using require()
www.it-ebooks.info

218 CHAPTER 9 The Web: Build leaner and meaner web applications
The web framework Flatiron (http://flatironjs.org/) has an application configura-tion module called nconf (https://npmjs.org/package/nconf) that handles configu-ration files, environmental variables, and command-line options. Each can be givenprecedence, so you can make command-line options override configuration files. It’sa unifying framework for processing options.
The following listing shows how nconf can be used to configure an Expressapplication.
var express = require('express');var app = express();var nconf = require('nconf');var routes = require('./routes');
nconf.argv().env().file({ file: 'config.json' });
nconf.set('db', 'localhost/development');nconf.set('port', 3000);
app.get('/', routes.index);
app.listen(nconf.get('port'), function() {console.log('Using database:', nconf.get('db'));console.log('Listening on port:', nconf.get('port'));
});
Here we’ve told nconf to prioritize options from the command line, but to also read aconfiguration file if one is available B. You don’t need to create a configuration file,and nconf can create one for you if you use nconf.save. That means you could allowusers of your application to change settings and persist them. This works best whennconf is set up to use a database to save settings—it comes with built-in Redis support.
Default values can be set with nconf.set C. If you run this example without anyoptions, it should use port 3000, but if you start it with node app.js --port 3001, it’lluse whatever you pass with --port. Getting settings is as simple as nconf.get D.
And you don’t need to pass the nconf object around! Settings are stored in mem-ory. Other files in your project can access settings by loading nconf with require, andthen calling nconf.get. The next listing loads nconf again, and then tries to accessthe db setting.
var nconf = require('nconf');
module.exports.index = function(req, res) {res.send('Using database:', nconf.get('db'));
};
Listing 9.13 Using nconf to configure an Express application
Listing 9.14 Loading nconf elsewhere in the application
Tell nconf to optionally use configuration file, and override it with command-line arguments
B
Set a default for db setting
C
Get the portD
If you load nconf again, it’ll know what to do.B
www.it-ebooks.info

219TECHNIQUE 70 Elegant error handling
Even though it seems like var nconf = require('nconf') might return a pristine copyof nconf, it doesn’t B.
A well-organized and carefully configured web application can still go wrong.When your application crashes, you’ll want logs to help debug the problem. The nexttechnique will help you improve how your application handles errors.
TECHNIQUE 70 Elegant error handling
This technique looks at using the Error constructor to catch and handle errors inyour application.
■ ProblemYou want to centralize error handling to simplify your web applications.
■ SolutionInherit from Error with error classes that include HTTP status codes, and use a mid-dleware component to handle errors based on content type.
■ DiscussionJavaScript has an Error constructor that you can inherit from to represent specifictypes of errors. In web development, some errors frequently crop up: incorrect URLs,incorrect parameters for query parameters or form values, and authentication fail-ures. That means you can define errors that include HTTP codes alongside the typicalthings Error provides.
Rather than branching on error conditions in HTTP routers, you should callnext(err). The next listing shows how that works.
var db = require('./../db');var errors = require('./../errors');
module.exports.show = function(req, res, next) {db.notes.find(req.param('id'), function(err, note) {
if (err) return next(err);if (!note) {return next(new errors.NotFound('That note was not found.'));
}res.send(note);
});};
In this example, error classes have been defined in a separate file B, which you canfind in listing 9.16. The route handler includes a third argument, next C, after thestandard req, res arguments that we’ve used in previous techniques.
Many of your route handlers will load data from a database, whether it’s MySQL,PostgreSQL, MongoDB, or Redis, so this example is based around a generic asynchro-nous database API. If an error was encountered by the database API, then return earlyand call next, including the error object as the first argument. This will pass the erroralong to the next middleware component D. This route handler has an additional
Listing 9.15 Passing errors to middleware
Keep error objects organized in separate file.B
Make sure theroute handler
signatureincludes the
thirdparameter,
next. C
If an error waspassed by thedatabase API,return early. D
If a note couldn’t be found,create an instance of a
suitable error class. E
www.it-ebooks.info

220 CHAPTER 9 The Web: Build leaner and meaner web applications
piece of logic—if a note wasn’t found in the database, then an error object is instanti-ated and passed along using next E.
The following listing shows how to inherit from Error.
var util = require('util');
function HTTPError() {Error.call(this, arguments);
}
util.inherits(HTTPError, Error);
function NotFound(message) {HTTPError.call(this);Error.captureStackTrace(this, arguments.callee);this.statusCode = 404;this.message = message;this.name = 'NotFound';
}util.inherits(NotFound, HTTPError);
module.exports = {HTTPError: HTTPError,NotFound: NotFound
};
Here we’ve opted to create two classes. Instead of just defining NotFound, we’ve cre-ated HTTPError B and inherited from it F. This is so it’s easier to track if an error isrelated to HTTP, or if it’s something else. The base HTTPError class inherits fromError C.
In the NotFound error, we’ve captured the stack trace to aid with debugging D,and set a statusCode property E that can be reported to the browser.
The next listing shows how to create an error-handling middleware component ina typical Express application.
var errors = require('./errors');var express = require('express');var app = express();var routes = require('./routes');
app.use(express.bodyParser());
app.get('/notes/:id', routes.notes.show);
app.use(function(err, req, res, next) {if (process.env.NODE_ENV !== 'test') {console.error(err.stack);
}
Listing 9.16 Inheriting errors and including status codes
Listing 9.17 Using an error-handling middleware component
Create generic HTTPError class
B
Inherit from Error, using util.inherits
C
Optionally capture stack trace
D
Set status code that can be passed to browserE
Additional HTTP errors can inherit from HTTPErrorF
If four arguments are used with app.use, then the first argument is the error object.
B
Print stack traces if you’re not running in the test mode.C
www.it-ebooks.info

221TECHNIQUE 70 Elegant error handling
res.status(err.statusCode || 500);
res.format({text: function() {
res.send(err.message);},
json: function() {res.send(err);
},
html: function() {res.render('errors', { err: err });
}});
});
module.exports = app;
This middleware component is fairly simple, but it has some tweaks that we’ve foundwork well in production. To get the error objects passed by next, make sure to use thefour-parameter form of app.use’s callback B. Also note that this middleware compo-nent comes at the end of the chain, so you need to put it after all your other middle-ware and route definitions.
You can conditionally print stack traces so they’re not visible when specifically test-ing expected errors C—errors may be triggered as part of testing, and you wouldn’twant stack traces cluttering the test output.
Because this centralizes error handling into the main application file, it’s a goodidea to conditionally return different formats. This is useful if your application pro-vides a JSON API as well as HTML pages. You can use app.format to do this D, and itworks by checking the MIME type in the request’s Accept header. The JSON responsemight not be needed, but it’s possible that your API would return well-formed errorsthat can be consumed by clients—it can be difficult to deal with APIs that suddenlyrespond with HTML when you’re asking for JSON.
Somewhere in your tests you should check that these errors do what you want. Thefollowing snippet shows a Mocha test that makes sure 404s are returned whenexpected, and in the expected format:
describe('Error handling', function() {it('should return a 404 for IDs that do not exist', function(done) {request(app)
.get('/notes/999')
.expect(404, done);});
it('should send JSON errors when requested', function(done) {request(app)
.get('/notes/999')
.set('Accept', 'application/json')
Respond with errors in the expected format.
D
Check that expected status code was returned
B
Set Accept header to get JSON
C
www.it-ebooks.info

222 CHAPTER 9 The Web: Build leaner and meaner web applications
.expect(404, function(err, res) { assert.equal(res.body.name, 'NotFound');done();
});});
});
This snippet includes two requests. The first checks that we get an error with a 404 B,and the second sets the Accept header to make sure we get back JSON C. This isimplemented with SuperTest, which will give us JSON in responses, so the assertioncan check to make sure we get an object in the format we expect D. The full sourcefor this example can be found in listings/web/error-handling.
This error-handling pattern is widely used in Express apps, and it’s even built into therestify framework (https://npmjs.org/package/restify). If you remember to pass errorobjects to next, you’ll find testing and debugging Express applications easier.
Errors can also be sent as emails with useful transcripts. To make the most out oferror emails, include the request and error objects in the email so you can see exactlywhere things broke. Also, you probably don’t want to send details about errors withcertain status codes, but that’s up to you.
In this technique we mentioned adapting code to work with REST APIs. The nexttechnique delves deeper into the world of REST, and has examples for both Expressand restify.
TECHNIQUE 71 RESTful web applications
At some stage you might want to add an API to your application. This technique is allabout building RESTful APIs. There are examples for both Express and restify, and tipson how to create APIs that use the right HTTP verbs and idiomatic URLs.
■ ProblemYou want to create a RESTful web service in Express, restify, or another web framework.
■ SolutionUse the right HTTP methods, URLs, and headers to build an intuitive, RESTful API.
Check that body was in expected formatD
Error email cheat sheetIf you’re going to make your application send email notifications when unexpectederrors occur, here’s a list of things you should include in the email to aid with debugging:
■ A string version of the error object■ The contents of err.stack—this is a nonstandard property of error objects that
Node includes■ The request method and URL■ The Express req.route property, if available■ The remote IP, which is req.ip in Express■ The request body, which you can convert to a string with inspect(req.body)
www.it-ebooks.info

223TECHNIQUE 71 RESTful web applications
■ DiscussionREST stands for representational state transfer ,2 which isn’t terribly useful to memorizeunless you want to impress someone in a job interview. The way web developers talkabout it is usually in contrast to SOAP (Simple Object Access Protocol), which is seenas a more corporate and strict way to create web APIs. In fact, there’s such a thing as astrict REST API, but the key distinction is that REST embraces HTTP at a fundamentallevel—the HTTP methods themselves have semantic meaning.
You should be familiar with using GET and POST requests if you’ve ever made a basicHTML form. In REST, these HTTP verbs have specific meanings. For example, POST willcreate a resource, and GET means fetch a resource.
Node developers typically create APIs that use JSON. JSON is the easiest structureddata format to generate and read in Node, but it also works well in client-sideJavaScript. But REST doesn’t imply JSON—you’re free to use any data format. Certainclients and services expect XML, and we’ve even seen those that work with CSV andspreadsheet formats like Excel.
The desired data format is specified by the request’s Accept header. For JSON thatshould be application/json, and application/xml for XML. There are other usefulrequest headers as well—Accept-Version can be used to request a different version ofthe API. This allows clients to lock themselves against a supported version, whileyou’re free to improve the server without breaking backward compatibility—you canalways update your server faster than people can update their clients.
Express provides a lightweight layer over Node’s http core module, but it doesn’tinclude any data persistence functionality outside of in-memory sessions and cookies.You’ll have to decide which database and database module to use. The same is truewith restify: it doesn’t automatically map data from HTTP to be stored offline; you’llneed to find a way to do that.
Restify is superficially similar to Express. The difference is that Express has fea-tures that help you build web applications, which includes rendering templates. Con-versely, restify is focused on building REST APIs, and that brings a different set ofrequirements. Restify makes it easy to serve multiple versions of an API with semanticversioning using HTTP headers, and has an event-based API for emitting and listeningfor HTTP-related events and errors. It also supports throttling, so you can control howquickly responses are made.
Figure 9.3 shows a typical RESTful API that allows page objects to be created, read,updated, and deleted.
To get started building REST APIs, you should consider what your objects are.Imagine you’re building a content management system: it probably has pages, users,and images. If you want to add a button that allows pages to be toggled between “pub-lished” and “draft,” and if you’ve already got a REST API and it supports requests toPATCH /pages/:id, you could just tie the button to some client-side JavaScript or aform that posts to /pages/:id with { state: 'published' } or { state: 'draft' }. If
2 For more about REST, see Fielding’s dissertation on the subject at http://mng.bz/7Fhj.
www.it-ebooks.info

224 CHAPTER 9 The Web: Build leaner and meaner web applications
you’ve been given an Express application that only has PUT /pages/:id, then youcould probably derive the code for PATCH from the existing implementation.
Table 9.1 shows HTTP verbs alongside the typical response. Note that PUT and PATCHhave different but similar meanings—PATCH means modify some of the fields in aresource, while PUT means replace the entire resource. It can take some practice to getthe hang of building applications this way, but it’s pragmatic and easy to test, so it’sworth learning properly. If these HTTP terms are new to you, then use table 9.1 whenyou’re designing the API for your application.
In an Express application, these URLs and methods are mapped using routes.Routes specify the HTTP verb and a partial URL. You can map these to any functionthat you like, but if you use the route separation pattern from technique 67, which isadvisable, then you should use the method names that are close to their associated
HTTP request
/pages/10/pages/pages /pages/10/pages/10
PagesPage 10 200 OKNew
pageUpdated
page
GET POST GET PATCH DELETE
Figure 9.3 Making requests to a REST API
Plural or singular?When you design your API’s URI endpoints, you should generally use plural nouns.That means /pages and also /pages/1 for a specific page, not /page/1. It’ll be eas-ier to use your API if the endpoints are consistent.
You may find there are certain resources that should be singular nouns, becausethere’s only ever one such item. If it makes semantic sense, use a singular noun,but use it consistently. For example, if your API requires that users sign in, and youdon’t want to expose a unique user ID, then /account might be a sensible endpointfor user account management, if there’s only ever one account for a given user.
www.it-ebooks.info

225TECHNIQUE 71 RESTful web applications
HTTP verbs. Listing 9.18 shows the routes for a RESTful resource in Express, and someof the required configuration to make it work.
var app;var express = require('express');var routes = require('./routes');
module.exports = app = express();
app.use(express.json());app.use(express.methodOverride());
app.get('/pages', routes.pages.index);app.get('/pages/:id', routes.pages.show);app.post('/pages', routes.pages.create);app.patch('/pages/:id', routes.pages.patch);app.put('/pages/:id', routes.pages.update);app.del('/pages/:id', routes.pages.remove);
This example uses some middleware for automatically parsing JSON requests B, andoverrides the HTTP method POST with the query parameter, _method C. That meansthat the PUT, PATCH, and DELETE HTTP verbs are actually determined by the _methodquery parameter. This is because most browsers can only send a GET or POST, so_method is a hack used by many web frameworks.
The routes in listing 9.18 define each of the usual RESTful resource methods D.Table 9.1 shows how these routes map to actions.
Table 9.1 Choosing the correct HTTP verbs
Verb Description Response
GET /animals Get a list of animals. An array of animal objects
GET /animals/:id Get a single animal. A single animal object, or an error
POST /animals Create an animal by sending the properties of a single animal.
The new animal
PUT /animals/:id Update a single animal record. All properties will be replaced.
The updated animal
PATCH /animals/:id/ Update a single animal record, but only change the fields specified.
The updated animal
Listing 9.18 A RESTful resource in Express
Table 9.2 Mapping routes to responses
Verb, URL Description
GET /pages An array of pages.
GET /pages/:id An object containing the page specified by id.
Use JSON body parser
BmethodOverridemiddleware
component allowsa query parameter
to specify extraHTTP methods C
The routes for the resourceD
www.it-ebooks.info

226 CHAPTER 9 The Web: Build leaner and meaner web applications
Listing 9.19 is an example implementation for the route handlers. It has a genericNode database API—a real Redis, MongoDB, MySQL, or PostgreSQL database modulewouldn’t be too far off, so you should be able to adapt it.
var db = require('./../db');
module.exports.index = function(req, res, next) {db.pages.findAll(function(err, pages) {if (err) return next(err);res.send(pages);
});};
module.exports.create = function(req, res, next) {var page = req.body.page;db.pages.create(page, function(err, page) {if (err) return next(err);res.send(page);
});};
module.exports.update = function(req, res, next) {var id = req.param('id');var page = req.body.page;db.pages.update(id, page, function(err, page) {if (err) return next(err);res.send(page);
});};
module.exports.show = function(req, res, next) {db.pages.find(req.param('id'), function(err, page) {if (err) return next(err);res.send(page);
});};
module.exports.patch = function(req, res, next) {var id = req.param('id');var page = req.body.page;
POST /pages Create a page.
PATCH /pages/:id Load the page for id, and change some of the fields.
PUT /pages/:id Replace the page for id.
DELETE /pages/:id Remove the page for id.
Listing 9.19 RESTful route handlers
Table 9.2 Mapping routes to responses (continued)
Verb, URL Description
Fall through to next middleware component when an error is raised by the database
B
Calling send will automatically return JSON to browserC
www.it-ebooks.info

227TECHNIQUE 71 RESTful web applications
db.pages.patch(id, page, function(err, page) {if (err) return next(err);res.send(page);
});};
module.exports.remove = function(req, res, next) {var id = req.param('id');db.pages.remove(id, function(err) {if (err) return next(err);res.send(200);
});};
Although this example is simple, it illustrates something important: you should keepyour route handlers lightweight. They deal with HTTP and then let other parts of yourcode handle the underlying business logic. Another pattern used in this example is theerror handling—errors are passed by calling next(err) B. Try to keep error-handlingcode centralizing and generic—technique 70 has more details on this.
To return the JSON to the browser, res.send() is called with a JavaScript object C.Express knows how to convert the object to JSON, so that’s all you need to do.
All of these route handlers use the same pattern: map the query or body to some-thing the database can use, and then call the corresponding database method. If you’reusing an ORM or ODM—a more abstracted database layer—then you’ll probably havesomething analogous to PATCH D. This could be an API method that allows you toupdate only the specified fields. Relational databases and MongoDB work that way.
If you download this book’s source code, you’ll get the other files required to tryout the full example. To run it, type npm start. Once the server is running, you canuse some of the following Curl commands to communicate with the server.
The first command creates a page:
curl -H "Content-Type: application/json" \-X POST -d '{ "page": { "title": "Home" } }' \http://localhost:3000/pages
First we specify the Content-Type using the -H option B. Next, the request is set touse POST, and the request body is included as a JSON string C. The URL is /pagesbecause we’re creating a resource D.
Curl is a useful tool for exploring APIs, once you understand the basic options. Theones to remember are -H for setting headers, -X for setting the HTTP method, and -dfor the request body.
To see the list of pages, just use curl http://localhost:3000/pages. To changethe contents, try PATCH:
curl -H "Content-Type: application/json" \-X PATCH -d '{ "page": { "title": "The Moon" } }' \http://localhost:3000/pages/1
Most database modules won’t have method named patch, but something similarD
Use JSON as body encoding
BMethodis POST
C
URL for creating pages is /pagesD
www.it-ebooks.info

228 CHAPTER 9 The Web: Build leaner and meaner web applications
Express has a few other tricks up its sleeves for creating RESTful web services. Remem-ber that some REST APIs use other data formats, like XML? What if you want both? Youcan solve this by using res.format:
module.exports.show = function(req, res, next) {db.pages.find(req.param('id'), function(err, page) {if (err) return next(err);res.format({
json: function() {res.send(page);
},xml: function() {
res.send('<page><title>' + page.title + '</title></page>');}
});});
};
To use XML instead of JSON, you have to include the Accept header in the request.With Curl, you can do this:
curl -H 'Accept: application/xml' \http://localhost:3000/pages/1
Just remember that Accept is used to ask the server for a specific format, and Content-Type is used to tell the server what format you’re sending it. It sometimes makes senseto include both in a single request!
Now that you’ve seen how REST APIs in Express work, we can compare them with res-tify. The patterns used to structure Express applications can be reused for restify proj-ects. The two important patterns are route separation, as described in technique 67,and defining the application in a separate file to the server (for easier testing and inter-nal reuse). Listing 9.20 is the restify equivalent of listing 9.18.
var app;var restify = require('restify');var routes = require('./routes');
module.exports = app = restify.createServer({name: 'NIP CMS',
});
app.use(restify.bodyParser());
app.get('/pages', routes.pages.index);app.get('/pages/:id', routes.pages.show);app.post('/pages', routes.pages.create);app.patch('/pages/:id', routes.pages.patch);app.put('/pages/:id', routes.pages.update);app.del('/pages/:id', routes.pages.remove);
Listing 9.20 A restify application
formatmethodaccepts
an object
B
json is shorthand for application/json
C
Include afunctionfor eachcontent
type D
Create restify server instance
B
Use middleware component to parse JSON
C
Set up routesD
www.it-ebooks.info

229TECHNIQUE 71 RESTful web applications
Using restify, instances of servers are created with some initial configuration optionsB. You don’t have to pass in any options, but here we’ve specified a name. Theoptions are actually the same as Node’s built-in http.Server.listen, so you can passin options for SSL/TLS certificates, if you want to use encryption. Restify-specificoptions that aren’t available in Express include formatters, which allows you to set upfunctions that res.send will use for custom content types.
This example uses bodyParser to parse JSON in the request bodies C. This is likethe Express middleware component in the previous example.
The route definitions are identical to Express D. The actual route callbacks areslightly different. Listing 9.21 shows a translation of listing 9.19. See if you can spot thedifferences.
var db = require('./../db');
module.exports.index = function(req, res, next) {db.pages.findAll(function(err, pages) {if (err) return next(err);res.send(pages);
});};
module.exports.create = function(req, res, next) {var page = req.body.page;db.pages.create(page, function(err, page) {if (err) return next(err);res.send(page);
});};
module.exports.update = function(req, res, next) {var id = req.params.id;var page = req.body.page;db.pages.update(id, page, function(err, page) {if (err) return next(err);res.send(page);
});};
module.exports.show = function(req, res, next) {db.pages.find(req.params.id, function(err, page) {if (err) return next(err);res.send(page);
});};
module.exports.patch = function(req, res, next) {var id = req.params.id;var page = req.body.page;db.pages.patch(id, page, function(err, page) {if (err) return next(err);
Listing 9.21 Restify routes
The callback arguments are similar to Express.B
Getting URL parameters is slightly different.C
www.it-ebooks.info

230 CHAPTER 9 The Web: Build leaner and meaner web applications
res.send(page);});
};
module.exports.remove = function(req, res, next) {var id = req.params.id;db.pages.remove(id, function(err) {if (err) return next(err);res.send(200);
});};
The first thing to note is the callback arguments for route handlers are the same asExpress B. In fact, you can almost lift the equivalent code directly from Express appli-cations. There are a few differences though: req.param() doesn’t exist—you need touse req.params instead, and note this is an object rather than a method C. LikeExpress, calling res.send() with an integer will return a status code to the client D.
If you download the full example and run it (listings/web/restify), you can try outsome of the Curl commands we described earlier. Create, update, and show shouldwork the same way.
Knowing that Express and restify applications are similar is useful, because you canstart to compose applications made from both frameworks. Both are based on Node’shttp module, which means you could technically mount a restify application insideExpress using app.use(restifyApp). This works well if the restify application is in itsown module—you could install it using npm, or put it in its own directory.
Both Express and restify use middleware, and you’ll find well-structured applica-tions have loosely coupled middleware that can be reused across different projects. In
Passing an integer to send() returns the status code.
D
Using other HTTP headersIn this technique you’ve seen how the Content-Type and Accept headers can beused to deal with different data formats. There are other useful headers that youshould take into account when building APIs.
One such header, supported by restify, is Accept-Version. When you define a route,you can include an optional first parameter that includes options, instead of the usualstring. The version property allows your API to respond differently based on theAccept-Version header.
For example, using app.get({ path: '/pages', version: '1.1.8' }, routes.v1.pages); allows you to bind specific route handlers to version 1.1.8. If you haveto change your API in 2.0.0, then you can do this without breaking older clients.
There’s nothing to stop you from using this header in an Express application, but it’seasier in restify. If you decide to take this approach, you should learn howmajor.minor.patch works in semantic versioning (http://semver.org/).
www.it-ebooks.info

231TECHNIQUE 72 Using custom middleware
the next technique you’ll see how to write your own middleware, so you can start dec-orating applications with useful features like custom logging.
TECHNIQUE 72 Using custom middleware
You’ve seen middleware being used for error handling, and you’ve also used some ofExpress’s built-in middleware. You can also use middleware to add custom behavior toroutes; this might add new functionality, improve logging, or control access based onauthentication or permissions.
The benefit of middleware is that it can improve code reuse in your application.This technique will teach you how to write your own middleware, so you can sharecode between projects, and structure projects in a more readable way.
■ ProblemYou want to add behavior—in a reusable, testable manner—that’s triggered when cer-tain routes are accessed.
■ SolutionWrite your own middleware.
■ DiscussionWhen you first start using Express, middleware sounds like a complicated conceptthat other people use for writing plugins that extend Express. But in fact, writing mid-dleware is a fundamental part of using Express, and you should start writing middle-ware as soon as possible. And if you can write routes, then you can write middleware:it’s basically the same API!
In technique 70, you saw how to handle errors with a middleware component.Error handling is a special case—you have to include a fourth parameter to capturethe error object: app.use(function(err, req, res, next) {. With other middle-ware, you can just use three arguments, like standard route handlers. This is the sim-plest middleware component:
app.use(function(req, res, next) {console.log('%s %s', req.method, req.url);next();
});
By passing an anonymous callback to app.use B, the middleware component willalways run, unless a previous middleware component fails to call next. When yourcode is finished, you can call next C to trigger the next middleware component inthe stack. That means two things: asynchronous APIs are supported, and the order inwhich you add middleware is important.
The following example shows how you can use asynchronous APIs inside middle-ware. This example is based on the idea of loading a user based on a user ID that hasbeen set in the session:
Apply middleware component by calling app.use()
B
Call next() to continue execution to next middleware componentC
www.it-ebooks.info

232 CHAPTER 9 The Web: Build leaner and meaner web applications
app.use(function(req, res, next) {if (req.session.user_id) {db.users.find(req.session.user_id, function(err, user) {if (err) {
next(err);} else if (user) {
res.locals.user = user;next();
} else {next(new Error('Account not found'));
}});
} else {next();
}});
This middleware will be triggered for every request B. It loads user accounts from adatabase, but only when the user’s ID has been set in the session C. The code thatloads the user is asynchronous, so next could be called after a short delay. There areseveral points where next is called: for example, if an error was encountered whenloading the user, next will be called with an error D.
In this example the loaded user is set as a property of res.locals E. By usingres.locals, you’ll be able to access the user in other middleware, route handlers, andtemplates.
This isn’t necessarily the best way to use middleware. Including an anonymousfunction this way means it can be hard to test—you can only test middleware by start-ing up the entire Express application. You might want to write simpler unit tests thatdon’t use HTTP requests, so it would be better to refactor this code into a function.The function would have the same signature, and would be used like this:
var middleware = require('./middleware');app.use(middleware.loadUser);
By grouping all the middleware together as modules B, you can load the middle-ware from other locations, whether they’re entirely different projects, test code, orinside separated routes. This function has decoupled the middleware to improvehow it can be reused.
If you’re using the route separation pattern from technique 67, then this makessense, because middleware can be applied to specific routes that might be defined indifferent files. Let’s say you’re using the RESTful API style from technique 71, and yourpage resource can only be updated by signed-in users, but other parts of the applica-tion should be accessible to anyone. You can restrict access to the page resourceroutes like this:
This callback will run for every request.
BIf a user ID hasbeen set in the
session, loadthe account.
C
If there was an errorloading the user,
pass control to theerror middleware
component. D
If the user was loaded, set it on res.locals so it can be used elsewhere.E
Loading a module that contains middlewareB
www.it-ebooks.info

233TECHNIQUE 72 Using custom middleware
var middleware = require('./middleware');
app.get('/pages', routes.pages.index);app.get('/pages/:id', routes.pages.show);app.post('/pages', middleware.loadUser, routes.pages.create);app.patch('/pages/:id', middleware.loadUser, routes.pages.patch);
In this fragment, routes are defined for a resource called pages. Some routes areaccessible to anyone B, but creating or updating pages is limited to people withaccounts on the system C. This is done by supplying the loadUser middleware com-ponent as the second argument when defining a route. In fact, multiple argumentscould be used—you could have a generic user loading route, and then a more specificpermission checking route that ensures users are administrators, or have the neces-sary rights to change pages.
Figure 9.4 shows how requests can pass through several callbacks until the finalresponse is sent back to the client. Sometimes this might cause a response to finishbefore other middleware has had a chance to run—if an error is encountered andpassed to next(err).
You can even apply middleware to batches of routes. It’s common to see somethinglike app.all('/admin/*', middleware.loadUser); in Express applications.
If you use modules to manage your middleware, and simplify route handlers by mov-ing shared functionality into separate files, then you’ll find that organizing middlewareinto modules becomes a fundamental architectural tool for organizing applications.
Anyone can view pages.
B
Only signed-in users cancreate or update pages. C
requireAccountMiddleware
Node application
requirePermissionMiddleware
createAccountRoute handler
403 Forbidden
401 Unauthorized
200 OK
POST/pages{ title: "Home" }
Figure 9.4 Requests can pass through several callbacks until the final response is sent.
www.it-ebooks.info

234 CHAPTER 9 The Web: Build leaner and meaner web applications
If you’re designing a new Express application, you should think in terms of middle-ware. Ask yourself what kinds of HTTP requests you’re going to deal with, and whatkinds of filtering they might need.
Now it’s time to combine all of these ideas into a worked example. Listing 9.22demonstrates one way of parsing requests that contain XML. Middleware has beenused to parse the XML, turning it into plain old JavaScript objects. That means twothings: only a small part of your code has to worry about XML, and you could poten-tially add support for other data formats as well.
var express = require('express');var app = express();var Schema = require('validate');var xml2json = require('xml2json');var util = require('util');var Page = new Schema();
Page.path('title').type('string').required();
function ValidatorError(errors) {this.statusCode = 400;this.message = errors.join(', ');
}util.inherits(ValidatorError, Error);
function xmlMiddleware(req, res, next) {if (!req.is('xml')) return next();
var body = '';req.on('data', function(str) {body += str;
});
req.on('end', function() {req.body = xml2json.toJson(body.toString(), {
object: true,sanitize: false
});next();
});}
function checkValidXml(req, res, next) {var page = Page.validate(req.body.page);if (page.errors.length) {next(new ValidatorError(page.errors));
} else {next();
}}
function errorHandler(err, req, res, next) {
Listing 9.22 Three types of middleware
Define some data validation to ensure pages have titles
B
Inherit from standard error object so validation errors can be handled in error middleware componentC
This function will be used as XML middleware componentD
Request object will emit data events when body is read from the clientE
Data-validation middleware component
F
Passing errors to next() will stop route handler from runningG
This is error-handling middleware component
H
www.it-ebooks.info

235TECHNIQUE 72 Using custom middleware
console.error('errorHandler', err);res.send(err.statusCode || 500, err.message);
}
app.use(xmlMiddleware);
app.post('/pages', checkValidXml, function(req, res) {console.log('Valid page:', req.body.page);res.send(req.body);
});
app.use(errorHandler);
app.listen(3000);
In summary, this example defines three middleware components to parse XML, vali-date it, and then either respond with a JSON object or display an error. We’ve used anarbitrary data-validation library here B—your database module may come with some-thing similar.
The routes deal with page resources, and the expected format for pages is XML. It’spassed in as request bodies and validated. An error object, ValidatorError C, is usedto return a 400 error when invalid data is sent to the server. The XML parser D readsin the request body using the standard event-based API E. This middleware compo-nent is called for every request I because it’s passed directly to app.use, but it onlyruns if the Content-Type is set to XML.
The data-validation middleware component F ensures a page title has been set—this is just an arbitrary example we’ve chosen to illustrate how this kind of validationworks. If the data is invalid, an instance of ValidatorError is passed when next iscalled G. This will trigger the error-handling middleware component H.
Data is only validated for certain requests. This is done by passing checkValidXmlwhen the /pages route is defined J.
The global error handler is the last middleware component to be added 1). Thisshould always be the case, because middleware is executed in the order it’s defined.Once res.send has been called, then no more processing will occur, so errors won’tbe triggered.
To try this example out, run node server.js and then try posting XML to theserver using curl:
curl -H "Content-Type: application/xml" \-X POST -d '<page><title>Node in Practice</title></page>' \http://localhost:3000/pages
You should try leaving out a title to ensure a 400 error is raised! This approach can be used for XML, JSON, CSV, or any other data formats you like.
It works well for minimizing the code that has to deal with XML, but there are otherways you can write decoupled code in Node web applications. In the next techniqueyou’ll see how something fundamental to Node—events—can be used as another use-ful architectural pattern.
Use XML middleware component for all requests
I
Validate XML for specific requestsJ
Last middleware component to be added should be error handler
1)
www.it-ebooks.info

236 CHAPTER 9 The Web: Build leaner and meaner web applications
TECHNIQUE 73 Using events to decouple functionality
In the average Express application, most code is organized into methods and mod-ules. This can make sharing functionality inconvenient in some cases, particularly ifyou want to neatly separate concerns within your application. This technique usessending emails as an example of something that doesn’t fit neatly into routers, mod-els, or views. Events are used to decouple emails from routers, which keeps email-related code outside of HTTP code.
■ ProblemYou want to do things that aren’t related to HTTP, like send emails, but aren’t sure howto structure the code so it’s neatly decoupled and easy to test.
■ SolutionUse easily accessible EventEmitter objects, like the Express app object.
■ DiscussionExpress and restify applications generally follow the Model-View-Controller (MVC)pattern. Models are used to save data, controllers are route handlers, and views arethe templates in the views/ directory.
Some code doesn’t fit neatly into these categories. For example, where would youkeep email-handling code? Email generation clearly doesn’t belong in routes, becauseemail isn’t related to HTTP. But like route handlers, it does require templates. It alsoisn’t really a model, because it doesn’t interact with the database.
What if you did put the email-handling code into models? In that case, given aninstance of a User model, you want to send an email when a new account is created. Youcould put the email code in the User.prototype.registerUser method. The problemwith that is you might not always want to send emails when users are created. It mightnot be convenient during testing, or some kind of periodic maintenance tasks.
The reason why sending email isn’t quite suitable for models or HTTP routes canbe understood by thinking about the SOLID principles (http://en.wikipedia.org/wiki/SOLID). There are two principles that are relevant to us: the single responsibilityprinciple and the dependency inversion principle.
Single responsibility dictates that the class that deals with HTTP routes reallyshouldn’t send emails, because these are different responsibilities that shouldn’t bemixed together. Inversion of control is a specific type of dependency inversion, and canbe done by removing direct invocation—rather than calling emails.sendAccount-Creation, your email-handling class should respond to events.
For Node programmers, events are one of the most important tools available. Andfortunately for us, the SOLID principles indicate that we can write better HTTP routersby removing our email code, and replacing it with abstract and generalized events.These events can then be responded to by the relevant classes.
Figure 9.5 shows what our idealized application structure might look like. But howdo we achieve this? Take Express applications as an example; they don’t typically havea suitable global event object. You could technically create a global variable somewhere
www.it-ebooks.info

237TECHNIQUE 73 Using events to decouple functionality
central, like the file that calls express(), but that would introduce a global shared state,and that would break the principles we described earlier.
Fortunately, Express includes a reference to the app object in the request. Routehandlers, which accept the req, res parameters, always have access to app in res.app.The app object inherits from EventEmitter, so we can use it to broadcast when thingshappen. If your route handler creates and saves new users, then it can also callres.app.emit('user:created', user), or something similar—you can use any nam-ing scheme for events as long as it’s consistent. Then you can listen for user:createdevents and respond accordingly. This could include sending email notifications, orperhaps even logging useful statistics about users.
The following listing shows how to listen for events on the application object.
var express = require('express');var app = express();var emails = require('./emails');var routes = require('./routes');
app.use(express.json());
app.post('/users', routes.users.create);
app.on('user:created', emails.welcome);
module.exports = app;
In this example a route for registering users is defined B, and then an event listeneris defined and bound to a method that sends emails C.
The route is shown in the next listing.
var User = require('./../models/user');
module.exports.create = function(req, res, next) {var user = new User(req.body);
Listing 9.23 Using events to structure an application
Listing 9.24 Emitting events
app.post('/users',accounts.create);
Modelnew User(...)
Emailemails.welcome(user)
Figure 9.5 Applications can be easier to understand if organized according to the SOLID principles.
Set up a route for creating users.
B
Listen for user creation events, and bind them to the email code.C
www.it-ebooks.info

238 CHAPTER 9 The Web: Build leaner and meaner web applications
user.save(function(err) {if (err) return next(err);res.app.emit('user:created', user);res.send('User created');
});};
This listing contains an example model for User objects. If a user is successfully cre-ated, then user:created is emitted on the app object. The downloadable code for thisbook includes a more complete example with the code that sends emails, but the basicprinciple for removing direct invocation and adhering to the single responsibilityprinciple is represented here.
Communication with events inside applications is useful when you need to makethe code easier for other developers to understand. There are also times when youneed to communicate with client-side code. The next technique shows you how totake advantage of WebSockets in your Node applications, while still being able toaccess resources like sessions.
TECHNIQUE 74 Using sessions with WebSockets
Node has strong support for the real-time web. Adopting event-oriented, asynchro-nous APIs means supporting WebSockets is a natural fit. Also, it’s trivial to run twoservers in the same process: a WebSocket server and a standard Node HTTP server cancoexist happily.
This technique shows you how to reuse the Connect and Express middleware thatwe’ve been using so far with a WebSocket server. If your application allows users tosign in, and you want to add WebSocket support, then read on to learn how to mastersessions in WebSockets.
■ ProblemYou want to add WebSocket support to an existing Express application, but you’re notsure how to access session variables, like whether the user is currently signed in.
■ SolutionReuse Connect’s cookie and session middleware with your WebSocket server.
■ DiscussionThis technique assumes you have a passing familiarity with WebSockets. To recap:HTTP requests are stateless and relatively short-lived. They’re great for downloadingdocuments, and requesting a state change for a resource. But what about streamingdata to and from a server?
Certain types of events originate from servers. Think about a web mail service.When you create and send a message, you push it to the server, and the server sendsit to the recipients. If the recipient is sitting watching their inbox, there’s no easyway for their browser to get updated. It could periodically check for new messagesusing an Ajax request, but this isn’t very elegant. The server knows it has a new mes-sage for the recipient, so it would be much better if it could push that messagedirectly to the user.
Emit user creation events when users are successfully registered.
www.it-ebooks.info

239TECHNIQUE 74 Using sessions with WebSockets
That’s where WebSockets come in. They’re conceptually like the TCP sockets we saw inchapter 7: a bidirectional bridge is set up between the client and server. To do this youneed a WebSocket server in addition to your standard Express server, or plain old Nodehttp server. Figure 9.6 illustrates how this works in a typical Node web application.
HTTP requests are short-lived, have specific endpoints, and use methods like POSTand PUT. WebSockets are long-lived, don’t have specific endpoints, and don’t havemethods. They’re conceptually different, but since they’re used to communicate withthe same application, they typically need access to the same data.
This presents a problem for sessions. The Express examples we’ve looked at usedmiddleware to automatically load the session. Connect middleware is based on theHTTP request and response, so how do we map this to WebSockets, which are long-lived and bidirectional? To understand this, we need to look at how WebSockets andsessions work.
Sessions are loaded based on unique identifiers that are included in cookies. Cook-ies are sent with every HTTP request. WebSockets are initiated with a standard HTTPrequest that asks to be upgraded to a WebSocket. This means there’s a point whereyou can grab the cookie from the request, and then load the session. For each Web-Socket, you can store a reference to the user’s session. Now you can do all the usualthings you need to do with a session: verify the user is signed in, set preferences, andso on.
Figure 9.7 extends figure 9.6 to show how sessions can be used with WebSockets, byincorporating the Connect middleware for parsing cookies and loading the session.
Now that you know how the parts fit together, how do you go about building it?The cookie-parsing middleware component can be found in express.cookieParser.This is actually a simple method that gets the cookie from the request headers, andthen parses the cookie string into separate values. It accepts an argument, secret,
http.createServer new WebSocketServer
Node web application
Figure 9.6 A Node web appli-cation should support both standard HTTP requests and WebSockets.
www.it-ebooks.info

240 CHAPTER 9 The Web: Build leaner and meaner web applications
which is the value used to sign the cookie. Once the cookie is decrypted, you can getthe session ID from it and load the session.
Sessions in Express are modeled on an asynchronous API for storing and retrievingvalues. They can be backed by a database, or you can use the built-in memory-basedclass. Passing the session ID and a callback to sessionStore.get will load the session,if the session ID is correct.
In this technique we’ll use the ws WebSocket module (https://www.npmjs.org/package/ws). This is a fast-but-minimal implementation that has a very different APIthan Socket.IO. If you want to learn about Socket.IO, then Node in Action has someexcellent tutorials. Here we’re using a simpler module so you can really see how Web-Sockets work.
To make ws load the session, you need to parse the cookies from the HTTPupgrade request, and then call sessionStore.get. A full example that shows how itall works follows.
var express = require('express');var WebSocketServer = require('ws').Server;var parseCookie = express.cookieParser('some secret');var MemoryStore = express.session.MemoryStore;var store = new MemoryStore();
Listing 9.25 An Express application that uses WebSockets
http.createServer new WebSocketServer
parseCookies sessionStore
Node web application
Figure 9.7 Accessing ses-sions from WebSockets
Loadcookie-parser
middlewarecomponent and
set the secret B
Load desired session storeC
www.it-ebooks.info

241TECHNIQUE 74 Using sessions with WebSockets
var app = express();var server = app.listen(process.env.PORT || 3000);var webSocketServer;
app.use(parseCookie);app.use(express.session({ store: store, secret: 'some secret' }));app.use(express.static(__dirname + '/public'));
app.get('/random', function(req, res) {req.session.random = Math.random().toString();res.send(200);
});
webSocketServer = new WebSocketServer({ server: server });
webSocketServer.on('connection', function(ws) {var session;
ws.on('message', function(data, flags) {var message = JSON.parse(data);
if (message.type === 'getSession') {parseCookie(ws.upgradeReq, null, function(err) {
var sid = ws.upgradeReq.signedCookies['connect.sid'];
store.get(sid, function(err, loadedSession) {if (err) console.error(err);session = loadedSession;ws.send('session.random: ' + session.random, {
mask: false});
});});
} else {ws.send('Unknown command');
}});
});
This example starts by loading and configuring the cookie parser B and the sessionstore C. We’re using signed cookies, so note that ws.upgradeReq.signedCookies isused when loading the session later.
Express is set up to use the session middleware component D, and we’ve created aroute that you can use for testing E. Just load http://localhost:3000/random in yourbrowser to set a random value in the session, and then visit http://localhost:3000/ tosee it printed back.
The ws module works by using a plain old constructor, WebSocketServer, to han-dle WebSockets. To use it, you instantiate it with a Node HTTP server object—we’vejust passed in the Express server here F. Once the server is started, it’ll emit eventswhen connections are created G.
The client code for this example sends JSON to the server, so there’s some code toparse the JSON string and check whether it’s valid H. This wasn’t entirely necessary
Tell Express to usesession store, and
set the secret
DCreate
Expressroute that
will set asession value
for testing
E
Start up WebSocketserver, and pass itthe Express server
F
On connectionevents, create
WebSocketfor the client G Data sent by the client is
assumed to be JSON, and is parsed here
H
Get session ID forWebSocket from the
HTTP upgrade request I Get user’s session from the storeJ
Send value from session back through the WebSocket1)
www.it-ebooks.info

242 CHAPTER 9 The Web: Build leaner and meaner web applications
for this example, but we included it to show that ws requires this kind of extra work tobe used in most practical situations.
Once the WebSocket server has a connection, the session ID can be accessedthrough the cookies on the upgrade request I. This is similar to what Express doesbehind the scenes—we just need to manually pass a reference to the upgrade requestto the cookie-parser middleware component. Then the session is loaded using the ses-sion store’s get method J. Once the session has been loaded, a message is sent backto the client that contains a value from the session 1).
The associated client-side implementation that’s required to run this example isshown in the following listing.
<!DOCTYPE html><html><head><script>var host = window.document.location.host.replace(/:.*/, '');var ws = new WebSocket('ws://' + host + ':3000');
setInterval(function() {ws.send('{ "type": "getSession" }');
}, 1000);
ws.onmessage = function(event) {document.getElementById('message').innerHTML = event.data;
};</script></head><body>
<h1>WebSocket sessions</h1><div id='message'></div><br>
</body></html>
All it does is periodically send a message to the server. It’ll display undefined until youvisit http://localhost:3000/random. If you open two windows, one to http://local-host:3000/random and the other to http://localhost:3000/, you’ll be able to keeprefreshing the random page so the WebSocket view shows new values.
Running this example requires Express 3 and ws 0.4—we’ve included a pack-age.json with everything you need in the book’s full listings.
The next technique has tips for migrating from Express 3 to Express 4.
TECHNIQUE 75 Migrating Express 3 applications to Express 4
This book was written before Express 4 was released, so our Express examples arewritten with version 3 of the framework in mind. We’ve included this technique tohelp you migrate, and also so you can see how version 4 differs from the previousversions.
Listing 9.26 The client-side WebSocket implementation
Periodically send message to the server
www.it-ebooks.info

243TECHNIQUE 75 Migrating Express 3 applications to Express 4
■ ProblemYou have an Express 3 application and want to upgrade it to use Express 4.
■ SolutionUpdate your application configuration, install missing middleware, and take advan-tage of the new routing API.
■ DiscussionMost of the updates from Express 3 to 4 were a long time coming. Certain changeshave been hinted at in Express 3’s documentation, so the API changes weren’t unex-pected or even too dramatic for the most part. You’ll probably spend most of yourtime replacing the middleware that used to ship with Express, because Express 4 nolonger has any built-in middleware components, apart from express.static.
The express.static middleware component enables Express to mount your pub-lic folder that contains JavaScript, CSS, and image assets. This has been left inbecause it’s convenient, but the rest of the middleware components have gone. Thatmeans you’ll need to use npm install --save body-parser if you previously usedbodyParser, for example. Refer to table 9.1 that has the old middleware names andthe newer equivalents. Just remember that you need to npm install --save each onethat you need, and then require it in your app.js file.
Table 9.3 Migrating Express middleware components
Express 3 Express 4 npm package Description
bodyParser body-parser Parses URL-encoded and JSON POST bodies
compress compression Compresses the server’s responses
timeout connect-timeout Allows requests to timeout if they take too long
cookieParser cookie-parser Parses cookies from HTTP headers, leaving the result in req.cookies
cookieSession cookie-session Simple session support using cookies
csrf csurf Adds a token to the session that you can use to pro-tect forms from CSRF attacks
error-handler errorhandler The default error handler used by Connect
session express-session Simple session handler that can be extended with stores that write sessions to databases or files
method-override method-override Maps new HTTP verbs to the _method request variable
logger morgan Log formatting
response-time response-time Track response time
favicon serve-favicon Send favicons, including a built-in default if you don’t have one yet
www.it-ebooks.info

244 CHAPTER 9 The Web: Build leaner and meaner web applications
You might not use most of these modules. In my applications I (Alex) usually haveonly body-parser, cookie-parser, csurf, express-session, and method-override,so migration isn’t too difficult. The following listing shows a small application thatuses these middleware components.
var bodyParser = require('body-parser');var cookieParser = require('cookie-parser');var csurf = require('csurf');var session = require('express-session');var methodOverride = require('method-override');var express = require('express');var app = express();
app.use(cookieParser('secret'));app.use(session({ secret: 'secret' }));app.use(bodyParser());app.use(methodOverride());app.use(csurf());
app.get('/', function(req, res) {res.send('Hello');
});
app.listen(3000);
To install Express 4 and the necessary middleware, you should run the following com-mand in a new directory:
npm install --save body-parser cookie-parser \csurf express-session method-override \serve-favicon express
This will install all of the required middleware modules along with Express 4, and savethem to a package.json file. Once you’ve loaded the middleware components withrequire B, you can add them to your application’s stack with app.use as you did inExpress 3 C. Route handlers can be added exactly as they were in Express 3 D.
OFFICIAL MIGRATION GUIDE The Express authors have written a migrationguide that’s available in the Express wiki on GitHub.3 This includes a quickrundown of every change.
directory serve-index Directory listings, similar to Apache’s directory indexing
vhost vhost Allow routes to match on subdomains
Listing 9.27 Express 4 middleware
3 https://github.com/visionmedia/express/wiki/Migrating-from-3.x-to-4.x
Table 9.3 Migrating Express middleware components (continued)
Express 3 Express 4 npm package Description
Load middleware modulesB
Configure each piece of middlewareC
Define a routeD
www.it-ebooks.info

245TECHNIQUE 75 Migrating Express 3 applications to Express 4
You can’t use app.configure anymore, but it should be easy to stop using it. If you’reusing app.configure to do only certain things for specific environments, then just usea conditional statement with process.env.NODE_ENV. The following example assumesa fictitious middleware component called logger that can be set to be noisy, whichmight not be desirable when the tests are running:
if (process.env.NODE_ENV !== 'test') {app.use(logger({ verbose: true }));
}
The new routing API reinforces the concept of mini-applications that can be mountedon different endpoints. That means your RESTful resources can leave off the resourcename from URLs. Instead of writing app.get('/songs', songs.index), you can nowwrite songs.get('/', index) and mount songs on /songs with app.use. This fits inwell with the route separation pattern in technique 67.
The next listing shows how to use the new router API.
var express = require('express');var app = express();
app.get('/', function(req, res) {res.send('Hello');
});
var songs = express.Router();
songs.get('/', function(req, res) {res.send('A list of songs');
});
songs.get('/:id', function(req, res) {res.send('A specific song');
});
app.use('/songs', songs);
app.listen(3000);
After creating a new router B, you can add routes the same way you always did, usingHTTP verbs like get C. The cool thing about this is you can also add middleware thatwill be confined to these routes only: just call songs.use. That was previously trickierin older versions of Express.
Once you’ve set up a router, you can mount it using a URL prefix D. That meansyou could do things like mount the same route handler on different URLs to easilyalias them.
If you put the routers in their own files and mount them in your main app.js file,then you could even distribute routers as modules on npm. That means you couldcompose applications from reusable routers.
Listing 9.28 Express 4 middleware
Create new router
B
Add route handler to this set of routesC
Mount router with a URL prefix
D
www.it-ebooks.info

246 CHAPTER 9 The Web: Build leaner and meaner web applications
The final thing we’ll mention about Express 4 is the new router.param method.This allows you to run asynchronous code when certain route parameters are present.Let’s say you have '/songs/:song_id', and :song_id should only ever be a valid songthat’s in the database. With route.param you can validate that the value is a numberand exists in the database, before any route handlers run!
router.param('song_id', function(req, res, next, id) {Song.find(id, function(err, song) {if (err) {
return next(err);} else if (!song) {
return next(new Error('Song not found'));}req.song = song;next();
});});
router.get('/songs/:song_id', function(req, res, next) {res.send(req.song);
});
In this example, Song is assumed to be a class that fetches songs from a database. Theactual route handler is now extremely simple, because it only runs if a valid song hasbeen found. Otherwise, next will shortcut execution and pass an error to the error-handling middleware.
That wraps up our section on web application development techniques. There’sone more important thing before we move on to the next chapter. Like everythingelse, web applications should be well tested. The next section has some techniquesthat we’ve found useful when testing web applications.
9.3 Testing web applicationsTesting can feel like a chore, but it can also be an indispensable tool for verifyingideas, particularly if you’re creating web APIs without user interfaces.
Chapter 10 has an introduction to testing in Node, and technique 84 has an exam-ple for testing web applications. In the next technique we extend this example toshow you how to test authenticated routes.
TECHNIQUE 76 Testing authenticated routes
Test frameworks like Mocha make tests easy to read and write, and SuperTest helpskeep HTTP-related tests clean. But authentication support isn’t usually built into suchmodules. In this technique you’ll learn one way to handle authentication in tests, andthe approach is general enough that it can be reused with other test modules as well.
■ ProblemYou want to test parts of your application that are behind a session-based usernameand password.
www.it-ebooks.info

247TECHNIQUE 76 Testing authenticated routes
■ SolutionMake a request that signs in during the setup phase of the tests, and then reuse thecookies for subsequent tests.
■ DiscussionSome web frameworks and testing libraries handle sessions for you, so you can testroutes without worrying too much about logging in. This isn’t true for Mocha andSuperTest, which we’ve used before in this book, so you’ll need to know a bit abouthow sessions work.
The session handling that Express uses from Connect is based around a cookie.Once the cookie has been set, it can be used to load the user’s session. That meansthat to write a test that accesses a secure part of your application, you’ll need to makea request that signs in the user, grabs the cookies, and then use the cookies for subse-quent requests. This process is shown in figure 9.8.
To write tests that access authenticated routes, you’ll need a test user account, whichusually involves creating database fixtures. You’ll read about fixtures in chapter 10,technique 87.
Once the data is ready, you can use a library like SuperTest to make a POST to yoursession-handling endpoint with a username and password. Cookies are transmittedusing HTTP headers, so you can read them from res.headers['set-cookie']. Youshould also make an assertion to ensure the account was signed in.
Now any new requests just need to set the Cookie header with the value fromres.headers, and your test user will be signed in. The next listing shows how this works.
var app = require('./../app');var assert = require('assert');var request = require('supertest');var administrator = {
username: 'admin',password: 'secret'
};
Listing 9.29 Testing authenticated requests
Node web application
Cookie: cookies
Request
GET/admin
set-cookie
Response
Headers
Request
POST/sessions
Figure 9.8 You can test authenticated routes by catching cookies.
This is a test user that would usually be loaded from a fixture.
B
www.it-ebooks.info

248 CHAPTER 9 The Web: Build leaner and meaner web applications
describe('authentication', function() {var cookies;
before(function(done) {request(app)
.post('/session')
.field('username', administrator.username)
.field('password', administrator.password)
.end(function(err, res) {assert.equal(200, res.statusCode);cookies = res.headers['set-cookie'];done();
});});
it('should allow admins to access the admin area', function(done) {request(app)
.get('/admin')
.set('Cookie', cookies)
.expect(200, done);});
});
The first part of this test loads the required modules and sets up an example user B.This would usually be stored in a database, or set by a fixture. Next, a POST is madewith the username and password C. The session cookie will be available in the set-cookie header D.
To access a route that’s behind a login E, set the Cookie header with the previ-ously saved cookies F. You should find that the request is handled as if the user hadsigned in normally.
The trick to understanding testing with sessions can be learned by looking at howConnect’s session middleware component works. Other middleware isn’t as easy tomanage during testing, so the next technique introduces the concept of test seams,which will allow you to bring middleware under control during testing.
TECHNIQUE 77 Creating seams for middleware injection
Middleware is flexible and composable. This modular approach makes Connect-basedapplications a joy to work on. But there’s a downside to middleware: testability. Somemiddleware makes routes inherently difficult to test. This technique looks at ways toget around this by creating seams.
■ ProblemYou’re using middleware that has made your application difficult to test.
■ SolutionFind seams where middleware can be replaced for the duration of the tests.
■ DiscussionThe term seam is a formal way of describing places in code that can be changed with-out editing the original code. The concept is extended to apply to languages like
Post the username and password.
CThesession
cookie isin the set-
cookieheader.
D
This route isbehind a login. E
Set the Cookie header with the saved session cookie.F
www.it-ebooks.info

249TECHNIQUE 77 Creating seams for middleware injection
JavaScript by Stephen Vance in his book Quality Code: Software Testing Principles, Prac-tices, and Patterns.4
A seam in our code gives us the opportunity to take control of that code and exercise it ina testing context. Any place that we can execute, override, inject, or control the codecould be a seam.
One example of this is the csrf middleware component from Connect. It creates asession variable that can be included in forms to avoid cross-site request forgeryattacks. Let’s say you have a web application that allows registered users to create cal-endar entries. If your site didn’t use CSRF protection, someone could create a webpage that tricks a user of your site into deleting items from their calendar. The attackmight look like this:
<img src="http://calendar.example.com/entry/1?_method=delete">
The user’s browser will dutifully load the image source that’s hosted on an externalsite. But it references your site in a potentially dangerous way. To prevent this, a ran-dom token is generated on each request and inserted into forms. The attacker doesn’thave access to the token, so the attack is mitigated.
Unfortunately, simply adding express.csrf to routes that render forms isn’tentirely testable. Tests can no longer post to route handlers without first loading theform and scraping out the session variable that contains the secret CSRF token.
To get around this, you need to take express.csrf under your control. Refactor itto create a seam: place it in a module that contains your other custom middleware,and then change it during tests. You don’t need to test express.csrf because theauthors of Express and Connect have done that for you—instead, change its behaviorduring tests.
Two other options are available: checking if process.env.NODE_ENV is set to testand then branching to a test-only version of the CSRF middleware component, orpatching express.csrf’s internals so you can extract the secret token. There areproblems with both of these approaches: the first means you can’t get 100% code cov-erage—your production code has to include test code. The second approach is poten-tially brittle: it’s too sensitive to Connect changing the way CSRF works in the future.
The seam-based concept that we’ll use requires that you create a middleware file ifyou don’t already have one. This is just a file that groups all of your middlewaretogether into a module that can be easily loaded. Then you need to create a functionthat wraps around express.csrf, or just returns it. A basic example follows.
var express = require('express');
module.exports.csrf = express.csrf;
4 https://www.informit.com/store/quality-code-software-testing-principles-practices-9780321832986
Listing 9.30 Taking control of middleware
Create a place where other middleware can be injected.
B
www.it-ebooks.info

250 CHAPTER 9 The Web: Build leaner and meaner web applications
All this does is export the original csrf middleware component B, but now it’s mucheasier to inject different behavior during tests. The next listing shows what such a testmight look like.
var middleware = require('./../middleware');
middleware.csrf = function() {return function(req, res, next) {req.session._csrf = '';next();
};};
var app = require('./../app');var request = require('supertest');
describe('calendar', function() {it('should allow us to turn off csrf', function(done) {request(app)
.post('/calendars')
.expect(200, done);});
});
This test loads our custom middleware module before anything else, and thenreplaces the csrf method B. When it loads app and fires off a request using Super-Test, Express will use our injected middleware component because middleware.jswill be cached. The _csrf value is set just in case any views expected it C, and therequest should return a 200 instead of a 403 (forbidden) D.
It might not seem like we’ve done much, but by refactoring how express.csrf isloaded, we’ve been able to run our application in a more testable way. You may preferto make two requests to ensure the csrf middleware component is used normally, butthis technique can be used for other things as well. You can bring any middlewareunder control for testing. If there’s something you don’t want to run during tests, lookfor seams that allow you to inject the desired behavior, or try to create a seam usingsimple JavaScript or Node patterns—you don’t need a complex dependency injectionframework; you can take advantage of Node’s module system.
The next technique builds on some of these ideas to allow tests to interact withsimulated versions of remote services. This will make it easier if you’re writing tests foran application that accesses remote services, like a payment gateway.
TECHNIQUE 78 Testing applications that depend on remote services
Third-party modules can help you integrate your applications with remote serviceslike GitHub, Twitter, and Facebook. But how do you test applications that depend onsuch remote services? This technique looks at ways to insert stubs for remote depen-dencies, to make your tests faster and more maintainable.
Listing 9.31 Injecting new behavior during tests
Load middleware component first, and replace csrf method.
B
This stops views from breaking if they expect _csrf to be set.C
A 200 should be returned, not a 403!D
www.it-ebooks.info

251TECHNIQUE 78 Testing applications that depend on remote services
■ ProblemYou’re using a social network for authentication, or a service to accept payments, andyou don’t want your tests to access these remote dependencies.
■ SolutionFind the seams between your application, the remote service, and the things you wantto test, and then insert your own HTTP servers to simulate parts of the remotedependency.
■ DiscussionOne of the things that most web applications need, yet is easy to get dangerouslywrong, is user accounts. Using a Node module that supports the authorization servicesprovided by companies like GitHub, Google, Facebook, and Twitter is both quick andpotentially safer than creating a bespoke solution.
It’s comparatively easy to adopt one of these services, but how do you test it? Intechnique 76, you saw how to write tests for authenticated routes. This involved sign-ing in and saving the session cookies so subsequent requests appeared authenticated.You can’t use the same approach with remote services, because your tests would haveto make requests to real-life production services. You could use a test account, butwhat if you wanted to run your tests offline?
To get around this, you need to create a seam between your application and theremote service. Whenever your application attempts to communicate with the remoteservice, you need to slot in a fake version that emits similar responses. In unit tests,mock objects simulate other objects. What you want is to mock a service.
There are two requirements that your application needs to satisfy to make thispossible:
■ Configurable remote services■ A web server that can stand in for the remote service
The first condition means your application should allow the URLs of remote servicesto be changed. If it needs to connect to http://auth.example.com/signin, then you’llneed to specify http://localhost:3001/signin during testing. The port is entirely up toyou—some solutions we’ve seen use a sequence of port numbers so multiple servicescan be run at once for the same tests.
The second condition can be handled however you want. If you’re using Express,you could start an Express server with a limited set of routes defined—just enoughroutes and code to simulate the remote service. This server can be kept in its ownmodule, and loaded in the tests that need it.
In practice this doesn’t require much code, so once you understand the principleit shouldn’t be too difficult to reuse it to handle practically any API. If the API you’reattempting to simulate isn’t well documented, then you may need to capture realrequests to figure out how it works.
www.it-ebooks.info

252 CHAPTER 9 The Web: Build leaner and meaner web applications
In the following three listings, you’ll see how to create a mock server that a test can useto simulate some of PayPal’s behavior. The first listing shows the application itself.
var express = require('express');var app = express();var PayPal = require('./paypal');var payPal = new PayPal({
user: 'NIP',payPalUrl: 'http://localhost:3001/validate',
Listing 9.32 A small web store that uses PayPal
Investigating remote APIsThere are times when remote APIs aren’t well documented. Once you get beyond thebasic API calls, there are bound to be parts that aren’t easy to understand. In caseslike this, we find it’s best to make requests with a command-line tool like curl, andwatch the requests and responses in an HTTP logging tool.
If you’re using Windows, then Fiddler (http://www.telerik.com/fiddler) is absolutelyessential. It’s described as a HTTP debugging proxy, and it supports HTTPS as well.
For Linux and Mac OS, mitmproxy (http://mitmproxy.org/) is a powerful choice. Itallows HTTP traffic to be observed in real time, dumped, saved, and replayed. We’vefound it perfect for debugging our own Node-powered APIs that support desktop apps,as well as figuring out the quirks of certain popular payment gateways.
Glance has built-in pages for errors.
These settings control PayPal’s behavior.
B
www.it-ebooks.info

253TECHNIQUE 78 Testing applications that depend on remote services
rootUrl: 'http://localhost:3000'});
app.use(express.bodyParser());
app.post('/buy', function(req, res, next) {var url = payPal.generateUrl(req.body);
// Send the user to the PayPal payment pageres.redirect(url);
});
app.post('/paypal/success', function(req, res, next) {payPal.verify(req.body, function(err) {if (err) next(err);app.emit('purchase:accepted', req.body);res.send(200);
});});
module.exports = app;
The settings passed to the PayPal class near the top of the file B are used to controlPayPal’s behavior. One of them, payPalUrl, could be https://www.sandbox.paypal.com/cgi-bin/webscr for testing against PayPal’s staging server. Here we use a localURL, because we’re going to run our own mock server.
If this were a real project, you should use a configuration file to store theseoptions. One for each environment would make sense. Then the test configurationcould point to a local server, staging could use PayPal sandbox, and live would use Pay-Pal.com. For more on configuration files, see technique 69.
To make a payment, the user is forwarded to PayPal’s hosted forms. Our demon-stration PayPal class has the ability to generate this URL, and it’ll use payPalUrl C.This example also features payment notification handling D—known as IPN in Pay-Pal’s nomenclature.
An extra feature we’ve added here is the call to emit E. This makes it easier totest, because our tests can now listen for purchase:accepted events. It’s also useful forsetting up email handling—see technique 73 for more on that.
Now for the mock PayPal server. All it needs to do is handle IPN requests. It basi-cally needs to say, “Yes, that purchase has been validated.” It could also optionallyreport errors so we can test error handling on our side as well. The next listing showswhat the tiny mocked server looks like.
var express = require('express');var paypalApp = express();
paypalApp.returnInvalid = false;
paypalApp.post('/validate', function(req, res) {
Listing 9.33 Mocking PayPal’s IPN requests
Get the purchase URL used by PayPal.
C
Handle payment notifications.
D
When a payment is successful, emit an event.E
Allow errors to be toggled
B
Handle IPN validation
C
www.it-ebooks.info

254 CHAPTER 9 The Web: Build leaner and meaner web applications
if (paypalApp.returnInvalid) {res.send('INVALID');
} else {res.send('VERIFIED');
}});
module.exports = paypalApp;
Real-life PayPal stores receive a POST from PayPal with an order’s details, near the endof the sales process. You need to take that order and send it back to PayPal for verifica-tion. This prevents attackers from crafting a POST request that tricks your applicationinto thinking a fake purchase was made.
This example includes a toggle so errors can be turned on B. We’re not going touse it here, but it’s useful in real projects because you’ll want to test how errors arehandled. There will be customers that encounter errors, so ensuring they’re handledgracefully is critical.
Once all that’s in place, all we need to do is send back the text VERIFIED C. That’sall PayPal does—it can be frustratingly abstruse at times!
Finally, let’s look at a test that puts all of this together. The next listing uses boththe mocked PayPal server and our application to make purchases.
var app = require('./../app');var assert = require('assert');var request = require('supertest');var payPalMock = require('./paypalmock');
function makeCustomer() {return {address1: '123',city: 'Nottingham',country: 'GB',email: '[email protected]',first_name: 'Paul',last_name: 'Smith',state: 'Nottinghamshire',zip: 'NG10932',tax_number: ''
};}
function makeOrder() {return {id: 1,customer: makeCustomer()
};}
function makePayPalIpn(order) {// More fields should be used for the real PayPal system
Listing 9.34 Testing PayPal
Customer fixtureB
Order fixture
C
What PayPal would send
D
www.it-ebooks.info

255TECHNIQUE 78 Testing applications that depend on remote services
return {'payment_status': 'Completed','receiver_email': order.customer.email,'invoice': order.id
};}
describe('buying the book', function() {var payPalServer;
before(function(done) {payPalServer = payPalMock.listen(3001, done);
});
after(function(done) {payPalServer.close(done);
});
it('should redirect the user to paypal', function(done) {var order = makeOrder();
request(app).post('/buy').send(order).expect(302, done);
});
it('should handle IPN requests from PayPal', function(done) {var order = makeOrder();
app.once('purchase:accepted', function(details) {assert.equal(details.receiver_email, order.customer.email);
});
request(app).post('/paypal/success').send(makePayPalIpn(order)).expect(200, done);
});});
This test sets up a sample order C, which requires a customer B. We also create anobject that has the same fields as a PayPal IPN request—this is what we’re going tosend to our mock PayPal server for validation. Before E and after F each test, wehave to start and stop the mock PayPal server. That’s because we don’t want serversrunning when they’re not needed—it might cause other tests to behave strangely.
When the user fills out the order form on our site, it will be posted to a route thatgenerates a PayPal URL. The PayPal URL will forward the user’s browser to PayPal forpayment. Listing 9.34 includes a test for this G, and the URL it generates will startwith our local test PayPal URL from listing 9.32.
There’s also a test for the notification sent by PayPal H. This is the one we’refocusing on that requires the PayPal mocked server. First we have to POST to our server
Before each test, start up mock PayPal server
E
After each test, close mock PayPal server
F
User should be redirected for valid orders
G
200 OK should be returned for valid orders
H
www.it-ebooks.info

256 CHAPTER 9 The Web: Build leaner and meaner web applications
at /paypal/success with the notification object D—this is what PayPal would normallydo—and then our application will make an HTTP request to PayPal, which will hit themocked server, and then return VERIFIED. The test simply ensures a 200 is returned,but it’s also able to listen for the purchase:accepted event, which indicates a givenpurchase is complete.
It might seem like a lot of work, but you’ll be able to work more efficiently once yourremote services are simulated with mock servers. Your tests run faster, and you can workoffline. You can also make your mocked services generate all kinds of unusualresponses, which will help you get better test coverage if that’s one of your goals.
This is the last web-related technique that we cover in this chapter. The next sec-tions discuss emerging trends in Node web development.
9.4 Full stack frameworksIn this chapter you’ve seen how to build web applications with Node’s built-in mod-ules, Connect, and Express. There’s an emerging class of new frameworks known asfull stack frameworks. They provide features that are needed to make rich, browser-based applications with modern tools like data binding, but also handle server-sideconcerns like modeling business logic and data persistence.
If you’re set on using Express, then you can still start working with full stack frame-works today. The MEAN solution stack uses MongoDB, Express, AngularJS, and Node.There could be many MEAN implementations out there, but the MEAN Stack fromLinnovate (https://github.com/linnovate/mean) is currently the most popular. Itcomes with Mongoose for data models, Passport for authorization, and Twitter Boot-strap for the user interface. If you’re working in a team that’s already familiar withBootstrap, AngularJS, and Mongoose, then this is a great way to get new projects offthe ground quickly.
The book Getting MEAN 5 introduces full stack development and covers Mongoosemodels, RESTful API design, and account management with Facebook and Twitter.
Another framework that builds on Express and MongoDB is Derby (http://derbyjs.com/). Instead of Mongoose, Derby uses Racer to implement data models.This allows data from different clients to be synchronized, using operational transfor-mation (OT). OT is specifically designed to support collaborative systems, so Derby is agood choice for developing software inspired by Etherpad (http://etherpad.org/). Italso has client-side features like templates and data binding.
If you like Express but want more features, then one option that we haven’t cov-ered is Kraken (http://krakenjs.com/) by PayPal. This framework adds more struc-ture to Express projects by adding subdirectories for configuration, controllers, Grunttasks, and tests. It also supports internationalization out of the box.
Some frameworks are almost entirely focused on the browser, relying on Node onlyfor sensitive operations and data persistence. One popular example is Meteor (https://www.meteor.com/). Like Derby and MEAN Stack, it uses MongoDB, but the creators
5 Getting MEAN by Simon Holmes: http://www.manning.com/sholmes/.
www.it-ebooks.info

257Real-time services
are planning support for other databases. It’s based around a pub/sub architecture,where JSON documents are pushed between the client and server. Clients retain an in-memory copy of the documents—servers publish sets of documents, while clients sub-scribe to them. This means most model-related code in the browser can be writtensynchronously.
Meteor embraces reactive programming, a paradigm that’s currently popular indesktop development circles. This allows reactive computations to be bound to methods.If you subscribe a function to such a value, the function will be rerun when the valuechanges. The overall effect in a real application is streamlined code—there’s essen-tially less pub/sub management and event-handling code.
Hoodie (http://hood.ie/) is a competitor to Meteor. It uses CouchDB, and is suit-able for mobile applications because it synchronizes data when possible. Almost every-thing can happen locally. It comes with built-in account management, which is assimple as hoodie.account.signUp('[email protected]', 'pass'). There’s even aglobal public store, so data can be saved for specific users or made available to every-one using a given application.
There’s lots of activity in the Node web framework scene, but there’s another aspectto Node web development that we haven’t mentioned yet: real-time development.
9.5 Real-time servicesNode is the natural choice for web-based real-time services. Broadly speaking, thisinvolves three types of applications: statistics servers, collaboration services, andlatency-sensitive applications like game servers.
It’s not that difficult to start a server with Express and collect data about your otherapplications, servers, weather sensor data, or dog-feeding robot. Unfortunately, doingthis well isn’t trivial. If you’re logging something every time someone plays your free-to-play iOS game, what happens when there are thousands of events a minute? Howdo you scale this, or view critical information in real time?
Some companies have this problem on a huge scale, and fortunately some of themhave created open source tools that we can reuse. One example is Cube (http://square.github.io/cube/) by Square. Cube allows you to collect timestamped eventsand then derive metrics on them. It uses MongoDB, so you could feed data out tosomething that generates graphs. Square has a solution for visualizing the data calledCubism.js (http://square.github.io/cubism/), which renders new values in real-time(see figure 9.9).
The Etherpad project (http://etherpad.org/) is a Node-powered collaborativedocument editor. It allows users to chat as they make changes to documents, andcolor-codes the changes so it’s easy to see what each person is doing. It’s basedon some of the modules you’ve seen in this book: Mikeal Rogers’ request, Express,and Socket.IO.
WebSockets make these projects possible. Without WebSockets, pushing data tothe client would be more cumbersome. Node has a rich set of WebSockets
www.it-ebooks.info

258 CHAPTER 9 The Web: Build leaner and meaner web applications
implementations—Socket.IO (http://socket.io/) is the most popular, but there’salso ws (https://www.npmjs.org/package/ws), which claims to be the fastestWebSocket implementation.
There’s a parallel between sockets and streams; SocketStream (http://socketstream.org/) aims to bridge the gap by building web applications entirely around streams. Ituses the HTML5 history.pushState API with single-page applications, Connect mid-dleware, and code sharing with the browser.
9.6 SummaryIn this chapter you’ve seen how Node fits in with modern web development. It can beused to improve client-side tooling—it’s now normal for client-side developers toinstall Node and a Node build tool.
Node is also used for server-side development. Express is the major web frame-work, but many projects can get off the ground with a subset from Connect. Otherframeworks are similar to Express, but have a different focus. Restify is one example,and can be used to make strict RESTful APIs (technique 71).
Writing well-structured Express applications means you should adopt certain pat-terns and idioms that the Node community has adopted. This includes error handling(technique 70), folders as modules and route separation (technique 67), and decou-pling through events (technique 73).
It’s also increasingly common to use Node modules in the browser (technique 66),and client-side code in Node (technique 65).
If you want to write better code, you should adopt test-driven development assoon as possible. We’ve included some techniques that enable you to test things likeauthentication (technique 76) and mocking remote APIs (technique 78), but thesimple act of writing a test to think about new code is one of the best ways toimprove your Node web applications. One way you can do this is every time you wantto add a new route to a web application, write the test first. Practice using Super-
Figure 9.9 Cubism.js shows time series values in real time.
www.it-ebooks.info

259Summary
Test, or a comparable HTTP request library, and use it to plan out new API methods,web pages, and forms.
The next chapter shows you how to write better tests, whether they’re simplescripts or database-driven web applications.
www.it-ebooks.info

260
Tests: The key to confident code
Imagine that you wanted to add a new currency to an online shop. First you’d add atest to define the expected calculations: subtotal, tax, and the total. Then you’dwrite code to make this test pass. This chapter will help you learn how to write testsby looking at Node’s built-in features for testing: the assert module and test scriptsthat you can set in your package.json file. We also introduce two major test frame-works: Mocha and node-tap.
This chapter covers■ Assertions, custom assertions, and automated
testing■ Ensuring things fail as expected■ Mocha and TAP■ Testing web applications■ Continuous integration■ Database fixtures
www.it-ebooks.info

261Introduction to testing with Node
One of the advantages of working with Node is that the community adopted testingearly on, so there’s no shortage of modules to help you write fast and readable tests.You might be wondering what’s so great about tests and why we write them early onduring development. Well, tests are important for exploring ideas before committingto them—you can think of them like small, flexible experiments. They also communi-cate your intent, which means they help document and expand on the ideas in the keyparts of the project. Tests can also help reduce maintenance in mature projects byallowing you to check that changes haven’t broken existing working features.
The first thing to learn about is Node’s assert module. This module allows you todefine an expectation that will throw an error when it isn’t met. Expressing and con-firming expectations is the main purpose of tests, so you’ll see a lot of assertions in thischapter. Although you don’t have to use assert to write tests, it’s a built-in core mod-ule and similar to assertion libraries you might’ve used before in other languages. Thefirst set of techniques in this chapter is all about assertions.
To get everyone up to speed, the next section includes a list of common terms usedwhen working with tests.
10.1 Introduction to testing with NodeTo make it easier for newcomers to automated testing, we’ve included table 10.1 thatdefines common terminology. This table also outlines what we mean by specific terms,because some programming communities use the same terms slightly differently.
Table 10.1 Node testing concepts
Term Description
Assertion A logical statement that allows you to test expressions. Supported by the assert core module; for example: assert.equal(user.email, '[email protected]');.
Test case One or more assertions that test a particular concept. In Mocha, a test case looks like this:
it('should calculate the square of a number', function() {assert.equal(square(4), 16);
});
Introduction to testingThis chapter assumes you have some experience at writing unit tests. Table 10.1includes definitions of the terminology used; if you want to know what we mean byassertions, test cases, or test harnesses, you can refer to this table.
For a more detailed introduction to testing, The Art of Unit Testing, Second Edition (RoyOsherove, Manning, 2013; http://manning.com/osherove2/) has step-by-stepexamples for writing maintainable and readable tests. Test Driven Development: ByExample (Kent Beck, Addison-Wesley, 2002; http://mng.bz/UT12) is another well-known foundational book on the topic.
www.it-ebooks.info

262 CHAPTER 10 Tests: The key to confident code
The only feature from table 10.1 that Node directly supports is assertions. The otherfeatures are provided through third-party libraries—you’ll learn about CI servers intechnique 86, and mocks and fixtures in technique 87. You don’t have to use all ofthese things to write tests, you can actually write tests with just the assertion module.The next section introduces the assert module so you can start writing basic tests.
10.2 Writing simple tests with assertionsSo far we’ve briefly mentioned that assertions are used to test expressions. But whatdoes this involve? Typically assertions are functions that cause an exception to beraised if a condition isn’t met. A failing assertion is like your credit card beingdeclined in a store—your program will refuse to run no matter how many times youtry. The idea of assertions has been around for a long time; even C has assertions.
Test harness A program that runs tests and collates output. The resulting reports help diagnose problems when tests fail.This builds on the previous example, so with Mocha a test harness looks like this:
var assert = require('assert');var square = require('./square');
describe('Squaring numbers', function() {it('should calculate the square of a number', function() {
assert.equal(square(4), 16);});
it('should return 0 for 0', function() {assert.equal(square(0), 0);
});});
Fixture Test data that is usually prepared before tests are run. Let’s say you want to test a user accounts system. You could predefine users and their passwords, and then include the passwords in the tests to ensure users can sign in correctly.In Node, JSON is a popular file format for fixtures, but you could use a database, SQL dump, or CSV file. It depends on your application’s requirements.
Mock An object that simulates another object. Mocks are often used to replace I/O opera-tions that are either slow or difficult to run in unit tests; for example, downloading data from a remote web API, or accessing a database.
Stub A method stub is used to replace functionality for the duration of tests. For example, methods used to communicate with an I/O source like a disk or remote API can be stubbed to return predefined data.
Continuous integration server
A CI server runs automated tests whenever a project is updated through a version control server.
Table 10.1 Node testing concepts (continued)
Term Description
www.it-ebooks.info

263TECHNIQUE 79 Writing tests with built-in modules
In C, the standard library includes the assert() macro, which is used for verifyingexpressions. In Node, we have the assert core module. There are other assertionmodules out there, but assert is built-in and easy to use and extend.
COMMONJS UNIT TESTING The assert module is based on the CommonJS UnitTesting 1.1 specification (http://wiki.commonjs.org/wiki/Unit_Testing/1.1).So even though it’s a built-in core module, you can use other assertion modulesas well. The underlying principles are always the same.
This section introduces Node’s built-in assertions. By following the first technique,you’ll be able to write tests using the assert core module by using assert.equal tocheck for equality, and to automate the running of tests by using npm scripts.1
TECHNIQUE 79 Writing tests with built-in modules
Have you ever tried to write a quick test for an important feature, but you found your-self lost in test library documentation? It can be hard to get started actually writingtests; it seems like there’s a lot to learn. If you just start using the assert module,though, you can write tests right now without any special libraries.
This is great when you’re writing a small module and don’t want to install anydependencies. This technique demonstrates how to write clean, expressive, single-filetests.
■ ProblemYou have a clear idea of the acceptable input and output values for your module, class,or functions, and you want it to be clear when the output values don’t match theinput.
■ SolutionUse the assert module and npm scripts.
■ DiscussionNode comes with an assertion module. You can think of this as a toolkit for checkingexpectations against outcomes. Internally this is done by comparing actual valuesagainst expected values. The assert.equal method demonstrates this perfectly: thearguments are actual, expected. There’s also a third optional argument: message.Passing a message makes it easier to understand what happened when tests fail.
Let’s say you’re writing an online shop that calculates order prices, and you’ve soldthree items at $3.99 each. You could ensure the correct price gets calculated with this:
assert.equal(order.subtotal, 11.97,'The price of three items at $3.99 each'
);
In methods with only a single required argument, like assert(value), theexpected value is true, so it uses the same pattern.
1 This is defined by the scripts property in a package.json file. See npm help scripts for details on thisfeature.
www.it-ebooks.info

264 CHAPTER 10 Tests: The key to confident code
To see what happens when a test fails, try running the next listing.
var assert = require('assert');var actual = square(2);var expected = 4;
assert(actual, 'square() should have returned a value');assert.equal(
actual,expected,
'square() did not calculate the correct value');
function square(number) {return number * number + 1;
}
The first line you’ll see in most test files is one that loads the assert module B. Theassert variable is also a function aliased from assert.ok—which means you can useeither assert() or assert.ok()C.
It’s easy to forget the order of the arguments for assert.equal, so you might findyourself checking Node’s documentation a lot. It doesn’t really matter how you orderthe arguments—some people might find it easier to list the expected value first sothey can scan the code for values—but you should be consistent. That’s why this exam-ple is explicit about the naming of actual and expected D.
This test has a function that has an intentional bug E. You can run the test withnode assertions.js, which should display an error with a stack trace:
assert.js:92throw new assert.AssertionError({
^AssertionError: square() did not calculate the correct value
at Object.anonymous (listings/testing/assertions.js:7:8)at Module._compile (module.js:456:26)
at Object.Module._extensions..js (module.js:474:10)at Module.load (module.js:356:32)at Function.Module._load (module.js:312:12)at Function.Module.runMain (module.js:497:10)at startup (node.js:119:16)at node.js:901:3
These stack traces can be hard to read. But because we’ve included a message with theassertion that failed, we can see a description of what went wrong. We can also see thatthe assertion failed in the file assertions.js on line 7 B.
The assert module has lots of other useful methods for testing values. The mostsignificant is assert.deepEqual, which can check for equality between two objects.This is important because assert.equal can only compare shallow equality. Shallowequality is used for comparing primitive values like strings or numbers, whereas deep-Equal can compare objects with nested objects and values.
Listing 10.1 The assert module
Load assertion moduleB
assert module is a functionfor testing truth C
assert.equalallows
expectationsto be set upfor shallow
equalitychecks D square() function is
what we’re testingE
File and line number where the assertion failedB
www.it-ebooks.info

265TECHNIQUE 80 Testing for errors
You might find deepEqual useful when you’re writing tests that return complexobjects. Think about the online shop example from earlier. Your shopping cart mightlook like this: { items: [ { name: "Coffee beans", price: 4.95 } ], subtotal: 4.95 }.It’s an object that contains an array of shopping cart items, and a subtotal that is calcu-lated by another object. Now, to check this entire object against one that you’ve definedin your unit test, you’d use assert.deepEqual, because it’s able to compare objectsrather than just primitive values.
The deepEqual method can be seen in the next listing.
var assert = require('assert');var actual = login('Alex');var expected = new User('Alex');
assert.deepEqual(actual, expected, 'The user state was not correct');
function User(name) {this.name = name;this.permissions = {admin: false
};}
function login(name) {var user = new User(name);user.permissions.admin = true;return user;
}
This example uses the assert module B to test objects created by a constructor func-tion, and an imaginary login system. The login system is accidentally loading normalusers as if they were administrators D.
The assert.deepEqual method C will go over each property in the objects to seeif any are different. When it runs into user.permissions.admin and finds the valuesdiffer, an AssertionError exception will be raised.
If you take a look at the assert module’s documentation, you’ll see many otheruseful methods. You can invert logic with notDeepEqual and notEqual, and even per-form strict equality checks just like === with strictEqual and notStrictEqual.
There’s another aspect to testing, and that’s ensuring that things fail the way weexpect. The next technique looks at testing for failures.
TECHNIQUE 80 Testing for errors
Programs will eventually fail, but when they do, we want them to produce usefulerrors. This technique is about ensuring that expected errors are raised, and abouthow to cause exceptions to be raised during testing.
■ ProblemYou want to test your error-handling code.
Listing 10.2 Testing object equality
Load the assert module.B
Use deepEqual tocompare objects. C
The login system has a bug!
D
www.it-ebooks.info

266 CHAPTER 10 Tests: The key to confident code
■ SolutionUse assert.throws and assert.ifError.
■ DiscussionOne of the conventions we use as Node developers is that asynchronous methodsshould return an error as the first argument. When we design our own modules, weknow there are places where errors are likely to occur. Ideally we should test thesecases to make sure the correct errors are passed to callbacks.
The following listing shows how to ensure an error hasn’t been passed to an asyn-chronous function.
var assert = require('assert');var fs = require('fs');
function readConfigFile(cb) {fs.readFile('config.cfg', function(err, data) {if (err && err.code === 'ENOENT') {
cb(null, { database: 'psql://localhost/test' });} else if (err) {
cb(err);} else {
// Do important configuration stuffcb(null, data);
}});
}
// Test to make sure non-existent configuration// files are handled correctly.readConfigFile(function(err, data) {
assert.ifError(err);});
Although assert.ifError works synchronously, it makes semantic sense to use it fortesting asynchronous functions that pass errors to callbacks. Listing 10.3 uses an asyn-chronous function called readConfigFile B to read a configuration file. In realitythis might be the database configuration for a web application, or something similar.If the file isn’t found, then it returns default values C. Any other error—and this isthe important part—will be passed to the callback D.
That means the assert.ifError test E can easily detect whether an unexpectederror has occurred. If something changes in the structure of the project that causes anunusual error to be raised, then this test will catch that and warn the developersbefore they release potentially dangerous code.
Now let’s look at raising exceptions during testing. Rather than using try andcatch in our tests, we can use assert.throws.
To use assert.throws, you must supply the function to be run and an expectederror constructor. Because a function is passed, this works well with asynchronousAPIs, so you can use it to test things that depend on I/O operations.
Listing 10.3 Handling errors from asynchronous APIs
The function we want to test takes a callback.
B
If the error is “file not found,” return default values.
C
Otherwise, pass the error to the callback.D
Now ifError will fail if any errors are passed.
E
www.it-ebooks.info

267TECHNIQUE 80 Testing for errors
The next listing shows how to use assert.throws with a fictitious user accountsystem.
var assert = require('assert');var util = require('util');
assert.throws(function() {loginAdmin('Alex');
},PermissionError,'A PermissionError was expected'
);
function PermissionError() {Error.call(this, arguments);
}util.inherits(PermissionError, Error);
function User(name) {this.name = name;this.permissions = {admin: false
};}
function loginAdmin(name) {var user = new User(name);if (!user.permissions.admin) {throw new PermissionError('You are not an administrator');
}return user;
}
The assertion B checks to ensure the expected exception is thrown. The first argu-ment is a function to test, in this case loginAdmin, and the second is the expectederror C.
This highlights two things about assert.throws: it can be used with asynchronousAPIs because you pass it a function, and it expects error objects of some kind. When devel-oping projects with Node, it’s a good idea to use util.inherits to inherit from the built-in Error constructor. This allows people to easily catch your errors, and you can decoratethem with extra properties that include useful additional information if required.
In this case we’ve created PermissionError D, which is a clear name and there-fore self-documenting—if someone sees a PermissionError in a stack trace, they’llknow what went wrong. A PermissionError is subsequently thrown in the login-Admin function E.
This technique delved into error handling with the assert module. Combined withthe previous techniques, you should have a good understanding of how to test a rangeof situations with assertions. With assert.equal you can quickly compare numbers and
Listing 10.4 Ensuring that exceptions are raised
The first argument of assert.throws is the function being tested.
B
The second argument is the expected error.C
PermissionError inherits from the standard Error constructor.D
This is a fake login system thatonly allows administrators to
sign in.
E
www.it-ebooks.info

268 CHAPTER 10 Tests: The key to confident code
strings, and this covers a lot of problems like checking prices in invoices or emailaddresses in web application account-handling code. A lot of the time, assert.ok—which is aliased as assert()—is enough to get by, because it’s a quick and handy way forchecking for truthy expressions. But there’s one last thing to master if you want to reallytake advantage of the assert module; read on to learn how to create custom assertions.
TECHNIQUE 81 Creating custom assertions
Node’s built-in assertions can be extended to support application-specific expressions.Sometimes you find yourself repeatedly using the same code to test things, and it seemslike there might be a better way. For example, suppose you’re checking for valid emailaddresses with a regular expression in assert.ok. Writing custom assertions can solvethis problem, and is easier than you might think. Learning how to write custom asser-tions will also help you understand the assertion module from the inside out.
■ ProblemYou’re repeating a lot of code in your tests that could be replaced if only you had theright assertion.
■ SolutionExtend the built-in assert module.
■ DiscussionThe assert module is built around a single function: fail. assert.ok actually callsfail with the logic inverted, so it looks like this: if (!value) fail(value). If you lookat how fail works, you’ll see that it just throws an assert.AssertionError:
function fail(actual, expected, message, operator, stackStartFunction) {throw new assert.AssertionError({message: message,actual: actual,expected: expected,operator: operator,stackStartFunction: stackStartFunction
});}
The error object is decorated with properties that make it easier for test reporters tobreak down the location and cause of failures. The people who wrote this moduleknew that others would like to write their own assertions, so the fail function isexported, which means it can be reused.
Writing a custom assertion involves the following steps:
1 Define a method with a signature similar to the existing assertion library.2 Call fail when an expectation isn’t matched.3 Test to ensure failure results in an AssertionError.
Listing 10.5 puts these steps together to define a custom assertion that ensures a regu-lar expression is matched.
www.it-ebooks.info

269TECHNIQUE 81 Creating custom assertions
var assert = require('assert');assert.match = match;
function match(actual, regex, message) {if (!actual.match(regex)) {assert.fail(actual, regex, message, 'match', assert.match);
}}
assert.match('{ name: "Alex" }', /Alex/, 'The name should be "Alex"');
assert.throws(function() {assert.match('{ name: "Alex" }', /xlex/, 'This should fail');
},assert.AssertionError,'A non-matching regex should throw an AssertionError'
);
This example loads the assertion module B and then defines a function called matchthat runs assert.fail to generate the right exception when the regular expressiondoesn’t match the actual value C. The key detail to remember is to define the argu-ment list to be consistent with other methods in the assertion module—the examplehere is based on assert.equal.
Listing 10.5 also includes some tests. In reality these would be in a separate file, buthere they illustrate how the custom assertion works. First we check to see if it passes asimple test by matching a string against a regular expression D, and thenassert.throws is used to ensure the test really does fail when it’s meant to E.
This example might seem simple, but understanding how to write custom assertionsimproves your knowledge of the underlying module. Custom assertions can helpclean up tests where expectations have been made less expressive by squeezing con-cepts into built-in assertions. If you want to be able to say something likeassert.httpStatusOK, now you can!
With assertions out of the way, it’s time to look at how to organize tests across mul-tiple files. The next technique introduces test harnesses that can be used to organizegroups of test files and run them more easily.
Listing 10.5 A custom assertion
Load assert moduleBExecute regular
expressionmatch against a
string usingString.prototype
.match C
Make suretests pass DMake sure
tests fail E
Your own domain-specific languageUsing custom assertions is but one technique for creating your own testing DSL(domain-specific language). If you find you’re duplicating code between test cases,then by all means wrap that code in a function or class.
For example, setUpUserAccount({ email: '[email protected]' }) is more readablethan three or four lines of setup code, particularly if it’s repeated between test cases.
www.it-ebooks.info

270 CHAPTER 10 Tests: The key to confident code
10.3 Test harnessesA test harness, or automated test framework, generally refers to a program that sets upthe runtime environment and runs tests, and then collects and compares the results.Since it’s automated, tests can be run by other systems including continuous integra-tion (CI) servers, covered in technique 86.
Test harnesses are used to execute groups of test files. That means you can easilyrun lots of tests with a single command. This not only makes it easier for you to runtests, but makes it easier for your collaborators as well. You may even decide to start allprojects with a test harness before doing anything else. The next technique shows youhow to make your own test harness, and how to save time by adding scripts to yourpackage.json files.
TECHNIQUE 82 Organizing tests with a test harness
Suppose you’re working on a project and it keeps on growing, and using a single test fileis starting to feel messy. It’s hard to read and causes confusion that leads to mistakes. Soyou’d like to use separate files that are related in some way. Perhaps you’d even like torun tests one file at a time to help track down issues when things go wrong.
Test harnesses solve this problem.
■ ProblemYou want to write tests organized into test cases and test suites.
■ SolutionUse a test harness.
■ DiscussionFirst, let’s consider what a test harness is. In Node, a test harness is a command-linescript that you can run by typing the name of the script. At its most basic, it must run agroup of test files and display any errors that occur. We don’t need anything particu-larly special to do that—a failed assertion will cause an exception to be thrown; other-wise the program will exit silently with a return code of 0.
That means a basic test harness is just node test/*.js, where test/ is a directory thatcontains a set of test files. We can go one better than that. All Node projects should havea package.json file. One of the properties in this file is scripts, and one of the defaultscripts is test. Any string you set here will be executed like a shell command.
The following listing shows an example package.json file with a test script.
{"name": "testrunner","version": "0.0.0","description": "A test runner","main": "test-runner.js","dependencies": {},"devDependencies": {},"scripts": {"test": "node test-runner.js test.js test2.js"
Listing 10.6 A package.json with a test script
Test script invocation goes here
B
www.it-ebooks.info

271TECHNIQUE 82 Organizing tests with a test harness
},"author": "","license": "MIT"
}
With node test-runner.js test.js test2.js set as the test script B, other devel-opers can now run your tests simply by typing npm test. This is much easier than hav-ing to remember a project-specific command.
Let’s expand this example by looking at how test harnesses work. A test harness is aNode program that runs groups of test files. Therefore, we should be able to give sucha program a list of files to test. Whenever a test fails, it should display a stack trace sowe can easily track down the source of the failure.
In addition, it should exit with a non-zero return code whenever a test fails. Thatallows tests to be run in an automated way—other software can easily see if a test failedwithout having to parse the textual output from the tests. This is how continuous inte-gration (CI) servers work: they automatically run tests whenever code is committed toa version control system like Git.
The next listing shows what a test file for this system should look like.
var assert = require('assert');
it('should run a test', function() {assert('a' === 'a');
});
it('should allow a test to fail', function() {assert(true);assert.equal('a', 'b', 'Bad test');
});
it('should run a test after the failed test', function() {assert(true);
});
The it function B looks strange, but it’s a global function that will be provided byour test framework. It gives each test case a name so it’s easier to understand theresults when the tests are run. A failing test is included C so we can see whathappens when tests fail. The last test case D should run even though the secondone failed.
Now, the final piece of the puzzle: the next listing includes a program capable ofexecuting this test.
Listing 10.7 An example test file
The it() function represents a test case.
B
A failing test is included so we can see what the results look like.
C
This last test should still run.D
www.it-ebooks.info

272 CHAPTER 10 Tests: The key to confident code
var assert = require('assert');var exitCode = 0;var filenames = process.argv.slice(2);
it = function(name, test) {var err;
try {test();
} catch (e) {err = e;
}
console.log(' - it', name, err ? '[FAIL]' : '[OK]');
if (err) {console.error(err);console.error(err.stack);exitCode = 1;
}};
filenames.forEach(function(filename) {console.log(filename);require('./' + filename);
});
process.on('exit', function() {process.exit(exitCode);
});
This example can be run by passing test files as arguments: node test-runner.jstest.js test2.js test-n.js. The it function is defined as a global B, and is calledit so the tests and their output read logically. This makes sense when the results areprinted D.
Because it takes a test case name and a callback, the callback can be run underwhatever conditions we desire. In this case we’re running it inside a try/catch state-ment C, which means we can catch failed assertions and report errors E to the user.
Tests are loaded by calling require on each of the files passed in as command-linearguments F. In a more polished version of this program, the file handling would needto be more sophisticated. Wildcard expressions would need to be supported, for example.
A failed test case causes the exitCode variable to be set to a non-zero value. This isreturned to the controlling process with process.exit in the exit handler G.
Even though this is a minimal example, it can be run with npm test, gives testcases a little syntax sugar with it, improves the error reporting over a simple file fullof assertions, and returns a non-zero exit code when something goes wrong. This isthe basis for most popular Node test frameworks like Mocha, which we’ll look at in thenext section.
Listing 10.8 Running tests in a prescribed manner
The it() function is defined as a global.
B
Tests are passed as callbacks and run inside a try/catch statement.C Results are printed
based on the presence of an exception.
D
A stack trace is printed to help track down errors.
E
Each file passed on the command-line is run.
F
When the program exits, return a non-zero error code if a test failed.
G
www.it-ebooks.info

273TECHNIQUE 83 Writing tests with Mocha
10.4 Test frameworksIf you’re starting a new project, then you should install a test framework early on. Sup-pose that you’re building an online blogging system, or perhaps a simple contentmanagement system. You’d like to allow people to sign in, but only allow specific usersto access the administration interface. By using a test framework like Mocha or node-tap, you can write tests that address these specific concerns: users signing up foraccounts, and administrators signing in to the admin interface. You could create sepa-rate test files for these concerns, or bundle them up as groups of test cases under“user accounts tests.”
Test frameworks include scripts to run tests and other features that make it eas-ier to write and maintain tests. This section features the Mocha test framework intechnique 84 and the Test Anything Protocol (TAP; http://testanything.org/) intechnique 85—two popular test frameworks favored by the Node community. Mochais lightweight: it runs tests, provides three styles for structuring test cases,2 andexpects you to use either Node’s assert module or another third-party module.Conversely, node-tap, which implements TAP, uses an API that includes assertions.
TECHNIQUE 83 Writing tests with Mocha
There are many test frameworks for Node, so it’s difficult to choose the right one.Mocha is a popular choice because it’s well maintained and has the right balance offeatures and conventions.
In general, you use a test framework to organize tests for a project. You’d like touse a test framework that other people are familiar with so they can easily navigate andcollaborate without learning a new module. Perhaps you’re just looking for a way torun tests the same way every time, or trigger them from an automated system.
■ ProblemYou need to organize your tests in a way other developers will be familiar with, and runthe tests with a single command.
■ SolutionUse one of the many open source test frameworks for Node, like Mocha.
■ DiscussionMocha must be installed from npm before you can do anything else. The best way toinstall it is with npm install --save-dev mocha. The --save-dev option causes npmto install Mocha into node_modules/ and update your project’s package.json file withthe latest version from npm. It will be saved as a development dependency.
Listing 10.9 shows an example of a simple test written with Mocha. It uses theassert core module to make assertions, and should be invoked using the mocha com-mand-line binary. You should add "./node_modules/mocha/bin/mocha test/*.js" to
2 Mocha supports API styles based on Behavior Driven Development (BDD), Test Driven Development (TDD),and Node’s module system (exports).
www.it-ebooks.info

274 CHAPTER 10 Tests: The key to confident code
the "test" property in package.json—see technique 82 for more details on how todo that.
var index = require('./../index');var assert = require('assert');
describe('Amazing mathematical operations', function() {it('should square numbers', function() {assert.equal(index.square(4), 16);
});
it('should run a callback after a delay', function(done) {index.randomTimeout(function() {
assert(true);done();
});});
});
The describe and it functions are provided by Mocha. The describe function canbe used to group related test cases together, and it contains a collection of assertionsthat form a test case B.
Special handling for asynchronous tests is required. This involves including a doneargument in the callback for the test case C, and then calling done() when the testhas finished D. In this example, a timeout will be triggered after a random interval,which means we need to call done in the index.randomTimeout method. The corre-sponding file under test is shown in the next listing.
module.exports.square = function(a) {return a * a;
};
module.exports.randomTimeout = function(cb) {setTimeout(cb, Math.random() * 500);
};
Listing 10.9 A simple Mocha test
Listing 10.10 A sample module to test
Mocha versionsThe version of Mocha we use for this chapter is 1.13.x. We prefer to run the tests byinstalling it locally to the project rather than as a systemwide Node module. Thatmeans that tests can be run using ./node_modules/mocha/bin/mocha test/*.jsrather than just typing mocha. That allows different projects to have different versionsof Mocha, just in case the API changes dramatically between major releases.
An alternative is to install Mocha globally with npm install --global mocha, andthen run tests for a project by typing mocha. It will display an error if it can’t find any tests.
Group related tests with describe()
B
Include done argument for asynchronous tests
C
Call done() when asynchronous test has finishedD
Simple synchronous function that squares numbersB
Asynchronous function that will run after a random amount of time
C
www.it-ebooks.info

275TECHNIQUE 83 Writing tests with Mocha
CONTROLLING SYNCHRONOUS AND ASYNCHRONOUS BEHAVIOR If done isn’tincluded as an argument to it, then Mocha will run the test synchronously.Internally, Mocha looks at the length property of the callback you pass to itto see if an argument has been included. This is how it switches between asyn-chronous and synchronous behavior. If you include an argument, thenMocha will wait around for done to be called until a timeout is reached.
This module defines two methods: one for squaring numbers B and another thatruns a callback after a random amount of time C. It’s just enough to demonstrateMocha’s main features in listing 10.9.
To set up a project for Mocha, the index.js file we’ve used in this example shouldbe in its own directory, and at the same level should be a package.json file with a testsubproperty of the scripts property set to "./node_modules/mocha/bin/mochatest/*.js". There should also be a test/ directory that contains example_test.js.3
With all that in place, you can run the tests with npm test. When the tests are run, you should notice some dots appearing. These mark a com-
pleted test case. When the tests take more than a preset amount of time, they’ll changecolor to denote they ran slower than is acceptable. Since index.randomTimeout pre-vents the second test from completing for a random amount of time, there will be timeswhen Mocha thinks the tests are running too slowly. You can increase this threshold bypassing --slow to Mocha, like this: ./node_modules/mocha/bin/mocha --slow 2000test/*.js. Now you don’t need to feel guilty about seemingly slow tests!
To see all of the command-line options, type node_modules/mocha/bin/mocha --helpor visit http://mochajs.org/.
We’ve included the final package.json file in listing 10.11 in case you have troublewriting your own. You can install Mocha and its dependencies with npm install.
{"name": "mocha-example-1","version": "0.0.0","description": "A basic Mocha example","main": "index.js",
3 The file can be called anything as long as it’s in the test/ directory.
Listing 10.11 The Mocha sample project’s JSON file
Assertions per testIn listing 10.9, each test case has a single assertion. Some consider this best prac-tice—and it can result in readable tests.
But we prefer the idea of a single concept per test. This style structures test casesaround well-defined concepts, using the absolute necessary amount of assertions.This will typically be a small number, but occasionally more than one.
www.it-ebooks.info

276 CHAPTER 10 Tests: The key to confident code
"dependencies": {},"devDependencies": {"mocha": "~1.13.0"
},"scripts": {"test": "./node_modules/mocha/bin/mocha --slow 2000 test/*.js"
},"author": "Alex R. Young","license": "MIT"
}
In this technique the assert core module has been used, but you could swap it foranother assertion library if you prefer. Others are available, like chai (https://npmjs.org/package/chai) and should.js (https://github.com/visionmedia/should.js).
Mocha is often used for testing web applications. In the next technique, you’ll seehow to use Mocha for testing web applications written with Node.
TECHNIQUE 84 Testing web applications with Mocha
Let’s suppose you’re building a web application with Node. You’d like to test it by run-ning it in a way that allows you to send requests and receive responses—you want tomake HTTP requests to test the web application works as expected.
■ ProblemYou’re building a web application and would like to test it with Mocha.
■ SolutionWrite tests with Mocha and the standard http module. Consider using an HTTP mod-ule designed for testing to simplify your code.
■ DiscussionThe trick to understanding web application testing in Node is to learn to think interms of HTTP. This technique starts off with a Mocha test and the http core module.Once you understand the principles at work and can write tests this way, we’ll intro-duce a third-party HTTP testing module to demonstrate how to simplify such tests.The built-in http module is demonstrated first because it’s useful to see what goes onbehind the scenes and to get a handle on exactly how to construct such tests.
The following listing shows what the test looks like.
var assert = require('assert');var http = require('http');var index = require('./../index');
function request(method, url, cb) {http.request({hostname: 'localhost',port: 8000,path: url,method: method
}, function(res) {res.body = '';
Listing 10.12 A Mocha test for a web application
This function is used to make HTTP requests in the tests.B
www.it-ebooks.info

277TECHNIQUE 84 Testing web applications with Mocha
res.on('data', function(chunk) {res.body += chunk;
});
res.on('end', function() {cb(res);
});}).end();
}
describe('Example web app', function() {it('should square numbers', function(done) {request('GET', '/square/4', function(res) {
assert.equal(res.statusCode, 200);assert.equal(res.body, '16');done();
});});
it('should return a 500 for invalid square requests', function(done) {request('GET', '/square', function(res) {
assert.equal(res.statusCode, 500);done();
});});
});
This example is a test for a web service that can square numbers. It’s a simple web ser-vice that expects GET requests and responds with plain text. The goal of this test suiteis to ensure that it returns the expected results and correctly raises errors when invaliddata is sent. The tests aim to simulate browsers—or other HTTP clients, for that mat-ter—and to do so, both the server and client are run in the same process.
To run a web service, all you need to do is create a web server with http.create-Server(). Exactly how this is done is shown in listing 10.13. Before discussing that,let’s finish looking at this test.
The test starts by creating a function for making HTTP requests B. This is toreduce the amount of duplication that would otherwise be present in the test cases.This function could be its own module, which could be used in other test files. After arequest has been sent, it listens for data events on the response object to store anydata returned by the server C. Then it runs the provided callback D, which is passedin from the test cases.
Figure 10.1 shows how Node can run both servers and clients in the same processto make web application testing possible.
An example of this is the test for the /square method that ensures 4 * 4 === 16 E.Once that’s done, we also make sure invalid HTTP query parameters cause the serverto respond with a 500 error F.
The standard assertion module is used throughout, and res.statusCode is used totest the expected status codes are returned.
After the request has been sent, collect any data that is sent back to the client.C
When the request and response have both finished, run the callback.D
Ensure the response is what we expect for the /square method.E
Ensure the server correctly raises an error for invalid requests.F
www.it-ebooks.info

278 CHAPTER 10 Tests: The key to confident code
The implementation of the corresponding web service is shown in the next listing.
var http = require('http');
var server = http.createServer(function(req, res) {if (req.url.match(/^/square/)) {var params = req.url.split('/');var number;if (params.length > 1 && params[2]) {
number = parseInt(params[2], 10);res.writeHead(200);res.end((number * number).toString());
} else {res.writeHead(500);res.end('Invalid input');
}} else {res.writeHead(404);res.end('Not found');
}})
server.listen(8000);
module.exports = server;
Before doing anything else, http.createServer is used to create a server. Near theend of the file, .listen(8000) is used to make the server start up and listen for con-nections. Whenever a request with a URL matching /square comes in, the URL isparsed for a numerical parameter B and then the number is squared and sent to theclient C. When the expected parameter isn’t present, a 500 is returned instead D.
Listing 10.13 A web application that can square numbers
HTTP request toweb application
Check responsewith assert.equal
Node process
index.js test/test.js
res.end((n * n) .toString());
assert.equal( res.statusCode, 200);
assert.equal( res.body, '16');
Figure 10.1 Node can run a web server and requests against it to support web application testing.
Parse out number parameter from the URL
B
Perform square calculation
C
Return a 500 when parameter is invalidD
www.it-ebooks.info

279TECHNIQUE 84 Testing web applications with Mocha
One part of listing 10.12 that can be improved on is the request method. Ratherthan defining a wrapper around http.request, we can use a library designed specifi-cally for testing with web requests.
The module we’ve chosen is SuperTest (https://github.com/visionmedia/supertest) by TJ Holowaychuk, who also wrote Mocha. There are other similar librar-ies out there. The general idea is to simplify HTTP requests and allow assertions tobe made about the request.
You can add SuperTest to the development dependencies for this example by run-ning npm install --save-dev supertest.
The following listing shows how the test can be refactored using the SuperTestmodule.
var assert = require('assert');var index = require('./../index');var request = require('supertest');
describe('Example web app', function() {it('should square numbers', function(done) {request(index)
.get('/square/4')
.expect(200)
.expect(/16/, done);});
it('should return a 500 for invalid square requests', function(done) {request(index)
.get('/square')
.expect(500, done);});
});
Although functionally identical to listing 10.12, this example improves it by removingthe boilerplate for making HTTP requests. The SuperTest module is easier to under-stand, and allows assertions to be expressed with less code while still being asynchro-nous. SuperTest expects an instance of an HTTP server B, which in this case is theapplication that we want to test. Once the application has been passed to SuperTest’smain function, request, we can then make a GET request using request().get. OtherHTTP verbs are also supported, and form parameters can be sent when using post()with the send method.
SuperTest’s methods are chainable, so once a request has been made, we canmake an assertion by using expect. This method is polymorphic—it checks the type ofthe argument and acts accordingly. If you pass it a number C, it’ll ensure that theHTTP status was that number. A regular expression will make it check the responsebody for a match D. These expectations are perfect for the requirements of this test.
Listing 10.14 The refactored Mocha test that uses SuperTest
Pass HTTPserver toSuperTest
B
Set up an assertion to make sure HTTP status is 200
C
Ensure request body contains the right answerD
When passing invalid parameters, check a 500 is returnedE
www.it-ebooks.info

280 CHAPTER 10 Tests: The key to confident code
Any HTTP status can be checked, so when we actually expect a 500, we can test forit E.
Though it’s useful to understand how to make simple web applications and testthem using the built-in http module, we hope you can see how third-party moduleslike SuperTest can simplify your code and make your tests clearer.
Mocha captures the zeitgeist of the current state of testing in Node, but there areother approaches that are just as valid. The next technique introduces TAP and the TestAnything Protocol, due to its endorsement by Node’s maintainer and core contributors.
TECHNIQUE 85 The Test Anything Protocol
Test harness output varies based on programming language and test framework.There are initiatives to unify these reports. One such effort that has been adopted bythe Node community is the Test Anything Protocol (http://testanything.org). Teststhat use TAP will produce lightweight streams of results that can be consumed by com-patible tools.
Suppose you need a test harness that’s compatible with the Test Anything Protocol,either because you have other tools that use TAP, or because you’re already familiarwith it from other languages. It could be that you don’t like Mocha’s API and want analternative, or are interested in learning about other solutions to testing in Node.
■ ProblemYou want to use a test framework that’s designed to interoperate with other systems.
■ SolutionUse Isaac Z. Schlueter’s tap module.
■ DiscussionTAP is unique because it aims to bridge test frameworks and tools by specifying a pro-tocol that implementors can use. The protocol is stream-based, lightweight, andhuman-readable. In comparison to other, heavier XML-based standards, TAP is easy toimplement and use.
It’s significant that the tap module (https://npmjs.org/package/tap) is written byNode’s former maintainer, Isaac Z. Schlueter. This is an important seal of approval bysomeone highly influential in the Node community.
The example in this technique uses the number squaring and random timeoutmodule used in technique 83 so you can compare how tests look in TAP and Mocha.
The following listing shows what the test looks like. For the corresponding mod-ule, see listing 10.10.
var index = require('./../index');var test = require('tap').test;
test("Alex's handy mathematics module", function(t) {t.test('square', function(t) {
t.equal(index.square(4), 16);
Listing 10.15 Testing with TAP
Load the tap module, and assign a variable to the test() method.
B
Define testswith test().
C
Using tap’s built-in assertions.D
www.it-ebooks.info

281TECHNIQUE 85 The Test Anything Protocol
t.end();});
t.test('randomTimeout', function(t) {t.plan(1);index.randomTimeout(function() {t.ok(true);
});});
t.end();});
This is different from the Mocha example because it doesn’t assume there are anyglobal test-related methods like it and describe: a reference to tap.test has to beset up B before doing anything else. Tests are then defined with the t.test()method C, and can be nested if needed. Nesting allows related concerns to begrouped, so in this case we’ve created a test case for each method being tested.
The tap module has built-in assertions, and we’ve used these throughout the testfile D. Once a test case has finished, t.end() must be called E. That’s because thetap module assumes tests are asynchronous, so t.end() could be called inside anasynchronous callback.
Another approach is to use t.plan F. This method indicates that n assertions areexpected. Once the last assertion has been called, the test case will finish running.Unlike the previous test case, the second one can leave off the call to t.end() G.
This test can be run with ./node_modules/tap/bin/tap.js test/*_test.js. Youcan add this line to the test property of scripts in the package.json file to make itrun with npm test.
If you run the test with the tap script, you’ll see some clean output that consoli-dates the results of each assertion. This is generated by one of tap’s submodules calledtap-results. The purpose of the tap-results module is to collect lines from a TAPstream and count up skips, passes, and fails to generate a simplified report;
ok test/index_test.js ................................... 3/3total ................................................... 3/3
ok
Due to the design of the tap module, you’re free to run the tests with node test/index_test.js. This will print out the TAP stream instead:
# Alex's handy mathematics module# squareok 1 should be equal# randomTimeoutok 2 (unnamed assert)
1..2# tests 2# pass 2
# ok
Call end() to indicate when a test has finished.E
plan() can be usedto indicate the
expected numberof assertions.
F
When plan() has been called there’s no need to call end().G
www.it-ebooks.info

282 CHAPTER 10 Tests: The key to confident code
Tests written with the tap module will still return a non-zero exit code to the shell whentests fail—you can use echo $? to see the exit code. Try making the test in listing 10.15fail on purpose and take a look at $?.
The fact that TAP is designed around producing and consuming streams fits inwell with Node’s design. It’s also a fact of life that tests must interact with other auto-mated systems in most projects, whether it’s a deployment system or a CI server.Working with this protocol is easier than heavyweight XML standards, so hopefully itwill rise in popularity.
Figure 10.2 illustrates how some of node-tap’s submodules are used to test a pro-gram. Control is transferred from different modules, to your tests, back to your pro-gram, and then out through the reporter, which collects and analyzes results. The keything to realize about this is that node-tap’s submodules can be reused andreplaced—if you don’t like the way results are displayed with tap-results, it could bereplaced with something else.
Beyond test frameworks, real-world testing depends on several more importanttools and techniques. The next section shows you how to use continuous integrationservers and database fixtures, and how to mock I/O.
10.5 Tools for testsWhen you’re working in a team, you want to quickly see when someone has commit-ted changes that break the tests. This section will help you to set up a continuous inte-gration server so you can do this. It also has techniques for other project-related issueslike using databases with tests and mocking web services.
tap-runner
tap-results
Tests
Program assert
assert
tap-assert
Runs each test file.
Tests invoke partsof the program.
Test behavior using assertions.
Collect theresults for display.
Figure 10.2 node-tap uses several reusable submodules to orchestrate tests.
www.it-ebooks.info

283TECHNIQUE 86 Continuous integration
TECHNIQUE 86 Continuous integration
Your tests are running, but what happens when someone makes a change that breaksthe project? Continuous integration (CI) servers are used to automatically run tests.Because most test harnesses return a non-zero exit code on failure, they’re conceptu-ally simple enough. Their real value comes becomes apparent when they can easily behooked up to services like GitHub and send out emails or instant messages to teammembers when tests fail.
■ ProblemYou want to see when members of a team commit broken code so you don’t acciden-tally release it.
■ SolutionUse a continuous integration server.
■ DiscussionYou’re working in a team and want to see when tests start to fail. You’re already using aversion control system like Git, and want to run tests whenever code is committed to atracked repository. Or you’ve written an open source project and want to indicate onthe GitHub or Bitbucket page that it’s well tested.
There are many popular open source and proprietary continuous integration ser-vices. In this technique we’ll look at Travis CI (https://travis-ci.org/), because it’s free foropen source projects and popular in the Node community. If you want an open sourceCI server that you can install locally, take a look at Jenkins (http://jenkins-ci.org/).
Travis CI provides a link to an image that shows your project’s build status. To adda project, sign in with your GitHub account at travis-ci.org, and then go to the profilepage at travis-ci.org/profile. You’ll see a list of your GitHub projects, and toggling aswitch to On will cause the repository to be updated with a service hook that will notifyTravis CI whenever you push an update to GitHub.
Once you’ve done that, you need to add a .travis.yml file to the repository to tellTravis CI about the environment your code depends on. All you need to do is set theNode version.
Let’s work through a full example and set up a project on Travis so you can seehow it works. You’ll need three files: a package.json, a file to test, and the .travis.ymlfile. The following listing shows the file we’ll be testing.
var assert = require('assert');
function square(a) {return a * a;
}
assert.equal(square(4), 16);
Listing 10.16 A simple test to try with Travis CI
This simple test should pass when run with Travis.
B
www.it-ebooks.info

284 CHAPTER 10 Tests: The key to confident code
This is just a simple test B that we can play with to see what Travis CI does. After run-ning, it should result in an exit code of zero—type node test.js and then echo $? tosee the exit code. Put this file in a new directory so you can set up a Git repository forit later. Before that we’ll need to create a package.json file. The next listing is a simplepackage.json that allows the tests to be run with npm test.
{"name": "travis-example","version": "0.0.0","description": "A sample project for setting up Travis CI and Node.","main": "test.js","scripts": {"test": "node test.js"
},"author": "Alex R. Young","license": "MIT"
}
Finally, you’ll need a .travis.yml file. It doesn’t need to do much other than tell TravisCI that you’re using Node.
language: node_jsnode_js:
- "0.10"
Now go to GitHub.com and sign in; then click New Repository to create a publicrepository. We’ve called ours travis-example so people know it’s purely educational.Follow the instructions on how to commit and push the project to GitHub—you’llneed to run git init in the directory where you placed the preceding three codefiles, and then git add . and git commit -m 'Initial commit'. Then use git remoteadd <url> with the repository URL GitHub gives you, and push it with git push -uorigin master.
Go to your profile at travis-ci.org/profile and toggle your new project to On. Youmight need to tell Travis CI to sync your project list—there’s a button near the top ofthe page.
There’s one last step before you can see any tests running on Travis CI. Make a sin-gle change in test.js—add another assertion if you like, and then commit and gitpush the change. This will cause GitHub to send an API request to Travis CI that willcause your tests to be run.
Travis CI knows how to run Node tests—it defaults to npm test. If you’re adaptingthis technique to an existing project and you use another command (perhaps maketest), then you can change what Travis CI runs by setting the script value in the YMLfile. Documentation can be found under “Configuring your build” in the documenta-tion (http://about.travis-ci.org/docs/user/build-configuration/#script).
Listing 10.17 A basic package.json file
Listing 10.18 Travis CI configuration
www.it-ebooks.info

285TECHNIQUE 87 Database fixtures
If you go to the homepage at Travis CI, you should now see a console log with detailson how the tests were run. Figure 10.3 shows what successful tests look like.
Now that you have tests running successfully, you should edit test.js to make thetests fail to see what happens.
Travis can be configured to use most of the things you expect when running testsin real-world projects—databases and other services can be added (http://about.travis-ci.org/docs/user/database-setup/), and even virtual machines.
Getting a database configured with suitable fixtures for your projects is one of themost important parts of testing. The next technique shows how to set up databases foryour tests.
TECHNIQUE 87 Database fixtures
Most applications need to persist data in some way, and it’s important to test that datais stored correctly. This technique explores three solutions for handling database fix-tures in Node: loading database dumps, creating data during tests, and using mocks.
■ ProblemYou need to test code that stores data in a database, or performs some other kind ofI/O like sending data over a network. You don’t want to access this I/O resource dur-ing testing, or you have test data that you want to preload before tests. Either way,your application is highly dependent on an I/O service, and you want to carefullytest how your code interacts with it.
Figure 10.3 Travis CI running tests
www.it-ebooks.info

286 CHAPTER 10 Tests: The key to confident code
■ SolutionPreload data before the tests, or mock the I/O layer.
■ DiscussionThe mark of well-written code is how testable it is. Code that performs I/O instinc-tively feels hard to test, but it shouldn’t be if the APIs are cleanly decoupled.
For example, if your code performs HTTP requests, then as you’ve seen in previoustechniques, you can run a customized HTTP server within your tests to simulate aremote service. This is known as mocking. But sometimes you don’t want to mock I/O.You may wish to write tests that result in changes being made against a real database,albeit an instance of the database that tests can safely destroy and re-create. Thesetypes of tests are known as integration tests—they “integrate” disparate layers of softwareto deeply test behavior.
This technique presents two ways to handle database fixtures for integration tests;then we’ll broaden the scope by demonstrating how to use mocks. First up: preload-ing data using database dumps.
Database dumpsUsing database dumps is the sledgehammer of database fixture techniques. All youneed is to be able to run some code before all of your other tests so you can clear outa database and drop in a pristine copy. If this test data is dumped from a database,then you can use your existing database tools for preparing and exporting the data.
Listing 10.19 uses Mocha and MySQL, but you could adapt the same principles towork with other databases and test frameworks. See technique 83 for more on Mocha.
var assert = require('assert');var exec = require('child_process').exec;var path = require('path');var ran = 0;var db = {
config: {username: 'nodeinpractice',password: 'password'
}};
function loadFixture(sqlFile, cb) {sqlFile = path.resolve(sqlFile);var command = 'mysql -u ' + db.config.username + ' ';command += db.config.database + ' < ' + sqlFile;
exec(command, function(err, stdout, stderr) {if (err) {
console.error(stderr);throw err;
} else {cb();
}
Listing 10.19 The assert module
ran variable will be used to ensure fixtures aren’t loaded more than onceB
loadFixture method is used to asynchronously prepare database
CMySQLcommand line
is preparedfor importing
databasedump
D
Node’s child_process.exec method is used to invoke mysql command-line tool to import data and overwrite existing dataE
www.it-ebooks.info

287TECHNIQUE 87 Database fixtures
});}
before(function(done) {ran++;assert.equal(1, ran);assert.equal(process.env.NODE_ENV, 'test', 'NODE_ENV is not test');loadFixture(__dirname + '/fixtures/file.sql', function() {
process.nextTick(done);});
});
The basic principle of this example is to run a database import before the other tests.If you use this approach with your own tests, make sure the import wipes the databasefirst. Relational databases can do this with DROP TABLE IF EXISTS, for example.
To actually run this test, you need to pass the filename to mocha before the othertests, and make sure the test environment is used. For example, if listing 10.19 iscalled test/init.js, then you could run these commands in the shell:NODE_ENV=test ./node_modules/.bin/mocha test/init.js test/**/*_test.js. Orsimply place the commands in your project’s package.json file under scripts, test.
The ran variable B is used to ensure the importer is only run once G. Mocha’sbefore function is used F to run the importer once, but if test/init.js is acciden-tally loaded elsewhere (perhaps by running mocha test/**/*.js), then the importwould happen twice.
To import the data, the loadFixture function is defined C and run in the beforecallback I. It accepts a filename and a callback, so it’s easy to use asynchronously. Anadditional check is performed to make sure the import is only run in the test envi-ronment H. The reasoning here is that the database settings would be set by the restof the application based on NODE_ENV, and you wouldn’t want to lose data by overwrit-ing your development or production databases with the test fixtures.
Finally, the shell command to import the data is built up D and run withchild_process E. This is database-dependent—we’ve used MySQL as an example,but a similar approach would work with MongoDB, PostgreSQL, or pretty much anydatabase that has command-line tools.
Using dump files for fixtures has some benefits: you can author test data with yourfavorite database tool (we like Sequel Pro), and it’s easy to understand how it allworks. If you change your database’s schema or the “model” classes that work with thedata, then you’ll need to update your fixtures.
Creating test data with your ORMAn alternative approach is to create data programmatically. This style requires setupcode—run in before callbacks or the equivalent in your test framework—which cre-ates database records using your model classes.
The next listing shows how this works.
before() callback will run prior to all other tests
FUse assertionsto ensuredatabase
import is onlyperformed
once
G
Use assertions to only allowimport to run in test environment H
Rundatabase
import I
www.it-ebooks.info

288 CHAPTER 10 Tests: The key to confident code
var assert = require('assert');var crypto = require('crypto');
function User(fields) {this.fields = fields;
}
User.prototype.save = function(cb) {process.nextTick(cb);
};
User.prototype.signIn = function(password) {var shasum = crypto.createHash('sha1');shasum.update(password);return shasum.digest('hex') === this.fields.hashed_password;
};
describe('user model', function() {describe('sign in', function() {var user = new User({
email: '[email protected]',hashed_password: 'a94a8fe5ccb19ba61c4c0873d391e987982fbbd3'
});
before(function(done) {user.save(done);
});
it('should accept the correct password', function() {assert(user.signIn('test'));
});
it('should not accept the wrong password', function() {assert.equal(user.signIn('wrong'), false);
});});
});
This example can be run with Mocha, and although it doesn’t use a real databaselayer, the User class B fakes the kind of behavior you’re likely to see with a library fora relational database or even a NoSQL database. A save function is defined that has anasynchronous API C so the tests look close to a real-world test.
In the describe block that groups together each test case, a variable called user isdefined D. This will be used by some of the following test cases. It’s defined abovetheir scope so they can all access it, but also because we want to persist it asynchro-nously in the before block. This runs prior to the test cases E.
Mocking the databaseThe final approach that will be discussed in this technique is mocking the databaseAPI. Although you should always write some integration tests, you can also write teststhat never touch the database at all. Instead, the database API is abstracted away.
Listing 10.20 Preparing test data with an ORM
A stand-in for a model class
B
Simulate non-blocking database save
C
Create user record to use for this test
D
Save user before the test starts
E
www.it-ebooks.info

289TECHNIQUE 87 Database fixtures
JavaScript allows objects to be modified after they have been defined. That means youcan override parts of the database module with your own methods to return test data.There are libraries designed to make this process easier and more expressive. Onemodule that does this exceptionally well is Sinon.JS. The next example uses Sinon.JSalong with Mocha to stub the database module.
Listing 10.21 presents an example that stubs a class that uses Redis for a useraccount database. The goal of the test is to check that password encryption workscorrectly.
var assert = require('assert');var sinon = require('sinon');var db = sinon.mock(require('./../db'));var User = require('./../user');
describe('Users', function() {var fields = {name: 'Huxley',hashedPassword: 'a94a8fe5ccb19ba61c4c0873d391e987982fbbd3'
};var user;
before(function() {user = new User(1, fields);var stub = sinon
.stub(user.db, 'hmget')
.callsArgWith(2, null, JSON.stringify(fields));});
it('should allow users to sign in', function(done) {user.signIn('test', function(err, signedIn) {
assert(signedIn);done(err);
});});
it('should require the correct password', function(done) {user.signIn('wrong', function(err, signedIn) {
assert(!signedIn);done(err);
Listing 10.21 Stubbing a database
Should I use the ORM for test data?Like the database dump example in listing 10.19, using an ORM to create test datais useful for integration tests where you really want to talk to a database server. It’smore programming effort than using database dumps, but it can be useful if you wantto call methods defined above the database in the ORM layer. The downside of thistechnique is that a database schema change will potentially require changes inmultiple test files.
Mock the database module.
B
This hashed passwordwill be used when the
user signs in.
C
Stub the Redis hmget method.
D
Make hmget call the passed-in callback, which is the third argument (index two), and pass the callback null and the fields we want to use.E
www.it-ebooks.info

290 CHAPTER 10 Tests: The key to confident code
});});
});
This example is part of a large project that includes a package.json file and the Userclass being tested—it’s available in the code samples, under testing/mocha-sinon.
On the third line you’ll notice something new: sinon.mock wraps the whole data-base module B. The database module is one we’ve defined that loads the node-redismodule, and then connects to the database. In this test we don’t want to connect to areal database, so we call sinon.mock to wrap it instead. This approach can be appliedto other projects that use MySQL, PostgreSQL, and so on. As long as you design theproject to centralize the database configuration, you can easily swap it for a mock.
Next we set up some fields that we want to use for this user C. In an integrationtest, these fields would be returned by the database. We don’t want to do that here, soin the before callback, we use a stub to redefine what Redis hmget does D. The stub-bing API is chainable, so we chain on the definition of what we want our version ofhmget to do by using .callsArgWith E.
The semantics of .callsArgWith can be confusing, so here’s a breakdown of howit works. In the User class, hmget is called like this:
this.db.hmget('user:' + this.id, 'fields', function(err, fields) {this.fields = JSON.parse(fields);cb(err, this);
}.bind(this));
As you can see, it takes three arguments: the record key, the hash value to fetch, andthen a callback that receives an optional error object and the loaded values. When westub this, we need to tell Sinon.JS how to respond. Therefore, the first argument tocallsArgWith is the index of the callback, which is 2, and then the arguments that thecallback should receive. We pass null for the error, and the user’s fields serialized as astrong. That gives us callsArgWith(2, null, JSON.stringify(fields)).
This test is useful because the intent of the test is to ensure users can sign in, but onlywith the correct password. The sign-in code doesn’t really require database access, soit’s better to pass in predefined values rather than going to the trouble of accessing thedatabase. And, because the code serializes JSON to Redis, we don’t need a special libraryfor serializing and decoding JSON—we can use the built-in JSON object.
Now you should know when and how to use integration tests, and mocks and stubs.All of these techniques will help you write better tests, but only if you use them in thecorrect circumstances. Table 10.2 provides a summary of these techniques andexplains when to use each one.
The next time you want to test code that connects to a remote web service, or youneed to write tests that run against a database, you should know what to do. If you’vefound this section interesting and you want to find out more, continue reading forsome ideas on what to learn next.
www.it-ebooks.info

291Further reading
10.6 Further readingTesting is a big topic, and although this chapter has been long, there are still impor-tant topics to consider. The Node community continues to explore ways to write bettertests, and it has started to bring its ideas to client-side development. One such devel-opment is Browserify (http://browserify.org)—this allows Node’s module pattern andcore modules like EventEmitter and stream.Readable to be used in the browser.
Some Node developers are taking advantage of Browserify to write better client-side tests. Not only can they take advantage of streams and Node’s module pattern forcleaner dependency management, but they can also write Mocha or TAP tests the waythey do on the server. James Halliday, the author of Browserify, created Testling, whichis a browser automation module for running client-side tests.
Along with continuous integration servers, another useful test-related tool is cover-age reports. These analyze code to see how much of a project is hit when the tests are
Table 10.2 When to use integration tests, mocks, and stubs
Technique When to use it
Integration testing
This means testing groups of modules. Here we’ve used the term to distinguish between tests that access a real database, and tests that somehow replace database access with a compatible API. You should use integration tests to ensure your database behaves the way you expect.Integration tests can help verify performance, but this is highly dependent on your test data. It may cause your tests to be more closely coupled to the database, which means that if you change the database or database API, you may need to change your test code as well.
Database dump
This is one way to preload data (before tests) into a test database. It requires a lot of work up front to prepare the data, and the data has to be maintained if you ever change the database schema. The added maintenance work is offset by the simplicity of the approach—you don’t need any special tools to create SQL, Mongo, or other data files.You should use this technique when you’re writing tests for a project that already has a database. Perhaps you’re moving to Node from another programming language or plat-form, and you’re using the existing database. You can take production data—being care-ful to remove or obscure any personal information, or other sensitive information—and then drop the resulting database export into your project’s repository.
ORM fixture Rather than creating a file to import before the tests are run, you can use your ORM mod-ule to create and store data in your test code. This can make it hard to maintain over time—any schema changes mean tests have to be carefully updated.You should use this technique for tests where algorithms are closely tied to the underly-ing data. By keeping the data near the code that uses it, any relating issues can be eas-ier to understand and fix.
Mocks and stubs
Mocks are objects that simulate other objects. In this chapter you saw Sinon.JS, a library for handling mocks and stubs for tests.You should use mocks when you don’t want to access an I/O resource. For example, if you’re writing tests for code that talks to a payment provider like WorldPay or Stripe, then you’d create objects that behave like Stripe’s API without actually communicating with Stripe. It’s generally safer to ensure tests never need to access the internet, so anything that hits the network should be mocked.
www.it-ebooks.info

292 CHAPTER 10 Tests: The key to confident code
run. There may be functions, methods, or even clauses in if statements that never getexecuted, which means untested and potentially buggy code could be released to theproduction environment.
10.7 SummaryIn this chapter you’ve learned how to write assertions and extend them, and how touse two popular test frameworks. When writing tests for your Node projects, youshould always err on the side of readability—tests should be fast, but if they don’t com-municate intent, they can cause maintenance issues in the future.
Here’s a recap of the main points we covered:
■ Master the assert module by learning each method and how to ensure errorsare correctly handled.
■ Use test harnesses like Mocha and node-tap to help make tests readable andmaintainable.
■ Write tests for code that uses a database by loading data or using mocks andstubs.
■ Improve mocks and stubs by using third-party modules like Sinon.JS.■ Develop your own domain-specific languages for tests—write functions and
classes that help keep test cases lean and succinct.
One aspect of development that we haven’t covered yet is debugging Node programs.This can be an important part of writing software, depending on your developmentstyle and background. If you’re interested in learning the basics of the Node debug-ger, or want to learn more about it, then read on to dive into debugging with Node.
www.it-ebooks.info

293
Debugging: Designing for introspection and
resolving issues
Understanding how errors are generated and handled in any given platform is par-amount to building stable applications. Good error introspection and tests that arebuilt-in are the best offense for debugging issues later on. In this chapter we focuson how to prepare for and what to do when things go south.
This chapter covers■ Handling uncaught exceptions■ Linting Node applications■ Using debugging tools■ Profiling applications and investigating memory
leaks■ Using a REPL to investigate a running process■ Tracing system calls
www.it-ebooks.info

294 CHAPTER 11 Debugging: Designing for introspection and resolving issues
Maybe your process keeps crashing or it’s using more memory than you expected.Perhaps it’s stuck at 100% CPU usage. We’ll look at debugging solutions for these andother problems you may encounter in your Node applications.
In the first part we’ll cover Node application design for error handling and detec-tion. In the second half we’ll look at debugging specific types of problems.
11.1 Designing for introspectionWhen we design applications, we need to be thinking about how we’ll handle errors.Relevant error logging and intervention takes thought. It also takes a good under-standing of where errors can occur in order to trap them. Throughout this book,we’ve covered various forms of errors that can happen in Node applications. Let’scover all the types here.
11.1.1 Explicit exceptions
Explicit exceptions are those explicitly triggered by the throw keyword. They clearlyindicate that something has gone wrong:
function formatName (name) {if (!name) throw new Error("name is required");...
}
Explicit exceptions are handled by a try/catch block:
try {formatName();
} catch (err) {console.log(err.message, err.stack);
}
If you throw your own exceptions, keep these guidelines in mind:
■ throw should be used only in synchronous functions; or in some cases, it makessense before the asynchronous action has occurred in asynchronous functions(like API misuse).
■ Always throw an Error object or something that inherits from Error. Using sim-ple strings (like throw "Oh no!") won’t generate a stack trace, so you’ll have noinformation as to where the error occurred.
■ Don’t throw inside Node-style callback functions; nothing exists on the stack tocatch it! Instead, deal directly with the error or pass the error off to anotherfunction that can properly handle the error.
REGAINING THROW You can regain the use of throw for asynchronous blocks ifthe structures support it; some notable ones are domains, promises, orgenerators.
www.it-ebooks.info

295Designing for introspection
11.1.2 Implicit exceptions
Implicit exceptions are any runtime JavaScript errors not triggered by the throw keyword.Unfortunately, these exceptions can sneak into our code too easily.
One common implicit exception is ReferenceError, which is caused when a refer-ence to a variable or property can’t be found.
Here, we see an innocent misspelling of data causes an exception:
function (err, data) {res.write(dat); // ReferenceError: dat is not defined
}
Another common implicit exception is SyntaxError, most famously triggered usingJSON.parse on invalid JSON data:
JSON.parse("undefined"); // SyntaxError: Unexpected token u
It’s a good idea to wrap JSON.parse with a try/catch block, especially if you aren’t incontrol of the input JSON data.
CATCH IMPLICIT EXCEPTIONS EARLY A great way to catch implicit exceptionsearly is to utilize linting tools like JSHint or JSLint. Adding them to your buildprocess helps keep your code in check. We’ll talk more on subject this later inthe chapter.
11.1.3 The error event
The error event can be emitted from any EventEmitter in Node. If left unhandled,Node will throw the error. These events can be the most difficult to debug if not han-dled, since many times they’re triggered during asynchronous operations like stream-ing data where the call stack is minimal:
var EventEmitter = require('events').EventEmitter;var ee = new EventEmitter();ee.emit('error', new Error('No handler to catch me'));
This will output the following:
events.js:72throw er; // Unhandled 'error' event
^Error: No handler to catch me
at Object.<anonymous> (/debugging/domain/ee.js:5:18)at Module._compile (module.js:456:26)at Object.Module._extensions..js (module.js:474:10)at Module.load (module.js:356:32)at Function.Module._load (module.js:312:12)at Function.Module.runMain (module.js:497:10)at startup (node.js:119:16)at node.js:902:3
www.it-ebooks.info

296 CHAPTER 11 Debugging: Designing for introspection and resolving issues
Luckily, we know where this error came from; we just wrote the code, after all! But inlarger applications, we may have errors triggered at the DNS layer and we have no ideawhich module utilizing DNS just had a problem.
So, when possible, handle error events:
ee.on('error', function (err) {console.error(err.message, err.stack);
});
When writing your own EventEmitters, do yourself and your API consumers a favorand give them context to any errors in your dependencies that you’re propagatingupward. Also, use Error objects over plain strings when emitting errors so a stack tracecan be found.
11.1.4 The error argument
Errors that occur during an asynchronous operation are provided as the first argu-ment in a callback function. Unlike the previous errors we’ve talked about, thesenever cause exceptions directly. But they can be the source of many implicit exceptions:
fs.readFile('/myfile.txt', function (err, buf) {var data = buf.toString();...
});
Here, we ignore the error returned from readFile, perhaps assuming we’ll alwayshave a buffer of the file data to continue working with. Unfortunately, the day comeswhen we can’t read the file and we have a ReferenceError because buf is not defined.
It’s more robust to just handle the asynchronous errors. A lot of times this canmean simply passing the error to another function that can gracefully handle theerror:
function handleError (err) {console.error('Failed:', err.message, err.stack);
}fs.readFile('/myfile.txt', function (err, buf) {
if (err) return handleError(err);var data = buf.toString();...
});
Handling each of these four types of errors effectively will give you much better datato work with when you’re debugging issues in the future!
Even with our best efforts and tooling, though, we can still miss exceptions andhave a crashed server on our hands. Let’s look at designing our applications to handlethese situations so we can quickly address and fix uncaught exceptions.
TECHNIQUE 88 Handling uncaught exceptions
How do you effectively handle Node crashes? One of the first things you discoverwhen working with Node is that it terminates a process whenever an exception is
www.it-ebooks.info

297TECHNIQUE 88 Handling uncaught exceptions
uncaught. It’s important to understand why this behavior exists and how you handleuncaught exceptions in order to build robustness into your programs.
■ ProblemYou have an uncaught exception taking down your process.
■ SolutionLog the exception, and shut down gracefully.
■ DiscussionSometimes exceptions go uncaught. When this happens, Node by default will termi-nate the process. There’s a good reason for this, which we’ll come back to, but let’sfirst talk about how we can change this default behavior.
With an uncaughtException handler set on the process object, Node will executethe handler instead of terminating your program:
process.on('uncaughtException', function (err) {console.error(err);
});
Yeah! Now your Node application will never crash! Although it’s true that exceptionswon’t take down your process anymore, the drawbacks of leaving the Node programrunning will most likely outweigh the benefits. If you choose to keep the applicationrunning, the application could leak resources and possibly become unstable.
How does that happen? Let’s look at an example of an application we intend torun for a long time: a web server. We won’t allow Node to terminate the process byadding an uncaughtException handler that just logs the error. What do you think willhappen when we have an uncaught exception while we’re handling a user’s request?
var http = require('http');
var server = http.createServer(req, res) {response.end('hello world');
});server.listen(3000);
process.on('uncaughtException', function (err) {console.error(err);
});
When a request comes in, an exception is thrown and then caught by the uncaught-Exception handler. What happens to the request? It is leaked, as that connection willremain open until the client times out (we also no longer have access to res to give aresponse back).
In figure 11.1, you can see an illustration of this leak happening. If we had noexception, we’d be fine, but since we had an exception, we leaked a resource.
Although this example is simplified to be clear, uncaught exceptions are a reality.Most of the time it will be open handles to sockets or files that aren’t able to be closedproperly. Uncaught exceptions are usually buried much deeper in the code, whichmakes determining what resources are being leaked even harder.
Throws a ReferenceError since response is not defined
www.it-ebooks.info

298 CHAPTER 11 Debugging: Designing for introspection and resolving issues
State can also be affected, since an uncaught exception takes you out of your current con-text and places you in a completely different context (the uncaughtException handler)where you don’t have references to objects in order to clean things up. In our example,we didn’t have access to the res object in order to send a response back to the client.
So what good is the uncaughtException handler? It enables your application tolog and restart gracefully. It’s wise to treat an uncaughtException handler as a lastchance to say your goodbyes before going down. Write out the error, perhaps send anemail or do some other notification, and then gracefully kill the app:
process.on('uncaughtException', function (err) {console.error(err);server.close();setTimeout(process.exit, 5000, 1);
});
The uncaughtException handler is a last defense. Ideally exceptions should be han-dled closer to the source so action can be taken to prevent leaks and instability. Forthat, you can use domains.
Using domains for uncaught exceptionsWhereas an uncaughtException casts a net over the entirety of your application codebase to catch errors, domains allow you to control the portions of code that are moni-tored by the domain and handle exceptions closer to the source (more on this back inchapter 4). Let’s implement the same uncaughtException example from earlier, butusing domains instead:
var domain = require('domain');var http = require('http');
var d = domain.create(); d.run(function () {
Incoming request
Outgoing response
Client Server
Uncaughtexception
Client makes a connection tothe sever; sends request.
Exception occurs;connection is leaked.
Server is unable tosend a response.
Figure 11.1 Leaking re-sources when using uncaughtException
Log error
Stopincoming
connections
Give any existing connections 5 more seconds and then kill process
Set up a new domain.
Run the followingcode inside the
domain.
www.it-ebooks.info

299TECHNIQUE 89 Linting Node applications
var server = http.createServer(req, res) {d.on('error', function (er) {res.statusCode = 500; )res.end('internal server error');server.close();setTimeout(process.exit, 5000, 1);
})response.end('hello world');
})server.listen(3000);
});
Using domains allowed us to sandbox our server code and still have access to the resobject to give the user a response, which is an improvement on the previous example.But even though we’re able to give the user a response and close the connection, it’sstill best practice to close out the process.
If you utilize domains, it’s not a bad idea to keep an uncaughtException handler asa catchall for those cases where an error slips by one of your domains, or your domain’serror handler throws an exception where no other domain is there to catch it.
Let’s switch to a helpful way to build introspection into your application and pre-vent errors before they happen: linting!
TECHNIQUE 89 Linting Node applications
Lint tools can help catch a multitude of application errors when properly tuned. Inour previous example, we misspelled res, which led to an uncaught exception.Although the code was valid JavaScript, we had an undefined variable being accessed.A lint tool would’ve caught this error.
■ ProblemYou want to catch potential coding errors and exceptions.
■ SolutionUse a lint tool.
■ DiscussionLet’s talk about setting up an application to use JSHint with Node. JSHint is an activelymaintained lint tool that includes a number of customizable options for JavaScriptcode bases.
First, we assume you already have a package.json file set up (if not: npm init) foryour project. Next, let’s add jshint to our development dependencies:
npm install jshint --save-dev
Now let’s configure JSHint so it knows what it’s working with. We just throw a .jshintrcfile—which takes a JSON configuration—in our project root. Let’s look at a basic con-figuration for Node projects:
{"node": true,"undef": true
}
Handle any uncaught exception that occurs in the domain.Respond to the
user with an errorresponse.
Make JSHint understand it’s working with Node. This avoids errors with known global variables and other Node-specific intelligence.
Catch any undefinedvariable usage.
www.it-ebooks.info

300 CHAPTER 11 Debugging: Designing for introspection and resolving issues
JSHint has a lot of options (http://jshint.com/docs/options/) that bend rules tomatch your coding style and intent, but these just shown are some good basic defaults.
To run JSHint, add the following line to the "scripts" block in your package.jsonfile (if you don’t have a "scripts" block, just add one):
"scripts": {"lint": "jshint *"
}
You can then run JSHint from your project root this way:
npm run lint
JSHint will give you output that tells you what errors it found, and you can either cor-rect or update the options to better fit your coding style and intent. Similarly to tests,it’s helpful to have your build tools run the lint tools as you push code, since it’s easyto forget to run and can be automated away.
Now that we’ve looked at ways to prevent and effectively handle application errors,let’s switch over to look at tools we can use to debug issues when they occur.
11.2 Debugging issuesWe have our tests, our logging, and our linting. How do we actually debug and fixissues when they occur? Thankfully, there are a number of tools for a number ofdifferent situations. In this section we’ll take a look at various and likely unrelatedproblems you can encounter when running your applications, and techniques to solvethem. We’ll start with using debuggers and move on to profiling, memory leaks,production debugging, and tracing.
TECHNIQUE 90 Using Node’s built-in debugger
Whenever you need step-by-step analysis of the state of your application, a debuggercan be an invaluable tool, and Node’s built-in debugger is no exception. Node’s built-in tooling allows you to watch variables, pause execution through breakpoints, step inand out of parts of your application, see backtraces, run an interactive context-awareREPL, and more.
Unfortunately, many shy away from the command-line tool, as it may seem intimi-dating at first. We want to debunk that and show how powerful it can be by walkingyou through most of the functionality it has to offer.
■ ProblemYou want to run a debugger to set breakpoints, watch variables, and step through yourapplication.
■ SolutionUse node debug.
■ DiscussionLet’s take a simple program to debug in order to demonstrate some of the features ofthe debugger:
Run JSHint against all JavaScript files in your project
www.it-ebooks.info

301TECHNIQUE 90 Using Node’s built-in debugger
var a = 0;function changeA () {
a = 50;}function addToA (toAdd) {
a += toAdd;}changeA();addToA(25);addToA(25);
To run the built-in debugging tool, simply use the debug command:
node debug myprogram
It will start the application with the debugger breaking on the first executable line:
< debugger listening on port 5858connecting... okbreak in start.js:1
1 var a = 0;23 function changeA () {
debug>
To view all the available commands and debugging variables, you can type help:
debug> helpCommands: run (r), cont (c), next (n), step (s), out (o),backtrace (bt), setBreakpoint (sb), clearBreakpoint (cb),watch, unwatch, watchers, repl, restart, kill, list, scripts,breakOnException, breakpoints, version
To continue from the default starting breakpoint, just type cont, or just c for short.Since we don’t have any other breakpoints, the application will terminate:
debug> contprogram terminateddebug>
But we’re still in the debugger and can restart the application again by using the runcommand (r for short):
debug> run< debugger listening on port 5858connecting... okbreak in start.js:1
1 var a = 0;23 function changeA () {
debug>
And we’re back in business. We can also restart the application with the restart com-mand or manually kill the application with the kill command if we need to.
www.it-ebooks.info

302 CHAPTER 11 Debugging: Designing for introspection and resolving issues
The application is all about the letter A, so let’s take a peek at how that changes asour application executes by making a watch expression for that. The watch functiontakes an expression to watch as an argument:
debug> watch('a')
We can view the state of all that we’re watching using the watchers command:
debug> watchers0: a = undefined
Currently we’re paused before the assignment to 0 has even been made, so we’reundefined. Let’s step into the next line with next(or n for short):
debug> nextbreak in start.js:11Watchers:
0: a = 0
9 }1011 changeA();12 addToA(25);13 addToA(25);
debug>
Well, that’s convenient: the debugger outputs our watchers for us as we step to thenext section. If we were to type watchers again, we’d see similar output:
debug> watchers0: a = 0
If we ever want to remove a watch expression, we can use the unwatch command giventhe same expression we used to create it.
By default, the debugger will print just a couple lines before and after to give asense of context. But sometimes we want to see more of what’s going on. We can usethe list command, giving it the number of lines around the current line where we’repaused:
debug> list(5)67 function addToA (toAdd) {8 a += toAdd;9 }1011 changeA();12 addToA(25);13 addToA(25);1415 });
debug>
www.it-ebooks.info

303TECHNIQUE 90 Using Node’s built-in debugger
We’re currently at line 11, the changeA function. If we were to type next, we’d move tothe next line, which is the addToA function, but let’s investigate our changeA functionmore by stepping into it. To do that we just use the step command (or s for short):
debug> stepbreak in start.js:4Watchers:
0: a = 0
23 function changeA () {4 a = 50;5 }6
debug>
Now that we’re in this function, we can step out of it at any time using the out com-mand. We’ll automatically step out of it once we reach the end, so we can also usenext; let’s try it:
debug> nextbreak in start.js:5Watchers:
0: a = 50
3 function changeA () {4 a = 50;5 }67 function addToA (toAdd) {
debug>
As you can see, our watchers updated to show that a is now 50. Let’s go to the next line:
debug> nextbreak in start.js:12Watchers:
0: a = 50
1011 changeA();12 addToA(25);13 addToA(25);14
debug>
Now we’re back to the line after our changeA function. Let’s step into this next func-tion again. Remember what command that was?
debug> stepbreak in start.js:8Watchers:
0: a = 50
www.it-ebooks.info

304 CHAPTER 11 Debugging: Designing for introspection and resolving issues
67 function addToA (toAdd) {8 a += toAdd;9 }10
debug>
Let’s explore another neat aspect of the debugger: the built-in REPL! We can access itby using the repl command:
debug> replPress Ctrl + C to leave debug repl>
This is a standard REPL that’s aware of the context that surrounds it when you usedthe repl command. So we can, for instance, output the value of the toAdd argument:
> toAdd25
We can also introduce state into the application. Let’s create a global b variable:
> b = 100100
In many ways, this behaves just like the standard Node REPL, so a lot of what you cando there, you can do here.
You can exit the REPL mode at any time with Ctrl-C. Let’s do that now. You’ll knowyou’ve exited because you’ll get your debug prompt back:
debug>
We were in a REPL for a while, so we likely lost context when we were paused. Let’s uselist again to get our bearings:
debug> list()3 function changeA () {4 a = 50;5 }67 function addToA (toAdd) {8 a += toAdd;9 }1011 changeA();12 addToA(25);13 addToA(25);
Ah yes, that’s right, we were on line 8. Well, you know what, we really wanted the changeAfunction to assign a to 100. It’s such a nice number to accompany such a nice letter! Butwe forgot to do that when we started the debugger. No problem! We can set a breakpointhere to save our spot by using the setBreakpoint function (or sb for short):
debug> setBreakpoint()3 function changeA () {4 a = 50;
www.it-ebooks.info

305TECHNIQUE 90 Using Node’s built-in debugger
5 }67 function addToA (toAdd) {
*8 a += toAdd;9 }1011 changeA();12 addToA(25);13 addToA(25);
debug>
Note that our line 8 now has a star (*) next to it indicating we have a breakpoint setthere. Let’s change that function in our code file and save it:
function changeA () {a = 100;
}
Back in our debugger, we can restart the app:
debug> restartprogram terminated<debugger listening on port 5858connecting... okRestoring breakpoint debug.js:8break in start.js:1
1 var a = 0;23 function changeA () {
debug>
Looks like our program was restarted and the breakpoint we set is still intact. Did itget our changes? Let’s see:
debug> list(20)1 var a = 0;23 function changeA () {4 a = 100;5 }67 function addToA (toAdd) {8 a += toAdd;9 }1011 changeA();12 addToA(25);13 addToA(25);1415 });
debug>
Another way we can set breakpoints right from our application code is to use thedebugger keyword:
www.it-ebooks.info

306 CHAPTER 11 Debugging: Designing for introspection and resolving issues
function changeA () {debugger;a = 100;
}
If we restart our application again, we’ll always stop on any debugger lines. We canclear breakpoints as well using clearBreakpoint (or cb for short).
Let’s look at one more topic: uncaught exceptions. Let’s introduce a nastyReferenceError in our changeA function:
function changeA () {a = 100;foo = bar;
}
If we restart our application using restart and then cont to skip the initial break-point, our application will crash due to an uncaught exception. We can break on theseexceptions instead using breakOnException:
debug> breakOnExceptiondebug>
Now, instead of crashing, we’ll break first, allowing us to inspect the state of the appli-cation and use the REPL before the program terminates.
HELPFUL MULTIFILE DEBUGGER COMMANDS This scenario only looked at a sin-gle file that included no other modules. The debugger also has a couple ofcommands that are helpful when you’re within multiple files. Use backtrace(or bt for short) to get a call stack on whatever line you’re currently pausedat. You can also use scripts to get a list of loaded files and an indicator ofwhat file you’re currently in.
The built-in debugger may feel odd at first if you’re used to a GUI tool for debuggingapplications, but it’s actually pretty versatile once you get the hang of it! Just throw aquick debugger statement where you’re working and fire it up.
TECHNIQUE 91 Using Node Inspector
Want to do everything you can with the built-in debugger, but using the Chrome Dev-Tools interface instead? There’s a module for that! It’s called node-inspector. In thistechnique we’ll look at how to set it up and start debugging.
■ ProblemYou want to debug a Node application using Chrome DevTools.
■ SolutionUse node-inspector.
■ DiscussionNode allows remote debugging by exposing a debugging port that third-party mod-ules and tools can hook into (including the built-in debugger). One popular moduleis node-inspector, which ties in debugging information from Node into the ChromeDevTools interface.
www.it-ebooks.info

307TECHNIQUE 91 Using Node Inspector
To set up node-inspector, simply install it:
npm install node-inspector -g
Don’t forget the -g flag to install it globally. Once you have it, you can fire it up by run-ning the following command:
node-inspector
Now node-inspector is ready to roll and will tell you where to reach it:
$ node-inspectorNode Inspector v0.7.0-2
info - socket.io startedVisit http://127.0.0.1:8080/debug?port=5858 to start debugging.
You can then visit that URL in any Blink-enabled browser like Chrome or Opera. Butwe don’t have any Node program that has an open debugging port to start debugging,so we receive an error message, as shown in figure 11.2.
Let’s leave that running for now and write a little application to debug:
var http = require('http');
var server = http.createServer();server.on('request', function (req, res) {
res.end('Hello World');});server.listen(3000);
Now we can run this application exposing the debugging port:
$ node --debug test.jsdebugger listening on port 5858
Figure 11.2 Error screen when no debugging agent is found
www.it-ebooks.info

308 CHAPTER 11 Debugging: Designing for introspection and resolving issues
Our application now lets us know that the debugger is listening on port 5858. If werefresh our Node inspector web page, it’ll look more interesting, as shown in figure 11.3.
We can use the inspector much like the built-in debugger to set breakpoints andwatch expressions. It also includes a console that’s similar to the REPL to allow you topoke around at the state of your application while it’s paused.
One difference between node-inspector and the built-in debugger is that Nodedoesn’t automatically break on the first expression. To enable that, you have to usethe --debug-brk flag:
node --debug-brk test.js
This tells the debugger to break on the first line until the inspector can step throughor continue execution. If we reload the inspector, we can see it’s paused on the firstline, as shown in figure 11.4.
node-inspector is continually being developed to support more of Chrome Dev-Tools’ functionality.
We’ve looked at two ways to use debugging tools in Node: the command-linedebugger and node-inspector. Now, let’s switch to another tool for resolving perfor-mance-related issues: the profiler.
TECHNIQUE 92 Profiling Node applications
Profiling aims to answer this question: Where is my application spending its time? Forinstance, you may have a long-running web server that gets stuck at 100% CPU usagewhen you hit a particular route. At first glance, you might view the various functionsthat touch that route to see if anything stands out, or you could run a profiler and letNode tell you where it’s stuck. In this technique you’ll learn how to use the profilerand interpret the results.
Figure 11.3 Node inspector connected to the debugger
www.it-ebooks.info

309TECHNIQUE 92 Profiling Node applications
■ ProblemYou want to find out where your application is spending its time.
■ SolutionUse node --prof.
■ DiscussionNode taps into the underlying V8 statistical profiler by the use of the --prof command-line flag. It’s important to understand how it works in order to interpret the data.
Every two milliseconds, the profiler looks at the running application and recordsthe function executing at that moment. The function may be a JavaScript function,but it also can come from C++, shared libraries, or V8 garbage collection. The profilerwrites these “ticks” to a file named v8.log, where they’re then processed by a specialV8 tick-processor program.
Let’s look at a simple application to see how this works. Here we have an applica-tion doing two different things—running a slower computational task every two sec-onds, and running a quicker I/O task more often:
function makeLoad () {for (var i=0;i<100000000000;i++);
}function logSomething () {
console.log('something');}
setInterval(makeLoad, 2000);setInterval(logSomething, 0);
We can profile this application like so:
node --prof profile-test.js
Figure 11.4 Using the --debug-brk flag
www.it-ebooks.info

310 CHAPTER 11 Debugging: Designing for introspection and resolving issues
If we let it run for 10 seconds or so and kill it, we’ll get a v8.log in that same directory.The log isn’t too helpful by itself. Let’s process the log by using the V8 tick-processortools. Those tools require that you build V8 from source on your machine, but there’sa handy third-party module that allows you to skip that. Just run the following com-mand to install:
npm install tick -g
This will install the appropriate tick processor for your operating system in order toview the data. You can then run the following command in the same directory as yourv8.log file to get some more helpful output:
node-tick-processor
You’ll get output that looks similar to the following (abbreviated to show structure):
Statistical profiling result from v8.log,(6404 ticks, 1 unaccounted, 0 excluded).
[Unknown]:ticks total nonlib name
1 0.0%
[Shared libraries]:ticks total nonlib name4100 64.0% 0.0% /usr/lib/system/libsystem_kernel.dylib211 3.3% 0.0% /Users/wavded/.nvm/v0.10.24/bin/node
...
[JavaScript]:ticks total nonlib name1997 31.2% 96.4% LazyCompile: *makeLoad profile-test.js:17 0.1% 0.3% LazyCompile: listOnTimeout timers.js:775 0.1% 0.2% RegExp: %[sdj%]
...
[C++]:ticks total nonlib name
[GC]:ticks total nonlib name
1 0.0%
[Bottom up (heavy) profile]:Note: percentage shows a share of a particular caller inthe total amount of its parent calls.Callers occupying less than 2.0% are not shown.
ticks parent name4100 64.0% /usr/lib/system/libsystem_kernel.dylib
1997 31.2% LazyCompile: *makeLoad profile-test.js:11997 100.0% LazyCompile: ~wrapper timers.js:2511997 100.0% LazyCompile: listOnTimeout timers.js:77
www.it-ebooks.info

311TECHNIQUE 93 Debugging memory leaks
Let’s look at what each section means:
■ Unknown—For that tick, the profiler couldn’t find a meaningful functionattached to the pointer. These are noted in the output but aren’t much helpbeyond that and can be safely ignored.
■ Shared libraries—These are usually underlying C++/C shared libraries; a lot ofthe I/O stuff happens here as well.
■ JavaScript—This is typically the most interesting part; it includes your applica-tion code as well as Node and V8 internal native JavaScript code.
■ C++—This is C++ code in V8.■ GC—This is the V8 garbage collector.■ Bottom up (heavy) profile—This shows a more detailed stack for the highest hitters
found by the profiler.
In our case, we can see that *makeLoad is the hottest JavaScript function, with 1997ticks accounted for:
[JavaScript]:ticks total nonlib name1997 31.2% 96.4% LazyCompile: *makeLoad profile-test.js:17 0.1% 0.3% LazyCompile: listOnTimeout timers.js:775 0.1% 0.2% RegExp: %[sdj%]
This makes sense since it has some heavy computation. Another interesting section tonote is RegExp: %[sdj%], which is used by util.format, which is used by console.log.
The profiler’s job is to show you what functions are running most often. It doesn’tnecessarily mean that the function is slow, but it does mean either a lot happens in thefunction or it’s called often. The results should serve as clues to help you understandwhat can be done to improve the performance. In some cases it may be surprising tofind out certain functions are running hot; other times it may be expected. Profilingserves as one piece of the puzzle to help solve performance-related issues.
Another potential source of performance-related issues is memory leaks, although,obviously they’re first a memory concern that may have performance ramifications.Let’s look at handling memory leaks next.
TECHNIQUE 93 Debugging memory leaks
Before the days of Ajax and Node, there wasn’t much effort put into debuggingJavaScript memory leaks, since page views were short-lived. But memory leaks can hap-pen, especially in Node programs where a server process is expected to stay up andrunning for days, weeks, or months. How do you debug a leaking application? We’lllook at a technique that works locally or in production.
■ ProblemYou want to debug a program leaking memory.
■ SolutionUse heapdump and Chrome DevTools.
www.it-ebooks.info

312 CHAPTER 11 Debugging: Designing for introspection and resolving issues
■ DiscussionLet’s write a leaky application to demonstrate how to use a couple of tools to debug amemory leak. Let’s make a leak.js program:
var string = '1 string to rule them all';
var leakyArr = [];var count = 2;setInterval(function () {
leakyArr.push(string.replace(/1/g, count++));}, 0);
How do we know this application is growing in memory? We could sit and watch topor some other process-monitoring application. We can also test it by logging the mem-ory used. To get an accurate read, let’s force a garbage collection before logging outthe memory usage. Let’s add the following code to our leak.js file:
setInterval(function () {gc();console.log(process.memoryUsage());
}, 10000)
In order to use the gc() function, we need to expose it by running our applicationwith the --expose-gc flag:
node --expose-gc leak.js
Now we can see some output showing clearly that we’re growing in memory usage:
{ rss: 15060992, heapTotal: 6163968, heapUsed: 2285608 }{ rss: 15331328, heapTotal: 6163968, heapUsed: 2428768 }{ rss: 15495168, heapTotal: 8261120, heapUsed: 2548496 }{ rss: 15585280, heapTotal: 8261120, heapUsed: 2637936 }{ rss: 15757312, heapTotal: 8261120, heapUsed: 2723192 }{ rss: 15835136, heapTotal: 8261120, heapUsed: 2662456 }{ rss: 15982592, heapTotal: 8261120, heapUsed: 2670824 }{ rss: 16089088, heapTotal: 8261120, heapUsed: 2814040 }{ rss: 16220160, heapTotal: 9293056, heapUsed: 2933696 }{ rss: 16510976, heapTotal: 10324992, heapUsed: 3085112 }{ rss: 16605184, heapTotal: 10324992, heapUsed: 3179072 }{ rss: 16699392, heapTotal: 10324992, heapUsed: 3267192 }{ rss: 16777216, heapTotal: 10324992, heapUsed: 3293760 }{ rss: 17022976, heapTotal: 10324992, heapUsed: 3528376 }{ rss: 17117184, heapTotal: 10324992, heapUsed: 3635264 }{ rss: 17207296, heapTotal: 10324992, heapUsed: 3728544 }
Although we know we’re growing pretty steadily, we don’t really know “what” is leak-ing from this output. For that we need to take some heap snapshots and comparethem to see what’s changing in our application. We’ll use the third-party heapdumpmodule (https://github.com/bnoordhuis/node-heapdump). The heapdump moduleallows us to take snapshots either programmatically or by sending a signal to the pro-cess (UNIX only). These snapshots can be processed using the Chrome DevTools.
Let’s install the module first:
npm install heapdump --save-dev
Since strings are immutable in JavaScript, we push a unique string every time into the array to intentionally grow memory and not allow the garbage collector to clean.
www.it-ebooks.info

313TECHNIQUE 93 Debugging memory leaks
Then include it in our leak.js file and instrument it to output a heap snapshot every 10seconds:
var heapdump = require('heapdump');var string = '1 string to rule them all';
var leakyArr = [];var count = 2;setInterval(function () {
leakyArr.push(string.replace(/1/g, count++));}, 0);
setInterval(function () {if (heapdump.takeSnapshot()) console.log('wrote snapshot');
}, 10000);
Now, every 10 seconds a file is written to the current working directory of the processthat contains the snapshot. A garbage collection is automatically performed whenevera snapshot is taken. Let’s run our application to write a couple snapshots and then ter-minate it:
$ node leak3.jswrote snapshotwrote snapshot
Now we can see what was written:
$ lsheapdump-29701132.649984.heapsnapshotheapdump-29711146.938370.heapsnapshot
The files are saved with their respective timestamps. The larger the number, the morerecent the snapshot. Now we can load these files into Chrome DevTools. OpenChrome and then the Developer Tools, go to the Profiles tab, and right-click on Pro-files to load a snapshot file (see figure 11.5).
Figure 11.5 Loading a heap snapshot into the Chrome DevTools
www.it-ebooks.info

314 CHAPTER 11 Debugging: Designing for introspection and resolving issues
To compare our two snapshots, let’s load them in the order we took them (see fig-ure 11.6).
Now that we have them loaded, we can do some investigation. Let’s select the sec-ond one and then choose the Comparison option. Chrome will automatically selectthe previous snapshot to compare to (see figure 11.7).
Now we can see something immediately interesting in our view—a lot of strings arebeing created and not being garbage collected (see figure 11.8).
Figure 11.6 Loading a second snapshot for comparison
Select comparison view.
Figure 11.7 Using the comparison view
www.it-ebooks.info

315TECHNIQUE 93 Debugging memory leaks
So we can see that strings could be a problem here. But what strings are getting cre-ated? Here we have to do some investigation. Expanding the (string) tree will show usthe largest strings first—typically application source code and some larger strings usedin Node core and V8. But when we scroll down, we start to see strings generated in ourapplication, and lots of them. By clicking one, we can see the retaining tree, or its rela-tionship to other objects (see figure 11.9).
Delta shows a large increase in strings.
Figure 11.8 Examining memory allocations between the snapshots
Strings created in our app
Members of an Array
Figure 11.9 Drilling down to the types of data being created in memory
www.it-ebooks.info

316 CHAPTER 11 Debugging: Designing for introspection and resolving issues
In this exercise, we had a hunch we were going to leak strings stored inside the leaky-Arr variable. But this exercise shows the relationship between the code and the toolsto inspect memory usage. As a developer, you’ll know your source code, and the cluesyou get inside DevTools will be specific to your code and modules. The Comparisonview can give a great snapshot of what’s changing.
We only talked about one way of creating snapshots. You can also send a SIGUSR2(on *NIX systems) to a process with heapdump to take a snapshots at will:
kill -USR2 1120
Just remember that it’ll write the snapshot to the CWD of the process and will failsilently if the CWD isn’t writable by the process user.
You can also be programmatically clever, depending on your needs. For example,you could set up heapdump to take a snapshot after a certain memory threshold isbreached, or if it grows faster than some expected limit given an interval.
Taking heap snapshots is something you can do in production for a small perfor-mance penalty while the snapshot is being written to disk. Let’s turn our attention toanother technique you can use in production that has a minimal penalty and lets youpoke around at the application state: using a REPL.
TECHNIQUE 94 Inspecting a running program with a REPL
Attaching a debugger to a production process isn’t a viable option, as we don’t want tobe pausing execution or adding a performance tax of running the V8 debugger. Sohow can we debug live or performance-sensitive issues? We can use a REPL to dive intothe process and inspect or change state. In this technique we’ll first look at how aREPL works in Node, and how to set up your own REPL server and client. Then we’llturn to inspecting a running process.
■ ProblemYou want to interact with a running process to inspect or change its state.
■ SolutionSet up a REPL in the process and a REPL client to access.
■ DiscussionThe Node REPL is a great way to play around and experiment with JavaScript andNode. The simplest way to play around with a REPL is to run Node without any argu-ments, as shown in figure 11.10.
But you can create your own REPLs using the built-in repl module. In fact, Nodeuses the same module when you type node. Let’s make our own REPL:
var repl = require('repl');repl.start({
input: process.stdin,output: process.stdout
});
Use stdin stream as input stream to the REPLUse stdout stream as
output stream fromthe REPL
www.it-ebooks.info

317TECHNIQUE 94 Inspecting a running program with a REPL
Executing this program creates a REPL that looks and functions much like node does:
$ node repl-basic.js> 10 + 2030>
But we don’t need to use the process’s stdio for input and output; we can use a UNIXor a TCP socket! This allows us to connect to a long-running process from the outside.Let’s make a TCP REPL server:
var net = require('net');var repl = require('repl');
net.createServer(function (socket) {var r = repl.start({input: socket,output: socket
});r.on('exit', function() {socket.end();
});}).listen(1337);
console.log('node repl listening on 1337');
Figure 11.10 Sample Node REPL session
Use incoming socket (a Duplex stream) as the input and output stream for REPL
When REPL is exited, end connection
www.it-ebooks.info

318 CHAPTER 11 Debugging: Designing for introspection and resolving issues
Now if we fire up our REPL server, it’ll be listening on port 1337:
$ node repl-tcp.jsnode repl listening on 1337
We can then connect to it with a TCP client like telnet or Netcat. You can do this in aseparate terminal window:
$ nc localhost 1337> 10 + 2030> exit$
That’s cool! But it doesn’t behave like our basic REPL (see figure 11.11) or the nodecommand:
■ The Tab key doesn’t autocomplete available properties and variables. ■ We don’t have any readline support, so the Up Arrow key doesn’t give us any
command history. ■ No color or bold output.
The reasons for this are twofold. First, the repl module can’t determine that we’re run-ning a TTY (terminal) session, so it provides a minimal interface avoiding the use ofANSI/VT100 escape codes for color and formatting. These escape codes end up beingnoise to clients like Netcat. Second, our client isn’t behaving like a TTY. It isn’t sendingthe proper input codes to get nice perks like autocomplete behavior or history.
In order to change this behavior, we need to modify both the server and client.First, to send proper ANSI/VT100 escape codes for things like color and bold output,we need to add the terminal option to our REPL configuration:
var net = require('net');var repl = require('repl');
net.createServer(function (socket) {var r = repl.start({
Figure 11.11 Using Netcat against a REPL server
www.it-ebooks.info

319TECHNIQUE 94 Inspecting a running program with a REPL
input: socket,output: socket,terminal: true
});r.on('exit', function() {socket.end();
});}).listen(1337);
console.log('node repl listening on 1337');
Second, to get the input tab completion and readline, we need to create a REPL clientthat can send the raw TTY input to the server. We can create that using Node:
var net = require('net');var socket = net.connect(1337);
process.stdin.setRawMode(true);process.stdin.pipe(socket);socket.pipe(process.stdout);
socket.once('close', function () {process.stdin.destroy();
});
Now we can start our REPL server with terminal support:
$ node repl-tcp-terminal.jsnode repl listening on 1337
We can connect to the server with our REPL client in another terminal session:
$ node repl-client.js> 10 + 2030> .exit$
Now our REPL session behaves as if we were running the node or a basic REPL. We canuse autocomplete, access our command history, and get colored output. Sweet!
Inspecting a running processWe’ve discussed how to use the repl module to create connection points and use vari-ous clients to access it. We did this to get you comfortable setting up REPL instanceson your applications so you can use them to inspect a running process. Now, let’s getpractical and instrument an existing application with a REPL server, and interact withit using the REPL client we created.
Treat output as a TTY stream
Connect to the REPL TCP server.
Treat stdin as a rawTTY input stream.
This allows, forexample, the Tab keyand Up Arrow key to
behave as you’dexpect in a modern
terminal session.
Pipe input from stdin to the socket.
Pipe output from the socket to stdout.
When the connectionis terminated, destroy
the stdin stream,allowing the process
to exit.
www.it-ebooks.info

320 CHAPTER 11 Debugging: Designing for introspection and resolving issues
First, let’s create a basic HTTP server:
var http = require('http');var server = http.createServer();server.on('request', function (req, res) {
res.end('Hello World');});server.listen(3000);console.log('server listening on 3000');
This should look familiar. But let’s expose this server to our REPL server by adding thefollowing code:
var net = require('net');var repl = require('repl');net.createServer(function (socket) {
var r = repl.start({input: socket,output: socket,terminal: true,useGlobal: true
});r.on('exit', function() { socket.end() });r.context.server = server;
}).listen(1337);console.log('repl listening on 1337');
A NOTE ABOUT USEGLOBAL When enabled, whenever you create a new variable(like var a = 1), it will be put in the global context (global.a === 1). But anow will also be accessible in functions run in a later turn in the event loop.
We exposed the server by setting a property on r.context. We can expose anythingwe want to the REPL in order to interact with it. It’s important to note that we also canoverride anything already existing in the context. This includes all the standard Nodeglobal variables like global, process, or Buffer.
Now that we have our server exposed, let’s see how we can inspect and debug ourHTTP server. First let’s fire up our HTTP and REPL servers:
$ node repl-app.jsserver listening on 3000repl listening on 1337
Now let’s use our REPL client to tap into the server:
$ node repl-client.js>
We can tap into useful bits of information right away. For instance, we can see howlong our process has been running, or how its memory usage is:
> process.uptime()115> process.memoryUsage()
{ rss: 17399808,heapTotal: 7195904,heapUsed: 4146840 }
Allow scripts to be executed in global context versus a separate context
Expose our server instance to REPL
Uptime in seconds
Memory in bytes
www.it-ebooks.info

321TECHNIQUE 94 Inspecting a running program with a REPL
We also exposed the server object, and we can access that by just typing server:
> server{ domain: null,
_events:..._connectionKey: '4:0.0.0.0:3000' }
Let’s see how many connections are currently active:
> server.connections0
Clearly this would be more interesting in a production context, since we are the onlyones using the server and we haven’t made a connection yet! Let’s hit http://local-host:3000 in our browser and inspect the connections again and see if they’vechanged:
> server.connections6
That works. Let’s instrument something more complex. Can you think of a way to starttallying the number of requests coming in to our server using the REPL?
ADDING INSTRUMENTATION One powerful aspect of a REPL is the ability to addinstrumentation to help us understand behavior in our application as it’s hap-pening. This is especially handy for tricky problems where restarting theapplication loses our precious state and we have no idea how to duplicate theissue except to wait for it to happen again.
Since our HTTP server is an EventEmitter, we can add another request handler thatwill be called on every request to instrument it with the behavior we want using theREPL:
> var numReqs = 0undefined
> function trackReqs (req, res) {..... numReqs++
..... }undefined> server.on('request', trackReqs){ domain: null,_events:..._connectionKey: '4:0.0.0.0:3000' }
>
Now we’re tracking incoming requests. Let’s hit Refresh a few times on our browserand see if it worked:
> numReqs8
Excellent. Since we have access to the request objects, we can inspect any informationabout requests available to us: IP addresses, headers, paths, and so on. In this example
Connections vary on browser/client
Create variable to store the number of requests
Create handler function for incoming requests that increments the request count
Add handler to the request event
www.it-ebooks.info

322 CHAPTER 11 Debugging: Designing for introspection and resolving issues
we exposed an HTTP server, but any objects can be put on the context where it makessense in your application. You may even consider writing a module exposing com-monly used methods in the REPL.
Some issues can’t be resolved at an application level and need deeper system intro-spection. One way to gain deeper understanding is by tracing.
TECHNIQUE 95 Tracing system calls
Understanding how the underlying system calls work can really help you understand aplatform. For example, Python and Node both have functionality to perform DNSlookups, but they go about it differently at a lower level. And if you’re wondering whyone is behaving differently than the other, tracing tools will show you that!
At their core, tracing tools monitor underlying system calls (typically C functionnames, arguments, and return values) that an application or multiple applications aremaking, and do interesting things with the data (like logging or statistics).
Tracing helps in production. If you have a process stuck at 100% and are unsurewhy, a tracer can help expose the underlying state at the system level. For example,you may discover in this instance that you exceeded the allowed open files for a pro-cess, and all I/O attempts are being rejected, causing the problem. Since tracing toolsaren’t performance intrusive like a profiler, they can be valuable assets.
■ ProblemYou want to understand what’s happening in your application at the system level.
■ SolutionUse tracing tools specific to the operating system to gain introspection.
■ DiscussionAll the techniques we’ve discussed so far have been system-agnostic. This one is OS-specific. There are a lot of different tools, but most are unique to an operating system.For our example, we’ll use the Linux-specific tool called strace. Similar tools existsfor Mac OS X/Solaris (dtruss) and Windows (ProcessMonitor: http://technet.microsoft.com/en-us/sysinternals/bb896645.aspx).
A tracing program is essentially a dump of system calls as they happen in a process.If you’re unfamiliar with the underlying OS, prepare to learn! We’ll walk through trac-ing a simple application to see what’s happening at the OS level when we run it tolearn how to read trace logs.
Let’s write an extremely simple program to trace:
console.log('hello world');
This seems innocent enough. To see what’s going on behind the scenes, let’s tracethis:
sudo strace -o trace.out node hello
You’ll see the program output “hello world” and exit as expected. But we also got adump of every system call in trace.out. Let’s examine that file.
www.it-ebooks.info

323TECHNIQUE 95 Tracing system calls
Right at the top we can see our first call, which makes sense. We’re executing/usr/bin/node, passing it the arguments node and hello:
execve("/usr/bin/node", ["node", "hello"], [/* 24 vars */]) = 0
If you ever wondered why process.argv[0] is node and process.argv[1] is the pathto our Node program, now you can see how the underlying call is being made! Thestrace output tells us the arguments passed and the return value.
To find more information about what execve is (and any other system call), we canjust look at the man pages on the host if available (best option), or if not, look online:
man execve
MORE ON MAN COMMAND Manual pages also include error codes that are help-ful to get more details on, for example, what ENOENT or EPERM mean on anoperating system. Many of these error codes can be found in the openman page.
Let’s examine more of this file. Many of the initial calls are loading the shared librar-ies libuv needs. Then we get to our application:
getcwd("/home/wavded", 4096) = 13...stat("/home/wavded/hello", 0x7fff082fda08) = -1
ENOENT (No such file or directory)stat("/home/wavded/hello.js",
{st_mode=S_IFREG|0664, st_size=27, ...}) = 0
We can see Node grabbing the current working directory and then looking up our fileto run. Note that we executed our application without the .js extension, so Node firstlooks for a program called “hello” and doesn’t find it, and then looks for hello.js and issuccessful. If we were to run it with the .js extension, you wouldn’t see the first stat call.
Let’s look at the next interesting bit:
open("/home/wavded/hello.js", O_RDONLY) = 9fstat(9, {st_mode=S_IFREG|0664, st_size=27, ...}) = 0...read(9, "console.log('hello world')\n", 27) = 27close(9) = 0
Here we open the hello.js file in read-only mode and get assigned a file descriptor. Filedescriptors are just integers assigned by the OS. But to understand the subsequentcalls, we should take note that 9 is the number assigned for hello.js until we see a sub-sequent close call.
After open, we then see an fstat to get the file’s size. Then we read the contents ofthe file in the read line. The strace output also shows us the contents of the buffer weused to store the file. We then close the file descriptor.
A trace output file won’t show us any application code being run. We just see thesystem effects of what’s being run. That is, we won’t see V8 parsing or executing ourconsole.log but we’ll see the underlying write out to stdout. Let’s look at that next:
write(1, "hello world\n", 12) = 12
www.it-ebooks.info

324 CHAPTER 11 Debugging: Designing for introspection and resolving issues
Recall from chapter 6 that every process has three file descriptors automaticallyassigned for stdin (0), stdout (1), and stderr (2). We can see that this write call usesstdout (1) to write out hello world. We also see that console.log appends a newlinefor us.
Our program eventually exits on the last line of trace.out:
exit_group(0)
The zero (0) here represents the process exit code. In this case it’s successful. If wewere to exit with process.exit(1) or some other status, we’d see that numberreflected here.
Tracing a running processSo far we’ve used strace to start and trace a program till it exits. How about tappinginto a running process?
Here we can just grab the PID for the process:
ps ax | grep node
The first number in the row is our PID:
32476 ? Ssl 0:08 /usr/bin/node long-running.js
Once we have our PID, we can run strace against it:
sudo strace -p 32476
All the currently running system calls will output to the console. This can be a great first line of defense when debugging live issues where CPU is
pegged. For example, if we’ve exceeded our ulimit for a process, this will typicallypeg our CPU, since open system calls continually will fail. Running strace on the pro-cess would quickly show a bunch of ENFILE errors occurring. And from the openmanpage, we can see a nice entry for the error:
ENFILE The system limit on the total number ofopen files has been reached.
LISTING OPEN FILES In this case, we can use another handy Linux tool calledlsof to get a list of open files for a process given a PID to further investigatewhat we have open right now.
We can also get a CPU pegged at 100% and open up strace and see just the followingrepeating over and over:
futex(0x7ffbe00008c8, FUTEX_WAKE_PRIVATE, 1) = 1
This, for the most part, is just event loop noise, and it’s likely that your applicationcode is stuck in an infinite loop somewhere. Tools like node --prof would help at thispoint.
www.it-ebooks.info

325Summary
About other operating system toolsThe actual system calls we looked at will be different on other operating systems. Forexample, you’ll see epoll calls being made on Linux that you won’t ever see on MacOS X because libuv uses kqueue for Mac. Although most OSes have POSIX methodslike open, the function signatures and error codes can vary. Get to understand themachines you host and develop your Node applications on to make best use of thetracing tools!
HOMEWORK! Make a simple HTTP server and trace it. Can you find out wherethe port is being bound, where connections are being accepted, and whereresponses are being written back to the client?
11.3 SummaryIn this chapter we looked at debugging Node applications. First, we focused on errorhandling and prevention:
■ How do you handle errors that your application generates? ■ How are you notified about crashes? Do you have domains set up or an
uncaughtException handler? ■ Are you using a lint tool to help prevent exceptions?
Then, we focused on debugging specific problems. We used various tools available inNode and third-party modules. The big thing to take away is knowing the right toolfor the job, so when a problem arises, you can assess it and gain useful information:
■ Do you need to be able to set breakpoints, watch expressions, and step throughyour code? Use the built-in debug command or node-inspector.
■ Do you need to see where your application is spending its time? Use the Nodebuilt-in profiler (node --prof).
■ Is your application using more memory than expected? Take heap snapshotsand inspect the results.
■ Do you want to investigate a running process without pausing it or incurring aperformance penalty? Set up and use a REPL server.
■ Do you want to see what underlying system calls are being made? Use your oper-ating system’s tracing tools.
In the next chapter we’ll dive into writing web applications with Node!
www.it-ebooks.info

326
Node in production: Deploying
applications safely
Once you’ve built and tested a Node application, you’ll want to release it. PopularPaaS (platform as a service) providers like Heroku and Nodejitsu make deploy-ment simple, but you can also deploy to private servers. Once your code is outthere, you’ll need to cope with unexpected errors, service outages, and bugs, andmonitor performance.
This chapter shows you how to safely release and maintain Node programs. Itcovers privately hosted servers that use Apache and nginx, WebSockets, horizontalscaling, automated deployment, logging, and ways to boost performance.
This chapter covers■ Deploying Node applications to your own server■ Deploying Node applications to cloud providers■ Managing packages for production■ Logging■ Scaling with proxies and cluster
www.it-ebooks.info

327TECHNIQUE 96 Deploying Node applications to the cloud
12.1 DeploymentIn this section you’ll learn how to deploy Node applications to popular cloud provid-ers and your own private servers. It’s likely that you’ll only typically use one of theseapproaches, depending on the requirements of your application or employer, butbeing familiar with both is instructive. For example, the Git-based workflow employedby Heroku has influenced how people deploy applications to servers they control, andwith a bit of knowledge you can set up a server without having to call for help from aDevOps specialist.
The first technique we cover is based on Windows Azure, Heroku, and Nodejitsu.This is probably the easiest way to deploy web applications today, and cloud providershave free plans that make it cheap and painless to share your work.
TECHNIQUE 96 Deploying Node applications to the cloud
This technique outlines how to use Node with PaaS providers, and has tips on how toconfigure and maintain applications in production. The focus is on the practicalaspects of deployment and maintenance, rather than pricing or business models.
You can try out Heroku and Azure for free, so follow along if you’ve ever wanted torun a Node application in the cloud.
■ ProblemYou’ve built a Node web application and want to run it on servers so people can use it.
■ SolutionUse a PaaS provider like Heroku or Nodejitsu.
■ DiscussionWe’ll look at three options for cloud deployment: Nodejitsu, Heroku, and WindowsAzure. All of these services allow you to deploy Node web applications, but they allhandle things slightly differently. The methods for uploading an application and con-figuring it vary, even though the fundamental concepts are the same.
Nodejitsu is an interesting case because it’s dedicated to Node. On the other hand,Windows Azure supports Microsoft’s software development tools, programming lan-guages, and databases. Azure even has features beyond web application hosting, likedatabases and Active Directory integration. Heroku draws on a rich community ofpartners that offers add-ons, whereas Azure is more of a full-service offering.
If you look in the source code provided with this book, you should find a smallExpress application in production/inky. This is the application we used to researchthis technique, and you can use it as a sample application to try each service provider.Nodejitsu and Azure’s documentation includes examples based on Node’s http mod-ule, but you really need something with a package.json to see how things work for typ-ical Node applications.
The first service provider we’ll look at is Nodejitsu (https://www.nodejitsu.com/).Nodejitsu is based in New York, and has data centers in North America and WesternEurope. Nodejitsu was founded in 2010, and has funding from the Bloomberg Betafund.
www.it-ebooks.info

328 CHAPTER 12 Node in production: Deploying applications safely
To get started with Nodejitsu, you’ll need to register an account. Go to Nodejitsu.comand sign up. You can sign up without selecting a pricing plan if you intend to releasean open source project through Nodejitsu.
Nodejitsu has a command-line client called jitsu. You can install it with npminstall -g jitsu. Once npm has finished, you’ll need to sign in—type jitsu loginand enter your username and password. This will save an API token to a file called~/.jitsuconf, so your password won’t be stored locally. Figure 12.1 shows what this pro-cess looks like in the terminal.
To deploy an application, type jitsu deploy. The jitsu command will promptwith questions about your application, and then set it up to run on a temporary sub-domain. If you’re using an Express application, it’ll automatically set NODE_ENV to pro-duction, but you can edit this setting along with other environmental variables in theweb interface. In fact, the web interface can do most of the things the jitsu com-mand does, which means you don’t necessarily need a developer on hand to do basicmaintenance chores like restarting applications.
Figure 12.2 shows a preview of Nodejitsu’s web interface, which is called WebOps. Itallows you to stop and start applications, manage environmental variables, roll back toearlier versions of your application, and even stream logs in real time.
Unsurprisingly Nodejitsu is heavily tailored toward Node applications, and thedeployment process is heavily influenced by npm. If you have a strong grasp of npmand package.json files, and your projects are all Node applications, then you’ll feel athome with Nodejitsu.
Another PaaS solution that’s popular with Node developers is Heroku. Herokusupports several programming languages and platforms, including Node, and was
Figure 12.1 The jitsu command-line client allows you to sign in.
www.it-ebooks.info

329TECHNIQUE 96 Deploying Node applications to the cloud
founded in 2007. It has since been acquired by Salesforce.com, and uses a virtualizedsolution based on Ubuntu servers. To use Heroku, you’ll need to sign up at heroku.com. It’s easy to create a free account, and you can even run production applicationson the free tier. Essential features like domain aliases and SSL are paid, so it doesn’ttake many requirements to hit around $20 a month, but if you don’t mind using aHeroku subdomain, you can keep things running for free.
Once you’ve created an account, you’ll need to install the Heroku Toolbelt fromtoolbelt.heroku.com. There are installers for Linux, Mac OS X, and Windows. Onceyou’ve installed it, you’ll have a command-line client called heroku that can be used tocreate and manage applications. Before you can use it, you’ll have to sign in; herokulogin can be used to do this, and functions in much the same way as Nodejitsu’sjitsu command. You only need to log in once because it stores a token that will beused for subsequent requests. Figure 12.3 shows what this should look like.
Figure 12.2 The WebOps management interface
Figure 12.3 Signing in with Heroku
www.it-ebooks.info

330 CHAPTER 12 Node in production: Deploying applications safely
The next step with a Heroku deploy is to prepare your repository. You’ll need to gitinit and commit your project. If you’re using our code samples and have checkedthem out of Git, then you should copy the specific project that you want to deploy outof our working tree. The full steps are as follows:
1 git init2 git add .3 git commit -m 'Create new project'4 heroku create5 git push heroku master
The heroku create command sets up a remote repository called heroku, and the firstgit push to it will trigger the creation of a temporary herokuapp.com subdomain.
If your application can be started with npm start, it should just work. If not, youmight need to add a file called Procfile to your application that contains web: nodeyourapp.js. This file lists the processes that your application needs to run—it couldinclude background workers as well.
If you’re using an Express application that expects NODE_ENV to be set, then you’llneed to do this manually with Heroku. The command is just heroku config:setNODE_ENV=production, but notice that this is automatic with Nodejitsu.
The last PaaS provider we’ll discuss is Windows Azure. Microsoft’s Azure platformcan be used entirely through the web interface, but there’s also a command-line inter-face that you can install with npm install -g azure-cli. Figure 12.4 shows what thecommand-line tool looks like.
Figure 12.4 The Azure CLI tool
www.it-ebooks.info

331TECHNIQUE 96 Deploying Node applications to the cloud
Azure also has an SDK that you can download for Linux, Mac OS X, and Windows. Thedownloads are available at www.windowsazure.com/en-us/downloads/.
To start using Azure, you’ll need to sign in to www.windowsazure.com with a Micro-soft account. This is the same account that you can use for other Microsoft services, soif you already have an email account with Microsoft, you should be able to sign in.Azure’s registration process has extra security steps: a credit card and phone numberare used to validate your account, so it’s a bit more tedious than Heroku or Nodejitsu.
Once you’ve created your Windows Azure account, you’ll want to go to the Portalpage. Next go to Compute, Web Site, and then Quick Create. Just keep in mind that you’recreating a “Web Site” and you should be fine—Microsoft supports a wide range of ser-vices that are partly tailored to .NET development with their existing tools like VisualStudio, so it can be bewildering for Mac and Unix developers.
Once your application has been created, you’ll need to tie it to a source controlrepository. Don’t worry, you can use GitHub! Before we go any further, check thatyou’re looking at a page like the one in figure 12.5.
Figure 12.5 Azure’s web interface after creating a website
Cloud configurationPaaS providers all seem to have their own approaches to application configuration.You can, of course, keep configuration settings in your code, or JSON files, but thereare times when it’s useful to store them outside of your repository.
For example, we build open source web applications that we also run on Heroku, sowe keep our database passwords outside of our open source repository and use herokuconfig:set instead.
www.it-ebooks.info

332 CHAPTER 12 Node in production: Deploying applications safely
Click your application’s name, select Set up deployment from source control, and then lookfor site URL on the right side. From here you’ll be able to choose from a huge range ofrepositories and service providers, but we tested our application with GitHub. Azurefetched the code and set up a Node application—it was the same Express code that weused for Heroku (listings/production/inky), and worked the first time.
Table 12.1 shows how to get and set configuration values on each of the cloud pro-viders we’ve discussed here.
Although Azure’s registration requirements might seem less convenient than Herokuand Nodejitsu, it does have several benefits: if you’re working with .NET, then you canuse your existing tools. Also, Microsoft’s documentation is excellent, and includesguides on setup and deploying for Linux and Mac OS X (http://www.windowsazure.com/en-us/documentation/articles/web-sites-nodejs-develop-deploy-mac/).
Your own servers, rented servers, or cheap virtual hosts all have their own advantages.If you want complete control over your server, or if your business already has its own serv-ers or data centers, then read on to learn how to deploy Node to your own servers.
TECHNIQUE 97 Using Node with Apache and nginx
Deploying Node to private servers running Apache or nginx is entirely possible, andrecommended for certain situations. This technique demonstrates how to run a Nodeprogram behind Apache and nginx.
■ ProblemYou want to run a Node web application on your own server.
■ SolutionUse Apache or nginx proxying and a service supervisor like runit.
■ DiscussionWhile PaaS solutions are easy to use, there are times when you have to use dedicatedhardware, or virtual machines that you have full control over. Larger businesses oftenhave investments in their own data centers, so it doesn’t make sense to switch to anexternal service provider.
Virtualization has transformed web hosting. Linux virtual machines have been akey solution for hosting web applications for several years, and services like AmazonElastic Compute Cloud make it easy to create and destroy services on demand.
Table 12.1 Setting environmental variables
Provider Set Remove List
Nodejitsu jitsu env set name value jitsu env delete name jitsu env list
Heroku heroku config:set name=value
heroku config:unset name
heroku config
Azure azure site appsetting add name=value
azure site appsetting delete name
azure site appsetting list
www.it-ebooks.info

333TECHNIQUE 97 Using Node with Apache and nginx
It’s therefore likely that at some point you’ll be faced with deploying Node applica-tions to servers that need configuration and maintenance. If you’re already experi-enced with basic systems administration tasks, then you can reuse your existing skillsand software. Otherwise, you’ll have to become familiar with web server daemons andthe tools used to keep Node programs running and recovering from errors.
This technique presents examples for Apache and nginx. They’re both web serv-ers, but their configuration formatsare very different, and they’re built indifferent ways. Figure 12.6 shows thebasic server architecture that we’llcreate in this section.
It’s not actually necessary to run aweb server—there are ways to makeNode programs safely access port 80.But we assume that you’re deployingto a server that has existing websites.Also, some people prefer to servestatic assets from Apache or nginx.
The same technique is used for bothservers: proxying. The following listingshows how to do this with Apache.
ProxyPass / http://localhost:3000/LoadModule proxy_module /lib/apache2/modules/mod_proxy.soLoadModule proxy_http_module /lib/apache2/modules/mod_proxy_http.so
The directives in listing 12.1 should be added to your Apache configuration file. Tofind the right file, type apache2 -V on your server, and look for the HTTPD_ROOT andSERVER_CONFIG_FILE values—joining them will give you the right path and file. It’slikely that you won’t want to redirect all requests to your Node application, so you canadd the proxy settings to a VirtualHost block.
With these three lines, requests to / will now be proxied to a process listeningon port 3000 B. In this case, the process is assumed to be a Node program thatyou’ve run with node server.js or npm start, but it could technically be any HTTPserver. The LoadModule directives tell Apache to use the proxy C and HTTP proxy-ing D modules.
If you forget to start the Node process, or quit it, then Apache will return a 503error. To avoid errors like this, you need a way to keep the Node process running, andto also run it when the server boots. One way to do this is with runit (http://smarden.org/runit/).
Listing 12.1 Proxying requests to a Node application with Apache
Proxy requests starting at / to localhost:3000
B
Loadproxy
module C Load HTTP proxy module D
nginx: 80
Node: 3001 Node: 3002Node: 3000
HTTP request on port 80
Figure 12.6 A Node program running alongside Apache or nginx
www.it-ebooks.info

334 CHAPTER 12 Node in production: Deploying applications safely
If you’re using Debian or Ubuntu, you can install runit with apt-get installrunit. Once it’s ready, create a shell script that can start your Node process. First, cre-ate a directory for your project: sudo mkdir /etc/service/nodeapp. Next, create a filethat will be used for the script: sudo touch /etc/service/nodeapp/run. Then edit thefile to make it look like the next listing.
#!/bin/shexport PATH=$PATH:/home/vagrant/.nvm/v0.10.26/bincd /home/vagrant/inkyexec npm start
Our server was using nvm (https://github.com/creationix/nvm) to manage theinstalled versions of Node, so we added its location to $PATH B; otherwise the shellcouldn’t find where node and npm were installed. You may have to modify this basedon the output of which node, or remove it entirely. The last two lines C just changethe directory to the location of your Node project, and then start it with npm start.
The application can be started with sudo sv start /etc/service/nodeapp andstopped with sudo sv stop /etc/service/nodeapp. Once the Node process is run-ning, you can test it by killing it, and then checking to see that it automatically getsrestarted by runit.
Now that you know how Apache handles proxies, and how to keep a process run-ning, let’s look at nginx. Nginx is often used as a web server, but it’s technically areverse proxy server that supports HTTP, HTTPS, and email. To make nginx proxy con-nections to Node applications, you can use the Proxy module, which uses aproxy_pass directive in a way similar to Apache.
Listing 12.3 has the settings needed by nginx. Like Apache, you could also put theserver block in a virtual host file.
http {server {listen 80;
location / {proxy_pass http://localhost:3000;proxy_http_version 1.1;
}}
}
If you have multiple applications on the same server, then you can use a differentport, but we’ve used 3000 here B. This example is basically the same as Apache—youtell the server what location to proxy, and then the port. And of course, this examplecould be combined with runit.
Listing 12.2 Running a program with runit
Listing 12.3 Proxying requests to a Node application with nginx
Set PATH so the shell can find your Node installationBChange directory to
location of your Node projectC
This proxies to port 3000, so you can change it to other ports if you use multiple applications.
B
www.it-ebooks.info

335TECHNIQUE 98 Safely running Node on port 80
If you don’t want to run Apache or nginx, you can run Node web applications withouta web server. Read on to learn how to do this using firewall rules and other techniques.
TECHNIQUE 98 Safely running Node on port 80
You can still run Node without a web server daemon like Apache. To do this, you basi-cally need to forward the external port 80 to an internal, unprivileged port. This tech-nique presents some ways to do this in Linux.
■ ProblemYou don’t want to use Apache or nginx.
■ SolutionUse firewall rules to redirect port 80 to another, unprivileged port.
■ DiscussionIn most operating systems, binding to port 80 requires special privileges. That meansthat if you try to use app.listen(80) instead of port 3000 as we’ve used in most of ourexamples, you’ll see Error: listen EACCES. This happens because your current useraccount doesn’t have permission to bind to port 80.
You could get around this restriction by running sudo npm start, but this is dan-gerous. Ideally you want your Node program to run as a nonroot user.
In Linux, traffic can be redirected from port 80 to a higher port number by usingiptables. Linux uses iptables to manage firewall rules, so you just need a rule thatmaps from port 80 to 3000:
iptables -t nat -I PREROUTING -p tcp --dport\80 -j REDIRECT --to-port 3000
To make this change permanent, you’ll need to save the rules to a file that gets runwhenever the network interface is set up. The general approach is to save the rules toa file, like /etc/iptables.up.rules, and then edit /etc/network/interfaces to use it:
auto eth0iface eth0 inet dhcp
pre-up iptables-restore < /etc/iptables.up.rulespost-down iptables-restore < /etc/iptables.down.rules
This is highly dependent on your operating system; these rules are adapted from Debianand Ubuntu’s documentation, but it may be different in other Linux distributions.
One downside of this technique is that it maps traffic to any process that’s listeningto that port. An alternative solution is to grant the Node binary extra capabilities. Youcan do this by installing libcap2.
In Debian and Ubuntu, you can use sudo apt-get install libcap2-bin. Thenyou just need to grant the Node binary the capabilities for accessing privileged ports:
sudo setcap cap_net_bind_service=+ep /usr/local/bin/node
You may need to change the path to Node—check the output of which node if you’renot sure where it is. The downside of using capabilities for this is that now the nodebinary can bind to all ports from 1–1024, so it’s not as specific as restricting it to port 80.
www.it-ebooks.info

336 CHAPTER 12 Node in production: Deploying applications safely
Once you’ve applied a capability to a binary, it will be fixed until the file changes.That means that you’ll need to run this command again if you upgrade Node.
Now that your application is running on a server, you’ll want to ensure that it runsforever. There are many different ways to do this; the next technique outlines runitand the forever module.
TECHNIQUE 99 Keeping Node processes running
Programs inevitably crash, and it’s unfortunate when this happens. What matters is howwell you handle failure—users should be informed, and programs should recover ele-gantly. This technique is all about keeping Node programs running, no matter what.
■ ProblemYour program crashed in the middle of the night, and customers were unable to usethe service until you restarted it.
■ SolutionUse a process monitor to automatically restart the Node program.
■ DiscussionThere are two main ways to keep a Node program running: service supervision or aNode program that manages other Node programs. The first method is a generic,operating system–specific technique. You’ve already seen runit in technique 97. Runitsupports service supervision, which means it detects when a process stops running andtries to restart it.
Another daemon manager is Upstart (http://upstart.ubuntu.com/). You mayhave seen Upstart if you use Ubuntu. To use it, you’ll need a configuration file thatdescribes how the Node program is managed. Listing 12.4 contains an example thatyou can modify for your server—it should be saved in /etc/init/nodeapp.conf, wherenodeapp is the name of your application.
#!upstartdescription "ExampleApp"author "alex"
env PATH=/usr/local/sbin:/usr/local/bin:/usr/sbin:/usr/bin:/sbin:/bin
respawnstart on runlevel [23]
scriptexport NODE_ENV=productionexec /usr/bin/node /apps/example/app.js 2>&1 >> /var/log/node.log
end script
This configuration file tells Upstart to respawn the application (http://upstart.ubuntu.com/wiki/Stanzas#respawn) if it dies for any reason. It sets up a PATH B
Listing 12.4 Managing a Node program with Upstart
You can change thePATH if it’s requiredby your application.
B
This causes the application to be started on run levels 2 and 3.C
The command thatruns the application. D
www.it-ebooks.info

337TECHNIQUE 99 Keeping Node processes running
that’s similar to the one you’ll see in your terminal if you type echo $PATH. Then itstates the program should be run on run levels 2 and 3 C—run level 2 is usually whennetworking daemons are started.
RUN LEVELS Unix systems handle run levels differently depending on the ven-dor. The Linux Standard Base specification describes run level 2 as multi-usermode, and 3 as multi-user mode with networking. In Debian, 2–5 are groupedas multi-user mode with console logins and the display manager. However,Ubuntu treats run level 2 as graphical multi-user with networking, so youshould check how your system implements run levels before using Upstart.
The Upstart script stanza allows you to include a short script, so this means you cando things like set NODE_ENV to production. The application itself is launched with theexec instruction. We’ve included some logging support by redirecting standard outand standard error to a log file D.
Upstart can be more work to set up than runit, but we’ve used it in production forthree years now without any issues. Both are easier to set up and maintain than tradi-tional stop/start init scripts, but there’s another technique you can use: Node pro-grams that monitor other Node programs.
Node process managers work by using a small program that ensures another pro-gram runs continuously. This program is simple and therefore less likely to crash thana more complex web application. One of the most popular modules for this is forever(https://www.npmjs.org/package/forever), which can be used as a command-line pro-gram or programmatically.
Most people use it through the command-line interface. The basic usage isforever start app.js, where app.js is your web application. It has lots of optionsbeyond this, though: it can manage log files and even wrap your program so itbehaves like a daemon.
To start your program as a daemon, use the following options:
forever start -l forever.log -o out.log -e err.log app.js
This will start app.js, creating some additional files: one to store the current PID of theactive process, a log file, and an error log file. Once the program is running, you canstop it gracefully like this:
forever stop app.js
Forever can be used with any Node program, but it’s generally seen as a tool for keep-ing web applications running for a long time. The command-line interface makes iteasy to use alongside other Unix programs.
Deploying applications that use WebSockets can bring a set of unique require-ments. It can be more difficult with PaaS providers, because they can kill requests thatlast for more than a certain number of seconds. If you’re using WebSockets, lookthrough the next technique to make sure your setup will work in production.
www.it-ebooks.info

338 CHAPTER 12 Node in production: Deploying applications safely
TECHNIQUE 100 Using WebSockets in production
Node is great for WebSockets—the same process can serve both standard HTTPrequests and the newer WebSocket protocol. But how exactly do you deploy programsthat use WebSockets in production? Read on to find out how to do this with web serv-ers and cloud providers.
■ ProblemYou want to use WebSockets in production.
■ SolutionMake sure the service provider or proxy you’re using supports HTTP Upgrade headers.
■ DiscussionWebSockets are amazing, but are still treated almost like second-class citizens by hostingproviders. Nodejitsu was the first PaaS provider to support WebSockets, and it uses node-http-proxy (https://github.com/nodejitsu/node-http-proxy) to do this. Almost allsolutions involve a proxy. To understand why, you need to look at how WebSockets work.
HTTP is essentially a stateless protocol, which means all interactions between aserver and a client can be modeled with requests and responses that hold all of therequired state. This level of encapsulation has led to the design of modern client/server web applications.
The downside of this is that the underlying protocol doesn’t support long-runningfull-duplex connections. There’s a wide class of applications that are built on TCP con-nections of this type; video streaming and conferencing, real-time messaging, andgames are prominent examples. As web browsers have evolved to support richer, moresophisticated applications, we’re naturally left trying to simulate these types of applica-tions using HTTP.
The WebSocket protocol was developed to support long-lived TCP-like connec-tions. It works by using a standard HTTP handshake where the client establisheswhether the server supports WebSockets. The mechanism for this is a new headercalled Upgrade. As HTTP clients and servers are typically bombarded with a variety ofnonstandard headers, servers that don’t support Upgrade should be fine—the clientwill just have to fall back to old-fashioned HTTP polling.
Because servers have to handle WebSocket connections so differently, it makes senseto effectively run two servers. In a Node program, we typically have an http.listen forour standard HTTP requests, and another “internal” WebSocket server.
In technique 97, you saw how to use nginx with Node. The example used proxiesto pass requests from nginx to your Node process, which meant the Node processcould bind to a different port to 80. By using the same technique, you can make nginxsupport WebSockets. A typical nginx.conf would look like the next listing.
http {server {listen 80;
Listing 12.5 Adding WebSocket support to nginx
www.it-ebooks.info

339TECHNIQUE 100 Using WebSockets in production
server_name example.com;
location / {proxy_pass http://localhost:3000;proxy_http_version 1.1;proxy_set_header Upgrade $http_upgrade;proxy_set_header Connection 'upgrade';proxy_set_header Host $host;proxy_cache_bypass $http_upgrade;
}}
}
Adding proxy_http_version 1.1 and proxy_set_header Upgrade B enables nginxto filter WebSocket requests through to your Node process. This example will also skipcaching for WebSocket requests.
Since we mentioned Nodejitsu supports WebSockets, what about Heroku? Well,you currently need to enable it as an add-on, which means you need to run a herokucommand:
heroku labs:enable websockets
Heroku’s web servers usually kill requests that take longer than around 75 seconds,but enabling this add-on means requests that originate with an Upgrade headershould keep running for as long as the network allows.
There are times when you might not be able to use WebSockets easily. One exam-ple is older versions of Apache, where the proxy module doesn’t support them. Incases like this, it can be better to use a proxy server that runs before everything else.
HAProxy (http://haproxy.1wt.eu/) is a flexible proxy server. The usage is similarto nginx, and it’s also event-based, so it has been widely adopted in the Node commu-nity. If you’re using an old version of Apache, you can proxy web requests to Apacheor Node, depending on various options like URL or headers.
If you want to install HAProxy in Debian or Ubuntu, you can do so with sudoapt-get install haproxy. Once it’s set up, you’ll need to edit /etc/default/haproxyand set ENABLED=1—this is just because it ships with a default configuration, so it’sdisabled by default. Listing 12.6 is a sample configuration that’s capable of routingrequests to a Node web application that runs on port 3000, but will be accessibleusing port 80 externally.
frontend http-inmode httpbind *:80timeout client 999sdefault_backend node_backend
backend node_backendmode http
Listing 12.6 Using HAProxy with a Node application
Support Upgrade header
B
Allow WebSocketconnections a very
long time to live.
B
All HTTP requests will be routed to your Node application.
www.it-ebooks.info

340 CHAPTER 12 Node in production: Deploying applications safely
timeout server 86400000timeout connect 5000server io_test localhost:3000
This should work with WebSockets, and we’ve used a long timeout so HAProxy doesn’tclose WebSockets connections, which are typically long-lived B. If you run a Nodeprogram that listens on port 3000, then after restarting HAProxy with sudo /etc/init.d/haproxy restart, your application should be accessible on port 80.
You can use table 12.2 to find the web server that’s right for your application.
Your HAProxy setup can be made aware of multiple “back ends” by naming them withthe backend instruction. In listing 12.7 we only have one—node_backend . It would bepossible to also run Apache, and route certain requests to it based on the domain name:
frontend http-inmode httpbind *:80acl static_assets hdr_end(host) -i static.manning.com
Table 12.2 Comparing server options
Server Features Best for
Apache ■ Fast asset serving
■ Works well with established web platforms(PHP, Ruby)
■ Lots of modules for things like proxying,URL rewriting
■ Virtual hosts
May already be on servers
nginx ■ Event-based architecture, very fast
■ Easy to configure
■ Proxy module works well with Node andWebSockets
■ Virtual hosts
Hosting Node applications when you also want to host static websites, but don’t yet have Apache or a legacy server set up
HAProxy ■ Event-based and fast
■ Can route to other web servers on thesame machine
■ Works well with WebSockets.
Scaling up to a cluster for high-traffic sites, or complex heterogeneous setups
Native Node proxy
■ Reuse your Node programming knowledge
■ Flexible
Useful if you want to scale and have a team with excellent Node skills
Which server is right for me?This chapter doesn’t cover every server choice out there—we’ve mainly focused onApache and nginx for Unix servers. Even so, it can be difficult to pick between theseoptions. We’ve included table 12.2 so you can quickly compare each option.
www.it-ebooks.info

341TECHNIQUE 100 Using WebSockets in production
backend static_assetsmode httpserver www_static localhost:8080
This works well if you have an existing set of Apache virtual hosts—perhaps servingthings like static assets, blogs, and websites—and you want to add Node to the sameserver. Apache can be set up to listen on a different port so HAProxy can sit in front ofit, and then route requests to Express on port 3000 and the existing Apache sites onport 8080. Apache allows you to change the port by using the Listen 8080 directive.
You can use the same acl option to route WebSockets based on URL. Let’s sayyou’ve mounted your WebSocket server on /chat in your Node application. You couldhave a specific instance of your server that just handles WebSockets, and route condi-tionally using HAProxy by using path_beg. The following listing shows how this works.
frontend http-inmode httpbind *:80acl is_websocket hdr(Upgrade) -i WebSocket
acl is_websocket path_beg -i /chat
use_backend ws if is_websocketdefault_backend node_backend
backend node_backendmode httpserver www_static localhost:3000
backend wstimeout server 600sserver ws1 localhost:3001
HAProxy can match requests based on lots of parameters. Here we’ve usedhdr(Upgrade) -i WebSocket to test if an Upgrade header has been used B. As you’vealready seen, that denotes a WebSocket handshake.
By using path_beg and marking matching routes with acl is_websocket C, youcan now route requests based on the prefix expression if is_websocket.
All of these HAProxy options can be combined to route requests to your Nodeapplication, Apache server, and WebSocket-specific Node server. That means you canrun your WebSockets off an entirely different process, or even another internal webserver. HAProxy is a great choice for scaling up Node programs—you could run multi-ple instances of your application on multiple servers.
HAProxy provides a weight option that allows you to implement round-robin loadbalancing by adding balance roundrobin to a backend.
You can initially deploy your application without nginx or HAProxy in front of it, butwhen you’re ready, you can scale up by using a proxy. If you don’t have performance
Listing 12.7 Using HAProxy with WebSockets
Check WebSocket header
B
Check if path for WebSockets was usedC
www.it-ebooks.info

342 CHAPTER 12 Node in production: Deploying applications safely
issues right now, then it’s worth just being aware that proxies can do things like routeWebSockets to different servers and handle round-robin load balancing. If you alreadyhave a server using Apache 2.2.x that isn’t compatible with proxying WebSockets, thenyou can drop HAProxy in front of Apache.
If you’re using HAProxy, you’ll still have to manage your Node processes with amonitoring daemon like runit or Upstart, but it has proven to be an incredibly flexi-ble solution.
Another approach that we haven’t discussed yet is to put your Node applicationsbehind a lightweight Node program that acts as a proxy itself. This is actually usedbehind the scenes by PaaS providers like Nodejitsu.
Selecting the right server architecture is just the first step to successfully deployinga Node application. You should also consider performance and scalability. The nextthree techniques include advice on caching and running clusters of Node programs.
12.2 Caching and scalingThis section is mainly about running multiple copies of Node applications at once,but we’ve also included a technique to give you details on caching. If you can makethe client do more work, then why not?
TECHNIQUE 101 HTTP caching
Even though Node is known for high-performance web applications, there are waysyou can speed things up. Caching is the major technique, and you should considercaching before deploying your application. This technique introduces the conceptsbehind HTTP caching.
■ ProblemYou want to reduce how long it takes to make requests to your application.
■ SolutionCheck to ensure that you’re using HTTP caching correctly.
■ DiscussionModern web applications can be huge: image assets, fonts, CSS, JavaScript, and HTMLall add up to a formidable payload that’s spread across several HTTP requests. Evenwith the best minimizers and compression, downloads can still run into megabytes. Toavoid requiring users to wait for every action they perform on your site, the best strat-egy can be to remove the need to download anything at all.
Browsers cache content locally, and can look at the cache to determine if aresource needs to be downloaded. This process is controlled by HTTP cache headers andconditional requests. In this technique we’ll introduce cache headers and explainhow they work, so when you watch your application serving responses in a debuggingtool like WebKit Inspector, you’ll know what caching headers to expect.
The main two headers are Cache-Control and Expires. The Cache-Controlheader allows the server to specify a directive that controls how a resource is cached.The basic directives are as follows:
www.it-ebooks.info

343TECHNIQUE 101 HTTP caching
■ public—Allow caching in the browser and any intermediate proxies betweenthe browser and server.
■ private—Only allow the browser to cache the resource.■ no-store—Don’t cache the resource (but some clients still cache under certain
conditions).
For a full list of Cache-Control directives, refer to the Hypertext Transfer Protocol 1.1specification (http://www.w3.org/Protocols/rfc2616/rfc2616.html).
The Expires header tells the browser when to replace the local resource. The dateshould be in the RFC 1123 format: Fri, 03 Apr 2014 19:06 BST. The HTTP/1.1 specifi-cation notes that dates over a year shouldn’t be used, so don’t set dates too far into thefuture because the behavior is undefined.
These two headers allow the server to tell clients when a resource should becached. Most Node frameworks like Express will set these headers for you—the staticserving middleware that’s part of Connect, for example, will set maxAge to 0 to indi-cate cache revalidation should occur. If you watch the Network console in yourbrowser’s debugging tools, you should see Express serving static assets with Cache-Control: public, max-age=0, and a Last-Modified dates based on the file date.
Connect’s static middleware, which is found in the send module, does this by usingstat.mtime.toUTCString to get the date of the last file modification. The browser willmake a standard HTTP GET request for the resource with two additional request headers:If-Modified-Since and If-None-Match. Connect will then check If-Modified-Sinceagainst the file modification date, andrespond with an HTTP 304, dependingon the modification date. A 304response like this will have no body, sothe browser can conditionally uselocal content instead of downloadingthe resource again.
Figure 12.7 shows a high-leveloverview of HTTP caching, from thebrowser’s perspective.
Conditional caching is great forlarge assets that may change, likeimages, because it’s much cheaper tomake a GET request to find out if aresource should be downloadedagain. This is known as a time-basedconditional request. There are also con-tent-based conditional requests, where adigest of the resource is used to see ifa resource has changed.
Request withlocal cache
304 with empty body,or 200 with document
New request
Local cachedresource
Conditionalrequest: content- or
time-based
Checkcache-control
Check expires
Figure 12.7 Browsers either use the local cache or make a conditional request, based on the previous re-quest’s headers.
www.it-ebooks.info

344 CHAPTER 12 Node in production: Deploying applications safely
Content-based conditional requests work using ETags. ETag is short for entity tag,and allows servers to validate resources in a cache based on their content. Connect’sstatic middleware generates ETags like this:
exports.etag = function(stat) {return '"' + stat.size + '-' + Number(stat.mtime) + '"';
};
Now contrast this to how Express generates ETags for dynamic content—this is usuallycontent sent with res.send, like a JavaScript object or a string:
exports.etag = function(body){return '"' + crc32.signed(body) + '"';
};
The first example uses the file modification time and size to create a hash. The seconduses a hashing function based on the content. Both techniques send the browser tagsthat are based on the content, but they’ve been optimized for performance based onthe resource type.
There’s pressure on developers of static servers to make them as fast as possible. Ifyou were to use Node’s built-in http module, you’d have to take all of these cachingheaders into account, and then optimize things like ETag generation. That’s why it’sadvisable to use a module like Express—it’ll handle the details of the required headersbased on sensible default behavior, so you can focus on developing your application.
Caching is an elegant way of improving performance because it effectively allowsyou to reduce traffic by making clients do a bit more work. Another option is to use aNode-based HTTP proxy to route between a cluster of processes or servers. Read on tolearn how to do this, or skip to technique 103 to see how to use Node’s cluster moduleto manage multiple Node processes.
TECHNIQUE 102 Using a Node proxy for routing and scaling
Local development is simple because you generally run one Node application at atime. But a production server can host multiple applications, and run the same appli-cation on multiple CPU cores to improve performance. So far we’ve talked about weband proxy servers, but this technique focuses on pure Node servers.
■ ProblemYou want to use a pure Node solution to host multiple applications, or scale anapplication.
■ SolutionUse a proxy server module like Nodejitsu’s http-proxy.
■ DiscussionThis technique demonstrates how to use Node programs to route traffic. It’s similar tothe proxy server examples in technique 100, so you can reapply these ideas toHAProxy or nginx. But there are times when it might be easier to express routing logicin code rather than using settings files.
www.it-ebooks.info

345TECHNIQUE 102 Using a Node proxy for routing and scaling
Also, as you’ve seen before in this book, Node programs run as a single process,which doesn’t usually take advantage of a modern server that may have multiple CPUsand CPU cores. Therefore, you can use the techniques here to route traffic based onyour production needs, but also to run multiple instances of your application so it canbetter take advantage of your server’s resources, reducing response latency and hope-fully keeping your customers happy.
Nodejitsu’s http-proxy (https://www.npmjs.org/package/http-proxy) is a light-weight wrapper around Node’s built-in http core module that makes it easier todefine proxies with code. The basic usage should be familiar to you if you’ve followedour chapter on Node web development. The following listing is a simple proxy thatredirects traffic to another port.
var httpProxy = require('http-proxy');var proxy = httpProxy.createProxyServer({
target: 'http://localhost:3000'});
proxy.on('error', function(err) {console.error('Error:', err);
});
proxy.listen(9000);
This example redirects traffic to port 3000 by using http-proxy’s target option B.This module is event-based, so errors can be handled by setting up an error listenerC. The proxy server itself is set to listen on port 9000 D, but we’ve just used that soyou can run it easily—port 80 would be used in production.
The options passed to createProxyServer can define other routing logic. If ws:true is set, then WebSockets will be routed separately. That means you can create aproxy server that routes WebSockets to one application, and standard requests else-where. Let’s look at that in a more detailed example. The next listing shows you howto route WebSocket requests to a separate application.
var http = require('http');var httpProxy = require('http-proxy');
var proxy = new httpProxy.createProxyServer({target: 'http://localhost:3000'
});
var wsProxy = new httpProxy.createProxyServer({target: 'http://localhost:3001'
});
var proxyServer = http.createServer(function(req, res) {
Listing 12.8 Redirecting traffic to another port with http-proxy
Listing 12.9 Routing WebSocket connections separately
Redirect traffic to port 3000
B
Catch errors and log them
C
Set this server to listen on port 9000
D
Create another proxy server for WebSockets
B
www.it-ebooks.info
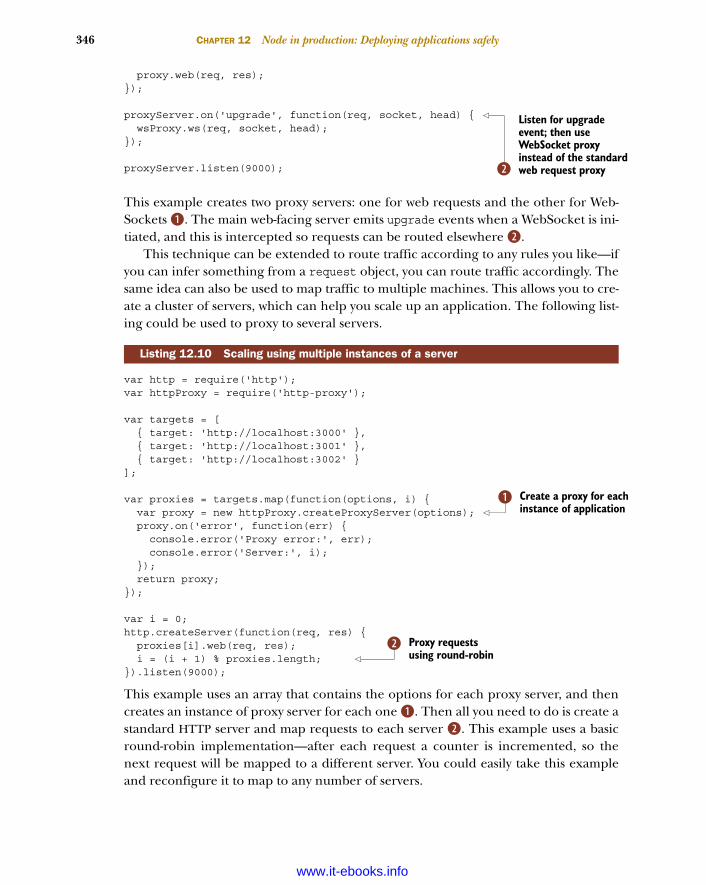
346 CHAPTER 12 Node in production: Deploying applications safely
proxy.web(req, res);});
proxyServer.on('upgrade', function(req, socket, head) {wsProxy.ws(req, socket, head);
});
proxyServer.listen(9000);
This example creates two proxy servers: one for web requests and the other for Web-Sockets B. The main web-facing server emits upgrade events when a WebSocket is ini-tiated, and this is intercepted so requests can be routed elsewhere C.
This technique can be extended to route traffic according to any rules you like—ifyou can infer something from a request object, you can route traffic accordingly. Thesame idea can also be used to map traffic to multiple machines. This allows you to cre-ate a cluster of servers, which can help you scale up an application. The following list-ing could be used to proxy to several servers.
var http = require('http');var httpProxy = require('http-proxy');
var targets = [{ target: 'http://localhost:3000' },{ target: 'http://localhost:3001' },{ target: 'http://localhost:3002' }
];
var proxies = targets.map(function(options, i) {var proxy = new httpProxy.createProxyServer(options);proxy.on('error', function(err) {console.error('Proxy error:', err);console.error('Server:', i);
});return proxy;
});
var i = 0;http.createServer(function(req, res) {
proxies[i].web(req, res);i = (i + 1) % proxies.length;
}).listen(9000);
This example uses an array that contains the options for each proxy server, and thencreates an instance of proxy server for each one B. Then all you need to do is create astandard HTTP server and map requests to each server C. This example uses a basicround-robin implementation—after each request a counter is incremented, so thenext request will be mapped to a different server. You could easily take this exampleand reconfigure it to map to any number of servers.
Listing 12.10 Scaling using multiple instances of a server
Listen for upgrade event; then use WebSocket proxy instead of the standard web request proxyC
Create a proxy for each instance of application
B
Proxy requests using round-robin
C
www.it-ebooks.info
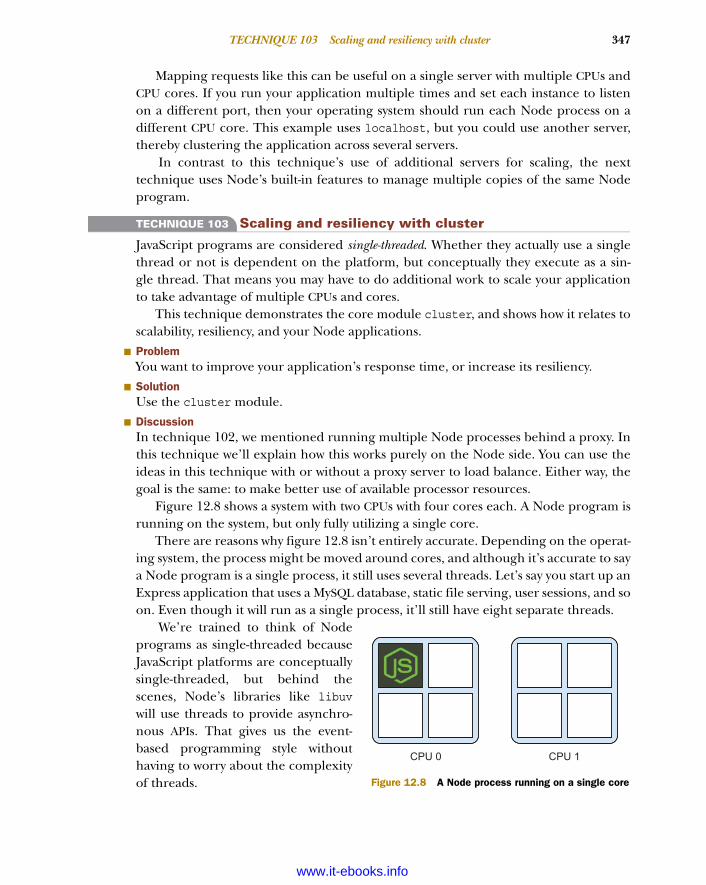
347TECHNIQUE 103 Scaling and resiliency with cluster
Mapping requests like this can be useful on a single server with multiple CPUs andCPU cores. If you run your application multiple times and set each instance to listenon a different port, then your operating system should run each Node process on adifferent CPU core. This example uses localhost, but you could use another server,thereby clustering the application across several servers.
In contrast to this technique’s use of additional servers for scaling, the nexttechnique uses Node’s built-in features to manage multiple copies of the same Nodeprogram.
TECHNIQUE 103 Scaling and resiliency with cluster
JavaScript programs are considered single-threaded. Whether they actually use a singlethread or not is dependent on the platform, but conceptually they execute as a sin-gle thread. That means you may have to do additional work to scale your applicationto take advantage of multiple CPUs and cores.
This technique demonstrates the core module cluster, and shows how it relates toscalability, resiliency, and your Node applications.
■ ProblemYou want to improve your application’s response time, or increase its resiliency.
■ SolutionUse the cluster module.
■ DiscussionIn technique 102, we mentioned running multiple Node processes behind a proxy. Inthis technique we’ll explain how this works purely on the Node side. You can use theideas in this technique with or without a proxy server to load balance. Either way, thegoal is the same: to make better use of available processor resources.
Figure 12.8 shows a system with two CPUs with four cores each. A Node program isrunning on the system, but only fully utilizing a single core.
There are reasons why figure 12.8 isn’t entirely accurate. Depending on the operat-ing system, the process might be moved around cores, and although it’s accurate to saya Node program is a single process, it still uses several threads. Let’s say you start up anExpress application that uses a MySQL database, static file serving, user sessions, and soon. Even though it will run as a single process, it’ll still have eight separate threads.
We’re trained to think of Nodeprograms as single-threaded becauseJavaScript platforms are conceptuallysingle-threaded, but behind thescenes, Node’s libraries like libuvwill use threads to provide asynchro-nous APIs. That gives us the event-based programming style withouthaving to worry about the complexityof threads.
CPU 0 CPU 1
Figure 12.8 A Node process running on a single core
www.it-ebooks.info

348 CHAPTER 12 Node in production: Deploying applications safely
If you’re deploying Node applica-tions and want to get more perfor-mance out of your multicore, multi-CPU system, then you need to startthinking more about how Node worksat this level. If you’re running a singleapplication on a multicore system, youwant something like the illustration infigure 12.9.
Here we’re running a Node pro-gram on all but one core, the idea being that a core is left free for the system. Youcan get the number of cores for a system with the os core module. On our system,running require('os').cpus().length returns 4—that’s the number of cores wehave, rather than CPUs—Node’s API cpus method returns an array of objects thatrepresent each core:
[{ model: 'Intel(R) Core(TM) i7-4650U CPU @ 1.70GHz',speed: 1700,times:{ user: 11299970, nice: 0, sys: 8459650, idle: 93736040, irq: 0 } },
{ model: 'Intel(R) Core(TM) i7-4650U CPU @ 1.70GHz',speed: 1700,times:{ user: 5410120, nice: 0, sys: 2514770, idle: 105568320, irq: 0 } },
{ model: 'Intel(R) Core(TM) i7-4650U CPU @ 1.70GHz',speed: 1700,times:{ user: 10825170, nice: 0, sys: 6760890, idle: 95907170, irq: 0 } },
{ model: 'Intel(R) Core(TM) i7-4650U CPU @ 1.70GHz',speed: 1700,times:{ user: 5431950, nice: 0, sys: 2498340, idle: 105562910, irq: 0 } } ]
With this information, we can automatically tailor an application to scale to the targetserver. Next, we need a way of forking our application so it can run as multiple pro-cesses. Let’s say you have an Express web application: how do you safely scale it upwithout completely rewriting it? The main issue is communication: once you start run-ning multiple instances of an application, how does it safely access shared resourceslike databases? There are platform-agnostic solutions to this that would require a bigproject rewrite—pub/sub servers, object brokers, distributed systems—but we’ll useNode’s cluster module.
The cluster module provides a way of running multiple worker processes thatshare access to underlying file handles and sockets. That means you can wrap a Nodeapplication with a master process that works workers. Workers don’t need access toshared state if you’re doing things like accessing user sessions in a database; all theworkers will have access to the database connection, so you shouldn’t need to set upany communication between workers.
CPU 0 CPU 1
Figure 12.9 Take advantage of more cores by run-ning multiple processes.
www.it-ebooks.info

349TECHNIQUE 103 Scaling and resiliency with cluster
Listing 12.11 is a basic example of using clustering with an Express application.We’ve just included the server.js file that loads the main Express application in app.js.This is our preferred method of structuring Node web applications—the part that setsup the server using .listen(port) is in a different file than the application itself. Inthis case, separating the server and application has the additional benefit of making iteasier to add clustering to the project.
var app = require('./app');var cluster = require('cluster');
if (cluster.isMaster) {var totalWorkers = require('os').cpus().length - 1;
console.log('Running %d total workers', totalWorkers);
for (var i = 0; i < totalWorkers; i += 1) {cluster.fork();
}} else {
console.log('Worker PID:', process.pid);app.listen(process.env.PORT || 3000);
}
The basic pattern is to load the cluster core module B, and then determine how manycores should be used C. The cluster.isMaster allows the code to branch if this is thefirst (or master) process, and then fork workers as needed with cluster.fork D.
Each worker will rerun this code, so when a worker hits the else branch, the servercan run the code particular to the worker E. In this example workers start listeningfor HTTP connections, thereby starting the Express application.
There’s a full example that includes this code in this book’s code samples, whichcan be found in production/inky-cluster.
If you’re a Unix hacker, this should all look suspiciously familiar. The semantics offork() are well known to C programmers. The way it works is whenever the systemcall fork() is used, the current process is cloned. Child processes have access to openfiles, network connections, and data structures in memory. To avoid performanceissues, a system called copy on write is used. This allows the same memory locations tobe used until a write is attempted, at which point each forked process receives a copyof the original. After the processes are forked, they’re isolated.
There’s an additional step to properly dealing with clustered applications: workerexit recovery. If one of your workers encounters an error and the process ends, thenyou’ll want to restart it. The cool thing about this is any other active workers can stillserve requests, so clustering will not only improve request latency but also potentiallyuptime as well. The next listing is a modification of listing 12.11, to recover from work-ers exiting.
Listing 12.11 Clustering a Node web application
Load the cluster core module.B
Determine how many processes should be started.C
Fork the process to create a worker.D
Workers will hit this branch, and the PID is displayed.E
www.it-ebooks.info

350 CHAPTER 12 Node in production: Deploying applications safely
var app = require('./app');var cluster = require('cluster');
if (cluster.isMaster) {var totalWorkers = require('os').cpus().length - 1;
console.log('Running %d total workers', totalWorkers);
for (var i = 0; i < totalWorkers; i += 1) {cluster.fork();
}
cluster.on('exit', function(worker) {console.log('Worker %d died', worker.id);cluster.fork();
});} else {
console.log('Worker PID:', process.pid);app.listen(process.env.PORT || 3000);
}
The cluster module is event-based, so the master can listen for events like exit B,which denotes the worker died. The callback for this event gets a worker object, soyou can get a limited amount of information about the worker. After that all you needto do is fork again C, and you’ll be back to the full complement of workers.
You can run this example with an Express application, and then use kill to forceworkers to quit. The transcript of such a session should look something like this:
Running 3 total workersWorker PID: 58733Worker PID: 58732Worker PID: 58734Worker 1 diedWorker PID: 58737
Three workers were running until kill 58734 was issued, and then a new worker wasforked and 58737 started.
Listing 12.12 Recovering from untimely worker death
cluster module is event-based
B
Fork again after worker diesC
Recovering from a crash in the master processYou might be wondering what happens when the master process itself dies. Eventhough the master should be kept simple to make this unlikely, a crash is still of coursepossible. To minimize downtime, you should still manage your clustered applicationswith a process manager like the forever module or Upstart. Both of these solutionsare explored in technique 99.
www.it-ebooks.info

351TECHNIQUE 104 Package optimization
Once you’ve got clustering set up, there’s one more thing to do: benchmark. We’lluse ab (http://httpd.apache.org/docs/2.0/programs/ab.html), the Apache bench-marking tool. It’s used like this:
ab -n 10000 -c 100 http://localhost:3000/
This makes 10,000 requests with 100 concurrent requests at any one time. Using threeworkers on our system gave 260 requests per second, whereas a single process versionresulted in 171 requests per second. The cluster was definitely faster, but is this reallyworking as well as our round-robin example with HAProxy or nginx?
The advantage of the cluster module is that you can script it with Node. Thatmeans your developers should be able to understand it rather than having to learnhow HAProxy or nginx works for load balancing. Load balancing with an additionalproxy server doesn’t have the same kind of interprocess communication options thatcluster has—you can use process.send and cluster.workers[id].on('message',fn) to communicate between workers.
But proxies with dedicated load-balancing features have a wider choice of load-balancing algorithms. Like all things, it would be wise to invest time in testingHAProxy, nginx, and Node’s clustering module to see which works best for your appli-cation and your team.
Also, dedicated load-balancing servers can proxy requests to multiple servers—youcould technically proxy from a central server to multiple Node application servers,each of which uses the cluster core module to take advantage of the server’s multi-core CPU.
With heterogeneous setups like this, you’ll need to keep track of what instances ofyour application are doing. The next section is dedicated to maintaining productionNode programs.
12.3 MaintenanceNo matter how solid your server architecture is, you’re still going to have to maintainyour production system. The techniques in this section are all about maintaining yourNode program; first, package optimization with npm.
TECHNIQUE 104 Package optimization
This technique is all about npm and how it can make deployments more efficient. Ifyou feel like your module folder might be getting a bit large, then read on for someideas on how to fix it.
■ ProblemYour application seems larger than expected when it’s released to production.
■ SolutionTry out some of npm’s maintenance features, like npm prune and npm shrinkwrap.
www.it-ebooks.info

352 CHAPTER 12 Node in production: Deploying applications safely
■ DiscussionHeroku makes your application’s size clear when you deploy: each release displays aslug size in megabytes, and the maximum size on Heroku is 300 MB. Slug size is closelyrelated to dependencies, so as your application grows and new dependencies areadded, you’ll notice that it can increase dramatically.
Even if you’re not using Heroku, you should be aware of your application’s size. Itwill impact how quickly you can release new code, and releasing new code should beas fast as possible. When deployment is fast, then releasing bug fixes and new featuresbecomes less of a chore and less risky.
Once you’ve gone through your dependencies in package.json and weeded outany that aren’t necessary, there are some other tricks you can use to reduce your appli-cation’s size. The npm prune command removes packages that are no longer listed inyour package.json, but it also applies to the dependencies themselves, so it can some-times dramatically reduce your application’s storage footprint.
You should also consider using npm prune --production to remove devDependen-cies from production releases. We’ve found test frameworks in our production releasesthat didn’t need to be there. If you have ./node_modules checked into git, then Herokuwill run npm prune for you, but it doesn’t currently run npm prune --production.
Another command you can use to potentially improve deployment is npm shrink-wrap. This will create a file called npm-shrinkwrap.json that specifies the exact versionof each of your dependencies, but it doesn’t stop there—it continues recursively tocapture the version of each submodule as well. The npm-shrinkwrap.json file can bechecked into your repository, and npm will use it during deployment to get the exactversion of each package.
shrinkwrap is also useful for collaboration, because it means people can duplicatethe modules you’ve had living on your computer during development. This helpswhen someone joins a project after you’ve been working solo for a few months.
Some PaaS providers have features for excluding files from deployment as well.For example, Heroku can accept a .slugignore file, which works like .gitignore—youcould create one like this to ignore tests and local seed data:
Why check in ./node_modules?It might be tempting to add ./node_modules to .gitignore, but don’t! When you’reworking on an application that will be deployed, then you should keep ./node_modules in your repository. This will help other people to run your application, andmake it easier to reproduce your local setup that passes tests and everything elseon a production environment.
Do not do this for modules you release through npm. Open source libraries shoulduse npm to manage dependencies during installation.
www.it-ebooks.info

353TECHNIQUE 105 Logging and logging services
/test/seed-data/docs
By taking advantage of npm’s built-in features, you can create solid and maintainablepackages, reduce deployment time, and improve deployment reliability.
Even with a well-configured, scalable, and carefully deployed application, you’llstill run into issues. When things go wrong, you need logs. Read on for techniqueswhen dealing with log files and logging services.
TECHNIQUE 105 Logging and logging services
When things break—not if, but when—you’ll need logs to uncover what happened.On a typical server, logs are text files. But what about PaaS providers, like Heroku andNodejitsu? For these platforms you’ll need logging services.
■ ProblemYou want to log messages from a Node application on your own server, or on a PaaSprovider.
■ SolutionEither redirect logs to files and use logrotate, or use a third-party logging service.
■ DiscussionIn Unix, everything is a file, and that partly dictates the way systems administratorsand DevOps experts think about log files. Logs are just files: programs stream datainto them, and we stream data out. This kind of setup is convenient for those of usthat live in the command line—piping files through commands like grep, sed, andawk makes light work of even gigabyte-sized logs.
Therefore, whatever you do, you’ll want to correctly use console.log andconsole.error. It also doesn’t hurt to be aware of err.stack—instances of Error inNode get a stack property when they’re defined, which can be extremely helpful fordebugging problems in production. For more on writing logs, take a look attechnique 6 in chapter 2.
The benefit of using console.error and console.log is that you can pipe out-put to different locations. The following command will redirect data from standardout (console.log) to application.log, and standard error (console.error) toerrors.log:
npm start 1> application.log 2> errors.log
All you need to remember is the greater-than symbol redirects output, and using anumber specifies the output stream: 1 is standard out, and 2 is standard error.
After a while, your log files will get too large. Fortunately, modern Unix systemsusually come with a log rotation package. This will split files up over time and option-ally compress them. The logrotate package can be installed in Debian or Ubuntuwith apt-get install logrotate. Once you’ve installed it, you’ll need a configuration
www.it-ebooks.info

354 CHAPTER 12 Node in production: Deploying applications safely
file for each set of log files you want to rotate. The following listing shows an exampleconfiguration that you can tailor for your application.
"/var/www/nodeapp/logs/application.log""/var/www/nodeapp/logs/application.err" {
dailyrotate 20compresscopytruncate
}
After listing the log files you want to rotate, you can list the options you want to use.logrotate has many options, and they’re documented in man logrotate. The firstone here, daily B, just states that we want to rotate files every day. The next linemakes logrotate keep 20 files; after that files will be removed C. The third optionwill make sure old log files are compressed so they don’t use up too much space D.
The fourth option, copytruncate E, is more important for an application thatuses simple standard I/O-based logging. It makes logrotate copy and then truncatethe current log file. That means that your application doesn’t need to close and re-open standard out—it should just work without any special configuration.
Using standard I/O and logrotate works well for a single server and a simpleapplication, but if you’re running an application in a cluster, you might find it difficultto manage logging. There are Node modules that are dedicated to logging and pro-vide cluster-specific options. Some people even prefer to use these modules becausethey generate output in standard log file formats.
Using the log4node module (https://github.com/bpaquet/log4node) is similarto using console.log, but has features that make it easier for use in a cluster. It cre-ates one log file for all workers, and listens for a USR2 signal to determine when to re-open files. It supports configuration options, including log level and message prefix,so you can keep logs quiet during tests or increase the verbosity for critical productionsystems.
winston (https://github.com/flatiron/winston) is a logging module that supportsmultiple transports, including Cassandra, which allows you to cluster your log writes.That means that if you have an application that writes millions of log entries an hour,then you can use multiple servers to capture the logs in a more reliable manner.
winston supports remote log services, including commercial ones like Papertrail.Papertrail and Loggly (see figure 12.10) are commercial services that you can pipeyour logs to, typically using the syslogd protocol. They will also index logs, so search-ing gigabytes of logs is extremely fast, depending on the query.
A service like Loggly is absolutely critical for Heroku. Heroku only stores the last 5,000log entries, which can be flooded off within minutes of running a typical application.If you’ve deployed a Node application to Heroku that uses console.log, log4node, orwinston, then you’ll be able to redirect your logs just by enabling the add-on.
Listing 12.13 logrotate configuration
Run everyday
B
Keep 20 filesCCompress
rotated files D Truncate current log fileE
www.it-ebooks.info

355TECHNIQUE 105 Logging and logging services
With Heroku, Loggly can be configured by selecting a plan name and running herokuaddons:add Loggly:PlanName from your project’s directory. Typing heroku
addons:open loggly will open the Loggly web interface, but there’s also a link inHeroku’s administration panel under Resources. Any logging you’ve done withstandard I/O should be sent straight to Loggly.
If you’re using winston, then there are transports available for Loggly. One iswinston-loggly (https://github.com/indexzero/winston-loggly), which can be usedfor easy access to Loggly with non-Heroku services, or your own private servers.
Because Winston transports can be changed by using winston.add(winston.transports.Loggly, options), you don’t need to do anything special to supportLoggly if you’re already using winston.
There’s a standard for logging that you can use with your applications: The SyslogProtocol (RFC 5424). Syslog message packets have a standard format, so you won’t usu-ally generate them by hand. Modules like winston typically support syslog, so you canuse it with your Node application, but there are two main benefits to using it. The firstis that messages have standardized log levels, so filtering logs is easier. Some examplesinclude level 0, known as Emergency, and level 4, which is Warning. The second is that the
Figure 12.10 Loggly’s dashboard
www.it-ebooks.info

356 CHAPTER 12 Node in production: Deploying applications safely
protocol defines how messages are sent over the network, which means you can makeyour Node application talk to a syslog daemon that runs on a remote server.
Some log services like Loggly and Splunk can act as syslog servers; or, you couldrun your own daemon on dedicated hardware or a virtual machine. By using a stan-dardized protocol like syslog, you can switch between log providers as your require-ments change.
That’s the last technique on Node-specific production concerns. The next sectionoutlines some additional issues relating to scaling and resiliency.
12.4 Further notes on scaling and resiliencyIn this chapter we’ve demonstrated how to use proxies and the cluster module toscale Node programs. One of the advantages we cited in cluster’s favor is easier inter-process communication. If you’re running an application on separate servers, how canNode processes communicate?
One simple answer might be HTTP—you could build an internal REST API for com-munication. You could even use WebSockets if messages need faster responses. Whenwe were faced with this problem, we used RabbitMQ (https://www.rabbitmq.com/).This allowed instances of our Node application to message each other using a sharedmessage bus, thereby distributing work throughout a cluster.
The project was a search engine that used Node programs to download and scrapecontent. Work was classified into spidering, downloading, and scraping. Swarms ofNode processes would take work from queues, and then push new jobs back to queuesas well.
There are several implementations of RabbitMQ clients on npm—we used amqplib(https://www.npmjs.org/package/amqplib). There are also competitors toRabbitMQ—zeromq (http://zeromq.org/) is a highly focused and simple alternative.
Another option is to use a hosted publish/subscribe service. One example of this isPusher (http://pusher.com/), which uses WebSockets to help scale applications. Theadvantage of this approach is that Pusher can message anything, including mobile cli-ents. Rather than restricting messaging to your Node programs, you can create mes-sage channels that web, mobile, and even desktop clients can subscribe to.
Finally, if you’re using private servers, you’ll need to monitor resource usage.StrongLoop (http://strongloop.com/) offers monitoring and clustering tools forNode, and New Relic (New Relic) also now has Node-specific features. New Relic canhelp you break down where time is being spent in a live application, so you can use itto discover bottlenecks in database access, view rendering, and application logic.
With service providers like Heroku, Nodejitsu, and Microsoft, and the tools pro-vided by StrongLoop and New Relic, running Node software in production has rapidlymatured and become entirely feasible.
www.it-ebooks.info

357Summary
12.5 SummaryIn this chapter you’ve seen how to run Node on PaaS providers, including Heroku,Nodejitsu, and Windows Azure. You’ve also learned about the issues of running Nodeon private servers: safely accessing port 80 (technique 98), and how WebSockets relateto production requirements (technique 100).
No matter how fast your code is, if your application is popular, then you may runinto performance issues. In our section on scaling, you’ve learned all about caching(technique 101), proxies (technique 102), and scaling with cluster (technique 103).
To keep your application running solidly, we’ve included maintenance-relatedtechniques on npm in production (technique 104) and logging (technique 105). Nowif anything goes wrong, you should have enough information to solve the problem.
Now you should know how to build Node web applications and release them in amaintainable and scalable state.
www.it-ebooks.info

Part 3
Writing modules
As we dove deep into Node’s core libraries and looked into real-world rec-ipes, we’ve been building a narrative that leads to the biggest part of the Node eco-system: community-driven innovation through third-party module development.As the core provides the Legos with which we build, and the recipes provide thetooling and insight to build confidently, what we ultimately build is up to us!
We have one last chapter that will take you through the ins and outs of build-ing a module and contributing it back to the community.
www.it-ebooks.info

361
Writing modules: Mastering what
Node is all about
The Node package manager (npm) is arguably the best package manager any plat-form has seen to date. npm at its core is a set of tools for installing, managing, andcreating Node modules. The barrier to entry is low and uncluttered with ceremony.Things “just work” and work well. If you aren’t convinced yet, we hope this chapterwill encourage you to take another look.
The subtitle for this chapter is “Mastering what Node is all about.” We chose thisbecause user-contributed modules make up the vast majority of the Node ecosystem. The
This chapter covers■ Planning a module■ Setting up a package.json file■ Working with dependencies and semantic versioning■ Adding executable scripts■ Testing out a module■ Publishing modules
www.it-ebooks.info

362 CHAPTER 13 Writing modules: Mastering what Node is all about
core team decided early on that Node would have a small standard library, containingjust enough core functionality to build great modules upon. We knew understandingthis core functionality was paramount to building modules, so we saved this chapterfor the end. In Node, you may find 5 or 10 different implementations for a particularprotocol or client, and we’re OK with that because it allows experimentation to driveinnovation in the space.
One thing we’ve learned through our experimentation is that smaller modules mat-ter. Larger modules tend to be hard to maintain and test. Node enables smaller mod-ules to be stuck together simply to solve more and more complex problems.
Node’s require system (based on CommonJS; http://wiki.commonjs.org/wiki/Modules/1.1) manages those dependencies in a way that avoids dependency hell. It’sperfectly fine for modules to depend on different versions of the same module, asshown in figure 13.1.
In addition to standard dependencies, you can specify development and peerdependencies (more on that later) and have npm keep those in check for you.
DEPENDENCY GRAPHS If you ever want to see a dependency graph for yourproject, just type npm ls at the project root to get a listing.
Another difference that was decided early on in the history of npm was to managedependencies at a local level by default as popularized by the bundler Ruby gem. Thisbundles modules inside your project (sitting in the node_modules folder), makingdependency hell a non-issue across multiple projects since there’s no globally sharedmodule state.
INSTALLING GLOBAL MODULES You can still install global modules if you wantwith npm install -g module-name, which can be useful when you need a sys-tem-wide executable, for instance.
A 1.0.0My
dependencies
My app uses the latestversion of module C.
My dependencies use the versionof C they depend upon.
B 1.0.0 C 0.8.0
My app 1.0.0
A Node dependency graph
C 0.5.0 C 0.6.0
Figure 13.1 Node avoids dependency hell
www.it-ebooks.info

363TECHNIQUE 106 Planning for our module
Hopefully we’ve whetted your appetite for exploring a range of module-authoringtechniques! In this chapter we’ll focus on a variety of techniques that center around
■ Effectively making the most of the package.json file ■ Using npm for various module-authoring tasks ■ Best practices for developing modules
Our techniques will follow a logical order from an empty project directory to a com-pleted and published npm module. Although we tried to stuff as many concepts aspossible into one module, you may find your module may only need a handful ofthese steps. When we can’t fit a concept into the module, we’ll focus on an isolateduse case to illustrate the point.
13.1 BrainstormingWhat kind of API do we want to build? How should someone consume it? Does it havea clear purpose? These are some of the questions we need to ask as we begin to write amodule. In this section we’ll walk through researching and proving out a moduleidea. But first, let’s introduce a problem we want to solve, which will provide a contextas we progress.
13.1.1 A faster Fibonacci module
One of the most famous Node critiques (although arguably misguided) early on in itshistory was “Node.js is Cancer” (http://pages.citebite.com/b2x0j8q1megb), wherethe author argued that a CPU-bound task on a running web server was miserably han-dled in Node’s single-threaded system.
The implementation was a common recursive approach to calculating a Fibonaccisequence (http://en.wikipedia.org/wiki/Fibonacci_number), which could be imple-mented as follows:
function fibonacci (n) {if (n === 0) return 0;if (n === 1) return 1;return fibonacci(n-1) + fibonacci(n-2);
}
This implementation is slow in V8, and since proper tail calls don’t yet exist inJavaScript, it wouldn’t be able to calculate very high numbers due to a stack overflow.
Let’s write a module to help rid the world of slow Fibonacci calculations in orderto learn about module development from start to finish.
TECHNIQUE 106 Planning for our module
So we want to start writing a module. How should we approach it? Is there anything wecan do before we even start writing a line of code? It turns out that planning ahead oftime can be extremely helpful and save pain down the road. Let’s take a peek on howto do that well.
This line was added to the original implementation, since the original didn’t return a proper sequence number for 0.
www.it-ebooks.info

364 CHAPTER 13 Writing modules: Mastering what Node is all about
■ ProblemYou want to write a module. What steps should you take in planning?
■ SolutionResearch what already exists, and ensure that your module does just one thing.
■ DiscussionIt’s important to clearly articulate the purpose of your module. If you can’t boil itdown to one sentence, it may be doing too much. Here’s where an important aspectof the Unix philosophy comes in: make each program do one thing well.
Surveying the landscapeFirst, it’s good to know what exists already. Has someone else implemented a solutionto my problem? Can I contribute there? How did others approach this? A great way todo that is searching on npmjs.org or doing a search from the command line:
npm search fibonacci
Let’s look at some of the more interesting results:
fibonacci Calculates fibonacci numbers for one or endless iterations.…=franklin 2013-05-01 1.2.3 fibonacci math bignum endless
fibonacci-async So, you want to benchmark node.js with fibonacci once…=gottox 2012-10-29 0.0.2
fibonacci-native A C++ addon to compute the nth fibonacci number.=avianflu 2012-03-21 0.0.0
Here we can see the names and descriptions of three different implementations. Wealso see what version was released last and on what date. It looks like a couple areolder and have a lower version number, which may mean the API is in flux or still inprogress. But the top result looks pretty mature at version 1.2.3 and has been updatedmost recently. Let’s get more information on that by running the following:
npm docs fibonacci
The npm docs command will load the module’s homepage if specified, or the npmjssearch result, which looks like figure 13.2.
The npmjs result page helps give you an overall picture for a module. We can seethis module depends on the bignum module and was updated a year ago, and we canview its readme to get a sense of the API.
Although this module looks pretty good, let’s create a module as an experiment totry out some other ideas for handling Fibonacci sequences. In our case, let’s create amodule where we’ll experiment with different implementations and benchmark ourresults using straight JavaScript with no required bignum dependency.
If this is your first time running npm search, it will take a while to update the local cache before you get any results.
www.it-ebooks.info

365TECHNIQUE 106 Planning for our module
Embrace doing one thing wellA module should be simple and pluggable. In this case, let’s try to define our mod-ule’s purpose in one phrase:
Calculates a Fibonacci number as quickly as possible with only JavaScript
That’s a pretty good start: it’s clear and succinct. When that concept doesn’t ring trueanymore, we’ve blown our scope, and it may be time to write another module thatextends this one rather than adding more to it. For this project, adding a web serverendpoint that returns the result of this function may be better served in a new modulethat depends on this one.
Of course, this isn’t a rigid requirement, but it helps us clarify the module’s pur-pose and makes it clear for our end users. This statement will be great to add to ourpackage.json (which we’ll look at later) and to the top of our readme file.
We’ll eventually need a module name, which isn’t vital at the start, but in order torefer to it in future techniques, let’s call ours fastfib. Go ahead and make a fastfibdirectory that will serve as our project directory:
mkdir fastfib && cd fastfib
Fulldescription
Installation
Recentdownload
activity
Packageinformation
Modulereadme
Figure 13.2 npmjs.com package details page
www.it-ebooks.info

366 CHAPTER 13 Writing modules: Mastering what Node is all about
Now that we’ve defined our “one thing” we want our module to do and have our bareproject directory, let’s prove out our module idea in the next technique to see if it willactually work.
TECHNIQUE 107 Proving our module idea
So we have a focus now; what next? Time to prove our idea. This is the step where wethink about the API surface of our module. Is it usable? Does it accomplish its pur-pose? Let’s look at this next.
■ ProblemWhat should you code first when proving out your module idea?
■ SolutionLook at the API surface through TDD.
■ DiscussionIt’s important to know how you want your module to function. In fastfib, we’ll calcu-late a Fibonacci sequence synchronously. What would be the simplest and easiest-to-useAPI we can think of?
fastfib(3) // => 2
Right, just a simple function call that returns the result. When building an asynchronous API, it’s recommended to use the Node callback
signature, as it will work well with pretty much any control flow library. If our modulewere asynchronous, it would look like this:
fastfib(3, function (err, result) {console.log(result); // => 2
});
We have our synchronous API. In the beginning of this chapter, we showed you animplementation that we wanted to improve on. Since we want a baseline to compareother implementations, let’s bring that recursive implementation into our project bycreating a lib folder with a file called recurse.js with the following content:
module.exports = recurse;
function recurse (n) {if (n === 0) return 0;if (n === 1) return 1;return recurse(n-1) + recurse(n-2);
}
Defining an entry pointEvery module has an entry point: the object/function/constructor that we get when it’srequired elsewhere using the require keyword. Since we know that we’ll be trying dif-ferent implementations inside our lib directory, we don’t want lib/recurse.js to be theentry point, as it may change.
Exporting a single function to match our API design
www.it-ebooks.info

367TECHNIQUE 107 Proving our module idea
Usually index.js in the project root makes the most sense as an entry point. Manytimes it makes sense to have the entry point be minimal in nature and just tie togetherthe parts needed to provide the API to the end user. Let’s create that file now:
module.exports = require('./lib/recurse');
Now when a consumer of the module does a require('fastfib'), they will get thisfile and in turn get our recursive implementation. We can then just switch this filewhenever we need to change the exposed implementation.
Testing our implementationNow that we have our first implementation of fastfib, let’s ensure that we actuallyhave a legit Fibonacci implementation. For that, let’s make a folder called test with asingle index.js file inside:
var assert = require('assert');var fastfib = require ('../');
assert.equal(fastfib(0), 0);assert.equal(fastfib(1), 1);assert.equal(fastfib(2), 1);assert.equal(fastfib(3), 2);assert.equal(fastfib(4), 3);assert.equal(fastfib(5), 5);assert.equal(fastfib(6), 8);assert.equal(fastfib(7), 13);assert.equal(fastfib(8), 21);assert.equal(fastfib(9), 34);assert.equal(fastfib(10), 55);assert.equal(fastfib(11), 89);assert.equal(fastfib(12), 144);
// if we get this far we can assume we are on the right track
Now we can run our test suite to see if we’re on track:
node test
We didn’t get any errors thrown, so it looks like we’re at least accurate in ourimplementation.
Benchmarking our implementationNow that we have a well-defined API and tests around our implementation of fastfib,how do we determine how fast it is? For this we’ll use a reliable JavaScript benchmark-ing tool behind the jsperf.com project called Benchmark.js (http://benchmarkjs.com/). Let’s include it in our project:
npm install benchmark
Let’s create another folder called benchmark and add an index.js file inside of it withthe following code:
var assert = require('assert');var recurse = require('../lib/recurse');var suite = new (require('benchmark')).Suite;
Include our recursive implementation to test.Set up a new
benchmark suite.
www.it-ebooks.info

368 CHAPTER 13 Writing modules: Mastering what Node is all about
suite.add('recurse', function () { recurse(20); }).on('complete', function () {console.log('results: ') ;this.forEach(function (result) {
console.log(result.name, result.count, result.times.elapsed);});assert.equal(
this.filter('fastest').pluck('name')[0],'recurse','expect recurse to be the fastest'
);}).run();
Let’s run our benchmark now from the root module directory:
$ node benchmarkresults:recurse 392 5.491
Looks like we were able to calculate recurse(20) 392 times in ~5.5 seconds. Let’s seeif we can improve on that. The original recursive implementation wasn’t tail call opti-mized, so we should be able to get a boost there. Let’s add another implementation tothe lib folder called tail.js with the following content:
module.exports = tail;
function tail (n) { return fib(n, 0, 1); }function fib (n, current, next) {
if (n === 0) return current;return fib(n -?1, next, current + next);
}
Now, add the test to our benchmark/index.js file and see if we did any better by add-ing the implementation to the top of the file:
var recurse = require('../lib/recurse');var tail = require('../lib/tail');---.add('recurse', function () { recurse(20); }).add('tail', function () { tail(20); })
Add a test for the recurse function, calculating the 20th number in the Fibonacci sequence.
After the testscomplete, aggregate
the results.
Output the test name,with the amount of
iterations it was able todo in the elapsed time.
Assert that recursewas the fastest
implementation; givenit’s the only
implementation so far,that should be easy!
In order to expose the same API as recurse, we add this function to set up our default values.
This recursivefibonacci function
takes the next indexn, the current
sequence number,and the next
sequence number.
If we’ve reached theend, return the current
sequence number.Calculate the next call. This is in tail
position because the calculationshappen before the recursive
function call and therefore are ableto be optimized by the compiler.
Require tail implementation after the recurse require
Add tail test afterthe recurse test
www.it-ebooks.info

369TECHNIQUE 107 Proving our module idea
Let’s see how we did:
$ node benchmarkresults:recurse 391 5.501tail 269702 5.469
assert.js:92throw new assert.AssertionError({^
AssertionError: expect recurse to be the fastest
Wow! Tail position really helped speed up our Fibonacci calculation. So let’s switchthat to be our default implementation in our main index.js file:
module.exports = require('lib/tail');
And make sure our tests pass:
node test
No errors; it looks like we’re still good. As noted earlier, a proper tail call implementa-tion will still blow our stack when it gets too large, due to it not being supported yet inJavaScript. So let’s try one more implementation and see if we can get any better. Toavoid a stack overflow on larger sequences of numbers, let’s make an iterative imple-mentation and create it at lib/iter.js:
module.exports = iter;
function iter (n) {var current = 0, next;for (var i = 0; i < n; i++) {
swap = current, current = next;next = swap + next;
}return current;
}
Let’s add this implementation to the benchmark/index.js file:
var tail = require('../lib/tail');var iter = require('../lib/iter');---.add('tail', function () { tail(20) }).add('iter', function () { iter(20) })
Let’s see how we did:
$ node benchmarkresults:recurse 392 5.456tail 266836 5.455iter 1109532 5.474
Putting our recursive function into tail position led to a 689x speedup!
Our assertion failed, as recurse is no longer the fastest implementation.
Set upcurrent and
next defaults
Iterate through index n, swapping next and current values and incrementing the next value
Return final current value
Require iterative implementation after the tail require
Add iterative test after the tail test
www.it-ebooks.info

370 CHAPTER 13 Writing modules: Mastering what Node is all about
An iterative approach turns out to be 4x faster than the tail version, and 2830x fasterthan the original function. Looks like we have a fastfib indeed, and have proven ourimplementation. Let’s update our benchmark/index.js file to assert that iter shouldbe the fastest now:
assert.equal(this.filter('fastest').pluck('name')[0],'iter','expect iter to be the fastest'
);
Then update our main index.js to point to our fastest version:
module.exports = require('./lib/iter');
And test that our implementation is still correct:
node test
No errors still, so we’re good! If we later find that V8 optimizes tail call flows to beeven faster than our iterative approach, our benchmark test will fail and we can switchimplementations. Let’s review our overall module structure at this point:
fastfibbenchmark
index.jsindex.jslib
iter.jsrecurse.jstail.js
node_modulesbenchmark
testindex.js
Looks like we’ve proved our idea. What’s important to take away is to experiment! Trydifferent implementations! You likely won’t get it right initially, so take this time toexperiment until you’re satisfied. In this particular technique, we tried three differentimplementations until we landed one.
Time to look at the next step in module development: setting up a package.jsonfile.
13.2 Building out the package.json fileNow we have an idea we like and we’ve proven that our idea does what we intend it todo, we’ll turn to describing that module though a package.json file.
TECHNIQUE 108 Setting up a package.json file
A package.json is the central file for managing core data about your module, commonscripts, and dependencies. Whether you ultimately publish your module or simply useit to manage your internal projects, setting up a package.json will help drive your
Our benchmark suiteOur moduleentry point
Our implementations
Our installeddependencies
Our tests
www.it-ebooks.info

371TECHNIQUE 108 Setting up a package.json file
development. In this technique we’ll talk about how to get a package.json set up andhow to populate your package json using npm.
■ ProblemYou need to create a package.json file.
■ SolutionUse the built-in npm tools.
■ DiscussionThe npm init command provides a nice step-by-step interface for setting up a pack-age.json. Let’s run this command on our fastfib project directory:
$ npm init
---
name: (fastfib) fastfib
version: (0.0.0) 0.1.0
description: Calculates a Fibonacci number as fast as possible
with only JavaScript.
entry point: (index.js)
test command: node test && node benchmark
git repository: git://github.com/wavded/fastfib.git
keywords: fibonacci fast
author: Marc Harter <[email protected]> (http://wavded.com)
license: (ISC) MIT
---
PACKAGE OPTIONS For extensive detail on each package option, view the offi-cial documentation (https://www.npmjs.org/doc/json.html) by running npmhelp json.
Running npm init gets even simpler when you set up your user config ($HOME/.npmrc) to prepopulate the values for you. Here are all the options you can set:
npm config set init.author.name "Marc Harter"npm config set init.author.email "[email protected]"npm config set init.author.url "http://wavded.com"npm config set init.license "MIT"
With these options, npm init won’t ask you for an author, but instead autopopulatethe values. It will also default the license to MIT.
A name for your package.This is required to publish.
Since our project folderwas called fastfib, this is
defaulted to fastfib for us.
The version of your package. This is also required and it is highly recommended to utilize semantic versioning (semver). We’ll look more at semver later. For now we’ll set the version at 0.1.0.
A longer descriptionfor your package.Here we use our
succinct one-liner todescribe the package.
The entry pointto your module,
loaded first whenyour package is
required.
Test command to run.This command will beset up to be executed
with npm test. Since ourmodule is consideredfully tested when it’sfast and correct, we run both node test
and node benchmark.
The location of the Git repositorywhere your code is hosted. If you’ve
already done a git init and git remoteadd, this will be autopopulated for you.
These are search keywords
This is you! Use theformat: [Full Name]
<[Email]> ([Website])!This is type of licensing for the software, defaults to ISC license: http://en.wikipedia.org/wiki/ISC_license. If you
need help deciding on a license, check out http://choosealicense.com/.
www.it-ebooks.info

372 CHAPTER 13 Writing modules: Mastering what Node is all about
A NOTE ABOUT EXISTING MODULES If you already have modules that youinstalled prior to setting up your package.json file, npm init is smart enoughto add them to package.json with the correct versions!
Once you’ve finished initializing, you’ll have a nice package.json file in your directorythat looks something like this:
{"name": "fastfib","version": "0.1.0","description": "Calculates a Fibonacci number as fast
as possible with only JavaScript.","main": "index.js","bin": {"fastfib": "index.js"
},"directories": {"test": "test"
},"dependencies": {
"benchmark": "^1.0.0"},"devDependencies": {},"scripts": {"test": "node test && node benchmark"
},"repository": {"type": "git","url": "git://github.com/wavded/fastfib.git"
},"keywords": ["fibonacci","fast"
],"author": "Marc Harter <[email protected]> (http://wavded.com)","license": "MIT","bugs": {
"url": "https://github.com/wavded/fastfib/issues"},"homepage": "https://github.com/wavded/fastfib"
}
Now that we have a good start on a package.json file, we can add more properties byeither directly modifying the JSON file or using other npm commands that modify dif-ferent parts of the file for you. The npm init command just scratches the surface on whatwe can do with a package.json file. We’ll look at more things we can add as we continue.
In order to look at more package.json configuration and other aspects of moduledevelopment, let’s head to the next technique.
Dependencies your module depends upon. Note how npm init discovered that we already were using the benchmark module and added it for us.
Additional dependencies only used for development. These are by default not included when someone installs your module.
Used by npm bugs to launcha browser at the location
where issues can bereported. Since we’re using
a GitHub repository, npminit autopopulated this
property for us.
The location of the project’s homepage.Defaulted to GitHub since we entered aGitHub repository URL. This is used by
npm docs to launch a browser at theproject’s homepage.
www.it-ebooks.info

373TECHNIQUE 109 Working with dependencies
TECHNIQUE 109 Working with dependencies
Node has over 80,000 published modules on npm. In our fastfib module, we’vealready tapped into one of those: the benchmark module. Having dependencies welldefined in our package.json file helps maintain the integrity of our module when it’sinstalled and worked on by ourselves and others. A package.json file tells npm what tofetch and at what version to fetch our dependencies when using npm install. Failing toinclude dependencies inside our package.json file will result in errors.
■ ProblemHow do you effectively manage dependencies?
■ SolutionKeep the package.json file in sync with your module requirements using npm.
■ DiscussionThe package.json file allows you to define four types of dependency objects, shown infigure 13.3.
The types of dependencies are as listed here:
■ dependencies—Required for your module to function properly ■ devDependencies—Required solely for development, like testing, bench-
marking, and server reloading tools ■ optionalDependencies—Not required for your module to work, but may
enhance the functionality in some way ■ peerDependencies—Requires another module to be installed in order to run
properly
My module
dependencies Dependencies required for my module to work
optionalDependencies Dependencies my module will use if available
peerDependencies Dependencies I require the end user to already have installed
devDependencies Dependencies only required for development tasks (like testing)
Figure 13.3 The different types of dependencies
www.it-ebooks.info

374 CHAPTER 13 Writing modules: Mastering what Node is all about
Let’s look at these in turn with our project and talk about adding and removing withinyour package.json file as we go.
Main and development dependenciesCurrently the package.json file that was generated with npm init has benchmark listedin the dependencies object. If we look at our list, that doesn’t hold true for a couple rea-sons. The first is because our main entry point (index.js) will never require benchmarkin its require chain, so an end user has no need for it:
index.js requires ./lib/iter.js which requires nothing
The second reason is because benchmarking is typically a development-only thing forthose who work on our module. To remove that out of our dependencies, we can usenpm remove and have it removed from our package.json file using the --save flag:
$ npm remove benchmark --saveunbuild [email protected]
Then we can install it into our development dependencies using npm install with the--save-dev flag:
$ npm install benchmark [email protected] node_modules/benchmark
Now if we look at our package.json file, we’ll see that benchmark is now a part of thedevDependencies object:
"devDependencies": {"benchmark": "^1.0.0"
},
This was somewhat of a brute force way to show you the commands to remove andinstall with npm. We could have also just moved benchmark inside the package.jsonfile in our text editor, avoiding the uninstall and re-install.
Now we have benchmark in the right spot, so it won’t be installed when others wantto use our module.
Optional dependenciesOptional dependencies aren’t required for a project to run, but they will be installedalong with the regular dependencies. The only difference from normal dependenciesis that if an optional dependency fails to install, it will be ignored and the moduleshould continue to install properly.
This typically plays out for modules that can get a boost by including a native add-on. For example, hiredis is a native C add-on to boost performance for the redismodule. But it can’t be installed everywhere, so it attempts to install, but if it fails, theredis module falls back to a JavaScript implementation. A typical pattern to check forthe dependency in the parent module is this:
try {var client = require('hiredis'); // super fast!
}Attempt to load the optional dependency.
www.it-ebooks.info

375TECHNIQUE 109 Working with dependencies
catch (e) {var client = require('./lib/redis'); // fast
}
module.exports = client;
Let’s say we wanted to support a larger set of sequence numbers for our fastfib. Wecould add the bignum native add-on to enable that functionality by running
npm install bignum --save-optional
Then we could optionally use that iteration instead if we detect the bignum modulewas able to be installed in our index.js file:
try {var fastfib = require('./lib/bigiter');
}catch (er) {
var fastfib = require('./lib/iter');}
module.exports = fastfib;
Unfortunately, the bignum implementation would be much slower, as it can’t be opti-mized by the V8 compiler. We’d be violating our goal of having the fastest Fibonacci ifwe included that optional dependency and implementation, so we’ll scratch it out fornow. But this illustrates how you may want to use optional dependencies (for example,if you wanted to support the highest possible Fibonacci numbers as your goal).
HOMEWORK The code and tests were intentionally left out for the bignumimplementation; try implementing a version that uses bignum and see whatperformance benchmarks you get from our test suite.
Peer dependenciesPeer dependencies (http://blog.nodejs.org/2013/02/07/peer-dependencies/) arethe newest to the dependency scene. Peer dependencies say to someone installingyour module: I expect this module to exist in your project and to be at this version in order formy module to work. The most common type of this dependency is a plugin.
Some popular modules that have plugins are
■ Grunt ■ Connect ■ winston■ Mongoose
Let’s say we really wanted to add a Connect middleware component that calculates aFibonacci number on each request; who wouldn’t, right? In order for that to work,
If that fails, continue without the dependency, perhaps shimming with another implementation.
Expose a common interface entry pointanyone can use regardless of whether
they got the optional dependency.
Try to include bignum implementation of fastfib.
If that fails, include iterative implementation.
www.it-ebooks.info

376 CHAPTER 13 Writing modules: Mastering what Node is all about
we need to make sure the API we write will work against the right version of Connect.For example, we may trust that for Connect 2 we can reliably say our module willwork, but we can’t speak for Connect 1 or 3. To do this we can add the following toour package.json file:
"peerDependencies": {"connect": "2.x"
}
In this technique we looked at the four types of dependencies you can define in yourpackage.json file. If you’re wondering what ^1.0.0 or 2.x means, we’ll cover that indepth in the next technique, but let’s first talk about updating existing dependencies.
Keeping dependencies up to dateKeeping a module healthy also means keeping your dependencies up to date. Thank-fully there are tools to help with that. One built-in tool is npm outdated, which willstrictly match your package.json file as well as all the package.json files in your depen-dencies, to see if any newer versions match.
Let’s purposely change our package.json file to make the benchmark module out ofdate, since npm install gave us the latest version:
"devDependencies": {"benchmark": "^0.2.0"
},
Then let’s run npm outdated and see what we get:
$ npm outdatedPackage Current Wanted Latest Locationbenchmark 1.0.0 0.2.2 1.0.0 benchmark
Looks like we have 1.0.0 currently installed, but according to our package.json we justchanged, we want the latest package matching ^0.2.0, which will give us version 0.2.2.We also see the latest package available is 1.0.0. The location line will tell us where itfound the outdated dependencies.
OUTDATED DEPENDENCIES THAT YOU DIRECTLY REQUIRE Often it’s nice to seejust your outdated dependencies, not your subdependencies (which can getvery large on bigger projects). You can do that by running npm outdated--depth 0.
If we want to update to the wanted version, we can run
npm update benchmark --save-dev
This will install 0.2.2 and update our package.json file to ^0.2.2. Let’s run npm outdated again:
$ npm outdatedPackage Current Wanted Latest Locationbenchmark 0.2.2 0.2.2 1.0.0 benchmark
Only allow module to be installed if Connect 2.x is also installed.
Roll benchmark back to earlier version.
www.it-ebooks.info

377TECHNIQUE 110 Semantic versioning
Looks like our current and our desired versions match now. What if we wanted to updateto the latest? That’s easy: we can install just the latest and save it to our package.json byrunning
npm install benchmark@latest --save-dev
VERSION TAGS AND RANGES Note the use of the @latest tag in order to getthe latest published version of a module. npm also supports the ability tospecify versions and version ranges, too! (https://www.npmjs.org/doc/cli/npm-install.html)
We’ve talked a little about version numbers so far, but they really need a techniqueunto their own, as it’s important to understand what they mean and how to use themeffectively. Understanding semantic versioning will help you define versions better foryour module and for your dependencies.
TECHNIQUE 110 Semantic versioning
If you’re not familiar with semantic versioning, you can read up on it at http://semver.org. Figure 13.4 captures the major points.
Here is how it’s described in the official documentation:1
Given a version number MAJOR.MINOR.PATCH, increment the:
1 MAJOR version when you make incompatible API changes,2 MINOR version when you add functionality in a backwards-compatible man-
ner, and3 PATCH version when you make backwards-compatible bug fixes.
In practice, these rules can be ignored or loosely followed, since, after all, nobody ismandating your version numbers. Also, many authors like to play around with their APIin the early stages and would prefer not to be at version 24.0.0 right away! But semvercan give you, as a module author and as a module consumer, clues within the versionnumber itself as to what may have happened since the last release.
1 From http://semver.org/.
Major Minor Patch
2 . 3 6.Major incompatible
API changes
Minor functionality updates thatare backwards compatible
Patches to existingfunctionality (bug fixes)
My module - Version 2.3.6
Figure 13.4 Semantic versioning
www.it-ebooks.info

378 CHAPTER 13 Writing modules: Mastering what Node is all about
In this technique we’ll look at how to use semver effectively within our fastfib library.
■ ProblemYou want to use semver effectively in your module and when including dependencies.
■ SolutionUnderstand your underlying projects in order to have a safe upgrade path, and clearlycommunicate the intent of your module version.
■ DiscussionWe currently have one development dependency in our project, which looks like thisin the package.json file:
"devDependencies": {"benchmark": "^1.0.0"
},
This is how npm, by default, will include the version inside the package.json file. Thisplays nice for how most modules authors behave:
■ If the version is less than 1.0.0, like ^0.2.0, then allow any greater PATCH versionto be installed. In the previous technique, we saw this ended up being 0.2.2 forthe benchmark module.
■ If the version is 1.0.0 or greater, like ^1.0.0, then allow any greater MINOR ver-sion to be installed. Typically 1.0.0 is considered stable and MINOR versionsaren’t breaking in nature.
This means that when another user installs your module dependencies, they’ll get thelatest version that’s allowed in your version range. For example, if Benchmark.jsreleased version 1.1.0 tomorrow, although you currently have 1.0.0 on your machine,they would get version 1.1.0, since it still matches the version range.
VERSION OPERATORS Node supports a whole host of special operators to cus-tomize multiple versions or version ranges. You can view them in the semverdocumentation (https://www.npmjs.org/doc/misc/semver.html).
Versioning dependenciesWhen writing modules, it can increase the confidence in your dependencies to use aspecific version number a user will install along with your module. This way, you knowwhat you’ve tested will run the same down the dependency chain. Since we know ourtest suite works with benchmark 1.0.0, let’s lock it in to be only that version by runningthe following:
npm install benchmark --save-dev --save-exact
We could’ve so updated our package.json manually. Let’s take a look at what it lookslike now:
"devDependencies": {"benchmark": "1.0.0"
},
Save exact same version installed to the package.json file.
Exact versions have no special identifiers.
www.it-ebooks.info

379TECHNIQUE 111 Adding executable scripts
Now that we’ve locked in our dependency, we can always use npm outdated to see if anew version exists and then npm install using the --save-exact flag to update ourpackage.json!
Versioning the moduleAs already noted, many module authors use versions less than 1.0.0 to indicate thatthe API hasn’t been fully implemented yet and may change in subsequent versions.Typically, when the version number hits 1.0.0, there’s some good stability to themodule, and although the API surface may grow, existing functionality shouldn’tchange that much. This matches how npm behaves when a module is saved to thepackage.json file.
Currently we have our fastfib module at version 0.1.0 in the package.json file. It’spretty stable, but there may be other changes we want to make before we give it the1.0.0 status, so we’ll leave it at 0.1.0.
The change logIt’s also helpful for module authors to have a change log summarizing anything usersshould be aware of when new releases happen. Here’s one such format:
Version 0.5.0?--?2014-04-03---added; feature xremoved; feature y [breaking change!]updated; feature zfixed; bug xx
Version 0.4.3?--?2014-03-25---
Breaking changes, especially in a minor version, should be noted clearly in the changelog so users know how to prepare for the update. Some authors like to keep a changelog inside their main readme or have a separate change log file.
We’ve covered some understanding and tooling around versioning our dependen-cies and our module; let’s look at what else we can expose to the consumers of ourmodules.
13.3 The end user experienceBefore we push our module out for consumption, it would be nice to test that it actuallyworks. Of course, we already have a test suite, so we know our logic is sound, but whatis the experience of an end user installing the module? How do we expose executablescripts to a user in addition to an API? What versions of Node can we support? In thissection we’ll take a look at those questions, starting with adding executable scripts.
TECHNIQUE 111 Adding executable scripts
Want to expose an executable when your module is installed? Express, for example,includes an express executable you can run from the command line to help initializenew projects:
www.it-ebooks.info

380 CHAPTER 13 Writing modules: Mastering what Node is all about
$ npm install express -g$ express
npm itself is an installable module with an npm executable, which we’ve been usingall over in this chapter.
Executables can help end users use your module in different ways. In this techniquewe’ll look at adding an executable script to fastfib and include it in our package.jsonto be installed along with our module.
■ ProblemHow do you add an executable script?
■ SolutionHow do you add command-line tools and scripts for a package and link it inside thepackage.json file?
■ DiscussionWe have our fastfib module built, but what if we wanted to expose a fastfib execut-able to the end user where they could run a command like fastfib 40 and get the 40thFibonacci number printed out? This would allow our module to be used on the com-mand line as well as programmatically.
In order to do this, let’s create a bin directory with an index.js file inside contain-ing the following:
#!/usr/bin/env nodevar fastfib = require('../');var seqNo = Number(process.argv[2]);
if (isNaN(seqNo)) {return console.error('\nInvalid sequence number provided,
➥ try:\n fastfib 30\n');}
console.log(fastfib(seqNo));
Now that we have our application executable, how do we expose it as the fastfibcommand when someone installs our module? For that, we need to update our pack-age.json file. Add the following lines underneath main:
"main": "index.js","bin": {
"fastfib": "./bin/index.js"},
Testing executables with npm linkWe can test our executable by using npm link. The link command will create a globalsymbolic link to our live module, simulating installing the package globally, as a userwould if they installed the module globally.
Installs express module globally making the executable accessible from anywhere
Indicate operating system should look for a node executable to run following code
Require fastfibmodule
Get sequencenumber
argument
If we didn’t get valid number, exit early and give error message with instructions
Output result
Alias executable as fastfib and have it run ./bin/index.js
www.it-ebooks.info

381TECHNIQUE 112 Trying out a module
Let’s run npm link from our fastfib directory:
$ npm link/usr/bin/fastfib
-> /usr/lib/node_modules/fastfib/bin/index.js/usr/lib/node_modules/fastfib
-> /Users/wavded/Dev/fastfib
Now that we’ve globally linked up our executable, let’s try it out:
$ fastfib 40102334155
Since these links are in place now, any edits will be reflected globally. Let’s update thelast line of our bin/index.js file to announce our result:
console.log('The result is', fastfib(seqNo));
If we run the fastfib executable again, we get our update immediately:
$ fastfib 40The result is 102334155
We’ve added a fastfib executable to our module. It’s important to note that every-thing discussed in this technique is completely cross-platform compatible. Windowsdoesn’t have symbolic links or #! statements, but npm wraps the executable with addi-tional code to get the same behavior when you run npm link or npm install.
Linking is such a powerful tool, we’ve devoted the next technique to it!
TECHNIQUE 112 Trying out a module
Besides using npm link to test our executables globally, we can use npm link to try outour module elsewhere. Say we wanted to try out our shiny new module in anotherproject and see if it’ll work out. Instead of publishing our module and installing it, wecan just link to it and play around with the module as we see it used in the context ofanother project.
■ ProblemYou want to try out your module before publishing it or you want to make changes toyour module and test them in another project without having to republish first.
■ SolutionUse npm link
■ DiscussionIn the previous technique we showed how to use npm link to test an executablescript’s behavior. This showed that we can test our executables while we’re developing,but now we want to simulate a local install of our module, not a global one.
Let’s start by setting up another project. Since we started this chapter with our can-cerous implementation of a Fibonacci web server, let’s go full circle and make a littleproject that exposes fastfib as a web service.
Link fastfib executable to the ./bin/index.js file
Link fastfib module to our working directory code
www.it-ebooks.info

382 CHAPTER 13 Writing modules: Mastering what Node is all about
Create a new project called fastfibserver and put a single server.js file insidewith the following content:
var fastfib = require('fastfib');var http = require('http');
http.createServer(function (req, res) {res.end(fastfib(40));
}).listen(3000);
console.log('fastfibber running on port 3000');
We have our server set up, but if we were to run node server, it wouldn’t work yetbecause we haven’t installed the fastfib module in this project yet. To do that we usenpm link:
$ npm link ../fastfib/usr/bin/fastfib-> /usr/lib/node_modules/fastfib/bin/index.js
/usr/lib/node_modules/fastfib-> /Users/wavded/Dev/fastfib
/Users/wavded/Projects/Dev/fastfibserver/node_modules/fastfib-> /usr/lib/node_modules/fastfib-> /Users/wavded/Dev/fastfib
Now if we run our web server, it will run successfully:
$ node serverfastfibber running on port 3000
And a visit to our site will give us the 40th Fibonacci number, as shown in figure 13.5.
ANOTHER WAY TO LINK Since we already linked our module globally in theprevious technique running npm link inside the fastfib project, we could’vealso run npm link fastfib in our fastfibserver project to set up the link.
Using npm link also helps a lot in debugging your module in the context of anothermodule. Edge cases come up that can best be debugged while running the projectthat’s requiring your module. Once you npm link the module, any changes will take
Require fastfib module
Respond with 40th Fibonacci number on every request
Pass in path to fastfib module
Links are created globally first
A final link is set upin fastwebserver
project
Figure 13.5 Sample output from fastfibserver
www.it-ebooks.info

383TECHNIQUE 113 Testing across multiple Node versions
effect immediately without the need to republish and re-install. This allows you to fixthe problem in your module’s code base as you debug.
So far we’ve defined and implemented our module with tests, set up our depen-dencies, locked our versions down for our dependencies and our module, added acommand-line executable, and practiced using our module. Next we’ll look atanother aspect of the package.json file—the engines section, and testing our moduleacross multiple versions of Node.
TECHNIQUE 113 Testing across multiple Node versions
Unfortunately, not everybody is able to upgrade to the latest and greatest Node ver-sion when it comes on the scene. It takes time for companies to adapt all their code tonewer versions, and some may never update. It’s important that we know what ver-sions of Node our module can run on so npm knows who can install and run it.
■ ProblemYou want to test your module across multiple versions of Node, and you want yourapplication to be installed only for those versions.
■ SolutionKeep the engines object accurate in the package.json file by running tests across mul-tiple versions of Node.
■ DiscussionThe npm init script we ran when first setting up our package.json doesn’t include anengines section, which means that npm will install it on any version of Node. At firstglance, we may think that’s OK, since we’re running pretty vanilla JavaScript code. Butwe don’t really know that without actually testing it.
Typically patch version updates (Node 0.10.2 to 0.10.3, for instance) shouldn’tbreak your modules. But it’s a good idea at a minimum to test your modules acrossminor and major version updates, as V8 receives a decent upgrade and Node’s APIscan change. Currently, we’ve been working off 0.10 branch of Node and things havebeen working well. So let’s start with that. Let’s add the following to the end of ourpackage.json file:
"homepage": "https://github.com/wavded/fastfib","engines": {"node": "0.10.x"
}}
That’s a start, but it really seems like we should be able to support earlier versions ofNode. How do we test for that?
A variety of popular options are available:
■ Install multiple versions of Node on your machine ■ Use Travis CI’s multi-Node version support (https://travis-ci.org/)■ Use a third-party multiversion test module that works for your environment
(like dnt—https://github.com/rvagg/dnt)
Indicate that our module can run on any patch version of Node 0.10.
www.it-ebooks.info

384 CHAPTER 13 Writing modules: Mastering what Node is all about
ABOUT NODE VERSIONS In Node, all odd-numbered minor versions are consid-ered unstable. So 0.11.0 is the unstable version for 0.12.0, and so on. Youshouldn’t need to test any existing unstable releases. Typically, moduleauthors will only test the latest unstable release as it nears completion.
For our technique we’ll focus on installing multiple versions of Node, as that cancome in handy for testing new features in upcoming versions of Node, as well as fortesting our module.
The tool we’ll use is nvm (https://github.com/creationix/nvm; the Windowscounterpart is nvmw: https://github.com/hakobera/nvmw). The following instruc-tions will be for nvm, but the commands will be similar in nvmw once installed.
To install, run
curl https://raw.github.com/creationix/nvm/v0.5.0/install.sh | shsource ~/.nvm/nvm.sh
Now that we have it installed, let’s go ahead and test Node version 0.8 of our fastfibmodule. First let’s install Node 0.8:
$ nvm install 0.8######################################################## 100.0%Now using node v0.8.26
nvm went out and grabbed the latest version of the 0.8 branch to test against. Wecould have specified a patch if we wanted, but this will work for now. Note how we’realso using this version. We can validate that by running
$ node -vv0.8.26
Now, all Node and npm interaction happens within an isolated environment just forNode 0.8.26. If we were to install more versions, they would be in their own isolatedenvironments. We use nvm use to switch between them. For example, if you wanted togo back to your system install of Node, you could do the following:
nvm use system
And to go back to Node version 0.8.26:
nvm use 0.8
Let’s run our test suite in 0.8.26 and see how we do:
$ npm test
> [email protected] test /Users/wavded/Dev/fastfib> node test && node benchmark
results:recurse 432 5.48tail 300770 5.361iter 1109759 5.428
We source it right away so we don’t have to reload our session. This is done automatically in future sessions.
www.it-ebooks.info

385TECHNIQUE 114 Publishing modules
Looks good! Let’s update our package.json to include 0.8 versions:
"engines": {"node": ">=0.8.0 <0.11.0"
}
WHAT IF MY MODULE LOSES SUPPORT FOR A PARTICULAR NODE VERSION? That’stotally fine. Users of an older version of Node will get the last-published pack-age that’s supported for their version.
We’ve tested Node version 0.10 and 0.8; try testing a few other versions on your own.When you’re done, switch back to the system Node version.
Now that we’ve looked through a variety of steps to get our module into a usablestate for others, let’s publish it!
13.4 PublishingAs we wrap up this chapter, we’ll turn our focus on module distribution by looking atpublishing modules publicly on npm or privately for internal use.
TECHNIQUE 114 Publishing modules
Whew! We’ve gone through a lot of different techniques getting our module ready topublish. We know there will likely be changes, but we’re ready to release our first ver-sion out in the wild to be required in other projects. This technique explores the vari-ous aspects of publishing.
■ ProblemYou want to get your module published publicly.
■ SolutionRegister with npm if you haven’t and npm publish.
■ DiscussionIf it’s your first time publishing a module, you’ll need to register yourself with npm.Thankfully, it couldn’t be any easier. Run the following command and follow theprompts:
npm adduser
Once finished, npm will save your credentials to the .npmrc file.
CHANGING EXISTING ACCOUNT DETAILS The adduser command can also beused to change account details (except username) and register a fresh installwith an existing account.
Once registered, publishing a module is just as simple as adding a user. But before weget to that, let’s cover some good practices when publishing modules.
Before you publishOne of the biggest things before publishing is to review technique 110 about semanticversioning:
Include any version from 0.8.0 up to but not including 0.11.0.
www.it-ebooks.info

386 CHAPTER 13 Writing modules: Mastering what Node is all about
■ Does your version number accurately reflect the changes since the last push? Ifthis is your first push, this doesn’t matter as much.
■ Do you do a changelog update with your release? Although not required, it canbe extremely helpful to those who depend on your project to get a high-levelview of what they can expect in this release.
Also, check whether your tests pass to avoid publishing broken code.
Publishing to npmOnce you’re ready to publish, it’s as simple as running the following command fromthe project root directory:
npm publish
npm will respond with the success or failure of the publish. If successful, it will indi-cate the version that was pushed to the public registry.
Can you tell that npm wants you to get your modules out there as painlessly as possible?
Undoing a publishAlthough we want a publish to go well, sometimes we miss things we wanted to release,or have some things we realize are broken after the fact. It’s recommended you don’tunpublish modules (although the ability exists). The reason is that people who aredepending on that module and/or version can no longer get it.
Typically, make the fix, increase the PATCH version, and npm publish again. A sim-ple way to do that is by running the following commands:
// make fixes$ npm version patchv0.1.1
$ npm publish
npm does not allow you to publish over an existing version, since that also would affectpeople who have already downloaded that particular version.
There are some cases where you really want to discourage users from using a par-ticular version. For example, maybe a severe security flaw was fixed in versions 0.2.5and above, yet you have users depending on versions earlier than that. npm can helpyou get the word out by using npm deprecate.
Let’s say in the future, we find a critical bug in fastfib version 0.2.5 and below, andwe wanted to warn users who are using those modules. We could run the following:
npm deprecate fastfib@"<= 0.2.5""major security issue was fixed in v0.2.6"
Now if any user installs fastfib 0.2.5 or less, they’ll receive the specified warning fromnpm.
The npm version command (https://www.npmjs.org/doc/cli/npm-version.html) will update your package.json based on the arguments passed. Here we used patch to tell it to increment the patch version.
Deprecate module name followed by version range affected and message NPM should display
www.it-ebooks.info

387TECHNIQUE 115 Keeping modules private
TECHNIQUE 115 Keeping modules private
Although open source can be a fun and collaborative environment, there are timeswhen you want your project to remain private. This is especially true for work done forclients. It can also be handy to bake a module first internally before deciding whetherto publish. npm can safeguard your module and keep it private for you. In this tech-nique we’ll talk about configuring your module to stay private and including privatemodules in your projects.
■ ProblemYou want to keep your module private and use it internally.
■ SolutionConfigure private in your package.json file and share it internally.
■ DiscussionLet’s say we want to let fastfib to only be used internally. To ensure it doesn’t getaccidentally published, we add the following to our package.json file:
"private": true
This tells npm to refuse to publish your package with npm publish. This setting works well for client-specific projects. But what if you have a core set of
internal modules you want to share across projects within your development team?For that there are a few different options.
Sharing private modules with Gitnpm supports a couple of ways you can share your internal modules that are minimalto set up out of the box. If you’re using a Git repository, npm makes this incrediblysimple to do.
Let’s use GitHub as an example (although it can be any Git remote). Let’s say wehad our private repo at
[email protected]:mycompany/fastfib.git
We can then include it in our package.json dependencies with npm install (or mod-ify the package.json directly):
npm install git+ssh://[email protected]:mycompany/fastfib.git --save
Pretty sweet! This by default will pull the contents of the master branch. If we wantedto specify a particular commit-ish (tag, branch, or SHA-1—http://git-scm.com/book/en/Git-Internals-Git-Objects), we can do that too! Here are some examples within apackage.json file:
"dependencies": {"a": "git+ssh://[email protected]:mycompany/a.git#0.1.0","b": "git+ssh://[email protected]:mycompany/b.git#develop","c": "git+ssh://[email protected]:mycompany/c.git#dacc525c"
}
Specifying by tag
Specifying by branch nameSpecifying by commit SHA-1 (typically
you won’t need the whole SHA-1)
www.it-ebooks.info

388 CHAPTER 13 Writing modules: Mastering what Node is all about
INCLUDING PUBLIC REPOSITORIES You may have guessed it, but you can alsouse public Git repositories as well. This can be helpful if you really need afeature or fix that hasn’t been published on npm yet. For more examples,see the package.json documentation (https://www.npmjs.org/doc/json.html#Git-URLs-as-Dependencies).
Sharing private modules as a URLIf you aren’t using Git or prefer to have your build system spit out packages, you canspecify a URL endpoint where npm can find a tarball. To package up your module,you can use the tar command like the following:
tar -czf fastfib.tar.gz fastfib
From here, we can throw that file on a web server and install it using the following:
npm install http://internal-server.com/fastfib.tar.gz --save
A NOTE ABOUT PUBLIC ENDPOINTS Although typically not used often, tarballs ofpackages can be used with public endpoints too; it’s usually better and easierto publish to npm instead.
Sharing modules with a private npm registryAnother option for private repositories is hosting your own private npm registry andhaving npm publish push to that repository. For the complete functionality of npm,this will require an installation of a recent version of CouchDB, which, in turn,requires Erlang.
Since this involves a variety of tricks/headaches depending on your operating sys-tem, we won’t cover setting up an instance here. Hopefully, the process will getstreamlined soon. If you want to experiment, check out the npm-registry-couchappproject (https://github.com/npm/npm-registry-couchapp).
13.5 SummaryThird-party modules are where innovation happens. npm makes this trivial and fun!With the rise of social coding sites like GitHub, collaboration on modules is also easyto do. In this chapter we looked at many different aspects of module development.Let’s summarize what we learned.
When starting to work on a module, consider the following:
■ Define your module idea. Can you summarize it in one sentence? ■ Check your module idea. Is there another module out there doing what you
want to do? Search it out with npm search or npmjs.org.
Once you’ve landed on an idea, prove it out. Start with a simple API you’d like to workwith. Write an implementation and tests installing any dependencies you need alongthe way.
We tell tar to make a new archive (c), compress the archive using gzip (z), and store it in the file (f) fastfib.tar.gz, giving it the contents of the fastfib directory.
www.it-ebooks.info

389Summary
After you’ve proven your idea (or perhaps during), think about these things:
■ Have you initialized your package.json file? Run npm init to get a skeleton rep-resenting the state of the current project.
■ Work with your dependencies. Are some optional, development-only? Makesure that’s indicated in your package.json file.
■ Check your semver ranges in package.json. Do you trust the version rangesspecified in your package.json file? Check for updates with npm outdated.
■ What versions of Node will your code run on? Check it out by using nvm or abuild system like Travis CI. Specify the version range in your package.json file.
■ Try out your module using npm link in another project.
When you’re ready to publish, it’s as simple as npm publish. Consider keeping achangelog for your users and try to follow semantic versioning, so users have a reason-able idea of what to expect from version to version.
And that’s a wrap for this book! We hope at this point you were able to grasp thecore foundations of Node, understand how to apply those foundations in real-worldscenarios, and how to go beyond standard development by writing your own Nodemodules (which we hope to see on npm!).
A growing Node community is available to help you continue to level up on your jour-ney. Please check out the appendix to make the most of that community. If you have spe-cific questions for us, please visit the #nodejsinpractice Google group (https://groups.google.com/forum/#!forum/nodejsinpractice), and thanks for reading!
www.it-ebooks.info

391
appendixCommunity
This section will help you to make the most of the growing Node community. Pro-gramming communities can help you get answers to problems that aren’t directlyanswered by the documentation. You can learn more effectively just by hanging outwith like-minded people—whether online or in person.
A.1 Asking questionsSometimes you just want to know how to do something that seems like it should beeasy, but isn’t. Other times you think you might have found a serious bug in Node.Whatever the situation, when you need help that isn’t satisfied by Node’s API docu-mentation, there are several official channels you can use.
The first is the Node mailing list, which is the nodejs Google Group (http://groups.google.com/group/nodejs). You can subscribe by email or use Google’s webinterface. The web interface allows posts to be searched, so you can see if someonehas asked your question before.
The group has contributions from prominent community members, includingIsaac Schlueter, Mikeal Rogers, and Tim Caswell, so it’s a good place to get helpand learn about Node in general.
There’s also an official IRC chat room: #node.js on irc.freenode.net. It’sextremely busy though, so be prepared for a lot of messages. Informative discus-sions do happen in #node.js, so some patience may be rewarded!
If you’re a fan of the Stack Exchange network, you can post questions using thenode.js tag (http://stackoverflow.com/questions/tagged/node.js).
If you prefer social networks, the Node users group (https://github.com/joyent/node/wiki/Node-Users) in the Node wiki lists hundreds of Twitter accounts along-side the developer’s time zone, so you could look for people to talk to that way. Hint:the authors of this book are listed!
www.it-ebooks.info

392 APPENDIX Community
Finally, if your question is about a specific module, you should check that module’sdocumentation for community information. For example, the Express web frameworkhas its own express-js Google Group (https://groups.google.com/group/express-js).
A.2 Hanging outYour city may have an active Node meet-up group. Examples include the LondonNode.js User Group (http://lnug.org/), the Melbourne Node.JS Meetup Group(http://www.meetup.com/MelbNodeJS/), and BayNode (http://meetup.com/BayN-ode/) in Mountain View, California.
There are also major Node conferences, including NodeConf (http://nodeconf.com/) and NodeConf EU (http://nodeconfeu.com/).
To help you find more meet-up groups and conferences, the Node.js Meatspacepage at https://github.com/knode/node-meatspace is frequently updated. You can, ofcourse, try searching at meetup.com as well.
A.3 ReadingIf you’re looking for something to read, you’ll find some great community publica-tions. Naturally reddit.com/r/node collects some great posts, but there are also collec-tions on Medium, including medium.com/node-js-javascript.
Noted Node developers have blogs you can check as well. Isaac Z. Schlueter(http://blog.izs.me/), James Halliday (http://substack.net/; see figure A.1), and TimCaswell all have personal blogs where they write about Node. Tim’s howtonode.orghas material suitable for beginners, but will also help you keep track of newdevelopments.
There are also commercial blogs that have some contributions from talented Nodedevelopers. Joyent’s blog at joyent.com/blog often has interesting posts relating todeploying Node, and StrongLoop’s blog, “In the Loop,” at strongloop.com/strong-blog, does as well.
Nodejitsu’s blog at blog.nodejitsu.com has advice on deployment, and also featuresmodule authors talking about their work.
Figure A.1 James Halliday’s blog about Node and testing
www.it-ebooks.info

393Marketing your open source projects
A.4 Training by the community, for the communityOne interesting development in teaching Node is NodeSchool (http://nodeschool.io/;see figure A.2). You can install lessons yourself, but there are also community-runin-person training events. NodeSchool provides the materials to set up training events,so they’re proliferating rapidly around the world. The site has more details on upcom-ing events.
A.5 Marketing your open source projectsIf you’re going to take part in the Node community, one of the best ways to it is toshare your work. But npm is now so popular that it’s hard to get your module noticed.
To really make an impact, you should consider marketing your open source proj-ects. If prominent Node bloggers have contact forms or Twitter accounts, it won’t hurtto tell them about what you’ve made. As long as you’re polite, and give your worksome context so it’s easy to understand, then it can really help you get feedback andimprove your skills.
Figure A.2Learn Node with NodeSchool.
www.it-ebooks.info

395
index
A
A records 165ab tool 351abstract interface 83Accept header 223, 228Accept-Version header 230adduser command 385advertising distribution 6advisory argument 98AMQP technology 78amqplib 356AngularJS 256Apache
benchmarking tool 118, 351deployment using 332–335features of 340proxying web requests 339
API, designing for module 366application layer 137args object 28argv array 28arrays 59ASCII encoding 41assert module 12
custom assertions 268–269overview 262–263writing tests using 263–265
AssertionError 265assertions
defined 261single per test 275
async library 128asynchronous calls
networking 142–143Node advantages 3
attached processes 183audio streams 83, 86authenticated routes 246–248Azure 327, 330, 332
B
backpressure 89backtrace command 306backward compatibility 85Base64 encoding 42Basic Authentication
header 41–42baudio module 86BDD (behavior-driven
development) 273benchmark module 26Benchmark.js 367benchmarking
clustering and 351modules 367–370using console output 25–27
Berkeley Sockets API 140binary data support 39bind method 33bitmask 59bitwise operators 59blogs 6body-parser module 243Bootstrap 256breakOnException
function 306Browserify 207, 291–292
Buffer class 16converting DBase file to JSON
field descriptor array 49–52header 45–49overview 44–45record data 53–58
creating Basic Authentication header 41–42
creating network protocolinflating data with zlib
62–63looking up key 61–62overview 58–59selecting database with first
byte 59–61data encodings
changing 41–44converting to other
formats 40–41data URIs 42–44
buffer module 141bulk file I/O 117
C
CA (Certificate Authority) 168Cache-Control header 342caching, HTTP 342–344callback argument 103Caswell, Tim 392Certificate Signing Request. See
CSRchai 276change log 379cheerio module 205
www.it-ebooks.info

INDEX396
child processesdetaching 182–183executing commands in shell
overview 180–181security and 181–182
executing external applicationserrors for 177–178overview 176PATH environment
variable and 176–177executing Node applications
on UNIX 186on Windows 185–186overview 185
forking modulescommunication with 188disconnecting from 188overview 186–187
I/O between parent process and 183–184
overview 174–175reference counting and
184–185resources required for 190running jobs
job pooling 190–191overview 188–190pooler module 191–192
streaming output 178–179stringing together
applications 179–180synchronous
error handling 194overview 192
chmod method 116chown method 116Chrome 208chunk argument 103CI (continuous
integration) 262, 270–271, 283–285
clearBreakpoint function 306clearInterval method 34clearTimeout method 33, 67clients
sending messages using UDP 153–156
TCP 145–147close method 116cloud deployment 327–332cluster module 347–351CMS (content management
system) 6
CNAME records 165comma-separated values. See CSVcommand-line integration
28–29Commander.js module 29CommonJS 263, 362community
asking questions 391–392marketing 393meet up groups 392NodeSchool 393online resources 392training 393
compression 62, 243compute-cluster module 192conferences 392configuration 215–219Connect framework 69, 201connect method 145–146connect-timeout module 243console object 8
benchmarking program25–27
errors 353logging 24–25, 353overview 24–25stack traces 25
content management system. See CMS
content-based conditional request 343
Content-Range headers 93Content-Type header 227–228continuous integration. See CICookie header 247cookie-parser module 243cookie-session module 243cookieParser middleware 239cookies 239counters, alternatives to 128CPU usage 308createProxyServer method 345createReadStream method 8,
47, 84createSecurePair method 172createServer method
143, 157–158createSocket method 150CSR (Certificate Signing
Request) 168csrf middleware 249csurf module 243CSV (comma-separated
values) 103, 235Cube 257
Cubism.js 257curl command 235
D
%d formatting placeholder 24data encodings
changing 41–44converting to other
formats 40–41data URIs 42–44databases
creating test data 287–289dumps 286–287mocking 288–290overview 285–286
datagramsdefined 137packet layout 152
DBase filesfield descriptor array 49–52header 45–49overview 44–45record data 53–58
.dbf files 44debug command 301--debug-brk flag 308debugging
debug flag 208error argument 296error event 295–296errors 222explicit exceptions 294implicit exceptions 295lint tools 299–300memory leaks 311–316Node debugger 300–306Node Inspector 306–308profiling applications
308–311REPL
inspecting running pro-gram with 319–322
setting up 316–322tracing system calls
operating systems and 325overview 322–324for running process 324
uncaught exceptionsoverview 296–298using domains 298–299
decodeStrings option 100deepEqual method 264deflate method 62
www.it-ebooks.info

INDEX 397
delaying executionnextTick method 35–38setInterval method 34–35setTimeout method 32–34
DELETE method 226dependencies
development 374keeping up to date 376–377Node require system 362optional 374–375overview 373–374peer 203, 375–376
dependency inversion principle 236
deploymentApache 332–335cloud 327–332HTTP caching 342–344keeping processes
running 336–337maintenance
logging 353–356package optimization
351–353nginx 332–335running on port 80 335–336scaling
interprocess communica-tion and 356
using cluster module347–351
using Node proxy 344–347using WebSockets 338–342
deprecate command 386Derby framework 256describe function 274development
dependencies 373–374dgram module 141directories
as modules 212watchFile method and 134
__dirname variable 22DNS (Domain Name System)
making requests 165–167module for 141record types 165
DOM (Document Object Model) 204–206
domain module 147domains
defined 6error handling with 71–72handling uncaught
exceptions 298–299
DSL (domain-specific language) 269
dtruss command 322Duplex class 95duplex streams 86, 101–102
E
EACCES error 177ECONNREFUSED error 167emit method 10encoding
changing 41–44converting to other
format 40–41specifying for strings 42
encoding argument 96, 100, 103encryption
HTTPS server 170–172module for 141–142overview 167TCP server 167–170
end method 281endpoints, naming of 224ENOENT error 177entry point, module 366–367environment
console outputbenchmarking
program 25–27logging messages 24–25stack traces 25
delaying execution with timersnextTick method 35–38setInterval method 34–35setTimeout method 32–34
modulescreating 17–19exporting 18installing 16–17loading 16–17, 19loading group of 19–21paths in 21–22
operating system integrationexiting program 29–30getting platform
information 27–28passing command-line
arguments 28–29responding to signals from
processes 31–32standard I/O 22–23variables 332
EPERM error 177
equal method 263err.stack 353error argument 296Error constructor 219error event 147, 295–296error handling
debugging 222error argument 296error event 295–296explicit exceptions 294for external applications
177–178implicit exceptions 295for synchronous child
processes 194testing 265–268uncaught exceptions
overview 296–298using domains 298–299
using events modulewith domains 71–72overview 69–70
using streams 90–91for web application
servers 219–222error method 25Error object 294errorhandler module 243ETags 344Etherpad 256–257EventEmitter class 147, 295
alternatives to 78–80exploiting methods 75–77inheriting from class 65–68mixing in use of 68–69overview 7streams and 87
events modulecategorizing event names
77–78error handling
with domains 71–72overview 69–70
exploiting EventEmitter methods 75–77
HTTP and 141inheriting from
EventEmitter 65–68mixing in EventEmitter
68–69overview 7third-party modules 78–80using reflection 73–75
events, decoupling functionality using 236–238
www.it-ebooks.info

INDEX398
exceptionsexplicit 294implicit 295uncaught
overview 296–298using domains 298–299
exclusive flag 123exec method 175, 180execFile method 175–176, 181execFileSync method 192execSync method 193executable scripts
adding 379–381npm and 186testing with npm link
380–381execution, delaying
nextTick method 35–38setInterval method 34–35setTimeout method 32–34
exit codes 30, 178exiting program 29–30Expires header 343explicit exceptions 294exporting modules 18--expose-gc flag 312Express
defined 5Google Group 392MEAN solution stack 256migrating from 3 to 4
242–246route separation 209–212streams and 91–93
express-session module 243Extensible Markup Language.
See XMLexternal applications
errors for 177–178executing 176executing in shell
overview 180–181security and 181–182
Node applicationsoverview 185on UNIX 186on Windows 185–186
PATH environment variable and 176–177
stringing together 179–180
F
Facebook 251fchmod method 116
fchown method 116Fibonacci sequence 363Fiddler 252file descriptors 120–121, 183file locking
creating lockfile module124–125
creating lockfile with mkdir 123
overview 121–123using exclusive flag 123
file watchingfs.watch method 132–134fs.watchFile method 132–134overview 118, 132
__filename variable 22fixtures 111, 262flag combinations 123Flatiron framework 218flock 122flushing writes 132folders, loading all files in 20forever module 337fork method 175, 187, 349forking modules
communication with 188disconnecting from 188overview 186–187
format method 24Formidable module 85freezing object 120fs module 213
buffers and 40bulk file I/O 117documentation 58file descriptors 120–121file locking
creating lockfile module 124–125
creating lockfiles with mkdir 123
overview 121–123using exclusive flag 123
file watchingfs.watch method 132–134fs.watchFile method
132–134overview 118, 132
loading configuration files 119–120
overview 8–115POSIX file I/O
wrappers 115–117
recursive file operations125–128
streams and 88, 117synchronous alternatives 118writing file database 128–132
fstat method 116fsync method 116ftruncate method 116full-duplex 140full-stack frameworks 256–257futimes method 116
G
game servers 6gc function 312genrsa command 168GET method 223, 225Getting MEAN 256Git 387–388GitHub 251glance module 202global objects
installing module globally17, 362
overview 8–16Google Group 391GraphicsMagick 174Grunt 202, 204grunt-cli module 203grunt-contrib-connect
module 203Gruntfile.js file 204Gulp 203gzip module 86
H
Halliday, James 392HAProxy 339–341harmony flag 215heapdump module 312Heroku 327–328, 332, 339Hiccup 102highWaterMark option 96Holowaychuk, TJ 392Hoodie 257host objects 15HTML5 (Hypertext Markup
Language 5) 32HTTP (Hypertext Transfer
Protocol)caching 342–344defined 137
www.it-ebooks.info

INDEX 399
HTTP (Hypertext Transfer Protocol) (continued)
handling redirects 158–162module for 141overview 156proxies 162–165servers 156–158streams for 83
http module 8http-proxy module 345HTTPD_ROOT value 333HTTPS (Hypertext Transfer
Protocol Secure) 170–172Hypertext Markup Language 5.
See HTML5Hypertext Transfer Protocol.
See HTTP
I
I/O (input/output)between child and parent
processes 183–184bulk files 117console output
benchmarking program 25–27
logging messages 24–25stack traces 25
non-blocking 3reading and writing
streams 22–23standard streams 25streams and 83
If-Modified-Since header 343If-None-Match header 343ifError method 266implicit exceptions 295inflate method 62info method 25init command 371injection attacks 182input/output. See I/Oinstalling modules 16–17integration tests 286, 288, 291IP (Internet protocol) 139IPC (interprocess
communication)175, 187, 356
iptables 335IPv6 139IRC chat room 391it function 272
J
%j formatting placeholder 24JavaScript 59JavaScript Object Notation. See
JSONJenkins 283jitsu command 328jobs
job pooling 190–191overview 188–190pooler module 191–192
jQuery 205js file extension 21JS-Signals 80jsdom module 205JSHint 295, 299–300JSLint 295JSON (JavaScript Object
Notation)converting DBase files to
field descriptor array 49–52header 45–49overview 44–45record data 53–58
Node strengths 5json file extension 21
K
kqueue 325Kraken 256
L
@latest tag 377layers 137–138lchmod method 116lchown method 116leaked resources 297libcap2 335libuv library 143, 325, 347link method 116linking to modules 380–383Linnovate 256lint tools 295, 299–300listen method 143, 158listening event 152loading modules
group of 19–21overview 16–17, 19
LoadModule directives 333log method 25log4node module 354
loggingmaintenance 353–356synchronously 121
Loggly service 354logrotate 353–354lookup method 166low-latency applications
147–149ls command 362lsof command 324lstat method 116
M
maintenancelogging 353–356package optimization
351–353man command 323marketing 393master process 349–350maximum transmission unit. See
MTUmaxTickDepth value 37–38MEAN solution stack 256Meatspace page 392meet up groups 392memory leaks 311–316memoryUsage method 27Meteor 256method-override module 243Microsoft Visual Studio 4microtime module 26middleware
overview 231–235testing 248–250
mitmproxy 252mkdir method 116, 123Mocha
help 275installing 273overview 273using 273–280versions of 274
mockingdatabases storage 288–290defined 262, 286servers 252
Model-View-Controller pattern. See MVC pattern
modulesbenchmarking 367–370caching of 19creating 17–19
www.it-ebooks.info

INDEX400
modules (continued)dependencies
development 374keeping up to date
376–377optional 374–375overview 373–374peer 375–376
directories as 212executable scripts
adding 379–381testing with npm link
380–381exporting 18global 362installing 16–17linking to 381–383loading 16–17, 19loading group of 19–21networking
DNS 141encryption 141–142HTTP 141
option parsing using 29overview 6, 361–363package.json file 370–372paths in 21–22planning for
API design 366best practices 365–366defining entry point
366–367overview 363–364
privateoverview 387sharing as URL 388sharing with Git 387–388sharing with private npm
registry 388publishing 385–386scope for 16searching 17semantic versioning
1.0.0 version and 379change log 379overview 377–378versioning
dependencies 378–379testing
across Node versions383–385
implementation testing 367using link 381–383
unloading 19
MongoDB 86, 256Mongoose 30, 86, 93, 256morgan module 243MTU (maximum transmission
unit) 137, 150MVC (Model-View-Controller)
pattern 236MySQL 86, 93–94
N
Nagle's algorithm 148–149nconf module 218net module
HTTP and 141overview 8streams and 88TCP sockets and 141
network protocols, creatinginflating data with zlib 62–63looking up key 61–62overview 58–59selecting database with first
byte 59–61networking
asynchronous 142–143DNS 165–167encryption
HTTPS server 170–172overview 167for TCP server 167–170
HTTPhandling redirects 158–162overview 156proxies 162–165servers 156–158
modules for 141–142TCP
clients 145–147servers 143–145TCP_NODELAY flag
147–149terminology
layers 137–138overview 137sockets 140–141TCP/IP 139UDP 139–140
thread pools 142–143UDP
overview 149sending messages to
client 153–156transferring files 149–152
New Relic 356newListener event 73nextTick method 35–38nginx
deployment using 332–335features of 340support WebSockets 338
Nodeadvantages of 4–6creating classes 9–10creating projects 9debugger 300–306events module 7features 6fs module 8global objects 8net module 8standard library 6stream module 7using stream 10–11version numbers 384writing tests 12–13
Node Inspector 306–308Node Package Manager. See npmNODE_ENV setting
216, 245, 249node-dirty module 132node-http-proxy 338node-inspector module 306Node.js in Action 4, 200Nodejitsu 327, 332, 338,
345, 392nodemon module 214NodeSchool 393non-blocking I/O 3notDeepEqual method 265notEqual method 265npm (Node Package Manager)
advantages of 361creating project 9executable files and 186installing module 16installing module globally 17searching modules 17using scripts with 13
npm-registry-couchapp project 388
npmjs.org 16npmsearch module 17NS records 165nstore module 132nvm 334, 384nvmw 384
www.it-ebooks.info

INDEX 401
O
object-relational mapping. See ORM
Object.freeze method 120objectMode option 96observer pattern 78on method 10, 188online resources 392open method 116OpenSSL 141, 168openssl command 170operating system integration
exiting program 29–30getting platform
information 27–28passing command-line
arguments 28–29responding to signals from
processes 31–32operational transformation.
See OToperators
bitwise 59precedence 60for version numbers 378
Optimist module 29optional dependencies 373–375ORM (object-relational
mapping) 93, 289, 291OT (operational
transformation) 256outdated command 376
P
PaaS (Platform as a Service) 326, 332
package.json fileoverview 370–372private property in 387when to use 9
packetsdatagram layout 152defined 137, 140
parent process 183–184parse method 164parsers 83PassThrough class 95PATCH method 225–226PATH environment
variable 176–177paths, in modules 21–22PayPal 252, 256
peer dependencies 203, 373, 375–376
PID (process ID) 123pipe method 11pipe symbol ( | ) 23Platform as a Service. See PaaSplatform, Node as 4pooler module 191–192port 80, running application
on 335–336POSIX file I/O wrappers
115–117POSIX signals 31POST method 223, 225–226private modules
overview 387sharing as URL 388sharing with Git 387–388sharing with private npm
registry 388process ID. See PIDProcess Monitor 322process object 8, 16, 22–23, 297production
deploymentApache 332–335cloud 327–332keeping processes
running 336–337nginx 332–335running on port 80
335–336using WebSockets 338–342
HTTP caching 342–344maintenance
logging 353–356package optimization
351–353scaling
inter-process communica-tion and 356
using cluster module347–351
using Node proxy 344–347--production flag 352--prof flag 309profiling applications 308–311projects, creating 9protocols, custom
inflating data with zlib 62–63looking up key 61–62overview 58–59selecting database with first
byte 59–61proxies, HTTP 162–165
prune command 352Pub/Sub API 79public key cryptography 141publish command 386publish-subscribe pattern 78publishing modules 385–386Pusher 356PUT method 226
Q
Q library 128
R
RabbitMQ 78, 356reactive computations 257read method 116read-eval-print loop. See REPLReadable class 95readable streams 86, 96–99, 179readdir method 116readdirSync method 118readFile method 206readFileSync method 118, 120readline module 156readlink method 116real-time services 257–258realpath method 116recursive file operations
125–128redirects 158–162Redis client 76, 85reference counting 184–185ReferenceError 295–296reflection 73–75remote APIs 252Remote Procedure Call. See RPCremote services, testing 250–256removeAllListeners method 67removeListener method 67rename method 116REPL (read-eval-print loop)
inspecting running program with 319–322
setting up 316–319representational state transfer.
See RESTreq object 157, 168request method 163request module 158, 162require method
files with other extensions 21loading modules 17overview 17
www.it-ebooks.info

INDEX402
res object 157resolve method 165resolveCname method 165resolveNs method 165resolveSrv method 165resolveTxt method 165resources 392response-time module 243REST (representational state
transfer) 222–231restarting servers
automatically 212–215restify framework 222, 229rinfo argument 153rmdir method 116Rogers, Mikeal 162routes, Express 92RPC (Remote Procedure
Call) 83runit 333, 336
S
%s formatting placeholder 24--save flag 374--save-dev flag 374--save-exact flag 379scaling
inter-process communication and 356
using cluster module 347–351using Node proxy 344–347
Schlueter, Isaac 392scripts command 306scripts, npm 13seams 248secure event 172Secure Sockets Layer. See SSLsegments 140semantic versioning
1.0.0 version and 379Accept-Version header
and 230change log 379overview 377–378versioning
dependencies 378–379send method 188, 227send module 343Sequelize library 93serve-favicon module 243serve-index module 244SERVER_CONFIG_FILE
value 333
serverless apps 201servers
configuration 215–219error handling 219–222Express route
separation 209–212HTTP 156–158HTTPS 170–172middleware 231–235migrating to Express 4
242–246REST 222–231restarting automatically
212–215for static sites 200–204TCP 143–145TCP encryption 167–170using events to decouple
functionality 236–238using sessions with
WebSockets 238–242setBreakpoint function 304setInterval method 34–35setTimeout method 32–34shell commands
overview 180–181security and 181–182
should.js 276shrinkwrap command 352SIGHUP signal 31–32silent option 187Simple Object Access Protocol.
See SOAPsingle page applications 201single responsibility
principle 236single-threaded programs 347Sinon.JS 289slice method 51--slow flag 275slug size 352SOAP (Simple Object Access
Protocol) 223Socket.IO 257sockets 137, 140–141SocketStream 258SOLID principles 236source maps 208spawn method 175, 179, 181spawnSync method 193Splunk 356Square 257SRV records 165
SSL (Secure Sockets Layer) 141Stack Exchange 391stack traces 25stat method 8, 116stateless, defined 150static middleware 343static web server
creating 200–204using streams 88–89
statSync method 8, 118STATUS_CODES object 158statusCode property 277stderr stream 25stdin stream 25stdout stream 25strace command 322, 324streams
adapting based on destination 109–110
backward compatibility 85base classes for
duplex streams 101–102inheriting 94–96readable streams 96–99transform streams 103–105writable streams 99–100
from child processes 178–179creating class 9–10error handling using 90–91EventEmitter and 87fs module and 117history of 85HTTP and 141inherited methods from
EventEmitter 10optimizing 105–108overview 7reading and writing 22–23static web server using 88–89testing 111–113third-party modules and
Express 91–93Mongoose 93MySQL 93–94overview 85–87, 91–94
types of 83–84using 10–11using old API 108–109when to use 84
strictEqual method 265stringify method 58strings 42Stripe 291StrongLoop 356
www.it-ebooks.info

INDEX 403
stubs 262, 291SuperTest module 247, 279symlink method 116synchronous child processes
error handling 194overview 192
synchronous functions, speed of 126
synchronous logging 121SyntaxError 295Syslog Protocol 355
T
tap module 280tap-results module 281TCP (Transmission Control
Protocol)clients 145–147defined 137, 139net module and 141server encryption 167–170servers 143–145TCP_NODELAY flag 147–149
TCP/IP suite 139TDD (test-driven
development) 273terminology
layers 137–138overview 137sockets 140–141TCP/IP 139UDP 139–140
Test Anything Protocol273, 280–282
test method 281test-driven development. See
TDDtesting
assert modulecustom assertions 268–269overview 262–263writing tests using 263–265
Browserify 291–292continuous integration
283–285database storage
creating test data 287–289dumps 286–287mocking 288–290overview 285–286
error handling 265–268executable scripts with npm
link 380–381
frameworksMocha 273–280overview 273Test Anything
Protocol 280–282modules
across Node versions383–385
implementation testing 367using link 381–383
overview 261–262streams 12–13, 111–113test harness
organizing tests 270–272overview 270
web applicationsauthenticated routes
246–248creating seams for middle-
ware injection 248–250remote service
dependencies 250–256text method 206third-party modules
Express 91–93Mongoose 93MySQL 93–94overview 85–87, 91–94
thread pools 142–143throw statement 294throws method 266–267time method 26time-based conditional
request 343timeEnd method 26timers
nextTick method 35–38precision of 33setInterval method 34–35setTimeout method 32–34
TLS (Transport Layer Security) 142
tls module 172toString method 41trace method 25tracing system calls
operating systems and 325overview 322–324for running process 324
training 393Transform class 95transform streams 86, 103–105Transmission Control Protocol.
See TCPtransport layer 137
Transport Layer Security. See TLS
Travis CI 283–284truncate method 116try/catch blocks 294TTY (user shell) 109Twitter 251, 391TXT records 165
U
UDP (User Datagram Protocol)defined 137, 139–140dgram module and 141overview 149sending messages to
client 153–156transferring files 149–152
uncaught exceptionsoverview 296–298using domains 298–299
uniform resource locators. See URLs
UNIXexecuting Node applications
on 186PATH environment
variable 176unlink method 116unloading modules 19unref method 158, 184unstable versions 384unwatch command 302Upstart 336url module 164URLs (uniform resource
locators) 388useGlobal property 320User Datagram Protocol. See
UDPUTF-8 encoding 41util.format method 24util.inherits method 65, 95util.pump method 85utimes method 116
V
V8 4version command 386versioning
1.0.0 version and 379Accept-Version header
and 230
www.it-ebooks.info

INDEX404
versioning (continued)change log 379dependencies 378–379operators for 378overview 377–378
vhost module 244
W
warn method 25watch method 213, 302watchers command 302watchFile method 213watching files
fs.watch method 132–134fs.watchFile method 132–134overview 118, 132
web applicationsaccessing DOM 204–206full-stack frameworks 256–257real-time services 257–258servers
automatically restarting 212–215
configuration 215–219error handling 219–222Express route
separation 209–212
middleware 231–235migrating to Express
4 242–246REST 222–231for static sites 200–204using events to decouple
functionality 236–238using sessions with
WebSockets 238–242testing
authenticated routes246–248
creating seams for middle-ware injection 248–250
remote service dependencies 250–256
using Node modules in browser 207–209
web scraping 5Web Workers 186WebMatrix 4WebOps 328websocket-server module 257WebSockets 257, 338–342Windows
executing Node applications on 185–186
PATH environment variable 176
Winston module 354winston-loggly transport 355wkhtmltopdf 174WorldPay 291Writable class 95writable streams 86, 99–100write method 116Writeable stream 179writeFile method 58ws module 240, 257
X
x509 command 168XML (Extensible Markup
Language) 235xmllint 181
Z
zero-indexed arrays 59zeromq 356ØMQ technology 79zlib, inflating data with 62–63
www.it-ebooks.info

You’ve decided to use Node.js for your next project and you need the skills to implement Node in production. It would be great to have Node experts Alex Young and Marc Har-
ter at your side to help you tackle those day-to-day challenges. With this book, you can!
Node.js in Practice is a collection of 115 thoroughly tested examples and instantly useful techniques guaranteed to make any Node application go more smoothly. Following a common-sense Problem/Solution format, these experience-fueled tech-niques cover important topics like event-based programming, streams, integrating external applications, and deployment. Th e abundantly annotated code makes the examples easy to follow, and techniques are organized into logical clusters, so it’s a snap to fi nd what you’re looking for.
What’s InsideCommon usage examples, from basic to advancedDesigning and writing modulesTesting and debugging Node appsIntegrating Node into existing systems
Written for readers who have a practical knowledge of JavaScript and the basics of Node.js.
Marc Harter works daily on large-scale projects including high-availability real-time applications, streaming interfaces, and other data-intensive systems. Alex Young is a seasoned JavaScript developer who blogs regularly at DailyJS.
To download their free eBook in PDF, ePub, and Kindle formats, owners of this book should visit manning.com/Node.jsinPractice
$49.99 / Can $52.99 [INCLUDING eBOOK]
WEB DEVELOPMENT/JAVASCRIPT
M A N N I N G
“An in-depth tour of Node.js.”—From the Foreword by
Ben Noordhuis, Cofounder of StrongLoop, Inc.
“Th e missing manual for Node.js, packed with real-world examples!”
—Kevin Baister1KB Soft ware Solutions Ltd.
“Essential recipes for the server-side
JavaScript developer.”—Gregor Zurowski, Sotheby’s
“Useful techniques and resources that help with
problem solving, debugging, and troubleshooting.”
—Michael PiscatelloMBP Enterprises, LLC
Young HarterNode.js IN PRACTICE
SEE INSERT
www.it-ebooks.info