“No Limits” USER MANUAL - red line watches
38
USER MANUAL “No Limits”
Transcript of “No Limits” USER MANUAL - red line watches

USER MANUAL
“No Limits”


• Brand Story
•GeneralInformation
•MovementInstructions
-Quartz2Handsand3HandsInstructions -QuartzMultifunctionInstructions -QuartzChronographInstructions -QuartzGMTInstructions
• Water Resistance
•AutomaticInstructionsandMaintenance
•DeploymentClaspandBuckleInstructions
• SAPPHITEK™ Crystal Warranty
•5YearLimitedInternationalWarranty
03
04
06
06081724
27
28
30
32
33
Toserveyoubetterpleasevisitwww.redlinewatches.com.


Brand Story
RED LINE WATCHESStay out of the comfort zone. Accept nothing less than greatness.
The founders of Red Line – manufacturers of quality watches for more than three decades – hold true to the belief that watches should symbolize far beyond just hands and pushers. Ourwatchescaptureanexhilarationwiththeirdynamicdesignstrengthandprecisioncraftsmanship.Theyareanextensionofone’sactions–thosewhopusheverylimittotheextreme.Big,boldstylesandfinishesexudespeedandsleekness.Fromthespeedometerlikedialstotheleatherinteriorinspiration,RedLinewatchesareinfluencedbyautoracingandroaringengines.Manufacturedtothehighestofstandards,itismorethantellingtime.RedLineisabrandinmotion,takingyousomewhere.Anywhere.Fast.SpeedisinourDNA.Itinfluencestheracer-inspireddesignandmaterialspainstakinglymanufacturedintoeachtimepiecejustwaitingtocrossthefinishlinefirst.
RED LINE WATCHES“No Limits”™
03
We congratulate you on receiving your Red Line watch and thank you for your purchase.
General Information:• Itisrecommendedtorinseyourwatchwithfreshwateraftercontactwithsaltedwater.• It is recommended not to use the crown or pushers if the watch is wet and certainly not
while it is immersed in water.• Water resistant watches should be inspected and serviced once a year.
Helpful Watch Tips:• A Quartz Watchisbatterypoweredanddoesnotrequirewinding.Eventuallythebattery
will need to be replaced.• An Automatic Watchisamechanicalwatchthatwindsitselfanddoesnotrequireabattery.
When worn daily, the movement of your wrist causes the mainspring to wind progressively, eliminatingtheneedforadditionalwinding.Tostartyourautomatic,youcanhandwinditbyrotatingthecrownclockwiseanumberofturnswhileinitsnormaloperatingposition(screwdowncrownswillneedtobeunscrewedfirst),orbyswingingitsidetosidefor30seconds.Werecommendhousinganautomaticinawatchwinderbox.
04
• A Manual Wind Watchisamechanicalwatchthatdoesnotrequireabattery,butcanonlybewoundbyhand.Towindit,turnthecrownclockwisewhileitisinitsnormaloperatingpositionuntilyoufeelresistance.Thistypeofwatchshouldbewounddaily.
• For Automatic and Mechanicalwatches,itisstronglyrecommendedtoavoidadjustingthedate,month,yearoranyotherfunctionsbetween9PMto2AM.Also,mostautomaticandmechanicalwatchesshouldnotbewornwhiledoingsportsorgolfingactivityduetopossible shock damage to the mechanisms inside the movements.
Important Things to Know:• Many Red Line watches are equipped with a screw down crown to help prevent water infiltration.Forwatcheswithascrewdownmustfirstgentlyrotatethecrowncounter-clockwiseuntilitspringsout.Thecrownmustthenbegentlypulledouttotheappropriatepositionfortimeordatesetting.
• Nevercorrectdatebetween9:00PMand1:00AM.• Itisveryimportantaftersettingyourwatchthatyougentlypushinandscrewdownthecrownfirmlytoensurewaterresistance.
• Not screwing down the crown will cause water damage and void warranty.• Toserveyoubetterpleaseregisteryourwatchatwww.redlinewatches.com.
05
Operating Instructions
Not all movements may be displayed in this booklet. If you do not find operat-ing instructions for your model, please visit www.redlinewatches.com.
Quartz 2 Hands and 3 Hands Instructions(ISA2331,Miyota2015,2315,2305orsimilar)
Time Setting For Models without Calendar• Gentlyunscrewcrowncounter-clockwiseand/orpulloutthecrowntoPosition2.• Adjustthetimebyturningthecrowninthedesireddirection.• Gentlypushinand/orscrewdownthecrownclockwisebackintoNormalPosition.
Time Setting For Models without Calendar and Crown• Toadjusttimepushbuttonislocatedonthecaseback.• Pushcontinuallyforquicksettingandpushstepbysteptoadjusttheminute.
06

Important Note:It is very important aft er adjusti ng the date and setti ng the ti me on your watch that you gently push in and screw down the crown fi rmly to ensure water resistance. Not doing so will void warranty.
Time Setti ng For Model with Calendar• Gentlyunscrewcrowncounter-clockwiseand/orpulloutthecrowntoPosition2.• Turnthecrownuntilthepreviewdaysdateappearsinthecalendarframe.• PulloutthecrowntoPosition3,andadvancethehourandtheminutehandsuntilthe
desired date appears. (Please set ti me according to AM or PM).
• Adjustthetimebyturningthecrowninthedesireddirection.• Gentlypushinand/orscrewdownthecrownclockwisebackintoNormalPosition.Note: For best accuracy when setti ng your ti mepiece. If your watch has three hands, gently pull out the crown when the second hand points at the 12 o’clock or “00” seconds.
(1=NormalPosition,2=CalendarPosition,3=TimeSettingPosition)
07
08
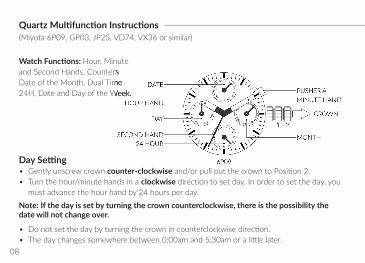
Quartz Multi functi on Instructi ons(Miyota6P09,GP03,JP25,VD74,VX36orsimilar)
Day Setti ng• Gently unscrew crown counter-clockwiseand/orpulloutthecrowntoPosition2.• Turn the hour/minute hands in a clockwisedirectiontosetday.Inordertosettheday,you
must advance the hour hand by 24 hours per day.Note: If the day is set by turning the crown counterclockwise, there is the possibility the date will not change over.
• Donotsetthedaybyturningthecrownincounterclockwisedirection.• Thedaychangessomewherebetween0:00amand5:30amoralittlelater.
Watch Functi ons: Hour, Minute and Second Hands. Counters Date of the Month, Dual Time 24H, Date and Day of the Week.
and Second Hands. Counters Date of the Month, Dual Time 24H, Date and Day of the Week.
09
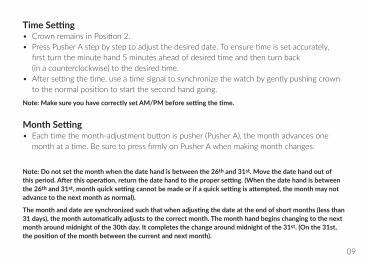
Time Setting• CrownremainsinPosition2.• PressPusherAstepbysteptoadjustthedesireddate.Toensuretimeissetaccurately, firstturntheminutehand5minutesaheadofdesiredtimeandthenturnback (inacounterclockwise)tothedesiredtime.• Aftersettingthetime,useatimesignaltosynchronizethewatchbygentlypushingcrown tothenormalpositiontostartthesecondhandgoing.Note: Make sure you have correctly set AM/PM before setting the time.
Month Setting• Eachtimethemonth-adjustmentbuttonispusher(PusherA),themonthadvancesonemonthatatime.BesuretopressfirmlyonPusherAwhenmakingmonthchanges.
Note: Do not set the month when the date hand is between the 26th and 31st. Move the date hand out of this period. After this operation, return the date hand to the proper setting. (When the date hand is between the 26th and 31st, month quick setting cannot be made or if a quick setting is attempted, the month may not advance to the next month as normal).
The month and date are synchronized such that when adjusting the date at the end of short months (less than 31 days), the month automatically adjusts to the correct month. The month hand begins changing to the next month around midnight of the 30th day. It completes the change around midnight of the 31st. (On the 31st, the position of the month between the current and next month).
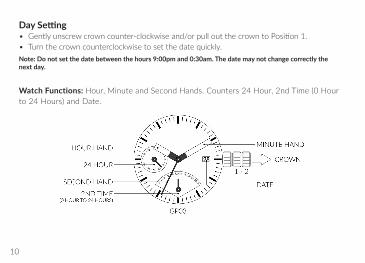
Watch Functions: Hour, Minute and Second Hands. Counters 24 Hour, 2nd Time (0 Hour to24Hours)andDate.
10
Day Setti ng• Gentlyunscrewcrowncounter-clockwiseand/orpulloutthecrowntoPosition1.• Turn the crown counterclockwise to set the date quickly.Note: Do not set the date between the hours 9:00pm and 0:30am. The date may not change correctly the next day.
Time Setting• Gentlyunscrewcrowncounter-clockwiseand/orpulloutthecrowntoPosition2.• Turn the crown to set hour and minute hands.• Gentlypushinand/orscrewdownthecrownclockwisebackintoNormalPosition,second
hand begins to run.
Day Setting• Gentlyunscrewcrowncounter-clockwiseand/orpulloutthecrowntoPosition1.• Turn the crown clockwise to set date. If the date is between the hours of around 9:00pm and 2:00am, the date may not change
on the following day.• Gentlypushinand/orscrewdownthecrownclockwisebackintoNormalPosition.
2nd Time (24 Hours) Setting• CrownremainsinPosition1.• Turnthecrowncounter-clockwisetosetthe2ndtine(24Hour). Gentlypushinand/orscrewdownthecrownclockwisebackintoNormalPosition.
11

Watch Functi ons: Hour, Minute and Second Hands. Counters 24 Hour, Dual Time, Day of the Week and Date.
Day Setti ng• Gently unscrew crown counter-clockwiseand/orpulloutthecrowntoPosition2.• Turn the crown clockwise to set the day.• Gentlypushinand/orscrewdownthecrownclockwisebackintoNormalPosition. The day is changed during the period from 0am to 5am.
12

Date Setting• Gently unscrew crown counter-clockwiseand/orpulloutthecrowntoPosition1.• Turn the crown clockwise to set the date. If the date is set between the hours of around 9:00pm and 1:00am, the date may not
change on the following day.• Gently push in and/or screw down the crown clockwise backintoNormalPosition.
Time Setting• Gently unscrew crown counter-clockwiseand/orpulloutthecrowntoPosition2.• Turn the crown to set hour and minute hands.• Gently push in and/or screw down the crown clockwisebackintoNormalPosition,second
hand begins to run.
Dual Time Setting• PressPusherAtosetthedualtimehandforwardinunitsof15minutes.• PressPusherBtosetthedualtimehandbackinunitsof15minutes. The dual time hand can be put rapidly by continuously pressing Pusher A or B.
13
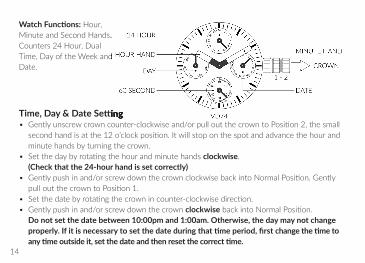
Time, Day & Date Setti ng• Gentlyunscrewcrowncounter-clockwiseand/orpulloutthecrowntoPosition2,thesmallsecondhandisatthe12o’clockposition.Itwillstoponthespotandadvancethehourandminute hands by turning the crown.
• Setthedaybyrotatingthehourandminutehandsclockwise. (Check that the 24-hour hand is set correctly)• Gentlypushinand/orscrewdownthecrownclockwisebackintoNormalPosition.GentlypulloutthecrowntoPosition1.
• Setthedatebyrotatingthecrownincounter-clockwisedirection.• Gently push in and/or screw down the crown clockwisebackintoNormalPosition. Do not set the date between 10:00pm and 1:00am. Otherwise, the day may not change
properly. If it is necessary to set the date during that ti me period, fi rst change the ti me to any ti me outside it, set the date and then reset the correct ti me.
Watch Functi ons: Hour, Minute and Second Hands. Counters 24 Hour, Dual Time, Day of the Week and Date.
14
Time, Day & Date Setti ng
Minute and Second Hands.
Time, Day of the Week and
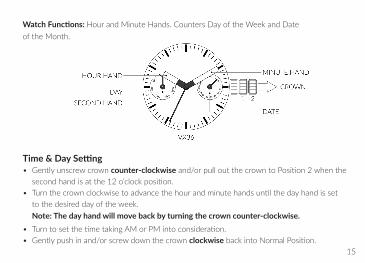
Watch Functi ons: Hour and Minute Hands. Counters Day of the Week and Dateof the Month.
Time & Day Setti ng• Gently unscrew crown counter-clockwiseand/orpulloutthecrowntoPosition2whenthesecondhandisatthe12o’clockposition.
• Turnthecrownclockwisetoadvancethehourandminutehandsuntilthedayhandissetto the desired day of the week.
Note: The day hand will move back by turning the crown counter-clockwise.• TurntosetthetimetakingAMorPMintoconsideration.• Gently push in and/or screw down the crown clockwisebackintoNormalPosition.
15
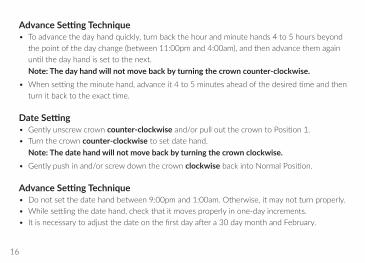
Advance Setting Technique• To advance the day hand quickly, turn back the hour and minute hands 4 to 5 hours beyond thepointofthedaychange(between11:00pmand4:00am),andthenadvancethemagainuntilthedayhandissettothenext.
Note: The day hand will not move back by turning the crown counter-clockwise.• Whensettingtheminutehand,advanceit4to5minutesaheadofthedesiredtimeandthenturnitbacktotheexacttime.
Date Setting• Gently unscrew crown counter-clockwiseand/orpulloutthecrowntoPosition1.• Turn the crown counter-clockwise to set date hand. Note: The date hand will not move back by turning the crown clockwise.• Gently push in and/or screw down the crown clockwisebackintoNormalPosition.
Advance Setting Technique• Donotsetthedatehandbetween9:00pmand1:00am.Otherwise,itmaynotturnproperly.• Whilesettlingthedatehand,checkthatitmovesproperlyinone-dayincrements.• Itisnecessarytoadjustthedateonthefirstdayaftera30daymonthandFebruary.
16
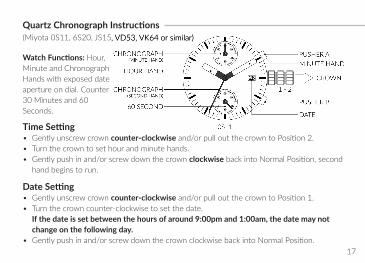
Quartz Chronograph Instructi ons(Miyota0S11,6S20,JS15,VD53,VK64orsimilar)
Time Setti ng• Gently unscrew crown counter-clockwiseand/orpulloutthecrowntoPosition2.• Turn the crown to set hour and minute hands.• Gently push in and/or screw down the crown clockwisebackintoNormalPosition,second
hand begins to run.
Date Setti ng• Gently unscrew crown counter-clockwiseand/orpulloutthecrowntoPosition1.• Turn the crown counter-clockwise to set the date. If the date is set between the hours of around 9:00pm and 1:00am, the date may not
change on the following day.• Gentlypushinand/orscrewdownthecrownclockwisebackintoNormalPosition.
Watch Functi ons: Hour, Minute and Chronograph Hands with exposed date aperture on dial. Counter 30 Minutes and 60 Seconds.
17
(Miyota0S11,6S20,JS15,VD53,VK64orsimilar)
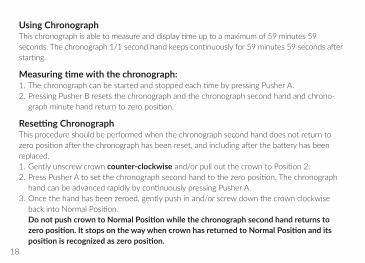
Using ChronographThischronographisabletomeasureanddisplaytimeuptoamaximumof59minutes59seconds.Thechronograph1/1secondhandkeepscontinuouslyfor59minutes59secondsafterstarting.
Measuring time with the chronograph:1.ThechronographcanbestartedandstoppedeachtimebypressingPusherA.2. Pressing Pusher B resets the chronograph and the chronograph second hand and chrono-graphminutehandreturntozeroposition.
Resetting ChronographThis procedure should be performed when the chronograph second hand does not return to zeropositionafterthechronographhasbeenreset,andincludingafterthebatteryhasbeenreplaced.1. Gently unscrew crown counter-clockwiseand/orpulloutthecrowntoPosition2.2.PressPusherAtosetthechronographsecondhandtothezeroposition.ThechronographhandcanbeadvancedrapidlybycontinuouslypressingPusherA.
3. Once the hand has been zeroed, gently push in and/or screw down the crown clockwise backintoNormalPosition.
Do not push crown to Normal Position while the chronograph second hand returns to zero position. It stops on the way when crown has returned to Normal Position and its position is recognized as zero position.
18
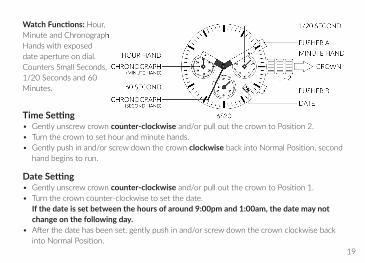
Watch Functi ons: Hour, Minute and Chronograph Hands with exposed date aperture on dial. Counters Small Seconds, 1/20 Seconds and 60 Minutes.
Time Setti ng• Gently unscrew crown counter-clockwiseand/orpulloutthecrowntoPosition2.• Turn the crown to set hour and minute hands.• Gently push in and/or screw down the crown clockwisebackintoNormalPosition,second
hand begins to run.
Date Setti ng• Gently unscrew crown counter-clockwiseand/orpulloutthecrowntoPosition1.• Turn the crown counter-clockwise to set the date. If the date is set between the hours of around 9:00pm and 1:00am, the date may not
change on the following day.• Afterthedatehasbeenset,gentlypushinand/orscrewdownthecrownclockwisebackintoNormalPosition.
19
Minute and Chronograph

Watch Functi ons: Hour, Minute and Second Hands with exposed date aperture on dial. Counters 24 Hour, Stopwatch 60 Seconds and 30 Minutes.
Time Setti ng• Gently unscrew crown counter-clockwiseand/orpulloutthecrowntoPosition2.• Turn the crown to set hour and minute hands.• Gently push in and/or screw down the crown clockwisebackintoNormalPosition,second
hand begins to run.
Date Setti ng• Gently unscrew crown counter-clockwiseand/orpulloutthecrowntoPosition1.• Turn the crown counter-clockwise to set the date. If the date is set between the hours of around 9:00pm and 1:00am, the date may not
change on the following day.• Afterthedatehasbeenset,gentlypushinand/orscrewdownthecrownclockwisebackintoNormalPosition.
20

Using StopwatchThisstopwatchisabletomeasureanddisplaytimeuptoamaximumof30minutes.Stopwatchwillstopautomaticallyafterrunningcontinuoslyfor30minutes.
1. Press Pusher A to start the stopwatch.
2.ThestopwatchcanbestartedandstoppedeachtimePusherAispressed.
3. Pressing Pusher B resets the stopwatch and stopwatch minute and second hands return to theirzeropositions.
Resetting StopwatchThis procedure should be performed when the stopwatch second and minute hand does not returntozeroposition.
1.Gentlyunscrewcrowncounter-clockwiseand/orpulloutthecrowntoPosition2.
2. Press Pusher A to set the stopwatch second hand forward. Press Pusher B to set the stopwatch second hand back.
The stopwatch minute hand is synchronized with stopwatch second hand. The stopwatch second hand can be advanced rapidly by continuously pressing Pusher A
or B.
3. Once both hands have been zeroed, gently push in and/or screw down the crown clockwise backintoNormalPosition.
21
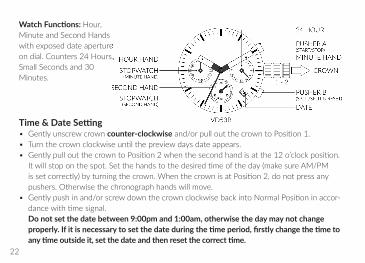
Watch Functi ons: Hour, Minute and Second Hands with exposed date aperture on dial. Counters 24 Hours, Small Seconds and 30 Minutes.
Time & Date Setti ng• Gently unscrew crown counter-clockwiseand/orpulloutthecrowntoPosition1.• Turnthecrownclockwiseuntilthepreviewdaysdateappears.• GentlypulloutthecrowntoPosition2whenthesecondhandisatthe12o’clockposition.Itwillstoponthespot.Setthehandstothedesiredtimeoftheday(makesureAM/PMissetcorrectly)byturningthecrown.WhenthecrownisatPosition2,donotpressanypushers. Otherwise the chronograph hands will move.
• Gentlypushinand/orscrewdownthecrownclockwisebackintoNormalPositioninaccor-dancewithtimesignal.
Do not set the date between 9:00pm and 1:00am, otherwise the day may not change properly. If it is necessary to set the date during the ti me period, fi rstly change the ti me to any ti me outside it, set the date and then reset the correct ti me.
22
with exposed date aperture on dial. Counters 24 Hours,
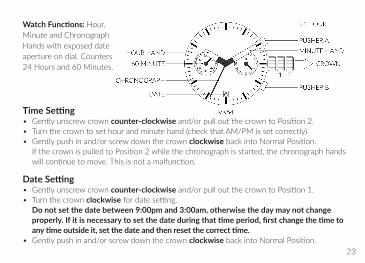
Watch Functi ons: Hour, Minute and Chronograph Hands with exposed date aperture on dial. Counters 24 Hours and 60 Minutes.
Time Setti ng• Gently unscrew crown counter-clockwiseand/orpulloutthecrowntoPosition2.• Turnthecrowntosethourandminutehand(checkthatAM/PMissetcorrectly).• Gently push in and/or screw down the crown clockwisebackintoNormalPosition. IfthecrownispulledtoPosition2whilethechronographisstarted,thechronographhandswillcontinuetomove.Thisisnotamalfunction.
Date Setti ng• Gently unscrew crown counter-clockwiseand/orpulloutthecrowntoPosition1.• Turn the crown clockwisefordatesetting. Do not set the date between 9:00pm and 3:00am, otherwise the day may not change
properly. If it is necessary to set the date during that ti me period, fi rst change the ti me to any ti me outside it, set the date and then reset the correct ti me.
• Gently push in and/or screw down the crown clockwisebackintoNormalPosition.23
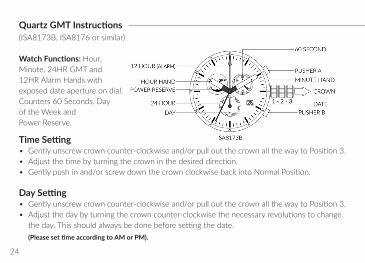
Quartz GMT Instructi ons (ISA8173B,ISA8176orsimilar)
Watch Functi ons: Hour,Minute, 24HR GMT and12HR Alarm Hands withexposed date aperture on dial. Counters 60 Seconds, Dayof the Week andPower Reserve.
Time Setti ng• Gentlyunscrewcrowncounter-clockwiseand/orpulloutthecrownallthewaytoPosition3.• Adjustthetimebyturningthecrowninthedesireddirection.• Gentlypushinand/orscrewdownthecrownclockwisebackintoNormalPosition.
Day Setti ng• Gentlyunscrewcrowncounter-clockwiseand/orpulloutthecrownallthewaytoPosition3.• Adjustthedaybyturningthecrowncounter-clockwisethenecessaryrevolutionstochangetheday.Thisshouldalwaysbedonebeforesettingthedate.
(Please set ti me according to AM or PM).
24

Alarm and Power Reserve Setti ngMovement with Alarm Repeti ti on:Ifthealarmisnotswitchedoffduringthefirstringing,asecondalarmwilloccurafter2minutes.
Date Setti ng• Gentlyunscrewcrowncounter-clockwiseand/orpulloutthecrowntoPosition2.• Adjust the date by turning the crown clockwise to set date.• Gentlypushinand/orscrewdownthecrownclockwisebackintoNormalPosition.
25
Second Time Zone Setti ng
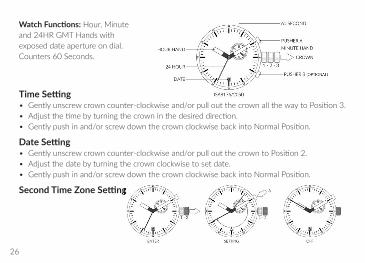
Time Setti ng• Gentlyunscrewcrowncounter-clockwiseand/orpulloutthecrownallthewaytoPosition3.• Adjustthetimebyturningthecrowninthedesireddirection.• Gentlypushinand/orscrewdownthecrownclockwisebackintoNormalPosition.
Date Setti ng• Gentlyunscrewcrowncounter-clockwiseand/orpulloutthecrowntoPosition2.• Adjust the date by turning the crown clockwise to set date.• Gentlypushinand/orscrewdownthecrownclockwisebackintoNormalPosition.
Second Time Zone Setti ngSecond Time Zone Setti ng
Watch Functi ons: Hour, Minute and 24HR GMT Hands with exposed date aperture on dial. Counters 60 Seconds.
26

Water Resistance Diagram
WatchesarerankedIthroughVforwaterresistance.Checktherankingofyourwatchinthefollowing chart to determine proper use.
Guide• I Note water-resistant. Avoid all moisture.• II Donotoperatebuttonsunderwater.• III If watch is exposed to salt water, wash thoroughly and dry.• V Usablewhilescubadiving(exceptatdepthsthatrequirehelium-oxygengas).
Rank Case Designation Splashes, Swim Snorkeling Scuba Rain etc car-wash Diving
I - NO NO NO NO
II 30M Water Resistant YES NO NO NO
III 50M Water Resistant YES YES NO NO
IV 100M Water Resistant YES YES YES NO
V 200M Water Resistant or greater YES YES YES YES
27
Automatic Instructions and Maintenance
Automaticmovementscontainnobattery,theyarepoweredbyacoiledmainspringthatischargedbyeitherwindingmanuallybythecrown,orfromtherotatingpendulum(rotor)attachedtothemovementthatrotatesthroughthenaturalmovementsofyourarmwhilewearingthewatch.Inthisinstance,thewatchis“self-winding”,andwillcontinuetochargeatalltimeswhilebeingworn.Whenanautomaticwatchisnotworn,andnotmanuallywoundby the crown, it will wind down and stop running. You only need to give the watch a shake, or windthecrowntorevivetheautomaticmovementagain.
HOW IT WORKS:Anautomaticmovementisalsoknownas“self-winding”becauseithastheability to wind itself through the movement of your wrist while the watch is being worn. The movementofyourarmcausestherotor,ametalpendulumattachedtoasetofwindinggears,tospin.Eventheslightestactionofthewristwillcausetherotortorotatebackandforthinacircularmotion.Astherotormoves,ittransferstheenergythroughthewindinggearstothemainspring,whichstorestheenergyrequiredtopowerthefunctionofthewatch.
MAINTENANCE:Ifyouselectaautomaticwatch,youshouldbesuretogetitservicedatregularintervals.Likeanyfinemachine(yourcar,lawnmowerorboat),regularmaintenanceandcarewillextendthelifeofthisfinelytunedmachine,andkeepeverythinginproperrunningorder.
28
Wesuggestthatyouserviceandlubricateyourmovementeverythreetofiveyearstomaintainthefinestlevelofaccuracyandreliability.Ifyouarerelyingonyourwatchfordivingpurposes,oritisexposedtowaterand/orexcessivetemperaturerangesoften,youshouldserviceyourwatch annually to replace vital seals & gaskets to maintain the proper water resistance.
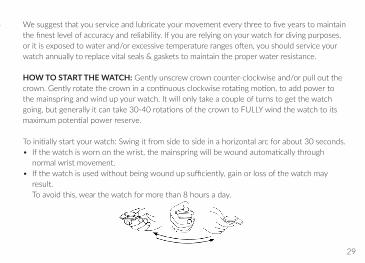
HOW TO START THE WATCH: Gently unscrew crown counter-clockwise and/or pull out the crown.Gentlyrotatethecrowninacontinuousclockwiserotatingmotion,toaddpowertothe mainspring and wind up your watch. It will only take a couple of turns to get the watch going,butgenerallyitcantake30-40rotationsofthecrowntoFULLYwindthewatchtoitsmaximumpotentialpowerreserve.
Toinitiallystartyourwatch:Swingitfromsidetosideinahorizontalarcforabout30seconds.• Ifthewatchiswornonthewrist,themainspringwillbewoundautomaticallythrough
normal wrist movement.• Ifthewatchisusedwithoutbeingwoundupsufficiently,gainorlossofthewatchmay
result. To avoid this, wear the watch for more than 8 hours a day.
29

30
Deployment Clasp and Buckle Instructi ons
INSTRUCTIONS FOR PUSH BUTTON DEPLOYMENT AND HIDDEN CLASP(Bracelet and Strap)
1. Pushthe2ClaspReleaseButtonson either side of the bracelet to release the clasp.
2. The Bracelet will release and open in an upward and outward motionasillustrated.
Important:Pleaseplacewatchonnon-abrasivesurfacebeforeadjustingdelopymentclasp.
Note:Iflinksneedtoberemoved,pleasegotoanAuthorizedRedLine Repair Center or reputable jeweler. Red Line will not be liable for damages carried out by anyone other than ourselves.
ClaspReleaseButton
Important:Pleaseplacewatchonnon-abrasivesurfacebefore
ClaspReleaseButton
31
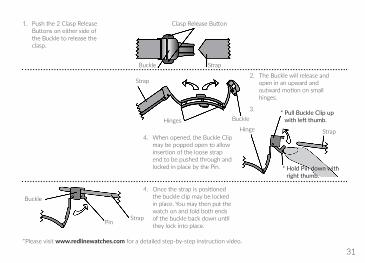
1. Push the 2 Clasp Release Buttonsoneithersideofthe Buckle to release the clasp.
2. The Buckle will release and open in an upward and outwardmotiononsmallhinges.
ClaspReleaseButton
Buckle
Buckle
Pin
HingesHinge Strap
Strap
* Pull Buckle Clip up with left thumb.
* Hold Pin down with right thumb.
Strap
3.
4. When opened, the Buckle Clip may be popped open to allow insertionoftheloosestrapend to be pushed through and locked in place by the Pin.
4. Oncethestrapispositionedthe buckle clip may be locked in place. You may then put the watch on and fold both ends ofthebucklebackdownuntilthey lock into place.
*Please visit www.redlinewatches.comforadetailedstep-by-stepinstructionvideo.
Buckle Strap

SAPPHITEK™ Crystal Warranty
RED LINE takesprideinmanufacturingtimepiecesusingthehigheststandardsformaterialandcraftsmanship.
MostREDLINEtimepiecesareequippedwithaSAPPHITEK™crystalwhichisprotectedbya5-year limited warranty against deep scratches and cracks. RED LINE is the proud trademark ownerandexclusivesupplierofSAPPHITEK™crystals.ForwarrantyinformationonotheraspectsofyourwatchpleaserefertothewarrantythatcamewithyourREDLINEtimepiece. SAPPHITEK™ crystals exhibit superior impact resistance to commonly used sapphire crystals, sincetheyaremanufacturedutilizingapuremulti-material,high-heatprocess.
RED LINE chooses SAPPHITEK™ crystals because they can withstand higher pressure, water, shock, wear and heat resistance.
This warranty is only valid with watches that contain SAPPHITEK™ crystals.
32

33
5 Year Limited International Warranty
We believe in the watches we sell and know you will too. The RED LINE watches warranty givesyouconfidenceofknowingyourwatchiscoveredbyour5-YearLimitedInternationalWarranty and by a team of people who truly care.
Your RED LINE watch is backed by a 5-Year Limited Warranty from the date of purchase.
Thiswarrantiesyourwatchagainstanymanufacturer’sdefects:functionality,material,andworkmanship.Thiswarrantydoesnotcoverthewatchcase,bracelet,strap,crystal,batteryorcrown, pushers or stem of the watch; it does not cover the watch against abuse, accidents, normaleverydaywearandtear,weathering,aging,andbatteryreplacement.Ifyourwatchisinneedofabatterychange,itisrecommendedthatyousendittoourservicecenter.
In the case of a replacement, RED LINE watches does not guarantee you will receive the identicalwatchmodel.Ifthemodelisnotavailable,awatchofequalvalueandsimilarstylewillbesenttoyou.Thewarrantyforthereplacementwatchendsfiveyearsfromthedatethereplacement watch is received.

34
Forservicenotcoveredunderthiswarranty,ourservicecentermayperformtheservicesyou request for a charge dependent on your watch style and type of work requested. These chargesaresubjecttochange.Youwillbenotifiedpriortoperformingtheservicesandyourauthorizationisrequired.
Toserveyoubetterpleaseregisteryourwatchatwww.redlinewatches.com.
If your watch should require service during the period of warranty, please contact us at 1-866-746-7794 or email us at [email protected].

Please visit www.redlinwatches.com for more information.
35
3701 S. Flamingo Road, Suite 100, Miramar, FL 33027Toll Free : 1-866-746-7794 Fax : 1-945-985-1828
“No Limits”

3701 S. Flamingo Road, Suite 100, Miramar, FL 33027Toll Free : 1-866-746-7794Fax : 1-945-985-1828
“No Limits”